Pagina wordt geladen...
Pagina wordt geladen...
Pagina wordt geladen...
Pagina wordt geladen...
Pagina wordt geladen...
Pagina wordt geladen...
Pagina wordt geladen...
Pagina wordt geladen...
Pagina wordt geladen...

10
1 - Activação/desactivação do sinal de confirmação da
abertura da fechadura.
2 - Regulação do volume (veja as próxima página).
3 - Indicadores luminosos verde: indicação de porta aberta.
4 - Indicadores luminosos verde: comunicação activa.
5 - Indicador luminoso lampejante Verde: chamada enviada;
Indicador luminoso lampejante Vermelho: sistema cupado.
6 - Alojamento configurador.
• Posto esterno
• Entrance panel
• Poste extérieur
• Türstation
• Placa exterior
• Externe plaats
• Unidade externa
1 - Habilitación/deshabilitación del tono de confirmación de
apertura de la cerradura.
2 - Regulación del volumen (véase la pág. siguiente).
3 - Led verde: indicación puerta abierta.
4 - Led verde: comunicación activada.
5 - Led parpadenate Verde: llamada enviada;
Led parpadenate Rojo: sistema ocupado.
6 - Alojamiento configuradores.
1 - Enabling/disabling of door lock opening
confirmation tone.
2 - Adjustment volume (see the following page).
3 - Green LED: door open indication.
4 - Green LED: communication active.
5 - Green flashing LED; call forwarded;
Red flashing LED: system busy.
6 - Configurator seat.
1 - Abilitazione/disabilitazione tono conferma apertura
serratura.
2 - Regolazione del volume (vedi pag. seguente).
3 - Led verde: indicazione porta aperta.
4 - Led verde: comunicazione attiva.
5 - Led lampeggiante Verde: chiamata inoltrata; Led
lampeggiante Rosso: sistema occupato.
6 - Sede configuratori.
1 - Aktivierung/Deaktivierung des Bestätigungssignals nach
erfolgter Türöffnung.
2 - Einstellung der Lautstärke (siehe nachfolgende Seiten).
3 - Grüne Led: Meldet offene Tür.
4 - Grüne Led: Kommunikation aktiv.
5 - Grüne blinkende Led: Ruf gesendet;
Rote blinkende Led: System belegt.
6 - Sitz der Konfiguratoren.
1 - Activation/désactivation tonalité de confirmation
ouverture serrure.
2 - Réglage du volume (voir page suivante).
3 - Diode verte: indication porte ouverte.
4 - Diode verte: communication active.
5 - Témoin clignotant vert - appel passé;
Témoin clignotant rouge: système occupé.
6 - Logement configurateurs.
1 - Activering/desactivering toon bevestiging opening slot.
2 - De geluidssterkte regelen (zie de volgende pagina’s).
3 - Groene led: aanduiding open deur.
4 - Groene led: communicatie actief.
5 - Groene knipperende led: oproep doorgestuurd; Rode
knipperende led: systeem bezet.
6 - Plaats van de configuratiemodules.
ON OFF
3
4
5
1
6
2
1
2
3
4
5
6

Video Kit
11
• Se si manifestasse il disturbo del fischio, (effetto Larsen), ridurre prima la potenza del microfono , agendo
con un cacciavite sul potenziometro corrispondente, fino ad un livello accettabile. Qualora il fenomeno persista,
agire sul potenziometro dell’altoparlante in modo da eliminare l’inconveniente. Se il volume è troppo basso,
aumentare prima il volume dell’altoparlante ed eventualmente anche quello del microfono, tenendo presente
che è preferibile una trasmissione chiara e priva di disturbi, che una al limite dell’innesco (Larsen).
• In case of a whistle (Larsen effect), first reduce the microphones
power, adjusting the corresponding
potentiometers with a screw driver, until an acceptable level is reached. Should the whistle persist, adjust the
loudspeakers volume in order to eliminate the trouble. If the volume is too low level then, increase first the
potentiometer of the loudspeaker and secondly the one for the microphone, bearing in mind that a clear and
noise free reception is preferable than one just before whistling (Larsen).
• Lors de sifflement (effet de Larsen), reduire d’abord la puissance du micro
sur le potentiomètre
correspondant, à l’aide d’un tournevis, jusqu’à l’obtention d’un niveau satisfaisant. Si le sifflement persiste, régler
le potentiomètre du hautparleur jusqu’à l’élimination de celui-ci. Si le volume est trop bas, augmenter
d’abord la puissance du haut-parleur et éventuellement celle du micro, en considérant qu’une réception claire et
sans parasite est préférable à une communication à la limite de l’accrochage (effet de Larsen).
• Beim etwaigen Auftreten eines Pfeiftones (Larsen-Effekt), zuerst die Lautstärke des Mikrophones
bis auf einen
annehmbaren Wert herabsetzen, indem man das entsprechende Potentiometer mit einem Schraubendreher
einstellt. Sollte die Störung weiterhin bestehen, dann das Potentiometer des Lautsprechers bis zur Beseitigung
des Pfeiftones einstellen. Ist die Lautstärke nun zu niedrig, dann zuerst die des Lautsprechers und erst danach
evtl. auch die des Mikrophones erhohen, wobei ein deutlicher und störungsfreier Empfang einem an der
Störungsgrenze liegendem (Larsen-Effekt) vorzuziehen ist.
• Si se manifesta el silbido de acoplamiento, (efecto Larsen), reducir primero la potencia del micrófono
, girando con un destornillador el potenciómetro correspondiente, hasta obtener un nivel aceptable. Si el
fenómeno persistiera, regular el potenciómetro del altavoz hasta eliminar la interferencia. Si el volumen
es demasiado bajo, aumentar primero el volumen del altavoz y eventualmente también el del micrófono,
teniendo en cuenta que es preferible una transmissión clara y limpia de interferencias, que una al limite del
acoplo (Larsen).
• Als er een fluittoon hoorbaar is (effect van Larsen): verminder eerst het vermogen van de microfoon
met behulp van een schroevendraaier zijn stroomregelaar zo te regelen dat de geluidssterkte van het gefluit
aanvaardbaar is. Als het verschijnsel niet verdwijnt, dan moet u ook de stroomregelaar van de luidspreker
bijstellen. Als de geluidssterkte nu te klein is, verhoog dan eerst de geluidssterkte van de luidspreker en daarna
eventueel ook die van de microfoon, en denk er bij het bijstellen aan dat een duidelijk hoorbaar en ongestoord
geluid beter is dan een harder geluid op de grens van het Larsen effect.
• Se se manifestar uma interferência no som (efeito de Larsen), começar por diminuir a potência do microfone
, rodando o potenciómetro correspondente com uma chave de parafusos, até obter um nível aceitável.
Se o fenómeno persistir, regular o potenciómetro do altifalante de modo a eliminar o problema. Se o
volume estiver demasiado baixo, começar por aumentar o volume do altifalante e depois, se necessário,
o do microfone, tendo presente que é melhor ter uma transmissão clara e sem interferências, que uma no
limiar de início de efeitos Larsen.
.)Larsen
Pagina wordt geladen...
Pagina wordt geladen...
Pagina wordt geladen...
Pagina wordt geladen...
Pagina wordt geladen...

Video Kit
17
La imagen representa el dispositivo con todas las
funciones habilitadas. Busque en el manual del
instalador cómo habilitar las funciones.
De afbeelding toont het apparaat met ingeschakelde
functies. Raadpleeg de installatiehandleiding voor de
inschakeling van de functies.
1 - Pantalla 7” (16 : 9)
2 - Tecla apagado
3 - Fecha y hora
4 - Exclusión timbre
5 - Activación Oficina Profesional
6 - Micrófono
7 - Activación Contestador
8 - Acciones rápidas
9 - Guías táctiles para invidentes
10 - Tecla conexión:
el encendido del led verde parpadeante indica una
llamada entrante
el encendido del led verde fijo indica la comunicación
en curso
11 - Autoencendido/Visualización cíclica:
al presionar la tecla el LED rojo se enciende
12 - Tecla Favoritos:
al presionar la tecla el LED rojo se enciende
(Configuración base = LUZ ESCALERAS. Para una
configuración distinta, consulte la tabla de la
configuración física en las páginas sucesivas.)
13 - Tecla apertura cerradura:
al presionar la tecla el LED rojo se enciende
14 - Estado Contestador:
Led rojo fijo = contestador activado
Led rojo parpadeante = presencia grabación/es no
vista/s
15 - Estado presencia notas:
Led rojo parpadeante = nueva/s notas no leída/s
16 - Estado Exclusión timbre:
Led rojo encendido = Timbre llamada desactivado
17 - Funciones (aparecen solamente los iconos de las
funciones configuradas)
18 - Alojamiento configuradores
19 - Configurador J1: extraiga para alimentación adicional
20 - Configurador J2: Master/Slave, extraiga para Slave
21 - Microinterruptor ON/OFF terminal de tramo
22 - Toma mini USB para actualización del firmware del
dispositivo
23 - Altavoz
24 - Bornes (1 - 2) para alimentación adicional
25 - Bornes para la conexión al BUS SCS 2 HILOS
26 - Bornes ( ) para la conexión de un pulsador
externo de llamada a la planta
27 - Bornes (1 - 5M) para la conexión de un timbre
adicional. Ha de efectuar la conexión punto - punto
en los bornes de los timbres adicionales
1 -
Display 7” (16 : 9)
2 -
Uitschakeltoets
3 -
Datum en tijd
4 -
Uitsluiting beltoon
5 -
Activering professionele studio
6 -
Microfoon
7 -
Activering antwoordapparaat
8 -
Sneltoetsen
9 -
Tastgeleiders voor blinden
10 -
Toets verbinding:
de groene led knippert om een binnenkomende
oproep aan te geven
de groene led brandt om een lopend gesprek aan te
geven
11 -
Automatische inschakeling/cyclische weergave:
bij een druk op de toets gaat de rode led branden
12 -
Toets Favorieten:
bij een druk op de toets gaat de rode led branden
(Standaardconfiguratie = TRAPHUISVERLICHTING. Voor
een andere configuratie raadpleeg de tabel met de
fysieke configuratie op de volgende pagina’s.)
13 -
Toets slotontgrendeling:
bij een druk op de toets gaat de rode led branden
14 -
Status antwoordapparaat:
Rode led brandt = antwoordapparaat geactiveerd
Rode led knippert = nieuwe registratie(s) aanwezig
15 -
Status notities aanwezig:
Rode led knippert = nieuwe notitie(s)
16 -
Status uitsluiting beltoon:
Rode led brandt = Beltoon oproep gedeactiveerd
17 -
Functies (uitsluitend de iconen van de geconfigureerde
functies worden weergegeven)
18 -
Plaats van de configuratiemodules
19 -
Configurator J1: uitnemen voor extra voeding
20 -
Configurator J2: Master/Slave, uitnemen voor Slave
21 -
Microschakelaar ON/OFF van beëindiging traject
22 -
Mini-UBS-aansluiting voor de update van de firmware
van het apparaat
23 -
Luidspreker
24 -
Aansluitklemmen (1 - 2) voor extra voeding
25 -
Aansluitklemmen voor de verbinding met de SCS
2-DRAADS BUS
26 -
Morsetti ( ) voor de verbinding van een externe
knop op de etage
27 -
Aansluitklemmen (1 - 5M) voor de verbinding van een
extra beltoon. Verricht een punt - punt verbinding op de
aansluitklemmen van de extra beltonen
Pagina wordt geladen...
Pagina wordt geladen...
Pagina wordt geladen...
Pagina wordt geladen...
Pagina wordt geladen...
Pagina wordt geladen...

24
• Programmazione Badge
• Badge programming
• Programmation des badges
• Badge programmieren
• Programación de credenciales
• Badge Programmeren
•
Programação do Crachá
• Badge gestore impianto
Nuovo badge gestore impianto
Per motivi di sicurezza è previsto un badge “Gestore“
programmato direttamente dall’installatore, tramite il
quale è possibile l’accesso alla programmazione degli altri
badge (residenti).
Il posto esterno segnalerà l’avvenuta accettazione o
cancellazione del badge con segnali acustici e visivi dei led
presenti sul posto esterno.
La presentazione di un badge non riconosciuto o un
errore di programmazione, comporta l’interruzione della
programmazione, la segnalazione tramite un beep lungo e
l’accensione LED rosso di occupato.
• Manager master badge
New manager master badge
For safety reasons, a “MASTER” badge is required, directly
programmed by the installer, providing access to the
programming of the other badges (residents).
The entrance panel will notify that the badge has been
accepted or deleted by means of sound notifications, as well
as visual indications using the LEDs on the entrance panel.
The presentation of an unrecognised badge, or a
programming error, will cause the interruption of the
programming procedure, and an extended beep; the red
“busy” LED will also come on.
• Badge master de gestion
Nouveau badge master de gestion
Pour des raisons de sécurité, est prévu un badge “MASTER“
programmé directement par l’installateur, à travers lequel,
il est possible d’accéder à la programmation des autres
(résidents).
Le poste externe signale l’acceptation ou l’élimination du
badge par des signaux sonores et visuels et par l’allumage
des leds présents sur le poste externe.
La présentation d’un badge non reconnu ou une
erreur de programmation provoque l’interruption de la
programmation, l’émission d’un bip prolongé et l’allumage
du LED rouge occupé.
• Master-Verwaltungs-Badge
Neuer Master-Verwaltungs-Badge
Aus Sicherheitsgründen ist ein „MASTER“-Badge vorgesehen,
der direkt vom Installateur programmiert wird. Damit können
die anderen Badges (Bewohner) programmiert werden.
Die Türstation meldet die erfolgte Annahme oder Löschung
des Badges durch akustische und visuelle Led-Signale, die an
derselben vorgesehen sind.
Wenn ein Badge nicht erkannt wird oder ein Fehler bei der
Programmierung aufgetreten ist, wird letztere unterbrochen
und ein langer Piepton erzeugt sowie die rote LED (belegt)
eingeschaltet.
• Credencial maestra de administrador
Nueva credencial maestra de administrador
Por razones de seguridad se prevé una credencial
“maestra” programada directamente por el instalador
mediante la cual es posible programar las demás
credenciales (residentes).
La placa exterior indicará si acepta o cancela unacredencial
con unaseñal acústica y visual de los leds incorporados en
la placa exterior.
La presentación de una credencial no reconocida o un
error de programación interrumpe la programación, que
se señala con un bip largo y la iluminación del LED rojo
ocupado.
• Badge master beheerder
Nieuwe master beheerder badge
Wegens veiligheidsredenen wordt door de installateur een
“Master” badge geprogrammeerd die de programmering van
de andere badges (inwoners) mogelijk maakt.
Het externe punt geeft met behulp van geluids- en
lichtsignalen van de leds op het externe punt aan of de badge
geaccepteerd of gewist is.
Door de presentatie van een niet-herkende badge of een fout
in de programmering wordt de programmering onderbroken,
hoort u een lange pieptoon en gaat de rode Led bezet
branden.
• Crachá master gestor
Novo crachá master gestor
Por razões de segurança é previsto um crachá “MASTER“,
programado directamente pelo instalador, por meio do
qual é possível o acesso à programação dos outros crachás
(residentes).
A unidade externa sinalizará a ocorrida aceitação ou
cancelamento do crachá com sinais acústicos e visuais dos
led presentes na unidade externa.
A apresentação de um crachá não reconhecido ou um erro
de programação, comporta a interrupção da programação,
a sinalização por meio de um beep longo e o acendimento
do LED vermelho de ocupado.
Pagina wordt geladen...

26
• Avvicinare al lettore il badge gestore impianto da memorizzare e attendere l’accensione del LED verde serratura e doppio
tono di conferma.
Se è già presente un badge gestore impianto, il nuovo sostituirà il vecchio.
• Move the system manager badge reader to save close and wait for the green door lock LED to switch on; a double confirmation
sound will be heard.
If a system manager badge is already present, the new one will replace the old one.
•
Approcher le Badge administrateur installation à mémoriser du lecteur et attendre que le LED vert serrure s’allume
et qu’une double tonalité de confirmation soit émise.
Si un Badge administrateur installation est déjà présent, le nouveau remplace le précédent.
• Dem Lesegerät das Badge des Anlagenbetreibers nähern, das gespeichert werden soll und warten, bis die grüne LED des Schlosses
aufleuchtet und das Bestätigungssignal zwei Mal ertönt.
Wenn ein Badge des Anlagenbetreibers schon vorhanden ist, wird das neue Badge das alter ersetzen.
• Acerque al lector la credencial del administrador del sistema que desea memorizar y esperar el encendido del LED verde
cerradura y doble tono de confirmación.
Si hay una credencial del administrador del sistema, la nueva reemplazará la vieja.
• Houd de installatiebeheerder badge die opgeslagen moet worden voor het leesapparaat, wacht tot de groene LED slot gaat
branden en u ter bevestiging een dubbel geluidssignaal hoort.
De nieuwe badge zal de oude badge vervangen als al een installatiebeheerder badge aanwezig is.
• Aproxime ao leitor o Crachá gestor da instalação a memorizar e espere o acendimento do LED verde da fechadura e o duplo
tom de confirmação.
Se já estiver presente um crachá gestor de instalação, o novo substituirá o antigo.
•
2 beep
2 beeps
2 beep
2 Pieptöne
2 bips
2 beep
2 beep
• Gestore impianto
• Manager master
• Master de gestion
• Master Verwaltung
• Credencial maestra de administrador
• Master beheerder
• Master gesto
r

Video Kit
27
• Se la memorizzazione non va a buon fine, lampeggia il LED rosso occupato e il dispositivo emette un beep lungo.
• If the saving operation fails, the red busy LED flashes, and the device emits a long beep.
•
Si la mémorisation échoue, le LED rouge occupé clignote et le dispositif émet un bip long.
• Wenn das Speichern nicht erfolgreich beendet worden ist, blinkt die rote LED für belegt und die Vorrichtung erzeugt einen langen
Piepton.
• Si la memorización no se realiza, el LED rojo ocupado parpadeará y el dispositivo emite un bip largo.
• Als de badge niet opgeslagen kan worden, gaat de rode LED systeem bezet knipperen en hoort een lange pieptoon.
• Se a memorização não tiver sucesso, o LED vermelho ocupado lampeja e o dispositivo emite um beep longo.
•
1 beep lungo
1 extended beep
1 bip prolongé
1 langer Piepton
1 bip largo
1 lange pieptoon
1 beep longo
Pagina wordt geladen...
Pagina wordt geladen...

30
• Badge residente
Nuovo badge residente
Per accedere alla programmazione di un badge
“RESIDENTE” è necessario essere in possesso di un
badge gestore impianto.
Il posto esterno segnalerà l’avvenuta accettazione o
cancellazione del badge con segnali acustici e visivi dei
led presenti sul posto esterno.
La presentazione di un badge non riconosciuto o un
errore di programmazione, comporta l’interruzione
della programmazione, la segnalazione tramite un
beep lungo e l’accensione LED rosso di occupato.
• Resident badge
New resident badge
In order to access to the programming of a “RESIDENT”
badge, a system manager badge is required.
The entrance panel will notify that the badge has been
accepted or deleted by means of sound notifications, as
well as visual indications using the LEDs on the entrance
panel.
The presentation of an unrecognised badge, or a
programming error, will cause the interruption of the
programming procedure, and an extended beep; the red
“busy” LED will also come on.
• Badge résident
Nouveau badge résident
Pour accéder à la programmation d’un badge
“RÉSIDENT”, il est nécessaire de disposer d’un badge
master de gestion installation.
Le poste externe signale l’acceptation ou l’élimination
du badge par des signaux sonores et visuels et par
l’allumage des leds présents sur le poste externe.
La présentation d’un badge non reconnu ou une
erreur de programmation provoque l’interruption de
la programmation, l’émission d’un bip prolongé et
l’allumage du LED rouge occupé.
• Bewohner-Badge
Neuer Bewohner-Badge
Um die Programmierung eines Badges „BEWOHNER“
abrufen zu können, ist das Badge des Anlagenbetreibers
erforderlich.
Die Türstation meldet die erfolgte Annahme oder
Löschung des Badges durch akustische und visuelle Led-
Signale, die an derselben vorgesehen sind.
Wenn ein Badge nicht erkannt wird oder ein Fehler
bei der Programmierung aufgetreten ist, wird letztere
unterbrochen und ein langer Piepton erzeugt sowie die
rote LED (belegt) eingeschaltet.
• Credencial de residente
Nueva credencial de residente
Para ingresar a la programación de una credencial
“RESIDENTE”, es necesario poseer una credencial de
administrador del sistema.
La placa exterior indicarási acepta o cancelala
credencial con una señal acústica y visual de los leds
incorporadosen la placa exterior.
La presentación de una credencial no reconocida o un
error de programación interrumpe la programación,
que se señala con un bip largo y la iluminación del LED
rojo ocupado.
• Inwoner badge
Nieuwe inwoner badge
Voor toegang tot de programmering van een
“INWONERBADGE” moet u in het bezit zijn van een
installatiebeheerder badge.
Het externe punt geeft met behulp van geluids- en
lichtsignalen van de leds op het externe punt aan of de
badge geaccepteerd of gewist is.
Door de presentatie van een niet-herkende badge of een
fout in de programmering wordt de programmering
onderbroken, hoort u een lange pieptoon en gaat de rode
Led bezet branden.
• Crachá residente
Novo crachá residente
Para ter acesso à programação de um crachá
“RESIDENTE” é necessário estar em posse de um
crachá gestor da instalação.
A unidade externa sinalizará que interveio a aceitação
ou o cancelamento do crachá com sinais acústicos e
visuais dos leds presentes na unidade externa.
A apresentação de um crachá não reconhecido ou
um erro de programação, comporta a interrupção
da programação, a sinalização por meio de um beep
longo e o acendimento do LED vermelho de ocupado.
Pagina wordt geladen...
Pagina wordt geladen...

Video Kit
33
• Se la memorizzazione non va a buon fine, lampeggia il LED rosso occupato e il dispositivo emette un beep lungo.
• If the saving operation fails, the red busy LED flashes and the device emits a long beep.
• Si la mémorisation échoue, le LED rouge occupé clignote et le dispositif émet un bip long.
• Wenn das Speichern nicht erfolgreich beendet worden ist, blinkt die rote LED für belegt und die Vorrichtung erzeugt einen langen Piepton.
• Si la memorización no se realiza, el LED rojo ocupado parpadeará y el dispositivo emite un bip largo.
• Als de badge niet opgeslagen kan worden, gaat de rode LED systeem bezet knipperen en hoort een lange pieptoon.
• Se a memorização não for bem sucedida, o LED vermelho ocupado lampeja e o dispositivo emite um beep longo.
•
1 beep lungo
1 extended beep
1 bip prolongé
1 langer Piepton
1 bip largo
1 lange pieptoon
1 beep longo
Pagina wordt geladen...
Pagina wordt geladen...

36
• Reset
Nel caso si avesse la necessità di cancellare tutti i
badge (gestore impianto e residenti) precedentemente
memorizzati è possibile resettare il posto esterno.
• Reset
In order to cancel all the previously saved badges (system
manager and residents) the entrance panel can be reset.
• Réinitialisation
Dans le cas où il serait nécessaire d’éliminer tous les
badges (master de gestion installation et résidents)
précédemment mémorisés, il est possible de
réinitialiser le poste externe.
• Reset
Falls alle zuvor gespeicherten Badges (Anlagenbetreiber
und Bewohner) gelöscht werden sollen, kann die
Türstation zurückgestellt werden.
• Reset
En caso de que fuera necesario cancelar todas las
credenciales memorizadas(administrador del sistema y
residentes), es posible restablecer la placa exterior.
• Reset
U kunt alle badges (installatiebeheerder en inwonerbadges)
uit het geheugen wissen door het externe punt te resetten.
• Rearme
No caso que houvesse a necessidade de cancelar
todos os crachás (gestor da instalação e residentes),
memorizados anteriormente, será possível fazer o
rearme (reset) da unidade externa.
ON
ON
OFF
OFF
•
Togliere il BUS; tenendo premuto il pulsante di programmazione, ridare alimentazione. Mantenere premuto il pulsante di
programmazione fino all’accensione alternata dei LED serratura e connessione + beep lungo.
•
Remove the BUS; press and hold down the programming pushbutton, reconnect the power supply. Press and hold down the
programming pushbutton until the door lock and the connection LEDs start flashing in succession; a long beep is also heard.
•
Retirer le BUS ; rétablir l’alimentation en maintenant enfoncée la touche de programmation. Maintenir enfoncée la
touche de programmation jusqu’à ce que les LEDs serrure et connexion clignotent alternativement + bip long.
•
Den BUS abtrennen, die Programmierungstaste gedrückt halten und wieder Strom geben. Die Programmierungstaste gedrückt
halten, bis die LEDs des Schlosses und der Verbindung abwechselnd aufleuchten und ein langes Bestätigungssignal ertönt.
•
Desconecte el BUS, mantenga apretado el pulsador de programación y vuelva a conectar la alimentación. Mantenga
apretado el pulsador de programaciónhasta el encendido alternado de los LEDS cerradura y conexión + bip largo.
•
Verwijder de BUS, houd de programmeringsknop ingedrukt en heractiveer de voeding.
Houd de programmeringsknop ingedrukt tot de led slot en de LED verbinding gaan knipperen en u een lange pieptoon hoort.
•
Remova o BUS; mantendo carregado o botão de programação, volte a ligar a alimentação. Mantenha carregado o botão de
programação até o acendimento alternado dos LED da fechadura e da conexão + beep longo.
Pagina wordt geladen...
Pagina wordt geladen...
Pagina wordt geladen...
Pagina wordt geladen...

Video Kit
41
P
+1
MOD=9
P
+1
P
+2
MOD=9
P
+2
P
P
+1
MOD=5
P
+1
P
+1
2
3
1 32
346210
1
P
+2
MOD=5
P
+2
P
+2
2
3
1 32
346210
1
P
+3
MOD=5
P
+3
P
+3
2
3
1 32
346210
1
P
+4
MOD=5
P
+4
P
+4
2
3
1 32
346210
1
1–+ 23 4
P
+3
MOD=9
P
+3
1–+ 23 4
2
3
1 32
346210
1
P
+1
MOD=9
P
+1
P
+2
MOD=9
P
+2
P
P
+1
MOD=5
P
+1
P
+1
2
3
1 32
346210
1
P
+2
MOD=5
P
+2
P
+2
2
3
1 32
346210
1
P
+3
MOD=5
P
+3
P
+3
2
3
1 32
346210
1
P
+4
MOD=5
P
+4
P
+4
2
3
1 32
346210
1
1–+ 23 4
1–+ 23 4
P
+3
MOD=9
P
+3
1–+ 23 4
P
+1
MOD=9
P
+1
P
+2
MOD=9
P
+2
P
P
+1
MOD=5
P
+1
P
+1
2
3
1 32
346210
1
P
+2
MOD=5
P
+2
P
+2
2
3
1 32
346210
1
P
+3
MOD=5
P
+3
P
+3
2
3
1 32
346210
1
P
+4
MOD=5
P
+4
P
+4
2
3
1 32
346210
1
1–+ 23 4
1–+ 23 4
P
+3
MOD=9
P
+3
1–+ 23 4
P
+1
MOD=9
P
+1
P
+2
MOD=9
P
+2
P
P
+1
MOD=5
P
+1
P
+1
2
3
1 32
346210
1
P
+2
MOD=5
P
+2
P
+2
2
3
1 32
346210
1
P
+3
MOD=5
P
+3
P
+3
2
3
1 32
346210
1
P
+4
MOD=5
P
+4
P
+4
2
3
1 32
346210
1
1–+ 23 4
1–+ 23 4
P
+3
MOD=9
P
+3
1–+ 23 4
Attivazione del PE (configurato
con P+1) in modo diretto senza la
chiamata oppure attivazione attuatore
346200/346210 (configurato con P+1
e MOD= 9).
Apertura serratura del PE (configurato
con P+1) in modo diretto senza la
chiamata oppure attivazione attuatore
346200/346210 (configurato con P+1 e
MOD= 5) oppure attivazione attuatore
346230 (configurato con P+1).
Apertura serratura del PE (configurato
con P+2) in modo diretto senza la
chiamata oppure attivazione attuatore
346200/346210 (configurato con P+2 e
MOD=5) oppure attivazione attuatore
346230 (configurato con P+2).
Apertura serratura del PE (configurato
con P+3) in modo diretto senza la
chiamata oppure attivazione attuatore
346200/346210 (configurato con P+3 e
MOD=5) oppure attivazione attuatore
346230 (configurato con P+3).
Activating the EP (configured with P+1)
directly without the call or activating
actuator 346200/346210 (configured
with P+1 and MOD= 9).
Door lock opening of EP (configured
with P+1) directly without the call or
activating the actuator 346200/346210
(configured with P+1 and MOD= 5)
or activating the actuator 346230
(configured with P+1).
Door lock opening of EP (configured
with P+2) directly without the call
or activating the actuator 346200
(configured with P+2 and MOD= 5)
or activating the actuator 346230
(configured with P+2).
Door lock opening of EP (configured
with P+3) directly without the call or
activating the actuator 346200/346210
(configured with P+3 and MOD= 5)
or activating the actuator 346230
(configured with P+3).
Activation du PE (configuré avec P+1)
en mode direct sans l’appel ou activation
actionneur 346200/346210 (configuré
avec P+1 et MOD= 9).
Ouverture serrure du PE (configuré avec
P+1) en mode direct sans l’appel ou
activation actionneur 346200/346210
(configuré avec P+1 et MOD= 5) ou
activation actionneur 346230 (configuré
avec P+1).
Ouverture serrure du PE (configuré avec
P+2) en mode direct sans l’appel ou
activation actionneur 346200 (configuré
avec P+2 et MOD= 5) ou activation
actionneur 346230 (configuré avec P+2).
Ouverture serrure du PE (configuré avec
P+3) en mode direct sans l’appel ou
activation actionneur 346200/346210
(configuré avec P+3 et MOD= 5) ou
activation actionneur 346230 (configuré
avec P+3).
Aktivierung der Türstation (mit P+1
konfiguriert) auf direkte Weise ohne
Ruf oder Aktivierung über den Aktvator
346200/346210 (mit P+1 und MOD= 9).
Türöffnung der Türstation (mit P+1
konfiguriert) oder Aktivierung über
den Aktivator 346200/346210 (mit
P+1 und MOD= 5) oder Aktivierung
über den Aktivator 346230 (mit P+1
konfiguriert).
Türöffnung der Türstation (mit P+2
konfiguriert) oder Aktivierung über
den Aktivator 346200/346210 (mit
P+2 und MOD= 5) oder Aktivierung
über den Aktivator 346230 (mit P+2
konfiguriert).
Türöffnung der Türstation (mit P+3
konfiguriert) oder Aktivierung über
den Aktivator 346200/346210 (mit
P+3 und MOD= 5) oder Aktivierung
über den Aktivator 346230 (mit P+3
konfiguriert).
Activación del PE (configurado con
P+1) en modo directo sin llamada o
activación del actuador 346200/346210
(configurado con P+1 y MOD= 9).
Apertura cerradura del PE (configurado
con P +1) en modo directo sin llamada o
activación del actuador 346200/346210
(configurado con P+1 y MOD= 5)
o activación del actuador 346230
(configurado con P+1).
Apertura cerradura del PE (configurado
con P+2) en modo directo sin llamada o
activación del actuador 346200/346210
(configurado con P+2 y MOD= 5)
o activación del actuador 346230
(configurado con P+2).
Apertura cerradura del PE (configurado
con P+3) en modo directo sin llamada o
activación del actuador 346200/346210
(configurado con P+3 y MOD= 5)
o activación del actuador 346230
(configurado con P+3).
Rechtstreekse activering van het
deurstation (als P+1 geconfigureerd)
zonder oproep of activering van het
toestel 346200/346210 (geconfigureerd
als P+1 en MOD = 9).
Rechtstreekse opening van het deurslot
van het als P+1 geconfigureerde
deurstation, zonder oproep of activering
van het toestel 346200/346210
(geconfigureerd als P+1 en MOD= 5)
of activering van het toestel 346230
(geconfigureerd als P+1).
Rechtstreekse opening van het deurslot
van het als P+2 geconfigureerde
deurstation, zonder oproep of activering
van het toestel 346200/346210
(geconfigureerd als P+2 en MOD= 5)
of activering van het toestel 346230
(geconfigureerd als P+2).
Rechtstreekse opening van het deurslot
van het als P+3 geconfigureerde
deurstation, zonder oproep of activering
van het toestel 346200/346210
(geconfigureerd als P+3 en MOD= 5)
of activering van het toestel 346230
(geconfigureerd als P+3).
Ligação da UE (con figurada com
P+1) de maneira directa sem a cha-
ma da ou então ligação do ac tua dor
346200/346210 (configurado com P+1
e MOD=9).
Abertura da fechadura da UE (configurada
com P+1) de ma nei ra directa sem a
chamada ou então ligação do actuador
346200/346210 (configurado com P+1
e MOD=5) ou então ligação do actuador
346230 (con fi gu ra do com P+1).
Abertura da fechadura da UE (configurada
com P+2) de ma nei ra directa sem a
chamada ou então ligação do actuador
346200/346210 (configurado com P+2
e MOD=5) ou então ligação do actuador
346230 (con fi gu ra do com P+2).
Abertura da fechadura da UE (configurada
com P+3) de ma nei ra directa sem a
chamada ou então ligação do actuador
346200/346210 (configurado com P+3
e MOD=5) ou então ligação do actuador
346230 (con fi gu ra do com P+3).
P+1
346200
P+1346210
.)
P+1
346200
P+1346210
346230
5
.)P+1
P+2
346200
P+2346210
346230
5
.)P+2
P+3
346200
P+3346210
346230
5
.)P+3

42
P
+1
MOD=9
P
+1
P
+2
MOD=9
P
+2
P
P
+1
MOD=5
P
+1
P
+1
2
3
1 32
346210
1
P
+2
MOD=5
P
+2
P
+2
2
3
1 32
346210
1
P
+3
MOD=5
P
+3
P
+3
2
3
1 32
346210
1
P
+4
MOD=5
P
+4
P
+4
2
3
1 32
346210
1
1–+ 23 4
1–+ 23 4
P
+3
MOD=9
P
+3
1–+ 23 4
Apertura serratura del PE (configurato
con P+4) in modo diretto senza la
chiamata oppure attivazione attuatore
346200/346210 (configurato con P+4 e
MOD= 5) oppure attivazione attuatore
346230 (configurato con P+4)
Intercom tra appartamenti
in impianti con interfaccia
da appartamento 346850
Intercom all’interno dell’appartamento
in impianti con interfaccia di
appartamento 346850; oppure intercom
tra appartamenti in impianti senza
interfaccia di appartamento
Intercom su se stesso,
invia la chiamata a tutti
gli apparecchi con uguale
indirizzo
Intercom generale, invia
una chiamata a tutti gli
apparecchi dell’impianto
Door lock opening of EP (configured
with P+4) directly without the call or
activating the actuator 346200/346210
(configured with P+4 and MOD= 5)
or activating the actuator 346230
(configured with P+4)
Intercommunicability
between apartments in
systems with
apartment interface
346850
Intercommunicability inside
an apartment in systems with
apartment interface 346850 or
intercommunicability between
apartments in systems without
apartment interface
Intercom on itself, sends
the call to all the devices
with the same address
General intercom, sends
a call to all the system
devices
Ouverture serrure du PE (configuré avec
P+4) en mode direct sans l’appel ou
activation actionneur 346200/346210
(configuré avec P+4 et MOD= 5) ou
activation actionneur 346230 (configuré
avec P+4)
Intercommunication
entre appartements sur
installations avec interface
d’appartement 346850
Intercommunication à l’intérieur de
l’appartement sur installations avec
interface d’appartement 346850 ou
intercommunication entre appartements
sur installations sans interface
d’appartement
Intercom sur lui-même,
envoie l’appel à tous
les appareils ayant une
adresse identique
Intercom général, envoie
l’appel à tous les appareils
de l’installation
Türöffnung der Türstation (mit P+4
konfiguriert) oder Aktivierung über den
Aktivator 346200/346210 (mit P+4 und
MOD= 5) oder Aktivierung über den
Aktivator 346230 (mit P+4 konfiguriert)
Gegenseitige
Kommunikation zwischen
Wohnungen für Anlagen
mit Wohnungsschnittstelle
346850
Gegenseitige Kommunikation
innerhalb der Wohnung für Anlagen
mit Wohnungsschnittstelle 346850
oder gegenseitige Kommunikation
zwischen Wohnungen für Anlagen ohne
Wohnungsschnittstelle
Intercom mit einseitiger
Funktion: sendet den
Ruf an alle Geräte mit
derselben Adresse
Intercom mit allgemeiner
Funktion: sendet den Ruf
an alle Geräte der Anlage
Apertura cerradura del PE (configurado
con P+4) en modo directo sin llamada o
activación del actuador 346200/346210
(configurado con P+4 y MOD= 5)
o activación del actuador 346230
(configurado con P+4)
Intercomunicación
entre apartamentos en
instalaciones con interfaz
de departamento 346850
Intercomunicación en el
apartamento en instalaciones con
interfaz de apartamento 346850 o
intercomunicación entre apartamentos
en instalaciones sin interfaz de
apartamento
Intercomunicación hacia
los aparatos iguales,
envía la llamada a todos
los aparatos con igual
dirección
Intercomunicación
general, envía una
llamada a todos los
aparatos de la instalación
Rechtstreekse opening van het deurslot van
het als P+4 geconfigureerde deurstation,
zonder oproep of activering van het toestel
346200/346210 (geconfigureerd als P+4
en MOD= 5) of activering van het toestel
346230 (geconfigureerd als P+4).
Intercom tussen
appartementen in
installaties met interface
van appartement 346850
Intercom binnen in het appartement
in installaties met interface van
appartement 346850 ofwel intercom
tussen appartementen in installaties
zonder interface van appartement
Intercom op zichzelf,
verstuurt de oproep
naar alle toestellen met
hetzelfde adres
Algemene Intercom,
verstuurt een oproep naar
alle toestellen van de
installatie
Abertura da fechadura da UE (configurada
com P+4) de maneira directa sem a
chamada ou então ligação do actuador
346200/346210 (configurado com P+4
e MOD= 5) ou então ligação do actuador
346230 (configurado com P+4)
Intercom entre
apartamentos em
instalações com interface
de apartamento 346850
Intercom dentro do apartamento
em instalações com interface de
apartamento 346850 ou então intercom
entre apartamentos em instalações sem
interface de apartamento
Intercomunicador sobre si
mesmo, envia a chamada
a todos os aparelhos com
endereço igual
Intercomunicador geral,
envia uma chamada a
todos os aparelhos da
instalação
P+4
346200
P+4346210
346230
5
.)P+4
.346850
346850
Pagina wordt geladen...
Pagina wordt geladen...
Pagina wordt geladen...
Pagina wordt geladen...
Pagina wordt geladen...

48
• Attenzione: il videocitofono deve rispettare le seguenti regole installative:
– deve essere installato solo in ambienti interni
– non deve essere esposto a stillicidio o a spruzzi d’acqua
– non ostruire le aperture di ventilazione
– deve essere usato unicamente su sistemi 2 fili SCS BTicino.
Ogni uso improprio dell’articolo puó comprometterne le caratteristiche di sicurezza.
• Caution: the video handset must respect the following installation rules:
– it must only be installed indoors
– it must not be exposed to water drops or splashes
– do not block the ventilation openings
– it must be used only on SCS BTicino 2-wire systems
An improper use of the item can compromise its safety features.
• Attention: le vidéophone doit respecter les règles d’installation suivantes:
– il doit être monté seulement à l’intérieur
– il ne doit pas être exposé à des suintements ou à des éclaboussures
– ne pas boucher les ouvertures d’aération
– il doit être utilisé uniquement sur des systèmes 2 fils SCS BTicino.
Tout usage impropre de la référence peut compromettre les caractéristiques de sécurité.
• Achtung: die Videogegensprechanlage muss nach folgenden Regeln installiert werden:
– sie darf nur im Inneren installiert werden
– sie darf nicht Tropfen oder Spritzer ausgesetzt werden
– die Belüftungsschlitze dürfen nicht abgedeckt werden
– es darf nur eine 2-Draht SCS-System von BTicino verwendet werden.
Ein ungeeigneter Gebrauch der Vorrichtung kann die Sicherheitseigenschaften beeinträchtigen.
• Atención: el videoportero ha de respetar las siguientes reglas de instalación:
– se ha de instalar solamente en ambientes internos
– no se ha de exponer a goteos o a chorros de agua
– no se han de tapar las aperturas de ventilación
– se ha de usar únicamente en sistemas de 2 hilos SCS BTicino.
Un uso impropio del artículo puede comprometer sus características de seguridad.
• Opgelet: voor de beeldhuistelefoon gelden de volgende installatievoorschriften:
– uitsluitend binnen geïnstalleerd
– niet blootgesteld aan druppelend of spattend water
– de ventilatie-openingen worden niet afgesloten
– mag uitsluitend worden gebruikt in SCS 2-draads systemen van BTicino.
Door oneigenlijk gebruik van het artikel kan de veiligheid worden beïnvloed.
• Atenção: o intercomunicador vídeo deve respeitar as seguintes regras de instalação:
– deve ser instalado exclusivamente em ambientes internos
– não deve ficar exposto a gotejamentos ou a salpicos de água
– não obstruir as aberturas de ventilação
– deve ser utilizado exclusivamente em sistemas SCS BTicino de 2 fios.
Qualquer uso impróprio do artigo pode comprometer as suas características de segurança.
.
Pagina wordt geladen...
Pagina wordt geladen...
Pagina wordt geladen...
Pagina wordt geladen...
Documenttranscriptie
• Posto esterno • Entrance panel • Poste extérieur • Türstation • Placa exterior • Externe plaats • Unidade externa • الوحدة الخارجية 3 4 5 6 2 1 ON 1 - Abilitazione/disabilitazione tono conferma apertura serratura. 2 - Regolazione del volume (vedi pag. seguente). 3 - Led verde: indicazione porta aperta. 4 - Led verde: comunicazione attiva. 5 - Led lampeggiante Verde: chiamata inoltrata; Led lampeggiante Rosso: sistema occupato. 6 - Sede configuratori. 1 - Enabling/disabling of door lock opening confirmation tone. 2 - Adjustment volume (see the following page). 3 - Green LED: door open indication. 4 - Green LED: communication active. 5 - Green flashing LED; call forwarded; Red flashing LED: system busy. 6 - Configurator seat. 1 - Activation/désactivation tonalité de confirmation ouverture serrure. 2 - Réglage du volume (voir page suivante). 3 - Diode verte: indication porte ouverte. 4 - Diode verte: communication active. 5 - Témoin clignotant vert - appel passé; Témoin clignotant rouge: système occupé. 6 - Logement configurateurs. 1 - Aktivierung/Deaktivierung des Bestätigungssignals nach erfolgter Türöffnung. 2 - Einstellung der Lautstärke (siehe nachfolgende Seiten). 3 - Grüne Led: Meldet offene Tür. 4 - Grüne Led: Kommunikation aktiv. 5 - Grüne blinkende Led: Ruf gesendet; Rote blinkende Led: System belegt. 6 - Sitz der Konfiguratoren. 10 OFF 1 - Habilitación/deshabilitación del tono de confirmación de apertura de la cerradura. 2 - Regulación del volumen (véase la pág. siguiente). 3 - Led verde: indicación puerta abierta. 4 - Led verde: comunicación activada. 5 - Led parpadenate Verde: llamada enviada; Led parpadenate Rojo: sistema ocupado. 6 - Alojamiento configuradores. 1 - Activering/desactivering toon bevestiging opening slot. 2 - De geluidssterkte regelen (zie de volgende pagina’s). 3 - Groene led: aanduiding open deur. 4 - Groene led: communicatie actief. 5 - Groene knipperende led: oproep doorgestuurd; Rode knipperende led: systeem bezet. 6 - Plaats van de configuratiemodules. 1 - Activação/desactivação do sinal de confirmação da abertura da fechadura. 2 - Regulação do volume (veja as próxima página). 3 - Indicadores luminosos verde: indicação de porta aberta. 4 - Indicadores luminosos verde: comunicação activa. 5 - Indicador luminoso lampejante Verde: chamada enviada; Indicador luminoso lampejante Vermelho: sistema cupado. 6 - Alojamento configurador. . إلغاء تمكين نغمة تأكيد فتح القفل/ تمكين- 1 .) ضبط مستوى الصوت (*انظر الصفحة التالية- 2 . يشير إلى أن الباب مفتوح: المؤشر الضوئي األخضر- 3 . االتصال نشط: المؤشر الضوئي األخضر- 4 ، تحويل المكالمة: المؤشر الضوئي األخضر الوامض- 5 . النظام مشغول:المؤشر الضوئي األحمر الوامض . موضع عناصر اإلعداد- 6 Video Kit • Se si manifestasse il disturbo del fischio, (effetto Larsen), ridurre prima la potenza del microfono , agendo con un cacciavite sul potenziometro corrispondente, fino ad un livello accettabile. Qualora il fenomeno persista, agire sul potenziometro dell’altoparlante in modo da eliminare l’inconveniente. Se il volume è troppo basso, aumentare prima il volume dell’altoparlante ed eventualmente anche quello del microfono, tenendo presente che è preferibile una trasmissione chiara e priva di disturbi, che una al limite dell’innesco (Larsen). power, adjusting the corresponding • In case of a whistle (Larsen effect), first reduce the microphones potentiometers with a screw driver, until an acceptable level is reached. Should the whistle persist, adjust the loudspeakers volume in order to eliminate the trouble. If the volume is too low level then, increase first the potentiometer of the loudspeaker and secondly the one for the microphone, bearing in mind that a clear and noise free reception is preferable than one just before whistling (Larsen). sur le potentiomètre • Lors de sifflement (effet de Larsen), reduire d’abord la puissance du micro correspondant, à l’aide d’un tournevis, jusqu’à l’obtention d’un niveau satisfaisant. Si le sifflement persiste, régler le potentiomètre du hautparleur jusqu’à l’élimination de celui-ci. Si le volume est trop bas, augmenter d’abord la puissance du haut-parleur et éventuellement celle du micro, en considérant qu’une réception claire et sans parasite est préférable à une communication à la limite de l’accrochage (effet de Larsen). bis auf einen • Beim etwaigen Auftreten eines Pfeiftones (Larsen-Effekt), zuerst die Lautstärke des Mikrophones annehmbaren Wert herabsetzen, indem man das entsprechende Potentiometer mit einem Schraubendreher einstellt. Sollte die Störung weiterhin bestehen, dann das Potentiometer des Lautsprechers bis zur Beseitigung des Pfeiftones einstellen. Ist die Lautstärke nun zu niedrig, dann zuerst die des Lautsprechers und erst danach evtl. auch die des Mikrophones erhohen, wobei ein deutlicher und störungsfreier Empfang einem an der Störungsgrenze liegendem (Larsen-Effekt) vorzuziehen ist. • Si se manifesta el silbido de acoplamiento, (efecto Larsen), reducir primero la potencia del micrófono , girando con un destornillador el potenciómetro correspondiente, hasta obtener un nivel aceptable. Si el fenómeno persistiera, regular el potenciómetro del altavoz hasta eliminar la interferencia. Si el volumen es demasiado bajo, aumentar primero el volumen del altavoz y eventualmente también el del micrófono, teniendo en cuenta que es preferible una transmissión clara y limpia de interferencias, que una al limite del acoplo (Larsen). • Als er een fluittoon hoorbaar is (effect van Larsen): verminder eerst het vermogen van de microfoon met behulp van een schroevendraaier zijn stroomregelaar zo te regelen dat de geluidssterkte van het gefluit aanvaardbaar is. Als het verschijnsel niet verdwijnt, dan moet u ook de stroomregelaar van de luidspreker bijstellen. Als de geluidssterkte nu te klein is, verhoog dan eerst de geluidssterkte van de luidspreker en daarna eventueel ook die van de microfoon, en denk er bij het bijstellen aan dat een duidelijk hoorbaar en ongestoord geluid beter is dan een harder geluid op de grens van het Larsen effect. • Se se manifestar uma interferência no som (efeito de Larsen), começar por diminuir a potência do microfone , rodando o potenciómetro correspondente com uma chave de parafusos, até obter um nível aceitável. Se o fenómeno persistir, regular o potenciómetro do altifalante de modo a eliminar o problema. Se o volume estiver demasiado baixo, começar por aumentar o volume do altifalante e depois, se necessário, o do microfone, tendo presente que é melhor ter uma transmissão clara e sem interferências, que uma no limiar de início de efeitos Larsen. وضبط مقياس الجهد، قم أوال بخفض قدرة الميكروفون،)• في حالة حدوث مشكلة صفير االرتجاع الصوتي (تأثير الرسن قم بضبط مقياس الجهد الخاص، إذا استمرت الظاهرة.ستخدما مفك مسامير حتى الوصول إلى المستوى المقبول المرادف ُم ً قم أوال بزيادة مستوى الصوت الخاصة بالمكبر،منخفضا للغاية إذا كان الصوت.حتى تتخلص من المشكلة بمكبر الصوت ً أيضا ذلك الخاص بالميكروفون مع األخذ في االعتبار أنه يُفضل بث واضح وخالي من االضطرابات عن بث عند حد االقتران ً وربما .)Larsen( 11 Video Kit La imagen representa el dispositivo con todas las funciones habilitadas. Busque en el manual del instalador cómo habilitar las funciones. De afbeelding toont het apparaat met ingeschakelde functies. Raadpleeg de installatiehandleiding voor de inschakeling van de functies. 1 - Pantalla 7” (16 : 9) 2 - Tecla apagado 3 - Fecha y hora 4 - Exclusión timbre 5 - Activación Oficina Profesional 6 - Micrófono 7 - Activación Contestador 8 - Acciones rápidas 9 - Guías táctiles para invidentes 10 - Tecla conexión: 1 - Display 7” (16 : 9) 2 - Uitschakeltoets 3 - Datum en tijd 4 - Uitsluiting beltoon 5 - Activering professionele studio 6 - Microfoon 7 - Activering antwoordapparaat 8 - Sneltoetsen 9 - Tastgeleiders voor blinden 10 - Toets verbinding: 11 - 11 - 12 - 13 14 15 16 17 18 19 20 21 22 23 24 25 26 27 - el encendido del led verde parpadeante indica una llamada entrante el encendido del led verde fijo indica la comunicación en curso Autoencendido/Visualización cíclica: al presionar la tecla el LED rojo se enciende Tecla Favoritos: al presionar la tecla el LED rojo se enciende (Configuración base = LUZ ESCALERAS. Para una configuración distinta, consulte la tabla de la configuración física en las páginas sucesivas.) Tecla apertura cerradura: al presionar la tecla el LED rojo se enciende Estado Contestador: Led rojo fijo = contestador activado Led rojo parpadeante = presencia grabación/es no vista/s Estado presencia notas: Led rojo parpadeante = nueva/s notas no leída/s Estado Exclusión timbre: Led rojo encendido = Timbre llamada desactivado Funciones (aparecen solamente los iconos de las funciones configuradas) Alojamiento configuradores Configurador J1: extraiga para alimentación adicional Configurador J2: Master/Slave, extraiga para Slave Microinterruptor ON/OFF terminal de tramo Toma mini USB para actualización del firmware del dispositivo Altavoz Bornes (1 - 2) para alimentación adicional Bornes para la conexión al BUS SCS 2 HILOS Bornes ( ) para la conexión de un pulsador externo de llamada a la planta Bornes (1 - 5M) para la conexión de un timbre adicional. Ha de efectuar la conexión punto - punto en los bornes de los timbres adicionales 12 - 13 14 15 16 17 18 19 20 21 22 23 24 25 26 27 - de groene led knippert om een binnenkomende oproep aan te geven de groene led brandt om een lopend gesprek aan te geven Automatische inschakeling/cyclische weergave: bij een druk op de toets gaat de rode led branden Toets Favorieten: bij een druk op de toets gaat de rode led branden (Standaardconfiguratie = TRAPHUISVERLICHTING. Voor een andere configuratie raadpleeg de tabel met de fysieke configuratie op de volgende pagina’s.) Toets slotontgrendeling: bij een druk op de toets gaat de rode led branden Status antwoordapparaat: Rode led brandt = antwoordapparaat geactiveerd Rode led knippert = nieuwe registratie(s) aanwezig Status notities aanwezig: Rode led knippert = nieuwe notitie(s) Status uitsluiting beltoon: Rode led brandt = Beltoon oproep gedeactiveerd Functies (uitsluitend de iconen van de geconfigureerde functies worden weergegeven) Plaats van de configuratiemodules Configurator J1: uitnemen voor extra voeding Configurator J2: Master/Slave, uitnemen voor Slave Microschakelaar ON/OFF van beëindiging traject Mini-UBS-aansluiting voor de update van de firmware van het apparaat Luidspreker Aansluitklemmen (1 - 2) voor extra voeding Aansluitklemmen voor de verbinding met de SCS 2-DRAADS BUS Morsetti ( ) voor de verbinding van een externe knop op de etage Aansluitklemmen (1 - 5M) voor de verbinding van een extra beltoon. Verricht een punt - punt verbinding op de aansluitklemmen van de extra beltonen 17 • Programmazione Badge • Badge programming • Programmation des badges • Badge programmieren • Programación de credenciales • Badge Programmeren • Programação do Crachá • Badge gestore impianto Nuovo badge gestore impianto Per motivi di sicurezza è previsto un badge “Gestore“ programmato direttamente dall’installatore, tramite il quale è possibile l’accesso alla programmazione degli altri badge (residenti). Il posto esterno segnalerà l’avvenuta accettazione o cancellazione del badge con segnali acustici e visivi dei led presenti sul posto esterno. La presentazione di un badge non riconosciuto o un errore di programmazione, comporta l’interruzione della programmazione, la segnalazione tramite un beep lungo e l’accensione LED rosso di occupato. • Credencial maestra de administrador Nueva credencial maestra de administrador Por razones de seguridad se prevé una credencial “maestra” programada directamente por el instalador mediante la cual es posible programar las demás credenciales (residentes). La placa exterior indicará si acepta o cancela unacredencial con unaseñal acústica y visual de los leds incorporados en la placa exterior. La presentación de una credencial no reconocida o un error de programación interrumpe la programación, que se señala con un bip largo y la iluminación del LED rojo ocupado. • Manager master badge New manager master badge For safety reasons, a “MASTER” badge is required, directly programmed by the installer, providing access to the programming of the other badges (residents). The entrance panel will notify that the badge has been accepted or deleted by means of sound notifications, as well as visual indications using the LEDs on the entrance panel. The presentation of an unrecognised badge, or a programming error, will cause the interruption of the programming procedure, and an extended beep; the red “busy” LED will also come on. • Badge master beheerder Nieuwe master beheerder badge Wegens veiligheidsredenen wordt door de installateur een “Master” badge geprogrammeerd die de programmering van de andere badges (inwoners) mogelijk maakt. Het externe punt geeft met behulp van geluids- en lichtsignalen van de leds op het externe punt aan of de badge geaccepteerd of gewist is. Door de presentatie van een niet-herkende badge of een fout in de programmering wordt de programmering onderbroken, hoort u een lange pieptoon en gaat de rode Led bezet branden. • Badge master de gestion Nouveau badge master de gestion Pour des raisons de sécurité, est prévu un badge “MASTER“ programmé directement par l’installateur, à travers lequel, il est possible d’accéder à la programmation des autres (résidents). Le poste externe signale l’acceptation ou l’élimination du badge par des signaux sonores et visuels et par l’allumage des leds présents sur le poste externe. La présentation d’un badge non reconnu ou une erreur de programmation provoque l’interruption de la programmation, l’émission d’un bip prolongé et l’allumage du LED rouge occupé. • Crachá master gestor Novo crachá master gestor Por razões de segurança é previsto um crachá “MASTER“, programado directamente pelo instalador, por meio do qual é possível o acesso à programação dos outros crachás (residentes). A unidade externa sinalizará a ocorrida aceitação ou cancelamento do crachá com sinais acústicos e visuais dos led presentes na unidade externa. A apresentação de um crachá não reconhecido ou um erro de programação, comporta a interrupção da programação, a sinalização por meio de um beep longo e o acendimento do LED vermelho de ocupado. • Master-Verwaltungs-Badge Neuer Master-Verwaltungs-Badge Aus Sicherheitsgründen ist ein „MASTER“-Badge vorgesehen, der direkt vom Installateur programmiert wird. Damit können die anderen Badges (Bewohner) programmiert werden. Die Türstation meldet die erfolgte Annahme oder Löschung des Badges durch akustische und visuelle Led-Signale, die an derselben vorgesehen sind. Wenn ein Badge nicht erkannt wird oder ein Fehler bei der Programmierung aufgetreten ist, wird letztere unterbrochen und ein langer Piepton erzeugt sowie die rote LED (belegt) eingeschaltet. • بطاقة المسؤول عن المنظوم بطاقة جديدة للمسؤول عن المنظومة ألسباب أمنية من المطلوب وجود بطاقة “مسؤول” ُمبرمجة ُمباشرة ومن خاللها يُمكن الوصول إلى برمجة،من ِقبل القائم بالتثبيت .)البطاقات األُخرى (السكان ستوضح الوحدة الخارجية إتمام قبول أو حذف البطاقة من خالل إشارات صوتية ومرئية للمؤشرات الضوئية الموجودة بالوحدة .الخارجية وجود بطاقة غير معروفة أو خطأ في البرمجة يؤدي إلى قطع البرمجة واإلخطار من خالل إشارة صوتية طويلة “بيب” وإضاءة المؤشر الضوئي .األحمر المشغول 24 • برمجة البطاقة 2 beep 2 beeps 2 beep 2 Pieptöne 2 bips 2 beep 2 beep المسؤول عن المنظومة • Gestore impianto • Manager master • Master de gestion • Master Verwaltung • Credencial maestra de administrador • Master beheerder • Master gestor المسؤول عن المنظومة • Avvicinare al lettore il badge gestore impianto da memorizzare e attendere l’accensione del LED verde serratura e doppio tono di conferma. Se è già presente un badge gestore impianto, il nuovo sostituirà il vecchio. • Move the system manager badge reader to save close and wait for the green door lock LED to switch on; a double confirmation sound will be heard. If a system manager badge is already present, the new one will replace the old one. • Approcher le Badge administrateur installation à mémoriser du lecteur et attendre que le LED vert serrure s’allume et qu’une double tonalité de confirmation soit émise. Si un Badge administrateur installation est déjà présent, le nouveau remplace le précédent. • Dem Lesegerät das Badge des Anlagenbetreibers nähern, das gespeichert werden soll und warten, bis die grüne LED des Schlosses aufleuchtet und das Bestätigungssignal zwei Mal ertönt. Wenn ein Badge des Anlagenbetreibers schon vorhanden ist, wird das neue Badge das alter ersetzen. • Acerque al lector la credencial del administrador del sistema que desea memorizar y esperar el encendido del LED verde cerradura y doble tono de confirmación. Si hay una credencial del administrador del sistema, la nueva reemplazará la vieja. • Houd de installatiebeheerder badge die opgeslagen moet worden voor het leesapparaat, wacht tot de groene LED slot gaat branden en u ter bevestiging een dubbel geluidssignaal hoort. De nieuwe badge zal de oude badge vervangen als al een installatiebeheerder badge aanwezig is. • Aproxime ao leitor o Crachá gestor da instalação a memorizar e espere o acendimento do LED verde da fechadura e o duplo tom de confirmação. Se já estiver presente um crachá gestor de instalação, o novo substituirá o antigo. وانتظر حتى يضيء المؤشر الضوئي األخضر الخاص،• قم بتقريب بطاقة المسؤول عن المنظومة التي ترغب في حفظها من قارئ البطاقات . وتصدر نغمة تأكيد مزدوجة،بالقفل . ستحل الجديدة محل القديمة،إذا كانت موجودة بالفعل بطاقة مسؤول عن المنظومة 26 Video Kit 1 beep lungo 1 extended beep 1 bip prolongé 1 langer Piepton 1 bip largo 1 lange pieptoon 1 beep longo إشارة صوتية واحدة طويلة • Se la memorizzazione non va a buon fine, lampeggia il LED rosso occupato e il dispositivo emette un beep lungo. • If the saving operation fails, the red busy LED flashes, and the device emits a long beep. • Si la mémorisation échoue, le LED rouge occupé clignote et le dispositif émet un bip long. • Wenn das Speichern nicht erfolgreich beendet worden ist, blinkt die rote LED für belegt und die Vorrichtung erzeugt einen langen Piepton. • Si la memorización no se realiza, el LED rojo ocupado parpadeará y el dispositivo emite un bip largo. • Als de badge niet opgeslagen kan worden, gaat de rode LED systeem bezet knipperen en hoort een lange pieptoon. • Se a memorização não tiver sucesso, o LED vermelho ocupado lampeja e o dispositivo emite um beep longo. . ويُصدر الجهاز إشارة صوتية مطوَّلة، يومض المؤشر الضوئي األحمر المشغول،• إذا لم يتم الحفظ بنجاح 27 • Badge residente Nuovo badge residente Per accedere alla programmazione di un badge “RESIDENTE” è necessario essere in possesso di un badge gestore impianto. Il posto esterno segnalerà l’avvenuta accettazione o cancellazione del badge con segnali acustici e visivi dei led presenti sul posto esterno. La presentazione di un badge non riconosciuto o un errore di programmazione, comporta l’interruzione della programmazione, la segnalazione tramite un beep lungo e l’accensione LED rosso di occupato. • Credencial de residente Nueva credencial de residente Para ingresar a la programación de una credencial “RESIDENTE”, es necesario poseer una credencial de administrador del sistema. La placa exterior indicarási acepta o cancelala credencial con una señal acústica y visual de los leds incorporadosen la placa exterior. La presentación de una credencial no reconocida o un error de programación interrumpe la programación, que se señala con un bip largo y la iluminación del LED rojo ocupado. • Resident badge New resident badge In order to access to the programming of a “RESIDENT” badge, a system manager badge is required. The entrance panel will notify that the badge has been accepted or deleted by means of sound notifications, as well as visual indications using the LEDs on the entrance panel. The presentation of an unrecognised badge, or a programming error, will cause the interruption of the programming procedure, and an extended beep; the red “busy” LED will also come on. • Inwoner badge Nieuwe inwoner badge Voor toegang tot de programmering van een “INWONERBADGE” moet u in het bezit zijn van een installatiebeheerder badge. Het externe punt geeft met behulp van geluids- en lichtsignalen van de leds op het externe punt aan of de badge geaccepteerd of gewist is. Door de presentatie van een niet-herkende badge of een fout in de programmering wordt de programmering onderbroken, hoort u een lange pieptoon en gaat de rode Led bezet branden. • Badge résident Nouveau badge résident Pour accéder à la programmation d’un badge “RÉSIDENT”, il est nécessaire de disposer d’un badge master de gestion installation. Le poste externe signale l’acceptation ou l’élimination du badge par des signaux sonores et visuels et par l’allumage des leds présents sur le poste externe. La présentation d’un badge non reconnu ou une erreur de programmation provoque l’interruption de la programmation, l’émission d’un bip prolongé et l’allumage du LED rouge occupé. • Crachá residente Novo crachá residente Para ter acesso à programação de um crachá “RESIDENTE” é necessário estar em posse de um crachá gestor da instalação. A unidade externa sinalizará que interveio a aceitação ou o cancelamento do crachá com sinais acústicos e visuais dos leds presentes na unidade externa. A apresentação de um crachá não reconhecido ou um erro de programação, comporta a interrupção da programação, a sinalização por meio de um beep longo e o acendimento do LED vermelho de ocupado. • Bewohner-Badge Neuer Bewohner-Badge Um die Programmierung eines Badges „BEWOHNER“ abrufen zu können, ist das Badge des Anlagenbetreibers erforderlich. Die Türstation meldet die erfolgte Annahme oder Löschung des Badges durch akustische und visuelle LedSignale, die an derselben vorgesehen sind. Wenn ein Badge nicht erkannt wird oder ein Fehler bei der Programmierung aufgetreten ist, wird letztere unterbrochen und ein langer Piepton erzeugt sowie die rote LED (belegt) eingeschaltet. • بطاقة الساكن بطاقة ساكن جديدة من الضروري امتالك بطاقة المسؤول،”للوصول إلى برمجة بطاقة “ساكن .عن المنظومة ستوضح الوحدة الخارجية إتمام قبول أو حذف البطاقة من خالل إشارات .صوتية ومرئية للمؤشرات الضوئية الموجودة بالوحدة الخارجية وجود بطاقة غير معروفة أو خطأ في البرمجة يؤدي إلى قطع البرمجة واإلخطار من خالل إشارة صوتية طويلة "بيب" وإضاءة المؤشر الضوئي .األحمر المشغول 30 Video Kit 1 beep lungo 1 extended beep 1 bip prolongé 1 langer Piepton 1 bip largo 1 lange pieptoon 1 beep longo إشارة صوتية واحدة طويلة • Se la memorizzazione non va a buon fine, lampeggia il LED rosso occupato e il dispositivo emette un beep lungo. • If the saving operation fails, the red busy LED flashes and the device emits a long beep. • Si la mémorisation échoue, le LED rouge occupé clignote et le dispositif émet un bip long. • Wenn das Speichern nicht erfolgreich beendet worden ist, blinkt die rote LED für belegt und die Vorrichtung erzeugt einen langen Piepton. • Si la memorización no se realiza, el LED rojo ocupado parpadeará y el dispositivo emite un bip largo. • Als de badge niet opgeslagen kan worden, gaat de rode LED systeem bezet knipperen en hoort een lange pieptoon. • Se a memorização não for bem sucedida, o LED vermelho ocupado lampeja e o dispositivo emite um beep longo. . ويُصدر الجهاز إشارة صوتية مطوَّلة، يومض المؤشر الضوئي األحمر المشغول،• إذا لم يتم الحفظ بنجاح 33 • Reset Nel caso si avesse la necessità di cancellare tutti i badge (gestore impianto e residenti) precedentemente memorizzati è possibile resettare il posto esterno. • Reset In order to cancel all the previously saved badges (system manager and residents) the entrance panel can be reset. • Réinitialisation Dans le cas où il serait nécessaire d’éliminer tous les badges (master de gestion installation et résidents) précédemment mémorisés, il est possible de réinitialiser le poste externe. • Reset Falls alle zuvor gespeicherten Badges (Anlagenbetreiber und Bewohner) gelöscht werden sollen, kann die Türstation zurückgestellt werden. • Reset En caso de que fuera necesario cancelar todas las credenciales memorizadas(administrador del sistema y residentes), es posible restablecer la placa exterior. • Reset U kunt alle badges (installatiebeheerder en inwonerbadges) uit het geheugen wissen door het externe punt te resetten. • Rearme No caso que houvesse a necessidade de cancelar todos os crachás (gestor da instalação e residentes), memorizados anteriormente, será possível fazer o rearme (reset) da unidade externa. • إعادة الضبط في حالة ضرورة حذف جميع البطاقات (المسؤول عن المنظومة الممكن إعادة ضبط الوحدة ُ من،والسكان) التي سبق حفظها .الخارجية OFF ON • Togliere il BUS; tenendo premuto il pulsante di programmazione, ridare alimentazione. Mantenere premuto il pulsante di programmazione fino all’accensione alternata dei LED serratura e connessione + beep lungo. • Remove the BUS; press and hold down the programming pushbutton, reconnect the power supply. Press and hold down the programming pushbutton until the door lock and the connection LEDs start flashing in succession; a long beep is also heard. • Retirer le BUS ; rétablir l’alimentation en maintenant enfoncée la touche de programmation. Maintenir enfoncée la touche de programmation jusqu’à ce que les LEDs serrure et connexion clignotent alternativement + bip long. • Den BUS abtrennen, die Programmierungstaste gedrückt halten und wieder Strom geben. Die Programmierungstaste gedrückt halten, bis die LEDs des Schlosses und der Verbindung abwechselnd aufleuchten und ein langes Bestätigungssignal ertönt. • Desconecte el BUS, mantenga apretado el pulsador de programación y vuelva a conectar la alimentación. Mantenga apretado el pulsador de programaciónhasta el encendido alternado de los LEDS cerradura y conexión + bip largo. • Verwijder de BUS, houd de programmeringsknop ingedrukt en heractiveer de voeding. Houd de programmeringsknop ingedrukt tot de led slot en de LED verbinding gaan knipperen en u een lange pieptoon hoort. • Remova o BUS; mantendo carregado o botão de programação, volte a ligar a alimentação. Mantenha carregado o botão de programação até o acendimento alternado dos LED da fechadura e da conexão + beep longo. استمر في الضغط على زر البرمجة حتى تتم اإلضاءة. وأعد توصيل مصدر التغذية، واستمر في الضغط على زر البرمجة،BUS • أزل مصدر التغذية . وإصدار إشارة صوتية مطوَّلة،المتبادلة للمؤشرات الضوئية الخاصة بالقفل واالتصال 36 MOD=9 –+ 1 23 P+1 4 –+ 1 23 4 P+3 1 23 P+3 3 Video Kit P+2 P+1 4 P+3 MOD=9 2 346210 P+1 P+1 MOD=5 P+2 P+2 MOD=9 –+ 1 3 2 1 P+3 MOD=9 1 2 3 2 1 3 2 1 1 2 3 3 346210 346210 P+1 P+1 MOD=5 P+2 P+2 MOD=5 P 2 P+1 3 2 1 1 P+3 P+2 3 346210 3 2 1 2 3 1 346210 P+1 P+1 MOD=9 Attivazione del PE (configurato P+2 senza la con P+1) in modo diretto P+2 MOD=9 chiamata oppure attivazione attuatore 346200/346210 (configurato con P+1 e MOD= 9). –+ –+ 1 1 23 23 4 4 P+3 PEP +3(configured MOD=9 with P+1) Activating the directly without the call or activating actuator 346200/346210 (configured with P+1 and MOD= 9). Activation du PE (configuré avec P+1) en mode direct sans l’appel ou activation actionneur 346200/346210 P+1 P+1 (configuré avec P+1 et MOD= 9). MOD=5 3 2 1 1 2 3 346210 Door lock opening of EP (configured with P+1) directly without the call or activating the actuator 346200/346210 P+3 (configured with P+1 and MOD= 5) or activating the actuator 346230 (configured with P+1). Door lock opening of EP (configured with P+2) directly without the call or activating the actuator 346200 P+4 (configured with P+2 and MOD= 5) or activating the actuator 346230 (configured with P+2). Door lock opening of EP (configured with P+3) directly without the call or activating the actuator 346200/346210 (configured with P+3 and MOD= 5) or activating the actuator 346230 (configured with P+3). P+3 Ouverture serrure du PEP+3 (configuré avec P+1) en modeMOD=5 direct sans l’appel ou activation actionneur 346200/346210 (configuré avec P+1 et MOD= 5) ou activation actionneur 346230 (configuré P+4 avec P+1). Ouverture serrure du PE (configuré avec MOD=5 P+2) en mode direct sans l’appel ou activation actionneur 346200 (configuré avec P+2 et MOD= 5) ou activation actionneur 346230 (configuré avec P+2). Ouverture serrure du PE (configuré avec P+3) en mode direct sans l’appel ou activation actionneur 346200/346210 (configuré avec P+3 et MOD= 5) ou activation actionneur 346230 (configuré avec P+3). Türöffnung der Türstation (mit P+2 konfiguriert) oder Aktivierung über den Aktivator 346200/346210 (mit P+2 und MOD= 5) oder Aktivierung über den Aktivator 346230 (mit P+2 konfiguriert). Türöffnung der Türstation (mit P+3 konfiguriert) oder Aktivierung über den Aktivator 346200/346210 (mit P+3 und MOD= 5) oder Aktivierung über den Aktivator 346230 (mit P+3 konfiguriert). Apertura cerradura del PE (configurado con P +1) en modo directo sin llamada o activación del actuador 346200/346210 (configurado con P+1 y MOD= 5) o activación del actuador 346230 (configurado con P+1). Apertura cerradura del PE (configurado con P+2) en modo directo sin llamada o activación del actuador 346200/346210 (configurado con P+2 y MOD= 5) o activación del actuador 346230 (configurado con P+2). Apertura cerradura del PE (configurado con P+3) en modo directo sin llamada o activación del actuador 346200/346210 (configurado con P+3 y MOD= 5) o activación del actuador 346230 (configurado con P+3). Rechtstreekse opening van het deurslot van het als P+1 geconfigureerde deurstation, zonder oproep of activering van het toestel 346200/346210 (geconfigureerd als P+1 en MOD= 5) of activering van het toestel 346230 (geconfigureerd als P+1). Rechtstreekse opening van het deurslot van het als P+2 geconfigureerde deurstation, zonder oproep of activering van het toestel 346200/346210 (geconfigureerd als P+2 en MOD= 5) of activering van het toestel 346230 (geconfigureerd als P+2). Rechtstreekse opening van het deurslot van het als P+3 geconfigureerde deurstation, zonder oproep of activering van het toestel 346200/346210 (geconfigureerd als P+3 en MOD= 5) of activering van het toestel 346230 (geconfigureerd als P+3). Abertura da fechadura da UE (configurada com P+1) de maneira directa sem a chamada ou então ligação do actuador 346200/346210 (configurado com P+1 e MOD=5) ou então ligação do actuador 346230 (configurado com P+1). Abertura da fechadura da UE (configurada com P+2) de maneira directa sem a chamada ou então ligação do actuador 346200/346210 (configurado com P+2 e MOD=5) ou então ligação do actuador 346230 (configurado com P+2). Abertura da fechadura da UE (configurada com P+3) de maneira directa sem a chamada ou então ligação do actuador 346200/346210 (configurado com P+3 e MOD=5) ou então ligação do actuador 346230 (configurado com P+3). 3 2 1 1 2 3 346210 P+2 MOD=5 3 2 1 1 2 3 346210 3 2 1 1 2 3 346210 P+3 P+3 MOD=5 Rechtstreekse activering van het deurstation (als P+1 geconfigureerd) zonder oproep of P+4 activering van het toestel 346200/346210 (geconfigureerd als P+1 en MOD = 9). 3 2 1 1 2 3 346210 P+4 P+4 MOD=5 Ligação da UE (configurada com P+1) de maneira directa sem a cha mada ou então ligação do actuador 346200/346210 (configurado com P+1 e MOD=9). 2 3 P+3 P+3 MOD=5 3 2 1 1 2 3 346210 P+4 P+4 3 2 1 1 2 3 346210 MOD=5 3 3 Activación del PE P+3 (configurado con P+1) en modo directo sin llamada o activación del actuador 346200/346210 (configurado con P+1 y MOD= 9). 3 2 1 1 346210 3 2 2 346210 3 2 2 P+3 P+3 MOD=5 Apertura serratura del PE (configurato con P+3) in modoP+4 diretto senza la chiamata oppure attivazione attuatore 346200/346210 (configurato con P+3 e MOD=5) oppure attivazione attuatore 346230 (configurato con P+3). P+4 P+4 1 1 346210 P+2 P+2 MOD=5 Apertura serratura del PE (configurato con P+2) in modoP+3 diretto senza la chiamata oppure attivazione attuatore 346200/346210 (configurato con P+2 e MOD=5) oppure attivazione attuatore 346230 (configurato con P+2). 1 1 3 3 Apertura serratura del PE (configurato con P+1) in modoP+2 diretto senza la chiamata oppure attivazione attuatore 346200/346210 (configurato con P+1 e MOD= 5) oppure attivazione attuatore 346230 (configurato con P+1). P+2 Türöffnung der Türstation (mit P+1 Aktivierung der Türstation (mit P+1 konfiguriert) oder Aktivierung über P+4 P+4 konfiguriert) auf direkte Weise ohne den Aktivator 346200/346210 (mit MOD=5 Ruf oder Aktivierung über den Aktivator P+1 und MOD= 5) oder Aktivierung 346200/346210 (mit P+1 P+2 P+2und MOD= 9). über den Aktivator 346230 (mit P+1 konfiguriert). MOD=5 P+2 2 3 346210 P+1 P+1 MOD=5 346210 P+1 2 2 1 3 2 1 1 1 فتح قفل الوحدة الخارجية (التي تم فتح قفل الوحدة الخارجية (التي تم فتح قفل الوحدة الخارجية (التي تم تنشيط الوحدة الخارجية (التي تم ) بشكل ُمباشر بدونP+1إعدادها بـ ) بشكل ُمباشر بدونP+2إعدادها بـ ) بشكل ُمباشر بدونP+3إعدادها بـ ) بشكل ُمباشر دونP+1 إعدادهابـ/ 346200 المشغِّل ُ المكالمة أو تنشيط/ 346200 المشغِّل ُ المكالمة أو تنشيط/ 346200 المشغِّل ُ المكالمة أو تنشيط 346200 المشغِّل ُ المكالمة أو تنشيطMOD = وP+1إعداده بـ تم (الذي 346210 MOD =و P+2بـ إعداده تم (الذي 346210 MOD P+3 (الذي تم إعداده بـ346210 وP+1 (الذي تم إعداده بـ346210 / (الذي تم346230 ) أو تنشيط المشغِّل5 (الذي تم346230 ) أو تنشيط المشغِّل5 و=(الذي تم346230 المشغِّل ُ ُ ُ ) أو تنشيط5 .)MOD=9 .)P+1إعداده بـ .)P+2إعداده بـ .)P+3إعداده بـ 41 P+2 3 2 1 1 2 3 346210 P+2 P+2 MOD=5 P+3 3 2 1 1 2 3 346210 P+3 P+3 MOD=5 P+4 3 2 1 1 2 3 346210 P+4 P+4 MOD=5 Apertura serratura del PE (configurato con P+4) in modo diretto senza la Intercom tra appartamenti chiamata oppure attivazione attuatore in impianti con interfaccia 346200/346210 (configurato con P+4 e MOD= 5) oppure attivazione attuatore da appartamento 346850 346230 (configurato con P+4) Intercom all’interno dell’appartamento in impianti con interfaccia di appartamento 346850; oppure intercom tra appartamenti in impianti senza interfaccia di appartamento Intercom su se stesso, Intercom generale, invia invia la chiamata a tutti una chiamata a tutti gli gli apparecchi con uguale apparecchi dell’impianto indirizzo Door lock opening of EP (configured with P+4) directly without the call or activating the actuator 346200/346210 (configured with P+4 and MOD= 5) or activating the actuator 346230 (configured with P+4) Intercommunicability between apartments in systems with apartment interface 346850 Intercommunicability inside an apartment in systems with apartment interface 346850 or intercommunicability between apartments in systems without apartment interface Intercom on itself, sends the call to all the devices with the same address General intercom, sends a call to all the system devices Ouverture serrure du PE (configuré avec P+4) en mode direct sans l’appel ou activation actionneur 346200/346210 (configuré avec P+4 et MOD= 5) ou activation actionneur 346230 (configuré avec P+4) Intercommunication entre appartements sur installations avec interface d’appartement 346850 Intercommunication à l’intérieur de l’appartement sur installations avec interface d’appartement 346850 ou intercommunication entre appartements sur installations sans interface d’appartement Intercom sur lui-même, envoie l’appel à tous les appareils ayant une adresse identique Intercom général, envoie l’appel à tous les appareils de l’installation Türöffnung der Türstation (mit P+4 konfiguriert) oder Aktivierung über den Aktivator 346200/346210 (mit P+4 und MOD= 5) oder Aktivierung über den Aktivator 346230 (mit P+4 konfiguriert) Gegenseitige Kommunikation zwischen Wohnungen für Anlagen mit Wohnungsschnittstelle 346850 Gegenseitige Kommunikation innerhalb der Wohnung für Anlagen mit Wohnungsschnittstelle 346850 oder gegenseitige Kommunikation zwischen Wohnungen für Anlagen ohne Wohnungsschnittstelle Intercom mit einseitiger Funktion: sendet den Ruf an alle Geräte mit derselben Adresse Intercom mit allgemeiner Funktion: sendet den Ruf an alle Geräte der Anlage Apertura cerradura del PE (configurado con P+4) en modo directo sin llamada o activación del actuador 346200/346210 (configurado con P+4 y MOD= 5) o activación del actuador 346230 (configurado con P+4) Intercomunicación entre apartamentos en instalaciones con interfaz de departamento 346850 Intercomunicación en el apartamento en instalaciones con interfaz de apartamento 346850 o intercomunicación entre apartamentos en instalaciones sin interfaz de apartamento Intercomunicación hacia los aparatos iguales, envía la llamada a todos los aparatos con igual dirección Intercomunicación general, envía una llamada a todos los aparatos de la instalación Rechtstreekse opening van het deurslot van het als P+4 geconfigureerde deurstation, zonder oproep of activering van het toestel 346200/346210 (geconfigureerd als P+4 en MOD= 5) of activering van het toestel 346230 (geconfigureerd als P+4). Intercom tussen appartementen in installaties met interface van appartement 346850 Intercom binnen in het appartement in installaties met interface van appartement 346850 ofwel intercom tussen appartementen in installaties zonder interface van appartement Intercom op zichzelf, verstuurt de oproep naar alle toestellen met hetzelfde adres Algemene Intercom, verstuurt een oproep naar alle toestellen van de installatie Abertura da fechadura da UE (configurada com P+4) de maneira directa sem a chamada ou então ligação do actuador 346200/346210 (configurado com P+4 e MOD= 5) ou então ligação do actuador 346230 (configurado com P+4) Intercom entre apartamentos em instalações com interface de apartamento 346850 Intercom dentro do apartamento em instalações com interface de apartamento 346850 ou então intercom entre apartamentos em instalações sem interface de apartamento Intercomunicador sobre si mesmo, envia a chamada a todos os aparelhos com endereço igual Intercomunicador geral, envia uma chamada a todos os aparelhos da instalação إنتركم بين الشقق في إنتركم داخل الشقة في منظومات منظومات بواجهة شقة أو إنتركم بين،346850 بواجهة شقة .346850 .شقق في منظومات بدون واجهة شقة إنتركم على ذاته يُرسل المكالمة إلى جميع األجهزة ذات العنوان .المتماثل فتح قفل الوحدة الخارجية (التي تم ) بشكل ُمباشر بدونP+4إعدادها بـ / 346200 المشغِّل ُ المكالمة أو تنشيط MOD = وP+4 (الذي تم إعداده بـ346210 (الذي تم346230 المشغِّل ُ ) أو تنشيط5 .)P+4إعداده بـ 42 إنتركم عام يُرسل المكالمة إلى جميع .أجهزة المنظومة • Attenzione: il videocitofono deve rispettare le seguenti regole installative: – deve essere installato solo in ambienti interni – non deve essere esposto a stillicidio o a spruzzi d’acqua – non ostruire le aperture di ventilazione – deve essere usato unicamente su sistemi 2 fili SCS BTicino. Ogni uso improprio dell’articolo puó comprometterne le caratteristiche di sicurezza. • Caution: the video handset must respect the following installation rules: – it must only be installed indoors – it must not be exposed to water drops or splashes – do not block the ventilation openings – it must be used only on SCS BTicino 2-wire systems An improper use of the item can compromise its safety features. • Attention: le vidéophone doit respecter les règles d’installation suivantes: – il doit être monté seulement à l’intérieur – il ne doit pas être exposé à des suintements ou à des éclaboussures – ne pas boucher les ouvertures d’aération – il doit être utilisé uniquement sur des systèmes 2 fils SCS BTicino. Tout usage impropre de la référence peut compromettre les caractéristiques de sécurité. • Achtung: die Videogegensprechanlage muss nach folgenden Regeln installiert werden: – sie darf nur im Inneren installiert werden – sie darf nicht Tropfen oder Spritzer ausgesetzt werden – die Belüftungsschlitze dürfen nicht abgedeckt werden – es darf nur eine 2-Draht SCS-System von BTicino verwendet werden. Ein ungeeigneter Gebrauch der Vorrichtung kann die Sicherheitseigenschaften beeinträchtigen. • Atención: el videoportero ha de respetar las siguientes reglas de instalación: – se ha de instalar solamente en ambientes internos – no se ha de exponer a goteos o a chorros de agua – no se han de tapar las aperturas de ventilación – se ha de usar únicamente en sistemas de 2 hilos SCS BTicino. Un uso impropio del artículo puede comprometer sus características de seguridad. • Opgelet: voor de beeldhuistelefoon gelden de volgende installatievoorschriften: – uitsluitend binnen geïnstalleerd – niet blootgesteld aan druppelend of spattend water – de ventilatie-openingen worden niet afgesloten – mag uitsluitend worden gebruikt in SCS 2-draads systemen van BTicino. Door oneigenlijk gebruik van het artikel kan de veiligheid worden beïnvloed. • Atenção: o intercomunicador vídeo deve respeitar as seguintes regras de instalação: – deve ser instalado exclusivamente em ambientes internos – não deve ficar exposto a gotejamentos ou a salpicos de água – não obstruir as aberturas de ventilação – deve ser utilizado exclusivamente em sistemas SCS BTicino de 2 fios. Qualquer uso impróprio do artigo pode comprometer as suas características de segurança. : يجب أن تكون وحدة البواب اآللي المزودة بفيديو مطابقة لقواعد التثبيت التالية:• تنبيه . يجب أن يتم تركيبها فقط في الداخل. يجب أال يتم تعريضها إلى قطرات أو رذاذ المياه. ال تقم بسد فتحات التهوية.BTicino“ ” مزدوجة األسالك منSCS“ يجب أن تستخدم فقط أنظمة توصيل سلكي ُمبسط.أي استخدام غير صحيح للعنصر يُمكن أن يؤثر سل ًبا على مواصفات السالمة الخاصة به 48-
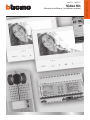 1
1
-
 2
2
-
 3
3
-
 4
4
-
 5
5
-
 6
6
-
 7
7
-
 8
8
-
 9
9
-
 10
10
-
 11
11
-
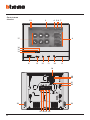 12
12
-
 13
13
-
 14
14
-
 15
15
-
 16
16
-
 17
17
-
 18
18
-
 19
19
-
 20
20
-
 21
21
-
 22
22
-
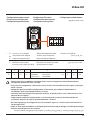 23
23
-
 24
24
-
 25
25
-
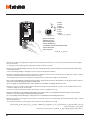 26
26
-
 27
27
-
 28
28
-
 29
29
-
 30
30
-
 31
31
-
 32
32
-
 33
33
-
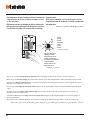 34
34
-
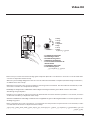 35
35
-
 36
36
-
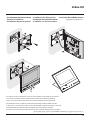 37
37
-
 38
38
-
 39
39
-
 40
40
-
 41
41
-
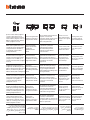 42
42
-
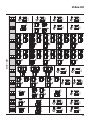 43
43
-
 44
44
-
 45
45
-
 46
46
-
 47
47
-
 48
48
-
 49
49
-
 50
50
-
 51
51
-
 52
52


Bticino 365711 Handleiding
- Type
- Handleiding
- Deze handleiding is ook geschikt voor
in andere talen
- English: Bticino 365711 Operating instructions
- italiano: Bticino 365711 Istruzioni per l'uso
- français: Bticino 365711 Mode d'emploi
- español: Bticino 365711 Instrucciones de operación
- Deutsch: Bticino 365711 Bedienungsanleitung
- português: Bticino 365711 Instruções de operação