Pagina wordt geladen...
Pagina wordt geladen...
Pagina wordt geladen...
Pagina wordt geladen...
Pagina wordt geladen...
Pagina wordt geladen...
Pagina wordt geladen...
Pagina wordt geladen...

Video Kit
9
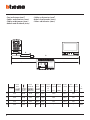
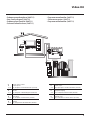
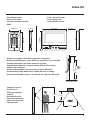
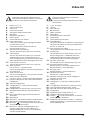
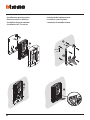
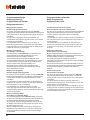
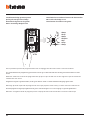
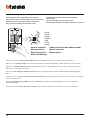
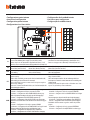
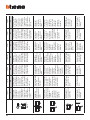
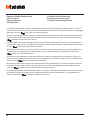
• Altezza consigliata salvo diversa normativa vigente.
• Recommended height, unless different regulations are specified.
• Hauteur conseillée sauf autre norme en vigueur.
• Empfohlene Höhe falls die gesetzlichen Vorschriften nichts
anderes vorschreiben.
• Altura recomendada salvo normativa vigente diferente.
• Aanbevolen hoogte behoudens andere normen in voege.
• Altura aconselhada a não ser se a norma em vigor for diferente.
160 – 165 cm
135–140 cm
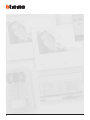
• Dati dimensionali
• Dimensional data
• Données dimensionnelles
• Maße
• Datos dimensionales
• Formaatgegevens
• Dados dimensionais
35 mm
106 mm
185 mm
194 mm
162 mm
25 mm
115 cm
50 cm
240 cm
• Campo di ripresa
• Field of view
• Éclairage cadrage
caméra
• Aufnahmebereich
• Campo de filmación
• Campo de filmagem
• Opnameveld

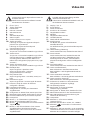
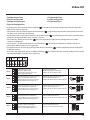
10
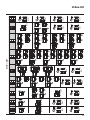
1 - Activação/desactivação do sinal de confir-
mação da abertura da fechadura.
2 - Regulação do volume
(*veja as próxima
página).
3 - Indicadores luminosos verde: indicação de
porta aberta.
4 - Indicadores luminosos verde: comunicação
activa.
5 - Indicador luminoso lampejante Verde:
chamada enviada; Indicador luminoso lam-
pejante Vermelho: sistema cupado.
6 - Alojamento configurador.
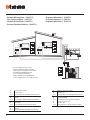
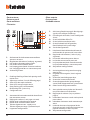
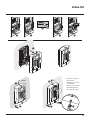
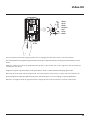
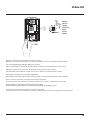
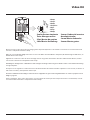
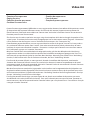
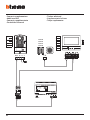
• Posto esterno
• Entrance panel
• Poste extérieur
• Türstation
• Placa exterior
• Externe plaats
• Unidade externa
1 -
Habilitación/deshabilitación del tono de
confirmación de apertura de la cerradura.
2 - Regulación del volumen (*véase la pág.
siguiente).
3 - Led verde: indicación puerta abierta.
4 - Led verde: comunicación activada.
5 - Led parpadenate Verde: llamada enviada;
Led parpadenate Rojo: sistema ocupado.
6 - Alojamiento configuradores.
1 - Enabling/disabling of door lock opening confir-
mation tone.
2 - Adjustment volume (*see the following page).
3 - Green LED: door open indication.
4 - Green LED: communication active.
5 - Green flashing LED; call forwarded;
Red flashing LED: system busy.
6 - Configurator seat.
1 - Abilitazione/disabilitazione tono conferma
apertura serratura.
2 - Regolazione del volume (*vedi pag. seguente).
3 - Led verde: indicazione porta aperta.
4 - Led verde: comunicazione attiva.
5 - Led lampeggiante Verde: chiamata inoltrata;
Led lampeggiante Rosso: sistema occupato.
6 - Sede configuratori.
1 - Aktivierung/Deaktivierung des Bestätigungs-
signals nach erfolgter Türöffnung.
2 -
Einstellung der Lautstärke (*siehe nachfolgende
Seiten).
3 - Grüne Led: Meldet offene Tür.
4 - Grüne Led: Kommunikation aktiv.
5 - Grüne blinkende Led: Ruf gesendet;
Rote blinkende Led: System belegt.
6 - Sitz der Konfiguratoren.
1 - Activation/désactivation tonalité de confirma-
tion ouverture serrure.
2 - Réglage du volume (* voir page suivante).
3 - Diode verte: indication porte ouverte.
4 - Diode verte: communication active.
5 - Témoin clignotant vert - appel passé;
Témoin clignotant rouge: système occupé.
6 - Logement configurateurs.
1 - Activering/desactivering toon bevestiging
opening slot.
2 - De geluidssterkte regelen
(*zie de volgende
pagina’s).
3 - Groene led: aanduiding open deur.
4 - Groene led: communicatie actief.
5 - Groene knipperende led: oproep doorge-
stuurd; Rode knipperende led: systeem bezet.
6 - Plaats van de configuratiemodules.
ON OFF
3
4
5
1
6
2

Video Kit
11
(*)
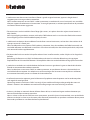
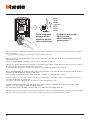
• Se si manifestasse il disturbo del fischio, (effetto Larsen), ridurre prima la potenza del microfono
, agen-
do con un cacciavite sul potenziometro corrispondente, fino ad un livello accettabile. Qualora il fenomeno
persista, agire sul potenziometro dell’altoparlante in modo da eliminare l’inconveniente. Se il volume è
troppo basso, aumentare prima il volume dell’altoparlante ed eventualmente anche quello del microfono,
tenendo presente che è preferibile una trasmissione chiara e priva di disturbi, che una al limite dell’innesco
(Larsen).
• In case of a whistle (Larsen effect), first reduce the microphones power, adjusting the corresponding
potentiometers with a screw driver, until an acceptable level is reached. Should the whistle persist, adjust the
loudspeakers volume in order to eliminate the trouble. If the volume is too low level then, increase first the
potentiometer of the loudspeaker and secondly the one for the microphone, bearing in mind that a clear and
noise free reception is preferable than one just before whistling (Larsen).
• Lors de sifflement (effet de Larsen), reduire d’abord la puissance du micro
sur le potentiomètre corres-
pondant, à l’aide d’un tournevis, jusqu’à l’obtention d’un niveau satisfaisant. Si le sifflement persiste, régler
le potentiomètre du hautparleur jusqu’à l’élimination de celui-ci. Si le volume est trop bas, augmenter
d’abord la puissance du haut-parleur et éventuellement celle du micro, en considérant qu’une réception
claire et sans parasite est préférable à une communication à la limite de l’accrochage (effet de Larsen).
• Beim etwaigen Auftreten eines Pfeiftones (Larsen-Effekt), zuerst die Lautstärke des Mikrophones
bis auf einen
annehmbaren Wert herabsetzen, indem man das entsprechende Potentiometer mit einem Schraubendreher
einstellt. Sollte die Störung weiterhin bestehen, dann das Potentiometer des Lautsprechers bis zur Beseitigung
des Pfeiftones einstellen. Ist die Lautstärke nun zu niedrig, dann zuerst die des Lautsprechers und erst danach
evtl. auch die des Mikrophones erhohen, wobei ein deutlicher und störungsfreier Empfang einem an der
Störungsgrenze liegendem (Larsen-Effekt) vorzuziehen ist.
• Si se manifesta el silbido de acoplamiento, (efecto Larsen), reducir primero la potencia del micrófono
, girando con un destornillador el potenciómetro correspondiente, hasta obtener un nivel aceptable. Si el
fenómeno persistiera, regular el potenciómetro del altavoz hasta eliminar la interferencia. Si el volumen
es demasiado bajo, aumentar primero el volumen del altavoz y eventualmente también el del micrófono,
teniendo en cuenta que es preferible una transmissión clara y limpia de interferencias, que una al limite del
acoplo (Larsen).
• Als er een fluittoon hoorbaar is (effect van Larsen): verminder eerst het vermogen van de microfoon
met behulp van een schroevendraaier zijn stroomregelaar zo te regelen dat de geluidssterkte van het gefluit
aanvaardbaar is. Als het verschijnsel niet verdwijnt, dan moet u ook de stroomregelaar van de luidspreker
bijstellen. Als de geluidssterkte nu te klein is, verhoog dan eerst de geluidssterkte van de luidspreker en daarna
eventueel ook die van de microfoon, en denk er bij het bijstellen aan dat een duidelijk hoorbaar en ongestoord
geluid beter is dan een harder geluid op de grens van het Larsen effect.
• Se se manifestar uma interferência no som (efeito de Larsen), começar por diminuir a potência do microfone
, rodando o potenciómetro correspondente com uma chave de parafusos, até obter um nível aceitável.
Se o fenómeno persistir, regular o potenciómetro do altifalante de modo a eliminar o problema. Se o
volume estiver demasiado baixo, começar por aumentar o volume do altifalante e depois, se necessário,
o do microfone, tendo presente que é melhor ter uma transmissão clara e sem interferências, que uma no
limiar de início de efeitos Larsen.

12
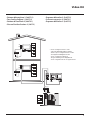
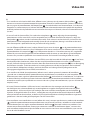
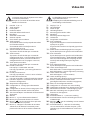
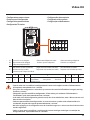
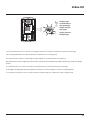
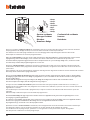
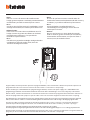
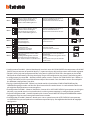
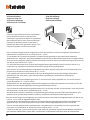
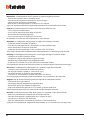
• Posto interno
• Handset
18
21
22
2323
19
20
24252627
1 2 3 4 5 7 6
16
15
14
17
91011
12
139
8
Pagina wordt geladen...
Pagina wordt geladen...
Pagina wordt geladen...
Pagina wordt geladen...

Video Kit
17
La imagen representa el dispositivo con todas
las funciones habilitadas.
Busque en el manual del instalador cómo
habilitar las funciones.
De afbeelding toont het apparaat met
ingeschakelde functies.
Raadpleeg de installatiehandleiding voor de
inschakeling van de functies.
1 - Pantalla 7” (16 : 9)
2 - Tecla apagado
3 - Fecha y hora
4 - Exclusión timbre
5 - Activación Oficina Profesional
6 - Micrófono
7 - Activación Contestador
8 - Acciones rápidas
9 - Guías táctiles para invidentes
10 - Tecla conexión:
el encendido del led verde parpadeante indica
una llamada entrante
el encendido del led verde fijo indica la
comunicación en curso
11 - Autoencendido/Visualización cíclica:
al presionar la tecla el LED rojo se enciende
12 - Tecla Favoritos:
al presionar la tecla el LED rojo se enciende
(Configuración base = LUZ ESCALERAS. Para una
configuración distinta, consulte la tabla de la
configuración física en las páginas sucesivas.)
13 - Tecla apertura cerradura:
al presionar la tecla el LED rojo se enciende
14 - Estado Contestador:
Led rojo fijo = contestador activado
Led rojo parpadeante = presencia grabación/es
no vista/s
15 - Estado presencia notas:
Led rojo parpadeante = nueva/s notas no leída/s
16 - Estado Exclusión llamada:
Led rojo encendido = Timbre llamada desactivado
17 - Funciones (aparecen solamente los iconos de las
funciones configuradas)
18 - Alojamiento configuradores
19 - Configurador J1: extraiga para alimentación
adicional
20 - Configurador J2: Master/Slave, extraiga para Slave
21 - Microinterruptor ON/OFF terminal de tramo
22 - Toma mini USB para actualización del firmware del
dispositivo
23 - Altavoz
24 - Bornes (1 - 2) para alimentación adicional
25 - Bornes para la conexión al BUS SCS 2 HILOS
26 - Bornes ( ) para la conexión de un pulsador
externo de llamada a la planta
27 - Bornes (1 - 5M) para la conexión de un timbre
adicional. Ha de efectuar la conexión punto -
punto en los bornes de los timbres adicionales
1 -
Display 7” (16 : 9)
2 -
Uitschakeltoets
3 -
Datum en tijd
4 -
Uitsluiting beltoon
5 -
Activering professionele studio
6 -
Microfoon
7 -
Activering antwoordapparaat
8 -
Sneltoetsen
9 -
Tastgeleiders voor blinden
10 -
Toets verbinding:
de groene led knippert om een binnenkomende
oproep aan te geven
de groene led brandt om een lopend gesprek aan
te geven
11 -
Automatische inschakeling/cyclische weergave:
bij een druk op de toets gaat de rode led branden
12 -
Toets Favorieten:
bij een druk op de toets gaat de rode led branden
(Standaardconfiguratie = TRAPHUISVERLICHTING.
Voor een andere configuratie raadpleeg de tabel
met de fysieke configuratie op de volgende
pagina’s.)
13 -
Toets slotontgrendeling:
bij een druk op de toets gaat de rode led branden
14 -
Status antwoordapparaat:
Rode led brandt = antwoordapparaat geactiveerd
Rode led knippert = nieuwe registratie(s) aanwezig
15 -
Status notities aanwezig:
Rode led knippert = nieuwe notitie(s)
16 -
Status uitsluiting oproep:
Rode led brandt = Beltoon oproep gedeactiveerd
17 -
Functies (uitsluitend de iconen van de
geconfigureerde functies worden weergegeven)
18 -
Plaats van de configuratiemodules
19 -
Configurator J1: uitnemen voor extra voeding
20 -
Configurator J2: Master/Slave, uitnemen voor Slave
21 -
Microschakelaar ON/OFF van beëindiging traject
22 -
Mini-UBS-aansluiting voor de update van de
firmware van het apparaat
23 -
Luidspreker
24 -
Aansluitklemmen (1 - 2) voor extra voeding
25 -
Aansluitklemmen voor de verbinding met de SCS
2-DRAADS BUS
26 -
Morsetti ( ) voor de verbinding van een externe
knop op de etage
27 -
Aansluitklemmen (1 - 5M) voor de verbinding
van een extra beltoon. Verricht een punt - punt
verbinding op de aansluitklemmen van de extra
beltonen
Pagina wordt geladen...
Pagina wordt geladen...
Pagina wordt geladen...
Pagina wordt geladen...

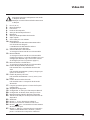
22
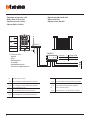
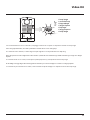
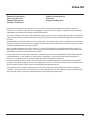
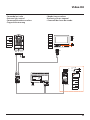
• La telecamera non deve essere installata di fronte a grandi sorgenti luminose, oppure in luoghi dove il
soggetto ripreso rimanga molto in controluce.
Nota: Le telecamere con sensore CMOS a colori presentano, in condizioni di scarsa luminosità, una sensibilità
inferiore rispetto alle telecamere in bianco/nero. Si consiglia pertanto, in ambienti poco illuminati di prevedere
una fonte di illuminazione aggiuntiva.
• The camera must not be installed in front of large light sources, or in places where the subject viewed remains in
deep shadow.
Note: in poor lighting conditions cameras with colour CMOS detector are less sensitive than black/white cameras.
An extra lighting source should be added in poorly lit rooms.
• La télécaméra ne doit pas être installée en face de fortes sources lumineuses, ou bien dans des endroits où le
sujet pris reste très à contre-jour.
Nota: les télécaméras avec capteur CMOS couleurs présentent, dans des conditions de faible luminosité, une
sensibilité inférieure aux télécaméras noir/blanc. Il est donc conseillé, dans des milieux peu éclairés, de prévoir
une source de lumière supplémentaire.
• Die Kamera darf nicht vor starken Lichtquellen oder an Orten installiert werden, wo das Subjekt sich im Gegenlicht
befindet.
Bemerkung: Farbkameras mit CMOS-Aufnahmeelement besitzen bei schlechter Beleuchtung eine geringere
Empfindlichkeit als Schwarz/Weiß Kameras. Wir empfehlen daher eine zusätzliche Beleuchtungsquelle vorzusehen.
• La telecámara no debe ser instalada delante de fuentes luminosas grande en lugares en donde el individuo
filmado se encuentre demasiado en contraluz.
Nota: las telecámaras con sensor CMOS en colores presentan, en condiciones de escasa luminosidad, una
sensibilidad inferior respecto a las telecámaras en blanco/negro. Por lo tanto es aconsejable en ambientes
escasamente iluminados prever una fuente de iluminación extra.
• Installeer de camera niet tegenover grote lichtbronnen of op plaatsen waar de opname van het onderwerp door
sterk tegenlicht wordt gestoord.
Opmerking: camera’s met kleuren-CMOS-sensor zijn bij een zwakke verlichting minder gevoelig dan zwart-wit
camera’s. Daarom is het raadzaam om zwak verlichte omgevingen van extra verlichting te voorzien.
• A câmara não deve ser montada diante de fortes fontes de luz, ou então em lugares onde o elemento que
deve ser filmado fique muito em contraluz.
Nota: as câmaras com sensor CMOS em cores apresentam, quando há pouca luminosidade, uma sensibilidade
inferior em relação às câmaras em branco e preto. Portanto, recomenda-se, quando os ambientes forem pouco
iluminados providenciar uma fonte de iluminação adicional.
Pagina wordt geladen...
Pagina wordt geladen...
Pagina wordt geladen...
Pagina wordt geladen...
Pagina wordt geladen...

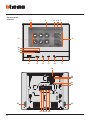
28
Cancellazione badge gestore impianto
Deleting the manager master badge
Élimination badge master de gestion
Master-Verwaltungs-Badge löschen
Cancelación de una credencial maestra de administrador
Master beheerder badge wissen
Cancelamento de crachá master gestor
1 beep
1 beep
1 beep
1 Piepton
1 bip
1 beep
1 beep
Tenere premuto il pulsante di programmazione fino al lampeggio del LED verde serratura e tono di conferma.
Press and hold down the programming pushbutton until the green door lock LED starts flashing, and a confirmation sound is
heard.
Maintenir enfoncée la touche de programmation jusqu’à ce que le LED vert serrure clignote et que la tonalité de
confirmation soit émise.
Programmierungstaste gedrückt halten, bis die grüne LED des Schlosses blinkt und das Bestätigungssignal ertönt.
Mantenga apretado el pulsador de programación hasta que parpadea el LED verde y se emite el tono de confirmación.
Houd de programmeringsknop ingedrukt tot de groene LED slot knippert en u ter bevestiging een geluidssignaal hoort.
Mantenha carregado o botão de programação até o lampejo do LED verde da fechadura e o tom de confirmação.
≥ 5s
Pagina wordt geladen...
Pagina wordt geladen...
Pagina wordt geladen...
Pagina wordt geladen...
Pagina wordt geladen...

34
Cancellazione di tutti i badge residenti in memoria
Cancellation of all the residents badges saved in the memory
Effacement de tous les badges résidents mémorisés
Alle gespeicherten Badges der Bewohner löschen
Cancelación de todas las credenciales residentes
memorizadas
Alle inwonerbadges uit het geheugen wissen
Cancelamento de todos os crachás residentes na memória
1 beep
1 beep
1 beep
1 Piepton
1 bip
1 beep
1 beep
Avvicinare al lettore il badge gestore impianto fino al lampeggio del LED verde serratura e tono di conferma.
Move the system manager badge close to the reader until the green door lock LED flashes, and a confirmation sound is heard.
Approcher le Badge administrateur installation du lecteur et attendre que le LED vert serrure clignote et qu’une
tonalité de confirmation soit émise.
Dem Lesegerät das Badge des Anlagenbetreibers nähern, bis die grüne LED des Schlosses blinkt und das Bestätigungssignal
ertönt.
Acerque al lector la credencial del administrador del sistema hasta que parpadea el LED verde de la cerradura y se produzca
el tono de confirmación.
Houd de installatiebeheerder badge voor het leesapparaat tot de groene LED slot gaat knipperen en u ter bevestiging een
geluidssignaal hoort.
Aproxime ao leitor o Crachá gestor da instalação até o lampejo do LED verde da fechadura e o tom de confirmação.
Gestore impianto
Manager master
Master de gestion
Master Verwaltung
Credencial maestra de administrador
Master beheerder
Master gestor

Video Kit
35
2 beep
2 beeps
2 beep
2 Pieptöne
2 bips
2 beep
2 beep
2 volte Gestore impianto
Twice Manager master
2 fois Master de gestion
2 Mal Master Verwaltung
2 veces Credencial maestra
de administrador
2 maal Master beheerder
2 vezes Master gestor
Riavvicinare per 2 volte consecutive il badge gestore impianto. Quando la cancellazione è avvenuta si accende il LED verde
serratura e il dispositivo emette 2 beep.
Move the system manager badge close twice in succession. When the cancellation is completed, the door lock green LED comes, on
and the device emits 2 beeps.
Approcher à nouveau 2 fois de suite le badge master de gestion installation. Une fois l’effacement obtenu, le LED
vert serrure s’allume et le dispositif émet 2 bips.
Das Badge des Anlagetreibers 2 Mal nähern. Nach erfolgter Löschung leuchtet die grüne LED des Schlosses auf und die Vorrichtung
erzeugt 2 Pieptöne.
Acerque 2 veces seguidas la credencial maestra de administrador del sistema.Cuando se produce la cancelación, se ilumina el
LED verde cerradura y el dispositivo emite 2 bips.
Houd de installatiebeheerder badge 2 maal voor het leesapparaat. De groene LED slot gaat branden en u hoort 2 pieptonen als de
badges zijn gewist.
Voltar a aproximar, por 2 vezes consecutivas, o crachá gestor da instalação. Uma vez que interveio o cancelamento, acende-
se o LED verde da fechadura e o dispositivo emite 2 beep.
Pagina wordt geladen...
Pagina wordt geladen...
Pagina wordt geladen...
Pagina wordt geladen...
Pagina wordt geladen...

Video Kit
41
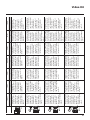
Legenda Legend Légende Erläuterung Leyenda Legende Legenda
IT EN FR DE ES NL PT
P
+1
MOD=9
P
+1
P
+2
MOD=9
P
+2
P
P
+1
MOD=5
P
+1
P
+1
2
3
1 32
346210
1
P
+2
MOD=5
P
+2
P
+2
2
3
1 32
346210
1
P
+3
MOD=5
P
+3
P
+3
2
3
1 32
346210
1
P
+4
MOD=5
P
+4
P
+4
2
3
1 32
346210
1
1–+ 23 4
P
+3
MOD=9
P
+3
1–+ 23 4
2
3
1 32
346210
1
Attivazione del PE
(configurato con P+1)
in mo do di ret to sen za
la chia mata op pu re
at tivazione at tua to re
art. 346200/346210
(con fi gu rato con P+1 e
MOD=9).
Activating the EP
(configured with P+1)
directly without the call
or ac ti va ting actuator
Item 346200/346210
(con fi gured with P+1
and MOD=9).
Activation du PE (con fi-
guré avec P+1) en mode
direct sans l’appel ou
activation actionneur
réf. 346200/346210
(configuré avec P+1 et
MOD=9).
Aktivierung der Türstation
(mit P+1 konfiguriert)
auf direkte Weise ohne
Ruf oder Aktivierung
über den Aktivator art.
346200/346210 (mit P+1
und MOD=9).
Activación del PE
(configurado con P+1) en
modo directo sin lla ma da
o activación del actuador
art. 346200/346210
(configurado con P+1 y
MOD=9).
Rechtstreekse activering
van het deur station (als
P+1 ge con fi gu reerd)
zonder oproep of ac ti-
ve ring van het toestel
art. 346200/346210
(ge con fi gureerd als P+1
en MOD = 9).
Ligação da UE (con-
figurada com P+1) de
maneira directa sem
a cha ma da ou então
ligação do ac tua dor
art. 346200/346210
(configurado com P+1 e
MOD=9).
P
+1
MOD=9
P
+1
P
+2
MOD=9
P
+2
P
P
+1
MOD=5
P
+1
P
+1
2
3
1 32
346210
1
P
+2
MOD=5
P
+2
P
+2
2
3
1 32
346210
1
P
+3
MOD=5
P
+3
P
+3
2
3
1 32
346210
1
P
+4
MOD=5
P
+4
P
+4
2
3
1 32
346210
1
1–+ 23 4
1–+ 23 4
P
+3
MOD=9
P
+3
1–+ 23 4
Apertura serratura del PE
(con fi gurato con P+1)
in mo do di retto senza
la chia mata op pu re
at ti va zione attuatore
art.346200/346210
(con figurato con P+1
e MOD=5) op pu re
at ti va zione attuatore
art.346230 (con figurato
con P+1).
Door lock opening of EP
(con figured with P+1)
directly without the call
or activating the actuator
Item 346200/346210
(con figured with
P+1 and MOD=5) or
activating the actuator
Item 346230 (configured
with P+1).
Ouverture serrure du PE
(con fi gu ré avec P+1) en
mode di rect sans l’appel
ou ac ti vation ac tion neur
réf. 346200/346210
(con fi gu ré avec P+1 et
MOD=5) ou ac ti va tion
ac tion neur réf. 346230
(con fi gu ré avec P+1).
Türöffnung der Türstation
(mit P+1 konfiguriert)
oder Aktivierung über
den Aktivator Art.
346200/346210 (mit
P+1 und MOD=5) oder
Aktivierung über den
Aktivator Art. 346230
(mit P+1 konfiguriert).
Apertura cerradura
del PE (con figurado
con P +1) en modo
directo sin llamada o
activación del actuador
art. 346200/346210
(con fi gurado con P+1
y MOD=5) o ac ti vación
del actuador art. 346230
(con fi gu rado con P+1).
Rechtstreekse opening
van het deurslot van het
als P+1 ge con figureerde
deurstation, zonder
oproep of activering
van het to e stel art.
346200/346210 (ge-
con fi gu re erd als P+1 en
MOD=5) of ac ti ve ring
van het toestel art.
346230 (ge con figureerd
als P+1).
Abertura da fechadura
da UE (configurada com
P+1) de ma nei ra directa
sem a chamada ou então
ligação do actuador
art. 346200/346210
(configurado com P+1
e MOD=5) ou então
ligação do actuador art.
346230 (con fi gu ra do
com P+1).
P
+1
MOD=9
P
+1
P
+2
MOD=9
P
+2
P
P
+1
MOD=5
P
+1
P
+1
2
3
1 32
346210
1
P
+2
MOD=5
P
+2
P
+2
2
3
1 32
346210
1
P
+3
MOD=5
P
+3
P
+3
2
3
1 32
346210
1
P
+4
MOD=5
P
+4
P
+4
2
3
1 32
346210
1
1–+ 23 4
1–+ 23 4
P
+3
MOD=9
P
+3
1–+ 23 4
Apertura serratura del PE
(con fi gurato con P+2)
in mo do di retto senza
la chia mata op pu re
at ti va zione attuatore
art.346200/346210
(con figurato con P+2
e MOD=5) op pu re
at ti va zione attuatore
art.346230 (con figurato
con P+2).
Door lock opening of EP
(con figured with P+2)
directly without the call
or activating the actuator
Item 346200 (con figured
with P+2 and MOD=5)
or activating the actuator
Item 346230 (configured
with P+2).
Ouverture serrure du PE
(con fi gu ré avec P+2) en
mode di rect sans l’appel
ou ac ti vation ac tion neur
réf. 346200 (con fi gu ré
avec P+2 et MOD=5)
ou ac ti va tion ac tion neur
réf. 346230 (con fi gu ré
avec P+2).
Türöffnung der Türstation
(mit P+2 konfiguriert)
oder Aktivierung über
den Aktivator Art.
346200/346210 (mit
P+2 und MOD=5) oder
Aktivierung über den
Aktivator Art. 346230
(mit P+2 konfiguriert).
Apertura cerradura del PE
(con figurado con P+2) en
modo di recto sin llamada
o activación del actuador
art. 346200/346210
(con fi gurado con P+2
y MOD=5) o ac ti vación
del actuador art. 346230
(con fi gu rado con P+2).
Rechtstreekse opening
van het deurslot van het
als P+2 ge con figureerde
deurstation, zonder
oproep of activering
van het to e stel art.
346200/346210 (ge-
con fi gu re erd als P+2 en
MOD=5) of ac ti ve ring
van het toestel art.
346230 (ge con figureerd
als P+2).
Abertura da fechadura
da UE (configurada com
P+2) de ma nei ra directa
sem a chamada ou então
ligação do actuador
art. 346200/346210
(configurado com P+2
e MOD=5) ou então
ligação do actuador art.
346230 (con fi gu ra do
com P+2).
P
+1
MOD=9
P
+1
P
+2
MOD=9
P
+2
P
P
+1
MOD=5
P
+1
P
+1
2
3
1 32
346210
1
P
+2
MOD=5
P
+2
P
+2
2
3
1 32
346210
1
P
+3
MOD=5
P
+3
P
+3
2
3
1 32
346210
1
P
+4
MOD=5
P
+4
P
+4
2
3
1 32
346210
1
1–+ 23 4
1–+ 23 4
P
+3
MOD=9
P
+3
1–+ 23 4
Apertura serratura del PE
(con fi gurato con P+3)
in mo do di retto senza
la chia mata op pu re
at ti va zione attuatore
art.346200/346210
(con figurato con P+3
e MOD=5) op pu re
at ti va zione attuatore
art.346230 (con figurato
con P+3).
Door lock opening of EP
(con figured with P+3)
directly without the call
or activating the actuator
Item 346200/346210
(con figured with
P+3 and MOD=5) or
activating the actuator
Item 346230 (configured
with P+3).
Ouverture serrure du PE
(con fi gu ré avec P+3) en
mode di rect sans l’appel
ou ac ti vation ac tion neur
réf. 346200/346210
(con fi gu ré avec P+3 et
MOD=5) ou ac ti va tion
ac tion neur réf. 346230
(con fi gu ré avec P+3).
Türöffnung der Türstation
(mit P+3 konfiguriert)
oder Aktivierung über
den Aktivator Art.
346200/346210 (mit
P+3 und MOD=5) oder
Aktivierung über den
Aktivator Art. 346230
(mit P+3 konfiguriert).
Apertura cerradura del PE
(con figurado con P+3) en
modo di recto sin llamada
o activación del actuador
art. 346200/346210
(con fi gurado con P+3
y MOD=5) o ac ti vación
del actuador art. 346230
(con fi gu rado con P+3).
Rechtstreekse opening
van het deurslot van het
als P+3 ge con figureerde
deurstation, zonder
oproep of activering
van het to e stel art.
346200/346210 (ge-
con fi gu re erd als P+3 en
MOD=5) of ac ti ve ring
van het toestel art.
346230 (ge con figureerd
als P+3).
Abertura da fechadura
da UE (configurada com
P+3) de ma nei ra directa
sem a chamada ou então
ligação do actuador
art. 346200/346210
(configurado com P+3
e MOD=5) ou então
ligação do actuador art.
346230 (con fi gu ra do
com P+3).

42
Legenda Legend Légende Erläuterung Leyenda Legenda Legenda
IT EN FR DE ES NL PT
P
+1
MOD=9
P
+1
P
+2
MOD=9
P
+2
P
P
+1
MOD=5
P
+1
P
+1
2
3
1 32
346210
1
P
+2
MOD=5
P
+2
P
+2
2
3
1 32
346210
1
P
+3
MOD=5
P
+3
P
+3
2
3
1 32
346210
1
P
+4
MOD=5
P
+4
P
+4
2
3
1 32
346210
1
1–+ 23 4
1–+ 23 4
P
+3
MOD=9
P
+3
1–+ 23 4
Apertura serratura
del PE (con fi gurato
con P+4) in mo do
di retto senza la
chia mata op pu re
at ti va zione attuatore
art.346200/346210
(con figurato con P+4
e MOD=5) op pu re
at ti va zione attuatore
art.346230 (con figurato
con P+4).
Door lock opening of
EP (con figured with
P+4) directly without
the call or activating
the actuator Item
346200/346210 (con-
figured with P+4 and
MOD=5) or activating
the actuator Item
346230 (configured
with P+4).
Ouverture serrure du
PE (con fi gu ré avec
P+4) en mode di rect
sans l’appel ou ac-
ti vation ac tion neur
réf. 346200/346210
(con fi gu ré avec P+4 et
MOD=5) ou ac ti va tion
ac tion neur réf. 346230
(con fi gu ré avec P+4).
Türöffnung der
Türstation (mit P+4
konfiguriert) oder
Aktivierung über
den Aktivator Art.
346200/346210 (mit
P+4 und MOD=5) oder
Aktivierung über den
Aktivator Art. 346230
(mit P+4 konfiguriert).
Apertura cerradura
del PE (con figurado
con P+4) en modo
di recto sin llamada o
activación del actuador
art. 346200/346210
(con fi gurado con P+4
y MOD=5) o ac ti vación
del actuador art.
346230 (con fi gu rado
con P+4).
Rechtstreekse opening
van het deurslot van
het als P+4 ge con-
figureerde deurstation,
zonder oproep of
activering van het to e-
stel art. 346200/346210
(ge con fi gu re erd als
P+4 en MOD=5) of ac-
ti ve ring van het toestel
art. 346230 (ge con-
figureerd als P+4).
Abertura da fechadura
da UE (configurada
com P+4) de ma-
nei ra directa sem a
chamada ou então
ligação do actuador
art. 346200/346210
(configurado com P+4
e MOD=5) ou então
ligação do actuador art.
346230 (con fi gu ra do
com P+4).
Intercom tra
appartamenti in
impianti con interfaccia
da appartamento art.
346850.
Intercommunicability
between apartments in
systems with
apartment interface
item 346850.
Intercommunication
entre appartements
sur installations
avec interface
d’appartement réf.
346850.
Gegenseitige
Kommunikation
zwischen Wohnungen
für Anlagen mit
Wohnungsschnittstelle
Art. 346850.
Intercomunicación
entre apartamentos
en instalaciones
con interfaz de
departamento Art.
346850.
Intercom tussen
appartementen
in installaties
met interface van
appartement art.
346850.
Intercom entre
apartamentos
em instalações
com interface de
apartamento art.
346850.
Intercom all’interno
dell’appartamento in
impianti con interfaccia
di appartamento
art.346850;
oppure intercom
tra appartamenti
in impianti senza
interfaccia di
appartamento.
Intercommunicability
inside an apartment
in systems with
apartment interface
item 346850 or
intercommunicability
between apartments
in systems without
apartment interface.
Intercommunication
à l’intérieur de
l’appartement
sur installations
avec interface
d’appartement
réf. 346850 ou
intercommunication
entre appartements
sur installations
sans interface
d’appartement.
Gegenseitige
Kommunikation
innerhalb der Wohnung
für Anlagen mit
Wohnungsschnittstelle
Art. 346850 oder
gegenseitige
Kommunikation
zwischen Wohnungen
für Anlagen ohne
Wohnungsschnittstelle.
Intercomunicación
en el apartamento
en instalaciones
con interfaz de
apartamento
Art. 346850 o
intercomunicación
entre apartamentos
en instalaciones
sin interfaz de
apartamento.
Intercom binnen in
het appartement
in installaties
met interface van
appartement art.
346850 ofwel intercom
tussen appartementen
in installaties
zonder interface van
appartement.
Intercom dentro
do apartamento
em instalações
com interface de
apartamento art.
346850 ou então
intercom entre
apartamentos
em instalações
sem interface de
apartamento.
Intercom su se stesso,
invia la chiamata a
tutti gli apparecchi con
uguale indirizzo
Intercom on itself,
sends the call to all the
devices with the same
address.
Intercom sur lui-même,
envoie l’appel à tous
les appareils ayant une
adresse identique.
Intercom mit einseitiger
Funktion: sendet den
Ruf an alle Geräte mit
derselben Adresse.
Intercomunicación
hacia los aparatos
iguales, envía la
llamada a todos los
aparatos con igual
dirección
Intercom op zichzelf,
verstuurt de oproep
naar alle toestellen met
hetzelfde adres
Intercomunicador
sobre si mesmo, envia
a chamada a todos
os aparelhos com
endereço igual
Intercom generale,
invia una chiamata
a tutti gli apparecchi
dell’impianto
General intercom, sends
a call to all the system
devices
Intercom général,
envoie l’appel à
tous les appareils de
l’installation
Intercom mit
allgemeiner Funktion:
sendet den Ruf an alle
Geräte der Anlage.
Intercomunicación
general, envía una
llamada a todos
los aparatos de la
instalación
Algemene Intercom,
verstuurt een oproep
naar alle toestellen van
de installatie
Intercomunicador geral,
envia uma chamada a
todos os aparelhos da
instalação
Pagina wordt geladen...
Pagina wordt geladen...
Pagina wordt geladen...
Pagina wordt geladen...
Pagina wordt geladen...
Pagina wordt geladen...
Pagina wordt geladen...
Pagina wordt geladen...
Pagina wordt geladen...
Pagina wordt geladen...
Documenttranscriptie
Video Kit • Dati dimensionali • Dimensional data • Données dimensionnelles • Maße • Datos dimensionales • Formaatgegevens • Dados dimensionais 162 mm 185 mm 25 mm 194 mm 35 mm 106 mm • Campo di ripresa • Field of view • Éclairage cadrage caméra • Aufnahmebereich • Campo de filmación • Campo de filmagem • Opnameveld 115 cm 160 – 165 cm 135–140 cm • Altezza consigliata salvo diversa normativa vigente. • Recommended height, unless different regulations are specified. • Hauteur conseillée sauf autre norme en vigueur. • Empfohlene Höhe falls die gesetzlichen Vorschriften nichts anderes vorschreiben. • Altura recomendada salvo normativa vigente diferente. • Aanbevolen hoogte behoudens andere normen in voege. • Altura aconselhada a não ser se a norma em vigor for diferente. 50 cm 240 cm 9 • Posto esterno • Entrance panel • Poste extérieur • Türstation • Placa exterior • Externe plaats • Unidade externa 3 1 - Aktivierung/Deaktivierung des Bestätigungs- 4 5 2 - Einstellung der Lautstärke (*siehe nachfolgende 6 2 1 signals nach erfolgter Türöffnung. Seiten). 3 - Grüne Led: Meldet offene Tür. 4 - Grüne Led: Kommunikation aktiv. 5 - Grüne blinkende Led: Ruf gesendet; Rote blinkende Led: System belegt. ON OFF 6 - Sitz der Konfiguratoren. 1 - Habilitación/deshabilitación del tono de confirmación de apertura de la cerradura. 2 - Regulación del volumen (*véase la pág. 1 - Abilitazione/disabilitazione tono conferma 23456- apertura serratura. Regolazione del volume (*vedi pag. seguente). Led verde: indicazione porta aperta. Led verde: comunicazione attiva. Led lampeggiante Verde: chiamata inoltrata; Led lampeggiante Rosso: sistema occupato. Sede configuratori. siguiente). 3 - Led verde: indicación puerta abierta. 4 - Led verde: comunicación activada. 5 - Led parpadenate Verde: llamada enviada; Led parpadenate Rojo: sistema ocupado. 6 - Alojamiento configuradores. 1 - Activering/desactivering toon bevestiging opening slot. 2 - De geluidssterkte regelen (*zie de volgende 1 - Enabling/disabling of door lock opening confir23456- mation tone. Adjustment volume (*see the following page). Green LED: door open indication. Green LED: communication active. Green flashing LED; call forwarded; Red flashing LED: system busy. Configurator seat. 1 - Activation/désactivation tonalité de confirma23456- 10 tion ouverture serrure. Réglage du volume (* voir page suivante). Diode verte: indication porte ouverte. Diode verte: communication active. Témoin clignotant vert - appel passé; Témoin clignotant rouge: système occupé. Logement configurateurs. pagina’s). 3 - Groene led: aanduiding open deur. 4 - Groene led: communicatie actief. 5 - Groene knipperende led: oproep doorge- stuurd; Rode knipperende led: systeem bezet. 6 - Plaats van de configuratiemodules. 1 - Activação/desactivação do sinal de confirmação da abertura da fechadura. 2 - Regulação do volume (*veja as próxima página). 3 - Indicadores luminosos verde: indicação de porta aberta. 4 - Indicadores luminosos verde: comunicação activa. 5 - Indicador luminoso lampejante Verde: chamada enviada; Indicador luminoso lampejante Vermelho: sistema cupado. 6 - Alojamento configurador. Video Kit (*) • Se si manifestasse il disturbo del fischio, (effetto Larsen), ridurre prima la potenza del microfono , agendo con un cacciavite sul potenziometro corrispondente, fino ad un livello accettabile. Qualora il fenomeno persista, agire sul potenziometro dell’altoparlante in modo da eliminare l’inconveniente. Se il volume è troppo basso, aumentare prima il volume dell’altoparlante ed eventualmente anche quello del microfono, tenendo presente che è preferibile una trasmissione chiara e priva di disturbi, che una al limite dell’innesco (Larsen). • In case of a whistle (Larsen effect), first reduce the microphones power, adjusting the corresponding potentiometers with a screw driver, until an acceptable level is reached. Should the whistle persist, adjust the loudspeakers volume in order to eliminate the trouble. If the volume is too low level then, increase first the potentiometer of the loudspeaker and secondly the one for the microphone, bearing in mind that a clear and noise free reception is preferable than one just before whistling (Larsen). sur le potentiomètre corres• Lors de sifflement (effet de Larsen), reduire d’abord la puissance du micro pondant, à l’aide d’un tournevis, jusqu’à l’obtention d’un niveau satisfaisant. Si le sifflement persiste, régler le potentiomètre du hautparleur jusqu’à l’élimination de celui-ci. Si le volume est trop bas, augmenter d’abord la puissance du haut-parleur et éventuellement celle du micro, en considérant qu’une réception claire et sans parasite est préférable à une communication à la limite de l’accrochage (effet de Larsen). bis auf einen • Beim etwaigen Auftreten eines Pfeiftones (Larsen-Effekt), zuerst die Lautstärke des Mikrophones annehmbaren Wert herabsetzen, indem man das entsprechende Potentiometer mit einem Schraubendreher einstellt. Sollte die Störung weiterhin bestehen, dann das Potentiometer des Lautsprechers bis zur Beseitigung des Pfeiftones einstellen. Ist die Lautstärke nun zu niedrig, dann zuerst die des Lautsprechers und erst danach evtl. auch die des Mikrophones erhohen, wobei ein deutlicher und störungsfreier Empfang einem an der Störungsgrenze liegendem (Larsen-Effekt) vorzuziehen ist. • Si se manifesta el silbido de acoplamiento, (efecto Larsen), reducir primero la potencia del micrófono , girando con un destornillador el potenciómetro correspondiente, hasta obtener un nivel aceptable. Si el fenómeno persistiera, regular el potenciómetro del altavoz hasta eliminar la interferencia. Si el volumen es demasiado bajo, aumentar primero el volumen del altavoz y eventualmente también el del micrófono, teniendo en cuenta que es preferible una transmissión clara y limpia de interferencias, que una al limite del acoplo (Larsen). • Als er een fluittoon hoorbaar is (effect van Larsen): verminder eerst het vermogen van de microfoon met behulp van een schroevendraaier zijn stroomregelaar zo te regelen dat de geluidssterkte van het gefluit aanvaardbaar is. Als het verschijnsel niet verdwijnt, dan moet u ook de stroomregelaar van de luidspreker bijstellen. Als de geluidssterkte nu te klein is, verhoog dan eerst de geluidssterkte van de luidspreker en daarna eventueel ook die van de microfoon, en denk er bij het bijstellen aan dat een duidelijk hoorbaar en ongestoord geluid beter is dan een harder geluid op de grens van het Larsen effect. • Se se manifestar uma interferência no som (efeito de Larsen), começar por diminuir a potência do microfone , rodando o potenciómetro correspondente com uma chave de parafusos, até obter um nível aceitável. Se o fenómeno persistir, regular o potenciómetro do altifalante de modo a eliminar o problema. Se o volume estiver demasiado baixo, começar por aumentar o volume do altifalante e depois, se necessário, o do microfone, tendo presente que é melhor ter uma transmissão clara e sem interferências, que uma no limiar de início de efeitos Larsen. 11 • Posto interno • Handset 12 3 4 56 7 8 17 16 15 14 9 13 12 11 10 9 18 19 20 21 22 23 23 27 26 25 24 12 Video Kit La imagen representa el dispositivo con todas las funciones habilitadas. Busque en el manual del instalador cómo habilitar las funciones. De afbeelding toont het apparaat met ingeschakelde functies. Raadpleeg de installatiehandleiding voor de inschakeling van de functies. 1 - Pantalla 7” (16 : 9) 2 - Tecla apagado 3 - Fecha y hora 4 - Exclusión timbre 5 - Activación Oficina Profesional 6 - Micrófono 7 - Activación Contestador 8 - Acciones rápidas 9 - Guías táctiles para invidentes 10 - Tecla conexión: 1 - Display 7” (16 : 9) 2 - Uitschakeltoets 3 - Datum en tijd 4 - Uitsluiting beltoon 5 - Activering professionele studio 6 - Microfoon 7 - Activering antwoordapparaat 8 - Sneltoetsen 9 - Tastgeleiders voor blinden 10 - Toets verbinding: 11 - 11 - 12 - 13 14 - 15 16 17 18 19 20 21 22 23 24 25 26 27 - el encendido del led verde parpadeante indica una llamada entrante el encendido del led verde fijo indica la comunicación en curso Autoencendido/Visualización cíclica: al presionar la tecla el LED rojo se enciende Tecla Favoritos: al presionar la tecla el LED rojo se enciende (Configuración base = LUZ ESCALERAS. Para una configuración distinta, consulte la tabla de la configuración física en las páginas sucesivas.) Tecla apertura cerradura: al presionar la tecla el LED rojo se enciende Estado Contestador: Led rojo fijo = contestador activado Led rojo parpadeante = presencia grabación/es no vista/s Estado presencia notas: Led rojo parpadeante = nueva/s notas no leída/s Estado Exclusión llamada: Led rojo encendido = Timbre llamada desactivado Funciones (aparecen solamente los iconos de las funciones configuradas) Alojamiento configuradores Configurador J1: extraiga para alimentación adicional Configurador J2: Master/Slave, extraiga para Slave Microinterruptor ON/OFF terminal de tramo Toma mini USB para actualización del firmware del dispositivo Altavoz Bornes (1 - 2) para alimentación adicional Bornes para la conexión al BUS SCS 2 HILOS Bornes ( ) para la conexión de un pulsador externo de llamada a la planta Bornes (1 - 5M) para la conexión de un timbre adicional. Ha de efectuar la conexión punto punto en los bornes de los timbres adicionales 12 - 13 14 15 16 17 18 19 20 21 22 23 24 25 26 27 - de groene led knippert om een binnenkomende oproep aan te geven de groene led brandt om een lopend gesprek aan te geven Automatische inschakeling/cyclische weergave: bij een druk op de toets gaat de rode led branden Toets Favorieten: bij een druk op de toets gaat de rode led branden (Standaardconfiguratie = TRAPHUISVERLICHTING. Voor een andere configuratie raadpleeg de tabel met de fysieke configuratie op de volgende pagina’s.) Toets slotontgrendeling: bij een druk op de toets gaat de rode led branden Status antwoordapparaat: Rode led brandt = antwoordapparaat geactiveerd Rode led knippert = nieuwe registratie(s) aanwezig Status notities aanwezig: Rode led knippert = nieuwe notitie(s) Status uitsluiting oproep: Rode led brandt = Beltoon oproep gedeactiveerd Functies (uitsluitend de iconen van de geconfigureerde functies worden weergegeven) Plaats van de configuratiemodules Configurator J1: uitnemen voor extra voeding Configurator J2: Master/Slave, uitnemen voor Slave Microschakelaar ON/OFF van beëindiging traject Mini-UBS-aansluiting voor de update van de firmware van het apparaat Luidspreker Aansluitklemmen (1 - 2) voor extra voeding Aansluitklemmen voor de verbinding met de SCS 2-DRAADS BUS Morsetti ( ) voor de verbinding van een externe knop op de etage Aansluitklemmen (1 - 5M) voor de verbinding van een extra beltoon. Verricht een punt - punt verbinding op de aansluitklemmen van de extra beltonen 17 • La telecamera non deve essere installata di fronte a grandi sorgenti luminose, oppure in luoghi dove il soggetto ripreso rimanga molto in controluce. Nota: Le telecamere con sensore CMOS a colori presentano, in condizioni di scarsa luminosità, una sensibilità inferiore rispetto alle telecamere in bianco/nero. Si consiglia pertanto, in ambienti poco illuminati di prevedere una fonte di illuminazione aggiuntiva. • The camera must not be installed in front of large light sources, or in places where the subject viewed remains in deep shadow. Note: in poor lighting conditions cameras with colour CMOS detector are less sensitive than black/white cameras. An extra lighting source should be added in poorly lit rooms. • La télécaméra ne doit pas être installée en face de fortes sources lumineuses, ou bien dans des endroits où le sujet pris reste très à contre-jour. Nota: les télécaméras avec capteur CMOS couleurs présentent, dans des conditions de faible luminosité, une sensibilité inférieure aux télécaméras noir/blanc. Il est donc conseillé, dans des milieux peu éclairés, de prévoir une source de lumière supplémentaire. • Die Kamera darf nicht vor starken Lichtquellen oder an Orten installiert werden, wo das Subjekt sich im Gegenlicht befindet. Bemerkung: Farbkameras mit CMOS-Aufnahmeelement besitzen bei schlechter Beleuchtung eine geringere Empfindlichkeit als Schwarz/Weiß Kameras. Wir empfehlen daher eine zusätzliche Beleuchtungsquelle vorzusehen. • La telecámara no debe ser instalada delante de fuentes luminosas grande en lugares en donde el individuo filmado se encuentre demasiado en contraluz. Nota: las telecámaras con sensor CMOS en colores presentan, en condiciones de escasa luminosidad, una sensibilidad inferior respecto a las telecámaras en blanco/negro. Por lo tanto es aconsejable en ambientes escasamente iluminados prever una fuente de iluminación extra. • Installeer de camera niet tegenover grote lichtbronnen of op plaatsen waar de opname van het onderwerp door sterk tegenlicht wordt gestoord. Opmerking: camera’s met kleuren-CMOS-sensor zijn bij een zwakke verlichting minder gevoelig dan zwart-wit camera’s. Daarom is het raadzaam om zwak verlichte omgevingen van extra verlichting te voorzien. • A câmara não deve ser montada diante de fortes fontes de luz, ou então em lugares onde o elemento que deve ser filmado fique muito em contraluz. Nota: as câmaras com sensor CMOS em cores apresentam, quando há pouca luminosidade, uma sensibilidade inferior em relação às câmaras em branco e preto. Portanto, recomenda-se, quando os ambientes forem pouco iluminados providenciar uma fonte de iluminação adicional. 22 Cancellazione badge gestore impianto Deleting the manager master badge Élimination badge master de gestion Master-Verwaltungs-Badge löschen Cancelación de una credencial maestra de administrador Master beheerder badge wissen Cancelamento de crachá master gestor 1 beep 1 beep 1 beep 1 Piepton 1 bip 1 beep 1 beep ≥ 5s Tenere premuto il pulsante di programmazione fino al lampeggio del LED verde serratura e tono di conferma. Press and hold down the programming pushbutton until the green door lock LED starts flashing, and a confirmation sound is heard. Maintenir enfoncée la touche de programmation jusqu’à ce que le LED vert serrure clignote et que la tonalité de confirmation soit émise. Programmierungstaste gedrückt halten, bis die grüne LED des Schlosses blinkt und das Bestätigungssignal ertönt. Mantenga apretado el pulsador de programación hasta que parpadea el LED verde y se emite el tono de confirmación. Houd de programmeringsknop ingedrukt tot de groene LED slot knippert en u ter bevestiging een geluidssignaal hoort. Mantenha carregado o botão de programação até o lampejo do LED verde da fechadura e o tom de confirmação. 28 Cancellazione di tutti i badge residenti in memoria Cancellation of all the residents badges saved in the memory Effacement de tous les badges résidents mémorisés Alle gespeicherten Badges der Bewohner löschen Cancelación de todas las credenciales residentes memorizadas Alle inwonerbadges uit het geheugen wissen Cancelamento de todos os crachás residentes na memória 1 beep 1 beep 1 beep 1 Piepton 1 bip 1 beep 1 beep Gestore impianto Manager master Master de gestion Master Verwaltung Credencial maestra de administrador Master beheerder Master gestor Avvicinare al lettore il badge gestore impianto fino al lampeggio del LED verde serratura e tono di conferma. Move the system manager badge close to the reader until the green door lock LED flashes, and a confirmation sound is heard. Approcher le Badge administrateur installation du lecteur et attendre que le LED vert serrure clignote et qu’une tonalité de confirmation soit émise. Dem Lesegerät das Badge des Anlagenbetreibers nähern, bis die grüne LED des Schlosses blinkt und das Bestätigungssignal ertönt. Acerque al lector la credencial del administrador del sistema hasta que parpadea el LED verde de la cerradura y se produzca el tono de confirmación. Houd de installatiebeheerder badge voor het leesapparaat tot de groene LED slot gaat knipperen en u ter bevestiging een geluidssignaal hoort. Aproxime ao leitor o Crachá gestor da instalação até o lampejo do LED verde da fechadura e o tom de confirmação. 34 Video Kit 2 beep 2 beeps 2 beep 2 Pieptöne 2 bips 2 beep 2 beep 2 volte Gestore impianto Twice Manager master 2 fois Master de gestion 2 Mal Master Verwaltung 2 veces Credencial maestra de administrador 2 maal Master beheerder 2 vezes Master gestor Riavvicinare per 2 volte consecutive il badge gestore impianto. Quando la cancellazione è avvenuta si accende il LED verde serratura e il dispositivo emette 2 beep. Move the system manager badge close twice in succession. When the cancellation is completed, the door lock green LED comes, on and the device emits 2 beeps. Approcher à nouveau 2 fois de suite le badge master de gestion installation. Une fois l’effacement obtenu, le LED vert serrure s’allume et le dispositif émet 2 bips. Das Badge des Anlagetreibers 2 Mal nähern. Nach erfolgter Löschung leuchtet die grüne LED des Schlosses auf und die Vorrichtung erzeugt 2 Pieptöne. Acerque 2 veces seguidas la credencial maestra de administrador del sistema.Cuando se produce la cancelación, se ilumina el LED verde cerradura y el dispositivo emite 2 bips. Houd de installatiebeheerder badge 2 maal voor het leesapparaat. De groene LED slot gaat branden en u hoort 2 pieptonen als de badges zijn gewist. Voltar a aproximar, por 2 vezes consecutivas, o crachá gestor da instalação. Uma vez que interveio o cancelamento, acendese o LED verde da fechadura e o dispositivo emite 2 beep. 35 –+ 1 23 4 2 2 3 3 1 2 2 3 3 –+ –+ 1 1 1 1 23 23 23 23 4 4 4 4 –+ –+ 1 1 23 23 4 4 –+ 1 23 1 23 –+ –+ 1 23 1 23 P+1 –+ 4 4 4 4 P+2 MOD=9 P+2 P+3 MOD=9 MOD=9 346210 P+1 MOD=9 P+2 P+1 MOD=9 MOD=9 P+3 MOD=9 1 –+ –+ P+1 MOD=9 P+2 MOD=9 2 2 2 3 3 3 3 1 1 1 1 2 2 2 3 2 2 3 3 3 3 3 12 12 23 2 2 2 23 3 3 3 3 3 2 2 3 3 3 2 1 1 1 1 2 3 2 2 2 3 3 3 41 1 2 2 3 3 3 3 P+4 2 3 3 P+4 346210 1 1 346210 2 2 P+4 P+4 P+4 P+4 MOD=5 1 2 346210 1 1 MOD=5 MOD=5 P+3 P+4 P+3 P+4 P+3 P+3 P+4 MOD=5 346210 346210 346210 1 1 P+3 P+4 P+3 P+3 P+3 MOD=5 346210 1 1 P+3 P+2 P+3 P+2 P+2 P+2 P+3 MOD=5 MOD=5 MOD=5 346210 346210 346210 1 1 1 1 P+3 P+2 P+2 P+2 P+2 MOD=5 346210 1 1 P+2 P+2 P+1 P+1 P+2 P+1 MOD=5P+1 MOD=5 MOD=5 2 346210 2 346210 346210 1 1 P+2 P+1 P+1 P+1 MOD=5 P+1 346210 1 1 346210 P+3 P+3 MOD=9 P+3 PP+1 +3 MOD=9 P+1 P+1 MOD=5 1 1 P P+2 +3 P+2 P+3 P+1 +2 P P+1 P+2 P P+1 P P P+1 P+1 MOD=9 Rechtstreekse opening van het deurslot van het als P+3 geconfigureerde deurstation, zonder oproep of activering van het toestel art. 346200/346210 (ge configureerd als P+3 en MOD=5) of activering van het toestel art. 346230 (geconfigureerd als P+3). Door lock opening of EP (configured with P+3) directly without the call or activating the actuator Item 346200/346210 (configured with P+3 and MOD=5) or activating the actuator Item 346230 (configured with P+3). Ouverture serrure du PE (configuré avec P+3) en mode direct sans l’appel ou activation actionneur réf. 346200/346210 (configuré avec P+3 et MOD=5) ou activation actionneur réf. 346230 (configuré avec P+3). Türöffnung der Türstation (mit P+3 konfiguriert) oder Aktivierung über den Aktivator Art. 346200/346210 (mit P+3 und MOD=5) oder Aktivierung über den Aktivator Art. 346230 (mit P+3 konfiguriert). Abertura da fechadura da UE (configurada com P+3) de maneira directa sem a chamada ou então ligação do actuador art. 346200/346210 (configurado com P+3 e MOD=5) ou então ligação do actuador art. 346230 (configurado com P+3). Abertura da fechadura da UE (configurada com P+2) de maneira directa sem a chamada ou então ligação do actuador art. 346200/346210 (configurado com P+2 e MOD=5) ou então ligação do actuador art. 346230 (configurado com P+2). Apertura cerradura del PE (configurado con P+3) en modo directo sin llamada o activación del actuador art. 346200/346210 (configurado con P+3 y MOD=5) o activación del actuador art. 346230 (configurado con P+3). Apertura serratura del PE (configurato con P+3) in modo diretto senza la chiamata oppure attivazione attuatore art.346200/346210 (configurato con P+3 e MOD=5) oppure attivazione attuatore art.346230 (configurato con P+3). Türöffnung der Türstation (mit P+2 konfiguriert) oder Aktivierung über den Aktivator Art. 346200/346210 (mit P+2 und MOD=5) oder Aktivierung über den Aktivator Art. 346230 (mit P+2 konfiguriert). Rechtstreekse opening van het deurslot van het als P+2 geconfigureerde deurstation, zonder oproep of activering van het toestel art. 346200/346210 (ge configureerd als P+2 en MOD=5) of activering van het toestel art. 346230 (geconfigureerd als P+2). Ouverture serrure du PE (configuré avec P+2) en mode direct sans l’appel ou activation actionneur réf. 346200 (configuré avec P+2 et MOD=5) ou activation actionneur réf. 346230 (configuré avec P+2). Apertura cerradura del PE (configurado con P+2) en modo directo sin llamada o activación del actuador art. 346200/346210 (configurado con P+2 y MOD=5) o activación del actuador art. 346230 (configurado con P+2). Door lock opening of EP (configured with P+2) directly without the call or activating the actuator Item 346200 (configured with P+2 and MOD=5) or activating the actuator Item 346230 (configured with P+2). Abertura da fechadura da UE (configurada com P+1) de maneira directa sem a chamada ou então ligação do actuador art. 346200/346210 (configurado com P+1 e MOD=5) ou então ligação do actuador art. 346230 (configurado com P+1). Rechtstreekse opening van het deurslot van het als P+1 geconfigureerde deurstation, zonder oproep of activering van het toestel art. 346200/346210 (ge configureerd als P+1 en MOD=5) of activering van het toestel art. 346230 (geconfigureerd als P+1). Apertura cerradura del PE (configurado con P +1) en modo directo sin llamada o activación del actuador art. 346200/346210 (configurado con P+1 y MOD=5) o activación del actuador art. 346230 (configurado con P+1). Türöffnung der Türstation (mit P+1 konfiguriert) oder Aktivierung über den Aktivator Art. 346200/346210 (mit P+1 und MOD=5) oder Aktivierung über den Aktivator Art. 346230 (mit P+1 konfiguriert). Ouverture serrure du PE (configuré avec P+1) en mode direct sans l’appel ou activation actionneur réf. 346200/346210 (configuré avec P+1 et MOD=5) ou activation actionneur réf. 346230 (configuré avec P+1). Door lock opening of EP (configured with P+1) directly without the call or activating the actuator Item 346200/346210 (configured with P+1 and MOD=5) or activating the actuator Item 346230 (configured with P+1). Apertura serratura del PE (configurato con P+1) in modo diretto senza la chiamata oppure attivazione attuatore art.346200/346210 (configurato con P+1 e MOD=5) oppure attivazione attuatore art.346230 (configurato con P+1). Apertura serratura del PE (configurato con P+2) in modo diretto senza la chiamata oppure attivazione attuatore art.346200/346210 (configurato con P+2 e MOD=5) oppure attivazione attuatore art.346230 (configurato con P+2). PT Ligação da UE (con figurada com P+1) de maneira directa sem a chamada ou então ligação do actuador art. 346200/346210 (configurado com P+1 e MOD=9). Rechtstreekse activering van het deurstation (als P+1 geconfigureerd) zonder oproep of acti vering van het toestel art. 346200/346210 (geconfigureerd als P+1 en MOD = 9). Activación del PE (configurado con P+1) en modo directo sin llamada o activación del actuador art. 346200/346210 (configurado con P+1 y MOD=9). Aktivierung der Türstation (mit P+1 konfiguriert) auf direkte Weise ohne Ruf oder Aktivierung über den Aktivator art. 346200/346210 (mit P+1 und MOD=9). Activation du PE (confi guré avec P+1) en mode direct sans l’appel ou activation actionneur réf. 346200/346210 (configuré avec P+1 et MOD=9). Activating the EP (configured with P+1) directly without the call or activating actuator Item 346200/346210 (configured with P+1 and MOD=9). Attivazione del PE (configurato con P+1) in modo diretto senza la chiamata oppure attivazione attuatore art. 346200/346210 (configurato con P+1 e MOD=9). Legenda NL Legende ES Leyenda DE Erläuterung FR Légende EN Legend IT Legenda Video Kit 42 2 2 3 3 P+3 2 2 3 3 P+4 P+4 P+4 MOD=5 346210 1 1 P+3 P+3 MOD=5 346210 1 1 P+2 P+2 MOD=5 Intercomunicador sobre si mesmo, envia a chamada a todos os aparelhos com endereço igual Intercomunicador geral, envia uma chamada a todos os aparelhos da instalação Intercom op zichzelf, verstuurt de oproep naar alle toestellen met hetzelfde adres Algemene Intercom, verstuurt een oproep naar alle toestellen van de installatie Intercom on itself, sends the call to all the devices with the same address. General intercom, sends a call to all the system devices Intercom su se stesso, invia la chiamata a tutti gli apparecchi con uguale indirizzo Intercom generale, invia una chiamata a tutti gli apparecchi dell’impianto Intercom général, envoie l’appel à tous les appareils de l’installation Intercom mit allgemeiner Funktion: sendet den Ruf an alle Geräte der Anlage. Intercomunicación general, envía una llamada a todos los aparatos de la instalación Intercomunicación hacia los aparatos iguales, envía la llamada a todos los aparatos con igual dirección Intercom dentro do apartamento em instalações com interface de apartamento art. 346850 ou então intercom entre apartamentos em instalações sem interface de apartamento. Intercom binnen in het appartement in installaties met interface van appartement art. 346850 ofwel intercom tussen appartementen in installaties zonder interface van appartement. Intercomunicación en el apartamento en instalaciones con interfaz de apartamento Art. 346850 o intercomunicación entre apartamentos en instalaciones sin interfaz de apartamento. Gegenseitige Kommunikation innerhalb der Wohnung für Anlagen mit Wohnungsschnittstelle Art. 346850 oder gegenseitige Kommunikation zwischen Wohnungen für Anlagen ohne Wohnungsschnittstelle. Intercommunication à l’intérieur de l’appartement sur installations avec interface d’appartement réf. 346850 ou intercommunication entre appartements sur installations sans interface d’appartement. Intercommunicability inside an apartment in systems with apartment interface item 346850 or intercommunicability between apartments in systems without apartment interface. Intercom all’interno dell’appartamento in impianti con interfaccia di appartamento art.346850; oppure intercom tra appartamenti in impianti senza interfaccia di appartamento. Intercom mit einseitiger Funktion: sendet den Ruf an alle Geräte mit derselben Adresse. Intercom entre apartamentos em instalações com interface de apartamento art. 346850. Intercom tussen appartementen in installaties met interface van appartement art. 346850. Intercomunicación entre apartamentos en instalaciones con interfaz de departamento Art. 346850. Gegenseitige Kommunikation zwischen Wohnungen für Anlagen mit Wohnungsschnittstelle Art. 346850. Intercommunication entre appartements sur installations avec interface d’appartement réf. 346850. Intercommunicability between apartments in systems with apartment interface item 346850. Intercom tra appartamenti in impianti con interfaccia da appartamento art. 346850. Intercom sur lui-même, envoie l’appel à tous les appareils ayant une adresse identique. Abertura da fechadura da UE (configurada com P+4) de ma neira directa sem a chamada ou então ligação do actuador art. 346200/346210 (configurado com P+4 e MOD=5) ou então ligação do actuador art. 346230 (configurado com P+4). PT Legenda Rechtstreekse opening van het deurslot van het als P+4 gecon figureerde deurstation, zonder oproep of activering van het toe stel art. 346200/346210 (geconfigureerd als P+4 en MOD=5) of ac tivering van het toestel art. 346230 (gecon figureerd als P+4). NL Legenda Apertura cerradura del PE (configurado con P+4) en modo directo sin llamada o activación del actuador art. 346200/346210 (configurado con P+4 y MOD=5) o activación del actuador art. 346230 (configurado con P+4). ES Leyenda Türöffnung der Türstation (mit P+4 konfiguriert) oder Aktivierung über den Aktivator Art. 346200/346210 (mit P+4 und MOD=5) oder Aktivierung über den Aktivator Art. 346230 (mit P+4 konfiguriert). DE Erläuterung Ouverture serrure du PE (configuré avec P+4) en mode direct sans l’appel ou ac tivation actionneur réf. 346200/346210 (configuré avec P+4 et MOD=5) ou activation actionneur réf. 346230 (configuré avec P+4). FR Légende Door lock opening of EP (configured with P+4) directly without the call or activating the actuator Item 346200/346210 (con figured with P+4 and MOD=5) or activating the actuator Item 346230 (configured with P+4). EN Legend Apertura serratura del PE (configurato con P+4) in modo diretto senza la chiamata oppure attivazione attuatore art.346200/346210 (configurato con P+4 e MOD=5) oppure attivazione attuatore art.346230 (configurato con P+4). IT Legenda-
 1
1
-
 2
2
-
 3
3
-
 4
4
-
 5
5
-
 6
6
-
 7
7
-
 8
8
-
 9
9
-
 10
10
-
 11
11
-
 12
12
-
 13
13
-
 14
14
-
 15
15
-
 16
16
-
 17
17
-
 18
18
-
 19
19
-
 20
20
-
 21
21
-
 22
22
-
 23
23
-
 24
24
-
 25
25
-
 26
26
-
 27
27
-
 28
28
-
 29
29
-
 30
30
-
 31
31
-
 32
32
-
 33
33
-
 34
34
-
 35
35
-
 36
36
-
 37
37
-
 38
38
-
 39
39
-
 40
40
-
 41
41
-
 42
42
-
 43
43
-
 44
44
-
 45
45
-
 46
46
-
 47
47
-
 48
48
-
 49
49
-
 50
50
-
 51
51
-
 52
52


Bticino 365711 Installatie gids
- Type
- Installatie gids
- Deze handleiding is ook geschikt voor
in andere talen
- English: Bticino 365711 Installation guide
- italiano: Bticino 365711 Guida d'installazione
- français: Bticino 365711 Guide d'installation
- español: Bticino 365711 Guía de instalación
- português: Bticino 365711 Guia de instalação