
343071
343081
343091
11/19-01 PC
LE08950AE
BTicino SpA – Viale Borri, 231 – 21100 Varese – Italy – www.bticino.com
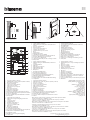
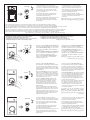
160 –165 cm
90 –130 cm
50 cm
105°
140 cm
100 mm
190 mm
26 mm
1
2
3
4
5
4
6
7
16
15
14
12
13
11
10
9
8
1. Telecamera (343081e 343091)
2. LED illuminazione campo di ripresa (343081 e 343091)
3. Morsetti di collegamento
4. Pulsanti di chiamata
5. Lettore di prossimità (343091)
6. LED connessione attiva
7. LED indicazione porta aperta
8. Microfono
9. Regolazione microfono
10. Regolazione altoparlante
11. Switch mono/bifamiliare
12. Pulsante programmazione badge/Reset (343091)
13. Pannello LED per illuminazione pulsante di chiamata
14. Sede dei conguratori
15. Sensore di luminosità per retroilluminazione notturna
16. Altoparlante
1. Camera (343081 and 343091)
2. LED for the shooting eld lighting (343081 and
343091)
3. Connection clamp
4. Call pushbuttons
5. Proximity reader (343091)
6. Active connection LED
7. Open door notication LED
8. Microphone
9. Microphone adjustment
10. Loudspeaker adjustment
11. One-family/two-family switch
12. Key card programming pushbutton / Reset (343091)
13. LED panel for call pushbutton lighting
14. Congurator socket
15. Brightness sensor for night backlighting
16. Loudspeaker
1. Kamera (343081und 343091)
2. LED Beleuchtung des Aufnahmefelds (343081 und
343091)
3. Anschlussklemmen
4. Ruftasten
5. Näherungsleser (343091)
6. LED Verbindung aktiv
7. LED Anzeige Tür oen
8. Mikrophon
9. Einstellung des Mikrophons
10. Einstellung des Lautsprechers
11. Switch Ein-/Zweifamilienhaus
12. Programmierungstaste Badge/Reset (343091)
13. LED-Tafel zur Beleuchtung der Ruftaste
14. Sitz der Konguratoren
15. Helligkeitssensor zur nächtlichen Rückbeleuchtung
16. Lautsprecher
1. Caméra (343081 et 343091)
2. LED d’éclairage du champ de la caméra (343081 et
343091)
3. Bornes de branchement
4. Boutons d’appel
5. Lecteur de proximité (343091)
6. VOYANT connexion active
7. VOYANT indication porte ouverte
8. Micro
9. Réglage micro
10. Réglage haut-parleur
11. Commutateur mono/bi-familial
12. Bouton de programmation badge/Reset (343091)
13. Panneau LED d’éclairage bouton d’appel
14. Logement des congurateurs.
15. Capteur de luminosité pour rétro-éclairage nocturne
16. Haut-parleur
1. Telecámara (343081y 343091)
2. LED iluminación campo de grabación (343081 y 343091)
3. Bornes de conexión
4. Pulsadores de llamada
5. Lector de proximidad (343091)
6. LED conexión activada
7. LED indicación puerta abierta
8. Micrófono
9. Regulación del micrófono
10. Regulación del altavoz
11. Switch mono/bifamiliar
12. Pulsador de programación credencial/Reset (343091)
13. Panel LED para iluminación pulsador de llamada
14. Alojamiento de los conguradores
15. Sensor de luminosidad para retroiluminación nocturna
16. Altavoz
1. Câmara (343081 e 343091)
2. LED de iluminação do campo de lmagem (343081 e
343091)
3. Bornes de conexão
4. Botões de chamada
5. Leitor de proximidade (343091)
6. LED de conexão ativa
7. LED indicação de porta aberta
8. Microfone
9. Regulação do microfone
10. Regulação do altifalante
11. Interruptor mono/bifamiliar
12. Botão de programação do Crachá/Rearme (343091)
13. Painel LED para iluminação do botão de chamada
14. Sede dos conguradores
15. Sensor de luminosidade para retroiluminação noturna
16. Altifalante
1. Camera (343081en 343091)
2. Led verlichting camerabereik (343081 en 343091)
3. Aansluitklemmen
4. Oproepknoppen
5. Nabijheidslezer (343091)
6. Led verbinding geactiveerd
7. Led aanduiding deur geopend
8. Microfoon
9. Regeling microfoon
10. Regeling luidspreker
11. Schakelaar een-/tweegezins
12. Knop badgeprogrammering/reset (343091)
13. Led paneel voor verlichting oproepknop
14. Plaats van de conguratoren
15. Lichtsensor voor achtergrondverlichting ‘s nachts
16. Luidspreker
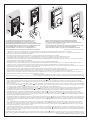
80°
85 cm
50 cm
.)3430913430811
.)3430913430812
3
4
.)3430915
6
7
8
9
10
11
.)34309112
13
14
15
16
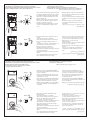
- Dispositivo di comunicazione contactless operante alla frequenza di 125kHz.
Potenza di trasmissione < 66dBuA/m a 10m
- Contactless communication device which works at the frequency of 125kHz.
Transmission power < 66dBuA/m at 10m
- Dispositif de communication sans contact qui fonctionne à la fréquence de 125kHz.
Puissance de transmission < 66dBuA/m à 10m
- Kontaktloses Kommunikationsgerät mit einer Frequenz von 125kHz.
Übertragungsleistung 66dBuA/m in 10m
- Dispositivo de comunicación sin contacto que trabaje con la frecuencia de 125kHz.
Potencia de transmisión < 66dBuA/m a 10m
- Contactloos communicatieapparaat dat werkt met een frequentie van 125kHz.
Zendvermogen < 66dBuA/m a 10m
- Dispositivo de comunicação sem contato que atua na frequência de 125 kHz.
Potência de transmissão <66dBuA/m a 10 m.
125
1066

2
** Prima dell’installazione assicurarsi che la vite sia completamente avvitata.
** Before installing make sure that the screw is completely tightened.
** Avant l’installation, s’assurer que la vis soit complètement vissée.
** Vor der Installation sicherstellen, dass die Schraube richtig festgeschraubt ist.
** Antes de la instalación, compruebe que el tornillo esté completamente enroscado.
** Vóór de installatie controleren of de schroef volledig vastgedraaid is.
** Antes da instalação vericar se o parafuso está completamente atarraxado.
• La telecamera non deve essere installata di fronte a grandi sorgenti luminose, oppure in luoghi dove il soggetto ripreso rimanga molto in controluce.
Le telecamere a colori presentano, in condizioni di scarsa luminosità, una sensibilità inferiore rispetto alle telecamere in bianco/nero. Si consiglia pertanto, in ambienti poco
illuminati di prevedere una fonte di illuminazione aggiuntiva.
• The camera must not be installed in front of large light sources, or in places where the subject viewed remains in deep shadow.
In poor lighting conditions cameras with colour are less sensitive than black/white cameras. An extra lighting source should be added in poorly lit rooms.
• La télécaméra ne doit pas être installée en face de fortes sources lumineuses, ou bien dans des endroits où le sujet pris reste très à contre-jour.
Les télécaméras couleurs présentent, dans des conditions de faible luminosité, une sensibilité inférieure aux télécaméras noir/blanc. Il est donc conseillé, dans des milieux peu
éclairés, de prévoir une source de lumière supplémentaire.
• Die Kamera darf nicht vor starken Lichtquellen oder an Orten installiert werden, wo das Subjekt sich im Gegenlicht bendet.
Farbkameras besitzen bei schlechter Beleuchtung eine geringere Empndlichkeit als Schwarz/Weiß Kameras. Wir empfehlen daher eine zusätzliche Beleuchtungsquelle vorzusehen.
• La telecámara no debe ser instalada delante de fuentes luminosas grande en lugares en donde el individuo lmado se encuentre demasiado en contraluz.
Las telecámaras en colores presentan, en condiciones de escasa luminosidad, una sensibilidad inferior respecto a las telecámaras en blanco/negro. Por lo tanto es aconsejable en
ambientes escasamente iluminados prever una fuente de iluminación extra.
• Installeer de camera niet tegenover grote lichtbronnen of op plaatsen waar de opname van het onderwerp door sterk tegenlicht wordt gestoord.
Camera’s met kleuren zijn bij een zwakke verlichting minder gevoelig dan zwart-wit camera’s. Daarom is het raadzaam om zwak verlichte omgevingen van extra verlichting te voorzien.
• A câmara não deve ser montada diante de fortes fontes de luz, ou então em lugares onde o elemento que deve ser lmado que muito em contraluz.
As câmaras em cores apresentam, quando há pouca luminosidade, uma sensibilidade inferior em relação às câmaras em branco e preto. Portanto, recomenda-se, quando os
ambientes forem pouco iluminados providenciar uma fonte de iluminação adicional.
• Se si manifestasse il disturbo del fischio, (effetto Larsen), ridurre prima la potenza del microfono , agendo con un cacciavite sul potenziometro corrispondente, fino ad un
livello accettabile. Qualora il fenomeno persista, agire sul potenziometro dell’altoparlante
in modo da eliminare l’inconveniente. Se il volume è troppo basso, aumentare
prima il volume dell’altoparlante ed eventualmente anche quello del microfono, tenendo presente che è preferibile una trasmissione chiara e priva di disturbi, che una al limite
dell’innesco (Larsen).
• In case of a whistle (Larsen effect), first reduce the microphones
power, adjusting the corresponding potentiometers with a screw driver, until an acceptable level is reached. Should the
whistle persist, adjust the loudspeakers
volume in order to eliminate the trouble. If the volume is too low level then, increase first the potentiometer of the loudspeaker and secondly the
one for the microphone, bearing in mind that a clear and noise free reception is preferable than one just before whistling (Larsen).
• Lors de sifflement (effet de Larsen), reduire d’abord la puissance du micro
, sur le potentiomètre correspondant, à l’aide d’un tournevis, jusqu’à l’obtention d’un niveau satisfaisant.
Si le sifflement persiste, régler le potentiomètre du hautparleur
jusqu’à l’élimination de celui-ci. Si le volume est trop bas, augmenter d’abord la puissance du haut-parleur et
éventuellement celle du micro, en considérant qu’une réception claire et sans parasite est préférable à une communication à la limite de l’accrochage (effet de Larsen).
• Beim etwaigen Auftreten eines Pfeiftones (Larsen-Effekt), zuerst die Lautstärke des Mikrophones
bis auf einen annehmbaren Wert herabsetzen, indem man das entsprechende
Potentiometer mit einem Schraubendreher einstellt. Sollte die Störung weiterhin bestehen, dann das Potentiometer des Lautsprechers
bis zur Beseitigung des Pfeiftones einstellen. Ist
die Lautstärke nun zu niedrig, dann zuerst die des Lautsprechers und erst danach evtl. auch die des Mikrophones erhohen, wobei ein deutlicher und störungsfreier Empfang einem an der
Störungsgrenze liegendem (Larsen-Effekt) vorzuziehen ist.
• Si se manifesta el silbido de acoplamiento, (efecto Larsen), reducir primero la potencia del micrófono
, girando con un destornillador el potenciómetro correspondiente, hasta
obtener un nivel aceptable. Si el fenómeno persistiera, regular el potenciómetro del altavoz
hasta eliminar la interferencia. Si el volumen es demasiado bajo, aumentar primero
el volumen del altavoz y eventualmente también el del micrófono, teniendo en cuenta que es preferible una transmissión clara y limpia de interferencias, que una al limite del
acoplo (Larsen).
• Als er een fluittoon hoorbaar is (effect van Larsen): verminder eerst het vermogen van de microfoon
met behulp van een schroevendraaier zijn stroomregelaar zo te regelen dat de
geluidssterkte van het gefluit aanvaardbaar is. Als het verschijnsel niet verdwijnt, dan moet u ook de stroomregelaar van de luidspreker
bijstellen. Als de geluidssterkte nu te klein is,
verhoog dan eerst de geluidssterkte van de luidspreker en daarna eventueel ook die van de microfoon, en denk er bij het bijstellen aan dat een duidelijk hoorbaar en ongestoord geluid
beter is dan een harder geluid op de grens van het Larsen effect.
• Se se manifestar uma interferência no som (efeito de Larsen), começar por diminuir a potência do microfone
, rodando o potenciómetro correspondente com uma chave de
parafusos, até obter um nível aceitável. Se o fenómeno persistir, regular o potenciómetro do altifalante
de modo a eliminar o problema. Se o volume estiver demasiado baixo,
começar por aumentar o volume do altifalante e depois, se necessário, o do microfone, tendo presente que é melhor ter uma transmissão clara e sem interferências, que uma no
limiar de início de efeitos Larsen.
.)Larsen
* Per garantire l’impermeabilità montare le guarnizioni a corredo.
* To guarantee water tightness make sure to t the seals supplied.
* Pour garantir l’imperméabilité, monter les joints fournis à cet eet..
* Um die Abdichtung sicherzustellen, montieren Sie die mitgelieferten Dichtungen..
* Montar las juntas de la dotación para garantizar la impermeabilidad.
* Monteer de geleverde pakkingen om de waterdichtheid te waarborgen.
* Para garantir a impermeabilidade, montar as vedações fornecidas juntamente.
*
*
1
**
2
3
4
5
Pagina wordt geladen...
Pagina wordt geladen...

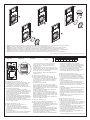
5
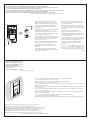
Se la memorizzazione non va a buon fine, si
accendono contemporaneamente i LED Serratura e
Connessione e il dispositivo emette un beep lungo.
If the saving is not successful, the Door lock and
Connection LED light up at the same time and the
device gives a long beep.
Si la mémorisation échoue, les voyants Serrure
et Connexion s'allument simultanément et le
dispositif émet un bip prolongé.
Wenn die Speicherung nicht erfolgreich bgeschlossen
wird, leuchten die LED Schloss und Verbindung
gleichzeitig auf und die Vorrichtung erzeugt einen
langen Piepton.
Si la memorización no se realiza, los LEDs
Cerradura y Conexión se encienden al mismo
tiempo y el dispositivo emite un beep largo.
Als het opslaan niet goed verloopt, gaan de leds
Slot en Verbinding tegelijkertijd branden en laat het
apparaat een lange pieptoon horen.
Se a memorização não for bem-sucedida,
acendem-se, simultaneamente, os LED Fechadura
e Conexão e o dispositivo emite um beep
prolongado.
1 beeeep
Nota: Il badge gestore impianto non comanda la serratura ma abilita solo la programmazione dei badge residenti
Note: The system management key card does not control the door lock but only enables the resident key card programming.
Note: le badge administrateur de l’installation ne commande pas la serrure mais active uniquement la programmation des badges résidents.
N.B.: Das Badge Anlagenbetreiber steuert nicht das Schloss sondern aktiviert nur die Programmierung der Bewohnerbadges.
Nota: La credencial gestor del sistema no acciona la cerradura sino que habilita solamente la programación de los credenciales residentes.
Opmerking: de badge van de installatiebeheerder bedient het slot niet maar activeert uitsluitend de programmering van de inwonersbadges.
Nota: O crachá gestor de instalação não comanda a fechadura, mas habilita apenas a programação dos crachás residentes.
· Configurazione badge residente (solo per articolo 343091)
· Resident badge configuration (only for item 343091)
· Configuration badge résident
(uniquement pour référence 343091)
· Konfiguration Badge der Bewohner (nur für Artikel 343091)
· Configuración de la credencial residente (solamente para el art. 343091)
· Configuratie inwonerbadge (uitsluitend voor artikel 343091)
· Configuração de crachá residente (somente para o item 343091)
)343091
1 beep
Avvicinare al lettore il Badge gestore impianto fino
al lampeggio del LED Serratura e tono di conferma.
Move the system manager badge close to the reader
until the Door lock LED flashes, and a confirmation
sound is heard.
Approcher le Badge administrateur installation du
lecteur et attendre que le LED Serrure clignote et
qu’une tonalité de confirmation soit émise.
Dem Lesegerät das Badge des Anlagenbetreibers
nähern, bis die LED des Schlosses blinkt und das
Bestätigungssignal ertönt.
Acerque al lector la credencial del administrador
del sistema hasta que parpadea el LED de la
Cerradura y se produzca el tono de confirmación.
Houd de installatiebeheerder badge voor het
leesapparaat tot de LED Slot gaat knipperen en u ter
bevestiging een geluidssignaal hoort.
Aproxime ao leitor o Crachá gestor da instalação
até o lampejo do LED da Fechadura e o tom de
confirmação.
2 beep
· Avvicinare al lettore il badge residente da
memorizzare, fino al lampeggio del LED Serratura
e tono di conferma. Per programmare altri badge
residenti, avvicinarli al lettore entro 30 secondi dal
precedente. Due beep brevi confermano l’avvenuta
programmazione.
· Move the resident badge to save close to the reader
until the Door lock LED flashes, and a confirmation
sound is heard. If programming other resident badges,
move each one close to the reader within 30 seconds
from the previous one. Two short beeps confirm that
programming has been successful.
· Approcher le Badge résident à mémoriser du
lecteur et attendre que le LED Serrure clignote
et qu’une tonalité de confirmation soit émise.
Pour programmer d’autres badges résidents,
les approcher du lecteur dans les 30 secondes
l’un après l’autre. Deux bips brefs confirment la
programmation.
· Dem Lesegerät das Badge des Bewohners nähern,
das gespeichert werden soll, bis die LED des Schlosses
blinkt und das Bestätigungssignal ertönt. Um weitere
Badge zu programmieren, diese innerhalb von 30
Sekunden nach dem vorhergehenden dem Lesegerät
nähern. Zwei kurze Pieptöne bestätigen, dass die
Programmierung erfolgt ist.
· Acerque al lector la credencial residente que
desea memorizar hasta que parpadea el LED de la
Cerradura y se produzca el tono de confirmación.
Para programar otras credenciales residentes, es
preciso acercarlas al lector antes de 30 segundos de
la anterior. Dos breves bips confirmarán que se ha
efectuado la programación.
· Houd de inwonerbadge die opgeslagen moet worden
voor het leesapparaat tot de LED Slot gaat knipperen
en u ter bevestiging een geluidssignaal hoort. Als u
andere inwonerbadges wilt opslaan, moet u deze
binnen 30 seconden na de vorige badge voor het
leesapparaat houden. De programmering is verricht
als u twee korte pieptonen hoort.
· Aproxime ao leitor o crachá residente a memorizar,
até o lampejo do LED da Fechadura e do tom
de confirmação. Para programar outros crachás
residentes, aproxime-os ao leitor dentro de 30
segundos do anterior. Dois beep breves confirmam
a ocorrida programação.
30
1 beeeep
Se la memorizzazione non va a buon fine, si
accendono contemporaneamente i LED Serratura e
Connessione e il dispositivo emette un beep lungo.
If the saving is not successful, the Door lock and
Connection LED light up at the same time and the
device gives a long beep.
Si la mémorisation échoue, les voyants Serrure
et Connexion s'allument simultanément et le
dispositif émet un bip prolongé.
Wenn die Speicherung nicht erfolgreich bgeschlossen
wird, leuchten die LED Schloss und Verbindung
gleichzeitig auf und die Vorrichtung erzeugt einen
langen Piepton.
Si la memorización no se realiza, los LEDs Cerradura
y Conexión se encienden al mismo tiempo y el
dispositivo emite un beep largo.
Als het opslaan niet goed verloopt, gaan de leds
Slot en Verbindingtegelijkertijd branden en laat het
apparaat een lange pieptoon horen.
Se a memorização não for bem-sucedida, acendem-
se, simultaneamente, os LED Fechadura e Conexão
e o dispositivo emite um beep prolongado.

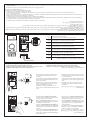
6
1 beep
≥ 5 s
2 beep
≥ 10 s
1 beep
2 beep
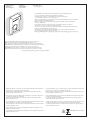
Cancellazione badge gestore impianto (solo per articolo 343091)
Cancellation of system management key card (only for item 343091)
Effacement badge administrateur installation (uniquement pour référence 343091)
· Badge des Anlagenverwalters löschen (nur für Artikel 343091)
Cancelación de credencial administrador del sistema
(solamente para el artículo 343091)
Badge installatiebeheerder wissen (uitsluitend voor artikel 343091)
Cancelamento do crachá Gestor da instalação (somente para o item 343091)
)343091
Tenere premuto il pulsante di programmazione fino
al lampeggio del LED Serratura e tono di conferma.
· Press and hold down the programming pushbutton
until the Door lock LED starts flashing, and a confir-
mation sound is heard.
· Maintenir enfoncée la touche de programmation
jusqu’à ce que le LED Serrure clignote et que la
tonalité de confirmation soit émise.
· Programmierungstaste gedrückt halten, bis die LED
des Schlosses blinkt und das Bestätigungssignal
ertönt.
· Mantenga apretado el pulsador de programación
hasta que parpadea el LED Cerradura y se emite el
tono de confirmación.
· Houd de programmeringsknop ingedrukt tot de LED
Slot knippert en u ter bevestiging een geluidssignaal
hoort.
· Mantenha carregado o botão de programação
até o lampejo do LED da Fechadura e o tom de
confirmação.
Ripremere il pulsante di programmazione per 10
secondi.
L'avvenuta cancellazione è confermata
dall'accensione del LED Serratura e da due beep.
Press the programming pushbutton again for 10
seconds.
The switching on of the Door Lock LED and two beeps
indicate that the cancellation has taken place.
Appuyer à nouveau sur le bouton de
programmation pendant 10 secondes.
L'effacement est confirmé par l'allumage du voyant
Serrure et par deux bips.
Die Programmierungstaste 10 Sekunden lang erneut
drücken.
Die Löschung wird durch das Aufleuchten der LED
Schloss und durch zwei Pieptöne bestätigt.
Presione de nuevo el pulsador de configuración 10
segundos. La cancelación efectuada se confirma
con el encendido del LED Cerradura y dos beeps.
Druk opnieuw 10 seconden lang op de
programmeerknop.
Het wissen wordt bevestigd door het oplichten van de
led slot en door twee pieptonen.
Premir novamente o botão de programação por 10
segundos.
O sucesso do cancelamento é confirmado pelo
acendimento do LED da Fechadura e por dois
beep.
10
· Avvicinare al lettore il badge Gestore impianto
fino al lampeggio del LED Serratura e l'emissione di
un tono di conferma.
· Move the System Management key card close to the
reader until the Door Lock LED starts flashing and a
confirmation tone is heard.
· Approcher le badge Administrateur installation du
lecteur et attendre que le voyant Serrure clignote
et qu’une tonalité de confirmation soit émise.
· Das Badge Anlagenverwalter dem Lesegerät nähern,
bis die Schloss-LED blinkt und ein Bestätigungston
erzeugt wird.
· Acerque la credencial delAdministrador del
sistema al lector hasta que parpadea el LED de la
cerradura y se produzca el tono de confirmación.
· Breng de badge van de installatiebeheerder naar
de lezer tot de led Slot gaat knipperen en u een
bevestigingstoon hoort.
· Avvicinare al lettore il badge Gestore impianto
fino al lampeggio del LED Serratura e l'emissione di
un tono di conferma.
Cancellazione di tutti i badge dei residenti (solo per articolo 343091)
Cancellation of all the resident key cards (only for item 343091)
Effacement de tous les badges des résidents (uniquement pour référence 343091)
Badge der Bewohner löschen (nur für Artikel 343091)
Cancelación de todas las credenciales de los residentes
(solamente para el artículo 343091)
Alle inwonersbadges wissen (uitsluitend voor artikel 343091)
Cancelamento de todos os crachás dos residentes
(somente para o item 343091)
.)343091
· Riavvicinare per 2 volte consecutive il badge
Gestore impianto.
L'avvenuta cancellazione è confermata
dall'accensione del LED Serratura e da due beep.
· Move the System Management key card twice
consecutively close to the reader again.
The switching on of the Door Lock LED and two beeps
indicate that the cancellation has taken place.
· Approcher à nouveau 2 fois de suite le badge
Administrateur installation.
L'effacement est confirmé par l'allumage du voyant
Serrure et par deux bips.
· 2 Mal nacheinander das Badge Anlagenverwalter
nähern.
Die Löschung wird durch das Aufleuchten der LED
Schloss und durch zwei Pieptöne bestätigt.
· Acerque de nuevo 2 veces consecutivas la credencial
del Administrador del sistema.
La cancelación efectuada se confirma con el
encendido del LED Cerradura y dos beeps.
· Breng de badge van de installatiebeheerder 2 keer
achtereenvolgens naar de lezer.
Het wissen wordt bevestigd door het oplichten van de
led slot en door twee pieptonen.
· Aproximar ao leitor o crachá Gestor da instalação
até o lampejo do LED Fechadura e a emissão de
um tom de confirmação.
Pagina wordt geladen...
Pagina wordt geladen...
Documenttranscriptie
343071 343081 343091 m 0m 190 mm 10 90 –130 cm 50 cm 105° 140 cm 50 cm 26 16 15 14 1 2 3 13 12 11 10 9 8 1. 2. 3. 4. 5. 6. 7. 8. 9. 10. 11. 12. 13. 14. 15. 16. 4 5 4 6 7 Telecamera (343081e 343091) LED illuminazione campo di ripresa (343081 e 343091) Morsetti di collegamento Pulsanti di chiamata Lettore di prossimità (343091) LED connessione attiva LED indicazione porta aperta Microfono Regolazione microfono Regolazione altoparlante Switch mono/bifamiliare Pulsante programmazione badge/Reset (343091) Pannello LED per illuminazione pulsante di chiamata Sede dei configuratori Sensore di luminosità per retroilluminazione notturna Altoparlante 1. Camera (343081 and 343091) 2. LED for the shooting field lighting (343081 and 343091) 3. Connection clamp 4. Call pushbuttons 5. Proximity reader (343091) 6. Active connection LED 7. Open door notification LED 8. Microphone 9. Microphone adjustment 10. Loudspeaker adjustment 11. One-family/two-family switch 12. Key card programming pushbutton / Reset (343091) 13. LED panel for call pushbutton lighting 14. Configurator socket 15. Brightness sensor for night backlighting 16. Loudspeaker m m 1. Caméra (343081 et 343091) 2. LED d’éclairage du champ de la caméra (343081 et 343091) 3. Bornes de branchement 4. Boutons d’appel 5. Lecteur de proximité (343091) 6. VOYANT connexion active 7. VOYANT indication porte ouverte 8. Micro 9. Réglage micro 10. Réglage haut-parleur 11. Commutateur mono/bi-familial 12. Bouton de programmation badge/Reset (343091) 13. Panneau LED d’éclairage bouton d’appel 14. Logement des configurateurs. 15. Capteur de luminosité pour rétro-éclairage nocturne 16. Haut-parleur 1. 2. 3. 4. 5. 6. 7. 8. 9. 10. 11. 12. 13. 14. 15. 16. 1. Kamera (343081und 343091) 2. LED Beleuchtung des Aufnahmefelds (343081 und 343091) 3. Anschlussklemmen 4. Ruftasten 5. Näherungsleser (343091) 6. LED Verbindung aktiv 7. LED Anzeige Tür offen 8. Mikrophon 9. Einstellung des Mikrophons 10. Einstellung des Lautsprechers 11. Switch Ein-/Zweifamilienhaus 12. Programmierungstaste Badge/Reset (343091) 13. LED-Tafel zur Beleuchtung der Ruftaste 14. Sitz der Konfiguratoren 15. Helligkeitssensor zur nächtlichen Rückbeleuchtung 16. Lautsprecher 1. Câmara (343081 e 343091) 2. LED de iluminação do campo de filmagem (343081 e 343091) 3. Bornes de conexão 4. Botões de chamada 5. Leitor de proximidade (343091) 6. LED de conexão ativa 7. LED indicação de porta aberta 8. Microfone 9. Regulação do microfone 10. Regulação do altifalante 11. Interruptor mono/bifamiliar 12. Botão de programação do Crachá/Rearme (343091) 13. Painel LED para iluminação do botão de chamada 14. Sede dos configuradores 15. Sensor de luminosidade para retroiluminação noturna 16. Altifalante 1. 2. 3. 4. 5. 6. 7. 8. 9. 10. 11. 12. 13. 14. 15. 16. Telecámara (343081y 343091) LED iluminación campo de grabación (343081 y 343091) Bornes de conexión Pulsadores de llamada Lector de proximidad (343091) LED conexión activada LED indicación puerta abierta Micrófono Regulación del micrófono Regulación del altavoz Switch mono/bifamiliar Pulsador de programación credencial/Reset (343091) Panel LED para iluminación pulsador de llamada Alojamiento de los configuradores Sensor de luminosidad para retroiluminación nocturna Altavoz Camera (343081en 343091) Led verlichting camerabereik (343081 en 343091) Aansluitklemmen Oproepknoppen Nabijheidslezer (343091) Led verbinding geactiveerd Led aanduiding deur geopend Microfoon Regeling microfoon Regeling luidspreker Schakelaar een-/tweegezins Knop badgeprogrammering/reset (343091) Led paneel voor verlichting oproepknop Plaats van de configuratoren Lichtsensor voor achtergrondverlichting ‘s nachts Luidspreker .)343091 و343081( الكاميرا التليفزيونية.1 .)343091 و343081( ليد إضاءة مجال الرؤية.2 . أطراف التوصيل.3 .أزرار المكالمة.4 .)343091( قارئ بطاقات إلكترونية.5 .ليد االتصال النشط.6 .ليد اإلشارة إلى فتح الباب.7 . الميكروفون.8 . ضبط الميكروفون.9 . ضبط مكبر الصوت.10 . عائلتين/ مفتاح عائلة واحدة.11 .)343091( إعادة الضبط/ زر برمجة البطاقة.12 .لوحة ليد إلضاءة زر المكالمة.13 .موضع عناصر اإلعداد.14 .حساس إضاءة لإلضاءة الخلفية الليلية.15 َّ . مكبر الصوت.16 - Dispositivo di comunicazione contactless operante alla frequenza di 125kHz. Potenza di trasmissione < 66dBuA/m a 10m - Contactless communication device which works at the frequency of 125kHz. Transmission power < 66dBuA/m at 10m - Dispositif de communication sans contact qui fonctionne à la fréquence de 125kHz. Puissance de transmission < 66dBuA/m à 10m - Kontaktloses Kommunikationsgerät mit einer Frequenz von 125kHz. Übertragungsleistung 66dBuA/m in 10m - Dispositivo de comunicación sin contacto que trabaje con la frecuencia de 125kHz. Potencia de transmisión < 66dBuA/m a 10m - Contactloos communicatieapparaat dat werkt met een frequentie van 125kHz. Zendvermogen < 66dBuA/m a 10m - Dispositivo de comunicação sem contato que atua na frequência de 125 kHz. Potência de transmissão <66dBuA/m a 10 m. BTicino SpA – Viale Borri, 231 – 21100 Varese – Italy – www.bticino.com LE08950AE 160 –165 cm 80° 85 cm . كيلو هرتز125 وحدة اتصال بدون لمس تعمل بتردد متر10 إلىBuA/m 66 > قدرة اإلرسال 11/19-01 PC 3 * ** 2 4 1 * * Per garantire l’impermeabilità montare le guarnizioni a corredo. * To guarantee water tightness make sure to fit the seals supplied. * Pour garantir l’imperméabilité, monter les joints fournis à cet effet.. * Um die Abdichtung sicherzustellen, montieren Sie die mitgelieferten Dichtungen.. ** Prima dell’installazione assicurarsi che la vite sia completamente avvitata. ** Before installing make sure that the screw is completely tightened. ** Avant l’installation, s’assurer que la vis soit complètement vissée. ** Vor der Installation sicherstellen, dass die Schraube richtig festgeschraubt ist. 5 * Montar las juntas de la dotación para garantizar la impermeabilidad. * Monteer de geleverde pakkingen om de waterdichtheid te waarborgen. * Para garantir a impermeabilidade, montar as vedações fornecidas juntamente. ** - بيكرتلا لبق، ماكحإب طوبرم رامسملا نأ دكأت. ** Antes de la instalación, compruebe que el tornillo esté completamente enroscado. ** Vóór de installatie controleren of de schroef volledig vastgedraaid is. ** Antes da instalação verificar se o parafuso está completamente atarraxado. . قم بتركيب الحشيات المزودة،* لضمان مقاومة الماء • La telecamera non deve essere installata di fronte a grandi sorgenti luminose, oppure in luoghi dove il soggetto ripreso rimanga molto in controluce. Le telecamere a colori presentano, in condizioni di scarsa luminosità, una sensibilità inferiore rispetto alle telecamere in bianco/nero. Si consiglia pertanto, in ambienti poco illuminati di prevedere una fonte di illuminazione aggiuntiva. • The camera must not be installed in front of large light sources, or in places where the subject viewed remains in deep shadow. In poor lighting conditions cameras with colour are less sensitive than black/white cameras. An extra lighting source should be added in poorly lit rooms. • La télécaméra ne doit pas être installée en face de fortes sources lumineuses, ou bien dans des endroits où le sujet pris reste très à contre-jour. Les télécaméras couleurs présentent, dans des conditions de faible luminosité, une sensibilité inférieure aux télécaméras noir/blanc. Il est donc conseillé, dans des milieux peu éclairés, de prévoir une source de lumière supplémentaire. • Die Kamera darf nicht vor starken Lichtquellen oder an Orten installiert werden, wo das Subjekt sich im Gegenlicht befindet. Farbkameras besitzen bei schlechter Beleuchtung eine geringere Empfindlichkeit als Schwarz/Weiß Kameras. Wir empfehlen daher eine zusätzliche Beleuchtungsquelle vorzusehen. • La telecámara no debe ser instalada delante de fuentes luminosas grande en lugares en donde el individuo filmado se encuentre demasiado en contraluz. Las telecámaras en colores presentan, en condiciones de escasa luminosidad, una sensibilidad inferior respecto a las telecámaras en blanco/negro. Por lo tanto es aconsejable en ambientes escasamente iluminados prever una fuente de iluminación extra. • Installeer de camera niet tegenover grote lichtbronnen of op plaatsen waar de opname van het onderwerp door sterk tegenlicht wordt gestoord. Camera’s met kleuren zijn bij een zwakke verlichting minder gevoelig dan zwart-wit camera’s. Daarom is het raadzaam om zwak verlichte omgevingen van extra verlichting te voorzien. • A câmara não deve ser montada diante de fortes fontes de luz, ou então em lugares onde o elemento que deve ser filmado fique muito em contraluz. As câmaras em cores apresentam, quando há pouca luminosidade, uma sensibilidade inferior em relação às câmaras em branco e preto. Portanto, recomenda-se, quando os ambientes forem pouco iluminados providenciar uma fonte de iluminação adicional. . أو في األماكن حيث يظل الشيء الملتقط صورته طويال في اإلضاءة الخلفية،• ال يجوز تركيب الكاميرا التليفزيونية أمام مصادر ضوئية كبيرة . لذا نوصي بوضع مصدر إضاءة إضافي في البيئات ذات اإلضاءة الضعيفة. يكون لديها حساسية منخفضة مقارنة بالكاميرات التليفزيونية األبيض واألسود، في ظروف اإلضاءة الضعيفة،• الكاميرات التليفزيونية الملونة • Se si manifestasse il disturbo del fischio, (effetto Larsen), ridurre prima la potenza del microfono , agendo con un cacciavite sul potenziometro corrispondente, fino ad un in modo da eliminare l’inconveniente. Se il volume è troppo basso, aumentare livello accettabile. Qualora il fenomeno persista, agire sul potenziometro dell’altoparlante prima il volume dell’altoparlante ed eventualmente anche quello del microfono, tenendo presente che è preferibile una trasmissione chiara e priva di disturbi, che una al limite dell’innesco (Larsen). power, adjusting the corresponding potentiometers with a screw driver, until an acceptable level is reached. Should the • In case of a whistle (Larsen effect), first reduce the microphones volume in order to eliminate the trouble. If the volume is too low level then, increase first the potentiometer of the loudspeaker and secondly the whistle persist, adjust the loudspeakers one for the microphone, bearing in mind that a clear and noise free reception is preferable than one just before whistling (Larsen). • Lors de sifflement (effet de Larsen), reduire d’abord la puissance du micro , sur le potentiomètre correspondant, à l’aide d’un tournevis, jusqu’à l’obtention d’un niveau satisfaisant. jusqu’à l’élimination de celui-ci. Si le volume est trop bas, augmenter d’abord la puissance du haut-parleur et Si le sifflement persiste, régler le potentiomètre du hautparleur éventuellement celle du micro, en considérant qu’une réception claire et sans parasite est préférable à une communication à la limite de l’accrochage (effet de Larsen). bis auf einen annehmbaren Wert herabsetzen, indem man das entsprechende • Beim etwaigen Auftreten eines Pfeiftones (Larsen-Effekt), zuerst die Lautstärke des Mikrophones bis zur Beseitigung des Pfeiftones einstellen. Ist Potentiometer mit einem Schraubendreher einstellt. Sollte die Störung weiterhin bestehen, dann das Potentiometer des Lautsprechers die Lautstärke nun zu niedrig, dann zuerst die des Lautsprechers und erst danach evtl. auch die des Mikrophones erhohen, wobei ein deutlicher und störungsfreier Empfang einem an der Störungsgrenze liegendem (Larsen-Effekt) vorzuziehen ist. • Si se manifesta el silbido de acoplamiento, (efecto Larsen), reducir primero la potencia del micrófono , girando con un destornillador el potenciómetro correspondiente, hasta hasta eliminar la interferencia. Si el volumen es demasiado bajo, aumentar primero obtener un nivel aceptable. Si el fenómeno persistiera, regular el potenciómetro del altavoz el volumen del altavoz y eventualmente también el del micrófono, teniendo en cuenta que es preferible una transmissión clara y limpia de interferencias, que una al limite del acoplo (Larsen). met behulp van een schroevendraaier zijn stroomregelaar zo te regelen dat de • Als er een fluittoon hoorbaar is (effect van Larsen): verminder eerst het vermogen van de microfoon bijstellen. Als de geluidssterkte nu te klein is, geluidssterkte van het gefluit aanvaardbaar is. Als het verschijnsel niet verdwijnt, dan moet u ook de stroomregelaar van de luidspreker verhoog dan eerst de geluidssterkte van de luidspreker en daarna eventueel ook die van de microfoon, en denk er bij het bijstellen aan dat een duidelijk hoorbaar en ongestoord geluid beter is dan een harder geluid op de grens van het Larsen effect. • Se se manifestar uma interferência no som (efeito de Larsen), começar por diminuir a potência do microfone , rodando o potenciómetro correspondente com uma chave de de modo a eliminar o problema. Se o volume estiver demasiado baixo, parafusos, até obter um nível aceitável. Se o fenómeno persistir, regular o potenciómetro do altifalante começar por aumentar o volume do altifalante e depois, se necessário, o do microfone, tendo presente que é melhor ter uma transmissão clara e sem interferências, que uma no limiar de início de efeitos Larsen. قم، إذا استمرت الظاهرة.ستخدما مفك مسامير حتى الوصول إلى المستوى المقبول قم أوال بخفض قدرة الميكروفون وضبط مقياس الجهد المرادف ُم،)• في حالة حدوث مشكلة صفير االرتجاع الصوتي (تأثير الرسن ً أيضا ذلك الخاص بالميكروفون مع األخذ في االعتبار إذا كان الصوت.بضبط مقياس الجهد الخاص بمكبر الصوت حتى تتخلص من المشكلة ً قم أوال بزيادة مستوى الصوت الخاصة بالمكبر وربما،منخفضا للغاية ً .)Larsen( أنه يُفضل بث واضح وخالي من االضطرابات عن بث عند حد االقتران 2 1 beeeep · Se la memorizzazione non va a buon fine, si accendono contemporaneamente i LED Serratura e Connessione e il dispositivo emette un beep lungo. · Si la memorización no se realiza, los LEDs Cerradura y Conexión se encienden al mismo tiempo y el dispositivo emite un beep largo. · If the saving is not successful, the Door lock and Connection LED light up at the same time and the device gives a long beep. · Als het opslaan niet goed verloopt, gaan de leds Slot en Verbinding tegelijkertijd branden en laat het apparaat een lange pieptoon horen. · Si la mémorisation échoue, les voyants Serrure et Connexion s'allument simultanément et le dispositif émet un bip prolongé. · Se a memorização não for bem-sucedida, acendem-se, simultaneamente, os LED Fechadura e Conexão e o dispositivo emite um beep prolongado. · Wenn die Speicherung nicht erfolgreich bgeschlossen wird, leuchten die LED Schloss und Verbindung gleichzeitig auf und die Vorrichtung erzeugt einen langen Piepton. يضيء زوج الليدات الخاصة بالقفل،إذا لم يتم الحفظ بنجاح . ويُصدر الجهاز إشارة صوتية مطوَّلة،واالتصال في نفس الوقت Nota: Il badge gestore impianto non comanda la serratura ma abilita solo la programmazione dei badge residenti Note: The system management key card does not control the door lock but only enables the resident key card programming. Note: le badge administrateur de l’installation ne commande pas la serrure mais active uniquement la programmation des badges résidents. N.B.: Das Badge Anlagenbetreiber steuert nicht das Schloss sondern aktiviert nur die Programmierung der Bewohnerbadges. Nota: La credencial gestor del sistema no acciona la cerradura sino que habilita solamente la programación de los credenciales residentes. Opmerking: de badge van de installatiebeheerder bedient het slot niet maar activeert uitsluitend de programmering van de inwonersbadges. Nota: O crachá gestor de instalação não comanda a fechadura, mas habilita apenas a programação dos crachás residentes. . ال تتحكم بطاقة المسؤول عن المنظومة في القفل بل تُمك ِّن فقط من برمجة بطاقات السكان:ملحوظة · Configurazione badge residente (solo per articolo 343091) · Resident badge configuration (only for item 343091) · Configuration badge résident (uniquement pour référence 343091) · Konfiguration Badge der Bewohner (nur für Artikel 343091) 1 beep · Configuración de la credencial residente (solamente para el art. 343091) · Configuratie inwonerbadge (uitsluitend voor artikel 343091) · Configuração de crachá residente (somente para o item 343091) )343091 • إعدادات بطاقة السكان (فقط للمنتج · Avvicinare al lettore il Badge gestore impianto fino al lampeggio del LED Serratura e tono di conferma. · Move the system manager badge close to the reader until the Door lock LED flashes, and a confirmation sound is heard. · Approcher le Badge administrateur installation du lecteur et attendre que le LED Serrure clignote et qu’une tonalité de confirmation soit émise. · Dem Lesegerät das Badge des Anlagenbetreibers nähern, bis die LED des Schlosses blinkt und das Bestätigungssignal ertönt. · Avvicinare al lettore il badge residente da memorizzare, fino al lampeggio del LED Serratura e tono di conferma. Per programmare altri badge residenti, avvicinarli al lettore entro 30 secondi dal precedente. Due beep brevi confermano l’avvenuta programmazione. 2 beep · Move the resident badge to save close to the reader until the Door lock LED flashes, and a confirmation sound is heard. If programming other resident badges, move each one close to the reader within 30 seconds from the previous one. Two short beeps confirm that programming has been successful. · Approcher le Badge résident à mémoriser du lecteur et attendre que le LED Serrure clignote et qu’une tonalité de confirmation soit émise. Pour programmer d’autres badges résidents, les approcher du lecteur dans les 30 secondes l’un après l’autre. Deux bips brefs confirment la programmation. · Dem Lesegerät das Badge des Bewohners nähern, das gespeichert werden soll, bis die LED des Schlosses blinkt und das Bestätigungssignal ertönt. Um weitere Badge zu programmieren, diese innerhalb von 30 Sekunden nach dem vorhergehenden dem Lesegerät nähern. Zwei kurze Pieptöne bestätigen, dass die Programmierung erfolgt ist. 1 beeeep · Acerque al lector la credencial del administrador del sistema hasta que parpadea el LED de la Cerradura y se produzca el tono de confirmación. · Houd de installatiebeheerder badge voor het leesapparaat tot de LED Slot gaat knipperen en u ter bevestiging een geluidssignaal hoort. · Aproxime ao leitor o Crachá gestor da instalação até o lampejo do LED da Fechadura e o tom de confirmação. قم بتقريب بطاقة المسؤول عن المنظومة من قارئ البطاقات . وتصدر نغمة التأكيد،حتي يومض ليد القفل · Acerque al lector la credencial residente que desea memorizar hasta que parpadea el LED de la Cerradura y se produzca el tono de confirmación. Para programar otras credenciales residentes, es preciso acercarlas al lector antes de 30 segundos de la anterior. Dos breves bips confirmarán que se ha efectuado la programación. · Houd de inwonerbadge die opgeslagen moet worden voor het leesapparaat tot de LED Slot gaat knipperen en u ter bevestiging een geluidssignaal hoort. Als u andere inwonerbadges wilt opslaan, moet u deze binnen 30 seconden na de vorige badge voor het leesapparaat houden. De programmering is verricht als u twee korte pieptonen hoort. · Aproxime ao leitor o crachá residente a memorizar, até o lampejo do LED da Fechadura e do tom de confirmação. Para programar outros crachás residentes, aproxime-os ao leitor dentro de 30 segundos do anterior. Dois beep breves confirmam a ocorrida programação. قم بتقريب بطاقة الساكن التي ترغب في حفظها من قارئ . وتصدر نغمة التأكيد،البطاقات حتى يومض ليد القفل قم بتقريبهم من القارئ في،لبرمجة بطاقات السكان األُخرى إشارتان صوتيتان قصيرتان تؤكدان. ثانية من السابقة30 غضون .إتمام البرمجة · Se la memorizzazione non va a buon fine, si accendono contemporaneamente i LED Serratura e Connessione e il dispositivo emette un beep lungo. · Si la memorización no se realiza, los LEDs Cerradura y Conexión se encienden al mismo tiempo y el dispositivo emite un beep largo. · If the saving is not successful, the Door lock and Connection LED light up at the same time and the device gives a long beep. · Als het opslaan niet goed verloopt, gaan de leds Slot en Verbindingtegelijkertijd branden en laat het apparaat een lange pieptoon horen. · Si la mémorisation échoue, les voyants Serrure et Connexion s'allument simultanément et le dispositif émet un bip prolongé. · Se a memorização não for bem-sucedida, acendemse, simultaneamente, os LED Fechadura e Conexão e o dispositivo emite um beep prolongado. · Wenn die Speicherung nicht erfolgreich bgeschlossen wird, leuchten die LED Schloss und Verbindung gleichzeitig auf und die Vorrichtung erzeugt einen langen Piepton. يضيء زوج الليدات الخاصة بالقفل،إذا لم يتم الحفظ بنجاح . ويُصدر الجهاز إشارة صوتية مطوَّلة،واالتصال في نفس الوقت 5 · Cancellazione badge gestore impianto (solo per articolo 343091) · Cancellation of system management key card (only for item 343091) · Effacement badge administrateur installation (uniquement pour référence 343091) · Badge des Anlagenverwalters löschen (nur für Artikel 343091) · Cancelación de credencial administrador del sistema (solamente para el artículo 343091) · Badge installatiebeheerder wissen (uitsluitend voor artikel 343091) · Cancelamento do crachá Gestor da instalação (somente para o item 343091) )343091 • حذف بطاقة المسؤول عن المنظومة (فقط للعنصر · Tenere premuto il pulsante di programmazione fino al lampeggio del LED Serratura e tono di conferma. 1 beep · Press and hold down the programming pushbutton until the Door lock LED starts flashing, and a confirmation sound is heard. · Maintenir enfoncée la touche de programmation jusqu’à ce que le LED Serrure clignote et que la tonalité de confirmation soit émise. · Programmierungstaste gedrückt halten, bis die LED des Schlosses blinkt und das Bestätigungssignal ertönt. · Mantenga apretado el pulsador de programación hasta que parpadea el LED Cerradura y se emite el tono de confirmación. · Houd de programmeringsknop ingedrukt tot de LED Slot knippert en u ter bevestiging een geluidssignaal hoort. · Mantenha carregado o botão de programação até o lampejo do LED da Fechadura e o tom de confirmação. ،• استمر في الضغط على زر البرمجة حتى يومض ليد القفل .وتصدر نغمة التأكيد ≥5s 2 beep · Ripremere il pulsante di programmazione per 10 secondi. L'avvenuta cancellazione è confermata dall'accensione del LED Serratura e da due beep. · Press the programming pushbutton again for 10 seconds. The switching on of the Door Lock LED and two beeps indicate that the cancellation has taken place. · Appuyer à nouveau sur le bouton de programmation pendant 10 secondes. L'effacement est confirmé par l'allumage du voyant Serrure et par deux bips. · Die Programmierungstaste 10 Sekunden lang erneut drücken. Die Löschung wird durch das Aufleuchten der LED Schloss und durch zwei Pieptöne bestätigt. ≥ 10 s · Cancellazione di tutti i badge dei residenti (solo per articolo 343091) · Cancellation of all the resident key cards (only for item 343091) · Effacement de tous les badges des résidents (uniquement pour référence 343091) · Badge der Bewohner löschen (nur für Artikel 343091) · Cancelación de todas las credenciales de los residentes (solamente para el artículo 343091) 1 beep 2 beep · Presione de nuevo el pulsador de configuración 10 segundos. La cancelación efectuada se confirma con el encendido del LED Cerradura y dos beeps. · Druk opnieuw 10 seconden lang op de programmeerknop. Het wissen wordt bevestigd door het oplichten van de led slot en door twee pieptonen. · Premir novamente o botão de programação por 10 segundos. O sucesso do cancelamento é confirmado pelo acendimento do LED da Fechadura e por dois beep. .ثوان ٍ 10• أعد الضغط على زر البرمجة لـ يتم تأكيد إتمام الحذف بإضاءة ليد القفل وإصدار إشارتين .صوتيتين قصيرتين · Alle inwonersbadges wissen (uitsluitend voor artikel 343091) · Cancelamento de todos os crachás dos residentes (somente para o item 343091) .)343091 • حذف جميع بطاقات السكان (فقط للعنصر · Avvicinare al lettore il badge Gestore impianto fino al lampeggio del LED Serratura e l'emissione di un tono di conferma. · Acerque la credencial delAdministrador del sistema al lector hasta que parpadea el LED de la cerradura y se produzca el tono de confirmación. · Move the System Management key card close to the reader until the Door Lock LED starts flashing and a confirmation tone is heard. · Breng de badge van de installatiebeheerder naar de lezer tot de led Slot gaat knipperen en u een bevestigingstoon hoort. · Approcher le badge Administrateur installation du lecteur et attendre que le voyant Serrure clignote et qu’une tonalité de confirmation soit émise. · Avvicinare al lettore il badge Gestore impianto fino al lampeggio del LED Serratura e l'emissione di un tono di conferma. · Das Badge Anlagenverwalter dem Lesegerät nähern, bis die Schloss-LED blinkt und ein Bestätigungston erzeugt wird. • قم بتقريب بطاقة المسؤول عن المنظومة من قارئ البطاقات . وتصدر نغمة التأكيد،حتى يومض ليد القفل · Riavvicinare per 2 volte consecutive il badge Gestore impianto. L'avvenuta cancellazione è confermata dall'accensione del LED Serratura e da due beep. · Acerque de nuevo 2 veces consecutivas la credencial del Administrador del sistema. La cancelación efectuada se confirma con el encendido del LED Cerradura y dos beeps. · Move the System Management key card twice consecutively close to the reader again. The switching on of the Door Lock LED and two beeps indicate that the cancellation has taken place. · Breng de badge van de installatiebeheerder 2 keer achtereenvolgens naar de lezer. Het wissen wordt bevestigd door het oplichten van de led slot en door twee pieptonen. · Approcher à nouveau 2 fois de suite le badge Administrateur installation. L'effacement est confirmé par l'allumage du voyant Serrure et par deux bips. · Aproximar ao leitor o crachá Gestor da instalação até o lampejo do LED Fechadura e a emissão de um tom de confirmação. · 2 Mal nacheinander das Badge Anlagenverwalter nähern. Die Löschung wird durch das Aufleuchten der LED Schloss und durch zwei Pieptöne bestätigt. 6 .• أعد تقريب بطاقة المسؤول عن المنظومة مرتين متتاليتين يتم تأكيد إتمام الحذف بإضاءة ليد القفل وإصدار إشارتين .صوتيتين قصيرتين-
 1
1
-
 2
2
-
 3
3
-
 4
4
-
 5
5
-
 6
6
-
 7
7
-
 8
8


Bticino 343071 Handleiding
- Type
- Handleiding
in andere talen
- English: Bticino 343071 Operating instructions
- italiano: Bticino 343071 Istruzioni per l'uso
- français: Bticino 343071 Mode d'emploi
- español: Bticino 343071 Instrucciones de operación
- português: Bticino 343071 Instruções de operação
