Waterdrop -PF-01A Plus NSF Certified Jug 3.5L de handleiding
- Type
- de handleiding

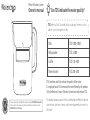
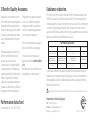
TDS level does not fully indicate the quality of the water.
It is improper to use TDS to measure the water filtered by this product.
Only the Reverse Osmosis Filtration System can really reduce TDS.
This product adopts coconut shell activated carbon to effectively adsorb
contaminants and heavy metals while retaining beneficial minerals in
the water.
Can TDS indicate the water quality?
TDS refers to Total Dissolved Solids, including all minerals such as
sodium, calcium, magnesium, etc.
TDS:1000~3000
TDS:>2000
TDS:150~400
TDS:200~500
Milk
Milk powder
Coffee
Mineral water
Pitcher filtration system
Owner's manual
System is tested and certified by NSF International against NSF/ANSI Standard 42
for the reduction of the claims specified on the Performance Data Sheet, and to
NSF/ANSI 372 (≤0.25% lead).

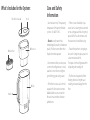
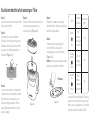
What's Included in the System:
Filter life indicator
Water filter
Lid
Reservoir
Tank
Handle
2
3
1
4
5
6
Care and Safety
Information
• Use cold water only. The operating
temperature of this pitcher filtration
system is 41-100°F/5-38°C.
• Do not use with water that is
microbiologically unsafe, or of unknown
quality. This filter can not filter other
liquids other than tap water.
• We recommend that you store your
system in the refrigerator or in a cool
area that is not in direct sunlight to
get refreshing, great-tasting water.
• If the filter dries out, soak it in cold
tap water for 10 minutes to remove
bubbles before use to activate the
filter and ensure the best filtration
performance.
• If there is a lot of turbidity in tap
water (such as cleaning the water tank
or not using tap water for a long time),
please flush it for a few minutes until
the water turns clean before using.
• If water filter pitcher is not going to
be used in a long time, please put it in
a clean container with lid.
Then place it in the refrigerator which
will prolong the cartridge life.
• The filter must be protected from
freezing, otherwise it might cause
cracking and water leakage from the
filter.

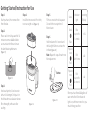
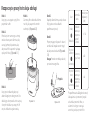
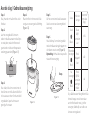
Step 1.
Wash your hands, then remove filter
from filter box.
Step 2.
Please soak it in cold tap water for 10
minutes to remove bubbles before
use to activate the filter and ensure
the best filtration performance.
[Figure 1.1]
Step 3.
Hand-wash pitcher, lid and reservoir
with a mild detergent. Don’t put it in
the dishwasher or use abrasive cleaners.
Rinse thoroughly with water after
washing.
Step 4.
Install filter into reservoir. Press firmly
to ensure a tight seal. [Figure 1.2]
Getting Started/Instruction for Use
Figure 1.2
Figure 1.1
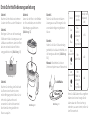
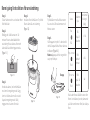
Step 5.
Fill the reservoir with cold tap water.
Discard the first two pitchers of
filtered water.
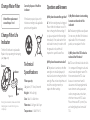
Step 6.
Hold the button for 5 seconds until
the blue light flashes to activate the
indicator. [Figure 1.3]
Note: Repeat this step after each new
filter replacement.
When you have filtered 200 gallons of
water or the filter life indicator red
light is on, whichever comes first, you
should change your filter.
Status
Good
Blue
Replace
soon
Red
Replace
now
Red
Indication
light
Remaining
life(day)
10
≤10
≤0
Blue
stay on for
5 seconds
Red
flash 6 times
Red
stay on for
10 seconds
Figure 1.3
Button

Correctly dispose of the filter
indicator
If the battery expires, dispose the
indicator according to all applicable
provision and regulation.
Technical
Specifications
Filter capacity:
200 gallons (757 liters)/3 months
Weight: 1.98 lbs (0.9kg)
Size: 10.0x 5.3 x 10.0 inches
Flow rate: 0.2-0.5 gpm/ 0.8-2 Ipm
Temperature: 41-100°F/5-38°C
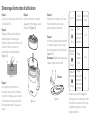
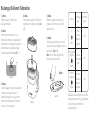
Change Filter Life
Indicator
The filter life indicator is replaceable.
Replace it by squeezing the clamping
jaw. [Figure 1.4]
During the reinstallation, make sure that the
clamping jaw is inserted into the groove
completely.
Change Water Filter
Water filter replacement
consult steps 1 to 6
Groove
Indicator
Clamping
jaw
Figure 1.4
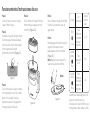
Questions and Answers
Q: Why does the water flow get slow?
A: The filter cartridge may be clogged.
Please check the indicator to see if it's
time to change the filter cartridge. If
yesplease replace the filter cartridge
immediately. If not, take out the filter
and shake it intensely in order to shift
the granules inside, which will
improve the speed of water flow.
Q: Why does the water taste bad?
A: The product is unclean, or the filter
cartridge is not installed properly. It
could also be time to change the filter
cartridge. Please clean the pitcher and
install the cartridge correctly or
replace the filter cartridge.
Q: My filter indicator is not working,
I cannot see the color of the
indicator!
A: The battery might be out of power.
Do not worry, the filter life indicator is
replaceable. If it’s in the warranty
period, we can replace it for free.
Q: Why doesn’t the TDS value be
reduced after filtration?
A: TDS stands for total dissolved solids.
It is composed of inorganic salts and a
small amount of organic matter. This
filter cannot lower the TDS value
because it can remove harmful
substances while keeping beneficial
trace elements such as potassium,
sodium, magnesium, and calcium,
which can increase the TDS value.
Please choose our RO system if you
are looking for physical removal of
TDS.

We promise your water filter system
for 3 months from the date of purchase
(except for the filter cartridge which is
assured for 30 days) against all defects
in materials and workmanship, when
used in compliance with the owner's
manual.
If the product proves to be defective
within 3 months from the date of
purchase, please contact our
customer service. During the quality
assurance period, we will replace or
repair any part which is deemed to be
defective, if product has not been
subjected to tampering, alteration or
improper use after delivery, and has not
been repaired by the manufacturer.
The product is not promised against
misuse, use in abnormal operation
temperature conditions, conditions
outside listed operating parameter or
use in commercial operations.
We are not responsible for damage in
transit and claims for such damage.
If you have any further questions,
please call us for free +1-888-352-3558
(U.S.).
Our professional team will take care of
your problem in a timely manner.
3 Months Quality Assurance
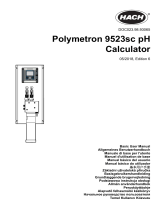
Performance data sheet
System Model No. : ECF-7017XX-21FZ
Substance reduction
The system has been tested and certified by the NSF International according to
NSF/ANSI Standard 42 and NSF/ANSI Standards 372. The concentration of the
indicated substances in water entering the system was reduced to a concentration
less than or equal to the permissible limit for the water leaving the system, as
specified by NSF/ANSI Standard 42. While testing was performed under standard
laboratory conditions, actual performance may vary.
System to be used with municipal or well water sources treated and tested on
regular basis to ensure bacteriological safe quality. Do not use with water that is
microbiologically unsafe or of unknown quality without adequate disinfection
before or after the system.
96.7%2.0 mg/L ± 10%2.0 mg/LChlorine Taste and odor
J-00355920≥50%N/A0.05 mg/L
Substance Inf. Average NSF Specified Challenge Concentration Ave. % Reduction
Performance Data Sheet
Average Product
Water Concentration
Max Permissible Product
Water Concentration
NSF Reduction
Requirements NSF Test Report
Testing was performed under standard laboratory conditions, actual performance may vary.
Manufacturer Technical Support
Tel: +1-888-352-3558 (U.S.)
E-mail: service@waterdropfilter.com
Qingdao Ecopure Filter Co., Ltd. Made in China V042

Krok 1.
Umyj ręce, a następnie wyjmij filtr z
pojemnika na filtr.
Krok 2.
Przed użyciem namocz go w zimnej
wodzie z kranu przez 10 minut, aby
usunąć pęcherzyki powietrza, aby
aktywować filtr i zapewnić najlepszą
wydajność filtracji. [Rysunek 1.1].
Krok 3.
Umyj ręcznie dzbanek, pokrywę i
zbiornik łagodnym detergentem. Nie
wkładaj go do zmywarki ani nie używaj
ściernych środków czyszczących. Po
umyciu dokładnie wypłucz wodą.
Krok 4.
Zamontuj filtr w zbiorniku. Mocno
naciśnij, aby zapewnić szczelne
zamknięcie. [Rysunek 1.2]
Rozpoczęcie pracy/instrukcja obsługi
Rysunek 1.2
Rysunek 1.1
Krok 5.
Napełnij zbiornik zimną wodą z kranu.
Wylej pierwsze dwa dzbanki
przefiltrowanej wody.
Krok 6.
Przytrzymaj przycisk przez 5 sekund,
aż niebieska lampka zacznie migać,
aby aktywować wskaźnik. [Rysunek
1.3]
Uwaga: Powtórz ten krok po każdej
wymianie nowego filtra.
Po przefiltrowaniu 200 galonów wody
lub zapaleniu się czerwonej lampki
wskaźnika żywotności filtra, w
zależności od tego, co nastąpi
wcześniej, należy wymienić filtr.
Stan
Dobry
Niebieski
Wymień
wkrótce
Czerwony
Wymień
teraz
Czerwony
Kontrolka
stanu
Pozostały czas
eksploatacji
(dni)
10
≤10
≤0
Niebieski
pozostaje
włączona
przez 5
sekund
Czerwony
miga 6 razy
Czerwony
pozostaje
włączona
przez 10
sekund
Rysunek 1.3
Przycisk

Schritt 1.
Waschen Sie Ihre Hände und nehmen
Sie dann den Filter aus dem Filterkasten.
Schritt 2.
Bitte legen Sie ihn vor der Verwendung
10 Minuten in kaltes Leitungswasser, um
Luftblasen zu entfernen, damit der Filter
aktiviert wird und die beste Filterleis-
tung gewährleistet ist [Abbildung 1.1].
Schritt 3.
Waschen Sie den Krug, den Deckel und
das Reservoir von Hand mit einem
milden Reinigungsmittel. Geben Sie sie
nicht in die Spülmaschine und
verwenden Sie keine Scheuermittel.
Nach dem Waschen gründlich mit
Wasser ausspülen.
Schritt 4.
Setzen Sie den Filter in den Behälter
ein. Fest andrücken, um eine dichte
Abdichtung zu gewährleisten.
[Abbildung 1.2]
Erste Schritte/Bedienungsanleitung
Abbildung 1.2
Abbildung 1.1
Schritt 5.
Füllen Sie das Reservoir mit kaltem
Leitungswasser auf. Entsorgen Sie die
ersten beiden Krüge mit gefiltertem
Wasser.
Schritt 6.
Halten Sie die Taste 5 Sekunden lang
gedrückt, bis das blaue Licht blinkt, um
die Anzeige zu aktivieren. [Abbildung
1.3]
Hinweis: Wiederholen Sie diesen
Schritt nach jedem neuen Filterwechsel.
Wenn Sie 200 Gallonen Wasser gefiltert
haben oder die rote Anzeige für die
Lebensdauer des Filters leuchtet, je
nachdem, was zuerst eintritt, sollten Sie
den Filter wechseln.
Status
Gut
Blau
Bald
austauschen
Rot
Jetzt
austauschen
Rot
Anzeige-
-leuchte
Pozostały czas
eksploatacji
(dni)
10
≤10
≤0
Blau
bleibt 5
Sekunden
lang
eingeschaltet
Rot
blinkt 6 Mal
Rot
Bleibt 10
Sekunden
lang
eingeschaltet
Abbildung 1.3
Schaltfläche

Étape 1.
Lavez-vous les mains, puis retirez le filtre
de la boîte à filtre.
Étape 2.
Trempez le filtre dans l'eau froide du
robinet pendant 10 minutes pour
éliminer les bulles avant de l'utiliser, afin
d'activer le filtre et d'assurer une
performance de filtration optimale
[Figure 1.1].
Étape 3.
Lavez le pichet, le couvercle et le
réservoir à la main avec un détergent
doux. Ne le mettez pas au lave-vaisselle
et n'utilisez pas de nettoyants abrasifs.
Rincez abondamment à l'eau après le
lavage.
Étape 4.
Installez le filtre dans le réservoir.
Appuyez fermement pour assurer
l'étanchéité. [Figure 1.2]
Démarrage/Instruction d'utilisation
Figure 1.2
Figure 1.1
Étape 5.
Remplissez le réservoir avec de l'eau
froide du robinet. Jetez les deux
premiers pichets d'eau filtrée.
Étape 6.
Maintenez le bouton enfoncé pendant
5 secondes jusqu'à ce que le voyant
bleu clignote pour activer l'indicateur.
[Figure 1.3]
Remarque: Répétez cette étape après
chaque remplacement de filtre.
Lorsque vous avez filtré 200 gallons
d'eau ou que le voyant rouge de durée
de vie du filtre est allumé, selon ce qui
se produit en premier, vous devez
changer votre filtre.
Statut
Bon
Bleu
Remplacer
bientôt
Rouge
Remplacer
maintenant
Rouge
Voyant
d'indication
Vie restante
(jour)
10
≤10
≤0
Bleu
reste allumé
pendant 5
secondes
Rouge
clignote
6 fois
Rouge
Reste allumé
pendant 10
secondesein-
geschaltet
Figure 1.3
Bouton

Stap 1.
Was je handen en haal het filter uit de
filterkast.
Stap 2.
Laat het voor gebruik 10 minuten
weken in koud kraanwater om belletjes
te verwijderen, zodat het filter wordt
geactiveerd en de beste filterprestaties
worden gegarandeerd.[Figuur 1.1]
Stap 3.
Was de kan, deksel en reservoir met de
hand af met een mild afwasmiddel. Niet
in de vaatwasser doen of schuurmiddel-
en gebruiken. Spoel na het wassen
grondig af met water.
Stap 4.
Plaats het filter in het reservoir. Druk
stevig aan voor een goede afdichting.
[Figuur 1.2]
Aan de slag / Gebruiksaanwijzing
Figuur 1.2
Figuur 1.1
Stap 5.
Vul het reservoir met koud kraanwater.
Gooi de eerste twee kannen gefilterd
water weg.
Stap 6.
Houd de knop 5 seconden ingedrukt
totdat het blauwe lampje knippert om
de indicator te activeren. [Figuur1.3]
Opmerking: Herhaal deze stap na elke
nieuwe filtervervanging.
Als je 200 liter water hebt gefilterd of als
het rode lampje voor de levensduur
van het filter brandt moet je je filter
vervangen, afhankelijk van welke van
de twee eerste gebeurd.
Status
Goed
Blauw
Binnenkort
vervangen
Rood
Nu
vervangen
Rood
Indicatie-
-lampje
Resterende
levensduur
(dag)
10
≤10
≤0
Blauw
blijft 5
seconden
aan
Rood
knippert 6
keer
Rood
Blijft 10
seconden
aaneinges-
chaltet
Figuur 1.3
Knop

Steg 1.
Tvätta händerna och ta sedan bort filtret
från filterlådan.
Steg 2.
Blötlägg det i kallt kranvatten i 10
minuter för att ta bort bubblor före
användning för att aktivera filtret och
säkerställa bästa filtreringsprestanda.
[Figur 1.1]
Steg 3.
Handtvätta kanna, lock och behållare
med ett milt rengöringsmedel. Lägg
den inte i diskmaskinen eller använd
slipande rengöringsmedel. Skölj
noggrant med vatten efter tvätt.
Steg 4.
Installera filtret i behållaren. Tryck hårt
för att säkerställa en tät tätning.
[Figur 1.2]
Kom igång/Instruktion för användning
Figur 1.2
Figur 1.1
Steg 5.
Fyll behållaren med kallt kranvatten.
Kassera de två första kannorna med
filtrerat vatten.
Steg 6.
Håll knappen intryckt i 5 sekunder tills
den blå lampan blinkar för att aktivera
indikatorn. [Figur 1.3]
Notera: Upprepa det här steget efter
varje nytt filterbyte.
När du har filtrerat 200 liter vatten eller
filtrets livsindikator lyser rött, beroende
på vilket som kommer först, bör du byta
filter.
Status
Bra
Blå
Byt ut snart
Röd
Byt ut nu
Röd
Indikation-
-sljus
Återstående
livslängd
(dag)
10
≤10
≤0
Blå
Är på i 5
sekunder
Röd
blinkar 6
timmar
Röd
Är på i 10
sekunder
Figur 1.3
Knapp

1. Adım.
Ellerinizi yıkayın ve filtreyi filtre
kutusundan çıkarın.
2. Adım.
Lütfen filtreyi çalıştırmak ve en iyi
filtreleme performansını sağlamak için
kullanmadan önce kabarcık oluşumunu
önlemek amacıyla 10 dakika soğuk
musluk suyunda bekletin.[Şekil 1.1]
3. Adım.
Sürahiyi, kapağı ve hazneyi yumuşak bir
deterjanla elde yıkayın. Bulaşık
makinesine koymayın veya aşındırıcı
temizleyiciler kullanmayın. Yıkadıktan
sonra su ile iyice durulayın.
4. Adım.
Filtreyi rezervuara takın. Sızdırmasını
engellemek için sıkıca bastırın. [Şekil
1.2]
Başlangıç/Kullanım Talimatları
Şekil 1.2
Şekil 1.1
5. Adım.
Rezervuarı soğuk musluk suyu ile
doldurun. Filtrelenmiş suyun ilk iki
sürahisini atın.
6. Adım.
Göstergeyi çalıştırmak için mavi ışık
yanıp sönene kadar düğmeye 5 saniye
basılı tutun. [Şekil 1.3]
Not: Her yeni filtre değişiminden
sonra bu adımı tekrarlayın.
200 galon su filtrelediğinizde veya filtre
ömrü göstergesi kırmızı ışığı yandığında
(hangisi önce gelirse) filtrenizi
değiştirmelisiniz.
Durum
İyi
Mavi
En kısa sürede
değiştirin
Kırmızı
Hemen
değiştirin
Kırmızı
Gösterge
ışığı
Kalan ömür
(gün)
10
≤10
≤0
Mavi
5 saniye
boyunca
açık kalır
Kırmızı
6 kez yanıp
söner
Kırmızı
10 saniye
boyunca
açık kalır
Şekil 1.3
Buton

Paso 1.
Lávese las manos. Lávese las manos y
saque el filtro de la caja.
Paso 2.
Sumérjalo en agua fría del grifo durante
10 minutos para eliminar las burbujas
antes de usarlo, de este modo activará
el filtro y garantizará el mejor
rendimiento de filtración [Figura 1.1].
Paso 3.
Lave a mano la jarra, la tapa y el tanque
con un detergente suave. No se debe
poner en el lavavajillas ni utilizar
limpiadores abrasivos. Enjuague bien
con agua después del lavado.
Paso 4.
Instale el filtro en el tanque. Presione
firmemente para asegurar un cierre
hermético. [Figura 1.2]
Funcionamiento/Instrucciones de uso
Figura 1.2
Figura 1.1
Paso 5.
Llene el tanque con agua fría del grifo.
Deseche las dos primeras jarras de
agua filtrada.
Paso 6.
Mantenga pulsado el botón durante 5
segundos hasta que la luz azul
parpadee para activar el indicador.
[Figura 1.3]
Nota: Repita este paso después de
cada nueva sustitución del filtro.
Cuando haya filtrado 200 galones de
agua o se encienda la luz roja
indicadora de vida útil del filtro, lo que
ocurra primero, debe cambiar su filtro.
Estado
Bien
Azul
Sustituir
pronto
Rojo
Sustituir
ahora
Rojo
Luz
indicadora
Vida útil
restante
(días)
10
≤10
≤0
Azul
Permanece
encendido
durante 5
segundos
Rojo
parpadea 6
veces
Rojo
Permanece
encendido
durante 10
segundos
Figura 1.3
Botón

Fase 1.
Lavarsi le mani, quindi rimuovere il filtro
dalla scatola del filtro.
Fase 2.
Immergerlo in acqua di rubinetto
fredda per 10 minuti per rimuovere le
bolle prima dell'uso per attivare il filtro
e garantire le migliori prestazioni di
filtrazione. [Figura 1.1]
Fase 3.
Lavare a mano la brocca, il coperchio e
il serbatoio con un detergente delicato.
Non metterlo in lavastoviglie e non
utilizzare detergenti abrasivi. Risciac-
quare abbondantemente con acqua
dopo il lavaggio.
Fase 4.
Installare il filtro nel serbatoio. Premere
con decisione per garantire una
tenuta ermetica. [Figura 1.2]
Guida introduttiva/Istruzioni per l'Uso
Figura 1.2
Figura 1.1
Fase 5.
Riempire il serbatoio con acqua di
rubinetto fredda. Scartare le prime due
brocche di acqua filtrata.
Fase 6.
Tenere premuto il pulsante per 5
secondi finché la luce blu non
lampeggia per attivare l'indicatore.
[Figura 1.3]
Nota: ripetere questo passaggio dopo
ogni nuova sostituzione del filtro.
Quando hai filtrato 200 galloni d'acqua o
la spia rossa dell'indicatore di durata del
filtro è accesa, qualunque cosa si verifichi
per prima, dovresti cambiare il filtro.
Stato
Buono
Blu
Sostituire
presto
Rosso
Sostituire
ora
Rosso
Indicatore
luminoso
Kalan ömür
(gün)
10
≤10
≤0
Blu
rimane
acceso per
5 secondi
Rosso
Lampeg-
gia 6 volte
Rosso
rimane
acceso per
10 secondi
Figura 1.3
Pulsante
-
 1
1
-
 2
2
-
 3
3
-
 4
4
-
 5
5
-
 6
6
-
 7
7
-
 8
8
-
 9
9
-
 10
10
-
 11
11
-
 12
12
-
 13
13


Waterdrop -PF-01A Plus NSF Certified Jug 3.5L de handleiding
- Type
- de handleiding
in andere talen
- English: Waterdrop -PF-01A Plus NSF Certified Jug 3.5L Owner's manual
- italiano: Waterdrop -PF-01A Plus NSF Certified Jug 3.5L Manuale del proprietario
- français: Waterdrop -PF-01A Plus NSF Certified Jug 3.5L Le manuel du propriétaire
- Deutsch: Waterdrop -PF-01A Plus NSF Certified Jug 3.5L Bedienungsanleitung
- Türkçe: Waterdrop -PF-01A Plus NSF Certified Jug 3.5L El kitabı
- polski: Waterdrop -PF-01A Plus NSF Certified Jug 3.5L Instrukcja obsługi
Gerelateerde papieren
Andere documenten
-
Brita PURITY C Handleiding
-
-
3M High Flow Series Ice Water Filtration System ICE195-S, 5616404, 3 um NOM, 5 gpm, 54000 gal, 0.4 ft3, 1/Case Handleiding
-
 Hach Polymetron 9523sc pH Basic User Manual
-
Katadyn 8019948 de handleiding
-
Hach CL17sc Handleiding
-
 Cal Spas Portable Spas de handleiding
-
 Cal Spas Portable Spas de handleiding
-
 Cal Spas Portable Spas de handleiding
-
Siemens KM40FAI20 de handleiding


