
LED-EINBAULEUCHTEN / LED RECESSED LIGHTS /
SPOTS ENCASTRABLES À LED
IAN 307293_1904
LED-EINBAULEUCHTEN
Montage-, Bedienungs- und Sicherheitshinweise
LED RECESSED LIGHTS
Assembly, operating and safety instructions
SPOTS ENCASTRABLES À LED
Instructions de montage, d‘utilisation et consignes de sécurité
LED-INBOUWLAMPEN
Montage-, bedienings- en veiligheidsinstructies
LED BODOVÁ SVĚTLA
Pokyny k montáži, obsluze a bezpečnostní pokyny
LAMPY LED DO ZABUDOWY
Wskazówki montażu, obsługi i bezpieczeństwa
LED VSTAVANÉ SVIETIDLÁ
Pokyny pre montáž, obsluhu a bezpečnostné pokyny

DE / AT / CH Montage-, Bedienungs- und Sicherheitshinweise Seite 3
GB / IE Assembly, operating and safety instructions Page 13
FR / BE Instructions de montage, d‘utilisation et consignes de sécurité Page 23
NL / BE Montage-, bedienings- en veiligheidsinstructies Pagina 33
PL Wskazówki montażu, obsługi i bezpieczeństwa Strona 43
CZ Pokyny k montáži, obsluze a bezpečnostní pokyny Strana 53
SK Pokyny pre montáž, obsluhu a bezpečnostné pokyny Strana 63

3 DE/AT/CH
Inhaltsverzeichnis
Legende der verwendeten Piktogramme ........................................................... Seite 4
Einleitung ......................................................................................................................................... Seite 4
Bestimmungsgemäße Verwendung ....................................................................................................Seite 5
Lieferumfang ........................................................................................................................................ Seite 5
Teilebeschreibung ...............................................................................................................................Seite 5
Technische Daten ................................................................................................................................Seite 5
Sicherheit ......................................................................................................................................... Seite 5
Sicherheitshinweise .............................................................................................................................Seite 5
Vorbereitung ................................................................................................................................Seite 7
Benötigtes Werkzeug und Material ...................................................................................................Seite 7
Vor der Installation .................................................................................................................Seite 7
Montage ...........................................................................................................................................Seite 8
Bedienung ......................................................................................................................................Seite 10
Einbauspots ausrichten .......................................................................................................................Seite 10
Einbauspots dimmen ...........................................................................................................................Seite 10
Leuchtmittel wechseln ..........................................................................................................................Seite 10
Wartung und Reinigung .....................................................................................................Seite 10
Entsorgung .....................................................................................................................................Seite 11
Garantie und Service ............................................................................................................Seite 11
Garantieerklärung ...............................................................................................................................Seite 11
Serviceadresse ....................................................................................................................................Seite 11
Konformitätserklärung .........................................................................................................................Seite 11
Hersteller ..............................................................................................................................................Seite 11

4 DE/AT/CH
Legende der verwendeten Piktogramme
Bedienungsanleitung lesen! Warnung!
Gefahr von elektrischem Schlag
Dieses Produkt ist ausschließlich für den
Betrieb im Innenbereich, in trockenen
und geschlossenen Räumen geeignet.
Vermeiden Sie Brand- und
Verletzungsgefahr
Volt (Wechselspannung) Vorsicht vor heißen Oberflächen!
Hertz (Frequenz) Explosionsgefahr!
Watt (Wirkleistung) Decken Sie die Einbauspots auf
keinen Fall mit wärmedämmenden
Materialien oder Ähnlichem ab.
Schutzklasse II So verhalten Sie sich richtig
Warn- und Sicherheitshinweise
beachten! b
a
Entsorgen Sie Verpackung
und Gerät umweltgerecht!
Lebens- und Unfallgefahr für
Kleinkinder und Kinder! Modul zum Einbau
Diese Leuchte ist nicht geeignet für ex-
terne Dimmer und elektrische Schalter. ON OFF Schaltzyklen
LED-Lebensdauer Die Verpackung besteht aus 100 %
recyceltem Papier.
36°
normal
Abstrahlwinkel: 36 ° normal Leuchtmittel - Nur in trockener
Umgebung einsetzen.
60 %
< 1 s Startzeit <1s 60 %
LED-Einbauleuchten
Einleitung
Wir beglückwünschen Sie zum Kauf Ihres
neuen Gerätes. Sie haben sich damit für
ein hochwertiges Produkt entschieden.
Bitte lesen Sie diese Bedienungsanleitung vollständig
und sorgfältig durch. Klappen Sie die beiden Seiten
mit den Abbildungen aus. Diese Anleitung gehört zu
diesem Produkt und enthält wichtige Hinweise zur
Inbetriebnahme und Handhabung. Beachten Sie
immer alle Sicherheitshinweise. Prüfen Sie vor der
Inbetriebnahme, ob die korrekte Spannung vorhanden
ist und ob alle Teile richtig montiert sind. Sollten Sie
Fragen haben oder unsicher in Bezug auf die Hand-
habung des Gerätes sein, setzen Sie sich bitte mit
Ihrem Händler oder der Servicestelle in Verbindung.
Bewahren Sie diese Anleitung bitte sorgfältig auf
und geben Sie sie ggf. an Dritte weiter.
Einleitung

5 DE/AT/CH
Bestimmungsgemäße
Verwendung
Diese Leuchte ist ausschließlich für den
Betrieb im Innenbereich, in trockenen und
geschlossenen Räumen geeignet. Dieses
Gerät ist nur für den Einsatz in privaten Haushalten
vorgesehen. Die Leuchte kann auf allen normal ent-
flammbaren Oberflächen befestigt werden.
Lieferumfang
Kontrollieren Sie unmittelbar nach dem Auspacken
immer den Lieferumfang auf Vollständigkeit sowie
den einwandfreien Zustand des Gerätes.
3 Einbauspots
3 Leuchtmittel, GU 10
6 Klemmen
3 Anschlusskästen
1 Doppelt isolierter Schutzschlauch
1 Montage- und Bedienungsanleitung
Teilebeschreibung
1 Schutzschlauch
2 Einbauspot
3 Leuchtmittel
4 Ring
5 Haltefeder
6 Anschlussbox
1 4
5
6
2
3
x 3
x 3
x 3
x 3
x 3
x 6
Technische Daten
Modell-Nr.: 14141302L / 14141306L
Betriebsspannung: 230‒240 V~, 50 Hz
Leistungsaufnahme: 3 x LED GU 10 max. 5 W
Abmessungen
je runde Leuchte: ø 86 mm
Einbauöffnung: ø 68 mm
Fassung: GU 10
Schutzklasse: II /
Für den Kabelbaum (nicht im Lieferumfang enthalten)
ist ein Mindestquerschnitt von 2 x 0,75 mm2 zu ver-
wenden. Das entsprechende Kabel ist mit Aderend-
hülsen zu versehen.
Sicherheit
Sicherheitshinweise
Bei Schäden, die durch Nichtbeachtung dieser
Bedienungsanleitung verursacht werden, erlischt der
Garantieanspruch! Für Folgeschäden wird keine
Haftung übernommen! Bei Sach- oder Personen-
schäden, die durch unsachgemäße Handhabung
oder Nichtbeachtung der Sicherheitshinweise verur-
sacht werden, wird keine Haftung übernommen!
LEBENS-
UND UNFALLGEFAHR FÜR
KLEINKINDER UND KINDER!
Lassen Sie Kinder niemals unbeaufsichtigt mit d
em
Verpackungsmaterial. Es besteht Erstickungsge-
fahr durch Verpackungsmaterial. Kinder unter-
schätzen häufig die Gefahren.
Dieses Gerät kann von Kindern ab 8 Jahren
und darüber sowie von Personen mit verringer-
ten physischen, sensorischen oder mentalen
Fähigkeiten oder Mangel an Erfahrung und
Wissen benutzt werden, wenn sie beaufsichtigt
oder bezüglich des sicheren Gebrauchs des
Gerätes unterwiesen wurden und die daraus
resultierenden Gefahren verstehen. Kinder
dürfen nicht mit dem Gerät spielen. Reinigung
und Benutzerwartung dürfen nicht von Kindern
ohne Beaufsichtigung durchgeführt werden.
Einleitung / Sicherheit

6 DE/AT/CH
Sicherheit / Vorbereitung / Vor der Installation
Vermeiden Sie Lebensgefahr
durch elektrischen Schlag
Die Elektroinstallation muss von einem Elektriker
oder einer für Elektroinstallationen eingewiesenen
Person durchgeführt werden.
Die basisisolierten Leitungen der festen Verdrah-
tung sind mit zusätzlicher Isolierung zu versehen.
Verwenden Sie doppelt isolierte Leitungen von
der Anschlussstelle bis zur Leuchte. Die Basis-
isolierung muss so kurz ausgeführt werden, dass
die Basisisolierung nicht an die Montagefläche
oder eine Schraube kommen kann.
Achten Sie beim Verbinden zusätzlicher Einbau-
leuchten auf die maximale Belastbarkeit der
Leitungen vor Ort. Die maximale Leistung der
Leitungen darf nicht überschritten werden.
Überprüfen Sie vor jedem Netzanschluss die
Leuchte und das Netzanschlusskabel auf etwaige
Beschädigungen. Benutzen Sie Ihre Leuchte
niemals, wenn Sie irgendwelche Beschädigungen
feststellen.
Beschädigte Netzkabel bedeuten Lebensgefahr
durch elektrischen Schlag. Wenden Sie sich bei
Beschädigungen, Reparaturen oder anderen
Problemen an der Leuchte an die Servicestelle
oder eine Elektrofachkraft.
Entfernen Sie vor der Montage die Sicherung
oder schalten Sie den Leitungsschutzschalter im
Sicherungskasten aus (0-Stellung).
Vergewissern Sie sich vor der Montage, dass die
vorhandene Netzspannung mit der benötigten
Betriebsspannung der Leuchte übereinstimmt
(siehe „Technische Daten“).
Verbinden Sie max. 3 Einbauspots miteinander.
Vermeiden Sie unbedingt die Berührung der
Leuchte mit Wasser oder anderen Flüssigkeiten.
Öffnen Sie niemals eines der elektrischen Betriebs-
mittel oder stecken irgendwelche Gegenstände
in dieselben. Derartige Eingriffe bedeuten Lebens-
gefahr durch elektrischen Schlag.
Installieren Sie die Leuchte nicht auf feuchten
oder leitenden Unterlagen.
Vermeiden Sie Brand- und
Verletzungsgefahr
VERLETZUNGSGEFAHR!
Überprüfen Sie unmittelbar nach dem Auspack
en
jedes Leuchtmittel und Lampenglas auf Beschä-
digungen. Montieren Sie die Leuchte nicht mit
defekten Leuchtmitteln und / oder Lampenglas.
Setzen Sie sich in diesem Fall für Ersatz mit der
Servicestelle in Verbindung.
VORSICHT! VERBRENNUNGS-
GEFAHR DURCH HEISSE OBER-
FLÄCHEN!
Stellen Sie sicher, dass die Leuchte ausgeschaltet
und abgekühlt ist, bevor Sie diese berühren,
um Verbrennungen zu vermeiden. Leuchtmittel
entwickeln im Bereich des Lampenkopfes eine
starke Hitze.
EXPLOSIONSGEFAHR!
Verwenden Sie das Produkt nicht in Räumen
oder in der Umgebung leicht entzündbarer
oder explosiver Flüssigkeiten, Gase, Dämpfe
oder Stäube.
VORSICHT!
BRANDGEFAHR!
Decken Sie die Einbauspots auf keinen Fall mit wär-
medämmenden Materialien oder Ähnlichem ab.
Sorgen Sie für eine ausreichende Kühlung. Die
maximale Temperatur von 90 °C im Einbau-
bereich darf nicht überschritten werden.
Verwenden Sie das Einbauspots-Set nur mit dem
mitgelieferten Zubehör. Nehmen Sie keine Anein-
anderschaltung von Einbauspots-Sets vor, ansonsten
erlöschen jegliche Gewährleistungsansprüche.
Lassen Sie die Leuchte oder Verpackungsmaterial
nicht achtlos liegen. Plastikfolien / -tüten, Kunst-
stoffteile, etc. könnten für Kinder zu einem
gefährlichen Spielzeug werden.
Nicht direkt in die Lichtquelle (Leuchtmittel, LED
etc.) hineinschauen. Die Lichtquelle (Leuchtmittel,
LED etc.) nicht mit einem optischen Instrument
(z. B. Lupe) betrachten.
Sicherheit

7 DE/AT/CH
Sicherheit / Vorbereitung / Vor der Installation
Diese Leuchte ist nicht geeignet für
externe Dimmer und elektrische
Schalter.
Leuchtmittel - Nur in trockener
Umgebung einsetzen.
So verhalten Sie sich richtig
Montieren Sie die Leuchte so, dass sie vor
Feuchtigkeit, Verschmutzung und zu starker
Erwärmung geschützt ist. Vermeiden Sie den
Einbau in Badezimmern oder ähnlichen Räumen.
Der Abstand zwischen zwei Einbauspots muss
mindestens 20 cm betragen.
min. 10 cm min. 10 cm
min. 2,5 cm
Der Einbaubereich über der Lampenfassung
muss mind. 2,5 cm und der seitliche Abstand
mind. 10 cm betragen.
Bereiten Sie die Montage sorgfältig vor und
nehmen Sie sich ausreichend Zeit. Legen Sie alle
Einzelteile und zusätzlich benötigtes Werkzeug
oder Material vorher übersichtlich und griffbe-
reit zurecht.
Seien Sie stets aufmerksam! Achten Sie immer
darauf, was Sie tun und gehen Sie stets mit Ver-
nunft vor. Montieren Sie die Leuchte in keinem
Fall, wenn Sie unkonzentriert sind oder sich
unwohl fühlen.
Vorbereitung
Benötigtes Werkzeug
und Material
Die genannten Werkzeuge und Materialien sind nicht
im Lieferumfang enthalten. Es handelt sich hierbei
um unverbindliche Angaben und Werte zur
Orientierung. Die Beschaffenheit des Materials rich-
tet sich nach den individuellen Gegebenheiten vor
Ort.
– Kabel H03VV-F in benötigter Länge mit
Aderendhülsen (Mindestquerschnitt 2 x 0,75 mm2)
– Bleistift / Markierwerkzeug
– 2-poliger Spannungsprüfer
– Schraubendreher
– Bohrmaschine
– Lochsäge
– Seitenschneider
– Leiter
Vor der Installation
Wichtig: Der elektrische Anschluss muss durch
einen ausgebildeten Elektriker oder eine für Elektro-
installationen eingewiesene Person erfolgen. Diese
muss Kenntnis über die Eigenschaften der Leuchte
und Anschlussbestimmungen haben.
Machen Sie sich vor der Installation mit allen
Anweisungen und Abbildungen in dieser
Anleitung sowie mit der Leuchte selbst vertraut.
OFF
Stellen Sie vor der Installation sicher, dass an
der Leitung, an der die Leuchte angeschlossen
werden soll, keine Spannung vorliegt. Entfernen
Sie hierfür die Sicherung oder schalten Sie den
Leitungsschutzschalter im Sicherungskasten aus
(0-Stellung).
Überprüfen Sie die Spannungsfreiheit mittels
2-poligem Spannungsprüfer.
Nur zur Installation außerhalb des Handbe-
reichs vorgesehen.

8 DE/AT/CH
Montage
Montage
≥ 70 mm
max. 20 mm
Markieren Sie die Positionen der Einbauspots.
Sägen Sie mit einer Lochsäge / einem Bohrer
(ø 68 mm) die 3 Löcher in die Montagestelle.
Beachten Sie dabei den Abstand zwischen
zwei Einbauspots. Dieser muss mindestens
20 cm betragen. Achten Sie außerdem darauf,
dass Sie keine Leitungen beschädigen. Nur
zur Installation außerhalb des Handbereichs
vorgesehen.
7
Führen Sie das Netzanschlusskabel
7 (extern)
durch die Montageöffnung.
2 3 4
Setzen Sie das Leuchtmittel 3 in den
Einbauspot 2 ein.
Befestigen Sie das Leuchtmittel 3 im Ein-
bauspot 2 mithilfe des Ringes 4 für das
Leuchtmittel.
5
5
Klippen Sie die beiden Haltefedern
5
von außen
in die beiden dafür vorgesehenen Öffnungen.
8 6
1
7
Öffnen Sie die Anschlussbox 6, indem Sie die
Abdeckung 8 mittels eines Schraubendrehers
abschrauben.
Schieben Sie nun den doppelt isolierten
Schutzschlauch 1 mind. 8 mm in die Öffnung
der Anschlussbox 6.
Stecken Sie nun das Netzanschlusskabel 7
(extern) durch den Schutzschlauch 1.
Montage

9 DE/AT/CH
Montage
7 91
Verbinden Sie das Netzanschlusskabel 7
(extern) mit der Lüsterklemme
9
.
Achten Sie
auch auf die L / N-Kennzeichnung (L = schwarz
oder braun, N = blau) der angeschlossenen
Leitungen. Ein eventuell vorhande
ner grün / gelber
Leiter wird nicht angeschlossen.
Ein Erdungsanschluss ist nicht notwendig, da es
sich bei der Leuchte um Schutzklasse II handelt.
Verwenden Sie ein Kabel des Typs H03VV-F
mit einem Mindestquerschnitt von 2 x 0,75 mm²
und Aderendhülsen.
Verschließen Sie die Anschlussbox 6, indem
Sie die Abdeckung 8 mittels eines Schrauben-
drehers festschrauben.
Entfernen Sie vor dem Einsetzen der Einbauspots
eventuell vorhandenes Dämmmaterial in der
Nähe der Anschlussbox 6 und der Einbauspots.
6
3
2
Verbinden Sie nun die Anschlussbox 6 mit dem
Einbauspot 2, indem Sie das Leuchtmittel 3
in die Fassung drehen.
6
Schieben Sie die Anschlussbox 6 durch die
Montageöffnung.
5
Setzen Sie die Einbauleuchte schräg an und
führen Sie zuerst eine Haltefeder 5 in die
Montageöffnung ein.
Führen Sie nun die zweite Haltefeder 5 in die
Montageöffnung ein.
5
Drücken Sie nun die Einbauleuchte vollständig
in die Montageöffnung. Nach dem Einschieben

10 DE/AT/CH
Wartung und Reinigung / Entsorgung / Garantie und ServiceMontage / Bedienung / Wartung und Reinigung
spannen sich die Haltefedern 5 und fixieren
somit die Einbauspots.
Überprüfen Sie den richtigen Sitz.
ON
Setzen Sie die Sicherung ein oder schalten Sie
den Leitungsschutzschalter am Sicherungskasten
ein (I-Stellung).
Nur zur Installation außerhalb des Handbe-
reichs vorgesehen.
Ihre Leuchte ist nun betriebsbereit.
Bedienung
Einbauspots ausrichten
Die Einbauspots
2 sind schwenkbar.
Um Verbrennungen zu vermeiden, stellen Sie
sicher, dass die Leuchte vollständig abgekühlt ist.
Um die Spots zu schwenken, drücken Sie den
innenliegenden Rand der Einbauspots
2 in
die gewünschte Richtung.
Einbauspots dimmen
Die Leuchtmittel
3 sind nicht geeignet für
externe Dimmer und elektronische Schalter.
Die Leuchten werden mit einem Leuchtmittel
geliefert, welches in 3 Stufen dimmbar ist.
Um das Leuchtmittel
3 zu dimmen, betätigen
Sie den Ein- / Aus-Wandschalter mehrfach kurz
hintereinander.
Mit Dimmung der Leuchtmittel
3 verändert
sich gleichzeitig auch die Lichtfarbe.
Die Dimmstufen der Leuchte sind folgende:
100% Helligkeit = 3000K
40% Helligkeit = 2500K
10% Helligkeit = 2000K
Leuchtmittel wechseln
Trennen Sie zum Auswechseln des Leuchtmittels
3 die Leuchte zuerst vom Stromnetz. Entfernen
Sie hierfür die Sicherung oder schalten Sie den
Leitungsschutzschalter im Sicherungskasten aus
(0-Stellung).
Lassen Sie das Leuchtmittel
3 vollständig
abkühlen.
Benutzen Sie zum Auswechseln des Leuchtmittels
3 ein sauberes, fusselfreies Tuch.
Drehen Sie das Leuchtmittel
3 vorsichtig mit
einer ¹⁄₄-Drehung gegen den Uhrzeigersinn
aus der Fassung.
Entfernen Sie den Ring
4 und nehmen Sie das
Leuchtmittel
3 aus dem Einbauspot
2.
Setzen Sie das neue Leuchtmittel so ein, wie im
Kapitel „Montage“ beschrieben.
Prüfen Sie den richtigen Sitz.
Setzen Sie die Sicherung ein oder schalten
Sie den Leitungsschutzschalter am Sicherungs-
kasten ein (I-Stellung).
Wartung und Reinigung
STROMSCHLAGGEFAHR!
Trennen Sie zur Reinigung die Leuchte zuerst vom
Stromnetz. Entfernen Sie hierfür die Sicherung oder

11 DE/AT/CH
Wartung und Reinigung / Entsorgung / Garantie und Service
schalten Sie den Leitungsschutzschalter im Sicher
ungs-
kasten aus (0-Stellung).
STROMSCHLAGGEFAHR!
Aus Gründen der elektrischen Sicherheit darf die
Leuchte niemals mit Wasser oder anderen Flüssig-
keiten gereinigt oder gar in Wasser getaucht werde
n.
Benutzen Sie keine Lösungsmittel, Benzin o. Ä.
Die Leuchte würde hierbei Schaden nehmen.
Lassen Sie die Leuchte vollständig abkühlen.
Verwenden Sie zur Reinigung nur ein trockenes,
fusselfreies Tuch.
Entsorgung
Die Verpackung besteht aus umwelt-
freundlichen Materialien, die Sie über
die örtlichen Recyclingstellen entsorgen
können.
b
a
Beachten Sie die Kennzeichnung der
Verpackungsmaterialien bei der Abfall-
trennung, diese sind gekennzeichnet mit
Abkürzungen (a) und Nummern (b) mit
folgender Bedeutung: 1–7: Kunststoffe /
20–22: Papier und Pappe / 80–98:
Verbundstoffe.
Werfen Sie Ihr Produkt, wenn es ausge-
dient hat, im Interesse des Umweltschutzes
nicht in den Hausmüll, sondern führen Sie
es einer fachgerechten Entsorgung zu.
Über Sammelstellen und deren
Öffnungs-
zeiten können Sie sich bei Ihrer zuständigen
Verwaltung informieren.
Garantie und Service
Garantieerklärung
Sie erhalten zum Zeitpunkt des Kaufs auf dieses
Gerät 36 Monate Garantie. Das Gerät wurde sorg-
fältig produziert und einer genauen Qualitätskon-
trolle unterzogen. Innerhalb der Garantiezeit
beheben wir kostenlos alle Material- oder
Herstellerfehler. Sollten sich dennoch während der
Garantiezeit Mängel herausstellen, senden Sie das
Gerät bitte an die aufgeführte Service-Adresse unter
Angabe folgender Artikel-Nummer: 14141302L /
14141306L.
Von der Garantie ausgeschlossen sind Schäden
durch nicht sachgemäße Handhabung, Nichtbeach-
tung der Bedienungsanleitung oder Eingriff durch nicht
autorisierte Personen sowie Verschleißteile (wie z. B.
Leuchtmittel). Durch die Garantieleistung wird die
Garantiezeit weder verlängert noch erneuert.
Serviceadresse
Briloner Leuchten GmbH & Co. KG
Im Kissen 2
59929 Brilon
DEUTSCHLAND
Tel.: +49 29 61 / 97 12–800
Fax: +49 29 61 / 97 12–199
E-Mail: [email protected]
www.briloner.com
IAN 307293_1904
Bitte halten Sie für alle Anfragen den Kassenbon
und die Artikelnummer (z. B. IAN 123456_7890)
als Nachweis für den Kauf bereit.
Konformitätserklärung
Dieses Produkt erfüllt die Anforderungen der gel-
tenden europäischen und nationalen Richtlinien Die
Konformität wurde nachgewiesen. Entsprechende
Erklärungen und Unterlagen sind beim Hersteller
hinterlegt.
Hersteller
Briloner Leuchten GmbH & Co. KG
Im Kissen 2
59929 Brilon
DEUTSCHLAND

12

13 GB/IE
Table of contents
List of pictograms used ........................................................................................................ Page 14
Introduction ................................................................................................................................... Page 14
Proper use ............................................................................................................................................Page 15
Included items .....................................................................................................................................Page 15
Parts description ..................................................................................................................................Page 15
Technical data ..................................................................................................................................... Page 15
Safety .................................................................................................................................................Page 15
Safety advice .......................................................................................................................................Page 15
Preparation ...................................................................................................................................Page 17
Required tools and materials ..............................................................................................................Page 17
Before installation ...................................................................................................................Page 17
Installation .....................................................................................................................................Page 18
Use ........................................................................................................................................................Page 20
Directing the spotlights ........................................................................................................................Page 20
Dimming the spotlights ........................................................................................................................ Page 20
Changing the light bulb ......................................................................................................................Page 20
Maintenance and cleaning ............................................................................................... Page 20
Disposal ............................................................................................................................................Page 21
Guarantee and service ........................................................................................................ Page 21
Warranty .............................................................................................................................................Page 21
Service address ................................................................................................................................... Page 21
Declaration of conformity ...................................................................................................................Page 21
Manufacturer .......................................................................................................................................Page 21

14 GB/IE
Introduction
List of pictograms used
Please read the operating instructions! Warning!
Risk of electric shock
This product is suitable only for use
indoors, in dry and enclosed rooms.
Prevent fire and injury hazards
Volt (AC) Caution - hot surfaces!
Hertz (frequency) Explosion hazard!
Watt (effective power) Under no circumstances should you
cover the spotlights with heat insu-
lating material or similar.
Protection class II For your safety
Observe the warnings and safety
notices! b
a
Dispose of the packaging and
device in an environmentally-
friendly manner!
Danger to life and risk of accidents
for infants and children! Module for installation
This light is not suitable for external
dimmers or electronic switches. ON OFF Switching cycles
LED operating life The packaging is made from 100 %
recycled paper.
36°
normal
Beam angle: 36 ° normal Light bulb - only insert in a dry
environment.
60 %
< 1 s Start time <1s 60 %
LED Recessed Lights
Q
Introduction
We congratulate you on the purchase of
your new device. You have chosen a high
quality product. Please read carefully
and completely through these operating instructions.
Fold out both pages with the illustrations. These
instructions form part of the product and contain
important information about bringing the product
into use and its handling. Always observe all the
safety advice. Check that the correct mains voltage is
available and that all the parts have been properly
assembled before bringing into use. Should you have
any questions or be uncertain as to how to operate
the device, please get in touch with your dealer or
service point. Please keep these instructions in a safe
place and hand them on to a third party if necessary.

15 GB/IE
Introduction / Safety
Q
Proper use
This light is suitable only for interior use,
in dry and enclosed spaces. This lamp
is intended for use only in a domestic
environment. The light can be fitted to all normally
inflammable surfaces.
Q
Included items
Check that all the items and accessories are present
and that the lamp is in perfect condition immediately
after unpacking.
3 Recessed spotlights
3 Light bulbs, GU10
6 Clamps
3 Connection boxes
1 Doubly insulated protective tube
1 Set of assembly instructions and instructions for use
Parts description
1 Protective tube
2 Recessed spotlight
3 Light bulb
4 Ring
5 Spring clip
6 Connection box
1 4
5
6
2
3
x 3
x 3
x 3
x 3
x 3
x 6
Technical data
Model no.: 14141302L / 14141306L
Operating voltage: 230‒240 V~, 50 Hz
Power input: 3 x LED GU10 max. 5 W
Dimensions
per round light: ø 86 mm
Installation opening: ø 68 mm
Socket: GU 10
Protection class: II /
For the cable harness (not supplied) a minimum
cross-section of 2 x 0.75 mm2 is to be used. The
corresponding cable is to be provided with wire
end ferrules.
Q
Safety
Safety advice
The right to claim under the guarantee shall be ren-
dered invalid in respect of damage caused by the
non-observance of these operating instructions!
No liability is accepted for consequent damage!
No liability is accepted for damage to property or
persons caused by improper handling or non-obser-
vance of the safety advice!
RISK OF FATAL
INJURY AND ACCIDENT HA-
ZARD FOR TODDLERS AND
SMALL CHILDREN!
Never leave children unsupervised with the
packaging materials. The packaging material
poses a suffocation hazard. Children frequently
underestimate dangers.
This device may be used by children aged 8 ye-
ars and up, as well as by persons with reduced
physical, sensory or mental capacities, or lacking
experience and / or knowledge, when supervised
or instructed in the safe use of the device and
they understand the associated risks. Do not
allow children to play with the product. Never
allow children to clean or maintain this product
unsupervised.

16 GB/IE
Safety
Avoid the risk of fatal injury
from electric shock
The electrical installation must be carried out
by a qualified electrician or a person trained in
electrical installations.
Cables with basic insulation and permanent wi-
ring must be provided with additional insulation.
Use double insulated cables from the connection
point to the lamp. The basic insulation must be
kept as short as possible so that the basic insu-
lation does not come into contact with the
mounting surface or a screw.
When connecting additional built-in lights, con-
sider the maximum current-carrying capacity of
the cables on location. Do not exceed the ma-
ximum capacity of the cables.
Every time before connecting the lamp the mains,
check it and the mains lead for damage. Never
use your light if you find it is damaged in any way.
A damaged mains lead presents a serious dan-
ger to life from electric shock. In the event of
damage, repairs or other problems with the lamp
please contact the service centre or an electri
cian.
Before installation, remove the fuse for this circuit
or switch off at the circuit breaker (0 setting) in
the fuse box.
Before assembly, ensure that the mains voltage
available corresponds to the operating voltage
necessary of the light (see “Technical data“).
Connect max. 3 recessed spotlights to each other.
Never let the lamp come into contact with
water or other liquids.
Never open or insert anything into electrical
fittings or equipment. Doing this sort of thing can
lead to a serious danger to life from electric shock.
Do not install the lamp on damp or conducting
surfaces.
To avoid danger of
fire and injury
RISK OF INJURY!
Check every bulb and lampshade for damage
immediately upon unpacking. Do not fit the light
i
f the bulbs and / or lampshades are faulty. If th
ey
are, contact the service point for a replacement.
CAUTION! RISK OF BURNS
DUE TO HOT SURFACES!
Ensure the lamp has been switched off and al-
lowed to cool before you touch it. In this way
you will avoid the danger of burns. Bulbs give
off a lot of heat around the top of the lamp.
DANGER OF EXPLOSION!
Never use the product in rooms or in the vicinity
of easily inflammable or explosive liquids, gases,
vapours or dusts.
CAUTION! DANGER OF FIRE!
Never cover the downlights with thermally insu-
lative covers or similar materials.
Please ensure there is adequate cooling! The
maximum temperature in the downlight installa-
tion area of 90 °C must not be exceeded.
Use the downlight set only with the supplied
accessories. Do not interconnect downlight sets.
Failure to observe this advice invalidates your
rights under the warranty.
Do not allow the lamp or the packaging mate-
rials to lie around unattended. Plastic film or
bags, Styrofoam etc. can turn into dangerous
toys for children.
Do not look directly into the illuminant (lamp,
LED, etc.). Do not look into the illuminant
(lamp, LED, etc.) with an optical instrument
(e.g. magnifier).
This light is not suitable for external
dimmers or electronic switches.
Light bulb - only insert in a dry
environment.

17 GB/IE
Working safely
Install the light so that it is protected from mois-
ture, dirt and the build-up of excessive heat. Do
not install the downlights in bathrooms or similar
rooms.
The distance between two installation spotlights
must be at least 20 cm.
min. 10 cm min. 10 cm
min. 2.5 cm
The installation area above the lamp socket
must be at least 2.5 cm and the side clearance
at least 10 cm.
Make careful preparations for the assembly
and take sufficient time. Clearly lay out all com-
ponents and any additional tools or materials
that might be required so that they are readily
to hand.
Remain alert at all times and always watch what
you are doing. Always proceed with caution
and do not assemble the lamp if you cannot
concentrate or feel unwell.
Q
Preparation
Q
Required tools and materials
The tools and materials mentioned are not included
in the delivery. The details and values given are
non-binding and for guidance only. The nature of
the material depends on the individual circumstances
on site.
– Cable H03VV-F of the required length with wire-
end sleeves (minimum diameter 2 x 0.75 mm2)
– Pencil / marking tool
– 2-pole circuit tester
– Screwdriver
– Electric drill
– Hole saw
– Edge cutter
– Ladder
Q
Before installation
Important: The electrical connection must be
carried out by a qualified electrician or someone
trained to perform electrical installations. This person
must be familiar with the features of the light and
the connection requirements.
Familiarise yourself with all instructions and
diagrams in this manual as well as with the
light before installation.
OFF
Before installation, ensure that the cable that
the light is to be attached to is not live. Remove
its fuse or switch off the automatic cutout in the
fuse box (0 position).
Check that the power is off using a 2-pole
circuit tester.
Only intended for installation outside of normal
reach.
Safety / Preparation / Before installation

18 GB/IE
Installation
Q
Installation
≥ 70 mm
max. 20 mm
Mark the position of the built-in spotlights.
Cut the 3 holes in the installation site using a
hole saw / a drill (ø 68 mm).
Please take into
account the distance between t
wo installation
spotlights. This must be at least 20 cm. Further-
more, be careful not to damage lines. Only
intended for installations out of normal reach.
7
Feed the power cord 7 (external) through the
mounting opening.
2 3 4
Insert the light bulb 3 into the recessed spot-
light 2.
Secure the light bulb 3 in the recessed spot-
light 2 using the ring 4 for the light bulb.
5
5
Clip both the spring clips 5 from the outside
into the two openings intended for this purpose.
8 6
1
7
Open the connection box 6 by unscrewing
the cover 8 using a screwdriver.
Now slide the doubly insulated protective tube
1 at least 8 mm into the opening of the con-
nection box 6.
Now feed the mains cable 7 (external)
through the protective tube 1.
Installation

19 GB/IE
Installation
7 91
Connect the mains connection cord (external)
7
using the lustre terminal 9.
Please note the marking L / N (L = black or
brown,
N = blue) of the connected wires. Any green /
yellow wire which may be present is not connected.
As the light is Protection Class II, earthing of the
lamp is not required.
Use a cable of type H03VV-F with a minimum
cross-section of 2 x 0.75 mm² and wire end
ferrules.
Close the connection box 6 by tightening the
cover 8 using a screwdriver.
Before fitting the spotlight, remove any insulating
material present from the vicinity of the connec-
tion box 6 and the spotlight.
6
3
2
Now connect the connection box 6 with the
recessed spotlight 2 by twisting the light bulb
3 into the socket.
6
Push the connection box 2 through the
mounting opening.
5
Position the built-in lights diagonally and start
by inserting one spring clip 5 into the moun-
ting opening.
Now insert the second spring clip 5 into the
mounting opening.
5
Then press the built-in light completely into the
mounting opening. Once they have been

20 GB/IE
Installation / Use / Maintenance and cleaning
pushed in, the retaining springs 5 unfold and
in doing so fix the spotlights in place.
Ensure that they are positioned correctly.
ON
Insert the fuse or switch on the circuit breaker
(I setting) inside the fuse box.
Only intended for installation outside of normal
reach.
Your light is now ready to use.
Q
Use
Directing the spotlights
The spotlights 2 can swivel.
To avoid burns, ensure that the light has cooled
down completely.
To swivel the spotlights, push the internal edge
of the spotlight 2 in the desired direction.
Dimming the spotlights
The light bulbs 3 are not suitable for external
dimmers or electronic switches.
The lights are provided with a light bulb 3
which is dimmable to 3 different levels.
To dim the light bulb 3, press the on / off wall
switch repeatedly in quick succession.
Dimming the light bulb 3 also changes the
light colour simultaneously.
The dimming levels of the light are as follows:
100% brightness = 3000K
40% brightness = 2500K
10% brightness = 2000K
Changing the light bulb
Disconnect the light from the mains before re-
placing the light bulb 3. To do so, remove the
fuse or switch off the circuit breaker (0 setting)
in the fuse box.
Allow the light bulb 3 to cool down completely.
Use a clean, lint-free cloth when replacing the
light bulb 3.
Carefully remove the light bulb 3 from the
socket by turning it anticlockwise for a ¹⁄₄ rotation.
Remove the ring 4 and remove the light bulb 3
from the recessed spotlight 2.
Insert the new light bulb as described in the
chapter Assembly.
Check that it is positioned correctly.
Insert the fuse or switch on the circuit breaker
(I setting) in the fuse box.
Q
Maintenance and cleaning
DANGER OF ELECTRIC
SHOCK!
Before cleaning the lamp make sure that it is isolated
from the mains supply. Remove its fuse or switch off
the automatic cutout in the fuse box (0 position).
DANGER OF ELECTRIC
SHOCK!
For reasons of electrical safety, the light must never be
cleaned with water or other fluids or be immersed in
water.
Maintenance and cleaning / Disposal / Guarantee and service

21 GB/IE
Maintenance and cleaning / Disposal / Guarantee and service
Do not use any solvents, petrol or similar. This
would cause damage to the light.
Allow the lamp to cool down completely.
When cleaning, only use a dry, lint-free cloth.
Q
Disposal
The packaging is made entirely of recy-
clable materials, which you may dispose
of at local recycling facilities.
b
a
Observe the marking of the packaging
materials for waste separation, which
are marked with abbreviations (a) and
numbers (b) with following meaning:
1–7: plastics / 20–22: paper and fibre-
board / 80–98: composite materials.
To help protect the environment, please
dispose of the product properly when it
has reached the end of its useful life and
not in the household waste. Information
on collection points and their opening
hours can be obtained from your local
authority.
Guarantee and service
Warranty
You receive a 36 month warranty on this product,
valid from the date of purchase. The appliance has
been carefully produced under strict quality control.
Within the warranty period we shall rectify without
charge all material and manufacturing defects. In the
event of a defect arising during the warranty period,
please send the appliance to the listed Service Cen-
tre address, making reference to the following item
number: 14141302L / 14141306L.
Wear parts (such as bulbs) and damage caused by
improper handling, non-observance of the operating
instructions or unauthorised interference are excluded
from the warranty. The performance of services
under the warranty does not extend or renew the
warranty period.
Service address
Briloner Leuchten GmbH & Co. KG
Im Kissen 2
59929 Brilon
GERMANY
Tel.: +49 29 61 / 97 12–800
Fax: +49 29 61 / 97 12–199
E-Mail: [email protected]
www.briloner.de
IAN 307293_1904
Please have your receipt and the item number
(e.g. IAN 123456_7890) ready as your proof of
purchase when enquiring about your product.
Declaration of conformity
This product fulfils the requirements of the applicable
European and national directives. Conformity has
been demonstrated. The relevant declarations and
documents are held by the manufacturer.
Manufacturer
Briloner Leuchten GmbH & Co. KG
Im Kissen 2
59929 Brilon
GERMANY

22
Table des matières

23 FR/BE
Table des matières
Légende des pictogrammes utilisés .......................................................................... Page 24
Introduction ................................................................................................................................... Page 24
Utilisation conforme ............................................................................................................................Page 25
Fourniture ............................................................................................................................................. Page 25
Descriptif des pièces ...........................................................................................................................Page 25
Caractéristiques techniques ................................................................................................................Page 25
Sécurité .............................................................................................................................................Page 25
Consignes de sécurité ......................................................................................................................... Page 25
Préparation ...................................................................................................................................Page 27
Outils et matériels nécessaires ...........................................................................................................Page 27
Avant l‘installation ..................................................................................................................Page 27
Montage ...........................................................................................................................................Page 28
Utilisation ........................................................................................................................................Page 30
Orienter les spots encastrés................................................................................................................Page 30
Faire varier l‘intensité des spots à encastrer......................................................................................Page 30
Remplacement de l‘ampoule ..............................................................................................................Page 30
Entretien et nettoyage..........................................................................................................Page 31
Mise au rebut ............................................................................................................................... Page 31
Garantie et service après-vente ..................................................................................Page 31
Garantie ..............................................................................................................................................Page 31
Adresse du service après-vente .......................................................................................................... Page 31
Déclaration de conformité .................................................................................................................. Page 32
Fabricant ..............................................................................................................................................Page 32

24 FR/BE
Introduction
Légende des pictogrammes utilisés
Lire le mode d'emploi ! Avertissement !
Attention, risque d'électrocution
Ce produit est exclusivement destiné à
un usage en intérieur, dans des pièces
sèches et fermées.
Prévention de risque d'incendies et
de blessures
Volt (tension alternative) Attention, surfaces très chaudes !
Hertz (fréquence) Risque d'explosion!
Watt (puissance active) Ne couvrez en aucun cas les spots
avec des matériaux d'isolation
thermique ou similaires.
Classe de protection II Conduite à tenir
Respecter les avertissements et
consignes de sécurité ! b
a
Mettez l’emballage et le produit au re-
b
ut dans le respect de l'environnement !
Danger de mort et risque de blessure
pour les enfants et les enfants en bas
âge! Module de montage
Cette lampe n’est pas appropriée
pour un variateur externe ni pour un
interrupteur électrique.
ON OFF Cycles de commutation
Durée de vie des LED L‘emballage est exclusivement
composé de papier recyclé.
36°
normal
Angle de rayonnement : 36° normal Ampoule - N'utiliser que dans un en-
vironnement sec.
60 %
< 1 s Temps de démarrage <1s 60 %
Spots encastrables à LED
Q
Introduction
Félicitations pour l’achat de ce nouvel
appareil. Vous avez opté pour un produit
de grande qualité. Veuillez lire ce mode
d‘emploi intégralement et attentivement. Ouvrez les
deux pages contenant les illustrations. Le manuel
accompagne ce produit et contient des instructions
essentielles pour la mise en service et la manipula-
tion. Toujours respecter les consignes de sécurité.
Avant l‘installation, vérifiez si la tension est correcte
et si toutes les pièces sont correctement montées. Si
vous avez des questions ou des doutes concernant
la manipulation de l‘appareil, veuillez contacter votre
revendeur ou le S.A.V. Veuillez conserver soigneuse-
ment ce manuel et le remettre aux autres utilisateurs.
Introduction / Sécurité

25 FR/BE
Introduction / Sécurité
Q
Utilisation conforme
Cette lampe est exclusivement conçue
pour un usage intérieur, dans des locaux
secs et fermés. Cet appareil est unique-
ment destiné à un usage domestique. La lampe peut
être fixée sur toutes les surfaces normalement in-
flammables.
Q
Fourniture
Immédiatement après le déballage, veuillez toujours
contrôler que la fourniture est au complet et que
l‘appareil se trouve en parfait état.
3 spots encastrables
3 ampoules, GU 10
6 attaches
3 boîtiers de connexion
1 gaine de protection doublement isolée
1 notice de montage et d‘utilisation
Descriptif des pièces
1 Gaine de protection
2 Spot encastrable
3 Ampoule
4 Anneau
5 Ressort de fixation
6 Boîtier de connexion
1 4
5
6
2
3
x 3
x 3
x 3
x 3
x 3
x 6
Caractéristiques techniques
N° de modèle: 14141302L /
14141306L
Tension de service: 230‒240 V~, 50 Hz
Puissance absorbée: 3 x LED GU 10 max. 5 W
Dimensions
de chaque lampe ronde : ø 86 mm
Orifice d‘encastrement: ø 68mm
Douille: GU 10
Classe de protection: II /
Pour le faisceau de câble (non compris dans la four-
niture), il faut utiliser un diamètre minimum de 2 x
0,75 mm2. Le câble respectif doit être muni de cosses.
Q
Sécurité
Consignes de sécurité
Les dommages causés par le non respect des ins-
tructions de ce mode d‘emploi sont exclus de la
garantie ! Le fabricant décline toute responsabilité
pour les dommages indirects ! De même, toute res-
ponsabilité est déclinée pour les dommages maté
riels
ou personnels causés par une manipulation incor-
recte ou le non respect des consignes de sécurité !
DANGER DE MORT ET RISQUE
D‘ACCIDENT POUR LES EN-
FANTS EN BAS ÂGE ET LES ENFANTS !
Ne jamais laisser les enfants sans surveillance
avec le matériel d’emballage. L‘emballage pré-
sente un risque d‘étouffement. Les enfants sous-
estiment souvent le danger.
Ce produit peut être utilisé par des enfants de
8 ans et plus ainsi que par des personnes avec
des capacités physiques, psychiques ou senso-
rielles limitées ou manquant d‘expérience ou
de connaissance, s‘ils sont surveillés ou s‘ils ont
é
té informés de l‘utilisation du produit de mani
ère
sûre et comprennent les risques découlant de
son utilisation. Ne laissez pas les enfants jouer
avec le produit. Le nettoyage et la maintenance

26 FR/BE
Sécurité
domestique du produit ne doivent pas être ef-
fectués par un enfant sans surveillance.
Prévention de risques mortels
par électrocution
L‘installation électrique doit être effectuée par
un électricien ou par une personne dûment for-
mée à cet effet.
Les câbles à isolation basique du câblage fixe
doivent être pourvues d‘une isolation supplé-
mentaire.
Utilisez des câbles doublement isolés, du point
de branchement jusqu‘au luminaire. L‘isolation
basique doit être la plus courte possible de so
rte
qu‘elle n‘entre pas en contact avec la surface
de montage ou une vis.
Prenez garde à la charge maximale admissible
des câbles sur place en connectant des lumi-
naires encastrés supplémentaires. La puissance
maximale des câbles ne doit pas être dépassée.
Avant chaque raccordement au secteur, contrôler
le bon état de l‘ampoule et du cordon secteur.
Ne jamais utiliser la lampe si vous détectez le
moindre endommagement.
Un câble secteur endommagé représente un
risque mortel d‘électrocution. En cas d‘endom-
magements, de réparations ou d‘autres pro-
blèmes, veuillez contacter la filiale S.A.V. ou un
électricien.
Avant le montage, retirez le fusible ou coupez
le disjoncteur (position 0).
Avant d‘effectuer le montage, vérifiez que la
tension secteur corresponde à la tension de
service requise de la lampe (voir «Caractéris-
tiques techniques»).
Connectez max. 3 spots encastrables entre eux.
Absolument éviter tout contact de la lampe
avec de l‘eau ou d‘autres liquides.
Ne jamais ouvrir les composants électriques,
ni insérer des objets quelconques dans ceux-ci.
Ce type d‘intervention représente un danger
mortel d‘électrocution.
Ne pas installer la lampe sur des surfaces
humides ou conductrices.
Prévention de risque
d‘incendies et de blessures
RISQUE DE BLESSURES !
Immédiatement après le déballage, contrôler
le parfait état de chaque ampoule et verre de
lampe. Ne pas monter la lampe avec des am-
poules et / ou des verres de lampe défectueux.
Veuillez dans ce cas contacter la filiale de ser-
vice pour une pièce de rechange.
ATTENTION! RISQUE DE
BRÛLURES ! SURFACES TRÈS
CHAUDES !
Afin d‘éviter toutes brûlures, vérifiez que la l
ampe
est éteinte et suffisamment froide avant de la
manipuler. L‘ampoule dégage une forte chaleur
dans la tête de la lampe.
RISQUE D’EXPLOSION !
Ne pas utiliser le produit dans des pièces ou da
ns
un environnement où se trouvent des liquides, d
es
gaz, des vapeurs ou des poussières facilement
inflammables ou explosifs.
ATTENTION !
RISQUE D’INCENDIE !
Ne couvrir en aucun cas les luminaires encastr
és
avec des recouvrements isolants ou des maté-
riaux similaires.
Veiller à un refroidissement suffisant. Ne pas
dépasser la température maximale de 90 °C
dans la zone d’encastrement.
N’utiliser le kit de luminaires encastrés qu’avec
les accessoires livrés. Ne pas démonter les kits
de luminaires encastrés, ce qui rendrait caduque
toute garantie.
Ne pas laisser la lampe ou le matériel d‘em-
ballage traîner négligemment. Les films et les
sachets en plastique, les éléments en matières
synthétiques, etc. peuvent devenir des jouets
dangereux dans les mains des enfants.
Ne jamais regarder directement dans la source
lumineuse (ampoule, LED, etc.). Ne pas observer
la source lumineuse (ampoule, LED etc.) à l‘aide
d‘un instrument d‘optique (p. ex. une loupe).
Sécurité / Préparation / Avant l‘installation

27 FR/BE
Sécurité / Préparation / Avant l‘installation
Cette lampe n’est pas appropriée
pour un variateur externe ni pour un
interrupteur électrique.
Ampoule - N‘utiliser que dans un
environnement sec.
Pour travailler en toute sécurité
Monter le luminaire de façon qu’il soit protégé
contre l’humidité, l’encrassement et un trop fort
échauffement. Eviter de les installer dans des
salles de bain ou des pièces similaires.
L’écart entre deux spots encastrés doit être d’au
moins 20 cm.
min. 10 cm min. 10 cm
min. 2,5 cm
La zone de montage doit se situer à au moins
2,5 cm au-dessus de la douille de lampe et à
au moins 10 cm à gauche ou à droite de celle-ci.
Soigneusement préparer le montage et l‘effectuer
sans hâte. Préparez toutes les pièces détachées
et l‘outillage requis et posez-les à portée de
main.
Toujours être vigilant ! Toujours travailler concen-
tré et procéder avec prudence. Ne jamais effec-
tuer le montage de la lampe si vous n‘êtes pas
concentré ou vous sentez mal.
Q
Préparation
Q
Outils et matériels nécessaires
Les outils et matériels indiqués ne sont pas compris
dans la fourniture. Il s‘agit d‘informations sans
caractère obligatoire et de valeurs données à titre
indicatif. Les caractéristiques du matériel dépendent
des conditions spécifiques sur place.
– Câble H03VV-F de longueur requise avec cosses
(section minimale 2 x 0,75 mm2)
– Crayon à papier / outil de marquage
– Détecteur de tension à 2 pôles
– Tournevis
– Perceuse
– Scie cloche
– Pince coupante
– Escabeau
Q
Avant l‘installation
Important : Le raccordement électrique doit
être réalisé par un électricien professionnel ou une
personne instruite pour exécuter une installation
électrique. Cette personne doit être informée des
caractéristiques de la lampe et des spécifications
de raccordement.
Avant d‘effectuer l‘installation, veuillez vous
familiariser avec toutes les instructions et les
illustrations de ce manuel et la lampe.
OFF
Avant d‘effectuer l‘installation, vérifier que la
ligne à laquelle la lampe doit être raccordée
ne soit pas sous tension. Il faut pour cela retirer
le fusible ou désactiver le disjoncteur dans le
boîtier de fusible (position 0).
Vérifiez l‘absence de tension au moyen d‘un
détecteur de tension à 2 pôles.
Montage exclusivement prévu dans une zone
hors d‘atteinte.

28 FR/BE
Montage
Q
Montage
≥ 70 mm
max. 20 mm
Marquez les positions des spots encastrables.
À l’aide d’une scie cloche / d’une perceuse
(ø 68 mm), sciez les 3 trous à l’emplacement
d’assemblage. Respecter l’écart requis entre
les spots. Celui-ci doit être d’au moins 20 cm.
Veiller à ne pas endommager les câbles. Mon-
tage exclusivement prévu dans une zone hors
d‘atteinte.
7
Introduisez le câble d‘alimentation 7 (externe)
dans l‘orifice de montage.
2 3 4
Insérez l‘ampoule
3
dans le spot encastrable
2
.
Fixez l‘ampoule 3 dans le spot encastrable 2
à l‘aide de l‘anneau 4 pour ampoule.
5
5
Clipsez les deux ressorts de fixation 5 à l‘ex-
térieur, dans les deux ouvertures prévues à cet
effet.
8 6
1
7
Ouvrez le boîtier de connexion 6 en dévis-
sant le cache 8 à l‘aide d‘un tournevis.
Poussez maintenant la gaine de protection
doublement isolée 1 d‘au moins 8 mm à tra-
vers l‘ouverture du boîtier de connexion 6.
Insérez ensuite le câble d‘alimentation 7
(externe) dans la gaine de protection 1.
Montage

29 FR/BE
Montage
7 91
Connectez le câble d‘alimentation électrique 7
(externe) à l‘aide du domino de raccordement
9.
Soyez également attentif à la désignation L/N
des fils raccordés ensemble (L = noir ou marron,
N = bleu ou blanc). Un éventuel conducteur
vert / jaune n‘est pas branché. Une mise à la
terre n‘est pas nécessaire car la lampe appar-
tient à la classe de protection II. Utilisez un câble
de type H03VV-F avec une section transversale
minimale de 2 x 0,75mm² et des cosses.
Refermez le boîtier de connexion 6 en revis-
sant le cache 8 à l‘aide d‘un tournevis.
Avant de mettre en place les spots, retirez les
éventuels matériaux isolants à proximité du
boîtier de connexion 6 ou des spots.
6
3
2
Raccordez maintenant le boîtier de connexion 6
avec le spot encastrable 2 en tournant
l‘ampoule 3 dans la douille.
6
Glissez le boîtier de connexion au travers
du trou de montage.
5
Placez la lampe encastrée de manière inclinée
et passez tout d‘abord un ressort de retenue 5
dans l‘orifice de montage.
Insérez ensuite le deuxième ressort de fixation
5 dans l‘ouverture de montage.
5
Pressez entièrement la lampe encastrée dans le
trou de montage. Après l‘insertion, les ressorts

30 FR/BE
Montage / Utilisation
de maintien 5 se tendent, et fixent ainsi les
spots encastrés.
Vérifiez que l‘installation est bien fixée.
ON
Remettez le fusible en place ou réenclenchez
le disjoncteur dans le boîtier à fusibles (position I).
Montage exclusivement prévu dans une zone
hors d‘atteinte.
Votre lampe est désormais prête à l’emploi.
Q
Utilisation
Orienter les spots encastrés
Les spots 2 encastrés pivotent.
Afin d‘éviter toute brûlure, vérifiez que la
lampe est complètement refroidie.
Afin d‘incliner les spots, appuyez sur la bordure
intérieure des spots
2
dans la direction souhaitée.
Faire varier l‘intensité des
spots à encastrer
Les ampoules 3 ne sont pas adaptées aux
variateurs externes et aux interrupteurs électro-
niques.
Les lampes sont livrées avec une ampoule à
3 niveaux d‘intensité.
Afin de faire varier l‘intensité de l‘ampoule 3,
actionnez rapidement plusieurs fois de suite le
commutateur mural marche / arrêt.
Lorsque l‘intensité lumineuse de l‘ampoule 3
varie, sa couleur change en même temps.
Les degrés de luminosité sont les suivants:
100% Luminosité = 3000K
40% Luminosité = 2500K
10% Luminosité = 2000K
Remplacement de l‘ampoule
Commencez par couper l‘alimentation secteur
de la lampe lors du remplacement de l‘am-
poule 3. Pour ce faire, retirez le fusible ou
coupez le disjoncteur dans la boîte à fusibles
(position 0).
Laissez l‘ampoule 3 refroidir complètement.
Pour remplacer l‘ampoule 3, utilisez un chif-
fon propre, non pelucheux.
Retirez l‘ampoule 3 de la douille en la tour-
nant avec prudence d‘¹⁄₄ de tour dans le sens
inverse des aiguilles d‘une montre.
Enlevez l‘anneau 4 et retirez l‘ampoule 3
du spot encastrable 2.
Placez la nouvelle ampoule comme indiqué
dans la partie «Montage».
Vérifiez qu‘elle est correctement fixée.
Remettez le fusible en place ou réenclenchez
le disjoncteur dans le boîtier à fusibles (posi-
tion I).
Entretien et nettoyage / Mise au rebut / Garantie et service après-vente

31 FR/BE
Entretien et nettoyage / Mise au rebut / Garantie et service après-vente
Q
Entretien et nettoyage
RISQUE
D’ÉLECTROCUTION !
Débrancher la lampe du courant secteur avant
de la nettoyer. Il faut pour cela retirer le fusible ou
désactiver le disjoncteur dans le boîtier de fusibles
(position 0).
RISQUE
D’ÉLECTROCUTION !
Uniquement utiliser un chiffon sec anti-effilochant
pour le nettoyage. Pour motifs de sécurité électrique,
la lampe ne doit jamais être nettoyée avec de l‘eau
ou d‘autres liquides, ni être immergée.
Ne pas utiliser de solvants, essence ou autres
ceci endommage la lampe.
Laisser la lampe refroidir complètement.
Uniquement utiliser un chiffon sec anti-effilochant
pour le nettoyage.
Q
Mise au rebut
L’emballage se compose de matières re-
cyclables pouvant être mises au rebut
dans les déchetteries locales.
b
a
Veuillez respecter l‘identification des ma-
tériaux d‘emballage pour le tri sélectif,
ils sont identifiés avec des abbréviations
(a) et des chiffres (b) ayant la significa-
tion suivante : 1–7 : plastiques / 20–22 :
papiers et cartons / 80–98 : matériaux
composite.
Afin de contribuer à la protection de
l’environnement, veuillez ne pas jeter
votre produit usagé dans les ordures
ménagères, mais éliminez-le de manière
appropriée. Pour obtenir des renseigne-
ments concernant les points de collecte
et leurs horaires d’ouverture, vous pouvez
contacter votre municipalité.
Garantie et service après-vente
Garantie
Vous bénéficiez d’une garantie de 36 mois à partir
de la date d’achat de l’appareil. Cet appareil a été
fabriqué avec soin et soumis à un contrôle qualité
minutieux. Pendant la durée de la garantie, nous
réparons gratuitement tous les défauts de matériaux
ou de fabrication. Si des défauts devaient se présenter
durant la période de garantie, veuillez expédier
l‘appareil à l‘adresse du service spécifique en indi-
quant cette référence d‘article : 14141302L /
14141306L.
La garantie exclut les dommages dus à une manipu-
lation incorrecte, au non-respect des instructions
du mode d’emploi ou à une intervention par une
personne non autorisée, ainsi que les pièces d’usure
(par ex, ampoule). La durée de garantie n’est aucu-
nement prolongée ou renouvelée par une prestation
de garantie.
Adresse du service après-vente
Briloner Leuchten GmbH & Co. KG
Im Kissen 2
59929 Brilon
ALLEMAGNE
Tél. : +49 29 61 / 97 12–800
Fax : +49 29 61 / 97 12–199
www.briloner.de
IAN 307293_1904
Veuillez conserver le ticket de caisse et la référence
de l’article (par ex. IAN 123456_7890) à titre de
preuve d’achat pour toute demande.

32 FR/BE
Garantie et service après-vente
Déclaration de conformité
Ce produit remplit les critères des réglementations
européennes et nationales. La conformité a été
attestée. Les déclarations et documents correspon-
dants sont en possession du fabricant.
Fabricant
Briloner Leuchten GmbH & Co. KG
Im Kissen 2
59929 Brilon
ALLEMAGNE
FR/BE
Inhoudsopgave

33 NL/BE
Legenda van de gebruikte pictogrammen ..................................................... Pagina 34
Inleiding ....................................................................................................................................... Pagina 34
Doelmatig gebruik........................................................................................................................... Pagina 35
Leveringsomvang ............................................................................................................................ Pagina 35
Beschrijving van de onderdelen ..................................................................................................... Pagina 35
Technische gegevens ...................................................................................................................... Pagina 35
Veiligheid .................................................................................................................................... Pagina 35
Veiligheidsinstructies ....................................................................................................................... Pagina 35
Voorbereiding ........................................................................................................................ Pagina 37
Vereist gereedschap en materiaal ................................................................................................. Pagina 37
Vóór de installatie ............................................................................................................... Pagina 37
Montage ....................................................................................................................................... Pagina 38
Bediening .................................................................................................................................... Pagina 40
Inbouwspots afstellen ..................................................................................................................... Pagina 40
Inbouwspots dimmen ...................................................................................................................... Pagina 40
Verlichtingsmiddel vervangen ........................................................................................................ Pagina 40
Onderhoud en reiniging ................................................................................................. Pagina 40
Afvoer ............................................................................................................................................ Pagina 41
Garantie en service ............................................................................................................ Pagina 41
Garantie .......................................................................................................................................... Pagina 41
Serviceadres .................................................................................................................................... Pagina 41
Conformiteitsverklaring ................................................................................................................... Pagina 41
Fabrikant .......................................................................................................................................... Pagina 41
Inhoudsopgave

34 NL/BE
Inleiding
Legenda van de gebruikte pictogrammen
Lees de gebruiksaanwijzing! Waarschuwing!
Kans op een elektrische schok
Dit product is uitsluitend geschikt
voor gebruik binnenshuis, in droge
en gesloten ruimtes.
Vermijd brandgevaar en kans
op letsel
Volt (wisselspanning) Wees voorzichtig bij hete
oppervlakken!
Hertz (frequentie) Explosiegevaar!
Watt (nuttig vermogen) Dek de inbouwspots in geen geval
met warmte-isolerend materiaal of
dergelijke af.
Beschermingsklasse II Zo handelt u correct
Waarschuwingen en
veiligheidsinstructies in acht nemen! b
a
Voer de verpakking en het apparaat
op een milieuvriendelijke manier af!
Levensgevaar en kans op ongevallen bij
kleuters en kinderen! Model voor inbouw
Deze lamp is niet geschikt voor een ex-
terne dimmer en elektrische schakelaar. ON OFF Schakelcycli
Led-levensduur De verpakking bestaat uit 100%
gerecycled papier.
36°
normaal
Stralingshoek: 36 ° normaal Verlichtingsmiddel - alleen monteren
in een droge omgeving.
60 %
< 1 s Opstarttijd <1s 60 %
LED-inbouwlampen
Q
Inleiding
Gefeliciteerd met de koop van uw nieuwe
apparaat. U hebt voor een hoogwaardig
product gekozen. Lees deze gebruiks-
aanwijzing en de veiligheidsinstructies volledig en
zorgvuldig door. Vouw de pagina met de afbeel-
dingen open. Deze gebruiksaanwijzing hoort bij dit
product en bevat belangrijke aanwijzingen voor de
ingebruikname en de bediening. Neem altijd de
veiligheidsinstructies in acht. Controleer vóór de in-
gebruikname of de juiste spanning beschikbaar is
en of alle onderdelen goed gemonteerd zijn. Wan-
neer u vragen hebt of onzeker bent in verband met
de bediening van het apparaat, kunt u contact op-
nemen met uw leverancier of met het servicepunt.
Bewaar deze handleiding op een veilige plaats en
geef ze evt. aan derden door.
Inleiding / Veiligheid

35 NL/BE
Inleiding / Veiligheid
Q
Doelmatig gebruik
Deze lamp is uitsluitend bedoeld voor
gebruik binnenshuis, in droge en gesloten
ruimten. Dit product is bestemd voor het
gebruik in privé-huishoudens. De lamp kan op alle
normaal ontvlambare oppervlakken bevestigd worden.
Q
Leveringsomvang
Controleer de levering altijd direct na het uitpakken
op volledigheid en de optimale staat van het product.
3 inbouwspots
3 verlichtingsmiddelen, GU 10
6 klemmen
3 aansluitdozen
1 dubbel geïsoleerde isolatiekous
1 montagehandleiding en gebruiksaanwijzing
Beschrijving van de
onderdelen
1 Isolatiekous
2 Inbouwspot
3 Verlichtingsmiddel
4 Ring
5 Klemveer
6 Aansluitdoos
1 4
5
6
2
3
x 3
x 3
x 3
x 3
x 3
x 6
Technische gegevens
Modelnr.: 14141302L /
14141306L
Bedrijfsspanning: 230‒240 V~, 50 Hz
Opgenomen vermogen: 3 x led GU 10 max. 5 W
Afmetingen
per ronde lamp: ø 86 mm
Inbouwopening: ø 68 mm
Fitting: GU 10
Beschermingsklasse: II/
Voor de kabelboom (niet bij de levering inbegrepen)
is een minimumdiameter van 2 x 0,75 mm² vereist.
De dienovereenkomstige kabel moet worden voor-
zien van adereindhulzen.
Q
Veiligheid
Veiligheidsinstructies
Bij schade die ontstaat door het negeren van deze
gebruiksaanwijzing komt de garantieverlening te
vervallen. Voor volgschade zijn wij niet aansprake-
lijk! Wij zijn niet aansprakelijk in geval van materiële
schade of persoonlijk letsel als gevolg van ondes
kundig
gebruik of het negeren van de veiligheidsinstructies!
LEVENSGEVAAR EN KANS OP
ONGEVALLEN BIJ KLEUTERS
EN KINDEREN!
Laat kinderen nooit zonder toezicht bij het ver-
pakkingsmateriaal. Er bestaat kans op verstikking
door verpakkingsmateriaal. Kinderen onder-
schatten vaak de gevaren.
Dit apparaat kan door kinderen vanaf 8 alsook
personen met verminderde fysieke, sensorische
of mentale vaardigheden of een gebrek aan
ervaring en kennis worden gebruikt, als zij on-
der toezicht staan of geïnstrueerd werden met
betrekking tot het veilige gebruik van het appa-
raat en de hieruit voortvloeiende gevaren be-
grijpen. Kinderen mogen niet met het apparaat
spelen. Reiniging en onderhoud mag niet door
kinderen zonder toezicht worden uitgevoerd.

36 NL/BE
Veiligheid
Vermijd levensgevaar door
een elektrische schok
De elektrische installatie moet door een elektricien
of door een voor elektrische installaties geïn-
strueerde persoon worden uitgevoerd.
De kabels van de vaste bekabeling die van
basisisolatie zijn voorzien, moeten met extra
isolatie worden uitgerust.
Gebruik vanaf de aansluiting tot aan de lamp
dubbel geïsoleerde kabels. De basisisolatie
moet dusdanig kort worden aangebracht, dat
deze niet met het montage-oppervlak of met
een schroef in aanraking kan komen.
Let bij het aansluiten van extra inbouwspots op
de maximale belastbaarheid van de stroomlei-
dingen ter plekke. Het maximale vermogen van
de leidingen mag niet worden overschreden.
Controleer vóór ieder gebruik de lamp en de
aansluitkabel op eventuele beschadigingen.
Gebruik de lamp nooit wanneer u ongeacht
welke beschadiging ook hebt geconstateerd.
Bij beschadigde netkabels bestaat levensgevaar
door elektrische schokken. Neem in geval van
beschadigingen, reparaties of andere problemen
aan de lamp contact op met de klantenservice
of een elektricien.
Verwijder de zekering of schakel de desbetref-
fe
nde stroomkring in de zekeringkast uit (0-sta
nd)
voordat u met de montage begint.
Overtuig u er vóór de montage van dat de
bestaande netspanning overeenstemt met
de vereiste bedrijfsspanning van de lamp
(zie ‚Technische gegevens‘).
Verbind max. 3 inbouwspots met elkaar.
Vermijd elk contact van de lamp met water of
andere vloeistoffen.
Open nooit een van de elektrische bedrijfsmid-
delen en steek ook geen voorwerpen in deze
onderdelen. Bij dergelijke ingrepen bestaat
levensgevaar door elektrische schokken.
Installeer de spot niet op vochtige of geleidende
ondergronden.
Vermijd brand- en
verwondingsgevaar
VERWONDINGSGEVAAR!
Controleer na het uitpakken elke lamp en elk
lampglas onmiddellijk op schade. Monteer de
lamp niet met defecte lampen of lampglaasjes.
Neem in dit geval voor vervangende levering
contact op met de klantenservice.
VOORZICHTIG! KANS OP
BRANDWONDEN DOOR
HETE OPPERVLAKKEN!
Voorkom brandwonden en waarborg dat de
lamp uitgeschakeld en afgekoeld is voordat u
hem aanraakt. Tijdens het bedrijf worden de
lampen rond de kop zeer heet.
EXPLOSIEGEVAAR!
Gebruik het product niet in vertrekken met of
in de omgeving van licht ontvlambare of explo-
sieve vloeistoffen, gassen, dampen of stoffen.
VOORZICHTIG!
BRANDGEVAAR!
Dek de inbouwlampen in geen geval af met
warmte-isolerende afdekkingen of soortgelijke
materialen.
Zorg voor voldoende koeling! De maximale
temperatuur van 90 °C in het inbouwbereik
mag niet worden overschreden.
Gebruik de set inbouwlampen alleen in combi-
natie met het bijgeleverde toebehoren. Schakel
nooit meerdere sets inbouwlampen achter elkaar.
Hierdoor komt het recht op garantieverlening
te vervallen.
Laat de lamp of het verpakkingsmateriaal niet
achteloos liggen. Plasticfolie / -zakken, kunst-
stofdelen enz. kunnen een gevaarlijk speelgoed
vormen voor kinderen.
Niet direct in de lichtbron (lamp, LED etc.) kijken.
De lichtbron (verlichtingsmiddel, LED, etc.) niet
met een optisch instrument (bijv. vergrootglas)
bekijken.
Deze lamp is niet geschikt voor een
externe dimmer en elektrische
schakelaar.
Veiligheid / Voorbereiding / Vóór de installatie

37 NL/BE
Veiligheid / Voorbereiding / Vóór de installatie
Verlichtingsmiddel - Alleen in een
droge omgeving monteren.
Zo handelt u correct
Monteer de lamp zodanig dat hij beschermd
wordt tegen vocht, verontreiniging en te sterke
verwarming. Vermijd de montage in badkamers
of dergelijke ruimten.
De afstand tussen twee inbouwspots moet
minimaal 20 cm bedragen.
min. 10 cm min. 10 cm
min. 2,5 cm
Het inbouwbereik boven de fitting moet mini-
maal 2,5 cm en de zijdelingse afstand minimaal
10 cm bedragen.
Bereid de montage zorgvuldig voor en neem
daarvoor voldoende tijd. Leg alle onderdelen
en het benodigde gereedschap of materiaal
tevoren overzichtelijk en binnen handbereik klaar.
Wees steeds opmerkzaam! Let altijd op wat u
doet en ga steeds met overleg te werk. Monteer
de lamp in geen geval wanneer u ongeconcen-
treerd bent of zich niet goed voelt.
Q
Voorbereiding
Q
Vereist gereedschap
en materiaal
De genoemde gereedschappen en materialen zijn
niet bij de leveringsomvang inbegrepen. Het gaat
hierbij om niet-bindende gegevens en waarden ter
oriëntatie. De hoedanigheid van het materiaal is af-
hankelijk van de individuele voorwaarden ter plekke.
– Kabel H03VV-F in vereiste lengte met adereind-
hulzen (minimale diameter 2 x 0,75 mm2)
– Potlood / markeerstift
– 2-polige spanningzoeker
– Schroevendraaier
– Boormachine
– Stootzaag
– Zijsnijder
– Geleider
Q
Vóór de installatie
Belangrijk: Laat de installatie uitvoeren door een
opgeleide elektricien of een voor elektro-installaties
bevoegde persoon. Deze persoon moet op de
hoogte zijn van de eigenschappen van de lamp en
van de aansluitbepalingen.
Maak u vóór de montage vertrouwd met alle
aanwijzingen en afbeeldingen in deze handlei-
ding en met de lamp zelf.
OFF
Waarborg vóór de montage dat er geen span-
ning staat op de netkabel waarop de lamp moet
worden aangesloten. Verwijder daartoe de ze-
kering of schakel de betreffende stroomkring in
de zekeringenkast uit (0-stand).
Controleer met een 2-polige spanningzoeker
of de leiding spanningsloos is.
Alleen bestemd voor installatie buiten handbere
ik.

38 NL/BE
Montage
Q
Montage
≥ 70 mm
max. 20 mm
Markeer de posities van de inbouwspotjes.
Zaag met een gatenzaag / een boor (ø 68 mm)
de 3 gaten in de montageplek. Let daarbij op
de afstand tussen twee inbouwspots. De afstand
moet minimaal 20 cm bedragen. Let er boven-
dien op dat u geen leidingen in de wand be-
schadigt. Alleen bedoeld voor installatie buiten
handbereik.
7
Voer de stroomkabel 7 (extern) door de
montageopening.
2 3 4
Plaats het verlichtingsmiddel 3 in de inbouw-
spot 2.
Bevestig het verlichtingsmiddel 3 in de in-
bouwspot 2 met behulp van de ring 4 voor
het verlichtingsmiddel.
5
5
Clip de beide klemveren 5 van buiten af in
de beide daarvoor bestemde openingen.
8 6
1
7
Open de aansluitdoos 6 door de afdekking 8
met behulp van een schroevendraaier los te
schroeven.
Schuif vervolgens de dubbel geïsoleerde isola-
tiekous 1 minstens 8 mm in de opening van
de aansluitdoos 6.
Steek vervolgens de stroomkabel 7 (extern)
door de isolatiekous 1.
Montage

39 NL/BE
Montage
7 91
Verbind de stroomkabel 7 (extern) met het
kroonsteentje 9.
Let ook op de L / N-markering (L = zwart of
bruin, N = blauw) van de aangesloten kabels.
Een eventueel aanwezige groen / gele geleider
wordt niet aangesloten. Het aarden is niet nood-
zakelijk, omdat het bij de lamp om beschermings-
klasse II gaat. Gebruik een kabel van het type
H03VV-F met een minimale diameter van 2 x
0,75 mm² en adereindhulzen.
Sluit de aansluitdoos 6 door de afdekking 8
met behulp van een schroevendraaier vast te
schroeven.
Verwijder voor het plaatsen van de inbouwspots
eventueel aanwezig isolatiemateriaal in de buurt
van de aansluitdoos 6 en de inbouwspots.
6
3
2
Verbind vervolgens de aansluitdoos 6 met de
inbouwspot 2 door het verlichtingsmiddel 3
in de fitting te draaien.
6
Schuif de aansluitdoos 6 door de
montageopening.
5
Houd de inbouwspot een beetje schuin en
steek eerst één klemveer 5 door de montage-
opening.
Steek vervolgens de tweede klemveer 5 door
de montageopening heen.
5
Druk vervolgens de inbouwspot volledig in de
montageopening. Na het inschuiven worden

40 NL/BE
Montage / Bediening / Onderhoud en reiniging
de klemveren 5 gespannen en houden zo-
doende de inbouwspots vast.
Controleer of deze goed vast zitten.
ON
Plaats de zekering weer terug of schakel de in-
stallatie-automaat in de groepenkast weer in
(I-stand).
Alleen bestemd voor installatie buiten handbereik.
Uw lamp is nu gereed voor gebruik.
Q
Bediening
Inbouwspots afstellen
De inbouwspots 2 zijn draaibaar.
Zorg ervoor dat de lamp volledig is afgekoeld
om verbrandingen te vermijden.
Om de spots te draaien, drukt u de rand aan
de binnenzijde van de inbouwspots 2 in de
gewenste richting.
Inbouwspots dimmen
De lichtbron
3
is niet geschikt voor externe dim-
m
ers en elektronische schakelaars.
De spots worden met een lichtbron geleverd
die op 3 standen kan worden gedimd.
Om de lichtbron 3 te dimmen, bedient u de
Aan- / Uit-wandschakelaar meerdere keren kort
achter elkaar.
Door het verlichtingsmiddel 3 te dimmen ver-
andert gelijktijdig ook de lichtkleur.
De dimstanden van de lamp zijn als volgt:
100% lichtsterkte = 3000K
40% lichtsterkte = 2500K
10% lichtsterkte = 2000K
Verlichtingsmiddel vervangen
Onderbreek voordat u het verlichtingsmiddel
3 vervangt eerst de stroomtoevoer naar de
lamp. Verwijder hiervoor de zekering of scha-
kel de betreffende installatie-automaat in de
groepenkast uit (0-stand).
Laat het verlichtingsmiddel 3 volledig afkoe-
len.
Gebruik voor het vervangen van het verlich-
tingsmiddel 3 een schone, pluisvrije doek.
Draai het verlichtingsmiddel 3 voorzichtig
met een ¹⁄₄-slag tegen de klok in uit de fitting.
Verwijder de ring 4 en haal het verlichtings-
middel 3 uit de inbouwspot 2.
Plaats het nieuwe verlichtingsmiddel zoals be-
schreven bij het onderdeel ‚Montage‘.
Controleer of alles goed vast zit.
Plaats de zekering weer terug of schakel de in-
stallatie-automaat in de groepenkast weer in
(I-stand).
Q
Onderhoud en reiniging
GEVAAR VOOR
ELEKTRISCHE SCHOK!
Onderbreek altijd de stroomtoevoer voordat u de
lamp reinigt. Verwijder daartoe de zekering of
schakel de betreffende stroomkring in de zekerin-
genkast uit (0-stand).
GEVAAR VOOR
ELEKTRISCHE SCHOK!
Onderhoud en reiniging / Afvoer / Garantie en service

41 NL/BE
Onderhoud en reiniging / Afvoer / Garantie en service
Omwille van de elektrische veiligheid mag de lamp
nooit met water of andere vloeistoffen gereinigd en
zeker niet daarin ondergedompeld worden.
Gebruik geen oplosmiddelen, benzine e.d.
Hierdoor wordt de lamp beschadigd.
Laat de lamp volledig afkoelen.
Gebruik voor de reiniging alleen een droge,
pluisvrije doek.
Q
Afvoer
De verpakking bestaat uit milieuvriende-
lijke grondstoffen die u via de plaatse-
lijke recyclingcontainers kunt afvoeren.
b
a
Neem de aanduiding van de verpakkings-
materialen voor de afvalscheiding in acht.
Deze zijn gemarkeerd met de afkortingen
(a) en een cijfers (b) met de volgende
betekenis: 1–7: kunststoffen / 20–22:
papier en vezelplaten / 80–98: compo-
sietmaterialen.
Gooi het afgedankte product omwille van
het milieu niet weg via het huisvuil, maar
geef het af bij het daarvoor bestemde
depot of het gemeentelijke milieupark.
Over afgifteplaatsen en hun openingstijden
kunt u zich bij uw aangewezen instantie
informeren.
Garantie en service
Garantie
Op dit product verlenen wij 36 maanden garantie
vanaf koopdatum. Het apparaat werd zorgvuldig
vervaardigd en aan een nauwkeurige kwaliteits-
controle onderworpen. Binnen de garantieperiode
herstellen wij kosteloos alle materiaal- of productie-
fouten. Mocht u desondanks tijdens de garantiepe-
riode mankementen aantreffen, stuur het apparaat
dan alstublieft naar het aangegeven serviceadres
met vermelding van het volgende artikelnummer:
14141302L / 14141306L.
Beschadigingen door ondeskundig gebruik, negeren
van de handleiding of ingrepen door niet-geautori-
seerde personen zijn van de garantieverlening
uitgesloten. Dit geldt eveneens voor aan slijtage
onderhevige delen (zoals bijv. gloeilampen). Door
de garantieservice wordt de garantieperiode noch
verlengd noch vernieuwd.
Serviceadres
Briloner Leuchten GmbH & Co. KG
Im Kissen 2
59929 Brilon
DUITSLAND
Tel.: +49 29 61 / 97 12–800
Fax: +49 29 61 / 97 12–199
E-mail: [email protected]
www.briloner.de
IAN 307293_1904
Houd bij alle vragen alstublieft de kassabon en
het artikelnummer (bijv. IAN 123456_7890) als
bewijs van aankoop bij de hand.
Conformiteitsverklaring
Dit product voldoet aan de eisen van de van toe-
passing zijnde Europese en nationale richtlijnen.
De conformiteit is aangetoond. Desbetreffende
verklaringen liggen ter inzage bij de fabrikant.
Fabrikant
Briloner Leuchten GmbH & Co. KG
Im Kissen 2
59929 Brilon
DUITSLAND

42 NL/BE
Spis zawartości

43 PL
Spis zawartości
Legenda zastosowanych piktogramów ...........................................................Strona 44
Instrukcja ......................................................................................................................................Strona 44
Zastosowanie zgodne z przeznaczeniem .....................................................................................Strona 45
Zawartość .........................................................................................................................................Strona 45
Opis części ....................................................................................................................................... Strona 45
Dane techniczne ..............................................................................................................................Strona 45
Bezpieczeństwo ......................................................................................................................Strona 45
Wskazówki bezpieczeństwa...........................................................................................................Strona 45
Przygotowanie .......................................................................................................................Strona 47
Potrzebne narzędzia i materiały .....................................................................................................Strona 47
Przed instalacją ......................................................................................................................Strona 47
Montaż ........................................................................................................................................... Strona 48
Obsługa .........................................................................................................................................Strona 50
Ustawianie lamp do zabudowy ......................................................................................................Strona 50
Ściemnianie lamp do zabudowy .................................................................................................... Strona 50
Wymiana żarówki ...........................................................................................................................Strona 51
Konserwacja i czyszczenie............................................................................................Strona 51
Utylizacja .....................................................................................................................................Strona 51
Gwarancja i serwis ..............................................................................................................Strona 51
Oświadczenie gwarancyjne ...........................................................................................................Strona 51
Adres serwisu ...................................................................................................................................Strona 52
Deklaracja zgodności ......................................................................................................................Strona 52
Producent ..........................................................................................................................................Strona 52

44 PL
Instrukcja / Bezpieczeństwo Instrukcja
Legenda zastosowanych piktogramów
Przeczytać instrukcję obsługi! Ostrzeżenie!
Niebezpieczeństwo porażenia
prądem
Niniejszy produkt nadaje się wyłącznie
do użytku wewnątrz, w suchych oraz
zamkniętych pomieszczeniach.
Jak uniknąć zagrożenia pożaro-
wego i obrażeń ciała
Wolt (napięcie przemienne) Uwaga – gorące powierzchnie!
Herc (częstotliwość) Niebezpieczeństwo wybuchu!
Wat (moc czynna) Nigdy nie przykrywać lamp mate-
riałami izolującymi lub podobnymi.
Klasa ochrony II Prawidłowy sposób postępowania
Przestrzegać wskazówek ostrzegaw-
czych i bezpieczeństwa! b
a
Opakowanie i urządzenie przeka-
zać do utylizacji zgodnie z prze-
pisami o ochronie środowiska!
Niebezpieczeństwo utraty życia i
odniesienia obrażeń przez dzieci! Moduł do zabudowy
Lampa ta nie nadaje się do użycia
w połączeniu z zewnętrznymi regulato-
rami jasności światła lub wyłącznikami
elektrycznymi.
ON OFF Cykle włączania
Żywotność diod LED Opakowanie składa się z w 100 %
zutylizowanego papieru.
36°
normalny
Kąt świecenia: 36 ° normalny Żarówka - montaż jedynie w
suchym otoczeniu.
60 %
< 1 s Czas uruchamiania <1s 60 %
Lampy LED do zabudowy
Instrukcja
Gratulujemy Państwu zakupu nowego
urządzenia. Zdecydowali się Państwo
na zakup produktu najwyższej jakości.
Proszę dokładnie przeczytać całą niniejszą instruk-
cję obsługi. Proszę rozłożyć strony z rysunkami.
Niniejsza instrukcja obsługi należy do produktu.
Zawiera ona ważne wskazówki dotyczące urucha-
miania i posługiwania się nim. Zawsze należy
przestrzegać wszystkich wskazówek dotyczących
bezpieczeństwa. Przed uruchomieniem proszę
sprawdzić, czy występuje prawidłowe napięcie i

45 PL
Instrukcja / Bezpieczeństwo
czy wszystkie części są prawidłowo zamontowane.
W przypadku zapytań lub niepewności odnośnie
obchodzenia się z urządzeniem, prosimy o kontakt
ze sprzedawcą lub punktem serwisowym. Proszę
starannie przechowywać niniejszą instrukcję obsługi,
a w razie oddania urządzenia osobom trzecim
przekazać ją wraz z nim.
Zastosowanie zgodne
z przeznaczeniem
Niniejsza lampa nadaje się wyłącznie do
pracy wewnątrz, w suchych i zamknię-
tych pomieszczeniach. To urządzenie
przewidziano wyłącznie do użytku w prywatnym
gospodarstwie domowym. Lampa może być moco-
wana na wszystkich powierzchniach o normalnym
stopniu palności.
Zawartość
Bezpośrednio po wypakowaniu należy sprawdzić,
czy zestaw jest kompletny oraz czy urządzenie
znajduje się w nienagannym stanie.
3 lampy do zabudowy
3 żarówki, GU 10
6 zacisków
3 skrzynki przyłączeniowe
1 podwójnie izolowany wężyk ochronny
1 instrukcja montażu i obsługi
Opis części
1 Wężyk ochronny
2 Spot do zabudowy
3 Żarówka
4 Pierścień
5 Zacisk sprężynowy
6 Skrzynka przyłączeniowa
1 4
5
6
2
3
x 3
x 3
x 3
x 3
x 3
x 6
Dane techniczne
Nr modelu: 14141302L / 14141306L
Napięcie robocze: 230–240 V~, 50 Hz
Pobór mocy: 3 x LED GU 10 maks. 5 W
Wymiary na
okrągłą lampa: ø 86 mm
Otwór montażowy: ø 68 mm
Oprawa: GU 10
Klasa ochrony: II /
Do wiązki przewodów kablowych (poza zakresem
dostawy) należy zastosować przekrόj poprzeczny
co najmniej 2 x 0,75 mm2. Odpowiedni przewόd
kablowy należy zaopatrzyć w końcόwki tulejkowe.
Bezpieczeństwo
Wskazówki bezpieczeństwa
W przypadku szkód spowodowanych nieprzestrze-
ganiem niniejszej instrukcji obsługi wygasa prawo
do gwarancji! Za szkody pośrednie producent nie
ponosi odpowiedzialności! W przypadku szkód
materialnych lub osobowych, które powstały wskutek
niewłaściwego obchodzenia się lub nieprzestrzegania
wskazówek dotyczących bezpieczeństwa, nie po-
nosimy żadnej odpowiedzialności!

46 PL
Bezpieczeństwo / Przygotowanie / Przed instalacją Bezpieczeństwo
ZAGROŻE-
NIE ŻYCIA I NIEBEZPIECZEŃ-
STWO WYPADKU U DZIECI!
Nigdy nie pozostawiać dzieci bez nadzoru z
materiałem opakowania. Istnieje zagrożenie
uduszeniem spowodowane przez materiał opa-
kowaniowy. Dzieci często nie dostrzegają nie-
bezpieczeństwa.
Niniejsze urządzenie może być używane przez
dzieci od lat 8 oraz przez osoby z obniżonymi
zdolnościami fizycznymi, sensorycznymi lub
mentalnymi lub brakiem doświadczenia i / lub
wiedzy, jeśli pozostają pod nadzorem lub zo-
stały pouczone w kwestii bezpiecznego użycia
urządzenia i rozumieją wynikające z niego za-
grożenia. Dzieciom nie mogą bawić się urząd
ze-
niem. Czyszczenie i konserwacja nie mogą być
przeprowadzane przez dzieci bez nadzoru.
Porażenie prądem
elektrycznym grozi śmiercią
I
nstalacja elektryczna musi być przeprowadzo
na
przez elektryka lub osobę przeszkoloną w za-
kresie instalacji elektrycznych.
Przewody z podstawową izolacją stałego oka-
blowania należy opatrzyć dodatkową izolacją.
Należy użyć podwójnie izolowanych przewo-
dów od miejsca przyłączenia aż do lampy.
Izolacja podstawowa musi być wykonana tak
krótko, aby podstawowa izolacja, aby nie do-
chodziła do powierzchni montażowej lub śruby.
Przy łączeniu dodatkowych lamp do zabu-
dowy zwrócić uwagę na maksymalną obcią-
żalność przewodów na miejscu. Nie można
przekraczać maksymalnej mocy przewodów.
Przed każdym podłączeniem do sieci elek-
trycznej należy dokonać kontroli lampy oraz
przewodu zasilającego pod względem jakich-
kolwiek uszkodzeń. Nigdy nie używać lampy
w razie stwierdzenia jakichkolwiek uszkodzeń.
Uszkodzone przewody sieciowe stwarzają nie-
bezpieczeństwo utraty życia wskutek poraże-
nia prądem elektrycznym. W razie uszkodzeń,
napraw lub innych problemów z lampą należy
zwrócić się do punktu serwisowego lub do
elektryka.
Przed rozpoczęciem montażu wyjąć bezpiecz
nik
lub wyłączyć wyłącznik nadmiarowo-prąd
owy w
skrzynce bezpiecznikowej (położenie 0).
Przed montażem należy upewnić się, że dostę
pne
napięcie sieci jest zgodne z wymaganym napię-
ciem roboczym lampy (patrz „Dane techniczne“).
Połącz ze sobą maks. 3 spoty do zabudowy.
Bezwzględnie unikać kontaktu lampy z wodą
lub innymi cieczami.
Nigdy nie otwierać elementów elektrycznych i
nie wkładać do nich jakichkolwiek przedmiotów.
Taka ingerencja oznacza zagrożenie życia
poprzez porażenie prądem.
Lampy nie należy instalować na wilgotnych lub
przewodzących podłożach.
Jak uniknąć zagrożenia
pożarowego i obrażeń ciała
NIEBEZPIECZEŃSTWO OBRAŻEŃ CIAŁA!
Bezpośrednio po rozpakowaniu sprawdzić każdą
żarówkę i klosz lampy pod kątem uszkodzeń.
Proszę nie montować oprawy oświetleniowej z
uszkodzonymi źródłami światła i / lub kloszami.
W takim przypadku należy skontaktować się z
punktem serwisowym.
OSTROŻNIE! NIEBEZPIECZEŃ-
STWO POPARZENIA GORĄ-
CYMI POWIERZCHNIAMI!
Aby uniknąć oparzenia, należy upewnić się
przed dotknięciem lampy, że jest ona wyłą-
czona i schłodzona. Żarówki wytwarzają w
obrębie głowicy lampy wysokie temperatury.
NIEBEZPIECZEŃSTWO
WYBUCHU!
Nie używać produktu w pomieszczeniach lub
w otoczeniu łatwopalnych lub wybuchowych
cieczy, gazów, oparów lub kurzu.
OSTROŻNIE! NIEBEZPIECZEŃ-
STWO POŻARU!
Nigdy nie przykrywać lamp do zabudowy
materiałami izolującymi lub podobnymi.

47 PL
Bezpieczeństwo / Przygotowanie / Przed instalacją
Należy zapewnić odpowiednie chłodzenie.
Nie można przekroczyć maksymalnej tempera-
tury 90 °C w obudowie.
Lamp do zabudowy należy użyć jedynie z do-
starczonymi akcesoriami. Nigdy nie łączyć lamp
do zabudowy ze sobą; w innym przypadku
wygasa gwarancja.
Lampy i materiału opakowania nie pozostawiać
bez nadzoru. Folie / woreczki plastikowe, ele-
menty z tworzywa sztucznego itp. mogą zostać
użyte przez dzieci jako niebezpieczna zaba
wka.
Nie należy wpatrywać się bezpośrednio w
źródło światła (żarówki, diody LED itp.). Źródła
światła (żarówki, diody LED) nie należy oglądać
za pomocą optycznego instrumentu (np. lupy).
Lampa ta nie nadaje się do użycia
w połączeniu z zewnętrznymi regu-
latorami jasności światła lub wyłącz-
nikami elektrycznymi.
Żarówka - montaż jedynie w suchym
otoczeniu.
P
rawidłowy sposób postępowania
Lampę zamontować w taki sposób, aby była
zabezpieczona przed wilgocią, wysoką tem-
peraturą i zanieczyszczeniami. Należy unikać
montażu w łazienkach lub podobnych po-
mieszczeniach.
Odstęp pomiędzy dwiema lampami do zabu-
dowy musi wynosić co najmniej 20 cm.
min. 10 cm min. 10 cm
min. 2,5 cm
Obszar zabudowy nad oprawą lampy musi
wynosić min. 2,5 cm, a odległość z boku min.
10 cm.
Starannie przygotować montaż i zarezerwować
sobie wystarczającą ilość czasu. Wszystkie
pojedyncze elementy i dodatkowo potrzebne
narzędzia lub materiał należy wcześniej uło-
żyć w sposób przejrzysty i pod ręką.
Zachować ostrożność! Zwracać uwagę na
wykonywane czynności izawsze kierować się
rozsądkiem. Nie należy wykonywać montażu
lampy w przypadku braku koncentracji lub złego
samopoczucia.
Przygotowanie
Potrzebne narzędzia i
materiały
Wymienione narzędzia i materiały nie są częścią
zestawu. Są to jedynie niewiążące informacje i
wartości orientacyjne. Właściwości materiału zależą
od indywidualnych warunków w pomieszczeniu.
– Przewόd kablowy H03VV-F o wymaganej
długości z końcόwkami tulejkowymi (przekrόj
poprzeczny co najmniej 2 x 0,75 mm2)
– Ołówek / narzędzie do oznaczania
– 2-biegunowy detektor napięcia
– Śrubokręt
– Wiertarka
– Otwornica
– Szczypce do cięcia drutu
– Drabina
Przed instalacją
Ważne: Wykonanie podłączenia elektrycznego
należy zlecić wykwalifikowanemu elektrykowi lub
osobie przeszkolonej w zakresie wykonywania in-
stalacji elektrycznych. Osoba ta musi posiadać
wiedzę na temat właściwości lampy i przepisów
dotyczących podłączania.
Przed instalacją należy zapoznać się ze wszyst-
kimi instrukcjami i rysunkami zawartymi w niniej-
szej instrukcji oraz z samą lampą.

48 PL
Montaż Przed instalacją / Montaż
OFF
Przed instalacją należy upewnić się, że przew
ód,
do którego ma być podłączona lampa, nie
znajduje się pod napięciem. W tym celu należy
wyjąć bezpiecznik lub wyłączyć wyłącznik
nadmiarowoprądowy w skrzynce bezpieczni-
kowej (położenie 0).
Sprawdzić brak napięcia za pomocą
2-biegunowego detektora napięcia.
Przeznaczone do instalacji tylko poza
zasięgiem ręki.
Montaż
≥ 70 mm
max. 20 mm
Zaznaczyć pozycje lamp do zabudowy.
Otwornicą / wiertłem (ø 68 mm) wywiercić
3 otwory w wybranym miejscu. Należy zwrócić
uwagę na odpowiedni odstęp. Musi on wynosić
przynajmniej 20 cm. Ponadto zwrócić uwagę
na to, aby nie uszkodzić żadnych przewodów.
Przeznaczone do instalacji tylko poza zasięgiem
ręki.
7
Przeprowadzić przewód zasilający 7
(zewnętrzny) przez otwór montażowy.
2 3 4
Włożyć nową żarówkę 3 w spot do zabu-
dowy 2.
Zamocować żarówkę 3 w spocie do zabu-
dowy 2 za pomocą pierścienia 4 do żarówki.
5
5
Zapiąć zaciski sprężynowe 5 od zewnątrz w
obu przewidzianych do tego otworach.

49 PL
Montaż
8 6
1
7
Otworzyć skrzynkę przyłączeniową 6, odkrę-
cając osłonę 8 za pomocą śrubokręta.
Następnie wsunąć podwójnie izolowany wę-
żyk ochronny 1 min. 8 mm w otwór w
skrzynce przyłączeniowej 6.
Włożyć kabel sieciowy 7 (zewnętrzny) przez
wężyk ochronny 1.
7 91
Podłączyć przewód zasilający (zewnętrzny) 7
przy pomocy zaciskowej kostki elektrycznej 9.
Zwrócić uwagę na oznakowanie L / N (L = cz
arny
lub brązowy, N = niebieski) podłączonych
przewodów. Ewentualny kabel zielono/żółty
nie musi być podłączony.
Uziemnienie nie jest konieczne, ponieważ lampa
ma klasę ochronną II.
Należy użyć kabla typu H03VV-F o poprzecz-
nym przekroju conajmniej 2 x 0,75 mm² i koń-
cówkami tulejkowymi.
Proszę zamknąć ponownie skrzynkę przyłącze-
niową 6, przykręcając mocno osłonę 8 za
pomocą śrubokręta.
Przed umieszczeniem lampy do zabudowy usu-
nąć ewentualny materiał izolacyjny znajdujący
się w pobliżu skrzynki przyłączeniowej 6 i
lampy do zabudowy.
6
3
2
Następnie połączyć skrzynkę przyłączeniową
6 ze spotem do zabudowy 2 poprzez
wkręcenie żarówki 3 do oprawy.
6
Wsunąć skrzynkę przyłączeniową 6 przez
otwór montażowy.

50 PL
Obsługa / Konserwacja i czyszczenie / Utylizacja / Gwarancja i serwisMontaż / Obsługa
5
Założyć ukośnie lampę do zabudowy i najpierw
wprowadzić sprężynę mocującą 5 w otwór
montażowy.
Następnie włożyć drugi zacisk sprężynowy 5
w otwór montażowy.
5
Następnie całkowicie wcisnąć lampę do
zabudowy w otwór montażowy. Po wsunięciu
zaciski sprężynowe 5 rozciągają się i w ten
sposób mocują lampy do zabudowy.
Sprawdzić, czy jest dobrze zamocowana.
ON
Włożyć bezpiecznik lub włączyć wyłącznik
nadmiarowo-prądowy na skrzynce bezpieczni-
kowej (pozycja I).
Przeznaczone do instalacji tylko poza zasięgiem
ręki.
Lampa jest gotowa do użycia.
Obsługa
Ustawianie lamp do
zabudowy
Lampy 2 do zabudowy są uchylne.
Aby uniknąć poparzeń upewnić się, że lampa
jest całkowicie ochłodzona.
Aby uchylić lampy 2, nacisnąć wewnętrzną
krawędź lampy do zabudowy w wybranym
kierunku.
Ściemnianie lamp do zabudowy
Źródła światła 3 nie nadają się do użycia w
połączeniu z zewnętrznymi regulatorami jasno-
ści światła lub wyłącznikami elektronicznymi.
Lampy dostarczane są ze źródłem światła, które
można ściemniać w 3 etapach.
Aby ściemnić źródło światła 3, kilka razy z
rzędu uruchomić przełącznik Włącz / Wyłącz
krótko po sobie.
Wraz ze ściemnieniem żarówki 3 jednocze-
śnie zmienia się też barwa światła.

51 PL
Obsługa / Konserwacja i czyszczenie / Utylizacja / Gwarancja i serwis
Poziomy ściemniania lampy są następujące:
100% jasność = 3000K
40% jasność = 2500K
10% jasność = 2000K
Wymiana żarówki
Aby wymienić żarówkę 3, należy najpierw
odłączyć lampę od sieci elektrycznej. W tym
celu należy wyjąć bezpiecznik lub wyłączyć
wyłącznik nadmiarowo-prądowy w skrzynce
bezpiecznikowej (pozycja 0).
Odczekać, aż żarówka 3 całkowicie ostygnie.
Do wymiany żarówki 3 należy użyć czystej,
niestrzępiącej się szmatki.
Ostrożnie wykręcić uszkodzoną żarówkę 3 z
¹⁄₄ obrotu z oprawy w kierunku odwrotnym do
ruchu wskazówek zegara.
Zdjąć pierścień 4 i wyjąć żarówkę 3 ze
spotu do zabudowy 2.
Założyć nową żarówkę, jak opisano w roz-
dziale „Montaż“.
Sprawdzić, czy zamocowanie jest prawidłowe.
Włożyć bezpiecznik lub włączyć wyłącznik
nadmiarowo-prądowy na skrzynce bezpieczni-
kowej (pozycja I).
Konserwacja i czyszczenie
NIEBEZPIECZEŃSTWO
PORAŻENIA PRĄDEM ELEKTRYCZNYM!
Przed rozpoczęciem czyszczenia, lampę odłączyć
od sieci elektrycznej. W tym celu należy wyjąć
bezpiecznik lub wyłączyć wyłącznik instalacyjny
w skrzynce bezpiecznikowej (pozycja 0).
NIEBEZPIECZEŃSTWO
PORAŻENIA PRĄDEM ELEKTRYCZNYM!
Ze względu na zachowanie bezpieczeństwa w
zakresie elektryczności nie wolno czyścić lampy za
pomocą wody lub innych płynów, ani też zanurzać
w wodzie.
Nie używać rozpuszczalników, benzyny itp.
Mogłoby to spowodować uszkodzenie lampy.
Odczekać, aż lampa całkowicie ostygnie.
Do czyszczenia należy używać wyłącznie
suchej, niestrzępiącej się szmatki.
Utylizacja
Opakowanie wykonane jest z materiałów
przyjaznych dla środowiska, które można
przekazać do utylizacji w lokalnym punk-
cie przetwarzania surowców wtórnych.
b
a
Przy segregowaniu odpadów prosimy
zwrócić uwagę na oznakowanie mate-
riałów opakowaniowych, oznaczone
są one skrótami (a) i numerami (b) o
następującym znaczeniu: 1–7: Tworzywa
sztuczne / 20–22: Papier i tektura /
80–98: Materiały kompozytowe.
Z uwagi na ochronę środowiska nie
wyrzucać urządzenia po zakończeniu
eksploatacji do odpadów domowych,
lecz prawidłowo zutylizować. Informacji
o punktach zbiorczych i ich godzinach
otwarcia udziela odpowiedni urząd.
Gwarancja i serwis
Oświadczenie gwarancyjne
W momencie zakupu otrzymują Państwo na to
urządzenie 36 miesięcy gwarancji. Urządzenie
wyprodukowano starannie i poddano dokładnej
kontroli jakości. Wokresie gwarancji usuwamy
bezpłatnie wszystkie wady materiałowe ifabryczne.
Jeśli mimo to w okresie gwarancji pojawią się usterki,
urządzenie należy przesłać na podany adres ser-
wisowy, podając następujący numer artykułu:
14141302L / 14141306L.
Gwarancji nie podlegają uszkodzenia spowodow
ane
pr
zez nieprawidłowe użytkowanie, nieprzestrzeganie
instrukcji obsługi lub ingerencję nieautoryzowanyc
h
osób, a także części szybkozużywające się (jak np.
elementy świetlne). Usługa gwarancyjna nie prze-
dłuża ani nie odnawia okresu gwarancji.

52 PL
Gwarancja i serwis
Zgodnie z Kodeksem Cywilnym art. 581 §1 wraz
z wymianą urządzenia lub ważnej części czas
gwarancji rozpoczyna się na nowo.
Adres serwisu
Briloner Leuchten GmbH & Co. KG
Im Kissen 2
59929 Brilon
NIEMCY
Tel.: +49 29 61 / 97 12–800
Faks: +49 29 61 / 97 12–199
E-mail: [email protected]
www.briloner.com
IAN 307293_1904
Przed skontaktowaniem się z działem serwisowym
należy przygotować paragon i numer artykułu
(np. IAN 123456_7890) jako dowód zakupu.
Deklaracja zgodności
Niniejszy produkt spełnia wymagania obowiązują-
cych dyrektyw europejskich i przepisów krajowych.
Zgodność została wykazana. Odpowiednie obja-
śnienia i podkładki dokumentacyjne są zdeponowane
u producenta.
Producent
Briloner Leuchten GmbH & Co. KG
Im Kissen 2
59929 Brilon
NIEMCY
PL

53 CZ
Obsah
Legenda použitých piktogramů ...............................................................................Strana 54
Úvod .................................................................................................................................................Strana 54
Použití ke stanovenému účelu..........................................................................................................Strana 54
Rozsah dodávky ..............................................................................................................................Strana 55
Popis dílů ..........................................................................................................................................Strana 55
Technická data .................................................................................................................................Strana 55
Bezpečnost ..................................................................................................................................Strana 55
Bezpečnostní pokyny .......................................................................................................................Strana 55
Příprava ........................................................................................................................................Strana 57
Potřebné nástroje a materiál ...........................................................................................................Strana 57
Před instalací .............................................................................................................................Strana 57
Montáž ........................................................................................................................................... Strana 57
Obsluha .........................................................................................................................................Strana 60
Nastavení vestavěných bodových světel ........................................................................................Strana 60
Tlumení vestavných bodových světel .............................................................................................. Strana 60
Výměna osvětlovacího prostředku .................................................................................................. Strana 60
Údržba a čistění ......................................................................................................................Strana 60
Zlikvidování ...............................................................................................................................Strana 60
Záruka a servis ....................................................................................................................... Strana 61
Záruka ..............................................................................................................................................Strana 61
Adresa servisu .................................................................................................................................. Strana 61
Prohlášení o shodě ...........................................................................................................................Strana 61
Výrobce ............................................................................................................................................Strana 61

54 CZ
Úvod
Legenda použitých piktogramů
Přečtěte si návod kobsluze! Výstraha! Nebezpečí zásahu
elektrickým proudem
Výrobek se hodí výhradně pro provoz
ve vnitřních prostorách, v suchých a
uzavřených místnostech.
Vyvarujte se nebezpečí požáru
a poranění
Volt (střídavé napětí) Pozor na horké povrchy!
Hertz (kmitočet) Nebezpečí výbuchu!
Watt (činný výkon) V žádném případě nepřikrývejte vesta-
vná bodová světla materiály izolujícími
teplo nebo podobnými předměty.
Třída ochrany II Tak postupujete správně
Dbejte na výstrahy a řiďte se
bezpečnostními pokyny! b
a
Obal i výrobek odstraňujte do
odpadu ekologicky!
Nebezpečí ohrožení života a zranění
malých i větších dětí! Modul k vestavění
Toto světlo není vhodné pro externí
stmívače a elektrické vypínače. ON OFF Cykly spínání
Životnost LED Obal je vyroben ze 100 %
recyklovatelného papíru.
36°
normálně
Úhel svícení: 36 ° normalně Osvětlovací prostředky - používejte
pouze vsuchém prostředí.
60 %
< 1 vteřina Doba startu <1vteřina 60 %
LED bodová světla
Q
Úvod
Blahopřejeme Vám ke koupi nového osvět-
lení. Rozhodli jste se pro jakostní výrobek.
Přečtěte si laskavě kompletně a pečlivě
tento návod k obsluze. Rozevřete stránku s obrázky.
Tento návod patří k tomuto výrobku a obsahuje důležit
á
upozornění k uvedení zařízení do provozu a k zachá-
zení s ním. Řiďte se vždy bezpečnostními pokyny.
Před uvedením do provozu přezkoušejte, je-li k dispozici
správné napětí a jsou-li všechny díly namontované.
V případě, že máte dotazy nebo si nejste jisti se
zacházením se zařízením, spojte se laskavě se
svým p
rodejcem nebo místem servisu. Návod pečlivě
us
chovejte a předejte jej případně třetímu.
Q
Použití ke stanovenému účelu
Svítidlo je výhradně určeno pro provoz
ve vnitřní oblasti, v suchých a

55 CZ
Úvod / Bezpečnost
uzavřených místnostech. Tento přístroj se hodí jen
pro použití v soukromých domácnostech. Svítidlo
lze upevnit na všech normálních nehořlavých povr-
chových plochách.
Q
Rozsah dodávky
Bezprostředně po vybavení vždy zkontrolujte úplnost
rozsahu dodávky a bezvadný stav přístroje.
3 bodová světla na vestavění
3 osvětlovací prostředky, GU 10
6 svorek
3 připojovací krabice
1 dvojitě izolovaná ochranná hadička
1 návod kmontáži a použití
Popis dílů
1 Ochranná hadička
2 Bodové světlo na vestavění
3 Osvětlovací prostředek
4 Kroužek
5 Přidržovací pružina
6 Připojovací box
1 4
5
6
2
3
x 3
x 3
x 3
x 3
x 3
x 6
Technická data
Model č.: 14141302L / 14141306L
Provozní napětí: 230 ‒ 240 V~, 50 Hz
Příkon:
3 x LED GU 10 maximálně 5 W
Rozměry každé
kulaté světlo: ø 86 mm
Montážní otvor: ø 68 mm
Objímka: GU 10
Třída ochrany: II /
Pro kabelovou formu (není zahrnuta v rozsahu do-
dávky) je třeba použít minimální průřez 2 x
0,75 mm2.
Příslušný kabel je opatřen pouzdry žil.
Q
Bezpečnost
Bezpečnostní pokyny
U škod způsobených nedodržováním tohoto návodu
k obsluze zaniká nárok na záruku! Za následovné
škody se nepřevezme záruka! U věcných škod nebo
poškození osob, které byly způsobeny neodborným
zacházením nebo nedbáním bezpečnostních po-
kynů, se nepřevezme záruka!
NEBEZPEČÍ
OHROŽENÍ ŽIVOTA A ZRANĚ-
NÍ PRO MALÉ A VELKÉ DĚTI!
Nenechávejte děti nikdy samotné s obalovým
materiálem. Hrozí nebezpečí udušení obalovým
materiálem. Děti nebezpečí často podceňují.
Tento výrobek mohou používat děti od 8 let,
osoby se sníženými fyzickými, smyslovými nebo
duševními schopnosti nebo s nedostatečnými
zkušenostmi a znalostmi, jestliže budou pod
dohledem nebo byly poučeny o bezpečném
používání výrobku a chápou nebezpečí, která
z jeho používání vyplývají. Děti si nesmí spří-
strojem neměly hrát. Děti nesmějí bez dohledu
provádět čištění ani uživatelskou údržbu.
Zabraňte ohrožení života
v důsledku zásahu elektrickým
proudem
Elektrickou instalaci nechte provádět jen vyuče-
ného elektrikáře nebo osobu s odpovídajícími
zkušenostmi.

56 CZ
Bezpečnost
Základně izolovaná vedení se musí ještě pří-
davně izolovat.
Použijte dvojitě izolovaná vedení od přípojky
až k svítidlu. Základní izolace musí být prove-
dena tak krátce, aby se nedotýkala montážní
plochy nebo šroubu.
Při připojování přídavných vestavěných svítidel
dbejte na maximální zatížitelnost elektrického
vedení v místě montáže. Maximální zatížitelnost
vedení se nesmí překročit.
Před každým připojením k síti přezkoušejte
svítidlo a připojovací síťový kabel vzhledem
k případným poškozením. Nikdy nepoužívejte
svítidlo, zjistíte-li nějaká poškození.
Poškozené síťové kabely znamenají ohrožení
života v důsledku úrazu elektrickým proudem.
Obraťte se při poškozeních, opravách nebo jiných
problémech na svítidle na servisní středisko
nebo elektrotechnického odborníka.
Před montáží odstraňte pojistku nebo vypněte
ochranný spínač vedení ve skříňce s pojistkami
(poloha 0).
Před montáží se ujistěte, že dané síťové napětí
souhlasí s potřebným provozním napětím svíti-
dla (viz „Technické údaje“).
Spojujte spolu maximálně 3 bodová světla.
Bezpodmínečně se vyhněte dotyku svítidla s
vodou nebo jinými kapalinami.
Nikdy neotvírejte některý z elektrických pro-
vozních prostředků, nebo do nich nestrkejte
nějaké předměty. Takové zásahy znamenají
ohrožení života v důsledku úrazu elektrickým
proudem.
Svítidlo neinstalujte na vlhkých nebo vodivých
podkladech.
Vyhněte se nebezpečí
požáru a poranění
NEBEZPEČÍ PORANĚNÍ!
Okamžitě po vybalení přezkoušejte každý sví-
ticí prostředek a sklo lampy vzhledem k poško-
zením. Svítidlo nemontujte se závadnými skly
lampy nebo svíticími prostředky. V tomto pří-
padě se pro nasazení spojte s místem servisu.
POZOR! NEBEZPEČÍ POPÁLE-
NÍ HORKÝMI POVRCHY!
Abyste se vyhnuli popálením, ujistěte se, že je
svítidlo vypnuté a ochlazené, předtím než se
jej dotknete. Svíticí prostředky vyvinou v oblasti
hlavy svítidla silné vedro.
NEBEZPEČÍ EXPLOZE!
N
epoužívejte výrobek v místnostech nebo v o
kolí
lehce zápalných nebo explozivních kapalin,
plynů, par nebo prachů.
POZOR! NEBEZPEČÍ POŽÁRU!
V žádné případě nepřikryjte vestavená svítidla
tepelně izolačními kryty nebo podobnými ma-
teriály.
Pečujte o dostatečné ochlazení. V montážní
oblasti se nesmí překročit maximální teplota
90 °C.
Sadu vestavěných svítidel použijte jen s doda-
ným příslušenstvím. Neprovádějte žádné zapo-
jení sady vestavěných svítidel za sebou,
jinak zaniknou veškeré nároky na poskytnutí
záruky.
Svítidlo a obalový materiál nenechejte jen
tak se povalovat. Plastové fólie / pytlíky, umělo-
hmotné díly atd. by mohly být pro děti nebez-
pečnou hračkou.
Nedívejte se přímo do zdroje světla (osvětlova-
cího prostředku, LED, atd.). Nedívejte se na zdroj
světla (osvětlovací prostředek, LED, atd.) optic-
kou pomůckou (např. lupou).
Toto světlo není vhodné pro externí
stmívače a elektrické vypínače.
Osvětlovací prostředky - používejte
pouze vsuchém prostředí.
Tak se budete bezpečně chovat
Svítidlo namontujte tak, aby bylo chráněné před
vlhkostí, znečištěním a příliš silným ohřátím.

57 CZ
Bezpečnost / Příprava / Před instalací / Montáž
Vyhněte se montáži v koupelnách nebo podob-
ných místnostech.
Vzdálenost mezi dvěma vestavěnými bodovými
svítidly musí činit aspoň 20 cm.
min. 10 cm min. 10 cm
min. 2,5 cm
Montážní oblast přes objímku žárovky musí činit
minimálně 2,5 cm a boční odstup minimálně
10 cm.
Montáž pečlivě připravte a věnujte jí dostateč-
nou časovou dobu. Položte předtím všechny
jednotlivé díly a přídavné nástroje nebo materiál
přehledně a připraveny k uchopení.
Buďte vždy pozorní! Dbejte vždy na to, co činíte
a postupujte vždy s rozumem. Nikdy nepouží-
vejte svítidla, nejste-li soustředěný nebo dokonce
necítíte-li se dobře.
Q
Příprava
Q
Potřebné nástroje a materiál
Vyjmenované nástroje a materiály nejsou zahrnuty
v rozsahu dodávky. Jedná se přitom o nezávazné
údaje a hodnoty k orientaci. Vlastnost materiálu se
řídí podle individuálních vlastností na místě.
– kabel H03VV-F v potřebné délce s koncovkami
vodičů (minimální průřez 2 x 0,75 mm2)
– tužka / nástroj koznačení
– 2pólová zkoušečka napětí
– šroubovák
– vrtačka
– děrovka
– štípací kleště
– žebřík
Q
Před instalací
Důležité: Elektrické připojení nechejte provést jen
vyškoleným elektrotechnikem nebo osobou pouče-
nou o instalaci. Musí mít znalosti o vlastnostech
svítidla a ustanovení přípojek.
Před instalací se seznamte se všemi instrukcemi
a obrázky v tomto návodě, jakož i se svítidlem.
OFF
Před instalací se ujistěte, že na vedení, k němuž
se má svítidlo připojit, není přiloženo napětí. Od-
straňte k tomu pojistku nebo vypněte vypínač
jištění vedení ve skříňce pojistek (poloha 0).
Zkontrolujte 2pólovou zkoušečkou napětí, jestli
je vypnutý proud.
Určené k instalaci jen na místo kam se nedá
dosáhnout rukou.
Q
Montáž
≥ 70 mm
max. 20 mm
Označte si polohu reflektorů. Vyřízněte děrovací
pilou nebo vyvrtejte vrtákem (ø 68 mm) 3 otvory
na místě označeném k montáži. Přitom dbejte
na odstup mezi vestavěnými bodovými svítidly.
Musí činit aspoň 20 cm. Mimo to dbejte na to,
abyste nepoškodili vodiče rozvodu proudu. Ur-
čené k instalaci na místo kam se nedá dosáhnout.

58 CZ
MontážMontáž
7
Protáhněte síťový připojovací kabel 7 (externí)
montážním otvorem.
2 3 4
Nasaďte osvětlovací prostředek 3 do bodo-
vého světla 2.
Připevněte osvětlovací prostředek 3 v bodo-
vém světle 2 kroužkem 4 pro osvětlovací
prostředky.
5
5
Zaklapněte obě přidržovací pružiny 5 zvenčí
do příslušných otvorů.
8 6
1
7
Otevřete připojovací box 6 odšroubováním
krytu 8 šroubovákem.
Nastrčte dvojitě izolovanou ochrannou hadičku
1 nejméně 8 mm do otvoru připojovacího
boxu 6.
Nyní protáhněte síťový připojovací kabel 7
(externí) skrz ochrannou hadičku 1.
7 91
Připojte síťový kabel 7 (externí) na svorkovnici
9. Dávejte také pozor na značení L / N (L =
černá nebo hnědá barva, N = modrá barva)
připojených vedení. Eventuálně integrovaný, žlu-
tozelený vodič se nepřipojuje. Uzemnění není
zapotřebí, protože se jedná u výrobku o ochra-
nou třídu II. Používejte kabel typu H03VV-F s
průřezem nejméně 2 x 0,75 mm² a koncovky
vodičů.
Uzavřete připojovací box 6 přišroubováním
krytu 8 šroubovákem.
Při nasazování bodového světla odstraňte

59 CZ
Montáž
případně izolační materiál v jeho blízkosti a
blízkosti připojovacího boxu 6.
6
3
2
Nyní spojte připojovací box 6 s bodovým
světlem 2 našroubováním osvětlovacího
prostředku 3 do objímky.
6
Prostrčte připojovací box 6 skrz montážní otvor.
5
Nastavte svítidlo šikmo a zaveďte nejdříve jednu
přídržnou pružinu 5 do montážního otvoru.
Nyní zaveďte druhou přídržnou pružinu 5 do
montážního otvoru.
5
Zatlačte svítidlo úplně do montážního otvoru.
Po vsunutí upněte přídržné pružiny 5 a zafi-
xujte tím bodová světla.
Zkontrolujte správné usazení.
ON
Nasaďte zase pojistku nebo zapněte jistič
vpojistkové skříni (do polohy I).
Určené k instalaci jen na místo kam se nedá
dosáhnout rukou.
Vaše svítidlo je připraveno kpoužití.

60 CZ
Záruka a servisObsluha / Údržba a čistění / Zlikvidování
Obsluha
Nastavení vestavěných
bodových světel
Bodová světla 2 jsou výkyvná.
Abyste se vyhnuli popálení nechte bodové
světlo úplně vychladnout.
Pro naklonění bodového světla 2 zatlačte na
jeho vnitřní okraj v požadovaném směru.
Tlumení vestavných
bodových světel
Osvětlovací prostředky 3 nejsou vhodné k tlu-
mení a používání spolu s elektronickými spínači.
Svítidla jsou dodávána s osvětlovacím prostřed-
kem, tlumitelným ve 3 stupních.
Pro tlumení osvětlovacího prostředku 3 stisk-
něte vícekrát krátce po sobě nástěnný vypínač.
S tlumením osvětlovacích prostředků 3 se zá-
roveň mění barva světla.
Stupně tlumení jsou následující:
100% jasnost = 3000 K
40% jasnost = 2500 K
10% jasnost = 2000 K
Výměna osvětlovacího
prostředku
Před výměnou osvětlovacího prostředku 3
nejdříve odpojte svítidlo od přívodu elektric-
kého proudu. Za tímto účelem vyjměte pojistku
nebo vypněte jistič vpojistkové skříni (po-
loha0).
Nechte osvětlovací prostředek 3 úplně vy-
chladnout.
Při výměně osvětlovacího prostředku 3 pou-
žijte na jeho držení čistý hadr, který nepouští
vlákna.
Vyšroubujte osvětlovací prostředek 3 z ob-
jímky otočením o ¼ otáčky ve směru proti
chodu hodinových ručiček.
Odstraňte kroužek 4 a vyjměte osvětlovací
prostředek 3 z bodového světla 2 na vesta-
vění.
Nasaďte nový osvětlovací prostředek podle
popisu v kapitole „Montáž“.
Zkontrolujte správné usazení.
Nasaďte zase pojistku nebo zapněte jistič
vpojistkové skříni (do polohy I).
Q
Údržba a čistění
NEBEZPEČÍ ÚRAZU
ELEKTRICKÝM PROUDEM!
K čistění nejprve odpojte svítidlo d proudové sítě.
Odstraňte proto pojistku nebo vypněte vypínač
jištění vedení ve skříňce pojistek (poloha 0).
NEBEZPEČÍ ÚRAZU
ELEKTRICKÝM PROUDEM!
Z důvodů elektrické bezpečnosti se svítidlo nikdy
nesmí čistit vodou nebo jinými kapalinami nebo
dokonce ponořit do vody.
Nepoužívejte ředidel, benzínu apod. Svítidlo
by se tím poškodilo.
Stolní lampu nechejte úplně vychladnout.
K čistění použijte jen suché tkaniny bez nitek.
Q
Zlikvidování
Obal se skládá zekologických materiálů,
které můžete zlikvidovat prostřednictvím
místních sběren recyklovatelných materiálů.
b
a
Při třídění odpadu se řiďte podle označení
obalových materiálů zkratkami (a) a čísly
(b), s následujícím významem: 1–7:
umělé
hmoty / 20–22: papír a lepenka / 80–98:
složené látky.
Vzájmu ochrany životního prostředí vy-
sloužilý výrobek nevyhazujte do domov-
ního odpadu, ale předejte k odborné
likvidaci. O sběrnách a jejich otevíracích
hodinách se můžete informovat u přís
lušné
správy města nebo obce.

61 CZ
Záruka a servis
Záruka a servis
Záruka
Od okamžiku zakoupení dostáváte na výrobek
záruku po dobu 36 měsíců. Přístroj byl svědomitě
vyroben a podroben přesné kontrole kvality. Během
záruční doby odstraníme bezplatně všechny vady
materiálu a výrobní vady. Vpřípadě, že se během
záruční doby přesto vyskytnou závady, zašlete las-
kavě lampu na uvedenou adresu servisu a uveďte
následující číslo artiklu: 14141302L / 14141306L.
Ze záruky vyloučeny škody způsobené neodborným
zacházením, nerespektováním návodu kobsluze
nebo zásahem neautorizovanou osobou, jakož i
poškození rychle opotřebitelných dílů (např. svíticí
prostředky). Záručním výkonem se záruční doba
neprodlouží ani neobnoví.
Adresa servisu
Briloner Leuchten GmbH & Co. KG
Im Kissen 2
59929 Brilon
NĚMECKO
Tel.: +49 29 61 / 97 12–800
Fax: +49 29 61 / 97 12–199
E-mail: [email protected]
www.briloner.de
IAN 307293_1904
Pro všechny požadavky si připravte pokladní blok
a číslo výrobku (např. IAN 123456_7890) jako
doklad o nákupu.
Prohlášení o shodě
Tento výrobek splňuje požadavky platných evrop-
ských a národních směrnic. Shoda byla prokázána.
Příslušná prohlášení a dokumentace jsou uloženy
uvýrobce.
Výrobce
Briloner Leuchten GmbH & Co. KG
Im Kissen 2
59929 Brilon
NĚMECKO

62 CZ

63 SK
Obsah
Legenda použitých piktogramov ............................................................................ Strana 64
Úvod .................................................................................................................................................Strana 64
Používanie v súlade s určeným účelom ..........................................................................................Strana 65
Obsah dodávky ............................................................................................................................... Strana 65
Popis častí .........................................................................................................................................Strana 65
Technické údaje ...............................................................................................................................Strana 65
Bezpečnosť ................................................................................................................................. Strana 65
Bezpečnostné upozornenia .............................................................................................................Strana 65
Príprava ........................................................................................................................................Strana 67
Potrebné náradie a materiál ...........................................................................................................Strana 67
Pred inštaláciou ...................................................................................................................... Strana 67
Montáž ........................................................................................................................................... Strana 67
Obsluha .........................................................................................................................................Strana 70
Nasmerovanie bodových svetiel .....................................................................................................Strana 70
Stmievanie bodových svetiel ........................................................................................................... Strana 70
Výmena osvetľovacieho prostriedku ...............................................................................................Strana 70
Údržba a čistenie ...................................................................................................................Strana 70
Likvidácia .....................................................................................................................................Strana 71
Záruka a servis ....................................................................................................................... Strana 71
Garančné prehlásenie .....................................................................................................................Strana 71
Servisná adresa ................................................................................................................................Strana 71
Konformitné vyhlásenie ....................................................................................................................Strana 71
Výrobca ............................................................................................................................................ Strana 71

64 SK
Úvod
Legenda použitých piktogramov
Prečítajte si návod na obsluhu! Výstraha!
Nebezpečenstvo zásahu
elektrickým prúdom
Tento výrobok je vhodný výhradne
na prevádzku v interiéri, v suchých a
uzavretých priestoroch.
Zabráňte nebezpečenstvu požiaru
a poranení
Volt (striedavé napätie) Nebezpečenstvo horúcich povrchov!
Hertz (frekvencia) Nebezpečenstvo explózie!
Watt (efektívny výkon) Bodové svetlá v žiadnom prípade
neprikrývajte tepelne izolačnými
materiálmi a pod.
Trieda ochrany II Takto postupujete správne
Rešpektujte výstražné a bezpečnostné
upozornenia! b
a
Obal a zariadenie ekologicky
zlikvidujte!
Nebezpečenstvo ohrozenia života a
nebezpečenstvo úrazu pre malé a
staršie deti! Modul pre zabudovanie
Toto svietidlo nie je vhodné pre externé
stmievače a elektrické spínače. ON OFF Spínacie cykly
Životnosť LED Obal je vyrobený zo 100%
recyklovaného papiera.
36°
normálne
Uhol vyžarovania: 36 ° normálne Osvetľovacie prostriedky - Nasad-
zujte iba v suchom prostredí.
60 %
< 1 s Čas spustenia <1s 60 %
LED vstavané svietidlá
Úvod
Blahoželáme Vám ku kúpe Vášho nového
prístroja. Rozhodli ste sa tým pre vysokokva-
litný
výrobok. Dôkladne si prečítajte celý
tento návod na obsluhu. Otvorte obe strany s obráz-
kami. Tento návod patrí k tomuto výrobku a obsahuje
dôležité upozornenia pre uvedenie do prevádzky a
manipuláciu. Dodržiavajte vždy všetky bezpečnostné
upozornenia. Pred uvedením do prevádzky prekon-
trolujte, či je k dispozícii správne napätie a či sú
všetky diely správne namontované. V prípade otá-
zok alebo neistoty ohľadom manipulácie s prístrojom
sa prosím spojte s Vaším predajcom alebo servisným
pracoviskom. Tento návod si starostlivo uschovajte a
prípadne ho odovzdajte tretej osobe.

65 SK
Úvod / Bezpečnosť
Používanie v súlade
s určeným účelom
Toto svietidlo je vhodné výhradne na
prevádzku v interiéri, v suchých a uza-
tvorených priestoroch. Tento prístroj je
určený len na používanie v súkromných domác-
nostiach. Svietidlo možno pripevniť na všetky nor-
málne zápalné povrchy.
Obsah dodávky
Bezprostredne po vybalení vždy skontrolujte úplnosť
dodávky ako aj bezchybný stav zariadenia.
3 bodové svetlá
3 osvetľovacie prostriedky, GU10
6 svoriek
3 pripojovacie skrinky
1 dvojito izolovaná ochranná hadička
1 návod na montáž a používanie
Popis častí
1 Ochranná hadička
2 Bodové svetlo
3 Osvetľovací prostriedok
4 Kruh
5 Prídržná pružina
6 Pripojovacia schránka
1 4
5
6
2
3
x 3
x 3
x 3
x 3
x 3
x 6
Technické údaje
Model č.: 14141302L / 14141306L
Prevádzkové napätie: 230‒240 V ~, 50 Hz
Príkon: 3 x LED GU 10 max. 5 W
Rozmery každé
okrúhle svietidlo: ø 86 mm
Montážny otvor: ø 68 mm
Objímka: GU10
Trieda ochrany: II /
Pre káblový zväzok (nie je súčasťou dodávky) pou-
žite minimálny prierez 2 x 0,75 mm2. Príslušný kábel
musí mať dutinky na vodič.
Bezpečnosť
Bezpečnostné
upozornenia
V prípade škôd, ktoré vzniknú nedodržiavaním tohto
návodu na obsluhu, zaniká garančný nárok! Pri ná-
sledných škodách nepreberá výrobca ručenie! V
prípade vecných škôd alebo poranenia osôb, ktoré
boli zapríčinené neodbornou manipuláciou alebo
nedodržiavaním bezpečnostných pokynov, nepre-
berá výrobca ručenie!
NEBEZPE-
ČENSTVO OHROZENIA ŽIVOTA
A NEBEZPEČENSTVO ÚRAZU
PRE MALÉ I STARŠIE DETI!
Nikdy nenechávajte deti bez dozoru s obalovým
materiálom. Existuje nebezpečenstvo zadusenia
obalovým materiálom. Deti často podceňujú
nebezpečenstvo.
Tento prístroj môžu používať deti od 8 rokov, ako
aj osoby so zníženými psychickými, senzorickými
alebo duševnými schopnosťami alebo s nedostat-
kom skúseností a vedomostí, ak sú pod dozorom,
alebo ak boli poučené ohľadom bezpečného
používania prístroja, a ak porozumeli nebez-
pečenstvám spojeným s jeho používaním. Deti
sa s výrobkom nesmú hrať. Čistenie a údržbu
nesmú vykonávať deti bez dozoru.

66 SK
Bezpečnosť
Zabráňte ohrozeniu života
zásahom elektrickým prúdom
Elektrickú inštaláciu musí vykonávať elektrikár
alebo osoba poverená elektroinštaláciami.
Základné izolované káble pevnej kabeláže
musia byť vybavené dodatočnou izoláciou.
Použite dvojito izolované káble od miesta pri-
pojenia až k svietidlu. Základná izolácia musí
byť taká krátka, aby izolácia základne nemohla
prísť na montážnu plochu alebo na skrutku.
Pri pripájaní ďalších vstavaných svietidiel dávajte
pozor na maximálnu nosnosť káblov na mieste.
Nesmie byť prekročený maximálny výkon
káblov.
Pred každým pripojením do siete prekontrolujte
svietidlo a sieťový pripojovací kábel ohľadom
prípadných poškodení. Ak zistíte akékoľvek
poškodenia, svietidlo za žiadnych okolností
nepoužívajte.
Poškodené sieťové káble predstavujú nebezpe-
čenstvo ohrozenia života zásahom elektrickým
prúdom. V prípade poškodení, opráv alebo
iných problémov so svietidlom sa obráťte na ser-
visné stredisko alebo kvalifikovaného elektrikára.
Pred montážou odstráňte poistku alebo vypnite
istič vedenia v poistkovej skrinke (poloha 0).
Pred montážou sa uistite, že sa existujúce sieťové
napätie zhoduje s potrebným prevádzkovým
napätím svietidla (pozri „Technické údaje“).
Navzájom spojte max. 3 bodové svetlá.
Bezpodmienečne zabráňte kontaktu svietidla s
vodou alebo inými kvapalinami.
Nikdy neotvárajte žiadny z elektrických pre-
vádzkových prostriedkov, ani do nich nestrkajte
žiadne predmety. Takéto zásahy predstavujú
ohrozenie života v dôsledku zásahu elektrickým
prúdom.
Neinštalujte svietidlo na vlhkých alebo vodivých
podkladoch.
Zabráňte nebezpečenstvu
požiaru a poranení
NEBEZPEČENSTVO PORANENIA!
Bezprostredne po vybalení prekontrolujte každý
osvetľovací prostriedok a sklenené tienidlo
ohľadom prípadných poškodení. Nemontujte
svietidlo s defektným osvetľovacím prostriedkom
a / alebo skleneným tienidlom. V takom prípade
sa spojte so servisným strediskom kvôli výmene.
OPATRNE! NEBEZPEČENSTVO
POPÁLENIA SKRZE HORÚCE
POVRCHY!
Zabezpečte, aby bolo svietidlo vypnuté a
vychladnuté skôr, ako sa ho budete dotýkať,
pretože inak hrozí nebezpečenstvo popálenia.
Osvetľovacie prostriedky vytvárajú v oblasti
hlavy lampy silné teplo.
NEBEZPEČENSTVO EXPLÓZIE!
Nepoužívajte produkt v miestnostiach alebo v
prostredí s ľahko zápalnými alebo výbušnými
kvapalinami, plynmi, výparmi alebo prachmi.
OPATRNE! NEBEZPEČENSTVO
POŽIARU!
Zabudované bodové svetlá v žiadnom prípade
neprikrývajte tepelne izolačnými materiálmi a
pod.
Zabezpečte dostatočné chladenie. Maximálna
teplota 90 °C v zóne zabudovania nesmie byť
prekročená.
Sadu bodových svetiel používajte iba s prilože-
ným príslušenstvom. Nezapájajte sadu bodových
svetiel do seba, inak zaniká akýkoľvek garančný
nárok.
Svietidlo alebo obalový materiál nenechávajte
voľne ležať bez povšimnutia. Plastové fólie /
plastové vrecúška, umelohmotné diely atď. by
sa mohli stať nebezpečnou hračkou pre deti.
Nepozerajte sa priamo do zdroja svetla (osvet-
ľovací prostriedok, LED, atď.). Zdroj svetla (osvet-
ľovací prostriedok, LED, atď.) nepozorujte
optickým nástrojom (napr. lupa).
Toto svietidlo nie je vhodné pre ex-
terné stmievače a elektrické spínače.
Osvetľovacie prostriedky - Nasa-
dzujte iba v suchom prostredí.

67 SK
Bezpečnosť / Príprava / Pred inštaláciou / Montáž
Takto postupujete správne
Svietidlo namontujte tak, aby bolo chránené pred
vlhkom, znečistením a príliš silným zahriatím.
Nemontujte svietidlo v kúpeľniach alebo po-
dobných miestnostiach.
Odstup medzi jednotlivými bodovými svetlami
musí byť minimálne 20 cm.
min. 10 cm min. 10 cm
min. 2,5 cm
Oblasť zabudovania nad objímkou žiarovky
musí byť min. 2,5 cm a bočný odstup min. 10 cm.
Montáž si starostlivo pripravte a doprajte si do-
statok času. Dopredu si pripravte všetky jednot-
livé diely a dodatočne potrebné náradie alebo
materiál prehľadne a na dosah ruky.
Buďte neustále opatrný! Dávajte vždy pozor
na to, čo robíte, a vždy postupujte rozvážne.
Svietidlo v žiadnom prípade nemontujte, ak ste
práve nesústredený alebo sa necítite dobre.
Príprava
Potrebné náradie a materiál
Uvedené náradie/nástroje a materiál nie sú súčas-
ťou dodávky. Ide tu o nezáväzné údaje a hodnoty
pre orientáciu. Charakter materiálu sa riadi podľa
individuálnych daností na mieste.
– kábel H03VV-F v potrebnej dĺžke s dutinami
(minimálny prierez 2 x 0,75 mm2)
– ceruzka/ označovací nástroj
– 2-pólová skúšačka napätia
– skrutkovač
– vŕtačka
– dierovacia píla
– bočné štipacie kliešte
– rebrík
Pred inštaláciou
Dôležité: Elektrické pripojenie musí vykonať kvali-
fikovaný elektrikár alebo osoba zaškolená pre elek-
troinštalácie. Táto musí mať znalosti o vlastnostiach
svietidla a predpisoch o pripojení.
Pred inštaláciou sa oboznámte so všetkými po-
kynmi a obrázkami v tomto návode, ako aj so
samotným svietidlom.
OFF
Pred inštaláciou zabezpečte, aby bolo vedenie,
na ktoré bude svietidlo pripojené, bez napätia.
Z tohto dôvodu odstráňte poistku alebo vypnite
istič vedenia v skrinke na poistky (poloha 0).
Beznapäťový stav prekontrolujte pomocou
2-pólovej skúšačky napätia.
Určené iba pre inštaláciu mimo oblasti rúk.
Montáž
≥ 70 mm
max. 20 mm
Označte pozície bodových svetiel. Pílkou /
vŕtačkou (ø 68 mm) vyrežte 3 otvory na mieste
montáže. Dbajte pritom na odstup medzi dvoma
bodovými svetlami. Odstup medzi jednotlivými
bodovými svetlami musí byť minimálne 20 cm.
Okrem toho dávajte pozor, aby ste nepoškodili
žiadne vedenia. Určené iba pre inštaláciu
mimo oblasti rúk.

68 SK
MontážMontáž
7
Preveďte sieťový prípojný kábel 7 (externý)
cez montážny otvor.
2 3 4
Nasaďte osvetľovací prostriedok 3 do bodo-
vého svetla 2.
Upevnite osvetľovací prostriedok 3 v bodo-
vom svetle 2 pomocou kruhu 4 pre osvetľo-
vací prostriedok.
5
5
Obe prídržné pružiny 5 zovrite zvonka do
dvoch otvorov určených na tento účel.
8 6
1
7
Otvorte pripojovaciu schránku 6 tak, že od-
skrutkujete kryt 8 pomocou šrobováka.
Teraz zasuňte dvojito izolovanú ochrannú ha-
dičku 1 min. 8 mm do otvoru pripojovacej
schránky 6.
Teraz preveďte sieťový prípojný kábel 7
(externý) cez ochrannú hadičku 1.
7 91
Spojte sieťový pripojovací kábel 7 (externý)
pomocou svorky svietidla 9. Dbajte i na L / N-
označenie (L = čierne alebo hnedé, N = modré)
zapojených vedení. Prípadne priložený zelený /
žltý vodič nie je zapojený.
Uzemňovacie pripojenie nie je potrebné, pretože
ide o svietidlo ochrannej triedy II.
Používajte kábel typu H03VV-F s minimálnym
prierezom 2 x 0,75 mm² a dutinou.
Zatvorte pripojovaciu schránku 6 tak, že pevne
priskrutkujete kryt 8 pomocou šrobováka.

69 SK
Montáž
Pred nasadením bodového svetla odstráňte prí-
padne prítomný izolačný materiál v blízkosti
pripojovacej schránky 6 a bodového svetla.
6
3
2
Teraz spojte pripojovaciu schránku 6 s bodo-
vým svetlom 2 tak, že osvetľovací prostriedok
3 zatočíte do objímky.
6
Zasuňte pripojovaciu schránku 6 cez mon-
tážny otvor.
5
Šikmo vložte vstavané svietidlo a najskôr za-
veďte jednu prídržnú pružinu 5 do montáž-
neho otvoru.
Teraz zaveďte druhú prídržnú pružinu 5 do
montážneho otvoru.
5
Teraz vstavané svietidlo úplne zatlačte do mon-
tážneho otvoru. Po zasunutí sa prídržné pružiny
5 napnú a tým upevnia bodové svetlo.
Skontrolujte správnosť osadenia.

70 SK
Likvidácia / Záruka a servisMontáž / Obsluha / Údržba a čistenie
ON
Nasaďte poistku alebo zapnite istič vedenia v
skrinke s poistkami (poloha I).
Určené iba pre inštaláciu mimo oblasti rúk.
Vaše svietidlo je teraz pripravené na prevádzku.
Obsluha
Nasmerovanie bodových
svetiel
Bodové svetlá 2 sú otáčateľné.
Aby ste predišli popáleniu, uistite sa, že svietidlo
úplne vychladlo.
Pre otočenie bodových svetiel zatlačte vnútri
ležiaci okraj bodového svetla 2 do želaného
smeru.
Stmievanie bodových svetiel
Osvetľovacie prostriedky 3 nie sú vhodné pre
externé stmievače a elektronické spínače.
Svietidlá sú dodané s osvetľovacím prostriedkom,
ktorý je stmievateľný v 3 stupňoch.
Pre stmievanie osvetľovacieho prostriedku 3
viackrát krátko za sebou stlačte stenový za- /
vypínač.
Stlmením osvetľovacích prostriedkov 3 sa
súčasne mení aj farba svetla.
Svietidlo má nesledujúce stupne stlmenia:
100% jas = 3000K
40% jas = 2500K
10% jas = 2000K
Výmena osvetľovacieho
prostriedku
Pri výmene osvetľovacieho prostriedku 3 naj-
skôr odpojte svietidlo z elektrickej siete. Z tohto
dôvodu odstráňte poistku alebo vypnite istič
vedenia v skrinke na poistky (poloha 0).
Nechajte osvetľovací prostriedok 3 úplne
vychladnúť.
Na výmenu osvetľovacieho prostriedku 3
použite suchú handričku, ktorá nezanecháva chlpy.
Opatrne vytočte osvetľovací prostriedok 3
¹⁄₄-otočaním proti smeru hodinových ručičiek z
objímky.
Odstráňte kruh 4 a vyberte osvetľovací
prostriedok 3 z bodového svetla 2.
Vložte nový osvetľovací prostriedok ako je
popísané v kapitole „Montáž“.
Skontrolujte správnosť osadenia.
Nasaďte poistku alebo zapnite istič vedenia
v skrinke s poistkami (poloha I).
Údržba a čistenie
NEBEZPEČENSTVO
ZÁSAHU ELEKTRICKÝM PRÚDOM!
Pred čistením najskôr odpojte svietidlo od elektrickej
siete. Z tohto dôvodu odstráňte poistku alebo vypnite
istič vedenia v skrinke na poistky (poloha 0).
NEBEZPEČENSTVO
ZÁSAHU ELEKTRICKÝM PRÚDOM!
Z dôvodu elektrickej bezpečnosti sa svietidlo nesmie
nikdy čistiť vodou alebo inými kvapalinami a v
žiadnom prípade sa nesmie ponárať do vody.
Nepoužívajte žiadne rozpúšťadlá, benzín a. i.
Svietidlo by sa pritom poškodilo.
Nechajte svietidlo úplne vychladnúť.
Na čistenie používajte iba suchú handričku,
ktorá nepúšťa vlákna.
SK

71 SK
Likvidácia / Záruka a servis
Likvidácia
Obal pozostáva z ekologických materi-
álov, ktoré môžete odovzdať na miest-
nych recyklačných zberných miestach.
b
a
Všímajte si prosím označenie obalových
materiálov pre triedenie odpadu, sú
označené skratkami (a) a číslami (b) s
nasledujúcim významom: 1–7: Plasty /
20–22: Papier a kartón / 80–98: Spo-
jené látky.
Ak výrobok doslúžil, v záujme ochrany
životného prostredia ho neodhoďte do
domového odpadu, ale odovzdajte na
odbornú likvidáciu. Informácie o zberných
miestach a ich otváracích hodinách získate
na Vašej príslušnej správe.
Záruka a servis
Garančné prehlásenie
Na tento prístroj poskytujeme záruku 36 mesiacov
od dátumu kúpy. Prístroj bol starostlivo vyrobený
a podrobený dôkladnej kontrole kvality. Vrámci
záručnej doby bezplatne odstránime všetky chyby
materiálu a výrobné chyby. Ak by sa však počas
záručnej doby vyskytli nedostatky, odošlite prístroj
na uvedenú adresu servisu s uvedením nasledovného
čísla výrobku: 14141302L / 14141306L.
Zo záruky sú vylúčené škody spôsobené neodbor-
nou manipuláciou, nedodržaním návodu na obsluhu
alebo zásahom neautorizovanej osoby, ako aj diely
podliehajúce opotrebovaniu (napr. osvetľovacie
prostriedky). Poskytnutím záruky sa záručná doba
nepredlžuje ani neobnovuje.
Servisná adresa
Briloner Leuchten GmbH & Co. KG
Im Kissen 2
59929 Brilon
NEMECKO
Tel.: +49 29 61 / 97 12–800
Fax: +49 29 61 / 97 12–199
Email: kundenservice@briloner.com
www.briloner.com
IAN 307293_1904
Pre všetky otázky majte pripravený pokladničný
doklad a číslo výrobku (napr. IAN 123456_7890)
ako dôkaz o kúpe.
Konformitné vyhlásenie
Tento výrobok spĺňa požiadavky platných európskych
a národných smerníc. Konformita bola preukázaná.
Príslušné prehlásenia a podklady sú uložené u výrobcu.
Výrobca
Briloner Leuchten GmbH & Co. KG
Im Kissen 2
59929 Brilon
NEMECKO

BRILONER LEUCHTEN GMBH & CO. KG
Im Kissen 2
59929 Brilon
GERMANY
Stand der Informationen · Last Information Update
Version des informations · Stand van de informatie
Stan informacji · Stav informací · Stav informácií: 09 / 2019
Ident.-No.: 14141302L / 14141306L092019-8
IAN 307293_1904
-
 1
1
-
 2
2
-
 3
3
-
 4
4
-
 5
5
-
 6
6
-
 7
7
-
 8
8
-
 9
9
-
 10
10
-
 11
11
-
 12
12
-
 13
13
-
 14
14
-
 15
15
-
 16
16
-
 17
17
-
 18
18
-
 19
19
-
 20
20
-
 21
21
-
 22
22
-
 23
23
-
 24
24
-
 25
25
-
 26
26
-
 27
27
-
 28
28
-
 29
29
-
 30
30
-
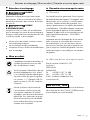 31
31
-
 32
32
-
 33
33
-
 34
34
-
 35
35
-
 36
36
-
 37
37
-
 38
38
-
 39
39
-
 40
40
-
 41
41
-
 42
42
-
 43
43
-
 44
44
-
 45
45
-
 46
46
-
 47
47
-
 48
48
-
 49
49
-
 50
50
-
 51
51
-
 52
52
-
 53
53
-
 54
54
-
 55
55
-
 56
56
-
 57
57
-
 58
58
-
 59
59
-
 60
60
-
 61
61
-
 62
62
-
 63
63
-
 64
64
-
 65
65
-
 66
66
-
 67
67
-
 68
68
-
 69
69
-
 70
70
-
 71
71
-
 72
72


in andere talen
- français: LIVARNO 307293 Le manuel du propriétaire
- Deutsch: LIVARNO 307293 Bedienungsanleitung
- slovenčina: LIVARNO 307293 Návod na obsluhu
- polski: LIVARNO 307293 Instrukcja obsługi