
PRODUCT OF
DO324A
Handleiding Air conditioner
Mode d’emploi Climatiseur
Gebrauchsanleitung Klimaanlage
Instruction booklet Air conditioner
Manual de instrucciones Aire acondicionado portátil
Istruzioni per l’uso Condizionatore d’aria portatile
Mobilná klimatizácia

Lees aandachtig alle instructies - bewaar deze handleiding voor latere raadpleging.
Lisez attentivement les instructions - gardez le mode d’emploi pour utilisation ultérieur.
Lesen Sie genau die Anweisungen - bewahren Sie die Gebrauchsanleitung für spätere
heranziehung.
Read all instructions carefully - save this instruction manual for future reference.
Lea detenidamente todas las instrucciones - Conserve este manual para futura referencia.
Leggere con attenzione le istruzioni - conservarle per future consultazioni
budúceho nahliadnutie.
NL Nederlands 3
FR Français 17
DE Deutsch 31
EN English 46
ES Espagnol 60
IT Italiano 73
CZ 86
SK 99

3
DO324A
www.domo-elektro.be
NL
GARANTIE
Geachte klant,
Al onze producten ondergaan steeds een strenge kwaliteitscontrole,
+32 14 21 71 91 [email protected]
Maandag – Donderdag : 8.30u – 12.00u en van 13.00u – 17.00u
garantieperiode zal de distributeur volledige verantwoording op zich nemen voor gebreken die
toestel hebt aangekocht.
automatisch in de volgende gevallen:
·
·
·
·
·
·
VEILIGHEIDSVOORSCHRIFTEN
worden:
· Lees deze instructies zorgvuldig door. Bewaar deze handleiding om later te raadplegen.
·
Zorg ervoor dat kinderen niet met de verpakkingsmaterialen spelen.
·
zoals:
·
omgevingen
·
· Hotel- en motelkamers en andere omgevingen met een residentieel karakter
·

4
DO324A
NL
·
sensoriële beperking of mensen met een beperkte mentale capaciteit of gebrek aan ervaring of
toestel. Kinderen mogen niet met het toestel spelen. Het onderhoud en de reiniging van het toestel
·
· Opgelet: het toestel mag niet gebruikt worden met een externe timer.
·
· Laat het snoer niet op een heet oppervlak of over de rand van een tafel of aanrecht hangen.
· Gebruik het toestel nooit wanneer het snoer of de stekker beschadigd is, na een slechte werking
·
· Het gebruik van accessoires die niet aanbevolen of verkocht worden door de fabrikant, kan brand,
elektrische schokken of verwondingen veroorzaken.
· Trek de stekker uit het stopcontact wanneer het toestel niet in gebruik is, vooraleer onderdelen te
monteren of demonteren en vooraleer het toestel te reinigen. Zet eerst alle knoppen in de ‘uit’-stand
stopcontact te trekken.
· Laat een werkend toestel niet zonder toezicht achter.
· Zet dit toestel nooit op of in de buurt van een gasvuur of elektrisch vuur of op een plaats waar het in
contact zou kunnen komen met een warm toestel.
· Gebruik het toestel niet buiten.
· Gebruik het toestel enkel voor het doel waarvoor het bestemd is.
·
·
· Alle herstellingen, buiten het gewone onderhoud van het toestel, moeten uitgevoerd worden door de
· Dompel het toestel, het elektrisch snoer of de stekker nooit onder in water of een andere vloeistof.
· Zorg ervoor dat kinderen het elektrisch snoer of het toestel niet kunnen aanraken.
· Hou het snoer uit de buurt van scherpe randen en hete onderdelen of andere warmtebronnen.
· Plaats het toestel nooit in de buurt van een gastoestel, vuur of een lichtontvlambare vloeistof.
· Sla nooit op het toestel of schud niet met het toestel, om schade te voorkomen.
· Dek de luchtinlaat en -uitlaat nooit af, om oververhitting te voorkomen.
· Besprenkel het toestel nooit met water of plaats het toestel nooit in de buurt van water, om
elektrocutie te voorkomen.
· Deel de stroomtoevoer naar de airco nooit met een ander toestel.
·
handen.
· Steek nooit vreemde voorwerpen in de openingen van het toestel.
· Gebruik nooit een verlengsnoer.
· Laat kinderen nooit in de buurt van het toestel spelen.
·
nodig hebben om terug op te starten.

5
DO324A
www.domo-elektro.be
NL
· Plaats het toestel minstens op 1 meter afstand van tv of radio, om storingen te voorkomen.
· Plaats het toestel niet in rechtstreeks zonlicht, om verkleuring van het toestel te voorkomen.
·
rechtopstaand. Verplaats het toestel nooit ondersteboven.
·
toestel.
· Gebruik geen chemische middelen om het toestel te reinigen, dit zal het toestel beschadigen.
·
· Zorg ervoor dat de airco steeds beschermd is tegen vocht, zoals condensatie, spatwater, etc. Zorg
· Gebruik de airco niet in een vochtige ruimte zoals een badkamer of wasplaats.
·
·
·
·
·
functioneert, wanneer het toestel gevallen of beschadigd is.
· Gebruik nooit de stekker om het toestel aan of uit te zetten.
·
petroleum, …
· Herstellingen, detectie van lekken en werkzaamheden aan de installatie dienen te gebeuren door
Specieke informatie over apparaten met R290 koelgas
· Lees grondig alle waarschuwingen.
·
· Het apparaat moet worden geplaatst in een ruimte zonder permanente ontstekingsbronnen
· Het mag niet worden doorprikt of verbrand.
·
· Het apparaat moet worden geïnstalleerd, gebruikt en bewaard in een ruimte die groter is dan 11 m
2
.
·
·
koelcircuit mag worden doorprikt.
· Als het apparaat geïnstalleerd, gebruikt of bewaard wordt in een niet-geventileerde ruimte, moet deze
tot een risico op brand of explosies door de ontsteking van het koelmiddel, die wordt veroorzaakt door
elektrische verwarming, elektrische kachels of andere ontstekingsbronnen.
· Het apparaat moet zodanig worden bewaard dat mechanische defecten worden voorkomen.
· Personen die het koelcircuit gebruiken of er werkzaamheden aan uitvoeren, moeten beschikken
beoordeling erkend door verenigingen in de sector.
·
moeten worden uitgevoerd onder toezicht van een persoon die is aangeduid voor het gebruik van
ontvlambare koelmiddelen.

6
DO324A
NL
Dit apparaat gebruikt een ontvlambaar koelmiddel. Als het koelmiddel lekt en is
blootgesteld aan een externe ontstekingsbron, is er gevaar voor brand.
ENERGIETIPS
·
· Plaat het toestel zo, dat luchtstroom niet belemmerd wordt door meubelen of andere voorwerpen.
·
·
· Houd ramen en deuren steeds gesloten om de koude lucht binnen te houden en de warme lucht
buiten.

7
DO324A
www.domo-elektro.be
NL
1
2
3
4
10
6
5
8
9
7
ONDERDELEN
1. Controle paneel
2. Luchtuitlaat
3.
4. Handvat
5. Permanente drainage
6. Luchtuitlaat
7. Stekkeropberging
8. Snoeropberging
9. Drainage onderaan
10.
11. Drainageslang
12. Luchtuitlaatslang
13. Raambevestiging
· Raamadapter
·
· Raamdichtingen
· Adapterstop
·
14. Muurbevestiging
·
· Muuradapter
· Schroeven en pluggen
15. Accessoire snoeropberging
16.
17.
11 12
13
14 15
16
17

8
DO324A
NL
INSTALLATIE
INSTALLATIE
· Plaats de airco op een solide en stabiele ondergrond, om de geluidshinder en
vibratie tot een minimum te beperken. Zorg er ook voor dat de ondergrond sterk
genoeg is om het gewicht van het toestel te dragen.
·
· Plaats het toestel in de buurt van een geaard stopcontact.
· Monteer het accessoire voor snoeropberging op de achterkant van het toestel.
· Plaats geen voorwerpen binnen een straal van 30 cm rondom het toestel.
· Zorg er ook voor dat zich rondom de luchtuitlaat buiten, in een straal van 50 cm,
geen obstakels bevinden.
· Zorg ervoor dat de luchtuitlaat met de slang naar buiten wordt gebracht. Houd de
binnen kan.
·
50cm
or
max 120cm
min 30cm
INSTALLATIE VAN DE RAAMUITLAAT
luchtuitlaatslang niet nodig.
1.
andere kant van de slang. De koppelstukken klikken vast zodra
2. Bevestig de slang aan het toestel. De kant van de slang met
luchtuitlaat aan de achterkant van het toestel. Schuif het
koppelstuk in de houders van de luchtuitlaat. Zorg ervoor dat
boven de luchtuitlaat.
3. Plaats de raamadapter in het venster. Dit kan zowel
horizontaal als verticaal. Maak gebruik van de raamdichtingen
om eventuele openingen in de venster af te sluiten. Blokkeer
de raamadapter op de gewenste lengte met behulp van de
meegeleverde raamadapter stop.
4.
5. Bevestig het koppelstuk op de raamadapter.
50cm
or
max 120cm
min 30cm
1.
50cm
or
max 120cm
min 30cm
2.
50cm
or
max 120cm
min 30cm
3.
50cm
or
max 120cm
min 30cm
50cm
or
max 120cm
min 30cm
50cm
or
max 120cm
min 30cm
4.
50cm
or
max 120cm
min 30cm
50cm
or
max 120cm
min 30cm
5.
50cm
or
max 120cm
min 30cm

9
DO324A
www.domo-elektro.be
NL
INSTALLATIE MUURUITLAAT
luchtuitlaatslang niet nodig.
1. Maak een opening in de muur ter grootte van de
Plaats de muuradapter in de opening en bevestig deze in de
muur met de 4 meegeleverde pluggen en schroeven.
2.
de andere kant van de slang. De koppelstukken klikken vast
3. Bevestig de slang aan het toestel. De kant van de slang met
luchtuitlaat aan de achterkant van het toestel. Schuif het
koppelstuk in de houders van de luchtuitlaat. Zorg ervoor dat
boven de luchtuitlaat.
4. Bevestig de luchtuitlaatslang op de muuradapter.
5.
muuradapter afsluiten met het deksel.
GEBRUIK
CONTROLEPANEEL
50cm
or
max 120cm
min 30cm
1234567
9
8
50cm
or
max 120cm
min 30cm
1. ON-OFF – toets
Om het toestel aan en uit te schakelen.
50cm
or
max 120cm
min 30cm
2. SLEEP – toets
temperatuur en wordt de “sleep”-instelling beëindigd.
50cm
or
max 120cm
min 30cm
3.
2.
50cm
or
max 120cm
min 30cm
1.

10
DO324A
NL
50cm
or
max 120cm
min 30cm
3. FAN – toets
het controlepaneel.
·
50cm
or
max 120cm
min 30cm
laag
·
50cm
or
max 120cm
min 30cm
midden
·
50cm
or
max 120cm
min 30cm
hoog
·
4. “+” en “-” – toetsen
Fahrenheit “F°”.
50cm
or
max 120cm
min 30cm
5. MODE – toets
controlepaneel zal oplichten.
50cm
or
max 120cm
min 30cm
De airco zal automatisch de kamertemperatuur stabiliseren op de ingestelde temperatuur.
50cm
or
max 120cm
min 30cm
COOL-instelling
Het toestel zal koelen met deze instelling.
gewenste kamertemperatuur in te stellen. Gebruik de “fan”-toets om de gewenste ventilatiesnelheid in
te stellen.
50cm
or
max 120cm
min 30cm
temperatuur of de ventilatiesnelheid niet instellen. Houd ramen en deuren gesloten, om zo de
functie.
50cm
or
max 120cm
min 30cm
FAN-instelling
ventilatiesnelheid in te stellen. De temperatuur kan niet worden ingesteld. Het is niet nodig de
50cm
or
max 120cm
min 30cm
6. TIMER – toets

11
DO324A
www.domo-elektro.be
NL
geeft aan dat de automatische uitschakeling actief is. Druk opnieuw op de “timer”-toets, het “timer on”-
uur.
50cm
or
max 120cm
min 30cm
Aanpassing van de luchtstroom.
50cm
or
max 120cm
min 30cm
met de afstandsbediening.
9. LED display
staat, zal op de display de kamertemperatuur weergegeven worden.
AFSTANDSBEDIENING
· Gebruik de afstandsbediening op maximum 8 meter van het toestel. Richt de
afstandsbediening in de richting van de airco. De ontvangst wordt bevestigd met
een biep signaal.
· De airco zal niet reageren op de afstandsbediening als het signaal geblokkeerd
· Zorg ervoor dat de afstandsbediening niet nat wordt. Stel de afstandsbediening
niet bloot aan direct zonlicht of warmte.
·
dat de airco niet reageert op de afstandsbediening. Zorg er dus voor dat er geen
direct zonlicht op de infrarood ontvanger staat.
·
·
·
·
Batterijen
·
·
·
programmeren.
ON /OFF
TE MP
SH ORT
CU T
TI MER
ON
TI MER
OF F
MO DE
FAN
LE D
SL EEP
FO LLO W
SW ING
ME
ON /OFF
TE MP
SH ORT
CU T
TI MER
ON
TI MER
OF F
MO DE
FAN
LE D
SL EEP
FO LLO W
SW ING
ME

12
DO324A
NL
Functietoetsen
ON/OFF
– TOETS
ON/OF F
TEM P
SHO RT
CUT
TIM ER
ON
TIM ER
OFF
MOD E
FAN
LED
SLE EP
FOL LOW
SWI NG
ME
PIJLTJESTOETSEN
MODE
MODE – TOETS
ON/OF F
TEM P
SHO RT
CUT
TIM ER
ON
TIM ER
OFF
MOD E
FAN
LED
SLE EP
FOL LOW
SWI NG
ME
Zorg ervoor dat de stekker in het stopcontact steekt. Druk op de “mode”-toets van de
ON /OFF
TE MP
SH ORT
CU T
TIM ER
ON
TIM ER
OFF
MO DE
FAN
LE D
SL EEP
FOL LOW
SW ING
ME
COOL-instelling
Zorg ervoor dat de stekker in het stopcontact steekt. Druk op de “mode”-toets om de gewenste
het toestel aan te zetten.
ON /OFF
TE MP
SH ORT
CU T
TIM ER
ON
TIM ER
OFF
MO DE
FAN
LE D
SL EEP
FOL LOW
SW ING
ME
Zorg ervoor dat de stekker in het stopcontact steekt. Druk op de “mode”-toets en selecteer de “dry”-
airco aan te zetten.
ON /OFF
TE MP
SH ORT
CU T
TIM ER
ON
TIM ER
OFF
MO DE
FAN
LE D
SL EEP
FOL LOW
SW ING
ME
FAN-instelling
Zorg ervoor dat de stekker in het stopcontact steekt. Druk op de “mode”-toets om de gewenste
kamertemperatuur kan ook niet ingesteld worden.
FAN
FAN – TOETS
Je gebruikt deze toets om de ventilatiesnelheid in te stellen: auto, low
55
66
MODE display
Displays the current
mode, including:
AUTO
COOL
DRY
HEAT
FAN
Transmission Indicator
Lights up when remote sends
signal to unit
ON/OFF display
Appears when the unit is turned on,
and disappears when it is turned off
TIMER ON display
Displays when TIMER
ON is set
TIMER OFF display
Displays when TIMER
OFF is set
SLEEP display
Battery display
SILENT display
ECO display
Displays when
SLEEP function
is activated
FOLLOW ME
display
Indicates that
the FOLLOW ME
function is on
FAN SPEED display
Displays selected FAN SPEED:
HIGH, MED,
or LOW
This display is blank when
set to AUTO speed.
Temperature/Timer display
Displays the set temperature by default, or timer setting
when using TIMER ON/OFF functions
o O O
Temperature range: 17-30 C(62 F-86 F)
Timer setting range: 0-24 hours
This display is blank when operating in FAN mode.
1. Press the MODE button to select
COOL mode.
2. Set your desired temperature using
the Temp or Temp button.
3. Press the FAN button to select the
fan speed: AUTO, LOW, MED,or
HIGH.
4. Press the ON/OFF button to start the
unit.
In AUTO mode, the unit will automatically
select the COOL, FAN, HEAT or DRY mode
based on the set temperature.
1. Press the MODE button to select Auto mode.
2. Set your desired temperature using the
Temp or Temp button.
3. Press the ON/OFF button to start the unit.
,
NOTE: FAN SPEED can t be set in Auto mode.
SETTING TEMPERATURE
AUTO operation
The operating temperature range for units is
O O O
17-30 C(62 F-86 F). You can increase or
O O
decrease the set tmeperature in 1 C(1 F)
increments.
COOL operation
1
3
2
1
3
2
4
Not available for this unit
Not available for
this unit
Not available for
this unit
Low battery
detection
Remote LED Screen Indicators
How To Use The Basic Functions
ON/OFF
ON/OFF
TEMP
TEMP
SHORT
CUT
SHORT
CUT
TIMER
ON
TIMER
ON
TIMER
OFF
TIMER
OFF
MODE
MODE
FAN
FAN
SLEEP
SLEEP
LED
LED
FOLLOW
ION
SWING
ME
FOLLOW
ION
SWING
ME
, med
55
66
MODE display
Displays the current
mode, including:
AUTO
COOL
DRY
HEAT
FAN
Transmission Indicator
Lights up when remote sends
signal to unit
ON/OFF display
Appears when the unit is turned on,
and disappears when it is turned off
TIMER ON display
Displays when TIMER
ON is set
TIMER OFF display
Displays when TIMER
OFF is set
SLEEP display
Battery display
SILENT display
ECO display
Displays when
SLEEP function
is activated
FOLLOW ME
display
Indicates that
the FOLLOW ME
function is on
FAN SPEED display
Displays selected FAN SPEED:
HIGH, MED,
or LOW
This display is blank when
set to AUTO speed.
Temperature/Timer display
Displays the set temperature by default, or timer setting
when using TIMER ON/OFF functions
o O O
Temperature range: 17-30 C(62 F-86 F)
Timer setting range: 0-24 hours
This display is blank when operating in FAN mode.
1. Press the MODE button to select
COOL mode.
2. Set your desired temperature using
the Temp or Temp button.
3. Press the FAN button to select the
fan speed: AUTO, LOW, MED,or
HIGH.
4. Press the ON/OFF button to start the
unit.
In AUTO mode, the unit will automatically
select the COOL, FAN, HEAT or DRY mode
based on the set temperature.
1. Press the MODE button to select Auto mode.
2. Set your desired temperature using the
Temp or Temp button.
3. Press the ON/OFF button to start the unit.
,
NOTE: FAN SPEED can t be set in Auto mode.
SETTING TEMPERATURE
AUTO operation
The operating temperature range for units is
O O O
17-30 C(62 F-86 F). You can increase or
O O
decrease the set tmeperature in 1 C(1 F)
increments.
COOL operation
1
3
2
1
3
2
4
Not available for this unit
Not available for
this unit
Not available for
this unit
Low battery
detection
Remote LED Screen Indicators
How To Use The Basic Functions
ON/OFF
ON/OFF
TEMP
TEMP
SHORT
CUT
SHORT
CUT
TIMER
ON
TIMER
ON
TIMER
OFF
TIMER
OFF
MODE
MODE
FAN
FAN
SLEEP
SLEEP
LED
LED
FOLLOW
ION
SWING
ME
FOLLOW
ION
SWING
ME
, high
55
66
MODE display
Displays the current
mode, including:
AUTO
COOL
DRY
HEAT
FAN
Transmission Indicator
Lights up when remote sends
signal to unit
ON/OFF display
Appears when the unit is turned on,
and disappears when it is turned off
TIMER ON display
Displays when TIMER
ON is set
TIMER OFF display
Displays when TIMER
OFF is set
SLEEP display
Battery display
SILENT display
ECO display
Displays when
SLEEP function
is activated
FOLLOW ME
display
Indicates that
the FOLLOW ME
function is on
FAN SPEED display
Displays selected FAN SPEED:
HIGH, MED,
or LOW
This display is blank when
set to AUTO speed.
Temperature/Timer display
Displays the set temperature by default, or timer setting
when using TIMER ON/OFF functions
o O O
Temperature range: 17-30 C(62 F-86 F)
Timer setting range: 0-24 hours
This display is blank when operating in FAN mode.
1. Press the MODE button to select
COOL mode.
2. Set your desired temperature using
the Temp or Temp button.
3. Press the FAN button to select the
fan speed: AUTO, LOW, MED,or
HIGH.
4. Press the ON/OFF button to start the
unit.
In AUTO mode, the unit will automatically
select the COOL, FAN, HEAT or DRY mode
based on the set temperature.
1. Press the MODE button to select Auto mode.
2. Set your desired temperature using the
Temp or Temp button.
3. Press the ON/OFF button to start the unit.
,
NOTE: FAN SPEED can t be set in Auto mode.
SETTING TEMPERATURE
AUTO operation
The operating temperature range for units is
O O O
17-30 C(62 F-86 F). You can increase or
O O
decrease the set tmeperature in 1 C(1 F)
increments.
COOL operation
1
3
2
1
3
2
4
Not available for this unit
Not available for
this unit
Not available for
this unit
Low battery
detection
Remote LED Screen Indicators
How To Use The Basic Functions
ON/OFF
ON/OFF
TEMP
TEMP
SHORT
CUT
SHORT
CUT
TIMER
ON
TIMER
ON
TIMER
OFF
TIMER
OFF
MODE
MODE
FAN
FAN
SLEEP
SLEEP
LED
LED
FOLLOW
ION
SWING
ME
FOLLOW
ION
SWING
ME
.
SHORT
CUT
gedurende 3 seconden ingedrukt te houden. Het toestel onthoudt dan de instellingen die op het moment

13
DO324A
www.domo-elektro.be
NL
instellingen.
auto-functie functioneren. Dit is op 26° en de fan-snelheid is auto.
TIMER
ON
TIMER ON – TOETS
display staat.
alle timers geannuleerd.
Zorg ervoor dat de stekker in het stopcontact steekt. Druk op de “timer
aangepast worden, tot max. 24 uur. Na het beeïndigen van de instelling,
het display.
TIMER
OFF
TIMER OFF – TOETS
drukken tot er terug 0.0 op de display staat.
alle timers geannuleerd.
Zorg ervoor dat de stekker in het stopcontact steekt. Druk op de “timer
worden, tot max. 24 uur. Na het beëindigen van de instelling, duurt het
display.
ook wanneer het toestel uitschakelt.
Je wil het toestel laten werken van 16:30 tot 18:00. Stel de functie TIMER ON in op 3,5 h en de TIMER OFF
op 5,0 h.
99
1010
NOTE:
" 0.0h "
When setting the TIMER ON or
TIMER OFF functions, up to 10 hours,
the time will increase in 30 minute
increments with each press. After 10
hours and up to 24, it will increase in 1
hour increments. The timer will revert to
zero after 24 hours.
You can turn off either function by
setting its timer to .
2. Press the TIMER ON button repeatedly
to set the time when you want the unit to
turn on.
3. Wait 2 seconds, then the TIMER ON
function will be activated. The digital
display on your remote control will then
return to the temperature display.
2. Press the TIMER OFF button repeatedly
to set the time when you want the unit to
turn off.
3. Wait 2 seconds, then the TIMER OFF
function will be activated. The digital
display on your remote control will then
return to the temperature display.
Example: Setting unit to turn on after 2.5
hours.
Example: Setting unit to turn off after 5
hours.
2sec
ON/OFF
MODE
FAN
SHORT
CUT
TIMER ON
TIMER OF
F
TEMP
S
L
E
EP
1sec
x5
1
3
2
4
TIMER OFF function
The TIMER OFF function allows you to
set a period of time after which the unit
will automatically turn off, such as when
you wake up.
1.
This number indicates the
amount of time after the current time
that you want the unit to turn on.
For example, if you set TIMER ON for
2 hours, will appear on the
screen, and the unit will turn on after
2 hours.
Press the TIMER ON button. By
default, the last time period that you
set and an "h" (indicating hours)will
appear on the display.
Note:
" 2.0h "
1.
This number indicates the
amount of time after the current time
that you want the unit to turn off.
For example, if you set TIMER OFF for
2 hours, will appear on the
screen, and the unit will turn off after
2 hours.
Press the TIMER OFF button. By
default, the last time period that you
set and an "h" (indicating hours)will
appear on the display.
Note:
" 2.0h "
2sec
x10
ON/OFF
MODE
FAN
SHORT
CUT
TIMER ON
TIMER OF
F
TEMP
S
L
EEP
1sec
1
3
2
4
TIMER ON function
The TIMER ON function allows you to set
a period of time after which the unit will
automatically turn on, such as when you
come home from work.
Your air conditioning unit has two
timer-related functions:
TIMER ON- sets the amount of timer after
which the unit will automatically turn on.
TIMER OFF- sets the amount of time after
which the unit will automatically turn off.
TIMER ON TIMER ON
TIMER OFF
TIMER OFF
Continue to press
TIMER ON
or
TIMER OFF until
desired time is
reached.
Setting the TIMER function
ON/OF F
TEMP
SHORT
CUT
TIMER
ON
TIMER
OFF
MODE
FAN
SLEEP
LED
Timer on
FOL LOW
SWING
ION
ME

14
DO324A
NL
SLEEP
SLEEP – TOETS
het symbool
ON/OF F
TEM P
SHO RT
CUT
TIM ER
ON
TIM ER
OFF
MOD E
FAN
LED
SLE EP
FOL LOW
SWI NG
ME
drukken.
wordt de “sleep”-instelling beëindigd.
SWING
FOLLOW
ME
– TOETS
Met deze wordt de omgevingstemperatuur gemeten door de afstandsbediening in plaats van door het
“auto” en “cool” - instelling zorgt deze functie voor de optimale temperatuur. Druk op de “follow me”
- toets om de functie te activeren. De afstandsbediening zal om de 3 minuten een signaal sturen naar
ON/OF F
TEM P
SHO RT
CUT
TIM ER
ON
TIM ER
OFF
MOD E
FAN
LED
SLE EP
FOL LOW
SWI NG
ME
. Druk opnieuw op de knop om de functie te
annuleren.
LED
LED – TOETS
gebruikt. Druk nog een keer op de knop om de display terug in te schakelen.
REINIGING EN ONDERHOUD
DRAINAGE
Permanente drainage
1.
achteraan het toestel.
2. Bevestig de drainageslang aan de drainage opening.
3. Zorg ervoor dat het water op een veilige en permanente manier
kan wegvloeien.
Drainage bij P1 code
drainagebak, onderaan het toestel.
·
is normaal.
·

15
DO324A
www.domo-elektro.be
NL
·
·
·
·
REINIGING
·
· Gebruik geen chemische of schurende producten om het toestel te reinigen.
·
·
Luchtlters
·
weken. Om te voorkomen dat de ventilator slecht gaat werken door stof
·
grondig en laat deze aan de lucht drogen.
·
plaatsen.
Behuizing
reinigen. Maak het toestel achteraf grondig droog met een zachte, droge doek.
Opbergen
toestel te voorkomen :
·
· Zet het toestel daarna aan op de FAN-instelling. Laat het toestel gedurende een halve dag in een
schimmelvorming.
·
afstandsbediening.
·
· Berg het toestel op in een droge, donkere ruimte.
1
2

16
DO324A
NL
MOGELIJKE PROBLEMEN EN HUN OPLOSSING
Het toestel werkt niet wanneer je op de aan/uit toets drukt.
·
· De kamertemperatuur is lager dan de ingestelde temperatuur op het toestel. Pas de temperatuur op
het toestel aan.
De ruimte koelt niet voldoende af.
·
·
· De luchtuitlaatslang is niet aangesloten of geblokkeerd. Sluit de slang aan en zorg ervoor dat ze naar
behoren kan functioneren.
· De ingestelde temperatuur is te hoog. Pas de ingestelde temperatuur aan.
Het toestel maakt te veel lawaai of zorgt voor trillingen.
· De vloer is niet recht of vlak genoeg. Plaats het toestel op een rechte, vlakke ondergrond, indien
·
Het toestel maakt een gorgelend geluid.
· Het geluid komt van de koelvloeistof in het toestel. Dit is normaal.
MILIEURICHTLIJNEN
als huishoudafval mag worden behandeld. Het moet naar een plaats worden
gebracht waar elektrische en elektronische apparatuur wordt gerecycleerd.
kunnen voordoen in geval van verkeerde afvalbehandeling. Voor meer
Het verpakkingsmateriaal is recycleerbaar. Behandel de verpakking
milieubewust.

17
DO324A
www.domo-elektro.be
FR
GARANTIE
Cher client,
d’être proposés à la vente. Si vous deviez toutefois rencontrer
un problème avec votre appareil, nous le déplorons vivement.
Dans ce cas, nous vous invitons à prendre contact avec notre service à la clientèle.
Nos collaboratrices se feront un plaisir de vous aider !
+32 14 21 71 91 [email protected]
Vendredi : 8 h 30 – 12 h et 13 h – 16 h 30
Cet appareil est garanti 2 ans à compter de la date d’achat. Durant la période de garantie, le distributeur
tel problème survient, l’appareil sera remplacé ou réparé. La période de garantie de 2 ans ne reprend pas
sur la base du ticket de caisse.
· Les instructions du manuel n’ont pas été suivies.
·
·
·
·
·
fabricant.
CONSIGNES DE SÉCURITÉ
·
ultérieurement.
· Avant la première utilisation, enlevez tous les éléments d’emballage et les éventuels autocollants
·
· Coin-cuisine du personnel dans les commerces, les bureaux et autres environnements
professionnels comparables
· Fermes
·
·
· Cet appareil peut être utilisé par des enfants âgés de 16 ans ou plus et par des personnes présentant

18
DO324A
FR
surveillance d’un adulte.
·
· Attention: l’appareil ne peut pas être utilisé avec une minuterie externe.
·
votre domicile.
· Ne laissez pas le cordon pendre sur une surface chaude ou sur le rebord d’une table.
·
·
·
électrocution ou des blessures.
·
·
·
entrer en contact avec un appareil chaud.
· N’utilisez pas l’appareil à l’extérieur.
·
·
·
fournies dans ce manuel.
· Toutes les réparations, en dehors de l’entretien ordinaire de l’appareil, doivent être réalisées par le
fabricant ou son service après-vente.
·
·
· Tenez le cordon éloigné de rebords tranchants et de pièces brûlantes ou d’autres sources de chaleur.
· Avant la première utilisation, enlevez tous les éléments d’emballage et les éventuels autocollants
promotionnels.
·
·
·
·
proximité d’un point d’eau.
·
·
mouillées.
·
·
·
·
3 minutes au moins pour redémarrer.

19
DO324A
www.domo-elektro.be
FR
· Placez l’appareil à au moins 1 mètre de distance d’un téléviseur ou d’une radio pour éviter des
interférences.
· Pour éviter toute décoloration, n’exposez pas l’appareil à la lumière directe du soleil.
·
·
vie.
·
·
·
·
· N’utilisez pas le climatiseur dans un local humide comme une salle de bain ou une buanderie.
·
·
· Veillez à laisser un espace libre d’au moins 30 cm tout autour de l’appareil.
·
·
·
·
correctement, s’il est tombé ou s’il est endommagé.
·
·
·
insecticide, essence,...
· Les réparations, la détection de fuites et toutes les autres interventions à l’installation doivent être
Informations spéciques concernant les appareils contenant du fluide frigorigène R290
· Lisez attentivement tous les avertissements.
·
fabricant.
·
· Ne pas percer, ne pas brûler.
· Les frigorigènes peuvent être sans odeur.
·
2
.
·
· R290 est un frigorigène conforme aux directives européennes en matière d’environnement. Ne percez
· Si l’appareil est installé, utilisé ou stocké dans une zone non-ventilée, la pièce doit être conçue de
·
·

20
DO324A
FR
·
CONSEILS ÉNERGÉTIQUES
·
·
·
·
· Gardez les portes et les fenêtres fermées pour garder l’air froid à l’intérieur et l’air chaud à l’extérieur.

21
DO324A
www.domo-elektro.be
FR
PARTIES
1. Panneau de commande
2. Évacuation d’air
3. Roulettes
4. Poignée
5. Vidange permanente
6. Évacuation d’air
7. Rangement prise
8. Rangement du cordon
9. Vidange bas
10. Arrivée d’air + Filtres à air
11. Flexible de vidange
12. Tuyau d’évacuation d’air
13.
· Adaptateur de fenêtre
·
· Étanchéité de la fenêtre
· Bouchon adaptateur
· Cornière avec vis
14.
·
· Adaptateur mural
· Vis et chevilles
15. Accessoire de rangement de câble
16. Télécommande avec piles, support et vis
17.
11 12
13
14 15
16
17
10
6
5
8
9
7
1
2
3
4

22
DO324A
FR
INSTALLATION
INSTALLATION
·
· L’appareil est muni de roulettes, pour pouvoir le déplacer facilement. Veillez à ce
· Placez l’appareil à proximité d’une prise reliée à la masse.
· Montez l’accessoire de rangement de câble à l’arrière de l’appareil.
·
·
de 50 cm.
·
·
y pénétrer.
50cm
or
max 120cm
min 30cm
INSTALLATION DE L’ÉVACUATION DE FENÊTRE
Le tuyau d’évacuation d’air doit être placé pendant le réglage
« froid » ou « auto ». Vous n’avez pas besoin du tuyau d’évacuation
1.
2.
à l’arrière de l’appareil. Glissez le raccord dans les supports
correspond à l’encoche au-dessus de la sortie d’air.
3. Placez l’adaptateur de châssis dans la fenêtre. Celui-ci peut
d’étanchéité de châssis pour obstruer toutes les ouvertures
désirée à l’aide du bouchon adaptateur de châssis fourni.
4.
la cornière et de 2 vis.
5. Fixez le raccord à l’adaptateur de châssis.
50cm
or
max 120cm
min 30cm
50cm
or
max 120cm
min 30cm
1.
50cm
or
max 120cm
min 30cm
2.
50cm
or
max 120cm
min 30cm
3.
50cm
or
max 120cm
min 30cm
50cm
or
max 120cm
min 30cm
50cm
or
max 120cm
min 30cm
4.
50cm
or
max 120cm
min 30cm
50cm
or
max 120cm
min 30cm
5.

23
DO324A
www.domo-elektro.be
FR
INSTALLATION DE L’ÉVACUATION MURALE
Le tuyau d’évacuation d’air doit être placé pendant le réglage
« froid » ou « auto ». Vous n’avez pas besoin du tuyau d’évacuation
1.
mur avec les 4 chevilles et vis fournies.
2.
3.
à l’arrière de l’appareil. Glissez le raccord dans les supports
correspond à l’encoche au-dessus de la sortie d’air.
4.
5.
l’adaptateur mural avec le couvercle.
UTILISATION
PANNEAU DE COMMANDE
50cm
or
max 120cm
min 30cm
1234567
9
8
50cm
or
max 120cm
min 30cm
1. Touche MARCHE-ARRÊT
Pour allumer et éteindre l’appareil.
50cm
or
max 120cm
min 30cm
2. Touche VEILLE
encore 30 minutes, la température augmente à nouveau de 1°C. Cette température est conservée pour les
7 heures suivantes. Ensuite, la température revient à la température réglée d’origine et le mode « veille »
est terminé.
NOTE : ce paramètre ne peut pas être sélectionné pour les modes « ventilateur » et « sec ».
50cm
or
max 120cm
min 30cm
3.
2.
50cm
or
max 120cm
min 30cm
1.

24
DO324A
FR
50cm
or
max 120cm
min 30cm
Cette touche vous permet de régler la vitesse de la ventilation. Le témoin lumineux correspondant
s’allume sur le panneau de commande.
·
50cm
or
max 120cm
min 30cm
bas
·
50cm
or
max 120cm
min 30cm
moyen
·
50cm
or
max 120cm
min 30cm
haut
·
4. Touches «+» et «-»
« C° » et « F° ».
50cm
or
max 120cm
min 30cm
5. Touche MODE
s’allume sur le panneau de commande.
50cm
or
max 120cm
min 30cm
50cm
or
max 120cm
min 30cm
entre la fonction « froid » ou « ventilateur », en fonction de la température de la pièce et de la
50cm
or
max 120cm
min 30cm
Mode FROID
L’appareil refroidira avec ce réglage.
50cm
or
max 120cm
min 30cm
Mode SEC
Ce mode ne permet pas de régler la température ou la vitesse de ventilation.
50cm
or
max 120cm
min 30cm
Cette fonction vous permet d’utiliser l’appareil comme un ventilateur.
Appuyez sur la touche « ventilateur » pour régler la vitesse de ventilation.
La température ne peut pas être réglée.
Vous ne devez pas faire passer le tuyau d’échappement par une fenêtre.

25
DO324A
www.domo-elektro.be
FR
50cm
or
max 120cm
min 30cm
vous avez réglé.
50cm
or
max 120cm
min 30cm
50cm
or
max 120cm
min 30cm
9. Écran LED
TÉLÉCOMMANDE
·
sonore.
·
rideaux, des portes ou d’autres matériaux.
·
télécommande à la lumière directe du soleil ou à la chaleur.
·
infrarouge ne soit pas directement exposé à la lumière du soleil.
·
appareils de la proximité de la climatisation ou contactez le distributeur.
· Ne mélangez pas piles neuves et piles usagées dans la télécommande. N’utilisez
·
·
Piles
·
· Enlevez le couvercle à l’arrière de la télécommande en appuyant dessus et en
le faisant glisser de la télécommande. Placez les piles dans la télécommande
couvercle.
ON /OFF
TE MP
SH ORT
CU T
TI MER
ON
TI MER
OF F
MO DE
FAN
LE D
SL EEP
FO LLO W
SW ING
ME
ON /OFF
TE MP
SH ORT
CU T
TI MER
ON
TI MER
OF F
MO DE
FAN
LE D
SL EEP
FO LLO W
SW ING
ME

26
DO324A
FR
·
les piles, la télécommande doit être reprogrammée.
TOUCHES DE FONCTION
ON/OFF
Pour allumer et éteindre l’appareil. Le symbole «
ON/OF F
TEM P
SHO RT
CUT
TIM ER
ON
TIM ER
OFF
MOD E
FAN
LED
SLE EP
FOL LOW
SWI NG
ME
FLÈCHES
enfoncée pendant 3 secondes, vous pouvez basculer entre Celsius « C° » et Fahrenheit « F° ».
MODE
ON/OF F
TEM P
SHO RT
CUT
TIM ER
ON
TIM ER
OFF
MOD E
FAN
LED
SLE EP
FOL LOW
SWI NG
ME
Appuyez sur la touche mode de la télécommande et sélectionnez « auto ».
ON /OFF
TE MP
SH ORT
CU T
TIM ER
ON
TIM ER
OFF
MO DE
FAN
LE D
SL EEP
FOL LOW
SW ING
ME
Fonction FROID
Appuyez sur la touche « mode » pour sélectionner le paramètre souhaité.
Appuyez sur la touche « ventilateur » pour régler la vitesse de ventilation souhaitée.
ON /OFF
TE MP
SH ORT
CU T
TIM ER
ON
TIM ER
OFF
MO DE
FAN
LE D
SL EEP
FOL LOW
SW ING
ME
Fonction SEC
Appuyez sur la touche « mode » et sélectionnez « sec ».
ON /OFF
TE MP
SH ORT
CU T
TIM ER
ON
TIM ER
OFF
MO DE
FAN
LE D
SL EEP
FOL LOW
SW ING
ME
Appuyez sur la touche « mode » pour sélectionner le paramètre souhaité.
Appuyez sur la touche « vitesse du ventilateur » pour régler la vitesse de ventilation souhaitée.
FAN
55
66
MODE display
Displays the current
mode, including:
AUTO
COOL
DRY
HEAT
FAN
Transmission Indicator
Lights up when remote sends
signal to unit
ON/OFF display
Appears when the unit is turned on,
and disappears when it is turned off
TIMER ON display
Displays when TIMER
ON is set
TIMER OFF display
Displays when TIMER
OFF is set
SLEEP display
Battery display
SILENT display
ECO display
Displays when
SLEEP function
is activated
FOLLOW ME
display
Indicates that
the FOLLOW ME
function is on
FAN SPEED display
Displays selected FAN SPEED:
HIGH, MED,
or LOW
This display is blank when
set to AUTO speed.
Temperature/Timer display
Displays the set temperature by default, or timer setting
when using TIMER ON/OFF functions
o O O
Temperature range: 17-30 C(62 F-86 F)
Timer setting range: 0-24 hours
This display is blank when operating in FAN mode.
1. Press the MODE button to select
COOL mode.
2. Set your desired temperature using
the Temp or Temp button.
3. Press the FAN button to select the
fan speed: AUTO, LOW, MED,or
HIGH.
4. Press the ON/OFF button to start the
unit.
In AUTO mode, the unit will automatically
select the COOL, FAN, HEAT or DRY mode
based on the set temperature.
1. Press the MODE button to select Auto mode.
2. Set your desired temperature using the
Temp or Temp button.
3. Press the ON/OFF button to start the unit.
,
NOTE: FAN SPEED can t be set in Auto mode.
SETTING TEMPERATURE
AUTO operation
The operating temperature range for units is
O O O
17-30 C(62 F-86 F). You can increase or
O O
decrease the set tmeperature in 1 C(1 F)
increments.
COOL operation
1
3
2
1
3
2
4
Not available for this unit
Not available for
this unit
Not available for
this unit
Low battery
detection
Remote LED Screen Indicators
How To Use The Basic Functions
ON/OFF
ON/OFF
TEMP
TEMP
SHORT
CUT
SHORT
CUT
TIMER
ON
TIMER
ON
TIMER
OFF
TIMER
OFF
MODE
MODE
FAN
FAN
SLEEP
SLEEP
LED
LED
FOLLOW
ION
SWING
ME
FOLLOW
ION
SWING
ME
– moyen
55
66
MODE display
Displays the current
mode, including:
AUTO
COOL
DRY
HEAT
FAN
Transmission Indicator
Lights up when remote sends
signal to unit
ON/OFF display
Appears when the unit is turned on,
and disappears when it is turned off
TIMER ON display
Displays when TIMER
ON is set
TIMER OFF display
Displays when TIMER
OFF is set
SLEEP display
Battery display
SILENT display
ECO display
Displays when
SLEEP function
is activated
FOLLOW ME
display
Indicates that
the FOLLOW ME
function is on
FAN SPEED display
Displays selected FAN SPEED:
HIGH, MED,
or LOW
This display is blank when
set to AUTO speed.
Temperature/Timer display
Displays the set temperature by default, or timer setting
when using TIMER ON/OFF functions
o O O
Temperature range: 17-30 C(62 F-86 F)
Timer setting range: 0-24 hours
This display is blank when operating in FAN mode.
1. Press the MODE button to select
COOL mode.
2. Set your desired temperature using
the Temp or Temp button.
3. Press the FAN button to select the
fan speed: AUTO, LOW, MED,or
HIGH.
4. Press the ON/OFF button to start the
unit.
In AUTO mode, the unit will automatically
select the COOL, FAN, HEAT or DRY mode
based on the set temperature.
1. Press the MODE button to select Auto mode.
2. Set your desired temperature using the
Temp or Temp button.
3. Press the ON/OFF button to start the unit.
,
NOTE: FAN SPEED can t be set in Auto mode.
SETTING TEMPERATURE
AUTO operation
The operating temperature range for units is
O O O
17-30 C(62 F-86 F). You can increase or
O O
decrease the set tmeperature in 1 C(1 F)
increments.
COOL operation
1
3
2
1
3
2
4
Not available for this unit
Not available for
this unit
Not available for
this unit
Low battery
detection
Remote LED Screen Indicators
How To Use The Basic Functions
ON/OFF
ON/OFF
TEMP
TEMP
SHORT
CUT
SHORT
CUT
TIMER
ON
TIMER
ON
TIMER
OFF
TIMER
OFF
MODE
MODE
FAN
FAN
SLEEP
SLEEP
LED
LED
FOLLOW
ION
SWING
ME
FOLLOW
ION
SWING
ME
– élevé
55
66
MODE display
Displays the current
mode, including:
AUTO
COOL
DRY
HEAT
FAN
Transmission Indicator
Lights up when remote sends
signal to unit
ON/OFF display
Appears when the unit is turned on,
and disappears when it is turned off
TIMER ON display
Displays when TIMER
ON is set
TIMER OFF display
Displays when TIMER
OFF is set
SLEEP display
Battery display
SILENT display
ECO display
Displays when
SLEEP function
is activated
FOLLOW ME
display
Indicates that
the FOLLOW ME
function is on
FAN SPEED display
Displays selected FAN SPEED:
HIGH, MED,
or LOW
This display is blank when
set to AUTO speed.
Temperature/Timer display
Displays the set temperature by default, or timer setting
when using TIMER ON/OFF functions
o O O
Temperature range: 17-30 C(62 F-86 F)
Timer setting range: 0-24 hours
This display is blank when operating in FAN mode.
1. Press the MODE button to select
COOL mode.
2. Set your desired temperature using
the Temp or Temp button.
3. Press the FAN button to select the
fan speed: AUTO, LOW, MED,or
HIGH.
4. Press the ON/OFF button to start the
unit.
In AUTO mode, the unit will automatically
select the COOL, FAN, HEAT or DRY mode
based on the set temperature.
1. Press the MODE button to select Auto mode.
2. Set your desired temperature using the
Temp or Temp button.
3. Press the ON/OFF button to start the unit.
,
NOTE: FAN SPEED can t be set in Auto mode.
SETTING TEMPERATURE
AUTO operation
The operating temperature range for units is
O O O
17-30 C(62 F-86 F). You can increase or
O O
decrease the set tmeperature in 1 C(1 F)
increments.
COOL operation
1
3
2
1
3
2
4
Not available for this unit
Not available for
this unit
Not available for
this unit
Low battery
detection
Remote LED Screen Indicators
How To Use The Basic Functions
ON/OFF
ON/OFF
TEMP
TEMP
SHORT
CUT
SHORT
CUT
TIMER
ON
TIMER
ON
TIMER
OFF
TIMER
OFF
MODE
MODE
FAN
FAN
SLEEP
SLEEP
LED
LED
FOLLOW
ION
SWING
ME
FOLLOW
ION
SWING
ME

27
DO324A
www.domo-elektro.be
FR
SHORT
CUT
Si vous paramétrez souvent l’appareil de la même manière, vous pouvez enregistrer ce réglage en
fonctionnera en mode auto. Ceci est au 26°C et la vitesse du ventilateur est auto.
TIMER
ON
Attention : si vous appuyez sur le bouton ON-OFF de la commande à
distance, toutes les minuteries seront annulées.
réglage du paramètre « marche minuterie ».
Réglez alors l’heure d’activation souhaitée en appuyant à nouveau sur la
température réglée apparaisse à nouveau à l’écran.
Photos illustrant un départ retardé de 2,5 heures.
TIMER
OFF
Appuyez sur cette touche si vous souhaitez éteindre l’appareil à un certain moment.
apparaisse à nouveau à l’écran.
Attention : si vous appuyez sur le bouton ON-OFF de la commande à
distance, toutes les minuteries seront annulées.
réglage du paramètre « arrêt minuterie ».
Réglez alors l’heure d’arrêt souhaitée en appuyant à nouveau sur la touche
température réglée apparaisse à nouveau à l’écran.
Photos illustrant un arrêt retardé de 5 heures.
99
1010
NOTE:
" 0.0h "
When setting the TIMER ON or
TIMER OFF functions, up to 10 hours,
the time will increase in 30 minute
increments with each press. After 10
hours and up to 24, it will increase in 1
hour increments. The timer will revert to
zero after 24 hours.
You can turn off either function by
setting its timer to .
2. Press the TIMER ON button repeatedly
to set the time when you want the unit to
turn on.
3. Wait 2 seconds, then the TIMER ON
function will be activated. The digital
display on your remote control will then
return to the temperature display.
2. Press the TIMER OFF button repeatedly
to set the time when you want the unit to
turn off.
3. Wait 2 seconds, then the TIMER OFF
function will be activated. The digital
display on your remote control will then
return to the temperature display.
Example: Setting unit to turn on after 2.5
hours.
Example: Setting unit to turn off after 5
hours.
2sec
ON/OFF
MODE
FAN
SHORT
CUT
TIMER ON
TIMER OF
F
TEMP
S
L
E
EP
1sec
x5
1
3
2
4
TIMER OFF function
The TIMER OFF function allows you to
set a period of time after which the unit
will automatically turn off, such as when
you wake up.
1.
This number indicates the
amount of time after the current time
that you want the unit to turn on.
For example, if you set TIMER ON for
2 hours, will appear on the
screen, and the unit will turn on after
2 hours.
Press the TIMER ON button. By
default, the last time period that you
set and an "h" (indicating hours)will
appear on the display.
Note:
" 2.0h "
1.
This number indicates the
amount of time after the current time
that you want the unit to turn off.
For example, if you set TIMER OFF for
2 hours, will appear on the
screen, and the unit will turn off after
2 hours.
Press the TIMER OFF button. By
default, the last time period that you
set and an "h" (indicating hours)will
appear on the display.
Note:
" 2.0h "
2sec
x10
ON/OFF
MODE
FAN
SHORT
CUT
TIMER ON
TIMER OF
F
TEMP
S
L
EEP
1sec
1
3
2
4
TIMER ON function
The TIMER ON function allows you to set
a period of time after which the unit will
automatically turn on, such as when you
come home from work.
Your air conditioning unit has two
timer-related functions:
TIMER ON- sets the amount of timer after
which the unit will automatically turn on.
TIMER OFF- sets the amount of time after
which the unit will automatically turn off.
TIMER ON TIMER ON
TIMER OFF
TIMER OFF
Continue to press
TIMER ON
or
TIMER OFF until
desired time is
reached.
Setting the TIMER function
ON/OF F
TEMP
SHORT
CUT
TIMER
ON
TIMER
OFF
MODE
FAN
SLEEP
LED
Timer on
FOL LOW
SWING
ION
ME

28
DO324A
FR
Vous devez dans ce cas régler la fonction « TIMER ON » sur 3,5 h, et la fonction « TIMER OFF » sur 5 h.
SLEEP
confortable et permet d’économiser de l’énergie. Vous pouvez régler cette fonction à l’aide des fonctions
« froid » et « auto ». Le symbole «
ON/OF F
TEM P
SHO RT
CUT
TIM ER
ON
TIM ER
OFF
MOD E
FAN
LED
SLE EP
FOL LOW
SWI NG
ME
encore 30 minutes, la température augmente à nouveau de 1°C. Cette température est conservée pour les
7 heures suivantes. Ensuite, la température revient à la température réglée d’origine et le mode « veille »
est terminé.
NOTE : ce paramètre ne peut pas être sélectionné pour les modes « ventilateur » et « sec ».
SWING
FOLLOW
ME
Avec cette dernière, la température ambiante est mesurée par la télécommande et non par l’appareil.
auto » et « cool », cette fonction assure une température optimale. Appuyez sur la touche « follow me
» pour activer la fonction. La télécommande enverra un signal au climatiseur toutes les 3 minutes. Le
symbole «
ON/OF F
TEM P
SHO RT
CUT
TIM ER
ON
TIM ER
OFF
MOD E
FAN
LED
SLE EP
FOL LOW
SWI NG
ME
LED
l’appareil la nuit. Appuyez de nouveau sur la touche pour rallumer l’écran.
NETTOYAGE ET ENTRETIEN
ÉVACUATION D’EAU
Vidange permanente
Vous pouvez utiliser une vidange permanente pendant la
1. Enlevez le bouchon de vidange et le capuchon en caoutchouc, au
milieu à l’arrière de votre appareil.
2. Fixez le tuyau de vidange sur l’ouverture de vidange.
3.

29
DO324A
www.domo-elektro.be
FR
Vidange code P1
Si vous n’utilisez pas la vidange continue, l’eau sera récupérée dans
le bac de vidange, au bas de l’appareil.
·
climatisation s’arrête.
Le ventilateur continue à fonctionner, c’est normal.
·
· Enlevez le bouchon de la vidange au bas de votre appareil. L’eau s’évacue alors.
·
·
l’appareil. Si le code se répète, veuillez prendre contact avec le service à la clientèle.
·
NETTOYAGE
·
·
·
électrocution.
·
Filtres à air
·
·
·
l’appareil.
Boîtier
Stockage
Avant de stocker l’appareil pour une plus longue durée, procédez comme suit pour éviter tout dommage
à l’appareil :
· Enlevez toute l’eau de l’appareil à l’aide du tuyau de vidange.
·
1
2

30
DO324A
FR
la formation de champignons.
·
·
· Rangez l’appareil dans un endroit sec et sombre.
PROBLÈMES POSSIBLES ET LEUR SOLUTION
·
· La température de la pièce est inférieure à la température réglée sur l’appareil. Adaptez la
température sur votre appareil.
·
fermées.
·
chaleur.
·
fonctionne correctement.
· La température réglée est trop élevée. Adaptez la température réglée.
L’appareil fait trop de bruit ou génère des vibrations.
·
Votre appareil fait un bruit d’écoulement d’eau.
·
MISE AU REBUT
de ce produit. Pour obtenir plus de détails sur le recyclage de ce produit,
veuillez prendre contact avec le bureau municipal de votre région, votre service
produit.

31
DO324A
www.domo-elektro.be
DE
GARANTIE
Sehr geehrter Kunde,
Sämtliche unserer Produkte unterliegen einer strengen Qualitätskontrolle,
bevor Sie Ihnen angeboten werden. Sollten dennoch
Probleme mit Ihrem Gerät auftreten, bedauern wir dies zutiefst.
+32 14 21 71 91 [email protected]
übernimmt der Hersteller die vollständige Verantwortung für Mängel, die nachweislich auf Material- oder
ausgetauscht oder repariert. Die Garantiezeit von 2 Jahren beginnt in diesem Moment nicht erneut,
sondern sie läuft bis 2 Jahre nach dem Kaufdatum weiter. Die Garantie wird auf der Grundlage des
Kassenbons gewährt.
Die Garantie auf Accessoires und Verschleißteile beträgt 6 Monate.
den folgenden Fällen:
· Bei Nichtbeachtung der Anweisungen in dieser Bedienungsanleitung.
· Bei falschem Anschluss, z.B. bei einer zu hohen Stromspannung.
· Bei falscher, grober oder abnormaler Verwendung.
·
· Bei vom Verbraucher oder von nicht ermächtigten Dritten vorgenommenen Reparaturen oder
Änderungen am Gerät.
·
empfohlen oder geliefert werden.
SICHERHEITSVORKEHRUNGEN
· Lesen Sie diese Hinweise sorgfältig durch. Bewahren Sie diese Bedienungsanleitung zum späteren
Nachschlagen auf.
·
Sorgen Sie dafür, dass Kinder nicht mit den Verpackungsmaterialien spielen.
·
folgenden Bereichen:
·
·
· Hotel- und Motelzimmer und andere Bereiche mit wohnungsähnlichem Charakter
· Gästezimmer oder Ähnliches

32
DO324A
DE
·
Behinderungen oder Menschen mit eingeschränkten geistigen Fähigkeiten oder mangelnder
Erfahrung bzw. Sachkenntnis unter der Bedingung verwendet werden, dass diese Personen
beaufsichtigt werden oder sie eine Anleitung zur sicheren Verwendung des Geräts erhalten haben und
sich der Gefahren bei der Verwendung des Geräts bewusst sind. Kinder dürfen nicht mit dem Gerät
diese sind älter als 16 Jahre und werden von einem Erwachsenen beaufsichtigt.
· Achtung: das Gerät darf nicht mit einer externen Zeitschaltuhr.
· Vor der Benutzung prüfen, ob die Spannung, die auf dem Gerät angegeben ist, mit der Spannung Ihres
Stromnetzes übereinstimmt.
· Lassen Sie das Netzkabel nicht über den Tisch oder die Anrichte hängen, oder in Kontakt mit heißen
· Benutzen Sie das Gerät niemals, wenn die Kabelschnur oder der Stecker beschädigt ist, nach
beeinträchtigtem Funktionieren des Gerätes, oder wenn das Gerät beschädigt ist. Bringen Sie in
· Beim Einsatz des Gerätes in Anwesenheit von Kindern ist strenge Aufsicht geboten.
·
Gefahr von Brand, elektrischen Schlages oder von Verletzungen.
· Ziehen Sie den Stecker aus der Steckdose, wenn das Gerät nicht im Einsatz ist, Einzelteile montiert
oder demontiert werden, oder das Gerät gereinigt wird. Ziehen Sie den Stecker direkt am Stecker
selber und nicht an der Kabelschnur aus der Steckdose.
·
·
einer Stelle ab, auf der es in Kontakt mit einem Elektroofen oder einem anderen heißen Geräten
kommen kann.
· Benutzen Sie das Gerät nicht im Freien.
· Benutzen Sie das Gerät ausschließlich für den Zweck, für den es gedacht ist.
·
· Das Gerät ist nur auf den privaten Gebrauch ausgelegt. Der Hersteller ist nicht verantwortlich für
Anleitung aufgeführten Regeln entstehen.
·
dessen Kundendienst zu übernehmen.
·
·
·
·
·
·
vermeiden.
·
überhitzen.
·
· Schließen Sie auf der gleichen Stromzufuhr, an der die Klimaanlage angeschlossen ist, kein weiteres
Gerät an.
· Bedienen Sie den Stecker nicht mit nassen Händen.

33
DO324A
www.domo-elektro.be
DE
·
· Benutzen Sie keine Verlängerungsschnur.
· Lassen Sie das Gerät nicht unbeaufsichtigt, wenn Kinder in der Nähe sind.
·
Kompressor wieder einsatzbereit ist.
·
Radio.
·
· Kippen Sie das Gerät nicht mehr als 35° wenn Sie es transportieren und transportieren Sie es niemals
·
·
Sie es für längere Zeit wegstellen und nicht benutzen.
· Benutzen Sie zur Reinigung des Gerätes keine chemischen Mittel, da diese das Gerät beschädigen
· Achten Sie darauf, dass das Gerät nicht an den Strom angeschlossen ist, wenn Sie den Lüftungsrost
einsetzen oder entnehmen.
· Achten Sie darauf, dass die Klimaanlage nicht in Kontakt mit Feuchtigkeit kommt (z.B.
Flüssigkeiten gefallen sein, ziehen Sie unmittelbar den Stecker aus der Steckdose.
·
·
· Sorgen Sie dafür, dass rund um das Gerät mindestens 30 cm Freiraum ist.
· Falls die Klimaanlage umgefallen ist muss sofort der Stecker aus der Steckdose gezogen werden.
· Berühren Sie das Gerät nicht, wenn Sie nasse Hände oder nackte Füße haben.
· Entfernen Sie keine festmontierten Teile des Gerätes und benutzen Sie das Gerät nicht, wenn es nicht
vernünftig funktioniert, gefallen oder beschädigt ist.
· Benutzen Sie nicht den Stecker zum An- und Abschalten.
·
Detaillierte Informationen bezüglich der Geräte mit dem Kältemittel R290
·
· Verwenden Sie beim Abtauen oder bei der Reinigung des Geräts keine anderen als vom Hersteller
·
· Nicht durchstechen oder verbrennen.
·
·
2
ist.
·
R290.
·
Kältekreislauf.
·
gestaltet sein, dass sich das Kältemittel bei einer Leackage nicht sammeln und eine Explosions- und
Brandgefahr darstellen kann, aufgrund der Entzündung des Kältemittels durch Elektroheizungen,

34
DO324A
DE
· Das Gerät ist so zu lagern, dass mechanische Schäden ausgeschlossen werden.
· Alle Personen, die an einem Kältemittelkreislauf arbeiten oder in ihn eingreifen, müssen im Besitz
·
Reparaturarbeiten, bei denen weitere Fachkräfte assistieren müssen, sind unter der Aufsicht der
Person, die in der Verwendung von brennbaren Kältemitteln geschult ist, durchzuführen.
ENERGIETIPPS
·
·
behindert wird.
· Halten Sie Gardinen während der wärmsten Tageszeit geschlossen.
· Achten Sie darauf, dass die Filter immer sauber sind.
· Halten Sie Fenster und Türen geschlossen, um die gekühlte Luft drinnen und die warme Luft draußen
zu halten.

35
DO324A
www.domo-elektro.be
DE
TEILE
1. Bedienpanel
2. Luftauslass
3. Rollen
4.
5. Dauerhafte Entwässerung
6. Luftauslass
7.
8. Stromkabelaufwicklung
9. Drainage
10.
11. Drainageschlauch
12. Schlauch
13. Fensterbefestigungssatz
· Fensteradapter
·
· Fensterdichtung
· Adapterstecker
· L-Eisen mit Schrauben
14.
·
·
· Schrauben und Dübel
15.
16.
17.
11 12
13
14 15
16
17
1
2
3
4
10
6
5
8
9
7

36
DO324A
DE
INSTALLATION
INSTALLATION
·
Lärmbelästigung und Vibrationen zu reduzieren.
·
Gerätes zu tragen.
·
über Teppiche sollte man besonders vorsichtig sein.
· Stellen Sie das Gerät in die Nähe einer geerdeten Steckdose.
·
·
· Achten Sie darauf, dass der Luftablassschlauch bei der Montage nicht zu stark
· Achten Sie darauf, dass der Luftauslass mit dem Schlauch nach draußen geführt
eindringen kann.
50cm
or
max 120cm
min 30cm
MONTAGE DER FENSTER-LUFTABFUHR
1.
Fensteradapteranschluss auf der anderen Seite des
Schlauches. Die Anschlüsse rasten ein, sobald Sie sie auf den
Schlauch drücken.
2. Befestigen Sie den Schlauch am Gerät. Die Seite des
Luftauslass auf der Rückseite des Gerätes montiert
werden. Schieben Sie den Anschluss in die Halterungen
am Anschluss mit der Einkerbung über dem Luftauslass
übereinstimmt.
3. Setzen Sie den Fensteradapter in das Fenster ein. Dies kann
sowohl horizontal als auch vertikal erfolgen. Verwenden
im Fenster zu schließen. Setzen Sie die gewünschte
Länge des Fensteradapters mit dem mitgelieferten
Fensteradapterstopper fest.
50cm
or
max 120cm
min 30cm
50cm
or
max 120cm
min 30cm
1.
50cm
or
max 120cm
min 30cm
2.
50cm
or
max 120cm
min 30cm
3.
50cm
or
max 120cm
min 30cm
50cm
or
max 120cm
min 30cm
50cm
or
max 120cm
min 30cm
4.
50cm
or
max 120cm
min 30cm
50cm
or
max 120cm
min 30cm
5.

37
DO324A
www.domo-elektro.be
DE
4.
5. Befestigen Sie den Anschluss am Fensteradapter.
MONTAGE DER WAND-LUFTABFUHR
1.
Sie ihn mit den 4 mitgelieferten Dübeln und Schrauben an
2.
Schlauches. Die Anschlüsse rasten ein, sobald Sie sie auf den
Schlauch drücken.
3. Befestigen Sie den Schlauch am Gerät. Die Seite des
Luftauslass auf der Rückseite des Gerätes montiert
werden. Schieben Sie den Anschluss in die Halterungen
am Anschluss mit der Einkerbung über dem Luftauslass
übereinstimmt.
4.
5.
GEBRAUCH
BEDIENPANEL
50cm
or
max 120cm
min 30cm
1234567
9
8
50cm
or
max 120cm
min 30cm
1. ON-OFF-Taste
50cm
or
max 120cm
min 30cm
2. SLEEP-Taste
50cm
or
max 120cm
min 30cm
3.
2.
50cm
or
max 120cm
min 30cm
1.

38
DO324A
DE
Nach weiteren 30 min. wird die Temperatur nochmals um 1 °C steigen. Die dann erreichte Temperatur
wird anschließend für die nächsten 7 Std. konstant gehalten. Danach sinkt die Temperatur auf ihre
ursprüngliche Einstellung und ist der „SLEEP“-Modus beendet.
50cm
or
max 120cm
min 30cm
3. FAN-Taste
Es gibt vier Einstellungen:
·
50cm
or
max 120cm
min 30cm
gering
·
50cm
or
max 120cm
min 30cm
durchschnittlich
·
50cm
or
max 120cm
min 30cm
hoch
· automatisch Im Automatikmodus leuchtet keine Kontrollleuchte auf.
4. “+” und “-”-Tasten
50cm
or
max 120cm
min 30cm
5. MODE-Taste
50cm
or
max 120cm
min 30cm
der Zimmertemperatur und der eingestellten Temperatur – zwischen „COOL“- und „FAN“-Funktion
entscheiden. Die Klimaanlage wird automatisch die Zimmertemperatur auf die eingestellte Temperatur
50cm
or
max 120cm
min 30cm
„COOL“-Funktion
Mit dieser Einstellung kühlt das Gerät ab.
Drücken Sie auf die „MODE“-Taste bis das „COOL“-Kontrolllämpchen leuchtet. Stellen Sie mit den
Pfeil-Tasten die gewünschte Raumtemperatur ein. Stellen Sie anschließend mit der „FAN“-Taste die
gewünschte Ventilator-Geschwindigkeit ein.
50cm
or
max 120cm
min 30cm
Diese Funktion wird verwendet, um die Luft zu entfeuchten.
und Türen geschlossen, um den Entfeuchtungsvorgang optimal verlaufen zu lassen. Es ist nicht
erforderlich, den Luftauslassschlauch bei dieser Funktion zu installieren.
50cm
or
max 120cm
min 30cm
„FAN“- Funktion
Drücken Sie auf die „MODE“-Taste bis das „FAN“-Kontrolllämpchen leuchtet. Stellen Sie anschließend
mit der „FAN“-Taste die gewünschte Ventilator-Geschwindigkeit ein. Bei dieser Funktion kann die
Temperatur nicht eingestellt werden und muss der Abluftschaluch nicht benutzt werden.

39
DO324A
www.domo-elektro.be
DE
50cm
or
max 120cm
min 30cm
6. TIMER-Taste
Drücken Sie bei eingeschaltetem Gerät auf die „TIMER“-Taste. Das „TIMER-OFF“-Kontrolllämpchen
wird leuchten. Das bedeutet, dass das automatische Abschalten aktiv ist. Drücken Sie nochmals auf die
TIMER-Taste. Das „TIMER-ON“-Kontrolllämpchen wird leuchten und die automatische Startfunktion ist
nun aktiv. Drücken Sie nun gleichzeitig beide Pfeil-Tasten, um die gewünschte Zeit einzustellen (max. 24
Vorgangs ablaufen.
annulliert.
50cm
or
max 120cm
min 30cm
50cm
or
max 120cm
min 30cm
Funktion nur mit der Fernbedienung aktivieren.
9. LED-Display
oder FAN-Modus steht, wird auf dem Display die Zimmertemperatur wiedergegeben.
FERNBEDIENUNG
· Benutzen Sie die Fernbedienung mit einem maximalen Abstand von 8 m zum Gerät.
Richten Sie die Fernbedienung in Richtung des Gerätes. Der Empfang wird mit
einem akustischen Signal bestätigt.
· Achten Sie darauf, dass die Fernbedienungssignale nicht durch Gardinen, Türen
Klimaanlage wird nicht funktionieren.
· chten Sie darauf, dass die Fernbedienung nicht nass wird. Setzen Sie die
· Sorgen Sie dafür, dass der Infrarotempfänger nicht direktem Sonnenlicht
·
oder nehmen Sie Kontakt mit dem Fachhändler auf.
· Benutzen Sie keine alten Batterien zusammen mit neuen in der Fernbedienung.
Vermeiden Sie ebenfalls Batterien von verschiedenen Herstellern zu benutzen.
·
Sie die Batterien aus der Fernbedienung.
· Gebrauchte Batterien müssen korrekt recycled werden.
ON /OFF
TE MP
SH ORT
CU T
TI MER
ON
TI MER
OF F
MO DE
FAN
LE D
SL EEP
FO LLO W
SW ING
ME

40
DO324A
DE
Batterien
·
· Entfernen Sie die Abdeckung des Batteriefachs, indem Sie darauf drücken und sie
von der Fernbedienung schieben. Legen Sie die Batterien ein. Achten Sie darauf
·
Fernbedienung erneut programmieren.
Funktionstasten
ON/OFF
Diese Taste dient zum An- und Abschalten. Auf der Anzeige erscheint das Symbol
ON/OF F
TEM P
SHO RT
CUT
TIM ER
ON
TIM ER
OFF
MOD E
FAN
LED
SLE EP
FOL LOW
SWI NG
ME
.
PFEIL-Tasten
MODE
„MODE“-Taste
diese Funktion wählen, funktioniert das Gerät nicht.
ON/OF F
TEM P
SHO RT
CUT
TIM ER
ON
TIM ER
OFF
MOD E
FAN
LED
SLE EP
FOL LOW
SWI NG
ME
Achten Sie darauf, dass der Stecker in der Steckdose steckt.
Drücken Sie auf die Pfeiltasten, um die Temperatur einstzustellen.
ON /OFF
TE MP
SH ORT
CU T
TIM ER
ON
TIM ER
OFF
MO DE
FAN
LE D
SL EEP
FOL LOW
SW ING
ME
„COOL“-Funktion
Achten Sie darauf, dass der Stecker in der Steckdose steckt.
Drücken Sie auf die „MODE“-Taste der Fernbedienung, um die gewünschte Einstellung zu wählen.
Drücken Sie auf die Pfeiltasten, um die Temperatur einstzustellen.
Drücken Sie auf die „FAN“-Taste, um die Geschwindigkeit des Ventilators zu wählen.
ON /OFF
TE MP
SH ORT
CU T
TIM ER
ON
TIM ER
OFF
MO DE
FAN
LE D
SL EEP
FOL LOW
SW ING
ME
Achten Sie darauf, dass der Stecker in der Steckdose steckt.
Drücken Sie auf die Pfeiltasten, um die Temperatur einstzustellen.
ON /OFF
TE MP
SH ORT
CU T
TIM ER
ON
TIM ER
OFF
MO DE
FAN
LE D
SL EEP
FOL LOW
SW ING
ME
„FAN“-Funktion
Achten Sie darauf, dass der Stecker in der Steckdose steckt.
Drücken Sie auf die „MODE“-Taste der Fernbedienung, um die gewünschte Einstellung zu wählen.
ON /OFF
TE MP
SH ORT
CU T
TI MER
ON
TI MER
OF F
MO DE
FAN
LE D
SL EEP
FO LLO W
SW ING
ME

41
DO324A
www.domo-elektro.be
DE
Drücken Sie auf die „FAN“-Taste, um die Geschwindigkeit des Ventilators zu wählen.
Zimmertemperatur kann somit nicht kontrolliert werden.
FAN
„FAN“-Taste
Mit dieser Taste wählen sie die Geschwindigkeit des Ventilators (auto – low
55
66
MODE display
Displays the current
mode, including:
AUTO
COOL
DRY
HEAT
FAN
Transmission Indicator
Lights up when remote sends
signal to unit
ON/OFF display
Appears when the unit is turned on,
and disappears when it is turned off
TIMER ON display
Displays when TIMER
ON is set
TIMER OFF display
Displays when TIMER
OFF is set
SLEEP display
Battery display
SILENT display
ECO display
Displays when
SLEEP function
is activated
FOLLOW ME
display
Indicates that
the FOLLOW ME
function is on
FAN SPEED display
Displays selected FAN SPEED:
HIGH, MED,
or LOW
This display is blank when
set to AUTO speed.
Temperature/Timer display
Displays the set temperature by default, or timer setting
when using TIMER ON/OFF functions
o O O
Temperature range: 17-30 C(62 F-86 F)
Timer setting range: 0-24 hours
This display is blank when operating in FAN mode.
1. Press the MODE button to select
COOL mode.
2. Set your desired temperature using
the Temp or Temp button.
3. Press the FAN button to select the
fan speed: AUTO, LOW, MED,or
HIGH.
4. Press the ON/OFF button to start the
unit.
In AUTO mode, the unit will automatically
select the COOL, FAN, HEAT or DRY mode
based on the set temperature.
1. Press the MODE button to select Auto mode.
2. Set your desired temperature using the
Temp or Temp button.
3. Press the ON/OFF button to start the unit.
,
NOTE: FAN SPEED can t be set in Auto mode.
SETTING TEMPERATURE
AUTO operation
The operating temperature range for units is
O O O
17-30 C(62 F-86 F). You can increase or
O O
decrease the set tmeperature in 1 C(1 F)
increments.
COOL operation
1
3
2
1
3
2
4
Not available for this unit
Not available for
this unit
Not available for
this unit
Low battery
detection
Remote LED Screen Indicators
How To Use The Basic Functions
ON/OFF
ON/OFF
TEMP
TEMP
SHORT
CUT
SHORT
CUT
TIMER
ON
TIMER
ON
TIMER
OFF
TIMER
OFF
MODE
MODE
FAN
FAN
SLEEP
SLEEP
LED
LED
FOLLOW
ION
SWING
ME
FOLLOW
ION
SWING
ME
– med
55
66
MODE display
Displays the current
mode, including:
AUTO
COOL
DRY
HEAT
FAN
Transmission Indicator
Lights up when remote sends
signal to unit
ON/OFF display
Appears when the unit is turned on,
and disappears when it is turned off
TIMER ON display
Displays when TIMER
ON is set
TIMER OFF display
Displays when TIMER
OFF is set
SLEEP display
Battery display
SILENT display
ECO display
Displays when
SLEEP function
is activated
FOLLOW ME
display
Indicates that
the FOLLOW ME
function is on
FAN SPEED display
Displays selected FAN SPEED:
HIGH, MED,
or LOW
This display is blank when
set to AUTO speed.
Temperature/Timer display
Displays the set temperature by default, or timer setting
when using TIMER ON/OFF functions
o O O
Temperature range: 17-30 C(62 F-86 F)
Timer setting range: 0-24 hours
This display is blank when operating in FAN mode.
1. Press the MODE button to select
COOL mode.
2. Set your desired temperature using
the Temp or Temp button.
3. Press the FAN button to select the
fan speed: AUTO, LOW, MED,or
HIGH.
4. Press the ON/OFF button to start the
unit.
In AUTO mode, the unit will automatically
select the COOL, FAN, HEAT or DRY mode
based on the set temperature.
1. Press the MODE button to select Auto mode.
2. Set your desired temperature using the
Temp or Temp button.
3. Press the ON/OFF button to start the unit.
,
NOTE: FAN SPEED can t be set in Auto mode.
SETTING TEMPERATURE
AUTO operation
The operating temperature range for units is
O O O
17-30 C(62 F-86 F). You can increase or
O O
decrease the set tmeperature in 1 C(1 F)
increments.
COOL operation
1
3
2
1
3
2
4
Not available for this unit
Not available for
this unit
Not available for
this unit
Low battery
detection
Remote LED Screen Indicators
How To Use The Basic Functions
ON/OFF
ON/OFF
TEMP
TEMP
SHORT
CUT
SHORT
CUT
TIMER
ON
TIMER
ON
TIMER
OFF
TIMER
OFF
MODE
MODE
FAN
FAN
SLEEP
SLEEP
LED
LED
FOLLOW
ION
SWING
ME
FOLLOW
ION
SWING
ME
– high
55
66
MODE display
Displays the current
mode, including:
AUTO
COOL
DRY
HEAT
FAN
Transmission Indicator
Lights up when remote sends
signal to unit
ON/OFF display
Appears when the unit is turned on,
and disappears when it is turned off
TIMER ON display
Displays when TIMER
ON is set
TIMER OFF display
Displays when TIMER
OFF is set
SLEEP display
Battery display
SILENT display
ECO display
Displays when
SLEEP function
is activated
FOLLOW ME
display
Indicates that
the FOLLOW ME
function is on
FAN SPEED display
Displays selected FAN SPEED:
HIGH, MED,
or LOW
This display is blank when
set to AUTO speed.
Temperature/Timer display
Displays the set temperature by default, or timer setting
when using TIMER ON/OFF functions
o O O
Temperature range: 17-30 C(62 F-86 F)
Timer setting range: 0-24 hours
This display is blank when operating in FAN mode.
1. Press the MODE button to select
COOL mode.
2. Set your desired temperature using
the Temp or Temp button.
3. Press the FAN button to select the
fan speed: AUTO, LOW, MED,or
HIGH.
4. Press the ON/OFF button to start the
unit.
In AUTO mode, the unit will automatically
select the COOL, FAN, HEAT or DRY mode
based on the set temperature.
1. Press the MODE button to select Auto mode.
2. Set your desired temperature using the
Temp or Temp button.
3. Press the ON/OFF button to start the unit.
,
NOTE: FAN SPEED can t be set in Auto mode.
SETTING TEMPERATURE
AUTO operation
The operating temperature range for units is
O O O
17-30 C(62 F-86 F). You can increase or
O O
decrease the set tmeperature in 1 C(1 F)
increments.
COOL operation
1
3
2
1
3
2
4
Not available for this unit
Not available for
this unit
Not available for
this unit
Low battery
detection
Remote LED Screen Indicators
How To Use The Basic Functions
ON/OFF
ON/OFF
TEMP
TEMP
SHORT
CUT
SHORT
CUT
TIMER
ON
TIMER
ON
TIMER
OFF
TIMER
OFF
MODE
MODE
FAN
FAN
SLEEP
SLEEP
LED
LED
FOLLOW
ION
SWING
ME
FOLLOW
ION
SWING
ME
SHORT
CUT
Taste
eventuell auch noch die SLEEP-Einstellung.
mit den zuvor festgelegten Einstellungen.
TIMER
ON
„TIMER-ON“-Taste
Diese Taste dient dazu, dass Gerät zu einer bestimmten Zeit einzuschalten. Jeder
Einschaltung zu annullieren halten Sie die Taste gedrückt, bis dass auf dem
Display 0.0 erscheint.
Achten Sie darauf, dass der Stecker in der Steckdose steckt.
Drücken Sie auf die „TIMER ON“-Taste. Auf dem Display erscheint die letzte
Einstellung der „TIMER ON “-Funktion. Stellen Sie nun die gewünschte
Startzeit ein, indem Sie nochmals die „TIMER-ON“-Taste drücken. Jedes
Mal, wenn Sie die „TIMER ON“-Taste drücken, wird die Zeit angepasst (max.
eingestellte Zeit auf dem Display erscheint.
TIMER
OFF
„TIMER-OFF“-Taste
Taste gedrückt, bis dass auf dem Display 0.0 erscheint.
Drücken Sie auf die „TIMER OFF“-Taste. Auf dem Display erscheint die letzte
Einstellung der „TIMER OFF“-Funktion. Stellen Sie nun die gewünschte
99
1010
NOTE:
" 0.0h "
When setting the TIMER ON or
TIMER OFF functions, up to 10 hours,
the time will increase in 30 minute
increments with each press. After 10
hours and up to 24, it will increase in 1
hour increments. The timer will revert to
zero after 24 hours.
You can turn off either function by
setting its timer to .
2. Press the TIMER ON button repeatedly
to set the time when you want the unit to
turn on.
3. Wait 2 seconds, then the TIMER ON
function will be activated. The digital
display on your remote control will then
return to the temperature display.
2. Press the TIMER OFF button repeatedly
to set the time when you want the unit to
turn off.
3. Wait 2 seconds, then the TIMER OFF
function will be activated. The digital
display on your remote control will then
return to the temperature display.
Example: Setting unit to turn on after 2.5
hours.
Example: Setting unit to turn off after 5
hours.
2sec
ON/OFF
MODE
FAN
SHORT
CUT
TIMER ON
TIMER OF
F
TEMP
S
L
E
EP
1sec
x5
1
3
2
4
TIMER OFF function
The TIMER OFF function allows you to
set a period of time after which the unit
will automatically turn off, such as when
you wake up.
1.
This number indicates the
amount of time after the current time
that you want the unit to turn on.
For example, if you set TIMER ON for
2 hours, will appear on the
screen, and the unit will turn on after
2 hours.
Press the TIMER ON button. By
default, the last time period that you
set and an "h" (indicating hours)will
appear on the display.
Note:
" 2.0h "
1.
This number indicates the
amount of time after the current time
that you want the unit to turn off.
For example, if you set TIMER OFF for
2 hours, will appear on the
screen, and the unit will turn off after
2 hours.
Press the TIMER OFF button. By
default, the last time period that you
set and an "h" (indicating hours)will
appear on the display.
Note:
" 2.0h "
2sec
x10
ON/OFF
MODE
FAN
SHORT
CUT
TIMER ON
TIMER OF
F
TEMP
S
L
EEP
1sec
1
3
2
4
TIMER ON function
The TIMER ON function allows you to set
a period of time after which the unit will
automatically turn on, such as when you
come home from work.
Your air conditioning unit has two
timer-related functions:
TIMER ON- sets the amount of timer after
which the unit will automatically turn on.
TIMER OFF- sets the amount of time after
which the unit will automatically turn off.
TIMER ON TIMER ON
TIMER OFF
TIMER OFF
Continue to press
TIMER ON
or
TIMER OFF until
desired time is
reached.
Setting the TIMER function
ON/OF F
TEMP
SHORT
CUT
TIMER
ON
TIMER
OFF
MODE
FAN
SLEEP
LED
Timer on
FOL LOW
SWING
ION
ME

42
DO324A
DE
Startzeit ein, indem Sie nochmals die „TIMER-OFF“-Taste drücken. Jedes Mal, wenn Sie die „TIMER OFF“-
sek. bevor die eingestellte Zeit auf dem Display erscheint.
eingeschaltet wird, aber auch, wann das Gerät ausgeschaltet wird.
Stunden ein und TIMER OFF auf 5,0 Stunden.
SLEEP
„SLEEP“-Taste
werden. Auf der Anzeige erscheint das Symbol
ON/OF F
TEM P
SHO RT
CUT
TIM ER
ON
TIM ER
OFF
MOD E
FAN
LED
SLE EP
FOL LOW
SWI NG
ME
Nach weiteren 30 min. wird die Temperatur nochmals um 1 °C steigen. Die dann erreichte Temperatur
wird anschließend für die nächsten 7 Std. konstant gehalten. Danach sinkt die Temperatur auf ihre
ursprüngliche Einstellung und ist der SLEEP-Modus beendet.
SWING
FOLLOW
ME
Für die Einstellungen „auto“ und „cool“ sorgt diese Funktion für die optimale Temperatur. Drücken Sie die
Taste „follow me“, um die Funktion zu aktivieren. Die Fernbedienung sendet alle 3 Minuten ein Signal an
die Klimaanlage. Das Symbol
ON/OF F
TEM P
SHO RT
CUT
TIM ER
ON
TIM ER
OFF
MOD E
FAN
LED
SLE EP
FOL LOW
SWI NG
ME
erscheint auf der Anzeige. Drücken Sie die Taste erneut, um die Funktion
abzubrechen.
LED
LED-TASTE
Drücken Sie diese Taste, um alle Kontrollleuchten auf dem Display auszuschalten, z.B. bei Verwendung
des Gerätes in der Nacht. Drücken Sie die Taste erneut, um die Anzeige wieder einzuschalten.

43
DO324A
www.domo-elektro.be
DE
REINIGUNG UND WARTUNG
WASSERABFUHR
Permanente Drainage
permanente Drainage benutzen.
1. Entfernen Sie den Drainage-Verschluss und die Gummikappe auf
der Rückseite des Gerätes.
2.
3.
kann.
Drainage Hinweis „P1“
·
stoppen, aber der Ventilator wird sich weiterhin drehen.
·
·
·
·
dem Display steht.
·
Sollte die Meldung dann noch stets auf dem Display erscheinen, wenden Sie sich bitte an den
Fachhändler.
·
einschalten.
REINIGUNG
· Ziehen Sie immer erst den Stecker aus der Steckdose, bevor Sie das Gerät reinigen.
· Benutzen Sie keine chemischen oder scheuernden Reinigungsmittel.
·
· Falls das Kabel des Gerätes beschädigt ist, muss dieses durch den
Luftlter
·
verhindern.
·
Reinigungsmittel. Spülen Sie die Filter gründlich ab und lassen Sie sie an
der Luft trocknen.
1
2

44
DO324A
DE
·
Gehäuse
Das Gehäuse kann mit einem weichen, feuchten Tuch mit etwas mildem Spülmittel abgewaschen werden.
Trocknen Sie das Gehäuse nach dem Abwaschen gründlich mit einem weichen, trockenen Tuch ab.
Verstauen
·
· Stellen bei dem Gerät anschließend die „FAN“-Funktion ein und lassen es einen halben Tag in
trockenen und wird sich kein Schimmel bilden.
· Schalten Sie das Gerät danach ab und ziehen Sie den Stecker aus der Steckdose. Entfernen Sie
anschließend die Batterien aus der Fernbedienung.
· Reinigen Sie die Filter und setzen Sie diese wieder ins Gerät ein.
· Verstauen Sie das Gerät in einem trockenen, dunklen Raum.
MÖGLICHE PROBLEME UND PROBLEMLÖSUNGEN
·
· Die Zimmertemperatur ist niedriger als die Temperatur, die Sie eingestellt haben. Ändern Sie
entsprechend die Temperatureinstellung am Gerät.
Das Zimmer kühlt nicht entsprechend ab
· Fenster und Türen sind nicht geschlossen. Sorgen Sie dafür, dass Fenster und Türen geschlossen
werden.
·
· Der Luftablassschlauch ist nicht angeschlossen oder blockiert. Schließen Sie den Schlauch an und
sorgen Sie dafür, dass er nicht zu sark gekrümmt ist.
· Die eingestellte Temperatur ist zu hoch. Passen Sie die Temperatureingabe entsprechend an.
Das Gerät macht zu viel Lärm und sorgt für Vibrationen
·
Das Gerät macht gurgelnde Geräusche
·

45
DO324A
www.domo-elektro.be
DE
ENTSORGEN
Dieses Symbol auf dem Produkt oder seiner Verpackung weist darauf hin, dass
dieses Produkt nicht als normaler Haushaltsabfall zu behandeln ist, sondern
an einem Sammelpunkt für das Recyling von elektrischen und elektronischen
Geräten abgegeben werden muss. Durch Ihren Beitrag zum korrekten
erhalten Sie von Ihren Rathaus, Ihrer Müllabfuhr oder dem Geschäft, in dem
Sie das Produkt gekauft haben.
Das Verpackungsmaterial ist wiederverwertbar. Entsorgen Sie die Verpackung

46
DO324A
EN
WARRANTY
Dear client ,
Should you nevertheless experience problems with your device, we sincerely regret this.
+32 14 21 71 91 [email protected]
Monday – Thursday: 8.30 – 12.00 and 13.00 – 17.00
Friday: 8.30 – 12.00 and 13.00 – 16.30
This appliance has a two year warranty period. During this period the manufacturer is responsible for
be repaired or replaced if necessary. The warranty will not be valid when the damage to the appliance is
caused by wrong use, not following the instructions or repairs executed by a third party. The guarantee is
If your device breaks down within the 2-year warranty period, you can return the device together with
your receipt to the shop where you purchased it.
The guarantee on accessories and components that are liable to wear-and-tear is only 6 months.
The guarantee and responsibility of the supplier and manufacturer lapse automatically in the following
cases:
· If the instructions in this manual have not been followed.
· In case of incorrect connection, e.g., electrical voltage that is too high.
· In case of incorrect, rough or abnormal use.
·
· In case of repairs or alterations to the device by the consumer or non-authorised third parties.
·
manufacturer.

47
DO324A
www.domo-elektro.be
EN
SAFETY INSTRUCTIONS
following:
· Read all instructions carefully. Keep this manual for future reference.
· Make sure all packaging materials and promotional stickers have been removed before using the
· This appliance is intended to be used in household and similar applications such as:
·
·
·
· bed and breakfast type environments.
· Children should be supervised to ensure that they do not play with the appliance.
· This appliance can be used by children aged from 16 years and above and persons with reduced
physical, sensory or mental capabilities or lack of experience and knowledge if they have been given
supervision or instruction concerning use of the appliance in a safe way and understand the hazards
involved. Children shall not play with the appliance. Cleaning and user maintenance shall not be made
by children unless they are older than 16 and supervised.
· Keep the appliance and its cord out of reach of children younger than 16 years.
· Attention: This appliance cannot be used with an external timer.
· Before use, check if the voltage stated on the appliance corresponds with the voltage of the power net
at your home.
· Do not let the cord hang on a hot surface or on the edge of a table or counter top.
· Never use the appliance when the cord or plug is damaged, after malfunction or when the appliance
and repair.
· Close supervision is necessary when the appliance is used near or by children.
·
·
grasping the plug. Never unplug by pulling the cord.
· Do not leave a working appliance unattended.
· Never place this appliance near a gas stove or electrical stove or in a place where it may come into
contact with a warm appliance.
· Do not use the appliance outdoors.
· Only use the appliance for its intended use.
· Always use the appliance on a steady, dry and level surface.
· Only use the appliance for domestic use. The manufacturer can not be held responsible for accidents
that result from improper use of the appliance or not following the instructions described in this
manual.
· All repairs should be carried out by the manufacturer or its aftersales service.
·
· Make sure that children do not touch the cord or appliance.
· Keep the cord away from sharp edges and hot parts or other heat sources.
· Before use, remove all packaging materials and any promotional stickers.
·
· Never hit or shake the unit, to prevent damage.

48
DO324A
EN
· Never cover the air inlet or air outlet, to prevent overheating the unit.
· Never splash water on the unit, or place the unit near water, to prevent electrocution.
· Never place another appliance on the same electrical circuit as the airco.
· Never handle the plug with wet hands.
·
· Never use an extension cord.
· Never let children play near the unit.
·
· immediatly afterwards, the compressor will need 3 min.to start up again.
· Always place the unit at least 1m away from TV or radio, to prevent disturbance.
· Never place the unit in direct sun light, to prevent discoloration of the airco.
· Make sure the angle of the unit is never more than 35°, when you move the airco. Never place the unit
upside down.
· Always remove the water from the water tank, when storing the airco. This will keep your airco in
optimal condition for a long time.
· Never use any chemicals to clean the unit, this will cause damage.
· Always make sure to disconnect the unit from the electrical supply before attaching or removing the
air inlet grill.
· Make sure the airco is always protected against condensation, splashing water, etc. Make sure the
· Never use the airco in a damp room such as a badroom or a laundry room.
·
· Make sure that the free space around the unit is at least 30 cm.
· Never touch the unit with wet hands or bare feed.
·
·
the unit has fallen or has been damaged.
·
·
Specic information regarding appliances with R290 refrigerant gas.
· Thoroughly read all of the warnings.
·
the manufacturing company.
· The appliance must be placed in an area without any continuous sources of ignition (for example: open
· Do not puncture and do not burn.
· Refrigerant gases can be odourless.
· The appliance must be installed, used and stored in an area that is greater than 11 m
2
.
·
gas.
· R290 is a refrigerant gas that complies with the European directives on the environment. Do not
puncture any part of the refrigerant circuit.
· If the appliance is installed, operated or stored in a nonventilated area, the room must be designed to
the refrigerant caused by electric heaters, stoves, or other sources of ignition.

49
DO324A
www.domo-elektro.be
EN
· The appliance must be stored in such a way as to prevent mechanical failure.
·
issued by an accredited organisation that ensures competence in handling refrigerants according to a
· Repairs must be performed based on the recommendations from the manufacturing company.
ENERGY TIPS
· Never use the unit it rooms that are bigger than the recommended room size.
·
· Keep curtains closed during the warmest hours of the day.
·
· Always keep doors and windows closed to keep the cool air inside and the warm air outside.

50
DO324A
EN
PARTS
1. Control panel
2. Air outlet
3.
4. Handle
5. Permanent drainage
6. Air outlet
7. Plug storage
8. Cord storage
9. Bottom drain
10.
11. Drain hose
12. Air outlet hose
13.
·
·
·
· Adapter plug
· L-iron with screws
14.
·
·
· Screws and plugs
15. Cable storage accessory
16. Remote control including batteries, suspension holder, and screws
17.
11 12
13
14 15
16
17
1
2
3
4
10
6
5
8
9
7

51
DO324A
www.domo-elektro.be
EN
INSTALLATION
INSTALLATION
·
the appliance.
· The appliance has small wheels for easy moving. Make sure only to move the airco
· Place the unit near an earthed socket.
· Mount the cable storage accessory on the back of the unit.
·
· Make sure that the air outlet is brought out with the hose. Keep the opening to the
outside as small as possible so that no warm air from the outside can come back
inside.
· Make sure there is a free surrounding of at least 50 cm around the outlet.
· Make sure the air outlet hose isn’t bend during use.
50cm
or
max 120cm
min 30cm
INSTALLATION OF THE WINDOW KIT
The air outlet hose must be used in the “cool” or “auto” mode.
During the “fan” or “dry” mode, you don’t need to attache the air
outlet hose.
1.
other side of the hose. The connectors snap into place as soon
as you push them onto the hose.
2.
appliance connector must be mounted on the air outlet at the
back of the appliance. Slide the connector into the air outlet
holders. Make sure that the hook on the connector matches
the notch above the air outlet.
3. Place the window adapter in the window. This can be done
any openings in the window. Block the window adapter at the
desired length using the supplied window adapter plug.
4.
5. Attach the connector to the window adapter.
50cm
or
max 120cm
min 30cm
50cm
or
max 120cm
min 30cm
1.
50cm
or
max 120cm
min 30cm
2.
50cm
or
max 120cm
min 30cm
3.
50cm
or
max 120cm
min 30cm
50cm
or
max 120cm
min 30cm
50cm
or
max 120cm
min 30cm
4.
50cm
or
max 120cm
min 30cm
50cm
or
max 120cm
min 30cm
5.

52
DO324A
EN
INSTALLATION WALL KIT
The air outlet hose must be used in the “cool” or “auto” mode.
During the “fan” or “dry” mode, you don’t need to attache the air
outlet hose.
1. Make an opening in the wall the size of the wall adapter (125
Insert the wall adapter into the opening and attach it to the
wall using the 4 supplied plugs and screws.
2.
side of the hose. The connectors snap into place as soon as
you push them onto the hose.
3.
appliance connector must be mounted on the air outlet at
the back of the appliance. Slide the connector into the air
outlet holders. Make sure that the hook on the connector
matches the notch above the air outlet.
4. Attach the air outlet hose to the wall adapter.
5.
USE
CONTROL PANEL
50cm
or
max 120cm
min 30cm
1234567
9
8
50cm
or
max 120cm
min 30cm
To turn the unit of or on.
50cm
or
max 120cm
min 30cm
2. SLEEP touch
another 30 min the temperature will increase with another 1°C. The airco will maintain this temperature
for 7 hours. After this time, the airco will go back to the original set temperature and the “sleep” function
will end.
NOTE : this function can not be selected with the “fan” or “dry” function.
50cm
or
max 120cm
min 30cm
3.
2.
50cm
or
max 120cm
min 30cm
1.

53
DO324A
www.domo-elektro.be
EN
50cm
or
max 120cm
min 30cm
3. FAN touch
There are four settings:
·
50cm
or
max 120cm
min 30cm
low
·
50cm
or
max 120cm
min 30cm
medium
·
50cm
or
max 120cm
min 30cm
high
· auto The indicator light will not illuminate in auto mode.
4.”+” and “-” touch
same time you can switch between “C°” or “F°”.
50cm
or
max 120cm
min 30cm
5. MODE- touch
50cm
or
max 120cm
min 30cm
“fan” function, depending on the room temperature and the selected temperature.
The airco will automatically stabelise the room temperature on the selected temperature.
50cm
or
max 120cm
min 30cm
COOL function
The unit will cool with this setting.
Press the “mode” touch until the “cool” indication light turns on.
50cm
or
max 120cm
min 30cm
This function is used to dehumidify the air.
Press the “mode” touch unit the “dry” indication light turns on.
It is not necessary to install the air outlet hose with this function.
50cm
or
max 120cm
min 30cm
FAN function
This function allows you to use the unit as a fan.
Press the “mode” touch until the fan indication light will turn on.
Press the “fan” touch to select the air speed.
The temperature can’t be selected.
50cm
or
max 120cm
min 30cm
6. TIMER touch
indication light will turn on. This indicates that the “auto on” function is activated.

54
DO324A
EN
Press the arrow buttons to select the time. The max time selection is 24 hours.
depending on the selection you made.
50cm
or
max 120cm
min 30cm
50cm
or
max 120cm
min 30cm
with the remote control.
9. LED display
show the room temperature.
REMOTE CONTROL
· The remote control will only function within 8 m of the airco. Point the remote in
· The airco will not react to the remote if the signal is blocked by curtains, doors or
other materials.
· Make sure the remote doesn’t get wet. Don’t expose the remote to direct sunlight
or heat.
·
possible that it won’t react to the remote control. Make sure there is no direct
sunlight on the infrared sensor.
·
further away from the airco or contact your supplier.
· Don’t use old and new batteries at the same time in the remote control. Don’t use
· Remove the batteries from the remote, when you won’t use it for a longer periode
· Recycle used batteries correctly.
Batteries
·
· Remove the cover of the batterie compartment, by pressing down on it and sliding it out of the
remote.
· Place the batteries, make sure to follow the indications + and – indicated in the
batterie compartment.
· Place the cover back on the batterie compartment.
·
new batteries you have to reinstall all the selections.
ON /OFF
TE MP
SH ORT
CU T
TI MER
ON
TI MER
OF F
MO DE
FAN
LE D
SL EEP
FO LLO W
SW ING
ME
ON /OFF
TE MP
SH ORT
CU T
TI MER
ON
TI MER
OF F
MO DE
FAN
LE D
SL EEP
FO LLO W
SW ING
ME

55
DO324A
www.domo-elektro.be
EN
Functions
ON/OFF
ON/OF F
TEM P
SHO RT
CUT
TIM ER
ON
TIM ER
OFF
MOD E
FAN
LED
SLE EP
FOL LOW
SWI NG
ME
symbol appears on the display
These buttons must be used for setting the temperature. If you hold the button down for 3 seconds, you
can switch between Celsius ‘C°’ and Fahrenheit ‘F°’.
MODE
select this function, the unit will not work.
ON/OF F
TEM P
SHO RT
CUT
TIM ER
ON
TIM ER
OFF
MOD E
FAN
LED
SLE EP
FOL LOW
SWI NG
ME
Make sure the unit is plugged in.
Press the “mode”-button and select the “auto” mode.
Press the arrow buttons to set the temperature.
NOTE : when selecting the “auto” function, the airco will determine in which setting it will work (airco –
ON /OFF
TE MP
SH ORT
CU T
TIM ER
ON
TIM ER
OFF
MO DE
FAN
LE D
SL EEP
FOL LOW
SW ING
ME
COOL mode
Make sure the unit is plugged in.
Press the “mode” button and select desired function.
Press the arrow buttons to select the desired temperature.
Press the “fan” button to select the fan speed.
ON /OFF
TE MP
SH ORT
CU T
TIM ER
ON
TIM ER
OFF
MO DE
FAN
LE D
SL EEP
FOL LOW
SW ING
ME
Make sure the unit is plugged in.
Press the “mode”button to select the “dry” function.
ON /OFF
TE MP
SH ORT
CU T
TIM ER
ON
TIM ER
OFF
MO DE
FAN
LE D
SL EEP
FOL LOW
SW ING
ME
FAN mode
Make sure the unit is plugged in.
Press the “mode” button and select desired function.
Press the “fan speed” button to select the fan speed.
NOTE : when using the “fan” mode, no temperature will be displayed. The room temperature can’t be
controled.
FAN
55
66
MODE display
Displays the current
mode, including:
AUTO
COOL
DRY
HEAT
FAN
Transmission Indicator
Lights up when remote sends
signal to unit
ON/OFF display
Appears when the unit is turned on,
and disappears when it is turned off
TIMER ON display
Displays when TIMER
ON is set
TIMER OFF display
Displays when TIMER
OFF is set
SLEEP display
Battery display
SILENT display
ECO display
Displays when
SLEEP function
is activated
FOLLOW ME
display
Indicates that
the FOLLOW ME
function is on
FAN SPEED display
Displays selected FAN SPEED:
HIGH, MED,
or LOW
This display is blank when
set to AUTO speed.
Temperature/Timer display
Displays the set temperature by default, or timer setting
when using TIMER ON/OFF functions
o O O
Temperature range: 17-30 C(62 F-86 F)
Timer setting range: 0-24 hours
This display is blank when operating in FAN mode.
1. Press the MODE button to select
COOL mode.
2. Set your desired temperature using
the Temp or Temp button.
3. Press the FAN button to select the
fan speed: AUTO, LOW, MED,or
HIGH.
4. Press the ON/OFF button to start the
unit.
In AUTO mode, the unit will automatically
select the COOL, FAN, HEAT or DRY mode
based on the set temperature.
1. Press the MODE button to select Auto mode.
2. Set your desired temperature using the
Temp or Temp button.
3. Press the ON/OFF button to start the unit.
,
NOTE: FAN SPEED can t be set in Auto mode.
SETTING TEMPERATURE
AUTO operation
The operating temperature range for units is
O O O
17-30 C(62 F-86 F). You can increase or
O O
decrease the set tmeperature in 1 C(1 F)
increments.
COOL operation
1
3
2
1
3
2
4
Not available for this unit
Not available for
this unit
Not available for
this unit
Low battery
detection
Remote LED Screen Indicators
How To Use The Basic Functions
ON/OFF
ON/OFF
TEMP
TEMP
SHORT
CUT
SHORT
CUT
TIMER
ON
TIMER
ON
TIMER
OFF
TIMER
OFF
MODE
MODE
FAN
FAN
SLEEP
SLEEP
LED
LED
FOLLOW
ION
SWING
ME
FOLLOW
ION
SWING
ME
, med
55
66
MODE display
Displays the current
mode, including:
AUTO
COOL
DRY
HEAT
FAN
Transmission Indicator
Lights up when remote sends
signal to unit
ON/OFF display
Appears when the unit is turned on,
and disappears when it is turned off
TIMER ON display
Displays when TIMER
ON is set
TIMER OFF display
Displays when TIMER
OFF is set
SLEEP display
Battery display
SILENT display
ECO display
Displays when
SLEEP function
is activated
FOLLOW ME
display
Indicates that
the FOLLOW ME
function is on
FAN SPEED display
Displays selected FAN SPEED:
HIGH, MED,
or LOW
This display is blank when
set to AUTO speed.
Temperature/Timer display
Displays the set temperature by default, or timer setting
when using TIMER ON/OFF functions
o O O
Temperature range: 17-30 C(62 F-86 F)
Timer setting range: 0-24 hours
This display is blank when operating in FAN mode.
1. Press the MODE button to select
COOL mode.
2. Set your desired temperature using
the Temp or Temp button.
3. Press the FAN button to select the
fan speed: AUTO, LOW, MED,or
HIGH.
4. Press the ON/OFF button to start the
unit.
In AUTO mode, the unit will automatically
select the COOL, FAN, HEAT or DRY mode
based on the set temperature.
1. Press the MODE button to select Auto mode.
2. Set your desired temperature using the
Temp or Temp button.
3. Press the ON/OFF button to start the unit.
,
NOTE: FAN SPEED can t be set in Auto mode.
SETTING TEMPERATURE
AUTO operation
The operating temperature range for units is
O O O
17-30 C(62 F-86 F). You can increase or
O O
decrease the set tmeperature in 1 C(1 F)
increments.
COOL operation
1
3
2
1
3
2
4
Not available for this unit
Not available for
this unit
Not available for
this unit
Low battery
detection
Remote LED Screen Indicators
How To Use The Basic Functions
ON/OFF
ON/OFF
TEMP
TEMP
SHORT
CUT
SHORT
CUT
TIMER
ON
TIMER
ON
TIMER
OFF
TIMER
OFF
MODE
MODE
FAN
FAN
SLEEP
SLEEP
LED
LED
FOLLOW
ION
SWING
ME
FOLLOW
ION
SWING
ME
55
66
MODE display
Displays the current
mode, including:
AUTO
COOL
DRY
HEAT
FAN
Transmission Indicator
Lights up when remote sends
signal to unit
ON/OFF display
Appears when the unit is turned on,
and disappears when it is turned off
TIMER ON display
Displays when TIMER
ON is set
TIMER OFF display
Displays when TIMER
OFF is set
SLEEP display
Battery display
SILENT display
ECO display
Displays when
SLEEP function
is activated
FOLLOW ME
display
Indicates that
the FOLLOW ME
function is on
FAN SPEED display
Displays selected FAN SPEED:
HIGH, MED,
or LOW
This display is blank when
set to AUTO speed.
Temperature/Timer display
Displays the set temperature by default, or timer setting
when using TIMER ON/OFF functions
o O O
Temperature range: 17-30 C(62 F-86 F)
Timer setting range: 0-24 hours
This display is blank when operating in FAN mode.
1. Press the MODE button to select
COOL mode.
2. Set your desired temperature using
the Temp or Temp button.
3. Press the FAN button to select the
fan speed: AUTO, LOW, MED,or
HIGH.
4. Press the ON/OFF button to start the
unit.
In AUTO mode, the unit will automatically
select the COOL, FAN, HEAT or DRY mode
based on the set temperature.
1. Press the MODE button to select Auto mode.
2. Set your desired temperature using the
Temp or Temp button.
3. Press the ON/OFF button to start the unit.
,
NOTE: FAN SPEED can t be set in Auto mode.
SETTING TEMPERATURE
AUTO operation
The operating temperature range for units is
O O O
17-30 C(62 F-86 F). You can increase or
O O
decrease the set tmeperature in 1 C(1 F)
increments.
COOL operation
1
3
2
1
3
2
4
Not available for this unit
Not available for
this unit
Not available for
this unit
Low battery
detection
Remote LED Screen Indicators
How To Use The Basic Functions
ON/OFF
ON/OFF
TEMP
TEMP
SHORT
CUT
SHORT
CUT
TIMER
ON
TIMER
ON
TIMER
OFF
TIMER
OFF
MODE
MODE
FAN
FAN
SLEEP
SLEEP
LED
LED
FOLLOW
ION
SWING
ME
FOLLOW
ION
SWING
ME
, high
55
66
MODE display
Displays the current
mode, including:
AUTO
COOL
DRY
HEAT
FAN
Transmission Indicator
Lights up when remote sends
signal to unit
ON/OFF display
Appears when the unit is turned on,
and disappears when it is turned off
TIMER ON display
Displays when TIMER
ON is set
TIMER OFF display
Displays when TIMER
OFF is set
SLEEP display
Battery display
SILENT display
ECO display
Displays when
SLEEP function
is activated
FOLLOW ME
display
Indicates that
the FOLLOW ME
function is on
FAN SPEED display
Displays selected FAN SPEED:
HIGH, MED,
or LOW
This display is blank when
set to AUTO speed.
Temperature/Timer display
Displays the set temperature by default, or timer setting
when using TIMER ON/OFF functions
o O O
Temperature range: 17-30 C(62 F-86 F)
Timer setting range: 0-24 hours
This display is blank when operating in FAN mode.
1. Press the MODE button to select
COOL mode.
2. Set your desired temperature using
the Temp or Temp button.
3. Press the FAN button to select the
fan speed: AUTO, LOW, MED,or
HIGH.
4. Press the ON/OFF button to start the
unit.
In AUTO mode, the unit will automatically
select the COOL, FAN, HEAT or DRY mode
based on the set temperature.
1. Press the MODE button to select Auto mode.
2. Set your desired temperature using the
Temp or Temp button.
3. Press the ON/OFF button to start the unit.
,
NOTE: FAN SPEED can t be set in Auto mode.
SETTING TEMPERATURE
AUTO operation
The operating temperature range for units is
O O O
17-30 C(62 F-86 F). You can increase or
O O
decrease the set tmeperature in 1 C(1 F)
increments.
COOL operation
1
3
2
1
3
2
4
Not available for this unit
Not available for
this unit
Not available for
this unit
Low battery
detection
Remote LED Screen Indicators
How To Use The Basic Functions
ON/OFF
ON/OFF
TEMP
TEMP
SHORT
CUT
SHORT
CUT
TIMER
ON
TIMER
ON
TIMER
OFF
TIMER
OFF
MODE
MODE
FAN
FAN
SLEEP
SLEEP
LED
LED
FOLLOW
ION
SWING
ME
FOLLOW
ION
SWING
ME
.

56
DO324A
EN
SHORT
CUT
seconds. The apparatus then remembers the settings that are switched on at the moment of pressing.
possibly also the SLEEP setting.
will be automatically in auto-function. This means 26° and the fan-speed is auto.
TIMER
ON
Every press of this button will elevate the current time. The max. Timer
setting is 24 hours. For canceling the auto on function you keep on pressing
the “timer on” button until “0.0” is dispayed.
timers.
Make sure the unit is plugged in.
Press the “timer on”button. The display will show the last setting of the
“timer on” mode. Press the “timer on” button again to start setting the
delay time you want to airco to start working. Every time you press the
timer the delay time will change. Max. delay timer setting is 24 hours.
After setting the timer, it takes about 2 sec. Before the set temperature will
be displayed again.
Illustrations to illustrate a 2.5-hour delayed start.
TIMER
OFF
can elevate the current time everytime you press the button . Max timer
setting is 24 hours. For canceling the auto on function you keep on pressing
the “timer on” button until “0.0” is dispayed.
timers.
delay time you want the airco to stop working. Every time you press the
timer the delay time will change. Max to set delay time is 24 hours. After
setting the timer, it takes about 2 sec. Before the set temperature will be
displayed again.
Illustrations to illustrate a 5-hour delayed stop.
99
1010
NOTE:
" 0.0h "
When setting the TIMER ON or
TIMER OFF functions, up to 10 hours,
the time will increase in 30 minute
increments with each press. After 10
hours and up to 24, it will increase in 1
hour increments. The timer will revert to
zero after 24 hours.
You can turn off either function by
setting its timer to .
2. Press the TIMER ON button repeatedly
to set the time when you want the unit to
turn on.
3. Wait 2 seconds, then the TIMER ON
function will be activated. The digital
display on your remote control will then
return to the temperature display.
2. Press the TIMER OFF button repeatedly
to set the time when you want the unit to
turn off.
3. Wait 2 seconds, then the TIMER OFF
function will be activated. The digital
display on your remote control will then
return to the temperature display.
Example: Setting unit to turn on after 2.5
hours.
Example: Setting unit to turn off after 5
hours.
2sec
ON/OFF
MODE
FAN
SHORT
CUT
TIMER ON
TIMER OF
F
TEMP
S
L
E
EP
1sec
x5
1
3
2
4
TIMER OFF function
The TIMER OFF function allows you to
set a period of time after which the unit
will automatically turn off, such as when
you wake up.
1.
This number indicates the
amount of time after the current time
that you want the unit to turn on.
For example, if you set TIMER ON for
2 hours, will appear on the
screen, and the unit will turn on after
2 hours.
Press the TIMER ON button. By
default, the last time period that you
set and an "h" (indicating hours)will
appear on the display.
Note:
" 2.0h "
1.
This number indicates the
amount of time after the current time
that you want the unit to turn off.
For example, if you set TIMER OFF for
2 hours, will appear on the
screen, and the unit will turn off after
2 hours.
Press the TIMER OFF button. By
default, the last time period that you
set and an "h" (indicating hours)will
appear on the display.
Note:
" 2.0h "
2sec
x10
ON/OFF
MODE
FAN
SHORT
CUT
TIMER ON
TIMER OF
F
TEMP
S
L
EEP
1sec
1
3
2
4
TIMER ON function
The TIMER ON function allows you to set
a period of time after which the unit will
automatically turn on, such as when you
come home from work.
Your air conditioning unit has two
timer-related functions:
TIMER ON- sets the amount of timer after
which the unit will automatically turn on.
TIMER OFF- sets the amount of time after
which the unit will automatically turn off.
TIMER ON TIMER ON
TIMER OFF
TIMER OFF
Continue to press
TIMER ON
or
TIMER OFF until
desired time is
reached.
Setting the TIMER function
ON/OF F
TEMP
SHORT
CUT
TIMER
ON
TIMER
OFF
MODE
FAN
SLEEP
LED
Timer on
FOL LOW
SWING
ION
ME

57
DO324A
www.domo-elektro.be
EN
Please note: this time is always from the hour when you programme the setting. For example: it is now 1
h.
SLEEP
This setting can be used during the night. It will keep a comfortable sleeping temperature and will save
energy. This function can be selected with the “cool” and “auto” setting. The
ON/OF F
TEM P
SHO RT
CUT
TIM ER
ON
TIM ER
OFF
MOD E
FAN
LED
SLE EP
FOL LOW
SWI NG
ME
symbol appears on the
another 30 min the temperature will increase with another 1°C. The airco will maintain this temperature
for 7 hours. After this time, the airco will go back to the original set temperature and the “sleep” function
will end.
NOTE : this function can not be selected with the “fan” or “dry” function.
SWING
FOLLOW
ME
the remote control where you want the set temperature to reach. This function ensures the optimum
temperature when using the ‘auto’ and ‘cool’ settings. Press the ‘follow me’ button to activate the
function. The remote control will send a signal to the air conditioner every 3 minutes. The symbol
ON/OF F
TEM P
SHO RT
CUT
TIM ER
ON
TIM ER
OFF
MOD E
FAN
LED
SLE EP
FOL LOW
SWI NG
ME
appears on the display. Press the button again to cancel the function.
LED
Press the button again to turn the display back on.
CLEANING AND MAINTENANCE
DRAINING
Permanent drain
During the “dry” mode you can use a permanent drainage.
1. Remove the drain plug and the rubber top.
2. Attach the drain hose on the drain.
3. Make sure the water is drained in a save and permanent way.
Drain code P1
water, will be stored in the water tank.
·
the display the code P1 will appear. The “cool” or “dry” mode will
end automatically. The fan will continue to operate, this is normal.
· Move the unit over to a place where you can easily drain the
water.
· Remove the drain plug at the bottom of your unit and drain the
water.

58
DO324A
EN
· After fully draining the water tank, place the drain plug back on the drain opening.
·
sales service.
· NOTE : always make sure to install the drain plug, before turning the unit back on.
CLEANING
· Always remove the plug from the socket before cleaning the unit.
· Never use any chemical or abrasive products to clean the unit.
·
·
Air lters
·
·
·
Airco body
thoroughly dried afterwards.
Storing
Before storing the unit for a longer periode of time, please follow the next steps :
· Drain all the water from the appliance.
· Afterwards turn on the unit in the “fan” mode for half a day. Make sure the unit is placed in a heated
room. This will dry the unit completely and previent the forming of mold.
·
·
· Store the unit in a dry, dark place.
POSSIBLE PROBLEMS AND THEIR SOLUTIONS
The appliance isn’t working when pressing the on/o touch.
· The error code P1 is dispayed , drain the water from the airco.
·
The room is not cool enough.
· The windows and doors aren’t closed. Make sure all windows and doors are closed.
· There are heat sources in the room. Remove all heat sources if possible.
1
2

59
DO324A
www.domo-elektro.be
EN
· The air outlet hose is not connected or blocked. Attache the hose and check if there is no blockage.
·
The appliance is making to much noise or is causing vibrations.
·
Your appliance makes a gurgling sound
· The sound is produced by the refrigerant in your appliance, this is normal.
ENVIRONMENTAL GUIDELINES
This symbol on the product or on its packaging indicates that this product
may not be treated as household waste. Instead it must be brought to
the applicable collection point for recycling of electrical and electronic
health, which could otherwise be caused by inappropriate waste handling of
this product. For more detailed information about recycling of this product,
the shop where you purchased the product.
The packaging is recyclable. Please treat the packaging ecologically.
-
 1
1
-
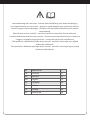 2
2
-
 3
3
-
 4
4
-
 5
5
-
 6
6
-
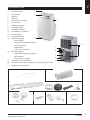 7
7
-
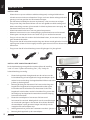 8
8
-
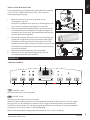 9
9
-
 10
10
-
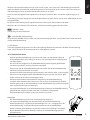 11
11
-
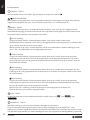 12
12
-
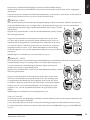 13
13
-
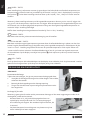 14
14
-
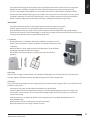 15
15
-
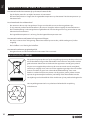 16
16
-
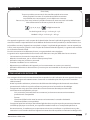 17
17
-
 18
18
-
 19
19
-
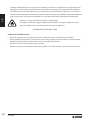 20
20
-
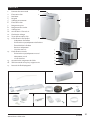 21
21
-
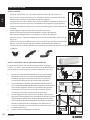 22
22
-
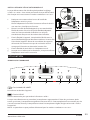 23
23
-
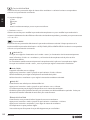 24
24
-
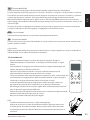 25
25
-
 26
26
-
 27
27
-
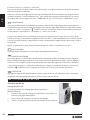 28
28
-
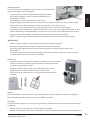 29
29
-
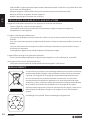 30
30
-
 31
31
-
 32
32
-
 33
33
-
 34
34
-
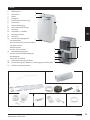 35
35
-
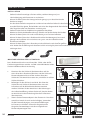 36
36
-
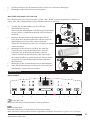 37
37
-
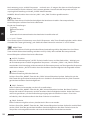 38
38
-
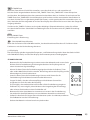 39
39
-
 40
40
-
 41
41
-
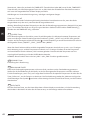 42
42
-
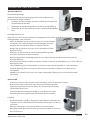 43
43
-
 44
44
-
 45
45
-
 46
46
-
 47
47
-
 48
48
-
 49
49
-
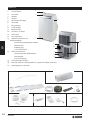 50
50
-
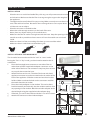 51
51
-
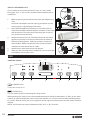 52
52
-
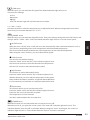 53
53
-
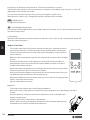 54
54
-
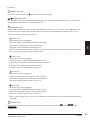 55
55
-
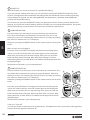 56
56
-
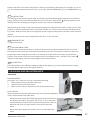 57
57
-
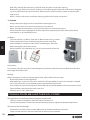 58
58
-
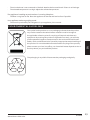 59
59


in andere talen
- English: Domo DO324A Owner's manual
- français: Domo DO324A Le manuel du propriétaire
- Deutsch: Domo DO324A Bedienungsanleitung
- eesti: Domo DO324A Omaniku manuaal
Gerelateerde artikelen
-
Domo DO263A de handleiding
-
Domo DO361A de handleiding
-
Domo-elektro DO324A Mobile Air Conditioner de handleiding
-
Domo DO360A de handleiding
-
Domo DO362A de handleiding
-
Domo Säulenventilator de handleiding
-
 Linea 2000 Domo DO263A de handleiding
-
Domo DO266A de handleiding
-
Domo DO8147 de handleiding
-

