68
DO362A
ES
FAN
BOTÓN FAN
55
66
MODE display
Displays the current
mode, including:
AUTO
COOL
DRY
HEAT
FAN
Transmission Indicator
Lights up when remote sends
signal to unit
ON/OFF display
Appears when the unit is turned on,
and disappears when it is turned off
TIMER ON display
Displays when TIMER
ON is set
TIMER OFF display
Displays when TIMER
OFF is set
SLEEP display
Battery display
SILENT display
ECO display
Displays when
SLEEP function
is activated
FOLLOW ME
display
Indicates that
the FOLLOW ME
function is on
FAN SPEED display
Displays selected FAN SPEED:
HIGH, MED,
or LOW
This display is blank when
set to AUTO speed.
Temperature/Timer display
Displays the set temperature by default, or timer setting
when using TIMER ON/OFF functions
o O O
Temperature range: 17-30 C(62 F-86 F)
Timer setting range: 0-24 hours
This display is blank when operating in FAN mode.
1. Press the MODE button to select
COOL mode.
2. Set your desired temperature using
the Temp or Temp button.
3. Press the FAN button to select the
fan speed: AUTO, LOW, MED,or
HIGH.
4. Press the ON/OFF button to start the
unit.
In AUTO mode, the unit will automatically
select the COOL, FAN, HEAT or DRY mode
based on the set temperature.
1. Press the MODE button to select Auto mode.
2. Set your desired temperature using the
Temp or Temp button.
3. Press the ON/OFF button to start the unit.
,
NOTE: FAN SPEED can t be set in Auto mode.
SETTING TEMPERATURE
AUTO operation
The operating temperature range for units is
O O O
17-30 C(62 F-86 F). You can increase or
O O
decrease the set tmeperature in 1 C(1 F)
increments.
COOL operation
1
3
2
1
3
2
4
Not available for this unit
Not available for
this unit
Not available for
this unit
Low battery
detection
Remote LED Screen Indicators
How To Use The Basic Functions
ON/OFF
ON/OFF
TEMP
TEMP
SHORT
CUT
SHORT
CUT
TIMER
ON
TIMER
ON
TIMER
OFF
TIMER
OFF
MODE
MODE
FAN
FAN
SLEEP
SLEEP
LED
LED
FOLLOW
ION
SWING
ME
FOLLOW
ION
SWING
ME
, med
55
66
MODE display
Displays the current
mode, including:
AUTO
COOL
DRY
HEAT
FAN
Transmission Indicator
Lights up when remote sends
signal to unit
ON/OFF display
Appears when the unit is turned on,
and disappears when it is turned off
TIMER ON display
Displays when TIMER
ON is set
TIMER OFF display
Displays when TIMER
OFF is set
SLEEP display
Battery display
SILENT display
ECO display
Displays when
SLEEP function
is activated
FOLLOW ME
display
Indicates that
the FOLLOW ME
function is on
FAN SPEED display
Displays selected FAN SPEED:
HIGH, MED,
or LOW
This display is blank when
set to AUTO speed.
Temperature/Timer display
Displays the set temperature by default, or timer setting
when using TIMER ON/OFF functions
o O O
Temperature range: 17-30 C(62 F-86 F)
Timer setting range: 0-24 hours
This display is blank when operating in FAN mode.
1. Press the MODE button to select
COOL mode.
2. Set your desired temperature using
the Temp or Temp button.
3. Press the FAN button to select the
fan speed: AUTO, LOW, MED,or
HIGH.
4. Press the ON/OFF button to start the
unit.
In AUTO mode, the unit will automatically
select the COOL, FAN, HEAT or DRY mode
based on the set temperature.
1. Press the MODE button to select Auto mode.
2. Set your desired temperature using the
Temp or Temp button.
3. Press the ON/OFF button to start the unit.
,
NOTE: FAN SPEED can t be set in Auto mode.
SETTING TEMPERATURE
AUTO operation
The operating temperature range for units is
O O O
17-30 C(62 F-86 F). You can increase or
O O
decrease the set tmeperature in 1 C(1 F)
increments.
COOL operation
1
3
2
1
3
2
4
Not available for this unit
Not available for
this unit
Not available for
this unit
Low battery
detection
Remote LED Screen Indicators
How To Use The Basic Functions
ON/OFF
ON/OFF
TEMP
TEMP
SHORT
CUT
SHORT
CUT
TIMER
ON
TIMER
ON
TIMER
OFF
TIMER
OFF
MODE
MODE
FAN
FAN
SLEEP
SLEEP
LED
LED
FOLLOW
ION
SWING
ME
FOLLOW
ION
SWING
ME
, high
55
66
MODE display
Displays the current
mode, including:
AUTO
COOL
DRY
HEAT
FAN
Transmission Indicator
Lights up when remote sends
signal to unit
ON/OFF display
Appears when the unit is turned on,
and disappears when it is turned off
TIMER ON display
Displays when TIMER
ON is set
TIMER OFF display
Displays when TIMER
OFF is set
SLEEP display
Battery display
SILENT display
ECO display
Displays when
SLEEP function
is activated
FOLLOW ME
display
Indicates that
the FOLLOW ME
function is on
FAN SPEED display
Displays selected FAN SPEED:
HIGH, MED,
or LOW
This display is blank when
set to AUTO speed.
Temperature/Timer display
Displays the set temperature by default, or timer setting
when using TIMER ON/OFF functions
o O O
Temperature range: 17-30 C(62 F-86 F)
Timer setting range: 0-24 hours
This display is blank when operating in FAN mode.
1. Press the MODE button to select
COOL mode.
2. Set your desired temperature using
the Temp or Temp button.
3. Press the FAN button to select the
fan speed: AUTO, LOW, MED,or
HIGH.
4. Press the ON/OFF button to start the
unit.
In AUTO mode, the unit will automatically
select the COOL, FAN, HEAT or DRY mode
based on the set temperature.
1. Press the MODE button to select Auto mode.
2. Set your desired temperature using the
Temp or Temp button.
3. Press the ON/OFF button to start the unit.
,
NOTE: FAN SPEED can t be set in Auto mode.
SETTING TEMPERATURE
AUTO operation
The operating temperature range for units is
O O O
17-30 C(62 F-86 F). You can increase or
O O
decrease the set tmeperature in 1 C(1 F)
increments.
COOL operation
1
3
2
1
3
2
4
Not available for this unit
Not available for
this unit
Not available for
this unit
Low battery
detection
Remote LED Screen Indicators
How To Use The Basic Functions
ON/OFF
ON/OFF
TEMP
TEMP
SHORT
CUT
SHORT
CUT
TIMER
ON
TIMER
ON
TIMER
OFF
TIMER
OFF
MODE
MODE
FAN
FAN
SLEEP
SLEEP
LED
LED
FOLLOW
ION
SWING
ME
FOLLOW
ION
SWING
ME
.
SHORT
CUT
determinados.
TIMER
ON
BOTÓN TIMER ON
determinada. Cada pulsación de este botón aumentará el tiempo de
encendido en 30 minutos. El retraso máximo establecido es de 24 horas.
vuelva a aparecer 0.0 en la pantalla.
distancia se anularán todos los temporizadores.
TIMER
OFF
BOTÓN TIMER OFF
Pulse este botón si desea apagar el aparato a una hora determinada. Cada
pulsación de este botón aumentará el tiempo de apagado en 30 minutos.
El retraso máximo establecido es de 24 horas. Para cancelar el apagado
la pantalla.
distancia se anularán todos los temporizadores.
99
1010
NOTE:
" 0.0h "
When setting the TIMER ON or
TIMER OFF functions, up to 10 hours,
the time will increase in 30 minute
increments with each press. After 10
hours and up to 24, it will increase in 1
hour increments. The timer will revert to
zero after 24 hours.
You can turn off either function by
setting its timer to .
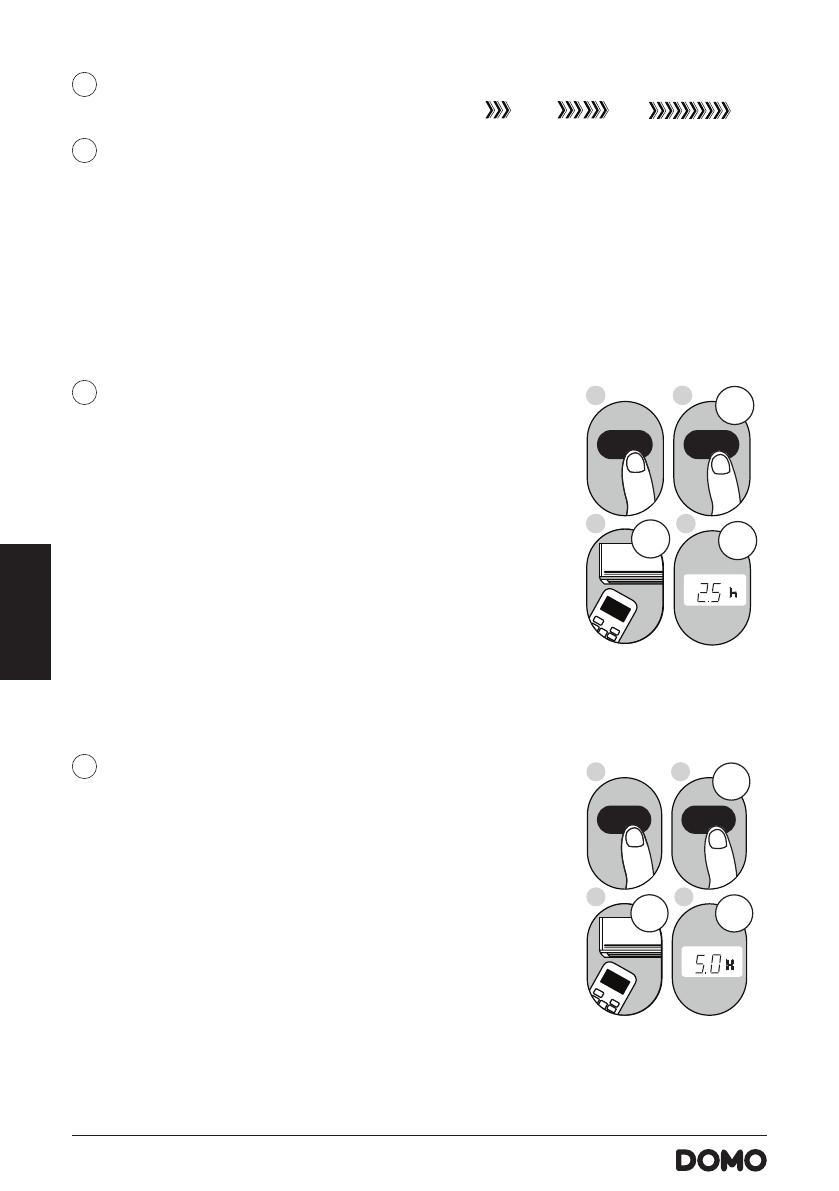
2. Press the TIMER ON button repeatedly
to set the time when you want the unit to
turn on.
3. Wait 2 seconds, then the TIMER ON
function will be activated. The digital
display on your remote control will then
return to the temperature display.
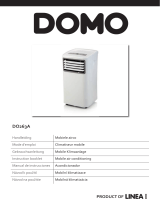
2. Press the TIMER OFF button repeatedly
to set the time when you want the unit to
turn off.
3. Wait 2 seconds, then the TIMER OFF
function will be activated. The digital
display on your remote control will then
return to the temperature display.
Example: Setting unit to turn on after 2.5
hours.
Example: Setting unit to turn off after 5
hours.
2sec
ON/OFF
MODE
FAN
SHORT
CUT
TIMER ON
TIMER OF
F
TEMP
S
L
E
EP
1sec
x5
1
3
2
4
TIMER OFF function
The TIMER OFF function allows you to
set a period of time after which the unit
will automatically turn off, such as when
you wake up.
1.
This number indicates the
amount of time after the current time
that you want the unit to turn on.
For example, if you set TIMER ON for
2 hours, will appear on the
screen, and the unit will turn on after
2 hours.
Press the TIMER ON button. By
default, the last time period that you
set and an "h" (indicating hours)will
appear on the display.
Note:
" 2.0h "
1.
This number indicates the
amount of time after the current time
that you want the unit to turn off.
For example, if you set TIMER OFF for
2 hours, will appear on the
screen, and the unit will turn off after
2 hours.
Press the TIMER OFF button. By
default, the last time period that you
set and an "h" (indicating hours)will
appear on the display.
Note:
" 2.0h "
2sec
x10
ON/OFF
MODE
FAN
SHORT
CUT
TIMER ON
TIMER OF
F
TEMP
S
L
EEP
1sec
1
3
2
4
TIMER ON function
The TIMER ON function allows you to set
a period of time after which the unit will
automatically turn on, such as when you
come home from work.
Your air conditioning unit has two
timer-related functions:
TIMER ON- sets the amount of timer after
which the unit will automatically turn on.
TIMER OFF- sets the amount of time after
which the unit will automatically turn off.
TIMER ON TIMER ON
TIMER OFF
TIMER OFF
Continue to press
TIMER ON
or
TIMER OFF until
desired time is
reached.
Setting the TIMER function
ON/OF F
TEMP
SHORT
CUT
TIMER
ON
TIMER
OFF
MODE
FAN
SLEEP
LED
Timer on
FOL LOW
SWING
ION
ME
99
1010
NOTE:
" 0.0h "
When setting the TIMER ON or
TIMER OFF functions, up to 10 hours,
the time will increase in 30 minute
increments with each press. After 10
hours and up to 24, it will increase in 1
hour increments. The timer will revert to
zero after 24 hours.
You can turn off either function by
setting its timer to .
2. Press the TIMER ON button repeatedly
to set the time when you want the unit to
turn on.
3. Wait 2 seconds, then the TIMER ON
function will be activated. The digital
display on your remote control will then
return to the temperature display.
2. Press the TIMER OFF button repeatedly
to set the time when you want the unit to
turn off.
3. Wait 2 seconds, then the TIMER OFF
function will be activated. The digital
display on your remote control will then
return to the temperature display.
Example: Setting unit to turn on after 2.5
hours.
Example: Setting unit to turn off after 5
hours.
2sec
ON/OFF
MODE
FAN
SHORT
CUT
TIMER ON
TIMER OF
F
TEMP
S
L
E
EP
1sec
x5
1
3
2
4
TIMER OFF function
The TIMER OFF function allows you to
set a period of time after which the unit
will automatically turn off, such as when
you wake up.
1.
This number indicates the
amount of time after the current time
that you want the unit to turn on.
For example, if you set TIMER ON for
2 hours, will appear on the
screen, and the unit will turn on after
2 hours.
Press the TIMER ON button. By
default, the last time period that you
set and an "h" (indicating hours)will
appear on the display.
Note:
" 2.0h "
1.
This number indicates the
amount of time after the current time
that you want the unit to turn off.
For example, if you set TIMER OFF for
2 hours, will appear on the
screen, and the unit will turn off after
2 hours.
Press the TIMER OFF button. By
default, the last time period that you
set and an "h" (indicating hours)will
appear on the display.
Note:
" 2.0h "
2sec
x10
ON/OFF
MODE
FAN
SHORT
CUT
TIMER ON
TIMER OF
F
TEMP
S
L
EEP
1sec
1
3
2
4
TIMER ON function
The TIMER ON function allows you to set
a period of time after which the unit will
automatically turn on, such as when you
come home from work.
Your air conditioning unit has two
timer-related functions:
TIMER ON- sets the amount of timer after
which the unit will automatically turn on.
TIMER OFF- sets the amount of time after
which the unit will automatically turn off.
TIMER ON TIMER ON
TIMER OFF
TIMER OFF
Continue to press
TIMER ON
or
TIMER OFF until
desired time is
reached.
Setting the TIMER function
ON/OF F
TEMP
SHORT
CUT
TIMER
ON
TIMER
OFF
MODE
FAN
SLEEP
LED
Timer on
FOL LOW
SWING
ION
ME


 Linea 2000 Domo DO263A de handleiding