audizio Tours Stereo HiFi System DAB+ Snelstartgids
- Categorie
- CD-radio's
- Type
- Snelstartgids

Ref. nr.: 102.318
QUICK START GUIDE
SNELSTARTGIDS
SCHNELLSTART-ANLEITUNG
GUÍA DE INICIO RÁPIDO
GUIDE DE DÉMARRAGE RAPIDE
V1.2

2

3
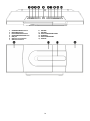
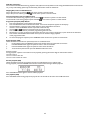
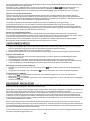
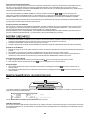
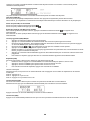
1. STANDBY/SOURCE button 8. VOLUME -
2. MENU/INFO button 9. VOLUME+
3. PLAY/PAUSE/SCAN button 10. DISC COMPARTMENT OPEN
4. STOP/UNPAIR/ENTER button 11. SPEAKERS
5. USB port 12. DISC COMPARTMENT
6. SKIP to previous button 13. DISPLAY
7. SKIP to next button

4
CAUTION! Immediately upon receiving the product, carefully unpack the carton, check the contents to ensure that all parts
are present, and have been received in good condition. Notify the shipper immediately and retain packing material for
inspection if any parts appear damage from shipping or the package itself shows signs of mishandling. Save the package and
all packing materials. In the event that the product must be returned to the factory, it is important that the product be
returned in the original factory box and packing. If the device has been exposed to drastic temperature fluctuation (e.g. after
transportation), do not switch it on immediately. the arising condensation water might damage your device. leave the device
switched off until it has reached room temperature.
When you first connect the unit to the mains socket, display will show the “00:00:00”. If you can receive a DAB+ signal in your
location, the unit will synchronize to the current local time. After approximate one minute, it will switch to STAND BY mode.
• Press the ON/STANDBY on the unit or on the remote control to switch the unit to ON mode.
• Press the ON/STANDBY on the unit or on the remote control to switch the unit back to STANDBY mode.
• Disconnect the mains plug from the mains socket if you want to switch the unit off completely.
Note:
If the digital radio is not used for 20 minutes, it will automatically enter into standby mode.
Follow the below instructions to switch between CD, DAB, FM, AUX IN, USB & BT input modes.
Press the SOURCE button on the micro system repeatedly to cycle between CD, FM, AUDIO-IN & BT input modes.
Press the relevant button on the remote to select the input mode you require. Press the FM/DAB button to switch to DAB
mode. Press once more to switch to FM mode.
Before switching to the DAB input mode the antenna needs to be extended fully to allow stations to be located during the
initial scan.
When the DAB mode is activated for the first time the unit will perform a scan for available stations. You will see SCANNING..
0 appear on the display until stations are located and then the O will change to the amount of stations found.
When located the first alphanumerical station will begin playback while the other stations are stored.
lf no stations where located during the scan, relocate the unit, extend the antenna fully and read the Performing a DAB
station scan section.
Listening to the stored DAB stations
To listen the DAB stations that have been stored press the [ ] or [ ] buttons on the micro system or < TUNE or TUNE >
buttons on the remote control.
Press the UNPAIR/ENTER button on the micro system or ENTER on the remote to switch to the selected station.
To scan for radio stations press and hold either of the < TUNE or TUNE > buttons on the remote or [ ] or [ ] buttons on the
micro system for two seconds to scan down or up the frequency band. When a station is found the scan will stop and the
station will begin to play.
To fine tune the frequency press either of the < TUNE or TUNE > buttons on the remote or [ ] or [ ] buttons on the micro
system (do not press & hold ), to jump 0.05 MHz up or down.
Alternatively press the SCAN button on the remote to begin scanning up the frequency range. When a station is located
playback will begin automatically.
FM scan modes
Scan modes determine how strong an FM signal needs to be, to be accepted as a potential radio station when scanning.
Press the MENU button on the remote or press and hold the MENU/INFO button on the micro system
When the SCAN SETTING option appears press and hold the ENTER button on the remote or UNPAIR/ENTER on the micro
system. Use the < TUNE or TUNE > buttons on the remote or [ ] or [ ] buttons on the micro system to select between
STRONG STATIONS (Strong local stations only) or ALL STATIONS (All available stations). Press ENTER button on the remote or
UNPAIR/ENTER on the micro system to save.
Storing station presets
Follow the below steps to store a tuned station to one of 10 preset locations to allow quick access. Tune to the station you
wish to store as a preset and follow the below instructions. Press and hold the MEMORY button on the remote control. The
display will show SAVE TO P1, where P1 is the selected preset location.

5
Use the PRESET UP or PRESET DOWN buttons on the remote to select the preset number from 1-10 you wish to use. Then
press the ENTER button on the remote or UNPAIR/ENTER on the micro system to store. When stored the display will show
PRESET X STORED.
Once a station is saved to a preset you will no longer see # EMPTY when pressing the MEMORY button, instead the station
name or frequency will appear.
Recalling station presets
To recall a stored preset station press the relevant numeric button on the remote control.
For example to recall the station stored on preset 3 press the numeric button 3. And to recall a station stored on location 10,
press the 10+ button and then the O button.
Alternatively, press the MEMORY button, use PRESET UP / PRESET DOWN on the remote to select the stored preset station,
then press the enter button to start.
Switch the input mode to CD & follow the instructions below to load a CD/ MP3CD.
1. Press the OPEN/CLOSE button on the micro system or remote, when the disc compartment cover slides fully to the
left; insert a disc into the spindle (label facing outwards)
2. Press the OPEN/CLOSE button once more to close the drawer.
3. When the door is closed READING will appear on the display as the unit detects compatible audio tracks.
Playing a CD/ MP3CD
1. After loading a CD in the steps above, the disc will be read and playback will begin automatically from track 01
2. To stop playback press the■ STOP button on the micro system or on the remote.
3. To pause playback press the ►Il PLAY/PAUSE button micro system or on the remote during playback. To resume
playback press the ►II PLAY/PAUSE button once more.
Skipping tracks on a CD/ MP3CD
1. Skip to the next track on a disc by pressing [ ] button on the micro system or the remote control.
2. Skip to the previous track by pressing [ ] button on the micro system or the remote control.
Fast searching tracks CD/ MP3CD
1. To fast forward a track during playback press and hold [ ] on the micro system or remote control.
2. To fast rewind a track during playback press and hold [ ] on the micro system or remote control.
NOTE: When using the BT connection, you can listen to audio wirelessly from a BT audio device (For example an MP3 player)
within 10 meters of the Micro System unit.
Make sure you are in BT input mode. When selected the BT LINK text on the display will flash while the system tries to
connect to previously paired devices. If no devices are found the BT LINK text will continue to flash to indicate it is ready for
pairing a new device. Enable the BT function on your audio device and search fora device labelled Audizio Tours in the
available list. Select and enable pairing for the Audizio Tours device. lf prompted for a password enter 0000.
If pairing is successful the micro system will play a melody and the BT LINK text will stop flashing.
If the connected device goes out of range, the micro system will attempt to connect for 2 minutes. When the device comes
into range the unit will reconnect again automatically.
To remove a paired device using the micro system, press and hold the UNPAIR/ENTER button on the micro system or press the
UNPAIR button on the remote The BT LINK text will begin flashing again.
Note: If you turn off either device before pairing is complete the process will need to be repeated when powered ON again.
insert a compatible USB flash drive into the USB port on the top of the micro system and switch to USB input mode
The unit will scan the USB flash drive and display the total number of tracks found on the drive. Playback of track 01 will
begin automatically.
Tracks inside folders are listed as part of the total number of tracks.
- -

6
USB/ MP3 information
Do not remove the USB device during playback. Max 999 tracks and 99 folders can be recognized USB flash drive format FAT
16, 32 only. USB reading speed may be effected by the number of files on the device
Skipping MP3 tracks on a USB flash drive
Skip to the next track by pressing [ ]on the micro system or remote control.
Skip to the previous track by pressing [ ] on the micro system or remote control.
Fast searching MP3 tracks on a USB flash drive
To fast forward a track during playback press and hold [ ] on the micro system or remote control.
To fast rewind a track during playback press and hold [ ] on tr1e micro system or remote control.
Programmed playback (USB)/ MP3CD
1. Press the STOP button to stop playback (if required).
2. Press the MEMORY button on the remote control. You will see the options appear on the display.
3. Use the FOLDER+/- buttons on the remote control to select the folder that track 01
resides in. Press the MEMORY button to proceed to the next step.
4. Use the [ ] or [] buttons to select the track you like as track 01
5. Press the MEMORY button to proceed to programming the next track.
6. Repeat steps 3-5 until you have programmed all the tracks you require in the playlist, up toa maximum of 100 tracks.
7. Press the ►Il PLAY/PAUSE button on the micro system or remote to begin playback
in the programmed order.
8. To cancel the program sequence press the ■ STOP button on the micro system or remote twice.
Repeat playback (USB)
Follow the below instructions to repeat MP3 tracks on a USB flash drive.
1. During playback press the REPEAT button on the remote control to repeat the current track.
2. Press the REPEAT button again to repeat all tracks in the current folder.
3. Press the REPEAT button again to repeat all tracks on the flash drive.
4. To cancel the repeat function press the REPEAT button once more.
Numeric buttons
During playback a specific track number can be played by pressing the relative digit on the number button s.
Track 02 . Press 2
Track 12 • Press 2 then 10+
Track 22 · Press 2 then 10+ twice
Random playback (USB)
Follow the below instructies to playback all tracks on a USB flash drive in a random order.
During playback press the RANDOM button on the remote control to begin random playback.
Press the RANDOM button again to cancel random playback.
Intro playback (USB)
Press the INTRO button during playback to play the first 10 seconds of all tracks on the USB flash drive.

7
LET OP! Onmiddellijk na ontvangst, zorgvuldig uitpakken van de doos, controleer de inhoud om ervoor te zorgen dat alle
onderdelen aanwezig zijn en zijn in goede staat zijn ontvangen. Bij transportschade of ontbreken van onderdelen
onmiddellijk de verkopende partij inlichten. Bewaar de verpakking en het verpakkingsmateriaal. Indien het product moet
worden teruggestuurd, is het belangrijk dat het product in originele verpakking wordt geretourneerd.
Als het apparaat is blootgesteld aan drastische temperatuurverschillen (bv. na het transport), schakel het apparaat niet
onmiddellijk in. De ontstane condensatie kan het apparaat beschadigen. Zorg ervoor dat het apparaat op kamertemperatuur
komt en steek vervolgens de voeding stekker in het stopcontact/wandcontactdoos.
Wanneer u het toestel voor het eerst aansluit op het stopcontact, zal het display de "00:00:00" tonen. Als u op uw locatie een
DAB+ signaal kunt ontvangen, zal het apparaat zich synchroniseren met de huidige lokale tijd. Na ongeveer een minuut
schakelt het over naar de STAND-BY modus.
Druk op ON/STANDBY op het apparaat of op de afstandsbediening om het apparaat in de ON-modus te zetten.
Druk op ON/STANDBY op het apparaat of op de afstandsbediening om het apparaat weer in STANDBY modus te zetten.
Trek de stekker uit het stopcontact als u het apparaat volledig wilt uitschakelen.
Opmerking: Als de digitale radio gedurende 20 minuten niet wordt gebruikt, zal deze automatisch in de stand-by modus
gaan.
Volg de onderstaande instructies om te schakelen tussen CD, DAB, FM, AUX IN, USB & BT-invoermodi.
Druk herhaaldelijk op de toets SOURCE op het microsysteem om te schakelen tussen CD, FM, AUDIO-IN & BT-invoermodi.
Druk op de relevante knop op de afstandsbediening om de gewenste ingangsmodus te selecteren. Druk op de FM/DAB-toets
om over te schakelen naar de DAB-modus. Druk nogmaals om over te schakelen naar de FM-modus.
Voordat u overschakelt op de DAB-invoermodus moet de antenne volledig worden uitgeschoven zodat de zenders tijdens de
eerste scan kunnen worden gevonden.
Wanneer de DAB-modus voor de eerste keer wordt geactiveerd, zal het toestel een scan uitvoeren naar beschikbare zenders.
U ziet SCANNING... 0 op het display verschijnen totdat er zenders gevonden zijn en daarna zal de O veranderen in het aantal
gevonden zenders.
Bij het vinden van de eerste alfanumerieke zender begint de weergave terwijl de andere zenders worden opgeslagen.
Als u tijdens het scannen geen zenders hebt gevonden, moet u het apparaat verplaatsen, de antenne volledig uitschuiven en
het hoofdstuk over het scannen van DAB-zenders lezen.
Luisteren naar de opgeslagen DAB-zenders
Om de opgeslagen DAB-zenders te beluisteren drukt u op de toetsen [ ] of [ ] op het microsysteem of op de toetsen <
TUNE of TUNE > op de afstandsbediening.
Druk op de toets UNPAIR/ENTER op het microsysteem of op ENTER op de afstandsbediening om over te schakelen naar de
geselecteerde zender.
Om te scannen naar radiozenders houdt u een van de < TUNE of TUNE > knoppen op de afstandsbediening of de [ ] of [ ]
knoppen op het microsysteem twee seconden lang ingedrukt om de frequentieband omlaag of omhoog te scannen. Wanneer
een zender is gevonden stopt de scan en begint de zender te spelen.
Om de frequentie fijn af te stellen drukt u op een van de < TUNE of TUNE > knoppen op de afstandsbediening of [ ] of [ ]
knoppen op het microsysteem (niet ingedrukt houden), om 0.05 MHz omhoog of omlaag te springen.
U kunt ook op de toets SCAN van de afstandsbediening drukken om het frequentiebereik af te tasten. Wanneer een zender is
gevonden, begint het afspelen automatisch.
FM-scanmodi
De scanmodi bepalen hoe sterk een FM-signaal moet zijn om bij het scannen te worden geaccepteerd als een potentiële
radiozender. Druk op de toets MENU op de afstandsbediening of houd de toets MENU/INFO op het microsysteem ingedrukt
Wanneer de optie SCAN SETTING verschijnt, drukt u op de ENTER toets op de afstandsbediening of op UNPAIR/ENTER op het
microsysteem. Gebruik de knoppen < TUNE of TUNE > op de afstandsbediening of de knoppen [ ] of [ ] op het
microsysteem om te kiezen tussen STRONG STATIONS (alleen sterke lokale zenders) of ALL STATIONS (alle beschikbare
zenders)
Druk op de ENTER toets op de afstandsbediening of UNPAIR/ENTER op het microsysteem om op te slaan.

8
Opslaan van voorkeuzezenders
Volg de onderstaande stappen om een afgestemde zender op te slaan in een van de 10 preset-locaties voor snelle toegang.
Stem af op de zender die u wilt opslaan als voorkeuzezender en volg de onderstaande instructies.
Druk op de toets MEMORY op de afstandsbediening en houd deze ingedrukt. Het display toont
SAVE TO P1, waarbij P1 de geselecteerde voorkeurszender is.
Gebruik de PRESET UP of PRESET DOWN knoppen op de afstandsbediening om het voorkeuzenummer van 1-10 te selecteren
dat u wilt gebruiken. Druk vervolgens op de ENTER toets op de afstandsbediening of UNPAIR/ENTER op het microsysteem om
op te slaan.
Na het opslaan verschijnt op het display PRESET X STORED.
Zodra een zender is opgeslagen als voorkeuzezender ziet u niet langer # EMPTY wanneer u de toets MEMORY indrukt, in
plaats daarvan verschijnt de naam van de zender of de frequentie.
Voorkeur-zenders oproepen
Om een opgeslagen voorkeuzezender op te roepen drukt u op de betreffende cijfertoets op de afstandsbediening.
Om bijvoorbeeld de opgeslagen zender onder voorkeuze 3 op te roepen, drukt u op de cijfertoets 3. En om een zender op te
roepen die is opgeslagen op locatie 10, drukt u op de knop 10+ en vervolgens op de knop O.
U kunt ook op de MEMORY-toets drukken, met PRESET UP / PRESET DOWN op de afstandsbediening de opgeslagen
voorkeuzezender selecteren en vervolgens op de ENTER toets drukken om te beginnen.
Schakel de ingangsmodus naar CD & volg de onderstaande instructies om een CD/ MP3CD te laden.
1. Druk op de toets OPEN/CLOSE op het microsysteem of de afstandsbediening, wanneer het deksel van het cd-vakje
volledig naar links schuift; plaats een cd in de spindel (label naar buiten gericht)
2. Druk nogmaals op de knop OPEN/CLOSE om de lade te sluiten.
3. Wanneer de klep gesloten is, verschijnt READING op het display wanneer het apparaat compatibele audiotracks
detecteert .
Een CD/MP3-CD afspelen
1. Nadat u een CD in de bovenstaande stappen hebt geladen, wordt de disc gelezen en begint de weergave
automatisch vanaf track 01
2. Om het afspelen te stoppen drukt u op de■ STOP toets op het microsysteem of op de afstandsbediening.
3. Om het afspelen te pauzeren drukt u tijdens het afspelen op de ►II PLAY/PAUSE toets op het microsysteem of op
de afstandsbediening. Om het afspelen te hervatten drukt u nogmaals op de toets ►II PLAY/PAUSE.
Nummers overslaan op een CD/MP3-CD
1. Ga naar de volgende track op een disc door op de [ ] toets van het microsysteem of de afstandsbediening te
drukken.
2. Ga naar de vorige track door op de [ ] toets van het microsysteem of de afstandsbediening te drukken.
Snel zoeken naar tracks CD/ MP3CD
1. Houd de [ ] toets op het microsysteem of de afstandsbediening ingedrukt om een track tijdens het afspelen snel
vooruit te spoelen.
2. Houd de [ ] toets op het microsysteem of de afstandsbediening ingedrukt om tijdens het afspelen een nummer
snel terug te spoelen.
OPMERKING: Wanneer u de BT-aansluiting gebruikt, kunt u draadloos naar audio luisteren vanaf een BT-audioapparaat
(bijvoorbeeld een MP3-speler) binnen 10 meter van het Microsysteem.
Zorg ervoor dat u in de BT ingangsmodus bent,
Wanneer deze is geselecteerd, knippert de tekst BT LINK op het display terwijl het systeem verbinding probeert te maken
met eerder gekoppelde apparaten.
Als er geen apparaten worden gevonden, blijft de tekst BT LINK knipperen om aan te geven dat het systeem klaar is om een
nieuw apparaat te koppelen.
Schakel de BT-functie op uw audioapparaat in en zoek naar een apparaat met het label Audizio Tours in de beschikbare lijst.
Selecteer en activeer koppeling voor het Audizio Tours-apparaat. lf om een wachtwoord wordt gevraagd voer 0000 in
Als de koppeling gelukt is, speelt het microsysteem een melodie en stopt de tekst BT LINK met knipperen.
Als het aangesloten apparaat buiten bereik komt, zal het microsysteem gedurende 2 minuten proberen verbinding te maken.
Als het apparaat binnen bereik komt, maakt het systeem automatisch weer verbinding.
Om een gekoppeld apparaat met het microsysteem te verwijderen, houdt u de toets UNPAIR/ENTER op het microsysteem
ingedrukt of drukt u op de toets UNPAIR op de afstandsbediening De tekst BT LINK begint weer te knipperen.
Opmerking: Als u een van beide apparaten uitschakelt voordat het koppelen is voltooid, moet het proces worden herhaald
wanneer het apparaat weer wordt ingeschakeld.

9
Plaats een compatibel USB-flashstation in de USB-poort op de bovenkant van het microsysteem en schakel over naar de USB-
invoermodus.
Het toestel scant de USB-stick en toont het totale aantal tracks op de drive. De weergave van track 01 begint automatisch.
Tracks in mappen worden vermeld als onderdeel van het totale aantal tracks.
USB/ MP3 informatie
Verwijder het USB-apparaat niet tijdens het afspelen. Max. 999 tracks en 99 mappen kunnen worden herkend USBflash-drive
formaat FAT 16, 32 alleen. De USB-leessnelheid kan worden beïnvloed door het aantal bestanden op het apparaat.
MP3-nummers op een USB-flashstation overslaan
Ga naar de volgende track door op het microsysteem of de afstandsbediening [ ] te drukken.
Naar het vorige nummer gaan door op het microsysteem of de afstandsbediening [ ] te drukken.
MP3-nummers op een USB-flashstation snel zoeken
Houd [ ] op het microsysteem of de afstandsbediening ingedrukt om een track tijdens het afspelen snel vooruit te spoelen.
Om een nummer snel terug te spoelen tijdens het afspelen houdt u [ ] op microsysteem of afstandsbediening ingedrukt.
Geprogrammeerd afspelen (USB)/MP3CD
• Druk op de STOP toets om het afspelen te stoppen (indien nodig).
• Druk op de toets MEMORY van de afstandsbediening. U ziet de opties op het display verschijnen.
• Gebruik de toetsen FOLDER+/- van de afstandsbediening om de map te selecteren waarin nummer 01
• zich bevindt. Druk op de toets MEMORY om naar de volgende stap over te gaan.
• Gebruik de knoppen [ ] of [ ] om de gewenste track te selecteren als track 01
• Druk op de MEMORY knop om verder te gaan met het programmeren van de volgende track.
• Herhaal de stappen 3-5 totdat u alle gewenste tracks in de afspeellijst heeft geprogrammeerd, tot een maximum van
100 tracks.
Druk op de toets ►II PLAY/PAUSE op het microsysteem of de afstandsbediening om het afspelen te beginnen
• in de geprogrammeerde volgorde.
Druk twee keer op de ■ STOP toets van het microsysteem of de afstandsbediening om de geprogrammeerde
volgorde te annuleren.
Herhaalde weergave (USB)
Volg de onderstaande aanwijzingen om MP3-nummers op een USB-flashstation te herhalen.
1. Druk tijdens het afspelen op de REPEAT toets op de afstandsbediening om het huidige nummer te herhalen.
2. Druk nogmaals op de REPEAT-toets om alle tracks in de huidige map te herhalen.
3. Druk nogmaals op de REPEAT-toets om alle tracks op de flashdrive te herhalen.
4. Om de herhaalfunctie te annuleren drukt u nogmaals op de REPEAT-toets.
Numerieke toetsen
Tijdens het afspelen kan een specifiek tracknummer worden afgespeeld door het betreffende cijfer op de cijfertoets s in te
drukken.
Nummer 02 . Druk op 2
Nummer 12 - Druk op 2 en vervolgens op 10+
Nummer 22 - Druk tweemaal op 2 en dan op 10+
Willekeurig afspelen (USB)
Volg de onderstaande instructies om alle tracks op een USB-stick in een willekeurige volgorde af te spelen.
Druk tijdens het afspelen op de RANDOM toets op de afstandsbediening om het afspelen in willekeurige volgorde te starten.
Druk nogmaals op de RANDOM toets om de willekeurige weergave te annuleren.
Intro afspelen (USB)
Druk tijdens het afspelen op de toets INTRO om de eerste 10 seconden van alle nummers op de USB-stick af te spelen.
- -

10
Packen Sie das Gerät sofort nach Empfang aus und prüfen Sie den Inhalt. Wenn Teile fehlen oder beschädigt sind,
benachrichtigen Sie sofort den Spediteur und bewahren Sie die Verpackung auf. Falls ein Gerät ins Werk zurückgeschickt
werden muss, ist es wichtig, dass es in der Originalverpackung versandt wird.
Das Gerät darf nicht in Betrieb genommen werden, nachdem es von einem kalten in einen warmen Raum gebracht wurde. Das
dabei entstehende Kondenswasser kann unter Umständen Ihr Gerät zerstören. Lassen Sie das Gerät solange ausgeschaltet,
bis es Zimmertemperatur erreicht hat!
Wenn Sie das Gerät zum ersten Mal einstecken, zeigt das Display "00:00:00" an. Wenn Sie an Ihrem Standort ein DAB+-Signal
empfangen können, synchronisiert sich das Gerät mit der aktuellen Ortszeit. Nach etwa einer Minute schaltet das Gerät in den
STAND-BY-Modus.
• Drücken Sie die ON/STANDBY-Taste am Gerät oder auf der Fernbedienung, um das Gerät in den ON-Modus zu
schalten.
• Drücken Sie die ON/STANDBY-Taste am Gerät oder auf der Fernbedienung, um das Gerät in den STANDBY-Modus zu
versetzen.
• Ziehen Sie den Stecker aus der Steckdose, wenn Sie das Gerät vollständig ausschalten möchten.
Anmerkung:
Wenn das Digitalradio 20 Minuten lang nicht benutzt wird, schaltet es automatisch in den Standby-Modus.
Befolgen Sie die nachstehenden Anweisungen, um zwischen den Eingangsmodi CD, DAB, FM, AUX IN, USB und BT zu wechseln.
Drücken Sie wiederholt die SOURCE-Taste am Mikrosystem, um zwischen den Eingangsmodi CD, FM, AUDIO-IN und BT zu
wechseln.
Drücken Sie die entsprechende Taste auf der Fernbedienung, um den gewünschten Eingangsmodus auszuwählen. Drücken
Sie die FM/DAB-Taste, um in den DAB-Modus zu wechseln. Drücken Sie erneut, um in den FM-Modus zu wechseln.
Vor dem Umschalten auf den DAB-Eingangsmodus muss die Antenne vollständig ausgefahren werden, damit die Sender
während des ersten Suchlaufs gefunden werden können.
Wenn der DAB-Modus zum ersten Mal aktiviert wird, führt das Gerät einen Suchlauf nach verfügbaren Sendern durch.
SCANNING.. 0 erscheint auf dem Display, bis ein Sender gefunden wurde (dann wechselt O auf die Anzahl der gefundenen
Sender).
Wenn der erste alphanumerische Sender gefunden ist, beginnt die Wiedergabe, während die anderen Sender gespeichert
werden.
Wenn beim Suchlauf keine Sender gefunden werden, bewegen Sie das Gerät, fahren Sie die Antenne vollständig aus und
lesen Sie das Kapitel über den DAB-Sendersuchlauf.
Anhören der gespeicherten DAB-Sender
Um die gespeicherten DAB-Sender zu hören, drücken Sie die [ ] oder [ ] Tasten am Mikrosystem oder die < TUNE oder
TUNE > Tasten auf der Fernbedienung. Drücken Sie die UNPAIR/ENTER-Taste am Mikrosystem oder ENTER auf der
Fernbedienung, um zum gewählten Sender zu wechseln.
Um nach Radiosendern zu suchen, halten Sie eine der < TUNE oder TUNE > Tasten auf der Fernbedienung oder die [ ] / [ ]
Tasten am Mikrosystem zwei Sekunden lang gedrückt, um das Frequenzband nach unten oder oben zu durchsuchen. Wenn
ein Sender gefunden wird, stoppt der Suchlauf und der Sender wird abgespielt.
Zur Feinabstimmung der Frequenz drücken Sie eine der < TUNE oder TUNE > Tasten auf der Fernbedienung oder die [ ] /
[] Tasten am Mikrosystem (nicht gedrückt halten), um 0,05 MHz nach oben oder unten zu springen.
Sie können auch die SCAN-Taste auf der Fernbedienung drücken, um den Frequenzbereich zu durchsuchen. Wenn ein Sender
gefunden wird, beginnt die Wiedergabe automatisch.
FM-Scan-Modi
Die Suchlaufmodi bestimmen, wie stark ein UKW-Signal sein muss, damit es beim Suchlauf als potenzieller Radiosender
akzeptiert wird. Drücken Sie die MENU-Taste auf der Fernbedienung oder halten Sie die MENU/INFO-Taste auf dem

11
Mikrosystem gedrückt. Wenn die Option SCAN SETTING erscheint, drücken Sie die ENTER-Taste auf der Fernbedienung oder
die UNPAIR/ENTER-Taste am Mikrosystem.
Verwenden Sie die < TUNE oder TUNE > Tasten auf der Fernbedienung oder die [ ] / [ ] Tasten am Mikrosystem, um
zwischen STRONG STATIONS (nur starke lokale Sender) oder ALL STATIONS (alle verfügbaren Sender) zu wählen.
Drücken Sie die ENTER-Taste auf der Fernbedienung oder die UNPAIR/ENTER-Taste am Mikrosystem, um zu speichern.
Speichern von voreingestellten Sendern
Gehen Sie wie folgt vor, um einen eingestellten Sender auf einem der 10 Speicherplätze für den schnellen Zugriff zu
speichern. Stellen Sie den Sender ein, den Sie als Voreinstellung speichern möchten, und folgen Sie den nachstehenden
Anweisungen. Drücken Sie die MEMORY-Taste auf der Fernbedienung und halten Sie sie gedrückt. Auf dem Display wird SAVE
TO P1 angezeigt, wobei P1 der ausgewählte voreingestellte Sender ist.
Verwenden Sie die PRESET UP oder PRESET DOWN Tasten auf der Fernbedienung, um die gewünschte
Voreinstellungsnummer von 1-10 auszuwählen. Drücken Sie dann die ENTER-Taste auf der Fernbedienung oder
UNPAIR/ENTER auf dem Mikrosystem, um zu speichern. Nach dem Speichern erscheint PRESET X STORED auf dem Display.
Sobald ein Sender als Voreinstellung gespeichert wurde, wird nicht mehr # EMPTY angezeigt, wenn Sie die MEMORY-Taste
drücken, sondern der Sendername oder die Frequenz erscheint.
Abrufen von voreingestellten Sendern
Um einen gespeicherten Sender aufzurufen, drücken Sie die entsprechende Nummerntaste auf der Fernbedienung.
Um zum Beispiel den gespeicherten Sender unter der Voreinstellung 3 aufzurufen, drücken Sie die Nummerntaste 3. Und um
einen auf Platz 10 gespeicherten Sender abzurufen, drücken Sie die Taste 10+ und dann die Taste 0.
Alternativ können Sie auch die MEMORY-Taste drücken, mit PRESET UP / PRESET DOWN auf der Fernbedienung den
gespeicherten Sender auswählen und dann die Enter-Taste drücken, um zu starten.
Schalten Sie den Eingabemodus auf CD um und folgen Sie den nachstehenden Anweisungen, um eine CD/MP3CD zu laden.
1. Drücken Sie die OPEN/CLOSE- Taste am Mikrosystem oder an der Fernbedienung, wobei der Deckel des CD-Fachs ganz
nach links geschoben wird; legen Sie eine CD in die Spindel ein (mit dem Etikett nach außen).
2. Drücken Sie die OPEN/CLOSE-Taste erneut, um das Fach zu schließen.
3. Wenn der Deckel geschlossen ist, erscheint READING auf dem Display, wenn das Gerät kompatible Audiotitel erkennt.
Abspielen einer CD/MP3-CD
1. Nachdem Sie eine CD wie oben beschrieben eingelegt haben, wird die CD gelesen und die Wiedergabe beginnt
automatisch bei Titel 01.
2. Um die Wiedergabe zu beenden, drücken Sie die STOP-Taste am Mikrosystem oder auf der Fernbedienung.
3. Um die Wiedergabe anzuhalten, drücken Sie während der Wiedergabe die ►Il PLAY/PAUSE-Taste am Mikrosystem oder
auf der Fernbedienung. Um die Wiedergabe fortzusetzen, drücken Sie erneut die ►Il PLAY/PAUSE-Taste.
Überspringen von Titeln auf einer CD/MP3-CD
1. Springen Sie zum nächsten Titel auf einer Disc, indem Sie die [ ]-Taste am Mikrosystem oder auf der Fernbedienung
drücken.
2. Springen Sie zum vorherigen Titel, indem Sie die [ ]-Taste am Mikrosystem oder auf der Fernbedienung drücken.
Schnelle Titelsuche CD/MP3CD
1. Halten Sie die [ ]-Taste auf dem Mikrosystem oder der Fernbedienung gedrückt, um einen Titel während der
Wiedergabe schnell vorzuspulen.
2. Halten Sie die [ ]-Taste am Mikrosystem oder auf der Fernbedienung gedrückt, um einen Titel während der Wiedergabe
schnell zurückzuspulen.
HINWEIS: Wenn Sie die BT-Buchse verwenden, können Sie in einem Umkreis von 10 Metern um das Mikrosystem drahtlos
Audio von einem BT-Audiogerät (z. B. einem MP3-Player) hören.
Stellen Sie sicher, dass Sie sich im BT-Eingabemodus befinden. Wenn diese Option ausgewählt ist, blinkt der Text BT LINK auf
dem Display, während das System versucht, eine Verbindung zu zuvor gekoppelten Geräten herzustellen.
Wenn keine Geräte gefunden werden, blinkt der Text BT LINK weiter und zeigt an, dass das System bereit ist, ein neues Gerät
zu koppeln. Schalten Sie die BT-Funktion an Ihrem Audiogerät ein und suchen Sie nach einem Gerät mit der Bezeichnung
Audizio Tours in der verfügbaren Liste. Wählen und aktivieren Sie das Pairing für das Audizio Tours Gerät. Wenn Sie nach
einem Passwort gefragt werden, geben Sie 0000 ein. Wenn das Pairing erfolgreich war, spielt das Mikrosystem eine Melodie
und der Text BT LINK hört auf zu blinken.
Wenn sich das angeschlossene Gerät außerhalb der Reichweite befindet, versucht das Mikrosystem 2 Minuten lang, eine
Verbindung herzustellen. Wenn das Gerät wieder in Reichweite ist, stellt das System die Verbindung automatisch wieder her.
Um ein gekoppeltes Gerät vom Mikrosystem zu trennen, halten Sie die UNPAIR/ENTER-Taste am Mikrosystem gedrückt oder
drücken Sie die UNPAIR-Taste auf der Fernbedienung.
Hinweis: Wenn Sie eines der Geräte ausschalten, bevor das Pairing abgeschlossen ist, muss der Vorgang wiederholt werden,
wenn das Gerät wieder eingeschaltet wird.

12
Stecken Sie ein kompatibles USB-Flash-Laufwerk in den USB-Anschluss an der Oberseite des Mikrosystems und schalten Sie
in den USB-Eingangsmodus.
Das Gerät scannt das USB-Laufwerk und zeigt die Gesamtzahl der Titel auf dem Laufwerk an. Die Wiedergabe von Titel 01
beginnt automatisch.
Tracks in Ordnern werden als Teil der Gesamtzahl der Tracks aufgelistet.
USB/MP3-Informationen
Entfernen Sie das USB-Gerät nicht während der Wiedergabe. Max. 999 Titel und 99 Ordner können erkannt werden. Nur USB-
Flash-Laufwerk-Format FAT 16, 32. Die USB-Lesegeschwindigkeit kann durch die Anzahl der Dateien auf dem Gerät
beeinträchtigt werden.
Überspringen von MP3-Titeln auf einem USB-Flash-Laufwerk
Springen Sie zum nächsten Titel, indem Sie auf dem Mikrosystem oder der Fernbedienung [ ] drücken.
Springen Sie zum vorherigen Titel, indem Sie das Mikrosystem oder die Fernbedienung [ ] drücken.
Schnelles Suchen nach MP3-Songs auf einem USB-Stick
Halten Sie [ ] auf dem Mikrosystem oder der Fernbedienung gedrückt, um einen Titel während der Wiedergabe
vorzuspulen. Um einen Titel während der Wiedergabe schnell rückwärtszuspülen, halten Sie [ ] auf dem micro system oder
der Fernbedienung gedrückt.
Programmierte Wiedergabe (USB)/MP3CD
1. Drücken Sie die STOP-Taste, um die Wiedergabe zu beenden (falls erforderlich).
2. Drücken Sie die MEMORY-Taste auf der Fernbedienung. Die Optionen werden auf dem Display angezeigt.
3. Verwenden Sie die FOLDER+/- Tasten auf der Fernbedienung, um den Ordner auszuwählen, in dem Track 01 sich befindet.
Drücken Sie die MEMORY-Taste, um zum nächsten Schritt zu gelangen.
4. Verwenden Sie die [ ] oder [ ] Tasten, um den gewünschten Track als Track 01 auszuwählen.
5. Drücken Sie die MEMORY-Taste, um mit der Programmierung des nächsten Titels fortzufahren.
6. Wiederholen Sie die Schritte 3-5, bis Sie alle gewünschten Titel in der Wiedergabeliste programmiert haben, bis zu einem
Maximum von 100 Titeln.
7. Drücken Sie die ►I PLAY/PAUSE Taste am Mikrosystem oder auf der Fernbedienung, um die Wiedergabe in der
programmierten Reihenfolge zu starten.
8. Drücken Sie die ■ STOP Taste am Mikrosystem oder auf der Fernbedienung zweimal, um die programmierte Sequenz
abzubrechen.
Wiederholte Wiedergabe (USB)
Befolgen Sie die nachstehenden Anweisungen, um MP3-Titel auf einem USB-Flash-Laufwerk zu wiederholen.
1. Drücken Sie während der Wiedergabe die REPEAT-Taste auf der Fernbedienung, um den aktuellen Titel zu wiederholen.
2. Drücken Sie die REPEAT-Taste erneut, um alle Titel im aktuellen Ordner zu wiederholen.
3. Drücken Sie die REPEAT-Taste erneut, um alle Titel auf dem Flash-Laufwerk zu wiederholen.
4. Um die Wiederholungsfunktion abzubrechen, drücken Sie erneut die REPEAT-Taste.
Numerische Schaltflächen
Während der Wiedergabe kann eine bestimmte Titelnummer durch Drücken der entsprechenden Ziffer auf der Zifferntaste s
wiedergegeben werden.
Titel 02 Drücken Sie 2
Titel 12 Drücken Sie 2 und dann 10+
Titel 22 Drücken Sie 2 und dann zweimal 10+
Zufallswiedergabe (USB)
Befolgen Sie die nachstehenden Anweisungen, um alle Titel auf einem USB-Speichergerät in zufälliger Reihenfolge
abzuspielen. Drücken Sie während der Wiedergabe die RANDOM-Taste auf der Fernbedienung, um die Zufallswiedergabe zu
starten. Drücken Sie erneut die Taste RANDOM, um die Zufallswiedergabe abzubrechen.
Intro-Wiedergabe (USB)
Drücken Sie während der Wiedergabe die INTRO-Taste, um die ersten 10 Sekunden aller Titel auf dem USB-Speicherstick
abzuspielen.
- -

13
ATENCIÓN! Inmediatamente después de recibir un dispositivo, desempaque cuidadosamente la caja de cartón, compruebe el
contenido para asegurarse de que todas las partes están presentes, y se han recibido en buenas condiciones. Notifique
inmediatamente al transportista y conserve el material de embalaje para la inspección por si aparecen daños causados por el
transporte o el propio envase muestra signos de mal manejo. Guarde el paquete y todos los materiales de embalaje. En el
caso de que deba ser devuelto a la fábrica, es importante que el aparato sea devuelto en la caja de la fábrica y embalaje
originales. Si el aparato ha estado expuesto a grandes cambios de temperatura (tras el transporte), no lo enchufe
inmediatamente. La condensación de agua producida podría dañar su aparato. Deje el dispositivo apagado hasta que se haya
alcanzado la temperatura ambiente.
Cuando conecte por primera vez la unidad a la toma de corriente, la pantalla mostrará "00:00:00". Si puede recibir una señal
DAB + en su ubicación, la unidad se sincronizará con la hora local actual. Después de aproximadamente un minuto, cambiará
al modo STAND BY.
• Presione ON/STANDBY en la unidad o en el control remoto para cambiar la unidad al modo ON.
• Pulse ON/STANDBY en la unidad o en el mando a distancia para volver la unidad al modo STANDBY.
• Desconecte el enchufe de red de la toma de corriente si desea apagar la unidad por completo.
Nota:
Si la radio digital no se utiliza durante 20 minutos, entrará automáticamente en modo de espera.
Siga las instrucciones a continuación para cambiar entre CD, DAB, FM, AUX IN, USB y Modos de entrada BT.
Pulse repetidamente el botón SOURCE del microsistema para alternar entre los modos de entrada CD, FM, AUDIO-IN y BT.
Pulse el botón correspondiente en el mando a distancia para seleccionar el modo de entrada que desee. Pulse el botón
FM/DAB para cambiar al modo DAB. Pulse una vez más para cambiar al modo FM.
Antes de cambiar al modo de entrada DAB, la antena debe extenderse completamente para permitir que las emisoras se
ubiquen durante el escaneo inicial.
Cuando el modo DAB se activa por primera vez, la unidad realizará una búsqueda de emisoras disponibles. Verá SCANNING ..
0 aparecerá en la pantalla hasta que se ubiquen las emisoras y luego la O cambiará a la cantidad de emisoras encontradas.
Una vez ubicada, la primera emisora alfanumérica comenzará a reproducirse mientras se almacenan las otras emisoras.
Si no se ubicaron emisoras durante el escaneo, reubique la unidad, extienda la antena completamente y lea la sección
Realización de un escaneo de emisoras DAB.
Escuchar las emisoras DAB almacenadas
Para escuchar las emisoras DAB que se han almacenado, presione los botones [ ] o [ ] en el microsistema o los botones
<TUNE o TUNE> en el control remoto.
Presione el botón UNPAIR / ENTER en el microsistema o ENTER en el control remoto para cambiar a la emisora seleccionada.
Para buscar emisoras de radio, presione y mantenga presionado cualquiera de los botones <TUNE o TUNE> en el control
remoto o los botones [ ] o [ ] en el microsistema durante dos segundos para buscar hacia abajo o hacia arriba la banda de
frecuencia. Cuando se encuentra una emisora, la búsqueda se detendrá y la emisora comenzará a reproducirse.
Para sintonizar la frecuencia, presione cualquiera de los botones <TUNE o TUNE> en el control remoto o los botones [ ] o
[ ] en el micro sistema (no presione y mantenga presionado), para saltar 0.05 MHz hacia arriba o hacia abajo.
Alternativamente, presione el botón SCAN en el control remoto para comenzar a escanear el rango de frecuencia. Cuando se
encuentra una emisora, la reproducción comenzará automáticamente.
Modos de escaneo FM
Presione el botón MENÚ en el control remoto o presione y mantenga presionado el botón MENÚ / INFO en el micro sistema
Cuando aparezca la opción AJUSTE DE ESCANEO, presione el botón ENTER en el control remoto o UNPAIR / ENTER en el
microsistema
Use los botones <TUNE o TUNE> en el control remoto o los botones [ ] [ ] en el micro sistema para seleccionar entre
STRONG STATIONS (solo emisoras fuertes locales) o ALL STATIONS (todas las emisoras disponibles)
Presione el botón ENTER en el control remoto o UNPAIR / ENTER en el microsistema para guardar.

14
Almacenar emisoras presintonizadas
Siga los pasos a continuación para almacenar una estación sintonizada en una de las 10 ubicaciones preestablecidas para
permitir un acceso rápido. Sintonice la estación que desea almacenar como preestablecida y siga las instrucciones a
continuación. Mantenga presionado el botón MEMORY en el control remoto. La pantalla mostrará SAVE TO P1, donde P1 es la
ubicación predeterminada seleccionada.
Use los botones PRESET UP y PRESET DOWN en el control remoto o los botones [ ] o [ ] en el microsistema para
seleccionar el número preestablecido del 1 al 10 que desea usar. Luego presione el botón ENTER en el control remoto o
UNPAIR / ENTER en el microsistema para almacenar. Cuando esté almacenado, la pantalla mostrará PRESET X STORED.
Una vez que se guarda una estación en una presintonía, ya no verá # EMPTY al presionar presionado el botón MEMORY, sino
que aparecerá el nombre de la estación o la frecuencia.
Recuperar emisora preestablecida
Para recuperar una emisora preestablecida almacenada, presione el botón numérico correspondiente en el control remoto.
Por ejemplo, para recuperar la emisora almacenada en el preajuste 3, presione el botón numérico 3. Y para recuperar una
emisora almacenada en la ubicación 10, presione el botón 10+ y luego el botón O.
Alternativamente, pulse el botón MEMORY, utilice PRESET UP / PRESET DOWN en el mando a distancia para seleccionar la
emisora preseleccionada almacenada y, a continuación, pulse el botón ENTER para comenzar.
Cambie el modo de entrada a CD y siga las instrucciones a continuación para cargar un CD / MP3CD.
1. Presione el botón OPEN / CLOSE en el micro sistema o en el control remoto, cuando la tapa del compartimiento del disco
se deslice completamente hacia la izquierda; inserte un disco en el eje (etiqueta hacia afuera)
2. Presione el botón OPEN / CLOSE una vez más para cerrar el cajón.
3. Cuando la puerta esté cerrada aparecerá READING en la pantalla cuando la unidad detecte pistas de audio compatibles.
Reproducir un CD/ MP3CD
1. Después de cargar un CD en los pasos anteriores, el disco se leerá y la reproducción comenzará automáticamente desde la
pista 01
2. Para detener la reproducción, presione el botón ■ STOP en el microsistema o en el control remoto.
3. Para pausar la reproducción, presione el botón ►Il PLAY / PAUSE del micro sistema o en el control remoto durante la
reproducción. Para reanudar la reproducción, presione el botón ►Il REPRODUCIR / PAUSA una vez más.
Pasar pistas en un CD/ MP3CD
1. Pase a la siguiente pista de un disco presionando el botón [ ] en el microsistema o en el control remoto.
2. Salte a la pista anterior presionando el botón [ ] en el microsistema o en el control remoto.
Búsqueda rápida
1. Para avanzar rápidamente una pista durante la reproducción, mantenga presionado [ ] en el micro sistema o en el
control remoto.
2. Para rebobinar rápidamente una pista durante la reproducción, mantenga presionado [ ] en el micro sistema o en el
control remoto.
inserte una unidad flash USB compatible en el puerto USB en la parte superior del microsistema y cambie al modo de entrada
USB.
La unidad escaneará la unidad flash USB y mostrará el número total de pistas encontradas en la unidad. La reproducción de la
pista 01 comenzará automáticamente.
Tracks inside folders are listed as part of the total number of tracks.
USB/ MP3 información
No retire el dispositivo USB durante la reproducción. Se pueden reconocer un máximo de 999 pistas y 99 carpetas en formato
de unidad flash USB FAT 16, 32 únicamente. La velocidad de lectura de USB puede verse afectada por la cantidad de archivos
en el dispositivo.
- -

15
Pasar pistas
Pase a la siguiente pista presionando [ ] en el micro sistema o en el control remoto.
Salta a la pista anterior presionando [ ] en el micro sistema o en el control remoto.
Búsqueda rápida
Para avanzar/retroceder rápidamente una pista durante la reproducción, mantenga pulsado [ ] o [ ] en el microsistema o
en el mando a distancia.
Reproducción programada (USB)/ MP3CD
1. Presione el botón STOP para detener la reproducción (si es necesario).
2. Presione el botón MEMORY en el control remoto. Verá que las opciones aparecen en la pantalla.
3. Use los botones FOLDER +/- en el control remoto para seleccionar la carpeta que donde se encuentre pista 01
4. Presione el botón MEMORIA para continuar con el siguiente paso.
5. Utilice los botones [ ] o [ ] para seleccionar la pista que le guste como pista 01
Presione el botón MEMORIA para proceder a programar la siguiente pista.
6. Repita los pasos 3-5 hasta que haya programado todas las pistas que necesita en la lista de reproducción, hasta un
máximo de 100 pistas.
7. Presione el botón ►Il PLAY / PAUSE en el micro sistema o en el control remoto para comenzar la reproducción en el orden
programado.
8. Para cancelar la secuencia del programa, presione el botón ■ STOP en el microsistema o en el control remoto dos veces.
Repetir reproducción (USB)
Siga las instrucciones a continuación para repetir pistas MP3 en una unidad flash USB.
1. Durante la reproducción, presione el botón REPEAT en el control remoto para repetir la pista actual.
2. Presione el botón REPEAT nuevamente para repetir todas las pistas en la carpeta actual.
3. Presione el botón REPEAT nuevamente para repetir todas las pistas en la unidad flash.
4. Para cancelar la función de repetición presione el botón REPEAT una vez más.
Botones numéricos
Durante la reproducción, se puede reproducir un número de pista específico presionando el dígito relativo en los botones
numéricos
Pista 02. Presione 2
Pista 12 • Presione 2 y luego 10+
Pista 22 · Presiona 2 y luego 10+ dos veces.
Reproducción aleatoria (USB)
Siga las instrucciones a continuación para reproducir todas las pistas en una unidad flash USB en orden aleatorio.
Durante la reproducción, presione el botón RANDOM en el control remoto para comenzar la reproducción aleatoria.
Presione el botón RANDOM nuevamente para cancelar la reproducción aleatoria.
Reproducción Intro (USB)
Presione el botón INTRO durante la reproducción para reproducir los primeros 10 segundos de todas las pistas en la unidad
flash USB

16
ATTENTION ! Immédiatement après réception, vérifiez le contenu du carton et assurez-vous que tous les éléments sont bien
présents et en bon état. Si besoin, faites les réserves nécessaires si le matériel ou les cartons sont endommagés. SI l’appareil
doit être retourné, faites-le dans l’emballage d’origine. Si l’appareil a ete expose a des fluctuations importantes de
temperatures (par exemple apres le transport), ne l’allumez pas immediatement. De la condensation peut survenir. Laissez
l’appareil eteint le temps qu’il atteigne la temperature ambiante.
Lorsque vous connectez l'appareil à la prise secteur pour la première fois, l'écran affiche "00:00:00". Si vous pouvez recevoir
un signal DAB+ dans votre région, l'appareil se synchronisera sur l'heure locale actuelle. Après environ une minute, il passera
en mode STAND BY.
• Appuyez sur la touche ON/STANDBY de l'appareil ou de la télécommande pour mettre l'appareil en mode ON.
• Appuyez sur la touche ON/STANDBY de l'appareil ou de la télécommande pour remettre l'appareil en mode
STANDBY.
• Débranchez la fiche de la prise secteursi vous voulez éteindre complètement l'appareil.
Remarque :
Si la radio numérique n'est pas utilisée pendant 20 minutes, elle se met automatiquement en mode veille.
Suivez les instructions suivantes pour commuter entre les modes d’entrée CD, DAB, FM, AUX IN, USB & BT.
Appuyez sur la touche SOURCE sur l’appareil pour commuter entre les modes d’entrée CD, FM, AUDIO-IN & BT.
Appuyez sur la touche correspondant sur la télécommande pour sélectionner le mode voulu/ Appuyez sur la touche FM/DAB
pour commuter en mode DAB. Appuyez à nouveau pour commuter en mode FM.
Avant de passer en mode d'entrée DAB, l'antenne doit être complètement déployée pour permettre de localiser les stations
pendant le balayage initial.
Lorsque le mode DAB est activé pour la première fois, l'appareil effectue une recherche des stations disponibles. SCANNING...
0 apparaît à l'écran jusqu'à ce que les stations soient trouvées, puis O devient le nombre de stations trouvées.
Lorsqu'elle est localisée, la première station alphanumérique commence la lecture pendant que les autres stations sont
mémorisées.
Si aucune station n'a été trouvée pendant la recherche, déplacez l'appareil, déployez complètement l'antenne et reportez-
vous au paragraphe - Effectuer un balayage des stations DAB.
Ecoute de stations DAB mémorisées
Pour écouter les stations DAB mémorisées, appuyez sur les touches [ ] ou [ ] sur l’appareil ou sur les touches < TUNE ou
TUNE > sur la télécommande.
Appuyez sur la touche UNPAIR/ENTER sur l’appareil ou sur ENTER sur la télécommande pour activer la station sélectionnée.
Pour rechercher des stations radio, appuyez sur une des touches < TUNE ou TUNE > sur la télécommande ou sur les touches
[ ] ou [ ] de l’appareil et maintenez-la enfoncée pendant deux secondes pour balayer la bande de fréquences vers le bas
ou vers le haut. Lorsqu'une station est trouvée, le balayage s'arrête et la station commence à être diffusée.
Pour régler avec précision la fréquence utilisez les touches < TUNE ou TUNE > sur la télécommande ou sur les touches [ ] ou
[ ] de l’appareil (ne maintenez pas enfoncée ), pour avancer ou reculer de 0,05 MHz.
Vous pouvez également appuyer sur SCAN sur la télécommande pour commencer à balayer la gamme de fréquences.
Lorsqu'une station est localisée, la lecture commence automatiquement.
Modes Scan FM
Les modes de recherche déterminent la force que doit avoir un signal FM pour être accepté comme une station de radio
potentielle lors du balayage.
Appuyez sur la touche MENU de la télécommande ou appuyez et maintenez enfoncée la touche MENU/INFO de l’appareil.
Lorsque l'option SCAN SETTING apparaît, appuyez sur la touche ENTER de la télécommande ou sur la touche UNPAIR/ENTER de
l’appareil.
Utilisez les touches < TUNE ou TUNE > de la télécommande ou [ ] ou [ ] de l’appareil pour choisir entre STATIONS FORTES
(Stations locales fortes uniquement) ou TOUTES LES STATIONS (Toutes les stations disponibles).
Appuyez sur la touche ENTER de la télécommande ou sur la touche UNPAIR/ENTER de l’appareil pour sauvegarder.
Mémorisation de presets de stations
Suivez les étapes ci-dessous pour mémoriser une station trouvée dans l'un des 10 emplacements prédéfinis afin d'y accéder
rapidement. Réglez la station que vous souhaitez mémoriser comme preset et suivez les instructions ci-dessous.
Appuyez sur la touche MEMORY de la télécommande et maintenez-la enfoncée. L'écran affiche SAVE TO P1, : P1 est
l'emplacement du preset sélectionné.

17
Utilisez les touches PRESET UP ou PRESET DOWN sur la télécommande pour sélectionner le numéro de preset de 1 à. 10 ;
appuyez ensuite sur ENTER sur la télécommande ou UNPAIR/ENTER sur l’appareil pour mémoriser.
Une fois la memorisation effectuée, l’affichage indique PRESET X STORED.
Une fois qu'une station est enregistrée dans un préréglage, vous ne verrez plus # EMPTY lorsque vous appuyez la touche
MEMORY enfoncée : le nom de la station ou la fréquence s’affichera à la place.
Appel de presets de stations
Pour rappeler une station préréglée mémorisée, appuyez sur la touche numérique correspondante de la télécommande.
Par exemple, pour rappeler la station mémorisée sur la présélection 3, appuyez sur la touche numérique 3. Et pour rappeler
une station mémorisée sur l'emplacement 10, appuyez sur la touche 10+ puis sur la touche O.
Vous pouvez également appuyer sur le bouton MEMORY, utiliser PRESET UP / PRESET DOWN sur la télécommande pour
sélectionner la station préréglée stockée, puis appuyer sur le bouton Enter pour démarrer.
Commutez sur le mode d’entrée CD et suivez les instructions ci-dessous pour charger un CD/MP3.
1. Appuyez sur le bouton OPEN/CLOSE de l’appareil ou de la télécommande, lorsque le compartiment CD glisse vers la
gauche ; insérez un disque (étiquette tournée vers l'extérieur).
2. Appuyez une fois de plus sur le bouton OPEN/CLOSE pour fermer le compartiment.
3. READING s'affiche alors sur l'écran lorsque l'appareil détecte des pistes audio compatibles.
Lecture d’un CD/CD MP3
1. Après avoir chargé un CD en suivant les étapes ci-dessus, le disque sera lu et la lecture commencera automatiquement à
partir de la piste 01.
2. Pour arrêter la lecture, appuyez sur la touche■ STOP sur l’appareil ou sur la télécommande.
3. Pour mettre la lecture en pause, appuyez sur ►II PLAY/PAUSE de l’appareil de la télécommande pendant la lecture. Pour
reprendre la lecture, appuyez une nouvelle fois sur ►II PLAY/PAUSE.
Sauter des pistes sur un CD/CD MP3
1. Appuyez sur la touche [ ] sur l’appareil ou sur la télécommande pour aller à la voie suivante.
2. Appuyez sur la touche [ ] sur l’appareil ou sur la télécommande pour aller à la voie précédente.
Recherche rapide sur un CD/CD MP3
1. Pour faire une avance rapide d'une piste pendant la lecture, appuyez sur la touche [ ] de l’appareil ou de la
télécommande et maintenez-la enfoncée.
2. Pour effectuer un retour rapide d'une piste pendant la lecture, maintenez la touche [ ] enfoncée sur l’appareil ou la
télécommande.
REMARQUE : Lorsque vous utilisez la connexion BT, vous pouvez écouter de l'audio sans fil à partir d'un appareil audio BT (par
exemple un lecteur MP3) dans un rayon de 10 mètres de l’appareil.
Assurez-vous que vous êtes bien en mode BT.
Le texte BT clignote sur l’affichage pendant que l’appareil essaie de se connecter à des appareils précédemment appairés.
Si aucun appareil n’est trouvé, le texte BT LINK continue de clignoter indiquant que l’appareil est prêt pour un appairage avec
un autre appareil
Activez la fonction BT sur votre appareil audio et recherchez un appareil dénommé Audizio Tours dans la liste.
Sélectionnez-le et appairez les deux appareils. Si demandé, le mot de passe est 0000.
Une fois l’appairage réalisé, l’appareil joue une mélodie, le texte BT LINK ne clignote plus.
Si l'appareil connecté se trouve hors de portée, l’appareil tentera de se connecter pendant 2 minutes. Lorsque l'appareil est à
nouveau à portée, l'unité se reconnectera automatiquement.
Pour supprimer un appareil appairé, appuyez et maintenez enfoncée la touche UNPAIR/ENTER sur l’appareil ou appuyez sur la
touche UNPAIR de la télécommande Le texte BT LINK se remet à clignoter.
Remarque : si vous éteignez l'un ou l'autre des appareils avant la fin de l’appairage, le processus devra être répété lors de la
remise sous tension.
Insérez une clé USB compatible dans le port USB sur le dessus de l’appareil et commutez sur le mode d’entrée USB.

18
L'appareil va scanner la clé USB et afficher le nombre total de pistes trouvées sur le lecteur. La lecture de la piste 01
commence automatiquement.
Les pistes à l'intérieur des dossiers sont listées comme faisant partie du nombre total de pistes.
Information USB/ MP3
Ne retirez pas le périphérique USB pendant la lecture. Max. 999 pistes et 99 dossiers peuvent être reconnus.
Format FAT 16, 32 uniquement. La vitesse de lecture USB peut être affectée par le nombre de fichiers sur le périphérique.
Sauter des pistes MP3 sur une clé USB
Passez à la piste suivante en appuyant la touche [ ].
Passez à la piste précédente en appuyant la touche [ ].
Recherche rapide de voies MP3 sur une clé USB
Pour avancer rapidement pendant la lecture, appuyez et maintenez enfoncée la touche [ ]sur l’appareil ou la
télécommande.
Pour effectuer un retour rapide pendant la lecture appuyez et maintenez enfoncée la touche [ ] sur l’appareil ou la
télécommande.
Lecture programmée (USB)/ MP3CD
1. Appuyez sur STOP pour arrêter la lecture (si nécessaire).
2. Appuyez sur la touche MEMORY de la télécommande. Vous verrez les options apparaître à l'écran.
3. Utilisez les touches FOLDER+/- de la télécommande pour sélectionner le dossier où se trouve la piste 01. Appuyez
sur la touche MEMORY pour passer à l'étape suivante.
4. Utilisez les touches [ ] ou [] pour sélectionner la piste que vous souhaitez comme piste 01.
5. Appuyez sur MEMORY pour programmer la piste suivante.
6. Répétez les étapes 3 à 5 jusqu'à ce que vous ayez programmé toutes les pistes dont vous avez besoin dans la liste de
lecture, jusqu'à un maximum de 100 pistes.
7. Appuyez sur la touche ►Il PLAY/PAUSE de l’appareil ou de la télécommande pour commencer la lecture dans l'ordre
programmé.
8. Pour annuler la séquence, appuyez deux fois sur la touche ■ STOP de l’appareil ou de la télécommande.
Répétition (USB)
Suivez les instructions ci-dessous pour répéter les voies SMP3 d’une clé USB.
1. Pendant la lecture, appuyez sur la touche REPEAT sur la télécommande pour répéter la voie en cours.
2. Appuyez à nouveau sur REPEAT pour répéter toutes les voies du dossier en cours.
3. Appuyez à nouveau sur REPEAT pour répéter toutes les voies sur la clé.
4. Pour annuler la fonction de répétition, appuyez une nouvelle fois sur REPEAT.
Touches numériques
Pendant la lecture, vous pouvez lire un numéro donné de voie en appuyant sur le numéro correspondant sur les touches
numériques.
Voie 02 : Appuyez sur 2
Voie 12 . Appuyez sur 2 puis sur 10+
Voie 22 • Appuyez sur 2 plus deux fois sur 10+
Lecture aléatoire (USB)
Suivez les instructions ci-dessous pour lire toutes les pistes de la clé USB dans un ordre aléatoire.
Pendant la lecture, appuyez sur RANDOM de la télécommande pour commencer la lecture aléatoire.
Appuyez à nouveau sur la touche RANDOM pour annuler la lecture aléatoire.
Lecture intro (USB)
Appuyez sur la touche INTRO pendant la lecture pour lire les 10 premières secondes de toutes les voies de la clé USB.
- -


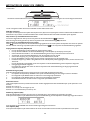
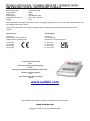
Playback Options : BT Streaming, CD, DAB+ Tuner, FM Radio, USB
Input Connections : 3.5mm Jack, USB
Output Power : 80W
Impedance : 4 Ohm
Power Supply : 220-240VAC 50Hz
Dimensions (L x W x H) : 450 x 195 x 100mm
Weight : 2.05
The specifications are typical. The actual values can slightly change from one unit to the other. Specifications can
be changed without prior notice.
The products referred to in this manual conform to the European Community Directives to which they are
subject:
Do you need the full manual?
Go to...
Heeft u de volledige handleiding nodig?
Ga naar ...
Benötigen Sie das vollständige Handbuch? Gehen Sie zu...
Necesita el manual completo?
Ve a...
Avez-vous besoin du manuel complet?
Allez à...
www.audizio.com
Specifications and design are subject to change without prior notice.
www.tronios.com
Copyright © 2022 by Tronios The Netherlands
European Union
United Kingdom
Tronios B.V.,
Bedrijvenpark Twente Noord 18,
7602KR Almelo, The Netherlands
Tronios Ltd.,
130 Harley Street,
London W1G 7JU, United Kingdom
2014/35/EU
S.I. 2016:1101
2014/30/EU
S.I. 2016:1091
2011/65/EC
S.I. 2012:3032
2014/53/EU
S.I. 2017:1206
-
 1
1
-
 2
2
-
 3
3
-
 4
4
-
 5
5
-
 6
6
-
 7
7
-
 8
8
-
 9
9
-
 10
10
-
 11
11
-
 12
12
-
 13
13
-
 14
14
-
 15
15
-
 16
16
-
 17
17
-
 18
18
-
 19
19
-
 20
20


audizio Tours Stereo HiFi System DAB+ Snelstartgids
- Categorie
- CD-radio's
- Type
- Snelstartgids