
Instruction Manual
Bedienungsanleitung
Mode d’emploi
Manuale di istruzioni
Manual de instrucciones
Handleiding
Bruksanvisning
Instrukcja obsługi
Model PB-15
30L Compressor Dehumidier
IMPORTANT INSTRUCTIONS
- RETAIN FOR FUTURE USE

2 of 124 | English
CONTENTS
Safety Instructions..................................................................................................................... Page 3
Specic Information Regarding R290 Refrigerant Gas ............................................... Page 6
Symbols Explained .................................................................................................................... Page 7
Specications .............................................................................................................................. Page 8
How it Works ................................................................................................................................Page 9
Accessories ................................................................................................................................ Page 10
Positioning The Unit ................................................................................................................ Page 10
Operating Instructions .............................................................................................................Page 11
Connecting To Wi ...................................................................................................................Page 12
Emptying The Water Tank .....................................................................................................Page 12
Continuous Drainage ..............................................................................................................Page 13
Cleaning & Storage ................................................................................................................. Page 14
Declaration Of Conformity ................................................................................................... Page 15
Recycling and Disposal ......................................................................................................... Page 15
Trouble Shooting Tips............................................................................................................. Page 16
Deutsch ........................................................................................................................................ Page 18
Français .......................................................................................................................................Page 33
Italiano ........................................................................................................................................ Page 48
Español ....................................................................................................................................... Page 63
Nederland ...................................................................................................................................Page 78
Svenska........................................................................................................................................Page 93
Polskie ........................................................................................................................................Page 108
EN
DE
FR
IT
ES
NL
SV
PL

English | 3 of 124
30L COMPRESSOR DEHUMIDIFIER
MODEL PB-15
Thank you for choosing to purchase a product from Pro Breeze. Please read the entire manual
carefully prior to rst use and keep in a safe place for future reference.
SAFETY INSTRUCTIONS
――
PLEASE READ AND SAVE THESE IMPORTANT SAFETY
INSTRUCTIONS.
When using electrical appliances, basic safety precautions
should always be followed to reduce risk of re, electric
shock, and injury to persons, including the following:
WARNING: TO AVOID THE RISK OF ELECTRICAL SHOCK,
FIRE OR INJURY TO PEOPLE, ALWAYS TURN THE APPLIANCE
OFF, UNPLUG THE POWER CORD FROM THE ELECTRICAL
OUTLET AND EMPTY THE WATER TANK BEFORE HANDLING,
CLEANING OR SERVICING THE APPLIANCE.
• Do not cover the appliance whilst in use.
• Use this appliance only as described in this manual. Any
other use not recommended by the manufacturer may
cause re, electric shock, or injury to person.
• Always unplug the appliance when not in use.
• Do not expose the appliance to direct sunlight, heat
sources or extreme cold.
• Keep the appliance out of reach of children and pets.
• Do not leave children alone or unattended in the area
where the appliance is in use.
• Children must be supervised not to play with the
appliance.
• Cleaning and user maintenance shall not be made by
children unless continuously supervised.
• Dispose of water held by the appliance. This water is not
drinkable

4 of 124 | English
• The appliance is not to be used by persons (including
children) with reduced physical, sensory or mental
capabilities, or lack of experience and knowledge, unless
they have been given supervision or instruction.
• When moving the appliance, ensure it is kept in an
upright position.
• The appliance must have a minimum 50cm clearance
around all sides.
• Never leave the appliance unattended while in use.
Always turn the appliance off and disconnected from the
power supply when not in use.
• Avoid placing the power cord in areas where it can
become a tripping hazard. Do not place the power cord
under carpeting or cover it with rugs, runners or similar.
• Place the appliance on a at, stable and dry surface
and always keep the appliance in an upright position.
Operating the appliance in any other position could
cause a hazard.
• Never place anything on top of the appliance.
• Ensure that the mains supply (including voltage,
frequency and power) complies with the rating label of
the appliance.
• There may be trace of odour during the rst few minutes
of initial use. This is normal and will quickly disappear.
• Do not place the appliance against a wall or other
appliances.
• Do not cover the appliance or restrict the air ow of the
inlet or exhaust grills whilst in use.
• Do not cover, obstruct or push objects into the vents and
opening of the appliance as this may cause an electric
shock, re or damage the appliance.
• Do not operate the appliance with wet hands.
• Do not operate the appliance without the lter.
• Do not use this appliance near water or in the immediate
surroundings of a bath, shower or a swimming pool.
Never place the appliance where it may fall into a

English | 5 of 124
bathtub or other water container.
• Do not allow water or other liquids to run into the interior
of the appliance, as this could create a re and/or
electrical hazard.
• Do not use mechanical devices to accelerate the
appliances defrosting process.
• Do not place the continuous drainage hose outside when
the temperature falls below 1C.
• This appliance is intended for indoor household use and
similar applications. Do not use outdoors.
• Do not use the appliance near petrol, paints, ammable
gases, ovens, or other heating sources.
• The mains cable should not hang down from the surface
on which the appliance is placed in order to prevent the
appliance from being pulled down.
• To avoid a circuit overload when using this appliance,
do not operate another high-wattage appliance on the
same electrical circuit.
• Always plug the appliance directly into a wall socket.
Avoid using extension leads where possible as they may
overheat and cause a risk of re.
• Do not use this appliance with an external programmer,
timer switch or any other device which would switch the
appliance on automatically unless this has already been
pre-built into the appliance by the manufacturer.
• Do not pull on the power cord. Never move, carry, or hang
the appliance by the power cord.
• Do not kink or wrap the power cord and plug around the
appliance, as this may cause the insulation to weaken or
split, particularly where it enters the appliance.
• Do not operate the appliance with the water tank
removed.
• Ensure the mains cable is fully extended before use and
arrange it so that it is not in contact with any part of the
appliance.
• Do not operate the appliance with any safety guards
removed.

6 of 124 | English
• Do not operate the appliance if there are signs of
damage to the appliance, power cord, or any of the
accessories supplied. If the supply cord is damaged, it
must be replaced by the manufacturer, its service agent
or a similarly qualied person in order to avoid a hazard.
• Do not operate the appliance if there are any signs of
damage to the appliance or accessories supplied.
• Do not attempt to repair or adjust any electrical or
mechanical elements in the appliance. Doing so may be
unsafe and will void your warranty.
• The appliance is only to be used with the power adapter
provided. Do not use other chargers or power adapters
as this may damage the appliance.
• Never insert ngers or metal objects into the vents and
openings of the appliance.
SPECIFIC INFORMATION REGARDING R290 REFRIGERANT GAS
――CAUTION
RISK OF FIRE
WARNING: THE APPLIANCE MUST BE INSTALLED, OPERATED
AND STORED IN A ROOM WITH A FLOOR AREA LARGER
THAN 4M2.
• This appliance contains 0.1kg (100g) of R290 refrigerant
gas.
• R290 is a refrigerant gas that complies with the European
directive on the environment.
• Do not puncture any part of refrigerant circuit.
• Be aware R290 refrigerant is odourless and does not
have the odour normally associated with natural gas and
propane tanks.
• Do not use means to accelerate the defrosting process

English | 7 of 124
SYMBOLS EXPLAINED
――
or to clean, other than those recommended by the
manufacturer.
• The appliance must be placed in an area without any
continuous sources of ignition such as open ames, gas,
or electrical appliances in operation.
• Do not puncture and do not burn.
• If the appliance is installed, operated or stored in a non-
ventilated area, the room must be designed to prevent
the accumulation of refrigerant leaks resulting in a risk of
re or explosion due to ignition of the refrigerant caused
by electric heaters, stoves, or other sources of ignition.
• The appliance must be stored in such a way as to
prevent mechanical failure.
• Individuals who operate or work on the refrigerant circuit
must have the appropriate certication issued by an
accredited organisation that ensures competence in
handling refrigerants according to a specic evaluation
recognised by associations in the industry.
• Maintenance and repairs that require the assistance
of other qualied personnel must be performed under
the supervision of an individual specied in the use of
ammable refrigerants.
For indoor use only. Please read instruction manual
and retain for future use.
Equipment complies with the
applicable UK safety requirements
and regulations.
Equipment complies with the
applicable EU safety requirements
and regulations.

8 of 124 | English
SPECIFICATIONS
――
• Size: 38.6 x 26 x 50cm
• Net Weight: 17kg
• Voltage: 220-240~, 1Ph
• Frequency: 50Hz
• Input Power: 715W
• Maximum Capacity (per 24hr): 30L
• Refrigerant: R290 / 0.099kg
Explanation of symbols displayed on the unit.
WARNING
CAUTION
CAUTION
CAUTION
The symbol shows that this appliance uses a ammable
refrigerant. If the refrigerant leaks and is exposed to an
external ignition source, there is a risk of re.
This symbol shows that the operation manual should be read
carefully.
This symbol shows that a service personnel should be
handling this equipment with reference to the installation
manual.
This symbol shows that information is available such as the
operating manual or instruction manual.

English | 9 of 124
HOW IT WORKS
――
Please familiarise yourself with the unit before use.
NOTE: All of the illustrations are for explanation purposes only. Your machine may be slightly
different.
Air lter
Continuous drain hose outlet
Power cord buckle (placed in the water
bucket,used only when storing the unit)
Castor Wheels
Power cord and plug
Control panel
Handle (both sides)
Panel
Water level window
Water bucket

10 of 124 | English
ACCESSORIES
――
The following accessories can be found in the water tank. Remove and install before use (as per
instructions listed below).
To install the power cord buckle, simply insert
into the back of the unit.
POSITIONING THE UNIT
――
• This unit is designed to operate in temperatures between 5ºc and 32ºc, and between a 30%
and 50% RH (relative humidity).
• Place the unit in an area where the temperature will not fall below 5ºc. In temperatures
below 5ºc, the coils may freeze; leading to a reduction in performance.
• Place the unit on a smooth, level surface, strong enough to support the unit with a full water
tank.
• Allow at least 50cm of space behind the air outlet (at the back of the unit) for good air
circulation. Allow at least 20cm of space on all other sides of the unit for good air circulation.
• Place the unit away from a clothes dryer, heater or radiator.
• For best results, place the unit in an enclosed space and close all doors windows and
outside openings.
• If placed near an enclosed storage area
(like a wardrobe or cupboard), ensure
there is adequate circulation of air.
• Do not use outdoors.
• This unit is intended for indoor residential
use only. It should not be used for
commercial or industrial applications.
• There are four wheels attached to the unit
for ease of transportation. Do not force the
castors to move over carpet.
• Do not transport the unit with water in the
water tank. This may cause the unit to tip
over or the water to spill.
power cord buckle
continuous
drainage hose Female threaded end
40cm +
20cm +
40cm + 20cm +
20cm +

English | 11 of 124
OPERATING INSTRUCTIONS
――
Control Panel
Buttons
NOTE: for safety reasons and to regulate temperature, the fan will continue to run when the
compressor is off.
• Auto / Comfort: Press once to start auto mode. This will automatically set the room humidity
to 45-55% based on the room’s environment.
• Filter: The lter light will ash after 250 hours of operation as a reminder to clean the lter on
the unit. Once cleaned, press the lter button once to reset.
To connect the unit to wi, hold the lter button down for three seconds until “AP” shows on
the LED display and follow the instructions below.
• Cont: press once to activate continuous dehumidifying mode. Before doing so, connect the
drainage hose to the back of the unit.
• Turbo: press once to start Turbo Mode. This will increase the fan speed to maximum. Press
again to reduce the fan speed.
• Timer: this button controls the auto-start and auto-stop functions.
For auto-start, turn the unit off using the power button. Press the timer button until the “on”
light illuminates.
• Use the arrows to select the auto time (available in 30 minute increments, up to 24 hours).
Once selected, wait ve seconds. The LED display will return to blank. The unit will turn on
after the time has been reached.
• For auto-stop, turn the unit on using the power button. Press the timer button until
the “on” light illuminates. Use the arrows to select the auto time (available in 30 minute
increments, up to 24 hours). Once selected, wait ve seconds. The LED display will
return to showing the RH. The unit will turn off after the time has been reached.
• Turning the unit on or off, or reducing the time to 0 will turn off timer mode. The unit will
turn off after the time has been reached.
• Up / Down Buttons: press to control the humidity level. The humidity level can be set from
25% RH to 85% RH in 5% increments. For drier air, set a lower RH. For damper air, set a higher
RH.

12 of 124 | English
Lights
• Auto, lter, continuous lights: these will illuminate when the modes are activated.
• Defrost: this will illuminate when frost builds up on the evaporator coils. When this happens,
the compressor will turn off and the fan will continue to run until the coils defrost.
• Full: this will illuminate when the water tank is full and needs to be emptied. To empty, follow
the instructions listed below.
Display
• As a default, the LED display will show the RH (relative humidity) of the room to +/- 5%
accuracy.
• If there is a problem with the unit, the following will display:
• P2: water tank is full or not in the right position. Empty the water tank or check its
positioning.
• AP: device is in auto-pairing mode, which is used to connect to wi. This mode should
turn off automatically within 8 minutes.
• AS: humidity sensor error. Unplug the unit, wait 30 seconds and plug back in. If the
problem persists, contact support.
• ES: tube temperature sensor error. Unplug the unit, wait 30 seconds and plug back in. If
the problem persists, contact support.
CONNECTING TO WIFI
――
NOTE: if you are having issues connecting to Wi, please ensure your network is set to 2.4G. If
you are continuing to have issues, please contact our customer care team by emailing help@
probreeze.com
• To connect to Wi, hold the lter button down for 3 seconds, or until the LED display shows
“AP” (auto-pairing). When in auto-pairing, the compressor will be forced off.
• Download the “NetHome plus” app, select “add device” and then select “dehumidier”.
Follow the instructions. All instructions can also be found in the App User Manual included
with this unit.
• If the connection is successful within 8 minutes of entering AP mode, the device will resume.
• If the connection is unsuccessful after 8 minutes of entering AP mode, the device will
resume.
• Once connected, you can view performance and control your dehumidier through the app.
EMPTYING THE WATER TANK
――
CAUTION: ALWAYS TURN THE UNIT OFF AND REMOVE THE PLUG FROM THE WALL OUTLET
BEFORE REMOVING THE WATER TANK.
• Do not transport the unit with water in the water tank. This may cause the unit to tip over or
the water to spill.
• Be careful when removing the water tank from the unit to avoid spilling water.

English | 13 of 124
• When you remove the water tank, do not touch any parts inside the unit. Doing so may
damage the product.
• If there is water anywhere else in the unit when the water tank is removed, clean with a dry
cloth.
• Once connected, you can view performance and control your dehumidier through the app.
Instructions
• If the unit is on and the water tank is full, the compressor and fan will turn off and the “full”
light will illuminate.
• To empty the water tank, slowly pull it out a little to loosen.
• Hold both sides of the water tank with two hands, and even strength, and pull it from the
unit. Do not put the water tank on the oor as the base is uneven.
• Throw the water away in a safe place and replace the water tank. Ensure this is done gently,
all the way into the unit, as forcing the water tank in may cause damage.
CONTINUOUS DRAINAGE
――
• Water can be automatically emptied into a oor drain or sink by attaching the unit to the
water hose (included).
• To do this, remove the plastic cover on the back of the unit. Caution: a small amount of
water may accumulate in the back drain outlet so have a small receptacle or dry cloth
ready to ensure this does not spill onto the oor.
• Attach the continuous hose cover and the drain hose to the back of the unit.
• Direct the hose to the drain; ensuring that there are no kinks and that the continuous hose
outlet is higher than the drain.
• Turn the unit on and press the “cont” button on the control panel.
NOTE: when the continuous drainage feature is not being used, remove the hose from the unit,
dry the outlet and replace the plastic cap.

14 of 124 | English
CLEANING & STORAGE
――
WARNING: ALWAYS TURN THE APPLIANCE OFF AND UNPLUG
THE POWER CORD FROM THE ELECTRICAL OUTLET BEFORE
HANDLING OR CLEANING IT.
CAUTION: DO NOT ALLOW WATER OR OTHER LIQUIDS TO
RUN INTO THE INTERIOR OF THE APPLIANCE, AS THIS COULD
CREATE A FIRE AND/OR ELECTRICAL HAZARD.
CAUTION: DO NOT USE ANY ABRASIVE CLEANERS OR
SOLVENTS, AS THIS CAN DAMAGE THE APPLIANCE.
• Do not attempt to clean the appliance in any other way
than that detailed by the manufacturer.
• Clean the exterior surface of the appliance by wiping
it with a soft, damp cloth. Dry the appliance with a soft,
clean cloth.
• The lter should be cleaned every two weeks using a
damp cloth
• Always empty the water tank, clean and dry the
appliance when not in use to prevent mould.
Cleaning the water tank:
• Remove and empty the water tank as per the instructions
above.
• Clean the water tank with warm tap water and mild
detergent (e.g. washing up liquid). Note: Do not use
Female threaded
end
Continuous
drainage hose
Remove the plastic
cover. Be careful of
water spilling.

English | 15 of 124
boiling water to clean the water tank.
• Ensure to remove any scale or deposits that have formed
inside the water tank.
• Wipe all surfaces dry before placing the water tank back
into the appliance.
Storage:
• To store your product, we recommend using the original
or a similar-sized box.
• Store the appliance in a safe, clean and dry place, away
from direct sunlight and out of reach of children when
not in use.
• The unit may need defrosting in temperatures less than
23°C - This will happen automatically and last up to 5
minutes. During this time, the dehumidifying function will
stop and the defrost indicator will light up. Do not switch
off while the unit is defrosting.
DECLARATION OF CONFORMITY
――
Hereby, One Retail Group Limited declares that the radio equipment type PB-15 is in compliance
with Directive 2014/53/EU. The full text of the EU declaration of conformity is available at the
following internet address: https://probreeze.com/ec-declaration-of-conformity/
RECYCLING AND DISPOSAL
――
Waste electrical and electronic products (WEEE), batteries, accumulators, and packaging
should not be disposed of with general household waste. This is to prevent possible harm to the
environment and human well-being, and to help conserve our natural resources. Most electrical
products with a plug, battery, or cable can be recycled. Contact your local council, household
waste disposal service, or the store where you purchased the product for information regarding
the collection schemes in your area.
Waste Electrical and
Electronic Equipment
(WEEE)
This symbol on the product and/or packaging indicates that
Waste Electrical products (WEEE) under Directive 2012/19/
EU which governs used electrical and electronic appliances,
should not be disposed of with general household waste.
The Mobius Loop This symbol indicates that the product or packaging is
capable of being recycled.

16 of 124 | English
Take-Back Scheme
Waste electrical products (WEEE) can be sent to One Retail Group for recycling and disposal
when you purchase a new product from One Retail Group, on a like-for-like basis. For more
information on how to recycle this product please visit www.probreeze.com
The end-user of electrical and electronic products (WEEE) is responsible for separating old
batteries and lamp bulbs before they are handed over to a designated disposal and recycling
service. Waste batteries can also be disposed of in collection bins, which can be found in most
local supermarkets and household waste recycling centres.

English | 17 of 124
Problem What to check
Unit does not start • Make sure the dehumidier plug is pushed
completely into the outlet.
• Check that the water tank is not full.
• Water bucket is not in the proper position.
The fan does not stop • The fan will continue to run even when the
compressor is off. This is for safety reasons
and to regulate the temperature of the
dehumidier. You will need to manually turn
the fan off.
Dehumidier does not dry the air as it
should
• Make sure nothing is blocking the back of the
dehumidier. Ensure it is at least 40cm away
from wall or any furniture.
• Lower the humidity control using the arrows.
• Check that all doors, windows or other
openings are securely closed.
• The room temperature is too low. The unit will
not work in temperatures below 5ºc.
• The unit will not dry enclosed spaces unless
there is sufcient air circulation.
• Check that there is nothing giving off
moisture into the room.
The unit is making a loud noise • The air lter is clogged and needs cleaning.
• The unit is tilted and not upright.
• The oor surface is not level.
Frost appears on the coils • This is normal. The dehumidier has an auto
defrost feature.
Water on oor • The hose connector on the back of the unit
may be loose.
• Check that the back drain plug is connected
when using the bucket to collect water.
ES, AS,P2,Eb appear in the display • These are error codes and will pause the unit.
For more information see the Control Panel
section above.
If you have any issues with our dehumidier, here are some troubleshooting tips that may help
you to overcome them.
TROUBLE SHOOTING TIPS
――

18 of 124 | Deutsch
30L LUFTENTFEUCHTER
MODELL PB-15
Vielen Dank, dass Sie sich für den Kauf eines Produkts von Pro Breeze entschieden haben. Bitte
lesen Sie das gesamte Handbuch vor der ersten Nutzung sorgfältig durch und bewahren Sie es
für später an einem sicheren Ort auf.
SICHERHEITSHINWEISE
――
BITTE LESEN UND BEWAHREN SIE DIESE WICHTIGEN
SICHERHEITSHINWEISE AUF.
Bei der Verwendung von Elektrogeräten sollten stets
grundlegende Sicherheitsvorkehrungen getroffen werden,
um das Risiko von Feuer, Stromschlag und Verletzungen zu
verringern, einschließlich der folgenden:
WARNUNG: UM DAS RISIKO VON ELEKTRISCHEN SCHLÄGEN,
EINEM BRAND ODER VERLETZUNGEN ZU VERMEIDEN,
SCHALTEN SIE DAS GERÄT IMMER AUS, ZIEHEN SIE DAS
NETZKABEL AUS DER STECKDOSE UND LEEREN SIE DEN
WASSERTANK, BEVOR SIE DAS GERÄT HANDHABEN,
REINIGEN ODER WARTEN.
• Decken Sie das Gerät während des Gebrauchs nicht ab.
• Verwenden Sie dieses Gerät ausschließlich wie in diesem
Handbuch beschrieben. Jede andere vom Hersteller
nicht empfohlene Nutzung kann zu Bränden, einem
elektrischen Schlag oder zu Verletzungen führen.
• Trennen Sie das Gerät stets vom Stromnetz, wenn es
nicht verwendet wird.
• Setzen Sie das Gerät keinem direkten Sonnenlicht,
Wärmequellen oder extremer Kälte aus.
• Bewahren Sie das Gerät außerhalb der Reichweite von
Kindern und Haustieren auf.
• Lassen Sie Kinder nicht alleine oder unbeaufsichtigt in
dem Bereich, an dem das Gerät verwendet wird.
• Achten Sie darauf, dass keine Kinder mit dem Gerät
spielen.

Deutsch | 19 of 124
• Die Reinigung und Wartung darf nicht von Kindern
durchgeführt werden, außer falls diese laufend
beaufsichtigt werden.
• Entsorgen Sie das vom Gerät zurückgehaltene Wasser.
Das Wasser ist nicht trinkbar.
• Das Gerät darf nicht von Personen (einschließlich
Kindern) mit eingeschränkten körperlichen, sensorischen
oder geistigen Fähigkeiten oder mangelnder Erfahrung
und Kenntnissen verwendet werden, es sei denn, sie wird
dabei beaufsichtigt oder wurde darin unterwiesen.
• Bewegen Sie das Gerät nur in aufrechter Position.
• Das Gerät muss im Umkreis von 50 cm frei stehen.
• Lassen Sie das Gerät während der Verwendung niemals
unbeaufsichtigt. Wenn Sie das Gerät gerade nicht
verwenden, schalten Sie es ab und trennen Sie es von der
Stromversorgung.
• Verlegen Sie das Netzkabel nicht so, dass man darüber
stolpern kann. Verlegen Sie das Netzkabel nicht unter
dem Teppichboden und bedecken Sie es nicht mit
Teppichen, Läufern oder Ähnlichem.
• Stellen Sie das Gerät auf eine flache, stabile und trockene
Oberfläche und halten Sie das Gerät immer aufrecht. Es
kann gefährlich sein, das Gerät in einer anderen Position
zu verwenden.
• Stellen Sie nichts auf das Gerät.
• Stellen Sie sicher, dass die Netzversorgung (einschließlich
Spannung, Frequenz und Leistung) dem Typenschild des
Geräts entspricht.
• In den ersten Minuten der ersten Nutzung kann es sein,
dass Sie einen Geruch wahrnehmen. Dies ist normal und
geht schnell vorbei.
• Lehnen Sie das Gerät nicht an eine Wand oder an andere
Geräte.
• Decken Sie das Gerät während des Betriebs nicht ab
und behindern Sie nicht den Luftstrom am Einlass- oder
Auslassgitter.

20 of 124 | Deutsch
• Decken Sie die Lüftungsschlitze und Öffnungen des
Geräts nicht ab, und stecken Sie keine Gegenstände
hinein, da dies zu einem elektrischen Schlag, einem
Brand oder einer Beschädigung des Geräts führen kann.
• Verwenden Sie das Gerät nicht mit nassen Händen.
• Betreiben Sie das Gerät nicht ohne Filter.
• Verwenden Sie dieses Gerät nicht in der Nähe von Wasser
oder in der unmittelbaren Umgebung eines Bades, einer
Dusche oder eines Schwimmbeckens. Stellen Sie das
Gerät niemals so auf, dass es in eine Badewanne oder
einen anderen Wasserbehälter fallen kann.
• Lassen Sie kein Wasser oder andere Flüssigkeiten in das
Innere des Geräts gelangen, da dies zu einem Brand und
/ oder zu einem elektrischen Schlag führen kann.
• Verwenden Sie keine mechanischen Geräte, um den
Abtauvorgang der Geräte zu beschleunigen.
• Verlegen Sie den kontinuierlichen Abflussschlauch nicht
im Freien, wenn die Temperatur unter 1 °C fällt.
• Dieses Gerät ist für den Hausgebrauch und ähnliche
Anwendungen vorgesehen. Nicht im Freien verwenden.
• Verwenden Sie das Gerät nicht in der Nähe von
Benzin, Farben, brennbaren Gasen, Öfen oder anderen
Heizquellen.
• Das Netzkabel sollte nicht von der Oberfläche
herunterhängen, auf der das Gerät platziert ist, um
zu verhindern, dass das Gerät durch das Gewicht
heruntergezogen wird.
• Verwenden Sie kein anderes Gerät mit hoher Leistung im
selben Stromkreis, um eine Überlastung des Stromkreises
zu vermeiden.
• Stecken Sie das Gerät immer direkt in eine
Steckdose. Verwenden Sie nach Möglichkeit keine
Verlängerungskabel, da diese überhitzen könnten, was
eine Brandgefahr darstellt.
• Verwenden Sie das Gerät nicht mit einem externen
Programm oder einem Timer, der das Gerät automatisch

Deutsch | 21 of 124
einschaltet, außer falls dieser bereits vom Hersteller in
das Gerät eingebaut wurde.
• Ziehen Sie nicht am Netzkabel. Bewegen, tragen oder
hängen Sie das Gerät niemals am Netzkabel auf.
• Knicken oder wickeln Sie das Netzkabel nicht um das
Gerät, da dies dazu führen kann, dass die Isolierung
beschädigt wird oder reißt, insbesondere dort, wo sie in
das Gerät eintritt.
• Betreiben Sie das Gerät nicht ohne Wassertank.
• Stellen Sie vor dem Gebrauch sicher, dass das Netzkabel
vollständig ausgerollt ist, und verlegen Sie es so, dass es
keinen Teil des Geräts berührt.
• Betreiben Sie das Gerät nicht ohne Sicherung.
• Betreiben Sie das Gerät nicht, wenn am Gerät, dem
Netzkabel oder am Zubehör Schäden zu sehen sind.
Wenn das Versorgungskabel beschädigt ist, muss es
vom Hersteller, einem Servicemitarbeiter oder einer
ähnlich qualifizierten Person ausgetauscht werden, um
Gefahren vorzubeugen.
• Betreiben Sie das Gerät nicht, wenn Sie Anzeichen von
Schäden am mitgelieferten Gerät oder Zubehör finden.
• Versuchen Sie nicht, elektrische oder mechanische
Komponenten des Geräts zu reparieren oder einzustellen.
Dies kann gefährlich sein und führt zum Erlöschen Ihrer
Garantie.
• Das Gerät darf nur mit dem mitgelieferten Netzteil
verwendet werden. Verwenden Sie keine anderen
Ladegeräte oder Netzteile, da dies das Gerät
beschädigen können.
• Führen Sie niemals Finger oder Metallgegenstände in die
Lüftungsschlitze und Öffnungen des Geräts ein.
• Nur für den Hausgebrauch.

22 of 124 | Deutsch
SPEZIFISCHE INFORMATION ZU DEM R290 KÄLTEMITTEL
――
VORSICHT
BRANDGEFAHR
WARNUNG: DAS GERÄT MUSS IN EINEM RAUM MIT EINER
BODENFLÄCHE VON MEHR ALS 4M2 INSTALLIERT, BETRIEBEN
UND GELAGERT WERDEN
• Dieses Gerät enthält 0,1 kg (100 g) des Kältemittelgases
R290.
• R290 ist ein Kältemittelgas, das der europäischen
Umweltrichtlinie entspricht.
• Durchstechen Sie den Kältemittelkreislauf nicht.
• Beachten Sie, dass das Kältemittel R290 geruchlos ist
und nicht über den typischen Geruch von Erdgas- und
Propantanks verfügt.
• Verwenden Sie keine anderen als die vom Hersteller
empfohlenen Mittel, um den Abtauvorgang zu
beschleunigen oder zu reinigen.
• Das Gerät muss an einem Ort aufgestellt werden, an dem
keine dauerhaften Zündquellen wie offenes Feuer, Gas
oder Elektrogeräte in Betrieb sind.
• Nicht durchstechen und nicht verbrennen.
• Wenn das Gerät in einem nicht-belüfteten Bereich
installiert, betrieben oder gelagert wird, muss der
Raum so gestaltet sein, dass sich keine Kältemittellecks
ansammeln und siche keine Gefahr eines Brandes oder
einer Explosion aufgrund der Entzündung des Kältemittels
durch elektrische Heizungen, Öfen oder andere
Zündquellen entsteht.
• Das Gerät muss so gelagert werden, dass ein
mechanischer Ausfall vermieden wird.

Deutsch | 23 of 124
• Personen, die den Kältemittelkreislauf betreiben oder an
ihm arbeiten, müssen über eine entsprechende Befugnis
verfügen, welche belegt, dass der Nutzer laut bestimmten
in der Branche anerkannten Verbänden kompetent im
Umgang mit Kältemitteln ist.
• Wartungen und Reparaturen, die die Unterstützung
anderer qualizierter Mitarbeiter erfordern, müssen unter
Aufsicht einer Person durchgeführt werden, die auf die
Nutzung brennbarer Kältemittel spezialisiert ist.
Erklärung der auf dem Gerät angezeigten Symbole
WARNUNG
Das Symbol verweist darauf, dass dieses Gerät ein brennbares
Kältemittel verwendet. Wenn das Kältemittel austritt und einer
externen Zündquelle ausgesetzt wird, besteht Brandgefahr.
VORSICHT
Dieses Symbol zeigt an, dass das Betriebshandbuch sorgfältig
gelesen werden sollte.
VORSICHT
Dieses Symbol zeigt an, dass Service-Mitarbeiter dieses Gerät
unter Bezugnahme auf das Installationshandbuch handhaben
sollten.
VORSICHT
Dieses Symbol zeigt an, dass Informationen verfügbar sind,
wie z. B. die Betriebsanleitung oder das Benutzerhandbuch.
SYMBOLS ERLÄUTERUNG
――
SPEZIFIKATIONEN
――
• Größe: L 38.6 x W 26 x H 50cm
• Nettogewicht: 17kg
• Spannung: 220-240~, 1Ph
• Frequenz: 50Hz
• Eingangsleistung: 715W
• Maximale Kapazität (pro 24 Stunden): 30L
• Kühlmittel: R290 / 0.099kg
Nur für den Innengebrauch. Bitte lesen Sie die
Bedienungsanleitung und
bewahren Sie sie für den späteren
Gebrauch auf.
Die Ausrüstung entspricht
den geltenden britischen
Sicherheitsanforderungen und
-vorschriften
Das Gerät entspricht den geltenden
EU-Sicherheitsanforderungen und
-vorschriften.

24 of 124 | Deutsch
ARBEITSWEISE
――
Bitte machen Sie sich mit dem Gerät vertraut, bevor Sie es benutzen.
Hinweis: Alle Illustrationen dienen nur zu Erklärungszwecken. Ihr Gerät kann u. U. davon abweichen.
Luftlter
Bedienfeld
Griff (beide Seiten)
Tafel
Wasserstands-Fenster
Wassertank
Kontinuierlicher Abussschlauch-Auslass
Netzkabelhalter
Rolle
Netzkabel und Stecker

Deutsch | 25 of 124
ZUBEHÖR
――
Im Wassertank ndet sich folgendes Zubehör: Entfernen und installieren Sie die Zubehörteile vor
dem Gebrauch, gemäß den unten aufgeführten Anweisungen.
POSITIONIEREN DES GERÄTS
――
• Dieses Gerät ist für den Betrieb bei Temperaturen zwischen 5ºc und 32ºc und einer relativen
Luftfeuchtigkeit zwischen 30 % und 50 % RH (relative Luftfeuchtigkeit) konzipiert.
• Stellen Sie das Gerät in einem Bereich auf, in dem die Temperaturen nicht unter
• 5°C sinken. Bei Temperaturen unter 5°C können die Spulen einfrieren, was zu einer
Leistungsminderung führt.
• Stellen Sie das Gerät auf eine glatte, ebene Oberäche, die stabil genug ist, um das Gewicht des
Geräts mit vollem Wassertank zu tragen.
• Lassen Sie hinter dem Luftauslass (an der Rückseite des Geräts) einen Mindestabstand von 50 cm
für eine gute Luftzirkulation. Lassen Sie an allen anderen Seiten des Geräts einen Mindestabstand
von 20 cm für eine gute Luftzirkulation.
• Stellen Sie das Gerät nicht in der Nähe eines Wäschetrockners, einer Heizung oder einem
Heizkörper auf.
• Um beste Ergebnisse zu erzielen, stellen Sie das Gerät in einen geschlossenen Raum und
schließen Sie alle Türen, Fenster und Außenöffnungen.
• Wird das Gerät in der Nähe eines geschlossenen Aufbewahrungsraums (wie einem Schrank oder
einer Garderobe) aufgestellt, ist für ausreichende Luftzirkulation zu sorgen.
• Das Gerät darf nicht im Freien verwendet werden.
• Dieses Gerät ist ausschließlich für die Verwendung in Innenräumen bestimmt. Es ist nicht für
kommerzielle oder industrielle Nutzung gedacht.
• Um den Transport zu erleichtern, ist das Gerät mit vier Rädern ausgestattet. Schieben Sie die
Rollen nicht mit Gewalt über einen Teppich.
• Das Gerät nicht transportieren, wenn Wasser im Wassertank enthalten ist. Dies kann dazu
führen, dass das Gerät umkippt oder das Wasser verschüttet wird.
Netzkabelhalter
Kontinuierlicher
Abussschlauch
Innengewindeende
Um den Netzkabelhalter zu installieren,
diesen einfach in die Verpackung des
Geräts stecken

26 of 124 | Deutsch
40cm +
20cm +
40cm + 20cm +
20cm +
BEDIENUNGSANLEITUNG
――
Bedienfeld
Schaltächen
Hinweis: Aus Sicherheitsgründen und zur Regulierung der Temperatur läuft der Lüfter weiter, wenn
der Kompressor ausgeschaltet ist.
• Auto / Comfort: Drücken Sie einmal um Auto-Modus zu aktivierien, Die Raumfeuchtigkeit
steigt dann automatisch auf 45%-55%. Das hängt vom Zustand des Raum. Im
Automatikmodus kann die Luftfeuchtigkeit nicht angepasst werden. Drücken Sie die
Aufwärts-/Abwärts-Tasten, um den automatischen Modus zu verlassen.
• Filter:
• Die Filterleuchte blinkt nach 250 Betriebsstunden auf, um daran zu erinnern, dass der
Filter des Geräts gereinigt werden muss. Nach der Reinigung einmal auf die Filtertaste
drücken, um sie zurückzusetzen.
• Um das Gerät an den WLAN anzuschließen, die Filtertaste drei Sekunden lang gedrückt
halten, bis „AP“ auf der LED-Anzeige erscheint, und den nachstehenden Anweisungen
folgen.
• Cont: Einmal drücken, um den kontinuierlichen Entfeuchtungsmodus zu aktivieren. Bevor Sie
dies tun, schließen Sie den Abussschlauch an der Rückseite des Geräts an.
• Turbo: Einmal drücken, um den Turbomodus zu starten. Dadurch wird die
Gebläsegeschwindigkeit auf das Maximum erhöht. Drücken Sie erneut, um die
Gebläsegeschwindigkeit zu verringern.

Deutsch | 27 of 124
• Timer: Diese Schaltäche steuert die Autostart- und Autostopp-Funktion.
• Für den automatischen Start schalten Sie das Gerät mit der Einschalttaste aus. Drücken
Sie die Timer-Taste, bis die „On“-Lampe aueuchtet. Verwenden Sie die Pfeile
zur Auswahl der Auto-Zeit (verfügbar in 30-Minuten-Schritten, bis zu 24 Stunden).
Warten Sie fünf Sekunden, nachdem Sie Ihre Wahl getroffen haben. Die LED-Anzeige
erlischt wieder. Das Gerät schaltet sich ein, wenn der Zeitpunkt erreicht ist.
• Für den automatischen Stopp schalten Sie das Gerät mit der Einschalttaste ein. Drücken
Sie die Timer-Taste, bis die „On“-Lampe aueuchtet. Verwenden Sie die Pfeile zur
Auswahl der Auto-Zeit (verfügbar in 30-Minuten-Schritten, bis zu 24 Stunden). Warten
Sie fünf Sekunden, nachdem Sie Ihre Wahl getroffen haben. Die LED-Anzeige kehrt
zur Anzeige der RH (relative Luftfeuchtigkeit) zurück. Das Gerät schaltet sich aus, wenn
der Zeitpunkt erreicht ist.
• Wenn Sie das Gerät ein- oder ausschalten oder die Zeit auf 0 reduzieren, wird der Timer-
Modus ausgeschaltet. Das Gerät schaltet sich aus, wenn der Zeitpunkt erreicht ist.
• Nach-oben-/Nach-unten-Tasten: Drücken, um das Feuchtigkeitsniveau zu steuern. Das
Feuchtigkeitsniveau kann in 5%-Schritten von 35 % RH bis 85 % RH eingestellt werden. Für
trockenere Luft stellen Sie einen niedrigeren RH-Wert ein. Für feuchtere Luft stellen Sie einen
höheren RH-Wert ein.
Kontrollleuchten
•
Komfort-, Filter-, Dauerlicht: Leuchten auf, wenn die jeweiligen Modi aktiviert sind.
• Abtauen: Leuchtet auf bei Frostbildung auf den Verdampferspulen. Wenn dies geschieht,
schaltet sich der Kompressor ab und das Gebläse läuft weiter, bis die Spulen abtauen.
• Voll: Leuchtet auf, wenn der Wassertank voll ist und geleert werden muss. Um ihn zu entleeren,
folgen Sie den unten aufgeführten Anweisungen.
Anzeigebildschirm
• Die LED-Anzeige zeigt die relative Luftfeuchtigkeit (RH) des Raumes standardmäßig mit
einer Genauigkeit von +/- 5 % an.
• Bei Problemen mit dem Gerät wird Folgendes angezeigt:
• P2: Wassertank ist voll oder nicht in der richtigen Position. Leeren Sie den Wassertank
oder überprüfen Sie seine Positionierung.
• AP: Das Gerät bendet sich im Auto-Pairing-Modus, der für die Verbindung zum
WLAN verwendet wird. Dieser Modus sollte sich innerhalb von 8 Minuten automatisch
ausschalten.
• AS: Fehler des Feuchtigkeitssensors. Ziehen Sie den Netzstecker heraus, warten Sie 30
Sekunden und schließen Sie das Gerät wieder an. Wenn das Problem weiterhin besteht,
wenden Sie sich an den Kundendienst.
• ES: Fehler des Rohr-Temperaturfühlers. Ziehen Sie den Netzstecker heraus, warten Sie
30 Sekunden und schließen Sie das Gerät wieder an. Wenn das Problem weiterhin
besteht, wenden Sie sich an den Kundendienst.

28 of 124 | Deutsch
VERBINDUNG ZUM WLAN
――
Hinweis: Wenn Sie Probleme beim Herstellen einer Wi-Fi-Verbindung haben, stellen Sie bitte sicher,
dass Ihr Netzwerk auf 2,4 G eingestellt ist. Wenn Sie weiterhin Probleme haben, wenden Sie sich bitte
per E-Mail unter [email protected] an unser Kundenserviceteam.
• Um eine WLAN-Verbindung herzustellen, halten Sie die Filtertaste 3 Sekunden lang gedrückt
oder bis das LED-Display „AP“ (automatisches Pairing) anzeigt. Beim automatischen Pairing
wird der Kompressor zwangsweise ausgeschaltet.
• Stellen Sie sicher, dass der Luftentfeuchter und Ihr Mobiltelefon mit demselben WLAN
verbunden sind.
• Laden Sie die App „NetHome plus“ herunter. Sie müssen ein Konto erstellen. Wählen Sie auf
dem Bildschirm "Gerät hinzufügen" und dann "Luftentfeuchter". Folgen Sie den Anweisungen in
der App.
• Wenn die Verbindung erfolgreich ist, schaltet sich der Luftentfeuchter automatisch wieder ein.
• Wenn die Verbindung nach 8 Minuten nicht erfolgreich ist, schaltet sich der Luftentfeuchter
automatisch wieder ein. Starten Sie den Verbindungsprozess von vorne.
Sobald die Verbindung hergestellt ist, können Sie die Leistung anzeigen und Ihren
Luftentfeuchter über die App steuern.
WASSERTANK ENTLEEREN
――
Vorsicht
• Schalten Sie das Gerät vor Entfernen des Wassertanks immer aus und ziehen Sie den Stecker
aus der Steckdose.
• Das Gerät nicht transportieren, wenn Wasser im Wassertank enthalten ist. Dies kann dazu
führen, dass das Gerät umkippt oder das Wasser verschüttet wird.
• Lassen Sie beim Entfernen des Wassertanks aus dem Gerät Vorsicht walten, um ein
Verschütten von Wasser zu vermeiden.
• Berühren Sie keine Teile im Inneren des Geräts, wenn Sie den Wassertank entfernen. Hierdurch
könnte das Produkt beschädigt werden.
• Wenn sich beim Entfernen des Wassertanks an einer anderen Stelle im Gerät Wasser bendet,
reinigen Sie es mit einem trockenen Tuch.
Anleitung
• Wenn das Gerät eingeschaltet ist und der Wassertank voll ist, schalten sich Kompressor und
Gebläse aus und die „Voll“-Lampe leuchtet auf.
• Um den Wassertank zu leeren, ziehen Sie ihn langsam ein wenig heraus, um ihn zu lockern.
• Halten Sie beide Seiten des Wassertanks mit zwei Händen und gleicher Kraft fest und ziehen
Sie ihn aus dem Gerät. Stellen Sie den Wassertank nicht auf den Boden, da der Behälterboden
uneben ist.
• Entsorgen Sie das Wasser an einem sicheren Ort und setzen Sie den Wassertank wieder ein.
Achten Sie darauf, dass das Einsetzen bis zur endgültigen Position vorsichtig geschieht, da ein
gewaltsames Einsetzen des Wassertanks Schäden verursachen kann.

Deutsch | 29 of 124
KONTINUIERLICHER ABFLUSS
――
•
Das Wasser kann automatisch in einen Bodenabuss oder ein Waschbecken entleert werden,
indem das Gerät an den Wasserschlauch (im Lieferumfang enthalten) angeschlossen wird.
• Entfernen Sie hierzu die Kunststoff-Abdeckung auf der Rückseite des Geräts. Vorsicht: Eine kleine
Menge Wasser kann sich im hinteren Abuss ansammeln. Halten Sie daher einen kleinen Behälter
oder ein trockenes Tuch bereit, um sicherzustellen, dass das Wasser nicht auf den Boden läuft.
• Bringen Sie die durchgehende Schlauchabdeckung und den Abussschlauch an der Rückseite des
Geräts an.
• Führen Sie den Schlauch zum Abuss; achten Sie darauf, dass es keine Knicke gibt und dass der
durchgehende Schlauchauslass höher liegt als der Abuss.
• Schalten Sie das Gerät ein und drücken Sie die Schaltäche „cont“ auf dem Bedienfeld.
• Hinweis: Wenn die kontinuierliche Abussfunktion nicht verwendet wird, entfernen Sie den
Schlauch vom Gerät, trocknen Sie den Auslass und setzen Sie die Kunststoffkappe wieder auf.
Innen mit
Gewinde
Kontinuierliche
Entwässerung
Schlauch
Entfernen Sie die
Kunststoffabdeckung.
Achten Sie darauf,
dass kein Wasser
verschüttet wird.

30 of 124 | Deutsch
REINIGUNG & LAGERUNG
――
WARNUNG: SCHALTEN SIE DAS GERÄT IMMER AUS UND
ZIEHEN SIE DAS NETZKABEL AUS DER STECKDOSE, BEVOR SIE ES
HANDHABEN ODER REINIGEN.
VORSICHT: LASSEN SIE KEIN WASSER ODER ANDERE
FLÜSSIGKEITEN IN DAS INNERE DES GERÄTS GELANGEN, DA DIES
ZU EINEM BRAND UND / ODER ZU EINEM ELEKTRISCHEN SCHLAG
FÜHREN KANN.
VORSICHT: VERWENDEN SIE KEINE SCHEUERMITTEL ODER
LÖSUNGSMITTEL, DA DIESE DAS GERÄT BESCHÄDIGEN KÖNNTEN.
• Versuchen Sie nicht, das Gerät auf eine andere als die
vom Hersteller angegebene Weise zu reinigen.
• Reinigen Sie die Außenäche des Geräts mit einem
weichen, feuchten Tuch. Trocknen Sie das Gerät danach
mit einem weichen, sauberen Tuch ab.
• Wenn Sie das Gerät nicht verwenden, leeren Sie stets den
Wassertank, reinigen und trocknen Sie es, um Schimmel
zu vermeiden.
Reinigung des Wassertanks:
• Entfernen und leeren Sie den Wassertank gemäß den
obigen Anweisungen.
• Reinigen Sie den Wassertank mit warmem
Leitungswasser und einem milden Reinigungsmittel (z. B.
Spülmittel). Hinweis: Verwenden Sie für die Reinigung des
Wassertanks kein kochendes Wasser.
• Stellen Sie sicher, dass sich keine Ablagerungen oder
Ablagerungen im Wassertank gebildet haben.
• Wischen Sie alle Oberächen trocken, bevor Sie den
Wassertank wieder in das Gerät stellen.
Lagerung:

Deutsch | 31 of 124
• Um Ihr Produkt aufzubewahren, empfehlen wir die
Verwendung der Originalverpackung oder einer Box
ähnlicher Größe.
• Bewahren Sie das Gerät an einem sicheren,
sauberen und trockenen Ort außerhalb direkter
Sonneneinstrahlung und außerhalb der Reichweite von
Kindern auf, wenn Sie es nicht benutzen.
• Bei Temperaturen unter 23 °C muss das Gerät
möglicherweise aufgetaut werden. Dies geschieht
automatisch und dauert bis zu 5 Minuten. Während
dieser Zeit stoppt die Entfeuchtungsfunktion und die
Abtauanzeige leuchtet auf. Schalten Sie das Gerät nicht
während des Auftauens aus.
RECYCLING & ENTSORGUNG
――
Elektro- und Elektronik-Altgeräte (WEEE), Batterien, Akkus und Verpackungen dürfen nicht mit
dem Hausmüll entsorgt werden. Dies dient dazu, mögliche Schäden für die Umwelt und das
menschliche Wohlergehen zu verhindern und unsere natürlichen Ressourcen zu schonen. Die
meisten Elektroprodukte mit Stecker, Batterie oder Kabel können recycelt werden. Informationen
zu den Sammelsystemen in Ihrer Nähe erhalten Sie von Ihrer Gemeindeverwaltung, der
Müllabfuhr oder dem Geschäft, in dem Sie das Produkt gekauft haben.
Rücknahmesystem
Sie können Elektro- und Elektronik-Altgeräte für Recycling und Entsorgung an die One Retail
Group schicken, wenn Sie ein neues, vergleichbares Produkt von One Retail Group kaufen.
Weitere Informationen zum Recycling dieses Produkts nden Sie unter www.probreeze.com
Der Endverbraucher von Elektro- und Elektronikprodukten (WEEE) ist dafür verantwortlich, alte
Batterien und Glühbirnen zu trennen, bevor sie einem dafür vorgesehenen Entsorgungs- und
Recyclingdienst übergeben werden. Altbatterien können auch in Sammelbehältern entsorgt
werden, die Sie in den meisten örtlichen Supermärkten und Recyclinghöfen für Hausmüll nden.
Elektro- und Elektronik-
Altgeräte (WEEE)
Dieses Symbol auf dem Produkt und/oder der Verpackung
weist darauf hin, dass Elektro-Altgeräte (WEEE) gemäß der
Richtlinie 2012/19/EU, die Elektro- und Elektronik-Altgeräte
regelt, nicht mit dem normalen Hausmüll entsorgt werden
dürfen.
Die Möbius-Schleife Dieses Symbol weist darauf hin, dass das Produkt oder die
Verpackung recycelt werden kann.

32 of 124 | Deutsch
Problem Lösung
Der Lüfter hält nicht an • Der Lüfter läuft auch bei ausgeschaltetem Kompressor
weiter. Dies dient Sicherheitsgründen und zur Regulierung
der Temperatur des Luftentfeuchters. Sie müssen den Lüfter
manuell ausschalten.
Gerät startet nicht • Stellen Sie sicher, dass der Stecker des Luftentfeuchters
vollständig in die Steckdose eingesteckt ist.
• Überprüfen Sie, dass der Wassertank nicht voll ist.
• Der Wasserbehälter ist nicht in der richtigen Position.
Der Luftentfeuchter
trocknet die Luft nicht so,
wie er sollte
• Stellen Sie sicher, dass nichts die Rückseite des
Luftentfeuchters blockiert. Stellen Sie sicher, dass ein
Abstand von mindestens 40 cm zur Wand oder zu den
Möbeln besteht.
• Senken Sie die Feuchtigkeitssteuerung mittels der Pfeile.
• Überprüfen Sie, ob alle Türen, Fenster oder sonstigen
Öffnungen sicher verschlossen sind.
• Die Zimmertemperatur ist zu niedrig. Das Gerät funktioniert
nicht bei Temperaturen unter 5ºc.
• Das Gerät trocknet geschlossene Räume nur, wenn
ausreichende Luftzirkulation vorhanden ist.
• Überprüfen Sie, dass nichts im Raum Feuchtigkeit abgibt.
Das Gerät macht ein
lautes Geräusch
• Der Luftlter ist verstopft und benötigt eine Reinigung.
• Das Gerät steht auf einer Neigung und nicht gerade.
• Der Boden ist uneben.
Die Spulen weisen Frost
auf
• Das ist normal. Der Luftentfeuchter besitzt eine automatische
Abtaufunktion.
Wasser auf dem
Fußboden
• Der Schlauchanschluss auf der Rückseite des Geräts ist
wahrscheinlich lose.
• Stellen Sie sicher, dass der hintere Entleerungs-Stopfen
angeschlossen ist, wenn Sie den Eimer verwenden, um
Wasser aufzufangen.
ES, AS,P2,Eb erscheinen in
der Anzeige
• Hierbei handelt es sich um Fehlercodes, die den Betrieb des
Geräts unterbrechen. Weitere Informationen nden Sie im
Bedienfeld-Abschnitt oben.
ABHILFE BEI PROBLEMEN
――
Wenn Sie Probleme mit unserem Luftentfeuchter haben sollten, nden Sie hier einige Tipps zur
Fehlerbehebung, die Ihnen bei der Lösung der Probleme helfen können.

Français | 33 of 124
30L DÉSHUMIDIFICATEUR
MODÈLE PB-15
Merci d’avoir acheté un produit Pro Breeze. Veuillez lire attentivement la notice dans son
intégralité avant la première utilisation et conservez-la en lieu sûr pour toute référence
ultérieure.
CONSIGNES DE SÉCURITÉ
――
VEUILLEZ LIRE ET CONSERVER CES CONSIGNES DE SÉCURITÉ.
Avant d’utiliser un appareil électrique, veillez à respecter
les mesures de sécurité de base an de réduire les risques
d’incendie, d’électrocution et de blessure, notamment:
AVERTISSEMENT: AFIN D’ÉVITER TOUT RISQUE D’ÉLECTROCUTION,
D’INCENDIE OU DE BLESSURE, ÉTEIGNEZ SYSTÉMATIQUEMENT
L’APPAREIL, DÉBRANCHEZ LE CÂBLE D’ALIMENTATION DE LA
PRISE ÉLECTRIQUE ET VIDEZ LE RÉSERVOIR D’EAU AVANT DE LE
MANIPULER, DE LE NETTOYER OU DE PROCÉDER À L’ENTRETIEN.
• Ne couvrez pas l’appareil en cours d’utilisation.
• Utiliser uniquement comme décrit dans le présent mode
d’emploi. Toute autre utilisation non recommandée
par le fabricant peut provoquer un incendie, un risque
d’électrocution ou de blessures.
• Débranchez toujours l'appareil lorsqu'il n'est pas utilisé.
• N’exposez pas l'appareil à la lumière directe du soleil, à
des sources de chaleur ou à un froid extrême.
• Gardez l'appareil hors de portée des enfants et des
animaux domestiques.
• Ne pas laisser un enfant seul ou sans surveillance dans la
zone où le produit est utilisé.
• Les enfants doivent être surveillés et ne peuvent en
aucun cas jouer avec l’appareil.
• Le nettoyage et l’entretien ne doivent en aucun cas
être conés à des enfants, à moins d’être surveillés en
permanence.

34 of 124 | Français
• Jetez l'eau retenue par l'appareil. Cette eau n’est pas
potable.
• L’appareilne doit pas être utilisé par des personnes (y
compris des enfants) dont les capacités physiques,
sensorielles ou mentales sont réduites, ou manquant
d’expérience et de connaissances, à moins d’être
supervisées ou d’avoir reçu des instructions spéciques.
• Lorsque vous déplacez l’appareil, veillez à le maintenir en
position verticale.
• Veillez à respecter un dégagement minimum de 50cm
sur tous les côtés de l’appareil.
• Ne laissez jamais le produitsans surveillance
pendant son utilisation. Éteignez toujours le produit et
débranchez-le de l’alimentation électrique lorsqu’il n’est
pas utilisé.
• Ne pas placer le câble d’alimentation dans une zone où
il pourrait présenter un risque de trébuchement. Ne pas
placer le câble d’alimentation sous une moquette ou
un tapis, et ne pas couvrir, d’un tapis des patins ou tout
autre revêtement similaire.
• Placez l’appareil sur une surface plane, stable et sèche et
maintenez-le à la verticale. L’utilisation de l’appareil dans
une autre position peut s’avérer dangereuse.
• Ne posez jamais aucun objet sur l’appareil.
• Assurez-vous que l’alimentation secteur (y compris la
tension, la fréquence et l’alimentation) est conforme à la
plaque signalétique de le produit.
• Une odeur pourrait se dégager au cours des premières
minutes d’utilisation. C’est normal et disparaîtra
rapidement.
• Ne placez pas l’appareil contre un mur ou d’autres
appareils.
• Ne couvrez pas l’appareil. Ne restreignez pas le débit d’air
des grilles d’entrée ou de sortie pendant son utilisation.
• Ne couvrez pas, ne bloquez pas ou ne poussez
pas d’objets dans les évents ni dans les orices de

Français | 35 of 124
l’appareil. Vous risqueriez ainsi de provoquer un
risque d’électrocution, un incendie ou d’endommager
l’appareil..
• N’utilisez pas le produit avec les mains mouillées.
• N’utilisez pas l'appareil sans le ltre.
• N’utilisez pas ce produit à proximité d’un point d’eau,
d’une baignoire, d’une douche ou d’une piscine. Ne
placez jamais le produit où il pourrait tomber dans une
baignoire ou un autre récipient contenant de l’eau.
• Ne laissez pas d’eau ou d’autres liquides pénétrer dans
l’appareil. Cela pourrait créer un incendie et/ou un risque
d’électrocution.
• N’utilisez pas de dispositifs mécaniques pour accélérer le
processus de dégivrage des appareils.
• Ne placez pas le exible d’évacuation continue à
l’extérieur si la température est inférieure à 1C°.
• L’appareil est destiné à un usage domestique intérieur et
autres applications similaires. Ne pas utiliser à l’extérieur.
• N’utilisez pas l’appareil à proximité d’essence, de gaz
inammables, de fours ou d’autres sources de chaleur.
• Le câble d’alimentation ne doit pas pendre de la surface
sur laquelle l’appareil est placé an d’éviter tout risque
de chute.
• Pour éviter une surcharge du circuit lors de l’utilisation de
ce produit, ne faites pas fonctionner un autre appareil de
forte puissance sur le même circuit électrique.
• Branchez toujours le produit directement sur une prise
murale. Évitez d’utiliser des rallonges, car elles pourraient
surchauffer et constituer un risque d’incendie.
• N’utilisez pas ce produit avec un programmateur externe,
un temporisateur ou tout autre dispositif qui l’l’activerait
automatiquement à moins que celui-ci n’ait été
préalablement intégré par le fabricant.
• Ne tirez pas sur le cordon d’alimentation pour arrêter
l’appareil. Ne pas déplacer, ne pas transporter, ne jamais
suspendre l’appareil par le câble d’alimentation.

36 of 124 | Français
• Ne pas plier ni enrouler le cordon d’alimentation et la
che autour de l’appareil, car cela pourrait fragiliser
ou ssurer l’isolant, en particulier à la jonction avec le
dispositif.
• N’utilisez pas l’appareil sans le réservoir d’eau.
• Vériez que le câble d’alimentation est bien tendu avant
l’utilisation et veillez à éviter tout contact avec le produit.
• Ne pas utiliser l’appareilsi les dispositifs de sécurité ont
été retirés.
• Ne pas utiliser le produit s’il présente des signes de
dommages, ou si le câble d’alimentation, ou l’un des
accessoires fournis est endommagé. Si le cordon
d’alimentation est endommagé, il doit être remplacé
par le fabricant, son représentant ou toute personne
qualiée, an d’éviter tout danger.
• N’utilisez pas l’appareilou ses accessoires si vous
constatez des signes de dommages.
• Ne tentez pas de réparer ou d’ajuster des éléments
électriques ou mécaniques dans le produit. Cela pourrait
être dangereux et annulerait votre garantie.
• L’appareil ne doit être utilisé qu’avec l’adaptateur secteur
fourni. Ne pas utiliser d’autres chargeurs ou adaptateurs
secteur qui risqueraient d’endommager le produit.
• Ne pas insérer les doigts ou des objets métalliques dans
l’entrée ou la sortie d’air.
• Usage domestique uniquement.
INFORMATIONS SPÉCIFIQUES CONCERNANT LE GAZ
RÉFRIGÉRANT R290
――ATTENTION
RISQUE D'INCENDIE
AVERTISSEMENT: L’APPAREIL DOIT ÊTRE INSTALLÉ, UTILISÉ ET

Français | 37 of 124
STOCKÉ DANS UNE ZONE À SUPERFICIE SUPÉRIEURE À 4M2.
• Cet appareil contient 100g de gaz réfrigérant R290.
• Le R290 est un gaz réfrigérant conforme à la directive
européenne sur l’environnement.
• Ne pas percer le circuit de refroidissement.
• Le réfrigérant R290 est inodore. Il n’a pas l’odeur
normalement associée aux gaz naturels ni au propane.
• Ne pas utiliser de méthodes de dégivrage accéléré ou
de nettoyage autres que celles recommandées par le
fabricant.
• L’appareil doit être placé dans une zone dépourvue
de toute source permanente de chaleur ou d’ignition,
notamment de ammes nues, de gaz ou d’appareils
électriques en fonctionnement.
• Ne pas percer, ni brûler.
• Si l’appareil est placé, utilisé ou rangé dans un endroit
non ventilé, le local doit être conçu de manière à prévenir
toute inltration de uide frigorigène, ce qui entraînerait
un risque d’incendie ou d’explosion en raison de la
combustion du uide frigorigène provoquée notamment
par un radiateur électrique ou une cuisinière.
• L’appareil doit être rangé de manière à éviter tout
dysfonctionnement mécanique.
• Les opérateurs ou les techniciens intervenant sur le
circuit de réfrigération doivent être agréés par un
organisme accrédité garantissant leur capacité à
manipuler les produits réfrigérants conformément à une
évaluation spécique reconnue par les associations de
l’industrie.
• L’entretien et les réparations qui nécessitent l’assistance
d’autres opérateurs qualiés seront supervisés par
une personne spécialisée dans l’utilisation de produits
réfrigérants inammables.

38 of 124 | Français
SYMBOLE EXPLICATION
――
SPÉCIFICATIONS
――
• Dimensions: L 38.6 x W 26 x H 50cm
• Poids net: 17kg
• Tension: 220-240~, 1Ph
• Fréquence: 50Hz
• Puissance d’entrée: 715W
• Capacité maximale (pour 24 h): 30L
• Gaz réfrigérant: R290 / 0.099kg
Explication des symboles afchés sur l’appareil.
AVERTISSEMENT
Ce symbole signie que cet appareil utilise un réfrigérant
inammable. Si le réfrigérant fuit et est exposé à une source
d’inammation extérieure, un incendie peut se déclarer.
ATTENTION
Ce symbole signie que le mode d’emploi doit être lu
attentivement.
ATTENTION
Ce symbole signie que cet appareil doit être manipulé par
du personnel technique qualié se référant aux consignes
d’installation.
ATTENTION
Ce symbole signie que des informations sont disponibles,
par exemple la notice d’utilisation ou le mode d’emploi.
Pour une utilisation en intérieur. Veuillez lire le manuel d'instructions
et le conserver pour une utilisation
future.
L'équipement est conforme aux
exigences et réglementations de
sécurité applicables au Royaume-
Uni
L'équipement est conforme à l'UE
applicable exigences et règles de
sécurité.

Français | 39 of 124
FONCTIONNEMENT
――
Veuillez vous familiariser avec l’appareil avant de l’utiliser.
Remarque: Les illustrations ne sont fournies qu’à des ns d’explication. L’aspect de votre appareil
peut être légèrement différent.
Filtre à air
Panneau de commande
Poignée (de chaque côté)
Panneau
Hublot de contrôle du niveau d’eau
Réservoir
Sortie du tuyau d’évacuation continue
Support pour cordon d’alimentation
Roulette
Support pour cordon d’alimentation

40 of 124 | Français
ACCESSOIRES
――
Les accessoires suivants se trouvent dans le réservoir d’eau. Retirez-les et installez-les avant
d’utiliser l’appareil, conformément aux instructions ci-dessous.
Pour installer le support pour cordon
d’alimentation, il vous suft de l’insérer à
l’arrière de l’appareil
POSITIONNER L’APPAREIL
――
• Cet appareil est conçu pour fonctionner à des températures comprises entre 5 °C et 32 °C,
et dans une plage d’humidité relative (HR) allant de 30 % à 50 %.
• Placez l’appareil à un endroit où la température ne chutera pas sous 5 °C. En cas de
températures inférieures à 5 °C, les bobines risquent de geler, d’où une baisse des
performances.
• Placez l’appareil sur une surface lisse, plane et sufsamment solide pour supporter le poids
de l’appareil et d’un réservoir d’eau plein.
• Pour une bonne circulation de l’air, laissez au moins 50 cm d’espace libre derrière la sortie
d’air (à l’arrière de l’appareil). Pour une bonne circulation de l’air, laissez au moins 20 cm
d’espace libre autour des autres côtés de l’appareil.
• Placez l’appareil à l’écart d’un sèche-linge, d’un radiateur ou d’un appareil de chauffage.
• Pour des résultats optimaux, placez l’appareil dans un espace clos et fermez toutes les
portes, fenêtres et ouvertures donnant sur l’extérieur.
• Si l’appareil est placé à proximité d’un espace de rangement clos (par exemple une
armoire ou un placard), veillez à ce que l’air circule correctement.
• Ne pas utiliser à l’extérieur.
• Cet appareil est réservé à un usage intérieur et résidentiel. Il ne doit pas être utilisé à des
ns commerciales ou industrielles.
• L’appareil est doté de quatre roulettes pour faciliter son transport. Ne forcez pas le passage
des roulettes sur un tapis.
• Ne pas transporter l’appareil avec de l’eau dans le réservoir d’eau. Vous risqueriez de faire
basculer l’appareil ou de renverser l’eau.
Support pour cordon
d’alimentation
Tuyau d’évacuation
continue Embout leté femelle

Français | 41 of 124
40cm +
20cm +
40cm + 20cm +
20cm +
CONSIGNES D’UTILISATION
――
Panneau de commande
Boutons
Remarque: pour des raisons de sécurité et pour réguler la température, le ventilateur continuera à
fonctionner une fois le compresseur à l’arrêt.
• Comfort (confort) / Auto: Appuyez une fois pour démarrer le mode automatique. Cela
réglera automatiquement l’humidité de la pièce à 45-55% en fonction de l’environnement de
la pièce. En mode automatique, le niveau d'humidité ne peut pas être ajusté. Appuyez sur les
boutons Haut/Bas pour quitter le mode automatique.
• Filter (ltre):
• Le témoin de ltre clignotera après 250 heures d’utilisation en guise de rappel de
nettoyer le ltre de l’appareil. Une fois nettoyé, appuyez une fois sur le bouton de ltre
pour le réinitialiser.
• Pour connecter l’appareil au Wi-Fi, maintenez enfoncé le bouton de ltre pendant trois
secondes jusqu’à ce que « AP » s’afche sur l’écran LED, puis suivez les instructions ci-
dessous.
• Cont: appuyez une fois sur ce bouton pour activer le mode de déshumidication en continu.
Avant cela, connectez le tuyau d’évacuation à l’arrière de l’appareil.
• Turbo: appuyez une fois pour activer le mode turbo. Ceci permet d’augmenter la vitesse du
ventilateur au maximum. Appuyez une deuxième fois pour réduire la vitesse du ventilateur.
• Timer: ce bouton contrôle les fonctionnalités de mise en marche automatique et d’arrêt
automatique.

42 of 124 | Français
• Pour la mise en marche automatique, éteignez l’appareil à l’aide du bouton Power.
Appuyez sur le bouton Timer jusqu’à ce que le voyant « On » s’allume. Utilisez les
èches pour sélectionner le délai de mise en marche automatique (par incréments de
30 minutes, jusqu’à 24 heures). Une fois sélectionné, attendez cinq secondes. L’écran
LED va s’éteindre. L’appareil s’allumera lorsque le délai sélectionné sera écoulé.
• Pour l’arrêt automatique, allumez l’appareil à l’aide du bouton Power. Appuyez sur
le bouton Timer jusqu’à ce que le voyant « On » s’allume. Utilisez les èches pour
sélectionner le délai d’arrêt automatique (par incréments de 30 minutes, jusqu’à 24
heures). Une fois sélectionné, attendez cinq secondes. L’écran LED va afcher l’humidité
relative. L’appareil s’éteindra lorsque le délai sélectionné sera écoulé.
• Allumer ou éteindre l’appareil ou sélectionner « 0 » comme délai désactive le mode
Timer. L’appareil s’éteindra lorsque le délai sélectionné sera écoulé.
• Boutons haut / bas: appuyer pour régler le taux d’humidité. Le taux d’humidité peut être
réglé entre 35 % HR et 85 % HR, par incréments de 5 %. Pour un air plus sec, dénissez une
HR plus basse. Pour un air plus humide, dénissez une HR plus élevée.
Voyants
• Voyants Comfort/Auto, Filter, Cont.: ces voyants s’allument lorsque ces modes sont activés.
• Defrost (dégivrage): ce voyant s’allume lorsque du givre s’accumule sur les bobines de
l’évaporateur. Lorsque ceci se produit, le compresseur s’éteint et le ventilateur continue à
fonctionner jusqu’à ce que les bobines soient dégivrées.
• Full (plein): ce voyant s’allume lorsque le réservoir d’eau est plein et doit être vidé. Pour le vider,
suivez les instructions ci-dessous.
Afchage
• Par défaut, l’écran LED afche l’humidité relative de la pièce avec un degré de précision de
+/- 5 %.
• En cas de problème avec l’appareil, l’écran afchera:
• P2: le réservoir d’eau est plein ou n’est pas installé correctement. Videz le réservoir
d’eau ou vériez son positionnement.
• AP: l’appareil est en mode auto-appairage, qui permet de le connecter au Wi-Fi. Ce
mode doit se désactiver automatiquement après 8 minutes.
• AS: erreur capteur d’humidité. Débranchez l’appareil, attendez 30 secondes et
rebranchez-le. Si le problème persiste, contactez l’assistance technique.
• ES: erreur capteur de température tube. Débranchez l’appareil, attendez 30 secondes
et rebranchez-le. Si le problème persiste, contactez l’assistance technique.
CONNEXION AU WI-FI
――
Remarque: en cas de problèmes de connexion au Wi, assurez-vous que votre réseau est déni
sur 2.4G. Si le problème persiste, contactez notre équipe de service à la clientèle en envoyant un
e-mail à [email protected]
• Pour vous connecter au WiFi, maintenez le bouton du ltre enfoncé pendant 3 secondes
ou jusqu'à ce que l'écran LED afche « AP » (appairage automatique). En mode appairage
automatique, le compresseur est forcé à l'arrêt.

Français | 43 of 124
• Le déshumidicateur et votre téléphone portable doivent être connectés au même réseau
WiFi.
• Téléchargez l'application « NetHome plus ». Vous devrez créer un compte. À l'écran,
sélectionnez « Ajouter un appareil », puis « déshumidicateur ». Suivez les instructions sur
l'application.
• Une fois la connexion établie, le déshumidicateur se rallumera automatiquement.
• Si après 8 minutes la connexion échoue, le déshumidicateur se rallumera automatiquement.
Démarrez le processus de connexion depuis le début.
• Une fois connecté, vous pouvez consulter les performances et contrôler votre
déshumidicateur via l'application.
VIDANGE DU RÉSERVOIR D’EAU
――
ATTENTION
• Pensez à systématiquement éteindre l’appareil et
débrancher le cordon d’alimentation de la prise
murale avant de retirer le réservoir d’eau.
• Ne pas transporter l’appareil avec de l’eau dans le
réservoir d’eau. Vous risqueriez de faire basculer
l’appareil ou de renverser l’eau.
• Lorsque vous retirez le réservoir d’eau de l’appareil,
veillez à ne pas renverser d’eau.
• Lorsque vous retirez le réservoir d’eau, ne touchez
aucun composant à l’intérieur de l’appareil. Vous
risqueriez d’endommager le produit.
• Si de l’eau s’est inltrée à l’intérieur de l’appareil lors du
retrait du réservoir d’eau, nettoyez à l’aide d’un chiffon
sec.
Instructions
• Si l’appareil est allumé et que le réservoir d’eau est plein,
le compresseur et le ventilateur s’éteindront et le voyant
« Full » s’allumera.
• Pour vider le réservoir d’eau, tirez doucement dessus
pour le détacher.
• Tenez les deux côtés du réservoir d’eau avec les deux
mains et en exerçant la même force, puis tirez pour le
retirer de l’appareil. Ne posez pas le réservoir d’eau au
sol car sa partie inférieure est irrégulière.
• Jetez l’eau de manière sûre et repositionnez le réservoir
d’eau. Pour cela, insérez-le jusqu’au bout dans
l’appareil, sans forcer, au risque de l’endommager.
• Insérer deux croquis montrant le retrait du réservoir
d’eau.

44 of 124 | Français
NETTOYAGE ET RANGEMENT
――
AVERTISSEMENT: TOUJOURS ÉTEINDRE L’APPAREIL,
DÉBRANCHER LA FICHE DU CÂBLE D’ALIMENTATION DE LA
PRISE AVANT DE LE MANIPULER OU DE LE NETTOYER.
ATTENTION: NE LAISSEZ PAS L’EAU OU D’AUTRES
LIQUIDES PÉNÉTRER À L’INTÉRIEUR DE L’APPAREIL, CAR
CELA POURRAIT CRÉER UN INCENDIE ET/OU UN RISQUE
D’ÉLECTROCUTION.
ATTENTION: NE PAS UTILISER DE NETTOYANTS OU DE
SOLVANTS ABRASIFS. CELA ENDOMMAGERAIT LE PRODUIT.
ÉVACUATION CONTINUE
――
• Il est possible de vider automatiquement l’eau dans un siphon de sol ou un évier en
connectant l’appareil au tuyau d’évacuation de l’eau (fourni).
• Pour cela, retirez délicatement la protection en plastique à l’arrière de l’appareil. Attention :
une petite quantité d’eau est susceptible de s’accumuler dans la sortie du tuyau de vidange
à l’arrière. Ayez donc avec vous un petit réceptacle ou un chiffon sec pour éviter que l’eau ne
coule au sol.
• Connectez la protection du tuyau d’évacuation continue et le tuyau du siphon à l’arrière de
l’appareil.
• Orientez le tuyau vers le siphon en veillant à ce qu’il ne forme pas de coudes, et à ce que la
sortie du tuyau d’évacuation continue soit surélevée par rapport au siphon.
• Allumez l’appareil et appuyez sur le bouton « Cont » sur le panneau de commande.
• N. B.: lorsque vous n’utilisez pas la fonctionnalité de vidange en continu, retirez le tuyau de
l’appareil, faites sécher la sortie et replacez le capuchon en plastique.
Embout
leté
femelle
Tuyau de
vidange
Retirer la protection
en plastique. Attention
à ne pasrenverser
d’eau.

Français | 45 of 124
• N’essayez pas de nettoyer le produit d’une manière autre
que celle décrite par le fabricant.
• Nettoyez la surface extérieure de l’appareil en l’essuyant
avec un chiffon doux et humide. Séchez l’appareil avec
un chiffon doux et propre.
• Videz toujours le réservoir d’eau, nettoyez et séchez
l’appareil lorsqu’il n’est pas utilisé pour éviter la formation
de moisissures.
Nettoyer le réservoir d’eau:
• Videz le réservoir selon les instructions ci-dessus.
• Videz le réservoir et nettoyez-le avec de l’eau du robinet
et un détergent doux (par exemple du liquide vaisselle).
Remarque: N’utilisez pas d’eau bouillante pour nettoyer
le réservoir.
• Assurez-vous d’éliminer tout tartre ou dépôt qui se serait
formé à l’intérieur du réservoir.
• Essuyez toutes les surfaces avant de remettre le réservoir
dans l’appareil.
Rangement:
• Pour ranger votre produit, utilisez la boîte d’origine ou
tout contenant de taille similaire.
• Rangez l’appareildans un endroit sûr, propre et sec, hors
de portée des enfants lorsqu’il n’est pas utilisé.
• L’appareil peut nécessiter un dégivrage à des
températures inférieures à 23 °C. Le cas échéant, le
système est automatique et le processus peut durer
jusqu’à 5 minutes. Pendant ce temps, la fonction de
déshumidication s’arrêtera et le témoin de dégivrage
s’allumera. Ne pas éteindre l’appareil pendant le
dégivrage.
DÉCLARATION DE CONFORMITÉ
――
Par la présente, One Retail Group Limited déclare que l’équipement radio de type PB-15 est

46 of 124 | Français
conforme à la directive 2014/53 / UE. Le texte complet de la déclaration de conformité UE est
disponible à l’adresse Internet suivante: https://probreeze.com/ec-declaration-of-conformity/
RECYCLAGE & MISE AU REBUT
――
Les produits électriques et électroniques (DEEE), les batteries (piles), les accumulateurs et les
emballages ne doivent pas être jetés avec les déchets ménagers ordinaires. Ceci an d’éviter
de porter préjudice à l’environnement et au bien-être humain et de contribuer à la conservation
de nos ressources naturelles. La plupart des produits électriques munis d’une che, d’une
batterie ou d’un câble peuvent être recyclés. Contactez votre municipalité/commune, le service
d’élimination des déchets ménagers ou la boutique où vous avez acheté le produit pour obtenir
des informations sur les programmes de collecte dans votre région.
Programme de reprise
Les déchets de produits électriques (DEEE) peuvent être envoyés à One Retail Group pour
recyclage et élimination lorsque vous achetez un nouveau produit auprès de One Retail Group,
sur un achat de valeur comparable. Pour plus d’informations sur la façon de recycler ce produit,
veuillez visiter www.probreeze.com
L’utilisateur nal des produits électriques et électroniques (DEEE) est responsable de la
séparation des piles et des ampoules usagées avant qu’elles ne soient remises à un service
d’élimination et de recyclage désigné. Les piles et batteries usagées peuvent également être
jetées dans les bacs de collecte, que l’on trouve dans la plupart des supermarchés locaux et
dans les centres de recyclage des déchets ménagers.
Déchets d’équipements
électriques et
électroniques (DEEE)
Ce symbole sur le produit et/ou l’emballage indique que
les déchets d’équipements électriques et électroniques
(DEEE), conformément à la directive 2012/19/UE qui régit les
appareils électriques et électroniques usagés, ne doivent
pas être jetés avec les déchets ménagers généraux.
La boucle de Mobius Ce symbole indique que le produit ou l’emballage est
recyclable.
Triman Logo
Nos produits et emballages se recyclent, ne les jetez pas!
Trouvez où les déposer sur le site
www.quefairedemesdechets.fr

Français | 47 of 124
Problème Solution
Le ventilateur ne s’arrête pas
• Le ventilateur continuera à fonctionner même si le
compresseur est arrêté, ceci pour des raisons de sécurité
et an de réguler la température du déshumidicateur.
Vous devrez éteindre manuellement le ventilateur.
L’appareil ne démarre pas
• Assurez-vous que la che du déshumidicateur est
enfoncée jusqu’au bout dans la prise secteur.
• Vériez que le réservoir d’eau n’est pas plein.
• Le réservoir d’eau est mal positionné.
Le déshumidicateur n’assèche
pas autant l’air qu’il le devrait
• Assurez-vous que rien ne bloque l’arrière du
déshumidicateur. Veillez à ce qu’il se trouve à au moins
40 cm du mur ou de tout meuble.
• Baissez le réglage de l’humidité à l’aide des èches.
• Assurez-vous que toutes les portes, fenêtres et autres
ouvertures sont correctement fermées.
• La température de la pièce est trop
• basse. L’appareil ne peut fonctionner si la température est
inférieure à 5°C.
• L’appareil n’assèchera pas un espace
• clos dans lequel la circulation de l’air est insufsante.
• Vériez que rien ne dégage de la moisissure dans la pièce.
L’appareil émet un bruit fort
• Le ltre à air est obstrué et doit être nettoyé.
• L’appareil est incliné au lieu d’être en position verticale.
• Le sol est irrégulier.
Du givre se forme sur les
bobines
• C’est normal. Le déshumidicateur est doté d’une fonction
de dégivrage automatique.
Il y a de l’e au au sol
• Il se peut que le connecteur du tuyau à l’arrière de
l’appareil soit mal enclenché.
• Assurez-vous que le tuyau de vidange à l’arrière est
correctement connecté lorsque vous utilisez un réceptacle
pour collecter l’eau.
ES, AS, P2, Eb s’afchent sur
l’écran
• Ce sont des codes d’erreur qui vont mettre l’appareil en
veille. Pour en savoir plus, consultez la section Panneau de
commande
• ci-dessus.
CONSEILS DE DÉPANNAGE
――
En cas de problème avec notre dés humidicateur, voici quelques conseils de dépannage qui
pourront vous aider à le résoudre.

48 of 124 | Italiano
30L DEUMIDIFICATORE
MODELLO PB-15
Grazie per aver scelto di acquistare un prodotto da Pro Breeze. Prima di procedere con il primo
utilizzo, leggere attentamente l'intero manuale e conservarlo in un luogo sicuro per future
consultazioni.
ISTRUZIONI DI SICUREZZA
――
SI PREGA DI LEGGERE E CONSERVARE QUESTE IMPORTANTI
ISTRUZIONI DI SICUREZZA.
Quando si utilizzano apparecchi elettrici, è necessario
rispettare sempre le precauzioni di sicurezza di base per
ridurre il rischio di incendi, scosse elettriche e lesioni alle
persone, compresa la seguente:
AVVERTENZA: PER EVITARE IL RISCHIO DI SCOSSE
ELETTRICHE, INCENDI O LESIONI ALLE PERSONE, SPEGNERE
SEMPRE L'APPARECCHIO, SCOLLEGARE IL CAVO DI
ALIMENTAZIONE DALLA PRESA ELETTRICA E SVUOTARE IL
SERBATOIO DELL'ACQUA PRIMA DI MANEGGIARE, PULIRE O
RIPARARE L'APPARECCHIO.
• Non coprire l'apparecchio durante l'uso.
• Utilizzare l’apparecchio solo secondo le istruzioni riportate
nel presente manuale. Qualsiasi altro uso non consigliato
dal fabbricante può provocare incendi, scosse elettriche o
lesioni alle persone.
• Scollegare sempre l'apparecchio quando non è in uso.
• Non esporre il prodotto alla luce solare diretta, a fonti di
calore o a freddo estremo.
• Tenere l'apparecchio fuori dalla portata di bambini e
animali domestici.
• Non lasciare i bambini soli o incustoditi nell'area in cui
l’apparecchio è in funzionamento.
• I bambini devono essere sorvegliati per impedire loro di
giocare con l'apparecchio.

Italiano | 49 of 124
30L DEUMIDIFICATORE
MODELLO PB-15 • La pulizia e la manutenzione dell'utente non devono essere
eseguite da bambini a meno che non siano costantemente
sorvegliati.
• Smaltire l'acqua trattenuta dall'apparecchio. Quest'acqua
non è potabile
• L'apparecchio non deve essere utilizzato da persone
(compresi i bambini) con capacità siche, sensoriali
o mentali ridotte o con mancanza di esperienza e
conoscenza, a meno che non agiscano sotto supervisione o
siano stati debitamente istruite.
• Quando si sposta l'apparecchio, assicurarsi che rimanga in
posizione verticale.
• L'apparecchio deve avere uno spazio libero di almeno 50
cm attorno a ciascuno dei suoi lati.
• Non lasciare mai l'apparecchio incustodito durante
il funzionamento. Spegnere sempre l'apparecchio e
scollegarlo dall'alimentazione quando non viene utilizzato.
• Evitare di posizionare il cavo di alimentazione in aree in cui
può costituire pericolo di inciampo. Non posizionare il cavo
di alimentazione sotto la moquette né coprirlo con tappeti,
pattini o simili.
• Posizionare l'apparecchio su una supercie piana, stabile e
asciutta e mantenerlo sempre in posizione verticale. L'utilizzo
dell’apparecchio in qualsiasi altra posizione potrebbe
essere causa di pericoli.
• Non posizionare mai alcun oggetto sopra l'apparecchio.
• Assicurarsi che l'alimentazione di rete (inclusi voltaggio,
frequenza e potenza) sia conforme a quanto riportato
sull'etichetta identicativa dell'apparecchio.
• Potrebbe esserci traccia di odori durante i primi minuti di
utilizzo iniziale. Si tratta di un fatto normale che scomparirà
rapidamente.
• Non posizionare l'apparecchio contro pareti o altri
apparecchi.
• Durante il funzionamento, non coprire l'apparecchio né
limitare il usso d'aria delle griglie di aspirazione o di scarico.
• Non coprire, ostruire o inserire oggetti nelle prese d'aria e

50 of 124 | Italiano
nelle aperture dell’apparecchiopoiché ciò potrebbe causare
scosse elettriche, incendi o danneggiare l'apparecchio.
• Non utilizzare l'apparecchio con le mani bagnate.
• Non mettere in funzione l'apparecchio senza il ltro.
• Non utilizzare l’apparecchio in prossimità dell’acqua o nelle
immediate vicinanze di una vasca da bagno, una doccia
o una piscina. Non posizionare mai l'apparecchio in punti
da cui possa cadere in una vasca da bagno o in un altro
recipiente d'acqua.
• Non permettere che acqua o altri liquidi penetrino all'interno
dell'apparecchio , ciò potrebbe creare un rischio di incendio
e/o elettrico.
• Non utilizzare dispositivi meccanici per accelerare il
processo di sbrinamento degli apparecchi.
• Non posizionare all'esterno il tubo di drenaggio continuo
quando la temperatura è inferiore a 1°C.
• L’apparecchio è destinato all'uso domestico in interni e
applicazioni simili. Non utilizzare all'aperto.
• Non utilizzare l'apparecchio vicino a benzina, vernici, gas
inammabili, forni o altre fonti di calore.
• Per evitare che venga tirato verso il basso, il cavo di
alimentazione non deve pendere dalla supercie su cui è
posizionato l'apparecchio .
• Per evitare qualsiasi sovraccarico del circuito quando si
utilizza l’apparecchio, non azionare un altro dispositivo ad
alta potenza sullo stesso circuito elettrico.
• Collegare sempre l’apparecchio direttamente a una presa
a muro. Evitare, ove possibile, di utilizzare prolunghe poiché
potrebbero surriscaldarsi e provocare rischio di incendio.
• Non utilizzare l’apparecchio con un programmatore
esterno, un timer o qualsiasi altro dispositivo che accenda
automaticamente l’apparecchio, a meno che questo non
sia già stato incorporato nell'apparecchio dal fabbricante.
• Non tirare il cavo di alimentazione. Non spostare, trainare o
appendere mai l'apparecchio per il cavo di alimentazione.
• Non attorcigliare o avvolgere il cavo di alimentazione e
la spina intorno all'apparecchio, ciò potrebbe indebolire

Italiano | 51 of 124
o spaccare l'isolamento, specie nel punto di ingresso al
dispositivo.
• Non mettere in funzione l'apparecchio senza il serbatoio
dell'acqua.
• Prima dell'uso, assicurarsi che il cavo di alimentazione sia
completamente esteso e sistemarlo in modo che non sia in
contatto con nessuna parte dell'apparecchio.
• Non mettere in funzione l'apparecchio se le protezioni di
sicurezza sono state rimosse.
• Non mettere in funzione il dispositivo se sono presenti
segni di danneggiamento all'apparecchio, al cavo di
alimentazione o ad uno qualsiasi degli accessori. Per evitare
pericoli, se il cavo di alimentazione presenta danni, dovrà
essere sostituito a cura del fabbricante, dal suo operatore
tecnico di servizio o da una persona qualicata.
• Non utilizzare l’apparecchio o agli accessori forniti se
presentano segni di danneggiamento.
• Non tentare di riparare o regolare nessun componente
elettrico o meccanico presente nell’apparecchio Ciò
potrebbe non essere sicuro e invalidare la garanzia.
• L'apparecchiodeve essere utilizzato solo con l'alimentatore
fornito in dotazione. Non utilizzare altri caricatori o adattatori
di alimentazione poiché potrebbero danneggiare il
prodotto.
• Non inserire mai le dita o oggetti metallici nelle prese d'aria
e nelle aperture dell’apparecchio
• Solo uso domestico.
INFORMAZIONI SPECIFICHE RELATIVE AL GAS REFRIGERANTE
R290
――
ATTENZIONE
RISCHIO DI INCENDIO

52 of 124 | Italiano
AVVERTENZA: L'APPARECCHIO DEVE ESSERE INSTALLATO, MESSO
IN FUNZIONE E STOCCATO IN UNA STANZA CON UNA SUPERFICIE
DEL PAVIMENTO MAGGIORE DI 4M2.
• L’apparecchio contiene 0.1kg (100g) di gas refrigerante R290.
• R290 è un gas refrigerante conforme alla direttiva europea
sull'ambiente.
• Non forare nessuna parte del circuito del refrigerante.
• Tenere presente che il refrigerante R290 è inodore e non
ha l'odore normalmente sprigionato dai serbatoi di gas
naturale e propano.
• Non utilizzare alcun mezzo per accelerare il processo di
sbrinamento o per pulire, diverso da quelli consigliati dal
fabbricante.
• L'apparecchio deve essere posizionato in un'area priva di
fonti continue di accensione quali amme libere, gas o
apparecchi elettrici in funzione.
• Non forare e non bruciare.
• Se l'apparecchio viene installato, utilizzato o stoccato in
un'area non ventilata, è necessario progettare il locale in
modo da prevenire l'accumulo di perdite di refrigerante che
potrebbero comportare il rischio di incendio o esplosione
dovuto all'accensione del refrigerante causata da
riscaldatori elettrici, stufe o altre fonti di accensione.
• L'apparecchio deve essere stoccato in modo da evitare
guasti meccanici.
• I soggetti che intervengono o lavorano sul circuito
refrigerante devono essere in possesso dell'apposita
certicazione rilasciata da un ente accreditato che
garantisca la competenza nella manipolazione dei
refrigeranti secondo una specica valutazione riconosciuta
dalle associazioni di settore.
• La manutenzione e le riparazioni che richiedono l'assistenza
di altro personale qualicato devono essere eseguite
sotto la supervisione di una persona esperta nell'uso di
refrigeranti inammabili.

Italiano | 53 of 124
SIMBOLO SPIEGAZIONE
――
SPECIFICHE
――
• Misure: L 38.6 x W 26 x H 50cm
• Peso netto: 17kg
• Tensione: 220-240~, 1Ph
• Frequenza: 50Hz
• Potenza d’ingresso: 715W
• Capacità massima (24 ore): 30L
• Refrigerante: R290 / 0.099kg
AVVERTENZA
Questo simbolo indica che l’apparecchio utilizza un
refrigerante inammabile. In caso di perdita di refrigerante
ed esposizione a una sorgente di ignizione esterna, vi è il
pericolo di incendio.
ATTENZIONE
Questo simbolo indica che il manuale operativo deve essere
letto con attenzione.
ATTENZIONE
Questo simbolo indica che l’apparecchio deve essere
maneggiato da personale addetto alla manutenzione
facendo riferimento al manuale di installazione.
ATTENZIONE
Questo simbolo indica che sono disponibili informazioni quali
il manuale operativo o di istruzioni.
Legenda dei simboli riportati sull’unità
Solo per uso interno. Si prega di leggere il manuale di
istruzioni e conservarlo per un uso
futuro.
L'attrezzatura è conforme ai
requisiti e alle normative di
sicurezza del Regno Unito
applicabili
L'attrezzatura è conforme ai
requisiti e alle normative di
sicurezza dell'UE applicabili.

54 of 124 | Italiano
MODALITÀ DI FUNZIONAMENTO
――
Familiarizzarsi con l’unità prima dell’uso.
Nota: Tutte le illustrazioni hanno nalità unicamente esplicative. L'apparecchio acquistato
potrebbe essere leggermente diverso.
Filtro dell’aria
Pannello di controllo
Maniglia (entrambi i lati)
Panello
Finestrella livello dell’acqua
Serbatoio dell’acqua
Tubo di scarico continuo incluso
Avvolgicavo per il lo dell’alimentazione
Rotelle
Cavo e spina di alimentazione

Italiano | 55 of 124
ACCESSORI
――
Nel serbatoio dell’acqua sono inclusi i
seguenti accessori. Rimuoverli e montarli
prima dell’uso, come da istruzioni riportate
sotto.
POSIZIONAMENTO DELL’UNITÀ
――
• Questa unità è progettata per funzionare a
temperature comprese fra 5°C e 32°C, e a
un’umidità relativa (UR) fra 30% e 50%.
• Collocare l’unità in un’area in cui la
temperatura non possa scendere al di
sotto di 5°C. A temperature inferiori a
5°C, le serpentine si possono congelare
determinando un calo delle prestazioni.
• Posizionare l’unità su una supercie piana e
liscia, sufcientemente robusta da poterla
supportare con il serbatoio dell’acqua
pieno.
• Lasciare uno spazio di almeno 50 cm dietro
l’uscita dell’aria (sul retro dell’unità) per
garantire una buona circolazione dell’aria.
Lasciare uno spazio di almeno 20 cm su
tutti i lati dell’unità per garantire una buona
circolazione dell’aria.
• Posizionare l’unità lontano da
stendibiancheria, riscaldatori o termosifoni
a radiatore.
• Per risultati ottimali, sistemare l’unità in uno
spazio circoscritto e chiudere tutte le porte,
nestre e aperture verso l’esterno.
• In caso di posizionamento vicino a uno
spazio per la conservazione di vestiti o
cibo (come un armadio o una dispensa),
vericare che vi sia un’adeguata
circolazione dell’aria.
• Non utilizzare all’aperto.
• Questa unità è destinata esclusivamente
all’uso in ambienti chiusi residenziali.
Non utilizzare per nalità commerciali o
industriali.
• Per semplicità di trasporto, all’unità sono
ssate quattro rotelle. Non forzare le
rotelle per spostare l’apparecchio sopra
moquette o tappeti.
• Non trasportare l’unità se nel serbatoio vi è
acqua per evitare ribaltamenti o fuoriuscite
di liquido.
Avvolgicavo per il lo
dell’alimentazione
Tubo di scarico
continuo
Attacco lettato femmina
Per installare l’avvolgicavo per il lo
dell’alimentazione, è sufciente inserirlo
nel retro dell’unità
40cm +
20cm +
40cm + 20cm +
20cm +

56 of 124 | Italiano
ISTRUZIONI PER IL FUNZIONAMENTO
――
Pannello di controllo
Tasti
Nota: per motivi di sicurezza e per la regolazione della temperatura, la ventola continuerà a
funzionare anche a compressore spento.
• Auto / Comfort: premere una volta per avviare la modalità Comfort. In modalità automatica,
non è possibile regolare il livello di umidità. Premere i pulsanti Su/Giù per uscire dalla modalità
automatica.
• Filtro:
• La spia del ltro lampeggia dopo 250 ore di funzionamento per ricordare all’utente di
pulire il ltro sull’unità. Una volta effettuata la pulizia, premere il tasto Filter (Filtro) una volta
per resettare.
• Per collegare l’unità al Wi-Fi, tenere premuto il tasto Filter (Filtro) per tre secondi no a che
non comprare sul display a LED la scritta “AP”, quindi seguire le istruzioni qui sotto.
• Cont: premere una volta per attivare la modalità di deumidicazione continua. Prima di farlo,
connettere il tubo di scarico sul retro dell’unità.
• Turbo: premere una volta per avviare la modalità Turbo: la velocità della ventola verrà
incrementata al massimo. Premere nuovamente per ridurre la velocità della ventola.
• Timer: questo tasto controlla le funzioni di avvio e arresto automatico.
• Per l’avvio automatico, spegnere l’unità usando il tasto di accensione. Premere il tasto
Timer nché non si accende la spia “ON”. Usando le frecce, selezionare il tempo no
all’avvio automatico (in incrementi di 30 minuti, no a 24 ore). Una volta effettuata la
selezione, attendere cinque secondi. Il display a LED ritorna vuoto. L’unità si accende al
raggiungimento dell’ora programmata.
• Per l’arresto automatico, accendere l’unità usando il tasto di accensione. Premere il tasto
Timer nché non si accende la spia “ON”. Usando le frecce, selezionare il tempo no
all’arresto automatico (in incrementi di 30 minuti, no a 24 ore). Una volta effettuata la
selezione, attendere cinque secondi. Il display a LED mostra ora nuovamente l’umidità
relativa (UR). L’unità si spegne al raggiungimento dell’ora programmata.
• L’accensione o lo spegnimento dell’unità o la riduzione del tempo a 0 spegnono la
modalità Timer. L’unità si spegne al raggiungimento dell’ora programmata.
• Tasti Su/Giù: premere per controllare il livello di umidità. Il livello dell’umidità può essere

Italiano | 57 of 124
impostato a un intervallo compreso fra 35% UR e 85% UR a incrementi del 5%. Per avere aria più
secca, impostare una UR più bassa. Per avere aria più umida, impostare una UR più alta.
Spie
• Spie Comfort/Auto, FILTRO, CONT: si accendono all’attivazione di ogni rispettiva modalità.
• Defrost (Sbrinamento): si accende quando si accumula della brina sulle serpentine
dell’evaporatore. Quando ciò si verica, il compressore si spegne e la ventola continua a girare
nché le serpentine non si sbrinano.
• Full (Pieno): si accende quando il serbatoio dell’acqua è pieno e deve essere svuotato. Per
svuotarlo, seguire le istruzioni riportate sotto.
Display
• Come impostazione predenita, il display a LED mostra l’umidità relativa (UR) della stanza
con una precisione di +/- 5%.
• In caso di problemi con l’unità, sul display vengono visualizzati i seguenti codici:
• P2: il serbatoio dell’acqua è pieno o non è nella posizione corretta. Svuotare il
serbatoio o vericarne il posizionamento.
• AP: il dispositivo è in modalità di associazione automatica, utilizzata per la connessione
a rete Wi-Fi. Questa modalità dovrebbe disattivarsi automaticamente entro 8 minuti.
• AS: ndi e reinserire la presa. Se il problema persiste, contattare l’assistenza.
• ES: errore del sensore della temperatura tubo. Scollegare l’unità dalla presa di
corrente, attendere 30 secondi e reinserire la spina. Se il problema persiste, contattare
l’assistenza.
CONNESSIONE A RETE WI-FI
――
Nota: in caso di problemi di connessione con il Wi-Fi, assicurarsi che la rete sia impostata su
2.4G. Se il problema persiste, contattare il nostro team di assistenza clienti inviando un’e-mail a
• Per connetterti al Wi-Fi, tieni premuto il pulsante del ltro per 3 secondi oppure no a
quando il display LED non mostrerà "AP" (accoppiamento automatico). Quando si trova in
accoppiamento automatico, il compressore verrà forzato a spegnersi.
• Assicurati che il deumidicatore e il tuo cellulare siano connessi allo stesso WiFi.
• Scarica l'app "NetHome plus". Dovrai creare un account. Sullo schermo, seleziona "aggiungi
dispositivo", quindi seleziona "deumidicatore". Segui le istruzioni riportate sull'app.
• Quando la connessione sarà andata a buon ne, il deumidicatore si riaccenderà
automaticamente.
• Se dopo 8 minuti la connessione non andrà a buon ne, il deumidicatore si riaccenderà
automaticamente. Avvia il processo di connessione dall'inizio.
• Una volta connesso, potrai visualizzare le prestazioni e controllare il tuo deumidicatore
tramite l'app.

58 of 124 | Italiano
SVUOTAMENTO DEL SERBATOIO DELL’ACQUA
――
ATTENZIONE
• Spegnere sempre l’unità e staccare la spina dalla presa di corrente prima di rimuovere il
serbatoio dell’acqua.
• Non trasportare l’unità se nel serbatoio vi è acqua per evitare ribaltamenti o fuoriuscite di
liquido.
• Fare attenzione durante la rimozione del serbatoio dall’unità per evitare fuoriuscite d’acqua.
• Quando si rimuove il serbatoio dell’acqua, non toccare le parti all’interno dell’unità per non
danneggiare il prodotto.
• Qualora fosse presente dell’acqua in altre parti dell’unità una volta rimosso il serbatoio, pulire
con un panno asciutto.
Istruzioni
• Se l’unità è accesa e il serbatoio dell’acqua è pieno, il compressore e la ventola si spengono e si
illumina la spia “Full” (“Pieno”).
• Per svuotare il serbatoio dell’acqua, tirarlo piano verso l’esterno per allentarlo.
• Tenendo entrambi i lati del serbatoio con due mani, e applicando una forza uniforme, nire
di estrarlo dall’unità. Non poggiare il serbatoio dell’acqua sul pavimento perché la base è
irregolare.
• Gettare l’acqua in un luogo sicuro e riposizionare il serbatoio. Spingere no in fondo il serbatoio
con la massima cura e delicatezza, senza forzarlo per evitare di danneggiarlo.
• Inserire due schizzi che mostrano il serbatoio dell’acqua mentre viene rimosso.
SCARICO CONTINUO
――
• L’acqua può essere svuotata automaticamente in uno scarico a terra o in un lavandino
collegando l’unità al tubo dell’acqua (incluso).
• Per far ciò, rimuovere delicatamente il coperchio di plastica presente sul retro dell’unità.

Italiano | 59 of 124
Attenzione: nell’uscita di scarico sul retro si può accumulare una piccola quantità d’acqua.
Tenere a portata di mano un bicchiere o un panno asciutto per evitare che nisca sul
pavimento.
• Collegare il coperchio del tubo continuo e il tubo di scarico sul retro dell’unità.
• Direzionare il tubo verso lo scarico, distendendolo bene e tenendolo più in alto rispetto allo
scarico.
• Accendere l’unità e premere il tasto “CONT” sul pannello di controllo.
• NB: quando la funzione di scarico continuo non è in uso, rimuovere il tubo dall’unità,
asciugare l’uscita e rimettere il tappo di plastica.
Attacco
lettato
femmina
Tubo di scarico
Rimuovere il coperchio
di plastica. Prestare
attenzione alle
fuoriuscite d’acqua
PULIZIA E CONSERVAZIONE
――
AVVERTENZA: PRIMA DELLA PULIZIA E DELLA
MANIPOLAZIONE, SPEGNERE SEMPRE L’APPARECCHIO E
SCOLLEGARE IL CAVO DI ALIMENTAZIONE DALLA PRESA
ELETTRICA.
ATTENZIONE: NON PERMETTERE CHE ACQUA O ALTRI
LIQUIDI PENETRINO ALL'INTERNO DELL'APPARECCHIO,
CIÒ POTREBBE CREARE UN RISCHIO DI INCENDIO E/O
ELETTRICO.
ATTENZIONE: NON UTILIZZARE DETERGENTI ABRASIVI
O SOLVENTI, POICHÉ POTREBBERO DANNEGGIARE
L'APPARECCHIO.
• Non tentare di pulire l'apparecchio in modo diverso da
quello specicato dal fabbricante.
• Pulire la supercie esterna dell'apparecchio stronandola
con un panno morbido e umido. Asciugare l'apparecchio

60 of 124 | Italiano
con un panno morbido e pulito.
• Svuotare sempre il serbatoio dell'acqua, pulire e
asciugare accuratamente l'apparecchioper evitare la
formazione di muffe quando non viene utilizzato.
Pulizia del serbatoio dell'acqua:
• Rimuovere e svuotare il serbatoio dell'acqua secondo le
istruzioni sopra riportate.
• Pulire il serbatoio con acqua del rubinetto e un
detergente delicato (es. detersivo per piatti). Nota: Non
utilizzare acqua bollente per pulire il serbatoio dell'acqua.
• Assicurarsi di aver rimosso eventuali residui di calcare o
depositi che si sono formati all'interno del serbatoio.
• Asciugare tutte le superfici prima di reinserire il serbatoio
dell'acqua nell'apparecchio.
Conservazione:
• Per conservare il prodotto, si consiglia di utilizzare la
scatola di dimensioni originali o un contenitore simile.
• Riporre l'apparecchio in un luogo sicuro, pulito e asciutto,
fuori dalla portata dei bambini quando non viene
utilizzato.
• Potrebbe essere necessario sbrinare l'unità
a temperature inferiori a 23°C - Ciò avverrà
automaticamente e potrà durare fino a 5 minuti.
Durante questo tempo, la funzione di deumidificazione
si interromperà e l'indicatore di sbrinamento si
accenderà. Non spegnere il dispositivo mentre è in fase
di sbrinamento.
DICHIARAZIONE DI CONFORMITÀ
――
Con la presente, One Retail Group Limited dichiara che il tipo di apparecchiatura radio PB-15
è conforme alla Direttiva 2014/53 / UE. Il testo completo della dichiarazione di conformità UE è
disponibile al seguente indirizzo Internet: https://probreeze.com/ec-declaration-of-conformity/

Italiano | 61 of 124
RICICLAGGIO & SMALTIMENTO
――
I riuti di prodotti elettrici ed elettronici (RAEE), batterie, accumulatori e imballaggi non devono
essere smaltiti con i riuti domestici generici. Ciò serve allo scopo di prevenire possibili danni
all'ambiente e al benessere umano e per aiutare a conservare le nostre risorse naturali.
La maggior parte dei prodotti elettrici con spina, batteria o cavo può essere riciclata. Per
informazioni sui programmi di raccolta nella tua zona, contatta il tuo comune, il servizio di
smaltimento dei riuti domestici o il negozio presso il quale hai acquistato il prodotto.
Programma di ritiro
I prodotti elettrici di scarto (WEEE) possono essere inviati a One Retail Group per il riciclaggio e lo
smaltimento quando si acquista un nuovo prodotto da One Retail Group, a parità di condizioni.
Per ulteriori informazioni su come riciclare questo prodotto, visitare www.probreeze.com
L'utente finale di prodotti elettrici ed elettronici (RAEE) è responsabile della separazione delle
vecchie batterie e delle lampadine prima che vengano consegnate a un servizio di smaltimento
e riciclaggio designato. Le batterie esauste possono anche essere smaltite negli appositi bidoni
di raccolta, che si trovano nella maggior parte dei supermercati locali e nei centri di riciclaggio
dei rifiuti domestici.
Riuti di
apparecchiature
elettriche ed
elettroniche (RAEE)
Questo simbolo sul prodotto e/o sulla confezione indica che
i riuti elettrici (RAEE), ai sensi della Direttiva 2012/19/UE che
disciplina gli apparecchi elettrici ed elettronici usati, non
devono essere smaltiti con i riuti domestici generici.
Il ciclo di Mobius Questo simbolo indica che il prodotto o l'imballaggio
possono essere riciclati.

62 of 124 | Italiano
Problema Soluzione
La ventola non si ferma • La ventola continuerà a funzionare anche quando
il compressore sarà spento. Ciò avviene per motivi
di sicurezza e per la regolazione della temperatura
del deumidicatore. La ventola dovrà essere spenta
manualmente.
L’unità non si avvia • Assicurarsi che la spina del deumidicatore sia
completamente inserita nella presa.
• Controllare che il serbatoio dell’acqua non sia pieno.
• Il cestello dell’acqua non è nella posizione corretta.
Il deumidicatore non asciuga
l’aria come dovrebbe
• Assicurarsi che non vi siano ostruzioni sul retro del
deumidicatore. Vericare che vi sia una distanza di
almeno 40 cm dalla parete o dai mobili.
• Abbassare il controllo dell’umidità usando le frecce.
• Vericare che tutte le porte, nestre e altre aperture
siano ben chiuse.
• La temperatura della stanza è troppo bassa. L’unità non
funziona a temperature inferiori a 5°C.
• L’unità non asciuga gli spazi chiusi a meno che non vi
sia sufciente circolazione dell’aria.
• Vericare che non vi sia una sorgente di umidità nella
stanza.
L’unità è molto rumorosa • Il ltro dell’aria è intasato e deve essere pulito.
• L’unità è inclinata e non è in posizione interamente
verticale.
• La supercie del pavimento non è a livello.
Sulle serpentine si forma della
brina
• Si tratta di un fenomeno normale. Il deumidicatore
dispone di una funzione di sbrinamento automatico.
Vi è presenza di acqua sul
pavimento
• Il connettore del tubo sul retro dell’unità potrebbe
essere allentato.
• Vericare che il tappo di spurgo sul retro sia collegato
quando si utilizza il cestello per raccogliere l’acqua.
Sul display vengono
visualizzati i codici ES, AS, P2, Eb
• Sul display vengono visualizzati i codici ES, AS, P2, Eb
SUGGERIMENTI PER LA RISOLUZIONE DEI PROBLEMI
――
In caso di problemi con il deumidicatore, ecco alcuni suggerimenti che potrebbero essere utili
per la risoluzione.

Español | 63 of 124
30L DESHUMIDIFICADOR
MODELO PB-15
Gracias por elegir comprar un producto de Pro Breeze. Lea todo el manual detenidamente antes
del primer uso y guárdelo en un lugar seguro para futuras consultas.
INSTRUCCIONES DE SEGURIDAD
――
POR FAVOR LEA Y CONSERVE ESTAS INSTRUCCIONES DE
SEGURIDAD.
Al utilizar aparatos eléctricos, siempre se deben seguir las
precauciones básicas de seguridad para reducir el riesgo
de incendio, descarga eléctrica y lesiones a las personas,
incluidas las siguientes:
ADVERTENCIA: PARA EVITAR EL RIESGO DE DESCARGA
ELÉCTRICA, FUEGO O LESIONES A LAS PERSONAS, SIEMPRE
APAGUE EL APARATO, DESENCHUFE EL CABLE DE ALIMENTACIÓN
DEL ENCHUFE Y VACÍE EL DEPÓSITO DE AGUA ANTES DE
MANIPULAR, LIMPIAR O REPARAR EL APARATO.
• No cubra el aparato mientras esté en uso.
• Utilice este aparato únicamente como se describe en
este manual. Cualquier otro uso no recomendado por
el fabricante puede provocar incendios, descargas
eléctricas o lesiones a las personas.
• Desenchufe siempre el aparato cuando no esté en uso.
• No exponga el aparato a la luz solar directa, fuentes de
calor o frío extremo.
• Mantenga el aparato fuera del alcance de los niños y las
mascotas.
• No deje a los niños solos o desatendidos en el área
donde se usa el aparato.
• Se debe vigilar a los niños para que no jueguen con el
aparato.
• Los niños no deben realizar la limpieza ni el
mantenimiento a menos que estén supervisados

64 of 124 | Español
continuamente.
• Deseche el agua retenida por el aparato. Este agua no es
potable
• El aparato no debe ser utilizado por personas (incluidos
niños) con capacidades físicas, sensoriales o mentales
reducidas, o con falta de experiencia y conocimiento, a
menos que hayan recibido supervisión o instrucción.
• Cuando mueva el aparato, asegúrese de que se
mantenga en posición vertical.
• El aparato debe tener un espacio libre mínimo de 50 cm
alrededor de todos sus lados.
• Nunca deje el aparato desatendido mientras está en
uso.
• Siempre apague el aparato y desconéctelo de la fuente
de alimentación cuando no esté en uso.
• Evite colocar el cable de alimentación en zonas donde
pueda convertirse en un peligro de tropiezo. No coloque
el cable de alimentación debajo de una alfombra ni lo
cubra con tapetes, mantas o similares.
• Coloque el aparato sobre una supercie plana, estable
y seca y mantenga siempre el aparato en posición
vertical. Manejar el aparato en cualquier otra posición
podría causar un peligro.
• Nunca coloque nada encima del aparato.
• Asegúrese de que el suministro eléctrico (incluido el
voltaje, la frecuencia y la alimentación) cumpla con la
etiqueta de clasicación del aparato.
• Puede haber algo de olor durante los primeros
minutos de uso inicial. Esto es normal y desaparecerá
rápidamente.
• No coloque el aparato contra una pared u otros
aparatos.
• No cubra el aparato ni restrinja el ujo de aire de las
rejillas de entrada o salida mientras está en uso.
• No cubra, obstruya ni introduzca objetos en las rejillas
de ventilación y la apertura de los aparatos, ya que esto

Español | 65 of 124
puede provocar una descarga eléctrica, un incendio o
dañar el aparato.
• No maneje el aparato con las manos mojadas.
• No maneje el aparato sin el ltro.
• No utilice este aparato cerca del agua o en las
inmediaciones de un baño, una ducha o una piscina.
Nunca coloque el aparato donde pueda caer en una
bañera u otro recipiente con agua.
• No permita que entre agua u otros líquidos en el interior
del aparato, ya que esto podría crear un incendio o
peligro eléctrico.
• No utilice dispositivos mecánicos para acelerar el
proceso de descongelación de los aparatos.
• No coloque la manguera de drenaje continuo en el
exterior cuando la temperatura descienda por debajo de
1 °C.
• Este aparato está diseñado para uso doméstico en
interiores y aplicaciones similares. No lo use al aire libre.
• No utilice el aparato cerca de gasolina, pinturas, gases
inamables, hornos u otras fuentes de calor.
• El cable de alimentación no debe colgar de la supercie
sobre la que está colocado el aparato para evitar que se
tire de él hacia abajo.
• Para evitar una sobrecarga del circuito al usar este
aparato, no haga funcionar otro electrodoméstico de
alta tensión en el mismo circuito eléctrico.
• Conecte siempre el aparato directamente a una toma
de corriente. Evite el uso de cables de extensión siempre
que sea posible, ya que pueden sobrecalentarse y
provocar un riesgo de incendio.
• No utilice este aparato con un programador externo, un
temporizador o cualquier otro dispositivo que encienda
el aparato automáticamente, a menos que el fabricante
lo haya incorporado previamente al aparato.
• No tire del cable de alimentación. Nunca mueva,
transporte o cuelgue el aparato del cable de red.

66 of 124 | Español
• No retuerza ni enrolle el cable de alimentación y el
enchufe alrededor del aparato, ya que esto puede hacer
que el aislamiento se debilite o se parta, especialmente
donde entra al aparato.
• No maneje el aparato sin el depósito de agua.
• Asegúrese de que el cable de alimentación esté
completamente extendido antes de su uso y colóquelo
de manera que no esté en contacto con ninguna pieza
del aparato.
• No maneje el aparato sin las protecciones de seguridad.
• No maneje el aparato si hay signos de daño en el mismo,
en el cable de alimentación o en cualquiera de los
accesorios suministrados. Si el cable de alimentación
está dañado, deberá reemplazarlo el fabricante, su
agente de servicio o una persona calicada similar para
evitar un peligro.
• No utilice el aparato si hay signos de daños en el aparato
o los accesorios suministrados.
• No intente reparar ni ajustar ningún elemento eléctrico o
mecánico del aparato. Hacerlo puede no resultar seguro
y anulará la garantía.
• El aparato solo debe utilizarse con el adaptador de
corriente suministrado. No utilice otros cargadores o
adaptadores de corriente, ya que esto puede dañar el
producto.
• Nunca inserte los dedos u objetos metálicos en las
rejillas de ventilación y aberturas del aparato
• Solo para uso doméstico.
NFORMACIÓN ESPECÍFICA SOBRE EL GAS REFRIGERANTE R290
――
PRECAUCIÓN
RIESGO DE INCENDIO

Español | 67 of 124
ADVERTENCIA: EL APARATO DEBE INSTALARSE, UTILIZARSE
Y ALMACENARSE EN UNA HABITACIÓN CON UNA
SUPERFICIE DE SUELO SUPERIOR A 4M2.
• Tenga en cuenta que el refrigerante R290 es inodoro
y no tiene el olor que normalmente se asocia con los
depósitos de gas natural y propano.
• No utilice medios para acelerar el proceso de
descongelación o para limpiar distintos de los
recomendados por el fabricante.
• El aparato debe colocarse en un área sin ninguna
fuente continua de ignición, como llamas abiertas, gas o
aparatos eléctricos en funcionamiento.
• No perforar y no quemar.
• Si el electrodoméstico se instala, funciona o almacena
en un área no ventilada, la habitación deberá estar
diseñada para evitar la acumulación de fugas de
refrigerante que resulten en un riesgo de incendio o
explosión debido a la ignición del refrigerante causada
por calentadores eléctricos, estufas o otras fuentes de
ignición.
• El aparato debe almacenarse de forma que se evite un
fallo mecánico.
• Las personas que manejan o trabajan en el circuito
de refrigerante deberán tener la certicación
correspondiente emitida por una organización
acreditada que garantice la competencia en el manejo
de refrigerantes de acuerdo con una evaluación
especíca reconocida por asociaciones de la industria.
• El mantenimiento y las reparaciones que requieran la
asistencia de otro personal calicado deben realizarse
bajo la supervisión de una persona especicada en el
uso de refrigerantes inamables.

68 of 124 | Español
SÍMBOLO EXPLICACIÓN
――
CARACTERÍSTICAS
――
• Tamaño: L 38.6 x W 26 x H 50cm
• Peso neto: 17kg
• Tensión: 220-240~, 1Ph
• Frecuencia: 50Hz
• Potencia de entrada: 715W
• Capacidad máxima (para 24 h): 30L
• Refrigerante: R290 / 0.099kg
ADVERTENCIA
Este símbolo indica que el dispositivo usa refrigerante
inamable. Si hay fugas de refrigerante y estas se exponen a
una fuente de ignición externa, existe riesgo de incendio.
PRECAUCIÓN
Este símbolo indica que se debe leer el manual de
instrucciones detenidamente.
PRECAUCIÓN
Es un símbolo que establece que el equipo debe manipularlo
un miembro del personal de mantenimiento, siguiendo
siempre las indicaciones del manual de instalación.
PRECAUCIÓN
El símbolo muestra que la información está disponible en el
manual de instrucciones o el manual de funcionamiento.
Explicación de los símbolos que se muestran en la unidad
Sólo para uso en interiores. Lea el manual de instrucciones y
consérvelo para uso futuro.
El equipo cumple con los requisitos
y reglamentos de seguridad
aplicables del Reino Unido.
El equipo cumple con los requisitos
y reglamentos de seguridad
aplicables de la UE.

Español | 69 of 124
CÓMO FUNCIONA
――
Familiarícese con la unidad antes de usarla.
Nota: todas las ilustraciones tienen nalidad meramente ilustrativa. Su dispositivo puede ser
ligeramente diferente.
Filtro de aire
Panel de control
Asa (a ambos lados)
Panel
Ventana de nivel de agua
Depósito de agua
Salida de la manguera de drenaje continuo
Organizador de cables
Ruedas
Cable de alimentación y clavija

70 of 124 | Español
ACCESORIOS
――
En el depósito de agua puede encontrar los
siguientes accesorios. Retire e instale antes
de su uso (según las instrucciones que
guran a continuación).
COLOCACIÓN DE LA UNIDAD
――
• Esta unidad está diseñada para funcionar
a temperaturas entre 5 y 32 °C, con una
humedad relativa del 30 al 50 %.
• Coloque la unidad en una zona en la que
las temperaturas no bajen de los 5 °C. Si la
temperatura es inferior a 5 °C, las bobinas
pueden congelarse, lo que conllevaría un
menor rendimiento del aparato.
• Coloque la unidad en una supercie
horizontal y plana, que pueda soportar el
peso de la unidad con el depósito de agua
lleno.
• Deje un espacio de al menos 50 cm detrás
de la salida de aire (en la parte posterior
de la unidad) para que el aire circule
correctamente. Deje un espacio de al
menos 20 cm a cada lado para que el aire
circule correctamente.
• Coloque la unidad en un sitio alejado de
calefactores, radiadores o secadoras.
• Para obtener el mejor rendimiento, coloque
la unidad en un espacio cerrado y cierre
todas las puertas, ventanas y aberturas al
exterior.
• Si está cerca de una zona de
almacenamiento cerrada (como un
armario o una alacena), asegúrese de que
la circulación de aire es correcta.
• No utilizar en exteriores.
• Esta unidad está diseñada solamente
para uso doméstico en interiores. No
debe utilizarse para nes comerciales ni
industriales.
• La unidad cuenta con cuatro ruedas
integradas para que su transporte resulte
más fácil. No fuerce las ruedas para que se
deslicen sobre una alfombra.
• No transporte la unidad si el depósito de
agua está lleno. Esto puede hacer que
la unidad se vuelque o que el agua se
derrame.
Organizador de cables
Manguera de
drenaje continuo
Extremo roscado hembra
Para instalar el organizador de cables,
basta con que lo introduzca en el bloque
de la unidad
40cm +
20cm +
40cm + 20cm +
20cm +

Español | 71 of 124
INSTRUCCIONES DE FUNCIONAMIENTO
――
Panel de control
Botones
Nota: por razones de seguridad y para regular la temperatura, el ventilador seguirá funcionando
cuando el compresor esté apagado.
• Auto / Comfort: Pulse el boton de empieza para iniciar el modo automático. Esto establecerá
automáticamente la humedad de la habitación en un 45-55% según el entorno de la
habitación. Cuando está en modo automático, el nivel de humedad no se puede ajustar. Pulse
los botones Arriba/Abajo para salir del modo automático.
• Filtro:
• La luz del ltro parpadeará tras 250 horas de funcionamiento como un recordatorio para
limpiar el ltro de la unidad. Cuando esté limpio, pulse el botón del ltro una vez para
reiniciar.
• Para conectar la unidad a una red wi, mantenga el botón del ltro pulsado durante tres
segundos, hasta que en la pantalla de LED aparezca «AP», y siga las instrucciones que
guran a continuación.
• Cont: pulsar una vez para activar el modo de deshumidicación continua. Antes de hacerlo,
conecte la manguera de drenaje a la parte posterior de la unidad.
• Turbo: pulsar una vez para iniciar el modo Turbo. Hará que la velocidad del ventilador
aumente al máximo. Vuelva a pulsarlo para reducir la velocidad del ventilador.
• Temporizador: este botón controla las funciones de inicio y parada automáticos.
• Para el inicio automático, apague la unidad con el botón de encendido/apagado. Pulse
el botón del temporizador hasta que la luz «on» se encienda. Utilice las echas para
seleccionar el tiempo automático (disponible en incrementos de 30 minutos, hasta 24
horas). Una vez seleccionado, espere cinco segundos. La pantalla LED se volverá a poner
en blanco. La unidad se encenderá cuando haya transcurrido el tiempo seleccionado.
• Para la parada automática, encienda la unidad con el botón de encendido apagado.
Pulse el botón del temporizador hasta que la luz «on» se encienda. Utilice las echas para
seleccionar el tiempo automático (disponible en incrementos de 30 minutos, hasta 24
horas). Una vez seleccionado, espere cinco segundos. La pantalla LED volverá a mostrar
la HR. La unidad se apagará cuando haya transcurrido el tiempo seleccionado.
• Si se enciende o se apaga la unidad, o si el tiempo se ajusta a 0, el modo Temporizador
se apagará. La unidad se apagará cuando haya transcurrido el tiempo seleccionado.

72 of 124 | Español
• Botones de arriba y abajo: al pulsarlos, se controla el nivel de humedad. El nivel de humedad
puede ajustarse entre un 35 % y un 85 % de HR, en incrementos de 5 %. Si necesita un aire
más seco, congure una HR más baja. Si necesita un aire más húmedo, congure una HR
más alta.
Luces
• Luces de Comfort/Auto, ltro, deshumidicación continua: se encenderán cuando los modos
correspondientes se activen.
• Luz de descongelación: se encenderá cuando se genere escarcha en las bobinas del
evaporador. Cuando esto ocurra, el compresor se apagará y el ventilador seguirá funcionando
hasta que las bobinas se descongelen.
• Luz de lleno: esta luz se encenderá cuando el depósito de agua esté lleno y haya que vaciarlo.
Para vaciar el depósito, siga las instrucciones que guran más adelante.
Pantalla
• La pantalla LED está ajustada de serie para mostrar la HR (humedad relativa) de la estancia
con una precisión de +/- 5 %.
• Si hay un problema en la unidad, se mostrará lo siguiente:
• P2: el depósito de agua está lleno o no está en la posición correcta. Vacíe el depósito de
agua o compruebe su colocación.
• AP: el dispositivo está en modo de sincronización automática, utilizado para conectarse
al wi. Este modo se apagará automáticamente en un plazo de 8 minutos.
• AS: error en el sensor de humedad. Desconecte la unidad, espere 30 segundos y vuelva a
enchufarla. Si el problema persiste, póngase en contacto con el equipo de soporte.
• ES: error en el sensor de temperatura del tubo. Desconecte la unidad, espere 30 segundos
y vuelva a enchufarla. Si el problema persiste, póngase en contacto con el equipo de
soporte.
CONEXIÓN A LA RED WIFI
――
Nota: si tiene problemas para conectarse a Wi, asegúrese de que su red esté congurada en
2.4 G. Si continúa teniendo problemas, comuníquese con nuestro equipo de atención al cliente
enviando un correo electrónico a [email protected].
• Para conectarse a WiFi, mantenga presionado el botón de ltro durante 3 segundos o
hasta que la pantalla LED muestre «AP» (enlazamiento automático). En el enlazamiento
automático, el compresor se apagará de forma forzada.
• Asegúrese de que el deshumidicador y su móvil estén conectados al mismo WiFi.
• Descargue la aplicación «NetHome plus». Tendrá que crear una cuenta. En la pantalla,
seleccione «añadir dispositivo» y luego seleccione «deshumidicador». Siga las
instrucciones de la aplicación.
• Cuando la conexión tenga éxito, el deshumidicador se encenderá automáticamente.
• Si después de 8 minutos la conexión no se realiza correctamente, el deshumidicador se
volverá a encender automáticamente. Inicie el proceso de conexión desde el principio.
• Una vez conectado, puede ver el rendimiento y controlar su deshumidicador a través de la
aplicación.

Español | 73 of 124
VACIAR EL DEPÓSITO DE AGUA
――
PRECAUCIÓN
• Apague siempre la unidad y desenchufe el dispositivo antes de quitar el depósito de agua.
• No transporte la unidad si el depósito de agua está lleno. Esto puede hacer que la unidad se
vuelque o que el agua se derrame.
• Tenga cuidado al retirar el depósito de agua de la unidad para no derramar agua.
• Cuando retire el depósito de agua, no toque ninguna de las piezas del interior de la unidad.
Hacerlo podría dañar el producto.
• Si hay agua en cualquier otro sitio de la unidad al retirar el depósito de agua, elimínela con
un paño seco.
Instrucciones
• Si la unidad está en funcionamiento y el depósito de agua está lleno, el compresor y el
ventilador se apagarán y se encenderá la luz de lleno (full).
• Para vaciar el depósito de agua, extráigalo lentamente para aojarlo.
• Sostenga el depósito por ambos lados y la misma fuerza y retírelo de la unidad. No ponga el
depósito de agua en el suelo, ya que su base no es uniforme.
• Tire el agua en un lugar seguro y vuelva a colocar el depósito de agua. Haga esto con
cuidado, hasta que el depósito esté totalmente introducido dentro de la unidad, ya que si lo
fuerza puede provocar daños al mismo.
DRENAJE CONTINUO
――
• El agua se puede vaciar automáticamente a un desagüe o un sumidero en el suelo. Para ello,
acople a la unidad la manguera de agua (incluida).
• Para ello, retire la cubierta de plástico de la parte posterior de la unidad. Precaución: se
puede acumular un poco de agua en la salida de drenaje trasera, por lo que le aconsejamos
que tenga un pequeño recipiente o un paño seco a mano para que el agua no se derrame

74 of 124 | Español
LIMPIEZA Y ALMACENAMIENTO
――
ADVERTENCIA: APAGUE SIEMPRE EL APARATO,
DESENCHUFE EL CABLE DE ALIMENTACIÓN DEL ENCHUFE
ANTES DE MANIPULARLO O LIMPIARLO.
PRECAUCIÓN: NO PERMITA QUE ENTRE AGUA U OTROS
LÍQUIDOS EN EL INTERIOR DEL APARATO, YA QUE ESTO
PODRÍA CREAR UN INCENDIO O PELIGRO ELÉCTRICO.
PRECAUCIÓN: NO UTILICE LIMPIADORES ABRASIVOS NI
DISOLVENTES, YA QUE DAÑARÁN EL APARATO.
• No intente limpiar el aparato de otra manera que no sea
la detallada por el fabricante.
• Limpie la supercie exterior del aparato frotándolo con
un paño suave y húmedo. Seque el aparato con un paño
suave y limpio.
• Vacíe siempre el depósito de agua, limpie y seque el
aparato cuando no esté en uso para evitar el moho.
sobre el suelo.
• Acople la cubierta de la manguera continua y la manguera de drenaje a la parte trasera de
la unidad.
• Dirija la manguera al drenaje, asegurándose de que no está retorcida en ningún punto y de
que la salida está más alta que el drenaje.
• Encienda la unidad y pulse el botón «cont» en el panel de control.
• Nota: cuando la funcionalidad de drenaje continuo no se esté utilizando, retire la manguera
de la unidad, seque la salida y vuelva a poner la cubierta de plástico.
Extremo
roscado
hembra
Manguera
de drenaje
Retirar la cubierta
de plástico. Tenga
cuidado de no
derramar agua

Español | 75 of 124
Limpieza del depósito de agua:
• Retire y vacíe el depósito de agua según las instrucciones
anteriores.
• Limpie el depósito de agua con agua del grifo caliente y un
detergente suave (por ejemplo, lavavajillas). Nota: No use
agua hirviendo para limpiar el depósito de agua.
• Asegúrese de eliminar las incrustaciones o depósitos que se
hayan formado dentro del depósito de agua.
• Seque todas las supercies antes de volver a colocar el
depósito de agua en el aparato.
Almacenamiento:
• Para almacenar su producto, le recomendamos utilizar
la caja original o una de tamaño similar.
• Guarde el aparato en un lugar seguro, limpio y seco, lejos
de la luz solar directa y fuera del alcance de los niños
cuando no lo utilice.
• Es posible que sea necesario descongelar la unidad
a temperaturas inferiores a 23°C. Esto ocurrirá
automáticamente y puede durar hasta 5 minutos.
Durante este tiempo, la función de deshumidicación se
detendrá y el indicador de descongelación se iluminará.
No apague el aparato mientras la unidad se está
descongelando.
DECLARACIÓN DE CONFORMIDAD
――
Por la presente, One Retail Group Limited declara que el equipo de radio tipo PB-15 cumple
con la Directiva 2014/53 / UE. El texto completo de la declaración de conformidad de la UE está
disponible en la siguiente dirección de Internet: https://probreeze.com/ec-declaration-of-
conformity/
RECICLAJE & ELIMINACIÓN
――
Los residuos de aparatos eléctricos y electrónicos (RAEE), las baterías, los acumuladores y el
embalaje no deben desecharse con la basura doméstica normal. Esto es para evitar posibles
daños al medio ambiente y al bienestar humano y para ayudar a conservar nuestros recursos

76 of 124 | Español
naturales. La mayoría de los productos eléctricos con enchufe, batería o cable se pueden
reciclar. Póngase en contacto con su ayuntamiento, con el servicio de recogida de residuos
domésticos o con la tienda donde compró el producto para obtener información sobre los
sistemas de recogida de su zona.
El programa Take-Back
Los residuos de aparatos eléctricos (WEEE) se pueden enviar a One Retail Group para su
reciclaje y desecho cuando compre un nuevo producto de One Retail Group, a modo de
intercambio. Para obtener más información sobre cómo reciclar este producto, visite www.
probreeze.com
El usuario final de aparatos eléctricos y electrónicos (RAEE) es responsable de separar las pilas y
las bombillas antiguas antes de entregarlas a un servicio de eliminación y reciclaje designado.
Las pilas usadas también pueden depositarse en los contenedores de recogida, que pueden
encontrarse en la mayoría de los supermercados locales y en los centros de reciclaje de
residuos domésticos.
Residuos de aparatos
eléctricos y electrónicos
(RAEE)
Este símbolo en el producto o en el embalaje indica que los
Residuos de Aparatos Eléctricos (RAEE), según la Directiva
2012/19/UE que regula los aparatos eléctricos y electrónicos
usados, no deben eliminarse con la basura doméstica
general.
La banda de Möbius Este símbolo indica que el producto o el embalaje pueden
reciclarse.

Español | 77 of 124
Problema Soluzione
El ventilador no se detiene • El ventilador seguirá funcionando incluso cuando el
compresor esté apagado. Es por razones de seguridad y
para regular la temperatura del deshumidicador. Deberá
apagar manualmente el ventilador.
La unidad no se enciende • Asegúrese de que el enchufe del deshumidicador esté
completamente insertado en la toma.
• Compruebe que el depósito de agua no esté lleno.
• El cubo de agua no está en su sitio.
El deshumidicador no seca
el aire como debería
• Asegúrese de que no haya nada bloqueando la parte
posterior del deshumidicador. Compruebe que esté al
menos a 40 cm de distancia de paredes y muebles.
• Use las echas para bajar el control de la humedad.
• Compruebe que todas las puertas, ventanas y demás
aperturas están bien cerradas.
• La temperatura ambiente es demasiado baja. La unidad
no funcionará si la temperatura es inferior a 5 °C.
• La unidad no secará espacios cerrados
• a menos que la circulación de aire sea suciente.
• Compruebe que no haya nada que produzca humedad
dentro de la estancia.
La unidad hace mucho
ruido
• El ltro de aire está atascado y hay que limpiarlo.
• La unidad está inclinada y no está en posición vertical.
• El suelo no está lo sucientemente plano.
Ha salido escarcha en las
bobinas
• Esto es normal. El deshumidicador incluye una
funcionalidad de descongelación.
Hay agua en el suelo • El conector de manguera de la parte trasera de la unidad
puede estar oja.
• Compruebe que la toma de drenaje de la parte trasera
esté conectada cuando utilice el cubo para recoger agua.
En la pantalla se visualiza ES,
AS,P2,Eb
• Compruebe que la toma de drenaje de la parte trasera
esté conectada cuando utilice el cubo para recoger agua.
• En la pantalla se visualiza ES, AS,P2,Eb
CONSEJOS PARA SOLUCIONAR PROBLEMAS
――
Si tiene algún problema con el deshumidicador, aquí tiene una serie de consejos que pueden
ayudarle a solucionarlos.

78 of 124 | Nederland
30L ONTVOCHTIGER
MODEL PB-15
Bedankt dat je hebt gekozen voor de aanschaf van een product van Pro Breeze. Lees vóór het
eerste gebruik de volledige handleiding zorgvuldig door en bewaar deze op een veilige plaats
voor toekomstig gebruik.
VEILIGHEIDSINSTRUCTIES
――
LEES EN BEWAAR DEZE BELANGRIJKE VEILIGHEIDSINSTRUCTIES.
Bij gebruik van elektrische apparaten moeten altijd
basisveiligheidsmaatregelen worden genomen om het
risico op brand, elektrische schokken en persoonlijk letsel te
verminderen, waaronder de volgende:
WAARSCHUWING: SCHAKEL HET APPARAAT ALTIJD UIT,
TREK DE STEKKER UIT HET STOPCONTACT EN LEEG HET
WATERRESERVOIR VOORDAT U HET APPARAAT AANRAAKT,
SCHOONMAAKT OF ER ONDERHOUD AAN PLEEGT, OM
HET RISICO OP ELEKTRISCHE SCHOKKEN, BRAND OF
PERSOONLIJK LETSEL TE VOORKOMEN.
• Dek het apparaat niet af terwijl het in gebruik is.
• Gebruik dit apparaat alleen zoals beschreven in deze
handleiding. Elk ander gebruik dat niet door de fabrikant
wordt aanbevolen, kan leiden tot brand, elektrische
schokken of persoonlijk letsel.
• Haal de stekker van het apparaat altijd uit het
stopcontact wanneer het niet in gebruik is.
• Stel het apparaat niet bloot aan direct zonlicht,
warmtebronnen of extreme kou.
• Houd het apparaat buiten bereik van kinderen en
huisdieren.
• Laat kinderen niet alleen of zonder toezicht in de ruimte
waar het apparaat wordt gebruikt.
• Kinderen moeten onder toezicht staan om niet met het
apparaat te spelen.

Nederland | 79 of 124
• Reiniging en gebruikersonderhoud mogen niet worden
uitgevoerd door kinderen, tenzij ze onder voortdurend
toezicht staan.
• Gooi water dat zich in het apparaat verzameld weg. Dit
water is niet drinkbaar
• Het apparaat mag niet worden gebruikt door personen
(inclusief kinderen) met verminderde fysieke, zintuiglijke
of mentale vermogens, of gebrek aan ervaring en kennis,
tenzij ze onder toezicht staan of instructies hebben
gekregen.
• Zorg dat het apparaat rechtop wordt gehouden wanneer
het wordt verplaatst.
• Het apparaat moet aan alle zijden minimaal 50 cm vrije
ruimte hebben.
• Laat het apparaat tijdens gebruik nooit onbeheerd
achter. Schakel het apparaat altijd uit en ontkoppel het
van de stroomtoevoer als het niet wordt gebruikt.
• Leg de stroomkabel niet op plekken waar men erover
zou kunnen struikelen. Leg de stroomkabel niet onder
vloerbedekking en bedek hem niet met vloerkleden,
lopers of dergelijke.
• Plaats het apparaat op een vlakke, stabiele en droge
ondergrond en bewaar het apparaat altijd rechtop.
Gebruik van het apparaat in een andere positie kan
gevaar veroorzaken.
• Plaats nooit iets op het apparaat.
• Zorg ervoor dat de netvoeding (inclusief spanning,
frequentie en vermogen) overeenkomt met het
typeplaatje van het apparaat.
• Tijdens de eerste minuten van het eerste gebruik kan er
een geur worden afgegeven. Dit is normaal en verdwijnt
snel.
• Plaats het apparaat niet tegen een muur of andere
apparaten.
• Dek het apparaat niet af en beperk de luchtstroom van
de inlaat- of afvoerroosters niet tijdens het gebruik.

80 of 124 | Nederland
• Bedek en blokkeer de ventilatieopeningen niet, en duw
geen voorwerpen in de ventilatie- en andere openingen
van het apparaat, dit kan een elektrische schok, brand of
schade aan het apparaat veroorzaken.
• Bedien het apparaat niet met natte handen.
• Gebruik het apparaat niet zonder lter.
• Gebruik dit apparaat niet in de buurt van water of in de
directe omgeving van een bad, douche of zwembad.
Plaats het apparaat nooit zo dat het in een badkuip of
ander waterreservoir kan vallen.
• Zorg dat er geen water of andere vloeistoffen in het
apparaat terechtkomen, hierdoor zou brand en/of
elektrisch gevaar kunnen ontstaan.
• Gebruik geen mechanische instrumenten om het
ontdooiproces van de apparaten te versnellen.
• Leg de doorlopende afvoerslang niet buiten bij
temperaturen lager dan 1C.
• Dit apparaat is bedoeld voor huishoudelijk gebruik
binnenshuis en soortgelijke toepassingen. Niet
buitenshuis gebruiken.
• Gebruik het apparaat niet in de buurt van benzine, verf,
brandbare gassen, ovens of andere warmtebronnen.
• Zorg dat de stroomkabel niet omlaag hangt van het
oppervlak waarop het apparaat is geplaatst, om te
voorkomen dat het apparaat naar beneden wordt
getrokken.
• Om een overbelasting van het circuit te voorkomen
wanneer je dit apparaat gebruikt, mogen geen andere
apparaten met een hoog wattage op hetzelfde
elektrische circuit worden gebruikt.
• Sluit het apparaat altijd rechtstreeks aan op een
wandstopcontact. Vermijd, waar mogelijk, het
gebruik van verlengsnoeren, aangezien deze kunnen
oververhitten, waardoor brandgevaar kan ontstaan.
• Gebruik dit apparaat niet met een externe programmeur,
tijdklokschakelaar of enig ander instrument dat het

Nederland | 81 of 124
apparaat automatisch zou kunnen inschakelen, tenzij
dit een door de fabrikant ingebouwde functie van het
apparaat betreft.
• Trek niet aan de stroomkabel. Verplaats, draag of hang
het apparaat nooit aan de stroomkabel.
• Knik of wikkel de stroomkabel en de stekker niet om het
apparaat, dit kan de isolatie verzwakken of splijten, vooral
op het punt waar de kabel het apparaat binnenkomt.
• Gebruik het apparaat niet als het waterreservoir is
verwijderd.
• Zorg dat de stroomkabel voor gebruik volledig is
uitgerold en plaats hem zo dat hij niet in contact staat
met enig onderdeel van het apparaat.
• Gebruik het apparaat niet als er veiligheidsvoorzieningen
zijn verwijderd.
• Gebruik het apparaat niet als er tekenen zijn van
schade aan het apparaat, de stroomkabel of een van
de meegeleverde accessoires. Als de stroomkabel
beschadigd is, moet deze, om gevaar te voorkomen,
worden vervangen door de fabrikant, diens serviceagent
of een vergelijkbaar gekwaliceerd persoon.
• Gebruik het apparaat niet als er tekenen zijn van schade
aan het apparaat of de meegeleverde accessoires.
• Probeer geen elektrische of mechanische elementen
in het apparaat te repareren of aan te passen. Dit kan
onveilig zijn en maakt de garantie ongeldig.
• Gebruik het apparaat uitsluitend met de meegeleverde
stroomadapter. Gebruik geen andere laders of
voedingsadapters, deze kunnen schade aan het
apparaat veroorzaken.
• Steek nooit vingers of metalen voorwerpen in de
ventilatieopeningen of andere openingen van het
apparaat
• Alleen voor huishoudelijk gebruik.

82 of 124 | Nederland
SPECIFIEKE INFORMATIE BETREFFENDE R290 KOELMIDDEL
――VOORZICHTIG
BRANDGEVAAR
WAARSCHUWING: HET APPARAAT MOET WORDEN
GEÏNSTALLEERD, BEDIEND EN OPGESLAGEN IN EEN RUIMTE
MET EEN VLOEROPPERVLAK GROTER DAN 4M2.
• Doorboor geen enkel deel van het koelcircuit.
• Houd er rekening mee dat R290-koelmiddel geurloos
is en niet de geur heeft die normaal gesproken wordt
geassocieerd met aardgas- en propaantanks.
• Gebruik voor het ontdooiproces te versnellen of voor het
schoonmaken geen andere middelen dan de middelen
die de fabrikant aanbeveelt.
• Het apparaat moet worden geplaatst in een omgeving
zonder continue ontstekingsbronnen zoals open vuur,
gas of elektrische apparaten die in werking zijn.
• Niet doorboren en niet verbranden.
• Als het apparaat wordt geïnstalleerd, gebruikt of
opgeslagen in een niet-geventileerde ruimte, moet
de kamer zijn ontworpen om te voorkomen dat gelekt
koelmiddel zich ophoopt, wat kan leiden tot brand- of
explosiegevaar door ontbranding van het koelmiddel,
veroorzaakt door elektrische kachels, fornuizen of andere
ontstekingsbronnen.
• Het apparaat moet zo worden opgeslagen dat
mechanische defecten worden voorkomen.
• Personen die het koelcircuit bedienen of eraan werken,
moeten de juiste certicering hebben, afgegeven door
een geaccrediteerde organisatie die bekwaamheid
garandeert in het omgaan met koelmiddelen volgens
een specieke evaluatie die wordt erkend door

Nederland | 83 of 124
SYMBOOL UITLEG
――
SPECIFICATIES
――
• Afmetingen: L 38.6 x W 26 x H 50cm
• Nettogewicht: 17kg
• Spanning: 220-240~, 1Ph
• Frequentie: 50Hz
• Ingangsvermogen: 715W
• Maximumcapaciteit (per 24 uur): 30L
• Koelmiddel: R290 / 0.099kg
verenigingen in de industrie.
• Onderhoud en reparaties waarbij de hulp van ander
gekwaliceerd personeel nodig is, moeten worden
uitgevoerd onder toezicht van een persoon die is
gespecialiseerd in de toepassing van brandbare
koelmiddelen.
WAARSCHUWING
Dit symbool geeft aan dat dit apparaat gebruikmaakt
van een ontvlambaar koelmiddel. Als het koelmiddel lekt
of in aanraking komt met een ontstekingsbron, kan brand
ontstaan.
PAS OP
Dit symbool geeft aan dat de bedieningshandleiding
nauwgezet moet worden gelezen.
PAS OP
Dit symbool geeft aan dat onderhoudspersoneel de
installatiehandleiding moet raadplegen bij het uitvoeren
van werkzaamheden aan het apparaat.
PAS OP
Dit symbool geeft aan dat er informatie, zoals een
bedieningshandleiding of gebruiksaanwijzing, beschikbaar
is.
Toelichting op de symbolen op de eenheid
Alleen voor Gebruik binnenshuis. Lees de handleiding en bewaar
deze voor toekomstig gebruik.
Apparatuur voldoet aan de
geldende Britse veiligheidseisen en
-voorschriften
Apparatuur voldoet aan de
geldende EU-veiligheidseisen en
-regelgeving.

84 of 124 | Nederland
HOE HET WERKT
――
Raak bekend met de eenheid voordat u deze gebruikt.
Opmerking: De afbeeldingen zijn alleen bedoeld om de werking van het apparaat toe te lichten.
Uw apparaat kan er iets anders uitzien.
Luchtlter
Slang voor permanente afvoer
Hulpstuk om stroomkabel omheen te wikkelen
Zwenkwieltjes
Stroomkabel en stekker
Controlepaneel
Handgreep (beide zijden)
Paneel
Venster waterniveau
Watertank

Nederland | 85 of 124
ACCESSOIRES
――
De volgende accessoires kunnen in de
watertank worden gevonden. Haal ze uit de
tank en plaats ze voorafgaand aan gebruik
volgens onderstaande instructies).
DE EENHEID POSITIONEREN
――
• De eenheid kan worden gebruikt bij
temperaturen tussen 5 °C en 32 °C en een
relatieve luchtvochtigheid (RH) tussen 30%
en 50%.
• Plaats het apparaat in een ruimte waar
de temperatuur niet onder de 5 °C daalt.
Bij temperaturen onder de 5 °C kunnen de
spoelen bevriezen, waardoor het apparaat
minder goed zal werken.
• Plaats de eenheid op een egaal, vlak
oppervlak dat stevig genoeg is om de
eenheid te dragen wanneer de watertank
vol is.
• Laat achter de luchtuitlaat (aan de
achterkant van de eenheid) ten minste
50 cm vrij voor een goede luchtcirculatie.
Laat aan alle andere zijden van de eenheid
ten minste 20 cm vrij voor een goede
luchtcirculatie.
• Plaats de eenheid niet in de buurt van een
wasdroger, kachel of radiator.
• Plaats de eenheid voor de beste resultaten
in een afgesloten ruimte en sluit alle deuren,
ramen en andere openingen.
• Zorg voor voldoende luchtcirculatie
als het apparaat nabij een afgesloten
opbergruimte (zoals een kleding- of andere
kast) wordt geplaatst.
• Niet buitenshuis gebruiken.
• Deze eenheid is alleen bedoeld voor
huishoudelijk gebruik binnenshuis. Hij mag
niet worden gebruikt voor commerciële of
industriële toepassingen.
• Er zitten vier wieltjes aan de eenheid
zodat deze gemakkelijk kan worden
verplaatst. Forceer de zwenkwieltjes niet op
vloerbedekking.
• Verplaats de eenheid niet als er water
in de watertank zit. De eenheid kan dan
omvallen en er zal water uitlopen.
hulpstuk om stroomkabel
omheen te wikkelen
slang voor
permanente afvoer
eindverbinding binnendraad
Het hulpstuk om de stroomkabel
omheen te wikkelen plaatst u
eenvoudigweg in de behuizing van de
eenheid.
40cm +
20cm +
40cm + 20cm +
20cm +

86 of 124 | Nederland
BEDIENINGSINSTRUCTIES
――
Controlepaneel
Knoppen
Opmerking: voor veiligheidsredenen en om de temperatuur te reguleren, blijft de ventilator
draaien terwijl de compressor uit staat.
• Auto / Comfort: druk hier één keer op om de Comfort/Auto te activeren. In de automatische
modus kan de vochtigheidsgraad niet worden aangepast. Druk op de knoppen Omhoog/
Omlaag om de automatische modus te verlaten.
• Filter:
• Het lterlampje zal na 250 gebruiksuren gaan knipperen om eraan te herinneren dat het
lter van de eenheid moet worden gereinigd. Druk na reiniging op de lterknop om deze
te resetten.
• Om de eenheid aan te sluiten op wi, houdt u de lterknop drie seconden ingedrukt
totdat “AP” op het led-scherm verschijnt. Volg vervolgens onderstaande instructies.
• Cont: druk hier één keer op om de permanente ontvochtigingsstand te activeren. Sluit
voordat u dit doet eerst de afvoerslang aan op de achterkant van de eenheid.
• Turbo: druk hier één keer op om de turbostand te activeren. De ventilator zal dan op
maximale snelheid werken. Druk hier nogmaals op om de ventilatorsnelheid te verlagen.
• Timer: deze knop stuurt de functies auto-start en auto-stop aan.
• Zet de eenheid voor auto-start uit met de aan/uit-knop. Druk op de timerknop totdat het
“aan”-lampje oplicht. Gebruik de pijltjes om de auto-tijd te selecteren (in stappen van 30
minuten, maximaal 24 uur). Wacht vijf seconden nadat u de selectie hebt gemaakt. Op
het led-scherm zal niets meer te zien zijn. De eenheid zal worden ingeschakeld wanneer
de opgegeven tijd is verstreken.
• Zet de eenheid voor auto-stop aan met de aan/uit-knop. Druk op de timerknop
totdat het “aan”-lampje oplicht. Gebruik de pijltjes om de auto-tijd te selecteren (in
stappen van 30 minuten, maximaal 24 uur). Wacht vijf seconden nadat u de selectie
hebt gemaakt. Op het led-scherm zal de relatieve luchtvochtigheid RH weer worden
weergegeven. De eenheid zal worden uitgeschakeld wanneer de opgegeven tijd is
verstreken.
• TAls u de eenheid aan- of uitzet of de tijd instelt op 0, wordt de timerstand uitgeschakeld.
De eenheid zal worden uitgeschakeld wanneer de opgegeven tijd is verstreken.

Nederland | 87 of 124
• Knoppen naar boven/beneden: druk hierop om de luchtvochtigheid te reguleren. De
luchtvochtigheid kan worden ingesteld tussen 35% RH en 85% RH in stappen van 5%. Kies een
lage HR voor drogere lucht. Kies een hogere HR voor vochtigere lucht.
Lampjes
• Comfort/Auto-, lter-, cont.-lampjes: deze gaan branden wanneer de desbetreffende standen
worden geactiveerd.
• Ontdooien: deze gaan branden wanneer er zich rijp heeft opgebouwd op de
verdampingsspoelen. Wanneer dit gebeurt, zal de compressor worden uitgeschakeld en blijft
de ventilator werken totdat de spoelen ontdooid zijn.
• Full (vol): dit lampje gaat branden wanneer de watertank vol is en moet worden geleegd. Volg
de instructies hieronder om de tank te legen.
Scherm
• Op het scherm wordt standaard de RH (relatieve luchtvochtigheid) van de ruimte
weergegeven met een nauwkeurigheid van +/- 5%.
• Als er iets mis is met de eenheid, wordt het volgende weergegeven:
• P2: watertank is vol of niet goed geplaatst. Leeg de watertank of controleer of deze goed
is geplaatst.
• AP: apparaat bevindt zich in de automatische koppelingsstand, die wordt gebruikt
om verbinding te maken met wi. Deze stand moet binnen 8 minuten automatisch
uitgeschakeld worden.
• AS: fout in vochtigheidssensor. Haal de eenheid uit het stopcontact, wacht 30 seconden
en doe de stekker weer in het stopcontact. Neem als het probleem zich blijft voordoen
contact op met de support-afdeling.
• ES: fout in sensor leidingtemperatuur. Haal de eenheid uit het stopcontact, wacht 30
seconden en doe de stekker weer in het stopcontact. Neem als het probleem zich blijft
voordoen contact op met de support-afdeling.
VERBINDING MAKEN MET WIFI
――
Opmerking: als je problemen ondervindt bij het verbinden met wi, zorg dan dat je netwerk
is ingesteld op 2.4G. Blijven de problemen zich voordoen, neem dan contact op met onze
klantenservice door een e-mail te sturen naar [email protected]
• Om verbinding te maken met wi, moet de lterknop 3 seconden lang worden ingedrukt, of
totdat het led-display de melding "AP" (auto-pairing) toont. Bij automatisch koppelen wordt
de compressor gedwongen uitgeschakeld.
• Zorg dat de luchtontvochtiger en je mobiel zijn verbonden met dezelfde wi.
• Download de app "NetHome plus". Er moet een account worden geregistreerd. Druk in het
scherm op "apparaat toevoegen" en selecteer vervolgens "luchtontvochtiger". Volg de
instructies in de app.
• Als de verbinding tot stand is gebracht, wordt de luchtontvochtiger automatisch weer
ingeschakeld.
• Als er na 8 minuten geen verbinding is gemaakt, wordt de luchtontvochtiger automatisch
weer ingeschakeld. Start het verbindingsproces vanaf het begin.

88 of 124 | Nederland
• Eenmaal verbonden, kunnen de prestaties worden bekeken en kan de luchtontvochtiger
worden bediend via de app.
DE WATERTANK LEGEN
――
PAS OP
• Zet de eenheid altijd uit en haal hem uit het stopcontact voordat u de watertank verwijdert.
• Verplaats de eenheid niet als er water in de watertank zit. De eenheid kan dan omvallen en er
zal water uitlopen.
• Haal de watertank voorzichtig uit de eenheid om te voorkomen dat er water uit stroomt.
• Raak bij het verwijderen van de watertank geen onderdelen aan de binnenzijde van de
eenheid aan. Hierdoor kan het product beschadigd raken.
• Als u na verwijdering van de watertank elders in de eenheid water ziet, verwijder dat water
dan met een droge doek.
Instructies
• Als de eenheid aan is en de watertank vol zit, zullen de compressor en ventilator worden
uitgeschakeld en zal het lampje dat aangeeft dat de tank vol is (“full”) gaan branden.
• Om de watertank te legen, trekt u hem een beetje uit de eenheid zodat hij los komt te zitten.
• Houd beide kanten van de watertank met twee handen even stevig vast en trek de tank uit de
eenheid. Zet de watertank niet op de grond, de onderkant is niet vlak.
• Gooi het water op een veilige plek weg en plaats de watertank terug. Doe dit voorzichtig en
plaats de tank helemaal in de eenheid. Als u de tank forceert kan er schade ontstaan.
PERMANENTE AFVOER
――
• De watertank kan automatisch worden geleegd in een vloerafvoer of gootsteen door de
eenheid aan te sluiten op de waterslang (meegeleverd).
• Om dit te doen verwijdert u de plastic dop aan de achterkant van de eenheid. Pas op: Er kan
wat water in de afvoeraansluiting aan de achterkant zijn achtergebleven, dus houd een bakje

Nederland | 89 of 124
of droge doek bij de hand om ervoor te zorgen dat het water niet op de vloer terechtkomt.
• Sluit het verbindingsstuk voor de permanente slang en de afvoerslang aan op de achterkant
van de eenheid.
• Richt de slang naar de afvoer en zorg er hierbij voor dat er geen kinken in de slang zitten en
dat de permanente afvoerslang zich op een hoger niveau bevindt dan de afvoer.
• Zet de eenheid aan en druk op de “cont”-knop op het controlepaneel.
• Opmerking: Maak de slang wanneer geen gebruik wordt gemaakt van de permanente
afvoerfunctie los van de eenheid, maak de uitgang goed droog en plaats de plastic dop
terug.
Eindverbinding
binnendraad
Afvoerslang
Verwijder de
plastic dop. Doe dit
voorzichtig zodat u
geen water morst
REINIGING & OPSLAG
――
WAARSCHUWING: SCHAKEL HET APPARAAT ALTIJD UIT EN
TREK DE STEKKER UIT HET STOPCONTACT VOORDAT JE HET
VASTPAKT OF SCHOONMAAKT.
PAS OP: ZORG DAT ER GEEN WATER OF ANDERE
VLOEISTOFFEN IN HET APPARAAT TERECHTKOMEN,
HIERDOOR ZOU BRAND EN/OF ELEKTRISCH GEVAAR
KUNNEN ONTSTAAN.
PAS OP: GEBRUIK GEEN SCHUUR- OF OPLOSMIDDELEN, DEZE
KUNNEN HET APPARAAT BESCHADIGEN.
• Probeer het apparaat niet op een andere manier te
reinigen dan door de fabrikant aangegeven.
• Reinig de buitenkant van het apparaat door het af
te vegen met een zachte, vochtige doek. Droog het
apparaat af met een zachte, schone doek.
• Wanneer het apparaat niet wordt gebruikt, leeg dan

90 of 124 | Nederland
altijd het waterreservoir en maak het apparaat schoon
en droog om schimmelvorming te voorkomen.
Het waterreservoir reinigen:
• Verwijder en leeg het waterreservoir volgens bovenstaande
instructies.
• Reinig het waterreservoir met warm leidingwater en een mild
schoonmaakmiddel (bijv. afwasmiddel). Let op: Gebruik geen
kokend water om het waterreservoir schoon te maken.
• Zorg dat je alle kalk of andere afzettingen verwijdert die zich in
het waterreservoir hebben gevormd.
• Veeg alle oppervlakken droog voordat je het waterreservoir
terug in het apparaat plaatst.
Opslag:
• Om je product op te slaan, raden we je aan de originele
doos of een doos van vergelijkbaar formaat te gebruiken.
• Bewaar het apparaat op een veilige, schone en droge
plek, weg van direct zonlicht en buiten bereik van
kinderen, wanneer het niet wordt gebruikt.
• Bij temperaturen lager dan 23 °C kan het apparaat
ontdooid moeten worden - Dit gebeurt automatisch en
duurt maximaal 5 minuten. Tijdens dit proces stopt de
luchtontvochtigingsfunctie en gaat het indicatielampje
voor ontdooien branden. Schakel het apparaat niet uit
terwijl het wordt ontdooid.
VERKLARING VAN CONFORMITEIT
――
Hierbij verklaart One Retail Group Limited dat het type radioapparatuur PB-15
in overeenstemming is met Richtlijn 2014/53 / EU. De volledige tekst van de EU-
conformiteitsverklaring is beschikbaar op het volgende internetadres: https://probreeze.com/
ec-declaration-of-conformity/
RECYCLING & VERWIJDERING
――
Afgedankte elektrische en elektronische apparatuur (AEEA), batterijen, accu›s en verpakkingen

Nederland | 91 of 124
mogen niet worden weggegooid met het restafval. Dit om mogelijke schade aan het milieu en
het menselijk welzijn te voorkomen en voor het behoud van onze natuurlijke bronnen te helpen
behouden. De meeste elektrische producten met een stekker, batterij of kabel kunnen worden
gerecycled. Neem contact op met de gemeente, de ophaaldienst voor huishoudelijk afval of de
winkel waar het product werd gekocht, voor informatie over de regionale inzamelprogramma's.
Terugnameregeling
Voor elk nieuw product dat u van One Retail Group koopt, kunt u één gelijkwaardig afgedankt
elektrisch apparaat (AEEA) naar One Retail Group terugsturen voor recycling en verwijdering. Ga
voor meer informatie over het recyclen van dit product naar www.probreeze.com
De eindgebruiker van elektrische en elektronische apparaten (AEEA) is verantwoordelijk voor het
scheiden van oude batterijen en gloeilampen voordat ze worden ingeleverd bij een aangewezen
dienst voor afvalverwerking en recycling. Afgedankte batterijen kunnen ook worden weggegooid
in verzamelbakken, die te vinden zijn in de meeste plaatselijke supermarkten en recyclingcentra
voor huishoudelijk afval.
Afgedankte elektrische
en elektronische
apparatuur (AEEA)
Dit symbool op het product en/of de verpakking geeft aan
dat, overeenkomstig Richtlijn 2012/19/EU, die van toepassing
is op gebruikte elektrische en elektronische apparaten,
afgedankte elektrische apparatuur (AEEA) niet mogen
worden weggegooid met het algemene huishoudelijke
afval.
De Mobius-loop Dit symbool geeft aan dat het product of de verpakking kan
worden gerecycled.

92 of 124 | Nederland
Probleem Oplossing
De ventilator stopt niet • De ventilator blijft draaien, zelfs wanneer de compressor is
uitgeschakeld. Dit is voor de veiligheid en om de temperatuur
van de luchtontvochtiger te reguleren. De ventilator moet
handmatig worden uitgeschakeld.
Eenheid gaat niet aan • Controleer of de stekker van de luchtontvochtiger volledig in
het stopcontact zit.
• Controleer of de watertank niet vol is.
• Wateremmer bevindt zich niet in de juiste positie.
De luchtontvochtiger
droogt de lucht niet
naar behoren
• Zorg ervoor dat de achterkant van de luchtontvochtiger niet
wordt geblokkeerd. De luchtontvochtiger moet ten minste 40
cm van een muur of meubelstuk staan.
• Verlaag de gewenste luchtvochtigheid met behulp van de
pijlen.
• Controleer of alle deuren, ramen en andere openingen goed
dicht zijn.
• De temperatuur in de ruimte is te laag. De eenheid werkt niet
bij temperaturen onder de 5 °C.
• De eenheid kan gesloten ruimtes alleen drogen als er
voldoende lucht circuleert.
• Ga na of er geen bron van vocht in de ruimte aanwezig is.
De eenheid maakt veel
lawaai
• Het luchtlter zit verstopt en moet worden gereinigd.
• De eenheid is gekanteld en staat niet rechtop.
• De ondergrond is niet vlak.
Er zit rijp op de spoelen • Dit is normaal. De luchtontvochtiger heeft een automatische
ontdooiingsfunctie.
Water op de grond • Het verbindingsstuk voor de slang aan de achterzijde van de
eenheid zit mogelijk los.
• Controleer of de afvoerplug aan de achterkant bevestigd is
wanneer u de emmer gebruikt om water te verzamelen.
ES, AS,P2,Eb worden
op het scherm
weergegeven
• S, AS,P2,Eb worden op het scherm weergegeven
TIPS OM PROBLEMEN OP TE LOSSEN
――
Als u problemen ondervindt met uw luchtontvochtiger, kunt u die met de volgende tips
mogelijk oplossen.

Svenska | 93 of 124
30L AVFUKTARE
MODELL PB-15
Tack för att du har valt att köpa din produkt från Pro Breeze. Läs igenom hela bruksanvisningen
noggrant innan du använder produkten för första gången och förvara instruktionerna på en
säker plats om du behöver läsa dem i framtiden.
SÄKERHETSANVISNINGAR
――
LÄS OCH SPARA DESSA VIKTIGA SÄKERHETSANVISNINGAR.
Vid användning av elektrisk utrustning ska grundläggande
säkerhetsåtgärder alltid följas för att minska risken för
brand, elstötar och personskador, inklusive följande:
VARNING: FÖR ATT UNDVIKA RISK FÖR ELEKTRISKA STÖTAR,
BRAND ELLER PERSONSKADOR, STÄNG ALLTID AV APPARATEN,
DRA UT STRÖMSLADDEN UR ELUTTAGET OCH TÖM
VATTENTANKEN INNAN DU HANTERAR, RENGÖR ELLER SERVAR
APPARATEN.
• Täck inte över apparatenunderanvändning.
• Använd apparaten endast enligt beskrivningen i
denna bruksanvisning. All annan användning som
inte rekommenderas av tillverkaren kan orsaka brand,
elstötar eller personskada.
• Koppla alltid ur apparaten när den inte används.
• Utsätt inte apparaten för direkt solljus, värmekällor eller
extrem kyla.
• Förvara apparaten utom räckhåll för barn och husdjur.
• Lämna inte barn ensamma eller obevakade i det område
där apparaten används.
• Barn måste övervakas så att de inte leker med
apparaten.
• Rengöring och underhåll får inte utföras av barn om de
inte övervakas kontinuerligt.
• Bortskaffa det vatten som samlas i apparaten. Detta
vatten är inte drickbart

94 of 124 | Svenska
• Apparaten får inte användas av personer (inklusive
barn) med nedsatt fysisk, sensorisk eller mental förmåga,
eller som saknar erfarenhet och kunskap, såvida de inte
har fått handledning eller instruktioner.
• Säkerställ att apparaten står i upprätt position när den
yttas.
• Apparaten måste ha ett fritt utrymme på minst 50 cm
runt alla sidor.
• Lämna inte apparaten utan uppsikt när den används.
Stäng alltid av apparaten och koppla bort den från
strömförsörjningen när den inte används.
• Undvik att placera nätsladden i områden där den kan
utgöra en snubbelrisk. Placera inte strömsladden under
mattor och täck inte över den med mattor, gångmattor
eller liknande.
• Placera apparaten på en plan, stabil och torr yta och håll
alltid apparaten i upprätt läge. Att använda apparaten i
någon annan position kan orsaka fara.
• Placera aldrig någonting ovanpå apparaten.
• Säkerställ att elnätet (inklusive spänning, frekvens och
ström) överensstämmer med apparatens märkning.
• Det kan nnas spår av lukt under de första minuterna vid
första användningen. Detta är normalt och försvinner
snabbt.
• Placera inte apparaten mot en vägg eller andra
apparater.
• Täck inte över apparaten eller begränsa luftödet från
inloppet eller ventilationsgaller medan den används.
• Täck inte över, blockera eller skjut in föremål i apparatens
ventilationsöppningar och öppning, eftersom det kan
orsaka elektriska stötar, brand eller skada apparaten.
• Hantera inte apparaten med våta händer.
• Använd inte apparaten utan ltret.
• Använd inte apparaten i närheten av vatten eller i den
omedelbara närheten av ett badkar, en dusch eller
pool. Placera aldrig apparaten där den kan hamna i ett

Svenska | 95 of 124
badkar eller någon annan vattenbehållare.
• Låt inte vatten eller andra vätskor tränga in på
apparatens insida, eftersom detta kan orsaka brand
och/eller elektrisk fara.
• Använd inte mekaniska enheter för att påskynda
avfrostningen av apparaten.
• Placera inte den kontinuerliga dräneringsslangen
utomhus när temperaturen sjunker under 1°C.
• Denna apparat är avsedd för hushållsbruk inomhus och
liknande användningsområden. Använd inte apparaten
utomhus.
• Använd inte apparaten nära bensin, färger, brandfarliga
gaser, ugnar eller andra värmekällor.
• Nätkabeln ska inte hänga ner från ytan på vilken
apparaten är placerad för att förhindra att apparaten
dras ner.
• För att undvika överbelastning av kretsen när du
använder den här apparaten, använd inte en annan
högeffektsapparat på samma elektriska krets.
• Anslut alltid apparaten direkt till ett vägguttag. Undvik att
använda förlängningskablar om möjligt eftersom de kan
överhettas och orsaka brandrisk.
• Använd inte den här apparaten med en extern
programmerare, timer eller någon annan apparat som
skulle kunna slå på enheten automatiskt, om inte dessa
redan är inbyggda i apparaten.
• Dra inte i nätsladden. Flytta, bär eller häng aldrig enheten
i nätsladden.
• Böj eller linda inte nätsladden och stickkontakten runt
apparaten, eftersom detta kan leda till att isoleringen
försvagas eller spricker, särskilt där den kommer in i
enheten.
• Använd inte apparaten när vattentanken är borttagen.
• Se till att nätsladden är helt ur utdragen före användning
och placera den så att den inte kommer i kontakt med
någon del av apparaten.

96 of 124 | Svenska
• Använd inte apparaten om säkerhetsskydd har tagits
bort.
• Använd inte apparaten om det nns tecken på skada
på apparaten, nätsladden eller något av tillbehören. Om
nätsladden är skadad måste den bytas ut av tillverkaren,
dess serviceverkstad eller en motsvarande behörig
person för att undvika fara.
• Använd inte apparaten om det nns några tecken på
skador på apparaten eller de medföljande tillbehören.
• Försök inte reparera eller justera några elektriska eller
mekaniska element i apparaten. Att göra så kan vara
riskfullt och upphäver garantin.
• Apparaten får endast användas med den medföljande
nätadaptern. Använd inte andra laddare eller nätadapter
eftersom det kan skada apparaten.
• För aldrig in ngrar eller metallföremål i apparatens
ventiler och öppningar
• Endast för hushållsbruk.
SPECIFIK INFORMATION OM R290 KYLMEDELSGAS
――
VARNING
BRANDRISK
VARNING: APPARATEN MÅSTE INSTALLERAS, ANVÄNDAS
OCH FÖRVARAS I ETT RUM MED EN GOLVYTA SOM ÄR
STÖRRE ÄN 4M2.
• Den här apparaten innehåller 0,1 kg (100 g) R290-kylgas.
• R290 är en kylgas som uppfyller det europeiska
miljödirektivet.
• Punktera inte någon del av kylmedelskretsen.
• Observera att R290-kylmedlet är luktfritt och har inte

Svenska | 97 of 124
den lukt som normalt förknippas med naturgas- och
propantankar.
• Använd inga andra medel för att påskynda avfrostningen
eller för att rengöra än de som rekommenderas av
tillverkaren.
• Apparaten måste placeras i ett område utan
kontinuerliga antändningskällor som öppen eld, gas eller
elektriska apparater i drift.
• Punktera inte och bränn inte.
• Om apparaten installeras, används eller förvaras i ett
område som inte är ventilerat måste rummet utformas
så att det förhindrar ackumulering av köldmedieläckage
som leder till risk för brand eller explosion på grund av
att kylmedlet antänds av elvärmare, spisar eller andra
antändningskällor.
• Apparaten måste förvaras på ett sådant sätt att
mekaniska fel förhindras.
VARNING
Symbolen visar att apparaten använder ett brandfarligt
kylmedel. Om kylmedlet läcker och utsätts för en extern
antändningskälla, nns det risk för brand.
VARNING
Denna symbol visar att bruksanvisningen bör läsas
noggrant.
VARNING
Denna symbol visar att servicepersonal ska hantera denna
utrustning med hänvisning till installationshandboken.
VARNING
Denna symbol visar att information nns tillgänglig, t.ex.
driftsmanual eller bruksanvisning.
Förklaring av symboler som visas på enheten

98 of 124 | Svenska
SPECIFIKATIONER
――
• Storlek: L 38.6 x W 26 x H 50cm
• Nettovikt: 17kg
• Spänning: 220-240~, 1Ph
• Frekvens: 50Hz
• Ingångseffekt: 715W
• Maximal kapacitet (per 24 timmar): 30L
• Kylmedel: R290 / 0.099kg
SYMBOL FÖRKLARING
――
Endast för inomhusbruk. Läs bruksanvisningen och spara
den för framtida bruk.
Utrustningen överensstämmer med
gällande brittiska säkerhetskrav
och föreskrifter
Utrustningen överensstämmer med
tillämpliga EU-säkerhetskrav och
föreskrifter.

Svenska | 99 of 124
HUR APPARATEN FUNGERAR
――
Bekanta dig med enheten före användning.
Observera: Alla illustrationer är endast avsedda för förklaringsändamål. Din maskin kan vara lite
annorlunda.
Luftlter
Kontinuerligt dräneringsslangutlopp
Strömkabelspänne (placeras i vattenhinken,
används endast när enheten ska förvaras)
Svänghjul Nätsladd och kontakt
Kontrollpanel
Kontrollpanelhandtag (båda sidor)
Panel
Fönster för vattennivå
Vattenhink

100 of 124 | Svenska
TILLBEHÖR
――
Följande tillbehör nns i vattentanken. Ta
bort och installera före användning (enligt
instruktionerna nedan).
För att installera nätsladdens spänne
sätter du bara i enhetens baksida
PLACERA ENHETEN
――
• Den här enheten är konstruerad för
att fungera i temperaturer mellan 5 °C
och 32 °C och mellan 30 % och 50 % RH
(relativ luftfuktighet).
• Placera enheten i ett område där
temperaturen inte sjunker under 5 ºC. Vid
temperaturer under 5 ºC kan spolarna
frysa; vilket leder till en minskning av
prestandan.
• Placera enheten på en jämn, plan yta
som är tillräckligt stark för att stödja
enheten med en full vattentank.
• Tillåt minst 50 cm utrymme bakom
luftutloppet (på enhetens baksida) för
god luftcirkulation. Tillåt minst 20 cm
utrymme på alla andra sidor av enheten
för god luftcirkulation.
• Placera inte enheten i närheten
av en torktumlare, värmare eller
värmeelement.
• För bästa resultat, placera enheten i ett
slutet utrymme och stäng alla dörrar,
fönster och öppningar.
• Om den placeras nära ett slutet
förvaringsutrymme (som ett garderob
eller skåp), se till att det nns tillräcklig
luftcirkulation.
• Använd inte utomhus.
• Enheten är endast avsedd för
inomhusbruk. Den ska inte användas
för kommersiella eller industriella
applikationer.
• Det nns fyra hjul anslutna till enheten
för enkel transport. Tvinga inte hjulen att
röra sig över mattan.
• Transportera inte enheten med vatten i
vattentanken. Detta kan få enheten att
välta eller vattnet att läcka ut.
Nätkabel Spänne
Kontinuerlig
Dräneringsslang
Gängad hona
40cm +
20cm +
40cm + 20cm +
20cm +

Svenska | 101 of 124
DRIFTSANVISNINGAR
――
Kontrollpanel
Knappar
Obs: Av säkerhetsskäl och för att reglera temperaturen fortsätter äkten att gå när kompressorn är
avstängd.
• Auto / Komfort: Tryck en gång för att starta autoläget. Detta ställer automatiskt in
luftfuktigheten i rummet till 45-55 % baserat på rummets miljö. När det är i autoläge kan
fuktighetsnivån inte justeras. Tryck på Upp/Ner-knapparna för att lämna autoläget.
• Filter:
• Filterlampan blinkar efter 250 timmars drift som en påminnelse om att rengöra ltret på
enheten. Efter rengöring trycker du på lterknappen en gång för att återställa.
• För att ansluta enheten till wi, håll ned lterknappen i tre sekunder tills “AP” visas på LED-
skärmen och följ instruktionerna nedan.
• Återuppta: tryck en gång för att aktivera kontinuerligt avfuktningsläge. Innan du gör det, anslut
dräneringsslangen till enhetens baksida.
• Turbo: tryck en gång för att starta Turbo-läget. Detta ökar äkthastigheten till max. Tryck igen
för att minska äkthastigheten.
• Timer: den här knappen styr funktionerna auto-start och auto-stop.
• För automatisk start stänger du av enheten med strömbrytaren. Tryck på timer-knappen
tills “på” -lampan tänds. Använd pilarna för att välja automatisk tid (tillgänglig i steg om
30 minuter, upp till 24 timmar). När du väl har valt, vänta fem sekunder. LED-displayen
återgår till tom. Enheten slås på när tiden har uppnåtts.
• För automatisk stopp, slå på enheten med strömbrytaren. Tryck på timer-knappen tills
“på”-lampan tänds. Använd pilarna för att välja automatisk tid (tillgänglig i steg om
30 minuter, upp till 24 timmar). När du väl har valt, vänta fem sekunder. LED-displayen
återgår till att visa RH. Enheten stängs av efter att tiden har uppnåtts.
• Om du slår på eller stänger av enheten eller förkortar tiden till 0 stängs timerläget av.
Enheten stängs av efter att tiden har uppnåtts.
• Upp / Ned-knappar: tryck för att kontrollera luftfuktighetsnivån. Luftfuktighetsnivån kan ställas
in från 35 % RH till 85 % RH i steg om 5 %. För torrare luft, ställ in en lägre RH. Ställ en högre RH för
spjälluft.

102 of 124 | Svenska
Ljus
•
Auto, lter, kontinuerliga lampor: dessa tänds när lägena är aktiverade.
• Avfrostning: denna tänds när frost ansamlats på förångarspolarna. När detta händer kommer
kompressorn att stängas av och äkten fortsätter att gå tills spolarna avfrostas.
• Full: denna tänds när vattentanken är full och måste tömmas. För att tömma, följ
instruktionerna nedan.
Display
• Som standard visar LED-displayen RH (relativ fuktighet) i rummet med +/- 5 % noggrannhet.
• Om det nns ett problem med enheten visas följande:
• P2: vattentanken är full eller inte i rätt läge. Töm vattentanken eller kontrollera dess
placering.
• AP: enheten är i automatiskt ihopparningsläge, som används för att ansluta till wi.
Detta läge ska stängas av automatiskt inom 8 minuter.
• AS: fel på fuktighetssensorn. Koppla ur enheten, vänta i 30 sekunder och anslut den
igen. Kontakta supporten om problemet kvarstår.
• ES: fel på rörtemperaturgivare. Koppla ur enheten, vänta i 30 sekunder och anslut den
igen. Kontakta supporten om problemet kvarstår.
ANSLUTNING TILL WIFI
――
Obs: Om du har problem med att ansluta till wi, se till att ditt nätverk är inställt på 2,4G. Om du
fortsätter att ha problem kontaktar du vårt kundtjänstteam via e -post till [email protected]
• För att ansluta till WiFi, håll lterknappen intryckt i 3 sekunder, eller tills LED-displayen visar
“AP” (automatisk parning). Vid automatisk parkoppling tvingas kompressorn stängas av.
• Se till att avfuktaren och din mobil är anslutna till samma WiFi.
• Ladda ner appen "NetHome plus". Du måste skapa ett konto. Välj "lägg till enhet" på skärmen
och välj sedan "avfuktare". Följ instruktionerna i appen.
• När anslutningen har lyckats startar avfuktaren automatiskt igen.
• Om anslutningen misslyckas efter 8 minuter, slås avfuktaren automatiskt på igen.
Starta anslutningsprocessen från början.
• När du är ansluten kan du se prestanda och styra din avfuktare via appen.
TÖMNING AV VATTENTANKEN
――
VARNING
• Stäng alltid av enheten och ta ut kontakten ur vägguttaget innan du tar bort vattentanken.
• Transportera inte enheten med vatten i vattentanken. Detta kan få enheten att välta eller
vattnet att läcka ut.
• Var försiktig när du tar bort vattentanken från enheten för att undvika att spilla vatten.
• Rör inte vid några delar inuti enheten när du tar bort vattentanken. Det kan skada produkten.
• Om det nns vatten någon annanstans i enheten när vattentanken tas bort, rengör med en

Svenska | 103 of 124
torr trasa.
• När du väl är ansluten kan du se prestanda och styra din avfuktare via appen.
Anvisningar
• Om enheten är på och vattentanken är full kommer kompressorn och äkten att stängas av
och “full” lampan tänds.
• För att tömma vattentanken drar du sakta ut den lite för att lossa den.
• Håll båda sidorna av vattentanken med två händer och jämn styrka och dra den från enheten.
Lägg inte vattentanken på golvet eftersom basen är ojämn.
• Häll ut vattnet på en säker plats och byt ut vattentanken. Se till att detta görs försiktigt, hela
vägen in i enheten, eftersom att tvinga in vattentanken kan orsaka skador.
KONTINUERLIG DRÄNERING
――
• Vatten kan tömmas automatiskt i ett golvavlopp eller diskbänk genom att fästa enheten på
vattenslangen (ingår).
• För att göra detta, ta bort plasthöljet på enhetens baksida. Varning: en liten mängd vatten
kan ackumuleras i avloppsutloppet så ha en liten behållare eller torr trasa redo för att
säkerställa att detta inte spills på golvet.
• Fäst det kontinuerliga slangskyddet och avloppsslangen på enhetens baksida.
• Rikta slangen till avloppet; se till att det inte nns några böjar och att det kontinuerliga
slangutloppet är högre än avloppet.
• Slå på enheten och tryck på “fortsättningsknappen” på kontrollpanelen.
• Obs: när den kontinuerliga dräneringsfunktionen inte används, ta bort slangen från
enheten, torka utloppet och sätt tillbaka plastlocket.

104 of 124 | Svenska
RENGÖRING OCH FÖRVARING
――
VARNING: STÄNG ALLTID AV APPARATEN, DRA UR
STRÖMSLADDEN UR ELUTTAGET INNAN DU HANTERAR ELLER
RENGÖR DEN.
VARNING: LÅT INTE VATTEN ELLER ANDRA VÄTSKOR TRÄNGA IN
PÅ APPARATENS INSIDA, EFTERSOM DETTA KAN ORSAKA BRAND
OCH/ELLER ELEKTRISK FARA.
VARNING: ANVÄND INTE FRÄTANDE RENGÖRINGSMEDEL ELLER
LÖSNINGSMEDEL, EFTERSOM DETTA KAN SKADA APPARATEN.
• Försök inte rengöra apparaten på något annat sätt än
vad som anges av tillverkaren.
• Rengör apparatens utsida genom att torka av den med
en mjuk, fuktig trasa. Torka av apparaten med en mjuk,
ren trasa.
• Töm alltid vattentanken, rengör och torka av apparaten
när den inte används för att förhindra mögel.
Rengöring av vattentanken:
• Avlägsna och töm vattentanken enligt anvisningarna ovan.
• Rengör vattentanken med kranvatten och milt
rengöringsmedel (t.ex. diskmedel). Observera: Använd inte
kokande vatten för att rengöra vattentanken.
• Se till att ta bort eventuella beläggningar eller avlagringar
som har bildats inuti vattentanken.
Gängad hona
Kontinuerlig
dränering
slang
Ta bort plasthöljet.
Var försiktig med att
vatten slösar ut.

Svenska | 105 of 124
• Torka av alla ytor innan du sätter tillbaka vattentanken i
apparaten.
Förvaring:
• Vid förvaring av din produkt rekommenderar vi att du
använder originalförpackningen eller en förpackning av
liknande storlek.
• Förvara apparaten på en säker, ren och torr plats, borta
från direkt solljus och utom räckhåll för barn när den inte
används.
• Enheten kan behöva frostas av vid temperaturer under
23 °C - detta sker automatiskt och varar upp till 5
minuter. Under denna tid kommer avfuktningsfunktionen
att stoppas och avfrostningsindikatorn tänds. Stäng inte
av medan enheten avfrostas.
ÖVERENSSTÄMMELSEFÖRKLARING
――
Härmed förklarar One Retail Group Limited att radioutrustningstypen typ PB-15 överensstämmer
med direktiv 2014/53/EU. Den fullständiga texten till EU-försäkran om överensstämmelse nns på
följande internetadress: https://probreeze.com/ec-declaration-of- conformity/
ÅTERVINNING & KASSERING
――
Avfall från elektriska och elektroniska produkter (WEEE), batterier, ackumulatorer och
förpackningar ska inte slängas tillsammans med hushållsavfallet. Detta för att förhindra
eventuell skador på miljön och mänskligt välbennande, och för att hjälpa till att bevara våra
naturresurser. De esta elektriska produkter med stickpropp, batteri eller kabel kan återvinnas.
Kontakta din lokala kommun, hushållsavfallshanteringen eller butiken där du köpte produkten för
information om insamlingssystemen i ditt område.
Avfall från elektrisk och
elektronisk utrustning
(WEEE)
Den här symbolen på produkten och/eller förpackningen
indikerar att elektriska avfallsprodukter (WEEE) enligt direktiv
2012/19/EU som reglerar använda elektriska och elektroniska
apparater inte ska slängas tillsammans med allmänt
hushållsavfall.
Mobius-slingan Denna symbol indikerar att produkten eller förpackningen
kan återvinnas.

106 of 124 | Svenska
Återtagningsschema
Avfall från elektriska produkter (WEEE) kan skickas till One Retail Group för återvinning och
kassering när du köper en ny produkt från One Retail Group, på likvärdig basis. För mer
information om hur man återvinner denna produkt, besök www.probreeze.com
Slutanvändaren av elektriska och elektroniska produkter (WEEE) är ansvarig för att separera
gamla batterier och glödlampor innan de lämnas till en avsedd avfalls- och återvinningstjänst.
Förbrukade batterier kan också slängas i uppsamlingskärl, som finns i de flesta lokala
stormarknader och återvinningscentraler för hushållsavfall.

Svenska | 107 of 124
Problem Vad man ska kontrollera
Enheten startar inte • Se till att avfuktningspluggen trycks in helt i
uttaget.
• Kontrollera att vattentanken inte är full.
• Vattenskopan är inte i rätt läge.
Fläkten stannar inte • Fläkten fortsätter att gå även när kompressorn är
avstängd. Detta är av säkerhetsskäl och för att
reglera avfuktarens temperatur. Du måste stänga
av äkten manuellt.
Avfuktaren torkar inte luften som
den ska
• Se till att inget blockerar avfuktarens baksida. Se till
att det är minst 40 cm från vägg eller möbler.
• Sänk luftfuktighetskontrollen med pilarna.
• Kontrollera att alla dörrar, fönster eller andra
öppningar är ordentligt stängda.
• Rumstemperaturen är för låg. Enheten fungerar
inte vid temperaturer under 5 ºC.
• Enheten torkar inte slutna utrymmen om det inte
nns tillräcklig luftcirkulation.
• Kontrollera att det inte nns något som avger fukt
i rummet.
Enheten gör ett högt ljud • Luftltret är igensatt och behöver rengöras.
• Enheten är lutad och inte upprätt.
• Golvytan är inte plan.
Frost dyker upp på spolarna • Det här är normalt. Avfuktaren har en automatisk
avfrostningsfunktion.
Vatten på golvet • Slanganslutningen på enhetens baksida kan vara
lös.
• Kontrollera att den bakre avtappningspluggen är
ansluten när du använder skopan för att samla
upp vatten.
ES, AS, P2, Eb visas på displayen • Dessa är felkoder och kommer att pausa enheten.
Mer information nns i avsnittet Kontrollpanelen
ovan.
FELSÖKNING
――
Om du har problem med vår avfuktare, här är några felsökningstips som kan hjälpa dig att
lösa dem.

108 of 124 | Polskie Polskie | 108 of 124
30L OSUSZACZ
MODEL PB-15
Dziękujemy za wybór i zakup produktu marki Pro Breeze. Przeczytaj uważnie całą instrukcję przed
pierwszym użyciem i przechowuj ją w bezpiecznym miejscu do wykorzystania w przyszłości.
INSTRUKCJE BEZPIECZEŃSTWA
――
PROSIMY PRZECZYTAĆ I ZACHOWAĆ TE WAŻNE INSTRUKCJE
BEZPIECZEŃSTWA.
Aby zmniejszyć ryzyko pożaru, porażenia prądem
elektrycznym i obrażeń osób, podczas korzystania z
urządzeń elektrycznych należy zawsze przestrzegać
podstawowych środków ostrożności, w tym następujących:
OSTRZEŻENIE: ABY UNIKNĄĆ RYZYKA PORAŻENIA
PRĄDEM ELEKTRYCZNYM, POŻARU LUB OBRAŻEŃ CIAŁA,
PRZED PRZYSTĄPIENIEM DO OBSŁUGI, CZYSZCZENIA
LUB SERWISOWANIA URZĄDZENIA ZAWSZE WYŁĄCZAJ
URZĄDZENIE, WYJMIJ WTYCZKĘ Z GNIAZDKA
ELEKTRYCZNEGO I OPRÓŻNIJ ZBIORNIK NA WODĘ.
• Nie zakrywaj urządzenia podczas użytkowania.
• Używaj tego urządzenia wyłącznie w sposób opisany w
niniejszej instrukcji. Użytkowanie urządzenia w sposób
inny niż zalecany przez producenta może spowodować
pożar, porażenie prądem elektrycznym lub obrażenia
ciała.
• Zawsze odłączaj urządzenie, gdy nie jest używane.
• Nie wystawiaj urządzenia na bezpośrednie działanie
promieni słonecznych, źródeł ciepła lub wysokiego mrozu.
• Przechowuj urządzenie poza zasięgiem dzieci i zwierząt
domowych.
• Nie zostawiaj dzieci samych lub bez opieki w obszarze
użytkowania urządzenia.
• Należy dbać, aby dzieci nie bawiły się urządzeniem.
• Dzieci nie mogą czyścić ani konserwować urządzenia bez

Polskie | 109 of 124
stałego nadzoru.
• Wylej wodę znajdującą się w urządzeniu. Ta woda nie
nadaje się do picia.
• Urządzenie nie może być obsługiwane przez osoby (w
tym dzieci) o ograniczonych zdolnościach zycznych,
sensorycznych lub umysłowych, ani przez osoby
nieposiadającego odpowiedniego doświadczenia i
odpowiedniej wiedzy, chyba że będą one nadzorowane
lub zostały odpowiednio przeszkolone.
• Podczas przenoszenia urządzenia zawsze utrzymuj je w
pozycji pionowej.
• Zapewnij co najmniej 50cm wolnej przestrzeni ze
wszystkich stron urządzenia.
• Nigdy nie pozostawiaj urządzenia bez nadzoru podczas
użytkowania. Zawsze wyłączaj urządzenie i odłączaj je od
zasilania, gdy nie jest używane.
• Unikaj umieszczania przewodu zasilającego w miejscach,
w których będzie on stanowić zagrożenie potknięciem.
Nie umieszczaj przewodu zasilającego pod wykładziną
ani nie przykrywaj go dywanami, chodnikami itp.
• Ustaw urządzenie na płaskiej, stabilnej i suchej
powierzchni i zawsze utrzymuj je w pozycji pionowej.
Użytkowanie urządzenia w jakimkolwiek innym położeniu
może stanowić zagrożenie.
• Nigdy nie kładź żadnych przedmiotów na górnej części
urządzenia.
• Upewnij się, że parametry zasilania sieciowego (w tym
napięcie, częstotliwość i moc) są zgodne z tabliczką
znamionową urządzenia.
• W ciągu pierwszych kilku minut po pierwszym użyciu
może być wyczuwalny zapach. Jest to normalne. Zapach
powinien szybko zniknąć.
• Nie umieszczaj urządzenia przy ścianie lub innych
urządzeniach.
• Podczas użytkowania nie zakrywaj urządzenia ani nie
ograniczaj przepływu powietrza przez kratki wlotowe lub
wylotowe.

110 of 124 | Polskie
• Nie zakrywaj, nie blokuj ani nie wpychaj przedmiotów do
otworów wentylacyjnych i innych otworów urządzenia,
ponieważ może to spowodować porażenie prądem,
pożar lub uszkodzenie urządzenia.
• Nie obsługuj urządzenia mokrymi rękami.
• Nie używaj urządzenia bez ltra.
• Nie używaj tego urządzenia w pobliżu wody ani w
bezpośrednim sąsiedztwie wanny, prysznica lub basenu.
Nigdy nie umieszczaj urządzenia w miejscu, z którego
może wpaść ono do wanny lub innego pojemnika z
wodą.
• Nie pozwól, aby woda lub inne płyny dostały się do
wnętrza urządzenia, ponieważ może to spowodować
pożar i zagrożenie porażeniem prądem.
• Nie używaj urządzeń mechanicznych do przyspieszenia
procesu rozmrażania urządzeń.
• Nie należy umieszczać węża ciągłego odpływu wody
poza pomieszczeniami, gdy temperatura spadnie poniżej
1°C.
• To urządzenie jest przeznaczone do użytku domowego
w pomieszczeniach i podobnych zastosowaniach. Nie
używaj produktu na zewnątrz.
• Nie używaj urządzenia w pobliżu benzyny, farb,
łatwopalnych gazów, piekarników lub innych źródeł
ciepła.
• Dbaj, aby kabel zasilający zwisał swobodnie z
powierzchni, na której stoi urządzenie, ponieważ może
dojść do przypadkowego ściągnięcia urządzenia na
podłogę.
• Aby uniknąć przeciążenia obwodu podczas korzystania z
tego urządzenia, nie podłączaj innego urządzenia o dużej
mocy do tego samego obwodu elektrycznego.
• Zawsze podłączaj urządzenie bezpośrednio do
gniazdka ściennego. W miarę możliwości unikaj
używania przedłużaczy, ponieważ mogą się przegrzać i
spowodować ryzyko pożaru.

Polskie | 111 of 124
• Nie używaj tego urządzenia z zewnętrznym
programatorem, wyłącznikiem czasowym ani żadnym
innym urządzeniem, które włączałoby urządzenie
automatycznie, chyba że zostało ono wbudowane w
urządzenie przez producenta.
• Nie ciągnij za przewód zasilający. Nigdy nie przenoś, nie
przesuwaj ani nie wieszaj urządzenia za kabel zasilający.
• Nie zaginaj ani nie owijaj przewodu zasilającego
ani wtyczki wokół urządzenia, ponieważ może to
spowodować osłabienie lub pęknięcie izolacji,
szczególnie w miejscu, w którym wchodzi on do
urządzenia.
• Nie używaj urządzenia bez włożonego zbiornika na wodę.
• Przed użyciem upewnij się, że kabel zasilający jest
całkowicie rozwinięty i ułóż go tak, aby nie stykał się z
żadną częścią urządzenia.
• Nie używaj urządzenia ze zdjętymi osłonami ochronnymi.
• Nie używaj urządzenia, jeśli na urządzeniu, przewodzie
zasilającym lub którymkolwiek z akcesoriów widoczne są
oznaki uszkodzenia. Jeśli zasilacz i przewód zasilający są
uszkodzone, muszą zostać wymienione przez producenta,
jego przedstawiciela serwisowego lub podobnie
wykwalikowaną osobę w celu uniknięcia zagrożenia.
• Nie używaj urządzenia, jeśli na urządzeniu lub
którymkolwiek z dostarczonych akcesoriów są widoczne
oznaki uszkodzenia.
• Nie próbuj naprawiać ani regulować żadnych elementów
elektrycznych lub mechanicznych w urządzeniu. Może to
być niebezpieczne i spowoduje utratę gwarancji.
• Urządzenie może być używane tylko z dostarczonym
zasilaczem. Nie używaj innych ładowarek ani zasilaczy,
ponieważ może to spowodować uszkodzenie urządzenia.
• Nigdy nie wkładaj palców ani metalowych przedmiotów
do otworów wentylacyjnych ani innych otworów w
urządzeniu.
• Tylko do użytku domowego.

112 of 124 | Polskie
SPECIFIK INFORMATION OM R290 KYLMEDELSGAS
――
PRZESTROGA
RYZYKO POŻARU
OSTRZEŻENIE: URZĄDZENIE NALEŻY ZAINSTALOWAĆ,
OBSŁUGIWAĆ I PRZECHOWYWAĆ W POMIESZCZENIU O
POWIERZCHNI WIĘKSZEJ NIŻ 4M2.
• To urządzenie zawiera 0,1kg (100g) czynnika chłodniczego
R290.
• R290 to czynnik chłodniczy zgodny z europejską
dyrektywą dotyczącą środowiska.
• Nie należy przebijać żadnej części obwodu chłodniczego.
• Należy pamiętać, że czynnik chłodniczy R290 jest
bezwonny i nie ma zapachu typowego dla gazu
ziemnego i propanu.
• Nie należy używać środków przyspieszających
rozmrażanie, ani środków do czyszczenia innych niż
zalecane przez producenta.
• Urządzenie należy umieścić w miejscu bez stałych źródeł
zapłonu, takich jak otwarty ogień, gaz lub działające
urządzenia elektryczne.
• Nie przekłuwać ani nie narażać na działanie ognia.
• Jeśli urządzenie jest instalowane, obsługiwane lub
przechowywane w miejscu bez wentylacji, pomieszczenie
musi być zaprojektowane tak, aby zapobiec gromadzeniu
się wycieków czynnika chłodniczego. Inaczej może dojść
do pożaru lub wybuchu w wyniku zapłonu czynnika
chłodniczego spowodowanego kontaktem z grzejnikami
elektrycznymi, piecami lub innymi źródłami zapłonu.
• Urządzenie należy przechowywać w taki sposób, który

Polskie | 113 of 124
uchroni je przed uszkodzeniami mechanicznymi.
• Osoby, które obsługują lub pracują przy obiegu czynnika
chłodniczego, muszą posiadać odpowiedni certykat
wydany przez akredytowaną organizację odpowiedzialną
za budowanie kompetencji w zakresie postępowania
z czynnikami chłodniczymi, i stosującą szczegółowe
kryteria oceny uznane przez stowarzyszenia branżowe.
• Konserwacje i naprawy wymagające pomocy innego
wykwalikowanego personelu muszą być wykonywane
pod nadzorem osoby wyszkolonej w zakresie
postępowania z łatwopalnymi czynnikami chłodniczymi.
OSTRZEŻENIE
Ten symbol oznacza, że w tym urządzeniu zastosowano
łatwopalny czynnik chłodniczy. Jeśli czynnik chłodniczy
wycieknie i zostanie wystawiony na działanie zewnętrznego
źródła zapłonu, istnieje ryzyko pożaru.
PRZESTROGA
Ten symbol oznacza, że należy uważnie przeczytać
instrukcję obsługi.
PRZESTROGA
Ten symbol wskazuje, że serwisanci powinni obsługiwać to
urządzenie zgodnie z instrukcją instalacji.
PRZESTROGA
Ten symbol oznacza, że dostępne są dodatkowe informacje,
na przykład w instrukcji obsługi.
Objaśnienie symboli wyświetlanych na urządzeniu

114 of 124 | Polskie
ZNAK WYJAŚNIENIE
――
DANE TECHNICZNE
――
• Rozmiar: L 38.6 x W 26 x H 50cm
• Waga netto: 17kg
• Napięcie: 220-240~, 1Ph
• Częstotliwość: 50Hz
• Moc wejściowa: 715W
• Maksymalna wydajność (na 24 godziny): 30L
• Chłodziwo: R290 / 0.099kg
Tylko do użytku w pomieszczeniach. Proszę przeczytać instrukcję obsługi
i zachować do wykorzystania w
przyszłości.
Sprzęt jest zgodny z
obowiązującymi brytyjskimi
wymogami i przepisami
bezpieczeństwa
Sprzęt jest zgodny z
obowiązującymi wymogami i
przepisami bezpieczeństwa UE.

Polskie | 115 of 124
ZASADA DZIAŁANIA
――
Prosimy o zapoznanie się z urządzeniem przed rozpoczęciem użytkowania.
Uwaga: Wszystkie ilustracje służą wyłącznie do celów informacyjnych. Wygląd urządzenia na
ilustracjach może nieznacznie odbiegać od rzeczywistego wyglądu produktu.
Filtr powietrza
Gniazdo węża ciągłego odpływu wody
Mocowanie kabla zasilającego (tylko gdy urządzenie
jest przygotowane do przechowywania, z kablem
zasilającym włożonym do zbiornika na wodę).
Kółka Kabel zasilający i wtyczka
Panel sterowania
Panel sterowania Uchwyt (po obu stronach)
Panel
Wizjer poziomu wody
Zbiornik na wodę

116 of 124 | Polskie
AKCESORIA
――
W zbiorniku na wodę można znaleźć
następujące akcesoria. Należy je wyjąć i
zainstalować przed użyciem (postępując
zgodnie z instrukcjami podanymi poniżej).
klamra przewodu zasilającego;
ciągły wąż
odpływowy
Końcówka z gwintem wewnętrznym Uchwyt na przewód zasilający
można założyć na tył urządzenia.
UMIEJSCOWIENIE URZĄDZENIA
――
• To urządzenie jest przeznaczone do pracy
w temperaturach od 5ºC do 32ºC oraz od
wilgotności względnej od 30% do 50%.
• Umieść urządzenie w miejscu, w którym
temperatura nie spadnie poniżej 5°C. Jeśli
temperatura otoczenia spadnie poniżej
5ºC, zwoje w urządzeniu mogą zamarznąć,
co może skutkować zmniejszeniem jego
wydajności.
• Ustaw urządzenie na gładkiej, równej
powierzchni, która będzie wystarczająco
wytrzymała, aby utrzymać urządzenie z
pełnym zbiornikiem na wodę.
• Pozostaw co najmniej 50 cm wolnej
przestrzeni za wylotem powietrza (z tyłu
urządzenia), aby zapewnić dobrą cyrkulację
powietrza. Pozostaw co najmniej 20 cm
wolnej przestrzeni ze wszystkich pozostałych
stron urządzenia, aby zapewnić dobrą
cyrkulację powietrza.
• Ustaw urządzenie z dala od suszarki do
ubrań, grzejnika i kaloryfera.
• Aby uzyskać najlepsze efekty, umieść
urządzenie w zamkniętej przestrzeni i zamknij
wszystkie drzwi, okna i otwory zewnętrzne.
• Jeżeli osuszacz zostanie umieszczony
w pobliżu zamkniętego miejsca do
przechowywania (np. szafy lub szafki), należy
zapewnić odpowiednią cyrkulację powietrza.
• Nie używaj produktu na zewnątrz.
• To urządzenie jest przeznaczone wyłącznie
do użytku w pomieszczeniach mieszkalnych.
Nie należy go używać zastosowań
komercyjnych ani przemysłowych.
• Do urządzenia przymocowane są cztery
kółka, które ułatwiają jego przemieszczanie.
Nie używaj nadmiernej siły do przesuwania
kółek po dywanie.
• Nie transportuj urządzenia ze zbiornikiem
na wodę napełnionym wodą. Może to
spowodować przewrócenie się urządzenia
lub rozlanie wody.
40cm +
20cm +
40cm + 20cm +
20cm +

Polskie | 117 of 124
INSTRUKCJA OBSŁUGI
――
Panel sterowania
Przyciski
Uwaga: Ze względów bezpieczeństwa oraz w celu regulacji temperatury wentylator będzie nadal
pracował, gdy sprężarka jest wyłączona.
• Auto / Komfort: naciśnij raz, aby uruchomić tryb automatyczny. Spowoduje to automatyczne
ustawienie nastawy wilgotności w pomieszczeniu na 45-55%, w zależności od otoczenia. När
det är i autoläge kan fuktighetsnivån inte justeras. Tryck på Upp/Ner-knapparna för att lämna
autoläget.
• Kontrolka ltra:
• Kontrolka ltra zacznie migać po 250 godzinach pracy, przypominając o konieczności
wyczyszczenia ltra w urządzeniu. Po wyczyszczeniu naciśnij raz przycisk ltra, aby
zresetować tę funkcję.
• Aby podłączyć urządzenie do sieci Wi-Fi, przytrzymaj przycisk ltra przez trzy sekundy, aż na
wyświetlaczu LED pojawi się symbol „AP” i postępuj zgodnie z poniższymi instrukcjami.
• Cont: naciśnij raz, aby aktywować tryb ciągłego osuszania. Zanim to zrobisz, podłącz wąż
odpływowy z tyłu urządzenia.
• Turbo: naciśnij raz, aby uruchomić tryb Turbo. W tym trybie prędkość wentylatora zostanie
zwiększona do maksimum. Naciśnij ten przycisk ponownie, aby zmniejszyć prędkość wentylatora.
• Timer: ten przycisk steruje funkcjami automatycznego uruchamiania i automatycznego
zatrzymywania urządzenia.
• Aby włączyć automatyczne uruchamianie, wyłącz urządzenie za pomocą przycisku zasilania.
Naciśnij przycisk timera, aż zaświeci się kontrolka „Włączone” (On). Za pomocą strzałek
wybierz czas automatycznego uruchomienia/zatrzymania (w 30-minutowych odstępach,
do 24 godzin). Po wybraniu poczekaj pięć sekund. Wyświetlacz LED zostanie wygaszony.
Urządzenie włączy się po upływie wyznaczonego czasu.
• Aby włączyć funkcję automatycznego zatrzymania, włącz urządzenie za pomocą przycisku
zasilania. Naciśnij przycisk timera, aż zaświeci się kontrolka „Włączone” (On). Za pomocą
strzałek wybierz czas automatycznego uruchomienia/zatrzymania (w 30-minutowych
odstępach, do 24 godzin). Po wybraniu poczekaj pięć sekund. Wyświetlacz LED powróci do
wyświetlania wilgotności względnej. Urządzenie wyłączy się po upływie ustawionego czasu.
• Włączenie lub wyłączenie urządzenia lub skrócenie czasu do 0 spowoduje wyłączenie trybu
timera. Urządzenie wyłączy się po upływie ustawionego czasu.

118 of 124 | Polskie
• Przyciski w górę / w dół: naciskaj, aby regulować nastawę poziomu wilgotności.
• Nastawę poziomu wilgotności można regulować w zakresie od 35% do 85% wilgotności względnej,
w krokach co 5%. Aby powietrze było bardziej suche, ustaw niższą wilgotność względną. Jeśli
chcesz, aby powietrze pozostało wilgotniejsze, ustaw wyższą wilgotność względną.
Kontrolki
• Auto, ltr, światła ciągłe: świecą, gdy poszczególne tryby są włączone.
• Rozmrażanie (Defrost): ta kontrolka zapala się, gdy dojdzie do nagromadzenia szronu na zwojach
parownika. W takim przypadku sprężarka zostanie wyłączona, a wentylator będzie działał do
czasu odszronienia zwojów.
• Urządzenie pełne (Full): ta kontrolka zapala się, gdy zbiornik na wodę jest pełny i należy go
opróżnić. Aby opróżnić zbiornik, postępuj zgodnie z instrukcjami podanymi poniżej.
Display
• Domyślnie wyświetlacz LED pokazuje wilgotność względną w pomieszczeniu z dokładnością +/-
5%.
• Jeśli wystąpi problem z urządzeniem, zostanie wyświetlony jeden z następujących komunikatów:
• P2: zbiornik na wodę jest pełny lub niewłaściwie włożony. Opróżnij zbiornik na wodę lub
sprawdź jego położenie.
• AP: urządzenie jest w trybie automatycznego parowania, który służy do łączenia się z siecią
Wi-Fi. Ten tryb powinien wyłączyć się automatycznie w ciągu 8 minut.
• AS: onownie. Jeśli problem będzie się powtarzał, skontaktuj się z działem pomocy
technicznej.
• ES: błąd czujnika temperatury w przewodzie. Odłącz urządzenie, odczekaj 30 sekund i
podłącz je ponownie. Jeśli problem będzie się powtarzał, skontaktuj się z działem pomocy
technicznej.
ŁĄCZENIE Z WIFI
――
Uwaga: jeśli masz problemy z połączeniem z Wi-Fi, upewnij się, że Twoja sieć jest ustawiona na
2.4G. Jeśli nadal masz problemy, skontaktuj się z naszym zespołem obsługi klienta, wysyłając
e-mail na adres [email protected]
• Aby połączyć się z Wi-Fi, przytrzymaj przycisk ltrowania przez 3 sekundy lub do momentu,
gdy wyświetlacz LED pokaże „AP” (automatyczne parowanie). W trybie automatycznego
parowania sprężarka zostanie wymuszona.
• Upewnij się, że osuszacz i telefon komórkowy są połączone z tym samym Wi-Fi.
• Pobierz aplikację „NetHome plus”. Będziesz musiał założyć konto. Na ekranie wybierz „dodaj
urządzenie”, a następnie wybierz „odwilżacz”. Postępuj zgodnie z instrukcjami w aplikacji.
• Po pomyślnym nawiązaniu połączenia osuszacz automatycznie włączy się ponownie.
• Jeśli po 8 minutach połączenie nie powiedzie się, osuszacz automatycznie włączy się
ponownie. Rozpocznij proces łączenia od początku.
• Po podłączeniu można przeglądać wydajność i sterować osuszaczem za pośrednictwem
aplikacji.

Polskie | 119 of 124
OPRÓŻNIANIE ZBIORNIKA NA WODĘ
――
PRZESTROGA
• Przed wyjęciem zbiornika wody zawsze wyłącz urządzenie i wyjmij wtyczkę z gniazdka
ściennego.
• Nie transportuj urządzenia ze zbiornikiem na wodę napełnionym wodą. Może to spowodować
przewrócenie się urządzenia lub rozlanie wody.
• Zachowaj ostrożność podczas wyjmowania zbiornika wody z urządzenia, aby uniknąć rozlania
wody.
• Podczas wyjmowania zbiornika na wodę nie dotykaj żadnych części wewnątrz urządzenia.
Może to spowodować uszkodzenie produktu.
• Jeśli po wyjęciu zbiornika wody w urządzeniu znajduje się woda, wytrzyj ją suchą szmatką.
• Po połączeniu urządzenia możesz wyświetlać informacje o działaniu osuszacza i sterować nim
za pomocą aplikacji.
Instrukcje
• Jeśli urządzenie jest włączone, a zbiornik na wodę jest pełny, kompresor i wentylator zostaną
wyłączone, a kontrolka sygnalizująca zapełnienie zbiornika (Full) zacznie świecić ciągłym
światłem.
• Aby opróżnić zbiornik na wodę, wyciągaj go powoli, aby go poluzować.
• Przytrzymaj zbiornik na wodę z obu stron obiema rękami i używając równomiernej
• siły, wyciągnij go z urządzenia. Nie stawiaj zbiornika na wodę na podłodze, ponieważ podstawa
zbiornika jest nierówna.
• Wylej wodę w bezpieczne miejsce i włóż zbiornik na wodę z powrotem do osuszacza. Wkładaj
zbiornik delikatnie, aż zostanie całkowicie wsunięty do wnętrza urządzenia. Wciskanie zbiornika
wody na siłę może spowodować uszkodzenie.

120 of 124 | Polskie
CZYSZCZENIE I PRZECHOWYWANIE
――
OSTRZEŻENIE: PRZED PRZYSTĄPIENIEM DO PRZENOSZENIA
LUB CZYSZCZENIA URZĄDZENIA NALEŻY JE UPRZEDNIO
WYŁĄCZYĆ I WYJĄĆ WTYCZKĘ PRZEWODU ZASILAJĄCEGO
Z GNIAZDKA.
PRZESTROGA: NIE POZWÓL, ABY WODA LUB INNE PŁYNY
DOSTAŁY SIĘ DO WNĘTRZA URZĄDZENIA, PONIEWAŻ MOŻE
TO SPOWODOWAĆ POŻAR I ZAGROŻENIE PORAŻENIEM
PRĄDEM.
PRZESTROGA: NIE UŻYWAJ ŻADNYCH ŚCIERNYCH
ŚRODKÓW CZYSZCZĄCYCH ANI ROZPUSZCZALNIKÓW,
PONIEWAŻ SPOWODUJE TO USZKODZENIE URZĄDZENIA.
CIĄGŁEGO ODPŁYWU
――
• Wodę z osuszacza można automatycznie odprowadzać do odpływu podłogowego lub zlewu,
podłączając urządzenie do węża na wodę (dołączonego do zestawu).
• Aby to zrobić, zdejmij plastikową osłonę z tyłu urządzenia. Uwaga: w tylnym odpływie mogą
gromadzić się niewielkie ilości wody, dlatego przygotuj mały pojemnik lub suchą ściereczkę i
miej je w pogotowiu, aby woda nie rozlała się na podłogę.
• Zamocuj pokrywę węża ciągłego odpływu oraz sam wąż z tyłu urządzenia.
• Poprowadź wąż do odpływu. Upewnij się, że nie jest on zagięty, a wylot węża ciągłego odpływu
znajduje się na wysokości wyższej niż sam odpływ.
• Włącz urządzenie i naciśnij przycisk „cont” na panelu sterowania.
• Uwaga: jeśli funkcja ciągłego opróżniania nie jest używana, zdemontuj wąż z urządzenia,
osusz wylot i załóż plastikową zaślepkę.
Końcówka
z gwintem
wewnętrznym
Ciągły drenaż
wąż gumowy
Zdejmij plastikową
osłonę. Uważaj na
rozlanie wody.

Polskie | 121 of 124
• Nie próbuj czyścić urządzenia w żaden inny sposób niż
ten określony przez producenta.
• Wyczyść zewnętrzne powierzchnie urządzenia,
przecierając ją miękką, wilgotną szmatką. Osusz
urządzenie miękką, czystą szmatką.
• Zawsze opróżnij zbiornik na wodę, wyczyść i wysusz
urządzenie, gdy nie jest używane, aby zapobiec
powstawaniu pleśni.
Czyszczenie zbiornika na wodę:
• Wyjmij i opróżnij zbiornik na wodę, postępując zgodnie z
powyższymi instrukcjami.
• Wyczyść zbiornik na wodę ciepłą wodą z kranu oraz łagodnym
detergentem (np. płynem do mycia naczyń). Uwaga: Nie
używaj wrzącej wody do czyszczenia zbiornika na wodę.
• Pamiętaj, aby usunąć ze zbiornika wszelki kamień lub osady,
które utworzyły się w jego wnętrzu.
• Wytrzyj wszystkie powierzchnie do sucha przed ponownym
włożeniem zbiornika wody do urządzenia.
Przechowywanie:
• Zalecamy przechowywanie produktu w oryginalnym
opakowaniu lub pudełku podobnych rozmiarów.
• Przechowuj nieużywane urządzenie w bezpiecznym, czystym i
suchym miejscu, które jest niedostępne dla dzieci.
• Urządzenie może wymagać rozmrażania, gdy temperatura
otoczenia jest mniejsza niż 23°C – zostanie ono
przeprowadzone automatycznie i potrwa do 5 minut. W tym
czasie funkcja osuszania zostanie zatrzymana i zapali się
kontrolka rozmrażania. Nie wyłączaj urządzenia w trakcie cyklu
rozmrażania.
DEKLARACJA ZGODNOŚCI
――
One Retail Group Limited oświadcza niniejszym, że typ urządzenia radiowego PB-15 jest zgodny z

122 of 124 | Polskie
dyrektywą 2014/53/UE. Pełny tekst deklaracji zgodności UE / brytyjskiej deklaracji zgodności jest
dostępny pod następującym adresem internetowym: https://probreeze.com/ec-declaration-of-
conformity/
RECYKLING & UTYLIZACJA
――
Instrukcja obsługi dotycząca zużytych produktów elektrycznych i elektronicznych.
Zużytych produktów elektrycznych i elektronicznych, baterii, akumulatorów i opakowań nie należy
wyrzucać wraz z innymi odpadami domowymi. Ma to na celu zapobieganie możliwym szkodom
dla środowiska i dobrobytu ludzi, a także pomoc w ochronie naszych zasobów naturalnych.
Większość produktów elektrycznych z wtyczką, baterią lub kablem można poddać recyklingowi.
Skontaktuj się z lokalnym urzędem, rmą zajmującą się usuwaniem odpadów domowych lub
sklepem, w którym zakupiono produkt, aby uzyskać informacje dotyczące programów odbioru
elektrośmieci w Twojej okolicy.
Schemat odbioru
Zużyte produkty elektryczne (WEEE) można wysłać do One Retail Group w celu recyklingu i
utylizacji przy zakupie nowego produktu od One Retail Group, na zasadzie równoważności
urządzeń. Więcej informacji na temat recyklingu tego produktu można znaleźć na stronie
www.probreeze.com
Użytkownik końcowy produktów elektrycznych i elektronicznych (WEEE) jest odpowiedzialny za
odseparowanie starych baterii, akumulatorów i żarówek od tych urządzeń przed przekazaniem
ich do wyznaczonej firmy zajmującej się utylizacją i recyklingiem. Zużyte baterie i akumulatory
można również wyrzucać do pojemników zbiorczych, które można znaleźć w większości lokalnych
supermarketów i centrów recyklingu odpadów domowych.
Zużyty sprzęt
elektryczny i
elektroniczny (WEEE)
Ten symbol na produkcie i/lub opakowaniu oznacza, że
zużyte urządzenia elektryczne, nie powinny być wyrzucane
razem z innymi odpadami domowymi, zgodnie z Dyrektywą
2012/19/UE w sprawie zużytego sprzętu elektrycznego i
elektronicznego (WEEE).
Pętla Mobiusa Ten symbol oznacza, że produkt lub opakowanie można
poddać recyklingowi.

Polskie | 123 of 124
Problem Co należy sprawdzić
Jednostka nie uruchamia się
• Upewnij się, że wtyczka osuszacza jest całkowicie włożona do
gniazdka.
• Sprawdź, czy zbiornik na wodę nie jest pełny.
• Wiaderko na wodę nie jest poprawnie włożone.
Wentylator nie zatrzymuje się
• Wentylator będzie działał nawet wtedy, gdy sprężarka jest
wyłączona. Dzieje się tak ze względów bezpieczeństwa i
regulacji temperatury osuszacza. Musisz go ręcznie wyłączyć.
Osuszacz nie osusza
powietrza tak, jak powinien
• Upewnij się, że nic nie blokuje tylnej części osuszacza. Upewnij
się, że osuszacz jest ustawiony co najmniej 40 cm od ściany
lub mebli.
• Zmniejsz nastawę wilgotności za pomocą przycisków strzałek.
• Sprawdź, czy wszystkie drzwi, okna i inne otwory są dobrze
zamknięte.
• Temperatura w pomieszczeniu jest za niska. Urządzenie nie
będzie działać, gdy temperatura otoczenia jest niższa niż 5ºC.
• Urządzenie nie wysuszy zamkniętych przestrzeni, jeśli obieg
powietrza jest zbyt słaby.
• Sprawdź, czy nic nie oddaje wilgoci do pomieszczenia.
Urządzenie wydaje głośne
dźwięki
• Filtr powietrza jest zatkany i wymaga czyszczenia.
• Urządzenie jest przechylone, a nie ustawione pionowo.
• Podłoga nie jest równa.
Na zwojach pojawia się szron
• To normalne. Osuszacz jest wyposażony w funkcję
automatycznego rozmrażania.
Woda na podłodze
• Złącze węża z tyłu urządzenia może być poluzowane.
• Sprawdź, czy tylny korek odpływu jest podłączony, jeśli woda
jest zbierana do zbiornika.
Na wyświetlaczu pojawiają
się symbole ES, AS, P2, Eb
• Są to kody błędów, które towarzyszą wstrzymaniu pracy
urządzenia. Więcej informacji można znaleźć w sekcji Panel
sterowania powyżej.
WSKAZÓWKI DOTYCZĄCE ROZWIĄZYWANIA PROBLEMÓW
――
Poniżej zamieszamy kilka wskazówek, które będą pomocne w rozwiązywaniu ewentualnych
problemów z obsługą naszego osuszacza.

One Retail Group, Ryland House,
24a Ryland Road, London, NW5 3EH, United Kingdom
EU Authorised Representative: Brandrep Limited, The Black Church,
St Mary's Pl N, Dublin, D07 P4AX, Ireland
© Copyright 2023
www.probreeze.com
-
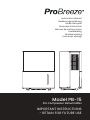 1
1
-
 2
2
-
 3
3
-
 4
4
-
 5
5
-
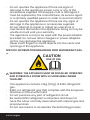 6
6
-
 7
7
-
 8
8
-
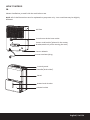 9
9
-
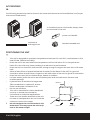 10
10
-
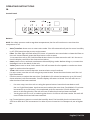 11
11
-
 12
12
-
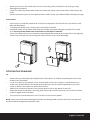 13
13
-
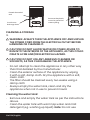 14
14
-
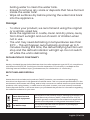 15
15
-
 16
16
-
 17
17
-
 18
18
-
 19
19
-
 20
20
-
 21
21
-
 22
22
-
 23
23
-
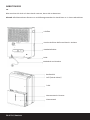 24
24
-
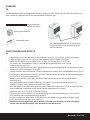 25
25
-
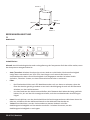 26
26
-
 27
27
-
 28
28
-
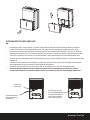 29
29
-
 30
30
-
 31
31
-
 32
32
-
 33
33
-
 34
34
-
 35
35
-
 36
36
-
 37
37
-
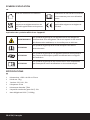 38
38
-
 39
39
-
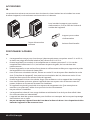 40
40
-
 41
41
-
 42
42
-
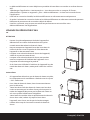 43
43
-
 44
44
-
 45
45
-
 46
46
-
 47
47
-
 48
48
-
 49
49
-
 50
50
-
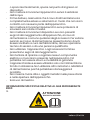 51
51
-
 52
52
-
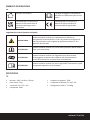 53
53
-
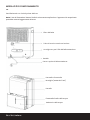 54
54
-
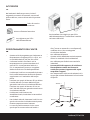 55
55
-
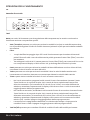 56
56
-
 57
57
-
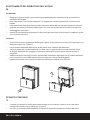 58
58
-
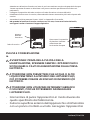 59
59
-
 60
60
-
 61
61
-
 62
62
-
 63
63
-
 64
64
-
 65
65
-
 66
66
-
 67
67
-
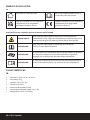 68
68
-
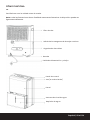 69
69
-
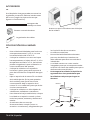 70
70
-
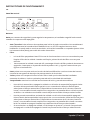 71
71
-
 72
72
-
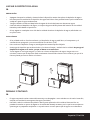 73
73
-
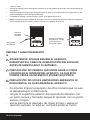 74
74
-
 75
75
-
 76
76
-
 77
77
-
 78
78
-
 79
79
-
 80
80
-
 81
81
-
 82
82
-
 83
83
-
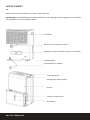 84
84
-
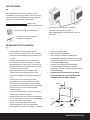 85
85
-
 86
86
-
 87
87
-
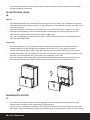 88
88
-
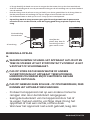 89
89
-
 90
90
-
 91
91
-
 92
92
-
 93
93
-
 94
94
-
 95
95
-
 96
96
-
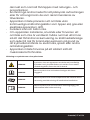 97
97
-
 98
98
-
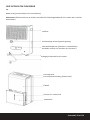 99
99
-
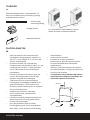 100
100
-
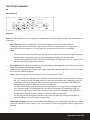 101
101
-
 102
102
-
 103
103
-
 104
104
-
 105
105
-
 106
106
-
 107
107
-
 108
108
-
 109
109
-
 110
110
-
 111
111
-
 112
112
-
 113
113
-
 114
114
-
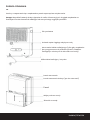 115
115
-
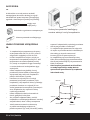 116
116
-
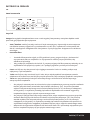 117
117
-
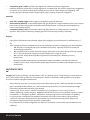 118
118
-
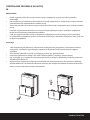 119
119
-
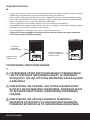 120
120
-
 121
121
-
 122
122
-
 123
123
-
 124
124


in andere talen
- italiano: Pro Breeze PB-15-UK-FBA Manuale utente
- français: Pro Breeze PB-15-UK-FBA Manuel utilisateur
- español: Pro Breeze PB-15-UK-FBA Manual de usuario
- Deutsch: Pro Breeze PB-15-UK-FBA Benutzerhandbuch
- svenska: Pro Breeze PB-15-UK-FBA Användarmanual
- polski: Pro Breeze PB-15-UK-FBA Instrukcja obsługi


