Samsung MWR-WG00JN Handleiding

Categorie
Split-systeem airconditioners
Type
Handleiding
Air conditioner
User manual
Wired remote controller MWR-WG00JN
Thank you for purchasing this Samsung Product.
Before operating this unit, please read this user manual carefully and retain it for future
reference.
Indoor
ߤߦ
Ventilator
Set
°
9цࣛťɇϑϑ
ߢߣ
ߢߤ
ߢߥ
ߢߧ
ߢߦ
ߢߨ
ߢߩ
A
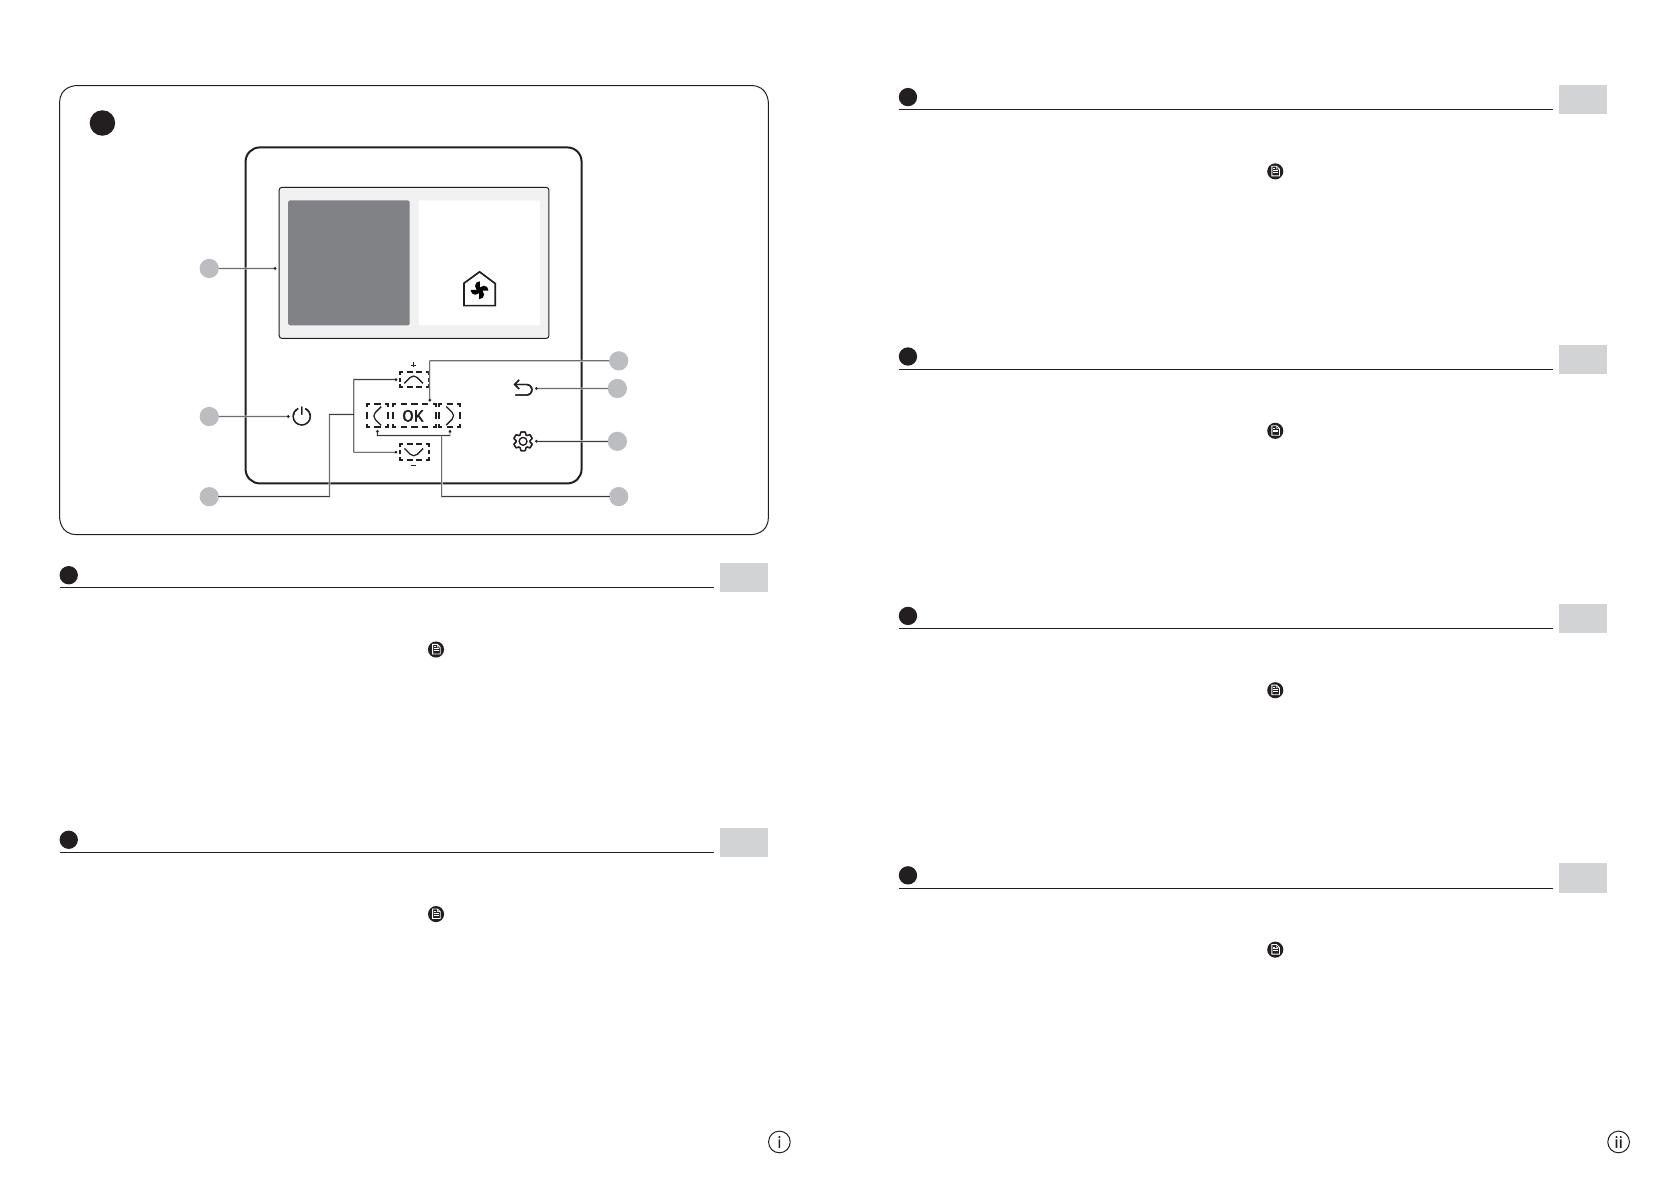
01 Operation status display
Displays the operation/function settings and statuses.
02 Operation On/Off button (LED display)
Turns the air conditioner/ventilator power On/Off
03 Up/Down button
Moves between items vertically or changes the set temperature.
04 Left/Right button
Moves between items horizontally or changes the item value.
05 OK button
Saves your new settings.
06 Save & Return button
Saves your new settings and returns to the previous step.
07 Option button
Selects the detailed setting function.
NOTE
࡙ The operation mode display on the remote controller changes
depending on the selected language.
࡙ Some functions may not be available, depending on the indoor
unit specifications.
࡙ You can see the operation status on the LED display.
ON: Operating,
Blinking: An error occurred,
OFF: Turns off
01 Pantalla de estado de funcionamiento
Muestra los ajustes y estados del funcionamiento o función.
02 Botón de Funcionamiento On/Off (pantalla LED)
Apaga o enciende la alimentación del aire acondicionado o ventilador
03 Botón Arriba/Abajo
Se mueve verticalmente entre los elementos o cambia la
temperatura establecida.
04 Botón Izquierda/Derecha
Se mueven horizontalmente entre los elementos o cambia el
valor del elemento.
05 Botón OK
Guarda sus ajustes nuevos.
06 Botón Guardar y Volver
Guarda sus nuevos ajustes y vuelve al paso anterior.
07 Botón Opción
Selecciona la función de ajuste detallado.
NOTA
࡙ La pantalla de modo de funcionamiento del control remoto cambia
según el idioma seleccionado.
࡙ Es posible que algunas funciones no estén disponibles, según las
especificaciones de la unidad interna.
࡙ Puede ver el estado de funcionamiento en la pantalla LED.
ENCENDIDO Funcionando,
Parpadeando: Se ha producido un error,
OFF: Apaga
A
Remote Controller Overview
EN
01 Affichage de l’état de fonctionnement
Affiche les réglages et les états du fonctionnement/de la fonction.
02 Bouton de mise en marche/arrêt (affichage LED)
Met le climatiseur/ventilateur en marche/arrêt
03 Bouton haut/bas
Parcourt les éléments verticalement ou modifie la température configurée.
04 Bouton gauche/droite
Parcourt les éléments horizontalement ou modifie la valeur de l’élément.
05 Bouton OK
Enregistre vos nouveaux réglages.
06 Bouton d’enregistrement et de retour
Enregistre vos nouveaux réglages et retourne à létape précédente.
07 Bouton Option
Sélectionne la fonction de réglage avancé.
REMARQUE
࡙ Laffichage du mode de fonctionnement sur la télécommande change
en fonction de la langue sélectionnée.
࡙ La disponibilité de certaines fonctions dépend des spécifications de
l’unité intérieure.
࡙ Vous pouvez voir l’état de fonctionnement sur l’affichage LED.
ĮĘईࡠk͝˙ͱ͝ʀϩ̈ͱ͝͝ʪ͔ʪ͝ϩࡡ
Ä̷˝͝ͱϩɇ͝ϩईࡠƸ͝ʪʪθθʪЇθϑʪϑϩΧθͱʒЇ̈ϩʪࡡ
ĮईࡠƊ࣭ʭϩʪ̈͝ϩ
A
Aperçu de la télécommande
FR
A
Descripción general del control remoto
ES
01 Visor do estado de funcionamento
Exibe as definições e os estados de funcionamento/função.
02 Botão Ligar/Desligar funcionamento (visor LED)
Liga/Desliga o aparelho de ar condicionado/ventilador
03 Botão Para cima/Para baixo
Navega verticalmente entre itens ou altera a temperatura definida.
04 Botão Esquerda/Direita
Navega horizontalmente entre itens ou altera o valor de um item.
05 Botão OK
Guarda as suas novas definições.
06 Botão Guardar & Voltar
Guarda as suas novas definições e volta ao passo anterior.
07 Botão Opção
Seleciona a função de definições detalhadas.
NOTA
࡙ O visor do modo de funcionamento no controlo remoto altera-se em
função do idioma selecionado.
࡙ Algumas funções poderão não estar disponíveis, dependendo das
especificações da unidade interior.
࡙ Pode ver o estado de funcionamento no visor LED.
LIGADO: em funcionamento,
Intermitente: ocorreu um erro,
OFF: desliga-se
A
Descrição geral do controlo remoto
PT
01 Betriebsstatusanzeige
Zeigt die Betriebs-/Funktionseinstellungen und Status an.
02 Betriebstaste (LED-Display)
Schaltet die Stromversorgung der Klimaanlage/des Ventilators ein/aus.
03 Auf-/Ab-Taste
Blättert zwischen den Elementen nach oben oder unten oder ändert die Solltemperatur.
04 Linke/Rechte Taste
Blättert zwischen den Elementen nach links oder rechts oder ändert den Elementwert.
05 Taste OK
Speichert die neuen Einstellungen.
06 Taste zum Speichern und Zurückkehren
Speichert die neuen Einstellungen und kehrt zum vorherigen Schritt zurück.
07 Optiontaste
Wählt die detaillierte Einstellungsfunktion.
HINWEIS
࡙ Die Betriebsmodusanzeige auf der Fernbedienung ändert sich je
nach der ausgewählten Sprache.
࡙ Manche Funktionen sind je nach den Spezifikationen des
Innengeräts nicht verfügbar.
࡙ Der Betriebsstatus wird auf der LED-Anzeige angezeigt.
EIN: In Betrieb,
Blinkt: Fehler,
AUS: Ausschalten
A
Übersicht über die Fernbedienung
DE
01 Weergave werkingstatus
Toont de werkings-/functie-instellingen en statussen.
02 Knop Bediening Aan/Uit (LED-scherm)
Schakelt de airconditioner/ventilator in/uit
03 Omhoog/Omlaag knop
Beweegt verticaal tussen items of wijzigt de ingestelde temperatuur.
04 Knop Links/Rechts
Beweegt horizontaal tussen items of wijzigt de itemwaarde.
05 Knop OK
Bewaart uw nieuwe instellingen.
06 Knop Opslaan en Terugkeren
Bewaart uw nieuwe instellingen en keert terug naar de vorige stap.
07 Knop Optie
Selecteert de functie gedetailleerde instelling.
OPMERKING
࡙ De weergave van de werkingsmodus op de afstandsbediening
verandert afhankelijk van de geselecteerde taal.
࡙ Sommige functies zijn niet beschikbaar, afhankelijk van de specificaties
van de binnenunit.
࡙ U kunt de werkingstatus zien op het LED-scherm.
AAN: In werking,
Knippert: Er is een fout opgetreden,
UIT: Schakelt uit
A
Overzicht afstandsbediening
NL
B
High Wide Wind-Free
Current
Set
Ventilator OFF
Indoor
ߤߦ
ߤߦ
࢏ߧ
Cool
ߢߣ
ߢߩ
ߢ߫
ߢߪ
ߣߢ
ߣߣ
ߢߥ
ߢߦ ߢߨ
ߣߤ
ߣߥ
ߣߦ
ߣߧ
ߢߤ
ߢߧ
²ʪɇϩࣛkǹ
Їϩͱ
AЇθθʪ͝ϩ
ߤߧ
࢏ߢ
Ã͝ʒͱͱθĮ
Ǥʪ͝ϩ̷̈ɇϩͱθ
ߢߦ
ߢߣ
ߢߤ
ߢߧ
ߢߨ
ߢߩ
ߢߪ
ߢ߫
ߣߢ
ߢߥ
Air conditioner
Ventilator
C
Air conditioner
Ventilator
Indoor Settings
ůЇ̈ʪϩ
ĮĘ
Sleep
Purify Air Quality Energy Option
Long Wind Schedule
LONG
OFF OFF
ON ON
ߢߦ
ߢߥ
ߢߩ
ߢߪ
ߢߣ
ߢߧ
ߢߤ
ߢߨ
Option Button
A̷ʪɇ͝ЇΧ
ĮĘ
OFF
E-Saver Schedule Option
Ǥʪ͝ϩ̷̈ɇϩͱθƊʪϩϩ̈͝˝ϑ
ߢߦ
ߢߥ
ߢߣ
ߢߤ
Option Button
Air conditioner
Air conditioner
Ventilator
Ventilator
Press the button to enter the Settings screen and then select the desired function or option.
01 Set temperature display
02 Current temperature display
03 Operation mode display
Displays any of Auto, Cool, Dry, Fan, and Heat.
04 Fan speed display
Displays any of Auto, Turbo, High, Medium, and Low.
05 Wind-Free display
06 Air flow direction display
Displays any of Fix, Spot, Mid, Wide, Swing, and Individual.
07 Activation Time Setting display
When Energy Saving Timer is activated.
When Override time is activated.
08 Schedule indicator
When a General Schedule is set.
When a Setback Schedule is set.
09 Clean indicator
10 Lock indicator
11 Check indicator
12 Filter reset indicator
13 Defrost indicator
14 Central Control indicator
15 Discharge temperature indicator
01 Quiet display
Displays the Quiet function.
02 Sleep display
Displays the Sleep function.
03 Long Wind display
Displays the Long Wind function.
04 Schedule display
Displays any of Timer, Weekly schedule, Yearly schedule,
and Holiday.
05 Purify display
Displays the Purify function.
06 Air Quality display
Displays the Air Quality.
07 Option display
Displays the Option.
08 Energy display
Displays any of Energy Usage, Energy Saving, and Energy
Settings.
01 Clean up display
Displays the Clean up function.
02 E-Saver display
Displays the E-Saver function.
03 Schedule display
Displays any of Timer, Weekly schedule, Yearly schedule,
and Holiday.
04 Option display
Displays the Option.
NOTE
࡙ Unavailable functions are marked inactive and they cannot be set.
࡙ In the menu with the > in the Option menu, you can select a menu
with the
button.
࡙ When you do not press any button for 180 seconds with the option
active, the settings are not saved and the Home screen appears.
01 Current temperature display
02 Operation mode display
Displays any of Heat-EX, Auto, By-Pass, Quiet, and Away.
03 Fan speed display
Displays any of Auto, Turbo, High, and Low.
04 Schedule indicator
When a General Schedule is set.
When a Setback Schedule is set.
05 Lock indicator
06 Check indicator
07 Filter reset indicator
08 Defrost indicator
09 Central Control indicator
10 Range hood (Exhaust hood) indicator
NOTE
࡙ Unavailable functions are marked inactive and they cannot be set.
࡙ The locations of icons may differ depending on the function.
࡙ When you do not press any button for 7 seconds, the function of
the position is automatically selected.
C
Settings Screen Overview
B
Home Screen Overview
EN
Aire acondicionado
Aire acondicionado
Ventilación
Ventilación
Pulse el botón para entrar en la pantalla de ajustes y, a continuación, seleccione la función u opción deseada.
01 Pantalla temperatura establecida
02 Pantalla temperatura actual
03 Pantalla modo de funcionamiento
Muestra cualquiera de los valores Auto, Frío, Seco, Vent o Calor.
04 Pantalla de velocidad del ventilador
Muestra cualquiera de los valores Auto, Turbo, Alto, Medio o Bajo.
05 Pantalla de Wind-Free
06 Pantalla de dirección del flujo de aire
Muestra cualquiera de los valore Fijo, Concentrado, Medio, Amplio,
Swing o Individual.
07 Visualización de Ajustes de Activación
Cuando se activa Temporizador de Ahorro Energético.
Cuando se activa el tiempo de Anular.
08 Indicador de Programa
Cuando se establece una Horario.
Cuando se establece una Retrasar Horario.
09 Indicador de Limpiar
10 Indicador de Bloqu.
11 Indicador de comprobación
12 Indicador de Reinicio de filtor
13 Indicador de Desescarche
14 Indicador de Control central
15 Indicador de Ɵޚʒʪʒʪϑʀɇθ˝ɇ
01 Pantalla Silen.
Muestra la función Silen.
02 Pantalla Sleep
Muestra la función Sleep.
03 Pantalla Long Wind
Muestra la función Long Wind.
04 Pantalla Programa
Muestra cualquiera de los siguientes valores: Temporizador,
Programa semanal, Programa anual o Vacaciones.
05 Pantalla Lmp.
Muestra la función Lmp.
06 Pantalla Calidad Aire
Muestra la Calidad Aire.
07 Pantalla Opción
Muestra la Opción.
08 Pantalla Energía
Muestra cualquiera de los siguientes valores:Consumo de
energía, Eco o Ajustes de energía.
01 Pantalla Lmp.
Muestra la función Lmp..
02 Pantalla Eco
Muestra la función Eco.
03 Pantalla Programa
Muestra cualquiera de los siguientes valores: Temporizador,
Programa semanal, Programa anual o Vacaciones.
04 Pantalla Opción
Muestra la Opción.
NOTA
࡙ Las funciones no disponibles se marcan como inactivas y no se
pueden establecer.
࡙ En el menú con el signo > dentro del menú Opción, podrá seleccionar
un menú con el botón
.
࡙ Si no pulsa ningún botón durante 180 segundos con la opción activa,
los ajustes no se guardan y aparece la pantalla de inicio.
01 Pantalla temperatura actual
02 Pantalla modo de funcionamiento
Muestra cualquiera de los valores Recup., Auto, By-Pass, Silencioso o
Ausente.
03 Pantalla de velocidad del ventilador
Muestra cualquiera de los valores Auto, Turbo, Alto o Bajo.
04 Indicador de Programa
Cuando se establece una Horario.
Cuando se establece una Retrasar Horario.
05 Indicador de Bloqu.
06 Indicador de comprobación
07 Indicador de Reinicio de filtor
08 Indicador de Desescarche
09 Indicador de Control central
10 Indicador de Extractor (Campana extractora)
NOTA
࡙ Las funciones no disponibles se marcan como inactivas y no se pueden establecer.
࡙ La ubicación de los iconos puede diferir según cada función.
࡙ Si no presiona ningún botón durante siete segundos, la función de la posición se
selecciona automáticamente.
C
Descripción general de la pantalla de ajustes
B
Descripción general de la pantalla de inicio
ES
Climatiseur
Air-conditioner
Ventilateur
Ventilateur
Appuyez sur le bouton pour accéder à l’écran de configuration puis sélectionnez la fonction ou l’option souhaitée.
01 Affichage de la température configurée
02 Affichage de la température actuelle
03 Affichage du mode de fonctionnement
˙˙̈ʀ˵ʪ࣭͔̈͝Χͱθϩʪ̷ɇαЇʪ̷̷ʪʒʪʀʪϑͱΧϩ̈ͱ͝ϑईࡠAuto, Froid, Sec, Ventil, et chaud.
04 Affichage de la vitesse du ventilateur
˙˙̈ʀ˵ʪ࣭͔̈͝Χͱθϩʪ̷ɇαЇʪ̷̷ʪʒʪʀʪϑͱΧϩ̈ͱ͝ϑईࡠAuto, Turbo, Grande, Moyenne, et Petite.
05 Affichage Wind-Free™
06 Affichage de la direction du flux d’air
˙˙̈ʀ˵ʪ࣭͔̈͝Χͱθϩʪ̷ɇαЇʪ̷̷ʪʒʪʀʪϑͱΧϩ̈ͱ͝ϑईࡠFixe, Fixe, Moyen, Large, Balayage, et
Individuelle.
07 Affichage de Réglage Heure
Lorsque Timer mode économie d’énergie est activé.
Lorsque l’heure de Passer est activée.
08 Indicateur de Prog.
Lorsqu’un Programmation est configuré.
Lorsqu’un Retour programmation est configuré.
09 Voyant de Nettoyage
10 Voyant de Verrouillage
11 Voyant de vérification
12 Voyant de Réinitialisation du filtre
13 Voyant de Dégivrage
14 Voyant de Commande centrale
15 Voyant de Température de sortie
01 Affichage Silence
Affiche la fonction Silence.
02 Affichage Nuit
Affiche la fonction Nuit.
03 Affichage Lg portée
Affiche la fonction Lg portée .
04 Affichage Prog.
˙˙̈ʀ˵ʪ࣭͔̈͝Χͱθϩʪ̷ɇαЇʪ̷̷ʪʒʪʀʪϑͱΧϩ̈ͱ͝ϑईࡠMinuteur,
Programmation hebdo., Programmation annuelle, et
Programmation Vacances.
05 Affichage Nettoyage
Affiche la fonction Nettoyage.
06 Affichage Qualité air
Affiche la Qualité air.
07 Affichage Option
Affiche l’Option.
08 Affichage Énergie
˙˙̈ʀ˵ʪ࣭͔̈͝Χͱθϩʪ̷ɇαЇʪ̷̷ʪʒʪʀʪϑͱΧϩ̈ͱ͝ϑईࡠConso. énergétique,
Économie d’énergies, et Réglages énergétiques.
01 Affichage Nettoyage
Affiche la fonction Nettoyage.
02 Affichage Éco énergie
Affiche la fonction Éco énergie.
03 Affichage Prog.
˙˙̈ʀ˵ʪ࣭͔̈͝Χͱθϩʪ̷ɇαЇʪ̷̷ʪʒʪʀʪϑͱΧϩ̈ͱ͝ϑईࡠMinuteur, Programmation
hebdo., Programmation annuelle, et Programmation Vacances.
04 Affichage Option
Affiche l’Option.
REMARQUE
࡙ Les fonctions indisponibles apparaissent inactives et ne peuvent être
configurées.
࡙ Dans le menu avec > dans le menu Option, vous pouvez sélectionner un
menu au moyen du bouton
.
࡙ Lorsque vous n’appuyez sur aucun bouton pendant 180 secondes avec
l’option active, les réglages ne sont pas enregistrés et l’écran d’accueil
apparaît.
01 Affichage de la température actuelle
02 Affichage du mode de fonctionnement
˙˙̈ʀ˵ʪ࣭͔̈͝Χͱθϩʪ̷ɇαЇʪ̷̷ʪʒʪʀʪϑͱΧϩ̈ͱ͝ϑईࡠRécup., Auto, Dériv., Silence,
et Absence.
03 Affichage de la vitesse du ventilateur
˙˙̈ʀ˵ʪ࣭͔̈͝Χͱθϩʪ̷ɇαЇʪ̷̷ʪʒʪʀʪϑͱΧϩ̈ͱ͝ϑईࡠAuto, Turbo, Grande, et Petite.
04 Indicateur de Prog.
Lorsqu’un Programmation est configuré.
Lorsqu’un Retour programmation est configuré.
05 Voyant de Verrouillage
06 Voyant de vérification
07 Voyant de Réinitialisation du filtre
08 Voyant de Dégivrage
09 Voyant de Commande centrale
10 Voyant de Hotte (hotte d’évacuation)
REMARQUE
࡙ Les fonctions indisponibles apparaissent inactives et ne peuvent être
configurées.
࡙ L’emplacement des icônes peut différer selon la fonction.
࡙ Lorsque vous n’appuyez sur aucun bouton pendant 7 secondes, la fonction de
la position est sélectionnée automatiquement.
C
Aperçu de lécran de configuration
B
Aperçu de l’écran d’accueil
FR
Aparelho de ar condicionado
Ventilador
Ventilador
Prima o botão para entrar no ecrã de definições e, em seguida, selecione a função ou opção pretendida.
01 Visor da temperatura definida
02 Visor da temperatura atual
03 Visor do modo de funcionamento
Exibe Auto, Arref., Desum., Vent e Aquec.
04 Visor da velocidade da ventoinha
Exibe Auto, Turbo, Alto, Médio e Baixo.
05 Visor Wind-Free
06 Visor da direção do fluxo de ar
Exibe Corrigir, Localizado, Médio, Disperso, Oscilação e Individual.
07 Visor Configuração da hora de início
Quando Temporizador de economia de energia é ativado.
Quando o tempo Sobreposição é ativado.
08 Indicador Programação
Quando um Horário geral é definido.
Quando um Horário de vazio é definido.
09 Indicador Limpar
10 Indicador Bloquear
11 Indicador de verificação
12 Indicador Reiniciar filtro
13 Indicador Descongelação
14 Indicador Controlo central
15 Indicador Temperatura de insuflação
01 Visor Silencioso
Exibe a função Silencioso.
02 Visor Noturno
Exibe a função Noturno.
03 Visor Long Wind
Exibe a função Long Wind.
04 Visor Program.
Exibe Temporizador, Programação semanal, Progr. anual e Def.
Modo Férias.
05 Visor Limpeza
Exibe a função Limpeza.
06 Visor Qualidade ar
Exibe a Qualidade ar.
07 Visor Opção
Exibe a Opção.
08 Visor Energia
Exibe Utiliz. energia, Poupança energia e Definições energia.
01 Visor Limpeza
Exibe a função Limpeza.
02 Visor P. energia
Exibe a função P. energia.
03 Visor Program.
Exibe Temporizador, Programação semanal, Progr. anual e Def.
Modo Férias.
04 Visor Opção
Exibe a Opção.
NOTA
࡙ As funções indisponíveis estão marcadas como inativas e não podem
ser definidas.
࡙ No menu com o > no menu Opção, pode selecionar um menu com
o botão
.
࡙ Se não premir qualquer botão durante 180 segundos com a opção
ativa, as definições não são guardadas e aparece o ecrã inicial.
01 Visor da temperatura atual
02 Visor do modo de funcionamento
Exibe Recup., Auto, By-Pass, Silencioso e Ausente.
03 Visor da velocidade da ventoinha
Exibe Auto, Turbo, Alto e Baixo.
04 Indicador Programação
Quando um Horário geral é definido.
Quando um Horário de vazio é definido.
05 Indicador Bloquear
06 Indicador de verificação
07 Indicador Reiniciar filtro
08 Indicador Descongelação
09 Indicador Controlo central
10 Indicador Exaustor
NOTA
࡙ As funções indisponíveis estão marcadas como inativas e não podem ser
definidas.
࡙ A localização dos ícones pode diferir consoante a função.
࡙ Se não premir qualquer botão durante 7 segundos, a função da posição é
selecionada automaticamente.
C
Descrição geral do ecrã de definições
B
Descrição geral do ecrã inicial
PT
Klimaanlage
Klimaanlage
Ventilator
Ventilator
Drücken Sie die Taste , um den Einstellungsbildschirm aufzurufen, und wählen Sie dann die gewünschte Funktion
oder Option aus.
01 Solltemperaturanzeige
02 Aktuelle Temperaturanzeige
03 Betriebsmodusanzeige
Anzeige der Betriebsmodi Auto, Kühlen, Dry, Lüfter und Heiz.
04 Ventilatorgeschwindigkeitsanzeige
Anzeige der Betriebsmodi Auto, Turbo, Hoch, Mittel und Niedrig.
05 Wind-Free-Anzeige
06 Gebläsestromrichtungsanzeige
Anzeige der Betriebsmodi Fix, Punkt, Mitte, Weit, Schwingen und Individuell.
07 Aktivierung Zeit Einstellungen-Display
Wenn Energiespar Timer aktiviert ist.
Wenn Übersteuern-Zeit aktiviert ist.
08 Zeitplan-Anzeige
Wenn ein Allgemeiner Zeitplan eingestellt ist.
Wenn ein Zeitplan Absenkung eingestellt ist.
09 Reinigen-Anzeige
10 Verriegeln-Anzeige
11 Einstellungen-Anzeige
12 Filter zurücksetzen-Anzeige
13 Abtaubetrieb-Anzeige
14 Zentralsteuerung-Anzeige
15 Ausblastemperatur-Anzeige
01 Leise-Anzeige
Zeigt die Leise-Funktion an.
02 Schlaf-Anzeige
Zeigt die Schlaf-Funktion an.
03 Langer Wind-Anzeige
Zeigt die Langer Wind-Funktion an.
04 Zeitplan-Anzeige
Anzeige der Einstellungen Timer, Wöchentlicher Zeitplan,
Jährlicher Zeitplan und Urlaub.
05 Reinigen-Anzeige
Zeigt die Reinigen-Funktion an.
06 Luftqualität-Anzeige
Zeigt die Luftqualität an.
07 Optionsanzeige
Zeigt die Option an.
08 Energie-Anzeige
Anzeige der Einstellungen Energieverbrauch,
Energiesparen und Energie-Einstellungen.
01 Reinigen-Anzeige
Zeigt die Reinigen-Funktion an.
02 E-Saver-Anzeige
Zeigt die E-Saver-Funktion an.
03 Zeitplan-Anzeige
Anzeige der Einstellungen Timer, Wöchentlicher Zeitplan,
Jährlicher Zeitplan und Urlaub.
04 Optionsanzeige
Zeigt die Option an.
HINWEIS
࡙ Nicht verfügbare Funktionen werden als inaktiv markiert und
können nicht eingestellt werden.
࡙ Im Menü mit dem Symbol > im Optionsmenü kann das Menü mit der
Taste
ausgewählt werden.
࡙ Ǯʪ͝͝Ɗ̈ʪɵʪ̈ɇ̧ϩ̈ӬʪθϩʪθĮΧϩ̈ͱ͝ߢߩߡईƊʪ̧Ї͝ʒʪ͝̷ɇ͝˝̧ʪ̈͝ʪƟɇϑϩʪ
drücken, werden die Einstellungen nicht gespeichert und der
Startbildschirm wird angezeigt.
01 Aktuelle Temperaturanzeige
02 Betriebsmodusanzeige
Anzeige der Betriebsmodi WT, Auto, By-Pass, Leise und Abwesend.
03 Ventilatorgeschwindigkeitsanzeige
Anzeige der Betriebsmodi Auto, Turbo, Hoch und Niedrig.
04 Zeitplan-Anzeige
Wenn ein Allgemeiner Zeitplan eingestellt ist.
Wenn ein Zeitplan Absenkung eingestellt ist.
05 Verriegeln-Anzeige
06 Einstellungen-Anzeige
07 Filter zurücksetzen-Anzeige
08 Abtaubetrieb-Anzeige
09 Zentralsteuerung-Anzeige
10 Haube-Anzeige (Abzugshaube)
HINWEIS
࡙ Nicht verfügbare Funktionen werden als inaktiv markiert und können
nicht eingestellt werden.
࡙ Die Position der Symbole kann je nach Funktion variieren.
࡙ Ǯʪ͝͝Ɗ̈ʪߨईƊʪ̧Ї͝ʒʪ͝̷ɇ͝˝̧ʪ̈͝ʪƟɇϑϩʪʒθАʀ̧ʪ͝ࡡӥθʒɇЇϩͱ͔ɇϩ̈ϑʀ˵ʒ̈ʪ
Funktion der Position ausgewählt.
C
Einstellungsbildschirm-Übersicht
B
Startbildschirm-Übersicht
DE
Airconditioner
Airconditioner
Ventilator
Ventilator
Druk op de knop om het scherm Instellingen te openen en vervolgens de gewenste functie of optie te selecteren.
01 Temperatuurweergave instellen
02 Weergave huidige temperatuur
03 Weergave werkingsmodus
Toont een van de volgende opties: Auto., Koelen, Dry, Fan en Heat.
04 Weergave fan snelheid
Toont een van de volgende opties: Auto., Turbo, Hoog, Medium en Laag.
05 Weergave Wind Free
06 Weergave richting luchtstroom
Toont een van de volgende opties: Vast, Lokaal, Mid, Breed,
Draaien en Individueel.
07 Weergave Starttijd instellen
Wanneer Energiebesparing timer geactiveerd is.
Wanneer Overnemen-tijd geactiveerd is.
08 Indicator Schema
Wanneer een Programma ingesteld is.
Wanneer een Uitgesteld schema ingesteld is.
09 Indicator Schoonmaken
10 Indicator Vergrendelen
11 Indicator Controle
12 Indicator Filter resetten
13 Indicator Ontdooien
14 Indicator Centrale regeling
15 Indicator Afvoertemperatuur
01 Weergave Stil
Toont de functie Stil.
02 Weergave Slapen
Toont de functie Slapen.
03 Weergave Lang draaien
Toont de functie Lang draaien.
04 Weergave Schema
Toont een van de volgende opties: Timer, Weekschema,
Jaarschema en Feestdag.
05 Weergave Clean
Toont de functie Clean.
06 Weergave Luchtkwaliteit
Toont de Luchtkwaliteit.
07 Weergave Optie
Toont de Optie.
08 Weergave Energie
Toont een van de volgende opties: Energieverbruik,
Energiebesparing en Energie-instellingen.
01 Weergave Reiniging
Toont de functie Reiniging.
02 Weergave Eco
Toont de functie Eco.
03 Weergave Schema
Toont een van de volgende opties: Timer, Weekschema,
Jaarschema en Feestdag.
04 Weergave Optie
Toont de Optie.
OPMERKING
࡙ Niet-beschikbare functies worden gemarkeerd als inactief en kunnen
niet worden ingesteld.
࡙ In het menu met de > in het menu Optie kunt u een menu selecteren
met de knop
.
࡙ Als u gedurende 180 seconden geen enkele knop indrukt terwijl de
optie actief is, worden de instellingen niet opgeslagen en wordt het
startscherm weergegeven.
01 Weergave huidige temperatuur
02 Weergave werkingsmodus
Toont een van de volgende opties: Heat-EX, Auto., By-Pass, Stil en
Afwezig.
03 Weergave fan snelheid
Toont een van de volgende opties: Auto., Turbo, Hoog en Laag.
04 Indicator Schema
Wanneer een Programma ingesteld is.
Wanneer een Uitgesteld schema ingesteld is.
05 Indicator Vergrendelen
06 Indicator Controle
07 Indicator Filter resetten
08 Indicator Ontdooien
09 Indicator Centrale regeling
10 Indicator Afzuigkap
OPMERKING
࡙ Niet-beschikbare functies worden gemarkeerd als inactief en kunnen
niet worden ingesteld.
࡙ Afhankelijk van de functie kunnen de locaties van pictogrammen verschillen.
࡙ Wanneer u 7 seconden lang op geen enkele knop drukt, wordt de
aangegeven functie automatisch geselecteerd.
C
Overzicht scherm Instellingen
B
Overzicht startscherm
NL
2
English
Contents
Safety Information 3
Power Smart Features 5
Remote Controller Operation 5
ĮΧʪθɇϩ̈ͱ͝͔ͱʒʪϑ࡙Aͱ͝ϩθͱ̷̷̈͝˝ϩʪ͔ΧʪθɇϩЇθʪ࡙Aͱ͝ϩθͱ̷̷̈͝˝˙ɇ͝ϑΧʪʪʒ ߦ
Aͱ͝ϩθͱ̷̷̈͝˝ɇ̈θ˙̷ͱиʒ̈θʪʀϩ̈ͱ͝ ߧ
Cooling Operation 7
Aͱͱ̷͔ͱʒʪ࡙Wind-Free function 7
Dehumidifying Operation 8
Dry mode 8
Air Purifying Operation 8
Purify function 8
Heating Operation 9
Heat mode 9
Quick Smart Features 9
Auto͔ͱʒʪ࡙Fan mode 9
Quiet˙Ї͝ʀϩ̈ͱ͝࡙Sleep˙Ї͝ʀϩ̈ͱ͝࡙Long Wind function 10
Ventilation (ERV) Operation 11
ĮΧʪθɇϩ̈ͱ͝͔ͱʒʪϑ࡙Aͱ͝ϩθͱ̷̷̈͝˝˙ɇ͝ϑΧʪʪʒ ߢߢ
E-Saver˙Ї͝ʀϩ̈ͱ͝࡙ʪɇ͝ЇΧ function 12
Energy-Saving Operation 13
Schedule 13
Energy 14
Setting Options 15
Setting Options 15
²ͱиϩͱϑʪϩϩ˵ʪOptionϑ ߢߦ
AЇθθʪ͝ϩƟ͔̈ʪƊʪϩϩ̈͝˝࣍kуɇ͔Χ̷ʪ࣎ ߢߨ
Ɵ˵ʪ̷ͱиʪϑϩϑʪϩϩʪ͔ΧʪθɇϩЇθʪ̈ϑ̷͔̈̈ϩʪʒϩͱߣߡʒʪ˝θʪʪ̈͝ϩ˵ʪƸkɇʀʀͱθʒ̈͝˝ϩͱƸkࢋƊߦߡߢߡࣗߦࡠߣߡߢߧࢋ
3
English
Safety Information
Safety Information
This content is intended to protect the user’s safety and prevent property damage. Please read it carefully
for correct use of the product.
WARNING
Hazards or unsafe practices that may result in severe personal injury or death.
CAUTION
Hazards or unsafe practices that may result in minor personal injury or property damage.
ͱ̷̷ͱиʒ̈θʪʀϩ̈ͱ͝ϑࢋ Do NOT attempt.
Make sure the machine is grounded to prevent electric shock.
Ƹ͝Χ̷Ї˝ϩ˵ʪɇΧΧ̷̈ɇ͝ʀʪࢋ Do NOT disassemble.
FOR INSTALLATION
WARNING
The installation of this appliance must be performed by a qualified technician or service company.
ɇ̷̈̈͝˝ϩͱʒͱϑͱ͔ɇцθʪϑЇ̷ϩ̈͝ʪ̷ʪʀϩθ̈ʀϑ˵ͱʀ̧ࡡ˙̈θʪࡡʪуΧ̷ͱϑ̈ͱ͝ࡡΧθͱɵ̷ʪ͔ϑӥϩ˵ϩ˵ʪΧθͱʒЇʀϩࡡͱθ̟̈͝Їθц
You must connect the product with rated power upon installation.
ɇ̷̈̈͝˝ϩͱʒͱϑͱ͔ɇцθʪϑЇ̷ϩ̈͝Χθͱɵ̷ʪ͔ϑӥϩ˵ϩ˵ʪΧθͱʒЇʀϩࡡʪ̷ʪʀϩθ̈ʀϑ˵ͱʀ̧ࡡͱθ˙̈θʪࢋ
Do not install this appliance near a heater, inflammable material. Do not install this appliance in a
humid, oily or dusty location, in a location exposed to direct sunlight and water (rain drops). Do not
install this appliance in a location where gas may leak.
Failing to do so may result in electric shock or fire.
CAUTION
Install the product on a hard and even place that can support its weight.
Ã˙ϩ˵ʪΧ̷ɇʀʪʀɇ͝͝ͱϩϑЇΧΧͱθϩ̈ϩϑиʪ̈˝˵ϩࡡϩ˵ʪΧθͱʒЇʀϩ͔ɇц˙ɇ̷̷ʒͱи͝ɇ͝ʒ̈ϩ͔ɇцʀɇЇϑʪΧθͱʒЇʀϩʒɇ͔ɇ˝ʪࢋ
FOR POWER SUPPLY
WARNING
Do not bend or pull the power cord excessively. Do not twist or tie up the power cord.
Failing to do so may result in electric shock or fire.
4
Safety Information
English
Safety Information
FOR OPERATION
WARNING
If the appliance generates a strange noise, a burning smell or smoke, unplug the product immediately
and contact your nearest service centre.
Failing to do so may result in electric shock or fire.
To reinstall the air conditioner, please contact your nearest service centre.
ɇ̷̈̈͝˝ϩͱʒͱϑͱ͔ɇцθʪϑЇ̷ϩ̈͝Χθͱɵ̷ʪ͔ϑӥϩ˵ϩ˵ʪΧθͱʒЇʀϩࡡиɇϩʪθ̷ʪɇ̧ɇ˝ʪࡡʪ̷ʪʀϩθ̈ʀϑ˵ͱʀ̧ࡡͱθ˙̈θʪ
A delivery service for the product is not provided. If you reinstall the product in another location,
ɇʒʒ̈ϩ̈ͱ͝ɇ̷ʀͱ͝ϑϩθЇʀϩ̈ͱ͝ʪуΧʪ͝ϑʪϑɇ͝ʒɇ͝̈͝ϑϩɇ̷̷ɇϩ̈ͱ͝˙ʪʪӥ̷̷ɵʪʀ˵ɇθ˝ʪʒࢋ
If the malfunction diagnosis indicator appears or malfunctions, then stop operation immediately.
If you detect any burning smells from the product or it malfunctions, then immediately turn off the air
ʀͱ͝ʒ̈ϩ̈ͱ͝ʪθǤʪ͝ϩ̷̈ɇϩͱθ࣍kŵǤ࣎ɇ͝ʒΧͱиʪθࡡɇ͝ʒϩ˵ʪ͝ʀͱ͝ϩɇʀϩϩ˵ʪϑʪθӬʀʪʀʪ͝ϩθʪࢋAͱ͝ϩ̈͝Ї̈͝˝ϩͱЇϑʪϩ˵ʪʒʪӬʀʪ̈͝
this state can cause electrical shock, fire, or damage to the product.
Ã˙ϩ˵ʪkߩߤߧ̈͝ʒ̈ʀɇϩͱθɇΧΧʪɇθϑࡡϩ˵ʪ͝̈ϩ͔ʪɇ͝ϑϩ˵ɇϩ̈ϩ̈ϑϩ͔̈ʪϩͱʀͱ͝ϩɇʀϩϩ˵ʪϑʪθӬʀʪʀʪ͝ϩθʪ˙ͱθΧʪθ̈ͱʒ̈ʀ
̈͝ϑΧʪʀϩ̈ͱ͝ࢋĘʪ˝̷ʪʀϩ̈͝˝ϩ˵ʪϑʪΧʪθ̈ͱʒ̈ʀ̈͝ϑΧʪʀϩ̈ͱ͝ϑʀɇ͝θʪϑЇ̷ϩ̈͝͔ɇ̷˙Ї͝ʀϩ̈ͱ͝ϑ࣍ͱ̷͝цɇΧΧ̷̈ʀɇɵ̷ʪϩͱ²ť͔ͱʒʪ̷࣎ࢋ
Do not attempt to repair, disassemble, or modify the product yourself.
Failing to do so may result in electric shock, fire, product malfunction, or injury.
CAUTION
Do not allow water to enter the product.
ɇ̷̈̈͝˝ϩͱʒͱϑͱ͔ɇцθʪϑЇ̷ϩ̈͝˙̈θʪͱθʪуΧ̷ͱϑ̈ͱ͝ࢋ
Do not operate the product with wet hands.
Failing to do so may result in electric shock.
Do not spray volatile material such as insecticide onto the surface of the product.
ϑиʪ̷̷ɇϑɵʪ̈͝˝˵ɇθ͔˙Ї̷ϩͱ˵Ї͔ɇ͝ϑࡡ̈ϩ͔ɇцɇ̷ϑͱθʪϑЇ̷ϩ̈͝ʪ̷ʪʀϩθ̈ʀϑ˵ͱʀ̧ࡡ˙̈θʪࡡͱθΧθͱʒЇʀϩ͔ɇ̷˙Ї͝ʀϩ̈ͱ͝ࢋ
Do not give a strong impact to the product and do not disassemble the product.
Do not use this product for other purposes.
This product is designed to be used only for a system air conditioner.
Do not press the buttons with any sharp objects.
Failing to do so may result in electric shock or part damage.
FOR CLEANING
WARNING
Do not clean the product by spraying water directly onto it. Do not use benzene, thinner, alcohol or
acetone to clean the product.
Failing to do so may result in discoloration, deformation, damage, electric shock, or fire.
5
English
Power Smart Features
You can use the air conditioner easily by selecting a mode and then by controlling the temperature, fan
ϑΧʪʪʒࡡɇ͝ʒɇ̈θ˙̷ͱиʒ̈θʪʀϩ̈ͱ͝ࢋ
Ƹϑʪϩ˵ʪ
and buttons to select the desired menu, press the button, use the , buttons to select
the desired item, and then press the button.
Remote Controller Operation
Operation modes
You can change the current mode to Auto, Aͱͱ̷, Dry, Fan, and Heat.
Controlling temperature
ǽͱЇʀɇ͝ʀͱ͝ϩθͱ̷ϩ˵ʪϩʪ͔ΧʪθɇϩЇθʪ̈͝ʪɇʀ˵͔ͱʒʪɇϑ˙ͱ̷̷ͱиϑࡠ
Mode Temperature control
Auto/Aͱͱ̷/Dry ʒ̟ЇϑϩɵцߢইA࣍ߢই࣎ɵʪϩиʪʪ͝ߢߩইA࣍ߧߦই࣎ɇ͝ʒߤߡইA࣍ߩߧই࣎ࢋ
Fan You cannot control the temperature.
Heat ʒ̟ЇϑϩɵцߢইA࣍ߢই࣎ɵʪϩиʪʪ͝ߢߧইA࣍ߧߢই࣎ɇ͝ʒߤߡইA࣍ߩߧই࣎ࢋ
NOTE
The set temperature range available on the remote controller may change depending on the set
temperature range that indoor unit supports.
Controlling fan speed
ǽͱЇʀɇ͝ϑʪ̷ʪʀϩϩ˵ʪ˙ͱ̷̷ͱӥ͝˝˙ɇ͝ϑΧʪʪʒϑ̈͝ʪɇʀ˵͔ͱʒʪࡠ
Mode Available fan speeds
Auto/Dry
Auto
Aͱͱ̷/Heat
Auto, Turbo, High, Medium, øͱи
Fan
Turbo, High, Medium, øͱи
NOTE
Turbo appears active only on the indoor unit that supports the Turbo fan speed.
6
Remote Controller Operation
English
Power Smart Features
Controlling air flow direction
ǽͱЇʀɇ͝ʀͱ͝ϩθͱ̷ɇ̈θ˙̷ͱиʒ̈θʪʀϩ̈ͱ͝ࢋ
General models
̈у, Ɗӥ͝˝, Ɗӥ͝˝, Ɗӥ͝˝, Individual
360 cassette model
Spot, Mid, Wide, Ɗӥ͝˝ߤߧߡ, Individual
ͱθߤߧߡࣗʀɇϑϑʪϩϩʪ̈͝ʒͱͱθЇ̈͝ϩ
Mode Wired remote controller display Indoor unit indicator
Spot
Spot
Mid
Mid
Wide
Wide
Swing
Ɗӥ͝˝ߤߧߡ
Ã˙ߤߧߡࣗʀɇϑϑʪϩϩʪ̈͝ʒͱͱθЇ̈͝ϩϑɇ͝ʒͱϩ˵ʪθ̈͝ʒͱͱθЇ̈͝ϩϑɇθʪ̈͝ϑϩɇ̷̷ʪʒϩͱ˝ʪϩ˵ʪθࡡϩ˵ʪɇ̈θ˙̷ͱиʒ̈θʪʀϩ̈ͱ͝ʒͱʪϑ͝ͱϩ
ʀ˵ɇ͝˝ʪͱ͝ϩ˵ʪ̈͝ʒͱͱθЇ̈͝ϩϑͱϩ˵ʪθϩ˵ɇ͝ߤߧߡࣗʀɇϑϑʪϩϩʪи˵ʪ͝Spot, Mid, or Wide̈ϑϑϩɇθϩʪʒɇϑϩ˵ʪɇ̈θ˙̷ͱи
direction.
You can select individualɇ̈θ˙̷ͱиʒ̈θʪʀϩ̈ͱ͝˙ͱθʪɇʀ˵ɵ̷ɇʒʪࡡи˵ʪ͝ϩ˵ʪ̈͝ʒ̈ӬʒЇɇ̷̈͝ʒ̈ʀɇϩ̈ͱ͝ɇΧΧʪɇθϑɇʀϩ̈Эʪ
on the indoor unit that supports this mode.
NOTE
Ɵ˵ʪʒ̈ϑΧ̷ɇцʪʒ˙̷ͱиʒ̈θʪʀϩ̈ͱ͝̈ʀͱ͝͔ɇцʒ̈˙˙ʪθʒʪΧʪ͝ʒ̈͝˝ͱ͝ϩ˵ʪ̈͝ʒͱͱθ͔ͱʒʪ̷ࢋ
Ɵ˵ʪʀЇθθʪ͝ϩɇ̈θ˙̷ͱиʒ̈θʪʀϩ̈ͱ͝Χʪθϑ̈ϑϩϑʪЭʪ͝̈˙цͱЇʀ˵ɇ͝˝ʪϩ˵ʪʀЇθθʪ͝ϩ͔ͱʒʪࡡͱθϩЇθ͝ͱ˙˙ɇ͝ʒϩ˵ʪ͝ϩЇθ͝ͱ͝
the remote controller.
Blades that can be selected for Individual may differ depending on the product model.
When Blade lock is set, the locked blade appears inactive.
7
English
Power Smart Features
Cool mode
Ƹϑʪϩ˵ʪAͱͱ̷͔ͱʒʪϩͱϑϩɇцʀͱͱ̷̈͝˵ͱϩиʪɇϩ˵ʪθ
NOTE
Ãϩ̈ϑθʪʀͱ͔͔ʪ͝ʒʪʒϩͱϑʪϩϩ˵ʪʒʪϑ̈θʪʒϩʪ͔ΧʪθɇϩЇθʪɵʪϩиʪʪ͝ߣߥঐ࣍ߨߦঔ࣎ɇ͝ʒߣߧঐ࣍ߨߪঔ࣎ࢋ
Ɵͱʀͱͱ̷цͱЇθθͱͱ͔αЇ̈ʀ̷̧цࡡϑʪ̷ʪʀϩɇ̷ͱиϩʪ͔ΧʪθɇϩЇθʪɇ͝ʒɇ˵̈˝˵˙ɇ͝ϑΧʪʪʒࢋ
ƟͱϑɇЭʪʪ͝ʪθ˝цࡡϑʪ̷ʪʀϩɇ˵̈˝˵ϩʪ͔ΧʪθɇϩЇθʪɇ͝ʒɇ̷ͱи˙ɇ͝ϑΧʪʪʒࢋ
ϑϩ˵ʪ̈͝ʒͱͱθϩʪ͔ΧʪθɇϩЇθʪɇΧΧθͱɇʀ˵ʪϑϩ˵ʪϑʪϩϩʪ͔ΧʪθɇϩЇθʪࡡϩ˵ʪʀͱ͔Χθʪϑϑͱθӥ̷̷ͱΧʪθɇϩʪɇϩɇ̷ͱиϑΧʪʪʒ
to save energy.
Wind-Free function
Ƹϑʪϩ˵ʪWind-Free˙Ї͝ʀϩ̈ͱ͝ϩͱʪ̟͝ͱц̷͔̈ʒʀͱͱ̷ɵθʪʪіʪʪуЇʒ̈͝˝˙θͱ͔˙̈͝ʪ˵ͱ̷ʪϑͱ͝ϩ˵ʪWind-Free Χɇ͝ʪ̷ӥϩ˵
ϩ˵ʪɇ̈θ˙̷ͱиɵ̷ɇʒʪʀ̷ͱϑʪʒࡡ̈͝ϑϩʪɇʒͱ˙˝ʪϩϩ̈͝˝ʀͱͱ̷ӥ͝ʒʒ̈θʪʀϩ̷цࢋƟ˵ʪɇЇϩͱ͔ɇϩʪʒʀͱ͝ϩθͱ̷ͱ˙ϩ˵ʪϩʪ͔ΧʪθɇϩЇθʪ
and fan speed according to the indoor temperatures keeps your room cool and pleasant.
NOTE
If the Wind-Free function is cancelled, the air conditioner returns to the previous fan speed.
You can adjust the set temperature during the Wind-Free function, and recommended set temperatures are
ߣߥϩͱߣߧইA࣍ߨߦϩͱߨߪঔ࣎ࢋ²ͱиʪЭʪθࡡцͱЇʀɇ͝͝ͱϩʀ˵ɇ͝˝ʪϩ˵ʪϑʪϩϩʪ͔ΧʪθɇϩЇθʪ̈͝ϩ˵ʪFan mode.
You can use the Wind-Free˙Ї͝ʀϩ̈ͱ͝и˵ʪ͝ϩ˵ʪAͱͱ̷, Dry, or Fan mode is running.
Ã˙ϩ˵ʪθͱͱ͔ϩʪ͔ΧʪθɇϩЇθʪ̈͝ʀθʪɇϑʪϑɵʪʀɇЇϑʪͱ˙θ̈ϑʪͱ˙ʪуϩʪθ͝ɇ̷ϩʪ͔ΧʪθɇϩЇθʪࡡ˵ʪɇϩ˙θͱ͔ʀͱͱ̧̈͝˝ࡡͱθͱϩ˵ʪθ
θʪɇϑͱ͝ࡡͱΧʪθɇϩʪ͝ͱθ͔ɇ̷ʀͱͱ̷̈͝˝˙̈θϑϩϩͱ̷ͱиʪθϩ˵ʪϩʪ͔ΧʪθɇϩЇθʪࡡɵʪ˙ͱθʪͱΧʪθɇϩ̈͝˝Wind-Free to keep the
desired temperature.
If you select the Wind-Free function in the Fan͔ͱʒʪࡡϩ˵ʪʀͱ͔ΧθʪϑϑͱθϑϩͱΧϑиͱθ̧̈͝˝ϑͱϩ˵ɇϩʀͱͱ̷ɇ̈θʒͱʪϑ
͝ͱϩʀͱ͔ʪͱЇϩࢋ²ͱиʪЭʪθࡡ̷͔̈ʒɵθʪʪіʪʀͱ͔ʪϑͱЇϩɇ͝ʒϑϩɇθϩϑϩͱʀ̷ʪɇ͝ϩ˵ʪɇ̈θ̈͝ϩ˵ʪθͱͱ͔ࢋ
During the Wind-FreeͱΧʪθɇϩ̈ͱ͝ࡡϩ˵ʪʀͱ̷ʒɇ̈θ͔ɇцɵʪ̈͝ϩʪθ͔̈ϩϩʪ͝ϩ̷циʪɇ̧ʪ͝ʪʒʒʪΧʪ͝ʒ̈͝˝ͱ͝ϩ˵ʪ
ϩʪ͔ΧʪθɇϩЇθʪɇ͝ʒ˵Ї͔̈ʒ̈ϩц̈͝ϩ˵ʪθͱͱ͔ࢋ9Їϩϩ˵ʪӥ͝ʒࣗ˙θʪʪɇ̈θʀЇθθʪ͝ϩϑɇθʪ͔ɇ̈͝ϩɇ̈͝ʪʒɇ͝ʒϩ˵ʪиʪɇ̧ʪ͝ʪʒ
ʀͱ̷ʒɇ̈θ̈ϑ͔͔̈ʪʒ̈ɇϩʪ̷цθʪʀͱЭʪθʪʒࡡʀͱ͝ϑʪαЇʪ͝ϩ̷ц̧ʪʪΧ̈͝˝ϩ˵ʪθͱͱ͔ʀͱ͔˙ͱθϩɇɵ̷ʪࢋ࣍UЇθ̈͝˝ϩ˵ʪWind-Free
ͱΧʪθɇϩ̈ͱ͝ࡡϩ˵ʪɇ̈θ˙̷ͱиɵ̷ɇʒʪϑ͔ɇцͱΧʪ͝ϩͱʀͱ͝ϩθͱ̷ϩ˵ʪ̈͝ʒͱͱθɇ̈θʀͱ͝ʒ̈ϩ̈ͱ͝ϑ͔ͱͱϩ˵̷цࡡʒʪΧʪ͝ʒ̈͝˝ͱ͝
the installation settings. In this case, as soon as the indoor temperature and humidity change, the air
˙̷ͱиɵ̷ɇʒʪϑɇθʪʀ̷ͱϑʪʒɇ͝ʒϩ˵ʪWind-Free operation restarts. For more information on the installation
settings, see "Setting the indoor unit addresses and the installation options" in the installation manual
ͱ˙ϩ˵ʪ̈͝ʒͱͱθЇ̈͝ϩࢋ࣎
Change of the air flow blade by temperature and humidity
Indoor
temperature
and humidity
øͱи High
9θʪʪіʪ̈ϑɵ̷ͱи͝Ӭɇϩ˵ʪ
͔̈ʀθͱ˵ͱ̷ʪϑͱ͝ϩ˵ʪɇ̈θ˙̷ͱи
blades
9θʪʪіʪ̈ϑɵ̷ͱи͝Ӭɇϩ˵ʪ͔̈ʀθͱ
˵ͱ̷ʪϑͱ͝ϩ˵ʪɇ̈θ˙̷ͱиɵ̷ɇʒʪϑ
Breeze comes from the air
˙̷ͱиɵ̷ɇʒʪʒʪΧʪ͝ʒ̈͝˝ͱ͝ϩ˵ʪ
setting
̈θ˙̷ͱиɵ̷ɇʒʪ A̷ͱϑʪʒ A̷ͱϑʪʒ࣍ʒʪ˙ɇЇ̷ϩ࣎ ĮΧʪ͝ʪʒ࣍ɇʀʀͱθʒ̈͝˝ϩͱϑʪϩϩ̈͝˝࣎
When the Wind-Free˙Ї͝ʀϩ̈ͱ͝θЇ͝ϑи˵̷̈ʪϑ̷ʪʪΧ̈͝˝ࡡцͱЇ͔ɇц˙ʪʪ̷ʀͱ̷ʒɇ̈θ̈˙ϩ˵ʪɇ̈θʀͱ͝ʒ̈ϩ̈ͱ͝ʪθ̈ϑ̈͝ϑϩɇ̷̷ʪʒ
over the bed. In this case, set the desired temperature higher than the normal setting temperature.
Ɵ˵ʪϑ͔ɇθϩɇ͝ʒΧͱиʪθ˙Ї̷ʀͱͱ̷̈͝˝˙Ї͝ʀϩ̈ͱ͝ϑͱ˙ϩ˵ʪƊɇ͔ϑЇ͝˝ɇ̈θʀͱ͝ʒ̈ϩ̈ͱ͝ʪθ̧ʪʪΧɇ͝ʪ͝ʀ̷ͱϑʪʒϑΧɇʀʪ
cool and comfortable.
Cooling Operation
8
Dehumidifying Operation
English
Power Smart Features
Dry mode
Ƹϑʪϩ˵ʪDry͔ͱʒʪ̈͝θɇ̈͝цͱθ˵Ї͔̈ʒиʪɇϩ˵ʪθ
NOTE
You cannot change fan speed in the Dry mode.
Ɵ˵ʪ˝θʪɇϩʪθϩ˵ʪʒ̈˙˙ʪθʪ͝ʀʪɵʪϩиʪʪ͝θͱͱ͔ϩʪ͔ΧʪθɇϩЇθʪɇ͝ʒϑʪϩϩʪ͔ΧʪθɇϩЇθʪࡡϩ˵ʪ̷ͱ͝˝ʪθϩ˵ʪ͝ʪʪʒʪʒϩ͔̈ʪ
to dehumidify the air is.
The dehumidifying function of the Samsung air conditioner keeps an enclosed space dry and comfortable.
Dehumidifying Operation
Purify function
Ƹϑʪϩ˵ʪPurify function to remove harmful materials in the air to provide you a clean and healthy
environment.
This function is available in the Auto, Aͱͱ̷, Dry, Fan, and Heat modes.
NOTE
During the Air Purifying operation, dust is collected on the active filter panel.
When the Purify function is additionally selected in the Fan mode, you cannot change the set
temperature.
When the Purify˙Ї͝ʀϩ̈ͱ͝̈ϑɇʒʒ̈ϩ̈ͱ͝ɇ̷̷цϑʪ̷ʪʀϩʪʒи˵̷̈ʪɇϑΧʪʀ̈˙̈ʀ͔ͱʒʪ̈ϑθЇ̈͝͝͝˝ࡡϩ˵ʪθʪ̈ϑ̷̈ϩϩ̷ʪ
difference in electricity consumption and operating noise.
Air purity level indications
The indications are displayed only on the models that support the air purity level display function.
Ɵ˵ʪɇ̈θΧЇθ̈ϩц̷ʪЭʪ̷ϑ˙ͱθťđߢߡࡡťđߣࢋߦࡡɇ͝ʒťđߢࢋߡɇΧΧʪɇθɇϑ˙ͱ̷̷ͱиϑࡠ
Purity level
PM10 PM2.5/PM1.0
Colour Aͱ͝ʀʪ͝ϩθɇϩ̈ͱ͝࣍ڋࢥ͔ࠠ࣎ Colour Aͱ͝ʀʪ͝ϩθɇϩ̈ͱ͝࣍ڋࢥ͔ࠠ࣎
Very Poor ŵʪʒ ߢߦߢͱθ͔ͱθʪ ŵʪʒ ߨߧͱθ͔ͱθʪ
Poor ǽʪ̷̷ͱи ߩߢࣗߢߦߡ ǽʪ̷̷ͱи ߤߧࣗߨߦ
Normal θʪʪ͝ 31-80 θʪʪ͝ ߢߧࣗߤߦ
ͱͱʒ Blue 30 or less Blue ߢߦͱθ̷ʪϑϑ
When you set Air Quality to ON, the screen saver displays the current air purity level details.
You can set the screen saver launch time in Option > Ƹϑʪθ͔ͱʒʪ.
Air purity level can only be displayed on indoor units supporting this function.
The air purification function of the Samsung air conditioner keeps the air in an enclosed space purified.
Air Purifying Operation
9
English
Power Smart Features
Heat mode
Ƹϑʪϩ˵ʪHeat͔ͱʒʪϩͱϑϩɇциɇθ͔ࢋ
NOTE
Ǯ˵̷̈ʪϩ˵ʪɇ̈θʀͱ͝ʒ̈ϩ̈ͱ͝ʪθиɇθ͔ϑЇΧࡡϩ˵ʪ˙ɇ͝͔ɇц͝ͱϩͱΧʪθɇϩʪ˙ͱθɇи˵̷̈ʪɇϩϩ˵ʪɵʪ˝̈̈͝͝͝˝ϩͱΧθʪЭʪ͝ϩʀͱ̷ʒ
ӥ͝ʒࢋ
Ã˙ϩ˵ʪͱЇϩʒͱͱθϩʪ͔ΧʪθɇϩЇθʪ̈ϑ̷ͱиɇ͝ʒϩ˵ʪ˵Ї͔̈ʒ̈ϩц̈ϑ˵̈˝˵и˵̷̈ʪϩ˵ʪHeat mode is running, the heating
performance of the air conditioner may decrease due to frost or ice that forms on the outdoor heat
ʪуʀ˵ɇ͝˝ʪθࢋǮ˵ʪ͝ϩ˵̈ϑʀͱ͝ʒ̈ϩ̈ͱ͝˵ɇΧΧʪ͝ϑࡡϩ˵ʪɇ̈θʀͱ͝ʒ̈ϩ̈ͱ͝ʪθθЇ͝ϑϩ˵ʪDefrost˙Ї͝ʀϩ̈ͱ͝˙ͱθɇɵͱЇϩߦϩͱߢߣ
͔̈͝Їϩʪϑϩͱθʪ͔ͱЭʪϩ˵ʪ˙θͱϑϩɇ͝ʒ̈ʀʪࡡɵͱϩ˵иɇϩʪθɇ͝ʒϑϩʪɇ͔ɇθʪθʪ̷ʪɇϑʪʒ˙θͱ͔ϩ˵ʪͱЇϩʒͱͱθЇ̈͝ϩࢋ
While the Defrost˙Ї͝ʀϩ̈ͱ͝̈ϑθЇ̈͝͝͝˝ࡡϩ˵ʪ̈͝ʒͱͱθЇ̈͝ϩΧθͱӬʒʪϑ͝ͱɵθʪʪіʪϩͱΧθʪЭʪ͝ϩʀͱ̷ʒӥ͝ʒࢋ
The operation time of the Defrost function varies depending on the amount of the frost and ice and the
humidity.
While the Defrost˙Ї͝ʀϩ̈ͱ͝̈ϑθЇ̈͝͝͝˝ࡡ͝ͱ͝ʪͱ˙ͱϩ˵ʪθ˙Ї͝ʀϩ̈ͱ͝ϑӥ̷̷иͱθ̧ࡡʪЭʪ͝̈˙цͱЇϑʪ̷ʪʀϩϩ˵ʪ͔ͱ͝ϩ˵ʪ
remote controller.
Ɵ˵ʪ˵ʪɇϩ̈͝˝˙Ї͝ʀϩ̈ͱ͝ϑͱ˙ϩ˵ʪƊɇ͔ϑЇ͝˝ɇ̈θʀͱ͝ʒ̈ϩ̈ͱ͝ʪθ̧ʪʪΧɇ͝ʪ͝ʀ̷ͱϑʪʒϑΧɇʀʪиɇθ͔ɇ͝ʒʀͱ͔˙ͱθϩɇɵ̷ʪ
Heating Operation
Auto mode
Ƹϑʪϩ˵ʪAuto͔ͱʒʪи˵ʪ͝цͱЇиɇ͝ϩϩ˵ʪɇ̈θʀͱ͝ʒ̈ϩ̈ͱ͝ʪθϩͱɇЇϩͱ͔ɇϩ̈ʀɇ̷̷цʀͱ͝ϩθͱ̷ϩ˵ʪ͔ͱʒʪ࣍Heat or Aͱͱ̷࣎ࢋƟ˵ʪ
ɇ̈θʀͱ͝ʒ̈ϩ̈ͱ͝ʪθӥ̷̷ΧθͱӬʒʪϩ˵ʪ͔ͱϑϩʀͱ͔˙ͱθϩɇɵ̷ʪɇϩ͔ͱϑΧ˵ʪθʪϩ˵ɇϩ̈ϩʀɇ͝ࢋ
NOTE
You cannot change the fan speed.
While the Aͱͱ̷ mode is running, the air conditioner produces a strong cold air if there is a large
ʒ̈˙˙ʪθʪ͝ʀʪɵʪϩиʪʪ͝ϩ˵ʪϑʪϩϩʪ͔ΧʪθɇϩЇθʪɇ͝ʒϩ˵ʪʀЇθθʪ͝ϩϩʪ͔ΧʪθɇϩЇθʪࢋǮ˵ʪ͝ϩ˵ʪϩʪ͔ΧʪθɇϩЇθʪʒ̈˙˙ʪθʪ͝ʀʪ
ɵʪʀͱ͔ʪϑϑ͔ɇ̷̷ࡡϩ˵ʪɇ̈θʀͱ͝ʒ̈ϩ̈ͱ͝ʪθɇЇϩͱ͔ɇϩ̈ʀɇ̷̷цʀ˵ɇ͝˝ʪϑϩ˵ʪɇ̈θ˙̷ͱиʒ̈θʪʀϩ̈ͱ͝ɇ͝ʒ̧ʪʪΧϑϩ˵ʪθͱͱ͔ɇϩɇ
comfortable temperature.
Fan mode
Ƹϑʪϩ˵ʪFan mode to run the air conditioner like a common fan. The air conditioner provides a natural breeze.
NOTE
Ã˙ϩ˵ʪɇ̈θʀͱ͝ʒ̈ϩ̈ͱ͝ʪθӥ̷̷͝ͱϩɵʪЇϑʪʒ˙ͱθɇ͝ʪуϩʪ͝ʒʪʒΧʪθ̈ͱʒͱ˙ϩ͔̈ʪࡡʒθцϩ˵ʪɇ̈θʀͱ͝ʒ̈ϩ̈ͱ͝ʪθɵцθЇ̈͝͝͝˝̈ϩ
in the Fan͔ͱʒʪɵʪϩиʪʪ͝ߤɇ͝ʒߥ˵ͱЇθϑࢋ
There is a variety of useful functionality provided by the Samsung air conditioner.
Quick Smart Features
10
English
Power Smart Features
Quiet function
Quiet function decreases the operation sound in the Auto, Aͱͱ̷, Dry, or Heat mode.
NOTE
ǽͱЇʀɇ͝ʀͱ͝ϩθͱ̷ϩ˵ʪϑʪϩϩʪ͔ΧʪθɇϩЇθʪࡡ˙ɇ͝ϑΧʪʪʒࡡɇ͝ʒɇ̈θ˙̷ͱиʒ̈θʪʀϩ̈ͱ͝ࢋ
When you select Quiet in Wind-Free or Long Wind function, the previous function is cancelled.
Sleep function
Sleep˙Ї͝ʀϩ̈ͱ͝ɇЇϩͱ͔ɇϩ̈ʀɇ̷̷цϩЇθ͝ϑͱ˙˙ϩ˵ʪɇ̈θʀͱ͝ʒ̈ϩ̈ͱ͝ʪθɇ˙ϩʪθߧ˵ͱЇθϑӥϩ˵ͱЇϩϑϩͱΧΧ̈͝˝ϩ˵ʪͱΧʪθɇϩ̈ͱ͝̈͝ϩ˵ʪ
middle of the night.
NOTE
You can select this function only in the Aͱͱ̷ and Heat modes.
ǽͱЇʀɇ͝ʀͱ͝ϩθͱ̷ϩ˵ʪϑʪϩϩʪ͔ΧʪθɇϩЇθʪࡡ˙ɇ͝ϑΧʪʪʒࡡɇ͝ʒɇ̈θ˙̷ͱиʒ̈θʪʀϩ̈ͱ͝ࢋ
When you select Sleep in Wind-Free or Long Wind function, the previous function is cancelled.
Long Wind function
Ƹϑʪϩ˵ʪLong Wind˙Ї͝ʀϩ̈ͱ͝ϩͱαЇ̈ʀ̷̧цʒʪ̷̈Эʪθɇ̷ͱ͝˝θʪɇʀ˵̈͝˝ɇ̈θ˙̷ͱи
NOTE
You can select this function only in the Aͱͱ̷, Dry, and Fan modes.
ǽͱЇʀɇ͝͝ͱϩʀͱ͝ϩθͱ̷ϩ˵ʪ˙ɇ͝ϑΧʪʪʒɇ͝ʒɇ̈θ˙̷ͱиʒ̈θʪʀϩ̈ͱ͝ࢋ
When you select Long Wind in the Wind-Free, Quiet, or Sleep function, the previous function is cancelled.
Quick Smart Features
11
English
Ventilation (ERV) Operation
Operation modes
You can select the desired mode.
Mode Description
Heat-EX
Ɵ˵̈ϑ͔ͱʒʪ͔͔̈̈̈͝іʪϑʪ͝ʪθ˝ц̷ͱϑϑɵцθʪʀͱЭʪθ̈͝˝ʪ͝ʪθ˝ц˙θͱ͔ϩ˵ʪʪу˵ɇЇϑϩɇ̈θʒЇθ̈͝˝
indoor heating or cooling.
Auto
This mode automatically adjusts the ventilation functions depending on the degree of
pollution in your indoor air.
By-Pass Ɵ˵̈ϑ͔ͱʒʪɇʀϩ̈Эɇϩʪϑϩ˵ʪ̈͝ϩɇ̧ʪͱ˙ʪуϩʪθ͝ɇ̷ɇ̈θϑͱϩ˵ɇϩ̈ϩʀͱ͔ʪϑ̈͝ʒͱͱθϑࢋ
Quiet Ɵ˵̈ϑ͔ͱʒʪθʪʒЇʀʪϑϩ˵ʪϑͱЇ͝ʒΧθͱʒЇʀʪʒɵцϩ˵ʪЭʪ͝ϩ̷̈ɇϩͱθ࣍kŵǤ࣎ࢋ
иɇц Ɵ˵̈ϑ͔ͱʒʪɇ̷̷ͱиϑцͱЇϩͱͱΧʪθɇϩʪϩ˵ʪЭʪ͝ϩ̷̈ɇϩͱθ࣍kŵǤ࣎и˵̷̈ʪцͱЇɇθʪɇиɇц˙θͱ͔˵ͱ͔ʪࢋ
NOTE
Į̷͝ци˵ʪ͝цͱЇϑʪ̷ʪʀϩɇ̷̷ϩ˵ʪͱΧϩ̈ͱ͝ϑͱ˙Эʪ͝ϩ̷̈ɇϩͱθ࣍kŵǤ࣎ࡡцͱЇʀɇ͝Їϑʪϩ˵ʪɇɵͱЭʪͱΧʪθɇϩ̈ͱ͝ࢋ࣍Į̷͝цɇЭɇ̷̈ɇɵ̷ʪ
и˵ʪ͝ϩ˵ʪӥθʪʒθʪ͔ͱϩʪʀͱ͝ϩθͱ̷̷ʪθ̈ϑ̈͝ϑϩɇ̷̷ʪʒ࣎
If the operation status is changed by another controller, the operation mode is cancelled.
Controlling fan speed
ǽͱЇʀɇ͝ϑʪ̷ʪʀϩϩ˵ʪ˙ͱ̷̷ͱӥ͝˝˙ɇ͝ϑΧʪʪʒϑ̈͝ʪɇʀ˵͔ͱʒʪࡠ
Heat-EX/Auto/
By-Pass
Auto, Turbo, High, Medium
Quiet/Away
Medium
NOTE
Auto appears active only on the ventilator that supports the Auto fan speed.
Ventilation (ERV) Operation
12
English
Ventilation (ERV) Operation
E-Saver function
ŵʪʒЇʀʪцͱЇθΧͱиʪθʀͱ͝ϑЇ͔Χϩ̈ͱ͝ɇ͝ʒϑɇЭʪ͔ͱ͝ʪцͱ͝цͱЇθʪ̷ʪʀϩθ̈ʀɵ̷̷̈ࢋ
Ǯ˵ʪ͝ϩ˵ʪЭʪ͝ϩ̷̈ɇϩͱθ࣍kŵǤ࣎ɇ͝ʒϩ˵ʪɇ̈θʀͱ͝ʒ̈ϩ̈ͱ͝ʪθ̈ϑʀͱ͝͝ʪʀϩʪʒϩͱ˝ʪϩ˵ʪθ
This function compares the outdoor and indoor temperatures, and then automatically selects
Heat-EX or By-Pass operation.
Ǯ˵ʪ͝ϩ˵ʪЭʪ͝ϩ̷̈ɇϩͱθ࣍kŵǤ࣎̈ϑ̈͝ϑϩɇ̷̷ʪʒϑʪΧɇθɇϩʪ̷ц࣍ʒʪΧʪ͝ʒ̈͝˝ͱ͝ϩ˵ʪͱΧϩ̈ͱ͝ϑʪϩϩ̈͝˝ϑɇϩ̈͝ϑϩɇ̷̷ɇϩ̈ͱ࣎͝ࡡ
̈ϩͱΧʪθɇϩʪϑɇϑ˙ͱ̷̷ͱиϑࡠ
ON/OFF Alternation
operation
Ɵ˵ʪЭʪ͝ϩ̷̈ɇϩͱθ࣍kŵǤ࣎ϩЇθ͝ϑĮ͝ɇ͝ʒĮ˙˙̈͝Quiet࣍Medium࣎͔ͱʒʪʪЭʪθц
30 minutes.
Outdoor air cooling
operation for different
temp. setting
ĮΧʪθɇϩʪϑи˵ʪ͝ϩ˵ʪǤ̈ʪиđɇϑϩʪθ̈ϑ˙ͱθkŵǤफ़ࢋ
With the temperature control button, the default temperature for
E-Saver can be set.
Depending on the set temperature, it automatically selects Heat-EX
or By-Pass operation.
NOTE
When the air conditioner is connected individually, E-Saver function is not available.
Clean up function
ťθʪЭʪ͝ϩͱʒͱθɇ͝ʒʒЇϑϩ˙θͱ͔ʪ͝ϩʪθ̈͝˝ɵц͔ɇ̧̈͝˝ϩ˵ʪɇ̈θ˙̷ͱи̈͝ΧЇϩɵ̈˝˝ʪθϩ˵ɇ͝ϩ˵ʪɇ̈θ˙̷ͱиͱЇϩΧЇϩࢋ
Ventilation (ERV) Operation
13
English
Energy-Saving Operation
Schedule
Press the button, press the or button to select Schedule, and then press the button.
You can set each of General Schedule, Setback Schedule, Override, Energy Saving Timer, Eco Setting, and
Activation Time Setting.
Type Description
ʪ͝ʪθɇ̷
Schedule
Timer
Turns the device on or off after a set time.
ǽͱЇʀɇ͝ϑʪϩϩ˵ʪϩ͔̈ʪθɵцߦ͔̈͝Їϩʪ̈͝ʀθʪ͔ʪ͝ϩϑࢋ
Weekly
schedule
Schedules the operation of the device on a set day and at a set time.
ǽͱЇʀɇ͝ϑʀ˵ʪʒЇ̷ʪͱ͝ϩ˵ʪиʪʪ̷̧цɵɇϑ̈ϑࢋǽͱЇʀɇ͝ɇ̷ϑͱϑʪϩϩ˵ʪЭɇ̷Їʪϑ
for day, time, operation on/off, scheduled device, and operation
ϑϩɇϩЇϑ࣍ͱΧʪθɇϩ̈ͱ͝͔ͱʒʪࡡϑʪϩϩʪ͔ΧʪθɇϩЇθʪࡡ˙ɇ͝ϑΧʪʪʒ࣎ࢋ
Yearly schedule
Aθʪɇϩʪϑ˝θͱЇΧϑ˙ͱθϩ˵ʪʒʪϑ̈θʪʒ͔ͱ͝ϩ˵ϑ˙ͱθϑʀ˵ʪʒЇ̷̈͝˝
You can schedule up to 8 groups on the yearly basis.
Holiday ̷̷ͱиϑцͱЇ͝ͱϩϩͱ͔ɇ̧ʪЇϑʪͱ˙ϩ˵ʪϑʀ˵ʪʒЇ̷ʪͱ͝˵ͱ̷̈ʒɇцϑࢋ
Setback Schedule
Aͱ͝ϩθͱ̷ϑϩ˵ʪ̈͝ʒͱͱθЇ̈͝ϩӥϩ˵ߥʒ̈˙˙ʪθʪ͝ϩͱΧʪθɇϩ̈ͱ͝Χɇϩϩʪθ͝ϑࢋ
kɇʀ˵Χɇϩϩʪθ͝ϑʪϩϑϩ˵ʪЭɇ̷Їʪϑ˙ͱθϩ͔̈ʪࡡͱΧʪθɇϩ̈ͱ͝࣍OFF, Aͱͱ̷, Heat,
Auto࣎ࡡɇ͝ʒϩ˵ʪϑʪϩϩʪ͔ΧʪθɇϩЇθʪ
Override
̷̷ͱиϑцͱЇϩͱθЇ͝ɇϩɇϑΧʪʀ̈˙̈ʀϩ͔̈ʪϩ˵ʪͱΧʪθɇϩ̈ͱ͝цͱЇϑʪϩЇϑ̈͝˝Energy
Saving Timer.
Energy Saving Timer
When set to "Turn off"
If the indoor unit is turned on, the indoor unit turns off after the
set time elapses.
When set to "Eco Setting"
If the current temperature continues to differ from the reference
cooling or heating temperature set in Eco Setting, the indoor unit
returns to the temperature set in Eco Setting after the set time elapses.
When set to "Setback Schedule"
If the most recently operated Setback Schedule status differs
from the indoor unit status, the indoor unit returns to that
Setback Schedule status after the set time elapses.
࢘Ǯ˵ʪ͝࢑Ɵ͔̈ʪθŵʪϑʪϩ" is set to "Enable", the set time is re-counted if
the indoor unit status changes.
࢘Ǯ˵ʪ͝ɇΧʪθ̈ͱʒͱ˙ϩ͔̈ʪ̈ϑϑʪϩ̈͝Activation Time Setting, the indoor
unit only operates for that period of time.
Ɵ˵ʪƊɇ͔ϑЇ͝˝ɇ̈θʀͱ͝ʒ̈ϩ̈ͱ͝ʪθΧθͱӬʒʪϑ˙Ї͝ʀϩ̈ͱ͝ϑϩ˵ɇϩɇ̷̷ͱицͱЇϩͱθʪʒЇʀʪʪ̷ʪʀϩθ̈ʀ̈ϩцʀͱ͝ϑЇ͔Χϩ̈ͱ͝ࢋ
Energy-Saving Operation
14
Energy-Saving Operation
English
Energy-Saving Operation
Type Description
Eco Setting
̷̷ͱиϑцͱЇϩͱϑʪϩϩ˵ʪθʪ˙ʪθʪ͝ʀʪʀͱͱ̷̈͝˝ɇ͝ʒ˵ʪɇϩ̈͝˝ϩʪ͔ΧʪθɇϩЇθʪϑи˵ʪ͝
"Energy Saving Timer" is set to "Eco Setting".
Activation Time Setting
̷̷ͱиϑцͱЇϩͱ͔ɇ̧ʪϩ˵ʪEnergy Saving Timer function operate only for
the period of time you set.
NOTE
Weekly schedule and Yearly schedule can cover settings up to 49.
Energy
Press the button, press the or button to select Energy, and then press the button.
You can see and set any of k͝ʪθ˝цƸϑɇ˝ʪ and Energy Setting.
Classification Type Description
k͝ʪθ˝цƸϑɇ˝ʪ -
Displays the Ã͝ϑϩɇ͝ϩɇ͝ʪͱЇϑťͱиʪθ, Ǯʪʪ̷̧цk͝ʪθ˝цƸϑɇ˝ʪ, Monthly
k͝ʪθ˝цƸϑɇ˝ʪ, ǽʪɇθ̷цk͝ʪθ˝цƸϑɇ˝ʪ, k͝ʪθ˝цƸϑɇ˝ʪͱЭʪθøɇϑϩǽʪɇθ,
and Operation Time in graph format.
NOTE
For accuracy of operation time, use the DMS time
synchronization.
Ɵ˵ʪиʪʪ̷̧цʒ̈ϑΧ̷ɇц˙ͱ̷̷ͱиϑϩ˵ʪÃƊĮߩߧߡߢϑϩɇ͝ʒɇθʒϑࢋ
Energy Setting
Set Outdoor
AɇΧɇʀ̈ϩц
Aͱ͝ϩθͱ̷ϑϩ˵ʪͱЇϩʒͱͱθЇ̈͝ϩϑͱΧʪθɇϩ̈ͱ͝ʀɇΧɇʀ̈ϩц
Target Energy
Aͱ͝ϑЇ͔Χϩ̈ͱ͝
Sets the target energy consumption.
Target Operation
Time
Sets the target operation time.
Alarm Popup
Ɗʪϩϑи˵ʪϩ˵ʪθͱθ͝ͱϩϩͱ˝ʪ͝ʪθɇϩʪɇ͝ɇ̷ɇθ͔и˵ʪ͝ϩ˵ʪϩɇθ˝ʪϩʪ͝ʪθ˝ц
consumption is reached.
Ƹϑɇ˝ʪUɇϩɇ
Initialization
Initialises the entire energy function.
15
English
Setting Options
How to set the Options
1 Press the button.
2 Press the
or button to select Option, and then press the button.
3 Ɗʪʪϩ˵ʪ˙ͱ̷̷ͱӥ͝˝Χɇ˝ʪϑϩͱϑʪ̷ʪʀϩϩ˵ʪʒʪϑ̈θʪʒ͔ʪ͝Їࢋ
Major Step 1 Step 2 Step 3 Step 4 Step 5 Description Default
ʪ͝ʪθɇ̷
Button lock ON/OFF -
Filter reset
Indoor -
Ventilator -
Error list -
Indoor unit
information
-
Indoor
Blade
selection
ߥࣗиɇцʀɇϑϑʪϩϩʪࡠ
Ɗӥ͝˝ĮĘ/Ɗӥ͝˝Į
ߤߧߡʀɇϑϑʪϩϩʪࡠSpot/Mid/Wide
-
Motion
detect sensor
Set Motion
detect sensor
ON/OFF OFF
Motion
detection
type
Indirect Wind/Direct Wind
Indirect
Wind
Option Ƹϑʪθ͔ͱʒʪ
Language
Differs depending on the
language
First value
for the
language
pack
Daylight
Savings Time
Daylight
Savings Time
ON/OFF OFF
Ƹ̈͝ϩ Day/Week Week
Week
Start Month January to December Mar
Start Week 1st to 4th, Final࣍˙̈͝ɇ̷иʪʪ̧࣎
࣍˙̈͝ɇ̷
иʪʪ̧࣎
End Month January to December Oct
End Week 1st to 4th, Final࣍˙̈͝ɇ̷иʪʪ̧࣎
࣍˙̈͝ɇ̷
иʪʪ̧࣎
Day
Start Month January to December Mar
Start Day 1~31 22
End Month January to December Sep
End Day 1~31 22
Air Purify
Display
PM10 ON/OFF ON
ťđߣࢋߦ ON/OFF ON
PM1.0 ON/OFF OFF
Setting Options
16
Setting Options
English
Setting Options
Major Step 1 Step 2 Step 3 Step 4 Step 5 Description Default
Option Ƹϑʪθ͔ͱʒʪ
Lock
All lock
ON/OFF OFF
Partial Lock
Fuction
Operation
Lock
ON/OFF OFF
Operation
mode Lock
All mode Lock
ON/OFF OFF
Auto mode Lock
ON/OFF OFF
Aͱͱ̷͔ͱʒʪøͱʀ̧
ON/OFF OFF
Dry mode Lock
ON/OFF OFF
Heat mode Lock
ON/OFF OFF
Fan mode Lock
ON/OFF OFF
Temperature Lock
ON/OFF OFF
Fan speed Lock
ON/OFF OFF
Additional
Mode Lock
Wind-Free Lock
ON/OFF OFF
Long Wind Lock
ON/OFF OFF
Quiet Lock ON/OFF OFF
Sleep Lock ON/OFF OFF
Schedule
Lock
ON/OFF OFF
Wired remote
controller
LED ON/OFF ON
Button Mute ON/OFF OFF
Wireless
remote
controller
ON/OFF OFF
AЇθθʪ͝ϩϩ͔̈ʪ
Date 2000 to 2099/1 to 12/1 to 31 2018.01.01.
Time
12-Hour/24-hour
ߢߣࣗ˵ͱЇθ˙ͱθ͔ɇϩࡠߢϩͱߢߣࡡ
ߣߥࣗ˵ͱЇθ˙ͱθ͔ɇϩࡠߡϩͱߣߤࡡ
͔̈͝Їϩʪϑࡠߡߡϩͱߦߪ
ߢߣࡠߡߡťđ
ŵʪϑʪϩθʪ͔ͱϩʪ
controller
--
Display setting
Brightness 10 to 100% 100%
Screen saver
Timer ߢߡϩͱߧߡϑʪʀͱ͝ʒϑ 30 sec
Brightness ߡࡡߢߡࡡߤߡࡡߦߡࡡߨߡज़ 30%
Ɗ͔ɇθϩŵʪϑʪϩ -
ŵʪϑʪϩ̷̷Ƹϑʪθ
modes
-
17
English
Setting Options
Major Step 1 Step 2 Step 3 Step 4 Step 5 Description Default
Option Ƹϑʪθ͔ͱʒʪ
Auto
changeover
Ƹϑʪͱ˙ӥθʪʒ
remote
controller DSP
ON/OFF OFF
Aͱͱ̷̈͝˝Ɗʪϩ
temp./Heating
Set temp.
ߢߩঐϩͱߤߡঐ
࣍Ɗʪϩϩʪ͔Χθɇ͝˝ʪ˙ͱθɇЇϩͱ
ͱΧʪθɇϩ̈ͱ͝ͱ˙ϩ˵ʪ̈͝ʒͱͱθЇ̈͝ϩ࣎
Indoor
unit status
value
Primary ߡࢋߦঐϩͱߣঐ࣍ͱθߢঔϩͱߥঔ࣎
Indoor
unit status
value
Secondary ߡࢋߦঐϩͱߣঐ࣍ͱθߢঔϩͱߥঔ࣎
Indoor
unit status
value
Temperature
limits
øͱиʪθø͔̈̈ϩ
Aʪ̷ϑ̈Їϑࡠߩϩͱߤߡঐ
Fahrenheitࡠߥߨϩͱߩߧঔ
ߩঐ
ƸΧΧʪθø͔̈̈ϩ
Aʪ̷ϑ̈Їϑࡠߩϩͱߤߡঐ
Fahrenheitࡠߥߨϩͱߩߧঔ
ߤߡঐ
Easy tuning ࣗߣϩͱफ़ߣ 0
Indoor
lighting
ON/OFF
Indoor
unit status
value
A̷ʪɇ͝ ON/OFF
Indoor
unit status
value
Delay time
Ƹϑʪͱ˙kŵǤ
delay time
ON/OFF OFF
kŵǤʒʪ̷ɇцϩ͔̈ʪ
ߤߡϩͱߧߡ͔̈͝Їϩʪϑ 30
NOTE
Ǯ˵ʪ͝ϩиͱӥθʪʒθʪ͔ͱϩʪʀͱ͝ϩθͱ̷̷ʪθϑɇθʪʀͱ͝͝ʪʀϩʪʒࡡϩ˵ʪɵθ̈˝˵ϩ͝ʪϑϑʀɇ͝ɵʪϑʪϩӥϩ˵̈͝ߢߡϩͱߦߡज़ࢋ
Current Time Setting (Example)
1 Press the button.
2 Press the
or button to select Option, and then press the button.
3 Press the
or button to select User mode, and then press the button.
4 Press the
or button to select Wired remote controller, and then press the button.
5 Press the
or button to select Current time, and then press the button.
6 Press the
or button to select Time, and then press the button.
7 Press the
or button to select Time format, Hour, Minute, and AM/PM, and then press the
button.
18
English
Setting Options
Memo
19
English
Setting Options
  • Page 1 1
  • Page 2 2
  • Page 3 3
  • Page 4 4
  • Page 5 5
  • Page 6 6
  • Page 7 7
  • Page 8 8
  • Page 9 9
  • Page 10 10
  • Page 11 11
  • Page 12 12
  • Page 13 13
  • Page 14 14
  • Page 15 15
  • Page 16 16
  • Page 17 17
  • Page 18 18
  • Page 19 19
  • Page 20 20
  • Page 21 21
  • Page 22 22
  • Page 23 23
  • Page 24 24
  • Page 25 25
  • Page 26 26
  • Page 27 27
  • Page 28 28

Samsung MWR-WG00JN Handleiding

Categorie
Split-systeem airconditioners
Type
Handleiding

in andere talen