
1
Content
Warnings 2
Safety Information 3
Getting Started 5-12
TV - Features 5
Accessories included 5
Installing / Removing the Base Stand 6
Viewing remote control 7-10
Control buttons(side) 10
Aerial connection 10
Power connection 10
Remote control - Inserting batteries 11
Switching the TV On and Off 11
Operation using TV control buttons 12
Operation using remote control 12
Initial setup 13
General operation 13
Connections 14-16
Left side connections explained 14
Left bottom connections explained 15
HDMI Connections 16
VGA Connections 16
Basic Feature 17-32
How to navigate menus - Selecting source
17
Electronic programme guide (EPG) (DTV
mode) 17
Teletext (ATV mode) 18
Digital Teletext (DTV mode) 19
Recording DTV Programme onto a USB
Storage Device 19
Timer Programming 20
Play Recorded Programme 21
Picture management (ATV / DTV Mode)
21
Picture management 22
Sound management 22-23
Channel management (ATV / DTV Mode)
23-28
Lock System management 28
Setup management 28-32
Entertainment 33-35
Other Information 36
6SHFL¿FDWLRQV 36
Product Support 37-38
Trouble shooting 37
6XSSRUWHG¿OHIRUPDWV 38
Energy Label 39
DISPOSAL 39

2
WARNINGS
This appliance is intended for domestic household use only and should not be used for any other purpose or in any
other application, such as for non domestic use or in a commercial environment.
Ventilation
Allow at least a 10 cm gap all around the product.
The ventilation should not be impeded by covering the ventilation openings with items, such as newspapers,
table-cloths, curtains, etc.
1RQDNHGÀDPHVRXUFHVVXFKDVOLJKWHGFDQGOHVVKRXOGEHSODFHGRQWKHDSSDUDWXV
This apparatus is not suitable for use in a tropical climate.
7KHDSSDUDWXVVKDOOQRWEHH[SRVHGWRGULSSLQJRUVSODVKLQJDQGWKDWQRREMHFWV¿OOHGZLWKOLTXLGVVXFKDVYDVHV
shall be placed on the apparatus.
Where the MAINS plug or an appliance coupler is used as the disconnect device, the disconnect device shall remain
readily operable.
%DWWHULHVEDWWHU\SDFNRUEDWWHULHVLQVWDOOHGVKDOOQRWEHH[SRVHGWRH[FHVVLYHKHDWVXFKDVVXQVKLQH¿UHRUWKHOLNH
To protect the environment, use local recycling facilities for battery disposal.
CAUTION:
To prevent possible hearing damage, do not listen at high volume levels for long periods.
WARNINGS

3
Safety Information
RISK OF ELECTRIC SHOCK
DO NOT OPEN
CAUTION
CAUTION:
TO REDUCE THE RISK OF ELECTRIC SHOCK,
DO NOT REMOVE COVER (OR BACK).
NO USER-SERVICEABLE PARTS INSIDE.
REFER SERVICING TO QUALIFIED SERVICE
PERSONNEL.
7KHOLJKWQLQJÀDVKZLWKDUURZKHDGV\PERO
ZLWKLQDQHTXLODWHUDOWULDQJOHLVLQWHQGHGWR
alert the user to the presence of un insulated
“dangerous voltage” within the product’s
HQFORVXUHWKDWPD\EHRIVXI¿FLHQWPDJQLWXGH
to constitute a risk of electric shock of persons.
7KHH[FODPDWLRQSRLQWZLWKLQDQHTXLODWHUDO
triangle is intended to alert the user to
the presence of important operating and
maintenance (servicing) instructions in the
literature accompanying the appliance.
Important-
Please read these instructions fully before installing or operating
Power source
Positioning the TV
Positioning the TV
Moisture and Water
Ventilation
Heat sources and Flames
7KH79VKRXOGEHRSHUDWHGRQO\IURPD9$&
50 Hz outlet.
Warning:
Do not
leave your TV in standby or operating
mode when you leave your house.
7KHSRZHUFRUGSOXJVKRXOGEHHDVLO\DFFHVVLEOH,Q
case of storms and lightning, when going on holiday,
or when the TV is not used for a long period of time
disconnect the power cord from the mains power socket.
Do not
place the TV, furniture, etc. on the power cord or
pinch the cord.
)RUYHQWLODWLRQSOHDVHOHDYHDFOHDUVSDFHRIDWOHDVW
10cm all around the TV.
Do not
block the ventilation openings.
Do not
place the TV on sloping or unstable surfaces,
the TV may tip over.
7RSUHYHQWGDPDJHWRWKH79
do not
place any objects
on top of the TV.
2QO\XVHWKH79LQPRGHUDWHFOLPDWHV
+DQGOHWKHSRZHUFRUGE\WKHSOXJ
do not
unplug the
TV by pulling the power cord.
1HYHUWRXFKWKHSRZHUFRUGSOXJZLWKZHWKDQGVDVWKLV
could cause a short circuit or electric shock.
1HYHUPDNHDNQRWLQWKHSRZHUFRUGRUWLHLWZLWKRWKHU
cords.
3RZHUFRUGVVKRXOGEHSODFHGLQVXFKDZD\WKDWWKH\
are not likely to be stepped on or driven over.
$GDPDJHGSRZHUFRUGSOXJFDQFDXVH¿UHRUJLYH\RX
an electric shock. When damaged it must be replaced,
WKLVVKRXOGRQO\EHGRQHE\TXDOL¿HGSHUVRQQHO
Do not
use this TV in a humid or damp place (avoid
bathrooms, the sink in the kitchen, and near the washing
machine).
Do not
expose this TV to rain or water, as this may be
dangerous.
Do not
SODFHREMHFWV¿OOHGZLWKOLTXLGVVXFKDVÀRZHU
vases, on top of the TV. Avoid from dripping or splashing.
,IDQ\VROLGREMHFWRUOLTXLGIDOOVLQWRWKHFDELQHWXQSOXJ
WKH79DQGKDYHLWFKHFNHGE\TXDOL¿HGSHUVRQQHOEHIRUH
operating it any further.
7KHVORWVDQGRSHQLQJVRQWKH79VHWDUHLQWHQGHGIRU
ventilation and to ensure reliable operation.
7RSUHYHQWRYHUKHDWLQJWKHVHRSHQLQJVPXVWQRWEH
blocked or covered in anyway.
Do not
expose the TV to direct sunlight or other heat
sources.
10cm
10cm
10cm

4
:DUQLQJ,QFRUUHFWLQVWDOODWLRQRIEDWWHULHVPD\FDXVH
battery leakage and corrosion, resulting in damage to the
remote control.
Do not
mix old and new batteries, or batteries of
different types.
Do not
GLVSRVHRIEDWWHULHVLQD¿UH
Do not
dispose of batteries with normal household
waste, take to a local recycling centre.
Dear Customer,
This apparatus is in conformance with the valid European
directives and standards regarding electromagnetic compatibility
and electrical safety.
Darty Holdings SAS © 14 route d’Aulnay 93140 Bondy,France
* DVB and the DVB logos are trademarks of the DVB
project.
* Manufactured under license from Dolby Laboratories.
Dolby, Dolby Audio and the double-D symbol are
trademarks of Dolby Laboratories.
7KHWHUPV+'0,DQG+'0,+LJK'H¿QLWLRQ0XOWLPHGLD
Interface, and the HDMI Logo are trademarks or
registered trademarks of HDMI Licensing LLC in the
United States and other countries.
:KHQUHSODFHPHQWSDUWVDUHUHTXLUHGPDNHVXUH
that the service technician has used replacement
SDUWVZKLFKDUHVSHFL¿HGE\WKHPDQXIDFWXUHRUKDYH
WKHVDPHVSHFL¿FDWLRQVDVWKHRULJLQDORQH8QDWKRULVHG
VXEVWLWXWLRQVPD\UHVXOWLQ¿UHHOHFWULFDOVKRFNRURWKHU
hazards.
Warning:
Risk of exposure to radiation from class 1/
class 3b visible and invisible laser beams.
Do not
open
the TV and stare directly into beam.
Warning:
Risk of electric shock,
do not
attempt to
repair, service or modify this TV yourself. Contact the
manufacturer, their approved service agent.
:DUQLQJ7RSUHYHQWWKH
VSUHDGRI¿UHNHHSFDQGOHVRU
RWKHURSHQÀDPHVDZD\IURP
this product at all times.
7KLVHTXLSPHQWLVD&ODVV,,RUGRXEOHLQVXODWHG
electrical appliance. It has been designed in such a
ZD\WKDWLWGRHVQRWUHTXLUHDVDIHW\FRQQHFWLRQWR
electrical earth.
Safety Information
Important-
Please read these instructions fully before installing or operating
7KH79VKRXOGQRWEHSODFHGQHDUWRRSHQÀDPHVDQG
sources of intense heat such as an electric heater.
(QVXUHWKDWQRRSHQÀDPHVRXUFHVVXFKDVOLJKWHG
candles, are placed on top of the TV.
([FHVVLYHVRXQGSUHVVXUHIURPHDUSKRQHVDQG
headphones can cause hearing loss, please take care.
To prevent injury, this TV must be securely attached to
the wall in accordance with the installation instructions (if
the option is available).
7KH/&'VFUHHQLVDYHU\KLJKWHFKQRORJ\SURGXFWZLWK
DERXWDPLOOLRQWKLQ¿OPWUDQVLVWRUVJLYLQJ\RX¿QHSLFWXUH
details. Occasionally, a few non-active pixels may appear
RQWKHVFUHHQDVD¿[HGEOXHJUHHQRUUHGSRLQW3OHDVH
note that this does not affect the performance of your
product.
7DNHFDUHQRWWRVFUDWFKWKHVFUHHQZLWK¿QJHUQDLOVRU
other hard objects.
%HIRUHFOHDQLQJXQSOXJWKH79IURPWKHZDOOVRFNHW
Do not
XVHOLTXLGRUDHURVROFOHDQHUV2QO\XVHDVRIW
dry cloth.
Headphone volume
Wall mounting (optional)
LCD Screen
Cleaning
Batteries
Replacement parts
Servicing
License information

5
Getting Started
TV - Features
Accessories included
5HPRWHFRQWUROOHGFRORXU/('79
)XOO\LQWHJUDWHGGLJLWDO79'9%7
+'0,FRQQHFWRUVIRUGLJLWDOYLGHRDQGDXGLR
This connection is also designed to accept high
GH¿QLWLRQVLJQDOV
86%LQSXW
SURJUDPPHVIURP9+)8+)DQDORJXH
SURJUDPPHVIRUGLJLWDOPRGH,'79
26'PHQXV\VWHP
6WHUHRVRXQGV\VWHP
7HOHWH[WIDVWH[W723WH[W
+HDGSKRQHFRQQHFWLRQ
$XWRPDWLFSURJUDPPLQJV\VWHP
)RUZDUGRUEDFNZDUGPDQXDOWXQLQJ
6OHHSWLPHU
&KLOGORFN
$9/$XWRPDWLF9ROXPH/LPLWLQJ
3//)UHTXHQF\6HDUFK
3&LQSXW
3OXJ3OD\IRU:LQGRZV0(;3
Vista.
79
6WDQG%DVH
0,1,<3%35&DEOH
0,1,$9&DEOH
5HPRWH&RQWURO
%DWWHULHV[$$$
,QVWUXFWLRQ%RRN
4 base screws
MUTE
PMODE SMODE FAV SLEEP
CH.LIST
ASPECT
EPG AUDIO
MENU
EXIT
DISPLAY
SOURCE
TEXT
INDEX
HOLD
SIZE
SUBPAGE
REVEAL
SUBTITLE
ENTER

6
Getting Started
Installing / Removing the Base Stand
Base Stand Assembly Instruction
1.
3ODFHWKH79ZLWKWKHGLVSOD\VLGHGRZQRQDÀDW
surface.Use a cloth to protect. Locate the bottom
at the stand.
2.
Fix the bracket with stand to the bottom of the
TV with the four screws.
INSTALLATION NOTES
This TV can be connected to an AC 100-240
Volts,50/60 Hz power supply. Never connect
straight to a DC power supply.
Locate the TV in a room where light does not
strike the screen directly. Total darkness or a
UHÀHFWLRQRQWKHVFUHHQFDQFDXVHH\HVWUDLQ
Soft and indirect lighting is recommended for
comfortable viewing.
Allow enough space between the TV and the
wall to permit ventilation.
Avoid excessively warm locations to prevent
possible damage to the cabinet or premature
component failure.
WALL MOUNTING INSTALLATION
GUIDELINES
1.
Place the LED LCD Television onto a solid
surface. Please place some soft material over
the front of the screen to protect it from any
damage.
2.
Remove the four screws to the TV .
3.
Remove the stand column.
4.
8VHWKHIRXUVFUHZVSURYLGHGWR¿[WKH79
onto a wall mounting bracket (not included) via
the four VESA standard holes on the back of the
television.
100 x 100mm VESA mount

7
1.
Switches the TV between on and standby
mode.
2. MUTE
Mutes and restores your TV sound.
3. P.MODE
6HOHFWSLFWXUHPRGH'\QDPLF6WDQGDUG
Mild / Personal.
4. S.MODE
6HOHFWVRXQGPRGH6WDQGDUG0XVLF0RYLH
/ Personal.
5. FAV
Used to access your favorite channels in
digital TV mode.
6. SLEEP
Set the TV sleep timer.
7. 0-9 Number Button
Press to select a programme. (ATV / DTV
mode)
8. -/--
Press this button before entering a
programme greater than 09.
9.
Return to the previous viewing channel.
(ATV / DTV mode)
10. VOL+/-
Adjust the volume.
11. CH /
Select a channel.
12. CH.LIST
Display channel list. (ATV / DTV mode)
13. ASPECT
6HOHFWIURPWKHIROORZLQJPRGHVHWWLQJV)XOO
=RRP=RRP$XWR
Viewing remote control
MUTE
PMODE SMODE FAV SLEEP
CH.LIST
ASPECT
EPG AUDIO
MENU
EXIT
DISPLAY
SOURCE
TEXT
INDEX
HOLD
SIZE
SUBPAGE
REVEAL
SUBTITLE
ENTER
21
7
3
8
4
10
6
5
9
11
12 13
Getting Started

8
14. EPG
Display the EPG (Electronic Program Guide).
(DTV mode)
15. AUDIO
Press to switch the audio mode.
16. Ɣ
Record the current programme. (DTV mode)
17. MENU
Display the OSD (On Screen Display) menu.
18. EXIT
Exit the OSD (On Screen Display) menu.
19. ŻźŸŹ
Allows you to navigate the OSD menus and
adjust the system settings to your preference.
ENTER
&RQ¿UPWKHVHOHFWLRQLQWKH26'PHQXV
'LVSOD\DOLVWRIFKDQQHOVVDYHGLQWKH79
tuner memory.
20. SOURCE
Select among the different input signal
VRXUFHV'79$79$96&$57<3E3U
HDMI1 / HDMI2 / HDMI3 / PC / MEDIA.
21. DISPLAY
Displays/removes the program Information.
22.
To reverse playback rapidly. (USB mode)
To advance playback rapidly. (USB mode)
To skip to the beginning of the previous
chapter / track / photo. (USB mode)
To skip to the beginning of the next chapter /
track / photo. (USB mode)
Viewing remote control
MUTE
PMODE SMODE FAV SLEEP
CH.LIST
ASPECT
EPG AUDIO
MENU
EXIT
DISPLAY
SOURCE
TEXT
INDEX
HOLD
SIZE
SUBPAGE
REVEAL
SUBTITLE
ENTER
15
14
18
17
20
19
21
16
22
Getting Started

9
23.TEXT
Turn on and off the Teletext function. (ATV /
DTV mode.
24.
Press once to stop. (USB mode)
Ź,,
7RVWDUWWKHWLPHVKLIWSOD\EDFN'79PRGH
7RVWDUWSOD\EDFNRUSDXVH86%PRGH
26. INDEX
To select the page number of the index from
teletext. (ATV / DTV mode)
27. SIZE
To enlarge the picture on the TV in
teletext.(ATV / DTV mode)
28. REVEAL
Reveals hidden information such as the
DQVZHUWRDTXL]LQWHOHWH[W$79'79
mode).
29. HOLD
Freezes a multi-page passage on screen in
teletext. (ATV / DTV mode)
30. SUBPAGE
Displays the subpage on the teletext screen.
(ATV / DTV mode)
31. SUBTITLE
Display the subtitle which is broadcast with
the program. (DTV mode)
Viewing remote control
Getting Started
MUTE
PMODE SMODE FAV SLEEP
CH.LIST
ASPECT
EPG AUDIO
MENU
EXIT
DISPLAY
SOURCE
TEXT
INDEX
HOLD
SIZE
SUBPAGE
REVEAL
SUBTITLE
ENTER
25
28
31
23
26
27
30
29
24
127(,IWKHUHLVQRLQSXWVLJQDO79ZLOODXWRPDWLFDOO\
enter the standby state or shut off.

10
Control buttons(side)
Power connection
Aerial connection
1.VOLUME DOWN/UP button
Increases/decreases the volume. In the menu
system, they act like the right/left direction
buttons on the remote and adjust menu controls.
1RWH,QVRPHPHQXV92/80(83DOVRDFWV
like the OK button on the remote.
2. CHANNEL DOWN/UP button
Scans up/down through the channel list. In the
menu system, they act like the up/down buttons
on the remote and adjust menu controls.
Note:
The location and names of the function
buttons and power button on the TV may vary
according to TV model.
3.MENU button
Brings up the main menu or press to return to
the previous menu.
4. SOURCE button
Press to select signal source.
5. button
7XUQVWKH79RQRUVWDQGE\1RWHIRUVRPH
models, the POWER button turns the TV on or
off.)
Please note:
After unpacking, allow the TV
to reach ambient room temperature before
connecting the TV to the mains power socket.
Connect the power cord plug to the mains power
socket.
Connect the “aerial” or “cable TV” plug to
AERIAL INPUT (ANT.) socket located on the
back of the TV.
X
Y
Z
[
\
Getting Started

11
Remote control - Inserting batteries
Switching the TV On and Off
Remove the battery cover on the back of the
remote control, gently push down and pull
backwards at the same time as shown .
Insert two
AAA/R3
RUHTXLYDOHQWW\SHEDWWHULHV
Ensure the batteries are inserted the correct way
and replace the battery cover.
Note:
When the remote control is not going to
be used for long periods of time, the batteries
should be removed. Otherwise the remote
control may be damaged, caused by battery
leakage and corrosion.
6ZLWFKLQJWKH792Q
With power cord plug connected to the mains
power socket and TV in ‘
Standby
’ mode.
To switch the TV on from standby mode, either:
a: The Remote control;
Press the “
” button.
b: The TV;
Press the
button on the side of
the TV.
6ZLWFKLQJWKH792II
Either press the “
” button on the remote control
or press the
button on the side of the TV, the
TV will then switch to standby mode.
AAA/R3 X2
Batteries
Getting Started

12
Operation using TV control buttons Operation using remote control
The
VOL+/VOL-
buttons will function as volume
up/down as default. Even if you set other
functions for these buttons, the
VOL+/VOL-
buttons will return to volume control after a short
while.
Volume Setting
Press
VOL+/VOL-
buttons to increase or
decrease volume.
Programme Selection
Press
CH /CH
buttons to select the next or
previous programme.
The remote control is designed to control all the
functions of the model you selected.
Volume Setting
Press
VOL+
button to increase the volume.
Press
VOL-
button to decrease the volume. A
volume level scale (slider) will be displayed on
the screen.
Programme Selection
(Previous or Next
Programme)
Press
CH
button to select
the previous programme.
Press
CH
button to select the next programme.
Programme Selection
(Direct Access)
Press number buttons on the remote control to
select programmes between 0 and 9. The TV will
switch to the selected programme
X
Y
Z
[
\
MUTE
PMODE SMODE FAV SLEEP
CH.LIST
ASPECT
EPG AUDIO
MENU
EXIT
DISPLAY
SOURCE
TEXT
INDEX
HOLD
SIZE
SUBPAGE
REVEAL
SUBTITLE
ENTER
Getting Started
Key button is used for normal OSD select and input
source change. If remote does not work well, please
change a new remote or commulicate with service.

13
Initial setup Initial setup
General operation
1.
Connect one end of the RF coaxial cable to
the aerial socket on the wall and the other end of
WKHFDEOHWRWKH5)ȍVRFNHWDWWKHERWWRPRI
your TV.
2.
Connect the mains cable to the mains socket
after you have completed all the connections.
3.
With power cord plug connected to the mains
power socket and TV in
'Standby'
mode.At this
stage, the TV switches to standby mode. The red
LED indicator will illuminate on the front panel of
the TV.
4.
In standby mode, press the
" "
button on
the side of the TV or the button on the remote
control to turn the TV on. The red LED indicator
will turn blue.
5.
7KH¿UVWWLPH\RXWXUQWKH79RQLWZLOOJR
straight into
First Time Setup
menu. Press
the
ŻŹŸź
buttons to navigate the menu and
change the settings.
OSD Language
Selects your desired language to be displayed
on the menu. The default on-screen menu
language is set as English.
Mode Setting
Selects your desired mode setting.
+RPH0RGH9LHZLQJDWKRPH
6WRUH0RGH)RUVWRUHGHPRWKHEULJKWQHVVLV
higher than home mode.
Country
Selects the country where you will operate the
TV. The default country is set as France.
Tuner Type
6HOHFW7XQHU7\SH&DEOH$QWHQQD
Auto Scan
6HOHFWVWKHDXWRVFDQW\SH'79$79'79
ATV.
LCN
Select LCN Type On or Off.
Auto Channel Update
Select Auto Channel Update Type On or Off.
Start
Press the
ENTER
button to start auto tuning.
Auto Scan will commence. The display will show
the progress of the tuning and the number of
channels found.
6.
If you want to skip the DTV tuning, press the
MENU
button to interrupt the tuning half way.
<RXZLOOWKHQJRVWUDLJKWWR$79WXQLQJ<RXPD\
repeat the above step if you also want to skip the
ATV tuning.
Press the
SOURCE
button on the remote control
and select DTV to switch the TV to Digital
Terrestrial Television Broadcasting.
Information Banner
Whenever you change channel using the CH
/ CH
buttons or the number buttons, the TV
displays the broadcast picture along with an
information banner on the top left of the screen
(available only in DTV/ATV mode)
The information banner can be displayed a any
time while watching TV by pressing the
DISPLAY
button on the remote control.
First Time Setup
OSD Language
Mode Setting
Country
Tuner Type
English
Home Mode
France
Cable
Auto Scan DTV+ATV
LCN On
Auto Channel Update Off
Start
Move Adjust MENU: Return EXIT: Exit
Auto Scan
Scanning CH34
Digital Channels Found:
DTV :10 Radio :0 Data:0
Analog Channels Found: 0
MENU: Skip EXIT: Exit
Getting Started

14
Connections
Left side connections explained
+HDGSKRQHMDFN
To connect an external headphone to the TV.
Connect to the HEADPHONE jack to listen to the
TV from headphones.
Note:
Headphone volume can be changed using
“VOL+” or “VOL-” buttons.
2. SCART
Inputs or outputs for external devices. Connect
the SCART cable between the SCART socket on
the TV and the SCART socket on the external
device (decoder, VCR or DVD player).
1RWH,IDQH[WHUQDOGHYLFHLVFRQQHFWHGYLDWKH
SCART socket, the TV will automatically switch
to SCART mode.
3. PC Input (VGA) / PC AUDIO
Connects a personal computer to the TV.
Connect the PC cable between the PC INPUT
on the TV and the PC output on the PC.
Note:
If you connect a device to the TV via the
PC cable, you should also use an audio cable to
connect your device to the
PC AUDIO INPUT
to
enable audio.
4. COAX OUT
Connect a sound bar, digital speaker system, or
home theater system to this jack to listen to TV
audio through external speakers.
5. RF Input (ANT.)
Connects to aerial (antenna) or cable TV. If you
use a decoder or a media recorder, you should
connect the aerial cable through the device to
the TV with an appropriate aerial cable.
6. HDMI Input
Connects a device that has an HDMI socket.
7KH79FDQGLVSOD\+LJK'H¿QLWLRQSLFWXUHV
IURPGHYLFHVVXFKDVD+LJK'H¿QLWLRQ6DWHOOLWH
Receiver or DVD Player. These devices must be
connected via the HDMI sockets or Component
Socket. No sound connection is needed for an
HDMI to HDMI connection.
1RWH7KH+'0,SRUWVXSSRUW$5&IXQWLRQ
2
1
6
3
4
5
SCART
HDMI1(ARC)RF INVGA IN COAX OUTPC AUDIO IN
HEADPHONE

15
Connections
Left bottom connections explained
7. USB Input
To connect devices to the TV, providing fast data
exchange. USB will have function in USB/DTV
mode.
8.MINI AV Input
Connect to the composite VIDEO and AUDIO (L/
R) output sockets on external video devices.
9.MINI YPbPr
<3E3U,QSXWVRFNHWLVMXVWVXLWDEOHIRU<3E3U
Mini Cable.
Connect to a DVD player, Digital Set-Top-Box, or
RWKHU$9GHYLFHVZLWKFRPSRQHQW<3E3UYLGHR
output sockets.
Note: Pls. use "L-AUDIO IN-R" socket, when
you want to connect to YPbPr audio.
10 CI Slot
Used to insert a CI card. A CI card allows you
to view all the channels that you subscribe to.
For more information, see “Conditional Access”
section.
8
7
9
10
6
HDMI2 HDMI3 USB
MINI
AV
MINI
YPbPr
CI SOLT

16
Connections
HDMI Connections
VGA Connections
+'0,OHWV\RXHQMR\KLJKGH¿QLWLRQGLJLWDOLPDJHV
DQGKLJKTXDOLW\VRXQGE\FRQQHFWLQJWKH79WR
external devices such as DVD players, set top
ER[HVRUJDPLQJHTXLSPHQW
Power off both the TV and the device before
making any connections.
For more information, refer to your device’s own
instruction book.
When connecting, switch “Source” to “
HDMI
”.
See, “Input Selection” section.
Note:
HDMI cable is not supplied.
<RXFDQFRQQHFWDFRPSXWHU3&WRWKH79WR
display your computer’s screen image on the TV.
Power off both computer and TV
before
making
any connections.
Use a 15-pin D-sub display cable to connect
a PC to the TV. Use an audio cable between
PC AUDIO inputs on the left side of the TV
and audio output on your PC to enable sound
connection.
When the connection is made, switch “Source”
to “PC”. See “Input selection” section.
Set the resolution that suits your viewing
UHTXLUHPHQWV5HVROXWLRQLQIRUPDWLRQFDQEH
found in the “Appendix parts”.
Note:
The VGA cable is not supplied.
HDMI1(ARC)RF IN
A
IN COAX OUT
HDMI2 HDMI3 USB
MINI
AV
MINI
YPbPr
CI SOLT
SCART
HDMI1(ARC)RF INVGA IN COAX OUTPC AUDIO IN
HEADPHONE
HDMI2 HDMI3 US
B

17
Basic Feature
How to navigate menus - Selecting source
Electronic programme guide (EPG) (DTV mode)
1.
Press the
SOURCE
button on the top o f the
TV or the
SOURCE
button on the remote control
to display the Input source list.
2.
Press the
Ÿź
buttons to select the input
VRXUFHWKDW\RXZDQW'79$79$96&$57
<3E3U+'0,+'0,+'0,3&0(',$
3.
Press
ENTER
EXWWRQWRFRQ¿UP\RXUVHOHFWLRQ
This system has an Electronic Programme
Guide (EPG) to help you navigate through all the
possible viewing options.
The EPG supplies information such as
programme listings, start and end times for
all available services. In addition, detailed
information about the programme is often
available in the EPG (the availability and amount
of programme information will vary, depending
on the particular broadcaster).
This function can be used only when the EPG
information is broadcast by broadcasting
companies.
The EPG displays the programme details for the
next 7 days.
1.
Press the
EPG
button to switch on
EPG
.
2.
Press
EPG
button or
EXIT
button again to
switch off EPG and return to normal TV viewing.
Info bar commands:
RED
(Prev. Date)
Press the
RED
button to view the schedule of
the previous day.
GREEN
(Next Date)
Press the
GREEN
button to view the schedule of
the next day.
YELLOW
(Schedule)
Press the
YELLOW
button to view the preset
reminders in the schedule list. Press the
YELLOW
button to return to the
EPG
.
BLUE
(Reminder)
Press the
BLUE
button while on the selected
programme, the Reminder setting menu will be
displayed.
Press the
ŻŹŸź
buttons to adjust the settings
DQGWKHQSUHVVWKH6DYHEXWWRQWRFRQ¿UPWKH
VHWWLQJV$IWHUFRQ¿UPDWLRQWKH
EPG
Schedule
List will then be displayed with your preset
reminders shown. Press the
YELLOW
button to
return to the
EPG
. The TV will automatically tune
to the selected programme when it starts.
REC
Timer Programming.
ENTER
Press to display detailed information of the
selected programme (if available).
SOURCE
DTV
ATV
AV
YPbPr
SCART
HDMI3
HDMI1
HDMI2
PC
MEDIA
Soure:Exit
Move
PROGRAM GUIDE
26 Dec 2008 10:00 - 26 Dec 2008 10:25 Big Cook Little Cook
Penguin: Cookey series with Big Cook Ben and foot-high Little Cook Small. Ben comes in to the cate
wearing flippers and a mask he’s found in the fancy dress box. [AD,S]
PrevDate NextDate Schedule Reminder
Rec: Record ENTER: Display EXIT: Exit
009 BBC FOUR
071 CBeebies
081 BBC Parliament
087 Community
301 301
302 302
10:00 Big Cook Little Cook
10:25 Bob the Builder
10:40 Me Too!
11:00 Something Special
11:15 Doodle Do
11:35 Our Planet
26 Dec 2008 10:21:43
[Children’s]

18
Basic Feature
Teletext (ATV mode)
Teletext is a free service broadcast by some TV
stations which gives up-to-the-minute information
on news, weather, television programmes,
share prices and many other topics. Using the
Teletext control buttons you can view pages of
information that are listed in the teletext
INDEX
.
To Turn on Teletext Function
In ATV mode, press the
TEXT
button to enter
Teletext mode. Press the
INDEX
button to
display the
INDEX
page.
Press the
TEXT
button once to exit and the TV
will return to the channel you were watching.
To select a page of text
Find the number of the page in the
INDEX
and
enter it using the
0-9
buttons. The number of
the page will appear on the top left corner of the
screen.
The page counter will search for your page.
:KHQLW¿QGVLWWKHSDJHZLOOEHGLVSOD\HG
To move to the next page of text, press the
Ÿ
button.
To move to the previous page, press the
ź
button.
To return to the
INDEX
page, enter the “
100
” by
using the
0-9
buttons or press the
INDEX
button.
Mix
To view a page of text while watching a TV
programme, press the
TEXT
button twice.
The text will be superimposed over the TV
programme.
Double height text
,I\RXKDYHGLI¿FXOW\UHDGLQJWKHWH[WRQWKH79
you can double the height of the text.
Press the
SIZE
button. The top half of the page
will be displayed in double height text.
Press the
SIZE
button again. The bottom half of
the page will be displayed in double height text.
Press the
SIZE
button again to return to the full
page.
Page HOLD
If the page of text you have selected contains
subpages, these subpages will automatically be
displayed in order with a delay to allow you to
have enough time to read the page.
To stop the movie to the next sub page, press
the
HOLD
button.
To continue moving through the sub pages,
press the
HOLD
button again.
Alternative: Press the SUBPAGE button, and
then use the 0-9 buttons to enter a 4-digit page
number.
7R5HYHDO,QIRUPDWLRQ
Press the
REVEAL
button to reveal concealed
LQIRUPDWLRQTXL]DQVZHUVHWF
Press the
REVEAL
button again to conceal the
information again.
Fasttext
At the bottom of the teletext screen is a row of
subject headings in red, green, yellow and blue.
The remote control has a row of colour buttons
corresponding to the row of coloured subjects on
the screen.
Pressing one of the colour buttons will take you
directly to the page corresponding to the subject
heading.
Make sure the TV channel you are watching
transmits teletext.
“No Teletext” sign will show on the screen if teletext
is not available.

19
Basic Feature
Digital Teletext (DTV mode)
Recording DTV Programme onto a USB Storage Device
Digital teletext can access special digital teletext
VHUYLFHVDQGVSHFL¿FVHUYLFHVZKLFKEURDGFDVW
GLJLWDOWHOHWH[W<RXZLOOQHHGWRWXUQRII6XEWLWOH
Function before using teletext.
1.
In DTV mode, press the
TEXT
button to
display the teletext page.
Use this function to record the DTV programme
you are watching on the main screen and save
it for future viewing. The recording from timer
programme or direct recording may have a little
bit of delay when it starts to record the broadcast
programme.
Please make sure the USB device is inserted. If
not, a warning message will pop up.
1.
Press the
Ɣ5(&
button to record the
programme that you are currently watching.
1.
Press the
Stop button to stop recording.
2.
Press the 0-9 buttons to select a page
number.
3.
Follow the instructions on digital teletext
and move onto the next step by pressing
(17(5ŻŹ5('*5((1<(//2:%/8(
or
0-9
buttons etc.
4.
To change digital teletext service, select a
different service by pressing the 0-9 buttons or
the
Ÿź
buttons.
$OWHUQDWLYH<RXPD\SUHVVWKH5('EXWWRQWRWKH
TEXT
button to display the teletext information
when you see a
Ɣ
red logo displayed on the
screen (e.g. BBC).
5.
Press the
TEXT
button to exit
To display the recording information, press
the
REC button.
Recording will stop automatically when the
disk is full.
Recording
Recorded Time : 00 : 00 : 47
Available Time: 3837 Minute
16 QVC
A Traditional Christ
adapter is connected to the mains supply.
adapter is connected to the mains supply as the
total current consumption may exceed 500mA.
hard disk is 1 TB.
programme, the transfer rate of the USB storage
device must not be less than 5MB/s, otherwise
the picture and sound of the programme will be
affected and a warning statement will be shown
on the screen. If this happens, please upgrade
your USB storage device.
take time to start up and stabilise the connected
hard disk. This is normal and the starting time
may vary depending on the brand and the
memory size of the connected hard disk.
use.

20
Basic Feature
Timer Programming
This function is used for scheduled recording.
The recording from timer programme or direct
recording may have a little bit of delay when it
starts to record the broadcast programme.
Please make sure the USB device is inserted. If
not, a warning message will pop up.
1. Press the
EPG
button on the remote control.
The
EPG
menu will appear.
2. Press the
Ɣ
(REC) button on the remote
control while on the selected programme, the
Scheduled Record
menu will be displayed.
Press the
ŸźŻŹ
buttons to select the settings
in the
RECORD
PHQXIRUWKH)UHTXHQF\
Channel, Start time, and End time.
Frequency
Press the
ŻŹ
EXWWRQVWRVHOHFWWKHIUHTXHQF\
(Off/Once / Daily / Weekly).
Channel
Press the
ENTER
button and then press the
Ÿź
buttons to select the channel that you want
to record.
Start time
(for Mode Once, Daily, Weekly) Press
the
ŸźŻŹ
buttons to adjust the start time.
End time
(for Mode Once, Daily, Weekly) Press
the
ŸźŻŹ
buttons to adjust the end time.
3.
$IWHU¿QLVKLQJDOOWKHUHFRUGHUDGMXVWPHQWV
SUHVVWKH6DYHEXWWRQWRFRQ¿UP\RXUVHWWLQJV
4.
The
Scheduled Record Setting List
will then
be displayed with your preset reminders shown.
5. Press the
EXIT
button to exit EPG.
Move
PROGRAM GUIDE
26 Dec 2008 10:00 - 26 Dec 2008 10:25 Big Cook Little Cook
Penguin: Cookey series with Big Cook Ben and foot-high Little Cook Small. Ben comes in to the cate
wearing flippers and a mask he’s found in the fancy dress box. [AD,S]
PrevDate NextDate Schedule Reminder
Rec: Record ENTER: Display EXIT: Exit
009 BBC FOUR
071 CBeebies
081 BBC Parliament
087 Community
301 301
302 302
10:00 Big Cook Little Cook
10:25 Bob the Builder
10:40 Me Too!
11:00 Something Special
11:15 Doodle Do
11:35 Our Planet
26 Dec 2008 10:21:43
[Children’s]
Delete One
Move Up
Move Down
Select
Return
Exit
Function
OK
MENU
EXIT
Frequency
Off
Off
Off
Off
Off
Off
Off
Off
Off
Off
Off
Off
Off
Off
Off
Off
Hot Key
Date
Scheduled Record
Scheduled Record Setting List
Standby
Delete All
Group
1
2
3
4
5
6
7
8
9
10
11
12
13
14
15
16
Channel
Start Time
Duration
10:03
25 Dec 2008 Thu.
Scheduled Record - Group 1
Move Up
Move Down
Adjust
Adjust
Select
Return
Exit
Hot Key
OK
MENU
EXIT
Setting Status
Setting Is Not In Use
Frequency Off
1 BBC ONE
2008-12-25
1 0 : 0 5
2008-12-25
1 0 : 1 5
Channel
Start Time
End Time
Save
recording automatically.
standby mode, the LED indicator will alternatively
flash red and blue.

21
Basic Feature
Play Recorded Programme
Picture management (ATV / DTV Mode)
Play Recorded Programme
<RXFDQSOD\DUHFRUGHGSURJUDPPHIURPWKH
recorded programme list or from a USB Storage
Device.
1.
Press the
SOURCE
button on the top of the
TV or the
SOURCE
button on the remote control
then press the
Ÿź
buttons to select the Media
mode and then press the
ENTER
button.
2.
Press the
ŻŹ
buttons to select
MOVIE
and
then press the
ENTER
button.
3.
Press the
Ÿź
buttons to select your storage
device and then press the
ENTER
button.
4.
Press the
Ÿź
buttons to select the “
usbrecord
” folder and then press the
ENTER
button.
5.
Press the
Ÿź
buttons to select your recorded
programme and then press the
Ź
II button to
view.
1.
Press the
MENU
button to display the main
menu. Press the
ŻŹ
buttons to select
Picture
in the main menu, then press the or
ENTER
EXWWRQLWZLOOKLJKOLJKWWKH¿UVWRSWLRQ
2.
Press the
Ÿź
buttons to select the option you
want to adjust in Picture menu.
3.
Press the
ŻŹŸź
buttons to change the
following settings.
7,36
<RXFDQFKDQJHWKHYDOXHRIEULJKWQHVV
contrast, sharpness and saturation when the
picture is in Personal mode.
<RXFDQSUHVV
P. MO DE
button on the remote
control to change the Picture Mode directly.
6.
Press the
ENTER
button or the
DISPLAY
button to display the function bar. Press the
ŻŹ
buttons and then press the
ENTER
button to
VHOHFWWKHIXQFWLRQ3DXVH3UHY1H[W)%))
/ Stop.
7.
Press
EPG
button to enter
Quick Menu
(Repeat/Encode Type)
8.
Press the
EXIT
button to return to the previous
menu.
Photo Music Movie Text
Movie
Move
Change Page OK Selete EPG Quick Menu EXIT Return
USB1
USB1
Movie
Move
Change Page OK Selete EPG Quick Menu EXIT Return
USB1/Movie
AITEMP
Movie
MY PVR
Photo
Te xt
Music
LE32G
1/1
00 : 05 : 1300 : 00 : 22
FileName
VideoCodec :
Resolution
Bitrate :
Animals.AVI
MPEG4
640 x 480
4158120 bps
AudioCodec :
SampleRate :
Channel :
MP3
44100 Hz
2
Picture
Picture Mode
Brightness
Contrast
Sharpness
Saturation
Hue
Colour Temp
Aspect Ratio
Standard
Standard
Full
50
50
50
50
0
Move tixE :TIXE nruteR :UNEMtsujdA

22
Basic Feature
Picture management Sound management
Picture Mode
Allows the selection of a picture-enhancement
WHFKQLFDOIURPDPRQJWKHIROORZLQJRSWLRQV
Dynamic / Standard / Mild / Personal.
Brightness
7KLVLWHPFDQDGMXVWWKHRSWLFDO¿EHURXWSXWRI
the entire picture; it will affect the dark region of
the picture.
Contrast
This item can adjust the highlight intensity of
the picture, but the shadow of the picture is
invariable.
Sharpness
This item can adjust the peaking in the detail of
the picture.
Saturation
This item can adjust the saturation of the colour
based on your own like.
Hue
This item may use in compensating colour
changed with the transmission in the NTSC
code.
Colour Temp
This item can increase or reduce warm colour of
the picture personally (red), and the cold colour
(blue) according to your like. The choice of Cold,
that means it will increase the blue tone for the
white. But choosing the Warm, it will increase the
red colou r for the white.
Aspect Ratio
Allows you to watch the screen in various picture
IRUPDWV$XWR)XOO=RRP=RRP
Screen Mode
6HOHFWWKH+'0,VLJQDOVFUHHQPRGH$XWR9HGLR
/ PC.
$GYDQFHG6HWWLQJV
151RLVH5HGXFWLRQ5HGXFHVWKHQRLVHOHYHO
of the connected device (Medium / Strong / Off /
Weak).
'\QDPLF&RQWUDVW$GMXVWVWKHG\QDPLF
contrast (Medium / Strong / Off / Weak).
4.
Press the
EXIT
button to exit menu.
1.
Press the
MENU
button to display the main
menu. Press the
ŻŹ
buttons to select Sound
in the main menu, then press the
ź
or
ENTER
EXWWRQLWZLOOKLJKOLJKWWKH¿UVWRSWLRQ
2.
Press the
Ÿź
buttons to select the option you
want to adjust in Sound menu.
3.
Press the
ŻŹŸź
buttons to change the
following settings.
7,36
<RXFDQFKDQJHWKHYDOXHRIWUHEOHDQGEDVV
when the sound is in Personal mode.
<RXFDQSUHVVWKH
S.MODE
button on the
remote control to change the Sound Mode
directly.
Sound Mode:
Allows the selection of an audio-enhancement
WHFKQLFDOIURPDPRQJWKHIROORZLQJRSWLRQV
6WDQGDUG0XVLF0RYLHDQG3HUVRQDO<RXFDQ
change the value of Treble and Bass when the
sound is in Personal mode.
Treble
Controls the relative intensity of higher-pitched
sounds.
Bass
Controls the relative intensity of lower-pitched
sounds.
Balance
Adjusts the relative volume of the speakers in a
multiple speaker system.
Surround Sound
7KLVFUHDWHVDIHHOLQJ¿WWHGWR\RXU79ZKHQ
switched on.
Sound Mode
Treble
Bass
Balance
EQ Setting
AVL
Surround Sound
SPDIF
Standard
Off
Off
PCM
0
0
0
Move tixE :TIXE nruteR :UNEMtsujdA
Sound

23
Sound management Channel management (ATV / DTV Mode)
EQ Setting
$OORZVWKHVHOHFWLRQRIDQHTXDOL]HUPRGH2II
5RFN3RS-D]]8VHU<RXFDQFKDQJHWKH
EQ value under User mode.
AVL
Selects to turn On/Off Audio Volume Leveler.
SPDIF
6HOHFWWKHGLJLWDODXGLRRXWSXWPRGH$XWR2II
PCM.
Audio Description
Selects to turn On/Off Audio Description.
Sound Type
When a programme is selected, press the
MTS
button to display the sound information for the
selected station.
Mono sound selection
If the stereo signal is weak in stereo reception,
you can switch to mono by pressing the
MTS
button. In mono reception, the clarity of sound
is improved. To switch back to stereo, press the
MTS
button again.
Language selection for dual language
broadcast
If a programme can be received in two
languages (dual language), you can swith to
DUAL I, DUAL II, Mixed or Mono by pressing the
MTS
button repeatedly.
Tuner Type
1.
Press the
MENU
button to display the main
PHQX3UHVVWKHŻŹEXWWRQVWRVHOHFW6HWXSLQ
WKHPDLQPHQXWKHQSUHVVWKHźRUWKH
ENTER
EXWWRQLWZLOOKLJKOLJKWWKH¿UVWRSWLRQ
2.
3UHVVWKHŸźEXWWRQVWRVHOHFW
Tuner Type
and then press the
ŻŹ
buttons to select Cable
or Antenna.
3.
Press the
EXIT
button to exit the menu.
Auto Scan
8VHWKLVWRDXWRPDWLFDOO\¿QGDQGVWRUH
all available channels. This is normally
recommended if some channels have been
added or removed by the broadcaster or you
have moved house.
1.
Press the
MENU
button to display the main
menu. Press the
ŻŹ
buttons to select
Channel
in the main menu, then
ź
press the or
ENTER
EXWWRQLWZLOOKLJKOLJKWWKH¿UVWRSWLRQ
2.
Press the
Ÿź
buttons to select Auto Scan
and then press the
ENTER
button to enter
submenu.
Basic Feature
Auto Scan
Tuner Type Cable
Off
Manual Scan
Channel Edit
Auto Channel Update
Common Interface
Favorite Manager
Signal Information
Move Adjust
MENU: Return EXIT: Exit
Channel
Country
Mode
Start
UK
DTV+ATV
Scan Type Full
Network ID Auto
AutoFrequency
AutoSymbol Rate
Move tixE :TIXE nruteR :UNEMtsujdA
Auto Scan
Auto Scan
Tuner Type Cable
Off
Manual Scan
Channel Edit
Auto Channel Update
Common Interface
Favorite Manager
Signal Information
Move Adjust
Channel
OK: Select MENU: Return EXIT: Exit
DAUL I
Sends the primary broadcast language to
the loudspeakers
DAUL II
Sends the secondary broadcast language
to the loudspeakers
Mixed
Sends the primary and secondary
broadcast languages to the loudspeakers
Mono
Mono
Stereo
STEREO
Dual DUAL I, DUAL II, Mixed
Brodcast
On Screen Display

24
Channel management (ATV / DTV Mode)
3.
Press the
ŻŹŸź
buttons to navigate the
menu and change the settings.
Country
Selects the country where you will operate the
TV.
Mode
6HOHFWVWKHDXWRVFDQPRGH'79$79'79
ATV. (DTV mode)
Scan Type
6HOHFW6FDQ7\SH$GYDQFHG4XLFN)XOO
1HWZRUN,'
6HOHFW1HWZRUN,'$XWRRUQWHUGLJLWDOQXPEHUV
Frequency
6HOHFW)UHTXHQF\$XWRRUQWHUGLJLWDOQXPEHUV
Symbol Rate
6HOHFW6\PERO5DWH$XWRRUQWHUGLJLWDOQXPEHUV
Start
Press the
ENTER
button to start auto tuning.
Manual Scan (DTV Mode)
$OORZV\RXWRPDNHPDQXDO¿QHWXQLQJ
adjustments to the channel under DTV mode.
1.
Press the
MENU
button to display the main
menu. Press the
ŻŹ
buttons to select Channel
in the main menu, then press the
ź
or
ENTER
EXWWRQLWZLOOKLJKOLJKWWKH¿UVWRSWLRQ
2.
Press the
Ÿź
buttons to select
Manual
Scan
and then press the
ENTER
button. On the
submenu, select Digital Manual Scan and then
press the
ENTER
button.
Tuner type is Antenna.
Digital Scan
3UHVVWKH
ŻŹ
buttons to select
the desired channel.
Start
3UHVVWKH
Ÿź
buttons to select Start and
then press the
OK
button to start tuning.
Tuner type is Cable.
1HWZRUN,'
Press the
ŻŹ
buttons to select
1HWZRUN,'$XWRRUQWHUGLJLWDOQXPEHUV
Symbol Rate:
Press the
ŻŹ
buttons to select
6\PERO5DWH$XWRRUQWHUGLJLWDOQXPEHUV
Modulation:
Press the
ŻŹ
buttons to select Mo
GXODWLRQ$XWR4$04$04$04$0
256QAM.
Start
3UHVVWKH
Ÿź
buttons to select Start and
then press the
ENTER
button to start tuning.
Basic Feature
Auto Scan
Scanning CH34
Digital Channels Found:
DTV :10 Radio :0 Data:0
Analog Channels Found: 0
MENU: Skip EXIT: Exit
If you stop the tuning before it has
finished, the TV will report a no signal
error. This is normal because all previous
channel memory has been cleared before
tuning is carried out.
Auto Scan
Tuner Type Cable
Off
Manual Scan
Channel Edit
Auto Channel Update
Common Interface
Favorite Manager
Signal Information
Move
OK: Select MENU: Return EXIT: Exit
Channel
Network ID
Frequency
Symbol Rate
Modulation
Auto
474000 KHz
Auto
Auto
Start
Strength
0
Move MENU: Return EXIT: Exit
Digital Manual Scan
Adjust
Digital Scan
Start
Frequency
Strength
CH21
474.00 MHz
0
Move 0~9 Input MENU: Return EXIT: Exit
Digital Manual Scan
Adjust
Tuner type is
Antenna
Tuner type is
Cable

25
Channel management (ATV / DTV Mode)
Manual Scan (ATV Mode)
$OORZV\RXWRPDNHPDQXDO¿QHWXQLQJ
adjustments if the channel reception is poor
under ATV mode.
1.
Press the
MENU
button to display the main
menu. Press the
ŻŹ
buttons to select
Channel
in the main menu, then
ź
press the or
ENTER
EXWWRQLWZLOOKLJKOLJKWWKH¿UVWRSWLRQ
2.
Press the
Ÿź
buttons to select
Manual
Scan
and then press the
ENTER
button. On the
submenu, select Analog Manual Scan and then
press the
ENTER
button.
Analog Scan
'LVSOD\VWKHFXUUHQWIUHTXHQF\SUHVVWKH
ŻŹ
EXWWRQVWRFKDQJHWKHIUHTXHQF\
&KDQQHOWR6DYH
Press the
Ÿź
buttons to select Channel to
Save, press the
ŻŹ
buttons to select channel
number you want to store.
Colour System
Press the
Ÿź
buttons to select Colou r System,
press the
ŻŹ
EXWWRQVWRVHOHFW$XWR3$/
SECAM.
Sound System
Press the
Ÿź
buttons to select Sound System,
press the
ŻŹ
EXWWRQVWRVHOHFW$XWR'.,
BG.
AFC
Press the
Ÿź
buttons to select AFC, press the
ŻŹ
buttons to select On or Off.
Start
Press the
Ÿź
buttons to select Start, press the
ŻŹ
buttons to start tuning.
Auto Channel Update
1.
Press the
MENU
button to display the main
menu. Press the
ŻŹ
buttons to select
Channel
in the main menu, then press the
ź
or
ENTER
EXWWRQLWZLOOKLJKOLJKWWKH¿UVWRSWLRQ
2.
Press the
Ÿź
buttons to select
Auto
Channel Update
and then press the
ŻŹ
button
to On or Off.
3.
Press the
EXIT
button to exit the menu.
Channel Edit (DTV mode)
1.
Press the
MENU
button to display the main
menu. Press the
ŻŹ
buttons to select
Channel
in the main menu, then press the
ź
or
ENTER
EXWWRQLWZLOOKLJKOLJKWWKH¿UVWRSWLRQ
2.
Press the
Ÿź
buttons to select
Channel
Edit
and then press the
ENTER
button to enter
submenu.
Basic Feature
Auto Scan
Tuner Type Cable
Off
Manual Scan
Channel Edit
Auto Channel Update
Common Interface
Favorite Manager
Signal Information
Move
OK: Select MENU: Return EXIT: Exit
Channel
Analog Scan
Channel to Save
Colour System
Sound System
AFC
Start
420.25 MHz
CH001
Auto
Auto
Off
Move 0~9 Input MENU: Return EXIT: Exit
Analog Manual Scan
Fine tune
Auto Scan
Tuner Type Cable
Off
Manual Scan
Channel Edit
Auto Channel Update
Common Interface
Favorite Manager
Signal Information
Move
OK: Select MENU: Return EXIT: Exit
Channel
Auto Scan
Tuner Type Cable
Off
Manual Scan
Channel Edit
Auto Channel Update
Common Interface
Favorite Manager
Signal Information
Move Adjust
MENU: Return EXIT: Exit
Channel

26
Channel management (ATV / DTV Mode)
Channel Edit (ATV mode)
1.
Press the
MENU
button to display the main
menu. Press the
ŻŹ
buttons to select
Channel
in the main menu, then press the
ź
or
ENTER
EXWWRQLWZLOOKLJKOLJKWWKH¿UVWRSWLRQ
2.
Press the
Ÿź
buttons to select
Channel
Edit
and then press the
ENTER
button to enter
submenu.
Delete
Press the
RED
button to delete the selected
channel.
6NLS
Press the
GREEN
button to select the channels
that you want to skip when you are selecting
channels. Press the
GREEN
button again to
undo it.
0RYH
Press the
BLUE
button and then press the
Ÿź
buttons to move to the selected channel. Press
the
BLUE
WRFRQ¿UP3UHVVWKH
ŻŹ
buttons to
VHOHFW$XWR3$/
Rename
3UHVVWKH<(//2:EXWWRQWRUHQDPHWKH
selected channel. Press the
Ÿź
buttons to
select the characters to represent the station
name. Press the
ŻŹ
buttons to move to the
next character and then press the
ENTER
button
DJDLQWRFRQ¿UPWKHQHZQDPH
)DYRULWH0DQDJHU
1.
Press the
MENU
button to display the main
menu. Press the
ŻŹ
buttons to select
Channel
in the main menu, then press the
ź
or
ENTER
EXWWRQLWZLOOKLJKOLJKWWKH¿UVWRSWLRQ
2.
Press the
Ÿź
buttons to select
)DYRULWH
Manager
and then press the
ENTER
button to
enter submenu.
Basic Feature
Auto Scan
Tuner Type Cable
Off
Manual Scan
Channel Edit
Auto Channel Update
Common Interface
Favorite Manager
Signal Information
Move
OK: Select MENU: Return EXIT: Exit
Channel
Delete
Move MENU: Return EXIT: Exit
Channel Edit
Page
Skip RenameMove
Auto Scan
Tuner Type Cable
Off
Manual Scan
Channel Edit
Auto Channel Update
Common Interface
Favorite Manager
Signal Information
Move
OK: Select MENU: Return EXIT: Exit
Channel
Favorite Manager
NO. Program Name Fav1 Fav2 Fav3 Fav4 Type
Favorite1 Favorite2 Favorite3 Favorite4
Move Page
EXIT: Exit MENU: Return
Delete
Move MENU: Return EXIT: Exit
Channel Edit
Page
Skip Move
Delete
Press the
RED
button to delete the selected
channel.
6NLS
Press the
GREEN
button to select the channels
that you want to skip when you are selecting
channels. Press the
GREEN
button again to
undo it.
0RYH
Press the
BLUE
button and then press the
Ÿź
buttons to move to the selected channel. Press
the
BLUE
WRFRQ¿UP

27
Channel management (ATV / DTV Mode)
Common Interface (DTV mode)
To view the module information.
1.
Press the
MENU
button to display the main
menu. Press the
ŻŹ
buttons to select
Channel
in the main menu, then press the
ź
or
ENTER
button.
2.
Press the
Ÿź
buttons to select
Common
Interface
and then press the
ENTER
button.
3.
A Common Interface main menu will pop up.
Press the
Ÿź
buttons to select the items and
press the
ENTER
EXWWRQWRFRQ¿UP
4.
Press the
EXIT
button to exit the menu.
The common interface allows the use of a
Common Access Module to enable you to view
scrambled (pay to view) services. These services
are provided by TopUp TV (UK only) and others.
The Common Access Module and viewing card
can be obtained from the service provider.
Signal Information (DTV mode)
1.
Press the
MENU
button to display the main
PHQX3UHVVWKHŻŹEXWWRQVWRVHOHFW
Channel
LQWKHPDLQPHQXWKHQSUHVVWKHźRU
ENTER
button.
2.
3UHVVWKHŸźEXWWRQVWRVHOHFW
Signal
Information
and then press the
ENTER
button
to view the Signal Information.
This feature is not available in all country.
To insert the Common Access Module
1.
Before you insert the Common Access
Module, ensure that the TV is switched off and
the viewing card is inserted
in accordance with
the Service Provider’s instructions.
2.
Insert the Common Access Module into the
slot. Flip the Common Access Module to another
side and try again if you feel resistance.
3.
Switch the TV on.
7RUHPRYHWKH&RPPRQ$FFHVV0RGXOH
1.
Before you remove the Common Access
Module, ensure that the TV is switched off.
2.
Pull the Common Access Module from the
slot.
3.
Switch the TV on.
Auto Scan
Tuner Type Cable
Off
Manual Scan
Channel Edit
Auto Channel Update
Common Interface
Favorite Manager
Signal Information
Move
OK: Select MENU: Return EXIT: Exit
Channel
Viaccess Conditional Access
Main Menu
Move OK: Select MENU: Return EXIT: Exit
Common Interface
1. Consultation
2. Settings
3. Upgrade
Press ‘OK’ to confirm, ‘EXIT’ to quit
Do not repeatedly insert or remove the Common
Access Module as this may damage the interface
and cause a malfunction.
CI (Common Interface)
Allows the Common Access Module to be
inserted and access the content that has been
encrypted.
C
A
i
n
Common Access Module
Basic Feature
Press the
5('*5((1<(//2:%/8(
button
to set the channel that you are currently watching
as set the Favorite1,Favorite2,Favorite3,Favorite
4 programmes.
7,36
3UHVVWKH
FAV/FAV+/FAV-
button to set the
Favorite List.

28
Lock System management
Setup management
Lock System managementChannel management (ATV / DTV Mode)
1.
Press the
MENU
button to display the main
menu. Press the
ŻŹ
buttons to select
/RFN
System
in the main menu, then press the
ź
or
ENTER
EXWWRQLWZLOOKLJKOLJKWWKH¿UVWRSWLRQ
2.
Use the
0-9
buttons to input a 4-digit password
to enter the Lock System menu.
3.
Press the
Ÿź
buttons to select the option you
want to adjust in Lock System menu.
4.
Press the
ŸźŻŹ
buttons to change the
following settings.
(QWHU3DVVZRUG
To access the Lock System menu, you must
enter the password. Enter the default password
“
0000
´IRUWKH¿UVWWLPHXVH
Enable
The lock system is designed to prevent
accidental returning of the TV/losing channels
and prevent children watching unsuitable
programme.
OSD Language
1.
Press the
MENU
button to display the main
menu. Press the
ŻŹ
buttons to select
Setup
in the main menu, then press the
ź
or
ENTER
EXWWRQLWZLOOKLJKOLJKWWKH¿UVWRSWLRQ
2.
Press the
Ÿź
buttons to select
OSD
Language
and then press the
ŻŹ
buttons to
select your desired on-screen display language.
The Lock System must be set to On for this
function to operate. If the Lock System is set to
On, a valid password must be entered when you
access Auto Scan / Manual Scan / Channel Edit
/First Time Setup.
&KDQQHO/RFNV
Channel Locks is designed to prevent children
watching unsuitable programmes. When a
channel is blocked, a valid password must be
entered.
Parental Rating
This function allows you to set up blocking
VFKHPHVWREORFNVSHFL¿FFKDQQHOVDQGUDWLQJV
3UHVVWKHEXWWRQVWRVHOHFWDQDJHUDWLQJ1RQH
4-18.
/RFN.H\SDG
Key Lock is designed to prevent children from
pressing the buttons on the TV. The Lock System
must be set On for this function to operate.
1HZ3DVVZRUG
Use the
0-9
buttons to input the old password
and then input the new 4-digit password. Re-
HQWHUQHZSDVVZRUGIRUFRQ¿UPDWLRQ
&OHDU/RFN
Reset all the lock settings to the factory defaults.
5.
Press the
EXIT
button to exit the menu.
3.
Press the
EXIT
button to exit the menu.
Auto Scan
Tuner Type Cable
Off
Manual Scan
Channel Edit
Auto Channel Update
Common Interface
Favorite Manager
Signal Information
Move
OK: Select MENU: Return EXIT: Exit
Channel
Enter Password
Enable
Channel Locks
Parental Rating
Lock Keypad
New Password
Clear Lock
_ _ _ _
Off
None
Off
_ _ _ _
Move 0~9: Input MENU: Return EXIT: Exit
Lock System
Basic Feature
Default password “0000”.
If you change the password, be sure to
remember the new password! If you forget
the new password, press the master
password“4711”.

29
Setup management
3.
Press the
EXIT
button to exit the menu.
OSD Language
Audio Languages
Subtitle
Teletext
Blue Screen
Mode Setting
Time Settings
PVR Settings
English
On
Home Mode
Move tixE :TIXE nruteR :UNEMtsujdA
Setup
Audio Languages (DTV Mode)
1.
Press the
MENU
button to display the main
menu. Press the
ŻŹ
buttons to select
Setup
in the main menu, then press the
ź
or
ENTER
EXWWRQLWZLOOKLJKOLJKWWKH¿UVWRSWLRQ
2.
Press the
Ÿź
buttons to select
Audio
Languages
and then press the
ENTER
button.
3.
Press the
ŻŹ
buttons to select your desired
Audio Primary Language. Press the
ź
button
and then press the
ŻŹ
buttons to select your
desired Audio Secondary Language.
4.
Press the
EXIT
button to exit the menu.
Subtitle (DTV Mode)
1.
Press the
MENU
button to display the main
menu. Press the
ŻŹ
buttons to select
Setup
in the main menu, then press the
ź
or
ENTER
EXWWRQLWZLOOKLJKOLJKWWKH¿UVWRSWLRQ
2.
Press the
Ÿź
buttons to select
Subtitle
and
then press the
ENTER
button to enter sub-menu.
Mode:
Selects to turn On/Off subtitle language.
Subtitle Primary Language
Press the
ŻŹ
buttons to select your desired
subtitle primary language.
Subtitle Secondary Language
Press the
ŻŹ
buttons to select your desired
subtitle secondary language.
Hearing Impaired
Press the
ŻŹ
buttons to turn On/Off hearing
impaired.
3.
Press the
EXIT
button to exit the menu.
Audio Primary Language
Audio Secondary Language
English
English
Move tixE :TIXE nruteR :UNEMtsujdA
Audio Languages
OSD Language
Audio Languages
Subtitle
Teletext
Blue Screen
Mode Setting
Time Settings
PVR Settings
English
On
Home Mode
Move MENU: Return EXIT: Exit
Setup
OK: Select
OSD Language
Audio Languages
Subtitle
Teletext
Blue Screen
Mode Setting
Time Settings
PVR Settings
English
On
Home Mode
Move MENU: Return EXIT: Exit
Setup
OK: Select
OSD Language
Audio Languages
Subtitle
Teletext
Blue Screen
Mode Setting
Time Settings
PVR Settings
English
On
Home Mode
Move MENU: Return EXIT: Exit
Setup
OK: Select
Basic Feature

30
Setup management
Blue Screen
1.
Press the
MENU
button to display the main
menu. Press the
ŻŹ
buttons to select
Setup
in the main menu, then press the
ź
or
ENTER
EXWWRQLWZLOOKLJKOLJKWWKH¿UVWRSWLRQ
2.
Press the
Ÿź
buttons to select
Blue Screen
and then press the
ENTER
button to select On /
Off.
3.
Press the
EXIT
button to exit the menu.
Time Settings
1.
Press the
MENU
button to display the main
menu. Press the
ŻŹ
buttons to select
Setup
in the main menu, then press the
ź
or
ENTER
EXWWRQLWZLOOKLJKOLJKWWKH¿UVWRSWLRQ
2.
Press the
Ÿź
buttons to select
Time
Settings
and then press the
ENTER
button.
OSD Time
'LVSOD\VWLPHRIWKHRQVFUHHQPHQX
10s/20s/30s/60s/Off.
Teletext
1.
Press the
MENU
button to display the main
menu. Press the
ŻŹ
buttons to select
Setup
in the main menu, then press the
ź
or
ENTER
EXWWRQLWZLOOKLJKOLJKWWKH¿UVWRSWLRQ
2.
Press the
Ÿź
buttons to select
Teletext
and
then press the
ENTER
button.
3.
Press the
ŻŹ
buttons to select your desired
Digital Teletext Language. Press the
ź
button
and then press the
ŻŹ
buttons to select your
desired Decoding Page Language.
4.
Press the
EXIT
button to exit the menu.
Mode Setting
1.
Press the
MENU
button to display the main
menu. Press the
ŻŹ
buttons to select
Setup
in the main menu, then press the
ź
or
ENTER
EXWWRQLWZLOOKLJKOLJKWWKH¿UVWRSWLRQ
2.
Press the
Ÿź
buttons to select
Mode Setting
and then press the
ŻŹ
buttons to select your
GHVLUHGPRGH+RPH0RGH6WRUH0RGH
+RPH0RGH9LHZLQJDWKRPH
6WRUH0RGH)RUVWRUHGHPRWKHEULJKWQHVVLV
higher than home mode.
3.
Press the
EXIT
button to exit the menu.
Digital Teletext Language
Decoding Page Language
English
West
Move tixE :TIXE nruteR :UNEMtsujdA
Teletext
OSD Language
Audio Languages
Subtitle
Teletext
Blue Screen
Mode Setting
Time Settings
PVR Settings
English
On
Home Mode
Move tixE :TIXE nruteR :UNEMtsujdA
Setup
Move tixE :TIXE nruteR :UNEMtsujdA
Setup
OSD Language
Audio Languages
Subtitle
Teletext
Blue Screen
Mode Setting
Time Settings
PVR Settings
English
On
Home Mode
Move tixE :TIXE nruteR :UNEMtsujdA
Time Settings
OSD Time
Sleep Timer
Auto Sleep
Time Zone
Time
10 seconds
Off
4 hours
Basic Feature

31
Setup management
Sleep Timer
Press the
ŻŹ
buttons to select a period of time
after which the TV automatically switches to
VWDQGE\PRGH2II«PLQV
Auto Sleep
The unit will automatically switch to standby
mode 3/4/5 hours after the last time the remote
control was used. If you want to operate the
TV for a long period of time, turn off the auto
standby function.
Time Zone
Selects your desired Time Zone city.
Time
The clock is set automatically when receiving a
digital signal or you can set it manually.
3.
Press the
EXIT
button to exit the menu.
PVR Settings
1.
Press the
MENU
button to display the main
PHQX3UHVVWKHŻŹEXWWRQVWRVHOHFW
Setup
in
WKHPDLQPHQXWKHQSUHVVWKHźRU
OK
button,it
ZLOOKLJKOLJKWWKH¿UVWRSWLRQ
2.
3UHVVWKHŸźEXWWRQVWRVHOHFW
PVR Settings
and then press the
OK
button.
3.
3UHVVWKHŻŹEXWWRQVWRVHOHFWWKHIROORZLQJ
PVR File System options and then press the
ENTER
button.
File Manager
Select File Manager to display the recorded
SURJUDPPHOLVWSUHVVWKHŸźEXWWRQVWRVHOHFW
the recorded programme and then press the
ENTER
RUŹ,,EXWWRQWRYLHZ
'HYLFH/LVW
Select Device List to check the information of the
connected USB storage device for PVR. Press
the
RED
button to format the selected USB
device.
Move tixE :TIXE nruteR :UNEMtsujdA
Time Settings
OSD Time
Sleep Timer
Auto Sleep
Time Zone
Time
10 seconds
Off
4 hours
Move MENU: Return EXIT: Exit
Time
Auto Sync
Date
Time
On
01 Jan 2010
22:33:11
Adjust
Delete One
Move Up
Move Down
Select
Return
Exit
Function
OK
MENU
EXIT
Hot Key
Scheduled Record
File Manager
Standby
Delete All
Zoom In/Out
Replay
Channel Name
Program Name
Recorded Time
Total Time
Parental Pating
BBC ONE
Pinky and Perky
25 Dec 2008 10:05
00:00:20
BBC ONE_Pinky and Perky_20081225_100524,is
BBC ONE_Pinky and Perky_20081225_100529,is
BBC ONE_Pinky and Perky_20081225_100530,is
Current Playing File Info
Device List
Format
Move Up
Move Down
Select
Return
Exit
Format
OK
MENU
EXIT
Device
USB1
Hot Key
1188 MB FAT32
Available Space
File System
Basic Feature

32
Setup management
Scheduled Record
Select Scheduled Record to view the scheduled
recordings list.
4.
Press the
EXIT
button to exit the menu.
Timeshift
Press Play/Pause key when the program is
playing under the DTV Source to start Timeshift.
The white bar indicated the recording progress.
The blue bar indicated the playback progress.
Reset
1.
Press the
MENU
button to display the main
PHQX3UHVVWKHŻŹEXWWRQVWRVHOHFW
Setup
LQWKHPDLQPHQXWKHQSUHVVWKHźRU
ENTER
EXWWRQLWZLOOKLJKOLJKWWKH¿UVWRSWLRQ
2.
3UHVVWKHŸźEXWWRQVWRVHOHFW
Reset
and
then press the
ENTER
button.
3.
3UHVVWKHŸźEXWWRQVWRVHOHFW<HVRU1RRQ
the screen. All settings will be reset to factory
defaults and the Setup menu will disappear.
Delete One
Move Up
Move Down
Select
Return
Exit
Function
OK
MENU
EXIT
Frequency
Off
Off
Off
Off
Off
Off
Off
Off
Off
Off
Off
Off
Off
Off
Off
Off
Hot Key
Date
Scheduled Record
Scheduled Record Setting List
Standby
Delete All
Group
1
2
3
4
5
6
7
8
9
10
11
12
13
14
15
16
Channel
Start Time
Duration
10:03
25 Dec 2008 Thu.
First Time Setup
1.
Press the
MENU
button to display the main
menu. Press the
ŻŹ
buttons to select
Setup
in the main menu, then press the
ź
or
ENTER
EXWWRQLWZLOOKLJKOLJKWWKH¿UVWRSWLRQ
2.
Press the
Ÿź
buttons to select
First Time
Setup
and then press the
ENTER
button.
3.
Press the
ŸźŻŹ
buttons to navigate the
menu and change the settings. Then it will
search automatically
4.
Press the
EXIT
button to exit the menu.
Move
OK: Select
MENU: Return EXIT: Exit
Setup
First Time Setup
Reset
Move
OK: Select
MENU: Return EXIT: Exit
Setup
First Time Setup
Reset
Move
OK: Select
MENU: Return EXIT: Exit
Setup
First Time Setup
Reset
Reset
Yes
No
Basic Feature

33
Entertainment
Entertainment
8VLQJWKH)HDWXUHVYLD86%3RUW
1.
Switch off the TV before connecting any USB
storage device.
2.
Connect your USB storage device to the USB
port of your TV.
3.
Press the button on the top of the TV or the
button on the remote control to turn on your TV
and your USB storage device.
4.
Press the
SOURCE
button on the top of theTV
or the
SOURCE
button on the remotecontrol to
display the Source List. Use the
Ÿź
buttons to
select MEDIA and then press the
ENTER
button
WRFRQ¿UP
Attention:
Some versions of portable hard disk may
UHTXLUHPRUHSRZHUWKDQWKH7986%VRFNHWFDQ
provide. To ensure correct operation please use
power adapter for that device.
,ID86%KXELVXVHGPDNHVXUHLWVPDLQV
adapter is connected to the mains supply as the
total current consumption exceed 500mA.
7KHPD[LPXPVXSSRUWHGVWRUDJHVSDFHRIWKH
hard disk is 1 TB.
7KH¿OHV\VWHPRQO\VXSSRUW)$7IRUPDW
,I\RXZDQWWRVWRUHWKHYLGHRVWUHDPLQJRI
a DTV programme, the transfer rate of the
USB storage device must not be less than
5MB/s, otherwise the picture and sound of
the programme will be affected and a warning
statement will be shown on the screen. If this
happens, please upgrade your USB storage
device.
7KH79VFUHHQZLOOEHEODQNWHPSRUDULO\DV
it will take time to start up and stabilize the
connected hard disk. This is normal and the
starting time may vary depending on the brand
and the memory size of the connected hard disk.
'LVFRQQHFWWKH86%VWRUDJHGHYLFHLILWLVQRWLQ
use.
9LHZLQJ3KRWR
1.
Press the
SOURCE
button on the top of theTV
or the
SOURCE
button on the remote control
WKHQSUHVVWKHŸźEXWWRQVWR0(',$DQGWKHQ
press the
ENTER
button.
2.
3UHVVWKHŸźEXWWRQVWRVHOHFW
Photo
and
then press the
ENTER
button.
3.
3UHVVWKHŻŹEXWWRQVWRVHOHFW\RXUVWRUDJH
device and then press the
ENTER
button.
4.
Press the
ŸźŻŹ
buttons to navigate in the
picture folder and then press the
ENTER
button.
,I\RXZDQWWRVHOHFWWKHVSHFL¿HGSKRWRVSUHVV
the
ŸźŻŹ
EXWWRQVWRVHOHFWWKHSLFWXUH¿OHDQG
then press the
ENTER
button.
5.
Press the or
ENTER
button to view.
Photo
Move CH + / - Change Page OK Selete EPG Quick Menu EXIT Return
USB1
. . .
USB1
1/1
File format VXSSRUWHG JPG.
Photo
Move
CH + / - Change Page OK Selete EPG Quick Menu EXIT Return
AITEMP MY PVR Movie Music Photo Te xt
LE32G
. . .
USB1
OK Slide Show / Single view Previous / Next Rotate EXIT Back EPG Quick Menu
Date 2010-05-13 20:28:40
Resolution 1366x768
6/12
5_1366x768x24b.jpg
Photo Music Movie Text

34
Entertainment
Entertainment
6.
Press the
ENTER
button or the
DISPLAY
EXWWRQWRGLVSOD\WKHIXQFWLRQEDU6LOGH6KRZ
Single view / Previous / Next / Rotate
7. Press EPG button to enter Quick Menu
(Interval Time / Repeat / Slideshow Effect /
Background Music).Random function for photo,
PHGLD¿OHVKRXOGPRUHWKDQ
8.
Press the
EXIT
button to return to the previous
menu.
Listening to Music
1.
Press the
INPUT
button on the top of the TV
or the
INPUT
button on the remote control then
SUHVVWKHŸźEXWWRQVWR0(',$DQGWKHQSUHVV
the
ENTER
button.
2.
3UHVVWKHŸźEXWWRQVWRVHOHFW
Music
and
then press the
ENTER
button.
3.
3UHVVWKHŻŹEXWWRQVWRVHOHFW\RXUVWRUDJH
device and then press the
ENTER
button.
4.
Press the
Ÿź
buttons to navigate in the music
folder and then press the
ENTER
button. If you
ZDQWWRVHOHFWWKHVSHFL¿HGPXVLFSUHVVWKH
Ÿź
EXWWRQVWRVHOHFWWKHPXVLF¿OHDQGWKHQ
press the
ENTER
button.
5.
3UHVVWKHŹ,,RU
ENTER
button to start to
play.
6.
3UHVVWKHŻŹEXWWRQVDQGWKHQSUHVVWKH
ENTER
EXWWRQWRVHOHFWWKHIXQFWLRQ3OD\
Previous / Next / FB / FF/ Stop .
7.
Press
EPG
button to enter
Quick Menu
(Repeat/Encode Type). Random function for
PXVLFPHGLD¿OHVKRXOGPRUHWKDQ
8.
Press the
EXIT
button to return to the previous
menu.
9LHZLQJ0RYLHV
1.
Press the
SOURCE
button on the top of the
TV or the
SOURCE
button on the remote control
WKHQSUHVVWKHŸźEXWWRQVWR0(',$DQGWKHQ
press the
ENTER
button.
2.
3UHVVWKHŸźEXWWRQVWRVHOHFW
0RYLH
and
then press the
ENTER
button.
3.
3UHVVWKHŸźEXWWRQVWRVHOHFW\RXUVWRUDJH
device and then press the
ENTER
button.
4.
3UHVVWKHŸźEXWWRQVWRQDYLJDWHLQWKH
movie folder and then press the
ENTER
button.
,I\RXZDQWWRVHOHFWWKHVSHFL¿HGPRYLHSUHVV
WKHŸźEXWWRQVWRVHOHFWWKHPRYLH¿OHDQGWKHQ
press the
ENTER
button.
If this folder also contains music files,
you can select a music track to play at
the same time you view your photos.
Photo Music Movie Text
Music
Move
Change Page CH+/- Plalyer OK Selete EPG Quick Menu EXIT Return
USB1
00 : 00 : 00
Title
Artist
Album
Track
Year
Date
FileSize
00 : 00 : 00
USB1
Music
Move
Change Page CH+/- Plalyer OK Selete EPG Quick Menu EXIT Return
USB1/Music
00 : 00 : 00
Title
Artist
Album
Track
Year
Date
FileSize
00 : 00 : 00
AITEMP
Movie
MY PVR
Photo
Te xt
Music
LE32G
1/1
Some audio file formats will not be supported.
Supported File fRUPDW MP3.
Music
Move
CH+/- FileList OK Selete EPG Quick Menu EXIT Return
USB1/Music/Call Me Maybe.mp3
00 : 03 : 13
Title
Artist
Album
Track
Year
Date
FileSize
00 : 00 : 22
Call Me Maybe.mp3
Good Time.mp3
1/1
Call Me Maybe.mp3 1/2
Call Me Maybe
Carly Rae Jepsen
Call Me Maybe
2012-02-27
2013-02-01
3.9MB
Photo Music Movie Text
Movie
Move
Change Page OK Selete EPG Quick Menu EXIT Return
USB1
USB1

35
Entertainment
5.
3UHVVWKHŹ,,RU
ENTER
button to view.
6.
Press the
ENTER
button or the
DISPLAY
button to display the function bar. Press the
ŻŹ
buttons and then press the
ENTER
button to
VHOHFWWKHIXQFWLRQ3DXVH3UHYLRXV1H[W)%
/ FF / Stop .
7.
Press
EPG
button to enter
Quick Menu
(Repeat/Encode Type). Random function for
PRYLHPHGLD¿OHVKRXOGPRUHWKDQ
8.
Press the
EXIT
button to return to the previous
menu.
My Text
1.
Press the
SOURCE
button on the top of the
TV or the
SOURCE
button on the remote control
WKHQSUHVVWKHŸźEXWWRQVWR0(',$DQGWKHQ
press the
ENTER
button.
2.
3UHVVWKHŸźEXWWRQVWRVHOHFW
Text
and then
press the
ENTER
button.
3UHVVWKHŸźEXWWRQVWRVHOHFW\RXUVWRUDJH
device and then press the
ENTER
button.
4.
3UHVVWKHŸźEXWWRQVWRQDYLJDWHLQWKHWH[W
folder and then press the
ENTER
button. If you
ZDQWWRVHOHFWWKHVSHFL¿HGWH[W¿OHSUHVVWKH
ŸźEXWWRQVWRVHOHFWWKHWH[W¿OHDQGWKHQSUHVV
the
ENTER
button.
5.
3UHVVWKHŹ,,RU
ENTER
button to view.
6.
Press the
ENTER
button or the
DISPLAY
button to display the function bar. Press the
ŻŹ
buttons and then press the
ENTER
button to
VHOHFWWKHIXQFWLRQ3UHYLRXV1H[W*RWR3DJH
7.
Press
EPG
button to enter
Quick Menu
(Repeat / Background Music / Encode Type).
8.
Press the
EXIT
button to return to the previous
menu.
Some audio file formats will not be supported.
Supported File fRUPDW MPEG 1/2.
Movie
Move
Change Page OK Selete EPG Quick Menu EXIT Return
USB1/Movie
AITEMP
Movie
MY PVR
Photo
Te xt
Music
LE32G
1/1
00 : 05 : 1300 : 00 : 22
FileName
VideoCodec :
Resolution
Bitrate :
Animals.AVI
MPEG4
640 x 480
4158120 bps
AudioCodec :
SampleRate :
Channel :
MP3
44100 Hz
2
Photo Music Movie Text
Te xt
Move
Change Page OK Selete EPG Quick Menu EXIT Return
USB1
USB1
Tex t
Move
Change Page OK Selete EPG Quick Menu EXIT Return
USB1/Text
AITEMP
Movie
MY PVR
Photo
Te xt
Music
LE32G
1/1
Tex t
Move
Change Page OK Selete EPG Quick Menu EXIT Return
USB1/Text/English Music .txt
1/1
1 Why are you so far from me?
In my arms is where you ought to be.
2 How long will you make me wait?
I don’t know how much more I can take.
3 (Chorus:)
I missed you
But I haven’t met you
Oh but I want to
How I do
4 Slowly counting down the days
English Music .txt
Previous / Next
0~9: Goto Page EPG Quick Menu EXIT Back
1/12
1 Why are you so far from me?
In my arms is where you ought to be.
2 How long will you make me wait?
I don’t know how much more I can take.
3 (Chorus:)
I missed you
But I haven’t met you
Oh but I want to
How I do
4 Slowly counting down the days
If this folder also contains music files,
you can select a music track to play at the
same time you view your texts.
Entertainment
If the some movie does not play well, please
try to change another high-speed USB disk.

36
6SHFL¿FDWLRQV
Digital reception
Other Information
Brand
JVC
Model
LT-32HG82U
(QHUJ\(I¿FLHQF\&ODVV
A
Screen Size (measured diagonally)
Approx. 80cm (31.5inch)
3RZHU&RQVXPSWLRQLQ+20(PRGH
40W
$YHUDJH$QQXDO(QHUJ\&RQVXPSWLRQ
58kwh
6WDQGE\3RZHU&RQVXPSWLRQ
0.5W
Display Resolution
1,920 pixel(horizontal) x 1,080 pixel(vertical)
TV Broadcasting
PAL, B/G, D/K, I, SECAM, L/L’
5HFHLYLQJ&KDQQHOV
ATV (48.25MHz ~ 863.25MHz)
Number of Preset Channels
99
Channel Indicator
On Screen Display
RF Aerial Input
75 Ohm (unbalanced)
Operating Voltage
AC 100-240V~ 50/60Hz
$XGLR2XWSXW3RZHU:5067+'
2 x 6 W
'LPHQVLRQV'[/[+ZLWKIRRW
180 x 731 x 470 mm
:HLJKWZLWKIRRW
5.2 kg
'LPHQVLRQV'[/[+ZLWKRXWIRRW
79 x 731 x 436 mm
:HLJKWZLWKRXWIRRW
5.0 kg
Surrounding temperature
2SHUDWLRQ
ȭ
~40
ȭ
6WRUDJH
ȭ
~60
ȭ
Operating Humidity
Less than 80
ͤ
RH
Standby Mode
After 4 Hours
Reception range VHF (50MHz~230MHz) - UHF (474MHz~862MHz)
Input impedance ȍ
Channel Bandwidth 7MHz/8MHz
Modulation
DVB-T COFDM 2K/8K,QPSK,16QAM,64QAM
DVB-C 16QAM, 32QAM, 64QAM, 128QAM,256QAM
Video System MPEG-2 MP@ML, MPEG-2 MP@HL,H.264
Sound System MPEG-1 layer 1/2
Basic Functions (3*6XEWLWOH/&17(/(7(;7(XURSH
Max Storage Channels &+'9%7'9%&G\QDPLF
*Energy consumption per year, based on the power consumption of the television operating 4 hours per
day for 365 days. The actual energy consumption will depend on how the television is used.
We apologise for any inconvenience caused by any minor inconsistencies in these instructions, which may
occur as a result of product improvements and development.

37
Trouble shooting
Product Support
Image persistence - ghosting Remote control - does not operate
Remote control - does not operate
No power
Poor picture
No picture
No sound
Please note that ghosting may occur while displaying a
persistent image (still or paused image). LCD TVs’ image
persistence may disappear after a short time. Try turning
off the TV for a while. To avoid this, do not leave the
screen in still picture mode for extended periods.
<RXU79QRORQJHUUHVSRQGVWRWKHUHPRWHFRQWURO7KH
batteries may be exhausted, if so you can still use the
control buttons on the left side of the TV.
1. If you cannot select an input source, it is possible that
no device is connected.
2. Check the AV cables and connections if you have tried
to connect a device.
If your TV has no power, please check the power cord
plug is connect to the mains power socket.
1. Have you selected the correct TV system?
2. Is your TV or house aerial located too close to a
QRQHDUWKHGDXGLRHTXLSPHQWRUQHRQOLJKWVHWF"
3. Mountains or high buildings can cause double pictures
or ghost images. Sometimes you can improve the picture
TXDOLW\E\FKDQJLQJWKHGLUHFWLRQRIWKHDHULDO,VWKH
picture or teletext unrecognisable?
&KHFNLI\RXKDYHHQWHUHGWKHFRUUHFWIUHTXHQF\
5. Please retune the channels.
7KHSLFWXUHTXDOLW\PD\GHJUDGHZKHQWZRGHYLFHVDUH
connected to the TV at the same time. In such a case,
disconnect one of the devices.
1. No Picture means that your TV is not receiving a
transmission. Have you selected the correct button on
the remote control? Try once more. Also make sure the
correct input source has been selected.
2. Is the aerial connected properly?
3. Are the plugs connected tightly to the aerial socket?
4. Is the aerial cable damaged?
5. Are suitable plugs used to connect the aerial?
6. If you are in doubt, consult your dealer.
1. Has the TV been set to mute? To cancel mute, press
the “ ” button, or increase the volume level.
2. Sound is coming from only one speaker. Is the balance
set to one extreme?

38
6XSSRUWHG¿OHIRUPDWV
Product Support
Multimedia
Categories
File Extension
Decoder
Notes
VideoD ecode AudioD ecode
Video
*.avi
MPEG-1
MPEG-2 MP
MPEG-4 SP
MPEG-4 ASP
MPEG-4 XVID
H.264(AVC)
MP@Level 4
H.264(AVC)
HP@Level 4
MPEG-1 Layer 2
MPEG-1 Layer 3
MPEG-2 Layer 3
AAC-LC
HE-AAC V1
HE-AAC V2
MPGE1/MPEG2/MPEG4:
Up to 1080p@ 30F
H.264: Up to 1080p@ 25F
AAC: AAC-LC(type2 ),
HE-AAC v1(type5 ,SBR),
HE-AAC v2(type
29,SBR+PS)
MPEG(*.mpeg,
*.mpg, *.dat, *vob)
MPEG-1 MP
MPEG-2 MP
MPEG-4(*.mp4)
MPEG-4 SP
MPEG-4 ASP
MPEG-4 XVID
H.264(AVC)
MP@Level 4
H.264(AVC)
HP@Level 4
TS(*.ts, *.trp, *tp)
MPEG-1
MPEG-2 MP
H.264(AVC)
MP@Level 4
H.264(AVC)
HP@Level 4
MKV(*.mkv)
MPEG-1
MPEG-2 MP
MPEG-4 SP
MPEG-4 ASP
MPEG-4 XVID
H.264(AVC)M P@
Level4
H.264(AVC)H P@
Level4
*.flv
H.264(AVC)M P@
Level4
H.264(AVC)H P@
Level4
Music
*.mp3
MPEG-1 Layer 3
BitR ate˖up to 320Kbps
Sample Rate˖32KHzˈ
44.1KHzˈ48KHz
MPEG-2 Layer 3
AAC(*.aac,*m4a)
AAC
HE-AAC V1
HE-AAC V2
*.wav
LPCM
ADPCM
Photo
*.jpg
*.jpeg
Baseline Mode
72x72< Baseline
resolution< 7680x4320
Progressive Mode Size
<=1280x1024
File Size <=10MB
Progressive Mode
Text *.txt
UTF-8
UNICODE
ASCII
File Size <=1MB
File system: Hi SpeedF S, FAT32, NTFS(NTFSc ompressedf ilei sn ot supported).
PVRf unction: Recording standby, time-shift,E PG recording reservation.
Note:1 .Max5 00 filess upportede achf older.
2. Licenses involved in specifications abovea res upposedt ob eo btainedb yc ustomerst hemselves.

39
DISPOSAL
Energy Label
DISPOSAL
As a responsible retailer we care about the environment.
As such we urge you to follow the correct disposal procedure forthe product, packaging materials and if applicable,
accessories andbatteries. This will help conserve natural resources and ensure thatthe materials are recycled in a
manner that protects health and theenvironment.
<RXPXVWIROORZODZVDQGUHJXODWLRQVDERXWGLVSRVDO:DVWHHOHFWULFDOSURGXFWVDQGEDWWHULHVPXVWEHGLVSRVHGRI
separately fromhousehold waste when the product reaches the end of its life.
Contact the store where you bought the product and your local authorityto learn about disposal and recycling.
The batteries must be disposed of at your local recycling point.
Darty Holdings SAS © 14 route d'Aulnay 93140 Bondy, France 13/06/2016
40
2010/1062 - 2014
58
80
31.5
+
LT-32HG82U

1
Table des Matières
Avertissements 2
Informations de sécurité 3
Démarrage 5-12
TV – Fonctions 5
Accessoires inclus 5
Installation / Retrait de la base de support 6
Description de la télécommande 7-10
Boutons de contrôle 10
Branchements de l’antenne 10
Branchement à l'alimentation 10
Télécommande - Insertion des piles 11
Mise en marche et arrêt de la TV 11
Utilisation des boutons de contrôle TV 12
Utilisation de la télécommande 12
Mise en service 13
Fonctionnement général 13
Branchements 14-16
Description des connexions du côté
gauche 14
Description des connexions du côté
gauche en bas 15
Connexions HDMI 16
Connexions VGA 16
Basic Feature 17-32
Navigation dans les menus - Sélection de
la source 17
Guide électronique des programmes (EPG)
(mode DTV) 17
Télétexte (mode ATV) 18
Télétexte numérique (mode DTV) 19
Enregistrement de programmes TV sur un
périphérique de stockage USB 19
Programmation du minuteur 20
Lecture d'un programme enregistré 21
Gestion de l'image (mode ATV / DTV) 21
Gestion de l'image 21
Gestion du son 22-23
Gestion des chaînes (mode ATV / DTV)
23-28
Gestion du système de verrouillage 28
*HVWLRQGHFRQ¿JXUDWLRQ 28-32
Divertissement 33-35
Autres Informations 36
6SpFL¿FDWLRQV 36
Assistance concernant le produit 37-38
Guide de dépannage 37
)RUPDWGH¿FKLHUVFRPSDWLEOHV 38
Étiquette énergétique 39
MISE AU REBUT 39

2
AVERTISSEMENTS
Cet appareil est destiné à un usage domestique uniquement. Toute utilisation autre que celle prévue pour cet
appareil, ou pour une autre application que celle prévue, par exemple une application commerciale, est interdite.
Aération
Prévoyez un espace libre d'au moins 10 cm tout autour du produit.
Il convient que l’aération ne soit pas gênee par l’obstruction des ouvertures d’aération par des objets tels que
journaux, nappes, rideaux, etc.
,OFRQYLHQWGHQHSDVSODFHUVXUO¶DSSDUHLOGHVRXUFHVGHÀDPPHVQXHVWHOOHVTXHGHVERXJLHVDOOXPpHV
Cet appareil n'est pas destiné à être utilisé sous un climat tropical.
L’appareil ne doit pas être exposé á des égouttements d'eau ou des éclaboussures et de plus qu'aucun objet rempli
de liquide tel que des vases ne doit être placé sur l’ appareil.
Lorsque la prise du réseau d'alimentation ou une prise placée sur
l’appareil est utilise comme dispositif de déconnexion, ce dispositif doit demeure aisément accessible.
Les piles (piles installées) ne doivent pas être exposées à une chaleur excessive telle que celle du soleil, d'un feu ou
d'origine similaire.
Déposez vos piles usagées auprès d'installation de recyclage pour protéger notre environnement.
ATTENTION:
$¿QG¶pYLWHUGHVGRPPDJHVDXGLWLIVpYHQWXHOVQHSDVpFRXWHUjXQQLYHDXVRQRUHpOHYpSHQGDQWXQH
longue durée.
AVERTISSEMENTS

3
Informations de sécurité
RISQUE D'ÉLECTROCUTION
NE PAS OUVRIR
ATTENTION
ATTENTION :
AFIN DE RÉDUIRE LES RISQUES D'ÉLECTROCUTION, NE PAS
DÉMONTER LE BOÎTIER (OU LA PARTIE ARRIÈRE) DE L'APPAREIL.
CET APPAREIL NE CONTIENT AUCUNE PIÈCE POUVANT ÊTRE
UTILISÉE SÉPARÉMENT.
POUR TOUTE RÉPARATION, FAITES APPEL À UN TECHNICIEN QUALIFIÉ.
Le symbole d'un éclair avec la pointe d'une
ÀqFKHGDQVXQWULDQJOHpTXLODWpUDOVHUWjDOHUWHU
l'utilisateur sur l'existence d'une « tension
dangereuse » non isolée dans le boîtier du
SURGXLW¶SRXYDQWrWUHVXI¿VDPPHQWLPSRUWDQWH
pour présenter un risque de choc électrique.
Le point d'exclamation dans un triangle
équilatéral sert à alerter l'utilisateur sur
d'importantes instructions d'utilisation et
d'entretien (réparations) dans la documentation
fournie avec l'appareil.
Important - Veuillez lire complètement toutes les instructions avant d'installer ou
de faire fonctionner l'appareil.
Source d’alimentation
Positionnement du téléviseur
Positionnement du téléviseur
Humidité et eau
Ventilation
6RXUFHVGHFKDOHXUHWÀDPPHV
/HWpOpYLVHXUGRLWrWUHXWLOLVpXQLTXHPHQWDYHFXQHSULVH
220-240 V AC, 50 Hz.
Avertissement: Ne
laissez
pas
votre téléviseur en
mode veille ou en fonctionnement lorsque vous quittez
votre domicile.
/HFkEOHGDOLPHQWDWLRQGRLWrWUHIDFLOHPHQWDFFHVVLEOH
En cas d'orages et de foudre, lorsque vous partez en
vacances, ou lorsque le téléviseur ne sera pas utilisé
SHQGDQWXQHORQJXHSpULRGHYHXLOOH]GpEUDQFKHUOHFkEOH
d'alimentation de la prise secteur.
Ne
placez
pas
le téléviseur, ou tout autre meuble, etc.
VXUOHFkEOHGDOLPHQWDWLRQTXLVHUDLWpFUDVpRXSLQFp
3RXUDVVXUHUXQHERQQHYHQWLODWLRQYHXLOOH]ODLVVHUXQ
espace libre d'au moins 10 cm autour du téléviseur
1HERXFKH]SDVOHVRXwHVGHYHQWLODWLRQ
1HSODFH]SDVOHWpOpYLVHXUVXUGHVVXUIDFHVLQFOLQpHV
ou instables car le téléviseur pourrait basculer.
3RXUpYLWHUGHQGRPPDJHUOHWpOpYLVHXUQHSODFH]SDV
d'objets sur le téléviseur.
8WLOLVH]XQLTXHPHQWOHWpOpYLVHXUGDQVGHVFOLPDWV
tempérés.
0DQLSXOH]OHFkEOHGDOLPHQWDWLRQSDUODSULVHQH
GpEUDQFKH]SDVOHWpOpYLVHXUHQWLUDQWVXUOHFkEOH
d'alimentation.
1HPDQLSXOH]MDPDLVOHFkEOHODSULVHG¶DOLPHQWDWLRQ
avec des mains mouillées car cela pourrait causer un
court-circuit ou un choc électrique.
1HIDLWHVMDPDLVXQQ°XGGDQVOHFkEOHGDOLPHQWDWLRQ
HWQHODWWDFKH]SDVjGDXWUHVFkEOHV
/HVFkEOHVGDOLPHQWDWLRQGRLYHQWrWUHSODFpVGH
manière à ce qu'ils ne soient pas susceptibles d'être
écrasés ou pincés.
8QFkEOHRXXQHSULVHGDOLPHQWDWLRQHQGRPPDJpH
peut provoquer un incendie ou un choc électrique. Si le
FkEOHG¶DOLPHQWDWLRQHVWHQGRPPDJpLOGRLWrWUHUHPSODFp
SDUXQWHFKQLFLHQTXDOL¿p
N'
utilisez
pas
ce téléviseur dans un endroit humide ou
mouillé (évitez de le placer dans une salle de bains, près
de l'évier de la cuisine ou près de la machine à laver).
N'
exposez
pas
ce téléviseur à la pluie ou à l'eau car
cela pourrait créer un danger.
$XFXQREMHWUHPSOLGHOLTXLGHFRPPHXQYDVH
ne
doit
être placé sur l’appareil. Évitez que le téléviseur soit
exposé à tout écoulement d'eau ou éclaboussures.
6LXQREMHWVROLGHRXOLTXLGHWRPEHVXUODSSDUHLO
GpEUDQFKH]OHWpOpYLVHXUHWIDLWHVOHYpUL¿HUSDUXQ
SHUVRQQHOTXDOL¿pDYDQWGHOHUHPHWWUHHQPDUFKH
/HVIHQWHVHWOHVRXYHUWXUHVGXWpOpYLVHXUVRQWGHVWLQpHV
jODYHQWLODWLRQHWSRXUDVVXUHUXQIRQFWLRQQHPHQW¿DEOH
3RXUpYLWHUODVXUFKDXIIHFHVRXYHUWXUHVQHGRLYHQWSDV
être bloquées ou couvertes.
N'
exposez
pas
ce téléviseur à la lumière directe du
soleil ou à toute autre source de chaleur.
10cm
10cm
10cm

4
$YHUWLVVHPHQW8QHLQVWDOODWLRQLQFRUUHFWHGHVSLOHVSHXW
entraîner une fuite du liquide des piles et une corrosion,
ce qui entraînerait des dommages sur la télécommande
Ne
mélangez
pas
des piles neuves avec des piles
usées, ou des piles de types différents.
Ne
jetez
pas
les piles dans un feu.
Ne
jetez
pas
les piles avec les ordures ménagères;
amenez-les dans un centre de recyclage local.
[Union européenne]
Cher client,
Cet appareil est conforme aux directives européennes
en vigueur et normes en matière de compatibilité
électromagnétique et de sécurité électrique.
Darty Holdings SAS © 14 route d’Aulnay 93140 Bondy, France
* DVB et les logos DVB sont des marques déposées du
projet DVB.
* Fabriqué sous licence de Dolby Laboratories. Dolby
et le symbole double-D sont des marques déposées de
Dolby Laboratories.
* Les termes HDMI et le Logo HDMI et HDMI High
Definition Multimedia Interface sont des marques
commerciales ou des marques déposées de HDMI
Licensing, LLC aux Etats-Unis et autres pays.
S'il est nécessaire d'utiliser des pièces de rechange,
assurez-vous que le réparateur utilise les pièces de
UHFKDQJHVSpFL¿pHVSDUOHIDEULFDQWRXD\DQWGHV
caractéristiques identiques aux pièces d’origine.
L’utilisation de pièces non autorisées peut provoquer un
incendie, un choc électrique ou d'autres dommages.
$YHUWLVVHPHQW
Risque d'exposition aux rayonnements
des faisceaux laser visibles et invisibles de classe 1 /
classe 3b.
N'
ouvrez
pas
le téléviseur et ne regardez pas
directement le faisceau.
Avertissement:
Risque de choc électrique,
ne
tentez
pas
de le réparer, de procéder à un entretien ou de
PRGL¿HUFHWpOpYLVHXUYRXVPrPH&RQWDFWH]OHIDEULFDQW
ou son représentant agréé.
$YHUWLVVHPHQW3RXUpYLWHUOD
propagation du feu, gardez les
ERXJLHVRXOHVDXWUHVÀDPPHVQXHV
toujours éloignées de ce produit.
Cet équipement est un appareil électrique
doublement isolé ou de classe II. Il a été conçu de
manière à ce qu'il ne nécessite pas de connexion à
la terre pour la protection électrique.
Informations de sécurité
Important - Veuillez lire attentivement ces instructions avant d'installer ou de faire
fonctionner ce téléviseur.
/HWpOpYLVHXUQHGRLWSDVrWUHSODFpSUqVGXQHÀDPPH
nue ou d'une source de chaleur intense, comme un
radiateur électrique.
$XFXQHÀDPPHYLYHFRPPHXQHERXJLHDOOXPpHQH
doit pas être placée sur l’appareil.
8QHSUHVVLRQVRQRUHH[FHVVLYHORUVGHO¶XWLOLVDWLRQ
d’un casque ou d’écouteurs peut provoquer des lésions
auditives; veuillez prendre des précautions.
Pour éviter toute blessure, ce téléviseur doit être
VROLGHPHQW¿[pDXPXUFRQIRUPpPHQWDX[LQVWUXFWLRQV
d'installation (si l'option est disponible).
/pFUDQ/&'HVWXQSURGXLWGHWUqVKDXWHWHFKQRORJLH
avec environ un million de couches minces de transistors,
vous offrant une image très détaillée. De temps en
temps, quelques pixels non actifs peuvent apparaître sur
OpFUDQFRPPHXQSRLQW¿[HEOHXYHUWRXURXJH9HXLOOH]
QRWHUTXHFHODQHPRGL¿HSDVOHVSHUIRUPDQFHVGHYRWUH
produit.
3UHQH]VRLQGHQHSDVUD\HUOpFUDQDYHFOHVRQJOHVRX
d'autres objets durs.
$YDQWOHQHWWR\DJHGpEUDQFKH]OHWpOpYLVHXUGHODSULVH
murale.
N'
utilisez
pas
de nettoyant liquide ou d'aérosols. Utilisez
uniquement un chiffon doux et sec.
Volume du casque
Fixation murale (optionnelle)
Ecran LCD
Nettoyage
Piles
Pièces de rechange
Réparation
Informations sur la licence

5
Démarrage
TV - Fonctions
Accessoires inclus
79/('FRXOHXUWpOpFRPPDQGpH
79QXPpULTXHHQWLqUHPHQWLQWpJUpH'9%7
&RQQHFWHXUV+'0,SRXUODYLGpRHWDXGLR
numérique. Cette connexion est également conçue
SRXUDFFHSWHUOHVVLJQDX[GHKDXWHGp¿QLWLRQ
(QWUpH86%
SURJUDPPHVHQ9+)8+)DQDORJLTXH
SURJUDPPHVHQPRGHQXPpULTXH,'79
6\VWqPHGHPHQX26'
6\VWqPHVRQRUHVWpUpR
7pOpWH[WHIDVWH[WWH[WH723
&RQQH[LRQGHFDVTXH
6\VWqPHGHSURJUDPPDWLRQ$XWRPDWLTXH
5pJODJHPDQXHOGHVFKDvQHV
0LQXWHXUVRPPHLO
9HUURXLOODJHVpFXULWpHQIDQWV
$9/OLPLWDWLRQDXWRPDWLTXHGXYROXPH
3//UHFKHUFKHGHVIUpTXHQFHV
(QWUpH3&
3OXJ3OD\SRXU:LQGRZV0(;3
Vista
79
%DVHGHVXSSRUW
&kEOH0,1,<3%35
0,1,&kEOH$9
7pOpFRPPDQGH
3LOHV[$$$
0DQXHOGLQVWUXFWLRQV
4 vis de base
MUTE
PMODE SMODE FAV SLEEP
CH.LIST
ASPECT
EPG AUDIO
MENU
EXIT
DISPLAY
SOURCE
TEXT
INDEX
HOLD
SIZE
SUBPAGE
REVEAL
SUBTITLE
ENTER

6
Démarrage
Installation / Retrait de la base de support
Instructions d'assemblage de la base de
support
1.
Placez le téléviseur avec l'écran vers le bas sur
une surface plane. Utilisez un tissu pour protéger
l’écran. Prenez la base.
2.
Fixez le support avec la base en bas du
téléviseur avec les quatre vis.
REMARQUES CONCERNANT
L’INSTALLATION
Ce téléviseur doit être connecté à une prise
d'alimentation CA 100-240 Volts, 50 / 60Hz. Ne
le connectez jamais directement à une source
d'alimentation de courant continu (CC).
Positionnez le téléviseur dans une pièce où
la lumière n’éclaire pas directement l'écran.
/¶REVFXULWpWRWDOHRXGHVUHÀHWVVXUO¶pFUDQ
du téléviseur peuvent provoquer une fatigue
oculaire. Pour que le visionnage soit confortable,
il est recommandé d’utiliser un éclairage indirect
et doux.
/DLVVH]XQHVSDFHVXI¿VDQWHQWUHOHWpOpYLVHXUHW
le mur pour permettre une bonne aération.
Évitez les endroits excessivement chauds,
D¿QG¶pYLWHUG¶HQGRPPDJHUOHPHXEOHRXGH
provoquer la panne prématurée d’un composant.
,16758&7,216328581(,167$//$7,21
MURALE
1.
Placez le téléviseur LED LCD sur une surface
solide. Intercalez un matériau mou entre la
VXUIDFHHWO¶pFUDQD¿QG¶pYLWHUG¶HQGRPPDJHUFH
dernier.
2.
Retirez les quatre vis du téléviseur.
3.
Retirez la colonne de support.
4.
8WLOLVH]OHVTXDWUHYLVIRXUQLHVSRXU¿[HUOH
téléviseur sur un support mural (non fourni)
en utilisant les quatre trous au standard VESA
présents au dos du téléviseur.
Montage VESA 100 x 100mm

7
1.
Pour mettre la TV en marche ou en mode de
veille.
2. MUTE (Sourdine)
Pour désactiver le son ou remettre le son.
302'(
3RXUVpOHFWLRQQHUOHPRGHGLPDJH
Dynamique / Standard / Doux / Personnalisé.
602'(
3RXUVpOHFWLRQQHUOHPRGHVRQRUH6WDQGDUG
Musique / Vidéo / Personnalisé.
5. FAV
Permet d'accéder à vos chaînes préférées en
mode TV numérique
6/((36200(,/
Pour régler le minuteur TV
7. Boutons numériques de 0 à 9
Pour sélec tionner un programme. (mode
ATV / DTV)
8. -/--
Appuyez sur ce bouton avant d'entrer un
numéro de chaîne supérieur à 09.
9.
Pour retourner à la chaîne visualisée
précédemment (mode ATV / DTV)
92/
Pour régler le niveau du volume.
11. CH
Pour sélectionner une chaîne.
12. CH.LIST
3RXUDI¿FKHUODOLVWHGHVFKDvQHVPRGH$79
/ DTV)
$63(&7)250$7',0$*(
Pour sélectionner un format parmi les modes
VXLYDQWV3OHLQpFUDQ=RRP=RRP$XWR
Description de la télécommande
MUTE
PMODE SMODE FAV SLEEP
CH.LIST
ASPECT
EPG AUDIO
MENU
EXIT
DISPLAY
SOURCE
TEXT
INDEX
HOLD
SIZE
SUBPAGE
REVEAL
SUBTITLE
ENTER
21
7
3
8
4
10
6
5
9
11
12 13
Démarrage

8
14. EPG
$I¿FKHOH(3**XLGHpOHFWURQLTXHGHV
programmes).
(mode DTV)
$8',2
Pour permuter en mode audio.
Ɣ
Pour enregistrer le programme en cours
(mode DTV)
17. MENU
3RXUDI¿FKHUOHPHQX26'$I¿FKDJHVXU
l'écran)
(;,748,77(5
3RXUTXLWWHUOHPHQX26'$I¿FKDJHVXU
l'écran).
19. ŻźŸŹ
3HUPHWGHQDYLJXHUGDQVOHVPHQXV26'HW
d'ajuster les réglages du système selon vos
préférences.
ENTER (ENTRER)
3RXUFRQ¿UPHUODVpOHFWLRQGDQVOHV
PHQXV26'
3RXUDI¿FKHUODOLVWHGHVFKDvQHV
sauvegardées dans la mémoire du tuner TV.
6285&(
Pour sélectionner la source parmi les
GLIIpUHQWVVLJQDX[GHQWUpH'79$79$9
3e5,7(/<3E3U+'0,+'0,+'0,
/ PC / MÉDIA.
',63/$<$)),&+$*(
3RXUDI¿FKHUFDFKHUOHVLQIRUPDWLRQVVXUOHV
programmes.
22.
Pour rembobiner rapidement la lecture
(mode USB)
Pour avancer rapidement la lecture
(mode USB)
Pour accéder au début du chapitre /
plage / photo précédent(e) (mode USB)
Pour accéder au début du chapitre /
plage / photo suivant(e) (mode USB)
Description de la télécommande
MUTE
PMODE SMODE FAV SLEEP
CH.LIST
ASPECT
EPG AUDIO
MENU
EXIT
DISPLAY
SOURCE
TEXT
INDEX
HOLD
SIZE
SUBPAGE
REVEAL
SUBTITLE
ENTER
15
14
18
17
20
19
21
16
22
Démarrage

9
7(;77(;7(
Pour activer ou désactiver la fonction du
télétexte (mode ATV / DTV)
24.
Appuyez une fois pour arrêter la lecture
(mode USB)
Ź,,
3RXUGpPDUUHUODOHFWXUHHQGpFDODJH
temporel (mode DTV)
3RXUGpPDUUHUODOHFWXUHRXSRXUPHWWUH
la lecture en pause (mode USB)
,1'(;
Pour sélectionner le numéro de la page
d'index du télétexte (mode ATV / DTV)
6,=(7$,//(
Pour agrandir la taille de l'image du télétexte
(mode ATV / DTV)
5(9($/5e9e/(5
3RXUDI¿FKHUOHVLQIRUPDWLRQVFDFKpHV
comme les réponses à un quiz dans le
télétexte (mode ATV / DTV).
+2/'%/2&$*(
Pour geler un passage sur l'écran dans le
télétexte (mode ATV / DTV)
68%3$*(62863$*(
3RXUDI¿FKHUODVRXVSDJHVXUOpFUDQGX
télétexte (mode ATV / DTV)
68%7,7/(62867,75(6
3RXUDI¿FKHUOHVVRXVWLWUHVTXLVRQWGLIIXVpV
avec le programme (mode DTV).
Description de la télécommande
Démarrage
MUTE
PMODE SMODE FAV SLEEP
CH.LIST
ASPECT
EPG AUDIO
MENU
EXIT
DISPLAY
SOURCE
TEXT
INDEX
HOLD
SIZE
SUBPAGE
REVEAL
SUBTITLE
ENTER
25
28
31
23
26
27
30
29
24
5(0$548(6LOQ\DSDVGHVLJQDOGHQWUpHOH
téléviseur se mettra automatiquement en veille ou
s'éteindra.

10
Boutons de contrôle (latéraux)
Branchement à l'alimentation
Branchements de l’antenne
%RXWRQVGH5e'8&7,21$8*0(17$7,21
GX92/80(
Pour augmenter / diminuer le volume. Dans
le système du menu, ils agissent comme les
touches de direction droite / gauche de la
télécommande et ajuste les contrôles du menu.
5HPDUTXH'DQVFHUWDLQVPHQXV92/80(83
$8*0(17$7,21GX92/80(DJLWpJDOHPHQW
FRPPHOHERXWRQ2.GHODWpOpFRPPDQGH
%RXWRQVGH5e'8&7,21$8*0(17$7,21
des CHAÎNES
3RXUIDLUHGp¿OHUODOLVWHGHVFKDvQHVYHUV
le haut / bas. Dans le système du menu, ils
agissent comme les boutons haut / bas de la
télécommande et pour ajuster les contrôles du
menu.
5HPDUTXH/HPSODFHPHQWHWOHQRPGHV
boutons des fonctions et le bouton d'alimentation
du téléviseur peuvent varier selon le modèle.
3. Bouton MENU
3RXUDI¿FKHUOHPHQXGDFFXHLORXSRXUUHYHQLU
au menu précédent.
%RXWRQ6285&(
Pour sélectionner la source du signal.
5. Bouton
Popur mettre la TV en marche ou pour la mettre
HQYHLOOHUHPDUTXHSRXUFHUWDLQVPRGqOHVOH
ERXWRQ32:(5$/,0(17$7,21HVWXWLOLVp
pour mettre le téléviseur en marche ou pour
l'éteindre).
Veuillez noter :
Après avoir déballé le téléviseur,
laissez le téléviseur atteindre la température
ambiante avant de le brancher à la prise
d'alimentation secteur.
Branchez le câble d'alimentation à une prise
secteur.
&RQQHFWH]ODSULVHGDQWHQQHRXGXFkEOH79
à l'ENTRÉE D'ANTENNE (ANT) située à l'arrière
du téléviseur.
X
Y
Z
[
\
Démarrage

11
Télécommande - Insertion des piles
Mise en marche et arrêt de la TV
Retirez le couvercle du compartiment des
piles au dos de la télécommande, poussez-le
doucement vers le bas et tirez-le vers l'arrière en
même temps, comme illustré.
Insérez deux piles de type
AAA/R3
ou de type
pTXLYDOHQW9pUL¿H]TXHOHVSLOHVVRQWLQVpUpHV
dans le sens correct et replacez le couvercle du
compartiment des piles.
Remarque :
Si la télécommande n'est pas
utilisée pendant une longue période, veuillez
retirer les piles. Autrement, la télécommande
pourrait être endommagée par une fuite du
liquide des piles ou par la corrosion.
Mise en marche de la TV
$YHFOHFkEOHGDOLPHQWDWLRQFRQQHFWpjODSULVH
secteur et le téléviseur en mode de
"veille"
.
Pour mettre la TV en mode de veille, procédez
FRPPHVXLW
a: Sur la télécommande:
appuyez sur le bouton
“ ”.
b: Sur la TV:
Appuyez sur le bouton sur le
côté de la TV.
Arrêt de la TV
Appuyez soit sur le bouton “ ” de la
télécommande ou appuyez sur le bouton sur
le côté de la TV, et le téléviseur sera mis en
mode de veille.
2 piles de
type AAA/R3
Démarrage

12
Fonctionnement en utilisant les boutons
de contrôle TV
Utilisation de la télécommande
Les boutons
VOL+/VOL-
fonctionnent pour
augmenter/diminuer le volume par défaut. Même
VLYRXVGp¿QLVVH]GDXWUHVIRQFWLRQVSRXUFHV
boutons, les boutons
VOL + / VOL-
contrôleront
de nouveau le niveau du volume après un court
moment.
Réglage du volume
Appuyez sur les boutons
VOL+/VOL-
pour
augmenter ou diminuer le niveau du volume.
Sélection de chaîne
Appuyez sur les boutons
&+ޔ&+ޕ
pour
sélectionner la chaîne précédente ou suivante.
La télécommande est conçue pour contrôler
toutes les fonctions du modèle que vous avez
sélectionné.
Réglage du volume
Appuyez sur le bouton
VOL+
pour augmenter le
niveau du volume.
Appuyez sur le bouton
VOL-
pour diminuer
le niveau du volume. Une échelle de volume
FXUVHXUVDI¿FKHUDVXUOpFUDQ
Sélection de chaîne (chaîne précédente ou
suivante)
Appuyez sur le bouton
&+ޕ
pour sélectionner la
chaîne précédente.
Appuyez sur le bouton
&+ޔ
pour sélectionner la
chaîne suivante.
Sélection de chaîne
(accès direct)
Appuyez sur les boutons numériques de la
télécommande pour sélectionner les chaînes
HQWUHHW/D79DI¿FKHUDODFKDvQH
sélectionnée.
X
Y
Z
[
\
MUTE
PMODE SMODE FAV SLEEP
CH.LIST
ASPECT
EPG AUDIO
MENU
EXIT
DISPLAY
SOURCE
TEXT
INDEX
HOLD
SIZE
SUBPAGE
REVEAL
SUBTITLE
ENTER
Démarrage
&HERXWRQFOpHVWXWLOLVpSRXUVpOHFWLRQQHUODI¿FKDJH
26'QRUPDOHWSRXUFKDQJHUODVRXUFHGHQWUpH6L
la télécommande ne fonctionne pas correctement,
veuillez la remplacer par une nouvelle télécommande
ou consultez le centre d'entretien.

13
MISE EN SERVICE MISE EN SERVICE
Fonctionnement général
%UDQFKH]XQHH[WUpPLWpGXFkEOHFRD[LDO5)
à la prise d'antenne mural et l'autre extrémité
GXFkEOHjODSULVH5)ȍDXEDVGHYRWUH
téléviseur.
%UDQFKH]OHFkEOHGDOLPHQWDWLRQjOD
prise secteur après avoir effectué toutes les
connexions.
8QHIRLVOHFkEOHGDOLPHQWDWLRQFRQQHFWpj
la prise secteur et le téléviseur mis en mode
de
"veille"
, le téléviseur passe en mode veille.
L'indicateur rouge s'allume sur le panneau avant
du téléviseur.
4. En mode de veille, appuyez sur le bouton
“ ”
situé sur le côté du téléviseur ou sur le bouton
de la télécommande pour allumer le téléviseur.
L'indicateur rouge devient bleu.
5. La première fois que vous allumez le
téléviseur, le menu de
3UHPLqUHLQVWDOODWLRQ
VDI¿FKHUDDXWRPDWLTXHPHQW$SSX\H]VXUOHV
ERXWRQVŻŹŸźSRXUQDYLJXHUGDQVOHPHQX
HWPRGL¿HUOHVSDUDPqWUHV
/DQJXHG¶DI¿FKDJH26'
6pOHFWLRQQH]ODODQJXHGpVLUpHTXLVDI¿FKHUD
sur le menu. La langue du menu par défaut sur
l'écran est l'anglais
.
Réglage du mode
Sélectionnez le réglage du mode désiré.
0RGH'RPLFLOHSRXUXQYLVLRQQDJHjOD
maison.
0RGH0DJDVLQSRXUXQHGpPRQVWUDWLRQGDQV
le magasin; la luminosité est plus élevée que le
mode Domicile.
3D\V
Pour sélectionner le pays où vous allez utiliser le
téléviseur. Le pays par défaut est la France.
Type de tuner
3RXUVpOHFWLRQQHUOHW\SHGHWXQHU&kEOH
Antenne.
Balayage automatique
Pour sélectionner le type de balayage
DXWRPDWLTXH'79$79'79$79
LCN
Pour activer ou désactiver le type LCN.
Mise à jour automatique des chaînes
Pour activer ou désactiver la mise à jour
automatique des chaînes.
Démarrage
Appuyez sur le bouton
ENTER
pour démarrer
le balayage automatique. Le le balayage
DXWRPDWLTXHFRPPHQFHUD/pFUDQDI¿FKHUD
l'état d'avancement du balayage et le nombre de
chaînes trouvées.
6.
Si vous voulez annuler le balayage
automatique DTV, appuyez sur le bouton
MENU
pour interrompre le réglage.
Vous serez alors diriger directement sur le
balayage ATV. Vous pouvez répéter l'étape ci-
dessus si vous voulez aussi annuler le réglage
ATV.
Appuyez sur le bouton
SOURCE
de la
télécommande et sélectionner DTV pour régler la
TV en mode de diffusion de télévision numérique
terrestre.
Bannière d'information
Chaque fois que vous changez de chaîne à
l'aide des boutons
&+ޔ&+ޕ
ou des boutons
QXPpULTXHVOHWpOpYLVHXUDI¿FKHOLPDJHGH
diffusion avec une bannière d'information sur la
partie supérieure gauche de l'écran (disponible
seulement en mode DTV / ATV)
/DEDQQLqUHGLQIRUPDWLRQSHXWrWUHDI¿FKpHj
tout moment en regardant la TV en appuyant sur
la touche
',63/$<
de la télécommande.
First Time Setup
OSD Language
Mode Setting
Country
Tuner Type
English
Home Mode
France
Cable
Auto Scan DTV+ATV
LCN On
Auto Channel Update Off
Start
Move Adjust MENU: Return EXIT: Exit
Auto Scan
Scanning CH34
Digital Channels Found:
DTV :10 Radio :0 Data:0
Analog Channels Found: 0
MENU: Skip EXIT: Exit
Démarrage

14
Branchements
Description des connexions du côté gauche
1. Prise du casque
Pour connecter un casque externe au téléviseur.
&RQQHFWH]OHFDVTXHjODSULVH+($'3+21(
&$648(SRXUpFRXWHUOD79SDUOHFDVTXH
5HPDUTXH/HYROXPHGXFDVTXHSHXWrWUH
PRGL¿pjODLGHGHVERXWRQV92/HW92/
6&$573e5,7(/
Entrées ou sorties pour les périphériques
H[WHUQHV%UDQFKH]OHFkEOH3e5,7(/HQWUHOD
prise PÉRITEL du téléviseur et la prise PÉRITEL
de l'appareil externe (décodeur, magnétoscope
RXOHFWHXU'9'5HPDUTXH6LXQSpULSKpULTXH
externe est connecté via la prise PÉRITEL, le
téléviseur se mettra automatiquement en mode
PÉRITEL.
(QWUpH3&9*$3&$8',2
Permet de connecter un ordinateur personnel à
OD79%UDQFKH]OHFkEOH3&HQWUHOHQWUpH3&GX
téléviseur à la sortie PC de l'ordinateur.
5HPDUTXH6LYRXVFRQQHFWH]XQDSSDUHLODX
WpOpYLVHXUYLDOHFkEOH3&YRXVGHYH]pJDOHPHQW
XWLOLVHUXQFkEOHDXGLRSRXUFRQQHFWHUYRWUH
DSSDUHLOjO(175e(3&$8',2SRXUDFWLYHUOH
son.
6257,(&2$;,$/(
Branchez une barre audio, un système de haut-
parleur numérique, ou un système home cinéma
à cette prise pour écouter le téléviseur par les
haut-parleurs externes.
5. Entrée RF (ANT.)
3HUPHWGHFRQQHFWHUODQWHQQHRXOHFkEOH79
Si vous utilisez un décodeur ou un enregistreur
PpGLDYRXVGHYH]FRQQHFWHUOHFkEOHGDQWHQQH
jWUDYHUVOHGLVSRVLWLIDXWpOpYLVHXUDYHFXQFkEOH
d'antenne approprié.
6. Entrée HDMI
Permet de connecter un appareil doté d'une
SULVH+'0,/HWpOpYLVHXUSHXWDI¿FKHUGHV
LPDJHV+DXWH'p¿QLWLRQjSDUWLUGHGLVSRVLWLIV
tels qu'un récepteur speaSatellite haute
Gp¿QLWLRQRXXQOHFWHXU'9'&HVDSSDUHLOV
doivent être connectés via les prises HDMI ou
la prise composante. Aucune connexion audio
n'est nécessaire pour une connexion HDMI vers
HDMI.
5HPDUTXH/HSRUW+'0,HVWFRPSDWLEOHDYHF
la fonction ARC.
2
1
6
3
4
5
SCART
HDMI1(ARC)RF INVGA IN COAX OUTPC AUDIO IN
HEADPHONE

15
Branchements
Description des connexions du côté gauche
7. Entrée USB
Permet de connecter des périphériques au
téléviseur, fournissant un échange de données
rapide. Le mode USB fonctionne en mode USB /
DTV.
8. MINI entrée AV
3HUPHWGHFRQQHFWHUOHVSULVHVGHVRUWLH9,'(2
HW$8',2/5jXQDSSDUHLOYLGpRH[WHUQH
0,1,<3E3U
/DSULVHGHQWUpH<3E3UFRQYLHQWXQLTXHPHQWj
XQPLQLFkEOH<3E3U
Permet de connecter un lecteur DVD, un
décodeur numérique ou d'autres appareils AV
avec des prises de sortie vidéo composantes
<3E3U
5HPDUTXH9HXLOOH]XWLOLVHUODSULVH/$8',2
IN-R" lorsque vous voulez connecter à l'audio
<3E3U
10. Logement CI
Utilisé pour insérer une carte CI. Une carte CI
vous permet de visualiser toutes les chaînes
auxquelles vous êtes abonné(e). Pour plus
d'informations, voir le paragraphe "Accès
conditionnel".
8
7
9
10
6
HDMI2 HDMI3 USB
MINI
AV
MINI
YPbPr
CI SOLT

16
Branchements
Connexions HDMI
Connexions VGA
+'0,YRXVSHUPHWGHSUR¿WHUGLPDJHV
QXPpULTXHVKDXWHGp¿QLWLRQHWGXQVRQGH
haute qualité en connectant le téléviseur à des
périphériques externes tels que des lecteurs
DVD, des décodeurs ou des consoles de jeu.
Éteignez le téléviseur et l'appareil avant
d'effectuer les connexions.
Pour plus d'informations, reportez-vous au
manuel d'instructions de votre appareil.
Lors de la connexion, réglez la "source" sur
"HDMI". Voir le paragraphe "Sélection d'entrée".
Remarque : Le câble HDMI n'est pas fourni.
Vous pouvez connecter un ordinateur (PC) au
WpOpYLVHXUSRXUDI¿FKHUOLPDJHGHOpFUDQGH
votre ordinateur sur le téléviseur.
Éteignez l'ordinateur et le téléviseur avant toute
connexion.
8WLOLVH]XQFkEOHGDI¿FKDJH'VXEjEURFKHV
pour connecter un PC au téléviseur. Utilisez un
FkEOHDXGLRHQWUHOHVHQWUpHV$8',23&VXUOH
côté gauche du téléviseur et la sortie audio de
votre PC pour permettre la connexion sonore.
Lorsque la connexion est établie, réglez la
"Source" sur "PC". Voir le paragraphe "Sélection
d'entrée".
Réglez la résolution qui convient à vos besoins
GDI¿FKDJH/HVLQIRUPDWLRQVVXUODUpVROXWLRQ
peuvent être trouvées dans les " Annexes ".
Remarque : Le câble VGA n'est pas fourni.
HDMI1(ARC)RF IN
A
IN COAX OUT
HDMI2 HDMI3 USB
MINI
AV
MINI
YPbPr
CI SOLT
SCART
HDMI1(ARC)RF INVGA IN COAX OUTPC AUDIO IN
HEADPHONE
HDMI2 HDMI3 US
B

17
Fonctions de base
Navigation dans les menus - Sélection de la source
*8,'(e/(&7521,48('(6352*5$00(6(3*0RGH'79
1. Appuyez sur le bouton
SOURCE
en haut
de la TV ou sur le bouton
SOURCE
de la
WpOpFRPPDQGHSRXUDI¿FKHUODOLVWHGHVVRXUFHV
d'entrée.
$SSX\H]VXUOHERXWRQŸźSRXUVpOHFWLRQQHU
ODVRXUFHGHQWUpHTXHYRXVGpVLUH]'79$79
$93e5,7(/<3E3U+'0,+'0,+'0,
/ PC / MÉDIA.
3. Appuyez sur le bouton
ENTER
SRXUFRQ¿UPHU
votre sélection.
Ce système a un guide électronique des
programmes (EPG) pour vous aider à naviguer à
WUDYHUVWRXWHVOHVRSWLRQVGDI¿FKDJHSRVVLEOHV
L'EPG fournit des informations telles que les
OLVWHVGHVFKDvQHVOHGpEXWHWOD¿QGHWRXVOHV
services disponibles. En outre, des informations
détaillées sur les chaînes sont souvent
disponibles dans l'EPG (la disponibilité et la
quantité d'informations sur la chaîne varient en
IRQFWLRQGHODGLIIXVLRQVSpFL¿TXH
Cette fonction ne peut être utilisée que lorsque
les informations EPG sont diffusées par les
sociétés de radiodiffusion.
/(3*DI¿FKHOHVGpWDLOVGHVFKDvQHVSRXUOHV
prochains jours.
1. Appuyez sur le bouton
(3*
pour accéder au
(3*
.
2. Appuyez de nouveau sur le bouton
(3*
ou sur le bouton
EXIT
pour quitter l'EPG et
retourner au visionnage normal du téléviseur.
&RPPDQGHVVXUODEDUUHGLQIRUPDWLRQ
528*(
(jour précédent)
Appuyez sur le bouton
528*(
pour voir le
programme du jour précédent.
VERT
(jour suivant)
Appuyez sur le bouton
VERT
pour voir le
programme du jour suivant.
JAUNE
(programmation)
Appuyez sur le bouton
JAUNE
SRXUDI¿FKHU
les rappels préréglés dans la liste de
programmation.
Appuyez sur le bouton JAUNE pour retourner à
l'EPG.
BLEU
(rappel)
Appuyez sur le bouton
BLEU
lorsqu'un
SURJUDPPHHVWVpOHFWLRQQpSRXUDI¿FKHUOH
menu de réglage des rappels.
$SSX\H]VXUOHVERXWRQVŻŹŸźSRXUDMXVWHU
les réglages puis appuyez sur le bouton
6DXYHJDUGHUSRXUFRQ¿UPHUOHVUpJODJHV$SUqV
FRQ¿UPDWLRQODOLVWHGHSURJUDPPDWLRQ(3*
VDI¿FKHUDDYHFYRVUDSSHOVSUpUpJOpV$SSX\H]
sur le bouton JAUNE pour retourner à l'EPG.
Le téléviseur syntonisera automatiquement le
programme sélectionné lorsqu'il démarrera.
REC
(ENREGISTREMENT)
Pour programmer le minuteur.
ENTER
(ENTRER)
$SSX\H]VXUFHERXWRQSRXUDI¿FKHUOHV
informations détaillées sur le programme
sélectionné (si disponible).
SOURCE
DTV
ATV
AV
YPbPr
SCART
HDMI3
HDMI1
HDMI2
PC
MEDIA
Soure:Exit
Move
PROGRAM GUIDE
26 Dec 2008 10:00 - 26 Dec 2008 10:25 Big Cook Little Cook
Penguin: Cookey series with Big Cook Ben and foot-high Little Cook Small. Ben comes in to the cate
wearing flippers and a mask he’s found in the fancy dress box. [AD,S]
PrevDate NextDate Schedule Reminder
Rec: Record ENTER: Display EXIT: Exit
009 BBC FOUR
071 CBeebies
081 BBC Parliament
087 Community
301 301
302 302
10:00 Big Cook Little Cook
10:25 Bob the Builder
10:40 Me Too!
11:00 Something Special
11:15 Doodle Do
11:35 Our Planet
26 Dec 2008 10:21:43
[Children’s]

18
Fonctions de base
Télétexte (mode ATV)
Le télétexte est un service gratuit diffusé par
certaines chaînes de télévision qui donnent à
la minute des informations sur les nouvelles, la
météo, les programmes de télévision, les prix
des actions et sur de nombreux autres sujets.
En utilisant les boutons de contrôle du télétexte,
YRXVSRXYH]DI¿FKHUGHVSDJHVGLQIRUPDWLRQTXL
sont répertoriées dans l'
INDEX
du télétexte.
3RXUDFWLYHUODIRQFWLRQ7pOpWH[WH
En mode ATV, appuyez sur le bouton
TEXT
7(;7(
pour accéder au mode Télétexte.
Appuyez sur le bouton
INDEX
SRXUDI¿FKHUOD
page de l'
INDEX
.
Appuyez une fois sur le bouton
TEXT
pour
quitter ce mode et le téléviseur retournera à la
chaîne que vous regardiez.
3RXUVpOHFWLRQQHUXQHSDJHGXWH[WH
Trouvez le numéro de la page dans l'
INDEX
et accédez-y en utilisant les boutons de
0 à 9
.
Le numéro de la page apparaîtra dans le coin
supérieur gauche de l'écran.
Le compteur de pages recherchera votre page.
8QHIRLVWURXYpHODSDJHVHUDDI¿FKpH
Pour passer à la page suivante du texte,
DSSX\H]VXUOHERXWRQŸ
Pour passer à la page précédente, appuyez sur
OHERXWRQź
Pour revenir à la page de l'
INDEX
, entrez le
numéro "
100
" utilisant les boutons de
0 à 9
ou
appuyez sur le bouton
INDEX
.
0L[6XSHUSRVLWLRQ
3RXUDI¿FKHUXQHSDJHGHWH[WHWRXWHQ
regardant un programme TV, appuyez deux fois
sur le bouton
TEXT
. Le texte sera superposé au
programme TV.
'RXEOHKDXWHXUGXWH[WH
6LYRXVDYH]GHVGLI¿FXOWpVjOLUHOHWH[WHVXUOH
téléviseur, vous pouvez doubler la hauteur du
texte.
Appuyez sur le bouton
6,=(7$,//(
. La moitié
VXSpULHXUHGHODSDJHVHUDDI¿FKpHDYHFXQ
texte à double hauteur.
Appuyez de nouveau sur le bouton
SIZE
7$,//(
. La moitié inférieure de la page sera
DI¿FKpHDYHFXQWH[WHjGRXEOHKDXWHXU
Appuyez une nouvelle fois sur le bouton
SIZE
7$,//(
pour revenir à la page complète.
%ORFDJHGHODSDJH+2/'
Si la page de texte que vous avez sélectionnée
contient des sous-pages, ces sous-pages seront
DXWRPDWLTXHPHQWDI¿FKpHVGDQVORUGUHDYHF
un délai pour vous permettre d'avoir assez de
temps pour lire la page.
3RXUDUUrWHUOHGp¿OHPHQWYHUVODVRXVSDJH
suivante, appuyez sur le bouton
HOLD
.
3RXUFRQWLQXHUOHGp¿OHPHQWGHVVRXVSDJHV
appuyez de nouveau sur le bouton
HOLD
.
0pWKRGHDOWHUQDWLYH$SSX\H]VXUOHERXWRQ
68%3$*(62863$*(
, puis utilisez les
boutons numériques de 0 à 9 pour entrer un
numéro de page à 4 chiffres.
3RXUDI¿FKHUOHVLQIRUPDWLRQV
Appuyez sur le bouton
5(9($/5e9e/(5
pour révéler les informations cachées (réponses
au quiz etc.).
Appuyez de nouveau sur le bouton
REVEAL
pour cacher les informations.
)DVWWH[W
Au bas de l'écran du télétexte se trouve une
rangée de rubriques en rouge, vert, jaune et
bleu. La télécommande est dotée d'une rangée
de boutons de couleur correspondant à la
rangée de rubriques de couleur sur l'écran.
Appuyez sur un des boutons de couleur pour
accéder directement à la page correspondante à
la rubrique.
Assurez-vous que la chaîne TV que vous
regardez transmet le télétexte.Le message "Pas
de télétexte" apparaîtra à l'écran si le télétexte
n'est pas disponible.

19
Fonctions de base
Télétexte numérique (mode DTV)
Enregistrement de programmes TV sur un périphérique de stockage USB
Le télétexte numérique peut accéder à des
services de télétexte numérique spéciaux et des
VHUYLFHVVSpFL¿TXHVTXLGLIIXVHQWOHWpOpWH[WH
numérique. Vous devez désactiver la fonction de
sous-titrage avant d'utiliser le télétexte.
1. En mode DTV, appuyez sur le bouton
TEXT
SRXUDI¿FKHUODSDJHGXWpOpWH[WH
Utilisez cette fonction pour enregistrer le
programme de télévision numérique que vous
UHJDUGH]VXUOpFUDQD¿QGHOHVDXYHJDUGHUSRXU
un visionnement ultérieur. L'enregistrement d'un
programme par minuteur ou un enregistrement
direct peut commencer à enregistrer le
programme diffusé avec un léger délai.
Veuillez vous assurer que le périphérique USB
est inséré. Sinon, un message d'avertissement
apparaîtra.
$SSX\H]VXUOHERXWRQƔ5(&SRXUHQUHJLVWUHU
le programme que vous êtes en train de
regarder.
1.Appuyez sur le bouton Stop pour arrêter
l'enregistrement.
2. Appuyez sur les boutons numériques de 0 à 9
pour sélectionner un numéro de page.
3. Suivez les instructions sur le télétexte
numérique et passez à l'étape suivante en
appuyant sur
(17(5ŻŹ528*(9(57
JAUNE, BLEU
ou sur les boutons numériques
de 0 à 9 etc.
4. Pour changer de service de télétexte
numérique, sélectionnez un service différent en
utilisant les boutons numériques de
0 à 9
ou les
ERXWRQVŸź
$XWUHPpWKRGH9RXVSRXYH]DSSX\HUVXUOH
ERXWRQ528*(GXERXWRQ
TEXT
SRXUDI¿FKHU
les informations télétexte lorsque vous voyez un
ORJRURXJHƔDI¿FKpjOpFUDQSDUH[HPSOHVXU
la chaîne BBC).
5. Appuyez sur le bouton
TEXT
pour quitter ce
mode.
Recording
Recorded Time : 00 : 00 : 47
Available Time: 3837 Minute
16 QVC
A Traditional Christ
3RXUDI¿FKHUOHVLQIRUPDWLRQVGHQUHJLVWUHPHQW
DSSX\H]VXUOHERXWRQƔ5(&
6LXQGLVTXHGXUHVWXWLOLVpDVVXUH]YRXVTXH
l'adaptateur secteur est branché sur le secteur.
6LXQFRQFHQWUDWHXU86%HVWXWLOLVpDVVXUH]
vous que l'adaptateur secteur est branché
sur le secteur car la consommation totale de
courant peut dépasser 500 mA.
/HVSDFHGHVWRFNDJHPD[LPXPGXGLVTXH
dur est de 1 To.
/HV\VWqPHGH¿FKLHUVQHVWFRPSDWLEOH
qu'avec le format FAT32.
6LYRXVVRXKDLWH]HQUHJLVWUHUODGLIIXVLRQ
vidéo d'un programme de télévision numérique
(DTV), le débit de transfert du périphérique
de stockage USB ne doit pas être inférieur à
5 Mo/s, sinon l'image et le son du programme
seront affectés et un message d'avertissement
VDI¿FKHUDVXUOpFUDQ6LFHODVHSURGXLW
veuillez mettre à jour votre périphérique de
stockage USB.
/pFUDQGXWpOpYLVHXUUHVWHUDWHPSRUDLUHPHQW
vide car il faudra du temps pour démarrer et
stabiliser le disque dur connecté. Ceci est
normal et la durée de démarrage peut varier
en fonction de la marque et de la taille de la
mémoire du disque dur connecté.
'pEUDQFKH]OHSpULSKpULTXHGHVWRFNDJH86%
si vous ne l'utilisez pas.
L'enregistrement s'arrête automatiquement
lorsque le disque est plein.

20
Fonctions de base
Programmation du minuteur
Cette fonction est utilisée pour programmer les
enregistrements.
L'enregistrement d'un programme par minuteur
ou un enregistrement direct peut commencer à
enregistrer le programme diffusé avec un léger
délai.
Veuillez vous assurer que le périphérique USB
est inséré. Sinon, un message d'avertissement
apparaîtra.
1. Appuyez sur le bouton
(3*
de la
télécommande. Le menu
(3*
apparaîtra.
$SSX\H]VXUOHERXWRQƔ5(&GHOD
télécommande lorsque le programme sélectionné
est en cours, le menu des
Enregistrements
programmés
VDI¿FKHUD$SSX\H]VXUOHV
ERXWRQVŸźŻŹSRXUVpOHFWLRQQHUOHVUpJODJHV
dans le menu
5(&25'(15(*,675(0(17
de la fréquence, de la chaîne, de l'heure du
GpEXWHWGHOKHXUHGH¿Q
Fréquence
$SSX\H]VXUOHERXWRQŻŹSRXUVpOHFWLRQQHUOD
fréquence (Désactivé / Une fois / Tous les jours /
Toutes les semaines).
Chaînes
Appuyez sur le bouton
ENTER
puis appuyez sur
OHVERXWRQVŸźSRXUVpOHFWLRQQHUODFKDvQHTXH
vous désirez enregistrer.
Heure du début
(pour les modes Une fois / Tous
les jours / Toutes les semaines) Appuyez sur les
ERXWRQVŸźŻŹSRXUUpJOHUOKHXUHGXGpEXW
+HXUHGH¿Q
(pour les modes Une fois / Tous les
jours / Toutes les semaines)
$SSX\H]VXUOHVERXWRQVŸźŻŹSRXUUpJOHU
OKHXUHGH¿Q
3. Après avoir terminé tous les réglages de
l'enregistreur, appuyez sur le bouton Save
6DXYHJDUGHUSRXUFRQ¿UPHUYRVSDUDPqWUHV
4. Le dossier
Liste des enregistrements
programmés
VDI¿FKHUDDORUVDYHFYRVUDSSHOV
préprogrammés.
5. Appuyez sur le bouton
EXIT
pour quitter le
mode EPG.
Move
PROGRAM GUIDE
26 Dec 2008 10:00 - 26 Dec 2008 10:25 Big Cook Little Cook
Penguin: Cookey series with Big Cook Ben and foot-high Little Cook Small. Ben comes in to the cate
wearing flippers and a mask he’s found in the fancy dress box. [AD,S]
PrevDate NextDate Schedule Reminder
Rec: Record ENTER: Display EXIT: Exit
009 BBC FOUR
071 CBeebies
081 BBC Parliament
087 Community
301 301
302 302
10:00 Big Cook Little Cook
10:25 Bob the Builder
10:40 Me Too!
11:00 Something Special
11:15 Doodle Do
11:35 Our Planet
26 Dec 2008 10:21:43
[Children’s]
Delete One
Move Up
Move Down
Select
Return
Exit
Function
OK
MENU
EXIT
Frequency
Off
Off
Off
Off
Off
Off
Off
Off
Off
Off
Off
Off
Off
Off
Off
Off
Hot Key
Date
Scheduled Record
Scheduled Record Setting List
Standby
Delete All
Group
1
2
3
4
5
6
7
8
9
10
11
12
13
14
15
16
Channel
Start Time
Duration
10:03
25 Dec 2008 Thu.
Scheduled Record - Group 1
Move Up
Move Down
Adjust
Adjust
Select
Return
Exit
Hot Key
OK
MENU
EXIT
Setting Status
Setting Is Not In Use
Frequency Off
1 BBC ONE
2008-12-25
1 0 : 0 5
2008-12-25
1 0 : 1 5
Channel
Start Time
End Time
Save
/RUVTXHOKHXUHSURJUDPPpHHVWDWWHLQWHOH
téléviseur commencera automatiquement à
enregistrer.
6LXQHQUHJLVWUHPHQWSURJUDPPpGpPDUUH
lorsque le téléviseur est en mode de veille,
l'indicateur LED clignotera alternativement en
rouge et bleu.

21
Fonctions de base
Lecture d'un programme enregistré
Gestion de l'image (mode ATV / DTV)
Lecture d'un programme enregistré
Vous pouvez mettre en lecture un programme
enregistré dans la liste des programmes
enregistrés ou à partir d'un périphérique de
stockage USB.
1. Appuyez sur le bouton
SOURCE
en haut
du téléviseur ou sur le bouton
SOURCE
de la
télécommande puis appuyez sur les boutons
ŸźSRXUVpOHFWLRQQHUOHPRGH0pGLDHW
appuyez sur le bouton
ENTER
.
$SSX\H]VXUOHVERXWRQVŻŹSRXU
sélectionner
029,(9,'e2
puis appuyez sur
le bouton
ENTER
.
3.
SSX\H]VXUOHVERXWRQVŸźSRXUVpOHFWLRQQHU
périphérique de stockage puis appuyez sur le
bouton
ENTER.
4.
$SSX\H]VXUOHVERXWRQVŸźSRXU
sélectionner le dossier des “
enregistrements
USB
” puis appuyez sur le bouton
ENTER
.
5.
$SSX\H]VXUOHVERXWRQVŸźSRXU
sélectionner le programme enregistré que vous
GpVLUH]YLVLRQQHUSXLVDSSX\H]VXUOHERXWRQŹ,,
pour le mettre en lecture.
1.
Appuyez sur le bouton
MENU
SRXUDI¿FKHUOH
PHQXGDFFXHLO$SSX\H]VXUOHVERXWRQVŻŹ
pour sélectionner
3LFWXUH,PDJH
dans le menu
d'accueil, puis appuyez sur le bouton
ENTER
et
la première option sera surlignée.
$SSX\H]VXUOHVERXWRQVŸźSRXU
sélectionner l'option que vous désirez régler
dans le menu Image.
$SSX\H]VXUOHVERXWRQVŻŹŸźSRXU
changer les paramètres suivants.
&216(,/6
9RXVSRXYH]FKDQJHUODYDOHXUGHODOXPLQRVLWp
du contraste, de la netteté et de la saturation
lorsque l'image est en mode "Personnalisé".
9RXVSRXYH]DSSX\H]VXUOHERXWRQ
302' (
de la télécommande pour changer directement
le mode d'image.
6.
Appuyez sur le bouton
ENTER
ou sur le
bouton
',63/$<
SRXUDI¿FKHUODEDUUHGHV
IRQFWLRQV$SSX\H]VXUOHVERXWRQVŻŹSXLV
appuyez sur le bouton
ENTER
pour sélectionner
ODIRQFWLRQ3DXVH3UpFpGHQW6XLYDQW5HWRXU
rapide / Avance rapide / Arrêt.
7.
Appuyez sur le bouton
(3*
pour accéder au
menu rapide (Répétition / Type d'encodage)
8.
Appuyez sur le bouton
EXIT
pour retourner au
menu précédent.
Photo Music Movie Text
Movie
Move
Change Page OK Selete EPG Quick Menu EXIT Return
USB1
USB1
Movie
Move
Change Page OK Selete EPG Quick Menu EXIT Return
USB1/Movie
AITEMP
Movie
MY PVR
Photo
Te xt
Music
LE32G
1/1
00 : 05 : 1300 : 00 : 22
FileName
VideoCodec :
Resolution
Bitrate :
Animals.AVI
MPEG4
640 x 480
4158120 bps
AudioCodec :
SampleRate :
Channel :
MP3
44100 Hz
2
Picture
Picture Mode
Brightness
Contrast
Sharpness
Saturation
Hue
Colour Temp
Aspect Ratio
Standard
Standard
Full
50
50
50
50
0
Move tixE :TIXE nruteR :UNEMtsujdA

22
Fonctions de base
Gestion de l'image Gestion du son
Mode Image
Permet la sélection d'une technique
d'amélioration de l'image parmi les options
VXLYDQWHV'\QDPLTXH6WDQGDUG'RX[
personnalisé.
Luminosité
Ce paramètre permet de régler la sortie de la
¿EUHRSWLTXHGHOLPDJHHQWLqUHHOOHVDSSOLTXH
sur la zone sombre de l'image.
Contraste
Ce paramètre permet de régler l'intensité
lumineuse de l'image, mais l'ombre de l'image
QHVWSDVPRGL¿pH
Netteté
Ce paramètre permet de régler la netteté des
détails de l'image.
Saturation
Ce paramètre permet de régler la saturation des
couleurs selon vos préférences.
Nuance
Ce paramètre peut être utilisé pour compenser
le changement de couleur avec la transmission
en code NTSC.
Température des couleurs
Ce paramètre peut être utilisé pour augmenter
ou réduire les tons chauds de l'image (rouge),
et les tons froids (bleu) en fonction de vos
SUpIpUHQFHV,QWHQVL¿HUOHVWRQVIURLGVDXJPHQWH
ODFRXOHXUEOHXHVXUOHEODQF0DLVLQWHQVL¿HUOHV
tons chauds augmente la couleur rouge sur le
blanc.
Format d'écran
Ce paramètre vous permet de regarder l'écran
GDQVGLIIpUHQWVIRUPDWVGLPDJH$XWR
3OHLQpFUDQ=RRP=RRP
Mode d'écran
Permet de sélectionner le mode d'écran du
VLJQDO+'0,$XWR9LGpR3&
3DUDPqWUHVDYDQFpV
155pGXFWLRQGXEUXLWUpGXLWOHQLYHDXVRQRUH
de l'appareil connecté (Moyen / Fort / Désactivé
/ Faible).
&RQWUDVWHG\QDPLTXHDMXVWHOHFRQWUDVWH
dynamique (Moyen / Fort / Désactivé / Faible).
4. Appuyez sur le bouton
EXIT
pour quitter le
menu.
1. Appuyez sur le bouton
MENU
SRXUDI¿FKHUOH
PHQXGDFFXHLO$SSX\H]VXUOHVERXWRQVŻŹ
pour sélectionner "Son" dans le menu d'accueil,
SXLVDSSX\H]VXUOHERXWRQźRXVXUOHERXWRQ
ENTER
et la première option sera surlignée.
$SSX\H]VXUOHVERXWRQVŸźSRXU
sélectionner l'option que vous désirez régler
dans le menu Son.
$SSX\H]VXUOHVERXWRQVŻŹŸźSRXU
changer les paramètres suivants.
&216(,/6
9RXVSRXYH]FKDQJHUODYDOHXUGHVDLJXV
et des graves lorsque le son est en mode
personnalisé.
9RXVSRXYH]DSSX\HUVXUOHERXWRQ
S.MODE
de la télécommande pour changer directement
le mode Son.
Mode sonore:
Permet la sélection d'une technique
d'amélioration de l'audio parmi les options
VXLYDQWHV6WDQGDUG0XVLTXH9LGpRHW
SHUVRQQDOLVp9RXVSRXYH]PRGL¿HUODYDOHXUGHV
aigus et des graves lorsque le son est en mode
personnalisé.
Aigus
Ce paramètre permet de contrôler l'intensité
relative des sons plus aigus.
Basses
Ce paramètre permet de contrôler l'intensité
relative des sons plus graves.
Balance
Ce paramètre permet de régler le volume relatif
des haut-parleurs dans un système de haut-
parleurs multiples.
Son surround
Ce paramètre permet de créer un environnement
sonore 3D à votre téléviseur lorsqu'il est en
marche.
Sound Mode
Treble
Bass
Balance
EQ Setting
AVL
Surround Sound
SPDIF
Standard
Off
Off
PCM
0
0
0
Move tixE :TIXE nruteR :UNEMtsujdA
Sound

23
Gestion du son Gestion des chaînes (mode ATV / DTV)
5pJODJH(4pJDOLVHXU
Ce paramètre permet de sélectionner un mode
GpJDOLVHXU'pVDFWLYp5RFN3RS-D]]
XWLOLVDWHXU9RXVSRXYH]PRGL¿HUODYDOHXUGH
l'égaliseur en mode utilisateur.
AVL
Ce paramètre permet d'activer / désactiver la
fonction de limitation du volume.
63',)
Ce paramètre permet de sélectionner le mode
GHVRUWLHDXGLRQXPpULTXH$XWR'pVDFWLYp
PCM.
Description audio
Ce paramètre permet d'activer / désactiver la
fonction de description audio.
Type de son
Lorsqu'un programme est sélectionné, appuyez
VXUOHERXWRQ076SRXUDI¿FKHUOHVLQIRUPDWLRQV
sonores sur la station sélectionnée.
Sélection sonore mono
Si le signal stéréo de la réception stéréo est
faible, vous pouvez permuter en mode mono en
appuyant sur le bouton
MTS
. En réception mono,
la clarté du son est améliorée. Pour revenir au
mode stéréo, appuyez de nouveau sur le bouton
MTS
.
Sélection de la langue lors de la diffusion de
deux langues
Si un programme peut être reçu en deux langues
(langue double), vous pouvez permuter sur
DUAL I, DUAL II, Mélange ou Mono en appuyant
plusieurs fois sur le bouton
MTS.
Type de tuner
1. Appuyez sur le bouton
MENU
SRXUDI¿FKHUOH
PHQXGDFFXHLO$SSX\H]VXUOHVERXWRQVŻŹ
pour sélectionner "Réglages" dans le menu
GDFFXHLOSXLVDSSX\H]VXUOHERXWRQźRXVXU
le bouton
ENTER
et la première option sera
surlignée.
$SSX\H]VXUOHVERXWRQVŸźSRXU
sélectionner
Type de tuner
puis appuyez sur
OHVERXWRQVŻŹSRXUVpOHFWLRQQHU&kEOHRX
Antenne ".
3.
Appuyez sur le bouton
EXIT
pour quitter le
menu.
Balayage automatique
Utilisez cette fonction pour rechercher
automatiquement et mémoriser toutes les
chaînes disponibles. Ceci est normalement
recommandé si certaines chaînes ont été
ajoutées ou supprimées par le diffuseur ou si
vous avez déménagé.
1. Appuyez sur le bouton
MENU
SRXUDI¿FKHUOH
PHQXGDFFXHLO$SSX\H]VXUOHVERXWRQVŻŹ
pour sélectionner
&KDQQHO&KDvQHV
dans le
PHQXGDFFXHLOSXLVDSSX\H]VXUOHERXWRQź
ou sur le bouton
ENTER
et la première option
sera surlignée.
$SSX\H]VXUOHVERXWRQVŸźSRXU
sélectionner Balayage automatique puis appuyez
sur le bouton
ENTER
pour accéder au sous-
menu.
Fonctions de base
Auto Scan
Tuner Type Cable
Off
Manual Scan
Channel Edit
Auto Channel Update
Common Interface
Favorite Manager
Signal Information
Move Adjust
MENU: Return EXIT: Exit
Channel
Auto Scan
Tuner Type Cable
Off
Manual Scan
Channel Edit
Auto Channel Update
Common Interface
Favorite Manager
Signal Information
Move Adjust
Channel
OK: Select MENU: Return EXIT: Exit
'LIIXVLRQ $I¿FKDJHVXUOpFUDQ
Mono Mono
6WpUpR 67e5e2
Dual DUAL I, DUAL II, Mélange
Envoie la langue de diffusion
primairevers les haut-parleurs
Envoie la langue de diffusion secondaire
vers les haut-parleurs
Envoie les langues de diffusion primaire et
secondaire vers les haut-parleurs
DU A L I
'84/,,
Mélange
Country
Mode
Start
UK
DTV+ATV
Scan Type Full
Network ID Auto
AutoFrequency
AutoSymbol Rate
Move tixE :TIXE nruteR :UNEMtsujdA
Auto Scan

24
Gestion des chaînes (mode ATV / DTV)
$SSX\H]VXUOHVERXWRQVŻŹŸźSRXU
QDYLJXHUGDQVOHPHQXHWPRGL¿HUOHV
paramètres.
3D\V
Ce paramètre permet de sélectionner le pays où
vous faites fonctionner la TV.
Mode
Ce paramètre permet de sélectionner le mode
GHEDOD\DJHDXWRPDWLTXH'79$79'79
ATV (mode DTV)
Type de balayage
Ce paramètre permet de sélectionner le type de
EDOD\DJH$YDQFp5DSLGH(QWLHU
ID réseau
Ce paramètre permet de sélectionner l'identité du
UpVHDX$XWRRXHQWUH]OHVFKLIIUHVQXPpULTXHV
Fréquence
Ce paramètre permet de sélectionner
ODIUpTXHQFH$XWRRXHQWUH]OHVFKLIIUHV
numériques.
Débit de symboles
Ce paramètre permet de sélectionner le débit
GHV\PEROHV$XWRRXHQWUH]OHVFKLIIUHV
numériques.
Start
Appuyez sur le bouton ENTER pour démarrer le
balayage automatique.
%DOD\DJHPDQXHO0RGH'79
Ce paramètre permet d'effectuer un réglage
manuel de précision sur les chaînes en mode
DTV.
1. Appuyez sur le bouton
MENU
SRXUDI¿FKHUOH
PHQXGDFFXHLO$SSX\H]VXUOHVERXWRQVŻŹ
pour sélectionner
&KDQQHO&KDvQHV
dans le
PHQXGDFFXHLOSXLVDSSX\H]VXUOHERXWRQź
ou sur le bouton
ENTER
et la première option
sera surlignée.
2.
$SSX\H]VXUOHVERXWRQVŸźSRXU
sélectionner
0DQXDO6FDQ%DOD\DJHPDQXHO
puis appuyez sur le bouton
ENTER
. Dans le
sous-menu, sélectionnez " Balayage manual
numérique " puis appuyez sur le bouton
ENTER.
Si le type de tuner est "Antenne"
Balayage numérique :
Appuyez sur les boutons
ŻŹSRXUVpOHFWLRQQHUODFKDvQHGpVLUpH
Démarrage :
$SSX\H]VXUOHVERXWRQVŸźSRXU
sélectionner "Démarrer" puis appuyez sur le
bouton
OK
pour démarrer le balayage.
Si le type de tuner est "Câble"
ID réseau:
$SSX\H]VXUOHVERXWRQVŻŹSRXU
VpOHFWLRQQHU,'UpVHDX$XWRRXHQWUH]OHV
chiffres numériques.
Débit de symboles :
Appuyez sur les boutons
ŻŹSRXUVpOHFWLRQQHU'pELWGHV\PEROHV
Auto ou entrez les chiffres numériques.
Modulation:
$SSX\H]VXUOHVERXWRQVŻŹ
SRXUVpOHFWLRQQHU0RGXODWLRQ$XWR4$0
4$04$04$04$0
Démarrage :
$SSX\H]VXUOHVERXWRQVŸźSRXU
sélectionner "Démarrer" puis appuyez sur le
bouton
ENTER
pour démarrer le balayage.
Fonctions de base
Auto Scan
Scanning CH34
Digital Channels Found:
DTV :10 Radio :0 Data:0
Analog Channels Found: 0
MENU: Skip EXIT: Exit
Auto Scan
Tuner Type Cable
Off
Manual Scan
Channel Edit
Auto Channel Update
Common Interface
Favorite Manager
Signal Information
Move
OK: Select MENU: Return EXIT: Exit
Channel
Network ID
Frequency
Symbol Rate
Modulation
Auto
474000 KHz
Auto
Auto
Start
Strength
0
Move MENU: Return EXIT: Exit
Digital Manual Scan
Adjust
Digital Scan
Start
Frequency
Strength
CH21
474.00 MHz
0
Move 0~9 Input MENU: Return EXIT: Exit
Digital Manual Scan
Adjust
Le type de tuner est "
Antenne
"
Le type de tuner est "
Câble
"
6LYRXVDUUrWH]OHEDOD\DJHDYDQWOD¿QOH
téléviseur signalera une erreur indiquant
qu'il n'y a plus de signal. Ceci est normal
car toutes les chaînes qui avaient été
mémorisées avant le balayage seront
effacées.

25
Gestion des chaînes (mode ATV / DTV)
%DOD\DJHPDQXHOPRGH$79
Ce paramètre permet d'effectuer un réglage
manuel de précision sur la réception des chaînes
est pauvre en mode ATV.
1. Appuyez sur le bouton
MENU
SRXUDI¿FKHUOH
PHQXGDFFXHLO$SSX\H]VXUOHVERXWRQVŻŹ
pour sélectionner
&KDQQHO&KDvQHV
dans le
PHQXGDFFXHLOSXLVDSSX\H]VXUOHERXWRQź
ou sur le bouton
ENTER
et la première option
sera surlignée.
2.
$SSX\H]VXUOHVERXWRQVŸźSRXU
sélectionner
0DQXDO6FDQ%DOD\DJHPDQXHO
puis appuyez sur le bouton
ENTER
. Dans le
sous-menu, sélectionnez " Balayage manuel
analogique " puis appuyez sur le bouton
ENTER
.
Balayage analogique
&HSDUDPqWUHSHUPHWGDI¿FKHUODIUpTXHQFH
HQFRXUVDSSX\H]VXUOHVERXWRQVŻŹSRXU
changer la fréquence.
Chaîne à sauvegarder
$SSX\H]VXUOHVERXWRQVŸźSRXUVpOHFWLRQQHU
"Chaîne à sauvegarder", appuyez sur les
ERXWRQVŻŹSRXUVpOHFWLRQQHUOHQXPpURGHOD
chaîne que vous voulez mémoriser.
Système des couleurs
$SSX\H]VXUOHVERXWRQVŸźSRXUVpOHFWLRQQHU
"Système de couleurs" puis appuyez sur les
ERXWRQVŻŹSRXUVpOHFWLRQQHU$XWR3$/
SECAM.
Système sonore
$SSX\H]VXUOHVERXWRQVŸźSRXUVpOHFWLRQQHU
"Système sonore" puis appuyez sur les boutons
ŻŹSRXUVpOHFWLRQQHU$XWR'.,%*
AFC
$SSX\H]VXUOHVERXWRQVŸźSRXUVpOHFWLRQQHU
$)&SXLVDSSX\H]VXUOHVERXWRQVŻŹSRXU
activer ou désactiver.
Démarrage
$SSX\H]VXUOHVERXWRQVŸźSRXUVpOHFWLRQQHU
'pPDUUHUSXLVDSSX\H]VXUOHVERXWRQVŻŹ
pour démarrer le réglage.
Mise à jour automatique des chaînes
1. Appuyez sur le bouton
MENU
SRXUDI¿FKHUOH
PHQXGDFFXHLO$SSX\H]VXUOHVERXWRQVŻŹ
pour sélectionner
&KDQQHO&KDvQHV
dans le
PHQXGDFFXHLOSXLVDSSX\H]VXUOHERXWRQź
ou sur le bouton
ENTER
et la première option
sera surlignée.
2.
$SSX\H]VXUOHVERXWRQVŸźSRXU
sélectionner
$XWR&KDQQHO8SGDWH0LVHjMRXU
DXWRPDWLTXHGHVFKDvQHV
puis appuyez sur le
ERXWRQŻŹSRXUDFWLYHURXGpVDFWLYHUODPLVHj
jour.
3.
Appuyez sur le bouton
EXIT
pour quitter le
menu.
0RGL¿FDWLRQGHVFKDvQHVPRGH'79
1.
Appuyez sur le bouton
MENU
SRXUDI¿FKHUOH
PHQXGDFFXHLO$SSX\H]VXUOHVERXWRQVŻŹ
pour sélectionner
&KDQQHO&KDvQHV
dans le
PHQXGDFFXHLOSXLVDSSX\H]VXUOHERXWRQź
ou sur le bouton
ENTER
et la première option
sera surlignée.
2.
$SSX\H]VXUOHVERXWRQVŸźSRXU
sélectionner
&KDQQHO(GLW0RGL¿FDWLRQGHV
FKDvQHV
puis appuyez sur le bouton
ENTER
pour accéder au sous-menu.
Fonctions de base
Auto Scan
Tuner Type Cable
Off
Manual Scan
Channel Edit
Auto Channel Update
Common Interface
Favorite Manager
Signal Information
Move
OK: Select MENU: Return EXIT: Exit
Channel
Analog Scan
Channel to Save
Colour System
Sound System
AFC
Start
420.25 MHz
CH001
Auto
Auto
Off
Move 0~9 Input MENU: Return EXIT: Exit
Analog Manual Scan
Fine tune
Auto Scan
Tuner Type Cable
Off
Manual Scan
Channel Edit
Auto Channel Update
Common Interface
Favorite Manager
Signal Information
Move
OK: Select MENU: Return EXIT: Exit
Channel
Auto Scan
Tuner Type Cable
Off
Manual Scan
Channel Edit
Auto Channel Update
Common Interface
Favorite Manager
Signal Information
Move Adjust
MENU: Return EXIT: Exit
Channel

26
Gestion des chaînes (mode ATV / DTV)
0RGL¿FDWLRQGHVFKDvQHVPRGH'79
1.
Appuyez sur le bouton
MENU
SRXUDI¿FKHUOH
PHQXGDFFXHLO$SSX\H]VXUOHVERXWRQVŻŹ
pour sélectionner
&KDQQHO&KDvQHV
dans le
PHQXGDFFXHLOSXLVDSSX\H]VXUOHERXWRQź
ou sur le bouton
ENTER
et la première option
sera surlignée.
2.
$SSX\H]VXUOHVERXWRQVŸźSRXU
sélectionner
&KDQQHO(GLW0RGL¿FDWLRQGHV
FKDvQHV
puis appuyez sur le bouton
ENTER
pour accéder au sous-menu.
Supprimer
Appuyez sur le bouton
528*(
pour supprimer
la chaîne sélectionnée.
Sauter
Appuyez sur le bouton
VERT
pour sélectionner
la chaîne que vous voulez sauter lorsque vous
sélectionnez les chaînes. Appuyez de nouveau
sur le bouton
VERT
pour annuler.
Déplacer
Appuyez sur le bouton
BLEU
puis appuyez
VXUOHVERXWRQVŸźSRXUGpSODFHUODFKDvQH
sélectionnée. Appuyez sur le bouton
BLUE
pour
FRQ¿UPHU$SSX\H]VXUOHVERXWRQVŻŹSRXU
VpOHFWLRQQHU$XWR3$/
Renommer
Appuyez sur le bouton
JAUNE
pour renommer
la chaîne sélectionnée. Appuyez sur les boutons
ŸźSRXUVpOHFWLRQQHUOHVFDUDFWqUHVIRUPDQWOH
QRPGHODFKDvQH$SSX\H]VXUOHVERXWRQVŻŹ
pour déplacer le curseur sur le caractère suivant
puis appuyez de nouveau sur le bouton
ENTER
SRXUFRQ¿UPHUOHQRXYHDXQRP
*HVWLRQGHVFKDvQHVIDYRULWHV
1.
Appuyez sur le bouton
MENU
SRXUDI¿FKHUOH
PHQXGDFFXHLO$SSX\H]VXUOHVERXWRQVŻŹ
pour sélectionner
&KDQQHO&KDvQHV
dans le
PHQXGDFFXHLOSXLVDSSX\H]VXUOHERXWRQź
ou sur le bouton
ENTER
et la première option
sera surlignée.
2.
$SSX\H]VXUOHVERXWRQVŸźSRXU
sélectionner
)DYRULWH0DQDJHU*HVWLRQGHV
FKDvQHVIDYRULWHV
puis appuyez sur le bouton
ENTER
pour accéder au sous-menu.
Fonctions de base
Auto Scan
Tuner Type Cable
Off
Manual Scan
Channel Edit
Auto Channel Update
Common Interface
Favorite Manager
Signal Information
Move
OK: Select MENU: Return EXIT: Exit
Channel
Delete
Move MENU: Return EXIT: Exit
Channel Edit
Page
Skip RenameMove
Auto Scan
Tuner Type Cable
Off
Manual Scan
Channel Edit
Auto Channel Update
Common Interface
Favorite Manager
Signal Information
Move
OK: Select MENU: Return EXIT: Exit
Channel
Favorite Manager
NO. Program Name Fav1 Fav2 Fav3 Fav4 Type
Favorite1 Favorite2 Favorite3 Favorite4
Move Page
EXIT: Exit MENU: Return
Delete
Move MENU: Return EXIT: Exit
Channel Edit
Page
Skip Move
Supprimer
Appuyez sur le bouton
528*(
pour supprimer
la chaîne sélectionnée.
Sauter
Appuyez sur le bouton
VERT
pour sélectionner
la chaîne que vous voulez sauter lorsque vous
sélectionnez les chaînes. Appuyez de nouveau
sur le bouton
VERT
pour annuler.
Déplacer
Appuyez sur le bouton
BLEU
puis appuyez
VXUOHVERXWRQVŸźSRXUGpSODFHUODFKDvQH
sélectionnée. Appuyez sur le bouton
BLUE
pour
FRQ¿UPHU

27
Gestion des chaînes (mode ATV / DTV)
,QWHUIDFHFRPPXQHPRGH'79
Pour voir les informations sur le module.
1.
Appuyez sur le bouton
MENU
SRXUDI¿FKHUOH
PHQXGDFFXHLO$SSX\H]VXUOHVERXWRQVŻŹ
pour sélectionner
&KDQQHO&KDvQHV
dans le
PHQXGDFFXHLOSXLVDSSX\H]VXUOHERXWRQź
ou sur le bouton
ENTER
.
2.
$SSX\H]VXUOHVERXWRQVŸźSRXU
sélectionner
&RPPRQ,QWHUIDFH,QWHUIDFH
FRPPXQH
puis appuyez sur le bouton
ENTER
.
3.
Le menu d'accueil de l'interface commune
VDI¿FKHUD$SSX\H]VXUOHVERXWRQVŸźSRXU
sélectionner les paramètres puis appuyez sur le
bouton
ENTER
pour cRQ¿UPHU
4.
Appuyez sur le bouton
EXIT
pour quitter le
menu.
L'interface commune permet l'utilisation d'un
module d'accès commun pour vous permettre
de voir les services brouillés (payants). Ces
services sont fournis par TopUp TV (Royaume-
Uni uniquement) ou d'autres fournisseurs.
Le module d'accès commun et une carte de
visualisation peuvent être obtenus auprès du
fournisseur de services.
,QIRUPDWLRQVVXUOHVLJQDOPRGH'79
1. Appuyez sur le bouton
MENU
SRXUDI¿FKHUOH
PHQXGDFFXHLO$SSX\H]VXUOHVERXWRQVŻŹ
pour sélectionner
&KDQQHO&KDvQHV
dans le
PHQXGDFFXHLOSXLVDSSX\H]VXUOHERXWRQź
ou sur le bouton
ENTER
.
$SSX\H]VXUOHVERXWRQVŸźSRXU
sélectionner
6LJQDO,QIRUPDWLRQ,QIRUPDWLRQV
VXUOHVLJQDO
puis appuyez sur le bouton
ENTER
pour voir les informations sur le signal.
Cette fonction n'est pas disponible dans tous les
pays.
3RXULQVpUHUOHPRGXOHGDFFqVFRPPXQ
1. Avant d'insérer le module d'accès commun,
assurez-vous que le téléviseur est éteint et que
la carte de visionnage est insérée conformément
aux instructions du fournisseur de services.
2. Insérez le module d'accès commun dans la
fente. Retournez le module d'accès commun
d'un autre côté et essayez de nouveau pour voir
si vous sentez une résistance.
3. Mettez le téléviseur en marche.
3RXUUHWLUHUOHPRGXOHGDFFqVFRPPXQ
1. Avant d'enlever le module d'accès commun,
assurez-vous que le téléviseur est éteint.
2. Tirez le module d'accès commun hors de la
fente.
3. Mettez le téléviseur en marche.
Auto Scan
Tuner Type Cable
Off
Manual Scan
Channel Edit
Auto Channel Update
Common Interface
Favorite Manager
Signal Information
Move
OK: Select MENU: Return EXIT: Exit
Channel
Viaccess Conditional Access
Main Menu
Move OK: Select MENU: Return EXIT: Exit
Common Interface
1. Consultation
2. Settings
3. Upgrade
Press ‘OK’ to confirm, ‘EXIT’ to quit
CI (Interface commune)
Permet au module d'accès commun d'être inséré
et d'accéder au contenu qui a été chiffré.
Module d'accès commun
FACE AVANT DE LA CARTE
Fonctions de base
Appuyez sur le bouton
528*(9(57
JAUNE, BLEU
pour définir la chaîne que
vous êtes en train de regarder comme
chaîne favorite 1, favorite 2, favorite 3,
favorite 4.
&216(,/6
$SSX\H]VXUOHERXWRQ
FAV/FAV+/FAV-
pour
Gp¿QLUODOLVWHGHVFKDvQHVIDYRULWHV
N'insérez pas et ne retirez pas de façon répétée
le module d'accès commun car cela pourrait
endommager l'interface et provoquer un
dysfonctionnement.

28
Gestion du système de verrouillage
*HVWLRQGHFRQ¿JXUDWLRQ
Lock System managementGestion des chaînes (mode ATV / DTV)
1. Appuyez sur le bouton
MENU
SRXUDI¿FKHU
le menu d'accueil. Appuyez sur les boutons
ŻŹSRXUVpOHFWLRQQHU
/RFN6\VWHP6\VWqPH
GHYHUURXLOODJH
dans le menu d'accueil, puis
DSSX\H]VXUOHERXWRQźRXVXUOHERXWRQ
ENTER
et la première option sera surlignée.
2. Utilisez les boutons numériques de
0 à 9
pour
saisir un mot de passe à 4 chiffres pour accéder
au menu du système de verrouillage.
$SSX\H]VXUOHVERXWRQVŸźSRXU
sélectionner l'option que vous désirez régler
dans le menu du système de verrouillage.
$SSX\H]VXUOHVERXWRQVŸźŻŹSRXU
changer les paramètres suivants.
Saisir le mot de passe
Pour accéder au menu du système de
verrouillage, vous devez entrer le mot de passe.
Entrez le mot de passe par défaut "0000" pour la
première utilisation.
Activer
Le système de verrouillage est conçu pour
empêcher la réinitialisation accidentelle de la TV
/ la perte des chaînes et pour empêcher que les
enfants ne regardent un programme inadapté.
Langue OSD
1. Appuyez sur le bouton
MENU
SRXUDI¿FKHUOH
PHQXGDFFXHLO$SSX\H]VXUOHVERXWRQVŻŹ
pour sélectionner
6HWXS&RQ¿JXUDWLRQ
dans
OHPHQXGDFFXHLOSXLVDSSX\H]VXUOHERXWRQź
ou sur le bouton
ENTER
et la première option
sera surlignée.
$SSX\H]VXUOHVERXWRQVŸźSRXU
sélectionner
26'/DQJXDJH/DQJXH26'
SXLVDSSX\H]VXUOHVERXWRQVŻŹSRXU
sélectionner la langue de votre choix sur l'écran
GDI¿FKDJH
Le système de verrouillage doit être réglé sur
2Q$FWLYpSRXUTXHFHWWHIRQFWLRQVRLWDFWLYpH
Si le système de verrouillage est activé, un mot
de passe valide doit être saisi lorsque pour
accéder au Balayage automatique / Balayage
PDQXHO0RGL¿FDWLRQGHVFKDvQHV5pJODJHV
lors de la première utilisation.
Verrouillage des chaînes
Le "verrouillage des chaînes" est conçu pour
empêcher que les enfants regardent des
programmes inappropriés. Lorsqu'une chaîne
est bloquée, un mot de passe valide doit être
saisi.
Contrôle parental
&HWWHIRQFWLRQYRXVSHUPHWGHFRQ¿JXUHUGHV
blocages pour verrouiller des chaînes ou des
QLYHDX[VSpFL¿TXHV$SSX\H]VXUOHVERXWRQV
SRXUVpOHFWLRQQHUXQkJHHQWUHHWDQV
Verrouillage du clavier
Ce paramètre est conçu pour empêcher les
enfants d'appuyer sur les boutons du téléviseur.
Le système de verrouillage doit être activé pour
utiliser cette fonction.
Nouveau mot de passe
Utilisez les touches numériques de 0 à 9 pour
saisir l'ancien mot de passe puis entrez le
nouveau mot de passe à 4 chiffres. Entrez le
QRXYHDXPRWGHSDVVHSRXUFRQ¿UPHU
Supprimer les verrouillages
Ce paramètre permet de réinitialiser tous les
réglages de verrouillage aux valeurs par défaut.
5.
Appuyez sur le bouton
EXIT
pour quitter le
menu.
3.
Appuyez sur le bouton
EXIT
pour quitter le
menu.
Auto Scan
Tuner Type Cable
Off
Manual Scan
Channel Edit
Auto Channel Update
Common Interface
Favorite Manager
Signal Information
Move
OK: Select MENU: Return EXIT: Exit
Channel
Enter Password
Enable
Channel Locks
Parental Rating
Lock Keypad
New Password
Clear Lock
_ _ _ _
Off
None
Off
_ _ _ _
Move 0~9: Input MENU: Return EXIT: Exit
Lock System
Fonctions de base
Le mot de passe par défaut est “0000”.
6LYRXVPRGL¿H]OHPRWGHSDVVHDVVXUH]YRXV
de vous rappeler le nouveau mot de passe! Si
vous oubliez le nouveau mot de passe, saisissez
le mot de passe prépondérant"4711".

29
*HVWLRQGHFRQ¿JXUDWLRQ
3.
Appuyez sur le bouton
EXIT
pour quitter le
menu.
OSD Language
Audio Languages
Subtitle
Teletext
Blue Screen
Mode Setting
Time Settings
PVR Settings
English
On
Home Mode
Move tixE :TIXE nruteR :UNEMtsujdA
Setup
/DQJXHVDXGLRPRGH'79
1.
Appuyez sur le bouton
MENU
SRXUDI¿FKHUOH
PHQXGDFFXHLO$SSX\H]VXUOHVERXWRQVŻŹ
pour
VpOHFWLRQQHU6HWXS&RQ¿JXUDWLRQ
dans
OHPHQXGDFFXHLOSXLVDSSX\H]VXUOHERXWRQź
ou sur le bouton
ENTER
et la première option
sera surlignée.
2.
$SSX\H]VXUOHERXWRQŸźSRXUVpOHFWLRQQHU
$XGLR/DQJXDJHV/DQJXHVDXGLR
puis
appuyez sur le bouton
ENTER
.
3.
$SSX\H]VXUOHVERXWRQVŻŹSRXU
sélectionner votre langue audio primaire désirée.
$SSX\H]VXUOHERXWRQźSXLVDSSX\H]VXUOHV
ERXWRQVŻŹSRXUVpOHFWLRQQHUYRWUHODQJXH
audio secondaire désirée.
4.
Appuyez sur le bouton
EXIT
pour quitter le
menu.
6RXVWLWUHVPRGH'79
1.
Appuyez sur le bouton
MENU
SRXUDI¿FKHUOH
PHQXGDFFXHLO$SSX\H]VXUOHVERXWRQVŻŹ
pour sélectionner
6HWXS&RQ¿JXUDWLRQ
dans
OHPHQXGDFFXHLOSXLVDSSX\H]VXUOHERXWRQź
ou sur le bouton
ENTER
et la première option
sera surlignée.
2.
$SSX\H]VXUOHVERXWRQVŸźSRXU
sélectionner
6XEWLWOH6RXVWLWUHV
puis appuyez
sur le bouton
ENTER
pour accéder au sous-
menu.
Mode :
Pour activer / désactiver la langue des sous-
titres.
Langue primaire de sous-titrage
$SSX\H]VXUOHVERXWRQVŻŹSRXUVpOHFWLRQQHU
votre langue de sous-titrage primaire désirée.
Langue secondaire de sous-titrage
$SSX\H]VXUOHVERXWRQVŻŹSRXUVpOHFWLRQQHU
votre langue de sous-titrage secondaire désirée.
Sous-titres pour malentendant
$SSX\H]VXUOHERXWRQŻŹSRXUDFWLYHU
/ désactiver les sous-titres pour les
malentendants.
3.
Appuyez sur le bouton
EXIT
pour quitter le
menu.
Audio Primary Language
Audio Secondary Language
English
English
Move tixE :TIXE nruteR :UNEMtsujdA
Audio Languages
OSD Language
Audio Languages
Subtitle
Teletext
Blue Screen
Mode Setting
Time Settings
PVR Settings
English
On
Home Mode
Move MENU: Return EXIT: Exit
Setup
OK: Select
OSD Language
Audio Languages
Subtitle
Teletext
Blue Screen
Mode Setting
Time Settings
PVR Settings
English
On
Home Mode
Move MENU: Return EXIT: Exit
Setup
OK: Select
OSD Language
Audio Languages
Subtitle
Teletext
Blue Screen
Mode Setting
Time Settings
PVR Settings
English
On
Home Mode
Move MENU: Return EXIT: Exit
Setup
OK: Select
Fonctions de base

30
*HVWLRQGHFRQ¿JXUDWLRQ
Écran bleu
1.Appuyez sur le bouton
MENU
SRXUDI¿FKHUOH
PHQXGDFFXHLO$SSX\H]VXUOHVERXWRQVŻŹ
pour sélectionner
6HWXS&RQ¿JXUDWLRQ
dans
OHPHQXGDFFXHLOSXLVDSSX\H]VXUOHERXWRQź
ou sur le bouton
ENTER
et la première option
sera surlignée.
$SSX\H]VXUOHERXWRQŸźSRXUVpOHFWLRQQHU
%OXH6FUHHQeFUDQEOHX
puis appuyez sur le
bouton
ENTER
pour activer ou désactiver l'écran
bleu.
3. Appuyez sur le bouton
EXIT
pour quitter le
menu.
Réglages temporels
1.Appuyez sur le bouton
MENU
SRXUDI¿FKHUOH
PHQXGDFFXHLO$SSX\H]VXUOHVERXWRQVŻŹ
pour sélectionner
6HWXS&RQ¿JXUDWLRQ
dans
OHPHQXGDFFXHLOSXLVDSSX\H]VXUOHERXWRQź
ou sur le bouton
ENTER
et la première option
sera surlignée.
$SSX\H]VXUOHERXWRQŸźSRXUVpOHFWLRQQHU
7LPH6HWWLQJV5pJODJHVWHPSRUHOV
puis
appuyez sur le bouton
ENTER
.
Heure d'aff ichage
3HUPHWGDI¿FKHUOKHXUHVXUOpFUDQ
10s/20s/30s/60s/Désactivé.
7pOpWH[WH
1. Appuyez sur le bouton
MENU
SRXUDI¿FKHUOH
PHQXGDFFXHLO$SSX\H]VXUOHVERXWRQVŻŹ
pour sélectionner
6HWXS&RQ¿JXUDWLRQ
dans
OHPHQXGDFFXHLOSXLVDSSX\H]VXUOHERXWRQź
ou sur le bouton
ENTER
et la première option
sera surlignée.
$SSX\H]VXUOHERXWRQŸźSRXUVpOHFWLRQQHU
7HOHWH[W7pOpWH[WH
puis appuyez sur le bouton
ENTER
.
$SSX\H]VXUOHERXWRQŻŹEXWWRQVSRXU
sélectionner votre langue de télétexte numérique
GpVLUpH$SSX\H]VXUOHERXWRQźSXLVDSSX\H]
VXUOHVERXWRQVŻŹSRXUVpOHFWLRQQHUYRWUH
langue de décodage des pages désirée.
4. Appuyez sur le bouton
EXIT
pour quitter le
menu.
Réglage du mode
1.Appuyez sur le bouton
MENU
SRXUDI¿FKHUOH
PHQXGDFFXHLO$SSX\H]VXUOHVERXWRQVŻŹ
pour sélectionner
6HWXS&RQ¿JXUDWLRQ
dans
OHPHQXGDFFXHLOSXLVDSSX\H]VXUOHERXWRQź
ou sur le bouton
ENTER
et la première option
sera surlignée.
$SSX\H]VXUOHVERXWRQVŸźSRXU
sélectionner
0RGH6HWWLQJ5pJODJHGX
PRGH
SXLVDSSX\H]VXUOHVERXWRQVŻŹSRXU
VpOHFWLRQQHUYRWUHPRGHGpVLUp0RGH'RPLFLOH
/ Mode Magasin.
0RGH'RPLFLOHSRXUXQYLVLRQQDJHjOD
maison.
0RGH0DJDVLQSRXUXQHGpPRQVWUDWLRQGDQV
le magasin; la luminosité est plus élevée que le
mode Domicile.
3.
Appuyez sur le bouton
EXIT
pour quitter le
menu.
Digital Teletext Language
Decoding Page Language
English
West
Move tixE :TIXE nruteR :UNEMtsujdA
Teletext
OSD Language
Audio Languages
Subtitle
Teletext
Blue Screen
Mode Setting
Time Settings
PVR Settings
English
On
Home Mode
Move tixE :TIXE nruteR :UNEMtsujdA
Setup
Move tixE :TIXE nruteR :UNEMtsujdA
Setup
OSD Language
Audio Languages
Subtitle
Teletext
Blue Screen
Mode Setting
Time Settings
PVR Settings
English
On
Home Mode
Move tixE :TIXE nruteR :UNEMtsujdA
Time Settings
OSD Time
Sleep Timer
Auto Sleep
Time Zone
Time
10 seconds
Off
4 hours
Fonctions de base

31
*HVWLRQGHFRQ¿JXUDWLRQ
Minuteur de sommeil
$SSX\H]VXUOHERXWRQŻŹSRXUVpOHFWLRQQHU
une période de temps après laquelle le
téléviseur passe automatiquement en mode
YHLOOH'pVDFWLYpPLQXWHV
Arrêt automatique
Le téléviseur passe automatiquement en mode
de veille 3, 4, ou 5 heures après la dernière fois
que la télécommande a été utilisée. Si vous
voulez faire fonctionner le téléviseur pendant
une plus longue période, désactivez la fonction
de mise en veille automatique.
Fuseau Horaire
Permet de sélectionner votre fuseau horaire.
Horloge
L'horloge est réglée automatiquement lors de la
réception d'un signal numérique ou vous pouvez
la régler manuellement.
3.
Appuyez sur le bouton
EXIT
pour quitter le
menu.
5pJODJHV395
1. Appuyez sur le bouton
MENU
SRXUDI¿FKHUOH
PHQXGDFFXHLO$SSX\H]VXUOHVERXWRQVŻŹ
pour sélectionner
6HWXS&RQ¿JXUDWLRQ
dans
OHPHQXGDFFXHLOSXLVDSSX\H]VXUOHERXWRQź
ou sur le bouton
OK
et la première option sera
surlignée.
$SSX\H]VXUOHVERXWRQVŸźSRXU
sélectionner
3956HWWLQJV5pJODJHV395
puis appuyez sur le bouton
OK
.
3.
$SSX\H]VXUOHVERXWRQVŻŹSRXU
VpOHFWLRQQHUOHVRSWLRQVGHV\VWqPHGHV¿FKLHUV
PVR suivants puis appuyez sur le bouton
ENTER.
6pOHFWLRQQH]*HVWLRQQDLUHGH¿FKLHUVSRXU
DI¿FKHUODOLVWHGHVSURJUDPPHVHQUHJLVWUpV
DSSX\H]VXUOHVERXWRQVŸźSRXUVpOHFWLRQQHU
le programme enregistré, puis appuyez sur le
ERXWRQ(17(5RXŹ,,SRXUOHPHWWUHHQOHFWXUH
Liste des périphériques
Sélectionnez " Liste des périphériques " pour
YpUL¿HUOHVLQIRUPDWLRQVVXUOHSpULSKpULTXHGH
stockage USB connecté pour PVR. Appuyez sur
le bouton
528*(
pour formater le périphérique
USB sélectionné.
Move tixE :TIXE nruteR :UNEMtsujdA
Time Settings
OSD Time
Sleep Timer
Auto Sleep
Time Zone
Time
10 seconds
Off
4 hours
Move MENU: Return EXIT: Exit
Time
Auto Sync
Date
Time
On
01 Jan 2010
22:33:11
Adjust
Delete One
Move Up
Move Down
Select
Return
Exit
Function
OK
MENU
EXIT
Hot Key
Scheduled Record
File Manager
Standby
Delete All
Zoom In/Out
Replay
Channel Name
Program Name
Recorded Time
Total Time
Parental Pating
BBC ONE
Pinky and Perky
25 Dec 2008 10:05
00:00:20
BBC ONE_Pinky and Perky_20081225_100524,is
BBC ONE_Pinky and Perky_20081225_100529,is
BBC ONE_Pinky and Perky_20081225_100530,is
Current Playing File Info
Device List
Format
Move Up
Move Down
Select
Return
Exit
Format
OK
MENU
EXIT
Device
USB1
Hot Key
1188 MB FAT32
Available Space
File System
Fonctions de base

32
*HVWLRQGHFRQ¿JXUDWLRQ
Enregistrement programmé
Sélectionnez " Enregistrement programmé
SRXUDI¿FKHUODOLVWHGHVHQUHJLVWUHPHQWV
programmés.
4. Appuyez sur le bouton
EXIT
pour quitter le
menu.
Décalage temporel
Appuyez sur le bouton Lecture / Pause lorsque
le programme est en cours de lecture en source
DTV pour démarrer le "Décalage temporel ".
La barre blanche indique la progression de
l'enregistrement.
La barre bleue indique la progression de la
lecture.
Réinitialisation
1.Appuyez sur le bouton
MENU
SRXUDI¿FKHUOH
PHQXGDFFXHLO$SSX\H]VXUOHVERXWRQVŻŹ
pour sélectionner
6HWXS&RQ¿JXUDWLRQ
dans
OHPHQXGDFFXHLOSXLVDSSX\H]VXUOHERXWRQź
ou sur le bouton
ENTER
et la première option
sera surlignée.
$SSX\H]VXUOHERXWRQŸźSRXUVpOHFWLRQQHU
5HVHW5pLQLWLDOLVDWLRQ
puis appuyez sur le
bouton
ENTER
.
3.
$SSX\H]VXUOHERXWRQŸźSRXUVpOHFWLRQQHU
2XLRX1RQVXUOpFUDQ7RXVOHVSDUDPqWUHV
seront réinitialisés aux valeurs par défaut et le
PHQXGHFRQ¿JXUDWLRQGLVSDUDvWUD
Delete One
Move Up
Move Down
Select
Return
Exit
Function
OK
MENU
EXIT
Frequency
Off
Off
Off
Off
Off
Off
Off
Off
Off
Off
Off
Off
Off
Off
Off
Off
Hot Key
Date
Scheduled Record
Scheduled Record Setting List
Standby
Delete All
Group
1
2
3
4
5
6
7
8
9
10
11
12
13
14
15
16
Channel
Start Time
Duration
10:03
25 Dec 2008 Thu.
3UHPLqUHLQVWDOODWLRQ
1. Appuyez sur le bouton
MENU
SRXUDI¿FKHUOH
PHQXGDFFXHLO$SSX\H]VXUOHVERXWRQVŻŹ
pour sélectionner
6HWXS&RQ¿JXUDWLRQ
dans
OHPHQXGDFFXHLOSXLVDSSX\H]VXUOHERXWRQź
ou sur le bouton
ENTER
et la première option
sera surlignée.
$SSX\H]VXUOHERXWRQŸźSRXUVpOHFWLRQQHU
)LUVW7LPH6HWXS3UHPLqUHLQVWDOODWLRQ
puis
appuyez sur le bouton
ENTER
.
3.
$SSX\H]VXUOHVERXWRQVŸźŻŹSRXU
naviguer dans le menu et changer les réglages.
Puis le téléviseur démarrera le balayage
automatique des chaînes.
4.
Appuyez sur le bouton
EXIT
pour quitter le
menu.
Move
OK: Select
MENU: Return EXIT: Exit
Setup
First Time Setup
Reset
Move
OK: Select
MENU: Return EXIT: Exit
Setup
First Time Setup
Reset
Move
OK: Select
MENU: Return EXIT: Exit
Setup
First Time Setup
Reset
Reset
Yes
No
Fonctions de base

33
Divertissement
Divertissement
Utilisation des fonctions via le port USB
1.Eteignez le téléviseur avant de connecter un
périphérique de stockage USB.
2.Connectez votre périphérique de stockage
USB au port USB de votre téléviseur.
3.Appuyez sur le bouton situé au-dessus du
téléviseur ou sur le bouton de la télécommande
pour mettre en marche votre téléviseur et votre
périphérique de stockage USB.
4.Appuyez sur le bouton
SOURCE
situé au-
dessus du téléviseur ou sur le bouton
SOURCE
GHODWpOpFRPPDQGHSRXUDI¿FKHUOD/LVWH
GHVVRXUFHV8WLOLVH]OHVERXWRQVŸźSRXU
sélectionner MÉDIA, puis appuyez sur le bouton
ENTER
SRXUFRQ¿UPHU
Attention :
Certaines versions de disque dur portable
peuvent nécessiter plus de puissance que la
prise TV USB peut fournir. Pour assurer un
fonctionnement correct, veuillez utiliser un
adaptateur secteur pour ce périphérique.
6LXQFRQFHQWUDWHXU86%HVWXWLOLVpDVVXUH]
vous que l'adaptateur secteur est branché sur le
secteur car la consommation totale de courant
peut dépasser 500 mA.
/HVSDFHGHVWRFNDJHPD[LPXPGXGLVTXHGXU
est de 1 To.
/HV\VWqPHGH¿FKLHUVQHVWFRPSDWLEOHTXDYHF
le format FAT32.
6LYRXVVRXKDLWH]HQUHJLVWUHUODGLIIXVLRQYLGpR
d'un programme de télévision numérique (DTV),
le débit de transfert du périphérique de stockage
USB ne doit pas être inférieur à 5 Mo/s, sinon
l'image et le son du programme seront affectés
HWXQPHVVDJHGDYHUWLVVHPHQWVDI¿FKHUDVXU
l'écran. Si cela se produit, veuillez mettre à jour
votre périphérique de stockage USB.
/pFUDQGXWpOpYLVHXUUHVWHUDWHPSRUDLUHPHQW
vide car il faudra du temps pour démarrer et
stabiliser le disque dur connecté. Ceci est normal
et la durée de démarrage peut varier en fonction
de la marque et de la taille de la mémoire du
disque dur connecté.
'pEUDQFKH]OHSpULSKpULTXHGHVWRFNDJH86%VL
vous ne l'utilisez pas.
Visionnage de photo
1.Appuyez sur le bouton
SOURCE
situé au-
dessus du téléviseur ou sur le bouton
SOURCE
GHODWpOpFRPPDQGHSXLVXWLOLVH]OHVERXWRQVŸ
źSRXUVpOHFWLRQQHU0e',$SXLVDSSX\H]VXUOH
bouton
ENTER
SRXUFRQ¿UPHU
$SSX\H]VXUOHERXWRQŸźSRXUVpOHFWLRQQHU
Photo " puis appuyez sur le bouton
ENTER
.
3.
$SSX\H]VXUOHERXWRQŻŹSRXUVpOHFWLRQQHU
votre périphérique de stockage puis appuyez sur
le bouton
ENTER
.
4.
$SSX\H]VXUOHVERXWRQVŸźŻŹSRXU
naviguer dans le dossier des photos appuyez sur
le bouton
ENTER
. Si vous voulez sélectionner
XQHSKRWRVSpFL¿TXHXWLOLVH]OHVERXWRQV
ŸźŻŹSRXUVpOHFWLRQQHUOH¿FKLHUSKRWRGpVLUp
et appuyez sur le bouton
ENTER
.
5.
Appuyez sur le bouton
ENTER
SRXUDI¿FKHU
les photos.
Photo
Move CH + / - Change Page OK Selete EPG Quick Menu EXIT Return
USB1
. . .
USB1
1/1
Photo
Move
CH + / - Change Page OK Selete EPG Quick Menu EXIT Return
AITEMP MY PVR Movie Music Photo Te xt
LE32G
. . .
USB1
OK Slide Show / Single view Previous / Next Rotate EXIT Back EPG Quick Menu
Date 2010-05-13 20:28:40
Resolution 1366x768
6/12
5_1366x768x24b.jpg
Photo Music Movie Text
)RUPDWGH¿FKLHUSULVHQFKDUJH-3*

34
Divertissement
Divertissement
6. Appuyez sur le bouton
ENTER
ou sur le
bouton
',63/$<$)),&+$*(
SRXUDI¿FKHU
ODEDUUHGHVIRQFWLRQV'LDSRUDPD$I¿FKDJH
simple / Précédent / Suivant / Rotation.
7.Appuyez sur le bouton EPG pour accéder au
Menu rapide (Minuteur d'intervalle / Répétition
/ Effet diaporama / Musique de fond). Pour la
fonction de lecture aléatoire, il doit y avoir au
PRLQV¿FKLHUVPXOWLPpGLD
8.
Appuyez sur le bouton
EXIT
pour retourner au
menu précédent.
Ecoute musicale
1.Appuyez sur le bouton
,1387(175e(
situé au-dessus du téléviseur ou sur le bouton
INPUT de la télécommande puis appuyez sur
OHVERXWRQVŸźSRXUVpOHFWLRQQHU0e',$SXLV
appuyez sur le bouton
ENTER
.
$SSX\H]VXUOHVERXWRQVŸźSRXU
sélectionner
0XVLF0XVLTXH
puis appuyez sur
le bouton
ENTER
.
$SSX\H]VXUOHVERXWRQVŻŹSRXU
sélectionner votre périphérique de stockage puis
appuyez sur le bouton
ENTER
.
$SSX\H]VXUOHERXWRQŸźSRXUQDYLJXHU
dans le dossier " Musique " puis appuyez sur le
bouton
ENTER
. Si vous voulez sélectionner une
PXVLTXHVSpFL¿TXHXWLOLVH]OHVERXWRQVŸź
SRXUVpOHFWLRQQHUOH¿FKLHUPXVLFDOGpVLUpHW
appuyez sur le bouton
ENTER
.
5.
$SSX\H]VXUOHERXWRQŹ,,RXVXUOHERXWRQ
ENTER
pour démarrer la lecture.
$SSX\H]VXUOHVERXWRQVŻŹSXLVDSSX\H]
sur le bouton
ENTER
pour sélectionner la
IRQFWLRQ/HFWXUH3UpFpGHQW6XLYDQW5HWRXU
rapide / Avance rapide / Arrêt.
7.Appuyez sur le bouton
(3*
pour accéder au
Menu rapide (Répétition / type d'encodage).
Pour la fonction de lecture musicale aléatoire, il
GRLW\DYRLUDXPRLQV¿FKLHUVPXVLFDX[
8.Appuyez sur le bouton
EXIT
pour retourner au
menu précédent.
Visionnage de vidéos
1. Appuyez sur le bouton
SOURCE
situé au-
dessus du téléviseur ou sur le bouton
SOURCE
de la télécommande puis appuyez sur les
ERXWRQVŸźSRXUVpOHFWLRQQHU0e',$SXLV
appuyez sur le bouton
ENTER
.
$SSX\H]VXUOHVERXWRQVŸźSRXU
sélectionner
0RYLH9LGpR
puis appuyez sur le
bouton
ENTER
.
$SSX\H]VXUOHVERXWRQVŸźSRXU
sélectionner votre périphérique de stockage puis
appuyez sur le bouton
ENTER
.
$SSX\H]VXUOHVERXWRQVŸźSRXUQDYLJXHU
dans le dossier " Vidéo " puis appuyez sur le
bouton
ENTER
. Si vous voulez sélectionner une
YLGpRVSpFL¿TXHXWLOLVH]OHVERXWRQVŸźSRXU
VpOHFWLRQQHUOH¿FKLHUYLGpRGpVLUpHWDSSX\H]
sur le bouton
ENTER
.
Photo Music Movie Text
Music
Move
Change Page CH+/- Plalyer OK Selete EPG Quick Menu EXIT Return
USB1
00 : 00 : 00
Title
Artist
Album
Track
Year
Date
FileSize
00 : 00 : 00
USB1
Music
Move
Change Page CH+/- Plalyer OK Selete EPG Quick Menu EXIT Return
USB1/Music
00 : 00 : 00
Title
Artist
Album
Track
Year
Date
FileSize
00 : 00 : 00
AITEMP
Movie
MY PVR
Photo
Te xt
Music
LE32G
1/1
Music
Move
CH+/- FileList OK Selete EPG Quick Menu EXIT Return
USB1/Music/Call Me Maybe.mp3
00 : 03 : 13
Title
Artist
Album
Track
Year
Date
FileSize
00 : 00 : 22
Call Me Maybe.mp3
Good Time.mp3
1/1
Call Me Maybe.mp3 1/2
Call Me Maybe
Carly Rae Jepsen
Call Me Maybe
2012-02-27
2013-02-01
3.9MB
Photo Music Movie Text
Movie
Move
Change Page OK Selete EPG Quick Menu EXIT Return
USB1
USB1
6LFHGRVVLHUFRQWLHQWpJDOHPHQWGHV¿FKLHUVGH
musique, vous pouvez sélectionner un morceau
de musique pour accompagner la lecture de vos
photos.
&HUWDLQVIRUPDWVGH¿FKLHUVDXGLRQHVHURQWSDV
SULVHQFKDUJH)RUPDWGH¿FKLHUSULVHQFKDUJH
MP3.

35
Divertissement
5.
$SSX\H]VXUOHERXWRQŹ,,RXVXUOHERXWRQ
ENTER
pour démarrer la lecture.
6.Appuyez sur le bouton
ENTER
ou sur le bouton
',63/$<$)),&+$*(
SRXUDI¿FKHUODEDUUH
GHVIRQFWLRQV$SSX\H]VXUOHVERXWRQVŻŹSXLV
appuyez sur le bouton
ENTER
pour sélectionner
ODIRQFWLRQGpVLUpH3DXVH3UpFpGHQW6XLYDQW
Retour rapide / Avance rapide / Arrêt.
7.Appuyez sur le bouton
(3*
pour accéder au
Menu rapide (Répétition / type d'encodage).
Pour la fonction de lecture vidéo aléatoire, il doit
\DYRLUDXPRLQV¿FKLHUVPpGLD
8.Appuyez sur le bouton
EXIT
pour retourner au
menu précédent.
0RQWH[WH
1.Appuyez sur le bouton
SOURCE
situé au-
dessus du téléviseur ou sur le bouton
SOURCE
de la télécommande puis appuyez sur les
ERXWRQVŸźSRXUVpOHFWLRQQHU0e',$SXLV
appuyez sur le bouton
ENTER
.
$SSX\H]VXUOHERXWRQŸźSRXUVpOHFWLRQQHU
7H[W7H[WH
puis appuyez sur le bouton
ENTER
.
$SSX\H]VXUOHVERXWRQVŸźSRXU
sélectionner votre périphérique de stockage puis
appuyez sur le bouton
ENTER
.
$SSX\H]VXUOHVERXWRQVŸźSRXUQDYLJXHU
dans le dossier " Texte " puis appuyez sur le
bouton
ENTER
. Si vous voulez sélectionner
XQ¿FKLHUWH[WHVSpFL¿TXHXWLOLVH]OHVERXWRQV
ŸźSRXUVpOHFWLRQQHUOH¿FKLHUWH[WHGpVLUpHW
appuyez sur le bouton
ENTER
.
$SSX\H]VXUOHERXWRQŹ,,RXVXUOHERXWRQ
ENTER
SRXUDI¿FKHUOH¿FKLHU
6.Appuyez sur le bouton
ENTER
ou sur le
bouton
',63/$<$)),&+$*(
SRXUDI¿FKHU
la barre des fonctions. Appuyez sur les boutons
ŻŹSXLVDSSX\H]VXUOHERXWRQ
ENTER
pour
VpOHFWLRQQHUODIRQFWLRQGpVLUpH3UpFpGHQW
Suivant / Aller à la page.
7.Appuyez sur le bouton
(3*
pour accéder au
Menu rapide (Répétition / Musique de fond /
Type d'encodage).
8.Appuyez sur le bouton
EXIT
pour retourner au
menu précédent.
Movie
Move
Change Page OK Selete EPG Quick Menu EXIT Return
USB1/Movie
AITEMP
Movie
MY PVR
Photo
Te xt
Music
LE32G
1/1
00 : 05 : 1300 : 00 : 22
FileName
VideoCodec :
Resolution
Bitrate :
Animals.AVI
MPEG4
640 x 480
4158120 bps
AudioCodec :
SampleRate :
Channel :
MP3
44100 Hz
2
Photo Music Movie Text
Te xt
Move
Change Page OK Selete EPG Quick Menu EXIT Return
USB1
USB1
Te xt
Move
Change Page OK Selete EPG Quick Menu EXIT Return
USB1/Text
AITEMP
Movie
MY PVR
Photo
Te xt
Music
LE32G
1/1
Te xt
Move
Change Page OK Selete EPG Quick Menu EXIT Return
USB1/Text/English Music .txt
1/1
1 Why are you so far from me?
In my arms is where you ought to be.
2 How long will you make me wait?
I don’t know how much more I can take.
3 (Chorus:)
I missed you
But I haven’t met you
Oh but I want to
How I do
4 Slowly counting down the days
English Music .txt
Previous / Next
0~9: Goto Page EPG Quick Menu EXIT Back
1/12
1 Why are you so far from me?
In my arms is where you ought to be.
2 How long will you make me wait?
I don’t know how much more I can take.
3 (Chorus:)
I missed you
But I haven’t met you
Oh but I want to
How I do
4 Slowly counting down the days
Divertissement
Si certaines vidéos ne sont pas correctement
mises en lecture, veuillez essayer d'utiliser un
autre périphérique USB à grande vitesse.
&HUWDLQVIRUPDWVGH¿FKLHUVDXGLRQHVHURQWSDV
pris en charge.
)RUPDWGH¿FKLHUSULVHQFKDUJH03(*
6LFHGRVVLHUFRQWLHQWpJDOHPHQWGHV¿FKLHUV
de musique, vous pouvez sélectionner un
morceau de musique pour accompagner la
lecture de vos textes.

36
6SpFL¿FDWLRQV
Réception numérique
Autres informations
Marque
JVC
Modèle
LT-32HG82U
&ODVVHGHI¿FDFLWppQHUJpWLTXH
A
7DLOOHGpFUDQYLVLEOHGLDJRQDOH
Approx. 80cm (31.5inch)
Consommation électrique en mode
:
Consommation d'énergie par an *
NZK
0RGHGHYHLOOHSXLVVDQFH
:
Display Resolution
1,920 pixel(horizontal) x 1,080 pixel(vertical)
Diffusion TV
3$/%*'.,6(&$0//
Réception de chaînes
ATV (48.25MHz ~ 863.25MHz)
Nombre de chaînes préréglées
99
Indicateur de chaîne
$I¿FKDJHVXUOpFUDQ
Entrée d'antenne RF
2KPLQVWDEOH
Tension de fonctionnement
AC 100-240V~ 50/60Hz
3XLVVDQFHGHVRUWLHDXGLR:506
7+'
[:
'LPHQVLRQV'LDPqWUH[/RQJXHXU[
+DXWHXUDYHFOHSLHG
180 x 731 x 470 mm
3RLGVDYHFOHSLHG
5.2 kg
'LPHQVLRQV'LDPqWUH[/RQJXHXU[
+DXWHXUVDQVOHSLHG
79 x 731 x 436 mm
3RLGVVDQVOHSLHG
5.0 kg
Température ambiante
2SHUDWLRQ
ȭ
~40
ȭ
6WRUDJH
ȭ
~60
ȭ
Humidité de fonctionnement
Less than 80
ͤ
RH
Mise en veille
Après 4 heures
Échelle de réception VHF (50MHz~230MHz) - UHF (474MHz~862MHz)
Impédance d'entrée ȍ
Impédance d'entrée 7MHz/8MHz
Modulation
DVB-T &2)'0..436.4$04$0
DVB-C 4$04$04$04$04$0
Système vidéo MPEG-2 MP@ML, MPEG-2 MP@HL,H.264
Système sonore MPEG-1 layer 1/2
Fonctions de base (3*6XEWLWOH/&17(/(7(;7(XURSH
Stockage max. des chaînes &+'9%7'9%&G\QDPLF
* Consommation d'énergie par an, basée sur la consommation d'énergie de la télévision 4 heures par jour pendant
365 jours de fonctionnement.. La consommation d'énergie réelle dépendra de l'utilisation de la télévision.
Nous nous excusons pour tout inconvénient causé par des incohérences mineures dans ces instructions, qui peuvent
survenir à la suite de l'amélioration et du développement du produit.

37
Guide de dépannage
Assistance concernant le produit
Persistance de l'image - image fantôme
La télécommande ne fonctionne pas
La télécommande ne fonctionne pas
Pas d’alimentation
Image de mauvaise qualité
Il n'y a pas d’image
Il n’y a pas de son
Veuillez noter qu'une image fantôme peut se produire
ORUVGHODI¿FKDJHGXQHLPDJHSHUVLVWDQWHLPDJH¿[HRX
en pause). La persistance de l'image sur les téléviseurs
LCD peut disparaître après une courte période. Essayez
d'éteindre le téléviseur pendant un certain temps. Pour
pYLWHUFHODQHODLVVH]SDVOpFUDQHQPRGHGLPDJH¿[H
pendant des périodes prolongées.
Votre téléviseur ne répond plus à la télécommande.
Les piles peuvent être épuisées, et si c'est le cas, vous
pouvez toujours utiliser les boutons de contrôle sur le
côté gauche du téléviseur.
1.Si vous ne pouvez pas sélectionner une source
d'entrée, il est possible qu'aucun appareil ne soit
connecté.
9pUL¿H]OHVFkEOHV$9HWOHVEUDQFKHPHQWVVLYRXVDYH]
essayé de connecter un périphérique.
6LYRWUHWpOpYLVHXUQHVWSDVDOLPHQWpYHXLOOH]YpUL¿HUTXH
OHFkEOHGDOLPHQWDWLRQHVWFRUUHFWHPHQWFRQQHFWpjOD
prise d'alimentation secteur.
1.Avez-vous sélectionné le système TV correct ?
2.Est-ce votre téléviseur ou votre antenne est situé trop
près d'un équipement audio non relié à la terre ou de
lampes au néon, etc.?
'HVPRQWDJQHVRXGHVEkWLPHQWVpOHYpVSHXYHQW
causer des images doubles ou fantômes. Parfois, vous
pouvez améliorer la qualité d'image en changeant la
direction de l'antenne. Est-ce que l'image ou le télétexte
est méconnaissable?
9pUL¿H]VLYRXVDYH]HQWUpODIUpTXHQFHFRUUHFWH
5.Veuillez effectuer de nouveau un balayage des chaînes.
6.La qualité de l'image peut se dégrader lorsque deux
appareils sont simultanément connectés au téléviseur.
Dans un tel cas, débranchez l'un des appareils.
6LOQ\DSDVGLPDJHFHODVLJQL¿HTXHYRWUHWpOpYLVHXU
ne reçoit pas de transmission. Avez-vous appuyé sur le
bon bouton de la télécommande ? Essayez encore une
fois. Assurez-vous également que la source d'entrée
correcte a été sélectionnée.
2.Est-ce l'antenne est connectée correctement ?
3.Est-ce que les prises sont solidement branchées à la
prise d'antenne ?
(VWFHOHFkEOHGDQWHQQHHVWHQGRPPDJp"
5.Est-ce que les prises utilisées sont appropriées pour
connecter l'antenne?
6.Si vous êtes dans le doute, consultez votre revendeur.
1.Est-ce que le son du téléviseur a été mis en sourdine ?
Pour annuler la sourdine, appuyez sur le bouton “ ” ou
augmentez le niveau de volume.
2.Le son provient d'un seul haut-parleur. La balance est-
elle réglée sur un extrême?

38
)RUPDWGH¿FKLHUVFRPSDWLEOHV
Assistance concernant le produit
*.avi
MPEG(*.mpeg,
*.mpg, *.dat, *vob)
MPEG-4(*.mp4)
TS(*.ts, *.trp, *tp)
MKV(*.mkv)
*.flv
*.mp3
AAC(*.aac,*m4a)
AAC
HE-AAC V1
HE-AAC V2
*.wav
LPCM
ADPCM
*.jpg
*.jpeg
*.txt
Multimédia
Catégories
Vidéo
Musique
Photo
Texte
6\VWqPHGH¿FKLHUV
)6JUDQGHYLWHVVH)$717)6OHV¿FKLHUV17)6FRPSUHVVpQHVWSDVFRPSDWLEOH
)RQFWLRQ395
Délai d'enregistrement, décalage temporel, réservation d'enregistrement EPG.
Remarques:
¿FKLHUVDXPD[LPXPGDQVFKDTXHGRVVLHU
/HVOLFHQFHVLPSOLTXpHVGDQVOHVVSpFL¿FDWLRQVFLGHVVXVVRQWFHQVpHVrWUHREWHQXHVSDUOHV
clients eux-mêmes.
Débit de bits -XVTXj.ESV
Taux d'échantillonnage .+]
03*(03(*03(*
Jusqu'à 1080p @ 30F
+-XVTXjS#)
$$&$$&/&W\SH
HE-AAC v1(type5 ,SBR),
+($$&YW\SH6%536
MPEG-1 Couche 2
MPEG-1 Couche 3
MPEG-2 Couche 3
AAC-LC
HE-AAC V1
HE-AAC V2
MPEG-1 Couche 3
MPEG-2 Couche3
UTF-8
81,&2'($6&,,
MPEG-1
MPEG-2 MP
MPEG-4 SP
MPEG-4 ASP
03(*;9,'
H.264(AVC)
MP@Niveau 4
H.264(AVC)
HP@Niveau 4
MPEG-4 SP
MPEG-4 ASP
03(*;9,'
H.264(AVC)
MP@Niveau 4
H.264(AVC)
HP@Niveau 4
MPEG-1
MPEG-2 MP
H.264(AVC)
MP@ Niveau 4
H.264(AVC)
HP@ Niveau 4
MPEG-1
MPEG-2 MP
MPEG-4 SP
MPEG-4 ASP
03(*;9,'
H.264(AVC) MP@
Niveau 4
H.264(AVC) HP@
Niveau l4
H.264(AVC)MP@
Niveau 4
H.264(AVC)HP@
Niveau 4
Mode Ligne de base
Mode progressif
MPEG-1 MP
MPEG-2 MP
7DLOOHGX¿FKLHU 0%
[/LJQHGHEDVH
5pVROXWLRQ[
Taille du mode progressif
[
7DLOOHGX¿FKLHU 0%
Extension de
¿FKLHU
Decoder
Code vidéo
Code audio
Notes

39
MISE AU REBUT
Étiquette énergétique
MISE AU REBUT
En tant que revendeur, nous nous préoccupons de l'environnement.Aidez-nous en observant toutes
les instructions de mise au rebutde vos produits, emballages et, le cas échéant, accessoires etpiles. Nous devons
tous oeuvrer pour la protection des ressourcesnaturelles et nous efforcer de recycler tous les matériaux d'une
manière qui ne puisse nuire ni à notre santé ni à l'environnement.
Nous devons tous nous conformer strictement aux lois et règlementsde mise au rebut édicté par nos autorités
locales. Évitez dejeter vos produits électriques défectueux ou obsolètes, et vos pilesusagées, avec vos ordures
ménagères. Contactez votre revendeur ou vos autorités locales pour connaîtreles instructions de mise au rebut et de
recyclage.Déposez les piles au point de collecte pour recyclage le plusproche de chez vous. Le guide d'instruction du
produit vous indiqueexactement comment procéder pour enlever les piles usagées. Nous nous excusons d'avance
pour les désagréments causés parles quelques erreurs mineures que vous pourriez rencontrer,généralement dues
aux constantes améliorations que nous apportonsà nos produits.
Hotline Darty France
4XHOVTXHVRLHQWYRWUHSDQQHHWOHOLHXGDFKDWGHYRWUHSURGXLWHQ)UDQFHDYDQWGHYRXV
déplacer en magasin Darty, appelez le 0 978 970 970 (prix d'un appel local) 7j/7 et 24h/24.
Hotline Vanden Borre
/HVHUYLFHDSUqVYHQWHHVWMRLJQDEOHDXGXOXQGLDXYHQGUHGLGHKjKHWOHVDPHGLGHKjK
Darty Holdings SAS © 14 route d'Aulnay 93140 Bondy, France 13/06/2016
40
2010/1062 - 2014
58
80
31.5
+
LT-32HG82U

1
Inhoud
Waarschuwingens 2
Veiligheidsvoorschriften 3
Aan de slag 5-12
TV-functies 5
Meegeleverde accessoires 5
De stander installeren / verwijderen 6
Afstandsbediening 7-10
Bedieningsknoppen (bovenkant) 10
Antenne-aansluiting 10
Stroomaansluiting 10
Afstandsbediening - de batterijen
installeren 11
De TV aan- en uitzetten 11
Bediening via de knoppen op de TV 12
Bediening via de afstandsbediening 12
Initiële instellingen 13
Algemene werking 13
Aansluitingen 14-16
Aansluitingen aan de linkerkant gauche 14
Aansluitingen in linker benedenhoek 15
HDMI-aansluitingen 16
VGA-aansluitingen 16
Basisfuncties 17-32
Door de menu’s navigeren - Een bron
selecteren 17
Elektronische programmagids (EPG) (DTV-
modus) 17
Teletekst (ATV-modus) 18
Digitale teletekst (DTV-modus) 19
Een DTV-programma op een USB-
opslagapparaat opnemen 19
Programmering van de timer 20
Opgenomen programma afspelen 21
Beeldbeheer (ATV / DTV-modus) 21
Beeldbeheer 21
Geluidsbeheer 22-23
Kanaalbeheer (ATV / DTV-modus) 23-28
Vergrendelingsbeheer 28
Instellingenbeheer 28-32
Entertainment 33-35
Overige informatie 36
Technische gegevens 36
Productondersteuning 37-38
Probleemoplossing 37
Ondersteunde bestandsformaten 38
Energielabel 39
VERWIJDERING 39

2
WAARSCHUWINGEN
Dit apparaat is alleen bedoeld voor huishoudelijk gebruik en mag niet voor andere doeleinden of
toepassingen worden gebruikt, zoals niet-huishoudelijk gebruik of in een commerciële omgeving.
Ventilatie
Laat minstens een vrije ruimte van 10cm rond het product.
Belemmer de ventilatie niet door het afdekken van de ventilatie-openingen met voorwerpen zoals
een krant, tafelkleed, gordijn, etc.
Plaats geen bronnen met open vlam, zoals een aangestoken kaars, op het apparaat.
Dit apparaat is niet geschikt voor gebruik in een tropisch klimaat.
Dit apparaat mag niet worden blootgesteld aan druppelende of spattende vloeistof.
Zet geen voorwerpen die met water zijn gevuld, zoals vazen, bovenop het apparaat.
Als de stekker of een aansluitsysteem voor apparaten wordt gebruikt om het apparaat volledig van
de netvoeding los te koppelen moet deze te allen tijde bereikbaar zijn.
Om het milieu te beschermen, maak gebruik van de lokale recyclingvoorzieningen voor het
verwijderen van gebruikte batterijen.
Stel batterijen (accupack of geïnstalleerde batterijen) nooit bloot aan overmatige warmte
zoals zonlicht, vuur, etc.
OPGELET: Om mogelijke gehoorbeschadiging te vermijden, luister niet
gedurende een lange periode aan een hoog volume.
WAARSCHUWINGEN

3
Veiligheidsinformatie
RISICO OP ELEKTRISCHE SCHOKKEN
NIET OPENEN
OPGELET
OPGELET:
VERWIJDER DE BEHUIZING (OF HET ACHTERPANEEL) NIET,
OM HET RISICO OP ELEKTRISCHE SCHOKKEN TE VOORKOMEN.
BEVAT GEEN ONDERDELEN DIE DOOR DE GEBRUIKER GEREPAREERD
KUNNEN WORDEN.
LAAT REPARATIEWERKZAAMHEDEN OVER AAN DAARTOE BEVOEGDE
PERSONEN.
Het bliksemschichtsymbool in een gelijkzijdige
driehoek is bedoeld om de gebruiker te wijzen
op de aanwezigheid van ongeïsoleerde,
“gevaarlijke spanning" in de behuizing van
het product, die sterk genoeg kan zijn om
een gevaar voor elektrocutie bij personen te
vormen.
Het uitroepteken in een gelijkzijdige driehoek
is bedoeld om de gebruiker te wijzen op de
aanwezigheid van belangrijke bedienings- en
onderhoudsinstructies in de literatuur bij het
apparaat.
Belangrijk - Lees deze handleiding volledig door voordat u het artikel in elkaar zet
of gebruikt
Voedingsbron
De televisie op een gepaste plaats installeren
De televisie op een gepaste plaats installeren
Vocht en water
Ventilatie
Warmtebronnen en vlammen
'H79PDJDOOHHQZRUGHQDDQJHVORWHQRSHHQ
V AC, 50 Hz stopcontact.
Waarschuwing:
Laat uw TV niet in stand-by of
ingeschakeld wanneer u uw woning verlaat.
+HWVQRHUPRHWHHQYRXGLJEHUHLNEDDU]LMQ,QJHYDO
van een storm of onweer, wanneer u op vakantiegaat,
of wanneer de TV gedurende een lange periode niet
gebruikt zal worden, haal de stekker uit het stopcontact.
3ODDWVJHHQ79PHXEHOVWXNHWFRSKHWVQRHUHQ]RUJ
dat het snoer niet gekneld raakt.
/DDWHHQYULMHUXLPWHYDQPLQVWHQVFPURQGDOOH
zijden van de televisie om voor voldoende ventilatie te
zorgen.
=RUJGDWGHYHQWLODWLHRSHQLQJHQQLHWZRUGHQEHOHPPHUG
3ODDWVGH79QLHWRSHHQVFKXLQRIRQVWDELHORSSHUYODN
de TV kan kantelen.
2PVFKDGHDDQGH79WHYHUPLMGHQSODDWVJHHQ
voorwerpen op de TV.
*HEUXLNGH79DOOHHQLQHHQJHPDWLJGNOLPDDW
tempérés.
+RXGKHWVQRHUDOWLMGELMGHVWHNNHUYDVWRQWNRSSHOGH
TV
niet
van de voeding door aan het snoer te trekken.
5DDNKHWVQRHUVWHNNHUQRRLWPHWQDWWHKDQGHQDDQGLW
kan een kortsluiting of elektrische schok veroorzaken.
0DDNQRRLWHHQNQRRSLQKHWVQRHUHQPDDNKHWQRRLW
aan andere snoeren vast.
/HJVQRHUHQRSHHQGHUJHOLMNHPDQLHU]RGDWQLHPDQGHU
over kan struikelen of over kan rijden.
(HQEHVFKDGLJGVQRHUVWHNNHUNDQEUDQGJHYDDURIHHQ
risico op elektrische schokken opleveren. Als het snoer/
de stekker is beschadigd, laat het alleen vervangen door
een vakbekwame technicus.
*HEUXLNGH]H79QLHWLQHHQYRFKWLJHUXLPWHYHUPLMG
badkamers, gootsteen in de keuken en in de buurt van
wasmachine).
6WHOGH]H79QLHWEORRWDDQUHJHQRIZDWHUGLWNDQ
gevaar opleveren.
3ODDWVJHHQYRRUZHUSHQJHYXOGPHWZDWHU]RDOVHHQ
vaas, op de TV. Vermijd gedruppel of gespetter.
$OVHHQYRRUZHUSRIHHQYORHLVWRILQGHNDVWWHUHFKWNRPW
ontkoppel de TV en laat het controleren door een
vakbekwame technicus voordat u het toestel opnieuw
gebruikt.
'HJOHXYHQHQRSHQLQJHQRSGH79]LMQEHVWHPGYRRU
een goede ventilatie en een betrouwbare werking van het
toestel.
2PRYHUYHUKLWWLQJWHYHUPLMGHQEHOHPPHURIEHGHNGH]H
openingen op geen enkele manier.
6WHOGH79QLHWEORRWDDQGLUHFW]RQOLFKWRIHHQDQGHUH
warmtebron.
10cm
10cm
10cm

4
:DDUVFKXZLQJ(HQYHUNHHUGHLQVWDOODWLHYDQGH
batterijen kan het lekken of roesten van de batterijen
veroorzaken wat tot schade aan de afstandsbediening
kan leiden.
0HQJJHHQRXGHHQQLHXZHEDWWHULMHQRIEDWWHULMHQYDQ
eenverschillend type.
*RRLJHHQEDWWHULMHQLQKHWYXXU
*RRLJHHQEDWWHULMHQVDPHQPHWKHWQRUPDOHKXLVDIYDO
weg, lever het in bij een lokaal recyclingcentrum.
[Europese Unie]
Geachte klant,
Dit apparaat is conform de geldende Europese richtlijnen
en normen betreffende elektromagnetische congruentie en
elektrische veiligheid.
Darty Holdings SAS © 14 route d’Aulnay 93140 Bondy, France
* DVB en de DVB-logo’s zijn handelsmerken van het
DVB-project.
* Vervaardigd onder licentie van Dolby Laboratories.
Dolby en het dubbele-D-symbool zijn handelsmerken van
Dolby Laboratories.
* De termen HDMI en HDMI High-Definition Multimedia
Interface en het HDMI-logo zijn handelsmerken of
geregistreerde handelsmerken van HDMI Licensing LLC
in de Verenigde Staten en andere landen.
Als vervangingsonderdelen nodig zijn, zorg dat de
reparateur alleen vervangingsonderdelen gebruikt
die door de fabrikant zijn aangegeven of die dezelfde
eigenschappen als de originele hebben. Het gebruik van
ongeoorloofde vervangingsonderdelen kan leiden tot
brand, elektrische schok of andere gevaren.
:DDUVFKXZLQJ
Risico op blootstelling aan straling van
klasse 1/ klasse 3b zichtbare en onzichtbare laserstralen.
Open de TV niet en kijk niet rechtstreeks in de straal.
:DDUVFKXZLQJ
Risico op elektrische schokken,
probeer niet om deze TV zelf te repareren, onderhouden
of aan te passen. Neem contact op met de fabrikant of
een erkende reparateur.
:DDUVFKXZLQJ2PEUDQGJHYDDU
te vermijden, houd kandelaars
en andere open vlammen op elk
moment uit de buurt van dit product.
Dit toestel is een Klasse 2 of dubbel geïsoleerd
elektrisch apparaat. Een aansluiting op een
elektrische aarding is aldus niet nodig.
Veiligheidsinformatie
Belangrijk - Lees deze handleiding volledig door voordat u het artikel in elkaar zet
of gebruikt.
3ODDWVGH79QLHWLQGHEXXUWYDQHHQRSHQYODP
of een andere warmtebron, zoals een elektrisch
verwarmingstoestel.
3ODDWVJHHQYRRUZHUSHQPHWHHQRSHQYODP]RDOVHHQ
aangestoken kaars, op de TV.
2YHUPDWLJHJHOXLGVGUXNGRRURRUWHOHIRRQVRI
koptelefoons kan gehoorverlies veroorzaken. Wees
voorzichtig.
Om letsel te vermijden, maak deze TV stevig aan de muur
vast overeenkomstig de gepaste installatie-instructies (als
deze optie voorhanden is).
+HW/&'VFKHUPLVHHQ]HHUKRRJWHFKQRORJLVFKSURGXFW
PHWFLUFDHHQPLOMRHQGXQQH¿OPWUDQVLVWRUHQRPYRRU¿MQH
beelddetails te zorgen. Het kan occasioneel voorkomen
dat er enkele niet actieve pixels op het scherm
verschijnen, als een vast blauwe, groene of rode punt. Dit
heeft echter geen negatieve invloed op de prestaties van
uw product.
=RUJGDWXKHWVFKHUPQLHWNUDVWPHWXZYLQJHUQDJHOVRI
een andere hard voorwerp.
+DDOGHVWHNNHUXLWKHWVWRSFRQWDFWYRRUGDWXGH79
reinigt.
*HEUXLNJHHQYORHLEDUHVFKRRQPDDNPLGGHOHQRI
schoonmaakmiddelen in spuitbussen Maak alleen schoon
met een zachte, droge doek.
Volume van de koptelefoon
Muurmontage (optioneel)
LCD-scherm
Reiniging
Batterijen
Vervangingsonderdelen
Reparatie
Informatie over licenties

5
Aan de slag
TV - Kenmerken
Toebehoren meegeleverd
2SDIVWDQGEHGLHQGHNOHXUHQ/('79
9ROOHGLJJHwQWHJUHHUGHGLJLWDOH79'9%7
+'0,DDQVOXLWLQJHQYRRUGLJLWDOHYLGHRHQDXGLR
Deze aansluiting is tevens ontworpen voor het
DDQQHPHQYDQKLJKGH¿QLWLRQVLJQDOHQ
86%LQJDQJ
SURJUDPPD¶VYDQ9+)8+)DQDORRJ
SURJUDPPD¶VYRRUGLJLWDOHPRGXV,'79
26'PHQXV\VWHHP
6WHUHRJHOXLGVV\VWHHP
7HOHWHNVWIDVWH[W723WHNVW
.RSWHOHIRRQDDQVOXLWLQJ
$XWRPDWLVFKSURJUDPPHULQJVV\VWHHP
9RRUXLW$FKWHUXLWKDQGPDWLJHDIVWHOOLQJ
,QVODDSWLPHU
.LQGHUVORW
$9/$XWRPDWLVFKHYROXPHJUHQV
3//)UHTXHQWLH]RHNHQ
3&LQJDQJ
3OXJ3OD\YRRU:LQGRZV0(;3
Vista
79
6WDQGHU
0,1,<3%35NDEHO
0,1,$9NDEHO
$IVWDQGVEHGLHQLQJ
%DWWHULMHQ[$$$
*HEUXLNVDDQZLM]LQJ
4 schroeven voor de voe
MUTE
PMODE SMODE FAV SLEEP
CH.LIST
ASPECT
EPG AUDIO
MENU
EXIT
DISPLAY
SOURCE
TEXT
INDEX
HOLD
SIZE
SUBPAGE
REVEAL
SUBTITLE
ENTER

6
Aan de slag
De stander installeren / verwijderen
De stander in elkaar zetten
1.Plaats de TV met het scherm naar onder gericht
op een vlak oppervlak. Bescherm het scherm met
behulp van een doek. Vind de onderkant van de
stander.
2.Maak de beugel van de stander vast aan de
onderkant van de TV met behulp van de vier
schroeven.
MEDEDELINGEN OVER DE INSTALLATIE
Deze TV kan alleen worden aangesloten op een
AC 100-240 Volt, 50/60 Hz stopcontact. Sluit de
TV nooit aan op gelijkstroom.
Plaats de TV in een kamer waar het licht het
scherm niet rechtstreeks kan raken. Totale
duisternis of een weerspiegeling op het scherm
kan leiden tot vermoeidheid van de ogen. Een
zachte en indirecte verlichting is aanbevolen om
comfortabel TV te kijken.
=RUJYRRUYROGRHQGHYULMHUXLPWHWXVVHQGH79
en de muur om voldoende ventilatie te hebben.
Plaats het apparaat nooit in een ruimte met een
hoge temperatuur om schade aan de kast of
een vroegtijdige storing van een component te
vermijden.
DE MUURSTEUN INSTALLEREN
1. Plaats de LED LCD televisie op een stevig
oppervlak. Plaats zacht materiaal over de
voorkant van het scherm om schade te
vermijden.
2.Verwijder de vier schroeven uit de TV.
3.Verwijder de stander.
4.
Gebruik de vier meegeleverde schroeven om
de TV aan een muurbeugel (niet meegeleverd)
vast te maken met gebruik van de vier VESA
standaard gaten aan de achterkant van de
televisie.
100 x 100mm VESA montage

7
1.
6FKDNHOWGH79WXVVHQGH$$1HQ67$1'%<
modus.
2. MUTE
Het geluid van uw TV dempen en herstellen.
3. P.MODE
'HEHHOGPRGXVVHOHFWHUHQ'\QDPLVFK
Standaard / Mild / Persoonlijk.
4. S.MODE
'HDXGLRPRGXVVHOHFWHUHQ6WDQGDDUG
Muziek / Film/ Persoonlijk.
5. FAV
Toegang tot uw favoriete kanalen in de
digitale TV-modus krijgen.
6. SLEEP
De TV-inslaaptimer instellen.
7. 0-9 Cijferknop
Druk om een programma te selecteren. (ATV
/ DTV-modus)
8. -/--
Druk op deze knop voordat u een programma
groter dan 09 invoert.
9.
Naar vorig bekeken kanaal teruggaan.
(ATV / DTV-modus)
10. VOL+/-
Het volume regelen.
11. CH /
Een kanaal kiezen.
12. CH.LIST
De kanaallijst weergeven (ATV / DTV-modus)
13. ASPECT
6HOHFWHHUXLWGHYROJHQGHPRGXVLQVWHOOLQJHQ
)XOO=RRP=RRP$XWR
Overzicht van de afstandsbediening
MUTE
PMODE SMODE FAV SLEEP
CH.LIST
ASPECT
EPG AUDIO
MENU
EXIT
DISPLAY
SOURCE
TEXT
INDEX
HOLD
SIZE
SUBPAGE
REVEAL
SUBTITLE
ENTER
21
7
3
8
4
10
6
5
9
11
12 13
Aan de slag

8
14. EPG
De EPG (Elektronische Programmagids)
weergeven.
(DTV-modus)
15. AUDIO
Druk om de audiomodus te doorlopen.
Ɣ
Het huidig programma opnemen. (DTV-
modus)
17. MENU
Het OSD (On Screen Display) menu
weergeven.
(;,7
Het OSD (On Screen Display) menu
weergeven.
19. ŻźŸŹ
Om de menu's op het scherm te doorlopen
en de systeeminstellingen naar wens aan te
passen.
ENTER
(HQVHOHFWLHLQGH26'PHQXV
bevestigen.
(HQOLMVWPHWNDQDOHQGLHLQKHWJHKHXJHQ
van deTV-tuner opgeslagen zijn weergeven.
20. SOURCE
Tussen de verschillende
LQJDQJVVLJQDDOEURQQHQVHOHFWHUHQ'79
$79$96&$57<3E3U+'0,+'0,
/ HDMI3 / PC / MEDIA.
',63/$<
De informatie over het programma
weergeven/verwijderen.
22.
Snel terugspoelen. (USB-modus)
Snel doorspoelen (USB-modus)
Naar het begin van de vorige hoofdstuk
/ track / foto gaan. (USB-modus)
Naar het begin van de volgende
hoofdstuk / track / foto gaan. (USB-modus)
Overzicht van de afstandsbediening
MUTE
PMODE SMODE FAV SLEEP
CH.LIST
ASPECT
EPG AUDIO
MENU
EXIT
DISPLAY
SOURCE
TEXT
INDEX
HOLD
SIZE
SUBPAGE
REVEAL
SUBTITLE
ENTER
15
14
18
17
20
19
21
16
22
Aan de slag

9
7(;7
De teletekstfunctie in-/uitschakelen. (ATV /
DTV-modus)
24.
Druk eenmaal om te stoppen. (USB-modus)
Ź,,
$IVSHOHQPHWWLMGVYHUVFKXLYLQJVWDUWHQ
(DTV-modus)
+HWDIVSHOHQVWDUWHQRIRQGHUEUHNHQ
(USB-modus)
,1'(;
Het paginanummer van de index in teletekst
kiezen. (ATV / DTV-modus)
6,=(
Het beeld op de TV in teletekst vergroten.
(ATV / DTV-modus)
28. REVEAL
Verborgen informatie onthullen, zoals
antwoorden in een quiz op teletekst. (ATV /
DTV-modus)
29. HOLD
Meerdere pagina's op het scherm vastzetten.
(ATV / DTV-modus)
30. SUBPAGE
De subpagina op het teletekstscherm
weergeven.
(ATV / DTV-modus)
31. SUBTITLE
De ondertitels die met het programma komen
weergeven. (DTV-modus)
Overzicht van de afstandsbediening
Aan de slag
MUTE
PMODE SMODE FAV SLEEP
CH.LIST
ASPECT
EPG AUDIO
MENU
EXIT
DISPLAY
SOURCE
TEXT
INDEX
HOLD
SIZE
SUBPAGE
REVEAL
SUBTITLE
ENTER
25
28
31
23
26
27
30
29
24
230(5.,1*$OVHUJHHQLQJDQJVVLJQDDOLV]DOGH79
automatisch in stand-by gaan of worden uitgeschakeld.

10
Bedieningsknoppen (zijkant)
Stroomaansluiting
Antenne-aansluiting
1.VOLUME OMLAAG / OMHOOG knop
Verhoogt of verlaagt het volume. In het
menusysteem werken ze net zoals de rechter /
linker richtingsknop op de afstandsbediening om
de menuopties aan te passen.
2SPHUNLQJ,QEHSDDOGHPHQX¶VZHUNW92/80(
OMHOOG tevens zoals de OK knop op de
afstandsbediening.
2.KANAAL OMLAAG / OMHOOG knop
Doorloop de kanaallijst omhoog / omlaag. In het
menusysteem werken ze net zoals de omhoog
/ omlaag knop op de afstandsbediening om de
menuopties aan te passen.
2SPHUNLQJ'HORFDWLHHQEHQDPLQJYDQGH
functieknoppen en aan/uit-knop op de TV
kunnen afwijken naargelang het model van uw
TV.
3.MENU knop
Geeft het hoofdmenu weer of druk om naar het
vorig menu terug te gaan.
4.SOURCE knop
Druk om signaalbron te selecteren.
5. knop
=HWGH79DDQRILQVWDQGE\2SPHUNLQJ9RRU
bepaalde modellen zet de AAN/UIT knop de TV
aan of uit.)
Opmerking:
Na het uitpakken, zorg dat de TV
zich op kamertemperatuur bevindt voordat u de
stekker in het stopcontact steekt.
Steek de stekker in het stopcontact.
Sluit de “antenne” of “kabeltelevisie” stekker aan
op de ANTENNE-INGANG (ANT.) aansluiting
aan de achterkant van de TV.
X
Y
Z
[
\
Aan de slag

11
Afstandsbediening - de batterijen installeren
Mise en marche et arrêt de la TV
Haal het batterijdeksel aan de achterkant van
de afstandsbediening af door het tegelijkertijd
voorzichtig omlaag te duwen en achterwaarts te
trekken, zoals afgebeeld.
Installeer twee
AAA/R3
batterijen of van een
JHOLMNVRRUWLJW\SH=RUJGDWGHEDWWHULMHQLQGH
juiste richting worden geplaatst en breng het
batterijdeksel opnieuw aan.
Opmerking:
Als u de afstandsbediening
gedurende een lange periode niet zult gebruiken,
haal de batterijen uit. De afstandsbediening
kan anders schade oplopen door het lekken of
roesten van de batterijen.
De TV aanzetten
Met de stekker in het stopcontact en de TV in de
‘
Stand-by
’ modus.
2PGH79YDQDIVWDQGE\DDQWH]HWWHQYLDGH
a: De afstandsbediening
; druk op de “ ” knop.
b: De TV;
druk op de knop aan de zijkant van
de TV.
De TV uitzetten
Druk op de “ ” knop op de afstandsbediening of
druk op de knop aan de zijkant van de TV, de
TV gaat vervolgens in stand-by.
AAA/R3 X2
batterijen
Aan de slag

12
Bediening via de knoppen op de TV
Bediening via de afstandsbediening
De VOL+/VOL- knoppen werken standaard als
YROXPHRPKRRJRPODDJ=HOIVDOVWHOWXGH]H
knoppen op een andere functie in, de VOL+/
VOL- knoppen keren na een korte periode terug
naar de volumeregeling.
Volume instellen
Druk op de VOL+/VOL- knoppen om het volume
te verhogen of te verlagen.
Programma kiezen
'UXNRSGH&+ޔ&+ޕNQRSSHQRPKHWYROJHQGH
of vorige programma te selecteren.
De afstandsbediening is ontworpen om alle
functies van het model te bedienen.
Volume instellen
Druk op de VOL+ knop om het volume te
verhogen.
Druk op de VOL- knop om het volume te
verlagen. Een volumeschaal (schuifregelaar)
wordt op het scherm weergegeven.
Programma selecteren (Vorig of volgend
programma)
'UXNRSGH&+ޕNQRSRPKHWYRULJSURJUDPPD
te selecteren.
'UXNRSGH&+ޔNQRSRPKHWYROJHQG
programma te selecteren.
Programma selecteren (Directe toegang)
Druk op de cijferknoppen op de
afstandsbediening om programma’s tussen
0 en 9 te selecteren. De TV wordt op het
geselecteerde programma ingesteld.
X
Y
Z
[
\
MUTE
PMODE SMODE FAV SLEEP
CH.LIST
ASPECT
EPG AUDIO
MENU
EXIT
DISPLAY
SOURCE
TEXT
INDEX
HOLD
SIZE
SUBPAGE
REVEAL
SUBTITLE
ENTER
Aan de slag
De knop wordt gebruikt voor het selecteren van
OSD en het wijzigen van de ingangsbron. Als de
afstandsbediening niet naar behoren werkt, vervang
de afstandsbediening of neem contact op met een
servicecentrum.

13
Initiële instellingen Initiële instellingen
Algemene werking
1.Sluit een uiteinde van de RF coaxiale kabel
aan op de antenneaansluiting op de muur en het
DQGHUXLWHLQGHRSGH5)ȍDDQVOXLWLQJDDQ
de onderkant van uw TV.
2.Steek de stekker in het snoer eenmaal alle
aansluitingen zijn gemaakt.
3.Met de stekker in het stopcontact en de TV in
de ‘
Stand-by
’ modus. De TV wordt in stand-by
gezet. Het rode LED-controlelampje brandt op
het frontpaneel van de TV.
4.In stand-by, druk op de knop aan de
zijkant van de TV of op de knop op de
afstandsbediening op de TV aan te zetten. Het
rode LED-controlelamje wordt blauw.
5.De eerste keer u de TV aanzet, wordt het menu
Instellingen bij ingebruikname
rechtstreeks
JHRSHQG'UXNRSGHŻŹŸźNQRSSHQRP
door het menu te navigeren en instellingen te
wijzigen.
OSD-taal
Selecteer uw gewenste taal voor het menu dat
op het scherm wordt weergegeven. De taal van
het menu dat op het scherm wordt weergegeven
is standaard in het Engels weergegeven.
Modusinstelling
Selecteer uw gewenste modusinstelling.
7KXLVPRGXV7KXLVQDDU79NLMNHQ
:LQNHOPRGXV,QGH:LQNHOPRGXVLVGH
helderheid hoger dan in de Thuismodus.
Land
Selecteer het land waar u de TV zult bedienen.
Het land is standaard op Frankrijk ingesteld.
Tunertype
6HOHFWHHUKHWWXQHUW\SH.DEHO$QWHQQH
Automatisch scannen
6HOHFWHHUKHWDXWRPDWLVFKVFDQW\SH'79$79
DTV / ATV.
LCN
Selecteer LCN Type Aan of Uit.
Automatisch bijwerken van de kanalen
Selecteer Automatisch bijwerken van de kanalen
Type Aan of Uit.
Start
Druk op de
ENTER
knop om het automatisch
afstemmen te starten. Het automatisch scannen
start. Het display toont de voortgang van het
afstemmen en het aantal gevonden kanalen.
6.
Als u het DTV-afstemmen wilt overslaan,
druk op de
MENU
knop om het afstemmen
halverwege af te breken.
De TV gaat rechtstreeks naar het ATV-
afstemmen. U kunt de bovenstaande stap
herhalen als u het ATV-afstemmen wilt
overslaan.
Druk op de
SOURCE
knop op de
afstandsbediening en selecteer DTV om de TV
op digitale aardse televisie-uitzendingen in te
stellen.
Informatiebanner
Telkens u het kanaal wijzigt met behulp van de
&+ޔ&+ޕNQRSSHQRIGHFLMIHUNQRSSHQJHHIWGH
TV in de linker bovenhoek van het scherm het
uitzendbeeld samen met een informatiebanner
weer (alleen beschikbaar in de DTV/ATV
modus).
De informatieban ner kan tijdens het TV kijken
op elk moment worden weergegeven door op
de
DISPLAY
knop op de afstandsbediening te
drukken.
First Time Setup
OSD Language
Mode Setting
Country
Tuner Type
English
Home Mode
France
Cable
Auto Scan DTV+ATV
LCN On
Auto Channel Update Off
Start
Move Adjust MENU: Return EXIT: Exit
Auto Scan
Scanning CH34
Digital Channels Found:
DTV :10 Radio :0 Data:0
Analog Channels Found: 0
MENU: Skip EXIT: Exit
Aan de slag

14
Aansluitingen
Aansluitingen aan de linkerkant
1. Koptelefoonaansluiting
Een externe koptelefoon op de TV aansluiten.
Sluit aan op de KOPTELEFOON aansluiting om
met een koptelefoon naar de TV te luisteren.
2SPHUNLQJ+HWYROXPHYDQGHNRSWHOHIRRQNDQ
worden gewijzigd met de “VOL+” of “VOL-” knop.
2.SCART
Ingangen of uitgangen voor externe apparaten.
Sluit de SCART-kabel aan op de SCART-
aansluiting op de TV en de SCART-aansluiting
op het extern apparaat (decoder, VCR of DVD-
VSHOHU2SPHUNLQJ$OVHHQH[WHUQDSSDUDDWYLD
de SCART-aansluiting is aangesloten, schakelt
de TV automatisch naar de SCART-modus.
3.PC Ingang (VGA) / PC AUDIO
Sluit een personal computer aan op de TV. Sluit
de PC-kabel aan op de PC INGANG op de TV
en de PC UITGANG op de TV.
2SPHUNLQJ$OVXHHQDSSDUDDWRSGH79DDQVOXLW
via de PC-kabel, gebruik tevens een audiokabel
om uw apparaat op de PC AUDIO-INGANG aan
te sluiten om audio in te schakelen.
&2$;287
Sluit een soundbar, digitaal luidsprekersysteem
of home theatersysteem op deze aansluiting aan
om via externe luidsprekers naar de TV-audio te
luisteren.
5.RF ingang (ANT.)
Sluit een antenne of TV-kabel aan. Als u een
decoder of een mediarecorder gebruikt, sluit de
antennekabel via het apparaat op de TV aan met
behulp van een gepaste antennekabel.
6.HDMI ingang
Sluit een apparaat aan met een HDMI-
DDQVOXLWLQJ'H79NDQ+LJK'H¿QLWLRQEHHOGHQ
weergeven vanaf apparaten zoals een High
'H¿QLWLRQVDWHOOLHWRQWYDQJHURI'9'VSHOHU'H]H
apparaten moeten via de HDMI aansluitingen of
componentaansluiting worden aangesloten. Voor
een HDMI naar HDMI-aansluiting is er geen
geluidsaansluiting nodig.
Opmerking: De HDMI1 poort ondersteunt de
ARC-functie.
2
1
6
3
4
5
SCART
HDMI1(ARC)RF INVGA IN COAX OUTPC AUDIO IN
HEADPHONE

15
Aansluitingen
Aansluitingen in linker benedenhoek
7.USB-ingang
Apparaten op de TV aansluiten die een snelle
gegevensuitwisseling leveren. USB werkt in de
USB/DTV modus.
8.MINI AV ingang
Aansluiting naar de composite VIDEO en AUDIO
(L/R) uitgangsaansluitingen op externe video-
apparatuur.
0,1,<3E3U
<3E3ULQJDQJVDDQVOXLWLQJLVDOOHHQJHVFKLNWYRRU
<3E3UPLQLNDEHO
Aansluiting naar een DVD-speler, digitale set-
top-box of ander AV-apparatuur met component
<3E3UYLGHRXLWJDQJVDDQVOXLWLQJHQ
2SPHUNLQJ*HEUXLNGH/$8',2,1
5DDQVOXLWLQJZDQQHHUX<3E3UDXGLRZLOW
aansluiten.
10.CI-sleuf
Om een CI-kaart in te brengen. Een CI-kaart stelt
u in staat om alle kanalen waarop u geabonneerd
bent te bekijken. Voor meer informatie, zie de
sectie “Voorwaardelijke toegang”.
8
7
9
10
6
HDMI2 HDMI3 USB
MINI
AV
MINI
YPbPr
CI SOLT

16
Aansluitingen
HDMI-aansluitingenI
VGA-aansluitingen
+'0,ODDWXJHQLHWHQYDQKLJKGH¿QLWLRQGLJLWDOH
beelden en hoogwaardig geluid door de TV aan
te sluiten op externe apparaten zoals een DVD-
speler, set-top box of spelconsole.
Schakel zowel de TV als het apparaat uit voordat
u de aansluitingen maakt.
Voor meer informatie, raadpleeg de
gebruiksaanwijzing van het apparaat.
Tijdens het aansluiten, schakel de “Bron” in op
³+'0,´=LHGHVHFWLH³,QYRHUVHOHFWLH´
Opmerking:
HDMI-kabel is niet meegeleverd.
U kunt een computer (PC) op uw TV aansluiten
om het scherm van uw computer op de TV weer
te geven.
Schakel zowel de computer als de TV uit voordat
u de aansluitingen maakt..
Maak gebruik van een 15-pin D-sub
weergavekabel om de PC op de TV aan te
sluiten. Gebruik een audiokabel tussen de
PC AUDIO ingangen aan de linkerkant van
de TV en de audio-uitgang op uw PC om een
geluidsverbinding tot stand te brengen.
Eenmaal de verbinding is gemaakt, schakel de
³%URQ´QDDU³3&´=LHGHVHFWLH³,QYRHUVHOHFWLH´
Stel de gewenste resolutie in. Meer informatie
over de resolutie kan in de “Bijlagen” worden
gevonden.
Opmerking: De VGA-kabel is niet meegeleverd.
HDMI1(ARC)RF IN
A
IN COAX OUT
HDMI2 HDMI3 USB
MINI
AV
MINI
YPbPr
CI SOLT
SCART
HDMI1(ARC)RF INVGA IN COAX OUTPC AUDIO IN
HEADPHONE
HDMI2 HDMI3 US
B

17
Basisfuncties
Door de menu’s navigeren - Een bron selecteren
Elektronische programmagids (EPG) (DTV-modus)
1.Druk op de
SOURCE
knop aan de
bovenkant van de TV of de SOURCE knop
op de afstandsbediening om de lijst met
ingangsbronnen weer te geven.
'UXNRSGHŸźNQRSSHQRPGHJHZHQVWH
LQJDQJVEURQWHVHOHFWHUHQ'79$79$9
6&$57<3E3U+'0,+'0,+'0,3&
MEDIA.
3.Druk op de
ENTER
knop om uw keuze te
bevestigen.
Dit systeem is voorzien van een Elektronische
programmagids (EPG) om u te helpen tijdens
het doorlopen van alle mogelijke kijkopties.
De EPG biedt informatie zoals programmalijsten
en de start- en eindtijden voor alle beschikbare
diensten. Gedetailleerde informatie over het
programma is tevens vaak beschikbaar in de
EPG (de beschikbaarheid en hoeveelheid
programma-informatie zijn afhankelijk van uw
omroep).
Deze functie kan alleen worden gebruikt
wanneer de EPG-informatie door de omroepen
wordt uitgezonden.
De EPG geeft de programmagegevens voor de
volgende 7 dagen weer.
1.Druk op de
EPG
knop om
EPG
in te schakelen.
2.Druk opnieuw op de
EPG
knop of
EXIT
knop
om EPG uit te schakelen en naar het normaal
TV kijken terug te gaan.
2SGUDFKWHQRSGHLQIRUPDWLHEDON
ROOD
(Vorige datum)
Druk op de
ROOD
knop om de planning van de
vorige dag te bekijken.
GROEN
(Volgende datum)
Druk op de
GROEN
knop om de planning van de
volgende dag te bekijken.
GEEL
(Planning)
Druk op de
GEEL
knop om de vooraf ingestelde
herinneringen in de planningslijst te bekijken.
Druk op de
GEEL
knop om naar de
EPG
terug
te gaan.
BLAUW
(Herinnering)
Druk op de BLAUW knop wanneer u zich
in het geselecteerde programma bevindt,
het instelmenu voor herinneringen wordt
weergegeven.
'UXNRSGHŻŹŸźNQRSSHQRPGHLQVWHOOLQJHQ
aan te passen en druk vervolgens op de Opslaan
knop om de instellingen te bevestigen. Na de
bevestiging wordt de EPG planningslijst met uw
vooraf ingestelde herinneringen weergegeven.
Druk op de
GEEL
knop om naar de EPG terug
te gaan. De TV wordt automatisch afgestemd op
het geselecteerde programma eenmaal het start.
REC
Programmering van de timer.
ENTER
Druk om gedetailleerde informatie over het
geselecteerde programma weer te geven (indien
beschikbaar).
SOURCE
DTV
ATV
AV
YPbPr
SCART
HDMI3
HDMI1
HDMI2
PC
MEDIA
Soure:Exit
Move
PROGRAM GUIDE
26 Dec 2008 10:00 - 26 Dec 2008 10:25 Big Cook Little Cook
Penguin: Cookey series with Big Cook Ben and foot-high Little Cook Small. Ben comes in to the cate
wearing flippers and a mask he’s found in the fancy dress box. [AD,S]
PrevDate NextDate Schedule Reminder
Rec: Record ENTER: Display EXIT: Exit
009 BBC FOUR
071 CBeebies
081 BBC Parliament
087 Community
301 301
302 302
10:00 Big Cook Little Cook
10:25 Bob the Builder
10:40 Me Too!
11:00 Something Special
11:15 Doodle Do
11:35 Our Planet
26 Dec 2008 10:21:43
[Children’s]

18
Basisfuncties
Teletekst (ATV-modus)
Teletekst is een gratis dienst van bepaalde TV-
stations met de allerlaatste informatie over
nieuws, weer, televisieprogramma’s, aandelen
en andere onderwerpen. Gebruik de teletekst
bedieningsknoppen om pagina’s met informatie
te bekijken die in de teletekst
INDEX
zijn
vermeld.
De teletekstfunctie inschakelen
In de ATV-modus, druk op de
TEXT
knop om de
teletekstmodus te openen. Druk op de
INDEX
knop om de
INDEX
pagina weer te geven.
Druk eenmaal op de
TEXT
knop om af te sluiten
en de TV gaat terug naar het kanaal naar waar u
aan het kijken bent.
Een tekstpagina selecteren
=RHNQDDUKHWSDJLQDQXPPHULQGH
INDEX
en
voer het in met behulp van de
0-9
knoppen. Het
paginanummer verschijnt in de linker bovenhoek
van het scherm.
De paginateller zoekt naar uw pagina. De pagina
wordt weergegeven eenmaal gevonden.
Om naar de volgende tekstpagina te gaan, druk
RSGHŸNQRS
Om naar de vorige tekstpagina te gaan, druk op
GHźNQRS
Om naar de
INDEX
pagina terug te gaan, voer
“
100
” in met behulp van de
0-9
knoppen of druk
RSGH,1'(;NQRS
Mix
Om een tekstpagina te bekijken terwijl u naar
een TV-programma kijkt, druk tweemaal op de
7(;7NQRS'HWHNVWZRUGWERYHQRSKHW79
programma weergegeven.
Dubbele teksthoogte
Als u de tekst op de TV moeilijk kunt lezen, kunt
u de hoogte van de tekst verdubbelen.
Druk op de
SIZE
knop. De tekst van de bovenste
helft van de pagina wordt in een dubbele
teksthoogte weergegeven.
Druk opnieuw op de
SIZE
knop. De tekst van
de onderste helft van de pagina wordt in een
dubbele teksthoogte weergegeven.
Druk opnieuw op de
SIZE
knop om naar de
volledige pagina terug te gaan.
Pagina VASTZETTEN
Als u de geselecteerde tekstpagina subpagina’s
bevat, worden deze subpagina’s automatisch
op volgorde met een bepaalde vertraging
weergegeven zodat u voldoende tijd hebt om de
pagina te lezen.
Om te vermijden dat de volgende subpagina
wordt geopend, druk op de
HOLD
knop.
Om de subpagina’s verder te doorlopen, druk
opnieuw op de
HOLD
knop.
$OWHUQDWLHI'UXNRSGH
SUBPAGE
knop en
gebruik vervolgens de 0-9 knoppen om een
paginanummer bestaande uit 4 cijfers in te
voeren.
Informatie onthullen
Druk op de
REVEAL
knop om verborgen
informatie te onthullen (bijv. quizantwoorden,
etc.).
Druk nogmaals op de
REVEAL
knop om de
informatie opnieuw te verbergen.
Fasttext
Aan de onderkant van het teletekstscherm
bevindt zich een rij met onderwerpen in rood,
groen, geel en blauw. De afstandsbediening heeft
een rij met kleurknoppen die overeenstemmen
met de rij met gekleurde onderwerpen op het
scherm.
Druk op een van de kleurknoppen om
rechtstreeks naar de pagina van het
overeenkomstig onderwerp te gaan.
=RUJGDWKHW79NDQDDOQDDUZDDUXDDQKHW
kijken bent teletekst uitzendt.
De melding “Geen teletekst” wordt op het
scherm weergegeven wanneer er geen teletekst
beschikbaar is.

19
Basisfuncties
Digitale teletekst (DTV-modus)
Een DTV-programma op een USB-opslagapparaat opnemen
Met digitale teletekst krijgt u toegang tot speciale
GLJLWDOHWHOHWHNVWGLHQVWHQHQVSHFL¿HNHGLHQVWHQ
die digitale teletekst uitzenden. U moet de
ondertitelingsfunctie uitschakelen voordat u
teletekst kunt gebruiken.
1.In de DTV-modus, druk op de
TEXT
knop om
de teletekstpagina weer te geven.
Gebruik deze functie om het DTV-programma
dat u op het hoofdscherm aan het bekijken bent
op te slaan om het later te bekijken. De opname
vanaf een vooraf ingesteld programma of directe
opname kan enige vertraging oplopen wanneer
het opnemen van het programma wordt gestart.
=RUJGDWKHW86%SURJUDPPDLVLQJHEUDFKW
anders wordt er een waarschuwing
weergegeven.
'UXNRSGHƔ
REC
knop om het programma
dat u momenteel aan het bekijken bent op te
nemen.
1.Druk op de Stop knop om de opname te
stoppen.
2.Druk op de knoppen 0-9 om een
paginanummer te selecteren.
3.Volg de instructies op de digitale teletekst en
ga naar de volgende stap door te drukken op
(17(5ŻŹ522'*52(1*((/%/$8:
of
0-9
knoppen, etc.
4.Om de digitale teletekstdienst te wijzigen,
selecteer een andere dienst door te drukken op
GHNQRSSHQRIGHŸźNQRSSHQ
$OWHUQDWLHI8NXQWRSGH522'NQRSQDDVWGH
TEXT
knop drukken om de teletekstinformatie
ZHHUWHJHYHQZDQQHHUHHQƔURGHORJRRSKHW
scherm wordt weergegeven (bijv. BBC).
5.Druk op de
TEXT
knop om af te sluiten.
Recording
Recorded Time : 00 : 00 : 47
Available Time: 3837 Minute
16 QVC
A Traditional Christ
Om de informatie over de opname weer te
JHYHQGUXNRSGHƔ5(&NQRS
$OVHHQKDUGHVFKLMIZRUGWJHEUXLNW]RUJGDW
de netadapter van deze schijf op de voeding is
aangesloten.
$OVHHQ86%KXEZRUGWJHEUXLNW]RUJGDW
de netadapter van de hub op de voeding
is aangesloten aangezien het totaal
stroomverbruik hoger dan 500 mA kan zijn.
'HPD[LPDOHRQGHUVWHXQGHRSVODJUXLPWHYRRU
de harde schijf is 1 TB.
+HWEHVWDQGVV\VWHHPRQGHUVWHXQWDOOHHQKHW
FAT32-formaat.
$OVXGHYLGHRVWUHDPLQJYDQHHQ'79
programma wilt opslaan, moet de
overdrachtssnelheid van het USB-
opslagapparaat minstens 5MB/s zijn,
anders zullen het beeld en geluid van het
programma worden aangetast en wordt er een
waarschuwing op het scherm weergegeven.
Als dit zich voordoet, werk uw USB-
opslagapparaat bij.
+HW79VFKHUP]DOWLMGHOLMNEODQFR]LMQ
aangezien het enige tijd duurt om de
aangesloten harde schijf op te starten en te
stabiliseren. Dit is normaal en de starttijd kan
variëren naargelang het merk en de totale
opslagruimte van de aangesloten harde schijf.
2QWNRSSHOKHW86%RSVODJDSSDUDDWZDQQHHU
niet in gebruik.
De opname stopt automatisch als de schijf
vol is.

20
Basisfuncties
Programmering van de timer
Deze functie wordt gebruikt na vervanging van
de accu.
De opname vanaf een vooraf ingesteld
programma of directe opname kan enige
vertraging oplopen wanneer het opnemen van
het programma wordt gestart.
=RUJGDWKHW86%SURJUDPPDLVLQJHEUDFKW
anders wordt er een waarschuwing
weergegeven.
1.Druk op de
EPG
knop op de afstandsbediening.
Het
EPG
menu wordt weergegeven.
'UXNRSGHƔ5(&NQRSRSGH
afstandsbediening terwijl in het geselecteerde
programma het
Geplande opname
menu wordt
ZHHUJHJHYHQ'UXNRSGHŸźŻŹNQRSSHQ
om de instellingen in het
OPNAME
menu voor
de Frequentie, Kanaal, Starttijd en Eindtijd te
selecteren.
Frequentie
'UXNRSGHŻŹNQRSSHQRPGHIUHTXHQWLH8LW
Eenmaal / Dagelijks / Wekelijks) te selecteren.
Kanaal
Druk op de
ENTER
knop en vervolgens op de
ŸźNQRSSHQRPKHWNDQDDOGDWXZLOWRSQHPHQ
te selecteren.
Starttijd
(voor Modus Eenmaal, Dagelijks,
:HNHOLMNV'UXNRSGHŸźŻŹNQRSSHQRPGH
starttijd aan te passen.
Eindtijd
(voor Modus Eenmaal, Dagelijks,
:HNHOLMNV'UXNRSGHŸźŻŹNQRSSHQRPGH
eindtijd aan te passen.
3.Na het voltooien van alle
recorderaanpassingen, druk op de Opslaan knop
om uw instellingen te bevestigen.
4.Na de bevestiging wordt de
Instellijst met
geplande opname
met uw vooraf ingestelde
herinneringen weergegeven.
5
.Druk op de
EXIT
knop om EPG af te sluiten.
Move
PROGRAM GUIDE
26 Dec 2008 10:00 - 26 Dec 2008 10:25 Big Cook Little Cook
Penguin: Cookey series with Big Cook Ben and foot-high Little Cook Small. Ben comes in to the cate
wearing flippers and a mask he’s found in the fancy dress box. [AD,S]
PrevDate NextDate Schedule Reminder
Rec: Record ENTER: Display EXIT: Exit
009 BBC FOUR
071 CBeebies
081 BBC Parliament
087 Community
301 301
302 302
10:00 Big Cook Little Cook
10:25 Bob the Builder
10:40 Me Too!
11:00 Something Special
11:15 Doodle Do
11:35 Our Planet
26 Dec 2008 10:21:43
[Children’s]
Delete One
Move Up
Move Down
Select
Return
Exit
Function
OK
MENU
EXIT
Frequency
Off
Off
Off
Off
Off
Off
Off
Off
Off
Off
Off
Off
Off
Off
Off
Off
Hot Key
Date
Scheduled Record
Scheduled Record Setting List
Standby
Delete All
Group
1
2
3
4
5
6
7
8
9
10
11
12
13
14
15
16
Channel
Start Time
Duration
10:03
25 Dec 2008 Thu.
Scheduled Record - Group 1
Move Up
Move Down
Adjust
Adjust
Select
Return
Exit
Hot Key
OK
MENU
EXIT
Setting Status
Setting Is Not In Use
Frequency Off
1 BBC ONE
2008-12-25
1 0 : 0 5
2008-12-25
1 0 : 1 5
Channel
Start Time
End Time
Save
'H79VWDUWDXWRPDWLVFKPHWRSQHPHQ
eenmaal de vooraf ingestelde tijd is bereikt.
$OVHHQSURJUDPPDRSQDPHVWDUWZDQQHHUGH
TV zich in stand-by bevindt, knippert het LED-
controlelampje afwisselend rood en blauw.

21
Basisfuncties
Opgenomen programma afspelen
Beeldbeheer (ATV / DTV-modus)
Lecture d'un programme enregistré
U kunt een opgenomen programma vanaf de
lijst met opgenomen programma’s of vanaf een
USB-opslagapparaat afspelen.
1.Druk op de
SOURCE
knop aan de bovenkant
van de TV of de
SOURCE
knop op de
DIVWDQGVEHGLHQLQJGUXNYHUYROJHQVRSGHŸź
knoppen om de Mediamodus te selecteren en
druk vervolgens op de
ENTER
knop.
'UXNRSGHŻŹNQRSSHQRP
FILM
te
selecteren en druk vervolgens op de
ENTER
knop.
'UXNRSGHŸźNQRSSHQRPXZ
opslagapparaat te selecteren en druk vervolgens
op de
ENTER
knop.
'UXNRSGHŸźNQRSSHQRPGHPDS
“usbrecord” te selecteren en druk vervolgens op
de
ENTER
knop.
'UXNRSGHŸźNQRSSHQRPXZRSJHVODJHQ
programma te selecteren en druk vervolgens op
GHŹ,,NQRSRPWHEHNLMNHQ
1.Druk op de
MENU
knop om het hoofdmenu
ZHHUWHJHYHQ'UXNRSGHŻŹNQRSSHQRP
Beeld in het hoofdmenu te selecteren, druk
YHUYROJHQVRSGHźRI
ENTER
knop en de
eerste optie wordt gemarkeerd.
'UXNRSGHŸźNQRSSHQRPGHRSWLHGLHXLQ
het Beeldmenu wilt aanpassen te selecteren.
'UXNRSGHŻŹŸźNQRSSHQRPGHYROJHQGH
instellingen te wijzigen.
7,36
8NXQWGHZDDUGHYRRUKHOGHUKHLGFRQWUDVW
scherpte en verzadiging wijzigen wanneer het
beeld zich in de modus Persoonlijk bevindt.
8NXQWRSGHNQRS
P. MO DE
op de
afstandsbediening drukken om de Beeldmodus
direct te wijzigen.
6.Druk op de
ENTER
knop of de
DISPLAY
knop
om de functiebalk weer te geven. Druk op de
ŻŹNQRSSHQHQGUXNYHUYROJHQVRSGH
ENTER
NQRSRPGHJHZHQVWHIXQFWLHWHVHOHFWHUHQ
Pauze / Vorige / Volgende / Snel terugspoelen /
Snel doorspoelen / Stop.
7.Druk op de
EPG
knop om het Snelmenu te
openen (Herhalen/Coderingstype)
8.Druk op de
EXIT
knop om naar het vorig menu
terug te gaan.
Photo Music Movie Text
Movie
Move
Change Page OK Selete EPG Quick Menu EXIT Return
USB1
USB1
Movie
Move
Change Page OK Selete EPG Quick Menu EXIT Return
USB1/Movie
AITEMP
Movie
MY PVR
Photo
Te xt
Music
LE32G
1/1
00 : 05 : 1300 : 00 : 22
FileName
VideoCodec :
Resolution
Bitrate :
Animals.AVI
MPEG4
640 x 480
4158120 bps
AudioCodec :
SampleRate :
Channel :
MP3
44100 Hz
2
Picture
Picture Mode
Brightness
Contrast
Sharpness
Saturation
Hue
Colour Temp
Aspect Ratio
Standard
Standard
Full
50
50
50
50
0
Move tixE :TIXE nruteR :UNEMtsujdA

22
Basisfuncties
Beeldbeheer Geluidsbeheer
Beeldmodus
Stelt u in staat om een van de volgende beeld-
YHUEHWHUHQGHRSWLHVWHVHOHFWHUHQ'\QDPLVFK
Standaard / Mild / Persoonlijk.
Helderheid
'LWLWHPSDVWGHRSWLVFKH¿EHUXLWYRHUYDQKHW
volledig beeld aan; dit wijzigt de lichtsterkte van
het beeld.
Contrast
Dit item past de markeringsintensiteit van het
beeld aan, de schaduw van het beeld wordt niet
gewijzigd.
Scherpte
Dit item wijzigt de scherpte in de details van het
beeld aan.
Verzadiging
Dit item past de kleurverzadiging naar wens aan.
Kleurschakering
Dit item kan worden gebruikt voor het
compenseren van de kleuren tijdens de
transmissie in de NTSC-code
Kleurtemperatuur
Dit item kan de warme kleur (rood) en de koude
kleur (blauw) van het beeld naar wens verhogen
of verlagen. Als Koud wordt gekozen wordt de
blauwe kleur in het wit verhoogd. Als Warm
echter wordt gekozen wordt de rode kleur in het
wit verhoogd.
Beeldverhouding
Stelt u in staat om het scherm in verschillende
EHHOGIRUPDWHQWHEHNLMNHQ$XWR)XOO
=RRP=RRP
Schermmodus
6HOHFWHHUGH+'0,VLJQDDOVFKHUPPRGXV$XWR
Video / PC.
Geavanceerde instellingen
15UXLVUHGXFWLH5HGXFHHUWKHWJHOXLGVQLYHDX
van het aangesloten apparaat (Medium / Sterk /
8LW=ZDN
'\QDPLVFKFRQWUDVW3DVWKHWG\QDPLVFK
FRQWUDVWDDQ0HGLXP6WHUN8LW=ZDN
4.Druk op de
EXIT
knop om het menu af te
sluiten.
1.Druk op de
MENU
knop om het hoofdmenu
ZHHUWHJHYHQ'UXNRSGHŻŹNQRSSHQRP
Geluid in het hoofdmenu te selecteren, druk
YHUYROJHQVRSGHźRI
ENTER
knop en de
eerste optie wordt gemarkeerd.
'UXNRSGHŸźNQRSSHQRPGHRSWLHGLHXLQ
het Geluidsmenu wilt aanpassen te selecteren.
'UXNRSGHŻŹŸźNQRSSHQRPGHYROJHQGH
instellingen te wijzigen.
7,36
8NXQWGHZDDUGHYRRUGHKRJHHQODJHWRQHQ
wijzigen wanneer het beeld zich in de modus
Persoonlijk bevindt.
8NXQWRSGHNQRS
S.MODE
op de
afstandsbediening drukken om de Geluidsmodus
direct te wijzigen.
Geluidsmodus:
Stelt u in staat om een van de volgende audio-
YHUEHWHUHQGHRSWLHVWHVHOHFWHUHQ6WDQGDDUG
Muziek, Film en Persoonlijk. U kunt de waarde
voor de hoge en lage tonen wijzigen wanneer
het beeld zich in de modus Persoonlijk bevindt.
Hoge tonen
Regelt de relatieve intensiteit van de hoge tonen.
Lage tonen
Regelt de relatieve intensiteit van de lage tonen.
Balans
Om het relatief volume van de luidsprekers
in een systeem met meerdere luidsprekers te
regelen.
Surround sound
Dit zorgt voor een bepaald gevoel die bij uw TV
past wanneer u het aanzet.
Sound Mode
Treble
Bass
Balance
EQ Setting
AVL
Surround Sound
SPDIF
Standard
Off
Off
PCM
0
0
0
Move tixE :TIXE nruteR :UNEMtsujdA
Sound

23
Geluidsbeheer Kanaalbeheer (ATV / DTV-modus)
EQ-instellingen
Stelt u in staat om een equalizermodus te
VHOHFWHUHQ8LW5RFN3RS-D]]*HEUXLNHU
U kunt tevens de EQ waarde in de modus
Gebruiker wijzigen.
AVL
Schakelt de audiovolumenivelleerder in/uit.
SPDIF
6HOHFWHHUGHGLJLWDOHDXGLRXLWJDQJVPRGXV$XWR
/ Uit / PCM.
Audiobeschrijving
Schakelt de audiobeschrijving in/uit.
Geluidstype
Wanneer een programma is geselecteerd, druk
op de MTS knop om de geluidsinformatie voor
het geselecteerd station weer te geven.
Monogeluid selecteren
Als het stereosignaal in stereo-ontvangst zwak
is, schakel naar mono door op de MTS knop te
drukken. In mono-ontvangst, zal het geluid beter
zijn. Om naar stereo terug te gaan, druk opnieuw
op de
MTS
knop.
De taal kiezen voor uitzendingen in twee
talen.
Als een programma in twee verschillende talen
ontvangen kan worden, schakel naar DUAL I,
DUAL II, Gemengd of Mono door herhaaldelijk
op de
MTS
knop te drukken.
Tunertype
1.Druk op de
MENU
knop om het hoofdmenu
ZHHUWHJHYHQ'UXNRSGHŻŹNQRSSHQRP
Instellingen in het hoofdmenu te selecteren,
GUXNYHUYROJHQVRSGHźRI
ENTER
knop en de
eerste optie wordt gemarkeerd.
'UXNRSGHŸźNQRSSHQRP
Tunertype
WHVHOHFWHUHQHQGUXNYHUYROJHQVRSGHŻŹ
knoppen om Kabel of Antenne te selecteren.
'UXNRSGH(;,7NQRSRPKHWPHQXDIWH
sluiten.
Automatisch scannen
Gebruik deze functie om automatisch naar
alle beschikbare kanalen te zoeken en ze op
te slaan. Dit is over het algemeen aanbevolen
wanneer bepaalde kanalen zijn toegevoegd of
verwijderd door de omroep of u bent verhuisd.
1.Druk op de
MENU
knop om het hoofdmenu
ZHHUWHJHYHQ'UXNRSGHŻŹNQRSSHQRP
Kanaal
in het hoofdmenu te selecteren, druk
YHUYROJHQVRSGHźRI(17(5NQRSHQGH
eerste optie wordt gemarkeerd.
'UXNRSGHŸźNQRSSHQRP$XWRPDWLVFK
scannen te selecteren en druk vervolgens op de
ENTER
knop om het submenu te openen.
Basisfuncties
Auto Scan
Tuner Type Cable
Off
Manual Scan
Channel Edit
Auto Channel Update
Common Interface
Favorite Manager
Signal Information
Move Adjust
MENU: Return EXIT: Exit
Channel
Auto Scan
Tuner Type Cable
Off
Manual Scan
Channel Edit
Auto Channel Update
Common Interface
Favorite Manager
Signal Information
Move Adjust
Channel
OK: Select MENU: Return EXIT: Exit
Uitzending Weergave op scherm
Mono Mono
Stereo STEREO
Dual DUAL I, DUAL II, Mixed
Stuurt de primaire uitzendtaal naar de
luidsprekers.
Stuurt de secundaire uitzendtaal naar de
luidsprekers.
Stuurt zowel de primaire als secundaire
uitzendtaal naar de luidsprekers.
DU A L I
DUQL II
Gemengd
Country
Mode
Start
UK
DTV+ATV
Scan Type Full
Network ID Auto
AutoFrequency
AutoSymbol Rate
Move tixE :TIXE nruteR :UNEMtsujdA
Auto Scan

24
Kanaalbeheer (ATV / DTV-modus)
'UXNRSGHŻŹŸźNQRSSHQRPGRRUKHW
menu te navigeren en instellingen te wijzigen.
Land
Selecteer het land waar u de TV zult bedienen.
Modus
6HOHFWHHUGHDXWRPDWLVFKVFDQPRGXV'79$79
/ DTV / ATV. (DTV-modus)
Scan type
6HOHFWHHUKHWVFDQW\SH*HDYDQFHHUG6QHO
Volledig.
Netwerk-ID
Selecteer netwerk Automatisch of digitale
nummers invoeren.
Frequentie
6HOHFWHHUGHIUHTXHQWLH$XWRPDWLVFKRIGLJLWDOH
nummers invoeren.
Symboolsnelheid
6HOHFWHHUGHV\PERROVQHOKHLG$XWRPDWLVFKRI
digitale nummers invoeren.
Start
Druk op de
ENTER
knop om het automatisch
afstemmen te starten.
Handmatig scannen (DTV-modus)
Stelt u in staat om het kanaal in de DTV-modus
KDQGPDWLJ¿MQDIWHVWHPPHQ
1.Druk op de
MENU
knop om het hoofdmenu
ZHHUWHJHYHQ'UXNRSGHŻŹNQRSSHQRP
Kanaal in het hoofdmenu te selecteren, druk
YHUYROJHQVRSGHźRI
ENTER
knop en de
eerste optie wordt gemarkeerd.
2.
'UXNRSGHŻŹNQRSSHQRP+DQGPDWLJ
scannen te selecteren en druk vervolgens op de
ENTER
knop. In het submenu, selecteer Digitaal
handmatig scannen en druk vervolgens op de
ENTER
knop.
Tunertype is Antenne.
Digitaal scannen:
'UXNRSGHŻŹNQRSSHQRP
het gewenste kanaal te selecteren.
Start:
'UXNRSGHŸźNQRSSHQRP6WDUWWH
selecteren en druk vervolgens op de OK knop
om het afstemmen te starten.
Tunertype is Kabel.
Netwerk-ID:
'UXNRSGHŻŹNQRSSHQRPGH
netwerk-ID te selecteren. Automatisch of digitale
nummers invoeren.
Symboolsnelheid:
'UXNRSGHŻŹNQRSSHQRP
GHV\PERROVQHOKHLGWHVHOHFWHUHQ$XWRPDWLVFK
of digitale nummers invoeren.
Modulatie:
'UXNRSGHŻŹNQRSSHQRP
0RGXODWLHWHVHOHFWHUHQ$XWR4$04$0
64QAM, 128QAM, 256QAM.
Start:
'UXNRSGHŸźNQRSSHQRP6WDUWWH
selecteren en druk vervolgens op de
ENTER
knop om het afstemmen te starten.
Basisfuncties
Auto Scan
Scanning CH34
Digital Channels Found:
DTV :10 Radio :0 Data:0
Analog Channels Found: 0
MENU: Skip EXIT: Exit
Auto Scan
Tuner Type Cable
Off
Manual Scan
Channel Edit
Auto Channel Update
Common Interface
Favorite Manager
Signal Information
Move
OK: Select MENU: Return EXIT: Exit
Channel
Network ID
Frequency
Symbol Rate
Modulation
Auto
474000 KHz
Auto
Auto
Start
Strength
0
Move MENU: Return EXIT: Exit
Digital Manual Scan
Adjust
Digital Scan
Start
Frequency
Strength
CH21
474.00 MHz
0
Move 0~9 Input MENU: Return EXIT: Exit
Digital Manual Scan
Adjust
Tunertype is
Antenne
Tunertype is
Kabel
Als u het afstemmen stopt voordat het
is voltooid, zal de TV een “geen signaal”
fout aangeven. Dit is normaal omdat het
geheugen met alle vorige ingestelde
kanalen is gewist voordat het afstemmen
werd uitgevoerd.

25
Kanaalbeheer (ATV / DTV-modus)
Handmatig scannen (DTV-modus)
Stelt u in staat om het kanaal in de ATV-modus
KDQGPDWLJ¿MQDIWHVWHPPHQLQJHYDOKHWVOHFKW
wordt ontvangen.
1.Druk op de
MENU
knop om het hoofdmenu
ZHHUWHJHYHQ'UXNRSGHŻŹNQRSSHQRP
Kanaal
in het hoofdmenu te selecteren, druk
YHUYROJHQVRSGHźRI
ENTER
knop en de
eerste optie wordt gemarkeerd.
'UXNRSGHŻŹNQRSSHQRP
Handmatig
scannen
te selecteren en druk vervolgens op
de
ENTER
knop. In het submenu, selecteer
Analoog handmatig scannen en druk vervolgens
op de
ENTER
knop.
Analoog scannen
De huidige frequentie wordt weergegeven,
GUXNRSGHŻŹNQRSSHQRPGHIUHTXHQWLHWH
wijzigen.
Kanaal om op te slaan
'UXNRSGHŸźNQRSSHQRP.DQDDORPRSWH
VODDQWHVHOHFWHUHQGUXNRSGHŻŹNQRSSHQ
om het kanaalnummer dat u wilt opslaan te
selecteren.
Kleurensysteem
'UXNRSGHŸźNQRSSHQRP.OHXUHQV\VWHHP
WHVHOHFWHUHQGUXNRSGHŻŹNQRSSHQRPHHQ
YDQYROJHQGHRSWLHVWHVHOHFWHUHQ$XWR3$/
SECAM.
Geluidssysteem
'UXNRSGHŸźNQRSSHQRP*HOXLGVV\VWHHP
WHVHOHFWHUHQGUXNRSGHŻŹNQRSSHQRPHHQ
YDQYROJHQGHRSWLHVWHVHOHFWHUHQ$XWR'.,
BG.
AFC
'UXNRSGHŸźNQRSSHQRP$)&WHVHOHFWHUHQ
GUXNRSGHŻŹNQRSSHQRP$DQRI8LWWH
selecteren.
Start
'UXNRSGHŸźNQRSSHQRP6WDUWWHVHOHFWHUHQ
HQGUXNYHUYROJHQVRSGHŻŹNQRSSHQRPKHW
afstemmen te starten.
Automatisch bijwerken van de kanalen
1.Druk op de
MENU
knop om het hoofdmenu
ZHHUWHJHYHQ'UXNRSGHŻŹNQRSSHQRP
Kanaal in het hoofdmenu te selecteren, druk
YHUYROJHQVRSGHźRI
ENTER
knop en de
eerste optie wordt gemarkeerd.
'UXNRSGHŸźNQRSSHQRP
Automatisch
kanaal bijwerken
te selecteren en druk
YHUYROJHQVRSGHŻŹNQRSSHQRP$DQRI8LWWH
selecteren.
3.Druk op de
EXIT
knop om het menu af te
sluiten.
Kanaal bewerken (DTV-modus)
1.Druk op de
MENU
knop om het hoofdmenu
ZHHUWHJHYHQ'UXNRSGHŻŹNQRSSHQRP
Kanaal
in het hoofdmenu te selecteren, druk
YHUYROJHQVRSGHźRI
ENTER
knop en de
eerste optie wordt gemarkeerd.
'UXNRSGHŸźNQRSSHQRP
Kanaal
bewerken
te selecteren en druk vervolgens op
de
ENTER
knop om het submenu te openen.
Basisfuncties
Auto Scan
Tuner Type Cable
Off
Manual Scan
Channel Edit
Auto Channel Update
Common Interface
Favorite Manager
Signal Information
Move
OK: Select MENU: Return EXIT: Exit
Channel
Analog Scan
Channel to Save
Colour System
Sound System
AFC
Start
420.25 MHz
CH001
Auto
Auto
Off
Move 0~9 Input MENU: Return EXIT: Exit
Analog Manual Scan
Fine tune
Auto Scan
Tuner Type Cable
Off
Manual Scan
Channel Edit
Auto Channel Update
Common Interface
Favorite Manager
Signal Information
Move
OK: Select MENU: Return EXIT: Exit
Channel
Auto Scan
Tuner Type Cable
Off
Manual Scan
Channel Edit
Auto Channel Update
Common Interface
Favorite Manager
Signal Information
Move Adjust
MENU: Return EXIT: Exit
Channel

26
Kanaalbeheer (ATV / DTV-modus)
Kanaal bewerken (ATV-modus)
1.Druk op de
MENU
knop om het hoofdmenu
ZHHUWHJHYHQ'UXNRSGHŻŹNQRSSHQRP
Kanaal
in het hoofdmenu te selecteren, druk
YHUYROJHQVRSGHźRI
ENTER
knop en de
eerste optie wordt gemarkeerd.
'UXNRSGHŸźNQRSSHQRP
Kanaal
bewerken
te selecteren en druk vervolgens op
de
ENTER
knop om het submenu te openen.
Verwijderen
Druk op de
ROOD
knop om het geselecteerd
programma te verwijderen.
Overslaan
Druk op de
GROEN
knop om de kanalen dit u
wilt overslaan te selecteren. Druk opnieuw op de
GROEN
knop om het ongedaan te maken.
Verplaatsen
Druk op de
BLAUW
knop en vervolgens op
GHŸźNQRSSHQRPQDDUKHWJHVHOHFWHHUGH
kanaal te gaan. Druk op de
BLAUW
knop om te
EHYHVWLJHQ'UXNRSGHŻŹNQRSSHQRPHHQ
YDQYROJHQGHRSWLHVWHVHOHFWHUHQ$XWR3$/
Hernoemen
Druk op de
ROOD
knop om het geselecteerd
SURJUDPPDWHKHUQRHPHQ'UXNRSGHŸź
knoppen om de gewenste tekens voor de
QLHXZHQDDPWHVHOHFWHUHQ'UXNRSGHŻŹ
knoppen om naar het volgende teken te gaan en
druk op de
ENTER
knop om de nieuwe naam te
bevestigen.
Favorieten beheren
1.Druk op de
MENU
knop om het hoofdmenu
ZHHUWHJHYHQ'UXNRSGHŻŹNQRSSHQRP
Kanaal
in het hoofdmenu te selecteren, druk
YHUYROJHQVRSGHźRI
ENTER
knop en de
eerste optie wordt gemarkeerd.
'UXNRSGHŸźNQRSSHQRP
Favorieten
beheren
te selecteren en druk vervolgens op de
ENTER
knop om het submenu te openen.
Basisfuncties
Auto Scan
Tuner Type Cable
Off
Manual Scan
Channel Edit
Auto Channel Update
Common Interface
Favorite Manager
Signal Information
Move
OK: Select MENU: Return EXIT: Exit
Channel
Delete
Move MENU: Return EXIT: Exit
Channel Edit
Page
Skip RenameMove
Auto Scan
Tuner Type Cable
Off
Manual Scan
Channel Edit
Auto Channel Update
Common Interface
Favorite Manager
Signal Information
Move
OK: Select MENU: Return EXIT: Exit
Channel
Favorite Manager
NO. Program Name Fav1 Fav2 Fav3 Fav4 Type
Favorite1 Favorite2 Favorite3 Favorite4
Move Page
EXIT: Exit MENU: Return
Delete
Move MENU: Return EXIT: Exit
Channel Edit
Page
Skip Move
Verwijderen
Druk op de
ROOD
knop om het geselecteerd
programma te verwijderen.
Overslaan
Druk op de
GROEN
knop om de kanalen die u
wilt overslaan te selecteren. Druk opnieuw op de
GROEN
knop om het ongedaan te maken.
Verplaatsen
Druk op de
BLAUW
knop en vervolgens op
GHŸźNQRSSHQRPQDDUKHWJHVHOHFWHHUGH
kanaal te gaan. Druk op de
BLAUW
knop om te
bevestigen.

27
Kanaalbeheer (ATV / DTV-modus)
Gemeenschappelijke interface (DTV-modus)
Informatie over de module bekijken.
1.Druk op de
MENU
knop om het hoofdmenu
ZHHUWHJHYHQ'UXNRSGHŻŹNQRSSHQRP
Kanaal
in het hoofdmenu te selecteren, druk
YHUYROJHQVRSGHźRI
ENTER
knop.
'UXNRSGHŻŹNQRSSHQRP
Gemeenschappelijke interface
te selecteren
en druk vervolgens op de
ENTER
knop.
3.Het hoofdmenu van de gemeenschappelijke
LQWHUIDFHYHUVFKLMQW'UXNRSGHŸźNQRSSHQ
om de items te selecteren en druk vervolgens op
de
ENTER
knop om te bevestigen.
4.Druk op de
EXIT
knop om het menu af te
sluiten.
De gemeenschappelijke interface laat het gebruik
van een gemeenschappelijke toegangsmodule
toe om gescrambelde (betaaltelevisie) diensten
te bekijken. Deze diensten worden geleverd
door TopUp TV (Alleen VK) en andere. De
gemeenschappelijke toegangsmodule en
nodige kaart kunnen bij de dienstenleverancier
verkregen worden.
Signaalinformatie (DTV-modus)
1.Druk op de
MENU
knop om het hoofdmenu
ZHHUWHJHYHQ'UXNRSGHŻŹNQRSSHQRP
Kanaal
in het hoofdmenu te selecteren, druk
YHUYROJHQVRSGHźRI
ENTER
knop.
'UXNRSGHŸźNQRSSHQRP
Signaalinformatie
te selecteren en druk
vervolgens op de
ENTER
knop om de
signaalinformatie te bekijken.
Deze functie is niet beschikbaar in alle landen.
De gemeenschappelijke toegangsmodule
inbrengen
1.Voordat u de gemeenschappelijke
toegangsmodule inbrengt, zorg dat de TV uit is
en de kaart is ingebracht
overeenkomstig de
aanwijzingen van de dienstenleverancier
.
2.Breng de gemeenschappelijke
toegangsmodule in de sleuf. Draai de
gemeenschappelijke toegangsmodule naar de
andere zijde en probeer opnieuw als u enige
weerstand voelt.
=HWGH79DDQ
De gemeenschappelijke toegangsmodule
inbrengen
1.Voordat u de gemeenschappelijke
toegangsmodule verwijdert, zorg dat de TV uit is.
2.Breng de gemeenschappelijke
toegangsmodule in de sleuf.
=HWGH79DDQ
Auto Scan
Tuner Type Cable
Off
Manual Scan
Channel Edit
Auto Channel Update
Common Interface
Favorite Manager
Signal Information
Move
OK: Select MENU: Return EXIT: Exit
Channel
Viaccess Conditional Access
Main Menu
Move OK: Select MENU: Return EXIT: Exit
Common Interface
1. Consultation
2. Settings
3. Upgrade
Press ‘OK’ to confirm, ‘EXIT’ to quit
CI (Gemeenschappelijke interface)
Maakt het inbrengen van de gemeenschappelijke
toegangsmodule en toegang tot de gecodeerde
inhoud mogelijk.
Gemeenschappelijke toegangsmodule
VOORKANT KAART
GEMEENSCHAPPELIJK INTERFACE
Basisfuncties
Druk op de
ROOD, GROEN, GEEL, BLAU
knop om het kanaal dat u momenteel aan
het bekijken bent als Favoriet 1, Favoriet 2,
Favoriet 3 of Favoriet 4 in te stellen.
7,36
'UXNRSGH
FAV/FAV+/FAV-
knop om de lijst
met favorieten in te stellen.
Breng de gemeenschappelijke toegangsmodule
niet herhaaldelijk in of uit om schade aan de
interface en een storing te vermijden.

28
Vergrendelingsbeheer
Instellingenbeheer
VergrendelingsbeheerKanaalbeheer (ATV / DTV-modus)
1.Druk op de
MENU
knop om het hoofdmenu
ZHHUWHJHYHQ'UXNRSGHŻŹNQRSSHQRP
Vergrendelingssysteem
in het hoofdmenu te
VHOHFWHUHQGUXNYHUYROJHQVRSGHźRI
ENTER
knop en de eerste optie wordt gemarkeerd.
2.Gebruik de 0-9 knoppen om een wachtwoord
bestaande uit 4 cijfers in te voeren voor toegang
tot het Vergrendelingssysteemmenu.
'UXNRSGHŸźNQRSSHQRPGHRSWLHGLHXLQ
het Vergrendelingssysteemmenu wilt aanpassen
te selecteren.
'UXNRSGHŸźŻŹNQRSSHQRPGHYROJHQGH
instellingen te wijzigen.
Wachtwoord invoeren
Om toegang tot het Vergrendelingssysteemmenu
te krijgen, voer het wachtwoord in. Bij eerste
gebruik, voer het standaard wachtwoord “0000”
in.
Inschakelen
Het vergrendelingssysteem is ontworpen om een
ongewenste terugkeer van de TV of het verlies
van kanalen te vermijden, of te voorkomen dat
kinderen naar ongepaste programma’s kijken.
OSD-taal
1.Druk op de
MENU
knop om het hoofdmenu
ZHHUWHJHYHQ'UXNRSGHŻŹNQRSSHQRP
Instellingen
in het hoofdmenu te selecteren,
GUXNYHUYROJHQVRSGHźRI
ENTER
knop en de
eerste optie wordt gemarkeerd.
'UXNRSGHŸźNQRSSHQRP
OSD-taal
te
VHOHFWHUHQHQGUXNYHUYROJHQVRSGHŻŹ
knoppen om uw gewenste taal die op het scherm
wordt weergegeven te selecteren.
Stel het vergrendelingssysteem in op Aan
om deze functie in te schakelen. Als het
vergrendelingssysteem op Aan is ingesteld, moet
een geldig wachtwoord ingesteld zijn wanneer
u toegang wilt krijgen tot Automatisch scannen /
Handmatig scannen / Kanaal bewerken / Initiële
instellingen.
Kanaalvergrendeling
Kanaalvergrendeling is ontworpen om te
voorkomen dat kinderen naar ongepaste
programma’s kijken. Als een kanaal geblokkeerd
is, moet een geldig wachtwoord ingevoerd
worden.
2XGHUOLMNHFODVVL¿FDWLH
Deze functie stelt u in staat om schema’s op te
VWHOOHQRPEHSDDOGHNDQDOHQHQFODVVL¿FDWLHVWH
blokkeren. Druk op de knoppen om een leeftijd
tussen 4 en 18 te selecteren.
Toetsenbord vergrendelen
Toetsenbord vergrendelen is ontworpen om te
vermijden dat kinderen op de knoppen van de
TV drukken. Stel het vergrendelingssysteem in
op Aan om deze functie in te schakelen.
Nieuw wachtwoord
Gebruik de 0-9 knoppen om het oud wachtwoord
in te voeren en voer vervolgens een nieuw
wachtwoord bestaande uit 4 cijfers in. Voer het
nieuwe wachtwoord opnieuw in als bevestiging.
Vergrendeling wissen
=HWDOOHYHUJUHQGHOLQJVLQVWHOOLQJHQWHUXJRSGH
fabrieksinstellingen.
5.Druk op de
EXIT
knop om het menu af te
sluiten.
3.
Druk op de
EXIT
knop om het menu af te
sluiten.
Auto Scan
Tuner Type Cable
Off
Manual Scan
Channel Edit
Auto Channel Update
Common Interface
Favorite Manager
Signal Information
Move
OK: Select MENU: Return EXIT: Exit
Channel
Enter Password
Enable
Channel Locks
Parental Rating
Lock Keypad
New Password
Clear Lock
_ _ _ _
Off
None
Off
_ _ _ _
Move 0~9: Input MENU: Return EXIT: Exit
Lock System
Basisfuncties
Het standaard wachtwoord is “0000.
Als u het wachtwoord vergeet, zorg dat u
het nieuw wachtwoord onthoudt! Als u het
nieuw wachtwoord bent vergeten, voer het
hoofdwachtwoord "4711” in.

29
Instellingenbeheer
3.Druk op de
EXIT
knop om het menu af te
sluiten.
OSD Language
Audio Languages
Subtitle
Teletext
Blue Screen
Mode Setting
Time Settings
PVR Settings
English
On
Home Mode
Move tixE :TIXE nruteR :UNEMtsujdA
Setup
Audiotalen (DTV-modus)
1.Druk op de
MENU
knop om het hoofdmenu
ZHHUWHJHYHQ'UXNRSGHŻŹNQRSSHQRP
Instellingen
in het hoofdmenu te selecteren,
GUXNYHUYROJHQVRSGHźRI
ENTER
knop en de
eerste optie wordt gemarkeerd.
'UXNRSGHŻŹNQRSSHQRP
Audiotalen
te
selecteren en druk vervolgens op de
ENTER
knop.
'UXNRSGHŻŹNQRSSHQRPXZJHZHQVWH
SULPDLUHDXGLRWDDOWHVHOHFWHUHQ'UXNRSGHź
NQRSHQGUXNYHUYROJHQVRSGHŻŹNQRSSHQRP
uw gewenste secundaire audiotaal te selecteren.
4.Druk op de
EXIT
knop om het menu af te
sluiten.
Ondertiteling (DTV-modus)
1.Druk op de
MENU
knop om het hoofdmenu
ZHHUWHJHYHQ'UXNRSGHŻŹNQRSSHQRP
Instellingen
in het hoofdmenu te selecteren,
GUXNYHUYROJHQVRSGHźRI
ENTER
knop en de
eerste optie wordt gemarkeerd.
'UXNRSGHŸźNQRSSHQRP
Ondertiteling
te selecteren en druk vervolgens op de
ENTER
knop om het submenu te openen.
Modus:
Schakelt de ondertitelingstaal in/uit.
Primaire ondertitelingstaal
'UXNRSGHŻŹNQRSSHQRPXZJHZHQVWH
primaire ondertitelingstaal te selecteren.
Secundaire ondertitelingstaal
'UXNRSGHŻŹNQRSSHQRPXZJHZHQVWH
secundaire ondertitelingstaal te selecteren.
Slechthorenden
'UXNRSGHŻŹRPGHIXQFWLHYRRU
slechthorenden in/uit te schakelen.
3.Druk op de
EXIT
knop om het menu af te
sluiten.
Audio Primary Language
Audio Secondary Language
English
English
Move tixE :TIXE nruteR :UNEMtsujdA
Audio Languages
OSD Language
Audio Languages
Subtitle
Teletext
Blue Screen
Mode Setting
Time Settings
PVR Settings
English
On
Home Mode
Move MENU: Return EXIT: Exit
Setup
OK: Select
OSD Language
Audio Languages
Subtitle
Teletext
Blue Screen
Mode Setting
Time Settings
PVR Settings
English
On
Home Mode
Move MENU: Return EXIT: Exit
Setup
OK: Select
OSD Language
Audio Languages
Subtitle
Teletext
Blue Screen
Mode Setting
Time Settings
PVR Settings
English
On
Home Mode
Move MENU: Return EXIT: Exit
Setup
OK: Select
Basisfuncties

30
Instellingenbeheer
Blauw scherm
1.Druk op de
MENU
knop om het hoofdmenu
ZHHUWHJHYHQ'UXNRSGHŻŹNQRSSHQRP
Instellingen
in het hoofdmenu te selecteren,
GUXNYHUYROJHQVRSGHźRI
ENTER
knop en de
eerste optie wordt gemarkeerd.
'UXNRSGHŸźNQRSSHQRP
Blauw scherm
te selecteren en druk vervolgens op de
ENTER
knop om Aan / Uit te selecteren.
3.Druk op de
EXIT
knop om het menu af te
sluiten.
Tijdinstellingen
1.Druk op de
MENU
knop om het hoofdmenu
ZHHUWHJHYHQ'UXNRSGHŻŹNQRSSHQRP
Instellingen
in het hoofdmenu te selecteren,
GUXNYHUYROJHQVRSGHźRI
ENTER
knop en de
eerste optie wordt gemarkeerd.
'UXNRSGHŻŹNQRSSHQRP
Tijdinstellingen
te selecteren en druk vervolgens op de
ENTER
knop.
OSD-tijd
Geeft de tijd dat het menu op het scherm wordt
ZHHUJHJHYHQZHHUVVVV8LW
Teletekst
1.Druk op de
MENU
knop om het hoofdmenu
ZHHUWHJHYHQ'UXNRSGHŻŹNQRSSHQRP
Instellingen
in het hoofdmenu te selecteren,
GUXNYHUYROJHQVRSGHźRI
ENTER
knop en de
eerste optie wordt gemarkeerd.
'UXNRSGHŻŹNQRSSHQRP7HOHWHNVWWH
selecteren en druk vervolgens op de
ENTER
knop.
'UXNRSGHŻŹNQRSSHQRPXZJHZHQVWH
digitale teleteksttaal te selecteren. Druk op de
źNQRSHQGUXNYHUYROJHQVRSGHŻŹNQRSSHQ
om uw gewenste decoderingspaginataal te
selecteren.
4.Druk op de
EXIT
knop om het menu af te
sluiten.
Modusinstelling
1.Druk op de
MENU
knop om het hoofdmenu
ZHHUWHJHYHQ'UXNRSGHŻŹNQRSSHQRP
Instellingen
in het hoofdmenu te selecteren,
GUXNYHUYROJHQVRSGHźRI
ENTER
knop en de
eerste optie wordt gemarkeerd.
'UXNRSGHŸźNQRSSHQRP0RGXVLQVWHOOLQJ
WHVHOHFWHUHQHQGUXNYHUYROJHQVRSGHŻŹ
knoppen om uw gewenste modus te selecteren.
Thuismodus/Winkelmodus.
7KXLVPRGXV7KXLVQDDU79NLMNHQ
:LQNHOPRGXV,QGH:LQNHOPRGXVLVGH
helderheid hoger dan in de Thuismodus.
3.
Druk op de
EXIT
knop om het menu af te
sluiten.
Digital Teletext Language
Decoding Page Language
English
West
Move tixE :TIXE nruteR :UNEMtsujdA
Teletext
OSD Language
Audio Languages
Subtitle
Teletext
Blue Screen
Mode Setting
Time Settings
PVR Settings
English
On
Home Mode
Move tixE :TIXE nruteR :UNEMtsujdA
Setup
Move tixE :TIXE nruteR :UNEMtsujdA
Setup
OSD Language
Audio Languages
Subtitle
Teletext
Blue Screen
Mode Setting
Time Settings
PVR Settings
English
On
Home Mode
Move tixE :TIXE nruteR :UNEMtsujdA
Time Settings
OSD Time
Sleep Timer
Auto Sleep
Time Zone
Time
10 seconds
Off
4 hours
Basisfuncties

31
Move tixE :TIXE nruteR :UNEMtsujdA
Time Settings
OSD Time
Sleep Timer
Auto Sleep
Time Zone
Time
10 seconds
Off
4 hours
Move MENU: Return EXIT: Exit
Time
Auto Sync
Date
Time
On
01 Jan 2010
22:33:11
Adjust
Delete One
Move Up
Move Down
Select
Return
Exit
Function
OK
MENU
EXIT
Hot Key
Scheduled Record
File Manager
Standby
Delete All
Zoom In/Out
Replay
Channel Name
Program Name
Recorded Time
Total Time
Parental Pating
BBC ONE
Pinky and Perky
25 Dec 2008 10:05
00:00:20
BBC ONE_Pinky and Perky_20081225_100524,is
BBC ONE_Pinky and Perky_20081225_100529,is
BBC ONE_Pinky and Perky_20081225_100530,is
Current Playing File Info
Device List
Format
Move Up
Move Down
Select
Return
Exit
Format
OK
MENU
EXIT
Device
USB1
Hot Key
1188 MB FAT32
Available Space
File System
Basisfuncties
Instellingenbeheer
Inslaaptimer
'UXNRSGHŻŹNQRSSHQRPHHQSHULRGHWH
selecteren waarna de TV automatisch in stand-
E\JDDW8LW«PLQ
Automatische inslaapstand
Het toestel gaat automatisch in stand-by na
3 / 4 / 5 uur na het laatste gebruik van de
afstandsbediening. Als u de TV gedurende
een lange periode wilt gebruiken, schakel de
automatische stand-byfunctie uit.
Tijdzone
Selecteer de stad van uw gewenste tijdzone.
Tijd
De klok wordt automatisch ingesteld
wanneer een digitaal signaal wordt
ontvangen of u kunt het handmatig instellen.
3.
Druk op de
EXIT
knop om het menu af te
sluiten.
PVR-instellingen
1. Druk op de
MENU
knop om het hoofdmenu
ZHHUWHJHYHQ'UXNRSGHŻŹNQRSSHQRP
Instellingen
in het hoofdmenu te selecteren,
GUXNYHUYROJHQVRSGHźRI
ENTER
knop en de
eerste optie wordt gemarkeerd.
'UXNRSGHŻŹNQRSSHQRP
PVR-
instellingen
te selecteren en druk vervolgens op
de
OK
knop.
3.
'UXNRSGHŻŹNQRSRPGHYROJHQGHRSWLHV
van het PVR-bestandssysteem te selecteren en
druk vervolgens op de
ENTER
knop.
Bestandsbeheer
Selecteer Bestandsbeheer om de lijst met
opgenomen programma’s weer te geven, druk op
GHŸźNQRSSHQRPKHWJHZHQVWHRSJHQRPHQ
programma te selecteren en druk vervolgens op
de
ENTER
RIŹ,,NQRSRPKHWWHEHNLMNHQ
Apparatuurlijst
Selecteer Apparatuurlijst om informatie over het
aangesloten USB-opslagapparaat voor PVR
te bekijken. Druk op de ROOD knop om het
geselecteerde USB-apparaat te formatteren.

32
Delete One
Move Up
Move Down
Select
Return
Exit
Function
OK
MENU
EXIT
Frequency
Off
Off
Off
Off
Off
Off
Off
Off
Off
Off
Off
Off
Off
Off
Off
Off
Hot Key
Date
Scheduled Record
Scheduled Record Setting List
Standby
Delete All
Group
1
2
3
4
5
6
7
8
9
10
11
12
13
14
15
16
Channel
Start Time
Duration
10:03
25 Dec 2008 Thu.
Move
OK: Select
MENU: Return EXIT: Exit
Setup
First Time Setup
Reset
Move
OK: Select
MENU: Return EXIT: Exit
Setup
First Time Setup
Reset
Move
OK: Select
MENU: Return EXIT: Exit
Setup
First Time Setup
Reset
Reset
Yes
No
Basisfuncties
Instellingenbeheer
Geplande opname
Selecteer Geplande opname om de lijst met
geplande opnames te bekijken.
4. Druk op de
EXIT
knop om het menu af te
sluiten.
Tijdsverschuiving
Druk op de Afspelen/Pauze toets tijdens het
afspelen van het programma onder de DTV-bron
om tijdsverschuiving te starten.
De witte balk geeft de opnamevoortgang aan.
De blauwe balk geeft de afspeelvoortgang aan.
Reset
1. Druk op de
MENU
knop om het hoofdmenu
ZHHUWHJHYHQ'UXNRSGHŻŹNQRSSHQRP
Instellingen
in het hoofdmenu te selecteren,
GUXNYHUYROJHQVRSGHźRI
ENTER
knop en
de eerste optie wordt gemarkeerd.
2. 'UXNRSGHŻŹNQRSSHQRP
Reset
te
selecteren en druk vervolgens op de
ENTER
knop.
3. 'UXNRSGHŸźNQRSSHQRP-DRI
Nee op het scherm te selecteren. Alle
instellingen worden opnieuw naar de
standaard fabrieksinstellingen teruggezet
en het Instelmenu verdwijnt.
4.
Druk op de
EXIT
knop om het menu af te
sluiten.
Instellingen bij ingebruikname
1.Druk op de
MENU
knop om het hoofdmenu
ZHHUWHJHYHQ'UXNRSGHŻŹNQRSSHQRP
Instellingen
in het hoofdmenu te selecteren,
GUXNYHUYROJHQVRSGHźRI
ENTER
knop en de
eerste optie wordt gemarkeerd.
'UXNRSGHŻŹNQRSSHQRP
Instellingen
bij ingebruikname
te selecteren en druk
vervolgens op de
ENTER
knop.
'UXNRSGHŸźŻŹNQRSSHQRPGRRUKHW
menu te navigeren en instellingen te wijzigen.
Het automatisch zoeken start vervolgens
automatisch.

33
Photo
Move CH + / - Change Page OK Selete EPG Quick Menu EXIT Return
USB1
. . .
USB1
1/1
Photo
Move
CH + / - Change Page OK Selete EPG Quick Menu EXIT Return
AITEMP MY PVR Movie Music Photo Te xt
LE32G
. . .
USB1
OK Slide Show / Single view Previous / Next Rotate EXIT Back EPG Quick Menu
Date 2010-05-13 20:28:40
Resolution 1366x768
6/12
5_1366x768x24b.jpg
Photo Music Movie Text
2QGHUVWHXQGEHVWDQGVIRUPDDW-3*
Entertainment
Entertainment
Met gebruik van de functies via de USB-poort
1. =HWGH79XLWYRRUGDWXHHQ86%
opslagapparaat aansluit.
2. Sluit uw USB-opslagapparaat aan op de
USB-poort van uw TV.
3. Druk op de
knop aan de bovenkant
van uw TV of de
knop op de
afstandsbediening om uw TV en uw USB-
opslagapparaat aan te zetten.
4. Druk op de
SOURCE
knop aan de
bovenkant van de TV of de
SOURCE
knop op de afstandsbediening om de lijst
met bronnen weer te geven. Druk op de
ŸźNQRSSHQRP0(',$WHVHOHFWHUHQHQ
druk vervolgens op de
ENTER
knop om te
bevestigen.
Opgelet:
Bepaalde versies van draagbare harde schijven
kunnen meer vermogen nodig hebben dan dat
de USB-aansluiting van de TV kan leveren. Voor
een juiste werking, gebruik een netadapter voor
dit apparaat.
Als een USB-hub wordt gebruikt, zorg dat
de netadapter van de hub op de voeding is
aangesloten aangezien het totaal stroomverbruik
hoger dan 500 mA kan zijn.
De maximale ondersteunde opslagruimte voor
de harde schijf is 1 TB.
Het bestandssysteem ondersteunt alleen het
FAT32-formaat.
Als u de videostreaming van een DTV-
programma wilt opslaan, moet de
overdrachtssnelheid van het USB-
opslagapparaat minstens 5MB/s zijn, anders
zullen het beeld en geluid van het programma
worden aangetast en wordt er een waarschuwing
op het scherm weergegeven. Als dit zich
voordoet, werk uw USB-opslagapparaat bij.
Het TV-scherm zal tijdelijk blanco zijn aangezien
het enige tijd duurt om de aangesloten harde
schijf op te starten en te stabiliseren. Dit is
normaal en de starttijd kan variëren naargelang
het merk en de totale opslagruimte van de
aangesloten harde schijf.
Ontkoppel het USB-opslagapparaat wanneer
niet in gebruik.
Foto’s bekijken
1.Druk op de
SOURCE
knop aan de bovenkant
van de TV of de
SOURCE
knop op de
DIVWDQGVEHGLHQLQJGUXNYHUYROJHQVRSGHŸź
knoppen om
MEDIA
te selecteren en druk
vervolgens op de
ENTER
knop.
'UXNRSGHŸźNQRSSHQRP
Foto
te
selecteren en druk vervolgens op de
ENTER
knop.
3.
'UXNRSGHŻŹNQRSSHQRPXZ
opslagapparaat te selecteren en druk vervolgens
op de
ENTER
knop.
4.
'UXNRSGHŸźNQRSSHQRPLQGHIRWRPDS
te navigeren en druk vervolgens op de
ENTER
knop. Als u bepaalde foto’s wilt selecteren, druk
RSGHŸźŻŹNQRSSHQRPKHWIRWREHVWDQGWH
selecteren en druk vervolgens op de
ENTER
knop.
5.
Druk op de of ENTER knop om het te
bekijken.

34
Photo Music Movie Text
Music
Move
Change Page CH+/- Plalyer OK Selete EPG Quick Menu EXIT Return
USB1
00 : 00 : 00
Title
Artist
Album
Track
Year
Date
FileSize
00 : 00 : 00
USB1
Music
Move
Change Page CH+/- Plalyer OK Selete EPG Quick Menu EXIT Return
USB1/Music
00 : 00 : 00
Title
Artist
Album
Track
Year
Date
FileSize
00 : 00 : 00
AITEMP
Movie
MY PVR
Photo
Te xt
Music
LE32G
1/1
Music
Move
CH+/- FileList OK Selete EPG Quick Menu EXIT Return
USB1/Music/Call Me Maybe.mp3
00 : 03 : 13
Title
Artist
Album
Track
Year
Date
FileSize
00 : 00 : 22
Call Me Maybe.mp3
Good Time.mp3
1/1
Call Me Maybe.mp3 1/2
Call Me Maybe
Carly Rae Jepsen
Call Me Maybe
2012-02-27
2013-02-01
3.9MB
Photo Music Movie Text
Movie
Move
Change Page OK Selete EPG Quick Menu EXIT Return
USB1
USB1
Entertainment
6.Druk op de
ENTER
NQRSRIGH',63/$<NQRS
RPGHIXQFWLHEDONZHHUWHJHYHQ'LDVKRZ(pQ
foto / Vorige / Volgende / Draaien.
7.Druk op de EPG knop om het Snelmenu te
openen (Intervaltijd / Herhalen / Diashoweffecten
/ Achtergrondmuziek). De willekeurige functie
voor foto’s of mediabestanden moet meer dan 3
bestanden bevatten.
8.
Druk op de
EXIT
knop om naar het vorig
menu terug te gaan.
Naar muziek luisteren
1.Druk op de
INPUT
knop aan de bovenkant
van de TV of de
INPUT
knop op de
afstandsbediening, druk vervolgens op de
ŸźNQRSSHQRP0(',$WHVHOHFWHUHQHQGUXN
vervolgens op de
ENTER
knop.
'UXNRSGHŸźNQRSSHQRP
Muziek
te
selecteren en druk vervolgens op de
ENTER
knop.
'UXNRSGHŻŹNQRSSHQRPXZ
opslagapparaat te selecteren en druk vervolgens
op de
ENTER
knop.
'UXNRSGHŸźNQRSSHQRPLQGHPX]LHNPDS
te navigeren en druk vervolgens op de
ENTER
knop. Als u bepaalde muziektracks wilt
VHOHFWHUHQGUXNRSGHŸźNQRSSHQRPKHW
muziekbestand te selecteren en druk vervolgens
op de
ENTER
knop.
5.
'UXNRSGHŹ,,RI
ENTER
knop om het
afspelen te starten.
'UXNRSGHŻŹNQRSSHQHQGUXNYHUYROJHQV
op de
ENTER
knop om de gewenste functie te
VHOHFWHUHQ$IVSHOHQ9RULJH9ROJHQGH6QHO
terugspoelen / Snel doorspoelen / Stop.
7.Druk op de
EPG
knop om het Snelmenu te
openen (Herhalen/Coderingstype) Als u de
muziek willekeurig wilt afspelen, selecteer
minstens 3 mediabestanden.
8.Druk op de
EXIT
knop om naar het vorig menu
terug te gaan.
Films kijken
1. Druk op de
SOURCE
knop aan de
bovenkant van de TV of de
SOURCE
knop op
de afstandsbediening, druk vervolgens op de
ŸźNQRSSHQRP0(',$WHVHOHFWHUHQHQGUXN
vervolgens op de
ENTER
knop.
'UXNRSGHŸźNQRSSHQRP
Film
te
selecteren en druk vervolgens op de
ENTER
knop.
3.'UXNRSGHŸźNQRSSHQRPXZ
opslagapparaat te selecteren en druk vervolgens
op de
ENTER
knop.
'UXNRSGHŸźNQRSSHQRPLQGH¿OPPDS
te navigeren en druk vervolgens op de
ENTER
NQRS$OVXEHSDDOGH¿OPVZLOWVHOHFWHUHQGUXN
RSGHŸźNQRSSHQRPKHW¿OPEHVWDQGWH
selecteren en druk vervolgens op de
ENTER
knop.
Als deze map tevens muziekbestanden bevat,
kunt u een muziektrack selecteren die u tijdens
het bekijken van uw foto’s kunt afspelen.
Bepaalde audiobestandformaten worden niet
ondersteund.
2QGHUVWHXQGHEHVWDQGVIRUPDDW03
Entertainment

35
Movie
Move
Change Page OK Selete EPG Quick Menu EXIT Return
USB1/Movie
AITEMP
Movie
MY PVR
Photo
Te xt
Music
LE32G
1/1
00 : 05 : 1300 : 00 : 22
FileName
VideoCodec :
Resolution
Bitrate :
Animals.AVI
MPEG4
640 x 480
4158120 bps
AudioCodec :
SampleRate :
Channel :
MP3
44100 Hz
2
Photo Music Movie Text
Te xt
Move
Change Page OK Selete EPG Quick Menu EXIT Return
USB1
USB1
Te xt
Move
Change Page OK Selete EPG Quick Menu EXIT Return
USB1/Text
AITEMP
Movie
MY PVR
Photo
Te xt
Music
LE32G
1/1
Te xt
Move
Change Page OK Selete EPG Quick Menu EXIT Return
USB1/Text/English Music .txt
1/1
1 Why are you so far from me?
In my arms is where you ought to be.
2 How long will you make me wait?
I don’t know how much more I can take.
3 (Chorus:)
I missed you
But I haven’t met you
Oh but I want to
How I do
4 Slowly counting down the days
English Music .txt
Previous / Next
0~9: Goto Page EPG Quick Menu EXIT Back
1/12
1 Why are you so far from me?
In my arms is where you ought to be.
2 How long will you make me wait?
I don’t know how much more I can take.
3 (Chorus:)
I missed you
But I haven’t met you
Oh but I want to
How I do
4 Slowly counting down the days
Entertainment
5.
'UXNRSGHŹ,,RI
ENTER
knop om het te
bekijken.
6.Druk op de
ENTER
knop of de
DISPLAY
knop
om de functiebalk weer te geven. Druk op de
ŻŹNQRSSHQHQGUXNYHUYROJHQVRSGH
ENTER
NQRSRPGHJHZHQVWHIXQFWLHWHVHOHFWHUHQ
Pauze / Vorige / Volgende / Snel terugspoelen /
Snel doorspoelen / Stop.
7.Druk op de
EPG
knop om het Snelmenu te
RSHQHQ+HUKDOHQ&RGHULQJVW\SH$OVXGH¿OPV
willekeurig wilt afspelen, selecteer minstens 3
mediabestanden.
8.Druk op de
EXIT
knop om naar het vorig menu
terug te gaan.
Mijn tekst
1.Druk op de
SOURCE
knop aan de bovenkant
van de TV of de
SOURCE
knop op de
afstandsbediening, druk vervolgens op de
ŸźNQRSSHQRP0(',$WHVHOHFWHUHQHQGUXN
vervolgens op de
ENTER
knop.
'UXNRSGHŸźNQRSSHQRPXZ
opslagapparaat te selecteren en druk vervolgens
op de
ENTER
knop.
3.
'UXNRSGHŸźNQRSSHQRPXZ
opslagapparaat te selecteren en druk
vervolgens op de
ENTER
knop.
'UXNRSGHŸźNQRSSHQRPLQGHWHNVWPDS
te navigeren en druk vervolgens op de
ENTER
knop. Als u bepaalde tekstbestanden wilt
VHOHFWHUHQGUXNRSGHŸźNQRSSHQRPKHW
tekstbestand te selecteren en druk vervolgens op
de
ENTER
knop.
'UXNRSGHŹ,,RI
ENTER
knop om het te
bekijken.
6.Druk op de
ENTER
knop of de
DISPLAY
knop
RPGHIXQFWLHEDONZHHUWHJHYHQ'UXNRSGHŻŹ
knoppen en druk vervolgens op de
ENTER
knop
RPGHJHZHQVWHIXQFWLHWHVHOHFWHUHQ9RULJH
Volgende/ Ga naar pagina.
7.Druk op de
EPG
knop om het Snelmenu
te openen (Herhalen / Achtergrondmuziek /
Coderingstype)
8.Druk op de
EXIT
knop om naar het vorig menu
terug te gaan.
Entertainment
Als deze map tevens muziekbestanden
bevat, kunt u een muziektrack selecteren die
u tijdens het bekijken van uw teksten kunt
afspelen.
Bepaalde audiobestandformaten worden niet
ondersteund.
2QGHUVWHXQGHEHVWDQGVIRUPDDW03(*
$OVEHSDDOGH¿OPVQLHWJRHGZRUGHQ
afgespeeld, probeer een andere high-speed
USB-station.

36
Technische gegevens
Digitale ontvangst
Overige informatie
Merk
-9&
Model
LT-32HG82U
Energieklasse
A
Zichtbare schermgrootte(diagonaal)
Approx. 80cm (31.5inch)
Stroomverbruik in aanmodus
40W
Jaarlijks energieverbruik *
58kwh
Gewicht (zonder voetjes)
0.5W
Schermresolutie
1,920 pixel(horizontal) x 1,080 pixel(vertical)
TV-uitzendingen
PAL, B/G, D/K, I, SECAM, L/L’
Kanalen ontvangen
ATV (48.25MHz ~ 863.25MHz)
Aantal voorkeuzekanalen
99
Kanaalindicator
$I¿FKDJHVXUOpFUDQ
Ingang RF-antenne
75 Ohm (instable)
Bedrijfsspanning
AC 100-240V~ 50/60Hz
Uitgaand audiovermogen (WRMS.)
(10% THD)
2 x 6 W
Afmetingen DxLxH (met voetjes)
180 x 731 x 470 mm
Gewicht (met voetjes)
5.2 kg
Afmetingen DxLxH (zonder voetjes)
79 x 731 x 436 mm
Gewicht (zonder voetjes)
5.0 kg
Omgevingstemperatuur
2SHUDWLRQ
ȭ
~40
ȭ
6WRUDJH
ȭ
~60
ȭ
Omgevingsvochtigheid
Less than 80
ͤ
RH
Stand-bymodus
Après 4 heures
Ontvangstbereik VHF (50MHz~230MHz) - UHF (474MHz~862MHz)
Ingangsimpedantie ȍ
Bandbreedte kanaal 7MHz/8MHz
Modulatie
DVB-T COFDM 2K/8K,QPSK,16QAM,64QAM
DVB-C 16QAM, 32QAM, 64QAM, 128QAM,256QAM
Videosysteem MPEG-2 MP@ML, MPEG-2 MP@HL,H.264
Videosysteem MPEG-1 layer 1/2
Basisfuncties EPG, Ondertiteling, LCN,TELETEKST (Europa)
Max aantal opgeslagen 1000 KANALEN (DVB-T+DVB-C, dynamisch)
* Het jaarlijkse energieverbruik is gebaseerd op het stroomverbruik als de televisie 365 dagen per jaar 4 uur per dag
wordt gebruikt.Het eigenlijke stroomverbruik is afhankelijk van de manier waarop de tv wordt gebruikt.
We verontschuldigen ons voor enig ongemak veroorzaakt door kleine inconsistenties in deze gebruikershandleiding,
die kunnen ontstaan door productverbeteringen of –ontwikkeling.

37
Productondersteuning
Inbranding - beeldschaduw
De afstandsbediening werkt niet
De afstandsbediening werkt niet
Geen stroom
Slecht beeld
Geen beeld
Geen geluid
Opgelet, beeldschaduw kan optreden wanneer een
beeld aanhoudend wordt weergegeven (stilstaand of
gepauzeerd beeld). De inbranding van de LCD TV kan
QDHQLJHWLMGYHUGZLMQHQ=HWGH79XLWJHGXUHQGHHHQ
bepaalde tijd. Om dit te vermijden, laat het stilstaand
beeld niet gedurende een lange periode op het scherm
weergegeven.
Uw TV reageert niet langer op de afstandsbediening. De
batterijen kunnen leeg zijn. Als dit het geval is, kunt u nog
altijd de bedieningsknoppen aan de linkerkant van de TV
gebruiken.
Als de TV niet onder stroom staat, controleer of de
stekker juist in het stopcontact zit.
1.Hebt u het juiste TV-systeem gekozen?
2.Bevindt uw TV of binnenantenne zich te dicht bij een
niet-geaard audioapparaat, neonlamp, etc.?
3.Bergen of hoge gebouwen kunnen dubbel beeld of
beeldschaduw veroorzaken. Wijzig de richting van de
antenne om de beeldkwaliteit te verbeteren. Is het beeld
of teletekst onherkenbaar?
4.Controleer of u de juiste frequentie hebt ingevoerd.
5.Stem de kanalen opnieuw af.
6.De beeldkwaliteit kan afnemen wanneer er tegelijkertijd
twee apparaten op de TV zijn aangesloten. Als dit het
geval is, ontkoppel een van de apparaten.
1. Geen beeld betekent dat uw TV geen transmissie
ontvangt. Hebt u de juiste knop op de
afstandsbediening geselecteerd? Probeer opnieuw.
=RUJGDWXGHMXLVWHLQJDQJVEURQKHEWJHVHOHFWHHUG
2. Is de antenne juist aangesloten?
3. =LMQGHVWHNNHUVVWHYLJRSGHDQWHQQHDDQVOXLWLQJ
aangesloten?
4. Is de antennekabel beschadigd?
5. =LMQGHJHSDVWHVWHNNHUVJHEUXLNWRPGHDQWHQQH
aan te sluiten?
6. In geval van twijfel, neem contact op met uw
handelaar.
1. Is het geluid van de TV gedempt? Om demping te
annuleren, druk op de
knop of verhoog het
volume.
2. Er komt maar geluid uit één luidspreker. Is de balans
op één uiteinde ingesteld?
Probleemoplossing
1. Als u geen ingangsbron kunt selecteren, is het
mogelijk dat er geen apparaat is aangesloten.
2. Controleer de AV-kabels en aansluitingen als er een
apparaat is aangesloten.

38
Ondersteunde bestandsformaten
Productondersteuning
*.avi
MPEG-1
MPEG-2 MP
MPEG-4 SP
MPEG-4 ASP
MPEG-4 XVID
H.264(AVC)
MP@Level 4
H.264(AVC)
HP@Level 4
MPEG-1 Layer 2
MPEG-1 Layer 3
MPEG-2 Layer 3
AAC-LC
HE-AAC V1
HE-AAC V2
MPEG(*.mpeg,
*.mpg, *.dat, *vob)
MPEG-1 MP
MPEG-2 MP
MPEG-4(*.mp4)
MPEG-4 SP
MPEG-4 ASP
MPEG-4 XVID
H.264(AVC)
MP@Level 4
H.264(AVC)
HP@Level 4
TS(*.ts, *.trp, *tp)
MPEG-1
MPEG-2 MP
H.264(AVC)
MP@Level 4
H.264(AVC)
HP@Level 4
MKV(*.mkv)
MPEG-1
MPEG-2 MP
MPEG-4 SP
MPEG-4 ASP
MPEG-4 XVID
H.264(AVC)M P@
Level4
H.264(AVC)H P@
Level4
*.flv
H.264(AVC)M P@
Level4
H.264(AVC)H P@
Level4
*.mp3
MPEG-1 Layer 3
MPEG-2 Layer 3
AAC(*.aac,*m4a)
AAC
HE-AAC V1
HE-AAC V2
*.wav
LPCM
ADPCM
*.jpg
*.jpeg
Baseline Mode
Progressive Mode
*.txt
UTF-8
UNICODE
ASCII
Video
Muziek
Foto
Tekst
Bestandssysteem:
Hi Speed FS, FAT32, NTFS (NTFS gecomprimeerd bestand wordt niet ondersteund).
PVR functie:
Opname stand-by, tijdverschuiving. EPG opnamereservering
Opmerking:
1. Elke map ondersteunt max 500 bestanden
/LFHQWLHVPHWEHWUHNNLQJWRWERYHQVWDDQGHVSHFL¿FDWLHVZRUGHQYHURQGHUVWHOGGRRUGHNODQWHQ]HOI
te zijn verkregen.
%LWVQHOKHLGWRW.ESV
%HPRQVWHULQJVIUHTXHQWLH.+]
44.1KHz 48KHz
Bestandsgrootte
<=1MB
72x72< Baseline resolutie<
7680x4320
Progressieve modus Grootte
<=1280x1024
Bestandsgrootte <=10MB
Decoder
Audiodecodering
Mededelingen
Multimedia
Categorieën
Bestandsextensie
Videodecodering
MPGE1/MPEG2/MPEG4:
Tot 1080p @ 30F
H.264: Tot 1080p @ 25F
AAC: AAC-LC(type2 ),
HE-AAC v1(type5 ,SBR),
HE-AAC v2(type29,SBR+PS)

39
9(5:,-'(5,1*
Energielabel
VERWIJDERING
Als een verantwoordelijke verdeler hechten wij waarde aan het milieu. Daarom raden wij U aan
om de correcte verwijderingprocedure te volgen voor uw product, verpakkingsmaterialen, en indien van toepassing,
accessoires en batterijen. Dit draagt bij tot de instandhouding van natuurlijke bronnen en zorgt ervoor dat de
materialen gerecycleerd worden op een manier die de gezondheid en het milieu beschermt. U moet de wetten en
regels volgens voor verwijdering. Elektrische afvalproducten en batterijen moeten afzonderlijk van het huishoudelijk
afval verwijderd worden wanneer het toestel het einde van de levensduur bereikt. Neem contact op met de
winkel waar U het product heeft gekocht en met het plaatselijke bestuur om meer te weten over het verwijderen
van afval en recyclage. De batterijen moeten verwijderd worden bij uw plaatselijk recyclagepunt. Raadpleeg de
gebruiksaanwijzing om te weten hoe U de batterijen moet verwijderen voor afval. We bieden onze excuses aan
voor elk ongemak dat veroorzaakt wordt door kleine onregelmatigheden in deze gebruiksaanwijzing die zich kunnen
voordoen als het gevolg van productverbetering -en ontwikkeling.
Hotline Vanden Borre
De dienst na verkoop is bereikbaar van maandag tot zaterdag op+32 2 334 00 00
Hulplijn Nederland
+LHUYRRUNXQWXFRQWDFWRSQHPHQPHWKHW%&&6HUYLFH&HQWHUORNDDOWDULHIJHRSHQGYDQPDDQGDJWP
vrijdag van 9.00 tot 17.00 uur.
Darty Holdings SAS © 14 route d'Aulnay 93140 Bondy, France 13/06/2016
40
2010/1062 - 2014
58
80
31.5
+
LT-32HG82U
-
 1
1
-
 2
2
-
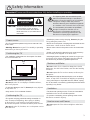 3
3
-
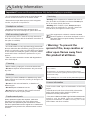 4
4
-
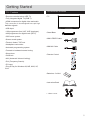 5
5
-
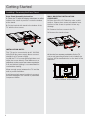 6
6
-
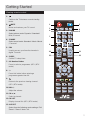 7
7
-
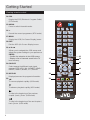 8
8
-
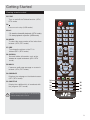 9
9
-
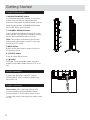 10
10
-
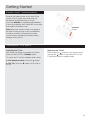 11
11
-
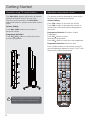 12
12
-
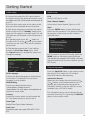 13
13
-
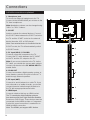 14
14
-
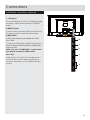 15
15
-
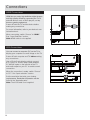 16
16
-
 17
17
-
 18
18
-
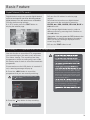 19
19
-
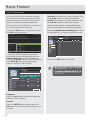 20
20
-
 21
21
-
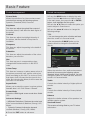 22
22
-
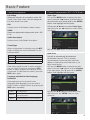 23
23
-
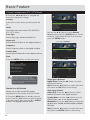 24
24
-
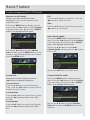 25
25
-
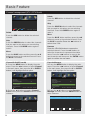 26
26
-
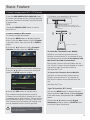 27
27
-
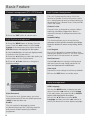 28
28
-
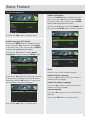 29
29
-
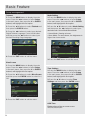 30
30
-
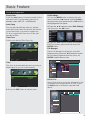 31
31
-
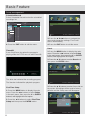 32
32
-
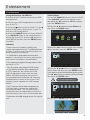 33
33
-
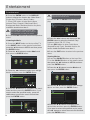 34
34
-
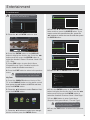 35
35
-
 36
36
-
 37
37
-
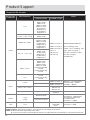 38
38
-
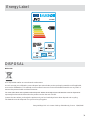 39
39
-
 40
40
-
 41
41
-
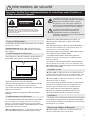 42
42
-
 43
43
-
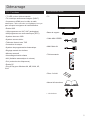 44
44
-
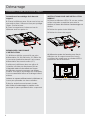 45
45
-
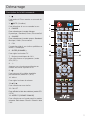 46
46
-
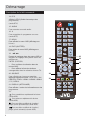 47
47
-
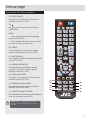 48
48
-
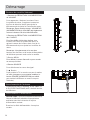 49
49
-
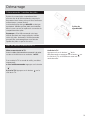 50
50
-
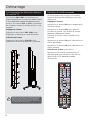 51
51
-
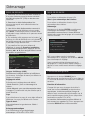 52
52
-
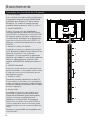 53
53
-
 54
54
-
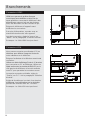 55
55
-
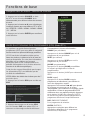 56
56
-
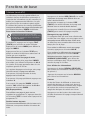 57
57
-
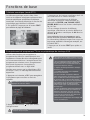 58
58
-
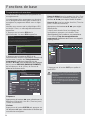 59
59
-
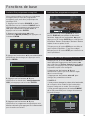 60
60
-
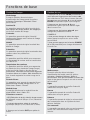 61
61
-
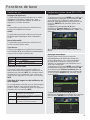 62
62
-
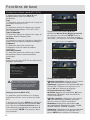 63
63
-
 64
64
-
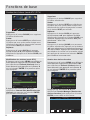 65
65
-
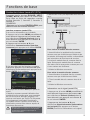 66
66
-
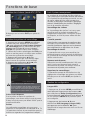 67
67
-
 68
68
-
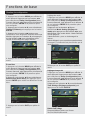 69
69
-
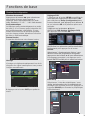 70
70
-
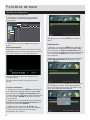 71
71
-
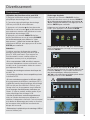 72
72
-
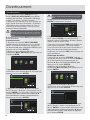 73
73
-
 74
74
-
 75
75
-
 76
76
-
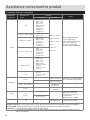 77
77
-
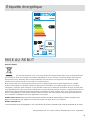 78
78
-
 79
79
-
 80
80
-
 81
81
-
 82
82
-
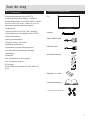 83
83
-
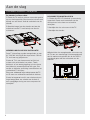 84
84
-
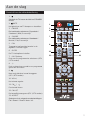 85
85
-
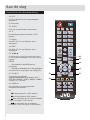 86
86
-
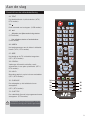 87
87
-
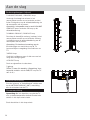 88
88
-
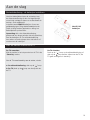 89
89
-
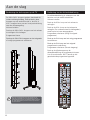 90
90
-
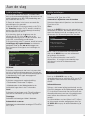 91
91
-
 92
92
-
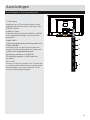 93
93
-
 94
94
-
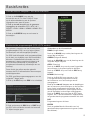 95
95
-
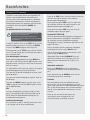 96
96
-
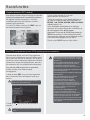 97
97
-
 98
98
-
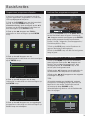 99
99
-
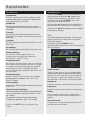 100
100
-
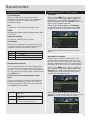 101
101
-
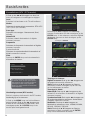 102
102
-
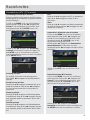 103
103
-
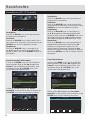 104
104
-
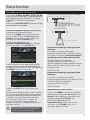 105
105
-
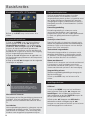 106
106
-
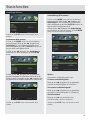 107
107
-
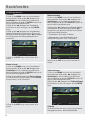 108
108
-
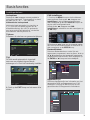 109
109
-
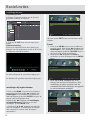 110
110
-
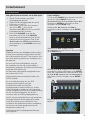 111
111
-
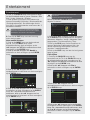 112
112
-
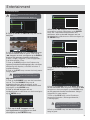 113
113
-
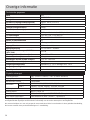 114
114
-
 115
115
-
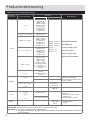 116
116
-
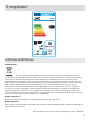 117
117


in andere talen
- français: JVC LT-32HG82U Le manuel du propriétaire
Andere documenten
-
DGM ETV-1969W Handleiding
-
-
Lenco LED-3213 Handleiding
-
EDENWOOD UHD 4K ED4301UHD CONNECTE DL de handleiding
-
Lenco TFT-2412 Handleiding
-
DGM LTV-1914WHTC Handleiding
-
Salora 24LEF-6000TDW Handleiding
-
Proline L1950HD LED Operating Instructions Manual
-
-
Lenco DVT-229 de handleiding