
L
ED-PENDELLEUCHTE / LED-DECKENLEUCHTE / LED PENDANT LIGHT /
LED CEILING LIGHT / SUSPENSION À LED / PLAFONNIER À LED
LED-PENDELLEUCHTE / LED-DECKENLEUCHTE
Montage-, Bedienungs- und Sicherheitshinweise
LED PENDANT LIGHT / LED CEILING LIGHT
Assembly, operating and safety instructions
SUSPENSION À LED / PLAFONNIER À LED
Instructions de montage, d‘utilisation et consignes de sécurité
LED-PENDELLAMP / LED-PLAFONDLAMP
Montage-, bedienings- en veiligheidsinstructies
IAN 327470_1901
LED ZÁVĚSNÉ SVÍTIDLO /
STROPNÍ LED SVÍTIDLO
Pokyny k montáži, obsluze a bezpečnostní pokyny
LAMPA WISZĄCA LED / LAMPA SUFITOWA LED
Wskazówki montażu, obsługi i bezpieczeństwa
LED ZÁVESNÉ SVIETIDLO /
STROPNÉ SVIETIDLO LED
Pokyny pre montáž, obsluhu a bezpečnostné pokyny

L
ED-PENDELLEUCHTE / LED-DECKENLEUCHTE / LED PENDANT LIGHT /
LED CEILING LIGHT / SUSPENSION À LED / PLAFONNIER À LED
DE / AT / CH Montage-, Bedienungs- und Sicherheitshinweise Seite 5
GB / IE Assembly, operating and safety instructions Page 11
FR / BE Instructions de montage, d‘utilisation et consignes de sécurité Page 17
NL / BE Montage-, bedienings- en veiligheidsinstructies Pagina 23
PL Wskazówki montażu, obsługi i bezpieczeństwa Strona 29
CZ Pokyny k montáži, obsluze a bezpečnostní pokyny Strana 35
SK Pokyny pre montáž, obsluhu a bezpečnostné pokyny Strana 41
Klappen Sie vor dem Lesen die beiden Seiten mit den Abbildungen aus und machen Sie sich anschließend
mit allen Funktionen des Gerätes vertraut.
Before reading, unfold both pages containing illustrations and familiarise yourself with all functions of
the device.
Avant de lire le mode d‘emploi, ouvrez les deux pages contenant les illustrations et familiarisez-vous
ensuite avec toutes les fonctions de l‘appareil.
Vouw vóór het lezen de beide pagina‘s met de afbeeldingen open en maak u vertrouwd met alle functies
van het apparaat.
Przed przeczytaniem proszę rozłożyć obie strony z ilustracjami, a następnie proszę zapoznać się z
wszystkimi funkcjami urządzenia.
Před čtením si odklopte obě dvě strany s obrázky a potom se seznamte se všemi funkcemi přístroje.
Pred čítaním si odklopte obidve strany s obrázkami a potom sa oboznámte so všetkými funkciami prístroja.

N
L
AC in
T OUC H
N
L
AC in
14117108L
1
3
2
4
5
10
14117008L
1
2
3
4
5
9
6
7 8
8
9
6
7 8
8

T OUC H
N
L
AC in
14116902L
1
2
3
4
10
5
9
6
7 8
8

5 DE/AT/CH
Inhaltsverzeichnis
Legende der verwendeten Piktogramme ........................................................... Seite 6
Einleitung ......................................................................................................................................... Seite 6
Bestimmungsgemäße Verwendung ....................................................................................................Seite 6
Lieferumfang ........................................................................................................................................ Seite 7
Teilebeschreibung ...............................................................................................................................Seite 7
Technische Daten ................................................................................................................................Seite 7
Sicherheit ......................................................................................................................................... Seite 7
Sicherheitshinweise .............................................................................................................................Seite 7
Vorbereitung ................................................................................................................................Seite 8
Benötigtes Werkzeug und Material ...................................................................................................Seite 8
Leuchte montieren ...................................................................................................................Seite 8
Inbetriebnahme ......................................................................................................................... Seite 9
Wartung und Reinigung .....................................................................................................Seite 9
Entsorgung .....................................................................................................................................Seite 9
Informationen .............................................................................................................................Seite 10
Garantie ..............................................................................................................................................Seite 10
Konformitätserklärung .........................................................................................................................Seite 10
Hersteller / Service ..............................................................................................................................Seite 10

6 DE/AT/CH
Einleitung / SicherheitEinleitung
Legende der verwendeten Piktogramme
Bedienungsanleitung lesen! Warnung vor elektrischem Schlag!
Lebensgefahr!
Watt (Wirkleistung)
Diese Leuchte ist ausschließlich
für den Betrieb im Innenbereich,
in trockenen und geschlossenen
Räumen geeignet.
Hertz (Frequenz) So verhalten Sie sich richtig
Volt (Wechselspannung) Vorsicht! Verbrennungsgefahr durch
heiße Oberflächen!
Schutzklasse II b
a
Entsorgen Sie Verpackung
und Gerät umweltgerecht!
Warn- und Sicherheitshinweise
beachten! Lebens- und Unfallgefahr für
Kleinkinder und Kinder
LED-Lebensdauer ON OFF Schaltzyklen
Modell 14117008L:
dimmbar per Wandschalter
Modell 14117108L / 14116902L:
dimmbar an der Leuchte
Die Verpackung besteht aus 100 %
recyceltem Papier.
LED-Pendelleuchte /
LED-Deckenleuchte
Einleitung
Wir beglückwünschen Sie zum Kauf Ihres
neuen Gerätes. Sie haben Sich damit für
ein hochwertiges Produkt entschieden.
Bitte lesen Sie diese Bedienungsanleitung vollständig
und sorgfältig durch. Klappen Sie die Seite mit den
Abbildungen aus. Diese Anleitung gehört zu diesem
Produkt und enthält wichtige Hinweise zur Inbetrieb-
nahme und Handhabung. Beachten Sie immer alle
Sicherheitshinweise. Prüfen Sie vor der Inbetriebnahme,
ob die korrekte Spannung vorhanden ist und ob alle
Teile richtig montiert sind. Sollten Sie Fragen haben
oder unsicher in Bezug auf die Handhabung des
Gerätes sein, setzen Sie sich bitte mit Ihrem Händler
oder der Servicestelle in Verbindung. Bewahren Sie
diese Anleitung bitte sorgfältig auf und geben Sie sie
ggf. an Dritte weiter.
Bestimmungsgemäße
Verwendung
Diese Leuchte ist ausschließlich für den
Betrieb im Innenbereich, in trockenen und
geschlossenen Räumen geeignet. Die
Leuchte kann auf allen normal entflammbaren Ober-
flächen befestigt werden. Das Produkt ist nur für den
Einsatz in privaten Haushalten und nicht für den
kommerziellen Gebrauch vorgesehen.

7 DE/AT/CH
Einleitung / Sicherheit
Lieferumfang
Kontrollieren Sie unmittelbar nach dem Auspacken
immer den Lieferumfang auf Vollständigkeit sowie
den einwandfreien Zustand des Gerätes.
1 LED-Deckenleuchte (Modell 14117008L) bzw.
LED-Pendelleuchte (14117108L / 14116902L)
2 Dübel
2 Schrauben
1 Montage- und Bedienungsanleitung
Teilebeschreibung
1 Dübel
2 Montagewinkel
3 Schrauben (Anschlussgehäuse)
4 Schrauben (Montagewinkel)
5 Anschlussgehäuse
6 Anschlusskasten
7 Lüsterklemme
8 Schutzschlauch
9 Netzanschlusskabel (extern)
10
Dimmschalter (Modell 14117108L / 14116902L)
Technische Daten
Leuchte:
Artikel-Nummer: 14117008L / 14117108L /
14116902L
Betriebsspannung: 230-240 V~, 50 Hz
Nennleistung: LED, 20 W
Schutzklasse: II /
LED:
Leuchtmittel: LED-Modul (nicht austauschbar)
Nennleistung: 14116902L: LED, 16,5 W
14117008L: LED, 16 W
(4 x 4 W)
14117108L: LED, 18,4 W
(4 x 4,6 W)
Sicherheit
Sicherheitshinweise
Bei Schäden, die durch Nichtbeachtung dieser Be-
dienungsanleitung verursacht werden, erlischt der
Garantieanspruch! Für Folgeschäden wird keine
Haftung übernommen! Bei Sach- oder Personen-
schäden, die durch unsachgemäße Handhabung
oder Nichtbeachtung der Sicherheitshinweise verur-
sacht werden, wird keine Haftung übernommen!
Es dürfen ausschließlich mitgelieferte Einzelteile
verwendet werden, da sonst jegliche Gewährleis-
tungsanprüche erlöschen.
LEBENS-
UND UNFALLGEFAHR FÜR
KLEINKINDER UND KINDER!
Lassen Sie Kinder niemals unbeaufsichtigt mit
dem Verpackungsmaterial. Es besteht Erstickungs-
gefahr durch Verpackungsmaterial. Kinder un-
terschätzen häufig die Gefahren. Halten Sie
Kinder stets vom Produkt fern.
Dieses Gerät kann von Kindern ab 8 Jahren und
darüber sowie von Personen mit verringerten
physischen, sensorischen oder mentalen Fähig-
keiten oder Mangel an Erfahrung und Wissen
benutzt werden, wenn sie beaufsichtigt oder
bezüglich des sicheren Gebrauchs des Gerätes
unterwiesen wurden und die daraus resultieren-
den Gefahren verstehen. Kinder dürfen nicht mit
dem Gerät spielen. Reinigung und Benutzerwar-
tung dürfen nicht von Kindern ohne Beaufsichti-
gung durchgeführt werden.
Vermeiden Sie Lebensgefahr
durch elektrischen Schlag
Lassen Sie die Elektroinstallation durch einen
ausgebildeten Elektriker oder eine für Elektroins-
tallationen eingewiesene Person durchführen.
Bei Sach- oder Personenschäden, die durch un-
sachgemäße Handhabung oder Nichtbeachtung
der Sicherheitshinweise verursacht werden, wird
keine Haftung übernommen!
Benutzen Sie Ihre Leuchte niemals, wenn Sie
irgendwelche Beschädigungen feststellen.
Einleitung

8 DE/AT/CH
Leuchte montieren / Inbetriebnahme / Wartung und Reinigung / Entsorgung
Entfernen Sie vor der Montage die Sicherung
oder schalten Sie den Leitungsschutzschalter im
Sicherungskasten aus (0-Stellung).
Vermeiden Sie unbedingt die Berührung der
Leuchte mit Wasser oder anderen Flüssigkeiten.
Vergewissern Sie sich vor der Montage, dass die
vorhandene Netzspannung mit der benötigten
Betriebsspannung der Leuchte übereinstimmt
(siehe „Technische Daten“).
Stellen Sie sicher, dass bei der Montage keine
Leitungen beschädigt werden.
Öffnen Sie niemals eines der elektrischen Betri
ebs-
mittel oder stecken irgendwelche Gegenstände
in dieselben. Derartige Eingriffe bedeuten Lebens-
gefahr durch elektrischen Schlag.
Modell 14116902L / 14117108L:
Die Pendelleuchte ist nicht in der Länge
verstellbar.
Vermeiden Sie Brand- und
Verletzungsgefahr
Stellen Sie sicher, dass die Leuchte ausgeschaltet
und abgekühlt ist, bevor Sie diese berühren, um
Verbrennungen zu vermeiden.
Befestigen Sie die Leuchte nicht auf feuchtem
oder leitendem Untergrund.
Nicht direkt in die Lichtquelle (Leuchtmittel, LED
etc.) hineinschauen. Die Lichtquelle (Leuchtmittel,
LED etc.) nicht mit einem optischen Instrument
(z. B. Lupe) betrachten.
Die Lichtquelle dieser Leuchte ist nicht ersetzbar;
wenn die Lichtquelle ihr Lebensdauerende er-
reicht hat, ist die gesamte Leuchte zu ersetzen.
So verhalten Sie sich richtig
Montieren Sie die Leuchte so, dass sie vor
Feuchtigkeit, Verschmutzung und zu starker
Erwärmung geschützt ist.
Seien Sie stets aufmerksam! Achten Sie immer
darauf was Sie tun und gehen Sie stets mit Ver-
nunft vor. Verwenden Sie die Leuchte in keinem
Fall, wenn Sie unkonzentriert sind oder sich
unwohl fühlen.
Machen Sie sich vor der Verwendung mit allen
Anweisungen und Abbildungen in dieser Anlei-
tung sowie mit der Leuchte selbst vertraut.
Vorbereitung
Benötigtes Werkzeug
und Material
Die genannten Werkzeuge und Materialien sind nic
ht
im Lieferumfang enthalten. Es handelt sich hierbei
um unverbindliche Angaben und Werte zur Orien-
tierung. Die Beschaffenheit des Materials richtet sich
nach den individuellen Gegebenheiten vor Ort.
- Bleistift / Markierwerkzeug
- 2-poliger Spannungsprüfer
- Schraubendreher
- Bohrmaschine
- Bohrer (ca. ø 6 mm)
- Seitenschneider
- Leiter
Leuchte montieren
STROMSCHLAGGEFAHR!
Entfernen Sie die Sicherung oder schalten Sie den
Leitungsschutzschalter im Sicherungskasten aus
(0-Stellung), bevor Sie mit der Montage der Leuchte
beginnen.
Entfernen Sie die seitlich am Anschlussgehäuse
5 sichtbaren Schrauben 3 und nehmen Sie
den Montagewinkel 2 auf der Rückseite ab.
Markieren Sie die Bohrlöcher mit Hilfe der im
Montagewinkel 2 für die Schrauben vorgese-
henen Langlöcher.
Bohren Sie nun die Befestigungslöcher (ca. 6 mm,
Tiefe ca. 40 mm). Stellen Sie sicher, dass Sie
die Zuleitung nicht beschädigen.
Führen Sie die Dübel 1 in die Bohrlöcher ein.
Befestigen Sie den Montagewinkel 2 mit den
mitgelieferten Schrauben 4.
Öffnen Sie den Anschlusskasten 6.
Sicherheit / Vorbereitung / Leuchte montieren

9 DE/AT/CH
Führen Sie das Netzanschlusskabel (extern) 9
durch den Schutzschlauch 8.
Verbinden Sie nun das Anschlusskabel der
Leuchte mittels Lüsterklemme 7 mit dem
Netzanschlusskabel (extern) 9.
Hinweis: Achten Sie darauf, dass Sie die ein-
zelnen Leiter des Netzanschlusskabels (extern)
jeweils richtig anschließen: stromführender
Leiter, schwarz oder braun = Symbol L, Neutral-
leiter, blau = Symbol N, Schutzklasse II / .
Drücken Sie die doppelte Isolierung des Netz-
anschlusskabels (extern) 9 mindestens 8 mm
in den Schutzschlauch 8 hinein.
Achten Sie darauf, dass der Schutzschlauch 8
richtig am Anschlusskasten 6 sitzt.
Schließen Sie den Anschlusskasten 6.
Verschrauben Sie nun die Leuchte mittels der
Schrauben 3 mit dem Montagewinkel 2.
Ihre Leuchte ist nun betriebsbereit.
Setzen Sie die Sicherung wieder ein oder schal-
ten Sie den Leitungsschutzschalter wieder an.
Inbetriebnahme
Modell 14117008L:
Schalten Sie die Leuchte über den Wandschalt
er
ein bzw. aus.
Dimmen Sie die Leuchte stufenweise über den
Wandschalter.
Modell 14117108L / 14116902L:
Schalten Sie die Leuchte über den Wandschalter
ein.
Hinweis:
Beim Einschalten, mit Hilfe des Dim-
mers, ist automatisch die niedrigste Dimmstufe
eingestellt.
Der Dimmschalter
10
arbeitet in Stufen.
Betätigen Sie den Dimmschalter
10
so oft, bis
Sie die gewünschte Helligkeit erreicht haben.
Die Leuchtkraft kann über den Dimmschalter
10
nur erhöht werden. Schalten Sie die Dimmstufen
einmal durch, um die Dimmung erneut zu be-
ginnen.
Schalten Sie die Leuchte aus, indem Sie den
Dimmschalter
10
mehrmals drücken.
Achtung! Die Leuchte befindet sich immer
noch im Stand-by-Betrieb. Betätigen Sie den
Wandschalter, um die Leuchte vollständig aus-
zuschalten.
Wenn sich die Leuchte im Stand-by-Betrieb be-
findet, können Sie diese durch das einmalige
Drücken des Dimmschalters
10
einschalten.
Wird die Leuchte im eingeschalteten Zustand
mit Hilfe des Wandschalters ausgeschaltet,
so schaltet sich diese in der zuletzt gewählten
Dimmstufe wieder ein.
Wartung und Reinigung
STROMSCHLAGGEFAHR!
Trennen Sie zur Reinigung die Leuchte zuerst vom
Stromnetz. Entfernen Sie hierfür die Sicherung oder
schalten Sie den Leitungsschutzschalter im Sicherungs-
kasten aus (0-Stellung).
VORSICHT! VERBRENNUNGSGEFAHR
DURCH HEISSE OBERFLÄCHEN!
Lassen Sie die Leuchte vollständig abkühlen.
Benutzen Sie keine Lösungsmittel, Benzin o. ä.
Die Leuchte würde hierbei Schaden nehmen.
Verwenden Sie zur Reinigung nur ein trockenes,
fusselfreies Tuch.
Setzen Sie die Sicherung wieder ein oder schalten
Sie den Leitungsschutzschalter am Sicherungs-
kasten ein (I-Stellung).
Entsorgung
Die Verpackung besteht aus umweltfreundlichen Ma-
terialien, die Sie über die örtlichen Recyclingstellen
entsorgen können.
b
a
Beachten Sie die Kennzeichnung der
Verpackungsmaterialien bei der Abfall-
trennung, diese sind gekennzeichnet mit
Abkürzungen (a) und Nummern (b) mit
folgender Bedeutung: 1–7: Kunststoffe /
20–22: Papier und Pappe / 80–98:
Verbundstoffe.
Leuchte montieren / Inbetriebnahme / Wartung und Reinigung / EntsorgungSicherheit / Vorbereitung / Leuchte montieren

10 DE/AT/CH
Werfen Sie Ihr Produkt, wenn es ausge-
dient hat, im Interesse des Umweltschutzes
nicht in den Hausmüll, sondern führen
Sie es einer fachgerechten Entsorgung
zu. Über Sammelstellen und deren Öff-
nungszeiten können Sie sich bei Ihrer
zuständigen Verwaltung informieren.
Informationen
Garantie
Sie erhalten zum Zeitpunkt des Kaufs auf dieses Gerät
36 Monate Garantie. Das Gerät wurde sorgfältig
produziert und einer genauen Qualitätskontrolle
unterzogen. Innerhalb der Garantiezeit beheben
wir kostenlos alle Material- oder Herstellerfehler.
Sollten sich dennoch während der Garantiezeit
Mängel herausstellen, senden Sie das Gerät bitte
an die aufgeführte Service-Adresse unter Angabe
folgender Artikel-Nummer: 14117008L /
14117108L / 14116902L.
Von der Garantie ausgeschlossen sind Schäden
durch nicht sachgemäße Handhabung, Nichtbe-
achtung der Bedienungsanleitung oder Eingriff durch
nicht autorisierte Personen sowie Verschleißteile (wie
z. B. Leuchtmittel). Durch die Garantieleistung wird
die Garantiezeit weder verlängert noch erneuert.
Konformitätserklärung
Dieses Produkt erfüllt die Anforderungen der gelten
den
europäischen und nationalen Richtlinien. Die Konfor-
mität wurde nachgewiesen. Entsprechende Erklärun-
gen und Unterlagen sind beim Hersteller hinterlegt.
Hersteller / Service
Briloner Leuchten GmbH & Co. KG
Im Kissen 2
59929 Brilon
DEUTSCHLAND
Tel.: +49 29 61 / 97 12–800
Fax: +49 29 61 / 97 12–199
E-Mail: [email protected]
www.briloner.com
IAN 327470_1901
Bitte halten Sie für alle Anfragen den Kassenbon
und die Artikelnummer (z. B. IAN 123456_7890)
als Nachweis für den Kauf bereit.
Entsorgung / Informationen Table of contents

11 GB/IE
Entsorgung / Informationen
List of pictograms used ........................................................................................................ Page 12
Introduction ................................................................................................................................... Page 12
Intended use ........................................................................................................................................ Page 12
Scope of delivery ................................................................................................................................Page 12
Parts description ..................................................................................................................................Page 13
Technical data ..................................................................................................................................... Page 13
Safety .................................................................................................................................................Page 13
Safety notices ......................................................................................................................................Page 13
Preparation ...................................................................................................................................Page 14
Required tools and material ...............................................................................................................Page 14
Mounting the light ...................................................................................................................Page 14
Initial use .........................................................................................................................................Page 14
Maintenance and cleaning ............................................................................................... Page 15
Disposal ............................................................................................................................................Page 15
Information....................................................................................................................................Page 15
Warranty .............................................................................................................................................Page 15
Declaration of conformity ...................................................................................................................Page 15
Manufacturer / Service .......................................................................................................................Page 16
Table of contents

12 GB/IE
Introduction / Safety Introduction
List of pictograms used
Please read the operating instructions! Electric shock warning! Danger
to life!
Watt (effective power) This light is only suitable for indoor
use in dry and enclosed spaces.
Hertz (mains frequency) For your safety
Volt (AC) Caution! Risk of burns due to hot
surfaces!
Safety class II b
a
Dispose of the packaging and de-
vice in an environmentally-friendly
manner!
Observe warnings and safety notices! Danger to life and risk of accidents
for infants and children!
LED lifespan ON OFF Switching cycles
Model 14117008L:
dimmable with wall switch
Model 14117108L / 14116902L:
dimmable on the lamp
The packaging is made from
100% recycled paper.
LED pendant light / LED ceiling light
Introduction
Congratulations on the purchase of your
new appliance. You have selected a high
quality product. Please be sure to care-
fully read all the instructions for use. Fold out the
page with illustrations. These instructions are part
of the product and contain important information
on setup and handling. Always observe all safety
instructions. Before using this product for the first
time verify the correct voltage and that all parts are
properly installed. If you have any questions or are
unsure about operating the product, please contact
your distributor or service centre. Please keep these
instructions in a safe place and pass them on to
third parties if necessary.
Intended use
This light is only suitable for indoor use in
dry and enclosed spaces. The light can
be mounted onto any normally inflamma-
ble surface. This product is only intended for private
household use and not for commercial purposes.
Scope of delivery
Check that all the parts are present and that the
appliance is in perfect condition immediately after
unpacking.
1 LED ceiling light (model 14117008L) or LED
pendant light (14117108L / 14116902L)
2 screw anchors
2 screws
1 instructions for assembly and use

13 GB/IE
Introduction / Safety Introduction
Parts description
1 Wall plug
2 Mounting bracket
3 Screws (connection housing)
4 Screws (mounting bracket)
5 Connection housing
6 Junction box
7 Lustre terminal
8 Protective tube
9 Mains connection cord (external)
10 Dimmer switch (model 14117108L /
14116902L)
Technical data
Lamp:
Item no.: 14117008L / 14117108L /
14116902L
Operating voltage: 230–240 V~, 50 Hz
Rated power: LED, 20 W
Protection class: II /
LED:
Illuminant: LED module (not replaceable)
Rated power: 14116902L: LED, 16.5 W
14117008L: LED, 16 W
(4 x 4 W)
14117108L: LED, 18.4 W
(4 x 4.6 W)
Safety
Safety notices
Damage due to failure to comply with these instruc-
tions for use will void the warranty! We assume no
liability for consequential damages! We assume no
liability for property damage or personal injury
due to improper handling or failure to comply with
the safety instructions! Only use the included parts,
using other parts will void the warranty.
DANGER TO
LIFE AND ACCIDENT HAZARD
FOR TODDLERS AND SMALL
CHILDREN!
Never leave children unsupervised with the
packaging material. The packaging material
poses a suffocation hazard. Children frequently
underestimate the dangers. Please always keep
the product out of the reach of children.
This device may be used by children aged 8
years and up, as well as by persons with reduced
physical, sensory or mental capacities, or lacking
experience and/or knowledge, so long as they
are supervised or instructed in the safe use of
the device and understand the associated risks.
Do not allow children to play with the device.
Cleaning and user maintenance must not be
performed by children without supervision.
Avoid the risk of fatal injury
from electric shock
Ensure that a qualified electrician, or a person
trained to carry out electrical installations, per-
forms the electrical installation.
We assume no liability for property damage
or personal injury due to improper handling
or failure to observe the safety notices!
Never use the light if any defects have been
identified.
Prior to installation, remove the fuse or switch
off the circuit breaker (0 setting) in the fuse box.
Ensure that the light does not come into contact
with water or other liquids under any circum-
stances.
Prior to installation, verify the available mains
voltage corresponds with the operating voltage
required for the light (see “Technical data“).
Be sure not to damage any wires during
installation.
Never open any of the components of the elec-
trical equipment or insert any objects into the
same components. This will pose a risk of fatal
injury from electric shock.
Model 14116902L / 14117108L:
The length of the pendant light is not adjustable.

14 GB/IE
Initial use / Maintenance and cleaning / Disposal / InformationSafety / Preparation / Mounting the light / Initial use
Prevent fire and
injury hazards
To prevent burns, be sure the light is switched
off and cooled down before touching it.
Do not attach the light to a damp or conductive
substrate.
Do not look directly into the light source (lamp,
LED, etc.). Do not look into the light source (lamp,
LED, etc.) with an optical instrument (e.g. mag-
nifier).
The illuminant in this light is not replaceable; if
the illuminant reaches the end of its life, replace
the entire light.
For your safety
Install the light so it is protected from moisture,
dirt and extreme heating.
Always be attentive! Always pay attention to
what you are doing and use common sense.
Never use the light if you are having difficulty
concentrating or do not feel well.
Familiarise yourself with all instructions and
diagrams in this manual as well as with the
light itself before use.
Preparation
Required tools and material
The tools and materials specified are not included.
This information and these values are non-binding
and are only provided as a reference. The nature
of the material is determined by the individual local
conditions.
- Pencil / marking tool
- 2-pole voltage tester
- Screwdriver
- Electric drill
- Drill (approx ø 6 mm)
- Side cutting pliers
- Ladder
Mounting the light
RISK OF ELECTRIC SHOCK!
Prior to installation, remove the fuse or switch off
the circuit breaker in the fuse box (Position 0).
Remove the screws 3 visible at the side of the
connection housing 5 and remove the mount-
ing bracket 2 at the back.
Use the slotted holes on the mounting bracket
2 to mark the bores.
Now drill the fixing holes (approx. 6 mm, depth
approx. 40 mm). Be sure not to damage the
supply line.
Insert the plugs 1 into the bores.
Fasten the mounting bracket 2 with the
provided screws 4.
Open the junction box 6.
Feed the mains cable (external) 9 through
the protective tube 8.
Now use the lustre terminal 7 to connect the
connection cable for the light to the mains con-
nection cable (external) 9.
Note: Be sure to connect the individual leads o
n
the mains connection cable (external) correctly:
l
ive wire, black or brown = symbol L, neutral w
ire,
blue = symbol N, protection class II / .
Push the mains connection cord (external) 9
double insulation at least 8 mm into the protec-
tive tube 8.
Be sure the protective tube 8 is seated correctly
at the junction box 6.
Close the junction box 6.
Now use the screws 3 to fasten the light to
the mounting bracket 2.
Your light is now ready to use.
Reinsert the fuse or switch the circuit breaker
back on.
Initial use
Model 14117008L:
Use the wall switch to switch the light on or off.
Use the wall switch to dim the light to the respec-
tive levels.

15 GB/IE
Initial use / Maintenance and cleaning / Disposal / InformationSafety / Preparation / Mounting the light / Initial use
Model 14117108L / 14116902L:
Use the wall switch to switch on the light.
Notice: When the light is turned on using the
dimmer, it automatically adjusts to the lowest
dimming level.
The dimmer switch 10 works in stages. Press
the dimmer switch 10 until the light is at the
desired brightness.
The intensity can only be increased using the
dimmer switch 10 .
Switch through the dimming
levels to reset the dimmer.
Press the dimmer switch 10 repeatedly to switch
the light off.
Attention! The light is still in standby mode.
Press the wall switch to switch the light all the
way off.
With the light in stand-by mode it can be s
witched
on by pressing the dimmer switch 10 once.
If the light is on and is switched off using the
wall switch, it will be in the last used dimmer
setting when switched on again.
Maintenance and cleaning
RISK OF ELECTRIC SHOCK!
Disconnect the light from the mains circuit before
cleaning. To do so, remove the fuse or switch off
the circuit breaker in the fuse box (0 position).
CAUTION! RISK OF BURNS DUE TO
HOT SURFACES!
Allow the light to cool down completely.
Do not use solvents, benzene or similar
substances. They could damage the light.
Only use a dry, lint-free cloth for cleaning.
Replace the fuse or switch on the circuit
breaker (Position I) inside the fuse box.
Disposal
The packaging is made entirely of recyclable mate-
rials, which you may dispose of at local recycling
facilities.
b
a
Observe the marking of the packaging
materials for waste separation, which
are marked with abbreviations (a) and
numbers (b) with following meaning:
1–7: plastics / 20–22: paper and fibre-
board / 80–98: composite materials.
To help protect the environment, please
dispose of the product properly when it
has reached the end of its useful life and
not in the household waste. Information
on collection points and their opening
hours can be obtained from your local
authority.
Information
Warranty
A 36 month warranty is extended for this appliance
at the time of purchase. The appliance has been
manufactured with care under strict quality control.
During the warranty period any defects in material
or manufacture will be replaced free of charge. In
the event of a defect during the warranty period,
please send the appliance to the service address
listed, indicating the following item number:
14117008L / 14117108L / 14116902L.
Expendable parts (such as bulbs) and damage
caused by improper handling, failure to observe
the instructions for use or modification by unauthor-
ised persons are excluded from the warranty. The
performance of services under the warranty does
not extend or renew the warranty period.
Declaration of conformity
This product fulfils the requirements of the applicable
European and national directives. Conformity has
been demonstrated. The relevant declarations and
documents are held by the manufacturer.

16 GB/IE
Information
Manufacturer / Service
Briloner Leuchten GmbH & Co. KG
Im Kissen 2
59929 Brilon
GERMANY
Tel.: +49 29 61 / 97 12–800
Fax: +49 29 61 / 97 12–199
E-Mail: [email protected]
www.briloner.com
IAN 327470_1901
Please have your receipt and item number (e.g
IAN 123456_7890) ready as your proof of
purchase when enquiring about your product.
Table des matières

17 FR/BE
Information Table des matières
Légende des pictogrammes utilisés .......................................................................... Page 18
Introduction ................................................................................................................................... Page 18
Utilisation conforme ............................................................................................................................Page 18
Contenu de la livraison .......................................................................................................................Page 18
Descriptif des pièces ...........................................................................................................................Page 19
Caractéristiques techniques ................................................................................................................Page 19
Sécurité .............................................................................................................................................Page 19
Indications de sécurité ........................................................................................................................Page 19
Préparation ...................................................................................................................................Page 20
Outils et matériel nécessaires ............................................................................................................. Page 20
Montage de la lampe ...........................................................................................................Page 20
Mise en service ...........................................................................................................................Page 21
Entretien et nettoyage..........................................................................................................Page 21
Mise au rebut ............................................................................................................................... Page 21
Informations .................................................................................................................................Page 22
Garantie ..............................................................................................................................................Page 22
Déclaration de conformité .................................................................................................................. Page 22
Fabricant / SAV ...................................................................................................................................Page 22

18 FR/BE
Introduction Introduction / Sécurité
Légende des pictogrammes utilisés
Lire le mode d'emploi !
Attention au risque d'électrocution !
Danger de mort !
Watt (puissance active) Cette lampe est exclusivement
conçue pour un usage intérieur,
dans des locaux secs et fermés.
Hertz (fréquence) Conduite à tenir
Volt (tension alternative) Attention ! Risque de brûlures du
fait des surfaces brûlantes !
Classe de protection II b
a
Mettez l’emballage et l’appareil
au rebut dans le respect de l'envi-
ronnement !
Respectez les avertissements et les
consignes de sécurité!
Danger de mort et risque d'acci-
dent pour les enfants en bas âge
et les enfants
Durée de vie des LED ON OFF Cycles de commutation
Modèle 14117008L :
variable par interrupteur encastré
Modèle 14117108L / 14116902L :
variable sur la lampe
L'emballage est exclusivement
composé de papier recyclé.
Suspension à LED / Plafonnier à LED
Introduction
Nous vous félicitons pour l‘achat de votre
nouvel appareil. Vous avez opté pour
un produit de grande qualité. Veuillez
lire ce mode d‘emploi intégralement et attentivement.
Ouvrez la page contenant les illustrations. Ce mode
d‘emploi fait partie du produit et contient des ins-
tructions essentielles pour sa mise en service et sa
manipulation. Respectez toujours toutes les consignes
de sécurité. Avant la mise en service, vérifiez si la
tension est correcte et si toutes les pièces sont cor-
rectement montées. Si vous avez des questions ou
des doutes concernant la manipulation de l‘appa-
reil, veuillez contacter votre revendeur ou le service
après-vente. Veuillez conserver soigneusement ce
mode d‘emploi et remettez-le aux autres utilisateurs.
Utilisation conforme
Cette lampe est exclusivement conçue
pour un usage intérieur, dans des locaux
secs et fermés. Cette lampe peut être
fixée sur toutes les surfaces normalement inflam-
mables. Ce produit est uniquement destiné à un
usage domestique et non à un usage commercial.
Contenu de la livraison
Après le déballage du produit, contrôlez toujours
et immédiatement que le contenu de la livraison est
complet et que l’appareil se trouve en parfait état.
1 plafonnier à LED (modèle 14117008L) ou
suspension à LED (14117108L / 14116902L)
2 chevilles

19 FR/BE
Introduction Introduction / Sécurité
2 vis
1 notice de montage et mode d’emploi
Descriptif des pièces
1 Cheville
2 Équerre de montage
3 Vis (boîtier de raccordement)
4 Vis (équerre de montage)
5 Boîtier de raccordement
6 Boîtier de raccordement
7 Domino de raccordement
8 Gaine de protection
9 Câble d‘alimentation électrique (externe)
10 Variateur (modèle 14117108L / 14116902L)
Caractéristiques techniques
Lampe:
Réf. d‘article : 14117008L / 14117108L /
14116902L
Tension de
fonctionnement : 230–240 V~, 50 Hz
Puissance nominale : LED, 20 W
Classe de protection: II /
LED:
Ampoule : Module LED (non rempla-
çable)
Puissance nominale : 14116902L : LED, 16,5 W
14117008L : LED, 16 W
(4 x 4 W)
14117108L : LED, 18,4 W
(4 x 4,6 W)
Sécurité
Indications de sécurité
Les droits de recours en garantie sont annulés en cas
de dommages résultant du non-respect du présent
mode d’emploi! Le fabricant décline toute responsa-
bilité pour les dommages consécutifs ! Toute respon-
sabilité est déclinée pour les dommages matériels ou
corporels causés par une manipulation incorrecte du
produit ou par le non-respect des consignes de sécu-
rité ! Seules les pièces fournies doivent être utilisées,
sinon tout recours en garantie est annulé.
DAN-
GER DE MORT ET D’ACCIDENT
POUR LES ENFANTS EN BAS
ÂGE ET LES ENFANTS !
Ne jamais laisser les enfants manipuler sans sur-
veillance le matériel d‘emballage. L‘emballage
présente un risque d‘étouffement. Les enfants
sous-estiment souvent le danger. Toujours tenir
le produit à l‘écart des enfants.
Ce produit peut être utilisé par des enfants âgés
de 8 ans et plus ainsi que par des personnes
ayant des capacités physiques, sensorielles ou
mentales réduites ou manquant d‘expérience ou
de connaissances, s‘ils sont surveillés ou s‘ils ont
été informés de l‘utilisation sûre du produit et
comprennent les risques liés à son utilisation. Les
enfants ne doivent pas jouer avec ce produit. Le
nettoyage et l‘entretien du produit ne doivent
pas être effectués par des enfants laissés sans
surveillance.
Prévention de risques mortels
par électrocution
L‘installation électrique doit être effectuée par
un électricien ou par une personne dûment
formée à cet effet.
De même, toute responsabilité est déclinée pour
les dommages matériels ou corporels causés
par une manipulation incorrecte ou par le non-
respect des consignes de sécurité !
N’utilisez jamais votre lampe si vous constatez
le moindre endommagement.
Avant le montage, retirez le fusible ou coupez
le disjoncteur de la boîte à fusibles (position 0).
Évitez impérativement tout contact de la lampe
avec de l‘eau ou d‘autres liquides.
Avant le montage, vérifiez que la tension sec-
teur corresponde à la tension de service requise
de la lampe (voir « Caractéristiques techniques »).
Assurez-vous que, lors du montage, aucun
câble ne soit endommagé.

20 FR/BE
Sécurité / Préparation / Montage de la lampe
N‘ouvrez jamais les composants électriques,
et n‘insérez jamais d‘objets quelconques dans
ceux-ci. De telles interventions impliquent un
danger de mort par électrocution.
Modèle 14116902L / 14117108L :
La suspension n‘est pas réglable dans sa
longueur.
Prévention de risque
d‘incendies et de blessures
Afin d‘éviter toute brûlure, vérifiez que la lampe
soit éteinte et suffisamment froide avant de la
manipuler.
Ne fixez pas la lampe sur un support humide
ou conducteur de courant.
Ne jamais regarder directement dans la source
lumineuse (ampoule, LED, etc.). Ne pas obser-
ver la source lumineuse (ampoule, LED etc.) à
l‘aide d‘un instrument d‘optique (p. ex. une loupe).
La source lumineuse de cette lampe n‘est pas
remplaçable ; lorsque la source de lumière ar-
rive en fin de vie, l‘ensemble de la lampe doit
être remplacé.
Conduite à tenir
Montez la lampe de telle sorte qu‘elle soit pro-
tégée de l‘humidité, des saletés et d‘un échauf-
fement trop important.
Soyez toujours vigilant ! Faites toujours attention
à ce que vous faites et agissez raisonnablement.
N‘utilisez jamais cette lampe si vous n‘êtes pas
concentré ou si vous vous sentez mal.
Avant l‘utilisation, prenez bien connaissance
de toutes les consignes et figures indiquées dans
le présent mode d‘emploi et familiarisez-vous
avec la lampe.
Préparation
Outils et matériel nécessaires
Les outils et matériels indiqués ne sont pas inclus
dans le contenu de la livraison. Il s‘agit là de
données et de valeurs indicatives vous permettant
de vous orienter. Les caractéristiques du matériel
dépendent des conditions spécifiques sur place.
- Crayon / outil marqueur
- Détecteur de tension à 2 pôles
- Tournevis
- Perceuse
- Foret (env. ø6 mm)
- Pince coupante diagonale
- Escabeau
Montage de la lampe
RISQUE
D’ÉLECTROCUTION!
Avant de commencer le montage de la lampe, reti-
rez le fusible ou coupez le disjoncteur de la boîte à
fusibles (position 0).
Retirez les vis visibles 3 sur le côté du boîtier
de raccordement 5 ainsi que l‘équerre de
montage 2 sur la face arrière.
Marquez les trous de perçage à l‘aide des
trous oblongs prévus pour les vis, dans l‘équerre
de montage 2.
Maintenant, percez les trous d‘attache (env.
6 mm, profondeur env. 40 mm). Assurez-vous de
ne pas endommager l‘alimentation électrique.
I
nsérer les chevilles
1
dans les trous de perça
ge.
Fixez l‘équerre de montage 2 avec les vis
fournies 4.
Ouvrez le boîtier de raccordement 6.
Passez le câble d‘alimentation (externe) 9
par la gaine de protection 8.
Reliez maintenant le câble d‘alimentation de la
lampe au câble d‘alimentation (externe) 9 à
l‘aide du domino 7.
Indication : veillez à ce que les fils du câble
d‘alimentation électrique (externe) aient leur
raccord respectif : fil conducteur, noir ou brun =
symbole L, fil neutre, bleu = symbole N, classe
de protection II / .
Enfoncez la double isolation du câble d‘alimen-
tation (externe) 9 dans la gaine de protection
8 sur au moins 8 mm.
Montage de la lampe / Mise en service / Entretien et nettoyage / Mise au rebut

21 FR/BE
Sécurité / Préparation / Montage de la lampe Montage de la lampe / Mise en service / Entretien et nettoyage / Mise au rebut
Veillez à ce que la gaine de protection 8 soit
placée correctement sur le boîtier de raccorde-
ment 6.
Fermez le boîtier de raccordement 6.
À l‘aide des vis 3, fixez la lampe sur l‘équerre
de montage 2.
Votre lampe est alors prête à l‘emploi.
Remettez le fusible en place ou remettez en
route le disjoncteur.
Mise en service
Modèle 14117008L :
Allumez ou éteignez la lampe en utilisant
l‘interrupteur mural.
Réglez graduellement l‘intensité de la lampe
en utilisant l‘interrupteur mural.
Modèle 14117108L / 14116902L :
Allumez la lampe en utilisant l‘interrupteur mural.
Remarque : Lors de l’allumage, le niveau de
luminosité le plus faible se règle automatiquement
grâce au variateur.
Le variateur 10 fonctionne par palier. Actionnez
le variateur 10 aussi souvent que souhaité,
jusqu‘à obtenir la luminosité de votre choix.
La luminosité peut être uniquement augmentée
grâce à l’interrupteur du variateur 10 . Passez
tout d’abord par tous les niveaux de variation
pour recommencer la variation depuis le début.
Éteignez la lampe en appuyant plusieurs fois
sur le variateur 10 .
Attention ! La lampe se trouve toujours en
mode veille. Actionnez l‘interrupteur mural afin
d‘éteindre complètement la lampe.
Lorsque la lampe se trouve en mode veille, vous
pouvez l‘allumer en exerçant une seule pression
sur le variateur 10 .
Lorsque la lampe est éteinte en état allumé à
l‘aide de l‘interrupteur mural, la lampe se rallume
sur le dernier niveau d‘intensité sélectionné.
Entretien et nettoyage
RISQUE
D’ÉLECTROCUTION!
Pour procéder au nettoyage, coupez tout d‘abord
l‘alimentation secteur de la lampe. Retirez à cet effet
le fusible ou coupez le disjoncteur de la boîte à
fusible (position 0).
ATTENTION ! RISQUE DE BRÛLURES !
SURFACES TRÈS CHAUDES !
Laissez la lampe refroidir complètement.
N‘utilisez ni solvant, ni benzine ou autres pro-
duits similaires qui endommageraient la lampe.
Pour procéder au nettoyage, utilisez uniquement
un chiffon sec et non pelucheux.
Remettez le fusible en place ou remettez en
route le disjoncteur dans le boîtier à fusibles
(position I).
Mise au rebut
L’emballage se compose de matières recyclables
pouvant être mises au rebut dans les déchetteries
locales.
b
a
Veuillez respecter l‘identification des
matériaux d‘emballage pour le tri sélectif,
ils sont identifiés avec des abbréviations
(a) et des chiffres (b) ayant la signification
suivante : 1–7 : plastiques / 20–22 :
papiers et cartons / 80–98 : matériaux
composite.
Afin de contribuer à la protection de
l’environnement, veuillez ne pas jeter
votre produit usagé dans les ordures
ménagères, mais éliminez-le de manière
appropriée. Pour obtenir des renseigne-
ments concernant les points de collecte
et leurs horaires d’ouverture, vous pouvez
contacter votre municipalité.

22 FR/BE
Informations
Informations
Garantie
Vous bénéficiez d’une garantie de 36 mois à partir
de la date d’achat de l’appareil. Cet appareil a été
fabriqué avec soin et soumis à un contrôle qualité
minutieux. Pendant la durée de la garantie, nous
réparons gratuitement tous les défauts de matériaux
ou de fabrication. Si toutefois vous constatez des
défauts pendant la période de garantie, envoyez-nous
l‘appareil à l‘adresse du SAV indiquée en mention-
nant le numéro d‘article : 14117008L /
14117108L / 14116902L.
La garantie exclut les dommages dus à une mani-
pulation incorrecte, au non-respect des instructions
du mode d’emploi ou à une intervention par une
personne non autorisée, ainsi que les pièces d’usure
(par ex. ampoule). La durée de garantie n’est aucu-
nement prolongée ou renouvelée par une prestation
de garantie.
Déclaration de conformité
Ce produit est conforme aux exigences des directives
européennes et nationales applicables. La confor-
mité a été attestée. Les déclarations et documents
correspondants sont en possession du fabricant.
Fabricant / SAV
Briloner Leuchten GmbH & Co. KG
Im Kissen 2
59929 Brilon
ALLEMAGNE
Tél. : +49 29 61 / 97 12–800
Fax : +49 29 61 / 97 12–199
www.briloner.com
IAN 327470_1901
Veuillez conserver le ticket de caisse et la référence
de l’article (par ex. IAN 123456_7890) à titre de
preuve d’achat pour toute demande.
Inhoudsopgave

23 NL/BE
Informations Inhoudsopgave
Legenda van de gebruikte pictogrammen ..................................................... Pagina 24
Inleiding ....................................................................................................................................... Pagina 24
Correct gebruik ............................................................................................................................... Pagina 24
Omvang van de levering ................................................................................................................ Pagina 24
Beschrijving van de onderdelen ..................................................................................................... Pagina 25
Technische gegevens ...................................................................................................................... Pagina 25
Veiligheid .................................................................................................................................... Pagina 25
Veiligheidsinstructies ....................................................................................................................... Pagina 25
Voorbereiding ........................................................................................................................ Pagina 26
Benodigd gereedschap en materiaal ............................................................................................ Pagina 26
Lamp monteren ...................................................................................................................... Pagina 26
Ingebruikname ...................................................................................................................... Pagina 27
Onderhoud en reiniging ................................................................................................. Pagina 27
Afvoer ............................................................................................................................................ Pagina 27
Informatie ................................................................................................................................... Pagina 28
Garantie .......................................................................................................................................... Pagina 28
Conformiteitsverklaring ................................................................................................................... Pagina 28
Fabrikant / service ........................................................................................................................... Pagina 28

24 NL/BE
Inleiding Inleiding / Veiligheid
Legenda van de gebruikte pictogrammen
Lees de gebruiksaanwijzing! Waarschuwing voor een
elektrische schok! Levensgevaar!
Watt (nuttig vermogen) Deze lamp is uitsluitend bedoeld
voor gebruik binnenshuis, in droge
en gesloten ruimtes.
Hertz (frequentie) Zo handelt u correct
Volt (wisselspanning) Voorzichtig! Kans op brandwonden
door hete oppervlakken!
Beschermingsklasse II b
a
Verwijder de verpakking en het
apparaat op een milieuvriendelijke
manier!
Waarschuwings- en veiligheidsinstructies
in acht nemen! Levensgevaar en kans op ongevallen
bij kleuters en kinderen
Levensduur LED ON OFF Schakelcycli
Model 14117008L:
dimbaar via een wandschakelaar
Model 14117108L / 14116902L:
dimbaar via de lamp
De verpakking bestaat uit 100%
gerecycled papier.
LED-pendellamp / LED-plafondlamp
Inleiding
Gefeliciteerd met de aankoop van uw
nieuwe apparaat. U heeft gekozen voor
een hoogwaardig product. Lees deze
gebruiksaanwijzing volledig en zorgvuldig door.
Vouw de pagina met de afbeeldingen open. Deze
gebruiksaanwijzing hoort bij dit product en bevat
belangrijke aanwijzingen voor de ingebruikname
en bediening. Neem altijd de veiligheidsinstructies
in acht. Controleer vóór de ingebruikname of de
juiste spanning beschikbaar is en of alle onderde-
len goed gemonteerd zijn. Wanneer u vragen heeft
of onzeker bent in verband met de bediening van het
apparaat, kunt u contact opnemen met uw leverancier
of met het servicepunt. Bewaar deze handleiding
op een veilige plaats en geef hem eventueel aan
derden door.
Correct gebruik
Deze lamp is uitsluitend bedoeld voor
gebruik binnenshuis, in droge en gesloten
ruimtes. De lamp kan op alle normaal
ontvlambare oppervlakken bevestigd worden. Het
product is alleen bedoeld voor gebruik in privé-huis-
houdens en niet voor commerciële doeleinden.
Omvang van de levering
Controleer de levering altijd direct na het uitpakken
op volledigheid en optimale staat van het product.

25 NL/BE
Inleiding Inleiding / Veiligheid
1 LED-plafondlamp (model 14117008L) resp.
LED-pendellamp (14117108L / 14116902L)
2 pluggen
2 schroeven
1 montage- en gebruiksaanwijzing
Beschrijving van de
onderdelen
1 Plug
2 Montagehoek
3 Schroeven (aansluitbehuizing)
4 Schroeven (montagehoek)
5 Aansluitbehuizing
6 Aansluitkast
7 Kroonsteentje
8 Beschermende slang
9 Stroomkabel (extern)
10 Dimschakelaar (model 14117108L /
14116902L)
Technische gegevens
Lamp:
Artikelnr.: 14117008L /
14117108L / 14116902L
Bedrijfsspanning: 230–240 V~, 50 Hz
Nominaal vermogen: LED, 20 W
Beschermingsklasse: II /
LED:
Verlichtingsmiddel: LED-module (niet
vervangbaar)
Nominaal vermogen: 14116902L: LED, 16,5 W
14117008L: LED, 16 W
(4 x 4 W)
14117108L: LED, 18,4 W
(4 x 4,6 W)
Veiligheid
Veiligheidsinstructies
Bij beschadigingen die worden veroorzaakt door
het niet in acht nemen van deze gebruiksaanwijzing
vervalt de garantie! Wij zijn niet aansprakelijk voor
gevolgschade! Bij materiële schade of persoonlijk
letsel dat wordt veroorzaakt door onjuist gebruik
of het niet in acht nemen van de veiligheidsinstruc-
ties zijn wij niet aansprakelijk! Er mogen uitsluitend
meegeleverde accessoires worden gebruikt, anders
komt de garantie te vervallen.
LEVENSGEVAAR EN KANS OP
ONGEVALLEN BIJ KLEUTERS
EN KINDEREN!
Laat kinderen nooit zonder toezicht bij het
verpakkingsmateriaal. Er bestaat kans op ver-
stikking door verpakkingsmateriaal. Kinderen
onderschatten vaak de gevaren. Houd het pro-
duct altijd buiten bereik van kinderen.
Dit apparaat kan door kinderen vanaf 8 alsmede
door personen met verminderde fysieke, senso-
rische of mentale vaardigheden of een gebrek
aan ervaring en kennis worden gebruikt, als zij
onder toezicht staan of geïnstrueerd werden met
betrekking tot het veilige gebruik van het appa-
raat en zij de hieruit voortvloeiende gevaren be-
grijpen. Kinderen mogen niet met het apparaat
spelen. Reiniging en onderhoud mag niet door
kinderen zonder toezicht worden uitgevoerd.
Vermijd levensgevaar door
een elektrische schok
Laat de elektronische installatie door een opge-
leide elektricien of een voor elektrische installa-
ties geïnstrueerde persoon uitvoeren.
Bij materiële schade of persoonlijk letsel dat
wordt veroorzaakt door onjuist gebruik of het
niet in acht nemen van de veiligheidsinstructies
zijn wij niet aansprakelijk!
Gebruik de lamp niet als u een beschadiging
heeft geconstateerd.

26 NL/BE
Veiligheid / Voorbereiding / Lamp monteren
Verwijder voor de montage de zekering of
schakel de aardlekschakelaar in de groepen-
kast uit (0-stand).
Vermijd dat de lamp in contact komt met water
of andere vloeistoffen.
Wees er voor de montage zeker van dat de
beschikbare netspanning overeenkomt met
de benodigde bedrijfsspanning van de lamp
(zie „Technische gegevens“).
Wees er zeker van dat er bij de montage geen
leidingen worden beschadigd.
Open nooit een van de elektrische delen en steek
er geen voorwerpen in. Bij dergelijke handelin-
gen bestaat levensgevaar door elektrische
schokken.
Model 14116902L / 14117108L:
De pendellamp kan niet in de lengte worden
ingesteld.
Vermijd brandgevaar en
kans op letsel
Zorg ervoor dat de lamp uitgeschakeld en
afgekoeld is voordat u deze aanraakt om
brandwonden te vermijden.
Bevestig de lamp niet op een vochtige of gelei-
dende ondergrond.
Niet direct in de lichtbron (lamp, LED etc.) kijken.
De lichtbron (verlichtingsmiddel, LED, etc.) niet
met een optisch instrument (bijv. vergrootglas)
bekijken.
De lichtbron van deze lamp kan niet worden
vervangen; als de lichtbron het einde van zijn
levensduur heeft bereikt, dient de complete
lamp te worden vervangen.
Zo handelt u correct
Monteer de lamp zo, zodat hij beschermd is
tegen vocht, vuil en te hoge verwarming.
Wees altijd alert! Let er altijd op wat u doet en
ga steeds bedachtzaam te werk. Gebruik de
lamp niet als u ongeconcentreerd bent of zich
niet lekker voelt.
Lees voor gebruik alle aanwijzingen en maak
uzelf met de afbeeldingen in deze gebruiks-
aanwijzing alsmede met de verlichting zelf
vertrouwd.
Voorbereiding
Benodigd gereedschap
en materiaal
Het genoemde gereedschap en materiaal wordt
niet meegeleverd. Het gaat hierbij om niet-bindende
informatie en waarden ter oriëntatie. De hoedanig-
heid van het materiaal is afhankelijk van de indivi-
duele omstandigheden ter plekke.
- Potlood / markeergereedschap
- 2-polige spanningzoeker
- Schroevendraaier
- Boormachine
- Boor (ca. ø 6 mm)
- Zijkniptang
- Ladder
Lamp monteren
KANS OP
ELEKTRISCHE SCHOK!
Verwijder de zekering of schakel de hoofdschake-
laar uit in de zekeringskast (0-stand), voordat u
begint met de montage van de lamp.
Verwijder de zijdelings aan de aansluitbehui-
zing 5 zichtbare schroeven 3 en neem de
montagehoek 2 aan de achterkant eraf.
Markeer de boorgaten met behulp van de
montagehoek 2 voor de lange gaten voor de
schroeven.
Boor nu de bevestigingsgaten (ca. 6 mm, diepte
ca. 40 mm). Zorg ervoor dat u de stroomkabel
niet beschadigt.
Plaats de pluggen 1 in de boorgaten.
Bevestig de montagehoek 2 met de meegele-
verde schroeven 4.
Open de aansluitkast 6.
Lamp monteren / Ingebruikname / Onderhoud en reiniging / Afvoer

27 NL/BE
Veiligheid / Voorbereiding / Lamp monteren Lamp monteren / Ingebruikname / Onderhoud en reiniging / Afvoer
Steek de stroomkabel (extern) 9 door de
beschermende slang 8.
Verbind vervolgens de aansluitkabel van de
lamp met behulp van een kroonsteentje 7 met
de netaansluitkabel (extern) 9.
Opmerking: let erop, dat u de afzonderlijke
aders van de stroomkabel (extern) telkens juist
aansluit: fasedraad, zwart of bruin = symbool L,
nuldraad, blauw = symbool N, beschermings-
klasse II / .
Druk de dubbele isolatie van de stroomaan-
sluitkabel (extern) 9 minimaal 8 mm in de
beschermende slang 8.
Let erop, dat de beschermende slang 8 juist
aan de aansluitkast 6 zit.
Sluit nu de aansluitkast 6.
Schroef de lamp nu met de schroeven 3 aan
de montagehoek 2.
Uw lamp is nu gereed voor gebruik.
Plaats de zekering weer terug en schakel de
leidingbeschermende schakelaar weer aan.
Ingebruikname
Model 14117008L:
Schakel de lamp aan resp. uit via de wand-
schakelaar.
Dim de lamp trapsgewijs met behulp van de
wandschakelaar.
Model 14117108L / 14116902L:
Schakel de lamp aan via de wandschakelaar.
Opmerking: bij het inschakelen met behulp
van de dimmer, wordt automatisch de laagste
dimstand ingesteld.
De dimschakelaar 10 werkt in trappen. Bedien
de dimschakelaar 10 zo vaak totdat de ge-
wenste helderheid wordt bereikt.
De helderheid kan via de dimschakelaar 10
alleen worden verhoogd. Loop een keer door
alle dimstanden om opnieuw te beginnen met
dimmen.
Schakel de lamp uit door meerdere keren op
de dimschakelaar 10 te drukken.
Waarschuwing! De lamp bevindt zich nog
altijd in stand by-modus. Bedien de wandscha-
kelaar om de lamp volledig uit te schakelen.
Als de lamp zich in de stand by-modus bevindt,
kunt u deze door één keer op de dimschake-
laar 10 te drukken, inschakelen.
Als de lamp in ingeschakelde toestand met
de wandschakelaar wordt uitgeschakeld, dan
schakelt deze zich in de laatst gekozen dimstand
weer in.
Onderhoud en reiniging
KANS OP
ELEKTRISCHE SCHOK!
Verbreek voor de reiniging eerst de verbinding van
de lamp met het stroomnet. Verwijder hiervoor de
zekering of schakel het betreffende stroomcircuit in
de groepenkast uit (0-stand).
VOORZICHTIG! GEVAAR VOOR BRAND-
WONDEN DOOR HETE OPPERVLAKKEN!
Laat de lamp volledig afkoelen.
Gebruik geen oplosmiddel, benzine e.d. De
lamp zal hierdoor schade ondervinden.
Gebruik voor de reiniging uitsluitend een droge,
pluisvrije doek.
Plaats de zekering weer terug of schakel de
hoofdzekering in de zekeringskast weer aan
(I-stand).
Afvoer
De verpakking bestaat uit milieuvriendelijke grond-
stoffen die u via de plaatselijke recyclingcontainers
kunt afvoeren.
b
a
Neem de aanduiding van de verpak-
kingsmaterialen voor de afvalscheiding
in acht. Deze zijn gemarkeerd met de
afkortingen (a) en een cijfers (b) met de
volgende betekenis: 1–7: kunststoffen /
20–22: papier en vezelplaten / 80–98:
composietmaterialen.

28 NL/BE
Spis zawartościAfvoer / Informatie
Gooi het afgedankte product omwille van
het milieu niet weg via het huisvuil, maar
geef het af bij het daarvoor bestemde
depot of het gemeentelijke milieupark.
Over afgifteplaatsen en hun openingstij-
den kunt u zich bij uw aangewezen in-
stantie informeren.
Informatie
Garantie
Op dit product verlenen wij 36 maanden garantie
vanaf aankoopdatum. Het apparaat werd zorgvuldig
vervaardigd en aan een nauwkeurige kwaliteits-
controle onderworpen. Binnen de garantieperiode
herstellen wij kosteloos alle materiaal- of productie-
fouten. Mochten er desalniettemin tijdens de garantie-
periode gebreken optreden, kunt u het apparaat naar
het genoemde serviceadres opsturen met vermel-
ding van het volgende artikelnummer: 14117008L /
14117108L / 14116902L.
Beschadigingen door ondeskundig gebruik, negeren
van de handleiding of ingrepen door niet-geautori-
seerde personen zijn van de garantieverlening
uitgesloten. Dit geldt eveneens voor aan slijtage on-
derhevige delen (zoals bijv. verlichtingsmiddelen).
Door de garantieservice wordt de garantieperiode
niet verlengd noch vernieuwd.
Conformiteitsverklaring
Dit product voldoet aan de eisen van de van de
van toepassing zijnde Europese en nationale richtlij-
nen. De conformiteit is aangetoond. Desbetreffende
verklaringen liggen ter inzage bij de fabrikant.
Fabrikant / service
Briloner Leuchten GmbH & Co. KG
Im Kissen 2
59929 Brilon
DUITSLAND
Tel.: +49 29 61 / 97 12–800
Fax: +49 29 61 / 97 12–199
E-mail: [email protected]
www.briloner.com
IAN 327470_1901
Houd bij alle vragen alstublieft de kassabon en het
artikelnummer (bijv. IAN 123456_7890) als be-
wijs van aankoop bij de hand.

29 PL
Legenda zastosowanych piktogramów ...........................................................Strona 30
Instrukcja ......................................................................................................................................Strona 30
Zastosowanie zgodne z przeznaczeniem .....................................................................................Strona 30
Zawartość .........................................................................................................................................Strona 31
Opis części ....................................................................................................................................... Strona 31
Dane techniczne ..............................................................................................................................Strona 31
Bezpieczeństwo ......................................................................................................................Strona 31
Wskazówki bezpieczeństwa...........................................................................................................Strona 31
Przygotowanie .......................................................................................................................Strona 32
Potrzebne narzędzia imateriały .....................................................................................................Strona 32
Montaż lampy ..........................................................................................................................Strona 32
Uruchomienie............................................................................................................................Strona 33
Konserwacja i czyszczenie............................................................................................Strona 33
Utylizacja .....................................................................................................................................Strona 33
Informacje ...................................................................................................................................Strona 34
Gwarancja .......................................................................................................................................Strona 34
Deklaracja zgodności ......................................................................................................................Strona 34
Producent / Serwis ............................................................................................................................Strona 34
Spis zawartościAfvoer / Informatie

30 PL
Instrukcja / Bezpieczeństwo Instrukcja
Legenda zastosowanych piktogramów
Przeczytać instrukcję obsługi! Ostrzeżenie o możliwości porażenia
prądem! Zagrożenie życia!
Wat (moc czynna)
Niniejsza oprawa oświetleniowa na-
daje się wyłącznie do pracy w ob-
szarze wewnętrznym, w suchych i
zamkniętych pomieszczeniach.
Herc (częstotliwość) Prawidłowy sposób postępowania
Wolt (napięcie przemienne)
Ostrożnie! Niebezpieczeństwo popa-
rzenia przez gorące powierzchnie!
Klasa ochrony II b
a
Opakowanie i urządzenie
przekazać do utylizacji zgodnie
zprzepisami oochronie środowiska!
Należy przestrzegać ostrzeżeń i
wskazówek dot. bezpieczeństwa! Niebezpieczeństwo utraty życia i
odniesienia obrażeń przez dzieci!
Żywotność diod LED ON OFF Cykle włączania
Model 14117008L:
ściemnialny przez włącznik ścienny
Model 14117108L / 14116902L:
ściemnialny na lampie
Opakowanie składa się w 100 %
ze zutylizowanego papieru.
Lampa wisząca LED / Lampa
sufitowa LED
Instrukcja
Gratulujemy Państwu zakupu nowego
urządzenia. Zdecydowali się Państwo na
zakup produktu najwyższej jakości. Pro-
szę dokładnie przeczytać całą niniejszą instrukcję
obsługi. Proszę wypiąć stronę z rysunkami. Niniejsza
instrukcja obsługi należy do produktu. Zawiera ona
ważne wskazówki dotyczące uruchamiania i posłu-
giwania się produktem. Zawsze należy przestrzegać
wszystkich wskazówek dotyczących bezpieczeń-
stwa. Przed uruchomieniem proszę sprawdzić, czy
występuje prawidłowe napięcie, i czy wszystkie
części są prawidłowo zamontowane. W przypadku
zapytań lub niepewności odnośnie obchodzenia się
z urządzeniem, prosimy o kontakt ze sprzedawcą
lub punktem serwisowym. Proszę starannie przecho-
wywać niniejszą instrukcję obsługi, a w razie odda-
nia urządzenia osobom trzecim przekazać ją wraz
z nim.
Zastosowanie zgodne z
przeznaczeniem
Niniejsza oprawa oświetleniowa nadaje się
wyłącznie do pracy w obszarze wewnętrz-
nym, w suchych i zamkniętych pomiesz-
czeniach. Lampa może być mocowana na wszystkich
powierzchniach onormalnym stopniu palności.
Produkt ten przeznaczony jest do zastosowania je-
dynie w prywatnych gospodarstwach domowych,
a nie w celach komercyjnych.

31 PL
Instrukcja / Bezpieczeństwo Instrukcja
Zawartość
Bezpośrednio po wypakowaniu należy sprawdzić,
czy zestaw jest kompletny oraz czy urządzenie
znajduje się w nienagannym stanie.
1 lampa sufitowa LED (model 14117008L) lub
lampa wisząca LED (14117108L / 14116902L)
2 kołki rozporowe
2 śruby
1 instrukcja montażu oraz obsługi
Opis części
1 Kołki
2 Kątownik montażowy
3 Śruby (obudowa połączeniowa)
4 Śruby (kątownik montażowy)
5 Obudowa połączeniowa
6 Skrzynka przyłączeniowa
7 Zacisk
8 Wężyk ochronny
9 Przewód zasilający (zewnętrzny)
10 Ściemniacz (model 14117108L / 14116902L)
Dane techniczne
Lampy:
Nr artykułu: 14117008L / 14117108L /
14116902L
Napięcie robocze: 230–240 V~, 50 Hz
Moc znamionowa: LED, 20 W
Klasa ochrony: II /
LED:
Źródło światła: moduł LED (nie podlega
wymianie)
Moc znamionowa: 14116902L: LED, 16,5 W
14117008L: LED, 16 W
(4 x 4 W)
14117108L: LED, 18,4 W
(4 x 4,6 W)
Bezpieczeństwo
Wskazówki
bezpieczeństwa
W przypadku szkód spowodowanych nieprzestrze-
ganiem niniejszej instrukcji obsługi prawo do gwa-
rancji wygasa! Za szkody pośrednie producent nie
ponosi odpowiedzialności! W przypadku szkód
materialnych lub osobowych, które powstały wsku-
tek niewłaściwego obchodzenia się z urządzeniem
lub nieprzestrzegania wskazówek dotyczących
bezpieczeństwa, nie ponosimy żadnej odpowie-
dzialności! Można używać wyłącznie dołączonych
pojedynczych części, w innym razie wygasają
wszelkie roszczenia gwarancyjne.
NIEBEZPIE-
CZEŃSTWO UTRATY ŻYCIA
I ODNIESIENIA OBRAŻEŃ
PRZEZ DZIECI!
Nigdy nie należy pozostawiać dzieci bez nad-
zoru z materiałem opakowaniowym. Istnieje
niebezpieczeństwo uduszenia się materiałem
opakowaniowym. Dzieci często nie dostrzegają
niebezpieczeństwa. Dzieci nie powinny mieć
dostępu do produktu.
Niniejsze urządzenie może być używane przez
dzieci od lat 8 oraz przez osoby z obniżonymi
zdolnościami fizycznymi, sensorycznymi lub
mentalnymi lub brakiem doświadczenia i / lub
wiedzy, jeśli pozostają pod nadzorem lub zo-
stały pouczone w kwestii bezpiecznego użycia
urządzenia i rozumieją wynikające z niego za-
grożenia. Dzieci nie mogą bawić się urządze-
niem. Czyszczenie i konserwacja nie mogą być
przeprowadzane przez dzieci bez nadzoru.
Porażenie prądem
elektrycznym grozi śmiercią
Wykonanie instalacji elektrycznej należy zlecić
wykwalifikowanemu elektrykowi lub osobie
przeszkolonej w zakresie wykonywania instala-
cji elektrycznych.
W przypadku szkód materialnych lub osobo-
wych, które powstały wskutek niewłaściwego
obchodzenia się z urządzeniem lub

32 PL
Montaż lampy / Uruchomienie / Konserwacja i czyszczenie / UtylizacjaBezpieczeństwo / Przygotowanie / Montaż lampy
nieprzestrzegania wskazówek dotyczących
bezpieczeństwa, nie ponosimy żadnej odpo-
wiedzialności!
Nigdy nie należy używać lampy w przypadku
stwierdzenia jakichkolwiek uszkodzeń.
Przed rozpoczęciem montażu wyjąć bezpiecz-
nik lub wyłączyć wyłącznik nadmiarowoprą-
dowy w skrzynce bezpiecznikowej (położenie 0).
Bezwzględnie unikać kontaktu lampy z wodą
lub innymi cieczami.
Przed montażem należy upewnić się, że istnie-
jące napięcie sieci jest zgodne z wymaganym
napięciem roboczym oprawy oświetleniowej
(patrz „Dane techniczne“).
Należy się upewnić, że przy montażu nie
zostaną uszkodzone żadne przewody.
Nigdy nie otwierać elementów elektrycznych i
nie wkładać do nich jakichkolwiek przedmiotów.
Tego rodzaju ingerencje oznaczają zagrożenie
życia wskutek porażenia prądem elektrycznym.
Model 14116902L / 14117108L:
Nie da się regulować długości lampy.
Jak uniknąć zagrożenia
pożarowego i obrażeń ciała
Aby uniknąć oparzenia, należy upewnić się
przed dotknięciem lampy, że jest ona wyłą-
czona i ochłodzona.
Lampy nie należy mocować na wilgotnym lub
przewodzącym prąd podłożu.
Nie należy bezpośrednio wpatrywać się w
źródło światła (elementy świetlne, LED, itp).
Źródła światła (żarówek, diod LED) nie należy
oglądać za pomocą optycznego instrumentu
(np. lupy).
Źródło światła tej lampy nie podlega wymianie;
jeśli źródło światła zakończy swoje działanie,
należy wymienić całą lampę.
Prawidłowy sposób
postępowania
Lampę zamontować w taki sposób, aby była
zabezpieczona przed wilgocią, wysoką tem-
peraturą i zanieczyszczeniami.
Zachować ostrożność! Zawsze zwracać uwagę
na wykonywane czynności i kierować się roz-
sądkiem. Nie używać lampy w przypadku
braku koncentracji lub złego samopoczucia.
Przed instalacją należy zapoznać się ze
wszystkimi instrukcjami i rysunkami zawartymi
w niniejszej instrukcji oraz z samą lampą.
Przygotowanie
Potrzebne narzędzia
imateriały
Wymienione narzędzia i materiały nie są częścią
zestawu. Są to jedynie niewiążące informacje i war-
tości orientacyjne. Właściwości materiału zależą
od warunków w pomieszczeniu.
- ołόwek / narzędzie do oznaczania
- 2-biegunowy detektor napięcia
- śrubokręt
- wiertarka
- wiertło (ok. ø 6 mm)
- szczypce do cięcia drutu
- drabina
Montaż lampy
NIEBEZPIECZEŃSTWO
PORAŻENIA PRĄDEM ELEKTRYCZNYM!
Przed rozpoczęciem montażu lampy wyjąć bez-
piecznik lub wyłączyć wyłącznik nadmiarowoprą-
dowy w skrzynce bezpiecznikowej (położenie 0).
U
sunąć widoczne śruby
3
po bokach obudo
wy
połączeniowej 5 i zdjąć kątownik monta-
żowy 2 na odwrotnej stronie.
Zaznaczyć otwory do wiercenia za pomocą
otworów wzdłużnych w kątowniku montażo-
wych 2 przeznaczonych na śruby.
Nawiercić otwory mocujące (ok. 6 mm, głębo-
kość ok. 40 mm). Uważać, aby nie uszkodzić
przewodu doprowadzającego.
Wprowadzić kołki
1
do nawierconych otworó
w.
Zamocować kątownik montażowy 2 za
pomocą dołączonych śrub 4.

33 PL
Montaż lampy / Uruchomienie / Konserwacja i czyszczenie / UtylizacjaBezpieczeństwo / Przygotowanie / Montaż lampy
Otworzyć skrzynkę przyłączeniową lampy 6.
Przeciągnąć kabel przyłączeniowy (zewnętrzny)
9 przez wężyk ochronny 8.
Za pomocą zacisku 7 połączyć kabel instala-
cyjny lampy zprzewodem zasilającym (zewnęt
rz-
nym) 9.
Wskazówka: Należy zwracać uwagę, aby
prawidłowo podłączyć poszczególne przewody
kabla zasilającego (zewnętrznego): przewód
przewodzący prąd, czarny lub brązowy =
symbolL, przewód zerowy, niebieski = symbol
N, klasa ochrony II / .
Podwójną izolację kabla przyłączeniowego
(zewnętrznego) 9 wetknąć 8 mm w wężyk
ochronny 8.
Należy uważać na to, aby wężyk ochronny 8
był poprawnie włożony do skrzynki przyłącze-
niowej 6.
Zamknąć skrzynkę przyłączeniową 6.
Przykręcić lampę za pomocą śrub 3 do
kątownika montażowego 2.
Lampa jest gotowa do zastosowania.
Ponownie nałożyć zabezpieczenie lub ponown
ie
uruchomić włącznik instalacyjny.
Uruchomienie
Model 14117008L:
Włączać lub wyłączać lampę za pomocą
przełącznika na ścianie.
Lampę ściemnia się stopniowo za pomocą
przełącznika na ścianie.
Model 14117108L / 14116902L:
Włączyć lampę za pomocą przełącznika na
ścianie.
Wskazówka: Przy włączaniu przy pomocy
ściemniacza, jest automatycznie uruchamiany
najniższy poziom ściemniania.
Ściemniacz 10 działa na zasadzie poziomów.
Włączać ściemniacz 10 tak długo, aż zostanie
osiągnięta żądana jasność.
Jasność można zwiększyć przełącznikiem
ściemniacza 10 . Jeden raz przełączyć poziomy
ściemniania, aby ponownie rozpocząć ściem-
nianie.
Wyłączyć lampę, wielokrotnie wciskając
ściemniacz 10 .
Uwaga! Lampa wciąż jeszcze znajduje się
w trybie stand by. Uruchomić przełącznik na
ścianie, aby całkowicie wyłączyć lampę.
Jeśli lampa znajduje się w trybie stand by,
można włączyć ją poprzez jednorazowe
naciśnięcie ściemniacza 10 .
Jeśli lampa w stanie włączonym zostanie wyłą-
czona przy pomocy przełącznika naściennego,
to włączy się ona ponownie z ostatnio wybra-
nym poziomem ściemnienia.
Konserwacja i czyszczenie
NIEBEZPIECZEŃSTWO
PORAŻENIA PRĄDEM ELEKTRYCZNYM!
Przed rozpoczęciem czyszczenia lampę odłączyć
od sieci elektrycznej. Wtym celu należy wyjąć
bezpiecznik lub wyłączyć wyłącznik nadmiarowo-
prądowy wskrzynce bezpiecznikowej (pozycja 0).
UWAGA! NIEBEZPIECZEŃSTWO
POPARZENIA WSKUTEK GORĄCYCH
POWIERZCHNI!
Odczekać, aż lampa całkowicie ostygnie.
Nie używać rozpuszczalników, benzyny i
podobnych substancji. W przeciwnym razie
lampa może zostać uszkodzona.
Do czyszczenia należy używać wyłącznie
suchej, niestrzępiącej się szmatki.
Ponownie włożyć bezpiecznik lub włączyć
wyłącznik nadmiaroprądowy na skrzynce
bezpiecznikowej (pozycja I).
Utylizacja
Opakowanie wykonane jest z materiałów przyja-
znych dla środowiska, które można przekazać do
utylizacji w lokalnym punkcie przetwarzania surow-
ców wtórnych.
b
a
Przy segregowaniu odpadów prosimy
zwrócić uwagę na oznakowanie mate-
riałów opakowaniowych, oznaczone
są one skrótami (a) i numerami (b) o

34 PL
Utylizacja / Informacje
następującym znaczeniu: 1-7: Tworzywa
sztuczne / 20-22: Papier i tektura / 80-98:
Materiały kompozytowe.
Z uwagi na ochronę środowiska nie
wyrzucać urządzenia po zakończeniu
eksploatacji do odpadów domowych,
lecz prawidłowo zutylizować. Informacji
o punktach zbiorczych i ich godzinach
otwarcia udziela odpowiedni urząd.
Informacje
Gwarancja
W momencie zakupu otrzymują Państwo na to
urządzenie 36 miesięcy gwarancji. Urządzenie
wyprodukowano starannie i poddano dokładnej
kontroli jakości. Wokresie gwarancji usuwamy
bezpłatnie wszystkie wady materiałowe ifabryczne.
Jeśli mimo to w okresie gwarancji pojawią się usterki,
urządzenie należy przesłać na podany adres ser-
wisowy, podając następujący numer artykułu:
14117008L / 14117108L / 14116902L.
Gwarancji nie podlegają uszkodzenia spowodowane
przez nieprawidłowe użytkowanie, nieprzestrzega-
nie instrukcji obsługi lub ingerencję nieautoryzowa-
nych osób, a także części szybkozużywające się
(jak np. elementy świetlne). Usługa gwarancyjna
nie przedłuża ani nie odnawia okresu gwarancji.
Zgodnie z Kodeksem Cywilnym art. 581 §1 wraz
z wymianą urządzenia lub ważnej części czas
gwarancji rozpoczyna się na nowo.
Deklaracja zgodności
Niniejszy produkt spełnia wymagania obowiązują-
cych dyrektyw europejskich i krajowych. Zgodność
została wykazana. Odpowiednie objaśnienia i
podkładki dokumentacyjne są zdeponowane u
producenta.
Producent / Serwis
Briloner Leuchten GmbH & Co. KG
Im Kissen 2
59929 Brilon
NIEMCY
Tel.: +49 29 61 / 97 12–800
Faks: +49 29 61 / 97 12–199
E-Mail: [email protected]
www.briloner.com
IAN 327470_1901
Przed skontaktowaniem się z działem serwisowym
należy przygotować paragon i numer artykułu
(np. IAN 123456_7890) jako dowód zakupu.
Seznam obsahu

35 CZ
Utylizacja / Informacje Seznam obsahu
Legenda k použitým piktogramům .......................................................................Strana 36
Úvod .................................................................................................................................................Strana 36
Použití ke stanovenému účelu..........................................................................................................Strana 36
Obsah dodávky ............................................................................................................................... Strana 36
Popis dílů ..........................................................................................................................................Strana 37
Technické údaje ...............................................................................................................................Strana 37
Bezpečnost ..................................................................................................................................Strana 37
Bezpečnostní pokyny .......................................................................................................................Strana 37
Příprava ........................................................................................................................................Strana 38
Potřebné nářadí a materiál ..............................................................................................................Strana 38
Montáž světla ...........................................................................................................................Strana 38
Uvedení do provozu ...........................................................................................................Strana 38
Údržba a čištění ......................................................................................................................Strana 39
Odstranění do odpadu .....................................................................................................Strana 39
Informace .....................................................................................................................................Strana 39
Záruka ..............................................................................................................................................Strana 39
Prohlášení o shodě ...........................................................................................................................Strana 39
Výrobce / servis ................................................................................................................................ Strana 39

36 CZ
Úvod Úvod / Bezpečnost
Legenda k použitým piktogramům
Přečtěte si návod kobsluze! Varování před zásahem elek-
trického proudu! Ohrožení života!
Watt (činný výkon) Lampa je určena výhradně pro
provoz vinteriéru, vsuchých a
uzavřených místnostech.
Hertz (kmitočet) Tak postupujete správně
Volt (střídavé napětí) Pozor! Nebezpečí popálení
horkými povrchy!
Ochranná třída II b
a
Obal i výrobek odstraňujte do
odpadu ekologicky!
Dbát na výstražná a bezpečnostní
upozornění! Nebezpečí ohrožení života a
zranění malých i větších dětí
Životnost LED ON OFF Spínací cykly
Model 14117008L:
tlumení světla nástěnným vypínačem
Model 14117108L / 14116902L:
tlumení světla na svítidle
Obal je vyroben ze 100 %
recyklovatelného papíru.
LED závěsné svítidlo / Stropní
LED svítidlo
Úvod
Blahopřejeme vám ke koupi nového
výrobku. Rozhodli jste se pro vysoce
kvalitní výrobek. Přečtěte si laskavě kom-
pletně a pečlivě tento návod k obsluze. Rozevřete
stránku sobrázky. Tento návod je součástí tohoto
výrobku a obsahuje důležité informace k jehouve-
dení do provozu a kzacházení sním. Řiďte se vždy
bezpečnostními pokyny. Před uvedením do provozu
zkontrolujte, jestli je kdispozici správné napětí a
jestli jsou všechny díly správně namontované. Jest-
liže máte ještě otázky nebo jste si nejistí při ovládání
přístroje, kontaktujte vašeho prodejce nebo servis.
Návod pečlivě uschovejte a případně jej předejte
třetí osobě.
Použití ke stanovenému účelu
Lampa je určena výhradně pro provoz
vinteriéru, vsuchých a uzavřených míst-
nostech. Svítidlo lze upevnit na všechny
běžně hořlavé povrchy. Výrobek je určen pouze
pro privátní použití v domácnosti, není vhodný pro
komerční účely.
Obsah dodávky
Bezprostředně po vybalení vždy zkontrolujte úplnost
dodávky a bezvadný stav zařízení.
1 stropní LED svítidlo (model 14117008L) resp.
LED závěsné svítidlo (14117108L / 14116902L)
2 hmoždíky
2 šrouby
1 návod k montáži a obsluze

37 CZ
Úvod Úvod / Bezpečnost
Popis dílů
1 Hmoždinka
2 Montážní úhelník
3 Šrouby (připojovací krabice)
4 Šrouby (montážní úhelník)
5 Připojovací krabice
6 Připojovací krabice
7 Svorkovnice
8 Ochranná hadička
9 Síťový připojovací kabel (externí)
10 Stmívací vypínač (model 14117108L /
14116902L)
Technické údaje
Lampička:
Artikl č.: 14117008L /
14117108L /
14116902L
Provozní napětí: 230–240 V~, 50 Hz
Jmenovitý výkon:: LED, 20 W
Třída ochrany: II /
LED:
Osvětlovací prostředek: LED modul (nelze vyměnit)
Jmenovitý výkon: 14116902L: LED,
16,5 W
14117008L: LED, 16 W
(4 x 4 W)
14117108L: LED,
18,4 W (4 x 4,6 W)
Bezpečnost
Bezpečnostní pokyny
Při škodách způsobených nedodržením tohoto ná-
vodu k obsluze zaniká záruka! Za následné škody
se neručí! Za věcné nebo osobní škody, způsobené
neodborným zacházením nebo nerespektováním
bezpečnostních pokynů, se neručí! Používat se smí
výhradně dodané, jednotlivé díly, v opačném pří-
padě zaniká záruka.
NEBEZPEČÍ
OHROŽENÍ ŽIVOTA A ÚRAZU
PRO MALÉ DĚTI A DĚTI!
Nenechávejte děti nikdy samotné s obalovým
materiálem. Hrozí nebezpečí udušení obalovým
materiálem. Děti nebezpečí často podceňují.
Výrobek chraňte před dětmi.
Tento výrobek mohou používat děti od 8 let,
osoby se sníženými fyzickými, smyslovými nebo
duševními schopnosti nebo s nedostatečnými
zkušenostmi a znalostmi, jestliže budou pod
dohledem nebo byly poučeny o bezpečném
používání výrobku a chápou nebezpečí, která
z jeho používání vyplývají. S výrobkem si děti
nesmí hrát. Děti nesmí bez dohledu provádět
čištění ani uživatelskou údržbu.
Zabraňte ohrožení života
v důsledku zásahu elektrickým
proudem
Elektrickou instalaci nechte provádět jen vyuče-
ného elektrikáře nebo osobu s odpovídajícími
zkušenostmi.
Za věcné nebo osobní škody, způsobené ne-
odborným zacházením nebo nerespektováním
bezpečnostních pokynů, se neručí!
Nepoužívejte světlo pokud jste zjistili že je
poškozené.
Před montáží odstraňte pojistku nebo vypněte
jistič v pojistkové skříni (poloha 0).
Bezpodmínečně zabraňte kontaktu lampy
svodou nebo jinými kapalinami.
Před montáží se přesvědčte, jestli se shoduje
napětí elektrického proudu, které máte k
dispozici s napětím potřebným pro svítidlo
(viz „Technické údaje“).
Zajistěte, aby se při montáži nepoškodily žádné
vodiče.
Nikdy neotvírejte žádný z elektrických provoz-
ních prostředků ani do nich nestrkejte jakékoli
předměty. Takové zásahy znamenají nebezpečí
ohrožení života elektrickým proudem.
Model 14116902L / 14117108L:
Závěsná lampa není nastavitelná na délku.

38 CZ
Bezpečnost / Příprava / Montáž světla / Uvedení do provozu
Vyvarujte se nebezpečí
požáru a poranění
Před dotykem se ujistěte, že je svítidlo vypnuté
a vychladlé, aby jste se vyhnuli popálení.
Svítidlo nemontujte na vlhké nebo vodivé pod-
klady.
Nedívejte se přímo do zdroje světla (osvětlova-
cího prostředku, LED, atd.). Nedívejte se na
zdroj světla (osvětlovací prostředek, LED, atd.)
optickou pomůckou (např. lupou).
Světelný zdroj tohoto svítidla nelze vyměnit; na
konci životnosti světelného zdroje se musí celé
svítidlo vyměnit.
Tak postupujete správně
Svítidlo instalujte tak, aby bylo chráněné před
vlhkostí, zahříváním a znečištěním.
Buďte vždy pozorní! Dbejte vždy na to, co
děláte, a postupujte vždy srozumem. Nepouží-
vejte světlo, nejste-li soustředění nebo necítíte-li
se dobře.
Před použitím se nejdříve seznamte se světlem,
pokyny a obrázky v tomto návodu.
Příprava
Potřebné nářadí a materiál
Uvedené nářadí a materiály nejsou součástí dodávky.
Jedná se zde o nezávazné údaje a orientační hod-
noty. Vlastnosti materiálu jsou závislé na individuál-
ních podmínkách v místě.
- tužka / nástroj k označení
- 2pólová zkoušečka napětí
- šroubovák
- vrtačka
- vrták (ø cca 6 mm)
- kleště štípačky
- žebřík
Montáž světla
NEBEZPEČÍ ZÁSAHU
ELEKTRICKÝM PROUDEM!
Před montáží vyšroubujte pojistku nebo vypněte
jistič v pojistkové skříňce (poloha 0).
Odšroubujte na straně připojovací krabice 5
viditelné šrouby 3 a sejměte montážní úhelník
2 ze zadní strany.
Označte si pomocí montážního úhelníku 2
místa pro vyvrtání otvorů.
Nyní vyvrtejte otvory (cca 6 mm, hloubka cca
40 mm). Dbejte, abyste nepoškodili vodiče pří-
vodu elektrického proudu.
Nasaďte hmoždinky 1 do vyvrtaných otvorů.
Přišroubujte úhelník 2 dodanými šrouby 4.
Otevřete svorkovnici 6.
Protáhněte síťový kabel (externí) 9 ochrannou
hadičkou 8.
Spojte připojovací kabel svítidla pomocí svor-
kovnice 7 se síťovým kabelem (externím) 9.
Upozornění: Dbejte na to, aby jste správně
připojili jednotlivé vodiče síťového kabelu
(externího): vodič vedoucí proud, černý nebo
hnědý = písmeno L, nulový vodič, modrý =
písmeno N, ochranná třída II / .
Zatlačte dvojitou izolaci síťového připojovacího
kabelu (externího) 9 nejméně 8 mm do
ochranné hadičky 8.
Dávejte pozor, aby ochranná hadička 8
správně držela na připojovací krabici 6.
Uzavřete svorkovnici 6.
Nyní přišroubujte svítidlo šrouby 3 na
úhelník 2.
Vaše svítidlo je nyní připraveno kprovozu.
Nasaďte zase pojistku nebo zase zapněte jistič.
Uvedení do provozu
Model 14117008L:
Zapínejte resp. vypínejte světlo nástěnným
spínačem.
Svítidlo můžete stupňovitě tlumit nástěnným
vypínačem.
Uvedení do provozu / Údržba a čištění / Odstranění do odpadu / Informace

39 CZ
Bezpečnost / Příprava / Montáž světla / Uvedení do provozu Uvedení do provozu / Údržba a čištění / Odstranění do odpadu / Informace
Model 14117108L / 14116902L:
Pomocí spínače na zdi zapněte svítidlo.
Upozornění: Při zapnutí stmívačem je auto-
maticky nastavený nejnižší stupeň tlumení.
Stmívač
10
pracuje po stupních. Držte spínač
10
tak dlouho stisknutý, až dosáhnete požadované
intenzity.
Intenzitu světla lze zvýšit stmívačem 10 . Abyste
mohli začít intenzitu světla regulovat od začátku,
projděte jednou všechny stupně tlumení světla.
Svítidlo můžete vypnout několikerým stisknutím
spínače 10 .
Pozor! Svítidlo je stále ještě v pohotovostním
režimu (stand by). Pro úplně vypnutí svítidla
stiskněte vypínač na zdi.
Když se svítidlo nachází v pohotovostním režimu,
můžete ho zapnout jedním stisknutím stmívacího
vypínače 10 .
Po zhasnutí rozsvíceného svítidla pomocí nástěn-
ného vypínače se svítidlo opět rozsvítí vposled-
ním stupni tlumení.
Údržba a čištění
NEBEZPEČÍ ZÁSAHU
ELEKTRICKÝM PROUDEM!
Při čištění nejprve svítidlo odpojte od elektrické sítě.
Za tímto účelem vyjměte pojistku nebo vypněte jistič
vpojistkové skříni (poloha0).
POZOR! NEBEZPEČÍ POPÁLENÍ
HORKÝMI POVRCHY!
Nechte svítidlo úplně vychladnout.
Nepoužívejte na čištění rozpouštědla, benzín
nebo podobné látky, svítidlo můžete poškodit.
K čištění používejte jen suchou utěrku nepouš-
tějící vlákna.
Nasaďte zase pojistku nebo zapněte jistič
vpojistkové skříni (do polohy I).
Odstranění do odpadu
Obal se skládá zekologických materiálů, které
můžete zlikvidovat prostřednictvím místních sběren
recyklovatelných materiálů.
b
a
Při třídění odpadu se řiďte podle ozna-
čení obalových materiálů zkratkami (a)
a čísly (b), s následujícím významem:
1–7: umělé hmoty / 20–22: papír a
lepenka / 80–98: složené látky.
Vzájmu ochrany životního prostředí
vysloužilý výrobek nevyhazujte do do-
movního odpadu, ale předejte k odborné
likvidaci. O sběrnách a jejich otevíracích
hodinách se můžete informovat u příslušné
správy města nebo obce.
Informace
Záruka
Od okamžiku zakoupení dostáváte na výrobek
záruku po dobu 36 měsíců. Přístroj byl pečlivě vy-
roben a podroben přesné kontrole kvality. Během
záruční doby odstraníme bezplatně všechny vady
materiálu a opravíme závady z výroby. Vpřípadě,
že se během záruční doby vyskytnou nedostatky,
zašlete laskavě přístroj na uvedenou adresu servisu
a uveďte následující číslo artiklu: 14117008L /
14117108L / 14116902L.
Ze záruky vyloučeny škody způsobené neodborným
zacházením, nerespektováním návodu kobsluze
nebo zásahem neautorizovanou osobou, jakož i
poškození rychle opotřebitelných dílů (např. svíticí
prostředky). Záručním výkonem se záruční doba
neprodlouží ani neobnoví.
Prohlášení o shodě
Tento výrobek splňuje požadavky platných evrop-
ských a národních směrnic. Shoda byla prokázána.
Příslušná prohlášení a dokumentace jsou uloženy
uvýrobce.

40 CZ
Informace
Výrobce / servis
Briloner Leuchten GmbH & Co. KG
Im Kissen 2
59929 Brilon
NĚMECKO
Tel.: +49 29 61 / 97 12–800
Fax: +49 29 61 / 97 12–199
E-mail: [email protected]
www.briloner.com
IAN 327470_1901
Pro všechny požadavky si připravte pokladní blok
a číslo výrobku (např. IAN 123456_7890) jako
doklad o nákupu.
Obsah

41 SK
Informace Obsah
Legenda použitých piktogramov ............................................................................ Strana 42
Úvod .................................................................................................................................................Strana 42
Používanie v súlade s určeným účelom ..........................................................................................Strana 42
Obsah dodávky ............................................................................................................................... Strana 43
Popis častí .........................................................................................................................................Strana 43
Technické údaje ...............................................................................................................................Strana 43
Bezpečnosť ................................................................................................................................. Strana 43
Bezpečnostné upozornenia .............................................................................................................Strana 43
Príprava ........................................................................................................................................Strana 44
Potrebné náradie a materiál ...........................................................................................................Strana 44
Montáž svietidla ....................................................................................................................Strana 44
Uvedenie do prevádzky ................................................................................................. Strana 45
Údržba a čistenie ...................................................................................................................Strana 45
Likvidácia .....................................................................................................................................Strana 45
Informácie ...................................................................................................................................Strana 45
Záruka ..............................................................................................................................................Strana 45
Prehlásenie o zhode ........................................................................................................................Strana 46
Výrobca / Servis ............................................................................................................................... Strana 46

42 SK
Úvod Úvod / Bezpečnosť
Legenda použitých piktogramov
Prečítajte si návod na obsluhu! Pozor na zásah elektrickým prúdom!
Nebezpečenstvo ohrozenia života!
Watt (efektívny výkon) Toto svietidlo je určené výhradne
na prevádzku v interiéri, v suchých
a uzatvorených priestoroch.
Hertz (frekvencia) Takto postupujete správne
Volt (striedavé napätie) Pozor! Nebezpečenstvo popálenia
skrze horúce povrchy!
Trieda ochrany II b
a
Obal a zariadenie ekologicky
zlikvidujte!
Dodržiavajte výstražné a
bezpečnostné pokyny!
Nebezpečenstvo ohrozenia života
a nebezpečenstvo nehody pre malé
i staršie deti
Životnosť LED ON OFF Spínacie cykly
Model 14117008L:
stmievateľné prostredníctvom
nástenného spínača
Model 14117108L / 14116902L:
stmievateľné na svietidle
Obal je vyrobený zo 100 %
recyklovaného papiera.
LED závesné svietidlo / Stropné
svietidlo LED
Úvod
Blahoželáme vám ku kúpe nového vý-
robku. Rozhodli ste sa pre veľmi kvalitný
výrobok. Prosím prečítajte si dôkladne a
pozorne tento návod na obsluhu. Otvorte si prosím
stranu z obrázkami. Tento návod patrí k tomuto vý-
robku a obsahuje dôležité pokyny pre uvedenie do
prevádzky a manipuláciu. Dodržiavajte vždy všetky
bezpečnostné pokyny. Pred uvedením do prevádzky
prekontrolujte, či je k dispozícii správne napätie a či
sú všetky diely správne namontované. Ak by ste mali
otázky, alebo ste si neboli istý, čo sa týka
manipulácie s prístrojom, spojte sa prosím so svojím
obchodníkom alebo servisným strediskom svojej
krajiny. Tento návod starostlivo uschovajte a prípadne
ho postúpte tretej osobe.
Používanie v súlade s
určeným účelom
Toto svietidlo je určené výhradne na
prevádzku v interiéri, v suchých a uza-
tvorených priestoroch. Svietidlo možno
pripevniť na všetky normálne zápalné povrchy.
Výrobok je určený iba na používanie v súkromných
domácnostiach a nie na komerčné účely.

43 SK
Úvod Úvod / Bezpečnosť
Obsah dodávky
Bezprostredne po vybalení vždy skontrolujte úplnosť
dodávky ako aj bezchybný stav zariadenia.
1 stropné svietidlo LED (Model 14117008L) resp.
LED závesné svietidlo (14117108L /
14116902L)
2 hmoždinky
2 skrutky
1 návod na montáž a obsluhu
Popis častí
1 Hmoždinky
2 Montážny uhol
3 Skrutky (pripojovacia schránka)
4 Skrutky (montážny uhol)
5 Pripojovacia schránka
6 Pripojovacia skrinka
7 Svorka svietidla
8 Ochranná hadička
9 Sieťový prípojný kábel (externý)
10 Stmievací spínač (Model 14117108L /
14116902L)
Technické údaje
Lampa:
Č. výrobku: 14117008L /
14117108L /
14116902L
Prevádzkové napätie: 230–240 V~, 50 Hz
Menovitý výkon: LED, 20 W
Trieda ochrany: II /
LED:
Osvetľovací prostriedok: LED-modul (bez mož-
nosti výmeny)
Menovitý výkon: 14116902L: LED,
16,5 W
14117008L: LED,
16 W (4 x 4 W)
14117108L: LED,
18,4 W (4 x 4,6 W)
Bezpečnosť
Bezpečnostné
upozornenia
V prípade škôd, ktoré vzniknú nedodržiavaním
tohto návodu na obsluhu, zaniká garančný nárok!
Pri následných škodách nepreberá výrobca ručenie!
V prípade vecných škôd alebo poranenia osôb,
ktoré boli zapríčinené neodbornou manipuláciou
alebo nedodržiavaním bezpečnostných pokynov,
nepreberá výrobca ručenie! Používajte výhradne
dodané jednotlivé diely, pretože v opačnom prí-
pade zanikajú všetky garančné nároky.
NEBEZPE-
ČENSTVO OHROZENIA ŽIVO
TA
A NEBEZPEČENSTVO ÚRAZU
PRE MALÉ I STARŠIE DETI!
Nikdy nenechávajte deti bez dozoru s obalovým
materiálom. Hrozí nebezpečenstvo udusenia
obalovým materiálom. Deti často podceňujú
nebezpečenstvá. Držte deti vždy v bezpečnej
vzdialenosti od výrobku.
Tento prístroj môžu používať deti od 8 rokov,
ako aj osoby so zníženými psychickými, senzo-
rickými alebo duševnými schopnosťami alebo s
nedostatkom skúseností a vedomostí, ak sú pod
dozorom, alebo ak boli poučené ohľadom
bezpečného používania prístroja, a ak porozu-
meli nebezpečenstvám spojeným s jeho použí-
vaním. Deti sa s prístrojom nesmú hrať. Čistenie
a údržbu nesmú vykonávať deti bez dozoru.
Zabráňte ohrozeniu života
zásahom elektrickým prúdom
Elektrickú inštaláciu prenechajte kvalifikovanému
elektrikárovi alebo osobe zaškolenej pre elek-
troinštalácie.
V prípade vecných škôd alebo poranenia osôb,
ktoré bolo zapríčinené neodbornou manipulá-
ciou alebo nedodržiavaním bezpečnostných
pokynov, nepreberá výrobca ručenie!
Svietidlo nikdy nepoužívajte v prípade, že
zistíte akékoľvek poškodenia.
Pred montážou odstráňte poistku alebo vypnite
istič vedenia v poistkovej skrinke (poloha 0).

44 SK
Bezpečnosť / Príprava / Montáž svietidla
Bezpodmienečne zabráňte kontaktu svietidla s
vodou alebo inými kvapalinami.
Pred montážou sa uistite, že sa existujúce
sieťové napätie zhoduje s potrebným prevádz-
kovým napätím svietidla (pozri „Technické
údaje“).
Zabezpečte, aby pri montáži neboli poškodené
žiadne vedenia.
Nikdy neotvárajte žiadny z elektrických pre-
vádzkových prostriedkov, ani do nich nestrkajte
žiadne predmety. Takéto zásahy predstavujú
ohrozenie života v dôsledku zásahu elektrickým
prúdom.
Model 14116902L / 14117108L:
Dĺžku závesného svietidla nie je možné prestaviť.
Zabráňte nebezpečenstvu
požiaru a poranení
Zabezpečte, aby bolo svietidlo vypnuté a
vychladnuté skôr, ako sa ho budete dotýkať,
pretože inak hrozí nebezpečenstvo popálenia.
Svietidlo neupevňujte na vlhký alebo vodivý
podklad.
Nepozerajte sa priamo do zdroja svetla
(osvetľovací prostriedok, LED, atď.). Zdroj svetla
(osvetľovací prostriedok, LED, atď.) nepozorujte
optickým nástrojom (napr. lupa).
Svetelný zdroj tohto svietidla nie je možné vy-
meniť; keď dosiahne koniec svojej životnosti,
je potrebné vymeniť celé svietidlo.
Takto postupujete správne
Svietidlo namontujte tak, aby bolo chránené
pred vlhkom, znečistením a príliš silným zahriatím.
Buďte neustále opatrný! Dávajte vždy pozor
na to, čo robíte, a vždy konajte rozvážne. Svie-
tidlo v žiadnom prípade nepoužívajte, ak ste
práve nekoncentrovaný alebo sa necítite dobre.
Pred používaním sa oboznámte so všetkými
pokynmi a obrázkami v tomto návode, ako aj
so samotným svietidlom.
Príprava
Potrebné náradie a materiál
Uvedené náradie/nástroje a materiál nie sú súčas-
ťou dodávky. Ide tu o nezáväzné údaje a hodnoty
pre orientáciu. Charakter materiálu sa riadi podľa
individuálnych daností na mieste.
- ceruzka / nástroj na označovanie
- 2-pólová skúšačka napätia
- skrutkovač
- vŕtačka
- vrták (cca ø 6mm)
- bočné štípacie kliešte
- rebrík
Montáž svietidla
NEBEZPEČENSTVO
ZÁSAHU ELEKTRICKÝM PRÚDOM!
Pred montážou svietidla odstráňte poistku alebo
vypnite istič vedenia v poistkovej skrinke (poloha 0).
Odstráňte skrutky 3 zboku viditeľné na kryte
prípojky 5 a vyberte montážny uhol 2 na
zadnej strane.
Označte otvory určené na vŕtanie pomocou
pozdĺžnych otvorov určených pre skrutky na
montážnom uhle 2.
Teraz vyvŕtajte otvory pre upevnenie (ø cca.
6 mm, hĺbka cca. 40 mm). Zabezpečte, aby ste
nepoškodili prívodné vedenie.
Vložte hmoždinky 1 do vyvŕtaných otvorov.
Upevnite montážny uhol 2 pomocou prilože-
ných skrutiek 4.
Otvorte pripojovaciu skrinku 6.
Preveďte sieťový prípojný kábel (externý) 9
cez ochrannú hadičku 8.
Spojte prípojný kábel svietidla pomocou svorky
svietidla 7 so sieťovým prípojným káblom
(externý) 9.
Poznámka: Dbajte na to, aby ste správne
pripojili jednotlivé vodiče sieťového prípojného
kábla (externý): vodič vedúci prúd, čierny alebo
Montáž svietidla / Uvedenie do prevádzky / Likvidácia / Informácie

45 SK
Bezpečnosť / Príprava / Montáž svietidla Montáž svietidla / Uvedenie do prevádzky / Likvidácia / Informácie
hnedý = symbol L, neutrálny vodič, modrý =
symbol N, trieda ochrany II / .
Zatlačte dvojitú izoláciu sieťového pripojovaci-
eho kábla (externý) 9 minimálne 8 mm do
ochrannej hadičky 8.
Dbajte na to, aby ochranná hadička 8
správne priliehala na pripojovacej schránke 6.
Zatvorte pripojovaciu skrinku 6.
Teraz priskrutkujte svietidlo pomocou skrutiek 3
s montážnym uhlom 2.
Svietidlo je teraz pripravené na prevádzku.
Opäť nasaďte poistku alebo zapnite istič
vedenia.
Uvedenie do prevádzky
Model 14117008L:
Svietidlo zapnite príp. vypnite nástenným
spínačom.
Svietidlo postupne stlmujte nástenným spínačom.
Model 14117108L / 14116902L:
Zapnite svietidlo prostredníctvom nástenného
spínača.
Upozornenie: Pri zapnutí, pomocou stmie-
vača je automaticky nastavený najnižší stupeň
stmievania.
Stmievací spínač 10 pracuje v stupňoch.
Aktivujte stmievací spínač 10 tak často, kým
nedosiahnete želaný jas.
Intenzita svetla sa dá stmievacím vypínačom 10
len zvýšiť. Abyste mohli začít intenzitu světla
regulovat od začátku, projděte jednou všechny
stupně tlumení světla.
Svietidlo vypnete tak, že viackrát stlačíte
stmievací spínač 10 .
Pozor! Svietidlo sa ešte stále nachádza v
režime Stand-by. Stlačte nástenný spínač, aby
ste svietidlo úplne vypli.
Keď sa svietidlo nachádza v režime Stand-by,
môžete ho zapnúť jedným stlačením stmieva-
cieho spínača 10 .
Ak svietidlo v zapnutom stave vypnete pomocou
nástenného spínača, opäť sa zapne v naposledy
zvolenom stupni stmievania.
Údržba a čistenie
NEBEZPEČENSTVO
ZÁSAHU ELEKTRICKÝM PRÚDOM!
Pred čistením najskôr odpojte svietidlo od elektrickej
siete. Z tohto dôvodu odstráňte poistku alebo vyp-
nite istič vedenia v skrinke na poistky (poloha 0).
POZOR! NEBEZPEČENSTVO POPÁLENIA
SKRZE HORÚCE POVRCHY!
Svietidlo nechajte úplne ochladnúť.
Nepoužívajte rozpúšťadlá, benzín a pod.
Svietidlo by sa pritom poškodilo.
Na čistenie používajte iba suchú handričku,
ktorá nepúšťa vlákna.
Opäť nasaďte poistku alebo zapnite istič
vedenia v skrinke s poistkami (poloha I).
Likvidácia
Obal pozostáva z ekologických materiálov, ktoré
môžete odovzdať na miestnych recyklačných zber-
ných miestach.
b
a
Všímajte si prosím označenie obalových
materiálov pre triedenie odpadu, sú
označené skratkami (a) a číslami (b) s
nasledujúcim významom: 1–7: Plasty /
20–22: Papier a kartón / 80–98:
Spojené látky.
Ak výrobok doslúžil, v záujme ochrany
životného prostredia ho neodhoďte do
domového odpadu, ale odovzdajte na
odbornú likvidáciu. Informácie o zber-
ných miestach a ich otváracích hodinách
získate na Vašej príslušnej správe.
Informácie
Záruka
Na tento prístroj poskytujeme záruku 36 mesiacov
od dátumu kúpy. Prístroj bol starostlivo vyrobený a
podrobený dôkladnej kontrole kvality. Vrámci záruč-
nej
doby bezplatne opravíme všetky chyby materiálu
a výrobné chyby. Ak by sa však počas záručnej doby

46 SK
Informácie
vyskytli nedostatky, odošlite prístroj na uvedenú ad-
resu servisu s uvedením nasledovného čísla výrobku:
14117008L / 14117108L / 14116902L.
Zo záruky sú vylúčené škody spôsobené neodbor-
nou manipuláciou, nedodržaním návodu na obsluhu
alebo zásahom neautorizovanej osoby, ako aj diely
podliehajúce opotrebovaniu (napr. osvetľovacie
prostriedky). Poskytnutím záruky sa záručná doba
nepredlžuje ani neobnovuje.
Prehlásenie o zhode
Tento výrobok spĺňa požiadavky platných európskych
a národných smerníc. Zhoda bola preukázaná. Prís-
lušné vysvetlenia a podklady sú uložené u výrobcu.
Výrobca / Servis
Briloner Leuchten GmbH & Co. KG
Im Kissen 2
59929 Brilon
NEMECKO
Tel.: +49 2961/9712-800
Fax: +49 2961/9712-199
E-Mail: [email protected]
www.briloner.com
IAN 327470_1901
Pre všetky otázky majte pripravený pokladničný
doklad a číslo výrobku (napr. IAN 123456_7890)
ako dôkaz o kúpe.

BRILONER LEUCHTEN GMBH & CO. KG
Im Kissen 2
59929 Brilon
GERMANY
Stand der Informationen · Last Information
Update · Version des informations · Stand van
de informatie · Stan informacji · Stav informací
Stav informácií: 07 / 2019 · Ident.-No.:
14117008L / 14117108L / 14116902L072019-8
IAN 327470_1901
-
 1
1
-
 2
2
-
 3
3
-
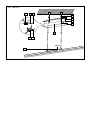 4
4
-
 5
5
-
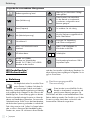 6
6
-
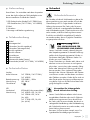 7
7
-
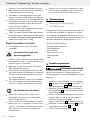 8
8
-
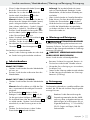 9
9
-
 10
10
-
 11
11
-
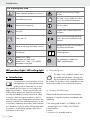 12
12
-
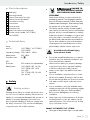 13
13
-
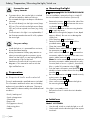 14
14
-
 15
15
-
 16
16
-
 17
17
-
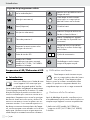 18
18
-
 19
19
-
 20
20
-
 21
21
-
 22
22
-
 23
23
-
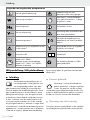 24
24
-
 25
25
-
 26
26
-
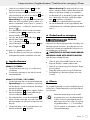 27
27
-
 28
28
-
 29
29
-
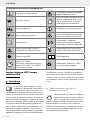 30
30
-
 31
31
-
 32
32
-
 33
33
-
 34
34
-
 35
35
-
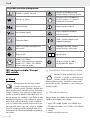 36
36
-
 37
37
-
 38
38
-
 39
39
-
 40
40
-
 41
41
-
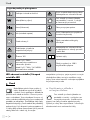 42
42
-
 43
43
-
 44
44
-
 45
45
-
 46
46
-
 47
47


in andere talen
- français: LIVARNO 327470 Le manuel du propriétaire
- Deutsch: LIVARNO 327470 Bedienungsanleitung
- slovenčina: LIVARNO 327470 Návod na obsluhu
- polski: LIVARNO 327470 Instrukcja obsługi