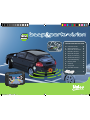
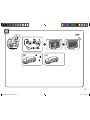
Valeo beep&park/vision Handleiding
- Categorie
- Auto videosystemen
- Type
- Handleiding

PARKING ASSISTANCE SYSTEM
en Instruction manual ..............03
fr
Manuel d’instruction
............07
es Manual de instrucciones .....11
it Manuale di istruzioni ...........15
pt Manual de instruções .........19
el ȅįȘȖȓİȢȉȠʌȠșȑIJȘıȘȢ
.........23
de Gebrauchsanweisung .........27
nl Instructiehandleiding
...........
31
cs 1iYRGNSRXåLWt ...................35
pl Instrukcja ............................39
ru ɢɧɫɬɪɭɤɰɢɹ .........................43
hu Használati útmutató ............47
.............................................51
PARKING ASSISTANCE SYSTEM
en Instruction manual .............. 03
fr Manuel d’instruction ............ 07
es Manual de instrucciones ..... 11
it Manuale di istruzioni ........... 15
pt Manual de instruções ......... 19
el .........23
de Gebrauchsanweisung ......... 27
nl Instructiehandleiding ........... 31
cs ................... 35
pl Instrukcja ............................ 39
ru ......................... 43
hu Használati útmutató ............ 47
............................................. 52
.............................................
Beep&Park_Vision-2011.indd 1 29/12/11 10:24

2
3
Beep&Park_Vision-2011.indd 2 29/12/11 10:24

2
3
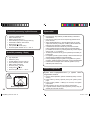
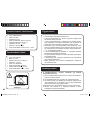
Thank you for purchasing this product. Please read
the manual carefully before commencing installation
and using the unit.
Parking assistance
&
Rear Camera
Instruction manual
The system provides a view of the space behind the vehicle
when reversing, and indicates the distance to the next obstacle
through a mini camera.
Continuous wide-angle images transmitted to the driver via a
LCD display.
PAL compatible.
Sound signal with adjustable volume.
Compatible with pulsed rear light signal.
vehicles.
“Parking assistance lines” display.
Automatic adjustment of the system for day & night vision.
The brightness, contrast and colour intensity can be adjusted.
Settings preserved when switched off.
Features
Rated voltage: From 9 to 16 V
Static current: 25 mA
ECU working current: 250 mA
Detecting range: 0.10 ~ 2.50 m
Display range: 0.30 ~ 2.50 m
Beep volume: 70 ~ 90 dB
Operation temperature: -40°C~ +85°C
Homologation: E-mark, CE and ROHS
Technical Parameters / parking assist system
www.smileyouaredriving.com
Beep&Park_Vision-2011.indd 3 29/12/11 10:24

4
5
Type/Mode: CMOS camera
Video standard: PAL
Voltage: DC 12V
Picture element: 640 (H) x 480 (V)
Horizontal resolution: 450 TV lines
Minimum illumination: 1 Lux
View angle: 110°x90° (HxV)
Operation temperature: Camera -30°C ~ +80°C
Technical Parameters / Rearview camera
Type: TFT screen
Size: 3’’ (16:9)
Display format: 400 (H) x 240 (V)
Number of pixels: ~96 000
Video mode: NTSC/PAL
Working current: 250 mA
Static current: 110 mA
Working temperature: -20°C ~ +60°C
Technical Parameters / Display
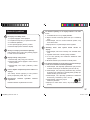
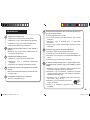
It is recommended that installation is carried out by an
approved professional auto technician.
It is strongly advised to check the position of the sensors
beep&park®/vision™ helps provide assistance when
reversing and parking. Driving skills, such as slowing down,
use of mirrors etc. are always essential.
You may have to replace the adapter ring (included in the kit)
around the sensor in order to obtain the required inclination
in the range of +/- 5° after installation on the vehicle bumper.
The angle of the camera should be adjusted using the angle
correction rings provided.
To ensure clear view, please keep the camera lens clean and
keep it away from sharp items.
If you wish to connect the system to an original navigation
system, please refer to your auto technician.
Please ensure waterproofness of the camera in case it would
Caution
No reset necessary
Self diagnosis
This system is equipped with a self-diagnosis of
sensors:
1. When the reverse gear is selected, the system automatically
tests the 4 rear sensors.
2. If all of the sensors are working, the system beeps once.
3. If there is a problem with any of the sensors, the system
beeps 3 times.
4.
5. In case of crash, you can replace the concerned sensor by
one available in the Valeo spare parts offer.
Beep&Park_Vision-2011.indd 4 29/12/11 10:24

4
5
When reverse gear is selected, 0.5 m or 0.6 m is shown
on the display:
1. There are obstacles within 0.6 m.
2. Are sensors mounted too low or detecting the ground?
3. Check whether the sensor is installed upside down.
4. Unplug 1 sensor at a time to check for response.
Blurred image or poor quality image on the display:
1. Check whether there is dirt or water on the lens of the
camera.
2. Clean the lens with a lint with alcohol, and then dry it with
a clean cloth.
3. Is there enough power supply provided to the ECU?
4. The brightness, contrast and colour intensity can be
adjusted.
Once reverse gear is selected, a sound signal is triggered
when there is no obstacle behind the vehicle:
1.
2.
is respected. If necessary, use the angle correction rings
for the installation.
3. Check that requested distance between sensors on the
bumper is respected (< or = 45 cm).
4. Check that the sensor is not installed upside-down.
5. Unplug one sensor at a time to identify the cause of the
anomaly.
There is no image on the display:
1. Is the power supply wire connected correctly?
2. Is the ignition turned to ACC ON?
3. Is the reverse gear selected?
4. Are all wire connections correct?
5. Check the correct function setting of the display.
Image on the display without selecting the reverse
gear:
Check whether the power wire of ECU is connected to
the reverse light wire.
The display indicates a defective sensor:
1. Check whether the sensor surface is clean.
2. Check whether the sensor wires are plugged in the
ECU properly.
3. Check whether the sensor wires are damaged or
not.
The object position does not correspond to the
correct indicator on the display:
Are the sensor cables connected to the control unit
(ECU) in the correct order e.g. A.B?
You would like to change the volume of the sound
signal:
Adjust the volume to a certain level.
Troubleshooting
1
2
3
4
5
6
7
8
Beep&Park_Vision-2011.indd 5 29/12/11 10:24

6
7
The distances represented by the parking assistance
lines do not correspond to the values displayed:
1. Check that the camera is between 45 and 60 cm
above the ground.
2. Check that the camera is at the right angle for an
obstacle 2.5 m away, displaying the obstacle in the
center of the screen. If necessary, correct the angle
using adapter rings.
3.
4. Turn the camera on its axis to line up with the horizon.
52
Once reverse gear is selected, an obstacle behind the
vehicle is not detected by the system:
1.
2.
is respected. If necessary, use the angle correction rings for
the installation.
3. Check that requested distance between sensors on the
bumper is respected (< or = 45 cm).
4. Check that the sensor is not installed upside-down.
5. Unplug one sensor at a time to identify the cause of the
anomaly.
The parking assistance lines are not parallel to the ground
or the parking space:
1. Check that the camera is between 45 and 60 cm above
the ground.
2. Check that the camera is at the right angle for an obstacle
2.5 m away, displaying the obstacle in the center of the
screen. If necessary, correct the angle using adapter rings.
3.
4. Turn the camera on its axis to line up with the horizon.
9 11
10
Beep&Park_Vision-2011.indd 6 29/12/11 10:24

6
7
Merci d’avoir acheté ce produit. Lire attentivement
la notice avant d’installer et d’utiliser l’appareil.
Aide au stationnement
&
Caméra de recul
Notice d’utilisation
Le système offre une vision de l’espace derrière le
véhicule lorsque vous passez en marche arrière, et
indique la distance à laquelle se trouve l’obstacle
suivant, à l’aide d’une mini caméra.
Des images grand-angle en continu sont transmises
au conducteur sur un écran LCD.
Compatible mode PAL.
Alerte sonore avec volume réglable.
Compatible avec un signal de marche arrière pulsé.
Système compatible avec un système d’attelage
installé sur le véhicule.
Ajustement automatique du système pour une
vision claire de jour comme de nuit.
La luminosité, le contraste ou l’intensité des
couleurs peuvent être réglées.
Conservation des réglages en mode hors tension.
Fonctionnalités
Tension nominale : de 9 à 16 V
Courant statique : 25 mA
Intensité de fonctionnement de l’ECU : 250 mA
Plage de détection : 0.10 ~ 2.50 m
Volume de l’alarme : 70 ~ 90 dB
Température d’utilisation : -40°C ~ +85°C
Homologation : E-mark, CE et ROHS
Paramètres techniques /
système d’aide au stationnement
www.souriezvousconduisez.com
Beep&Park_Vision-2011.indd 7 29/12/11 10:24

8
9
Type/mode : caméra CMOS
Standard vidéo : PAL
Tension : CC 12 V
Pixels : 640 (H) x 480 (V)
Résolution horizontale : 450 lignes TV
Eclairement minimum : 1 lux
Angle de vue : 110°x90° (HxV)
Température d’utilisation : Caméra -30°C ~ +80°C
Paramètres techniques / caméra de recul
Type : Ecran TFT
Taille : 3’’ (16:9)
400 (H) x 240 (V)
Nombre de pixels : ~96 000
Mode vidéo : NTSC/PAL
Intensité de fonctionnement : 250 mA
Courant statique : 110 mA
Température d’utilisation : -20°C ~ +60°C
Paramètres techniques / Ecran
Il est recommandé de faire effectuer l’installation par un
professionnel de l’électricité automobile.
Le système Valeo beep&park®/vision™ aide le conducteur à
manoeuvrer en marche arrière et à se garer. Cela ne dispense pas
de savoir bien conduire, de ralentir, d’utiliser les rétroviseurs, etc.
La bague de correction d’angle (fournie dans le kit) autour du
imposée sur le pare-choc dans la plage de +/- 5°.
L’inclinaison de la caméra doit être ajustée à l’aide de bagues de
correction d’angle fournies.
Pour que la vision reste nette, veillez à la propreté de l’objectif de la
caméra et tenez-le à l’abri des objets pointus.
Si vous souhaitez connecter le système à un système de navigation,
consultez votre technicien auto.
Assurez-vous de l’étanchéité de la caméra en cas de montage hors
du pare-choc.
Attention
Pas de réinitialisation nécessaire
Autodiagnostic
Le système est équipé d’une fonction diagnostic des capteurs :
1. Lorsque la marche arrière est enclenchée, le système teste
automatiquement les 4 capteurs arrière.
2. S’ils fonctionnent tous correctement, le système émet un
3. Si en l’absence d’obstacle, le haut-parleur émet un triple
connectés ou sont endommagés.
4.
5. En cas de choc, remplacez le capteur défectueux par un capteur
disponible dans l’offre Valeo en pièce détachée.
Beep&Park_Vision-2011.indd 8 29/12/11 10:24

8
9
Lorsque vous passez la marche arrière, 0,5 m ou 0,6 m
s’afche sur l’écran :
1. Il y a des obstacles dans les 0,6 m.
2. Les capteurs sont montés trop bas ou dirigés vers le sol ?
3.
4. Débrancher 1 capteur à la fois pour déterminer l’origine.
Image à l’écran oue ou de mauvaise qualité :
1.
2. Nettoyer l’objectif avec un linge imbibé d’alcool, puis
l’essuyer avec un linge propre.
3.
électronique (ECU) ?
4. La luminosité, le contraste ou l’intensité des couleurs
peuvent être réglées.
Une fois la marche arrière enclenchée, l’alerte sonore
se déclenche alors qu’il n’y a pas d’obstacle derrière le
véhicule :
1.
rapport au sol est respectée (entre 45 et 60 cm).
2.
pare-chocs est respecté. Si besoin, ajouter des bagues
d’adaptation pour corriger l’angle.
3.
pare-chocs a été respectée (< ou = à 45 cm).
4.
5. Débrancher 1 capteur à la fois pour déterminer l’origine
de l’anomalie.
Il n’y a pas d’image à l’écran :
1. L’alimentation est-elle bien branchée ?
2. Le contact est-il sur ACC ON ?
3. La marche arrière est-elle enclenchée ?
4. Tous les branchements électriques sont-ils corrects ?
5.
Image à l’écran alors que la marche arrière n’est pas
enclenchée :
L’écran signale un capteur défectueux :
1.
2.
la centrale ECU.
3.
La position de l’objet ne correspond pas au bon
indicateur sur l’écran :
dans le bon ordre, c’est-à-dire A.B ?
Le volume de l’alerte n’est pas à votre convenance :
Réglez le volume à un niveau plus élevé.
Dépannage
1
2
3
4
5
6
7
8
Beep&Park_Vision-2011.indd 9 29/12/11 10:24

10
11
Les distances représentées par les lignes
d’assistance au stationnement ne correspondent
pas aux valeurs afchées :
1.
est respectée (entre 45 et 60 cm).
2.
rapport à un obstacle à 2,5 m, en s’assurant que ce
dernier est bien centré sur l’écran. Si besoin, ajouter
des bagues d’adaptation pour corriger les angles.
3.
proposées.
4. Tourner la caméra autour de son axe pour l’aligner
à l’horizon.
52
Une fois la marche arrière enclenchée, le système ne
détecte pas l’obstacle présent derrière le véhicule :
1.
rapport au sol est respectée (entre 45 et 60 cm).
2.
pare-chocs est respecté. Si besoin, ajouter des bagues
d’adaptation pour corriger l’angle.
3.
pare-chocs a été respectée (< ou = à 45 cm).
4.
5. Débrancher 1 capteur à la fois pour déterminer l’origine
de l’anomalie.
Les lignes d’assistance au stationnement n’apparaissent
pas bien parrallèles au sol ou à la place de parking :
1.
respectée (entre 45 et 60 cm).
2.
à un obstacle à 2,5 m, en s’assurant que ce dernier est
bien centré sur l’écran. Si besoin, ajouter des bagues
d’adaptation pour corriger les angles.
3.
4. Tourner la caméra autour de son axe pour l’aligner à
l’horizon.
9
10
1111
Beep&Park_Vision-2011.indd 10 29/12/11 10:24

10
11
Gracias por comprar este producto. Por favor, antes
de comenzar la instalación y utilización lea
atentamente el manual de instrucciones.
Asistencia en el
aparcamiento y
Cámara trasera
Manual
de instrucciones
Al meter marcha atrás el sistema proporciona una
la distancia hasta el siguiente obstáculo a través de
una mini cámara.
Al conductor le llegan las imágenes mediante una
pantalla LCD.
Compatible con el modo PAL.
Alerta sonora con volumen ajustable.
Compatible con señal de marcha atrás cuadrada
(pulso variable).
el aparcamiento”.
Ajuste automático del sistema para tener una visión
La luminosidad, el contraste o la intensidad de los
colores pueden ajustarse.
Conservación de los ajustes en modo no conectado.
Tensión nominal: de 9 a 16 V
Corriente estática: 25 mA
Intensidad de funcionamiento del calculador del
motor:
250 mA
Alcance de detección: 0.10 ~ 2.50 m
Alcance en la pantalla: 0.30 ~ 2.50 m
Volumen del pitido: 70 ~ 90 dB
Temperatura operativa: -40°C ~ +85°C
Homologación: E-mark, CE y ROHS
Características
Parámetros técnicos /
Sistema de asistencia en el aparcamiento
www.sonriaestaconduciendo.com
Beep&Park_Vision-2011.indd 11 29/12/11 10:24

12
13
Tipo/Modo: cámara CMOS
Tensión: DC 12V
640 (H) x 480 (V)
1 Lux
Ángulo de visión: 110°x90° (HxV)
Temperatura operativa: Cámara -30°C ~ +80°C
Tipo: pantalla TFT
Tamaño: 3’’ (16:9)
Formato de pantalla: 400 (H) x 240 (V)
~96 000
Corriente de trabajo: 250 mA
Corriente estática: 110 mA
Temperatura operativa: -20°C ~ +60°C
Parámetros técnicos /
cámara de visión trasera
Parámetros técnicos / Pantalla
Se recomienda que lo instale un profesional.
Se recomienda comprobar la posición de los sensores antes de
El beep&park®/vision™ de Valeo proporciona asistencia en las
maniobras de marcha atrás y aparcamiento. Es esencial la
atención permanente del conductor, aminorar la marcha, utilizar
los espejos, etc.
que rodea el captor para poder obtener la inclinación del rango
La inclinación de la cámara debe ajustarse con las anillas de
corrección de ángulo suministradas.
Para asegurar una visión amplia, por favor, mantenga la lente
de la cámara limpia y en perfectas condiciones.
Si desea conectar el sistema a un sistema de navegación
original, por favor, consulte a su mecánico.
Por favor asegure la stanqueidad de la camara en caso de
instalación fuera del parachoques.
Precauciones
No es necesario resetear
Autodiagnóstico
El sistema esta equipado de una función de diagnostico de
los sensores:
1. Una vez puesta la marcha atrás, el sistema comprueba
automáticamente los 4 sensores traseros.
2. Si funcionan correctamente, el sistema emite un pitido único.
3. Si en caso de ausencia de obstáculo, el altavoz emite un
conectados o defectuosos.
4. Compruebe que los sensores están correctamente instalados.
5. En caso de choque, sustituir el sensor defectuoso por otro
sensor disponible en la oferta de despiece de Valeo.
Beep&Park_Vision-2011.indd 12 29/12/11 10:24

12
13
Al seleccionar la marcha atrás, aparece 0.5 m o 0.6 m en
la pantalla:
1. Existen obstáculos a menos de 0.6 m.
2. ¿Se ha colocado algún sensor demasiado bajo o está
detectando el suelo?
3. Compruebe que el sensor esté instalado boca abajo.
4. Desconecte los sensores de uno en uno para comprobar
su respuesta.
Imagen borrosa o de mala calidad en la pantalla:
1. Compruebe si hay suciedad o agua en la lente de la cámara.
2. Limpie la lente con un paño con alcohol y después séquelo
con un paño seco.
3.
centralita (ECU)?
4. La luminosidad, el contraste o la intensidad de los colores
pueden ajustarse.
Una vez puesta la marcha atrás, el pitido suena cuando no
hay obstáculos detrás del vehículo:
1. Compruebe que la altura entre los sensores y el suelo es
respetada (entre 45 y 60 cm).
2. Compruebe que el ángulo de posición de los sensores es
respetado. Si fuera necesario añadir una anilla de ajuste
para corregir el ángulo.
3. Compruebe que la distancia entre los sensores ha sido
respetada (< o = 45 cm).
4. Compruebe que los sensores no se han montado al revés.
5. Desconecte los sensores de uno en uno para determinar el
sensor defectuoso.
No aparecen imágenes en la pantalla:
1. ¿Está el cable de alimentación eléctrica conectado
correctamente?
2.
3. ¿Está puesta la marcha atrás?
4. ¿Son todas las conexiones por cable las correctas?
5. Compruebe el ajuste de las funciones de la pantalla.
Aparece una imagen en la pantalla sin haber
seleccionado la marcha atrás:
Compruebe si el cable de alimentación de la Centralita
está conectado al cable de luz de marcha atrás.
La pantalla indica que uno de los sensores está
defectuoso:
1.
2. Compruebe que los cables del sensor estén enchufado
a la centralita correctamente.
3. Compruebe que los cables del sensor no estén
dañados.
La posición del objeto no se corresponde con el
indicador correcto en la pantalla:
¿Están los cables del sensor conectados a la unidad de
control (Centralita) en el orden correcto ej. A. B?
El volumen de la alerta no está a su gusto:
Ajuste el volumen al nivel deseado.
Solución de problemas
1
2
3
4
5
6
7
8
Beep&Park_Vision-2011.indd 13 29/12/11 10:24

14
15
Las distancias representadas por las líneas de
asistencia en el aparcamiento no coinciden con los
valores mostrados:
1.
respecto al suelo (entre 45 y 60 cm).
2.
un obstáculo a 2,5 m, comprobando que este último
esté ben centrado en la pantalla. Si es necesario,
instalar anillas de adaptación para corregir los
ángulos.
3.
propuestas.
4. Girar la cámara sobre su eje para alinearla al
horizonte.
52
Una vez puesta la marcha atrás, el sistema no detecta
obstáculos detrás del vehículo:
1. Compruebe que la altura entre los sensores y el suelo es
respetada (entre 45 y 60 cm).
2. Compruebe que el ángulo de posición de los sensores es
respetado. Si fuera necesario añadir una anilla de ajuste
para corregir el ángulo.
3. Compruebe que la distancia entre los sensores ha sido
respetada (< o = 45 cm).
4. Compruebe que los sensores no se han montado al revés.
5. Desconecte los sensores de uno en uno para determinar
el sensor defectuoso.
Las líneas de asistencia en el aparcamiento no aparecen
bien paralelas al suelo o al lugar de aparcamiento:
1.
suelo (entre 45 y 60 cm).
2.
obstáculo a 2,5 m, comprobando que este último esté ben
centrado en la pantalla. Si es necesario, instalar anillas de
adaptación para corregir los ángulos.
3.
propuestas.
4. Girar la cámara sobre su eje para alinearla al horizonte.
9 11
10
Beep&Park_Vision-2011.indd 14 29/12/11 10:24

14
15
Grazie per avere acquistato questo prodotto. Per
favore leggete attentamente le istruzioni prima di
procedere con l’installazione.
Sistema di parcheggio &
Videocamera posteriore
Istruzioni d’uso
Il sistema fornisce una maggiore visibilità durante
le manovre in retromarcia e indica la distanza
dall’ostacolo attraverso la mini videocamera.
Sullo schermo LCD il conducente vedrà trasmesse
le immagini.
Compatibile modalità PAL.
Allarme sonoro con volume regolabile.
Compatibile con il segnale luminoso posteriore
intermittente.
Compatibile con il sistema di gancio traino installato
sul veicolo.
Visualizzazione “linee di assistenza al parcheggio”.
Regolazione automatica del sistema per una
visione chiara sia di giorno che di notte.
La luminosità, il contrasto o l’intensità dei colori
sono regolabili.
Mantenimento delle regolazioni in modalità spenta.
Tensione nominale: da 9 a 16 V
Corrente statica: 25 mA
Intensità di funzionamento dell’ECU: 250 mA
Zona di rilevamento: 0.10 ~ 2.50 m
Range sullo schermo: 0.30 ~ 2.50m
Volume beep: 70 ~ 90dB
Temperatura di esercizio: -40°C ~ +85°C
Omologazione: E-mark, CE e ROHS
Caratteristiche
Parametri tecnici /
sistema di assistenza al parcheggio
www.sorridistaiguidando.com
Beep&Park_Vision-2011.indd 15 29/12/11 10:24

16
17
Caratteristiche tecniche / Schermo
Tipologia: CMOS camera
Tipologia schermo: PAL
Alimentazione: 12V DC
Pixel: 640 (H) x 480 (V)
Risoluzione: 450 TV linee
Illuminazione min: 1 Lux
Angolazione: 110°x90° (HxV)
Temperatura di esercizio: Camera -30°C ~ +80°C
Caratteristiche tecniche /
telecamera posteriore
Tipo: schermo TFT
Dimensione: 3’’ (16:9)
Dimensione schermo: 400 (H) x 240 (V)
Numero pixel: ~96 000
Modalità video: NTSC/PAL
Corrente di esercizio: 250 mA
Corrente statica: 110 mA
Temperatura di esercizio: -20°C ~ +60°C
È raccomandata l’installazione da parte di un professionista.
È fortemente raccomandato di controllare la posizione dei
sensori prima di forare.
Valeo beep&park®/vision™ vi assiste durante le manovre
di parcheggio e di retromarcia. È sempre necessario usare
cautela e servirsi degli altri strumenti di bordo.
Potrebbe essere necessario sostituire i correttori d’angolo
(inclusi nel kit) attorno al sensore per ottenere il corretto
angolo per l’installazione sul paraurti: +/- 5°.
L’inclinazione della telecamera deve essere regolata mediante
gli appositi anelli di correzione d’angolo in dotazione.
Per assicurare una chiara visibilità, mantenere pulita la
videocamera e tenerla lontana da oggetti appuntiti.
Per collegare il sistema al navigatore originale, rivolgersi ad
un tecnico auto.
Attenzione, assicurarsi che la telecamera sia
impermeabilizzata nel caso venga montata all’esterno del
paraurti.
Attenzione
Reset non necessario
Autodiagnostica
Il sistema è fornito di una funzione di diagnostica dei sensori:
1. Non appena inserita la retromarcia, il sistema testa
automaticamente i sensori posteriori.
2. Se tutto funziona correttamente, il sistema emette un “bip”
unico.
3. Se in assenza di un ostacolo, l’altoparlante emette un triplo
“bip”, uno o più sensori sono stati mal collegati o sono
danneggiati.
4.
5. In caso di urto, sostituire i sensori difettosi con un sensore
disponibile nell’offerta Valeo come parte sciolta.
Beep&Park_Vision-2011.indd 16 29/12/11 10:24

16
17
Avvertenze
A retromarcia inserita, se sullo schermo apparirà 0.5 m o
0.6 m:
1. Ci sono ostacoli entro 0.6 m.
2. I sensori sono montati troppo bassi oppure rilevano il suolo?
3. Controllate se i sensori sono installati correttamente.
4. Scollegate un sensore per volta e controllate la segnalazione.
Immagine confusa o scarsa qualità dell’immagine sul
display:
1. Controllate se la lente della videocamera è sporca o bagnata.
2. Pulite la lente con garza e alcool e quindi asciugate con un
panno asciutto e pulito.
3. C’è abbastanza alimentazione per l’ECU (centralina)?
4. La luminosità, il contrasto o l’intensità dei colori sono
regolabili.
Una volta inserita la retromarcia, l’allarme sonoro si
disattiva se non ci sono ostacoli dietro il veicolo:
1.
suolo sia rispettata (fra 45 e 60 cm).
2.
paraurti sia stato rispettato. Se necessario, aggiungere
anelli di regolazione per correggere l’angolo.
3.
rispettata (< o = 45 cm).
4.
5. Scollegare 1 sensore per volta per determinare l’origine
dell’anomalia.
Se non appare l’immagine sullo schermo:
1. L’alimentazione è connessa correttamente?
2. La chiave di avviamento è su ACC ON?
3. È inserita la retromarcia?
4. Tutti i cavi sono collegati correttamente?
5. Controllare l’impostazione delle funzioni dello
schermo.
Immagine sullo schermo senza l’inserimento della
retromarcia:
Controllate se il cavo di alimentazione dell’ECU
(centralina) è connesso al negativo del cavo luci.
Lo schermo segnala un sensore difettoso:
1.
2. Controllate se il cavo del sensore è inserito nell’ECU
(centralina) correttamente.
3. Controllate se i cavi dei sensori sono danneggiati.
La posizione dell’oggetto indicata sullo schermo
non è corretta:
I cavi sensori sono connessi all’ECU (centralina)
nell’ordine corretto es. A. B?
Il volume dell’allarme non è di vostro gradimento:
Regolate il volume.
1
2
3
4
5
6
7
8
Beep&Park_Vision-2011.indd 17 29/12/11 10:24

18
19
Le distanze rappresentate dalle linee di assistenza al
parcheggio non corrispondono ai valori visualizzati:
1.
suolo sia rispettata (tra 45 e 60 cm).
2.
regolata rispetto a un ostacolo a 2,5 m, assicurandosi
che l’immagine dell’ostacolo sia centrata sullo
schermo. Se necessario, aggiungere anelli di
adattamento per correggere gli angoli.
3.
proposte.
4. Fare ruotare la telecamera attorno al suo asse per
regolare l’angolo orizzontale.
52
Una volta inserita la retromarcia, il sistema non rileva
l’ostacolo dietro al veicolo:
1.
suolo sia rispettata (fra 45 e 60 cm).
2.
paraurti sia stato rispettato. Se necessario, aggiungere gli
anelli di regolazione per correggere l’angolo.
3.
rispettata (< o = 45 cm).
4.
5. Scollegare 1 sensore per volta per determinare l’origine
dell’anomalia.
Le linee di assistenza al parcheggio non sono
perfettamente parallele al suolo o al posto di parcheggio:
1.
sia rispettata (tra 45 e 60 cm).
2.
rispetto a un ostacolo a 2,5 m, assicurandosi che l’immagine
dell’ostacolo sia centrata sullo schermo. Se necessario,
aggiungere anelli di adattamento per correggere gli angoli.
3.
proposte.
4. Fare ruotare la telecamera attorno al suo asse per regolare
l’angolo orizzontale.
9 11
10
Beep&Park_Vision-2011.indd 18 29/12/11 10:24

18
19
Agradecemos o seu interesse no nosso produto.
Por favor, leia o manual com atenção antes de
começar a instalação e utilização da unidade.
Assistência no
estacionamento
Manual de instruções
O sistema proporciona uma vista do espaço situado
e indica a distância para o seguinte obstáculo
através de uma mini câmera.
O condutor recebe continuamente imagens com um
grande ângulo de visão mediante um ecrã LCD.
Alerta sonora com volume ajustável.
Exibição “linhas de assistência no estacionamento”.
Ajuste automático do sistema para visão diurna e
noturna.
A luminosidade, o contraste ou a intensidade das
cores podem ser ajustados.
Conservação dos ajustes em modo sem tensão.
Características
Voltagem: de 9 a 16 V
Corrente estática: 25 mA
Corrente de operação ECU: 250 mA
Alcance de detecção: 0.10 ~ 2.50 m
Alcance no ecrã: 0.30 ~ 2.50 m
Volume do sinal sonoro: 70 ~ 90 dB
Temperatura operativa: -40°C ~ +85°C
Homologação: E-mark, CE e ROHS
Parâmetros técnicos /
Sistema de assistência no estacionamento
Beep&Park_Vision-2011.indd 19 29/12/11 10:24

20
21
Tipo/Modo: Câmera CMOS
Tensão: DC 12V
Pixéis: 640 (H) x 480 (V
Resolução horizontal: 450 TV linhas
1 Lux
Ângulo de visão: 110°x90° (HxV)
Temperatura operativa: Câmera -30°C ~ +80°C
Parâmetros técnicos /
câmera de visão traseira
Tipo: Ecrã TFT
Tamanho: 3’’ (16:9)’
Formato de ecrã: 400 (H) x 240 (V)
Número de pixéis: ~96 000
Corrente de trabalho: 250 mA
Corrente estática: 110 mA
Temperatura operativa: -20°C ~ +60°C
Parâmetros técnicos / Ecrã
Recomenda-se cuidado e que se comprove a posição
O beep&park®/vision™ da Valeo proporciona assistência
ao ir marcha atrás e ao estacionar, mas é essencial
conduzir bem, reduzir a marcha, utilizar os espelhos, etc.
instalação correcto na instalação do pára-choques: +/- 5°.
A inclinação da câmara deve ser ajustada com os anéis
de correção de ângulo fornecidos.
Para assegurar uma visão clara, por favor, mantenha a
Se deseja ligar o sistema a um sistema de navegação
original, por favor, consulte o seu mecânico.
Por favor garanta isolamento à prova de água no caso de
instalar a câmera fora do pára-choques.
Precauções
Não é necessário fazer reset
Diagnóstico próprio
O sistema é equipado com um diagnóstico próprio dos
sensores:
1. Quando a marcha atrás é engrenada, o sistema
automáticamente testa os 4 sensores traseiros.
2. Se todos os sensores estão a trabalhar, o sistema apita uma vez.
3. Se existir algum problema com alguma dos sensores, o
sistema apita 3 vezes.
4.
5. No caso de acidente, poderá substituir o sensor por um
Beep&Park_Vision-2011.indd 20 29/12/11 10:24

20
21
Precauções
Ao seleccionar a marcha atrás, aparece 0.5 m ou 0.6 m
no ecrã:
1. Há obstáculos a menos de 0.6 m.
2. Algum sensor foi colocado demasiado baixo ou está a
detectar o chão?
3. Comprove que o sensor está instalado para baixo.
4. Desligue os sensores um por um para comprovar
a sua resposta.
Imagem imprecisa ou de má qualidade no ecrã:
1. Comprove se há sujidade ou água na lente da câmera.
2. Limpe a lente com um apósito com álcool e depois seque-o
com um pano seco.
3.
4. A luminosidade, o contraste ou a intensidade das cores
podem ser ajustados.
Quando a marcha-atrás é engrenada, um sinal sonoro
despoletado indica quando não existe nenhum obstáculo:
1.
pára-choques até ao solo é respeitada (entre 45 e 60 cm).
2.
pára-choques é respeitado. Se necessário use o ângulo de
correcção dos aneis na instalação.
3.
pára-choques é respeitada (< ou = 45 cm).
4.
5.
Não aparecem imagens no ecrã:
1. O cabo de alimentação eléctrica está ligado
correctamente?
2. Ligou o carro?
3. Meteu a marcha atrás?
4. Todas as ligações por cabo são correctas?
5. Comprove o ajuste das funções correctas do ecrã.
Imagem no ecrã sem ter seleccionado a marcha
atrás:
Comprove se o cabo de alimentação da ECU está
ligado ao cabo de luz de marcha atrás.
O ecrã indica que um dos sensores é defeituoso:
1.
2. Comprove que os cabos do sensor estão ligados à
ECU correctamente.
3. Comprove que os cabos do sensor não estão
A posição do objecto não se corresponde com o
indicador correcto no ecrã digital azul:
Os cabos do sensor estão ligados à unidade de controlo
(ECU) na ordem correcta ex. A. B?
O volume de alerta não é adequado:
Solução de problemas
1
2
3
4
5
6
7
8
Beep&Park_Vision-2011.indd 21 29/12/11 10:24

22
23
As distâncias representadas pelas linhas de
assistência no estacionamento não correspondem
aos valores exibidos:
1.
respeitada (entre 45 e 60 cm).
2.
bem centrado no ecrã. Se necessário, acrescentar
anéis de adaptação para corrigir os ângulos.
3.
4. Rodar a câmara em torno do seu eixo para alinhar com
o horizonte.
52
Solução de problemas
Quando a marcha-atrás é engrenada, um sinal sonoro
indica quando existe nenhum obstáculo:
1.
pára-choques até ao solo é respeitada (entre 45 e 60 cm).
2.
pára-choques é respeitado. Se necessário use o ângulo de
correcção dos aneis na instalação.
3.
pára-choques é respeitada (< ou = 45 cm).
4.
5.
anomalia.
As linhas de assistência no estacionamento não
aparecem bem paralelas ao solo ou ao lugar de
estacionamento:
1.
respeitada (entre 45 e 60 cm).
2.
centrado no ecrã. Se necessário, acrescentar anéis de
adaptação para corrigir os ângulos.
3.
4. Rodar a câmara em torno do seu eixo para alinhar com o
horizonte.
9
10
11
Beep&Park_Vision-2011.indd 22 29/12/11 10:24

22
23
Σας ευχαριστούμε για την αγορά του προϊόντος.
Παρακαλώ διαβάστε προσεκτικά αυτό το εγχειρίδιο
πριν από την αγορά,εγκατάσταση και τη χρήση του
προϊόντος.
Σύστημα υποβοήθησης
παρκαρίσματος &
Κάμερα οπισθοπορείας
Χαρακτηριστικά
25 mA
250 mA
Τεχνικά χαρακτηριστικά / σύστημα
υποβοήθησης παρκαρίσματος
Beep&Park_Vision-2011.indd 23 29/12/11 10:24

24
25
CMOS
640 (H) x 480 (V)
1 Lux
110°x90° (HxV)
3’’ (16:9)
400 (H) x 240 (V)
~96 000
250 mA
110 mA
-20°C ~ +60°C
Τεχνικά χαρακτηριστικά /
κάμερα οπισθοπορείας
Τεχνικά χαρακτηριστικά/ οθόνη
Προσοχή
Δεν χρειάζεται επανεκκίνηση
Αυτοδιάγνωση
Το σύστημα Valeo beep&park®/vision™ διαθέτει λειτουργία
αυτοδιάγνωσης για τους αισθητήρες :
1.
2.
3.
4.
5.
Beep&Park_Vision-2011.indd 24 29/12/11 10:24

24
25
Δεν εμφανίζονται εικόνες στην οθόνη:
1.
2.
3.
4.
5.
Εικόνες στην οθόνη χωρίς να είναι επιλεγμένη η
όπισθεν:
Η οθόνη δείχνει βλάβη σε ένα αισθητήρα:
1.
2.
3.
Η θέση του εμποδίου δεν επισημαίνεται σωστά στην
ένδειξη της οθόνης:
Η ένταση της προειδοποήσης δεν σας εξυπηρετεί:
Επίλυση προβλημάτων
1
2
3
4
5
6
7
8
Όταν επιλέγεται η όπισθεν, εμφανίζεται η ένδειξη 0.5 m ή
0.6 m στην οθόνη:
1.
2.
3.
4.
Θολή ή κακή εικόνα στην οθόνη:
1.
2.
3.
4.
Όταν επιλέγετε η όπισθεν, παράγονται προειδοποιητικοί
ήχοι ενώ δεν υπάρχει κάποιο εμπόδιο πίσω από το όχημα:
1.
2.
3.
4.
5.
Beep&Park_Vision-2011.indd 25 29/12/11 10:24

26
27
Οι αποστάσεις που αντιπροσωπεύονται από
τις γραμμές υποστήριξης στην στάθμευση δεν
αντιστοιχούν στις εμφανιζόμενες τιμές:
1.
2.
3.
4.
52
Όταν επιλέγετε η όπισθεν, το εμπόδιο πίσω από το όχημα
δεν ανιχνεύεται από το σύστημα:
1.
2.
3.
4.
5.
Οι γραμμές υποστήριξης στην στάθμευση δεν φαίνονται
αρκετά παράλληλες με το έδαφος ή με την θέση
στάθμευσης:
1.
2.
3.
4.
9
10
11
Beep&Park_Vision-2011.indd 26 29/12/11 10:24

26
27
Vielen Dank für den Kauf von beep&park®/vision™.
Bitte lesen Sie vor Einbau und Gebrauch die
Bedienungsanleitung.
Einparkhilfe &
Heckkamera
Bedienungsanleitung
Das System liefert eine Ansicht des rückwärtigen
Parkraumes und zeigt den Abstand zu einem
Hindernis durch eine Minikamera.
Auf das LCD Display werden kontinuierlich
Weitwinkelbilder übertragen.
PAL Modus verfügbar.
Akustische Warnung mit einstellbarer Lautstärke.
Kompatibel mit einem pulsierenden Rückfahrsignal.
Auch für Fahrzeuge mit Anhängerkupplung.
Anzeige: „Einpark-Hilfslinien”.
Selbstregulierend für klare Sicht bei Tag und Nacht.
Helligkeit, Kontrast und Intensität der Farben lassen
sich einstellen.
Einstellungen bleiben nach Abschaltung gespeichert.
Nennspannung: von 9 bis 16 V
Ruhestrom: 25 mA
Betriebsstromstärke ECU: 250 mA
Erfassungszone der Hecksensoren: 0.10 ~ 2.50 m
Anzeigebereich: 0.30 ~ 2.50m
Warntonlautst_rke: 70 ~ 90dB
Temperatur: -40°C ~ +85°C
Typprüfung: E-Kennzeichnung, CE und ROHS
Merkmale
Technische Parameter / Einparkhilfe-System
www.spassamfahren.com
Beep&Park_Vision-2011.indd 27 29/12/11 10:24

28
29
Type/Mode: CMOS Kamera
Video Standard: PAL
Spannung: DC 12V
Bildelement: 640 (H) x 480 (V)
Min. Helligkeit: 1 Lux
Sichtwinkel: 110°x90° (HxV)
Betriebstemperatur: Camera -30°C ~ +80°C
Typ: TFT-Bildschirm
3’’ (16:9)
Displayformat: 400 (H) x 240 (V)
Pixel: ~96 000
Video Standart: NTSC/PAL
Arbeitsstrom: 250 mA
Ruhestrom: 110 mA
Betriebstemperatur: -20°C ~ +60°C
Technische Parameter / Rückfahrkamera
Technische Parameter / Display
Einbau nur durch geschultes Fachpersonal.
Vor dem Bohren die Position der Sensoren überprüfen.
Valeo beep&park®/vision™ unterstützt beim Rückwärtsfahren
und Einparken. Tätigkeiten wie abbremsen, Spiegel benutzen
etc sind weiter erforderlich.
Eventuell muss der Anpassring um den Sensor ausgetauscht
werden (im Set mitgeliefert), damit die vorgeschriebene
Sensorneigung in der Spanne von +/- 5° nach Anbau am
Neigungswinkel der Minikamera muss mit Hilfe des
Winkelenistellrings eingestellt werden.
Bitte die Kameralinse sauber halten und vor scharfen
Gegenständen schützen, um eine klare Sicht zu gewährleisten.
Wenn Sie das System mit einem Navigationssystem
Fachwerkstatt.
die Kamera vor Wassereintritt geschützt werden.
Achtung
Kein Reset erforderlich
Diagnosefunktion
Valeo beep&park®/vision™ ist mit einer Diagnosefunktion
für die Sensoren ausgestattet:
1. Sobald der Rückwärtsgang eingelegt ist, prüft das System
automatisch die 4 Hecksensoren.
2.
3. Liegt bei einem oder mehreren der Sensoren eine
4.
und des Winkels richtig angepasst sind.
5. Einzelne Sensoren sind als Ersatzteile erhältlich.
Beep&Park_Vision-2011.indd 28 29/12/11 10:24

28
29
Beim Einlegen des Rückwärtsgangs werden 0.5 m oder 0.6 m
auf dem Bildschirm angezeigt:
1. Hindernisse sind innerhalb 0.6 m vorhanden.
2. Sind die Sensoren zu niedrig eingebaut oder zeigen sie den
Boden?
3. Prüfen, ob ein Sensor verkehrt herum /verdreht eingebaut wurde.
4. Sensoren einzeln abklemmen und Anzeige überprüfen.
Verschwommenes Bild oder schlechte Qualität auf dem
Display:
1. Prüfen, ob die Kameralinse verschmutzt oder nass ist.
2.
sauberen Tuch trocknen.
3. Ist die Versorgungsspannung des Steuergerätes hoch genug?
4. Helligkeit, Kontrast und Intensität der Farben lassen sich
einstellen.
Sobald der Rückwärtsgang eingelegt ist, wird ein Warnsignal
ausgelöst, obwohl sich kein Hindernis hinter dem Fahrzeug
bendet:
1. Stellen Sie sicher, dass der erforderliche Abstand der Sensoren
wurde (zwischen 45 und 60 cm).
2.
Sensoren. Falls notwendig, benutzen Sie die Winkeleinstellringe.
3. Vergewissern Sie sich, dass der Abstand zwischen
(< oder = 45 cm).
4. Überprüfen Sie, ob der Sensor nicht verkehrt
herum eingebaut wurde.
5. Klemmen Sie einen Sensor nach dem anderen ab, um die
Es ist kein Bild auf dem Display zu sehen:
1. Ist die Stromversorgungsleitung richtig
angeschlossen?
2. Ist die Zündung eingeschaltet?
3. Ist der Rückwärtsgang eingelegt?
4. Sind alle Kabel richtig angeschlossen?
5. Die korrekte Funktionseinstellung des
Bildschirms überprüfen.
Bild auf dem Display, ohne dass der
Rückwärtsgang eingelegt ist:
Prüfen ob die Stromversorgungsleitung an das
Rücklicht angeschlossen ist.
Der Bildschirm zeigt einen defekten Sensor:
1.
2. Prüfen, ob das Kabel des Sensors richtig
angeschlossen ist.
3. Prüfen, ob das Kabel des Sensors beschädigt
ist.
Die Position des Hindernisses stimmt nicht mit der
Anzeige auf dem Bildschirm überein:
Sind die Sensoren in der richtigen Reihenfolge am
Steuergerät angeschlossen z. B. A, B?
Sie sind mit der Lautstärke des Warnsignals
nicht zufrieden:
Die Lautstärke anpassen.
Fehlersuche
1
2
3
4
5
6
7
8
Beep&Park_Vision-2011.indd 29 29/12/11 10:24

30
31
Die mit den Einpark-Hilfslinien dargestellten
Abstände entsprechen nicht den angezeigten
Werten:
1. Überprüfen Sie, ob der erforderliche Abstand der
Minikamera vom Boden eingehalten wurde (45 bis 60
cm).
2. Überprüfen Sie den Kamerawinkel bezüglich eines
Hindernisses in 2,5 m Entfernung, indem Sie
kontrollieren, ob das Hindernis genau in der Mitte des
Bildschirms erscheint. Fügen Sie zur Winkelkorrektur
weitere Einstellringe hinzu.
3. Wählen Sie bei der Justierung unter den 6
4. Drehen Sie die Kamera zur Ausrichtung auf den
Horizont um ihre eigene Achse.
52
Obgleich der Rückwärtsgang eingelegt ist, erkennt das
System kein Hindernis hinter dem Fahrzeug:
1. Stellen Sie sicher, dass der erforderliche Abstand der
berücksichtigt wurde (zwischen 45 und 60 cm).
2.
eingepassten Sensoren. Falls notwendig, benutzen Sie die
Winkeleinstellringe.
3. Vergewissern Sie sich, dass der Abstand zwischen den einzelnen
4. Überprüfen Sie, ob der Sensor nicht
verkehrt herum eingebaut wurde.
5. Klemmen Sie einen Sensor nach dem anderen ab, um die
Die Einpark-Hilfslinien scheinen nicht parallel zum Boden
bzw. zur Lage des Stellplatzes zu verlaufen:
1. Überprüfen Sie, ob der erforderliche Abstand der Minikamera
vom Boden eingehalten wurde (45 bis 60 cm).
2. Überprüfen Sie den Kamerawinkel bezüglich eines
Hindernisses in 2,5 m Entfernung, indem Sie kontrollieren, ob
das Hindernis genau in der Mitte des Bildschirms erscheint.
Fügen Sie zur Winkelkorrektur weitere Einstellringe hinzu.
3. Wählen Sie bei der Justierung unter den 6 vorgeschlagenen
4. Drehen Sie die Kamera zur Ausrichtung auf den Horizont um
ihre eigene Achse.
9
11
10
Beep&Park_Vision-2011.indd 30 29/12/11 10:24

30
31
Hartelijk dank voor de aanschaf van dit product.
Lees de handleiding goed door voordat u met het
inbouwen begint en het systeem gaat gebruiken.
Parkeerhulp
en
achteruitrijcamera
Instructiehandleiding
Het systeem geeft door middel van een minicamera
tijdens het achteruitrijden een beeld van de ruimte achter
de auto, en geeft tevens aan waar zich een obstakel
bevindt.
Doorlopend groothoekbeelden die worden geprojecteerd
op het LCD-scherm.
PAL modus compatibel.
Waarschuwingssignaal met instelbaar volume.
Toepasbaar op voertuigen met een modulerend
achteruitrijsignaal.
Het systeem is geschikt voor voertuigen met trekhaak.
Weergave van de “parkeerhulpstrepen”.
Het systeem past zich automatisch aan voor helder zicht
De helderheid, het contrast en de intensiteit van de
kleuren kunnen worden ingesteld.
In spanningsloze modus blijven de instellingen behouden.
Nominale spanning: van 9 tot 16 V
Stroomsterkte (stand-by): 25 mA
Werkstroom van de ECU: 250 mA
Detectie bereik: 0.10 ~ 2.50 m
Weergavebereik: 0.30 ~ 2.50 m
Volume geluidssignaal: 70 ~ 90 dB
Werkingstemperatuur: -40°C ~ +85°C
Typegoedkeuring: E-mark, CE en ROHS
Kenmerken
Technische gegevens / parkeerhulpsysteem
www.lachendrijden.nl
Beep&Park_Vision-2011.indd 31 29/12/11 10:24

32
33
Type: CMOS-camera
Videostandaard: PAL
Afbeelding: 640 (H) x 480 (V)
Horizontale resolutie: 450 TV-lijnen
Minimale lichtsterkte: 1 Lux
Gezichtsveld: 110°x90° (HxV)
Werkingstemperatuur: Camera -30°C ~ +80°C
Type: TFT scherm
Grootte: 3’’ (16:9)
Schermformaat: 400 (H) x 240 (V)
Aantal pixels: ~96 000
Videostandaard: NTSC/PAL
Stroomsterkte (actief): 250 mA
Stroomsterkte (stand-by): 110 mA
Werkingstemperatuur: -20°C ~ +60°C
Technische gegevens /
achteruitrijcamera
Technische gegevens / scherm
Er wordt aanbevolen het inbouwen te laten uitvoeren door een
erkende, professionele automonteur.
Er wordt sterk aanbevolen om de positie van de sensoren te
controleren voordat u de gaten boort.
Valeobeep&park®/vision™ assisteert bij het achteruitrijden en
parkeren. Rijvaardigheden, zoals afremmen en het gebruik van
spiegels, blijven echter essentieel.
Het hoekcorrectiemateriaal (geleverd in de kit) rond de sensor
kan worden vervangen om de vereiste hellingsgraad van +/- 5°
te bekomen na installatie op de bumper van het voertuig.
De schuine stand van de camera moet worden bijgesteld met
behulp van de meegeleverde ringen voor het corrigeren van
de hoek.
Voor een duidelijk beeld dient u de lens van de camera schoon
te houden en te beschermen tegen scherpe voorwerpen.
Neem contact op met een automonteur als u het systeem wilt
aansluiten op een reeds aanwezig navigatiesysteem.
Draag zorg voor de waterdichtheid van de camera indien u
deze buiten de bumper monteert.
Waarschuwing
Resetten niet nodig
Diagnosefunktion
Valeo beep&park®/vision™ ist mit einer Diagnosefunktion
für die Sensoren ausgestattet:
1. Sobald der Rückwärtsgang eingelegt ist, prüft das System
automatisch die 4 Hecksensoren.
2.
3. Liegt bei einem oder mehreren der Sensoren eine
4.
und des Winkels richtig angepasst sind.
5. Einzelne Sensoren sind als Ersatzteile erhältlich.
Beep&Park_Vision-2011.indd 32 29/12/11 10:24

32
33
Als de achteruitrijversnelling is geselecteerd, wordt er
0.5m of 0.6m weergegeven op het scherm:
1. Er bevinden zich obstakels binnen een afstand van 0.6 m.
2. Zijn de sensoren te laag geplaatst of registreren ze het
grondoppervlak?
3. Controleer of de sensor ondersteboven geplaatst is.
4. Neem steeds 1 sensor tegelijk los om de werking ervan te
controleren.
Vertroebeld beeld of slecht beeld op het scherm:
1. Controleer of er zich vuil of water op de lens van de camera
bevindt.
2. Reinig de lens met wat alcohol en droog de lens met een
schone doek.
3. Is er voldoende voeding naar de ECU?
4. De helderheid, het contrast en de intensiteit van de kleuren
kunnen worden ingesteld.
Als het voertuig in de achteruitrijversnelling is
geschakeld en een geluidssignaal wordt geactiveerd als
er geen obstakel achter het voertuig aanwezig is:
1. Controleer of de gemonteerde sensoren op de
voorgeschreven hoogte geplaatst zijn (tussen 45 en 60 cm).
2. Controleer of de gemonteerde sensoren in de voorges-
chreven hoek geplaatst zijn. Indien nodig, gebruik bij de
montage de speciale ringen om de juiste hoek te bepalen.
3. Controleer of de gemonteerde sensoren op de voorges-
chreven afstand van elkaar geplaatst zijn (< of = 45 cm).
4. Controleer of de sensor ondersteboven
geplaatst is.
5. Neem steeds één sensor tegelijk los om de mogelijke
Er wordt niets weergegeven op het scherm:
1. Is de voedingskabel juist aangesloten?
2. Is het contact in stand ACC ON gezet?
3. Is de achteruitrijversnelling geselecteerd?
4. Zijn alle draden juist aangesloten?
5. Controleer de juiste functieinstelling van het scherm.
Er wordt iets weergegeven op het scherm zonder
dat de achteruitrijversnelling is geselecteerd:
Controleer of de voedingskabel van de ECU
is aangesloten op de bedrading van de
achteruitrijverlichting.
Het scherm geeft aan dat er een storing aanwezig
is in een sensor:
1. Controleer of het sensoroppervlak schoon is.
2. Controleer of de bedrading van de sensoren juist is
aangesloten op de ECU.
3. Controleer of de bedrading van de sensoren
beschadigd is.
De positie van het object komt niet overeen met de
indicator op het scherm:
Zijn de kabels van de sensoren in de juiste volgorde
(A, B) aangesloten op de ECU?
Het volume van het waarschuwingssignaal is niet
naar uw zin:
Stel het volume af op het gewenste niveau.
Storingzoeken
1
2
3
4
5
6
7
8
Beep&Park_Vision-2011.indd 33 29/12/11 10:24

34
35
De afstanden voorgesteld door de parkeerhulpstre-
pen komen niet overeen met de weergegeven
waarden
1. Controleer of de juiste hoogte van de camera ten
opzichte van de grond in acht is genomen (tussen 45
en 60 cm).
2. Controleer of de camera onder de juiste hoek is
geplaatst ten opzichte van een obstakel op 2,5 m,
door te controleren of het obstakel goed in het midden
van het scherm wordt weergegeven. Voeg zo nodig
stelringen toe om de hoek te corrigeren.
3. Pas de instelling aan de 6 gepresenteerde
4. Draai de camera om zijn as om hem uit te lijnen op
de horizon.
52
Als het voertuig in de achteruitrijversnelling is
geschakeld en een obstakel achter het voertuig wordt niet
gedetecteerd door het system:
1. Controleer of de gemonteerde sensoren op de
voorgeschreven hoogte geplaatst zijn (tussen 45 en 60 cm).
2. Controleer of de gemonteerde sensoren in de voorgeschreven
hoek geplaatst zijn. Indien nodig, gebruik bij de montage de
speciale ringen om de juiste hoek te bepalen.
3. Controleer of de gemonteerde sensoren op de
voorgeschreven afstand van elkaar geplaatst zijn (< of = 45 cm).
4. Controleer of de sensor ondersteboven
geplaatst is.
5. Neem steeds één sensor tegelijk los om de mogelijke
De parkeerhulpstrepen verschijnen niet goed parallel op
de grond of op de parkeerplaats:
1. Controleer of de juiste hoogte van de camera ten opzichte
van de grond in acht is genomen (tussen 45 en 60 cm).
2. Controleer of de camera onder de juiste hoek is geplaatst
ten opzichte van een obstakel op 2,5 m, door te controleren
of het obstakel goed in het midden van het scherm wordt
weergegeven. Voeg zo nodig stelringen toe om de hoek te
corrigeren.
3.
aan.
4. Draai de camera om zijn as om hem uit te lijnen op de
horizon.
9
10
11
Beep&Park_Vision-2011.indd 34 29/12/11 10:24

34
35
Děkujeme vám za zakoupení tohoto výrobku.
Pečlivě si prosím přečtěte tuto příručku před
instalací a použitím přístroje.
Parkovací asistent
&
zadní kamera
dne i v noci.
Trvalý proud: 25 mA
250 mA
Rozsah detekce: 0.10 ~ 2.50 m
Rozsah hlasitosti: 70 ~ 90 dB
Funkční vlastnosti
Technické parametry / systém parkovacího asistenta
www.usmivejsezavolantem.com
Beep&Park_Vision-2011.indd 35 29/12/11 10:24

36
37
CMOS kamera
Video-standard: PAL
640 (H) x 480 (V)
450 TV lines
1 Luxy
Úhel pohledu: 110°x90° (HxV)
Typ: displej TFT
Velikost:3’’ (16:9)
Formát displeje: 400 (H) x 240 (V)
~96 000
250 mA
Trvalý proud: 110 mA
Technické parametry / zpětná kamera
Technické parametry / displej
správný úhel: +/- 5° od kolmice.
korekci úhlu.
Upozornění
Není nutný reset
Vlastní diagnostika
Systém Valeo beep&park®/vision™ je vybaven vlastní
diagnostikou senzorů:
1.
senzory.
2.
3.
4.
5.
Beep&Park_Vision-2011.indd 36 29/12/11 10:24

36
37
Při zařazení zpátečky se na displeji zobrazí 0.5 m nebo
0.6 m:
1.
2.
zem?
3.
4.
Zamlžený obraz nebo špatná kvalita obrazu na
displeji:
1.
voda.
2.
3.
4.
Při zařazení zpátečky se spustí zvukový signál informující
o tom, že za vozidlem není žádná překážka:
1.
2.
3.
4.
5.
poruchy.
Na displeji není žádný obraz:
1.
2.
3.
4.
5.
Obraz je na displeji i bez zařazení zpátečky:
Displej indikuje vadný senzor:
1.
2.
3.
Pozice objektu neodpovídá správné indikaci na
displeji:
Nevyhovující hlasitost výstražné zvukové
signalizace:
Odstranění problémů
1
2
3
4
5
6
7
8
Beep&Park_Vision-2011.indd 37 29/12/11 10:24

38
39
Vzdálenosti zobrazené pomocí řádek parkovacího
asistenta neodpovídají zobrazeným hodnotám:
1.
2.
3.
4.
s horizontem.
52
Při zařazení zpátečky systém nedetekuje překážku za
vozidlem:
1.
2.
3.
4.
5.
poruchy.
Řádky parkovacího asistenta se nezobrazují rovnoběžně
se zemí nebo s parkovacím místem:
1.
2.
3.
4.
horizontem.
9 11
10
Beep&Park_Vision-2011.indd 38 29/12/11 10:24

38
39
Dziękujemy, że zakupili Państwo ten produkt.
Prosimy od dokładne przeczytanie instrukcji przed
rozpoczęciem montażu oraz użytkowania.
Asystent parkowania &
Kamera tylna
kompatybilny z systemem PAL.
System ten jest kompatybilny z systemami haka
holowniczego montowanymi w samochodach.
Cechy
25 mA
250 mA
Temperatury pracy: -40°C ~ +85°C
Homologacja: Znak E, CE i ROHS
Dane techniczne / asystent parkowania
Beep&Park_Vision-2011.indd 39 29/12/11 10:24

40
41
Typ: kamera CMOS
Video standard: PAL
Zasilanie: DC 12V
Element optyczny: 640 (H) x 480 (V)
1 Lux
Kat widzenia: 110°x90° (HxV)
Temperatura pracy: kamera -30°C ~ +80°C
Typ: ekran TFT
3’’ (16:9)
Format: 400 (H) x 240 (V)
~96 000
Video mode: NTSC/PAL
250 mA
110 mA
Temperatura pracy: -20°C ~ +60°C
Dane techniczne / kamera tylna
Dane techniczne / Wyświetlacz
warsztat.
Uwaga
Nie trzeba zerować
Autodiagnostyka
System Valeo beep&park®/vision™ wyposażony jest w
autodiagnostykę czujników:
1.
czujniki tylne.
2.
3.
4.
5.
Beep&Park_Vision-2011.indd 40 29/12/11 10:24

40
41
Bark obrazu na wyświetlaczu:
1. Is the power supply wire connected correctly?
2.
3.
4.
5.
6.
Obraz na wyświetlaczu bez włączonego biegu
wstecznego:
Wyświetlacz wskazuje uszkodzenie czujnika:
1.
2.
ECU poprawnie.
3.
uszkodzone.
Umiejscowienie przeszkód nie odpowiada
odległości na pokazanej na wyświetlaczu:
Głośność alarmu jest nieodpowiednia:
Rozwiązywanie problemów
1
2
3
4
5
Włączony bieg wsteczny i wyświetlacz wskazuje
0.5 m lub 0.6 m:
1.
2.
grunt?
3.
4.
Obraz rozmazany lub niskiej jakości na wyświetlaczu:
1.
2.
3.
4.
Po włączeniu biegu wstecznego sygnał dźwiękowy
uruchamiany jest przy braku przeszkody za pojazdem:
1.
instalacji czujników zamontowanych na zderzaku
2.
czujników zamontowanych na zderzaku. W razie
3.
4.
5.
6
7
8
Beep&Park_Vision-2011.indd 41 29/12/11 10:24

42
43
Odległości przedstawione za pomocą linii pomocy
przy parkowaniu nie odpowiadają wyświetlonym
wartościom:
1.
jest zachowana (od 45 do 60 cm).
2.
3.
4.
horyzont.
52
Po włączeniu biegu wstecznego system nie wykrywa
przeszkody za pojazdem:
1.
2.
czujników zamontowanych na zderzaku. W razie potrzeby
3.
4.
5.
Linie pomocy przy parkowaniu nie wyświetlają się
równolegle na ziemi lub miejscu parkingowym:
1.
zachowana (od 45 do 60 cm).
2.
3.
4.
horyzont.
9
10
11
Beep&Park_Vision-2011.indd 42 29/12/11 10:24

42
43
Спасибо за выбор нашего устройства.
Пожалуйста, внимательно прочтите
инструкцию перед установкой и использованием.
Система парковки с задней
видеокамерой
Функции
25 mA
250 mA
Технические параметры (датчики парковки)
Beep&Park_Vision-2011.indd 43 29/12/11 10:24

44
45
CMOS camera
640 (H) x 480 (V)
1 Lux
110°x90° (HxV)
3’’ (16:9)
240 (H) x 400 (V)
~96 000
Технические параметры (видеокамера)
Технические параметры (дисплей)
Внимание!
Нет необходимости в обнулении
блока управления
Самодиагностика
Система помощи при парковке оборудована
самодиагностикой датчиков:
1.
2.
3.
4.
5.
Beep&Park_Vision-2011.indd 44 29/12/11 10:24

44
45
При включении задней передачи на дисплее
изображено 0.5 м или 0.6 м:
1.
2.
3.
4.
Плохое качество изображения на дисплее:
1.
2.
3.
4.
При включении передачи заднего хода раздается
звуковой сигнал, но препятствия за автомобилем
нет:
1.
2.
3.
4.
5.
Нет картинки на дисплее:
1.
2.
3.
4.
5.
Изображение появляется на дисплее без
включения задней передачи:
Дисплей показывает неисправность датчика
парковки:
1.
2.
3.
Реальное расположение препятствия не
соответствует изображению на дисплее:
Вы не можете регулировать громкость звука
сигнала предупреждения:
Диагностика неисправностей
1
2
3
4
5
6
7
8
Beep&Park_Vision-2011.indd 45 29/12/11 10:24

46
47
Расстояния, отображаемые вспомогательными
линиями при парковке, не соответствуют
показываемым значениям:
1.
2.
3.
4.
52
При включении передачи заднего хода препятствия за
автомобилем система не обнаруживает:
1.
2.
3.
4.
5.
Вспомогательные линии при парковке не
отображаются точно параллельно на земле или на
парковочном месте:
1.
2.
3.
4.
9
10
11
Beep&Park_Vision-2011.indd 46 29/12/11 10:24

46
47
Köszönjük, hogy termékünket választotta!
Kérjük, gyelmesen olvassa el a tájékoztatót
beszerelés, illetve használat előtt!
Parkolási asszisztens
&
Hátsó kamera
használati útmutató
távolságát.
PAL üzemmód kompatibilis.
Kompatibilis a pulzusos tolatólámpa jellel.
A rendszer kompatibilis vontatóhoroggal felszerelt
nappali és éjszakai láthatóság érdekében.
Névleges feszültség: 9-16 V
Statikus áramfelvétel: 25 mA
250 mA
Kijelzési távolság: 0.30 ~ 2.50 m
Hangjelzés hangereje: 70 ~ 90 dB
Homologáció: E-jelzés, CE és ROHS
Tulajdonságok
Technikai adatok / parkolási asszisztens rendszer
www.vezetesorome.com
Beep&Park_Vision-2011.indd 47 29/12/11 10:24

48
49
CMOS kamera
Video mód: PAL
Feszültég: DC 12V
640 (H) x 480 (V)
1 Lux
110°x90° (HxV)
Méret: 3’’ (16:9)
400 (H) x 240 (V)
Pixelszám: ~96 000
Video mód: NTSC/PAL
Üzemi áramfelvétel: 250 mA
Statikus áramfelvétel: 110 mA
Technical adatok / hátsó kamera
Technical adatok / kijelző
és sérülésmentesen.
A berendezés gyári navigációs rendszerhez való kapcsolását
való felszerelés elott.
Figyelmeztetés
Az ECU lecsatlakoztatás
szükséges
Autodiagnosztika
A beep&park®/vision™ rendszer rendelkezik egy érzékelő
diagnosztikai funkcióval:
1.
2.
3.
4.
5.
Beep&Park_Vision-2011.indd 48 29/12/11 10:24

48
49
A hátramenet kiválasztása után a kék színű kijelző 0.5m
és 0.6m távolságot mutat:
1. Akadály található 0.6m-en belül.
2.
érzékelik?
3.
beszerelve.
4.
Homályos vagy gyenge minőségű kép látható:
1.
2.
3.
szintje.
4.
A hátramenet kapcsolása után a gyelmeztető jelzés
megszólal annak ellenére, hogy nincs akadály a jármű
mögött:
1.
2.
3.
van-e tartva (< vagy = 45 cm).
4.
5.
megtalálja.
A kijelzőn nem látható kép:
1.
2.
3.
4.
Hátramenet kapcsolása nélkül is kép látható a
kijelzőn:
A kijelző hibás érzékelőt mutat:
1.
2.
3.
Az akadály helyzete nem egyezik meg a kijelzőn
lévővel:
sorrendjét: A.B?
A hangjelzés hangereje nem megfelelő:
Hibaelhárítás
1
2
3
4
5
6
7
8
Beep&Park_Vision-2011.indd 49 29/12/11 10:24

50
51
A parkolássegítő vonalak által ábrázolt távolságok
nem felelnek meg a kijelzett értékeknek:
1.
2.
3.
4.
52
Hibaelhárítás
A hátramenet kapcsolása után a rendszer nem ismeri fel a
jármű mögött található akadályt:
1.
2.
3.
tartva (< vagy = 45 cm).
4.
5.
megtalálja.
A parkolássegítő vonalak nem párhuzamosak a talajra
vagy a parkolóhelyre:
1.
2.
3.
4.
érdekében.
9
11
10
Beep&Park_Vision-2011.indd 50 29/12/11 10:24

50
51
Beep&Park_Vision-2011.indd 51 29/12/11 10:24

52
53
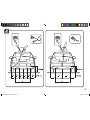
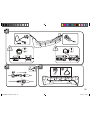
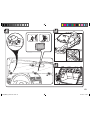
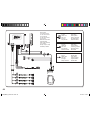
Step by step installation
Installation pas à pas
Instalación paso a paso
Sequenza d’installazione
Instalação passo a passo
Εγκατάσταση βήμα - βήμα
Einbau
Inbouwen stap voor stap
Instalace krok za krokem
Instalacja krok po kroku
Установка шаг за шагом
Beszerelés lépésről lépésre
Beep&Park_Vision-2011.indd 52 29/12/11 10:24

52
53
Beep&Park_Vision-2011.indd 53 29/12/11 10:24

54
55
Beep&Park_Vision-2011.indd 54 29/12/11 10:24

54
55
Beep&Park_Vision-2011.indd 55 29/12/11 10:24

56
57
Beep&Park_Vision-2011.indd 56 29/12/11 10:25

56
57
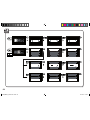
1
Beep&Park_Vision-2011.indd 57 29/12/11 10:25

58
59
2
Beep&Park_Vision-2011.indd 58 29/12/11 10:25

58
59
3
4
5
Beep&Park_Vision-2011.indd 59 29/12/11 10:25

60
61
6
Beep&Park_Vision-2011.indd 60 29/12/11 10:25

60
61
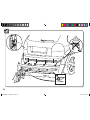
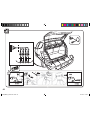
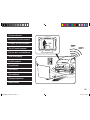
45 cm 49 cm - 8° - 12°
50 cm
54 cm - 9° - 13°
55 cm
60 cm -10° -14°
7
Beep&Park_Vision-2011.indd 61 29/12/11 10:25

62
63
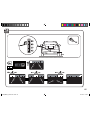
8
Beep&Park_Vision-2011.indd 62 29/12/11 10:25

62
63
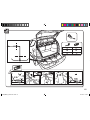
9 10
11
Beep&Park_Vision-2011.indd 63 29/12/11 10:25

64
65
12
Beep&Park_Vision-2011.indd 64 29/12/11 10:25

64
65
13
Beep&Park_Vision-2011.indd 65 29/12/11 10:25

66
67
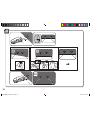
14
Beep&Park_Vision-2011.indd 66 29/12/11 10:25

66
67
15
Beep&Park_Vision-2011.indd 67 29/12/11 10:25

68
69
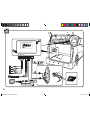
Reverse light
Feu marche arrière
Luz de marcha atrás
Luce posteriore
Luz de marcha atrás
Rückfahrscheinwerfer
Achteruitrijlamp
Kabel svetla zpátecky
Tolatólámpa kábele
Red wire
Fil rouge
Cable rojo
Filo rosso
Fio vermelho
Rotes Kabel
Rode kabel
Cervený kabel
Czerwony przewód
Piros kábel
Pink wire
Fil rose
Cable rosa
Filo rosa
Fio rosa
Rosafarbenes Kabel
Roze kabel
Rózowy przewód
Black wire
Fil noir
Cable negro
Filo nero
Fio negro
Schwarzes Kabel
Zwarte kabel
Cerný kabel
Czarny przewód
Fekete kábel
Beep&Park_Vision-2011.indd 68 29/12/11 10:25

68
69
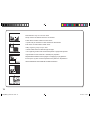
Functional tests
Essais de fonctionnement
Pruebas de funcionalidad
Test di funzionamento
Provas de funcionalidade
Τεστ λειτουργίας
Funktionstests
Functietests
Test funkce
Test działania
Проверка работы
funkció teszt
Beep&Park_Vision-2011.indd 69 29/12/11 10:25

70
71
False detection may occur in such cases:
Risque d’erreur de détection dans les cas suivants :
Puede darse una falsa alarma en estos casos:
Pode dar-se um falso alarme nestes casos:
In de volgende gevallen werkt het detectiesysteem mogelijk niet optimaal:
Beep&Park_Vision-2011.indd 70 29/12/11 10:25

70
71
Beep&Park_Vision-2011.indd 71 29/12/11 10:25

72
NP
Valeo Service | 70, rue Pleyel | 93285 Saint-Denis Cedex
Valeo Service SAS au capital de 12 900 000 € - RCS Bobigny 306 486 408
632060
Beep&Park_Vision-2011.indd 72 29/12/11 10:25
-
 1
1
-
 2
2
-
 3
3
-
 4
4
-
 5
5
-
 6
6
-
 7
7
-
 8
8
-
 9
9
-
 10
10
-
 11
11
-
 12
12
-
 13
13
-
 14
14
-
 15
15
-
 16
16
-
 17
17
-
 18
18
-
 19
19
-
 20
20
-
 21
21
-
 22
22
-
 23
23
-
 24
24
-
 25
25
-
 26
26
-
 27
27
-
 28
28
-
 29
29
-
 30
30
-
 31
31
-
 32
32
-
 33
33
-
 34
34
-
 35
35
-
 36
36
-
 37
37
-
 38
38
-
 39
39
-
 40
40
-
 41
41
-
 42
42
-
 43
43
-
 44
44
-
 45
45
-
 46
46
-
 47
47
-
 48
48
-
 49
49
-
 50
50
-
 51
51
-
 52
52
-
 53
53
-
 54
54
-
 55
55
-
 56
56
-
 57
57
-
 58
58
-
 59
59
-
 60
60
-
 61
61
-
 62
62
-
 63
63
-
 64
64
-
 65
65
-
 66
66
-
 67
67
-
 68
68
-
 69
69
-
 70
70
-
 71
71
-
 72
72


Valeo beep&park/vision Handleiding
- Categorie
- Auto videosystemen
- Type
- Handleiding
in andere talen
- English: Valeo beep&park/vision User manual
- italiano: Valeo beep&park/vision Manuale utente
- русский: Valeo beep&park/vision Руководство пользователя
- français: Valeo beep&park/vision Manuel utilisateur
- español: Valeo beep&park/vision Manual de usuario
- Deutsch: Valeo beep&park/vision Benutzerhandbuch
- português: Valeo beep&park/vision Manual do usuário
- čeština: Valeo beep&park/vision Uživatelský manuál
- polski: Valeo beep&park/vision Instrukcja obsługi
Gerelateerde papieren
Andere documenten
-
Kenwood CMOS 210 de handleiding
-
Velleman SPBS4 Handleiding
-
Velleman SPBS8 Handleiding
-
Norauto 2611990-NO3201 Handleiding
-
Volkswagen 1K0 054 630 B Installation Instructions Manual
-
Waeco MagicWatch MW(E)-XXL Handleiding
-
Trebs Comfortcam CC-106 de handleiding
-
Pioneer ND-PS1 Handleiding
-
Pioneer AVIC F9310 BT de handleiding
-
Pioneer AVIC F840 BT Handleiding