L
ED-TISCHLEUCHTE / LED DESK LAMP /
LAMPE DE TABLE À LED
LED-TISCHLEUCHTE
Bedienungs- und Sicherheitshinweise
LED DESK LAMP
Operation and safety notes
LAMPE DE TABLE À LED
Instructions d‘utilisation et consignes de sécurité
LED TAFELLAMP
Bedienings- en veiligheidsinstructies
LED STOLNÁ LAMPA
Pokyny pre obsluhu a bezpečnostné pokyny
STOLNÍ LED LAMPA
Pokyny pro obsluhu a bezpečnostní pokyny
LAMPKA STOŁOWA - LED
Wskazówki dotyczące obsługi i bezpieczeństwa
IAN 345257_2004

DE / AT / CH Bedienungs- und Sicherheitshinweise Seite 5
GB / IE Operation and safety notes Page 13
FR / BE Instructions d‘utilisation et consignes de sécurité Page 21
NL / BE Bedienings- en veiligheidsinstructies Pagina 31
PL Wskazówki dotyczące obsługi i bezpieczeństwa Strona 39
CZ Pokyny pro obsluhu a bezpečnostní pokyny Strana 47
SK Pokyny pre obsluhu a bezpečnostné pokyny Strana 55
Klappen Sie vor dem Lesen die Seiten mit den Abbildungen aus und machen Sie sich anschließend mit
allen Funktionen des Gerätes vertraut.
Before reading, unfold the pages containing illustrations and familiarise yourself with all functions of the
device.
Avant de lire le mode d‘emploi, ouvrez les pages contenant les illustrations et familiarisez-vous ensuite
avec toutes les fonctions de l‘appareil.
Vouw vóór het lezen de paginas met de afbeeldingen open en maak u vertrouwd met alle functies van het
apparaat.
Przed przeczytaniem proszę rozłożyć strony z ilustracjami, a następnie proszę zapoznać się z wszystkimi
funkcjami urządzenia.
Před čtením si odklopte strany s obrázky a potom se seznamte se všemi funkcemi zařízení.
Pred čítaním si odklopte strany s obrázkami a potom sa oboznámte so všetkými funkciami prístroja.

14141605L
11a 2
8
8
4
3
2a
5
6
7
A B
11
9
10
3a
7

HI GH LO W CC T ON /OF F
14150705L
1
15 12
14 13
7 8
5
6
A B
4
6
11

5 DE/AT/CH
Inhaltsverzeichnis
Legende der verwendeten Piktogramme ........................................................... Seite 6
Einleitung ......................................................................................................................................... Seite 7
Bestimmungsgemäße Verwendung ....................................................................................................Seite 7
Lieferumfang ........................................................................................................................................ Seite 7
Teilebeschreibung ...............................................................................................................................Seite 7
Technische Daten ................................................................................................................................Seite 7
Sicherheit ......................................................................................................................................... Seite 8
Sicherheitshinweise .............................................................................................................................Seite 8
Inbetriebnahme ......................................................................................................................... Seite 9
Leuchte ein- / ausschalten ...................................................................................................................Seite 9
Leuchte ausrichten ............................................................................................................................... Seite 10
Funktionen der Leuchte ....................................................................................................... Seite 10
Wartung und Reinigung .....................................................................................................Seite 11
Entsorgung .....................................................................................................................................Seite 12
Informationen .............................................................................................................................Seite 12
Garantie ..............................................................................................................................................Seite 12
Hersteller / Service ..............................................................................................................................Seite 12
Konformitätserklärung .......................................................................................................Seite 12

6 DE/AT/CH
Legende der verwendeten Piktogramme / EinleitungLegende der verwendeten Piktogramme
Legende der verwendeten Piktogramme
Anweisungen lesen! Warnung vor elektrischem Schlag!
Lebensgefahr!
VVolt Das Leuchtmittel ist nicht geeignet für
externe Dimmer und elektronische
Schalter.
A.C. a.c.
Wechselspannung
(Strom- und Spannungsart) So verhalten Sie sich richtig
Hertz (Frequenz) Vorsicht! Verbrennungsgefahr durch
heiße Oberflächen!
Watt (Wirkleistung) Lebensdauer
Schutzklasse II ON OFF Schaltzyklen
Warn- und Sicherheitshinweise
beachten! Nur für den Innenbereich
Diese Leuchte ist ausschließlich für den
Betrieb im Innenbereich, in trockenen
und geschlossenen Räumen geeignet. ta Umgebungstemperatur
Lebens- und Unfallgefahr für
Kleinkinder und Kinder! tc Gehäusetemperatur am
angegebenen Punkt
Polarität des Netzanschlusses SELV Schutzkleinspannung
Unabhängiges Betriebsgerät Die Verpackung besteht aus
100 % recyceltem Papier.
Kurzschlussfester
Sicherheitstransformator b
a
Entsorgen Sie Verpackung und
Gerät umweltgerecht!
d.c. DC Gleichspannung
(Strom- und Spannungsart)
Die Leuchte ist geeignet zur Montage
auf normal entflammbaren Flächen.
Schutzklasse III mA Milliampere
Stufenlos dimmbar Mit Memoryfunktion
Lichttemperatur in Kelvin Ra Farbwiedergabeindex

7 DE/AT/CH
Legende der verwendeten Piktogramme / Einleitung
Legende der verwendeten Piktogramme
Alarmfunktion Kalender
Uhrzeitanzeige
LED-Tischleuchte
Einleitung
Wir beglückwünschen Sie zum Kauf Ihres
neuen Gerätes. Sie haben Sich damit für
ein hochwertiges Produkt entschieden.
Bitte lesen Sie diese Bedienungsanleitung vollständig
und sorgfältig durch. Klappen Sie die Seite mit den
Abbildungen aus. Diese Anleitung gehört zu diesem
Produkt und enthält wichtige Hinweise zur Inbetrieb-
nahme und Handhabung. Beachten Sie immer alle
Sicherheitshinweise. Prüfen Sie vor der Inbetriebnahme,
ob die korrekte Spannung vorhanden ist und ob alle
Teile richtig montiert sind. Sollten Sie Fragen haben
oder unsicher in Bezug auf die Handhabung des
Gerätes sein, setzen Sie sich bitte mit Ihrem Händler
oder der Servicestelle in Verbindung. Bewahren Sie
diese Anleitung bitte sorgfältig auf und geben Sie
sie ggf. an Dritte weiter.
Bestimmungsgemäße
Verwendung
Diese Leuchte ist ausschließlich für den
Betrieb im Innenbereich, in trockenen
und geschlossenen Räumen geeignet.
Dieses Gerät ist nur für den Einsatz in privaten
Haushalten vorgesehen. Die Leuchte ist vorgesehen
für den normalen Betrieb.
Lieferumfang
Kontrollieren Sie unmittelbar nach dem Auspacken
immer den Lieferumfang auf Vollständigkeit sowie
den einwandfreien Zustand des Gerätes.
1 LED-Tischleuchte, 14141605L / 14150705L
1 Steckertrafo
1 Leuchtenfuß
1 Bedienungsanleitung
Teilebeschreibung
1 Leuchtenkopf
1a Gelenk (Leuchtenkopf) (14141605L)
2 oberer Leuchtenarm (14141605L)
2a Gelenk (oberer Leuchtenarm) (14141605L)
3 unterer Leuchtenarm (14141605L)
3a Gelenk (unterer Leuchtenarm) (14141605L)
4 Steckertrafo
5 Zuleitung
6 Leuchtenfuß
7 Funktionstasten
8 ON / OFF-Touchtaste (14141605L) /
ON / OFF-Taste (14150705L)
9 Stift (14141605L)
10 Nut (14141605L)
11 Schraube
12 Taste (14150705L)
13 Taste (14150705L)
14 Taste S (14150705L)
15 Taste M (14150705L)
16 LC-Display (14150705L)
Technische Daten
14141605L:
Leuchte:
Modellnummer: 14141605L
Betriebsspannung: 100–240 V~50 / 60 Hz
Nennleistung max.: LED max. 9 W
Schutzklasse: II /
Schutzart: IP20
Legende der verwendeten Piktogramme

8 DE/AT/CH
Sicherheit / Inbetriebnahme Einleitung / Sicherheit
LED:
Modellnummer: 14141605L-1
Nennleistung: LED 6,6 W / 500 mA
Schutzklasse: III /
Eingangsstrom: 12 V
Netzteil:
Modellnummer: BLW018-1200550EU
Betriebsspannung: 100–240 V~ 50 / 60 Hz
Ausgangsspannung: 12 V , 550 mA
Schutzklasse: II /
Schutzart: IP20
Nennleistung: 10 W
14150705L:
Leuchte:
Modellnummer: 14150705L
Betriebsspannung: 230–240 V~50 Hz
Nennleistung max: LED max. 6 W
Schutzklasse: II /
Schutzart: IP20
LED:
Nennleistung: LED 4,2 W
Netzteil:
Modellnummer: BLW-5688-6
Betriebsspannung: 100–240 V~ 50 / 60 Hz
Ausgangsspannung: 12 V
Schutzklasse: II /
Schutzart: IP20
Nennleistung: 4,2 W
Sicherheit
Sicherheitshinweise
Bei Schäden, die durch Nichtbeachtung dieser
Bedienungsanleitung verursacht werden, erlischt
der Garantieanspruch! Für Folgeschäden wird keine
Haftung übernommen! Bei Sach- oder Personen-
schäden, die durch unsachgemäße Handhabung
oder Nichtbeachtung der Sicherheitshinweise ver-
ursacht werden, wird keine Haftung übernommen!
LEBENS- UND UNFALLGEFAHR
FÜR KLEINKINDER UND
KINDER!
Lassen Sie Kinder niemals unbeaufsichtigt mit
dem Verpackungsmaterial. Es besteht Erstickungs-
gefahr durch Verpackungsmaterial. Kinder un-
terschätzen häufig die Gefahren. Halten Sie
Kinder stets vom Produkt fern.
Dieses Gerät kann von Kindern ab 8 Jahren und
darüber, sowie von Personen mit verringerten
physischen, sensorischen oder mentalen Fähig-
keiten oder Mangel an Erfahrung und Wissen
benutzt werden, wenn sie beaufsichtigt oder
bezüglich des sicheren Gebrauchs des Gerätes
unterwiesen wurden und die daraus resultieren-
den Gefahren verstehen. Kinder dürfen nicht
mit dem Gerät spielen. Reinigung und Benut-
zerwartung dürfen nicht von Kindern ohne
Beaufsichtigung durchgeführt werden.
Vermeiden Sie Lebensgefahr
durch elektrischen Schlag
Überprüfen Sie vor jedem Gebrauch die Leuchte
auf etwaige Beschädigungen. Benutzen Sie
Ihre Leuchte niemals, wenn Sie irgendwelche
Beschädigungen feststellen.
Eine beschädigte Leuchte bedeutet Lebensge-
fahr durch elektrischen Schlag. Wenden Sie sich
bei Beschädigungen, Reparaturen oder anderen
Problemen an der Leuchte an die Servicestelle
oder eine Elektrofachkraft.
Zur Vermeidung von Gefährdungen darf die
beschädigte äußere flexible Leitung dieser
Leuchte ausschließlich vom Hersteller, seinem
Servicevertreter oder einer vergleichbaren Fach-
kraft ausgetauscht werden!
Vergewissern Sie sich vor der Benutzung, dass
die vorhandene Netzspannung mit der benötig-
ten Betriebsspannung der Leuchte übereinstimmt
(siehe „Technische Daten“).
Die Lichtquelle dieser Leuchte darf nur vom
Hersteller oder von einem von ihm beauftragten
Techniker oder einer vergleichbar qualifizierten
Person ersetzt werden.

9 DE/AT/CH
Sicherheit / Inbetriebnahme
Vermeiden Sie unbedingt die Berührung der
Leuchte mit Wasser oder anderen Flüssigkeiten.
Um die Leuchte vollständig von der Stromver-
sorgung zu trennen, muss der Steckertrafo 4
aus der Steckdose entfernt werden.
Ziehen Sie immer den Steckertrafo 4 vor der
Montage, Demontage, Reinigung oder, wenn
Sie die Leuchte eine Zeit lang nicht verwenden,
aus der Steckdose.
Öffnen Sie niemals eines der elektrischen Betr
iebs-
mittel oder stecken irgendwelche Gegenstände
in dieselben. Derartige Eingriffe bedeuten
Lebensgefahr durch elektrischen Schlag.
Das Leuchtmittel ist nicht geeignet für
externe Dimmer und elektronische
Schalter.
Verwenden Sie die Zuleitung 5 nicht als
Tragegriff.
Knicken Sie die Zuleitung 5 nicht und legen
Sie sie nicht über scharfe Kanten.
Vermeiden Sie Brand- und
Verletzungsgefahr
VERLETZUNGSGEFAHR!
Überprüfen Sie unmittelbar nach dem Auspacken
jedes Leuchtmittel auf Beschädigungen. Montie-
ren Sie die Leuchte nicht mit defekten Leuchtmit-
teln. Setzen Sie sich in diesem Fall für Ersatz mit
der Servicestelle in Verbindung.
Nicht direkt in die Lichtquelle (Leuchtmittel, LED
etc.) hineinschauen.
Decken Sie die Leuchte bzw. den Steckertrafo 4
nicht mit Gegenständen ab. Eine übermäßige
Wärmeentwicklung kann zu Brandentwicklung
führen.
Lassen Sie die Leuchte im Betrieb nicht unbe-
aufsichtigt.
Die LED nicht mit einem optischen Instrument
(z. B. Lupe) betrachten.
Inbetriebnahme
Modell 14141605L:
Nehmen Sie die Teile der Leuchte vorsichtig
aus der Verpackung.
Entfernen Sie sämtliches Schutzmaterial.
Stecken Sie den unteren Leuchtenarm 3 so
in die dafür vorgesehene Befestigung, dass der
Stift 9 in der Nut 10 sitzt (siehe Abb. A). Ach-
ten Sie darauf, dass Sie den Leuchtenarm nicht
beschädigen.
Um den unteren Leuchtenarm 3 zu befestigen,
ziehen Sie die Schraube 11 leicht an (siehe
Abb. B).
Verbinden Sie den Steckertrafo 4 mit dem
Leuchtenfuß 6.
Stecken Sie den Steckertrafo 4 in eine
vorschriftsmäßig installierte Steckdose.
Ihre Leuchte ist nun betriebsbereit.
Modell 14150705L:
Nehmen Sie die Teile der Leuchte vorsichtig
aus der Verpackung.
Entfernen Sie sämtliches Schutzmaterial.
Entfernen Sie die beiden Schrauben 11 von
der Unterseite der Leuchte (siehe Abb. A).
Setzen Sie die Leuchte auf den Leuchtenfuß 6
(siehe Abb. B) und schrauben Sie diesen mit
den beiden Schrauben 11 von unten fest
(siehe Abb. C).
Achten Sie auf den richtigen Sitz.
Verbinden Sie den Steckertrafo 4 mit dem
Leuchtenfuß 6.
Stecken Sie den Steckertrafo 4 in eine vor-
schriftsmäßig installierte Steckdose.
Hinweis: Der Leuchtenkopf 1 kann nicht
aus gerichtet werden.
Ihre Leuchte ist nun betriebsbereit.
Leuchte ein- / ausschalten
Modell 14141605L:
Berühren Sie die ON / OFF-Touchtaste 8, um
die Leuchte ein- bzw. auszuschalten.
Hinweis: Die Leuchte bestätigt die Stromzufuhr
mit einem grünen Aufblinken der Funktions-
tasten 7.
Einleitung / Sicherheit

10 DE/AT/CH
Funktionen der Leuchte / Wartung und ReinigungInbetriebnahme / Funktionen der Leuchte
Modell 14150705L:
Drücken Sie die ON / OFF-Taste 8, um die
Leuchte ein- bzw. auszuschalten.
Leuchte ausrichten
Modell 14141605L:
Hinweis: Verändern Sie die Ausrichtung an den
3 Gelenken 1a , 2a und 3a nur, wenn die Leuchte
ausgeschaltet ist.
Lassen Sie die Leuchte vollständig abkühlen.
Bringen Sie den Leuchtenkopf 1, den oberen
Leuchtenarm
2
und den unteren Leuchtenarm
3
in die gewünschte Position.
Wenn Sie die Schraube 11 an der unteren
Befestigung leicht lösen, können Sie die Leuchte
auch drehen.
Ziehen Sie die Schraube 11 nach dem Drehen
wieder fest an.
Funktionen der Leuchte
Modell 14141605L:
Mit den Funktionstasten 7 können
folgende Einstellungen vorgenommen
werden:
Read: neutralweißes Licht
Work: kaltweißes Licht
Relax: warmweißes Licht
High: stufenloses Hochdimmen
Low: stufenloses Herunterdimmen
Wenn Sie die Leuchte vom Stromnetz trennen,
startet sie wieder in der Einstellung „Read“.
Hinweis: Die Leuchte verfügt über eine
Memory-Funktion; sie speichert die zuvor
ausgewählte Einstellung.
Modell 14150705L:
Mit den Funktionstasten 7 können
folgende Einstellungen vorgenommen
werden:
CCT: Farbtemperatur in 3 Stufen einstellen
LOW: stufenloses Herunterdimmen
HIGH: stufenloses Hochdimmen
Hinweis: Die Leuchte verfügt über eine Memory-
funktion. Beim Einschalten ist die zuletzt ausge-
wählte Einstellung aktiv.
Mit den Steuerungstasten 12 , 13 , 14 und 15
können folgende Einstellungen vorge-
nommen werden:
Taste M 15 : zwischen Anzeige für Uhrzeit und
Weckalarm wechseln
Taste S 14 : Einstellungen bestätigen
Taste 13 : den nächsthöheren Wert einstellen /
zwischen 12h- / 24 h-Anzeige
wechseln
Taste 12 : den nächstkleineren Wert einstellen /
zwischen °C / °F wechseln
Uhrzeit / Datum einstellen:
Drücken Sie die Taste M 15 , bis das Symbol
im LC-Display 16 angezeigt wird.
Drücken Sie die Taste S 14 . Die Stundenanzeige
und das Symbol blinken.
Drücken Sie die Tasten 13 und 12 ,
um die Einstellungen für die Stundenanzeige
vorzunehmen und drücken Sie erneut die Taste
S 14 . Die Minutenanzeige und das Symbol
blinken.
Nehmen Sie nun mithilfe der Tasten 13 und
12 die weiteren Einstellungen für Minute /
Jahr / Monat (Month) / Tag (Day) vor und be-
stätigen Sie jede Einstellung durch Drücken der
Taste S 14 .
Hinweis: Das Symbol hört auf zu blinken,
wenn die Einstellungen abgeschlossen sind.

11 DE/AT/CH
Funktionen der Leuchte / Wartung und Reinigung
Weckalarm einstellen:
Drücken Sie die Taste M 15 , bis das Symbol
im LC-Display 16 angezeigt wird.
Hinweis: Die Anzeige im LC-Display
16
wechselt
zwischen Uhrzeit und Weckalarm .
Wird der Weckalarm gewählt, aber keine
Einstellungen vorgenommen, wechselt die An-
zeige im LC-Display 16 nach ca. 60 Sekunden
zurück zur Uhrzeitanzeige .
Drücken Sie die Taste S 14 . Die Stundenanzeige
und das Symbol blinken.
Stellen Sie mit den Tasten 13 und 12 die
Stunde ein und drücken erneut die Taste S 14 .
Die Minutenanzeige und das Symbol blinken.
Stellen Sie mit den Tasten 13 und 12 die
Minuten ein und drücken erneut die Taste S 14 .
Die Anzeige für die Dauer der Schlummerzeit
und das Symbol blinken.
Stellen Sie mit den Tasten 13 und 12 die
Schlummerzeit im Bereich von 1 bis 60 Minuten
ein und drücken erneut die Taste S 14 .
Am unteren Rand des LC-Displays 16 blinkt die
Nummer des Wecktons.
Wählen Sie mit den Tasten 13 und 12
einen der 8 verschiedenen Wecktöne aus.
Hinweis: Nach Abschluss der Einstellungen
für den Weckalarm leuchtet das Symbol
konstant im LC-Display 16 .
Weckalarm / Schlummerfunktion
aktivieren / deaktivieren:
Drücken Sie die Taste M 15 , bis das Symbol
im LC-Display 16 angezeigt wird.
Drücken Sie die Taste 13 . Im LC-Display 16
werden die Symbole und angezeigt. Der
zuvor eingestellte Weckalarm ist nun aktiviert.
Drücken Sie nun die Taste 13 oder 12 .
Im LC-Display 16 werden nun die Symbole ,
und angezeigt. Die zuvor eingestellte
Schlummerfunktion ist nun aktiviert.
Hinweis: Um den Weckalarm und die
Schlummerfunktion zu deaktivieren, drücken Sie
die Taste 13 oder 12 . Im LC-Display 16
erlischen die zuvor angezeigten Symbole ,
und .
Hinweis: Der Weckalarm beträgt ca. 1 Minute.
Weckalarm / Schummerfunktion
ausschalten:
Weckalarm ohne Schlummerfunktion:
Drücken Sie, wenn die Schlummerfunktion nicht
aktiviert ist, eine der 4 Funktionstasten 12 , 13 ,
14
oder
15
, um den Weckalarm auszuschalten.
WICHTIG: Der Weckalarm ist für den folgen-
den Tag noch aktiviert.
Weckalarm mit Schlummerfunktion:
Ist die Schlummerfunktion aktiviert, startet der
Weckalarm nach Ablauf der eingestellten Schlum-
merfunktion erneut (max. dreimal).
Drücken Sie die Taste M 15 , bis das Symbol
im LC-Display 16 angezeigt wird.
Drücken Sie nun die Taste 13 oder 12 ,
bis die Symbole und erlischen, um
den Weckalarm mit Schlummerfunktion auszu-
schalten.
WICHTIG: Der Weckalarm ist nun auch für
den folgenden Tag deaktiviert.
Zwischen 12h -/ 24h-Anzeige wechseln:
Drücken Sie die Taste M 15 , bis das Symbol
im LC-Display 16 angezeigt wird.
Drücken Sie die Taste 13 . Die Stunden-
anzeige im LC-Display 16 wechselt zwischen
den Anzeigeformaten 12h und 24h.
Hinweis: Im Anzeigeformat 12h erscheint
nachmittags vor der Uhrzeit die Anzeige PM.
Temperaturanzeige einstellen:
Drücken Sie die Taste M 15 , bis das Symbol
im LC-Display 16 angezeigt wird.
Drücken Sie die Taste 12 . Die Tempera-
turanzeige im LC-Display 16 wechselt zwischen
°C (Celsius) und °F (Fahrenheit).
Wartung und Reinigung
STROMSCHLAGGEFAHR!
Ziehen Sie den Steckertrafo 4 bei jeder Wartung
und Reinigung zuerst aus der Steckdose.
STROMSCHLAGGEFAHR!
Aus Gründen der elektrischen Sicherheit darf die
Leuchte niemals mit Wasser oder anderen Flüssig-
keiten gereinigt oder gar in Wasser getaucht werden.
Inbetriebnahme / Funktionen der Leuchte

12 DE/AT/CH
Wartung und Reinigung / Entsorgung / Informationen / Konformitätserklärung
VORSICHT! VERBRENNUNGSGEFAHR
DURCH HEISSE OBERFLÄCHEN!
Lassen Sie die Leuchte zunächst vollständig abkühlen.
Benutzen Sie keine Lösungsmittel, Benzin o. Ä.
Die Leuchte würde hierbei Schaden nehmen.
Verwenden Sie zur Reinigung nur ein trockenes,
fusselfreies Tuch.
Stecken Sie den Steckertrafo 4 wieder in die
Steckdose.
Entsorgung
b
a
Beachten Sie die Kennzeichnung der
Verpackungsmaterialien bei der Abfall-
trennung, diese sind gekennzeichnet mit
Abkürzungen (a) und Nummern (b) mit
folgender Bedeutung: 1–7: Kunststoffe /
20–22: Papier und Pappe / 80–98:
Verbundstoffe.
D
as Produkt und die Verpackungsmateria-
lien sind recycelbar, entsorgen Sie diese
getrennt für eine bessere Abfallbehandlung.
Das Triman-Logo gilt nur für Frankreich.
Werfen Sie Ihr Produkt, wenn es ausge-
dient hat, im Interesse des Umweltschutzes
nicht in den Hausmüll, sondern führen Sie
es einer fachgerechten Entsorgung zu.
Über Sammelstellen und deren Öffnungs-
zeiten können Sie sich bei Ihrer zuständi-
gen Verwaltung informieren.
Informationen
Garantie
Sie erhalten zum Zeitpunkt des Kaufs auf dieses Gerät
36 Monate Garantie. Das Gerät wurde sorgfältig
produziert und einer genauen Qualitätskontrolle
unterzogen. Innerhalb der Garantiezeit beheben wir
kostenlos alle Material- oder Herstellerfehler. Sollten
sich dennoch während der Garantiezeit Mängel
herausstellen, senden Sie das Gerät bitte an die
aufgeführte Service-Adresse unter Angabe folgen-
der Artikel-Nummer: 14141605L / 14150705L.
Von der Garantie ausgeschlossen sind Schäden
durch nicht sachgemäße Handhabung, Nichtbe-
achtung der Bedienungsanleitung oder Eingriff durch
nicht autorisierte Personen sowie Verschleißteile (wie
z. B. Leuchtmittel). Durch die Garantieleistung wird
die Garantiezeit weder verlängert noch erneuert.
Hersteller / Service
Briloner Leuchten GmbH & Co. KG
Im Kissen 2
59929 Brilon
DEUTSCHLAND
Tel.: +49 29 61 / 97 12–800
Fax: +49 29 61 / 97 12–199
E-Mail: [email protected]
www.briloner.com
Kostenlose Servicenummer:
Tel.: 00800 / 27456637
IAN 345257_2004
Bitte halten Sie für alle Anfragen den Kassenbon
und die Artikelnummer (z. B. IAN 123456_7890)
als Nachweis für den Kauf bereit.
Konformitätserklärung
Dieses Produkt erfüllt die Anforderungen der geltenden
europäischen und nationalen Richtlinien. Die Kon-
formität wurde nachgewiesen. Entsprechende
Erklärungen und Unterlagen sind beim Hersteller
hinterlegt.
Table of contents

13 GB/IE
Wartung und Reinigung / Entsorgung / Informationen / Konformitätserklärung Table of contents
List of pictograms used ........................................................................................................ Page 14
Introduction ................................................................................................................................... Page 15
Intended use ........................................................................................................................................ Page 15
Scope of delivery ................................................................................................................................Page 15
Parts description ..................................................................................................................................Page 15
Technical data ..................................................................................................................................... Page 15
Safety .................................................................................................................................................Page 16
Safety information ............................................................................................................................... Page 16
Initial use .........................................................................................................................................Page 17
Switching the lamp on / off .................................................................................................................Page 17
Adjusting the light ................................................................................................................................Page 17
Light functions .............................................................................................................................Page 18
Maintenance and cleaning ............................................................................................... Page 19
Disposal ............................................................................................................................................Page 19
Information....................................................................................................................................Page 20
Warranty .............................................................................................................................................Page 20
Manufacturer / Service .......................................................................................................................Page 20
Declaration of conformity ................................................................................................. Page 20

14 GB/IE
List of pictograms used
List of pictograms used
Read the instructions! Electric shock warning!
Danger to life!
VVolt The light bulb is not suitable for
external dimmers or electronic
switches.
A.C. a.c.
Alternating current
(type of current and voltage) For your safety
Hertz (mains frequency) Caution! Risk of burns due to hot
surfaces!
Watt (effective power) Lifespan
Safety class II ON OFF Switching cycles
Observe the warnings and safety notices! For indoor use only
This light is only suitable for indoor use
in dry and enclosed spaces. ta Ambient temperature
Danger to life and risk of accidents
for infants and children! tc Housing temperature at stated point
Polarity of the power supply SELV Safety extra-low voltage
Separate control unit The packaging is made from
100 % recycled paper.
Short-circuit proof safety transformer
b
a
Dispose of the packaging and de-
vice in an environmentally friendly
manner!
d.c. DC Direct current
(type of current and voltage)
The lamp is suitable for installation on
any surface of normal flammability.
Protection class III mA Milliampere
Continuously variable dimmable With memory function
Light temperature in Kelvin Ra Colour rendering index
List of pictograms used / Introduction

15 GB/IE
List of pictograms used List of pictograms used / Introduction
List of pictograms used
Alarm function Calendar
Time display
LED desk lamp
Introduction
Congratulations on your new product.
You have selected a high quality product.
Please be sure to carefully read the com-
plete operating instructions. Fold out the page with
the illustrations. These instructions are part of the
product and contain important information on setup
and handling. Always follow all safety instructions.
Before using this product for the first time verify the
correct voltage and that all parts are properly in-
stalled. Should you have any questions or you are
unsure about operating the product, please contact
the dealer or service centre. Please keep these in-
structions in a safe place and pass them on third
parties as applicable.
Intended use
This light is only suitable for indoor use
in dry and enclosed spaces. This product
is intended for private household use only.
The lamp is intended for normal operation.
Scope of delivery
Check immediately after unpacking that the parts are
complete and that the product is in proper condition.
1 LED desk lamp 14141605L / 14150705L
1 Plug-in transformer
1 Lamp base
1 Set of instructions for use
Parts description
1 Lamp head
1a Joint (lamp head) (14141605L)
2 upper lamp arm (14141605L)
2a Joint (upper lamp arm) (14141605L)
3 lower lamp arm (14141605L)
3a Joint (lower lamp arm) (14141605L)
4 Plug-in transformer
5 Power cable
6 Lamp base
7 Function buttons
8 ON / OFF touch button (14141605L) /
ON / OFF button (14150705L)
9 Pin (14141605L)
10 Slot (14141605L)
11 Screw
12 Button (14150705L)
13 Button (14150705L)
14 S button (14150705L)
15 M button (14150705L)
16 LC display (14150705L)
Technical data
14141605L:
Lamp:
Model number: 14141605L
Operating voltage: 100–240 V~ 50 / 60 Hz
Max. rated power: LED max. 9 W
Protection class: II /
IP rating: IP20
LED:
Model number: 14141605L-1
Rated power: LED 6.6 W / 500 mA
Protection class: III /
Input current: 12 V

16 GB/IE
Introduction / Safety
Mains adapter:
Model number: BLW018-1200550EU
Operating voltage: 100–240 V~ 50 / 60 Hz
Output voltage: 12 V , 550 mA
Protection class: II /
IP rating: IP20
Rated power: 10 W
14150705L:
Lamp:
Model number: 14150705L
Operating voltage: 230–240 V~ 50 Hz
Max. rated power: LED max. 6 W
Protection class: II /
IP rating: IP20
LED:
Rated power: LED 4.2 W
Mains adapter:
Model number: BLW-5688-6
Operating voltage: 100–240 V~ 50 / 60 Hz
Output voltage: 12 V
Protection class: II /
IP rating: IP20
Rated power: 4.2 W
Safety
Safety information
Damage due to failure to comply with these operat-
ing instructions will invalidate the guarantee! We
assume no liability for consequential damage!
We assume no liability for material damage or
personal injury due to improper handling or failure
to comply with the safety instructions!
RISK OF FATAL INJURY AND
ACCIDENT HAZARD FOR TOD-
DLERS AND SMALL CHILDREN!
Never leave children unsupervised with the
packaging materials. The packaging material
poses a suffocation hazard. Children frequently
underestimate the dangers. Please always keep
the product out of the reach of children.
This device may be used by children aged
8 years and up, as well as by persons with re-
duced physical, sensory or mental capacities,
or lacking experience and/or knowledge, so
long as they are supervised or instructed in
the safe use of the device and understand the
associated risks. Do not allow children to play
with the device. Cleaning and user maintenance
must not be performed by children without su-
pervision.
Avoid the risk of fatal injury
from electric shock
Check the light for damage every time before
you use it. Never use the light if it shows any
signs of damage.
A damaged light means danger of death from
electric shock. In the event of damage, repairs
or other problems with the light please contact
the service centre or a qualified electrician.
To prevent hazards, a damaged flexible outer
lead on this lamp must be replaced by the man-
ufacturer, its service representative or an equally
qualified professional!
Before use, verify the available mains voltage
corresponds with the operating voltage of the
lamp (see “Technical data”).
The illuminant in this light must be replaced by
the manufactured or an authorised technician
or similarly qualified person.
Ensure that the light does not come into contact
with water or other liquids under any circum-
stances.
In order to completely disconnect the lamp from
the power supply, the plug-in transformer 4
must be removed from the socket.
Always disconnect the plug-in transformer 4
from the mains prior to assembly, disassembly,
cleaning, or if the light will not be used for
extended periods.
Never open any of the components of the elec-
trical equipment or insert any objects into the
same components. This will pose a risk of fatal
injury from electric shock.
Safety / Initial use

17 GB/IE
Introduction / Safety
The light bulb is not suitable for
external dimmers or electronic
switches.
Never use the power cable 5 to carry the
device.
Do not kink the power cable 5 or run it over
sharp edges.
Prevent fire and
injury hazards
RISK OF INJURY!
Check every illuminant for damage immediately
upon unpacking. Do not install the light if the il-
luminants are defective. In this case contact the
service centre for a replacement.
Do not look directly into the light source (light
bulb, LED etc.).
Do not cover the lamp or the plug-in transformer
4 with objects. Excessive heat build-up can
result in fire.
Never leave the lamp unattended whilst in use.
D
o not look at the LED with an optical instrum
ent
(e.g. magnifier).
Initial use
Model 14141605L:
Carefully remove the parts of the lamp from the
packaging.
Remove all protective material.
Insert the lower lamp arm 3 into the mounting
provided so that the pin 9 is seated in the slot
10 (see Fig. A). Be careful not to damage the
lamp arm.
To fasten the lower lamp arm 3, tighten the
screw 11 slightly (see Fig. B).
Connect the plug-in transformer 4 to the lamp
base 6.
Plug the plug-in transformer 4 into a socket that
has been professionally installed.
Your lamp is now ready to use.
Model 14150705L:
Carefully remove the parts of the lamp from the
packaging.
Remove all protective material.
Remove both screws 11 from the underside of
the lamp (see Fig. A).
Position the lamp on the lamp base 6 (see
Fig. B) and screw this in place from underneath
using the two screws 11 (see Fig. C).
Be sure it is positioned correctly.
Connect the plug-in transformer 4 to the lamp
base 6.
Plug the plug-in transformer 4 into a socket
that has been professionally installed.
Note: The lamp head 1 cannot be adjusted.
Your lamp is now ready to use.
Switching the lamp on / off
Model 14141605L:
Touch the ON / OFF touch button 8 to switch
the lamp on or off.
Note: The lamp confirms the power supply by
flashing the function buttons 7 green.
Model 14150705L:
Press the ON / OFF button 8 to switch the
lamp on or off.
Adjusting the light
Model 14141605L:
Note: Only adjust the 3 joints
1a
,
2a
and
3a
when
the lamp is switched off.
Allow the lamp to cool down completely.
Move the lamp head
1
, the upper lamp arm
2
,
and the lower lamp arm
3
to the desired position.
If you slightly loosen the screw 11 on the lower
fastening, you can also turn the lamp.
Re-tighten the screw 11 securely after turning.
Safety / Initial use

18 GB/IE
Light functions / Maintenance and cleaning / Disposal Light functions
Light functions
Model 14141605L:
The following settings can be applied
using the function buttons 7:
Read: neutral white light
Work: cold white light
Relax: warm white light
High: continuous brightening
Low: continuous dimming
When you disconnect the lamp from the mains
power, it will start again in the ”Read” setting.
Note: The lamp has a memory function; it
saves the previously selected setting.
Model 14150705L:
The following settings can be applied
using the function buttons 7:
CCT: Set the colour temperature in 3 stages
LOW: continuous dimming
HIGH: continuous brightening
Note: The lamp has a memory function. When the
lamp is switched on, the most recently selected
setting is active.
The following settings can be applied using
the control buttons 12 , 13 , 14 and 15 :
M button 15 : switch between the information for
the time and alarm
S button 14 : confirm settings
Button 13 : set the next highest value / switch
between 12h / 24h display
Button 12 : set the next smallest value / switch
between °C / °F
Set the time / date:
Press the M button 15 until the symbol
appears in the LC display 16 .
Press the S button 14 . The hour information
and the symbol will flash.
Press the buttons 13 and 12 , to apply
the settings for the hour information, and press
the S button 14 again. The minute information
and the symbol will flash.
Now use the buttons 13 and 12 to
apply the other settings for minute / year /
month / day and confirm each setting by press-
ing the S button 14 .
Note: The symbol stops blinking when the
settings are finalised.
Setting the alarm:
Press the M button 15 until the symbol
appears in the LC display 16 .
Note: The information in the LC display 16
switches between the time and the alarm .
If the alarm is selected, but no settings are
applied, after approx. 60 seconds the informa-
tion in the LC display 16 switches back to
showing the time .
Press the S button 14 . The hour information
and the symbol will flash.
Set the hour using the buttons
13
and
12
and press the S button 14 again. The minute
information and the symbol will flash.
Set the minutes using the buttons 13 and
12 and press the S button 14 again. The
information for the duration of the snooze time
and the symbol will flash.
Set the snooze time within a range of 1 to 60
minutes using the buttons 13 and 12
and press the S button 14 again.
The number of the alarm tone will flash in the
lower edge of the LC display 16 .
Select one of the 8 different alarm tones using
the buttons 13 and 12 .
Note: After finalising the settings for the alarm,
the symbol lights up constantly in the LC
display 16 .
Activating / Deactivating the alarm /
snooze function:
Press the M button 15 until the symbol
appears in the LC display 16 .

19 GB/IE
Light functions / Maintenance and cleaning / Disposal
Press the button 13 . The symbols and
will appear in the LC display 16 . The pre-
viously set alarm is now activated.
Now press the button 13 or 12 . Now
the symbols , and will appear in
the LC display 16 . The previously set snooze
function is now activated.
Note: To deactivate the alarm and the snooze
function, press the button 13 or 12 . The
symbols , and that were previously
shown in the LC display 16 will disappear.
Note: The alarm lasts approx. 1 minute.
Switching the alarm / snooze function off:
Alarm without snooze function:
When the snooze function is not activated,
press one of the 4 function buttons 12 , 13 , 14
or 15 to switch off the alarm.
IMPORTANT: The alarm is still activated for
the following day.
Alarm with snooze function:
If the snooze function is activated, the alarm starts
again after the set snooze function has finished
(max three times).
Press the M button 15 until the symbol
appears in the LC display 16 .
Now press the button 13 or 12 , until
the symbols and disappear, in order
to switch off the alarm with snooze function.
IMPORTANT: The alarm is now also deacti-
vated for the following day.
Switching between 12h / 24h display:
Press the M button 15 until the symbol
appears in the LC display 16 .
Press the button 13 . The hour information
in the LC display 16 switches between the 12h
and 24h formats.
Note: In the 12h format, the information PM
appears in front of the time in the afternoon.
Setting the temperature display:
Press the M button 15 until the symbol
appears in the LC display 16 .
Press the button 12 . The temperature infor-
mation in the LC display
16
switches between °C
(Celsius) und °F (Fahrenheit).
Maintenance and cleaning
DANGER OF
ELECTRIC SHOCK!
Always unplug the plug-in transformer 4 from the
mains socket before performing maintenance or
cleaning.
DANGER OF
ELECTRIC SHOCK!
For electrical safety, never clean the light with
water or other liquids, or immerse it in water.
CAUTION! RISK OF BURNS DUE TO
HOT SURFACES!
Allow the lamp to cool down completely.
Do not use solvents, benzene or similar
substances. They could damage the light.
Only use a dry, lint-free cloth for cleaning.
Plug the plug-in transformer 4 into the mains
socket again.
Disposal
b
a
Observe the marking of the packaging
materials for waste separation, which
are marked with abbreviations (a) and
numbers (b) with following meaning:
1–7: plastics / 20–22: paper and fibre-
board / 80–98: composite materials.
The product and packaging materials
are recyclable, dispose of it separately
for better waste treatment. The Triman
logo is valid in France only.
To help protect the environment, please
dispose of the product properly when it
has reached the end of its useful life and
not in the household waste. Information
on collection points and their opening
hours can be obtained from your local
authority.
Light functions

20 GB/IE
Information / Declaration of conformity
Information
Warranty
You receive a 36 month warranty on this product,
valid from the date of purchase. The appliance has
been carefully produced under strict quality control.
Within the warranty period we shall rectify without
charge all material and manufacturing defects. In the
event of a defect arising during the warranty period,
please send the appliance to the listed Service Centre
address, making reference to the following article
number: 14141605L / 14150705L.
Wear parts (such as bulbs) and damage caused by
improper handling, non-observance of the operating
instructions or unauthorised interference are excluded
from the warranty. The performance of services un
der
the warranty does not extend or renew the warranty
period.
Manufacturer / Service
Briloner Leuchten GmbH & Co. KG
Im Kissen 2
59929 Brilon
GERMANY
Tel.: +49 29 61 / 97 12–800
Fax: +49 29 61 / 97 12–199
E-Mail: [email protected]
www.briloner.com
Free service number:
Tel.: 00800 / 27456637
IAN 345257_2004
Please have your receipt and the article number
(e.g. IAN 123456_7890) ready as your proof
of purchase when enquiring about your product.
Declaration of conformity
This product fulfils the requirements of the applicable
European and national directives. Conformity has
been demonstrated. The relevant declarations and
documents are held by the manufacturer.
Table des matières

21 FR/BE
Information / Declaration of conformity Table des matières
Légende des pictogrammes utilisés .......................................................................... Page 22
Introduction ................................................................................................................................... Page 23
Utilisation conforme ............................................................................................................................Page 23
Contenu de la livraison .......................................................................................................................Page 23
Descriptif des pièces ...........................................................................................................................Page 23
Caractéristiques techniques ................................................................................................................Page 24
Sécurité .............................................................................................................................................Page 24
Indications de sécurité ........................................................................................................................Page 24
Mise en service ...........................................................................................................................Page 25
Allumer / éteindre la lampe ................................................................................................................Page 26
Orienter la lampe ................................................................................................................................Page 26
Fonctions de la lampe ........................................................................................................... Page 26
Entretien et nettoyage..........................................................................................................Page 28
Mise au rebut ............................................................................................................................... Page 28
Informations .................................................................................................................................Page 28
Garantie ..............................................................................................................................................Page 28
Fabricant / S.A.V. ................................................................................................................................Page 29
Déclaration de conformité ................................................................................................ Page 29

22 FR/BE
Légende des pictogrammes utilisés / Introduction Légende des pictogrammes utilisés
Légende des pictogrammes utilisés
Lisez les instructions! Attention au risque d'électrocution !
Danger de mort !
VVolt Cette ampoule n'est pas adaptée
aux variateurs et interrupteurs
électriques extérieurs.
A.C. a.c.
Tension alternative
(type de courant et de tension) Conduite à tenir
Hertz (fréquence) Attention! Risque de brûlures à
cause des surfaces brûlantes!
Watt (puissance active) Durée de vie
Classe de protection II ON OFF Cycles de commutation
Respecter les avertissements et
consignes de sécurité ! Pour un usage en intérieur
Cette lampe est exclusivement conçue
pour un usage en intérieur, dans des
locaux secs et fermés. ta Température ambiante
Danger de mort et d'accident pour les
enfants en bas âge et les enfants ! tc Température du logement à
l'endroit indiqué
Polarité de l'alimentation secteur SELV Très basse tension
Dispositif de fonctionnement autonome L'emballage est composé à
100% de papier recyclé.
Transformateur de sécurité
anti-court-circuit b
a
Mettez l'emballage et l'appareil au
rebut dans le respect de
l'environnement!
d.c. DC Tension continue
(type de courant et de tension)
La lampe est appropriée au montage
sur des surfaces normalement inflam-
mables.
Classe de protection III mA Milliampère
Variation en continu Avec fonction mémoire

23 FR/BE
Légende des pictogrammes utilisés / Introduction
Légende des pictogrammes utilisés
Température de lumière en kelvins Ra Indice de restitution des couleurs
Fonction d'alarme Calendrier
Affichage de l'heure
Lampe de table à LED
Introduction
Félicitations pour l‘achat de votre nouvel
appareil. Vous avez opté pour un produit
de grande qualité. Veuillez lire ce mode
d‘emploi intégralement et attentivement. Ouvrez la
page contenant les illustrations. Le présent mode
d‘emploi fait partie de ce produit et contient des
instructions essentielles pour sa mise en service et sa
manipulation. Respectez toujours toutes les consignes
de sécurité. Avant la mise en service, vérifiez si la
tension est correcte et si toutes les pièces sont cor-
rectement montées. Si vous avez des questions ou
des doutes concernant la manipulation de l‘appa-
reil, veuillez contacter votre revendeur ou le service
après-vente. Veuillez conserver soigneusement ce
mode d‘emploi et remettez-le aux autres utilisateurs.
Utilisation conforme
Cette lampe est exclusivement conçue
pour un usage intérieur, dans des locaux
secs et fermés. Cet appareil est destiné
uniquement à un usage domestique privé. La lampe
est prévue pour un fonctionnement normal.
Contenu de la livraison
Contrôlez toujours immédiatement après le débal-
lage que le contenu de la livraison est complet et
que l’appareil se trouve en parfait état.
1 lampe de bureau à LED, 14141605L / 14150705L
1 transformateur à fiche
1 pied de lampe
1 mode d'emploi
Descriptif des pièces
1 Tête de lampe
1a Articulation (tête de lampe) (14141605L)
2 Bras de lampe supérieur (14141605L)
2a Articulation (bras de lampe supérieur)
(14141605L)
3 Bras de lampe inférieur (14141605L)
3a Articulation (bras de lampe inférieur)
(14141605L)
4 Transformateur à fiche
5 Câble d'alimentation
6 Pied de lampe
7 Touches de fonction
8 Touche tactile ON / OFF (14141605L) /
Touche ON / OFF (14150705L)
9 Tige (14141605L)
10 Rainure (14141605L)
11 Vis
12 Touche (14150705L)
13 Touche (14150705L)
14 Touche S (14150705L)
15 Touche M (14150705L)
16 Écran à cristaux liquides (14150705L)
Légende des pictogrammes utilisés

24 FR/BE
Introduction / Sécurité
Caractéristiques techniques
14141605L:
Lampe:
Référence de modèle : 14141605L
Tension de service: 100–240 V~
50 / 60 Hz
Puissance nominale max.: LED max. 9 W
Classe de protection: II /
Type de protection: IP20
LED:
Référence de modèle: 14141605L-1
Puissance nominale: LED 6,6 W / 500 mA
Classe de protection: III /
Courant d'entrée: 12 V
Alimentation électrique:
Référence de modèle: BLW018-1200550EU
Tension de service: 100–240 V~
50 / 60 Hz
Tension de sortie: 12 V , 550 mA
Classe de protection: II /
Type de protection: IP20
Puissance nominale: 10 W
14150705L:
Lampe:
Référence de modèle : 14150705L
Tension de fonctionnement: 230–240 V~50 Hz
Puissance nominale max.: LED, max. 6 W
Classe de protection: II /
Type de protection: IP20
LED:
Puissance nominale: LED 4,2 W
Alimentation électrique:
Référence de modèle: BLW-5688-6
Tension de service: 100–240 V~
50 / 60 Hz
Tension de sortie: 12V
Classe de protection: II /
Type de protection: IP20
Puissance nominale: 4,2 W
Sécurité
Indications de sécurité
Les droits de recours en garantie sont annulés en cas
de dommages résultant du non-respect du présent
mode d’emploi ! Le fabricant décline toute respon-
sabilité pour les dommages indirects ! De même, toute
responsabilité est déclinée pour les dommages ma-
tériels ou corporels causés par une manipulation
in-
correcte ou le non-respect des consignes de sécurité !
DANGER DE MORT ET D‘ACCI-
DENT POUR LES ENFANTS EN
BAS ÂGE ET LES ENFANTS !
Ne jamais laisser les enfants manipuler sans
surveillance le matériel d‘emballage. Le matériel
d‘emballage présente un risque d‘étouffement.
Les enfants sous-estiment souvent les dangers.
Toujours tenir le produit à l‘écart des enfants.
Ce produit peut être utilisé par des enfants
de 8 ans et plus, ainsi que par des personnes
avec des capacités physiques, psychiques ou
sensorielles réduites ou manquant d‘expérience
ou de connaissance s‘ils sont surveillés ou s‘ils
ont été instruits de l‘utilisation du produit de
manière sûre et comprennent les risques liés à
son utilisation. Les enfants ne doivent pas jouer
avec ce produit. Le nettoyage et l‘entretien du
produit ne doivent pas être effectués par des
enfants laissés sans surveillance.
Prévention de risques mortels
par électrocution
Avant chaque utilisation, contrôlez le bon état
de la lampe. N‘utilisez jamais la lampe si vous
constatez le moindre dommage.
Une lampe endommagée implique un danger
de mort par électrocution. En cas d’endomma-
gements, de réparations ou d’autres problèmes,
veuillez contacter le SAV ou un électricien.
Pour éviter toute mise en danger, le remplace-
ment du câble flexible extérieur de cette lampe
est exclusivement réservé au fabricant, à son

25 FR/BE
Sécurité / Mise en service
représentant de maintenance ou à un spécialiste
comparable !
Assurez-vous avant l’utilisation que la tension
secteur à disposition correspond à la tension de
service nécessaire pour la lampe
(voir « Caracté-
ristiques techniques »)
.
La source lumineuse de cette lampe doit unique-
ment être remplacée par le fabricant ou par
l'un de ses techniciens autorisés, ou par une
personne aux qualifications similaires.
Évitez impérativement tout contact de la lampe
avec de l‘eau ou d‘autres liquides.
Afin de couper entièrement la lampe du courant
électrique, le transformateur à fiche 4 doit être
débranché de la prise.
Avant le montage, le démontage, le nettoyage
ou lorsque vous n'utilisez pas la lampe pendant
une certaine période, débranchez toujours le
transformateur à fiche 4 de la prise.
N‘ouvrez jamais les composants électriques, et
n‘insérez jamais des objets quelconques dans
ceux-ci. De telles interventions impliquent un
danger de mort par électrocution.
Cette ampoule n'est pas adaptée
aux variateurs et interrupteurs élec-
triques extérieurs.
N'utilisez pas le câble d'alimentation 5 comme
poignée de transport.
Ne pliez pas le câble d'alimentation 5 et ne
le placez pas sur des arêtes pointues.
Prévention de risque
d‘incendies et de blessures
RISQUE DE BLESSURES!
Vérifiez l‘état des
ampoules immédiatement après
le déballage.
Ne montez pas la lampe avec des
ampoules et / ou des ampoules défectueuses.
Dans ce cas, veuillez contacter le service après-
vente pour faire remplacer une pièce défectueuse.
Ne regardez jamais direct dans la source
lumineuse (ampoule, LED, etc.).
Ne couvrez pas la lampe ou le transformateur
à fiche 4 avec des objets. Un dégagement de
chaleur excessif peut provoquer un incendie.
Ne laissez jamais sans surveillance la lampe
en service.
Ne pas regarder les LED à l‘aide d‘un instrument
optique (par exemple une loupe).
Mise en service
Modèle 14141605L:
Sortez avec précaution les éléments de la
lampe de l'emballage.
Retirez la totalité du matériel de protection.
Enfichez le bras de lampe inférieur 3 dans la
fixation prévue à cet effet, de façon à ce que la
tige 9 se trouve dans la rainure 10 (voir fig. A).
Veillez à ne pas endommager le bras de lampe.
Pour fixer le bras de lampe inférieur 3, serrez
légèrement la vis 11 (voir fig. B).
Connectez le transformateur à fiche 4 au pied
de lampe 6.
Branchez le transformateur à fiche 4 dans une
prise installée conformément aux spécifications
applicables.
Votre lampe est maintenant prête à l'emploi.
Modèle 14150705L:
Sortez avec précaution les éléments de la
lampe de l'emballage.
Retirez la totalité du matériel de protection.
Retirez les deux vis 11 situées à l'arrière de la
lampe (voir fig. A).
Placez la lampe sur le pied de lampe 6 (voir
fig. B) puis visser par le bas ces éléments avec
les deux vis 11 (voir fig. C).
Assurez-vous que le positionnement est correct.
Connectez le transformateur à fiche 4 au
pied de lampe 6.
Branchez le transformateur à fiche 4 dans une
prise installée conformément aux spécifications
applicables.
Remarque: la tête de lampe 1 ne peut
pas être orientée.
Votre lampe est maintenant prête à l'emploi.

26 FR/BE
Fonctions de la lampeMise au rebut / Fonctions de la lampe
Allumer / éteindre la lampe
Modèle 14141605L:
Touchez la touche tactile ON / OFF 8 pour
allumer ou éteindre la lampe.
Remarque: la lampe confirme l'alimentation
en courant électrique avec un clignotement vert
des touches de fonction 7.
Modèle 14150705L:
Appuyez sur la touche ON / OFF 8 pour
allumer ou éteindre la lampe.
Orienter la lampe
Modèle 14141605L:
Remarque: modifiez uniquement l'orientation
des 3 articulations 1a , 2a et 3a lorsque la lampe
est éteinte.
Laissez refroidir complètement la lampe.
Placez la tête de lampe 1, le bras de lampe
supérieur 2 et le bras de lampe inférieur 3
dans la position correcte.
Si vous desserrez légèrement la vis 11 sur le
dispositif de fixation inférieur, vous pouvez
également pivoter la lampe.
Après avoir pivoté la lampe, resserrez la vis 11 .
Fonctions de la lampe
Modèle 14141605L:
Les touches de fonction 7 permettent
d'effectuer les réglages suivants:
Read (Lecture): lumière blanc neutre
Work (Travail): lumière blanc froid
Relax (Relaxation): lumière blanc chaud
High (Élevé): variation continue vers un
niveau supérieur
Low (Bas): variation continue vers un
niveau inférieur
Lorsque vous débranchez la lampe du courant,
vous redémarrez ensuite sur le réglage «Read».
Remarque : la lampe est équipée d'une
fonction mémoire, qui enregistre les réglages
effectués auparavant.
Modèle 14150705L:
Les touches de fonction 7 permettent
d'effectuer les réglages suivants:
CCT: régler la température de couleur sur 3 niveaux
LOW: variation continue vers un niveau inférieur
HIGH: variation continue vers un niveau supérieur
Remarque: la lampe dispose d'une fonction
mémoire. En s'allumant, elle active le dernier réglage
sélectionné.
Les touches de fonction 12 , 13 , 14 et 15
permettent d'effectuer les réglages sui-
vants:
Touche M 15 : basculer entre l'affichage de
l'heure et du réveil
Touche S 14 : confirmer les paramètres
Touche 13 : régler la prochaine valeur la
plus élevée / basculer entre
l'affichage 12 h / 24 h
Touche 12 : régler la prochaine valeur la
plus basse / basculer entre
°C / °F
Réglage de l'heure / de la date:
Appuyez sur la touche M 15 jusqu'à l'affichage
du symbole sur l'écran à cristaux liquides 16 .
Appuyez sur la touche S 14 . L'affichage des
heures et le symbole clignotent.
Appuyez sur les touches 13 et 12 , afin
d'entreprendre des réglages de l'heure et rappuyez
sur la touche S 14 . L'affichage des minutes et
le symbole clignotent.
À l'aide des touches 13 et 12 , effectuez
d'autres réglages pour les minutes / l'année /
le mois (Month) / le jour (Day) et confirmez
chaque réglage en appuyant sur la touche S 14 .
Remarque: le symbole arrête de clignoter
lorsque les réglages sont terminés.

27 FR/BE
Fonctions de la lampe
Régler le réveil:
Appuyez sur la touche M 15 jusqu'à l'affichage
du symbole sur l'écran à cristaux liquides 16 .
Remarque: l'affichage de l'écran à cristaux
liquides 16 bascule entre l'heure et le ré-
veil . Si le réveil est sélectionné mais
qu'aucun réglage n'est effectué, l'affichage de
l'écran à cristaux liquides 16 revient à l'affi-
chage de l'heure après 60 secondes.
Appuyez sur la touche S 14 . L'affichage des
heures et le symbole clignotent.
Réglez l'heure avec les touches 13 et 12 ,
puis rappuyez sur la touche S 14 . L'affichage
des minutes et le symbole clignotent.
Réglez les minutes avec les touches 13 et
12 , puis rappuyez sur la touche S 14 . L'af-
fichage pour la durée du temps de répétition
d'alarme et le symbole clignotent.
Avec les touches 13 et 12 , réglez le
temps de répétition d'alarme sur une durée
allant de 1 à 60 minutes, puis rappuyez sur
la touche S 14 .
Sur le bord inférieur de l'écran à cristaux liquides
16 , le numéro de sonnerie du réveil clignote.
Avec les touches 13 et 12 , sélectionnez
une des 8 sonneries disponibles.
Remarque: une fois les réglages du réveil
effectués, le symbole apparaît en perma-
nence sur l'écran à cristaux liquides 16 .
Activer / désactiver le réveil / la fonction
de répétition d'alarme:
Appuyez sur la touche M 15 jusqu'à l'affichage
du symbole sur l'écran à cristaux liquides 16 .
Appuyez sur la touche 13 . Les symboles
et apparaissent sur l'écran à cristaux
liquides 16 . Le réveil réglé auparavant est
à présent activé.
Appuyez maintenant sur la touche 13 ou
12 . Les symboles , et appa-
raissent sur l'écran à cristaux liquides 16 . La
fonction de répétition d'alarme paramétrée au-
paravant est maintenant activée.
Remarque: appuyez sur la touche 13
ou 12 pour désactiver le réveil et la fonction
de répétition d’alarme. Les symboles ,
et affichés auparavant disparaissent de
l'écran à cristaux liquides 16 .
Remarque: l'alarme est d'environ 1 minute.
Désactiver le réveil / la fonction de répéti-
tion d'alarme:
Réveil sans fonction de répétition d'alarme:
Lorsque la fonction de répétition d'alarme n'est
pas activée, appuyez sur l'une des 4 touches
de fonction 12 , 13 , 14 ou 15 , afin de désactiver
le réveil.
IMPORTANT: le réveil est encore activé
pour le jour suivant.
Réveil avec fonction de répétition d'alarme:
Si la fonction de répétition d'alarme est activée, le
réveil se déclenche de nouveau à la fin du délai
paramétré pour la fonction de répétition d'alarme
(max. trois fois).
Appuyez sur la touche M 15 jusqu'à l'affichage
du symbole sur l'écran à cristaux liquides 16 .
Appuyez désormais sur la touche 13 ou
12 , jusqu'à disparition des symboles
et , afin de désactiver le réveil et la fonction
de répétition d'alarme.
IMPORTANT: maintenant, le réveil est dé-
sactivé pour le jour suivant.
Basculer entre l'affichage 12h / 24h:
Appuyez sur la touche M 15 jusqu'à l'affichage
du symbole sur l'écran à cristaux liquides 16 .
Appuyez sur la touche 13 . L'affichage des
heures sur l'écran à cristaux liquides 16 bascule
entre les formats 12h et 24h.
Remarque: au format d'affichage 12h, la
mention PM apparaît devant l'heure au moment
de l'après-midi.
Réglage de l'affichage de température:
Appuyez sur la touche M 15 jusqu'à l'affichage
du symbole sur l'écran à cristaux liquides 16 .
Appuyez sur la touche 12 . L'affichage de
la température sur l'écran à cristaux liquides 16
bascule entre °C (Celsius) et °F (Fahrenheit).
Mise au rebut / Fonctions de la lampe

28 FR/BE
Informations / Déclaration de conformitéEntretien et nettoyage / Mise au rebut / Informations
Entretien et nettoyage
RISQUE
D’ELECTROCUTION!
Débranchez toujours le transformateur à fiche 4
de la prise électrique avant chaque entretien et
nettoyage.
RISQUE
D’ELECTROCUTION!
Pour des raisons de sécurité électrique, il est interdit
de nettoyer la lampe à l‘eau ou avec d‘autres liquides
ou encore de la plonger dans de l‘eau.
ATTENTION ! RISQUE DE BRÛLURES !
SURFACES TRÈS CHAUDES !
Laissez d‘abord complètement refroidir la lampe.
N‘utilisez ni solvants, ni essence, ni autres pro-
duits similaires. Ceci endommagerait la lampe.
Pour procéder au nettoyage, utilisez uniquement
un chiffon sec, non pelucheux.
Rebranchez le transformateur à fiche 4 dans
la prise de courant.
Mise au rebut
b
a
Veuillez respecter l‘identification des ma-
tériaux d‘emballage pour le tri sélectif, ils
sont identifiés avec des abbréviations (a)
et des chiffres (b) ayant la signification
suivante : 1–7 : plastiques / 20–22 :
papiers et cartons / 80–98 : matériaux
composite.
Le produit et les matériaux d’emballage
sont recyclables, mettez-les au rebut sé-
parément pour un meilleur traitement des
déchets. Le logo Triman n’est valable
qu’en France.
Afin de contribuer à la protection de
l’environnement, veuillez ne pas jeter votre
produit usagé dans les ordures ménagères,
mais éliminez-le de manière appropriée.
Pour obtenir des renseignements concer-
nant les points de collecte et leurs horaires
d’ouverture, vous pouvez contacter votre
municipalité.
Informations
Garantie
Article L217-16 du Code de la consommation
Lorsque l‘acheteur demande au vendeur, pendant le
cours de la garantie commerciale qui lui a été consen-
tie lors de l‘acquisition ou de la réparation d‘un bien
meuble, une remise en état couverte par
la garantie,
toute période d‘immobilisation d‘au m
oins sept jours
vient s‘ajouter à la durée de la garantie qui restait à
courir. Cette période court à compter de la demande
d‘intervention de l‘acheteur ou de la mise à disposition
pour réparation du bien en cause, si cette mise à dis-
position est postérieure à la demande d‘intervention.
Indépendamment de la garantie commerciale sous-
crite, le vendeur reste tenu des défauts de conformité
du bien et des vices rédhibitoires dans les conditions
prévues aux articles L217-4 à L217-13 du Code
de la consommation et aux articles 1641 à 1648
et 2232 du Code Civil.
Article L217-4 du Code de la consommation
Le vendeur livre un bien conforme au contrat et ré-
pond des défauts de conformité existant lors de la
délivrance.
Il répond également des défauts de conformité résul-
tant de l‘emballage, des instructions de montage ou
de l‘installation lorsque celle-ci a été mise à sa charge
par le contrat ou a été réalisée sous sa responsabilité.
Article L217-5 du Code de la consommation
Le bien est conforme au contrat :
1° S´il est propre à l‘usage habituellement attendu
d‘un bien semblable et, le cas échéant :
- s‘il correspond à la description donnée par le
vendeur et posséder les qualités que celui-ci a
présentées à l‘acheteur sous forme d‘échantillon
ou de modèle ;
- s‘il présente les qualités qu‘un acheteur peut
l
égitimement attendre eu égard aux déclaratio
ns
publiques faites par le vendeur, par le produc-
teur ou par son représentant, notamment dans
la publicité ou l‘étiquetage ;

29 FR/BE
Informations / Déclaration de conformitéEntretien et nettoyage / Mise au rebut / Informations
2° Ou s‘il présente les caractéristiques définies d‘un
commun accord par les parties ou être propre
à tout usage spécial recherché par l‘acheteur,
porté à la connaissance du vendeur et que ce
dernier a accepté.
Article L217-12 du Code de la
consommation
L‘action résultant du défaut de conformité se prescrit
par deux ans à compter de la délivrance du bien.
Article 1641 du Code civil
Le vendeur est tenu de la garantie à raison des
défauts cachés de la chose vendue qui la rendent
impropre à l‘usage auquel on la destine, ou qui
diminuent tellement cet usage que l‘acheteur ne
l‘aurait pas acquise, ou n‘en aurait donné qu‘un
moindre prix, s‘il les avait connus.
Article 1648 1er alinéa du Code civil
L‘action résultant des vices rédhibitoires doit être in-
tentée par l‘acquéreur dans un délai de deux ans
à compter de la découverte du vice.
Les pièces détachées indispensables à l’utilisation
du produit sont disponibles pendant la durée de la
garantie du produit.
Vous bénéficiez d’une garantie de 36 mois à partir
de la date d’achat de l’appareil. Cet appareil a été
fabriqué avec soin et soumis à un contrôle qualité
minutieux. Pendant la durée de la garantie, nous ré-
parons gratuitement tous les défauts de matériaux ou
de fabrication. Si des défauts devaient se présenter
durant la période de garantie, veuillez expédier l‘ap-
pareil à l‘adresse du service spécifique en indiquant
ce numéro de série : 14141605L / 14150705L.
La garantie exclut les dommages dus à une manipu-
lation incorrecte, au non-respect des instructions du
mode d’emploi ou à une intervention par une per-
sonne non autorisée, ainsi que les pièces d’usure
(par ex, ampoule). La durée de garantie n’est aucu-
nement prolongée ou renouvelée par une prestation
de garantie.
Fabricant / S.A.V.
Briloner Leuchten GmbH & Co. KG
Im Kissen 2
59929 Brilon
ALLEMAGNE
Tel. : +49 29 61 / 97 12–800
Fax : +49 29 61 / 97 12–199
E-Mail : kundenservice@briloner.com
www.briloner.com
Numero de service gratuit
Tél. : 00800 / 27456637
IAN 345257_2004
Veuillez conserver le ticket de caisse et la référence
de l’article (par ex. IAN 123456_7890) à titre de
preuves d’achat pour toute demande.
Déclaration de conformité
Ce produit remplit les critères des réglementations
européennes et nationales. La conformité a été
attestée. Les déclarations et documents respectifs
sont en possession du fabricant.

30
Inhoudsopgave

31 NL/BE
Inhoudsopgave
Legenda van de gebruikte pictogrammen ..................................................... Pagina 32
Inleiding ....................................................................................................................................... Pagina 33
Correct gebruik ............................................................................................................................... Pagina 33
Omvang van de levering ................................................................................................................ Pagina 33
Beschrijving van de onderdelen ..................................................................................................... Pagina 33
Technische gegevens ...................................................................................................................... Pagina 33
Veiligheid .................................................................................................................................... Pagina 34
Veiligheidsinstructies ....................................................................................................................... Pagina 34
Ingebruikname ...................................................................................................................... Pagina 35
Lamp in- / uitschakelen .................................................................................................................... Pagina 35
Lamp afstellen.................................................................................................................................. Pagina 35
Functies van de lamp ......................................................................................................... Pagina 36
Onderhoud en reiniging ................................................................................................. Pagina 37
Afvoer ............................................................................................................................................ Pagina 38
Informatie ................................................................................................................................... Pagina 38
Garantie .......................................................................................................................................... Pagina 38
Fabrikant / service ........................................................................................................................... Pagina 38
Conformiteitsverklaring ................................................................................................. Pagina 38

32 NL/BE
Legenda van de gebruikte pictogrammen
Legenda van de gebruikte pictogrammen
Instructies lezen! Waarschuwing voor een
elektrische schok! Levensgevaar!
VVolt De lamp is niet geschikt voor ex-
terne d
immers en elektronische scha-
ke
laars.
A.C. a.c.
Wisselspanning
(stroom- en spanningstype) Zo handelt u correct
Hertz (frequentie) Voorzichtig! Kans op brandwon-
den door hete oppervlakken!
Watt (nuttig vermogen) Levensduur
Beschermingsklasse II ON OFF Schakelcycli
Waarschuwingen en veiligheidsinstructi
es
in acht nemen! Alleen voor binnenshuis
Deze lamp is uitsluitend bedoeld voor
gebruik binnenshuis, in droge en
gesloten ruimtes. ta Omgevingstemperatuur
Levensgevaar en kans op ongevallen
voor kleuters en kinderen! tc Temperatuur van de behuizing op
het aangegeven punt
Polariteit van de stroomaansluiting SELV Beveiligde extra lage spanning
Onafhankelijk voorschakelapparaat De verpakking bestaat uit 100 %
gerecycled papier.
Tegen kortsluiting bestendige
veiligheidstransformator b
a
Voer de verpakking en het ap-
paraat op een milieuvriendelijke
manier af!
d.c. DC Gelijkspanning
(stroom- en spanningstype)
De lamp is geschikt voor montage op
normaal ontvlambare oppervlakken.
Beschermingsklasse III mA Milliampère
Traploos dimbaar Met geheugenfunctie
Lichttemperatuur in Kelvin Ra Kleurweergave-index
Legenda van de gebruikte pictogrammen / Inleiding

33 NL/BE
Legenda van de gebruikte pictogrammen Legenda van de gebruikte pictogrammen / Inleiding
Legenda van de gebruikte pictogrammen
Alarmfunctie Kalender
Tijdweergave
LED tafellamp
Inleiding
Gefeliciteerd met de koop van uw nieuwe
apparaat. U heeft gekozen voor een
hoogwaardig product. Lees deze ge-
bruiksaanwijzing volledig en zorgvuldig door. Vouw
de pagina met de afbeeldingen open. Deze gebruiks-
aanwijzing hoort bij dit product en bevat belangrijke
aanwijzingen voor de ingebruikname en bediening.
Neem altijd de veiligheidsinstructies in acht. Con-
troleer vóór de ingebruikname of de juiste spanning
beschikbaar is en of alle onderdelen goed gemon-
teerd zijn. Wanneer u vragen hebt of onzeker bent
in verband met de bediening van het apparaat, kunt
u contact opnemen met uw leverancier of met het
servicepunt. Bewaar deze handleiding op een vei-
lige plaats en geef hem evt. aan derden door.
Correct gebruik
Deze lamp is uitsluitend bedoeld voor
gebruik binnenshuis, in droge en gesloten
ruimtes. Dit product is bestemd voor het
gebruik in privé-huishoudens. De lamp is bestemd
voor normaal gebruik.
Omvang van de levering
Controleer de levering altijd direct na het uitpakken
op volledigheid en optimale staat van het product.
1 led-bureaulamp, 14141605L / 14150705L
1 netadapter
1 lampvoet
1 gebruiksaanwijzing
Beschrijving van de onderdelen
1 Lampkop
1a Scharnier (lampkop) (14141605L)
2 Bovenste lamparm (14141605L)
2a Scharnier (bovenste lamparm) (14141605L)
3 Onderste lamparm (14141605L)
3a Scharnier (onderste lamparm) (14141605L)
4 Netadapter
5 Stroomkabel
6 Lampvoet
7 Functietoetsen
8 ON / OFF-touchtoets (14141605L) /
ON / OFF-knop (14150705L)
9 Pen (14141605L)
10 Uitsparing (14141605L)
11 Schroef
12 Knop (14150705L)
13 Knop (14150705L)
14 Knop S (14150705L)
15 Knop M (14150705L)
16 Display (14150705L)
Technische gegevens
14141605L:
Lamp:
Modelnummer: 14141605L
Bedrijfsspanning:
1
00–240 V~ 50 / 60 Hz
Nominaal vermogen max.: led max. 9 W
Beschermingsklasse: II /
Beschermingstype: IP20

34 NL/BE
Inleiding / Veiligheid
Led:
Modelnummer: 14141605L-1
Nominaal vermogen: led 6,6 W / 500 mA
Beschermingsklasse: III /
Ingangsstroom: 12 V
Netadapter:
Modelnummer: BLW018-1200550EU
Bedrijfsspanning:
100–240 V~ 50 / 60 Hz
Uitgangsspanning: 12 V , 550 mA
Beschermingsklasse: II /
Beschermingstype: IP20
Nominaal vermogen: 10 W
14150705L:
Lamp:
Modelnummer: 14150705L
Bedrijfsspanning: 230–240 V~50 Hz
Nominaal vermogen max: led max. 6 W
Beschermingsklasse: II /
Beschermingstype: IP20
Led:
Nominaal vermogen: led 4,2 W
Netadapter:
Modelnummer: BLW-5688-6
Bedrijfsspanning:
100–240 V~ 50 / 60 Hz
Uitgangsspanning: 12 V
Beschermingsklasse: II /
Beschermingstype: IP20
Nominaal vermogen: 4,2 W
Veiligheid
Veiligheidsinstructies
Bij beschadigingen die worden veroorzaakt door
het niet in acht nemen van deze gebruiksaanwijzing
vervalt de garantie! Wij zijn niet aansprakelijk voor
gevolgschade! Bij materiële schade of persoonlijk
letsel die worden veroorzaakt door onjuist gebruik
of het niet in acht nemen van de veiligheidsinstructies
zijn wij niet aansprakelijk!
LEVENSGEVAAR EN KANS OP
ONGEVALLEN BIJ KLEUTERS
EN KINDEREN!
Laat kinderen nooit zonder toezicht bij het
verpakkingsmateriaal. Er bestaat gevaar voor
verstikking door verpakkingsmateriaal. Kinde-
ren onderschatten de gevaren vaak. Houd
kinderen altijd uit de buurt van het product.
Dit apparaat kan door kinderen vanaf 8 alsmede
personen met verminderde fysieke, sensorische
of mentale vaardigheden of een gebrek aan
ervaring en kennis worden gebruikt, als zij onder
toezicht staan of geïnstrueerd werden met be-
trekking tot het veilige gebruik van het apparaat
en de hieruit voortvloeiende gevaren begrijpen.
Kinderen mogen niet met het apparaat spelen.
Reiniging en onderhoud mag niet door kinderen
zonder toezicht worden uitgevoerd.
Vermijd levensgevaar door
elektrische schok
Controleer de lamp voor ieder gebruik op even-
tuele beschadigingen. Gebruik uw lamp nooit,
wanneer u een beschadiging hebt geconstateerd.
Een beschadigde lamp betekent levensgevaar
door een elektrische schok. Neem in geval van
beschadigingen, reparaties of andere problemen
aan de lamp contact op met de klantenservice
of met een elektricien.
Ter vermijding van gevaren mag de beschadigde,
buitenste flexibele kabel van deze lamp uitslui-
tend door de fabrikant, zijn serviceverlener of
een vergelijkbare vakman worden vervangen!
Wees er voor gebruik zeker van dat de be-
schikbare netspanning overeenkomt met de
benodigde bedrijfsspanning van de verlichting
(zie “Technische gegevens”).
De lichtbron van deze lamp mag alleen door
de fabrikant of door een door hem geautorise-
erde technicus of een vergelijkbaar gekwalifi-
ceerde persoon worden vervangen.
Vermijd dat de lamp in contact komt met water
of andere vloeistoffen.

35 NL/BE
Veiligheid / Ingebruikname
Om de lamp volledig stroomvrij te maken, moet
de netadapter 4 uit het stopcontact worden
gehaald.
Haal voor de montage, demontage, reiniging
of wanneer u de lamp gedurende een langere
periode niet gebruikt altijd de netadapter 4
uit de contactdoos.
Open nooit een van de elektrische delen en
steek er geen voorwerpen in. Bij dergelijke in-
grepen bestaat levensgevaar door elektrische
schokken.
De lamp is niet geschikt voor externe
dimmers en elektronische schakelaars.
Gebruik de stroomkabel 5 niet als draaggreep.
Knik de stroomkabel 5 niet en leg deze niet
over scherpe randen heen.
Vermijd brand- en
letselgevaar
GEVAAR VOOR LETSEL!
Controleer direct na het uitpakken elk verlichtings-
middel op beschadigingen. Monteer de lamp
niet met defecte verlichtingsmiddelen. Neem in
dit geval contact op met het klantenservice.
Niet direct in de lichtbron (lamp, LED etc.) kijken.
Dek de lamp of de netadapter 4 niet af met
voorwerpen. Een overmatige warmteontwikke-
ling kan tot brand leiden.
Laat de ingeschakelde lamp niet zonder toezicht.
De led niet met behulp van een optisch instrument
(bijv. vergrootglas) bekijken.
Ingebruikname
Model 14141605L:
Haal de onderdelen van de lamp voorzichtig
uit de verpakking.
Verwijder al het beschermende materiaal.
Plaats de onderste lamparm 3 zodanig in de
daarvoor bestemde bevestiging dat de pen 9
in de uitsparing 10 valt (zie afb. A). Zorg ervoor
dat u de lamparm niet beschadigt.
Om de onderste lamparm 3 te bevestigen,
zet u de schroef 11 lichtjes vast (zie afb. B).
Verbind de netadapter 4 met de lampvoet 6.
Steek de netadapter 4 in een correct geïnstal-
leerde contactdoos.
Uw lamp is nu gereed voor gebruik.
Model 14150705L:
Haal de onderdelen van de lamp voorzichtig
uit de verpakking.
Verwijder al het beschermmateriaal.
Verwijder de beide schroeven 11 aan de
onderkant van de lamp (zie afb. A).
Plaats de lamp op de lampvoet 6 (zie afb. B)
en schroef deze met de beide schroeven 11
aan de onderkant vast (zie afb. C).
Let op de juiste positie.
Verbind de netadapter 4 met de lampvoet 6.
Steek de netadapter 4 in een correct geïnstal-
leerd stopcontact.
Opmerking: de lampkop 1 kan niet worden
afgesteld.
Uw lamp is nu gereed voor gebruik.
Lamp in- / uitschakelen
Model 14141605L:
Raak de ON / OFF-touchtoets 8 aan om de
lamp in resp. uit te schakelen.
Opmerking: de lamp bevestigt de stroom-
toevoer met het groen oplichten van de functie-
toetsen 7.
Model 14150705L:
Druk op de ON / OFF-knop 8 om de lamp in
resp. uit te schakelen.
Lamp afstellen
Model 14141605L:
Opmerking: verander de afstelling van de
3 scharnieren 1a , 2a en 3a alleen als de lamp
is uitgeschakeld.

36 NL/BE
Functies van de lamp / Onderhoud en reinigingIngebruikname / Functies van de lamp
Laat de lamp volledig afkoelen.
Zet de lampkop 1, de bovenste lamparm 2
en de onderste lamparm 3 in de gewenste
positie.
Als u de schroef 11 aan de onderste bevestiging
iets los draait, kunt u de lamp ook draaien.
Zet de schroef 11 na het draaien weer vast.
Functies van de lamp
Model 14141605L:
Met de functietoetsen 7 kunnen de
volgende instellingen worden gemaakt:
Read: neutraal-wit licht
Work: koud-wit licht
Relax: warm-wit licht
High: traploos hoger dimmen
Low: traploos lager dimmen
Als u de lamp van het stroomnet afhaalt, start
deze weer in de instelling “Read”.
Opmerking: de lamp beschikt over een
memory-functie; hij slaat de eerder gekozen
instelling op.
Model 14150705L:
Met de functietoetsen 7 kunnen de
volgende instellingen worden gemaakt:
CCT: kleurtemperatuur in 3 stappen instellen
LOW: traploos lager dimmen
HIGH: traploos hoger dimmen
Opmerking: de lamp heeft een geheugenfunctie.
Bij het inschakelen is de laatst gekozen instelling
actief.
Met de knoppen 12 , 13 , 14 en 15 kunnen
de volgende instellingen worden gemaakt:
Knop M 15 : wisselen tussen het weergeven van
de tijd en het wekkeralarm
Knop S 14 : instellingen bevestigen
Knop 13 : de eerstvolgende hogere waarde in-
stellen / tussen 12h- / 24 h-weergave
wisselen
Knop 12 : de eerstvolgende kleinere waarde
instellen / tussen °C / °F wisselen
Tijd / datum instellen:
Druk op de knop M 15 tot het symbool op
het display 16 wordt getoond.
Druk op de knop S 14 . De urenweergave en
het symbool knipperen.
Druk op de knoppen 13 en 12 om de
instellingen voor de urenweergave te maken en
druk nogmaals op de knop S 14 . De minuten-
weergave en het symbool knipperen.
Maak vervolgens met behulp van de knoppen
13 en 12 de overige instellingen voor
minuten / jaar / maand (Month) / dag (Day) en
bevestig elke instelling door te drukken op de
knop S 14 .
Opmerking: het symbool stopt met knip-
peren als de instellingen zijn voltooid.
Wekkeralarm instellen:
Druk op de knop M 15 tot het symbool op
het display 16 wordt getoond.
Opmerking: de weergave op het display 16
wisselt tussen tijd en wekkeralarm . Als
wekkeralarm wordt geselecteerd maar er
geen instellingen worden gemaakt, gaat de
weergave op het display 16 na ca. 60 seconden
terug naar tijdweergave .
Druk op de knop S 14 . De urenweergave en
het symbool knipperen.
Stel met de knoppen 13 en 12 de uren
in en druk nogmaals op de knop S 14 . De minu-
tenweergave en het symbool knipperen.
Stel met de knoppen 13 en 12 de mi-
nuten in en druk nogmaals op de knop S 14 .
De weergave voor de duur van de sluimertijd
en het symbool knipperen.

37 NL/BE
Functies van de lamp / Onderhoud en reiniging
Stel met de knoppen 13 en 12 de slui-
mertijd tussen 1 en 60 minuten in en druk nog-
maals op de knop S 14 .
Bij de onderste rand van het display 16 knippert
het nummer van de wektoon.
Selecteer met de knoppen 13 en 12
een van de 8 verschillende wektonen.
Opmerking: na het afsluiten van de instellingen
voor het wekkeralarm brandt het symbool
permanent in het display 16 .
Wekkeralarm / sluimerfunctie activeren /
deactiveren:
Druk op de knop M 15 tot het symbool op
het display 16 wordt getoond.
Druk op de knop 13 . Op het display 16
worden de symbolen en getoond. Het
eerder ingestelde wekkeralarm is nu geactiveerd.
Druk vervolgens op de knop 13 of 12 .
Op het display 16 worden nu de symbolen ,
en getoond. De eerder ingestelde slui-
merfunctie is nu geactiveerd.
Opmerking: om het wekkeralarm en de slui-
merfunctie te deactiveren, drukt u op de knop
13 of 12 . Op het display 16 gaan de
eerder getoonde symbolen , en uit.
Opmerking: het wekkeralarm duurt ca.
1 minuut.
Wekkeralarm / sluimerfunctie uitschakelen:
Wekkeralarm zonder sluimerfunctie:
Druk, indien de sluimerfunctie niet is geactiveerd,
op een van de 4 functieknoppen 12 , 13 , 14
of 15 om het wekkeralarm uit te schakelen.
BELANGRIJK: het wekkeralarm is voor de
volgende dag nog geactiveerd.
Wekkeralarm met sluimerfunctie:
Als de sluimerfunctie is geactiveerd, start het wekker-
alarm na afloop van de ingestelde sluimerfunctie
opnieuw (max. driemaal).
Druk op de knop M 15 tot het symbool op
het display 16 wordt getoond.
Druk vervolgens op de knop 13 of 12
tot de symbolen en uit gaan om het
wekkeralarm met sluimerfunctie uit te schakelen.
BELANGRIJK: het wekkeralarm is nu ook
voor de volgende dag gedeactiveerd.
Wisselen tussen 12h -/ 24h-weergave:
Druk op de knop M 15 tot het symbool op
het display 16 wordt getoond.
Druk op de knop 13 . De urenweergave op
het display 16 wisselt tussen de formaten 12h
en 24h.
Opmerking: in het 12h-formaat verschijnt 's
middags voor de tijd de aanduiding PM.
Temperatuurweergave instellen:
Druk op de knop M 15 tot het symbool op
het display 16 wordt getoond.
Druk op de knop 12 . De temperatuurweer-
gave op het display 16 wisselt tussen °C (Cel-
sius) en °F (Fahrenheit).
Onderhoud en reiniging
GEVAAR VOOR
ELEKTRISCHE SCHOKKEN!
Haal voor elk onderhoud en elke reiniging eerst
de netadapter 4 uit de contactdoos.
GEVAAR VOOR
ELEKTRISCHE SCHOKKEN!
Op basis van de elektrische veiligheid mag de
verlichting nooit met water of andere vloeistoffen
worden gereinigd of in zijn geheel in water worden
gedompeld.
VOORZICHTIG! VERBRANDINGSGEVA
AR
DOOR HETE OPPERVLAKKEN!
Laat de lamp eerst volledig afkoelen.
Gebruik geen oplosmiddel, benzine e.d. De
lichten zullen hierdoor schade ondervinden.
Gebruik voor de reiniging alleen een droge,
pluisvrije doek.
Steek de netadapter 4 weer in de contactdoos.
Ingebruikname / Functies van de lamp

38 NL/BE
Afvoer / Informatie / Conformiteitsverklaring
Afvoer
b
a
Neem de aanduiding van de verpakkings-
materialen voor de afvalscheiding in acht.
Deze zijn gemarkeerd met de afkortingen
(a) en een cijfers (b) met de volgende
betekenis: 1–7: kunststoffen / 20–22:
papier en vezelplaten / 80–98: compo-
sietmaterialen.
Het product en de verpakkingsmaterialen
zijn recyclebaar; verwijder deze afzonder-
lijk voor een betere afvalbehandeling. Het
Triman-logo geldt alleen voor Frankrijk.
Gooi het afgedankte product omwille van
het milieu niet weg via het huisvuil, maar
geef het af bij het daarvoor bestemde de-
pot of het gemeentelijke milieupark. Over
afgifteplaatsen en hun openingstijden
kunt u zich bij uw aangewezen instantie
informeren.
Informatie
Garantie
Op dit product verlenen wij 36 maanden garantie
vanaf koopdatum. Het apparaat werd zorgvuldig
vervaardigd en aan een nauwkeurige kwaliteitscon-
trole onderworpen. Binnen de garantieperiode her-
stellen wij kosteloos alle materiaal- of productiefouten.
Mocht u desondanks tijdens de garantieperiode
mankementen aantreffen, stuur het apparaat dan
alstublieft naar het aangegeven serviceadres met
vermelding van het volgende artikelnummer:
14141605L / 14150705L.
Beschadigingen door ondeskundig gebruik, negeren
van de handleiding of ingrepen door niet-geautoriseerde
personen zijn van de garantieverlening uitgesloten.
Dit geldt eveneens voor aan slijtage onderhevige
onderdelen (zoals bijv. verlichtingsmiddelen). Door
de garantieservice wordt de garantieperiode noch
verlengd noch vernieuwd.
Fabrikant / service
Briloner Leuchten GmbH & Co. KG
Im Kissen 2
59929 Brilon
DUITSLAND
Tel.: +49 29 61 / 97 12–800
Fax: +49 29 61 / 97 12–199
E-mail: [email protected]
www.briloner.com
Gratis servicenummer:
Tel.: 00800 / 27456637
IAN 345257_2004
Houd bij alle vragen alstublieft de kassabon en
het artikelnummer (bijv. IAN 123456_7890) als
bewijs van aankoop bij de hand.
Conformiteitsverklaring
Dit product voldoet aan de eisen van de van toe-
passing zijnde Europese en nationale richtlijnen.
De conformiteit is aangetoond. Desbetreffende
verklaringen liggen ter inzage bij de fabrikant.
Spis zawartości

39 PL
Afvoer / Informatie / Conformiteitsverklaring Spis zawartości
Legenda zastosowanych piktogramów ...........................................................Strona 40
Instrukcja ......................................................................................................................................Strona 41
Zastosowanie zgodne z przeznaczeniem .....................................................................................Strona 41
Zawartość .........................................................................................................................................Strona 41
Opis części ....................................................................................................................................... Strona 41
Dane techniczne ..............................................................................................................................Strona 42
Bezpieczeństwo ......................................................................................................................Strona 42
Wskazówki bezpieczeństwa...........................................................................................................Strona 42
Uruchomienie............................................................................................................................Strona 43
Włączanie / Wyłączanie lampy ..................................................................................................... Strona 44
Ustawienie lampy.............................................................................................................................Strona 44
Funkcje lampy ..........................................................................................................................Strona 44
Konserwacja i czyszczenie............................................................................................Strona 45
Utylizacja .....................................................................................................................................Strona 46
Informacje ...................................................................................................................................Strona 46
Gwarancja .......................................................................................................................................Strona 46
Producent / Serwis ............................................................................................................................Strona 46
Deklaracja zgodności ........................................................................................................ Strona 46

40 PL
Legenda zastosowanych piktogramów
Legenda zastosowanych piktogramów
Należy przeczytać instrukcje! Ostrzeżenie o możliwości porażenia
prądem! Zagrożenie życia!
VWolt
Ta żarówka nie nadaje się do uży-
cia w połączeniu z zewnętrznymi
regulatorami jasności światła lub
wyłącznikami elektronicznymi.
A.C. a.c.
Napięcie przemienne
(rodzaj prądu i napięcia) Prawidłowy sposób postępowania
Herc (częstotliwość) Ostrożnie! Niebezpieczeństwo po-
parzenia gorącymi powierzchniami!
Wat (moc czynna) Żywotność
Klasa ochrony II ON OFF Cykle włączania
Przestrzegać wskazówek ostrzegaw-
czych i bezpieczeństwa! Wyłącznie do użytku w
pomieszczeniach
Niniejsza lampa nadaje się wyłącznie
do pracy wewnątrz, w suchych i
zamkniętych pomieszczeniach. ta Temperatura otoczenia
Niebezpieczeństwo utraty życia i
wypadku przez dzieci! tc Temperatura obudowy w danym
punkcie
Biegunowość przyłącza sieciowego SELV Bardzo niskie napięcie bezpieczne
Niezależne urządzenie sterujące Opakowanie składa się w 100 %
ze zutylizowanego papieru.
Odporny na zwarcie
transformator bezpieczeństwa b
a
Opakowanie i urządzenie przekazać
do utylizacji zgodnie z przepisami
o ochronie środowiska!
d.c. DC Napięcie stałe
(rodzaj prądu i napięcia) Lampa nadaje się do zamontowania
na normalnie niepalnej powierzchni.
Klasa ochrony III mA Miliampery
Możliwość płynnego ściemniania Z funkcją memory
Legenda zastosowanych piktogramów / Instrukcja

41 PL
Legenda zastosowanych piktogramów Legenda zastosowanych piktogramów / Instrukcja
Legenda zastosowanych piktogramów
Temperatura barwowa w kelwinach Ra Współczynnik oddawania barw
Funkcja alarmu Kalendarz
Wyświetlacz godziny
Lampka stołowa - LED
Instrukcja
Gratulujemy Państwu zakupu nowego
urządzenia. Zdecydowali się Państwo na
zakup produktu najwyższej jakości. Pro-
szę dokładnie przeczytać całą niniejszą instrukcję
obsługi. Proszę rozłożyć stronę z rysunkami. Niniej-
sza instrukcja obsługi należy do produktu. Zawiera
ona ważne wskazówki dotyczące uruchamiania i
posługiwania się nim. Zawsze należy przestrzegać
wszystkich wskazówek dotyczących bezpieczeństwa.
Przed uruchomieniem proszę sprawdzić, czy wystę-
puje prawidłowe napięcie i czy wszystkie części są
prawidłowo zamontowane. W przypadku zapytań
lub niepewności odnośnie obchodzenia się z urządze-
niem prosimy o kontakt ze sprzedawcą lub punktem
serwisowym. Proszę starannie przechowywać ni-
niejszą instrukcję obsługi, a w razie oddania urzą-
dzenia osobom trzecim przekazać ją wraz z nim.
Zastosowanie zgodne z
przeznaczeniem
Niniejsza lampa nadaje się wyłącznie do
pracy wewnątrz, w suchych i zamknię-
tych pomieszczeniach. To urządzenie
przewidziano wyłącznie do użytku w prywatnym
gospodarstwie domowym. Lampa przeznaczona
jest do normalnego użytku.
Zawartość
Bezpośrednio po wypakowaniu należy sprawdzić,
czy zestaw jest kompletny oraz czy urządzenie
znajduje się w nienagannym stanie.
1 lampa stołowa LED, 14141605L / 14150705L
1 transformator wtyczkowy
1 podstawa lampy
1 instrukcja obsługi
Opis części
1 Głowica lampy
1a Przegub (głowica lampy) (14141605L)
2 Górne ramię lampy (14141605L)
2a Przegub (górne ramię lampy) (14141605L)
3 Dolne ramię lampy (14141605L)
3a Przegub (dolne ramię lampy) (14141605L)
4 Transformator wtyczkowy
5 Przewód doprowadzający
6 Podstawa lampy
7 Przyciski funkcji
8 Przycisk dotykowy ON / OFF (14141605L) /
Przycisk ON / OFF (14150705L)
9 Trzpień (14141605L)
10 Wpust (14141605L)
11 Śruba
12 Przycisk (14150705L)
13 Przycisk (14150705L)
14 Przycisk S (14150705L)
15 Przycisk M (14150705L)
16 Wyświetlacz LCD (14150705L)

42 PL
Instrukcja / Bezpieczeństwo
Dane techniczne
14141605L:
Lampa:
Numer modelu: 14141605L
Napięcie robocze:
100–240 V~ 50 / 60 Hz
Moc znamionowa maks.: LED, maks. 9 W
Klasa ochrony: II /
Rodzaj ochrony: IP20
LED:
Numer modelu: 14141605L-1
Moc znamionowa: LED 6,6 W / 500 mA
Klasa ochrony: III /
Prąd wejściowy: 12 V
Zasilacz sieciowy:
Numer modelu: BLW018-1200550EU
Napięcie robocze:
100–240 V~ 50 / 60 Hz
Napięcie wyjściowe: 12 V , 550 mA
Klasa ochrony: II /
Rodzaj ochrony: IP20
Moc znamionowa: 10 W
14150705L:
Lampa:
Numer modelu: 14150705L
Napięcie robocze: 230–240 V~ 50 Hz
Moc znamionowa maks.: LED maks. 6 W
Klasa ochrony: II /
Rodzaj ochrony: IP20
LED:
Moc znamionowa: LED 4,2 W
Zasilacz sieciowy:
Numer modelu: BLW-5688-6
Napięcie robocze:
100–240 V~ 50 / 60 Hz
Napięcie wyjściowe: 12 V
Klasa ochrony: II /
Rodzaj ochrony: IP20
Moc znamionowa: 4,2 W
Bezpieczeństwo
Wskazówki
bezpieczeństwa
W przypadku szkód spowodowanych nieprzestrze-
ganiem niniejszej instrukcji obsługi wygasa prawo
do gwarancji! Za szkody pośrednie producent nie
ponosi odpowiedzialności! W przypadku szkód
materialnych lub osobowych, które powstały wskutek
niewłaściwego obchodzenia się lub nieprzestrze-
gania wskazówek dotyczących bezpieczeństwa,
nie ponosimy żadnej odpowiedzialności!
ZAGROŻENIE ŻYCIA I NIEBEZ-
PIECZEŃSTWO WYPADKU
DLA DZIECI!
Nigdy nie należy pozostawiać dzieci bez
nadzoru z materiałem opakowaniowym. Istnieje
zagrożenie uduszeniem spowodowane przez
materiał opakowaniowy. Dzieci często nie do-
strzegają niebezpieczeństwa. Dzieci nie powinny
mieć dostępu do produktu.
Niniejsze urządzenie może być używane przez
dzieci od lat 8 oraz przez osoby z obniżonymi
zdolnościami fizycznymi, sensorycznymi lub
mentalnymi lub brakiem doświadczenia i / lub
wiedzy, jeśli pozostają pod nadzorem lub zo-
stały pouczone w kwestii bezpiecznego użycia
urządzenia i rozumieją wynikające z niego za-
grożenia. Dzieci nie mogą bawić się urządzen
iem.
Czyszczenie i konserwacja nie mogą być wy-
konywane przez dzieci bez nadzoru.
Porażenie prądem
elektrycznym grozi śmiercią
Przed każdym użyciem należy sprawdzić lampę
pod kątem ewentualnych uszkodzeń. Nigdy nie
używać lampy w razie stwierdzenia jakichkol-
wiek uszkodzeń.
Uszkodzona lampa oznacza zagrożenie dla
życia wskutek porażenia prądem. W razie
uszkodzeń, napraw lub innych problemów z
lampą należy zwrócić się do punktu serwiso-
wego lub do elektryka.
Bezpieczeństwo / Uruchomienie

43 PL
Instrukcja / Bezpieczeństwo Bezpieczeństwo / Uruchomienie
Aby uniknąć zagrożeń, uszkodzony kabel
zewnętrzny lampy może być wymieniany wy-
łącznie przez producenta, serwis lub innego
odpowiednio wykwalifikowanego specjalistę!
Przed użyciem należy upewnić się, że istniejące
napięcie sieci jest zgodne z wymaganym napię-
ciem roboczym lampy (patrz „Dane techniczne“).
Źródło światła tej lampy może być wymieniane
wyłącznie przez producenta lub upoważnionego
przez niego technika lub osobę o podobnych
kwalifikacjach.
Bezwzględnie unikać kontaktu lampy z wodą
lub innymi cieczami.
Aby całkowicie odłączyć lampę od źródła za-
silania, należy wyjąć transformator wtyczkowy 4
z gniazdka.
Przed przystąpieniem do montażu, demontażu
bądź czyszczenia lub jeśli lampa jest przez
długi czas nieużywana, należy zawsze wycią-
gnąć transformator wtyczkowy 4 z gniazdka.
Nigdy nie otwierać elementów elektrycznych i
nie wkładać do nich jakichkolwiek przedmiotów.
Taka ingerencja oznacza zagrożenie życia po-
przez porażenie prądem.
Ta żarówka nie nadaje się do użycia
w połączeniu z zewnętrznymi regu-
latorami jasności światła lub wyłącz-
nikami elektronicznymi.
Nie używać przewodu doprowadzającego 5
jako uchwytu do przenoszenia.
Nie zginać przewodu doprowadzającego 5
ani nie kłaść go na ostrych krawędziach.
Jak uniknąć zagrożenia
pożarowego i obrażeń ciała
NIEBEZPIECZEŃSTWO OBRAŻEŃ CIAŁA!
Od razu po rozpakowaniu sprawdzić każdą
żarówkę pod kątem uszkodzeń. Nie montować
lampy z uszkodzonymi żarówkami. W razie
uszkodzenia należy skontaktować się z punktem
serwisowym.
Nie należy bezpośrednio wpatrywać się w
źródło światła (żarówki, LED, itp.).
Nie należy zakrywać lampy lub transformatora
wtyczkowego 4 żadnymi przedmiotami.
Nadmierne wydzielanie się ciepła może spo-
wodować pożar.
Włączonej lampy nie pozostawiać bez nadzoru.
Diod LED nie należy oglądać za pomocą optycz-
nego instrumentu (np. lupy).
Uruchomienie
Model 14141605L:
Ostrożnie wyjąć części lampy z opakowania.
Usunąć cały materiał ochronny.
Następnie założyć dolne ramię lampy 3 w
taki sposób w przewidziane mocowanie, aby
trzpień 9 tkwił we wpuście 10 (patrz rys. A).
Uważać na to, aby nie uszkodzić ramienia lampy.
Aby zamocować dolne ramię lampy 3, lekko
dokręcić śrubę 11 (patrz rys. B).
Połączyć transformator wtyczkowy 4 z pod-
stawą lampy 6.
W
łożyć transformator wtyczkowy
4
do gni
azdka
zainstalowanego w sposób zgodny z przepisami.
Lampa jest gotowa do zastosowania.
Model 14150705L:
Ostrożnie wyjąć części lampy z opakowania.
Usunąć cały materiał ochronny.
Usunąć obie śruby 11 ze spodu lampy (patrz
rys. A).
Lampę umieścić na podstawie lampy 6 (patrz
rys. B) i przykręcić ją od dołu przy pomocy
śrub 11 (patrz rys. C).
Należy uważać na właściwe ułożenie.
Transformator wtyczkowy 4 połączyć z
podstawą lampy 6.
Transformator wtyczkowy
4
włożyć do gniazdka
zainstalowanego w sposób zgodny z przepisami.
Wskazówka: nie można ustawiać głowicy
lampy 1.
Lampa jest gotowa do zastosowania.

44 PL
Funkcje lampy / Konserwacja i czyszczenie
Włączanie / Wyłączanie lampy
Model 14141605L:
Dotknąć przycisk dotykowy ON / OFF 8, aby
lampę włączyć lub wyłączyć.
Wskazówka: lampa potwierdza dopływ
prądu miganiem na zielono przycisków
funkcji 7.
Model 14150705L:
Wcisnąć przycisk ON / OFF 8, aby lampę
włączyć lub wyłączyć.
Ustawienie lampy
Model 14141605L:
Wskazówka: ustawienie lampy zmieniać na
3 przegubach 1a , 2a i 3a jedynie, gdy lampa
jest wyłączona.
Odczekać, aż lampa całkowicie ostygnie.
Przesunąć głowicę lampy 1, górne ramię
lampy 2 i dolne ramię lampy 3 na wybraną
pozycję.
Jeśli lekko poluźni się śrubę 11 przy dolnym
mocowaniu, można również obrócić lampę.
Po obróceniu ponownie dokręcić śrubę 11 .
Funkcje lampy
Model 14141605L:
Przy pomocy przycisków funkcji 7 można
dokonywać następujących ustawień:
Read: neutralne białe światło
Work: zimne białe światło
Relax: ciepłe białe światło
High: bezstopniowe rozjaśnianie
Low: bezstopniowe ściemnianie
Jeśli odłączy się lampę od sieci elektrycznej,
uruchamia się ona ponownie z ustawieniem
„Read“.
Wskazówka: Lampa jest wyposażona w
funkcję Memory; zachowuje ona wcześniej
wybrane ustawienie.
Model 14150705L:
Przy pomocy przycisków funkcji 7 można
dokonywać następujących ustawień:
CCT: ustawianie temperatury barwy w 3 poziomach
LOW: płynne ściemnianie
HIGH: płynne rozświetlanie
Wskazówka: lampa posiada funkcję pamięci.
Przy włączaniu aktywne jest ostatnio wybrane usta-
wienie.
Przy pomocy przycisków sterowania 12 ,
13 , 14 und 15 można dokonywać nastę-
pujących ustawień:
Przycisk M 15 : przełączanie pomiędzy wy-
świetlaniem godziny i budzika
Przycisk S 14 : potwierdzenie ustawień
Przycisk 13 : ustawianie wyższej z kolei
wartości /przełączanie pomię-
dzy wskaźnikiem 12h / 24 h
Przycisk 12 : ustawianie wyższej z kolei
wartości /przełączanie pomię-
dzy °C / °F
Ustawianie godziny / daty
Nacisnąć przycisk M 15 , aż na wyświetlaczu
LCD 16 pojawi się symbol .
Nacisnąć przycisk S 14 . Wskaźnik godziny i
symbol migają.
Nacisnąć przyciski 13 i 12 , aby dokonać
ustawień godziny i ponownie nacisnąć przycisk
S 14 . Wskaźnik minut i symbol migają.
Teraz przy pomocy przycisków 13 i 12
dokonać innych ustawień dla minut /roku / mie-
siąca (Month) / dnia (Day) i każde ustawienie
potwierdzić naciśnięciem przycisku S 14 .
Wskazówka: symbol przestaje migać,
gdy ustawienia zostały zakończone.
Uruchomienie / Funkcje lampy

45 PL
Funkcje lampy / Konserwacja i czyszczenie
Ustawianie alarmu budzika:
Nacisnąć przycisk M 15 , aż na wyświetlaczu
LCD 16 pojawi się symbol .
Wskazówka: wyświetlanie na wyświetlaczu
LCD 16 zmienia się pomiędzy godziną a
alarmem budzika . Jeśli wybierze się alarm
budzika , ale nie dokona się ustawień, to
wyświetlanie na wyświetlaczu LCD 16 po ok.
60 sekundach przechodzi z powrotem do go-
dziny .
Nacisnąć przycisk S 14 . Wskaźnik godziny i
symbol migają.
Przy pomocy przycisków 13 i 12 ustawić
godzinę i ponownie nacisnąć przycisk S 14 .
Wskaźnik minut i symbol migają.
Przy pomocy przycisków 13 i 12 ustawić
minuty i ponownie nacisnąć przycisk S 14 .
Miga teraz wskaźnik czasu drzemki i symbol .
Przy pomocy przycisków 13 i 12 ustawić
czas drzemki w przedziale od 1 do 60 minut i
ponownie nacisnąć przycisk S 14 .
W dolnym rogu wyświetlacza LCD 16 miga
numer dźwięku budzika.
Przy pomocy przycisków 13 i 12 wybrać
jeden z 8 różnych dźwięków budzika.
Wskazówka: po zakończeniu ustawień
alarmu budzika symbol stale świeci się na
wyświetlaczu LCD 16 .
Aktywowanie / dezaktywowanie alarmu
budzika / funkcji drzemki:
Nacisnąć przycisk M 15 , aż na wyświetlaczu
LCD 16 pojawi się symbol .
Nacisnąć przycisk 13 . Na wyświetlaczy
LCD 16 zostaną pokazane symbole i .
Wcześniej ustawiony alarm budzika został teraz
aktywowany.
Nacisnąć teraz przycisk 13 lub 12 .
Na wyświetlaczy LCD 16 zostaną teraz poka-
zane symbole , i . Wcześniej ustawiona
funkcja drzemki jest teraz aktywowana.
Wskazówka: aby wyłączyć alarm budzika i
funkcję drzemki, nacisnąć przycisk 13 lub
12 . Na wyświetlaczu LCD 16 gasną wcze-
śniej wyświetlane symbole , i .
Wskazówka: alarm budzika wynosi
ok. 1 minutę.
Wyłączanie alarmu budzika / funkcji
drzemki:
Alarm budzika bez funkcji drzemki:
Jeśli funkcja drzemki nie jest aktywna, nacisnąć
jeden z 4 przycisków 12 , 13 , 14 lub 15 , aby
wyłączyć alarm budzika.
WAŻNE: alarm budzika jest jeszcze aktywny
dla następnego dnia.
Alarm budzika z funkcją drzemki:
Jeśli funkcja drzemki jest aktywna, alarm budzika
włącza się ponownie po upłynięciu ustawionej
funkcji drzemki (maks. trzy razy).
Nacisnąć przycisk M 15 , aż na wyświetlaczu
LCD 16 pojawi się symbol .
Nacisnąć przycisk 13 lub 12 , aż
znikną symbole i , aby wyłączyć alarm
budzika z funkcją drzemki.
WAŻNE: alarm budzika jest jeszcze wyłą-
czony dla następnego dnia.
Przełączanie między wskaźnikiem
12h / 24h:
Nacisnąć przycisk M 15 , aż na wyświetlaczu
LCD 16 pojawi się symbol .
Nacisnąć przycisk 13 . Wskaźnik godziny
na wyświetlaczu LCD 16 przechodzi między
12h a 24h formatem wyświetlania.
Wskazówka: w formacie wyświetlania 12h
po południu pojawia się przed godziną PM.
Ustawianie wyświetlacza temperatury:
Nacisnąć przycisk M 15 , aż na wyświetlaczu
LCD 16 pojawi się symbol .
Nacisnąć przycisk 12 . Wyświetlanie tem-
peratury na wyświetlaczu LCD 16 zmienia się
pomiędzy °C (Celsius) a °F (Fahrenheit).
Konserwacja i czyszczenie
NIEBEZPIECZEŃSTWO
PORAŻENIA PRĄDEM ELEKTRYCZNYM!
Przed przystąpieniem do każdej konserwacji i
czyszczenia najpierw wyjąć transformator wtycz-
kowy 4 z gniazdka.
Uruchomienie / Funkcje lampy

46 PL
Konserwacja i czyszczenie / Utylizacja / Informacje / Deklaracja zgodności
NIEBEZPIECZEŃSTWO
PORAŻENIA PRĄDEM ELEKTRYCZNYM!
Ze względu na zachowanie bezpieczeństwa w zakre-
sie elektryczności nie wolno czyścić lampy za pomocą
wody lub innych płynów, ani też zanurzać w wodzie.
OSTROŻNIE! NIEBEZPIECZEŃSTWO PO-
PARZENIA GORĄCYMI POWIERZCHNIAMI!
Odczekać, aż lampa całkowicie ostygnie.
Nie używać rozpuszczalników, benzyny i
podobnych substancji. W przeciwnym razie
lampa może zostać uszkodzona.
Do czyszczenia należy używać wyłącznie
suchej, niestrzępiącej się szmatki.
Włożyć ponownie transformator wtyczkowy 4
do gniazdka zasilania.
Utylizacja
b
a
Przy segregowaniu odpadów prosimy
zwrócić uwagę na oznakowanie mate-
riałów opakowaniowych, oznaczone są
one skrótami (a) i numerami (b) o nastę-
pującym znaczeniu: 1–7: Tworzywa
sztuczne / 20–22: Papier i tektura /
80–98: Materiały kompozytowe.
Produkt i materiał opakowania nadają
się do ponownego przetworzenia, należy
je zutylizować osobno w celu lepszego
przetworzenia odpadów. Logo Triman
jest ważne tylko dla Francji.
Z uwagi na ochronę środowiska nie wy-
rzucać urządzenia po zakończeniu eks-
ploatacji do odpadów domowych, lecz
prawidłowo zutylizować. Informacji o
punktach zbiorczych i ich godzinach
otwarcia udziela odpowiedni urząd.
Informacje
Gwarancja
W momencie zakupu otrzymują Państwo na to
urządzenie 36 miesięcy gwarancji. Urządzenie
wyprodukowano starannie i poddano dokładnej
kontroli jakości. W okresie gwarancji usuwamy bez-
płatnie wszystkie wady materiałowe lub fabryczne.
Jeśli mimo to w okresie gwarancji pojawią się usterki,
urządzenie należy przesłać na podany adres
serwisowy, podając następujący numer artykułu:
14141605L / 14150705L.
Gwarancji nie podlegają uszkodzenia spowodowane
przez nieprawidłowe użytkowanie, nieprzestrzega-
nie instrukcji obsługi lub ingerencję nieautoryzowa-
nych osób, a także części szybko zużywające się
(jak np. elementy świetlne). Usługa gwarancyjna
nie przedłuża ani nie odnawia okresu gwarancji.
Zgodnie z Kodeksem Cywilnym art. 581 §1 wraz
z wymianą urządzenia lub ważnej części czas
gwarancji rozpoczyna się na nowo.
Producent / Serwis
Briloner Leuchten GmbH & Co. KG
Im Kissen 2
59929 Brilon
NIEMCY
Tel.: +49 29 61 / 97 12–800
Fax: +49 29 61 / 97 12–199
E-Mail: [email protected]
www.briloner.com
Bezpłatny numer serwisu:
Tel.: 00800 / 27456637
IAN 345257_2004
Przed skontaktowaniem się z działem serwisowym
należy przygotować paragon i numer artykułu
(np. IAN 123456_7890) jako dowód zakupu.
Deklaracja zgodności
Niniejszy produkt spełnia wymagania obowiązują-
cych dyrektyw europejskich i krajowych. Zgodność
została wykazana. Odpowiednie deklaracje i do-
kumenty są przechowywane przez producenta.
Seznam obsahu

47 CZ
Konserwacja i czyszczenie / Utylizacja / Informacje / Deklaracja zgodności
Vysvětlení použitých piktogramů ...........................................................................Strana 48
Úvod .................................................................................................................................................Strana 49
Používání v souladu s určením ........................................................................................................Strana 49
Obsah dodávky ............................................................................................................................... Strana 49
Popis dílů ..........................................................................................................................................Strana 49
Technická data .................................................................................................................................Strana 49
Bezpečnost ..................................................................................................................................Strana 50
Bezpečnostní pokyny .......................................................................................................................Strana 50
Uvedení do provozu ...........................................................................................................Strana 51
Rozsvícení a zhasnutí svítidla ..........................................................................................................Strana 51
Nasměrování svítidla ....................................................................................................................... Strana 51
Funkce svítidla ......................................................................................................................... Strana 52
Údržba a čištění ......................................................................................................................Strana 53
Likvidace .......................................................................................................................................Strana 53
Informace .....................................................................................................................................Strana 54
Záruka ..............................................................................................................................................Strana 54
Výrobce / Servis ...............................................................................................................................Strana 54
Prohlášení oshodě ..............................................................................................................Strana 54
Seznam obsahu

48 CZ
Vysvětlení použitých piktogramů
Vysvětlení použitých piktogramů
Přečtěte si pokyny! Varování před zásahem elektrického
proudu! Nebezpečí ohrožení života!
VVolt
Tento osvětlovací prostředek není
vhodný k tlumení externími stmívači
a k použití s elektronickými spínači.
A.C. a.c. Střídavé napětí (druh proudu a napětí) Tak postupujete správně
Hertz (kmitočet) Pozor! Nebezpečí popálení
ohorký povrch!
Watt (činný výkon) Životnost
Ochranná třída II ON OFF Spínací cykly
Dbejte na výstrahy a řiďte se
bezpečnostními pokyny! Jen pro vnitřní prostory
Toto svítidlo je určeno výhradně kpou-
žití vinteriéru, vsuchých a uzavřených
místnostech. ta Teplota okolního prostředí
Nebezpečí ohrožení života a nehody
malých a velkých dětí! tc Teplota tělesa v udaném bodě
Polarita síťové přípojky SELV Malé ochranné napětí
Nezávislý předřadník Obal je vyroben ze 100 % recyklo-
vatelného papíru.
Před zkratem chráněný
bezpečnostní transformátor b
a
Obal a přístroj odstraňujte do
odpadu ekologicky!
d.c. DC Stejnosměrné napětí
(druh proudu a napětí) Svítidlo je vhodné kmontáži na plo-
chách sběžnou mírou hořlavosti.
Třída ochrany III mA Miliampéry
Plynulé tlumení intenzity světla Sfunkcí paměti
Teplota světla vkelvinech Ra Index podání barev
Vysvětlení použitých piktogramů / Úvod

49 CZ
Vysvětlení použitých piktogramů Vysvětlení použitých piktogramů / Úvod
Vysvětlení použitých piktogramů
Funkce alarmu Kalendář
Ukazatel času
Stolní LED lampa
Úvod
Blahopřejeme vám ke koupi nového vý-
robku. Rozhodli jste se pro vysoce kvalitní
výrobek. Přečtěte si laskavě kompletně
a pečlivě tento návod k obsluze. Rozevřete stránku
sobrázky. Tento návod je součástí tohoto výrobku
a obsahuje důležité informace ouvedení zařízení do
provozu a kzacházení sním. Řiďte se vždy bezpeč-
nostními pokyny. Před uvedením do provozu zkont-
rolujte, jestli je kdispozici správné napětí a jestli jsou
všechny díly správně namontované. Jestliže máte
ještě otázky nebo jste si nejistí při ovládání přístroje,
kontaktujte vašeho prodejce nebo servis. Návod
pečlivě uschovejte a případně jej předejte třetí osobě.
Používání v souladu s určením
Svítidlo je určeno výhradně pro provoz
vinteriéru, vsuchých a uzavřených míst-
nostech. Tento přístroj je určen pouze
pro soukromé použití. Svítidlo je určeno kběžnému
použití.
Obsah dodávky
Bezprostředně po vybalení vždy zkontrolujte úplnost
dodávky a bezvadný stav zařízení.
1LED stolní lampa, 14141605L / 14150705L
1 zástrčkový transformátor
1 podstavec svítidla
1návod kobsluze
Popis dílů
1 Hlava svítidla
1a Kloub (hlava svítidla) (14141605L)
2 Horní rameno svítidla (14141605L)
2a Kloub (horní rameno svítidla) (14141605L)
3 Dolní rameno svítidla (14141605L)
3a Kloub (dolní rameno svítidla) (14141605L)
4 Zástrčkový transformátor
5 Přívodní kabel
6 Podstavec svítidla
7 Funkční tlačítka
8 Dotykový vypínač (14141605L) /
vypínač ZAP / VYP (14150705L)
9 Kolík (14141605L)
10 Drážka (14141605L)
11 Šroub
12 Tlačítko (14150705L)
13 Tlačítko (14150705L)
14 Tlačítko S (14150705L)
15 Tlačítko M (14150705L)
16 Displej LC (14150705L)
Technická data
14141605L:
Svítidlo:
Model číslo: 14141605L
Provozní napětí: 100–240 V~ 50 / 60 Hz
Jmenovitý příkon
maximálně: LED, max. 9 W
Ochranná třída: II /
Druh ochrany: IP20
LED:
Číslo modelu: 14141605L-1
Jmenovitý výkon: LED 6,6 W / 500mA

50 CZ
Úvod / Bezpečnost
Třída ochrany: III /
Vstupní proud: 12 V
Síťový adaptér:
Číslo modelu: BLW018-1200550EU
Provozní napětí: 100–240 V~ 50 / 60 Hz
Výstupní napětí: 12 V , 550 mA
Ochranná třída: II /
Druh ochrany: IP20
Jmenovitý výkon: 10 W
14150705L:
Svítidlo:
Model číslo: 14150705L
Provozní napětí: 230–240 V~ 50 Hz
Jmenovitý výkon max: LED max. 6 W
Třída ochrany: II /
Druh ochrany: IP20
LED:
Jmenovitý výkon: LED 4,2 W
Síťový adaptér:
Číslo modelu: BLW-5688-6
Provozní napětí: 100–240 V~ 50 / 60 Hz
Výstupní napětí: 12 V
Ochranná třída: II /
Druh ochrany: IP20
Jmenovitý výkon: 4,2 W
Bezpečnost
Bezpečnostní pokyny
Při škodách způsobených nedodržením tohoto ná-
vodu k obsluze zaniká záruka! Za následné škody
se neručí! Za věcné nebo osobní škody, způsobené
neodborným zacházením nebo nerespektováním
bezpečnostních pokynů, se neručí!
NEBEZPEČÍ OHROŽENÍ
ŽIVOTA A ÚRAZU PRO
MALÉ DĚTI A DĚTI!
Nenechávejte děti nikdy bez dozoru sobalo-
vým materiálem. Hrozí jim nebezpečí udušení
obalovým materiálem. Děti často podcení
nebezpečí. Výrobek chraňte před dětmi.
Tento přístroj mohou používat děti starší osmi
let, osoby se sníženými fyzickými, smyslovými
nebo duševními schopnosti nebo s nedostateč-
nými zkušenostmi a znalostmi, jestliže budou pod
dohledem nebo byly poučeny o bezpečném
používání přístroje a chápou nebezpečí, která
z jeho používání vyplývají. Svýrobkem si děti
nesmí hrát. Děti nesmí bez dohledu provádět
čištění ani uživatelskou údržbu výrobku.
Zabraňte ohrožení života
v důsledku zásahu elektrickým
proudem
Před každým použitím svítidlo zkontrolujte zhle-
diska případných poškození. Nikdy nepoužívejte
svítidlo, pokud jste zjistili, že je poškozené.
Poškozené svítidlo znamená ohrožení života
úrazem elektrickým proudem. Při poškozeních,
opravách nebo jiných problémech se obraťte
na servisní místo nebo na kvalifikovaného elek-
trikáře.
Pro vyloučení ohrožení smí vyměňovat poškozené
vnější pružné vedení této lampy výhradně vý-
robce, jeho servisní zástupce nebo srovnatelný
odborník!
Před použitím se ujistěte, že dané síťové napětí
souhlasí s potřebným provozním napětím pro
lampu (viz „Technická data“).
Světelný zdroj tohoto svítidla smí vyměnit jen
výrobce nebo výrobcem pověřený technik
anebo srovnatelně kvalifikovaná osoba.
Bezpodmínečně zabraňte kontaktu lampy
svodou nebo jinými kapalinami.
Pro úplné odpojení svítidla od přívodu elektric-
kého proudu musíte odpojit zástrčkový transfor-
mátor 4 ze zásuvky.
Před montáží, demontáží, čištěním nebo delším
nepoužívání svítidla vždy vytáhněte zástrčkový
transformátor 4 ze zásuvky.
Nikdy neotvírejte žádný z elektrických provoz-
ních prostředků ani do nich nestrkejte jakékoli
předměty. Takové zásahy znamenají nebezpečí
ohrožení života elektrickým proudem.
Bezpečnost / Uvedení do provozu

51 CZ
Úvod / Bezpečnost Bezpečnost / Uvedení do provozu
Tento osvětlovací prostředek není
vhodný k tlumení externími stmívači
a k použití s elektronickými spínači.
Nepoužívejte přívodní kabel 5 na nošení.
Neohýbejte přívodní kabel 5 ani ho nepoklá-
dejte přes ostré hrany.
Vyvarujte se nebezpečí
požáru a poranění
NEBEZPEČÍ ZRANĚNÍ!
Bezprostředně po vybalení přezkoušejte každý
svíticí prostředek zhlediska poškození. Svítidlo
nemontujte s defektními svíticími prostředky.
Vtakovém případě se obraťte na servis se
žádostí o náhradu.
Nedívejte se přímo do zdroje světla (osvětlovací
prostředek LED, atd.).
Nezakrývejte svítidlo resp. zástrčkový transfor-
mátor 4 předměty. Nadměrné zahřátí může
vést ke vzniku požáru.
Nenechávejte zapnutou lampu bez dohledu.
Nedívejte se na LED optickou pomůckou (např.
lupou).
Uvedení do provozu
Model 14141605L:
Opatrně vyjměte díly svítidla zobalu.
Odstraňte veškerý ochranný materiál.
Nastrčte dolní rameno svítidla 3 do příslušného
uložení tak, aby osa 9 zapadla do drážky 10
(viz obr. A). Dávejte přitom pozor, abyste rameno
svítidla nepoškodili.
Pro připevnění dolního ramena 3 mírně
utáhněte šroub 11 (viz obr. B).
Spojte zástrčkový transformátor 4 s podstav-
cem svítidla 6.
Zastrčte zástrčkový transformátor 4 do
předpisově instalované zásuvky.
Nyní je svítidlo připravené kpoužití.
Model 14150705L:
Opatrně vyjměte díly svítidla zobalu.
Odstraňte veškerý ochranný materiál.
Odšroubujte oba šrouby 11 ze spodní strany
svítidla (viz obr. A).
Nasaďte svítidlo na podstavec svítidla 6
(viz obr. B) a pevně je přišroubujte dvěma
šrouby 11 zespodu (viz obr. C).
Dbejte na správné usazení.
Spojte zástrčkový transformátor 4 spodstavcem
svítidla 6.
Zapojte zástrčkový transformátor 4 do před-
pisově instalované zásuvky.
Upozornění: Polohu hlavy svítidla 1 nemů-
žete nastavit.
Nyní je svítidlo připravené kpoužití.
Rozsvícení a zhasnutí svítidla
Model 14141605L:
Krozsvícení nebo zhasnutí svítidla se dotkněte
dotykového vypínače 8.
Upozornění: Svítidlo potvrzuje přívod proudu
rozsvícením funkčních tlačítek 7 zelenou barvou.
Model 14150705L:
Krozsvícení nebo zhasnutí svítidla stiskněte
vypínač ZAP / VYP 8.
Nasměrování svítidla
Model 14141605L:
Upozornění: Nastavujte polohu pomocí 3kloubů
svítidla 1a , 2a a 3a pouze na zhasnutém svítidle.
Nechte svítidlo úplně vychladnout.
Nastavte hlavu svítidla 1, horní rameno
svítidla 2 a dolní rameno svítidla 3 do
požadované polohy.
Po mírném povolení šroubu 11 na dolním
uložení můžete svítidlo také natáčet.
Po natočení zase šroub 11 pevně utáhněte.

52 CZ
Funkce svítidla / Údržba a čištění / LikvidaceFunkce svítidla
Funkce svítidla
Model 14141605L:
Pomocí funkčních tlačítek 7 můžete
provést následující nastavení:
Read: neutrální bílé světlo
Work: bílé studené světlo
Relax: bílé teplé světlo
High: plynulé zvýšení intenzity světla
Low: plynulé snížení intenzity světla
Po odpojení od sítě elektrického proudu,
startuje svítidlo v nastavení „Read“.
Upozornění: Svítidlo je vybaveno paměťovou
funkcí memory, ukládá do paměti naposledy
zvolené nastavení.
Model 14150705L:
Pomocí funkčních tlačítek 7 můžete
provést následující nastavení:
CCT: Nastavení teploty barev ve 3stupních
LOW: Plynulé snížení intenzity světla
High: Plynulé zvýšení intenzity světla
Upozornění: Svítidlo je vybaveno paměťovou
funkcí. Po rozsvícení bude aktivní poslední vybrané
nastavení.
Pomocí ovládacích tlačítek 12 , 13 , 14 a 15
můžete provést následující nastavení:
TlačítkoM 15 : přepínání zobrazení přesného
času a budíka
TlačítkoS 14 : ovládání nastavení
Tlačítko 13 : nastavení nejbližší vyšší hod-
noty /přepínání zobrazení
12h / 24 h
Tlačítko 12 : nastavení nejbližší nižší hod-
noty /přepínání zobrazení
°C / °F
Nastavení času a data:
Stiskněte tlačítkoM 15 , dokud se na displeji
LC 16 nezobrazí symbol .
Stiskněte tlačítkoS 14 . Bliká zobrazení hodin
a symbol .
Stiskněte tlačítka 13 a 12 , tím provedete
nastavení hodin a znovu stiskněte tlačítkoS 14 .
Bliká zobrazení minut a symbol .
Nyní proveďte pomocí tlačítek 13 a 12
další nastavení minut /roku / měsíce (Month) /
dne (Day) a potvrďte každé nastavení stisknutím
tlačítkaS 14 .
Upozornění: Symbol přestane blikat,
jakmile budou nastavení dokončena.
Nastavení buzení:
Stiskněte tlačítkoM 15 , dokud se na displeji
LC 16 nezobrazí symbol .
Upozornění: Zobrazení na displejiLC 16
střídavě ukazuje přesný čas a čas buzení .
Pokud vyberete čas buzení , ale neprovedete
nastavení, přepne zobrazení na displejiLC 16
po cca 60sekundách zpět na zobrazení přes-
ného času .
Stiskněte tlačítkoS 14 . Bliká zobrazení hodin
a symbol .
Nastavte pomocí tlačítek 13 a 12 hodinu
a stiskněte znovu tlačítkoS 14 . Bliká zobrazení
minut a symbol .
Nastavte pomocí tlačítek 13 a 12 minuty
a stiskněte znovu tlačítkoS 14 . Bliká zobrazení
doby dřímání a symbol .
Nastavte pomocí tlačítek 13 a 12
dobu dřímání vrozsahu 1minuta až 60minut
a stiskněte znovu tlačítkoS 14 .
Na spodním okraji displeje LC 16 bliká číslo
melodie buzení.
Vyberte pomocí tlačítek 13 a 12 někte-
rou z8melodií buzení.
Upozornění: Po dokončení nastavení času
buzení svítí symbol na displeji LC 16 trvale.
Aktivace / deaktivace funkce buzení /
dřímání:
Stiskněte tlačítkoM 15 , dokud se na displeji
LC 16 nezobrazí symbol .

53 CZ
Funkce svítidla / Údržba a čištění / Likvidace
Stiskněte tlačítko 13 . Na displeji LC 16 se
zobrazují symboly a . Nyní je aktivní
původně nastavený čas buzení.
Nyní stiskněte tlačítko 13 nebo 12 . Na
displeji LC 16 se nyní zobrazují symboly ,
a . Původně nastavená funkce dřímání
je nyní aktivní.
Upozornění: Kdeaktivaci buzení a funkce
dřímání stiskněte tlačítko 13 nebo 12 .
Na displejiLC 16 zhasnou dříve zobrazené
symboly , a .
Upozornění: Doba buzení trvá cca 1minutu.
Vypnutí buzení / funkce dřímání:
Buzení bez funkce dřímání:
Při deaktivované funkci dřímání stiskněte některé
ze 4funkčních tlačítek 12 , 13 , 14 nebo 15 ,
abyste vypnuli buzení.
DŮLEŽITÉ: Buzení je stále aktivní pro následu-
jící den.
Buzení sfunkcí dřímání:
Pokud je aktivní funkce dřímání, buzení bude znovu
zahájeno po uplynutí nastavené funkce dřímání
(max. třikrát).
Stiskněte tlačítkoM 15 , dokud se na displeji
LC 16 nezobrazí symbol .
Stiskněte nyní tlačítko 13 nebo 12 , do-
kud nezhasnou symboly a tak, abyste
vypnuli buzení sfunkcí dřímání.
DŮLEŽITÉ: Buzení je není deaktivováno i pro
následující den.
Přepínání zobrazení 12h / 24h:
Stiskněte tlačítkoM 15 , dokud se na displeji
LC 16 nezobrazí symbol .
Stiskněte tlačítko 13 . Zobrazení času na
displejiLC 16 přepíná mezi formáty 12h a 24h.
Upozornění: Ve 12hodinovém formátu se
před zobrazeným časem odpoledne zobrazí
označení PM.
Nastavení ukazatele teploty
Stiskněte tlačítkoM 15 , dokud se na displeji
LC 16 nezobrazí symbol .
Stiskněte tlačítko 12 . Ukazatel teploty na
displeji LC 16 přepíná mezi zobrazením °C
(Celsius) a °F (Fahrenheit).
Údržba a čištění
NEBEZPEČÍ ZÁSAHU
ELEKTRICKÝM PROUDEM!
Před každým čištěním a údržbou vytáhněte zástrč-
kový transformátor 4 ze zásuvky.
NEBEZPEČÍ ZÁSAHU
ELEKTRICKÝM PROUDEM!
Z důvodu elektrické bezpečnosti se lampa nikdy
nesmí čistit vodou nebo jinými kapalinami či dokonce
do vody ponořovat.
POZOR! NEBEZPEČÍ POPÁLENÍ
HORKÝMI POVRCHY!
Nechte lampu nejprve úplně.
Nepoužívejte na čištění rozpouštědla, benzín
nebo podobné látky, lampu můžete poškodit.
K čištění používejte jen suchou utěrku nepouš-
tějící vlákna.
Zastrčte zástrčkový transformátor 4 zase do
zásuvky.
Likvidace
b
a
Při třídění odpadu se řiďte podle ozna-
čení obalových materiálů zkratkami (a)
a čísly (b), s následujícím významem:
1–7: umělé hmoty / 20–22: papír a
lepenka / 80–98: složené látky.
Výrobek a obalové materiály jsou recy-
klovatelné, zlikvidujte je odděleně pro
lepší odstranění odpadu. Logo Triman
platí jen pro Francii.
Vzájmu ochrany životního prostředí
vysloužilý výrobek nevyhazujte do do-
movního odpadu, ale předejte k odborné
likvidaci. O sběrnách a jejich otevíracích
hodinách se můžete informovat u přís
lušné
správy města nebo obce.
Funkce svítidla

54 CZ
Informace / Prohlášení oshodě
Informace
Záruka
Od okamžiku zakoupení dostáváte na výrobek zá-
ruku po dobu 36 měsíců. Zařízení bylo svědomitě
vyrobeno a podrobeno přesné kontrole jakosti. Bě-
hem záruční doby odstraníme bezplatně všechny
vady materiálu a výrobní vady. Vpřípadě, že se
během záruční doby vyskytnou nedostatky, zašlete
laskavě artikl na uvedenou adresu servisu a uveďte
následující číslo zboží: 14141605L / 14150705L.
Ze záruky vyloučeny škody způsobené neodborným
zacházením, nerespektováním návodu kobsluze
nebo zásahem neautorizovanou osobou, jakož i
poškození rychleopotřebitelných dílů (např. svíticí
prostředky). Záručním výkonem se záruční doba
neprodlouží ani neobnoví.
Výrobce / Servis
Briloner Leuchten GmbH & Co. KG
Im Kissen 2
59929 Brilon
NĚMECKO
Tel.: +49 29 61 / 97 12–800
Fax: +49 29 61 / 97 12–199
E-Mail: [email protected]
www.briloner.com
Servisní číslo zdarma:
Tel.: 00800 / 27456637
IAN 345257_2004
Pro všechny požadavky si připravte pokladní blok
a číslo výrobku (např. IAN 123456_7890) jako
doklad o nákupu.
Prohlášení oshodě
Tento výrobek splňuje požadavky platných evrop-
ských a národních směrnic. Shoda byla prokázána.
Příslušná prohlášení a dokumentace jsou uloženy
uvýrobce.
Zoznam obsahu

55 SK
Informace / Prohlášení oshodě
Legenda použitých piktogramov ............................................................................ Strana 56
Úvod .................................................................................................................................................Strana 57
Používanie v súlade s určeným účelom ..........................................................................................Strana 57
Obsah dodávky ............................................................................................................................... Strana 57
Popis častí .........................................................................................................................................Strana 57
Technické údaje ...............................................................................................................................Strana 57
Bezpečnosť ................................................................................................................................. Strana 58
Bezpečnostné upozornenia .............................................................................................................Strana 58
Uvedenie do prevádzky ................................................................................................. Strana 59
Zapnutie / vypnutie svietidla ............................................................................................................Strana 59
Nastavenie svietidla .........................................................................................................................Strana 59
Funkcie svietidla .....................................................................................................................Strana 60
Údržba a čistenie ...................................................................................................................Strana 61
Likvidácia .....................................................................................................................................Strana 62
Informácie ...................................................................................................................................Strana 62
Záruka ..............................................................................................................................................Strana 62
Výrobca / Servis ............................................................................................................................... Strana 62
Konformitné vyhlásenie ..................................................................................................Strana 62
Zoznam obsahu

56 SK
Legenda použitých piktogramov
Legenda použitých piktogramov
Prečítajte si pokyny! P
ozor na zásah elektrickým prúdom!
Nebezpečenstvo ohrozenia života!
VVolt Osvetľovací prostriedok nie je
vhodný pre externé stmievače a
elektronické spínače.
A.C. a.c.
Striedavé napätie
(druh prúdu a druh napätia) Takto postupujete správne
Hertz (frekvencia) Pozor! Nebezpečenstvo popálenia
skrze horúce povrchy!
Watt (efektívny výkon) Životnosť
Trieda ochrany II ON OFF Spínacie cykly
Rešpektujte výstražné a bezpečnostné
upozornenia! Iba pre interiér
Toto svietidlo je určené výhradne na
prevádzku v interiéri, v suchých a uza-
tvorených priestoroch. ta Teplota okolia
Nebezpečenstvo ohrozenia života a
nebezpečenstvo nehody pre malé a
staršie deti! tc Teplota schránky na uvedenom
bode
Polarita sieťového pripojenia SELV Ochranné nízke napätie
Nezávislý prevádzkový prístroj Obal je vyrobený zo 100 %
recyklovaného papiera.
Skratuvzdorný bezpečnostný
transformátor b
a
Obal a zariadenie ekologicky
zlikvidujte!
d.c. DC Jednosmerné napätie
(druh prúdu a druh napätia) Svietidlo je vhodné pre montáž na
normálne vznietiteľných povrchoch.
Trieda ochrany III mA Miliampéry
Plynulo stlmiteľné S funkciou pamäte
Legenda použitých piktogramov / Úvod

57 SK
Legenda použitých piktogramov Legenda použitých piktogramov / Úvod
Legenda použitých piktogramov
Teplota svetla v Kelvin Ra Index reprodukcie farieb
Funkcia alarmu Kalendár
Zobrazenie času
LED stolná lampa
Úvod
Blahoželáme Vám ku kúpe Vášho nového
prístroja. Rozhodli ste sa tým pre veľmi
kvalitný výrobok. Dôkladne si prečítajte
celý tento návod na obsluhu. Otvorte stranu s ob-
rázkami. Tento návod patrí k tomuto výrobku a
obsahuje dôležité upozornenia pre uvedenie do
prevádzky a manipuláciu. Dodržiavajte vždy všetky
bezpečnostné upozornenia. Pred uvedením do
prevádzky prekontrolujte, či je k dispozícii správne
napätie a či sú všetky diely správne namontované.
V prípade otázok alebo neistoty ohľadom manipu-
lácie s prístrojom sa prosím spojte s Vaším predaj-
com alebo servisným pracoviskom. Tento návod si
starostlivo uschovajte a prípadne ho odovzdajte
tretej osobe.
Používanie v súlade
s určeným účelom
Toto svietidlo je vhodné výhradne na
prevádzku v interiéri, v suchých a uzatvo-
rených priestoroch. Tento prístroj je určený
len na používanie v súkromných domácnostiach.
Svietidlo je určené len na normálnu prevádzku.
Obsah dodávky
Bezprostredne po vybalení vždy skontrolujte úplnosť
dodávky ako aj bezchybný stav zariadenia.
1 LED stolové svietidlo, 14141605L / 14150705L
1 zástrčkový transformátor
1 stojan svietidla
1 návod na používanie
Popis častí
1 Hlava svietidla
1a Kĺb (Hlava svietidla) (14141605L)
2 Horné rameno svietidla (14141605L)
2a Kĺb (Horné rameno svietidla) (14141605L)
3 Dolné rameno svietidla (14141605L)
3a Kĺb (Dolné rameno svietidla) (14141605L)
4 Zástrčkový transformátor
5 Prívodové vedenie
6 Stojan svietidla
7 Funkčné tlačidlá
8 Dotykové tlačidlo ON / OFF (14141605L) /
Tlačidlo ON / OFF (14150705L)
9 Kolík (14141605L)
10 Drážka (14141605L)
11 Skrutka
12 Tlačidlo (14150705L)
13 Tlačidlo (14150705L)
14 Tlačidlo S (14150705L)
15 Tlačidlo M (14150705L)
16 LC-displej (14150705L)
Technické údaje
14141605L:
Svietidlo:
Číslo modelu: 14141605L
Prevádzkové napätie: 100–240 V~ 50 / 60 Hz
Menovitý výkon max.: LED max. 9 W

58 SK
Úvod / Bezpečnosť
Trieda ochrany: II /
Druh ochrany: IP20
LED:
Číslo modelu: 14141605L-1
Menovitý výkon: LED 6,6 W / 500 mA
Trieda ochrany: III /
Vstupný prúd: 12 V
Sieťový diel:
Číslo modelu: BLW018-1200550EU
Prevádzkové napätie: 100–240 V~ 50 / 60 Hz
Výstupné napätie: 12 V , 550 mA
Trieda ochrany: II /
Druh ochrany: IP20
Menovitý výkon: 10 W
14150705L:
Svietidlo:
Číslo modelu: 14150705L
Prevádzkové napätie: 230–240 V~ 50 Hz
Menovitý výkon max: LED max. 6 W
Trieda ochrany: II /
Druh ochrany: IP20
LED:
Menovitý výkon: LED 4,2 W
Sieťový diel:
Číslo modelu: BLW-5688-6
Prevádzkové napätie: 100–240 V~ 50 / 60 Hz
Výstupné napätie: 12 V
Trieda ochrany: II /
Druh ochrany: IP20
Menovitý výkon: 4,2 W
Bezpečnosť
Bezpečnostné upozornenia
V prípade škôd, ktoré vzniknú nedodržiavaním
tohto návodu na obsluhu, zaniká garančný nárok!
Pri následných škodách nepreberá výrobca ručenie!
V prípade vecných škôd alebo poranenia osôb,
ktoré boli zapríčinené neodbornou manipuláciou
alebo nedodržiavaním bezpečnostných pokynov,
nepreberá výrobca ručenie!
NEBEZPEČENSTVO OHROZE-
NIA ŽIVOTA A NEBEZPEČEN-
STVO ÚRAZU PRE MALÉ I
STARŠIE DETI!
Nikdy nenechávajte deti bez dozoru s obalovým
materiálom. Existuje nebezpečenstvo zadusenia
obalovým materiálom. Deti často podceňujú ne-
bezpečenstvo. Držte deti vždy v bezpečnej
vzdialenosti od výrobku.
Tento prístroj môžu používať deti od 8 rokov ako
aj osoby so zníženými psychickými, senzorickými
alebo duševnými schopnosťami alebo s nedostat-
kom skúseností a vedomostí, ak sú pod dozorom,
alebo ak boli poučené ohľadom bezpečného
používania prístroja, a ak porozumeli nebez-
pečenstvám spojeným s jeho používaním. Deti
sa s prístrojom nesmú hrať. Čistenie a údržbu
nesmú vykonávať deti bez dozoru.
Zabráňte ohrozeniu života
zásahom elektrickým prúdom
Pred každým použitím skontrolujte prípadné po-
škodenia svietidla. Ak zistíte akékoľvek poškode-
nia, svietidlo za žiadnych okolností nepoužívajte.
Poškodené svietidlo predstavuje riziko ohrozenia
života v dôsledku zásahu elektrickým prúdom.
V prípade poškodení, opráv alebo iných prob-
lémov so svietidlom sa obráťte na servisné stre-
disko alebo kvalifikovaného elektrikára.
Aby nedošlo k ohrozeniu, smie poškodené von-
kajšie flexibilné vedenie tohto svietidla vymeniť
výhradne výrobca, jeho servisný zástupca alebo
porovnateľný odborník!
Pred použitím sa ubezpečte, že sa sieťové napä-
tie v zásuvke zhoduje s potrebným prevádzkovým
napätím svietidla (pozri „Technické údaje“).
Svetelný zdroj tohto svietidla smie vymieňať
iba výrobca alebo ním poverený technický pra-
covník alebo osoba s podobnou kvalifikáciou.
Bezpodmienečne zabráňte kontaktu svietidla s
vodou alebo inými kvapalinami.
Bezpečnosť / Uvedenie do prevádzky

59 SK
Úvod / Bezpečnosť Bezpečnosť / Uvedenie do prevádzky
Ak chcete svietidlo úplne odpojiť od zdroja p
rúdu,
musíte vytiahnuť zástrčkový transformátor 4 z
elektrickej zásuvky.
Pred montážou, demontážou, čistením, alebo
ak svietidlo dlhší čas nepoužívate, vždy vytiah-
nite zástrčkový transformátor 4 zo zásuvky.
Nikdy neotvárajte žiadny z elektrických prevádz-
kových prostriedkov, ani do nich nestrkajte žiadne
predmety. Takéto zásahy predstavujú ohrozenie
života v dôsledku zásahu elektrickým prúdom.
Osvetľovací prostriedok nie je
vhodný pre externé stmievače a
elektronické spínače.
Nepoužívajte prívodové vedenie 5 na držanie.
Nezalamujte prívodové vedenie 5 a neveďte
ho ponad ostré hrany.
Zabráňte nebezpečenstvu
požiaru a poranení
NEBEZPEČENSTVO PORANENIA!
Bezprostredne po vybalení prekontrolujte každý
osvetľovací prostriedok ohľadom prípadných
poškodení. Svietidlo nemontujte s chybnými osvet-
ľovacími prostriedkami. V takom prípade sa spojte
so servisným strediskom kvôli výmene.
Nepozerajte sa priamo do svetelného zdroja
(osvetľovací prostriedok, LED atď.).
Svietidlo resp. zástrčkový transformátor 4 ne-
prikrývajte predmetmi. Nadmerná tvorba tepla
môže viesť k vzniku požiaru.
Svietidlo nenechávajte počas prevádzky bez
dozoru.
Nepozerajte do LED pomocou optického
nástroja (napr. lupy).
Uvedenie do prevádzky
Model 14141605L:
Opatrne vyberte časti svietidla z obalu.
Odstráňte všetok ochranný materiál.
Zastrčte dolné rameno svietidla 3 do upevne-
nia určeného preň tak, aby kolík 9 sedel v
drážke 10 (pozri obr. A). Dbajte na to, aby ste
rameno svietidla nepoškodili.
Pre upevnenie dolného ramena svietidla 3
skrutku jemne zatiahnite 11 (pozri obr. B).
Spojte zástrčkový transformátor 4 so stojanom
svietidla 6.
Zástrčkový transformátor 4 zastrčte do zá-
suvky, ktorá je nainštalovaná podľa predpisov.
Vaše svietidlo je teraz pripravené na prevádzku.
Model 14150705L:
Opatrne vyberte časti svietidla z obalu.
Odstráňte všetok ochranný materiál.
Odstráňte obe skrutky 11 z dolnej strany
svietidla (pozri obr. A).
Postavte svietidlo na stojan svietidla 6 (pozri
obr. B) a prišróbujte ho zdola dvoma skrutkami
11 (pozri obr. C).
Dbajte na správne priliehanie.
Spojte zástrčkový transformátor 4 so stojanom
svietidla 6.
Zástrčkový transformátor 4 zastrčte do zásuvky,
ktorá je nainštalovaná podľa predpisov.
Poznámka: Hlavu svietidla 1 nie je možné
nasmerovať.
Vaše svietidlo je teraz pripravené na prevádzku.
Zapnutie / vypnutie svietidla
Model 14141605L:
Dotknite sa dotykového tlačidla ON / OFF 8,
aby ste za- resp. vypli svietidlo.
Poznámka: Svietidlo potvrdí prívod vzduchu
zeleným zablikaním funkčných tlačidiel 7.
Model 14150705L:
Stlačte dotykové tlačidlo ON / OFF 8 pre
za- resp. vypnutie svietidla.
Nastavenie svietidla
Model 14141605L:
Poznámka: Nasmerovanie 3 kĺbov 1a , 2a a 3a
zmeňte len vtedy, keď je svietidlo vypnuté.
Nechajte svietidlo úplne vychladnúť.
Umiestnite hlavu svietidla 1, horné rameno
svietidla 2 a dolné rameno svietidla 3 do
želanej pozície.

60 SK
Funkcie svietidla / Údržba a čistenieUvedenie do prevádzky / Funkcie svietidla
Keď jemne uvoľníte skrutku 11 na dolnom
upevnení, môžete svietidlo aj otáčať.
Po otočení skrutku 11 opäť dotiahnite.
Funkcie svietidla
Model 14141605L:
Pomocou nasledujúcich funkčných tlači-
diel 7 môžete vykonať nasledujúce
nastavenia:
Read: neutrálne biele svetlo
Work: studené biele svetlo
Relax: teplé biele svetlo
High: plynulé zvýšenie jasu
Low: plynulé zníženie jasu
Keď svietidlo odpojíte od zdroja prúdu, spustí
sa opäť v nastavení „Read“.
Poznámka: Svietidlo disponuje funkciou
pamäte, ukladá predtým zvolené nastavenie.
Model 14150705L:
Pomocou nasledujúcich funkčných tlači-
diel 7 môžete vykonať nasledujúce
nastavenia:
CCT: Nastavenie farebnej teploty v 3 stupňoch
LOW: Plynulé zníženie jasu
HIGH: Plynulé zvýšenie jasu
Poznámka: Svietidlo disponuje funkciou pamäte.
Pri zapnutí je aktívne naposledy zvolené nastavenie.
Pomocou riadiacich tlačidiel 12 , 13 , 14 a 15
môžete vykonať nasledujúce nastavenia:
Tlačidlo M 15 : striedanie medzi zobrazením
denného času a budiaceho
alarmu
Tlačidlo S 14 : potvrdenie nastavení
Tlačidlo 13 : nastaviť nasledujúcu vyššiu
hodnotu /striedať medzi
12h- / 24 h-zobrazením
Tlačidlo 12 : nastaviť nasledujúcu nižšiu
hodnotu /striedanie medzi
°C / °F
Nastavenie času/ dátumu:
Stlačte tlačidlo M 15 , až kým sa symbol
neobjaví na LC-displeji 16 .
Stlačte tlačidlo S 14 . Bliká zobrazenie hodín a
symbol .
Stlačte tlačidlá 13 a 12 , aby ste nastavili
zobrazenie hodín a znova stlačte tlačidlo S 14 .
Bliká zobrazenie minút a symbol .
Teraz pomocou tlačidiel 13 a 12 vyko-
najte ďalšie nastavenia pre minúty /rok / mesiac
(Month) / deň (Day) a každé nastavenie potvrďte
stlačením tlačidla S 14 .
Poznámka: Symbol prestane blikať, keď
sú nastavenia ukončené.
Nastavenie budiaceho alarmu:
Stlačte tlačidlo M 15 , až kým sa symbol
neobjaví na LC-displeji 16 .
Poznámka: Zobrazenie na LC-displeji 16
prepína medzi denným časom a budiacim
alarmom . Ak zvolíte budiaci alarm , ale
nevykonáte žiadne nastavenia, prepne zobra-
zenie na LC-displeji 16 po cca. 60 sekundách
naspäť na zobrazenie denného času .
Stlačte tlačidlo S 14 . Bliká zobrazenie hodín
a symbol .
Pomocou tlačidiel 13 a 12 nastavte
hodinu a znova stlačte tlačidlo S 14 . Bliká zo-
brazenie minút a symbol .
Pomocou tlačidiel 13 a 12 nastavte mi-
núty a znova stlačte tlačidlo S 14 . Bliká zobra-
zenie času opakovaného budenia a symbol .

61 SK
Funkcie svietidla / Údržba a čistenie
Pomocou tlačidiel 13 a 12 nastavte
čas opakovaného budenia v rozsahu od 1 do
60 minút a znova stlačte tlačidlo S 14 .
V dolnom okraji LC-displeja 16 bliká číslo
zvuku budíka.
Pomocou tlačidiel 13 a 12 vyberte
jeden z 8 rôznych budiacich zvukov.
Poznámka: Po ukončení nastavení pre
budiaci alarm svieti symbol konštantne na
LC-displeji 16 .
Aktivovanie/deaktivovanie budiaceho
alarmu / funkcie opakovaného budenia:
Stlačte tlačidlo M 15 , až kým sa symbol
neobjaví na LC-displeji 16 .
Stlačte tlačidlo 13 . Na LC-displeji 16 sa
zobrazia symboly a . Vopred nastavený
budiaci alarm je teraz aktivovaný.
Teraz stlačte tlačidlo 13 alebo 12 . Na
LC-displeji 16 sa teraz zobrazia symboly ,
a . Vopred nastavená funkcia opakova-
ného budenia je teraz aktivovaná.
Poznámka: Pre deaktivovanie budiaceho
alarmu a funkcie odloženého budenia stlačte
tlačidlo 13 alebo 12 . Na LC-displeji 16
zhasnú predtým zobrazované symboly ,
a .
Poznámka: Budiaci alarm trvá cca. 1 minútu.
Vypnutie budiaceho alarmu / funkcie
odloženého budenia:
Budiaci alarm bez funkcie opakovaného
budenia:
Ak funkcia odloženého budenia nie je aktivovaná,
stlačte jedno zo 4 funkčných tlačidiel 12 , 13 ,
14 alebo 15 , aby ste vypli budiaci alarm.
DÔLEŽITÉ: Budiaci alarm je pre nasledujúci
deň naďalej aktivovaný.
Budiaci alarm s funkciou opakovaného
budenia:
Ak je aktivovaná funkcia opakovaného budenia,
spustí sa budiaci alarm po uplynutí nastaveného
času pre opakované budenie znovu (max. trikrát).
Stlačte tlačidlo M 15 , až kým sa symbol
neobjaví na LC-displeji 16 .
Teraz stlačte tlačidlo 13 alebo 12 , až
kým symboly a zmiznú, aby ste vypli
budiaci alarm s funkciou odloženého budenia.
DÔLEŽITÉ: Budiaci alarm je teraz deaktivo-
vaný aj pre nasledujúci deň.
Striedanie medzi 12- / 24-hodinovým
zobrazením:
Stlačte tlačidlo M 15 , až kým sa symbol
neobjaví na LC-displeji 16 .
Stlačte tlačidlo 13 . Zobrazenie hodín na
LC-displeji 16 prepína medzi formátom 12h
a 24h.
Poznámka: Vo formáte 12h sa poobede
pred denným časom objaví zobrazenie PM.
Nastavenie zobrazenia teploty:
Stlačte tlačidlo M 15 , až kým sa symbol
neobjaví na LC-displeji 16 .
Stlačte tlačidlo 12 . Zobrazenie teploty na
LC-displeji 16 prepína medzi °C (Celzius) a
°F (Fahrenheit).
Údržba a čistenie
NEBEZPEČENSTVO
ZÁSAHU ELEKTRICKÝM PRÚDOM!
Pred každou údržbou a čistením vždy najskôr vy-
tiahnite zástrčkový transformátor 4 zo zásuvky.
NEBEZPEČENSTVO
ZÁSAHU ELEKTRICKÝM PRÚDOM!
Z dôvodu elektrickej bezpečnosti sa svietidlo nesmie
nikdy čistiť vodou alebo inými kvapalinami a v žiad-
nom prípade sa nesmie ponárať do vody.
OPATRNE! NEBEZPEČENSTVO POPÁLE-
NIA SKRZE HORÚCE POVRCHY!
Svietidlo nechajte najskôr úplne vychladnúť.
Nepoužívajte žiadne rozpúšťadlá, benzín a. i.
Svietidlo by sa pritom poškodilo.
Na čistenie používajte iba suchú handričku,
ktorá nepúšťa vlákna.
Opäť zastrčte zástrčkový transformátor 4 do
zásuvky.
Uvedenie do prevádzky / Funkcie svietidla

62 SK
Likvidácia / Informácie / Konformitné vyhlásenie
Likvidácia
b
a
Všímajte si prosím označenie obalových
materiálov pre triedenie odpadu, sú ozna-
čené skratkami (a) a číslami (b) s nasle-
dujúcim významom: 1–7: Plasty / 20–22:
Papier a kartón / 80–98: Spojené látky.
Výrobok a obalové materiály sú recyklo-
vateľné, zlikvidujte ich oddelene pre lepšie
spracovanie odpadu. Triman-Logo platí
iba pre Francúzsko.
Ak výrobok doslúžil, v záujme ochrany
životného prostredia ho neodhoďte do
domového odpadu, ale odovzdajte na
odbornú likvidáciu. Informácie o zber-
ných miestach a ich otváracích hodinách
získate na Vašej príslušnej správe.
Informácie
Záruka
Na tento prístroj poskytujeme záruku 36 mesiacov
od dátumu kúpy. Prístroj bol starostlivo vyrobený a
podrobený dôkladnej kontrole kvality. Vrámci záruč-
nej doby bezplatne odstránime všetky chyby materi-
álu a výrobné chyby. Ak by sa však počas záručnej
doby vyskytli nedostatky, odošlite prístroj na uvedenú
adresu servisu s uvedením nasledovného čísla vý-
robku: 14141605L / 14150705L.
Zo záruky sú vylúčené škody spôsobené neodbor-
nou manipuláciou, nedodržaním návodu na obsluhu
alebo zásahom neautorizovanej osoby, ako aj diely
podliehajúce opotrebovaniu (napr. osvetľovacie
prostriedky). Poskytnutím záruky sa záručná doba
nepredlžuje ani neobnovuje.
Výrobca / Servis
Briloner Leuchten GmbH & Co. KG
Im Kissen 2
59929 Brilon
NEMECKO
Tel.: +49 29 61 / 97 12–800
Fax: +49 29 61 / 97 12–199
E-mail: [email protected]
www.briloner.com
Bezplatné servisné číslo:
Tel.: 00800 / 27456637
IAN 345257_2004
Pre všetky otázky majte pripravený pokladničný
doklad a číslo výrobku (napr. IAN 123456_7890)
ako dôkaz o kúpe.
Konformitné vyhlásenie
Tento výrobok spĺňa požiadavky platných európskych
a národných smerníc. Konformita bola preukázaná.
Príslušné prehlásenia a podklady sú uložené u výrobcu.

C
11
14150705L

BRILONER LEUCHTEN GMBH & CO. KG
Im Kissen 2
59929 Brilon
GERMANY
Stand der Informationen · Last Information
Update · Version des informations · Stand
van de informatie · Stan informacji · Stav
informací · Stav informácií: 09 / 2020
Ident.-No.: 14141605L / 14150705L092020-8
IAN 345257_2004
-
 1
1
-
 2
2
-
 3
3
-
 4
4
-
 5
5
-
 6
6
-
 7
7
-
 8
8
-
 9
9
-
 10
10
-
 11
11
-
 12
12
-
 13
13
-
 14
14
-
 15
15
-
 16
16
-
 17
17
-
 18
18
-
 19
19
-
 20
20
-
 21
21
-
 22
22
-
 23
23
-
 24
24
-
 25
25
-
 26
26
-
 27
27
-
 28
28
-
 29
29
-
 30
30
-
 31
31
-
 32
32
-
 33
33
-
 34
34
-
 35
35
-
 36
36
-
 37
37
-
 38
38
-
 39
39
-
 40
40
-
 41
41
-
 42
42
-
 43
43
-
 44
44
-
 45
45
-
 46
46
-
 47
47
-
 48
48
-
 49
49
-
 50
50
-
 51
51
-
 52
52
-
 53
53
-
 54
54
-
 55
55
-
 56
56
-
 57
57
-
 58
58
-
 59
59
-
 60
60
-
 61
61
-
 62
62
-
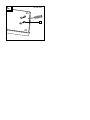 63
63
-
 64
64


in andere talen
- français: LIVARNO 345257 Le manuel du propriétaire
- Deutsch: LIVARNO 345257 Bedienungsanleitung
- slovenčina: LIVARNO 345257 Návod na obsluhu
- polski: LIVARNO 345257 Instrukcja obsługi