
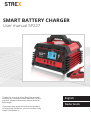
SMART BATTERY CHARGER
User manual SP227
STREX
Thanks for choosing Strex! Read the manual
carefully for correct and safe operation of the
product. Always follow these instructions for
safe usage.
If you have any questions about the product
or encounter problems, you can contact us by
email: [email protected]
English
Nederlands

INHOUDSOPGAVE - TABLE OF CONTENTS
2
OVER 4
BEOOGD GEBRUIK 5
VERPAKKINGSINHOUD 5
UITPAKKEN 5
TECHNISCHE GEGEVENS 7
PRODUCT ONDERDELEN 9
DE FUNCTIES VAN DE KNOPPEN 11
PRODUCT KENMERKEN 12
CONCEPT 12
LAADSCHEMA 12
Gebruikerstips: 13
AANSLUITMETHODE 13
SNELLE BEDIENINGSSTAPPEN 15
ZELFTEST BIJ NIET STARTEN 18
VEILIGHEIDSINSTRUCTIES 18
Algemene Apparaat Veiligheid 19
Personen & Gebruik 19
Elektronica 20
Netsnoer 20
Hitte & Koeling 21
Water 22
Veiligheid Tijdens Gebruik 22
Barst & Explosiegevaar 24
REINIGING 24
ONDERHOUD & SERVICE 25
OPSLAG & TRANSPORT 25
AFVALVERWERKING & RECYCLAGE 26
Verwijdering van het Product 26
Verwijdering van het Verpakkingsmateriaal 26
GARANTIE & AANSPRAKELIJKHEID 27

3
ABOUT 28
INTENDED USE 29
PACKAGE CONTENTS 29
UNPACKING 29
TECHNICAL DATA 31
PRODUCT PARTS 33
THE FUNCTION OF THE BUTTONS 35
PRODUCT FEATURES 36
CONCEPT 36
CHARGING SCHEDULE 36
User tips: 37
METHODE OF CONNECTION 37
QUICK OPERATION STEPS 39
BREAKDOWN SELF CHECK 42
SAFETY INSTRUCTIONS 42
General Device Safety 43
Persons & Use 43
Electronics 44
Power Cord 44
Heat & Cooling 45
Water 46
Safety During Use 46
Burst & Explosion Hazards 48
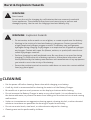
CLEANING 48
MAINTENANCE & SERVICE 49
STORAGE & TRANSPORT 49
DISPOSAL & RECYCLING 50
Device Disposal 50
Packing Material Disposal 50
WARRANTY & LIABILITY 51

OVER
WAARSCHUWING:
Bedankt voor het kiezen van een STREX product. Om een juist en veilig gebruik van het product te
garanderen, dien je de handleiding voor gebruik zorgvuldig te lezen. Volg altijd de instructies om
schade of letsel te voorkomen.
Ons product voldoet aan de volgende wettelijke nationale, internationale en Europese eisen:
Verklaring van overeenstemming: Wij, de fabrikant/importeur, verklaren op eigen
verantwoordelijkheid dat dit product voldoet aan de essentiële eisen en andere relevante
bepalingen van de vereiste richtlijnen die op dit product van toepassing kunnen zijn.
●CE Certicaat: De CE-markering (een acroniem voor het Franse “Conformite Europeenne”)
bevestigt dat een product voldoet aan de EU-eisen op het gebied van gezondheid, veiligheid en
milieu, die de veiligheid van de consument garanderen.
●Conform RoHS: De RoHS-richtlijn 2015/863/EU (van het Engelse Restriction of Hazardous
Substances - beperking van gevaarlijke stoen), is een EU-richtlijn met als doel het gebruik van
bepaalde gevaarlijke stoen in elektrische en elektronische apparatuur te beperken. Iedere
lidstaat van de EU moet een eigen wet aannemen om deze richtlijn in te voeren.
Als een product RoHS-gecerticeerd is, bevestigt dit dat het aandeel gevaarlijke of moeilijk te
verwijderen stoen beperkt is tot het maximaal toegestane.
4
Deze handleiding hoort bij de STREX Slimme Acculader en bevat
belangrijke informatie over de installatie, veiligheid en het gebruik. Lees
de handleiding zorgvuldig door en volg de instructies en waarschuwingen
om te zorgen voor je eigen veiligheid en de veiligheid van anderen.
Bewaar de handleiding voor verder gebruik. Zorg ervoor dat je deze
handleiding bijsluit wanneer je dit product doorgeeft aan derden.
De afbeeldingen in de handleiding zijn alleen ter illustratie en kunnen
lichtjes afwijken van het product. Gebruik het werkelijke product als
referentie.
Heb je vragen, opmerkingen of problemen bij het gebruik van het product, neem dan contact met
ons op via email: [email protected].
Wij wensen je veel plezier met je aankoop!
RoHS

BEOOGD GEBRUIK
VERPAKKINGSINHOUD
UITPAKKEN
De STREX Slimme Acculader is een geavanceerd apparaat dat wordt gebruikt voor het opladen van
alle 12 en 24-volt AGM-, GEL- en loodzuuraccu’s. Er zijn geen andere toepassingen voor dit product.
Gebruik de Acculader alleen zoals beschreven is in deze handleiding. Elk ander gebruik wordt
als oneigenlijk beschouwd en kan leiden tot persoonlijk letsel of materiële schade. STREX is niet
aansprakelijk voor schade of letsel die het gevolg is van oneigenlijk of onzorgvuldig gebruik.
Haal alles uit de verpakking en controleer op beschadigingen. Als dit het geval is, gebruik of
installeer de acculader dan niet. Wees zeer voorzichtig bij het openen van de verpakking om schade
aan het product te voorkomen.
Vergelijk alle onderdelen met de verpakkingsinhoud. Mis je een onderdeel, of je hebt een
beschadigd onderdeel, neem dan contact met ons op via email: [email protected]
Laat het verpakkingsmateriaal niet achteloos rondslingeren. Het kan gevaarlijk speelmateriaal
worden voor kinderen. Gooi het verpakkingsmateriaal pas weg als de Acculader geïnstalleerd is en
werkt.
●Acculader: 1 stuk
●Handleiding: 1 stuk
De volgende componenten zijn bij de levering inbegrepen:
5

6
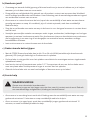
WAARSCHUWING: PLASTIC ZAKKEN.
WAARSCHUWING: WURGGEVAAR.
Houd plastic zakken en folies uit de buurt van baby’s en kinderen om
verstikkingsgevaar te voorkomen!
Dunne folies kunnen aan de neus en mond blijven plakken en de
ademhaling belemmeren.
Kabels, snoeren of koorden die langer zijn dan 18 cm (7 inch) kunnen
schadelijk zijn voor baby’s en zeer jonge kinderen.
Kinderen kunnen verstrikt raken tijdens het spelen met de snoeren van
de accu klemmen of het netsnoer. Laat de Acculader niet rondslingeren.

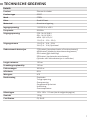
TECHNISCHE GEGEVENS
7
Details
Product Slimme Acculader
Product type SP227
Merk STREX
Kleur Rood & Zwart
Materiaal Aluminium legering
Ingangsspanning 110/220 V ac ±20 V
Frequentie 50/60Hz
Uitgangsspanning STD: 14,4 V 28,8 V
GEL: 14,4 V 28,8 V
AGM: 14,8 V 29,6 V
12 V (5 A – 10 A - 25 A)
Uitgangsstroom 12 V (5 A - 10 A - 25 A)
24 V (5 A - 10 A) Optioneel
Ondersteunde batterijen STD-batterij (standaard natte of loodzuurbatterij)
AGM-batterij (elektrolyt absorberende glasmat)
GEL-batterij (gel elektrolyt)
EFB-batterij (verbeterde natte batterij)
(Opladen van lithiumbatterijen is verboden)
Lengte netsnoer 150 cm
Draadlengte oplaadclip 150 cm
Piekvermogen 300 W ac
eciëntie 85 %
Weergave LCD
Bescherming Overladen
Te lage spanning
Overspanning
Omgekeerde polariteit
Kortsluiting
Overtemperatuur
Afmetingen 195 x 185 x 115 mm (zie de volgende pagina)
Gewicht 1,8 kg
Certicaten CE, RoHS

8

9
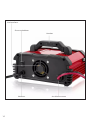
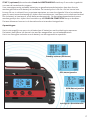
PRODUCT ONDERDELEN
LCD scherm
Behuizing
Stroom
Batterij capaciteit
Batterij type
Spanning
Automatische identicatie
van het batterij type
OPLADEN START/
STOP knop HERSTEL MODUS
startknop
BATTERIJ TYPE
selectie knop
OPLAADSTROOM
selectie knop

10
Handvat
Stroomschakelaar
Accuklem snoerenNetsnoer
Koelventilator

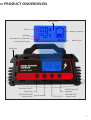
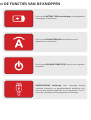
DE FUNCTIES VAN DE KNOPPEN
Druk op de BATTERY TYPE selectieknop om de gewenste
batterijtype te selecteren.
Druk op de OPLAADSTROOM selectieknop om de
laadstroom te selecteren.
Druk op de OPLADEN START/STOP knop om het opladen
te starten.
HERSTELMODUS startknop. Voor sommige ernstig
ontladen batterijen en gevulkaniseerde batterijen kan
deze functie worden gebruikt om te repareren. Circa 5
seconden inhouden om herstelmodus te activeren.

1. Intelligente automatische identicatie: 12/24V auto-batterij identicatie.
2. Opladen in de herstelmodus met één druk op de knop: een batterij van minder
dan 8 V kan worden hersteld door intelligent opladen en kan beginnen bij 0 V (het
duurt 24 uur om het herstel te voltooien).
3. Intelligente ventilatorregeling: wanneer de interne temperatuur van de machine
45°C bereikt, begint de ventilator met warmteafvoer om een hoge temperatuur te
voorkomen en de om de levensduur te verlengen.
4. Digitale weergave: de digitale weergave van de huidige spanning.
5. Bescherming tegen kortsluiting: de lader schakelt de uitgang automatisch uit
wanneer er per ongeluk kortsluiting optreedt in de uitgang van de lader.
6. Bescherming tegen omgekeerde polariteit: wanneer de positieve en negatieve
uitgang van de lader en de positieve en negatieve pool van de batterij verkeerd
verbonden zijn, stopt de lader automatisch de uitgang en geeft een piepend alarm.
Na de juiste aansluiting wordt het alarm automatisch opgeheven.
7. Automatisch opladen (cyclusmodus): als de batterijspanning lager is dan 12,8 V,
wordt deze automatisch opgeladen.
8. Oplaadmodus: constante stroommodus + constante spanningsmodus + zwevende
laadmodus + volledige laadmodus.
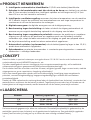
PRODUCT KENMERKEN
CONCEPT
LAADSCHEMA
12
Deze Acculader is speciaal ontworpen voor gebruik met 12 V & 24 V accu’s zoals loodzuuraccu’s,
onderhoudsvrije accu’s/AGM/EFB startaccu’s, etc.
De lader maakt gebruik van een intelligente microcomputerverwerkingschip, zelf ontwikkelde
softwaretechnologie en geavanceerde PWM-pulsmodulatietechnologie.
De Acculader heeft de voordelen van klein formaat, veiligheid, gemak, hoge conversieratio, stabiele
uitgangsstroom, grote capaciteit en langdurig vollastbedrijf.
Het is een nieuwe generatie oplader met kortsluitbeveiliging, beveiliging tegen omgekeerde
polariteit, oververhittingsbeveiliging, laagspanningsbeveiliging en stabiele en betrouwbare
prestatieveiligheid.
Dankzij de PWM-oplaadmodus verhoogt deze lader de laadsnelheid van de batterij, vermindert het
waterverlies en voorkomt dat de batterij ontlaadt. Tegelijkertijd vermindert het de schade aan de
batterijplaat tot de laagste waarde, wat de levensduur van de batterij aanzienlijk verbetert.
De bovenstaande gegevens zijn alleen ter referentie. De werkelijke oplaadtijd is gebaseerd op de
werkelijke capaciteit van de batterij en de geselecteerde laadstroom. Een gedeeltelijk opgeladen
batterij heeft minder tijd nodig om op te laden dan een volledig ontladen batterij.
Stroom Batterij capaciteit Oplaadtijd
5 A 15 Ah - 50 Ah 4,5 h -15 h
10 A 30 Ah - 100 Ah 4,5 h -15 h
25 A 60 Ah - 250 Ah 4,5 h -15 h

AANSLUITMETHODE
13
De levensduur van je accu zal aanzienlijk langer zijn als het volgende advies wordt opgevolgd:
Gebruikerstips:
●Voorkom dat de accu’s te ver worden ontladen. De levensduur van de accu wordt op deze
manier aanzienlijk verkort. Mocht een accu diep ontladen zijn, laad deze dan zo snel mogelijk
weer op.
●Laat de Acculader altijd volledig opladen. Vermijd kleine “onvoltooide oplaadbeurten”.
●Controleer maandelijks het vloeistofpeil van de accu en vul deze zo nodig bij met gedestilleerd
water.
●Maak de polen van je accu regelmatig schoon om afzettingen te voorkomen. Doe een klein
beetje vaseline op de klemmen.
●Als het voertuig zelden wordt gebruikt, zal de accu ontladen. Daarom moet hij regelmatig
worden opgeladen tot de maximale capaciteit. Op deze manier kunnen storingen worden
voorkomen.
WAARSCHUWING:
Voordat je een accu laadt die permanent op het voertuig is aangesloten,
moet je eerst de aansluitkabel van de minpool (zwart) van de accu
loskoppelen van de minpool van de accu. De negatieve accupool is
typisch verbonden met de carrosserie.
Koppel vervolgens de aansluitkabel van de pluspool van het voertuig
(rood) los van de pluspool van de accu. Zorg ervoor dat alle accessoires
in het voertuig zijn uitgeschakeld om een vlamboog te voorkomen.
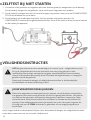
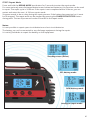
Volg nu deze 4 stappen:
③Voeding
Battery
②Negatieve
pool
①Positieve
pool

14
① Sluit eerst de rode klem aan op de positieve (plus) pool van de accu.
② Sluit nu de zwarte klem aan op de negatieve (min) pool van de accu.
③ Zodra beide klemmen op de auto-accu zijn aangesloten, sluit je de Acculader aan op de
netspanning.
④ Zet de aan/uit-schakelaar op “1”. Nadat de machine is ingeschakeld, detecteert deze automatisch
de batterijspanning en het vermogen en knippert het huidige batterijvermogen.
WAARSCHUWING:
WAARSCHUWING:
Koppel het snoer van een accuklem niet los tijdens het opladen vanwege
vonkgevaar. Haal eerst de stekker uit het stopcontact of wacht tot het
opladen is voltooid.
Zodra het opladen is voltooid, volg je voor permanent geïnstalleerde
accu’s in voertuigen deze stappen in de juiste volgorde:
1. Koppel de Acculader los van de netspanning.
2. Verwijder de negatieve accuklem (zwart) van de “-“ (negatieve) accupool.
3. Verwijder de positieve accuklem (rood) van de “+“ (positieve) accupool.
4. Sluit de positieve aansluitkabel van het voertuig weer aan op de
positieve accupool.
5. Sluit de negatieve aansluitkabel van het voertuig weer aan op de
negatieve accupool.

SNELLE BEDIENINGSSTAPPEN
15
1. Maak de verbinding met de batterij.
3. Het scherm knippert (Stand-by-modus).
5. Druk op de OPLAADSTROOM
selectieknop om de laadstroom te
selecteren..
7. (optioneel) In geval van een probleem
met de batterij: druk vijf seconden op
de HERSTELMODUS startknop om de
sneeuwmarkering op het scherm te zien
en naar de herstelmodus te gaan.
2. Zet de stroomschakelaar aan.
4.Druk op de BATTERY TYPE selectieknop om
het batterijtype te selecteren.
6. Druk op de OPLADEN START/STOP knop
om het opladen te starten
TIPS:
●Naast AGM/GEL-accu’s kunnen andere
accu’s (standaard loodzuuraccu’s/
tractieaccu’s) worden opgeladen
door tijdens het opladen direct op de
OPLADEN START/STOP knop te drukken,
waarna het systeem automatisch de
stroom en spanning herkent.
●Als de batterijspanning lager is dan
6V, kan onze oplader de batterij niet
opladen en repareren.

STAP 1: Zie hoofdstuk “AANSLUITMETHODE” voor meer details.
STAP 2: Zet de aan/uit-schakelaar aan de achterkant van de Acculader aan.
0 = UIT
1 = AAN
STAP 3: Het scherm knippert (Stand-by-modus).
STAP 4: Druk op de BATTERY TYPE selectieknop om het batterijtype te selecteren.
STD, GEL en AGM worden cyclisch geselecteerd. De standaardinstelling is STD.
Batterij type Scherm
GEL gel elektrolyt
STD standaard loodzuurbatterij
AGM elektrolyt absorberende glasmat
Bij het selecteren van het batterijtype zal de lader eerst gedurende 5 seconden de laadspanning
van het corresponderende batterijtype weergeven en vervolgens de waarde van de
batterijspanning. Het batterijtype moet worden geselecteerd voordat het opladen begint en kan
niet worden geselecteerd nadat het opladen is gestart.
Als je het batterijtype opnieuw wilt selecteren, moet je op de OPLADEN START/STOP knop
drukken om het opladen te stoppen voordat je een nieuwe selectie maakt.
STAP 5: Druk op de OPLAADSTROOM selectieknop om de gewenste laadstroom te selecteren.
Selecteer de vereiste laadstroomversnelling op basis van de grootte van de batterij. Het 12
V-systeem heeft drie opties van 5 A/10 A/25 A en het 24 V-systeem heeft twee opties van 5 A/10 A.
De laadstroom kan tijdens het laadproces worden geschakeld. Wanneer de stroom is
geselecteerd, zal de machine eerst de bijbehorende stroom gedurende 5 seconden weergeven en
vervolgens de realtime laadstroom weergeven.
STAP 6: Nadat de instelling is voltooid, druk je op de OPLADEN START/STOP knop om het
opladen te starten, of je kunt een minuut wachten nadat de instelling is voltooid, waarna de
machine automatisch begint met opladen.
16

STAP 7: (optioneel) Herstelmodus Houd de HERSTELMODUS startknop 5 seconden ingedrukt
om naar de herstelmodus te gaan.
Voor sommige ernstig ontladen batterijen en gevulkaniseerde batterijen kan deze functie
worden gebruikt om de batterij te herstellen. De herstelcyclus is 24 uur. Als het herstel niet
binnen 24 uur is voltooid, kun je opnieuw opstarten en naar de volgende 24-uur herstelmodus
gaan.Er moet iemand aanwezig zijn tijdens het herstelproces. Laat deze nooit onbeheerd achter!
Als de batterij te heet wordt, moet deze worden gestopt. De herstelwerkzaamheden kunnen
worden gestopt door tijdens het herstellen op de OPLADEN START/STOP knop te drukken.
De twee klemmen kunnen in de herstelmodus niet worden kortgesloten.
Opmerkingen:
Het is niet mogelijk om open circuit batterijen of batterijen met kortsluiting te repareren.
De batterij kan tijdens het herstel niet worden aangesloten op ontlaadapparatuur.
Het is ten strengste verboden om de batterij van het apparaat te repareren.
17
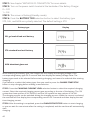
Standby-scherm (ikkeren)
GEL-batterijmodus
AGM-Batterijmodus
Intelligente herstelmodus

ZELFTEST BIJ NIET STARTEN
1. Controleer of de positieve en negatieve pool van de klem goed zijn aangesloten op de batterij.
Als de batterij niet goed is aangesloten, zal je niet kunnen beginnen met opladen.
2. Als de batterij is aangesloten en het scherm knippert nog steeds, moet je op de OPLADEN START/
STOP knop drukken om op te laden.
3. Als de batterij een onderspanning heeft, kan het opladen niet gestart worden. De
HERSTELMODUS startknop kan geselecteerd worden. Houd 5 seconden om het herstel te starten
en de batterij te repareren
VEILIGHEIDSINSTRUCTIES
LEES de gebruikersinstructies aandachtig en let vooral op de veiligheidsinstructies.
Als je de veiligheidsinstructies en informatie over het juiste gebruik in deze
handleiding niet opvolgt, aanvaarden wij geen aansprakelijkheid voor eventueel
daaruit voortvloeiend persoonlijk letsel of schade aan eigendommen. In dergelijke
gevallen vervalt de garantie.
Neem ook de waarschuwingen of veiligheidsvoorschriften in de afzonderlijke
hoofdstukken van deze handleiding in acht.
Elektrische apparaten en batterijen kunnen mensen, vooral kinderen, blootstellen
aan gevaren die zowel ernstig letsel als de dood tot gevolg kan hebben. Het gebruik
van elektrische apparaten en batterijen kan gevaren opleveren, waaronder, maar
niet uitsluitend, letsel, brand, elektrische schokken en schade aan het elektrische
systeem. Deze veiligheidsinstructies zijn bedoeld om je de informatie te geven die
je nodig hebt om de STREX Acculader te gebruiken en om dergelijke gevaren te
voorkomen.
JOUW VERANTWOORDELIJKHEDEN:
18
Als je vragen hebt die onbeantwoord blijven door deze waarschuwingen en veiligheidsinstructies,
neem dan contact met ons op via email: [email protected].

19
Algemene Apparaat Veiligheid
●Gebruik de Acculader niet voor een ander doel dan waarvoor het bedoeld is (zie het hoofdstuk “BEOOGD
GEBRUIK”).
●De Acculader is alleen ontworpen en bedoeld voor privégebruik en is niet geschikt voor commerciële
doeleinden.
●De Acculader is alleen bedoeld voor gebruik binnenshuis. Gebruik het apparaat niet buitenshuis.
●Ga voorzichtig met het apparaat om. Schokken, stoten of een val, zelfs van geringe hoogte, kunnen het
apparaat beschadigen.
●Plaats de Acculader niet op een onstabiel oppervlak. Dit kan leiden tot vallen en kan storingen
veroorzaken.
●Plaats de Acculader niet onder mechanische belasting.
●Het apparaat moet correct en veilig zijn aangesloten. Volg de instructies om eventueel schade/letsel te
voorkomen (zie hoofdstuk “AANSLUITMETHODE”).
●Steek geen voorwerpen in welke opening ook.
●Oefen geen overmatige kracht uit bij het gebruik van de knoppen op de Acculader.
●Oefen geen overmatige kracht uit op het scherm en raak het scherm niet aan met scherpe voorwerpen.
●Laat de ingeschakelde Acculader niet onbeheerd achter. Bij gebruik in de buurt van kleine kinderen is
nauw toezicht noodzakelijk.
●Houd omstanders op afstand. Kinderen, toeschouwers en voorbijgangers mogen voor hun bescherming
het werkgebied niet betreden.
●Als het niet meer mogelijk is om de Acculader veilig te gebruiken, stel het apparaat dan buiten gebruik en
bescherm het tegen onbedoeld gebruik. Een veilige werking kan niet langer worden gegarandeerd als het
apparaat::
– zichtbaar beschadigd is,
– niet meer naar behoren werkt,
– gedurende langere perioden in slechte omgevingsomstandigheden is opgeslagen of
– is blootgesteld aan ernstig transport gerelateerde belastingen.
Je kunt het apparaat buiten bedrijf stellen door het netsnoer te verwijderen of door de netstekker
van het netsnoer af te knippen.
Personen & Gebruik
●De Acculader is geen speelgoed. Houd en bewaar het apparaat buiten bereik van kleine
kinderen.
●Het apparaat mag alleen door volwassenen worden gebruikt.
●De Acculader kan worden gebruikt door personen met verminderde fysieke, zintuiglijke of
mentale capaciteiten of gebrek aan ervaring en kennis als ze onder toezicht staan of instructies
hebben gekregen over het veilige gebruik van het apparaat en ze de daaruit voortvloeiende
gevaren begrijpen.
●Gebruik het apparaat nooit als je zich slaperig voelt of als je stoen hebt ingenomen die je
reactietijd verkorten (zoals pijnstillers of alcohol).
●Wees permanent alert. Let op wat je aan het doen bent. Ga verstandig te werk. Gebruik de
Acculader niet, als je niet geconcentreerd bent.

20
Elektronica
Netsnoer
●Je mag de Acculader niet reconstrueren, repareren of demonteren. Dit kan het apparaat
beschadigen.
●Onderhoud, wijzigingen en reparaties mogen uitsluitend worden uitgevoerd door een
deskundige of in een gekwaliceerde winkel.
●Controleer het apparaat af en toe op beschadigingen. Gebruik het apparaat nooit als de
Acculader, de snoeren van de accuklemmen of het netsnoer tekenen van beschadiging vertonen.
●Zorg ervoor dat je stopcontact de juiste voedingsspanning levert om schade aan het apparaat te
voorkomen.
●Het stopcontact moet zich in de buurt van het apparaat bevinden en gemakkelijk toegankelijk
zijn.
●Verwijder de netstekker uit het stopcontact als je het apparaat niet gebruikt en voor het
schoonmaken.
●Forceer de stekker van je netsnoer nooit in een stopcontact; als het niet gemakkelijk in het
stopcontact past, stop dan met het gebruik. Zorg er altijd voor dat de stekker van je apparaat
goed in het stopcontact zit.
●Als de stroom uitvalt tijdens het gebruik, schakel het apparaat dan onmiddellijk uit en verwijder
de stekker uit het stopcontact.
●Als er rook, vuur of een vreemde geur uit je apparaat komt, moet je zowel het apparaat als de
stroomonderbreker of zekeringkast uitschakelen.
●Als het apparaat een vreemd geluid maakt, trek dan onmiddellijk de stekker uit het stopcontact
en neem contact op met een servicecentrum.
●Haal om veiligheidsredenen altijd de stekker uit het stopcontact in geval van onweer.
●Pas het netsnoer niet aan.
●Controleer het netsnoer regelmatig op beschadigingen. Gebruik het netsnoer nooit als er
tekenen van beschadiging zijn.
●Raak het netsnoer niet aan als het beschadigd is. Een beschadigd netsnoer kan een dodelijke
elektrische schok veroorzaken. Schakel eerst het betreende stopcontact uit (bijv. via de
betreende stroomonderbreker) en verwijder vervolgens de netstekker voorzichtig uit het
stopcontact. Gebruik het apparaat nooit als het netsnoer beschadigd is.
●Om risico’s te voorkomen, mogen beschadigde netsnoeren alleen worden vervangen door de
fabrikant, een door de fabrikant aangewezen professionele werkplaats of een gelijkwaardig
gekwaliceerde persoon.
●Verwijder de netstekker nooit uit het stopcontact door aan het netsnoer te trekken. Trek hem
altijd uit het stopcontact met de daarvoor bestemde handgrepen.
●Draag de Acculader niet aan het netsnoer en gebruik het netsnoer niet als handvat.

21
Hitte & Koeling
●Dek het apparaat of de ventilatieopeningen niet af terwijl het in werking is omdat dit kan leiden
tot oververhitting van de Acculader. Dit vormt een risico op brand, elektrische schokken of letsel.
●Zorg voor een goede ventilatie rondom het apparaat.
●Houd het apparaat uit de buurt van warmtebronnen en in of nabij gebieden waar de
omgevingstemperatuur relatief hoog is (bijv. fornuizen of andere warmtebronnen). Gebruik
het apparaat nooit in de buurt van open vuurbronnen (zoals brandende kaarsen) of op hete
oppervlakken.
●De Acculader is ontworpen om het beste te werken bij normale omgevingstemperaturen
tussen 0° en 35°C en te worden bewaard bij temperaturen tussen 0° en 45°C. De Acculader kan
beschadigd raken en de levensduur kan verkorten als het apparaat buiten deze temperatuur
bereiken wordt bewaard of gebruikt. Stel je apparaat niet bloot aan dramatische veranderingen
in temperatuur.
●Bewaar je apparaat niet in een hete auto of gedurende langere tijd in direct zonlicht.
●Gebruik dit apparaat niet in een tropisch klimaat.
●Wikkel het netsnoer nooit om het apparaat.
●Zorg ervoor dat je niet over het netsnoer struikelt.
●Laat het netsnoer niet over de rand van een tafel, aanrecht of werkblad hangen.
●Het netsnoer mag niet worden geknikt, bekneld of gedraaid.
●Zorg ervoor dat het netsnoer niet wordt samengedrukt, gebogen, beschadigd door scherpe
randen of onder mechanische belasting komt te staan.
●Vermijd overmatige thermische belasting van het netsnoer door extreme hitte of kou.
●Als je een verlengsnoer gebruikt dat op het stopcontact is aangesloten, zorg er dan voor dat
het totale elektriciteitsverbruik van de aangesloten apparaten de nominale capaciteit niet
overschrijdt.
●Kinderen kunnen verstrikt raken tijdens het spelen met het netsnoer (wurggevaar). Netsnoeren
zijn geen speelgoed.

22
Water
Veiligheid Tijdens Gebruik
WAARSCHUWING:
De Acculader is niet waterdicht.
●Gebruik de Acculader nooit met vochtige of natte handen. Vocht kan leiden tot
elektrische schokken of kortsluitingen.
●Gebruik de Acculader niet in of nabij een bad, douche, zwembad of een met water
gevulde container, zoals bijv. een wasbak.
●Niet gebruiken in natte omgevingen en niet onderdompelen in vloeistof. Giet nooit
vloeistoen boven of in de buurt van de Acculader. Er bestaat gevaar voor elektrische
schokken! Als er toch vloeistof in de behuizing komt, schakel de Acculader dan
onmiddellijk uit.
●Let erop dat het apparaat op een droge ondergrond staat.
●We raden aan om de accu los te koppelen van het voertuig. Dit voorkomt eventuele schade aan
de dynamo.
●Controleer of de spanning van de accu overeenkomt met die van de oplader.
●Reinig de accupolen voordat je ze op de oplader aansluit. Laat corrosie niet in contact komen
met de ogen.
●Voordat je de accu op de lader aansluit, moet je ervoor zorgen dat beide (de accu en de
Acculader) stabiel en op een vlakke ondergrond staan. Als de accu celvuldoppen heeft, draai
ze dan los of verwijder ze om te helpen bij het ontsnappen van laadgassen (als de accu een
gel- of onderhoudsvrij/verzegeld type is, raadpleeg dan het gepubliceerde oplaadadvies van
de accufabrikant). Nadat de celdoppen zijn losgemaakt of verwijderd, is het raadzaam om het
elektrolytniveau in elke cel te controleren en alleen gedestilleerd water bij te vullen tot het
aanbevolen vulniveau. Voorzichtig! Vul je accu nooit bij met kraanwater.
●Plaats de lader niet in de motorruimte of in de buurt van de accu. Plaats de oplader zo ver weg
als de snoeren van de oplaadklemmen toelaten. Plaats een oplader nooit direct boven een
accu die wordt opgeladen; gassen of vloeistoen uit de accu zullen corroderen en de oplader
beschadigen.
a) Voorbereiding

23
●Overweeg om iemand dichtbij genoeg of binnen bereik van je stem te hebben om je te helpen
wanneer je in de buurt van een accu werkt.
●Draag altijd een veiligheidsbril bij gebruik van dit product: contact met accuzuur kan blindheid
en/of ernstige brandwonden veroorzaken. Houd rekening met de eerstehulpprocedures in geval
van accidenteel contact met accuzuur.
●Als accuzuur in contact komt met de huid, spoel dan onmiddellijk af met water en was daarna
grondig met water en zeep. Als roodheid, pijn of irritatie optreedt, zoek dan onmiddellijk
medische hulp.
●Zorg dat er voldoende vers water en zeep in de buurt is voor het geval accuzuur in contact komt
met de huid.
●Verwijder persoonlijke metalen voorwerpen zoals ringen, armbanden, halskettingen en horloges
wanneer je met een loodzuuraccu werkt. Een loodzuuraccu kan een kortsluitstroom produceren
die hoog genoeg is om een ring of iets dergelijks van metaal te lassen, waardoor ernstige
brandwonden ontstaan.
●Laat nooit accuzuur in contact komen met de Acculader.
●Met de STREX Slimme Acculader kan je alle 12 en 24 volt AGM (met elektrolyt absorberende
glasmat), GEL (met gel elektrolyt) en loodzuuraccu’s opladen.
●De Acculader is niet geschikt voor het opladen van elektrische voertuigen met een ingebouwde
oplaadbare batterij.
●Laad accu’s niet op bij temperaturen onder 0 °C. Transporteer de accu en de Acculader eerst
naar een plaats waar de temperatuur hoger is en start dan het opladen.
●Gebruik de Acculader niet om een beschadigde of bevroren accu op te laden!
●Als accuzuur in aanraking komt met huid of kleding, was dan onmiddellijk met water en zeep
gedurende minstens 10 minuten en roep onmiddellijk medische hulp in.
●Als er accuzuur in je ogen komt, spoel dan onmiddellijk je ogen, gedurende minimaal 15
minuten, en zoek onmiddellijk medische hulp.
b) Bescherm jezelf
c) Ondersteunde batterijtypes
d) Eerste hulp
Gevaar voor chemische brandwonden!
Bescherm je ogen en huid tegen corrosie door zuur bij contact met de accu! Gebruik
een zuurbestendige veiligheidsbril, kleding en handschoenen!
WAARSCHUWING:

24
Barst & Explosiegevaar
Gevaar voor openbarsten.
Gebruik het apparaat niet voor het opladen van droge celbatterijen die vaak
worden gebruikt met huishoudelijke apparaten. Deze batterijen kunnen barsten en
persoonlijk letsel en materiële schade veroorzaken. Gebruik het apparaat alleen voor
het opladen van een loodzuuraccu.
WAARSCHUWING:
WAARSCHUWING: Explosiegevaar
●Rook niet, gebruik geen lucifers of aanstekers en maak geen vonk in de
buurt van de accu.
●Werken in de buurt van een loodzuuraccu is gevaarlijk. Bescherm
jezelf tegen een zeer explosieve waterstof-zuurstofreactie! De accu kan
tijdens het opladen gasvormige waterstof afgeven. Oxy-waterstof is een
explosief mengsel van gasvormig waterstof en zuurstof. Contact met
open vuur (vlammen, sintels of vonken) veroorzaakt de zogenaamde oxy-
waterstofreactie! Voer het opladen uit in een goed geventileerde ruimte.
Zorg ervoor dat er geen open vuur is tijdens het opladen! Volg deze
instructies en de instructies die zijn gepubliceerd door de accufabrikant
en de fabrikant van alle apparatuur die je in de buurt van de accu wilt
gebruiken om het risico van een batterijexplosie te verminderen.
●Zorg ervoor dat de aansluitkabel van
●Zet de stroom uit voordat je gaat reinigen. Maak nooit schoon tijdens het opladen van een
autoaccu.
●Een zachte droge doek wordt aanbevolen voor het reinigen van de buitenkant van de Acculader.
●Pas op dat je tijdens het reinigen niet te veel druk uitoefent op het scherm of de knoppen.
●Dompel de Acculader niet onder in water of andere vloeistoen. Het is niet toegestaan om het
apparaat met water af te spoelen, om te voorkomen dat het water in het elektrische circuit lekt
en storingen veroorzaakt.
●Gebruik in geen geval agressieve reinigingsmiddelen, reinigingsalcohol of andere chemische
oplossingen, omdat deze de behuizing kunnen binnendringen of de functionaliteit kunnen
aantasten.
●Gebruik voor het schoonmaken geen staalborstel, staalwol of andere schurende voorwerpen.
●Reiniging mag niet worden uitgevoerd door kinderen.
REINIGING

25
●De Acculader heeft geen onderhoud nodig.
●Je mag de Acculader niet reconstrueren, zelf repareren of demonteren.
●Controleer regelmatig op beschadigingen en ernstige slijtage.
●We raden aan om de Acculader schoon te maken voordat je het apparaat voor lange tijd
opbergt.
●Laat het apparaat volledig afkoelen alvorens op te bergen. Als je dit niet doet, is er brandgevaar.
●Bewaar de Acculader op een stofvrije plaats die niet wordt blootgesteld aan zonlicht en
vochtigheid.
●Bewaar de Acculader niet bij extreem hoge of extreem lage temperaturen. Dit kan het apparaat
beschadigen.
●Bewaar het apparaat buiten bereik van kleine kinderen.
●Bescherm het apparaat tijdens transport tegen trillingen en schokken.
●Na transport of opslag bij zeer koude temperaturen, moet de Acculader gedurende ca. 30
minuten aan kamertemperatuur wennen in verband met mogelijke condensatie. Daarna kan het
apparaat gebruikt worden.
●Probeer de Acculader niet te openen voor onderhoud. Het verwijderen van
de behuizing of een onjuiste hermontage kan elektrische schokken, schade,
kortsluitingen of brand veroorzaken.
●Als je om welke reden dan ook de behuizing opent, vervalt de garantie. De Acculader
bevat geen onderdelen die door de gebruiker kunnen worden gerepareerd.
●Om onderhoud of service te verkrijgen, neem dan eerst contact met ons op via ons
mailadres [email protected]. Reparaties mogen uitsluitend worden uitgevoerd door een
deskundige of in een gekwaliceerde winkel.
WAARSCHUWINGEN:
ONDERHOUD & SERVICE
OPSLAG & TRANSPORT

26
Dit product voldoet aan de richtlijn voor afgedankte elektrische en
elektronische apparatuur 2012/19/EU (WEEE).
Het symbool met de doorstreepte vuilnisbak op het apparaat geeft aan dat het
product op het einde van zijn levenscyclus afzonderlijk van het gewoon
huishoudelijk afval moet worden afgedankt en hiervoor naar een centrum voor
gescheiden afvalophaling voor de recyclage van elektrische en elektronische
apparatuur moet worden gebracht of terugbezorgd moet worden aan de verkoper
op het moment waarop een nieuw gelijkaardig apparaat wordt aangekocht.
De gebruiker is er verantwoordelijk voor om het apparaat op het einde van de
levenscyclus naar een dienst voor afvalophaling te brengen. De correcte
gescheiden afvalophaling met het oog op de daaropvolgende recyclage,
verwerking en milieuvriendelijke afdanking van het apparaat draagt bij tot het
voorkomen van mogelijke negatieve invloeden op het milieu en de gezondheid
en bevordert de recyclage van de materialen waaruit het product is samengesteld
De onrechtmatige afdanking van het product door de gebruiker heeft door de
wet vastgelegde administratieve sancties tot gevolg. Voor meer gedetailleerde
informatie over de recyclage van dit product en de beschikbare ophaalsystemen,
wendt je zich tot de lokale dienst voor afvalophaling of de winkel waar je het
product hebt gekocht.
Voldoe aan je wettelijke verplichtingen en draag bij aan de bescherming van het
milieu.
Zorg ervoor dat plastic zakken, verpakkingen enz. op een juiste milieuvriendelijke
manier worden weggegooid. Deponeer deze materialen niet zomaar bij het
normale
huisvuil, maar zorg ervoor dat ze worden ingezameld voor hergebruik.
Volg de aanwijzingen en markeringen op de verpakking.
Verwijdering van het Verpakkingsmateriaal
Verwijdering van het Product
AFVALVERWERKING & RECYCLAGE

27
STREX garandeert dat dit product gedurende één jaar vanaf de aankoopdatum vrij zal zijn van
materiaal- en fabricagefouten. STREX zal, naar eigen goeddunken, dit product of enig onderdeel van
het product dat defect blijkt te zijn tijdens de garantieperiode vervangen of repareren. Vervanging vindt
plaats door een nieuw of gereviseerd product of onderdeel. Als het product niet langer beschikbaar
is, kan een vervanging worden gemaakt door een vergelijkbaar product van gelijke of hogere waarde.
Dit is jouw exclusieve garantie. Je vervangende apparaat wordt kosteloos aan je geretourneerd en valt
gedurende de rest van de garantieperiode onder deze garantie.
De verzendingskosten zijn niet inbegrepen in de garantie, de koper is verantwoordelijk voor de
verzendingskosten en de kosten voor de dienst na verkoop. Gelieve het pakket zorgvuldig te verpakken
als je het product wilt retourneren of service wenst, de koper is verantwoordelijk voor eventuele
schade of verlies tijdens het transport.
Deze garantie is geldig voor de oorspronkelijke koper vanaf de datum van eerste aankoop en is niet
overdraagbaar. Een aankoopbewijs is vereist om ondersteuning onder de garantie te verkrijgen.
Deze garantie dekt geen:
Bij beschadigingen veroorzaakt door het niet in acht nemen van deze handleiding, vervalt de
garantie!Voor gevolgschade aanvaarden wij geen enkele aansprakelijkheid! Wij aanvaarden geen
aansprakelijkheid voor materiële schade of persoonlijk letsel veroorzaakt door ondeskundig gebruik
of het niet opvolgen van de veiligheidsvoorschriften! In dergelijke gevallen vervalt de garantie!
De fabrikant is in geen geval aansprakelijk voor enige gevolg- of incidentele schade, inclusief verlies
van bedrijfswinsten of andere commerciële schade, die voortvloeit uit het gebruik van zijn product.
STREX behoudt zich het recht voor om op elk moment, zonder kennisgeving of verplichting, wijzigingen
aan te brengen in de handleiding, kleuren, specicaties, accessoires, materialen en modellen.
Alle rechten voorbehouden. Niets uit deze uitgave mag worden verveelvoudigd, verspreid of verzonden in welke vorm of op welke
manier dan ook, inclusief fotokopieën, opnamen of andere elektronische of mechanische methoden, zonder de voorafgaande
schriftelijke toestemming van de uitgever, behalve in het geval van korte citaten belichaamd in kritische recensies en bepaalde andere
niet-commerciële toepassingen die zijn toegestaan door het auteursrecht. Voor toestemmingsverzoeken raadpleeg ons op het adres
op de laatste pagina.
●nalatig gebruik of misbruik van het product;
●gebruik met een onjuiste spanning of stroom;
●gebruik in strijd met de bedieningsinstructies;
●demontage, reparatie of wijziging door iemand anders dan STREX;
●schade veroorzaakt door ongevallen of rampen, zoals brand, overstroming, aardbeving, oorlog,
vandalisme of diefstal;
●accessoires zoals batterijen en zekeringen;
●normale slijtage
GARANTIE & AANSPRAKELIJKHEID

ABOUT
WARNING:
Thank you for choosing a STREX product. To ensure proper and safe use of the product, please read
the user manual carefully before use. Always follow the instructions to prevent damage or harm.
Our product complies with the statutory national and European requirements. All names of
companies and products are the trademarks of the respective owners. All rights reserved.
Declaration of conformity: We, the manufacturer/importer, declare under our sole responsibility
that this product complies with the essential requirements and other relevant provisions of the
required directives that may apply to this product.
●CE Certicate: The CE mark (an acronym for the French “Conformite Europeenne”) certies that
a product meets EU health, safety, and environmental requirements, guaranteeing consumer
safety.
●Compliant with RoHS: The Restriction of Hazardous Substances (RoHS) directive 2015/863/EU
is an EU directive to restrict the use of certain hazardous substances in electrical and electronic
equipment. Each EU Member State must adopt its law to implement this directive. If a product is
RoHS certied, this conrms that the proportion of hazardous or dicult-to-remove substances
is limited to the maximum allowed.
28
This manual accompanies the STREX Smart Battery Charger and contains
important information about safety and use. Please read the manual
carefully and follow the instructions and warnings to ensure your own
safety and the safety of others.
Keep the manual for further reference. Make sure to include this manual
when passing on this product to third parties.
The images in the manual are for illustrative purposes only and may dier
slightly from the product. Please use the actual product as a reference.
If you have any questions, remarks, or problems using the product please contact us by email:
We hope you enjoy your order!
RoHS

INTENDED USE
PACKAGE CONTENTS
UNPACKING
The STREX Smart Battery Charger is an advanced device used for charging all 12 and 24-volt AGM,
GEL, and lead-acid batteries. There are no other uses for this product.
Only use the Battery Charger as described in this manual. Any other use is considered improper and
may result in personal injury or material damage. STREX is not liable for damage or injury resulting
from improper or careless use.
Remove everything from the packaging and check for damage. If this is the case, do not use the
Battery Charger. Be very careful when opening the package to avoid damage to the product.
Compare all parts with the package contents. If you are missing a part, or if you have a damaged
part, please contact us by email: [email protected].
Do not leave packaging material or Battery Charger lying around carelessly. It may become
dangerous playing material for children. Do not dispose of the packing materials until the Battery
Charger has been tried and is working.
●Battery Charger: 1 piece
●User manual: 1 piece
The following components are included in the scope of delivery:
29

30
WARNING: PLASTIC BAGS.
WARNING: STRANGULATION HAZARD.
To avoid the danger of suocation, keep plastic bags and foils away from
babies and children!
Thin foils may cling to the nose and mouth and prevent breathing.
Cables, cords, or strings longer than 18 cm (7 inches) can be harmful to
babies and very young children.
Children may get entangled while playing with the charging clip wires or
the power cord. Do not leave the Battery Charger lying around.

TECHNICAL DATA
31
Details
Product Smart Battery Charger
Product type SP227
Brand STREX
Color Red & Black
Material Aluminum alloy
Input Voltage 110/220V ac ±20V
Frequency 50/60Hz
Output Voltage STD: 14.4V 28.8V
GEL: 14.4V 28.8V
AGM: 14.8V 29.6V
12V (5A - 10A - 25A)
Output Current 12V (5A - 10A - 25A)
24V (5A - 10A) Optional
Supported batteries STD battery (standard wet or ooded lead-acid battery)
AGM battery (Absorbent Glass Mat)
GEL battery (Gelied electrolyte)
EFB battery (Enhanced Flooded Battery)
(Lithium battery charging is forbidden)
Power cord length 150cm
Charging clip wire length 150cm
Peak power 300W ac
Eciency 85%
Display LCD
Protection Over-charge
Low-voltage
Overvoltage
Reverse-polarity
Short circuit
Over-temperature
Dimensions 195 x 185 x 115mm (see next page)
Weight 1.8kg
Certicates CE, RoHS

32

33
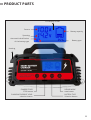
PRODUCT PARTS
LCD display screen
Housing
Current
Battery capacity
Battery type
Spanning
Automatic identication
of the battery type
CHARGE START/
STOP button
REPAIR MODE
start button
BATTERY TYPE
Selection button
CHARGING CURRENT LEVEL
selection button

34
Handle
Power Switch
Charging clip wiresPower cord
Cooling fan

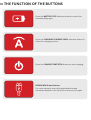
THE FUNCTION OF THE BUTTONS
Press the BATTERY TYPE selection button to select the
desired battery type.
Press the CHARGING CURRENT LEVEL selection button to
select the charging current.
Press the CHARGE START/STOP button to start charging.
REPAIR MODE start button.
For some seriously over-discharged batteries and
vulcanized batteries, this function can be used to repair.

1. Intelligent automatic identication: 12/24V battery auto-identication.
2. One-press repair mode charging: a battery under 8V can be repaired by intelligent
charging, and can start at 0V (it takes 24 hours to stop repair).
3. Intelligent fan control: when the internal temperature of the machine reaches 45°C,
the fan will start with heat dissipation to prevent a high-temperature operation and
enhance the service life.
4. Digital display: the digital display of the current voltage.
5. Short circuit protection: the charger will automatically shut down the output when an
accidental short circuit occurs to the charger output.
6. Reverse-polarity protection: Reverse-polarity protection: when the charger’s positive
& negative output and the battery’s positive & negative pole are in opposite
connections, the charger will automatically stop the output, and give a beeping
alarm. After the correct connection, the alarm will automatically be lifted.
7. Automatic cycle charging (Cycle mode): if the battery voltage is lower than 12.8V, it
will start to charge automatically.
8. Charging mode: constant current mode + constant voltage mode + oating charging
mode + all-charging mode full stop.
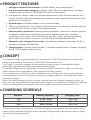
PRODUCT FEATURES
CONCEPT
CHARGING SCHEDULE
36
This Battery Charger is specially designed to be used with 12V & 24V batteries such as lead-acid
batteries, maintenance-free batteries / AGM / EFB starter batteries, etc.
The Charger is using an intelligent microcomputer processing chip, self-developed software
technology, and advanced PWM pulse modulation technology.
The battery Charger has the advantages of small size, safety, convenience, high conversion rate,
stable output current, large capacity, and long-time full load operation.
It is a new generation of a green environmental protection Charger with short circuit protection,
reverse-polarity protection, overheat protection, low voltage protection, and stable and reliable
performance safety.
Due to the PWM charging mode, this charger increases the rate of battery charging, reduces the
water loss rate, and prevents the battery from discharging. At the same time, it reduces the damage
rate of the battery plate to the lowest value, which greatly improves the battery service life.
The above data is for reference only. The actual charging time is based on the true capacity of the
battery and the selected charging current. A partially charged battery will take less time to charge
than a fully discharged battery.
Current Battery capacity Charging time
5 A 15 Ah - 50 Ah 4,5 h -15 h
10 A 30 Ah - 100 Ah 4,5 h -15 h
25 A 60 Ah - 250 Ah 4,5 h -15 h

METHODE OF CONNECTION
37
The life of your battery will be considerably longer if the following advice is taken:
User tips:
●Prevent the battery from being discharged too far. The battery life is shortened considerably in
this way. Should a battery be deeply discharged, recharge it as soon as possible.
●Always allow the Battery Charger to complete a charge once started. Avoid small “uncompleted
charges”.
●Check the liquid level of the battery every month and, if necessary, ll it up with distilled water.
●Clean the terminals of your battery regularly to prevent deposits. Put a little bit of vaseline on the
terminals.
●If the vehicle is seldom used, the battery will discharge. Therefore it needs to be charged
regularly to maximum capacity. In this way, malfunctioning can be prevented.
WARNING:
Before charging a battery permanently connected to the vehicle, rst
disconnect the battery’s negative terminal connection cable (black) from
the negative battery terminal. The negative battery terminal is typically
connected to the car body.
Then disconnect the vehicle’s positive terminal connection cable (red)
from the positive battery terminal. Make sure all accessories in the
vehicle are turned o to avoid an arc ash.
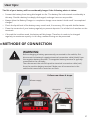
Follow now these 4 steps:
③Power supply
Battery
②Negative
pole
①Positive
pole

38
① First connect the red clip to the positive (plus) pole of the battery.
② Connect now the black clip to the negative (minus) pole of the battery.
③ Once both clips are connected to the car battery, connect the Battery Charger to the power
supply.
④ Switch the power switch to “1” After the machine is turned on, it will automatically detect the
battery voltage and power, and ash the current battery power level.
WARNING:
WARNING:
Do not disconnect a charging clip wire during charging due to the danger
of sparking. First, remove the mains plug from the wall socket or wait
until the charge has been completed.
Once the charging is completed, for batteries permanently installed in
vehicles, follow these steps in the correct sequence:
1. Disconnect the Battery Charger from the mains.
2. Remove the negative charging clip (black) from the “-“ (negative) battery
terminal.
3. Remove the positive charging clip (red) from the “+“ (positive) battery
terminal.
4. Reconnect the vehicle’s positive connection cable to the positive battery
terminal.
5. 5) Reconnect the vehicle’s negative connection cable to the negative
battery terminal.

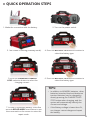
QUICK OPERATION STEPS
39
1. Make the connection with the battery.
3. The screen is ashing (Standby mode).
5.Press the CHARGING CURRENT
LEVEL selection button to select the
charging current...
7. In case of a problem battery: Press ve
seconds REPAIR MODE start button to see
the snow mark on the screen to enter the
repair mode.
2. Turn on the power switch.
4. Press the BATTERY TYPE selection button to
select the battery type.
6. Press the BATTERY TYPE selection button to
select the battery type.
TIPS:
●In addition to AGM/GEL batteries, other
batteries (standard lead-acid batteries/
traction batteries) can be charged by
directly pressing the CHARGE START/
STOP button when charging, and the
system will automatically identify the
current and voltage.
●If the Battery voltage is lower than 6V,
our charger cannot charge and repair
the battery.

STEP 1: See chapter “METHODE OF CONNECTION” for more details.
STEP 2: Turn on the power switch located at the backside of the Battery Charger.
0 = OFF
1 = ON
STEP 3: The screen is ashing (Standby mode).
STEP 4: Press the BATTERY TYPE selection button to select the battery type.
STD, GEL, and AGM are cyclically selected. The default setting is STD.
Battery type Display
GEL gel sealed lead-acid battery
STD standard lead-acid battery
AGM absorbent glass mat
When selecting the battery type, the charger will rst display the charging voltage of the
corresponding battery type for 5 seconds and then display the battery voltage value. The
battery type needs to be selected before starting charging, and cannot be selected after starting
charging.
If you want to re-select the battery type, then you need to press the CHARGE START/STOP
button to stop charging before making a new selection.
STEP 5: Press the CHARGING CURRENT LEVEL selection button to select the required charging
current. Select the required charging current gear according to the size of the battery. The 12V
system has three options of 5A/10A/25A, and the 24V system has two options of 5A/10A.
The charging current can be switched during the charging process. When the current is selected,
the machine will rst display the corresponding current for 5 seconds and then display the real-
time charging current.
STEP 6: After the setting is completed, press the CHARGE START/STOP button to start charging,
or you can wait for one minute after the setting is completed, and the machine will automatically
start
charging.
40

STEP 7: Repair Mode
Press and hold the REPAIR MODE start button for 5 seconds to enter the repair mode.
For some seriously over-discharged batteries and vulcanized batteries, this function can be used
to repair. The repair cycle is 24 hours. If the repair is not completed within 24 hours, you can
restart and enter the next --A 24-hour repair mode.
Someone needs to be on duty during the repair process. If the battery becomes too hot, it must
be 38 stopped. The repair work can be stopped by pressing the CHARGE START/STOP button
during work. The two clips cannot be short-circuited in the repair mode
Notes:
It is not possible to repair open-circuit batteries or short-circuit batteries.
The battery can not be connected to any discharge equipment during the repair.
It is strictly forbidden to repair the battery on the equipment.
41
Standby-screen (icker)
GEL battery mode
AGM battery mode
Intelligent repair mode

BREAKDOWN SELF CHECK
1. Check whether the positive and negative terminals of the clip are properly connected to the
battery. If the battery is not properly connected, it will not be able to start charging normally.
2. If the battery is connected and the screen is still ashing, you need to press the CHARGE START/
STOP button to charge.
3. If your battery has an under-voltage, the battery cannot be started charging. The REPAIR MODE
start button can be selected. Press and hold for 5 seconds to start the repair function and repair
the battery.
SAFETY INSTRUCTIONS
READ the user instructions carefully and especially observe the safety information.
If you do not follow the safety instructions and information on proper handling in
this manual, we assume no liability for any resulting personal injury or damage to
property. Such cases will invalidate the warranty.
Also, observe the safety instructions in the individual chapters of this manual.
Electrical appliances can expose people, especially children, to hazards that can
cause serious injury or death. The use of electrical appliances can present hazards
including, but not limited to, injury, re, electric shock, and damage to the electrical
system. These safety instructions are intended to give you the information you
need to use the STREX Battery Charger and avoid such hazards. Common sense and
respect for the device will help reduce the risk of injury..
YOUR RESPONSIBILITIES:
42
Contact us by email at [email protected], if you have questions that remain unanswered by these
warnings & safety instructions.

43
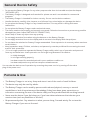
General Device Safety
●Do not use the Battery Charger for any other purpose other than its intended use (see the chapter
“INTENDED USE”).
●The Battery Charger is designed and intended for private use and is not suitable for commercial
purposes.
●The Battery Charger is intended for indoor use only. Do not use the device outdoors.
●Handle the device carefully. Jolts, impacts, or a fall even from a low height can damage the device.
●Do not place the Battery Charger on any unstable surface. This may result in falling and cause
malfunction.
●Do not place the Battery Charger under mechanical stress.
●The device needs to be properly and securely connected. Follow the instructions to prevent any possible
damage/injury (see chapter “METHOD OF CONNECTION”).
●Never drop or insert any object into any opening.
●Do not apply excessive force when using the buttons on the Battery Charger.
●Do not apply excessive force on the display and do not touch the display with sharp objects.
●Do not leave the switched-on Battery Charger unattended. Close supervision is necessary when used near
small children.
●Keep bystanders away. Children, onlookers, and passers-by must be prohibited from entering the work
area for their protection.
● If it is no longer possible to operate the Battery Charger safely, take it out of operation and protect it
from any accidental use. A safe operation can no longer be guaranteed if the device:
– is visibly damaged,
– is no longer working properly,
– has been stored for extended periods in poor ambient conditions or
– has been subjected to any serious transport-related stresses.
You can take the device out of operation by removing the power cord or by cutting o the mains
plug of the power cord.
Persons & Use
●The Battery Charger is not a toy. Keep and store it out of the reach of small children.
●The device may only be used by adults.
●The Battery Charger can be used by persons with reduced physical, sensory or mental
capabilities or lack of experience and knowledge if they have been given supervision or
instruction concerning the use of the device safely and they understand the resulting hazards.
●Never use the device if you feel sleepy or if you have taken substances that shorten your
reaction time (such as painkillers or alcohol).
●Be permanently alert. Pay attention to what you are doing. Proceed wisely. Do not use the
Battery Charger if you are not focused.

44
Electronics
Power Cord
●You may not reconstruct, self-repair, or disassemble the Battery Charger. This can damage the
device.
●Maintenance, modications, and repairs may only be carried out by an expert or a qualied
shop.
●Check the device from time to time for damage. Never use the device if the Battery Charger, the
charging clip wires, or the power cable shows signs of damage.
●Make sure your mains socket supplies the correct power voltage to avoid damage to the device.
●The mains socket must be located near the device and be easily accessible.
●Unplug the mains plug from the mains socket if you do not use the device and before cleaning.
41
●Never force the mains plug of the power cord into a mains socket; if it does not t easily into
the mains socket, please stop using it. Always make sure that the mains plug of your device is
properly connected to the mains socket.
●If the power fails during the operation, turn o the device immediately and pull the mains plug
from the mains socket.
●If there’s a smoke, re, or a strange odor coming from your device, you should turn o both the
device and the circuit breaker or fuse box’s main switch.
●If the device generates a strange noise, unplug the power plug immediately and contact a service
center.
●For safety reasons, always unplug the device in case of a thunderstorm.
●Do not modify the power cord.
●Check the power cord periodically for damage. Never use the power cord if there are any signs
of damage.
●Do not touch the power cord if it is damaged. A damaged power cord can cause a deadly electric
shock. First, power down the respective mains socket (e.g. via the respective circuit breaker) and
then carefully pull the mains plug from the mains socket. Never use the device if the power cord
is damaged.
●To prevent risks, damaged power cords may only be replaced by the manufacturer, a
professional workshop appointed by the manufacturer, or a similarly qualied person.
●Never pull the mains plug from the mains socket by pulling at the power cord. Always pull it from
the mains socket using the intended grips.
●Do not carry the Battery Charger by the power cord or use the power cord as a handle.

45
Heat & Cooling
●Do not cover the device or the ventilation holes while it is in operation as this may cause the
Battery Charger to overheat. This poses a risk of re, electric shock, or injury.
●Make sure that the ventilation around the device is good.
●Keep the device away from heat and in or close to areas where the surrounding temperature is
relatively hot (e.g. stoves or other sources of heat). Never use the device near naked ames (such
as burning candles) or on hot surfaces.
●The Battery Charger is designed to work best in normal ambient temperatures between 0°
and 35°C and to be stored at temperatures between 0°C and 45°C. The Battery Charger may
be damaged and the lifespan may be shortened if the device is stored or used outside this
temperature range. Do not subject the devices to dramatic changes in temperature. Do not store
your device in a hot car or in direct sunlight for extended periods.
● Do not use this device in a tropical climate.
●Never wrap the power cord around the device.
●Make sure that you do not trip over the power cord.
●Do not let the power cord hang over the edge of a table or counter.
●The power cord should not be kinked, trapped, or twisted.
●Make sure that the power cord is not squeezed, bent, damaged by sharp edges, or put under
mechanical stress.
●Avoid excessive thermal stress on the power cord from extreme heat or cold.
●If using an extension cord attached to the mains socket, make sure that the total electric power
consumption of connected devices does not exceed the rated capacity.
●Children may get entangled when playing with the power cord (danger of strangulation). Power
cords are not toys.

46
Water
Safety During Use
WARNING:
This device is not waterproof.
●Never use the Battery Charger with damp or wet hands. Moisture can cause electric shock
or short circuits.
●Do not use the Battery Charger in or near a bath, shower, swimming pool, or any
container lled with water, such as a sink.
●Do not use in wet environments and do not immerse in liquid. Never pour liquids over
or near the Battery Charger. There is a risk of electric shock! If liquid does get into the
housing, turn o the Battery Charger immediately.
●Make sure that the device is placed on a dry surface.
●We recommend that the battery is disconnected from the vehicle. This will avoid any possible
damage to the alternator.
●Check that the voltage of the battery matches that of the charger.
●Clean the battery terminals before connecting them to the charger. Do not allow corrosion to
come into contact with the eyes.
●Before connecting the battery to the charger ensure that both (the battery and the Battery
Charger) are stable and on a level surface. If the battery has cell ller caps, loosen or remove
them to aid in the escape of charging gasses (if the battery is a Gel or maintenance-free/sealed
type, please refer to the battery manufacturer’s published charging advice). Once the cell caps
have been loosened or removed it is advisable to check the level of electrolyte in each cell and
top up with distilled water only to the recommended ll level. Caution! Never top up your battery
with tap water.
●Do not place the charger in the engine compartment or near the battery. Place the charger as far
away as the charging clip cables allow. Never place a charger directly over a battery that is being
charged; gases or liquids from the battery will corrode and damage the charger.
a) Preparation

47
●Consider having someone close enough or within range of your voice to assist you when working
near a battery.
●Always have protective eyewear when using this product: contact with battery acid may cause
blindness and/or severe burns. Be aware of rst aid procedures in case of accidental contact
with battery acid.
●If battery acid comes in contact with skin, rinse immediately with water, and then wash
thoroughly with soap and water. If redness, pain, or irritation occurs, seek immediate medical
attention.
●Have plenty of fresh water and soap nearby in case battery acid contacts the skin.
●Remove personal metal items such as rings, bracelets, necklaces, and watches when working
with a lead-acid battery. A lead-acid battery can produce a short circuit current high enough to
weld a ring, or the like of a metal, causing a severe burn.
●Never allow battery acid to come in contact with the Battery Charger.
●With the STREX Smart Battery Charger you can charge all 12 and 24-volt AGM (with electrolyte
absorbent glass mat), GEL (with gelied electrolyte), and lead-acid batteries.
●The Battery Charger is not suitable for charging electric vehicles with a built-in rechargeable
battery.
●Do not charge the batteries at temperatures below 0°C. Transport the battery and Battery
Charger to a place where the temperature is higher rst, and then start the charge.
●Do not use the Battery Charger to charge a damaged or frozen battery!
●If battery acid contacts skin or clothing, wash immediately with soap and water for at least 10
minutes and get medical attention immediately.
●If battery acid comes in contact with your eyes, ush your eyes immediately, for a minimum of
15 minutes, and seek immediate medical attention.
b) Protect yourself
c) Supported battery types
d) First aid
Danger of chemical burns!
Protect your eyes and skin against corrosion from acids when coming into contact
with the battery! Use acid-proof goggles, clothing, and gloves!
WARNING:

48
Burst & Explosion Hazards
Burst hazard.
Do not use the unit for charging dry-cell batteries that are commonly used with
home appliances. These batteries may burst and cause injury to persons and
damage property. Use the unit for charging a lead-acid battery only.
WARNING:
WARNING: Explosion hazards
●Do not smoke, strike a match or use a lighter, or create a spark near the battery.
●Working in the vicinity of a lead-acid battery is dangerous. Protect yourself from
a highly explosive hydrogen-oxygen reaction! The battery may emit gaseous
hydrogen during charging. Oxyhydrogen is an explosive mix of gaseous hydrogen
and oxygen. Contact with open re (ames, embers, or sparks) will cause the so-
called oxyhydrogen reaction!
●Perform charging in a well-ventilated room. Be sure there is no open re during
charging! To reduce the risk of battery explosion, follow these instructions and
those published by the battery manufacturer and manufacturer of any equipment
you intend to use in the vicinity of the battery.
●Ensure the positive terminal connection cable does not come into contact withfuel
lines (e.g. petrol pipe)!
●Put the power o before cleaning. Never clean while charging a car battery.
●A soft dry cloth is recommended for cleaning the exterior of the Battery Charger.
●Be careful not to put too much pressure on the display or buttons while cleaning.
●Do not immerse the Battery Charger in water or any other liquids. It is not allowed to rinse
the device with water, to prevent the water from leaking into the electrical circuit and causing
malfunctions.
●Under no circumstances use aggressive cleaning agents, cleaning alcohol, or other chemical
solutions since these can penetrate the housing or impair functionality.
●Do not use a wire brush, steel wool, or other abrasive objects for cleaning.
●Cleaning must not be performed by children.
CLEANING

49
●The Battery Charger does not require any maintenance.
●You may not reconstruct, self-repair, or disassemble the Battery Charger.
●Check regularly for damage and severe wear.
●We advise cleaning the Battery Charger before long-time storage.
●Allow the device to cool down completely before storing. If you do not do this, there is a risk of
re.
●Store the device in a place not exposed to sunlight & humidity, which is dust-free.
●Do not store the device in extremely high or extremely low temperatures. This can damage the
device.
●Store beyond the reach of small children.
●Protect the device against vibrations and shocks during transport.
●After transport or storage at very cold temperatures, the Battery Charger must be accustomed
to room temperature for approx. 30 minutes due to possible condensation. After that, the device
can be used.
●Do not attempt to open the Battery Charger for maintenance. Removing the
housing or improper reassembly may cause electric shocks, damage, short
circuit, or re.
●If for any reason you open the housing, the warranty will become null and void.
The device contains no user-serviceable parts.
●To obtain maintenance or service, please contact us rst at our email address
[email protected]. Repairs should only be carried out by an expert or a qualied
shop.
WARNINGS:
MAINTENANCE & SERVICE
STORAGE & TRANSPORT

50
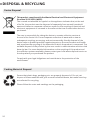
This product complies with the Waste Electrical and Electronic Equipment
Directive 2012/19/EU (WEEE).
The crossed-out wheeled bin symbol on the appliance indicates that, at the end
of its life, the product must be disposed of separately from normal household
waste and taken to a separate collection center for the recycling of electrical and
electronic equipment or returned to the seller at the time a new similar device is
purchased.
The user is responsible for taking the device to a waste collection service at
the end of its service life. Correct separate collection of waste with a view to
subsequent recycling, processing, and environmentally friendly disposal of the
device helps to prevent possible negative impacts on the environment and health
and promotes the recycling of the materials of which the product is composed. The
unlawful disposal of the product by the user results in administrative sanctions laid
down by law. For more detailed information on the recycling of this product and
the collection systems available, please contact your local waste disposal service or
the shop where you purchased the product.
Comply with your legal obligations and contribute to the protection of the
environment.
Ensure that plastic bags, packaging, etc. are properly disposed of. Do not just
dispose of these materials with your normal household waste, but make sure they
are collected for recycling.
Please follow the notes and markings on the packaging.
Packing Material Disposal
Device Disposal
DISPOSAL & RECYCLING

51
STREX guarantees that for one year from the date of purchase, this product will be free from defects
in materials and workmanship. STREX, at its discretion, will replace or repair this product or any
component of the product found to be defective during the warranty period. Replacement will be made
with a new or refurbished product or component. If the product is no longer available, a replacement
may be made with a similar product of equal or greater value. This is your exclusive warranty. Your
replacement unit will be returned to you for no charge and will be covered under this warranty for the
balance of the warranty period.
Shipping charges are not included in the warranty; the buyer is responsible for shipping charges and
after-sales service charges. Please pack the package carefully if you want to return the product or
require service, the buyer is responsible for any damage or loss in transit.
This warranty is valid for the original purchaser from the date of initial purchase and is not
transferrable. Proof of purchase is required to obtain support under the warranty.
Damage caused by failure to observe this manual will void the warranty! We do not accept any liability
for consequential damage! We accept no liability for material damage or personal injury caused by
improper use or failure to observe the safety instructions! In such cases, the warranty becomes void!
In no event shall the manufacturer be liable for any consequential or incidental damages, including
loss of business prots or other commercial damages, arising out of the use of its product.
STREX reserves the right to make changes at any time, without notice or obligation, in colors,
specications, accessories, materials, and models.
All rights reserved. No part of this publication may be reproduced, distributed, or transmitted in any form or by any means,
including photocopying, recording, or other electronic or mechanical methods, without the prior written permission of the
publisher, except in the case of brief quotations embodied in critical reviews and certain other noncommercial uses permitted
by copyright law. For permission requests, contact us at the address on the last page.
●negligent use or misuse of the product;
●use with incorrect voltage or current;
●use contrary to the operating instructions;
●disassembly, repair, or modication by anyone other than STREX;
●damage caused by accidents or disasters, such as re, ood, earthquake, war, vandalism, or
theft;
●incompatibility with other hardware/software not dened as minimum system requirements;
●accessories such as batteries and fuses;
●normal wear and tear.
This warranty does not cover:
WARRANTY & LIABILITY

All rights reserved. No part of this publication may be reproduced, distributed, or transmitted in any form or
by any means, including photocopying, recording, or other electronic or mechanical methods, without the
prior written permission of the publisher, except in the case of brief quotations embodied in critical reviews
and certain other noncommercial uses permitted by copyright law. For permission requests contact us at the
address at the last page.
STREX
©STREX2022
Document versie/version: 01-10-2022
SBD Trading B.V. - Strex Europe
Van der Landeweg 7
7418HG Deventer
The Netherlands
[email protected] - www.strex.nl
-
 1
1
-
 2
2
-
 3
3
-
 4
4
-
 5
5
-
 6
6
-
 7
7
-
 8
8
-
 9
9
-
 10
10
-
 11
11
-
 12
12
-
 13
13
-
 14
14
-
 15
15
-
 16
16
-
 17
17
-
 18
18
-
 19
19
-
 20
20
-
 21
21
-
 22
22
-
 23
23
-
 24
24
-
 25
25
-
 26
26
-
 27
27
-
 28
28
-
 29
29
-
 30
30
-
 31
31
-
 32
32
-
 33
33
-
 34
34
-
 35
35
-
 36
36
-
 37
37
-
 38
38
-
 39
39
-
 40
40
-
 41
41
-
 42
42
-
 43
43
-
 44
44
-
 45
45
-
 46
46
-
 47
47
-
 48
48
-
 49
49
-
 50
50
-
 51
51
-
 52
52


in andere talen
- English: STREX SP227 User manual
Gerelateerde papieren
Andere documenten
-
Tecmate TM-254 TM-256 OptiMate 7 Ampmatic de handleiding
-
Schumacher DSR5254 Automatic Battery Charging Station de handleiding
-
Samlexpower SEC-2415E de handleiding
-
 Oxford Oximiser 3X Handleiding
-
ULTIMATE SPEED KH 3033 de handleiding
-
CTEK MXS 10 EU de handleiding
-
CTEK MXS 5.0 EU de handleiding
-
CTEK MXS 3.8 de handleiding
-
-
