
LX790 LX791
LX792 LX793
P09
P22
P37
P51
P64
P78
P91
P105
P119
P131
P144
P158
P172
P185
EN
D
F
I
ES
NL
PL
HU
RO
CZ
SK
PT
TR
SL
Owner’s Manual
Benutzerhandbuch
Mode d’emploi
Manuale d’uso
Manual del propietario
Gebruikershandleiding
Felhasználói kézikönyv
Manual utilizator
Manual de utilizador
Navodila za uporabo

Original instructions EN
Originalbetriebsanleitung D
Notice originale F
Istruzioni originali I
Manual original ES
Oorspronkelijke gebruiksaanwijzing NL
Instrukcja oryginalna PL
Eredeti használati utasítás HU
RO
CZ
SK
Manual original PT
TR
SL

127 8
21
20
9 10
11
12
13
14
15
16
17
18 19
22 23 24
3 4
6
5

A
C
B

DD
E1
E2 F
G
H

K2
K1
K3
1
2
L
I
J

M
N
O1
O2
P
Q1

Q3
Q5Q4
Q2
1
2 2

EN 9
1. Product Safety
1.1 General & Additional Safety Instruction
WARNING: Read all safety warnings and all instructions.
Failure to follow the warnings and instructions may result in
electric shock, fire and/or serious injury.
Carefully read the instructions for the safe operation of the
machine.
Save all warnings and instructions for future reference.
• This appliance is not intended for use by persons (including
children) with reduced physical, sensory or mental capabilities, or
lack of experience and knowledge, unless they have been given
supervision or instruction concerning use of the appliance by a
person responsible for their safety.
• Children should be supervised to ensure that they do not play with
the appliance.
• The appliance is only to be used with the power supply unit
provided with the appliance.
IMPORTANT
READ CAREFULLY BEFORE USE
KEEP FOR FUTURE REFERENCE
SAFE OPERATION PRACTICES
Training
a) Read the instructions carefully. Make sure you understand the
instructions and be familiar with the controls and the proper use of
the appliance;
b) Never allow people unfamiliar with these instructions or children
to use the appliance. Local regulations can restrict the age of the
operator;
c) The operator or user is responsible for accidents or hazards
occurring to other people or their property.
Preparation
a) Ensure the correct installation of the boundary wire as instructed.
b) Periodically inspect the area where the appliance is to be used and
remove all stones, sticks, wires, bones, and other foreign objects.
c) Periodically visually inspect to see that the blades, blade bolts
and cutter assembly are not worn or damaged. Replace worn or
damaged blades and bolts in sets to preserve balance.
d) On multi-spindle appliances, take care as rotating one blade can
cause other blades to rotate.
e) WARNING! The lawnmower shall not be operated without the guard
in place.
OPERATION
1. GENERAL
a) Never operate the appliance with defective guards, or without
safety devices, for example deflectors, in place.
b) Do not put hands or feet near or under rotating parts. Keep clear of
the discharge opening at all times.
c) Never pick up or carry an appliance while the motor is running.
d) Operate the disabling device from the appliance.
- Before clearing a blockage;
- Before checking, cleaning or working on the appliance.
e) It is not permitted to modify the original design of robotic
lawnmower. All modifications are made at your own risk.
f) Start robotic lawnmower according to the instructions. When the
power key is switched on, make sure you keep your hands and
feet away from the rotating blades. Never put your hands and feet
under the mower.
g) Never lift up robotic lawnmower or carry it when the power key is
switched on.
h) Do not let persons who do not know how robotic lawnmower
works and behaves use the mower.
i) Do not put anything on top of robotic lawnmower or its charging
station.
j) Do not allow robotic lawnmower to be used with a defective blade
disc or body. Neither should it be used with defective blades,
screws, nuts or cables.
k) Always switch off robotic lawnmower when you do not intend to
use the mower. Robotic lawnmower can only start when the power
key is switched on and the correct PIN code has been entered.
l) Keep your hands and feet away from the rotating blades. Never
place your hands or feet close to or under the body when robotic
lawnmower is in operation.
m) To avoid using the machine and its peripherals in bad weather
conditions especially when there is a risk of lightning.
n) Not to touch moving hazardous parts before these have come to a
complete stop.
o) For machines used in public areas, that warning signs shall be
placed around the working area of the machine. They shall show
the substance of the following text:
WARNING!
Automatic lawnmower! Keep away from the
machine! Supervise children!
2. ADDITIONALLY WHEN THE APPLIANCE IS OPERATING
AUTOMATICALLY
a) Do not leave the machine to operate unattended if you know that
there are pets, children or people in the vicinity.
MAINTENANCE AND STORAGE
When the mower is turned upside down the power key must
always be switched off.
The power key should be switched off during all work on the
mower’s underframe, such as cleaning or replacing the blades.
a) Keep all nuts, bolts and screws tight to be sure the appliance is in
safe working condition.
b) Inspect the robotic lawnmower each week and replace worn or
damaged parts for safety.
c) Check especially that the blades and blade disc are not damaged.
Replace all blades and screws at the same time if necessary so
that the rotating parts are balanced.
d) Ensure that only replacement cutting means of the right type are
used.
e) Ensure that batteries are charged using the correct charger
recommended by the manufacturer. Incorrect use may result in
electric shock, overheating or leakage of corrosive liquid from the
battery.
f) In the event of leakage of electrolyte flush with water/neutralizing
agent, seek medical help if it comes into contact with the eyes etc.
g) Servicing of the appliance should be according to manufacturers’
instructions.
Recommendation
To connect the machine and/or its peripherals only to a supply circuit
protected by a residual current device (RCD ) with a tripping current of
not more than 30 mA.

EN10
Residual risks
To avoid injuries, wear protective gloves when replacing the blades.
Transport
The original packaging should be used when transporting robotic
lawnmower over long distances.
To safely move from or within the working area:
a) Press the STOP button to stop the mower.
You select the four digit PIN code when you start the mower for the
first time.
b) Always switch off robotic lawnmower if you intend to carry the
mower.
c) Carry the mower by the handle at the front under the mower. Carry
the mower with the blade disc away from the body.
Safety Warnings for battery pack inside the tool
a) Do not dismantle, open or shred battery pack.
b) Do not short-circuit a battery pack. Do not store battery
packs haphazardly in a box or drawer where they may short-
circuit each other or be short-circuited by conductive
materials.
When battery pack is not in use, keep it away from
other metal objects, like paper clips, coins, keys, nails, screws or
other small metal objects, that can make a connection from one
terminal to another. Shorting the battery terminals together may
cause burns or a fire.
direct sunlight.
d) Do not subject battery pack to mechanical shock.
e) In the event of battery leaking, do not allow the liquid to
come into contact with the skin or eyes. If contact has been
made, wash the affected area with copious amounts of water
and seek medical advice.
f) Seek medical advice immediately if a cell or battery pack
has been swallowed.
g) Keep battery pack clean and dry.
h) Battery pack gives its best performance when it is operated
at normal room temperature (20 °C ± 5 °C).
i) When disposing of battery packs, keep battery packs of
different electrochemical systems separate from each
other.
TM
.
for use with the equipment. A charger that is suitable for one
another battery pack.
k) Do not use any battery pack which is not designed for use
with the equipment.
l) Keep battery pack out of the reach of children.
m) Retain the original product literature for future reference.
n) Dispose of properly.
2. Information on the Landxcape
TM
WARNING - Robotic lawnmower can be dangerous if
incorrectly used.
Read through the Operator’s manual carefully and
understand the content before using your robotic
lawnmower.
WARNING - Keep a safe distance from the machine
when operating.
WARNING – Operate the disabling device before
working on or lifting the machine.
WARNING - Do not ride on the machine.
Do not burn
Do not expose to rain or water.
Do not dispose of batteries. Return exhausted
batteries to your local collection or recycling point.
Do not wash the machine with a high pressure
washer
Class III appliance
Waste electrical products must not be disposed of
with household waste. Please recycle where facilities
exist. Check with your local authorities or retailer for
recycling advice.

EN 11
1. STOP BUTTON
2. CUTTING HEIGHT ADJUSTMENT KNOB
3. ON/OFF KEY
4. START KEY
5. HOME BUTTON
6. DISPLAY
7. CHARGING STRIPS
8. RAIN SENSOR
9. FRONT WHEEL
10. BLADE TURNING DISC
11. CUTTING BLADE
12. BATTERY PACK
13. USB PORT
14. REAR DRIVING WHEEL
15. HANDLE
16. CONTACT PINS
17. CHARGING BASE
18. POWER ADAPTER
19. WIRE PEGS
20. BOUNDARY WIRE
21. CHARGING BASE FIXING NAILS
22. BOUNDARY WIRE DISTANCE GAUGE
23. HEX KEY
24. CONNECTOR
Not all the accessories illustrated or described are included in standard delivery.
2. Component List

EN12
3. Technical data and noise data
3.1 Technical data
Type LX790 LX791 LX792 LX793 (790-799 - designation of
machinery, representative of Robotic Lawn mower)
LX790 LX792 LX791 LX793
Rated voltage 20V
Max.*
No load speed 2800/min
Cutting area 600m
2
900m
2
Cutting diameter 16cm 18cm
Cutting height 30-60mm
Cutting height positions 4
Battery type Lithium-ion
Battery model LA0001 LA0002
Charging time approx. 1.3hrs 2hrs
Charger model LA8001 / LA8002
Charger rating
Input: 100-240V~50/60Hz, 38W,
Output: 20V
, 1.5A
Machinery weight 8.4kg
Protection degree III
*Voltage measured at no load. Initial battery voltage reaches maximum
of 20 volts. Nominal voltage is 18 volts.
Accessories
LX790 LX792 LX791 LX793
Screw 9 9
Charging base 1 1
Charging base fixing nails 7 7
Boundary wire 150m 180m
Wire pegs 210 250
Hex key 1 1
Boundary wire distance gauge 2 2
Blade 9 9
Connector 2 2
Battery pack (LA0001/ LA0002) 1 1
Charger (LA8001 / LA8002) 1 1
We recommend that you purchase genuine accessories listed in the
above list from the same store that sold you the tool. Refer to the
accessory packaging for further details. Store personnel can assist you
and offer advice.
3.2
Noise data
A weighted sound pressure L
pA
= 44.2dB (A), K
PA
= 0.4dB(A)
A weighted sound power
L
wA
= 64.2dB (A) K
wA
= 0.4dB(A)
Wear ear protection when
sound pressure is over
80dB(A)
A degree of noise from the machine is not avoidable. Route noisy work
is to be licensed and limits for certain periods. Keep rest periods and
they may need to restrict the working hours to a minimum. For their
personal protection and protection of people working nearby, an ap-
propriate hearing protection shall be worn.
Intended Use
The garden product is intended for domestic lawn mowing. It is de-
signed to mow often, maintaining a healthier and better looking lawn
than ever before. Depending on the size of your lawn, your Landxcape
TM
may be programmed to operate at any time or frequency. It is impos-
sible for digging, sweeping or snow cleaning.

EN 13
4. Control panel
Start
1) After the boundary wire installation, you can start using Landxcape
TM
(Please refer to Installation Guide for boundary wire installation).
2) Press
until Landxcape
TM
turns on. For the first use, input the default PIN code 0000 by pressing for four times when the number 0 is
blinking. (The PIN code can be changed, please refer to “Setting” in the Installation Guide).
NOTE:
Landxcape
TM
will turn off if it does not receive any input within 30 seconds after it is turned on. If you enter wrong PIN code three times,
Landxcape
TM
will raise the alarm “di-di” and then turn off.
3) Press
, then press to start mowing.
4) Press then to make Landxcape
TM
go to the charging base, with the blades rotating to cut grass on the way home.
Landxcape
TM
will work continuously until reaching low battery power level and then it will return to the charging base. Once charging is complete,
Landxcape
TM
will automatically resume mowing or it stay in the charging base according to the mowing schedule.
NOTE:
When Landxcape
TM
turns on, all lights on the display will be illuminated and then turn off. Check if there is any light damaged. It is
recommended to shield the display with your hand when the outdoor light gets too strong.
POWER ON/OFF
Turns Landxcape
TM
on
and off
LOCK
BATTERY CAPACITY
Working time
START
Starts mowing/
Selects up
STANDBY PAGE:
Landxcape
TM
is not in the
working hours.
SLEEP PAGE:
Landxcape
TM
is fully charged and is
not in the working hours.
DISPLAY
Displays the state of your setting
STOP
Stops Landxcape
TM
during
operation
HOME
Sends Landxcape to its
charging base during
operation with the blades
rotating to cut grass
on the way home and
activates charging/Selects
down
OK
Confirms any setting

EN14
5. Understanding Your Landxcape
TM
Congratulations on your new purchase of Landxcape
TM
and welcome
to the care-free life of automatic mowing. In the following, we want to
help you to better understand how your Landxcape
TM
thinks.
5.1 How does my Landxcape
TM
know what
to mow?
Landxcape
TM
chooses its direction at random. It will make sure your
entire lawn is evenly mowed without leaving unattractive mowing paths
(See Fig. A).
5.2 How does my Landxcape
TM
know where
to go?
Your Landxcape
TM
is made to work on its own. Landxcape
TM
knows
when it needs to go to its charging base to charge, can sense when it is
raining, can stop itself if it senses a problem, and knows to stop, draw
back, and turn around when it bumps into something blocking its path.
Landxcape
TM
will also automatically stop its blade turning disc from
rotating if it is lifted off the ground to prevent an accident.
A. Finding the Charging Base
When your Landxcape
TM
needs to recharge, it will stop mowing and
follow the boundary wire in an anti-clockwise direction back to its
charging base. Landxcape
TM
is pre-programmed to mow the grass near
the boundary wire twice a week. By default, Landxcape
TM
will mow near
the boundary wire every Monday and Friday after it is powered on.
B. Rain sensors
Landxcape
TM
is equipped with a rain sensor which detects rain and tells
Landxcape
TM
to stop mowing and follow the boundary wire back to its
charging base (See Fig. B).
Landxcape
TM
will resume mowing after passing the delay time. The
default delay time is 180mins.
When the rain sensors are wet,
Landxcape
TM
returns to its charging
base. When the rain sensors are dry,
Landxcape
TM
will begin the delay
time countdown. If you want to exit from the rain delay, dry the sensor
area, and perform a power cycle by operating the on/off key. After the
power cycle has been performed, you can operate again.
C. Sensing the boundary wire
Landxcape
TM
always obeys the border set by the boundary wire and
uses sensors at its front to detect it. (See Fig. C)
D. Starting and stopping while mowing (See Fig. D, E1, E2)
To start mowing, press the on/off key and input the PIN code. Press
, then press . If you would like
Landxcape
TM
to stop mowing, simply
press the STOP button on top of the mower.
If
Landxcape
TM
senses something is wrong, it will display a fault message
on the display. For information on these messages, refer to the Error
Messages.
Landxcape
TM
will turn off if it does not receive any input from
the user within 20 minutes.
To resume:
• Press , then press
• Now Landxcape
TM
will begin to mow!
5.3 Setting
First please set the height to a desired grass level after cut and you can
do the program setting manually.
NOTE: When doing the program setting manually, Landxcape
TM
will
enter the standby page if it does not receive any input from the user
within 30 seconds.
(1) Change PIN code
To change the PIN code, keep pressing both
and buttons at the
same time for 5 seconds. The icon will be blinking, and “ ” will
be rolling flashing. After that, the first number will be blinking, use or
to select the number you want and press to confirm. The next
number will be blinking. Use the same method to complete other numbers.
For example, the new PIN code is set to be 0326. After that, “ ”
will be rolling flashing and the first number will be blinking again. Use the
same method to input the new PIN code you set just now (in this example,
). Then “ ” will be rolling flashing on the display.
Your PIN code has been changed successfully.
Only for reference
(2) Set year, date and time
Set year, date and time are compulsory setting items. If you don’t set these
items, it will influence the schedule time in the following setting. These
items should be set in the order of year, date and time. For the year setting,
keep pressing
for 3 seconds until the icon and a number are
blinking on the display, for example, . Use or to select
the year you want. Then press to confirm to finish the year setting.
Only for reference

EN 15
Meanwhile, the icon
will be flashing again and a number will be
displayed to indicate the date, for example, , meaning September
29. When is flashing, use or to select the number and press
to confirm. Then will be flashing. Use the same method to select
the number and press to confirm to finish the date setting.
Only for reference
Meanwhile, the icon
will be flashing and the time will be displayed,
for example, . When is blinking, use or to to select
the number and press to confirm. Then will be blinking, use the
same method to select the number and press to confirm. Now the
time setting is completed and Landxcape
TM
will enter the standby page.
Only for reference
(3) Set work area
Keep pressing
for 3 seconds. When the icon is blinking, press
. A number will be blinking on the display, for example, , which
is the lawn area. The working time will be automatically set according to
the size of your garden. Use or to set the lawn area (the area will
increase / decrease by 50m
2
each time the / is pressed), and
press to confirm. Then Landxcape
TM
will enter the standby page.
Only for reference
(4) Change default start time
The default start time of 9:00 can be changed to anytime by keep pressing
both
and buttons at the same time until a ding sound is heard.
For example, keep pressing both and buttons at 14:05, and
your Landxcape
TM
will start mowing from 14:05.
Only for reference
5.4 How efficiently will my Landxcape
TM
mow the grass?
Mowing times are different for every lawn depending on the factors
mentioned below. Gradually adjust the time you allow Landxcape
TM
to
mow each day until you find the most suitable setting.
Your Landxcape
TM
is capable of mowing areas of different sizes,
although this depends on various factors, such as:
• Species of grass in your lawn and its growth rate
• Sharpness of the cutting blades
• Humidity
• Surrounding temperature
• Amount of obstacles in your Lawn
Unlike most other mowers,
Landxcape
TM
uses a side charging system,
which is able to cut the surrounding grass as much as possible. The holes
on the bottom of the charging base allow the grass to grow through the
base to help disguise it and create an elegant appearance.
Landxcape
TM
’s cutting height can be adjusted between 3cm-6cm. Before
starting your Landxcape
TM
for the first time, you should cut the grass to
the height no more than 9 cm with your manual lawnmower. Then, set the
cutting height of your Landxcape
TM
to its maximum setting (6cm) for its
first time mowing. (See Fig. F)
Your Landxcape
TM
will cut best in dry weather. Wet grass can build up
on the blade turning disc and within the motor, and can also cause
loose traction and slippage while working.Your Landxcape
TM
is afraid of
lightning storms. In case of a lightning storm, protect Landxcape
TM
by
unplugging the charging base, disconnecting the boundary wire, and
making sure Landxcape
TM
is not allowed to charge.
Your Landxcape
TM
loves mowing grass and requires the cutting blades
to be kept in good condition to cut at its best. Landxcape
TM
can do most
things by itself, but will sometimes need your help to prevent damage
to itself.
• Never let Landxcape
TM
travel over gravel.
• Remove or prevent access to obstacles that Landxcape
TM
could
accidentally climb on and damage its blade turning disc.
• Remove all debris and foreign objects from your lawn.
6. Boundary Wire Basics
6.1. Pegging the Boundary Wire
Use the boundary wire distance gauge to set the correct distance
between the wire and the border of your lawn (more than 26cm).This
is the recommended distance. The provided distance gauge ensures
proper installation.
If your neighbor also uses a Landxcape
TM
, keep a spacing of at least 1
metre between your boundary wire and your neighbor’s.
The boundary wire must outline the intended mowing area

EN16
exactly.
Your Landxcape
TM
will become confused by extra bends or
coils of boundary wire that are not part of its mowing area (See Fig.
G). If there is excess boundary wire after the mowing area has been
outlined, cut it off and store this additional wire in a separate location.
It is important to leave the necessary length where it connects to the
charging base so it can be connected and still remain buried.
6.2 Burying the Boundary Wire
If you are planning to bury the boundary wire, it is recommended to first
peg it down. This allows you to easily change the layout if necessary before
burying the wire. When the boundary wire installation is complete, have
Landxcape
TM
follow and check the path by pressing and . This
allows your
Landxcape
TM
to adjust to its new environment. .
While observing
Landxcape
TM
you can easily make alterations to the
boundary wire to ensure
Landxcape
TM
's trouble-free tracking when locating
the charging station. Confirm that
Landxcape
TM
docks in the charging
station successfully, and bury the wire if desired.
6.3 Joining the boundary wire
If you want to extend and splice the boundary wire, use a connector.
The connector is waterproof and provides optimal connection.
Insert both wire ends in any two of the three holes of the connector.
Insert the wires fully until both wire ends are visible on the other side of
the connector. (See Fig. H) Press the connector together by using a pair
of pliers. (See Fig. I, J)
WARNING!
It is not recommended to simply splice the boundary
wire with insulating tape or use a screw terminal block for
connection. A broken circuit may occur after a period of time as soil
moisture can oxidize the wire.
7. Software update
The software can be updated when new versions become available.
The latest software can be downloaded from our website
www.landxcape-robotics.com.
Update via USB. See below for download and installation instructions:
(1) Locate the latest software version at: www.landxcape-robotics.
com. Save the file to an empty
FAT32
formatted USB (flash drive).
Delete any other files on the drive and check the format. If the drive
is not formatted in
FAT32
, please reformat the drive.
NOTE:
the software update is downloaded as a zipped file. You will
need to unzip or extract it before proceeding.
(2) Place Landxcape
TM
on a secure and level surface. Press
to turn
off your Landxcape
TM
.
(3) Insert the USB drive (flash drive) in the port. (See Fig. K1)
(4) Turn Landxcape
TM
on. The update will begin automatically. Wait until
the display shows “ ” (See Fig. K2), then remove the USB drive
(flash drive) and tightly close the protective cover. When the display
shows “ ”, the update is complete and Landxcape
TM
will enter
the PIN page.
The manual included with your Landxcape
TM
is based on the default
software at the time of production. Some new features/functions in the
new version may not exist in the manual. If you found some settings not
in the manual, please visit www.landxcape-robotics.com to download
the latest manual.
8. Maintenance
Your Landxcape
TM
works hard and needs to be cleaned and checked
from time to time. Some parts will require replacement as they become
worn. Never use your Landxcape
TM
with defective main switch.
Switch off the machine before carrying out any service or maintenance.
Here's how to take care of your Landxcape
TM
.
8.1 Keep it sharp
WARNING: Before cleaning, adjusting, or replacing the
blades, turn your Landxcape
TM
OFF and put on protective
gloves.
WARNING: When fitting new blades, make sure you
replace ALL the blades. Always use new screws when
fitting blades. This is important to ensure blade retention and
balance the blade turning disc. Failure to use new screws could
cause serious injury.
Landxcape
TM
does not cut grass like other mowers. Its cutting blades
are razor sharp on 2 edges and rotate in both directions for maximum
cutting capacity (See Fig. L). Each blade of your
Landxcape
TM
has 2
cutting edges. The blade turning disc will make forward and reverse
rotation at random to use both cutting edges and minimize the
frequency of replacing the blades. Each cutting blade will last up to
2 months when it is programmed to mow everyday. Always check to
see if the blades are chipped or damaged and replace them if they
are. When the cutting blades are dull and worn out, they should be
replaced with the spare blades provided with your
Landxcape
TM
. Spare
blades are also available at your nearest
Landxcape
TM
retailer.
A. Replace the Blades
After some time, usually every season, your Landxcape
TM
’s Blades
will need to be replaced. When replacing the blades, make sure to
replace ALL of them at the same time. You can replace them with one
of the spare blade kits and extra blade screws supplied with your
Landxcape
TM
.
Before attempting to replace your Landxcape
TM
’s blades, turn the
power off and put on protective gloves and follow these steps:
1. Gently flip Landxcape
TM
over.
2. Remove the battery cover and remove the battery.
3. Take the screws off the blades with a screwdriver. (See Fig. M)
4. Firmly screw on the new blades.
5. Refit the battery and the battery cover.
IMPORTANT: After screwing the blade to the blade disc, make
sure the blade is able to spin freely.
8.2 Keep it clean
WARNING:
Before cleaning, turn your Landxcape
TM
OFF.
Put on protective gloves before cleaning the blade
turning disc and do not rinse or flush with water.
A. Cleaning the body
Your Landxcape
TM
will live a much happier and longer life if it is
cleaned regularly. Although, since your Landxcape
TM
is an electric
machine, you will need to take care when cleaning.
DO NOT use a
hose, high pressure washers and do not pour running water on
your Landxcape
TM
.
It is best to use a spray bottle filled with water.
When cleaning the machine body, use a soft brush or clean cloth and
avoid using solvents or polishes (See Fig. N). Lastly, remove all build
up of grass clippings and debris.
B. Cleaning the Underside
Again, it is important that you power Landxcape
TM
OFF and
wear

EN 17
protective gloves before touching the blade turning disc
.
First, flip your Landxcape
TM
upside down to expose its underside. Here
you will see the blade disc, the chassis, and the front wheel and driving
wheels. Clean everything thoroughly with a soft brush or moist rag.
WARNING:
NEVER clean the underside of Landxcape
TM
with
running water. Component damage can occur. (See Fig. O1,
O2)
Rotate the blade disc to ensure it rotates freely. Check the blades spin
freely around the fixing screws. Remove any obstructions.
IMPORTANT:
Remove any lodged debris so that it does not cause
a crack in the blade disc. Even the tiniest crack can decrease
your Landxcape
TM
's mowing output.
C. Clean the contact pins and the charging strips
Clean the contact pins located on the charging base and the charging
strips located on Landxcape
TM
using a cloth. Remove any built up
grass clippings or debris around the contact pins and charge strips
periodically to ensure Landxcape
TM
successfully charges each time.
8.3 Battery life
The heart of Landxcape
TM
is its 20V Li-Ion battery. For proper storage of
the battery, make sure it is fully charged and kept in a cool dry place.
NOTE:
The recommended Landxcape
TM
operation temperature is
between 0-55
0
C.
The life-span of Landxcape
TM
’s battery depends on various factors,
such as:
• The length of the mowing season in your region
• Amount of hours Landxcape
TM
mows per day
• Battery maintenance during storage
Landxcape
TM
can be charged manually without the boundary
wire.
1. Connect the charging base to a suitable power supply. The
green light on the charging base will turn on.
2. Manually dock Landxcape
TM
into the charging base while
Landxcape
TM
is powered off. (See Fig. P)
3. The green light on the charging base will be flashing.
Landxcape
TM
will begin to charge.
8.4 Winter hibernation
Your Landxcape
TM
will live longer and healthier if it is allowed to
hibernate. So even though it is troublesome, we recommend storing
your Landxcape
TM
in your shed or garage during the winter.
Before you prepare your Landxcape
TM
for winter hibernation, we
recommend you:
• Thoroughly clean your Landxcape
TM
• Fully charge the battery and remove it from Landxcape
TM
• Turn power off
To maximize the battery life, fully charge the battery and remove it from
Landxcape
TM
before storage during winter.
WARNING: Protect the underside of Landxcape
TM
from
water. NEVER store Landxcape
TM
upside down outdoors.
The boundary wire can be left in the ground but its ends should be
protected, such as placed in a tin can with grease. If the charging base
is left outside for the winter, leave the boundary wire connected.
NOTE:
When bringing Landxcape
TM
back to work after winter
hibernation, make sure the charging strips and contact pins are clean.
We recommend using a fine grade emery cloth to clean the contacts.
8.5 Replacing the battery
WARNING: Power off before attempting any adjustment,
replacement or repair.
Before replacing the blades, turn your Landxcape
TM
OFF and put on
protective gloves.
If you need to replace the battery, follow these steps:
1. Gently turn your Landxcape
TM
upside down.
2. Remove the screws on the battery cover. Remove the battery cover.
(See Fig. Q1)
3. Lift out the old battery carefully. Press the latch and release the
connectors. (See Fig. Q2)
NOTE:
Do not pull by the cables. Hold the connectors and release the
latch.
4. Connect a new original battery by attaching the connectors until
they click into position. (See Fig. Q3, Q4)
5. Fit the battery as shown. (See Fig. Q5) Place the cover back in its
position and tighten the screws.

EN18
9. Function Messages
Display Message Action
Rain delay activated. No action is required.
10. Error Messages
Display Cause Action
Landxcape
TM
is outside
working area.
1. If
Landxcape
TM
is actually outside its territory: turn
Landxcape
TM
off, take
Landxcape
TM
inside its territory. Turn
Landxcape
TM
on. Press then .
2. If
Landxcape
TM
is inside its territory, check if the LED on the charging base is green. If not,
verify that the charging base is properly connected to the charger and that the charger is
connected to a suitable power supply. If they are properly connected, the boundary wires are
clamped incorrectly and must be reversed.
3. If the LED light on the charging base turns on red, confirm that the boundary wire is well
connected to the clamps on the charging base. If the problem persists, check that the boundary
wire hasn’t been cut.
Wheel motor blocked
1. Turn Landxcape
TM
off; take Landxcape
TM
to an area free of obstacles.
2. Turn Landxcape
TM
on. Press then .
3. If the error message is still displayed, turn power off; turn Landxcape
TM
upside-down and
check if there’s anything preventing the wheels from rotating.
4. Remove any obstruction, turn Landxcape
TM
upright, turn power on. Press then .
Blade disc blocked
1. Turn Landxcape
TM
off.
2. Turn Landxcape
TM
upside down and check if there’s anything preventing the blade disc to
rotate.
3. Remove any obstruction.
4. Turn Landxcape
TM
upright and take it to an area with short grass or adjust the cutting
height;
5. Turn Landxcape
TM
on. Press then .
Landxcape
TM
is trapped.
1. Turn Landxcape
TM
off;
2. Take Landxcape
TM
to an area in your lawn free of obstacles obstacles.
3. Turn Landxcape
TM
on. Press
then .
4. If the error message is still displayed; turn power off; turn Landxcape
TM
upside-down.
Check if there is anything preventing the wheels from rotating.
5. Remove any obstruction, turn Landxcape
TM
upright, turn power on. Press
then .
Landxcape
TM
is lifted up.
1. Turn Landxcape
TM
off.
2. Take Landxcape
TM
to a lawn area clear of obstacles, turn Landxcape
TM
on. Press
then .
3. If the error message is still displayed: turn Landxcape
TM
off, turn Landxcape
TM
upside-
down and check if there’s anything preventing the front wheels from rotating.
4. Remove any possible object, turn Landxcape
TM
upright, turn Landxcape
TM
on. Press
then .
Landxcape
TM
is upside
down.
Turn Landxcape
TM
upright. Press then .
Battery error
1. Check the battery temperature. If the temperature is too high, wait until the
temperature has cooled down. Press then .
2. If the error message is still displayed, replace a new battery. Restart Landxcape
TM
.
Press then .
3. If the error repeatedly occurs, try to change the working schedule.

EN 19
It takes too long for
Landxcape
TM
to go back to
the charging base.
Manually dock Landxcape
TM
in the charging base for charging. After Landxcape
TM
is
fully charged, Press then .
Error unknown.
Restart Landxcape
TM
. Press then . If the error message is still displayed,
contact a service agent for help.
NOTES
• Before turning power on, always return Landxcape
TM
to its territory. If not, “
” will be displayed. This message is also displayed when
Landxcape
TM
is sitting over the boundary wire when turned on.
• If for any reason—i.e. a party, children playing...—you want to park your Landxcape
TM
in the charging base: Press then . Landxcape
TM
will go to its charging base and stay there. Press to turn Landxcape
TM
off.
• If an error repeatedly occurs in the same area of your lawn, you might have a problem with the boundary wire. Please refer to the Installation
Guide and check your set up with its help.
• If your lawn is divided in two separate areas connected by a corridor less than 1m, one of which is not provided with the charging base: when
Landxcape
TM
runs out of charge, take it manually to the charging base, the charge process will start.
• If Landxcape
TM
runs abnormally once in a while, please try to restart it. If the problem is not resolved, try to removing and reinstalling the
battery . If the problem is still not resolved, please contact a Landxcape
TM
service agent for help.
• Do not wash your Landxcape
TM
with a high pressure washer. This could cause damage to the battery or the machine.
11. Troubleshooting
If your Landxcape
TM
does not work correctly, follow the troubleshooting guide below. If the issue persists, contact your Dealer.
Symptom Cause Action
The LED light on the charging base does
not turn on.
There is no power.
Check the charging base is connected properly to the
charger and the charger is connected to a suitable
power supply.
Red light turns on the charging base. The boundary wire isn’t connected.
Check that the boundary wire has been connected
correctly to the charging base.
Check there are no breaks in the boundary wire, especially
in the wire ends.
Landxcape
TM
turns on, but the blade
disc does not move.
Landxcape
TM
is searching for the charging
base (unless you press then button to
make it go to the charging base)
This is normal. Landxcape
TM
needs to recharge, the
blade disc does not rotate while it is searching for the
charging base automatically.
Landxcape
TM
vibrates.
Blades may be damaged. Check condition of
the blade disc.
Check the blades, and replace them if damaged.
Remove debris and foreign objects from the blades
and blade disc.
Grass is being cut unevenly.
Landxcape
TM
does not work enough hours per
day.
Add more hours to the scheduled mowing time.
Mowing area is too big.
Try decreasing the size of the mowing area or adding
more hours to the mowing time.
Blades are dull.
Change all the blades and screws in order to balance
the blade disc.
The cutting height is too low for the length of
the grass.
Raise the cutting height and then gradually lower.
Grass or other object has wrapped around the
blade disc.
Check the blade disc and remove the grass or other
object.
There is a build-up of grass in the blade disc or
motor frame box.
Make sure the blade disc rotates easily. If need be, you
may take off the blade disc and remove the debris.
Your Landxcape
TM
is inside its territory
and the boundary wire is connected.
And “
“ is displayed.
The boundary wire ends are clamped
incorrectly.
Reverse the boundary wire ends.
The boundary wire is broken. Repair damaged boundary wire with connectors.

EN20
The charging time is far more than the
rated charging time.
Poor connection caused by debris on the
charging strip.
Clean the contact pins located on the charging base
and the charging strip on Landxcape
TM
using a cloth.
The charging protection program has activated
due to high temperature.
Place the charging base in a shady area or wait until
the temperature has cooled down.
The mower does not charge.
There is no power.
Check the power cord is connected properly to the
charger and the charger is connected to a suitable
power supply.
Landxcape
TM
does not operate correctly while
manually charging.
Refer to manual charging in Section 8.3.
Landxcape
TM
is starting to have shorter
run-times between charges.
Something is clogging in the blade disc. Take off the blade disc and clean it.
The grass is too high and too thick.
Check the Blade Disc and blades, remove debris and
foreign objects from the blades and Blade Disc.
Landxcape
TM
is shaking heavily.
Check the blade disc and blades, remove debris and
foreign objects from the blades and blade disc.
Landxcape
TM
is not operating at the
correct time.
The clock is not set to the correct time.
Set the clock to the correct time (refer to Section 5.3)
or by using App.
Programmed cutting times for Landxcape
TM
are not correct.
Change the time settings for the mower to start and
stop.
Landxcape
TM
is manually docked in the
charging base.
Press
then .
The battery does not charge as its temperature
rises above 55
O
C in hot weather.
Wait until the battery has cooled down.
Landxcape
TM
cannot correctly dock
with the charging base.
Environmental influences. Restart Landxcape
TM
.
Poor connection caused by debris on the
charging strip.
Clean the contact pins located on the charging base
and the charging strip on Landxcape
TM
using a cloth.
The green light on the charging base
turns on before charging is complete.
The charging base is overheated.
Place the charging base in a shady area or wait until
the temperature has cooled down.
Landxcape
TM
runs outside the boundary
wire. Landxcape
TM
does not mow an
area within a boundary wire zone.
Landxcape
TM
reverses or rotates
erratically near the boundary wire.
The boundary wire of another Landxcape
TM
or another robotic mower is positioned too
closely.
Ensure your Landxcape
TM
boundary wire has at least
1m of space between the neighboring boundary wire.
The boundary wire has been installed with
tight corners.
Check the boundary wire to ensure the corners are
smooth.
In wet conditions, the boundary wire electric
signal may leak were wire has been joined or
repaired.
Check boundary wire joints. Insulate to provide a fully
waterproof connection.
There is boundary wire electric signal leakage
due to broken insulation.
Repair damaged boundary wire insulation with
connectors.
The cutting area is larger than the allowable
cutting area for Landxcape
TM
.
Reduce the cutting area or use Landxcape
TM
with a
larger allowable cutting area.
Landxcape
TM
wheels skid or damage
lawn.
Foreign obstacles, such as twigs and branches
may be lodged under Landxcape
TM
.
Remove foreign objects from underside of
Landxcape
TM
.
The lawn is too wet. Wait until lawn has dried.
Landxcape
TM
exits the boundary wire
due to high speed when going down a
hill.
The boundary wire is placed on a slope
steeper than 17% (10°).
Reposition the boundary wire away from slopes that
are steeper than 17% (10°). Please refer Installation
Guide for details.
Software update failure occurs. Try again according to section “Software update”.
Environmental Protection
Waste electrical products should not be disposed of with household waste. Please recycle where facilities exist. Check with your Local
Authority or retailer for recycling advice.

EN 21
Declaration of Conformity
We,
Positec Germany GmbH
Grüner Weg 10, 50825 Cologne, Germany
Declare that the product,
Description Robotic Lawn mower
Type LX790 LX791 LX792 LX793 (790-799 - designation of machinery, representative of Robotic Lawnmower) (Year, article number and
month of serial number are placed on the back page. The complete serial number is clearly stated on the enclosure of lawnmower)
with battery charger LA8001 / LA8002 and charging base LA3000
Function Cutting grass
Complies with the following Directives,
2006/42/EC, 2014/30/EU, 2014/35/EU, 2011/65/EU, 2000/14/EC amended by 2005/88/EC
2000/14/EC amended by 2005/88/EC
- Conformity Assessment Procedure as per Annex V
- Measured Sound Power Level 64.2dB (A)
- Declared Guaranteed Sound Power Level 65 dB (A)
The notified body involved
Name: Intertek Testing & Certification Ltd. (notified body 0359)
Address: Cleeve Road, Leatherhead, Surrey, KT22 7SB United Kingdom
Certification No. : 181000479SHA-V1
Standards conform to,
EN 60335-1:2012+A11+A13:2017, EN 50636-2-107:2015+A1:2018, EN 60335-2-29:2004+A2:2010,
EN 62233:2008, EN ISO 3744:2005, EN 55014-1:2017, EN 55014-2:2015,EN 61000-3-2:2014,
EN 61000-3-3:2013, EN 61558-1:2005+A1:2009, EN 61558-2-16:2009+A1:2013, EN 303 447 V1.1.1
The person authorized to compile the technical file,
Name Marcel Filz
Address Positec Germany GmbH, Grüner Weg 10, 50825 Cologne, Germany
2018/10/26
Allen Ding
Deputy Chief Engineer, Testing & Certification
Positec Technology (China) Co., Ltd.
18, Dongwang Road, Suzhou Industrial
Park, Jiangsu 215123, P. R. China

DE22
1. Produktsicherheit
1.1 Allgemeine Sicherheitshinweise für
Elektrowerkzeuge
WARNUNG: Lesen Sie alle Sicherheitshinweise und
Anweisungen.
Versäumnisse bei der Einhaltung der
Sicherheitshinweise und Anweisungen können elektrischen Schlag,
Brand und/oder schwere Verletzungen verursachen.
Lesen Sie die Bedienungsanleitung zum sicheren Betrieb des
Gerätes aufmerksam durch.
Bewahren Sie alle Sicherheitshinweise und Anweisungen für die
Zukunft auf.
• Dieses Gerät ist nicht zur Verwendung durch Personen
(einschließlich Kindern) vorgesehen, die über reduzierte körperliche
Eignung, Wahrnehmung oder geistige Fähigkeiten, Mangel an
Erfahrung und Wissen verfügen, sofern diese Personen nicht
von einer verantwortlichen Person beaufsichtigt oder in der
Verwendung des Gerätes unterwiesen wurden.
• Kinder sollten grundsätzlich beaufsichtigt werden, damit sie nicht
mit dem Gerät spielen.
• Das Gerät darf nur mit dem mitgelieferten Netzteil verwendet werden.
WICHTIG
VOR GEBRAUCH BITTE SORGFÄLTIG
DURCHLESEN UND FÜR WEITERE FRAGEN AUFBEWAHREN
Sicherer Betrieb
Training
a) Die Anweisungen aufmerksam durchlesen. Machen Sie sich mit
den Bedienelementen und dem vorschriftsmäßigen Gebrauch des
Rasenmähers vertraut.
b) Niemals Kindern oder mit diesen Anweisungen nicht vertrauten
Personen erlauben, den Rasenmäher zu benutzen. Nationale
Vorschriften können das Alter der Bedienperson möglicherweise
beschränken.
c) Bedenken Sie, dass der Bediener oder Benutzer bei Unfällen
oder Gefährdungen anderer Personen oder deren Eigentum die
Verantwortung trägt!
Vorbereitung
a) Stellen Sie sicher, dass das Begrenzungskabel gemäß den
Anweisungen verlegt wird.
b) Inspizieren Sie die Gegend, in der die Ausrüstung eingesetzt
werden soll, gründlich und entfernen Sie alle Objekte, die durch die
Maschine aufgeschleudert werden könnten.
c) Überprüfen Sie in regelmäßigen Abständen, ob Messer,
Messerschrauben und Schneidbalken abgenutzt oder beschädigt
sind. Abgenutzte Messer und Schrauben nur im ganzen Satz
auswechseln, um Unwuchten zu vermeiden.
d) Achten Sie darauf, dass bei Geräten mit mehreren Klingen ein
Klingensatz durch den anderen in Rotation versetzt werden kann.
e) WARNUNG! Der Rasenmäher darf nicht betrieben werden, wenn
der Schutz nicht angebracht ist.
Betrieb
1. Allgemeine Sicherheitshinweise
a) Betreiben Sie das Gerät niemals mit defektem Schutz oder ohne
installierte Sicherheitsvorrichtungen, wie etwa Deflektoren;
b) Hände und Füße nicht in die Nähe oder unter rotierende Teile
bringen. Halten Sie sich stets von der Austrittsöffnung fern.
c) Niemals den Rasenmäher bei laufendem Motor anheben oder
tragen.
d) Betätigen Sie die Deaktivierungseinrichtung des Geräts,
– vor dem Beseitigen einer Verstopfung;
– vor dem Überprüfen, Reinigen oder Arbeiten am Gerät.
e) Der ursprüngliche Zustand des Landxcape
TM
darf nicht modifiziert
werden. Alle Änderungen erfolgen auf eigene Verantwortung.
f) Starten Sie den Roboter-Rasenmäher gemäß Anweisungen. Wenn
der Netzschalter eingeschaltet ist, stellen Sie sicher, dass Sie Ihre
Hände und Füße von den drehenden Messern entfernt halten.
Bringen Sie Ihre Hände und Füße niemals unter den Rasenmäher.
g) Heben Sie den Roboter-Rasenmäher niemals an bzw. tragen Sie
ihn nicht, wenn der Netzschalter eingeschaltet ist.
h) Erlauben Sie niemandem, der sich mit den Funktionen und
Verhaltensmustern des Landxcape
TM
nicht auskennt, den Mäher zu
benutzen.
i) Keine Gegenstände auf den Landxcape
TM
oder seine Ladestation legen.
j) Wenn der Messerteller oder das Gehäuse defekt ist, darf der
Landxcape
TM
nicht in Betrieb genommen werden. Das gleiche gilt
für defekte Messer, Schrauben, Muttern oder Kabel.
k) Schalten Sie den Roboter-Rasenmäher stets aus, wenn dieser
nicht verwendet wird. Der Roboter-Rasenmäher kann nur starten,
wenn der Netzschalter eingeschaltet ist und der korrekte PIN-Code
eingegeben wurde.
l) Halten Sie Hände und Füße von den rotierenden
Rasenmäherklingen fern. Halten Sie mit Ihren Händen und Füßen
stets einen sicheren Abstand zum Gehäuse ein, solange der
Rasenmäher in Betrieb ist.
m) Vermeiden Sie die Nutzung der Maschine und deren
Peripheriegeräten bei schlechtem Wetter, besonders wenn die
Gefahr eines Blitzschlags.
n) Berühren Sie sich bewegende gefährliche Teile nicht, bevor diese
vollständig zum Stillstand gekommen sind.
o) Bei Maschinen, die in öffentlichen Bereichen verwendet werden,
müssen diese Warnschilder um den Arbeitsbereich der Maschine
angebracht werden. Sie sollen den Inhalt des folgenden Textes zeigen:
WARNUNG! Automatischer Rasenmäher! Halten Sie sich von der
Maschine fern! Beaufsichtigen Sie Kinder!
2. HINWEIS ZUM AUTOMATIKBETRIEB DES ROBOTERS
a) Den Landxcape
TM
niemals unbeaufsichtigt verwenden, wenn
sich Personen – besonders Kinder – oder Haustiere in der Nähe
aufhalten.
WARTUNG UND LAGERUNG
WARNUNG! Wenn der Rasenmäher umgedreht wird, muss der
Netzschalter stets ausgeschaltet werden.
Der Netzschalter muss bei allen Arbeiten am Unterbau des
Rasenmähers ausgeschaltet werden, beispielsweise bei der
Reinigung oder beim Wechseln der Messer.
a) Stellen Sie den festen Sitz aller Schrauben, Muttern und Bolzen
sicher, um zu gewährleisten, dass sich der Rasenmäher in einem
betriebssicheren Zustand befindet.
b) Den Landxcape
TM
einmal pro Woche kontrollieren und eventuell
beschädigte oder verschlissene Teile austauschen.
c) Messer und Messerteller besonders sorgfältig auf Schäden
untersuchen. Bei Bedarf alle Messer und Schrauben gleichzeitig
austauschen, um eine Unwucht der rotierenden Teile zu vermeiden.
d) Verwenden Sie beim Austausch nur Original Messer.
e) Verwenden Sie zum Laden des Akkus nur das vom Hersteller
empfohlene Ladegerät. Eine nicht den Hinweisen entsprechende
Verwendung kann zu einem Stromschlag, zur Überhitzung oder
zum Auslaufen der Batterieflüssigkeit führen.
f) Tritt Batterieflüssigkeit aus, beseitigen Sie sie mit Wasser und
einem neutralen Reinigungsmittel. Kommt sie mit Augen etc. in

DE 23
Kontakt, suchen Sie sofort einen Arzt auf.
g) Warten Sie den Roboter nach den Anweisungen des Herstellers.
Empfehlung
Schließen Sie die Maschine und/oder deren Peripheriegeräte nur an
einen Speisestromkreis an, der über einen Fehlerstromschutzschalter
(RCD) mit einem Auslösestrom von nicht mehr als 30 mA verfügt.
Restrisiken
Um Verletzungen zu vermeiden, tragen Sie beim Wechseln der Klingen
Schutzhandschuhe.
Transport
Für längere Transporte legen Sie den Landxcape
TM
am besten in die
Originalverpackung.
Für einen sicheren Transport vom oder innerhalb des Arbeitsbereichs:
a) Drücken Sie die STOP -Taste, um den Mäher zu stoppen.
Sie wählen den vierstelligen PIN aus, wenn Sie den Mäher das
erste Mal benutzen.
b) Schalten Sie den Roboter-Rasenmäher immer aus, wenn Sie
diesen tragen möchten.
c) Den Mäher an seinem Griff vorne unten tragen. Halten Sie den
Messerteller beim Tragen des Mähers vom Körper weg.
Sicherheitshinweise bezüglich des Akkus im Werkzeug
a) Zellen bzw. Akku nicht zerlegen, öffnen oder zerdrücken.
b) Akku nicht kurzschließen. Akkus nicht wahllos in einer
Schachtel oder Schublade aufbewahren, wo sie einander
kurzschließen oder durch andere leitfähige Materialien
kurzgeschlossen werden könnten.
Bei Nichtverwenden
des Akkus ist dieses von Metallgegenständen, wie etwa
Büroklammern, Münzen, Nägeln, Schrauben oder anderen kleinen
Metallgegenständen fernzuhalten, wo sich die Batterieklemmen
berühren können. Das Kurzschließen der Batterieklemmen kann
Verbrennungen bzw. einen Brand verursachen.
c) Zellen bzw. Akkus nicht Hitze oder Feuer aussetzen. Lagerung
in direktem Sonnenlicht vermeiden.
d) Akku nicht mechanischen Stößen aussetzen.
e) Im Fall, dass Flüssigkeit aus dem Akku austritt, darf diese
nicht in Kontakt mit der Haut oder den Augen kommen. Sollte
dies dennoch geschehen, den betroffenen Bereich sofort
mit viel Wasser spülen und einen Arzt aufsuchen.
f) Beim Verschlucken einer Zelle oder eines Akkus muss sofort
ein Arzt herangezogen werden.
g) Akku sauber und trocken halten.
h) Akkus funktionieren bei normaler Zimmertemperatur (20 °C
± 5 °C) am besten.
i) Beim Entsorgen von Akkus sollten Akkus mit verschiedenen
elektrochemischen Systemen voneinander getrennt
gehalten werden.
j) Nur mit dem von Landxcape
TM
bezeichneten Ladegerät
für den Gebrauch mit dem Gerät vorgesehen ist. Ein
Ladegerät, das für eine bestimmte Art von Akku geeignet
ist, kann bei Verwendung mit einem anderen Akku eine
Brandgefahr darstellen.
k) Keinen Akku verwenden der nicht für den Gebrauch mit dem
Gerät vorgesehen ist.
l) Akkus von Kindern fernhalten.
m) Die originalen Produktunterlagen zum späteren
Nachschlagen aufbewahren.
n) Ordnungsgemäß entsorgen.
1.2 Informationen zum Landxcape
TM
WARNUNG–Rasenmähroboter können bei
unsachgemäßer Verwendung gefährlich sein.
Lesen Sie die Bedienungsanleitung sorgfältig durch
und verstehen Sie deren Inhalt, bevor Sie Ihren
Rasenmähroboter betreiben.
WARNUNG- Halten Sie einen Sicherheitsabstand
wenn der Roboter-Rasenmäher in Betrieb ist.
WARNUNG – Betätigen Sie die
Deaktivierungsvorrichtung, bevor Sie am Gerät
arbeiten oder die Maschine anheben.
WARNUNG – RASENMÄHROBOTER darf nicht als
Transportmittel missbraucht werden.
Nicht im Feuer entsorgen
Vor Regen und Feuchtigkeit schützen
Akku nicht in den Haushaltsmüll geben. Bringen
Sie den leeren Akku zu Ihrer lokalen Sammel- oder
Recyclingstelle.
Waschen Sie das Gerät nicht mit einem
Hochdruckreiniger.
Gerät der Klasse III
Elektroprodukte dürfen nicht mit dem normalen
Haushaltsmüll entsorgt werden, sondern sollten nach
Möglichkeit zu einer Recyclingstelle gebracht werden.
Ihre zuständigen Behörden oder Ihr Fachhändler
geben Ihnen hierzu gerne Auskunft.

DE24
1. STOPPTASTE
2. DREHKNOPF ZUM EINSTELLEN DER SCHNITTHÖHE
3. EIN/AUS-TASTE
4. START-TASTE
5. HOME-TASTE
6. ANZEIGE
7. LADESTREIFEN
8. REGENSENSOR
9. VORDERRAD
10. MESSERTELLER
11. MESSER
12. AKKU
13. USB-SCHNITTSTELLE
14. HINTERES ANTRIEBSRAD
15. GRIFF
16. KONTAKTSTIFTE
17. LADESTATION
18. NETZTEIL
19. HERINGE
20. BEGRENZUNGSKABEL
21. LADESTATION-BEFESTIGUNGSSCHRAUBEN
22. BEGRENZUNGSKABEL-ABSTANDLEHRE
23. INBUSSCHLÜSSEL
24. VERBINDUNGSSTÜCK
Abgebildetes oder beschriebenes Zubehör gehört teilweise nicht zum Lieferumfang.
2. Komponenten

DE 25
3.Technische Daten und
Geräuschentwicklung
3.1 Technische Daten
Typ LX790 LX791 LX792 LX793 (790-799 - Bezeichnung der
Maschine, repräsentiert den Rasenmähroboter)
LX790 LX792 LX791 LX793
Nennleistung 20V
Max.*
Leerlaufdrehzahl 2800/min
Schneidebereich 600m
2
900m
2
Schnittbreite 16cm 18cm
Schnitthöhe 30-60mm
Schnitthöhenverstellung 4
Batterietyp Lithium-ion
Akkumodell LA0001 LA0002
Ladezeit Ca. 1.3hrs 2hrs
Ladegerätmodell LA8001 / LA8002
Leistung des Ladegeräts
Eingang: 100-240V~50/60Hz, 38W,
Ausgang: 20V
, 1.5A
Gewicht 8.4kg
Schutzklasse III
*Spannung ohne Arbeitslast gemessen. Die anfängliche Akkuspannung
erreicht maximal 20 Volt. Die Nennspannung liegt bei 18 Volt.
Zubehörteile
LX790 LX792 LX791 LX793
Schrauben 9 9
Ladestation 1 1
Fixierungsnägel für Ladestation 7 7
Begrenzungskabel 150m 180m
Heringe 210 250
Inbusschlüssel 1 1
Begrenzungskabel Abstandslehre 2 2
Messer 9 9
Verbindungsstück 2 2
Akkupack (LA0001/ LA0002) 1 1
Lader (LA8001 / LA8002) 1 1
Wir empfehlen Ihnen, sämtliche Zubehörteile beim selben Fachhändler
zu beziehen, bei dem Sie auch Ihr Elektrowerkzeug oder Gartengerät
gekauft haben. Weitere Informationen finden Sie auf der Verpackung
der Zubehörteile. Auch Ihr Fachhändler berät Sie gerne.
3.2 Informationen über lärm
Gewichteter Schalldruck
L
pA
= 44.2dB (A)
K
PA
= 0.4dB(A)
Gewichtete Schallleistung
L
wA
= 64.2dB (A)
K
wA
= 0.4dB(A)
Tragen Sie einen Schallschutz bei
einem Schalldruck über
80dB(A)
Eine gewisse Geräuschentwicklung der Maschine ist unvermeidlich. Die
Durchführung geräuschintensiver Arbeiten benötigt eine Zulassung und
muss in bestimmten Zeiten eingeschränkt werden. Halten Sie Ruhe-
phasen ein und beschränken Sie die Arbeitsstunden auf ein Minimum.
Zu Ihrem eigenen Schutz und den von Personen, die sich in der Nähe
befinden, muss ein geeigneter Gehörschutz getragen werden.
Bestimmungsgemäßer Gebrauch
Dieses Produkt ist bestimmt für das Rasenmähen im privaten Bereich.
Er ist zum häufigen Mähen bestimmt – er hält Ihren Rasen gesund und
dieser wird gepflegter aussehen als je zuvor. Je nach Größe des Rasens
kann der Landxcape
TM
so programmiert werden, dass er zu jeder beli-
ebigen Zeit und mit jeder beliebigen Frequenz uneingeschränkt arbeitet.
Es ist nicht zum Graben, Reinigen oder Schneeräumen konzipiert.

DE26
4. Bedienfeld
Start
1) Nach der Installation des Begrenzungskabels können Sie den Landxcape
TM
verwenden (Informationen zum Verlegen des Begrenzungskabels
finden Sie im Installationsleitfaden).
2) Drücken Sie zuerst power on/off
. Geben Sie bei der ersten Verwendung den voreingestellten PIN-Code 0000 ein, indem Sie
viermal drücken, wenn die Zahl 0 blinkt. (Der PIN-Code kann geändert werden. Weitere Informationen finden Sie unter „Einstellungen“ in der
Installationsanleitung)
HINWEIS:
Landxcape
TM
wird automatisch ausgeschaltet, wenn keine Eingabe innerhalb 30 Sekunden nach dem Einschalten empfangen wird.
Wenn Sie dreimal einen falschen PIN-Code eingeben, wird der Alarm „di-di“ ausgelöst und Landxcape
TM
wird dann automatisch ausgeschaltet.
3) Drücken Sie auf , drücken Sie dann auf , um mit dem Mähen zu beginnen.
4)
Drücken Sie und dann , um Landxcape
TM
zur Ladestation zu bringen, wobei sich die Messer drehen undschneiden auf dem Heimweg noch Gras.
Der Landxcape
TM
wird kontinuierlich arbeiten, bis der Akku schwach ist. Anschließend fährt er zurück zur Ladestation. Sobald der Ladevorgang
beendet ist, wird der Landxcape
TM
gemäß Zeitplan den Mähvorgang automatisch fortsetzen oder in der Ladestation bleiben.
HINWEIS:
Wenn Landxcape
TM
eingeschaltet wird, werden alle Lichter der Anzeige angemacht und dann ausgemacht. Prüfen Sie, ob irgendein Licht
beschädigt ist. Es wird empfohlen, die Anzeige mit Händen abzuschirmen, wenn die Umgebung zu hell ist.
Arbeitszeit
START
Mähvorgang starten /
Aufwärts
Verrieglung
Akkukapazität
Anzeige
Zeigt den Status Ihrer
Einstellung an
OK
Bestätigt die jeweilige
Einstellung
STOPP
Landxcape
TM
beim Betrieb
stoppen
Ein-/Ausschalten
Schalten Sie
Landxcape
TM
ein oder
aus.
HOME
Wenn Sie Landxcape
TM
während des Betriebs
zur Ladestation bringen,
drehen sich die Messer
undschneiden auf dem
Heimweg noch Gras.
Aktivieren Sie Aufladen/
wählen Sie herunter.
STANDBY:
Landxcape
TM
ist nicht in der
Arbeitszeit.
RUHEZUSTAND:
Landxcape
TM
ist voll aufgeladen
und nicht in der Arbeitszeit.

DE 27
5. Wissenswertes zu Ihrem
Landxcape
TM
Herzlichen Glückwunsch zum Kauf Ihren neuen Landxcape
TM
und
willkommen in der komfortablen Welt des automatischen Mähens.
Nun möchten wir Ihnen zeigen, wie Ihr Landxcape
TM
funktioniert und
„denkt“.
5.1 Wie weiß mein Landxcape
TM
, wo er
mähen soll?
Der Landxcape
TM
wählt seine Richtung nach dem Zufallsprinzip.
Dadurch sorgt das Gerät dafür, dass der Rasen gleichmäßig gemäht
wird und keine auffälligen Mähspuren entstehen (Siehe Abb. A).
5.2 Wie weiß mein Landxcape
TM
, wohin er
fahren soll?
Ihr Landxcape
TM
kann völlig selbstständig arbeiten. Der Landxcape
TM
weiß, wann er zu seiner Ladestation zurückkehren muss, um
aufgeladen zu werden. Er erkennt einsetzenden Regen und kann selbst
stoppen, wenn er ein Problem erkennt. Er weiß auch, wie er anhält,
zurückfährt und dann umdreht, wenn sein Weg durch ein anderes
Objekt blockiert wird. Der Landxcape
TM
stoppt auch die Messerteller
automatisch, sobald er angehoben wird, um Unfällen vorzubeugen.
A. Ladestation finden
Wenn Ihr Landxcape
TM
aufgeladen werden muss, stoppt er das Mähen
und folgt dem Begrenzungskabel gegen den Uhrzeigersinn zurück zur
Ladestation. Der Landxcape
TM
ist vorprogrammiert, um das Gras entlang
des Begrenzungskabels einmal wöchentlich zu mähen. Standardmäßig
mäht Landxcape
TM
jeden Montag nach dem Einschalten in der Nähe des
Begrenzungskabels.
B. Regensensor
Der Landxcape
TM
hat einen Regensensor auf der Seite, der Regentropfen
registriert und den Landxcape
TM
anweist, mit dem Mähen aufzuhören
und den Begrenzungsdraht entlang zurück zur Ladestation zu folgen.
(Siehe Abb. B)
Der Landxcape
TM
wird das Mähen nach Ablauf der Verzögerungszeit
fortsetzen; die standardmäßige Verzögerungszeit beträgt 180 Minuten.
Sollten die Regensensoren nass werden, so kehrt der Landxcape
TM
zurück in seine Docking-Station. Wenn die Regensensoren trocken
sind, beginnt Landxcape
TM
mit dem Countdown der Verzögerungszeit.
Wenn Sie eine Regenverzögerung beenden möchten, trocknen Sie
den Sensorbereich und führen Sie einen Leistungszyklus über den
Hauptschalter durch. Wenn der Leistungszyklus durchgeführt wurde; Sie
können das Gerät daher wieder in Betrieb nehmen.
C. Begrenzungskabel erkennen
Der Landxcape
TM
hält sich grundsätzlich an die vom Begrenzungskabel
vorgegebenen Grenzen; dazu setzt er spezielle Sensoren an seiner
Vorderseite ein. (Siehe Abb. C).
D. Beim Mähen stoppen und wieder starten (Siehe Abb. D, E1, E2)
Um mit dem Mähen zu beginnen, drücken Sie die EIN/AUS-Taste und
geben Sie den PIN-Code ein. Drücken Sie auf , drücken Sie dann auf
. Wenn Sie den Landxcape
TM
beim Mähen stoppen möchten, drücken
Sie einfach die Zugangstaste am Oberteil.
Falls der Landxcape
TM
erkennt, wird er eine Fehlermeldung auf dem
Display ausgeben. Für Informationen zu Fehlermeldungen, siehe
Fehlermeldungen. Und der Landxcape
TM
schaltet sich aus, wenn er vom
Benutzer innerhalb von 20 Min. keine Rückmeldung erhält.
Betrieb wieder aufnehmen:
• Drücken Sie auf , drücken Sie dann auf
• Der Landxcape
TM
beginnt jetzt mit dem Mähen!
5.3 Einstellungen
Stellen Sie zuerst die gewünschte Grashöhe nach dem Abschneiden
ein. Sie können das Programm manuell einstellen.
HINWEIS: Landxcape
TM
ruft die Standby-Seite auf, wenn das Programm
manuell eingestellt und keine Eingabe vom Benutzer innerhalb 30
Sekunden vorgenommen wird.
(1) PIN-Code ändern
Halten Sie zum Ändern des PIN-Codes 5 Sekunden lang beide Tasten
& gleichzeitig gedrückt. Das Symbol blinkt und “ ” blinkt
rollend. Danach blinkt die erste Stelle. Benutzen Sie oder , und
wählen Sie die gewünschte Ziffer, und drücken Sie zur Bestätigung.
Die nächste Stelle blinkt. Auf derselben Weise wählen Sie die anderen
Stellen. Der neue PIN-Code lautet beispielsweise 0326. Danach blinkt „
“ rollend und die erste Stelle blinkt erneut. Auf derselben Weise
geben Sie den neuen PIN-Code ein (von diesem Beispiel ). Auf
der Anzeige blinkt dann „ “. Ihr PIN-Code wird erfolgreich
geändert.
Nur als Referenz
(2) Stellen Sie Jahr, Datum und Uhrzeit ein
Die Einstellung von Jahr, Datum und Uhrzeit ist obligatorisch. Wenn
Sie diese Elemente nicht einstellen, beeinflusst dies die Zeitplanung
in der folgenden Einstellung. Diese Elemente sollen in der Reihenfolge
von Jahr, Datum und Uhrzeit eingestellt werden. Halten
Sie für die
Jahreseinstellung 3 Sekunden lang gedrückt, bis das Symbol und eine
Zahl auf der Anzeige blinken, z. B. . Verwenden oder
wählen Sie das gewünschtes Jahr. Drücken Sie anschließend, um die
Jahreseinstellung zu bestätigen und beenden.

DE28
Nur als Referenz
Gleichzeitig blinkt das Symbol
erneut und das Datum wird angezeigt,
z. B. , d.h. 29 . September. Wenn blinkt, verwenden oder
wählen Sie die Ziffer und drücken Sie zur Bestätigung. Dann blinkt
die Ziffer . Auf derselben Weise wählen Sie die Ziffer und drücken
zur Bestätigung der Einstellung vom Datum.
Nur als Referenz
Gleichzeitig blinkt das Symbol
und die Uhrzeit wird angezeigt, zum
Beispiel . Wenn blinkt, verwenden oder wählen Sie die
Ziffer und drücken Sie zur Bestätigung. Wenn blinkt, verwenden
oder wählen Sie die Ziffer und drücken Sie zur Bestätigung. Damit ist
die Zeiteinstellung abgeschlossen und Landxcape
TM
öffnet die Standby-
Seite.
Nur als Referenz
(3) Stellen Sie den Arbeitsbereich ein
Drücken Sie 3 Sekunden lang. Wenn das Symbol blinkt, drücken
Sie . Auf der Anzeige blinkt eine Ziffer, z. B. , also der
Rasenbereich. Die Arbeitszeit wird automatisch an die Größe Ihres Gartens
angepasst. Verwenden oder stellen Sie den Rasenbereich ein
(der Bereich wird sich bei jedem Drücken um 50 m² vergrößert /
verkleinert) und drücken Sie zur Bestätigung. Dann wird Landxcape
TM
die Standby-Seite aufrufen.
4hrs
Nur als Referenz
(4) Änderung der voreingestellten Startzeit
Die voreingestellten Startzeit von 9:00 Uhr kann jederzeit geändert
werden, indem Sie beide Tasten
& gleichzeitig gedrückt
halten, bis ein Ding-Ton zu hören ist.
Drücken Sie beispielsweise beide Tasten & um 14:05 Uhr,
und Ihr Landxcape
TM
beginnt um 14:05 Uhr zu mähen.
Nur als Referenz
5.4 Wie gut mäht der Landxcape
TM
das
Gras?
Die Mähzeiten sind für jeden Rasen unterschiedlich, abhängig von den
nachfolgend erwähnten Faktoren. Experimentieren Sie ein wenig mit
der Zeit, die Sie Ihrem Landxcape
TM
täglich zum Mähen zugestehen, bis
Sie die perfekte Vorgabe gefunden haben.
Ihr Landxcape
TM
kann Flächen unterschiedlicher Größen mähen;
die exakte Fläche hängt natürlich von verschiedenen Faktoren ab –
beispielsweise:
• Art und Wachstumsgeschwindigkeit des Rasens
• Schärfe der Messer
• Feuchtigkeit
• Umgebungstemperatur
• Art und Anzahl der Hindernisse im oder auf dem Rasen
Anders als viele andere Mäher verwendet der Landxcape
TM
ein seitliches
Ladesystem, sodass viel umliegendes Gras geschnitten werden kann.
Zusätzlich ermöglichen Löcher auf der Unterseite der Ladestation,
dass das Gras hindurch wachsen kann und zu einem eleganten
Erscheinungsbild beiträgt.
Die Schnitthöhe des Landxcape
TM
lässt sich zwischen 3 und 6 cm
einstellen. Bevor Sie Ihren Landxcape
TM
zum ersten Mal starten, sollen Sie
das Gras mit Ihrem Handrasenmäher bis zu einer Höhe von höchstens 9
cm abschneiden. Stellen Sie dann die Schnitthöhe Ihres Landxcapes auf
seinen maximalen Wert (6 cm) ein, wenn Sie zum ersten Mal mähen. (Siehe
Abb. F)
Ihr Landxcape
TM
mäht am besten bei trockenem Wetter. Ihr Landxcape
TM
mag kein feuchtes Gras, da sich dieses am Messerteller und am Motor
sammeln kann; zusätzlich kommt der Landxcape
TM
auf feuchtem
Untergrund nur mühsam vorwärts und kommt leichter ins Rutschen.

DE 29
Ihr Landxcape
TM
fürchtet Gewitter. Schützen Sie den Landxcape
TM
bei Gewittern, indem Sie den Stecker der Ladebasis ziehen,
das Begrenzungskabel trennen und dafür sorgen, dass sich der
Landxcape
TM
nicht aufladen darf.
Ihr Landxcape
TM
liebt Rasenmähen; vor allem dann, wenn Sie seine
Messer stets in gutem Zustand halten. Der Landxcape
TM
kann eine
Menge Dinge ganz allein erledigen – allerdings benötigt er manchmal
Ihre Hilfe, damit er sich nicht selbst verletzt.
• Lassen Sie den Landxcape
TM
niemals über Kies fahren.
• Entfernen oder blockieren Sie Hindernisse, an denen der
Landxcape
TM
aus Versehen hochklettern und seine Messerscheibe
beschädigen könnte.
• Befreien Sie Ihren Rasen von sämtlichen Abfällen und
Fremdkörpern.
6.
Grundlegendes zum
Begrenzungskabel
6.1 Begrenzungskabel abstecken
Mit der Begrenzungskabel-Abstandlehre schaffen Sie den richtigen
Abstand zur Rasenkante (mehr als 26cm). Dies ist ein empfohlener
Abstand. Sorgen Sie mit der mitgelieferten Abstandlehre für die
richtigen Entfernungen.
Falls Ihr Nachbar ebenfalls einen Landxcape
TM
nutzt, müssen Sie einen
Abstand von mindestens 1m zwischen Ihrem Begrenzungskabel und
dem des Nachbarn einhalten.
Das Begrenzungskabel muss die Fläche, die gemäht werden
soll, exakt umschließen.
Ihr Landxcape
TM
kommt durcheinander,
wenn er auf zusätzliche Biegungen oder Windungen des Grenzkabels
stößt, die nicht zur Mähfläche gehören (Siehe Abb. G). Wenn nach dem
Umschließen der Mähfläche noch Begrenzungskabel übrig sein sollte,
schneiden Sie das überschüssige Stück ab und lagern es separat.
Vergessen Sie aber nicht, beim Abschneiden ein kleines Stück zum
Anschluss an die Ladebasis zu verschonen, damit der Anschluss
möglich ist, ohne wieder einen Teil des Kabels ausgraben zu müssen.
6.2 Begrenzungskabel eingraben
Wenn Sie das Begrenzungskabel eingraben möchten, es wird empfohlen,
dass Sie zuerst den Begrenzungsdraht im Rasen festpflocken, damit Sie
gegebenenfalls leicht Anpassungen vornehmen können. Wenn Sie den
Begrenzungsdraht fertig installiert haben, wird empfohlen, dass Sie den
Landxcape
TM
bitten, dem Begrenzungsdraht zu folgen, indem Sie auf
und drücken. Dadurch kann sich der Landxcape
TM
an seine neue
Umgebung gewöhnen.
Wenn Sie zusehen, wie der Landxcape
TM
die Ladestation ansteuert, können
Sie anschließend Änderungen an der Route des Begrenzungsdrahts
vornehmen, um für ein störungsfreies Verfolgen des Begrenzungsdrahts
durch den Landxcape
TM
zu sorgen, wenn dieser die Ladestation ansteuert.
Es wird sichergestellt, dass er erfolgreich mit der Ladestation arbeitet, bevor
der Begrenzungsdraht eingegraben wird.
6.3 Zusammenfügen des
Begrenzungskabels
Verwenden Sie eine Verbindung, wenn das Begrenzungskabel
verlängert und zusammengefügt werden soll. Dies ist wasserdicht und
garantiert eine verlässliche elektrische Verbindung.
Geben Sie beide Kabelenden in eines der drei Löcher der Verbindung.
Stellen Sie sicher, dass die Drähte vollständig in der Verbindung
stecken, sodass beide Enden sichtbar sind am durchsichtigen Ende auf
der anderen Seite der Verbindung. (Siehe Abb. H) Verwenden Sie eine
Zange, um den Knopf oben auf der Verbindung vollständig hinein zu
drücken (Siehe Abb. I, J)
WARNHINWEIS:
Es wird nicht empfohlen, das
Begrenzungskabel einfach mit Isolierband zu verbinden, oder
ein Schraubendstück als Verbindung zu verwenden. Feuchtigkeit aus
dem Boden kann das Kabel oxidieren lassen und dies kann nach einer
Weile zu einer Unterbrechung des Stromkreises führen.
7. Softwareaktualisierung
Ihre Landxcape
TM
-Software kann aktualisiert werden, wenn neue
Versionen verfügbar sind. Die aktuellste Software kann auf unserer
Webseite www.landxcape-robotics.com heruntergeladen werden.
Über USB aktualisieren. Siehe unten hinsichtlich des Downloads sowie
Installierungsanweisungen:
(1) Sie finden die aktuellste Software unter: www.landxcape-robotics.
com. Speichern Sie die Datei auf einem leeren,
FAT32
formatierten
USB-Stick. Entfernen Sie bitte alle restlichen Dateien von dem
USB-Stick und überprüfen Sie das Format. Wenn der USB-Stick
nicht entsprechend formatiert ist, bitte reformatieren Sie ihn.
ACHTUNG:
Das Software-Update wird als ZIP-Datei zur Verfügung
gestellt. Bitte entpacken Sie die Datei, bevor Sie fortfahren.
(2) Stellen Sie den Landxcape
TM
auf einen sicheren. Schalten
Sie
Ihr Landxcape
TM
aus.
(3) Führen Sie den USB-Stick (USB-Massenspeicher) in die
Schnittstelle ein. (Siehe Abb. K1)
(4) Schalten Sie Ihr Landxcape
TM
ein. Das Update beginnt automatisch.
Warten Sie, bis „ “ angezeigt wird (siehe Abb. K2), entfernen
Sie dann das USB-Laufwerk (Flash-Laufwerk) und schließen Sie
die Schutzabdeckung fest. Wenn „ “ angezeigt wird, ist das
Update abgeschlossen und die PIN-Seite wird geöffnet.
Das beiliegende Handbuch basiert auf der Standardsoftware in der
Massenproduktion. Einige neue Merkmale/Funktionen der neuen
Version sind in dem Handbuch möglicherweise nicht vorhanden.
Wenn Sie Einstellungen finden, die im Handbuch nicht vorhanden
sind, besuchen Sie www.landxcape-robotics.com, um das aktuellste
Handbuch herunterzuladen.
8. Wartung
Ihr Landxcape
TM
muss hin und wieder überprüft werden. Der
Landxcape
TM
arbeitet hart und verdient daher von Zeit zu Zeit eine
ordentliche Reinigung oder einen Austausch von Verschleißteilen.
Verwenden Sie niemals Ihren Landxcape
TM
, wenn der Ein/Aus Schalter
defekt ist.
Schalten Sie die Maschine aus, ehe Sie jegliche Reparatur- oder
Wartungsarbeiten ausführen.
In Folgenden möchten wir Ihnen erklären, wie Sie Ihren neuen
Landxcape
TM
am besten an sein neues Umfeld gewöhnen und ihm die
Pflege zukommen lassen, die er verdient.
8.1 Immer schön scharf
WARNUNG: Bevor Sie den Landxcape
TM
reinigen,
einstellen oder die Messer auswechseln, schalten Sie

DE30
Ihren Landxcape
TM
AUS und ziehen Sie Schutzhandschuhe an.
WARNUNG: Beim Austausch der Messer Wechseln Sie bei
einem Austausch unbedingt grundsätzlich alle Messer
auf einmal. Verwenden Sie beim Fixieren der Messer stets neue
Schrauben. Das ist wichtig, um den Klingenhalt sicherzustellen
und die Klingendrehscheibe auszuwuchten. Falls Sie keine
neuen Schrauben verwenden, kann dies zu schweren
Verletzungen führen.
Der Landxcape
TM
schneidet Gras nicht wie andere Rasenmäher.
Seine Messer sind an 2 Kanten rasiermesserscharf und wirbeln zum
perfekten Schnitt in beide Richtungen (Siehe Abb. L). Jedes Messer
Ihres Landxcape
TM
ist mit 2 Schneiden ausgestattet. Die rotierenden
Klingen macht willkürliche Vor- und Rückwärtsbewegungen, damit
beide Seiten der Klingen genutzt werden. Dadurch kann die Häufigkeit
beim Wechseln der Schneidklinge minimiert werden. Die einzelnen
Messer halten bis zu 2 Monate, wenn täglich gemäht wird. Schauen Sie
immer nach, ob die Messer angeschlagen oder anderweitig beschädigt
sind; falls ja, wechseln Sie die Messer aus. Wenn die Messer stumpf
und verschlissen sind, sollten sie durch die Ersatzmesser ersetzt
werden, die mit Ihrem Landxcape
TM
geliefert wurden. Ersatzmesser
erhalten Sie auch beim Landxcape
TM
-Händler in Ihrer Nähe.
A. Messer austauschen
Nach einer Weile (normalerweise einmal pro Saison) müssen
die Messer Ihres Landxcape
TM
komplett ausgewechselt werden.
Tauschen Sie also unbedingt immer alle Messer auf einmal aus.
Zum Austausch können Sie einen der Ersatzmessersätze und
die zusätzlichen Messerschrauben verwenden, die mit Ihrem
Landxcape
TM
geliefert wurden.
Vor dem Austausch der Messer schalten Sie den Landxcape
TM
unbedingt ab und ziehen Schutzhandschuhe über! Dann führen Sie
diese Schritte aus:
1. Drehen Sie den Landxcape
TM
sanft auf den Rücken.
2. Entfernen Sie die Batterieabdeckung und entnehmen Sie den
Akku.
3. Lösen Sie die Messerschrauben mit einem Schlitz- oder
schraubendreher. (Siehe Abb. M)
4. Schrauben Sie die neuen Messer gut fest.
5. Setzen Sie den Akku ein, und bringen Sie die Batterieabdeckung
wieder an.
WICHTIG: Überzeugen Sie sich nach dem Verschrauben der
Messer, dass sich diese frei drehen lassen.
8.2 Sauber halten
WARNUNG: Bevor Sie Ihren Landxcape
TM
reinigen,
schalten Sie ihn AUS. Ziehen Sie Schutzhandschuhe über,
bevor Sie die Messerscheibe reinigen; nutzen Sie dazu kein
fließendes Wasser.
A. Gehäuse reinigen
Ihr Landxcape
TM
fühlt sich deutlich wohler und lebt länger, wenn
Sie ihn regelmäßig reinigen. Da Ihr Landxcape
TM
im Grunde ein
Elektrogerät ist, müssen Sie beim Reinigen mit einer gewissen
Sorgfalt vorgehen -
verwenden Sie deshalb KEINEN Schlauch oder
Hochdruckreiniger bzw. ertränken Sie Ihren Landxcape
TM
nicht
mit fließendem Wasser;
greifen Sie am besten zu einer mit Wasser
gefüllten Sprühflasche. Reinigen Sie das Kunststoffgehäuse mit einer
weichen Bürste oder einem Tuch, verzichten Sie auf Lösungsmittel
und Polituren (Siehe Abb. N). Achten Sie gut darauf, dass sämtliche
Grasreste und sonstige Rückstände gründlich entfernt werden.
B. Unterseite reinigen
Nicht vergessen, ganz wichtig: Schalten Sie den Landxcape
TM
,
ziehen Sie Schutzhandschuhe über, bevor Sie den Messerteller
berühren!
Drehen Sie zuerst Ihren Landxcape
TM
um, so dass die Unterseite
exponiert wird. Nun sehen Sie den Messerteller, den umgebenden
Motorgehäuserahmen sowie die Vorderräder und Antriebsräder.
Reinigen Sie alles gründlich mit einer weichen Bürste oder mit einem
feuchten Lappen.
WARNUNG:
Reinigen Sie NIEMALS die Unterseite des
Landxcape
TM
s mit fließendem Wasser. Es können Schäden an
den Komponenten auftreten. (Siehe Abb. O1, O2)
Drehen Sie das Schneidrad um sicherzustellen, dass es frei
dreht. Prüfen Sie, dass sich die Klingen problemlos um die.
Befestigungsschrauben drehen. Beseitigen Sie alle Hindernisse.
WICHTIG: Entfernen Sie sämtliche (auch die kleinsten)
Rückstände, damit es nicht zu Rissen in der Messerscheibe
kommt. Auch der winzigste Riss kann die Mähleistung Ihres
Landxcape
TM
beeinträchtigen.
C. Kontakte und Ladestreifen reinigen
Reinigen Sie die Kontakte an der Ladestation und den Ladestreifen
am Landxcape
TM
mit einem Tuch. Entfernen Sie sämtliche Grasreste
und sonstige Rückstände rund um die Kontakte und Ladestreifen
regelmäßig, damit sich der Landxcape
TM
stets problemlos aufladen
kann.
8.3
Akkulaufzeit und -haltbarkeit
Das Herzstück des Landxcape
TM
ist sein 20V-Lithiumbatterie. Stellen
Sie sicher, dass der Akku vollständig aufgeladen und an einem kühlen,
trockenen Ort aufbewahrt wird.
HINWEIS:
Die empfohlene Betriebstemperatur des Landxcape
TM
liegt
zwischen 0-55
o
C.
Die Lebenserwartung des Landxcape
TM
-Akkus hängt von
unterschiedlichen Faktoren ab; beispielsweise:
• Dauer der Schönwettersaison (der „Mähsaison“) an Ihrem
Wohnort.
• Landxcape
TM
-Arbeitsstunden pro Tag
• Art und Weise der Akkulagerung
Landxcape
TM
kann ohne das Begrenzungskabel manuell
aufgeladen werden.
1. Schließen Sie die Ladestation an eine geeignete
Stromversorgung an. Die grüne Lampe der Ladestation
erleuchtet grün.
2. Docken Sie den Landxcape
TM
manuell an die Ladestation an,
während der Landxcape
TM
ausgeschaltet ist (siehe Abb. P).
3. Die grüne LED auf der Ladestation blinkt, der Landxcape
TM
beginnt mit dem Ladevorgang.
8.4 Überwintern
Ihr Landxcape
TM
lebt länger und gesünder, wenn Sie ihm einen
wohlverdienten Winterschlaf gönnen. Obwohl der Landxcape
TM
ein
zäher Bursche ist, sollten Sie ihm im Winter einen Platz im Schuppen
oder in der Garage zugestehen.
Bevor Sie Ihren Landxcape
TM
in den Winterschlaf entlassen, sollten Sie
noch Folgendes erledigen:

DE 31
• Reinigen Sie Ihren Landxcape
TM
gründlich.
• Laden Sie den Akku vollständig auf und entfernen Sie ihn aus dem
Landxcape
TM
.
• Schalten Sie das Gerät ab.
Um die Lebensdauer des Akkus zu maximieren, laden Sie den Akku vor
der Aufbewahrung im Winter vollständig auf und entfernen Sie ihn aus
dem Landxcape
TM
.
WARNUNG: Schützen Sie die Unterseite des Landxcape
TM
s
vor Wasser. Lagern Sie den Landxcape
TM
NIEMALS
draußen falsch herum.
Das Begrenzungskabel kann im Boden verbleiben; seine Enden sollten
Sie jedoch vor der Witterung schützen – zum Beispiel, indem Sie ein mit
Fett gefülltes Döschen darüber stülpen. Falls die Ladebasis im Winter
draußen verbleibt, lassen Sie das Begrenzungskabel angeschlossen.
HINWEIS:
Wenn Sie den Landxcape
TM
wieder aus seinem Winterschlaf
erwecken, sorgen Sie dafür, dass die Ladestreifen und die
Kontaktstreifen gründlich sauber sind; dies können Sie mit feinem
Schleifpapier erledigen.
8.5 Akku austauschen
WARNUNG: Schalten Sie das Gerät unbedingt mit der Ein-/
Austaste aus, bevor Sie sich Einstellungen, Austausch oder
Reparatur zuwenden!
Bevor Sie die Messer auswechseln, schalten Sie Ihren Landxcape
TM
AUS und ziehen Sie Schutzhandschuhe an.
Wenn der Akku ausgetauscht werden muss, erledigen Sie dies mit den
folgenden Schritten:
1. Drehen Sie Ihren Landxcape
TM
sanft auf den Rücken.
2. Lösen Sie die Schrauben an der Abdeckung. Entfernen Sie die
Abdeckung des Batteriefachs. (siehe Abb. Q1)
3. Nehmen Sie die alte Batterie vorsichtig heraus. Drücken Sie die
Verriegelung und lösen Sie die Steckverbinder. (siehe Abb. Q2)
HINWEIS:
Nicht an den Drähten ziehen. Halten Sie die Verbindungen
fest und lösen Sie den Riegel.
4. Verbinden Sie eine neue, Original Batterie, indem Sie die
Verbindungen zusammenbringen, bis diese in Position sind. (siehe
Abb. Q3, Q4)
5. Montieren Sie den Akku wie abgebildet. (siehe Abb. Q5) Platzieren Sie
die Abdeckung erneut in ihre Position und ziehen Sie die Schrauben
gut an.

DE32
9. Funktionsmeldungen
Anzeige Meldung Handlung
Regenverzögerung aktiviert. Keine Handlung ist angefordert.
10. Fehlermeldungen
Symptome Ursache Maßnahme
Der Landxcape
TM
befindet
sich außerhalb des
Funktionsbereichs.
1. Falls sich der Landxcape
TM
tatsächlich außerhalb seines Arbeitsbereich befindet: schalten
Sie den Landxcape
TM
ab, bringen Sie ihn wieder zurück in den Arbeitsbereich. Schalten Sie den
Landxcape
TM
ein. Drücken Sie auf , drücken Sie dann auf .
2. Falls sich der Landxcape
TM
nicht unerlaubt von seinem Arbeitsbereich entfernt hat: Prüfen
Sie, dass die LED an der Ladestation grün leuchtet. Falls nicht, prüfen Sie, dass die Ladestation
ordnungsgemäß mit dem Ladegerät verbunden und dieses an eine passende Stromversorgung
angeschlossen ist. Ist das der Fall, bedeutet das, dass die Enden des Begrenzungskabels mit
falscher Polarität verbunden sind, und Sie müssen diese wechseln.
3. Die rote LED auf der Ladestation leuchtet auf, stellen Sie sicher, dass das Begrenzungskabel
gut mit den Klemmen der Ladestation verbunden ist. Wenn das Problem weiterhin besteht,
prüfen Sie, ob das Begrenzungskabel geschnitten wird.
Radmotor blockiert.
1. Schalten Sie den Landxcape
TM
aus. Bringen Sie den Landxcape
TM
zu einer Stelle, an der
sich keine Hindernisse befinden.
2. Schalten Sie den Landxcape
TM
ein. Drücken Sie auf , drücken Sie dann auf .
3. Falls die Fehlermeldung immer noch angezeigt werden sollte: schalten Sie den
Landxcape
TM
aus, drehen Sie den Landxcape
TM
auf den Rücken, schauen Sie nach, ob
irgendetwas die Räder am Drehen hindert.
4. Entfernen Sie sämtliche Fremdkörper und Hindernisse, drehen Sie den Landxcape
TM
wieder richtig herum, schalten Sie ihn ein. Drücken Sie auf , drücken Sie dann auf .
Messer blockiert.
1. Schalten Sie den Landxcape
TM
aus.
2. Drehen Sie den Landxcape
TM
auf den Rücken, schauen Sie nach, ob die Messerscheibe
durch einen Fremdkörper blockiert wird.
3. Entfernen Sie das Hindernis.
4. Bringen Sie den Landxcape
TM
wieder in die aufrechte Position und bringen Sie ihn in einen
Bereich mit kurzem Gras, oder ändern Sie die Schnitthöhe.
5. Schalten Sie das Gerät ein. Drücken Sie auf , drücken Sie dann auf .
Der Landxcape
TM
steckt fest.
1. Schalten Sie den Landxcape
TM
aus.
2. Befreien Sie den Landxcape
TM
und bringen Sie ihn an eine andere Stelle.
3. Schalten Sie den Landxcape
TM
ein. Drücken Sie auf , drücken Sie dann auf .
4. Falls die Fehlermeldung immer noch angezeigt werden sollte: schalten Sie den
Landxcape
TM
aus, drehen Sie den Landxcape
TM
um. Prüfen Sie, ob die Räder durch
irgendetwas am Drehen gehindert werden.
5. Entfernen Sie sämtliche Fremdkörper und Hindernisse, drehen Sie den Landxcape
TM
wieder richtig herum, schalten Sie ihn ein. Drücken Sie auf , drücken Sie dann auf .
Der Landxcape
TM
wird
hochgehoben.
1. Schalten Sie den Landxcape
TM
aus.
2. Bringen Sie den Landxcape
TM
zu einer Stelle, an der sich keine Hindernisse befinden,
schalten Sie ihn ein. Drücken Sie auf , drücken Sie dann auf .
3. Falls die Fehlermeldung immer noch angezeigt werden sollte: schalten Sie die
Stromversorgung aus, Wenn die Fehlermeldung weiterhin angezeigt wird: Schalten Sie
Landxcape
TM
aus, drehen Sie Landxcape
TM
um und prüfen Sie, ob die Vorderräder drehbar
sind.
4. Entfernen Sie eventuell vorhandene Fremdkörper, drehen Sie den Landxcape
TM
wieder
richtig herum, schalten Sie ihn ein. Drücken Sie auf , drücken Sie dann auf .

DE 33
Der Landxcape
TM
wird
hochgehoben.
Drehen Sie den Landxcape
TM
richtig herum. Drücken Sie auf , drücken Sie dann auf
.
Akkufehler
1. Überprüfen Sie die Akkutemperatur. Wenn die Temperatur zu hoch ist, warten Sie,
bis die Temperatur gesunken ist. Drücken Sie und dann .
2. Benutzen Sie einen neuen Akku. Starten Sie Landxcape
TM
wieder ein. Drücken Sie
und dann .
3. Wenn der Fehler wiederholt auftritt, versuchen Sie, den Arbeitszeitplan zu ändern.
Es dauert zu lange,
bis Landxcape
TM
zur
Ladestation zurückkehrt.
Landxcape
TM
zum Aufladen manuell in die Ladestation einstecken. Wenn Landxcape
TM
vollständig aufgeladen ist, drücken Sie und dann .
Unbekannte Fehler.
Starten Sie Landxcape
TM
wieder ein. Drücken Sie und dann . Wenn die
Fehlermeldung weiterhin angezeigt wird, wenden Sie sich an den Kundendienst.
HINWEISE
• Achten Sie vor dem Einschalten stets darauf, dass sich der Landxcape
TM
innerhalb seines Arbeitsbereiches befindet. Falls nicht, wird die
Meldung „
“ angezeigt. Diese Meldung erscheint auch, wenn der Landxcape
TM
beim Einschalten direkt über dem Begrenzungskabel liegt.
• Falls Sie Ihren Landxcape
TM
aus bestimmten Gründen (z. B. Party, spielende Kinder und dergleichen) in seiner Ladebasis parken möchten:
drücken Sie dann . Der Landxcape
TM
kehrt zu seiner Basis zurück und bleibt dort. Drücken Sie , um Landxcape
TM
auszuschalten.
• Falls derselbe Fehler immer wieder an derselben Stelle Ihres Rasens auftreten sollte, gibt es eventuell ein Problem mit dem Begrenzungskabel.
Schauen Sie sich daher noch einmal die Installationsanleitung an, überprüfen Sie Ihre Installation mit deren Hilfe.
• Sollte Ihr Rasen in zwei getrennte Bereiche geteilt sein, die durch einen Korridor von weniger als 1 m verbunden ist, wobei ein Teil über keine
Ladestation verfügt: Wenn sich der Landxcape
TM
entladen hat, diesen manuell zur Ladestation zurückbringen, schalten Sie den Strom ein, und
der Ladevorgang startet.
• Falls der Landxcape
TM
gelegentlich nicht korrekt arbeitet, versuchen Sie bitte, ihn nochmals zu starten. Wenn das Problem nicht behoben wird,
versuchen Sie, den Akku zu entfernen und neu einzulegen. Falls das Problem nicht behoben werden kann, wenden Sie sich bitte an Ihren
Landxcape
TM
-Kundendienstberater um Hilfe.
• Waschen Sie das Gerät nicht mit einem Hochdruckreiniger, da dies dem Akku oder dem Gerät Schaden zufügen könnte.
11. Sicherheit
Wenn der Landxcape
TM
mit Ihrem Mobiltelefon verbunden ist, können Sie ihn auf Ihrem Mobiltelefon sperren. Dies verhindert die Verwendung durch
Unbefugte.
Problem Ursache Abhilfe/Informationen
Die LED an der Ladebasis leuchtet nicht
auf.
Kein Strom.
Prüfen Sie, ob das Netzkabel ordnungsgemäß
an das Ladegerät und dieses an eine passende
Stromversorgung angeschlossen ist.
Die rote LED auf der Ladestation
leuchtet auf.
Des Begrenzungskabel ist nicht angeschlossen.
Prüfen Sie, dass das Begrenzungskabel ordnungsgemäß
an die Ladestation angeschlossen wurde.
Prüfen Sie, dass es keine Brüche im Begrenzungskabel
gibt, besonders an den Kabelenden.
Der Landxcape
TM
schaltet sich ein, die
Messerscheibe bewegt sich jedoch
nicht.
Der Landxcape
TM
sucht nach seiner Ladestation
(Außer wenn Sie und dann drücken,
damit Landxcape
TM
zur Ladestation geht.)
Dies ist normal: Wenn der Landxcape
TM
Energie
benötigt, dreht sich die Messerscheibe nicht, während
er seine Ladebasis ansteuert.
Der Landxcape
TM
vibriert.
Die Messer könnten beschädigt sein.
Überprüfen Sie den Zustand der
Messerscheibe.
Prüfen Sie Messer und Schrauben, tauschen Sie
defekte oder fehlende Teile bei Bedarf aus.
Entfernen Sie Rückstände und Fremdkörper von den
Messern und der Messerscheibe.

DE34
Das Gras wird unregelmäßig
geschnitten.
Der Landxcape
TM
arbeitet nicht lange genug pro
Tag.
Verlängern Sie die Mähdauer.
Der Mähbereich ist zu groß.
Verkleinern Sie den Mähbereich oder verlängern Sie
die Mähdauer.
Die Messer sind stumpf.
Wechseln Sie zum Ausbalancieren der Messerscheibe
sämtliche Messer und Schrauben aus.
Die Schnitthöhe wurde nicht richtig an die Höhe
des Grases angepasst (zu niedrig).
Erhöhen Sie die Schnitthöhe, vermindern Sie die
Schnitthöhe anschließend wieder nach Bedarf.
Gras oder andere Dinge haben sich um die
Messerscheibe gewickelt.
Schauen Sie sich die Messerscheibe an, entfernen Sie
Gras und andere Fremdkörper.
Gras hat sich an der Messerscheibe oder im
Motorgehäuserahmen abgesetzt.
Sorgen Sie dafür, dass sich die Messerscheibe leicht
drehen lässt. Bei Bedarf können Sie die Messerscheibe
abnehmen und Ablagerungen anschließend entfernen.
Ihr Landxcape
TM
befindet sich
innerhalb seines Gebiets und der
Begrenzungsdraht ist verbunden. Aber
das Display sagt „
“.
Die Begrenzungskabelenden sind falsch
angeschlossen.
Vertauschen Sie die Enden des Begrenzungskabels.
Das Begrenzungskabel ist gebrochen.
Beschädigtes Begrenzungskabel mit Anschlussteilen
reparieren.
Die Ladezeit liegt weiter über der
Nennladezeit.
Schlechte Verbindung durch Verschmutzung
des Ladestreifens.
Reinigen Sie die Kontakte an der Ladestation und die
Kontakte am Landxcape
TM
.
Aufgrund von hoher Temperatur ist der
Ladeschutz aktiviert
Bringen Sie die Ladestation in den Schatten oder
warten Sie, bis die Temperatur abgekühlt hat
Der Landxcape
TM
lädt sich nicht auf.
Kein Strom.
Prüfen Sie, dass das Netzkabel ordnungsgemäß
an das Ladegerät und dieses an eine passende
Stromversorgung angeschlossen ist.
Funktioniert beim manuellen Aufladen nicht
einwandfrei
Siehe manuelles Aufladen im Abschnitt 8.3.
Der Landxcape
TM
arbeitet zwischen den
einzelnen Aufladungen deutlich weniger.
Etwas verhindert oder bremst die Drehung der
Messerscheibe.
Nehmen Sie die Messerscheibe ab, reinigen Sie die
Scheibe.
Das Gras steht zu hoch und ist zu dick.
Der Landxcape
TM
vibriert stark.
Schauen Sie sich Messerscheibe und Messer an,
entfernen Sie Gras und andere Fremdkörper.
Die Batterie ist eventuell erschöpft oder alt Gegen eine neue Batterie austauschen.
Der Landxcape
TM
arbeitet nicht zur
richtigen Zeit.
Die Uhr ist falsch eingestellt.
Stellen Sie die Uhr auf die richtige Uhrzeit ein, siehe
Abschnitt 5.3.
Die für den Landxcape
TM
programmierten
Schnittzeiten sind falsch.
Stellen Sie die Zeiten zum Beginn und zum Beenden
des Mähens richtig ein.
Der Landxcape
TM
wurde manuell an die
Ladestation angedockt.
Drücken Sie
und anschließend .
Der Akku wird nicht aufgeladen, da seine
Temperatur bei heißem Wetter über 55° C
steigt.
Warten Sie, bis der Akku abgekühlt ist.
Der Landxcape
TM
kann nicht richtig an
die Ladestation andocken
Umwelteinflüsse Starten Sie den Landxcape
TM
nochmals
Schlechte Verbindung durch Verschmutzung
des Ladestreifens.
Reinigen Sie die Kontakte an der Ladestation und die
Kontakte am Landxcape
TM
.
Die grüne LED auf der Ladestation
schaltet sich EIN, bevor der
Ladevorgang abgeschlossen ist.
Die Ladestation überhitzt.
Bringen Sie die Ladestation in den Schatten oder
warten Sie, bis die Temperatur abgekühlt hat.

DE 35
Der Landxcape
TM
fährt außerhalb des
Begrenzungskabels. Der Landxcape
TM
mäht einen Bereich außerhalb des
Begrenzungskabelbereichs. Der
Landxcape
TM
dreht sporadisch am
Begrenzungskabel um bzw. fährt
zurück.
Der Begrenzungsdraht eines anderen
Landxcape
TM
oder eines anderen Marken-
Rasenroboters ist zu nahe positioniert.
Stellen Sie sicher, dass der Begrenzungsdraht Ihres
Landxcape
TM
mindestens 1m vom benachbarten
Begrenzungsdraht entfernt ist.
Der Begrenzungsdraht wurde mit scharfen
Ecken installiert.
Überprüfen Sie den Begrenzungsdraht und stellen Sie
sicher, dass die Ecken abgerundet sind.
Bei feuchten Bedingungen kann das
elektrische Signal aus dem Begrenzungskabel
austreten, wenn das Kabel verbunden oder
repariert wurde.
Überprüfen Sie die Verbindungspunkte des
Begrenzungskabels. Isolieren Sie diese, um eine
absolut wasserdichte Verbindung zu gewährleisten.
Aufgrund einer defekten Isolierung kann das
elektrische Signal aus dem Begrenzungskabel
austreten.
Reparieren Sie die beschädigte Isolierung des
Begrenzungsdrahts mithilfe von Verbindungen.
Der Schneidebereich ist größer als der
zulässige Schneidebereich des Landxcape
TM
.
Reduzieren Sie den Schneidebereich oder verwenden
Sie Landxcape
TM
in einer größeren zulässigen
Schneidebereich.
Die Räder des Landxcape
TM
rutschen
durch oder beschädigen den Rasen.
Unter dem Landxcape
TM
können sich
Fremdkörper befinden, z. B. Zweige und Äste.
Entfernen Sie die Fremdkörper unter dem
Landxcape
TM
.
Das Gras ist zu feucht. Warten Sie, bis das Gras getrocknet ist.
Aufgrund der hohen Geschwindigkeit
beim Hinunterfahren eines Abhangs
schießt der Landxcape
TM
über den
Begrenzungsdraht hinaus
Der Begrenzungsdraht befindet sich auf einem
Gefälle, das 17% (10°) überschreitet.
Verlegen Sie den Begrenzungsdraht entfernt von
Steigungen über 17% (10°). Bitte schlagen Sie für
Einzelheiten im Installationshandbuch nach.
Fehler beim Software-Update tritt auf.
Versuchen Sie erneut gemäß dem Abschnitt
„Software-Update“.
Umweltschutz
Elektroprodukte dürfen nicht mit dem normalen Haushaltsmüll entsorgt werden, sondern sollten nach Möglichkeit zu einer Recyclingstelle
gebracht werden. Bitte erkundigen Sie sich bei der örtlichen Behörde oder beim Vertragshändler über Müllsammlung und -Entsorgung.

DE36
Konformitätserklärung
WIR,
Positec Germany GmbH
Grüner Weg 10, 50825 Cologne, Germany
Erklären Hiermit, Dass Unser Produkt
Beschreibung Roboter-Rasenmäher
Typ LX790 LX791 LX792 LX793 (790-799 - Bezeichnung der Maschine, Repräsentant der Roboter-Rasenmäher) (Jahr, Artikelnummer und
Monat der Seriennummer sind auf der Rückseite angegeben. Die vollständige Seriennummer ist auf dem Gehäuse des Rasenmähers
deutlich sichtbar aufgedruckt) mit Batterieladegerät LA8001 / LA8002 und Ladestation LA3000
Funktion Grasschnitt
den Bestimmungen der folgenden Richtlinien entspricht:
2006/42/EC, 2014/30/EU, 2014/35/EU, 2011/65/EU, 2000/14/EC geändert durch 2005/88/EC,
2000/14/EC geändert durch 2005/88/EC
- Konformitätsbewertungsverfahren nach Annex V
- Gemessene Schallleistung 64.2 dB (A)
- Garantierte Schallleistung 64 dB (A)
Zertifizierungsstelle
Anschrift: Cleeve Road, Leatherhead, Surrey, KT22 7SB United Kingdom
Bescheinigungsnummer: 181000479SHA-V1
Normen,
EN 60335-1:2012+A11+A13:2017, EN 50636-2-107:2015+A1:2018, EN 60335-2-29:2004+A2:2010,
EN 62233:2008, EN ISO 3744:2005, EN 55014-1:2017, EN 55014-2:2015,EN 61000-3-2:2014,
EN 61000-3-3:2013, EN 61558-1:2005+A1:2009, EN 61558-2-16:2009+A1:2013, EN 303 447 V1.1.1
Zur Kompilierung der technischen Datei ermächtigte Person,
Name Marcel Filz
Adresse Positec Germany GmbH, Grüner Weg 10, 50825 Cologne, Germany
2018/10/26
Allen Ding
Stellvertretender Chefingenieur, Prüfung und Zertifizierung
Positec Technology (China) Co., Ltd
18, Dongwang Road, Suzhou Industrial Park, Jiangsu 215123, P. R. China

FR 37
1. Sécurité du produit
1.1 Mises en garde générales et
complémentaires
ATTENTION : Lisez toutes les mises en garde et toutes les
instructions.
Le non-respect des mises en garde et des instructions
peut être à l'origine d'électrocutions, d'incendies et/ou de blessures graves.
d’une manière sécurisée.
Gardez le mode d'emploi et les mises en garde pour pouvoir vous y
référer ultérieurement.
• Cet appareil n’est pas conçu pour être utilisé par des personnes aux
capacités physiques, mentales, sensorielles réduites, ou manquant
d’expérience et de connaissances (y compris les enfants), sauf si une
personne responsable de leur sécurité leur a donné les indications
nécessaires ou les surveille pendant l’utilisation.
• Il convient de surveiller les enfants pour s’assurer qu’ils ne jouent pas
avec l’appareil.
• L'appareil ne doit être utilisé qu'avec l'alimentation fournie avec celui-ci.
IMPORTANT
LISEZ ATTENTIVEMENT LE MODE D’EMPLOI AVANT D’UTILISER L’APPAREIL
CONSERVEZ-LE POUR RÉFÉRENCE ULTÉRIEURE
PRATIQUES DE TRAVAIL SÛRES
Apprentissage
a) Lisez attentivement le mode d'emploi. Vous devez impérativement
comprendre les instructions et vous familiariser avec les contrôles et le
mode d'utilisation de l'appareil.
b) Ne laissez en aucun cas l’appareil à un enfant ou à une personne n'ayant
pas pris connaissance du mode d’emploi. Les réglementations locales
définissent parfois des limites d'âge pour l'utilisateur.
c) L'utilisateur est responsable des accidents et des dommages causés à
d'autres personnes ou à leurs biens.
Préparation
a) Veillez à ce que le câble périphérique soit correctement installé en suivant
les instructions.
b) Inspectez régulièrement la zone où l’appareil doit être utilisé et enlevez
toutes les pierres, tous les bâtons, câbles, os et autres objets étrangers.
c) Procédez régulièrement à un examen visuel des lames, des boulons
de lame et de l’unité de coupe pour vous assurer qu'ils ne sont ni usés,
ni endommagés. Afin de préserver l'équilibre de la machine, changez
toujours les lames et leurs boulons en même temps.
d) Sur les appareils comportant plusieurs arbres, veuillez noter que la
rotation d'une lame peut entraîner la rotation des autres lames.
e) ATTENTION: Ne faites jamais fonctionner l’appareil si l’une de ses
protections est défectueuse ou si l’un de ses dispositifs de sécurité n’est
pas en place.
UTILISATION
1. GÉNÉRALITÉS
a) Ne faites jamais fonctionner l’appareil si l’une de ses protections est
défectueuse ou si l’un de ses dispositifs de sécurité n’est pas en place (ex:
les déflecteurs).
b) N'approchez jamais les mains ou les pieds des parties rotatives, et ne
les mettez jamais sous l’appareil. Ne vous mettez jamais en travers de
l'ouverture d'évacuation.
c) Ne soulevez jamais et ne portez jamais une tondeuse dont le moteur est
en marche.
d) Actionnez le dispositif de désactivation de l'appareil.
- Avant de le débloquer;
- Avant d’inspecter, de nettoyer ou de travailler sur l’appareil.
e) Il n'est pas permis de modifier le design d'origine du robot tondeuse.
Toute modification effectuée est à vos risques et périls.
f) Démarrer la tondeuse à gazon robotique conformément aux instructions.
Lorsque la touche d'alimentation est allumée, veillez à garder vos mains
et pieds loin des lames pivotantes. Ne jamais mettre vos mains ou pieds
sous la tondeuse.
g) Ne jamais soulever la tondeuse à gazon robotique ou la porter tant que la
touche d'alimentation est allumée.
h) Ne laissez en aucun cas la tondeuse à une personne non familiarisée
avec l'appareil et son mode d'utilisation.
i) Ne posez jamais des objets sur le robot ou sur le socle de recharge.
j) Ne faites jamais fonctionner le robot si le boîtier ou l'une des lames sont
endommagés. L'appareil ne doit pas être utilisé si les lames, les vis, les
écrous ou les câbles sont endommagés.
k) Toujours éteindre la tondeuse à gazon robotique lorsque vous n'avez pas
l'intention de l'utiliser. La tondeuse à gazon robotique ne peut démarrer
que lorsque la touche d'alimentation est allumée et que le code PIN
correct a été saisi.
l) Maintenez vos mains et pieds éloignés des lames rotatives. Ne placez
jamais vos mains ou pieds à proximité ou sous le corps lorsque la
tondeuse automatique est en marche.
m) Éviter d'utiliser la machine et ses périphériques dans de mauvaises
conditions météorologiques, en particulier, lorsqu'il existe un risque
d'éclair.
n) Ne pas toucher de pièces mobiles dangereuses avant que celles-ci ne
s'arrêtent complètement.
o) Pour les machines utilisées dans des zones publiques, des panneaux
d'avertissement doivent être placés autour de la zone de travail de la
machine. Le contenu du texte ci-dessus doit être compris:
ALERTE!
Tondeuse automatique! Tenir à l'écart de la machine! Attention
aux enfants!
2. MISE EN GARDE COMPLÉMENTAIRE EN CAS DE FONCTIONNEMENT
AUTOMATIQUE
a) Ne laissez pas la machine fonctionner sans surveillance si vous savez que
des personnes (notamment des enfants) ou des animaux domestiques se
trouvent à proximité.
ENTRETIEN ET RANGEMENT
AVERTISSEMENT! Lorsque la tondeuse est retournée, la touche
d'alimentation doit toujours être éteinte.
La touche d'alimentation doit être éteinte pendant tous les travaux
sur le châssis de base de la tondeuse, tels que le nettoyage ou le
remplacement des lames.
a) Veillez à ce que tous les écrous, vis et boulons soient bien serrés, afin de
vous assurer que l’appareil reste en bon état de marche.
b) Inspectez le robot tondeuse régulièrement et, par sécurité, remplacez
toute pièce usée ou endommagée.
c) Assurez-vous que les lames et le disque de coupe ne sont pas
endommagés. Afin d'assurer l'équilibre des pièces rotatives, changez
toujours les lames et les vis en même temps.
d) Les accessoires de coupe de rechange doivent impérativement être du
même type que ceux d'origine.
e) Rechargez toujours la batterie avec le chargeur fourni par le fabricant.
Toute utilisation incorrecte peut être à l'origine d'un choc électrique, d'une
surchauffe ou d'une fuite du liquide corrosif de la batterie.
f) En cas de fuite d'électrolyte et de contact avec les yeux, rincez
abondamment avec de l'eau ou un agent neutralisant et appelez les
urgences.

FR38
g) Toute réparation sur l'appareil doit s'effectuer d'une manière conforme
aux instructions du fabricant.
Recommandation
Connecter uniquement la machine et/ou ses périphériques à un circuit
d'alimentation protégé par un dispositif de courant résiduel (RCD) avec un
courant de déclenchement ne dépassant pas 30 mA.
RISQUES RÉSIDUELS
Pour éviter les blessures, porter des gants de protection lors du remplacement
des lames.
DÉPLACER L’APPAREIL
Utilisez l'emballage d'origine pour transporter le robot sur de longues
distances.
Pour déplacer l'appareil de ou vers la zone de travail en toute sécurité:
a) Appuyez sur le bouton STOP pour arrêter la tondeuse.
Vous choisissez un code PIN à quatre chiffres lorsque vous démarrez la
tondeuse pour la première fois.
b) Toujours éteindre la tondeuse à gazon robotique si lorsque vous avez
l'intention de la porter.
c) Portez la tondeuse en la tenant par la poignée situéeà l'avant, en dessous.
Tenez la tondeuse avec le disque de coupe du côté opposé à vous.
Avertissements de sécurité pour la batterie à l’intérieur de l’appareil
a) La batterie et les piles secondaires ne doivent pas être ouvertes,
démontées ou broyées.
b) La batterie ne doit pas être court-circuitée. Évitez de mettre
la batterie en vrac dans une boîte ou dans un tiroir où elles
risqueraient de se court-circuiter entre elles ou au contact
d'autres objets métalliques.
Après usage, évitez tout contact de la
batterie avec d’autres objets métalliques de petite taille (trombones,
pièces, clés, clous, vis etc.) susceptibles de court-circuiter les pôles. Un
court-circuit entre les pôles de la batterie peut être à l’origine de brûlures
ou d’un incendie.
c) La batterie ne doit pas être exposée au feu et à la chaleur. Évitez de
la ranger à la lumière du soleil.
d) La batterie et les piles ne doivent pas être soumises à des chocs
mécaniques.
e) En cas de fuite des piles, évitez tout contact du liquide avec la peau
et les yeux. En cas de contact, rincez abondamment la surface
touchée avec de l'eau et appelez les urgences.
f) En cas d'ingestion d'une pile ou d'une batterie, appelez
immédiatement les urgences.
g) La batterie et les piles doivent rester propres et sèches.
h) La batterie et les piles fonctionnent au mieux de leur capacité
dans une température ambiante normale, comprise entre +15°C et
+25°C environ.
i) Les batteries fonctionnant avec des systèmes électrochimiques
différents doivent être mis au rebut séparément.
TM
.
avec l'appareil. Un chargeur destiné à un type de batterie donné
peut être à l’origine d’un incendie s’il est utilisé avec une autre
batterie.
k) N'utilisez en aucun cas une batterie autre que celle prévue pour
cet appareil.
l) La batterie doit être tenue hors de portée des enfants.
y référer ultérieurement.
n) Respectez les procédures de mise au rebut.
1.2 Informations sur le Landxcape
TM
AVERTISSEMENT – ce robot tondeuse peut être
dangereux s'il est utilisé de manière incorrecte.
Avant d'utiliser le robot tondeuse pour la première
fois, vous devez avoir lu et compris le contenu dans
son intégralité.
AVERTISSEMENT - Restez à distance de la machine
pendant qu'elle fonctionne.
AVERTISSEMENT – Éteignez la machine avant de la
manipuler ou de la soulever.
AVERTISSEMENT –Ne pas s'asseoir sur la machine.
Ne pas jeter au feu
Ne pas exposer à la pluie ou à l’eau
Ne pas jeter les batteries. Les batteries usagées
doivent être déposées dans un centre de collecte
local ou dans un centre de recyclage.
Ne lavez pas la machine avec un nettoyeur à haute
pression.
Appareil de classe III
Les déchets d’équipements électriques et
électroniques ne doivent pas être déposés avec les
ordures ménagères. Ils doivent être collectés pour
être recyclés dans des centres spécialisés. Consultez
les autorités locales ou votre revendeur pour obtenir
des renseignements sur l’organisation de la collecte.

FR 39
2. Liste des composants
1. BOUTON STOP
2. BOUTON DE RÉGLAGE DE LA HAUTEUR DE COUPE
3. TOUCHE ON/OFF (MARCHE/ARRÊT)
4. TOUCHE START (DÉMARRER)
5. BOUTON ACCUEIL
6. ÉCRAN
7. BANDE DE CHARGE
8. CAPTEUR PLUVIOMÉTRIQUE
9. ROUE AVANT
10. DISQUE DE COUPE ROTATIF
11. LAMES DE COUPE
12. BATTERIE
13. PORT USB
14. ROUE MOTRICE ARRIÈRE
15. POIGNÉE
16. BROCHES DE CONTACT
17. SOCLE DE CHARGEMENT
18. ADAPTATEUR D'ALIMENTATION
19. FIL-BARRIÈRE
20. CHEVILLES MÉTALLIQUES
21. CLOUS DE FIXATION DE LA BASE DE CHARGE
22. JAUGE DE DISTANCE DU FIL-BARRIÈRE
23. CLEF ALLEN
24. CONNECTEUR
Les accessoires reproduits ou décrits ne sont pas tous compris avec le modèle standard livré.

FR40
3. Données techniques et données
de bruit
3.1 Caractéristiques techniques
Modèle LX790 LX791 LX792 LX793 (790-799 - désignations des
pièces, illustration de la Robot de fauchage à pelouse)
LX790 LX792 LX791 LX793
Tension nominale 20V
Max.*
Vitesse à vide 2800/min
Zone de coupe 600m
2
900m
2
Diamètre de coupe 16cm 18cm
Hauteur de coupe 30-60mm
Positions de hauteur de coupe 4
Type de batterie Lithium
Modèle de batterie LA0001 LA0002
Durée de charge environ. 1.3hrs 2hrs
Modèle de chargeur LA8001 / LA8002
Valeurs nominales du chargeur
Entrée: 100-240V~50/60Hz, 38W,
Sortie: 20V
, 1.5A
Poids de la machine 8.4kg
Classe de protection III
*La tension est mesurée à vide. La tension initiale de la batterie attaint
un maximum de 20 volts. La tension
nominale est de 18 volts.
Accessoires
LX790 LX792 LX791 LX793
Vis 9 9
Socle de recharge 1 1
Clous de fixation de la base de
chargement
7 7
Câble périphérique 150m 180m
Piquets-fils 210 250
Clef Allen 1 1
Jauges de distance de câbles
périphériques
2 2
Lames 9 9
Connecteur 2 2
Batterie (LA0001/ LA0002) 1 1
Chargeur (LA8001 / LA8002) 1 1
Nous recommandons d’acheter tous les accessoires dans le magasin
d’acquisition de la machine. Pour plus d’informations, se référer à
l’emballage des accessoires. Le personnel du magasin est également
là pour vous conseiller.
3.2 Informations relatives au bruit
Niveau de pression acoustique
L
pA
= 44.2dB (A)
K
PA
= 0.4dB(A)
Niveau de puissance acoustique
L
wA
= 64.2dB (A)
K
wA
= 0.4dB(A)
Porter des protections auditives
lorsque la pression sonore est
supérieure à
80dB(A)
Un certain niveau de bruit de la machine est inévitable. Le travail
bruyant sur des routes doit être autorisé et limité à certaines périodes.
Les périodes de repos doivent être préservées et les heures de travail
peuvent être restreintes à un minimum. Pour sa propre protection et la
protection des personnes travaillant dans les environs, le personnel doit
porter une protection auditive appropriée.
Utilisation conforme
Ce produit est destiné à la tonte de pelouses de particuliers. Il est conçu
pour tondre fréquemment la pelouse de manière à la garder plus belle
et plus saine que jamais auparavant. Selon la taille de votre pelouse, le
Landxcape
TM
peut être programmé de manière à travailler à n’importe
quel moment et avec n’importe quelle fréquence. Il n’est pas destiné à
creuser, balayer ou nettoyer la neige.

FR 41
4. Tableau de bord
Démarrer
1) Après l'installation du câble périphérique, vous pouvez commencer à utiliser le Landxcape
TM
(reportez-vous au Guide d'installation pour
l'installation du câble périphérique).
2) Appuyer d’abord sur
jusqu’à ce que la Landxcape
TM
s’allume. Pour la première utilisation, entrez le code PIN par défaut 0000 en appuyant
quatre fois sur la touche lorsque le chiffre 0 clignote. (Le code PIN peut être changé, veuillez vous lire le «Réglage» dans le Guide d'installation)
REMARQUE:
Landxcape
TM
se désactivera s’il ne reçoit aucun de signal d’entrée dans 30 secondes après avoir été activé. Si vous ne réussissez
pas d’entrer le correct code PIN pour trois fois, l’alerte de Landxcape
TM
sera lancé en “di-di” et puis l’appareil se désactivera.
3) Appuyez sur , puis sur pour commencer le déplacement.
4) Appuyezsur ensuite pour que Landxcape
TM
se rende au socle de recharge, lorsque les lames tournent pour couper l'herbe sur le
chemin du retour.
Le Landxcape
TM
continuera à fonctionner jusqu'à ce que le niveau de batterie soit faible, puis il retournera à la station de charge. Une fois que la
charge est terminée, le Landxcape
TM
reprendra automatiquement la tonte ou restera sur la station de charge en fonction du programme de tonte.
REMARQUE:
Activez Landxcape
TM
, tous les voyants sur l’écran seront allumés et puis désactivez-le. Vérifiez s’il y a des voyants endommagés. Il est
recommandé de couvrir l’écran par votre main en cas de fort soleil à l’extérieur.
MARCHE / ARRÊT
Activez et désactivez
Landxcape
TM
Serrure
Capacité de la batterie
Temps de travail
DÉMARRER
Démarrer tonte/
Sélectionnez
PAGE DE VEILLE
Landxcape
TM
n'est pas dans les
heures de travail.
PAGE DE SOMMEIL:
Landxcape
TM
est complètement
chargé et n'est pas dans les heures
de travail.
AFFICHAGE
Affichage de l'état de votre
réglage
ARRÊT
Pour arrêter le Landxcape
TM
au
cours de son fonctionnement
ACCUEIL
Envoyez le Landxcape
TM
à son socle de
recharge pendant le
fonctionnement, lorsque
les lames tournent pour
couper l'herbe sur le
chemin du retour et
activez le recharge/
Sélection vers le bas
OK
Valide la configuration

FR42
5. Principe de fonctionnement du
Landxcape
TM
Félicitations pour votre achat de ce Landxcape
TM
; avec cet appareil
commence pour vous une nouvelle vie dans laquelle votre pelouse se
tondra toute seule! Dans cette section, nous vous aiderons à mieux
comprendre le mode de fonctionnement du Landxcape
TM
.
5.1 Comment mon Landxcape
TM
peut-il
savoir quels endroits il est censé tondre?
Le Landxcape
TM
choisit sa direction au hasard. Grâce à lui, toute votre
pelouse sera tondue de manière parfaitement uniforme et sans couloirs
disgracieux (Voir Fig. A).
5.2 Comment mon Landxcape
TM
peut-il
savoir où il est censé aller?
Le Landxcape
TM
peut fonctionner de manière autonome. La
Landxcape
TM
sait lorsqu'elle doit aller sur sa base de chargement
pour se recharger, elle peut détecter lorsqu'il pleut et peut s'arrêter en
cas de détection d'un problème, et sait s'arrêter, reculer, puis tourner
quand elle heurte un obstacle bloquant son chemin. D'autre part,
afin de prévenir tout risque d'accident, le disque de coupe s'arrête
automatiquement lorsque le Landxcape
TM
est soulevé.
A. Recherche du socle de recharge
Lorsque votre Landxcape
TM
a besoin de se recharger, il cessera de
tondre et suivra le câble périphérique dans le sens anti-horaire pour
retourner sur son socle de recharge. Landxcape
TM
est préprogrammé
pour tondre la pelouse près du câble périphérique une fois par semaine.
Par défaut, Landxcape
TM
coupera près du câble périphérique tous les
lundis après sa mise en électricité.
B. Capteurs pluviométriques
Le Landxcape
TM
dispose d'un Détecteur de pluie sur ses côtés qui
détecte les gouttes de pluie et informe le Landxcape
TM
pour arrêter la
tonte et suivre le câble délimitant jusqu’à sa base de chargement (Voir
Fig. B)
Le Landxcape
TM
abandonnera de nouveau la tonte après avoir passé le
Délai de retard. Le délai de retard par défaut est de 180 min.
Lorsque les capteurs de pluie sont humides, le Landxcape
TM
retourne
à sa station d'accueil. Lorsque les capteurs de pluie sont secs, le
Landxcape
TM
commence le compte à rebours du temps de retard. Pour
sortir de retard pluie, sécher la zone du capteur et réaliser un cycle de
mise sous tensionà l’aide de l’interrupteur principal. Après la réalisation
du cycle de mise sous tension, vous pouvez utiliser de nouveau le robot.
C. Détection du fil-barrière
Grâce à ses capteurs situés à l'avant, le Landxcape
TM
sait lorsqu'il
s'approche du fil-barrière et ne dépasse jamais cette limite. (Voir Fig. C).
D. Démarrage et arrêt au cours du travail (Voir Fig. D, E1, E2)
Pour commencer la tonte, appuyez sur la touche ON/OFF et saisissez
le code PIN. Appuyez sur , puis sur . Si vous souhaitez que le
Landxcape
TM
arrête de travailler, il vous suffit d'appuyer la touche d'accès
située au-dessus.
Chaque fois que le Landxcape
TM
détecte un problème, un message
d’erreur apparaîtra sur l’écran. Pour plus d’information sur les messages
de défaut, consultez les Messages d’erreur. Landxcape
TM
s’éteindra si
aucune entrée de l’utilisateur n’est reçue dans les 20 minutes qui suivent.
Pour Continuer:
• Appuyez sur , puis sur .
• Maintenant, la Landxcape
TM
commencera à tondre!
5.3 Réglage
Premièrement, réglez la hauteur après le coupage du gazon selon
votre besoin et vous pouvez manuellement effectuer le réglage de
programme.
REMARQUE: En cas de réglage du programme manuel, Landxcape
TM
entrera dans la page Standby s’il ne reçoit pas de signal d’entrée de
l’utilisateur dans 30 secondes.
(1) Changer le code PIN
Pour changer le code PIN, maintenez d’appuyer sur les deux boutons
& en même temps pendant 5 secondes. L’ icône sera
en clignotement et “ ” sera le même. Ensuite, le premier chiffre
sera en clignotement, utilisez-le ou choisissez le chiffre que
vous voulez et appuyez pour confirmer. Le prochain chiffre sera en
clignotement. Utilisez cette méthode pour compléter les autres chiffres.
Par exemple, le nouveau code PIN sera 0326. Après, ” ” sera en
clignotement, ainsi que son premier chiffre. Utilisez la même méthode
pour entrer le nouveau code PIN que vous configurez (dans cet exemple,
). Le “ ” sera en clignotement sur l’écran. Votre
code PIN est changé avec réussite.
À titre indicatif uniquement
(2) Régler l’année, la date et l’heure
Régler l’année, la date et l’heure, et les autres réglages obligatoires. Si
vous n’effectuez pas ces réglages, le calendrier sera influence dans des
réglages suivants. Ces réglages doivent être effetués par l’ordre : l’année,
la date et l’heure. Pour régler l’année, appuyez
pendant 3 secondes
jusqu’à l’icône et un chiffre clignotant sur l’écran, par exemple
. Utilisez-le ou choisissez l’année que vous voulez.
Appuyer pour confirmer et finir le réglage de l’année.

FR 43
À titre indicatif uniquement
En outre, l’icône
sera en clignotement de nouveau et un nombre sera
présenté sur l’écran qui indique la date, par exemple , pour le 29
septembre. Si est en clignotement, utilisez-le ou choisissez
le nombre et appuyez pour confirmer. Et après, sera en
clignotement. Utilisez la même méthode pour choisir le nombre et appuyer
pour confirmer et finir le réglage de la date.
À titre indicatif uniquement
Après,l’icône
se mettra en clignotement et l’heure sera présnetée, par
exemple . Si en clignotement, utilisez-le ou choisissez
le nombre et appuyer pour confirmer. Et puis en clignotement,
utilisez la même méthode pour choisir le chiffre et appuyer pour
confirmer. Voila la fin de réglage du temps, et Landxcape
TM
entera la page
Standby.
À titre indicatif uniquement
Appuyez
pendant 3 secondes. Icône clignotant, appuyez . Un
chiffre sera en clignotement sur l’écran, par exemple , ce qui est
la zone de gazon. Le temps de travail sera automatiquement réglé selon
la superfice de votre jardin. Utilisez ou rélgez la zone de gazon
(la zone sera augmenter / diminuer de 50m2 chaque fois que /
est appuyé), et appuyez pour confirmer. Landxcape
TM
entera la page
Standby.
4hrs
À titre indicatif uniquement
(4) Changer l’heure de début par défaut
L’heure de début par défaut à 9:00 peut être changée à toute autre heure
en appuyant les deux boutons
& en même temps jusqu’à un
bruit “ding”.
Par exemple, appuyez les deux & boutons à 14:05, et votre
Landxcape
TM
se lancera à 14:05.
À titre indicatif uniquement
5.4 Quel sera le degré d'efficacité du
travail de mon Landxcape
TM
?
Les durées de tonte sont différentes pour chaque pelouse en fonction
des facteurs mentionnés ci-dessous. Ajustez progressivement la durée
de travail quotidienne du Landxcape
TM
jusqu'à trouver le réglage qui
convient.
Le Landxcape
TM
est capable de tondre différentes tailles de superficie;
cette superficie dépend cependant de plusieurs facteurs:
• L'espèce d'herbe dont est constituée votre pelouse, ainsi que sa
vitesse de croissance
• L'affûtage des lames
• L'humidité
• La température ambiante
• Le nombre d'obstacles dans votre jardin
Contrairement à la plupart des autres tondeuses, le Landxcape
TM
utilise
un système de recharge latérale, qui est capable de couper l'herbe
environnante au maximum. De plus, les orifices au fond de la station de
charge permettent à la pelouse de croître à travers, lui donnant un aspect
élégant.
La hauteur de coupe du Landxcape
TM
se règle entre 3cm et 6cm. Avant
de commencer votre Landxcape
TM
pour la première fois, vous devez
couper le gazon à une hauteur maximale de 9 cm avec votre tondeuse à
gazon manuelle. réglez la hauteur de coupe de votre Landxcape
TM
sur son
réglage maximum (6 cm) pour la première fois. (Voir Fig. F)
Le Landxcape
TM
produit un meilleur travail par temps sec. Il n'aime pas
l'herbe mouillée car celle-ci a tendance à s'accumuler sur le disque de
coupe et dans le moteur, outre le fait qu'elle peut le faire dévier et glisser.
Le Landxcape
TM
a peur de la foudre! En cas d'orage, protégez-le en
débranchant le socle de recharge, en déconnectant le fil-barrière et en

FR44
vous assurant que le robot n'est pas sur son socle.
Le Landxcape
TM
aime tondre la pelouse et a besoin d'avoir des lames en
bon état pour pouvoir mener sa tâche à bien. Le Landxcape
TM
peut faire
la plus grande partie du travail tout seul, mais il aura de temps en temps
besoin de votre aide pour éviter de se blesser.
• Ne laissez jamais le Landxcape
TM
rouler sur du gravier.
• Enlevez tous les obstacles sur lesquels le Landxcape
TM
risquerait
de monter ou qui seraient susceptibles d'abîmer le disque de
coupe; ou isolez de tels obstacles.
• Enlevez tous les détritus et autres objets étrangers de votre
pelouse.
6. Principe de fonctionnement du fil-
barrière
6.1 Pose du fil-barrière
Utilisez la jauge de distance de bord pour régler correctement la
distance jusqu'au bord de votre pelouse (Plus de 26 cm).C'est la
distance recommandée. Utilisez la jauge de distance fournie pour
assurer une bonne installation.
Si votre voisin utilise également un Landxcape
TM
, laissez un espace d'au
moins 1m entre le fil-barrière et la propriété voisine.
Le fil-barrière est censé délimiter précisément la surface
devant être tondue.
Les plis et les tas de fil ne faisant pas partie de
la zone de travail sont susceptibles de perturber le fonctionnement du
Landxcape
TM
(Voir Fig. G). Si vous disposez d'un excédent de fil après
avoir délimité le périmètre de coupe, coupez-le et rangez-le dans
un endroit à part. Il est cependant important de prévoir une longueur
suffisante pour que le fil puisse être correctement relié au socle de
recharge tout en étant enterré.
6.2 Enterrement du fil-barrière
Si vous avez l'intention d'enterrer le fil, il est recommandé d'arrimer d’abord
le fil délimitant au gazon pour qu’il soit facile de faire des ajustements si
nécessaire. Lorsque vous avez terminé l'installation du câble périphérique,
nous vous recommandons de demander à Landxcape
TM
de suivre le
câble périphérique en appuyant sur et sur . Ceci permettra au
Landxcape
TM
de s’ajuster à son nouvel environnement.
Tout en observant le Landxcape
TM
localiser la station de charge, vous
pouvez apporter des modifications à l'itinéraire du câble périphérique,
afin d’assurer un bon dépistage du câble périphérique par le Landxcape
TM
quand il localise la station de charge. Garantira qu'il réussira à fonctionner
avec sa base de recharge avant que le câble délimitant ne soit enterré.
6.3 Raccord du câble périphérique
Utilisez un connecteur si le câble périphérique doit être rallongé et
épissé. Il est étanche et garantit une connexion électrique fiable.
Insérez les deux extrémités du fil dans deux des trois trous du
connecteur. Assurez-vous que les fils sont complètement insérés dans
le connecteur de sorte que les deux extrémités soient visibles à travers
la zone transparente de l'autre côté du connecteur. (Voir Fig. H) Utilisez
une pince pour presser complètement le bouton sur le dessus du
connecteur. (Voir Fig. I, J)
AVERTISSEMENT:
Nous ne vous recommandons pas de
simplement épisser le câble périphérique avec du ruban isolant
ou d’utiliser un bornier à vis pour la connexion. L'humidité du sol peut
oxyder le fil et entraîner la rupture du circuit après un certain temps.
7. Mise à jour du logiciel
Votre logiciel Landxcape
TM
peut être mis à jour lorsque de nouvelles
versions sont disponibles. Le dernier logiciel peut être téléchargé à
partir de notre site Web www.landxcape-robotics.com.
Mise à jour via USB. Voir ci-dessous les instructions de téléchargement
et d'installation:
(1) Recherchez la dernière version du logiciel sur: www.landxcape-
robotics.com. Enregistrez le fichier sur une clé USB vide FAT32
(lecteur flash). Supprimez tous les autres fichiers sur le lecteur et
vérifier le format. Si le lecteur est pas formaté en FAT32, s'il vous
plaît reformater le disque.
REMARQUE: la mise à jour de logiciel est téléchargé sous forme
de fichier compressé. Vous aurez besoin de décompresser ou de
l'extraire avant de continuer.
(2) Placez votre Landxcape
TM
sur une surface plane et sécurisée.
Appuyez pour
désactiver votre Landxcape
TM
.
(3) Insérez le lecteur USB (lecteur flash) dans le port. (Ver Fig. K1)
(4) Activez Landxcape
TM
. La mise à jour commencera
automatiquement. Attendez que l’écran affiche «USb» (voir fig.
K2), puis retirez le lecteur USB (lecteur flash) et fermez bien le
couvercle de protection. Lorsque l'écran affiche “0 - - -”, la mise à
jour est terminée et Landxcape
TM
ouvrira la page PIN.
Le manuel dans la boîte est basé sur le logiciel par défaut de la
production de masse. Certaines nouvelles caractéristiques / fonctions
de la nouvelle version peuvent ne pas exister dans le manuel. Si vous
ne trouvez pas certains paramètres dans le manuel, veuillez consulter
www.landxcape-robotics.com pour télécharger la dernière version de
manuel.
8. Entretien
Le Landxcape
TM
doit faire l'objet d'un examen périodique. Le
Landxcape
TM
travaille dur, c'est pourquoi vous devez régulièrement le
nettoyer en profondeur et changer les pièces usées. N’utilisez jamais le
Landxcape
TM
quand le bouton marche/arrêt est endommagé.
Éteignez la machine avant d’effectuer tout entretien ou maintenance
que ce soit.
Dans cette section, nous vous expliquerons comment prendre soin de
votre nouveau Landxcape
TM
de manière à ce qu'il s'adapte parfaitement
à sa nouvelle demeure.
8.1 Affûtage
AVERTISSEMENT: Avant d'effectuer toute manipulation
de nettoyage, de réglage ou de changement des lames,
éteignez le Landxcape
TM
et mettez des gants de protection.
AVERTISSEMENT: Pour le remplacement des lames,
assurez-vous de remplacer TOUTES les lames à la fois.
Utilisez toujours des vis neuves lors du montage des lames. Il est
important d’assurer la rétention de la lame et l’équilibre du
disque de rotation de la lame. Le fait de ne pas utiliser de vis
neuves pourrait entraîner des blessures graves.
Le LandxcapeTM ne coupe pas l'herbe de la même manière que les
autres tondeuses. Ses lames sont tranchantes comme des rasoirs
sur leurs 2 bords et tournent dans les deux sens pour une efficacité
de coupe maximale (Voir Fig. L). Chaque lame de votre Landxcape
TM

FR 45
a 2 bords coupants. Le disque de coupe tourne vers l’avant et dans
le sens contraire au hasard pour utiliser les deux bords tranchants.
Ceci contribue à minimiser la fréquence de remplacement de la
lame de coupe. Chaque lame va durer jusqu'à 2 mois quand il est
programmé pour tondre la pelouse tous les jours. Vérifiez chaque fois
si les lames sont ébréchées ou endommagées et changez-les le cas
échéant. Lorsque les lames sont usées et ne coupent plus bien, elles
doivent être remplacées par les lames de rechange fourni avec votre
Landxcape
TM
. Des lames de rechange sont également disponibles chez
votre détaillant Landxcape
TM
le plus proche.
A. Changement des lames
Au bout d'une certaine durée d'utilisation (normalement en fin de
saison), les lames du Landxcape
TM
auront besoin d'être changées.
C'est pourquoi il est indispensable de toujours changer toutes
les lames en même temps. Vous pouvez utiliser l'un des kits de
rechange fournis avec le Landxcape
TM
, avec les vis de montage
correspondantes.
Avant de changer les lames, coupez le moteur et mettez des gants de
protection. Puis procédez de la manière suivante:
1. Retournez délicatement le Landxcape
TM
.
2. Retirez le couvercle de la batterie et la batterie.
3. Dévissez les vis des lames avec un tournevis. (Voir Fig. M)
4. Puis fixez solidement les lames neuves.
5. Remontez la batterie et son couvercle.
IMPORTANT: Après avoir vissé les lames sur le disque, assurez-
vous qu’elles peuvent tourner librement.
8.2 Nettoyage
AVERTISSEMENT: Avant de le nettoyer, éteignez votre
Landxcape
TM
. Mettez des gants de protection avant de
nettoyer le disque de coupe, et ne le lavez pas sous le robinet.
A. Nettoyage du boîtier
Votre Landxcape
TM
fonctionnera mieux et plus longtemps s'il est
nettoyé régulièrement. Toutefois, comme votre Landxcape
TM
est une
machine électrique, vous devez faire attention lors du nettoyage,
de
NE PAS UTILISER un tuyau, des nettoyeurs à haute pression ou
autre pour faire couler de l'eau sur votre Landxcape
TM
; il est
préférable d'utiliser un vaporisateur rempli d'eau. Pour nettoyer le
boîtier en plastique moulé, utilisez un chiffon ou une brosse à poils
mous et évitez les solvants et les produits de cirage (Voir Fig. N). Enfin,
n'oubliez pas d'enlever tous les dépôts d'herbe et autres détritus.
B. Nettoyage de la partie inférieure
Une fois encore, vous devez impérativement éteindre le Landxcape
TM
avec le bouton marche/arrêt et
mettre des gants de protection
avant de toucher le disque de coupe.
Retournez tout d'abord votre Landxcape
TM
à l'envers pour en
exposer sa face inférieure. Repérez le disque de coupe, le boîtier
du moteur ainsi que les roues avant et les roues motrices. Nettoyez
soigneusement toutes ces pièces avec un chiffon mouillé ou une
brosse à poils mous.
AVERTISSEMENT:
NE JAMAIS nettoyer le dessous de
Landxcape
TM
au jet d’eau. Des composants pourraient
s’endommager. (Voir Fig. O1, O2)
Faites tourner le disque de coupe pour vous assurer qu'il tourne
librement. Vérifiez que les lames tournent librement autour des vis de
fixation. Retirez tout obstacle.
IMPORTANT: Enlevez tous les détritus accumulés susceptibles
de fissurer le disque de coupe. Même la fissure la plus
microscopique peut influencer le fonctionnement du
Landxcape
TM
de manière importante.
C. Nettoyez les broches de contact et les bandes
Nettoyer la broche de contact située sur la base de chargement et la
bande de chargement situé sur le Landxcape
TM
à l'aide d'un chiffon.
Enlevez toute accumulation de débris d'herbe et de débris autour des
broches de contact et des bandes de chargement de temps en temps
pour vous assurer que le Landxcape
TM
se charges corectement à
chaque fois.
8.3
Durée de vie de la batterie
Le cœur du Landxcape
TM
est une Pile de Lithium de 20V. Pour un
stockage correct de la batterie, assurez-vous qu'elle est complètement
chargée et conservée dans un endroit frais et sec.
REMARQUE:
La plage de température de fonctionnement pour
Landxcape
TM
va de 0
o
C à 55
o
C.
La durée de vie de la batterie du Landxcape
TM
dépend de plusieurs
facteurs:
• La durée de la saison de tonte dans votre région
• Le nombre d'heures que le Landxcape
TM
travaille chaque jour
• L'entretien de la batterie pendant le rangement
Le Landxcape
TM
peut être chargé manuellement sans le câble
périphérique.
1. Connectez la base de charge à une source d'alimentation
appropriée. Le voyant vert de la station de chargement
s’allumera.
2. Placez manuellement la Landxcape
TM
dans la base de
charge alors que la Landxcape
TM
est éteinte. (Voir Fig. P)
3. L'indicateur lumineux vert clignote sur la base de charge,
Landxcape
TM
commencera à se charger.
8.4 Hibernation
Votre Landxcape
TM
fonctionnera mieux et plus longtemps si vous
le laissez reposer pendant l'hiver. Bien que le Landxcape
TM
soit un
appareil très solide, nous vous recommandons néanmoins de le ranger
dans une remise ou dans un garage pendant l'hiver.
Avant de ranger le Landxcape
TM
pour l'hiver, n'oubliez pas:
• de le nettoyer soigneusement
• Chargez complètement la batterie et retirez-la de Landxcape
TM
• de l'éteindre
Pour maximiser la durée de vie de la batterie, chargez-la complètement
et retirez-la de Landxcape
TM
avant de la ranger en hiver.
AVERTISSEMENT: Protéger le dessous de Landxcape
TM
de
l’eau. NE JAMAIS ranger Landxcape
TM
à l’envers à
l’extérieur.
Le fil-barrière peut être laissé par terre, mais il est préférable de
protéger les extrémités, par exemple en les mettant dans une boîte
de conserve remplie de graisse. Si vous choisissez de laisser le socle
de recharge à l'extérieur pendant l'hiver, laissez le fil-barrière relié au
socle.
REMARQUE:
Lorsque vous redémarrez le Landxcape
TM
après le repos
hivernal, nettoyez soigneusement les bornes de recharge et les broches
de contact en utilisant de préférence une toile émeri fine.

FR46
8.5 Changement de la batterie
AVERTISSEMENT: Mettez le bouton marche/arrêt avant d'effectuer toute manipulation de réglage, de changement ou de
réparation. Avant de changement des lames, éteignez le Landxcape
TM
et mettez des gants de protection.
Si vous devez changer la batterie, procédez de la manière suivante.
1. Retournez délicatement le Landxcape
TM
.
2. Enlevez les vis de fixation de la batterie. Retirez le carter de la batterie. (Voir Fig. Q1)
3. Sortez l’ancienne batterie en faisant attention. Appuyez sur l’enclenchement et libérez les connecteurs. (Voir Fig. Q2)
REMARQUE:
Ne tirez pas sur les câbles. Tenez les connecteurs et sortez l’élément de blocage.
4. Connectez la nouvelle batterie originale en reliant les connecteurs ensemble jusqu’à ce qu’ils soient en position (Voir Fig. Q3, Q4).
5. Installez la batterie tel qu’indiqué. (Voir Fig. Q5) Replacez le carter dans sa position et vissez fermement les vis.
9. Messages fonctionnels
Affichage Message Action
Délai de pluie activé Aucune action n'est requise.
10. Messages d'erreur
Symptôme Cause Action
Landxcape
TM
est en-
dehors de la zone de
fonctionnement.
1. Si le Landxcape
TM
se trouve actuellement en dehors de son périmètre: éteignez l'appareil et
remettez-le dans son périmètre. Rallumez-le. Appuyez sur , puis sur .
2. Si le Landxcape
TM
est à l'intérieur de son périmètre, vérifiez que le voyant LED de la station
de charge soit vert. S’il ne l’est pas, vérifiez que la station de charge est correctement reliée
au chargeur et que ce dernier est branché à une alimentation appropriée. Si c’est le cas, cela
signifie que les extrémités du câble périphérique sont mal fixées et que vous devez les inverser.
3. L'indicateur lumineux rouge de charge s'allumera, vérifiez que le câble périphérique est
bien connecté aux pinces de la socle de recharge. Si le problème persiste, vérifiez que le câble
périphérique n’a pas été coupé.
Roues bloquées
1. Éteignez le Landxcape
TM
et placez-le dans un endroit sans obstacles.
2. Rallumez-le. Appuyez sur , puis sur .
3. Si le message d'erreur s'affiche toujours, éteignez l'appareil, retournez-le et vérifiez si la
rotation des roues est bloquée par un objet.
4. Enlevez l'objet à l'origine du blocage, remettez le Landxcape
TM
d'aplomb, rallumez-le.
Appuyez sur , puis sur .
Disque de coupe bloqué
1. Éteignez l'appareil;
2. Retournez le Landxcape
TM
et vérifiez si la rotation du disque de coupe n'est pas bloquée
par un objet.
3. Enlevez l'objet à l'origine du blocage.
4. Placez le Landxcape
TM
verticalement et utilisez le dans un endroit avec de l’herbe courte
ou ajuster la hauteur de coupe;
5. Rallumez-le. Appuyez sur , puis sur .
Landxcape
TM
est coincé.
1. Éteignez l'appareil;
2. Placez le Landxcape
TM
dans un endroit sans obstacles.
3. Rallumez-le. Appuyez sur , puis sur .
4. Si le message d'erreur s'affiche toujours, éteignez l'appareil, retournez-le. Vérifier la
présence d'un obstacle qui empêche les roues de tourner.
5. Enlevez l'objet à l'origine du blocage, remettez le Landxcape
TM
d'aplomb, rallumez-le.
Appuyez sur , puis sur .

FR 47
Landxcape
TM
est soulevé.
1. Clavier et éteignez l'appareil.
2. Placez le Landxcape
TM
dans un endroit sans obstacles, rallumez-le. Appuyez sur ,
puis sur .
3. Si le message d'erreur s'affiche toujours, désactivez Landxcape
TM
, retournez-le et vérifiez
s’il y a des choses qui empêchent les roues à tourner.
4. Enlevez l'objet à l'origine du blocage, remettez le Landxcape
TM
d'aplomb, rallumez-le.
Appuyez sur , puis sur .
Landxcape
TM
est à l’envers. Remettez le Landxcape
TM
d'aplomb. Appuyez sur , puis sur .
Erreur de batterie
1. Vérifiez la température de la batterie. Si la température est trop élevée, attendez
que la température se soit refroidie. Appuyez sur
puis sur .
2. Remplacer une nouvelle batterie Relancer Landxcape
TM
Appuyez sur puis sur .
3. Si l'erreur se répète, essayez de modifier l'horaire de travail.
Landxcape
TM
met trop de
temps à retourner à la socle
de recharge.
Mettez manuellement Landxcape
TM
dans la socle de recharge pour le recharge.
Appuyez sur puis sur après que Landxcape
TM
est rechargé pleinement.
Erreur inconnue
Relancer Landxcape
TM
Appuyez sur puis sur . Si le message d’erreur se
répète, contactez un agent de service pour les aides.
REMARQUES
• Avant d'allumer l'appareil, vérifiez toujours que le Landxcape
TM
est bien situé dans son périmètre. Dans le cas contraire, le message «
»
sera affiché. Le même message apparaîtra si le Landxcape
TM
est posé sur le fil-barrière au moment où vous l'allumez.
• Si vous souhaitez garer le Landxcape
TM
sur son socle pour quelque raison que ce soit (ex: fête, présence d'enfants en train de jouer): appuyez
sur puis sur . Le Landxcape
TM
retournera à sa base et y restera. Appuyez pour désactivez Landxcape
TM
.
• Si une erreur se répète toujours au même endroit de la pelouse, cela peut être le signe d'un problème dans l'installation du fil-barrière; vérifiez
le montage du fil en vous référant aux instructions d'installation.
• Si votre pelouse est divisée en deux zones séparées, reliées par un couloir de moins de 1m, dont l'une ne comporte pas de base de recharge:
lorsque le Landxcape
TM
est à cours de charge, amenez-le manuellement à la base de charge, il commencera à charger.
• Si le Landxcape
TM
fonctionne anormalement de temps en temps, essayez de le redémarrer. Si le problème persiste, enlever et remettre la
batterie. Si le problème persiste, veuillez contacter l’agent de service après-vente Landxcape
TM
pour obtenir de l'aide.
• Ne lavez pas la machine avec un nettoyeur à haute pression. Cela pourrait endommager la batterie ou la machine.
11. Guide de dépannage
Si votre Landxcape
TM
ne fonctionne pas correctement, consultez le guide de dépannage ci-dessous. Si le défaut persiste, contactez le magasin d'achat.
Symptôme Cause Action
La LED du socle de recharge ne s'allume
pas.
Pas d'alimentation
Vérifiez que le cordon d'alimentation est correctement
relié au chargeur et que le chargeur est branché à une
alimentation appropriée.
L'indicateur lumineux rouge de charge
s'allumera.
Le fil-barrière n'est pas connecté.
Vérifiez que le câble périphérique a été correctement
branché à la station de charge.
Vérifiez que le câble périphérique n’est pas cassé,
notamment aux extrémités du cable.
Le Landxcape
TM
s'allume, mais le disque
de coupe ne bouge pas.
Le Landxcape
TM
est en train de chercher le
socle de recharge (sauf que si vous appuyez
sur puis sur le bouton pour le faire
aller à la socle de recharge).
Ceci est normal: le Landxcape
TM
a besoin de se
recharger et le disque de coupe ne tourne pas
lorsque le robot est en train de revenir sur son socle.
Le Landxcape
TM
vibre.
Les lames peuvent être endommagées.
Vérifiez l'état du disque de lame.
Examinez les lames et les vis, et changez-les le cas
échéant.
Supprimez les débris et corps étrangers des lames et
du disque porte-lames.

FR48
La coupe du gazon est irrégulière.
Le Landxcape
TM
ne travaille pas assez
longtemps chaque jour.
Programmez une durée de travail plus longue.
La surface de travail est trop grande.
Essayez de diminuer la superficie de la surface de
travail ou augmentez la durée du travail.
Les lames sont émoussées.
Changez toutes les lames et les vis en même temps
afin que le disque de coupe reste bien équilibré.
La hauteur de coupe est réglée sur un cran trop
bas pour votre pelouse.
Réglez la hauteur sur un cran élevé, puis baissez
progressivement.
Le disque de coupe est recouvert d'herbe ou
d'un autre objet.
Examinez le disque de coupe et enlevez l'herbe et tous
les objets.
De l'herbe s'est accumulée sur le disque ou
dans le boîtier du moteur.
Vérifiez que le disque peut bien tourner sans entrave.
Si nécessaire, démontez le disque et enlevez les
détritus.
Landxcape
TM
est dans son périmètre et
le câble périphérique est connecté. Mais
l'écran affiche «
» .
Les extrémités du câble périphérique ne sont
pas fixées correctement.
Inversez les extrémités du câble périphérique.
Le câble périphérique est cassé.
Réparez le câble périphérique endommagé avec des
connecteurs.
La durée de charge est beaucoup
plus longue que la durée de charge
nominale.
Mauvais contact dû à la souillure de la borne
de recharge.
Nettoyez les broches de contact du socle et les
bornes de recharge de la machine à l'aide d'un
chiffon.
Le système de protection de la charge s'est
activé à cause de la température trop élevée.
Placez la base de charge dans une zone ombragée
ou attendez que la température refroidisse.
La tondeuse ne se recharge pas
Pas d'alimentation
Vérifiez que le cordon d'alimentation est correctement
relié au chargeur et que le chargeur est branché à
une alimentation appropriée.
Dysfonctionnement pendant le chargement
manuel
Voir la recharge manuelle dans la Section 8.3.
La durée d'autonomie du Landxcape
TM
est de plus en plus courte après chaque
recharge.
Quelque chose bloque le disque de coupe.
Enlevez le disque de coupe et nettoyez-le.
L’herbe est trop haute et trop épaisse.
Le Landxcape
TM
tremble beaucoup.
Examinez les lames et le disque de coupe et enlevez
l'herbe et tous les objets.
La batterie est peut-être vieille ou épuisée. Changez-la.
Le Landxcape
TM
ne se met pas en
marche à l'heure prévue.
L'horloge est mal réglée. Régler correctement l’horaire, voir la Section 5.3.
Les temps de coupe programmés pour le
Landxcape
TM
sont incorrects.
Changez les heures de début et de fin de travail du
Landxcape
TM
.
Le Landxcape
TM
est amarré manuellement sur
la station de recharge.
Appuyer sur
, puis sur .
La batterie ne se charge pas en cas de sa
température dépassant 55
o
C au temps chaud.
Attendez que la batterie se soit refroidie.
Landxcape
TM
ne peut pas s'enclencher
correctement dans la base de charge
Influences environnementales. Redémarrez la Landxcape
TM
.
Mauvais contact dû à la souillure de la borne
de recharge.
Nettoyez les broches de contact du socle et les
bornes de recharge de la machine à l'aide d'un
chiffon.
L'indicateur vert sur la base de charge
s'allume avant que la charge ne soit
terminée.
La station de charge est en surchauffe.
Placez la base de charge dans une zone ombragée
ou attendez que la température refroidisse.

FR 49
Le Landxcape
TM
fonctionne en dehors
du câble périphérique. Le Landxcape
TM
ne tond pas de zone dans une zone de
câble périphérique. Le Landxcape
TM
se
retourne ou tourne de façon erratique
près du câble périphérique.
Le câble périphérique d'une autre
Landxcape
TM
ou une tondeuse robotique d'une
autre marque est trop proche.
Assurez-vous que le câble périphérique de la
Landxcape
TM
est espacé d'au moins 1m du câble
périphérique voisin.
Le câble périphérique a été installé avec des
angles droits.
Vérifiez que le câble périphérique a été installé avec
des coins arrondis.
Dans des conditions d’humidité, le signal
électrique du câble périphérique peut fuir de
l’union ou de la réparation du câble.
Vérifiez les joints du câble périphérique.
Il existe une fuite du signal électrique du câble
périphérique due à une rupture de l’isolation.
Isolez-les pour offrir un raccord complètement
étanche.
La zone de coupe est plus grande que la zone
de coupe admissible pour le Landxcape
TM
.
Réparez l’isolation du câble périphérique avec des
connecteurs.
Les roues du Landxcape
TM
dérapent ou
endommagent la pelouse.
Des obstacles étrangers, tels que des
brindilles et des branches peuvent être
coincées sous le Landxcape
TM
.
Enlevez les objets étrangers de sous le Landxcape
TM
.
La pelouse est trop humide. Attendez jusqu'à ce que la pelouse ait séché.
Le Landxcape
TM
quitte le câble
périphérique en descendant une colline
en raison de vitesses élevées.
Le câble périphérique est placé sur une pente
plus abrupte que 17% (10°).
Repositionnez le câble périphérique loin des pentes
ayant une déclivité de plus de 17% (10°). Veuillez
vous reporter au manuel d'installation pour plus de
détails.
Échec de la mise à jour du logiciel. Réessyez selon la section “mise à jour du logiciel”.
Protection de l’environnement
Les déchets d’équipements électriques et électroniques ne doivent pas être déposés avec les ordures ménagères. Ils doivent être collectés
pour être recyclés dans des centres spécialisés. Consultez les autorités locales ou votre revendeur pour obtenir des renseignements sur
l’organisation de la collecte.

FR50
Déclaration de conformité
Nous,
Positec Germany GmbH
Grüner Weg 10, 50825 Cologne, Germany
Déclarons ce produit,
Description Robot de fauchage à pelouse
Modèle LX790 LX791 LX792 LX793 (790-799 - désignations des pièces, illustration de la Robot de fauchage à pelouse)
(L’année, la référence de l’article et le mois du numéro de série sont placés au dos. Le numéro de série complet est clairement indiqué
sur le boîtier de la tondeuse à gazon) avec chargeur de batterie LA8001 / LA8002 et station de recharge LA3000
Fonction Tondeuse à gazon
Est conforme aux directives suivantes,
2006/42/EC, 2014/30/EU, 2014/35/EU, 2011/65/EU, 2000/14/EC amendée par 2005/88/EC,
2000/14/EC amendée par 2005/88/EC
- Procédure d’évaluation de la conformité conformément à Annex V
- Niveau de pression acoustique 64.2 dB (A)
- Niveau d’intensité acoustique 65 dB (A)
Notification réalisée par
Adresse: Cleeve Road, Leatherhead, Surrey, KT22 7SB United Kingdom
Et conforme aux normes,
EN 60335-1:2012+A11+A13:2017, EN 50636-2-107:2015+A1:2018, EN 60335-2-29:2004+A2:2010,
EN 62233:2008, EN ISO 3744:2005, EN 55014-1:2017, EN 55014-2:2015,EN 61000-3-2:2014,
EN 61000-3-3:2013, EN 61558-1:2005+A1:2009, EN 61558-2-16:2009+A1:2013, EN 303 447 V1.1.1
La personne autorisée à compiler le dossier technique,
Nom Marcel Filz
Adresse Positec Germany GmbH, Grüner Weg 10, 50825 Cologne, Germany
2018/10/26
Allen Ding
Ingénieur en chef adjoint, Essais & Certification
Positec Technology (China) Co., Ltd.
18, Dongwang Road, Suzhou Industrial
Park, Jiangsu 215123, P. R. China

IT 51
1. Sicurezza del prodotto
1.1 Avvisi generali per la sicurezza degli
utensili a motore
AVVERTENZA: È assol
utamente necessario leggere
attentamente tutte le istruzioni.
Eventuali errori
nell’adempimento delle istruzioni qui di seguito riportate potranno causare
scosse elettriche, incendi e/o lesioni gravi.
Leggere accuratamente queste istruzioni per usare la macchina in
sicurezza.
Conservare tutti gli avvisi e le istruzioni per poterle consultare
quando necessario.
• Questo dispositivo non è inteso per l’uso da parte di persone (inclusi i
bambini) con capacità fisiche, sensorie o mentali ridotte o con scarsa
esperienza e conoscenza del prodotto, a meno che non sia utilizzato
sotto la supervisione da parte di persone responsabili per la loro
sicurezza.
• I bambini devono essere controllati per garantire che non giochino con
il dispositivo.
• Questo dispositivo deve essere utilizzato esclusivamente con
l'alimentatore fornito in dotazione.
IMPORTANTE
LEGGERE ATTENTAMENTE PRIMA DELL’USO
CONSERVARE PER RIFERIMENTO FUTURO
PROCEDURE PER UN USO SICURO
Addestramento
a) Leggere con attenzione le istruzioni. Acquisire familiarità con i comandi
e il corretto funzionamento dell’apparecchio.
b) Non permettere mai a bambini o a persone sprovviste delle necessarie
competenze di utilizzare l’attrezzo. L’età minima di utilizzo dello stesso
può variare a seconda delle diverse normative locali.
c) Ricordare che l’operatore o l’utente sono responsabili di incidenti o
rischi che dovessero verificarsi ai danni di terzi o delle proprietà.
OPERAZIONI PRELIMINARI
a) Accertarsi che il filo perimetrale sia installato correttamente, in base
alle istruzioni.
b) Ispezionare con attenzione l’area in cui si deve utilizzare il robot
tosaerba e togliere tutti gli oggetti che potrebbero essere lanciati dal
robot tosaerba.
c) Prima dell’uso, verificare visivamente che le lame, i rispettivi bulloni e il
gruppo di taglio non siano usurati o danneggiati. In tal caso, sostituire
le lame o i bulloni in blocco per mantenere il bilanciamento.
d) Su macchine con più lame, prestare attenzione perché ruotando una
lama si provoca la rotazione dell’altra lama.
e) AVVERTENZA! Non utilizzare mai il robot tosaerba se le protezioni o i
ripari sono danneggiati o senza i gli appositi apparati di sicurezza.
FUNZIONAMENTO
1. GENERALI
a) Non utilizzare mai il robot tosaerba se le protezioni o i ripari sono
danneggiati o senza i gli appositi apparati di sicurezza, come i deflettori
e di raccolta erba.
b) Non avvicinare mani o piedi accanto o sotto le parti rotanti. Nel caso
di falciatrici rotative, mantenere costantemente libere le aperture di
scarico.
c) Non raccogliere, né trasportare il robot tosaerba quando è in funzione.
d) Spegnere il Landxcape
TM
:
– prima di eliminare un ostacolo;
– prima di controllare, pulire o effettuare lavori sul robot tosaerba.
e) Non è consentito modificare la versione originale del robot tosaerba.
Il produttore declina ogni responsabilità per eventuali modifiche non
autorizzate.
f) Avviare il robot tosaerba, come descritto nelle istruzioni. Quando
l'interruttore principale è in posizione ON, assicurarsi di tenere mani e
piedi lontani dalle lame rotanti. Non infilare mai le mani o i piedi sotto
al tosaerba.
g) Non sollevare né trasportare il robot tosaerba quando l'interruttore
principale è in posizione ON.
h) Non consentire a persone che non conoscono il funzionamento e il
comportamento del robot tosaerba di utilizzarlo.
i) Non sistemare oggetti sopra al robot tosaerba o alla base di ricarica.
j) Non utilizzare il robot tosaerba se il disco lame o la scocca presentano
difetti. Non utilizzarlo nemmeno se presenta lame, viti, dadi o cavi
difettosi.
k) Spegnere sempre il robot tosaerba quando non si ha intenzione di
utilizzarlo. Il robot tosaerba può avviarsi solo se l'interruttore principale
è in posizione ON e se è stato inserito il codice PIN corretto.
l) Tenere mani e piedi lontani dalle lame rotanti. Non mettere mai le mani
o i piedi vicino o sotto il corpo quando il robot tosaerba è in funzione.
m) Evitare di utilizzare la macchina e i suoi accessori in condizioni meteo
avverse, specialmente in caso di rischio di caduta di fulmini.
n) Non toccare parti mobili pericolose prima che si siano completamente
arrestate.
o) Per le macchine utilizzate in aree pubbliche, i segnali di avvertimento
devono essere collocati attorno all'area di lavoro della macchina.
Mostrano la sostanza del seguente testo:
ATTENZIONE!
Tosaerba automatico! Stare lontano dalla macchina!
Supervisionare i bambini!
2. ULTERIORI INFORMAZIONI PER QUANDO L’APPARECCHIATURA
FUNZIONA IN MODALITÀ AUTOMATICA
a) Non usare il robot tosaerba in presenza di altre persone, in particolar
modo di bambini o di animali domestici.
MANUTENZIONE E CONSERVAZIONE
AVVERTENZA! Se il robot tosaerba viene capovolto,
l'interruttore principale deve essere sempre in posizione
OFF.
L'interruttore principale deve essere in posizione OFF durante tutti i lavori
al sottoscocca del tosaerba, come, ad esempio, la pulizia o la sostituzione
delle lame.
a) Ai fini della sicurezza delle operazioni, accertarsi che tutti i dadi, i
bulloni e le viti del robot tosaerba siano saldamente avvitati.
b) Controllare il robot tosaerba ogni settimana e sostituire le eventuali
parti danneggiate o usurate.
c) Controllare in particolare che le lame e il disco lame siano integri.
All’occorrenza, sostituire tutte le lame e le viti contemporaneamente in
modo che le parti rotanti siano bilanciate.
d) Assicurarsi di utilizzare solo ricambi originali.
e) Assicurarsi che le batterie siano caricate utilizzando il caricabatteria
corretto consigliato dal costruttore. L’uso non corretto potrebbe
causare folgorazioni, surriscaldamento o perdite di liquidi corrosivi
dalla batteria.
f) Nel caso di perdite di elettroliti, lavare con acqua/un agente
neutralizzante, chiedere l’aiuto di un medico nel caso vengano a
contatto con gli occhi, ecc;

IT52
g) Le manutenzione del robot tosaerba deve essere eseguita seguendo le
istruzioni del costruttore.
Suggerimento
Collegare la macchina e/o i suoi accessori solo a un circuito di
alimentazione protetto da un dispositivo di corrente residua (RCD ) con
corrente di intervento non superiore a 30 mA.
Rischi residui
Per evitare infortuni, indossare guanti produttivi quando si sostituiscono le
lame.
Trasferimento
Per i trasporti più lunghi, si raccomanda di riporre il robot tosaerba
nell’imballaggio originale.
Per un trasferimento sicuro dall’area di lavoro o al suo interno:
a) fermare il tagliaerba premendo il tasto STOP;
Si sceglie il PIN a quattro cifre quando si avvia il tagliaerba per la prima
volta.
b) spegnere sempre il robot tosaerba se si ha intenzione di trasportarlo;
c) afferrare il robot tosaerba per l’impugnatura presente nella parte
anteriore, nella parte posteriore. Trasportare il robot tosaerba con il
disco lame lontano dal corpo.
Avvertenze di sicurezza per il pacco batteria all'interno
dell'elettroutensile
a) Non smontare, aprire o strappare le celle secondarie o il pacco
batteria.
b) Non mettere in corto circuito il pacco batteria. Non conservare
il pacco batteria disordinatamente in una scatola o in un
cassetto in cui potrebbe essere cortocircuitato da altri oggetti
metallici.
Quando il pacco batteria non è in uso, tenerlo lontano da
altri oggetti metallici come graffette, monete, chiavi, chiodi, viti e altri
piccoli oggetti metallici, perché potrebbe crearsi un collegamento tra
i due terminali. Collegare i terminali della batteria potrebbe causare
incendi o ustioni.
c) Non esporre il pacco batteria a calore o fuoco. Evitare di
conservarlo alla luce diretta del sole.
d) Non sottoporre il pacco batteria a scosse meccaniche.
e) In caso di perdite da una cellula, evitare che il liquido entri in
contatto con la pelle o gli occhi. In caso di contatto, lavare l'area
interessata con abbondante acqua e consultare un medico.
f) Se si ingerisce una cella o un pacco batteria, consultare
immediatamente un medico.
g) Tenere le celle e il pacco batteria puliti e asciutti.
h) Il pacco batteria offre prestazioni ottimali se utilizzato a una
temperatura ambientale normale (20°C ± 5°C).
i) Quando si smaltiscono i pacchi batteria, tenere i pacchi
batteria con sistemi elettrochimici diversi separati gli uni dagli
altri.
j) Ricaricare solo con la base di ricarica fornita da Landxcape
TM
.
Non utilizzare caricabatterie diversi da quelli forniti per l'uso
al pacco batteria potrebbe provocare rischi d'incendio.
k) Non utilizzare un pacco batteria non progettato per questo
prodotto.
l) Tenere il pacco batteria fuori dalla portata dei bambini.
m) Conservare i documenti originali del prodotto per riferimenti
futuri.
n) Smaltire adeguatamente.
1.2 Simboli su Landxcape
TM
AVVERTENZA – In caso di uso improprio, il robot
tosaerba può essere pericoloso.
Leggere attentamente le istruzioni per l’uso e
comprenderne il significato prima di utilizzare il robot
tosaerba.
AVVERTENZA - Tenere gli astanti a distanza di
sicurezza.
AVVERTENZA – Spegnere la macchina prima di
sottoporla a manutenzione o di sollevarla.
AVVERTENZA – Non salire sopra il robot tosaerba.
Non bruciare
Non esporre alla pioggia o all’acqua.
Non smaltire gettare le batterie nei rifiuti. Portare le
batterie scariche presso un punto locale di riciclaggio
o di raccolta.
Non lavare il robot tosaerba con apparecchi ad alta
pressione.
Dispositivo di Classe III
I prodotti elettrici non possono essere gettati tra i
rifiuti domestici. L’apparecchio da rottamare deve
essere portato al centro di riciclaggio per un corretto
trattamento. Controllare con le autorità locali o con il
rivenditore per localizzare il centro di riciclaggio più
vicino.

IT 53
2. Componenti del robot tosaerba
1. TASTO STOP
2. MANOPOLA DI REGOLAZIONE DELL'ALTEZZA DI TAGLIO
3. TASTO DI ACCENSIONE/SPEGNIMENTO
4. TASTO START
5. PULSANTE HOME
6. DISPLAY
7. STRISCIA DI RICARICA
8. SENSORE PIOGGIA
9. RUOTA ANTERIORE
10. DISCO LAME
11. LAME
12. PACCO BATTERIA
13. PORTA USB
14. RUOTA POSTERIORE
15. MANIGLIA
16. PIN DI CONTATTO
17. BASE DI RICARICA
18. TRASFORMATORE
19. PICCHETTO FILO PERIMETRALE
20. FILO PERIMETRALE
21. CHIODI DI ANCORAGGIO DELLA BASE DI RICARICA
22. DISTANZIATORE PER IL FILO PERIMETRALE
23. CHIAVE A BRUGOLA
24. CONNETTORE
Accessori illustrati o descritti non fanno necessariamente parte del volume di consegna.

IT54
3. Dati tecnici e dati sulla rumorosità
3.1 Dati tecnici
Codice LX790 LX791 LX792 LX793 (790-799 - Designazione del
macchinario, rappresentativo della Robot tosaerba)
LX790 LX792 LX791 LX793
Potenza nominale 20V
Max.*
Velocità a vuoto nominale 2800/min
Superficie di taglio 600m
2
900m
2
Diametro di taglio 16cm 18cm
Altezza di taglio 30-60mm
Posizioni altezza di taglio 4
Tipo di batteria Litio
Modello batteria LA0001 LA0002
Tempo di ricarica circa. 1.3hrs 2hrs
Modello caricatore LA8001 / LA8002
Potenza caricabatteria
Ingresso: 100-240V~50/60Hz, 38W,
Uscita: 20V
, 1.5A
Peso Macchina 8.4kg
Classe protezione III
*Tensione misurata senza carico di lavoro. La tensione iniziale della batteria
raggiunge un massimo di 20 Volt. La tensione nominale è di 18 Volt.
Accessori
LX790 LX792 LX791 LX793
Viti 9 9
Base di ricarica 1 1
Chiodi di ancoraggio della base di
ricarica
7 7
Filo perimetrale 150m 180m
Picchetti di fissaggio 210 250
Chiave Allen 1 1
Distanziatori del filo perimetrale 2 2
Lame 9 9
Connettore 2 2
Batteria (LA0001/ LA0002) 1 1
Caricabatteria (LA8001 / LA8002) 1 1
Si raccomanda di acquistare tutti gli accessori nello stesso negozio
in cui è stato acquistato l’attrezzo. Fare riferimento alla confezione
dell’accessorio per altri dettagli. Il personale del negozio può aiutarvi e
consigliarvi.
3.2 Dati relativi al rumore
Pressione acustica ponderata
L
pA
= 44.2dB (A)
K
PA
= 0.4dB(A)
Potenza acustica ponderata
L
wA
= 64.2dB (A)
K
wA
= 0.4dB(A)
Indossare protezione per le orecchie
quando la pressione acustica è
superiore a
80dB(A)
Un certo livello di rumore prodotto dalla macchina è inevitabile. Per
eseguire lavori rumorosi è necessario essere autorizzati e farlo solo in
determinati momenti. Per rispettare i periodi di riposo potrebbe essere
necessario ridurre al minimo le ore di lavoro. Per proteggere il proprio
udito e quello delle persone che lavorano nelle vicinanze, indossare un
dispositivo di protezione acustica adeguato.
Uso conforme alle norme
Questo prodotto è stato progettato per tosare l’erba di prati domestici.
È progettato per falciare spesso, mantenendo il prato più vigoroso e
bello che mai. In base alle dimensioni del prato, Landxcape
TM
può es-
sere programmato per funzionare in qualsiasi orario e con qualsiasi
frequenza. Non è concepito per scavare, spazzare o sgombrare la neve.

IT 55
4. Pannello di controllo
Avvio
1) Dopo aver installato il filo perimetrale è possibile avviare Landxcape
TM
(per posizionare il filo perimetrale consultare la Guida per l’installazione).
2) Premere innanzitutto
finché il Landxcape
TM
non si accende. Per il primo utilizzo, immettere il codice PIN predefinito 0000 premendo
per quattro volte quando il numero 0 lampeggia. (Il codice PIN può essere modificato, fare riferimento a "Impostazioni" nella Guida
all'installazione)
NOTA:
Landxcape
TM
si spegne se non riceve input entro 30 secondi dall'accensione. Se si inserisce un codice PIN errato per tre volte,
Landxcape
TM
fara partire l'allarme "di-di" e quindi si spegnerà.
3) Premere seguito da per iniziare a tagliare l’erba.
4) Premere poi per far arrivare Landxcape
TM
alla base di ricarica, con le lame rotanti per tagliare l'erba sulla strada di casa.
Landxcape
TM
continuerà a tagliare l'erba fino all'esaurimento della carica della batteria, poi tornerà alla base di ricarica. Al completamento della
carica, Landxcape
TM
riprenderà automaticamente a tagliare l’erba oppure rimarrà fermo nella base di ricarica, in base al programma di tosatura
impostato.
NOTA:
Quando Landxcape
TM
si accende, tutte le spie sul display si illuminano e quindi si spengono. Controllare se c'è qualche luce danneggiata. Si
consiglia di schermare il display con la mano quando la luce esterna diventa troppo forte.
ACCENSIONE/
SPEGNIMENTO
Attiva e disattiva
Landxcape
TM
BLOCCO
CAPACITÀ DELLA BATTERIA
Tempo di lavoro
START
Avvia il tosaerba /
Selezionare su
PAGINA DI STANDBY:
Landxcape
TM
non è nelle ore di
lavoro.
PAGINA DI SOSPENSIONE:
Landxcape
TM
è completamente carico
e non è nelle ore di lavoro.
DISPLAY
Mostra lo stato delle tue
impostazioni
STOP
Arresta Landxcape
TM
quando è in
funzione
HOME
Inviare Landxcape
TM
alla sua base di ricarica
durante il funzionamento,
con le lame rotanti per
tagliare l'erba sulla strada
di casa e attivare la
carica/Seleziona giù
OK
Conferma le impostazion

IT56
5. Per comprendere Landxcape
TM
Complimenti per l'acquisto del nuovo Landxcape
TM
e per essere entrati
nella spensierata vita della tosatura automatica. Di seguito, vogliamo
aiutarvi a capire meglio come pensa Landxcape
TM
.
5.1 Come fa Landxcape
TM
a riconoscere
ciò che deve tagliare?
Landxcape
TM
sceglie la direzione a caso. Si assicura che tutto il prato
venga tagliato uniformemente senza lasciare alcuna striscia di erba
poco attraente (Vedere Fig. A).
5.2 Come fa Landxcape
TM
a sapere dove
deve andare?
Landxcape
TM
è in grado di agire per conto proprio. Landxcape
TM
sa
quando deve portarsi sulla propria base di ricarica per fare il pieno
di corrente, rileva la pioggia, si arresta se intuisce un problema e
quando urta qualcuno o qualcosa che gli ostruisce il percorso, si
ferma, fa retromarcia e cambia strada. Landxcape
TM
arresta inoltre
automaticamente la rotazione del disco lame se viene sollevato da
terra, al fine di evitare un incidente.
A. Per trovare la base di ricarica
Quando Landxcape
TM
rileva la necessità di ricaricarsi, smetta di tagliare
e segue il cavo perimetrale in senso anti-orario per tornare alla base di
ricarica. Landxcape
TM
è pre-programmato per tagliare l'erba vicino al
cavo perimetrale una volta a settimana. Per impostazione predefinita,
Landxcape
TM
falcia vicino al cavo perimetrale ogni lunedì dopo
l'accensione.
B. Sensore di pioggia
Landxcape
TM
è dotato di un sensore di pioggia laterale, sensibile alle
gocce di pioggia, che comunica a Landxcape
TM
di smettere di tosare
l'erba e di seguire il cavo perimetrale fino alla base di ricarica. (Vedere
Fig. B).
Una volta trascorso il tempo di ritardo, Landxcape
TM
riprenderà a
tagliare l’erba. Il tempo di ritardo predefinito è di 180 min.
Quando i sensori di pioggia sono bagnati, Landxcape
TM
ritorna alla sua
base. Quando i sensori pioggia sono asciutti, Landxcape
TM
inizierà il
conto alla rovescia del lasso di tempo. Se si desidera uscire dal Ritardo
per pioggia, asciugare l'area del sensore e spegnere e riaccendere il
robot rasaerba agendo sull’interruttore principale. Una volta completato
il ciclo di spegnimento e riaccensione, sarà possibile utilizzare
nuovamente l’apparecchio.
C. Rilevazione del filo perimetrale
Landxcape
TM
segue sempre il limite impostato dal filo perimetrale e
utilizza sensori nella parte anteriore per rilevare quando si avvicina.
(Vedere Fig. C).
D. Avvio e arresto durante la tosatura (Vedere Fig. D, E1, E2)
Per iniziare a tagliare l’erba, premere il tasto ON/OFF e inserire il codice
PIN. Premere
seguito da . Per comandare a Landxcape
TM
di
arrestare la tosatura, basta premere il pulsante di STOP nella parte
superiore del tosaerba.
Se Landxcape
TM
sente che qualcosa è sbagliato, verrà visualizzato un
messaggio di errore sul display. Per informazioni sui messaggi di errore,
consultare la sezione Messaggi di errore. E si spegne se non riceve
alcun input dall’utilizzatore entro 20 min.
Per riavviarlo:
• Premere seguito da .
• Landxcape
TM
è quindi pronto per iniziare la tosatura!
5.3 Impostazione
Innanzitutto, si prega di impostare l’altezza sul livello di erba desiderato
dopo il taglio e si può eseguire manualmente l’impostazione del
programma.
NOTA: Quando si esegue l’impostazione del programma manualmente,
Landxcape
TM
entrerà nella pagina di standby se non riceve alcun input
dall’utente entro 30 secondi.
(1) Cambiare il codice PIN
Per modificare il codice PIN, tenere premuti
contemporaneamente entrambi i tasti e per 5 secondi. L’icona
lampeggerà e “ ” inizierà a lampeggiare. Dopodiché, il primo
numero lampeggerà, usare o selezionare il numero desiderato
e premere per confermare. Il prossimo numero lampeggerà. Usa lo
stesso metodo per completare altri numeri. Ad esempio, il nuovo codice
PIN è impostato su 0326. Dopodiché, “ ” inizierà a lampeggiare
e il primo numero lampeggerà di nuovo. Utilizzare lo stesso metodo per
inserire il nuovo codice PIN impostato in questo momento (in questo
esempio, ). Quindi “ ” lampeggerà sul display. Il
tuo codice PIN è stato cambiato con successo.
Solo per riferimento
(2) Impostare anno, data e ora
Impostare l’anno, la data e l’ora sono elementi di impostazione
obbligatori. Se non si impostano questi elementi, ciò influenzerà il tempo
di pianificazione nelle seguenti impostazioni. Questi articoli dovrebbero
essere impostati nell’ordine dell’anno, data e ora. Per l’impostazione
dell’anno, tenere premuto per 3 secondi fino a quando l’icona e
un numero lampeggiano sul display, ad esempio . Utilizzare
o selezionare l’anno desiderato. Quindi premere per confermare
per completare l’impostazione dell’anno.

IT 57
Solo per riferimento
Nel frattempo, l’icona
lampeggerà di nuovo e verrà visualizzato un
numero per indicare la data, ad esempio , ovvero il 29 settembre.
Quando lampeggia, utilizzare o selezionare il numero e
premere per confermare. Quindi lampeggerà. Utilizzare lo stesso
metodo per selezionare il numero e premere per confermare per
completare l’impostazione della data.
Solo per riferimento
Nel frattempo, l’icona
lampeggerà e verrà visualizzata l’ora, ad
esempio . Quando lampeggia, utilizzare o selezionare
il numero e premere per confermare. Quindi lampeggerà,
utilizzare lo stesso metodo per selezionare il numero e premere per
confermare. Ora l’impostazione dell’ora è completata e Landxcape
TM
entrerà nella pagina di standby.
Only for reference
(3) Impostare l’area di lavoro
Continuare a premere
per 3 secondi. Quando l’icona lampeggia,
premere . Un numero lampeggerà sul display, ad esempio ,
che è l’area del prato. Il tempo di lavoro verrà impostato automaticamente
in base alle dimensioni del tuo giardino. Utilizzare o impostare
l’area del prato (l’area aumenterà / diminuirà di 50m2 ogni volta che
si preme / ), quindi premere per confermare. Quindi
Landxcape
TM
entrerà nella pagina di standby.
4hrs
Solo per riferimento
L’ora di inizio predefinita delle 9:00 può essere modificata in qualsiasi
momento tenendo premuti contemporaneamente entrambi i pulsanti
e fino a quando viene emesso un suono di ding.
Ad esempio, continua a premere entrambi e i pulsanti alle
14:05 e il tuo Landxcape
TM
inizierà a tagliare dalle 14:05.
Solo per riferimento
5.4 Con che efficienza Landxcape
TM
taglia
l'erba?
I tempi di tosatura sono diversi per ciascun prato e dipendono dai
fattori indicati di seguito. Regolare gradualmente i tempi di tosatura di
Landxcape
TM
al giorno fino a trovare l'impostazione più adeguata.
Landxcape
TM
è in grado di eseguire la tosatura in aree di dimensioni
diverse, sebbene ciò dipenda da vari fattori, tra cui:
• tipo di erba nel prato e relativo tasso di crescita;
• affilatura delle lame;
• umidità
• temperatura circostante
• quantità di ostacoli presenti nel prato
A differenza della maggior parte degli altri rasaerba, Landxcape
TM
utilizza
un sistema di carica laterale che consente di tagliare il più possibile l'erba
circostante. Inoltre la parte inferiore forata della base di ricarica consente
all’erba di crescere tra un foro e l’altro, conferendo alla base un aspetto
piacevole.
L'altezza di taglio di Landxcape
TM
può essere regolata tra 3 cm e 6 cm.
Prima di avviare Landxcape
TM
per la prima volta, è necessario tagliare l'erba
fino a un'altezza non superiore a 9 cm con il rasaerba manuale. Quindi,
impostare l'altezza di taglio del tuo Landxcape
TM
al massimo (6 cm) per la
sua prima falciatura. (Vedere Fig. F)
Landxcape
TM
offre prestazioni di taglio ottimali in condizioni climatiche
asciutte. Non gradisce l'erba bagnata che può accumularsi sul disco lame
e all'interno del motore, causando la mancanza di trazione e lo slittamento
durante il lavoro.
Landxcape
TM
teme i temporali. In caso di temporale, proteggere
Landxcape
TM
scollegando la base di ricarica eil filo perimetrale e
assicurandosi che Landxcape
TM
non possa caricarsi.
Pagina di standby

IT58
Landxcape
TM
adora tagliare l'erba e, per tagliare meglio, richiede che le
sue lame siano tenute in buone condizioni. Landxcape
TM
è in grado di
compiere varie operazioni da solo, ma a volte necessita di aiuto per evitare
che si danneggi.
• Evitare che Landxcape
TM
si muova sulla ghiaia.
• Rimuovere o sbloccare gli ostacoli sui quali Landxcape
TM
potrebbe accidentalmente salire e con i quali potrebbe danneggiare
il disco lame.
• Rimuovere tutti i detriti e i corpi estranei dal prato.
6. Nozioni di base relative al filo
perimetrale
6.1 Per fissare il filo perimetrale
Utilizzare il distanziatore per il filo perimetrale per impostare la distanza
adeguata dal bordo del prato (oltre 26 cm). Questa è la distanza
raccomandata. Utilizzare il distanziatore per un'installazione adeguata.
Se anche i vicini utilizzano un Landxcape
TM
, è necessario mantenere
una distanza di almeno 1 metri dal filo perimetrale ed i vicini.
Il filo perimetrale deve delimitare esattamente l'area di taglio
prevista.
Landxcape
TM
potrebbe confondersi in presenza di altre curve
o bobine di filo perimetrale che non fanno parte della sua area di taglio
(Vedere Fig. I). In caso di eccesso di filo perimetrale una volta delimitata
l'area di taglio, tagliare e conservare il filo in un altro luogo. Tuttavia, è
importante lasciare la lunghezza necessaria nel punto in cui si collega
alla base di ricarica in modo che possa collegarsi e rimanere interrato.
6.2 Per interrare il filo perimetrale
Se si pianifica di seppellire il cavo perimetrale, si raccomanda prima di
fissare il cavo perimetrale con le apposite pinze al prato per facilitare
eventuali regolazioni che dovessero essere necessarie. Una volta
completata l’installazione del filo perimetrale, si raccomanda di chiedere
a Landxcape
TM
di seguire il filo perimetrale premendo e . Ciò
consentirà verificare il funzionamento del Landxcape
TM
nel nuovo ambiente.
Mentre si osserva il Landxcape
TM
che individua la base di ricarica si
possono fare modifiche al percorso del cavo perimetrale per assicurarsi
che Landxcape
TM
sia in grado di seguirlo quando torna alla base di ricarica.
garantendone il funzionamento in relazione alla base si ricarica prima di
seppellire il cavo di confine.
6.3 Unione del filo perimetrale
Se il filo perimetrale deve essere prolungato o giuntato, utilizzare un
connettore. È resistente all’acqua e assicura una connessione elettrica
affidabile.
Inserire le estremità dei due fili in uno dei tre fori del connettore.
Accertarsi che i fili siano inseriti completamente nel connettore, in
modo che siano visibili entrambe le estremità attraverso la parte
trasparente dall’altro lato del connettore. (Vedere Fig. H) Utilizzare
una pinza per premere completamente il pulsante sopra il connettore.
(Vedere Fig. I, J)
AVVERTENZA:
Si raccomanda di non giuntare il filo perimetrale
semplicemente con del nastro adesivo, né di utilizzare una
morsettiera per effettuare la connessione. L’umidità del terreno
potrebbe ossidare il filo, provocando col tempo un corto circuito.
7. Aggiornamento del software
Il software di Landxcape
TM
può essere aggiornato quando sono
disponibili nuove versioni. L'ultima versione del software può essere
scaricata dal nostro sito web www.landxcape-robotics.com.
Aggiornamento tramite USB. Vedere le istruzioni per il download e
l'installazione sotto.
(1) l'ultima versione del software è disponibile su: www.landxcape-
robotics.com. L’aggiornamento verrà scaricato come file zip.
Decomprimere il file zip e copiare il contenuto in una chiavetta USB
vuota formattata in
FAT32
.
NOTA:
il software verrà scaricato come file zip. Decomprimi il file
zip prima di salvarlo nella chiavetta USB.
(2) Appoggiare il Landxcape
TM
su una superficie piana. Premi
per
spegnere Landxcape.
(3) Inserire la chiavetta USB nella porta. (Vedere Fig. K1)
(4) Accendi Landxcape. L'aggiornamento inizierà automaticamente.
Attendere finché sul display non compare " " (vedere la
figura K2), quindi rimuovere l'unità USB (unità flash) e chiudere
saldamente il coperchio di protezione. Quando il display mostra
" ", l'aggiornamento è completo e Landxcape
TM
inserirà la
pagina PIN.
Il manuale contenuto nella confezione si riferisce al software installato
"di serie". Alcune nuove caratteristiche/funzioni disponibili nella
nuova versione potrebbero non essere descritti nel manuale. Per le
impostazioni non descritte nel manuale contenuto nella confezione,
visitare il sito web www.landxcape-robotics.com per scaricare l'ultima
versione del manuale.
8. Manutenzione
Controllare periodicamente Landxcape
TM
. Landxcape
TM
lavora sodo
e dopo un certo periodo di tempo ha bisogno di una buona pulizia e
di sostituire le sue parti, le quali potrebbero usurarsi. Non utilizzare il
Landxcape
TM
se l’interruttore di accensione/spegnimento è difettoso.
Prima di qualsiasi intervento di assistenza o manutenzione spegnere il
robot tosaerba.
Nella seguente documentazione desideriamo mostrare come lasciare
adattare il nuovo Landxcape
TM
alla sua nuova casa offrendogli la
migliore assistenza possibile.
8.1 Mantenere affilate le lame
AVVERTENZA: prima di pulire, regolare o sostituire le
lame, spegnere Landxcape
TM
e indossare dei guanti di
protezione.
AVVERTENZA: assicurarsi di sostituire TUTTE le lame ogni
volta. Usare sempre viti nuove quando si sistemano le
lame. Questa precauzione è importante per assicurare il
trattenimento delle lame e il bilanciamento del disco lame
rotante. Il mancato utilizzo di viti nuove può provocare serie
lesioni.
Landxcape
TM
non taglia l'erba come altri tosaerba. Le sue lame
sono affilatissime su tutti i 2 lati e ruotano in entrambe le direzioni
raggiungendo la massima capacità di taglio (Vedere Fig. L). Ogni lama
del Landxcape
TM
ha 2 estremità taglienti. Il disco lame ruoterà in avanti
o all’indietro in modo casuale per usare entrambe le estremità taglienti.
Ciò contribuisce a ridurre al minimo la frequenza di sostituzione della

IT 59
lama di taglio. Ogni lama durerà 2 mesi se il dispositivo è programmato
per tagliare l'erba ogni giorno. Verificare sempre se le lame sono
scheggiate o danneggiate e sostituirle, se necessario. Quando le
lame sono smussate e usurate devono essere sostituite con le lame
di ricambio fornite con Landxcape
TM
. Le lame di ricambio sono anche
disponibili presso il rivenditore Landxcape
TM
più vicino.
A. Sostituire le lame
Dopo un certo periodo di tempo, di solito dopo ogni stagione,
le lame di Landxcape
TM
devono essere sostituite. Pertanto,
quando si sostituiscono la lame, assicurarsi di sostituirle tutte
contemporaneamente. È possibile sostituirle con uno dei kit di
lame di ricambio e le viti delle lame supplementari in dotazione con
Landxcape
TM
.
Prima di tentare di sostituire le lame di Landxcape
TM
, spegnere il
tosaerba e indossare guanti protettivi. Quindi attenersi alle seguenti
procedure:
1. Capovolgere delicatamente Landxcape
TM
.
2. Rimuovere il coperchio della batteria e rimuovere la batteria.
3. Svitare le viti delle lame con un cacciavite a taglio. (Vedere Fig. M)
4. Avvitare saldamente le nuove lame.
5. Risistemare la batteria e il coperchio della batteria.
IMPORTANTE: una volta avvitate le lame sul disco lamee,
assicurarsi che routino liberamente.
8.2 Pulizia
AVVERTENZA: prima di eseguire la pulizia, spegnere
Landxcape
TM
Indossare guanti protettivi prima di pulire il
disco lame e non utilizzare acqua corrente.
A. Pulizia del corpo
Landxcape
TM
dura più a lungo e meglio se pulito periodicamente. Dal
momento che il vostro Landxcape
TM
è un apparecchio elettrico dovete
fare attenzione quando lo pulite,
quindi NON usare una canna,
apparecchi ad alta pressione o versare acqua corrente su
Landxcape
TM
, è meglio usare una bottiglia spray piena d’acqua. Per
la pulizia dell'alloggiamento in plastica stampo utilizzare una spazzola
morbida o un panno pulito ed evitare l'uso di solventi o lucidanti (Vedere
Fig. N). Infine, assicurarsi di rimuovere tutto l'accumulo di erba tagliata
e dii detriti, soprattutto dalle prese d'aria di raffreddamento del motore.
B. Pulizia della scocca
Anche in questo caso, è importante spegnere Landxcape
TM
e
indossare guanti protettivi prima di toccare il disco lama.
Prima capovolgere Landxcape
TM
per esporne la parte inferiore. Qui
si può notare il disco lame, il telaio scatolato motore circostante e le
ruote anteriori e motrici. Pulire tutto accuratamente con una spazzola
morbida o un panno umido.
AVVERTENZA:
Non pulire MAI la parte inferiore di Landxcape
TM
con un getto d’acqua. I componenti potrebbero danneggiarsi.
(Vedere Fig. O1, O2)
Ruotare il disco lame per assicurarsi che ruoti liberamente. Controllare
che le lame girino liberamente attorno alle viti di fissaggio. Rimuovere
qualsiasi ostacolo.
IMPORTANTE: rimuovere i detriti depositatisi in modo che non
causino crepe nel disco lame. Anche la più piccola crepa può
ridurre la potenza di taglio di Landxcape
TM
.
C. Pulizia dei pin di contatto e delle strisce di ricarica
Pulire con un panno i pin di contatto situati sulla base di ricarica e le
strisce di ricarica situate su Landxcape
TM
. Rimuovere periodicamente
tutto l'accumulo di erba tagliata e di detriti intorno ai pin di contatto e
alle strisce di ricarica per garantire ogni volta il corretto caricamento di
Landxcape
TM
.
8.3
Durata della batteria
Il cuore di Landxcape
TM
è costituito da una batteria al litio a 20V.
Per una corretta conservazione della batteria, assicurarsi che sia
completamente carica e conservata in un luogo fresco e asciutto.
NOTA:
La temperatura di esercizio raccomandata per Landxcape
TM
è di
0-55
o
C.
La vita utile della batteria di Landxcape
TM
dipende da vari fattori, tra cui:
• la durata della stagione di tosatura nella propria regione geografica;
• la quantità di ore in cui Landxcape
TM
esegue la tosatura al giorno;
• la cura della batteria quando viene conservata.
Landxcape
TM
si può caricare manualmente senza cavo
perimetrale
1. Connettere la base di ricarica a una fonte di alimentazione
adatta. La spia verde sulla base di ricarica si illuminerà.
2. Mentre Landxcape
TM
è spento, agganciarlo manualmente
alla base di ricarica. (Vedere Fig. P)
3. La luce verde lampeggia sulla base di ricarica, Landxcape
TM
incomincerà la ricarica.
8.4 Rimessaggio invernale
Landxcape
TM
dura più a lungo e conserva le prestazioni ottimali se
viene riposto al coperto. Perciò, sebbene sia resistente, si consiglia di
riporre Landxcape
TM
nella rimessa o nel garage durante l'inverno.
Prima di riporre al coperto Landxcape
TM
, assicurarsi di:
• pulire accuratamente Landxcape
TM
;
• Caricare completamente la batteria e rimuoverla da LandxcapeTM.
• spegnere il tosaerba.
Per massimizzare la durata della batteria, caricare completamente la
batteria e rimuoverla da Landxcape
TM
prima di riporla durante l'inverno.
AVVERTENZA: Proteggere la parte inferiore di Landxcape
TM
dall’acqua. Non riporre MAI Landxcape
TM
all’aperto
sottosopra.
Il filo perimetrale può essere lasciato nel terreno, anche se le sue
estremità devono essere protette, ad esempio collocandole in una
lattina di grasso. Se la base di ricarica viene lasciata fuori durante
l'inverno, lasciare il filo perimetrale collegato.
NOTA:
Quando si riattiva Landxcape
TM
dal rimessaggio invernale,
assicurarsi che le strisce di ricarica e i pin di contatto siano pulite. È
meglio utilizzare carta vetrata fine.
8.5 Sostituzione della batteria
AVVERTENZA: premere il tasto ON/OFF su OFF prima di
effettuare qualsiasi regolazione, sostituzione o
riparazione. Prima sostituire le lame, spegnere Landxcape
TM
e
indossare dei guanti di protezione.
Per sostituire la batteria, attenersi alle seguenti procedure:
1. Capovolgere delicatamente Landxcape
TM
.
2. Rimuovere le viti sulla batteria. Rimuovere il coperchio della
batteria. (Vedere Fig. Q1)

IT60
3. Estrarre delicatamente la vecchia batteria. Premere il fermo e sganciare i connettori. (Vedere Fig. Q2)
NOTA:
non tirare dai cavi. Tenere con la mano i connettori e sganciare il fermo.
4. Inserire una nuova batteria originale collegando insieme i connettori e farla scattare in posizione. (Vedere Fig. Q3, Q4)
5. Montare la batteria come illustrato. (Vedere Fig. Q5) Rimontare il coperchio e stringere saldamente le viti.
9. Messaggi di funzione
Display Messaggio Azione
Ritardo pioggia attivato. Non è richiesta alcuna azione
10. Error Messages
Sintomo Causa Azione
Landxcape
TM
si trova fuori
dall'area di lavoro.
1. Se Landxcape
TM
si trova fuori dall'area di lavoro: spegnere Landxcape
TM
e portarlo all'interno
dell'area di lavoro. Accendere Landxcape
TM
. Premere seguito da .
2. Se Landxcape
TM
si trova all'interno dell'area di lavoro, controllare che il LED sulla base di
ricarica sia verde. In caso contrario, verificare che la base di ricarica sia collegata correttamente
al caricabatterie e che il caricabatteria sia collegato a una fonte di alimentazione idonea. In
questo caso, significa che le estremità del filo perimetrale non sono collegate ai morsetti corretti
ed è necessario invertire il collegamento.
3. L'indicatore luminoso rosso della base di ricarica si illumina, verificare che il cavo perimetrale
sia ben collegato ai morsetti sulla base di ricarica. Se il problema persiste, verificare che il cavo
perimetrale non sia stato tagliato.
Motore delle ruote bloccato
1. Spegnere Landxcape
TM
: portare Landxcape
TM
in un'area priva di ostacoli;
2. Accendere Landxcape
TM
. Premere seguito da .
3. Se continua ad essere visualizzato il messaggio di errore; spegnere Landxcape
TM
;
capovolgere Landxcape
TM
e controllare se è presente qualche ostacolo che impedisce alle
ruote di ruotare.
4. Rimuovere qualsiasi ostacolo, capovolgere Landxcape
TM
, accendere Landxcape
TM
.
Premere seguito da .
Disco lame bloccato
1. Spegnere Landxcape
TM
;
2.Capovolgere Landxcape
TM
e controllare se è presente qualche ostacolo che impedisce al
disco lama di ruotare.
3. Rimuovere qualsiasi ostacolo.
4. Capovolgere di nuovo il Landxcape
TM
e portarlo in un’area con erba bassa o regolare
l’altezza di taglio;
5. Accenderlo Landxcape
TM
. Premere seguito da .
Landxcape
TM
è intrappolato.
1. Spegnere Landxcape
TM
.
2. Portare Landxcape
TM
in un'area priva di ostacoli.
3. Accendere Landxcape
TM
. Premere seguito da .
4. Se continua ad essere visualizzato il messaggio di errore; spegnere Landxcape
TM
;
capovolgere Landxcape
TM
. Verificare che nulla impedisca alle ruote di girare.
5. Rimuovere qualsiasi ostacolo, capovolgere Landxcape
TM
, accendere Landxcape
TM
.
Premere seguito da .
Landxcape
TM
è sollevato da
terra.
1. Spegnere Landxcape
TM
.
2. Portare Landxcape
TM
in un'area priva di ostacoli, accendere Landxcape
TM
. Premere
seguito da .
3. Se il messaggio di errore è ancora visualizzato: spegniere Landxcape, capovolgere
Landxcape
TM
e controllare se c'è qualcosa che impedisce alle ruote anteriori di ruotare.
4. Rimuovere qualsiasi oggetto, capovolgere Landxcape
TM
, accendere Landxcape
TM
. Premere
seguito da .

IT 61
Landxcape
TM
è capovolto. Capovolgere Landxcape
TM
. Premere seguito da .
Errore della batteria
1. Controllare la temperatura della batteria. Se la temperatura è troppo alta, attendere
che la temperatura si sia raffreddata. Premi poi .
2. Sostituire con una nuova batteria. Riavviare Landxcape. Premi poi .
3. Se l'errore si verifica ripetutamente, provare a modificare la pianificazione di lavoro.
Ci vuole troppo tempo prima
che Landxcape
TM
torni alla
base di ricarica.
Agganciare manualmente Landxcape
TM
alla base di ricarica per la ricarica. Dopo che
Landxcape
TM
è completamente carico, Premi
poi .
Errore sconosciuto
Riavviare Landxcape
TM
. Premi
poi . Se il messaggio di errore è ancora
visualizzato, contattare un agente di servizio per assistenza.
NOTA
• Prima di accendere Landxcape
TM
, controllare sempre che si trovi all'interno dell'area di lavoro. In caso contrario, viene visualizzato il messaggio
“
”. Questo messaggio viene visualizzato anche quando Landxcape
TM
si trova sul filo perimetrale quando è acceso.
• Se per qualsiasi motivo (ad esempio, una festa o bambini che giocano...) si desidera parcheggiare Landxcape
TM
nella base di ricarica: premere
seguito da . Landxcape
TM
tornerà alla base di ricarica e si fermerà là. Premere per disattivare Landxcape
TM
.
• Se un errore si verifica ripetutamente nella stessa area del prato, potrebbe esservi un problema con il filo perimetrale. Fare riferimento alle
precedenti istruzioni di installazione e controllare l'impostazione con il suo aiuto.
• Se il prato è diviso in due zone separate collegate da un corridoio inferiore a 1 m, uno dei quali non è dotato di base di ricarica: quando il
Landxcape
TM
è scarico, portarlo manualmente alla base di ricarica. Il processo di ricarica avrà inizio.
• Se occasionalmente il Landxcape
TM
non funziona normalmente cercare di riavviarlo. Se il problema persiste, provare a rimuovere e reinstallare
la batteria. Se non si riesce a risolvere il problema contattare il tecnico dell'assistenza Landxcape
TM
.
• Non lavare l’apparecchio con impianti ad alta pressione. Potrebbero causare danni alle batterie o all’apparecchio.
11. Risoluzione dei problemi
Se Landxcape
TM
non funziona correttamente, attenersi alla guida alla risoluzione dei problemi di seguito. Se il problema persiste, contattare il
rivenditore.
Sintomo Causa Azione
Il LED della base di ricarica non si
accende.
Non vi è alimentazione.
Verificare che il cavo di alimentazione sia collegato
correttamente al caricabatterie e che il caricabatteria
sia collegato a una fonte di alimentazione idonea.
L'indicatore luminoso rosso della base
di ricarica si illumina.
Il filo perimetrale non è collegato.
Verificare che il filo perimetrale sia collegato correttamente
alla base di ricarica.
Controllare che il filo perimetrale non presenti rotture,
specialmente alle estremità, specialmente alle estremità.
Landxcape
TM
si accende, ma il disco
lame non si muove.
Landxcape
TM
sta cercando la base di ricarica (a
meno che non si prema il pulsante per
farlo andare alla base di ricarica).
È normale. Landxcape
TM
deve essere ricaricato e il
disco lame non ruota mentre cerca la base di ricarica.
Landxcape
TM
vibra
È possibile che le lame siano danneggiate.
Controllare le condizioni del disco lame.
Controllare le lame e le viti e sostituirle, se
necessario.
Rimuovere gli eventuali detriti e corpi estranei dalle
lame e dal disco lame.
L'erba è stata tagliata in modo non
uniforme.
Landxcape
TM
non funziona una quantità di ore
sufficiente al giorno.
Utilizzarlo più a lungo.
L'area di taglio è troppo grande.
Ridurre le dimensioni dell'area di taglio o utilizzarlo più a lungo.
Le lame non sono affilate. Sostituire le lame e le viti per bilanciare il disco lame
L'altezza di taglio impostata è bassa per la
lunghezza dell'erba.
Sollevare l'altezza di taglio, quindi abbassarla
gradualmente.
Erba o altri oggetti sono avvolti
intorno il disco lame.
Controllare il disco lame e rimuovere l'erba o altri
oggetti.
Vi è un accumulo di erba nel disco lama o nel
telaio scatolato motore.
Assicurarsi che il disco lame ruoti agevolmente. Se
necessario, estrarre il disco lame e rimuovere i detriti.

IT62
Landxcape
TM
si trova all’interno dell’area
di lavoro e il filo perimetrale è collegato.
Ma il display mostra il messaggio
“ ”.
Le estremità del filo perimetrale non sono
collegate correttamente ai morsetti.
Invertire il collegamento delle estremità del filo
perimetrale.
Il cavo perimetrale è rotto. Riparare il cavo perimetrale danneggiato con connettori.
Il tempo di ricarica è molto più lungo di
quanto previsto.
Collegamento scadente causato dalla
contaminazione delle strisce di ricarica.
Pulire le pin di contatto della base di ricarica e le
strisce di ricarica della macchina con un panno.
Il programma di protezione della ricarica si è
attivato a causa dell’elevata temperatura.
Posizionare la base di ricarica in un’area ombreggiata
o attendere finché la temperatura è diminuita.
Il tosaerba non si ricarica
Non c'è corrente.
Verificare che il cavo di alimentazione sia collegato
correttamente al caricabatterie e che il caricabatterie
sia collegato a una fonte di alimentazione idonea.
Non funziona correttamente durante la ricarica manuale
Fare riferimento alla ricarica manuale nella Sezione 8.3.
Landxcape
TM
inizia ad avere tempi di
esercizio più brevi tra le ricariche
Il disco lame è intasato da corpi estranei Estrarre il disco lame e pulirlo
Landxcape
TM
vibra fortemente L'erba è troppo alta e troppo spessa.
La batteria potrebbe essere scarica o vecchia.
Controllare il disco lame e la lama, rimuovere l'erba o altri oggetti.
Landxcape
TM
non si aziona all'orario
corretto.
L'orologio non è impostato all'orario corretto.
Impostare l'orologio sull'ora corretta, fare riferimento
alla Sezione 5.3.
Gli orari di taglio programmati per il
Landxcape
TM
non sono corretti.
Modificare le impostazioni dell'orario di avvio e
arresto tosatura.
Landxcape
TM
viene posizionato manualmente
nella base di ricarica.
Premere
e successivamente .
La batteria non si carica poiché la sua
temperatura supera i 55 quando fa caldo.
Attendere fino a quando la batteria si è raffreddata.
Landxcape
TM
non può agganciarsi
correttamente alla base di ricarica
Influenze da parte dell’ambiente. Riattivare Landxcape
TM
.
Collegamento scadente causato dalla
contaminazione delle strisce di ricarica.
Pulire i pin di contatto della base di ricarica e le
strisce di ricarica della macchina con un panno.
La spia verde sulla base di ricarica si
accende prima che la ricarica sia completa.
La base di ricarica si sta surriscaldando.
Posizionare la base di ricarica in un’area ombreggiata
o attendere finché la temperatura è diminuita.
Landxcape
TM
si muove fuori dal filo
perimetrale. Il Landxcape
TM
non taglia
l'erba in un'area all'interno della
zona perimetrale. Il Landxcape
TM
fa
retromarcia o ruota in modo erratico
vicino al filo perimetrale.
Il cavo perimetrale di un altro Landxcape
TM
o di
un robot tosaerba di altra marca è posizionato
troppo nelle vicinanze.
Assicurarsi che il Cavo Perimetrale Landxcape
TM
sia
posizionato ad una distanza di almeno 1m rispetto al
cavo perimetrale limitrofo.
Il cavo perimetrale è stato installato con angoli acuti.
Controllare che gli angoli del cavo siano morbidi.
In condizioni di umidità, il segnale elettrico
del filo perimetrale potrebbe interrompersi nei
punti di giunzione o di riparazione.
Controllare i punti di giunzione del filo perimetrale.
Isolarli per ottenere una connessione completamente
impermeabile.
Si è verificata una perdita di segnale dovuta a
un isolamento danneggiato.
Riparare l'isolamento danneggiato del filo perimetrale
con dei connettori.
L'area di taglio è più ampia dell'area
consentita per il Landxcape
TM
.
Ridurre l'area di taglio o utilizzare Landxcape
TM
con
un'area di taglio più ampia consentita.
Le ruote del Landxcape
TM
scivolano o
danneggiano il prato.
Corpi estranei, come rami e frasche,
potrebbero impigliarsi sotto il Landxcape
TM
.
Rimuovere gli eventuali corpi estranei dalla parte
inferiore del Landxcape
TM
.
Il prato è troppo bagnato. Attendere che il prato si sia asciugato.
Il Landxcape
TM
esce dal cavo
perimetrale a causa dell’alta velocità se
si trova in discesa.
Il cavo di perimetrale si trova su un pendio
superiore al 17% (10°).
Riposizionare il cavo perimetralelontano da pendenze
superiori al 17% (10°). Fare riferimento al manuale
d’installazione per i particolari.
Si verifica un errore di aggiornamento del
software.
Riprovare seguendo la sezione "Aggiornamento
software".
Tutela ambientale
I prodotti elettrici non possono essere gettati tra i rifiuti domestici. L’apparecchio da rottamare deve essere portato al centro di riciclaggio per
un corretto trattamento. Controllare con le autorità locali o con il rivenditore per localizzare il centro di riciclaggio più vicino.

IT 63
Dichiarazione di conformità
Noi,
Positec Germany GmbH
Grüner Weg 10, 50825 Cologne, Germany
Dichiara che l’apparecchio,
Descrizione Robot tosaerba
Codice LX790 LX791 LX792 LX793 (790-799 - Designazione del macchinario, rappresentativo della Robot tosaerba) (Anno, codice articolo
e mese del numero di serie sono riportati sull’ultima pagina. Il numero di serie completo è chiaramente riportato sull’involucro del
tosaerba) con caricabatterie LA8001 / LA8002 e base di ricarica LA3000
Funzione Falciatura prati
È conforme alle seguenti direttive,
- Procedura di conformità come da Annex V
- Potenza acustica pesata 64.2 dB (A)
- Massima potenza di rumore garantita 65 dB (A)
L’organismo competente
Indirizzo: Cleeve Road, Leatherhead, Surrey, KT22 7SB United Kingdom
Conforme a,
EN 60335-1:2012+A11+A13:2017, EN 50636-2-107:2015+A1:2018, EN 60335-2-29:2004+A2:2010,
EN 62233:2008, EN ISO 3744:2005, EN 55014-1:2017, EN 55014-2:2015, EN 61000-3-2:2014,
EN 61000-3-3:2013, EN 61558-1:2005+A1:2009, EN 61558-2-16:2009+A1:2013,EN 303 447 V1.1.1
Il responsabile autorizzato alla compilazione della documentazione tecnica,
Nome Marcel Filz
Indirizzo Positec Germany GmbH, Grüner Weg 10, 50825 Cologne, Germany
2018/10/26
Allen Ding
Vice capo ingegnere, testing e certificazione
Positec Technology (China) Co., Ltd.
18, Dongwang Road, Suzhou Industrial
Park, Jiangsu 215123, P. R. China

ES64
1. Seguridad del producto
1.1 Instrucciones generales y adicionales
de seguridad
ADVERTENCIA: Lea todas las advertencias e instrucciones
de seguridad.
El incumplimiento de las advertencias e
instrucciones puede provocar una descarga eléctrica, incendio y/o
lesiones graves.
Lea atentamente las instrucciones para un correcto
funcionamiento de la máquina.
Guarde todas las advertencias e instrucciones como referencia
para el futuro.
• Este aparato no se ha diseñado para ser utilizado por personas
(incluidos niños) con una incapacidad física, sensorial o mental
reducida, o falta de experiencia y conocimiento, a menos que
una persona responsable de su seguridad les autorice a ello o les
proporcione la formación necesaria para usar el aparato.
• No se debe permitir que los niños jueguen con este aparato.
• El aparato solo puede utilizarse con la fuente de alimentación que
lo acompaña.
IMPORTANTE
LEA ATENTAMENTE ANTES DE USAR
GUARDE COMO REFERENCIA PARA EL FUTURO
Prácticas para un correcto funcionamiento
Formación
a) Lea las instrucciones con atención. Asegúrese que ha entendido
las instrucciones y se ha familiarizado con los controles y el uso
apropiado del aparato;
b) No permita que el aparato sea usado por niños o por personas que
desconocen las instrucciones. La normativa local puede restringir
la edad del operador;
c) El operador o usuario es responsable de los accidentes o peligros
que se produzcan a otras personas o propiedades.
Preparación
a) Asegúrese de que la instalación del alambre delimitador es
correcta y se ha hecho según las instrucciones.
b) Revise periódicamente el área donde el aparato se va a utilizar
y elimine todas las piedras, palos, cables, huesos y otros objetos
extraños.
c) Periódicamente realice una inspección visual para comprobar que
las cuchillas, los pernos de las cuchillas y el montaje del equipo de
corte no estén desgastados o dañados. Cambie el juego completo
de cuchillas y pernos para conservar el equilibrio.
d) Tenga cuidado con los equipos que presentan un sistema multieje
porque el giro de una hoja puede provocar que las otras hojas
también giren.
e) ¡ADVERTENCIA! La cortadora de césped no debe utilizarse sin el
protector.
Funcionamiento
1. Aspectos generales
a) Nunca haga funcionar el aparato con los protectores defectuosos
o sin los dispositivos de seguridad, por ejemplo, los deflectores, en
su sitio;
b) No ponga las manos ni los pies cerca o debajo de las partes
giratorias. Manténgase alejado de la apertura de descarga en todo
momento;
c) Nunca levante o transporte el aparato con el motor en marcha;
d) Accionar el dispositivo de desconexión del aparato.
– Antes de despejar un obstáculo;
– Antes de inspeccionar, limpiar o trabajar con el equipo.
e) No se permite modificar el diseño original del robot cortacésped.
Todas las modificaciones se hacen bajo su propio riesgo.
f) Ponga en marcha el robot cortacésped según las instrucciones.
Cuando se conecte la tecla de encendido, asegúrese de que
las manos y los pies se mantengan alejados de las cuchillas
en movimiento. Nunca ponga los pies o las manos debajo del
cortacésped.
g) No levante ni transporte el robot cortacésped cuando la tecla de
encendido esté conectada.
h) No permita que el robot cortacésped sea usado por personas que
desconocen su funcionamiento.
i) No ponga nada encima del robot cortacésped o el cargador.
j) No permita que se use el robot cortacésped con una cuchilla de
corte o mecanismo defectuoso. Tampoco se debe utilizar con
cuchillas, tornillos, tuercas o cables defectuosos.
k) Apague el robot cortacésped siempre que no tenga intención de
utilizarlo. El robot cortacésped solo podrá arrancar cuando la tecla
de encendido esté activada y se haya introducido un código PIN
correcto.
l) Mantenga las manos y los pies alojados de las hojas en
movimiento. No coloque nunca las manos o los pies cerca o
debajo del cuerpo del cortacésped robótico cuando esté en
funcionamiento.
m) La máquina y sus dispositivos periféricos no se deben utilizar
cuando haga mal tiempo, especialmente si existe riesgo de
tormenta eléctrica.
n) No toque las piezas móviles peligrosas hasta que se hayan parado
por completo.
o) Para usar máquinas en áreas públicas, los signos de advertencia
deben de colocarse en lugares donde la máquina está en
funcionamiento Ellos deberían de enseñar el significado del
siguiente texto:
Advertenica! Cortacésped automático! Manténgase lejos de la
máquina! Vigile a losniños!
2. En el caso de que el equipo funcione automáticamente
a) No deje que el aparato funcione sin vigilancia si sabe que hay
animales domésticos, niños o personas en los alrededores.
Mantenimiento y almacenamiento
¡ADVERTENCIA! Antes de dar la vuelta al cortacésped, debe
desconectarse siempre la tecla de encendido.
La tecla de encendido debe estar desconectada siempre que se
trabaje en la parte inferior del cortacésped, como al limpiarla o al
reemplazar las cuchillas.
a) Mantenga todas las tuercas, pernos y tornillos apretados para unas
condiciones de trabajo seguras.
b) Por su seguridad inspeccione el robot cortacésped cada semana y
sustituya las piezas desgastadas o dañadas;
c) Compruebe que las cuchillas y el disco de corte no están dañados.
Cuando sea necesario cambie las cuchillas y los tornillos al mismo
tiempo a fin de que las partes giratorias estén equilibradas.
d) Asegúrese de que las partes cortantes que se sustituyen son del
tipo correcto.
e) Asegúrese de que las baterías se cargan con el cargador correcto
recomendado por el fabricante. El uso incorrecto puede provocar
descargas eléctricas, sobrecalentamiento o una fuga del líquido
corrosivo de la batería;
f) En el caso de que se produzca una fuga de electrólito y se mezcle
con agua o agente neutralizante, busque ayuda médica si entrara
en contacto con los ojos, etc.;

ES 65
g) La asistencia técnica del equipo se debería realizar de acuerdo con
las instrucciones del fabricante.
Recomendación
Conecte la máquina y sus dispositivos periféricos únicamente a un
circuito de alimentación protegido mediante un interruptor diferencial
(ID) con una corriente de disparo que no sea superior a 30 mA.
Riesgos residuales
Para evitar lesiones, utilice guantes de protección para sustituir las
cuchillas.
Transporte
Para el transporte del robot cortacésped a largas distancias, se debe
utilizar el embalaje original.
Para un traslado seguro desde o dentro de la zona de trabajo:
a) Pulse el botón STOP para detener la segadora.
Selecciona los cuatro dígitos del PIN cuando utiliza la segadora por
primera vez.
b) Apague el robot cortacésped siempre que tenga intención de
transportarlo.
c) Lleve el cortacésped por el mango de la parte en la parte delantera.
Lleve el cortacésped con el disco de corte lejos del cuerpo.
herramienta
recargables.
otros objetos metálicos.
Cuando la batería no esté siendo
utilizada, manténgala alejada de objetos metálicos, como clips de
papel, monedas, llaves, clavos, tornillos u otros objetos metálicos
pequeños, que pueden posibilitar la conexión de un borne con otro.
Al provocar un cortocircuito con los bornes de la batería se pueden
sufrir quemaduras o generar un incendio.
expuestas directamente al sol.
se produce el contacto, lave la zona afectada con grandes
cantidades de agua y acuda a un médico.
f) Acuda a un médico inmediatamente si se ha ingerido una
cuando se utilizan a temperatura ambiente normal (20 ± 5 °C).
j) Recargue solo con el cargador indicado por Landxcape
TM
. No
proporcionado para el uso con este equipo. El cargador
utilizarse con el aparato.
m) Conserve la documentación original del producto por si
tuviera que consultarla en otro momento.
n) Deshágase del producto correctamente.
1.2 Información sobre el Landxcape
TM
ADVERTENCIA –El robot cortacésped puede ser
peligroso si se usa incorrectamente.
Lea con atención el Manual de Usuario y entienda su
contenido antes de usar su robot cortacésped.
ADVERTENCIA - Manténgase a una distancia segura
mientras la máquina esté en funcionamiento.
ADVERTENCIA – Apague la máquina antes de trabajar
en ella o levantarla.
ADVERTENCIA –No use la máquina como medio de
transporte.
No incinerar
No exponer a la lluvia o al agua.
No tirar las baterías. Las baterías agotadas deben
llevarse al punto local de recogida o reciclaje de
residuos.
No lave la máquina utilizando agua a alta presión.
Dispositivo de clase III
Los residuos de aparatos eléctricos y electrónicos no
deben depositarse en la basura doméstica. Se deben
reciclar en las instalaciones especializadas. Consulte
a las autoridades locales o el establecimiento para
saber cómo reciclar estos productos.

ES66
2. Lista de componentes
1. BOTÓN STOP (DETENER)
2. MANDO DE AJUSTE DE LA ALTURA DE CORTE
3. TECLA DE ENCENDIDO Y APAGADO
4. TECLA START
5. BOTÓN HOME
6. MONITOR
7. PLETINA DE CARGA
8. SENSOR DE LLUVIA
9. RUEDAS DELANTERAS
10. DISCO GIRADOR DE LA CUCHILLA
11. HOJA DE LA CUCHILLA
12. BATERÍA
13. PUERTO USB
14. RUEDA DE TRACCIÓN TRASERA
15. MANGO
16. PATILLAS DE CONTACTO
17. BASE DE CARGA
18. CABLE DELIMITADOR
19. CLAVIJAS DEL CABLE
20. CABLE DELIMITADOR
21. CLAVOS DE RETENCIÓN DE LA BASE DE CARGA
22. MEDIDOR DE DISTANCIA DEL CABLE DELIMITADOR
23. LLAVE ALLEN
24. CONECTOR
Los accesorios ilustrados o descritos pueden no corresponder al material suministrado de serie con el aparato.

ES 67
3. Datos técnicos y acústicos
3.1 Datos técnicos
Modelo LX790 LX791 LX792 LX793 (790-799 - denominaciones
de maquinaria, representantes de Robot Cortacesped)
LX790 LX792 LX791 LX793
Tensión nominal 20V
Max.*
Velocidad en vacío 2800/min
Área de corte 600m
2
900m
2
Diámetro de corte 16cm 18cm
Altura de corte 30-60mm
Posiciones de altura de corte 4
Tipo de batería Litio
Modelo de la batería LA0001 LA0002
Tiempo de carga aprox. 1.3hrs 2hrs
Modelo del cargador LA8001 / LA8002
Datos nominales del cargador
Entrada: 100-240V~50/60Hz, 38W,
Salida: 20V
, 1.5A
Peso de la Máquina 8.4kg
Clase de protección III
* Voltaje medido sin carga. El voltaje inicial máximo de la batería es de
20 voltios. El voltaje nominal es de 18 voltios.
ACCESORIOS
LX790 LX792 LX791 LX793
Tornillos 9 9
Base de carga 1 1
Estacas de sujeción de la base de
carga
7 7
Alambre delimitador 150m 180m
Estacas delimitadoras 210 250
Llave Allen 1 1
Patrón de medida para el alambre
delimitador
2 2
Cuchillas 9 9
Conector 2 2
Batería (LA0001/ LA0002) 1 1
Cargador (LA8001 / LA8002) 1 1
Recomendamos que adquiera todos sus accesorios en el mismo
comercio donde compró la herramienta. Consulte los estuches de los
accesorios para más detalles. El personal del comercio también puede
ayudar y aconsejar.
3.2 Información de ruido
Nivel de presión acústica de
ponderación
L
pA
= 44.2dB (A)
K
PA
= 0.4dB(A)
Nivel de potencia acústica de
ponderación
L
wA
= 64.2dB (A)
K
wA
= 0.4dB(A)
Úsese protección auditiva
cuando la presión acústica sea
mayor a
80dB(A)
Es inevitable un cierto grado de ruido procedente de la máquina. El
trabajo con maquinarias ruidosas está sujeto a licencia y debe estar
limitado a determinados periodos. Respete los periodos de descanso y
puede que sea necesario restringir las horas de trabajo al mínimo. Para
su protección personal y la de las personas que trabajen cerca, debe
usar una protección auditiva adecuada.
Utilización reglamentaria
Este producto ha sido proyectado para utilizarse en el área doméstica.
Se ha diseñado para cortar el césped con frecuencia, permitiéndole
disfrutar de un césped más verde y de mejor aspecto como nunca
antes. Según el tamaño de su jardín, Landxcape
TM
puede programarse
para funcionar en cualquier momento o con la frecuencia que desee.
No está diseñado para cavar, barrer ni quitar nieve.

ES68
4. Panel de control
Start (Inicio)
1) Después de la instalación del cable delimitador, puede empezar a utilizar el Landxcape
TM
(consulte la guía de instalación para instalar el cable
delimitador).
2) Primero pulse
hasta que el Landxcape
TM
se active. Para la primera vez que se usa, ingrese el código PIN predeterminado 0000 presionando
cuatro veces cuando el número 0 esté parpadeando. (El código PIN se puede cambiar, consulte "Configuración" en la Guía de instalación)
NOTA:
Landxcape
TM
se apagará si no recibe ninguna entrada dentro de los 30 segundos posteriores a su activación. Si ingresa el código PIN
incorrecto tres veces, Landxcape
TM
activará la alarma "di-di" y luego se apagará.
3) Pulse y, luego, pulse para comenzar a cortar el césped.
4) Presione y para que Landxcape
TM
vaya a la base de carga, con las cuchillas rotativas para cortar el césped de camino a casa.
Landxcape
TM
funcionará de forma ininterrumpida hasta que la batería esté baja; entonces volverá a la base de carga. Una vez se ha cargado por
completo, el Landxcape
TM
continuará cortando el césped automáticamente o permanecerá en la base de carga dependiendo de su plan de siega.
NOTA:
Cuando se active Android
®
, se eliminarán todas las luces de la pantalla y luego se apagarán. Compruebe si hay alguna luz dañada. Se
recomienda proteger la pantalla con la mano cuando la luz exterior sea demasiado fuerte.
Encender/Apagar
Encender / Apagar
Landxcape
TM
Bloquear
Capacidad de la batería
Tiempo de
trabajo
START (INICIO)
Para empezar a cortar/
Seleccionararriba
PÁGINA DE ESPERA:
Landxcape
TM
no está en horario
de trabajo.
PÁGINA DE ESPERA:
Landxcape
TM
está totalmente cargado y no está
en horario de trabajo.
Monitor
Monitor del estado de su
configuración
STOP (DETENER)
Para detener el Landxcape
TM
durante el funcionamiento
INICIO
Enviar Landxcape
TM
a su
base de cambio durante
la operación, con las
cuchillas rotativas para
cortar el césped de
camino a casa y active
cargando/selección abajo
OK (ACEPTAR)
Confirma cualquier
configuración

ES 69
5. Funcionamiento del Landxcape
TM
Nos gustaría felicitarle por la nueva compra del Landxcape
TM
y por su
entrada en la vida sin preocupaciones con el uso de cortacéspedes
automáticos. En las páginas siguientes, nos gustaría ayudarle a
comprender mejor cómo piensa su Landxcape
TM
.
5.1 ¿Cómo sabe mi Landxcape
TM
qué tiene
que cortar?
El Landxcape
TM
elige su dirección aleatoriamente. Se asegurará de que
todo el césped está cortado de manera uniforme sin dejar de lado las
rutas de corte poco interesantes (Véase la fig. A).
5.2 ¿Cómo sabe mi Landxcape
TM
adónde
tiene que ir?
Su Landxcape
TM
es capaz de hacer cosas por su cuenta. El Landxcape
TM
sabe cuándo debe ir a su base de carga para cargarse, puede notar
cuando está lloviendo, puede pararse si detecta un problema, y
sabe detenerse, retroceder y dar un rodeo cuando choca contra un
objeto o con algo que le bloquea el paso. El Landxcape
TM
parará
automáticamente el disco de corte si el aparato se levanta del suelo
con el fin de evitar un accidente.
A. Encontrar el cargador
Cuando su Landxcape
TM
necesite recargarse, se detendrá y seguirá
el alambre delimitador en sentido anti-horario hacia la base de carga.
El Landxcape
TM
ha sido programado para cortar el césped cerca del
alambre delimitador una vez por semana. De forma predeterminada,
Landxcape
TM
cortará cerca del cable de límite todos los lunes después
de que se encienda.
B. Sensor de lluvia
La Landxcape
TM
cuenta con un Sensor de lluvia en el lateral que detecta
las gotas de lluvia y ordena al Landxcape
TM
que deje de cortar y siga al
Cable delimitador hasta su Base de carga (Véase la fig. B).
Landxcape
TM
volverá a salir para segar una vez transcurrido el tiempo
de retardo, el tiempo de retardo predeterminado es de 180 min.
Cuando los sensores de lluvia se mojan, Landxcape
TM
regresa a su
base de acoplamiento. Cuando los sensores de lluvia estén secos,
Landxcape
TM
comenzará la cuenta atrás del tiempo de demora. Para
salir de la función de retardo por lluvia, seque la zona del sensor y
apague y vuelva a encender el aparato con el interruptor principal.
Cuando se vuelva a encender el aparato después de apagarlo, verá que
el aparato vuelve a funcionar.
C. Detectar el cable delimitador
El Landxcape
TM
siempre se mantiene dentro del límite establecido
por el cable delimitador y utiliza sensores en su parte delantera para
detectar cuando se está acercando. (Véase la fig. C).
D. Arrancar y parar el funcionamiento (Véase la fig. D, E1, E2)
Para comenzar a cortar el césped, pulse el botón de encendido/apagado
e introduzca el código PIN. Pulse y, a continuación, pulse . Si
quiere que el Landxcape
TM
cese de cortar, solo tiene que pulsar el botón
de STOP en la parte superior de la máquina.
Si el Landxcape
TM
detecta que algo está mal, se mostrará un mensaje de
error en la pantalla. Para obtener más información sobre los mensajes de
fallo, consulte Mensajes de error. El Landxcape
TM
se apagará si no recibe
ninguna señal del usuario pasados 20 minutos.
Para reanudar:
• Pulse y, luego,
• ¡Ahora el Landxcape
TM
empezará a segar!
5.3 Configuración
Primero, establezca la altura a un nivel de césped deseado después del
corte y puede hacer la configuración del programa manualmente.
NOTA: Cuando realice la configuración del programa manualmente,
Landxcape
TM
entrará en la página de espera si no recibe ninguna
entrada del usuario dentro de los 30 segundos.
(1) Cambiar el código PIN
Para cambiar el código PIN, siga presionando los botones
y al
mismo tiempo durante 5 segundos. El ícono estará parpadeando,
y el “ ” estará parpadeando. Después de eso, el primer número
parpadeará, para usar o para seleccionar el número que desea
presione para confirmar. El siguiente número estará parpadeando.
Usa el mismo método para completar otros números. Por ejemplo, el
nuevo código PIN está configurado para ser 0326. Después de eso, el “
” comenzará a parpadear y el primer número volverá a parpadear.
Use el mismo método para ingresar el nuevo código PIN que acaba de
configurar (en este ejemplo, ). Luego, “ ” estará
parpadeando en la pantalla. Su código PIN ha sido cambiado con éxito.
Solo como referencia
Establecer año, fecha y hora son elementos de ajuste obligatorios. Si no
configura estos elementos, influirá en la hora programada en la siguiente
configuración. Estos elementos deben establecerse en el orden del
año, la fecha y la hora. Para la configuración del año, siga presionando
durante 3 segundos hasta que el icono y un número estén
parpadeando en la pantalla, por ejemplo, . Utilice o para
seleccionar el año que desee. Luego presione para confirmar para
finalizar el ajuste del año.

ES70
Solo como referencia
Mientras tanto, el icono
volverá a parpadear y se mostrará un
número para indicar la fecha, por ejemplo, , que significa
29 de septiembre. Cuando esté parpadeando, úselo o
seleccione el número y presione para confirmar. Y entonces
estará parpadeando. Use el mismo método para seleccionar el número y
presione para confirmar para finalizar la configuración de la fecha.
Solo como referencia
Mientras tanto, el icono
parpadeará y se mostrará la hora, por ejemplo,
. Cuando está parpadeando, úselo o seleccione el
número y presione para confirmar. Luego, estará parpadeando,
use el mismo método para seleccionar el número y presione para
confirmar. Ahora se ha completado el ajuste de la hora y Landxcape
TM
entrará en la página de espera.
Solo como referencia
(3) Establecer áreas de trabajo
Siga presionando durante 3 segundos. Cuando el icono esté
parpadeando, presione . Aparecerá un número parpadeando en la
pantalla, por ejemplo, , que es el área del césped. El tiempo de
trabajo se ajustará automáticamente de acuerdo con el tamaño de su
jardín. Use o configurare el área de césped (el área aumentará
/ disminuirá en 50 m2 cada vez que presione / ) y presione
para confirmar. Entonces Landxcape
TM
entrará en la página de espera.
4hrs
Solo como referencia
(4) Cambiar la hora de inicio predeterminada
La hora de inicio predeterminada de las 9:00 se puede cambiar a
cualquier momento presionando los botones
y al mismo
tiempo hasta que se escuche un sonido.
Por ejemplo, siga presionando los botones y a las 14:05, y su
Landxcape
TM
comenzará a cortar desde las 14:05.
Solo como referencia
5.4 ¿Cuál es la eficiencia de mi
Landxcape
TM
al cortar el césped?
Las horas de corte varían para cada jardín en función de los factores
que se indican abajo. Ajuste gradualmente el tiempo de corte de su
Landxcape
TM
hasta que encuentre el valor más adecuado para usted.
Su Landxcape
TM
es capaz de cortar áreas de hasta áreas de diferentes
tamaños, aunque esto depende de varios factores como, por ejemplo:
• Variedades de hierba en su césped y su tasa de crecimiento
• Delgadez de las hojas de corte
• Humedad
• Temperatura ambiental
• Cantidad de obstáculos en el césped
A diferencia de la mayoría de cortadoras, Landxcape
TM
emplea un sistema
de carga lateral que permite cortar la mayor parte posible de la hierba
circundante. Además, los agujeros en la parte inferior de la base de carga
permiten que la hierba crezca a través, lo que proporciona un aspecto
elegante.
La altura de corte del Landxcape
TM
se puede ajustar entre 3 cm y 6 cm.
Antes de iniciar su Landxcape
TM
por primera vez, debe cortar el césped a
una altura de no más de 9 cm con su cortacésped manual. Luego, ajuste
la altura de corte de su Landxcape
TM
a su ajuste máximo (6 cm) para su
funcionamiento por primera vez. (Véase la fig. F)
El Landxcape
TM
cortará mejor con tiempo seco. No le gusta la hierba
mojada, que puede acumularse en el disco de corte y dentro del motor, y
también puede causar la pérdida de tracción y deslizamiento durante el
trabajo.
A su Landxcape
TM
no le gustan las tormentas eléctricas. En el caso de
tormenta eléctrica, desconecte el Landxcape
TM
de la base de carga,
desconecte el cable delimitador y asegúrese de que el Landxcape
TM
no
puede cargarse.

ES 71
A su Landxcape
TM
le gusta cortar la hierba y necesita unas Cuchillas en
buenas condiciones para poder cortarla bien. El Landxcape
TM
puede hacer
la mayoría de las cosas por sí mismo, pero a veces necesitará su ayuda
para no hacerse daño.
• No deje nunca que el Landxcape
TM
se desplace sobre grava
• Elimine o bloquee los obstáculos sobre los que el Landxcape
TM
podría subir accidentalmente y dañar su disco de corte
• Elimine todos los restos y objetos extraños de su césped
6. Fundamentos del cable
delimitador
6.1 Fijar el cable delimitador
Utilice el calibre de distancia del alambre de limitador para establecer
la distancia correcta desde el borde del césped (Más de 26cm). Esta es
la distancia recomendada. Utilice el calibre de distancia proporcionado
para garantizar la instalación adecuada.
Si su vecino también utiliza un Landxcape
TM
, entonces debe mantener
una distancia mínima de 1 metros entre su cable delimitador y su
vecino.
de césped que se quiere cortar.
Su Landxcape
TM
se va confundir
si encuentra curvas adicionales o rollos de cable delimitador que no
son parte del área de corte (Véase la fig. G). Si hay demasiado cable
delimitador después de haber marcado el perímetro de trabajo, córtelo
y guárdelo en un lugar separado. Sin embargo, es importante dejar la
longitud necesaria en el punto donde se conecta a la base de carga
para que pueda conectarse y permanecer enterrado.
6.2 Enterrar el cable delimitador
Si planea enterrar el cable delimitador debe tener en cuenta que, es
recomendable fijar el Cable delimitador al césped de forma que resulte más
fácil hacer ajustes en caso necesario. Cuando haya terminado de instalar
el cable delimitador, se recomienda que ordene al Landxcape
TM
seguir el
cable delimitador, pulsando para ello y . Con ello, se permite que
la Landxcape
TM
se ajuste al nuevo entorno.
Mientras observa cómo el Landxcape
TM
localiza la base de carga, puede
usted realizar modificaciones en la ruta del cable delimitador para asegurar
un recorrido del cable delimitador sin problemas para el Landxcape
TM
en
su búsqueda de la base de carga. Funcione correctamente con la base de
carga antes de enterrar el Cable delimitador.
6.3 Unión del cable limitador
Si fuera necesario alargar y empalmar el cable limitador, utilice un
conector. De esta forma se obtendrá una unión impermeable y una
conexión eléctrica fiable.
Introduzca los dos extremos del cable en cualquiera de los dos
agujeros del conector. Compruebe que los cables estén totalmente
insertados en el conector, de forma que se vean los dos extremos por
la parte transparente del otro lado del conector. (Véase la fig. H) Utilice
unos alicates para presionar por completo el botón de la parte superior
del conector (Véase la fig. I, J)
ADVERTENCIA:
Se desaconseja empalmar el cable limitador con
cinta aislante o utilizar un bloque de terminales para realizar la
conexión, ya que la humedad ambiente podría oxidar el cable y
provocar una avería en el circuito al cabo de un tiempo.
7. Actualización del software
Se podrá actualizar el software de su Landxcape
TM
cuando haya
nuevas versiones disponibles. La última versión del software puede
descargarse de nuestro sitio web www.landxcape-robotics.com.
Actualizar a través de USB. Vea a continuación las instrucciones de
descarga e instalación:
(1) Busque la última versión de software en: www.landxcape-
robotics.com. Guarda el archivo en una unidad USB con formato
FAT32
. Borra cualquier contenido previo en la unidad y confirma
el formato. Si no está en formato
FAT32
, por favor, formatea la
unidad.
NOTA:
La actualización del software se descarga en formato de
archivo comprimido. Necesitará un descompresor de archivos para
descomprimir la información.
(2) Coloque el Landxcape
TM
en una superficie segura y nivelada.
Presione
para apagar su Landxcape.
(3) Inserte la unidad USB en el puerto. (Véase la fig. K1)
(4) EnciendaLandxcape. La actualización empezará automáticamente.
Espere hasta que la pantalla muestre " " (vea la Fig. K2),
luego retire la unidad USB (unidad flash) y cierre bien la cubierta
protectora. Cuando la pantalla muestre " ", la actualización
estará completada y Landxcape
TM
ingresará a la página del PIN.
El manual de la caja se basa en el software predeterminado en la
producción en masa. Algunas características/funciones nuevas de la
nueva versión pueden no existir en el manual. Si encuentra algunos
ajustes que no estén en el manual, por favor visite www.landxcape-
robotics.com para descargar el manual más reciente.
8. Mantenimiento
Tiene que revisar su Landxcape
TM
de vez en cuando. El Landxcape
TM
trabaja mucho y después de un tiempo necesita una buena limpieza,
así como reemplazar aquellas partes que se hayan podido desgastar.
Nunca use su Landxcape
TM
si el interruptor On/Off está defectuoso.
Apague la máquina antes de realizar cualquier servicio técnico o
mantenimiento.
En los siguientes apartados queremos informarle de cómo hacer que
su nuevo Landxcape
TM
se adapte a su nuevo hogar y darle el mejor
cuidado posible.
8.1 Mantenerlo afilado
ADVERTENCIA: Antes de limpiar, ajustar o reemplazar las
hojas, apague su Landxcape
TM
OFF y póngase guantes
de protección.
ADVERTENCIA: Para sustituir la cuchilla, Asegúrese de
cambiar todas las hojas si cambia una. Utilice siempre
tornillos nuevos para instalar las cuchillas. Esto es importante
para asegurarse de que las cuchillas queden fijadas
correctamente y que el disco de rotación de las cuchillas esté
ocasionar lesiones graves.
El Landxcape
TM
no corta el césped como las otras cortadoras. Las
cuchillas son como un cuchillo afilado en los 2 bordes y gira en ambas
direcciones para obtener una capacidad máxima de corte (Véase la fig.
L). Cada hoja de su Landxcape
TM
tiene 2 bordes de corte. El disco de
corte realiza una rotación hacia delante y hacia atrás de forma aleatoria
para usar ambos filos de corte. Esto ayuda a minimizar la frecuencia

ES72
con que debe sustituirse la cuchilla de corte. Cada hoja de corte tendrá
una duración de hasta 2 meses cuando la siega se realice diariamente.
Siempre revise si las cuchillas están astilladas o dañadas y cámbielas
si lo están. Cuando la hoja de corte esté roma o desgastada, se debe
cambiar por una hoja de repuesto proporcionada con su Landxcape
TM
.
También puede obtener las hojas de repuesto en su distribuidor de
Landxcape
TM
más cercano.
A. Sustituir las cuchillas
Después de un tiempo, por lo general cada temporada, tendrá que
reemplazar las cuchillas del Landxcape
TM
. Así que cuando cambie
las cuchillas, asegúrese de cambiarlas todas al mismo tiempo. Se
pueden reemplazar con uno de los conjuntos de cuchillas de repuesto
y tornillos adicionales suministrados con el Landxcape
TM
.
Antes de proceder a cambiar las cuchillas del Landxcape
TM
, apague el
cortacésped y póngase guantes de protección. Luego siga los pasos
siguientes:
1. Ponga el Landxcape
TM
del revés con delicadeza
2. Extraiga la cubierta de la batería y la batería.
3. Saque los tornillos de las cuchillas con un destornillador de
punta plana. (Véase la fig. M)
4. Atornille las hojas nuevas firmemente.
5. Vuelva a instalar la batería y la cubierta de la batería.
IMPORTANTE: Después de enroscar las cuchillas al disco de
corte, asegúrese de que el disco puede girar libremente.
8.2 Manténgalo limpio
ADVERTENCIA: Antes de la limpieza, apague su
Landxcape
TM
. Póngase guantes de protección antes de
limpiar el disco de corte y no utilice agua corriente.
A. Limpieza del mecanismo
El Landxcape
TM
tendrá una vida mucho más saludable y larga más si
se limpia con regularidad. Tenga en cuenta que su Landxcape
TM
es una
máquina eléctrica, por lo que deberá tener cuidado al limpiarla, NO
utilice una manguera, ni agua a alta presión ni vierta agua de ninguna
otra manera sobre su Landxcape
TM
, es mejor utilizar un atomizador
lleno con agua. Al limpiar la carcasa de plástico utilice un cepillo suave
o un paño limpio y evite el uso de solventes o limpiadores (Véase la
fig. N). Por último, asegúrese de retirar toda la acumulación de restos
de césped y residuos, especialmente de las rejillas de ventilación del
motor.
B. Limpieza de la parte inferior
Una vez más, es importante que apague el Landxcape
TM
y use guantes
de protección antes de tocar el disco de corte.
En primer lugar, coloque la Landxcape
TM
boca abajo para exponer la
parte inferior. Aquí verá el disco de corte, la caja del motor y las ruedas
delanteras y motrices. Limpie todo a fondo con un cepillo suave o un
paño húmedo.
ADVERTENCIA:
NUNCA limpie los bajos del Landxcape
TM
con
un chorro de agua. Podría dañar los componentes. (Véase la
fig. O1, O2)
Gire el disco de corte para asegurarse de que gira libremente.
Compruebe que las cuchillas giran libremente sobre los tornillos de
fijación. Quite cualquier obstrucción que se haya podido generar.
IMPORTANTE: Elimine todos los residuos para que no se
disminuir el rendimiento de corte de su Landxcape
TM
.
C. Limpie las patillas de los contactos y las regletas de carga
Mediante un paño, limpie la patilla de contacto situada en la base
de carga y la regleta de carga situada en su Landxcape
TM
. Quite
cualquier resto de hierba cortada alrededor de las patillas de contacto
y las regletas de carga para garantizar que su Landxcape
TM
se carga
correctamente en todo momento.
8.3
Duración de la bacteria
El corazón del Landxcape
TM
es la Batería de Litio de 20 voltios.
Para guardar correctamente la batería, asegúrese de que esté
completamente cargada y en un lugar fresco y seco.
NOTA:
La temperatura de funcionamiento recomendada para el
Landxcape
TM
es de 0 - 55
o
C.
La vida útil de la batería del Landxcape
TM
depende de varios factores,
tales como:
• Duración de la temporada de corte en su región
• Cantidad de horas que el Landxcape
TM
funciona diariamente
• La forma de tratar la batería durante el almacenamiento
El Landxcape
TM
puede ser cargado manualmente sin el cable de
1. Conecte la Base de Carga a una toma de corriente adecuada.
La luz verde de la base de carga se encenderá.
2. Conecte manualmente el Landxcape
TM
en la Base de Carga
mientras el Landxcape
TM
está apagado. (Véase la fig. P)
3. Luz verde intermitente en la base de carga, se inicia el
proceso de carga del Landxcape
TM
.
8.4 Hibernación
Your Landxcape
TM
will live longer and healthier if it is allowed to
hibernate. So even though it is troublesome, we recommend storing
your Landxcape
TM
in your shed or garage during the winter.
Before you prepare your Landxcape
TM
for winter hibernation, we
recommend you:
• Limpiar a fondo su Landxcape
TM
• Cargue completamente la batería y retírela de Landxcape
• Voltear el cortacésped
Para maximizar la vida útil de la batería, cárguela completamente y
sáquela de Landxcape
TM
antes de guardarla durante el invierno.
ADVERTENCIA: Proteja los bajos del Landxcape
TM
frente al
agua. NUNCA almacene el Landxcape
TM
cara arriba al aire
libre si con ello queda expuesto al agua.
El cable delimitador se puede dejar en el suelo, pero se deberían
proteger los extremos, por ejemplo, colocándolos dentro en una lata
con grasa. Si la base de carga queda fuera durante el invierno, deje el
cable delimitador conectado.
NOTA:
Cuando vuelva a usar el Landxcape
TM
después de la hibernación,
asegúrese de que las bandas de carga y patillas de contacto están
limpias, lo mejor es usar un paño muy suave.
ADVERTENCIA: Pulse el botón ON/OFF en OFF antes de
realizar cualquier ajuste, sustitución o reparación.
Antes de reemplazar las hojas, apague su Landxcape
TM
OFF y
póngase guantes de protección.
Si necesita reemplazar la batería, siga estos pasos:
1. Ponga el Landxcape
TM
del revés con delicadeza.
2. Retire los tornillos de la batería. Retire la cubierta de la batería.
(Véase la fig. Q1)
3. Levante la batería con cuidado. Presione el enganche y suelte los

ES 73
conectores. (Véase la fig. Q2)
NOTA:
No la sujete por los cables. Sostenga los conectores y libere el pestillo.
4. Para instalar una nueva batería original, conecte los conectores entre sí hasta que la batería quede sujeta a su posición. (Véase la fig. Q3, Q4)
5. Instale la batería tal como se muestra. (Véase la fig. Q5) Vuelva a instalar la cubierta en su posición y apriete bien los tornillos.
9. Mensajes de función
Monitor Mensaje Acción
Retardo de lluviaactivado. No se require ninguna acción
10. Mensajes de error
Causa Acción
El Landxcape
TM
está fuera
del área de trabajo.
1. Si el Landxcape
TM
está en realidad fuera de su territorio, apague el aparato y lleve el
Landxcape
TM
dentro de su zona de trabajo. Encienda la máquina. Pulse y, luego, .
2. Si el Landxcape
TM
está dentro de su territorio, compruebe que el LED de la base de carga
está en verde. De lo contrario, compruebe que la base de carga está conectada correctamente
al cargador y que el cargador está conectado a una fuente de alimentación adecuada. Si es
así, significa que los extremos del cable delimitador están fijados de forma incorrecta, y debe
invertirlos.
3. La luz roja de la base de carga se enciende, confirme que el cable delimitador esté bien
conectado a las abrazaderas de la base de carga. Si el problema persiste, verifique que no se
haya cortado el cable delimitador.
Motor rueda bloq.
1. Apague el aparato; lleve el Landxcape
TM
en una zona libre de obstáculos;
2. Encienda la máquina. Pulse y, luego, .
3. Si el mensaje de error sigue en pantalla; apague el aparato; ponga el Landxcape
TM
del
revés y compruebe si hay algo que impida el giro de las ruedas.
4. Elimine cualquier obstrucción posible, coloque el Landxcape
TM
en posición vertical,
encienda el aparato. Pulse y, luego, .
Disco corte bloq.
1. Apague el aparato;
2. Dé la vuelta al Landxcape
TM
hacia abajo y compruebe si hay algo que impida la rotación
del disco de corte.
3. Elimine cualquier posible obstrucción.
4. Coloque su Landxcape
TM
en posición vertical y llévelo a un área con hierba baja o ajuste
la altura de corte;
5. Desconecte la alimentación. Pulse y, luego, .
El Landxcape
TM
se ha
atascado.
1. Apague el aparato;
2.Coloque el Landxcape
TM
en una zona libre de obstáculos;
3. Apague la máquina. Pulse y, luego, .
4. Si el mensaje de error sigue en pantalla; apague el aparato; ponga el Landxcape
TM
del
revés. Compruebe si hay algo que obstaculice la rotación de las ruedas.
5. Elimine cualquier obstrucción posible, coloque el Landxcape
TM
en posición vertical,
encienda el aparato. Pulse y, luego, .
El Landxcape
TM
está
levantado.
1. Apague el aparato.
2. Lleve el Landxcape
TM
a una zona libre de obstáculos, encienda el aparato. Pulse y,
luego, .
3. Si el mensaje de error persiste: apague el equipo, apague Landxcape
TM
, gire Landxcape
TM
al revés y verifique si hay algo que impida que las ruedas delanteras giren.
4. Elimine cualquier obstrucción posible, coloque el Landxcape
TM
en posición vertical,
encienda el aparato. Pulse y, luego, .

ES74
El Landxcape
TM
está dado la
vuelta.
Coloque el Landxcape
TM
en posición vertical. Pulse y, luego, .
Error de la batería
1. Chequee la temperatura de la batería. Si la temperatura es demasiado alta, espere
hasta que la temperatura se haya enfriado. Presionar y .
2. Reemplazar la nueva batería Resetear Landxcape
TM
. Presionar y .
3. Si el error ocurre repetidamente, intente cambiar el horario de trabajo.
Landxcape
TM
está tardando
demasiado tiempo en volver
a la base de carga.
Acople manualmente Landxcape
TM
en la base de carga para cargar. Después de que
Landxcape
TM
esté completamente cargado, presione y .
Error desconocido.
Resetear Landxcape
TM
. Presionar y . Si aún se muestra el mensaje de error,
comuníquese con un agente de servicio para obtener ayuda.
NOTAS
• Antes de poner en marcha el equipo, compruebe siempre que el Landxcape
TM
está dentro de su territorio. De lo contrario, se mostrará
el mensaje “
”. Este mensaje también aparece cuando se pone en marcha el Landxcape
TM
y este se encuentra encima del cable
delimitador.
• Si por cualquier motivo -i.e. una fiesta, niños jugando... - desea colocar su Landxcape
TM
en la base de carga: pulse y luego . Su
Landxcape
TM
irá a su base y permanecerá allí. Tenga en cuenta que el Landxcape
TM
esperará a la siguiente sesión de cortado programada.
Presione para apagar Landxcape
TM
.
• Si un error ocurre repetidamente en la misma zona de su jardín, puede que tenga un problema con el cable delimitador. Por favor refiérase a
las instrucciones de instalación anteriores y revise su instalación.
• Si su jardín está dividido en dos zonas separadas, conectadas por un pasillo de menos de 1 m, y una de las zonas no dispone de base de
carga: cuando el Landxcape
TM
se descargue, transpórtelo manualmente hasta la base de carga el proceso de carga comenzará.
• Si el Landxcape
TM
funciona de manera extraña de vez en cuando, intente reiniciándolo. Si el problema persiste, intente quitar y volver a instalar
la batería. Si el problema persiste, póngase en contacto con el Servicio Técnico de Landxcape
TM
para que le asistan.
• No lave la máquina utilizando agua a alta presión. Esto podría provocar daños en la batería o en la máquina.
11. Solución de problemas
Si su Landxcape
TM
no funciona correctamente, siga esta Guía de Resolución de Problemas. Si el problema persiste, contacte con su distribuidor.
Causa Acción
El indicador LED de la estación de carga
no se enciende.
No hay alimentación.
Compruebe que el cable de alimentación está
conectado correctamente al cargador y que el
cargador está conectado a una fuente de alimentación
adecuada.
La luz roja de la base de carga se
enciende.
El cable delimitador no está conectado.
Compruebe que el cable delimitador se ha conectado
correctamente a la base de carga.
Compruebe que no hay ninguna interrupción en el cable
delimitador, especialmente en los extremos del cable.
El Landxcape
TM
se enciende, pero el
disco de corte no se mueve.
El Landxcape
TM
está buscando la base de carga
(al menos que se presione la y el botón
de la para que se destine a la base de la
carga).
Esto es normal. El Landxcape
TM
necesita recargarse,
el disco de corte no gira mientras está buscando la
base de carga.
El Landxcape
TM
vibra
Las cuchillas pueden estar dañadas.
Compruebe el estado del Disco de la Cuchilla.
Compruebe las hojas y los tornillos y reemplace tanto
como sea necesario.
Retire la suciedad y los objetos extraños de las
cuchillas y del disco de la cuchilla.

ES 75
La hierba se corta de forma irregular
El Landxcape
TM
no trabaja suficientes horas al
día.
Aumente las horas del tiempo de corte
El área de trabajo es demasiado grande.
Trate de reducir el tamaño del área de trabajo o
aumentar las horas de corte .
Las hojas están desafiladas.
Cambie todas las hojas y tornillos con el fin de
equilibrar el disco de corte
La altura de corte de la hierba está ajustada al
mínimo.
Aumente la altura de corte y redúzcala gradualmente
La hierba o cualquier otro objeto ha envuelto el
disco de corte.
Compruebe el disco de corte y elimine la hierba y
demás objetos.
Hay una acumulación de hierba en el disco de
corte o en la caja del motor
Asegúrese de que el disco de corte puede girar
fácilmente. Si es necesario, puede sacar el disco de
corte y limpiar los restos.
Su Landxcape
TM
está dentro de su
territorio y el cable delimitador está
conectado. Pero en la pantalla se
muestra “
”.
Los extremos del cable delimitador están
fijados de forma incorrecta.
Invierta los extremos del cable delimitador.
El cable delimitador está roto. Repare el cable delimitador dañado con conectores.
El tiempo de carga es muy superior al
tiempo de carga especificado.
Mala conexión debido a la contaminación de
la banda de carga.
Limpie la patillas de contacto de la base de carga y la
banda de carga de la máquina con un paño.
El programa de protección de carga se ha
activado debido a una temperatura excesiva
Coloque la base de carga en una zona sombreada o
espere hasta que haya descendido la temperatura.
El cortacésped no se carga
No hay alimentación
Compruebe que el cable de alimentación está
conectado correctamente al cargador y que
el cargador está conectado a una fuente de
alimentación adecuada.
No funciona correctamente durante la carga
manual
Consulte la carga manual en la Sección 8.3.
El Landxcape
TM
empieza a reducir el
tiempo de funcionamiento entre cargas
Algo está atascado en el disco de corte Saque el disco de corte y límpielo
El Landxcape
TM
se está agitando bruscamente. El césped está demasiado alto y espeso.
La batería puede estar agotada o ser antigua. Coloque una batería nueva.
El Landxcape
TM
no funciona a la hora
prevista.
El reloj no está ajustado a la hora correcta.
Ajuste el reloj a la hora correcta, consulte la Sección
5.3.
Los tiempos de corte programados para el
Landxcape
TM
no son correctos.
Cambie la configuración del tiempo iniciar y detener
el corte de césped.
El Landxcape
TM
se ha estacionado
manualmente en la base de carga.
Pulse
y luego .
La batería no se carga ya que su temperatura
está por encima de 55
o
C en climas cálidos.
Espere hasta que la batería se haya enfriado.
Landxcape
TM
no se puede conectar
correctamente a la Base de Carga
Influencia medioambiental. Reinicie el Landxcape
TM
.
Mala conexión debido a la contaminación de
la banda de carga.
Limpie la patillas de contacto de la base de carga y la
banda de carga de la máquina con un paño.
La luz verde de la Base de Carga se
ENCIENDE antes de finalizar el proceso
de carga.
La base de carga se está sobrecalentando.
Coloque la base de carga en una zona sombreada o
espere hasta que haya descendido la temperatura.

ES76
El Landxcape
TM
se sale del cable
delimitador. EL Landxcape
TM
no corta
un área dentro de la zona del cable
delimitador. El Landxcape
TM
invierte la
marcha o gira de forma errónea cerca
del cable delimitador.
El cable delimitador de otro Landxcape
TM
u
otro robot cortacésped está excesivamente
cerca.
Compruebe que el cable delimitador de su
Landxcape
TM
está al menos a 1m de distancia de otro
límite.
El cable de límites ha sido instalado con
esquinas puntiagudas.
Compruebe el cable de límites para suavizar las
esquinas.
En condiciones con agua o humedad, la señal
eléctrica del cable delimitador puede perderse
en las zonas en las que el cable se ha unido o
reparado.
Compruebe las juntas de unión del cable delimitador.
Aíslelas para proporcionar una conexión totalmente
impermeable.
Hay una pérdida de la señal eléctrica del cable
delimitador debido a un aislamiento roto.
Repare el aislamiento del cable delimitador dañado y
sus conectores.
El área de corte es superior al área de corte
permitida para el Landxcape
TM
.
Reduzca el área de corte o use Landxcape
TM
con un
área de corte más grande permitida.
Las ruedas del Landxcape
TM
patinan o
dañan el césped.
Puede haber obstáculos extraños, como palos
o ramas, debajo del Landxcape
TM
.
Retire los objetos extraños de la parte inferior del
Landxcape
TM
.
El césped está demasiado mojado. Espere a que el césped se haya secado.
El Landxcape
TM
se sale del límite del
cable debido a un exceso de velocidad
cuando va cuesta abajo
El Cable Delimitador está colocado sobre una
pendiente con una inclinación superior a un
17% (10°).
Recoloque el Cable Delimitador lejos de pendientes
que tengan una inclinación superior a un 17% (10°).
Consulte el manual de instalación para más detalles.
Se produce un error de actualización de
software.
Inténtalo de nuevo según la sección "Actualización de
software".
Protección ambiental
Los residuos de equipamientos eléctricos y electrónicos no deben depositarse con las basuras domésticas. Se recogen para reciclarse en
centros especializados. Consulte las autoridades locales o su distribuidor para obtener información sobre la organización de la recogida.

ES 77
Declaración de conformidad
Los que reciben,
Positec Germany GmbH
Grüner Weg 10, 50825 Cologne, Germany
Declaran que el producto,
Descripcón Robot Cortacesped
Modelo
referencia y el mes del número de serie se indican en la página posterior. El número de serie completo se indica de forma clara en la
Función corte de césped
Cumple con las siguientes Directivas,
- Procedimiento de evaluación de la conformidad de acuerdo con Annex V
- Nivel de presión acústica 64.2 dB (A)
- Nivel de intensidad acústica 65 dB (A)
Notificación realizada por:
Dirección: Cleeve Road, Leatherhead, Surrey, KT22 7SB United Kingdom
Normativas conformes a,
EN 60335-1:2012+A11+A13:2017, EN 50636-2-107:2015+A1:2018, EN 60335-2-29:2004+A2:2010,
EN 62233:2008, EN ISO 3744:2005, EN 55014-1:2017, EN 55014-2:2015,EN 61000-3-2:2014,
EN 61000-3-3:2013, EN 61558-1:2005+A1:2009, EN 61558-2-16:2009+A1:2013,EN 303 447 V1.1.1
La persona autorizada para componer el archivo técnico,
Firma Marcel Filz
Dirección Positec Germany GmbH, Grüner Weg 10, 50825 Cologne, Germany
2018/10/26
Allen Ding
Ingeniero Jefe Adjunto. Pruebas y Certificación.
Positec Technology (China) Co., Ltd.
18, Dongwang Road, Suzhou Industrial
Park, Jiangsu 215123, P. R. China

NL78
1. Productveiligheid
1.1 Algemene & extra veiligheidsinstructie
WAARSCHUWING! Lees alle instructies zorgvuldig door.
Indien u zich niet aan alle onderstaande instructies houdt, kan
dat leiden tot een elektrische schok, brand en/of ernstig letsel.
Lees de instructies aandachtig voor een veilig gebruik van de
machine.
Bewaar alle waarschuwingen en instructies voor latere naslag.
• Dit apparaat is niet bedoeld voor gebruik door personen (waaronder
kinderen) met verminderde fysieke of mentale capaciteiten of
een verminderd waarnemingsvermogen, tenzij ze voor gebruik
van het apparaat toezicht en instructie krijgen van iemand die
verantwoordelijk is voor hun veiligheid.
• Kinderen moeten onder toezicht worden gehouden om te
verzekeren dat ze niet met het apparaat spelen.
• Het apparaat mag alleen worden gebruikt met de voedingsadapter
die wordt meegeleverd met het apparaat.
BELANGRIJK
LEES ALLE INSTRUCTIES ZORGVULDIG DOOR.
BEWAAR ALLE WAARSCHUWINGEN EN INSTRUCTIES VOOR LATERE
NASLAG
Veilige Bediening
Instructies
a) Lees de instructies nauwkeurig door. Zorg ervoor dat u de
instructies begrijpt en dat u bekend bent met de bedieningsorganen
en het juiste gebruik van het toestel;
b) Sta niet toe dat het toestel gebruikt wordt door personen die niet
bekend zijn met deze instructies of door kinderen. Plaatselijke
voorschriften kunnen een grens leggen aan de leeftijd van de
gebruiker;
c) De gebruiker is verantwoordelijk voor ongevallen en gevaren die
optreden met andere personen of hun eigendommen.
Voorbereiding
a) Zorg ervoor dat de grensdraad correct wordt geïnstalleerd volgens
de instructies.
b) Controleer het gebied waarin het toestel gebruik wordt geregeld.
Verwijder alle stenen, stokken, draden, botten en ander vreemde
voorwerpen.
c) Inspecteer de messen, bouten en het snijmechanisme geregeld op
slijtage en schade. Vervang versleten en beschadigde messen en
bouten gelijktijdig, zodat de balans behouden blijft.
d) Bij toestellen met meerdere assen let u erop dat het draaien van
het ene mes ook het ander mes in beweging brengt.
e) WAARSCHUWING! De grasmaaier mag niet worden gebruikt zonder
dat de afscherming op zijn plaats is.
BEDIENING
1. ALGEMEEN
a) Gebruik het toestel niet met een defecte kap of zonder dat de
veiligheidsmiddelen, zoals de, af buigers op hun plaats zitten;
b) S teek geen handen of voeten in de buurt van de draaiende
delen. Houd steeds afstand van de; uitwerp opening
c) Til het toestel niet op en vervoer het niet terwijl het in werking is;
d) Bedien de uitschakelinrichting van het apparaat.
- Voordat u een blokkering verwijdert;
- Voordat u de machine controleert, schoonmaakt of onderhoudt;
e) Het is niet toegestaan het oorspronkelijke ontwerp van de
grasmaaier te veranderen. Alle wijzigingen zijn op eigen risico.
f) Start de automatische grasmaaier volgens de instructies. Als de
aan-uitknop aan staat, zorg er dan voor dat uw handen en voeten
uit de buurt blijven van de draaiende messen. Plaats nooit uw
handen en voeten onder de Robotmaaier.
g) Til de Robotmaaier niet op en draag deze niet als de aan-uitknop
aan staat.
h) Sta niet toe dat de maaier gebruikt wordt door personen die niet
weten hoe de Robotmaaier werkt en zich gedraagt.
i) Leg geen voorwerpen op de Robotmaaier of op het laadstation.
j) Laat de Robotmaaier niet werken met een defect mes of een
defecte behuizing. Hij moet ook niet worden gebruikt met defecte
schroeven, moeren of kabels.
k) Schakel de Robotmaaier altijd uit als u niet van plan bent om de
Robotmaaier te gebruiken. De Robotmaaier kan alleen starten als
de aan-uitknop aan staat en de juiste pincode is ingevoerd.
l) Houd uw handen en voeten buiten het bereik van de roterende
bladen. Plaats uw handen of voe-ten bij of onder de behuizing als
de robotische gazonmaaier in bedrijf is.
m) Vermijd gebruik van de machine en de accessoires onder slechte
weersomstandigheden, voornamelijk als er gevaar op blikseminslag
is.
n) Raak riskante bewegende delen niet aan, voordat die stilgezet zijn.
o) Voor machines die gebruikt worden in publieke ruimtes, dienen
waarschuwingsborden geplaatst te worden rond de ruimte waar de
machine in werking treedt. Geven de inhoud van de volgende tekst weer:
WAARSCHUWING!
Automatische grasmachine! Houd uit de
buurt van de machine! Kinderen onder toezicht houden!
2. Als het toestel automatisch functioneert
a) Laat de machine niet werken zonder toezicht als u weet dat er
dieren, kinderen of andere personen in de omgeving zijn.
ONDERHOUD EN OPSLAG
WAARSCHUWING! Schakel de aan-uitknop altijd uit wanneer u
de grasmaaier ondersteboven houdt.
De aan-uitknop moet uit staan tijdens alle werkzaamheden aan de
onderkant van de grasmaaier, zoals het reinigen of vervangen van
de messen.
a) Zet alle moeren, bouten en schroeven vast om zeker te weten dat
het toestel in de veilige werktoestand is;
b) Inspecteer de grasmaaier elke week en vervang versleten of
beschadigde onderdelen voor de veiligheid;
c) Controleer of de messen en de schijf niet beschadigd zijn. Verwijder
alle messen en schroeven tegelijk, zodat de draaiende delen in
balans blijven.
d) Zorg ervoor dat uitsluitend vervangingsonderdelen van het juiste
type worden gebruikt;
e) Zorg ervoor dat batterijen worden opgeladen met de juiste lader,
aanbevolen door de fabrikant. Onjuist gebruik kan resulteren in een
elektrische schok, oververhitting of lekkage van de corroderende
vloeistof uit de batterij;
f) Bij lekkage van het elektrolyt spoelt u met water of een
neutraliserend middel. Vraag medische hulp als het elektrolyt in
contact komt met de ogen e.d.;
g) Onderhoud van het toestel moet geschieden in overeenstemming
met de instructies van de fabrikant.

NL 79
Aanbeveling
Sluit het apparaat en/of de accessoires alleen aan op een
elektriciteitsnet dat door een aardlekschakelaar met een schakelstroom
van niet meer dan 30 mA beveiligd is.
Overige risico's
Draag, als u de bladen vervangt, beschermende handschoenen om
verwondingen te voorkomen.
Vervoer
De oorspronkelijke verpakking moet worden gebruikt als de grasmaaier
over een langere afstand vervoerd wordt.
Veilig vervoer van en naar het werkgebied:
a) Druk op de knop STOP om de maaier te stoppen.
U geeft de volledige PIN-code van vier cijfers als u de maaier voor
het eerst start.
b) Schakel de automatische grasmaaier altijd uit als u van plan bent
om de grasmaaier te dragen.
c) Draag de maaier bij het handvat aan de achterkant, aan de
voorzijdede maaier. Draag hem met de messen van uw lichaam
afgekeerd.
Veiligheidsvoorschriften voor de accu in het apparaat
a) Batterijcellen en accupacks mogen niet gedemonteerd,
geopend of vernietigd worden.
b) Sluit accupacks niet kort. Bewaar accupacks niet willekeurig
in een doos of lade waar ze elkaar
kunnen kortsluiten of door geleidende voorwerpen
kortgesloten kunnen worden.
Houd het accupack op een afstand van andere metalen voorwerpen
als paperclips, muntstukken, sleutels, nagels, schroeven en andere
kleine metalen voorwerpen die de contacten van de accupack
kunnen verbinden. Kortgesloten contacten van accupacks kunnen
brandwonden of brand veroorzaken.
c) Stel accupacks niet bloot aan warmte of vuur. Vermijd opslag
in direct zonlicht.
d) Stel accupacks niet bloot aan mechanische schokken.
e) Als een accu lekt dient men voorzichtig te zijn dat de
vloeistof niet in contact komt met de huid of de ogen. Als dat
toch gebeurt spoelt men de huid onder stromend water en
raadpleegt men een arts.
f) Raadpleeg meteen een arts wanneer een batterij of
accupack is ingeslikt .
g) Houd batterijcellen en accupacks schoon en droog.
h) Accupacks presteren het best bij normale
kamertemperatuur (20 °C ± 5 °C).
i) Wanneer u accupacks wegwerpt, dient u accupacks van
verschillende elektrochemische systemen van elkaar
afgezonderd te houden.
j) Laad alleen op met een lader met de technische gegevens
van LandxcapeTM. Gebruik geen andere lader dan de
meegeleverd. Een lader voor één type accupack geschikt is
kan een brandgevaar inhouden wanneer gebruikt met een
ander type.
k) Gebruikt geen accupack dat niet bedoeld is voor gebruik met
deze apparatuur.
l) Houd accupacks buiten het bereik van kinderen.
m) Bewaar de oorspronkelijke instructies van het product voor
latere gebruik.
n) Volg de juiste procedure voor afvalverwijdering na afdanken
van dit apparaat.
1.2 Informatie over de Landxcape
TM
WAARSCHUWING –de Robotmaaier kan gevaarlijk zijn
bij verkeerd gebruik.
Lees de gebruiksaanwijzing grondig door en
zorg ervoor dat u de inhoud begrijpt voordat u de
Robotmaaier gebruikt.
WAARSCHUWING - Houd omstanders op afstand.
WAARSCHUWING – Schakel de aan-uitknop altijd uit
voordat u aan de machine werkt of de machine
WAARSCHUWING –Rij niet op de machine.
Niet in brand steken.
Niet blootstellen aan regen of water.
Batterijen niet weggooien. Breng lege accu’s naar een
recyclingcentrum of inzamelpunt voor chemisch afval
bij u in de buurt.
Reinig de machine niet met een hogedrukreiniger.
Klasse III-apparaten
Afgedankte elektrische producten mogen niet bij
het normale huisafval terechtkomen. Breng deze
producten waar mogelijk naar een recyclecentrum
bij u in de buurt. Vraag de verkoper of de gemeente
informatie en advies over het recyclen van elektrische
apparatuur.

NL80
2. Onderdelenlijst
1. STOPKNOP
2. REGELKNOP MAAIHOOGTE
3. ENCENDER/APAGARLLAVE
4. INICIAR LLAVE
5. BOTÓN HOME
6. MONITOR
7. LAADSTRIP
8. REGENSENSOR
9. VOORWIEL
10. MESDRAAIENDE SCHIJF
11. SNIJMES
12. BATTERIJPAKKET
13. PUERTO USB
14. ACHTERSTE RIJWIEL
15. HANDVAT
16. CONTACTPINNEN
17. LAADSTATION
18. VOEDINGSAPPARAAT
19. DRAADPENNEN
20. GRENSDRAAD
21. BEVESTIGINGSCHROEVEN VOOR LAADSTATION
22. AFSTANDMAL VOOR GRENSDRAAD
23. INBUSSLEUTEL
24. KOPPELSTUK
Niet alle afgebeelde of beschreven toebehoren worden standaard meegeleverd.

NL 81
3. Technische gegevens en
geluidsgegevens
3.1 Technische gegevens
Type LX790 LX791 LX792 LX793 (790-799 - aanduiding van
machinerie, kenmerkend voor robotgrasmaaier)
LX790 LX792 LX791 LX793
Nominaal vermogen 20V
Max.*
Toerental onbelast 2800/min
Maaigebied 600m
2
900m
2
Snijdiameter 16cm 18cm
Maaihoogte 30-60mm
Hoogte-instellingen 4
Accutype Lithium
Batterijmodel LA0001 LA0002
Laadtijd Ongeveer 1.3hrs 2hrs
Model Lader LA8001 / LA8002
Lader gegevens
Lader primair: 100-240V~50/60Hz, 38W,
Secundair: 20V , 1.5A
Gewicht machine 8.4kg
Veiligheidsklasse III
*Spanning gemeten zonder belasting. Beginspanning batterij bereikt
maximum 20 volt. Nominale spanning is 18 volt.
Toebehoren
LX790 LX792 LX791 LX793
Schroeven 9 9
Laagspanningskabel 1 1
Bevestigings schroeven voor
laadstation
7 7
Grensdraad 150m 180m
Draadpennen 210 250
Inbussleutel 1 1
Afstand mal voor grensdraad 2 2
Messen 9 9
Koppelstuk 2 2
Accu (LA0001/ LA0002) 1 1
Lader (LA8001 / LA8002) 1 1
Wij adviseren u alle accessoires te kopen in de winkel waar u het
gereedschap heeft gekocht. Kijk op de verpakking van het accessoire
voor meer informatie. Ook het winkelpersoneel kan u helpen en
adviseren.
3.2 Geluids gegevens
A-gewogen geluidsdruk
L
pA
= 44.2dB (A)
K
PA
= 0.4dB(A)
A-gewogen geluidsvermogen
L
wA
= 64.2dB (A)
K
wA
= 0.4dB(A)
Gebruik gehoorbescherming
indien de geluidsdruk hoger is
dan
80dB(A)
Het is onvermijdelijk dat de machine wat lawaai veroorzaakt. Voor
luidruchtig werk is een vergunning vereist en het werk is gelimiteerd
tot bepaalde periodes. Houd rusttijden aan en beperkt de werkuren tot
een minimum. Draag passende gehoorbeschermers voor de persoon-
lijke bescherming en de bescherming van mensen die in de omgeving
werken.
Gebruik volgens bestemming
Dit product is bestemd voor het maaien van gazons (uitsluitend par-
ticulier gebruik). Hij is gemaakt om vaak te maaien en een gezonder
en mooier gazon te maken. Afhankelijk van de grootte van uw gazon
kan de Landxcape
TM
geprogrammeerd worden om op elk moment te
werken. Het apparaat is niet bedoeld om er mee te graven, te vegen of
sneeuw te ruimen.

NL82
4. Bedieningspaneel
Start
1) Na het installeren van de grensdraad kunt u de Landxcape
TM
beginnen gebruiken (Raadpleeg de installatiegids voor het installeren van de
grensdraad).
2) Druk op
tot de Landxcape
TM
aan gaat. Bij het eerste gebruik, geeft u de standaard PIN code 0000 in door vier maal te drukken
wanneer het nummer 0 knippert. (De PIN code kan worden aangepast, gelieve te kijken naar het onderdeel “Setting” in de installatie gids)
OPMERKING:
Landxcape
TM
schakelt uit indien er gedurende 30 seconden geen input is nadat het toestel aangeschakeld is. Indien u driemaal de
verkeerde PIN code ingeeft, zal Landxcape
TM
het alarm geluid “di-di” maken en uitschakelen.
3) Druk op , vervolgens op om te beginnen maaien.
4) Druk dan om Landxcape
TM
naar het laadplatform te sturen, met messen die nog snijden en het gras maaien.
De Landxcape
TM
zal continu blijven werken tot batterij bijna leeg is en zal dan terugkeren naar het oplaadstation. Nadat hij volledig is opgeladen,
Landxcape
TM
zal automatisch het maaien hervatten of zal in het laadstation blijven, op basis van het maaischema.
OPMERKING:
Wanneer Landxcape
TM
aanstaat, lichten alle lichten op de display op, en schakelen nadien uit. Kijk na of de lichten beschadigd zijn. Het
is aangeraden om de display te beschermen met uw hand wanneer het buitenlicht te sterk is.
POWER AAN/UIT
Schakelt Landxcape
TM
aan en uit
Vergrendelen
Batterij capaciteit
Werktijd
START
Beginnen maaien/
Selecteert boven
STAND-BY PAGINA:
Landxcape
TM
is momenteel niet
in de werkende uren.
SLAAP PAGINA:
Landxcape
TM
is volledig opgeladen en
niet in de werkende uren.
DISPLAY
Geeft de status van uw instelling
weer
STOP
Om Landxcape
TM
tijdens gebruik
te stoppen
HOME
Stuurt Landxcape
TM
naar
het laadplatform terwijl
het toestel werkt. De
messen blijven het gras
maaien, terwijl het toestel
onderweg is naar het
laadplatform en activeren
het laadsysteem/
selecteert beneden.
OK
Bevestigt de instelling

NL 83
5. Kennismaking met uw
Landxcape
TM
We feliciteren u met de aankoop van een Landxcape
TM
waarmee u het
leven van zorgeloos grasmaaien betreedt. Hierna helpen we u om beter
te begrijpen hoe uw Landxcape
TM
denkt.
5.1 Hoe weet de Landxcape
TM
wat er
gemaaid moet worden?
De Landxcape
TM
kiest zijn richting willekeurig. Hij zorgt ervoor dat het
hele gazon gemaaid wordt, zonder lelijke maaipaden achter te laten (Zie
Fig. A).
5.2 Hoe weet de Landxcape
TM
waar hij
heen moet gaan?
De Landxcape
TM
is in staat op zichzelf te werken. De Landxcape
TM
weet
wanneer het terug moet keren naar het laadstation om op te laden,
kan voelen of het regent, kan zichzelf stoppen als het een probleem
detecteert, zich terug moet trekken en vervolgens om moet keren
als het ergens tegenaan botst dat zijn pad blokkeert of als het tegen
een ander voorwerp aanbotst. De Landxcape
TM
brengt de messen
automatisch tot stilstand als hij wordt opgetild, om ongelukken te
vermijden.
A. Het laadstation vinden
Als uw Landxcape
TM
opnieuw moet worden opgeladen stopt het met
maaien en volgt het de grensdraad tegen de klok in terug naar het
laadstation. De Landxcape
TM
is voorgeprogrammeerd om het gras in de
buurt van de grensdraad één keer per week te maaien. De standaard
instelling is om Landxcape
TM
elke Maandag langs de grensdraad te
laten maaien, nadat het toestel is aangezet.
B. Regensensor
De Landxcape
TM
heeft een regensensor aan de zijkant die regendruppels
waarneemt, waarna de Landxcape
TM
stopt met maaien en langs de
grensdraad terugrijdt naar het laadstation (Zie Fig. B).
Landxcape
TM
zal na de vertragingstijd opnieuw beginnen maaien, de
standard vertragingstijd bedraagt 180 min.
Zijn de regensensoren nat, dan rijdt de Landxcape
TM
terug naar het
dokstation. Wanneer de regen sensoren droog zijn, begint Landxcape
TM
met het aftellen van de vertragingstijd. Als u de regenvertraging
wilt verlaten, moet u de sensorzone drogen en het apparaat uit- en
inschakelen via de hoofdschakelaar. Nadat in- en uitschakelen kunt u
kunt het apparaat weer gebruiken.
C. De grensdraad volgen
De Landxcape
TM
blijft gehoorzaam binnen de grens die bestaat uit het
grensdraad. Hij heeft sensoren aan de voorkant die vaststellen of het
draad in de buurt is (Zie Fig. C).
D. Starten en stoppen tijdens het maaien (Zie Fig. D, E1, E2)
Om te beginnen maaien, druk op AAN/UIT knop en geef Pincode. Druk op
en vervolgens op . Wilt u dat de Landxcape
TM
stopt met maaien,
druk dan op de STOP-knop boven op de maaier.
Constateert de Landxcape
TM
een probleem, het display toont en verkeerd
bericht op het display. Voor informatie over foutmeldingen raadpleeg
Foutmeldingen. Landxcape
TM
zal worden uitgeschakeld als hij binnen 20
min geen input van de gebruiker ontvangt.
Hervatten:
• Druk op , vervolgens op
• De Landxcape
TM
begint nu te maaien!
5.3 Setting
Stel eerst de, door u gewenste, hoogte van het gras in dat u na het
maaien wil verkrijgen. U kan het programma manueel instellen.
OPMERKING: Wanneer u het programma manueel instelt, zal
Landxcape
TM
naar de stand-by pagina gaan indien het gedurende 30
seconden geen input ontvangt van de gebruiker.
(1) Pas PIN code aan
Om de PIN code aan te passen, houd beide
and knoppen samen
ingedrukt gedurende 5 seconden. Het icoontje zal knipperen en
“ 1” zal flikkeren. Nadien zal het eerste nummer flikkeren, gebruik
of selecteer de nummer die u wilt en druk om te bevestigen.
Het volgende nummer zal knipperen. Gebruik dezelfde methode om de
andere nummers te vervolledigen. Bijvoorbeeld, de nieuwe PIN code
is ingesteld op 0326. Nadien zal “ ” flikkeren en zal het eerste
nummer opnieuw knipperen. Gebruik dezelfde methode om de nieuwe
PIN code die u hebt ingesteld, in te geven (in dit voorbeeld
). Nadien zal “ ”op de display knipperen. Uw pin is met
succes aangepast.
Enkel ter referentie
(2) Stel jaar, datum en tijdstip in
Het instellen van jaar, datum en tijdstip is verplicht. Indien u deze items
niet instelt, zal het een invloed uitoefenen op de tijdsplanning in de
volgende setting. Dit item dient ingesteld te worden in de volgorde
van jaar, datum en tijdstip. Voor het instellen van het jaar, druk
3
seconden tot het icoontje en de nummer op de display knipperen,
bijvoorbeeld . Gebruik om het gewenste jaar te
selecteren. Druk nadien om te bevestigen, en het jaar in te stellen.

NL84
Enkel ter referentie
Ondertussen knippert het icoontje
opnieuw en staat het nummer op
de display, om de datum aan te tonen, bijvoorbeeld betekent
29 September. Wanneer knippert, gebruik het en selecteer
een nummer. Druk om te bevestigen. Nadien knippert . Gebruik
dezelfde methode om een nummer te kiezen. Druk om te bevestigen
en om het instellen van de datum te beëindigen.
Enkel ter referentie
Ondertussen knippert het icoontje
en wordt de tijd weergegeven,
bijvoorbeeld . Wanneer 14 knippert, gebruik het en
selecteer een nummer. Druk om te bevestigen. Nadien knippert
, gebruik dezelfde methode om een nummer te kiezen en druk om te
bevestigen. Het instellen van de tijd is complete en Landxscape gaat naar
de stand-by pagina.
Enkel ter referentie
(3) Stel werkruimte in
Houd
3 seconden ingedrukt. Druk wanneer het icoontje
knippert. Er zal een nummer op de display knipperen, bijvoorbeeld
, wat grasruimte betekent. De werktijd stelt zich automatisch in
volgens de afmeting van uw tuin. Gebruik of stel de grasruimte in
(de ruimte zal elke keer verhogen of verlagen met 50m
2
dan / is
ingedrukt), en druk om te bevestigen. Nadien gaat Landxcape
TM
naar
de stand-by pagina.
4hrs
Enkel ter referentie
(4) Pas standaard tijd aan
De standaard starttijd van 09:00 kan aangepast worden door beide
and knoppen samen in te drukken tot u een ding-geluid hoort.
Bijvoorbeeld, u drukt beide and knoppen op 14:05 en uw
Landxcape
TM
begint om 14:05 het gras af te snijden.
Enkel ter referentie
5.4 Hoe efficiënt maait de
Landxcape
TM
het gras?
De maaitijden zijn voor elk gazon anders, afhankelijk van de hieronder
vermelde factoren. Stel de tijdsduur geleidelijk in tot u de beste
instelling gevonden hebt.
Uw Landxcape
TM
kan gebieden van verschillende formaten maaien,
hoewel dit afhankelijk is van diverse factoren, zoals:
• Grassoort in uw gazon en groeisnelheid
• Scherpte van de snijmessen
• Vochtigheid
• Omgevingstemperatuur
• Obstakels in het grasveld
In tegenstelling tot de meeste andere maaiers gebruikt Landxcape
TM
een zijlaadstation, dat zo veel mogelijke gras aan de kant kan maaien.
Bovendien kan er gras door de gaten in de bodem van het laadstation
groeien, zodat het er eleganter uitziet.
De snijhoogte van de Landxcape
TM
kan worden ingesteld tussen 3 en 6
cm. Alvorens u uw Landxcape
TM
voor de eerste keer opstart, dient u uw
gras te maaien met uw manuele grasmaaier, opdat het niet langer is dan
9cm. Stel nadien de maaihoogte van uw Landxcape
TM
is op zijn maximale
setting (6cm), voor zijn eerste maaibeurt. (Zie Fig. F)
De Landxcape
TM
werkt het best bij droog weer. Hij houdt niet van
nat gras, wat zich kan ophopen op de draaischijf en in de motor, en
bovendien problemen kan geven met de aandrijving.
De Landxcape
TM
is bang voor onweer. Bij onweer beschermt u de
Landxcape
TM
door de stekker van het laadstation uit het stopcontact
te nemen, de grensdraad los te maken en ervoor te zorgen dat de
Landxcape
TM
niet opgeladen kan worden.
De Landxcape
TM
houdt ervan om gras te maaien en heeft graag

NL 85
goede, scherpe snijmessen om zin werk zo goed mogelijk te doen. De
Landxcape
TM
kan de meeste dingen zelf doen, maar soms is uw hulp
nodig om te voorkomen dat hij zich bezeert.
• Laat de Landxcape
TM
niet op grind werken
• Verwijder obstakels waar de Landxcape
TM
tegenop zou kunnen
klimmen waarbij hij zich bezeert aan zijn messen
• Verwijder alle vreemde voorwerpen van het gras
6. Het principe van de grensdraad
6.1 De grensdraad vastleggen
Met de afstandsmal voor het grensdraad zorgt u voor de juiste afstand
tot de rand van uw gazon (ten minste 26cm). Dit is de aanbevolen
afstand. Gebruik de meegeleverde afstandsmal om zeker te zijn van
correcte installatie.
Gebruiken uw buren ook een Landxcape
TM
, zorg dan voor minstens 1
meter ruimte tussen uw grensdraad en het grensdraad van uw buren.
Het grensdraad moet precies langs de rand van het gewenste
maaigebied liggen.
De Landxcape
TM
raakt in de war als er extra
stukken of lussen grensdraad zijn die niet gebruikt zijn om het
maaigebied af te bakenen (Zie Fig. G). Hebt u nog draad over nadat
het maaigebied is afgebakend, snij het dan weg en bewaar het
restant elders. Het is echter nodig wat extra lengte te gebruiken bij de
verbinding met het laadstation en om de draad in te graven.
6.2 De grensdraad ingraven
Wilt u het grensdraad ingraven, het is aan te bevelen het grensdraad
eerst met pennen langs het gazon te leggen zodat de ligging gemakkelijk
gewijzigd kan worden. Wanneer u klaar bent met de installatie van het
grensdraad, wordt het aanbevolen om Landxcape
TM
te vragen om de
grensdraad te volgen door op en te drukken. De Landxcape
TM
stelt zich dan in op de nieuwe omgeving.
Observeer hoe de Landxcape
TM
het oplaadstation zoekt en pas waar nodig
de ligging van het grensdraad aan, zodat de Landxcape
TM
zonder problemen
het grensdraad kan volgen tot bij zijn oplaadstation. De Landxcape
TM
zal correct met het laadstation werken voordat het grensdraad wordt
ingegraven.
6.3 Koppelen van de hekdraad
Gebruik een koppelstuk als de hekdraad moet worden verlengd en
gesplitst. Deze is waterdicht en garandeert een betrouwbare elektrische
aansluiting.
Steek beide draden door twee van de drie gaten van het koppelstuk.
Zorg dat de draden volledig in het koppelstuk zijn gestoken, zodat
beide uiteinden zichtbaar zijn door het doorzichtige deel aan de andere
kant van het koppelstuk. (Zie Fig. H) Gebruik een tang voor het volledig
indrukken van de knop bovenop het koppelstuk. (Zie Fig. I, J)
WAARSCHUWING!
Het wordt niet aanbevolen de hekdraad bij
het aansluiten eenvoudig te splitsen met isolatietape of via een
schroefklemmenblok. Vocht uit de grond kan zorgen voor het oxideren
van de draad en het na verloop van tijd onderbreken van het circuit.
7. Software-update
Uw Landxcape
TM
-software kan worden bijgewerkt als er nieuwe versies
beschikbaar zijn. De nieuwste software kan vanaf onze website worden
gedownload www.landxcape-robotics.com.
Bijwerken via USB. Zie de download- en installatie-instructies
hieronder:
(1) Zoek de nieuwste softwareversie op: www.landxcape-robotics.
com. Sla het bestand op op een lege
FAT32
geformatteerde USB-
stick. Verwijder alle andere bestanden op de schijf en controleer het
formaat. Als de schijf niet geformatteerd is in
FAT32
, herformatteer
de schijf.
NOTA:
de software update wordt gedownload als een
gecomprimeerd bestand (ZIP file). U dient deze eerst uit te pakken
voor u verder kan gaan.
(2) Plaats de Landxcape
TM
op een veilige en vlakke ondergrond. Druk
om uw Landxcape
TM
uit te schakelen.
(3) Plaats de USB-stick in de poort. (Zie Fig. K1)
(4) Schakel Landxcape
TM
aan. De update begint automatisch. Wacht
tot de display “ ” weergeeft (Zie Fig. K2), verwijder dan de
USB drive (USB-stick) en sluit de beschermhoes goed af. Wanneer
de display “ ”aantoont, is de update klaar en gaat de
Landxcape
TM
naar de Pin pagina.
De handleiding in de doos is gebaseerd op de standaard-software uit
de massaproductie. Enkele nieuwe instellingen/functies in de nieuwe
versie staan wellicht niet in de handleiding. Kunt u enkele instellingen
niet vinden in de handleiding, bezoek dan www.landxcape-robotics.
com voor de meest recente handleiding.
8. Onderhoud
De Landxcape
TM
moet af en toe gecontroleerd worden. De Landxcape
TM
werkt hard en heeft af en toe een schoonmaakbeurt nodig, waarbij
onderdelen vervangen worden, want ze kunnen slijten. Gebruik nooit
uw Landxcape
TM
met een defecte aan-/ uitschakelaar.
Schakel de machine voor het uitvoeren van reparaties en onderhoud.
Hieronder staat hoe u de Landxcape
TM
verzorgt.
8.1 Houd hem scherp
WAARSCHUWING: Zet uw Landxcape
TM
vóór reiniging,
afstelling of vervanging van de bladen op OFF en trek
veiligheidshandschoenen aan.
WAARSCHUWING: Vervangt u het mes, vervang dan alle
messen tegelijk. Gebruik altijd nieuwe schroeven bij het
inzetten van messen. Dit is belangrijk om intrekking van het blad
te waarborgen en om de bladdraaischijf in balans te brengen.
Het gebruik van oude schroeven kan tot ernstige verwonding
leiden.
De Landxcape
TM
maait het gras niet zoals andere maaiers. De messen
zijn aan 2 kanten scherp als een scheermes en draaien in beide
richtingen voor de maximale snijcapaciteit (Zie Fig. L). Elk mes van
de Landxcape
TM
heeft 2 snijranden. De draaischijf voor de messen
zal willekeurig naar voren of achteren draaien om beide snijranden
te gebruiken. Dat helpt om het aantal malen te minimaliseren dat
een snijblad vervangen moet worden. Elk mes heeft een levensduur
van maximaal 2 maanden als er elke dag gemaaid wordt. Controleer
steeds of de messen niet beschadigd zijn en vervang ze zo nodig. Zijn
de messen bot en versleten, dan moeten ze vervangen worden door
de reservemessen die met de Landxcape
TM
geleverd zijn. U vindt ook
reservemessen bij uw Landxcape
TM
-leverancier.
A. De messen vervangen
Na enige tijd, meestal een keer per seizoen, moeten de messen van
de Landxcape
TM
vervangen worden. Vervang ze allemaal tegelijk. U

NL86
kunt ze vervangen met een van de kits met reservemessen en extra
schroeven die met de Landxcape
TM
geleverd zijn.
Voordat u begint met het vervangen van de messen van de
Landxcape
TM
, schakelt u de voeding uit en trekt u beschermende
handschoenen aan. Ga dan als volgt te werk:
1. Keer de Landxcape
TM
voorzichtig om
2. Verwijder het batterijklepje en verwijder de batterij.
3. Haal de schroeven uit de messen met een schroevendraaier. (Zie
Fig. M)
4. Schroef de nieuwe messen er stevig op.
5. Plaats de batterij en het batterijklepje opnieuw.
BELANGRIJK: Nadat u de messen aan de schijf heeft
vastgeschroefd, controleert u of de messen vrij kunnen
draaien.
8.2 Houd hem schoon
WAARSCHUWING: Zet uw uw Landxcape
TM
op OFF vóórdat u
hem schoonmaakt. Draag beschermende
handschoenen als u de schijf schoonmaakt en gebruik geen
stromend water.
A. De behuizing schoonmaken
De Landxcape
TM
is gelukkiger en leeft langer als hij geregeld
schoongemaakt wordt. Uw Landxcape
TM
is een elektrisch apparaat
dat met de nodige voorzichtigheid moet worden gereinigd.
Gebruik
daarom GEEN tuinslang of hogedrukreiniger, noch stromend
water op uw Landxcape
TM
. U gebruikt hiervoor het beste een
sproeifles die gevuld is met water. Bij het schoonmaken van de
behuizing gebruikt u een zachte borstel of schone doek, zonder oplos-
of polijstmiddelen (Zie Fig. N). Tenslotte verwijdert u alle resten van
afgemaaid gras en vuil.
B. De onderkant schoonmaken
We herhalen het, het is belangrijk dat u de Landxcape
TM
uitschakelt
met de Aan/uitknop en dat u beschermende handschoenen draagt
voordat u de schijf aanraakt.
Keer de Landxcape
TM
eerst ondersteboven, zodat de onderkant
zichtbaar wordt. U ziet de schijf, het chassis en de voorste wielen en
de aandrijfwielen. Maak alles grondig schoon met een zachte doek of
een zachte borstel.
WAARSCHUWING:
Spoel de onderzijde van de Landxcape
TM
NOOIT met water. De onderdelen kunnen worden beschadigd.
(Zie Fig. O1, O2) Draai aan de messenschijf om er zeker van te zijn dat
deze vrij kan draaien. Controleer of de messen vrij draaien rondom
debevestigingsschroeven. Verwijder eventuele obstakels.
BELANGRIJK: Verwijder vastzittend materiaal zodat het geen
barst in de schijf kan veroorzaken. Zelfs een kleine barst kan de
maaiprestaties van de Landxcape
TM
negatief beïnvloeden.
C. Maak de contactpinnen en de laad strips schoon
Maak de contactpin op het laadstation en de laadstrip op de
Landxcape
TM
schoon met een doek. Verwijder restanten van gras en
vuil rondom de contactpinnen en laad strips periodiek om zeker te
weten dat de Landxcape
TM
elke keer goed kan worden opgeladen.
8.3
Levensduur van de batterij
Het hart van de Landxcape
TM
is een lithium–ion batterij van 20 volt.
Zorg ervoor dat het toestel volledig is opgeladen en bewaar het in een
koele, droge ruimte voor optimale opslag van de batterij.
OPMERKING:
De aanbevolen Landxcape
TM
bedrijfstemperatuur ligt
tussen 0-55°C.
De levensduur van de batterij van de Landxcape
TM
is van diverse
factoren afhankelijk zoals:
• Hoe lang het maaiseizoen duurt in uw woonplaats
• Aantal uren per dag dat de Landxcape
TM
maait
• Onderhoud van de batterij bij opslag.
Landxcape
TM
kan handmatig worden opgeladen zonder de
begrenzingskabel.
1. Sluit het laadstation aan op een geschikte voedingsbron. Het
groene lampje van het oplaadstation gaat branden.
2. Plaats de uitgeschakelde Landxcape
TM
handmatig in het
laadstation. (Zie Fig. P)
3. Groene lampje van het oplaadstation knippert, de
Landxcape
TM
begint te laden.
8.4 Winteropslag
De Landxcape
TM
leeft langer en blijft gezonder als u hem een goede
winterslaap gunt. Hij is onverwoestbaar, maar hij slaapt in de winter
toch liever in de schuur of in de garage.
Voordat u de Landxcape
TM
wegbrengt voor de winterslaap, zorgt u voor
het volgende:
• Maak de Landxcape
TM
grondig schoon
• Laadt de batterij volledig op en verwijder deze van de Landxcape
• Schakel de Landxcape
TM
uit
Om de levensduur van de batterij te maximaliseren, laadt de batterij
volledig op en verwijder van de Landxcape
TM
alvorens op te slagen
tijdens de winter.
WAARSCHUWING: Bescherm de onderkant van
Landxcape
TM
tegen water. Sla de Landxcape
TM
NOOIT
ondersteboven.
Het grensdraad kan in de grond blijven liggen, maar de uiteinden
moeten beschermd worden, bijvoorbeeld door de uiteinden in te
vetten. Blijft het laadstation in de winter buiten, laat de grensdraad dan
aangesloten.
OPMERKING:
Neemt u de Landxcape
TM
na de winterslaap weer in
gebruik, zorg er dan voor dat de laad strips en contactpinnen schoon zijn.
Het is aan te bevelen ze schoon te maken met een fijne schuurdoek.
8.5 De batterij vervangen
WAARSCHUWING: Zet de Aan/uitschakelaar in de stand
UIT voordat u begint met enige instelling, vervanging of
reparatie.
Zet uw Landxcape
TM
vóór vervanging van de bladen op OFF en trek
veiligheidshandschoenen aan.
Moet u de batterij vervangen, ga dan als volgt te werk:
1. Keer de Landxcape
TM
voorzichtig om.
2. Draai de schroeven van de batterij los. Verwijder het batterijdeksel.
(Zie Fig. Q1)
3. Verwijder de oude accu voorzichtig. Druk op de grendel en trek de
connectors los. (Zie Fig. Q2)
OPMERKING:
Trek niet aan de kabels. Houd de connectoren vast en
maak de vergrendeling los.
4. Sluit een nieuwe originele accu aan door de connectors aan te
sluiten totdat deze vastklikken. (Zie Fig. Q3, Q4)
5. Plaats de accu zoals getoond wordt. (Zie Fig. Q5) Plaats het deksel
terug op zijn plaats en maak het goed met schroeven vast.

NL 87
9. Functieberichten
Display Bericht Actie
Vertraging voor regen geactiveerd. Er is geen actie nodig.
10. Foutberichten
Problemen Mogelijke oorzaken Herstelhandeling
Landxcape
TM
is buiten
werkgebied.
1. Is de Landxcape
TM
buiten het territorium, schakel hem dan uit, breng de Landxcape
TM
binnen
het territorium en schakel hem weer in. Druk op , vervolgens op .
2. Is de Landxcape
TM
binnen het territorium, controleer dan of de LED op het oplaadstation
op groen staat. Als dat niet zo is, controleer dan of het oplaadstation goed op de oplader is
aangesloten en of de lader is aangesloten op een geschikte voeding. Als dat zo is, betekent dit
dat de grensdraaduiteinden onjuist zijn ingeplugd en moet u ze omdraaien.
3. Het rode lampje van het oplaadstation gaat branden, bevestig dan of de grensdraad goed is
verbonden met de klemmen op het laadstation. Indien het probleem zich blijft voordoen, kijk
dan na of de grensgraad niet is oversneden.
Wiel motor vast
1. Schakel de Landxcape
TM
uit en breng hem naar een gebied zonder obstakels;
2. Schakel de Landxcape
TM
in. Druk op , vervolgens op .
3. Wordt de foutmelding nog steeds getoond, schakel dan weer uit, keer de Landxcape
TM
om
en controleer of er iets is waardoor de wielen niet goed draaien.
4. Verwijder een mogelijke blokkade, zet de Landxcape
TM
rechtop en schakel hem weer in.
Druk op , vervolgens op .
Maaischijf vast
1. Schakel de Landxcape
TM
uit;
2.Zet de Landxcape
TM
ondersteboven en controleer of er iets is wat de schijf blokkeert.
3. Verwijder een mogelijke blokkering.
4. Zet de Landxcape
TM
rechtop en breng hem naar een gebied met kort gras of stel de
maaihoogte in;
5. Schakel de Landxcape
TM
in. Druk op , vervolgens op .
Landxcape
TM
zit vast.
1. Schakel de Landxcape
TM
uit;
2. Breng hem naar een gebied zonder obstakels;
3. Schakel de Landxcape
TM
in. Druk op , vervolgens op .
4. Wordt de foutmelding nog steeds getoond, schakel dan weer uit, keer de Landxcape
TM
om. Kijk of er iets de wielen blokkeerd.
5. Verwijder een mogelijke blokkade, zet de Landxcape
TM
rechtop en schakel hem weer in.
Druk op , vervolgens op .
Landxcape
TM
wordt opgetild.
1. Schakel de Landxcape
TM
uit.
2. Breng hem naar een gebied zonder obstakels. Schakel de Landxcape
TM
in. Druk op ,
vervolgens op .
3. Indien de foutmelding nog steeds voorkomt: schakel de Landxcape
TM
uit, keer de
Landxcape
TM
ondersteboven en kijk na of er iets voorkomt dat de voorste wielen draaien.
4. Verwijder een mogelijk voorwerp, zet de Landxcape
TM
rechtop en schakel hem weer in.
Druk op , vervolgens op .
Landxcape
TM
is
ondersteboven.
Zet de Landxcape
TM
rechtop. Druk op , vervolgens op .
Batterij foutmelding
1. Kijk de temperatuur van de batterij na. Indien de temperatuur te hoog is, wacht tot
de temperatuur is afgekoeld. Druk op en vervolgens op .
2. Vervang met een nieuwe batterij. Start Landxcape
TM
opnieuw op. Druk op en
vervolgens op .
3. Indien de foutmelding meermaals voorkomt, probeer het werkschema aan te
passen.

NL88
Het duurt te lang voor
Landxcape
TM
om terug te
gaan naar het laadstation.
Plaats Landxcape
TM
manueel in het laadstation om op te laden. Nadat Landxcape
TM
volledig is opgeladen, druk .
Onbekende foutmelding.
Start Landxcape
TM
opnieuw op. Druk op en vervolgens op . Indien de
foutmelding nog steeds is weergegeven, neem contact op met een vertegenwoordiger
voor hulp.
OPMERKINGEN
• Voordat u inschakelt, controleert u of de Landxcape
TM
binnen zijn territorium staat. Zoniet, dan verschijnt het bericht, “
” in het display.
Dit bericht verschijnt ook als de Landxcape
TM
bij het inschakelen op de grensdraad staat.
• Als u om enige reden—bijvoorbeeld voor een tuinfeest of spelende kinderen – de Landxcape
TM
in het laadstation wilt zetten: druk op
vervolgens op . De Landxcape
TM
gaat dan naar het laadstation en blijft daar. Druk om de Landxcape
TM
uit te schakelen.
• Treedt er herhaaldelijk een fout op op dezelfde plek van het gazon, dan kan dat komen door ene probleem met de grensdraad. Zie de
voorafgaande installatie-instructies en controleer de installatie.
• Als uw gazon door een corridor van minder dan 1m is verdeeld in twee afzonderlijke gebieden waarvan het ene niet van een oplaadstation is
voorzien: wanneer de accu van de Landxcape
TM
leeg is moet u hem handmatig naar het oplaadstation brengen, het laadproces zal starten.
• Als de Landxcape
TM
af en toe abnormaal lijkt te functioneren, kunt u proberen hem te herstarten. Als het probleem niet is opgelost, probeer
dan de accu te verwijderen en opnieuw te plaatsen. Als het probleem hiermee niet wordt verholpen neemt u best contact op met de
Reparatieservice van Landxcape
TM
.
• Reinig de machine niet met een hogedrukreiniger, omdat dit de batterij of de machine kan beschadigen.
11. Problemen oplossen
Werkt de Landxcape
TM
niet goed, volg dan de gids voor het oplossen van problemen hieronder. Heft dat de storing niet op, neem dan contact op met
de leverancier.
Problemen Mogelijke oorzaken Herstelhandeling
De led op het laadstation brandt niet. Er is geen netvoeding.
Controleer of de stroomkabel correct op het
oplaadstation is aangesloten en of de oplader op een
geschikte voeding is aangesloten.
Het rode lampje van het oplaadstation
gaat branden.
De grensdraad is niet aangesloten.
Controleer of de grensdraad correct is aangesloten op het
oplaadstation.
Controleer of de grensdraad geen breuken vertoont, vooral
niet in de kabeluiteinden.
De Landxcape
TM
schakelt in, maar de
schijf met de messen draait niet.
Landxcape
TM
is op zoek naar het laadstation
(tenzij u de knop opnieuw drukt om
het toestel naar het laadstation te brengen).
Dit is normaal, de Landxcape
TM
moet opgeladen
worden. De schijf draait niet als hij op zoek is naar het
laadstation.
De Landxcape
TM
trilt.
De messen zijn wellicht beschadigd. Controleer
de toestand van de Messchijf.
Controleer de messen en schroeven en vervang ze zo nodig.
Verwijder modder en vreemde voorwerpen van de messen.
Gras wordt ongelijkmatig gemaaid
LandxcapeTM werkt niet genoeg uren per dag. Voeg uren aan de maaitijd toe.
Gazon is te groot.
Probeer het te maaien gebied kleiner te maken of voeg
meer uren aan de maaitijd toe.
Messen zijn bot.
Vervang alle messen en schroeven gelijktijdig zodat de
schijf gebalanceerd blijft.
De maaihoogte is te laag voor de lengte van het
gras.
Stel een hogere maaihoogte n en maak die
langzamerhand minder
Gras of een voorwerp is om de schijf gewikkeld.
Controleer de schijf en verwijder het gras of het
voorwerp.
Gras heeft zich opgehoopt in de messenschijf of
in het motorframe.
Zorg ervoor dat de schijf vrij kan draaien. eventueel
moet de schijf verwijderd worden om het vuil te
verwijderen.
Uw Landxcape
TM
is binnen zijn
werkgebied en de grensdraad is
aangesloten. Maar het display zegt
“
”.
De grensdraadeinden zijn niet correct geplaatst. Draai de uiteinden van de grensdraad om.
De grensdraad is gebroken. Herstel de beschadigde draad met verbindingen.

NL 89
De oplaadtijd is veel meer dan
verwacht.
Slechte verbinding door vuil op de laadstrip.
Reinig de contactstrip van het laadstation en de
oplaadstrip op de Landxcape
TM
met een doek.
De laadbeveiligingsfunctie is geactiveerd
omwille van de hoge temperatuur.
Zet het laadstation in de schaduw of wacht tot de
temperatuur ervan is afgekoeld.
De maaier laadt niet op
Er is geen netvoeding.
Controleer of de elektriciteitskabel correct op het
oplaadstation is aangesloten en of de oplader op een
geschikte voeding is aangesloten.
Werkt niet goed tijdens het handmatig opladen. Zie manueel opladen in sectie 8.3.
Landxcape
TM
werkt steeds korter na een
bezoek aan het laadstation.
Er is iets opgehoopt in de messenschijf.
Verwijder de schijf en maak hem schoon.
Het gras is te hoog en te dik.
De Landxcape
TM
schudt zwaar.
Controleer de messenschijf en de messen. Verwijder
gras en vreemde voorwerpen.
De batterij kan uitgeput of verouderd zijn. Vervang de batterij.
Landxcape
TM
werkt niet op het juiste
moment.
De klok is niet op de juiste tijd ingesteld. Stel de klok in op het juiste uur, zie sectie 5.3.
De geprogrammeerde maaitijden voor de
Landxcape
TM
zijn niet correct.
Verander de start- en stoptijden van de maaier.
Landxcape
TM
wordt handmatig in de oplaadbasis
geplaatst.
Druk op
en dan op .
De batterij kan niet laden vermits de
temperatuur van de batterij bij warm weer
boven de 55
o
C stijgt.
Wacht tot de batterij is afgekoeld.
De Landxcape
TM
dokt niet goed in het
laadstation
Omgevingsfactoren. Herstart de Landxcape
TM
.
Slechte verbinding door vuil op de laadstrip.
Reinig de contactstrip van het laadstation en de
oplaadstrip op de Landxcape
TM
met een doek.
Het groene lampje op het laadstation
BRANDT voordat de accu volledig is
opgeladen.
Het oplaadstation oververhit.
Zet het laadstation in de schaduw of wacht tot de
temperatuur ervan is afgekoeld.
De Landxcape
TM
beweegt buiten de
grensdraad. De Landxcape
TM
maait
een gebied binnen de grensdraad
niet. De Landxcape
TM
keert om of
draait onregelmatig in de buurt van de
grensdraad.
De begrenzingskabel van een andere
Landxcape
TM
of robotmaaier van een ander
merk bevindt zich te dicht in de buurt.
Zorg voor minstens 1 meter afstand tussen de
begrenzingskabel van uw Landxcape
TM
en andere
begrenzingskabels in de buurt.
De begrenzingskabel is geïnstalleerd met
scherpe hoeken.
Controleer de begrenzingskabel en zorg ervoor dat
alle hoeken gerond zijn.
Onder natte omstandigheden kan het
elektrische signaal op de grensdraad
weglekken op plaatsen waar de draad
verbonden of gerepareerd is.
Controleer de grensdraadverbindingen. Isoleer de
draad voor een volledig waterdichte verbinding.
Er is een lekkage van het elektrische signaal
op de grensdraad vanwege defecte isolatie.
Herstel beschadigde begrenzingsdraad met
aansluitingen.
Het maaigebied is groter dan het toegestane
maaigebied voor de Landxcape
TM
.
Verminder de oppervlakte van het gras dat moet
gemaaid worden of gebruik Landxcape
TM
met een
groter toegestane oppervlakte om te maaien.
De Landxcape
TM
-wielen slippen of
beschadigen het gazon.
Vreemde obstakels, zoals takken en twijgen,
kunnen onder de Landxcape
TM
raken.
Verwijder vreemde voorwerpen uit de onderkant van
de Landxcape
TM
.
Het gazon is te nat. Wacht tot het gazon is opgedroogd.
De Landxcape
TM
verlaat het afgebakende
gebied door een te hoge snelheid tijdens
het afdalen van een helling.
De grensdraad is geplaatst op een helling die
steiler is dan 17% (10°).
Verplaats de grensdraad op een helling die minder
steil is dan 17% (10°). Verwijs naar de gids voor de
installatie voor meer informatie.
Er is een software-update fout ontstaan.
Probeer opnieuw conform de sectie “Software
Update”.
Bescherming van het milieu
Afgedankte elektrische producten kunt u niet met het normale huisafval weggooien. Breng deze producten, indien mogelijk, naar een
recyclecentrum bij u in de buurt. Vraag de verkoper of de gemeente naar informatie en advies over het recyclen van elektrische producten.

NL90
Conformiteitverklaring
Wij,
Positec Germany GmbH
Grüner Weg 10, 50825 Cologne, Germany
Verklaren dat het product,
Beschrijving Robotgrasmaaier
Type LX790 LX791 LX792 LX793 (790-799 - aanduiding van machinerie, kenmerkend voor Robotgrasmaaier) (Jaar, artikelnummer en
gazonmaaier) met acculader LA8001 / LA8002 en oplaadbasis LA3000
Functie gras maaien
Overeenkomt met de volgende richtlijnen,
2006/42/EC, 2014/30/EU, 2014/35/EU, 2011/65/EU, 2000/14/EC gewijzigd door 2005/88/EC,
2000/14/EC gewijzigd door 2005/88/EC
- Procedure beoordeling conformiteit volgens Annex V
- Niveau gemeten geluidsvermogen 64.2 dB (A)
- Opgegeven, gegarandeerde niveau geluidsvermogen 65 dB (A)
De betrokken aangemelde instantie
Adres: Cleeve Road, Leatherhead, Surrey, KT22 7SB United Kingdom
Standaards in overeenstemming met,
EN 60335-1:2012+A11+A13:2017, EN 50636-2-107:2015+A1:2018, EN 60335-2-29:2004+A2:2010,
EN 62233:2008, EN ISO 3744:2005, EN 55014-1:2017, EN 55014-2:2015,EN 61000-3-2:2014,
EN 61000-3-3:2013, EN 61558-1:2005+A1:2009, EN 61558-2-16:2009+A1:2013, EN 303 447 V1.1.1
De persoon die bevoegd is om het technische bestand te compileren,
Naam Marcel Filz
Adres Positec Germany GmbH, Grüner Weg 10, 50825 Cologne, Germany
2018/10/26
Allen Ding
Plaatsvervangend Chief Ingenieur, Testen en Certificering
Positec Technology (China) Co., Ltd.
18, Dongwang Road, Suzhou Industrial
Park, Jiangsu 215123, P. R. China

PL 91
1.1 Ogólne i dodatkowe instrukcje
•
•
•
Przeszkolenie
Przygotowanie
1. Informacje ogólne
Konserwacja i przechowywanie
czyszczenie lub wymiana ostrzy.

PL92
Zalecenie
Ryzyko
Transport
a) Nie demontuj, nie otwieraj lub nie niszcz ogniw pomocniczych
ulec zwarciu przez inne metalowe przedmioty.
mechaniczne.
suchym.
temperaturze pokojowej (20
o
C ± 5
o
C).
poleci producent Landxcape
TM
akumulatory.
gospodarki odpadami.
Landxcape
TM

PL 93
1. PRZYCISK ZATRZYMANIA
4. PRZYCISK START
5. PRZYCISK HOME
8. CZUJNIK DESZCZU
10. TARCZA OBROTOWA Z OSTRZEM
12. AKUMULATOR
13. PORT USB
16. WTYKI
18. ZASILACZ SIECIOWY
19. SZPILKI DO PRZEWODÓW
20. PRZEWÓD GRANICZNY
23. KLUCZ IMBUSOWY

PL94
3.1 Dane techniczne
Typ LX790 LX791 LX792 LX793 (790-799 - oznaczenie maszyn
zgodnych z robotem do koszenia trawy)
LX790 LX792 LX791 LX793
Powierzchnia koszenia
2
2
4
Litowo-jonowa
2hrs
III
Akcesoria
LX790 LX792 LX791 LX793
9 9
1 1
7 7
1 1
granicznego
2 2
Ostrzy 9 9
2 2
1 1
1 1
3.2 H
L
K
L
K
-
-

PL 95
4. Panel sterowania
Uruchomienie
cztery
UWAGA:
Landxcape
Landxcape
UWAGA:
Landxcape
Czas pracy
Landxcape
Landxcape
podczas pracy
do
OK
Potwierdza dowolne
ustawienie

PL96
5. Zrozumienie pracy Landxcape
TM
i
TM
Landxcape
TM
Gdy robot Landxcape
Landxcape
B. Czujniki deszczu
C. Wyczuwanie przewodu granicznego
zawsze przestrzega granicy wyznaczonej przez
D. Ruszanie i zatrzymywanie podczas koszenia (Patrz Rys. D, E1, E2)
Landxcape
5.3 Ustawienie
UWAGA:
(1) Zmiana kodu PIN
wybierz lub
z lub

PL 97
skorzystaj z lub
skorzystaj z lub
(3) Ustaw obszar pracy.
Naciskaj
lub
2
4hrs
i
i
Landxcape
5.4 Jak skutecznie robot Landxcape
TM
aby Landxcape
Landxcape
robot Landxcape

PL98
6. Podstawowe informacje
6.1 Mocowanie przewodu granicznego
koszenia.
robota Landxcape
6.2 Zakopywanie przewodu granicznego
i
Landxcape
7. Aktualizacja oprogramowania
FAT32
FAT32
UWAGA:
w celu pobrania najnowszej
8. Konserwacja
eksploatacji Landxcape
Landxcape
TM
A. Wymiana ostrzy

PL 99
robota Landxcape
Landxcape
TM
. Przed wyczyszczeniem
A. Czyszczenie korpusu
jest
czyszczenia dolnej strony robota Landxcape
TM
.
8.3
UWAGA:
jest w
o
Landxcape
TM
granicznego.
zielonym kolorze.
TM
momencie, gdy robot Landxcape
TM
P)
Landxcape
TM
8.4 Przechowywanie w okresie zimowym
Landxcape
TM
Landxcape
TM
UWAGA:
do pracy po okresie
8.5 Wymiana akumulatora
TM

PL100
UWAGA:
9. Komunikaty funkcjonalne
Oznaka Przyczyna
Landxcape
Landxcape
Landxcape
jest

PL 101
Landxcape
jest
Landxcape
Landxcape
UWAGI
Landxcape
Landxcape
w celu
11. R
Oznaka Przyczyna

PL102
Landxcape
nie pracuje o
Landxcape
Landxcape
o

PL 103
pracuje poza
Landxcape

PL104
Opis Robot do koszenia trawy
Koszenie trawy
Annex V
64.2 dB (A)
65 dB (A)
Adres: Cleeve Road, Leatherhead, Surrey, KT22 7SB United Kingdom
EN 60335-1:2012+A11+A13:2017, EN 50636-2-107:2015+A1:2018, EN 60335-2-29:2004+A2:2010,
EN 62233:2008, EN ISO 3744:2005, EN 55014-1:2017, EN 55014-2:2015,EN 61000-3-2:2014,
EN 61000-3-3:2013, EN 61558-1:2005+A1:2009, EN 61558-2-16:2009+A1:2013, EN 303 447 V1.1.1
Adres Positec Germany GmbH, Grüner Weg 10, 50825 Cologne, Germany

HU 105
1. Biztonsági óvintézkedések
óvintézkedések
szüksége lehet ezekre.
•
•
•
FONTOS
Tájékozódás
1. Általánosságok
Figyelem!
Karbantartás és tárolás
mindig kapcsolja ki az Áramellátás gombot.
Az áramellátási gomb megnyomásával az áramellátást mindig ki
hajt végre.

HU106
Jótanács
Reziduális veszélyek
a) Az akkumulátort ne szedje szét, ne nyissa fel és ne vágja
meg.
b) Ne zárja rövidre az akkumulátort. Az akkumulátorokat ne
okozhatja.
közvetlen napfényben.
d) Az akkumulátort ne tegye ki ütésnek.
e) Ha az akkumulátor szivárog, vigyázzon, hogy a folyadék ne
forduljon orvoshoz.
f) Az akkumulátor vagy egy cella lenyelése esetén azonnal
forduljon orvoshoz.
g) Vigyázzon, hogy az akkumulátor tiszta és száraz maradjon.
j) Csak a Landxcape
TM
1.2 A Landxcape
TM
-re vonatkozó
információk

HU 107
2. Alkatrészlista
1. STOP GOMB
2. VÁGÁSI MAGASSÁGOT ÁLLÍTÓ FORGÓGOMB
3. BE/KI KAPCSOLÓGOMB
4. START GOMB
5. HOME GOMB
10. KÉSFORGATÓ TÁRCSA
11. VÁGÓÉL
12. AKKUMULÁTOR
13. USB CSATLAKOZÓ PORT
14. HÁTSÓ MEGHAJTÓ KERÉK
15. FOGANTYÚ
16. CSATLAKOZTATÓ CSAPOK
18. HÁLÓZATI ADAPTER
20. BEHATÁROLÓ HUZAL
23. HEX. KULCS
24. CSATLAKOZÓ
Nem minden készülék tartalmazza valamennyi, a fentiekben felsorolt alkatrészt.

HU108
LX790 LX792 LX791 LX793
2
2
4
2hrs
III
Tartozékok
LX790 LX792 LX791 LX793
9 9
1 1
7 7
1 1
2 2
9 9
2 2
1 1
1 1
3.2
L
K
L
K
Ha a hangnyomásszint meghaladja a
-
Rendeltetés
robo-

HU 109
MEGJEGYZÉS:
MEGJEGYZÉS:
kikapcsoása
Landxcape
Landxcape
elküldi a Landxcape
-

HU110
5. A Landxcape
TM
ismertetése
Landxcape
5.1 Honnan tudja a Landxcape
TM
, hogy mit
5.2 Honnan tudja a Landxcape
TM
, hogy
merre kell mennie?
Landxcape
C. A behatároló huzal érzékelése
MEGJEGYZÉS:
(1) Változtassa meg a PIN-kódot
a
az ikon
a

HU 111
a
az
4hrs
az ön Landxcape
TM
-je?
Landxcape
Landxcape
Landxcape
akkujának

HU112
Landxcape
Landxcape
6. A behatároló huzalra vonatkozó
alapfogalmak
6.1 A behatároló huzal lecövekelése
kiszemelt területet.
Landxcape
6.2 A behatároló huzal földbe temetése
Landxcape
a
Landxcape
6.3 A behatároló huzal összekapcsolása
FIGYELEM!
Landxcape
FAT32
FAT32
MEGJ.:
8. Karbantartás
Landxcape
kapcsolja ki (OFF) Landxcape
TM
gépét, és mindig viseljen
FIGYELEM: Az új kések beillesztésekor ügyeljen arra, hogy az
ÖSSZES kést kicserélje. Az új kések beillesztésékor azokat új
szempontjából. Ha a csavarok nem újak, súlyos sérülések
történhetnek.
Ez a Landxcape

HU 113
azokat a Landxcape
A. A kések cseréje
Fontos: A kés késtárcsára való csavarozása után bizonyosodjon
meg, hogy a kés akadálymentesen tud forogni.
8.2 A robotizált gép tisztán tartása
Landxcape
TM
Landxcape
mosókat vagy folyóvizet Landxcape
TM
FIGYELEM:
Landxcape
TM
Landxcape
8.3
Az akkucsomag élettartama
MEGJ.:
o
A Landxcape
TM
gépet behatároló huzal nélkül, manuálisan is fel
lehet tölteni.
2. Miután kikapcsolta, a Landxcape
TM
gépet helyezze kézzel a
az akku feltöltése.
8.4 Téli tárolás
Landxcape
Landxcape
TM
gép alját. SOHA ne
TM
hatolt bele.
MEGJEGYZÉS:

HU114
8.5 Akkucsere
TM
MEGJEGYZÉS:
Üzenet
10. Hibaüzenetek
Tünet Ok
a

HU 115
Landxcape
Landxcape
Landxcape
MEGJEGYZÉS
Landxcape
11. Hibakeresés
Tünet Ok

HU116
Landxcape
o

HU 117
Landxcape
a Landxcape
olyan Landxcape
Környezetvédelem

HU118
Leírás
V. függelék értelmében
64.2 dB (A)
- Garantált hangerõ-szint 65 dB (A)
EN 60335-1:2012+A11+A13:2017, EN 50636-2-107:2015+A1:2018, EN 60335-2-29:2004+A2:2010,
EN 62233:2008, EN ISO 3744:2005, EN 55014-1:2017, EN 55014-2:2015,EN 61000-3-2:2014,
EN 61000-3-3:2013, EN 61558-1:2005+A1:2009, EN 61558-2-16:2009+A1:2013, EN 303 447 V1.1.1
Név Marcel Filz

RO 119
1. Securitatea produsului
AVERTIS
ulterioare.
•
•
•
IMPORTANT
Instruirea
Aten
ie!
automat
Power.

RO120
Recomandare
Riscuri reziduale
acumulatoarele la întâmplare într-o cutie sau într-un sertar
unde s-ar putea scurtcircuita între ele sau prin materiale
conductoare.
acumulator.
acumulatoarele unor sisteme electrochimice diferite.
Landxcape
TM
un alt acumulator.
utilizarea cu acest echipament.
Landxcape
TM

RO 121
3. Date Tehnice
ʞ
i Date Zgomot
3.1 Date Tehnice
respectiv a Robotului de tuns iarba)
LX790 LX792 LX791 LX793
2
2
4
Litiu-ion
2hrs
III
Accesorii
LX790 LX792 LX791 LX793
9 9
1 1
7 7
1 1
2 2
9 9
Conector 2 2
1 1
1 1
3.2 I
L
K
L
K
Folosirea inten
ʠ

RO122
4. Panou Control
Pornire
Landxcape
Landxcape
pentru a face ca Landxcape
Landxcape
robotul Landxcape
Capacitatea bateriei
Landxcape
Landxcape
la
care se rotesc pentru a
OK

RO 123
5. Prezentarea robotului dvs.
Landxcape
TM
Landxcape
TM
TM
este
B. Senzori de ploaie
C. Detectarea sârmei de delimitare a perimetrului
(1) Schimbarea codului PIN
sau
(2) Setaʠi anul, data ʞi timpul
sau

RO124
sau
sau
sau
Landxcape
4hrs
(4) Schimbarea paginii implicite.
butoane
Landxcape
5.4 Cât de eficient tunde iarba robotul
meu Landxcape
TM
?
Landxcape
Landxcape

RO 125
sârma de delimitare a perimetrului
6.1 Priponirea sârmei de delimitare a
perimetrului
iarba.
perimetrului
AVERTISMENT!
7. Actualizarea software-ului
FAT32
FAT32
a opri
Landxcape
Landxcape
grave.
Landxcape

RO126
Landxcape
Landxcape
robinet.
este o
pentru
ATEN
ʟ
IE:
TM
.
8.3
este
o
Acumulatorul robotului Landxcape
TM
TM
fig. P)
acumulatorul robotului Landxcape
TM
8.4 Hibernarea
Landxcape
ATEN
ʟ
IE: Proteja
ʠ
i spateel Landxcape
TM
nu depozita
ʠ
i Landxcape
TM
întors.

RO 127
9. Mesaj Func
ʠ
ie
ʞ
aj Mesaj Ac
ʠ
iune
10. Mesaj eroare
ʞ
aj Ac
ʠ
iune
În afara zonei de lucru
blocat
robotul Landxcape
blocat
Landxcape
Landxcape

RO128
Eroare baterie
11. Probleme
Simptom
robotului Landxcape

RO 129
cu
robotul Landxcape
nu poate andoca
cu
Landxcape
sau a unui alt robot de tuns iarba
Landxcape
cu
Landxcape

RO130
Robot de tuns iarba marca
LX790 LX791 LX792 LX793 (790-799 - Utilizarea ma
LA8001/LA8002
Tunderea gazonului
Anexa V
64.2 dB (A)
65 dB (A)
Adresa: Cleeve Road, Leatherhead, Surrey, KT22 7SB United Kingdom
EN 60335-1:2012+A11+A13:2017, EN 50636-2-107:2015+A1:2018, EN 60335-2-29:2004+A2:2010,
EN 62233:2008, EN ISO 3744:2005, EN 55014-1:2017, EN 55014-2:2015,EN 61000-3-2:2014,
EN 61000-3-3:2013, EN 61558-1:2005+A1:2009, EN 61558-2-16:2009+A1:2013, EN 303 447 V1.1.1
Denumire Marcel Filz

CZ 131
pokyny
instrukce.
•
•
•

CZ132
TM
Landxcape
TM

CZ 133
6. DISPLEJ
7. NABÍJECÍ PÁSEK
12. BATERIE
13. PORT USB
16. KONTAKTNÍ KOLÍKY
17. NABÍJECÍ ZÁKLADNA
18. NAPÁJECÍ ADAPTÉR
20. VYMEZOVACÍ DRÁT
24. SPOJOVACÍ KONEKTOR

CZ134
3. Technické údaje a údaje o úrovni
hluku
3.1 Technické údaje
LX790 LX792 LX791 LX793
2
2
4
Model baterie
2hrs
III
P
LX790 LX792 LX791 LX793
9 9
Nabíjecí základna 1 1
základnu
7 7
1 1
drátu
2 2
9 9
2 2
1 1
1 1
3.2
L
K
L
K
-

CZ 135
POZNÁMKA:
a
Landxcape
bude
POZNÁMKA:
Kapacita baterie
Landxcape
do
OK

CZ136
TM
Landxcape
TM
pozná,
co má sekat?
TM
pozná,
kde má jet?
POZNÁMKA:
Pouze pro referenci
nebudou blikat ikona
Pouze pro referenci

CZ 137
Pouze pro referenci
bliká
Pouze pro referenci
2
Landxcape
4hrs
Pouze pro referenci
a
a
Landxcape
Pouze pro referenci
Landxcape
TM
• Okolní teplota
Landxcape

CZ138
drátu
a
Landxcape
VAROVÁNÍ:
7. Aktualizace softwaru
Landxcape
FAT32
FAT32
POZNÁMKA:
TM
rukavice.

CZ 139
Landxcape
TM
TM
VAROVÁNÍ:
TM
.
Landxcape
8.3
POZNÁMKA
O
TM
TM
, která je vypnuta, do
Landxcape
TM
TM
TM
kontaktu s vodou.
POZNÁMKA:
TM
ochranné rukavice.
POZNÁMKA:

CZ140
Displej Zpráva Akce
je
je
pak
pak
Landxcape

CZ 141
pak
POZNÁMKA
a
Landxcape
základ
pro

CZ142
dobu
Landxcape
o
Landxcape
Landxcape
hodnotu pro Landxcape
Landxcape
prokluzují

CZ 143
Robot de tuns iarba marca
LX790 LX791 LX792 LX793 (790-799 - Utilizarea ma
LA8001/LA8002
Tunderea gazonului
Anexa V
64.2 dB (A)
65 dB (A)
Adresa: Cleeve Road, Leatherhead, Surrey, KT22 7SB United Kingdom
EN 60335-1:2012+A11+A13:2017, EN 50636-2-107:2015+A1:2018, EN 60335-2-29:2004+A2:2010,
EN 62233:2008, EN ISO 3744:2005, EN 55014-1:2017, EN 55014-2:2015,EN 61000-3-2:2014,
EN 61000-3-3:2013, EN 61558-1:2005+A1:2009, EN 61558-2-16:2009+A1:2013, EN 303 447 V1.1.1
Jméno Marcel Filz
Adresa Positec Germany GmbH, Grüner Weg 10, 50825 Cologne, Germany

SK144
•
•
•
1. Základné pokyny

SK 145
Ostatné riziká
Preprava
zariadenia.
b) Batériu neskratujte. Neukladajte batérie náhodne v
vzájomnému skratovaniu alebo k skratovaniu spôsobenému
izbovej teplote (20 °C ± 5 °C).
budúce odkazy.
n) Vykonávajte riadnu likvidáciu batérie.
Landxcape
TM

SK146
2. Zoznam dielov
6. DISPLEJ
7. NABÍJACIA PÁSKA
9. PREDNÉ KOLIESKO
12. BATÉRIA
13. PORT USB
14. ZADNÉ HNACIE KOLIESKO
16. KONTAKTNÉ KOLÍKY
18. NAPÁJACÍ ADAPTÉR
19. DRÔTENÉ KOLÍKY
24. SPÁJACÍ KONEKTOR

SK 147
3. Technické údaje a údaje o úrovni
hluku
3.1 Technické údaje
LX790 LX792 LX791 LX793
2
2
Šírka záberu
4
2hrs
III
LX790 LX792 LX791 LX793
9 9
1 1
7 7
1 1
2 2
9 9
2 2
1 1
1 1
3.2 Ú
L
K
L
K
-

SK148
Spustenie
POZNÁMKA:
Landxcape
Landxcape
POZNÁMKA:
Po zapnutí Landxcape
Landxcape
Landxcape
Landxcape
je plne nabitá a
Landxcape
TM
do
dole
OK

SK 149
Landxcape
TM
Landxcape
TM
TM
vie,
5.3 Nastavenie
POZNÁMKA:
obe
alebo
alebo

SK150
alebo pre
alebo
Landxcape
alebo
2
4hrs
obe
obe
Landxcape
Landxcape
TM
trávnika?
• Okolitá teplota

SK 151
kosenie.
Landxcape
VAROVANIE:
7. Aktualizácia softwaru
Landxcape
FAT32
POZNÁMKA:
Landxcape
ochranné rukavice.

SK152
Landxcape
TM
aby ste si pred manipuláciou s
VAROVANIE:
Landxcape
TM
.
8.3
POZNÁMKA
je
o
C
kosenie
TM
Landxcape
TM
8.4 Uskladnenie na zimu
TM
obrátenú naruby z dôvodu pritekajúcej vody.
POZNÁMKA:
do

SK 153
POZNÁMKA:
Displej Správa Opatrenie
10. Chybové hlásenia
sa
a

SK154
hornou
Landxcape
a následne
Landxcape
•
11. Iskanje napak
pre

SK 155
sa nachádza
Landxcape
o

SK156
Landxcape
Landxcape
hodnotu pre Landxcape
s

SK 157
Prehlásenie o zhode
Popis
Kosenie trávy
2006/42/EC, 2014/30/EU, 2014/35/EU, 2011/65/EU, 2000/14/EC v novelizácii 2005/88/EC
64.2 dB (A)
65 dB (A)
Adresa: Cleeve Road, Leatherhead, Surrey, KT22 7SB United Kingdom
EN 60335-1:2012+A11+A13:2017, EN 50636-2-107:2015+A1:2018, EN 60335-2-29:2004+A2:2010,
EN 62233:2008, EN ISO 3744:2005, EN 55014-1:2017, EN 55014-2:2015,EN 61000-3-2:2014,
EN 61000-3-3:2013, EN 61558-1:2005+A1:2009, EN 61558-2-16:2009+A1:2013, EN 303 447 V1.1.1
Meno Marcel Filz
Adresa Positec Germany GmbH, Grüner Weg 10, 50825 Cologne, Germany

PT158
1. Segurança do Produto
1.1 Instruções de segurança gerais e
adicionais
AVISO: Leia todos os avisos e instruções de segurança.
O
desrespeito dos avisos e instruções pode resultar em choques
eléctricos, incêndios e/ou ferimentos graves.
Leia cuidadosamente as instruções sobre o funcionamento
seguro da máquina.
Preserve todos avisos e instruções para referência futura.
• Este aparelho não se destina a ser utilizado por indivíduos (incluindo
crianças) com capacidades físicas reduzidas, capacidades
sensoriais e mentais reduzidas ou falta de experiência e
conhecimento, salvo quando supervisionados ou instruídos por
uma pessoa responsável acerca da utilização do aparelho e
respectiva segurança.
• Deve supervisionar as crianças para garantir que não brincam com
o aparelho.
• Este aparelho só deve ser utilizado com a fonte de alimentação
fornecida com o mesmo.
IMPORTANTE
LEIA CUIDADOSAMENTE ANTES DE UTILIZAR
PRESERVE PARA FUTURA REFERÊNCIA
Práticas de utilização segura
Formação
a) Leia atentamente as instruções. Certifique-se de que compreende
as instruções e familiarize-se com os controlos e com a utilização
adequada do aparelho;
b) Nunca permita que o aparelho seja utilizado por crianças ou
pessoas que não estejam familiarizadas com a utilização do
aparelho. Os regulamentos locais podem restringir a idade do
operador;
c) O operador ou utilizador é responsável por acidentes ou situações
de perigos ocorrendo a outras pessoas ou na sua propriedade.
Preparação
a) Certifique-se de que instala correctamente o fio de delimitação
conforme instruído.
b) Inspeccione periodicamente a área onde o aparelho deve ser
utilizado e retire todas as pedras, paus, fios, ossos e outros
objectos estranhos.
c) Inspeccione a máquina visual e periodicamente para verificar se
as lâminas, os parafusos das lâminas e o conjunto de corte estão
desgastados ou danificados. Substitua lâminas e parafusos gastos
ou danificados em conjunto de modo a preservar o equilíbrio.
d) Nos aparelhos com vários pivôs, preste atenção ao rodar uma
lâmina pois pode provocar a rotação das restantes lâminas.
e) AVISO! O cortador de relva não deve ser utilizado sem a protecção
no local correcto.
Funcionamento
1. Geral
a) Nunca utilize o aparelho com protecções defeituosas ou sem
dispositivos de segurança no local correcto, por exemplo
deflectores;
b) Não coloque os pés nem as mãos perto ou debaixo de peças em
rotação. Mantenha-se sempre afastado da abertura de descarga;
c) Nunca pegue ou transporte um aparelho enquanto o motor estiver
a funcionar;
d) Utilize o dispositivo desactivado do aparelho;
– Antes de eliminar um bloqueio;
– Antes de inspeccionar, limpar ou trabalhar no aparelho;
e) Não é permitido modificar a concepção original do robot corta-
relva. Todas as modificações são da sua exclusiva responsabilidade.
f) Ligue o robot corta-relva de acordo com as instruções. Quando o
botão de energia está activado, certifique-se de que mantém as
mãos afastadas das lâminas rotativas. Nunca coloque as mãos e
pés sob o cortador.
g) Nunca levante ou transporte o robot corta-relva com o botão de
energia activado.
h) Não deixe as pessoas que não se encontram familiarizadas com o
funcionamento do robot corta-relva utilizarem o mesmo.
i) Não coloque objectos sobre o robot corta-relva ou na respectiva
estação de carga.
j) Não permita que o robot corta-relva seja utilizado com um disco da
lâmina ou corpo defeituosos. Também não deve ser utilizado com
lâminas, parafusos, porcas ou cabos defeituosos.
k) Desligue sempre o robot corta-relva quando concluir a sua
utilização. O robot corta-relva só pode iniciar quando o botão de
energia estiver activado e tenha sido introduzido o código PIN
correcto.
l) Mantenha as suas mãos e pés longe das lâminas giratórias. Nunca
coloque as mãos ou pés próximo ou por baixo do corpo quando o
corta-relva robotizado estiver em funcionamento.
m) De modo evitar a utilização da máquina e dos respetivos periféricos
em condições atmosféricas adversas, especialmente quando existe
risco de queda de raios.
n) Não tocar em peças móveis perigosas antes de estar terem parado
por completo.
o) Para máquinas usadas em áreas públicas, os sinais de aviso
devem ser colocados em torno da área de trabalho da máquina.
Devem apresentar a substância do seguinte texto:
AVISO!
Cortador de grama automático! Mantenha longe da
máquina! Supervisione as crianças!
2. Além disso, quando o aparelho estiver a funcionar
automaticamente
a) Não deixe a máquina a funcionar sem supervisão caso não saiba
se existem animais de estimação, crianças ou pessoas nas
proximidades.
Manutenção e armazenamento
AVISO! Quando o cortador estiver ao contrário, o botão de
energia deve estar sempre desligado.
O botão de energia deve estar sempre desligado durante os trabalhos
realizados sob a estrutura, como a limpeza ou substituição das lâminas.
a) Mantenha todas as porcas, pernos e parafusos apertados
para garantir que o aparelho se encontra em condições de
funcionamento seguras;
b) Inspeccione o robot corta-relva semanalmente e substitua as peças
gastas ou danificadas por motivos de segurança;
c) Verifique especialmente se as lâminas e respectivos discos estão
danificados. Substitua todas as lâminas e parafusos em simultâneo
(caso necessário) para que as peças rotativas fiquem equilibradas.
d) Certifique-se de que são utilizados apenas meios de corte
sobresselentes do tipo correcto;
e) Certifique-se de que as baterias estão carregadas utilizando o
carregador correcto recomendado pelo fabricante. A utilização
incorrecta pode provocar choques eléctricos, sobreaquecimento ou

PT 159
fugas de líquido corrosivo da bateria;
f) Em caso de fuga de electrólitos lave com água/agente
neutralizador e procure aconselhamento médico se entrar em
contacto com os olhos, etc.;
g) A assistência ao aparelho deve estar de acordo com as instruções
do fabricante.
Recomendação
Ligar a máquina e/ou os respetivos periféricos apenas a um circuito de
alimentação protegido por um dispositivo de corrente residual (RCD)
com uma corrente de disparo não superior a 30 mA.
Riscos residuais
Para evitar lesões, usar luvas de proteção quando substituir as lâminas.
Transporte
A embalagem original deve ser utilizada ao transportar o robot corta-
relva em longas distâncias.
Para transportá-lo desde ou na área de funcionamento:
a) Pressione o botão PARAR para parar o cortador.
Selecione o código PIN de quatro dígitos quando iniciar o corta-
relva pela primeira vez.
b) Desligue sempre o robot corta-relva caso pretenda transportá-lo.
c) Transporte sempre o cortador pelo manípulo na frente sob o cortador.
Transporte o cortador com o disco da lâmina afastado do corpo.
Avisos de segurança para a bateria no interior da ferramenta
a) Não desmonte, abra ou corte as células da bateria.
b) Não submeta a bateria a curto-circuitos. Não armazena
as baterias ao acaso numa caixa ou gaveta onde possam
provocar um curto-circuito ou submetidas a curto-circuitos
por materiais condutores.
Quando não estiver a utilizar a
bateria, mantenha-a afastada de outros objectos metálicos, como
clipes, moedas, chaves, pregos, parafusos ou outros pequenos
objectos de metal, que possam realizar uma ligação de um
terminal a outro. Um curto-circuito dos terminais da bateria pode
provocar queimaduras ou um incêndio.
c) Não exponha a bateria ao calor ou a incêndios. Evite o
armazenamento à exposição de luz solar directa.
d) Não exponha a bateria ao choque eléctrico.
entre em contacto com a pele ou olhos. Caso entre em
contacto, lave a área afectada com quantidades abundantes
de água e procure aconselhamento médico.
f) Procure imediatamente aconselhamento médico se ingerir
uma célula ou bateria.
g) Mantenha a bateria limpa e seca.
h) A bateria regista o seu melhor desempenho quando é
utilizada a uma temperatura ambiente normal (20 ºC ± 5 ºC).
i) Ao eliminar as baterias, mantenha as baterias com diferentes
Landxcape
TM
. Não utilize um carregador que não se encontra
carregador adequado para um determinado tipo de bateria
pode provocar risco de incêndio quando é utilizado com
outra bateria.
k) Não utilize uma bateria que não se encontra concebida para
a utilização com o equipamento.
l) Mantenha a bateria fora do alcance das crianças.
m) Preserve as informações originais do produto para futura
referência.
n) Elimine-a de forma adequada.
1.2 Informações sobre o Landxcape
TM
AVISO – o robot cortador de relva pode ser perigoso
se for utilizado incorrectamente.
Leia cuidadosamente o manual do proprietário e
compreenda o respectivo conteúdo antes de utilizar o
seu robot cortador de relva.
AVISO - Mantenha uma distância segura da máquina
quando estiver em utilização.
AVISO – Remova o dispositivo de desativação antes
de trabalhar na máquina ou proceder à elevação
desta.
AVISO – Não se coloque sobre a máquina.
Não queimar
Não expor à chuva ou água.
As baterias usadas devem ser separadas de forma
ecológica. Não elimine as baterias usadas como
resíduo municipal indiferenciado.
Não lave a máquina com equipamento de lavagem de
pressão elevada.
Aparelho Classe III
Os produtos eléctricos residuais não devem ser
eliminados juntamente com o lixo doméstico. Recicle
onde existam instalações. Confirme com as suas
autoridades locais ou distribuidor relativamente ao
dispositivo de reciclagem.

PT160
1. BOTÃO PARAR
2. BOTÃO DE AJUSTE DA ALTURA DE CORTE
3. TECLA LIGAR/DESLIGAR
4. TECLA DE INICIAR
5. BOTÃO DE HOME
6. DISPLAY
7. TIRA DE CARGA
8. SENSOR DE CHUVA
9. RODA DIANTEIRA
10. DISCO DE ROTAÇÃO DAS LÂMINAS
11. LÂMINA DE CORTE
12. BATERIA CARREGÁVEL
13. PORTA DE USB
14. RODA DE CONDUÇÃO TRASEIRA
15. MANÍPULO
16. PINOS DE CONTACTO
17. BASE DE CARGA
18. TRANSFORMADOR
19. ESPIGAS DE ARAME
20. FIO DE DELIMITAÇÃO
21. PREGOS DE FIXAÇÃO DA BASE DE CARGA
22. MEDIDOR DE DISTÂNCIA DO FIO DE DELIMITAÇÃO
23. CHAVE HEXAGONAL
24. CONECTOR
Acessórios ilustrados ou descritos não estão totalmente abrangidos no fornecimento.
2. Informações sobre o Landxcape
TM

PT 161
3.1 Dados técnicos
Tipo LX790 LX791 LX792 LX793 (790-799 - designação da máquina,
representante do robot corta-relva)
LX790 LX792 LX791 LX793
Tensão nominal 20V
Max.*
Velocidade sem carga 2800/min
Área de corte 600m
2
900m
2
Diâmetro de corte 16cm 18cm
Altura de corte 30-60mm
Posições de altura de corte 4
Tipo de bateria Lão de lítio
Modelo da bateria LA0001 LA0002
Tempo de carga approx. 1.3hrs 2hrs
Tempo de carga LA8001 / LA8002
Modelo do carregador
Entrada: 100-240V~50/60Hz, 38W,
Saída: 20V
, 1.5A
Peso da máquina 8.4kg
Grau de protecção III
* Tensão medida sem carga de trabalho. A tensão inicial da bateria
alcança um máximo de 20 volts. A tensão nominal é 18 volts.
Acessórios
LX790 LX792 LX791 LX793
Parafusos 9 9
Base de carga 1 1
Pregos de fixação da base de carga 7 7
Fio de delimitação 150m 180m
Espigas de arame 210 250
Chave hexagonal 1 1
Medidores de distância do fio de
delimitação
2 2
Lâminas 9 9
Conector 2 2
Bateria (LA0001/ LA0002) 1 1
Carregador (LA8001 / LA8002) 1 1
Recomendamos a compra de acessórios genuínos indicados na
lista acima na mesma loja onde comprou a ferramenta. Consulte a
embalagem do acessório para obter mais informações. O pessoal da
loja pode auxiliar e aconselhá-lo.
3.2
Uma pressão sonora ponderada
L
pA
= 44.2dB (A)
K
PA
= 0.4dB(A)
Uma potência sonora ponderada
L
wA
= 64.2dB (A)
K
wA
= 0.4dB(A)
Utilize protecção auditiva quando a
pressão sonora for superior a
80dB(A)
Um nível de ruído vindo da máquina é inevitável. O curso de trabalho
ruidoso deve ser licenciado e dentro de limites durante certos perío-
dos. Cumpra os períodos de descanso, visto que podem necessitar de
restringir as horas de trabalho ao mínimo. Para a sua própria proteção
e para a proteção das pessoas que trabalham nas proximidades, deve
ser utilizado um equipamento de proteção auditiva adequado.
Utilização conforme as disposições
Este produto é concebido para o corte de relva doméstico. Foi con-
cebido para cortar relva frequentemente, mantendo uma relva mais
saudável e com o melhor aspeto de sempre. Dependendo do tamanho
da sua relva, o Landxcape
TM
poderá ser programado para operar em
qualquer altura ou frequência sem restrições. Não se destina a escavar,
varrer ou limpar neve.

PT162
4. Painel de controlo
Iniciar
1) Após a instalação do fio de delimitação, pode começar a utilizar o Landxcape
TM
(Por favor consulte o Guia de instalação para a instalação do fio
de delimitação).
2) Prima
até o Landxcape
TM
ligar. Para o primeiro uso, insira o código PIN padrão 0000 pressionando quatro vezes quando o número 0
estiver piscando. (O código PIN pode ser alterado, por favor, consulte "Configuração" no Guia de Instalação)
NOTA:
O Landxcape
TM
será desligado se não receber nenhuma entrada dentro de 30 segundos depois de ser ligado. Se você digitar o código
PIN errado três vezes, o Landxcape
TM
acionará o alarme “di-di” e depois desligará.
3) Pressione e, de seguida, pressione para começar a cortar relva.
4) Pressione , e em seguida para fazer o Landxcape
TM
ir para a base de carregamento, com as lâminas girando para cortar grama no
caminho à casa.
Landxcape
TM
irá trabalhar de forma contínua até a bateria ficar fraca, regressando de seguida à base de carregamento. Assim que o carregamento
tiver sido concluído, o Landxcape
TM
retomará automaticamente o corte da relva ou manter-se-á na base de carregamento de acordo com a
programação de corte de relva.
NOTA:
Quando o Landxcape
TM
for ligado, todas as luzes no display serão iluminadas e, em seguida, desligadas. Verifique se há alguma luz
danificada. Recomenda-se proteger o display com a sua mão quando a luz externa fica muito forte.
PODER LIGADO/
DESLIGADO
Liga e desliga o
Landxcape
Bloqu
Capacidade de carga da
bateria
Horário de
trabalho
START (Iniciar)
Iniciar corte da relva /
Selecionar para cima
PÁGINA DE ESPERA:
O Landxcape
não está no
horário de trabalho.
PÁGINA DE SONO:
O Landxcape
está totalmente
carregado e não está no horário de
trabalho.
Display
Exibe o estado da sua
configuração
STOP (Parar)
Parar o Landxcape
durante o
funcionamento
INÍCIO
Envia o Landxcape
TM
para
sua base de carregamento
durante a operação,
com as lâminas girando
para cortar a grama
no caminho à casa e
ativando o carregamento /
Selecionando para baixo
ON (Ligar)
Confirma qualquer definição

PT 163
5. Compreender o seu Landxcape
TM
Gostaríamos de o felicitar pela nova aquisição do Landxcape
TM
e pela
entrada no mundo sem preocupações do corte de relva automático.
De seguida, gostaríamos de o ajudar a compreender melhor como o
Landxcape
TM
pensa.
5.1 Como é que o meu Landxcape
TM
sabe o
que cortar?
O Landxcape
TM
escolhe a direcção aleatoriamente. Irá garantir que
o seu relevado é cortado de forma uniforme, deixando para trás
quaisquer acessos de corte de relva indesejados (ver Fig. A).
5.2 Como é que o meu Landxcape
TM
sabe para
onde ir?
O seu Landxcape
TM
é capaz de fazer coisas sozinho. O Landxcape
TM
sabe quando precisa de regressar à base de carga para carregar,
consegue sentir quando está a chover, pára sozinho quando detecta
um problema e sabe parar, recuar e virar ao contrário quando bate
contra alguma coisa que esteja a bloquear o caminho ou outro objecto.
O Landxcape
TM
também pára automaticamente a rotação do disco de
rotação das lâminas se for levantado do chão para evitar um acidente.
A. Detectar a base de carga
Quando o seu Landxcape
TM
tiver de ser recarregado pára de cortar relva
e segue o Fio de Delimitação no sentido anti-horário de regresso à Base
de Carregamento. O Landxcape
TM
está pré-programado para cortar a
relva junto do fio de delimitação uma vez por semana. Por padrão, o
Landxcape
TM
corta perto do fio de limite toda segunda-feira depois de
ser ligado.
B. Sensores de chuva
O Landxcape
TM
possui um sensor de chuva que detecta gotas de chuva
e ordena que o Landxcape
TM
pare de cortar a relva e siga o fio de
delimitação até à base de carga. (Ver Fig. B)
O Landxcape
TM
sairá para cortar relva novamente após ter decorrido o
Tempo de Atraso, o Tempo de Atraso predefinido é 180 mins.
Quando os sensores de chuva estão molhados, o Landxcape
TM
regressa
à estação de ancoragem. Quando os sensores de chuva estiverem
secos, o Landxcape
TM
começará a contagem regressiva do tempo de
atraso. Se pretender sair do atraso de chuva, seque a área do sensor
e execute um ciclo de alimentação utilizando o Interruptor principal.
Após ter executado o ciclo de alimentação, desse modo, pode utilizá-lo
novamente.
C. Detectar o fio de delimitação
O Landxcape
TM
respeita sempre a definição de limite do fio de
delimitação e utiliza sensores na dianteira para detectar quando se está
a aproximar (Ver Fig. C).
D. Iniciar e parar ao cortar a relva (Ver Fig. D, E1, E2)
Para começar a cortar a relva, pressione a tecla ON/OFF e insira o código
PIN. Pressione e, de seguida, pressione . Caso gostasse de
ordenar o Landxcape
TM
a parar de cortar, basta premir o botão STOP na
parte superior do corta-relva.
Se o Landxcape
TM
detectar algo de errado, irá exibir uma mensagem de
falha no visor. Para obter informações sobre as mensagens de avaria,
consulte as Mensagens de Erro. E o Landxcape
TM
desliga caso não receba
qualquer informação do utilizador nos 20 minutos seguintes.
Para resumir:
• Pressione e, de seguida, pressione
• Agora o Landxcape
TM
irá começar a cortar!
5.3 Configuração
Primeiro, defina a altura para um nível de grama desejado após o corte
e você pode fazer a configuração do programa manualmente.
NOTA: Ao fazer a configuração do programa manualmente, o
Landxcape
TM
entrará na página de espera se não receber nenhuma
entrada do usuário dentro de 30 segundos.
(1) Alterar o código PIN
Para alterar o código PIN, continue pressionando os dois botões &
ao mesmo tempo por 5 segundos. O ícone ficará piscando e o
“ ” ficará piscando. Depois disso, o primeiro número estará
piscando, use ou para selecionar o número desejado, você deve
pressionar para confirmar. O próximo número estará piscando. Use
o mesmo método para completar outros números. Por exemplo, o novo
código PIN é definido como 0326. Depois disso, “ ” rolará flashing
e o primeiro número estará piscando novamente. Use o mesmo método
para inserir o novo código PIN definido agora (neste exemplo, ). Em
seguida, “ ” rolará flashing no display. Seu código PIN foi
alterado com sucesso.
Apenas para referência
As configurações de ano, data e hora são itens de configuração
obrigatória. Se você não configurar esses itens, isso influenciará o
horário da programação na seguinte configuração. Esses itens devem
ser configurados na ordem do ano, data e hora. Para a configuração de
ano, mantenha pressionado
por 3 segundos até que o ícone e
um número estejam piscando no display, por exemplo, . Use
ou para selecionar o ano desejado. Em seguida, pressione para
confirmar a concluir a configuração do ano.

PT164
Apenas para referência
Enquanto isso, o ícone
estará piscando novamente e um número será
exibido para indicar a data, por exemplo, que significa 29 de
setembro. Quando estiver piscando, use ou para selecionar
o número e pressione para confirmar. Então estará piscando.
Use o mesmo método para selecionar o número e pressione para
confirmar a concluir a configuração da data.
Apenas para referência
Enquanto isso, o ícone estará piscando e a hora será exibida, por
exemplo, . Quando estiver piscando, use ou para
selecionar o número e pressione para confirmar. Então estará
piscando, use o mesmo método para selecionar o número e pressione
para confirmar. Agora a configuração da hora está concluída e o
Landxcape
TM
entrará na página de espera.
Apenas para referência
Mantanha pressionando
por 3 segundos. Quando o ícone estiver
piscando, pressione . Um número estará piscando no display, por
exemplo, , que é a área do gramado. O tempo de trabalho será
definido automaticamente de acordo com o tamanho do seu jardim. Use
ou para definir a área do gramado (a área aumentará/diminuirá
50m
2
cada vez que pressionar / ) e pressione para confirmar. Em
seguida, o Landxcape
TM
entrará na página de espera.
4hrs
Apenas para referência
O horário de início padrão de 9:00 pode ser alterado para qualquer
momento, mantendo pressionados os dois botões & e ao
mesmo tempo até ouvir um som.
Por exemplo, mantanha pressionando os dois botões & e às
14:05, e seu Landxcape
TM
começará a cortar a partir de 14:05.
Apenas para referência
relva do meu Landxcape
TM
?
Os tempos de corte são diferentes de acordo com a relva, dependendo
dos fatores mencionados abaixo. Ajuste gradualmente o tempo que
pretende que o Landxcape
TM
corte cada dia até descobrir a definição
mais adequada.
O Landxcape
TM
consegue cortar áreas de até diferentes tamanhos,
embora tal dependa de vários factores, tais como:
• Espécies de gramíneas no relvado e a taxa de crescimento
• Afiação das lâminas de corte
• Humidade
• Temperatura ambiente
• Quantidade de obstáculos no relvado
Ao contrário da maioria dos outros cortadores de relva, o Landxcape
TM
utiliza um sistema de carregamento lateral, o qual é capaz de cortar o
máximo de relva circundante possível. Além disso, os orifícios na parte
inferior da base de carregamento permite que a relva cresça à vontade,
dando um aspecto elegante.
A altura de corte do Landxcape
TM
pode ser ajustada entre 3 e 6 cm.
Antes de iniciar o seu Landxcape
TM
pela primeira vez, você deve
cortar a grama até a altura de não mais do que 9 cm com o cortador
de grama manual. Em seguida, ajuste a altura de corte do seu
Landxcape
TM
para o seu máximo (6cm) na primeira vez que corta. (Ver
Fig. F)
O Landxcape
TM
corta melhor em tempo seco. Não gosta de relva
molhada, que pode acumular-se no disco de rotação das lâminas e
no motor e também pode causar a perda de tracção e deslizamento
aquando do funcionamento.
O seu Landxcape
TM
não deve ser utilizado durante tempestades.
Numa tempestade, proteja o Landxcape
TM
desligando-o da base de

PT 165
carga, desconectando o fio de delimitação e certificando-se de que o
Landxcape
TM
não consegue carregar.
O Landxcape
TM
adora cortar relva e necessita que as lâminas de corte
sejam mantidas em boas condições para o melhor desempenho de
corte. O Landxcape
TM
consegue fazer a maioria das coisas sozinho,
mas necessita de o ajudar às vezes para evitar que se magoe.
• Nunca deixe o Landxcape
TM
deslocar-se no cascalho.
• Retire os obstáculos aos quais o Landxcape
TM
pode subir
acidentalmente ou impeça o acesso aos mesmos para não danificar o
disco de rotação das lâminas.
• Retire todos os detritos e objectos estranhos do relvado.
6. Informações básicas sobre o fio
de delimitação
6.1 Prender o fio de delimitação
Utilize o medidor de distância do fio de delimitação para definir a
distância correcta da borda da sua relva (Mais do que 26 cm). Esta é a
distância recomendada. Utilize o medidor de distância fornecido para
garantir uma instalação apropriada.
Se o seu vizinho também utilizar um Landxcape
TM
, tem de manter um
espaço de, pelo menos, 1 metros entre o seu fio de delimitação e os
seus vizinhos.
O fio de delimitação deve contornar exactamente a área de corte
de relva pretendida.
O seu Landxcape
TM
ficará confuso por curvas ou
bobinas extra do fio de delimitação que não façam parte da sua área
de corte de relva (Ver Fig. G). Se houver fio de delimitação em excesso
após a área de corte de relva ter sido contornada, então corte-o e
armazene este fio adicional numa localização em separado. Contudo,
é importante deixar o comprimento necessário onde se liga à base de
carga para que possa ser ligado e permanecer na mesma enterrado.
6.2 Enterrar o fio de delimitação
Se planeia enterrar o fio de delimitação, é recomendado que primeiro
espigue o fio de delimitação à relva para que seja mais fácil efectuar
ajustes, se necessário. Quando concluir a instalação do fio de delimitação,
recomenda-se que solicite ao Landxcape
TM
que siga o fio de delimitação ao
pressionar e . Isto permitirá que o Landxcape
TM
ajuste-se ao seu
novo ambiente.
Enquanto observa o Landxcape
TM
a localizar a estação de carga, pode
então efectuar alterações ao caminho do fio de delimitação para garantir
um acompanhamento livre de problemas do Landxcape
TM
quando localizar
a estação de carga. Garantirá que funcionará com sucesso com a base de
carga antes do fio de delimitação ser enterrado.
6.3 Unir o fio de delimitação
Utilize um conector se for necessário alongar ou unir o arame de limite.
É à prova de água e garante uma ligação elétrica confiável.
Insira as duas extremidades do arame em quaisquer dois dos três
orifícios do conector. Certifique-se de que os arames estão totalmente
inseridos no conector, de modo a que ambas as extremidades sejam
visíveis através da área transparente, do outro lado do conector. (Ver
Fig. H) Utilize uma pinça para pressionar totalmente o botão na parte
superior do conector. (Ver Fig. I, J)
AVISO:
É recomendado simplesmente unir o arame de limite à
fita isoladora ou utilizar o bloco de terminais de aperto para a
ligação. A humidade do solo pode oxidar o arame e resultar num
circuito avariado após algum tempo.
7. Actualização de software
O software do seu Landxcape
TM
pode ser actualizado quando estiverem
disponíveis novas versões. O software mais recente pode ser
transferido do nosso site Web www.landxcape-robotics.com.
Atualização através de USB. Consulte abaixo as instruções de
transferência e instalação:
(1) Localize a versão de software mais recente em: www.landxcape-
robotics.com. Salve o arquivo em um flash drive (pen drive)
formatado como
FAT32
. Delete quaisquer arquivos no drive e
cheque o formato. Se o drive não estiver formatado em Impact, por
favor reformate a unidade.
NOTA:
o download da atualização de software é um arquivo zipado.
Você precisará extrair/descompactar o arquivo antes de proceder a
instalação.
(2) Coloque o Landxcape
TM
sobre uma superfície firme e nivelada.
Pressione
para desligar o seu Landxcape.
(3) Insira a unidade USB (unidade flash) na porta. (Ver Fig. K1)
(4) Ativar o Landxcape. A atualização começará automaticamente.
Aguarde até o display mostrar “ ” (veja a Fig. K2), depois
remova a drive USB (drive flash) e aperte bem a tampa de
proteção. Quando o display exibir “ ”, a atualização foi
concluída e o Landxcape
TM
entrará na página PIN.
O manual na caixa é baseado no software predefinido na produção
em massa. Algumas das novas funcionalidades/funções existentes na
nova versão podem não existir no manual. Se verificou que algumas
definições não se encontram no manual, visite www.landxcape-
robotics.com para transferir o manual mais recente.
8. Manutenção
O seu Landxcape
TM
necessita de ser verificado periodicamente. O
Landxcape
TM
funciona intensamente e, após algum tempo, necessita
de uma boa limpeza, bem como a substituição de algumas peças, pois
estas podem desgastar-se. Nunca utilize o seu Landxcape
TM
com o
Interruptor Ligar/Desligar avariado.
Desligue a máquina antes de realizar qualquer reparação ou
manutenção.
Seguidamente queremos informá-lo de como cuidar do seu
Landxcape
TM
.
8.1 Mantenha-o afiado
AVISO: Antes de limpar, ajustar ou substituir as lâminas,
desligue o seu Landxcape
TM
e coloque luvas de
protecção.
AVISO: Quando encaixar lâminas novas, certifique-se de
que substitui TODAS as lâminas. Utilize sempre parafusos
novos quando encaixar as lâminas. Isto é importante por forma
a assegurar a retenção da lâmina e equilibrar o disco de rotação
da lâmina. Caso contrário, pode provocar lesões graves.
O Landxcape
TM
não corta relva como outros cortadores de relva. As
suas lâminas de corte são muito afiadas nos 2 cantos e giram em
ambas as direcções para a máxima capacidade de corte (Ver Fig.
L). Cada lâmina do seu Landxcape
TM
possui dois cantos de corte. O
Disco de Rotação da Lâmina procederá à rotação de avanço e recuo
aleatoriamente para utilizar ambas as arestas de corte. Isto ajuda a
diminuir a frequência de substituição da lâmina de corte. Cada lâmina

PT166
de corte dura até dois meses quando estiver programada para cortar
a relva todos os dias. Verifique sempre se as lâminas estão lascadas
ou danificadas e substitua-as se assim for. Quando as lâminas de
corte estiverem danificadas e desgastadas devem ser substituídas por
lâminas sobressalentes fornecidas com o seu Landxcape
TM
. Também
se encontram disponíveis lâminas sobressalentes no seu distribuidor
Landxcape
TM
mais próximo.
A. Substitua as lâminas
Após algum tempo, normalmente a cada estação, as lâminas do seu
Landxcape
TM
irão necessitar de ser substituídas. Por isso, quando
substituir as lâminas, certifique-se de que substitui todas ao mesmo
tempo. Pode substitui-las com um dos kits de lâminas sobressalentes
e parafusos extra fornecidos com o seu Landxcape
TM
.
Antes de tentar substituir as lâminas do seu Landxcape
TM
, desligue
a alimentação e coloque luvas de protecção. Em seguida, siga estes
passos:
1. Vire cuidadosamente o Landxcape
TM
ao contrário
2. Retire a tampa da bateria e seguidamente a bateria.
3. Retire os parafusos das lâminas com uma chave de parafusos (Ver Fig. M)
4. Aparafuse firmemente as lâminas novas.
5. Encaixe novamente a bateria e a tampa da bateria.
Importante: Após aparafusar a lâmina no disco das lâminas,
certifique-se que a mesma consegue girar livremente.
8.2 Mantenha-o limpo
AVISO: Antes de limpar, desligue o seu Landxcape
TM
.
Coloque luvas de protecção antes de limpar o disco de
rotação das lâminas e não utilize água corrente.
A. Limpar o corpo
O seu Landxcape
TM
terá uma vida útil maior e mais feliz se for limpo
regularmente. Embora, como o seu Landxcape
TM
é uma máquina
eléctrica, irá necessitar de ter cuidado quando limpar, por isso, NÃO
utilize uma mangueira, lavadores de alta pressão ou verter água
corrente no seu Landxcape
TM
, é melhor utilizar um frasco pulverizador
com água. Quando limpar o corpo da máquina, utilize uma escova
suave ou um pano limpo e evite utilizar solventes ou polidores (Ver Fig.
N). Por último, certifique-se de que remove todos os pedaços de relva
e detritos acumulados.
B. Limpar a parte interior
De novo, é importante que desligue o seu Landxcape
TM
utilizando
o botão ON/OFF
e utilize luvas de protecção antes de tocar no
disco de rotação das lâminas.
Primeiro, vire o seu Landxcape
TM
do avesso para expor a sua parte
inferior. Aqui verá o disco das lâminas, o chassis, a roda dianteira e
a roda de condução. Limpe tudo meticulosamente com uma escova
suave ou um pano húmido.
AVISO:
NUNCA limpe a parte inferior do Landxcape
TM
com
descarga de água. Podem ocorrer danos nos componentes.
(Ver Fig. O1, O2)
Rode o disco das lâminas para certificar-se de que se move
livremente. Além disso, certifique-se de que as lâminas conseguem
rodar livremente e que não existe relva a obstruí-las.
IMPORTANTE: Retire quaisquer detritos alojados para que tal
não provoque uma fenda no disco das lâminas. Mesmo a fenda
mais pequena pode diminuir a capacidade de cortar a relva do
seu Landxcape
TM
.
C. Limpar os pinos de contacto e tiras de carga
Limpe os pinos de contacto localizados na base de carga e a tira
de carga localizada no Landxcape
TM
utilizando um pano. Retire
periodicamente quaisquer pedaços de relva ou detritos acumulados à
volta dos pinos de contacto e das tiras de carga para garantir sempre
carregamentos bem-sucedidos do Landxcape
TM
.
8.3
Vida útil da bateria
O coração do Landxcape
TM
é a sua bateria de iões de lítio de 20 volts.
Para o armazenamento adequado da bateria, verifique se ela está
totalmente carregada e mantida em local fresco e seco.
NOTA: A temperatura de funcionamento recomendada do Landxcape
TM
é entre 0-55
o
C.
A vida útil da bateria do Landxcape
TM
depende de vários factores, tais
como:
• O período de tempo da estação de corte de relva na sua região
• A quantidade de horas que o Landxcape
TM
corta relva por dia
• Manutenção da bateria durante o armazenamento
O Landxcape
TM
pode ser carregado manualmente sem o fio de
delimitação.
1. Ligue a base de carga a uma fonte de alimentação adequada.
A luz verde da Base de Carregamento liga.
2. Coloque manualmente o Landxcape
TM
na base de carga
enquanto o Landxcape
TM
está desligado. (Ver Fig. P)
3. Luz verde intermitente na base de carregamento, o
Landxcape
TM
irá começar a carregar.
8.4 Armazenamento no Inverno
O seu Landxcape
TM
terá uma vida útil maior e mais saudável se lhe for
permitido hibernar. Mesmo que seja duro, recomendamos que guarde o
seu Landxcape
TM
no seu telheiro ou garagem durante o inverno.
Antes de preparar o seu Landxcape
TM
para o armazenamento no
inverno, recomendamos que:
• Limpe meticulosamente o seu Landxcape
TM
• Carregue totalmente a bateria e remova-a do Landxcape
• Desligue a alimentação
Para maximizar a vida útil da bateria, carregue totalmente a bateria e
remova-a da Landxcape
TM
antes do armazenamento durante o inverno.
AVISO: Proteja a parte inferior do Landxcape
TM
contra
água. NUNCA guarde o Landxcape
TM
virado para baixo no
caso de entrada de água.
O fio de delimitação pode ser deixado no solo, embora as suas
extremidades devam ser protegidas, tais como serem colocadas numa
lata com massa lubrificante. Se a base de carga for deixada no exterior
durante o inverno, deixe o fio de delimitação ligado.
NOTA:
Quando trouxer o Landxcape
TM
de volta para o trabalho após o
armazenamento no inverno, certifique-se de que as tiras de carga e os
pinos de contacto estão limpos, é recomendado que se utilize uma tela
de esmeril fina para limpar.
8.5 Substituição da bateria
AVISO: Desligue a alimentação antes de tentar qualquer
ajuste, substituição ou reparação.
Antes de substituir as lâminas, desligue o seu Landxcape
TM
e
coloque luvas de protecção.
Se necessitar de substituir a bateria, siga estes passos:
1. Vire cuidadosamente o seu Landxcape
TM
do avesso.

PT 167
2. Retire os parafusos na tampa da bateria. Remova a tampa da bateria. (Ver Fig. Q1)
3. Retire cuidadosamente a bateria usada. Pressione a lingueta e solte as fichas. (Ver Fig. Q2)
NOTA:
Não puxe pelos cabos. Segure os conectores e solte o fecho.
4. Ligue uma nova bateria original unido os conectores entre si até ficarem bloqueados na devida posição. (Ver Fig. Q3, Q4)
5. Instale a bateria conforme ilustrado. (Ver Fig. Q5) Coloque novamente a tampa na respetiva posição e encaixe firmemente os parafusos.
9. Mensagens de funções
Display Mensagem Ação
Atraso de chuva ativado. Nenhuma ação é necessária.
10. Mensagens de erro
Sintoma Causa Solução
O Landxcape
TM
está fora da
área de funcionamento.
1. Se o Landxcape
TM
estiver de facto fora do seu território: desligue a potência, leve o
Landxcape
TM
para dentro do seu território. Ligue a potência. Pressione e, de seguida,
pressione .
2. Se o Landxcape
TM
estiver dentro do seu território, verifique se o LED na base de carregamento
está verde. Se não estiver, verifique se a base de carregamento está ligada de forma adequada
ao carregador e se o carregador está ligado a uma fonte de alimentação indicada. Se estiver,
significa que as extremidades do arame de limite estão fixadas de forma incorreta e deve
invertê-las.
3. A luz vermelha da base de carregamento acende, confirme se o fio de limite está bem
conectado aos grampos na base de carregamento. Se o problema persistir, verifique se o fio de
limite não foi cortado.
Motor bloq
1. Desligar a potência: levar o Landxcape
TM
para uma área sem obstáculos;
2. Ligar a potência. Pressione e, de seguida, pressione .
3. Se a mensagem de erro ainda estiver exibida, desligue a potência, vire o Landxcape
TM
para baixo e verifique se existe alguma coisa a impedir as rodas de rodar.
4. Remova qualquer eventual obstrução, virar o Landxcape
TM
para cima, ligar a potência.
Pressione e, de seguida, pressione .
Lâmina bloq
1. Desligar a potência;
2. Virar o Landxcape
TM
para baixo e verificar se existe alguma coisa a impedir que o disco
da lâmina rode.
3. Remover qualquer eventual obstrução.
4. Virar o Landxcape
TM
para cima e levá-lo para uma área com relva rasa ou ajustar a altura
de corte;
5. Ligar a potência. Pressione e, de seguida, pressione .
O Landxcape
TM
está preso.
1. Desligar a potência;
2. Levar o Landxcape
TM
para uma área sem obstáculos;
3. Ligar a potência. Pressione e, de seguida, pressione .
4. Se a mensagem de erro ainda estiver exibida, desligue a potência, vire o Landxcape
TM
para baixo. Verificar se existem alguma coisa a impedir as rodas de rodar.
5. Remova qualquer eventual obstrução, virar o Landxcape
TM
para cima, ligar a potência.
Pressione e, de seguida, pressione .
O Landxcape
TM
está elevado.
1. Desligar a potência.
2. Levar o Landxcape
TM
para uma área sem obstáculos, ligar a potência. Pressione e,
de seguida, pressione .
3. Se a mensagem de erro ainda for exibida: desligue o Landxcape, vire o Landxcape
TM
de
cabeça para baixo e verifique se há algo impedindo a rotação das rodas dianteiras.
4. Remover qualquer eventual objecto, virar o Landxcape
TM
para cima, ligar a potência.
Pressione
e, de seguida, pressione .

PT168
O Landxcape
TM
está virado
para baixo.
Virar o Landxcape
TM
para cima. Pressione e, de seguida, pressione .
Erro na bateria
1. Verifique a temperatura da bateria. Se a temperatura estiver muito alta, aguarde até
que a temperatura tenha esfriado. Pressione e depois .
2. Substitua uma nova bateria. Reinicie o Landxcape. Pressione e depois .
3. Se o erro ocorrer repetidamente, tente alterar o horário de trabalho.
Leva muito tempo para a
Landxcape
TM
voltar para a
base de carga.
Coloque manualmente o Landxcape
TM
na base de carregamento para carregar. Depois
que o Landxcape
TM
estiver totalmente carregado, pressione e depois .
Erro desconhecido.
Reinicie o Landxcape. Pressione e depois . Se a mensagem de erro ainda for
exibida, entre em contato com um agente de serviço para obter ajuda.
NOTAS
• Antes de ligar a potência, verifique sempre se o Landxcape
TM
está dentro do seu território. Caso contrário, será exibida a mensagem “
”.
Esta mensagem é exibida também quano o Landxcape
TM
está pousado sobre o fio de delimitação quando ligado.
• Se por qualquer motivo - isto é, uma festa, crianças a brincar... - pretender estacionar o seu Landxcape
TM
na base de carregamento: pressione
e, de seguida, pressione . O Landxcape
TM
irá para a sua base e manter-se-á nesta. Pressione para desligar o Landxcape.
• Se um erro ocorre repetidamente na mesma área do seu relvado, poderá ter um problema com o fio de delimitação, por isso, consulte as
instruções de instalação anteriores e verifique a sua configuração com a sua ajuda.
• Se o seu relvado estiver dividido em duas áreas separadas, ligadas por um corredor inferior a 1m, uma das quais não é fornecida com a base
de carregamento: quando o Landxcape
TM
fica sem carga, leve-o manualmente até à base de carregamento, o processo de carregamento será
iniciado.
• Se o Landxcape
TM
operar de forma anormal de vez em quando, por favor tente reiniciá-lo. Se o problema não for solucionado, tente remover e
reinstalar a bateria. Se não for possível solucionar o problema, por favor contacte o Representante de Assistência da Landxcape
TM
para obter ajuda.
• Não lave a máquina com um aparelho de limpeza de alta pressão. Isto poderá causar danos na bateria ou na máquina.
11. Resolução de problemas
Se o seu Landxcape
TM
não funcionar corretamente siga o guia de resolução de problemas seguinte. Se a avaria persistir, contacte o seu distribuidor.
Sintoma Causa Solução
A luz LED na estação de carga não liga. Não existe potência.
Verifique se o cabo de alimentação está liga de forma
adequada ao carregador e se o carregador está ligado
a uma fonte de alimentação indicada.
A luz vermelha da base de
carregamento acende.
O fio de delimitação não está ligado.
Verifique se o Arame de Limite foi ligado de forma correta
à base de carregamento.
Verifique se não existem intervalos no arame de limite,
especialmente nas extremidades do fio.
O Landxcape
TM
é ligado mas o disco da
lâmina não é movido.
O Landxcape
TM
está a pesquisar a base de
carregamento (a menos que você pressione
e depois o botão para ir até a base de
carregamento).
Isto é normal, o Landxcape
TM
tem de ser recarregado,
o disco da lâmina não roda enquanto está a pesquisar
a base de carregamento automaticamente.
O Landxcape
TM
vibra.
As lâminas podem estar danificadas. Verifique
o estado do disco da lâmina.
Verifique as lâminas e substitua-as caso estejam
danificadas.
Limpe os resíduos ou objectos estranhos nas lâminas
e no disco da lâmina.

PT 169
A relva está a ser cortada de forma
irregular.
O Landxcape
TM
não trabalha horas suficientes
por dia.
Adicionar mais horas ao tempo de corte de relva.
A área de corte de relva é demasiado grande.
Tente diminuir o tamanho da área de corte de relva ou
adicionar mais horas ao tempo de corte de relva.
As lâminas não estão afiadas.
Substitua as lâminas e os parafusos para equilibrar o
disco da lâmina.
A altura de corte é definida para baixa para o
comprimento da relva.
Eleve a altura de corte e depois desça-a gradualmente.
A relva ou outro objeto ficaram
envoltos no disco da lâmina.
Verifique o disco da lâmina e remova a relva ou outro
objeto.
Existe relva acumulada no disco da lâmina ou
na caixa da estrutura do motor.
Certifique-se de que o disco da lâmina roda com
facilidade. Se necessário, pode retirar o disco da
lâmina e, de seguida, remover os resíduos.
O seu Landxcape
TM
está dentro do
seu território e o fio de delimitação
está ligado. No entanto, o visor indica
“
”.
As extremidades do arame de limite estão
fixadas de forma incorreta.
Inverta as extremidades do arame de limite.
O fio de limite está quebrado. Repare o fio de limite danificado com conectores.
O tempo de carregamento é muito
mais do que o tempo de carregamento
classificado.
Ligação fraca causada por resíduos na faixa
de carregamento.
Limpe os pinos de contacto localizados na base
de carregamento e a faixa de carregamento no
Landxcape
TM
utilizando um pano.
O programa de proteção durante o
carregamento foi ativado devido a temperatura
elevada.
Coloque a base de carregamento numa área à
sombra ou aguarde até que a temperatura tenha
baixado.
O cortador de relva não carrega
Não existe potência.
Verifique se o cabo de alimentação está ligado de
forma adequada ao carregador e se o carregador
está ligado a uma fonte de alimentação indicada.
Não opera corretamente durante o
carregamento manual.
Consulte o carregamento manual na Seção 8.3.
Landxcape
TM
está a começar a ter
tempos de execução mais curtos entre
cargas.
Alguma coisa está a entupir o disco da lâmina. Retire o disco da lâmina e limpe-o.
O Landxcape
TM
está a vibrar muito. A relva está demasiado alta e demasiado espessa.
A bateria poderá estar gasta ou usada.
Verifique o disco da lâmina e a lâmina, retire os
resíduos e objetos estranhos das lâminas e discos
das lâminas.
O Landxcape
TM
não está a operar na
hora correta.
O relógio não está definido para a hora
correta.
Ajuste o relógio para a hora correta, consulte a Seção
5.3.
As horas de corte programadas para
Landxcape
TM
não estão corretas.
Altere as definições da hora para o cortador de relva
iniciar e parar.
Landxcape
TM
é colocado manualmente na base
de carregamento.
Prima
e, depois, .
A bateria não carrega quando sua temperatura
sobe acima de 55
o
C no tempo quente.
Espere até que a bateria tenha esfriado.
O Landxcape
TM
não pode ser
corretamente acoplado à base de
carregamento.
Influências ambientais. Reiniciar o Landxcape
TM
.
Má ligação causada pelos resíduos na Faixa
de Carregamento.
Limpe os Pino de Contacto localizados na Base
de Carregamento e na Faixa de Carregamento no
Landxcape
TM
utilizando um pano.
A luz verde na base de carregamento
liga antes de o carregamento estar
concluído.
A base de carregamento está sobreaquecida.
Coloque a base de carregamento numa área à
sombra ou aguarde até a temperatura ter descido.

PT170
O Landxcape
TM
está a sair da área do fio
de delimitação. Landxcape
TM
não corta
uma área dentro da zona do arame de
limite. Landxcape
TM
inverte ou roda de
forma irregular junto ao arame de limite.
O fio de delimitação de outro Landxcape
TM
ou
um cortador de relva robótico de outra marca
está posicionado demasiado próximo.
Certifique-se de que o fio de delimitação do seu
Landxcape
TM
possui pelo menos 1m de espaço entre
o fio de delimitação adjacente.
O fio de delimitação foi instalado com cantos
afiados.
Verifique o fio de delimitação para assegurar que os
cantos são suaves.
Em condições de terreno molhado, o sinal
elétrico do arame de limite pode verter para
onde o arame foi unido ou reparado.
Verifique as juntas do arame de limite. Isole para
fornecer uma ligação à prova de água.
Existe uma fuga do sinal elétrico do arame de
limite devido à danificação de um isolamento.
Proceda à reparação do isolamento do fio de
delimitação danificado com connectors.
A área de corte é maior que a área de corte
permitida para o Landxcape
TM
.
Reduza a área de corte ou use o Landxcape
TM
com
uma maior área de corte permitida.
As rodas de Landxcape
TM
derrapam ou
danificam a relva.
Obstáculos estranhos, como galhos e
ramos podem ser depositados por baixo de
Landxcape
TM
.
Elimine os objetos estranhos da parte inferior do
Landxcape
TM
.
A relva está demasiado molhada. Espere até a relva secar.
O Landxcape
TM
sai do fio de delimitação
devido a velocidade elevada quando
desce um sulco.
O fio de delimitação é colocado numa
inclinação superior a 17% (10°).
Reposicione o fio de delimitação longe das
inclinações com acentuação superior a 17% (10°).
Por favor consulte o manual de instalação para obter
detalhes.
Falha na atualização de software.
Tente novamente de acordo com a seção "Atualização
de software".
Protecção ambiental
Os equipamentos eléctricos não devem ser despositados com o lixo doméstico. Se existirem instalações adequadas deve reciclá-los. Consulte
a sua autoridade local para tratamento de lixos ou fornecedor para obter aconselhamento sobre reciclagem.

PT 171
Declaração de conformidade
NÓS,
Positec Germany GmbH
Grüner Weg 10, 50825 Cologne, Germany
Declaramos que o produto,
Descrição Robot cortador de relva
Tipo LX790 LX791 LX792 LX793 (790-799 - designação da máquina, representante do robot corta-relva) (O ano, o número do artigo e
o mês do número de série são inscritos no verso da página. O número de série completo encontra-se descrito claramente na caixa do
cortador de relva) com o carregador de baterias LA8001 / LA8002 e a base de carregamento LA3000
Função Cortar relva
Em conformidade com as seguintes directivas,
2006/42/EC, 2014/30/EU, 2014/35/EU, 2011/65/EU, 2000/14/EC alterada pela 2005/88/EC
2000/14/EC alterada pela 2005/88/EC
- Procedimento de avaliação de conformidade consoante Anexo V
- Nível de potência sonora medido 64.2 dB (A)
- Nível de potência sonora garantido declarado 65 dB (A)
Organismo notificado envolvido
Morada: Cleeve Road, Leatherhead, Surrey, KT22 7SB United Kingdom
Normas em conformidade com,
EN 60335-1:2012+A11+A13:2017, EN 50636-2-107:2015+A1:2018, EN 60335-2-29:2004+A2:2010,
EN 62233:2008, EN ISO 3744:2005, EN 55014-1:2017, EN 55014-2:2015,EN 61000-3-2:2014,
EN 61000-3-3:2013, EN 61558-1:2005+A1:2009, EN 61558-2-16:2009+A1:2013, EN 303 447 V1.1.1
A pessoa autorizada a compilar o ficheiro técnico,
Nome Marcel Filz
Morada Positec Germany GmbH, Grüner Weg 10, 50825 Cologne, Germany
2018/10/26
Allen Ding
Engenheiro-chefe adjunto, Teste e Certificação
Positec Technology (China) Co., Ltd.
18, Dongwang Road, Suzhou Industrial
Park, Jiangsu 215123, P. R. China

TR172
•
•
•
KULLANMADAN ÖNCE OKUYUN
1. Genel
BAKIM VE DEPOLAMA
Tavsiye

TR 173
g) Pilünitesinitemizve kuru tutun.
j) Sadece Landxcape
TM
1.2 Landxcape
TM

TR174
5. ANASAYFA BUTONU
6. EKRAN
9. ÖN TEKER
10. BIÇAK DÖNME DISKI
12. PIL TAKIMI
13. USB PORTU
14. ARKA TEKER
15. KOL
16. TEMAS PIMI
19. TEL ÇIVILER
20. KENAR TELI
22. KENAR TELI UZAKLIK AYARI
23. ALYAN ANAHTARI
24. KONEKTÖR

TR 175
3. Teknik bilgiler ve gürültü bilgileri
3.1 Teknik bilgiler
Tip LX790 LX791 LX792 LX793 (790-799 - çim biçme robotu sistem
LX790 LX792 LX791 LX793
2
2
4
2hrs
III
Aksesuarlar
LX790 LX792 LX791 LX793
9 9
1 1
7 7
1 1
2 2
9 9
2 2
1 1
1 1
3.2 Gürültü ve teknik veriler
L
K
L
K

TR176
4. Kontrol paneli
NOT:
Landxcape
Landxcape
Landxcape
NOT:
Landxcape
Kilit
Landxcape
Landxcape
Ekran
Landxcape

TR 177
5. Landxcape
TM
5.1 Landxcape
TM
anlar?
Landxcape
5.2 Landxcape
TM
Landxcape
Landxcape
Landxcape
Landxcape
Landxcape
Landxcape
'e
Landxcape
•
5.3 Ayarlar
NOT:
and
or
or

TR178
or
or
or
2
artacak
4hrs
and
and
Landxcape
5.4 Landxcape
TM
Landxcape
Landxcape
Landxcape
Landxcape
Landxcape
Landxcape
• Landxcape

TR 179
• Landxcape
6. Kenar Teli Temel Bilgileri
6.2 Kenar Telini Gömme
Landxcape
UYARI:
FAT32
FAT32
NOT:
adresini
Landxcape
Landxcape
Landxcape
8.1 Keskin Olsun
TM
‘inizi KAPALI konuma
Landxcape
Landxcape
'inizin
Landxcape

TR180
Landxcape
8.2 Temiz tutun
UYARI: Temizlemeden önce Landxcape
TM
A. Gövdeyi Temizleme
hortum,
TM
'inize musluk suyu dökmeyin,
Landxcape
TM
takmak önemlidir.
UYARI:
Landxcape
Landxcape
TM
Landxcape
'in her seferinde
8.3
Batarya Ömrü
Landxcape
NOT:
Landxcape
• Landxcape
Landxcape
TM
2. Landxcape
TM
TM
TM
Landxcape
'i
Landxcape
• Landxcape
UYARI: Landxcape
TM
TM
'i ters çevirmeyin.
NOT:
TM
‘inizi KAPALI
NOT:

TR 181
Ekran Mesaj
10. Hata iletileri
Belirti Sebep Eylem
Landxcape
Landxcape
Landxcape
Landxcape

TR182
NOTLAR
Landxcape
• Landxcape
11. Hata belirtileri
Landxcape
Belirti Sebep Eylem
Landxcape
Landxcape
butonuna
'in yeniden
Landxcape
Landxcape
günlük olarak yeterli sürede
Landxcape
‘in

TR 183
Landxcape
Landxcape
Landxcape
Landxcape
Landxcape
Landxcape
Landxcape
‘in
Landxcape
Landxcape
Landxcape
Landxcape
Landxcape
Landxcape
Landxcape
Çevre Koruma

TR184
Uygunluk beyannamesi
Robotik Çim Biçme Makinesi
Çim biçme
2006/42/EC, 2014/30/EU, 2014/35/EU, 2011/65/EU, 2000/14/EC ile yeniden düzenlenen 2005/88/EC,
Annex V
64.2 dB (A)
65 dB (A)
Adres: Cleeve Road, Leatherhead, Surrey, KT22 7SB United Kingdom
EN 60335-1:2012+A11+A13:2017, EN 50636-2-107:2015+A1:2018, EN 60335-2-29:2004+A2:2010,
EN 62233:2008, EN ISO 3744:2005, EN 55014-1:2017, EN 55014-2:2015,EN 61000-3-2:2014,
EN 61000-3-3:2013, EN 61558-1:2005+A1:2009, EN 61558-2-16:2009+A1:2013, EN 303 447 V1.1.1
Ilgi Positec Germany GmbH, Grüner Weg 10, 50825 Cologne, Germany

SL 185
1. Varnost izdelka
OPOZORILO Preberite vsa varnostna opozorila in navodila.
Pred uporabo si pazljivo preberite navodila za varno obratovanje
naprave.
•
POMEMBNO
PRED UPORABO OBVEZNO PREBERITE
Varna uporaba
Usposabljanje
Priprava
Delovanje
OPOZORILO!
2. Dodatna opozorila pri samodejnem obratovanju
OPOZORILO! Kadar robotsko kosilnico obrnete okoli, mora biti
ali menjavo rezil.

SL186
Preostala tveganja
Prevoz
Varnostna opozorila za akumulatorske celice v orodju
a) Ne razstavljajte, odpirajte ali odstranjujte celic
akumulatorja.
stika kontaktov s prevodnimi predmeti.
d) Akumulatorja ne izpostavljajte mehanskim udarcem.
(20 °C ± 5 °C).
i) Pri odlaganju akumulatorja pazite, da boste akumulatorje, ki
j) Za polnjenje uporabljajte le polnilce, ki jih je predpisal
Landxcape
TM
. Nikoli ne uporabljajte polnilnikov, ki niso
Polnilec, ki je lahko primeren za polnjenje ene vrste
k) Nikoli ne uporabljajte polnilcev, ki niso posebej zasnovani za
l) Akumulatorje shranjujte izven dosega otrok.
akumulatorju.
n) Akumulatorje odlagajte skladno s predpisi.
1.2 Informacije o napravi Landxcape
TM

SL 187
2. Seznam delov
1. GUMB ZA IZKLOP
3. TIPKA VKLOP/IZKLOP
4. TIPKA START
5. GUMB DOMOV
6. ZASLON
7. TRAKOVA NAPAJALNIKA
9. SPREDNJE KOLO
10. REZALNI KOLUT
11. REZILO
12. AKUMULATOR
13. USB VHOD
14. ZADNJE POGONSKO KOLO
16. KONTAKTNA PRIKLOPA
17. BAZA ZA POLNJENJE
18. NAPAJALNI ADAPTER
21. KLINI ZA PRITRDITEV BAZE ZA POLNJENJE
24. SPOJNIK

SL188
hrupu
Vrsta LX790 LX791 LX792 LX793 (790-799 - oznaka naprave,
predstavnik robotske kosilnice)
LX790 LX792 LX791 LX793
2
2
4
Li-ion
2hrs
Model polnilca
Napetost polnilca
III
P
LX790 LX792 LX791 LX793
9 9
1 1
7 7
1 1
2 2
9 9
2 2
1 1
1 1
L
K
L
K
Namen uporabe
lahko pro-

SL 189
Zagon
OPOMBA:
Landxcape
Landxcape
Landxcape
Landxcape
OPOMBA:
Ko se Landxcape
Landxcape
Landxcape
Landxcape
Landxcape
Landxcape

SL190
5. Predstavitev naprave Landxcape
TM
5.1 Kako moj Landxcape
TM
ve, kaj mora
kositi?
Landxcape
5.2 Kako moj Landxcape
TM
ve, kam mora
iti?
A. Iskanje baze za polnjenje
Landxcape
Landxcape
Landxcape
• Pritisnite
• Landxcape
5.3 Nastavitev
OPOMBA:
(1) Spremenite PIN kodo
na
ali
in pritisnite
(2) Nastavite leto, datum in uro
ali izberite

SL 191
uporabite
ali
utripala
ali za
in pritisnite
Landxcape
Uporabite ali
2
za
4hrs
pritisnete
oba
oba
Landxcape
TM
pokosil travo?
• Ostrina rezil
Landxcape
Landxcape
lahko
omejitev

SL192
Landxcape
TM
in
pri iskanju postaje
OPOZORILO:
7. Posodobitev programske opreme
FAT32
FAT32
Landxcape
deluje s polno
ne
8.1 Skrbite, da bodo rezila vedno ostra
rezil, obvezno IZKLOPITE Landxcape
TM
in si nadenite
hkrati zamenjali VSA rezila. Pri pritrjevanju rezil, obvezno
Landxcape
Landxcape
A. Menjava rezil
Landxcape
Landxcape
okoli
prosto vrti.
TM
. Pred
vrta
Landxcape

SL 193
in si
OPOZORILO:
-a s
TM
na Landxcape
8.3
OPOMBA:
je
o
Landxcape
TM
omejitev.
TM
v bazo za polnjenje, medtem naj
bo Landxcape
TM
odklopljen. (Glejte sliko P)
TM
se
8.4 Shranjevanje preko zime
TM
-a z vodo.
NIKOLI ne shranjujte Landxcape
TM
-a obrnjenega pokonci
in zunaj, kjer bi vanj lahko pritekala voda.
OPOMBA:
8.5 Menjava akumulatorja.
OPOZORILO: Pred nastavitvami, menjavo ali popravili
ugasnite napravo.
Pred menjavo rezil, obvezno IZKLOPITE Landxcape
TM
in si nadenite
OPOMBA:

SL194
Zaslon Ukrep
Simptom Vzrok Opravilo
Motor za pogon koles je
blokiran
Pritisnite
Landxcape
na
Pritisnite
Landxcape
na
Landxcape
Napaka baterije
Pritisnite

SL 195
OPOMBE
in
11. Odpravljanje napak
Simptom Vzrok Opravilo
Landxcape
Landxcape
pritisnete
Landxcape
Landxcape

SL196
Landxcape
Landxcape
Landxcape
niso
Kosilnica Landxcape
Pritisnite
in nato
Landxcape
Landxcape
ali
Landxcape
Landxcape
Kolesa Landxcape
Landxcape
Odstranite tujke iz spodnjega dela Landxcape
Landxcape
Varovanje okolja

SL 197
Izjava o skladnosti
Opis Robotska kosilnica
akumulatorjev LA8001 / LA8002 ter postajo za polnjenje LA3000
Rezanje trave
2006/42/EC, 2014/30/EU, 2014/35/EU, 2011/65/EU, 2000/14/EC spremenjena z 2005/88/EC,
Dodatek V
64.2 dB (A)
65 dB (A)
Naslov: Cleeve Road, Leatherhead, Surrey, KT22 7SB United Kingdom
EN 60335-1:2012+A11+A13:2017, EN 50636-2-107:2015+A1:2018, EN 60335-2-29:2004+A2:2010,
EN 62233:2008, EN ISO 3744:2005, EN 55014-1:2017, EN 55014-2:2015, EN 61000-3-2:2014,
EN 61000-3-3:2013, EN 61558-1:2005+A1:2009, EN 61558-2-16:2009+A1:2013, EN 303 447 V1.1.1
Ime Marcel Filz
Naslov Positec Germany GmbH, Grüner Weg 10, 50825 Cologne, Germany


Copyright © 2018, Positec. All Rights Reserved.
AR01410800
-
 1
1
-
 2
2
-
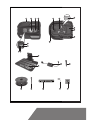 3
3
-
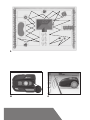 4
4
-
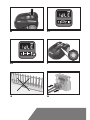 5
5
-
 6
6
-
 7
7
-
 8
8
-
 9
9
-
 10
10
-
 11
11
-
 12
12
-
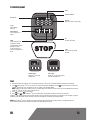 13
13
-
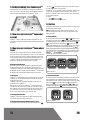 14
14
-
 15
15
-
 16
16
-
 17
17
-
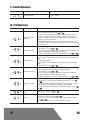 18
18
-
 19
19
-
 20
20
-
 21
21
-
 22
22
-
 23
23
-
 24
24
-
 25
25
-
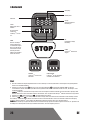 26
26
-
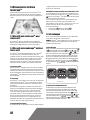 27
27
-
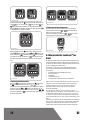 28
28
-
 29
29
-
 30
30
-
 31
31
-
 32
32
-
 33
33
-
 34
34
-
 35
35
-
 36
36
-
 37
37
-
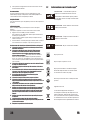 38
38
-
 39
39
-
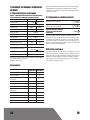 40
40
-
 41
41
-
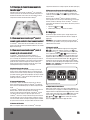 42
42
-
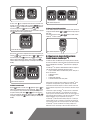 43
43
-
 44
44
-
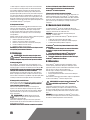 45
45
-
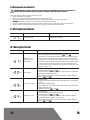 46
46
-
 47
47
-
 48
48
-
 49
49
-
 50
50
-
 51
51
-
 52
52
-
 53
53
-
 54
54
-
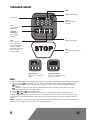 55
55
-
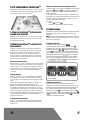 56
56
-
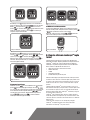 57
57
-
 58
58
-
 59
59
-
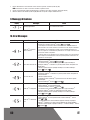 60
60
-
 61
61
-
 62
62
-
 63
63
-
 64
64
-
 65
65
-
 66
66
-
 67
67
-
 68
68
-
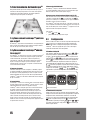 69
69
-
 70
70
-
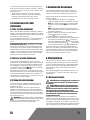 71
71
-
 72
72
-
 73
73
-
 74
74
-
 75
75
-
 76
76
-
 77
77
-
 78
78
-
 79
79
-
 80
80
-
 81
81
-
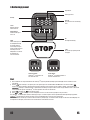 82
82
-
 83
83
-
 84
84
-
 85
85
-
 86
86
-
 87
87
-
 88
88
-
 89
89
-
 90
90
-
 91
91
-
 92
92
-
 93
93
-
 94
94
-
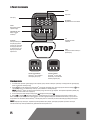 95
95
-
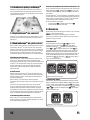 96
96
-
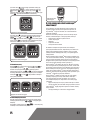 97
97
-
 98
98
-
 99
99
-
 100
100
-
 101
101
-
 102
102
-
 103
103
-
 104
104
-
 105
105
-
 106
106
-
 107
107
-
 108
108
-
 109
109
-
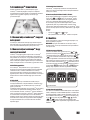 110
110
-
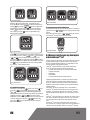 111
111
-
 112
112
-
 113
113
-
 114
114
-
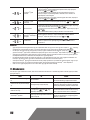 115
115
-
 116
116
-
 117
117
-
 118
118
-
 119
119
-
 120
120
-
 121
121
-
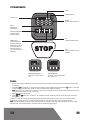 122
122
-
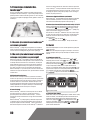 123
123
-
 124
124
-
 125
125
-
 126
126
-
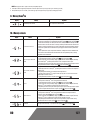 127
127
-
 128
128
-
 129
129
-
 130
130
-
 131
131
-
 132
132
-
 133
133
-
 134
134
-
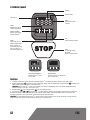 135
135
-
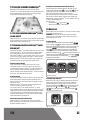 136
136
-
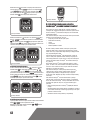 137
137
-
 138
138
-
 139
139
-
 140
140
-
 141
141
-
 142
142
-
 143
143
-
 144
144
-
 145
145
-
 146
146
-
 147
147
-
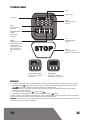 148
148
-
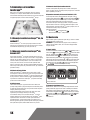 149
149
-
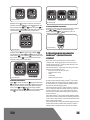 150
150
-
 151
151
-
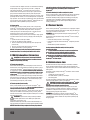 152
152
-
 153
153
-
 154
154
-
 155
155
-
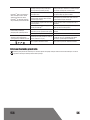 156
156
-
 157
157
-
 158
158
-
 159
159
-
 160
160
-
 161
161
-
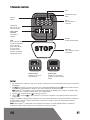 162
162
-
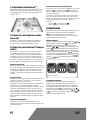 163
163
-
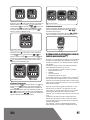 164
164
-
 165
165
-
 166
166
-
 167
167
-
 168
168
-
 169
169
-
 170
170
-
 171
171
-
 172
172
-
 173
173
-
 174
174
-
 175
175
-
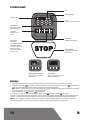 176
176
-
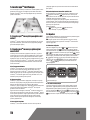 177
177
-
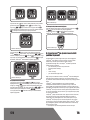 178
178
-
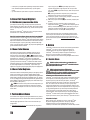 179
179
-
 180
180
-
 181
181
-
 182
182
-
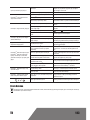 183
183
-
 184
184
-
 185
185
-
 186
186
-
 187
187
-
 188
188
-
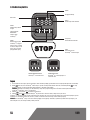 189
189
-
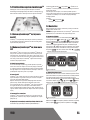 190
190
-
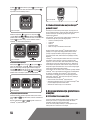 191
191
-
 192
192
-
 193
193
-
 194
194
-
 195
195
-
 196
196
-
 197
197
-
 198
198
-
 199
199
-
 200
200


Landxcape LX792 de handleiding
- Categorie
- Grasmaaiers
- Type
- de handleiding
in andere talen
- English: Landxcape LX792 Owner's manual
- italiano: Landxcape LX792 Manuale del proprietario
- français: Landxcape LX792 Le manuel du propriétaire
- español: Landxcape LX792 El manual del propietario
- Deutsch: Landxcape LX792 Bedienungsanleitung
- português: Landxcape LX792 Manual do proprietário
- slovenčina: Landxcape LX792 Návod na obsluhu
- čeština: Landxcape LX792 Návod k obsluze
- Türkçe: Landxcape LX792 El kitabı
- polski: Landxcape LX792 Instrukcja obsługi
- română: Landxcape LX792 Manualul proprietarului
Andere documenten
-
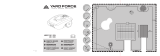 Yard Force XKZ1820A – Amiro Robot Mower 400 de handleiding
-
AL-KO Robolinho® 1000 Handleiding
-
DeWalt DGN9033 Handleiding
-
Viking MI 422 de handleiding
-
STIHL RMI 422 Handleiding
-
-
-
STIHL RMI 522.0 C Handleiding
-
Greenworks Optimow 15 de handleiding
-
Bosch Indego l Original Instructions Manual
