
Remote Thermo-Hygrometer Sensor
Model: THGR122NX
USER MANUAL
EN
OVERVIEW
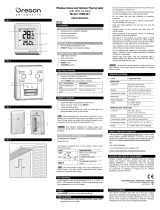
FRONT VIEW
1
2
1. LCD display
2. LED status indicator
BACK VIEW
1. Wall mount hole
2. RESET hole
3. CHANNEL number (1-3)
4. Battery compartment
(Battery compartment cover not shown)
GETTING STARTED
BATTERIES
Remote unit 2 x UM-4 (AAA) 1.5V batteries
Insert batteries before first use, matching the polarity
(+ and -) as shown in the battery compartment. For best
results, install batteries in the remote sensor before the
main unit. Press RESET after each battery change.
NOTE Do not use rechargeable batteries.
shows when batteries are low.
NOTE It is recommended that you use alkaline batteries
with this product for longer performance.
TABLE STAND OR WALL MOUNT
To use the remote sensor stand or wall mount:
REMOTE SENSOR (THGR122NX)
SETUP SENSOR
1. Open the remote sensor battery compartment with
a small Phillips screwdriver.
2. Insert the batteries, matching the polarity (+ and -)
as shown in the battery compartment.
SWITCH OPTION
Channel Channel 1-3. If you are using more
than one sensor, select a different
channel for each sensor.
3. Set the channel. The switch is located in the battery
compartment.
4. Place the sensor near the main unit. Press RESET
on the sensor. Then, press the appropriate main unit
button (as specified in the main unit manual) to initiate
signal sending between the sensor and the main
unit. The reception icon on the main unit will blink for
approximately 3 minutes while it is searching for the
sensor.
5. Close the remote sensor battery compartment.
6. Secure the sensor in the desired location using the wall
mount or table stand.
For best results:
• Insert the batteries and select the channel before you
mount the sensor.
• Place the sensor out of direct sunlight and moisture.
• Do not place the sensor more than 30 metres (98 feet)
from the main (indoor) unit.
• Position the sensor so that it faces the main (indoor)
unit, minimizing obstructions such as doors, walls, and
furniture.
• Place the sensor in a location with a clear view to the
sky, away from metallic or electronic objects.
• Position the sensor close to the main unit during cold
winter months as below-freezing temperatures may
affect battery performance and signal transmission.
You may need to experiment with various locations to get
the best results.
SAFETY AND CARE
Clean the product with a slightly damp cloth and
alcohol-free, mild detergent. Avoid dropping the product
or placing it in a high-traffic location.
WARNINGS
This product is designed to give you years of service
if handled properly. Oregon Scientific will not be
responsible for any deviations in the usage of the
device from those specified in the user instructions or
any unapproved alterations or repairs of the product.
Observe the following guidelines:
• Never immerse the product in water. This can cause
electrical shock and damage the product.
• Do not subject the product to extreme force, shock, or
fluctuations in temperature or humidity.
• Do not tamper with the internal components.
• Do not mix new and old batteries or batteries of
different types.
• Do not use rechargeable batteries with this product.
• Remove the batteries if storing this product for a long
period of time.
• Do not scratch the LCD display.
NOTE The technical specification of this product and
contents of this user guide are subject to change without
notice. Images not drawn to scale.
TROUBLESHOOTING
PROBLEM SYMPTOM REMEDY
Remote
sensor
Cannot locate
remote sensor
Check batteries
Check location
Cannot change
channel
Check sensors.
Only one sensor
is working
Data does not
match main unit
Initiate a
manual sensor
search
SPECIFICATIONS
REMOTE SENSOR DIMENSIONS
L x W x H 92 x 60 x 20 mm
(3.6 x 2.4 x 0.79 inches)
Weight 63 grams (2.22 ounces)
without battery
TEMPERATURE
Unit °C
Outdoor range -20°C to 60°C
Resolution 0.1°C
REMOTE SENSOR (THGR122NX)
RF frequency 433 MHz
Range 30 metres (98 feet)
with no obstructions
Transmission Every 40 seconds
Channel No. 1 - 3
POWER
Sensor batteries 2 x UM-4 (AAA) 1.5V
NOTE It is recommended that you use alkaline batteries
with this product for longer performance.
ABOUT OREGON SCIENTIFIC
Visit our website (www.oregonscientific.com) to learn more
about Oregon Scientific products. If you’re in the US and
would like to contact our Customer Care department directly,
please visit: www2.oregonscientific.com/service/support
OR
Call 1-800-853-8883.
For international inquiries, please visit:
www2.oregonscientific.com/about/international
EU-DECLARATION OF CONFORMITY
Hereby, Oregon Scientific, declares that this Remote
Thermo-Hygrometer Sensor (model: THGR122NX) is in
compliance with the essential requirements and other
relevant provisions of Directive 1999/5/EC. A copy of the
signed and dated Declaration of Conformity is available on
request via our Oregon Scientific Customer Service.
COUNTRIES RTTE APPROVED COMPLIED
All EU countries, Switzerland CH
and Norway N
FCC STATEMENT
This device complies with Part 15 of the FCC Rules.
Operation is subject to the following two conditions: (1) This
device may not cause harmful interference, and (2) This
device must accept any interference received, including
interference that may cause undesired operation.
WARNING Changes or modifications not expressly
approved by the party responsible for compliance could void
the user’s authority to operate the equipment.
NOTE This equipment has been tested and found to comply
with the limits for a Class B digital device, pursuant to Part
15 of the FCC Rules. These limits are designed to provide
reasonable protection against harmful interference in a
residential installation.
This equipment generates, uses and can radiate radio
frequency energy and, if not installed and used in accordance
with the instructions, may cause harmful interference to
radio communications. However, there is no guarantee
that interference will not occur in a particular installation. If
this equipment does cause harmful interference to radio or
television reception, which can be determined by turning the
equipment off and on, the user is encouraged to try to correct
the interference by one or more of the following measures:
• Reorient or relocate the receiving antenna.
• Increase the separation between the equipment and
receiver.
• Connect the equipment into an outlet on a circuit different
from that to which the receiver is connected.
• Consult the dealer or an experienced radio / TV technician for
help.
DECLARATION OF CONFORMITY
The following information is not to be used as contact for
support or sales. Please call our customer service number
(listed on our website at www.oregonscientific.com, or on the
warranty card for this product) for all inquiries instead.
We
Name: Oregon Scientific, Inc.
Address: 19861 SW 95
th
Ave.,Tualatin,
Oregon 97062 USA
Telephone No.: 1-800-853-8883
declare that the product
Product No.: THGR122NX
Product Name: Remote Thermo-Hygrometer Sensor
Manufacturer: IDT Technology Limited
Address: Block C, 9/F, Kaiser Estate,
Phase 1,41 Man Yue St., Hung
Hom, Kowloon,
Hong Kong
is in conformity with Part 15 of the FCC Rules. Operation is
subject to the following two conditions: 1) This device may
not cause harmful interference. 2) This device must accept
any interference received, including interference that may
cause undesired operation.
Sensore Remoto
Modello: THGR122NX
MANUALE PER L’UTENTE
IT
PANORAMICA
VISTA ANTERIORE
1
2
1. Display LCD
2. Indicatore LED
VISTA POSTERIORE
1. Foro per il fissaggio a muro
2. RESET
3. Numero di canale
CHANNEL (1-3)
4. Vano batterie
(Il coperchio del vano batterie non è mostrato)
OPERAZIONI PRELIMINARI
BATTERIE
Alimentazione 2 batterie tipo UM-4 (AAA) da 1,5V
Inserire le batterie prima di utilizzare l’unità per la prima
volta, accordando le polarità (+ e -) come mostrato nel vano
batterie. Per un migliore risultato, si consiglia di installare le
batterie nel sensore remoto, dopo averle inserite nell’unità
principale. Premere
RESET dopo ogni sostituzione delle
batterie.
NOTA Non utilizzare batterie ricaricabili.
indica che le batterie sono scariche.
NOTA Per una maggiore durata, si consiglia di utilizzare
batterie alcaline.
SUPPORTO DA TAVOLO O FISSAGGIO A MURO
Uso del supporto da tavolo o fissaggio a muro del sensore
remoto:
SENSORE REMOTO (THGR122NX)
IMPOSTAZIONE DEL SENSORE
1. Aprire il vano batterie del sensore remoto usando un
piccolo cacciavite.
2. Inserire le batterie nel vano batterie, accordando le
polarità (+ e -) come mostrato.
INTERRUTTORE OPZIONE
Channel Canali 1-3. Se si utilizza più di un
sensore, selezionare un canale
diverso per ciascun sensore.
3. Impostare il canale. L’interruttore si trova nel vano
batterie.
4. Collocare il sensore vicino all’unità principale.
trasmissione del segnale. Premere
RESET sul sensore.
Quindi premere per iniziare la trasmissione di segnali tra
il sensore e Potrebbe essere necessario cambiare più
volte la l’unità principale. L’icona di ricezione sull’unità
posizione per ottenere i migliori risultati. principale
lampeggerà per circa tre minuti durante la ricerca del
sensore.
5. Chiudere il vano batterie del sensore remoto.
6. Collocare il sensore nel luogo desiderato usando il
supporto da tavolo o fissandolo al muro.
Per un migliore risultato:
• Inserire le batterie e selezionare il canale prima di
montare il sensore.
• Collocare il sensore lontano dalla luce diretta del sole e
dall’umidità.
• Non collocare il sensore a più di 30 metri (98 piedi)
dall’unità principale (interno).
• Collocare il sensore in modo che sia rivolto verso l’unità
principale (interno), riducendo al minimo gli ostacoli
come porte, muri e mobili.
• Collocare il sensore in un luogo in cui abbia una buona
visibilità verso il cielo, lontano da oggetti metallici o
elettronici.
• Collocare il sensore più vicino all’unità principale
durante i mesi invernali, poiché temperature rigide sotto
lo zero possono influire negativamente sulla durata
della batteria e sulla trasmissione del segnale.
Potrebbe essere necessario cambiare più volte la
posizione per ottenere i migliori risultati.
SICUREZZA E MANUTENZIONE
Pulire il prodotto usando un panno leggermente inumidito e
un detergente delicato senza alcool. Evitare di versare liquidi
nell’unità o di collocare l’apparecchio in punti di maggior
passaggio.
AVVERTENZE
Il presente prodotto è progettato per offrire molti anni di
funzionamento soddisfacente a condizione che venga
maneggiato con cura. Oregon Scientific declina ogni
responsabilità per danni derivanti da un utilizzo
dell’apparecchio diverso da quello specificato nel presente
manuale d’uso, o da qualsiasi alterazione o riparazione non
autorizzata del prodotto. Attenersi alle seguenti istruzioni:
• Non immergere mai il prodotto nell’acqua. Ciò
potrebbecausare scosse elettriche e danneggiare il
prodotto.
• Non sottoporre il prodotto a forza eccessiva, urto, o
variazioni eccessive di temperatura o umidità.
• Non manomettere i componenti interni.
• Non mischiare batterie vecchie e nuove o batterie di
tipo diverso.
• Non utilizzare batterie ricaricabili con questo
apparecchio.
• Rimuovere le batterie se si prevede di non utilizzare
l’apparecchio per un lungo periodo di tempo.
• Non graffiare il display LCD.
NOTA Le specifiche di questo prodotto e il contenuto del
presente manuale d’uso sono soggetti a modifiche senza
preavviso. Le immagini non sono riprodotte in scala.
RISOLUZIONE DEI PROBLEMI
PROBLEMA SINTOMO
POSSIBILI
SOLUZIONI
Sensore
Remoto
Non è possibile
localizzare il
sensore remoto
Verificare le batterie
Controllare la posizione
Non è possibile
cambiare canale
Controllare i sensori.
Solo un sensore è in
funzione
I dati visualizzati
sul sensore non
corrispondono a
quelli dell’unità
principale
Avviare una ricerca
manuale dei segnali
dai sensori
SPECIFICHE
DIMENSIONI DEL SENSORE REMOTO
B x A x P 2 x 60 x 20 mm
(3,6 x 2,4 x 0,79 pollici)
Peso 63 grammi (2,22 once)
senza batteria
TEMPERATURA
Unità di misura °C
Gamma Temperatura da -20 °C a 60 °C
esterna
Risoluzione 0,1 °C
SENSORE REMOTO (THGR122NX)
Frequenza RF 433 MHz
Gamma 30 metri (98 piedi)
senza ostacoli
Trasmissione Ogni 40 secondi
Numero di canale 1 - 3
ALIMENTAZIONE
Batterie del sensore 2, tipo UM-4 (AAA) da
1,5V
NOTA Per una maggiore durata, si consiglia di utilizzare
batterie alcaline.
INFORMAZIONI AGLI UTENTI DEI PRODOTTI DI
TIPO “DOMESTICO”
INFORMAZIONE AGLI UTENTI
ai sensi dell’art. 13 del Decreto Legislativo 25 luglio 2005,
n. 151”Attuazione delle Direttive 2002/95/CE, 2002/96/CE
e 2003/108/CE, relative alla riduzione dell’uso di sostanze
pericolose nelle apparecchiature elettriche ed elettroniche,
nonché allo smaltimento dei rifiuti”
Il simbolo del cassonetto barrato riportato sull’apparecchiatura
o sulla sua confezione indica che il prodotto alla fine della
propria vita utile deve essere raccolto separatamente dagli
altri rifiuti.
L’utente dovrà, pertanto, conferire l’apparecchiatura giunta
a fine vita agli idonei centri di raccolta differenziata dei
rifiuti elettronici ed elettrotecnici, oppure riconsegnarla
al rivenditore al momento dell’acquisto di una nuova
apparecchiatura di tipo equivalente, in ragione di uno a uno.
L’adeguata raccolta differenziata per l’avvio successivo
dell’apparecchiatura dismessa al riciclaggio, al trattamento
e allo smaltimento ambientalmente compatibile contribuisce
ad evitare possibili effetti negativi sull’ambiente e sulla
salute e favorisce il reimpiego e/o riciclo dei materiali di cui è
composta l’apparecchiatura.
Lo smaltimento abusivo del prodotto da parte dell’utente
comporta l’applicazione delle sanzioni amministrative
previste dalla normativa vigente
INFORMAZIONI SU OREGON SCIENTIFIC
Per avere maggiori informazioni sui nuovi prodotti Oregon
Scientific visita il nostro sito internet
www.oregonscientific.
it, dove potrai trovare tutte le informazioni di cui hai bisogno.
Per ricerche di tipo internazionale puoi visitare invece il sito
www2.oregonscientific.com/about/international.asp.
DICHIARAZIONE DI CONFORMITA’ UE
Con la presente Oregon Scientific dichiara che questo
prodotto (Modello: THGR122NX) è conforme ai requisiti
essenziali ed alle altre disposizioni pertinenti stabilite
dalla direttiva 1999/5/CE. Una copia firmata e datata della
Dichiarazione di Conformità è disponibile, su richiesta,
tramite il servizio clienti della Oregon Scientific.
PAESI CONFORMI ALLA DIRETTIVA R&TTE
Tutti I Paesi Ue, Svizzera CH
E Norvegia N
Sonde Thermo-Hygromètre Sans Fil
Modèle : THGR122NX MANUEL
D’UTILISATION
FR
VUE D’ENSEMBLE
FACE AVANT
1
2
1. Affichage LCD
2. Voyant lumineux indicateur d’état
FACE ARRIÈRE
1. Fixation murale
2. RESET [RÉINITIALISATION]
3. Numéro de CANAL (1 à 3)
4. Compartiment des piles
(La trappe du compartiment des piles n’est pas
représentée)
MISE EN MARCHE
PILES
Sonde x 2 piles UM-4 (AAA) 1,5 V
Insérer les piles avant la première utilisation, en respectant
la polarité (+ et -) indiquée dans le compartiment des piles.
Pour un résultat optimal, installer les piles de la sonde avant
d’installer celles de l’appareil principal. Appuyer sur
RESET
après avoir remplacé les piles.
REMARQUE Ne pas utiliser de pile rechargeable.
apparaît lorsque les piles sont faibles.
REMARQUE Il est recommandé d’utiliser des piles alcalines
avec ce produit pour des performances optimales.
INSTALLATION SUR PIED OU MONTAGE MURAL
Utilisation de la fixation murale ou du pied ou de la sonde :
SONDE SANS FIL (THGR122NX)
MISE EN SERVICE DE LA SONDE
1. Ouvrir le compartiment des piles à l’aide d’un petit
tournevis cruciforme.
2. Insérer les piles, en respectant la polarité (+ et -)
indiquée dans le compartiment des piles.
SÉLECTEUR OPTION
Canal Canal 1 à 3. Sélectionner un
canal différent pour chaque sonde
utilisée (dans le cas où plusieurs
sondes sont utilisées).
3. Régler le canal. Le sélecteur se trouve dans le l’appareil
principal pendant les mois les plus froids compartiment
des piles.
4. Placer la sonde le plus proche possible de l’appareil
principal. Appuyer sur
RESET sur la sonde. Puis,
appuyer sur le bouton approprié sur l’appareil principal
(cf. manuel d’utilisation de l’appareil principal) pour
initialiser le signal transmis entre la sonde et l’appareil
principal. L’icône de réception affichée sur l’appareil
principal clignote pendant environ 3 minutes pour
indiquer qu’il recherche la sonde.
5. Refermer le compartiment des piles.
6. Installer la sonde à l’endroit souhaité, en utilisant le
support sur pied ou la fixation murale.
Pour un résultat optimal :
• Insérer les piles et sélectionner le canal avant d’installer
la sonde.
• La sonde ne doit pas être exposée à l’humidité et ne
doit pas être installée en plein soleil.
• Ne pas placer la sonde à une distance de plus 30
mètres (98 pieds) de l’appareil principal (à l’intérieur).
• Positionner la sonde de telle sorte qu’elle soit orientée
en direction de l’appareil principal (à l’intérieur), en
évitant au maximum les obstacles tels que les portes,
les murs et les meubles.
• Choisir un emplacement à ciel ouvert pour la sonde, à
l’écart de tout objet métallique ou électronique.
• Placer la sonde le plus proche possible de l’appareil
principal pendant les mois les plus froids de l’hiver car
le gel peut affecter les performances des piles et la
transmission du signal.
Si besoin, essayer plusieurs emplacements jusqu’à
obtenir le meilleur résultat.
SÉCURITÉ ET ENTRETIEN
Nettoyer ce produit avec un chiffon légèrement humide et un
produit nettoyant doux et sans alcool. Ne pas faire tomber le
produit et ne pas le placer là où pourrait être heurté.
AVERTISSEMENTS
Ce produit est conçu pour offrir des années de service
s’il est manipulé correctement. Oregon Scientific décline
toute responsabilité en cas d’utilisation de cet appareil non
conforme aux instructions d’utilisation spécifiées dans ce
manuel et en cas de modification ou de réparation non
autorisée. Respecter les recommandations suivantes :
• Ne pas immerger l’appareil dans l’eau. Ceci peut
provoquer un choc électrique et endommager le
produit.
• Ne pas soumettre le produit à des forces extrêmes ou à
des variations de température et d’humidité.
• Ne pas manipuler les composants internes.
• Ne pas mélanger des piles neuves avec des piles
usagées ou des piles de différents types.
• Ne pas utiliser de pile rechargeable avec ce produit.
• Retirer les piles si le produit est rangé pour une longue
durée.
• Ne pas rayer l’affichage LCD.
REMARQUE Les spécifications techniques de ce produit et
le contenu de ce manuel sont susceptibles de modifications
sans avis préalable. Les représentations ne sont pas à la
taille réelle.
RÉSOLUTION DES PROBLÈMES
PROBLÈME SYMPTÔME SOLUTION
Sonde
Impossible de
détecter la sonde
Vérifier les piles
Vérifier l’emplacement
Impossible de
modifier le canal
Vérifier les sondes.
Une seule sonde peut
fonctionner en même
temps
Les données ne
correspondent
pas sur l’appareil
principal
Lancer une recherche
manuelle de la sonde
SPÉCIFICATIONS
DIMENSIONS DE LA SONDE
L x l x H 92 x 60 x 20 mm
(3,6 x 2,4 x 0,79 pouces)
Poids
63 grammes (2,22 onces)
sans pile
TEMPÉRATURE
Unité °C
produitsPlage de mesure -20 °C à 60 °C
extérieure
Résolution 0,1 °C
SONDE (THGR122NX)
Fréquences RF 433 MHz
Distance de transmission 30 mètres (98 pieds) sans
obstacle
Fréquence de transmission Toutes les 40 secondes
N ° de Canal 1 à 3
ALIMENTATION
Piles 2 x UM-4 (AAA) 1,5 V
REMARQUE Il est recommandé d’utiliser des piles alcalines
avec ce produit pour des performances optimales.
À PROPOS D’OREGON SCIENTIFIC
Pour plus d‘informations sur les produits Oregon Scientific
France, rendez-vous sur notre site:
www.oregonscientific
.fr.
Si vous êtes aux Etats-Unis, vous pouvez contacter notre
support consommateur directement sur le site:
www2.oregonscientific.com/service/support.asp
OU
par téléphone au: 1-800-853-8883
Pour des renseignements internationaux, rendez vous sur le
site: www2.oregonscientific.com/about/international.asp
.
EUROPE - DECLARATION DE CONFORMITE
Par la présente Oregon Scientific déclare que l’appareil
Sonde Thermo-Hygromètre Sans Fil (Modèle:THGR122NX)
est conforme aux exigences essentielles et aux autres
dispositions pertinentes de la directive 1999/5/CE. Une
copie signée et datée de la déclaration de conformité est
disponible sur demande auprès de notre Service Client.
PAYS CONCERNÉS RTT&E
Tous les pays Européens, la Suisse
CH
et la Norvège N
Funksendeeinheit
Modell:THGR122NX
BEDIENUNGSANLEITUNG
DE
ÜBERSICHT
VORDERANSICHT
1
2
1. LCD-Anzeige
2. LED-Statusanzeige
RÜCKANSICHT
1. Öse für die Wandaufhängung
2. RESET
3. CHANNEL (Kanalnr. 1-3)
4. Batteriefach
(Ohne Batteriefachdeckel abgebildet)
VORBEREITUNG ZUM EINSATZ
BATTERIEN
Funksendeinheit 2 x UM-4 (AA) 1,5 V Batterien
Legen Sie die Batterien vor der ersten Benutzung ein und
beachten Sie dabei die im Batteriefach abgebildeten (+ und
-)-Polaritäten. Installieren Sie für optimale Ergebnisse die
Batterien zuerst in der Funksendeeinheit und dann in der
Empfangseinheit. Drücken Sie nach jedem Batteriewechsel
auf RESET.
HINWEIS Verwenden Sie keine wiederaufladbaren Akkus.
zeigt an, wenn die Batterien schwach sind.
HINWEIS Um eine längere Lebensdauer zu erzielen, wird
für dieses Gerät die Verwendung von Alkaline-Batterien
empfohlen.
TISCHSTÄNDER ODER WANDAUFHÄNGUNG
Benutzung des Tischständers oder der Wandaufhängung
der Funksendeeinheit
FUNKSENDEEINHEIT (THGR122NX)
EINRICHTEN DER FUNKSENDEEINHEIT
1. Öffnen Sie das Batteriefach der Funksendeeinheit mit
einem kleinen Kreuzschlitzschraubendreher.
2. Legen Sie die Batterien ein und beachten Sie dabei die
im Batteriefach abgebildeten (+ und -)-Polaritäten.
SCHALTER AUSWAHL
Channel Kanal 1-3. Wenn Sie mehr
als eine Funksendeeinheit
einsetzen, wählen Sie für jede
Funksendeeinheit einen anderen
Kanal aus.
3. Kanal einstellen. Der Schalter befindet sich im
Batteriefach.
4. Stellen Sie den Sensor in der Nähe der
Empfangseinheit auf. Drücken Sie RESET an dem
Sensor. Drücken Sie dann die entsprechende
Taste an der Empfangseinheit (vgl. Sie dazu die
Bedienungsanleitung der Empfangseinheit), um das
Aussenden des Signals zwischen dem Sensor und der
Empfangseinheit einzuleiten. Das Empfangssymbol auf
der Empfangseinheit blinkt für etwa 3 Minuten, während
es nach einem Sensor sucht
5. Schließen Sie das Batteriefach der Funksendeeinheit.
6. Befestigen Sie die Funksendeeinheit an der
gewünschten Stelle mit der Wandbefestigung oder
verwenden Sie den Tischständer.
Für optimale Ergebnisse:
• Legen Sie die Batterien ein und wählen Sie den Kanal
aus, bevor Sie die Funksendeeinheit montieren.
• Platzieren Sie die Funksendeeinheit entfernt von
direkter Sonnenbestrahlung und Feuchtigkeit.
• Platzieren Sie die Funksendeeinheit nicht weiter als
30 Meter (98 Fuß) von der Empfangseinheit im Haus
entfernt.
• Positionieren Sie die Funksendeeinheit so, dass sie
auf die Empfangseinheit im Haus ausgerichtet ist, und
vermeiden Sie wenn möglich Hindernisse wie Türen,
Wände und Möbel.
• Platzieren Sie die Funksendeeinheit entfernt von
metallischen und elektronischen Objekten an einen
Standort mit freier Sicht auf den Himmel.
• Positionieren Sie die Funksendeeinheit während der
kalten Wintermonate in die Nähe der Empfangseinheit,
da Temperaturen unter der Frostgrenze die
Batterieleistung und dadurch die Signalübertragung
beeinträchtigen können.
Möglicherweise müssen Sie verschiedene Standorte testen,
um optimale Ergebnisse zu erzielen.
SICHERHEIT UND PFLEGE
Reinigen Sie das Gerät mit einem leicht angefeuchteten
Tuch und einem alkoholfreien milden Reinigungsmittel.
Vermeiden Sie das Herabfallen des Gerätes oder die
Platzierung an einem stark frequentierten Standort.
WARNUNGEN
Dieses Gerät ist für viele Betriebsjahre vorgesehen, sofern
es richtig gehandhabt wird. Oregon Scientific übernimmt
keine Verantwortung für beliebige Abweichungen von der in
der Bedienungsanleitung spezifizierten Verwendung oder für
irgendwelche ungenehmigte Änderungen oder Reparaturen
des Geräts. Beachten Sie folgende Hinweise:
• Tauchen Sie das Gerät niemals in Wasser. Dies kann
einen elektrischen Schock und Beschädigungen des
Gerätes verursachen.
• Setzen Sie die Empfangseinheit keiner extremen
Gewalt, keinen Stößen und keinen hohen
Temperaturänderungen aus.
• Machen Sie sich nicht an den internen Komponenten
zu schaffen.
• Mischen Sie keine neuen und alten Batterien oder
Batterien unterschiedlichen Typs.
• Verwenden Sie in diesem Gerät keine wiederaufladbaren
Akkus.
• Entfernen Sie die Batterien, wenn Sie das Produkt über
einen längeren Zeitraum lagern.
• Verkratzen Sie nicht die LCD-Anzeige.
HINWEIS Die technischen Daten dieses Gerätes und der
Inhalt dieser Bedienungsanleitung können ohne Mitteilung
geändert werden. Die Bilder sind nicht maßstabsgerecht
gezeichnet.
FEHLERSUCHE UND ABHILFE
PROBLEM SYMPTOM ABHILFE
Funksende-
einheit
Kann die
Funksendeeinheit
nicht lokalisieren
Batterien prüfen
Standort prüfen
Kann den Kanal
nicht ändern
Funksendeeinheiten
überprüfen Nur eine
Funksendeeinheit
arbeitet
Unpassende
Daten für die
Empfangseinheit
Eine manuelle
Funksendeeinheiten-
suche einleiten
TECHNISCHE DATEN
FUNKSENDEEINHEITS-ABMESSUNGEN
L x B x T 92 x 60 x 20 mm
(3,6 x 2,4 x 0,79 Zoll)
Poids
63 g (2,22Unzen)
ohne Batterie
TEMPERATUR
Einheit °C
Außenbereich -20 °C bis 60 °C
Abstufung 0,1 °C
FUNKSENDEEINHEIT (THGR122NX)
Funkfrequenz 433 MHz
Bereich 30 Meter (98 Fuß)
ohne Hindernisse
Datenübertragung Alle 40 Sekunden
Kanal-Nr. 1 - 3
STROMVERSORGUNG
Funksendeeinheits-Batterien 2 x UM-4 (AAA) 1,5 V
HINWEIS Um eine längere Lebensdauer zu erzielen, wird
für dieses Gerät die Verwendung von Alkaline-Batterien
empfohlen.
ÜBER OREGON SCIENTIFIC
Besuchen Sie unsere Website www.oregonscientific.
de und erfahren Sie mehr über unsere Oregon Scientific-
Produkte. Auf der Website finden Sie auch Informationen,
wie Sie im Bedarfsfall unseren Kundendienst erreichen und
Daten herunterladen können. Für internationale Anfragen
besuchen Sie bitte unsere Website: www2.oregonscientific.
com/about/international.
EU-KONFORMITÄTSERKLÄRUNG
Hiermit erklärt Oregon Scientific, dass Funksendeeinheit
(Modell: THGR122NX) mit den grundlegenden Anforderungen
und anderen relevanten Vorschriften der Richtlinie 1999/5/
EG übereinstimmt. Eine Kopie der unterschriebenen und mit
Datum versehenen Konformitätserklärung erhalten Sie auf
Anfrage über unseren Oregon Scientific Kundendienst.
KONFORM IN FOLGENDEN LÄNDERN
Alle Länder der EU, Schweiz CH
und Norwegen N
THGR122NX EU MANUAL R3.indd 1 1/29/08 9:12:56 AM

Sensor Remoto
Modelo: THGR122NX
MANUAL DE USUARIO
ES
RESUMEN
VISTA FRONTAL
1
2
1. Display LCD
2. Indicador LED de estado
VISTA TRASERA
1. Orificio para instalación en la pared
2. RESET
3. Número de
CHANNEL (1-3)
4. Compartimento para las pilas
(Tapa para el compartimento de las pilas no mostrado)
CÓMO EMPEZAR
PILAS
Unidad remota 2 pilas UM-4 (AAA) 1.5V
Introduzca las pilas antes de utilizarlo por primera vez,
respetando la polaridad (+ y -) tal y como aparece en el
compartimento para las pilas. Para un óptimo resultado,
instale las pilas en el sensor remoto antes de instalar las de la
unidad principal. Pulse RESET siempre que haya cambiado
las pilas.
NOTA No utilice pilas recargables.
aparece cuando las pilas están agotadas.
NOTA Se recomienda la utilización de pilas alcalinas con
este producto para una vida más prolongada.
PIE O PARED
Para utilizar el soporte del sensor remoto o instalarlo en la
pared:
SENSOR REMOTO (THGR122NX)
CONFIGURAR EL SENSOR
1. Abra el compartimento de las pilas del sensor remoto con
un destornillador pequeño.
2. Introduzca las pilas, respetando la polaridad (+ y -) como
se muestra en el compartimento de las pilas.
SELECTOR SELECTOR
Canal Canal 1-3. Si está utilizando más
de un sensor, seleccione un canal
diferente para cada sensor.
3. Ajuste el canal. El selector está situado en el
compartimento para las pilas.
4. Coloque el sensor cerca de la unidad principal. Pulse
RESET en el sensor y a continuación pulse para iniciar
el envío de señal entre el sensor y la unidad principal.
El icono de recepción de la unidad principal parpadeará
durante aproximadamente 3 minutos mientras busca el
sensor.
5. Cierre el compartimento para las pilas del sensor
remoto.
6. Asegúrese de que el sensor está en el lugar deseado
utilizando el soporte de mesa o instalándolo en la
pared.
Para un óptimo resultado:
• Introduzca las pilas y seleccione el canal antes de
montar el sensor.
• Coloque el sensor lejos de la luz solar directa y de
cualquier humedad.
• No coloque el sensor a más de 30 metros (98 pies) de
distancia de la unidad principal (interior).
• Coloque el sensor de manera que encare la unidad
principal (interior), evitando obstáculos como puertas,
muros o mobiliario.
• Coloque el sensor en un lugar libre al cielo, lejos de
objetos metálicos o electrónicos.
• Coloque el sensor cerca de la unidad principal durante
los meses fríos de invierno dado que las temperaturas
bajo cero pueden afectar al funcionamiento de las pilas
y la transmisión de la señal.
Quizás deba Vd. experimentar con varias posiciones para
obtener los mejores resultados.
SEGURIDAD Y CUIDADO
Limpie el producto con un paño ligeramente húmedo y un
detergente suave, sin alcohol. Evite que el producto caiga y
no lo coloque en un lugar con mucho tráfico.
AVISOS
Este producto está diseñado para funcionar durante años si se
trata adecuadamente. Oregon Scientific no se responsabiliza
de cualquier utilización inadecuada del aparato, distinta a la
especificada en el manual de instrucciones, ni de alteraciones
o reparaciones del producto no autorizadas.
Observe las siguientes instrucciones:
• Nunca sumerja el producto en agua. Esto puede causar
una descarga eléctrica y dañar el producto.
• No golpee el producto, lo exponga a corrientes eléctricas
o a fluctuaciones extremas de temperatura y humedad
• No manipule los componentes internos.
• No mezcle pilas nuevas y usadas ni pilas de diferentes
tipos.
• No utilice pilas recargables con este producto.
• Extraiga las pilas si no va a utilizar este producto durante
un periodo de tiempo prolongado.
• No raye el display LCD.
NOTA Las especificaciones técnicas de este producto y el
contenido de este manual de instrucciones pueden variar sin
previo aviso. Las imágenes no están realizadas a escala.
FEHLERSUCHE UND ABHILFE
PROBLEMA SÍNTOMA REMEDIO
Remoto
sensor
No puede
encontrar el
sensor remoto
Compruebe las pilas
Compruebe la
situación
No puede
cambiar de canal
Compruebe los
sensores. Sólo
un sensor está
funcionando
La información
no coincide
con la unidad
principal
Inicie una búsqueda
manual de sensor
ESPECIFICACIONES
DIMENSIONES DEL SENSOR REMOTO
Largo x Ancho x Alto 92 x 60 x 20 mm
(3,6 x 2,4 x 0,79 pulgadas)
Poids
63 grams (2.22 onzas)
sin pilas
TEMPERATURA
Unidad °C
Alcance exterior -20 °C a 60 °C
Resolución 0,1 °C
SENSOR REMOTO (THGR122NX)
Frecuencia RF 433 MHz
Alcance 30 metros (98 pies)
sin obstáculos
Transmisión Cada 40 segundos
Canal Núm. 1 - 3
ALIMENTACIÓN
Pilas sensor 2 x UM-4 (AAA) 1.5V
NOTA Se recomienda utilizar pilas alcalinas con este
producto para prolongar su duración.
SOBRE OREGON SCIENTIFIC
Visite nuestra página web (www.oregonscientific.com) para
conocer más sobre los productos de Oregon Scientific. Si
está en EE.UU y quiere contactar directamente con nuestro
Departamento de Atención al Cliente, por favor visite
www2.oregonscientific.com/service/support.asp
o llame al 1-800-853-8883.
Si está en España y quiere contactar directamente con
nuestro Departamento de Atención al Cliente, por favor
visite www.oregonscientific.es o llame al 902 338 368. Para
consultas internacionales, por favor visite
www2.oregonscientific.com/about/international.asp
.
EU - DECLARACIÓN DE CONFORMIDAD
Por medio de la presente Oregon Scientific declara que el
Sensor Remoto (Modelo: THGR122NX) cumple con los
requisitos esenciales y cualesquiera otras disposiciones
aplicables o exigibles de la Directiva 1999/5/CE. Tiene a su
disposición una copia firmada y sellada de la Declaración
de Conformidad, solicítela al Departamento de Atención al
Cliente de Oregon Scientific PAÍSES.
PAÍSES BAJO LA DIRECTIVA RTTE
Todos los países de la UE, Suiza
CH
y Noruega N
Sensor Termo-Higrômetro Remoto
Modelo: THGR122NX
MANUAL DO USUÁRIO
POR
VISÃO GERAL
VISTA FRONTAL
1
2
1. Tela de cristal líquido
2. LED (indicador de estado)
VISTA TRASEIRA
1. Orifício para montagem em parede
2. Botão
RESET [REINICIALIZAÇÃO]
3. CHANNEL – Número do canal (de 1 a 3)
4. Compartimento das pilhas
(A tampa do compartimento das pilhas não é mostrada
na figura.)
PARA COMEÇAR
PILHAS
Unidade remota 2 Pilhas AAA de 1,5 V
Antes de usar o aparelho pela primeira vez, insira as pilhas,
coincidindo as polaridades (+ e -) conforme mostradas no
compartimento das pilhas. Para obter resultados melhores,
instale as pilhas no sensor remoto antes de instalar as da
unidade principal. Pressione
RESET depois de cada troca
de pilhas.
NOTA Não use pilhas recarregáveis.
indica quando as pilhas estão com baixo nível de
carga.
NOTA É recomendável usar pilhas alcalinas neste produto,
para obter o máximo desempenho.
APOIO PARA MESA OU MONTAGEM EM PAREDE
Para usar o apoio ou o suporte de parede do sensor remoto:
SENSOR REMOTO (THGR122NX)
AJUSTE DO SENSOR
1. Abra o compartimento das pilhas do sensor remoto com
uma chave Phillips pequena.
2. Insira as pilhas, coincidindo as polaridades (+ e -)
conforme mostradas no compartimento das pilhas.
BOTÃO OPÇÃO
Channel Canais de 1 a 3. Se você utiliza mais
de um sensor, selecione um canal
diferente para cada um.
3. Ajuste o canal. A chave localiza-se no compartimento
das pilhas.
4. Coloque o sensor próximo à unidade principal.
Pressione RESET no sensor. A seguir, pressione a
fim de iniciar a transmissão de sinal entre o sensor e
a unidade principal. O ícone de recepção na unidade
principal piscará durante aproximadamente 3 minutos,
enquanto estiver fazendo a busca do sensor.
5. Feche o compartimento das pilhas do sensor remoto.
6. Fixe o sensor no local desejado, usando o suporte de
parede ou o apoio de mesa.
Para obter melhores resultados:
• Insira as pilhas e selecione o canal antes de fixar o
sensor no local desejado.
• Posicione o sensor em local afastado da luz solar direta
e da umidade.
• Não coloque o sensor a mais de 30 metros (98 pés) da
unidade principal.
• Posicione o sensor de modo que ele fique voltado para
a unidade principal. Procure minimizar a presença de
obstáculos, como portas, paredes e móveis.
• Coloque o sensor afastado de objetos metálicos ou
equipamentos eletrônicos.
• Nos meses frios de inverno, posicione o sensor próximo
à unidade principal, uma vez que as temperaturas abaixo
do ponto de congelamento podem afetar o desempenho
das pilhas e a transmissão de sinais.
Talvez seja necessário experimentar vários locais até obter
os melhores resultados.
SEGURANÇA E CUIDADOS
Limpe o produto com pano levemente úmido e detergente
neutro sem álcool. Evite deixar o produto cair e não o deixe
em local de alto tráfego de pessoas.
AVISOS
Este produto foi projetado para oferecer muitos anos de
funcionamento, desde que manuseado adequadamente.
A Oregon Scientific não se responsabiliza por utilizações
do aparelho divergentes do especificado nas instruções
do usuário, nem por quaisquer alterações ou reparos
não aprovados feitos no produto. Observe as seguintes
orientações:
• Nunca mergulhe o produto em água. Isso pode causar
choque elétrico e danificar o produto.
• Não submeta o produto a forças extremas, choques
nem a variações de temperatura ou umidade.
• Não tente acessar nem violar os componentes internos
do aparelho.
• Não misture pilhas novas com velhas, nem pilhas de
diferentes tipos.
• Não use pilhas recarregáveis com este produto.
• Remova as pilhas quando for necessário armazenar o
produto por um longo período.
• Não arranhe tela de cristal líquido.
NOTA As especificações técnicas deste produto e o conteúdo
deste Manual do Usuário estão sujeitos a alterações sem a
obrigação de notificação prévia por parte do fabricante. As
figuras não estão em escala.
SOLUÇÃO DE PROBLEMAS
PROBLEMA SINTOMA REPARAÇÃO
Sensor remoto
Não é possível
localizar o sensor
remoto.
Verifique as pilhas
Verifique o
posicionamento
Não é possível
trocar o canal.
Verifique os sensores.
Apenas um sensor
está funcionando
Os dados não
coincidem
com a unidade
principal.
Inicie uma tentativa
de localização manual
do sensor
ESPECIFICAÇÕES
DIMENSÕES DO SENSOR REMOTO
C x L x A 92 x 60 x 20 (mm)
(3,6 x 2,4 x 0,79 pol.)
Peso
63 g (2,22 oz) sem pilhas
TEMPERATURA
Unidade °C
Intervalo em ambiente -20 °C a 60 °C
externo
Resolução 0,1 °C
SENSOR REMOTO (THGR122NX)
Radiofreqüência 433 MHz
Alcance 30 m (98 pés) sem
obstruções
Transmissão A cada 40 segundos
No do canal 1 a 3
ALIMENTAÇÃO
Baterias do sensor 2 x AAA de 1,5 V
NOTA É recomendável usar pilhas alcalinas neste produto,
para obter o máximo desempenho.
SOBRE A OREGON SCIENTIFIC
Visite nosso site (www.oregonscientific.com.br) para saber
mais sobre os produtos Oregon Scientific.
Caso você necessite de mais informações ou tenha dúvidas,
entre em contato com o nosso Serviço de Atendimento ao
Consumidor através do telefone (11) 5095 2329 ou e-mail
sac@oregonscientific.com.br.
CE – DECLARAÇÃO DE CONFORMIDADE
Oregon Scientific declara que este(a) Sensor Termo-
Higrômetro Remoto (Modelo:THGR122NX) está conforme
com os requisitos essenciais e outras provisões da Diretriz
1999/5/CE. Uma cópia assinada e datada da Declaração de
Conformidade está disponível para requisições através do
nosso SAC.
PAISES SUJEITOS A NORMA R&TTE
Todos os paises da União Européia, Suíça
CH
e Noruega N
Draadloze Sensor
Model: THGR122NX
HANDLEIDING
NL
OVERZICHT
VOORKANT
1
2
1. LCD-scherm
2. Indicator LED-status
ACHTERKANT
1. Uitsparing voor muurbevestiging
2. Terugsteltoets
RESET
3. CHANNEL kanaalnummer (1-3)
4. Batterijenvak
(Deksel van het batterijenvak hier niet vertoond)
OM TE BEGINNEN
BATTERIJEN
Afstandssensor 2 batterijen van het type UM-4 (AAA)
1,5 V
Wanneer u het product voor het eerst gebruikt moet u eerst
de batterijen inzetten, daarbij lettend op de aanduiding van
de polariteiten (+ en -) in het batterijenvak. Voor de beste
resultaten zet u de batterijen eerst in de afstandssensor en
daarna pas in het hoofdtoestel. Druk na elke vervanging van
de batterijen op RESET.
NB Gebruik geen herlaadbare batterijen.
wordt weergegeven indien batterijspanning laag is.
NB Met het oog op een langere gebruiksduur is het gebruik
van alkaline batterijen voor dit product aanbevolen.
TAFELSTAANDER OF MUURBEVESTIGING
Het gebruik van de tafelstaander of muurbevestiging van de
afstandssensor:
DRAADLOZE SENSOR (THGR122NX)
SENSOR INSTELLEN
1. Open het batterijenvak van de afstandssensor met
behulp van een kleine kruiskopschroevendraaier.
2. Zet de batterijen in met de polariteiten (+ en -) als
aangeduid in het batterijenvak.
SCHAKELAAR OPTIE
Channel Kanaal 1-3. Wanneer u meer dan één
sensor gebruikt moet u aan elke sensor
een ander kanaalnummer toekennen.
3. Stel het kanaal in. De schakelaar bevindt zich in het
batterijenvak.
4. Plaats de sensor in de buurt van het apparaat. Druk
RESET op de sensor. Druk dan om een signal te
verzenden tussen de sensor en het apparaat. Het
ontvangsticoon op het apparaat zal voor ongeveer 3
minuten gaan knipperen terwijl het de sensor zoekt.
5. Sluit het batterijenvak van de afstandssensor.
6. Zet of hang de sensor op de gewenste plaats met behulp
van de tafelstaander of muurbevestiging.
Voor de beste resultaten:
• Zet de batterijen in en selecteer het kanaal voordat u de
sensor ophangt of neerzet.
• Plaats de sensor niet waar hij aan rechtstreeks zonlicht
of vochtigheid kan worden blootgesteld.
• Plaats de sensor niet verder dan 30 meter van het
hoofdtoestel (binnen) verwijderd.
• Positioneer de sensor zo dat hij tegenover het
hoofdtoestel (binnen) staat, met een minimum aan
obstructies zoals deuren, muren of meubilair.
• Zorg ervoor dat u de sensor plaatst waar een open zicht
naar de hemel toe is en uit de buurt van metalen of
elektronische voorwerpen.
• Positioneer de sensor in de koude wintermaanden zo
dicht mogelijk bij het hoofdtoestel, omdat de batterijen
en de signaaltransmissie gevoelig zijn voor vorst.
Het kan nodig blijken met verschillende locaties te
experimenteren vooraleer u de beste resultaten bekomt.
VEILIGHEID EN ONDERHOUD
Maak het toestel schoon met een lichtvochtige doek en een
zachte, alcoholvrije detergens. Voorkom dat het product kan
vallen en plaats het niet waar voortdurend veel passage is.
WAARSCHUWINGEN
Dit product werd ontworpen en vervaardigd om u vele jaren
trouw te kunnen dienen, op voorwaarde dat het correct wordt
gehanteerd. Oregon Scientific is niet aansprakelijk voor de
gevolgen van afwijkend gebruik van de instructies die in de
gebruiksaanwijzing beschreven staan of voor ongeoorloofde
wijzigingen of herstellingen van het product. Neem de
volgende richtlijnen in acht:
• Dompel het product nooit onder in water. Dit kan
elektrocutie en beschadiging van het product
veroorzaken.
• Stel dit product niet bloot aan extreme krachten,
schokken, of fluctuaties in termperatuur of vochtigheid.
• Knoei niet met de interne onderdelen.
• Gebruik nooit oude en nieuwe batterijen of batterijen van
verschillende types samen.
• Gebruik in dit product geen herlaadbare batterijen.
• Verwijder de batterijen wanneer u dit product voor een
langere periode gaat opbergen.
• Maak geen krassen in de LCD-scherm.
NB De technische gegevens van dit product en de inhoud
van deze gebruiksaanwijzing kunnen zonder kennisgeving
worden gewijzigd. De afbeeldingen zijn niet op schaal.
PROBLEMEN OPLOSSEN
PROBLEEM SYMPTOOM OPLOSSING
Afstandssensor
Kan de
afstandssensor
niet vinden
locatie
Controleer de
batterijen
Controleer de
Kan geen ander
kanaal vinden
Controleer de
sensoren. Er werkt
slechts één sensor
Gegevens
stemmen niet
overeen met
die van het
hoofdtoestel
Start het zoeken
naar de sensor
handmatig
SPECIFICATIES
AFMETINGEN VAN DE AFSTANDSSENSOR
L x B x H 92 x 60 x 20 mm
Gewicht
63 gram zonder batterijen
TEMPERATUUR
Temperatuureenheid °C
Reikwijdte buiten -20 °C tot 60 °C
Resolutie 0,1 °C
AFSTANDSSENSOR (THGR122NX)
RF-frequentie 433 MHz
Reikwijdte 30 meter zonder
obstructies
Transmissie ledere 40 seconden
Kanaal nr. 1 - 3
STROOM
Batterijen voor de sensor 2 x UM-4 (AAA) 1,5 V
NB Met het oog op een langere gebruiksduur is het gebruik
van alkaline batterijen voor dit product aanbevolen.
OVER OREGON SCIENTIFIC
Bezoek onze website (www.oregonscientific.com) om meer
te weten over uw nieuwe product en andere Oregon Scientific
producten zoals digitale fototoestellen, gezondheids- en
fitnessuitrusting en weerstations. Op deze website vindt u
tevens de informatie over onze klantendienst, voor het geval
u ons wenst te contacteren.
EU CONFORMITEITS VERKLARING
Bij deze verklaart Oregon Scientific dat deze Draadloze
Sensor (Model: THGR122NX) voldoet aan de essentiële
eisen en aan de overige relevante bepalingen van Richtlijn
1999/5/EC. Een kopie van de getekende en gedateerde
Conformiteits verklaring is op verzoek beschikbaar via onze
Oregon Scientific klanten service.
LANDEN DIE ZIJN ONDERWORPEN AAN RTT&E
Alle EU landen, Zwitserland
CH
en Noorwegen N
Trådlös Fjärrenhet
Modell: THGR122NX
BRUKSANVISNING
SWE
PRODUKTÖVERSIKT
VY FRAMSIDA
1
2
1. LCD display
2. LED indikator
VY BAKSIDA
1. Väggmonteringshål
2. RESET
3. Kanalnummer
(1-3)
4. Batterifack
(Lock för batterifacket visas ej)
ATT KOMMA IGÅNG
BATTERIER
Fjärrenhet 2 x UM-4 (AAA) 1.5V batterier
Se till att batterierna sätts in enligt figuren i batterifacket.
För bästa resultat, installera batterierna i fjärrenheten före
huvudenheten. Tryck RESET efter varje batteribyte.
NOTERA Använd inte laddningsbara batterier.
Visas vid låg batterinivå
NOTERA Det rekommenderas att använda Alkaline batterier
till denna produkt för maximal drifttid.
BORDSSTÄLL ELLER VÄGGMONTERING
Använd bordstativet på baksidan av huvudenheten /Bordsställ
eller Väggmontering av fjärrenhet
TRÅDLÖS FJÄRRENHET (THN122NX)
STÄLL IN SENSOR
1. Öppna batterifacket på fjärrenheten med en liten Phillips
skruvmejsel.
2. Se till att batterierna sätts in enligt figuren i batterifacket.
OMKOPPLARE VAL
Kanal Kanal 1-3. Om du använder fler än 1
sensor, välj en unik kanal för respektive
sensor.
3. Ställ in kanalen. Omkopplaren finns I batterifacket.
4. Placera sensorn nära huvudenheten. Tryck
RESET
på sensorn. Tryck därefter på motsvarande knapp på
huvudenheten (se bruksanvisning för huvudenheten)
för att manuellt initiera signalen som sänds mellan fjärr-
och huvudenhet. Mottagningsikonen på huvudenheten
kommer att blinka ca 3 minuter medan den letar efter en
sensor.
5. Stäng batteriluckan för fjärrenheten.
6. Säkra fjärrenheten genom att antingen använda dess
bordsstatv eller väggmontering.
För bästa resultat:
• Välj kanal innan du monterar enheten.
• Undvik att placera enheten så att den utsätts för direkt
solljus eller fukt.
• Placera inte fjärrenheten mer än 30 meter
• (98 fot) från huvudenheten.
• Placera fjärrenheten så att den är riktad mot
huvudenheten, minimera hinder såsom dörrar, väggar
och möbler.
• Placera fjärrenheten med fri sikt mot himlen, avskild från
metall– och elektroniska föremål.
• Placera fjärrenheten nära huvudenheten under
vintermånaderna då temperaturer under nollpunkten
kan påverka batterilivslängd och signalstyrka.
Du kan behöva experimentera med olika platser för att erhålla
det bästa resultatet.
SÄKERHET OCH UNDERHÅLL
Rengör produkten med en lätt fuktad trasa och milt alkoholfritt
tvättmedel. Undvik att tappa produkten eller att placera den i
ett högtrafikerat område ( signalmässigt).
VARNINGSMEDDELANDEN
Denna produkt är designad för att ge dig många års glädje
om den hanteras på ett korrekt sätt. Oregon Scientific är
inte ansvariga om några avsteg från instruktionsmanualen
gällande användningen av produkten görs eller om icke
godkända förändringar eller reparationer utförs. Se följande
anvisningar:
• Lägg aldrig ner produkten i vatten. Detta kan orsaka en
elektrisk stöt som förstör produkten.
• Utsätt inte produkten för extrema krafter, stötar eller
variationer i temperatur eller luftfuktighet.
• Mixtra inte med interna komponenter.
• Blanda inte gamla och nya batterier eller batterier av
olika fabrikat.
• Använd inte laddningsbara batterier till denna produkt.
• Plocka ur batterierna om produkten skall förvaras under
en längre period.
• Repa inte LCD displayen.
NOTERA Innehållet i denna manual kan komma att ändras
utan vidare upplysning. Bilderna är inte ritade i skala.
FELSÖKNING
PROBLEM SYMPTOM ÅTGÄRD
Trådlös
fjärrenhet
Hittar inte
fjärrenhet
Kontrollera batterier
Kontrollera plats
Kan inte ändra
kanal
Kontrollera
fjärrenheterna.
Endast en sensor
fungerar
Data
överrensstämmer
inte med
huvudenhet
Initiera manuell
sökning av
fjärrenhet
SPECIFIKATIONER
DIMENSIONER FÖR FJÄRRENHETEN
L x B x H 92 x 60 x 20 mm
(3,6 x 2,4 x ,79 tum)
Vikt 63 gram (2,22 oz) utan batterier
TEMPERATUR
Enhet °C
Mätområde Utomhus -20°C till 60°C
Upplösning 0,1 °C
TRÅDLÖS FJÄRRENHET (THN122NX)
RF frekvens 433 MHz
Avstånd 30 meter (98 fot) fri sikt
Sändning Var 40:e sekund
Kanal 1 - 3
STRÖMFÖRSÖRJNING
Batterier Fjärrenhet 2 x UM-4 (AAA) 1,5 V
NOTERA Det rekommenderas att använda Alkaline batterier
till denna produkt för längre drifttid.
OM OREGON SCIENTIFIC
Besök vår hemsida (www.oregonscientific.se) för att se
mer av våra produkter såsom digitalkameror; MP3 spelare;
projektionsklockor; hälsoprodukter; väderstationer; DECT-
telefoner och konferenstelefoner.
Hemsidan innehåller också information för våra kunder i de
fall ni behöver ta kontakt med oss eller behöver ladda ner
information.Vi hoppas du hittar all information du behöver
på vår hemsida och om du vill komma i kontakt med Oregon
Scientific kundkontakt besöker du vår lokala hemsida
www.
oregonscientific.se eller www.oregonscientific.com för att fi
nna telefonnummer till respektive supportavdelning.
EU-FÖRSÄKRAN OM ÖVERENSSTÄMMELSE
Härmed intygar Oregon Scientific att denna Trådlös Fjärrenhet
(Modell:THGR122NX) står I överensstämmelse med de
väsentliga egenskapskrav och övriga relevanta bestämmelser
som framgår av direktiv 1999/5/EG. En signerad kopia
av “DECLARATION OF CONFORMITY” kan erhållas vid
hänvändelse till OREGON SCIENTIFIC servicecenter.
LÄNDER SOM OMFATTAS AV RTTE-DIREKTIVET
Alla länder inom EU, Schweiz CH
och Norge N
C 2008 Oregon Scientific. All rights reserved.
P/N:086L003640-079
THGR122NX EU MANUAL R3.indd 2 1/29/08 9:13:08 AM
-
 1
1
-
 2
2


Oregon Scientific THGR122NX Handleiding
- Type
- Handleiding
- Deze handleiding is ook geschikt voor
in andere talen
Gerelateerde papieren
-
 Oregon Scientific BAR638HG / BAR638HG-2 / BAR638HGU / BAR638HGU-2 Handleiding
-
 Oregon Scientific BAR629HG / BAR629HGU Handleiding
-
Oregon Scientific BAR908HG Handleiding
-
 Oregon Scientific BAR 926HG Wetterstation Handleiding
-
 Oregon Scientific thgn132n Handleiding
-
 Oregon Scientific BAR28 3 Handleiding
-
 Oregon Scientific THN132ES / THGN132ES Handleiding
-
 Oregon Scientific EMR201 Handleiding
-
 Oregon Scientific THN122N Handleiding


