


4
ITALIANO
MANUALE DI INSTALLAZIONE E D’USO
Si prega di leggere attentamente queste istruzioni, prima di utilizzare il prodotto, in modo da evitare danneg-
giamenti o comunque il vericarsi di situazioni di pericolo. Qualsiasi utilizzo del prodotto diverso da quanto
indicato nel presente manuale può causare incendi, pericoli elettrici o ferite e rende nulla qualsiasi garanzia.
La garanzia non si applica ad alcun difetto, deterioramento, perdita, ferimento o danneggiamento riconducibili ad un
uso non corretto del prodotto. Rimangono garantiti tutti i diritti di legge in materia. Nessuna condizione di garanzia può
escludere o modicare le condizioni di garanzia regolamentate da leggi dello Stato che non possono essere a nessun
titolo escluse o modicate.
Prima di ogni operazione, rimuovere con cura l’imballo e controllare la perfetta integrità del prodotto. Nel caso si
evidenziassero dei difetti o danni, non installare né cercare di riparare l’apparecchiatura, ma rivolgersi al rivenditore.
Non lasciare l’imballo alla portata dei bambini e smaltirne le parti in conformità con le disposizioni vigenti.
1.
Per la vostra sicurezza
• Questo prodotto è per uso domestico e non è adatto per l’utilizzo
in ambienti commerciali/industriali o su veicoli, imbarcazioni o
aeromobili.
• L’apparecchio può essere utilizzato da bambini di età non inferio-
re a 8 anni e da persone con ridotte capacità siche, sensoriali
o mentali, o prive di esperienza o della necessaria conoscenza,
purché sotto sorveglianza oppure dopo che le stesse abbiano
ricevuto istruzioni relative all’uso sicuro dell’apparecchio e alla
comprensione dei pericoli ad esso inerenti. I bambini non devono
giocare con l’apparecchio. La pulizia e la manutenzione destinata
ad essere effettuata dall’utilizzatore non deve essere effettuata da
bambini senza sorveglianza.
• I bambini di età inferiore a 3 anni non devono avvicinarsi al pro-
dotto se non costantemente supervisionati.
• I bambini di età compresa fra 3 e 8 anni possono solamente ac-
cendere e spegnere l’apparecchio purchè esso sia stato installato
e posizionato secondo le normali condizioni d’uso e loro siano
supervisionati o adeguatamente istruiti riguardo al corretto e si-
curo utilizzo del prodotto e ne abbiano compresa la pericolosità.
I bambini di età compresa fra 3 e 8 anni non possono collegare il
prodotto, regolarlo, pulirlo o effettuare manutenzione.
• ATTENZIONE: Alcune parti di questo prodotto possono di-
ventare molto calde e causare bruciature. Particolare atten-
zione deve essere prestata in presenza di bambini o persone
vulnerabili.
• Assicuratevi che l’alimentazione di rete corrisponda ai dati di tar-

5
ga: 230V~, 50Hz.
• Questo termoventilatore ha un gradi di protezione IPX4 e può
quindi essere utilizzato nei bagni PURCHE’ NON SIA INSTALLA-
TO ENTRO IL PERIMETRO DELLA VASCA O DELLA DOCCIA. Il
prodotto non può quindi essere installato nelle aree indicate come
Volume 1 nello schema di gura 1.
• Durante il funzionamento collocate il termoventilatore in una posi-
zione sicura ovvero:
- ad almeno 1m da oggetti inammabili o mobili;
- lasciando libera la griglia di uscita dell’aria: nessun oggetto
deve essere presente nel raggio di 1m dalla griglia di uscita;
- mai posizionato immediatamente sotto ad una presa di cor-
rente.
• Non lasciate che animali o bambini giochino o tocchino il termo-
ventilatore. Attenzione! Durante il funzionamento la griglia di usci-
ta dell’aria può diventare molto calda (oltre 90°C);
• IMPORTANTE: per evitare surriscaldamenti non ricoprite mai
il prodotto. Non appoggiate mai alcun oggetto o coperta sull’ap-
parecchio mentre è in funzione. Questo è chiaramente scritto
sull’apparecchio o illustrato dal simbolo
• Non utilizzate il termoventilatore in stanze sature di gas esplosivi,
di vapori generati da solventi e vernici o comunque di vapori/gas
inammabili.
• Se il cavo è danneggiato e dovete sostituirlo non eseguite questa
operazione da soli, riportate il termoventilatore ad un centro di
riparazioni autorizzato perché è richiesto l’intervento di personale
specializzato al ne di evitare qualunque rischio di danneggia-
mento.
• Il termoventilatore deve essere posizionato in modo tale che la
presa di alimentazione sia sempre raggiungibile.
• Non installate il prodotto su pareti di materiale sintetico.

6
2.
Montaggio a Muro
• Installare il termoventilatore in posizione verticale con la griglia di uscita dell’aria rivolta verso il basso.
• Questo termoventilatore è in doppio isolamento elettrico (classe II) pertanto la connessione di terra non è richie-
sta.
• Questo termoventilatore deve essere installato seguendo le norme in vigore nel paese di installazione.
• In ambienti umidi come bagni e cucine la connessione alla rete elettrica deve essere ad almeno 25 cm di altezza
dal suolo. I dispositivi di disconnessione dalla rete di alimentazione devono consentire la disconnessione com-
pleta nelle condizioni della categoria di sovratensioni III.
• Per decidere l’installazione ideale, si tenga presente che il sensore rileva i movimenti entro l’area descritta dalla
gura 2. Installate il termoventilatore nella migliore posizione che consente di rilevare le persone all’interno della
stanza e avere campo libero da oggetti che possono interferire con il raggio del sensore stesso. Il rilevamento è
più efcace quando le persone si muovono davanti al prodotto invece che verso di esso.
• L’apparecchio deve essere installato a muro, rispettando le distanze minime dal softto, dal pavimento e dalle
pareti laterali indicate in gura 3. Mai installare il prodotto ad una distanza dal pavimento inferiore a 600mm:
- Praticate nel muro 3 fori di diametro 6mm rispettando le distanze indicate in gura 4;
- Inserite i tre tasselli forniti con il prodotto;
- Inserite le 2 viti in alto, fornite nello stesso sacchetto, avendo cura di lasciare 8mm tra la testa della vite
ed il muro;
- Fate agganciare il prodotto alle 2 viti che avete ssato tenendolo sempre saldamente tra le mani; ATTEN-
ZIONE ! Prima di lasciare il prodotto vericate che sia bene agganciato alle 2 viti;
- Fissate inne il prodotto con la terza vite in basso.
3.
Filtro
• Il vostro prodotto è dotato di un ltro per proteggere gli elementi riscaldanti dalla polvere e dallo sporco.
• Il ltro è facilmente rimuovibile e può essere lavato con acqua (gura 5).
• Per un corretto funzionamento del prodotto consigliamo di pulire il ltro almeno una volta ogni 6 mesi RICOR-
DANDOSI DI INSERIRLO NUOVAMENTE NELLA SUA SEDE DOPO IL LAVAGGIO.
• Ogni 120 ore di funzionamento l'utente viene avvisato della necessità di pulire il ltro posto sul retro del prodotto.
L'avviso avviene tramite la visualizzazione a display della scritta scorrevole
" PULIrE FILtro - CLEAn FILtEr - nEttoYEr FILtrE "
.
• Anche se il display visualizza la scritta sopra indicata il prodotto continua a funzionare nella modalità attiva al
momento della comparsa dell'avviso.
• La pressione di un qualsiasi tasto cancella la scritta dal display. Essa tornerà ad essere visibile dopo un'ulteriore
ora di funzionamento del termoventilatore.
• La pressione prolungata del tasto mode con avviso attivo invece azzera il contatore interno e l'avviso torne-
rà ad essere mostrato dopo ulteriori 120 ore di funzionamento. La conferma dell'avvenuto azzeramento è data
dalla visualizzazione sul display per 5" della scritta
"donE "
.
4.
salviette
• Il prodotto integra una barra portasalviette dotata di 4 ganci addizionali collocatI dietro alla barra stesssa.
• Le salviette devono essere posizionate correttamente sul supporto, come indicato in gura 7 e NON come indi-
cato in gura 6, per evitare surriscaldamenti e malfunzionamenti.

7
5.
Descrizione Dei coManDi e Del FunzionaMento
• Il termoventilatore è dotato di un pulsante di accensione e spegnimento posto sul anco sinistro. Spegnendo il
prodotto i componenti elettrici interni non saranno più sotto tensione.
• I seguenti controlli sono integrati sul frontale del prodotto (gura 8):
A - Sensore di presenza
B - Display
C - Mostra e aumenta
D - Mostra e diminuisci
E - Impostazioni
F - Funzione antigelo
G - Programmazione
H - Stand-by
I - Indicatore led modalità antigelo
J - Indicatore led modalità programmata
K - Indicatore led di funzionamento
Questo termoventilatore incorpora un sensore di presenza e un sistema di gestione automatica della potenza.
Il sensore di presenza permette una riduzione del consumo energetico abbassando automaticamente la temperatura
ambiente quando il locale non è occupato per almeno 10 minuti. Il ritorno alla temperatura di Comfort avviene automa-
ticamente non appena viene nuovamente rilevata una presenza.
Il selettore automatico di potenza invece permette una gestione ottimale dei consumi ed una regolazione precisa del
livello di comfort mantenendo automaticamente la temperature selezionata costante nel tempo, in accordo con quanto
è stato impostato sul termostato elettronico.
Il funzionamento del sensore di presenza non può essere disabilitato e il prodotto può essere fatto funzionare in 2
distinte modalità: automatica o programmata.
Modalità Automatica
Il prodotto è impostato per funzionare ad una temperatura Comfort ogni qualvolta qualcuno venga rilevato nella stanza.
In caso di mancato rilevamento di qualsiasi presenza per più di 10 minuti, il termoventilatore imposta automaticamen-
te la temperature Eco (3,5°C meno della temperature Comfort impostata). Se il mancato rilevamento di presenza
dovesse protrarsi per più di 36 ore, il termoventilatore imposta automaticamente la funzione Antigelo (7°C). In caso il
prodotto dovesse rilevare una presenza per un tempo di almeno 2 minuti, il termoventilatore riporta automaticamente
la temperatura al livello di comfort impostato.
In modalità automatica è inoltre disponibile una speciale funzione, attivabile a scelta dell’utente, che permette di
rilevare l’eventuale apertura di una nestra e forzare il funzionamento in modalità Antigelo per limitare al massimo lo
spreco di energia.
Modalità Programmata
Il prodotto può essere programmato, su base oraria, per ogni giorno della settimana. Per ogni ora di ogni giorno infatti
è possibile denire la temperatura di riferimento da raggiungere/mantenere scegliendo fra le temperature di Comfort,
Eco o Antigelo.
Per tutto il tempo di funzionamento in modalità programmata il sensore di presenza e il rilevamento dell’aper-
tura di una nestra vengono disattivati afnché il prodotto possa correttamente seguire il prolo di tempera-
ture impostato dall’utente.
6.
colori Della luce leD
• Ci sono 3 diverse luci led sul prodotto:
• Luce led sotto il pulsante Antigelo (gura 8-I)
- Il led è rosso quando la funzione antigelo è attivata. Risulta spento quando la funzione antigelo è disatti-
vata.
- Lampeggia quando la funzione è stata attivata in seguito al rilevamento dell’apertura di una nestra.
• Luce led sotto il pulsante Programmazione (gura 8-J)
- La luce è rossa quando la modalità Programmata è attivata. Risulta spento quando la modalità Program-
mata è disattivata.
• Luce led sotto il pulsante Stand-by (gura 8-K)
- La luce è rossa quando il prodotto sta funzionando in modalità Comfort;
- La luce è verde quando il prodotto sta funzionando in modalità Eco;
- La luce è spenta quando il prodotto è in Stand-by.

8
7.
utilizzo Del terMoventilatore
PULSANTE DI ACCENSIONE/SPEGNIMENTO (situato sul lato sinistro del prodotto)
L'alimentazione del prodotto è controllata tramite un pulsante elettromeccanico di accensione e spegnimento. Spe-
gnere il prodotto tramite questo pulsante causa l’interruzione di alimentazione della scheda elettronica provocando,
dopo 30 minuti di interruzione, la perdita delle impostazioni immesse. Raccomandiamo di utilizzare questo pulsante
in caso non si debba usare il prodotto per un periodo prolungato di tempo e di utilizzare invece il controllo frontale di
Accensione / Stand-by, in caso di breve interruzione di utilizzo del prodotto, in modo da non perdere le impostazioni di
regolazione precedentemente immesse.
Al primo utilizzo del prodotto, o in caso di mancata alimentazione per un periodo superiore a 30 minuti, quando viene
acceso il termoventilatore sul display compare l'indicazione 00:00 e l'orologio inizia a contare il tempo.
In caso non venga immessa nessuna impostazione entro 15 minuti dall’accensione, il prodotto imposta auto-
maticamente la funzione Antigelo, accendendo il led corrispondente.
ON/OFF
PULSANTE STAND-BY
Usare il pulsante per accendere o mettere in Stand-by il prodotto. Il led corrispondente sotto il pulsante si ac-
cende di colore verde.
00
:
00
00
:
00
IMPOSTAZIONI
I pulsanti , e , permettono di impostare l’ora e il giorno correnti, la temperatura di Comfort e di attivare o
disattivare il rilevamento dell’apertura di una nestra. Il giorno “1” corrisponde al LUNEDI.
Es.: Per impostare le ore 08:30, il giorno “martedì”, una temperatura Comfort di 25°C e abilitare il rilevamento della
nestra aperta precedentemente disabilitato, procedere come segue:
Attivare la visualizzazione/modica premendo il tasto per almeno 3 secondi:
3"
00
:
00

9
Regolazione dell'orario
Le 2 cifre dell'ora lampeggiano: selezionare l'ora corrente usando i tasti e
00
:
00
Premere il tasto per confermare
08
:
00
Le 2 cifre dei minuti lampeggiano: selezionare i minuti correnti usando i tasti e
08
:
00
Premere il tasto per confermare
08
:
30
Regolazione del giorno della settimana (1 = lunedì)
Dopo aver confermato i minuti correnti, il giorno della settimana inizia a lampeggiare: selezionare il giorno corrente
usando i tasti e
d
:
1
Premere il tasto per confermare
d
:
2
Regolazione della temperatura di Comfort (Eco = Comfort - 3,5°C)
Dopo aver confermato il giorno corrente, la temperatura di Comfort inizia a lampeggiare: selezionare la temperatura
desiderata usando i tasti e
23 C

10
Premere il tasto per confermare
25 C
SENSORE FINESTRA APERTA
Questa funzione permette di identicare l’apertura di una nestra e di impostare automaticamente il modo di funziona-
mento Antigelo. L’accensione di un punto rosso nella parte alta del display fra la terza e la quarta cifra, indica che la
funzione è abilitata e pronta ad attivare la modalità antigelo qualora venga rilevata l’apertura di una nestra.
:
Qualora venga rilevata una brusca riduzione della temperatura durante il normale funzionamento del prodotto, viene
attivata automaticamente la modalità antigelo per ridurre lo spreco di energia. Il led rosso in corrispondenza del tasto
antigelo lampeggia per indicare l’attivazione della funzione.
Il ripristino del normale funzionamento non è automatico ma si ottiene premendo uno qualsiasi dei 5 tasti del prodotto.
Il corretto funzionamento di questa funzione può dipendere dal posizionamento del prodotto del locale, dalla
presenza di spifferi, dalla temperatura esterna e dal tempo di apertura della nestra.
Attivazione della funzione di rilevamento della nestra aperta
Dopo aver confermato il valore della temperatura di Comfort, la modalità di identicazione della nestra aperta inizia
a lampeggiare. Il display indica 88:on se la funzione è attiva e 88:of se è disattiva. Selezionare il modo desiderato
usando i tasti e
88
:
oF
Premere il tasto per confermare
88
:
on
Fine delle impostazioni:
08
:
30
VISUALIZZARE / MODIFICARE LA TEMPERATURA COMFORT
Potete controllare la temperatura Comfort preimpostata, in qualsiasi momento, premendo una sola volta i tasti o
. Ogni ulteriore successiva pressione cambierà la temperatura impostata.
Quando il prodotto è in modalità Eco, premendo il tasto il termoventilatore inizierà automaticamente a funzionare
in modalità Comfort, senza dover aspettare che il sensore di presenza rilevi la vostra presenza all’interno della stanza
per almeno 2 minuti
In caso si desideri visualizzare o modicare il livello di temperatura Comfort senza abbandonare la modalità Eco,
basterà premere prima una sola volta il tasto . La modalità Eco rimarrà sempre indicata tramite la luce led verde

11
accesa.
NOTA: La temperatura misurata tramite il sensore interno al prodotto indica sempre la temperatura ambiente nelle
immediate vicinanze del prodotto e potrebbe differire dalla temperatura misurata con altri strumenti in altre aree della
stanza. Questa differenza può dipendere da vari fattori, come ad esempio:
- La posizione dell’installazione: alcune aree della stanza possono risentire di correnti o sacche d’aria calda che pos-
sono modicare la misurazione del sensore;
- L’installazione su un muro perimetrale esterno, che essendo normalmente più freddo dei muri interni, può provocare
una misurazione più bassa della temperatura rispetto alla temperatura ambiente reale;
- Un carico eccessivo di salviette sulla barra di supporto può ostruire il usso d’aria calda, provocando una misurazione
della temperatura più alta rispetto alla reale temperatura;
- Condizioni instabili: ogni valutazione deve essere fatta in condizioni stabili di funzionamento. Per questo motivo la
temperatura Comfort non dovrebbe essere cambiata prima che siano trascorsi 60 minuti dalla precedente modica.
Non è possibile infatti valutare se la temperatura ambiente è mantenuta correttamente dal prodotto se il livello di tem-
peratura è continuamente modicato in un breve periodo di tempo.
Se la differenza tra la temperature impostata e la temperature ambiente è rilevata in condizioni di stabilità, calcolate
tale differenza e quindi aumentate o diminuite il livello di temperature Comfort sul prodotto dell’esatto valore della
differenza calcolata.
PROGRAMMAZIONE SETTIMANALE
La modalità Programmata permete di impostare, per ogni ora del giorno e per tutti i giorni della settimana in modo
indipendente, la temperatura desiderata scegliendo fra quella di Comfort, quella di Eco (pari a quella di Comfort ridotta
di 3,5°C) o quella di Antigelo.
La semplice pressione del tasto permette di attivare/disattivare il funzionamento programmato. La sua pressione
prolungata invece permette di accedere alla visualizzazione/modica del programma di funzionamento. Se il prodotto
è nuovo il prolo predenito per il programma è il seguente:
Sempre Antigelo con attivazione della modalità comfort:
- dalle 06:00 alle 08:00 dal lunedì al venerdì;
- dalle 08:00 alle 10:00 il sabato e la domenica.
Premete il tasto dedicato per attivare immediatamente e senza pensieri la programmazione!
Per visualizzare/modicare il programma procedere come segue:
Attivare la visualizzazione/modica premendo il tasto per almeno 3 secondi:
3"
08
:
30
Il display visualizza il giorno 1 (lunedì) . Premendo i tasti e si visualizzano le diverse ore del giorno iniziando
da “00” (ora compresa fra le ore 00:00 e le 00:59):
d
:
1
La temperatura di riferimento impostata per la fascia oraria selezionata è indicata dall’accensione del led antigelo
(temperatura di 7°C), del led di funzionamento di colore verde (temperatura Eco = Comfort – 3,5°C) o del led di funzio-
namento di colore rosso (temperatura Comfort impostata dall’utente):
H
:
00

12
La temperatura di riferimento desiderata può essere modicata premendo il tasto . L’accensione in sequenza dei
led sopra indicati indica la temperatura di riferimento:
H
:
23
Usare i tasti e per visualizzare/modicare la temperatura impostata per ognuna delle ore del giorno 1. Giunti
alle ore 23, la successiva pressione del tasto permette di accedere alla programmazione del giorno 2:
H
:
23
d
:
2
A questo punto è possibile scegliere se visualizzare/modicare la temperatura delle singole ore del giorno 2 oppure
impostare il giorno 2 identico al giorno 1. Nel primo caso, usare i tasti e come già illustrato per il giorno 1, nel
secondo è sufciente premere nuovamente il tasto . Così facendo il giorno 2 viene posto automaticamente uguale
al giorno 1 e il sistema si porta all’inizio del giorno 3. Questa procedura può essere ripetuta no alla programmazione
del giorno 7:
d
:
2
d
:
3
Al termine della programmazione del giorno 7, oppure in qualsiasi fase intermedia della programmazione in seguito
alla pressione del tasto , si accede alla fase di conferma e salvataggio del programma. Sul display appare la
scritta “End” e con la successiva pressione del tasto si memorizza il programma appena denito:
End

13
La visualizzazione sul display della scritta “donE” per alcuni secondi conferma che la procedura si è conclu-
sa correttamente. Il prodotto si porta nello stato di funzionamento programmato per l'ora ed il giorno correnti.
donE
Nota bene:
-In ogni momento è possibile abbandonare la procedura di visualizzazione/modica cancellando le modiche
non ancora salvate premendo il tasto stand-by;
-Durante la programmazione gli elementi riscaldanti vengono disattivati ed il radiatore non scalda.
MODALITÀ ANTIGELO
Per attivare la modalità Antigelo premete il pulsante per 3’’. Il termostato viene in questo modo impostato per
mantenere 7°±3°C. Per disattivare la funzione Antigelo è sufuciente premere il pulsante o .
La modalità Antigelo si attiva automaticamente quando non viene rilevata alcuna presenza per almeno 36
ore. In questo caso, non appena verrà nuovamente rilevata una presenza, il prodotto imposterà automatica-
mente la modalità automatica con temperatura Comfort.
3"
00
:
00
08
:
30
8.
risoluzione Dei ProbleMi
• In caso di surriscaldamento, il protettore di sicurezza all’interno del prodotto disattiva sia la resistenza che il
motore. In questo caso:
- Spegnere il termoventilatore e lasciarlo raffreddare per circa 15/20 minuti;
- Assicurarsi che il ltro antipolvere non sia ostruito e pulire se necessario. Ricordarsi di ricollocarlo nella sua
posizione originaria prima di riattivare il prodotto;
- Eliminare ogni possible causa di surriscaldamento (es.: ostruzioni in corrispondenza della griglia di uscita
dell’aria, residui di sporcizia sul prodotto);
- Riaccendere il termoventilatore e controllare il corretto funzionamento.
• Se i comandi touch screen del prodotto non rispondono alla pressione digitale o non funzionano correttamente,
spegnere il termoventilatore per almeno 10 secondi tramite l'interruttore elettromeccanico posto sul lato sinistro
del prodotto.
9.
Manutenzione
• Questo prodotto non richiede manutenzione speciale.
• Pulire il prodotto con un panno asciutto almeno una volta ogni 6 mesi.
• In caso il prodotto debba essere riparato, rivolgersi ad un centro di assistenza qualicato.
• In caso di sostituzione del cavo di alimentazione, utilizzare un tipo 2x1,00mm2 H05VV-F <HAR>. Tale sostituzio-
ne deve essere effettuata da personale tecnico qualicato e mai dall’utente nale per evitare un danneggiamento
del prodotto e ogni rischio per la persona.

14
10.
coMunicazioni Di legge
Tutela dell'ambiente e riciclaggio
Afnché il vostro apparecchio non subisca danni durante il trasporto, esso è stato imballato con cura. Per
contribuire alla tutela del nostro ambiente, vi chiediamo di smaltire in modo appropriato il materiale utiliz-
zato per l'imballaggio dell'apparecchio.
Smaltimento degli apparecchi usati
Gli apparecchi che recano il contrassegno riportato a anco non devono essere smaltiti insieme ai riuti
urbani, ma vanno raccolti e smaltiti separatamente. Lo smaltimento degli apparecchi usati va eseguito a
regola d'arte, in conformità con le prescrizioni e leggi vigenti localmente in materia.
Informazioni obbligatorie per gli apparecchi per il riscaldamento d’ambiente locale elettrici
Identicativo del modello: TOUCH
Dato Sim-
bolo Valore Unità Dato Unità
Potenza termica Tipo di potenza termica, solo per gli apparecchi per il riscaldamento
d’ambiente locale elettrici ad accumulo (indicare una sola opzione)
Potenza termica
nominale Pnom 1,8 kW controllo manuale del carico termico, con termostato
integrato
no
Potenza termica
minima (indica-
tiva)
Pmin 1,0 kW
controllo manuale del carico termico con riscontro della
temperatura ambiente e/o esterna
no
Massima potenza
termica continua Pmax,c 1,8 kW controllo elettronico del carico termico con riscontro della
temperatura ambiente e/o esterna
no
Consumo ausi-
liario di energia
elettrica
potenza termica assistita da ventilatore no
Alla potenza ter-
mica nominale elmax 1,800 kW Tipo di potenza termica/controllo della temperatura
ambiente (indicare una sola opzione)
Alla potenza
termica minima elmin 1,000 kW potenza termica a fase unica senza controllo della tempera-
tura ambiente
no
In modo stand-by elSB 0,00076 kW due o più fasi manuali senza controllo della temperatura
ambiente
no
con controllo della temperatura ambiente tramite termostato
meccanico
no
con controllo elettronico della temperatura ambiente no
con controllo elettronico della temperatura ambiente e
temporizzatore giornaliero
no
con controllo elettronico della temperatura ambiente e
temporizzatore settimanale
si
Altre opzioni di controllo (è possibile selezionare più
opzioni)
controllo della temperatura ambiente con rilevamento di
presenza
si
controllo della temperatura ambiente con rilevamento di
nestre aperte
si
con opzione di controllo a distanza no
con controllo di avviamento adattabile no
con limitazione del tempo di funzionamento no
con termometro a globo nero no
Contatti Ermete Giudici S.p.A. - via L. da Vinci 27 - 20090 Segrate (MI) Italia

15
ENGLISH
INSTALLATION AND OPERATING MANUAL
Before operating the heater, please read these instructions thoroughly to avoid damage and hazardous situa-
tions. Any use of this heater other than that stipulated in this instruction manual may cause re, electric shock
or injury, and voids all warranties.
Warranty does not apply to any defect, deterioration, loss, injury or damage caused by, or as a result of, the misuse or
abuse of this heater. The rights dictated by State law are not prejudiced. None of the terms of this warranty are to be
taken as excluding any conditions or warranties implied by State law, which cannot be excluded or modied.
Before any operation remove the packaging and check product integrity. In case of defects or damages do not try to
repair it yourself but contact your dealer.
Do not let children play with the packaging and protect the environment by disposing of the packaging in accordance
with the national regulations for waste processing.
1.
For your saFety
• This appliance is intended for normal household use and not for
use in commercial/industrial enviroment, in vehicles or on board
ships or aircrafts.
• This appliance can be used by children aged from 8 years and
above and persons with reduced physical, sensory or mental ca-
pabilities or lack of experience and knowledge if they have been
given supervision or instruction concerning use of the appliance
in a safe way and understand the hazards involved. Children shall
not play with the appliance. Cleaning and user maintenance shall
not be made by children without supervision.
• Children of less than 3 years should be kept away unless conti-
nuously supervised.
• Children aged from 3 years and less than 8 years shall only switch
on/off the appliance provided that it has been placed or installed
in its intended normal operating position and they have been gi-
ven supervision or instruction concerning use of the appliance in
a safe way and understand the hazards involved. Children aged
from 3 years and less than 8 years shall not plug in, regulate and
clean the appliance or perform user maintenance.
• CAUTION — Some parts of this product can become very hot
and cause burns. Particular attention has to be given where
children and vulnerable people are present.
• Make sure that your supply rating corresponds to what specied
on the rating plate: 230V~, 50Hz.
• This heater is water resistant to IPX4. It can therefore be used
in bathrooms or other areas subject to humidity AS LONG AS IT

16
IS NOT INSTALLED WITHIN THE PERIMETER OF BATH TUBS
OR SHOWERS. This means that it cannot be installed in the are-
as marked as VOLUME 1 in picture 1.
• During function, place the heater in a safe position:
- at least 1m far from inammable objects or furnitures;
- leaving not less than 1m of free space in front of the heater;
- not located immediately below a socket-outlet.
• Do not leave animals or children touch or play with the appliance.
Pay attention! The air outlet grille gets hot during operation (more
than 90°C)
• WARNING: In order to avoid overheating, do not cover the
heater. Do not hang anything on the heater and do not cover it
while it’s working. This is clearly written on the cover of the pro-
duct or shown by the symbol
• Do not use the heater in rooms with explosive gas or while using
inammable solvents or varnish or glues.
• If the cordset is damaged and you have to change it, do not do
the job yourselves! Take the product to an after sales authorised
repair centre or to a person with similar skill and knowledge, in
order to avoid any risk of danger.
• The appliance must be positioned so that the plug is always ac-
cessible.
• Do not mount the product on walls made of synthetic material.
2.
Wall Mounting
• Only x the heater in vertical position with the air outlet grid downward;
• This heater is tted with a double electrical insulation circuit (class II) and therefore does not require an earth
connection.
• This heater must be correctly installed in compliance with the regulations in force in the country of installation.
• In wet spaces like bathrooms or kitchens, the connection terminal must be installed at least 25 cm above the
oor. The electrical connection to the power supply must also be tted with a two-pole switch with a minimum
gap between the contacts that allows complete disconnection according to excess voltage III category conditions.
• To choose the best installation position please consider that the sensor is able to detect movements in the areas
shown in picture 2. Place the heater in the best position to detect people inside the room and to be clear from
any object that may interfere with the sensor's beam. Detection is more efcient when people move in front of
the product instead towards it.
• Always make observe the minimum distances from walls, furniture and/or objects, as indicated in picture 3. Never
install the product so that the distance between the oor and the lower side of the product is less than 600 mm:
- Drill three 6 mm diameter holes in the wall, as shown in picture 4
- Insert the three wall plugs supplied with the product

17
- Insert the 2 upper screws, contained in the same bag, taking care to leave a distance of 8 mm between the
head of the screws and the wall;
- Gripping the heater rmly, hook it onto the two screws; CAUTION! Before releasing the heater make sure
it is attached to the 2 screws.
- Then secure the product with the lower screw.
3.
Filter
• This product is tted with a lter to protect the heating element from dust and dirt.
• The lter is removable to be easily cleaned with water (picture 5).
• To keep the heater in perfect condition, clean the lter once every six months REMEMBERING TO PUT IT BACK
AGAIN AFTERWARDS.
• Every 120 working hours, the user is notied of the need to clean the lter on the back of the product. The warning
is given in the form of a running message on the display that reads:
" PULIrE FILtro - CLEAn FILtEr - nEttoYEr FILtrE "
.
• Even when the display is showing the message indicated above, the product continues to work in the mode active
at the time the notication appears.
• If any key is pushed the text is removed from the display. It will once again be displayed when the fan heater has
been running for another hour.
• By holding the key down when the notication is displayed, the built-in counter is reset and the notication
will be displayed again after another 120 working hours. Conrmation of resetting is given by a message on the
display for 5 seconds that reads
"donE "
.
4.
toWels
• The product is equipped with a towel rail and n. 4 additional hooks placed on rail's back side.
• Please do not push or embed towel close to the air outlet grid (picture 6) but place them as shown in picture 7.
5.
coMManD DescriPtion anD Functioning
• The heater is tted with a double pole electromechanical ON/OFF switch on its left side. Switching off the product
the supply voltage is disconnected from all the internal components.
• The following controls are available on the front panel (picture 8):
A - Presence Sensor
B - Display
C - Show and increase
D - Show and decrease
E - Settings
F - Frost free mode
G - Programmed mode
H - Stand-by
I - Frost free mode led indicator
J - Programmed mode led indicator
K - Functioning led indicator
This bathroom fan heater features a presence sensor and an automatic power management function.
The presence sensor allows a reduced energy consumption, lowering automatically the ambient temperature when no
one is detected in the room, while it comes back to the set comfort temperature, maintaining it throughout the time of
someone's detection.
The automatic electronic power selection, instead, manages the consumption through an accurate and comfortable
regulation in order to automatically keep constant the selected temperature, according to what has previously been set
on the electronic thermostat.
The operation of the presence sensor cannot be disabled and the product can be used in two distinct modes: auto-
matic or programmed.
Automatic Mode
The product is set to work at a comfort temperature whenever someone is detected in the room. Should no one be
detected in the room for at least 10 minutes, the heater will automatically set the Eco mode (3,5°C less than the set
Comfort temperature). Should no one be detected in the room for more than 36 hours, the heater will automatically set
the Frost free mode (7°C). In case someone should be detected again for at least 2 minutes, the product will automa-
tically increase the temperature to the comfort level.

18
In automatic mode is also available a special feature, which is activated at user’s choice, which allows to detect the
possible opening of a window and force the functioning to the Frost free mode to minimize energy waste.
Programmed Mode
The product can be programmed, on hour base, for each day of the week. For each hour of the day it is possible to
dene the reference temperature to be reached/maintained, choosing between Comfort, Eco or Frost free.
In programmed mode the presence detector and the open window detection functions are disabled so that the
product can correctly follow the temperature prole dened by the user.
6.
leDs color
• There are 3 different led lights on the product:
• Led light under the frost free button (picture 8, item I)
- The led is red when the frost free mode is activated. It is switched off when the frost free mode is disabled.
- Blinks when the Frost free mode was activated by the open window detection function.
• Led light under the Programmed mode button (picture 8, item J)
- The led is red when the Programmed mode is activated. It is switched off when the Programmed mode is
disabled.
• Led light under the stand-by button (picture 8, item K)
- The led is red when the product is in the Comfort mode;
- The led is green when the product is in the Eco mode;
- The led is switched off when the product is in Stand-by.
7.
using the Fan heater
MAIN ON/OFF SWITCH
The power supply of the product is controlled by an electromechanical ON/OFF switch. Switching off the fan heater
will cut off the power to the electronic board and this will cause the loss of every stored information, after 30 minutes
of absence of the power supply. We recommend to use this switch only when you are not using the product for long
periods and instead to use the on / stand-by control for any short-term interruptions. In this way you will not lose the
stored settings.
For the rst use of the product or in case of power loss for over 30 minutes, when on ON position, the display shows
00:00 and begins counting the time starting from this value.
Should no adjustment be made within 15min after power up, the product will automatically switch in Frost
free mode with the lighting of the corresponding led.
ON/OFF
STAND-BY BUTTON
Use this button to switch ON or put the product in Stand-by mode. The led beneath the Stand-by button will light
on in green color.
00
:
00

19
00
:
00
SETTINGS
The following keys , and , will allow you to adjust the current hour and day of the week (1 = Monday), the
Comfort temperature and to activate or deactivate the open window detection function.
E.g.: To set 08:30, Tuesday, Comfort temperature of 25°C and enable the open window detection previously disabled,
proceed as follows:
Press and hold the button for 3 seconds to enter the settings menu:
3"
00
:
00
Set the time:
The 2 digits of the hour start blinking: set the current hour using and buttons
00
:
00
Press to conrm
08
:
00
The 2 digits of the minutes start blinking: set the current minutes using and buttons
08
:
00
Press to conrm
08
:
30

20
Set the day of the week (1 = Monday)
After conrming the time, the day of the week starts blinking: set the current day of the week using and
buttons
d
:
1
Press to conrm
d
:
2
Set the Comfort temperature (Eco = Comfort - 3,5°C)
After conrming the day, the comfort temperature value starts blinking: set the desired temperature using and
buttons
23 C
Press to conrm
25 C
OPEN WINDOW DETECTION
This function makes it possible to detect an open window and automatically activate the Anti-freeze operating mode.
When the function is enabled and ready to set the Frost-free mode if an open windows is detected, a red dot lights up
on the upper right area of the display between the 3rd and the 4th digit.
:
If a temperature drop is observed in the room during the normal functioning, the Frost-free mode is automatically
activated to save enery consumption. The red light under the Frost-free button ashes to show that the open window
function operates.
The reset of the normal functioning is not automatic but is achieved by pressing one of the ve buttons of the product.
Correct operation of this function may depend on where the radiator is positioned in the room, the presence
of draughts, the outside temperature, and how long the window stays open.

21
Activate the open window detection function
After conrming the comfort temperature, window detection mode starts blinking. the display shows 88:on if the mode
is activated and 88:0f if it is deactivated. Set the desired mode using and buttons.
88
:
oF
Press to conrm
88
:
on
End of settings:
08
:
30
DISPLAY / CHANGE THE COMFORT TEMPERATURE
You can check the set Comfort temperature at any time by pressing a single time the or key. A further pres-
sion will modify the set temperature.
When in Eco mode, by pressing the key the product will automatically turn back on Comfort temperature, without
having to wait until the sensor detects the presence in the room for at least 2min.
Should you wish to view and / or change the temperature of comfort without leaving the ECO mode rst press the
key. The Eco mode is always indicated by the green power light.
Note: The temperature measured by the inner sensor of the product is representative of the ambient temperature
nearby it and it may differ from the temperature measured using other instruments in other areas of the room. That
difference may depend on many factors including, for example:
- the installation position: some areas of the room may be affected by drafts or hot air sacs that modify the sensor
measurement;
- the xation to an external wall that, being normally colder than internal walls, may imply the measurement of a tem-
perature lower than the real room temperature;
- a full load of towels on the support bar may obstruct the airow. As a result the sensor may measure a temperature
higher than the real room temperature;
- unstable conditions: any evaluation must be done in stable working conditions. For this purpose comfort temperature
should be changed only 60min after a previous change . It is not possible, indeed, to evaluate the room temperature
maintained by the product correctly if the comfort level temperature is continually changed in a short time.
If a difference between set temperature and room temperature is detected in stable working conditions, measure the
difference and then increase or decrease the comfort temperature on the product of the exact value of measured
difference.
WEEKLY PROGRAM
The Programmed mode allows to set, for every hour of day and for every day of the week independently, the
desired temperature choosing between the Comfort, Eco (equal to that of Comfort decreased by 3.5 ° C) or Antifreeze.
A short press of the button allows to activate/deactivate the programmed functioning. A long press (> 3") allows to
enter the view/change menu. If the product is brand new the default program is the following:
Always Frost-free mode except Comfort mode in the following hours:
- from 06:00 to 08:00 on Monday-Friday;
- from 08:00 to 10:00 on Saturday-Sunday.
Press the dedicated button to quickly activate the program mode!

22
To view/change the program proceed as follows:
Press and hold the button for 3 seconds to enter the menu:
3"
08
:
30
The display shows the day 1 (Monday). By pressing the buttons and the different hours of the day are shown
starting from “00” (hour between 00:00 e le 00:59):
d
:
1
The reference temperature set for the selected hour is shown by the Frost-free led (temperature of 7°C), The green
led under the Stand-by button (temperature Eco = Comfort - 3,5°C) or the red led under the Stand-by button (Comfort
temperature set by the user):
H
:
00
The reference temperature chan be changed by pressing the button. The led light corresponding to each different
temperature (Comfort, Eco or Frost free) will light up in sequence to show the selected reference temperature:
H
:
23
Use the buttons and to show/change the set temperature for each one of the hours of day 1. Once reached
the last hour of the day (23) the next press of the button allows to enter the programming for day 2:
H
:
23
d
:
2
At this time it is possible to show/change the reference temperature for all the hours of the Day 2 or directly set the
Day 2 identical to Day 1. In the rst case just use the buttons and as already described for the day 1; in the
second case just press the button once. In this way the day 2 is automatically set equal to Day 1 and the system
automatically goes at the beginning of Day 3. This procedure can be repeated untill Day 7 programming:

23
d
:
2
d
:
3
At the end of Day 7 programming, or in any other intermediate step by pressing the button , the nal conrm and
save step is activated. The display shows “End” and the next press of the button saves the program just shown/
modied:
End
The display shows “donE” for some second to conrm that the program is correct-
ly saved. The product goes in the mode programmed for the current time and day of the week.
donE
Note:
-At any time you can abandon the procedure for viewing / editing the program deleting unsaved changes by
pressing the Stand-by button;
-During the programming the heating elements are disconnected and the product doesn't heat.
FROST FREE MODE
To activate the Frost free Mode hold the key for 3’’. The thermostat is now set to maintain 7±3°C. To deactivate
the Frost free position just press the or the button.
Frost free mode will activate automatically when no one has been detected for at least 36 hours. In this case,
the Comfort temperature will be automatically activated once a presence will have been detected.
3"
00
:
00
08
:
30

24
8.
troubleshooting
• In the event of overheating, the safety device on the appliance automatically disabled the heating elements and
motor. In this case:
- Turn off the fan heater and allow it to cool down for about 15/20 minutes.
- Make sure the dust lter is not totally obstructed and clean if necessary. Remember to put it back again
afterwards.
- Eliminate any other possible reasons for overheating (e.g.: obstructions in front of the air inlet/outlet grilles,
build-ups of dirt).
- Turn on the fan heater again and check it works correctly.
• If the touch control commands are blocked or don't properly answer to digital pressure, turn off the heater using
the electromechanic switch on the left side of the heater. Then turn on the heater using the same switch.
9.
Maintenance
• This product does not require any special maintenance.
• Clean the product with a dry cloth once every 6 months.
• If the product requires repairing, contact an authorised technical service centre.
• When replacing the power cable, use a 2x1,00mm2 H05VV-F HAR type. This operation must be performed
by qualied personnel and never by the end user in order to avoid damaging the appliance and jeopardising
personal safety.
10.
legal notice
Environment and recycling
Please help us to protect the environment by disposing of the packaging in accordance with the national
regulations for waste processing.
Recycling of obsolete appliances
Appliances with this label must not be disposed off with the general waste. They must be
collected separately and disposed off according to local regulations.

25
Information requirements for electric local space heaters
Model identier(s): TOUCH
Item Symbol Value Unit Item Unit
Heat output Type of heat input, for electric storage local space heaters only (select
one)
Nominal heat
output Pnom 1,8 kW manual heat charge control, with integrated thermostat no
Minimum heat
output (indicative) Pmin 1,0 kW manual heat charge control with room and/or outdoor
temperature feedback
no
Maximum
continuous heat
output
Pmax,c 1,8 kW
electronic heat charge control with room and/or outdoor
temperature feedback
no
Auxiliary electri-
city consum-
ption
fan assisted heat output no
At nominal heat
output elmax 1,800 kW Type of heat output/room temperature control (select
one)
At minimum heat
output elmin 1,000 kW single stage heat output and no room temperature control no
In standby mode elSB 0,00076 kW Two or more manual stages, no room temperature control no
with mechanic thermostat room temperature control no
with electronic room temperature control no
electronic room temperature control plus day timer no
electronic room temperature control plus week timer yes
Other control options (multiple selections possible)
room temperature control, with presence detection yes
room temperature control, with open window detection yes
with distance control option no
with adaptive start control no
with working time limitation no
with black bulb sensor no
Contact details Ermete Giudici S.p.A. - via L. da Vinci 27 - 20090 Segrate (MI) Italia

26
NEDERLANDS
INSTALLATIE- EN BEDIENINGSHANDLEIDING
Lees deze instructies zorgvuldig door voordat u het verwarmingstoestel gebruikt. Zo voorkomt u schade
en gevaarlijke situaties. Enig gebruik anders dan beschreven in deze handleiding kan brand, elektrische
schokken of letsel veroorzaken en leidt ertoe dat de garantie vervalt.
De garantie geldt niet voor eventuele defecten, verslechtering, verlies, letsel of schade veroorzaakt door of als gevolg
van het verkeerde gebruik of misbruik van dit toestel. Aan rechten die voortvloeien uit nationale wetgeving wordt
geen afbreuk gedaan. Geen van de garantiebepalingen sluit voorwaarden of garanties uit die in nationale wetgeving
vastgelegd zijn en niet uitgesloten of gewijzigd mogen worden.
Verwijder vóór het gebruik de verpakking en controleer of het apparaat intact is. Neem in geval van defecten of schade
contact op met de dealer. Probeer het apparaat niet zelf te repareren.
Laat kinderen niet met de verpakking spelen en bescherm het milieu door de verpakking overeenkomstig de nationale
voorschriften voor afvalverwerking te verwijderen.
1.
voor uW veiligheiD
• Dit apparaat is bedoeld voor normaal huishoudelijk gebruik en
niet voor gebruik in commerciële/industriële omgevingen, in voer-
tuigen of aan boord van schepen of vliegtuigen.
• Dit apparaat kan worden gebruikt door kinderen vanaf 8 jaar en
personen met verminderde lichamelijke, zintuiglijke of verstande-
lijke vermogens of een gebrek aan ervaring en kennis, mits ze
onder toezicht staan of instructies hebben gekregen over hoe ze
het apparaat op een veilige manier kunnen gebruiken en de ri-
sico's begrijpen. Kinderen mogen niet met het apparaat spelen.
Reiniging of onderhoud mag niet door kinderen worden uitgevo-
erd, tenzij onder toezicht.
• Kinderen jonger dan 3 jaar moeten uit de buurt van het apparaat
worden gehouden, tenzij er voortdurend toezicht is.
• Kinderen vanaf 3 jaar en jonger dan 8 jaar mogen het apparaat al-
leen in-/uitschakelen indien het op de beoogde, normale plek van
gebruik is geplaatst of geïnstalleerd, en ze onder toezicht staan of
instructies hebben gekregen over hoe ze het apparaat op een vei-
lige manier kunnen gebruiken en de risico's begrijpen. Kinderen
vanaf 3 jaar en jonger dan 8 jaar mogen het apparaat niet aanslu-
iten, instellen of schoonmaken, of onderhoud uitvoeren.
• LET OP — Sommige delen van dit apparaat kunnen zeer heet
worden en brandwonden veroorzaken. Let vooral op wanne-
er kinderen en kwetsbare personen aanwezig zijn.
• Controleer of de netvoeding overeenkomt met de gegevens op
het typeplaatje. 230 V~, 50 Hz.

27
• Dit verwarmingstoestel is waterbestendig (IP24) en kan daar-
om in badkamers of andere vochtige ruimtes worden gebruikt,
MITS HET NIET IN DE ZONE VAN BADKUIPEN OF DOUCHES
WORDT GEÏNSTALLEERD. Dit betekent dat het toestel niet in
de zone aangeduid als VOLUME 1 (afbeelding 1) mag worden
geïnstalleerd.
• Als u het apparaat inschakelt, moet het op een veilige plek zijn
gemonteerd:
- op minstens 1 m van ontvlambare objecten of meubilair;
- 1 m vóór het apparaat mogen zich geen objecten bevinden;
- niet direct onder een stopcontact.
• Laat dieren of kinderen niet met het apparaat spelen; ze mogen
het bovendien niet aanraken.
• Let op! Het luchtuitlaatrooster kan erg warm worden als het appa-
raat in werking is (> 90 °C).
• WAARSCHUWING: Om oververhitting te voorkomen, mag het
apparaat niet worden bedekt. Hang geen voorwerpen over het
verwarmingstoestel en bedek het niet terwijl het in werking is. Dit
is duidelijk op het apparaat vermeld of wordt aangegeven door
het symbool:
• Gebruik het apparaat niet in ruimtes met explosieve gassen of
terwijl u ontvlambare oplosmiddelen, lak of lijm gebruikt.
• Indien het netsnoer beschadigd is en vervangen moet worden,
mag u dit niet zelf doen! Breng het apparaat naar een bevoegd
reparatiecentrum of een persoon met vergelijkbare kennis en va-
ardigheden. Zo voorkomt u gevaarlijke situaties.
• Het apparaat moet zodanig worden gemonteerd dat het stopcon-
tact altijd bereikbaar is.
• Bevestig het apparaat niet op wanden van synthetisch materiaal.
2.
WanDMontage
• Het verwarmingstoestel uitsluitend verticaal (met het luchtuitlaatrooster naar onderen gericht) monteren.
• Dit toestel beschikt over een dubbel elektrisch isolatiecircuit (klasse II). Een aardverbinding is daarom niet nodig.
• Dit toestel moet correct en conform de in uw land geldende voorschriften worden geïnstalleerd.
• In vochtige ruimtes (bijv. badkamer of keuken) moet het aansluitblok ten minste 25 cm boven de vloer worden
geïnstalleerd. Voor de elektrische aansluiting op de netvoeding moet ook een 2-polige schakelaar met een

28
minimale contactopening worden gebruikt, zodat volledige ontkoppeling overeenkomstig de voorwaarden van
overspanningscategorie III mogelijk is.
• Bij het kiezen van de beste installatiepositie moet u er rekening mee houden dat de sensor bewegingen detec-
teert in de zones die in afbeelding 2 te zien zijn. Positioneer het apparaat zodanig dat het zonder problemen
mensen in de ruimte kan detecteren en de straal van de sensor niet wordt belemmerd. Detectie is bovendien
effectiever wanneer personen voor de sensor langs lopen in plaats van ernaartoe.
• Neem altijd de minimumafstanden tot wanden, meubels en/of objecten in acht (zie afbeelding 3). De afstand
tussen de vloer en de onderkant van het apparaat mag niet minder dan 600 mm bedragen:
- Boor drie gaten met een diameter van 6 mm in de wand (zie afbeelding 4);
- Steek de drie bij het apparaat meegeleverde wandpluggen in de wand;
- Steek de twee bovenste schroeven (in hetzelfde zakje) in de pluggen en zorg ervoor dat de afstand tussen
de kop van de schroeven en de wand 8 mm bedraagt;
- Pak het verwarmingstoestel goed vast en haak het op de twee schroeven. LET OP! Voordat u het toestel
loslaat, moet u controleren of het op de twee schroeven gehaakt is;
- Maak het toestel vervolgens vast met de onderste schroef.
3.
Filter
• Dit apparaat heeft een lter dat het verwarmingselement tegen stof en vuil beschermt.
• Het lter kan verwijderd worden (afbeelding 5). Hierna kunt u het eenvoudig met water reinigen.
• Om ervoor te zorgen dat het apparaat in perfecte staat blijft, moet het lter elke zes maanden worden schoonge-
maakt. VERGEET NIET HET FILTER NADERHAND TERUG TE PLAATSEN.
• Elke 120 bedrijfsuren, wordt de gebruiker geïnformeerd over de noodzaak om het lter te reinigen aan de achter-
zijde van het product. De waarschuwing wordt gegeven in de vorm van een lopend bericht op het scherm dat
luidt:
" PULIrE FILtro - CLEAn FILtEr - nEttoYEr FILtrE "
.
• Zelfs als de display de boodschap hierboven aangeeft, blijft het product werken in de actief modus op het mo-
ment dat deze melding verschijnt.
• Als een willekeurige toets wordt ingedrukt wordt de tekst verwijderd uit het display. Deze zal opnieuw worden
weergegeven wanneer de fan heater opnieuw een uur in bedrijf is.
• Door de mode-toets ingedrukt vast te houden wanneer deze melding wordt weergegeven, wordt de inge-
bouwde teller gereset en de melding opnieuw weergegeven na nog eens 120 bedrijfsuren. De bevestiging van
de reset wordt gegeven door het bericht op het display gedurende 5 seconden
"donE "
.
4.
hanDDoeken
• Het apparaat is voorzien van een handdoekhouder en biedt 4 extra haken op de achterkant van de houder.
• Plaats handdoeken niet zoals in afbeelding 6 (uitlaatrooster wordt geblokkeerd), maar hang ze op zoals in af-
beelding 7.
5.
beschrijving beDiening en gebruik
• Het apparaat beschikt aan de linkerkant over een 2-polige elektromechanische AAN-/UITSCHAKELAAR. Als u
het toestel uitzet, worden alle interne componenten spanningsvrij geschakeld.
• De volgende bedieningselementen zijn beschikbaar op het voorpaneel (afbeelding 8):
A - Aanwezigheidssensor
B - Display
C - Toets tonen en verhogen
D - Toets tonen en verlagen
E - Mode instellingen
F - Toets vorstvrije modus
G - Weekprogramma modus
H - Toets standby
I - Ledindicatorlampje vorstvrije modus
J - Ledindicatorlampje weekprogramma modus
K - Ledindicatorlampje functie
Deze fan heater voor de badkamer beschikt over een aanwezigheidssensor en automatische energiebeheerfunctie.
De aanwezigheidssensor zorgt voor een lager energieverbruik door automatisch de omgevingstemperatuur te verla-
gen wanneer er geen personen in de ruimte gedetecteerd worden. Indien de sensor wel een persoon detecteert, wordt
de temperatuur tot de ingestelde comforttemperatuur verhoogd.

29
De automatische elektronische vermogensselectie beheert daarentegen het verbruik door middel van een nauwkeuri-
ge en comfortabele instelling om zo de geselecteerde temperatuur te handhaven (op basis van de gekozen instelling
op de elektronische thermostaat).
De aanwezigheidssensor kan niet worden uitgeschakeld en heeft twee verschillende modi: automatisch of geprogram-
meerd.
Automatische modus
Het apparaat handhaaft de handmatig ingestelde comforttemperatuur wanneer een persoon in de ruimte gedetecteerd
wordt. Indien de sensor ten minste 10 minuten lang niemand in de ruimte detecteert, schakelt de verwarming automa-
tisch over naar de ECO temperatuur/modus (ECO temperatuur/modus = 3,5°C lager dan de ingestelde COMFORT
temperatuur/modus). Wanneer langer dan 36 uur niemand in de ruimte gedetecteerd wordt, schakelt de verwarming
automatisch in de vorstvrije modus (7 °C). Als een persoon weer ten minste 2 minuten gedetecteerd wordt, verhoogt
het apparaat vervolgens automatisch de temperatuur naar COMFORT niveau.
In de automatische modus is tevens een speciale functie beschikbaar, die door de gebruiker geactiveerd kan worden.
Deze functie detecteert of een raam openstaat en schakelt het apparaat automatisch naar de vorstvrije modus om
energieverspilling te beperken.
Weekprogramma modus
Het apparaat kan op uurbasis worden geprogrammeerd, voor elke dag van de week. Voor elk uur van de dag kan de
keuzetemperatuur worden ingesteld die moet worden bereikt/gehandhaafd. U heeft daarbij keuze uit de temperaturen,
COMFORT, ECO of VORSTVRIJ.
In de weekprogramma modus zijn de aanwezigheidssensor en de openraamdetectie uitgeschakeld, zodat
het apparaat het door de gebruiker ingestelde temperatuurproel correct kan volgen.
6.
kleur leDs
• Het apparaat is voorzien van 3 verschillende leds:
• Led onder de VORSTVRIJ toets (afbeelding 8, item I)
- De led is rood wanneer de VORSTVRIJ modus geactiveerd is,
- De led brandt niet waneer deVORSTVRIJ modus uitgeschakeld is.
- De led knippert als de VORSTVRIJ modus geactiveerd is door de OPEN-RAAM-DETECTIE.
• Led onder de knop WEEKPROGRAMMA (afbeelding 8, item J)
- De led is rood wanneer de WEEKPROGRAMMA modus geactiveerd is,
- De led brandt niet wanneer de WEEKPROGRAMMA modus uitgeschakeld is.
• Led onder de STANDBY toets (afbeelding 8, item K)
- De led is rood wanneer de COMFORT modus geactiveerd is;
- De led is groen wanneer de ECO modus geactiveerd is;
- De led brandt niet wanneer het apparaat op STANDBY staat.
7.
De Fan heater gebruiken
AAN-/UITSCHAKELAAR (witte ronde knop op de linkerzijkant)
De voeding van het apparaat wordt geregeld door een elektromechanische AAN-/UITSCHAKELAAR. Als u de fan
heater uitschakelt, wordt de stroomtoevoer naar de printplaat onderbroken. Na 30 minuten van onderbreking gaat alle
opgeslagen informatie verloren. Wij raden aan deze schakelaar alleen te gebruiken wanneer u het apparaat lange
tijd niet gebruikt. Gebruik in plaats daarvan de aan/STANDBY toets voor korte onderbrekingen; zo verliest u de
opgeslagen instellingen niet.
Als het apparaat voor het eerst wordt gebruikt of de voeding langer dan 30 minuten onderbroken is, toont het display
(indien AAN) 00:00 en begint de tijd vanaf deze waarde te tellen.
Indien binnen 15 minuten na inschakeling geen aanpassing wordt gedaan, schakelt het apparaat automatisch
naar de vorstvrije modus (de bijbehorende led gaat branden).
ON/OFF

30
STANDBY toets
Gebruik de STANDBY toets om het apparaat AAN te zetten of de Standby-modus in te schakelen.
00
:
00
De led onder de STANDBY toets wordt groen.
00
:
00
LED=GROEN
START: BASIS INSTELLINGEN
Met de , en ,-toetsen moet u ALTIJD EERST DE HUIDIGE TIJD EN DAG VAN DE WEEK INSTELLEN:
(d:1 = maandag, d:2 = dinsdag, d:3 = woensdag, etc .), alsmede de COMFORT temperatuur (gewenste ruimte-tempe-
ratuur) aanpassen en de OPEN-RAAM-DETECTIE functie aanzetten (88:ON) of uitzetten (88:OF).
VOORBEELD BASIS INSTELLING: Stel het is nu dinsdag 08.30 's morgens en u wilt de basisinstellingen
programmeren met de vaste COMFORT temperatuur van 25 °C en met de OPEN-RAAM-DETECTIE aan,
dan moet u het volgende doen:
Houd de -toets 3 seconden ingedrukt om het instellingenmenu te openen:
3"
00
:
00
STEL DE HUIDIGE TIJD IN (volgens dit voorbeeld 08.30, in werkelijkheid de huidige tijd instellen!):
De 2 uurcijfers beginnen te knipperen: stel het huidige uur in met de en -toetsen.
00
:
00
Druk op om te bevestigen (volgens dit voorbeeld 08.30, in werkelijkheid de huidige tijd, instellen!):
08
:
00
De 2 minutencijfers beginnen te knipperen: stel de huidige minuten in met de en -toetsen.
08
:
00

31
Druk op om te bevestigen (volgens dit voorbeeld 08.30, in werkelijkheid de huidige tijd, instellen!):
08
:
30
STEL DE HUIDIGE DAG VAN DE WEEK IN (d:1 = maandag, d:2 = dinsdag, d:3 = woensdag etc.)
Volgens het voorbeeld is het nu dinsdag, d:2.
Nadat u de tijd heeft bevestigd, gaat de dag van de week knipperen: STEL DE HUIDIGE DAG VAN DE WEEK IN
met de en -toetsen.
d
:
1
Druk op om te bevestigen (volgens dit voorbeeld dinsdag d:2, in werkelijkheid de huidige dag, instellen!):
d
:
2
S
TEL NU DE GEWENSTE COMFORT TEMPERATUUR IN (=gewenste ruimtetemperatuur, IN DIT VOORBEELD 25 °C)
Hierdoor wordt nu ook automatisch de ECO temperatuur bepaald.
(ECO temperatuur = COMFORT temperatuur - 3,5 °C)
Nadat u de dag heeft bevestigd, gaat de COMFORT temperatuurwaarde knipperen: stel de gewenste temperatuur in
met de en -toetsen.
23 C
Druk op om te bevestigen(volgens dit voorbeeld 25.°C, in werkelijkheid de huidige temperatuur instellen!):
25 C
OPEN-RAAM-DETECTIE (functie aanzetten (88:on) of uitzetten (88:oF)
Deze functie maakt het mogelijk een open raam te detecteren en automatisch de vorstvrije modus te activeren. Indien
de functie ingeschakeld en gereed is om de vorstvrije modus te activeren als er een open raam gedetecteerd wordt,
licht er rechtsboven op het display een rode punt tussen het 3e en 4e cijfer op:
:
Indien de temperatuur in de ruimte daalt tijdens de normale werking, wordt automatisch de VORSTVRIJ
modus geactiveerd om energie te besparen. De rode led onder de VORSTVRIJ-toets knippert om aan te geven dat de
OPEN-RAAM-DETECTIE actief is.

32
De normale werking wordt niet automatisch gereset; druk hiervoor op een van de vijf toetsen van het apparaat.
De correcte werking van deze functie is afhankelijk van de plaats waar het toestel in de ruimte geïnstalleerd
is, de aanwezigheid van tocht, de buitentemperatuur en hoe lang het raam open blijft.
OPEN-RAAM-DETECTIE ACTIVEREN
Nadat u de COMFORT temperatuur heeft bevestigd, begint de OPEN-RAAM-DETECTIE modus te knipperen.
Het display toont 88:oN als de modus aan staat en 88:oF als deze gedeactiveerd is. Stel de gewenste modus in met
de en -toetsen.
88
:
oF
Druk op om te bevestigen.
88
:
on
EINDE: BASIS INSTELLINGEN
U heeft nu de juiste TIJD, DAG, COMFORT temperatuur en OPEN-RAAM-DETECTIE vast ingesteld.
(al deze basisinstellingen gelden nu voor ALLE DAGEN VAN DE WEEK d:1 T/M d:7 en voor de gehele verdere
werking van de fanheater)
08
:
30
COMFORTTEMPERATUUR TONEN/WIJZIGEN
U kunt de ingestelde comforttemperatuur op elk moment bekijken door één keer op de of -toets te drukken.
Als u nogmaals drukt, kunt u de ingestelde temperatuur naar boven met de -toets of met de naar beneden
-toets aanpassen.
Wanneer de ECO modus actief is en u op de -toets drukt, schakelt het apparaat automatisch de COMFORT
temperatuur weer in. U hoeft niet te wachten tot de sensor ten minste 2 minuten lang iemand in de ruimte detecteert.
Indien u de COMFORT temperatuur wilt bekijken/aanpassen zonder de ECO modus te verlaten, drukt u eerst op de
-toets. Indien de ECO modus actief is, brandt de led groen.
OPMERKING: De temperatuur die door de binnensensor van het apparaat wordt gemeten, is de omgevingstemperatuur
vlakbij het apparaat en kan afwijken van de temperatuur die met andere instrumenten in andere delen van de ruimte
wordt gemeten. Het verschil kan van een groot aantal factoren afhankelijk zijn, bijvoorbeeld:
- plaats van installatie: in sommige delen van de ruimte is er sprake van tocht of warme luchtzakken die de meting van
de sensor beïnvloeden;
- montage op een externe muur: deze is gewoonlijk kouder dan een interne muur, wat ertoe kan leiden dat een
temperatuur gemeten wordt die lager is dan de echte temperatuur in de ruimte.
- veel handdoeken op de handdoekhouder: dit kan de luchtstroom belemmeren. Als gevolg hiervan kan de sensor een
temperatuur meten die hoger is dan de echte temperatuur in de ruimte.
- onstabiele omstandigheden: een beoordeling moet plaatsvinden bij stabiele omstandigheden. Hiertoe mag de
comforttemperatuur uitsluitend 60 minuten na een eerdere aanpassing worden gewijzigd. Indien de comforttemperatuur
in korte tijd vaak wordt aangepast, kan de temperatuur die het apparaat in een ruimte handhaaft niet correct worden
beoordeeld.
Als bij stabiele omstandigheden een verschil tussen de ingestelde temperatuur en kamertemperatuur wordt
gedetecteerd, moet u het verschil meten en de comforttemperatuur verhogen of verlagen op basis van het exact
gemeten verschil.

33
WEEKPROGRAMMA OPTIES:
Optie 1. STANDAARD WEEKPROGRAMMA (FABRIEKSINSTELLING)
of
Optie 2. BEKIJKEN EN-OF WIJZIGEN VAN HET STANDAARD WEEKPROGRAMMA
Indien het apparaat nieuw is, is het STANDAARD WEEKPROGRAMMA als volgt:
Optie 1. WEEKPROGRAMMA STANDAARD
VORSTVRIJ modus is altijd actief, met uitzondering van de COMFORT-modus op de volgende tijden:
- van 06:00 tot 08:00 op maandag-vrijdag;
- van 08:00 tot 10:00 op zaterdag-zondag.
Druk 1 seconde op de WEEKPROGRAMMA -toets om het STANDAARD WEEKPROGRAMMA
(FABRIEKSINSTELLING) modus te activeren/deactiveren!
Optie 2. BEKIJKEN EN-OF WIJZIGEN VAN HET STANDAARD WEEKPROGRAMMA
Met behulp van de WEEKPROGRAMMA modus kunt u voor:
ELK UUR VAN DE DAG en voor
ELKE DAG VAN DE WEEK
AFZONDERLIJK DE GEWENSTE TEMPERATUUR instellen, waarbij u keuze heeft uit:
COMFORT (reeds door uzelf ingesteld bij BASIS INSTELLING)
ECO (De ECO temperatuur wordt automatisch bepaald door de COMFORT temperatuur-minus 3,5 °C)
VORSTVRIJ (vaste fabrieksinstelling instelling 7 °C)
Als u het STANDAARD WEEKPROGRAMMA wilt BEKIJKEN EN-OF WIJZIGEN, moet u het volgende doen:
Houd de -toets 5 seconden ingedrukt om het menu te openen:
5"
08
:
30
Het display toont dag 1 (d:1 maandag). Als u nu op de - en -toetsen drukt, worden de VERSCHILLENDE
UREN van de dag getoond, beginnende bij H:00 (dit is de tijd vanaf 00:00 tot 01:00 uur) en eindigend bij H:23 (dit is
de tijd vanaf 23:00 tot 00:00 uur
d
:
1
De reeds eerder ingestelde referentietemperatuur VORSTVRIJ, ECO of COMFORT kunt u nu voor alle
VERSCHILLENDE UREN H:00 t/m H:23 individueel instellen, dit blijkt uit de LEDS die OPLICHTEN ONDER DE:
VORSTVRIJ toets RODE LED =VORSTVRIJ temperatuur (vast ingestelde temperatuur 7 °C)
STANDBY toets RODE LED=COMFORT temperatuur (reeds door uzelf ingesteld bij BASIS INSTELLING)
STANDBY toets GROENE LED=ECO temperatuur
(De ECO temperatuur wordt automatisch bepaald door de COMFORT temperatuur-minus 3,5 °C)
H
:
00
ROOD=VORSTVRIJ GROEN=ECO / ROOD=COMFORT

34
De referentietemperatuur kan worden aangepast door op de -toets te drukken. De led die overeenkomt met elke
verschillende gewenste temperatuur VORSTVRIJ, ECO of COMFORT en licht in volgorde op, en toont hiermee de
geselecteerde referentietemperatuur: VORSTVRIJ, ECO of COMFORT.
H
:
23
ROOD=VORSTVRIJ GROEN=ECO / ROOD=COMFORT
Gebruik de en -toetsen om de ingestelde temperatuur voor elk van de uren van dag 1 te bekijken en-of te
wijzigen. Als het laatste uur van de dag (H:23) is bereikt, drukt u nogmaals op de -toets om het programma voor
dag 2 te openen:
H
:
23
ROOD=VORSTVRIJ GROEN=ECO / ROOD=COMFORT
d
:
2
Alle dagen identiek:
Indien u direct dag 2 identiek als dag 1 in wil stellen dan drukt u één keer op de . -toets.
Zo wordt dag 2 automatisch hetzelfde ingesteld als dag 1 en gaat het systeem automatisch naar het begin van dag 3.
Deze procedure kan tot en met dag 7 worden herhaald:
Alle of meerdere dagen afwijkend:
Het is ook mogelijk om de referentietemperaturen voor alle uren van dag 2 te bekijken en-of te wijzigen.
In dit geval gebruikt u de en -toetsen, zoals reeds beschreven voor dag 1.
d
:
2
d
:
3
Nadat dag 7 is geprogrammeerd (of in elke tussenliggende stap), kunt u de laatste stap (BEVESTIGEN EN OPSLAAN)
activeren door op de , -toets te drukken. Het display toont “End”. Door nogmaals op de -toets te drukken,
wordt het net bekeken/gewijzigde programma opgeslagen:

35
End
Op het display verschijnt enkele seconden lang “Done” ter bevestiging dat het programma juist is opgeslagen.
Het apparaat schakelt over naar de WEEKPROGRAMMA modus voor de huidige tijd en dag van de week.
Done
Opmerking:
- U kunt de procedure voor het bekijken/wijzigen van het programma op elk moment beëindigen door op de
standby-toets te drukken; niet-opgeslagen wijzigingen worden dan gewist.
- De verwarmingselementen zijn uitgeschakeld tijdens het programmeren en het apparaat verwarmt niet.
VORSTVRIJ MODUS
Als u de VORSTVRIJ modus wilt activeren, dient u de -toets 3 seconden ingedrukt te houden.
De thermostaat handhaaft de temperatuur op 7 °C.
Om de VORSTVRIJ modus te deactiveren, drukt u op de of .-toets.
De VORSTVRIJ modus wordt automatisch geactiveerd indien er gedurende 36 uur geen persoon is
gedetecteerd. De COMFORT temperatuur wordt in dit geval automatisch geactiveerd wanneer een persoon
wordt gedetecteerd.
3"
00
:
00
08
:
30
8.
ProbleeMoPlossing
• In geval van oververhitting schakelt de veiligheidsvoorziening van het apparaat de verwarmingselementen en
motor automatisch uit. In dat geval moet u het volgende doen:
- Schakel de fan heater uit en laat deze gedurende circa 15/20 minuten afkoelen.
- Controleer of het stoflter niet te vervuild of geblokkeerd is en maak het indien nodig schoon. Plaats het
lter naderhand terug.
- Controleer of er andere oorzaken van oververhitting zijn (bijv. objecten die zich voor het luchtinlaat-/-
uitlaatrooster bevinden, vuilophoping).
- Zet de fan heater weer aan en controleer of deze correct functioneert.
• Indien de toetsen geblokkeerd zijn of niet juist reageren als erop gedrukt wordt, moet u het apparaat uitschake-
len met de elektromechanische schakelaar aan de linkerkant. Schakel de verwarming vervolgens weer in met
dezelfde schakelaar.
9.
onDerhouD
• Dit apparaat vereist geen speciek onderhoud.
• Maak het apparaat om de zes maanden met een droge doek schoon.
• Indien het apparaat gerepareerd dient te worden, dient u contact op te nemen met een erkend technisch servi-
cecentrum.

36
• Als het netsnoer vervangen moet worden, dient een 2 x 1,00 mm2-kabel (type H05VV-F HAR) te worden ge-
bruikt. Dit mag uitsluitend door gekwaliceerd personeel en nooit door de eindgebruiker zelf worden gedaan om
schade aan het apparaat en persoonlijk letsel te voorkomen.
10.
juriDische MeDeDeling
Milieu en recycling
Help ons mee het milieu te beschermen. Verwijder de verpakking daarom overeenkomstig de nationale
voorschriften voor afvalverwerking.
Recycling van oude toestellen
Toestellen met dit symbool horen niet thuis in de vuilnisbak. Ze moeten apart worden ingezameld en
volgens lokale voorschriften worden verwijderd.
Informatie-eisen voor elektrische toestellen voor lokale ruimteverwarming
Typeaanduiding(en): TOUCH
Item Symbool Waar-
de
Een-
heid Item Eenheid
Warmteafgifte Type warmte-input, uitsluitend voor elektrische warmteopslagtoestellen
(selecteer één)
Nominale warmte-
afgifte Pnom 1,8 kW Handmatige sturing van de warmteopslag, met geïntegreer-
de thermostaat
neen
Minimale warmte-
afgifte (indicatief) Pmin 1,0 kW Handmatige sturing van de warmteopslag, met kamer- en/of
buitentemperatuurfeedback
neen
Maximale conti-
nue warmteafgifte Pmax,c 1,8 kW Elektronische sturing van de warmteopslag, met kamer- en/
of buitentemperatuurfeedback
neen
Aanvullend
elektriciteitsver-
bruik
Door een ventilator bijgestane warmteafgifte neen
Bij nominale
warmteafgifte elmax 1,800 kW Type warmteafgifte/sturing kamertemperatuur (selecteer
één)
Bij minimale
warmteafgifte elmin 1,000 kW
Eentrapswarmteafgifte, geen sturing van de kamertempe-
ratuur
neen
In stand-bymodus elSB 0,00076 kW Twee of meer handmatig in te stellen trappen, geen sturing
van de kamertemperatuur
neen
Met mechanische sturing van de kamertemperatuur door
thermostaat
neen
Met elektronische sturing van de kamertemperatuur neen
Elektronische sturing van de kamertemperatuur plus dag-
tijdschakelaa
neen
Elektronische sturing van de kamertemperatuur plus week-
tijdschakelaar
ja
Andere sturingsopties (meerdere selecties mogelijk)
Sturing van de kamertemperatuur, met aanwezigheidsde-
tectie
ja
Sturing van de kamertemperatuur, met openraamdetectie ja
Met de optie van afstandsbediening neen
Met adaptieve sturing van de start neen
Met beperking van de werkingstijd neen
Met black-bulbsensor neen
Contactgegevens Ermete Giudici S.p.A. - via L. da Vinci 27 - 20090 Segrate (MI) Italia
TOUCH2_R5_20170221
-
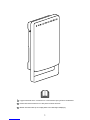 1
1
-
 2
2
-
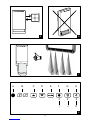 3
3
-
 4
4
-
 5
5
-
 6
6
-
 7
7
-
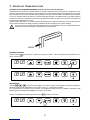 8
8
-
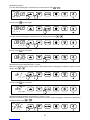 9
9
-
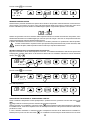 10
10
-
 11
11
-
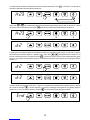 12
12
-
 13
13
-
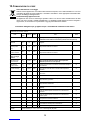 14
14
-
 15
15
-
 16
16
-
 17
17
-
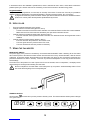 18
18
-
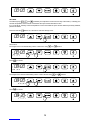 19
19
-
 20
20
-
 21
21
-
 22
22
-
 23
23
-
 24
24
-
 25
25
-
 26
26
-
 27
27
-
 28
28
-
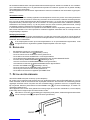 29
29
-
 30
30
-
 31
31
-
 32
32
-
 33
33
-
 34
34
-
 35
35
-
 36
36


in andere talen
- English: Radialight Touch Installation guide
Gerelateerde papieren

Andere documenten
-
 Cordivari RF Digital Remote Control Handleiding
-
Steba FH 502 Handleiding
-
Stovax Stockton2 Small Installatie gids
-
-
-
-
-
Steba Pikkolo 60 T 3 de handleiding
-
