
1
IT - Quando utilizzato come portatile il presente prodotto è adatto
solo ad ambienti correttamente isolati o ad un uso occasionale.
EN - When used as portable this product is only suitable for well
insulated spaces or occasional use.
RO - Cand aparatul este utilizat ca incalzitor portabil, se recomanda
folosirea ocazionala si numai in spatii bine izolate.
PL - Kiedy jest używany jako przenośny Ten produkt jest odpowiedni
tylko do sporadycznego użytku lub do stosowania w dobrze izolo-
wanych pomieszczeniach.
NL - Bij gebruik als draagbaar , dit product is uitsluitend geschikt
voor goed geïsoleerde plaatsen of voor incidenteel gebruik.
DE - Dieses Produkt ist nur für Räume geeignet, die korrekt isoliert
wurden oder für einen gelegentlichen Gebrauch

2
min
15cm
min
15cm
min
15cm
min
50cm
min
15cm
Volume
3
Volume
1
Volume
2
60cm
60cm
2,25m
60cm
1
190mm
min
295mm
B
A (min)
C (min)
2
3
4

3
click!
6
5
7
8

4
9
W
110,5mm
420mm
10
W
SIRIO 5 450mm
SIRIO 10 650mm
SIRIO 15 850mm
SIRIO 20 1050mm

5
ITALIANO
MANUALE DI INSTALLAZIONE E D’USO
Si prega di leggere attentamente queste istruzioni, prima di utilizzare il prodotto, in modo da evitare danneg-
giamenti o comunque il vericarsi di situazioni di pericolo. Qualsiasi utilizzo del prodotto diverso da quanto
indicato nel presente manuale può causare incendi, pericoli elettrici o ferite e rende nulla qualsiasi garanzia.
La garanzia non si applica ad alcun difetto, deterioramento, perdita, ferimento o danneggiamento riconducibili ad un
uso non corretto del prodotto. Rimangono garantiti tutti i diritti di legge in materia. Nessuna condizione di garanzia può
escludere o modicare le condizioni di garanzia regolamentate da leggi dello Stato che non possono essere a nessun
titolo escluse o modicate.
Prima di ogni operazione, rimuovere con cura l’imballo e controllare la perfetta integrità del prodotto. Nel caso si
evidenziassero dei difetti o danni, non installare né cercare di riparare l’apparecchiatura, ma rivolgersi al rivenditore.
Non lasciare l’imballo alla portata dei bambini e smaltirne le parti in conformità con le disposizioni vigenti.
1.
Per la vostra sicurezza
• Questo prodotto è per uso domestico e non è adatto per l’utilizzo
in ambienti commerciali/industriali o su veicoli, imbarcazioni o
aeromobili.
• L’apparecchio può essere utilizzato da bambini di età non inferio-
re a 8 anni e da persone con ridotte capacità siche, sensoriali
o mentali, o prive di esperienza o della necessaria conoscenza,
purché sotto sorveglianza oppure dopo che le stesse abbiano
ricevuto istruzioni relative all’uso sicuro dell’apparecchio e alla
comprensione dei pericoli ad esso inerenti. I bambini non devono
giocare con l’apparecchio. La pulizia e la manutenzione destinata
ad essere effettuata dall’utilizzatore non deve essere effettuata da
bambini senza sorveglianza.
• I bambini di età inferiore a 3 anni non devono avvicinarsi al pro-
dotto se non costantemente supervisionati.
• I bambini di età compresa fra 3 e 8 anni possono solamente ac-
cendere e spegnere l’apparecchio purchè esso sia stato installato
e posizionato secondo le normali condizioni d’uso e loro siano
supervisionati o adeguatamente istruiti riguardo al corretto e si-
curo utilizzo del prodotto e ne abbiano compresa la pericolosità.
I bambini di età compresa fra 3 e 8 anni non possono collegare il
prodotto, regolarlo, pulirlo o effettuare manutenzione.
• ATTENZIONE: Alcune parti di questo prodotto possono di-
ventare molto calde e causare bruciature. Particolare atten-
zione deve essere prestata in presenza di bambini o persone

6
vulnerabili.
• Assicuratevi che l’alimentazione di rete corrisponda ai dati di tar-
ga: 230V~, 50Hz.
• Il prodotto ha un doppio livello di protezione dall’acqua: IPX0
quando utilizzato come portatile e IPX4 quando installato a muro.
Rispettate le normative del paese in cui viene installato il prodotto
relative all’utilizzo nei diversi ambienti. Quando installato a muro
può essere utilizzato nei bagni PURCHE’ NON SIA INSTALLA-
TO ENTRO IL PERIMETRO DELLA VASCA O DELLA DOCCIA. Il
prodotto non può quindi essere installato nelle aree indicate come
Volume 1 nello schema di gura 1. Se utilizzato come portatile
accertarsi che il convettore non sia accessibile dalla vasca da
bagno, dalla doccia o da una piscina.
• Durante il funzionamento collocate il convettore in una posizione
sicura ovvero:
- ad almeno 1m da oggetti inammabili o mobili;
- lasciando libera la griglia di uscita dell’aria: nessun oggetto
deve essere presente nel raggio di 1m dalla griglia di uscita;
- mai posizionato immediatamente sotto ad una presa di cor-
rente.
• Non lasciate che animali o bambini giochino o tocchino il con-
vettore. Attenzione! Durante il funzionamento la griglia di uscita
dell’aria può diventare molto calda (oltre 90°C);
• IMPORTANTE: per evitare surriscaldamenti non ricoprite mai
il prodotto. Non appoggiate mai alcun oggetto o coperta sull’ap-
parecchio mentre è in funzione. Questo è chiaramente scritto
sull’apparecchio o illustrato dal simbolo
• Non utilizzate il convettore in stanze sature di gas esplosivi, di
vapori generati da solventi e vernici o comunque di vapori/gas
inammabili.
• Se il cavo è danneggiato e dovete sostituirlo non eseguite questa
operazione da soli, riportate il convettore ad un centro di ripara-
zioni autorizzato perché è richiesto l’intervento di personale spe-
cializzato al ne di evitare qualunque rischio di danneggiamento.
• Il convettore deve essere posizionato in modo tale che la presa di

7
alimentazione sia sempre raggiungibile.
• Non installate il prodotto su pareti di materiale sintetico.
• Non utilizzate questo convettore se è caduto;
• Non utilizzare se vi sono segni visibili di danneggiamento del con-
vettore;
• Utilizzare il convettore su una supercie orizzontale e stabile;
• ATTENZIONE: Non utilizzate il convettore in stanze di piccole di-
mensioni quando esse sono occupate da persone non in grado di
uscire dalla stanza da sole a meno ché non siano sotto la super-
visione di qualcuno responsabile per la loro sicurezza;
• ATTENZIONE: Per ridurre il rischio di incendio tenete tessuti, ten-
de o qualsiasi altro materiale inammabile ad almeno 1m di di-
stanza dalla griglia di uscita dell’aria.
2.
Montaggio a Muro
• Installare il convettore in posizione orizzontale con la griglia di uscita dell’aria rivolta verso l'alto.
• Questo convettore è in doppio isolamento elettrico (classe II) pertanto la connessione di terra non è richiesta.
• Questo convettore deve essere installato seguendo le norme in vigore nel paese di installazione.
• In ambienti umidi come bagni e cucine la connessione alla rete elettrica deve essere ad almeno 25 cm di altezza
dal suolo. I dispositivi di disconnessione dalla rete di alimentazione devono consentire la disconnessione com-
pleta nelle condizioni della categoria di sovratensioni III.
• L’apparecchio deve essere installato a muro, rispettando le distanze minime dal softto, dal pavimento e dalle
pareti laterali indicate in gura 2. A tale scopo la staffa di supporto deve essere ssata al muro rispettando le
distanze indicate in gura 3 e nella tabella sotto riportata.
• Per procedere con l'installazione:
- Rimuovete la staffa dal prodotto;
- Praticate nel muro 4 fori rispettando le distanze indicate in gura 3 e specicate nella seguente tabella:
MODELLO A B C
SIRIO 5 205mm 180mm 357mm
SIRIO 10 290mm 260mm 400mm
SIRIO 15 270mm 480mm 400mm
SIRIO 20 250mm 700mm 400mm
- Fissate la staffa utilizzando i tasselli e le viti adatti per il tipo di parete;
- Vericate che le distanze minime precedentemente descritte siano soddisfatte;
- Avvicinate il prodotto alla staffa no ad inserire i ganci inferiori della staffa nelle fessure presenti sul pan-
nello posteriore come indicato in gura 4;
- Fate ruorate la parte superiore del prodotto verso il muro no a bloccarlo assicurandovi di far scattare i 2
ganci superiori della staffa come indicato in gura 5;
- Bloccate i 2 ganci superiori della staffa usando le viti in dotazione come indicato in gura 6.

8
3.
Fissaggio delle ruote (oPzionali)
• Il convettore può essere anche utilizzato come prodotto portatile acquistando le ruote fornite separatamente.
• Per ssare le ruote:
- vericare il corretto orientamento secondo quanto indicato in gura 7;
- ssare ognuno dei 2 supporti con le ruote utilizzando le viti in dotazione come indicato in gura 8. Le viti
possono essere ssate a mano e non richiedono l'ultilizzo di un utensile.
4.
descrizione dei coMandi
• Il convettore è dotato di un pulsante di accensione e spegnimento posto sul lato destro. Spegnendo il prodotto i
componenti elettrici interni non saranno più sotto tensione.
• I seguenti controlli sono integrati sul frontale del prodotto (gura 10):
Display multifunzione per visualizzare lo stato di funzionamento e di attivazione delle funzioni:
Comfort
Comfort - 1 °C
Comfort - 2°C
Eco
Antigelo
Blocco tastiera
Rilevamento nestra aperta
Riscaldamento in corso
Pulsante di selezione della modalità di funzionamento.
Pulsante di selezione delle funzioni speciali.
Pulsante di navigazione all'interno dei vari menu.
Pulsante per attivare o disattivare lo stato di standby.

9
5.
accensione e sPegniMento
L'alimentazione del prodotto è controllata tramite un pulsante elettromeccanico di accensione e spegnimento. Spegne-
re il prodotto tramite questo pulsante causa l’interruzione di alimentazione della scheda elettronica e la conseguente
cancellazione dell'orario e del giorno correnti. Raccomandiamo di utilizzare questo interruttore solo in caso non si
debba usare il prodotto per un periodo prolungato di tempo e di utilizzare invece il pulsante di Accensione / Stand-by
presente nel pannello comandi in caso di breve interruzione di utilizzo del prodotto. In questo modo non si perderanno
le impostazioni di regolazione precedentemente immesse.
Al momento dell'accensione il convettore attiva l'ultima modalità utilizzata prima dello spegnimento o della mancanza
di alimentazione. L'orario viene reimpostato alle 12:00 e il giorno della settimana a lunedì.
ON - OFF
Usare il pulsante di Accensione / Stand-by per accendere e spegnere il convettore senza perdere l'orario memorizzato.
ACCENSIONE - STANDBY

10
6.
Modalità di FunzionaMento
La pressione del pulsante permette di selezionare una delle seguenti 6 modalità di funzionamento:
Modalità COMFORT
Il convettore funziona per raggiungere e mantenere la temperatura di
Comfort impostata.
Il simbolo corrispondente alla modalità Comfort si accende.
Il simbolo relativo al riscaldamento si accende quando l'elemento riscal-
dante è in funzione.
In questa modalità è disponibile la funzione di rilevamento nestra
aperta (vedere il pulsante FUNZIONI).
Modalità COMFORT-1
Il convettore funziona per raggiungere e mantenere la temperatura di
Comfort impostata ridotta di 1°C .
Il simbolo corrispondente alla modalità Comfort-1 si accende.
Il simbolo relativo al riscaldamento si accende quando l'elemento riscal-
dante è in funzione.
In questa modalità è disponibile la funzione di rilevamento nestra
aperta (vedere il pulsante FUNZIONI).
Modalità COMFORT-2
Il convettore funziona per raggiungere e mantenere la temperatura di
Comfort impostata ridotta di 2°C .
Il simbolo corrispondente alla modalità Comfort-2 si accende.
Il simbolo relativo al riscaldamento si accende quando l'elemento riscal-
dante è in funzione.
In questa modalità è disponibile la funzione di rilevamento nestra
aperta (vedere il pulsante FUNZIONI).
Modalità ECO
Il convettore funziona per raggiungere e mantenere la temperatura di
Comfort impostata ridotta di 3,5°C .
Il simbolo corrispondente alla modalità Eco si accende.
Il simbolo relativo al riscaldamento si accende quando l'elemento riscal-
dante è in funzione.
In questa modalità è disponibile la funzione di rilevamento nestra
aperta (vedere il pulsante FUNZIONI).
Modalità ANTIGELO
Il termostato viene automaticamente impostato alla temperatura di
7±3°C.
Il simbolo corrispondente alla modalità Antigelo si accende.
Il simbolo relativo al riscaldamento si accende quando l'elemento riscal-
dante è in funzione.
In questa modalità la funzione di rilevamento nestra aperta non è
disponibile.
Modalità PROGRAMMATA
Il convettore funziona per raggiungere e mantenere la temperatura im-
postata nel programma settimanale (vedere il paragrafo relativo alla
PROGRAMMAZIONE SETTIMANALE).
Il simbolo corrispondente alla modalità di funzionamento (Comfort,
Comfort-1, Comfort-2, Eco o Antigelo) si accende in funzione delle im-
postazioni previste per l'ora e il giorno correnti.
In questa modalità è disponibile la funzione di rilevamento nestra
aperta (vedere il pulsante FUNZIONI).

11
7.
Funzioni sPeciali
La pressione del pulsante permette di selezionare una delle seguenti 3 funzioni speciali:
Funzione di RESET
Attivando questa funzione tutte le impostazioni vengono ripristinate al
valore di fabbrica iniziale. La temperatura di Comfort viene impostata
pari a 19,0°C, il programma preimpostato quello descritto nell'apposita
sezione e la funzione di rilevamento nestra aperta viene disattivata.
5"
Per eseguire il RESET premere per almeno 5 secondi il
tasto .
Il convettore viene automaticamente impostato in moda-
lità Comfort
Funzione di RILEVAMENTO FINESTRA APERTA
Questa funzione permette di identicare l’apertura di una nestra e di
impostare automaticamente il modo di funzionamento Antigelo.
Qualora venga rilevata una brusca riduzione della temperatura am-
biente durante il normale funzionamento del prodotto, viene attivata
automaticamente la modalità antigelo per ridurre lo spreco di energia.
Il simbolo della nestra e quello antigelo lampeggiano per indicare l’at-
tivazione della funzione.
Il ripristino del normale funzionamento non è automatico ma si ottiene
premendo uno qualsiasi dei 5 tasti del prodotto.
Il corretto funzionamento di questa funzione può dipendere
dal posizionamento del prodotto del locale, dalla presenza di
spifferi, dalla temperatura esterna e dal tempo di apertura della
nestra.
Attivare la funzione premendo il tasto .
Il simbolo della nestra si accende sul display.
Disattivare la funzione premendo il tasto .
Il simbolo della nestra si spegne.

12
Funzione di BLOCCO
Attivando questa funzione tutti i tasti vengono disattivati in modo da im-
pedire modiche non desiderate delle impostazioni di funzionamento.
5"
Attivare la funzione premendo per almeno 5 secondi il
tasto .
Il simbolo della chiave si accende sul display ed i tasti
vengono bloccati.
5"
Disattivare la funzione premendo contemporaneamente
per almeno 5" secondi i tasti e .
Il simbolo della chiave si spegne, i tasti tornano ad
essere funzionanti.
8.
controllo della teMPeratura
Il controllo elettronico della temperatura si basa sul valore che l'utente assegna alla temperatura di COMFORT.
I valori delle temperature per le modalità Comfort-1, Comfort-2, Eco e Antigelo sono calcolati automaticamente e non
possono essere direttamente modicati dall'utente. La temperatura di riferimento viene sempre indicata sul display
unitamente al simbolo che rappresenta la modalità di funzionamento selezionata.
NOTA: La temperatura misurata tramite il sensore interno al prodotto indica sempre la temperatura ambiente nelle
immediate vicinanze del prodotto e potrebbe differire dalla temperatura misurata con altri strumenti in altre aree della
stanza. Questa differenza può dipendere da vari fattori, come ad esempio:
- La posizione dell’installazione: alcune aree della stanza possono risentire di correnti o sacche d’aria calda che pos-
sono modicare la misurazione del sensore;
- L’installazione su un muro perimetrale esterno, che essendo normalmente più freddo dei muri interni, può provocare
una misurazione più bassa della temperatura rispetto alla temperatura ambiente reale;
- Condizioni instabili: ogni valutazione deve essere fatta in condizioni stabili di funzionamento. Per questo motivo la
temperatura Comfort non dovrebbe essere cambiata prima che siano trascorsi 60 minuti dalla precedente modica.
Non è possibile infatti valutare se la temperatura ambiente è mantenuta correttamente dal prodotto se il livello di tem-
peratura è continuamente modicato in un breve periodo di tempo.
Se la differenza tra la temperature impostata e la temperature ambiente è rilevata in condizioni di stabilità, calcolate
tale differenza e quindi aumentate o diminuite il livello di temperature Comfort sul prodotto dell’esatto valore della
differenza calcolata.

13
9.
iMPostazione del giorno e dell'ora
Per impostare l'orario ed il giorno correnti procedere come segue:
Premere il tasto no a selezionare la modalità programmata
3"
Premere il tasto per almeno 3 secondi no a quando il giorno della
settimana non inizia a lampeggiare.
Usare i tasti
e per selezionare il giorno corrente.
Premere il tasto per passare dall'impostazione del giorno a quella
dell'ora.
Usare i tasti
e per selezionare l'ora corrente.
Premere il tasto per passare dall'impostazione dell'ora a quella dei
minuti.
Usare i tasti
e per selezionare i minuti correnti.
Premere il tasto per concludere l'impostazione e tornare in modalità
Programmata.
10.
PrograMMazione settiManale
La programmazione settimanale permette di impostare, per ogni ora del giorno e per ogni giorno della settimana, la
modalità di funzionamento desiderata. Il convettore viene fornito preimpostato con il seguente programma settimanale:
Lunedì - Venerdì
Sabato - Domenica

14
Per visualizzare/modicare il programma procedere come segue:
Premere il tasto no ad attivare la modalità di funzionamento Pro-
grammata.
3"
Premere il tasto per almeno 3 secondi per entrare in modalità di
visualizzaziopne/modica della programmazione.
Il primo giorno della settimana, la temperatura impostata e il relativo
simbolo iniziano a lampeggiare.
Usare i tasti e per selezionare le diverse ore del giorno ed il
tasto
per cambiarne la modalità di funzionamento di ciascuna ora.
Ad ogni pressione del tasto
la modalità di funzionamento cambia
seguendo la sequenza:
Comfort > Comfort-1 > Comfort-2 > Eco >Antigelo
Premere il tasto per passare alla visualizzazione/modica del gior-
no successivo.
Qualora si desideri copiare le impostazioni di un giorno su un altro (seguente) procedere come segue:
Selezionare il giorno da cui si desidera copiare le impostazioni e preme-
re contemporaneamente i tasti
e .
La scritta "COPY" appare sul display a conferma dell'avvenuta memo-
rizzazione.
Premere il tasto F per selezionare il giorno che si desidera programma-
re con il medesimo programma appena copiato.
Premere nuovamente insieme i tasti e per incollare il pro-
gramma sul giorno selezionato. Sul display torna ad apparire la scritta
PROG.
Premere il tasto per passare alla visualizzazione/modica del gior-
no successivo.
La procedura termina premendo nuovamente il tasto
dopo la visua-
lizzazione/modica dell'ultimo giorno della settimana. Il display torna
a visualizzare le impostazioni di programmazione per il giorno e l'ora
correnti.

15
11.
risoluzione dei ProbleMi
• In caso di surriscaldamento, il protettore di sicurezza all’interno del prodotto disattiva la resistenza. In questo
caso:
- Spegnere il convettore e lasciarlo raffreddare per circa 15/20 minuti;
- Eliminare ogni possible causa di surriscaldamento (es.: ostruzioni in corrispondenza della griglia di uscita
dell’aria, residui di sporcizia sul prodotto ecc.);
- Riaccendere il convettore e controllare il corretto funzionamento.
12.
Manutenzione
• Questo prodotto non richiede manutenzione speciale.
• Pulire il prodotto con un panno asciutto almeno una volta ogni 6 mesi.
• In caso il prodotto debba essere riparato, rivolgersi ad un centro di assistenza qualicato.
• In caso di sostituzione del cavo di alimentazione, utilizzare un tipo 2x0,75mm
2
H05RR-F o 2x1,00mm
2
H05RR-
F <HAR> in funzione del modello di convettore. Tale sostituzione deve essere effettuata da personale tecnico
qualicato e mai dall’utente nale per evitare un danneggiamento del prodotto e ogni rischio per la persona.
13.
coMunicazioni di legge
Tutela dell'ambiente e riciclaggio
Afnché il vostro apparecchio non subisca danni durante il trasporto, esso è stato imballato con cura. Per
contribuire alla tutela del nostro ambiente, vi chiediamo di smaltire in modo appropriato il materiale utiliz-
zato per l'imballaggio dell'apparecchio.
Smaltimento degli apparecchi usati
Gli apparecchi che recano il contrassegno riportato a anco non devono essere smaltiti insieme ai riuti
urbani, ma vanno raccolti e smaltiti separatamente. Lo smaltimento degli apparecchi usati va eseguito a
regola d'arte, in conformità con le prescrizioni e leggi vigenti localmente in materia.

16
Informazioni obbligatorie per gli apparecchi per il riscaldamento d’ambiente locale elettrici
Identicativo del modello: SIRIO
Dato
Sim-
bolo
Valore Unità Dato Unità
Potenza termica Tipo di potenza termica, solo per gli apparecchi per il riscaldamento
d’ambiente locale elettrici ad accumulo (indicare una sola opzione)
Potenza termica
nominale
P
nom
(*) kW
controllo manuale del carico termico, con termostato
integrato
no
Potenza termica
minima (indica-
tiva)
P
min
(**) kW
controllo manuale del carico termico con riscontro della
temperatura ambiente e/o esterna
no
Massima potenza
termica continua
P
max,c
(***) kW
controllo elettronico del carico termico con riscontro della
temperatura ambiente e/o esterna
no
Consumo ausi-
liario di energia
elettrica
potenza termica assistita da ventilatore no
Alla potenza ter-
mica nominale
el
max
0,000 kW
Tipo di potenza termica/controllo della temperatura
ambiente (indicare una sola opzione)
Alla potenza
termica minima
el
min
0,000 kW
potenza termica a fase unica senza controllo della tempera-
tura ambiente
no
In modo stand-by el
SB
0,162
W
due o più fasi manuali senza controllo della temperatura
ambiente
no
con controllo della temperatura ambiente tramite termostato
meccanico
no
con controllo elettronico della temperatura ambiente no
con controllo elettronico della temperatura ambiente e
temporizzatore giornaliero
no
con controllo elettronico della temperatura ambiente e
temporizzatore settimanale
si
Altre opzioni di controllo (è possibile selezionare più
opzioni)
controllo della temperatura ambiente con rilevamento di
presenza
no
controllo della temperatura ambiente con rilevamento di
nestre aperte
si
con opzione di controllo a distanza no
con controllo di avviamento adattabile no
con limitazione del tempo di funzionamento no
con termometro a globo nero no
Contatti Ermete Giudici S.p.A. - via L. da Vinci, 27 - 20090 Segrate (MI) Italy
(*) SIRIO 5 =0,50 SIRIO 10 = 1,00 SIRIO 15 = 1,50 SIRIO 20 = 2,00
(**) SIRIO 5 =0,25 SIRIO 10 = 0,50 SIRIO 15 = 0,75 SIRIO 20 = 1,00
(***) SIRIO 5 =0,50 SIRIO 10 = 1,00 SIRIO 15 = 1,50 SIRIO 20 = 2,00

17
ENGLISH
INSTALLATION AND OPERATING MANUAL
Before operating the convector, please read these instructions thoroughly to avoid damage and hazardous si-
tuations. Any use of this convector other than that stipulated in this instruction manual may cause re, electric
shock or injury, and voids all warranties.
Warranty does not apply to any defect, deterioration, loss, injury or damage caused by, or as a result of, the misuse or
abuse of this heater. The rights dictated by State law are not prejudiced. None of the terms of this warranty are to be
taken as excluding any conditions or warranties implied by State law, which cannot be excluded or modied.
Before any operation remove the packaging and check product integrity. In case of defects or damages do not try to
repair it yourself but contact your dealer.
Do not let children play with the packaging and protect the environment by disposing of the packaging in accordance
with the national regulations for waste processing.
1.
For your saFety
• This appliance is intended for normal household use and not for
use in commercial/industrial enviroment, in vehicles or on board
ships or aircrafts.
• This appliance can be used by children aged from 8 years and
above and persons with reduced physical, sensory or mental ca-
pabilities or lack of experience and knowledge if they have been
given supervision or instruction concerning use of the appliance
in a safe way and understand the hazards involved. Children shall
not play with the appliance. Cleaning and user maintenance shall
not be made by children without supervision.
• Children of less than 3 years should be kept away unless conti-
nuously supervised.
• Children aged from 3 years and less than 8 years shall only switch
on/off the appliance provided that it has been placed or installed
in its intended normal operating position and they have been gi-
ven supervision or instruction concerning use of the appliance in
a safe way and understand the hazards involved. Children aged
from 3 years and less than 8 years shall not plug in, regulate and
clean the appliance or perform user maintenance.
• CAUTION — Some parts of this product can become very hot
and cause burns. Particular attention has to be given where
children and vulnerable people are present.
• Make sure that your supply rating corresponds to what specied
on the rating plate: 230V~, 50Hz.

18
• This convector has a double water protection level: IPX0 when
used as portable and IPX4 when wall-mounted. Respect the re-
gulations of the country concerned about its use in different en-
vironments. It can therefore be used in bathrooms or other areas
subject to humidity AS LONG AS IT IS NOT INSTALLED WITHIN
THE PERIMETER OF BATH TUBS OR SHOWERS. This means
that it cannot be installed in the areas marked as VOLUME 1 in
picture 1. If used as portable do not use this heater in the imme-
diate surroundings of a bath, a shower or a swimming pool;
• During function, place the convector in a safe position:
- at least 1m far from inammable objects or furnitures;
- leaving not less than 1m of free space in front of the convector;
- not located immediately below a socket-outlet.
• Do not leave animals or children touch or play with the appliance.
Pay attention! The air outlet grille gets hot during operation (more
than 90°C)
• WARNING: In order to avoid overheating, do not cover the
heater. Do not hang anything on the heater and do not cover it
while it’s working. This is clearly written on the cover of the pro-
duct or shown by the symbol
• Do not use the heater in rooms with explosive gas or while using
inammable solvents or varnish or glues.
• If the cordset is damaged and you have to change it, do not do
the job yourselves! Take the product to an after sales authorised
repair centre or to a person with similar skill and knowledge, in
order to avoid any risk of danger.
• The appliance must be positioned so that the plug is always ac-
cessible.
• Do not mount the product on walls made of synthetic material.
• Do not use this heater if it has been dropped;
• Do not use if there are visible signs of damage to the heater;
• Use this heater on a horizontal and stable surface;
• WARNING: Do not use this heater in small rooms when they are
occupied by persons not capable of leaving the room on their own,

19
unless constant supervision is provided.
• WARNING: To reduce the risk of re, keep textiles, curtains, or
any other ammable material a minimum distance of 1 m from the
air outlet.
2.
Wall Mounting
• Fix the convector in horizontal position with the air outlet grid upward;
• This convector is tted with a double electrical insulation circuit (class II) and therefore does not require earth
connection.
• This heater must be correctly installed in compliance with the regulations in force in the country of installation.
• In wet spaces like bathrooms or kitchens, the connection terminal must be installed at least 25 cm above the
oor. The electrical connection to the power supply must also be tted with a two-pole switch with a minimum
gap between the contacts that allows complete disconnection according to excess voltage III category conditions.
• The device must be wall-mounted respecting the minimum distances from ceiling, oor and side walls shown in
gure 2. The support bracket must be xed to the wall respecting the distances indicated in gure 3 and specied
in the following table. Always observe the minimum distances from walls, furniture and/or objects, as indicated
in picture 3.
• To proceed with the installation:
- Remove the bracket from the product;
- Drill 4 holes in the wall respecting the distances indicated in gure 3 and specied in the following table:
MODEL A B C
SIRIO 5 205mm 180mm 357mm
SIRIO 10 290mm 260mm 400mm
SIRIO 15 270mm 480mm 400mm
SIRIO 20 250mm 700mm 400mm
- Fix the bracket using the wall plugs and screws suitable for the wall type;
- Verify that the minimum distances previously described are satised;
- Approach the product to the bracket until the lower hooks of the bracket are inserted in the slots on the
rear panel as shown in gure 4;
- Rotate the upper part of the product towards the wall until it locks, making sure to snap the 2 upper hooks
of the bracket as shown in gure 5;
- Lock the 2 upper hooks of the bracket using the supplied screws as shown in gure 6.
3.
Wheel Fastening (oPtional)
• The convector can also be used as a portable product by purchasing the wheels supplied separately.
• To x the wheels:
- check the correct orientation as shown in gure 7;
- x each of the 2 supports with the wheels using the screws provided as shown in gure 8. The screws can
be xed by hand and do not require any tool.
4.
coMMands descriPtion
• The convector is equipped with an on / off button on the right side. When the product is switched off, the internal
electrical components will no longer be under tension.
• The following controls are integrated on the front of the product (gure 10):

20
Multi-function display to view the operation and activation status of the functions.
Comfort
Comfort - 1 °C
Comfort - 2°C
Eco
Anti freeze
Keypad lock
Open window detection
Heating in progress
Operation mode selection button.
Special functions button.
Navigation menu button.
Enable/disable stand-by mode button.

21
5.
turning on and oFF
The product is powered by an electromechanical on / off button. Switching off the product pressing this button causes
the power supply to the electronic board to be interrupted and the current time and day to be canceled. We recommend
using it only if you do not use the product for a long time and instead use the on / stand-by button on the control panel
in the event of a short operating interruption of the device. This way you will not lose the adjustment settings previously
entered.
When switched on, the convector activates the last mode used before switching off or power failure. The time is reset
at 12:00 and the day of the week on Monday.
ON - OFF
Use the Power / Stand-by button to turn the convector on and off without losing the stored time.

22
6.
oPerating Modes
By pressing button it is possible to select one of the following 6 operating modes:
COMFORT mode
The convector operates to reach and maintain the set comfort tempe-
rature.
The symbol corresponding to the Comfort mode lights up.
The heating symbol lights up when the heating element is operating.
In this mode, the open window detection function is available (see the
FUNCTIONS button).
COMFORT mode -1
The convector operates to achieve and maintain the set comfort tempe-
rature reduced by 1° C.
The symbol corresponding to the Comfort mode lights up.
The heating symbol lights up when the heating element is operating.
In this mode, the open window detection function is available (see the
FUNCTIONS button).
COMFORT mode -2
The convector operates to achieve and maintain the set comfort tempe-
rature reduced by 2° C.
The symbol corresponding to the Comfort mode lights up.
The heating symbol lights up when the heating element is operating.
In this mode, the open window detection function is available (see the
FUNCTIONS button).
ECO mode
The convector operates to achieve and maintain the set comfort tempe-
rature reduced by 3.5° C.
The symbol corresponding to the Eco mode lights up.
The heating symbol lights up when the heating element is operating.
In this mode, the open window detection function is available (see the
FUNCTIONS button).
ANTI-FREEZE mode
The thermostat is automatically set at the temperature of 7±3 ° C.
The symbol corresponding to the antifreeze mode lights up.
The heating symbol lights up when the heating element is operating.
In this mode the open window detection function is not available.
PROGRAMMED mode
The convector works to reach and maintain the temperature set in the
weekly program (see the paragraph about WEEKLY PROGRAMMING).
The symbol corresponding to the operating mode (Comfort, Comfort-1,
Comfort-2, Eco or Anti-freeze mode) lights up according to the settings
for the current time and day.
In this mode, the open window detection function is available (see the
FUNCTIONS button).

23
7.
sPecial Functions
By pressing button it is possible to select one of the following 3 special functions:
RESET function
By activating this function all the settings are restored to the initial facto-
ry value. The comfort temperature is set to 19.0 ° C, the preset program
is the one described in the appropriate section and the open window
detection function is deactivated.
5"
To RESET press the button for at least 5 seconds.
The convector is automatically set in Comfort mode.
OPEN WINDOW DETECTION function
This function allows to identify the opening of a window and to automa-
tically set the Antifreeze operation mode.
If a sharp reduction of the ambient temperature is detected during the
normal operation of the product, the antifreeze mode is automatically
activated to reduce energy wastes. The window symbol and the anti-
freeze symbol ash to indicate that the function is activated.
The restoration of normal operation is not automatic but is obtained by
pressing any of the 5 buttons of the product.
The correct functioning of this function may depend on the po-
sitioning of the product in the room, the presence of drafts, the
external temperature and the window opening time.
Activate the function by pressing the button.
The window symbol lights up on the display.
Deactivate the function by pressing the button.
The window symbol turns off on the display.

24
LOCK function
By activating this function all the keys are deactivated to prevent un-
wanted modications of the operating settings.
5"
Activate the function by pressing the button for at
least 5 seconds.
The key symbol lights up on the display and the keys
are locked.
5"
Deactivate the function by pressing the and
buttons simultaneously for at least 5 seconds.
The key symbol turns off, the buttons work again.
8.
teMPerature control
The electronic temperature control is based on the value that the user assigns to the COMFORT temperature.
The temperature values for the Comfort-1, Comfort-2, Eco and Antifreeze modes are automatically calculated and can
not be directly modied by the user. The reference temperature is always indicated on the display together with the
symbol representing the selected operating mode.
NOTE: The temperature measured by the sensor inside the product always indicates the ambient temperature in the
immediate vicinity of the product and may differ from the temperature measured with other instruments in other areas
of the room. This difference may depend on various factors, such as:
- The installation position: some areas of the room may be affected by currents or warm air pockets that can change
the sensor measurement;
- The installation on an external perimeter wall, which is normally colder than internal walls, may result in a lower tem-
perature measurement than the actual room temperature;
- Unstable conditions: each evaluation must be made under stable operating conditions. For this reason the Comfort
temperature should not be changed before 60 minutes have elapsed since the previous modication. In fact, it is not
possible to assess whether the room temperature is correctly maintained by the product if the temperature level is
continuously modied in a short period of time.
If the difference between the set temperature and the ambient temperature is detected in stability conditions, calculate
this difference and then increase or decrease the comfort temperature level on the product of the exact calculated
difference value.

25
9.
date and tiMe setting
To set the current time and date, proceed as follows:
Keep pressing the button untill the programmed mode is selected.
3"
Press the button for at least 3 seconds until the day of the week
starts to ash.
Use
and buttons to select the current date.
Press the button to switch between day setting to time setting.
Use
and buttons to select the current time.
Press the button to switch between hour setting and minutes set-
ting.
Use
and buttons to select the current minutes.
Press the button to end the setting and return to the Programmed
mode.
10.
Weekly PrograMMing
The weekly programming allows you to set the desired operating mode for each hour of the day and for each day of
the week. The convector is supplied preset with the following weekly program:
Monday - Friday
Saturday - Sunday

26
To view / modify the program, proceed as follows:
Press the button until the Programmed operating mode is activated.
3"
Press the button for at least 3 seconds to enter the view / edit the
Programming mode.
On the rst day of the week, the set temperature and the corresponding
symbol start to ash.
Use and buttons to to select the different times of the day and
the
button to change the operating mode of each hour.
Each time the
button is pressed, the operating mode changes fol-
lowing the sequence:
Comfort > Comfort-1 > Comfort-2 > Eco >Anti-freeze
Press the button to view / edit the following day.
If you wish to copy the settings for one day to another (following), proceed as follows:
Select the day you want to copy the settings from and press and
buttons at the same time.
The word "COPY" appears on the display conrming that it has been
saved.
Press the F button to select the day you want to program with the same
program you just copied.
Press and buttons together again to paste the program on the
selected day. The word PROG appears on the display.
Press the button to view / edit the following day.
The procedure ends by pressing the button again after viewing / editing
the last day of the week. The display returns to show the programming
settings for the current day and time.

27
11.
troubleshooting
• In the event of overheating, the safety device on the appliance automatically disabled the heating elements. In
this case:
- Turn off the convector and allow it to cool down for about 15/20 minutes.
- Eliminate any other possible reasons for overheating (e.g.: obstructions in front of the air inlet/outlet grilles,
build-ups of dirt).
- Turn on the convector again and check it works correctly.
12.
Maintenance
• This product does not require any special maintenance.
• Clean the product with a dry cloth once every 6 months.
• If the product requires repairing, contact an authorised technical service centre.
• When replacing the power cable, use a 2x0,75mm
2
H05RR-F or 2x1,00 mm
2
H05RR-F <HAR> type. This ope-
ration must be performed by qualied personnel and never by the end user in order to avoid damaging the
appliance and jeopardising personal safety.
13.
legal notice
Environment and recycling
To avoid damages during transport, your device has been carefully packed. To contribute to the protection
of our environment, we ask you to dispose of the packaging materials properly.
Recycling of obsolete appliances
Appliances with this label must not be disposed off with the general waste but they must be collected and
disposed of separately. The disposal of used devices must be carried out with precision, in compliance with
the locally applicable regulations and laws in force.

28
Information requirements for electric local space heaters
Model identier(s): SIRIO
Item Symbol Value Unit Item Unit
Heat output Type of heat input, for electric storage local space heaters only (select
one)
Nominal heat
output
P
nom
(*) kW
manual heat charge control, with integrated thermostat no
Minimum heat
output (indicative)
P
min
(**) kW
manual heat charge control with room and/or outdoor
temperature feedback
no
Maximum
continuous heat
output
P
max,c
(***) kW
electronic heat charge control with room and/or outdoor
temperature feedback
no
Auxiliary electri-
city consum-
ption
heat output no
At nominal heat
output
el
max
0,000 kW
Type of heat output/room temperature control (select
one)
At minimum heat
output
el
min
0,000 kW
single stage heat output and no room temperature control no
In standby mode el
SB
0,162
W Two or more manual stages, no room temperature control no
with mechanic thermostat room temperature control no
with electronic room temperature control no
electronic room temperature control plus day timer no
electronic room temperature control plus week timer yes
Other control options (multiple selections possible)
room temperature control, with presence detection no
room temperature control, with open window detection yes
with distance control option no
with adaptive start control no
with working time limitation no
with black bulb sensor no
Contact details Your dealer or Ermete Giudici S.p.A. - via L. da Vinci, 27 - 20090 Segrate (MI) Italy
(*) SIRIO 5 =0,50 SIRIO 10 = 1,00 SIRIO 15 = 1,50 SIRIO 20 = 2,00
(**) SIRIO 5 =0,25 SIRIO 10 = 0,50 SIRIO 15 = 0,75 SIRIO 20 = 1,00
(***) SIRIO 5 =0,50 SIRIO 10 = 1,00 SIRIO 15 = 1,50 SIRIO 20 = 2,00

29
ROMANA
MANUAL DE INSTALARE SI UTILIZARE
Citiți cu atenție aceste instrucțiuni înainte de a utiliza produsul, pentru a evita deteriorarea sau apariția unor
situații periculoase. Orice utilizari a produsului, altele decât cele indicate în acest manual, poate provoca
incendii, pericole electrice sau răniri și va anula orice garanție.
Garanția nu se aplică defecțiunilor, pierderilor, vătămărilor sau deteriorărilor cauzate de utilizarea incorectă a
produsului. Toate drepturile legale în acest domeniu rămân garantate. Nici o garanție nu poate exclude sau modica
condițiile de garantare reglementate de legile statului care nu pot excluse sau modicate în niciun caz.
Înainte de ecare operație, scoateți cu atenție ambalajul și vericați integritatea perfectă a produsului. Dacă se
înregistrează defecțiuni sau deteriorări, nu instalați și nu încercați să reparați echipamentul! Contactați distribuitorul!
Nu lăsați ambalajul la îndemâna copiilor și nu aruncați componentele acestuia decat în conformitate cu reglementările
în vigoare.
1.
Pentru siguranta dvs.
• Acest produs este destinat uzului casnic și nu este adecvat pentru
utilizare în medii comerciale / industriale sau pe vehicule, bărci
sau aeronave.
• Aparatul poate utilizat de copii cu vârsta de minim 8 ani si de
persoane cu capacitate zica, senzoriala si mentala redusa sau
fără experiență si cunoștințe necesare, numai sub supraveghe-
re sau după ce au fost instruiți să folosească echipamentul în
siguranță și să înțeleagă pericolele inerente acestuia. Copiii nu
trebuie să se joace cu aparatul. Curățarea și întreținerea necesa-
re bunei functionari a aparatului nu trebuie efectuate de copii fără
supraveghere.
• Copiii sub 3 ani nu trebuie să se apropie de produs fara suprave-
gherea unui adult.
• Copiii cu vârste cuprinse între 3 și 8 ani po tdoar porni/opri apara-
tul atât timp cât acesta a fost instalat și poziționat în conformitate
cu condițiile normale de utilizare și sunt supravegheati sau instru-
iti în mod corespunzător cu privire la utilizarea corectă și sigură a
produsului și au înțeles pericolul acestuia. Copiii cu vârste cuprin-
se între 3 și 8 ani nu pot conecta sau programa produsul, nu îl pot
curăța sau întreține.
• ATENȚIE: Unele părți ale acestui produs po dteveni foar-
te erbinti si pot cauza arderi. O atenție deosebită trebuie
acordată în prezența copiilor sau a oamenilor vulnerabili.
• Asigurați-vă că sursa de alimentare corespunde datelor de cali-
brare: 230V ~, 50Hz.

30
• Produsul are un nivel dublu de protecție împotriva apei: IPX0
când este folosit ca incalzitor mobil și IPX4 când este instalat pe
perete. Respectați reglementările țării în care produsul este insta-
lat pentru a utilizat în medii diferite. Când este instalat pe perete,
acesta poate folosit în bai atata timp cat nu se aa in perimetrul
vanei sau dusului. Prin urmare, produsul nu poate instalat în
zonele indicate ca volum 1 în diagrama din gura 1. Dacă este
folosit ca incalzitor mobil, asigurați-vă că convectorul nu este ac-
cesibil de la cadă, duș sau piscină.
• În timpul funcționării, așezați convectorul într-o poziție sigură,
adică:
- cel puțin la 1 m de obiecte inamabile sau mobile
- lăsând grilajul de evacuare a aerului liber, neacoperit
- nu se aă niciodată imediat sub o priză electrică
• Nu lăsați animalele sau copiii să se joace sau să atingă suportul
convectorului. Atenție! În timpul funcționării, grilajul de evacuare a
aerului poate deveni foarte erbinte (peste 90 ° C);
• IMPORTANT: pentru a evita supraîncălzirea, nu acoperiți
niciodată produsul. Nu puneți niciodată obiecte sau pături pe
aparat în timp ce acesta funcționează. Acest lucru este scris
în mod clar pe dispozitiv sau ilustrat de simbolul
• Nu utilizați convectorul în încăperi saturate cu gaze explozive, va-
pori generați de solvenți și lacuri sau în orice tip de vapori/gaze
inamabile.
• Dacă cablul este deteriorat și trebuie să îl înlocuiți, nu efectuați
această operațiune singur. Trimiteti convectorul la un centru de
reparații autorizat deoarece este necesara interventia unui perso-
nal special instruit pentru a evita orice risc de deteriorare.
• Convectorul trebuie să e poziționat astfel încât priza sa e intot-
deauna accesibila.
• Nu instalați produsul pe pereți din material sintetic.
• Nu utilizați convectorul dacă acesta a căzut;
• Nu utilizați dacă există semne vizibile de deteriorare a convecto-
rului;

31
• Utilizați convectorul pe o suprafață orizontală și stabilă;
• ATENȚIE: Nu utilizați convectorul în încăperi mici atunci când
sunt ocupate de persoane care nu pot părăsi singure încăperea,
decât dacă sunt sub supravegherea unei persoane responsabile
de siguranța acestora;
• ATENȚIE: Pentru a reduce riscul de incendiu, păstrați țesăturile
departe de orice alt material inamabil si la cel puțin 1 m distanță
de grila de evacuare a aerului.
2.
Montajul Pe Perete
• Montați convectorul într-o poziție orizontală cu grila de evacuare a aerului orientată în sus.
• Acest convector este cu izolație electrică dublă (clasa II), astfel încât nu este necesară conectarea la pământare.
• Acest convector trebuie instalat în conformitate cu reglementările în vigoare în țara de instalare..
• În medii umede, cum ar bai și bucătării, conexiunea la rețeaua de alimentare trebuie să aibă o înălțime de cel
puțin 25 cm de la sol. Dispozitivele de deconectare de la rețeaua de alimentare trebuie să permită deconectarea
completă în condițiile categoriei de supratensiune III.
• Aparatul trebuie instalat pe perete, respectând distanțele minime de la tavan, podea și pereții laterali indicați în
gura 2. În acest scop, suportul trebuie xat pe perete, respectând distanțele indicate în gura 3 și în tabelul de
mai jos.
• Pentru a continua instalarea:
- Scoateți suportul de pe produs;
- Faceti 4 găuri în perete, respectând distanțele indicate în gura 3 și specicate în tabelul următor:
MODEL A B C
SIRIO 5 205mm 180mm 357mm
SIRIO 10 290mm 260mm 400mm
SIRIO 15 270mm 480mm 400mm
SIRIO 20 250mm 700mm 400mm
- Fixați consola cu ajutorul dopurilor de perete și a șuruburilor corespunzătoare tipului de perete;
- Vericați dacă distanțele minime descrise anterior sunt îndeplinite;
- Apropiați produsul de suport până când cârligele inferioare ale consolei sunt introduse în sloturile de pe
panou. în spate, așa cum este indicat în gura 4;
- Rotiți partea superioară a produsului spre perete până când acesta se blochează, asigurându-vă că xați
cele 2 cârlige superioare ale suportului, așa cum se arată în gura 5;
- Blocați cele două cârlige superioare ale brațului folosind șuruburile furnizate, după cum se arată în gura 6.
3.
Fixarea roților (opțional)
• Convectorul poate de asemenea utilizat ca produs mobil prin achiziționarea roților furnizate separat.
• Pentru xarea roților:
- vericați orientarea corectă așa cum este indicat în gura 7;
- xați ecare dintre cele două suporturi cu roțile folosind șuruburile prevăzute în gura 8. Șuruburile acestea
pot xate manual și nu necesită utilizarea unei scule.

32
4.
descrierea coMenzilor
• Convectorul este echipat cu un buton pornit / oprit pe partea dreaptă. Atunci când produsul este oprit,
• componentele electrice interne nu vor mai funcționa.
• Următoarele comenzi sunt integrate pe partea frontală a produsului (gura 10):
Așaj multifuncțional pentru a așa starea de funcționare și activarea funcțiilor:
Comfort
Confort - 1 °C
Confort - 2°C
Eco
Antiinghet
Tastatura blocata
Senzor fereastra deschisa
Incalzire in curs
Butonul de selectare a modului de funcționare.
Buton pentru selectarea funcțiilor speciale.
Butoane de navigare din cadrul diverselor meniuri.
Buton pentru a activa sau a dezactiva starea de așteptare.

33
5.
pornire și încălzire
Produsul este alimentat de la un buton electromecanic pornit / oprit. Oprirea produsului prin intermediul acestui buton
face ca alimentarea plăcii electronice să e întreruptă și timpul și ziua curentă să e anulate. Vă recomandăm să
utilizați acest întrerupător numai dacă nu utilizați produsul pentru o perioadă îndelungată de timp. Utilizați în schimb
butonul ON / STAND-BY de pe panoul de control în cazul unei întreruperi scurte a utilizării produsului. În acest fel, nu
veți pierde setările de ajustare introduse anterior.
Atunci când este pornit, convectorul activează ultimul mod utilizat înainte de oprire sau întreruperea alimentării.
Timpul este resetat la ora 12:00 și ziua săptămânii, luni.
ON - OFF
Utilizați butonul Power / Stand-by pentru a porni și opri convectorul fără a pierde timpul memorat.

34
6.
Mod de oPerare
Apăsând butonul vă permite să selectați unul din următoarele 6 moduri de operare:
Mod CONFORT
Convectorul funcționează pentru atingerea și menținerea temperaturii
de confort stabilite.
Simbolul corespunzător modului Comfort se aprinde.
Simbolul încălzirii se aprinde atunci când elementul de încălzire
funcționează.
În acest mod, funcția de detectare a ferestrelor deschise este
disponibilă (consultați butonul FUNCȚII).
Mod CONFORT-1
Convectorul funcționează pentru atingerea și menținerea temperaturii
de confort setată, reduse cu 1 ° C.
Simbolul corespunzător modului Confort-1 se aprinde.
Simbolul încălzirii se aprinde atunci când elementul de încălzire
funcționează.
În acest mod, funcția de detectare a ferestrelor deschise este
disponibilă (consultați butonul FUNCȚII).
Mod CONFORT-2
Convectorul funcționează pentru atingerea și menținerea temperaturii
de confort setată, reduse cu 2 ° C.
Simbolul corespunzător modului Confort-2 se aprinde.
Simbolul încălzirii se aprinde atunci când elementul de încălzire
funcționează.
În acest mod, funcția de detectare a ferestrelor deschise este
disponibilă (consultați butonul FUNCȚII).
Modul ECO
Convectorul funcționează pentru a atinge și menține temperatura de
confort setată, redusă cu 3,5 ° C.
Simbolul corespunzător modului Eco se aprinde.
Simbolul încălzirii se aprinde atunci când elementul de încălzire
funcționează.
În acest mod, funcția de detectare a ferestrelor deschise este
disponibilă (consultați butonul FUNCȚII).
Modul ANTI-FREEZE
Termostatul este setat automat la temperatura de 7 ± 3 ° C.
Simbolul corespunzător modului antiîngheț se aprinde.
Simbolul încălzirii se aprinde atunci când elementul de încălzire
funcționează.
În acest mod, funcția de detectare a ferestrelor deschise nu este
disponibilă.
Modul PROGRAMAT
Convectorul funcționează pentru atingerea și menținerea temperaturii
setate în programul săptămânal (vezi paragraful PROGRAMARE
WEEKLY).
Simbolul corespunzător modului de funcționare (Confort, Confort-1,
Confort-2, Eco sau Anti-îngheț) se aprinde în funcție de setările pentru
ora curentă și ziua curentă.
În acest mod, funcția de detectare a ferestrelor deschise este
disponibilă (consultați butonul FUNCȚII).

35
7.
Functii sPeciale
Apăsând butonul vă permite să selectați una dintre următoarele 3 funcții speciale:
Funcția RESET
Prin activarea acestei funcții, toate setările sunt restaurate la valoa-
rea inițială din fabrică. Temperatura de confort este setată la 19,0 ° C,
programul prestabilit este cel descris în secțiunea corespunzătoare și
funcția de detectare a ferestrei deschise este dezactivată.
5"
Apăsați RESET pentru cel puțin 5 secunde pentru a
efectua RESET tasta .
Activarea funcției de detectare a ferestrei deschise
Această funcție permite identicarea deschiderii unei ferestre și setarea
automată a modului de funcționare antiîngheț.
Dacă în timpul funcționării normale a produsului este detectată o
reducere bruscă a temperaturii ambiante, modul antiinghet se
activează automat pentru a reduce pierderile de energie. Simbolul
ferestrei și simbolul antiinghet indică activarea funcției.
Restaurarea funcționării normale nu este automată, ci se obține prin
apăsarea oricăruia dintre cele 5 taste ale produsului.
Funcționarea corectă a acestei funcții poate depinde de
poziționarea produsului in cameră, de prezența curenților, de
temperatura exterioară și de timpul de deschidere a ferestrei.
Activați funcția apăsând butonul simbolul ferestrei se
aprinde pe așaj.
Dezactivați funcția apăsând butonul . Simbolul
ferestrei se stinge.

36
Functia de blocare a tastaturii
Prin activarea acestei funcții, toate tastele sunt dezactivate pentru a
preveni modicările nedorite ale setărilor de funcționare.
5"
Activați funcția apăsând butonul timp de cel puțin 5
secunde.
Simbolul cheie se aprinde pe așaj, iar tastele sunt
blocate.
5"
Dezactivați funcția apăsând tastele simultan timp de cel
puțin 5 secunde.
Simbolul cheie se stinge, iar tastele devin din nou active.
8.
controlul teMPeraturii
Controlul electronic al temperaturii se bazează pe valoarea pe care utilizatorul o atribuie temperaturii COMFORT.
Valorile temperaturii pentru modurile Confort-1, Confort-2, Eco și Anti-îngheț sunt calculate automat și nu pot
modicate direct de către utilizator. Temperatura de referință este indicată întotdeauna pe așaj împreună cu
simbolul reprezentând modul de funcționare selectat.
NOTĂ: Temperatura măsurată de senzorul din interiorul produsului indică întotdeauna temperatura ambientală în
imediata vecinătate a produsului și poate diferită de temperatura măsurată cu alte instrumente din alte zone ale
încăperii. Această diferență poate depinde de diferiți factori, cum ar :
- poziția de instalare: unele zone ale camerei pot afectate de curenți sau zone de aer cald care pot schimba
măsurarea senzorului;
- Instalarea pe un perete perimetral exterior, care în mod normal este mai rece decât pereții interiori, poate duce la o
temperatură mai scăzută decât temperatura reală a încăperii;
- Condiții instabile: ecare evaluare trebuie făcută în condiții de funcționare stabile. Din acest motiv, temperatura
Confort nu trebuie schimbată înainte de trecerea a 60 de minute de la modicarea anterioară. Nu este posibil să se
evalueze dacă temperatura camerei este corect menținută de produs dacă nivelul de temperatură este modicat
continuu într-o perioadă scurtă de timp.
Dacă diferența dintre temperatura setată și temperatura ambiantă este detectată în condiții de stabilitate, calculați
această diferență și apoi măriți sau micșorați nivelul temperaturii de confort pe produs a valorii diferențiale calculate
exact.

37
9.
setarea zilei si orei
Pentru a seta ora curentă și ziua, procedați după cum urmează:
Apăsați butonul timp de cel puțin 3 secunde până cand ziua din
săptămâna începe să clipească.
3"
Apăsați butonul timp de cel puțin 3 secunde până cand ziua din
săptămâna începe să clipească.
Utilizați tastele
ee pentru a selecta ziua curenta
Apăsați butonul pentru a trece la introducerea orei curente
Utilizați tastele
ee pentru a selecta ora curenta
Apăsați butonul pentru a trece la introducerea minutelor
Utilizați tastele
ee pentru a selecta minutele
Apăsați butonul pentru a termina setarea și a reveni la modul Pro-
gramabil.
10.
programarea săptămânală
Programul săptămânal vă permite să setați modul de funcționare dorit pentru ecare oră din zi și pentru ecare zi a
săptămânii. Convectorul este furnizat presetat cu următorul program săptămânal:
Lunì - Vinerì
Sambata - Duminica

38
Pentru a vizualiza / modica programul, procedați după cum urmează:
Apăsați butonul până când modul de operare Programabil este
activat.
3"
Apăsați butonul per almtimp de 3 secunde pentru a intra în modul
de așare / schimbare programare.On the rst day of the week, the set
temperature and the corresponding symbol start to ash.
Folositi tastele si pentru a selecta diferitele ore ale zilei și
tasta
pentru a schimba modul în care funcționează ecare oră.
Când este apăsat butonul
modul de operare se modică dupa
secventa:
Confort > Confort-1 > Confort-2 > Eco >Anti-inghet
Apăsați butonul pentru a comuta la vizualizarea / editarea zilei ur-
matoare.
Dacă doriți să copiați setările pentru o zi în alta (după), procedați după cum urmează:
Selectați ziua de la care doriți să copiați setările și apăsați
simultan tasta
si .
Mesajul "COPY" apare pe ecran pentru a conrma că memoria a fost
salvată.
Apăsați tasta F pentru a selecta ziua pe care doriți să o programați cu
același program pe care tocmai l-ați copiat.
Apăsați din nou tastele împreună si pentru a alipi programul în
ziua selectată. Pe ecran apare din nou cuvântul PROG.
Apăsați butonul pentru a comuta pentru a vizualiza / modica ziua
urmatoare.
Procedura se încheie prin apăsarea butonului
după așarea / mo-
dicarea ultimei zile a săptămânii. Așajul revine pentru a așa setările
de programare pentru ziua și ora curente.

39
11.
dePanarea
• În cazul supraîncălzirii, dispozitivul de protecție din interiorul produsului dezactivează atât rezistența. În acest
caz:
- Opriți convectorul și lăsați-l să se răcească timp de aproximativ 15/20 minute;
- Eliminați orice posibilă cauză de supraîncălzire (de exemplu: obstrucții la grilele de ieșire aer, reziduuri de
murdărie pe produs etc.;
- Porniți din nou convectorul și vericați dacă acesta funcționează corect.
12.
întreținere
• Acest produs nu necesită întreținere specială.
• Curățați produsul cu o cârpă uscată cel puțin o dată la 6 luni.
• Dacă produsul trebuie reparat, contactați un centru de service calicat.
• În cazul înlocuirii cablului de alimentare, utilizați un H05RR-F 2x0,75mm2 sau 2x1,00mm2 H05RRF
<HAR> conform modelului de convector. Această înlocuire trebuie efectuată de personal tehnic cali-
cat și niciodată de utilizatorul nal, pentru a evita deteriorarea produsului și orice risc pentru persoană.
13.
Prevederi legale
Protecția mediului și reciclarea
Pentru ca aparatul să nu e deteriorat în timpul transportului, a fost ambalat cu grijă. Pentru a contribui la
protecția mediului nostru, vă rugăm să eliminați corespunzator materialul utilizat pentru ambalarea corectă
a aparatului.
Eliminarea aparatelor uzate
Aparatele marcate cu marcajul lateral nu trebuie aruncate împreună cu deșeurile menajere, ci trebuie
colectate și eliminate separat. Eliminarea echipamentelor uzate trebuie efectuată într-o manieră adecvata,
în conformitate cu regulamentele și reglementările aplicabile la nivel local.

40
Informații obligatorii pentru încălzitoarele electrice locale
Identicator model: SIRIO
Data Simbol Valoare Unitati Date Unitati
Putere termica Tipul de căldură, numai pentru încălzitoare electrice locale de
stocare (indicați numai o singură opțiune)
Putere termica
nominala
P
nom
(*) kW
controlul manual al sarcinii termice, cu termostat integrat nu
Putere termica
minima (indica-
tiva)
P
min
(**) kW
controlul manual al sarcinii termice cu feedback ambiental la
temperatura camerei și / sau exterior
nu
Putere maxima
termica continua
P
max,c
(***) kW
control electronic al sarcinii termice cu feedback ambiental la
temperatura camerei și / sau exterior
nu
Consum auxiliar
de energie
electrica
ventilator asistat de putere termică nu
La putere termica
nominala
el
max
0,000 kW
Tipul de ieșire termică / controlul temperaturii camerei
(indicați doar o opțiune)
La putere termica
minima
el
min
0,000 kW
puterea termică monofazată fără controlul temperaturii
ambientale
nu
In mod stand-by el
SB
0,162
W
două sau mai multe faze manuale fără a controla tempera-
tura camerei
nu
cu reglarea temperaturii camerei prin intermediul termosta-
tului mecanic
nu
cu control electronic al temperaturii ambiante nu
cu control electronic al temperaturii camerei și al cronome-
trului zilnic
nu
cu control electronic al temperaturii camerei și al cronome-
trului săptămânal
si
Mai multe opțiuni de control (puteți selecta mai multe
opțiuni)
controlul temperaturii camerei cu detectarea prezenței nu
controlul temperaturii camerei cu detectarea ferestrelor
deschise
si
cu opțiunea de control la distanță nu
cu control adaptiv de pornire nu
cu limitarea timpului de funcționare nu
cu termometru cu glob negru nu
Contactati-ne Distribuitorul sau Ermete Giudici S.p.A. - via L. da Vinci, 27 - 20090 Segrate (MI) Italy
(*) SIRIO 5 =0,50 SIRIO 10 = 1,00 SIRIO 15 = 1,50 SIRIO 20 = 2,00
(**) SIRIO 5 =0,25 SIRIO 10 = 0,50 SIRIO 15 = 0,75 SIRIO 20 = 1,00
(***) SIRIO 5 =0,50 SIRIO 10 = 1,00 SIRIO 15 = 1,50 SIRIO 20 = 2,00

41
POLSKI
INSTRUKCJA MONTAŻU I OBSŁUGI
Przed uruchomieniem grzejnika należy dokładnie zapoznać się z poniższymi instrukcjami, aby uniknąć
uszkodzeń i niebezpiecznych sytuacji. Jakiekolwiek użycie grzejnika inne niż określone w niniejszej instrukcji
obsługi może spowodować pożar, porażenie prądem elektrycznym lub obrażenia i utratę gwarancji.
Gwarancja nie obejmuje wad, pogorszenia, utraty, uszkodzenia lub szkody spowodowane przez lub w wyniku nieo-
dpowiedniego użycia lub nadużycia tego grzejnika. Prawa dyktowane przez prawo państwowe nie są pomijane. Żaden
z warunków niniejszej gwarancji nie wyłącza jakichkolwiek warunków bądź gwarancji przewidzianych przepisami pra-
wa krajowego, które nie mogą zostać uchylone ani zmienione.
Przed rozpoczęciem użytkowania usunąć opakowanie i sprawdzić integralność produktu. W przypadku wad lub
uszkodzeń, nie próbuj naprawiać go samodzielnie, lecz skontaktuj się z sprzedawcą.
Nie pozwalaj dzieciom bawić się opakowaniem i chroń środowisko poprzez utylizację opakowania zgodnie z krajowymi
przepisami dotyczącymi przetwarzania odpadów.
1.
Dla własnego bezpieczeństwa
• Ten grzejnik jest przeznaczony do użytku domowego i nie
zostałprzystosowany do użytku komercyjnego/przemysłowego,
wsamochodach, na statkach lub samolotach.
• Produkt może być stosowany przez dzieci od 8 roku życia oraz
osobyoograniczonych zdolnościach zycznych, czuciowych
lubumysłowych, lub z niedostatecznym doświadczeniem i wiedzą,
podwarunkiem że są one pod nadzorem osoby odpowiedzial-
nej za ichbezpieczeństwo lub zostały odpowiednio poinstruo-
wane. Dzieci niepowinny bawić się produktem. Czyszczeniem i
przeglądamiużytkownika nie powinny się zajmować dzieci bez
nadzoru.
• Dzieci poniżej 3 roku życia powinny być trzymane z dala
odurządzenia chyba że są pod stałą opieką.
• Dzieci pomiędzy 3 a 8 rokiem życia powinny tylko włączać i
wyłączaćurządzenie, oczywiście tylko wtedy, gdy umiejscowie-
nie grzejnika nato pozwala, nie zapominając o ciągłym nadzorze
i wytłumaczeniu jakkorzystać z urządzenia w bezpieczny sposób.
Dzieci pomiędzy 3 a 8rokiem życia nie powinny wyciągać wtyczki
z gniazda, operowaćtermostatem, czyścić grzejnik lub wykonywać
kontrole użytkoweurządzenia.
• UWAGA – Niektóre elementy tego produktu mogą być
bardzogorące i mogą spowodować oparzenia. Szczególną
uwagę trzebapoświęcić gdy w pobliżu znajdują się dzieci i
osoby starsze.

42
• Upewnij się, że zasilanie sieciowe odpowiada nominalnej mocy:
230VAC, 50Hz.
• Ten konwektor ma podwójny poziom ochrony przed wodą:
IPX0, gdyjest używany jako przenośny, a IPX4 kiedy zamon-
tujemy go naścianie. Należy przestrzegać przepisów danego
kraju sposobu imiejsca montażu w różnych pomieszczeniach.
Z tego powodu możebyć stosowany w łazienkach lub w innych
pomieszczeniachnarażonych na wilgoć POD WARUNKIEM ŻE
ZNAJDUJE SIĘ WBEZPIECZNEJ ODLEGŁOŚCI OD WANNY
CZY PRYSZNICA.Oznacza to, że nie można go instalować w ob-
szarach oznaczonychjako VOLUME 1 na rysunku 1. W przypadku
używania jakourządzenia przenośnego nie należy używać tego
grzejnika wnajbliższym otoczeniu wanny, prysznica lub basenu;
• Podczas działania ustawić konwektor w bezpiecznej pozycji:
- co najmniej 1m od łatwopalnych przedmiotów lub mebli;
- pozostawiając nie mniej niż 1m wolnej przestrzeni przedkon-
wektorem;
- nie znajduje się bezpośrednio pod gniazdem.
• Grzejnika nie wolno pozostawiać do zabawy dzieciom ani nie
wolnodopuścić, aby zwierzęta dotykały jego powierzchni. Zwróć
uwagę!Kratka wylotu powietrza nagrzewa się podczas pracy
urządzenia (do ponad 90 °C)
• UWAGA: Aby uniknąć przegrzania, nie należy
przykrywaćgrzejnika. Nie zawieszaj niczego na grzejniku i nie
zakrywaj gopodczas pracy. Jest to wyraźnie napisane na okładce
produktulub oznaczone symbolem:
• Nie używaj grzejnika w pomieszczeniach z gazem wybuchowym
lubpodczas korzystania z łatwopalnych rozpuszczalników, la-
kierów lubklejów.
• Jeśli przewód jest uszkodzony i trzeba go wymienić, nie rób tego
sam!Dostarcz produkt do autoryzowanego centrum napraw lub
do osoby opodobnych umiejętnościach i wiedzy, w celu uniknięcia
ryzykauszkodzenia.
• Urządzenie musi być zamontowane tak, aby wtyczka była

43
zawszedostępna.
• Nie należy montować urządzenia na ścianach wykonanych
zmateriałów syntetycznych.
• Nie używaj tego grzejnika, jeśli został upuszczony;
• Nie używać, jeśli widoczne są oznaki uszkodzenia grzejnika;
• Używaj tego grzejnika na poziomej i stabilnej powierzchni;
• UWAGA: Nie używaj tego grzejnika w małych pomieszczeniach,
gdysą one zajęte przez osoby, które nie mogą opuścić pomieszc-
zeniasamodzielnie, chyba że zapewniony jest stały nadzór.
• UWAGA: Aby zmniejszyć ryzyko pożaru, tkaniny, zasłony lub
innełatwopalne materiały należy przechowywać w odległości co
najmniej 1m od wylotu powietrza.
2.
montaż na ścianie
• Przymocuj konwektor w pozycji poziomej, z kratką wylotu powietrza skierowaną do góry;
• Konwektor jest wyposażony w podwójny obwód izolacji elektrycznej (klasa II) i w związku z tym nie wymaga
uziemienia;
• Sposób montażu grzejnika musi być zgodny z wymaganiami określonymi w obowiązujących przepisach kra-
jowych.
• W pomieszczeniach wilgotnych, takich jak łazienki czy kuchnie, przyłącze elektryczne należy zamontować
nawysokości co najmniej 25 cm powyżej poziomu podłogi. Ponadto, sieć zasilającą, do której ma zostać
podłączone urządzenie, należy wyposażyć w wyłącznik dwubiegunowy zapewniający minimalną odległośćmiędzy
stykami. Takie rozwiązanie pozwoli na całkowite odłączenie urządzenia w warunkach określonych zgodnie z III
kategorią przepięciową.
• Urządzenie musi być zamontowane na ścianie z zachowaniem minimalnych odległości od sutu, podłogi
i ścian bocznych pokazanych na rys. 2. Wspornik montażowy musi być przymocowany do ściany zgodnie
z odległościami wskazanymi na rysunku 3 i podanymi w poniższej tabeli. Zawsze przestrzegaj minimalnych
odległości od ścian, mebli i / lub przedmiotów, jak pokazano na rysunku 3.
• Aby kontynuować montaż:
- Usuń wspornik z produktu;
- Wywierć 4 otwory w ścianie zgodnie z odległościami wskazanymi na rysunku 3 i określonymi w
tabeliponiżej:
MODEL A B C
SIRIO 5 205mm 180mm 357mm
SIRIO 10 290mm 260mm 400mm
SIRIO 15 270mm 480mm 400mm
SIRIO 20 250mm 700mm 400mm
- Przymocuj wspornik za pomocą kołków i śrub odpowiednich do rodzaju ściany;
- Upewnij się, że opisane powyżej minimalne odległości są zachowane;
- Zbliż produkt do wspornika, aż dolne zaczepy wspornika zostaną włożone w dolne otwory z tyłu grzejnika,
jak pokazano na rysunku 4;
- Obróć górną część produktu w kierunku ściany, aż się zablokuje, upewniając się, aby zatrzasnąć 2 górne
zaczepy wspornika, jak pokazano na rysunku 5;
- Zablokuj 2 górne zaczepy wspornika za pomocą dostarczonych śrub, jak pokazano na rysunku 6.

44
3.
montaż kółek (opcjonalnie)
• Konwektor można również wykorzystać jako produkt przenośny, dokonując zakupu kół, które są dostarczane
osobno.
• Aby zamontować koła:
- sprawdź poprawną pozycję grzejnika, jak pokazano na rysunku 7.
- Zamocuj każdą z 2 podpór za pomocą dostarczonych śrub, jak pokazano na rysunku 8. Śruby można
zamocować ręcznie i nie wymagają żadnego narzędzia.
4.
korzystanie z Produktu
• Konwektor jest wyposażony w przycisk włączania / wyłączania po prawej stronie. Gdy produkt jest wyłączony,
wewnętrzne komponenty elektryczne nie będą zasilane.
• Od góry urządzenia zintegrowano następujące elementy sterujące (rysunek 10):
Wyświetlacz wielofunkcyjny do przeglądania stanu działania i aktywacji funkcji.
Komfort
Komfort - 1 °C
Komfort - 2°C
Eco
Przeciw-zamrożeniowy
Blokada klawiatury
Czujnik otwartego okna
W trakcie ogrzewania
Przycisk wyboru trybu pracy.
Przycisk funkcji specjalnych.
Przyciski nawigacyjne.
Włącz/wyłącz przycisk Zasilanie/Czuwanie.

45
5.
włączanie/wyłączanie
Produkt jest zasilany przez elektromechaniczny przycisk włączania / wyłączania. Po wyłączeniu tego przełącznika
następuje wyłączenie zasilania termostatu oraz anulowanie bieżącej godziny i dnia. Zalecamy używanie go tylko wte-
dy, gdy nie używasz go przez dłuższy czas, a zamiast tego użyj przycisku Zasilanie / Czuwanie na panelu sterowania
w przypadku krótkiej przerwy w działaniu urządzenia. W ten sposób nie utracisz wcześniej wprowadzonych ustawień.
Po włączeniu konwektor aktywuje ostatni tryb używany przed wyłączeniem lub awarią zasilania. Czas resetuje się na
godzinę 12:00 oraz dzień tygodnia na poniedziałek.
ON - OFF
Użyj przycisku Zasilanie / Czuwanie, aby włączyć i wyłączyć konwektor bez utraty wprowadzonych ustawień.

46
6.
tryby Pracy
Po naciśnięciu przycisku można wybrać jeden z 6 następujących trybów pracy:
Tryb KOMFORT
Konwektor działa, aby osiągnąć i utrzymać ustawioną temperaturę
komfortową.
Symbol odpowiadający trybowi Komfort pojawi się na wyświetlaczu.
Symbol grzania świeci się, gdy element grzewczy działa. W tym try-
bie dostępna jest funkcja wykrywania otwartego okna (patrz przycisk
FUNKCJE).
Tryb KOMFORT -1
Konwektor działa, aby osiągnąć i utrzymać ustawioną temperaturę
komfortową zmniejszoną o 1° C.
Symbol odpowiadający trybowi Komfort pojawi się na wyświetlaczu.
Symbol grzania świeci się, gdy element grzewczy działa. W tym try-
bie dostępna jest funkcja wykrywania otwartego okna (patrz przycisk
FUNKCJE).
Tryb KOMFORT -2
Konwektor działa, aby osiągnąć i utrzymać ustawioną temperaturę
komfortową zmniejszoną o 2° C.
Symbol odpowiadający trybowi Komfort pojawi się na wyświetlaczu.
Symbol grzania świeci się, gdy element grzewczy działa. W tym try-
bie dostępna jest funkcja wykrywania otwartego okna (patrz przycisk
FUNKCJE).
Tryb ECO
Konwektor działa, aby osiągnąć i utrzymać ustawioną temperaturę
komfortową zmniejszoną o 3.5° C.
Symbol odpowiadający trybowi Eco pojawi się na wyświetlaczu. Symbol
grzania świeci się, gdy element grzewczy działa. W tym trybie dostępna
jest funkcja wykrywania otwartego okna (patrz przycisk FUNKCJE).
Tryb Przeciw-zamrożeniowy
Termostat jest automatycznie ustawiany na temperaturę 7±3 ° C.
Symbol odpowiadający trybowi przeciw zamarzaniu pojawi się na
wyświetlaczu.
Symbol grzania świeci się, gdy element grzewczy działa. W tym trybie
funkcja wykrywania otwartego okna nie jest dostępna.
Tryb programu
Konwektor pracuje, aby osiągnąć i utrzymać temperaturę ustawioną w
programie tygodniowym (patrz akapit dotyczący PROGRAMOWANIA
TYGODNIOWEGO). Symbol odpowiadający trybowi pracy (tryb Kom-
fort, Komfort-1, Komfort-2, Eco lub przeciw-zamrożeniowy) pojawi się
na wyświetlaczu zgodnie z ustawieniami dla bieżącej godziny i dnia.
W tym trybie dostępna jest funkcja wykrywania otwartego okna (patrz
przycisk FUNKCJE).

47
7.
Funkcje sPecjalne
Po naciśnięciu przycisku można wybrać jedną z 3 następujących funkcji specjalnych:
Funkcja RESET
Po aktywowaniu tej funkcji wszystkie ustawienia zostają przywrócone
do początkowej wartości fabrycznej. Temperatura komfortowa jest usta-
wiona na 19,0 °C, nastawiony program (opisany w odpowiedniej sekcji)
oraz funkcja wykrywania otwartego okna są dezaktywowane.
5"
Aby zresetować przytrzymaj przycisk przez 5
sekund.
Konwektor jest automatycznie ustawiany w trybie
Komfort.
Funkcja wykrywania otwartego okna
Ta funkcja pozwala zidentykować otwarcie okna i au-
tomatycznie ustawić tryb pracy przeciw-zamrożeniowy.
Jeżeli podczas normalnej pracy urządzenia zostanie wykryty nagły
spadek temperatury otoczenia, tryb przeciw zamarzaniu włącza się au-
tomatycznie w celu zmniejszenia strat energii. Symbol okna i symbol
przeciw zamarzaniu migają, wskazując, że funkcja jest aktywna.
Przywrócenie normalnej pracy nie jest automatyczne, ale uzyskuje się
je poprzez naciśnięcie dowolnego z 5 przycisków produktu.
Prawidłowe działanie tej funkcji może zależeć od umiejscowie-
nia produktu w pomieszczeniu, obecności przeciągów, tempera-
tury zewnętrznej i czasu otwarcia okna.
Aktywuj funkcję naciskając przycisk .
Symbol okna zaświeci się na wyświetlaczu.
Dezaktywuj funkcję naciskając przycisk .
Symbol okna wyłączy się na wyświetlaczu.

48
Funkcja blokady klawiatury
Po uaktywnieniu tej funkcji wszystkie klawisze zostają dezaktywowane,
aby zapobiec niechcianej modykacji ustawień.
5"
Aktywuj funkcję przytrzymując przycisk 5 sekund.
Na wyświetlaczu pojawia się symbol klucza, a klawisze
zostaną zablokowane.
5"
Dezaktywuj funkcję przytrzymując przyciski i
jednocześnie przez co najmniej 5 sekund.
Symbol klucza wyłącza się, przyciski działają ponownie.
8.
kontrola teMPeratury
Elektroniczna kontrola temperatury opiera się na wartości, którą użytkownik przypisuje do temperatury KOMFORT.
Wartości temperatur dla trybów Komfort-1, Komfort-2, Eco i przeciw-zamrożeniowa są obliczane automatycz-
nie i niemogą być bezpośrednio modykowane przez użytkownika. Zadana temperatura jest zawsze wskazywana
nawyświetlaczu razem z symbolem przedstawiającym wybrany tryb pracy. UWAGA: Temperatura mierzona przez czu-
jnik wewnątrz produktu zawsze wskazuje temperaturę otoczenia w bezpośrednim sąsiedztwie produktu i możeróżnić
się od temperatury zmierzonej za pomocą innych przyrządów pomiarowych w innych częściach pomieszczenia. Ta
różnica może zależeć od różnych czynników, takich jak:
- Miejsce instalacji: na niektóre obszary pomieszczenia mogą wpływać prądy ciepłego powietrza, które mogą
zmienićpomiar czujnika;
- Instalacja na zewnętrznej ścianie, która jest zwykle zimniejsza niż ściany wewnętrzne, może powodować niższy
pomiar temperatury niż rzeczywista temperatura pomieszczenia;
- Niestabilne warunki: każdą ocenę należy przeprowadzić w stabilnych warunkach pracy. Z tego powo-
du temperatura komfortu nie powinna być zmieniana przed upływem 60 minut od poprzedniej mody-
kacji. W rzeczywistości nie można ocenić, czy temperatura w pomieszczeniu jest prawidłowo utr-
zymywana przez produkt, jeśli poziom temperatury jest stale modykowany w krótkim okresie czasu.
Jeśli różnica między temperaturą zadaną a temperaturą otoczeniazostanie wykryta w warunkach stabilnych, należy
obliczyć tę różnicę, anastępnie zwiększyć lub zmniejszyć poziom temperatury komfortu naprodukcie o dokładnie
obliczoną wartość różnicy.

49
9.
ustaWienie daty i czasu
Aby ustawić aktualną godzinę i datę, wykonaj następujące czynności:
Naciskaj przycisk ,aż wybrany zostanie tryb programu.
3"
Przytrzymaj przycisk przez 3 sekundy dopóki nie zacznie migać
dzień tygodnia.
Użyj przycisków
i aby ustawić aktualną datę.
Naciśnij przycisk aby przełączyć między ustawieniem dnia a usta-
wieniem czasu.
Użyj przycisków
i aby wybrać aktualny czas.
Naciśnij przycisk aby przełączyć między ustawieniem godzin i mi-
nut.
Użyj przycisków
i aby ustawić bieżące minuty.
Naciśnij przycisk aby zakończyć ustawienie i powrócić do trybu
programu.
10.
PrograMoWanie tygodnioWe
Tygodniowe programowanie pozwala ustawić żądany tryb pracy dla każdej godziny i dnia tygodnia. Konwektor
dostarczany jest z ustawionym programem tygodniowym:
Poniedziałek - Piątek
Sobota - Niedziela

50
Aby wyświetlić / zmodykować program, wykonaj następujące czynności:
Naciskaj przycisk aż uaktywni się zaprogramowany tryb pracy.
3"
Przytrzymaj przycisk przez co najmniej 3 sekundy, aby przejść do
widoku / edycji trybu programowania.
W pierwszy dzień tygodnia, ustawiona temperatura i odpowiedni
symbol zaczną migać.
Użyj przycisków i aby ustawić różne pory
dnia i przycisk
aby zmienić tryb pracy każdej godziny.
Z każdym naciśnięciem przycisku
tryb pracy zmienia się w
następującej sekwencji:
Komfort > Komfort-1 > Komfort-2 > Eco >Przeciw-zamrożeniowy
Naciśnij przycisk aby wyświetlić / edytować następny dzień.
Jeśli chcesz skopiować ustawienia z jednego dnia do drugiego (kolejno), wykonaj następujące czynności:
Wybierz dzień, w którym chcesz skopiować ustawienia, a następnie
naciśnij przyciski
i jednocześnie.
Na wyświetlaczu pojawi się słowo "COPY" potwierdzające, że zostało
zapisane.
Naciśnij przycisk F, aby wybrać dzień, który chcesz zaprogramować za
pomocą tego samego skopiowanego programu.
Naciśnij ponownie przyciski i jednocześnie aby wkleić program
w wybranym dniu. Na wyświetlaczu pojawi się słowo PROG.
Naciśnij przycisk aby wyświetlić / edytować następny dzień.
Procedura kończy się po ponownym naciśnięciu przycisku po obejrze-
niu / edycji ostatniego dnia tygodnia. Na wyświetlaczu pojawi się usta-
wienie programu dla bieżącego dnia i godziny.

51
11.
wrazie problemów
• W przypadku przegrzania urządzenie zabezpieczające na urządzeniu automatycznie wyłączy elementgrzewczy.
W takim przypadku należy:
- Wyłączyć konwektor i pozwolić mu ostygnąć przez około 15/20 minut.
- Wyeliminować wszelkie inne możliwe przyczyny przegrzania (np. Przeszkody przed kratkami wlotu /wylotu
powietrza, gromadzenie się brudu).
- Włącz konwektor ponownie i sprawdź, czy działa poprawnie.
12.
konserWacja
• Ten produkt nie wymaga specjalnej konserwacji.
• Czyszczenie produktu za pomocą suchej szmatki raz na 6 miesięcy.
• Jeśli produkt wymaga naprawy, należy skontaktować się z autoryzowanym serwisem technicznym.
• W przypadku wymiany kabla zasilającego, użyj 2x0,75mm2 H05RR-F lub 2x1,00 mm2 Typu H05RR-F
<HAR>Czynności te muszą być wykonywane przez wykwalikowany personel, a nie przez użytkownika
końcowego,aby uniknąć uszkodzenia urządzenia oraz zagrożenia bezpieczeństwa osobistego.
13.
inForMacja PraWna
Środowisko i recykling
Aby uniknąć uszkodzeń podczas transportu, urządzenie zostało starannie zapakowane. Aby przyczynić
się do ochrony naszego środowiska, prosimy o prawidłowe pozbywanie się materiałów opakowaniowych.
Recykling przestarzałych urządzeń
Urządzenia z tą etykietą nie mogą być utylizowane wraz z odpadami ogólnymi, ale należy je zbierać i
usuwać osobno. Usuwanie zużytych urządzeń musi odbywać się z dużą dokładnością, zgodnie z lokalnie
obowiązującymi przepisami.

52
Informacje wymagane dla lokalnych elektrycznych ogrzewaczy pomieszczeń
Model: SIRIO
Opis Symbol Wartość Jednostka Opis
Moc grzewcza Rodzaj wejścia ciepła, dla elektrycznych miejscowych ogrzewaczy
pomieszczeń (wybierz jeden)
Nominalna moc
grzewcza
P
nom
(*) kW
Ręczna regulacja ładowania ciepła, z wbudowanym termo-
statem
nie
Minimalna moc
grzewcza(orientacyjny)
P
min
(**) kW
Ręczna regulacja ładowania ciepła z odczytem temperatury
pokojowej i/lub temperatury zewnętrznej
nie
Maksymalna
ciągła moc
grzewcza
P
max,c
(***) kW
Elektroniczna regulacja ładowania ciepła z odczytem tempe-
ratury pokojowej i/lub temperatury zewnętrznej
nie
Dodatkowe
zużycie energii
elektrycznej
Ciepło wspomagane wentylatorem nie
Przy nominalnej
mocy grzewczej
el
max
0,000 kW
Rodzaj mocy grzewczej/kontroli temperatury pokojowej
(wybierz jedną)
Przy minimalnej
mocy grzewczej
el
min
0,000 kW
Jednostopniowe wytwarzanie ciepła i brak kontroli tempera-
tury w pomieszczeniu
nie
W trybie
czuwania(standby)
el
SB
0,162
W
Dwa lub więcej ręcznych etapów, brak kontroli temperatury
w pomieszczeniu
nie
Z ręczną regulacją temperatury pomieszczenia nie
Z elektroniczną regulacją temperatury pomieszczenia nie
Elektroniczna regulacja temperatury w pomieszczeniu plus
zegar dzienny
nie
Elektroniczna regulacja temperatury w pomieszczeniu plus
zegar tygodniowy
tak
Inne opcje sterowania (możliwe wielokrotne wybory)
Kontrola temperatury w pomieszczeniu, z wykrywaniem
obecności
nie
Kontrola temperatury w pomieszczeniu, z wykrywaniem
otwartego okna
tak
Z opcją kontroli odległości nie
Z adaptacyjną kontrolą startu nie
Z ograniczeniem czasu pracy nie
Z czujnikiem black bulb nie
Dane producenta Twój sprzedawca lub Ermete Giudici S.p.A. - via L. da Vinci, 27 - 20090 Segrate (MI) Italy
(*) SIRIO 5 =0,50 SIRIO 10 = 1,00 SIRIO 15 = 1,50 SIRIO 20 = 2,00
(**) SIRIO 5 =0,25 SIRIO 10 = 0,50 SIRIO 15 = 0,75 SIRIO 20 = 1,00
(***) SIRIO 5 =0,50 SIRIO 10 = 1,00 SIRIO 15 = 1,50 SIRIO 20 = 2,00

53
NEDERLANDS
INSTALLATIE EN GEBRUIKSINSTRUCTIES
Lees deze instructies zorgvuldig door voordat u de convector gebruikt. Zo voorkomt u schade en gevaarlijke
situaties. Enig gebruik anders dan beschreven in deze handleiding kan brand, elektrische schokken of letsel
veroorzaken en leidt ertoe dat de garantie vervalt.
De garantie geldt niet voor eventuele defecten, verslechtering, verlies, letsel of schade veroorzaakt door of als gevolg
van het verkeerd gebruik of misbruik van deze radiator. Aan rechten die voortvloeien uit nationale wetgeving wordt
geen afbreuk gedaan. Geen van de garantiebepalingen vormt een uitsluiting van voorwaarden of garanties vastgelegd
in nationale wetgeving, die niet uitgesloten of gewijzigd kunnen worden.
Verwijder vóór het gebruik de verpakking en controleer of het apparaat intact is. Neem in geval van defecten of schade
contact op met de dealer. Probeer het apparaat niet zelf te repareren.
Laat kinderen niet met de verpakking spelen en bescherm het milieu door de verpakking overeenkomstig de nationale
voorschriften voor afvalverwerking te verwijderen.
1.
voor uW veiligheid
• Dit apparaat is bedoeld voor normaal huishoudelijk gebruik en
niet voor gebruik in commerciële/industriële omgevingen, in voer-
tuigen of aan boord van schepen of vliegtuigen.
• - Dit apparaat kan worden gebruikt door kinderen vanaf 8 jaar
en personen met verminderde lichamelijke, zintuiglijke of verstan-
delijke vermogens of een gebrek aan ervaring en kennis, mits
ze onder toezicht staan of instructies hebben gekregen over hoe
ze het apparaat op een veilige manier kunnen gebruiken en de
risico's begrijpen. Kinderen mogen niet met het apparaat spelen.
Reiniging of onderhoud mag niet door kinderen worden uitgevo-
erd, tenzij onder toezicht.
• Het gebruik van water is strikt verboden.
• Kinderen jonger dan 3 jaar moeten uit de buurt van het apparaat
worden gehouden, tenzij er voortdurend toezicht is.
• Kinderen tussen de 3 en 8 jaar mogen het apparaat alleen in-/
uitschakelen indien het op de beoogde, normale plek van gebruik
is geplaatst of geïnstalleerd, mits ze onder toezicht staan of in-
structies hebben gekregen over hoe ze het apparaat op een vei-
lige manier kunnen gebruiken en de risico's begrijpen. Kinderen
tussen de 3 en 8 jaar mogen het apparaat niet aansluiten, regelen
of schoonmaken, of onderhoud eraan plegen.
• LET OP: Sommige delen van dit apparaat kunnen zeer heet
worden en brandwonden veroorzaken. Let vooral op wanne-
er kinderen en kwetsbare personen aanwezig zijn.

54
• Zorg ervoor dat de netvoeding overeenkomt met de nominale vo-
edingsspanning: 230 V AC, 50 Hz
• Deze convector heeft classicatie IPX4. Houd u zich aan de plaat-
selijk geldende voorschriften betreft de plaatsingsmogelijkheden
in verschillende ruimtes. De convector kan in vochtige ruimtes
worden toegepast, zie voor de plaatsingsmogelijkheid in vochtige
ruimtes afbeelding 1. Dit betekent dat de convector in zone 2 ge-
monteerd mag worden, elektrische aansluiting in zone 3. Plaats
de convector niet in de omgeving van zwembaden.
• Plaats de convector op een veilige plaats:
- houd minstens 1m afstand van ontvlambare objecten (textiel,
gordijnen of andere ontvlambare materialen) om het risico op
brand te verminderen.
- 1 meter vrije ruimte voor de convector.
• Laat kinderen niet met de convector spelen en zorg ervoor dat
kinderen en dieren het niet aanraken. Let op! Het paneel kan ti-
jdens gebruik zeer heet worden (circa 90 °C);
• WAARSCHUWING: Om oververhitting te voorkomen mag de
convector niet worden afgedekt. Hang niets over de convector
en dek het niet af terwijl deze in bedrijf is (zie afbeelding 9). Dit
zoals aangegeven op het bedieningspaneel van de convector met
het symbool:
• Gebruik de convector niet in ruimtes met explosieve gassen, dam-
pen van oplosmiddelen of verf, of ontvlambare dampen/gassen.
• Repareer een beschadigde kabel en/of stekker niet zelf, maar
breng de convector naar de technische dienst of een erkend re-
paratiecentrum en laat het repareren door gespecialiseerd perso-
neel om het risico op beschadiging te voorkomen.
• Plaats de convector zodanig dat de stekker altijd bereikbaar is.
• De convector mag niet direct onder een stopcontact worden ge-
plaatst.
• Steek geen objecten of papier in de convector.
• Monteer het product niet op wanden van kunststof.
• Gebruik deze convector niet als deze is gevallen;

55
• Niet gebruiken als er zichtbare tekenen van schade aan de kachel
zijn;
• Gebruik deze convector op een horizontaal en stabiel oppervlak;
• WAARSCHUWING: Gebruik deze convector niet in kleine ruimtes
wanneer deze worden gebruikt door personen die niet in staat zijn
de kamer zelfstandig te verlaten, tenzij constant toezicht wordt
geboden.
• WAARSCHUWING: om brandgevaar te verminderen
houdt textiel, gordijnen of andere ontvlambare produc-
ten minimaal op 1 meter afstand van de warme lucht uitlaat.
2.
Montage
• Bevestig de convector in horizontale positie met het luchtuitlaatrooster naar boven gericht;
• De convector heeft een dubbele elektrische isolatie (klasse II) en heeft daarom geen aarding nodig;
• Deze convector moet worden geïnstalleerd in overeenstemming met de geldende voorschriften die van kracht
zijn in het land van installatie.
• Installeer de aansluitdoos in badkamers, keukens of andere vochtige ruimtes ten minste 25 cm boven de vloer.
• - De elektrische aansluiting op de netvoeding moet tevens een 2-polige schakelaar met een minimale con-
tactopening van 3 mm omvatten. Leef altijd de nationale bekabelingsvoorschriften na en houd u aan de plaat-
singsvoorschriften (zie afbeelding 1).
• - De convector moet aan de muur worden gemonteerd met inachtneming van de minimumafstanden van
het plafond, de vloer en de zijwanden zoals weergegeven in guur 2. De wandbeugel moet aan de muur worden
bevestigd met inachtneming van de afstanden, aangegeven in guur 3 en gespeciceerd in de volgende tabel.
• Houd altijd rekening met de minimale afstanden tot muren, meubels en/of objecten, zoals aangegeven op afbe-
elding 3.
• Installeren convector:
- Verwijder de beugel van de convector;
- Boor 4 gaten in de muur met inachtneming van de afstanden aangegeven in guur 3 en gespeciceerd in
de volgende tabel:
MODEL A B C
SIRIO 5 205mm 180mm 357mm
SIRIO 10 290mm 260mm 400mm
SIRIO 15 270mm 480mm 400mm
SIRIO 20 250mm 700mm 400mm
- Bevestig de muurbeugel met behulp van muurpluggen en schroeven die geschikt zijn voor het muurtype;
- Controleer of aan de eerder beschreven minimumafstanden is voldaan;
- Breng de convector naar de beugel totdat de onderste haken van de beugel in de sleuven op het achter-
paneel zijn gestoken, zoals weergegeven in afbeelding 4;
- Draai het bovenste deel van het product naar de muur totdat het vastklikt in de 2 bovenste haken, zoals
weergegeven in afbeelding 5;
- Vergrendel de 2 bovenste haken van de beugel met behulp van de meegeleverde schroeven, zoals we-
ergegeven in guur 6.

56
3.
Wielbevestiging (oPtioneel)
• De convector kan ook worden gebruikt als een verplaatsbaar product door de afzonderlijk geleverde wielen te
kopen.
• Bevestigen van de wielen:
- - controleer de juiste richting zoals weergegeven in guur 7;
- bevestig de 2 steunen met de wielen met behulp van de meegeleverde schroeven, zoals weergegeven in
guur 8. De schroeven kunnen met de hand worden bevestigd en vereisen geen gereedschap.
4.
beschrijving bediening
• De convector is uitgerust met een aan/uit schakelaar aan de rechterkant. Als de convector is uitgeschakeld,
staan de interne elektrische componenten niet meer onder spanning.
• De volgende bedieningstoetsen zijn aan de rechter bovenzijde van het product geïntegreerd (afbeelding 10):
Multifunctioneel display om de werking en activeringsstatus van de functies te bekijken.
Comfort
Comfort - 1 °C
Comfort - 2°C
Eco -3,5°C
Antivorst
Toetsenblokkering
Open raam-sensor
Verwarming aan
Bedrijfsmodus.
Speciale functies.
Navigatie knoppen.
Stand-by modus aan/uit

57
5.
in – uit schakelen
De convector kan worden aan/uit gezet door de aan/uit schakelaar aan de rechter zijkant. Als de convector wordt uitge-
schakeld middels deze schakelaar, wordt de stroomtoevoer onderbroken en vervalt de huidige tijd en dag. We raden u
aan deze aan/uit schakelaar alleen te gebruiken als u de convector gedurende langere tijd niet gebruikt.
Wanneer de convector wordt ingeschakeld (met de aan/uit schakelaar aan de zijkant of activeren van de stroomtoevo-
er), activeert de convector de laatste modus die werd gebruikt voor het uitschakelen of bij stroomuitval. De tijd wordt
gereset op 12:00 uur en de dag van de week op maandag.
ON - OFF
Gebruik de aan/uit Stand-by knop op het bedieningspaneel om de convector in of uit te schakelen zonder de opgesla-
gen tijd en dag te verliezen. Display geeft huidige dag en tijd, na het inschakelen gaat de convector in comfort modus.

58
6.
bedrijFs Modus
Door te drukken op de knop is het mogelijk om een van de volgende 6 bedieningsmodi te selecteren:
Comfort -modus:
De convector werkt om de ingestelde comforttemperatuur te bereiken
en te handhaven, instelbaar tussen 100C en 300C.
Het symbool dat overeenkomt met de Comfort-modus licht op.
Het verwarmingssymbool licht op wanneer het verwarmingselement
in werking is. In deze modus is de open raam functie actief (zie de
Functie-knop).
Comfort -modus -1:
De convector werkt om de ingestelde comforttemperatuur te bereiken
en te handhaven, verminderd met 1 ° C.
Het symbool dat overeenkomt met de Comfort-modus licht op.
Het verwarmingssymbool licht op wanneer het verwarmingselement in
werking is. In deze modus is de open raam functie actief (zie de Functie
-knop).
Comfort-modus -2:
De convector werkt om de ingestelde comforttemperatuur te bereiken
en te handhaven, verminderd met 2 ° C.
Het symbool dat overeenkomt met de Comfort-modus licht op.
Het verwarmingssymbool licht op wanneer het verwarmingselement in
werking is. In deze modus is de open raam functie actief (zie de Functie
-knop).
Eco-modus:
De convector werkt om de ingestelde comforttemperatuur te bereiken
en te handhaven, verminderd met 3,5 ° C.
Het symbool dat overeenkomt met de Eco-modus licht op.
Het verwarmingssymbool licht op wanneer het verwarmingselement in
werking is. In deze modus is de open raam functie actief (zie de Functie
-knop).
Anti vorst-modus:
De thermostaat wordt automatisch ingesteld op een temperatuur van 7
± 3 ° C. Het symbool dat overeenkomt met de anti vorst-modus licht op.
Het verwarmingssymbool licht op wanneer het verwarmingselement in
werking is. In deze modus is de open raam functie niet actief.
Programma modus:
De convector werkt om de temperatuur te bereiken en vast te houden
die is ingesteld in het weekprogramma (zie de paragraaf over WEKELI-
JKSE PROGRAMMERING). Het symbool dat overeenkomt met de be-
drijfsmodus (Comfort, Comfort-1, Comfort-2, Eco of Anti vorst-modus)
licht op volgens de instellingen voor de huidige tijd en dag.
In deze modus is de open raam functie actief (zie de Functie -knop).

59
7.
sPeciale Functies
Door te drukken op de knop is het mogelijk om een van de volgende 3 speciale functies te selecteren:
Reset-functie:
Door deze functie te activeren, worden alle instellingen hersteld naar de
oorspronkelijke fabrieks-waarde. De comforttemperatuur is ingesteld
op 19.0°C, het vooraf fabrieksmatig ingestelde programma is actief en
de open-raam-functie is gedeactiveerd.
5"
Om te resetten drukt u gedurende minstens 5 seconden
op de -knop.
De convector wordt automatisch ingesteld in de Comfort-
modus.
Open raam functie:
Met deze functie zal de convector een open raam detecteren.
Als tijdens de normale werking van de convector een sterke daling van
de omgevingstemperatuur wordt waargenomen wordt, om energiever-
spilling te verminderen, de anti vorst modus automatisch geactiveerd.
Het open raam symbool en het anti vorst symbool knipperen om aan te
geven dat de functie is geactiveerd.
De open raam detectie zal niet automatisch herstellen, door op een van
de 5 knoppen van het bedieningspaneel te drukken zal de open raam
detectie gedeactiveerd worden.
De juiste werking van de open raam functie is afhankelijk van de
opstelling van de convector in de kamer, de aanwezigheid van
tocht, de buitentemperatuur en de openingstijd van het venster.
Activeer de functie door op te drukken.
Het open raam-symbool knippert het display.
Deactiveer de functie door op de knop te drukken.
Het open raam- symbool gaat uit op het display.

60
Lock-functie
Door deze functie te activeren worden alle knoppen vergrendeld, hier-
door kunnen in het programma geen wijzigen worden aangebracht.
5"
Activeer de functie door de knop gedurende min-
stens 5 seconden ingedrukt te houden.
Het sleutelsymbool licht op het display op en de toetsen
zijn vergrendeld.
5"
Deactiveer de functie door de knoppen en
tegelijkertijd gedurende minstens 5 seconden ingedrukt
te houden.
Het sleutelsymbool gaat uit, de knoppen werken weer.
8.
teMPeratuur regeling
De elektronische temperatuurregeling is gebaseerd op de temperatuur die de gebruiker instelt als COMFORT-tempe-
ratuur.
De temperatuurwaarden voor de modi Comfort-1, Comfort-2, Eco en Anti vorst worden automatisch berekend en
kunnen niet rechtstreeks door de gebruiker worden aangepast. De referentietemperatuur wordt altijd op het display
weergegeven samen met het symbool dat de geselecteerde bedieningsmodus weergeeft.
OPMERKING: De temperatuur gemeten door de sensor in de convector geeft altijd de omgevingstemperatuur in de
onmiddellijke nabijheid van de convector aan en kan afwijken van de temperatuur die wordt gemeten in andere delen
van de ruimte.
Dit verschil is van verschillende factoren afhankelijk, zoals:
- De installatiepositie: sommige delen van de kamer kunnen worden beïnvloed door stromingen of warme luchtzakken
die de sensormeting kunnen veranderen;
- De installatie op een externe buitenmuur, die normaal kouder is dan binnenwanden, kan resulteren in een lagere
temperatuurmeting dan de werkelijke kamertemperatuur;
- Onstabiele omstandigheden: elke temperatuurmeting moet onder stabiele bedrijfsomstandigheden worden uitgevo-
erd. Om deze reden mag de comforttemperatuur niet worden gewijzigd voordat 60 minuten zijn verstreken sinds de
vorige wijziging. In feite is het niet mogelijk om te beoordelen of de kamertemperatuur correct wordt onderhouden door
de convector als het temperatuurniveau in korte tijd continu wordt aangepast.
Als het verschil tussen de ingestelde temperatuur en de omgevingstemperatuur wordt gedetecteerd in stabiele to-
estand, moet u dit verschil berekenen en vervolgens het comforttemperatuurniveau op het product met de exact
berekende verschilwaarde verhogen of verlagen.

61
9.
datuM en tijd instelling
Instellen huidige tijd en datum:
Blijf op de knop drukken totdat de programmeer modus is gese-
lecteerd.
3"
Houd de knop minimaal 3 seconden inge-
drukt tot de dag van de week begint te knipperen.
Gebruik de knoppen
en om de huidige datum te selecteren.
Druk op de knop om te schakelen tussen dag- en tijdinstelling.
Gebruik de knoppen
en om uren te selecteren.
Druk op de knop om te schakelen tussen uur- en minuteninstelling.
Gebruik de knoppen
en om minuten te selecteren.
Druk op de knop om de instelling te beëindigen en terug te keren
naar de programma modus
10.
Wekelijks PrograMMa
Met de wekelijkse programmering kunt u de gewenste bedrijfsmodus instellen voor elk uur van de dag en voor elke
dag van de week. De convector wordt vooraf ingesteld met het volgende weekprogramma:
Maandag-vrijdag
Zaterdag-Zondag

62
Om het programma te bekijken/wijzigen, gaat u als volgt te werk:
Druk op de knop totdat de programma modus is geactiveerd.
3"
Houd de knop gedurende minstens 3 seconden ingedrukt om de
programmeermodus te openen/wijzigen. Op de eerste dag (maandag)
van de week beginnen de ingestelde temperatuur en het bijbehorende
symbool te knipperen.
Gebruik de symbolen en om de verschillende tijden van de dag
en te selecteren de knop
om de bedrijfsmodus van elk uur te wijzigen.
Telkens wanneer op de knop
wordt gedrukt, verandert de bedie-
ningsmodus volgens de volgorde:
Comfort > Comfort-1 > Comfort-2 > Eco >Anti-freeze
Druk op de knop om de volgende dag te bekijken/wijzigen.
Als u de instellingen voor de ene dag naar een andere wilt kopiëren (volgende), gaat u als volgt te werk:
Selecteer de dag waarop u de instellingen wilt kopiëren en druk op
gelijktijdig de knoppen
en in.
Het woord "COPY" verschijnt op het display en bevestigt dat het is op-
geslagen
Druk op de F-knop om de dag te selecteren die u wilt programmeren
met hetzelfde programma dat u zojuist hebt gekopieerd.
Druk opnieuw gelijktijdig op de knoppen en om het programma
te “plakken” naar geselecteerde dag. Het woord PROG verschijnt op
het display.
Druk op de knop om de volgende dag te bekijken/wijzigen.
De programmeer functie wordt beëindigd door opnieuw op de knop te
drukken. Na het bekijken/wijzigen van de laatste dag van de week. Het
display keert terug en toont de geprogrammeerde instellingen voor de
huidige dag en tijd.

63
11.
ProbleMen oPlossen
In het geval van oververhitting wordt het verwarmingselement automatisch uitgeschakeld door de beveiliging op het
apparaat. In dit geval:
- Zet de convector uit en laat hem ongeveer 15/20 minuten afkoelen.
- Verwijder alle andere mogelijke redenen van de oververhitting (bijvoorbeeld: obstructies voor de
luchtinlaat/-uitlaatroosters, opeenhopingen van vuil).
- Schakel de convector opnieuw in en controleer of deze correct werkt.
12.
onderhoud
• Dit product vereist geen speciaal onderhoud
• Reinig het product eenmaal per 6 maanden met een droge doek
• Neem contact op met een erkend technisch servicecentrum als het product gerepareerd moet worden.
• Gebruik bij het vervangen van het netsnoer een 2x0,75mm2 H05RR-F of 2x1,00 mm2 H05RR-F <HAR> type.
Deze werkzaamheden moet worden uitgevoerd door gekwaliceerd personeel en nooit door de eindgebruiker, dit
om schade aan het apparaat te voorkomen en de persoonlijke veiligheid in niet gevaar te brengen.
13.
juridische Mededeling
Milieu en recycling:
Om schade tijdens het transport te voorkomen, is uw apparaat zorgvuldig verpakt. Wij verzoeken u ons bij
de bescherming van ons milieu behulpzaam te zijn. Verwijder de verpakking daarom overeenkomstig de
voor de afvalverwerking geldende nationale voorschriften.
Recycling van verouderde apparaten:
Toestellen met dit kenmerk horen niet thuis in de vuilnisbak en moeten apart worden ingezameld en gere-
cycled volgens de ter plaatse geldende voorschriften en wetgeving.

64
Informatie-eisen voor elektrische toestellen voor lokale ruimteverwarming
Type aanduiding(en): SIRIO
Item Symbool Waarde Eenheid Item Eenheid
Warmteafgifte Type warmte-input, uitsluitend voor elektrische warmteopslagtoestellen
(selecteer één)
Nominale warmte-
afgifte
P
nom
(*) kW
Handmatige sturing van de warmteopslag, met geïntegreer-
de thermostaat
nee
Minimale warmte-
afgifte (indicatief)
P
min
(**) kW
Handmatige sturing van de warmteopslag, met kamer- en/of
buitentemperatuurfeedback
nee
Maximale conti-
nue warmteafgifte
P
max,c
(***) kW
Elektronische sturing van de warmteopslag, met kamer- en/
of buitentemperatuurfeedback
nee
Aanvullend
elektriciteits-
verbruik
Door een ventilator bijgestane warmteafgifte nee
Bij nominale
warmteafgifte
el
max
0,000 kW
Type warmteafgifte/sturing kamertemperatuur
(selecteer één)
Bij minimale
warmteafgifte
el
min
0,000 kW
Eentraps-warmteafgifte, geen sturing van de kamertempe-
ratuur.
nee
In standby modus el
SB
0,162
W
Twee of meer handmatig in te stellen trappen, geen sturing
van de kamertemperatuur
nee
Met mechanische sturing van de kamertemperatuur door
thermostaat
nee
Met elektronische sturing van de kamertemperatuur nee
Elektronische sturing van de kamertemperatuur plus dag-
tijdschakelaar
nee
Elektronische sturing van de kamertemperatuur plus week-
tijdschakelaar
ja
Andere sturingsopties (meerdere selecties mogelijk)
Sturing van de kamertemperatuur, met aanwezigheidsde-
tectie
nee
Sturing van de kamertemperatuur, met openraamdetectie ja
Met de optie van afstandsbediening nee
Met adaptieve sturing van de start nee
Met beperking van de werkingstijd nee
Met black-bulbsensor nee
Contact details Uw dealer of Ermete Giudici S.p.A. - via L. da Vinci, 27 - 20090 Segrate (MI) Italy
(*) SIRIO 5 =0,50 SIRIO 10 = 1,00 SIRIO 15 = 1,50 SIRIO 20 = 2,00
(**) SIRIO 5 =0,25 SIRIO 10 = 0,50 SIRIO 15 = 0,75 SIRIO 20 = 1,00
(***) SIRIO 5 =0,50 SIRIO 10 = 1,00 SIRIO 15 = 1,50 SIRIO 20 = 2,00

65
DEUTSCH
INSTALLATIONS -UND BEDIENUNGSANLEITUNG
Bitte lesen Sie diese Anweisungen vor der Verwendung des Produkts aufmerksam durch, um Schäden oder in
jedem Fall das Auftreten von Gefahrensituationen zu vermeiden. Jegliche Verwendung des Produkts, die von
den Vorgaben in diesem Handbuch abweicht, kann Brände, elektrische Gefahren oder Verletzungen verursa-
chen und macht die Garantie nichtig.
Die Garantie gilt nicht für Defekte, Verschlechterungen, Verluste, Verletzungen oder Schäden, die auf eine unsach-
gemäße Verwendung des Produkts zurückzuführen sind. Alle gesetzlichen Rechte in diesem Bereich bleiben garan-
tiert. Keine Garantiebedingung kann die durch staatliche Gesetze geregelten Garantiebedingungen ausschließen oder
abändern.
Entfernen Sie vor jeder Maßnahme sorgfältig die Verpackung und überprüfen Sie die perfekte Integrität des Produkts.
Falls Defekte oder Beschädigungen festgestellt werden, installieren Sie das Gerät nicht und versuchen Sie auch nicht,
es zu reparieren. Wenden Sie sich in diesem Fall bitte an den Händler.
Bewahren Sie die Verpackung nicht in der Reichweite von Kindern auf und entsorgen Sie die Teile in Einklang mit den
geltenden Vorschriften.
1.
Für ihre sicherheit
• Dieses Produkt ist für den Hausgebrauch bestimmt und nicht
für die Verwendung in kommerziellen/industriellen Umgebungen
oder auf Fahrzeugen, Booten oder Flugzeuge geeignet.
• Das Gerät kann von Kindern unter 8 Jahren und von Personen
mit eingeschränkten physischen und sensorischen oder menta-
len Fähigkeiten oder ohne Erfahrung oder notwendiges Wissen
verwendet werden, sei denn unter Aufsicht oder nachdem diese
Anweisungen in Bezug auf die sichere Verwendung des Geräts
und Kenntnisse über die Gefahren in diesem Zusammenhang
erhalten haben. Die Reinigung und die Wartung, die vom Benut-
zer auszuführen ist, darf nicht von Kindern ohne Aufsicht durch-
geführt werden.
• Kinder unter 3 Jahren dürfen sich dem Produkt nicht nähern,
wenn sie nicht konstant beaufsichtigt werden.
• Kinder zwischen 3 und 8 Jahren dürfen das Gerät nur ein- und
ausschalten, sofern dieses gemäß den normalen Nutzungsbedin-
gungen installiert und positioniert wurde und sie überwacht wer-
den oder angemessen in Bezug auf die korrekte und sichere Ver-
wendung des Produkts geschult wurden und seine Gefährlichkeit
verstanden haben.
• Kinder im Alter zwischen 3 und 8 Jahren dürfen das Produkt nicht

66
anschließen, einstellen, reinigen oder an ihm Wartungsarbeiten
ausführen.
• ACHTUNG: Einige Teile dieses Produkts können sehr heiß
werden und Verbrennungen verursachen. Besondere Auf-
merksamkeit muss bei Anwesenheit von Kindern oder verlet-
zbaren Personen geboten werden.
• Vergewissern Sie sich, dass die Netzspannung den Daten auf
dem Typenschild entspricht: 230V~, 50Hz.
• Das Produkt verfügt über eine doppelte Schutzwirkung vor Wa-
sser: IPX0, wenn es als tragbares Produkt verwendet wird und
IPX4, wenn es an der Wand installiert wird.
• Beachten Sie die Vorschriften des Landes, in dem das Produkt
installiert wird in Bezug auf die Verwendung in unterschiedlichen
Umgebungen. Wenn an der Wand installiert, kann es in den Ba-
dezimmern verwendet werden, SOFERN ES NICHT IN UNMIT-
TELBARER NÄHE ZUR BADEWANNE ODER ZUR DUSCHE IN-
STALLIERT WIRD. Das Produkt darf daher nicht in den Bereichen
installiert werden, die im Schema der Abbildung 1 als Volumen 1
angegeben sind. Wenn es als tragbares Produkt verwendet wird,
vergewissern Sie sich, dass der Konvektor nicht von der Bade-
wanne, von der Dusche oder vom Pool aus zugänglich ist.
• Stellen Sie den Konvektor während des Betriebs in eine sichere
Position, d.h.:
- in mindestens 1m Entfernung von entammbaren Gegenstän-
den oder Möbeln;
- indem das Luftauslassgitter freigelassen wird: es darf sich
kein Gegenstand in einem Umkreis von 1 m vom Auslassgitter
benden;
- es darf niemals direkt unterhalb einer Steckdose positioniert
werden.
• Lassen Sie nicht zu, dass Tiere oder Kinder mit dem Konvektor
spielen oder diesen berühren. Achtung! Während des Betriebs
kann das Luftauslassgitter sehr heiß werden (über 90°C);
• WICHTIG: decken Sie es niemals ab, um Überhitzungen zu
vermeiden.
Legen Sie niemals irgendeinen Gegenstand oder eine
Decke auf das Gerät, während es in Betrieb ist. Dies steht eindeutig
auf dem Gerät geschrieben oder wird durch das Symbol illustriert:

67
• Verwenden Sie den Konvektor nicht in Zimmern, die mit explo-
siven Gasen, durch Lösungsmittel und Lacke erzeugte Dämpfe
oder in jedem Fall entzündlichen Dämpfen/Gasen gesättigt sind.
• Wenn das Kabel beschädigt ist, müssen Sie es ersetzen. Führen
Sie diese Maßnahmen nicht allein aus, bringen Sie den Konvektor
in ein befugtes Reparaturzentrum, da der Eingriff von Fachperso-
nal erforderlich ist, um jegliches Risiko von Beschädigungen zu
vermeiden.
• Der Konvektor muss so positioniert werden, dass die Steckdose
stets erreichbar ist.
• Installieren Sie das Produkt nicht an Wänden aus synthetischem
Material.
• Verwenden Sie diesen Konvektor nicht, nachdem er herunterge-
fallen ist;
• Verwenden Sie ihn nicht, wenn sichtbare Zeichen auf Beschädi-
gung des Konvektors bestehen;
• Verwenden Sie den Konvektor auf einer horizontalen und stabilen
Oberäche;
• ACHTUNG: Verwenden Sie den Konvektor nicht in kleinen Zim-
mern, wenn diese von Personen besetzt sind, die nicht in der
Lage sind, das Zimmer allein zu verlassen, sei denn, sie stehen
unter der Aufsicht irgendeiner für ihre Sicherheit verantwortlichen
Person;
• ACHTUNG: Halten Sie, um das Brandrisiko zu vermei-
den, Stoffe, Gardinen oder jedes andere entammbare Ma-
terial auf mindestens 1m Abstand vom Luftaustrittsgitter.

68
2.
WandMontage
• Installieren Sie den Konvektor mit dem nach oben gerichteten Luftaustrittsgitter in einer horizontalen Position.
• Dieser Konvektor ist doppelt elektrisch isoliert (Klasse II), daher ist der Erdungsanschluss nicht erforderlich;
• Dieser Konvektor muss unter Befolgung der im Installationsland geltenden Vorschriften installiert werden.
• In feuchten Umgebungen wie Badezimmern und Küchen muss der Anschluss an das Stromnetz mindestens 25
Höhe vom Boden betragen. Die Geräte, die vom Stromnetz getrennt werden müssen, erlauben die vollständige
Abtrennung unter den Bedingungen der Überspannungskategorie III.
• Das Gerät muss an der Wand unter Einhaltung der Mindestabstände von der Decke, vom Boden und von den
Seitenwänden, die in der Abbildung 2 angegeben sind, installiert werden. Zu diesem Zweck muss der Stützbügel
an der Wand unter Einhaltung der Abstände, die in Abbildung 3 und in der nachfolgenden Tabelle angegeben
sind, befestigt werden.
• Um mit der Installation fortzufahren:
- Entfernen Sie den Bügel vom Produkt;
- Bohren Sie unter Einhaltung der in Abbildung 3 angegebenen und in der nachfolgenden Tabelle spezizier-
ten Abstände 4 Löcher in die Wand:
MODELL A B C
SIRIO 5 205mm 180mm 357mm
SIRIO 10 290mm 260mm 400mm
SIRIO 15 270mm 480mm 400mm
SIRIO 20 250mm 700mm 400mm
- Befestigen Sie die Halterung mit den für diese Wandart passenden Dübeln und Schrauben;
- Stellen Sie sicher, dass die zuvor beschriebenen Mindestabstände eingehalten werden;
- Nähern Sie das Produkt der Halterung an, bis die unteren Haken der Halterung in die auf dem hinteren
Paneel vorhandenen Schlitze greifen, wie in Abbildung 4 angegeben;
- Drehen Sie den oberen Teil des Produkts in Richtung Wand bis es blockiert und vergewissern Sie sich,
dass die 2 oberen Haken der Halterung, wie in Abbildung 5 angegeben, einrasten;
- Verriegeln Sie die 2 oberen Haken der Halterung mit den im Lieferumfang enthaltenen Schrauben, wie in
Abbildung 6 angegeben.
3.
beFestigung der räder (oPtional)
• Der Konvektor kann auch als tragbares Produkt verwendet werden, indem Sie die separat gelieferten Räder
kaufen.
• Für die Befestigung der Räder:
- überprüfen Sie die korrekte Ausrichtung gemäß den Angaben in Abbildung 7;
- befestigen Sie jede der 2 Halterungen mit den Rädern, indem Sie die im Lieferumfang enthaltenen Schrau-
ben, wie in Abbildung 8 angegeben, verwenden. Die Schrauben können per Hand befestigt werden und
erfordern kein Werkzeug.

69
4.
beschreibung der beFehle
• Der Konvektor ist mit einer Taste zum Einschalten und Ausschalten ausgestattet, die sich auf der rechten Seite
bendet. Beim Ausschalten des Produkts werden die elektrischen Komponenten nicht mehr unter Spannung
sein.
• Die folgenden Befehle wurden auf der Vorderseite des Produkts integriert (Abbildung 10):
Multifunktions-Display für die Anzeige des Betriebs- und Aktivierungszustands der Funktionen.
Comfort
Comfort - 1 °C
Comfort - 2°C
Eco -3,5°C
Frostschutz
Tastatursperre
Erkennung eines geöffneten Fensters
Erwärmung läuft
Auswahltaste des Betriebsmodus.
Auswahltaste der Sonderfunktionen.
Navigationstaste innerhalb der verschiedenen Menüs.
Taste zur Aktivierung oder Deaktivierung des Standby-Status

70
5.
einschalten und ausschalten
Die Speisung des Produkts wird über eine elektromechanische Ein- und Ausschalttaste gesteuert. Das Ausschalten
des Produkts mit Hilfe dieser Taste verursacht die Unterbrechung der Speisung der elektronischen Platinen und die
daraus folgende Löschung der aktuellen Uhrzeit und des aktuellen Datums. Wir empfehlen, diesen Schalter nur zu
verwenden, wenn das Produkte für einen längeren Zeitraum nicht verwendet wird. Verwenden Sie hingegen die Ein-
schalt-/ Stand-by-Taste auf dem Bedienfeld für kurze Unterbrechungen bei der Verwendung des Produkts. Auf diese
Weise gehen die zuvor eingegebenen Einstellungen nicht verloren.
Zum Zeitpunkt des Einschaltens aktiviert der Kollektor den zuletzt vor dem Ausschalten oder vor einem Stromausfall
verwendeten Modus. Die Uhrzeit wird erneut auf 12:00 Uhr und der Wochentag auf Montag eingestellt.
ON - OFF
Verwenden Sie die Einschalt- / Stand-by-Taste, um den Konvektor ein- und auszuschalten, ohne die gespeicherte
Uhrzeit zu verlieren.

71
6.
betriebsModus
Das Drücken der Taste ermöglicht die Auswahl eines der folgenden 6 Betriebsmodi:
Comfort -modus:
Der Konvektor funktioniert, um die eingestellte Comfort-Temperatur zu
erreichen und beizubehalten.
Das Symbol, das dem Comfort-Modus entspricht, schaltet sich ein.
Das Symbol in Bezug auf die Erwärmung schaltet sich ein, wenn das
Heizelement in Betrieb ist. In diesem Modus ist die Funktion zur Erken-
nung des geöffneten Fensters verfügbar. (siehe die Taste FUNKTIO-
NEN).
Comfort -modus -1:
Der Konvektor funktioniert, um die eingestellte Comfort-Temperatur,
reduziert um 1°C, zu erreichen und beizubehalten.
Das Symbol, das dem Comfort-1-Modus entspricht, schaltet sich ein.
Das Symbol in Bezug auf die Erwärmung schaltet sich ein, wenn das
Heizelement in Betrieb ist. In diesem Modus ist die Funktion zur Erken-
nung des geöffneten Fensters verfügbar (siehe die Taste FUNKTIO-
NEN).
Comfort-modus -2:
Der Konvektor funktioniert, um die eingestellte Comfort-Temperatur,
reduziert um 2°C, zu erreichen und beizubehalten.
Das Symbol, das dem Comfort-2-Modus entspricht, schaltet sich ein.
Das Symbol in Bezug auf die Erwärmung schaltet sich ein, wenn das
Heizelement in Betrieb ist. In diesem Modus ist die Funktion zur Erken-
nung des geöffneten Fensters verfügbar (siehe die Taste FUNKTIO-
NEN).
Eco-modus:
Der Konvektor funktioniert, um die eingestellte Comfort-Temperatur,
reduziert um 3,5°C, zu erreichen und beizubehalten.
Das Symbol, das dem Eco-Modus entspricht, schaltet sich ein.
Das Symbol in Bezug auf die Erwärmung schaltet sich ein, wenn das
Heizelement in Betrieb ist. In diesem Modus ist die Funktion zur Erken-
nung des geöffneten Fensters verfügbar (siehe die Taste FUNKTIO-
NEN).
Frostschutz-modus:
Der Thermostat wird automatisch auf die Temperatur von 7±3°C ein-
gestellt.
Das Symbol, das dem Frostschutz-Modus entspricht, schaltet sich ein.
Das Symbol in Bezug auf die Erwärmung schaltet sich ein, wenn das
Heizelement in Betrieb ist. In diesem Modus ist die Funktion zur Erken-
nung des geöffneten Fensters nicht verfügb.
Programmiert modus:
Der Konvektor funktioniert, um die im Wochenprogramm eingestellte
Temperatur zu erreichen und beizubehalten (siehe Absatz in Bezug auf
die WOCHENPROGRAMMIERUNG).
Das Symbol, das dem Betriebs-Modus entspricht (Comfort, Comfort-1,
Comfort-2, Eco oder Frostschutz) schaltet sich in Abhängigkeit von den
vorgesehenen Einstellungen für die aktuelle Uhrzeit und den aktuellen
Tag ein. In diesem Modus ist die Funktion zur Erkennung des geöffne-
ten Fensters verfügbar (siehe die Taste FUNKTIONEN)

72
7.
sonderFunktionen
Das Drücken der Taste erlaubt die Auswahl einer der folgenden 3 Sonderfunktionen:
Reset-Funktion:
Durch Aktivierung dieser Funktion werden alle Einstellungen auf den
anfänglichen Fabrikwert zurückgesetzt. Die Comfort-Temperatur wird
auf 19,0°C eingestellt, das voreingestellte Programm, das im entspre-
chenden Abschnitt beschrieben wird und die Funktion zur Erkennung
eines geöffneten Fensters werden deaktiviert.
5"
Drücken Sie, um den RESET auszuführen, die Taste
für wenigstens 5 Sekunden.
Der Konvektor wird automatisch auf den Comfort-Modus
eingestellt.
Funktion zur ERKENNUNG EINES GEÖFFNETEN
FENSTERS:
Diese Funktion erlaubt das Erkennen eines geöffneten Fensters und
die automatische Einstellung des Frostschutz-Modus.
Falls ein plötzlicher Abfall der Umgebungstemperatur während des nor-
malen Betriebs erfasst wird, wird automatisch der Frostschutz-Modus
aktiviert, um die Energieverschwendung zu reduzieren.
Das Symbol des Fensters und das Frostschutzsymbol blinken, um die
Aktivierung der Funktion anzuzeigen.
Das Zurücksetzen des normalen Betriebs erfolgt nicht automatisch,
sondern man es erreicht über das Drücken irgendeiner der 5 Tasten
des Produkts.
Der korrekte Betrieb dieser Funktion kann von der Positionie-
rung des Produkts im Raum, vom Vorhandensein von Zugluft
und von der Länge der Öffnungszeit des Fensters abhängen.
Aktivieren Sie die Funktion durch Drücken der Taste
Das Symbol des Fensters schaltet sich auf dem Display
ein
Deaktivieren Sie die Funktion durch Drücken der Taste
Das Symbol des Fensters schaltet sich aus

73
SPERR-Funktion
Durch Aktivierung dieser Funktion werden die Tasten deaktiviert, um
unerwünschte Abänderungen der Betriebseinstellungen zu verhindern.
5"
Aktivieren Sie die Funktion durch Drücken der Taste
für mindestens 5 Sekunden.
Das Schlüsselsymbol schaltet sich auf dem Display ein
und die Tasten werden gesperrt.
5"
Deaktivieren Sie die Funktion durch gleichzeitiges
Drücken der Tasten und und für mindestens 5
Sekunden.
Das Schlüsselsymbol schaltet sich aus und die Tasten
funktionieren wieder.
8.
kontrolle der teMPeratur
Die elektronische Kontrolle der Temperatur basiert auf dem Wert, den der Benutzer der COMFORT-Temperatur zu-
weist.
Die Werte der Temperaturen für die Modi Comfort-1, Comfort-2, Eco und Frostschutz werden automatisch berechnet
und können nicht direkt vom Benutzer verändert werden. Die Bezugstemperatur wird immer auf dem Display zusam-
men mit dem Symbol, das den ausgewählten Betriebsmodus darstellt, angegeben.
HINWEIS: Die mit dem Sensor im Produkt gemessene Temperatur zeigt immer die Umgebungstemperatur in der
unmittelbaren Nähe des Produktes an und kann von der mit anderen Instrumenten in anderen Bereichen des Zim-
mers gemessenen Temperatur abweichen. Diese Differenz kann von unterschiedlichen Faktoren abhängen, wie zum
Beispiel:
- Die Installationsposition: einige Bereiche des Zimmers können Luftzügen oder warmen Luftlöchern ausgesetzt sein,
die die Messung des Sensors verändern;
- Die Installation an der Außenwand, die normalerweise kälter als die Innenwände ist, kann die Messung einer niedri-
geren Temperatur im Vergleich zur realen Umgebungstemperatur verursachen;
- Instabile Bedingungen: jede Bewertung muss unter stabilen Betriebsbedingungen ausgeführt werden. Aus diesem
Grund darf die Comfort-Temperatur nicht geändert werden, bevor nicht 60 Minuten seit der vorherigen Abänderungen
verstrichen sind.
Es ist in der Tat nicht möglich, zu bewerten, ob die Umgebungstemperatur korrekt vom Produkt beibehalten wird, wenn
das Temperaturniveau kontinuierlich in kurzen Zeiträumen verändert wird.
Wenn die Differenz zwischen der eingestellten Temperatur und der Umgebungstemperatur unter stabilen Bedingungen
erfasst wurde, berechnen Sie diese Differenz und erhöhen oder reduzieren Sie das Niveau der Comfort-Temperatur
auf dem Produkt um den exakten Wert der berechneten Differenz

74
9.
einstellung des tages und der uhrzeit
Um die aktuelle Uhrzeit und den aktuellen Tag einzustellen, müssen Sie wie folgt vorgehen:
Drücken Sie die Taste bis zur Auswahl des programmierten Modus.
3"
Drücken Sie die Taste für mindestens 3 Sekunden bis der Wo-
chentag anfängt zu blinken.
Verwenden Sie die Tasten
und um den aktuellen Tag aus-
zuwählen.
Drücken Sie die Taste um von der Einstellung des Tages zu der
der Stunde zu wechseln.
Verwenden Sie die Tasten
und für die Auswahl der aktuellen
Stunde.
Drücken Sie die Taste um von der Einstellung der Stunde zu der
der Minuten zu wechseln.
Verwenden Sie die Tasten
und für die Auswahl der aktuellen
Minuten.
Drücken Sie die Taste um die Einstellung abzuschließen und in den
programmierten Modus zurückzukehren

75
10.
WochenPrograMMierung
Die Wochenprogrammierung erlaubt für jede Stunde des Tages und für jeden Tag der Woche die Einstellung des
gewünschten Betriebsmodus. Der Konvektor wird voreingestellt mit dem folgenden Wochenprogramm geliefert:
Montag - Freitag
Samstag - Sonntag
Um das Programm anzuzeigen/abzuändern, müssen Sie wie folgt vorgehen:
Drücken Sie die Taste bis zur Aktivierung des programmierten Be-
triebsmodus.
3"
Drücken Sie mindestens für 3 Sekunden die Taste um in den Mo-
dus der Anzeige/Abänderung der Programmierung zu gelangen.
Der erste Tag der Woche, die eingestellte Temperatur und das entspre-
chende Symbol beginnen zu blinken.
Verwenden Sie die Tasten und um die unterschiedlichen
Stunden des Tages auszuwählen und um den Betriebsmodus jeder
Stunde abzuändern.
Bei jedem Drücken der Taste
ändert sich der Betriebsmodus in
folgender Reihenfolge
Comfort > Comfort-1 > Comfort-2 > Eco >Frostschutz
Drücken Sie die Taste um auf die Anzeige/Abänderung des nach-
folgenden Tages zu gelangen.
Falls Sie die Einstellungen eines Tages auf einen anderen (nachfolgenden) kopieren möchten, müssen Sie wie folgt
vorgehen:
Wählen Sie den Tag, dessen Einstellungen Sie kopieren möchten und
drücken Sie gleichzeitig die Tasten
und .
Die Schrift "COPY" erscheint auf dem Display zur Bestätigung der er-
folgten Speicherung

76
Drücken Sie die Taste F, um den Tag, den Sie mit demselben soeben
kopierten Programm programmieren möchten, auszuwählen.
Drücken Sie erneut zusammen die Tasten und um das Pro-
gramm in den ausgewählten Tag einzufügen. Auf dem Display erscheint
wieder die Schrift PROG.
Drücken Sie die Taste um zur Anzeige/Abänderung des nachfol-
genden Tages zu gelangen.
Das Verfahren endet durch erneutes Drücken der Taste nach der An-
zeige/Abänderung des letzten Wochentages. Das Display zeigt wieder
die Programmiereinstellungen für den aktuellen Tag und die aktuelle
Stunde an.
11.
Fehlerbehebung
Bei Überhitzung deaktiviert der Sicherheitsschutz innerhalb des Produkts sowohl den Widerstand als auch den Motor.
In diesem Fall:
- Schalten Sie den Konvektor aus und lassen Sie ihn für etwa 15/20 Minuten abkühlen;
- Entfernen Sie jegliche Ursache der Überhitzung (z.B.: Verstopfung des Luftauslassgitters, Reste von Ver-
schmutzungen auf dem Produkt, usw.);
- Schalten Sie den Konvektor erneut ein und überprüfen Sie den korrekten Betrieb
12.
Wartung
• Dieses Produkt erfordert keine spezielle Wartung.
• Reinigen Sie mindestens alle 6 Monate das Produkt mit einem trockenen Tuch.
• Falls das Produkt repariert werden muss, wenden Sie sich bitte an ein qualiziertes Servicecenter.
• Verwenden Sie bei Ersatz des Stromversorgungskabels in Abhängigkeit vom Konvektormodell den Typ
2x0,75mm2 H05RR-F oder 2x1,00mm2 H05RRF<HAR>. Diese Situation muss von qualizierten Technikern
ausgeführt werden und niemals vom Endnutzer, um eine Beschädigung des Produkts und jedes Risiko für Per-
sonen zu vermeiden.
13.
gesetzliche Mitteilungen
Umweltschutz und Recycling:
Damit Ihr Gerät während des Transports keine Schäden erleidet, wurde es sorgfältig verpackt. Um zum
Umweltschutz beizutragen, bitten wir Sie, das für die Verpackung des Geräts verwendete Material ange-
messen zu entsorgen.
Entsorgung von gebrauchten Geräten:
Die Geräte, die das nebenstehende Zeichen tragen, dürfen nicht zusammen mit dem Hausmüll entsorgt
werden, sondern müssen getrennt gesammelt und entsorgt werden. Die Entsorgung von gebrauchten
Geräten muss fachgerecht in Einklang mit den lokal geltenden Vorschriften und Gesetzen erfolgen.

77
SIRIO_R4_20180619
Obligatorische Informationen für elektrische Geräte für das Heizen von Räumen
Modellkennung: SIRIO
Daten Symbol Wert Einheit Daten Einheit
Thermische Leistung Art der thermischen Leistung, nur für elektrische Speichergeräte für
das Heizen von Räumen (nur eine Option angeben)
Thermische
Nennleistung
P
nom
(*) kW
manuelle Kontrolle der thermischen Belastung, mit integrier-
tem Thermostat
nein
Thermische
Mindestleistung
(indikativ)
P
min
(**) kW
manuelle Kontrolle der thermischen Belastung, mit Nachprü-
fung der Umgebungstemperatur und/oder Außentemperatur
nein
Maximale konti-
nuierliche thermi-
sche Leistung
P
max,c
(***) kW
elektronische Kontrolle der thermischen Belastung, mit
Nachprüfung der Umgebungstemperatur und/oder Außen-
temperatur
nein
Hilfsstromver-
brauch
vom Ventilator unterstützte thermische Leistung nein
Bei thermischer
Nennleistung
el
max
0,000 kW
Art der thermischen Leistung/Kontrolle der Umgebung-
stemperatur (nur eine Option angeben)
Bei thermischer
Mindestleistung
el
min
0,000 kW
einphasige thermische Leistung ohne Kontrolle der Umge-
bungstemperatur
nein
Im Stand-by-
Modus
el
SB
0,162
W
zwei oder mehrere manuelle Phasen ohne Kontrolle der
Umgebungstemperatur
nein
mit Kontrolle der Umgebungstemperatur mittels mechani-
schem Thermostat
nein
mit elektronischer Kontrolle der Umgebungstemperatur nein
mit elektronischer Kontrolle der Umgebungstemperatur und
Tagestimer
nein
mit elektronischer Kontrolle der Umgebungstemperatur und
Wochentimer
ja
Weitere Kontrolloptionen (es ist möglich, mehrere Optio-
nen auszuwählen)
Kontrolle der Umgebungstemperatur mit Anwesenheitser-
kennung
nein
Kontrolle der Umgebungstemperatur mit Erkennung eines
geöffneten Fensters
ja
mit Option der Fernkontrolle nein
mit anpassbarer Startkontrolle nein
mit Begrenzung der Betriebszeit nein
mit Schwarzkugelsensor nein
Kontakte Ermete Giudici S.p.A. - via L. da Vinci, 27 - 20090 Segrate (MI) Italien
(*) SIRIO 5 =0,50 SIRIO 10 = 1,00 SIRIO 15 = 1,50 SIRIO 20 = 2,00
(**) SIRIO 5 =0,25 SIRIO 10 = 0,50 SIRIO 15 = 0,75 SIRIO 20 = 1,00
(***) SIRIO 5 =0,50 SIRIO 10 = 1,00 SIRIO 15 = 1,50 SIRIO 20 = 2,00

78

79

80
-
 1
1
-
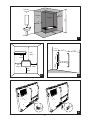 2
2
-
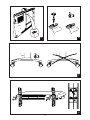 3
3
-
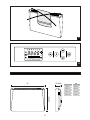 4
4
-
 5
5
-
 6
6
-
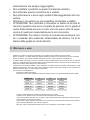 7
7
-
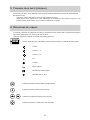 8
8
-
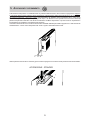 9
9
-
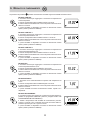 10
10
-
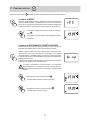 11
11
-
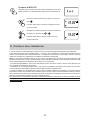 12
12
-
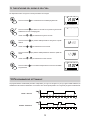 13
13
-
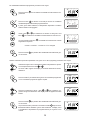 14
14
-
 15
15
-
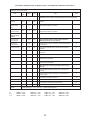 16
16
-
 17
17
-
 18
18
-
 19
19
-
 20
20
-
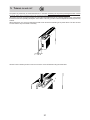 21
21
-
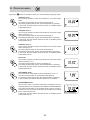 22
22
-
 23
23
-
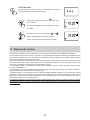 24
24
-
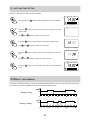 25
25
-
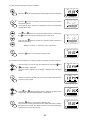 26
26
-
 27
27
-
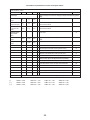 28
28
-
 29
29
-
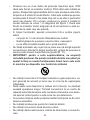 30
30
-
 31
31
-
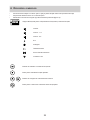 32
32
-
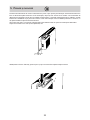 33
33
-
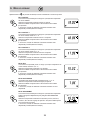 34
34
-
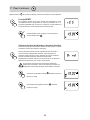 35
35
-
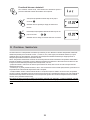 36
36
-
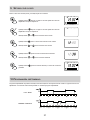 37
37
-
 38
38
-
 39
39
-
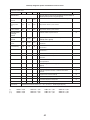 40
40
-
 41
41
-
 42
42
-
 43
43
-
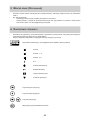 44
44
-
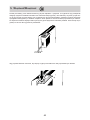 45
45
-
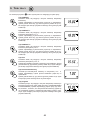 46
46
-
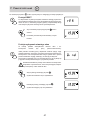 47
47
-
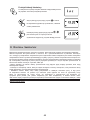 48
48
-
 49
49
-
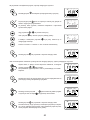 50
50
-
 51
51
-
 52
52
-
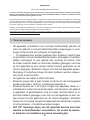 53
53
-
 54
54
-
 55
55
-
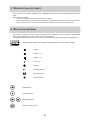 56
56
-
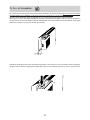 57
57
-
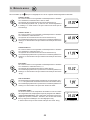 58
58
-
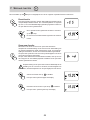 59
59
-
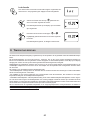 60
60
-
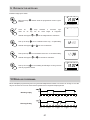 61
61
-
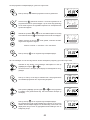 62
62
-
 63
63
-
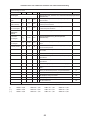 64
64
-
 65
65
-
 66
66
-
 67
67
-
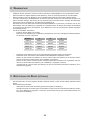 68
68
-
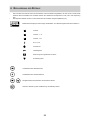 69
69
-
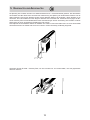 70
70
-
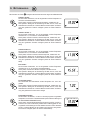 71
71
-
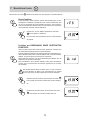 72
72
-
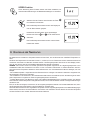 73
73
-
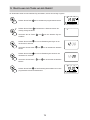 74
74
-
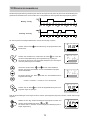 75
75
-
 76
76
-
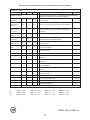 77
77
-
 78
78
-
 79
79
-
 80
80


in andere talen
- English: Radialight SIRIO Installation guide
- italiano: Radialight SIRIO Guida d'installazione
- Deutsch: Radialight SIRIO Installationsanleitung
- polski: Radialight SIRIO Instrukcja instalacji
- română: Radialight SIRIO Ghid de instalare
Gerelateerde papieren

Andere documenten
-
auronic AU3159, AU3160 Glass Convector Heater Handleiding
-
 Cordivari RF Digital Remote Control Handleiding
-
Samsung AG060MN4PKH/EU Handleiding
-
Samsung AG090MN4PKH/EU Handleiding
-
Steba BS 1800 TOUCH Handleiding
-
Terma Sim Handleiding
-
-
ProfiCare PC-GKH 3118 Handleiding
-
Taurus Alpatec CHTA 500 - 1000 - 1500 - 2000 de handleiding
-
DeLonghi HCM2020 de handleiding
