
Endomed 482
Bedieningshandleiding
Operating Instructions
Gebrauchsanweisung
Mode d´emploi
Instrucciones de manejo
Guía de usuario

Copyright:
Enraf-Nonius B.V.
P.O. Box 12080
3004 GB Rotterdam
The Netherlands
Tel: +31 (0)10 – 20 30 600
Fax: +31 (0)10 – 20 30 699
info@enraf-nonius.nl
www.enraf-nonius.com
Part number: 1497.759-41
August 2005

Endomed 482
Bedieningshandleiding
Operating Instructions
Gebrauchsanweisung
Mode d´emploi
Instrucciones de manejo
Guía de usuario


INHOUDSOPGAVE TABLE OF CONTENTS INHALTSVERZEICHNIS
TABLE DES MATIÈRES INDICE DE MATERIAS INDICE
1 Hoofdstuk 1 - Inleiding................................................................................................................ 1
1.1 Algemeen ............................................................................................................................ 1
1.2 Therapiemogelijkheden....................................................................................................... 1
1.3 Tot slot................................................................................................................................. 1
2 Veiligheid...................................................................................................................................... 1
2.1 Opmerkingen vooraf............................................................................................................ 1
2.2 Algemeen ............................................................................................................................ 1
2.3 Uitsluitingen......................................................................................................................... 1
2.4 Stroomdichtheid .................................................................................................................. 1
2.5 Elektromagnetische interferentie ........................................................................................ 2
2.6 Productaansprakelijkheid.................................................................................................... 2
3 Indicaties en contra-indicaties................................................................................................... 2
3.1 Indicaties ............................................................................................................................. 2
3.2 Therapeutisch handelen:..................................................................................................... 2
3.3 Contra-indicaties (elektrotherapie)...................................................................................... 3
4 Installatie...................................................................................................................................... 3
4.1 Aansluiten ........................................................................................................................... 3
4.2 Aansluiten lichtnetadapter................................................................................................... 3
4.3 Aanzetten en zelftest...........................................................................................................3
4.4 Ontkoppelen van het lichtnet .............................................................................................. 3
4.5 Werken op batterij (optioneel)............................................................................................. 3
4.6 Installatie ............................................................................................................................. 4
4.7 Elektromagnetische interferentie ........................................................................................ 4
5 Bediening ..................................................................................................................................... 4
5.1 Bedieningsorganen ............................................................................................................. 4
5.1.1 Apparaat ...............................................................................................................................4
5.1.2 Bedieningspaneel .................................................................................................................4
5.2 Bediening ............................................................................................................................ 6
5.2.1 Inleiding ................................................................................................................................6
5.2.1.1 Inschakelen van het apparaat................................................................................................................ 6
5.2.1.2 Therapievorm en kanaalselectie............................................................................................................ 6
5.2.1.3 Selectie van stroomvorm ....................................................................................................................... 6
5.2.1.4 Instellen van parameters........................................................................................................................ 6
5.2.1.5 Behandeltijd ........................................................................................................................................... 6
5.2.1.6 Zwelprogramma ..................................................................................................................................... 6
5.2.1.7 Stroomintensiteit .................................................................................................................................... 6
5.2.1.8 CC/CV instelling..................................................................................................................................... 7
5.2.1.9 Polariteit................................................................................................................................................. 7
5.2.1.10 Noodstop.............................................................................................................................................. 7
5.2.2 Elektrotherapie......................................................................................................................7
5.2.2.1 Bipolaire interferentie............................................................................................................................. 7
5.2.2.2 Onderbroken wisselstroom (Russische stimulatie)................................................................................ 8
5.2.2.3 Asymmetrische en symmetrische bifasische pulsstromen (TENS) ....................................................... 8
5.2.2.4 Faradische rechthoek- of driehoekstromen ........................................................................................... 9
5.2.2.5 Microcurrent ........................................................................................................................................... 9
5.2.2.6 High voltage......................................................................................................................................... 10
5.2.2.7 Diadynamische stromen ...................................................................................................................... 10
5.2.2.8 Onderbroken gelijkstroom.................................................................................................................... 11
5.2.2.9 Interferentie (klassiek).......................................................................................................................... 11
5.2.2.10 Isoplanaire vector............................................................................................................................... 11
5.2.2.11 Dipool vector manueel ....................................................................................................................... 11
5.2.2.12 Dipool vector automatisch.................................................................................................................. 12
5.3 Maatregelen met betrekking tot behandelingen................................................................ 12
5.3.1 Elektrotherapie....................................................................................................................12
5.4 Bediening van het geheugen ............................................................................................ 12
5.4.1 Apparaatinstellingen ...........................................................................................................12
5.4.1.1 Apparaatinstelling oproepen ................................................................................................................ 12
5.4.1.2 Apparaatinstelling opslaan................................................................................................................... 13
5.4.2 Protocollen..........................................................................................................................13
5.4.2.1 Protocol oproepen................................................................................................................................ 13
5.4.2.2 Protocol opslaan .................................................................................................................................. 14
5.4.2.3 Protocol samenstellen.......................................................................................................................... 14
5.5 Openings- en sluitingsreacties.......................................................................................... 14
5.6 Elektrolytische effecten ..................................................................................................... 14
5.7 Afstandsbediening............................................................................................................. 15
NL
F
GB
E
D
I

6 Onderhoud..................................................................................................................................15
6.1 Technisch onderhoud ........................................................................................................15
6.2 Reinigen van het apparaat ................................................................................................15
6.3 Reinigen van de accessoires.............................................................................................15
6.3.1 Elektroden en sponsjes.......................................................................................................15
6.3.2 Patiëntenkabel ....................................................................................................................15
6.4 Einde levensduur apparaat en toebehoren .......................................................................15
7 Aanwijzingen bij storingen .......................................................................................................16
7.1 Displays lichten niet op......................................................................................................16
7.2 Foutcode............................................................................................................................16
7.3 Verbroken contact in de CC-mode ....................................................................................16
7.4 Geen of onvoldoende uitgangsstroom...............................................................................16
7.5 Controle bedieningspaneel................................................................................................16
8 Specificaties ...............................................................................................................................16
8.1 Productspecificaties...........................................................................................................16
8.2 Technische specificaties....................................................................................................18
8.3 Classificatie........................................................................................................................19
9 Bestelgegevens..........................................................................................................................19
1 Introduction ..................................................................................................................................1
1.1 General ................................................................................................................................1
1.2 Therapy possibilities ............................................................................................................1
1.3 Finally...................................................................................................................................1
2 Safety ............................................................................................................................................1
2.1 Preliminary notes .................................................................................................................1
2.2 General ................................................................................................................................1
2.3 Exclusions............................................................................................................................1
2.4 Current density ....................................................................................................................1
2.5 Electromagnetic interference...............................................................................................2
2.6 Limitations of liability............................................................................................................2
3 Indications and Contra-Indications............................................................................................2
3.1 Indications............................................................................................................................2
3.1.1 Electro therapy......................................................................................................................2
3.2 Absolute specific contra-indications ....................................................................................3
3.2.1 Electro therapy......................................................................................................................3
4 Installation ....................................................................................................................................3
4.1 Connection...........................................................................................................................3
4.2 Connection of the mains adapter.........................................................................................3
4.3 Switching on and self test....................................................................................................3
4.4 Disconnecting from the mains .............................................................................................3
4.5 Battery operation (optional) .................................................................................................3
4.6 Installation............................................................................................................................4
4.7 Electromagnetic interference...............................................................................................4
5 Operation ......................................................................................................................................4
5.1 Controls ...............................................................................................................................4
5.1.1 Device ...................................................................................................................................4
5.1.2 Control panel.........................................................................................................................4
5.2 Operating the apparatus......................................................................................................5
5.2.1 Introduction ...........................................................................................................................5
5.2.1.1 Switch on the apparatus ........................................................................................................................ 5
5.2.1.2 Therapy and channel selection.............................................................................................................. 5
5.2.1.3 Selection of current waveform ............................................................................................................... 6
5.2.1.4 Adjusting parameters............................................................................................................................. 6
5.2.1.5 Treatment timer ..................................................................................................................................... 6
5.2.1.6 Surge programs ..................................................................................................................................... 6
5.2.1.7 Current intensity..................................................................................................................................... 6
5.2.1.8 CC/CV mode.......................................................................................................................................... 6
5.2.1.9 Current polarity ...................................................................................................................................... 6
5.2.1.10 Emergency stop................................................................................................................................... 7
5.2.2 Electrotherapy.......................................................................................................................7
5.2.2.1 2-pole interferential current (premodulated) .......................................................................................... 7
5.2.2.2 Russian stimulation................................................................................................................................ 7
5.2.2.3 Asymmetrical and Symmetrical biphasic pulsed current (TENS) ......................................................... 8
5.2.2.4 Monophasic rectangular –and triangular pulsed current ....................................................................... 8
5.2.2.5 Microcurrent........................................................................................................................................... 9
5.2.2.6 High voltage........................................................................................................................................... 9
5.2.2.7 Diadynamic currents ............................................................................................................................ 10
5.2.2.8 Medium frequency interrupted direct current ....................................................................................... 10

5.2.2.9 4-pole interferential current (classical)................................................................................................. 11
5.2.2.10 Isoplanar vector ................................................................................................................................. 11
5.2.2.11 Dipole vector manual ......................................................................................................................... 11
5.2.2.12 Dipole vector automatic ..................................................................................................................... 12
5.3 Measures with regard to treatments ................................................................................. 12
5.3.1 Electrotherapy.....................................................................................................................12
5.3.1.1 Before treatment .................................................................................................................................. 12
5.4 Memory functions.............................................................................................................. 12
5.4.1.1 Loading a protocol ............................................................................................................................... 13
5.4.1.2 Storing a protocol................................................................................................................................. 13
5.4.1.3 Creating a user defined protocol.......................................................................................................... 13
5.5 Connection and disconnection reactions .......................................................................... 14
5.6 Electrolytic effects ............................................................................................................. 14
5.7 Remote control..................................................................................................................14
6 Maintenance............................................................................................................................... 14
6.1 Technical maintenance ..................................................................................................... 14
6.2 Cleaning of the apparatus................................................................................................. 14
6.3 Cleaning of accessories.................................................................................................... 15
6.3.1 Electrodes and sponge pads...............................................................................................15
6.3.2 Patient cable .......................................................................................................................15
6.4 Environment information ................................................................................................... 15
7 Diagnostics ................................................................................................................................ 15
7.1 Displays fail to light up ...................................................................................................... 15
7.2 Error code ......................................................................................................................... 15
7.3 Broken contact in the CC-mode........................................................................................ 15
7.4 Insufficient or no output current ........................................................................................ 15
7.5 Front panel check.............................................................................................................. 16
8 Specifications ............................................................................................................................ 16
8.1 Specifications .................................................................................................................... 16
8.2 Technical specifications .................................................................................................... 18
8.3 Classification ..................................................................................................................... 18
Order detail................................................................................................................................................ 18
1 Einleitung ..................................................................................................................................... 1
1.1 Allgemein ............................................................................................................................ 1
1.2 Umfassende Therapie......................................................................................................... 1
1.3 Abschließend ...................................................................................................................... 1
2 Sicherheit ..................................................................................................................................... 1
2.1 Einführung........................................................................................................................... 1
2.2 Allgemeines......................................................................................................................... 1
2.3 Ausschlüsse ........................................................................................................................ 1
2.4 Stromdichte ......................................................................................................................... 2
2.5 Elektromagnetische Interferenz .......................................................................................... 2
2.6 Produkthaftung.................................................................................................................... 2
3 Indikationen und Kontraindikationen........................................................................................ 2
3.1 Indikationen......................................................................................................................... 2
3.2 Absolute spezifische Kontraindikationen ............................................................................ 3
4 Installation.................................................................................................................................... 3
4.1 Anschluß ............................................................................................................................. 3
4.2 Anschluß des Stromversorgungsgerätes............................................................................ 3
4.3 Einschalten und Selbsttest.................................................................................................. 3
4.4 Gerät von der Netzstromversorgung trennen ..................................................................... 3
4.5 Batteriebetrieb (optional)..................................................................................................... 4
4.6 Geräteaufstellung................................................................................................................ 4
4.7 Elektromagnetische Interferenz .......................................................................................... 4
5 Bedienung.................................................................................................................................... 5
5.1 Bedienungsorganen............................................................................................................ 5
5.1.1 Gerät.....................................................................................................................................5
5.2 Bedienung des Gerätes ...................................................................................................... 6
5.2.1 Einleitung ..............................................................................................................................6
5.2.1.1 Anschalten des Gerätes......................................................................................................................... 6
5.2.1.2 Wahl der Therapie und Kanäle .............................................................................................................. 6
5.2.1.3 Wahl der Stromform............................................................................................................................... 6
5.2.1.4 Wahl und Einstellung der Parameter ..................................................................................................... 6
5.2.1.5 Einstellen der Uhr .................................................................................................................................. 6
5.2.1.6 Trainingsdurchlauf ................................................................................................................................. 7

5.2.1.7 Einstellen der Stromstärke..................................................................................................................... 7
5.2.1.8 CC/CV Einstellung ................................................................................................................................. 7
5.2.1.9 Einstellung der Polarität......................................................................................................................... 7
5.2.1.10 Notstop ................................................................................................................................................ 7
5.2.2 Elektrotherapie......................................................................................................................8
5.2.2.1 Bipolare Interferenz ............................................................................................................................... 8
5.2.2.2 „Russian stimulation“ Unterbrochener Mittelfrequenz-Wechselstrom.................................................... 8
5.2.2.3 Asymmetrischer und symmetrischer biphasischer Impuls (TENS)........................................................ 9
5.2.2.4 Monophasischer Rechteck- und Dreieckimpulsstrom............................................................................ 9
5.2.2.5 Microcurrent......................................................................................................................................... 10
5.2.2.6 Hoch Volt (Hochspannung).................................................................................................................. 10
5.2.2.7 Diadynamische Ströme....................................................................................................................... 11
5.2.2.8 Mittelfrequenter unterbrochener Direktstrom ....................................................................................... 11
5.2.2.9 Klassische Interferenz ......................................................................................................................... 12
5.2.2.10 Isoplanarer Vektor ............................................................................................................................. 12
5.2.2.11 Manueller Dipol-Vektor ...................................................................................................................... 12
5.2.2.12 Automatischer Dipol-Vektor ............................................................................................................... 13
5.3 Vorkehrungen für die Behandlungen.................................................................................13
5.3.1 Vor der Behandlung ............................................................................................................13
5.4 Speicherfunktionen............................................................................................................13
5.4.1 Geräteeinstellungen............................................................................................................13
5.4.1.1 Laden von Geräteeinstellungen........................................................................................................... 13
5.4.1.2 Speichern von Geräteeinstellungen:.................................................................................................... 13
5.4.2 Protokolle ............................................................................................................................14
5.4.2.1 Laden eines Protokolls ........................................................................................................................ 14
5.4.2.2 Speichern eines Protokolls .................................................................................................................. 15
5.4.2.3 Erstellung eines benutzerdefinierten Protokolls................................................................................... 15
5.5 Öffnungs- und Schließreaktionen ......................................................................................15
5.6 Elektrolytische Wirkungen .................................................................................................15
5.7 Fernbedienung...................................................................................................................15
6 Wartung.......................................................................................................................................16
6.1 Technische Wartung..........................................................................................................16
6.2 Reinigung von Gehäuse ....................................................................................................16
6.3 Reinigung und Desinfektion von Zubehör .........................................................................16
6.3.1 Elektroden und Schwämme ................................................................................................16
6.3.2 Patientenleitung und Kabeladapter .....................................................................................16
6.4 Entsorgen von Gerät und Zubehör....................................................................................16
7 Diagnose.....................................................................................................................................17
7.1 Anzeigen leuchten nicht.....................................................................................................17
7.2 Fehlercode.........................................................................................................................17
7.3 Unterbrochener Kontakt im CC-Modus .............................................................................17
7.4 Kein oder unzureichender Ausgangsstrom .......................................................................17
7.5 Kontrolle des Bedienfelds..................................................................................................17
8 Spezifikationen...........................................................................................................................17
8.1 Produkt Spezifikationen.....................................................................................................17
8.2 Technische Daten..............................................................................................................19
8.3 Einstufung..........................................................................................................................19
9 Bestelldaten................................................................................................................................20
1 Introduction ..................................................................................................................................1
1.1 Généralités ..........................................................................................................................1
1.2 Possibilités thérapeutiques..................................................................................................1
1.3 En Conclusion......................................................................................................................1
2 Sécurité.........................................................................................................................................1
2.1 Remarques préalables.........................................................................................................1
2.2 Sécurité................................................................................................................................1
2.3 Exclusions............................................................................................................................1
2.4 Densité de courant...............................................................................................................1
2.5 Interférences électromagnétiques .......................................................................................2
2.6 Responsabilité du fabricant .................................................................................................2
3 Indications et Contre-indications...............................................................................................2
3.1 Indications............................................................................................................................2
3.1.1 Électrothérapie......................................................................................................................2
3.2 Contre-indications électrothérapie.......................................................................................3
4 Installation ....................................................................................................................................3
4.1 Raccordements....................................................................................................................3
4.2 Connexion de l’adaptateur secteur......................................................................................3
4.3 Mettre en marche et autotest...............................................................................................3

4.4 Déconnexion du réseau ...................................................................................................... 3
4.5 Utilisation sur batterie (optionnel) ....................................................................................... 3
4.6 Installation ........................................................................................................................... 4
4.7 Interférences électromagnétiques....................................................................................... 4
5 Service.......................................................................................................................................... 4
5.1 Eléments d’utilisation ..........................................................................................................4
5.1.1 Appareil.................................................................................................................................4
5.2 Réglage de l’appareil .......................................................................................................... 5
5.2.1 Introduction ...........................................................................................................................5
5.2.1.1 Mise en route de l’appareil..................................................................................................................... 5
5.2.1.2 Type de thérapie et sélection des canaux ............................................................................................. 5
5.2.1.3 Sélection du type de courant ................................................................................................................. 6
5.2.1.4 Définition et modification des paramètres.............................................................................................. 6
5.2.1.5 Réglage de la minuterie. ........................................................................................................................ 6
5.2.1.6 Programme d’entraînement ................................................................................................................... 6
5.2.1.7 Instauration de l’ intensité ...................................................................................................................... 6
5.2.1.8 Paramètres CC/CV ................................................................................................................................ 6
5.2.1.9 Polarité................................................................................................................................................... 7
5.2.1.10 Arrêt d’urgence. ................................................................................................................................... 7
5.2.2 Électrothérapie......................................................................................................................7
5.2.2.1 Interférence bipolaire ............................................................................................................................. 7
5.2.2.2 Courant alternatif interrompu (Stimulation Russe)................................................................................. 7
5.2.2.3 Courants pulsés biphasés asymétrique et symétrique (TENS) ............................................................. 8
5.2.2.4 Courants Faradiques rectangulaires ou triangulaires ............................................................................ 9
5.2.2.5 Microcurrent ........................................................................................................................................... 9
5.2.2.6 High voltage......................................................................................................................................... 10
5.2.2.7 Courant dia dynamique........................................................................................................................ 10
5.2.2.8 Courant continu interrompu ................................................................................................................. 11
5.2.2.9 Interférence (classique) ....................................................................................................................... 11
5.2.2.10 Vecteur isoplanaire ............................................................................................................................ 11
5.2.2.11 Vecteur dipôle manuel ....................................................................................................................... 11
5.2.2.12 Vecteur dipôle automatique ............................................................................................................... 12
5.3 Mesures propres aux traitements ..................................................................................... 12
5.3.1 Électrothérapie....................................................................................................................12
5.4 Utilisation de la mémoire................................................................................................... 12
5.4.1 Paramètres de l’appareil .....................................................................................................12
5.4.1.1 Appel des paramètres de l’appareil ..................................................................................................... 12
5.4.1.2 Sauvegarde des paramètres................................................................................................................ 13
5.4.2 Protocoles...........................................................................................................................13
5.4.2.1 Rappel d’un protocole.......................................................................................................................... 13
5.4.2.2 Sauvegarde d’un protocole.................................................................................................................. 14
5.4.2.3 Composition d’un protocole ................................................................................................................. 14
5.5 Réactions à l'ouverture et à la fermeture .......................................................................... 14
5.6 Effets électrolytiques......................................................................................................... 14
5.7 Commande à distance ...................................................................................................... 14
6 Entretien..................................................................................................................................... 15
6.1 Entretien technique ........................................................................................................... 15
6.2 Nettoyage de l’appareil ..................................................................................................... 15
6.3 Nettoyage des accessoires............................................................................................... 15
6.3.1 Electrodes et éponges ........................................................................................................15
6.3.2 Câble de patient et câble adaptateur ..................................................................................15
6.4 Informations pour l’environnement.................................................................................... 15
7 Conseil en cas de pannes ........................................................................................................16
7.1 L’écran ne s’éclaire pas .................................................................................................... 16
7.2 Le cadran affiche un numéro (ou code)............................................................................ 16
7.3 Rupture de contact dans la mode CC............................................................................... 16
7.4 Pas ou pas assez de courant de sortie............................................................................. 16
7.5 Contrôle du panneau de commande................................................................................. 16
8 Spécificités................................................................................................................................. 16
8.1 Spécificités ........................................................................................................................ 16
9 Données de commande............................................................................................................ 19
1 Introducción................................................................................................................................. 1
1.1 General................................................................................................................................ 1
1.2 Posibilidades de terapia...................................................................................................... 1
1.3 Finalmente .......................................................................................................................... 1
2 Seguridad..................................................................................................................................... 1
2.1 Notas preliminares ..............................................................................................................1
2.2 General................................................................................................................................ 1
2.3 Exclusiones ......................................................................................................................... 1

2.4 Densidad de corriente..........................................................................................................1
2.5 Interferencia electromagnética ............................................................................................2
2.6 Limitación de responsabilidad .............................................................................................2
3 Indicaciones y Contra-indicaciones ..........................................................................................2
3.1 Indicaciones.........................................................................................................................2
3.1.1 Electroterapia........................................................................................................................2
3.2 Contraindicaciones específicas absolutas...........................................................................3
3.2.1 Electroterapia........................................................................................................................3
4 Instalación ....................................................................................................................................3
4.1 Conexión..............................................................................................................................3
4.2 Conexión del adaptador de red ...........................................................................................3
4.3 Encendido y auto test ..........................................................................................................3
4.4 Desconectar de la red..........................................................................................................3
4.5 Funcionamiento con bateria (opcional) ...............................................................................4
4.6 Instalación............................................................................................................................4
4.7 Interferencia Electromagnética............................................................................................4
5 Operación .....................................................................................................................................4
5.1 Controles .............................................................................................................................4
5.1.1 Aparato .................................................................................................................................4
5.1.2 Panel de control ....................................................................................................................5
5.2 Funcionamiento de la unidad ..............................................................................................6
5.2.1 Introduccion ..........................................................................................................................6
5.2.1.1 Encender el aparato .............................................................................................................................. 6
5.2.1.2 Terapia y selección de canal ................................................................................................................. 6
5.2.1.3 Selección de corriente en forma de onda.............................................................................................. 6
5.2.1.4 Ajuste de parámetros............................................................................................................................. 6
5.2.1.5 Tiempo de tratamiento........................................................................................................................... 6
5.2.1.6 Programas de sobre corriente ............................................................................................................... 6
5.2.1.7 Intensidad de corriente .......................................................................................................................... 6
5.2.1.8 Modo CC/CV.......................................................................................................................................... 7
5.2.1.9 Polaridad de corriente............................................................................................................................ 7
5.2.1.10 Parada de Emergencia. ....................................................................................................................... 7
5.2.2 Electroterapia........................................................................................................................7
5.2.2.1 Interferencia de dos-polos ..................................................................................................................... 7
5.2.2.2 Estimulación Rusa................................................................................................................................. 8
5.2.2.3 Corriente pulsada bifásico Asimétrica y Simétrica (TENS).................................................................... 8
5.2.2.4 Corriente pulsada Triangular –y monofásica rectangular...................................................................... 9
5.2.2.5 Micro corriente ....................................................................................................................................... 9
5.2.2.6 Voltaje alto ........................................................................................................................................... 10
5.2.2.7 Corrientes Diadinamicas...................................................................................................................... 10
5.2.2.8 Corriente directa interrumpida de frecuencia - media.......................................................................... 11
5.2.2.9 Interferencia (clásica) .......................................................................................................................... 11
5.2.2.10 Vector isoplanar................................................................................................................................. 11
5.2.2.11 Vector manual dipolar........................................................................................................................ 12
5.2.2.12 Vector dipolar automático .................................................................................................................. 12
5.3 Medidas con respecto a tratamientos................................................................................12
5.3.1 Electroterapia......................................................................................................................12
5.4 Funciones de memoria ......................................................................................................12
5.4.1 Ajustes de equipo................................................................................................................13
5.4.1.1 Carga de ajustes de equipo................................................................................................................. 13
5.4.1.2 Almacenamiento de ajustes de equipo................................................................................................ 13
5.4.2 Protocolos ...........................................................................................................................13
5.4.2.1 Carga de un protocolo ......................................................................................................................... 13
5.4.2.2 Guardar un protocolo........................................................................................................................... 14
5.4.2.3 Creación de un protocolo definido por el usuario ................................................................................14
5.5 Reacciones al conectar y desconectar..............................................................................15
5.6 Efectos electrolíticos..........................................................................................................15
5.7 Control remoto ...................................................................................................................15
6 Mantenimiento por el usuario...................................................................................................15
6.1 Mantenimiento técnico.......................................................................................................15
6.2 Limpieza del aparato .........................................................................................................15
6.3 Limpieza de los accesorios ...............................................................................................15
6.3.1 Electrodos y esponjas .........................................................................................................15
6.3.2 Cable del paciente ..............................................................................................................16
6.4 Duración de vida del aparato y accesorios........................................................................16
7 Diagnóstico.................................................................................................................................16
7.1 Las luces y pantallas no se encienden..............................................................................16
7.2 Código de Error .................................................................................................................16
7.3 Contacto roto en modo CC................................................................................................16
7.4 Falta de corriente (insuficiente) .........................................................................................16

7.5 Comprobación de panel frontal......................................................................................... 16
8 Especificaciones ....................................................................................................................... 17
8.1 Especificaciones del producto .......................................................................................... 17
8.2 Especificaciones técnicas ................................................................................................. 19
8.3 Clasificación ...................................................................................................................... 19
9 Datos de pedido ........................................................................................................................ 19
1 Introduzione................................................................................................................................. 1
1.1 Generalità............................................................................................................................ 1
1.2 Possibilità terapeutiche ....................................................................................................... 1
1.3 Conclusioni.......................................................................................................................... 1
2 Sicurezza...................................................................................................................................... 1
2.1 Note preliminari ................................................................................................................... 1
2.2 Generalità............................................................................................................................ 1
2.3 Campi di non applicazione.................................................................................................. 1
2.4 Densità di corrente .............................................................................................................. 1
2.5 Interferenza elettromagnetica ............................................................................................. 2
2.6 Limiti di responsabilità......................................................................................................... 2
3 Indicazioni e controindicazioni.................................................................................................. 2
3.1 Indicazioni ........................................................................................................................... 2
3.1.1 Elettroterapia.........................................................................................................................2
3.2 Controindicazioni specifiche assolute ................................................................................. 3
3.2.1 Elettroterapia.........................................................................................................................3
4 Installazione................................................................................................................................. 3
4.1 Collegamento ...................................................................................................................... 3
4.2 Collegamento dell’adattatore di rete ................................................................................... 3
4.3 Accensione e auto diagnosi di controllo.............................................................................. 3
4.4 Scollegamento dalla rete..................................................................................................... 3
4.5 Funzionamento a batterie (opzionale) ................................................................................ 3
4.6 Installazione ........................................................................................................................ 4
4.7 Interferenza elettromagnetica ............................................................................................. 4
5 Funzionamento............................................................................................................................ 4
5.1 Controlli ............................................................................................................................... 4
5.1.1 Apparecchio..........................................................................................................................4
5.2 Funzionamento dell’apparecchio ........................................................................................ 5
5.2.1 Introduzione ..........................................................................................................................6
5.2.1.1 Accensione ............................................................................................................................................ 6
5.2.1.2 Selezione della terapia e del canale ...................................................................................................... 6
5.2.1.3 Selezione delle forme di corrente .......................................................................................................... 6
5.2.1.4 Regolazione dei parametri ..................................................................................................................... 6
5.2.1.5 Timer trattamento................................................................................................................................... 6
5.2.1.6 Programmi modulazione corrente.......................................................................................................... 6
5.2.1.7 Intensità di corrente ............................................................................................................................... 7
5.2.1.8 Modo CC/CV.......................................................................................................................................... 7
5.2.1.9 Polarità di corrente................................................................................................................................. 7
5.2.1.10 Stop di emergenza............................................................................................................................... 7
5.2.2 Elettroterapia.........................................................................................................................7
5.2.2.1 Corrente interferenziale a 2 poli (premodulata) ..................................................................................... 7
5.2.2.2 Stimolazione russa................................................................................................................................. 8
5.2.2.3 Corrente pulsata bifasica simmetrica e asimmetrica (TENS) ................................................................ 8
5.2.2.4 Corrente pulsata monofasica rettangolare e triangolare........................................................................ 9
5.2.2.5 Microcorrente ....................................................................................................................................... 10
5.2.2.6 Alta tensione ........................................................................................................................................ 10
5.2.2.7 Correnti diadinamiche.......................................................................................................................... 11
5.2.2.8 Corrente continua interrotta a media frequenza ..................................................................................11
5.2.2.9 Corrente interferenziale a 4 poli (classica) .......................................................................................... 11
5.2.2.10 Vettore isoplanare.............................................................................................................................. 12
5.2.2.11 Vettore dipolo manuale...................................................................................................................... 12
5.2.2.12 Selezionare
con il regolatore centrale [16] e premer il tasto [14] per confermare; ..................... 12
5.2.2.13 Vettore dipolo automatico .................................................................................................................. 12
5.3 Precauzioni in relazione ai trattamenti .............................................................................. 13
5.3.1 Elettroterapia.......................................................................................................................13
5.4 Funzioni di memoria.......................................................................................................... 13
5.4.1 Programmi dell’unità ...........................................................................................................13
5.4.1.1 Caricamento dei programmi................................................................................................................. 13
5.4.1.2 Memorizzazione dei programmi........................................................................................................... 13
5.4.2 Protocolli .............................................................................................................................14
5.4.2.1 Caricamento di un protocollo ............................................................................................................... 14
5.4.2.2 Memorizzare un protocollo................................................................................................................... 14
5.4.2.3 Creare un protocollo personalizzato .................................................................................................... 15

5.5 Reazioni al collegamento - scollegamento degli elettrodi .................................................15
5.6 Effetti elettrolitici.................................................................................................................15
5.7 Telecomando .....................................................................................................................15
6 Manutenzione .............................................................................................................................15
6.1 Manutenzione tecnica........................................................................................................15
6.2 Pulizia dell’apparecchio .....................................................................................................16
6.3 Pulizia degli accessori .......................................................................................................16
6.3.1 Elettrodi e spugnette ...........................................................................................................16
6.3.2 Cavo paziente .....................................................................................................................16
6.4 Informazioni ambientali......................................................................................................16
7 Diagnostica.................................................................................................................................16
7.1 Display che non si illumina ................................................................................................16
7.2 Codice errore .....................................................................................................................16
7.3 Contatto interrotto nel modulo CC .....................................................................................16
7.4 Assenza totale o parziale di corrente in uscita ..................................................................17
7.5 Controllo del pannello frontale...........................................................................................17
8 Caratteristiche............................................................................................................................17
8.1 Caratteristiche....................................................................................................................17
8.2 Caratteristiche tecniche .....................................................................................................19
8.3 Classificazione...................................................................................................................19
9 Dati per l’ordinazione ................................................................................................................20
1 Figuren – Pictures – Abbildungen – Image – Imagen - Immagine
22


1
NL
1 Hoofdstuk 1 - Inleiding
1.1 Algemeen
De Endomed 482 is voorzien van twee volledig identieke multifunctionele elektrotherapiekanalen. De
elektrotherapiekanalen kunnen naar keuze volledig onafhankelijk of gekoppeld worden gebruikt. De
Endomed 482 is voorzien van de meest uitgebreide reeks stroomvormen en maken van dit apparaat het
ultieme stimulatieapparaat in elke praktijk.
Dit apparaat is uitsluitend bedoeld voor gebruik door vakkundig personeel in de fysiotherapie, revalidatie
en aangrenzende gebieden.
1.2 Therapiemogelijkheden
Elektrotherapie met laagfrequent, middenfrequent, TENS, High Voltage, Microcurrent.
Door gebruik van deze stromen is het o.a. mogelijk spierontspanning en pijnvermindering te
bewerkstelligen en de doorbloeding en regeneratievermogen van het weefsel te bevorderen.
1.3 Tot slot
Met het aanschaffen van de Endomed 482 heeft u de juiste keuze gemaakt. Wij zijn ervan overtuigd dat u
vele jaren plezierig zult werken met dit apparaat. Mocht u onverhoopt nog vragen hebben dan kunt u zich
wenden tot uw leverancier.
2 Veiligheid
2.1 Opmerkingen vooraf
Het is belangrijk dat u, voor het in gebruik nemen van de Endomed 482, deze handleiding goed
doorleest. Zorgt u er vooral voor dat deze handleiding altijd beschikbaar is voor al het betrokken
personeel.
Let bij het gebruik van de Endomed 482 met name op het volgende:
1. U dient zich op de hoogte te stellen van de contra-indicaties (zie hoofdstuk 3).
2. Het apparaat mag niet gebruikt worden in de nabijheid (d.w.z. op minder dan 2 meter
afstand) van een kortegolfapparaat.
3. Het apparaat mag niet gebruikt worden in zogeheten “natte ruimten” (hydrotherapieruimten).
4. De patiënt dient te allen tijde in het zicht van de behandelaar te zijn.
De fabrikant is niet aansprakelijk voor de gevolgen van gebruik van het apparaat anders dan beschreven
in deze handleiding.
2.2 Algemeen
Een ingebouwde microprocessor controleert bij het opstarten alle belangrijke functies van het apparaat.
Gedurende de werking van het apparaat wordt constant de werkelijk afgegeven stroom gemeten en
vergeleken met de ingestelde stroom. Mocht er iets fout gaan, dan zal het apparaat zelf de stroom
afkoppelen.
2.3 Uitsluitingen
Elektrotherapie is niet bedoeld voor de volgende specifieke toepassingen:
Inter craniale behandelingen, zoals slaaptherapie;
Trans cordiale behandelingen (het toepassen van elektrodes bij de thorax kan het risico van
hartfibrillatie vergroten);
Cervicaal occipitale behandelingen.
2.4 Stroomdichtheid
De norm IEC 60601-2-10 adviseert een stroomdichtheid van 2 mA effectief per cm² niet te overschrijden.
Voor elke elektrode kan de aanbevolen maximum effectieve patiëntenstroom berekend worden door het
contactoppervlak (in vierkante centimeters) te vermenigvuldigen met 2 [mA/cm²].
Let op dat de elektroden zo geplaatst worden dat er, over het gehele oppervlak, goed contact is met de
huid.
N.B.: Het gebruik van kleine elektroden in combinatie met een hoge intensiteit kan huidirritatie of zelfs
brandwonden ten gevolgen hebben.

2
NL
2.5 Elektromagnetische interferentie
Het gelijktijdig aansluiten van een patiënt op de Endomed 482 en HF-chirurgische apparatuur kan
brandwonden ter plaatse van de stimulerende elektroden veroorzaken. Het gelijktijdig aansluiten is
daarom niet toegestaan.
Zie verder Hoofdstuk 4 Installatie.
2.6 Productaansprakelijkheid
Voorzover toegestaan door de van toepassing zijnde wetgeving zullen Enraf-Nonius of zijn leveranciers
of verkopers onder geen enkele omstandigheid aansprakelijk zijn voor indirecte, uitzonderlijke, incidentele
of gevolgschade voortvloeiend uit het gebruik van dan wel de onmogelijkheid van het gebruik van het
product, met inbegrip van maar niet beperkt tot schade als gevolg van verlies aan goodwill,
werkonderbreking, computerdefecten of -storingen, of andere commerciële schade of verliezen, zelfs
indien Enraf-Nonius dan wel zijn leveranciers of verkopers op de hoogte is gesteld van de mogelijkheid
van een dergelijke schade en ongeacht de rechts- of billijkheidstheorie (contract, onrechtmatige daad of
anderszins) waarop de claim is gebaseerd. Enraf-Nonius zal op grond van bepalingen van deze
overeenkomst in geen geval aansprakelijk zijn voor schade die meer bedraagt dan het bedrag dat Enraf-
Nonius voor dit product van u heeft ontvangen en eventuele vergoedingen voor ondersteuning van het
product die door Enraf-Nonius op grond van een afzonderlijke ondersteuningsovereenkomst zijn
ontvangen. In geval van dood of lichamelijk letsel voortvloeiend uit de nalatigheid van Enraf-Nonius geldt
deze beperking niet voorzover de toepasselijke wetgeving een dergelijke beperking verbiedt.
Enraf-Nonius is niet aansprakelijk voor de gevolgen van de onjuiste gegevens and adviezen van haar
personeel, dan wel fouten voorkomende in deze handleiding, en/of ander begeleidend schrijven (met
inbegrip van commerciële documentatie).
De wederpartij (gebruiker of representant van de gebruiker) is gehouden Enraf-Nonius te vrijwaren voor
alle aanspraken van derden, hoe ook genaamd en op welke grond dan ook gebaseerd.
3 Indicaties en contra-indicaties
3.1 Indicaties
Diagnostiek, elektropalpatie voor:
• pijnpunten;
• trigger points;
• hyperesthetische gebieden;
• motorische prikkelpunten;
• I/t-curve
3.2 Therapeutisch handelen:
A. Pijndemping door stimulatie van:
• pijnpunten;
• trigger points;
• hyperesthetische gebieden.
B. Behandelingen van aandoeningen waarbij een vegetatieve disbalans op de voorgrond staat,
onder andere bij:
• het schouder/hand syndroom;
• M. Raynaud;
• M. Buerger;
• Sudeckse dystrofie;
• neurologische aandoeningen;
• myalgieën.
C. Spierstimulatie:
• voor herstellen van het bewegingsgevoel;
• bij atrofie;
• van de interne en externe sphincters bij de behandeling van incontinentia urinae;
• bij revalidatie;
• bij spierversterking (sport);
• bij neurologische aandoeningen.
D. Iontoforese.

3
NL
E. Wondgenezing:
• huiddefecten t.g.v. doorbloedingsstoornissen;
• postoperatief.
3.3 Contra-indicaties (elektrotherapie)
• koorts;
• tumoren;
• tuberculose;
• plaatselijke ontstekingsprocessen;
• trombose;
• zwangerschap;
• pacemaker;
• metaalimplantaten.
4 Installatie
4.1 Aansluiten
• De netaansluiting moet voldoen aan de plaatselijke eisen voor medisch gebruikte ruimten. Het
apparaat is voorzien van een veiligheidsaarde en moet worden aangesloten op een wandcontactdoos,
voorzien van randaarde.
• Controleer eerst of de netspanning en netfrequentie, vermeld op het typeplaatje overeenkomen
met die van het lichtnet.
• De lichtnetadapter maakt deel uit van het voedingscircuit waarop de veiligheid van het apparaat
gedeeltelijk is gebaseerd. De goedkeuring van de Endomed 482 is alleen van kracht bij gebruik in
combinatie met lichtnetadapter ENA-1550
Het is niet toegestaan de Endomed 482 aan te sluiten op een andere lichtnetadapter dan het type
ENA-1550.
4.2 Aansluiten lichtnetadapter
• Sluit de bijgeleverde lichtnetadapter aan op connector [3.1].
• Sluit de lichtnetadapter aan op een wandcontactdoos. Indicatie lampje [6] geeft aan dat het
apparaat op het lichtnet is aangesloten en standby staat.
4.3 Aanzetten en zelftest
• Zet het apparaat aan met de aan/uit schakelaar [1].
• Bij het inschakelen voert het apparaat een zelftest uit.
Aan het eind van de test is een pieptoon hoorbaar. Wordt er een fout gevonden, dan verschijnt er een
foutcode op het display. Zie hoofdstuk 7. voor details.
4.4 Ontkoppelen van het lichtnet
• Schakel de Endomed 482 uit met behulp van de aan/uit schakelaar [1].
• Neem de stekker van de lichtnetadapter uit de wandcontactdoos.
4.5 Werken op batterij (optioneel)
Het is mogelijk het apparaat onafhankelijk van het lichtnet te gebruiken. Hiertoe moet eerst een batterij
geplaatst worden. Hierbij gaat men als volgt te werk:
• Zet het apparaat uit en neem de lichtnetadapter los van connector [3.1].
• Draai het apparaat om en verwijder de twee schroeven die het deksel van het
batterijcompartiment met de bodem van het apparaat verbinden.
• Sluit de rode draad aan op de positieve (+) pool van de batterij en de zwarte draad op de
negatieve (-) pool.
• Laat de batterij in het batterijcompartiment zakken.
• Plaats het deksel weer terug en draai de twee schroeven weer vast.
• Sluit de lichtnetadapter weer aan op connector [3.1].
Met aangesloten lichtnetadapter wordt de batterij automatisch geladen, onafhankelijk van de stand van
de aan/uit schakelaar [1]. Wij adviseren het apparaat zoveel mogelijk met aangesloten lichtnetadapter te
gebruiken. Dit komt de levensduur van de batterij ten goede.

4
NL
Om problemen te voorkomen adviseren wij uitsluitend door Enraf-Nonius geleverde batterijen van het
type 2601.016 te gebruiken. De batterij bevat stoffen die schadelijk zijn voor het milieu. Houdt U bij afvoer
van de batterij aan de plaatselijk geldende regels. Zie ook hoofdstuk 6.4.
4.6 Installatie
• Zet het apparaat niet in de buurt van een warmtebron zoals een radiator.
• Voorkom blootstelling aan direct zonlicht, veel stof, vocht, trillingen en stoten.
• Het gebruik van elektronische apparatuur zoals een draadloze telefoon in de nabijheid van het
apparaat wordt afgeraden.
• Het is niet toegestaan dit apparaat in zogeheten "natte ruimten" (hydrotherapieruimten) te
gebruiken.
• Het apparaat moet zodanig opgesteld worden dat er geen vloeistof in terecht kan komen.
• Gebruik altijd de door Enraf-Nonius voor dit apparaat voorgeschreven originele toebehoren.
Mocht er vloeistof in de behuizing terechtkomen, trek dan het netsnoer/netstekker (indien aangesloten) uit
de contactdoos. Laat het apparaat door een geautoriseerde deskundige controleren.
Gebruik altijd de door Enraf-Nonius voor dit apparaat voorgeschreven originele toebehoren.
4.7 Elektromagnetische interferentie
• Bij gebruik in de onmiddellijke nabijheid (d.w.z. op 2 meter afstand of minder) van in gebruik
zijnde kortegolfapparatuur kan instabiliteit in het afgegeven signaal van de Endomed 482 ontstaan.
• Om elektromagnetische beïnvloeding te voorkomen, adviseren wij de Endomed 482 en de
kortegolfapparatuur elk op een verschillende groep van het lichtnet aan te sluiten.
• Zorg ervoor dat het netsnoer van het kortegolfapparaat niet in de nabijheid van de Endomed 482
of van de patiënt komt.
Bij blijvende storing, veroorzaakt door elektromagnetische interferentie, dient u contact op te nemen met
uw leverancier.
5 Bediening
5.1 Bedieningsorganen
5.1.1 Apparaat
(Figuren)
[1] Aan/uit schakelaar
Met deze schakelaar wordt de Endomed 482 aan of uit gezet.
[2] Typestikker / waarschuwingssticker
Hier vindt u apparaat gegevens zoals type- en serienummer en aansluitgegevens zoals spanning en
maximale opgenomen stroom.
[3-1] Plug voor lichtnetadapter
Hier wordt de lichtnetadapter aangesloten.
[3-2] Plug voor afstandsbediening
Hier wordt de afstandsbediening aangesloten.
[4-1] Aansluiten patiëntenkabel elektrotherapie
Hier wordt de kabeladapter aangesloten
5.1.2 Bedieningspaneel
(Figuren)

5
NL
[5] Indicatielampje accuconditie
Er zijn vier mogelijkheden aanwezig:
• Brandt continu groen: accu is voldoende geladen
• Knippert groen: accu raakt leeg, lichtnetadapter aansluiten.
• Brandt geel: accu is bijna leeg, er kan niet meer gewerkt worden,
lichtnetadapter aansluiten.
• Is uit: geen accu aanwezig; is leeg of defect, lichtnetadapter aansluiten
[6] Indicatielampje lichtnetadapter
Dit lampje geeft aan of er een lichtnetadapter is aangesloten en werkend is.
[7] Therapie keuzetoets
Keuzetoets elektrotherapie, stroomkanaalkeuze, gekoppelde stroomkanalen, pauze bij
behandelprotocollen.
[8] Keuzetoets stroomvorm elektrotherapie
Met deze toets wordt de stroomvorm geselecteerd
[9] Keuzetoets voor:
Draaggolffrequentie, microcurrent frequentie, faseduur, interferentie type, alternerende mode (High
Voltage en Microcurrent)
[10] Keuzetoets voor:
Prikkelfrequentie, fase interval, burst frequentie (Russische stimulatie), vector positie, balans,
diadynamisch stroomtype en spectrum.
[11] Keuzetoets voor:
Spectrum doorloop, duty cycle (Russische stimulatie), burstfrequentie (TENS) en behandelstapnummer
(protocollen).
[12] Keuzetoets voor:
Trainingsprogramma's, vector rotatietijd en klok
[13] Keuzetoets voor:
Stroomkanaal, CC/CV, polariteit
[12]+[13] Noodstop.
Door de toetsen [12] en [13] tegelijk in te drukken kan de behandeling op alle kanalen tegelijk worden
gestopt.
[14] Accepttoets
Met de accept toets worden de selectie van de stroomvorm, “het ophalen uit” of “het opslaan in” het
geheugen bevestigd.
Met deze toets kan ook het trainingsprogramma worden gestart.
[15] Geheugentoets
Met deze toets kunnen gegevens worden opgehaald uit of opgeslagen in het geheugen.
[16] Centrale regelaar
Regelaar voor het instellen van parameters.
[17] Intensiteitregelaar
Regelaar voor het instellen van de patiëntenstroom voor kanaal 1 en kanaal 2. Bij 4-polige interferentie
technieken (2-kanaals) wordt met deze regelaar de intensiteit over 2 kanalen tegelijk ingesteld.
[19] Pauzesymbool
Het symbool geeft de pauze tussen twee behandelstappen van een behandelprotocol aan.

6
NL
5.2 Bediening
5.2.1 Inleiding
5.2.1.1 Inschakelen van het apparaat
Zet het apparaat aan met schakelaar [1]. Het apparaat doorloopt een zelftest en presenteert zich met de
voorkeurinstelling, apparaatinstelling 0. Vanuit de fabriek is deze voorkeurinstelling geprogrammeerd. U
kunt deze instelling vervangen door uw eigen favoriete instelling. Wij verwijzen hiervoor naar hoofdstuk
5.4, “Bediening van het geheugen”.
5.2.1.2 Therapievorm en kanaalselectie
De Endomed 482 beschikt over twee stroomkanalen. Deze kanalen kunnen onafhankelijk gebruikt
worden, waarbij ieder kanaal over eigen parameters en een eigen behandeltijd beschikt. Tevens is het
mogelijk kanalen te koppelen. Met toets [7] kiest u tussen de basistherapievormen Elektrotherapie,
kanaalselectie en het aanbrengen van koppelingen tussen kanalen geschiedt met de centrale regelaar
[16]. De volgende selecties zijn mogelijk:
U elektrotherapie over stroomkanaal 1
V elektrotherapie over stroomkanaal 2
elektrotherapie met gekoppelde kanalen
Bedenk dat u bij onafhankelijk gebruik van de stroomkanalen de parameters van beide kanalen
afzonderlijk moet instellen. Is dit niet gewenst of is onafhankelijk gebruik niet nodig, dan kunt u
gekoppelde stroomkanalen kiezen. Bepaalde stroomvormen, zoals interferentiestromen, zijn alleen
mogelijk met gekoppelde stroomkanalen.
5.2.1.3 Selectie van stroomvorm
Druk op toets [8]. Alle beschikbare stroomvormen verschijnen op het display. Het knipperende symbool
geeft de gekozen stroomvorm weer. Selecteer een stroomvorm met de centrale regelaar [16] en druk op
toets [14] om uw keuze te bevestigen.
Kiest U (interferentiestromen) of (diadynamische stromen), dan wordt U vervolgens verzocht een
stroomtype binnen deze groep te selecteren. Kies een stroomtype met de centrale regelaar [16] en druk
op toets [14] om uw keuze te bevestigen.
5.2.1.4 Instellen van parameters
Met de druktoetsen [9] t/m [13] worden de parameters gekozen. Een druktoets bedient alle parameters
die in hetzelfde horizontale vlak liggen. Wijzigen van de parameterinstelling gebeurt met de centrale
regelaar [16]. De parameters kunnen gewijzigd worden zolang het bijbehorende symbool knippert. Het
display toont alleen de parameters die van toepassing zijn bij de gekozen therapievorm.
5.2.1.5 Behandeltijd
Kies de klok met toets [12]. Het symbool min knippert. Het display laat de behandeltijd zien van het
kanaal, dat op dit moment op het display (onder 5.2.1.2.) geselecteerd is. Boven de tijdaanduiding
knippert een kanaalindicator ter herinnering. Alleen van dit kanaal kan nu met de centrale regelaar [16] de
behandeltijd worden ingesteld.
Wanneer één of meerdere kanalen actief zijn knippert <. Boven de tijdaanduiding wordt aangegeven
welke kanalen actief zijn.
5.2.1.6 Zwelprogramma
Sommige stroomvormen kunnen gebruikt worden in combinatie met een zwelprogramma.
Druk toets [12] en kies achtereenvolgens de zweltijd 3, de houdtijd 4, de slinktijd 5 en de pauzetijd
7. Stel deze parameters in met de centrale regelaar [16].
Bij gekoppelde stroomkanalen zijn de zwelprogramma’s op beide stroomkanalen identiek. Hierbij kan een
vertragingstijd worden ingesteld tussen de zwelprogramma’s op kanaal 1 en kanaal 2. Dit geschiedt als
volgt:
Kies met toets [13] en de centrale regelaar [16] kanaal 2.
Kies vervolgens met toets [12] de vertragingstijd 6 en stel deze tijd in met de centrale regelaar [16].
5.2.1.7 Stroomintensiteit
De stroomintensiteit wordt ingesteld met intensiteitregelaar [17]. De stroomintensiteit kan alleen ingesteld
worden, als de klok gezet is.
De kanaalindicator @, gevolgd door het kanaalnummer A of C, geeft aan welk kanaal op het display
zichtbaar is en kan worden ingesteld. U kunt dit kanaalnummer wijzigen met toets [13] en de centrale
regelaar [16]. Deze selectie werkt parallel aan de onder 5.2.1.2. uitgevoerde kanaalselectie.

7
NL
Bij 4-polaire stromen werkt de intensiteitregelaar [17] op beide kanalen parallel. Op het display wordt dit
aangegeven met A B C, waarbij het weergegeven kanaal knippert. Hierbij is voorzien in een
balansregeling voor de klassieke interferentie stroomvorm (zie paragraaf 5.2.2.9.).
De eenheid van de stroomintensiteit is afhankelijk van de gekozen stroomvorm en kan worden
weergegeven met mA, µA of V.
De behandeling wordt gestart met het opdraaien van de stroomintensiteit, tenzij een zwelpatroon is
ingesteld. Met een ingesteld zwelpatroon wordt de behandeling gestart met toets [14].
De indicatoren > en ? verschijnen op het display, zodra er stroom uit de betreffende kanalen komt.
Een knipperende stroomwaarde geeft aan dat er slecht contact is.
5.2.1.8 CC/CV instelling
De elektrotherapiekanalen kunnen, afhankelijk van de gekozen stroomvorm, in Constant Current of
Constant Voltage mode gebruikt worden. Bij toepassing van een dynamische elektrodetechniek wordt
aangeraden de CV mode te gebruiken. In de CV mode is de uitgangsstroom afhankelijk van de
elektrische koppeling met de patiënt en kan derhalve variëren. U kunt de CC/CV instelling wijzigen met
toets [13] en de centrale regelaar [16].
5.2.1.9 Polariteit
Bij galvanische stromen is de rode uitgang positief en de zwarte uitgang negatief. Voor het handmatig
veranderen van de polariteit kies F of G met toets [13] en de centrale regelaar [16]:
F : normaal
G : omgepoold
Wordt tijdens een lopende behandeling handmatig omgepoold, dan zwelt de stroom uit en met
tegenovergestelde polariteit weer aan naar 80% van de vorige waarde.
Voor het automatisch ompolen van de stroomvormen High Voltage en Microcurrent, kies of met
toets [9] en de centrale regelaar [16]:
: alternerend (alternating)
: niet alternerend (not alternating)
Bij de Onderbroken Gelijkstroom stroomvorm is ompolen niet mogelijk.
5.2.1.10 Noodstop.
Door de toetsen [12] en [13] tegelijk in te drukken kan de behandeling op alle kanalen tegelijk worden
gestopt.
5.2.2 Elektrotherapie
5.2.2.1 Bipolaire interferentie
• Kies
met toets [7]. Kies met de centrale regelaar [16] het gewenste kanaal of kies gekoppelde
kanalen;
• Druktoets [8], selecteer ? met de centrale regelaar [16] en bevestig uw keuze met toets [14];
• Kiezen van bipolaire interferentie:
Kies met de centrale regelaar [16] en bevestig uw keuze met toets [14];
• Draaggolffrequentie kiezen of wijzigen:
Kies (kHz) met toets [9] tot en wijzig de waarde met de centrale regelaar [16];
• Prikkelfrequentie wijzigen:
Kies met toets [10] en wijzig de waarde met de centrale regelaar [16];
• Frequentiemodulatie (spectrum) wijzigen:
Kies * met toets [10] en wijzig de waarde met de centrale regelaar [16];
• Spectrumdoorloop wijzigen:
Kies , met toets [11] en wijzig het doorloopprogramma met de centrale regelaar [16];
• Behandeltijd instellen:
Kies < met toets [12] en wijzig de waarde met de centrale regelaar [16];
• Instellen van zwelprogramma (indien gewenst):
• Zweltijd wijzigen:
Kies 3 met toets [12] en wijzig de waarde met de centrale regelaar [16];
• Houdtijd wijzigen:
Kies 4 met toets [12] en wijzig de waarde met de centrale regelaar [16];
• Slinktijd wijzigen:
Kies 5 met toets [12] en wijzig de waarde met de centrale regelaar [16];
• Pauzetijd wijzigen:
Kies 7 met toets [12] en wijzig de waarde met de centrale regelaar [16];
• Vertragingstijd wijzigen (alleen bij gekoppelde kanalen):
Druk toets [13] en kies kanaal 2 met de centrale regelaar [16].
Kies vervolgens 6 met toets [12] en wijzig de waarde met de centrale regelaar [16];

8
NL
• Kies CC of CV met toets [13] en de centrale regelaar [16];
• Kies het gewenst kanaal met toets [13] en de centrale regelaar [16]. Stel de intensiteit in met
regelaar [17];
• Start de behandeling met toets [14] indien een zwelprogramma is ingesteld.
5.2.2.2 Onderbroken wisselstroom (Russische stimulatie)
• Kies
met toets [7]. Kies met de centrale regelaar [16] het gewenste kanaal of kies gekoppelde
kanalen;
• Druk toets [8], selecteer met de centrale regelaar [16] en bevestig uw keuze met toets [14];
• Draaggolffrequentie wijzigen:
Kies (kHz) met toets [9] en wijzig de waarde met de centrale regelaar [16];
• Burstfrequentie wijzigen:
Kies met toets [10] en wijzig de waarde met de centrale regelaar [16];
• Burst / pauze verhouding wijzigen:
Kies - met toets [11] en wijzig de waarde met de centrale regelaar [16];
• Behandeltijd instellen:
Kies < met toets [12] en wijzig de waarde met de centrale regelaar [16];
• Instellen van zwelprogramma (indien gewenst):
• Zweltijd wijzigen:
Kies 3 met toets [12] en wijzig de waarde met de centrale regelaar [16];
• Houdtijd wijzigen:
Kies 4 met toets [12] en wijzig de waarde met de centrale regelaar [16];
• Slinktijd wijzigen:
Kies 5 met toets [12] en wijzig de waarde met de centrale regelaar [16];
• Pauzetijd wijzigen:
Kies 7 met toets [12] en wijzig de waarde met de centrale regelaar [16];
• Vertragingstijd wijzigen (alleen bij gekoppelde kanalen):
Druk toets [13] en kies kanaal 2 met de centrale regelaar [16].
Kies vervolgens 6met toets [12] en wijzig de waarde met de centrale regelaar [16];
• Kies CC of CV met toets [13] en de centrale regelaar [16];
• Kies het gewenst kanaal met toets [13] en de centrale regelaar [16]. Stel de intensiteit in met
regelaar [17];
• Start de behandeling met toets [14] indien een zwelprogramma is ingesteld.
5.2.2.3 Asymmetrische en symmetrische bifasische pulsstromen (TENS)
• Kies
met toets [7]. Kies met de centrale regelaar [16] het gewenste kanaal of kies gekoppelde
kanalen;
• Druk toets [8], selecteer of met de centrale regelaar [16] en bevestig uw keuze met toets
[14];
• Faseduur wijzigen:
Kies met toets [9] en wijzig de waarde met de centrale regelaar [16];
• Prikkelfrequentie wijzigen:
Kies met toets [10] en wijzig de waarde met de centrale regelaar [16];
• Maak een keuze tussen spectrum (frequentiemodulatie) of burst.
Let hierbij op, dat spectrum en burst niet gelijktijdig gekozen kunnen worden.
• Indien SPECTRUM is gewenst:
Controleer of BURST is uitgeschakeld:
• Kies . met toets [11] en maak de waarde gelijk aan 0 met de centrale regelaar [16];
• SPECTRUM wijzigen:
Kies * met toets [10] en wijzig de waarde met de centrale regelaar [16];
• Spectrumdoorloop wijzigen:
Kies , met toets [11] en wijzig het doorloopprogramma met de centrale regelaar [16];
• Indien BURST is gewenst:
Controleer of SPECTRUM is uitgeschakeld:
• Kies * met toets [10] en maak de waarde gelijk aan 0 met de centrale regelaar [16];
• Burstfrequentie wijzigen:
Kies . met toets [11] wijzig de waarde met de centrale regelaar [16];
• Behandeltijd instellen:
Kies < met toets [12] en wijzig de waarde met de centrale regelaar [16];
• Instellen van zwelprogramma (indien gewenst):
• Zweltijd wijzigen:
Kies 3 met toets [12] en wijzig de waarde met de centrale regelaar [16];
• Houdtijd wijzigen:
Kies 4 met toets [12] en wijzig de waarde met de centrale regelaar [16];
• Slinktijd wijzigen:

9
NL
Kies 5 met toets [12] en wijzig de waarde met de centrale regelaar [16];
• Pauzetijd wijzigen:
Kies 7 met toets [12] en wijzig de waarde met de centrale regelaar [16];
• Vertragingstijd wijzigen (alleen bij gekoppelde kanalen):
Druk toets [13] en kies kanaal 2 met de centrale regelaar [16].
Kies vervolgens 6 met toets [12] en wijzig de waarde met de centrale regelaar [16];
• Kies CC of CV met toets [13] en de centrale regelaar [16];
• Kies het gewenst kanaal met toets [13] en de centrale regelaar [16]. Stel de intensiteit in met
regelaar [17];
• Start de behandeling met toets [14] indien een zwelprogramma is ingesteld.
5.2.2.4 Faradische rechthoek- of driehoekstromen
• Kies
met toets [7]. Kies met de centrale regelaar [16] het gewenste kanaal of kies gekoppelde
kanalen;
• Druk toets [8], selecteer of met de centrale regelaar [16] en bevestig uw keuze met toets
[14];
• Faseduur wijzigen:
Kies met toets [9] en wijzig de waarde met de centrale regelaar [16];
• Fase interval wijzigen:
Kies met toets [10] en wijzig de waarde met de centrale regelaar [16];
• Behandeltijd instellen:
Kies < met toets [12] en wijzig de waarde met de centrale regelaar [16];
• Instellen van zwelprogramma (indien gewenst):
• Zweltijd wijzigen:
Kies 3 met toets [12] en wijzig de waarde met de centrale regelaar [16];
• Houdtijd wijzigen:
Kies 4 met toets [12] en wijzig de waarde met de centrale regelaar [16];
• Slinktijd wijzigen:
Kies 5 met toets [12] en wijzig de waarde met de centrale regelaar [16];
• Pauzetijd wijzigen:
Kies 7 met toets [12] en wijzig de waarde met de centrale regelaar [16];
• Vertragingstijd wijzigen (alleen bij gekoppelde kanalen):
Druk toets [13] en kies kanaal 2 met de centrale regelaar [16].
Kies vervolgens 6 met toets [12] en wijzig de waarde met de centrale regelaar [16];
• Kies CC of CV met toets [13] en de centrale regelaar [16];
• Polariteit wijzigen:
Kies F of G met toets [13] en de centrale regelaar [16];
• Kies het gewenst kanaal met toets [13] en de centrale regelaar [16]. Stel de intensiteit in met
regelaar [17];
• Start de behandeling met toets [14] indien een zwelprogramma is ingesteld.
5.2.2.5 Microcurrent
• Kies
met toets [7]. Kies met de centrale regelaar [16] het gewenste kanaal of kies gekoppelde
kanalen;
• Druk toets [8], selecteer met de centrale regelaar [16] en bevestig uw keuze met toets [14];
• Frequentie wijzigen:
Kies (Hz of kHz) met toets [9] wijzig de waarde met de centrale regelaar [16];
• Alternerend of niet alternerend instellen:
Kies of met toets [9] en wijzig de waarde met de centrale regelaar [16];
• Behandeltijd instellen:
Kies < met toets [12] en wijzig de waarde met de centrale regelaar [16];
• Instellen van ompoolprogramma (uitsluitend bij ):
• Zweltijd wijzigen:
Kies 3 met toets [12] en wijzig de waarde met de centrale regelaar [16].
• Houdtijd wijzigen:
Kies 4 met toets [12] en wijzig de waarde met de centrale regelaar [16].
• Slinktijd wijzigen:
Kies 5 met toets [12] en wijzig de waarde met de centrale regelaar [16].
• Instellen van zwelprogramma (uitsluitend bij ):
• Zweltijd wijzigen:
Kies 3 met toets [12] en wijzig de waarde met de centrale regelaar [16];
• Houdtijd wijzigen:
Kies 4 met toets [12] en wijzig de waarde met de centrale regelaar [16];
• Slinktijd wijzigen:

10
NL
Kies 5 met toets [12] en wijzig de waarde met de centrale regelaar [16];
• Pauzetijd wijzigen:
Kies 7 met toets [12] en wijzig de waarde met de centrale regelaar [16];
• Vertragingstijd wijzigen (alleen bij gekoppelde kanalen):
Druk toets [13] en kies kanaal 2 met de centrale regelaar [16].
Kies vervolgens 6 met toets [12] en wijzig de waarde met de centrale regelaar [16];
• Polariteit wijzigen (uitsluitend bij ):
Kies F of G met toets [13] en de centrale regelaar [16];
• Kies het gewenst kanaal met toets [13] en de centrale regelaar [16]. Stel de intensiteit in met
regelaar [17];
• Start de behandeling met toets [14] indien een zwelprogramma is ingesteld.
5.2.2.6 High voltage
• Kies
met toets [7]. Kies met de centrale regelaar [16] het gewenste kanaal of kies gekoppelde
kanalen;
• Druk toets [8], selecteer met de centrale regelaar [16] en bevestig uw keuze met toets [14];
• Alternerend of niet alternerend instellen:
Kies of met toets [9] en wijzig de waarde met de centrale regelaar [16];
• Prikkelfrequentie wijzigen:
Kies met toets [10] en wijzig de waarde met de centrale regelaar [16];
• Frequentiemodulatie (spectrum) wijzigen:
Kies * (%) met toets [10] en wijzig met de centrale regelaar [16];
• Spectrumdoorloop wijzigen:
Kies , met toets [11] en wijzig het doorloopprogramma met de centraleregelaar [16];
• Behandeltijd wijzigen:
Kies < met toets [12] en wijzig de waarde met de centrale regelaar [16];
• Instellen van ompoolprogramma (uitsluitend bij ):
• Zweltijd wijzigen:
Kies 3 met toets [12] en wijzig de waarde met de centrale regelaar [16];
• Houdtijd wijzigen:
Kies 4 met toets [12] en wijzig de waarde met de centrale regelaar [16];
• Slinktijd wijzigen:
Kies 5 met toets [12] en wijzig de waarde met de centrale regelaar [16];
• Instellen van zwelprogramma (uitsluitend bij ):
• Zweltijd wijzigen:
Kies 3 met toets [12] en wijzig de waarde met de centrale regelaar [16];
• Houdtijd wijzigen:
Kies 4 met toets [12] en wijzig de waarde met de centrale regelaar [16];
• Slinktijd wijzigen:
Kies 5 met toets [12] en wijzig de waarde met de centrale regelaar [16];
• Pauzetijd wijzigen:
Kies 7 met toets [12] en wijzig de waarde met de centrale regelaar [16];
• Vertragingstijd wijzigen (alleen bij gekoppelde kanalen):
Druk toets [13] en kies kanaal 2 met de centrale regelaar [16].
Kies vervolgens 6met toets [12] en wijzig de waarde met de centrale regelaar [16];
• Polariteit wijzigen (uitsluitend bij ):
Kies F of G met toets [13] en de centrale regelaar [16];
• Kies het gewenst kanaal met toets [13] en de centrale regelaar [16]. Stel de intensiteit in met
regelaar [17];
• Start de behandeling met toets [14] indien een zwelprogramma is ingesteld.
5.2.2.7 Diadynamische stromen
• Kies
met toets [7]. Kies met de centrale regelaar [16] het gewenste kanaal of kies gekoppelde
kanalen;
• Druktoets [8], selecteer met de centrale regelaar [16] en bevestig uw keuze met toets [14];
• Kies MF, DF, LP, CP of CPid met de centrale regelaar [16] en bevestig uw keuze met toets [14];
• Behandeltijd instellen:
Kies < met toets [12] en wijzig de waarde met de centrale regelaar [16];
• Instellen van zwelprogramma (uitsluitend bij MF en DF):
• Zweltijd wijzigen:
Kies 3 met toets [12] en wijzig de waarde met de centrale regelaar [16];
• Houdtijd wijzigen:
Kies 4 met toets [12] en wijzig de waarde met de centrale regelaar [16];
• Slinktijd wijzigen:

11
NL
Kies 5 met toets [12] en wijzig de waarde met de centrale regelaar [16];
• Pauzetijd wijzigen:
Kies 7 met toets [12] en wijzig de waarde met de centrale regelaar [16];
• Vertragingstijd wijzigen (alleen bij gekoppelde kanalen):
Druk toets [13] en kies kanaal 2 met de centrale regelaar [16].
Kies vervolgens 6met toets [12] en wijzig de waarde met de centrale regelaar [16];
• Kies CC of CV met toets [13] en de centrale regelaar [16];
• Polariteit wijzigen:
Kies F of G met toets [13] en de centrale regelaar [16];
• Kies het gewenst kanaal met toets [13] en de centrale regelaar [16]. Stel de intensiteit in met
regelaar [17];
• Start de behandeling met toets [14] indien een zwelprogramma is ingesteld.
5.2.2.8 Onderbroken gelijkstroom
• Kies
met toets [7]. Kies met de centrale regelaar [16] het gewenste kanaal of kies gekoppelde
kanalen;
• Druk toets [8], selecteer met de centrale regelaar [16] en bevestig uw keuze met toets [14];
• Behandeltijd instellen:
Kies < met toets [12] en wijzig de waarde met de centrale regelaar [16];
• Kies het gewenst kanaal met toets [13] en de centrale regelaar [16]. Stel de intensiteit in met
regelaar [17];
5.2.2.9 Interferentie (klassiek)
• Kies
met toets [7]. Kies met de centrale regelaar [16] gekoppelde kanalen;
• Druk toets [8], selecteer met de centrale regelaar [16] en bevestig uw keuze met toets [14];
• Kiezen van Interferentie klassiek:
Kies met de centrale regelaar [16] en bevestig uw keuze met toets [14];
• Draaggolffrequentie wijzigen:
Kies (kHz) met toets [9] en wijzig de waarde met de centrale regelaar [16];
• Prikkelfrequentie (AMF) wijzigen:
Kies met toets [10] en wijzig de waarde met de centrale regelaar [16];
• Frequentiemodulatie (spectrum) wijzigen:
Kies * met toets [10 ] en wijzig de waarde met de centrale regelaar [16];
• Spectrumdoorloop wijzigen:
Kies , met toets [11] en wijzig het doorloopprogramma met de centrale regelaar [16];
• Behandeltijd instellen:
Kies < met toets [12] en wijzig de waarde met de centrale regelaar [16];
• Kies CC of CV met toets [13] en de centrale regelaar [16];
• Stel de intensiteit in met regelaar [17];
• Balans instellen:
Kies
met toets [10] en wijzig de waarde met de centrale regelaar [16];
5.2.2.10 Isoplanaire vector
• Kies
met toets [7]. Kies met de centrale regelaar [16] gekoppelde kanalen;
• Druk toets [8], selecteer met de centrale regelaar [16] en bevestig uw keuze met toets [14];
• Kiezen van isoplanaire vector:
Kies
met de centrale regelaar [16] en bevestig uw keuze met toets [14];
• Draaggolffrequentie wijzigen:
Kies (kHz) met toets [9] en wijzig de waarde met de centrale regelaar [16];
• Prikkelfrequentie wijzigen:
Kies met toets [10] en wijzig de waarde met de centrale regelaar [16];
• Frequentiemodulatie (spectrum) wijzigen:
Kies * met toets [10] en wijzig de waarde met de centrale regelaar [16];
• Spectrumdoorloop wijzigen:
Kies , met toets [11] en wijzig het doorloopprogramma met de centrale regelaar [16];
• Behandeltijd instellen:
Kies < met toets [12] en wijzig de waarde met de centrale regelaar [16];
• Kies CC of CV met toets [13] en de centrale regelaar [16];
• Stel de intensiteit in met regelaar [17];
5.2.2.11 Dipool vector manueel
• Kies
met toets [7]. Kies met de centrale regelaar [16] gekoppelde kanalen;
• Druk toets [8], selecteer met de centrale regelaar [16] en bevestig uw keuze met toets [14];

12
NL
• Kiezen van Dipool vector manueel:
Kies
met de centrale regelaar [16] en bevestig uw keuze met toets [14];
• Draaggolffrequentie wijzigen:
Kies (kHz) met toets [9] en wijzig de waarde met de centrale regelaar [16];
• Prikkelfrequentie wijzigen:
Kies met toets [10] en wijzig de waarde met de centrale regelaar [16];
• Frequentiemodulatie (spectrum) wijzigen:
Kies * met toets [10] en wijzig de waarde met de centrale regelaar [16];
• Spectrumdoorloop wijzigen:
Kies , met toets [11] en wijzig het doorloopprogramma met de centrale regelaar [16];
• Behandeltijd instellen:
Kies < met toets [12] en wijzig de waarde met de centrale regelaar [16];
• Kies CC of CV met toets [13] en de centrale regelaar [16];
• Stel de intensiteit in met regelaar [17];
• Positie bepaling:
Kies # met toets [10] en stel de positie in met de centrale regelaar [16];
5.2.2.12 Dipool vector automatisch
• Kies
met toets [7]. Kies met de centrale regelaar [16] gekoppelde kanalen;
• Druk toets [8], selecteer met de centrale regelaar [16] en bevestig uw keuze met toets [14];
• Kiezen van Dipool vector automatisch:
Kies
met de centrale regelaar [16] en bevestig uw keuze met toets [14];
• Draaggolffrequentie wijzigen:
Kies (kHz) met toets [9] en wijzig de waarde met de centrale regelaar [16];
• Prikkelfrequentie wijzigen:
Kies met toets [10] en wijzig de waarde met de centrale regelaar [16];
• Frequentiemodulatie (spectrum) wijzigen:
Kies * met toets [10] en wijzig de waarde met de centrale regelaar [16];
• Spectrumdoorloop wijzigen:
Kies , met toets [11] en wijzig het doorloopprogramma met de centrale regelaar [16];
• Behandeltijd instellen:
Kies < met toets [12] en wijzig de waarde met de centrale regelaar [16];
• Instellen rotatie tijd:
Kies 8 met toets [12] en wijzig met de centrale regelaar [16];
• Kies CC of CV met toets [13] en de centrale regelaar [16];
• Stel de intensiteit in met regelaar [17].
5.3 Maatregelen met betrekking tot behandelingen
5.3.1 Elektrotherapie
Voor de behandeling
• Controleer de patiënt op aanwezigheid van eventuele absolute en relatieve contra-indicaties.
• Test de warmtesensibiliteit van het te behandelen gebied.
• Sterke beharing kan het beste afgeschoren worden.
5.4 Bediening van het geheugen
De Endomed 482 bevat een geheugen voor de opslag van apparaatinstellingen en behandelprotocollen.
5.4.1 Apparaatinstellingen
Apparaatinstellingen omvatten alle parameters van het apparaat, met uitzondering van de
stroomintensiteit. In tegenstelling tot protocollen werken apparaatinstellingen over alle kanalen tegelijk,
inclusief het ultrageluidkanaal. Apparaatinstellingen worden opgeslagen op de geheugennummers 0 - 9.
Het geheugennummer wordt weergegeven op het display, na bediening van toets [15]. De
apparaatinstelling onder geheugennummer 0 wordt automatisch opgehaald als het apparaat wordt
aangezet. Apparaatinstellingen kunnen alleen worden opgehaald en weggeschreven, als er op geen
enkel kanaal een therapie actief is.
5.4.1.1 Apparaatinstelling oproepen
• Druk op toets [15]. 1 knippert op het display;
• Kies met de centrale regelaar [16] een geheugennummer in het bereik van 0 - 9. Op het display
verschijnen de instellingen die onder dit geheugennummer zijn opgeslagen;
• Druk op toets [14] om de apparaatinstelling op te halen;

13
NL
• Stel de intensiteit in met regelaar [17];
• Start de behandeling met toets [14] indien een zwelprogramma is ingesteld.
Het ophalen van de apparaatinstelling dient te geschieden zolang 1 knippert. Wacht men te lang, of
drukt men een andere toets in dan toets [14] of toets [15], dan wordt de oproepprocedure afgebroken.
5.4.1.2 Apparaatinstelling opslaan
• Stel de therapievorm en alle parameters in op alle gewenste kanalen;
• Druk op toets [15]. 1 knippert op het display;
• Kies met de centrale regelaar [16] een geheugennummer in het bereik van 0 - 9. Op het display
verschijnen de instellingen die onder dit geheugennummer zijn opgeslagen, zodat u kunt
controleren welke gegevens u gaat overschrijven;
• Druk nogmaals op toets [15]. 1 knippert op het display. Op het display verschijnen nu de huidige
instellingen die zullen worden opgeslagen;
• Druk op toets [14] om de opslagprocedure uit te voeren.
Het uitvoeren van de opslagprocedure dient te geschieden zolang 1? knippert. Wacht men te lang, of
drukt men een andere toets in dan toets [14] of toets [15], dan wordt de opslagprocedure afgebroken.
5.4.2 Protocollen
Een protocol bestaat één of meerdere behandelstappen die elkaar, na een vooraf bepaalde tijd
automatisch opvolgen. Elke behandelstap kent zijn eigen stroomvorm, parameterinstellingen en
behandelduur. De protocollen zijn naar toepassingsgebied gerangschikt in clusters. Protocollen worden
geïdentificeerd met een 2-cijferig nummer:
1:1 het eerste nummer is het clusternummer
1:1 het tweede nummer is het protocolnummer
De Endomed 482 beschikt over een aantal voorgeprogrammeerde protocollen, die zijn terug te vinden
vanaf cluster 2. Ieder clusternummer heeft zijn eigen indicatiegebied. Zo zijn bijvoorbeeld onder
clusternummer 2 alle antalgische behandelingen en onder clusternummer 3 alle circulatiebevorderende
protocollen opgeslagen. In de meegeleverde “Therapiewijzer” bevindt zich een overzicht van alle clusters
en de daarin opgenomen protocollen. Hiernaast is het mogelijk om met de Endomed 482 zelf protocollen
samen te stellen. Clusternummer 1 is gereserveerd voor deze vrij programmeerbare protocollen.
Protocollen voor elektrotherapie kunnen voor 1-kanaals of 2-kanaals toepassingen bestemd zijn. Als een
1-kanaals protocol wordt opgehaald, moet eerst het kanaalnummer gekozen worden, waarop dit protocol
moet worden uitgevoerd. Hierbij is de instelling “gekoppelde kanalen” ook toegestaan, waarbij het 1-
kanaals protocol op beide kanalen uitgevoerd zal worden. Is een 1-kanaals protocol actief, dan kan op
het tweede kanaal een willekeurig ander 1-kanaals protocol worden uitgevoerd. 2-kanaals protocollen
kunnen uiteraard alleen worden opgehaald bij de instelling “gekoppelde kanalen”.
5.4.2.1 Protocol oproepen
• Kies met toets [7] en de centrale regelaar [16] het gewenste kanaal waarop het protocol moet
worden geladen;
• Druk op toets [15]. 1 knippert op het display;
• Kies met de centrale regelaar [16] een protocolnummer in het bereik vanaf 1:1. Op het display
verschijnt de totale behandelduur van het geselecteerde protocol;
• Druk op toets [14] om het protocol op te halen;
• Stel de intensiteit in met regelaar [17];
• Start de behandeling met toets [14] indien een zwelprogramma is ingesteld.
Bij het doorlopen van het protocol wordt telkens de resterende behandeltijd van de lopende behandelstap
weergegeven. Aan het einde van elke behandelstap klinkt een kort geluidssignaal. Aan het einde van het
protocol wordt het standaard 'einde therapie' geluidssignaal weergegeven, waarna het apparaat de
protocolmode verlaat.
Opmerkingen:
• Nadat een protocol is opgehaald blijft het protocolnummer op het display aanwezig. Hiermee
wordt aangegeven dat de protocolmode actief is. Achter het protocolnummer verschijnt het
behandelstapnummer, tezamen met het bijbehorende symbool 0.
• Een opgehaald, doch nog niet lopend protocol kan worden verwijderd door opnieuw op toets [15]
te drukken. Door een moment te wachten of door een willekeurig andere toets dan toets [14] of
toets [15] in te drukken, zal het apparaat de protocolmode weer verlaten.

14
NL
• Alle parameters van het opgehaalde protocol kunnen naar wens worden aangepast. Kies hiertoe
0 met toets [11] en wijzig het behandelstapnummer met de centrale regelaar [16]. Alle
parameters van de nu geselecteerde behandelstap kunnen worden gewijzigd. Vergeet na de
wijzigingen het behandelstapnummer niet terug te zetten naar 1.
• Het opgehaalde protocol kan vanaf een willekeurige behandelstap worden uitgevoerd. Kies
hiertoe 0 met toets [11] en wijzig het behandelstapnummer met de centrale regelaar [16].
• Een behandelstap kan voortijdig worden afgebroken door het behandelstapnummer op te hogen.
Kies hiertoe 0 met toets [11] en wijzig het behandelstapnummer met de centrale regelaar [16].
De patiëntstroom zal naar 0 mA slinken. Het protocol kan voortgezet worden vanaf het nieuw
ingestelde behandelstapnummer door de intensiteit weer op te draaien met regelaar [17].
• Een lopend protocol kan voortijdig worden afgebroken, door de behandeltijd van de op dat
moment actieve behandelstap op 0 te zetten. Het apparaat zal dan de protocolmode verlaten.
5.4.2.2 Protocol opslaan
Voordat gewijzigde protocollen worden uitgevoerd kunnen ze onder clusternummer 1 worden opgeslagen
voor later gebruik:
• Druk tweemaal op toets [15]. 1 knippert op het display;
• Kies met de centrale regelaar [16] een protocolnummer in het bereik 1:1 - 1:9. Op het display
verschijnt de totale behandelduur van het protocol dat moet worden opgeslagen;
• Druk op toets [14] om de opslagprocedure uit te voeren.
5.4.2.3 Protocol samenstellen
In cluster 1 kunt u zelf protocollen samenstellen. Cluster 1 biedt ruimte aan maximaal 10 protocollen, die
elk uit maximaal 20 behandelstappen kunnen bestaan. Controleert u eerst, voordat u verder gaat, dat het
apparaat niet in de protocolmode staat (zie paragraaf 5.4.2.1 hoe de protocolmode te verlaten):
• Druk tweemaal op toets [15]. 1 knippert op het display;
• Kies met de centrale regelaar [16] een protocolnummer in het bereik 1:1 - 1:9;
• Druk op toets [14], 1 knippert, 0 verschijnt en het behandelstapnummer wordt op 1 gezet;
• Stel alle parameters van de huidige behandelstap in;
• Druk op toets [14] om de behandelstap op te slaan. Het behandelstapnummer wordt automatisch
met 1 opgehoogd;
• Herhaal de vorige twee stappen totdat het einde van het protocol is bereikt;
• Sluit het protocol af met een behandelstap met een behandeltijd van 0. Druk op toets [14] om
deze behandelstap op te slaan. Het afsluiten wordt bevestigd met een geluidssignaal.
Opmerkingen:
• Wanneer verschillende typen wisselstromen elkaar opvolgen of wanneer de voorgaande
stroomvorm identiek is aan de volgende stroomvorm, blijft de intensiteit gehandhaafd, ongeacht
wijzigingen van parameters zoals bijvoorbeeld frequentie en faseduur.
• Bij een overgang van wisselstroom naar gelijkstroom of bij een overgang tussen verschillende
typen gelijkstroom zal de intensiteit automatisch naar nul gaan en dient U voor de volgende
behandelstap de intensiteit opnieuw in te stellen.
Voorbeelden:
• De intensiteit blijft gehandhaafd bij:
klassieke interferentie -> klassieke interferentie (overgang naar dezelfde stroomvorm),
MF -> CP (overgang van diadynamisch naar diadynamisch),
klassieke interferentie -> asymmetrisch bifasisch
• Overgang van wisselstromen).
De intensiteit gaat automatisch naar nul bij:
Asymmetrisch bifasisch -> onderbroken gelijkstroom (overgang van AC naar DC),
Onderbroken gelijkstroom -> diadynamisch (overgang verschillende typen gelijkstroom).
5.5 Openings- en sluitingsreacties
Bij een constant current (CC) uitgangskarakteristiek kunnen onaangename openings- en sluitingsreacties
optreden als de elektroden niet goed vastzitten of geheel losraken. Zorg ervoor dat bij het plaatsen en los
nemen van de elektroden bij CC instelling de patiëntenstroom 0 mA. is.
5.6 Elektrolytische effecten
Bij stroomvormen met een gelijkstroomcomponent treedt er onder de elektroden elektrolyse op. Om de
elektrolytische producten die onder de elektroden ontstaan zoveel mogelijk te absorberen en de effecten
hiervan te beperken is het noodzakelijk de bijgeleverde sponsjes te gebruiken. Zorg ervoor dat deze

15
NL
voldoende nat gemaakt zijn met water en plaats de dubbele laag van de spons tussen plaatelektrode en
patiënt.
5.7 Afstandsbediening
Voor de Endomed 482 is er een speciale afstandsbediening beschikbaar. Deze kan aangesloten worden
op de aansluitplug [3-2]. De afstandsbediening beschikt over 2 intensiteitregelaars voor het instellen van
de intensiteit in de stroomkanalen en een noodstop.
6 Onderhoud
6.1 Technisch onderhoud
De elektrische veiligheid van het apparaat is afhankelijk van de conditie van de verbinding met
randaarde, die via het netsnoer loopt. Het is daarom noodzakelijk dat deze verbinding jaarlijks wordt
gecontroleerd. Verder adviseren wij een jaarlijkse algemene controle van het apparaat. De controle en/of
onderhoudsbeurt moet uitgevoerd worden conform de in de service manual van apparaat beschreven
procedure. U kunt dit laten doen door uw leverancier of andere, door Enraf-Nonius geautoriseerde
instantie.
Het is tevens raadzaam een dossier bij te houden van alle uitgevoerde onderhoudsactiviteiten. In
sommige landen is dit zelfs verplicht.
Onderhoud en reparaties dienen uitsluitend te worden verricht door een geautoriseerde instantie. Enraf-
Nonius is niet aansprakelijk voor de gevolgen van onderhoud of reparaties door onbevoegden.
Het openen van het apparaat door andere dan geautoriseerde instanties is niet toegestaan en doet de
aanspraak op garantie vervallen.
6.2 Reinigen van het apparaat
Schakel eerst het apparaat uit en verwijder de stekker uit de wandcontactdoos.
Het apparaat kan gereinigd worden met een vochtige doek. Gebruik hiervoor lauw water en eventueel
een huishoudelijk schoonmaakmiddel (geen schuurmiddel en geen alcohol oplossing).
6.3 Reinigen van de accessoires
6.3.1 Elektroden en sponsjes
De rubberelektroden dienen gereinigd te worden met lauw water. In geval van hardnekkig vuil en voor
desinfecteren van de rubberelektroden mag een 70% alcoholoplossing gebruikt worden. De
rubberelektroden kunnen hierbij afgeven, dit is echter niet nadelig voor de werking.
De sponsjes dienen na gebruik gewassen te worden in warm water met een huishoudelijk
schoonmaakmiddel. Spoel ze daarna met water uit en laat ze dakpansgewijs drogen. Beschadigde
sponsjes dienen te worden vervangen.
Het is mogelijk dat bij een lage hardheidsgraad van het water de sponsjes onvoldoende geleiden
waardoor de gewenste stroomsterkte niet wordt bereikt. In deze gevallen kunt u een zoutoplossing
gebruiken. Dit verhoogt de geleidbaarheid van het water. Wanneer de elektroden niet gebruikt worden,
dienen de sponsjes verwijderd te worden. Dit verhoogt de levensduur van de elektroden en sponsjes. Wij
raden aan sponsjes en een set elektroden in voorraad te houden.
6.3.2 Patiëntenkabel
Controleer de kabel geregeld op beschadigingen en slechte contacten. Wij adviseren een patiëntenkabel
in voorraad te houden.
6.4 Einde levensduur apparaat en toebehoren
Uw Endomed 482 en toebehoren bevatten materialen die hergebruikt kunnen worden en materialen die
schadelijk zijn voor het milieu. Bij het afvoeren, aan het einde van de levensduur, kunnen
gespecialiseerde bedrijven deze artikelen demonteren om er de schadelijke materialen en de her te
gebruiken materialen uit te halen. Hiermee draagt u bij tot een beter milieu.
Informeer a.u.b. naar de plaatselijke regels voor het afvoeren van apparatuur en toebehoren.

16
NL
7 Aanwijzingen bij storingen
7.1 Displays lichten niet op
• Controleer of de lichtnetadapter is aangesloten.
7.2 Foutcode
Het apparaat heeft tijdens of na de zelftest een fout gevonden. De code bestaat uit een getal van
maximaal drie cijfers en verschijnt op display van de stroomintensiteit. Verwijder de eventueel
aangesloten toebehoren en zet het apparaat opnieuw aan. Neem contact op met uw leverancier als de
code opnieuw verschijnt. Het apparaat is vermoedelijk defect.
7.3 Verbroken contact in de CC-mode
Indien in de CC-mode het contact verbroken wordt, zal het apparaat dit met een pieptoon melden. Om
onaangename sensaties bij de patiënt te vermijden, wanneer de behandelkop of elektrode weer op het te
behandelen oppervlak teruggeplaatst wordt, zal de stroom uitzwellen tot 0. Om de behandeling te
vervolgen zult u de stroom opnieuw moeten instellen.
7.4 Geen of onvoldoende uitgangsstroom
• Controleer de patiëntenkabel op breuk of slecht contact.
• Zorg ervoor dat de sponsjes voldoende nat zijn.
• Gebruik eventueel een zoutoplossing.
• Reinig de elektroden.
• Controleer de elektroden op slecht contact.
7.5 Controle bedieningspaneel
Wanneer u het apparaat aanzet, terwijl u de toetsen [9] en [10] ingedrukt houdt, zullen alle segmenten op
het display zichtbaar worden. Hiermee kunt u hun werking controleren. Drukt u op de toetsen, of draait u
aan de regelaars, dan is een geluidssignaal hoorbaar. U kunt deze mode alleen verlaten door het
apparaat uit te zetten.
8 Specificaties
8.1 Productspecificaties
Algemeen
Aantal kanalen : 2
Stroomkarakteristiek : Constant Current (CC) of Constant Voltage (CV)
Instelresolutie : 0,2 mA
Klok : 0 - 60 minuten
0 - 10 minuten in stappen van 0,5 min.
10 - 60 minuten in stappen van 1 min.
Polariteitwissel gelijkstromen : manueel
De maximale intensiteit wordt binnen de specificatie gehaald tot een belasting van 500 ? (CC).
Symmetrische en asymmetrische bifasische pulsstroom, TENS
Frequentie : 1 - 200 Hz
Faseduur : 10 - 400 µs
Burstfrequentie : 0 - 9 Hz
Frequentiemodulatie (spectrum) : 0 - 180 Hz
Doorloopprogramma’s : 1/1, 6/6, 12/12 en 1/30/1/30 s
Zwelpatroon : zweltijd 0 - 9 s
houdtijd 1 - 60 s
slinktijd 0 - 9 s
pauzetijd 1 - 60 s
vertragingstijd 0,1 - 80 s
Intensiteit : 0 - 140 mA.
Bij bepaalde combinaties van pulsbreedte, frequentie en spectrum wordt het instelbereik tot max. 90 mA
teruggebracht om aan de limietwaarden van IEC 60601-2-10 te voldoen.

17
NL
High Voltage
Frequentie : 1- 200 Hz
Frequentiemodulatie (spectrum) : 0 – 90 %
Doorloop programma : 1/1, 6/6, 12/12 en 1/30/1/30 s
Amplitude : 0 – 500 V
Bij alternerend gebruik:
Alterneringstijd : 5 tot 50 seconden
Zweltijd en slinktijd : 0,1 – 1 seconde
Bij niet alternerend gebruik:
Zwelpatroon : als bij bifasische pulsstromen
Microcurrent
Amplitude : 10 µA - 1 mA
Spanningsbereik : 200 Volt
Bij alternerend gebruik:
Frequentie : 0 – 1000 Hz
Alterneringstijd : 0,1 – 10 seconde, alterneringstijd is afhankelijk van de pulsfrequentie
Inzweltijd en slinktijd : 0,1 – 1 seconde
Bij niet-alternerend gebruik:
Frequentie : 0,1 – 1000 Hz
Zwelpatroon : als bij bifasische pulsstromen
Onderbroken wisselstroom, Russische Stimulatie
Draaggolffrequentie : 2 - 10 kHz
Burstfrequentie : 0 - 100 Hz
Verhouding burst / pauze : 1:1, 1:2, 1:4 en 1:5
Zwelpatroon : als bij bifasische pulsstromen
Intensiteit : 0 - 100 mA
Diadynamische stroomvormen
Mogelijkheden : MF, DF, CP, LP en CPid
Intensiteit : 0 - 70 mA
Zwelpatroon, alleen bij MF en DF:als bij bifasische pulsstromen
Faradische stromen
Mogelijkheden : 2-5 stroom volgens Träbert
default keuze rechthoek-/driehoekpulsstroom
Faseduur : 0.02 - 1000 ms bij rechthoekpulsstroom
0.1 - 1000 ms bij driehoekpulsstroom
Fase-interval : 5 - 5000 ms
Zwelpatroon : als bij bifasische pulsstromen
Intensiteit : 0 - 80 mA
Onderbroken gelijkstroom
Frequentie : 8000 Hz
Duty cycle : 95%
Intensiteit : 0 - 40 mA
Bipolaire interferentie
Draaggolffrequentie : 2- 10 kHz
Prikkelfrequentie (AMF) : 0 - 200 Hz
Frequentiemodulatie (spectrum) : 0 - 180 Hz
Spectrumdoorloop : 1/1, 6/6, 12/12 en 1/30/1/30 s
Zwelpatroon : als bij bifasische pulsstromen
Intensiteit : 0 - 100 mA
Klassieke interferentie
Draaggolffrequentie : 2 - 10 kHz
Prikkelfrequentie (AMF) : als bij bipolaire interferentie
Frequentiemodulatie (spectrum) : als bij bipolaire interferentie
Spectrumdoorloop : 1/1, 6/6, 12/12 en 1/30/1/30 s
Zwelpatroon : niet instelbaar
Intensiteit : 0 - 100 mA
Balansinstelling : via centrale regelaar

18
NL
Isoplanaire vector
Draaggolffrequentie : 2 - 10 kHz
Prikkelfrequentie (AMF) : als bij bipolaire interferentie
Frequentiemodulatie (spectrum) : als bij bipolaire interferentie
Spectrumdoorloop : 1/1, 6/6, 12/12, 1/30/1/30 s
Zwelpatroon : niet instelbaar
Intensiteit : 0 - 100 mA
Dipool vector automatisch
Draaggolffrequentie : 2 - 10 kHz
Prikkelfrequentie (AMF) : als bij bipolaire interferentie
Frequentiemodulatie (spectrum) : als bij bipolaire interferentie
Spectrumdoorloop : 1/1, 6/6, 12/12, 1/30 s
Zwelpatroon : niet instelbaar
Amplitude : 0 - 100 mA
Rotatiesnelheid vector : instelbaar tussen 1 en 10 s
Dipool vector manueel
Draaggolffrequentie : 2 - 10 kHz
Prikkelfrequentie (AMF) : als bij bipolaire interferentie
Frequentiemodulatie (spectrum) : als bij bipolaire interferentie
Spectrumdoorloop : 1/1, 6/6, 12/12, 1/30 s
Zwelpatroon : niet instelbaar
Amplitude : 0 - 100 mA
Positie : 360 º
Geheugenfuncties
Apparaatinstelling 0 : geheugen met voorkeurinstelling.
Apparaatinstellingen : geheugen voor 10 vrij te programmeren instellingen.
Vrij te programmeren protocollen: 10
Voorgeprogrammeerde protocollen: 50
8.2 Technische specificaties
Lichtnetadapter
Type lichtnetadapter : ENA-1550
Netspanning : 100 - 240 Volt +/- 10%
Frequentie : 50/60 Hz.
Uitgangsspanning : 15 Volt
Uitgangsstroom : 3,3 A.
Apparaat
Medische klasse : IIa (volgens Richtlijn Medische Hulpmiddelen (93/42/EEG))
Veiligheidsklasse : I*, BF** volgens IEC 60601-1.
Patiënten lekstroom : Beter dan IEC eis ( <100 µA.)
Patiënten lekstroom,
enkele foutconditie : Beter dan IEC eis (< 500 µA.)
Keurinstituut : TÜV Rheinland
Afmetingen : 29 x 28 x 11 cm. (bxdxh)
Gewicht : 4 kg.
Omgevingscondities voor Transport en Opslag
Omgevingstemperatuur : -10° tot +50° C
Relatieve vochtigheid : 10 tot 100 %
Atmosferische druk : 500 tot 1060 hPa
Omgevingscondities voor normaal gebruik
Omgevingstemperatuur : 10° tot 40° C
Relatieve vochtigheid : 10 tot 90 % (niet condenserend)
Atmosferische druk : 500 tot 1060 hPa

19
NL
8.3 Classificatie
Richtlijn Medische hulpmiddelen (93/42/EEG), klasse IIa.
BF : type BF, het apparaat heeft een zwevend patiëntencircuit
Internationale veiligheidsnorm
Het apparaat voldoet aan de internationale norm voor medisch elektrische apparatuur IEC 60601-1, IEC
60601-1-2 en IEC 60601-2-10 (Electrical nerve stimulators).
I : Het apparaat is voorzien van een veiligheidsaarde en moet op een randgeaarde wandcontactdoos
worden aangesloten.
Technische wijzigingen voorbehouden.
9 Bestelgegevens
Voor de bestelgegevens van de Endomed 482, standaard toebehoren en extra toebehoren verwijzen wij
naar de Catalogus Enraf-Nonius.


1
GB
1 Introduction
1.1 General
The Endomed 482 is equipped with two completely identical multi functional electrotherapy channels. The
electrotherapy channels can be used in combination or totally independent. These combination
opportunities along with the largest possible quantity of available current waveforms make this apparatus
the ultimate solution for your professional activities.
The apparatus is only meant to be used by competent personnel in physiotherapy, rehabilitation or
adjacent areas.
1.2 Therapy possibilities
Electrotherapy with low frequency, medium frequency, TENS, High Voltage and Microcurrent currents.
Through the application of these currents it is amongst others possible to diminish muscle tone, manage
pain and increase the circulation and regeneration of tissue..
1.3 Finally
You have made a wise choice in selecting the Endomed 482. We are confident that your unit will continue
to give satisfaction over many years of use. Nevertheless, if you have any queries or suggestions, please
contact your authorised distributor.
2 Safety
2.1 Preliminary notes
It is important that you read these operating instructions carefully before using the Endomed 482. Please
make sure that these instructions are available to all personnel who operates the equipment.
Pay attention to the following before using the Endomed 482:
1. Keep yourself informed of the contra-indications (see chapter 3).
2. Never leave the patient unattended during treatment.
3. The apparatus may not be used in close proximity (i.e. less than 2 metres) to shortwave equipment.
4. The apparatus may not be used in so-called “wet rooms” (hydrotherapy rooms).
The manufacturer cannot be held responsible for the results of using this apparatus for any purposes
other than described in these operating instructions.
2.2 General
When the apparatus is switched on all vital functions are checked by the internal microprocessor. During
operation the apparatus the actual output of the current is measured continuously and compared to the
requested output. Whenever a faulty situation is detected the apparatus will switch off the current
immediately.
2.3 Exclusions
Electrotherapy is not intended for the following specific applications:
• Intercranial treatment, like sleep therapy;
• Transcordial treatments (applying electrodes at the thorax may increase the risk of heart fibrillation);
• Cervical occipital treatments.
2.4 Current density
The particular standard for Therapeutic Electrical Stimulation Equipment is IEC 60601-2-10 (BS 5724 part
2.10). The maximum permissible Current Density is 2 mA R.M.S. per cm². To verify that this value is not
exceeded in electrotherapy, divide the current output in mA by the effective electrode area in cm²; a value
of less than two should result.
Note that placing the electrodes should be done carefully and solidly, and that the use of small electrodes
in combination with high intensities may cause skin irritations or burns.

2
GB
2.5 Electromagnetic interference
Simultaneous connection of a patient to HF surgical equipment and an electrical stimulator must not be
done as this may result in burns at the site of the stimulator electrodes. Therefore, simultaneous
connection is not allowed.
For more information see chapter 4, Installation.
2.6 Limitations of liability
To the maximum extent permitted by applicable law, in no event will Enraf-Nonius or its suppliers or
resellers be liable for any indirect, special, incidental or consequential damages arising from the use of or
inability to use the product, including, without limitation, damages for loss of goodwill, work and
productivity, computer failure or malfunction, or any and all other commercial damages or losses, even if
advised of the possibility thereof, and regardless of the legal or equitable theory (contract, tort or
otherwise) upon which the claim is based. In any case, Enraf-Nonius's entire liability under any provision
of this agreement shall not exceed in the aggregate the sum of the fees paid for this product and fees for
support of the product received by Enraf-Nonius under a separate support agreement (if any), with the
exception of death or personal injury caused by the negligence of Enraf-Nonius to the extent applicable
law prohibits the limitation of damages in such cases.
Enraf-Nonius can not be held liable for any consequence resulting from incorrect information provided by
it’s personnel, or errors incorporated in this manual and / or other accompanying documentation
(including commercial documentation)
The opposing party (product’s user or it’s representative) shall disclaim Enraf-Nonius from all claims
arising from third parties, whatever nature or whatever relationship to the opposing party.
3 Indications and Contra-Indications
Please refer to the optional therapy books.
3.1 Indications
3.1.1 Electro therapy
Diagnostics, electropalpation for:
• pain points;
• trigger points;
• hyperaesthetic regions;
• motor trigger points;
• S/d curve
Therapy:
A. Pain control in:
• pain points;
• trigger points;
• hyperaesthetic regions.
B. Autonomic disorders such as:
• shoulder/hand syndrome;
• Raynaud’s disease;
• Buerger’s disease;
• Sudeck’s dystrophy;
• neurological diseases;
• myalgia.
C Muscle stimulation:
• for restoration of kinaesthesia;
• for treatment of atrophy;
• for stimulation of the internal and external sphincters in the treatment of urinary incon-tinence;
• revalidation;
• muscle strengthening (sport);
• neurological conditions.
D. Iontophoresis.

3
GB
E Wound healing:
• skin lesions due to circulation disorders;
• post-operative wounds.
3.2 Absolute specific contra-indications
3.2.1 Electro therapy
• pyrexia;
• tumours;
• tuberculosis;
• localized inflammation;
• thrombosis;
• pregnancy;
• pacemakers;
• metal implants.
4 Installation
4.1 Connection
• Mains supply connections must comply with the national requirements regarding medical rooms. The
equipment has a safety earth (ground) connection, and must be connected to an earthed (grounded)
wall socket.
• Prior to connection of this apparatus to the mains supply, check that the voltage and frequency stated
on the type plate correspond with the available mains supply.
• The mains adapter is a part of the supply circuit on which the device’s safety partly depends. The
approvals for the Endomed 482 are only valid if used in combination with this type of adapter ENA
1524
It is not permitted to connect the Endomed 482 to another type of adapter than type ENA-1550.
4.2 Connection of the mains adapter
• Connect the supplied mains adapter to the connector [3-1].
• Connect the mains adapter to a wall socket. Lamp [6] indicates that the apparatus is connected to the
mains supply and stand-by.
4.3 Switching on and self test
• Switch On the apparatus, using the On/Off switch [1]
• Immediately after switching on, the apparatus carries out a self test.
At the end of the self-test a beep is heard. When an error is found an error code will appear on the
display. See section 7 for details.
4.4 Disconnecting from the mains
• Switch Off the Endomed 482, using the mains switch [1].
• Pull out the mains plug of the mains adapter from the wall socket.
4.5 Battery operation (optional)
The apparatus can be operated independent of the mains supply. To make this possible, first a battery
must be installed. This is done as follows:
• Turn off the apparatus and remove the mains adapter from connector [3-1].
• Put the apparatus upside down and remove the two screws fixating the battery compartment cover to
the bottom of the apparatus.
• Connect the red lead to the positive (+) pole of the battery and the black lead to the negative (-) pole.
• Slide the battery into its compartment.
• Reattach the battery compartment cover using the two screws.
• Reconnect the mains adapter to connector [3-1].

4
GB
With a mains adapter connected, the battery is automatically charged, independent of the state of the
on/off switch [1]. We recommend to use the apparatus with the mains adapter connected whenever
possible. This will increase the service life of the battery.
We recommend to explicitly use Enraf-Nonius supplied batteries of type 2601.016. The battery contains
material that is noxious to the environment. You should attend the local regulations when disposing the
battery. See also chapter 6.4.
4.6 Installation
• Do not install the apparatus in a location near a heat source such as a radiator.
• Avoid exposure to direct sunlight, rain, excessive dust, moisture, mechanical vibrations and shocks.
• Cordless telephones should not be used in close proximity of the apparatus.
• This apparatus should not be used in so-called "wet- rooms" (hydrotherapy rooms).
• The apparatus has to be installed in such way that liquid cannot enter.
Should any liquid ingress into the housing of this equipment, unplug the apparatus from the wall socket (if
connected) and have it checked by an authorised expert.
4.7 Electromagnetic interference
• Operation in close proximity (i.e. less than 2 meters) to working short-wave or microwave therapy units
may produce instability in the Endomed 482 output.
• To prevent electromagnetic interference, we strongly advise using separate mains groups (phases) for
the Endomed 482 and the short-wave or microwave equipment, and a distance of at least 2 meters is
kept between the Endomed 482 and the short-wave or microwave equipment.
• Ensure that the mains cable of the short-wave/microwave unit does not come near the Endomed 482
or the patient.
If problems with electromagnetic interference persist, please contact your authorized distributor.
5 Operation
5.1 Controls
(See Pictures)
5.1.1 Device
[1] On/Off Power switch
With this switch the Endomed 482 is switched On/Off.
[2] Type number/warning sticker
Provides information on the apparatus, such as type and serial number, as well as connection data
such as mains voltage and maximum current consumption.
[3-1] Connector for mains adapter
[3-2] Connector for remote control
For connection of the optional remote control.
[4-1] Connection Patient Cable Electrotherapy
[4-2] Connection Ultrasound treatment head
5.1.2 Control panel
(see pictures)
[5] Battery indicator
There are four possibilities:
• Lights green : battery is fully charged
• Lights blinking green : battery partial discharged, connect mains adapter
• Lights yellow : battery insufficiently charged, therapies disabled, connect mains adapter
• Off : no battery present, battery fully discharged or defective, connect mains
adapter

5
GB
[6] Mains adapter indicator
This lamp indicates that the mains adapter is connected to the power supply.
[7]Therapy options
Selection button for electrotherapy, current channel selection, linked current channels, interval
between program steps.
[8] Selection button current waveform
This button is to select the different current waveforms.
[9] Selection button for:
Carrier wave, pulse width, microcurrent frequency, interferential current type, alternating mode (High
Voltage and Microcurrent).
[10] Selection button for:
Beat frequency, phase interval, burst frequency (Russian stimulation), vector position, balance
position, Diadynamic current waveforms and modulation frequency (spectrum).
[11] Selection button for:
Modulation time (spectrum), duty cycle (Russian stimulation), burst frequency (TENS) and treatment
step number (protocols)
[12] Selection button for:
Surge programme, vector rotation time and treatment timer
[13] Selection button for:
Current channel, CC/CV mode and polarity.
[12]+[13] Emergency stop.
Pressing buttons [12] and [13] simultaneously will terminate all active treatments.
[14] Accept button
To accept the current waveform selection, the pre-programmed protocols and to start the surge
programs.
[15] Memory button
To generate the memory functions and to recall and store programs
[16] Central controller
Controller to adjust all settings and parameters.
[17] Intensity controller
Controller to adjust the current intensity in channel 1 and 2. In 4-pole mode (interferential currents) this
controller adjusts the intensity in both channels together.
[19] Interval symbol
The symbol
indicates the interval between two program steps of a sequential program.
5.2 Operating the apparatus
5.2.1 Introduction
5.2.1.1 Switch on the apparatus
Turn the apparatus on with switch [1]. The apparatus executes a self test, checking all important functions
and presents itself with the start up settings. The start up settings are adjustable at memory location 0. To
personalise the start up settings, refer to chapter 5.4, Memory Functions.
5.2.1.2 Therapy and channel selection
The Endomed 482 is equipped with two electrotherapy channels. These channels can be used
independently, each channel offering its own set of parameters and treatment timer. It is also possible to
link channels. Use button [7] to differentiate between the basic therapy functions Electrotherapy use the
central controller [16] to select or link channels. The following selections are available:
U electrotherapy on current channel 1
V electrotherapy on current channel 2
electrotherapy on linked channels

6
GB
Consider that independent use of the electrotherapy channels requires adjusting all parameters on both
channels. When this is not desired, or when independent use is not needed, you can also link the
channels. Some waveforms, such as interferential currents are only possible on linked channels.
5.2.1.3 Selection of current waveform
Press button [8]. All waveforms appear on the display, the currently selected one blinking. Select a
current waveform using the central controller and press button [14] to accept the selection.
When you select (interferential current group) or (Diadynamic current group), you will be
requested to select a current type within this group. Select the current type using the central controller
[16] and press button [14] to accept the selection.
5.2.1.4 Adjusting parameters
Press the buttons [9] thru [13] to select a parameter. A button effects all parameters that are in line with it
on the display. Once selected a parameter can be adjusted, using the central controller [16]. A parameter
can be modified, as long as the icon identifying it is blinking. The display will only show those parameters,
that are applicable to the selected therapy.
5.2.1.5 Treatment timer
Press button [12] to select the treatment timer. The min icon is blinking. The display shows the treatment
time of the channel, that is currently present (selected under 5.2.1.2.) on the display. As a reminder, a
channel indicator is blinking above the treatment timer value. Only the treatment timer of this channel can
now be modified, using the central controller [16].
When one or more channels are active < is blinking. An indication of the currently active channels is
available above the treatment timer value.
5.2.1.6 Surge programs
Some current waveforms can be embedded in a surge program. Press button [12] to sequentially select
ramp up time 3, hold time 4, ramp down time 5 and interval time 7. Adjust these parameters using
the central controller [16].
When the current channels are linked, the surge programs are identical on both channels. In this mode a
delay time can be set between the start of the surge program on channel 1 and on channel 2. This is
done as follows:
Press button [13] and select channel 2 using the central controller [16].
Next press button [12] to select the delay time 6 and adjust it using the central controller [16].
5.2.1.7 Current intensity
The current intensity is adjusted using intensity controller [17]. The current intensity can only be adjusted
when the clock has been set.
The channel indicator @, followed by the channel number A or C indicates the channel, that is currently
present on the display and that can be adjusted. You can change the channel number, using button [13]
and the central controller [16]. This selection operates in parallel to the channel selection described in
paragraph 5.2.1.2.
At 4-pole current waveforms the intensity controller [17] operates on both channels simultaneously. On
the display this is indicated by A B C, in which the channel that is currently displayed is blinking. In this
case a balance control facility is available for the classical interferential current waveform (see paragraph
5.2.2.9. for details).
The unity of the displayed current intensity depends on the previously selected current waveform and can
be expressed in mA, µA or V.
A treatment is started by adjusting the current intensity, unless a surge program has been selected. Press
button [14] to start a treatment that includes a surge program.
The indicators > and ? will show up when current is actually flowing from the corresponding channels.
A blinking current intensity value indicates a poor electrical contact with the patient.
5.2.1.8 CC/CV mode
Depending on the selected current waveform, the electrotherapy channels can be used in the Constant
Current or Constant Voltage mode. It is advised to use the CV mode with dynamic electrode applications.
In CV mode the output current depends on the electrical contact with the patient and can therefore vary.
You can change the CC/CV setting using button [13] and the central controller [16].
5.2.1.9 Current polarity
When DC currents are used, the red terminal is the positive terminal and the black one the negative
terminal. To manually change the polarity, press button [13] and select F or G using the central controller
[16]:
F: Standard
G: reversed

7
GB
Manually changing the polarity during a treatment will result in a current decaying to 0, followed by a
current with the opposite polarity, rising to a value equal to 80% of the previous value.
To activate automatic polarity reversal of the The High voltage and Microcurrent waveforms, select or
with button [9] and the central controller [16]:
: alternating
: not alternating
With the Interrupted DC current waveform it is not possible to reverse the current polarity.
5.2.1.10 Emergency stop
Pressing buttons [12] and [13] simultaneously will terminate all active treatments.
5.2.2 Electrotherapy
5.2.2.1 2-pole interferential current (premodulated)
• Push button [7] to select . Use the central controller [16] to select the desired channel or to link the
channels;
• Push button [8], select with the central controller [16] and press button [14] to accept;
• Selection of 2-pole interferential current:
Select with the central controller [16] and press button [14] to accept;
• Carrier wave selection:
Push button [9] to select (kHz) and adjust its value with the central controller [16];
• Beat frequency:
Select with button [10] and adjust its value with the central controller [16];
• Modulation frequency (spectrum):
Select * with button [10] and adjust its value with the central controller [16];
• Modulation time (spectrum):
Select , with button [11] and adjust its value with the central controller [16];
• Treatment time:
Select < with button [12] and adjust its value with the central controller [16];
• Surge program (when desired):
• Ramp up time:
Select 3 with button [12] and adjust its value with the central controller [16];
• Hold time:
Select 4 with button [12] and adjust its value with the central controller [16];
• Ramp down time:
Select 5 with button [12] and adjust its value with the central controller [16];
• Interval time:
Select 7 with button [12] and adjust its value with the central controller [16];
• Delay time (only available with linked channels):
Push button [13] and select channel 2 with the central controller [16].
Select 6 with button [12] and adjust its value with the central controller [16];
• Select CC or CV with button [13] and the central controller [16];
• Select the desired channel with button [13] and the central controller [16]. Adjust the current intensity
with controller [17];
• Push button [14] to start the therapy in case a surge program was selected.
5.2.2.2 Russian stimulation
• Push button [7] to select . Use the central controller [16] to select the desired channel or to link the
channels;
• Push button [8], select with the central controller [16] and press button [14] to accept;
• Carrier wave selection:
Push button [9] to select (kHz) and adjust its value with the central controller [16];
• Burst frequency:
Select with button [10] and adjust its value with the central controller [16];
• Burst / interval ratio:
Select - with button [11] and adjust its value with the central controller [16];
• Treatment time:
Select < with button [12] and adjust its value with the central controller [16];
• Surge program (when desired):
• Ramp up time:
Select 3 with button [12] and adjust its value with the central controller [16];
• Hold time:
Select 4 with button [12] and adjust its value with the central controller [16];
• Ramp down time:

8
GB
Select 5 with button [12] and adjust its value with the central controller [16];
• Interval time:
Select 7 with button [12] and adjust its value with the central controller [16];
• Delay time (only available with linked channels):
Push button [13] and select channel 2 with the central controller [16].
Select 6 with button [12] and adjust its value with the central controller [16];
• Select CC or CV with button [13] and the central controller [16];
• Select the desired channel with button [13] and the central controller [16]. Adjust the current intensity
with controller [17];
• Push button [14] to start the therapy in case a surge program was selected.
5.2.2.3 Asymmetrical and Symmetrical biphasic pulsed current (TENS)
• Push button [7] to select . Use the central controller [16] to select the desired channel or to link the
channels;
• Push button [8], select or with the central controller [16] and press button [14] to accept;
• Pulse width:
Select with button [9] and adjust its value with the central controller [16];
• Beat frequency:
Select with button [10] and adjust its value with the central controller [16];
• Make your choice between frequency modulation and burst mode as these two options are mutually
exclusive;
• If frequency modulation is desired:
First check burst mode to be off:
• Select . with button [11] and set its value to zero with the central controller [16];
• Modulation frequency (spectrum):
Select * with button [10] and adjust its value with the central controller [16];
• Modulation time (Spectrum):
Select , with button [11] and adjust its value with the central controller [16];
• If burst mode is desired:
First check frequency modulation to be off:
• Select * with button [10] and set its value to zero with the central controller [16];
• Burst frequency:
Select . with button [11] and adjust its value with the central controller [16];
• Treatment time:
Select < with button [12] and adjust its value with the central controller [16];
• Surge program (when desired):
• Ramp up time:
Select 3 with button [12] and adjust its value with the central controller [16];
• Hold time:
Select 4 with button [12] and adjust its value with the central controller [16];
• Ramp down time:
Select 5 with button [12] and adjust its value with the central controller [16];
• Interval time:
Select 7 with button [12] and adjust its value with the central controller [16];
• Delay time (only available with linked channels):
Push button [13] and select channel 2 with the central controller [16].
Select 6 with button [12] and adjust its value with the central controller [16];
• Select CC or CV with button [13] and the central controller [16];
• Select the desired channel with button [13] and the central controller [16]. Adjust the current intensity
with controller [17];
• Push button [14] to start the therapy in case a surge program was selected.
5.2.2.4 Monophasic rectangular –and triangular pulsed current
• Push button [7] to select . Use the central controller [16] to select the desired channel or to link the
channels;
• Push button [8], select or with the central controller [16] and press button [14] to accept;
• Pulse width:
Select with button [9] and adjust its value with the central controller [16];
• Pulse interval:
Select with button [10] and adjust its value with the central controller [16];
• Treatment time:
Select < with button [12] and adjust its value with the central controller [16];
• Surge program (when desired):
• Ramp up time:
Select 3 with button [12] and adjust its value with the central controller [16];

9
GB
• Hold time:
Select 4 with button [12] and adjust its value with the central controller [16];
• Ramp down time:
Select 5 with button [12] and adjust its value with the central controller [16];
• Interval time:
Select 7 with button [12] and adjust its value with the central controller [16];
• Delay time (only available with linked channels):
Push button [13] and select channel 2 with the central controller [16].
Select 6 with button [12] and adjust its value with the central controller [16];
• Select CC or CV with button [13] and the central controller [16];
• Polarity:
Select F or G with button [13] and the central controller [16];
• Select the desired channel with button [13] and the central controller [16]. Adjust the current intensity
with controller [17];
• Push button [14] to start the therapy in case a surge program was selected.
5.2.2.5 Microcurrent
• Push button [7] to select . Use the central controller [16] to select the desired channel or to link the
channels;
• Push button [8], select with the central controller [16] and press button [14] to accept;
• Frequency:
Select (Hz or kHz) with button [9] and adjust its value with the central controller [16];
• Alternating or not alternating:
Select or with button [9] and the central controller [16];
• Treatment time:
Select < with button [12] and adjust its value with the central controller [16];
• Alternation sequence (only with selected):
• Ramp up time:
Select 3 with button [12] and adjust its value with the central controller [16];
• Hold time:
Select 4 with button [12] and adjust its value with the central controller [16];
• Ramp down time:
Select 5 with button [12] and adjust its value with the central controller [16];
• Surge program (only with selected):
• Ramp up time:
Select 3 with button [12] and adjust its value with the central controller [16];
• Hold time:
Select 4 with button [12] and adjust its value with the central controller [16];
• Ramp down time:
Select 5 with button [12] and adjust its value with the central controller [16];
• Interval time:
Select 7 with button [12] and adjust its value with the central controller [16];
• Delay time (only available with linked channels):
Push button [13] and select channel 2 with the central controller [16].
Select 6 with button [12] and adjust its value with the central controller [16];
• Polarity (only with selected):
Select F or G with button [13] and the central controller [16];
• Select the desired channel with button [13] and the central controller [16]. Adjust the current intensity
with controller [17];
• Push button [14] to start the therapy in case a surge program was selected.
5.2.2.6 High voltage
• Push button [7] to select . Use the central controller [16] to select the desired channel or to link the
channels;
• Push button [8], select with the central controller [16] and press button [14] to accept;
• Alternating or not alternating:
Select or with button [9] and the central controller [16];
• Beat frequency:
Select with button [10] and adjust its value with the central controller [16];
• Modulation frequency (spectrum):
Select * (%) with button [10] and adjust its value with the central controller [16];
• Modulation time (spectrum):
Select , with button [11] and adjust its value with the central controller [16];
• Treatment time:

10
GB
Select < with button [12] and adjust its value with the central controller [16];
• Alternation sequence (only with selected):
• Ramp up time:
Select 3 with button [12] and adjust its value with the central controller [16];
• Hold time:
Select 4 with button [12] and adjust its value with the central controller [16];
• Ramp down time:
Select 5 with button [12] and adjust its value with the central controller [16];
• Surge program (only with selected):
• Ramp up time:
Select 3 with button [12] and adjust its value with the central controller [16];
• Hold time:
Select 4 with button [12] and adjust its value with the central controller [16];
• Ramp down time:
Select 5 with button [12] and adjust its value with the central controller [16];
• Interval time:
Select 7 with button [12] and adjust its value with the central controller [16];
• Delay time (only available with linked channels):
Push button [13] and select channel 2 with the central controller [16].
Select 6 with button [12] and adjust its value with the central controller [16];
• Polarity (only with selected):
Select F or G with button [13] and the central controller [16];
• Select the desired channel with button [13] and the central controller [16]. Adjust the voltage intensity
with controller [17];
• Push button [14] to start the therapy in case a surge program was selected.
5.2.2.7 Diadynamic currents
• Push button [7] to select . Use the central controller [16] to select the desired channel or to link the
channels;
• Push button [8], select with the central controller [16] and press button [14] to accept;
• Select MF, DF, LP, CP or CPid with the central controller [16] and press button [14] to accept;
• Treatment time:
Select < with button [12] and adjust its value with the central controller [16];
• Surge program (only with MF and DF):
• Ramp up time:
Select 3 with button [12] and adjust its value with the central controller [16];
• Hold time:
Select 4 with button [12] and adjust its value with the central controller [16];
• Ramp down time:
Select 5 with button [12] and adjust its value with the central controller [16];
• Interval time:
Select 7 with button [12] and adjust its value with the central controller [16];
• Delay time (only available with linked channels):
Push button [13] and select channel 2 with the central controller [16].
Select 6 with button [12] and adjust its value with the central controller [16];
• Select CC or CV with button [13] and the central controller [16];
• Polarity:
Select F or G with button [13] and the central controller [16];
• Select the desired channel with button [13] and the central controller [16]. Adjust the current intensity
with controller [17];
• Push button [14] to start the therapy in case a surge program was selected.
5.2.2.8 Medium frequency interrupted direct current
• Push button [7] to select . Use the central controller [16] to select the desired channel or to link the
channels;
• Push button [8], select with the central controller [16] and press button [14] to accept;
• Treatment time:
Select < with button [12] and adjust its value with the central controller [16];
• Select the desired channel with button [13] and the central controller [16]. Adjust the current intensity
with controller [17];

11
GB
5.2.2.9 4-pole interferential current (classical)
• Push button [7] to select . Use the central controller [16] to link the channels;
• Push button [8], select with the central controller [16] and press button [14] to accept;
• Selection of 4-pole interferential current:
Select with the central controller [16] and press button [14] to accept;
• Carrier wave selection:
Push button [9] to select (kHz) and adjust its value with the central controller [16];
• Beat frequency:
Select with button [10] and adjust its value with the central controller [16];
• Modulation frequency (spectrum):
Select * with button [10] and adjust its value with the central controller [16];
• Modulation time (spectrum):
Select , with button [11] and adjust its value with the central controller [16];
• Treatment time:
Select < with button [12] and adjust its value with the central controller [16];
• Select CC or CV with button [13] and the central controller [16];
• Adjust the current intensity with controller [17];
• Balance:
Select with button [10] and adjust its value with the central controller [16]
5.2.2.10 Isoplanar vector
• Push button [7] to select . Use the central controller [16] to link the channels;
• Push button [8], select with the central controller [16] and press button [14] to accept;
• Selection of isoplanar vector current:
Select
with the central controller [16] and press button [14] to accept;
• Carrier wave selection:
Push button [9] to select (kHz) and adjust its value with the central controller [16];
• Beat frequency:
Select with button [10] and adjust its value with the central controller [16];
• Modulation frequency (spectrum):
Select * with button [10] and adjust its value with the central controller [16];
• Modulation time (spectrum):
Select , with button [11] and adjust its value with the central controller [16];
• Treatment time:
Select < with button [12] and adjust its value with the central controller [16];
• Select CC or CV with button [13] and the central controller [16];
• Adjust the current intensity with controller [17]
5.2.2.11 Dipole vector manual
• Push button [7] to select . Use the central controller [16] to link the channels;
• Push button [8], select with the central controller [16] and press button [14] to accept;
• Selection of manual dipole vector current:
Select
with the central controller [16] and press button [14] to accept;
• Carrier wave selection:
Push button [9] to select (kHz) and adjust its value with the central controller [16];
• Beat frequency:
Select with button [10] and adjust its value with the central controller [16];
• Modulation frequency (spectrum):
Select * with button [10] and adjust its value with the central controller [16];
• Modulation time (spectrum):
Select , with button [11] and adjust its value with the central controller [16];
• Treatment time:
Select < with button [12] and adjust its value with the central controller [16];
• Select CC or CV with button [13] and the central controller [16];
• Adjust the current intensity with controller [17];
• Dipole vector:
Select
# with button [10] and adjust the position with the central controller [16]

12
GB
5.2.2.12 Dipole vector automatic
• Push button [7] to select . Use the central controller [16] to link the channels;
• Push button [8], select with the central controller [16] and press button [14] to accept;
• Selection of automatic dipole vector current:
Select
with the central controller [16] and press button [14] to accept;
• Carrier wave selection:
Push button [9] to select (kHz) and adjust its value with the central controller [16];
• Beat frequency:
Select with button [10] and adjust its value with the central controller [16];
• Modulation frequency (spectrum):
Select * with button [10] and adjust its value with the central controller [16];
• Modulation time (spectrum):
Select , with button [11] and adjust its value with the central controller [16];
• Treatment time:
Select < with button [12] and adjust its value with the central controller [16];
• Rotation speed
Select 8with button [12] and adjust its value with the central controller [16];
• Select CC or CV with button [13] and the central controller [16];
• Adjust the current intensity with controller [17].
5.3 Measures with regard to treatments
5.3.1 Electrotherapy
5.3.1.1 Before treatment
• Check the patient for absolute and relative contraindications.
• Test the heat sensibility of the treatment area.
• If the skin is hairy shaving is the best.
5.4 Memory functions
The Endomed 482 is equipped with a memory to store equipment settings and protocols.
5.4.1. Equipment settings
Equipment settings store all parameters of the apparatus, except the current intensity. Contrary to
protocols, equipment settings operate on all channels together, including the ultrasound channel.
Equipment settings are stored at locations 0 - 9. The location number will appear on the display when
button [15] is pushed. Equipment setting 0 is automatically loaded when the apparatus is turned on.
Equipment settings can only be loaded and stored when all channels are inactive.
5.4.1.1. Loading equipment settings
• Push button [15], 1 is blinking;
• Select a memory location in the range of 0 - 9 with the central controller [16]. The display shows the
equipment settings that are stored at the selected location;
• Push button [14] to load the selected equipment settings;
• Adjust the current intensity with controller [17];
• Push button [14] to start the therapy in case a surge program was selected.
Loading the selected equipment settings has to occur within a certain time delay as long as 1 is blinking.
Waiting too long, or pushing any other button than [14] or [15] will cancel the load operation.
.
5.4.1.2. Storing equipment settings
• Select a therapy and set all parameters on all desired channels;
• Push button [15], 1 is blinking;
• Select a memory location in the range of 0 - 9 with the central controller [16]. The display shows the
equipment settings that are stored at the selected location, allowing you to check what will be
overwritten;
• Push button [15] a second time, 2 is blinking. The display now shows the current equipment settings
that are to be stored at the selected location;
• Push button [14] to execute the store operation.
Execution of the store operation has to occur within a certain time delay as long as 2 is blinking. Waiting
too long, or pushing any other button than [14] or [15] will cancel the store operation.

13
GB
5.4.2. Protocols
A protocol consists of one or more treatment steps that are sequentially executed. Each treatment step
has its own current waveform, parameter settings and treatment time. The protocols are categorised in
clusters according to their application. Protocols are identified as follows:
1:1 the first number is the cluster number
1:1 the second number is the protocol number
The Endomed 482 provides a number of pre-programmed protocols, that are available at cluster 2 and
higher. Each cluster is intended for a specific indication. In the therapy guide that is supplied with the
apparatus you will find a survey of all clusters and the corresponding protocols. Additionally the Endomed
482 supports user-defined protocols, for which cluster 1 has been reserved.
Electrotherapy protocols can constitute either single or dual channel applications. Prior to loading a single
channel protocol, first the target channel must be specified. In this case it is also allowed to link the
current channels, causing the protocol to be executed on both channels. When a single channel protocol
is being executed, a completely different single channel protocol can be executed at the other channel. Of
course dual channel protocols can only be loaded when the current channels are linked.
5.4.1.1 Loading a protocol
• Select a target channel, using button [7] and the central controller [16];
• Push button [15], 1 is blinking;
• Select a protocol number in the range of 1:1 and higher with the central controller [16]. The display
shows the total treatment time of the selected protocol;
• Push button [14] to load the selected protocol;
• Adjust the current intensity with controller [17];
• Push button [14] to start the therapy in case a surge program was selected.
When a protocol is executed, the display shows the remaining treatment time of the running treatment
step. Each treatment step is terminated with a short beep. When the end of the protocol has been
reached, a standard “end-of-treatment” beep is given, after which the apparatus will exit the protocol
mode.
Notes:
• To indicate the protocol mode the protocol number remains visible on the display once a protocol has
been loaded. Following the protocol number, the treatment step number is shown, accompanied by its
icon 0.
• To remove a loaded but not yet executing protocol, push button [14] again. By waiting a moment, or by
pushing any other button than [14] or [15], the apparatus will exit the protocol mode.
• All parameters of a loaded protocol can be changed at will. Select 0 with button [11] and select the
treatment step number with the central controller [16]. All parameters of the now selected treatment
step can be changed. Do not forget to reset the treatment step number to 1.
• A loaded protocol can be executed starting from any treatment step. Select 0 with button [11] and
select the treatment step number with the central controller [16].
• The execution of a treatment step can be terminated by advancing the treatment step number. Select
0 with button [11] and select the new treatment step number with the central controller [16]. The
current will decay to zero. You can resume the execution of the protocol from the new treatment step
by adjusting the current intensity with controller [17].
• The execution of a protocol can be terminated, by setting the treatment time of the running treatment
step to zero. The apparatus will then exit the protocol mode.
5.4.1.2 Storing a protocol
Prior to the execution of a modified protocol, it can be saved for later use in cluster 1:
• Push button [15] twice. 2 is blinking;
• Select a protocol number in the range of 1:1 - 1:9 with the central controller [16]. The display shows
the total treatment time of the protocol to be stored;
• Push button [14] to execute the store operation.
5.4.1.3 Creating a user defined protocol
In cluster 1 you can create your own protocols. A maximum of 10 protocols can be stored, each with a
maximum length of 20 treatment steps. Before you proceed with the steps below, first make sure that the
apparatus is not in protocol mode (see section 5.4.2.1. how to exit protocol mode):
• Push button [15] twice. 2 is blinking;
• Select a protocol number in the range of 1:1 - 1:9 with the central controller [16];
• Push button [14]. 2 is blinking, 0 is visible and the treatment step number is set to 1.
• Set all parameters of the current treatment step;

14
GB
• Push button [14] to store the treatment step. The treatment step number is automatically incremented;
• Repeat the previous two steps until the end of your protocol has been reached;
• Terminate your protocol with a treatment step with a treatment time of zero. Push button [14] to
confirm. The end of your protocol is confirmed with a beep.
Notes:
• When two consecutive treatment steps contain AC current waveforms, the current intensity will be
maintained at the adjusted level when the protocol is executed.
• When switching to or between DC current waveforms, the current intensity will be decayed to zero.
The next treatment step will have to be started manually by adjusting the current intensity.
5.5 Connection and disconnection reactions
Constant Current (CC) output characteristics may cause unpleasant connection and disconnection
reactions if the electrodes are not securely placed or lose contact with the skin. Make sure the output is
set to 0 mA when you apply or remove the electrodes. Preferably use Constant Voltage (CV) in case of
dynamic application techniques.
5.6 Electrolytic effects
Electrolysis occurs under the electrodes when current types with a DC component are applied. Because
the greatest concentration of electrolytic by-products caused by ion migration occur under the electrodes,
we recommend the use of the supplied sponges to keep the effects to a minimum. Make sure that the
sponges are kept well moistened and place the thick side of the sponge between the flexible rubber
electrodes and the patient.
5.7 Remote control
For the Endomed 482 a special remote control is available. The remote control can be connected to
connector [3-2]. The remote control has 2 intensity buttons for setting the intensity of the current channels
and an emergency stop.
6 Maintenance
6.1 Technical maintenance
Electrical safety of the apparatus depends on the electrical connection (via the power cord) to protective
earth. It is therefore necessary to have this connection checked annually. Further an annual overall check
is recommended. This may be done by your supplier, or by another agency, authorized by the
manufacturer. It is also recommended that a record of the service history is kept for all activities relating
to service and maintenance. In some countries this is even obligatory.
Maintenance and all repairs should only be carried out by an authorized agency. The manufacturer will
not be held responsible for the results of maintenance or repairs by unauthorized persons.
The service and/or maintenance must be carried out conform the procedure described in the service
manual of the apparatus.
Opening of the equipment by unauthorized agencies is not allowed and will terminate any claim to
warranty.
6.2 Cleaning of the apparatus
Switch off the apparatus and disconnect it from the mains supply. The apparatus can be cleaned with a
damp cloth. Use lukewarm water and a non-abrasive liquid household cleaner (no abrasive, no alcohol
content solution).

15
GB
6.3 Cleaning of accessories
6.3.1 Electrodes and sponge pads
The rubber electrodes should be cleaned with lukewarm water. For stubborn stains or dirt, cleaning and
disinfection of the rubber electrodes can be done using a 70% alcohol solution. During this process, the
black colouration of the rubber electrodes may be stained. This does not affect the operation of the
electrodes.
The sponge pads must be washed after use in warm water with a household cleaner. Then they must be
rinsed with water, drained thoroughly and then dried, after they have been placed like roofing tiles.
Damaged sponge pads must be replaced.
In areas where the water is soft, it is possible that the water may conduct poorly resulting in abnormally
low currents. In this case it is possible to use a saline solution to improve the conductivity of the water.
When the electrodes are not being used, the sponge pads should be removed. This increases the
operational life of the rubber electrodes. We advise that you should keep an extra set of sponge pads in
stock.
6.3.2 Patient cable
Check the cable regularly for damages and/or bad electrical contact. We also advise that you keep an
extra patient cable in stock.
6.4 Environment information
Your Endomed 482 contains materials which can be recycled and/or are noxious for the environment. At
the end of the duration of life, specialized concerns can take apart the Endomed 482 and sort out the
noxious materials and materials for recycling. By doing so you contribute to a better environment.
Please ensure that you are well informed of the local rules and regulations regarding to the
removal of equipment and accessories.
7 Diagnostics
7.1 Displays fail to light up
Check if the mains adapter is connected to the apparatus and mains supply.
7.2 Error code
The apparatus has discovered a fault during or after the self test. The error code consists of a 3 digit
number and appears on the current intensity display. Remove any applicators or cables from the output
sockets and switch the apparatus off and on again. If the code re-appears, contact your supplier. The
apparatus is probably defective.
7.3 Broken contact in the CC-mode
When contact is broken in the CC-mode, the equipment will indicate this with a beep-tone. In order to
avoid an unpleasant sensation for the patient, when the treatment head or electrode is placed back onto
the surface that is to be treated, the current will ramp down to 0. To continue the treatment, you will have
to set the current again.
7.4 Insufficient or no output current
• Check the patient cable for breaks or poor contact.
• Ensure that the sponges are sufficiently wet.
• If necessary, use a salt solution.
• Clean the electrodes.
• Check for poor contact.

16
GB
7.5 Front panel check
Switching the apparatus on with buttons [9] and [10] pressed will turn all display segments on, allowing
you to check their operation. Pressing buttons and operating the regulators should result in a beep. You
can only exit this mode by switching the apparatus off.
8 Specifications
8.1 Specifications
Electrotherapy general
Channels : 2
Current characteristic : Constant Current (CC) or Constant Voltage (CV)
Setting resolution : 0.2 mA
Timer : 0 - 60 minutes
Polarity reversion direct currents : manual
The maximum intensity within the specification is achieved up to a load of 500 Ω (CC).
Symmetrical and asymmetrical biphasic Pulsed Current, TENS
Frequency : 1 - 200 Hz
Phase duration (pulse width) : 10 - 400 µs
Burst frequency : 0 - 9 Hz
Modulation frequency (spectrum) : 0 - 180 Hz
Modulation time (spectrum) : 1/1, 6/6, 12/12 en 1/30/1/30 s
Surge pattern : Ramp up 0 - 9 s
Hold time 1 - 60 s
Ramp down 0 - 9 s
Interval time 1 - 60 s
Delay time 0.1 - 80 s
Intensity : 0 - 140 mA.
In certain pulse width, frequency and spectrum combinations the setting range is reduced to 90-mA max.
in order to meet the limit values of IEC 60601-2-10
High voltage
Frequency : 1- 200 Hz
Modulation frequency (spectrum) : 0 - 90 %
Modulation time (spectrum) : 1/1, 6/6, 12/12 en 1/30/1/30 s
Intensity : 0 - 500 Volt
Alternating mode:
Alternation time : 5 tot 50 seconds
Ramp up and ramp down time : 0.1 - 1 second
Non alternating mode:
Surge pattern : As with TENS currents
Microcurrent
Current intensity : 10 µA - 1 mA
Voltage range : 200 V
Alternating mode:
Frequency : 0 - 1000 Hz
Alternation time : 0.1 - 10 seconds (the alternation time is related to the
pulse frequency)
Ramp up and ramp down : 0.1 - 1 second
Non alternating mode:
Frequency : 0,1 - 1000 Hz
Surge pattern : As with TENS currents
Interrupted alternating current, Russian Stimulation
Carrier frequency : 2 - 10 kHz
Burst-frequency : 0 - 100 Hz
Burst / interval ratio : 1:1, 1:2, 1:4 and 1:5
Surge pattern : As with TENS currents
Intensity : 0 - 100 mA

17
GB
Diadynamic current forms
Options : MF, DF, CP, LP and CPid
Intensity : 0 - 70 mA
Surge pattern (MF and DF only) : As with TENS currents
Faradic currents
Options : 2 - 5 current according to Träbert (default choice
rectangular pulse)
Phase duration : 0.02 - 1000 ms with rectangular pulsed current
0.1 - 1000 ms with triangular pulsed current
Phase interval : 5 - 5000 ms
Surge pattern : As with TENS currents
Intensity : 0 - 80 mA
Interrupted direct current
Frequency : 8000 Hz
Duty cycle : 95%
Intensity : 0 - 40 mA
2-pole interferential current (premod)
Carrier wave : 2 - 10 kHz
Beat frequency (AMF) : 0 - 200 Hz
Modulation frequency (spectrum) : 0 - 180 Hz
Modulation time (spectrum) : 1/1, 6/6, 12/12 and 1/30/1/30 s
Surge pattern : As with TENS currents
Intensity : 0 - 100 mA
4-pole interferential current (classical)
Carrier wave : 2- 10 kHz
Beat frequency (AMF) : 0 - 200 Hz
Modulation frequency (spectrum) : 0 - 180 Hz
Modulation time (spectrum) : 1/1, 6/6, 12/12 and 1/30/1/30 s
Surge pattern : Not adjustable
Intensity : 0 - 100 mA
Balance setting : With central controller
Isoplanar vector
Carrier wave : 2- 10 kHz
Beat frequency (AMF) : 0 - 200 Hz
Modulation frequency (spectrum) : 0 - 180 Hz
Modulation time (spectrum) : 1/1, 6/6, 12/12 and 1/30/1/30 s
Surge pattern : Not adjustable
Intensity : 0 - 100 mA
Dipole vector automatic
Carrier wave : 2- 10 kHz
Beat frequency (AMF) : 0 - 200 Hz
Modulation frequency (spectrum) : 0 - 180 Hz
Modulation time (spectrum) : 1/1, 6/6, 12/12 and 1/30/1/30 s
Surge pattern : Not adjustable
Intensity : 0 - 100 mA
Rotation speed : adjustable from 1 to 10 seconds
Dipole vector manual
Carrier wave : 2 - 10 kHz
Beat frequency (AMF) : 0 - 200 Hz
Modulation frequency (spectrum) : 0 - 180 Hz
Modulation time (spectrum) : 1/1, 6/6, 12/12 and 1/30/1/30 s
Surge pattern : Not adjustable
Intensity : 0 - 100 mA
Position : 360 º
Memory functions
Equipment setting 0 : start-up setting.
Equipment settings : 10, user programmable
User defined protocols : 10
Pre-programmed protocols : 50

18
GB
8.2 Technical specifications
Mains adapter
Type mains adapter : ENA-1550
Mains voltage : 100 - 240 Volt, +/- 10 %
Frequency : 50 / 60 Hz
Output voltage : 15 Volt
Max. Output current : 3,3 Ampere
Apparatus
Medical device classification : IIa (according to Medical Device Directive (93/42/EEC)
Safety class : I* type BF**, according to IEC 60601-1
Patient leakage current : Better than IEC requirement (IEC < 100 µA)
Ditto, first fault condition : Better than IEC requirement (IEC: < 500 µA)
Safety tests : CE-MDD (TÜV Rheinland)
Dimensions : 29 x 28 x 11 cm (w x d x h)
Weight : 4 kg.
Environment conditions for transport and Storage
Environment temperature : -10° till +50° C
Relative humidity : 10 till 100 %
Atmospheric pressure : 500 till 1060 hPa
Environment conditions normal use
Environment temperature : 10° till 40° C
Relative humidity : 10 till 90 % (non condensing)
Atmospheric pressure : 500 till1060 hPa
8.3 Classification
Medical class IIa
This equipment complies with all requirements of the Medical Device Directive
(93/42/EEC).
BF : type BF, the equipment has a floating patient circuit.
International safety norm
The Endomed 482 complies to the international norm for medical electrical devices IEC 60601-1 and IEC
60601-2-10 (Electrical nerve stimulators).
I : The equipment has a safety earth (ground) connection, and must be connected to an earthed
(grounded) wall socket.
Technical modifications reserved
Order detail
For the ordering data of the Endomed 482, standard accessories and additional accessories refer to the
Catalogue for Physiotherapy and leaflet.

1
D
1 Einleitung
1.1 Allgemein
Der Endomed 482 verfügt über zwei vollständig identische multifunktionale Elektrotherapiekanäle. Die
Elektrotherapiekanäle können zusammen oder vollständig unabhängig voneinander verwendet werden.
Mit der höchstmöglichen Qualität der verfügbaren Stromformen machen dieses Gerät zur ultimativen
Lösung für die professionelle Anwendung.
Die in dieser Gebrauchsanweisung beschriebenen Produkte sind ausschließlich für die Anwendung durch
sachkundiges Personal in Physiotherapie, Rehabilitation und angrenzenden Bereichen bestimmt.
1.2 Umfassende Therapie
Elektrotherapie mit niederfrequenten, mittelfrequenten Strömen, TENS, Hochspannung und Mikro-Strom.
Durch die Anwendung dieser Stromarten ist es unter anderem möglich, Muskeltöne zu verringern,
Schmerzen zu steuern und die Gewebezirkulation und -Regeneration zu steigern.
1.3 Abschließend
Mit dem Endomed 482 haben Sie eine gute Wahl getroffen. Wir sind sicher, daß das Endomed 482 auf
Jahre hinaus ein unentbehrlicher Helfer in Ihrer Praxis sein wird. Wenn Sie Fragen oder Vorschläge
haben, setzen Sie sich bitte mit Ihrem Fachhändler in Verbindung.
2 Sicherheit
2.1 Einführung
Bitte lesen Sie die Gebrauchsanweisung aufmerksam, bevor Sie das Endomed 482 benutzen. Die
Gebrauchsanweisung muß allen Anwendern leicht zugänglich sein.
Beachten Sie bitte folgende Punkte vor dem Einsatz des Endomed 482:
1. Berücksichtigen Sie die Kontraindikationen (siehe Kapitel 3).
2. Das Gerät darf nicht in der Nähe (d. h. weniger als 2 m) von Kurzwellengeräten eingesetzt werden.
3. Der Patient soll sich zur jederzeit im Blickfeld (in der Sicht) des Therapeutes befinden.
4. Das Gerät ist nicht für sogenannte Feuchträume (Hydrotherapie) geeignet.
Der Hersteller ist nicht haftbar, wenn das Gerät nicht entsprechend der vorliegenden
Gebrauchsanweisung genutzt wird.
2.2 Allgemeines
Wenn das Gerät eingeschaltet wird, werden alle Vitalfunktionen von dem internen Mikroprozessor
geprüft. Während des Betriebs wird der Iststromausgang ständig gemessen und mit dem
Sollstromausgang verglichen. Wenn eine Fehlfunktionssituation erfasst wird, schaltet das Gerät den
Strom sofort aus.
2.3 Ausschlüsse
Elektrotherapie ist für folgende spezifische Anwendungen nicht geeignet:
• Interkraniale Behandlungen, wie Schlaftherapie;
• Transkardiale Behandlungen (die Anwendung von Elektroden am Thorax kann das Risiko von
Herzflimmern vergrößern);
• Zervikale okzipitale Behandlungen.

2
D
2.4 Stromdichte
Gemäß der Internationalen Sicherheitsnorm IEC 60601-2-10 ist eine Überschreitung einer effektiven
Stromdichte von 2 mA pro cm² nicht zulässig.
Für jede Elektrode läßt sich der empfohlene maximale Effektivwert des Patientenstroms leicht errechnen
durch Multiplikation der Kontaktfläche (in Quadratzentimetern) mit dem Faktor 2.
Man achte darauf, daß die Elektroden sorgfältig und fest angebracht werden und daß durch Benutzung
kleiner Elektroden in Kombination mit hohen Amplituden leicht Hautreizungen oder sogar
Verbrennungseffekte ausgelöst werden können.
2.5 Elektromagnetische Interferenz
Gleichzeitiger Anschluß eines Patienten an das Endomed und chirurgische HF-Geräte kann zu
Brandverletzungen an der Stelle der Stimulator-elektroden führen und ist deswegen untersagt.
Für weitere Informationen sehe Kapitel 4 Installation.
2.6 Produkthaftung
Enraf-Nonius bzw. Lieferanten von Enraf-Nonius oder Verkäufer sind, soweit die zutreffende
Gesetzgebung dies zuläßt, unter keinen Umständen haftbar für indirekten, außergewöhnlichen,
nebensächlichen Schaden, sowie Folgeschaden, der sich aus der Benutzung oder aus der Unmöglichkeit
der Benutzung des Produktes ergibt, einschließlich (aber nicht beschränkt auf) Schaden, der als Folge
von Verlust von Goodwill, Arbeitsunterbrechung, Computerdefekten oder -störungen entsteht oder
anderer kommerzieller Schaden oder Verlust, selbst wenn Enraf-Nonius bzw. Lieferanten oder Verkäufer
informiert sind über die Möglichkeit eines solchen Schadens, und ungeachtet der Recht- und
Billigkeitstheorie (Vertrag, widerrechtliche Tat oder dergleichen), worauf der Anspruch beruht. Enraf-
Nonius wird auf Grund von Klauseln in diesem Vertrag auf keinen Fall haftbar sein für Schaden, der
höher ist als der Betrag, den Enraf-Nonius für dieses Produkt von Ihnen empfangen hat, einschließlich
eventueller Vergütungen für Benutzungsunterstützung, die Enraf-Nonius aus einem separaten Vertrag für
Benutzungsunterstützung von Ihnen empfangen hat. Wenn die zutreffende Gesetzgebung eine
Haftungsbeschränkung im Falle von Tod oder Körperschaden als Folge von Nachlässigkeit von Enraf-
Nonius verbietet, ist die hier beschriebene Haftungsbeschränkung ungültig.
Enraf-Nonius ist nicht haftbar für Folgen, die von unrichtigen Informationen und Empfehlungen ihrer
Mitarbeiter stammen sowie für Fehler, die aus dieser Gebrauchsanleitung sowie anderer Begleitschreiben
(einschließlich kommerzieller Dokumentationen) stammen.
Die Gegenpartei (Benutzer oder sein Repräsentant) ist verpflichtet, Enraf-Nonius gegen Haftpflicht von
Dritten (unabhängig von wem und aufgrund welcher Bestimmungen) zu schützen.
3 Indikationen und Kontraindikationen
3.1 Indikationen
Diagnostik, Elektropalpation von:
• Schmerzpunkten;
• Trigger points;
• Hyperästhetischen Bereichen;
• Motorischen Reizpunkten;
• I/T-Kurve
Therapeutische Maßnahmen:
A. Schmerzlinderung von:
• Schmerzpunkten;
• Trigger points;
• Hyperästhetischen Bereichen.
B. Behandlung von Erkrankungen, bei denen ein vegetatives Ungleichgewicht im Vorder-grund steht
• das Schulter-Hand-Syndrom;
• Raynaud-Syndrom;
Buerger-Krankheit;
• Sudeck-Syndrom;
• Neurologischen Erkrankungen;
• Myalgien.

3
D
C. Muskelstimulation:
• Zur Wiederherstellung des motorischen Gefühls;
• Bei Atrophie;
• Der internen und externen Sphinkter bei der Behandlung von Harninkontinenz;
• Bei der Rehabilitation;
• Zur Muskeltraining (Sport);
• Neurologischen Erkrankungen.
D. Iontophorese
E. Wundheilung:
• Hautdefekte infolge peripherer Durchblutungsstörungen;
• Postoperative und posttraumatische Wunden.
3.2 Absolute spezifische Kontraindikationen
• Fieber;
• Tumore;
• Tuberkulose;
• Lokale Entzündungsprozesse;
• Thrombose;
• Schwangerschaft;
• Patienten mit einem implantierten elektrischen Gerät (z.B. Herzschrittmacher) ohne vorherige
Zustimmung eines Facharztes;
• Metallimplantate.
4 Installation
4.1 Anschluß
• Der Netzanschluß muß den nationalen Bestimmungen für medizinische Räume entsprechen.
Das Gerät verfügt über einen Sicherheitsleiter (Masseleiter) und muss an eine geerdete
Netzsteckdose angeschlossen werden.
• Vor dem Anschluß prüfen, ob Volt und Stromstärke mit dem auf dem Typenschild angegebenen
übereinstimmen.
• Der Netzadapter ist Teil des Zuleitungskreises, auf dem die Sicherheit der Apparatur teilweise basiert
ist. Die Genehmigungen des Endomed 482 sind nur in Kombination mit diesem ENA-1550 gültig.
Es ist nicht erlaubt, das Endomed 482 an andere Netzadapter als an den ENA-1550 anzuschließen.
4.2 Anschluß des Stromversorgungsgerätes
• Schließen Sie das mitgelieferte Stromversorgungsgerät an den Anschluß [3-1] an.
• Schließen Sie den Netzstecker des Stromversorgungsgerätes an eine Steckdose an. LED [6] zeigt an,
daß das Gerät mit der Stromversorgung verbunden ist und sich im „stand-by“-Betrieb befindet.
4.3 Einschalten und Selbsttest
• Mit der EIN-/AUS-Schalter [1] wird das Gerät eingeschaltet.
• Beim Einschalten führt das Gerät einen Selbsttest durch.
Am Ende des Selbsttests ist ein akustisches Warnsignal zu hören. Wenn eine Fehlfunktion erfasst wird,
erscheint ein Fehlercode in der Anzeige. Siehe Abschnitt 7 für weitere Einzelheiten.
Falls der Selbsttest nicht ordnungsgemäß durchlaufen wird, nehmen Sie bitte mit Ihrem Lieferanten
Kontakt auf.
4.4 Gerät von der Netzstromversorgung trennen
• Schalten Sie das Endomed 482 mit Hilfe des EIN-/AUS-Schalter [1] aus.
• Ziehen Sie den Netzstecker des Netzadapters aus der Netzsteckdose.

4
D
4.5 Batteriebetrieb (optional)
Das Gerät kann unabhängig von der Netzstromversorgung betrieben werden. Hierzu müssen Sie
zunächst eine Batterie in das Gerät einsetzen. Dies geschieht wie folgt:
• Schalten Sie das Gerät aus und ziehen Sie den Netzadapter aus dem Anschluss [3-1].
• Legen Sie das Gerät mit der Oberseite nach unten und entfernen Sie die beiden Schrauben, die die
Abdeckung des Batteriefachs auf der Unterseite des Geräts halten.
• Schließen Sie das rote Kabel am positiven Pol (+) der Batterie an und das schwarze Kabel am
negativen Pol (-).
• Setzen Sie die Batterie in das Batteriefach ein.
• Montieren Sie die Abdeckung des Batteriefachs mit Hilfe der beiden Schrauben.
• Schließen Sie den Netzadapter wieder am Anschluss [3-1] an.
Wenn ein Netzadapter angeschlossen ist, wird die Batterie automatisch geladen, unabhängig vom Status
des EIN/AUS-Schalters [1]. Wir empfehlen, das Gerät so oft wie möglich mit angeschlossenem
Netzadapter zu verwenden. Dies erhöht die Lebensdauer der Batterie.
Wir empfehlen ferner nachdrücklich die Verwendung der im Lieferumfang enthaltenen Enraf-Nonius-
Batterien des Typs 2601.016. Batterien enthalten umweltschädliche Stoffe. Bitte beachten Sie bei der
Entsorgung der Batterien die lokalen gesetzlichen Bestimmungen. Siehe auch Kapitel 6.4.
4.6 Geräteaufstellung
• Stellen Sie das Gerät nicht in der Nähe von Wärmequellen wie etwa einem Heizkörper auf.
• Achten Sie darauf, daß das Gerät nicht direktem Sonnenlicht, Staub, Feuchtigkeit oder
Erschütterungen ausgesetzt wird.
• Wir raten von einer Benutzung von drahtlosen Telefonen in der Nähe des Gerätes ab.
• Das Gerät ist nicht für den Einsatz in sogenannten “Naßräumen” (Hydrotherapie-Räumen) geeignet.
Das Gerät ist immer so aufzustellen, daß das Eindringen von Flüssigkeiten in das Gerät und in das
Stromversorgungsgerät zuverlässig verhindert wird.
• Verwenden Sie nur das von Enraf-Nonius original Zubehör.
Sollten Flüssigkeiten oder Fremdkörper in das Gerät gelangen, ist der Netzstecker sofort aus der
Steckdose zu ziehen und das Gerät muß von einem autorisierten Fachmann überprüft werden.
Verwenden Sie nur das von Enraf-Nonius original Zubehör.
4.7 Elektromagnetische Interferenz
• Der Betrieb des Gerätes in unmittelbarer Nähe (d.h. 2 Meter Entfernung oder weniger) eines
eingeschalteten Kurz_ oder Mikrowellentherapiegerätes kann eine Instabilität des abgegebenen
Signals des Endomed 482 bewirken.
• Um elektromagnetische Interferenzen zu vermeiden, empfehlen wir dringend, getrennte
Netzanschlußkreise für das Endomed 482 und das Kurz_ oder Mikrowellengerät zu benutzen. Ein
Abstand von wenigstens 2 Metern sollte zwischen dem Endomed 482 und des Kurzwellen- oder
Mikrowellengeräts eingehalten werden.
• Achten Sie darauf, daß sich die Netzanschlußleitung des Kurz- oder Mikrowellengerätes nicht in der
Nähe des Endomed 482 oder des Patienten befindet.
Falls dauerhafte Probleme mit elektromagnetischer Interferenz auftreten, verständigen Sie bitte Ihren
autorisierten Kundendienst.

5
D
5 Bedienung
5.1 Bedienungsorganen
5.1.1 Gerät
(Abbildungen)
[1] Ein/Aus- Schalter
Ein/Aus-Schalter des Endomed 482.
[2] Typenschild
Enthält Informationen über das Gerät wie Typ und Serien-Nummer sowie Anschlußspannung und
maximaler Stromverbrauch
[3-1] Anschluß für Netzadapter
[3-2] Stecker für Fernbedienung
Für den Anschluß der optionalen Fernbedienung
[4-1] Anschluß Patientenkabel Elektrotherapie
5.1.2. Bedienfeld
(Abbildungen)
[5] Batterieanzeige
Batterieanzeige (nur wenn optionale Batterie eingesetzt ist)
Licht grün : Batterie voll geladen.
Grünes Licht blinkt : Batterie teilweise entladen, Netzadapter anschließen.
Gelbes Licht : Batterie unzureichend geladen, die Behandlung kann nicht fortgesetzt werden,
Netzadapter anschließen.
Kein Licht : Batterie leer oder defekt oder es wird keine Batterie verwendet. Netzadapter
anschließen.
[6] Netzadapterlampe
Dieses Lämpchen zeigt an, ob das Gerät am Netz angeschlossen ist.
[7] Therapiewahl
Hier stellen Sie die gewünschte Therapie ein: Elektrotherapie, aktuelle Kanalauswahl, verbundene
Stromkanäle.
[8] Stromeinstellung
Hier wählen Sie die verschiedenen Stromformen.
[9] Wahlschalter für Wahltaste
Trägerfrequenz, Impulsdauer, Microcurrent Frequenz, Art der Interferenz, Wechselstrom-Modus
(Hochspannung und Micro-Strom).
[10] Wahlschalter für Wahltaste
Reizfrequenz, Phasenintervall, Burstfrequenz (Russian Simulation), Vektorposition, Balance,
Diadynamische Stromformen, Frequenzmodulation.
[11] Wahlschalter für Wahltaste
Frequenzmodulationsprogramm, Arbeitszyklus (Russian Simulation), Impulsfrequenz und
Behandlungsschritt-Nummer (Protokolle)
[12] Schalter für Wahltaste
Trainingsdurchlauf-Programm: Rotationszeit des Vektors und der Uhr
[13] Schalter für Wahltaste
Stromkanal 1 und 2, CC (Konstantstrom) und CV (Konstantspannung) und Polarität.
[12]+[13] Notstop
Werden beide Schalter gleichzeitig gedrückt, wird die Therapie sofort auf allen Kanälen unterbrochen.

6
D
[14] Enter / Bestätigen
Hiermit bestätigen Sie die Wahl der Stromformen, die programmierten Therapien und starten Sie die
Anstiegsmodus.
[15] Speicher
Aktiviert die Speicherfunktion und gespeicherte Programme
[16] Zentralregler
Regelknopf zur Einstellung aller Parameter
[17] Intensitätsregler
Dieser Regler regelt die Intensität auf Kanal 1 und 2. Bei 4-Pol-Interferenz gilt dies für beide Kanäle
gleichzeitig.
[19] Intervall-Symbol
Dieses Symbol zeigt den Intervall zwischen 2 Schritten einer Programmsequenz
5.2 Bedienung des Gerätes
5.2.1 Einleitung
5.2.1.1 Anschalten des Gerätes
Schalten Sie das Gerät mit Schalter [1] ein. Die automatische Selbstkontrolle prüft alle wichtigen
Funktionen des Gerätes; dann erscheinen die Start-Einstellungen, die unter Programmnummer P0 neu
eingestellt werden können. Möchten Sie diese Einstellung verändern, schlagen Sie bitte in Kapitel 5.4.
nach.
5.2.1.2 Wahl der Therapie und Kanäle
Der Endomed 482 verfügt über zwei Elektrotherapiekanäle. Diese Kanäle können separat verwendet
werden, jeder Kanal verfügt hierbei über einen eigenen Parametersatz und einen Behandlungstimer. Es
ist jedoch möglich, Kanäle zu verbinden. Mit dem [7] wechseln Sie zwischen den grundlegenden
Therapiefunktionen, mit dem Zentralregler [16] wählen Sie die Kanäle aus oder verbinden Sie. Die
folgenden Abschnitte sind verfügbar:
U Elektrotherapie auf Stromkanal 1
V Elektrotherapie auf Stromkanal 2
Elektrotherapie auf verbundenen Kanälen
Bedenken Sie, dass die separate Verwendung der Elektrotherapiekanäle die Eintellung aller Parameter
auf beiden Kanälen erfordert. Wenn dies nicht gewünscht wird oder wenn eine separate Nutzung nicht
erforderlich ist, können Sie die Kanäle auch verbinden. Einige Stromformen wie beispielsweise
Interferenzströme sind nur möglich bei verbundenen Kanälen.
5.2.1.3 Wahl der Stromform
Drücken Sie Knopf [8]. Das blinkende Symbol steht für die gewählte Stromform. Wählen Sie die
Stromform mit mit dem Zentralregler [16] und bestätigen Sie Ihre Wahl mit Knopf [14].
Wenn Sie das Symbol (Gruppe Interferenzstrom) oder (Gruppe Dynamischer Strom) verwenden,
werden Sie aufgefordert, einen Stromtyp innerhalb der Gruppe zu wählen. Wählen Sie den aktuellen Typ
mit dem Zentralregler [16] und betätigen Sie dann den Knopf [14], um die Auswahl zu bestätigen.
5.2.1.4 Wahl und Einstellung der Parameter
Wahl der Parameter mit Knopf [9] - [13]. Ein Schalter signalisiert die horizontale Bewegung auf dem
Display. Drücken Sie diesen Knopf, bis der gewünschte Parameter erscheint. Sie verändern den
blinkenden Parameter durch Drehen des Zentralreglers [16]. Die Anzeige zeigt nur die für die
ausgewählte Behandlung relevanten Parameter an.
5.2.1.5 Einstellen der Uhr
Betätigen Sie zur Auswahl des Behandlungstimers den Knopf [12]. Das Symbol min blinkt. Die Anzeige
zeigt die Behandlungszeit des gegenwärtig angesteuerten Kanals (des im Abschnitt 5.2.1.2 ausgewählten
Kanals). Als Erinnerungsanzeige blinkt eine Kanalanzeige über dem Behandlungstimer-Wert. Nur der
Behandlungstimers dieses Kanals kann jetzt mit Hilfe des Zentralreglers [16] geändert werden. Wenn ein
oder mehrere Kanäle aktiv sind, blinkt die Anzeige <. Eine Anzeige des derzeit aktiven Kanals finden Sie
über dem Behandlungstimer-Wert.

7
D
5.2.1.6 Trainingsdurchlauf
Einige Stromformen können in ein Trainingsdurchlauf-Programm eingebunden werden. Betätigen Sie den
Knopf [12], um nacheinander die Spannungsanstiegszeit 3, Haltezeit 4, die Spannungsabfallzeit 5 und
die Intervallzeit 7einzustellen. Stellen Sie die Parameter mit dem Zentralregler [16] ein.
Wenn die Stromkanäle verbunden sind, sind die Trainingsdurchlauf-Programme bei beiden Kanälen
gleich. In diesen Modi kann die Verzögerungszeit zwischen dem Start des Trainingsdurchlauf-Programms
auf Kanal 1 und auf Kanal 2 eingestellt werden. Dies geschieht wie folgt:
Betätigen Sie den Knopf [13] und wählen Sie den Kanal 2 mit Hilfe des Zentralreglers aus [16].
Betätigen Sie dann den Knopf [12], um die Verzögerungszeit auszuwählen. Stellen Sie die
Verzögerungszeit mit dem Zentralregler [16] ein.
5.2.1.7 Einstellen der Stromstärke
Die Stromstärke wird mit dem Intensitätsregler [17] eingestellt. Die Stromstärke kann nur eingestellt
werden, wenn die Uhr eingestellt ist.
In der Anzeige wird zunächst die Kanalanzeige @, dann die Kanalnummer A oder C für den Kanal
angezeigt, der gegenwärtig angesteuert und eingestellt werden kann. Sie können die Kanalnummer mit
dem Knopf [13] und dem Zentralregler [16] ändern. Die Auswahl erfolgt wie die Kanalauswahl im
Abschnitt 5.2.1.2.
Bei 4-poligen Stromformen funktioniert der Intensitätsregler [17] gleichermaßen für beiden Kanäle. In der
Anzeige wird dies deutlich durch die Zahlen A B C, wobei der gegenwärtig angezeigte Kanal blinkt. In
diesem Fall steht ein Balanceregler für die klassische Interferenz-Stromform zur Verfügung (siehe
Abschnitt 5.2.2.9. für weitere Einzelheiten).
Die Einheit der angezeigten Stromstärke ist abhängig von der vorab ausgewählten Stromform und kann
in mA, µA oder V angegeben sein.
Eine Behandlung wird durch Einstellen der Stromstärke gestartet, sofern nicht ein Trainingsdurchlauf-
Programm ausgewählt wurde. Betätigen Sie den Knopf [14], um eine Behandlung mit einem
Trainingsdurchlauf zu starten.
Die Anzeigen > und ? leuchten auf, wenn tatsächlich Strom von den entsprechenden Kanälen fließt.
Ein blinkender Stromstärkenwert zeigt an, dass ein schlechter Kontakt zum Patienten vorliegt.
5.2.1.8 CC/CV Einstellung
Je nach ausgewählter Stromform können die Elektrotherapiekanäle im Modus Konstantstrom (CC) oder
Konstantspannung (CV) verwendet werden. Es ist ratsam, den CV-Modus mit dynamischer
Elektrodenanlegung zu verwenden. Im CV-Modus ist der Ausgangsstrom abhängig vom elektrischen
Kontakt zum Patienten und kann folglich variieren. Sie können Die CC/CV-Einstellung mit Hilfe des
Knopfes [13] und des Zentralreglers [16] ändern.
5.2.1.9 Einstellung der Polarität
Wenn Gleichstrom verwendet wird, ist der rote Pol der positive Pol und der schwarze Pol der negative
Pol. Um die Polarität manuell zu wechseln, betätigen Sie den Knopf [13] und wählen die EinstellungF
oderG mit dem Zentralregler [16]:
F: Standard
G: : Umgekehrte Polarität
Bei einer manuellen Änderung der Polarität während einer Behandlung geht der Strom auf 0 zurück und
ein Strom mit umgekehrter Polarität wird angelegt, der dann auf einen Wert ansteigt, der 80% des
vorherigen Stromstärkenwerts entspricht.
Zur Aktivierung des automatischen Polaritätswechsels der Kurven Hochspannung und Mikro-Strom
wählen Sie oder mit dem Knopf [9] und dem Zentralregler [16]:
: Alternierender Strom
: Konstantstrom
Bei der Unterbrochenen Gleichstromform ist es nicht möglich, die Polarität umzukehren.
5.2.1.10 Notstop
Werden beide Schalter gleichzeitig gedrückt, wird die Therapie sofort auf allen Kanälen unterbrochen.

8
D
5.2.2 Elektrotherapie
5.2.2.1 Bipolare Interferenz
• Wählen Sie
mit Knopf [7]. Wählen Sie das gewünschte Kanal oder verbinden Sie die Kanäle mit
dem Zentralregler [16];
• Drücken Sie Knopf [8, wählen Sie mit dem Zentralregler [16] und bestätigen Sie Ihre Wahl mit
Knopf [14];
• Bipolare Interferenz:
Wählen Sie mit dem Zentralregler [16] und bestätigen Sie Ihre Wahl mit Knopf [14];
• Trägerfrequenz:
Wählen Sie (kHz) mit Knopf [9] und stellen Sie den Wert mit dem Zentralregler ein [16];
• Reizfrequenz:
Wählen Sie mit Knopf [10] und stellen Sie den Wert mit dem Zentralregler ein [16];
• Frequenzmodulation (Spektrum):
Wählen Sie * mit Knopf [10] und stellen Sie den Wert mit dem Zentralregler ein [16];
• Spektrumdurchlauf:
Wählen Sie , mit Knopf [11] und stellen Sie den Wert mit dem Zentralregler ein [16];
• Behandlungszeit:
Wählen Sie < mit Knopf [12] und stellen Sie den Wert mit dem Zentralregler ein [16];
• Trainungsdurchlauf, falls gewünscht:
• Anstiegszeit:
Wählen Sie 3 mit Knopf [12] und stellen Sie den Wert mit dem Zentralregler ein [16];
• Haltezeit:
Wählen Sie 4 mit Knopf [12] und stellen Sie den Wert mit dem Zentralregler ein [16];
• Abklingzeit:
Wählen Sie 5 mit Knopf [12] und stellen Sie den Wert mit dem Zentralregler ein [16];
• Intervallzeit:
Wählen Sie 7 mit Knopf [12] und stellen Sie den Wert mit dem Zentralregler ein [16];
• Verzögerungszeit (nur bei verbundenen Kanälen möglich):
Wählen Sie Kanal 2 mit Knopf [13] und dem Zentralregler.
Wählen Sie 6 mit Knopf [12] und stellen Sie den Wert mit dem Zentralregler ein [16];
• Wählen Sie CC (kontinuierlicher Strom) oder CV (kontinuierliche Spannung) mit Knopf [13] und dem
Zentralregler [16];
• Wählen Sie das gewünschte Kanal mit Knopf [13] und dem Zentralregler. Stellen Sie die Intensität mit
Regler [17] ein;
• Starten Sie die Behandlung mit Knopf [14], falls ein Trainungsdurchlauf eingestellt ist.
5.2.2.2 „Russian stimulation“ Unterbrochener Mittelfrequenz-Wechselstrom
• Wählen Sie
mit Knopf [7]. Wählen Sie das gewünschte Kanal oder verbinden Sie die Kanäle mit
dem Zentralregler [16];
• Drücken Sie Knopf [8], wählen Sie mit dem Zentralregler [16] und bestätigen Sie Ihre Wahl mit
Knopf [14];
• Trägerfrequenz:
Wählen Sie (kHz) mit Knopf [9] und stellen Sie den Wert mit dem Zentralregler ein [16];
• Burstfrequenz:
Wählen Sie mit Knopf [10] und stellen Sie den Wert mit dem Zentralregler ein [16];
• Burst / Intervallratio:
Wählen Sie + mit Knopf [11] und stellen Sie den Wert mit dem Zentralregler ein [16];
• Behandlungszeit:
Wählen Sie < mit Knopf [12] und stellen Sie den Wert mit dem Zentralregler ein [16];
• Trainungsdurchlauf, falls gewünscht:
• Anstiegszeit:
Wählen Sie 3 mit Knopf [12] und stellen Sie den Wert mit dem Zentralregler ein [16];
• Haltezeit:
Wählen Sie 4 mit Knopf [12] und stellen Sie den Wert mit dem Zentralregler ein [16];
• Abklingzeit:
Wählen Sie 5 mit Knopf [12] und stellen Sie den Wert mit dem Zentralregler ein [16];
• Intervallzeit:
Wählen Sie 7 mit Knopf [12] und stellen Sie den Wert mit dem Zentralregler ein [16];
• Verzögerungszeit (nur bei verbundenen Kanälen möglich):
Wählen Sie Kanal 2 mit Knopf [13] und dem Zentralregler.
Wählen Sie 6 mit Knopf [12] und stellen Sie den Wert mit dem Zentralregler ein [16];
• Wählen Sie CC (kontinuierlicher Strom) oder CV (kontinuierliche Spannung) mit Knopf [13] und dem
Zentralregler [16];

9
D
• Wählen Sie das gewünschte Kanal mit Knopf [13] und dem Zentralregler. Stellen Sie die Intensität mit
Regler [17] ein;
• Starten Sie die Behandlung mit Knopf [14], falls ein Trainungsdurchlauf eingestellt ist.
5.2.2.3 Asymmetrischer und symmetrischer biphasischer Impuls (TENS)
• Wählen Sie
mit Knopf [7]. Wählen Sie das gewünschte Kanal oder verbinden Sie die Kanäle mit
dem Zentralregler [16];
• Drücken Sie Knopf [8], wählen Sie oder mit dem Zentralregler [16] und bestätigen Sie Ihre Wahl
mit Knopf [14];
• Impulsbreite:
Wählen Sie mit Knopf [9] und stellen Sie den Wert mit dem Zentralregler ein [16];
• Reizfrequenz:
Wählen Sie mit Knopf [10] und stellen Sie den Wert mit dem Zentralregler ein [16];
• Wählen Sie zwischen Spektrum und Burst (Spektrum und Burst schließen einander aus);
• Falls Frequenzmodulation gewünscht wird:
Stellen Sie zuerst sicher daß Burst auf 0 steht:
• Wählen Sie . mit Knopf [11] und stellen Sie den Wert mit dem Zentralregler [16] auf 0;
• Frequenzmodulation (Spektrum):
Wählen Sie * mit Knopf [10] und stellen Sie den Wert mit dem Zentralregler ein [16];
• Spektrumdurchlauf:
Wählen Sie , mit Knopf [11] und stellen Sie den Wert mit dem Zentralregler ein [16];
• Falls Burst gewünscht wird:
Stellen Sie zuerst sicher daß die Frequenzmodulation auf 0 steht:
• Wählen Sie * mit Knopf [10] und stellen Sie den Wert mit dem Zentralregler [16] auf 0;
• Burstfrequenz:
Wählen Sie . mit Knopf [11] und stellen Sie den Wert mit dem Zentralregler ein [16];
• Behandlungszeit:
Wählen Sie < mit Knopf [12] und stellen Sie den Wert mit dem Zentralregler ein [16];
• Trainungsdurchlauf, falls gewünscht:
• Anstiegszeit:
Wählen Sie 3 mit Knopf [12] und stellen Sie den Wert mit dem Zentralregler ein [16];
• Haltezeit:
Wählen Sie 4 mit Knopf [12] und stellen Sie den Wert mit dem Zentralregler ein [16];
• Abklingzeit:
Wählen Sie 5 mit Knopf [12] und stellen Sie den Wert mit dem Zentralregler ein [16];
• Intervallzeit:
Wählen Sie 7 mit Knopf [12] und stellen Sie den Wert mit dem Zentralregler ein [16];
• Verzögerungszeit (nur bei verbundenen Kanälen möglich):
Wählen Sie Kanal 2 mit Knopf [13] und dem Zentralregler.
Wählen Sie 6 mit Knopf [12] und stellen Sie den Wert mit dem Zentralregler ein [16];
• Wählen Sie CC (kontinuierlicher Strom) oder CV (kontinuierliche Spannung) mit Knopf [13] und dem
Zentralregler [16];
• Wählen Sie das gewünschte Kanal mit Knopf [13] und dem Zentralregler. Stellen Sie die Intensität mit
Regler [17] ein;
• Starten Sie die Behandlung mit Knopf [14], falls ein Trainungsdurchlauf eingestellt ist.
5.2.2.4 Monophasischer Rechteck- und Dreieckimpulsstrom
• Wählen Sie
mit Knopf [7]. Wählen Sie das gewünschte Kanal oder verbinden Sie die Kanäle mit
dem Zentralregler [16];
• Drücken Sie Knopf [8], wählen Sie oder mit dem Zentralregler [16] und bestätigen Sie Ihre
Wahl mit Knopf [14];
• Impulsbreite:
Wählen Sie mit Knopf [9] und stellen Sie den Wert mit dem Zentralregler ein [16];
• Impulsintervall:
Wählen Sie mit Knopf [10] und stellen Sie den Wert mit dem Zentralregler ein [16];
• Behandlungszeit:
Wählen Sie < mit Knopf [12] und stellen Sie den Wert mit dem Zentralregler ein [16];
• Trainungsdurchlauf, falls gewünscht:
• Anstiegszeit:
Wählen Sie 3 mit Knopf [12] und stellen Sie den Wert mit dem Zentralregler ein [16];
• Haltezeit:
Wählen Sie 4 mit Knopf [12] und stellen Sie den Wert mit dem Zentralregler ein [16];
• Abklingzeit:
Wählen Sie 5 mit Knopf [12] und stellen Sie den Wert mit dem Zentralregler ein [16];
• Intervallzeit:

10
D
Wählen Sie 7 mit Knopf [12] und stellen Sie den Wert mit dem Zentralregler ein [16];
• Verzögerungszeit (nur bei verbundenen Kanälen möglich):
Wählen Sie Kanal 2 mit Knopf [13] und dem Zentralregler.
Wählen Sie 6 mit Knopf [12] und stellen Sie den Wert mit dem Zentralregler ein [16];
• Wählen Sie CC (kontinuierlicher Strom) oder CV (kontinuierliche Spannung) mit Knopf [13] und dem
Zentralregler [16];
• Polarität:
Wählen Sie F oder G mit Knopf [13] und dem Zentralregler [16];
• Wählen Sie das gewünschte Kanal mit Knopf [13] und dem Zentralregler. Stellen Sie die Intensität mit
Regler [17] ein;
• Starten Sie die Behandlung mit Knopf [14], falls ein Trainungsdurchlauf eingestellt ist.
5.2.2.5 Microcurrent
• Wählen Sie
mit Knopf [7]. Wählen Sie das gewünschte Kanal oder verbinden Sie die Kanäle mit
dem Zentralregler [16];
• Drücken Sie Knopf [8], wählen Sie mit dem Zentralregler [16] und bestätigen Sie Ihre Wahl mit
Knopf [14];
• Frequenz:
Wählen Sie (Hz oder kHz) mit Knopf [9] und stellen Sie den Wert mit dem Zentralregler ein [16];
• Alternierender Strom oder Nicht alterierend
Wählen Sie oder mit Knopf [9] und dem Zentralregler [16];
• Behandlungszeit:
Wählen Sie < mit Knopf [12] und stellen Sie den Wert mit dem Zentralregler ein [16];
• Umpolungsdurchlauf, nur bei möglich:
• Anstiegszeit:
Wählen Sie 3 mit Knopf [12] und stellen Sie den Wert mit dem Zentralregler ein [16];
• Haltezeit:
Wählen Sie 4 mit Knopf [12] und stellen Sie den Wert mit dem Zentralregler ein [16];
• Abklingzeit:
Wählen Sie 5 mit Knopf [12] und stellen Sie den Wert mit dem Zentralregler ein [16];
• Trainungsdurchlauf, nur bei möglich:
• Anstiegszeit:
Wählen Sie 3 mit Knopf [12] und stellen Sie den Wert mit dem Zentralregler ein [16];
• Haltezeit:
Wählen Sie 4 mit Knopf [12] und stellen Sie den Wert mit dem Zentralregler ein [16];
• Abklingzeit:
Wählen Sie 5 mit Knopf [12] und stellen Sie den Wert mit dem Zentralregler ein [16];
• Intervallzeit:
Wählen Sie 7 mit Knopf [12] und stellen Sie den Wert mit dem Zentralregler ein [16];
• Verzögerungszeit (nur bei verbundenen Kanälen möglich):
Wählen Sie Kanal 2 mit Knopf [13] und dem Zentralregler.
Wählen Sie 6 mit Knopf [12] und stellen Sie den Wert mit dem Zentralregler ein [16];
• Polarität, nur bei möglich:
Wählen Sie F oder G mit Knopf [13] und dem Zentralregler [16];
• Wählen Sie das gewünschte Kanal mit Knopf [13] und dem Zentralregler. Stellen Sie die Intensität mit
Regler [17] ein;
• Starten Sie die Behandlung mit Knopf [14], falls ein Trainungsdurchlauf eingestellt ist.
5.2.2.6 Hoch Volt (Hochspannung)
• Wählen Sie
mit Knopf [7]. Wählen Sie das gewünschte Kanal oder verbinden Sie die Kanäle mit
dem Zentralregler [16];
• Drücken Sie Knopf [8], wählen Sie mit dem Zentralregler [16] und bestätigen Sie Ihre Wahl mit
Knopf [14];
• Alternierender Strom oder Nicht alternierend:
Wählen Sie oder mit Knopf [9] und dem Zentralregler [16];
• Reizfrequenz:
Wählen Sie mit Knopf [10] und stellen Sie den Wert mit dem Zentralregler ein [16];
• Frequenzmodulation (Spektrum):
Wählen Sie * (%) mit Knopf [10] und stellen Sie den Wert mit dem Zentralregler ein [16];
• Spektrumdurchlauf:
Wählen Sie , mit Knopf [11] und stellen Sie den Wert mit dem Zentralregler ein [16];
• Behandlungszeit:
Wählen Sie < mit Knopf [12] und stellen Sie den Wert mit dem Zentralregler ein [16];
• Umpolungsdurchlauf, nur bei möglich:

11
D
• Anstiegszeit:
Wählen Sie 3 mit Knopf [12] und stellen Sie den Wert mit dem Zentralregler ein [16];
• Haltezeit:
Wählen Sie 4 mit Knopf [12] und stellen Sie den Wert mit dem Zentralregler ein [16];
• Abklingzeit:
Wählen Sie 5 mit Knopf [12] und stellen Sie den Wert mit dem Zentralregler ein [16];
• Trainungsdurchlauf, nur bei möglich:
• Anstiegszeit:
Wählen Sie 3 mit Knopf [12] und stellen Sie den Wert mit dem Zentralregler ein [16];
• Haltezeit:
Wählen Sie 4 mit Knopf [12] und stellen Sie den Wert mit dem Zentralregler ein [16];
• Abklingzeit:
Wählen Sie 5 mit Knopf [12] und stellen Sie den Wert mit dem Zentralregler ein [16];
• Intervallzeit:
Wählen Sie 7 mit Knopf [12] und stellen Sie den Wert mit dem Zentralregler ein [16];
• Verzögerungszeit (nur bei verbundenen Kanälen möglich):
Wählen Sie Kanal 2 mit Knopf [13] und dem Zentralregler.
Wählen Sie 6 mit Knopf [12] und stellen Sie den Wert mit dem Zentralregler ein [16];
• Polarität, nur bei möglich:
Wählen Sie F oder G mit Knopf [13] und dem Zentralregler [16];
• Wählen Sie das gewünschte Kanal mit Knopf [13] und dem Zentralregler. Stellen Sie die Intensität mit
Regler [17] ein;
• Starten Sie die Behandlung mit Knopf [14], falls ein Trainungsdurchlauf eingestellt ist.
5.2.2.7 Diadynamische Ströme
• Wählen Sie
mit Knopf [7]. Wählen Sie das gewünschte Kanal oder verbinden Sie die Kanäle mit
dem Zentralregler [16];
• Drücken Sie Knopf [8], wählen Sie mit dem Zentralregler [16] und bestätigen Sie Ihre Wahl mit
Knopf [14];
• Wählen Sie MF, DF, LP, CP oder CPid mit dem Zentralregler [16] und bestätigen Sie Ihre Wahl mit
Knopf [14];
• Behandlungszeit:
Wählen Sie < mit Knopf [12] und stellen Sie den Wert mit dem Zentralregler ein [16];
• Trainungsdurchlauf, nur bei MF und DF möglich:
• Anstiegszeit:
Wählen Sie 3 mit Knopf [12] und stellen Sie den Wert mit dem Zentralregler ein [16];
• Haltezeit:
Wählen Sie 4 mit Knopf [12] und stellen Sie den Wert mit dem Zentralregler ein [16];
• Abklingzeit:
Wählen Sie 5 mit Knopf [12] und stellen Sie den Wert mit dem Zentralregler ein [16];
• Intervallzeit:
Wählen Sie 7 mit Knopf [12] und stellen Sie den Wert mit dem Zentralregler ein [16];
• Verzögerungszeit (nur bei verbundenen Kanälen möglich):
Wählen Sie Kanal 2 mit Knopf [13] und dem Zentralregler.
Wählen Sie 6 mit Knopf [12] und stellen Sie den Wert mit dem Zentralregler ein [16];
• Wählen Sie CC (kontinuierlicher Strom) oder CV (kontinuierliche Spannung) mit Knopf [13] und dem
Zentralregler [16];
• Polarität:
Wählen Sie F oder G mit Knopf [13] und dem Zentralregler [16];
• Wählen Sie das gewünschte Kanal mit Knopf [13] und dem Zentralregler. Stellen Sie die Intensität mit
Regler [17] ein;
• Starten Sie die Behandlung mit Knopf [14], falls ein Trainungsdurchlauf eingestellt ist.
5.2.2.8 Mittelfrequenter unterbrochener Direktstrom
• Wählen Sie
mit Knopf [7]. Wählen Sie das gewünschte Kanal oder verbinden Sie die Kanäle mit
dem Zentralregler [16];
• Drücken Sie Knopf [8], wählen Sie mit dem Zentralregler [16] und bestätigen Sie Ihre Wahl mit
Knopf [14];
• Behandlungszeit:
Wählen Sie < mit Knopf [12] und stellen Sie den Wert mit dem Zentralregler ein [16];
• Wählen Sie das gewünschte Kanal mit Knopf [13] und dem Zentralregler. Stellen Sie die Intensität mit
Regler [17] ein;

12
D
5.2.2.9 Klassische Interferenz
• Wählen Sie
mit Knopf [7]. Verbinden Sie die Kanäle mit dem Zentralregler [16];
• Drücken Sie Knopf [8], wählen Sie mit dem Zentralregler [16] und bestätigen Sie Ihre Wahl mit
Knopf [14];
• Klassische Interferenz:
Wählen Sie mit dem Zentralregler [16] und bestätigen Sie Ihre Wahl mit Knopf [14];
• Trägerfrequenz:
Wählen Sie (kHz) mit Knopf [9] und stellen Sie den Wert mit dem Zentralregler ein [16];
• Reizfrequenz:
Wählen Sie mit Knopf [10] und stellen Sie den Wert mit dem Zentralregler ein [16];
• Frequenzmodulation (Spektrum):
Wählen Sie * mit Knopf [10] und stellen Sie den Wert mit dem Zentralregler ein [16];
• Spektrumdurchlauf:
Wählen Sie , mit Knopf [11] und stellen Sie den Wert mit dem Zentralregler ein [16];
• Behandlungszeit:
Wählen Sie < mit Knopf [12] und stellen Sie den Wert mit dem Zentralregler ein [16];
• Wählen Sie CC (kontinuierlicher Strom) oder CV (kontinuierliche Spannung) mit Knopf [13] und dem
Zentralregler [16];
• Stellen Sie die Intensität mit Regler [17] ein;
• Balance einstellen:
Wählen Sie
mit Knopf [10] und stellen Sie den Wert mit dem Zentralregler ein [16].
5.2.2.10 Isoplanarer Vektor
• Wählen Sie
mit Knopf [7]. Verbinden Sie die Kanäle mit dem Zentralregler [16];
• Drücken Sie Knopf [8], wählen Sie mit dem Zentralregler [16] und bestätigen Sie Ihre Wahl mit
Knopf [14];
• Isoplanarer Vektor:
Wählen Sie
mit dem Zentralregler [16] und bestätigen Sie Ihre Wahl mit Knopf [14];
• Trägerfrequenz:
Wählen Sie (kHz) mit Knopf [9] und stellen Sie den Wert mit dem Zentralregler ein [16];
• Reizfrequenz:
Wählen Sie mit Knopf [10] und stellen Sie den Wert mit dem Zentralregler ein [16];
• Frequenzmodulation (Spektrum):
Wählen Sie * mit Knopf [10] und stellen Sie den Wert mit dem Zentralregler ein [16];
• Spektrumdurchlauf:
Wählen Sie , mit Knopf [11] und stellen Sie den Wert mit dem Zentralregler ein [16];
• Behandlungszeit:
Wählen Sie < mit Knopf [12] und stellen Sie den Wert mit dem Zentralregler ein [16];
• Wählen Sie CC (kontinuierlicher Strom) oder CV (kontinuierliche Spannung) mit Knopf [13] und dem
Zentralregler [16];
• Stellen Sie die Intensität mit Regler [17] ein.
5.2.2.11 Manueller Dipol-Vektor
• Wählen Sie
mit Knopf [7]. Verbinden Sie die Kanäle mit dem Zentralregler [16];
• Drücken Sie Knopf [8], wählen Sie mit dem Zentralregler [16] und bestätigen Sie Ihre Wahl mit
Knopf [14];
• Manueller Dipol-Vektor:
Wählen Sie
mit dem Zentralregler [16] und bestätigen Sie Ihre Wahl mit Knopf [14];
• Trägerfrequenz:
Wählen Sie (kHz) mit Knopf [9] und stellen Sie den Wert mit dem Zentralregler ein [16];
• Reizfrequenz:
Wählen Sie mit Knopf [10] und stellen Sie den Wert mit dem Zentralregler ein [16];
• Frequenzmodulation (Spektrum):
Wählen Sie * mit Knopf [10] und stellen Sie den Wert mit dem Zentralregler ein [16];
• Spektrumdurchlauf:
Wählen Sie , mit Knopf [11] und stellen Sie den Wert mit dem Zentralregler ein [16];
• Behandlungszeit:
Wählen Sie < mit Knopf [12] und stellen Sie den Wert mit dem Zentralregler ein [16];
• Wählen Sie CC (kontinuierlicher Strom) oder CV (kontinuierliche Spannung) mit Knopf [13] und dem
Zentralregler [16];
• Stellen Sie die Intensität mit Regler [17] ein;
• Position des Vektors einstellen:
Wählen Sie
# mit Knopf [10] und stellen Sie den Wert mit dem Zentralregler ein [16].

13
D
5.2.2.12 Automatischer Dipol-Vektor
• Wählen Sie
mit Knopf [7]. Verbinden Sie die Kanäle mit dem Zentralregler [16];
• Drücken Sie Knopf [8], wählen Sie mit dem Zentralregler [16] und bestätigen Sie Ihre Wahl mit
Knopf [14];
• Automatischer Dipol-Vektor:
Wählen Sie
mit dem Zentralregler [16] und bestätigen Sie Ihre Wahl mit Knopf [14];
• Trägerfrequenz:
Wählen Sie (kHz) mit Knopf [9] und stellen Sie den Wert mit dem Zentralregler ein [16];
• Reizfrequenz:
Wählen Sie mit Knopf [10] und stellen Sie den Wert mit dem Zentralregler ein [16];
• Frequenzmodulation (Spektrum):
Wählen Sie * mit Knopf [10] und stellen Sie den Wert mit dem Zentralregler ein [16];
• Spektrumdurchlauf:
Wählen Sie , mit Knopf [11] und stellen Sie den Wert mit dem Zentralregler ein [16];
• Behandlungszeit:
Wählen Sie < mit Knopf [12] und stellen Sie den Wert mit dem Zentralregler ein [16];
• Rotationsgeschwindigkeit:
Wählen Sie 8 mit Knopf [12] und stellen Sie den Wert mit dem Zentralregler ein [16];
• Wählen Sie CC (kontinuierlicher Strom) oder CV (kontinuierliche Spannung) mit Knopf [13] und dem
Zentralregler [16];
• Stellen Sie die Intensität mit Regler [17] ein.
5.3 Vorkehrungen für die Behandlungen
5.3.1 Vor der Behandlung
• Kontrollieren Sie, ob beim Patienten keine absoluten oder relativen Kontraindikationen bestehen.
• Testen Sie die Wärmeempfindlichkeit des zu behandelnden Körperteils.
• Wir empfehlen starke Behaarung zu entfernen.
5.4 Speicherfunktionen
Der Endomed 482 verfügt über einen Speicher zur Ablage von Geräteeinstellungen und Protokollen.
5.4.1 Geräteeinstellungen
Die Geräteeinstellungen speichern alle Parameter des Geräts, mit Ausnahme der Stromstärke. Im
Gegensatz zu den Protokollen, wirken Geräteeinstellungen auf allen Kanälen, dem Ultraschallkanal
inbegriffen, zusammen.
Die Geräteeinstellungen werden an den Speicherplätzen 0 - 9 gespeichert. Wenn Sie den Knopf [15]
betätigen, erscheint die Speicherplatznummer in der Anzeige. Die Geräteeinstellung 0 wird bei
Einschalten des Geräts automatisch geladen. Die Geräteeinstellungen können nur geladen und
gespeichert werden, wenn alle Kanäle inaktiv sind.
5.4.1.1 Laden von Geräteeinstellungen
• Betätigen Sie den Knopf [15], 1 blinkt;
• Wählen Sie einen Speicherplatz von 0 - 9 mit dem Zentralregler [16]. Die Anzeige zeigt die
Geräteeinstellungen an, die am gewählten Speicherplatz gespeichert sind;
• Betätigen Sie zum Laden der ausgewählten Geräteeinstellungen den Knopf [14];
• Stellen Sie die Stromstärke mit dem Controller [17] ein;
• Betätigen Sie zum Starten der Therapie den Knopf [14], sofern ein Trainingsdurchlauf-Programm
ausgewählt wurde.
Das Laden muss innerhalb einer bestimmten Verzögerungszeit erfolgen, so lange 1 blinkt. Wenn Sie zu
lange warten oder eine andere Taste als [14] oder [15] betätigen, wird der Ladevorgang abgebrochen.
5.4.1.2 Speichern von Geräteeinstellungen:
• Wählen Sie eine Behandlung und stellen Sie alle Parameter auf allen gewünschten Kanälen ein;
• Betätigen Sie den Knopf [15], 1 blinkt;
• Wählen Sie einen Speicherplatz im Bereich von 0 - 9 mit dem Zentralregler [16]. Die Anzeige zeigt die
Geräteeinstellungen, die an dem ausgewählten Speicherplatz abgelegt wurden. Hierdurch können Sie
prüfen, welche Einstellungen überschrieben werden;
• Betätigen Sie den Knopf [15] ein zweites Mal, 2 blinkt. Die Anzeige zeigt jetzt die aktuellen
Geräteeinstellungen, die an dem gewählten Speicherplatz gespeichert werden sollen;
• Betätigen Sie zur Ausführung des Speichervorgangs den Knopf [14].

14
D
Das Speichern muss innerhalb einer bestimmten Verzögerungszeit erfolgen, so lange 2 blinkt. Wenn Sie
zu lange warten oder eine andere Taste als [14] oder [15] betätigen, wird der Speichervorgang
abgebrochen.
5.4.2 Protokolle
Ein Protokoll besteht aus einem oder mehreren Behandlungsschritten, die nacheinander ausgeführt
werden. Jeder Behandlungsschritt weist eine eigene Stromform, Parametereinstellungen und
Behandlungszeit auf. Die Protokolle werden in Clustern gemäß Ihrer Anwendung eingeordnet. Protokolle
werden wie folgt identifiziert:
1:1 Die erste Nummer ist die Clusternummer.
1:1 Die zweite Nummer ist die Protokollnummer.
Der Endomed 482 bietet eine Vielzahl vorprogrammierter Protokolle, die im Cluster 2 und höher zur
Verfügung stehen. Jedes Cluster dient einer speziellen Indikation. In dem im Lieferumfang des Geräts
enthaltenen Therapie-Handbuch finden Sie eine Übersicht über alle Cluster und die entsprechenden
Protokolle. Darüber hinaus unterstützt der Endomed 482 benutzerdefinierte Protokolle. Für diese
Protokolle wurde der Cluster 1 reserviert.
Elektrotherapie-Protokolle können entweder Ein- oder Zwei-Kanal-Anwendungen umfassen. Vor dem
Laden eines einzelnen Kanalprotokolls muss zunächst der Zielkanal festgelegt werden. in diesem Fall ist
es zulässig, die gegenwärtig ausgewählten Kanäle zu verbinden, wodurch das Protokoll auf beiden
Kanälen ausgeführt wird. Wenn ein einzelnes Kanalprotokoll ausgeführt wird, kann ein vollkommen
anderes einzelnes Kanalprotokoll auf dem anderen Kanal ausgeführt werden. Wenn die Stromkanäle
verbunden sind, können zwei-Kanal-Protokolle geladen werden.
5.4.2.1 Laden eines Protokolls
• Wählen Sie einen Zielkanal mit Hilfe der Taste [7] und des Zentralreglers [16];
• Betätigen Sie den Knopf [15], 1 blinkt;
• Wählen Sie eine Protokollnummer im Bereich von 1:1 und höher mit dem Zentralregler [16]. Die
Anzeige zeigt die Gesamtbehandlungszeit des ausgewählten Protokolls;
• Betätigen Sie zum Laden des gewünschten Protokolls den Knopf [14];
• Stellen Sie die Stromstärke mit dem Controller [17] ein;
• Betätigen Sie zum Starten der Behandlung den Knopf [14], wenn ein Trainingsdurchlauf-Programm
gewählt wurde.
Wenn ein Protokoll ausgeführt wird, zeigt die Anzeige die verbleibende Behandlungszeit des derzeit
ausgeführten Behandlungsschritts. Jeder Behandlungsschritt wird mit einem kurzen Warnsignal beendet.
Wenn das Ende des Protokolls erreicht worden ist, wird ein Standard-Warnsignal “Ende der Behandlung”
ausgegeben. Nach diesem Signalton verlässt das Gerät den Protokollmodus.
Hinweise:
• Zum Anzeigen des Protokollmodus ist die Protokollnummer in der Anzeige zu sehen, wenn das
Protokoll geladen ist. Nach der Protokollnummer wird die Behandlungsschritt-Nummer angezeigt,
gefolgt von dem entsprechenden Symbol 0.
• Zum Löschen eines geladenen, jedoch noch nicht ausgeführten Protokolls betätigen Sie nochmals
den Knopf [14]. Indem Sie kurz warten oder einen anderen Knopf als den Knopf [14] oder [15]
betätigen, beendet das Gerät den Protokollmodus.
• Alle Parameter des geladenen Protokolls können nach Belieben geändert werden. Wählen Sie das
Symbol 0 mit dem Knopf [11] und wählen Sie dann den Behandlungsschritt mit dem Zentralregler
[16]. Alle Parameter des jetzt ausgewählten Behandlugnsschritts können geändert werden. Achten Sie
darauf, die Behandlungsschritt-Nummer auf 1 zurückzusetzen.
• Ein geladenes Protokoll kann von jedem beliebigen Behandlungsschritt ausgeführt werden. Wählen
Sie das Symbol 0 mit dem Knopf [11] und wählen Sie dann den Behandlungsschritt mit dem
Zentralregler [16].
• Die Ausführung eines Behandlugnsschritts kann durch Hochzählen der aktuellen Behandlungsschritt-
Nummer beendet werden. Wählen Sie das Symbol 0 mit dem Knopf [11] und wählen Sie mit dem
Zentralregler [16] die neue Behandlungsschritt-Nummer. Die Stromstärke geht auf Null zurück. Sie
können die Ausführung des Protokolls vom neuen Behandlungsschritt durch Einstellung der
Stromstärke mit dem Regler [17] wiederaufnehmen.
• Die Ausführung eines Protokolls kann beendet werden, indem die Behandlungszeit eines gegewärtig
ausgeführten Behandlungsschritts auf Null gesetzt wird. Das Gerät verlässt dann daraufhin den
Protokollmodus.

15
D
5.4.2.2 Speichern eines Protokolls
Vor der Ausführung eines modifizierten Protokolls kann dieses zur späteren Verwendung in Cluster 1
gespeichert werden:
• Betätigen Sie zwei Mal den Knopf [15]. 2 blinkt;
• Wählen Sie eine Protokollnummer im Bereich von zwischen 1:1 - 1:9 mit dem Zentralregler [16]. er
Anzeige wird die Gesamtbehandlungszeit des zu speichernden Protokolls angezeigt;
• Betätigen Sie den Knopf [14] zum Ausführen des Speichervorgangs.
5.4.2.3 Erstellung eines benutzerdefinierten Protokolls
In Cluster 1 können Sie Ihre eigenen Protokolle erstellen. Maximal 10 Protokolle können gespeichert
werden, jedes mit einer Höchstlänge von 20 Behandlungsschritten. Stellen Sie sicher, dass sich das
Gerät nicht im Protokollmodus befindet (siehe Abschnitt 5.4.2.1 zum Beenden des Protokollmodus),
bevor Sie mit den nachfolgend aufgeführten Schritten:
• Betätigen Sie zwei Mal den Knopf [15]. 2 blinkt;
• Wählen Sie eine Protokollnummer im Bereich von 1:1 - 1:9 mit dem Zentralregler [16];
• Betätigen Sie den Knopf [14]. 2 blinkt, 0 wird angezeigt und die Behandlungsschritt-Nummer ist auf
1 gesetzt.
• Stellen Sie alle Parameter des aktuellen Behandlungsschritts ein;
• Betätigen Sie den Knopf [14], um den Behandlungsschritt zu speichern. Die Behandlungsschritt-
Nummer wird automatisch weitergezählt;
• Wiederholen Sie die beiden vorherigen Schritte, bis das Ende Ihres Protokolls erreicht ist;
• Beenden Sie Ihr Protokoll mit einem Behandlungsschritt mit einer Behandlungszeit von Null. Betätigen
Sie zum Bestätigen den Knopf [14]. Das Ende Ihres Protokolls wird mit einem Signalton bestätigt.
Hinweise:
• Wenn zwei aufeinander folgende Behandlungsschritte AC-Stromformen enthalten, wird die
Stromstärke bei Auführung des Protokolls auf dem eingestellten Niveau gehalten.
• Beim Schalten in die oder beim Wechseln zwischen den DC-Stromformen geht die Stromstärke auf
Null zurück. Der nächste Behandlungsschritt muss manuell durch Justieren der Stromstärke gestartet
werden.
5.5 Öffnungs- und Schließreaktionen
Bei einer Konstantstrom-Ausgangscharakteristik kann es zu unangenehmen Öffnungs- und
Schließreaktionen kommen, falls die Elektroden nicht korrekt befestigt bzw. stark gelockert sind. Achten
Sie darauf, daß beim Anbringen und Lösen der Elektroden mit Konstantstrom-Einstellung der
Patientenstrom 0 mA beträgt. Verwenden Sie bei dynamischen Anwendungstechniken vorzugsweise die
Einstellung Konstantspannung.
5.6 Elektrolytische Wirkungen
Bei Stromformen mit einer Gleichstromkomponente entsteht unter den Elektroden eine elektrolytische
Reaktion. Um die Auswirkungen zu begrenzen, empfehlen wir besonders dicke Schwämme zu
verwenden. Achten Sie darauf, daß die Schwämme während der Behandlung immer ausreichend feucht
sind und daß die dicke Seite der Schwämme sich zwischen der Leitgummi-Plattenelektrode und dem
Patienten befindet.
5.7 Fernbedienung
Für das Endomed 482 ist eine Fernbedienung lieferbar. Diese kann an den Verbindungsstecker
angeschlossen werden [3-2]. Die Fernbedienung hat zwei Intensitätsschalter zum Einstellen des
jeweiligen Stromkanals und einen Notfall- Stopschalter.
Das Anschließen anderer als der vorgeschriebenen Fernbedienungen von Enraf Nonius kann die
Sicherheit des Patienten und das korrekte Funktionieren des Gerätes nachteilig beeinflussen und ist
deshalb nicht erlaubt.

16
D
6 Wartung
6.1 Technische Wartung
Die elektrische Sicherheit des Geräts ist abhängig von den (über das Netzkabel) an Masse gelegten
elektrischen Anschlüssen (über das Netzkabel). Aus diesem Grund ist es notwendig, die Anschlüsse
einmal pro Jahr überprüfen zu lassen. Eine zusätzliche jährliche Gesamtinspektion wird empfohlen. Sie
können die Wartung von Ihrem Lieferanten oder einer von dem Hersteller autorisierten Stelle durchführen
lassen. Es wird empfohlen, über alle Wartungstätigkeiten buchzuführen. In einigen Ländern ist dies
Vorschrift.
Die Kontrolle und/oder Wartung soll erledigt werden gemäß dem in der Serviceanweisung des Geräts
beschriebenen Verfahren.
Versuchen Sie niemals, das Gerät zu öffnen. Lassen Sie Wartung und Reparaturen nur von einer
autorisierten Stelle durchführen. Der Hersteller ist nicht für die Folgen verantwortlich, die aus von
Unbefugten durchgeführten Wartungs- und Reparaturtätigkeiten entstehen.
Das Öffnen des Apparats von anderen als autorisierten Stellen ist nicht erlaubt und führt zum Erlöschen
Ihrer Garantieansprüche.
6.2 Reinigung von Gehäuse
Schalten Sie vor dem Reinigen das Gerät aus und ziehen Sie den Netzstecker aus der Steckdose.
Das Gerät und der LCD-Bildschirm können mit einem angefeuchteten Lappen gereinigt werden.
Verwenden Sie zu diesem Zweck einen weichen Lappen, lauwarmes Wasser und eventuell ein
Haushaltsreinigungsmittel (kein Scheuermittel oder Alkohollösung!).
6.3 Reinigung und Desinfektion von Zubehör
6.3.1 Elektroden und Schwämme
Die Leitgummi-Plattenelektroden und Schwämme müssen mit lauwarmen Wasser gereinigt werden. Bei
einer hartnäckigen Verschmutzung und zur Desinfektion kann eine 70 %ige Alkohollösung verwendet
werden. Die Leitgummi-Plattenelektroden können dabei abfärben.
Die Schwämme müssen nach Gebrauch mit einem Haushaltreinigungsmittel gewaschen werden in
warmem Wasser. Spülen Sie die Schwämme da-nach gut mit Wasser und lassen Sie sie trocknen, indem
Sie sie wie Dachziegel aufeinander legen.
Beschädigte Schwämme müssen ersetzt werden.
Es ist möglich, daß die Schwämme bei geringer Wasserhärte nicht leitfähig genug sind, so daß die
gewünschte Stromstärke nicht erreicht wird. Dies kann auch nach Desinfektion der Schwämme der Fall
sein. Zur Erhöhung der Leitfähigkeit des Wassers kann eine Salzlösung verwendet werden.
Werden die Elektroden nicht benutzt, so müssen die Schwämme entfernt werden. Dies verlängert die
Lebensdauer der Elektroden und Schwämme. Schwämme müssen regelmäßig erneuert werden. Es wird
empfohlen, einen zusätzlichen Satz Originalelektroden und -schwämme vorrätig zu haben.
6.3.2 Patientenleitung und Kabeladapter
Prüfen Sie diese Leitung regelmäßig auf Schäden. Es wird empfohlen, eine Ersatzleitung vorrätig zu
haben.
Bei der Benutzung eines Kabeladapters muß auch der Kabeladapter auf Beschädigungen und schlechte
Kontakte kontrolliert werden. Wir empfehlen einen Kabeladapter auf Vorrat zu haben.
6.4 Entsorgen von Gerät und Zubehör
Ihr Endomed 482 und Zubehör enthält Material, das recycled werden kann oder umweltschädlich ist. Muß
das Gerät entsorgt werden, so gibt es hierfür spezialisierte Betriebe, die die Objekte trennen und
schädliches Material aussortieren. Sie tragen so zu einer sauberen Umwelt bei.
Bitte entsprechen Sie den örtlichen Richtlinien bei der Entsorgung des Gerätes und des
Zubehörs.

17
D
7 Diagnose
7.1 Anzeigen leuchten nicht
Prüfen Sie ob das Stromversorgungsgerät mit dem Endomed 482 und mit einer Netzsteckdose
verbunden ist.
7.2 Fehlercode
Das Gerät hat einen Fehler gefunden. Der Fehlercode erscheint im Anzeigefeld der Stromintensität.
Schalten Sie das Gerät erneut ein. Nehmen Sie mit Ihrem Kundendienst Kontakt auf, falls der Fehlercode
wieder erscheint. Das Gerät ist dann wahrscheinlich defekt.
7.3 Unterbrochener Kontakt im CC-Modus
Sollte im CC-Modus der Kontakt unterbrochen werden, so wird das Gerät dies mit einem Signal melden.
Um unangenehme Sensationen bei dem Patienten zu vermeiden, wenn der Behandlungskopf oder die
Elektrode wieder auf die zu behandelnde Hautoberfläche gestezt wird, wird der Strom auf 0 abschwellen.
Um die Behandlung fortzusetzen, müssen Sie den Strom aufs neue einstellen.
7.4 Kein oder unzureichender Ausgangsstrom
• Patientenleitung auf Bruch oder schlechten Kontakt prüfen.
• Sorgen Sie dafür, daß die Schwämmchen feucht genug sind.
• Gegebenenfalls eine Salzlösung verwenden.
• Elektroden reinigen und Kontaktflächen überprüfen.
7.5 Kontrolle des Bedienfelds
Durch Einschalten des Geräts mit den Knöpfen [9] und [10] werden alle Anzeigesegmente aktiviert, so
dass Sie deren korrekte Funktion prüfen können. Bei Betätigung der Knöpfe und Regler sollte ein
akustischer Signalton zu hören sein. Sie können diesen Modus nur durch Ausschalten des Geräts
verlassen.
8 Spezifikationen
8.1 Produkt Spezifikationen
Elektrotherapie, allgemeine Informationen
Kanäle : 2
Stromform : Constant Current (CC) oder constant Voltage (CV)
Einstellung : 0,2 mA
Zeitschaltuhr : 0 - 60 Minuten
Wechsel der Polarität bei direktem Strom : manuell
Die maximale Intensität gemäß Spezifikation wird bei 500 Ohm (CC) erreicht.
Symmetrischer and asymmetrischer biphasischer pulsierender Strom, TENS
Frequenz : 1 - 200 Hz
Impulsdauer (Impulsbreite) : 10 - 400 µs
Burstfrequenz : 0 - 9 Hz
Frequenzmodulation (Spektrum) : 0 - 180 Hz
Frequenzmodulationsprogramm : 1/1, 6/6, 12/12 en 1/30/1/30 s
Anstiegsmodus: Anstiegszeit 0 - 9 s
Haltezeit 1 - 60 s
Abklingzeit 0 - 9 s
Intervallzeit 1 - 60 s
Verzögerungszeit 0,1 - 80 s
Intensität : 0 - 140 mA. In bestimmten Therapieeinstellungen wird die
Intensität auf 90-mA reduziert, um die von der IEC
60601-2-10 geforderten Grenzwerte einzuhalten.

18
D
Hochspannung:
Frequenz : 1- 200 Hz
Frequenzmodulation (Spektrum) : 0 – 90 %
Modulationsprogramm : 1/1, 6/6, 12/12 und 1/30/1/30 s
Intensität : 0 – 500 Volt
Parameter bei alternierendem Strom:
Frequenzmodulation (Spektrum) : 0 –90 %
Wechselzeit : 5 to 50 Sek.
Anstiegszeit and Abklingzeit : 0,1 – 1 Sek
Parameter bei Konstantstrom:
Anstiegsmodus : Wie bei TENS-Stromformen
Micro-Strom
Stromstärke : 10 µA - 1 mA
Höchstspannung : 200 V
Parameter bei alternierendem Strom:
Frequenz : 0 – 1000 Hz
Wechselzeit : 0,1 – 10 Sek. (die Wechselzeit ist abhängig von der
Impulsfrequenz)
Anstiegszeit and Abklingzeit : 0,1 – 1 Sek
Parameter bei Konstantstrom:
Frequenz : 0,1 – 1000 Hz
Anstiegsmodus : wie in TENS-Stromformen
Unterbrochener Wechselstrom, Russian Simulation
Trägerfrequenz : 2 - 10 kHz
Burstfrequenz : 0 - 100 Hz
Burst / Intervallratio : 1:1, 1:2, 1:4 and 1:5
Anstiegsmodus : wie in TENS-Stromformen
Intensität : 0 - 100 mA
Diadynamische Stromformen
Optionen : MF, DF, CP, LP and CPid
Intensität : 0 - 70 mA
Anstiegsmodus (nur bei MF und DF) : wie in TENS-Stromformen
Faradische Ströme
Optionen : 2-5 Strom nach Träbert (Standardwahl: Rechteckimpuls)
Phasendauer : 0.02 - 1000 ms mit Rechteckimpulsstrom
0,1 - 1000 ms mit pulsierendem Dreiecksstrom
Phasen Intervall : 5 - 5000 ms
Anstiegsmodus : wie in TENS-Stromformen
Intensität : 0 - 80 mA
Unterbrochener Gleichstrom
Frequenz : 8000 Hz
Duty cycle : 95%
Intensität : 0 - 40 mA
Bipolare Interferenz
Trägerfrequenz: : 2- 10 kHz
Reizfrequenz (AMF) : 0 - 200 Hz
Frequenzmodulation (Spektrum) : 0 - 180 Hz
Frequenzmodulationsprogramm : 1/1, 6/6, 12/12 and 1/30/1/30 s
Anstiegsmodus : wie in TENS-Stromformen
Intensität : 0 - 100 mA
Klassische Interferenz
Trägerfrequenz : 2- 10 kHz
Reizfrequenz (AMF) : 0 - 200 Hz
Frequenzmodulation (Spektrum) : 0 - 180 Hz
Modulationsprogramm : 1/1, 6/6, 12/12 and 1/30/1/30 s
Intensität : 0 - 100 mA
Balance Einstellung : mit dem Zentralregler

19
D
Isoplanarer Vektor
Trägerfrequenz : 10 kHz
Reizfrequenz (AMF) : 0 - 200 Hz
Frequenzmodulation (Spektrum) : 0 - 180 Hz
Modulation Programm : 1/1, 6/6, 12/12 und 1/30/1/30 s
Intensität : 0 - 100 mA
Automatischer Dipol Vektor
Trägerfrequenz : 2- 10 kHz
Reizfrequenz (AMF) : 0 - 200 Hz
Modulation Frequenz (Spektrum) : 0 - 180 Hz
Modulation Programm : 1/1, 6/6, 12/12 und 1/30/1/30 s
Intensität : 0 - 100 mA
Rotationsgeschwindigkeit: : einstellbar von 1 bis 10 sec.
Manueller Dipol-Vektor
Trägerfrequenz : 2- 10 kHz
Reizfrequenz (AMF) : 0 - 200 Hz
Frequenzmodulation (Spektrum) : 0 - 180 Hz
Modulationsprogramm : 1/1, 6/6, 12/12 and 1/30/1/30 s
Intensität : 0 - 100 mA
Positionseinstellung : 360 º
Speicherfunktionen
Geräteeinstellung : Starteinstellung.
Geräteeinstellungen : 10, vom Anwender programmierbar
Benutzerdefinierte Protokolle : 10
Vorprogrammierte Protokolle : 50
8.2 Technische Daten
Stromversorgungsgerät
Typ : ENA-1550
Netzspannung : 100 - 240 V +/- 10 %
Frequenz : 50/60 Hz.
Ausgangsspannung : 15 V.
Höchstausgangsstrom : 3,3 A.
Gerät
Medizingeräte Klasse : IIA gemäß 93/42/EWG
Internationalen Schutzklasse : Klasse I* type BF**, gemäß IEC 60601-1
Patientenableitstrom : besser wie IEC-Anforderung (< 100 µA)
Patientenableitstrom (1. Fehler) : besser wie IEC-Anforderung (< 500 µA)
Prüfstelle : TÜV Rheinland
Abmessungen : 29 x 28 x 11 cm (BxTxH)
Gewicht : 4,0 kg.
Umgebungsbedingungen für Transport und Lagerung
Temperatur : -10° bis +50° C
Relative Feuchtigkeit : 10 bis 100 %
Atmosphärischer Druck : 500 bis 1060 hPa
Umgebungsbedingungen für normalen Gebrauch
Temperatur : 10° bis 40° C
Relative Feuchtigkeit : 10 bis 90 % (nicht kondensierend)
Atmosphärischer Druck : 500 bis 1060 hPa
8.3 Einstufung
Medizingeräte Klasse IIa
Das Gerät entspricht allen Anforderungen der Medizingeräteverordnung (93/42/EWG).
BF: Das Gerät besitzt einen floatenden Patientenstromkreis

20
D
Internationalen Schutzklasse:
Die Endomed 482 erfüllt die Anforderungen der internationalen Normen für Medizingeräte IEC 60601-1,
IEC 60601-2-10 (Reizstromgeräte).
*I : das Gerät muß an eine Schutzkontakt-Steckdose angeschlossen werden.
Technische Änderungen vorbehalten.
9 Bestelldaten
Für die Bestelldaten des Endomed 482 sowie des Standard Zubehörs und weiteren Zubehörs weisen wir
auf unseren Physiotherapie Katalog hin

1
F
1 Introduction
1.1 Généralités
Le Endomed 482 est pourvu de deux canaux d’électrothérapie multi fonctionnels exactement identiques.
Ces canaux peuvent au choix être utilisés individuellement ou accouplés. Ces l’utilisation de types de
courant variés font de cette appareil un cheval de bataille pour vos activités professionnelles.
Les produits de ce mode d’emploi ne sont destinés qu’à une utilisation par des personnes compétentes
dans les domaines de la physiothérapie, la rééducation et des domaines contigus.
1.2 Possibilités thérapeutiques
Electrothérapie à fréquence base, moyenne, TENS High Voltage, Microcurrent
L’ utilisation de ces courants permet entre autres la détente des muscles, la diminution de la douleur et
favorise la circulation et la régénération des tissus.
1.3 En Conclusion
En acquérant le Endomed 482 , vous avez fait le juste choix. Nous sommes persuadés que vous aurez
beaucoup de plaisir à l’utiliser. Pour toutes les questions d’utilisation, votre fournisseur reste à votre
disposition
2 Sécurité
2.1 Remarques préalables
Il est important de lire attentivement ce mode d’emploi avant la mise en service du Endomed 482. Veillez
à ce qu’il soit disponible pour tout utilisateur.
L’utilisation du Endomed 482 est soumis aux règles suivantes:
1. Soyez attentif aux contre-indications (chapitre 4).
2. L’appareil ne peut être utilisé à moins de 2 mètres d’un appareil à ondes courtes.
3. Le patient doit toujours être à portée visuelle du thérapeute.
4. L’appareil ne peut pas être utilisé dans une pièce humide (salle d’hydrothérapie).
Le fabricant n’est pas tenu pour responsable des suites d’un autre usage que celui décrit dans ce mode
d’emploi.
2.2 Sécurité
Au démarrage un microprocesseur incorporé contrôle toutes les fonctions importantes de l’appareil.
Durant l’utilisation, l’appareil mesure l’intensité réelle du courant délivré et la compare au courant désiré.
En cas de divergence le courant sera automatiquement interrompu
2.3 Exclusions
L’électrothérapie n’est pas destinée aux applications spécifiques suivantes:
• Les traitement inter crâniens tel que la thérapie du sommeil;
• Les traitements trans thorax (l’application d’électrodes sur le thorax pouvant accroître le risque de
palpitations cardiaques);
• Les traitements cervicaux occipitaux.
2.4 Densité de courant
Conformément à la norme CEI 60601-2-10 il est interdit de dépasser une densité de courant de 2 mA eff.
par cm². Pour chaque électrode, la valeur maximale recommandée de l’intensité appliquée au malade
peut être calculée en multipliant par 2 [mA/cm²] la surface de contact (en cm² ) de cette électrode.
A noter que les électrodes doivent être appliquées de telle façon, que toute la surface des électrodes soit
en contact avec la peau. L’utilisation de petites électrodes avec des intensités élevées peut facilement
provoquer des irritations cutanées et même des brûlures.

2
F
2.5 Interférences électromagnétiques
Le branchement simultané d’un patient à l' Endomed 482 et à un appareil chirurgical HF peut provoquer
des brûlures au niveau des électrodes stimulantes. Un tel branchement est donc interdit.
Voir chapitre 4
2.6 Responsabilité du fabricant
Pour autant qu'il soit autorisé par la législation en vigueur , Enraf-Nonius ou ses fournisseurs et vendeurs,
ne peuvent en aucune cas être tenus pour responsable des dommages directs, indirects, accidentels ou
exceptionnels, ou résultants d'un usage, ou impossibilité de l'usage, du produit, y compris, mais non
limitatif, des dommages suite à la perte involontaire, arrêt de travail, défectuosités ou problèmes
d'ordinateur ou autres dégâts et pertes commerciales, même si Enraf-Nonius ses fournisseurs ou
vendeurs ont été mis au courant de la possibilité de tels dommages et sans préjudice la théorie de droit
et légitime (contrat, acte illégitime ou autre) sur lequel est basé la demande d'indemnité. Enraf-Nonuis ne
sera, sur base de modalités de ce contrat, en aucun cas responsable pour les dommages dont le
montant dépasse le montant qu' Enraf-Nonius a obtenu et des indemnités éventuelles pour support de ce
produit qu' Enraf-Nonius obtenues sur base d'un contrat de maintenance explicite. En cas de décès ou
blessure corporelle due à une négligence d' Enraf-Nonius cette limitation est abrogée pour autant que la
législation en vigueur interdise une telle limite.
Enraf-Nonius n'est pas responsable des conséquences résultant de données ou de conseils fautifs
donnés par son personnel ou des erreurs provenant de ce mode d'emploi ou d'un écrit accompagnateur
éventuel (y compris la documentation commerciale).
La partie adverse (utilisateur ou représentant de l'utilisateur) est tenu de préserver Enraf-Nonius de
toutes prétentions de tiers, de quelque nature qu ils soient
3 Indications et Contre-indications
Consulter également les manuels de thérapie optionnels.
3.1 Indications
3.1.1 Électrothérapie
Le diagnostic, l’électro-palpation pour déterminer:
• les points douloureux;
• les points de déclenchement;
• les zones d’hyperesthésie;
• les points de stimulation moteurs;
• Courbe I/t;
Le traitement thérapeutique:
A. L’ atténuation de douleur dans:
• les points douloureux;
• les points de déclenchement;
• les zones d’hyperesthésie.
B. Troubles du système végétatif, tels:
• le syndrome épaule-main;
• la maladie de Raynaud;
• la thrombo-angéite oblitérante (maladie de Buerger);
• l’atrophie osseuse de Sudeck;
• troubles neurologiques;
• myalgies.
C. La stimulation musculaire:
• pour rétablir la sensibilité motrice;
• à la suite d’atrophie;
• dans la rééducation;
• pour le renforcement du tonus musculaire (sport);
• troubles neurologiques.
D. L'ionophorèse.

3
F
E. La cicatrisation:
• imperfections cutanées à cause de troubles circulatoirespériphériques;
• plaies post-opératoires.
3.2 Contre-indications électrothérapie
• fièvre;
• tumeurs;
• tuberculose;
• inflammations locales;
• thrombose;
• grossesse;
• stimulateur cardiaque;
• implantations métalliques.
4 Installation
4.1 Raccordements
• Le raccordement doit répondre aux exigences d’utilisation en milieu médical.
L’appareil est pourvu d’un fil de sécurité terre et doit être branché à une prise de courant raccordé à la
terre
• Contrôlez en premier lieu si le voltage et la fréquence de l’appareil (plaque d’immatriculation) sont en
concordance avec le réseau.
• L’adaptateur réseau est un élément du circuit d’alimentation sur lequel la sécurité de l’appareil est
basée. Les caractéristiques des Endomed 482 ne sont garanties que dans le cas d’une utilisation en
combinaison avec le type d’adaptateur réseau ENA 1524.
L’utilisation d’un adaptateur réseau autre que celui de type ENA 1524 n’est pas autorisée pour les
Endomed 482.
4.2 Connexion de l’adaptateur secteur
• Connectez l’adaptateur de réseau fourni à la connexion [3.1].
• Connectez l’adaptateur à une prise de courant. La lampe indicatrice [6] montre que l’appareil est
branché sur le réseau et est en mode stand-by .
4.3 Mettre en marche et autotest
• Mettez l’appareil en marche par l’interrupteur général on/off [1].
• Dès la mise en marche, l’appareil effectue un auto contrôle.
A la fin de l’autotest un signal sonore retentit. Si une erreur est perçue, un code d’erreur apparaît sur le
display. Voir section 7
4.4 Déconnexion du réseau
• Débranchez Endomed 482, au moyen de l’interrupteur on/off [1].
• Retirez la prise de l’adaptateur .
4.5 Utilisation sur batterie (optionnel)
L’appareil peut être utilisé indépendamment du réseau. Pour ce faire il y a lieu d’installer une batterie
Installation:
• Débranchez l’appareil et déconnecter l’adaptateur [3-1].
• Retournez l’appareil et dévissez les deux vis du compartiment batterie.
• Connectez le fil rouge sur la borne positive (+) et le fil noir sur la borne négative (-).
• Glissez la batterie dans le compartiment.
• Fermez et fixez le couvercle au moyen des deux vis.
• Reconnectez l’adaptateur sur connecteur [3-1].
Lorsque l’adaptateur est branché, la batterie se charge automatiquement qu’elle que soit la position de
l’interrupteur on/off. Nous conseillons d’utiliser au maximum l’ appareil avec l’adaptateur branché. Ceci
augmente la durée de vie des batteries.

4
F
Afin d’éviter des problèmes nous conseillons d’utiliser exclusivement les batteries fournies par Enraf-
Nonius du type 2601.012. Les batteries contiennent des composants qui sont nuisibles pour le milieu
Pour l’évacuation des batteries respectez la reglémentation locales en vigueur . Voir aussi Chapitre 6.4.
4.6 Installation
• Ne pas installer l’appareil à proximité de sources de chaleur telles que les radiateurs.
• Eviter de placer l’appareil dans un endroit directement exposé à la lumière solaire, à la pluie, aux
poussières, à l’humidité, aux vibrations mécaniques et aux chocs.
• Nous vous conseillons de ne pas utiliser de téléphone sans fil à proximité de l’appareil.
• Cet équipement ne peut être utilisé dans un «local humide». (Salle d’hydrothérapie).
• Utilisez toujours l’adaptateur d’origine Enraf-Nonius (type ENA-1550).
Dans le cas où un liquide viendrait à pénétrer à l’intérieur de l’appareil, il faut le débrancher et le faire
contrôler par un spécialiste agréé.
4.7 Interférences électromagnétiques
• Le fonctionnement à proximité (c’est-à-dire dans un rayon de deux mètres ou moins) d’un appareil de
thérapie par ondes courtes ou micro-ondes en fonctionnement peut provoquer des variations du
courant de sortie du Endomed 482.
• Pour éviter des interférences électromagnétiques, nous conseillons vivement d’utiliser des phases
d’alimentation différentes pour le Endomed 482 et les appareils à ondes courtes ou à micro-ondes.
• Prenez soin que le câble d’alimentation de l’appareil à ondes courtes ou à micro-ondes ne se trouve
pas à proximité du Endomed 482 ou du patient.
Si les problèmes d’interférences électromagnétiques persistent, il est souhaitable de contacter le
fournisseur.
5 Service
5.1 Eléments d’utilisation
5.1.1 Appareil
(Images)
[1] Interrupteur on/off
Permet l'allumage ou l’arrêt du Endomed 482 .
[2] Étiquettes « type » et étiquette de prévention
Renseignent les données de l’appareil tels que type, numéro de série, données de raccordement
telles que tension et courant maximum
[3-1] Fiche pour adaptateur réseau
Permet le raccordement de l’adaptateur réseau
[3-2] Fiche pour commande à distance
Permet le raccordement de la commande à distance.
[4-1] Raccordement câble électro thérapie et patient
Permet le raccordement le l’adaptateur d’électrodes
5.1.2. Panneau d’utilisation
(voir images)
[5] Lampe indicatrice d’état de la batterie
Si un accu est branché, il y a quatre possibilités
Lampe verte allumée en continu : accu suffisamment chargé
Lampe verte clignotante : accu charge minimale, raccordez l’adaptateur réseau.
Lampe jaune : accu vide, raccordez l’adaptateur réseau.
Lampe éteinte : pas d’accu branché, accu vide ou défectueux, raccordez l’adaptateur réseau.
[6] Lampe indicatrice adaptateur réseau
Signale si un adaptateur est branché et fonctionne.

5
F
[7] Bouton sélection de thérapie
Touche choix : électrothérapie, choix de canal, canal courant accouplé, pause en cas de programme
séquentiel.
[8] Bouton sélection de la forme de courant électrothérapie
[9] Bouton sélection :
fréquence de l’onde porteuse, fréquence microcurrent , de la durée de phase, mode alternatif (High
Voltage et Microcurrent), du type d’interférence.
[10] Bouton sélection:
fréquence de stimulation, l’intervalle de phase, fréquence burst (stimulation russe), la position vecteur,
balance, courant dia dynamique et spectre.
[11] Bouton de sélection :
de balayage du spectre, du cycle duty (stimulation russe), fréquence burst et étape de programme
[12] Bouton sélection de programme d’entraînement, du temps de rotation du vecteur et de la
minuterie
[13] Bouton sélection pour choix du canal, CC/CV et polarité.
[12]+[13] Arrêt d’urgence.
En appuyant sur les deux touches simultanément, les traitements en cours seront immédiatement
interrompus
[14] Touches Accept
Confirme en mémoire le choix de la sélection du type de courant et permet le démarrage du programme
d’entraînement.
[15] Touches mémoires
Permet de rechercher ou de sauvegarder des données de ou en mémoire
[16] Régulateur central
Régulateur pour la définition de paramètres.
[17] Régulateur d’intensité
Régulateur pour la définition du courant pour les canaux 1 et 2
Pour la technique d’interférence quatro-polaire (deux canaux), ce régulateur défini simultanément
l’intensité des deux canaux
[19] Symbole pause
Ce symbole indique la pause entre deux pas de programme d’un programme séquentiel.
5.2 Réglage de l’appareil
5.2.1 Introduction
5.2.1.1 Mise en route de l’appareil
Mettez l’appareil en route avec la touche [1]. L'appareil effectue un autotest et présente par défaut le
programme 0. Ce programme est programmé en usine, vous pouvez remplacer cette définition par des
paramètres personnels. Voir chapitre 10 « Utilisation –Programmes »
5.2.1.2 Type de thérapie et sélection des canaux
Le Endomed 482 est équipé de deux canaux de courant.
Ces canaux peuvent être utilisés de manière indépendantes avec pour chaque canal des paramètres et
durée de traitement propres. Il est également possible d’accoupler des canaux. Choisissez les fonctions
de thérapie de base électrothérapie au moyen de la touche [7]. La sélection des canaux et le choix des
accouplements se font au moyen du régulateur central [16].
Les sélections suivantes sont possibles :
U électrothérapie via canal 1
V électrothérapie via canal 2
électrothérapie par canaux accouplés

6
F
Remarquez que lors de l’usage indépendant des canaux, les paramètres des deux canaux doivent être
définis individuellement. Si ce n’est pas votre volonté ou nécessaire, vous pouvez faire le choix de
canaux accouplés.
5.2.1.3 Sélection du type de courant
Appuyer sur la touche [8]. Le symbole clignotant affiche le courant choisi. Sélectionnez un type de
courant avec le régulateur central [16] et confirmez votre choix au moyen de la touche Accept [14].
Si vous sélectionnez (courants interférentiels) ou (courant dia dynamique), vous serez amener à
choisir au moyen du régulateur central [16] un type de courant propre à ces groupes. Confirmez par la
touche [14].
5.2.1.4 Définition et modification des paramètres
Définition et modification des paramètres
Les touches [9] à [13] permettent de choisir les paramètres. Une touche effectue les paramètres d’un
même plan horizontal. La modification des paramètres s'effectue par le régulateur central [16]. Les
paramètres peuvent être modifiés tant que les symboles correspondants clignotent. Le display n’affiche
que les paramètres propres au type de thérapie choisi.
5.2.1.5 Réglage de la minuterie.
Choisissez horloge au moyen de la touché [12] . L’icône min clignote. L’écran affiche le temps de
traitement du canal sélectionné sur le display (sous 5.2.1.2.). Pour rappel un indicateur de canal clignote
au-dessus de l’indicateur temps. Le temps de traitement de ce seul canal peut être modifié au moyen du
régulateur [16].
Si un ou plusieurs canaux sont actifs « 0« clignote. Au dessus de l’indicateur temps les canaux actifs,
sont visualisés
5.2.1.6 Programme d’entraînement
Certains types de courant peuvent être utilisés en combinaison avec un programme de gonflement
Appuyer sur la touche [12] et choisissez ensuite le temps de gonflement 3, le temps de maintenance 4,
le temps de dégonflement et le temps de pause7 La définition de ces paramètres se fait au moyen du
régulateur central [16].
En cas de canaux accouplés, les programmes de gonflement sont identiques pour les deux canaux. Un
temps de ralentissement peut être défini entre les programmes du canal 1 et du canal 2 par la procédure
ci-après :
Choisissez au moyen de la touche [13] et du régulateur central [16] le canal 2.
Choisissez ensuite au moyen de la touche [12) le temps de ralentissement instaurez cette valeur au
moyen du régulateur central [16].
5.2.1.7 Instauration de l’ intensité
L’intensité du courant est instauré par le régulateur d’intensité [17]. L’intensité ne peut être instauré que si
l’horloge est activée.
L’indicateur de canal 4 suivi du numéro de canal 9 ou C, mentionne le canal visualisé sur le display et
pouvant être défini. Vous pouvez modifiez ce numéro au moyen de la touche [13] et du régulateur central
[16]. Cette sélection s’effectue en parallèle avec la sélection de canal effectuée sous 5.2.1.2
Pour les courants quadripolaires le régulateur d’intensité [17] fonctionne en parallèle sur les deux canaux.
Cela apparaît sur le display par 9 B C, le canal utilisé clignote .Il est prévu un régulateur de balance pour
les types de courant interférentiels classiques (voir paragraphe 5.2.2.9.).
L’unité de l’intensité du courant est tributaire du type de courant et peut être représentée en mA, µA of V
Le traitement peut être démarrer en activant l’intensité du courant sauf si un patron de gonflement a été
défini dans ce cas le traitement est lancé par la touche [14].
Dès que le courant passe par les canaux concernés, les indicateurs 2 et 3 s’affichent à l’écran.
Une valeur de courant clignotante fait état d’un mauvais contact.
5.2.1.8 Paramètres CC/CV
En fonction des types de courant choisis, les canaux d’électrothérapie peuvent être utilises en mode
Constant current ou en Constant Voltage. En cas d’utilisation de la technique électrodes dynamiques, il
est conseillé d’utiliser le mode CV. Dans ce mode le courant de sortie est tributaire de l’accouplement
électrique du patient et peut dès lors varié. Vous pouvez modifiez le paramètres CC/CV moyen de la
touche [13] et du régulateur central [16].

7
F
5.2.1.9 Polarité
La sortie de courant rouge est positif et la sortie noire est négative. Pour un changement manuel de la
polarité choisissez :
normal
inversé ;
au moyen de la touche [13] et du régulateur central [16]
Si en cours de traitement une inversion manuel de polarité est exécutée, le courant s’éteint et revient
avec une polarité contraire à 80% de la valeur précédente
Pour un inversion automatique des types higt Voltage et Microcurrent, choisissez ouau moyen
de la touche [9] et du régulateur central [16].
: alterné (alternating)
: non alterné (not alternating)
Pour le type de courant interrompu l’inversion de polarité n’est pas possible.
5.2.1.10 Arrêt d’urgence.
En appuyant sur les touches [12]+[13] simultanément, les traitements en cours seront immédiatement
interrompus
5.2.2 Électrothérapie
5.2.2.1 Interférence bipolaire
• Enfoncez la touche [7] et choisissez . Sélectionnez avec le régulateur central [16] le canal désiré ou
accoupler les deux canaux;
• Appuyer sur la touche [8], sélectionnez avec le régulateur central [16] et confirmez votre choix
avec la touche Accept [14].
• Sélection de interférence bipolaire:
Sélectionnez avec le régulateur central [16] et confirmez votre choix avec la touche Accept [14];
• Modifiez la fréquence de l’onde porteuse:
Sélectionnez (kHz) avec le bouton [9] et modifiez la valeur avec le régulateur central [16];
• Modifiez la fréquence de Stimulation:
Sélectionnez avec le bouton [10] et modifiez la valeur avec le régulateur central [16];
• Modifiez la fréquence modulée (spectre):
Sélectionnez * avec le bouton [10] et modifiez la valeur avec le régulateur central [16];
• Modifiez la balayage du spectre:
Sélectionnez , avec le bouton [11] et modifiez la valeur avec le régulateur central [16];
• Modifiez le temps de traitement :
Sélectionnez < avec le bouton [12] et modifiez la valeur avec le régulateur central [16];
• Programme d’entraînement (si désiré):
• Modifiez le temps d’augmentation:
Choisir 3 avec le bouton [12] et modifiez la valeur avec le régulateur central [16];
• Modifiez le temps de maintien:
Choisir 4 avec le bouton [12] et modifiez la valeur avec le régulateur central [16];
• Modifiez le temps de réduction:
Choisir 5 avec le bouton [2] et modifiez la valeur avec le régulateur central [16];
• Modifiez le temps de pause:
Choisir 7 avec le bouton [12] et modifiez la valeur avec le régulateur central [16];
• Modifiez le temps de retardement (uniquement pour canaux accouplés):
Choisir canal 2 avec le bouton [13] et le régulateur central [16].
Sélectionnez 6 avec le bouton [12] et modifiez la valeur avec le régulateur central [16];
• Sélectionnez CC ou CV avec le bouton [13] et le régulateur central [16];
• Sélectionnez le canal désiré avec le bouton[13] et le régulateur central [16]. Instaurez l’intensité au
moyen du régulateur [17];
• Appuyer sur la touche [14] pour démarrer le déroulement du programme d’entraînement.
5.2.2.2 Courant alternatif interrompu (Stimulation Russe)
• Enfoncez la touche [7] et choisissez . Sélectionnez avec le régulateur central [16] le canal désiré ou
accoupler les deux canaux;
• Appuyer sur la touche [8], sélectionnez avec le régulateur central [16] et confirmez votre choix
avec la touche Accepté [14];
• Modifiez la fréquence de l’onde porteuse:
Sélectionnez (kHz) avec le bouton [9] et modifiez la valeur avec le régulateur central [16];
• Modifiez la fréquence Burst:
Sélectionnez avec le bouton [10] et modifiez la valeur avec le régulateur central [16];

8
F
• Modifiez le rapport Burst/pause:
Sélectionnez - avec le bouton [11] et modifiez la valeur avec le régulateur central [16];
• Modifiez le temps de traitement :
Sélectionnez < avec le bouton [12] et modifiez la valeur avec le régulateur central [16];
• Programme d’entraînement (si désiré):
• Modifiez le temps d’augmentation:
Choisir 3 avec le bouton [12] et modifiez la valeur avec le régulateur central [16];
• Modifiez le temps de maintien:
Choisir 4 avec le bouton [12] et modifiez la valeur avec le régulateur central [16];
• Modifiez le temps de réduction:
Choisir 5 avec le bouton [2] et modifiez la valeur avec le régulateur central [16];
• Modifiez le temps de pause:
Choisir 7 avec le bouton [12] et modifiez la valeur avec le régulateur central [16];
• Modifiez le temps de retardement (uniquement pour canaux accouplés):
Choisir canal 2 avec le bouton [13] et le régulateur central [16].
Sélectionnez 6 avec le bouton [12] et modifiez la valeur avec le régulateur central [16];
• Sélectionnez CC ou CV avec le bouton [13] et le régulateur central [16];
• Sélectionnez le canal désiré avec le bouton[13] et le régulateur central [16]. Instaurez l’intensité au
moyen du régulateur [17];
• Appuyer sur la touche [14] pour démarrer le déroulement du programme d’entraînement.
5.2.2.3 Courants pulsés biphasés asymétrique et symétrique (TENS)
• Enfoncez la touche [7] et choisissez . Sélectionnez avec le régulateur central [16] le canal désiré ou
accouplez les deux canaux;
• Appuyer sur la touche [8], sélectionnez ou avec le régulateur central [16] et confirmez votre
choix avec la touche Accept [14];
• Modifiez la durée de phase:
Sélectionnez avec le bouton [9] et modifiez la valeur avec le régulateur central [16];
• Modifiez la fréquence de Stimulation:
Sélectionnez avec le bouton [10] et modifiez la valeur avec le régulateur central [16];
• Faites votre choix entre la modulation de fréquence (SPECTRE) et le mode BURST ces deux options
s’excluent;
• Si SPECTRE est désiré:
Contrôlez si BURST est désactivé:
• Sélectionnez . avec le bouton [11] et instaurez la valeur à zéro avec le régulateur central [16];
• Modifiez la fréquence modulée (spectre):
Sélectionnez * avec le bouton [10] et modifiez la valeur avec le régulateur central [16];
• Modifiez la balayage du spectre:
Sélectionnez , avec le bouton [11] et modifiez la valeur avec le régulateur central [16];
• Si BURST est désiré:
Contrôlez si SPECTRE est désactivé:
• Sélectionnez * avec le bouton [10] et instaurez la valeur à zéro avec le régulateur central [16];
• Modifiez la fréquence Burst:
Sélectionnez . avec le bouton [11] et modifiez la valeur avec le régulateur central [16];
• Modifiez le temps de traitement :
Sélectionnez < avec le bouton [12] et modifiez la valeur avec le régulateur central [16];
• Programme d’entraînement (si désiré):
• Modifiez le temps d’augmentation:
Choisir 3 avec le bouton [12] et modifiez la valeur avec le régulateur central [16];
• Modifiez le temps de maintien:
Choisir 4 avec le bouton [12] et modifiez la valeur avec le régulateur central [16];
• Modifiez le temps de réduction:
Choisir 5 avec le bouton [2] et modifiez la valeur avec le régulateur central [16];
• Modifiez le temps de pause:
Choisir 7 avec le bouton [12] et modifiez la valeur avec le régulateur central [16];
• Modifiez le temps de retardement (uniquement pour canaux accouplés):
Choisir canal 2 avec le bouton [13] et le régulateur central [16].
Sélectionnez 6 avec le bouton [12] et modifiez la valeur avec le régulateur central [16];
• Sélectionnez CC ou CV avec le bouton [13] et le régulateur central [16];
• Sélectionnez le canal désiré avec le bouton[13] et le régulateur central [16]. Instaurez l’intensité au
moyen du régulateur [17];
• Appuyer sur la touche [14] pour démarrer le déroulement du programme d’entraînement.

9
F
5.2.2.4 Courants Faradiques rectangulaires ou triangulaires
• Enfoncez la touche [7] et choisissez . Sélectionnez avec le régulateur central [16] le canal désiré ou
accoupler les deux canaux;
• Appuyer sur la touche [8], sélectionnez ou avec le régulateur central [16] et confirmez votre
choix avec la touche Accepté [14];
• Modifiez la durée de phase:
Sélectionnez avec le bouton [9] et modifiez la valeur avec le régulateur central [16];
• Modifiez l’intervalle de phase:
Sélectionnez avec le bouton [10] et modifiez la valeur avec le régulateur central [16];
• Modifiez le temps de traitement :
Sélectionnez < avec le bouton [12] et modifiez la valeur avec le régulateur central [16];
• Programme d’entraînement (si désiré):
• Modifiez le temps d’augmentation:
Choisir 3 avec le bouton [12] et modifiez la valeur avec le régulateur central [16];
• Modifiez le temps de maintien:
Choisir 4 avec le bouton [12] et modifiez la valeur avec le régulateur central [16];
• Modifiez le temps de réduction:
Choisir 5 avec le bouton [2] et modifiez la valeur avec le régulateur central [16];
• Modifiez le temps de pause:
Choisir 7 avec le bouton [12] et modifiez la valeur avec le régulateur central [16];
• Modifiez le temps de retardement (uniquement pour canaux accouplés):
Choisir canal 2 avec le bouton [13] et le régulateur central [16].
Sélectionnez 6 avec le bouton [12] et modifiez la valeur avec le régulateur central [16];
• Sélectionnez CC ou CV avec le bouton [13] et le régulateur central [16];
• Modifiez la polarité: Sélectionnez F ou G avec le bouton [13] et le régulateur central [16];
• Sélectionnez le canal désiré avec le bouton[13] et le régulateur central [16]. Instaurez l’intensité au
moyen du régulateur [17];
• Appuyer sur la touche [14] pour démarrer le déroulement du programme d’entraînement.
5.2.2.5 Microcurrent
• Enfoncez la touche [7] et choisissez . Sélectionnez avec le régulateur central [16] le canal désiré ou
accoupler les deux canaux;
• Appuyer sur la touche [8], sélectionnez avec le régulateur central [16] et confirmez votre choix
avec la touche Accept [14];
• Modifiez la fréquence:
Sélectionnez (Hz ou kHz) avec le bouton [9] et modifiez la valeur avec le régulateur central [16];
• Modification alterner ou non alterner:
Sélectionnez ou avec le bouton [9] et le régulateur central [16];
• Modifiez le temps de traitement :
Sélectionnez < avec le bouton [12] et modifiez la valeur avec le régulateur central [16];
• Programme d’alterné (uniquement avec ):
• Modifiez le temps d’augmentation:
Choisir 3 avec le bouton [12] et modifiez la valeur avec le régulateur central [16];
• Modifiez le temps de maintien:
Choisir 4 avec le bouton [12] et modifiez la valeur avec le régulateur central [16];
• Modifiez le temps de réduction:
Choisir 5 avec le bouton [2] et modifiez la valeur avec le régulateur central [16];
• Programme d’entraînement (uniquement avec ):
• Modifiez le temps d’augmentation:
Choisir 3 avec le bouton [12] et modifiez la valeur avec le régulateur central [16];
• Modifiez le temps de maintien:
Choisir 4 avec le bouton [12] et modifiez la valeur avec le régulateur central [16];
• Modifiez le temps de réduction:
Choisir 5 avec le bouton [2] et modifiez la valeur avec le régulateur central [16];
• Modifiez le temps de pause:
Choisir 7 avec le bouton [12] et modifiez la valeur avec le régulateur central [16];
• Modifiez le temps de retardement (uniquement pour canaux accouplés):
Choisir canal 2 avec le bouton [13] et le régulateur central [16].
Sélectionnez 6 avec le bouton [12] et modifiez la valeur avec le régulateur central [16];
• Modifiez la polarité (uniquement avec ):
Sélectionnez F ou G avec le bouton [13] et le régulateur central [16];
• Sélectionnez le canal désiré avec le bouton[13] et le régulateur central [16]. Instaurez l’intensité au
moyen du régulateur [17];
• Appuyer sur la touche [14] pour démarrer le déroulement du programme d’entraînement.

10
F
5.2.2.6 High voltage
• Enfoncez la touche [7] et choisissez . Sélectionnez avec le régulateur central [16] le canal désiré ou
accoupler les deux canaux;
• Appuyer sur la touche [8], sélectionnez avec le régulateur central [16] et confirmez votre choix
avec la touche Accept [14];
• Modification alterner ou non alterner:
Sélectionnez ou avec le bouton [9] et le régulateur central [16];
• Modifiez la fréquence de Stimulation:
Sélectionnez avec le bouton [10] et modifiez la valeur avec le régulateur central [16];
• Modifiez la fréquence modulée (spectre):
Sélectionnez * (%)avec le bouton [10] et modifiez la valeur avec le régulateur central [16];
• Modifiez la balayage du spectre:
Sélectionnez , avec le bouton [11] et modifiez la valeur avec le régulateur central [16];
• Modifiez le temps de traitement :
Sélectionnez < avec le bouton [12] et modifiez la valeur avec le régulateur central [16];
• Programme d’alterné (uniquement avec ):
• Modifiez le temps d’augmentation:
Choisir 3 avec le bouton [12] et modifiez la valeur avec le régulateur central [16];
• Modifiez le temps de maintien:
Choisir 4 avec le bouton [12] et modifiez la valeur avec le régulateur central [16];
• Modifiez le temps de réduction:
Choisir 5 avec le bouton [2] et modifiez la valeur avec le régulateur central [16];
• Programme d’entraînement (uniquement avec ):
• Modifiez le temps d’augmentation:
Choisir 3 avec le bouton [12] et modifiez la valeur avec le régulateur central [16];
• Modifiez le temps de maintien:
Choisir 4 avec le bouton [12] et modifiez la valeur avec le régulateur central [16];
• Modifiez le temps de réduction:
Choisir 5 avec le bouton [2] et modifiez la valeur avec le régulateur central [16];
• Modifiez le temps de pause:
Choisir 7 avec le bouton [12] et modifiez la valeur avec le régulateur central [16];
• Modifiez le temps de retardement (uniquement pour canaux accouplés):
Choisir canal 2 avec le bouton [13] et le régulateur central [16].
Sélectionnez 6 avec le bouton [12] et modifiez la valeur avec le régulateur central [16];
• Modifiez la polarité (uniquement avec ):
Sélectionnez F ou G avec le bouton [13] et le régulateur central [16];
• Sélectionnez le canal désiré avec le bouton[13] et le régulateur central [16]. Instaurez l’intensité au
moyen du régulateur [17];
• Appuyer sur la touche [14] pour démarrer le déroulement du programme d’entraînement.
5.2.2.7 Courant dia dynamique
• Enfoncez la touche [7] et choisissez . Sélectionnez avec le régulateur central [16] le canal désiré ou
accoupler les deux canaux;
• Appuyer sur la touche [8], sélectionnez avec le régulateur central [16] et confirmez votre choix
avec la touche Accepté [14];
• Choisissez MF, DF, LP, CP ou CPid avec le régulateur central [16] et confirmez votre choix avec la
touche Accept [14];
• Modifiez le temps de traitement:
Sélectionnez < avec le bouton [12] et modifiez la valeur avec le régulateur central [16];
• Programme d’entraînement (uniquement avec MF et DF):
• Modifiez le temps d’augmentation:
Choisir 3 avec le bouton [12] et modifiez la valeur avec le régulateur central [16];
• Modifiez le temps de maintien:
Choisir 4 avec le bouton [12] et modifiez la valeur avec le régulateur central [16];
• Modifiez le temps de réduction:
Choisir 5 avec le bouton [2] et modifiez la valeur avec le régulateur central [16];
• Modifiez le temps de pause:
Choisir 7 avec le bouton [12] et modifiez la valeur avec le régulateur central [16];
• Modifiez le temps de retardement (uniquement pour canaux accouplés):
Choisir canal 2 avec le bouton [13] et le régulateur central [16].
Sélectionnez 6 avec le bouton [12] et modifiez la valeur avec le régulateur central [16];
• Sélectionnez CC ou CV avec le bouton [13] et le régulateur central [16];
• Modifiez la polarité:
Sélectionnez F ou G avec le bouton [13] et le régulateur central [16];

11
F
• Sélectionnez le canal désiré avec le bouton[13] et le régulateur central [16]. Instaurez l’intensité au
moyen du régulateur [17];
• Appuyer sur la touche [14] pour démarrer le déroulement du programme d’entraînement.
5.2.2.8 Courant continu interrompu
• Enfoncez la touche [7] et choisissez . Sélectionnez avec le régulateur central [16] le canal désiré ou
accoupler les deux canaux;
• Appuyer sur la touche [8], sélectionnez avec le régulateur central [16] et confirmez votre choix
avec la touche Accept [14];
• Modifiez le temps de traitement :
Sélectionnez < avec le bouton [12] et modifiez la valeur avec le régulateur central [16];
• Sélectionnez le canal désiré avec le bouton[13] et le régulateur central [16]. Instaurez l’intensité au
moyen du régulateur [17];
5.2.2.9 Interférence (classique)
• Enfoncez la touche [7] et choisissez . Accouplé les deux canaux avec le régulateur central [16];
• Appuyer sur la touche [8], sélectionnez avec le régulateur central [16] et confirmez votre choix
avec la touche Accept [14];
• Sélection de interférence classique:
Sélectionnez avec le régulateur central [16] et confirmez votre choix avec la touche Accept [14];
• Modifiez la fréquence de l’onde porteuse:
Sélectionnez (kHz) avec le bouton [9] et modifiez la valeur avec le régulateur central [16];
• Modifiez la fréquence de Stimulation:
Sélectionnez avec le bouton [10] et modifiez la valeur avec le régulateur central [16];
• Modifiez la fréquence modulée (spectre):
Sélectionnez * avec le bouton [10] et modifiez la valeur avec le régulateur central [16];
• Modifiez la balayage du spectre:
Sélectionnez , avec le bouton [11] et modifiez la valeur avec le régulateur central [16];
• Modifiez le temps de traitement :
Sélectionnez < avec le bouton [12] et modifiez la valeur avec le régulateur central [16];
• Sélectionnez CC ou CV avec le bouton [13] et le régulateur central [16];
• Instaurez l’intensité au moyen du régulateur [17];
• Balance:
Sélectionnez
avec bouton [10] et balancez avec le régulateur central [16].
5.2.2.10 Vecteur isoplanaire
• Enfoncez la touche [7] et choisissez . Accouplez les deux canaux avec le régulateur central [16];
• Appuyer sur la touche [8], sélectionnez avec le régulateur central [16] et confirmez votre choix
avec la touche Accept [14];
• Sélection du vecteur isoplanaire:
Sélectionnez avec le régulateur central [16] et confirmez votre choix avec la touche Accept [14];
• Modifiez la fréquence de l’onde porteuse:
Sélectionnez (kHz) avec le bouton [9] et modifiez la valeur avec le régulateur central [16];
• Modifiez la fréquence de Stimulation:
Sélectionnez avec le bouton [10] et modifiez la valeur avec le régulateur central [16];
• Modifiez la fréquence modulée (spectre):
Sélectionnez * avec le bouton [10] et modifiez la valeur avec le régulateur central [16];
• Modifiez la balayage du spectre:
Sélectionnez , avec le bouton [11] et modifiez la valeur avec le régulateur central [16];
• Modifiez le temps de traitement :
Sélectionnez < avec le bouton [12] et modifiez la valeur avec le régulateur central [16];
• Sélectionnez CC ou CV avec le bouton [13] et le régulateur central [16];
• Instaurez l’intensité au moyen du régulateur [17].
5.2.2.11 Vecteur dipôle manuel
• Enfoncez la touche [7] et choisissez . Accouplez les deux canaux avec le régulateur central [16];
• Appuyer sur la touche [8], sélectionnez avec le régulateur central [16] et confirmez votre choix
avec la touche Accept [14].Sélectionnez avec le bouton [8] et le régulateur central [16];
• Sélection du vecteur dipôle manuel:
Sélectionnez avec le régulateur central [16] et confirmez votre choix avec la touche Accept [14];
• Modifiez la fréquence de l’onde porteuse:
Sélectionnez (kHz) avec le bouton [9] et modifiez la valeur avec le régulateur central [16];
• Modifiez la fréquence de Stimulation:

12
F
Sélectionnez avec le bouton [10] et modifiez la valeur avec le régulateur central [16];
• Modifiez la fréquence modulée (spectre):
Sélectionnez * avec le bouton [10] et modifiez la valeur avec le régulateur central [16];
• Modifiez la balayage du spectre:
Sélectionnez , avec le bouton [11] et modifiez la valeur avec le régulateur central [16];
• Modifiez le temps de traitement :
Sélectionnez < avec le bouton [12] et modifiez la valeur avec le régulateur central [16];
• Sélectionnez CC ou CV avec le bouton [13] et le régulateur central [16];
• Instaurez l’intensité au moyen du régulateur [17];
• Définition de la position du vecteur:
Sélectionnez
# avec le bouton [10] et ajustez la position avec le régulateur central [16].
5.2.2.12 Vecteur dipôle automatique
• Enfoncez la touche [7] et choisissez . Accouplez les deux canaux avec le régulateur central [16];
• Appuyer sur la touche [8], sélectionnez avec le régulateur central [16] et confirmez votre choix
avec la touche Accept [14];
• Sélection du vecteur dipôle automatique:
Sélectionnez avec le bouton [9] et le régulateur central [16] et confirmez votre choix avec la touche
Accept [14];
• Modifiez la fréquence de l’onde porteuse:
Sélectionnez (kHz) avec le bouton [9] et modifiez la valeur avec le régulateur central [16];
• Modifiez la fréquence de Stimulation:
Sélectionnez avec le bouton [10] et modifiez la valeur avec le régulateur central [16];
• Modifiez la fréquence modulée (spectre):
Sélectionnez * avec le bouton [10] et modifiez la valeur avec le régulateur central [16];
• Modifiez la balayage du spectre:
Sélectionnez , avec le bouton [11] et modifiez la valeur avec le régulateur central [16];
• Modifiez le temps de traitement :
Sélectionnez < avec le bouton [12] et modifiez la valeur avec le régulateur central [16];
• Modifiez la temps rotation
Sélectionnez 8 avec le bouton [12] et modifiez la valeur avec le régulateur central [16];
• Sélectionnez CC ou CV avec le bouton [13] et le régulateur central [16];
• Instaurez l’intensité au moyen du régulateur [17];
5.3 Mesures propres aux traitements
5.3.1 Électrothérapie
Avant le traitement
• Contrôlez le patient sur d ‘éventuelles contre-indications absolues ou relatives
• Testez la sensibilité à la chaleur de la surface à traiter .
• En cas d’abondance, les poils doivent être rasés.
5.4 Utilisation de la mémoire
Le Endomed 482 est équipé d’une mémoire pour le stockage des paramètres de l’appareil et protocoles
de traitement.
5.4.1 Paramètres de l’appareil
Les paramètres de l’appareils comprennent toutes les définitions de l’appareil à l’exception de l’intensité
du courant. Au contraire des protocoles, les paramètres sont valables simultanément sur tous les canaux
y compris le canal ultrasons. Ces paramètres sont stockés sous les numéros de mémoire 0 – 9. Le
numéro de mémoire est affiché sur le display après utilisation de la touche [15]. Les paramètres sous
numéro 0 sont automatiquement chargés au démarrage de l’appareil. Les paramètres sont uniquement
accessibles et modifiables si aucun canal n’est activé.
5.4.1.1 Appel des paramètres de l’appareil
• Appuyez sur le bouton [15], 1 clignote;
• Sélectionnez au moyen du régulateur central [16] un numéro de mémoire compris entre 0 et 9. Le
display affiche les définitions pour ce numéro;
• Appuyez sur le bouton [14] pour charger les paramètres sélectionnés;
• Instaurez l’intensité au moyen du contrôleur [17];
• Appuyez sur le bouton [14] pour démarrer le programme si un programme de gonflement est instauré.

13
F
Le rappel des paramètres peut ce faire tant que 1 clignote, si on attend trop longtemps ou si on appuie
sur une autre touche que [14] ou [15] la procédure sera interrompue.
5.4.1.2 Sauvegarde des paramètres
• Sélectionnez le type de thérapie et tous les paramètres pour tous les canaux désirés.
• Appuyez sur le bouton [15], 1 clignote;
• Sélectionnez un numéro de mémoire compris entre 0 - 9 au moyen du régulateur central [16]. Le
display affiche les paramètres définis pour ce numéro et vous permet de contrôler les données qui
seront remplacées;
• Appuyez une deuxième fois sur le bouton [15] , 2 clignote. Le display affiche les nouvelles données à
sauvegarder.;
• Appuyez sur le bouton [14] pour exécutez la procédure de sauvegarde.
Le rappel des paramètres peut ce faire tant que 1 clignote, si on attend trop longtemps ou si on appuie
sur une autre touche que [14] ou [15] la procédure sera interrompue.
5.4.2 Protocoles
Un protocole est constitué d’un ou de plusieurs pas de traitement qui se suivent automatiquement suivant
un temps préalablement défini. Chaque pas définis le type de courant, les paramètres et durée de
traitement. Les paramètres sont classés suivant leur domaine d’action en clusters. Les protocoles sont
identifiés par un nombre à deux chiffres:
1:1 le premier chiffre est le numéro de cluster
1:1 le deuxième chiffre est le numéro de protocole
Le Endomed 482 à un certain nombre de protocoles préprogrammés qui peuvent être retrouvés à partir
du cluster 2. Chaque numéro de cluster à son propre domaine d’application. Ainsi par exemple sous le
numéro de cluster 2 sont rangés tous les traitements antalgiques et sous le numéro de cluster 3 tous les
protocoles favorisants une bonne circulation .Dans le « Manuel de thérapie « fourni sont repris une
synthèse de tous les clusters et des protocoles repris. De plus il est possible avec le Endomed 482 de
réaliser ses propres protocoles. Le numéro de cluster 1 est réservé aux protocoles à programmation libre.
Les protocoles pour électrothérapie peuvent être d’application pour des applications à un ou deux
canaux. Si un protocole à un canal est appelé, il faut au préalable choisir le numéro de canal sur lequel
sera appliqué ce protocole. La définition de canaux accouplés est toutefois autorisé, le protocole à un
canal es appliqué sur les deux canaux. Si un protocole à un canal est actif, on peut sur le deuxième
canal exécuté tout autre protocole à un canal. Protocole à deux canaux ne peuvent être chargés que
pour la définition « canaux accouplés »
5.4.2.1 Rappel d’un protocole
• Au moyen de la touche [7] et du régulateur central [16] choisissez le canal pour lequel le protocole doit
être chargé.
• Appuyer sur la touche [15]. 1 clignote sur le display;
• Au moyen du régulateur central [16] choisissez le numéro de protocole à partir de 1:1.
La durée totale du traitement du protocole sélectionné apparaît sur le display.;
• Appuyer sur la touche [14] pour charger le protocole;
• Définissez l’intensité au moyen du régulateur [17];
• Démarrez le traitement au moyen de la touche [14] pour autant qu’aucun programme de gonflement
n’a été défini.
Lors du déroulement du protocole la durée restante du temps de traitement, pour le pas en cours, est
affiché. A la fin de chaque pas un signal sonore court retentit.
A la fin du protocole le signal sonore standard « fin de thérapie » retentit et l’appareil quitte le mode
protocole.
Remarques:
• Lorsque un protocole est chargé, le numéro de protocole reste affiché sur le display
de manière à attirer l’attention que le mode protocole est activé. Derrière le numéro de protocole
apparaît le numéro du pas de traitement ainsi que le symbole correspondant 0.
• Un protocole chargé mais non actif peut être supprimé en poussant de nouveau sur la touche [15]. En
attendant un instant ou en poussant sur toute autre touche que [14] ou [15], l’appareil quittera le mode
protocole.
• Tous les paramètres du protocole chargé peuvent être modifiés. Au moyen de la touche [11]
choisissez Y et modifiez le numéro du pas de traitement au moyen du régulateur central [16].
Tous les paramètres du pas sélectionné peuvent être modifiés. N’oubliez pas de remettre le numéro
de pas de traitement à 1 après modifications.

14
F
• Un protocole chargé peut être exécuté à partir d’un pas de traitement quelconque.
Au moyen de la touche [11] choisissez Y et modifiez le numéro du pas de traitement au moyen du
régulateur central [16].
• Un pas de traitement peut être interrompu à tout moment en augmentant le numéro du pas. Au moyen
de la touche [11] choisissez Y et modifiez le numéro du pas de traitement au moyen du régulateur
central [16]. Le courant « patient » descendra à 0 mA . Le protocole peut être repris à partir du
nouveau numéro de pas de traitement défini en augmentant l’intensité au moyen du régulateur [17].
• Le protocole actif peut être arrêté avant terme en ramenant la durée de traitement du pas de
traitement actif sur 0. L’ appareil quittera alors le mode protocole.
5.4.2.2 Sauvegarde d’un protocole
Avant d’exécuter des protocoles modifiés, on peut les sauvegarder sous un numéro de cluster 1 pour un
usage ultérieur.
• Appuyer deux fois sur la touche [15]. 2 clignote sur le display;
• Au moyen du régulateur central [16] choisissez un numéro de protocole dans la limite 1:1 - 1:9. Sur le
display apparaît la durée totale du protocole qui doit être sauvegardé
• Appuyer sur la touche [14] pour exécuter la procédure de sauvegarde.
5.4.2.3 Composition d’un protocole
Sous le cluster 1 vous pouvez composez vos propres protocoles. Cluster 1 permet la réalisation de max.
10 protocoles composés chacun de max. 20 pas de traitement:
• Appuyer deux fois sur la touche [15]. 2 clignote sur le display;
• Au moyen du régulateur central [16] choisissez un numéro de protocole dans la limite 1:1 - 1:9.
• Choisissez 0 au moyen de la touche [11] et au moyen du régulateur central instaurez le numéro du
pas de traitement sur 1.
• Instaurez tous les paramètres du pas de traitement actuel.;
• Appuyer sur la touche [14] pour sauvegarder le pas de traitement. La sauvegarde est confirmée par un
léger signal sonre et le numéro de pas de traitement est augmenté de 1
• Répétez les deux dernières actions jusqu’à la fin de protocole;
• Fermez le protocole par un pas d’un durée de traitement égale à 0. Appuyer sur la touche [14] pour
sauvegarder ce pas de traitement. La sauvegarde est confirmée par un signal sonore long.
Remarques:
• Lorsque des types courants alternatifs différents se suivent ou lorsque le type de courant précédent
est identique au suivant, l’intensité reste la même indépendamment des modifications éventuelles de
paramètres tels par ex fréquence et durée de phase.
• Dans le cas d’un passage d’un courant alternatif vers courant continu ou un passage entre différents
types de courant continu, l’intensité serra automatiquement ramenée à 0 et vous devrez pour les pas
suivants instaurer de nouveau l’intensité.
5.5 Réactions à l'ouverture et à la fermeture
En présence de courant de sortie constant (CC), des effets indésirables de fermeture et d’ouverture de
circuit peuvent se manifester lorsque les électrodes ne sont pas bien posées ou qu’elles se détachent
totalement. Veiller à ce que le courant auquel est soumis le patient, en cas de CC, soit réglé sur 0 mA
lors de la pose et de l’enlèvement des électrodes. Si vous optez pour les techniques d’application
dynamiques, réglez de préférence sur voltage constant (CV).
5.6 Effets électrolytiques
En présence de courants à composantes de courants continus une électrolyse se produit sous les
électrodes. Afin d’absorber autant que possible les dépôts électrolytiques sous les électrodes et d’en
neutraliser au maximum les effets, nous recommandons d’utiliser les éponges livrées. Prenez soin que
les éponges soient parfaitement humides et que le côté épais de l’éponge se trouve entre l’électrode à
plaque en caoutchouc et le patient.
5.7 Commande à distance
Une commande à distance spéciale est disponible pour le Endomed 482 . Elle doit être raccordée sur la
fiche de raccordement [3-2]. La commande à distance dispose de deux régulateurs d’intensité pour la
définition de l’intensité des canaux et un arrêt d’urgence.

15
F
6 Entretien
6.1 Entretien technique
La sécurité électrique de l’appareil dépend de l’état du cordon d’alimentation et de sa protection à la terre.
Il est donc nécessaire de vérifier annuellement l’état de cette connexion . Nous avisons également
d’effectuer un contrôle annuel de tout l’appareil
Faites-le réviser soit par votre fournisseur, soit par un installateur Enraf-Nonius autorisé. Nous vous
conseillons également de tenir un dossier entretien à jour où sont recensés tous les entretiens. Dans
certains pays, c’est déjà une obligation.
L’entretien et les réparations ne peuvent être confiées qu’à un réparateur autorisé par Enraf-Nonius.
Enraf-Nonius n’est pas responsable des suites d’un entretien ou d’une réparation réalisées par une
personne non autorisée.
Le contrôle et l’entretien doivent être exécutés conformément à la procédure décrite dans le manuel de
service de l’appareil
L’ouverture de l’appareil par une personne non-autorisée est interdite et annule la garantie.
6.2 Nettoyage de l’appareil
Eteingnez l’appareil et enlevez l’adaptateur de la prise de courant, si celui-ci était branché.
Débrancher l’appareil et enlevez le câble d’alimentation. L’écran à cristaux liquides peut être nettoyé avec
un linge humide. Utilisez de l’eau tiède, éventuellement avec un détergent ménager (non abrasif, sans
alcool).
6.3 Nettoyage des accessoires
6.3.1 Electrodes et éponges
Les électrodes à plaque en caoutchouc et les éponges doivent être nettoyées à l’eau tiède. En présence
de souillure persistante, et afin de être désinfecter, on pourra utiliser une solution d’alcool à 70%. Tenir
compte que le noir des électrodes à plaque en caoutchouc peut tacher.
Après usage les éponges doivent être lavées à l'eau chaude avec un produit ménager. Vous devez les
rincer ensuite avec de l'eau et faire les sécher en les imbriquant.
Les éponges endommagées doivent être rem-placées.
La teneur locale en calcaire de l’eau peut selon sa dureté influer négativement sur la conductivité des
éponges; il peut être difficile d’obtenir l’intensité de courant souhaitée. Une baisse de conductivité peut
également être due à la désinfection des éponges. En ce cas, nous suggérons d’utiliser une solution
saline pour augmenter la conductivité de l’eau.
Lorsque les électrodes ne sont pas utilisées, il est préférable de retirer à chaque fois les éponges. Ceci
prolongera la durée de vie des électrodes et des éponges. Les éponges doivent être renouvelées
régulièrement. Il est souhaitable d’avoir toujours en réserve un jeu d’électrodes et d’éponges.
6.3.2 Câble de patient et câble adaptateur
Vérifier régulièrement que le câble n’est pas abîmé et qu’ il n’ y a pas de mauvais contact. Nous
conseillons d’avoir toujours un câble de patient en réserve.
Lors de l’utilisation d’un câble adaptateur celui-ci doit subir un contrôle quant à son bon état et sa bonne
connexion. Nous vous conseillons d’avoir un câble en réserve.
6.4 Informations pour l’environnement
Votre Endomed 482 contient des matériaux à recycler et/ou qui sont dangereux pour l’environnement.
Lors de la mise au rebut, à la fin de la durée de fonctionnement, des entreprises spécialisées peuvent
démonter votre Endomed 482 pour enlever les matériaux dangereux et récupérables. Ainsi, vous
contribuez à la protection de l’environnement.
Informez-vous des règles locales pour l’enlèvement de l’appareillage et des accessoires.

16
F
7 Conseil en cas de pannes
7.1 L’écran ne s’éclaire pas
• Vérifiez si l’adaptateur et le câble sont branchés à l’unité et à la prise secteur.
7.2 Le cadran affiche un numéro (ou code)
L’appareil a détecté une anomalie au cours du test automatique. Retirez un accessoire éventuellement
branché et remettez l’appareil en marche. Contactez votre distributeur si le code apparaît à nouveau.
L’appareil est probablement défectueux.
7.3 Rupture de contact dans la mode CC
Si dans la mode CC le contact est rompu, l'appareil l'indiquera avec un signal. Afin d'éviter des
sensations désagréables pour le patient quand la tête de traitement ou l'électrode sera replacé sur la
surface en traitement, le courant se réduira à 0. Pour continuer le traitement, vous devez ajuster le de
nouveau courant.
7.4 Pas ou pas assez de courant de sortie
• Vérifier le câble de patient pour une éventuelle rupture ou un mauvais contact.
• Vérifier que les éponges sont suffisamment humides.
• Utiliser une solution saline, si nécessaire.
• Nettoyer les électrodes et vérifier si le contact est bon.
• En cas de thérapie combiné le courant de sortie maximum est limité jusqu’a 60 mA.
7.5 Contrôle du panneau de commande
Lorsque vous allumez l’appareil tout en appuyant simultanément les touches [9] et [10], tous les
segments du display s’allumeront ce qui vous permet d’en vérifier le fonctionnement. Si vous appuyez sur
les touches ou tournez les boutons de régulation, un signal sonore retentit .Pour quitter ce mode il faut
couper l’appareil.
8 Spécificités
8.1 Spécificités
Électrothérapie : généralités
Nombre de canaux : 2
Caractéristique de courant : Constant Curent (CC) ou Constant Voltage (CV)
Paramètres de résolution : 0,2 mA
Minuterie : 0 - 60 minutes
Alternat ion de polarité courant continu : manuel
L’intensité maximale est atteinte dans les spécifications jusqu’à une charge de 500 Ω (CC)
Courant pulsés biphasés symétriques et asymétriques TENS
Fréquence : 1 - 200 Hz
Durée de phase : 10 - 400 µs
Fréquence Burst : 0 - 9 Hz (Burst et spectre s’exclussent !)
Modulation de fréquence (spectre) : 0 - 180 Hz
Balayage de spectre : 1/1, 6/6, 12/12 en 1/30/1/30 s
Programmes en cours : Temps d’augmentation 0 - 9 s
Temps de maintien 1 - 60 s
Temps de réduction 0 - 9 s
Temps de pause 1 - 60 s
Temps de retardement 0,1 - 80 s
Intensité : 0 - 140 mA. Pour certaines combinaisons de largeur
de pulsion, fréquence et spectre, la possibilité réglage
est réduite jusqu’a max. 90 mA afin de répondre aux
valeurs limites de CEI 60601-2-10 .

17
F
High voltage (Twin pulses)
Fréquence : 1- 200 Hz
Modulation de fréquence (spectre) : 0 – 90 %
Balayage de spectre : 1/1, 6/6, 12/12 en 1/30/1/30 s
Intensité : 0 – 500 Volt
Mode alternée:
Temps d’alternat ion : 5 à 50 secondes
Temps d'augmentation : 0,1 – 1 secondes
Mode non alternée:
Programmes en cours : comme les courants TENS
Microcurrent
Amplitude : 10 µA - 1 mA
Tension maximale : 200 Volt
Mode alternée:
Fréquence : 0 – 1000 Hz
Temps d’alternat ion : 0,1 – 10 secondes (le temps d’alternat ion est
tributaire de la fréquence de pulsion)
Temps d'augmentation : 0,1 – 1 secondes
Mode non alternée:
Fréquence : 0,1 – 1000 Hz
Programmes en cours : comme les courants TENS
Courant alternatif interrompu, Stimulation Russe
Fréquence de l’onde de porteuse : 2 - 10 kHz
Fréquence Burst : 0 - 100 Hz
Rapport burst / pause : 1:1, 1:2, 1:4 en 1:5
Programmes en cours : comme les courants TENS
Intensité : 0 - 100 mA
Type de courant dia dynamique
Possibilités : MF, DF, CP, LP et CPid
Intensité : 0 - 70 mA
Programmes en cours (MF et DF) : comme les courants TENS
Courant Faradique
Possibilités : : 2-5 courant selon Träbert (choix par défaut pulsé
rectangulaire)
Durée de phase : 0,02 - 1000 ms pour le courant pulsé rectangulaire
: 0,1 - 1000 ms pour le courant pulsé triangulaire
Intervalle de phases : 5 - 5000 ms
Programmes en cours : comme les courants TENS
Intensité : 0 - 80 mA
Courant continu interrompu
Fréquence : 8000 Hz
Duty cycle : 95%
Intensité : 0 - 40 mA
Interférence bipolaire
Fréquence l’onde de porteuse : 2 - 10 kHz
Fréquence de stimulation (AMF) : 0 - 200 Hz
Modulation de fréquence (spectre) : 0 - 180 Hz.
Balayage de spectre : 1/1, 6/6, 12/12 en 1/30/1/30 s
Programme de cours : comme les courants TENS
Intensité : 0 - 100 mA.
Interférence classique
Fréquence l’onde de porteuse : 2 - 10 kHz
Fréquence de stimulation (AMF) : 0 - 200 Hz
Modulation de fréquence (spectre) : 0 - 180 Hz
Balayage de spectre : 1/1, 6/6, 12/12 en 1/30/1/30 s
Programme de cours : ne peut être défini
Intensité : 0 - 100 mA
Balance : Via régulateur central

18
F
Interférence Iso planaire
Fréquence l’onde de porteuse : 2- 10 kHz
Fréquence de stimulation (AMF) : 0 - 200 Hz
Modulation de fréquence (spectre) : 0 - 180 Hz
Balayage de spectre : 1/1, 6/6, 12/12 en 1/30/1/30 s
Programme de cours : ne peut être défini
Intensité : 0 - 100 mA
Dipool vector automatique
Fréquence l’onde de porteuse : 2- 10 kHz
Fréquence de stimulation (AMF) : 0 - 200 Hz
Modulation de fréquence (spectre) : 0 - 180 Hz
Balayage de spectre : 1/1, 6/6, 12/12 en 1/30/1/30 s
Programme de cours : ne peut être défini
Intensité : 0 - 100 mA
Vitesse de rotation vector : réglable de 1 en 10 s
Dipool vector manuel
Fréquence l’onde de porteuse : 2- 10 kHz
Fréquence de stimulation (AMF) : 0 - 200 Hz
Modulation de fréquence (spectre) : 0 - 180 Hz
Balayage de spectre : 1/1, 6/6, 12/12 en 1/30/1/30 s
Programme de cours : ne peut être défini
Intensité : 0 - 100 mA
Position : 360 º
Fonctions mémoires
Paramètre de l’appareil 0 : Définitions de démarrage.
Paramètres de l’appareil : 10 mémoires à programmation libre
Protocoles programmables : 10
Protocoles pré-programmés : 50
8.2. Données Techniques
Adaptateur
Type : ENA-1550
Voltage : 100 - 240 V, +/- 10 %
Fréquence : 50/60 Hz
Voltage de sortie : 15 V.
Courant de sortie : 3,3 A.
Appareil
Classe de risque : IIa (suivant les Dispositions Médicales et des Moyens
d’aides (93/42/CEE))
Classe de sécurité : I* type BF** , selon CEI 60601-1
Courant de fuite patient : meilleur que le exigence CEI (< 100 µA)
Idem, dans les conditions
de premier défaut : meilleur que le exigence CEI (< 500 µA)
Approbations : CE-MDD (TÜV Rheinland)
Dimensions : 29 x 28 x 11 cm.
Poids : 4,0 kg.
Conditions de transport et de stockage
Température ambiante : -10° à +50° C
Humidité relative : 10 à 100 %
Pression atmosphérique : 500 à 1060 hPa
Conditions d’usage normal
Température ambiante : 10° à 40° C
Humidité relative : 10 à 90 % (non condensant)
Pression atmosphérique : 500 à 1060 hPa

19
F
8.3. Classification
Classe médicale IIa
Cet appareil répond de la Directive 93/42/CEE.
Classe de sécurité I
L’appareil est pourvu d’une prise de terre et doit être raccordé à une prise reliée à la terre.
BF : L’appareil possède un circuit patient flottant.
Norme de sécurité internationale CEI 60601-1
L’appareil répond à la norme internationale pour l’appareillage électro-médical CEI 60601-1 et CEI
60601-2-10 (stimulateurs de nerfs et de muscles).
Sous réserve de modifications techniques.
9 Données de commande
Pour les données en vue d’une commande du Endomed 482, des accessoires standards et des
accessoires supplémentaires, nous vous renvoyons au catalogue de kinésithérapie.


1
E
1 Introducción
1.1 General
El Endomed 482 está equipado con dos canales completos de electroterapia idénticos multi- funcionales.
Los canales de electroterapia pueden estar en combinación o totalmente independientes. El canal de
electroterapia restante puede mientras tanto ser usado independientemente. Estas oportunidades de la
gran cantidad posible de corrientes disponibles hacen a esta unidad la solución última para sus fines
profesionales.
Los equipos presentados en estas instrucciones de manejo han sido diseñados para ser usados sólo por
personal especializado en fisioterapia, rehabilitación y/o disciplinas afines.
1.2 Posibilidades de terapia
Electroterapia con baja frecuencia, media frecuencia, TENS, alto voltaje y micro-corriente. Mediante la
aplicación de estas corrientes es posible entre otros, disminuir el tono muscular, gestionar el dolor y
aumentar la circulación y la regeneración del tejido.
1.3 Finalmente
Usted ha hecho una gran elección al seleccionar el Endomed 482. Estamos seguros que su unidad
continuará satisfaciéndole durante muchos años de uso. Sin embargo, si tiene cualquier duda o
sugerencias, por favor contacte con su distribuidor.
2 Seguridad
2.1 Notas preliminares
Es importante leer detenidamente estas instrucciones de manejo antes de usar el Endomed 482.
Asegúrese por favor que éstas instrucciones están disponibles para todo el personal que trabaja con el
equipo.
Prestar atención a lo siguiente antes de usar el Endomed 482 :
1. Mantenerse informado de las contra-indicaciones (ver capitulo 3).
2. El aparato no debe usarse cuando haya cerca un equipo de onda corta (ej. a menos de 2 metros).
3. El paciente debe estar siempre a la vista del fisioterapeuta.
4. El aparato no debe usarse en las llamadas “salas húmedas” (salas de hidroterapia).
El fabricante no se hace responsable de los resultados por uso indebido del aparato o por cualquier otro
fin que no sea el descrito en estas instrucciones de manejo.
2.2 General
Cuando se enciende la unidad todas las funciones vitales son controladas por un microprocesador
interno. Durante el funcionamiento de la unidad, la salida de corriente actual es continuamente medida y
comparada a la solicitada. Si se detecta una situación de fallo, la unidad se desconectará de la corriente
inmediatamente.
2.3 Exclusiones
No se debe usar la electroterapia para las aplicaciones siguientes:
• Tratamiento intercraneales, como terapia de sueño;
• Tratamiento transcordiales (poner los electrodos sobre el pecho puede aumentar el riesgo al
corazón);
• Tratamiento occipital cervical.
2.4 Densidad de corriente
La norma IEC 60601-2-10 avisa no aplicar una densidad de corriente mayor de 2 mA efectivo. Se puede
calcular la máxima corriente de paciente y efectiva para cada electrodo, con multiplicar la superficie de
contacto (en cm²) por 2 mA/cm².

2
E
Cuidar que los electrodos están colocados de tal manera, que hay buen contacto con la piel en toda la
superficie.
NB. Usando electrodos pequeños en combinación con una amplitud alta puede tener como efectos
irritaciones de la piel o aún quemaduras.
2.5 Interferencia electromagnética
La conexión simultánea de un paciente al Endomed 482 y los aparatos de frecuencia alta puede causar
quemaduras en el sitio de los electrodos estimulantes. Vea el Capitulo 4 para más informaciones.
2.6 Limitación de responsabilidad
El máximo permitido y aplicable por ley, en ningún caso Enraf-Nonius o sus proveedores o distribuidores
serán responsables por cualquier daño indirecto, especial, incidental o consecuencial que se produzca
por el uso o inhabilidad para usar el producto, incluyendo, sin limitación, daños por pérdida de buena
voluntad, trabajo y productividad, fallo de ordenador o mal funcionamiento, o cualquier otro daño
comercial o pérdidas, incluso si se avisa de esa posibilidad, y sin tener en cuenta los términos legales o
la teoría de equidad (contrato, agravio u otra cosa) en la que se basa la demanda. En cualquier caso, la
responsabilidad integra de Enraf-Nonius bajo cualquier provisión de este acuerdo no excederá de la
suma total del precio pagado por este producto o el precio para el apoyo del producto recibido por Enraf-
Nonius bajo un acuerdo de apoyo comercial (si los hay), con la excepción de muerte o daño personal
causado por negligencia de Enraf-Nonius aplicable a la ley que prohíbe la limitación de daños en tales
casos.
Enraf-Nonius no puede mantener la responsabilidad por cualquier consecuencia resultante de la
información incorrecta suministrada por su personal, o errores incluídos en este manual y / o en otra
documentación acompañada (incluida documentación comercial)
La parte contraria (el usuario del producto o sus representantes) descargará a Enraf-Nonius de cualquier
queja originada por terceras partes, cualquiera que sea la naturaleza o cualquiera que sea la relación
con la parte contraria.
3 Indicaciones y Contra-indicaciones
Consultar también los manuales de terapia opcionales con el aparato.
3.1 Indicaciones
3.1.1 Electroterapia
Diagnóstico, electropalpación para:
• puntos dolorosos;
• puntos desencadenantes;
• áreas hiperestéticas;
• puntos de estimulación motora;
• curva I/t
La terapia:
A. Reducción del dolor en:
• puntos dolorosos;
• puntos desencadenantes;
• áreas hiperestéticas.
B. Trastornos del sistema vegetativo, como:
• el síndrome hombro-mano;
• la enfermedad de Raynaud;
• la enfermedad de Buerger;
• la distrofia de Sudeck;
• con trastornos neurológicos;
• mialgias

3
E
C. Estimulación muscular:
• para restablecer la sensación de movimiento;
• después de atrofia;
• de los esfínteres internos y externos en el tratamiento de incontinencia fecal;
• en rehabilitación;
• para fortalecimiento muscular (deportes);
• con trastornos neurológicos.
D. Iontoforesis.
E. Cicatrización:
• defectos cutáneos a causa de trastornos de la circulación periférica;
• heridas postoperativas.
3.2 Contraindicaciones específicas absolutas
3.2.1 Electroterapia
• fiebre;
• tumores;
• tuberculosis;
• inflamaciones locales;
• trombosis;
• embarazo;
• marcapasos cardíaco;
• implantes metálicos.
4 Instalación
4.1 Conexión
• Las conexiones de la red eléctrica deben cumplir con las regulaciones nacionales de acuerdo a las
salas médicas.El equipo tiene una conexión con toma a tierra, y debe ser conectado a un enchufe con
toma a tierra.
• Antes de conectar este aparato a la red, comprobar que el voltaje y la frecuencia establecidos en la
placa tipo se corresponden con los de la red eléctrica.
• El adaptador es una parte del circuito en que la seguridad del aparato depende en parte. La
aprobación del Endomed 482 son válidos solo si se usan en combinación con este tipo de adaptador,
ENA-1550.
No está permitido conectar el Endomed 482 a cualquier otro tipo de adaptador que el tipo ENA-
1550
4.2 Conexión del adaptador de red
• Conectar el adaptador de red suministrado al conector [3-1]
• Conectar el adaptador de red a un enchufe. La lámpara [6] indica que el aparato está conectado a la
red y preparado.
4.3 Encendido y auto test
• Encender la unidad usando el interruptor On/Off [1].
• Inmediatamente después de encenderse, la unidad realiza un auto chequeo.
Al final del auto chequeo se oye un beep. Cuando se encuentra un error, aparecerá un código de error
en el display. Ver sección 7 para detalle.
4.4 Desconectar de la red
• Apagar el Endomed 482, usando el interruptor de red [1].
• Desenchufar el enchufe de adaptador.

4
E
4.5 Funcionamiento con bateria (opcional)
El aparato puede funcionar independiente de la red. Para hacer esto posible, primero debe ser instalada
una batería. Esto se hace de la manera siguiente:
• Apagar el aparato y sacar el adaptador de red del conector [3-1].
• Poner el aparato boca abajo y sacar los dos tornillos fijando la tapa compartimento de la bateria al
fondo del aparato .
• Conectar el cabezal rojo al polo positivo (+) de la bateria y el cabezal negro al polo negativo (-) .
• Deslizar la bateria en su compartimento.
• Readjuntar la tapa compartimento de la bateria usando los dos tornillos.
• Reconectar el adaptador de red al conector [3-1].
Con un adaptador de red conectado, la bateria se carga automáticamente, independiente de si está
encendido/apagado [1]. Recomendamos usar el aparato con el adaptador de red conectado siempre que
sea posible. Esto incrementará la vida de la bateria.
Recomendamos usar explicitamente las baterias suministradas por Enraf-Nonius de tipo 2601.016. La
bateria contiene material que es nocivo para el medioambiente. Deberá seguir las normas locales
cuando disponga de la batería. Ver tambien capitulo 6.4.
4.6 Instalación
• No instalar la unidad en un sitio cercano a fuentes de calor como radiadores.
• Evitar la exposición a la luz directa, lluvia, exceso de polvo, humedad, vibraciones mecánicas y
shocks.
• Los teléfonos inalámbricos no deben usarse cuando está cerca la unidad.
• Esta unidad no debe utilizarse en las llamadas “salas húmedas” (salas de hidroterapia).
• La unidad tiene que ser instalada de tal manera que ningún líquido pueda entrar.
• Utilizar siempre los adaptadores de red suministrados por Enraf-Nonius tipo ENA-1550.
En caso de que cualquier líquido entrara en la estructura del equipo, desenchufar la unidad de la red (si
está conectada) y que un técnico autorizado lo compruebe.
La conexión de los accesorios distintos de las prescritas por Enraf-Nonius puede perjudicar la
seguridad del paciente así como el correcto funcionamiento del Endomed 482, y por lo tanto no se
permite.
4.7 Interferencia Electromagnética
• El trabajar cerca de unidades de terapia de onda corta o microondas (ej. a menos de 2 metros)
puede producir inestabilidad en el Endomed 482.
• Para evitar la interferencia electromagnética, advertimos utilizar grupos de red separados (fases) para
el Endomed 482 y los equipos de onda corta y microondas, y mantener una distancia al menos de 2
metros entre el Endomed 482 y estos equipos.
• Asegurarse que los cables de la red de la unidad de onda corta y microondas no están cerca del
Endomed 482 ni del paciente.
Si persisten problemas de interferencia electromagnética, contacte con su proveedor.
5 Operación
5.1 Controles
5.1.1 Aparato
(Ver imagen)
[1] Interruptor de On/Off
Con este interruptor el Endomed 482 se enciende / apaga.
[2] Número de tipo/pegatina de advertencia
Se suministra con la unidad, tipo y número de serie, así como información de conexión como voltage de
red y consumo máximo de corriente.

5
E
[3-1] Conector para adaptador de red
[3-2] Enchufe para control remoto
Para conexión del control remoto opcional.
[4-1] Conexión cable de paciente para Electroterapia
5.1.2 Panel de control
(Ver imagen)
[5] Indicador de batería
Indicación para batería. (Solo cuando se conecta la batería opcional)
Luz verde: batería está totalmente cargada
Luz parpadeando en verde : batería parcialmente descargada, conectar el adaptador de red
Luz amarilla: batería cargada insuficientemente, terapias discapacitadas, conectar adaptador de red
Sin Luz: batería casi vacía, no hay batería conectada o defectuosa, conectar adaptador de red
[6] Indicador de adaptador de red
Esta lampara indica que la unidad está conectada a la fuente de alimentación.
[7] Elecciones de terapia
Con este botón Vd. puede elegir la terapia: electroterapia, selección de canal de corriente, canales de
corriente unidos, intervalo entre pasos de programa.
[8] Elecciones de formas de corriente
Este botón es para seleccionar las diferentes formas de corriente.
[9] Botón de opción para:
Onda portadora, anchura de pulso, frecuencia de microcorriente, tipo de interferencia, modo alternante
(Alto Voltaje y Microcorriente)
[10] Botón de opción para:
Frecuencia de pulso, intervalo de fase, frecuencia burst (estimulación Rusa ), posición de vector,
balance, formas de corriente Diadinámica, frecuencia de modulación.
[11] Botón de opción para:
Programa de modulación, Duty Cycle (estimulación rusa), Frecuencia de Burst (TENS) y número de paso
de tratamiento (protocolos pre-programados).
[12] Botón de opción para:
Programa de sobre corriente, vector de tiempo de rotación y de tiempo
[13] Botón de opción para:
Corriente de canal 1 y 2, modo CC/CV, indicador de potencia y polaridad.
[12]+[13] Parada de Emergencia.
Pulsando los dos botones al mismo tiempo la terapia en todos los canales parará inmediatamente
[14] Botón de aceptar
Aceptar seleccion de corriente en forma de onda, los protocolos pre-programados e iniciar los programas
de sobre corriente.
[15] Botón de memoria
Generar las funciones de memoria y rellamar a los programas de guardados
[16] Controlador central
Controlador para ajustes de todas las pruebas y parámetros.
[17] Controlador de intensidad
Controlador para ajustes de la intensidad en canal 1 y 2. En modo de 4-polos (interferencia) este
controlador ajusta la intensidad en ambos canales juntos.
[19] Símbolo de Intervalo
El símbolo indica el intervalo entre dos pasos de programa de un programa secuencial.

6
E
5.2 Funcionamiento de la unidad
5.2.1 Introduccion
5.2.1.1 Encender el aparato
Encender el aparato con el interruptor [1]. El aparato ejecuta un autochequeo, comprobando todas las
funciones importantes y presenta los ajustes de inicio. Los ajustes de inicio son ajustables en memoria
localización 0. Para personalizar los ajustes de inicio, ver capitulo 5.4, Funciones de Memoria.
5.2.1.2 Terapia y selección de canal
El Endomed 482 está equipado con dos canales de electroterapia y un canal de ultrasonido. Estos
canales puede ser ajustados independientemente, cada canal ofrece su propio ajuste de parámetros y
tiempo de tratamiento. Tambien es posible unir canales. Usar el botón [7] para diferenciar entre las
funciones de terapia básicas de Electroterapia el controlador central [16] para seleccionar o unir canales.
Están disponibles las siguientes selecciones:
U electroterapia en corriente de 1 canal
V electroterapia en corriente de 2 canales
electroterapia en canales unidos
Tener en cuenta que el uso independiente de los canales de electroterapia requiere ajustar todos los
parámetros en ambos canales. Cuando no se desea esto, o cuando no se necesita el uso independiente,
usted puede tambien unir los canales. Algunas formas de corriente, tales como corrientes interferenciales
son solo posibles en canales unidos.
5.2.1.3 Selección de corriente en forma de onda
Pulsar el botón [8]. Todas las formas de onda aparecen en el display, parpadeando la corriente
seleccionada. Seleccionar una corriente usando el controlador central y pulsando el botón [14] para
aceptar la selección.
Cuando Vd. selecciona (grupo de corriente interferencial) o (grupo de corriente diadinamica), se
le pedirá seleccionar un tipo de corriente dentro de este grupo. Seleccionar el tipo de corriente usando el
controlador central [16] y pulsar el botón [14] para aceptar la selección.
5.2.1.4 Ajuste de parámetros
Pulsar los botones [9] y [13] para seleccionar un parámetro. Un botón afecta a todos los parámetros que
están en linea con él en el display. Una vez seleccionado se puede ajustar un parámetro, usando el
controlador central [16]. Un parámetro puede ser modificado, tanto tiempo como el icono identificador
esté parpadeando. El display solo mostrará esos parámetros, que son aplicables a la terapia
seleccionada.
5.2.1.5 Tiempo de tratamiento
Pulsar el botón [12] para seleccionar el tiempo de tratamiento. El icono min está parpadeando. El display
muestra el tiempo de tratamiento del canal, que está presente normalmente (seleccionado bajo 5.2.1.2.)
en el display. Como recordatorio, un indicador de canal está parpadeando por encima del valor del
tiempo de tratamiento. Solo el tiempo de tratamiento de este canal puede ahora ser modificado, usando
el controlador central [16].
Cuando están activos uno o más canales el < está parpadeando. Hay disponible una indicación de los
canales activos corrientemente por encima del valor de tiempo de tratamiento.
5.2.1.6 Programas de sobre corriente
Algunas corrientes pueden ser metidas en un programa de sobre corriente. Pulsar el botón [12] para
seleccionar secuencialmente tiempo de rampa de subida 3, tiempo de mantenimiento 4, tiempo de
rampa de bajada 5 y tiempo de intervalo 7. Ajustar estos parámetros usando el controlador central
[16].
Cuando loa canales de corriente están unidos, los programas de sobre corriente son idénticos en ambos
canales. En este modo se puede ajustar un tiempo de demora entre el inicio de un programa de corriente
en el canal 1 y en el canal 2. Esto se hace de la manera siguiente:
Pulsar el botón [13] y seleccionar el canal 2 usando el controlador central [16].
Después pulsar el botón [12] para seleccionar el tiempo de demora 6 y ajustarlo usando el
controlador central [16].
5.2.1.7 Intensidad de corriente
La intensidad de coriente se ajusta usando el controlador de intensidad [17]. La intensidad de corriente
puede ser ajustada solo cuando el reloj ha sido ajustado.
El indicador de canal @, seguido por el canal número A o C indica el canal, que está presente
corrientemente en el display y que puede ser ajustado. Vd. puede cambiar el número de canal, usando el

7
E
botón [13] y el controlador central [16]. Esta selección funciona en paralelo a la selección del canal
descrita en párrafo 5.2.1.2.
En la corriente de 4-polos en formas de onda el controlador de intensidad [17] funciona en ambos
canales simultáneamente. En el display esto se indica mediante A B C, en el que el canal que
normalmente es visualizado está parpadeando. En este caso un control de balance está disponible
fácilmente para la corriente interferencial clásica en forma de onda (ver párrafo 5.2.2.9. para detalles).
La unidad de la intensidad de corriente visualizada depende de la corriente en forma de onda
previamente seleccionada y puede ser expresada en mA, µA o V.
Un tratamiento es iniciado ajustando la intensidad de corriente, a menos que un programa de sobre
corriente haya sido seleccionado. Pulsar el botón [14] para iniciar un tratamiento que incluya un
programa de sobre corriente.
Los indicadores > y ? se mostrarán hacia arriba cuando la corriente está fluyendo normalmente desde
los canales correspondientes.
Un valor de intensidad de corriente parpadeando indica un mal contacto eléctrico con el paciente.
5.2.1.8 Modo CC/CV
Dependiendo de la corriente en forma de onda seleccionada, los canales de electroterapia pueden ser
usados en modo de Corriente Constante o Voltaje Constante. Aconsejamos usar el modo CV con
aplicaciones de electrodo dinámicas. En modo CV la corriente de salida depende del contacto eléctrico
con el paciente y puede por tanto variar. Vd. puede cambiar elajuste CC/CV usando el botón [13] y el
controlador central [16].
5.2.1.9 Polaridad de corriente
Cuando se usan corrientes DC, el terminal rojo es el terminal positivo y el negro el terminal negativo.
Para cambiar manualmente la polaridad, pulsar el botón [13] y seleccionar F o G usando el controlador
central [16]:
F: standard
G: reverso
El cambiar manualmente la polaridad durante un tratamiento provocará un descenso a 0, seguida por
una corriente con la polaridad contraria, elevándose a un valor igual al 80% del valor previsto.
Para activar el reverso de la polaridad automática de las formas de corriente de voltaje Alto y
Microcorriente, seleccionar o con el botón [9] y el controlador central [16]:
: alternante
: no alternante
Con la corriente en forma de onda interrumpida DC no es posible hacer el reverso de la polaridad de
corriente.
5.2.1.10 Parada de Emergencia.
Pulsando los dos botones [12] y [13] al mismo tiempo la terapia en todos los canales parará
inmediatamente.
5.2.2 Electroterapia.
5.2.2.1 Interferencia de dos-polos
• Pulsar el botón [7] seleccionar corriente . Usar el controlador central [16] para seleccionar el canal
deseado o unir los canales;
• Pulsar el botón [8], seleccionar con el controlador central [16] y pulsar el botón [14] para aceptar;
• Para seleccionar la corriente interferencial de 2-polos:
Seleccionar con el controlador central [16] y pulsar el botón [14] para aceptar;
• Selección de onda portadora:
Seleccionar con el botón [9] y ajustar con el controlador central [16];
• Frecuencia de pulso:
Seleccionar con el botón [10] y ajustar con el controlador central [16];
• Frecuencia de modulación:
Select * con el botón [10] y ajustar con el controlador central [16];
• Tiempo de modulación (espectro):
Seleccionar , con el botón [11] y ajustar con el controlador central [16];
• Tiempo de tratamiento:
Seleccionar < con el botón [12] y ajustar con el controlador central [16];
• Programa de sobre corriente (cuando se desee):
• Rampa de subida:
Seleccionar 3 con el botón [12] y ajustar con el controlador central [16];
• Tiempo de mantenimiento:
Seleccionar 4 con el botón [12] y ajustar con el controlador central [16];
• Rampa de bajada:

8
E
Seleccionar 5 con el boton [12] y ajustar con el controlador central [16];
• Tiempo de intervalo:
Seleccionar 7 con el botón [12] y ajustar con el controlador central [16];
• Tiempo de retraso (solo disponible con canales unidos):
Pulsar el botón [13] y seleccionar canal 2 con el controlador central.
Seleccionar 6con el botón [12] y ajustar con el controlador central;
• Seleccionar D o E con el botón [13] y ajustar con el controlador central [16];
• Seleccionar el canal deseado con el botón [13] y el controlador central [16]. Ajustar la intensidad con
el saliente [17];
• Para iniciar la terapia pulsar el botón de accept [14].
5.2.2.2 Estimulación Rusa
• Pulsar el botón [7] y seleccionar corriente . Usar el controlador central [16] para seleccionar el canal
deseado o unir los canales;
• Pulsar el botón [8], seleccionar con el controlador central y pulsar el botón [14] para aceptar;
• Selección de onda portadora:
Seleccionar con el botón [9] (kHz) y ajustar con el controlador central [16];
• Frecuencia Burst:
Seleccionar con el botón [10] y ajustar con el controlador central [16];
• Burst / rango de intervalo:
Seleccionar + con el botón [11] y ajustar con el controlador central [16];
• Tiempo de tratamiento:
Seleccionar < con el botón [12] y ajustar con el controlador central [16];
• Programa de sobre corriente (cuando se desee):
• Rampa de subida:
Seleccionar 3 con el botón [12] y ajustar con el controlador central [16];
• Tiempo de mantenimiento:
Seleccionar 4 con el botón [12] y ajustar con el controlador central [16];
• Rampa de bajada:
Seleccionar 5 con el boton [12] y ajustar con el controlador central [16];
• Tiempo de intervalo:
Seleccionar 7 con el botón [12] y ajustar con el controlador central [16];
• Tiempo de retraso (solo disponible con canales unidos):
Pulsar el botón [13] y seleccionar canal 2 con el controlador central.
Seleccionar 6con el botón [12] y ajustar con el controlador central;
• Seleccionar D o E con el botón [13] y ajustar con el controlador central [16];
• Seleccionar el canal deseado con el botón [13] y el controlador central [16]. Ajustar la intensidad con
el saliente [17];
• Para iniciar la terapia pulsar el botón de accept [14].
5.2.2.3 Corriente pulsada bifásico Asimétrica y Simétrica (TENS)
• Pulsar el botón [7] y seleccionar . Usar el controlador central [16] para seleccionar el canal deseado
o unir los canales;
• Pulsar el botón [8], seleccionar o con el controlador central [16] y pulsar el botón [14] para
aceptar;
• Anchura de pulso:
Seleccionar con el botón [9] y ajustar el valor con el controlador central [16];
• Frecuencia de pulso:
Seleccionar con el botón [10] y ajustar con el controlador central [16];
• Haga su elección entre frecuencia de modulación y modo burst ya que estos dos opciones son
mutuamente excluyentes;
• Si se quiere modulación de frecuencia:
Controlar primero si la frecuencia de Burst está en 0:
• Seleccionar . con el boton [11] y ajustar su valor a cero con el controlador central [16];
• Frecuencia de modulación:
Seleccionar * con el botón [10] y ajustar con el controlador central [16];
• Tiempo de modulación (Espectro):
Seleccionar , con el botón [11] y ajustar con el controlador central [16];
• Si se quiere Burst:
Controlar primero si la frecuencia de modulación está en 0:
• Seleccionar * con el botón [10] y ajustar su valor a acero con el controlador central [16];
• Frecuencia Burst:
Seleccionar . con el botón [11] y ajustar el valor con el controlador central [16];
• Tiempo de tratamiento: Seleccionar < con el botón [12] y ajustar con el controlador central [16];

9
E
• Programa de sobre corriente (cuando se desee):
• Rampa de subida:
Seleccionar 3 con el botón [12] y ajustar con el controlador central [16];
• Tiempo de mantenimiento:
Seleccionar 4 con el botón [12] y ajustar con el controlador central [16];
• Rampa de bajada:
Seleccionar 5 con el boton [12] y ajustar con el controlador central [16];
• Tiempo de intervalo:
Seleccionar 7 con el botón [12] y ajustar con el controlador central [16];
• Tiempo de retraso (solo disponible con canales unidos):
Pulsar el botón [13] y seleccionar canal 2 con el controlador central.
Seleccionar 6con el botón [12] y ajustar con el controlador central;
• Seleccionar D o E con el botón [13] y ajustar con el controlador central [16];
• Seleccionar el canal deseado con el botón [13] y el controlador central [16]. Ajustar la intensidad con
el saliente [17];
• Para iniciar la terapia pulsar el botón de accept [14].
5.2.2.4 Corriente pulsada Triangular –y monofásica rectangular
Pulsar el botón [7] y seleccionar corriente . Usar el controlador central [16] para seleccionar el canal
deseado o unir los canales;
• Pulsar el botón [8], seleccionar o con el controlador central [16] y pulsar el botón [14] para
aceptar;
• Anchura de pulso:
Seleccionar con el botón [9] y ajustar con el controlador central [16];
• Intervalo de pulso:
Seleccionar con el boton [10] y ajustar con el controlador central [16];
• Tiempo de tratamiento:
Seleccionar < con el botón [12] y ajustar con el controlador central [16];
• Programa de sobre corriente (cuando se desee):
• Rampa de subida:
Seleccionar 3 con el botón [12] y ajustar con el controlador central [16];
• Tiempo de mantenimiento:
Seleccionar 4 con el botón [12] y ajustar con el controlador central [16];
• Rampa de bajada:
Seleccionar 5 con el boton [12] y ajustar con el controlador central [16];
• Tiempo de intervalo:
Seleccionar 7 con el botón [12] y ajustar con el controlador central [16];
• Tiempo de retraso (solo disponible con canales unidos):
Pulsar el botón [13] y seleccionar canal 2 con el controlador central.
Seleccionar 6con el botón [12] y ajustar con el controlador central;
• Seleccionar D o E con el botón [13] y ajustar con el controlador central [16];
• Polaridad:
Seleccionar F o G con el botón [13] y ajustar con el controlador central [16];
• Seleccionar el canal deseado con el botón [13] y el controlador central [16]. Ajustar la intensidad con
el saliente [17];
• Para iniciar la terapia pulsar el botón de accept [14].
5.2.2.5 Micro corriente
• Pulsar el botón [7] seleccionar corriente . Usar el controlador central [16] para seleccionar el canal
deseado o unir los canales;
• Pulsar el botón [8], seleccionar con el controlador central [16] y pulsar el botón [14] para aceptar;
• Frecuencia:
Seleccionar (Hz or kHz) con el boton [9] y ajustar con el controlador central [16];
• Alternada o no alternada:
Seleccionar o con el botón [9] y ajustar con el controlador central [16];
• Tiempo de tratamiento:
Seleccionar < con el botón [12] y ajustar el tiempo con el controlador central [16]
• Secuencia de alternación (seleccionado solo con ):
• Rampa de subida:
Seleccionar 3 con el botón [12] y ajustar con el controlador central [16];
• Tiempo de mantenimiento:
Seleccionar 4 con el botón [12] y ajustar con el controlador central [16];
• Rampa de bajada:
Seleccionar 5 con el botón [12] y ajustar con el controlador central [16];

10
E
• Programa de sobre corriente (seleccionado solo con ):
• Rampa de subida:
Seleccionar 3 con el botón [12] y ajustar con el controlador central [16];
• Tiempo de mantenimiento:
Seleccionar 4 con el botón [12] y ajustar con el controlador central [16];
• Rampa de bajada:
Seleccionar 5 con el botón [12] y ajustar con el controlador central [16];
• Tiempo de intervalo:
Seleccionar 7 con el botón [12] y ajustar con el controlador central [16];
• Tiempo de retraso (solo disponible con canales unidos):
Pulsar el botón [13] y seleccionar canal 2 con el controlador central.
Seleccionar 6con el botón [12] y ajustar con el controlador central;
• Polaridad (seleccionado solo con ):
Seleccionar F o G con el botón [13] y ajustar con el controlador central [16];
• Seleccionar el canal deseado con el botón [13] y el controlador central [16]. Ajustar la intensidad con
el saliente [17];
• Para iniciar la terapia pulsar el botón de accept [14].
5.2.2.6 Voltaje alto
• Pulsar el botón [7] y seleccionar la corriente . Usar el controlador central [16] para seleccionar el
canal deseado o unir los canales;
• Pulsar el botón [8], seleccionar con el controlador central [16] y pulsar el botón [14] para aceptar;
• Alternada o no alternada:
Seleccionar o con el botón [9] y ajustar con el controlador central [16];
• Frecuencia de modulación:
Seleccionar con el botón [10] y ajustar el valor con el controlador central [16];
• Tiempo de modulación (Espectro):
Seleccionar , con el botón [11] y ajustar con el controlador central [16];
• Tiempo de tratamiento:
Seleccionar < con el botón [12] y ajustar con el controlador central [16];
• Secuencia de alternación (seleccionado solo con :
• Rampa de subida:
Seleccionar 3 con el botón [12] y ajustar con el controlador central [16];
• Tiempo de mantenimiento:
Seleccionar 4 con el botón [12] y ajustar con el controlador central [16];
• Rampa de bajada:
Seleccionar 5 con el botón [12] y ajustar con el controlador central [16];
• Programa de sobre corriente (seleccionado solo con ):
• Rampa de subida:
Seleccionar 3 con el botón [12] y ajustar con el controlador central [16];
• Tiempo de mantenimiento:
Seleccionar 4 con el botón [12] y ajustar con el controlador central [16];
• Rampa de bajada:
Seleccionar 5 con el botón [12] y ajustar con el controlador central [16];
• Tiempo de intervalo:
Seleccionar 7 con el botón [12] y ajustar con el controlador central [16];
• Tiempo de retraso (solo disponible con canales unidos):
Pulsar el botón [13] y seleccionar canal 2 con el controlador central.
Seleccionar 6con el botón [12] y ajustar con el controlador central;
• Polaridad (seleccionado solo con ):
Seleccionar F o G con el botón [13] y ajustar con el controlador central [16];
• Seleccionar el canal deseado con el botón [13] y el controlador central [16]. Ajustar la intensidad con
el saliente [17];
• Para iniciar la terapia pulsar el botón de accept [14].
5.2.2.7 Corrientes Diadinamicas
• Pulsar el botón [7] y seleccionar corriente . Usar el controlador central [16] para seleccionar el
canal deseado o unir los canales;
• Pulsar el botón [8], seleccionar con el controlador central [16] y pulsar el botón [14] para aceptar;
• Seleccionar MF, DF, CP, CPid y LP con el controlador central [16] y pulsar el botón [14] para aceptar;
• Tiempo de tratamiento:
Seleccionar < con el botón [12] y ajustar con el controlador central [16];
• Programa de sobre corriente (cuando se quiera):
• Rampa de subida:

11
E
Seleccionar 3 con el boton [12] y ajustar con el controlador central [16];
• Tiempo de mantenimiento:
Seleccionar 4 con el botón [12] y ajustar con el controlador central [16];
• Rampa de bajada:
Seleccionar 5 con el botón [12] y ajustar con el controlador central [16];
• Tiempo de intervalo:
Seleccionar 7 con el botón [12] y ajustar con el controlador central [16];
• Tiempo de retraso (solo disponible con canales unidos):
Pulsar el botón [13] y seleccionar canal 2 con el controlador central.
Seleccionar 6 con el botón [12] y ajustar con el controlador central;
• Seleccionar D o Econ el botón [13] y ajustar con el controlador central [16];
• Polaridad:
Seleccionar F o G con el botón [13] y ajustar con el controlador central [16];
• Seleccionar el canal deseado con el botón [13] y el controlador central [16]. Ajustar la intensidad con
el saliente [17];
• Para iniciar la terapia pulsar el botón de accept [14].
5.2.2.8 Corriente directa interrumpida de frecuencia - media
Pulsar el botón [7] y seleccionar corriente . Usar el controlador central [16] para seleccionar el
canal deseado o unir los canales;
• Pulsar el botón [8], seleccionar con el controlador central [16] y pulsar el botón [14] para aceptar;
• Tiempo de tratamiento:
Seleccionar < con el botón [12] y ajustar con el controlador central [16];
• Seleccionar el canal deseado con el botón [13] y el controlador central [16]. Ajustar la intensidad con
el saliente [17];
5.2.2.9 Interferencia (clásica)
• Pulsar el botón [7] y seleccionar corriente . Seleccionar con el controlador central [16] el canal
unido;
• Pulsar el botón [8], seleccionar con el controlador central [16] y pulsar el botón [14] para aceptar;
• Selección de corriente interferencial de 4-polos:
Seleccionar con el controlador central [16] y pulsar el botón [14] para aceptar;
• Selección de onda portadora:
Seleccionar con el botón [9] y ajustar con el controlador central [16];
• Frecuencia de pulso:
Seleccionar con el botón [10] y ajustar con el controlador central [16];
• Frecuencia de modulación:
Seleccionar * con el botón [10] y ajustar con el controlador central [16];
• Tiempo de modulación (Espectro):
Seleccionar , con el botón [11] y ajustar con el controlador central [16];
• Tiempo de tratamiento:
Seleccionar < con el botón [12] y ajustar con el controlador central [16];
• Seleccionar Do E con el botón [13] y ajustar con el controlador central [16];
• Ajustar la intensidad con el saliente [17];
• Balance:
Seleccionar
con el botón [10] y ajustar el balance con el controlador central [16].
5.2.2.10 Vector isoplanar
• Pulsar el botón [7] y seleccionar corriente . Seleccionar con el controlador central [16] el canal
unido;
• Pulsar el botón [8], seleccionar con el controlador central [16] y pulsar el botón [14] para aceptar;
• Selección de corriente de vector isoplanar :
Seleccionar
con el controlador central [16] y pulsar el botón [14] para aceptar;
• Selección de onda portadora :
Seleccionar con el botón [9] y ajustar con el controlador central [16];
• Frecuencia de pulso:
Seleccionar con el botón [10] y ajustar con el controlador central [16];
• Frecuencia de modulación:
Seleccionar *con el botón [10] y ajustar con el controlador central [16];
• Tiempo de modulación (Espectro):
Seleccionar ,con el botón [11] y ajustar con el controlador central [16];
• Tiempo de tratamiento :
Seleccionar < con el botón [12] y ajustar con el controlador central [16];

12
E
• Seleccionar Do E con el botón [13] y ajustar con el controlador central [16];
• Ajustar la intensidad con el saliente [17].
5.2.2.11 Vector manual dipolar
• Pulsar el botón [7] y seleccionar corriente . Seleccionar con el controlador central [16] el canal
unido;
• Pulsar el botón [8], seleccionar con el controlador central [16] y pulsar el botón [14] para aceptar;
• Seleccion manual de corriente de vector dipolar :
Seleccionar
con el controlador central [16] y pulsar el botón [14] para aceptar;
• Selección de onda portadora:
Seleccionar con el botón [9] y ajustar con el controlador central [16];
• Frecuencia de pulso:
Seleccionar con el botón [10] y ajustar con el controlador central [16];
• Frecuencia de modulación:
Seleccionar * con el botón [10] y ajustar con el controlador central [16];
• Tiempo de modulación (Espectro):
Seleccionar , con el botón [11] y ajustar con el controlador central [16];
• Tiempo de tratamiento:
Seleccionar < con el botón [12] y ajustar con el controlador central [16];
• Seleccionar D o E con el botón [13] y ajustar con el controlador central [16];
• Ajustar la intensidad en con el saliente [17];
• Vector dipolar:
Seleccionar
# con el botón [10] y ajustar la posición con el controlador central [16].
5.2.2.12 Vector dipolar automático
• Pulsar el botón [7] y seleccionar corriente . Seleccionar con el controlador central [16] el canal
unido;
• Pulsar el botón [8], seleccionar con el controlador central [16] y pulsar el botón [14] para aceptar;
• Seleccion de corriente de vector dipolar automático :
Seleccionar
con el controlador central [16] y pulsar el botón [14] para aceptar;
• Selección de onda portadora:
Seleccionar con el botón [9] y ajustar con el controlador central [16];
• Frecuencia de pulso:
Seleccionar con el botón [10] y ajustar con el controlador central [16];
• Frecuencia de modulación:
Seleccionar * con el botón [10] y ajustar con el controlador central [16];
• Tiempo de modulación (Espectro):
Seleccionar , con el botón [11] y ajustar con el controlador central [16];
• Tiempo de tratamiento:
Seleccionar < con el botón [12] y ajustar con el controlador central [16];
• Velocidad de rotación:
Seleccionar 8 con el botón [12] y ajustar con el controlador central [16];
• Seleccionar Do E con el botón [13] y ajustar con el controlador central [16];
• Ajustar la intensidad con el saliente [17].
5.3 Medidas con respecto a tratamientos
5.3.1 Electroterapia
Antes del tratamiento
• Comprobar si el paciente tiene contraindicaciones absolutas y relativas.
• Probar la sensibilidad al calor del área de tratamiento.
• Si la piel está afeitada del vello es lo mejor.
5.4 Funciones de memoria
El Endomed 482 está equipado con una memoria para guardar los ajustes de equipo y protocolos.

13
E
5.4.1 Ajustes de equipo
Los ajustes de equipo almacenan todos los parámetros del aparato, excepto la intensidad de corriente.
Contrario a protocolos, los ajustes de equipo funcionan en todos los canales juntos, incluyendo el canal
de ultrasonido.
Los ajustes de equipo están almacenados en las localizaciones 0 - 9. El número de localización
aparecerá en el display cuando el botón [15] sea pulsado. El ajuste 0 de equipo es cargado
automáticamente cuando el aparato es encendido. Los ajustes de equipo pueden ser cargados y
guardados solamente cuando todos los canales están inactivos.
5.4.1.1 Carga de ajustes de equipo
• Pulsando el botón [15], 1 está parpadeando;
• Seleccionar una localización de memoria en el rango de 0 - 9 con el controlador central [16]. El
display muestra los ajustes de equipo que son guardados en la localización seleccionada;
• Pulsar el botón [14] para cargar los ajustes de equipo seleccionados;
• Ajustar la intensidad de corriente con el controlador [17];
• Pulsar el botón [14] para iniciar la terapia en caso de que un programa de sobre corriente fuera
seleccionado.
La carga de los ajustes de equipo seleccionados tiene que ocurrir en un cierto retraso de tiempo tan
largo como 1 esté parpadeando. Esperar demasiado, o pulsar cuaquier otro botón que no sea [14] o
[15] cancelará la función de carga.
5.4.1.2 Almacenamiento de ajustes de equipo
• Seleccionar una terapia y ajustar todos los parámetros en todos los canales deseados;
• Pulsando el botón [15], 1 parpadea;
• Seleccionar una localización de memoria en el rango de 0 - 9 con el controlador central [16]. El
display muestra los ajustes de equipo que son almacenados en la localización seleccionada,
permitiéndole comprobar lo que será sobre escrito;
• Pulsando el botón [15] una segunda vez, 2 parpadeará. El display muestra ahora los ajustes de
corriente del equipo que están para ser guardados en la localización seleccionada;
• Pulsar el botón [14] para ejecutar la función de guardar.
La ejecución de la función de guardar sucederá dentro de un cierto retraso de tiempo tan largo como el
simbolo 2 esté parpadeando. Esperar demasiado, o pulsar cualquier otro botón que no sea [14] o [15]
cancelará la función de guardar.
5.4.2 Protocolos
Un protocolo consta de uno o más pasos de tratamiento que son ejecutados secuencialmente. Cada
paso de tratamiento tiene su propia corriente en forma de onda, ajustes de parámetro y tiempo de
tratamiento. Los protocolos están categorizados en grupos de acuerdo a su aplicación. Los protocolos
son identificados de la manera siguiente:
1:1 el primer número es el número de grupo
1:1 el segundo número es el número de protocolo
El Endomed 482 proporciona un número de protocolos pre-programados, que están disponibles en el
grupo 2 y mayores. Se entiende que cada grupo es para una indicación especifica. En la guia de terapia
que se suministra con el aparato, encontrará una relación de todos los grupos y protocolos
correspondientes. Adicionalmente el Endomed 482 soporta los protocolos de usuario definidos, por lo
que se ha reservado el grupo 1.
Los protocolos de electroterapia pueden constituir aplicaciones de canal simple o dual. Antes de cargar
un protocolo de canal simple, primero se debe especificar el objetivo del canal. En este caso tambien se
permite unir los canales de corriente, haciendo que el protocolo sea ejecutado en ambos canales.
Cuando se está ejecutando un protocolo de canal simple, un protocolo de canal simple completamente
diferente puede ser ejecutado en el otro canal. Desde luego los protocolos de dos canales solo pueden
ser cargados cuando los canales de corriente están unidos.
5.4.2.1 Carga de un protocolo
• Seleccionar un objetivo de canal, usando el botón [7] y el controlador central [16];
• Pulsando el botón [15], el simbolo 1 parpadeará;
• Seleccionar un número de protocolo en el rango de 1:1 y mayor con el controlador central [16]. El
display muestra el tiempo de tratamiento total del protocolo seleccionado;
• Pulsar el botón [14] para cargar el protocolo seleccionado;
• Ajustar la intensidad de corriente con el controlador [17];

14
E
• Pulsar el botón [14] para iniciar la terapia en el caso de ser seleccionado un programa de
sobrecorriente.
Cuando se ejecuta un protocolo, el display muestra el tiempo de tratamiento restante del paso de
tratamiento que está funcionando. Cada paso de tratamiento es terminado con un sonido corto. Cuando
se ha alcanzado el final del protocolo, se emite un sonido standard de “final de tratamiento”, después del
cuál el aparato saldrá del modo protocolo.
Notas:
• Para indicar el modo protocolo el número de protocolo permanece visible en el display una vez que
un protocolo ha sido cargado. Siguiendo el número de protocolo, se muestra el numero de paso de
tratamiento, acompañado por su propio icono 0.
• Para quitar un protocolo cargado pero no ejecutado todavía, pulsar el botón [14] otra vez. Esperando
un momento, o pulsando cualquier otro botón que no sea el [14] o [15], el aparato saldrá del modo
protocolo.
• Todos los parámetros de un protocolo cargado pueden ser cambiados cuando se quiera. Seleccionar
0 con el botón [11] y seleccionar el número de paso de tratamiento con el controlador central [16].
Todos los parámetros del paso de tratamiento ahora seleccionado, pueden ser cambiados. No olvidar
resetear el número de paso de tratamiento al 1.
• Un protocolo cargado puede ser ejecutado empezando desde cualquier paso de tratamiento.
Seleccionar 0 con el botón [11] y seleccionar el número de paso de tratamiento con el controlador
central [16].
• La ejecución de un paso de tratamiento puede ser terminada avanzando el numero de paso de
tratamiento. Seleccionar 0 con el botón [11] y seleccionar el nuevo número de paso de tratamiento
con el controlador central [16]. La corriente decaerá a cero. Vd. puede resumir la ejecución del
protocolo desde el nuevo paso de tratamiento ajustando la intensidad de corriente con el controlador
[17].
• La ejecución de un protocolo puede ser terminada, ajustando el tiempo de tratamiento del paso de
tratamiento que está trabajando a cero. El aparato saldrá entonces del modo protocolo.
5.4.2.2 Guardar un protocolo
Antes de ejecutar un protocolo modificado, puede ser salvado para un último uso en el grupo 1:
• Pulsar el botón [15] dos veces. El simbolo 2 está parpadeando;
• Seleccionar un número de protocolo en el rango de 1:1 - 1:9 con el controlador central [16]. El display
muestra el tiempo de tratamiento total del protocolo que va ser guardado;
• Pulsar el botón [14] para ejecutar la función de guardar.
5.4.2.3 Creación de un protocolo definido por el usuario
En el grupo 1 usted puede crear sus propios protocolos. Un máximo de 10 protocolos pueden ser
guardados, cada uno con una longitud máxima de 20 pasos de tratamiento. Antes de proceder con los
pasos de abajo, primero estar seguros de que el aparato no está en modo protocolo (ver sección
5.4.2.1. como salir del modo protocolo):
• Pulsar el botón [15] dos veces. El simbolo 2 parpadeará;
• Seleccionar un número de protocolo en el rango de 1:1 - 1:9 con el controlador central [16];
• Pulsar el botón [14]. El simbolo 2 parpadeará, 0 es visible y el número de paso de tratamiento es
ajustado a 1.
• Ajustar todos los parámetros del paso de tratamiento actual;
• Pulsar el botón [14] para guardar el paso de tratamiento. El número de paso de tratamiento se
incrementa automáticamente;
• Repetir los dos pasos anteriores hasta que se haya alcanzado el final de su protocolo;
• Terminar su protocolo con un paso de tratamiento con un tiempo de tratamiento de cero. Pulsar el
botón [14] para confirmar. El final de su protocolo se confirma con un beep.
Notas:
• Cuando dos pasos de tratamiento consecutivos contienen corriente AC, la intensidad de corriente
será mantenida en el nivel ajustado cuando se ejecute el protocolo.
• Cuando se encienda o entre corrientes DC, la intensidad de corriente decaerá a cero. El siguiente
paso de tratamiento tendrá que ser iniciado manualmente ajustando la intensidad de corriente.

15
E
5.5 Reacciones al conectar y desconectar
Se pueden producir reacciones desagradables al conectar y desconectar - en el caso de una
característica de salida de corriente constante - cuando los electrodos no están fijados o están
completamente sueltos. Procure que la corriente de paciente es 0 mA cuando coloca y suelta los
electrodos cuando CC está establecido . Con técnicas de aplicación dinámicas utilizar preferiblemente la
elección de voltaje constante (CV).
5.6 Efectos electrolíticos
Con tipos de corriente con un componente de corriente directa se produce electrolisis debajo de los
electrodos. Para absorber lo más posible los productos electrolíticos que se producen debajo de los
electrodos y para limitar los efectos de esto, es necesario que se usen las esponjas suministradas.
Procurar que estén mojadas suficientemente con agua y colocar la capa doble de la esponja entre el
electrodo de goma flexible y el paciente.
5.7 Control remoto
Para el Endomed 482 hay disponible un control remoto especial. Este puede ser conectado al enchufe
conector [3-2]. El control remoto tiene 2 botones de intensidad para ajustar la intensidad de los canales
de corriente y una parada de emergencia.
6 Mantenimiento por el usuario
6.1 Mantenimiento técnico
La seguridad eléctrica del aparato depende de la conexión eléctrica (mediante el cable equipotencial) a
la toma de tierra. Por tanto es necesario tener chequeada esta conexión anualmente. Además se
recomienda un chequeo anual de todo. Esto debe ser hecho por su proveedor u otra empresa autorizada
por el fabricante. Recomendamos igualmente llevar un registro de todas las actividades relacionadas con
el mantenimiento. En algunos países tal registro es obligatorio.
El control y/o un mantenimiento técnico debe realizarse conforme al procedimiento descrito en el manual
de servicio de este aparato.
No intente abrir el aparato. El mantenimiento y las reparaciones deben ser realizados siempre por una
empresa autorizada. El fabricante no asume la responsabilidad de las consecuencias de reparaciones o
trabajos de mantenimiento efectuados por personas no autorizadas.
6.2 Limpieza del aparato
Apagar la unidad y desconectarla de la red. El aparato debe limpiarse con un paño húmedo. Usar agua
tibia y un liquido limpiador casero no-abrasivo (no abrasivo, sin contenido de alcohol).
6.3 Limpieza de los accesorios
6.3.1 Electrodos y esponjas
Los electrodos de goma y las esponjas deben limpiarse con agua templada. En caso de suciedad
persistente y para desinfección, puede utilizarse una solución de alcohol al 70%. Los electrodos de goma
pueden desteñir durante este procedimiento.
Es posible que las esponjas no sean buenos conductores cuando el grado de dureza del agua es bajo,
no alcanzándose la intensidad de corriente deseada. Esta conductividad puede disminuir también como
consecuencia de la desinfección de las esponjas. En tal caso, sugerimos utilizar una solución salina para
aumentar la conductividad del agua.
Cuando no se utilicen los electrodos saque las esponjas, y así prolongará la vida útil de los electrodos.
Las esponjas deben substituirse regularmente. Aconsejamos tener un juego de esponjas y electrodos de
reserva.

16
E
6.3.2 Cable del paciente
El cable del paciente debe limpiarse con un paño húmedo. Compruebe el cable con regularidad para
detectar daños que pueden causar interferencias. Aconsejamos tener también un cable del paciente de
reserva.
Antes de usar un cable adaptador, examinarlo por si tiene mal contacto o está dañado. Se recomienda
tener un adaptador de cable en stock.
6.4 Duración de vida del aparato y accesorios
Su Endomed 482 y accesorios contienen materiales que pueden ser reciclados y/o son nocivos para el
medio ambiente. Al final de su vida, los especialistas que les concierna, pueden separar estos artículos y
clasificarlos en materiales nocivos y materiales para reciclaje. Haciendo eso, Vd. contribuye a un medio
ambiente mejor.
Por favor asegúrese que está bien informado de las reglas locales y regulaciones respecto a
sacar el aparato y accesorios.
7 Diagnóstico
7.1 Las luces y pantallas no se encienden
• Posiblemente la pila está vacía. Trata de utilizar el aparato con el enchufe.
7.2 Código de Error
El aparato ha descubierto un fallo durante o después del auto chequeo. El código de error consiste en un
número de 3 digitos y aparece en el display de intensidad de corriente. Sacar cualquier aplicador o
cables de los enchufes y apagar el aparato y encenderlo otra vez. Si reparece el código, contacte con su
proveedor. El aparato está defectuoso probablemente.
7.3 Contacto roto en modo CC
Si en el modo CC el contacto está roto, el aparato lo señalará con una señal acústica. Para evitar
sensaciones desagradables para el paciente cuando la cabeza de tratamiento sea colocada sobre la piel,
la corriente se reduce hasta 0. Para continuar el tratamiento, Ud. debe ajustar la corriente de nuevo.
7.4 Falta de corriente (insuficiente)
• Buscar una ruptura o contacto en mal estado en el cable del paciente.
• Asegurarse que las esponjas están suficientemente húmedas.
• Si es necesario, mojarlas en una solución salina.
• Limpiar los electrodos y comprobar si el contacto es bueno.
• En terapia combinada, la corriente de salida máxima para interferencia bipolar se limita a 60 mA.
7.5 Comprobación de panel frontal
Encendiendo el aparato con los botones [9] y [10] pulsados, se encenderán todos los segmentos en el
display, permitiéndole comprobar su funcionamiento. La pulsación de los botones y el funcionamiento de
los reguladores dará como resultado un beep. Usted puede salir de este modo solo apagando el aparato.

17
E
8 Especificaciones
8.1 Especificaciones del producto
Electroterapia general
Canales : 2
Característica de corriente : corriente constante (CC) o voltaje constante (CV)
Resolución de ajuste : 0,2 mA
Tiempo : 0 - 60 minutos
Revisión de polaridad corrientes directas : manual
La intensidad máxima dentro de la especificación se consigue hasta una carga de 500 Ω (CC).
Corriente pulsada bifásica Simetrica y asimetrica, TENS
Frecuencia : 1 - 200 Hz
Duración de fase (anchura de pulso) : 10 - 400 µs
Frecuencia Burst : 0 - 9 Hz
Frecuencia de Modulación (espectro) : 0 - 180 Hz
Programa de Modulación : 1/1, 6/6, 12/12 en 1/30/1/30 s
Forma de corriente: Rampa de subida 0 - 9 s
Tiempo de mantenimiento 1 - 60 s
Rampa de bajada 0 - 9 s
Tiempo de Intervalo 1 - 60 s
Tiempo de retraso 0,1 - 80 s
Intensidad : 0 - 140 mA.
En ciertas combinaciones de anchura de pulso, frecuencia y espectro el rango de ajuste es reducido a
90-mA max. Para cumplir los valores limite de IEC 60601-2-10
Voltaje alto
Frecuencia : 1- 200 Hz
Frecuencia de Modulación (espectro) : 0 – 90 %
Programa de Modulación : 1/1, 6/6, 12/12 en 1/30/1/30 s
Forma de corriente : Como en las formaa de corriente TENS
Intensidad : 0 – 500 Volt
Modo alternante:
Tiempo alternado : 5 tot 50 segundos
Rampa de subida y de bajada : 0,1 – 1 segundos
Modo no-alternante:
Forma de corriente Surge pattern : Como en las corrientes TENS
Micro-corriente
Intensidad : 10 µA - 1 mA
Alcance de voltajo : 200 Volt
Modo alternante:
Frecuencia : 0 – 1000 Hz
Tiempo alternado : 0,1 – 10 segundos (el tiempo alternado es relativo a la
frecuencia de pulso)
Rampa de subida y de bajada : 0,1 – 1 segundos
Modo no-alternante:
Frecuencia : 0,1 – 1000 Hz
Forma de corriente : Como en las corrientes TENS
Corriente alternante Interrumpida, Estimulación Rusa
Frecuencia portadora : 2 - 10 kHz
Frecuencia Burst : 0 - 100 Hz
Burst / ratio de intervalo : 1:1, 1:2, 1:4 y 1:5
Forma de corriente : Como en las corrientes TENS
Intensidad : 0 - 100 mA
Formas de corriente diadinamica
Opciones : MF, DF, CP, LP y CPid
Forma de corriente (MF y DF solo) : Como en las corrientes TENS
Intensidad : 0 - 70 mA

18
E
Corrientes faradizas
Opciones : 2-5 corriente según Träbert (pulso rectangular por
defecto de elección)
Duración de fase : 0.02 - 1000 ms con corriente pulsada rectangular
0.1 - 1000 ms con corriente pulsada triangular
intervalo de fase : 5 - 5000 ms
Forma de corriente : Como en las corrientes TENS
Intensidad : 0 - 80 mA
Corriente directa interrumpida
Frecuencia : 8000 Hz
Duty cycle : 95%
Intensidad : 0 - 40 mA
Interferencia Bipolar
Onda portadora : 2- 10 kHz
Frecuencia de pulso (AMF) : 0 - 200 Hz
Frecuencia de Modulacion (espectro) : 0 - 180 Hz
Programa de Modulacion : 1/1, 6/6, 12/12 y 1/30/1/30 s
Forma de corriente : Como en las corrientes TENS
Intensidad : 0 - 100 mA
Interferencia Clásica
Onda portadora : 2- 10 kHz
Frecuencia de pulso (AMF) : 0 - 200 Hz
Frecuencia de Modulacion (espectro) : 0 - 180 Hz
Programa de Modulacion : 1/1, 6/6, 12/12 y 1/30/1/30 s
Forma de corriente : No ajustable
Intensidad : 0 - 100 mA
Ajuste de Balance : mediante el controlador central
Vector Isoplanar
Onda portadora : 2- 10 kHz
Frecuencia de pulso (AMF) : 0 - 200 Hz
Frecuencia de Modulación (espectro) : 0 - 180 Hz
Programa de Modulación : 1/1, 6/6, 12/12 y 1/30/1/30 s
Forma de corriente : No ajustable
Intensidad : 0 - 100 mA
Vector Dipolo automático
Onda portadora : 2- 10 kHz
Frecuencia de pulso (AMF) : 0 - 200 Hz
Frecuencia de Modulación (espectro) : 0 - 180 Hz
Programa de modulación : 1/1, 6/6, 12/12 y 1/30/1/30 s
Forma de corriente : No ajustable
Intensidad : 0 - 100 mA
Velocidad de rotación : ajustable desde 1 a 10 segundos
Vector manual dipolar
Onda portadora : 2- 10 kHz
Frecuencia de pulso (AMF) : 0 - 200 Hz
Frecuencia de modulación (espectro) : 0 - 180 Hz
Programa de modulación : 1/1, 6/6, 12/12 y 1/30/1/30 s
Forma de corriente : No ajustable
Intensidad : 0 - 100 mA
Posición : 360 º
Funciones de memoria
Ajuste de equipo 0 : ajuste de inicio.
Ajustes de equipo : 10, programables de usuario
Protocolos de usuario a definir : 10
Protocolos pre-programados : 50

19
E
8.2 Especificaciones técnicas
Adaptador de red
Tipo de adaptador de red : ENA-1550
Voltage de red : 100 - 240 Volt +/- 10 %
Frecuencia : 50 / 60 Hz
Voltage de salida : 15 Volt
Corriente de salida Max. : 3,3 A.
Unidad
Clasificación equipos médicos : IIa (de acuerdo a la Directiva de Equipos
Médico(93/42/CEE))
Clase de seguridad : I* tipo BF**, según IEC 60601-1
Corriente de dispersión de paciente : Mejor de la norma de IEC ( < 100 µA)
Corriente de dispersión de paciente,
condición de error singular : Mejor de la norma de IEC (< 500 µA)
Pruebas de tipo y seguridad : CE-MDD (TÜV Rheinland)
Dimensiones : 29 x 28 x 11 cm.
Peso : 4 kg.
Condiciones medioambientales para transporte y Almacenaje
Temperatura medioambiental : -10° hasta +50° C
Humedad relativa : 10 hasta 100 %
Presión atmosférica : 500 hasta 1060 hPa
Condiciones medioambientales uso normal
Temperatura medioambiental : 10° hasta 40° C
Humedad relativa : 10 hasta 90 % (no condensada)
Presión atmosféricia : 500 hasta 1060 hPa
8.3 Clasificación
Clase Médica IIa
Este equipo cumple con todos las normativas esencial de la Directiva de Equipos Médicos
(93/42/CEE).
I : El aparato cuenta con toma de tierra de seguridad y tiene que ser conectado a
una toma de pared con toma de tierra.
*BF : El aparato tiene un circuito de paciente flotante.
Normas de seguridad internacionales
El Endomed 482 cumple con la norma internacional para equipos eléctricos médicos IEC 60601-1 y IEC
60601-2-10 (estimuladores eléctricos del nervio).
Copias de informaciones de prueba están disponibles.
Modificaciones técnicas reservadas.
9 Datos de pedido
Para pedir el Endomed 482, accesorios estándar o los accesorios complementarios, mirar el catálogo de
Fisioterapia


1
I
1 Introduzione
1.1 Generalità
Il Endomed 482 è dotato di due canali elettroterapici multifunzione assolutamente identici e di un canale
multifrequenza per la terapia ad ultrasuoni. I canali elettroterapici possono essere utilizzati in
combinazione o in maniera del tutto indipendente. e.
Tali possibilità di la vasta gamma di forme di correnti disponibili fanno di questo apparecchio la soluzione
più azzeccata per la Vostra attività professionale.
Questo apparecchio è stato unicamente progettato per essere utilizzato da personale competente in
fisioterapia, riabilitazione e ambiti similari.
1.2 Possibilità terapeutiche
Elettroterapia con correnti a bassa e media frequenza, TENS, Alta Tensione e Micro correnti. Attraverso
l’applicazione di queste correnti è tra le altre cose possibile ridurre il tono muscolare, alleviare il dolore e
incrementare la circolazione e la rigenerazione dei tessuti.
1.3 Conclusioni
L’acquisto del Endomed 482 rappresenta una scelta vincente. Si tratta infatti di un apparecchio che può
essere utilizzato per anni con piena soddisfazione da parte dell’utilizzatore. Eventuali suggerimenti o
richieste di informazioni potranno essere rivolti direttamente al Vostro distributore di zona.
2 Sicurezza
2.1 Note preliminari
Leggere attentamente le istruzioni d’uso prima di utilizzare il Endomed 482. Assicurarsi che tali istruzioni
siano accessibili a tutti coloro che utilizzano l’unità.
Particolare attenzione deve essere riservata alle seguenti precauzioni:
1. Prendere atto delle controindicazioni (vedere capitolo 3).
2. Non abbandonare mai il paziente durante il trattamento.
3. Usare l’apparecchio ad almeno 2 metri di distanza da un’unità ad onde corte.
4. Non utilizzare l’apparecchio in stanze umide adibite ad idroterapia.
Il costruttore non risponde di eventuali danni provocati a causa della non osservanza delle precauzioni
qui esposte.
2.2 Generalità
All'accensione dell’apparecchio tutte le funzioni vitali sono controllate da un microprocessore interno.
Durante il funzionamento, l’uscita reale di corrente è continuamente misurata e comparata all’uscita
richiesta. Nel caso in cui venisse rilevato un errore, l’unità interrompe immediatamente l’emissione di
corrente.
2.3 Campi di non applicazione
L’elettroterapia non viene utilizzata nelle sotto riportate applicazioni:
• Trattamenti cranici, quali terapie del sonno;
• Trattamenti transcordiali (il posizionamento di elettrodi sul torace potrebbe aumentare il rischio di
fibrillazione cardiaca);
• Trattamenti cervicali occipitali.
2.4 Densità di corrente
La norma particolare per apparecchi elettromedicali di stimolazione è la Iec 60601-2-10. La massima
densità di corrente consentita è pari a 2 ma R.M.S. per cm2 . Per assicurarsi che tale valore non venga
superato, dividere il valore d’uscita (in mA) per la superficie di contatto degli elettrodi espressa in cm2 ; il
valore ricavato deve sempre essere inferiore a due.
Prestare la massima cura nel posizionare gli elettrodi. L’utilizzo di elettrodi piccoli in combinazione con
intensità elevate può causare irritazioni della pelle o bruciature.

2
I
2.5 Interferenza elettromagnetica
Evitare la connessione contemporanea di un paziente ad un apparecchio ad Alta Frequenza e ad uno
stimolatore elettrico, in quanto ciò potrebbe causare bruciature cutanee a livello degli elettrodi. Pertanto la
connessione simultanea è vietata.
Per maggiori informazioni vedere il capitolo 4, Installazione.
2.6 Limiti di responsabilità
Fino all’estensione massima concessa dalla legge in vigore, in nessun caso la Enraf-Nonius, i suoi
fornitori o rivenditori saranno responsabili di qualsiasi danno indiretto, particolare, incidentale o
consequenziale causato dall’utilizzo o dall’incapacità di utilizzo dell’apparecchio, includendo, senza limiti,
danni per mala fede, guasti del computer o malfunzionamenti, o qualsiasi danno o perdita commerciale,
anche se avvisati della possibilità e incuranti della teoria legale o equa (contratti, illeciti civili ecc.) sulla
quale si basa il reclamo. In ogni caso, la responsabilità totale della Enraf-Nonius, considerando tutte le
clausole di questo contratto, non deve eccedere nel complesso la somma dei costi sostenuti per il
prodotto ricevuto dalla Enraf-Nonius in base ad un eventuale contratto di supporto separato, ad
eccezione di decesso o danno personale provocato dalla negligenza della Enraf-Nonius, poiché in tali
casi la legge in vigore proibisce i limiti di danni sopra esposti.
La Enraf-Nonius non è responsabile delle conseguenze risultanti dalla errata informazione fornita dal suo
personale, o a causa di errori contenuti in questo manuale e/o in altri documenti (compresi i documenti
commerciali).
La controparte (utilizzatore o un suo rappresentante) libera la Enraf-Nonius da tutti i reclami derivanti da
terzi.
3 Indicazioni e controindicazioni
Consultare anche i manuali di terapia opzionali.
3.1 Indicazioni
3.1.1 Elettroterapia
Diagnostica, elettropalpazione per:
• punti dolenti;
• trigger points;
• zone iperestetiche;
• trigger point motori;
• curva I/t
Terapia:
A. Controllo del dolore in:
• punti dolenti;
• trigger points;
• zone iperestetiche.
B. Disturbi del sistema autonomo quali:
• sindrome della spalla/mano;
• Morbo di Raynaud;
• Morbo di Buerger;
• Distrofia di Sudeck;
• malattie neurologiche;
• mialgia.
C Stimolazione muscolare:
• per il ripristino della chinestesia;
• per il trattamento delle atrofie muscolari;
• per la stimolazione degli sfinteri interni ed esterni nel trattamento dell’incontinenza urinaria;
• per la rieducazione;
• per il rafforzamento muscolare (a livello sportivo);
• patologie neurologiche.
D. Ionoforesi.

3
I
E Cicatrizzazione delle ferite:
• lesioni cutanee dovute a problemi di circolazione;
• ferite post-operatorie.
3.2 Controindicazioni specifiche assolute
3.2.1 Elettroterapia
• piressia;
• tumori;
• tubercolosi;
• processi infiammatori localizzati;
• trombosi;
• gravidanza;
• portatori di pacemaker;
• protesi metalliche impiantate.
4 Installazione
4.1 Collegamento
• Il collegamento alla rete deve soddisfare i requisiti vigenti nel paese in cui l’apparecchio viene
utilizzato per quel che riguarda i locali medici. L’unità ha un collegamento alla terra di sicurezza, e
deve essere collegato a una presa a muro con terra.
• Prima di procedere al collegamento, verificare che la tensione e la frequenza riportate sulla targhetta
dell’apparecchio corrispondano a quelle della rete elettrica.
• L’adattatore fa parte del circuito di rete da cui dipende in parte la sicurezza dell’apparecchio. Utilizzare
esclusivamente l’adattatore tipo ENA-1550 fornito con l’apparecchio.
È assolutamente vietato collegare il Endomed 482 a un altro tipo di adattatore diverso dall’ENA-
1550.
4.2 Collegamento dell’adattatore di rete
• Collegare l’adattatore di rete fornito con l’apparecchio al connettore [3-1].
• Collegare l’adattatore di rete a una presa a muro. La spia [6] indica che l’unità è collegata alla rete e
si trova in stato di stand-by.
4.3 Accensione e auto diagnosi di controllo
• Accendere l’unità mediante l’apposito interruttore [1]
• Non appena acceso, il dispositivo effettua un’auto diagnosi di controllo.
Alla fine del controllo si avvertirà un segnale acustico. Se si verifica un errore sul display apparirà un
codice di errore. Per maggiori informazioni vedere la sezione 7.
4.4 Scollegamento dalla rete
• Spegnere il Endomed 482 mediante l’apposito interruttore [1].
• Staccare la spina dell’adattatore di rete dalla presa a muro.
4.5 Funzionamento a batterie (opzionale)
L’unità può operare anche senza essere collegata alla rete. Per rendere tutto ciò possibile, innanzitutto
deve essere inserita una batteria. Procedere come segue:
• Spegnere l’apparecchio e rimuovere l’adattatore di rete dal connettore [3-1].
• Capovolgere l’unità e rimuovere le due viti che fissano il coperchio del vano batterie.
• Collegare il cavetto rosso al polo positivo (+) della batteria e quello nero al polo negativo (-).
• Posizionare la batteria nel vano.
• Fissare nuovamente il coperchio del vano batterie utilizzando le due viti.
• Ricollegare l’adattatore di rete al connettore [3-1].

4
I
Se l’adattatore di rete è collegato, la batteria si ricarica automaticamente, indipendentemente dalla
posizione dell’interruttore on/off [1]. Se possibile, si consiglia di utilizzare il Endomed 482 collegato
all’adattatore di rete. Ciò aumenta la durata della batteria.
Si consiglia di usare esclusivamente le batterie Enraf-Nonius tipo 2601.016 in dotazione. Le batterie
contengono materiali inquinanti. Accertarsi di essere a conoscenza delle regolamentazioni locali
riguardanti la loro eliminazione. Vedere anche capitolo 6.4.
4.6 Installazione
• Non collocare l’apparecchio nelle vicinanze di una fonte di calore come, per es., un radiatore.
• Evitare l’esposizione alla luce diretta del sole, alla pioggia, alla polvere, all’umidità, a vibrazioni
meccaniche e urti.
• Non utilizzare telefoni senza fili in prossimità dell’apparecchio.
• Quest’unità non può essere usata nei cosiddetti “ambienti umidi” (locali adibiti all’idroterapia).
• L’apparecchio dovrà essere sistemato in modo che non possano penetrarvi liquidi di nessun genere.
In caso di accidentali infiltrazioni di liquidi, scollegare l’unità dalla presa a muro (se collegata) e farla
controllare da un tecnico autorizzato.
4.7 Interferenza elettromagnetica
• Se nelle immediate vicinanze (meno di 2 metri) sono in funzione apparecchi ad onde corte o
microonde, può manifestarsi un’instabilità di emissione del Endomed 482.
• Per prevenire ogni eventuale interferenza elettromagnetica, si consiglia di allacciare il Endomed 482 e
gli apparecchi ad onde corte o microonde a linee di alimentazione separate, mantenendo tra gli stessi
una distanza minima di 2 metri.
• Assicurarsi che vi sia sempre un’adeguata distanza fra i cavi di alimentazione degli apparecchi ad
onde corte o microonde e il Endomed 482 o il paziente.
Nel caso in cui i disturbi causati da interferenza elettromagnetica persistano, consultare il distributore di
zona autorizzato.
5 Funzionamento
5.1 Controlli
(Vedere immagin)
5.1.1 Apparecchio
[1] Tasto On/Off
Questo tasto ha la funzione di accendere e spegnere l’unità.
[2] Targhetta di identificazione
Fornisce tutte le informazioni utili per l’identificazione dell’unità, quali modello, matricola (necessaria
per la garanzia e l’assistenza), così come tutte le informazioni elettriche, es.: tensione di rete e
consumo massimo di corrente.
[3-1] Connettore per l’adattatore di rete
[3-2] Connettore per il telecomando
Per il collegamento del telecomando opzionale.
[4-1] Connessione elettroterapia cavo paziente
Pannello di controllo

5
I
5] Indicatore di batteria
Vi sono quattro possibilità:
• Luce verde : la batteria è in piena carica
• Luce verde che lampeggia: la batteria è parzialmente scarica, collegare l’adattatore di rete
• Luce gialla : la batteria non è sufficientemente carica, impossibilità di effettuare le
terapie, collegare l’adattatore di rete
• Off : assenza di batteria, batteria completamente scarica o difettosa,
collegare l’adattatore di rete
[6] Indicatore adattatore di rete
Questa spia indica che l’adattatore di rete è collegato alla corrente.
[7] Opzioni terapeutiche
Tasto selezione per elettroterapia, scelta del canale, canali collegati, intervallo tra livelli di
programma,
[8] Tasto selezione forme di corrente
Questo tasto ha la funzione di selezionare le differenti forme di corrente.
[9] Tasto selezione per:
Onda portante, larghezza d’impulso, frequenza delle micro correnti, tipo di corrente interferenziale,
modo alternato (Alta Frequenza e Micro corrente).
[10] Tasto selezione per:
Frequenza d’impulso, intervallo di fase, frequenza burst (stimolazione russa), posizione vettore,
posizione di bilanciamento, forme di correnti diadinamiche e modulazione di frequenza (spettro).
[11] Tasto selezione per:
Tempo di modulazione (spettro), duty cycle (stimolazione russa), frequenza burst (TENS) e numero
dei passi di trattamento (protocolli)
[12] Tasto selezione per:
Programma di modulazione corrente, tempo di rotazione vettoriale e durata trattamento
[13] Tasto selezione per:
Canale, modo Corrente Costante (CC) o Tensione Costante (CV) e polarità.
[12]+[13] Stop di emergenza.
Premendo contemporaneamente i tasti [12] e [13] vengono interrotti tutti i trattamenti attivi.
[14] Tasto accettazione
Per accettare la selezione della forma di corrente, i protocolli preimpostati e dare inizio ai programmi di
corrente modulata.
[15] Tasto memoria
Per generare le funzioni di memoria e richiamare o immagazzinare programmi
[16] Regolatore centrale
Per regolare tutte le posizioni e i parametri.
[17] Regolatore di intensità
Per regolare l’intensità di corrente nei canali 1 e 2. Nel modulo a 4 poli (correnti interferenziali) regola
l’intensità in entrambi i canali assieme.
[19] Simbolo intervallo
Il simbolo
indica l’intervallo tra due livelli di programma di un programma sequenziale.
5.2 Funzionamento dell’apparecchio

6
I
5.2.1 Introduzione
5.2.1.1 Accensione
Accendere l’apparecchio azionando l’interruttore [1]. L’unità esegue un’auto diagnosi, controllando tutte le
funzioni più importanti e presentandosi con le funzioni di inizio. Le funzioni di inizio sono regolabili
attraverso la posizione di memoria 0. Per personalizzarle, vedere il capitolo 5.4, Funzioni di Memoria.
5.2.1.2 Selezione della terapia e del canale
Il Endomed 482 è dotato di due canali elettroterapici. Questi canali possono essere usati
indipendentemente, in quanto ognuno offre la sua serie di parametri e trattamenti. Vi è inoltre la
possibilità di interconnettere i canali. Utilizzare il tasto [7] per effettuare una distinzione tra le funzioni
terapeutiche basilari dell’elettroterapia e utilizzare il regolatore centrale [16] per selezionare o
interconnettere i canali. Queste sono le selezioni disponibili:
U elettroterapia sul canale 1
V elettroterapia sul canale 2
elettroterapia su canali Abbinati
Si consideri che l’utilizzo indipendente dei canali elettroterapici richiede la regolazione di tutti i parametri
su entrambi i canali. Se non lo si desidera, o se l’uso indipendente non è necessario, i canali possono
essere collegati. Alcune forme di corrente, quali le correnti interferenziali, sono possibili solo sui canali
collegati.
5.2.1.3 Selezione delle forme di corrente
Premere il tasto [8]. Tutte le correnti appaiono sul display, mentre quella selezionata lampeggia.
Selezionarne una agendo sul regolatore centrale e premere il tasto [14] per confermare la selezione.
Se si sceglie (gruppo di corrente interferenziale) o (gruppo di correnti Diadinamiche), dovrete
selezionare un tipo di corrente all’interno di quel gruppo. Selezionare la corrente desiderata agendo sul
regolatore centrale [16] e premere il tasto [14] per confermare la selezione.
5.2.1.4 Regolazione dei parametri
Premere i tasti dal [9] al [13] per selezionare un parametro. Un tasto esegue tutti i parametri che si
trovano in sua corrispondenza sul display. Una volta selezionato, il parametro può essere regolato,
usando il regolatore centrale [16]. Un parametro può essere modificato, fino a quando l’icona che lo
identifica lampeggia. Il display mostrerà solamente quei parametri, che sono applicabili alla terapia
selezionata.
5.2.1.5 Timer trattamento
Premere il tasto [12] per selezionare il timer. L’icona min lampeggia. Il display mostra il tempo di
trattamento del canale, che è in quel momento presente (punto 5.2.1.2.) sul display. Come un
promemoria, un indicatore di canale lampeggia sopra il valore del timer. Ora, solo il timer di questo
canale può essere modificato per mezzo del regolatore centrale [16].
Quando uno o più canali sono attivi < lampeggia. Sopra il valore del timer è presente un indicatore
illustrante i canali al momento attivi.
5.2.1.6 Programmi modulazione corrente
Alcune forme di corrente possono essere inserite in un programma con modulazione di corrente.
Premere il tasto [12] per selezionare in maniera sequenziale tempo di salita 3, tempo di tenuta 4, tempo
di discesa 5 e tempo di intervallo 7. Regolare questi parametri per mezzo del regolatore centrale
[16].
Se i canali sono collegati, i programmi di modulazione sono identici su entrambi i canali. In questo modo
è possibile programmare un ritardo tra l’inizio del programma del canale 1 e quello del canale 2. Seguire i
sotto riportati passaggi:
Premere il tasto [13] e selezionare il canale 2 per mezzo del regolatore centrale [16].
In seguito premere il tasto [12] per selezionare il tempo di ritardo 6 e regolarlo attraverso il
regolatore centrale [16].

7
I
5.2.1.7 Intensità di corrente
L’intensità di corrente viene regolata utilizzando il regolatore d’intensità [17]. L’intensità di corrente può
essere regolata solo dopo che l’orologio è stato programmato.
L’indicatore di canale 4, seguito dal numero del canale 5 o 7 indica il canale, che è al momento presente
sul display e che può essere regolato. Vi è la possibilità di cambiare il numero di canale, agendo sul tasto
[13] e sul regolatore centrale [16]. Tale selezione opera in parallelo con la selezione del canale descritta
al paragrafo 5.2.1.2.
Con forme di correnti a 4 poli il regolatore d’intensità [17] opera su entrambi i canali simultaneamente. Sul
display tutto ciò è indicato con A B C, dove il canale che è al momento visualizzato lampeggia. In questo
caso è disponibile una funzione di controllo bilanciamento per le classiche correnti interferenziali (per
maggiori informazioni vedere paragrafo 5.2.2.9.).
L’unità dell’intensità di corrente visualizzata dipende dalla forma di corrente precedentemente selezionata
e può essere espressa in mA, µA o V.
Un trattamento ha inizio regolando l’intensità di corrente, a meno che non sia stato selezionato un
programma con modulazione di corrente. Premere il tasto [14] per dare avvio ad un trattamento che
include un programma co modulazione di corrente.
Gli indicatori > e ? si accenderanno quando la corrente sta effettivamente scorrendo dai canali
corrispondenti.
Un valore di intensità di corrente che lampeggia indica uno scarso contatto elettrico con il paziente.
5.2.1.8 Modo CC/CV
A seconda della forma di corrente selezionata, i canali elettroterapici possono essere utilizzati nel modo
Corrente Costante o Tensione Costante. Si consiglia di utilizzare il modulo CV con applicazioni
dinamiche. Nel modulo CV la corrente in uscita dipende dal contatto elettrico con il paziente e può di
conseguenza variare. È possibile cambiare il modo CC/CV usando il tasto [13] e il regolatore centrale
[16].
5.2.1.9 Polarità di corrente
Se si utilizzano Correnti Continue, il terminale rosso è quello positivo mentre il nero quello negativo. Per
cambiare manualmente la polarità, premere il tasto [13] e selezionare F o G agendo sul regolatore
centrale [16]:
F: Standard
G: invertita
Se, durante un trattamento, la polarità viene modificata manualmente, si assisterà alla riduzione della
corrente a 0, seguita dalla risalita con polarità opposta, raggiungendo un valore pari all’ 80% del valore
precedente.
Per attivare l’inversione automatica della polarità della corrente ad Alta Tensione e delle Microcorrenti,
selezionare o con il tasto [9] e il regolatore centrale [16]:
: alternata
: non alternata
Con le Correnti Continue interrotte non è possibile invertire la polarità.
5.2.1.10 Stop di emergenza
La pressione simultanea dei tasti [12] e [13] interrompe tutti i trattamenti attivi.
5.2.2 Elettroterapia
5.2.2.1 Corrente interferenziale a 2 poli (premodulata)
• Premere il tasto [7] per selezionare . Usare il regolatore centrale [16] per selezionare il canale
desiderato o per interconnettere i canali;
• Premere il tasto [8], per selezionare con il regolatore centrale [16] e premere il tasto [14] per
confermare;
• Selezione della corrente interferenziale a 2 poli:
Selezionare con il regolatore centrale [16] e premere il tasto [14] per confermare;
• Selezione dell’onda portante:
Premere il tasto [9] per selezionare (kHz) e regolarne il valore con il regolatore centrale [16];
• Frequenza d’impulso:
Selezionare con il tasto [10] e regolarne il valore con il regolatore centrale [16];
• Modulazione di frequenza (spettro):
Selezionare * con il tasto [10] e regolarne il valore con il regolatore centrale [16];
• Tempo di modulazione (spettro):
Selezionare , con il tasto [11] e regolarne il valore con il regolatore centrale [16];
• Tempo di trattamento:
Selezionare < con il tasto [12] e regolarne il valore con il regolatore centrale [16];

8
I
• Programma di modulazione corrente (se desiderato):
• Tempo in salita:
Selezionare 3 con il tasto [12] e regolarne il valore con il regolatore centrale [16];
• Tempo di tenuta:
Selezionare 4 con il tasto [12] e regolarne il valore con il regolatore centrale [16];
• Tempo in discesa:
Selezionare 5 con il tasto [12] e regolarne il valore con il regolatore centrale [16];
• Tempo di intervallo:
Selezionare 7 con il tasto [12] e regolarne il valore con il regolatore centrale [16];
• Tempo di ritardo (disponibile solamente con i canali abbinati):
Premere il tasto [13] e selezionare il canale 2 con il regolatore centrale [16].
Selezionare 6 con il tasto [12] e regolarne il valore con il regolatore centrale [16];
• Selezionare CC o CV con il tasto [13] e il regolatore centrale [16];
• Selezionare il canale desiderato con il tasto [13] e il regolatore centrale [16]. Regolare l’intensità di
corrente con il regolatore [17];
• Premere il tasto [14] per dare inizio ad una terapia in caso sia stato selezionato un programma a
modulazione di corrente.
5.2.2.2 Stimolazione russa
• Premere il tasto [7] per selezionare . Usare il regolatore centrale [16] per selezionare il canale
desiderato o per abbinare i canali;
• Premere il tasto [8], selezionare con il regolatore centrale [16] e premere il tasto [14] per
confermare;
• Selezione dell’onda portante:
Premere il tasto [9] per selezionare (kHz) e regolarne il valore con il regolatore centrale [16];
• Frequenza treni d'impulsi:
Selezionare con il tasto [10] e regolarne il valore con il regolatore centrale [16];
• Rapporto treni impulso / intervallo:
Selezionare - con il tasto [11] e regolarne il valore con il regolatore centrale [16];
• Tempo di trattamento:
Selezionare < con il tasto [12] e regolarne il valore con il regolatore centrale [16];
• Programma modulazione di corrente (se desiderato):
• Tempo di salita:
Selezionare 3 con il tasto [12] e regolarne il valore con il regolatore centrale [16];
• Tempo di tenuta:
Selezionare 4 con il tasto [12] e regolarne il valore con il regolatore centrale [16];
• Tempo di discesa:
Selezionare 5 con il tasto [12] e regolarne il valore con il regolatore centrale [16];
• Tempo di intervallo:
Selezionare 7 con il tasto [12] e regolarne il valore con il regolatore centrale [16];
• Tempo di ritardo (disponibile solamente con i canali abbinati):
Premere il tasto [13] e selezionare il canale 2 con il regolatore centrale [16].
Selezionare 6 con il tasto [12] e regolarne il valore con il regolatore centrale [16];
• Selezionare CC o CV con il tasto [13] e il regolatore centrale [16];
• Selezionare il canale desiderato con il tasto [13] e il regolatore centrale [16]. Regolare l’intensità di
corrente con il regolatore [17];
• Premere il tasto [14] per dare inizio ad una terapia in caso sia stato selezionato un programma con
modulazione di corrente.
5.2.2.3 Corrente pulsata bifasica simmetrica e asimmetrica (TENS)
• Premere il tasto [7] per selezionare . Usare il regolatore centrale [16] per selezionare il canale
desiderato o per abbinare i canali;
• Premere il tasto [8], selezionare o con il regolatore centrale [16] e premere il tasto [14] per
confermare;
• Larghezza d’impulso:
Selezionare con il tasto [9] e regolarne il valore con il regolatore centrale [16];
• Frequenza d’impulso:
Selezionare con il tasto [10] e regolarne il valore con il regolatore centrale [16];
• Operare una scelta tra modulazione di frequenza e modo burst in quanto queste due opzioni si
escludono a vicenda;
• Se si desidera una modulazione di frequenza:
In primo luogo controllare che il modo burst sia escluso:
• Selezionare . con il tasto [11] e regolarne il valore a 0 con il regolatore centrale [16];
• Modulazione di frequenza (spettro):
Selezionare * con il tasto [10] e regolarne il valore con il regolatore centrale [16];

9
I
• Tempo di modulazione (Spettro):
Selezionare , con il tasto [11] e regolarne il valore con il regolatore centrale [16];
• Se si desidera il modo burst:
In primo luogo controllare che la modulazione di frequenza sia esclusa:
• Selezionare * con il tasto [10] e regolarne il valore a 0 con il regolatore centrale [16];
• Frequenza d’impulso:
Selezionare . con il tasto [11] e regolarne il valore con il regolatore centrale [16];
• Tempo di trattamento:
Selezionare < con il tasto [12] e regolarne il valore con il regolatore centrale [16];
• Programma modulazione corrente (se desiderato):
• Tempo di salita:
Selezionare 3 con il tasto [12] e regolarne il valore con il regolatore centrale [16];
• Tempo di fermo:
Selezionare 4 con il tasto [12] e regolarne il valore con il regolatore centrale [16];
• Tempo di discesa:
Selezionare 5 con il tasto [12] e regolarne il valore con il regolatore centrale [16];
• Tempo di intervallo:
Selezionare 7 con il tasto [12] e regolarne il valore con il regolatore centrale [16];
• Tempo di ritardo (disponibile solamente con i canali abbinati):
Premere il tasto [13] e selezionare il canale 2 con il regolatore centrale [16].
Selezionare 6 con il tasto [12] e regolarne il valore con il regolatore centrale [16];
• Selezionare CC o CV con il tasto [13] e il regolatore centrale [16];
• Selezionare il canale desiderato con il tasto [13] e il regolatore centrale [16]. Regolare l’intensità di
corrente con il regolatore [17];
• Premere il tasto [14] per dare inizio ad una terapia in caso sia stato selezionato un con modulazione di
corrente.
5.2.2.4 Corrente pulsata monofasica rettangolare e triangolare
• Premere il tasto [7] per selezionare . Usare il regolatore centrale [16] per selezionare il canale
desiderato o per abbinare i canali;
• Premere il tasto [8], selezionare o con il regolatore centrale [16] e premere il tasto [14] per
confermare;
• Larghezza d’impulso:
Selezionare con il tasto [9] e regolarne il valore con il regolatore centrale [16];
• Intervallo di impulso:
Selezionare con il tasto [10] e regolarne il valore con il regolatore centrale [16];
• Tempo di trattamento:
Selezionare < con il tasto [12] e regolarne il valore con il regolatore centrale [16];
• Programma modulazione corrente (se desiderato):
• Tempo di salita:
Selezionare 3 con il tasto [12] e regolarne il valore con il regolatore centrale [16];
• Tempo di fermo:
Selezionare 4 con il tasto [12] e regolarne il valore con il regolatore centrale [16];
• Tempo di discesa:
Selezionare 5 con il tasto [12] e regolarne il valore con il regolatore centrale [16];
• Tempo di intervallo:
Selezionare 7 con il tasto [12] e regolarne il valore con il regolatore centrale [16];
• Tempo di ritardo (disponibile solamente con i canali abbinati):
Premere il tasto [13] e selezionare il canale 2 con il regolatore centrale [16].
Selezionare 6 con il tasto [12] e regolarne il valore con il regolatore centrale [16];
• Selezionare CC o CV con il tasto [13] e il regolatore centrale [16];
• Polarità:
Selezionare F o G con il tasto [13] e il regolatore centrale [16];
• Selezionare il canale desiderato con il tasto [13] e il regolatore centrale [16]. Regolare l’intensità di
corrente con il regolatore [17];
• Premere il tasto [14] per dare inizio ad una terapia in caso sia stato selezionato un programma con
modulazione di corrente.

10
I
5.2.2.5 Microcorrente
• Premere il tasto [7] per selezionare . Usare il regolatore centrale [16] per selezionare il canale
desiderato o per collegare i canali;
• Premere il tasto [8], selezionare con il regolatore centrale [16] e premere il tasto [14] per
confermare;
• Frequenza:
Selezionare (Hz o kHz) con il tasto [9] e regolarne il valore con il regolatore centrale [16];
• Alternata o non alternata:
Selezionare o con il tasto [9] e il regolatore centrale [16];
• Tempo di trattamento:
Selezionare < con il tasto [12] e regolarne il valore con il regolatore centrale [16];
• Sequenza alternata (solo con selezionato):
• Tempo di salita:
Selezionare 3 con il tasto [12] e regolarne il valore con il regolatore centrale [16];
• Tempo di tenuta:
Selezionare 4 con il tasto [12] e regolarne il valore con il regolatore centrale [16];
• Tempo di discesa:
Selezionare 5 con il tasto [12] e regolarne il valore con il regolatore centrale [16];
• Programma modulazione di corrente (solo con selezionato):
• Tempo di salita:
Selezionare 3 con il tasto [12] e regolarne il valore con il regolatore centrale [16];
• Tempo di tenuta:
Selezionare 4 con il tasto [12] e regolarne il valore con il regolatore centrale [16];
• Tempo di discesa:
Selezionare 5 con il tasto [12] e regolarne il valore con il regolatore centrale [16];
• Tempo di intervallo:
Selezionare 7 con il tasto [12] e regolarne il valore con il regolatore centrale [16];
• Tempo di ritardo (disponibile solamente con i canali abbinati):
Premere il tasto [13] e selezionare il canale 2 con il regolatore centrale [16].
Selezionare 6 con il tasto [12] e regolarne il valore con il regolatore centrale [16];
• Polarità (solo con selezionato):
Selezionare F o G con il tasto [13] e il regolatore centrale [16];
• Selezionare il canale desiderato con il tasto [13] e il regolatore centrale [16]. Regolare l’intensità di
corrente con il regolatore [17];
• Premere il tasto [14] per dare inizio ad una terapia in caso sia stato selezionato un programma con
modulazione di corrente.
5.2.2.6 Alta tensione
• Premere il tasto [7] per selezionare . Usare il regolatore centrale [16] per selezionare il canale
desiderato o per collegare i canali;
• Premere il tasto [8], selezionare con il regolatore centrale [16] e premere il tasto [14] per
confermare;
• Alternata o non alternata:
Selezionare o con il tasto [9] e il regolatore centrale [16];
• Frequenza d’impulso:
Selezionare con il tasto [10] e regolarne il valore con il regolatore centrale [16];
• Modulazione di frequenza (spettro):
Selezionare * (%) con il tasto [10] e regolarne il valore con il regolatore centrale [16];
• Tempo di modulazione (spettro):
Selezionare , con il tasto [11] e regolarne il valore con il regolatore centrale [16];
• Tempo di trattamento:
Selezionare < con il tasto [12] e regolarne il valore con il regolatore centrale [16];
• Sequenza alternata (solo con selezionato):
• Tempo di salita:
Selezionare 3 con il tasto [12] e regolarne il valore con il regolatore centrale [16];
• Tempo di tenuta:
Selezionare 4 con il tasto [12] e regolarne il valore con il regolatore centrale [16];
• Tempo di discesa:
Selezionare 5 con il tasto [12] e regolarne il valore con il regolatore centrale [16];
• Programma modulazione di corrente (solo con selezionato):
• Tempo di salita:
Selezionare 3 con il tasto [12] e regolarne il valore con il regolatore centrale [16];
• Tempo di tenuta:

11
I
Selezionare 4 con il tasto [12] e regolarne il valore con il regolatore centrale [16];
• Tempo di discesa:
Selezionare 5 con il tasto [12] e regolarne il valore con il regolatore centrale [16];
• Tempo di intervallo:
Selezionare 7 con il tasto [12] e regolarne il valore con il regolatore centrale [16];
• Tempo di ritardo (disponibile solamente con i canali abbinati):
Premere il tasto [13] e selezionare il canale 2 con il regolatore centrale [16].
Selezionare 6 con il tasto [12] e regolarne il valore con il regolatore centrale [16];
• Polarità (solo con selezionato):
Selezionare F o G con il tasto [13] e il regolatore centrale [16];
• Selezionare il canale desiderato con il tasto [13] e il regolatore centrale [16]. Regolare l’intensità di
corrente con il regolatore [17];
• Premere il tasto [14] per dare inizio ad una terapia in caso sia stato selezionato un programma
modulazione di correntedi corrente.
5.2.2.7 Correnti diadinamiche
• Premere il tasto [7] per selezionare . Usare il regolatore centrale [16] per selezionare il canale
desiderato o per collegare i canali;
• Premere il tasto [8], selezionare con il regolatore centrale [16] e premere il tasto [14] per
confermare;
• Selezionare MF, DF, LP, CP o CPid con il regolatore centrale [16] e premere il tasto [14] per
confermare;
• Tempo di trattamento:
Selezionare < con il tasto [12] e regolarne il valore con il regolatore centrale [16];
• Programma con modulazione di corrente (solo con MF e DF):
• Tempo di salita:
Selezionare 3 con il tasto [12] e regolarne il valore con il regolatore centrale [16];
• Tempo di tenuta:
Selezionare 4 con il tasto [12] e regolarne il valore con il regolatore centrale [16];
• Tempo di discesa:
Selezionare 5 con il tasto [12] e regolarne il valore con il regolatore centrale [16];
• Tempo di intervallo:
Selezionare 7 con il tasto [12] e regolarne il valore con il regolatore centrale [16];
• Tempo di ritardo (disponibile solamente con i canali abbinati):
Premere il tasto [13] e selezionare il canale 2 con il regolatore centrale [16].
Selezionare 6 con il tasto [12] e regolarne il valore con il regolatore centrale [16];
• Selezionare CC o CV con il tasto [13] e il regolatore centrale [16];
• Polarità:
Selezionare F o G con il tasto [13] e il regolatore centrale [16];
• Selezionare il canale desiderato con il tasto [13] e il regolatore centrale [16]. Regolare l’intensità di
corrente con il regolatore [17];
• Premere il tasto [14] per dare inizio ad una terapia in caso sia stato selezionato un programma con
modulazione di corrente.
5.2.2.8 Corrente continua interrotta a media frequenza
• Premere il tasto [7] per selezionare . Usare il regolatore centrale [16] per selezionare il canale
desiderato o per collegare i canali;
• Premere il tasto [8], selezionare con il regolatore centrale [16] e premere il tasto [14] per
confermare;
• Tempo di trattamento:
Selezionare < con il tasto [12] e regolarne il valore con il regolatore centrale [16];
• Selezionare il canale desiderato con il tasto [13] e il regolatore centrale [16]. Regolare l’intensità di
corrente con il regolatore [17];
5.2.2.9 Corrente interferenziale a 4 poli (classica)
• Premere il tasto [7] per selezionare . Usare il regolatore centrale [16] per collegare i canali;
• Premere il tasto [8], selezionare con il regolatore centrale [16] e premere il tasto [14] per
confermare;
• Selezione della corrente interferenziale a 4 poli:
Selezionare con il regolatore centrale [16] e premere il tasto [14] per confermare;
• Selezione dell’onda portante:
Premere il tasto [9] per selezionare (kHz) e regolarne il valore con il regolatore centrale [16];
• Frequenza di stimolazione:
Selezionare con il tasto [10] e regolarne il valore con il regolatore centrale [16];

12
I
• Modulazione di frequenza (spettro):
Selezionare * con il tasto [10] e regolarne il valore con il regolatore centrale [16];
• Tempo di modulazione (spettro):
Selezionare , con il tasto [11] e regolarne il valore con il regolatore centrale [16];
• Tempo di trattamento:
Selezionare < con il tasto [12] e regolarne il valore con il regolatore centrale [16];
• Selezionare CC o CV con il tasto [13] e il regolatore centrale [16];
• Regolare l’intensità di corrente con il regolatore [17];
• Bilanciamento:
Selezionare con il tasto [10] e regolarne il valore con il regolatore centrale [16]
5.2.2.10 Vettore isoplanare
• Premere il tasto [7] per selezionare . Usare il regolatore centrale [16] per collegare i canali;
• Premere il tasto [8], selezionare con il regolatore centrale [16] e premere il tasto [14] per
confermare;
• Selezione del vettore isoplanare della corrente:
Selezionare
con il regolatore centrale [16] e premere il tasto [14] per confermare;
• Selezione dell’onda portante:
Premere il tasto [9] per selezionare (kHz) e regolarne il valore con il regolatore centrale [16];
• Frequenza di stimolazione:
Selezionare con il tasto [10] e regolarne il valore con il regolatore centrale [16];
• Modulazione di frequenza (spettro):
Selezionare * con il tasto [10] e regolarne il valore con il regolatore centrale [16];
• Tempo di modulazione (spettro):
Selezionare , con il tasto [11] e regolarne il valore con il regolatore centrale [16];
• Tempo di trattamento:
Selezionare < con il tasto [12] e regolarne il valore con il regolatore centrale [16];
• Selezionare CC o CV con il tasto [13] e il regolatore centrale [16];
• Regolare l’intensità di corrente con il regolatore [17]
5.2.2.11 Vettore dipolo manuale
• Premere il tasto [7] per selezionare . Usare il regolatore centrale [16] per collegare i canali;
• Premere il tasto [8], selezionare con il regolatore centrale [16] e premere il tasto [14] per
confermare;
• Selezione manuale del vettore dipolo:
5.2.2.12 Selezionare
con il regolatore centrale [16] e premer il tasto [14] per confermare;
• Selezione dell’onda portante:
Premere il tasto [9] per selezionare (kHz) e regolarne il valore con il regolatore centrale [16];
• Frequenza di stimolazione:
Selezionare con il tasto [10] e regolarne il valore con il regolatore centrale [16];
• Modulazione di frequenza (spettro):
Selezionare * con il tasto [10] e regolarne il valore con il regolatore centrale [16];
• Tempo di modulazione (spettro):
Selezionare , con il tasto [11] e regolarne il valore con il regolatore centrale [16];
• Tempo di trattamento:
Selezionare < con il tasto [12] e regolarne il valore con il regolatore centrale [16];
• Selezionare CC o CV con il tasto [13] e il regolatore centrale [16];
• Regolare l’intensità di corrente con il regolatore [17]
• Vettore dipolo:
Selezionare # con il tasto [10] e regolarne la posizione con il regolatore centrale [16]
5.2.2.13 Vettore dipolo automatico
• Premere il tasto [7] per selezionare . Usare il regolatore centrale [16] per collegare i canali;
• Premere il tasto [8], selezionare con il regolatore centrale [16] e premere il tasto [14] per
confermare;
• Selezione vettore dipolo automatico della corrente:
Selezionare
con il regolatore centrale [16] e premere il tasto [14] per confermare;
• Selezione dell’onda portante:
Premere il tasto [9] per selezionare (kHz) e regolarne il valore con il regolatore centrale [16];
• Frequenza di stimolazione:
Selezionare con il tasto [10] e regolarne il valore con il regolatore centrale [16];
• Modulazione di frequenza (spettro):

13
I
Selezionare * con il tasto [10] e regolarne il valore con il regolatore centrale [16];
• Tempo di modulazione (spettro):
Selezionare , con il tasto [11] e regolarne il valore con il regolatore centrale [16];
• Tempo di trattamento:
Selezionare < con il tasto [12] e regolarne il valore con il regolatore centrale [16];
• Velocità di rotazione
Selezionare 8 con il tasto [12] e regolarne il valore con il regolatore centrale [16];
• Selezionare CC o CV con il tasto [13] e il regolatore centrale [16];
• Regolare l’intensità di corrente con il regolatore [17].
5.3 Precauzioni in relazione ai trattamenti
5.3.1 Elettroterapia
Prima del trattamento
• Visitare il paziente onde accertarsi delle controindicazioni assolute e relative.
• Verificare la sensibilità al calore della zona da trattare.
• Si consiglia di depilare la porzione di cute oggetto del trattamento.
5.4 Funzioni di memoria
Il Endomed 482 è dotato di una memoria che permette di memorizzare programmi e protocolli di
trattamento.
5.4.1 Programmi dell’unità
I programmi memorizzano tutti i parametri dell’apparecchio, fatta eccezione per l’intensità di corrente. A
differenza dei protocolli, i programmi operano su tutti i canali assieme, compreso il canale dell’ultrasuono.
I programmi sono memorizzati nelle posizioni 0 - 9. Il numero di posizione apparirà sul display premendo
il tasto [15]. Il programma 0 viene caricato automaticamente all’accensione dell’unità. I programmi
possono essere caricati e memorizzati solo quando tutti i canali sono inattivi.
5.4.1.1 Caricamento dei programmi
• Premere il tasto [15], 1 lampeggia;
• Selezionare una posizione di memoria nella gamma 0 - 9 con il regolatore centrale [16]. Il display
visualizza i programmi che sono memorizzati nella posizione selezionata;
• Premere il tasto [14] per caricare il programma selezionato;
• Regolare l’intensità di corrente con il regolatore [17];
• Premere il tasto [14] per dare inizio alla terapia nel caso sia stato selezionato un programma ad
impulso di corrente.
Il caricamento dei programmi selezionati deve avvenire in un determinato lasso di tempo fino a che 1
lampeggia. Attendere troppo a lungo, o il fatto di premere qualsiasi altro tasto diverso da [14] o [15]
determinerà la cancellazione dell’operazione di caricamento.
5.4.1.2 Memorizzazione dei programmi
• Selezionare una terapia e impostare tutti i parametri su tutti i canali desiderati;
• Premere il tasto [15], 1 lampeggia;
• Selezionare una posizione di memoria nella gamma 0 - 9 con il regolatore centrale [16]. Il display
visualizza i programmi che sono memorizzati nella posizione selezionata, permettendo di controllare
ciò che verrà sovrascritto;
• Premere il tasto [15] una seconda volta, 2 lampeggia. Il display visualizza ora il programma corrente
che deve essere memorizzato nella posizione selezionata;
• Premere il tasto [14] per eseguire l’operazione di memorizzazione.
La memorizzazione deve avvenire in un determinato lasso di tempo fino a che 2 lampeggia. Attendere
troppo a lungo, o il fatto di premere qualsiasi altro tasto diverso da [14] o [15] determinerà la
cancellazione dell’operazione di memorizzazione.

14
I
5.4.2 Protocolli
Un protocollo consiste in uno o più passi di trattamento che vengono eseguiti in maniera sequenziale.
Ogni passo ha la propria forma di corrente, parametri e tempo di trattamento. I protocolli vengono
classificati in gruppi a seconda della loro applicazione. I protocolli vengono identificati come segue:
1:1 il primo numero è quello che corrisponde al gruppo
1:1 il secondo numero è quello del protocollo
Il Endomed 482 dispone di un numero di protocolli pre-programmati, che sono disponibili a partire dal
gruppo 2. Ogni gruppo è designato per una specifica indicazione. Nella guida alla terapia fornita con
l’apparecchio troverete una relazione riportante tutti i gruppi e i relativi protocolli. Inoltre, i protocolli
personalizzati dell’utilizzatore possono essere memorizzati nel gruppo 1.
I protocolli elettroterapici possono costituire applicazioni a uno o due canalie. Prima di caricare un
protocollo su un canale singolo, è necessario specificare il canale “target”. In questo caso è anche
possibile abbinare i canali, permettendo quindi l’esecuzione del protocollo su entrambi i canali. Se si
esegue un protocollo su un canale singolo, sull’altro canale potrà essere eseguito un protocollo per
canale singolo completamente diverso. Naturalmente i protocolli sul doppio canale possono essere
caricati solo quando i canali sono abbinati.
5.4.2.1 Caricamento di un protocollo
• Selezionare il canale “target”, usando il tasto [7] e il regolatore centrale [16];
• Premere il tasto [15], 1 lampeggia;
• Selezionare un numero di protocollo nel range 1:1 o maggiore con il regolatore centrale [16]. Il display
visualizza il tempo totale di trattamento del protocollo selezionato;
• Premere il tasto [14] per caricare il protocollo selezionato;
• Regolare l’intensità di corrente con il regolatore [17];
• Premere il tasto [14] per dare inizio alla terapia nel caso sia stato selezionato un programma con
modulazione di corrente.
Quando un protocollo è stato eseguito, il display visualizza il tempo di trattamento rimanente del passo in
corso. Ogni passo di trattamento è segnalato con un leggero suono. La fine del protocollo viene
segnalata da un suono standard di “fine trattamento”, a seguito del quale l’unità esce dal modo protocollo.
Note:
• Per indicare il modo protocollo, il numero di protocollo resta visibile sul display una volta che un
protocollo è stato caricato. Seguendo il numero di protocollo, viene visualizzato il numero di passo,
accompagnato dalla sua icona 0.
• Per eliminare un protocollo caricato ma non ancora eseguito, premere ancora il tasto [14].
Pazientando un attimo, o premendo un tasto qualsiasi diverso da [14] o [15], il dispositivo uscirà dal
modulo protocollo.
• Se lo si desidera, tutti i parametri dei protocolli caricati possono essere modificati. Selezionare 0 con
il tasto [11] e selezionare il numero di passo di trattamento agendo sul regolatore centrale [16]. Tutti i
parametri del passo appena selezionato possono essere modificati. Ricordarsi di cancellare il passo
numero 1.
• Un protocollo caricato può essere eseguito partendo da qualsiasi passo. Selezionare 0 con il tasto
[11] e selezionare il numero di passo con il regolatore centrale [16].
• L’esecuzione di un passo può essere determinata anticipando il numero di passo. Selezionare 0 con
il tasto [11] e selezionare il nuovo numero di passo con il regolatore centrale [16]. La corrente si
azzererà. È possibile riprendere l’esecuzione del protocollo dal nuovo passo regolando l’intensità di
corrente con il regolatore [17].
• L’esecuzione di un protocollo può essere terminata regolando il tempo di trattamento del passo in
corso a zero. In questo modo il dispositivo uscirà dal modo protocollo.
5.4.2.2 Memorizzare un protocollo
Prima di procedere all’esecuzione di un protocollo modificato, vi è la possibilità di salvarlo, per un utilizzo
successivo, nel gruppo 1:
• Premere il tasto [15] due volte. 2 lampeggia;
• Selezionare un numero di protocollo nella gamma 1:1 - 1:9 con il regolatore centrale [16]. Il display
visualizza il tempo totale di trattamento del protocollo che deve essere memorizzato;
• Premere il tasto [14] per eseguire l’operazione di memorizzazione.

15
I
5.4.2.3 Creare un protocollo personalizzato
Nel gruppo 1 è possibile creare i vostri protocolli. Vi è la possibilità di memorizzare un massimo di 10
protocolli, ognuno con una lunghezza massima di 20 passi di trattamento. Prima di procedere con i punti
sotto riportati, assicurarsi che l’apparecchio non si trovi nel modo protocollo (vedere la sezione 5.4.2.1.
come uscire dal modulo protocollo):
• Premere il tasto [15] due volte. 2 lampeggia;
• Selezionare un numero di protocollo nella gamma 1:1 - 1:9 con il regolatore centrale [16];
• Premere il tasto [14]. 2 lampeggia, 0 è visibile e il numero di passo è posizionato su 1.
• Regolare tutti i parametri del passo in corso;
• Premere il tasto [14] per memorizzare il passo. Il numero di passo viene incrementato
automaticamente;
• Ripetere gli ultimi due punti fino alla fine del Vostro protocollo;
• Terminare il protocollo con un passo avente un tempo di trattamento pari a 0. Premere il tasto [14] per
confermare. La fine del protocollo viene segnalata da un avvertimento acustico.
Note:
• Se due passi consecutivi contengono una corrente AC, al momento dell’esecuzione del protocollo,
l’intensità di corrente sarà mantenuta al livello regolato.
• Se si passa a o tra correnti DC, l’intensità di corrente si azzererà. L’inizio del passo successivo
avverrà manualmente regolando l’intensità di corrente.
5.5 Reazioni al collegamento - scollegamento degli elettrodi
Con l’impiego di una corrente di tipo costante (CC) è necessario prestare particolare attenzione che gli
elettrodi siano adeguatamente fissati alla superficie corporea e che non perdano aderenza con la cute, al
fine di non provocare delle spiacevoli reazioni dovute ad un possibile scollegamento. Durante
l’applicazione o la rimozione degli elettrodi, assicurarsi che l’uscita di corrente sia portata a 0 mA. In caso
di tecniche con applicazioni di tipo dinamico, utilizzare di preferenza la Tensione Costante (CV).
5.6 Effetti elettrolitici
Le forme di corrente con una componente continua generano un processo di elettrolisi fra gli elettrodi e
l’epidermide. Per assorbire al massimo i prodotti elettrolitici causati dalla migrazione di ioni che si
formano sotto gli elettrodi e per limitarne gli effetti, è necessario utilizzare le apposite spugnette in
dotazione, assicurandosi che siano bagnate a sufficienza. Interporre il doppio strato della spugna tra
l’elettrodo e l’epidermide del paziente.
5.7 Telecomando
Il Endomed 482 dispone di uno speciale telecomando che può essere collegato al connettore [3-2]. È
dotato di 2 tasti intensità per impostare l’intensità dei canali e di uno stop di emergenza.
6 Manutenzione
6.1 Manutenzione tecnica
La sicurezza elettrica del dispositivo dipende dalle connessioni elettriche (attraverso il cavo elettrico) e
dalla presa di terra. Si consiglia quindi di far controllare annualmente l’apparecchio. La manutenzione e le
riparazioni devono essere eseguite esclusivamente presso i centri autorizzati. Si raccomanda inoltre di
registrare tutti gli interventi di manutenzione; in alcuni paesi si tratta di una prassi obbligatoria.
La manutenzione e le riparazioni devono essere eseguite esclusivamente presso i centri autorizzati. Il
costruttore non risponde di eventuali danni derivanti da manutenzioni o riparazioni eseguite da personale
non autorizzato.
La manutenzione e le riparazioni devono essere eseguite in conformità alle procedure descritte nel
service manual dell’unità.
L’intervento sull’apparecchio da parte di personale non autorizzato è proibito ed invalida ogni diritto alla
garanzia sul prodotto.

16
I
6.2 Pulizia dell’apparecchio
Prima di qualsiasi operazione di manutenzione, spegnere l’apparecchio e staccare la presa di
alimentazione. L’apparecchio si pulisce con un panno umido. Utilizzare acqua tiepida e un normale
detergente ad uso casalingo. (Mai usare composti a contenuto abrasivo o soluzioni a base d’alcool).
6.3 Pulizia degli accessori
6.3.1 Elettrodi e spugnette
Gli elettrodi in gomma devono essere puliti con acqua tiepida. In caso di sporco ostinato, pulire e
disinfettare gli elettrodi utilizzando una soluzione alcolica al 70%. In tal caso è normale che gli elettrodi
stingano leggermente, tuttavia ciò non influisce sulla loro funzionalità.
Dopo l’utilizzo le spugnette devono essere lavate in una soluzione di acqua calda e un normale
detergente ad uso casalingo. Sciacquarle, strizzarle e farle asciugare. Le spugnette rovinate devono
essere sostituite.
È possibile che in caso di acqua con basso grado di durezza, non ci sia sufficiente conduttività e pertanto
non si raggiunga l’intensità di corrente desiderata. In tal caso utilizzare una soluzione salina per
ripristinare la conduttività dell’acqua.
Quando gli elettrodi non vengono utilizzati, le spugnette devono essere rimosse per favorire la durata
degli elettrodi stessi. Si consiglia di tenere sempre a portata di mano una scorta di spugnette ed elettrodi.
6.3.2 Cavo paziente
Controllare con regolarità che non sia stato danneggiato o che presenti falsi contatti. Si consiglia di avere
sempre a disposizione un cavo di scorta.
6.4 Informazioni ambientali
Il Endomed 482 contiene materiali che possono essere riciclati e/o sono nocivi per l’ambiente. Nel
momento in cui verrà dismesso, potrà essere smontato separando i materiali nocivi da quelli riciclabili. In
questo modo contribuirete ad ottenere un ambiente migliore.
Accertarsi di essere a conoscenza delle regolamentazioni locali riguardanti l’eliminazione di
dispositivi e accessori.
7 Diagnostica
7.1 Display che non si illumina
• Accertarsi che l’adattatore di rete sia collegato all’unità e alla rete.
7.2 Codice errore
L’apparecchio ha rilevato un errore durante o dopo l’auto diagnosi. Il codice errore è costituito da 3 cifre e
viene visualizzato sul display dell’intensità di corrente. Scollegare ogni accessorio o i cavi dalle prese e
accendere nuovamente l’unità. Nel caso in cui il messaggio compaia nuovamente sul display, contattare il
Vostro centro di assistenza autorizzato, poiché presumibilmente l’apparecchio è difettoso.
7.3 Contatto interrotto nel modulo CC
Utilizzando una corrente di tipo costante (CC), qualsiasi interruzione di contatto viene segnalata dall’unità
mediante un segnale acustico e la corrente viene automaticamente ridotta a 0, al fine di prevenire delle
spiacevoli sensazioni per il paziente, una rivolta riposizionata la testina o l'elettrodo sulla superficie da
trattare. Per continuare il trattamento occorre impostare nuovamente la corrente in uscita.

17
I
7.4 Assenza totale o parziale di corrente in uscita
• Verificare che il cavo di collegamento paziente non sia danneggiato o non abbia falsi contatti.
• Assicurarsi che le spugne siano sufficientemente inumidite.
• Se necessario, utilizzare una soluzione salina.
• Pulire gli elettrodi.
• Verificare che non vi siano falsi o difettosi contatti.
7.5 Controllo del pannello frontale
Accendendo l’apparecchio e contemporaneamente tenendo premuti tasti [9] e [10] verranno attivati tutti i
segmenti del display, permettendo di controllarne il funzionamento. La pressione esercitata sui tasti e sui
regolatori viene indicata da un segnale acustico. L’unica maniera per uscire da questo stato consiste nel
spegnere l’apparecchio.
8 Caratteristiche
8.1 Caratteristiche
Elettroterapia (caratteristiche generali)
Numero canali : 2
Caratteristiche di uscita : Corrente Costante (CC) o Tensione Costante (CV)
Risoluzione display : 0.2 mA
Timer : 0 - 60 minuti
Inversione di polarità correnti continue : manuale
La massima ampiezza è raggiunta con un carico massimo di 500 Ω (CC).
Corrente pulsata bifasica simmetrica e asimmetrica, TENS
Frequenza : 1 - 200 Hz
Durata fase (larghezza d’impulso) : 10 - 400 µs
Frequenza treno impulsi : 0 - 9 Hz
Modulazione di frequenza (spettro) : 0 - 180 Hz
Tempo di modulazione (spettro) : 1/1, 6/6, 12/12 e 1/30/1/30 s
Modulazione corrente : Salita 0 - 9 s
Tenuta 1 - 60 s
Discesa 0 - 9 s
Tempo di intervallo 1 - 60 s
Tempo di ritardo 0.1 - 80 s
Intensità : 0 - 140 mA.
In alcune combinazioni di larghezza d’impulso, frequenza e spettro, la gamma di regolazione è ridotta a
90-mA massimi, in accordo ai valori limite imposti dalla direttiva IEC 60601-2-10
Alta tensione
Frequenza : 1- 200 Hz
Modulazione di frequenza (spettro) : 0 - 90 %
Tempo di modulazione (spettro) : 1/1, 6/6, 12/12 e 1/30/1/30 s
Intensità : 0 - 500 Volt
Modulo alternato:
Tempo di alternanza : 5 a 50 secondi
Tempo in salita e in discesa : 0.1 - 1 secondi
Modulo non alternato:
Modulazione di corrente : come per le correnti TENS

18
I
Microcorrenti
Intensità di corrente : 10 µA - 1 mA
Tensione uscita : 200 V
Modulo alternato:
Frequenza : : 0 - 1000 Hz
Tempo di alternanza : 0.1 - 10 secondi (il tempo di alternanza è in relazione alla
frequenza d’impulso)
Salita e discesa : 0.1 - 1 secondi
Modulo non alternato:
Frequenza : 0,1 - 1000 Hz
Modulazione di corrente : come per le correnti TENS
Corrente alternata interrotta, Stimolazione russa
Frequenza portante : 2 - 10 kHz
Frequenza treno d’impulsi : 0 - 100 Hz
Treno d’impulsi / rapporto intervallo : 1:1, 1:2, 1:4 e 1:5
Modulazione di corrente : come per le correnti TENS
Intensità : 0 - 100 mA
Correnti diadinamiche
Opzioni : MF, DF, CP, LP e CPid
Intensità : 0 - 70 mA
Modulazione di corrente (solo MF e DF) : come per le correnti TENS
Correnti faradiche
Opzioni : 2 - 5 corrente secondo Träbert (impulso rettangolare di
default)
Durata fase : 0.02 - 1000 ms con corrente pulsata rettangolare
0.1 - 1000 ms con corrente pulsata triangolare
Intervallo fase : 5 - 5000 ms
Modulazione di corrente : come per le correnti TENS
Intensità : 0 - 80 mA
Corrente continua interrotta
Frequenza : 8000 Hz
Duty cycle : 95%
Intensità : 0 - 40 mA
Corrente interferenziale bipolare (premod)
Onda portante : 2 - 10 kHz
Frequenza di stimolazione (AMF) : 0 - 200 Hz
Modulazione di frequenza (spettro) : 0 - 180 Hz
Tempo di modulazione(spettro) : 1/1, 6/6, 12/12 e 1/30/1/30 s
Modulazione di corrente : come per le correnti TENS
Intensità : 0 - 100 mA
corrente interferenziale quadripolare (classica)
Onda portante : 2- 10 kHz
Frequenza di stimolazione (AMF) : 0 - 200 Hz
Modulazione di frequenza (spettro) : 0 - 180 Hz
Tempo di modulazione (spettro) : 1/1, 6/6, 12/12 e 1/30/1/30 s
Modulazione di corrente : Non regolabile
Intensità : 0 - 100 mA
Impostazione bilanciamento : con il regolatore centrale
Vettore isoplanare
Onda portante : 2- 10 kHz
Frequenza di stimolazione (AMF) : 0 - 200 Hz
Modulazione di frequenza (spettro) : 0 - 180 Hz
Tempo di modulazione(spettro) : 1/1, 6/6, 12/12 e 1/30/1/30 s
Modulazione di corrente : Non regolabile
Intensità : 0 - 100 mA

19
I
Vettore dipolo automatico
Onda portante : 2- 10 kHz
Frequenza di stimolazione (AMF) : 0 - 200 Hz
Modulazione di frequenza (spettro) : 0 - 180 Hz
Tempo di modulazione (spettro) : 1/1, 6/6, 12/12 e 1/30/1/30 s
Modulazione di corrente : Non regolabile
Intensità : 0 - 100 mA
Velocità di rotazione : regolabile da 1 a 10 secondi
Vettore dipolo manuale
Onda portante : 2- 10 kHz
Frequenza di stimolazione (AMF) : 0 - 200 Hz
Modulazione di frequenza (spettro) : 0 - 180 Hz
Tempo di modulazione (spettro) : 1/1, 6/6, 12/12 e 1/30/1/30 s
Modulazione di corrente : Non regolabile
Intensità : 0 - 100 mA
Posizione : 360 º
Funzioni di memoria
Programma 0 : programma di inizio.
Programmi : 10, programmabili dall’utilizzatore
protocolli utente personalizzati : 10
Protocolli pre-programmati : 50
8.2 Caratteristiche tecniche
Adattatore di rete
Tipo : ENA-1550
Tensione di rete : 100 - 240 Volt, +/- 10 %
Frequenza : 50 / 60 Hz
Tensione di uscita : 15 Volt
Corrente massima in uscita : 3.3 Ampere
Unità
Classificazione dispositivo medico : IIa (secondo la Direttiva Dispositivi Medici (93/42/EEC)
Classe di Sicurezza : I* tipo BF**, secondo IEC 60601-1
Corrente di dispersione sul paziente : Migliore del requisito IEC (IEC < 100 µA)
Idem, in condizione di primo guasto : Migliore del requisito IEC (IEC: < 500 µA)
Certificazione di Sicurezza : CE-MDD (TÜV Rheinland)
Dimensioni : 29 x 28 x 11 cm (l x p x a)
Peso : 4 kg.
Condizioni ambientali per trasporto e immagazzinamento
Temperatura : -10° fino a +50° C
Umidità relativa : 10 fino a 100 %
Pressione atmosferica : 500 fino a 1060 hPa
Condizioni ambientali per il normale utilizzo
Temperatura : 10° fino a 40° C
Umidità relativa : 10 fino a 90 % (senza condensa)
Pressione atmosferica : 500 fino a 1060 hPa
8.3 Classificazione
Classe Medica IIa
Questo apparecchio risponde a tutti i requisiti della Direttiva Dispositivi Medici (93/42/EEC).
I : L’apparecchio ha una connessione terra di sicurezza, e deve essere collegato a
una presa a muro.
BF : tipo BF, l’apparecchio ha un circuito paziente di tipo flottante.

20
I
Norme internazionali di sicurezza
Il Endomed 482 è conforme alle norme internazionali per i dispositivi elettromedicali IEC 60601-1 e la IEC
60601-2-10 (Elettrostimolatori).
La Enraf-Nonius si riserva di operare modifiche tecniche
9 Dati per l’ordinazione
Per quel che concerne l’ordinazione del Endomed 482, degli accessori standard e degli accessori
opzionali consultare il Catalogo Fisioterapia.

21
I

1 Figuren – Pictures – Abbildungen – Image – Imagen - Immagine

-
 1
1
-
 2
2
-
 3
3
-
 4
4
-
 5
5
-
 6
6
-
 7
7
-
 8
8
-
 9
9
-
 10
10
-
 11
11
-
 12
12
-
 13
13
-
 14
14
-
 15
15
-
 16
16
-
 17
17
-
 18
18
-
 19
19
-
 20
20
-
 21
21
-
 22
22
-
 23
23
-
 24
24
-
 25
25
-
 26
26
-
 27
27
-
 28
28
-
 29
29
-
 30
30
-
 31
31
-
 32
32
-
 33
33
-
 34
34
-
 35
35
-
 36
36
-
 37
37
-
 38
38
-
 39
39
-
 40
40
-
 41
41
-
 42
42
-
 43
43
-
 44
44
-
 45
45
-
 46
46
-
 47
47
-
 48
48
-
 49
49
-
 50
50
-
 51
51
-
 52
52
-
 53
53
-
 54
54
-
 55
55
-
 56
56
-
 57
57
-
 58
58
-
 59
59
-
 60
60
-
 61
61
-
 62
62
-
 63
63
-
 64
64
-
 65
65
-
 66
66
-
 67
67
-
 68
68
-
 69
69
-
 70
70
-
 71
71
-
 72
72
-
 73
73
-
 74
74
-
 75
75
-
 76
76
-
 77
77
-
 78
78
-
 79
79
-
 80
80
-
 81
81
-
 82
82
-
 83
83
-
 84
84
-
 85
85
-
 86
86
-
 87
87
-
 88
88
-
 89
89
-
 90
90
-
 91
91
-
 92
92
-
 93
93
-
 94
94
-
 95
95
-
 96
96
-
 97
97
-
 98
98
-
 99
99
-
 100
100
-
 101
101
-
 102
102
-
 103
103
-
 104
104
-
 105
105
-
 106
106
-
 107
107
-
 108
108
-
 109
109
-
 110
110
-
 111
111
-
 112
112
-
 113
113
-
 114
114
-
 115
115
-
 116
116
-
 117
117
-
 118
118
-
 119
119
-
 120
120
-
 121
121
-
 122
122
-
 123
123
-
 124
124
-
 125
125
-
 126
126
-
 127
127
-
 128
128
-
 129
129
-
 130
130
-
 131
131
-
 132
132
-
 133
133
-
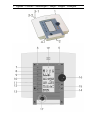 134
134
-
 135
135


in andere talen
Gerelateerde papieren
-
Enraf-Nonius Endomed 482e Handleiding
-
-
-
-
-
-
-
-
-