
1885
Manuale d'uso e istruzioni
IT
Operation manual and instructions
EN
Notice d'utilisation et instructions
FR
Bedienungsanleitung
DE
Manual de uso e instrucciones
ES
Gebruikshandleiding
NL
Instrukcja obsługi i zalecenia
PL
Manual de uso e instruções
PT
Használati kézikönyv és útmutató
HU
Libretto 1885.indd 1 08/07/19 16:35

2
2
1
Libretto 1885.indd 2 08/07/19 16:35

3
MANUALE D’USO ED ISTRUZIONI
IT
MANUALE D’USO ED ISTRUZIONI PER STAZIONE LAVAGGIO CAMBIO AUTOMATICO PRODOTTA DA:
BETA UTENSILI S.P.A.
Via A. Volta 18,
20845 Sovico (MB)
ITALIA
Documentazione redatta originariamente in lingua ITALIANA.
Conservare accuratamente le istruzioni di sicurezza e consegnarle al personale utilizzatore.
DESTINAZIONE D’USO
- La stazione per il lavaggio del cambio automatico, è destinata al seguente uso:
• Da utilizzare esclusivamente su veicoli con cambio automatico
- Non sono consentite le seguenti operazioni:
• è vietato l’uso in ambienti umidi, bagnati, non esporlo a pioggia o neve
• è vietato l’utilizzo al di fuori delle prescrizioni tecniche contenute nella tabella DATI TECNICI
• è vietato l’utilizzo per tutte quelle applicazioni diverse da quelle indicate
SICUREZZA DELLA POSTAZIONE DI LAVORO
Non utilizzare la stazione di lavaggio del cambio automatico in ambienti contenenti atmosfere potenzialmente esplosive o
materiali inammabili, perché possono svilupparsi scintille in grado di incendiare polveri o vapori.
Impedire che bambini o visitatori possano avvicinarsi alla postazione di lavoro mentre si sta operando con la stazione
lavaggio del cambio automatico. La presenza di altre persone provoca distrazione e può comportare la perdita del controllo
durante l’utilizzo.
Non inalare eventuali gas sprigionati dalla stazione di lavaggio del cambio automatico, mentre si opera sul motore.
Utilizzare la stazione lavaggio del cambio automatico in una zona asciutta evitando umidità.
INDICAZIONI DI SICUREZZA LA STAZIONE DI LAVAGGIO DEL CAMBIO AUTOMATICO
- Controllare prima dell’utilizzo che la stazione di lavaggio del cambio automatico non abbia subito danneggiamenti, o che non vi
siano parti usurate.
- Non utilizzare la stazione di lavaggio del cambio automatico se è danneggiata o non cercare di aprirla o modicarla.
- Prima del collegamento all’impianto chiudere tutti i rubinetti.
- Non riempire il serbatoio di stoccaggio oltre 80%.
- Periodicamente vericare l’integrità della stazione di lavaggio del cambio automatico e relativi accessori.
- Non coprire in alcun modo la stazione di lavaggio del cambio automatico durante il suo l’utilizzo. Garantire uno spazio adeguato
per la ventilazione.
- Non utilizzare la stazione di lavaggio del cambio automatico in ambienti umidi, bagnati, non esporla a pioggia.
INDICAZIONE PER LA SICUREZZA DEL PERSONALE
- Si raccomanda la massima attenzione, avendo cura di concentrarsi sempre sulle proprie azioni. Non utilizzare la stazione di
lavaggio del cambio automatico in caso di stanchezza o sotto l’effetto di droghe, bevande alcoliche o medicinali.
Utilizzare sempre i seguenti dispositivi individuali di protezione:
• scarpe di sicurezza
• occhiali di protezione
• mascherina di protezione
• guanti di protezione per agenti sici e chimici
• indumenti protettivi contro sostanze chimiche
- Effettuare tutte le operazioni previste in ambienti adeguatamente areati ed asciutti.
- Assicurarsi che i cavi siano lontani da ventole, parti in movimento e dal condotto del carburante.
IMPORTANTE LEGGERE COMPLETAMENTE IL PRESENTE MANUALE
PRIMA DI UTILIZZARE LA STAZIONE LAVAGGIO CAMBIO AUTOMATICO.
IN CASO DI MANCATO RISPETTO DELLE NORME DI SICUREZZA E DELLE
ISTRUZIONI OPERATIVE, POSSONO VERIFICARSI SERI INFORTUNI.
ATTENZIONE
Libretto 1885.indd 3 08/07/19 16:35

4
MANUALE D’USO ED ISTRUZIONI
IT
- Non indossare vestiti larghi, non portare bracciali, catenine od oggetti metallici quando si lavora sul veicolo.
- Interrompere sempre l’alimentazione prima di effettuare le operazioni di verica guasti o di pulizia: questa misura preventiva
impedisce l’avvio accidentale della stazione permettendo di operare in sicurezza.
UTILIZZO ACCURATO DELLA STAZIONE DI LAVAGGIO DEL CAMBIO AUTOMATICO
- Non utilizzare la stazione di lavaggio del cambio automatico se presenta danneggiamenti.
- La stazione di lavaggio del cambio automatico non deve essere modicata. Le modiche possono ridurre l’efcacia delle misure
di sicurezza e aumentare i rischi per l’operatore.
- Far riparare la stazione di lavaggio del cambio automatico solo ed esclusivamente da personale specializzato e solo impiegando
pezzi di ricambio originali.
- Non utilizzare la stazione di lavaggio del cambio automatico con tensioni diverse da quelle indicate in tabella DATI TECNICI.
- Per la pulizia utilizzare un panno asciutto, scollegando sempre la stazione di lavaggio del cambio automatico. Non utilizzare mai
panni umidi o bagnati.
- Non posizionare mai la stazione orizzontalmente, si vericherebbero fuoriuscite di olio.
TENSIONE NOMINALE DI FUNZIONAMENTO
POMPA ELETTRICA PRESSIONE MAX
POMPA ELETTRICA PORTATA MAX
EFFICIENZA FILTRANTE
TANICA RACCOLTA OLIO N°2
TEMPERATURA DI UTILIZZO
DIMENSIONI
PESO
230V – 50Hz
16 bar
14l/min
10 micron
20l cad.
-20°C +60°C
520x650x1000 mm
78 kg
DATI TECNICI
DISPOSITIVI DI PROTEZIONE INDIVIDUALI PREVISTI DURANTE L’UTILIZZO DELLA STAZIONE LAVAGGIO
CAMBIO AUTOMATICO
La mancata osservanza delle seguenti avvertenze può causare lesioni siche e/o patologie.
UTILIZZARE SEMPRE GUANTI DI PROTEZIONE PER AGENTI FISICI E
CHIMICI DURANTE L’UTILIZZO DELLA STAZIONE DI LAVAGGIO DEL CAMBIO
AUTOMATICO
UTILIZZARE SEMPRE CALZATURE DI SICUREZZA
INDOSSARE SEMPRE GLI OCCHIALI PROTETTIVI
UTILIZZARE MASCHERA DI PROTEZIONE PER AGENTI FISICI
Può essere necessario l’utilizzo di ulteriori dispositivi di protezione individuali da utilizzare in funzione dei
valori riscontrati nell’indagine di igiene ambientale/analisi rischi, nell’eventualità che i valori superino i limiti
previsti dalle vigenti normative.
DOTAZIONE DI SERIE
La dotazione di serie è sempre completa e al top della qualità:
- n. 1 tubo mandata (gura 1)
- n. 1 tubo ritorno (gura 1)
- n. 1 kit raccordi (gura 2)
RACCORDI OPTIONAL (www.beta-tools.com)
Libretto 1885.indd 4 08/07/19 16:35

5
MANUALE D’USO ED ISTRUZIONI
IT
UTILIZZO
Preparazione all’uso.
Collegare il cavo di alimentazione alla rete (220V ac monofase) e accendere la stazione tramite l’interruttore generale:
- Controllare che i rubinetti siano CHIUSI.
- Controllare i livelli degli olii.
- Svuotare eventualmente la tanica dell’olio esausto.
- Vericare il livello dell’olio presente nel cambio automatico.
- Posizionando l’autovettura su un ponte sollevatore a ruote libere individuare sulla linea di raffreddamento dell’olio del cambio i
tubi di ingresso e di uscita.
- Aprire la linea nel cambio nel punto più raggiungibile stando attendi a non connettersi a raccordi in plastica o all’innesto del
radiatore al ne di evitare delle rotture.
- Posizionare un raccoglitore di olio immediatamente sotto il punto scelto per l’apertura della linea del cambio e convogliarne
dentro l’olio che uscirà dalla tubazione.
- Mettere in moto l’autovettura per controllare da quale tubo esce l’olio in modo da vericare l’uscita del cambio.
- Collegare quindi il tubo di ritorno della stazione 1885 all’uscita del cambio come individuata al precedente punto e il tubo di
mandata alla linea di ritorno.
- Avviare il motore dell’autovettura e controllare la tenuta dei collegamenti effettuati e il manometro indicante la pressione di
esercizio che dovrà salire da 1 a 4 bar
6
5
1
8
9
2
4
3
7
Libretto 1885.indd 5 08/07/19 16:35

6
ISTRUZIONI PER L’USO
I
MANUALE D’USO ED ISTRUZIONI
IT
Il quadro strumenti è stato costruito in modo tale da rendere facilmente intuibili a colpo d’occhio le funzioni, tutti i manometri, e i
tasti dotati di simboli:
1 – Manometro “pressure”: serve per la verica della pressione impianto autovettura.
2 – Tasto : serve per scorrere le funzioni della stazione e per impostare il tempo e le qualità dell’olio.
3 – Tasto : serve per scorrere le funzioni della stazione e per impostare il tempo e le qualità dell’olio.
4 – Tasto : serve per confermare le funzioni impostate.
5 – Tasto : serve per interrompere qualsiasi operazione.
6 – Display graco retroilluminato: visualizza le funzioni della stazione.
7 – Contenitore solvente: serve per contenere il solvente per il lavaggio dell’ impianto.
8 – Vetrino spia olio nuovo: serve per vedere il colore dell’olio nuovo immesso.
9 – Vetrino spia olio esausto: serve per vedere il colore dell’olio esausto recuperato.
FUNZIONI GENERALI DELLA STAZIONE DI LAVAGGIO
DESCRIZIONE SINTETICA DEI CICLI DI LAVORO
All’accensione il display si posiziona automaticamente sulla funzione CAMBIO AUTOMATICO, dalla cui gestione derivano le
seguenti fasi:
- Immissione solvente
- Lavaggio
- Svuotamento coppa olio
- Sostituzione olio convertitore
- Immissione olio per livello
Scorrendo da CAMBIO AUTOMATICO con il tasto la stazione si posiziona sulla funzione CAMBIO DSG, dalla cui gestione
derivano le seguenti fasi:
- Immissione solvente
- Lavaggio
- Sostituzione olio convertitore
- Immissione olio per livello
Scorrendo ancora con il tasto da CAMBIO AUTOMATICO la stazione si posiziona su funzioni speciali come SETUP e
INFO.
Cambio automatico.
- Fase 1: immissione del solvente nell’impianto del cambio automatico.
- Fase 2: ciclo di lavaggio dell’impianto con il solvente e l’olio esausto.
- Fase 3: svuotamento dell’olio esausto dalla coppa per la sostituzione oltre che dell’olio anche del ltro e della guarnizione
della coppa stessa.
- Fase 4: Immissione dell’olio nuovo nella coppa.
- Fase 5: Sostituzione dell’olio esausto presente nel convertitore mediante immissione dell’olio nuovo.
- Fase 6: verica del livello dell’olio presente in coppa
Cambio DSG – AISIN
- Fase 1: immissione del solvente nell’impianto del cambio automatico.
- Fase 2: ciclo di lavaggio dell’impianto con il solvente e l’olio esausto.
- Fase 3: Sostituzione dell’olio esausto presente nel convertitore mediante immissione dell’olio nuovo.
- Fase 4: verica del livello dell’olio.
Libretto 1885.indd 6 08/07/19 16:35

7
ISTRUZIONI PER L’USO
I
MANUALE D’USO ED ISTRUZIONI
IT
Impostazioni
- Controllo della taratura per la bilance elettroniche.
- Impostazione lingua.
- Impostazione data e ora.
- Setting LCD- Aggiornamento le.
Il lavaggio e la sostituzione dell’olio esausto devono essere sempre effettuati con olio cambio caldo (oltre 40°C).
Seguire le speciche del costruttore. Si consiglia l’utilizzo di apposito tester diagnostico.
DESCRIZIONE ANALITICA DEI CICLI
Cambio automatico.
Dopo aver collegato la tubazione “PRESSURE” e la tubazione “RETURN”, come descritto nel paragrafo “Utilizzo - Preparazione
all’uso”, procedere come segue.
FASE 1
- Collegare la stazione alla rete elettrica e accendere l’interruttore laterale. Sul display apparirà CAMBIO AUTOMATICO,
premere il tasto , e sul display apparirà:
- Con la pressione del tasto impostare la quantità di solvente desiderata. Lasciare impostato “0“ se non si desidera
immettere il solvente nel circuito dell’autovettura. Una volta impostata la quantità desiderata premere il tasto .
Vericare preliminarmente la compatibilità del solvente con il cambio.
- Il cursore si posizionerà automaticamente su “lavaggio min“. Con la pressione del tasto impostare la durata del ciclo di
lavaggio desiderata. Lasciare impostato “0” se non si desidera effettuare il ciclo di lavaggio. Una volta impostata la durata del
ciclo di lavaggio desiderata premere il tasto .
- Il cursore si posizionerà automaticamente su “olio lt.”. Con la pressione del tasto impostare la quantità di olio totale
contenuta nell’impianto del cambio automatico di cui si vuol eseguire la sostituzione. Una volta impostata la quantità di olio
premere il tasto .
- Se sono stati impostati i dati relativi al solvente, al lavaggio e all’olio, la stazione inizierà il ciclo di lavoro dalla FASE 1
“Immissione solvente” e sul display apparirà la quantità man mano immessa nel circuito del cambio automatico.
Libretto 1885.indd 7 08/07/19 16:35

8
ISTRUZIONI PER L’USO
I
MANUALE D’USO ED ISTRUZIONI
IT
FASE 2
- Una volta terminata la FASE 1, la stazione inizierà la FASE 2 “Lavaggio”, richiedendo preliminarmente all’utente di avviare
l’autovettura, lasciando il cambio sulla posizione P (parking) o N (neutral). Sul display apparirà:
- Avviare quindi l’autovettura lasciando il cambio sulla posizione P o N e premere sollecitamente il tasto . La stazione
inizierà ad effettuare il lavaggio del circuito, ltrando le impurità, e indicherà quindi il tempo mancante alla ne dell’operazione.
Durante la fase del lavaggio, avendo posto l’autovettura su un ponte a ruote alzate, si consiglia di effettuare alcuni cicli di
cambiate di tutte le marce, compresa la retromarcia.
Il lavaggio deve essere effettuato quando l’olio del cambio è caldo.
- Se nella schermata iniziale la quantità di solvente è impostata a “0” la stazione salterà automaticamente la FASE 1 e inizierà
immediatamente dalla FASE 2.
FASE 3
- Quando sarà trascorso il tempo impostato la stazione emetterà alcuni beep e inizierà automaticamente la FASE 3
“Svuotamento olio coppa”. Sul display apparirà.
- Man mano che la stazione svuoterà la coppa, sul display apparirà la quantità scaricata nella tanica contrassegnata con
l’etichetta “OLD OIL” e collegata alla stazione per mezzo di tubazione di colore nero. Una volta svuotata la coppa, la stazione
si fermerà automaticamente, e segnalerà attraverso dei beep il termine dell’operazione; e sul display apparirà.
Durante questa fase si consiglia di osservare il visore dell’olio esausto e di spegnere la macchina se si nota la
presenza di bolle d’aria nello stesso.
- Provvedere quindi sollecitamente a spegnere l’auto. Premere il tasto . La stazione memorizzerà il dato relativo alla
quantità di olio esausto estratto dalla coppa. Sul display apparirà quindi.
- Procedere quindi allo smontaggio della coppa prestando attenzione a eventuali residui di olio presenti nella stessa, procedere
alla pulizia della coppa e delle calamite presenti al suo interno nonché alla sostituzione del ltro e della guarnizione del
cambio. Una volta terminate queste operazioni, premere il tasto .
- Se nella schermata iniziale la quantità di solvente e la durata del lavaggio sono entrambe impostate a “0”, la stazione salterà
automaticamente la FASE 1 e la FASE 2 e inizierà immediatamente dalla FASE 3.
Libretto 1885.indd 8 08/07/19 16:35

9
ISTRUZIONI PER L’USO
I
MANUALE D’USO ED ISTRUZIONI
IT
FASE 4
- Inizierà quindi la FASE 4 “Riempimento coppa”. Sul display apparirà immediatamente la quantità di olio corrispondente a
quella scaricata nella fase precedente.
Assicurarsi di utilizzare olio come da speciche del costruttore.
- Agendo sul tasto incrementare eventualmente la quantità in relazione agli eventuali residui di olio trovati nella coppa in
fase di smontaggio. Premendo il tasto , la stazione inizierà a riempire la coppa e sul display apparirà la quantità di olio
man mano immessa.
- Una volta terminata l’immissione dell’olio nuovo in coppa la stazione emetterà dei beep e sul display apparirà la quantità
necessaria per la sostituzione dell’olio presente nel convertitore.
FASE 5
- Il dato fornito dalla stazione, è calcolato tenendo presente la quantità di olio totale impostata dall’utente nella videata iniziale
e quella immessa nella coppa nella precedente fase 4 (può eventualmente essere incrementata o diminuita dall’operatore
agendo sui tasti ). Premere quindi il tasto . La stazione richiederà di accendere la l’autovettura lasciando il
cambio in P (parking) o N (neutral) con il messaggio che appare sul display.
- Una volta avviata l’autovettura lasciando il cambio in P o N premere sollecitamente il tasto . La stazione inizierà
automaticamente a immettere olio nuovo estraendo la stessa quantità di olio esausto dal convertitore. Sul display appariranno
le quantità di olio nuovo immesso e di olio esausto estratto.
Quando l’olio visualizzato nel visore dell’olio vecchio avrà colore simile a quello visualizzato nel settore dell’olio
nuovo spegnere l’autovettura.
- Una volta ultimata la sostituzione dell’olio del convertitore la stazione si fermerà posizionandosi automaticamente su.
Libretto 1885.indd 9 08/07/19 16:35

10
ISTRUZIONI PER L’USO
I
MANUALE D’USO ED ISTRUZIONI
IT
FASE 6
Scollegare quindi i raccordi della stazione ripristinando la linea del cambio come in origine, e assicurarsi che
non ci siano perdite. Spostare la leva del cambio in R D N P per procedere allo spurgo dell’impianto. Accendere
l’autovettura, e posizionando il cambio su P o N e procedere al controllo del livello dell’olio.
- Per poter procedere ad un’eventuale operazione di rabbocco di olio attraverso la sonda, premere il tasto e apporre
l’apposita sonda sul tubo PRESSURE. Sul display apparirà.
- Agire sui tasti per impostare la quantità di olio che si vuole rabboccare, assicurarsi che la sonda sia posta
correttamente sul tubo PRESSURE e immettere la sonda stessa all’interno del tappo del livello presente sull’autovettura
e premere il tasto .
- Terminata la fase la stazione si posizionerà automaticamente sulla fase di Stampa di tutto il processo effettuato.
Per ottenere la giusta uidità di guida potrebbe essere necessario effettuare 40-50 km.
CAMBIO DSG-AISIN
Dopo aver collegato la tubazione “PRESSURE” e la tubazione “RETURN”, come descritto nel paragrafo “Utilizzo - Preparazione
all’uso”, procedere come segue:
FASE 1
- Dopo aver collegato la tubazione “PRESSURE” e la tubazione “RETURN”, come descritto nel paragrafo “Descrizione analitica
dei cicli – Cambio automatico”, agire sul tasto e premere il tasto ; e sul display apparirà.
- Premere il tasto e sul display apparirà.
- Con la pressione del tasto impostare la quantità di solvente desiderata. Lasciare impostato “0“ se non si desidera
immettere il solvente nel circuito dell’autovettura. Una volta impostata la quantità desiderata, premere il tasto
Vericare preliminarmente le compatibilità del solvente con il cambio.
- Il cursore si posizionerà automaticamente su “Lavaggio min”. Con la pressione del tasto impostare la durata del ciclo di
lavaggio desiderata. Lasciare impostato “0” se non si desidera effettuare il ciclo di lavaggio. Una volta impostato la durata del
ciclo di lavaggio desiderata premere il tasto .
Libretto 1885.indd 10 08/07/19 16:35

11
ISTRUZIONI PER L’USO
I
MANUALE D’USO ED ISTRUZIONI
IT
- Il cursore si posizionerà automaticamente su “olio lt.”. Con la pressione del tasto impostare la quantità di olio totale
contenuta nell’impianto del cambio automatico di cui si vuole eseguire la sostituzione. Una volta impostata la quantità di olio
premere il tasto .
- Se sono stati impostati i dati relativi al solvente, al lavaggio e all’olio la stazione inizierà il ciclo di lavoro dalla FASE 1
“Immissione solvente” e sul display apparirà la quantità man mano immessa nel circuito del cambio automatico.
- Se nella schermata iniziale la quantità di solvente è impostata a “0” la stazione salterà automaticamente la FASE 1 e inizierà
immediatamente dalla FASE 2.
FASE 2
- Una volta terminata la FASE 1 la stazione inizierà la FASE 2 “Lavaggio”, richiedendo preliminarmente all’utente di avviare
l’autovettura, lasciando il cambio sulla posizione P (parking) o N (neutral). Sul display apparirà.
- Avviare quindi l’autovettura lasciando il cambio sulla posizione P o N, e premere sollecitamente il tasto . La
stazione inizierà ad effettuare il lavaggio del circuito, ltrando le impurità, ed indicherà quindi il tempo mancante alla ne
dell’operazione. Durante la fase del lavaggio, avendo posto l’autovettura su un ponte a ruote alzate, si consiglia di effettuare
alcuni cicli di cambiate di tutte le marce compresa la retromarcia.
Il lavaggio deve essere effettuato quando l’olio del cambio è caldo.
- Se nella schermata iniziale la quantità di solvente e la durata del lavaggio sono entrambe impostate a “0” , la stazione salterà
automaticamente la FASE 1 e la FASE 2 e inizierà immediatamente dalla FASE 3.
FASE 3
- Quando sarà trascorso il tempo impostato la stazione emetterà alcuni beep e inizierà automaticamente la FASE 3
“Sostituzione olio convertitore”. Sul display apparirà la quantità di olio da sostituire.
- Premere quindi il tasto . La stazione richiederà di accendere l’autovettura lasciando il cambio in P (parking) o N (neutral)
con il messaggio che appare sul display.
Libretto 1885.indd 11 08/07/19 16:35

12
ISTRUZIONI PER L’USO
I
MANUALE D’USO ED ISTRUZIONI
IT
- Una volta avviata l’autovettura lasciando il cambio in P o N, premere sollecitamente il tasto . La stazione inizierà
automaticamente a immettere olio nuovo, estraendo la stessa quantità di olio esausto dal convertitore. Sul display
appariranno le quantità di olio nuovo immesso e di olio esausto estratto.
Quando l’olio visualizzato nel visore dell’olio vecchio avrà colore simile a quello visualizzato nel visore dell’olio
nuovo spegnere l’autovettura.
- Una volta ultimata la sostituzione dell’olio del convertitore la stazione si fermerà posizionandosi automaticamente su:
FASE 4
Scollegare quindi i raccordi della stazione ripristinando la linea del cambio come in origine, e assicurarsi che
non ci siano perdite. Spostare la leva del cambio in R D N P per procedere allo spurgo dell’impianto. Accendere
l’autovettura, posizionando il cambio su P o N, e procedere al controllo del livello dell’olio.
- Per poter procedere ad un’eventuale operazione di rabbocco di olio attraverso la sonda, premere il tasto e apporre
l’apposita sonda sul tubo PRESSURE. Sul display apparirà.
- Agire sui tasti per impostare la quantità di olio che si vuole rabboccare, assicurarsi che la sonda sia posta
correttamente sul tubo PRESSURE e immettere la sonda stessa all’interno del tappo del livello presente sull’autovettura e
premere il tasto .
- Terminata la fase, la stazione si posizionerà automaticamente sulla fase di Stampa dell’intero processo effettuato.
Per ottenere la giusta uidità di guida potrebbe essere necessario effettuare 40 – 50 km.
IMMISSIONE OLIO
- Collegare la stazione alla rete elettrica e accendere l’interruttore laterale. Sul display apparirà CAMBIO AUTOMATICO, agire
sul tasto per due volte e premere il tasto ; e sul display apparirà:
- Premere il tasto e sul display apparirà.
- Agire sui tasti per impostare la quantità di olio che si vuole rabboccare, assicurarsi che la sonda sia posta
correttamente sul tubo PRESSURE e immettere la sonda stessa all’interno del tappo del livello presente sull’ autovettura o nel
contenitore che si desidera riempire; e premere il tasto . La stazione inizierà a reintegrare l’olio nella quantità impostata.
Libretto 1885.indd 12 08/07/19 16:35

13
ISTRUZIONI PER L’USO
I
MANUALE D’USO ED ISTRUZIONI
IT
SETUP
Impostazione data e ora.
- Consente di modicare la data e l’ora per la stampa dello scontrino.
Controllo della taratura della bilancia.
- Selezionare con il tasto la funzione - SETUP- e premere il tasto .
- Selezionare con il tasto la funzione - TEST TARA (icona bilancia) - e premere il tasto . Il display mostrerà sulla riga in
alto la quantità di olio presente nel serbatoio e sulla riga in basso il peso campione.
- A questo punto l’operatore collocherà sul serbatoio di stoccaggio un peso conosciuto (per esempio un peso da 2 kg) e dovrà
leggere sul display l’esatto peso. Tale operazione serve all’operatore per controllare periodicamente che la bilancia della
propria stazione pesi delle quantità corrette.
Lingua
La stazione prevede la possibilità di visualizzare i messaggi sul display in varie lingue:
• ITALIANO
• INGLESE
• OLANDESE
• ecc…
Il cambio di lingua si effettua nel modo seguente:
- Selezionare con il tasto la funzione - SETUP- e premere il tasto .
- Selezionare con il tasto la funzione - LINGUA (icona bandiera) - e premere il tasto .
- Selezionare con il tasto la lingua desiderata e premere il tasto .
NOTE
Svuotamento e riempimento serbatoi olio.
Olio esausto.
- Svuotare il serbatoio quando il livello è intorno a 10 litri.
- Utilizzare gli appositi contenitori per l’olio esausto
L’olio esausto è un riuto speciale e come tale deve essere smaltito secondo le norme vigenti.
Olio nuovo
- Si consiglia di usare olii raccomandati dal costruttore dell’impianto.
SERVICE
Sostituzione del ltro.
Per sostituirlo, eseguire le seguenti operazioni:
- Aprire il carter posteriore.
- Sul pianetto centrale svitare il corpo del ltro (gura 3).
- Inserire una nuova cartuccia.
Sostituire il ltro con un ltro originale (cod. BETA 018850510).
gura 3
Libretto 1885.indd 13 08/07/19 16:35

14
ISTRUZIONI PER L’USO
I
MANUALE D’USO ED ISTRUZIONI
IT
BANCA DATI
Per poter accedere alla banca dati online dei cambi automatici vai sul sito BETA all’indirizzo www.beta-tools.com e
registrati per accedere all’area riservata.
MANUTENZIONE
Gli interventi di manutenzione e di riparazione devono essere eseguiti solo ed esclusivamente da personale specializzato. Per tali
interventi potete rivolgervi al centro riparazioni di Beta Utensili S.P.A. attraverso il vostro rivenditore Beta di ducia.
SMALTIMENTO
La stazione lavaggio del cambio automatico, gli accessori e gli imballaggi devono essere inviati ad un centro di raccolta
smaltimento riuti, secondo le leggi vigenti nel Paese in cui vi trovate.
GARANZIA
Questa attrezzatura è fabbricata e collaudata secondo le norme attualmente vigenti nella Comunità Europea. E’
coperta da garanzia per un periodo di 12 mesi per uso professionale o 24 mesi per uso non professionale.
Vengono riparati guasti dovuti a difetti di materiale o di produzione, mediante ripristino o sostituzione dei pezzi
difettosi a nostra discrezione.
L’effettuazione di uno o più interventi nel periodo di garanzia non modica la data di scadenza della stessa.
Non sono soggetti a garanzia difetti dovuti all’usura, all’uso errato od improprio e a rotture causate da colpi e/o
cadute.
La garanzia decade quando vengono apportate modiche, quando la stazione lavaggio cambio automatico viene
manomessa o quando viene inviata all’assistenza smontata.
Sono espressamente esclusi danni causati a persone e/o cose di qualsiasi genere e/o natura, diretti e/o indiretti.
DICHIARAZIONE DI CONFORMITÀ
Dichiariamo sotto la nostra responsabilità che il prodotto descritto è conforme a tutte le disposizioni pertinenti alle
seguenti Direttive:
• Direttiva Macchine 2006/42/CE;
• Direttiva Bassa Tensione (L.V.D.) 2014/35/UE;
Il Fascicolo Tecnico è disponibile presso:
BETA UTENSILI S.P.A.
Via A. Volta 18,
20845 Sovico (MB)
ITALIA
Libretto 1885.indd 14 08/07/19 16:35

15
ISTRUZIONI PER L’USO
I
OPERATION MANUAL AND INSTRUCTIONS
EN
OPERATION MANUAL AND INSTRUCTIONS FOR AUTOMATIC TRANSMISSION CLEANING STATION
MANUFACTURED BY:
BETA UTENSILI S.P.A.
Via A. Volta 18,
20845 Sovico (MB)
ITALY
Original documentation drawn up in ITALIAN.
Store the safety instructions with care and hand them over to the users.
PURPOSE OF USE
- The automatic transmission cleaning station can be used for the following purpose:
• For use only on vehicles with automatic transmission.
- The automatic transmission cleaning station must not be used for the following operations:
• Use in damp or wet environments; exposure to rain or snow
• Use outside the technical specications contained in the TECHNICAL DATA table
• Use for any applications other than stated ones
WORK AREA SAFETY
Do not operate the automatic transmission cleaning station in environments containing potentially explosive atmospheres
or inammable materials, because sparks may be generated, which can ignite the dust or fumes.
Keep children and bystanders away from your workplace while operating the automatic transmission cleaning station.
Distraction from other people can cause you to lose control over the automatic transmission cleaning station during use.
Do not inhale any harmful gases that may be released by the automatic transmission cleaning station while working on
the engine.
Use the automatic transmission cleaning station in a dry area, avoiding humidity.
AUTOMATIC TRANSMISSION SAFETY
- Before use, check that the automatic transmission cleaning station has not been damaged, and that there are no worn parts.
- Do not use the automatic transmission cleaning station when damaged; do not try to open or modify it.
- Before connection to the system, close all the valves.
- Do not ll the storage tank more than 80%.
- Periodically check the automatic transmission cleaning station and its accessories.
- Do not cover the automatic transmission cleaning station when using it. Allow adequate space for ventilation.
- Do not use the automatic transmission cleaning station in damp or wet environments; do not expose it to rain.
PERSONNEL SAFETY
- Stay alert; watch what you are doing. Do not use the automatic transmission cleaning station while tired or under the inuence
of drugs, alcohol, or medications.
Always use the following personal protective equipment:
• safety shoes
• eye protection
• protective mask
• protective gloves against physical and chemical agents
• protective clothing against chemicals
- Carry out all operations in well-aired, dry rooms.
- Check that the cables are away from fans, moving parts and the fuel pipe.
- Do not wear loose clothing, jewellery or metal objects when working on the motor vehicle.
IMPORTANT! READ THIS MANUAL THOROUGHLY BEFORE USING THE
AUTOMATIC TRANSMISSION CLEANING STATION. FAILURE TO COMPLY
WITH THE SAFETY STANDARDS AND OPERATING INSTRUCTIONS MAY
RESULT IN SERIOUS INJURY.
CAUTION
Libretto 1885.indd 15 08/07/19 16:35

16
ISTRUZIONI PER L’USO
I
OPERATION MANUAL AND INSTRUCTIONS
EN
- Always disconnect the automatic transmission cleaning station before checking it for failures or cleaning it: this precaution will
prevent the station from being accidentally started, thereby ensuring safety during use.
AUTOMATIC TRANSMISSION CLEANING STATION USE AND CARE
- Do not use the automatic transmission cleaning station if it has been damaged.
- Do not modify the automatic transmission cleaning station. This can reduce the effectiveness of safety measures and increase
operator risk.
- Have the automatic transmission cleaning station repaired only through a trained person and only using original replacement
parts.
- Do not use the automatic transmission cleaning station with any voltages other than those stated in the TECHNICAL DATA table.
- To clean the automatic transmission cleaning station, use a dry cloth. Always disconnect the automatic transmission cleaning
station from the power supply mains before cleaning it. Never use damp or wet cloths.
- Do not place the station horizontally, because oil would leak.
NOMINAL POWER SUPPLY VOLTAGE
ELECTRIC PUMP – MAX. PRESSURE
ELECTRIC PUMP - MAX. FLOW RATE
FILTERING EFFICIENCY
OIL TANK N°. 2
OPERATING TEMPERATURE
DIMENSIONS
WEIGHT
230V – 50Hz
16 bar
14l/min
10 microns
20l/each.
-20 °C ÷ +60 °C
520x650x1000 mm
78 kg
TECHNICAL DATA
PERSONAL PROTECTIVE EQUIPMENT TO WEAR WHILE OPERATING AUTOMATIC TRANSMISSION
CLEANING STATION
Failure to observe the following warnings may result in physical injury and/or disease.
ALWAYS WEAR PROTECTIVE GLOVES AGAINST PHYSICAL AND CHEMICAL
AGENTS WHILE OPERATING AUTOMATIC TRANSMISSION CLEANING STATION
ALWAYS WEAR SAFETY SHOES
ALWAYS WEAR EYE PROTECTION
WEAR A PROTECTIVE MASK AGAINST PHYSICAL AGENTS
Additional personal protective equipment to wear according to the values found in the environmental
hygiene/risk analysis survey may be required if the values exceed the limits under current regulations.
EQUIPMENT SUPPLIED WITH AUTOMATIC TRANSMISSION CLEANING STATION
The automatic transmission cleaning station is always supplied with comprehensive, top-quality equipment:
- 1 delivery pipe (gure 1)
- 1 return pipe (gure 1)
- 1 ttings kit (gure 2)
OPTIONAL FITTINGS (www.beta-tools.com)
Libretto 1885.indd 16 08/07/19 16:35

17
ISTRUZIONI PER L’USO
I
OPERATION MANUAL AND INSTRUCTIONS
EN
USE
Preparation for use.
Connect the power supply cable to the mains (220V AC, single-phase) and turn on the station by pressing the master switch:
- Check that the valves are CLOSED.
- Check the oil levels.
- Empty the old oil tank, if necessary.
- Check the oil level in the automatic transmission.
- Place the car on a free-wheel lift and locate the input and output pipes on the oil cooling line of the gearbox.
- Open the transmission line in the most easily reachable point, being careful not to be connected to plastic ttings or the radiator
coupling, in order to avoid breaks.
- Place an oil collector directly under the point chosen for the opening of the transmission line, and let in the oil that will come out
of the pipe.
- Start the car, to determine from which pipe oil comes out, and thus check the transmission outlet.
- Then connect the return pipe of station 1885 to the transmission outlet as determined above, and the delivery pipe to the return
line.
- Start the car engine, and check the connections as well as the operating pressure gauge; the operating pressure must increase
from 1 to 4 bar.
6
5
1
8
9
2
4
3
7
Libretto 1885.indd 17 08/07/19 16:35

18
ISTRUZIONI PER L’USO
I
OPERATION MANUAL AND INSTRUCTIONS
EN
The instrument panel has been designed to make all the functions, gauges and symbol keys easy to understand at a glance:
1 – Pressure gauge: used to check pressure in car system.
2 – key : used to scroll up station functions and set time and oil qualities.
3 – key : used to scroll down station functions and set time and oil qualities.
4 – key : used to conrm set functions.
5 – key : used to interrupt any operation.
6 – Backlit graphic display: shows station functions.
7 – Solvent container: contains solvent for cleaning system.
8 – Fresh oil sight glass: shows colour of injected fresh oil.
9 – Old oil sight glass: shows colour of recycled old oil.
GENERAL FUNCTIONS OF CLEANING STATION
BRIEF DESCRIPTION OF WORK CYCLES
When the display is turned on, the AUTOMATIC TRANSMISSION function will be automatically selected, thereby allowing the
following steps to be performed:
- Feeding solvent
- Cleaning
- Emptying oil sump
- Changing converter oil
- Filling up oil
Scrolling down from AUTOMATIC TRANSMISSION using the key will cause the station to select the DSG function, thereby
allowing the following steps to be performed:
- Feeding solvent
- Cleaning
- Changing converter oil
- Filling up oil
Further scrolling down from AUTOMATIC TRANSMISSION using the key will cause the station to select such special
functions as SETUP and INFO.
Automatic transmission.
- Step 1: Feeding solvent into automatic transmission system.
- Step 2: System cleaning cycle with solvent and old oil.
- Step 3: Emptying old oil out of sump to change oil and replace lter and sump gasket.
- Step 4: Feeding fresh oil into sump.
- Step 5: Changing old oil in converter by feeding fresh oil.
- Step 6: Checking oil level in sump
DSG – AISIN transmission
- Step 1: Feeding solvent into automatic transmission system.
- Step 2: System cleaning cycle with solvent and old oil.
- Step 3: Changing old oil in converter by feeding fresh oil.
- Step 4: Checking oil level.
Libretto 1885.indd 18 08/07/19 16:35

19
ISTRUZIONI PER L’USO
I
OPERATION MANUAL AND INSTRUCTIONS
EN
Settings
- Checking calibration for electronic balances.
- Setting language.
- Setting date and time.
- Setting LCD – Updating les.
Oil cleaning and change must always be performed with warm transmission oil (>40 °C). Please follow the
manufacturer’s specications. A proper diagnostic test should be used.
ANALYTICAL DESCRIPTION OF CYCLES
Automatic transmission.
After connecting the “PRESSURE” and “RETURN” pipes, as described in the section “Use – Preparation for use”, take the
following steps.
STEP 1
- Connect the station to the power supply mains and press the side switch. The display will show AUTOMATIC
TRANSMISSION. Press the key; the display will show the following:
- Press the key to set the required amount of solvent. If you are not going to feed any solvent into the car circuit, keep
the “0” setting. After the required amount of solvent has been set, press the key.
Make sure to have checked the compatibility of the solvent with the transmission.
- The cursor will automatically select “cleaning min.“. Press the key to set the required duration of the cleaning cycle. If you
are not going to perform any cleaning cycle, keep the “0” setting. After the required duration of the cleaning cycle has been set,
press the key. .
- The cursor will automatically select “oil lt.”. Press the key to set the total amount of oil in the automatic transmission
system to be changed. After the amount of oil has been set, press the key.
- If the data about the solvent, cleaning and oil have been set, the station will start performing the work cycle from STEP 1,
“Feeding solvent”, and the display will show the amount as it is injected into the automatic transmission circuit.
Libretto 1885.indd 19 08/07/19 16:35

20
ISTRUZIONI PER L’USO
I
OPERATION MANUAL AND INSTRUCTIONS
EN
STEP 2
- After STEP 1 has been completed, the station will proceed to STEP 2, “Cleaning”, requiring the user to have started the car
with the gearshift in the parking (“P”) or neutral (“N”) position. The display will show the following:
- Start the car keeping the gearshift in “P” or “N” position, and quickly press the key. The station will start cleaning the
circuit, ltering impurities, and then show the time remaining to the end of the operation. During cleaning, as the car has been
placed on a lift with raised wheels, all the gears – including the reverse gear – should be shifted a few times.
Cleaning must be performed with warm transmission oil.
- If the startup screen shows that the amount of solvent has been set to “0”, the station will automatically skip STEP 1 and
immediately move on to STEP 2.
STEP 3
- When the set time has elapsed, the station will emit a few beeps, and STEP 3, “Emptying oil sump”, will automatically start.
The display will show the following:
- As the station empties the oil sump, the display will show the amount discharged into the tank marked “OLD OIL” and
connected to the station through a black pipe. After the oil sump has been emptied, the station will automatically stop, and
emit a few beeps to indicate the end of the operation; the display will show the following:
During this step, the old oil sight glass should be looked at, and the station turned off if any air bubbles are
found in it.
- QUICKLY switch off the car. Press the key. The station will save the data about the amount of old oil removed from the
sump. The display will show the following:
- Then remove the oil sump, paying attention to any oil residues found in it. Clean both the oil sump and the magnets found in it;
replace the lter and the gearbox gasket. After these operations have been completed, press the key.
- If in the start-up screen both the amount of solvent and the duration of the cleaning cycle have been set to “0”, the station will
automatically skip STEP 1 and STEP 2, and immediately move on to STEP 3.
Libretto 1885.indd 20 08/07/19 16:35

21
ISTRUZIONI PER L’USO
I
OPERATION MANUAL AND INSTRUCTIONS
EN
STEP 4
- STEP 4, “Filling oil sump”, will then start. The display will immediately show the amount of oil equivalent to the amount of oil
discharged in the previous step.
Make sure to use an oil that complies with the manufacturer’s specications.
- Press the key to increase the amount, if necessary, according to any oil residues found in the sump during removal.
Pressing the key will cause the station to start lling the sump, and the display will show the amount of oil that is being
poured in.
- After fresh oil has been injected into the sump, the station will emit a few beeps, and the display will show the amount needed
to replace oil in the converter.
STEP 5
- The value provided by the station was calculated on the basis of the total amount of oil set by the user in the startup screen
and that injected into the sump in the previous step (step 4) (it can be increased or decreased by pressing ). Then
press the key. The station will require the user to start the car with the gearshift in the parking (“P”) or neutral (“N”)
position, the message being shown on the display.
- After the car has been started, keeping the gearshift in “P” or “N” position, QUICKLY press the key. The station will
automatically start injecting fresh oil, removing the same amount of old oil from the converter. The display will show both the
amount of injected fresh oil and the amount of removed old oil.
When the oil displayed in the old oil sight glass has a colour similar to that of the oil displayed in the fresh oil
sight glass, switch off the car.
- After the oil in the converter has been changed, the station will stop, automatically selecting the following:
Libretto 1885.indd 21 08/07/19 16:35

22
ISTRUZIONI PER L’USO
I
OPERATION MANUAL AND INSTRUCTIONS
EN
STEP 6
Disconnect the ttings of the station, bringing the transmission line back to its original setting, and make sure
that there are no leaks. Move the gearshift to R D N P, to bleed the system. Start the car and move the gearshift
to either P or N; check the oil level.
- To ll up oil, IF NECESSARY, through the probe, press the key and place the probe on the PRESSURE pipe. The display
will show the following:
- Press to set the amount of oil to be lled up. Make sure that the probe has been placed on the PRESSURE pipe
correctly, and t it into the oil level plug of the car; press the key.
- After the operation has been completed, the station will automatically enable the Printing of the entire process thus performed.
For smooth driving quality to be ensured, it might be necessary to drive 40-50 km.
DSG-AISIN TRANSMISSION
After connecting the “PRESSURE” and “RETURN” pipes, as described in the section “Use – Preparation for use”, take the
following steps:
STEP 1
- After connecting the “PRESSURE” and “RETURN” pipes, as described in the section “Analytical description of cycles –
Automatic transmission”, press the key; then press the key; the display will show the following:
- Press the key; the display will show the following:
- Press the key to set the required amount of solvent. If you are not going to feed any solvent into the car circuit, keep the
“0” setting. After the required amount of solvent has been set, press the key.
Make sure to have checked the compatibility of the solvent with the transmission.
- The cursor will automatically select “cleaning min.”. Press the key to set the required duration of the cleaning cycle. If you
are not going to perform any cleaning cycle, keep the “0” setting. After the required duration of the cleaning cycle has been
set, press the key.
Libretto 1885.indd 22 08/07/19 16:35

23
ISTRUZIONI PER L’USO
I
OPERATION MANUAL AND INSTRUCTIONS
EN
- The cursor will automatically select “oil lt.”. Press the key to set the total amount of oil in the automatic transmission
system to be changed. After the amount of oil has been set, press the key.
- If the data about the solvent, cleaning and oil have been set, the station will start performing the work cycle from step 1,
“Feeding solvent”, and the display will show the amount as it is injected into the automatic transmission circuit.
- If the startup screen shows that the amount of solvent has been set to “0”, the station will automatically skip STEP 1 and
immediately move on to STEP 2.
STEP 2
- After STEP 1 has been completed, the station will proceed to STEP 2, “Cleaning”, requiring the user to have started the car
with the gearshift in the parking (“P”) or neutral (“N”) position. The display will show the following:
- Start the car keeping the gearshift in “P” or “N” position, and quickly press the key. The station will start cleaning the
circuit, ltering impurities, and then show the time remaining to the end of the operation. During cleaning, as the car has been
placed on a lift with raised wheels, all the gears – including the reverse gear – should be shifted a few times.
Cleaning must be performed with warm transmission oil.
- If in the startup page both the amount of solvent and the duration of the cleaning cycle have been set to “0”, the station will
automatically skip STEP 1 and STEP 2, and immediately move on to STEP 3.
STEP 3
- When the set time has elapsed, the station will emit a few beeps, and STEP 3, “Changing converter oil”, will automatically
start. The display will show the amount of oil to be changed.
- Then press the key. The station will require the user to start the car with the gearshift in the parking (“P”) or neutral (“N”)
position, the message being shown on the display.
Libretto 1885.indd 23 08/07/19 16:35

24
ISTRUZIONI PER L’USO
I
OPERATION MANUAL AND INSTRUCTIONS
EN
- After the car has been started, keeping the gearshift in “P” or “N” position, QUICKLY press the key. The station will
automatically start injecting fresh oil, removing the same amount of old oil from the converter. The display will show both the
amount of injected fresh oil and the amount of removed old oil.
When the oil displayed in the old oil sight glass has a colour similar to that of the oil displayed in the fresh oil
sight glass, switch off the car.
- After the oil in the converter has been changed, the station will stop, automatically selecting the following:
STEP 4
Disconnect the ttings of the station, bringing the transmission line back to its original setting, and make sure
that there are no leaks. Move the gearshift to R D N P, to bleed the system. Start the car and move the gearshift
to either P or N; check the oil level.
- To ll up oil, IF NECESSARY, through the probe, press the key and place the probe on the PRESSURE pipe. The display
will show the following:
- Press to set the amount of oil to be lled up. Make sure that the probe has been placed on the PRESSURE pipe
correctly, and t it into the oil level plug in the car; press the key.
- After the operation has been completed, the station will automatically enable the Printing of the entire process thus performed.
For smooth driving quality to be ensured, it might be necessary to drive 40 – 50 km.
FEEDING OIL
- Connect the station to the power supply mains and press the side switch. The display will show AUTOMATIC
TRANSMISSION. Press the key twice, then press the key; the display will show the following:
- Press the key; the display will show the following:
- Press the keys to set the amount of oil to be lled up. Make sure that the probe has been placed on the PRESSURE
pipe correctly, and t it into the oil level plug in the car or in the container to be lled up, and press the key . The station
will start lling up oil to the required amount.
Libretto 1885.indd 24 08/07/19 16:35

25
ISTRUZIONI PER L’USO
I
OPERATION MANUAL AND INSTRUCTIONS
EN
SETUP
Setting up date and time.
- This function allows the date and time for printing the ticket to be changed.
Checking balance calibration.
- Press the key to select - SETUP-; press the key.
- Press the key to select – TARE TEST (balance icon) -; press the key. The display will show the amount of oil in the
tank in the top line, and the sample weight in the bottom line respectively.
- The operator will then place a known weight (e. g. a 2 kg weight) on the storage tank and read the exact weight on the display.
This will allow the operator to periodically check that the balance of the station weighs correctly.
Language
The station can display messages in several languages:
• ITALIAN
• ENGLISH
• DUTCH
• etc.
To change the language, take the following steps:
- Press the key to select the - SETUP- function; press the key.
- Press the key to select the - LANGUAGE (ag icon) – function; press the key.
- Press the key to select the required language; press the key.
NOTES
Emptying and lling oil tanks.
Old oil.
- Empty the tank when the level is approximately 10 l.
- Use old oil containers.
Old oil shall be disposed of as special waste in accordance with current provisions.
Fresh oil
- Oils recommended by the system’s manufacturer should be used.
SERVICE
Filter replacement.
To replace the lter, take the following steps:
- Open the rear cover.
- Unscrew the body of the lter on the central plate (gure 3).
- Fit in a new cartridge.
Replace the lter with an original one (BETA item 018850510).
Figure 3
Libretto 1885.indd 25 08/07/19 16:35

26
ISTRUZIONI PER L’USO
I
OPERATION MANUAL AND INSTRUCTIONS
EN
DATABASE
To access the online automatic transmission database, please go to BETA’s website www.beta-tools.com and sign up
to get access to the reserved area.
MAINTENANCE
Maintenance and repair jobs must be carried out by trained personnel only. For such jobs, you can contact Beta Utensili S.P.A.’s
repair centre through your Beta dealer.
DISPOSAL
The automatic transmission cleaning station, accessories and packaging should be sent to a waste disposal centre, in accordance
with the laws in force in your country.
WARRANTY
This equipment is manufactured and tested in accordance with current EU regulations. It is covered by a 12-month
warranty for professional use or a 24-month warranty for non professional use.
We will repair any breakdowns caused by material or manufacturing defects, by xing the defective pieces or
replacing them at out discretion.
Should assistance be required once or several times during the warranty period, the expiry date of this warranty
will remain unchanged.
This warranty will not cover defects due to wear, misuse or breakdowns caused by blows and/or falls.
In addition, this warranty will no longer be valid if any changes are made, or if the automatic transmission cleaning
station is forced or sent to the customer service in pieces.
This warranty explicitly excludes any damage to people and/or things, whether direct or consequential.
DECLARATION OF CONFORMITY EC/EU
We hereby declare, assuming full responsibility, that the described product complies with all the relevant provisions
of the following Directives:
• Machine Directive 2006/42/EC;
• Low Voltage Directive (LVD) 2014/35/EU;
The Technical Brochure is available at:
BETA UTENSILI S.P.A.
Via A. Volta 18,
20845 Sovico (MB)
ITALY
Libretto 1885.indd 26 08/07/19 16:35

27
ISTRUZIONI PER L’USO
I
NOTICE D'UTILISATION ET INSTRUCTIONS
FR
NOTICE D'UTILISATION ET INSTRUCTIONS POUR STATION DE LAVAGE DE BOÎTE DE VITESSES AUTOMATIQUE
FABRIQUÉE PAR :
BETA UTENSILI S.P.A.
Via A. Volta 18,
20845 Sovico (MB)
ITALIA
Documentation rédigée à l’origine en langue ITALIENNE.
Garder scrupuleusement les instructions sur la sécurité et les remettre au personnel concerné.
DESTINATION D’USAGE
- La station de lavage de la boîte de vitesses automatique est destinée à l’usage suivant :
• à utiliser exclusivement sur les véhicules avec boîte de vitesses automatique
- Les opérations suivantes sont interdites :
• utilisation interdite dans des milieux humides, mouillés ou exposés aux intempéries
• utilisation interdite en dehors des prescriptions techniques contenues dans le tableau DONNÉES TECHNIQUES
• utilisation interdite pour toutes les applications autres que celles indiquées
SÉCURITÉ DU POSTE DE TRAVAIL
Ne pas utiliser la station de lavage de la boîte de vitesses automatique dans des milieux contenant des atmosphères
potentiellement explosives ou des matériaux inammables car des étincelles peuvent se produire et incendier les
poussières ou les vapeurs.
Faire en sorte que les enfants ou les visiteurs ne puissent pas s’approcher du poste de travail pendant l’utilisation de la
station de lavage de la boîte de vitesses automatique. La présence d’autres personnes provoque des distractions et peut
entraîner la perte du contrôle lors de l’utilisation.
Ne pas inhaler les éventuels gaz nocifs qui se dégagent de la station de lavage de la boîte de vitesses automatique
pendant l’intervention sur le moteur.
Utiliser la station de lavage de la boîte de vitesses automatique dans une zone sèche, sans humidité.
INDICATIONS DE SÉCURITÉ POUR LA STATION DE LAVAGE DE LA BOÎTE DE VITESSES AUTOMATIQUE
- Avant l’utilisation, contrôler que la station de lavage de la boîte de vitesses automatique n’ait pas subi de dommages et
l’absence de pièces usées.
- Ne pas utiliser la station de lavage de la boîte de vitesses automatique s’elle est endommagée, ne pas essayer de l’ouvrir ou
de la modier.
- Avant le branchement à l’installation, fermer tous les robinets.
- Ne pas dépasser 80 % du remplissage du réservoir de stockage.
- Vérier périodiquement l’intégrité de la station de lavage de la boîte de vitesses automatique et de ses accessoires.
- Ne couvrir en aucune façon la station de lavage de la boîte de vitesses automatique pendant sa utilisation. Garantir un espace
approprié pour la ventilation.
- Ne pas utiliser la station de lavage de la boîte de vitesses automatique dans des milieux humides, mouillés, ne pas l’exposer
à la pluie.
INDICATION POUR LA SÉCURITÉ DU PERSONNEL
- La plus grande attention est recommandée ainsi qu’une concentration extrême sur ses propres actions. Ne pas utiliser la
station de lavage de la boîte de vitesses automatique en cas de fatigue ou sous l’effet de drogues, de boissons alcoolisées ou
de médicaments.
Utiliser systématiquement les équipements de protection individuelle suivants :
• chaussures de sécurité
• lunettes de protection
• masque de protection
IL EST IMPORTANT DE LIRE INTÉGRALEMENT LE PRÉSENT MANUEL
AVANT D’UTILISER LA STATION DE LAVAGE DE BOÎTE DE VITESSES
AUTOMATIQUE. LE NON-RESPECT DES NORMES DE SÉCURITÉ ET
DES INSTRUCTIONS D’UTILISATION PEUT PROVOQUER DE GRAVES
ACCIDENTS.
ATTENTION
Libretto 1885.indd 27 08/07/19 16:35

28
NOTICE D'UTILISATION ET INSTRUCTIONS
FR
• gants de protection pour agents physiques et chimiques
• vêtements de protection contre les substances chimiques
- Effectuer toutes les opérations prévues dans des milieux correctement aérés et secs.
- S’assurer que les câbles soient loin de ventilateurs, parties en mouvement et du conduit de carburant.
- Ne pas porter de vêtements larges, ne pas porter de bracelets, de chaînettes ou d’objets métalliques pendant le travail sur le
véhicule.
- Interrompre systématiquement le courant avant d’effectuer les opérations de contrôle des pannes ou de nettoyage : cette
mesure de prévention empêche la mise en marche accidentelle de la station et permet de travailler en toute sécurité.
UTILISATION ATTENTIVE DE LA STATION DE LEVAGE DE LA BOÎTE DE VITESSES AUTOMATIQUE
- Ne pas utiliser la station de lavage de la boîte de vitesses automatique en cas de présence de dommages.
- La station de lavage de la boîte de vitesses automatique ne doit pas être modiée. Les modications peuvent réduire l’efcacité
des mesures de sécurité et augmenter les risques pour l’opérateur.
- Faire réparer la station de lavage de la boîte de vitesses automatique seulement et exclusivement par un personnel spécialisé
et uniquement en employant des pièces de rechange originales.
- Ne pas utiliser la station de lavage de la boîte de vitesses automatique avec des tensions autres que celles indiquées dans le
tableau des DONNÉES TECHNIQUES.
- Pour le nettoyage, utiliser un chiffon sec, en débranchant toujours la station de lavage de la boîte de vitesses automatique. Ne
jamais utiliser de chiffons humides ou mouillés.
- Ne jamais placer la station en position horizontale, cela pourrait causer des fuites d’huile.
TENSION NOMINALE DE FONCTIONNEMENT
POMPE ÉLECTRIQUE PRESSION MAX.
POMPE ÉLECTRIQUE DÉBIT MAX.
EFFICIENCE FILTRANTE
BIDON DE COLLECTE DE L’HUILE (2)
TEMPÉRATURE D’UTILISATION
DIMENSIONS
POIDS
230V – 50Hz
16 bars
14 l/mn
10 microns
20 l l’un
-20°C +60°C
520x650x1000 mm
78 kg
DONNÉES TECHNIQUES
ÉQUIPEMENTS DE PROTECTION INDIVIDUELLE PRÉVUS PENDANT L'UTILISATION DE LA STATION DE
LAVAGE DE LA BOÎTE DE VITESSES AUTOMATIQUE
Le non-respect des indications suivantes peuvent entraîner des lésions physiques et/ou des pathologies.
UTILISER SYSTÉMATIQUEMENT DES GANTS DE PROTECTION CONTRE LES
AGENTS PHYSIQUES ET CHIMIQUES PENDANT L’UTILISATION DE LA STATION
DE LAVAGE DE LA BOÎTE DE VITESSES AUTOMATIQUE
UTILISER SYSTÉMATIQUEMENT DES CHAUSSURES DE SÉCURITÉ
PORTER SYSTÉMATIQUEMENT DES LUNETTES DE PROTECTION
PORTER UN MASQUE DE PROTECTION CONTRE LES AGENTS PHYSIQUES
Autres équipements de protection individuelle à utiliser en fonction des valeurs relevées au cours de
l’analyse d’hygiène environnementale/des risques si les valeurs dépassent les limites prévues par les normes
en vigueur.
Libretto 1885.indd 28 08/07/19 16:35

29
ISTRUZIONI PER L’USO
I
NOTICE D'UTILISATION ET INSTRUCTIONS
FR
MATÉRIEL FOURNI EN SÉRIE
- 1 tuyau de refoulement (gure 1)
- 1 tuyau de retour (gure 1)
- 1 kit raccords (gure 2)
RÉDUCTEURS EN OPTION (www.beta-tools.com)
UTILISATION
Préparation à l’utilisation
Brancher le câble d’alimentation au réseau (220V ac monophasé) et mettre la station en marche au moyen de l’interrupteur
général :
- Contrôler que les robinets soient FERMÉS ;
- Contrôler les niveaux des huiles ;
- Éventuellement vider le bidon d’huile usée ;
- Vérier le niveau d’huile présent dans la boîte de vitesses automatique ;
- En plaçant le véhicule sur un pont élévateur à roues libres, chercher les tuyaux d’entrée et de sortie de la ligne de refroidissement
de l’huile de la boîte de vitesses ;
- Ouvrir la ligne dans la boîte de vitesses sur le point le plus pratique en faisant attention à ne pas se brancher sur des raccords
en plastique ou sur l’embout du radiateur, et ce an d’éviter des ruptures ;
- Placer un bac pour collecter l’huile précisément sous le point choisi pour l’ouverture de la ligne de la boîte de vitesses et y faire
écouler l’huile qui sortira du tuyau ;
- Mettre le véhicule en marche pour contrôler de quel tuyau sort l’huile de sorte à vérier la sortie de la boîte de vitesses ;
- Puis brancher le tuyau de retour de la station 1885 à la sortie de la boîte de vitesses, conformément au point précédent et le
tuyau de refoulement à la ligne de retour ;
- Mettre le moteur du véhicule en marche et contrôler l’étanchéité des branchements effectués et le manomètre indiquant la
pression de fonctionnement qui devra passer de 1 à 4 bars.
6
5
1
8
9
2
4
3
7
Libretto 1885.indd 29 08/07/19 16:36

30
NOTICE D'UTILISATION ET INSTRUCTIONS
FR
Le panneau des instruments a été conçu de sorte à identier d’un seul coup d’œil les fonctions, tous les manomètres et les
touches marquées de symboles :
1 – Manomètre pressure : sert au contrôle de la pression de l’installation du véhicule.
2 – Touche : sert à faire déler les fonctions de la station et à programmer la durée et les qualités de l’huile.
3 – Touche : sert à faire déler les fonctions de la station et à programmer la durée et les qualités de l’huile.
4 – Touche : sert à conrmer les fonctions programmées.
5 – Touche : sert à interrompre toute opération.
6 – Écran d’afchage graphique rétroéclairé : afche les fonctions de la station.
7 – Récipient solvant : sert à contenir le solvant pour le lavage de l’installation.
8 – Verre du voyant huile propre : sert à voir la couleur de l’huile propre ajoutée.
9 – Verre du voyant huile usée : sert à voir la couleur de l’huile usée récupérée.
FONCTIONS GENERALES DE LA STATION DE LAVAGE
BRÈVE DESCRIPTION DES CYCLES DE TRAVAIL
Brève description des cycles de travail.
Au moment de la mise en marche, l’écran d’afchage se place automatiquement sur la fonction BOÎTE DE VITESSES AUTO-
MATIQUE, ce qui donne lieu aux phases suivantes :
- Introduction solvant
- Lavage
- Vidange du carter d’huile
- Remplacement huile convertisseur
- Introduction huile pour niveau
En allant sur BOÎTE DE VITESSES AUTOMATIQUE avec la touche la station se place sur la fonction BOÎTE DE VITES-
SES DSG, ce qui donne lieu aux phases suivantes :
- Introduction solvant
- Lavage
- Remplacement huile convertisseur
- Introduction huile pour niveau
En allant à nouveau sur BOÎTE DE VITESSES AUTOMATIQUE avec la touche , la station se place sur les fonctions
spéciales comme INSTALLATION et INFO.
Boîte de vitesses automatique
- Phase 1 : introduction solvant dans le système de la boîte de vitesses automatique.
- Phase 2 : cycle de lavage du système avec le solvant et l’huile usée.
- Phase 3 : vidange de l’huile usée du carter pour le remplacement de l’huile mais aussi du ltre et du joint du carter.
- Phase 4 : Introduction d’huile propre dans le carter.
- Phase 5 : Remplacement de l’huile usée présente dans le convertisseur au moyen de l’introduction d’huile propre.
- Phase 6 : lecture du niveau d’huile présente dans le carter
Boîte de vitesses DSG – AISIN
- Phase 1 : introduction solvant dans le système de la boîte de vitesses automatique.
- Phase 2 : cycle de lavage du système avec le solvant et l’huile usée.
- Phase 3 : Remplacement de l’huile usée présente dans le convertisseur au moyen de l’introduction d’huile propre.
- Phase 4 : lecture du niveau d’huile.
Libretto 1885.indd 30 08/07/19 16:36

31
ISTRUZIONI PER L’USO
I
NOTICE D'UTILISATION ET INSTRUCTIONS
FR
Réglages
- Contrôle de l’étalonnage pour les balances électroniques
- Programmation langue
- Réglage date et heure
- Conguration LCD - Mise à jour chier.
Le lavage et le remplacement de l’huile usée doivent toujours être effectués avec de l’huile chaude (plus de 40 °C).
Suivre les indications du fabricant. L’utilisation d’un testeur de diagnostic est préconisée.
DESCRIPTION ANALYTIQUE DES CYCLES
Boîte de vitesses automatique
Après avoir branché le tuyau “PRESSURE” au tuyau “RETURN”, conformément à la description du paragraphe « Utilisation -
Préparation à l’utilisation » , procéder de la manière suivante :
PHASE 1
- Brancher la station au réseau électrique et appuyer sur l’interrupteur latéral. L’écran afchera BOÎTE DE VITESSES
AUTOMATIQUE, appuyer sur la touche Abra el cárter trasero arrière, l’écran afchera :
- Avec la touche indiquer la quantité de solvant souhaitée. Laisser le réglage “0“ si le solvant ne doit pas être introduit dans
le circuit du véhicule. Après avoir programmé la quantité souhaitée, appuyer sur la touche Abra el cárter trasero arrière.
Vérier préalablement la compatibilité du solvant avec la boîte de vitesses.
- Le curseur se placera automatiquement sur “lavage mn“. Avec la touche programmer la durée du cycle de lavage
souhaitée. Laisser sur “0” si le cycle de lavage ne doit pas être effectué. Après avoir programmé la durée du cycle de lavage
souhaitée, appuyer sur la touche .
- Le curseur se placera automatiquement sur “huile l.”. Avec la touche programmer la quantité d’huile totale contenue dans
le circuit de la boîte de vitesses automatique à remplacer. Après avoir programmé la quantité d’huile, appuyer sur la touche .
- Si les données relatives au solvant, au lavage et à l’huile ont été programmées, la station commencera le cycle de travail de
la PHASE 1 “Introduction solvant” et l’écran afchera la quantité au fur et au mesure de l’introduction dans le circuit de la boîte
de vitesses automatique.
Libretto 1885.indd 31 08/07/19 16:36

32
NOTICE D'UTILISATION ET INSTRUCTIONS
FR
PHASE 2
- Au terme de la PHASE 1, la station commencera la PHASE 2 “Lavage” en demandant préalablement à l’utilisateur de mettre
le véhicule en marche en mettant le levier de vitesses sur la position P (parking) ou N (neutre). L’écran afchera :
- Mettre le véhicule en marche en plaçant le levier de vitesse sur la position P ou N et appuyer à plusieurs reprises sur la
touche . La station commencera à effectuer le lavage du circuit en ltrant les impuretés et indiquera le temps qu’il
manque avant la n de l’opération. Pendant la phase de lavage, après avoir placé la voiture sur un pont à roues levées, il est
recommandé d’effectuer quelques cycles de changement de toutes les vitesses, y compris la marche arrière.
Le lavage doit être effectué lorsque l’huile de la boîte de vitesses est chaude.
- Si sur l’écran initial la quantité de solvant est programmée sur “0”, la station sautera automatiquement la PHASE 1 et
commencera immédiatement par la PHASE 2.
PHASE 3
- Lorsque le temps programmé se sera écoulé, la station émettra des bips sonores et commencera automatiquement la
PHASE 3 “Vidange huile du carter“. L’écran afchera :
- Au fur de la mesure que la station vide le carter, l’écran afchera la quantité déchargée dans le bidon étiqueté “OLD OIL” et
reliée à la station au moyen du tuyau de couleur noire. Après avoir vidé le carter, la station s'arrêtera automatiquement et
signalera par des bips sonores la n de l’opération. L’écran afchera :
Il est recommandé d’observer, pendant cette phase, l’afcheur de l’huile usée et d'arrêter la machine si des
bulles d’air se forment.
- Puis arrêter IMMÉDIATEMENT le moteur du véhicule. Appuyer sur la touche , la station mémorisera la donnée relative à
la quantité d’huile usée extraite du carter. L’écran afchera :
- Procéder ensuite au démontage du carter en faisant attention aux éventuels résidus d’huile présents dans le carter. Nettoyer
le carter et les aimants qui s’y trouvent et remplacer le ltre et le joint de la boîte de vitesses. Au terme de ces opérations,
appuyer sur la touche .
- Si l’écran initial prévoit la quantité de solvant à “0” et la durée du lavage à “0”, la station sautera automatiquement la PHASE 1
et la PHASE 2 et commencera immédiatement par la PHASE 3.
Libretto 1885.indd 32 08/07/19 16:36

33
ISTRUZIONI PER L’USO
I
NOTICE D'UTILISATION ET INSTRUCTIONS
FR
PHASE 4
- Puis commencera la PHASE 4 « Remplissage carter ». L’écran afchera immédiatement la quantité d’huile correspondant
à la quantité vidangée lors de la phase précédente.
S’assurer d’utiliser de l’huile correspondant au cahier des charges du fabricant.
- En agissant sur la touche augmenter éventuellement la quantité en fonction des éventuels résidus d’huile présents dans
le carter au moment du démontage. En appuyant sur la touche , la station commencera à remplir le carter et l’écran
afchera la quantité d’huile introduite au fur et à mesure.
- Au terme de l’introduction de l’huile propre dans le carter, la station émettra des bips sonores et l’écran afchera la quantité
nécessaire pour le remplacement de l’huile présente dans le convertisseur.
PHASE 5
- La donnée indiquée par la station est calculée en tenant compte de la quantité totale d’huile programmée par l’utilisateur dans
la fenêtre initiale et de celle introduite dans le carter lors de la phase 4 précédente (pouvant éventuellement être augmentée
ou diminuée par l’opérateur au moyen des touches ). Puis appuyer sur la touche . La station demandera de
mettre le véhicule en marche en plaçant le levier de vitesse sur P (Parking) ou sur N (Neutral) avec le message qui s’afche
sur l’écran.
- Après avoir mis le véhicule en marche en plaçant le levier de vitesse sur P ou N, appuyer à PLUSIEURS REPRISES sur la
touche . La station commencera automatiquement à introduire de l’huile propre en extrayant la même quantité d’huile
usée du convertisseur. L’écran afchera les quantités d’huile propre introduite et d’huile usée extraite.
Lorsque l’huile visualisée dans l’afcheur de l’huile usée aura une couleur semblable à celle se trouvant dans le
secteur de l’huile propre, arrêter le véhicule.
- Au terme du remplacement de l’huile du convertisseur, la station s'arrêtera en se positionnant automatiquement sur :u.
Libretto 1885.indd 33 08/07/19 16:36

34
NOTICE D'UTILISATION ET INSTRUCTIONS
FR
PHASE 6
Débrancher les raccords de la station en rétablissant la ligne de la boîte de vitesses comme à l’origine et en
s’assurant qu'il n’y ait pas de fuites. Déplacer le levier de vitesses sur R D N P pour procéder à la vidange du
circuit. Mettre le véhicule en marche et placer le levier de vitesses sur P ou N et procéder au contrôle du niveau
d’huile.
- An de pouvoir procéder à une ÉVENTUELLE opération de remplissage d’huile à travers la sonde, appuyer sur la touche
et placer la sonde prévue à cet effet sur le tuyau PRESSURE. L’écran afchera :
- Activer les touches pour programmer la quantité d’huile nécessaire, s’assurer que la sonde soit correctement placée
sur le tuyau PRESSURE et introduire la sonde dans le bouchon du niveau présente sur le véhicule, puis appuyer sur la
touche .
- Au terme de la phase, la station se positionnera automatiquement sur la phase d'impression de tout le processus effectué.
Pour obtenir la juste uidité de conduite, il pourrait être nécessaire de parcourir 40-50 km.
BOÎTE DE VITESSES DSG-AISIN
Après avoir branché le tuyau “PRESSURE” et le tuyau “RETURN”, conformément à la description du paragraphe « Utilisation -
préparation à l’utilisation », procéder de la façon suivante :
PHASE 1
- Après avoir branché le tuyau “PRESSURE” et le tuyau “RETURN”, conformément à la description du paragraphe “Analyse
des cycles - boîte de vitesses automatique -, appuyer sur la touche et sur la touche , l’écran afchera :
- Appuyer sur la touche , l’écran afchera :
- Avec la touche indiquer la quantité de solvant souhaitée. Laisser le réglage “0“ si le solvant ne doit pas être introduit dans
le circuit du véhicule. Après avoir programmé la quantité souhaitée, appuyer sur la touche .
Vérier au préalable les compatibilités du solvant avec la boîte de vitesses.
- Le curseur se placera automatiquement sur “Lavage mn”. Avec la touche programmer la durée du cycle de lavage
souhaitée. Laisser sur “0” si le cycle de lavage ne doit pas être effectué. Après avoir programmé la durée du cycle de lavage
souhaitée, appuyer sur la touche .
Libretto 1885.indd 34 08/07/19 16:36

35
ISTRUZIONI PER L’USO
I
NOTICE D'UTILISATION ET INSTRUCTIONS
FR
- Le curseur se placera automatiquement sur “huile l”. En appuyant sur la touche programmer la quantité d’huile totale à
remplacer contenue dans le circuit de la boîte de vitesses automatique. Après avoir programmé la quantité d’huile, appuyer
sur la touche .
- Si les données relatives au solvant, au lavage et à l’huile ont été programmées, la station commencera le cycle de travail
de la PHASE 1 “Introduction solvant” et l’écran afchera la quantité au fur et au mesure de l’introduction dans le circuit de la
boîte de vitesses automatique.
- Si sur l’écran initial la quantité de solvant est programmée sur “0”, la station sautera automatiquement la PHASE 1 et
commencera immédiatement par la PHASE 2.
PHASE 2
- Au terme de la PHASE 1, la station commencera la PHASE 2 “Lavage” en demandant préalablement à l’utilisateur de mettre
le véhicule en marche en plaçant le levier de vitesses sur la position P (parking) ou N (neutre). L’écran afchera :
- Mettre le véhicule en marche en plaçant le levier de vitesse sur la position P ou N et appuyer à plusieurs reprises
sur la touche . La station commencera à effectuer le lavage du circuit en ltrant les impuretés et indiquera le temps qu’il
manque avant la n de l’opération. Pendant la phase de lavage, après avoir placé la voiture sur un pont à roues levées, il est
recommandé d’effectuer quelques cycles de changement de toutes les vitesses, y compris la marche arrière.
Le lavage doit être effectué lorsque l’huile de la boîte de vitesses est chaude.
- Si l’écran initial prévoit la quantité de solvant à “0” et la durée du lavage est programmée à “0”, la station sautera
automatiquement la PHASE 1 et la PHASE 2 et commencera immédiatement par la PHASE 3.
PHASE 3
- Lorsque le temps programmé se sera écoulé, la station émettra des bips sonores et commencera automatiquement la
PHASE 3 “Remplacement huile du convertisseur“. L’écran afchera la quantité d’huile à remplacer.
- Puis appuyer sur la touche . La station demandera de mettre le véhicule en marche en plaçant le levier de vitesse
sur P (Parking) ou sur N (Neutral) avec le message qui s’afche sur l’écran.
Libretto 1885.indd 35 08/07/19 16:36

36
NOTICE D'UTILISATION ET INSTRUCTIONS
FR
- Après avoir mis le véhicule en marche en plaçant le levier de vitesses sur P ou N, appuyer à PLUSIEURS REPRISES sur la
touche . La station commencera automatiquement à introduire de l’huile propre en extrayant la même quantité d’huile
usée du convertisseur. L’écran afchera les quantités d’huile propre introduite et d’huile usée extraite.
Lorsque l’huile visualisée dans l’afcheur de l’huile usée aura une couleur semblable à celle se trouvant dans le
secteur de l’huile propre, arrêter le véhicule.
- Au terme du remplacement de l’huile du convertisseur, la station s'arrêtera en se plaçant automatiquement sur :
PHASE 4
Débrancher les raccords de la station en rétablissant la ligne de la boîte de vitesses comme à l’origine et
s’assurer qu’il n’y ait pas de fuites. Déplacer le levier de vitesses sur R D N P pour procéder à la vidange du
circuit. Mettre le véhicule en marche et placer le levier de vitesses sur P ou N et procéder au contrôle du niveau
d’huile.
- An de pouvoir procéder à une ÉVENTUELLE opération de remplissage d’huile à travers la sonde, appuyer sur la touche
et placer la sonde prévue à cet effet sur le tuyau PRESSURE. L’écran afchera :
- Appuyer sur les touches pour programmer la quantité d’huile nécessaire, s’assurer que la sonde soit correctement
placée sur le tuyau PRESSURE et introduire la sonde dans le bouchon du niveau présente sur le véhicule, puis appuyer sur
la touche .
- Au terme de la phase, la station se positionnera automatiquement sur la phase d'impression de tout le processus effectué.
Pour obtenir la juste uidité de conduite, il pourrait être nécessaire de parcourir 40-50 km.
INTRODUCTION DE L’HUILE
- Brancher la station au réseau électrique et appuyer sur l’interrupteur latéral. L’écran afchera BOÎTE DE VITESSES
AUTOMATIQUE, appuyer deux fois sur la touche et appuyer sur la touche , l’écran afchera :
- Appuyer sur la touche , l’écran afchera :
- Appuyer sur les touches pour programmer la quantité d’huile nécessaire, s’assurer que la sonde soit correctement
placée sur le tuyau PRESSURE et introduire la sonde dans le bouchon du niveau présente sur le véhicule ou sur le récipient
à remplir puis appuyer sur la touche . La station commencera à réintégrer l’huile dans la quantité programmée.
Libretto 1885.indd 36 08/07/19 16:36

37
ISTRUZIONI PER L’USO
I
NOTICE D'UTILISATION ET INSTRUCTIONS
FR
RÉGLAGES
Réglage date et heure
- Permet de modier la date et l’heure qui apparaîtront sur le ticket.
Contrôle de l’étalonnage de la balance.
-Avec la touche , sélectionner la fonction – INSTALLATION - et appuyer sur la touche .
- Avec la touche , sélectionner la fonction - TEST TARE (icône balance) - et appuyer sur la touche . L’écran afchera
sur la ligne supérieure la quantité d’huile présente dans le réservoir et sur la ligne inférieure le poids échantillon.
- À ce point, l’opérateur indiquera sur le réservoir de stockage un poids connu (par exemple un poids de 2 kg) et devra lire sur
l’écran le poids exact. Cette opération sert à l’opérateur pour contrôler périodiquement que la balance de la station pèse des
quantités correctes.
Langue
La station prévoit la possibilité d’afcher les messages sur l’écran en différentes langues :
• ITALIEN
• ANGLAIS
• HOLLANDAIS
• etc.
Le changement de langue se fait de la manière suivante :
- Avec la touche sélectionner la fonction – INSTALLATION - et appuyer sur la touche .
- Avec la touche sélectionner la fonction - LANGUE (icône drapeau) - et appuyer sur la touche .
- Avec la touche sélectionner la langue souhaitée et appuyer sur la touche .
.
NOTES
Vidange et remplissage des réservoirs d’huile
Huile usée
- Vider le réservoir lorsque le niveau est à environ 10 litres.
- Utiliser les récipients dédiés pour l’huile usée.
L’huile usée est considérée comme déchet spécial et en tant que tel doit être écoulé conformément aux normes
en vigueur.
Huile propre
Il est recommandé d’utiliser les huiles préconisées par le fabricant du système.
SERVICE
Remplacement du ltre
Pour le remplacer, effectuer les opérations suivantes :
- Ouvrir le carter arrière.
- Sur le plan central, dévisser le corps du ltre (gure 3).
- Introduire une nouvelle cartouche.
Remplacer le ltre par un ltre original (code BETA 018850510).
Figure 3
Libretto 1885.indd 37 08/07/19 16:36

38
BASE DE DONNÉES
An de pouvoir accéder à la base de données en ligne concernant les boîtes de vitesses automatiques, allez sur le site
BETA au lien www.beta-tools.com et inscrivez-vous pour ouvrir la section réservée.
MAINTENANCE
Les interventions de maintenance et de réparation doivent être exclusivement effectuées par un personnel spécialisé. Pour ces
interventions, vous pouvez vous adresser au centre des réparations de Beta Utensili S.p.A. à travers votre revendeur Beta de
référence.
ÉCOULEMENT
La station de levage de boîte de vitesses automatique, les accessoires et les emballages doivent être envoyés à un centre
d’écoulement des déchets, conformément aux lois en vigueur du pays où vous vous trouvez.
GARANTIE
Cet appareil est fabriqué et testé conformément aux normes actuellement en vigueur dans la Communauté
Européenne et est couvert par une garantie de 12 mois pour une utilisation professionnelle et de 24 mois pour
une utilisation non professionnelle.
Toutes les pannes dues à un défaut matériel ou de production seront réparées, en ajustant ou en remplaçant les
pièces défectueuses à notre discrétion.
La réalisation d’une ou de plusieurs interventions pendant la période de garantie n’en modie pas la date
d’échéance.
La garantie ne couvre pas les problèmes dus à l’usure des composants, à un usage erroné ou incorrect de
l’appareil, aux ruptures causées pas des coups et/ou des chutes.
La garantie déchoit en cas de modications apportées, d'interventions sur la station de lavage de boîte de vitesses
automatique o bien si celle-ci est envoyée à l’assistance démontée d'envoi à l'assistance de la station de lavage
de boîte de vitesses automatique démontée.
Tous les dommages causés aux personnes et/ou aux biens, directs et/ou indirects et de quelque genre ou nature
que ce soit, sont exclus de la garantie.
DÉCLARATION DE CONFORMITÉ
Nous déclarons sous notre pleine responsabilité que le produit est conforme à toutes les dispositions pertinentes
aux Directives :
• Directive Machines 2006/42/CE;
• Directive Basse Tension (L.V.D.) 2014/35/UE;
Le Fascicule Technique est disponible chez:
BETA UTENSILI S.P.A.
Via A. Volta 18,
20845 Sovico (MB)
ITALIE
NOTICE D'UTILISATION ET INSTRUCTIONS
FR
Libretto 1885.indd 38 08/07/19 16:36

39
BEDIENUNGSANLEITUNG
DE
BEDIENUNGSANLEITUNG FÜR AUTOMATIKGETRIEBE-SPÜLSTATION HERGESTELLT VON:
BETA UTENSILI S.P.A.
Via A. Volta 18,
20845 Sovico (MB)
ITALIA
Originalsprache dieses Dokuments ist ITALIENISCH.
Die Sicherheitsanweisungen sorgfältig aufbewahren und dem Bedienerpersonal überreichen.
GEBRAUCHSZWECK
- Die Automatikgetriebe-Spülstation ist für den folgenden Gebrauch bestimmt:
• Ausschließlich an Fahrzeugen mit Automatikgetriebe verwenden.
- Unzulässig sind folgende Vorgänge:
• Verboten ist die Verwendung in feuchten, nassen oder Witterungseinüssen ausgesetzten Umgebungen
• Verboten ist die Verwendung, die nicht den technischen Anforderungen in der Tabelle TECHNISCHE DATEN entspricht
• Verboten ist der Gebrauch für alle jene Anwendungen, die nicht hier angegeben sind.
SICHERHEIT DES ARBEITSPLATZES
Die Automatikgetriebe-Spülstation nicht in potentiell explosionsfähigen Umgebungen oder in Umgebungen, in denen
entammbares Material gelagert ist, verwenden, da sich Funken entwickeln können, die in der Lage sind, Staub oder
Dämpfe zu entzünden.
Dafür sorgen, dass sich während der Arbeit mit der Automatikgetriebe-Spülstation keine Kinder oder Besucher dem
Arbeitsbereich nähern können, während Sie mit dem Gerät arbeiten. Die Anwesenheit anderer Personen lenkt ab und kann
zum Verlust der Kontrolle des Geräts während der Arbeit führen.
Keine eventuell aus der Automatikgetriebe-Spülstation heraustretenden schädlichen Gase einatmen, während Sie am
Motor arbeiten.
Die Automatikgetriebe-Spülstation in einer trockenen Umgebung verwenden und Feuchtigkeit vermeiden.
SICHERHEITSANWEISUNGEN FÜR DIE AUTOMATIKGETRIEBE-SPÜLSTATION
- Vor dem Gebrauch der Automatikgetriebe-Spülstation ist sicherzustellen, dass sie nicht beschädigt ist oder verschlissene Teile
aufweist.
- Die beschädigte Automatikgetriebe-Spülstation niemals verwenden; nicht versuchen, die Automatikgetriebe-Spülstation zu
öffnen oder zu ändern.
- Vor dem Anschluss an die Anlage alle Ventile schließen.
- Den Speichertank nicht über 80% befüllen.
- In regelmäßigen Zeitabständen die Unversehrtheit der Automatikgetriebe-Spülstation und des entsprechenden Zubehörs
überprüfen.
- Die Automatikgetriebe-Spülstation auf keinen Fall während dem Gebrauch abdecken. Ausreichend Freiraum für die Belüftung
garantieren.
- Die Automatikgetriebe-Spülstation nicht in feuchten und nassen Umgebungen verwenden und auf keinen Fall Regen aussetzen.
HINWEISE FÜR DIE SICHERHEIT DES PERSONALS
- Es ist höchste Vorsicht und Konzentration bei der Arbeit geboten. Die Automatikgetriebe-Spülstation nicht bei Müdigkeit oder
unter Einuss von Drogen, Alkohol oder Medikamenten verwenden.
Stets die folgende persönliche Schutzausrüstung (PSA) verwenden:
• Sicherheitsschuhe
• Schutzbrille
• Atemschutzmaske
• Schutzhandschuhe gegen physikalische und chemische Einwirkungen
• Schutzkleidung gegen chemische Substanzen.
ES IST WICHTIG, DIESE BEDIENUNGSANLEITUNG VOR DEM GEBRAUCH
DER AUTOMATIKGETRIEBE-SPÜLSTATION VOLLSTÄNDIG ZU LESEN.
DIE NICHTBEACHTUNG DER SICHERHEITSVORSCHRIFTEN UND DER
BEDIENUNGSANLEITUNGEN KANN ZU SCHWEREN VERLETZUNGEN
FÜHREN.
ACHTUNG
Libretto 1885.indd 39 08/07/19 16:36

40
BEDIENUNGSANLEITUNG
DE
- Alle vorgesehenen Arbeiten in angemessen belüfteten und trockenen Räumen durchführen.
- Sicherstellen, dass die Kabel weit ab von Lüftern, beweglichen Teilen und von der Kraftstofeitung sind.
- Keine weite Kleidung, Armreife, Kettchen oder sonstige Metallgegenstände tragen, wenn Sie am Fahrzeug arbeiten.
- Vor der Durchführung von Reinigungsarbeiten oder Prüfvorgängen eventueller Fehler ist stets die Spannungsversorgung zu
unterbrechen: Diese Maßnahme verhindert das unabsichtliche Einschalten der Station und gewährleistet somit das sichere
Arbeiten.
SORGFÄLTIGER GEBRAUCH DER AUTOMATIKGETRIEBE-SPÜLSTATION
- Die Automatikgetriebe-Spülstation nicht verwenden, wenn diese Beschädigungen aufweist.
- Die Automatikgetriebe-Spülstation darf nicht modiziert werden. Die Änderungen können die Sicherheitsmaßnahmen
beeinträchtigen und das Risiko für den Bediener erhöhen.
- Die Automatikgetriebe-Spülstation ausschließlich von Fachpersonal reparieren lassen und nur Originalersatzteile verwenden.
- Die Automatikgetriebe-Spülstation mit keinen anderen Spannungen, als jene, die in der Tabelle TECHNISCHE DATEN
angegeben sind, verwenden.
- Für die Reinigung ein trockenes Tuch verwenden, und die Automatikgetriebe-Spülstation vom Stromnetz trennen. Niemals
feuchte oder nasse Tücher benutzen.
- Die Station niemals horizontal positionieren, weil Öl austreten würde.
BETRIEBSNENNSPANNUNG
ELEKTROPUMPE MAX. DRUCK
ELEKTROPUMPE MAX. DURCHFLUSSMENGE
FILTEREFFIZIENZ
ÖLAUFFANGKANISTER Nr. 2
BETRIEBSTEMPERATUR
ABMESSUNGEN
GEWICHT
230V – 50Hz
16 bar
14l/min
10 μm
Jeder 20l
-20 °C ÷ +60 °C
520x650x1000 mm
78 kg
TECHNISCHE DATEN
VORGESCHRIEBENE PERSÖNLICHE SCHUTZAUSRÜSTUNG WÄHREND DEM GEBRAUCH DER
AUTOMATIKGETRIEBE-SPÜLSTATION
Die Nichtbeachtung der folgenden Warnhinweise kann zu Körperverletzungen und/oder Krankheiten führen.
WÄHREND DEM GEBRAUCH DER AUTOMATIKGETRIEBE-SPÜLSTATION
IMMER SCHUTZHANDSCHUHE GEGEN PHYSIKALISCHE UND CHEMISCHE
BELASTUNGEN VERWENDEN
ETS SICHERHEITSSCHUHE VERWENDEN
STETS SCHUTZBRILLE TRAGEN
ATEMSCHUTZMASKE ZUM SCHUTZ VOR PHYSIKALISCHEN EINWIRKUNGEN
VERWENDEN
Es kann notwendig sein, aufgrund der bei der umwelthygienischen Untersuchung und Gefahrenanalyse
festgestellten Werten, welche die von den geltenden Vorschriften vorgesehenen Grenzwerte überschreiten,
weitere persönliche Schutzausrüstungen tragen zu müssen.
SERIENAUSSTATTUNG
Die Serienausstattung ist immer komplett und von der höchsten Qualität:
- 1 Druck-/Vorlaufschlauch (Abbildung 1)
- 1 Rücklaufschlauch (Abbildung 1)
- 1 Anschlusskit (Abbildung 2)
OPTIONAL ANSCHLÜSSE (www.beta-tools.com)
Libretto 1885.indd 40 08/07/19 16:36

41
BEDIENUNGSANLEITUNG
DE
GEBRAUCH
Vorbereitung für den Gebrauch.
Das Spannungsversorgungskabel an den Netzanschluss (220V ac Monophase) anschließen und die Station mit dem Hauptschalter
einschalten:
- Kontrollieren, dass die Ventilhebel GESCHLOSSEN sind.
- Die Ölstände überprüfen.
- Eventuell den Altöltank entleeren.
- Den im Automatikgetriebe vorhandenen Ölstand überprüfen.
- Das Fahrzeug auf einer Hebebühne mit frei drehenden Rädern positionieren und auf der Kühlleitung des Getriebeöls die Ein-
und Ausgangsleitungen ermitteln.
- Die Leitung des Getriebes an der besten erreichbaren Stelle öffnen, wobei darauf zu achten ist, sich nicht an Kunststoffanschlüsse
oder an den Anschluss des Kühlers anzuklemmen, um Brüche zu vermeiden.
- Eine Ölauffangwanne direkt unter den zur Öffnung der Getriebeleitung ausgewählte Punkt stellen und das aus der Leitung
austretende Öl in den Behälter leiten.
- Den Motor starten, um zu kontrollieren, aus welcher Leitung das Öl herausießt, um den Ausgang des Getriebes zu überprüfen.
- Dann den Rücklaufschlauch der Servicestation 1885 an den Getriebeausgang und den Druck-/Vorlaufschlauch an die
Rücklaueitung anschließen.
- Den Motor des Fahrzeugs starten und die durchgeführten Anschlüsse bzw. Verbindungen auf Dichtheit prüfen, zudem ist auf
dem Manometer ‘Pressure’ zu überprüfen, dass der Betriebsdruck von 1 bar auf 4 bar ansteigt.
6
5
1
8
9
2
4
3
7
Libretto 1885.indd 41 08/07/19 16:36

42
BEDIENUNGSANLEITUNG
DE
Die Bedien- und Steuertafel ist so gestaltet, dass die Funktionen, alle Manometer und die Symboltasten mit einem Blick intuitiv
vom Bediener erkannt werden:
1 – Manometer ‘Pressure’: Dient zur Druckprüfung der Anlage des Fahrzeugs.
2 – Taste : Dient zum Durchblättern der Funktionen der Servicestation und zur Einstellung der Zeit und der Ölqualität.
3 – Taste : Dient zum Durchblättern der Funktionen der Servicestation und zur Einstellung der Zeit und der Ölqualitäten.
4 – Taste : Dient zur Bestätigung der eingestellten Funktionen.
5 – Taste : Dient zum Unterbrechen aller Vorgänge.
6 – Hintergrundbeleuchtetes Grakdisplay: Zeigt die Funktionen der Servicestation an.
7 – Lösemittelasche: Beinhaltet das Lösemittel für die Systemspülung.
8 – Schauglas Frischöl: Dient zur Ansicht der Farbe des zugeführten Frischöls.
9 – Schauglas Altöl: Dient zur Ansicht der Farbe des abgesaugten Altöls.
ALLGEMEINE FUNKTIONEN DER SPÜLSTATION
KURZBESCHREIBUNG DER ARBEITSZYKLEN
Bei Einschalten der Station positioniert sich das Display automatisch auf der Funktion AUTOMATIKGETRIEBE, welche die
folgenden Phasen umfasst:
- Zuführung Lösemittel
- Spülung
- Entleeren der Ölwanne
- Ölwechsel Wandler
- Ölbefüllung nach Füllstand
Wenn Sie von AUTOMATIKGETRIEBE mittels der Taste weiterblättern, positioniert sich die Station auf der Funktion DSG-
GETRIEBE, welche die folgenden Phasen umfasst:
- Zuführung Lösemittel
- Spülung
- Ölwechsel Wandler
- Ölbefüllung nach Füllstand
Wenn Sie von AUTOMATIKGETRIEBE mittels der Taste weiterblättern, positioniert sich die Station auf den Sonderfunktio-
nen wie SETUP und INFO.
Automatikgetriebe.
- Phase 1: Zuführung des Lösemittels in das Automatikgetriebesystem.
- Phase 2: Spülzyklus des Systems mit dem Lösemittel und dem Altöl.
- Phase 3: Entleeren des Altöls aus der Ölwanne für den Wechsel sowie des Öls des Filters und der Wannendichtung.
- Phase 4: Zuführung des Frischöls in die Ölwanne.
- Phase 5: Wechsel des im Wandler vorhandenen Altöls mittels Zuführung des Frischöls.
- Phase 6: Prüfung des in der Ölwanne vorhandenen Ölfüllstands.
Getriebe DSG – AISIN
- Phase 1: Zuführung des Lösemittels in das Automatikgetriebesystem.
- Phase 2: Spülzyklus des Systems mit dem Lösemittel und dem Altöl.
- Phase 3: Wechsel des im Wandler vorhandenen Altöls mittels Zuführung des Frischöls.
- Phase 4: Prüfung des Ölfüllstands.
Libretto 1885.indd 42 08/07/19 16:36

43
BEDIENUNGSANLEITUNG
DE
Einstellungen
- Kontrolle der Kalibrierung für die elektronische Waage.
- Einstellung der Sprache.
- Einstellung von Datum und Uhrzeit.
- LCD-Setting- Dateiaktualisierung.
Die Spülung und der Wechsel des Altöls müssen immer mit warmem Getriebeöl (> 40 °C) durchgeführt werden.
Die Herstellervorgaben befolgen. Es wird die Verwendung eines angemessenen Diagnosegerätes empfohlen.
ANALYTISCHE BESCHREIBUNG DER ZYKLEN
Automatikgetriebe.
Nach erfolgtem Anschluss des Schlauchs „PRESSURE” und des Schlauchs „RETURN“ - wie im Abschnitt “Gebrauch“ –
Vorbereitung für den Gebrauch beschrieben -, wie folgt vorgehen.
PHASE 1
- Die Servicestation an das Stromnetz anschließen und den seitlichen Schalter einschalten. Auf dem Display erscheint
AUTOMATIKGETRIEBE, dann die Taste drücken, und auf dem Display erscheint:
- Durch Drücken der Taste die gewünschte Lösemittelmenge einstellen. Lassen Sie den eingestellten Wert „0“, wenn kein
Lösemittel in den Kreislauf des Fahrzeugs eingeführt werden soll. Nach erfolgter Einstellung der gewünschten Menge die
Taste drücken.
Vorab die Kompatibilität des Lösemittels mit dem Getriebe überprüfen.
- Der Cursor positioniert sich automatisch auf „Spülung Min.”. Durch Drücken der Taste die gewünschte Dauer des
Spülzyklus einstellen. Lassen Sie den eingestellten Wert „0”, wenn kein Spülzyklus durchgeführt werden soll. Nach erfolgter
Einstellung der Dauer des Spülzyklus auf die Taste drücken.
- Der Cursor positioniert sich automatisch auf „Öl lt.”. Durch Drücken der Taste die im Automatikgetriebesystem enthaltene
Gesamtölmenge einstellen. Nach erfolgter Einstellung die Taste drücken.
- Wenn die Daten bezüglich des Lösemittels, der Spülung und des Öls eingestellt worden sind, beginnt die Station den
Arbeitszyklus mit der PHASE 1 „Zuführung des Lösemittels“ und auf dem Display erscheint nach und nach die dem Kreislauf
des Automatikgetriebes zugeführte Menge.
Libretto 1885.indd 43 08/07/19 16:36

44
PHASE 2
- Nach Abschluss der PHASE 1 beginnt die Station die PHASE 2 „Spülung” und fordert den Bediener vorab auf, das Fahrzeug
mit Getriebe auf Position P (Parking) oder N (Neutral) zu starten. Auf dem Display erscheint:
- Das Fahrzeug also mit Getriebe auf Position P oder N starten und die Taste drücken. Die Station beginnt den
Spülvorgang des Kreislaufs und ltriert die Unreinheiten. Während des Vorgangs wird die verbleibende Zeit bis zum Ende
des Vorgangs angezeigt. Da das Fahrzeug auf der Hebebühne mit angehobenen und somit frei drehenden Rädern steht, wird
empfohlen, einige Gangwechsel aller Gänge, einschließlich Rückwärtsgang, durchzuführen.
Die Spülung muss mit warmem Getriebeöl durchgeführt werden.
- Wenn im Anfangsbildschirm die Lösemittelmenge auf „0” eingestellt ist, wird die Servicestation automatisch die PHASE 1
überspringen und sofort mit der PHASE 2 beginnen.
PHASE 3
- Nach Ablauf der eingestellten Zeit ertönt ein Signalton, und es beginnt automatisch die PHASE 3 „Entleeren der Ölwanne”.
Auf dem Display erscheint:
- Während die Servicestation die Ölwanne entleert, erscheint auf dem Display die in den Kanister mit dem Etikett „OLD OIL”
abgelassene Menge. Der Kanister ist mittels einer schwarzen Schlauchleitung mit der Servicestation verbunden. Sobald die
Ölwanne vollständig entleert ist, stoppt die Servicestation automatisch und ein Signalton weist darauf hin, dass der Vorgang
abgeschlossen ist. Auf dem Display erscheint:
Es wird empfohlen, während dieser Phase das Schauglas des Altöls zu beobachten und das Fahrzeug
auszuschalten, wenn das Vorhandensein von Luftblasen im Altöl bemerkt wird.
- SOFORT das Fahrzeug ausschalten und die Taste drücken. Die Servicestation wird die der Ölwanne entnommene
Altölmenge speichern. Auf dem Display erscheint daraufhin:
- Nun die Ölwanne ausbauen, wobei auf eventuell in der Wanne verbliebene Ölrückstände zu achten ist. Die Wanne sowie die
enthaltenen Magnete reinigen und den Filter sowie di Getriebedichtung austauschen. Nach Abschluss dieser Vorgänge die
Taste drücken.
- Wenn im Anfangsbildschirm die Lösemittelmenge auf „0” und die Dauer der Spülung auf „0” eingestellt sind, wird die
Servicestation PHASE 1 und PHASE 2 überspringen und automatisch mit PHASE 3 beginnen.
BEDIENUNGSANLEITUNG
DE
Libretto 1885.indd 44 08/07/19 16:36

45
PHASE 4
- Es beginnt die PHASE 4 „Befüllen der Ölwanne“. Auf dem Display erscheint unverzüglich die Ölmenge, die der in der
vorherigen Phase abgelassenen Menge entspricht.
Sicherstellen, dass das in den Herstellervorgaben aufgeführte Öl verwendet wird.
- Durch Drücken der Taste die Menge im Verhältnis zu den eventuell während der Ausbauphase in der Ölwanne
gefundenen Ölrückstände erhöhen. Durch Drücken auf die Taste beginnt die Servicestation mit der Befüllung der
Ölwanne und auf dem Display erscheint die nach und nach zugeführte Ölmenge.
- Nach Einführung des Frischöls in die Wanne, ertönt ein Piepston und auf dem Display erscheint die notwendige Menge für
den Austausch des im Drehmomentwandler vorhandenen Öls.
FASE 5
- Der von der Station gelieferte Wert wurde berechnet anhand der vom Bediener im Anfangsbildschirm eingestellten
Gesamtölmenge und der in der vorherigen Phase 4 zugeführten Menge (kann eventuell mittels der Tasten erhöht
oder verringert werden). Die Taste drücken. Die Servicestation fordert mittels Meldung auf dem Display auf, das Fahrzeug
mit Getriebe in P (Parking) oder N (Neutral) zu starten.
- Nach Start des Fahrzeugs mit Getriebe in P oder N SOFORT die Taste drücken. Die Servicestation beginnt automatisch
die Zuführung des Frischöls und das Absaugen der gleichen Menge Altöl aus dem Wandler. Auf dem Display erscheinen die
zugeführte Frischölmenge und die entnommene Altölmenge.
Sobald das im Schauglas des Altöls sichtbare Öl eine ähnliche Farbe wie die im Bereich des Frischöls
angezeigte Farbe hat, das Fahrzeug ausschalten.
- Sobald der Ölwechsel des Wandlers beendet ist, stoppt die Servicestation und positioniert sich auf:
BEDIENUNGSANLEITUNG
DE
Libretto 1885.indd 45 08/07/19 16:36

46
BEDIENUNGSANLEITUNG
DE
PHASE 6
Die Anschlüsse/Kupplungen der Station abtrennen und die Getriebeleitung wie ursprünglich wiederherstellen.
Sicherstellen, dass keine Leckagen vorhanden sind. Den Getriebewählhebel in R D N P verschieben, um die
Entlüftung des Systems zu starten. Das Fahrzeug einschalten und das Getriebe auf P oder N stellen und den
Ölfüllstand kontrollieren.
- Um EVENTUELL mittels der Sonde Öl nachzufüllen, die Taste drücken, und die Sonde am Schlauch „Pressure” anlegen.
Auf dem Display erscheint:
- Mittels der Tasten die gewünschte Ölnachfüllmenge einstellen. Sicherstellen, dass die Sonde korrekt am Schlauch
„PRESSURE“ angelegt ist, und die Sonde in den Füllstandstutzen am Fahrzeug einführen und die Taste drücken.
- Nach Abschluss der Phase positioniert sich die Servicestation automatisch auf der Phase „Ausdrucken“ des durchgeführten
Prozesses.
Um eine üssige Fahrqualität zu erzielen, könnte eine Fahrstrecke von 40-50 km erforderlich sein.
GETRIEBE DSG-AISIN
Nach erfolgtem Anschluss des Schlauchs „PRESSURE” und des Schlauchs “RETURN” – wie im Abschnitt „Gebrauch“ –
Vorbereitung für den Gebrauch beschrieben -, wie folgt vorgehen:
PHASE 1
- Nach erfolgtem Anschluss des Schlauchs „PRESSURE” und des Schlauchs „RETURN“, wie im Abschnitt „Analytische
Beschreibung der Zyklen” – Automatikgetriebe – vorgehen und die Taste und die Taste drücken; auf dem Display
erscheint:
- Die Taste drücken; auf dem Display erscheint:
- Durch Drücken der Taste die gewünschte Lösemittelmenge einstellen. Lassen Sie den eingestellten Wert „0“, wenn kein
Lösemittel in den Kreislauf des Fahrzeugs eingeführt werden soll. Nach erfolgter Einstellung der gewünschten Menge die
Taste drücken.
Vorab die Kompatibilität des Lösemittels mit dem Getriebe überprüfen.
- Der Cursor positioniert sich automatisch auf „Spül Min.“ Durch Drücken der Taste die gewünschte Dauer des Spülzyklus
einstellen. Lassen Sie den eingestellten Wert „0”, wenn kein Spülzyklus durchgeführt werden soll. Nach erfolgter Einstellung
der Dauer des Spülzyklus auf die Taste drücken.
Libretto 1885.indd 46 08/07/19 16:36

47
BEDIENUNGSANLEITUNG
DE
- Der Cursor positioniert sich automatisch auf „Öl lt.”. Durch Drücken der Taste die im Automatikgetriebesystem enthaltene
Gesamtölmenge einstellen. Nach erfolgter Einstellung der Ölmenge die Taste drücken.
- Sobald die Daten bezüglich des Lösemittels, der Spülung und des Öls eingestellt worden sind, beginnt die Station den
Arbeitszyklus mit der PHASE 1 „Zuführung des Lösemittels”, und auf dem Display erscheint die nach und nach dem Kreislauf
des Automatikgetriebes zugeführte Menge.
- Wenn im Anfangsbildschirm die Lösemittelmenge auf „0” eingestellt ist, wird die Servicestation automatisch die PHASE 1
überspringen und sofort mit der PHASE 2 beginnen.
PHASE 2
- Nach Abschluss der PHASE 1 beginnt die Station die PHASE 2 „Spülung“ und fordert den Bediener vorab auf, das Fahrzeug
mit Getriebe in Position P (Parking) oder N (Neutral) zu starten. Auf dem Display erscheint:
- Das Fahrzeug also mit Getriebe auf Position P oder N starten und die Taste sofort drücken. Die Station beginnt den
Spülvorgang des Kreislaufs und ltriert die Unreinheiten. Während des Vorgangs wird die verbleibende Zeit bis zum Ende
des Vorgangs angezeigt. Da das Fahrzeug auf der Hebebühne mit angehobenen und somit frei drehenden Rädern steht, wird
empfohlen, einige Gangwechsel aller Gänge, einschließlich Rückwärtsgang, durchzuführen.
Die Spülung muss mit warmem Getriebeöl durchgeführt werden.
- Wenn im Anfangsbildschirm die Lösemittelmenge auf „0” und die Dauer der Spülung auf „0” eingestellt sind, wird die
Servicestation PHASE 1 und PHASE 2 überspringen und automatisch mit PHASE 3 beginnen.
PHASE 3
- Nach Ablauf der eingestellten Zeit ertönt ein Signalton, und es beginnt automatisch die PHASE 3 „Ölwechsel des Wandlers”.
Auf dem Display erscheint die auszuwechselnde Ölmenge.
- Die Taste drücken. Die Servicestation fordert mittels einer Meldung auf dem Display auf, das Fahrzeug mit Getriebe
in P (Parking) oder N (Neutral) zu starten.
Libretto 1885.indd 47 08/07/19 16:36

48
BEDIENUNGSANLEITUNG
DE
- Nach Start des Fahrzeugs mit Getriebe in P oder N SOFORT die Taste drücken. Die Servicestation beginnt automatisch
die Zuführung des Frischöls und das Absaugen der gleichen Menge Altöl aus dem Wandler. Auf dem Display erscheinen die
zugeführte Frischölmenge und die entnommene Altölmenge.
Sobald das im Schauglas des Altöls sichtbare Öl eine ähnliche Farbe wie die im Bereich des Frischöls
angezeigte Farbe hat, das Fahrzeug ausschalten.
- Sobald der Ölwechsel des Wandlers beendet ist, stoppt die Servicestation und positioniert sich auf:
PHASE 4
Die Anschlüsse/Kupplungen der Station abtrennen und die Getriebeleitung wie ursprünglich wiederherstellen.
Sicherstellen, dass keine Leckagen vorhanden sind. Den Getriebewählhebel in R D N P verschieben, um die
Entlüftung des Systems zu starten. Das Fahrzeug einschalten und das Getriebe auf P oder N stellen und den
Ölfüllstand kontrollieren.
- Um EVENTUELL mittels der Sonde Öl nachzufüllen, die Taste drücken, und die Sonde am Schlauch „Pressure” anlegen.
Auf dem Display erscheint:
- Mittels der Tasten die gewünschte Ölnachfüllmenge einstellen. Sicherstellen, dass die Sonde korrekt am Schlauch
„Pressure” angelegt ist, und die Sonde in den Füllstandstutzen am Fahrzeug einführen und die Taste drücken.
- Nach Abschluss der Phase positioniert sich die Servicestation automatisch auf der Phase „Ausdrucken“ des durchgeführten
Prozesses.
Um eine üssige Fahrqualität zu erzielen, könnte eine Fahrstrecke von 40-50 km erforderlich sein.
ÖLZUFÜHRUNG
- Die Servicestation ans Stromnetz anschließen und den seitlichen Schalter einschalten. Auf dem Display erscheint
AUTOMATIKGETRIEBE, zwei Mal die Taste drücken, danach mit der Taste bestätigen. Auf dem Display erscheint:
- Die Taste drücken; auf dem Display erscheint:
- Mittels der Tasten die gewünschte Ölnachfüllmenge einstellen, sicherstellen, dass die Sonde korrekt am Schlauch
„Pressure” angelegt ist, und die Sonde in den Füllstandstutzen am Fahrzeug oder in das Behältnis, das gefüllt werden soll,
einführen, und die Taste drücken. Die Servicestation beginnt das Nachfüllen der eingestellten Menge.
Libretto 1885.indd 48 08/07/19 16:36

49
BEDIENUNGSANLEITUNG
DE
SETUP
Datum und Uhrzeit einstellen.
- Ermöglicht das Ändern von Datum und Uhrzeit für den Ausdruck des Belegs.
Kontrolle der Kalibrierung der Waage.
- Mittels der Taste die Funktion – SETUP – auswählen, und die Taste drücken.
- Mittels der Taste die Funktion - TEST TARA (Waage Icon) auswählen - und die Taste drücken. Das Display zeigt auf
der
Zeile oben die im Tank vorhandene Ölmenge und auf der Zeile unten das Mustergewicht.
- Der Bediener legt nun auf den Speichertank ein bekanntes Gewicht (zum Beispiel ein Gewicht von 2 kg) und muss daraufhin
auf dem Display das exakte Gewicht lesen. Dieser Vorgang dient dazu, in regelmäßigen Zeitabständen zu prüfen, ob die
Waage der Servicestation korrekte Mengen wiegt.
Sprache
Die Station ermöglicht die Anzeige der Meldungen auf dem Display in verschiedenen Sprachen:
• ITALIENISCH
• ENGLISCH
• HOLLÄNDISCH
• usw.
Zum Wechsel der Sprache wie folgt vorgehen:
- Mittels der Taste die Funktion - SETUP- auswählen und die Taste drücken.
- Mittels der Taste die Funktion - SPRACHE (Flagge ICON) - auswählen und die Taste drücken.
- Mittels der Taste die gewünschte Sprache auswählen und die Taste drücken.
HINWEISE
HINWEISE
Entleeren und Befüllen der Ölbehälter.
Altöl
- Den Behälter entleeren, wenn der Füllstand in etwa 10 Liter ist.
- Die entsprechenden Behältnisse für Altöl benutzen.
Altöl ist Sondermüll und muss als solcher entsprechend den geltenden Vorschriften entsorgt werden.
Frischöl
Es wird empfohlen, die vom Hersteller der Anlage angegebenen Öle zu verwenden.
SERVICE
Austausch des Filters
Zum Austausch wie folgt vorgehen:
- Öffnen Sie die hintere Wanne
- Auf dem zentralen Teller den Filterkörper abschrauben (Abbildung 3).
- Eine neue Kartusche einsetzen.
Den Filter mit einem Originallter austauschen (Cod. BETA 018850510).
Abbildung 3
Libretto 1885.indd 49 08/07/19 16:36

50
BEDIENUNGSANLEITUNG
DE
DATEBANK
Zum Zugriff auf die Online-Datenbank der Automatikgetriebe besuchen Sie die BETA Internetseite unter der Adresse
www.beta-tools.com und melden Sie sich an, um den reservierten Bereich öffnen zu können.
WARTUNG
Die Wartungs- und Reparaturarbeiten dürfen nur von qualiziertem Fachpersonal durchgeführt werden. Für diese Eingriffe können
Sie sich an das Reparaturzentrum Beta Utensili S.P.A. über Ihren Beta Händler wenden.
ENTSORGUNG
Die Automatikgetriebe-Spülstation, die Zubehörteile und die Verpackung müssen entsprechend den im Benutzerland geltenden
Gesetzen zu einer Entsorgungs- und Sammelstelle gebracht werden.
GARANTIE
Dieses Werkzeug wird entsprechend der in der Europäischen Gemeinschaft geltenden Bestimmungen hergestellt
und geprüft und hat eine Garantie für einen Zeitraum von 12 Monaten für den beruichen Gebrauch oder von 24
Monaten für den privaten Gebrauch.
Störungen, die auf Material- oder Fertigungsfehler zurückzuführen sind, werden unentgeltlich durch Reparatur oder
Austausch der defekten Teile beseitigt bzw. wiederinstandgesetzt.
Die Durchführung einer oder mehrerer Reparaturen unter Garantie hat keinerlei Auswirkungen auf die Garantiedauer
des Werkzeugs.
Von der Garantie ausgeschlossen sind Fehler, die auf natürlichen Verschleiß, unsachgemäßen Gebrauch und
Brüche infolge von Stößen und/oder Stürzen zurückzuführen sind.
Die Garantie verfällt, wenn die Automatikgetriebe-Spülstation verändert oder dem Kundendienst in zerlegtem
Zustand übergeben wird.
Ausdrücklich ausgeschlossen sind Personen- und/oder Sachschäden jeglicher Herkunft, direkter und/oder
indirekter Art.
KONFORMITÄTSERKLÄRUNG
Wir erklären in alleiniger Verantwortung, dass das Produkt allen einschlägigen Bestimmungen der folgenden
Richtlinien entspricht:
• Maschinenrichtlinie 2006/42/EG;
• Niederspannungsrichtlinie (LVD) 2014/35/EU;
Die technische Dokumentation und Akte ist verfügbar bei:
BETA UTENSILI S.P.A.
Via A. Volta 18,
20845 Sovico (MB)
ITALIEN
Libretto 1885.indd 50 08/07/19 16:36

51
MANUAL DE USO E INSTRUCCIONES
ES
MANUAL DE USO E INSTRUCCIONES PARA ESTACIÓN DE LAVADO CAMBIO AUTOMÁTICO FABRICADA POR:
BETA UTENSILI S.P.A.
Via A. Volta 18,
20845 Sovico (MB)
ITALIA
Documentación redactada originariamente en ITALIANO.
IMPORTANTE LEA COMPLETAMENTE ESTE MANUAL ANTES DE
UTILIZAR LA ESTACIÓN DE LAVADO DEL CAMBIO AUTOMÁTICO. DE
NO RESPETAR LAS NORMAS DE SEGURIDAD Y LAS INSTRUCCIONES
OPERATIVAS, PUEDEN PRODUCIRSE ACCIDENTES SERIOS.
ATENCIÓN
Guarde con atención las instrucciones de seguridad y entréguelas al personal usuario.
DESTINO DE USO
- La estación de lavado del cambio automático está destinada al siguiente uso:
• A utilizar exclusivamente en vehículos con cambio automático.
- No están permitidas las siguientes operaciones:
• queda prohibida la utilización en medios húmedos, mojados o expuestos a la intemperie
• queda prohibida la utilización fuera de las prescripciones técnicas contenidas en la tabla DATOS TÉCNICOS
• queda prohibida la utilización en todas las aplicaciones diferentes de las indicadas
SEGURIDAD DEL PUESTO DE TRABAJO
No utilice la estación de lavado del cambio automático en medios que contienen atmósferas potencialmente explosivas o
materiales inamables porque pueden desarrollarse chispas con riesgo de incendiar polvos o vapores.
Impida que niños o visitantes puedan acercarse al puesto de trabajo mientras se está trabajando con la estación de lavado
del cambio automático. La presencia de otras personas produce distracción y puede suponer la pérdida de control durante
la utilización.
No inhalar posibles gases nocivos que salen de la estación de lavado del cambio automático mientras está trabajando en
el motor mientras está trabajando en el motor.
Utilice la estación de lavado del cambio automático en una zona seca evitando humedad.
INDICACIONES DE SEGURIDAD PARA LA ESTACIÓN DE LAVADO CAMBIO AUTOMÁTICO
- Compruebe antes del uso que la estación de lavado del cambio automático no haya sufrido daños y que no haya partes
desgastadas.
- No utilice la estación de lavado del cambio automático cuando está dañada, no trate de abrirla o modicarla.
- Antes de conectar a la instalación cierre todos los grifos.
- No llene el depósito de almacenamiento más del 80%.
- Compruebe periódicamente la integridad de la estación de lavado del cambio automático y los accesorios correspondientes.
- No cubra bajo ningún concepto la estación de lavado del cambio automático durante el uso. Asegure un espacio adecuado
para la ventilación.
- No utilice la estación de lavado del cambio automático en medios húmedos, mojados, no lo exponga a la lluvia.
INDICACIONES PARA LA SEGURIDAD DEL PERSONAL
- Se recomienda el máximo cuidado, prestando atención para concentrarse siempre en las propias acciones. No utilice la
estación de lavado del cambio automático en caso de cansancio o bajo el efecto de drogas, bebidas alcohólicas o medicinas.
Utilice siempre los siguientes equipos de protección individual:
• calzado de seguridad
• gafas de protección
• máscara de protección
• guantes de protección para agentes físicos y químicos
• ropa de protección contra sustancias químicas
- Lleve a cabo todas las operaciones previstas en medios adecuadamente aireados y secos.
- Asegúrese de que los cables de la estación de lavado del cambio automático, partes en movimiento y del conducto de
combustible.
Libretto 1885.indd 51 08/07/19 16:36

52
E
MANUAL DE USO E INSTRUCCIONES
ES
- No lleve puestos vestidos anchos, o pulseras, cadenas u objetos metálicos cuando trabaja en el vehículo.
- Interrumpa siempre la alimentación antes de llevar a cabo operaciones de comprobación de averías o limpieza: esta medida de
prevención impide la puesta en marcha accidental de la estación permitiendo trabajar en condiciones de seguridad.
UTILIZACIÓN ANTENTA DE LA ESTACIÓN DE LAVADO CAMBIO AUTOMÁTICO
- No utilice la estación de lavado del cambio automático de presentar la misma daños.
- La estación de lavado del cambio automático no ha de modicarse. Las modicaciones pueden reducir la ecacia de las
medidas de seguridad y aumentar los riesgos para el operario.
- Haga reparar la estación de lavado del cambio automático exclusivamente por personal especializado y tan sólo utilizando
repuestos originales.
- No utilice la estación de lavado del cambio automático con tensiones diferentes de las indicadas en la tabla DATOS TÉCNICOS.
- Para la limpieza utilice un trapo seco, desconectando siempre la alimentación de red de la estación de lavado del cambio
automático. No utilice nuca trapos húmedos o mojados.
- Coloque nunca la estación horizontalmente: se producirían fugas de aceite.
TENSIÓN NOMINAL DE FUNCIONAMIENTO
BOMBA ELÉCTRICA PRESISÓN MÁX
BOMBA ELÉCTRICA CAPACIDAD MÁX
EFICIENCIA DE FILTRACIÓN
TÉCNICA DE RECOGIDA ACEITE N°2
TEMPERATURA DE UTILIZACIÓN
DIMENSIONES
PESO
230V – 50Hz
16 bares
14l/min
10 micras
20l cad.
-20 °C ÷ +60 °C
520x650x1000 mm
78 kg
DATOS TÉCNICOS
DISPOSITIVOS DE PROTECCIÓN INDIVIDUAL PREVISTOS DURANTE LA UTILIZACIÓN DE LA ESTACIÓN
DE LAVADO CAMBIO AUTOMÁTICO
El incumplimiento de las siguientes advertencias puede ocasionar lesiones físicas y/o enfermedades.
UTILICE SIEMPRE GUANTES DE PROTECCIÓN PARA AGENTES FÍSICOS Y
QUÍMICOS DURANTE LA UTILIZACIÓN DE LA ESTACIÓN DE LAVADO DEL
CAMBIO AUTOMÁTICO
UTILICE SIEMPRE CALZADO DE SEGURIDAD
LLEVE SIEMPRE PUESTAS GAFAS DE PROTECCIÓN
UTILICE MÁSCARA DE PROTECCIÓN PARA AGENTES FÍSICOS
Puede ser necesario utilizar otros equipos de protección individual dependiendo de los valores detectados
en la encuesta de higiene medioambiental/análisis de riesgos, en caso de sobrepasar los valores los límites
previstos por la normativa vigente.
DOTACIÓN DE SERIE
La dotazione di serie è sempre completa e al top della qualità:
La dotación de serie siempre es completa y de máxima calidad:
- 1 tubo de impulsión (gura 1)
- 1 tubo de retorno (gura 1)
- 1 kit de uniones (gura 2)
UNIONES OPCIONALES (www.beta-tools.com)
Libretto 1885.indd 52 08/07/19 16:36

53
MANUAL DE USO E INSTRUCCIONES
ES
UTILIZACIÓN
Preparación para el uso
Conecte el cable de alimentación a la red (220V ac monofásica) y encienda la estación mediante el interruptor general:
- Controle que los grifos estén CERRADOS.
- Compruebe los niveles de los aceites.
- Vacíe, en su caso, el depósito del aceite agotado.
- Compruebe el nivel de aceite presente en el cambio automático.
- Colocando el vehículo sobre un puente elevador con las ruedas libres detecte en la línea de enfriamiento del aceite del cambio
los tubos de entrada y de salida.
- Abra la línea del cambio en el punto más fácil de alcanzar teniendo cuidado para no conectarse a uniones de plástico o a la
conexión del radiador con el objeto de evitar rupturas.
- Coloque un recolector de aceite inmediatamente bajo el punto seleccionado para la apertura de la línea del cambio y para que
pueda entrar el aceite que saldrá de la tubería.
- Ponga en marcha el vehículo para controlar de qué tubo sale el aceite con el onjeto de comprobar la salida del cambio.
- A continuación conecte el tubo de retorno de la estación 1885 en la salida del cambio que ha detectado en el apartado anterior
y el tubo de impulsión a la línea de retorno.
- Arranque el motor del vehículo, compruebe la solidez de las conexiones efectuadas así como el manómetro que indica la
presión de funcionamiento, que tendrá que subir de 1 a 4 bares.
6
5
1
8
9
2
4
3
7
Libretto 1885.indd 53 08/07/19 16:36

54
MANUAL DE USO E INSTRUCCIONES
ES
El cuadro de instrumentos se ha construido de manera que resulten fácil e intuitivas las funciones, todos los manómetros y las
teclas que llevan símbolos:
1 – Manómetro ‘Pressure’: sirve para comprobar la presión de la instalación del vehículo.
2 – Tecla : sirve para pasar en secuencia las funciones de la estación y seleccionar el tiempo y la calidad del aceite.
3 – Tecla : sirve para pasar en secuencia las funciones de la estación y seleccionar el tiempo y la calidad del aceite.
4 – Tecla : sirve para conrmar las funciones seleccionadas.
5 – Tecla : sirve para interrumpir cualquier operación.
6 – Pantalla gráca retroiluminada: visualiza las funciones de la estación.
7 – Contenedor disolvente: sirve para contener el disolvente para el lavado de la instalación.
8 – Indicador de aceite nuevo: sirve para ver el color del aceite nuevo que se ha introducido.
9 – Indicador aceite agotado: sirve para ver el color del aceite agotado recuperado.
FUNCIONES GENERALES DE LA ESTACIÓN DE LAVADO
DESCRIPCIÓN SINTÉTICA DE LOS CICLOS DE TRABAJO
Al encender la pantalla se coloca automáticamente en la función CAMBIO AUTOMÁTICO, de la que se deprenden las siguien-
tes fases:
- Introducción disolvente
- Lavado
- Vaciado cárter de aceite
- Sustitución aceite conversor
- Introducción aceite para nivel
Pasando de CAMBIO AUTOMÁTICO con la tecla la estación se coloca en la función CAMBIO DSG, de la que se despren-
den las siguientes fases:
- Introducción disolvente
- Lavado
- Sustitución aceite conversor
- Introducción aceite para nivel
Pasando de nuevo con la tecla de CAMBIO AUTOMÁTICO la estación se coloca en funciones especiales entre otras
CONFIGURACIÓN e INFO.
Cambio automático.
- Fase 1: introducción disolvente en la instalación del cambio automático.
- Fase 2: ciclo de lavado de la instalación con el disolvente y el aceite agotado.
- Fase 3: vaciado del aceite agotado del cárter pera la sustitución además del aceite también del ltro y de la guarnición del
cárter.
- Fase 4: introducción del aceite nuevo en el cárter.
- Fase 5: sustitución del aceite agotado presente en el conversor introduciendo aceite nuevo.
- Fase 6: vericación del nivel de aceite presente en el cárter.
Cambio DSG – AISIN
- Fase 1: introducción disolvente en la instalación del cambio automático.
- Fase 2: ciclo de lavado de la instalación con el disolvente y el aceite agotado.
- Fase 3: sustitución del aceite agotado presente en el conversor introduciendo aceite nuevo.
- Fase 4: vericación del nivel de aceite.
Libretto 1885.indd 54 08/07/19 16:36

55
MANUAL DE USO E INSTRUCCIONES
ES
Selecciones
- Control de la calibración para las balanzas electrónicas.
- Selección idioma.
- Selección fecha y hora.
- Selección LCD- Actualización archivo.
El lavado y la sustitución del aceite agotado han de efectuarse siempre con aceite cambio caliente (más de 40 °C).
Siga las instrucciones del fabricante. Se recomienda utilizar un tester diagnóstico destinado al efecto.
DESCRIPCIÓN ANALÍTICA DE LOS CICLOS
Cambio automático.
Después de conectar la tubería “PRESSURE” y la tubería “RETURN”, como se detalla en el apartado “Utilización –
Preparación al uso”, proceda como sigue.
FASE 1
- Conecte la estación a la red eléctrica y encienda el interruptor lateral. En la pantalla aparecerá CAMBIO AUTOMÁTICO,
pulse la tecla , y en la pantalla aparecerá:
- Presionando la tecla seleccione la cantidad de disolvente deseada. Deje seleccionado “0“ si no quiere introducir
disolvente en el circuito del vehículo. Después de seleccionar la cantidad deseada pulse la tecla .
Compruebe previamente la compatibilidad del disolvente con el cambio.
- El cursor se colocará automáticamente en “lavado min“. Presionando la tecla seleccione la duración del ciclo de lavado
deseado. Deje seleccionado “0” si no desea efectuar el ciclo de lavado. Después de seleccionar la duración del ciclo de
lavado deseado pulse la tecla .
- El cursor se colocará automáticamente en “aceite l.”. Presionando la tecla seleccione la cantidad de aceite total
contenida en la instalación del cambio automático que desea sustituir. Después de seleccionar la cantidad de aceite pulse la
tecla .
- De seleccionar tanto los datos correspondientes al disolvente como al lavado y al aceite, la estación comenzará el ciclo de
trabajo desde la FASE 1 “Introducción disolvente” y en la pantalla aparecerá la cantidad que se va introduciendo en el circuito
del cambio automático.
Libretto 1885.indd 55 08/07/19 16:36

56
MANUAL DE USO E INSTRUCCIONES
ES
FASE 2
- Terminada la FASE 1 la estación comenzará la FASE 2 “Lavado” pidiendo previamente al usuario que arranque el vehículo
dejando el cambio en la posición P (aparcamiento) o N (neutra). En la pantalla aparecerá:
- A continuación arranque el vehículo dejando el cambio en la posición P o N y pulse inmediatamente la tecla . La estación
comenzará efectuar el lavado del circuito ltrando las impurezas e indicará el tiempo que falta hasta el nal de la operación.
Durante la fase de lavado, al colocar el vehículo sobre un puente con las ruedas levantadas, se recomienda efectuar algunos
ciclos de cambio de todas las marchas incluyendo la marcha atrás.
El lavado ha de efectuarse cuando el aceite del cambio está caliente.
- Si en la pantalla inicial la cantidad de disolvente está seleccionada en “0”, la estación saltará automáticamente la FASE 1 y
comenzará inmediatamente desde la FASE 2.
FASE 3
- Cuando habrá transcurrido el tiempo seleccionado, la estación emitirá unos cuantos beeps y comenzará automáticamente
la FASE 3 “Vaciado aceite cárter”. En la pantalla aparecerá:
- A medida que la estación vacía el cárter en la pantalla aparecerá la cantidad descargada en el depósito marcado con la
etiqueta “OLD OIL” y conectado a la estación mediante la tubería de color negro. Tras vaciar el cárter, la estación se parará
automáticamente e indicará mediante unos beeps que ha nalizado la operación y en la pantalla aparecerá:
Se recomienda observar durante esta fase el visor del aceite agotado y apagar el coche de notar la presencia de
burbujas de aire en el mismo.
- Apague INMEDIATAMENTE el coche. Pulse la tecla . La estación almacenará el dato correspondiente a la cantidad de
aceite agotado sacado del cárter. En la pantalla aparecerá:
- A continuación proceda con el desmontaje del cárter prestando atención a posibles residuos de aceite presentes en el
cárter, proceda con la limpieza del mismo y de los imanes presentes en su interior así como con la sustitución del ltro y la
guarnición del cambio. Tras terminar estas operaciones pulse la tecla .
- De estar seleccionada en la pantalla de inicio la cantidad de disolvente en “0” y de estar seleccionada la duración del lavado
en “0”, la estación saltará automáticamente la FASE 1 y la FASE 2 y comenzará inmediatamente desde la FASE 3.
Libretto 1885.indd 56 08/07/19 16:36

57
MANUAL DE USO E INSTRUCCIONES
ES
FASE 4
- A continuación comenzará la FASE 4 “Llenado del cárter”. En la pantalla aparecerá inmediatamente la cantidad de aceite
correspondiente a la descargada en la fase anterior.
Asegúrese de que se está utilizando el aceite indicado por el fabricante.
- Pulsando la tecla aumente, en su caso, la cantidad en relación con los posibles residuos de aceite encontrados en el
cárter en fase de desmontaje. Pulsando la tecla la estación comenzará a llenar el cárter y en la pantalla aparecerá la
cantidad de aceite que se está introduciendo.
- Terminada la introducción del aceite nuevo en el cárter, la estación emitirá unos beeps y en la pantalla aparecerá la cantidad
necesaria para la sustitución del aceite presente en el conversor.
FASE 5
- El dato facilitado por la estación se calcula tomando en cuenta la cantidad de aceite total seleccionada por el usuario en la
pantalla inicial y la introducida en el cárter en la fase 4 (el operador puede, en su caso, aumentarla o disminuirla utilizando
las teclas ). A continuación pulse la tecla . La estación pedirá que arranque el coche dejando el cambio en P
(estacionamiento) o N (neutro) con el mensaje que aparece en la pantalla.
- Tras arrancar el vehículo dejando el cambio en P o N pulse INMEDIATAMENTE la tecla . La estación comenzará
automáticamente a introducir aceite nuevo sacando la misma cantidad de aceite agotado del conversor. En la pantalla
aparecerán las cantidades de aceite nuevo introducido y de aceite agotado sacado.
Cuando el aceite visualizado en el visor de aceite antiguo tendrá un color parecido al visualizado en el sector
del aceite nuevo apague el coche.
- Tras nalizar la sustitución del aceite del conversor, la estación se detendrá colocándose automáticamente en:
Libretto 1885.indd 57 08/07/19 16:36

58
MANUAL DE USO E INSTRUCCIONES
ES
FASE 6
A continuación desconecte las uniones de la estación reponiendo la línea del cambio como en origen y
asegúrese de que no haya habido derrames. Desplace la palanca del cambio en R D N P para purgar la
instalación. Arranque el coche y coloque el cambio en P o N y proceda con el control del nivel de aceite.
- Para que se pueda proceder con una POSIBLE operación de rellenado de aceite mediante la sonda pulse la tecla
y coloque la sonda destinada al efecto en el tubo PRESSURE. En la pantalla aparecerá:
- Pulse las teclas para seleccionar la cantidad de aceite que se quiere rellenar; asegúrese de que la sonda esté
colocada correctamente en el tubo PRESSURE e introduzca la sonda dentro del tapón del nivel presente en el coche y pulse
la tecla .
- Finalizada la fase, la estación se colocará automáticamente en la fase de Impresión de todo el proceso efectuado.
Para lograr la correcta uidez de conducción podría ser necesario efectuar 40-50 km.
CAMBIO DSG-AISIN
Después de conectar la tubería “PRESSURE” y la tubería “RETURN”, como se detalla en el apartado “Utilización –
Preparación al uso”, proceda como sigue:
FASE 1
- Después de conectar la tubería “PRESSURE” y la tubería “RETURN”, como se detalla en el apartado “Descripción analítica
de los ciclos– cambio automático”, pulse la tecla y pulse la tecla y en la pantalla aparecerá:
- Pulse la tecla y en la pantalla aparecerá:
- Pulsando la tecla seleccione la cantidad de disolvente deseada. Deje seleccionado “0“ si no quiere introducir el
disolvente en el circuito del vehículo. Después de seleccionar la cantidad deseada pulse la tecla .
Compruebe previamente las compatibilidades del disolvente con el cambio.
- El cursor se colocará automáticamente en “Lavado min”. Pulsando la tecla seleccione la duración del ciclo de lavado
deseada. Deje seleccionado “0” si no desea efectuar el ciclo de lavado. Tras seleccionar la duración del ciclo de lavado
deseada pulse la tecla .
Libretto 1885.indd 58 08/07/19 16:36

59
MANUAL DE USO E INSTRUCCIONES
ES
- El cursor se colocará automáticamente en “aceite l.”. Pulsando la tecla seleccione la cantidad de aceite total contenida
en la instalación del cambio automático donde se quiere realizar la sustitución. Después de seleccionar la cantidad de aceite
pulse la tecla
- De haber seleccionado tanto los datos relativos al disolvente como al lavado y el aceite, la estación comenzará el ciclo de
trabajo desde la FASE 1 “Introducción disolvente” y en la pantalla aparecerá la cantidad que se está introduciendo en el
circuito del cambio automático.
- De estar seleccionada en la pantalla de inicio la cantidad de disolvente en “0”, la estación saltará automáticamente la FASE 1
y comenzará inmediatamente desde la FASE 2.
FASE 2
- Tras terminar la FASE 1 la estación comenzará la FASE 2 “Lavado” pidiendo previamente al usuario que arranque el coche
dejando el cambio en la posición P (estacionamiento) o N (neutro). En la pantalla aparecerá:
- A continuación arranque el vehículo dejando el cambio en la posición P o N y pulse inmediatamente la tecla . La estación
comenzará a efectuar el lavado del circuito ltrando las impurezas e indicará el tiempo que falta hasta el nal de la operación.
Durante la fase de lavado, después de colocar el vehículo sobre un puente con las ruedas levantadas se recomienda efectuar
unos cuantos ciclos de cambio con todas las marchas incluyendo la marcha atrás.
El lavado ha de efectuarse cuando el aceite del cambio está caliente.
- De estar seleccionada en la pantalla de inicio la cantidad de disolvente en “0” y la duración del lavado en “0” la estación
saltará automáticamente la FASE 1 y la FASE 2 y comenzará inmediatamente desde la FASE 3.
FASE 3
- Cuando habrá transcurrido el tiempo seleccionado la estación emitirá unos cuantos beeps y comenzará automáticamente la
FASE 3 “Sustitución aceite conversor”. En la pantalla aparecerá la cantidad de aceite por sustituir.
- A continuación pulse la tecla . La estación pedirá que arranque el coche dejando el cambio en P (estacionamiento)
o N (neutro) con el mensaje que aparece en la pantalla.
Libretto 1885.indd 59 08/07/19 16:36

60
MANUAL DE USO E INSTRUCCIONES
ES
- Tras arrancar el vehículo dejando el cambio en P o N pulse INMEDIATAMENTE la tecla . La estación comenzará
automáticamente a introducir aceite nuevo sacando la misma cantidad de aceite agotado del conversor. En la pantalla
aparecerán las cantidades de aceite nuevo introducido y de aceite agotado sacado.
Cuando el aceite visualizado en el visor del aceite viejo tendrá un color similar al visualizado en el visor del
aceite nuevo apague el coche.
- Tras nalizar la sustitución del aceite del conversor la estación se detendrá colocándose automáticamente en:
FASE 4
A continuación desconecte las uniones de la estación reponiendo la línea del cambio como en origen y
asegúrese de que no haya derrames. Desplace la palanca del cambio en R D N P para purgar la instalación.
Arranque el vehículo y coloque el cambio en P o N y proceda con el control del nivel de aceite.
- Para que se pueda proceder con una POSIBLE operación de rellenado de aceite mediante la sonda pulse la tecla y
coloque la sonda destinada al efecto en el tubo PRESSURE. En la pantalla aparecerá:
- Pulse las teclas para seleccionar la cantidad de aceite que quiere rellenar, asegúrese de que la sonda esté
colocada correctamente en el tubo PRESSURE e introduzca la sonda dentro del tapón del nivel presente en el coche y pulse
la tecla .
- Tras nalizar la fase, la estación se colocará automáticamente en la fase de Impresión de todo el proceso efectuado.
Para lograr la correcta uidez de conducción podría ser necesario efectuar 40 – 50 km.
INTRODUCCIÓN ACEITE
- Conecte la estación a la red eléctrica y encienda el interruptor lateral. En la pantalla aparecerá CAMBIO AUTOMÁTICO,
pulse la dos veces y pulse la tecla y en la pantalla aparecerá:
- Pulse la tecla y en la pantalla aparecerá:
- Pulse las teclas para seleccionar la cantidad de aceite que quiere rellenar, asegúrese de que la sonda esté
colocada correctamente en el tubo PRESSURE e introduzca la sonda dentro del tapón del nivel presente en el coche
o en el contenedor que quiere rellenar y pulse la tecla . La estación comenzará a rellenar aceite según la cantidad
seleccionada.
Libretto 1885.indd 60 08/07/19 16:36

61
MANUAL DE USO E INSTRUCCIONES
ES
CONFIGURACIÓN
Selección fecha y hora.
- Permite modicar la fecha y la ora para imprimir el ticket.
Control de calibración de la balanza
- Seleccione con la tecla la función - CONFIGURACIÓN- y pulse la tecla .
- Seleccione con la tecla la función - PRUEBA TARA (icono balanza) – y pulse la tecla . La pantalla mostrará en la línea
de arriba la cantidad de aceite presente en el depósito y en la línea de abajo el peso muestra.
- A este punto el operador colocará sobre el depósito de almacenamiento un peso conocido (por ejemplo un peso de 2 AKIg)
y tendrá que leer en la pantalla el peso exacto. Dicha operación le sirve al operador para controlar periódicamente que la
balanza de la estación pese las cantidades correctas.
Idioma
La estación permite visualizar los mensajes en la pantalla en varios idiomas:
• ITALIANO
• INGLÉS
• HOLANDÉS
• etc.
El cambio de idioma se efectúa de la siguiente manera:
- Seleccione con la tecla la función - CONFIGURACIÓN- y pulse la tecla .
- Seleccione con la tecla la función - IDIOMA (icono bandera) – y pulse la tecla .
- Seleccione con la tecla - el idioma deseado y pulse la tecla .
NOTAS
Vaciado y llenado de los depósitos de aceite.
Aceite agotado.
- Vacíe el depósito cuando el nivel está alrededor de 10 litros.
- Utilice los contenedores destinados al aceite agotado.
El aceite agotado es un residuo especial y ha de eliminarse conforme a la normativa vigente.
Aceite nuevo
- Se aconseja utilizar aceites recomendados por el fabricante de la instalación.
MANTENIMIENTO
Sustitución del ltro.
Para sustituirlo proceda como sigue:
- Abra el cárter trasero.
- En el tablero central desenrosque el cuerpo del ltro (gura 3).
- Introduzca un cartucho nuevo.
Sustituya el ltro con un ltro original (cód. BETA 018850510).
gura 3
Libretto 1885.indd 61 08/07/19 16:36

62
MANUAL DE USO E INSTRUCCIONES
ES
BACO DE DATOS
Para acceder al banco de datos online de los cambios automáticos entre en la web BETA en la dirección
www.beta-tools.com y regístrese para acceder al área privada.
MANTENIMIENTO
Las actuaciones de mantenimiento y reparación ha de llevarlas a cabo tan sólo y exclusivamente personal especializado. En
caso de dichas actuaciones puede acudir al centro de reparaciones de Beta Utensili S.P.A. a través de su revendedor Beta de
conanza.
ELIMINACIÓN
La estación de lavado del cambio automático, los accesorios y los embalajes han de enviarse a un centro de recogida y eliminación
de residuos, según la normativa vigente en el país en el que se encuentra.
GARANTÍA
Esta herramienta se ha fabricado y ensayado conforme a la normativa actualmente vigente en la Unión Europea y
tiene una garantía por un periodo de 12 meses para uso profesional o 24 meses para uso no profesional.
Se repararán averías debidas a defectos de material o producción mediante reposición o sustitución de piezas
defectuosas a nuestra discreción.
La efectuación de una o más actuaciones durante el período de garantía no modica la fecha de caducidad de la
misma.
No están sujetos a garantía defectos debidos al desgaste, al uso incorrecto o impropio y las rupturas ocasionadas
por golpes y/o caídas.
La garantía cesa cuando se aportan modicaciones, cando la estación de lavado del cambio automático se altera
o se envía para reparación desmontada.
Quedan expresamente excluidos daños ocasionados a personas y/o objetos de cualquier tipo y/o naturaleza,
directos y/o indirectos.
DECLARACIÓN DE CONFORMIDAD
Declaramos bajo nuestra responsabilidad que el producto descrito cumple con todas las disposiciones relativas a
las siguientes Directivas:
• Directiva Máquinas 2006/42/CE;
• Direttiva Bassa Tensione (L.V.D.) 2014/35/UE;
El Informe Técnico está disponible en:
BETA UTENSILI S.P.A.
Via A. Volta 18,
20845 Sovico (MB)
ITALIA
Libretto 1885.indd 62 08/07/19 16:36

63
GEBRUIKSHANDLEIDING
NL
GEBRUIKSHANDLEIDING VOOR SPOELSTATIONS VOOR AUTOMATISCHE VERSNELLINGSBAKKEN
GEPRODUCEERD DOOR:
BETA UTENSILI S.P.A.
Via A. Volta 18,
20845 Sovico (MB)
ITALIË
Oorspronkelijk in de ITALIAANSE taal geschreven documentatie.
Bewaar de veiligheidsinstructies zorgvuldig en geef ze aan het personeel dat het product gebruikt.
GEBRUIKSDOEL
- Het spoelstation voor automatische versnellingsbakken is bedoeld voor het volgende gebruik:
• Alleen te gebruiken bij voertuigen met automatische versnellingsbak.
- De volgende handelingen zijn niet toegestaan:
• het is verboden het apparaat in een vochtige, natte omgeving te gebruiken. Stel het apparaat niet bloot aan regen of sneeuw.
• het is verboden het apparaat te gebruiken voor toepassingen die niet binnen de technische specicaties vallen die in de
tabel TECHNISCHE GEGEVENS staan
• het is verboden het apparaat voor iets anders te gebruiken dan voor de toepassingen die hier worden beschreven
VEILIGHEID VAN DE WERKPLEK
Gebruik het spoelstation voor automatische versnellingsbakken niet in omgevingen met mogelijk explosieve atmosferen of
brandbare materialen, omdat er vonken kunnen ontstaan, waardoor stof of damp in brand kunnen vliegen.
Voorkom dat kinderen of bezoekers in de buurt van de werkplek kunnen komen terwijl met het spoelstation voor
automatische versnellingsbakken wordt gewerkt. De aanwezigheid van andere personen leidt af, waardoor men tijdens
het gebruik van het apparaat de controle erover kan verliezen.
Inhaleer de schadelijke gassen niet, die het spoelstation voor automatische versnellingsbakken afgeeft terwijl aan de
motor wordt gewerkt.
Gebruik het spoelstation voor automatische versnellingsbakken op een droge plek en voorkom vocht.
VEILIGHEIDSINSTRUCTIES VOOR HET SPOELSTATION VOOR AUTOMATISCHE VERSNELLINGSBAKKEN
- Controleer voor het gebruik of het spoelstation voor automatische versnellingsbakken niet beschadigd is en er geen versleten
delen zijn.
- Gebruik het spoelstation voor automatische versnellingsbakken niet als het beschadigd is. Probeer niet om het te openen of er
wijzigingen aan aan te brengen.
- Sluit alle kranen voordat u hem op het systeem aansluit.
- Vul de opslagtank voor niet meer dan 80%.
- Controleer regelmatig of het spoelstation voor automatische versnellingsbakken en de bijbehorende accessoires intact zijn.
- Dek het spoelstation voor automatische versnellingsbakken tijdens het gebruik op geen enkele wijze af. Garandeer een
geschikte ruimte voor de ventilatie.
- Het is verboden het spoelstation voor automatische versnellingsbakken in een vochtige, natte omgeving te gebruiken. Stel het
niet bloot aan regen of sneeuw.
AANWIJZINGEN VOOR DE VEILIGHEID VAN HET PERSONEEL
- We raden u aan uiterst voorzichtig te zijn en u altijd te concentreren op uw handelingen. Gebruik het spoelstation voor
automatische versnellingsbakken niet als u moe bent of onder invloed van drugs, alcohol of medicijnen.
Gebruik altijd de volgende persoonlijke beschermingsmiddelen:
• veiligheidsschoenen
• een beschermende bril
• een beschermingsmasker
• beschermende handschoenen voor fysische agentia en chemische stoffen
• beschermende kleding tegen chemische stoffen.
BELANGRIJK: LEES DEZE HANDLEIDING HELEMAAL DOOR ALVORENS
HET SPOELSTATION VOOR AUTOMATISCHE VERSNELLINGSBAKKEN
TE GEBRUIKEN. INDIEN DE VEILIGHEIDSVOORSCHRIFTEN EN DE
AANWIJZINGEN NIET IN ACHT WORDEN GENOMEN, KUNNEN ZICH
ERNSTIGE ONGEVALLEN VOORDOEN
LET OP
Libretto 1885.indd 63 08/07/19 16:36

64
GEBRUIKSHANDLEIDING
NL
- Verricht alle voorgeschreven werkzaamheden in goed geventileerde en droge ruimtes.
- Controleer of de kabels van de signaaldetector zich uit de buurt van ventilatoren, bewegende delen en de brandstoeiding
bevinden.
- Draag geen wijde kleding, armbanden, kettingen of metalen voorwerpen wanneer u aan het voertuig werkt.
- Schakel de stroomtoevoer altijd uit voordat u storingen controleert of reinigingswerkzaamheden uitvoert: deze preventieve
maatregel voorkomt dat het station per ongeluk wordt opgestart, zodat u veilig kunt werken.
VOOR EEN ZORGVULDIG GEBRUIK VAN HET SPOELSTATION VOOR AUTOMATISCHE VERSNELLINGSBAKKEN
- Gebruik het spoelstation voor automatische versnellingsbakken niet als het beschadigd is.
- Er mogen geen wijzigingen aan het spoelstation voor automatische versnellingsbakken worden aangebracht. Wijzigingen
kunnen de efciëntie van de veiligheidsmaatregelen verminderen en meer gevaren voor de gebruiker inhouden.
- Laat het spoelstation voor automatische versnellingsbakken enkel en alleen door vakmensen met gebruik van originele
reserveonderdelen repareren.
- Gebruik het spoelstation voor automatische versnellingsbakken niet met andere spanningen dan die in de tabel met
TECHNISCHE GEGEVENS staan.
- Gebruik een droge doek om het spoelstation voor automatische versnellingsbakken schoon te maken en ontkoppel hem hiervoor
altijd. Gebruik nooit vochtige of natte doeken.
- Plaats het laadstation nooit horizontaal omdat het dan olie kan lekken.
NOMINALE WERKSPANNING
ELEKTRISCHE POMP MAX. DRUK
ELEKTRISCHE POMP MAX. VERMOGEN
FILTEREFFICIËNTIE
2 OLIETANKS
GEBRUIKSTEMPERATUUR
AFMETINGEN
GEWICHT
230V – 50Hz
16 bar
14 l/min
10 micron
20 l elk
-20 °C ÷ +60°C
520x650x1000 mm
78 kg
TECHNISCHE GEGEVENS
INDIVIDUELE BESCHERMINGSMIDDELEN DIE NODIG ZIJN TIJDENS HET GEBRUIK VAN HET
SPOELSTATION VOOR AUTOMATISCHE VERSNELLINGSBAKKEN
Niet inachtneming van de volgende waarschuwingen kan lichamelijk letsel en/of ziektes veroorzaken.
GEBRUIK ALTIJD BESCHERMENDE HANDSCHOENEN VOOR FYSISCHE AGENTIA
EN CHEMISCHE STOFFEN TIJDENS HET GEBRUIK VAN HET SPOELSTATION
VOOR AUTOMATISCHE VERSNELLINGSBAKKEN
GEBRUIK ALTIJD VEILIGHEIDSSCHOENEN
GEBRUIK ALTIJD EEN BESCHERMENDE BRIL
GEBRUIK EEN BESCHERMEND MASKER TEGEN FYSISCHE AGENTIA
Het kan nodig zijn verdere persoonlijke beschermingsmiddelen te gebruiken afhankelijk van de waarden die
zijn gevonden bij het onderzoek van de milieuhygiëne /risicoanalyse indien de waarden de maximumwaarden
STANDAARDUITRUSTING
De standaarduitrusting is altijd compleet en van topkwaliteit:
- 1 toevoerleiding (afbeelding 1)
- 1 retourleiding (afbeelding 1)
- 1 set koppelingen (afbeelding 2)
OPTIONELE KOPPELINGEN (www.beta-tools.com)
Libretto 1885.indd 64 08/07/19 16:36

65
GEBRUIKSHANDLEIDING
NL
GEBRUIK
Voorbereiding op het gebruik.
Sluit de stroomkabel op het elektriciteitsnet (220V AC enkelfasig) aan en schakel het station met behulp van de hoofdschakelaar
in:
- Controleer of de kranen DICHT zijn.
- Controleer de oliepeilen.
- Maak de eventuele jerrycan met afgewerkte olie leeg.
- Controleer het oliepeil in de automatische versnellingsbak.
- Nadat u de auto in zijn vrij op een hefbrug heeft gezet zoekt u de in- en uitlaatslangen op de koelleiding van de versnellingsbakolie.
- Open de leiding in de versnellingsbak op het meest toegankelijke punt en zorg er om breuken te voorkomen voor dat deze niet
wordt aangesloten op kunststof koppelingen of op de radiatorkoppeling.
- Zet een opvangbak voor de olie direct onder het punt dat is gekozen om de leiding van de versnellingsbak te openen en laat de
olie die uit de leiding komt erin lopen.
- Start de auto om te controleren uit welke leiding de olie komt om te controleren of hij uit de versnellingsbak komt.
- Sluit vervolgens de retourleiding van het station 1885 op de uitlaat van de versnellingsbak aan, die in het vorige punt is
waargenomen, en de toevoerleiding op de retourleiding.
- Start de motor van de auto en controleer of de gemaakte verbindingen niet lekken, en de drukmeter die de werkdruk aangeeft
en die moet stijgen van 1 tot 4 bar
6
5
1
8
9
2
4
3
7
Libretto 1885.indd 65 08/07/19 16:36

66
GEBRUIKSHANDLEIDING
NL
Het instrumentenpaneel is zodanig gemaakt dat de functies eenvoudig in één oogopslag te raden zijn. Alle drukmeters en de
toetsen zijn voorzien van symbolen:
1 - Pressure drukmeter wordt gebruikt om de druk in het systeem van de auto te controleren.
2 - Toets : wordt gebruikt om door de functies van het station te scrollen om de tijd in te stellen en de kwaliteit van de olie
3 - Toets : wordt gebruikt om door de functies van het station te scrollen om de tijd in te stellen en de kwaliteit van de olie
4 - Toets : wordt gebruikt om de ingestelde functies te bevestigen.
5 - Toets : wordt gebruikt om elke handeling te onderbreken.
6 - Grasch display met achtergrondverlichting: geeft de functies van het station weer.
7 - Fles voor het oplosmiddel: wordt gebruikt om het oplosmiddel in te doen om het systeem mee te spoelen.
8 - Peilglas nieuwe olie: wordt gebruikt om de kleur van de nieuwe olie te zien.
9 - Peilglas afgewerkte olie: wordt gebruikt om de kleur van de opgevangen afgewerkte olie te zien.
ALGEMENE FUNCTIES VAN HET SPOELSTATION
BEKNOPTE BESCHRIJVING VAN DE WERKCYCLI
Wanneer het display wordt ingeschakeld, gaat het display automatisch naar de functie AUTOMATISCHE VERSNELLINGSBAK,
waar de volgende fasen uit voortkomen:
- Oplosmiddel invoeren
- Spoelen
- Oliecarter legen
- De olie van de omvormer verversen
- Olie voor het oliepeil invoeren
Door vanuit AUTOMATISCHE VERSNELLINGSBAK met de toets te scrollen, gaat het station naar de functie DSG-
VERSNELLINGSBAK, waar de volgende fasen uit voortkomen:
- Oplosmiddel invoeren
- Spoelen
- De olie van de omvormer verversen
- Olie voor het oliepeil invoeren
Door met de knop van AUTOMATISCHE VERSNELLINGSBAK verder te scrollen, gaat het station naar de speciale
functies zoals SET-UP en INFO.
Automatische versnellingsbak.
- Fase 1: oplosmiddel in het systeem van de automatische versnelling doen.
- Fase 2: spoelcyclus van het systeem met het oplosmiddel en de afgewerkte olie.
- Fase 3: de afgewerkte olie uit het oliecarter halen om niet alleen de olie, maar ook het lter en de pakking van het carter
zelf te vervangen.
- Fase 4: Nieuwe olie in het carter doen.
- Fase 5: De afgewerkte olie die zich in de omvormer bevindt verversen met nieuwe olie.
- Fase 6: het oliepeil in het carter controleren
DSG - AISIN versnellingsbak
- Fase 1: oplosmiddel in het systeem van de automatische versnelling doen.
- Fase 2: spoelcyclus van het systeem met het oplosmiddel en de afgewerkte olie.
- Fase 3: De afgewerkte olie die zich in de omvormer bevindt verversen met nieuwe olie.
- Fase 4: het oliepeil controleren.
Libretto 1885.indd 66 08/07/19 16:36

67
GEBRUIKSHANDLEIDING
NL
Instellingen
- De controle van de ijking van de elektronische weegschalen.
- Taalinstelling.
- Datum- en tijdinstelling.
- LCD-set-up - update van de bestanden.
Het spoelen en verversen van de afgewerkte olie moet altijd worden gedaan als de olie in de versnellingsbak
warm is (warmer dan 40 °C). Volg de specicaties van de fabrikant. Het wordt aanbevolen een speciaal hiervoor
bestemde diagnostische tester te gebruiken.
ANALYTISCHE BESCHRIJVING VAN DE CYCLI
Automatische versnellingsbak.
Nadat de "PRESSURE" -(druk)leiding en de "RETURN"-(terug)leiding, zoals beschreven in de paragraaf “gebruik -
voorbereiding op het gebruik”, zijn aangesloten, handelt u als volgt:
FASE 1
- Sluit het station op het elektriciteitsnet aan en schakel de schakelaar aan de zijkant in. Op het display verschijnt
AUTOMATISCHE VERSNELLINGSBAK, druk op de toets en op het display verschijnt:
- Druk op de knop om de gewenste hoeveelheid oplosmiddel in te stellen. Laat "0" ingesteld als u geen oplosmiddel in het
systeem van de auto wilt invoeren. Als de gewenste hoeveelheid eenmaal is ingesteld, drukt u op .
Controleer vooraf of het oplosmiddel compatibel is met de versnellingsbak.
- De cursor gaat automatisch naar "min. spoelen". Druk op de knop om de duur van de gewenste spoelcyclus in te stellen.
Laat "0" ingesteld als u geen spoelcyclus wilt verrichten. Als de gewenste duur van de spoelcyclus eenmaal is ingesteld, drukt
u op .
- De cursor gaat automatisch naar "l. olie". Door op de knop te drukken, stelt u de totale hoeveelheid olie in het systeem
van de automatische versnellingsbak in die u wilt verversen. Als de gewenste hoeveelheid olie eenmaal is ingesteld, drukt u
op .
- Als zowel de gegevens van het oplosmiddel, als het spoelen en de olie zijn ingesteld, start het station de werkcyclus
vanaf FASE 1 "Oplosmiddel invoeren" en verschijnt de hoeveelheid die geleidelijk in het systeem van de automatische
versnellingsbak wordt ingevoerd op het display.
Libretto 1885.indd 67 08/07/19 16:36

68
GEBRUIKSHANDLEIDING
NL
FASE 2
- Zodra FASE 1 is voltooid, start het station FASE 2 "Spoelen", waarbij de gebruiker vooraf wordt gevraagd de auto te starten
en de versnellingsbak in de stand P (parkeren) of N (neutraal) te laten staan. Op het display verschijnt:
- Start vervolgens de auto en laat de versnellingsbak in de stand P of N staan en druk snel op toets . Het station
zal beginnen het circuit te spoelen door de onzuiverheden te lteren en zal dan de resterende tijd tot het einde van de
werkzaamheden aangeven. Tijdens de spoelfase, nadat de auto op een hefbrug is gezet, wordt aangeraden om een aantal
schakelcycli van alle versnellingen te verrichten, inclusief de achteruit.
Er moet worden gespoeld wanneer de olie in de versnellingsbak heet is.
- Als de hoeveelheid oplosmiddel op het startscherm is ingesteld op "0" slaat het station FASE 1 automatisch over en start
onmiddellijk vanaf FASE 2.
FASE 3
- Na aoop van de ingestelde tijd geeft het station enkele PIEPTONEN af en begint automatisch FASE 3 "Het oliecarter legen".
Op het display verschijnt:
- Terwijl het station het carter leegmaakt, verschijnt de verwijderde hoeveelheid, die in de jerrycan met het opschrift “OLD OIL”
loopt, die door middel van een zwarte slang op het station is aangesloten, op het display. Zodra het carter is geleegd, stopt
het station automatisch en geeft met een aantal PIEPTONEN het einde van de werkzaamheden aan. Op het display wordt nu
weergegeven.
Het is tijdens deze fase raadzaam om het peilglas van de afgewerkte olie in de gaten te houden en de auto uit te
zetten als u de aanwezigheid van luchtbellen erin opmerkt.
- Schakel de auto dus SNEL uit. Druk op de toets . Het station zal het gegeven met betrekking tot de hoeveelheid
afgewerkte olie die uit het carter is verwijderd opslaan. Op het display verschijnt vervolgens:
- Demonteer vervolgens het carter en kijk uit voor eventuele resten olie in het carter. Maak het carter en de magneten erin
schoon en vervang het lter en de pakking van de versnellingsbak. Zodra deze werkzaamheden zijn voltooid, drukt u op .
- Als de hoeveelheid oplosmiddel op het startscherm is ingesteld op "0" en de spoeltijd is ingesteld op "0", slaat het station
FASE 1 en FASE 2 automatisch over en start onmiddellijk vanaf FASE 3.
Libretto 1885.indd 68 08/07/19 16:36

69
GEBRUIKSHANDLEIDING
NL
FASE 4
- Vervolgens begint FASE 4 "Het oliecarter vullen". Op het display wordt onmiddellijk de hoeveelheid olie weergegeven die
overeenkomt met de hoeveelheid olie die in de vorige fase is verwijderd.
Zorg ervoor dat u olie gebruikt volgens de specicaties van de fabrikant.
- Door op de knop te drukken verhoogt u, indien nodig de hoeveelheid in verhouding tot eventuele resten olie die tijdens
de demontage in het carter zijn aangetroffen. Door op te drukken, begint het station het carter te vullen en verschijnt op
het display de hoeveelheid olie terwijl die wordt ingevoerd.
- Nadat de nieuwe olie in het carter is gedaan, geeft het station een aantal PIEPTONEN af en verschijnt de hoeveelheid olie die
nodig is om de olie in de omvormer te verversen op het display.
FASE 5
- Het door het station geleverde gegeven is berekend door rekening te houden met de totale hoeveelheid olie die door de
gebruiker op het beginscherm is ingesteld en de hoeveelheid olie die in de voorgaande fase 4 in het carter is ingevoerd (deze
kan door de gebruiker met de toetsen worden verhoogd of verlaagd). Druk vervolgens op . Het station zal u met
de melding die op het display verschijnt vragen om de auto te starten en de versnellingsbak in P (parkeren) of N (neutraal) te
zetten.
- Als de auto eenmaal is gestart en de versnellingsbak in de stand P of N staat, drukt u SNEL op de toets . Het station
zal automatisch nieuwe olie invoeren en dezelfde hoeveelheid afgewerkte olie uit de omvormer verwijderen. Op het display
verschijnen de hoeveelheden nieuwe olie die ingevoerd en de hoeveelheden afgewerkte olie die verwijderd zijn.
Wanneer de olie die in het peilglas van de afgewerkte olie te zien is een kleur heeft die vergelijkbaar is met die in
het gedeelte van de nieuwe olie, zet u de auto uit.
- Nadat de olie van de omvormer is ververst, stopt het station en positioneert zich automatisch op.
Libretto 1885.indd 69 08/07/19 16:36

70
GEBRUIKSHANDLEIDING
NL
FASE 6
Ontkoppel de koppelingen vervolgens van het station en herstel de leiding van de versnellingsbak zoals deze
voorheen was en controleer of er geen lekken zijn. Verplaats de versnellingspook naar R D N P om het systeem
te ontluchten. Start de auto aan en zet de versnellingsbak op P of N en controleer het oliepeil.
- Om EVENTUEEL olie via de sensor bij te kunnen vullen, drukt u op en plaatst u de betreffende sensor op de
PRESSURE-(druk)leiding. Nu verschijnt het display.
- Druk op de toetsen om de hoeveelheid olie in te stellen die u bij wilt vullen. Controleer of de sensor correct op de
PRESSURE-(druk)leiding is geplaatst, steek de sensor zelf in de olievuldop van de auto en druk op de toets .
- Na aoop van de fase positioneert het station zich automatisch op de fase die het gehele verrichte proces afdrukt.
Het duurt mogelijk zo’n 40 tot 50 km voordat de auto weer helemaal vloeiend rijdt.
DSG-AISIN VERSNELLINGSBAK
Nadat de "PRESSURE" -(druk)leiding en de "RETURN"-(terug)leiding, zoals beschreven in de paragraaf “gebruik -
voorbereiding op het gebruik”, zijn aangesloten, handelt u als volgt:
FASE 1
- Nadat de "PRESSURE" -(druk)leiding en de "RETURN"-(terug)leiding, zoals beschreven in de paragraaf Analytische
beschrijving van de cycli - automatische versnellingsbak zijn aangesloten, drukt u op de knop en op , en op het
display verschijnt nu:
- Druk op de toets en op het display verschijnt nu:
- Druk op de knop om de gewenste hoeveelheid oplosmiddel in te stellen. Laat "0" ingesteld als u geen oplosmiddel in het
systeem van de auto wilt invoeren. Als de gewenste hoeveelheid eenmaal is ingesteld, drukt u op .
Controleer vooraf of het oplosmiddel compatibel is met de versnellingsbak.
- De cursor gaat automatisch naar "Min. spoelen". Druk op de knop om de duur van de gewenste spoelcyclus in te stellen.
Laat "0" ingesteld als u geen spoelcyclus wilt verrichten. Als de gewenste duur van de spoelcyclus eenmaal is ingesteld, drukt
u op .
Libretto 1885.indd 70 08/07/19 16:36

71
GEBRUIKSHANDLEIDING
NL
- De cursor gaat automatisch naar "l. olie". Door op de knop te drukken, stelt u de totale hoeveelheid olie in het systeem
van de automatische versnellingsbak in die u wilt verversen. Als de gewenste hoeveelheid olie eenmaal is ingesteld, drukt u
op .
- Als zowel de gegevens van het oplosmiddel, als het spoelen en de olie zijn ingesteld, start het station de werkcyclus
vanaf FASE 1 "Oplosmiddel invoeren" en verschijnt de hoeveelheid die geleidelijk in het systeem van de automatische
versnellingsbak wordt ingevoerd op het display.
- Als de hoeveelheid oplosmiddel op het startscherm is ingesteld op "0" slaat het station FASE 1 automatisch over en start
onmiddellijk vanaf FASE 2.
FASE 2
- Zodra FASE 1 is voltooid, start het station FASE 2 "Spoelen", waarbij de gebruiker vooraf wordt gevraagd de auto te starten
en de versnellingsbak in de stand P (parkeren) of N (neutraal) te laten staan. Op het display verschijnt.
- Start vervolgens de auto en laat de versnellingsbak in de stand P of N staan en druk snel op toets . Het station
zal beginnen het circuit te spoelen door de onzuiverheden te lteren en zal dan de resterende tijd tot het einde van de
werkzaamheden aangeven. Tijdens de spoelfase, nadat de auto op een hefbrug is gezet, wordt aangeraden om een aantal
schakelcycli van alle versnellingen te verrichten, inclusief de achteruit.
Er moet worden gespoeld wanneer de olie in de versnellingsbak heet is.
- Als de hoeveelheid oplosmiddel op het startscherm is ingesteld op "0" en de spoeltijd is ingesteld op "0", slaat het station
FASE 1 en FASE 2 automatisch over en start onmiddellijk vanaf FASE 3.
FASE 3
- Na aoop van de ingestelde tijd geeft het station enkele PIEPTONEN af en begint automatisch FASE 3 "De olie van de
omvormer verversen". De hoeveelheid olie die moet worden ververst, verschijnt op het display.
- Druk vervolgens op . Het station zal u met de melding die op het display verschijnt vragen om de auto te starten en de
versnellingsbak in P (parkeren) of N (neutraal) te zetten.
Libretto 1885.indd 71 08/07/19 16:36

72
GEBRUIKSHANDLEIDING
NL
- Als de auto eenmaal is gestart en de versnellingsbak in de stand P of N staat, drukt u SNEL op de toets . Het station
zal automatisch nieuwe olie invoeren en dezelfde hoeveelheid afgewerkte olie uit de omvormer verwijderen. Op het display
verschijnen de hoeveelheden nieuwe olie die ingevoerd en de hoeveelheden afgewerkte olie die verwijderd zijn.
Wanneer de olie die in het peilglas van de afgewerkte olie te zien is een kleur heeft die vergelijkbaar is met die in
het peilglas van de nieuwe olie, zet u de auto uit.
- Nadat de olie van de omvormer is ververst, stopt het station en positioneert zich automatisch op.
FASE 4
Ontkoppel de koppelingen vervolgens van het station en herstel de leiding van de versnellingsbak zoals deze
voorheen was en controleer of er geen lekken zijn. Verplaats de versnellingspook naar R D N P om het systeem
te ontluchten. Start de auto en zet de versnellingsbak op P of N en controleer het oliepeil.
- Om EVENTUEEL olie via de sensor bij te kunnen vullen, drukt u op en plaatst u de betreffende sensor op de
PRESSURE-(druk)leiding. Nu verschijnt het display.
- Druk op de toetsen om de hoeveelheid olie in te stellen die u bij wilt vullen. Controleer of de sensor correct op de
PRESSURE-(druk)leiding is geplaatst, steek de sensor zelf in de olievuldop van de auto en druk op de toets .
- Na aoop van de fase positioneert het station zich automatisch op de fase om het gehele verrichte proces af te drukken
Het duurt mogelijk zo’n 40 tot 50 km voordat de auto weer helemaal vloeiend rijdt.
OLIE INVOEREN
- Sluit het station op het elektriciteitsnet aan en schakel de schakelaar aan de zijkant in. Op het display verschijnt
AUTOMATISCHE VERSNELLINGSBAK. Druk twee keer op de knop en druk op de toets , en op het display
verschijnt.
- Druk op de toets en op het display verschijnt nu.
- Druk op de toetsen om de hoeveelheid olie in te stellen die u bij wilt vullen. Controleer of de sensor correct op de
PRESSURE-(druk)leiding is geplaatst, steek de sensor zelf in de olievuldop van de auto of in de houder die u wilt vullen en
druk op de toets . Het station zal beginnen de olie met de ingestelde hoeveelheid bij te vullen.
Libretto 1885.indd 72 08/07/19 16:36

73
GEBRUIKSHANDLEIDING
NL
SET-UP
Datum- en tijdinstelling.
- Hiermee kunt u de datum en tijd voor het afdrukken van de bon wijzigen.
Controle van de ijking van de weegschaal.
- Gebruik de toets om de functie SET-UP te selecteren en druk op de toets .
- Gebruik de toets om de functie TARRA-TEST (weegschaal-icoon) te selecteren en druk op de toets . Op de bovenste
regel geeft het display de hoeveelheid olie in de tank weer en op de onderste het gewicht van het monster.
- Nu zal de bediener een bekend gewicht op de opslagtank zetten (bijvoorbeeld een gewicht van 2 kg) en moet hij het exacte
gewicht op het display aezen. Deze handeling heeft de bediener nodig om periodiek te controleren of de weegschaal van zijn
station nog correct weegt.
Taal
Het station biedt de mogelijkheid om de meldingen in verschillende talen op het display weer te geven:
• ITALIAANS
• ENGELS
• NEDERLANDS
• enz.
Handel als volgt om van taal te veranderen:
- Gebruik de toets om de functie SET-UP te selecteren en druk op de toets .
- Gebruik de toets om de functie TAAL (vlag-icoon) te selecteren en druk op de toets .
- Gebruik de toets om de gewenste taal te selecteren en druk op de toets .
OPMERKINGEN
De olietanks legen en vullen.
Afgewerkte olie.
- Leeg de tank wanneer de inhoud rond de 10 l ligt.
- Gebruik de speciaal voor afgewerkte olie bestemde houders
De afgewerkte olie is bijzonder afval en moet als zodanig volgens de geldende voorschriften worden afgevoerd.
Nieuwe olie
- Het wordt aangeraden om oliën te gebruiken die door de fabrikant van het systeem worden aanbevolen.
ONDERHOUD
Het lter vervangen.
Om het te vervangen, moet u de volgende handelingen verrichten:
- Open de kap de achterkant.
- Schroef het lterhuis op het vlak in het midden los (afbeelding 3).
- Breng een nieuw lterpatroon aan.
Vervang het lter door een originele lter (code BETA 018850510).
Afbeelding 3
Libretto 1885.indd 73 08/07/19 16:36

74
GEBRUIKSHANDLEIDING
NL
DATABASE
Om toegang te krijgen tot de online database van de automatische versnellingsbakken, gaat u naar de BETA-website op
het volgende adres www.beta-tools.com en schrijft u zich in om toegang te krijgen tot de gereserveerde zone.
ONDERHOUD
Onderhoudswerkzaamheden en reparaties mogen enkel en alleen door vakmensen worden verricht. Wend u voor deze
werkzaamheden via uw vertrouwde Beta dealer tot het reparatiecentrum van Beta Utensili S.P.A.
AFDANKEN
Het spoelstation voor automatische versnellingsbakken, de accessoires en verpakkingen moeten volgens de wetten van het land
waarin u zich bevindt naar een centrum voor afvalverwerking worden gestuurd.
GARANTIE
Deze apparatuur is vervaardigd en getest in overeenstemming met de voorschriften die momenteel van kracht zijn
in de Europese Gemeenschap. De apparatuur heeft 12 maanden garantie bij professioneel gebruik en 24 maanden
bij niet-professioneel gebruik.
Storingen veroorzaakt door materiaal- of fabrieksfouten worden naar ons goeddunken ofwel gerepareerd of de
defecte onderdelen worden vervangen.
Eén of meerdere reparaties tijdens de garantieperiode wijzigt de verloopdatum ervan niet.
Defecten veroorzaakt door slijtage, een verkeerd of oneigenlijk gebruik, of door vallen en/of stoten worden niet door
de garantie gedekt.
De garantie vervalt wanneer er wijzigingen worden aangebracht, wanneer er met het spoelstation voor automatische
versnellingsbakken wordt geknoeid en wanneer het gedemonteerd naar de servicedienst wordt gestuurd.
Schade toegebracht aan personen en / of voorwerpen van welke aard en / of natuur, direct en / of indirect is
uitdrukkelijk uitgesloten.
VERKLARING VAN OVEREENSTEMMING
We verklaren onder eigen verantwoordelijkheid dat het beschreven product voldoet aan alle relevante bepalingen
van de volgende richtlijnen:
• Machinerichtlijn 2006/42/EG;
• Laagspanningsrichtlijn (L.V.D.) 2014/35/EU.
Het technische dossier is verkrijgbaar bij:
BETA UTENSILI S.P.A.
Via A. Volta 18,
20845 Sovico (MB)
ITALIË
Libretto 1885.indd 74 08/07/19 16:36

75
INSTRUKCJA OBSŁUGI I ZALECENIA
PL
INSTRUKCJA OBSŁUGI I ZALECENIA DO STACJI MYCIA AUTOMATYCZNEJ SKRZYNI BIEGÓW PRODUKOWANEJ
PRZEZ:
BETA UTENSILI S.P.A.
Via A. Volta 18,
20845 Sovico (MB)
WŁOCHY
Dokumentacja oryginalna sporządzona jest w języku WŁOSKIM.
Starannie przechowywać instrukcje dotyczące bezpieczeństwa i przekazać je personelowi korzystającemu z urządzenia.
PRZEZNACZENIE UŻYTKOWE
- Stacja do mycia automatycznej skrzyni biegów przeznaczona jest do następującego użytku:
• Do stosowania wyłącznie w pojazdach z automatyczną skrzynią biegów.
- Nie są dozwolone następujące operacje:
• zabrania się używania w środowisku wilgotnym, mokrym i nie wystawiać na działanie deszczu czy śniegu
• zabrania się używania poza specykacjami technicznymi zawartymi w tabeli DANE TECHNICZNE
• zabrania się stosowania do wszelkich innych celów niż te określone
BEZPIECZEŃSTWO NA STANOWISKU PRACY
Nie używać stacji mycia automatycznej skrzyni biegów w pomieszczeniach zawierających atmosferę potencjalnie
wybuchową lub materiały łatwopalne, ponieważ mogą powstać iskry i spowodować zapalenie się pyłów lub oparów.
Nie pozwalać dzieciom lub osobom postronnym zbliżać się do stanowiska pracy podczas używania stacji mycia
automatycznej skrzyni biegów. Obecność innych osób powoduje rozproszenie uwagi i może spowodować utratę kontroli
podczas użytkowania.
Nie wdychać ewentualnych szkodliwych gazów emitowanych przez stację mycia automatycznej skrzyni biegow, podczas
pracy przy silniku.
Stosować stację mycia automatycznej skrzyni biegów w miejscu suchym, unikając wilgoci.
ZALECENIA BEZPIECZEŃSTWA ODNOŚNIE STACJI MYCIA AUTOMATYCZNEJ SKRZYNI BIEGÓW
- Przed użyciem sprawdzić, czy stacja mycia automatycznej skrzyni biegów nie została uszkodzona i czy nie ma zużytych części.
- Nie używać stacji mycia automatycznej skrzyni biegów, jeśli jest uszkodzona i nie próbować jej otwierać lub modykować.
- Przed podłączeniem do instalacji, zamknąć wszystkie zawory.
- Nie napełniać zbiornika o ponad 80%.
- Okresowo sprawdzać integralność stacji mycia automatycznej skrzyni biegów i odnośnych akcesoriów.
- W żaden sposób nie należy przykrywać stacji mycia automatycznej skrzyni biegów podczas używania. Należy zapewnić
odpowiednią przestrzeń do wentylacji.
- Nie używać stacji mycia automatycznej skrzyni biegów w środowisku wilgotnym, mokrym i nie wystawiać jej na deszcz.
ZALECENIA ODNOŚNIE BEZPIECZEŃSTWA PERSONELU
- Zaleca się maksymalną uwagę, starając się zawsze skupić na czynnościach, które się wykonuje. Nie używać stacji mycia
automatycznej skrzyni biegów, gdy jest się zmęczonym lub pod wpływem narkotyków, alkoholu lub leków.
Należy zawsze stosować następujące środki ochrony indywidualnej:
• obuwie ochronne
• okulary ochronne
• maskę ochronną
• rękawice chroniące przed czynnikami zycznymi i chemicznymi
• odzież chroniącą przed czynnikami chemicznymi
- Wszystkie przewidziane prace wykonywać w pomieszczeniach suchych i dobrze wentylowanych.
- Upewnić się, że kable detektora sygnału są oddalone od wirników, ruchomych części i przewodu paliwowego.
BARDZO WAŻNE, ABY PRZED UŻYCIEM STACJI MYCIA
AUTOMATYCZNEJ SKRZYNI BIEGÓW PRZECZYTAĆ CAŁĄ
NINIEJSZĄ INSTRUKCJĘ OBSŁUGI. NIEPRZESTRZEGANIE ZASAD
BEZPIECZEŃSTWA I INSTRUKCJI OBSŁUGI MOŻE BYĆ PRZYCZYNĄ
POWAŻNYCH WYPADKÓW.
UWAGA
Libretto 1885.indd 75 08/07/19 16:36

76
INSTRUKCJA OBSŁUGI I ZALECENIA
PL
- Nie nosić luźnej odzieży, bransoletek, łańcuszków czy metalowych przedmiotów podczas pracy przy pojeździe.
- Przerwać zawsze zasilanie przed przeprowadzeniem kontroli awarii lub czyszczeniem: ten środek prewencyjny zapobiega
przypadkowemu uruchomieniu stacji i umożliwia bezpieczne działanie.
PRAWIDŁOWE STOSOWANIE STACJI MYCIA AUTOMATYCZNEJ SKRZYNI BIEGÓW
- Nie używać stacji mycia automatycznej skrzyni biegów, jeśli jest uszkodzona.
- Stacja mycia automatycznej skrzyni biegów nie może być przerabiana. Zmiany mogą zmniejszyć skuteczność środków
bezpieczeństwa i zwiększyć ryzyko dla operatora.
- Naprawa stacji mycia automatycznej skrzyni biegów może być wykonana wyłącznie przez fachowy personel i tylko przy użyciu
oryginalnych części zamiennych.
- Nie używać stacji mycia automatycznej skrzyni biegów z napięciami innymi niż te wskazane w tabeli DANE TECHNICZNE.
- Do czyszczenia używać suchej szmatki, odłączając zawsze stację mycia automatycznej skrzyni biegów. Nigdy nie używać
wilgotnych lub mokrych szmatek.
- Nigdy nie ustawiać stacji poziomo, gdyż pojawiłyby się wycieki oleju.
NOMINALNE NAPIĘCIE ROBOCZE
POMPA ELEKTRYCZNA MAKS. CIŚNIENIE
POMPA ELEKTRYCZNA MAKS. PRZEPŁYW
SKUTECZNOŚĆ FILTRACJI
2 KANISTRY NA ZBIÓR OLEJU
TEMPERATURA ROBOCZA
WYMIARY
WAGA
230V – 50Hz
16 bar
14l/min
10 mikronów
20l każdy
-20°C +60°C
520x650x1000 mm
78 kg
DANE TECHNICZNE
ŚRODKI OCHRONY INDYWIDUALNEJ PRZEWIDZIANE W TRAKCIE UŻYWANIA STACJI MYCIA
AUTOMATYCZNEJ SKRZYNI BIEGÓW
Nieprzestrzeganie poniższych zaleceń może spowodować obrażenia ciała i/lub patologie.
UŻYWAĆ ZAWSZE RĘKAWIC CHRONIĄCYCH PRZED CZYNNIKAMI FIZYCZNYMI
I CHEMICZNYMI PODCZAS STOSOWANIA STACJI MYCIA AUTOMATYCZNEJ
SKRZYNI BIEGÓW
UŻYWAĆ ZAWSZE OBUWIA OCHRONNEGO
ZAKŁADAĆ ZAWSZE OKULARY OCHRONNE
UŻYWAĆ MASKI CHRONIĄCEJ PRZED CZYNNIKAMI FIZYCZNYMI
Może być wymagane użycie dodatkowego wyposażenia ochrony osobistej w zależnosci od wartości
określonych w ankiecie dotyczącej higieny środowiskowej/analizy ryzyka, w przypadku gdy wartości
przekraczają limity określone w obowiązujących przepisach.
WYPOSAŻENIE STANDARDOWE
Standardowe wyposażenie jest zawsze kompletne i najwyższej jakości:
- 1 wąż tłoczny (ilustracja 1)
- 1 wąż powrotny (ilustracja 1)
- 1 zestaw złączek (ilustracja 2)
ZŁĄCZKI OPCJONALNE (www.beta-tools.com)
Libretto 1885.indd 76 08/07/19 16:36

77
INSTRUKCJA OBSŁUGI I ZALECENIA
PL
UŻYCIE
Przygotowanie do użycia.
Podłączyć kabel zasilający do sieci (220V AC jednofazowy) i włączyć stację za pomocą głównego przełącznika:
- Sprawdzić, czy zawory są ZAMKNIĘTE.
- Sprawdzić poziomy olejów.
- W razie potrzeby opróżnić kanister zużytego oleju.
- Sprawdzić poziom oleju w automatycznej skrzyni biegów.
- Ustawić pojazd na podnośniku z wolnymi kołami i znaleźć rury wlotowe i wylotowe na linii chłodzenia oleju skrzyni biegów.
- Otworzyć linię w skrzyni biegów w najbardziej dostępnym punkcie, uważając, aby nie połączyć się z plastikowymi złączkami lub
do sprzęgła chłodnicy, aby uniknąć uszkodzenia.
- Umieścić kanister oleju bezpośrednio pod wybranym punktem do otworzenia linii skrzyni biegów i odprowadzić do niego olej,
który wydostanie się z rury.
- Uruchomić samochód, aby sprawdzić, z której rury wycieka olej, aby sprawdzić wyjście skrzyni biegów.
- Następnie podłączyć wąż powrotny stacji 1885 do wylotu skrzyni biegów, znaleziony jak wskazano w poprzednim punkcie, i wąż
tłoczny do linii powrotnej.
- Uruchomić silnik samochodu i sprawdzić szczelność wykonanych połączeń oraz manometr wskazujący ciśnienie robocze, które
musi wzrosnąć od 1 do 4 barów.
6
5
1
8
9
2
4
3
7
Libretto 1885.indd 77 08/07/19 16:36

78
INSTRUKCJA OBSŁUGI I ZALECENIA
PL
Panel przyrządów został zbudowany w taki sposób, aby ułatwić zrozumienie na pierwszy rzut oka funkcji, wszystkich
wskaźników i klawiszy z symbolami:
- 1 – Ciśnieniomierz: służy do werykacji ciśnienia w instalacji pojazdu.
- 2 – Klawisz : służy do przewijania funkcji stacji i ustawiania czasu i jakości oleju.
- 3 – Klawisz : służy do przewijania funkcji stacji i ustawiania czasu i jakości oleju.
- 4 – Klawisz : służy do potwierdzenia ustawionych funkcji.
- 5 – Klawisz : służy do przerwania jakiejkolwiek operacji.
- 6 – Podświetlany wyświetlacz graczny: wyświetla funkcje stacji.
- 7 – Pojemnik z rozpuszczalnikiem: służy do przechowywania rozpuszczalnika do mycia instalacji.
- 8 – Wziernik nowego oleju: służy do sprawdzania koloru wprowadzanego nowego oleju.
- 9 – Wziernik zużytego oleju: służy do sprawdzania koloru zużytego odzyskanego oleju.
FUNKCJE OGÓLNE STACJI DO MYCIA
KRÓTKI OPIS CYKLI PRACY
Po włączeniu wyświetlacz automatycznie ustawi się na funkcji AUTOMATIC TRANSMISSION, rozwijając ją, uzyskuje się
następujące fazy:
- Wprowadzanie rozpuszczalnika
- Mycie
- Opróżnianie miski olejowej
- Wymiana oleju konwertera
- Wprowadzanie oleju na poziom
Przewijając z AUTOMATIC TRANSMISSION klawiszem stacja ustawi się na funkcji DSG, rozwijając ją, uzyskuje się
następujące fazy:
- Wprowadzanie rozpuszczalnika
- Mycie
- Wymiana oleju konwertera
- Wprowadzanie oleju na poziom
Przewijając jeszcze z AUTOMATIC TRANSMISSION klawiszem stacja ustawi się na funkcjach specjalnych, typu SETUP i
INFO.
Automatyczna skrzynia biegów.
- Faza 1: wprowadzenie rozpuszczalnika do instalacji automatycznej skrzyni biegów.
- Faza 2: cykl mycia instalacji rozpuszczalnikiem i zużytym olejem.
- Faza 3: opróżnienie zużytego oleju z miski olejowej, wymiana oleju, a także ltra i uszczelki miski olejowej.
- Faza 4: wprowadzenie nowego oleju do miski olejowej.
- Faza 5: wymiana zużytego oleju obecnego w konwerterze przez wprowadzenie nowego oleju.
- Faza 6: wykonanie poziomu oleju w misce olejowej
Skrzynia biegów DSG - AISIN
- Faza 1: wprowadzanie rozpuszczalnika do instalacji automatycznej skrzyni biegów.
- Faza 2: cykl mycia instalacji rozpuszczalnikiem i zużytym olejem.
- Faza 3: wymiana zużytego oleju obecnego w konwerterze przez wprowadzenie nowego oleju.
- Faza 4: wykonanie poziomu oleju.
Libretto 1885.indd 78 08/07/19 16:36

79
INSTRUKCJA OBSŁUGI I ZALECENIA
PL
Ustawienia
- Kontrola kalibracji dla wag elektronicznych.
- Ustawianie języka.
- Ustawianie daty i godziny.
- Ustawianie LCD - Aktualizacja pliku.
Mycie i wymiana zużytego oleju musi być zawsze wykonywana za pomocą gorącego oleju przekładniowego
(ponad 40 °C). Postępować zgodnie ze specykacjami producenta. Zalecamy używanie specjalnego testera
diagnostycznego.
ANALITYCZNY OPIS CYKLI
Automatyczna skrzynia biegów.
Po podłączeniu rury „PRESSURE” i rury „RETURN”, zgodnie z opisem w akapicie użycie - przygotowanie do użycia,
postępować jak następuje.
FAZA 1
- Podłączyć stację do sieci elektrycznej i włączyć przełącznik boczny. Na wyświetlaczu pojawi się AUTOMATIC
TRANSMISSION, nacisnąć klawisz K, i na wyświetlaczu pojawi się:
- Naciskając na klawisz ustawić żądaną ilość rozpuszczalnika. Pozostawić ustawienie na „0”, jeśli nie chce się wprowadzać
rozpuszczalnika w obieg samochodu. Po ustawieniu żądanej ilości nacisnąć klawisz .
Sprawdzić wcześniej zgodność rozpuszczalnika ze skrzynią biegów.
- Kursor automatycznie ustawi się na „mycie min”. Naciskając na klawisz ustawić żądany czas trwania cyklu mycia.
Pozostawić ustawienie na „0”, jeśli nie chce się wykonywać cyklu mycia. Po ustawieniu żądanego czasu trwania cyklu mycia
nacisnąć klawisz .
- Kursor automatycznie ustawi się na „olej lt”. Naciskając na klawisz ustawić całkowitą ilość oleju zawartą w instalacji
automatycznej skrzyni biegów, która ma zostać wymieniona. Po ustawieniu ilości oleju, nacisnąć ponownie klawisz .
- Jeśli ustawiono zarówno dane dotyczące rozpuszczalnika, jak i mycia i oleju, stacja rozpocznie cykl roboczy, zaczynając od
FAZY 1 „Wprowadzanie rozpuszczalnika”, a ilość będzie się pojawiać na wyświetlaczu, w miarę jak zostanie wprowadzana do
obiegu automatycznej skrzyni biegów.
Libretto 1885.indd 79 08/07/19 16:36

80
INSTRUKCJA OBSŁUGI I ZALECENIA
PL
FAZA 2
- Po zakończeniu FAZY 1 stacja rozpocznie FAZĘ 2 „Mycie”, która wymaga wstępnego uruchomienia samochodu i
pozostawienia skrzyni biegów w pozycji P (parkowania) lub N (neutralnej). Na wyświetlaczu pojawi się
- Uruchomić samochód pozostawiając skrzynię biegów w pozycji P lub N i nacisnąć natychmiast klawisz . Stacja
rozpocznie cykl mycia obiegu, ltrując zanieczyszczenia oraz wskaże czas pozostały do końca operacji. Podczas fazy mycia,
przy pojeździe ustawionym na moście z uniesionymi kołami, zaleca się przeprowadzenie kilku cykli zmiany biegów, wszystkich
biegów, w tym biegu wstecznego.
Mycie należy przeprowadzać, gdy olej przekładniowy jest gorący.
- Jeśli na ekranie początkowym ilość rozpuszczalnika jest ustawiona na „0”, stacja automatycznie pominie FAZĘ 1 i natychmiast
rozpocznie pracę od FAZY 2.
FAZA 3
- Po upływie ustawionego czasu stacja emituje kilka beep i automatycznie rozpocznie FAZĘ 3 „Opróżnianie miski olejowej”.
Na wyświetlaczu pojawi się.
- W miarę jak stacja opróżnia miskę, na wyświetlaczu będzie się pojawiać ilość odprowadzana do kanistra oznaczonego
etykietą „OLD OIL” i połączonego ze stacją za pomocą Czarnych rur. Po opróżnieniu miski stacja zatrzyma się automatycznie
i zasygnalizuje koniec operacji za pomocą beep i na wyświetlaczu pojawi się.
Zaleca się obserwowanie podczas tej fazy, wziernika zużytego oleju i wyłączenie maszyny, jeśli zauważy się
obecność w nim pęcherzyków powietrza.
- Gdy to zaistnieje, wyłączyć NATYCHMIAST samochód. Wcisnąć klawisz . Stacja zapisze dane dotyczące ilości zużytego
oleju odprowadzonego z miski. Na wyświetlaczu pojawi się.
- Następnie przystąpić do demontażu miski, zwracając uwagę na wszelkie pozostałości oleju w misce olejowej, wyczyścić
ją oraz magnesy znajdujące się wewnątrz, a także wymienić ltr i uszczelkę skrzyni biegów. Po zakończeniu tych operacji
nacisnąć klawisz .
- Jeśli na ekranie początkowym ilość rozpuszczalnika jest ustawiona na „0” i czas trwania cyklu mycia jest ustawiony na „0”,
stacja automatycznie pominie FAZĘ 1 i FAZĘ 2 i natychmiast rozpocznie pracę od FAZY 3.
Libretto 1885.indd 80 08/07/19 16:36

81
INSTRUKCJA OBSŁUGI I ZALECENIA
PL
FAZA 4
- Następnie rozpocznie się FAZA 4 „Napełnianie miski”. Na wyświetlaczu pojawi się natychmiast ilość oleju odpowiadająca ilości
odprowadzonej w poprzedniej fazie.
Pamiętać, aby używać oleju zgodnie ze specykacjami producenta.
- Naciskając klawisz zwiększyć ewentualnie ilość w związku z ewentualnymi pozostałościami oleju znajdującymi się w
misce podczas demontażu. Naciśnięcie klawisza spowoduje, że stacja rozpocznie napełnianie miski, a na wyświetlaczu
będzie pojawiała się ilość wprowadzonego oleju.
- Po zakończeniu wprowadzania nowego oleju do miski, stacja wyemituje kilka beep, a na wyświetlaczu pojawi się ilość
wymagana do wymiany oleju w konwertorze.
FAZA 5
- Dane dostarczone przez stację, obliczone z uwzględnieniem całkowitej ilości oleju ustawionej przez użytkownika na ekranie
początkowym i tej wprowadzonej do miski w poprzedniej fazie 4 (może zostać zwiększona lub zmniejszona przez operatora
za pomocą klawiszy ). Wcisnąć klawisz . Stacja będzie wymagała włączenia maszyny, pozostawiając skrzynię
biegów w pozycji P (parkowania) lub N (neutralnej) z komunikatem, który pojawi się na wyświetlaczu.
- Po uruchomieniu pojazdu, pozostawiając skrzynię biegów w P lub N, nacisnąć SZYBKO klawisz . Stacja automatycznie
rozpocznie wprowadzanie nowego oleju, odprowadzając jednocześnie taką samą ilości oleju zużytego z konwertera. Na
wyświetlaczu pojawi się ilość wprowadzonego nowego oleju i odprowadzonego oleju zużytego.
Gdy olej sprawdzany na wzierniku zużytego oleju ma kolor podobny do tego wyświetlanego w sektorze nowego
oleju, wyłączyć maszynę.
- Po wymianie oleju konwertera stacja zatrzyma się i automatycznie ustawi się na.
Libretto 1885.indd 81 08/07/19 16:36

82
INSTRUKCJA OBSŁUGI I ZALECENIA
PL
FAZA 6
Następnie odłączyć złączki stacji, przywracając pierwotną linię skrzyni biegów i upewnić się, że nie ma
wycieków. Przestawić dźwignię zmiany biegów na R D N P, aby oczyścić instalację. Włączyć samochód i ustawić
skrzynię biegów na P lub N oraz sprawdzić poziom oleju.
- Aby wykonać EWENTUALNĄ operację uzupełniania oleju przez sondę, nacisnąć klawisz i umieścić odpowiednią sondę
na wężu PRESSURE. Na wyświetlaczu pojawi się.
- Za pomocą klawiszy ustawić ilość oleju, którą chce się uzupełnić, upewniając się, że sonda jest prawidłowo
ustawiona na wężu PRESSURE, wprowadzić sondę do wnętrza korka poziomu znajdującego się na maszynie i nacisnąć
klawisz .
- Po zakończeniu fazy stacja automatycznie ustawi się na fazie Druku całego przeprowadzonego procesu.
Aby uzyskać odpowiednią płynność jazdy, może być konieczne wykonanie 40-50 km.
SKRZYNIA BIEGÓW DSG - AISIN
Po podłączeniu węża „PRESSURE” i węża „RETURN”, zgodnie z opisem w akapicie użycie - przygotowanie do użycia,
postępować jak następuje:
FAZA 1
- Po podłączeniu rury „PRESSURE” i rury „RETURN”, jak opisano w akapicie opisu analitycznego cykli – automatyczna
skrzynia biegów, nacisnąć klawisz i nacisnąć klawisz , na wyświetlaczu pojawi się.
- Nacisnąć klawisz i na wyświetlaczu ukaże się.
- Ustawić żądaną ilość rozpuszczalnika. Pozostawić ustawienie na „0”, jeśli nie chce się wprowadzać rozpuszczalnika w obieg
samochodu. Po ustawieniu żądanej ilości, nacisnąć klawisz .
Sprawdzić wcześniej zgodność rozpuszczalnika ze skrzynią biegów.
- Kursor automatycznie ustawi się na „Mycie min”. Przez naciśnięcie klawisza ustawić żądany czas trwania cyklu mycia.
Pozostawić ustawienie na „0”, jeśli nie chce się wykonywać cyklu mycia. Po ustawieniu żądanego czasu trwania cyklu mycia
nacisnąć klawisz .
Libretto 1885.indd 82 08/07/19 16:36

83
INSTRUKCJA OBSŁUGI I ZALECENIA
PL
- Kursor automatycznie ustawi się na „olej lt”. Przez naciśnięcie klawisza ustawić całkowitą ilość oleju zawartą w
automatycznej skrzyni biegów, która ma zostać wymieniona. Po ustawieniu ilości oleju, nacisnąć ponownie klawisz .
- Jeśli ustawiono zarówno dane dotyczące rozpuszczalnika, jak i mycia i oleju, stacja rozpocznie cykl roboczy, zaczynając od
FAZY 1 „Wprowadzanie rozpuszczalnika”, a ilość będzie się pojawiać na wyświetlaczu, w miarę jak zostanie wprowadzana do
obiegu automatycznej skrzyni biegów.
- Jeśli na ekranie początkowym ilość rozpuszczalnika jest ustawiona na „0”, stacja automatycznie pominie FAZĘ 1 i natychmiast
rozpocznie pracę od FAZY 2.
FAZA 2
- Po zakończeniu FAZY 1 stacja rozpocznie FAZĘ 2 „Mycie”, która wymaga wstępnego uruchomienie samochodu, ze skrzynię
biegów w pozycji P (parkowania) lub N (neutralnej). Na wyświetlaczu pojawi się.
- Uruchomić samochód pozostawiając skrzynię biegów w pozycji P lub N i nacisnąć natychmiast klawisz . Stacja rozpocznie
cykl mycia obiegu, ltrując zanieczyszczenia oraz wskaże czas pozostały do końca operacji. Podczas fazy mycia, przy
pojeździe ustawionym na moście z uniesionymi kołami, zaleca się przeprowadzenie kilku cykli zmiany biegów wszystkich
biegów, w tym biegu wstecznego.
Mycie należy przeprowadzać, gdy olej przekładniowy jest gorący.
- Jeżeli na ekranie początkowym ilość rozpuszczalnika jest ustawiona na „0” i czas trwania cyklu mycia jest ustawiony na „0”,
stacja automatycznie pominie FAZĘ 1 i FAZĘ 2 i natychmiast rozpocznie pracę od FAZY 3.
FAZA 3
- Po upływie ustawionego czasu stacja emituje kilka BEEP i automatycznie rozpocznie FAZĘ 3 „Wymiana oleju konwertera” Na
wyświetlaczu pojawi się ilość oleju do wymiany.
- Nacisnąć klawisz . Stacja będzie wymagała włączenia pojazdu, pozostawiając skrzynię biegów w pozycji P (parkowanie)
lub N (neutralnej) z komunikatem, który pojawi się na wyświetlaczu.
Libretto 1885.indd 83 08/07/19 16:36

84
INSTRUKCJA OBSŁUGI I ZALECENIA
PL
- Po uruchomieniu pojazdu, pozostawiając skrzynię biegów w P lub N, nacisnąć SZYBKO klawisz . Stacja automatycznie
rozpocznie wprowadzanie nowego oleju, odprowadzając jednocześnie taką samą ilości oleju zużytego z konwertera. Na
wyświetlaczu pojawi się ilość wprowadzonego nowego oleju i odprowadzonego oleju zużytego.
Gdy olej sprawdzany na wzierniku zużytego oleju ma kolor podobny do tego wyświetlanego w sektorze nowego
oleju, wyłączyć samochód.
- Po wymianie oleju konwertera stacja zatrzyma się i automatycznie ustawi się na.
FAZA 4
Następnie odłączyć złączki stacji, przywracając pierwotną linię skrzyni biegów i upewnić się, że nie ma
wycieków. Przestawić dźwignię zmiany biegów na R D N P, aby oczyścić instalację. Włączyć samochód i ustawić
skrzynię biegów na P lub N i sprawdzić poziom oleju.
- Aby wykonać EWENTUALNĄ operację uzupełniania oleju przez sondę, nacisnąć klawisz i umieścić odpowiednią sondę
na wężu PRESSURE. Na wyświetlaczu pojawi się.
- Za pomocą klawiszy ustawić ilość oleju, którą chce się uzupełnić, upewniając się, że sonda jest prawidłowo
ustawiona na wężu PRESSURE, wprowadzić sondę do wnętrza korka poziomu znajdującego się na maszynie i nacisnąć
klawisz .
- Po zakończeniu fazy stacja automatycznie ustawi się na fazie Druku całego przeprowadzonego procesu.
Aby uzyskać odpowiednią płynność jazdy, może być konieczne wykonanie 40 - 50 km.
WPROWADZANIE OLEJU
- Podłączyć stację do sieci elektrycznej i włączyć przełącznik boczny. Na wyświetlaczu pojawi się AUTOMATIC
TRANSMISSION, nacisnąć klawisz dwa razy i nacisnąć klawisz , a na wyświetlaczu pojawi się.
- Nacisnąć klawisz i na wyświetlaczu ukaże się.
- Za pomocą klawiszy ustawić ilość oleju, którą chce się uzupełnić, upewniając się, że sonda jest prawidłowo
ustawiona na wężu PRESSURE, wprowadzić sondę do wnętrza korka poziomu znajdującego się na maszynie lub w
pojemniku, który chce się napełnić i nacisnąć klawisz . Stacja zacznie uzupełniać olej do ustalonej ilości.
Libretto 1885.indd 84 08/07/19 16:36

85
INSTRUKCJA OBSŁUGI I ZALECENIA
PL
SETUP
Ustawianie daty i godziny.
- Umożliwia zmianę daty i godziny do drukowania paragonu.
Sprawdzanie kalibracji wagi.
- Wybrać klawiszem funkcję - SETUP- i nacisnąć klawisz .
- Wybrać klawiszem funkcję - TARE TEST (ikona wagi) - i nacisnąć klawisz . Wyświetlacz pokaże, w górnej linii ilość
oleju znajdującą się w zbiorniku i w dolnej linii wagę próbki.
- W tym momencie operator umieści znaną masę (na przykład ciężar 2 kg) na zbiorniku i będzie musiał odczytać dokładną
wagę na wyświetlaczu. Operacja ta jest niezbędna, aby operator mógł okresowo sprawdzać, czy waga jego stacji waży
prawidłowe ilości.
Język
Stacja zapewnia możliwość wyświetlania komunikatów na wyświetlaczu w różnych językach:
• WŁOSKIM
• ANGIELSKIM
• HOLENDERSKIM
• itd.
Zmiany języka dokonuje się w następujący sposób:
- Wybrać klawiszem funkcję - SETUP- i nacisnąć klawisz .
- Wybrać klawiszem funkcję - LANGUAGE (ikona aga) - i klawisz .
- Wybrać klawiszem żądany język i nacisnąć klawisz .
UWAGI
Opróżnianie i napełnianie zbiorników oleju.
Zużyty olej.
- Opróżnić zbiornik, gdy poziom wynosi około 10 litrów.
- Używać odpowiednich zbiorników na zużyty olej
Zużyty olej jest odpadem specjalnym i jako taki musi zostać usuwany zgodnie z obowiązującymi przepisami.
Nowy olej
- Zaleca się stosowanie olejów zalecanych przez producenta urządzenia.
SERWIS
Wymiana ltra.
Aby go wymienić, należy wykonać następujące czynności:
- Otworzyć tylną pokrywę.
- Na środkowej półce odkręcić korpus ltra (ilustracja 3).
- Włożyć nowy kartusz.
Wymienić ltr na nowy oryginalny ltr (kod. BETA 018850510).
Ilustracja 3
Libretto 1885.indd 85 08/07/19 16:36

86
BAZY DANYCH
Aby uzyskać dostęp do internetowej bazy danych automatycznych skrzyń biegów, odwiedź stronę BETA pod adresem
www.beta-tools.com i zarejestruj się, aby uzyskać dostęp do zastrzeżonego obszaru.
KONSERWACJA
Prace konserwacyjne i naprawcze powinny być wykonywane tylko i wyłącznie przez wykwalikowany personel. Odnośnie tych
interwencji można kontaktować się z centrum serwisowym Beta Utensili S.P.A., za pośrednictwem zaufanego dystrybutora Beta.
LIKWIDACJA
Stacja do mycia automatycznej skrzyni biegów, akcesoria i opakowanie muszą zostać przesłane do do punktu zbiórki odpadów,
zgodnie z przepisami obowiązującymi w Kraju, w którym się znajdujecie.
GWARANCJA
Warunki gwarancji dla towarów produkcji Beta Utensili S.p.A. sprzedawanych przez Beta Polska Sp. z o.o.
określone są w aktualnym Oświadczeniu Gwarancyjnym Beta Polska Spółka z ograniczoną odpowiedzialnością
z siedzibą w Skarbimierzycach, które dostępne jest na stronie internetowej spółki oraz będzie wysyłane na każde
żądanie.
DEKLARACJA ZGODNOŚCI
Niniejszym oświadczamy z pełną odpowiedzialnością, że opisany produkt jest zgodny ze wszystkimi odnośnymi
przepisami następujących Dyrektyw:
• Dyrektywa maszynowa 2006/42/WE;
• Dyrektywa Niskonapięciowa (LVD) 2014/35/UE.
Dokumentacja techniczna dostępna jest pod adresem:
BETA UTENSILI S.P.A.
Via A. Volta 18,
20845 Sovico (MB)
WŁOCHY
INSTRUKCJA OBSŁUGI I ZALECENIA
PL
Libretto 1885.indd 86 08/07/19 16:36

87
P
MANUAL DE USO E INSTRUÇÕES
MANUAL DE USO E INSTRUÇÕES PARA EQUIPAMENTO DE LAVAGEM DE CAIXA DE VELOCIDADES AUTOMÁTICA
FABRICADO POR:
BETA UTENSILI S.P.A.
Via A. Volta 18,
20845 Sovico (MB)
ITÁLIA
Documentação redigida originariamente no idioma ITALIANO.
Guarde cuidadosamente as instruções de segurança e entregue-as ao pessoal utilizador.
DESTINO DE USO
- O equipamento de lavagem de caixa de velocidades automática é nalizado ao uso a seguir:
• Para utilizar exclusivamente em veículos com caixa de velocidades automática.
- Não são permitidas as operações a seguir:
• é proibida a utilização em ambientes húmidos, molhados ou expostos a intempéries
• é proibida a utilização fora das prescrições técnicas contidas na tabela DADOS TÉCNICOS
• é proibido utilizar em todas aquelas aplicações diferentes daquelas indicadas
SEGURANÇA DA POSIÇÃO DE TRABALHO
Não utilize o equipamento de lavagem de caixa de velocidades automática em ambientes que contêm atmosferas
potencialmente explosivas ou materiais inamáveis porque podem ser desenvolvidas faíscas capazes de incendiar
poeiras ou vapores.
Impeça que crianças ou visitantes possam aproximar-se da posição de trabalho enquanto se está a utilizar o equipamento
de lavagem de caixa de velocidades automática. A presença de outras pessoas causa distração e pode causar a perda
do controlo durante a utilização.
Não inalar eventuais gases nocivos desprendidos pelo equipamento de lavagem de caixa de velocidades automática,
enquanto se está a trabalhar no motor.
Utilize o equipamento de lavagem de caixa de velocidades automática em uma área seca evitando a humidade.
INDICAÇÕES DE SEGURANÇA DO EQUIPAMENTO DE LAVAGEM DE CAIXA DE VELOCIDADES AUTOMÁTICA
- Antes da utilização controle que o equipamento de lavagem de caixa de velocidades automática não tenha sofrido danos e que
não tenha partes consumidas.
- Não utilize o equipamento de lavagem de caixa de velocidades automática se estiver danicado, não tente abri-lo ou alterá-lo.
- Antes de ligar na instalação feche todas as torneiras.
- Não encha o reservatório de armazenamento mais de 80%.
- Periodicamente verique que o equipamento de lavagem de caixa de velocidades automática e relativos acessórios estejam
em perfeito estado.
- Não cubra de maneira nenhuma o equipamento de lavagem de caixa de velocidades automática durante a sua utilização.
Providencie um espaço apropriado para a ventilação.
- Não utilize o detector de sinais em ambientes húmidos, molhados, não expô-lo à chuva.
INFORMAÇÃO PARA A SEGURANÇA DO PESSOAL
- Recomenda-se a máxima atenção e deve-se sempre tomar o cuidado de concentrar-se nas próprias ações. Não utilize
o equipamento de lavagem de caixa de velocidades automática no caso de cansaço ou sob o efeito de drogas, bebidas
alcoólicas ou remédios.
Utilizzare sempre i seguenti dispositivi individuali di protezione:
• calçados de segurança
• óculos de proteção
• mascherina di protezione
• luvas de proteção para agentes físicos e químicos
• roupas de proteção contra substâncias químicas.
É IMPORTANTE LER TOTALMENTE O PRESENTE MANUAL ANTES DE
UTILIZAR O EQUIPAMENTO DE LAVAGEM DE CAIXA DE VELOCIDADES
AUTOMÁTICA. SE AS NORMAS DE SEGURANÇA E AS INSTRUÇÕES
OPERACIONAIS NÃO FOREM RESPEITADAS, PODEM OCORRER
ACIDENTES GRAVES.
ATENÇÃO
Libretto 1885.indd 87 08/07/19 16:36

88
MANUAL DE USO E INSTRUÇÕES
PT
- Efetue todas as operações previstas em ambientes apropriadamente ventilados e secos.
- Verique que os cabos do detector de sinais estejam longe de ventoinhas, de partes em movimento e da mangueira de
combustível.
- Não use roupas largas, não use pulseiras, correntes ou objetos metálicos quando está a trabalhar no veículo.
- Interrompa sempre a alimentação do ar antes de efetuar as operações de vericação de avarias ou de limpeza: esta medida
preventiva impede o acionamento acidental do equipamento a m de permitir operar com segurança.
UTILIZAÇÃO CUIDADOSA DO EQUIPAMENTO DE LAVAGEM DE CAIXA DE VELOCIDADES AUTOMÁTICA
- Não utilize o equipamento de lavagem de caixa de velocidades automática se apresentar danos.
- O equipamento de lavagem de caixa de velocidades automática não deve ser alterado. As modicações podem reduzir a
eciência das medidas de segurança e aumentar os riscos para o operador.
- O equipamento de lavagem de caixa de velocidades automática deve ser reparado apenas e exclusivamente por pessoal
especializado e apenas com a utilização de peças sobressalentes originais.
- Não utilize o equipamento de lavagem de caixa de velocidades automática com tensões diferentes daquelas indicadas na
tabela DADOS TÉCNICOS.
- Para a limpeza utilizar um pano seco e desligar sempre a alimentação de rede do equipamento de lavagem de caixa de
velocidades automática. Nunca devem ser utilizados panos húmidos ou molhados.
- A estação nunca deve ser posicionada horizontalmente, poderá haver vazamentos de óleo.
TENSÃO NOMINAL DE FUNCIONAMENTO
BOMBA ELÉCTRICA PRESSÃO MÁXIMA
BOMBA ELÉCTRICA CAPACIDADE MÁXIMA
EFICIÊNCIA FILTRANTE
TAMBOR RECOLHA ÓLEO N°2
TEMPERATURA DE UTILIZAÇÃO
DIMENSÕES
PESO
230V – 50Hz
16 bar
14l/min
10 mícron
20l cad.
-20°C +60°C
520x650x1000 mm
78 kg
DADOS TÉCNICOS
EQUIPAMENTOS DE PROTEÇÃO INDIVIDUAL PREVISTOS DURANTE A UTILIZAÇÃO DO EQUIPAMENTO
DE LAVAGEM DE CAIXA DE VELOCIDADES AUTOMÁTICA
A falta de observação dos seguintes avisos pode causar ferimentos físicos e/ou patologias.
UTILIZE SEMPRE LUVAS DE PROTEÇÃO PARA AGENTES FÍSICOS Y QUÍMICOS
DURANTE A UTILIZAÇÃO DO EQUIPAMENTO DE LAVAGEM DE CAIXA DE
VELOCIDADES AUTOMÁTICA
UTILIZAR SEMPRE CALÇADOS DE SEGURANÇA
UTILIZE SEMPRE OS ÓCULOS DE PROTEÇÃO
UTILIZAR MÁSCARA DE PROTEÇÃO CONTRA AGENTES FÍSICOS
Pode ser necessário utilizar outros equipamentos de proteção individual, em função dos valores
encontrados na investigação de higiene ambiental/análise de riscos, no caso em que os valores ultrapassem
os limites previstos pelas normas vigentes.
Libretto 1885.indd 88 08/07/19 16:36

89
P
MANUAL DE USO E INSTRUÇÕES
FORNECIMENTOS DE SÉRIE
O fornecimento de série é sempre completo e no topo da qualidade:
- n° 1 mangueira de vazão (gura 1)
- n° 1 mangueira de retorno (gura 1)
- n° 1 kit de conexões (gura 2)
CONEXÕES OPCIONAIS (www.beta-tools.com)
UTILIZAÇÃO
Preparo para o uso.
Conecte o cabo de alimentação na rede (220V CA monofásica) e ligue o equipamento com o interruptor geral:
- Controle que as torneiras estejam FECHADAS.
- Controle os níveis dos óleos.
- Eventualmente esvazie o tambor do óleo usado.
- Verique o nível do óleo presente na caixa de velocidades automática.
- Posicione o veículo sobre uma plataforma elevatória com rodas livres e identique na linha de resfriamento do óleo da caixa de
velocidades as mangueiras de entrada e de saída.
- Abra a linha na caixa de velocidades no ponto mais acessível prestando atenção para não conectar-se com conexões em
plástico ou no engate do radiador a m de evitar quebras.
- Posicione um recipiente de recolha de óleo imediatamente em baixo do ponto escolhido para a abertura da linha da caixa de
velocidades e transra para dentro o óleo que sairá pela mangueira.
- Arranque o veículo para controlar por qual mangueira sai o óleo de modo a vericar a saída da caixa de velocidades.
- Conecte então a mangueira de retorno do equipamento 1885 na saída da caixa de velocidades como identicada no item
anterior e a mangueira de vazão na linha de retorno.
- Arranque o motor do automóvel e controle a vedação das ligações efetuadas e o manómetro que indica a pressão de exercício
que deverá subir de 1 para 4 bar.
6
5
1
8
9
2
4
3
7
Libretto 1885.indd 89 08/07/19 16:36

90
MANUAL DE USO E INSTRUÇÕES
PT
O quadro de instrumentos foi realizado de forma a tornar facilmente perceptíveis com um relance de olhos as funções, todos
os manómetros e as teclas com os símbolos:
1 – Manómetro ‘Pressure’: serve para a vericação da pressão da instalação do automóvel.
2 – Tecla : serve para rolar as funções do equipamento e para congurar o tempo e as qualidades do óleo.
3 – Tecla : serve para rolar as funções do equipamento e para congurar o tempo e as qualidades do óleo.
4 – Tecla : serve para conrmar as funções conguradas.
5 – Tecla : serve para interromper qualquer operação.
6 – Écran gráco retro-iluminado: visualiza as funções do equipamento.
7 – Recipiente solvente: serve para conter o solvente para a lavagem da instalação.
8 – Visor de óleo novo: serve para ver a cor do óleo novo introduzido.
9 – Visor de óleo usado: serve para ver a cor do óleo usado recuperado.
FUNÇÕES GERAIS DO EQUIPAMENTO DE LAVAGEM
DESCRIÇÃO RESUMIDA DOS CICLOS DE TRABALHO
Ao ligar o écran se posiciona automaticamente na função CAIXA DE VELOCIDADES AUTOMÁTICA, da qual derivam as
seguintes fases:
- Introdução solvente
- Lavagem
- Esvaziamento bujão de óleo
- Substituição óleo conversor
- Introdução de óleo para nível
Ao rolar em CAIXA DE VELOCIDADES AUTOMÁTICA com a tecla a estação se posiciona na função CAIXA DE
VELOCIDADES DSG, de cujo controlo derivam as seguintes fases:
- Introdução solvente
- Lavagem
- Substituição óleo conversor
- Introdução de óleo para nível
Rolando mais com a tecla por CAIXA DE VELOCIDADES AUTOMÁTICA o equipamento se posiciona em funções
especiais como CONFIGURAÇÃO e INFO.
Caixa de velocidades automática.
- Fase 1: introdução de solvente na instalação da caixa de velocidades automática.
- Fase 2: ciclo de lavagem da instalação com o solvente e o óleo usado.
- Fase 3: esvaziamento do óleo usado pelo bujão para a substituição do óleo e também do ltro e da guarnição do próprio
bujão.
- Fase 4: introdução do óleo novo no bujão.
- Fase 5: substituição do óleo usado presente no conversor mediante introdução do óleo novo.
- Fase 6: vericação do nível do óleo presente no bujão.
Caixa de Velocidades DSG – AISIN
- Fase 1: introdução do solvente na instalação da caixa de velocidades automática.
- Fase 2: ciclo de lavagem da instalação com o solvente e o óleo usado.
- Fase 3: substituição do óleo usado presente no conversor mediante introdução do óleo novo.
- Fase 4: vericação do nível do óleo.
Libretto 1885.indd 90 08/07/19 16:36

91
MANUAL DE USO E INSTRUÇÕES
Congurações
- Controlo da calibração para as balanças electrónicos.
- Conguração do idioma.
- Conguração da data e hora.
- Conguração do LCD-Atualização do arquivo.
A lavagem e a substituição do óleo usado devem sempre ser realizadas com óleo da caixa de velocidades
quente (mais de 40 °C). Siga as especicações do fabricante. Recomenda-se a utilização de testador diagnóstico
apropriado.
DESCRIÇÃO ANALÍTICA DOS CICLOS
Caixa de velocidades automática.
Depois de ter conectado a mangueira “PRESSURE” e a mangueira “RETURN”, como descrito no parágrafo “Utilização –
Preparo para o uso”, efetue quanto segue.
FASE 1
- Conecte o equipamento na rede eléctrica e ligue o interruptor lateral. No écran aparecerá CAIXA DE VELOCIDADES
AUTOMÁTICA, carregue a tecla , e no écran aparecerá:
- Ao carregar a tecla congure a quantidade de solvente desejada. Deixe congurado “0” se não quer introduzir o solvente
no circuito do automóvel. Depois de congurada a quantidade desejada carregue a tecla .
Verique preliminarmente a compatibilidade do solvente com a caixa de velocidades.
- O cursor se posicionará automaticamente em “lavagem min”. Ao carregar a tecla congure a duração do ciclo de
lavagem desejada. Deixe congurado “0” se não quer realizar o ciclo de lavagem. Depois de congurada a duração do ciclo
de lavagem desejada carregue a tecla .
- O cursor se posicionará automaticamente em “óleo l.”. Ao carregar a tecla congure a quantidade de óleo total contida na
instalação da caixa de velocidades automática onde se quer fazer a substituição. Depois de congurada a quantidade de óleo
carregue a tecla .
- Se foram congurados os dados relativos ao solvente e à lavagem e ao óleo a estação começará o ciclo de trabalho a
partir da FASE 1 “Introdução de solvente” e no écran aparecerá a quantidade conforme é introduzida no circuito da caixa de
velocidades automática.
Libretto 1885.indd 91 08/07/19 16:36

92
MANUAL DE USO E INSTRUÇÕES
PT
FASE 2
- Depois de terminada a FASE 1 o equipamento começará a FASE 2 “Lavagem” solicitando preliminarmente que o utente
arranque o automóvel deixando a caixa de velocidades na posição P (parking) ou N (neutral). No écran aparecerá:
- Arranque então o automóvel deixando a caixa de velocidades na Posição P ou N e carregue rapidamente a tecla . O
equipamento começará a efetuar a lavagem do circuito ltrando as impuridades e indicará, portanto, o tempo restante ao
m da operação. Durante a fase de lavagem, por ter colocado o automóvel sobre uma plataforma com rodas erguidas,
recomenda-se efetuar alguns ciclos de trocas de todas as marchas inclusive a marcha atrás.
A lavagem deve ser efetuada quando o óleo da caixa de velocidades está quente.
- Se na tela inicial a quantidade de solvente está congurada em “0”, o equipamento pulará automaticamente a FASE 1 e
começará imediatamente pela FASE 2.
FASE 3
- Quando tiver passado o tempo congurado o equipamento emitirá alguns bip e começará automaticamente a FASE 3
“Esvaziamento do óleo do bujão”. No écran aparecerá:
- Conforme o equipamento esvazia o bujão no écran aparecerá a quantidade descarregada no tambor marcado com a etiqueta
“OLD OIL” e conectado no equipamento por meio de mangueira de cor preta. Depois de esvaziado o bujão o equipamento irá
parar automaticamente e, através do bip, indicará o m da operação e no écran aparecerá:
Recomenda-se observar durante esta fase o visor do óleo usado e desligar o automóvel se perceber a presença
de bolhas de ar no mesmo.
- Então desligue RAPIDAMENTE o automóvel. Carregue a tecla . O equipamento gravará o dado relativo à quantidade de
óleo usado extraído pelo bujão. No écran aparecerá então:
- Providencie, portanto, a desmontagem do bujão prestando atenção em eventuais resíduos de óleo presentes no bujão, efetue
a limpeza do mesmo e dos ímanes presentes no seu interior, assim como a substituição do ltro e da guarnição da caixa de
velocidades. Depois de terminadas estas operações carregue a tecla .
- Se na tela inicial a quantidade de solvente está congurada em “0” e a duração da lavagem está congurada em “0”, o
equipamento pulará automaticamente a FASE 1 e a FASE 2 e começará imediatamente pela FASE 3.
Libretto 1885.indd 92 08/07/19 16:36

93
MANUAL DE USO E INSTRUÇÕES
FASE 4
- Começará, portanto, a FASE 4 “Enchimento do bujão”. No écran aparecerá imediatamente a quantidade de óleo
correspondente àquela descarregada na fase anterior.
Verique de utilizar óleo conforme as especicações do fabricante.
- Atuando na tecla aumente eventualmente a quantidade em relação aos eventuais resíduos de óleo encontrados no bujão
na fase de desmontagem. Ao carregar a tecla o equipamento começará a encher o bujão e no écran a quantidade de
óleo que está a ser introduzida.
- Depois de terminada a introdução do óleo novo no bujão, o equipamento emitirá alguns bip e no écran aparecerá a
quantidade necessária para a substituição do óleo presente no conversor.
FASE 5
- O dado fornecido pelo equipamento, calculado levando em consideração a quantidade de óleo total congurada pelo utente
na tela inicial e aquela introduzida no bujão na fase 4 anterior (pode eventualmente ser aumentada ou diminuída pelo
operador atuando nas teclas ). Portanto, carregue a tecla . O equipamento solicitará o arranque do veículo
deixando a caixa de velocidades em P (parking) ou N (neutral) com a mensagem que aparece no écran.
- Depois de arrancado o automóvel deixando a caixa de velocidades em P ou N carregue RAPIDAMENTE a tecla . A
estação começará automaticamente a introduzir óleo novo extraindo a mesma quantidade de óleo usado pelo conversor. No
écran aparecerão as quantidades de óleo novo introduzido e de óleo usado extraído.
Quando o óleo visualizado no visor do óleo velho tiver cor semelhante ao visualizado no sector do óleo novo
desligue o veículo.
- Depois de terminada a substituição do óleo do conversor o equipamento irá parar posicionando-se automaticamente em.
Libretto 1885.indd 93 08/07/19 16:36

94
MANUAL DE USO E INSTRUÇÕES
PT
FASE 6
Desligue, portanto, as conexões do equipamento restaurando a linha da caixa de velocidades na origem e
verique que não haja vazamentos. Desloque a alavanca da caixa de velocidades em R D N P para efetuar a
purga da instalação. Arranque o automóvel e posicione a caixa de velocidades em P ou N e efetue o controlo do
nível do óleo.
- Para poder realizar uma EVENTUAL operação de reabastecimento de óleo através da sonda carregue a tecla e coloque
a sonda apropriada na mangueira PRESSURE. Aparecerá no écran:
- Atue nas teclas para congurar a quantidade de óleo que se quer reabastecer, verique que a sonda esteja
colocada corretamente na mangueira PRESSURE e introduza a própria sonda no interior da tampa do nível presente no
automóvel e carregue a tecla .
- Terminada a fase o equipamento se posicionará automaticamente na fase de Impressão de todo o processo efetuado.
Para obter a uidez certa de guia poderá ser necessário percorrer 40-50 km.
CAIXA DE VELOCIDADES DSG-AISIN
Depois de ter conectado a mangueira “PRESSURE” e a mangueira “RETURN”, como descrito no parágrafo “Utilização –
Preparo para o uso“, efetue quanto segue:
FASE 1
- Depois de ter conectado a mangueira “PRESSURE” e a mangueira “RETURN”, como descrito no parágrafo “Descrição
analítica dos ciclos – caixa de velocidades automática”, atue na tecla e carregue a tecla e no écran aparecerá:
- Carregue a tecla e no écran aparecerá:
- Ao carregar a tecla congure a quantidade de solvente desejada. Deixe congurado “0” se não quer introduzir o solvente
no circuito do automóvel. Depois de congurada a quantidade desejada carregue a tecla .
Verique preliminarmente a compatibilidade do solvente com a caixa de velocidades.
- O cursor se posicionará automaticamente em “Lavagem min”. Ao carregar a tecla congure a duração do ciclo de
lavagem desejada. Deixe congurado “0” se não quer realizar o ciclo de lavagem. Depois de congurada a duração do ciclo
de lavagem desejada carregue a tecla .
Libretto 1885.indd 94 08/07/19 16:36

95
MANUAL DE USO E INSTRUÇÕES
- O cursor se posicionará automaticamente em “óleo l.”. Ao carregar a tecla congure a quantidade de óleo total contida
na instalação da caixa de velocidades automática onde se quer fazer a substituição. Depois de congurada a quantidade de
óleo carregue a tecla .
- Se foram congurados os dados relativos ao solvente e à lavagem e ao óleo a estação começará o ciclo de trabalho a
partir da FASE 1 “Introdução de solvente” e no écran aparecerá a quantidade conforme é introduzida no circuito da caixa de
velocidades automática.
- Se na tela inicial a quantidade de solvente está congurada em “0”, o equipamento pulará automaticamente a FASE 1 e
começará imediatamente pela FASE 2.
FASE 2
- Depois de terminada a FASE 1 o equipamento começará a FASE 2 “Lavagem” solicitando preliminarmente que o utente
arranque o automóvel deixando a caixa de velocidades na posição P (parking) ou N (neutral). No écran aparecerá:
- Arranque então o automóvel deixando a caixa de velocidades na Posição P ou N e carregue rapidamente a tecla .
O equipamento começará a efetuar a lavagem do circuito ltrando as impuridades e indicará, portanto, o tempo restante
ao m da operação. Durante a fase de lavagem, tendo colocado o automóvel sobre uma plataforma com rodas erguidas,
recomenda-se efetuar alguns ciclos de trocas de todas as marchas inclusive a marcha atrás.
A lavagem deve ser efetuada quando o óleo da caixa de velocidades está quente.
- Se na tela inicial a quantidade de solvente está congurada em “0” e a duração da lavagem está congurada em “0”, o
equipamento pulará automaticamente a FASE 1 e a FASE 2 e começará imediatamente pela FASE 3.
FASE 3
- Quando tiver passado o tempo congurado o equipamento emitirá alguns bip e começará automaticamente a FASE 3
“Substituição do óleo do conversor”. No écran aparecerá a quantidade de óleo a substituir.
- Portanto, carregue a tecla . O equipamento solicitará o arranque do veículo deixando a caixa de velocidades em P
(parking) ou N (neutral) com a mensagem que aparece no écran.
Libretto 1885.indd 95 08/07/19 16:36

96
MANUAL DE USO E INSTRUÇÕES
PT
- Depois de arrancado o automóvel deixando a caixa de velocidades em P ou N carregue RAPIDAMENTE a tecla .
O equipamento começará automaticamente a introduzir óleo novo extraindo a mesma quantidade de óleo usado pelo
conversor. No écran aparecerão as quantidades de óleo novo introduzido e de óleo usado extraído.
Quando o óleo visualizado no visor do óleo velho tiver cor semelhante ao visualizado no sector do óleo novo
desligue o veículo.
- Depois de terminada a substituição do óleo do conversor o equipamento irá parar posicionando-se automaticamente em:
FASE 4
Desligue, portanto, as conexões do equipamento restaurando a linha da caixa de velocidades na origem e
verique que não haja vazamentos. Desloque a alavanca da caixa de velocidades em R D N P para efetuar a
purga da instalação. Arranque o automóvel e posicione a caixa de velocidades em P ou N e efetue o controlo do
nível do óleo.
- Para poder realizar uma EVENTUAL operação de reabastecimento de óleo através da sonda carregue a tecla e coloque
a sonda apropriada na mangueira PRESSURE. Aparecerá no écran:
- Atue nas teclas para congurar a quantidade de óleo que se quer reabastecer, verique que a sonda esteja
colocada corretamente na mangueira PRESSURE e introduza a própria sonda no interior da tampa do nível presente no
automóvel e carregue a tecla .
- Terminada a fase o equipamento se posicionará automaticamente na fase de Impressão de todo o processo efetuado.
Para obter a uidez certa de guia poderá ser necessário percorrer 40-50 km.
INTRODUÇÃO DE ÓLEO
- Conecte o equipamento na rede eléctrica e ligue o interruptor lateral. No écran aparecerá CAIXA DE VELOCIDADES
AUTOMÁTICA, atue na tecla duas vezes e carregue a tecla , e no écran aparecerá:
- Carregue a tecla e no écran aparecerá:
- Atue nas teclas para congurar a quantidade de óleo que se quer reabastecer, verique que a sonda esteja
colocada corretamente na mangueira PRESSURE e introduza a própria sonda no interior da tampa do nível presente no
automóvel ou no recipiente que se quer encher e carregue a tecla . O equipamento começará a reabastecer o óleo na
quantidade congurada.
Libretto 1885.indd 96 08/07/19 16:36

97
MANUAL DE USO E INSTRUÇÕES
SETUP
Conguração da data e hora.
- Permite alterar a data e a hora para a impressão do talão.
Controlo da calibração da balança.
- Selecione com a tecla a função - CONFIGURAÇÃO- e carregue a tecla .
- Selecione com a tecla a função - TESTE TARA (ícone balança) - e carregue a tecla . O écran mostrará, na linha
superior a quantidade do óleo presente no reservatório e na linha inferior o peso amostra.
- Nessa altura o operador colocará em cima do reservatório de armazenamento um peso conhecido (por exemplo, um peso de
2 kg) e deverá ler o peso exato no écran. Essa operação serve ao operador para controlar periodicamente que a balança do
próprio equipamento pese quantidades corretas.
Idioma
O Equipamento possui a possibilidade de visualizar as mensagens no écran em vários idiomas:
• ITALIANO
• INGLÊS
• HOLANDÊS
• etc.
Para a troca do idioma efetue quanto segue:
- Selecione com a tecla a função - CONFIGURAÇÃO- e carregue a tecla .
- Selecione com a tecla a função – IDIOMA (ícone bandeira) - e carregue a tecla .
- Selecione com a tecla - o idioma desejado e carregue a tecla .
NOTAS
NOTAS
Esvaziamento e enchimento dos reservatórios de óleo.
Óleo usado.
- Esvazie o reservatório quando o nível está ao redor de 10 litros.
- Utilize os recipientes apropriados para o óleo usado.
O óleo usado é um resíduo especial e como tal deve ser eliminado segundo as normas vigentes.
Óleo novo
- Aconselha-se o uso de óleos recomendados pelo fabricante da instalação.
MANUTENÇÃO
Substituição do ltro.
Para substituí-lo efetue as seguintes operações:
- Abra o bujão traseiro.
- Na parte central desparafuse o corpo do ltro (gura 3).
- Introduza um cartucho novo.
Substitua o ltro com um ltro original (cód. BETA 018850510).
gura 3
Libretto 1885.indd 97 08/07/19 16:36

98
BASE DE DADOS
Para aceder à base de dados online das caixas de velocidades automáticas entre no site BETA no endereço www.beta-
tools.com e registe-se para entrar na área reservada.
MANUTENÇÃO
As operações de manutenção e de reparação devem ser efetuadas somente e exclusivamente por pessoal especializado. Para
essas operações pode-se entrar em contato com o centro de reparações da Beta Utensili S.P.A, através do próprio revendedor
Beta de conança.
ELIMINAÇÃO
O equipamento de lavagem de caixa de velocidades automática, os acessórios e as embalagens devem ser enviados para um
ponto de colecta de eliminação de lixos, segundo as leis vigentes no País de utilização.
GARANTIA
Esta ferramenta é fabricada e testada segundo as normas vigentes atualmente na Comunidade Europeia e é
coberta por garantia durante um prazo de 12 meses para uso prossional ou 24 meses para uso não prossional.
São reparadas avarias devido a defeitos de material ou de fabrico mediante restauração ou substituição das
peças defeituosas a nosso critério.
A realização de uma ou mais intervenções no prazo da garantia não altera a data de seu vencimento.
Não estão sujeitos a garantia os defeitos devido ao desgaste, ao uso errado ou impróprio e as quebras causadas
por batidas e/ou caídas.
A garantia decai quando forem efetuadas alterações, quando o equipamento de lavagem de caixa de velocidades
automática è adulterado ou quando è enviado à assistência desmontado.
São expressamente excluídos danos causados a pessoas e/ou coisas de qualquer género e/ou natureza, diretos
e/ou indiretos.
DECLARAÇÃO DE CONFORMIDADE
Declaramos sob a nossa responsabilidade que o produto descrito é conforme a todas as disposições pertinentes
às Diretivas a seguir:
• Diretiva de Máquinas 2006/42/CE;
• Diretiva de Baixa Tensão (L.V.D.) 2014/35/UE.
O caderno técnico está disponível junto a:
BETA UTENSILI S.P.A.
Via A. Volta 18,
20845 Sovico (MB)
ITÁLIA
MANUAL DE USO E INSTRUÇÕES
PT
Libretto 1885.indd 98 08/07/19 16:36

99
HASZNÁLATI KÉZIKÖNYV ÉS ÚTMUTATÓ
HU
HASZNÁLATI KÉZIKÖNYV ÉS ÚTMUTATÓ AUTOMATA SEBESSÉGVÁLTÓ MOSÓ ÁLLOMÁS, MELYNEK GYÁRTÓJA:
BETA UTENSILI S.P.A.
Via A. Volta 18,
20845 Sovico (MB)
OLASZORSZÁG
Az eredeti dokumentum OLASZ nyelven íródott.
A biztonsági előírásokat tartalmazó útmutatót gondosan meg kell őrizni és át kell adni a felhasználó személyeknek
FELHASZNÁLÁSI CÉLZATOK
- Az automata sebességváltó mosó állomást a következő célra fejlesztették ki:
• Kizárólag automata sebességváltós gépjárművek esetén
- Az eszköz nem használható a következő célokra:
• tilos nedves, vizes környezetben használni, hónak vagy esőnek kitenni
• tilos a technikai előírásoktól és a TECHNIKAI ADATOK-tól eltérő esetekben használni
• tilos, az előírt felhasználástól eltérő esetekben használni
A MUNKAHELY BIZTONSÁGA
Az automata sebességváltó mosó állomást tilos robbanásveszélyes környezetben használni, mivel a működés alatt szikrák
pattanhatnak ki, amelyek a környezeti port vagy gőzöket berobbanthatják.
Figyeljünk arra, hogy gyermekek illetve látogatók ne lépjenek be abba a munkahelyi környezetbe, ahol az automata
sebességváltó mosó állomást hasznosítják. Más személyek jelenléte elvonhatja a gyelmünket az eszköz használatáról.
Figyeljünk arra, hogy a motoron végzett munkavégzés közben ne lélegezzük be az automata sebességváltó mosó állomás
által keltett gázokat.
Az automata sebességváltó mosó állomást kizárólag száraz, nedvességtől mentes helyen szabad használni.
AZ AUTOMATA SEBESSÉGVÁLTÓ MOSÓ ÁLLOMÁS BIZTONSÁGI ELŐÍRÁSAI
- Az automata sebességváltó mosó állomás épségét a használat előtt le kell ellenőrizni, bizonyosodjunk meg arról, hogy az
eszközön ne legyenek sérülések vagy elhasználódott részek.
- Tilos sérült automata sebességváltó mosó állomást használni, illetve tilos az állomást megnyitni vagy módosítani.
- A berendezéshez való csatlakoztatás előtt a csapokat el kell zárni.
- A tárolótartályt tilos 80% fölé tölteni.
- Rendszeresen ellenőrizzük le az automata sebességváltó mosó állomást és annak kiegészítőinek épségét.
- A használat alatt tilos letakarni az automata sebességváltó mosó állomást. Biztosítsunk megfelelő teret a szellőzésnek.
- Az automata sebességváltó mosó állomást ne használjuk nedves, vizes környezetben, tilos esőre kitenni.
A SZÜKSÉGES SZEMÉLYVÉDELMI ESZKÖZÖK
- Minden esetben maximális gyelemre van szükség, a munkavégzés alatt gyeljünk a mozdulatainkra. Az automata
sebességváltó mosó állomást nem szabad használni, ha fáradtak vagyunk vagy drog, alkohol, gyógyszerek hatása alatt állunk.
A használat alatt viseljük mindig az alábbi személyvédelmi eszközöket:
• munkavédelmi cipő
• munkavédelmi szemüveg
• munkavédelmi maszk
• zikai és kémiai tényezők ellen védelmet nyújtó kesztyű
• kémiai vegyükletek ellen védelmet nyújtó munkavédelmi ruházat
- Minden munkavégzést kizárólag száraz, jól szellőztetett munkakörnyezetben szabad elvégezni.
- Bizonyosodjunk meg arról, hogy a motor hatékonysági teszter vezetékei ne kerüljenek a ventillátor, a mozgó részek vagy az
üzemanyag vezeték közelébe.
AZ AUTOMATA SEBESSÁGVÁLTÓ MOSÓ ÁLLOMÁS HASZNÁLATA
ELŐTT ELENGEDHETETLEN A KÉZIKÖNYV TELJES TARTALMÁNAK
MEGISMERÉSE. A BIZTONSÁGI ELŐÍRÁSOK ÉS A FELHASZNÁLÁSI
ÚTMUTATÓBAN FOGLALTAK BE NEM TARTÁSA SÚLYOS SÉRÜLÉSEKET
OKOZHAT
FIGYELEM
Libretto 1885.indd 99 08/07/19 16:36

100
HASZNÁLATI KÉZIKÖNYV ÉS ÚTMUTATÓ
HU
- A gépjárművön végzett munkál elvégzése alatt tilos bő ruhát, karkötőt, láncot vagy egyéb, fémből készült tárgyat viselni.
- Az automata sebességváltó mosó állomást karbantartását vagy tisztítását kizárólag az eszköz elektromos hálózatról való
lecsatlakoztatását követően szabad elvégezni: ez az elővigyázatosság megelőzi az állomás esetleges beindulását és biztosítja
az eszköz biztonságos használatát.
AZ AUTOMATA SEBESSÉGVÁLTÓ MOSÓ ÁLLOMÁS BIZTONSÁGOS HASZNÁLATA
- Tilos láthatóan sérült automata sebességváltó mosó állomást használni.
- Az automata sebességváltó mosó állomást tilos módosítani. A módosítások lecsökkentik a biztonsági egységek hatásosságát
és megemelik a felhasználó személyt érintő veszélyeket.
- Az automata sebességváltó mosó állomást kizárólag szakember szerelheti és kizárólag eredeti cserealkatrészeket használhatnak
a javításhoz.
- Tilos a TECHNIKAI ADATOK táblázatban feltüntetett hálózat feszültségtől eltérő értékekkel használni az automata sebességváltó
mosó állomást.
- Az automata sebességváltó mosó állomást az elektromos hálózatról való lekötés után száraz törlőruhával szabad megtisztítani.
Tilos nedves vagy vizes törlőt használni a tisztításhoz
- Tilos vízszintesen elhelyezni az állomást, ez olajszivárgást okozhat.
MŰKÖDÉSI NÉVLEGES FESZÜLTSÉG
MAX. ELEKTROMOS PUMPA NYOMÁS
MAX. ELEKTROMOS PUMPA HOZAM
SZÜRÉSI HOZAM
N°2 OLAJGYŰJTŐ TARTÁLY
HASZNÁLATI HŐMÉRSÉKLET
MÉRETEK
SÚLY
230V – 50Hz
16 bar
14l/perc
10 mikron
20l darabonként
-20°C +60°C
520x650x1000 mm
78 kg
TECHNIKAI ADATOK
AZ AUTOMATA SEBESSÉGVÁLTÓ MOSÓ ÁLLOMÁS HASZNÁLATA ALATT SZÜKSÉGES SZEMÉLYVÉDELMI
ESZKÖZÖK
Az alábbi előírások be nem tartása komoly zikai sérüléseket és/vagy betegségeket idézhet elő.
AZ AUTOMATA SEBESSÉGVÁLTÓ MOSÓ ÁLLOMÁS HASZNÁLATA ALATT
VISELJÜNK MINDIG MUNKAVÉDELMI KESZTYŰT, AMELY MEGVÉD A KÜLSŐ
KÉMIAI ÉS FIZIKAI HATÓANYAGOKTÓL.
VISELJÜNK MINDIG MUNKAVÉDELMI CIPŐT
VISELJÜNK MINDIG MUNKAVÉDELMI SZEMÜVEGET
A FIZIKAI TÉNYEZŐK ELLEN VISELJEN MUNKAVÉDELMI MASZKOT
A felhasználási környezet higiéniai/veszélyek felmérés által kapott eredmények alapján, bizonyos esetekben
szükséges lehet, az adott helyzetnek megfelelő további személyvédelmi eszközök használata is, főleg
azokban az esetekben, amikor a mért értékek meghaladják a törvényileg előírt határértékeket.
ALAPVETŐ KISZERELÉS TARTALMA
Az alapvető kiszerelés mindig teljes, és csak magas minőségű elemeket tartalmaz:
- 1 db bemeneti cső (1. ábra)
- 1 db visszafolyási cső (1. ábra)
- 1 db csatlakozó csomag (2. ábra)
CSATLAKOZÓK OPCIONÁLIS (www.beta-tools.com)
Libretto 1885.indd 100 08/07/19 16:36

101
HASZNÁLATI KÉZIKÖNYV ÉS ÚTMUTATÓ
HU
FELHASZNÁLÁS
A használatra történő előkészítés.
Csatlakoztassuk a berendezést az elektromos hálózathoz (mono-fázisú 220V-os váltott áram) és kapcsoljuk be az állomást
a főkapcsoló használatával:
- Bizonyosodjunk meg arról, hogy a csapok ZÁRVA legyenek.
- Ellenőrizzük le az olajszintet.
- Ha szükséges ürítsük ki a fáradtolaj tartályt.
- Ellenőrizzük le az automata sebességváltóban lévő olaj mennyiségét.
- Helyezzük a gépjárművet az emelőre szabad kerekekkel, majd bizonyosodjunk meg az olajhűtő csoport bemeneti és kimeneti
csöveinek pontos pozíciójáról.
- Nyissuk meg a váltó egységet a legkönnyebben elérhető ponton, ügyelve arra, hogy ne kapcsolódjunk műanyag csatlakozóhoz
vagy a radiátor kapcsolószerkezetéhez, megelőzve így a töréseket.
- Az olajgyűjtő tartályt helyezzük közvetlenül a kiválasztott pont alá, ahol a váltó egységet meg kívánjuk nyitni és ahová az olajat
a csövekből ki szeretnénk folyatni.
- Indítsuk be a gépjárművet, és ellenőrizzük le melyik csőből folyik ki az olaj és hol van a váltó olajának kimenete.
- Csatlakoztassuk végül a visszafolyási csövet a 1885ös állomás és a váltó kimenetére, ahogy azt az előző pontban leírtuk, majd
a visszafolyási cső bemenetére.
- Indítsuk be a gépjármű motorját és ellenőrizzük le, hogy a csövek megfelelően tartanak-e az elvégzett csatlakozások, valamint,
hogy a felhasználási nyomás értékét jelző nyomásmérőn a nyomás 1-ről 4 barra emelkedjen.
6
5
1
8
9
2
4
3
7
Libretto 1885.indd 101 08/07/19 16:37

102
HASZNÁLATI KÉZIKÖNYV ÉS ÚTMUTATÓ
HU
A műszerfal úgy lett kialakítva, hogy a funkciókat, a nyomásmérőt és a szimbólummal jelölt gombokat könnyedén és intuitív
módon lehessen leolvasni:
1 – PRESSURE nyomásmérője: a gépjármű berendezésének nyomásának vizsgálatához szükséges.
2 – gomb: az állomás funkciói közti mozgáshoz, valamint az idő és olajminőség beállításához szükséges.
3 – gomb: az állomás funkciói közti mozgáshoz, valamint az idő és olajminőség beállításához szükséges.
4 – gomb: a kiválasztott funkció megerősítéséhez szükséges.
5 – gomb: bármely munkafázisok megszakításához szükséges.
6 – Hátsómegvilágítású grakai kijelző: az állomás funkcióit mutatja.
7 – Hígító tartó: a berendezés mosásához szükséges hígítót tartalmazza.
8 – Friss olaj ellenőrzőlyuk: a betöltött friss olaj színének ellenőrzéséhez szükséges.
9 – Fáradt olaj ellenőrzőlyuk: a begyűjtött fáradt olaj színének ellenőrzéséhez szükséges.
A MOSÓ ÁLLOMÁS ÁLTALÁNOS FUNKCIÓI
A MUNKACIKLUSOK SZINTETIKUS LEÍRÁSA
A berendezés bekapcsolásakor a kijelző automatikusan az AUTOMATIC TRANSMISSION funkcióra áll rá, amely az alábbi
munkafázisokat futtatja le:
- Hígító betöltése
- Mosás
- Olaj gyűjtőtölcsér ürítése
- Olaj konverter cseréje
- Olaj szintig töltése
Az AUTOMATIC TRANSMISSION soron belül a gomb segítségével mozogva az állomás a DSG sorra áll, amely az alábbi
munkafázisokat futtatja le:
- Hígító betöltése
- Mosás
- Olaj konverter cseréje
- Olaj szintig töltése
A gomb segítségével mozogva az AUTOMATIC TRANSMISSION sorból az állomás az olya speciális beállításokra tud
továbblépni, mint a SETUP és az INFO.
AUTOMATIC GEARBOX:
- 1. Fázis: hígító betöltése az automata váltó berendezésbe.
- 2. Fázis: a berendezés mosási ciklusa, hígítóval és a fáradt olajjal.
- 3. Fázis: az utántöltéshez, szűrőcseréhez és a tölcsér szigetelésének cseréjéhez szükséges fáradt olaj kiürítése a
gyűjtőtölcséren keresztül.
- 4. Fázis: Friss olaj töltése a gyűjtőtölcsérbe.
- 5. Fázis: A konverterben található fáradt olaj cseréje, friss olaj betöltésével.
- 6. Fázis: Gyűjtőtölcsérbe történő olaj szintig töltése.
DSG – AISIN TRANSMISSION:
- 1. Fázis: hígító betöltése az automata váltó berendezésbe.
- 2. Fázis: a berendezés mosási ciklusa, hígítóval és a fáradt olajjal.
- 3. Fázis: A konverterben található fáradt olaj cseréje, friss olaj betöltésével.
- 4. Fázis: Gyűjtőtölcsérbe történő olaj szintig töltése.
Libretto 1885.indd 102 08/07/19 16:37

103
HASZNÁLATI KÉZIKÖNYV ÉS ÚTMUTATÓ
HU
Beállítások:
- Az elektromos mérleg kalibrálásának ellenőrzése.
- Nyelv beállítása.
- Dátum és óra beállítása.
- Setting LCD- le frissítés.
A mosási folyamatot, valamint a fáradt olaj cseréjét, kizárólag meleg (40 °C feletti) csereolajjal szabad elvégezni.
Tartsuk mindig tiszteletben a gyártó által előírtakat. Tanácsoljuk, hogy használjanak megfelelő diagnosztikai
tesztelő eszközt.
A CIKLUSOK ANALÍTIKUS LEÍRÁSA
Automata váltó:
Miután a “PRESSURE” és “RETURN” csőrendszereket bekötöttük – ahogy azt a felhasználói-felhasználást előkészítő
fejezetben leírtuk -, végezzük el a következő lépéseket.
1. FÁZIS
- Csatlakoztassuk az állomást az elektromos hálózathoz, majd az oldalsó kapcsolóval indítsuk be. A kijelzők ekkor az
AUTOMATIC TRANSMISSION felirat jelenik meg, nyomjuk meg az gombot, ekkor a kijelzőn fel fog tűnni
- A gomb lenyomásával állíthatjuk be a hígító kívánt mennyiségét. Abban az esetben, ha a nem kívánunk hígítót betölteni a
gépjármű rendszerébe, hagyjuk a “0“ értéket beállítva. Miután beállítottuk a kívánt mennyiséget, nyomjunk le az gombot.
A felhasználás előtt, győződjünk meg, hogy a hígító megfelel-e a váltóhoz való felhasználáshoz.
- A kurzor automatikusan a “mosási idő percben “ sorra fog állni. A gomb lenyomásával állíthatjuk be a mosási ciklus
kívánt időtartamát. Abban az esetben, ha a nem kívánunk mosási ciklust végezni, hagyjuk a “0“ értéket beállítva. Miután
beállítottuk a kívánt mennyiséget, nyomjunk le az gombot.
- A kurzor automatikusan a “olaj literben“ sorra fog állni. A gomb lenyomásával állíthatjuk be a berendezésben található
és kicserélendő teljes olajmennyiséget. Miután beállítottuk a kívánt mennyiséget, nyomjunk le az gombot.
- Abban az eseten, ha mind a hígítóra, mind a mosási ciklusra és az olajra vonatkozó adatok betöltésre kerültek, akkor az
állomás az 1. Fázistól a “Hígító betöltése” szakasztól kezdi meg a munkafolyamatot, a kijelző pedig az automata váltó
rendszerbe kerülő hígító mennyiségét jelzi ki.
Libretto 1885.indd 103 08/07/19 16:37

104
HASZNÁLATI KÉZIKÖNYV ÉS ÚTMUTATÓ
HU
2. Fázis
- Miután az 1. Fázis lefutott az állomás megkezdi a 2. Fázist a “Mosás” programot, a rendszer pedig kéri a felhasználót, hogy
indítsa be a gépjárművet, a sebességváltót pedig P (parkoló) vagy N (üres/semleges) módban hagyva. Ekkor a kijelzőn fel fog
tűnni.
- Indítsuk be tehát a gépjármű motorját, a váltót hagyjuk P vagy N pozícióban és a megerősítéshez nyomjuk le az gombot.
Az állomás megkezdi a mosási munkafolyamatot és a piszok megszűrését, valamint jelezni fogja a munkafolyamat végéig
visszamaradó időt. A mosási folyamat alatt, miközben a gépjármű a szerelőhídon megemelt kerekekkel áll, tanácsoljuk, hogy
végezzenek el több fokozat cserét, beleértve a tolatási fokozatot is.
A mosási folyamatot meleg csereolajjal kell elvégezni..
- Abban az esetben, ha a kezdési kijelző ábrán a hígító mennyiségét “0”-ra állítottuk, az állomás automatikusan átugorja az 1.
Fázist és közvetlenül a 2. Fázis indul el.
3. Fázis
- Amikor a beállított időtartam lefutott az állomás néhány beep hangjelet fog leadni és automatikusan beindul a 3. Fázis a
“Olajtölcsér ürítés”. Ekkor a kijelzőn fel fog tűnni.
- Miközben az állomás folyamatosan kiüríti a gyűjtőtölcsért a kijelzőn a kiürített olaj mennyisége tűnik elő, amelyet a rendszer
a hozzá fekete színű csövekkel csatlakoztatott, “OLD OIL” felirattal ellátott tartályba gyűjtött össze. Miután a tölcsér kiürítésre
került az állomás automatikusan leáll, és néhány beep hangjelet fog leadni a rendszer, majd a kijelzőn fel fog tűnni.
Tanácsoljuk, hogy a fáradtolaj ellenőrzőlyukán keresztül tartsuk szemmel a folyamatot és abban az esetben ha,
buborékok alakulnának ki a tartályban kapcsoljuk le a gépjárművet.
- A gépjárművet tehát AZONNAL le kell állítani. Majd nyomjuk le az gombot. Az állomás ekkor elmenti a tölcsérből
eltávolított fáradtolaj mennyiségét. Ekkor a kijelzőn fel fog tűnni.
- Ezt követően távolítsuk el a tölcsért, gyelve az esetleges olajmaradékokra, ami a tölcsérben maradthatott, majd tisztítsuk
meg a tölcsért és az abban lévő mágneseket, valamint cseréljük ki a szűrőt és a váltó szigetelését. Miután elvégeztük ezeket
a lépéseket nyomjuk meg az gombot.
- Abban az esetben, ha a kezdési kijelző ábrán a hígító mennyiségét, valamint a mosási folyamat időtartamát “0”-ra állítottuk az
állomás automatikusan átugorja az 1. és a 2. Fázist, és közvetlenül a 3. Fázis indul el.
Libretto 1885.indd 104 08/07/19 16:37

105
HASZNÁLATI KÉZIKÖNYV ÉS ÚTMUTATÓ
HU
4. FÁZIS
- Ezt követően beindul a 4. Fázis az “Olajtölcsér feltöltés”. A kijelzőn azonnal fel fog tűnni a kiürített olaj mennyisége, az előző
fázisban mért alapján.
Bizonyosodjunk meg arról, hogy csak a gyártó által előírt olajat használjunk.
- A gomb lenyomásával emelhetjük meg a mennyiség értékét attól függően, hogy a szétszereléskor mekkora mennyiségű
visszamaradt olajat találtunk a gyűjtőtölcsérben. Az gomb lenyomásával az állomás elkezdi feltölteni a tölcsért és a
kijelzőn a betöltött olaj mennyisége fog folyamatában előtűnni.
- Miután elvégeztük a friss olaj tölcsérbe történő betöltését az állomás beep hangjelet fog leadni és a kijelzőn a konverterben
található olaj mennyisége tűnik elő, amely a cseréhez lesz szükséges.
5.FÁZIS
- Az állomás által megadott adat a felhasználó által, a kezdési kijelzőn beállított olajmennyiség és a 4. Fázisban a tölcsérbe
töltött mennyiség alapján kerül kiszámításra (ezt utólag növelni vagy csökkenteni lehet a felhasználó által, a gombok
lenyomásával). Majd végezetül nyomjuk le az gombot. Az állomás, a kijelzőn feltűnő üzenettel kérni fogja a gépjármű
motorjának beindítását, és azt hogy hagyjuk a váltót hagyjuk P (parkoló) vagy N (üres/semleges) pozícióban.
- Miután beindítottuk a gépjárművet, és a váltót P vagy N pozícióban hagytuk, AZONNAL nyomjuk le az gombot. Az
állomás megkezdi a konverterből eltávolított fáradt olaj mennyiségével megegyező mennyiségű friss olajat. A kijelzőn ekkor a
friss olaj és az eltávolított olaj mennyisége fog előtűnni.
Amikor az olajellenőrzőlyukon keresztül azt látjuk, hogy a fáradt olaj színe a friss olaj színével egyezik meg,
kapcsoljuk le a gépjárművet.
- Miután elvégeztük a konverterben lévő olaj cseréjét, az állomás automatikusan megáll a pozícióban.
Libretto 1885.indd 105 08/07/19 16:37

106
HASZNÁLATI KÉZIKÖNYV ÉS ÚTMUTATÓ
HU
6. FÁZIS
Csatlakoztassuk le végül a csatlakozásokat az állomásról, állítsuk vissza a váltót a kiindulási állapotába és
bizonyosodjunk meg arról, hogy ne legyenek szivárgások. A sebességváltót próbáljuk ki minden pozícióban R D
N P így a berendezés kiürül. Indítsuk be a gépjárművet és tegyük a váltót P vagy N pozícióba és végezzük el az
olajszint ellenőrzését.
- Ahhoz, hogy az olaj ESETLEGES szintig töltését elvégezzük a szondán keresztül, nyomjuk le az gombot és helyezzük el
a megfelelő szondát a PRESSURE csőben. A kijelzőn fel fog tűnni.
- A gombok lenyomásával állítsuk be szintig töltéshez szükséges olaj mennyiségét, bizonyosodjunk meg arról, hogy a
szonda megfelelőlen került elhelyezésre a PRESSURE csőbe, majd tegyük a szondát a járművön található szintjelző kupakba
és nyomjuk le az gombot.
- A folyamat elvégzését követően az állomás automatikusan a Nyomtatási fázisra áll át, amely a teljes elvégzett
munkafolyamatot fogja kinyomtatni.
Ahhoz, hogy a vezetés megfelelő és gördülékeny legyen újra, körülbelül 40-50 km megtétele szükséges.
DSG-AISIN VÁLTÓ
Azt követően, hogy csatlakoztassuk a “PRESSURE” és “RETURN” csőrendszereket, ahogy azt a felhasználás-előkészítő
fejezetben leírtuk, majd végezzük el a következő lépéseket:
1. FÁZIS
- Miután összekötöttük a “PRESSURE” és “RETURN” csőrendszereket, ahogy azt a ciklusok-automata váltó analitikus leírása
fejezetben leírtuk, a gomb segítségével mozogjunk, majd nyomjuk meg az gombot és a képernyő fel fog jönni.
- Nyomjuk meg az gombot és a képernyő fel fog jönni.
- A gomb segítségével állítsuk be a hígító kívánt mennyiségét. Ha a nem kívánunk hígítót betölteni a gépjármű
rendszerébe, hagyjuk a “0“ értéket beállítva. Miután beállítottuk a kívánt mennyiséget, nyomjuk le az gombot.
A felhasználás előtt, győződjünk meg, hogy a hígító megfelel-e a váltóhoz való felhasználáshoz.
- A kurzor automatikusan a “mosási idő percben “ sorra fog állni. A gomb lenyomásával állíthatjuk be a mosási ciklus
kívánt időtartamát. Abban az esetben, ha a nem kívánunk mosási ciklust végezni, hagyjuk a “0“ értéket beállítva. Miután
beállítottuk a kívánt mennyiséget, nyomjuk le az gombot.
Libretto 1885.indd 106 08/07/19 16:37

107
HASZNÁLATI KÉZIKÖNYV ÉS ÚTMUTATÓ
HU
- A kurzor automatikusan a “olaj literben“ sorra fog állni. A gomb lenyomásával állíthatjuk be a berendezésben található és
kicserélendő teljes olajmennyiséget. Miután beállítottuk a kívánt mennyiséget, nyomjuk le az gombot.
- Abban az eseten, ha mind a hígítóra, mind a mosási ciklusra és az olajra vonatkozó adatok betöltésre kerültek, akkor az
állomás az 1. Fázistól a “Hígító betöltése” szakasztól kezdi meg a munkafolyamatot, a kijelző pedig az automata váltó
rendszerbe kerülő hígító mennyiségét jelzi ki.
- Ha a nyitó beállításban a hígító mennyisége “0”-ra lett beállítva, akkor az állomás automatikusa az 1. Fázist átugorva a 2.
Fázist kezdi el futtatni.
2. Fázis
- Miután az 1. Fázis lefutott az állomás megkezdi a 2. Fázist a “Mosás” programot, a rendszer pedig kéri a felhasználót, hogy
indítsa be a gépjárművet, a sebességváltót pedig P (parkoló) vagy N (üres/semleges) módban hagyva. Ekkor a kijelző fel fog
tűnni.
- Indítsuk be tehát a gépjármű motorját, a váltót hagyjuk P vagy N pozícióban és a megerősítéshez nyomjuk le az gombot.
Az állomás megkezdi a mosási munkafolyamatot és a piszok megszűrését, valamint jelezni fogja a munkafolyamat végéig
visszamaradó időt. A mosási folyamat alatt, miközben a gépjármű a szerelőhídon megemelt kerekekkel áll, tanácsoljuk, hogy
végezzenek el több fokozat cserét, beleértve a tolatási fokozatot is.
A mosási folyamatot meleg váltóolajjal kell elvégezni.
- Abban az esetben, ha a kezdési kijelző ábrán a hígító mennyiségét “0”-ra állítottuk, valamint a mosási folyamat időtartamát az
állomás automatikusan átugorja az 1. és a 2. Fázist és közvetlenül a 3. Fázis indul el.
3. FÁZIS
- Amikor ez előre beállított időtartam lefutott, a rendszer beep hangjelet ad majd le, ezt követően beindul a 3. Fázis az “A
konverter olaj cseréje”. A kijelzőn cserélendő olaj mennyisége fog feltűnni.
- Nyomjuk le az gombot. Az állomás kérni fogja a gépjármű beindítását a váltót P (parkoló) vagy N (üres/semleges)
pozícióban hagytuk, az üzenet a kijelzőn fog megjelenni.
Libretto 1885.indd 107 08/07/19 16:37

108
HASZNÁLATI KÉZIKÖNYV ÉS ÚTMUTATÓ
HU
- Miután beindítottuk a gépjárművet, és a váltót P vagy N pozícióban hagytuk, AZONNAL nyomjuk le az gombot. Az
állomás megkezdi a konverterből eltávolított fáradt olaj mennyiségével megegyező mennyiségű friss olajat. A kijelzőn ekkor a
friss olaj és az eltávolított olaj mennyisége fog előtűnni.
Amikor az olajellenőrzőlyukon keresztül azt látjuk, hogy a fáradt olaj színe a friss olaj színével egyezik meg,
kapcsoljuk le a gépjárművet.
- Miután elvégeztük a konverterben lévő olaj cseréjét, az állomás automatikusan megáll a pozícióban.
4. FÁZIS
Csatlakoztassuk le végül a csatlakozásokat az állomásról, állítsuk vissza a váltót a kiindulási állapotába és
bizonyosodjunk meg arról, hogy ne legyenek szivárgások. A sebességváltót próbáljuk ki minden pozícióban R D
N P így a berendezés kiürül. Indítsuk be a gépjárművet és tegyük a váltót P vagy N pozícióba és végezzük el az
olajszint ellenőrzését.
- Ahhoz, hogy az olaj ESETLEGES szintig töltését elvégezzük a szondán keresztül, nyomjuk le az gombot és helyezzük el
a megfelelő szondát a PRESSURE csőben. A kijelzőn fel fog tűnni.
- A gombok lenyomásával állítsuk be szintig töltéshez szükséges olaj mennyiségét, bizonyosodjunk meg arról,
hogy a szonda megfelelőlen került elhelyezésre a PRESSURE csőbe, majd tegyük a szondát a járművön található szintjelző
kupakba és nyomjuk le az gombot.
- A folyamat elvégzését követően az állomás automatikusan a Nyomtatási fázisra áll át, amely a teljes elvégzett
munkafolyamatot fogja kinyomtatni.
Ahhoz, hogy a vezetés megfelelő és gördülékeny legyen újra, körülbelül 40-50 km megtétele szükséges.
OLAJ BETÖLTÉS
- Csatlakoztassuk az állomást az elektromos hálózatra és kapcsoljuk be az oldalsó kapcsoló segítségével. A kijelzőn az
AUTOMATIC TRANSMISSION felirat jelenik meg, nyomjuk le a gombot kétszer, majd nyomjuk le az gombot, ekkor
a kijelző fel fog tűnni.
- Nyomjuk meg az gombot és a képernyő fel fog jönni.
- A gombok lenyomásával állítsuk be szintig töltéshez szükséges olaj mennyiségét, bizonyosodjunk meg arról,
hogy a szonda megfelelőlen került elhelyezésre a PRESSURE csőbe, majd tegyük a szondát a járművön található szintjelző
kupakba és nyomjuk le az gombot. Az állomás meg fogja kezdeni a beállított olajmennyiség betöltését.
Libretto 1885.indd 108 08/07/19 16:37

109
HASZNÁLATI KÉZIKÖNYV ÉS ÚTMUTATÓ
HU
SETUP
Dátum és óra beállítása.
- Dátum és óra beállítás az elismervény nyomtatásához.
A mérleg kalibrálásának ellenőrzése.
- Válassza ki a gombbal, funkció - SETUP- majd nyomja meg az gombot.
- Válassza ki a gombbal, funkció TARE TEST (mérleg ikon) - majd nyomja meg az gombot. A kijelzőn, a felső sorban
fog megjelenni a tartályban lévő olaj mennyisége, az alsó sorban pedig a minta súlya.
- Ekkor a felhasználó a tároló tartályra egy ismert értékű súlyt kell tegyen (például egy 2 Kg-os súlyt), majd le kell olvassa
kijelzőn a pontos súlyt. Ez a folyamat ahhoz szükséges, hogy rendszeresen le legyen ellenőrizve az állomás mérlegének
helyes működése és pontos mérése.
LANGUAGE
Az Állomás lehetővé teszi, hogy a kijelző üzenetei különböző nyelveken jelenjenek meg:
• OLASZ
• ANGOL
• HOLLAND
• Stb.
A nyelv cseréje a következő módon végezhető el:
- Válassza ki a gombbal, funkció - SETUP- majd nyomja meg az gombot.
- Válassza ki a gombbal, funkció - LANGUAGE (zászlóikon) - majd nyomja meg az gombot.
- Válassza ki a gombbal, a kívánt LANGUAGE majd nyomja meg az gombot.
MEGJEGYZÉS
Az olajtartály ürítése és feltöltése.
Fáradt olaj.
- A tartályt akkor kell kiüríteni, amikor az olajszint 10 liter körül van.
- A fáradt olaj tárolásához a megfelelő tárolótartályokat kell használni.
A fáradt olaj speciális hulladéknak minősül, és mint ilyen, az érvényes előírások betartásával kell feldolgozni.
Friss olaj
- Tanácsoljuk, hogy a berendezés gyártója által javasolt olajat használjanak.
SZERVÍZ
Szűrő cseréje.
A cseréhez a következő lépéseket kell megtenni:
- Nyissuk ki az en a hátsó cartert.
- A középső lapon csavarozzuk le a szűrőtestet (3. ábra).
- Helyezzük el az új szűrőt.
Cseréljük ki a szűrőt egy eredeti cserealkatrésszel (BETA kód 018850510).
3. ábra
Libretto 1885.indd 109 08/07/19 16:37

110
ADATBANKHOZ
Az automata váltók adatait tartalmazó adatbankhoz való hozzáfáráshez keresse fel a BETA honlapját www.beta-tools.
com, itt a regiszrálás után tud belépni majd a korlátolt elérésű felületre.
KARBANTARTÁS
A karbantartási és javítási munkálatokat kizárólag szakember végezheti el. Az ilyen beavatkozások elvégeztetéséhez, a Beta
viszonteladójukon keresztül tudnak a Beta Utensili S.P.A. javítási központjához fordulni.
HULLADÉK FELDOLGOZÁS
Az automata sebességváltó mosó állomást, a kiegészítőket és a csomagolóanyagokat megfelelő hulladékfeldolgozó központba
kell eljuttatni, ahol a felhasználási országban érvényes törvényi előírások szerint dolgozzák fel azokat.
GARANCIA
Ezt az eszköszt az Európai Unióban érvényes vonatkozó szabályzatok szerint gyártották és vizsgáltak be.
Szakirányú felhasználás esetén az eszközt 12 hónapos garancia fedi, nem szakirányú használat esetén 24
hónapos garancia fedi.
Kizárólag anyaghibából történő javítást vagy gyártási helyreállítást vagy a hibás részek cseréjét végezzük el, saját
meglátásunk szerint.
A garancia által fedett munkálatok elvégzése nem befolyásolja a garancia érvényességét, annak lejárata nem
változik.
A garancia nem fedi az elhasználódásból, helytelen vagy az előírttól eltérő használatból származó meghibásodásokat,
illetve a csapódásból és/vagy ütésből származó meghibásodásokat.
A garancia azonnal érvényét veszti, ha a berendezésen módosítást végeznek, vagy ha az automata sebességváltó
mosó állomást megnyitják vagy ha a szervízbe már bontottan érkezne.
A garancia kifejezetten érvénytelen személyek és/vagy tárgyak által elszenvedett bármilyen jellegű és/vagy
természetű, közvetlen és/vagy közvetett sérülések esetében.
MEGFELELŐSÉGI BIZONYLAT
Felelősségünk teljes tudatában kijelentjük, hogy az itt leírt műszer mindenben megfelel a vonatkozó előírásoknak,
illetve a következő Irányelveknek és azok módosításainak:
• 2006/42/EK Mechanikai Irányelv;
• Alacsony Feszültségi Irányelv (L.V.D.) 2014/35/EU;
A Technikai Leírás a következő címen érhető el:
BETA UTENSILI S.P.A.
Via A. Volta 18,
20845 Sovico (MB)
OLASZORSZÁG
HASZNÁLATI KÉZIKÖNYV ÉS ÚTMUTATÓ
HU
Libretto 1885.indd 110 08/07/19 16:37

111
BETA UTENSILI S.p.A.
via Alessandro Volta, 18 - 20845 Sovico (MB) ITALY
Tel. +39 039.2077.1 - Fax +39 039.2010742
www.beta-tools.com
Libretto 1885.indd 111 08/07/19 16:37
-
 1
1
-
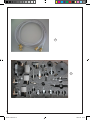 2
2
-
 3
3
-
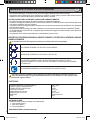 4
4
-
 5
5
-
 6
6
-
 7
7
-
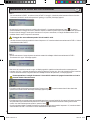 8
8
-
 9
9
-
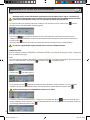 10
10
-
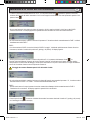 11
11
-
 12
12
-
 13
13
-
 14
14
-
 15
15
-
 16
16
-
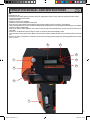 17
17
-
 18
18
-
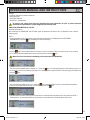 19
19
-
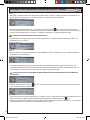 20
20
-
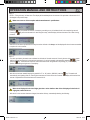 21
21
-
 22
22
-
 23
23
-
 24
24
-
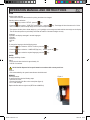 25
25
-
 26
26
-
 27
27
-
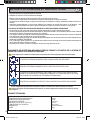 28
28
-
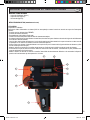 29
29
-
 30
30
-
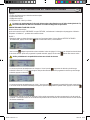 31
31
-
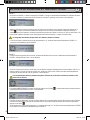 32
32
-
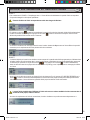 33
33
-
 34
34
-
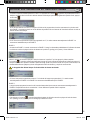 35
35
-
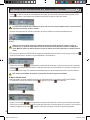 36
36
-
 37
37
-
 38
38
-
 39
39
-
 40
40
-
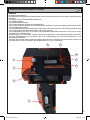 41
41
-
 42
42
-
 43
43
-
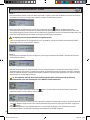 44
44
-
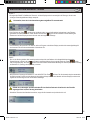 45
45
-
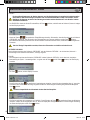 46
46
-
 47
47
-
 48
48
-
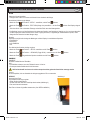 49
49
-
 50
50
-
 51
51
-
 52
52
-
 53
53
-
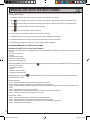 54
54
-
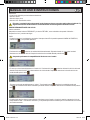 55
55
-
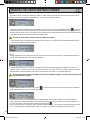 56
56
-
 57
57
-
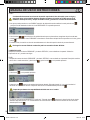 58
58
-
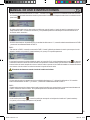 59
59
-
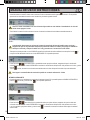 60
60
-
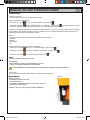 61
61
-
 62
62
-
 63
63
-
 64
64
-
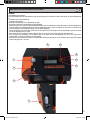 65
65
-
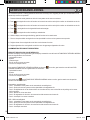 66
66
-
 67
67
-
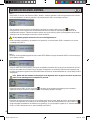 68
68
-
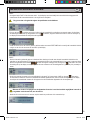 69
69
-
 70
70
-
 71
71
-
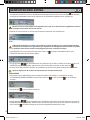 72
72
-
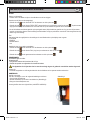 73
73
-
 74
74
-
 75
75
-
 76
76
-
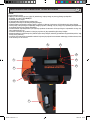 77
77
-
 78
78
-
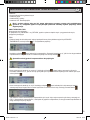 79
79
-
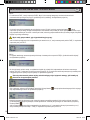 80
80
-
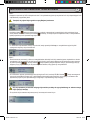 81
81
-
 82
82
-
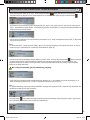 83
83
-
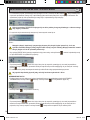 84
84
-
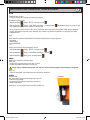 85
85
-
 86
86
-
 87
87
-
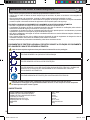 88
88
-
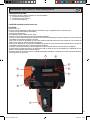 89
89
-
 90
90
-
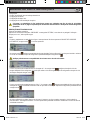 91
91
-
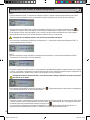 92
92
-
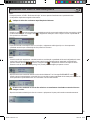 93
93
-
 94
94
-
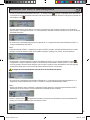 95
95
-
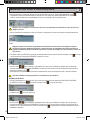 96
96
-
 97
97
-
 98
98
-
 99
99
-
 100
100
-
 101
101
-
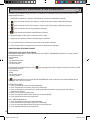 102
102
-
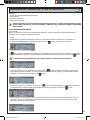 103
103
-
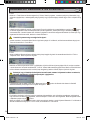 104
104
-
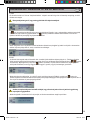 105
105
-
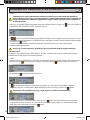 106
106
-
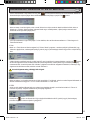 107
107
-
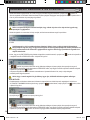 108
108
-
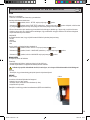 109
109
-
 110
110
-
 111
111


in andere talen
- italiano: Beta 1885 Istruzioni per l'uso
- français: Beta 1885 Mode d'emploi
- español: Beta 1885 Instrucciones de operación
- Deutsch: Beta 1885 Bedienungsanleitung
- português: Beta 1885 Instruções de operação
- polski: Beta 1885 Instrukcja obsługi

