Blaupunkt Calais MP48 de handleiding
- Categorie
- Auto media-ontvangers
- Type
- de handleiding

Calais MP48 7 620 000 033
www.blaupunkt-professional-systems.com
Truck Entertainment
Bedienungs- und Einbauanleitung
Operating and installation instructions
Mode d’emploi et de montage
Istruzioni d’uso e di installazione
Instrucciones de manejo e instalación
Instruções de serviço e de montagem
Gebruiksaanwijzing en inbouwhandleiding
Bruks- och monteringsanvisning
Kullanım ve montaj kılavuzu
01_CalaisMP48_de.indd 101_CalaisMP48_de.indd 1 11.06.2008 15:11:38 Uhr11.06.2008 15:11:38 Uhr

2
7
11
12
13
3
2
4
8
5
1
6
10
14
9
15
01_CalaisMP48_de.indd 201_CalaisMP48_de.indd 2 11.06.2008 15:11:40 Uhr11.06.2008 15:11:40 Uhr

3
DEUTSCH
1 Lautstärkeregler
2 BND-Taste
Kurzdruck: Wahl der Speicherebene
bzw. des Wellenbereichs
Langdruck: Start der Travelstore-Funk-
tion (FMT oder MWT/LWT)
3 Ein-/Aus-Taste
Kurzdruck: Einschalten des Ge rä tes
Im Betrieb: Stummschaltung (Mute)
Langdruck: Ausschalten des Ge rä tes
4 CD-Auswurftaste
5 CD-Schacht
6 Display
7 MENU-Taste
Aufrufen der Menüs für die Grund ein-
stellungen.
8 Multifunktionswippe
9 Infrarot-Empfänger für IR-Fernbe die-
nung (optional)
: AUD-Taste
Kurzdruck: Audio-Menü zur Einstellung
von Bässen, Höhen, Balance, Fader
und Loudness öffnen
Langdruck (10 Sek.): Werkseinstel-
lungen wiederherstellen
; TA-Taste
Ein-/Ausschalten des Vorrangs für
Verkehrsfunk
Abbruch einer laufenden Verkehrs funk-
durch sage
< Tastenblock 1 - 6
= RDS-Taste
RDS Komfortfunktion ein-/ausschalten
> SRC-Taste
Quellenwahl zwischen Radio und
(wenn eingelegt, angeschlossen bzw.
eingeschaltet) CD, MP3, CD-Wechsler
und AUX
? Code LED
Bedienelemente
01_CalaisMP48_de.indd 301_CalaisMP48_de.indd 3 11.06.2008 15:11:40 Uhr11.06.2008 15:11:40 Uhr

4
Wichtige Hinweise .............................6
Bestimmungsgemäßer Gebrauch .......6
Fernbedienung (Option) ...................6
CD-Wechsler (Option) ......................6
USB-Interface (Option) .....................6
Altgerät-Entsorgung ......................... 6
Diebstahlschutz CODE .......................7
Code-Abfrage ein-/ausschalten
(CODE) .......................................... 7
Code-Nummer nach
Spannungsunterbrechung eingeben ...8
Ein-/Ausschalten ...............................8
Ein-/Ausschalten mit der
Ein-/Aus-Taste .................................8
Aus-/Einschalten über die
Fahrzeugzündung ............................ 8
Einschalten durch CD-Einschub .........8
Ausschaltzeit einstellen ....................9
Einschalten durch Telefon (Option) .....9
Einschalten mit der
IR-Fernbedienung RC 10 P (Option) ...9
Lautstärke einstellen .........................9
Stummschaltung (MUTE) ..................9
Telefon-/Navigation-Audio .................9
Bestätigungston (BEEP)
ein-/ausschalten ............................ 10
Maximale Einschaltlautstärke
einstellen (ON VOL)........................10
Geräuschabhängige Lautstärke-
anpassung einstellen (GALA) ...........11
Klang .............................................. 11
Höhen einstellen ............................11
Bässe einstellen.............................11
Mitten einstellen ............................ 12
Lautstärkeverteilung links/rechts
einstellen (BAL) ............................. 12
Lautstärkeverteilung vorn/hinten
einstellen (FAD) .............................12
Uhrzeit ............................................13
Uhrzeit anzeigen ............................13
Uhrzeit einstellen ........................... 13
Uhrmodus 12/24 Std. wählen ......... 13
Zeitzone einstellen (TIMEZONE) ....... 14
Radiobetrieb ...................................14
Radiobetrieb einschalten ................14
RDS-Komfortfunktion (AF, REG) .......14
Wellenbereich/Speicherebene
wählen ......................................... 15
Sender einstellen ...........................15
Sender speichern ..........................16
Gespeicherte Sender abrufen ..........16
Empfangbare Sender anspielen
(BANDSCAN) ................................ 17
Programm-Typ (PTY) ......................17
Störabhängige Höhenabsenkung
(HICUT) ........................................17
Radiotext ein-/ausschalten ..............18
Verkehrsfunk ..................................18
Vorrang für Verkehrsfunk
ein-/ ausschalten ...........................18
Lautstärkeanhebung für
Verkehrsdurchsagen einstellen ........19
Verkehrsdurchsagen ausblenden......19
Inhaltsverzeichnis
01_CalaisMP48_de.indd 401_CalaisMP48_de.indd 4 11.06.2008 15:11:40 Uhr11.06.2008 15:11:40 Uhr

5
DEUTSCH
CD-Betrieb ...................................... 19
CD-Betrieb starten .........................20
Anzeige von Titelinformationen
(CD-Text) ......................................20
Titel wählen .................................. 20
Schneller Suchlauf (hörbar) ............ 21
Zufallswiedergabe der Titel (MIX) .....21
Titel anspielen (SCAN) ....................21
Titel wiederholen (RPT) ..................21
Wiedergabe unterbrechen
(PAUSE) ....................................... 21
CD entnehmen ..............................21
MP3-/WMA-Betrieb .........................22
Vorbereitung eines
MP3-Datenträgers .........................22
MP3-Betrieb starten ....................... 24
Anzeige von Titelinformationen
(ID3-Tags) .................................... 24
Verzeichnis wählen ........................ 25
Titel/Dateien wählen ......................25
Schneller Suchlauf ......................... 25
Titel in zufälliger Reihenfolge
abspielen (MIX) .............................25
Titel anspielen (SCAN) ....................26
Einzelne Titel oder ganze
Verzeichnisse wiederholt
abspielen (REPEAT) ....................... 26
Wiedergabe unterbrechen
(PAUSE) ....................................... 26
CD-Wechsler-Betrieb .......................27
CD-Wechsler-Betrieb starten ...........27
CD wählen ....................................27
Titel wählen .................................. 27
Schneller Suchlauf (hörbar) ............ 27
Einzelne Titel oder ganze CDs
wiederholt abspielen (RPT) ............. 27
Titel in zufälliger Reihenfolge
abspielen (MIX) .............................28
Alle Titel aller CDs anspielen
(SCAN) ........................................28
Wiedergabe unterbrechen
(PAUSE) ....................................... 28
IR-Fernbedienung RC 10 P ................ 29
Fernbedienungsempfänger .............29
Funktionen der Fernbedienung ........29
Vorverstärkerausgang .....................30
Externe Audioquellen .......................31
AUX-Eingang einstellen ...................31
Pegel des AUX-Eingangs einstellen....32
Werkseinstellungen
wiederherstellen (RESET) ................32
Technische Daten ............................ 33
Betriebsspannung..........................33
Verstärker .....................................33
Tuner ...........................................33
CD ...............................................33
ISO connector................................281
Inhaltsverzeichnis
01_CalaisMP48_de.indd 501_CalaisMP48_de.indd 5 11.06.2008 15:11:40 Uhr11.06.2008 15:11:40 Uhr

6
Wichtige Hinweise
Wichtige Hinweise
Bevor Sie Ihr Gerät in Betrieb nehmen,
lesen Sie diese Anleitung sorgfältig und
machen Sie sich mit dem Gerät vertraut.
Bewahren Sie diese Anleitung für spätere
Fragen im Fahrzeug auf.
Bestimmungsgemäßer Gebrauch
Das Gerät ist für den Betrieb in einem
Nutzfahrzeug mit 24-V-Bordnetzspannung
und für den Einbau in einen 1-DIN-Schacht
konzipiert.
Verkehrssicherheit
Die Verkehrssicherheit ist obers-
tes Gebot. Bedienen Sie Ihr Gerät nur,
wenn es die Verkehrslage zulässt. Machen
Sie sich vor Fahrtantritt mit dem Gerät ver-
traut. Akustische Warnsignale von Polizei,
Feuerwehr und Rettungsdiensten müssen
im Fahrzeug rechtzeitig wahrgenommen
werden können. Hören Sie deshalb wäh-
rend der Fahrt Ihr Programm in angemes-
sener Lautstärke.
Fernbedienung (Option)
Mit der Fernbedienung RC 10 P können die
wichtigsten Funktionen bedient werden.
Eine Infrarot-Fernbedienung ist als Zubehör
(Blaupunkt-Nr. 7 607 591 512) erhältlich.
CD-Wechsler (Option)
Sie können den CD-Wechsler CDC A08 T
(Blaupunkt-Nr. 7 607 274 002) oder
IDC A09 (Blaupunkt-Nr. 7 607 274 005)
anschließen. Die CD-Wechsler sind als
Zubehör erhältlich.
USB-Interface (Option)
Sie können das Blaupunkt-USB-Interface
anschließen, um MP3-/WMA-Dateien von
einem USB-Datenträger abzuspielen. Das
USB-Interface ist als Zubehör (Blaupunkt-
Nr. 7 607 541 576) erhältlich.
Altgerät-Entsorgung
Entsorgen Sie Ihr Altgerät bitte nicht
in den Hausmüll!
Nutzen Sie zur Entsorgung des
Altgerätes die zur Verfügung stehenden
Rückgabe- und Sammelsysteme.
01_CalaisMP48_de.indd 601_CalaisMP48_de.indd 6 11.06.2008 15:11:40 Uhr11.06.2008 15:11:40 Uhr

7
DEUTSCH
Diebstahlschutz
Diebstahlschutz CODE
Ihr Gerät ist zum Schutz gegen Diebstahl
mit einer vierstelligen Code-Nummer aus-
gestattet. Diese Nummer muss immer dann
eingegeben werden, wenn das Gerät von
der Betriebsspannung des Fahrzeugs ge-
trennt wurde. Die Code-Abfrage ist werk-
seitig ausgeschaltet, kann aber eingeschal-
tet werden.
Hinweis:
Ist die Code-Abfrage eingeschaltet,
beginnt die Code LED ? zu blinken
wenn sowohl das Gerät als auch die
Fahrzeugzündung ausgeschaltet sind.
Die Code-Nummer fi nden Sie im Radio-
Pass zu Ihrem Gerät.
Hinweis:
Bewahren Sie den Radio-Pass niemals
im Fahrzeug auf!
Code-Abfrage ein-/ausschalten
(CODE)
Drücken Sie die Taste MENU 7.
Drücken Sie die Taste
oder 8
so oft, bis „CODE“ und die aktuelle
Einstellung „ON“ (ein) oder „OFF“ (aus)
im Display 6 angezeigt werden.
Drücken Sie die Taste
oder 8.
Im Display 6 wird „0000“ angezeigt.
Geben Sie den Code ein:
Hinweis:
Wenn Sie eine falsche Code-Nummer
eingeben, wird erneut „0000“ im
Display 6 angezeigt. Sie können die
Eingabe noch zweimal wiederholen.
Nach der dritten Fehleingabe wird das
Gerät für 1 Stunde gesperrt. In dieser
쏅
쏅
쏅
Zeit wird „WAIT 1HR“ im Display 6
angezeigt. Wenn Sie das Gerät in die-
ser Wartezeit ausschalten, müssen Sie
nach dem Wiedereinschalten wieder
eine volle Stunde warten.
Drücken Sie die Stationstaste 1 <
so oft, bis die erste Zahl Ihrer Code-
Nummer im Display 6 erscheint.
Drücken Sie die Stationstaste 2 <
so oft, bis die zweite Zahl Ihrer Code-
Nummer im Display 6 erscheint.
Drücken Sie die Stationstaste 3 <
so oft, bis die dritte Zahl Ihrer Code-
Nummer im Display 6 erscheint.
Drücken Sie die Stationstaste 4 <
so oft, bis die vierte Zahl Ihrer Code-
Nummer im Display 6 erscheint.
Wenn die richtige Code-Nummer im
Display 6 angezeigt wird, halten Sie
die Stationstaste 5 < länger als 2
Sekunden gedrückt.
Im Display 6 werden erneut „CODE“ und
die aktuelle Einstellung „ON“ (ein) oder
„OFF“ (aus) angezeigt.
Drücken Sie die Taste
bzw. 8,
um die Code-Abfrage aus- bzw. einzu-
schalten.
Um das Menü zu verlassen,
drücken Sie die Taste MENU 7.
쏅
쏅
쏅
쏅
쏅
쏅
쏅
01_CalaisMP48_de.indd 701_CalaisMP48_de.indd 7 11.06.2008 15:11:40 Uhr11.06.2008 15:11:40 Uhr

8
Code-Nummer nach
Spannungsunterbrechung
eingeben
Schalten Sie das Gerät ein.
Im Display 6 erscheint erst „CODE“ und
dann „0000“. Sie können den Code einge-
ben:
Hinweis:
Wenn Sie eine falsche Code-Nummer
eingeben, wird erneut „0000“ im
Display 6 angezeigt. Sie können die
Eingabe noch zweimal wiederholen.
Nach der dritten Fehleingabe wird das
Gerät für 1 Stunde gesperrt. In dieser
Zeit wird „WAIT 1HR“ im Display 6
angezeigt. Wenn Sie das Gerät in die-
ser Wartezeit ausschalten, müssen Sie
nach dem Wiedereinschalten wieder
eine volle Stunde warten.
Geben Sie die Code-Nummer wie im
Abschnitt „Code-Abfrage ein-/aus-
schalten“ beschrieben ein.
Wenn die richtige Code-Nummer im
Display 6 angezeigt wird, halten Sie
die Stationstaste 5 < länger als 2
Sekunden gedrückt.
Das Gerät wird eingeschaltet.
쏅
쏅
쏅
Ein-/Ausschalten
Zum Ein- bzw. Ausschalten des Geräts ste-
hen Ihnen verschiedene Möglichkeiten zur
Verfügung:
Ein-/Ausschalten mit der Ein-
/Aus-Taste
Zum Einschalten drücken Sie die Ein-
/Aus-Taste 3.
Zum Ausschalten halten Sie die Ein-/
Aus-Taste 3 länger als zwei Sekunden
gedrückt.
Hinweis:
Zum Schutz der Fahrzeugbatterie
wird das Gerät bei ausgeschalteter
Fahrzeugzündung automatisch nach
einer einstellbaren Zeit ausgeschaltet
(siehe Abschnitt „Ausschaltzeit einstel-
len“ in diesem Kapitel).
Aus-/Einschalten über die
Fahrzeugzündung
Wenn das Gerät mit der Fahrzeugzündung
verbunden ist und es nicht mit der Ein-/Aus-
Taste 3 ausgeschaltet wurde, wird es mit
der Fahrzeugzündung ein- bzw. ausgeschal-
tet.
Einschalten durch CD-Einschub
Zum Einschalten mit dem CD-Einschub,
schieben Sie eine CD mit der bedruck-
ten Seite nach oben in den CD-Schacht
5, bis Sie einen leichten Widerstand
spüren.
Die CD wird automatisch eingezogen, das
Gerät startet im CD-Betrieb.
쏅
쏅
쏅
Diebstahlschutz Ein-/Ausschalten
01_CalaisMP48_de.indd 801_CalaisMP48_de.indd 8 11.06.2008 15:11:40 Uhr11.06.2008 15:11:40 Uhr

9
DEUTSCH
Ausschaltzeit einstellen
Drücken Sie die Taste MENU 7.
Drücken Sie die Taste
oder 8
so oft, bis „HOUR“ und die aktuelle
Einstellung im Display 6 angezeigt
werden.
Stellen Sie die Ausschaltzeit mit der
Taste
bzw. 8 in 5-Minuten-
Schritten zwischen 5 und 60 Minuten
ein.
Um das Menü zu verlassen,
drücken Sie die Taste MENU 7.
Einschalten durch Telefon
(Option)
Wenn bei ausgeschaltetem Gerät das
Telefon aktiviert wird, schaltet sich das
Gerät ein. Nach dem Ausschalten des
Telefons wird das Gerät automatisch wie-
der ausgeschaltet. Vorraussetzung ist, dass
das Telefon ordnungsgemäß mit dem Gerät
verbunden ist.
Einschalten mit der IR-
Fernbedienung RC 10 P (Option)
Zum Einschalten drücken Sie die Taste
ON H auf der IR-Fernbedienung
RC 10 P.
Hinweis:
Der IR-Empfänger des Gerätes muss
eingeschaltet sein, damit Sie die IR-
Fernbedienung verwenden können.
Lesen Sie dazu den Abschnitt „Fern-
bedienungsempfänger“ im Kapitel „IR
Fernbedienung RC 10 P“.
쏅
쏅
쏅
쏅
쏅
Lautstärke einstellen
Die Systemlautstärke ist in Schritten von 0
(aus) bis 32 (maximal) regelbar.
Um die Systemlautstärke zu erhöhen,
drehen Sie den Lautstärkeregler 1
nach rechts.
Um die Systemlautstärke zu verrin-
gern, drehen Sie den Lautstärkeregler
1 nach links.
Stummschaltung (MUTE)
Sie können die Systemlautstärke schlagar-
tig stummzuschalten (Mute).
Drücken Sie kurz die Taste 3.
Mute aufheben
Um die vorher gehörte Lautstärke wieder zu
aktivieren,
drücken Sie erneut kurz die Taste 3.
Telefon-/Navigation-Audio
Stummschaltung während Telefonbetrieb
Wenn Ihr Autoradio mit einem Mobiltelefon
oder Navigationssystem verbunden ist,
wird bei einem eingehenden Anruf oder
einer Sprachausgabe der Navigation das
Autoradiogerät stummgeschaltet. Das
Gespräch oder die Sprachausgabe wird
über die Autoradiolautsprecher wiederge-
geben.
Dazu muss das Mobiltelefon oder das
Navigationssystem an das Autoradio an-
geschlossen sein (Kammer C2 auf der
Geräterückseite).
Welche Navigationssysteme an Ihrem
Autoradio verwendet werden können, erfah-
ren Sie von Ihrem Blaupunkt-Fachhändler.
쏅
쏅
쏅
쏅
Ein-/Ausschalten Lautstärke
01_CalaisMP48_de.indd 901_CalaisMP48_de.indd 9 11.06.2008 15:11:40 Uhr11.06.2008 15:11:40 Uhr

10
Wenn ein Anruf eingeht oder eine
Navigationsdurchsage stattfi ndet, wird im
Display „PHONE“ angezeigt.
Lautstärke für Telefon-/Navigation-
Audio einstellen (PHONEVOL)
Die Lautstärke von Telefongesprächen oder
Sprachausgaben der Navigation ist einstell-
bar:
Drücken Sie die Taste MENU 7.
Drücken Sie dieTaste
oder 8 so
oft, bis „PHONEVOL“ angezeigt wird.
Nach ca. 2 Sekunden werden „VOL“ und
die aktuelle Einstellung im Display 6 an-
gezeigt.
Drücken Sie die Taste
bzw. 8,
um die Lautstärke zwischen 0 und 32
einzustellen.
Hinweis:
Sie müssen nicht auf die Anzeige der
aktuellen Einstellung warten, um sie
durch Drücken der Taste
bzw. 8
zu ändern.
Um das Menü zu verlassen,
drücken Sie die Taste MENU 7.
Hinweis:
Sie können die Lautstärke auch wäh-
rend eines Telefongesprächs oder ei-
ner Navigationsdurchsage mit dem
Lautstärkeregler 1 einstellen. Die
eingestellte Lautstärke wird automa-
tisch gespeichert.
Bestätigungston (BEEP) ein-/
ausschalten
Auf bestimmte Aktionen, z. B. länge-
res Drücken einer Taste, ertönt ein
쏅
쏅
쏅
쏅
Bestätigungston (Beep). Sie können den
Bestätigungston abschalten:
Drücken Sie die Taste MENU 7.
Drücken Sie die Taste
oder 8
so oft, bis „BEEP“ und die aktuelle
Einstellung „ON“ (ein) bzw. „OFF“ (aus)
im Display 6 angezeigt werden.
Drücken Sie die Taste
bzw. 8,
um den Beep aus- bzw. einzuschalten.
Um das Menü zu verlassen,
drücken Sie die Taste MENU 7.
Maximale Einschaltlautstärke
einstellen (ON VOL)
Wenn Sie das Gerät einschalten, spielt es in
der zuletzt gewählten Lautstärke. Wenn Sie
die Lautstärke vor dem Ausschalten jedoch
höher als die maximale Einschaltlautstärke
eingestellt hatten, wird die Lautstärke beim
Wiedereinschalten automatisch auf die ein-
gestellte Einschaltlautstärke begrenzt.
Hinweis:
Um das Gehör zu schützen, ist die ma-
ximale Einschaltlautstärke auf den Wert
25 begrenzt.
Drücken Sie die Taste MENU 7.
Drücken Sie die Taste
oder 8 so
oft, bis „ON VOL“ angezeigt wird.
Nach ca. 2 Sekunden werden „VOL“ und
die aktuelle Einstellung im Display 6 an-
gezeigt.
Drücken Sie die Taste
bzw. 8,
um die maximale Einschaltlautstärke
zwischen 5 und 25 einzustellen.
Hinweis:
Sie müssen nicht auf die Anzeige der
aktuellen Einstellung warten, um sie
쏅
쏅
쏅
쏅
쏅
쏅
쏅
Lautstärke
01_CalaisMP48_de.indd 1001_CalaisMP48_de.indd 10 11.06.2008 15:11:41 Uhr11.06.2008 15:11:41 Uhr

11
DEUTSCH
durch Drücken der Taste bzw. 8
zu ändern.
Um das Menü zu verlassen,
drücken Sie die Taste MENU 7.
Geräuschabhängige Lautstärke-
anpassung einstellen (GALA)
Mit dieser Funktion wird die Lautstärke des
Autoradios automatisch der gefahrenen
Geschwindigkeit und den damit verbun-
denen Fahrgeräuschen angepasst. Zum
Beispiel wird bei steigender Geschwindigkeit
die Lautstärke automatisch angehoben, um
die lauteren Fahrgeräusche (z. B. durch
Fahrtwind) auszugleichen.
Dazu muss Ihr Fahrzeug das
Tachometersignal zur Verfügung stellen und
das Autoradio entsprechend angeschlos-
sen sein.
Die automatische Lautstärkeanhebung ist
in 6 Stufen (OFF (aus), 1-5) einstellbar.
Drücken Sie die Taste MENU 7.
Drücken Sie die Taste
oder 8
so oft, bis „GALA“ und die aktuelle
Einstellung angezeigt werden.
Drücken Sie die Taste
bzw. 8,
um die Lautstärkeanpassung zwischen
„OFF“ (aus) und 5 einzustellen.
Um das Menü zu verlassen,
drücken Sie die Taste MENU 7.
쏅
쏅
쏅
쏅
쏅
Klang
Höhen einstellen
Drücken Sie die Taste AUD :.
Drücken Sie die Taste
oder 8 so
oft, bis TREBLE“ angezeigt wird.
Halten Sie die Taste
bzw. 8 län-
ger als 2 Sekunden gedrückt.
Im Display wird kurz „FREQ“ und dann die
aktuell ausgewählte Höhenfrequenz ange-
zeigt.
Um eine andere Höhenfrequenz zwischen
10,0 kHz und 17,5 kHz auszuwählen,
drücken Sie die Taste
bzw. 8.
Um den Höhenpegel einzustellen,
drücken Sie die Taste
oder 8 so
oft, bis „GAIN“ angezeigt wird.
Nach ca. 2 Sekunden werden „GAIN“ und
die aktuelle Einstellung angezeigt.
Drücken Sie die Taste
bzw. 8,
um den Höhenpegel zwischen –7 und
+7 einzustellen.
Um das Menü zu verlassen,
drücken Sie die Taste AUD :.
Bässe einstellen
Drücken Sie die Taste AUD :.
Drücken Sie die Taste
oder 8 so
oft, bis „BASS“ angezeigt wird.
Halten Sie die Taste
bzw. 8 län-
ger als 2 Sekunden gedrückt.
Im Display wird kurz „FREQ“ und dann die
aktuell ausgewählte Bassfrequenz ange-
zeigt.
Um eine andere Bassfrequenz zwischen 60
Hz und 200 Hz auszuwählen,
drücken Sie die Taste
bzw. 8.
쏅
쏅
쏅
쏅
쏅
쏅
쏅
쏅
쏅
쏅
쏅
Lautstärke Klang
01_CalaisMP48_de.indd 1101_CalaisMP48_de.indd 11 11.06.2008 15:11:41 Uhr11.06.2008 15:11:41 Uhr

12
Drücken Sie die Taste bzw. 8,
um den Mittenpegel zwischen –7 und
+7 einzustellen.
Um den Gütefaktor für die Mitten einzustel-
len,
drücken Sie die Taste
oder 8 so
oft, bis „Q FACTOR“ angezeigt wird.
Nach ca. 2 Sekunden werden „Q“ und die
aktuelle Einstellung angezeigt.
Drücken Sie die Taste
bzw. 8,
um den Gütefaktor zwischen 0,5 und
1,25 einzustellen.
Um das Menü zu verlassen,
drücken Sie die Taste AUD :.
Lautstärkeverteilung links/
rechts einstellen (BAL)
Drücken Sie die Taste AUD :.
Drücken Sie die Taste
oder 8
so oft, bis „BAL“ und die aktuelle
Einstellung angezeigt werden.
Drücken Sie die Taste
bzw. 8, um
die Lautstärkeverteilung links/rechts
zwischen –10 und +10 einzustellen.
Um das Menü zu verlassen,
drücken Sie die Taste AUD :.
Lautstärkeverteilung vorn/
hinten einstellen (FAD)
Hinweis
Die hinteren Lautsprecher müssen
über einen zusätzlichen Verstärker an-
geschlossen werden.
Drücken Sie die Taste AUD :.
Drücken Sie die Taste
oder 8
so oft, bis „FAD“ und die aktuelle
Einstellung angezeigt werden.
쏅
쏅
쏅
쏅
쏅
쏅
쏅
쏅
쏅
쏅
Um den Basspegel einzustellen,
drücken Sie die Taste
oder 8 so
oft, bis „GAIN“ angezeigt wird.
Nach ca. 2 Sekunden werden „GAIN“ und
die aktuelle Einstellung angezeigt.
Drücken Sie die Taste
bzw. 8,
um den Basspegel zwischen –7 und +7
einzustellen.
Um den Gütefaktor für den Bass einzustel-
len,
drücken Sie die Taste
oder 8 so
oft, bis „Q FACTOR“ angezeigt wird.
Nach ca. 2 Sekunden werden „Q“ und die
aktuelle Einstellung angezeigt.
Drücken Sie die Taste
bzw. 8,
um den Gütefaktor zwischen 1,0 und
2,0 einzustellen.
Um das Menü zu verlassen,
drücken Sie die Taste AUD :.
Mitten einstellen
Drücken Sie die Taste AUD :.
Drücken Sie die Taste
oder 8 so
oft, bis „MIDDLE“ angezeigt wird.
Halten Sie die Taste
bzw. 8 län-
ger als 2 Sekunden gedrückt.
Im Display wird kurz „FREQ“ und dann die
aktuell ausgewählte Mittenfrequenz ange-
zeigt.
Um eine andere Mittenfrequenz zwischen
500 Hz und 2,5 kHz auszuwählen,
drücken Sie die Taste
bzw. 8.
Um den Mittenpegel einzustellen,
drücken Sie die Taste
oder 8 so
oft, bis „GAIN“ angezeigt wird.
Nach ca. 2 Sekunden werden „GAIN“ und
die aktuelle Einstellung angezeigt.
쏅
쏅
쏅
쏅
쏅
쏅
쏅
쏅
쏅
쏅
Klang
01_CalaisMP48_de.indd 1201_CalaisMP48_de.indd 12 11.06.2008 15:11:41 Uhr11.06.2008 15:11:41 Uhr

13
DEUTSCH
Drücken Sie die Taste bzw. 8, um
die Lautstärkeverteilung vorn/hinten
zwischen –10 und +10 einzustellen.
Um das Menü zu verlassen,
drücken Sie die Taste AUD :.
쏅
쏅
Uhrzeit
Uhrzeit anzeigen
Um die Uhrzeit für ca. 10 Sekunden im
Display einzublenden,
halten Sie die Taste MENU 7 länger
als 2 Sekunden gedrückt.
Uhrzeit einstellen
Drücken Sie die Taste MENU 7.
Drücken Sie die Taste
oder 8 so
oft, bis „TIMESET“ im Display 6 ange-
zeigt werden.
Nach ca. 2 Sekunden wird die aktuelle
Uhrzeit im Display 6 angezeigt. Vor der
Uhrzeit wird im 24-Std.-Modus „24H“ und
im 12-Std.-Modus „AM“ bzw. „PM“ ange-
zeigt. Die Stunden blinken und können ein-
gestellt werden.
Um die Stunden bzw. Minuten einzustellen,
drücken Sie die Taste
bzw. 8.
Um zwischen Stunden und Minuten zu
wechseln,
drücken Sie die Taste 6 <.
Hinweis:
Sie müssen nicht auf die Anzeige der
aktuellen Uhrzeit warten, um sie durch
Drücken der Taste
bzw. 8 zu än-
dern.
Um das Menü zu verlassen,
drücken Sie die Taste MENU 7.
Uhrmodus 12/24 Std. wählen
Drücken Sie die Taste MENU 7.
Drücken Sie die Taste
oder 8 so
oft, bis „24H MODE“ bzw. „12H MODE“
im Display 6 angezeigt wird.
쏅
쏅
쏅
쏅
쏅
쏅
쏅
쏅
Klang Uhrzeit
01_CalaisMP48_de.indd 1301_CalaisMP48_de.indd 13 11.06.2008 15:11:41 Uhr11.06.2008 15:11:41 Uhr

14
Drücken Sie die Taste bzw. 8,
um zwischen den Modi zu wechseln.
Um das Menü zu verlassen,
drücken Sie die Taste MENU 7.
Zeitzone einstellen (TIMEZONE)
Falls Sie sich über Zeitzonen hinweg be-
wegen, können Sie den Zeitunterschied
zur aktuell eingestellten Uhrzeit in 1-Std.-
Schritten einstellen. Auf diese Weise kön-
nen Sie die Anzeige der Uhrzeit für die ak-
tuell gültige Zeitzone korrigieren, ohne die
Uhrzeit selbst neu einstellen zu müssen.
Drücken Sie die Taste MENU 7.
Drücken Sie die Taste
oder 8 so
oft, bis „TIMEZONE“ angezeigt wird.
Nach ca. 2 Sekunden werden „ZONE“ und
die aktuelle Einstellung im Display 6 an-
gezeigt.
Drücken Sie die Taste
bzw. 8,
um den Zeitunterschied in Schritten
von 1 Std. zwischen –12 und +12 ein-
zustellen.
Hinweis:
Sie müssen nicht auf die Anzeige der
aktuellen Einstellung warten, um sie
durch Drücken der Taste
bzw. 8
zu ändern.
Um das Menü zu verlassen,
drücken Sie die Taste MENU 7.
쏅
쏅
쏅
쏅
쏅
쏅
Radiobetrieb
Dieses Gerät ist mit einem RDS-Radio-
empfänger ausgestattet. Fast alle zu emp-
fangenden FM-Sender senden ein Signal
aus, das neben dem Programm auch
Informationen wie den Sendernamen und
den Programm-Typ (PTY) enthält.
Der Sendername wird, sobald er empfang-
bar ist, im Display 6 angezeigt.
Radiobetrieb einschalten
Wenn Sie sich in einer anderen Betriebsart
befi nden,
drücken Sie die Taste BND 2,
oder
drücken Sie die Taste SRC > so oft,
bis „RADIO“ im Display 6 erscheint.
Im Display 6 wird die aktuelle Frequenz
bzw.der Sendername angezeigt.
RDS-Komfortfunktion (AF, REG)
Die RDS-Komfortfunktionen AF (Alternativ-
frequenz) und REG (Regional) erweitern das
Leistungsspektrum Ihres Radiogerätes:
AF: Wenn die RDS-Komfortfunktion
aktiviert ist, sucht das Gerät im
Hintergrund automatisch nach der am
besten zu empfangenden Frequenz des
eingestellten Senders.
REG: Einige Sender teilen zu be-
stimmten Zeiten ihr Programm in
Regionalprogramme mit unterschied-
lichem Inhalt auf. Mit aktivierter REG-
Funktion wird verhindert, dass das
Gerät auf Alternativfrequenzen des ein-
gestellten Senders wechselt, die einen
anderen Programminhalt haben.
쏅
쏅
•
•
Uhrzeit Radiobetrieb
01_CalaisMP48_de.indd 1401_CalaisMP48_de.indd 14 11.06.2008 15:11:42 Uhr11.06.2008 15:11:42 Uhr

15
DEUTSCH
Hinweis:
REG muss gesondert im Menü ein- bzw.
ausgeschaltet werden.
RDS-Komfortfunktion ein-bzw.
ausschalten
Um die RDS-Funktionen AF und REG zu
nutzen, drücken Sie die Taste RDS =.
Die RDS-Komfortfunktionen sind aktiv,
wenn das RDS-Symbol im Display 6 an-
gezeigt wird.
REG ein-/ausschalten
Drücken Sie die Taste MENU 7.
Drücken Sie die Taste
oder 8
so oft, bis „REG“ und die aktuelle
Einstellung „ON“ (ein) bzw. „OFF“ (aus)
im Display 6 angezeigt werden.
Drücken Sie die Taste
bzw. 8,
um REG aus- bzw. einzuschalten.
Um das Menü zu verlassen,
drücken Sie die Taste MENU 7.
Hinweis:
Die Einstellung REG ON/OFF wirkt sich
nur aus, wenn die RDS-Funktion akti-
viert ist.
Wellenbereich/Speicherebene
wählen
Mit diesem Gerät können Sie Programme
der Frequenzbänder FM, MW und LW
(Europa) bzw. FM und AM (NAFTA) emp-
fangen. Für den Wellenbereich FM ste-
hen drei Speicherebenen FM1, FM2 und
FMT und für die Wellenbereiche MW und
LW bzw. AM je eine Speicherebene zur
Verfügung. Zusätzlich gibt es eine weitere
Speicherebene MWT/LWT bzw. AMT. Auf
쏅
쏅
쏅
쏅
쏅
jeder Speicherebene können 6 Sender ge-
speichert werden.
Um zwischen den Wellenbereichen bzw.
Speicherebenen umzuschalten,
drücken Sie die Taste BND 2.
Sender einstellen
Sie haben verschiedene Möglichkeiten,
Sender einzustellen.
Automatischer Sendersuchlauf
Drücken Sie die Taste
bzw. 8.
Der nächste empfangbare Sender wird ein-
gestellt.
Hinweise:
Ist der Vorrang für Verkehrsfunk
eingeschaltet, wird der nächste
Verkehrsfunksender eingestellt.
Ist PTY eingeschaltet, wird der
nächste Sender des gewählten
Programmtyps eingestellt.
Empfi ndlichkeit des Sendersuchlaufs
einstellen
Sie können wählen, ob bei geringer
Empfi ndlichkeit nur starke oder bei hoher
Empfi ndlichkeit auch schwache Sender
eingestellt werden sollen.
Drücken Sie die Taste MENU 7.
Drücken Sie die Taste
oder
8 8 so oft, bis „SENS“ und die
aktuelle Einstellung „LO“ (geringe
Empfi ndlichkeit) bzw. „DX“ (hohe
Empfi ndlichkeit) im Display 6 ange-
zeigt werden.
Drücken Sie die Taste
bzw. 8,
um zwischen den Einstellungen „LO“
und „DX“ zu wechseln.
쏅
쏅
•
•
쏅
쏅
쏅
Radiobetrieb
01_CalaisMP48_de.indd 1501_CalaisMP48_de.indd 15 11.06.2008 15:11:42 Uhr11.06.2008 15:11:42 Uhr

16
Um das Menü zu verlassen,
drücken Sie die Taste MENU 7.
Manuelle Senderabstimmung
Um die eingestellte Frequenz in kleinen
Schritten zu ändern,
drücken Sie die Taste oder 8.
Um die eingestellte Frequenz schnell zu än-
dern,
halten Sie die Taste
oder 8 ge-
drückt
Hinweis:
Die manuelle Senderabstimmung ist
nur möglich, wenn die RDS-Funktion
und PTY ausgeschaltet sind.
Blättern in Senderketten (nur FM)
Stellt ein Sender mehrere Programme
zur Verfügung, können Sie in dieser sog.
„Senderkette“ blättern.
Drücken Sie die Taste
oder 8, um
zum nächsten Sender der Senderkette
zu wechseln.
Hinweis:
Das Blättern in Senderketten ist nur
möglich, wenn die RDS-Funktion ein-
geschaltet und PTY ausgeschaltet ist.
Sie können so nur zu Sendern wech-
seln, die Sie schon einmal empfangen
haben. Verwenden Sie dazu z. B. die
Travelstore-Funktion (T-STORE).
Sender speichern
Sender manuell speichern
Wählen Sie die gewünschte Speicher-
ebene bzw. den Wellenbereich.
Stellen Sie den Sender ein.
쏅
쏅
쏅
쏅
쏅
쏅
Halten Sie die Stationstaste 1 - 6 <,
auf die der Sender gespeichert werden
soll, länger als 2 Sekunden gedrückt.
Der Bestätigungston ertönt. Der Sender
ist auf der gewählten Stationstaste gespei-
chert.
Sender automatisch speichern
(T-STORE)
Sie können die 6 stärksten Sender aus
der Region automatisch speichern.
Für den Wellenbereich FM erfolgt die
Speicherung auf der Speicherebene FMT,
für die Wellenbereiche MW und LW auf
der Speicherebene MWT/LWT und für den
Wellenbereich AM auf der Speicherebene
AMT.
Hinweis:
Zuvor auf dieser Ebene gespeicherte
Sender werden dabei durch neu gefun-
dene Sender ersetzt.
Wählen Sie den gewünschten
Wellenbereich.
Halten Sie die Taste BND 2 länger als
zwei Sekunden gedrückt.
Die Speicherung beginnt. Im Display 6
wird „T-STORE“ angezeigt. Nachdem der
Vorgang abgeschlossen ist, wird der Sender
auf Speicherplatz eins der Speicherebene
FMT, MWT/LWT bzw. AMT gespielt.
Gespeicherte Sender abrufen
Wählen Sie die Speicherebene bzw.
den Wellenbereich.
Drücken Sie die Stationstaste 1 - 6 <,
auf der gewünschte Sender gespei-
chert ist.
쏅
쏅
쏅
쏅
쏅
Radiobetrieb
01_CalaisMP48_de.indd 1601_CalaisMP48_de.indd 16 11.06.2008 15:11:42 Uhr11.06.2008 15:11:42 Uhr

17
DEUTSCH
Empfangbare Sender anspielen
(BANDSCAN)
Mit der Bandscan-Funktion können Sie alle
empfangbaren Sender für jeweils ca. 10
Sekunden anspielen lassen.
Bandscan starten
Halten Sie die Taste
bzw. 8 län-
ger als 2 Sekunden gedrückt.
Im Display wird kurz „BANDSCAN“ an-
gezeigt. Das Gerät sucht im aktuellen
Wellenbereich nach Sendern. Jeder ge-
fundene Sender wird für ca. 10 Sekunden
angespielt. Dabei wird die eingestellte
Frequenz bzw. der Sendername angezeigt.
Bandscan beenden
Drücken Sie die Taste
bzw. 8.
Der Scanvorgang wird beendet. Der zuletzt
gespielte Sender bleibt eingestellt.
Programm-Typ (PTY)
Neben dem Sendernamen übermitteln eini-
ge FM-Sender auch Informationen über den
Typ ihres Programms. Solche Programm-
Typen können z. B. sein:
KULTUR REISE JAZZ SPORT
NACHRICH POP ROCK MUSIK
Mit der PTY-Funktion können Sie gezielt
Sender eines bestimmten Programm-Typs
auswählen.
Wenn PTY eingeschaltet ist und ein PTY-
Suchlauf gestartet wurde, wechselt das
Gerät automatisch vom aktuellen Sender
bzw. aus einer anderen Betriebsart zu dem
Sender mit dem gewählten Programm-Typ.
PTY ein-/ausschalten
Drücken Sie die Taste MENU 7.
쏅
쏅
쏅
Drücken Sie die Taste
oder 8
so oft, bis „PTY“ und die aktuelle
Einstellung „ON“ (ein) bzw. „OFF“ (aus)
im Display 6 angezeigt werden.
Drücken Sie die Taste
bzw. 8,
um PTY aus- bzw. einzuschalten.
Um das Menü zu verlassen,
drücken Sie die Taste MENU 7.
Programm-Typ auswählen und Suchlauf
starten
Drücken Sie die Taste
oder 8 so
oft, bis der gewünschte Programm-Typ
angezeigt wird.
Drücken Sie die Taste
bzw. 8,
um den Suchlauf zu starten.
Falls ein Sender mit dem gewählten
Programm-Typ gefunden wird, wird dieser
eingestellt.
Störabhängige Höhenabsenkung
(HICUT)
Die Hicut-Funktion bewirkt eine Wieder-
gabeverbesserung bei schlechtem Radio-
empfang. Wenn Empfangsstörungen
vorhanden sind, wird automatisch der
Störpegel abgesenkt.
Um HICUT ein- bzw. ausschalten,
drücken Sie die Taste MENU 7.
Drücken Sie die Taste
oder 8
so oft, bis „HICUT“ und die aktuelle
Einstellung „ON“ (ein) bzw. „OFF“ (aus)
im Display 6 angezeigt werden.
Drücken Sie die Taste
bzw. 8,
um HICUT aus- bzw. einzuschalten.
Um das Menü zu verlassen,
drücken Sie die Taste MENU 7.
쏅
쏅
쏅
쏅
쏅
쏅
쏅
쏅
쏅
Radiobetrieb
01_CalaisMP48_de.indd 1701_CalaisMP48_de.indd 17 11.06.2008 15:11:42 Uhr11.06.2008 15:11:42 Uhr

18
Radiotext ein-/ausschalten
Einige Radiosender benutzen das RDS-
Signal dazu, Werbung oder andere Infor-
mationen anstelle ihres Sendernamens
zu übermitteln. Dieser Radiotext wird im
Display 6 angezeigt.
Um die Anzeige von Radiotext ein- bzw. aus-
schalten,
drücken Sie die Taste MENU 7.
Drücken Sie die Taste
oder 8 so
oft, bis „RADIOTXT“ angezeigt wird.
Nach ca. 2 Sekunden wird die aktuelle
Einstellung „TEXT ON“ (ein) bzw. „TEXT
OFF“ (aus) im Display 6 angezeigt.
Drücken Sie die Taste
bzw. 8,
um die Anzeige von Radiotext aus- bzw.
einzuschalten.
Hinweis:
Sie müssen nicht auf die Anzeige der
aktuellen Einstellung warten, um sie
durch Drücken der Taste
bzw. 8
zu ändern.
Um das Menü zu verlassen,
drücken Sie die Taste MENU 7.
쏅
쏅
쏅
쏅
Verkehrsfunk
Vorrang für Verkehrsfunk ein-/
ausschalten
Um den Vorrang für Verkehrsfunk in jeder
Betriebsart ein- bzw. auszuschalten,
drücken Sie die Taste TA ;.
Hinweis:
In den Betriebsarten CD, MP3, CD-
Wechsler und AUX steht diese Funktion
nur zur Verfügung, wenn zuletzt der
Wellenbereich FM eingestellt war.
Der Vorrang für Verkehrsdurchsagen ist
aktiviert, wenn im Display 6 das TA-
Symbol angezeigt wird. Sobald das Gerät
eine Verkehrsdurchsage empfängt, wird sie
durchgestellt. Im Display 6 wird für die
Dauer der Durchsage „TRAFFIC“ angezeigt.
Hinweis:
Sie hören einen Warnton,
wenn Sie beim Hören des Verkehrs-
funksenders oder einer CD den Sen-
de bereich des eingestellten Ver kehrs-
funksenders verlassen und der dar-
auf folgende automatische Suchlauf
keinen neuen Verkehrsfunksender
fi ndet.
wenn Sie von einem Verkehrsfunk-
sender zu einem Sender ohne Ver-
kehrsfunk wechseln.
Schalten Sie dann entweder den
Vorrang für Verkehrsfunk aus oder
wechseln Sie zu einem Sender mit
Verkehrsfunk.
쏅
•
•
Radiobetrieb Verkehrsfunk
01_CalaisMP48_de.indd 1801_CalaisMP48_de.indd 18 11.06.2008 15:11:42 Uhr11.06.2008 15:11:42 Uhr

19
DEUTSCH
Lautstärkeanhebung für
Verkehrsdurchsagen einstellen
Sie können einstellen, um wie viele
Lautstärkestufen Verkehrsdurchsagen lau-
ter als die eingestellte Lautstärke wiederge-
geben werden:
Drücken Sie die Taste MENU 7.
Drücken Sie die Taste
oder 8 so
oft, bis „TA VOL“ angezeigt wird.
Nach ca. 2 Sekunden werden „VOL“ und
die aktuelle Einstellung im Display 6 an-
gezeigt.
Drücken Sie die Taste
bzw. 8,
um die Lautstärkeanhebung zwischen
0 und 10 einzustellen.
Hinweis:
Sie müssen nicht auf die Anzeige der
aktuellen Einstellung warten, um sie
durch Drücken der Taste
bzw. 8
zu ändern.
Um das Menü zu verlassen,
drücken Sie die Taste MENU 7.
Hinweis:
Sie können während einer
Verkehrsdurchsage die Lautstärke mit
dem Lautstärkeregler 1 für die Dauer
der Durchsage einstellen.
Verkehrsdurchsagen ausblenden
Um eine laufende Verkehrsdurchsage abzu-
brechen und zur zuvor gehörten Audioquelle
zurückzukehren,
drücken Sie die Taste TA ;.
Der Vorrang für Verkehrsdurchsagen bleibt
eingeschaltet.
쏅
쏅
쏅
쏅
쏅
CD-Betrieb
Sie können mit diesem Gerät handelsüb-
liche Audio-CDs, CD-Rs und CD-RWs mit
einem Durchmesser von 12 cm abspielen.
Um Probleme beim Abspielen zu vermei-
den, sollten Sie selbst erstellte CDs nicht
schneller als 16fach brennen.
Zerstörungsgefahr des
CD-Laufwerks!
Single-CDs mit einem Durchmesser von
8 cm und unrund konturierte CDs (Shape-
CDs) dürfen nicht verwendet werden.
Behandeln Sie die CD sorgsam und ver-
meiden Sie Kratzer und Beschädigungen
auf der CD. Fassen Sie die CD, wenn mög-
lich, nur am Rand an. Sollte einmal eine CD
verschmutzt sein, so reinigen Sie diese mit
einem fusselfreien Tuch ohne Zusatz von
Lösungsmitteln. Wischen Sie die CD immer
von innen nach außen ab.
Setzen Sie die CD nicht direkter
Sonnenstrahlung aus, und bewahren Sie
die CD außerhalb des Gerätes in einer
Schutzhülle auf.
Kleben sie keine Etiketten auf die CD.
Beschriften Sie die CD nur mit den dafür
geeigneten, handelsüblichen Stiften.
Für Beschädigungen des CD-Laufwerks
durch ungeeignete oder beschädigte CDs
übernehmen wir keine Haftung.
Für eine einwandfreie Funktion verwen-
den Sie nur CDs mit dem Compact-Disc-
Logo. CDs mit Kopierschutz können zu
Abspielschwierigkeiten führen. Blaupunkt
kann die einwandfreie Funktion von kopier-
geschützten CDs nicht gewährleisten!
Verkehrsfunk CD-Betrieb
01_CalaisMP48_de.indd 1901_CalaisMP48_de.indd 19 11.06.2008 15:11:43 Uhr11.06.2008 15:11:43 Uhr

20
CD-Betrieb starten
Wenn keine CD im Laufwerk ist,
schieben Sie die CD mit der bedruck-
ten Seite nach oben ohne Kraftaufwand
in den CD-Schacht, bis Sie einen
Widerstand spüren.
Die CD wird automatisch in das Laufwerk
eingezogen. Im Display 6 erscheint das
CD-Symbol.
Hinweis:
Der Einzug der CD darf nicht behindert
oder unterstützt werden.
Die CD-Wiedergabe beginnt. Im Display
6 werden die Nummer des aktuellen
Titels (z. B. „T12“) und die Spielzeit sowie
Titelinformationen (CD-Text) angezeigt.
Wenn bereits eine CD im Laufwerk ist,
drücken Sie die Taste SRC > so oft,
bis „CD“ im Display 6 erscheint.
Die Wiedergabe startet an der Stelle, an der
sie unterbrochen wurde.
Anzeige von Titelinformationen
(CD-Text)
Falls die CD CD-Text zur Verfügung stellt,
wird die Information zu jedem Titel beim
Start des Titels einmal als Laufschrift im
Display 6 angezeigt.
Titelinformationen einmalig als Lauftext
anzeigen
Drücken Sie die Taste 5 <.
Der CD-Text zum aktuellen Titel wird einmal
als Laufschrift im Display 6 angezeigt.
Hinweis:
Diese Funktion steht nicht zur
Verfügung, wenn die Anzeige von CD-
쏅
쏅
쏅
Text als Laufschrift ausgeschaltet ist
(siehe folgenden Abschnitt).
Anzeige von Titelinformationen als
Laufschrift ein-/ausschalten
Um die Anzeige von Titelinformationen als
Laufschrift ein- bzw auszuschalten,
drücken Sie die Taste MENU 7.
Drücken Sie die Taste
oder 8
so oft, bis „SCRL“ und die aktuelle
Einstellung „ON“ (ein) bzw. „OFF“ (aus)
im Display 6 angezeigt werden.
Drücken Sie die Taste
bzw. 8, um
Laufschrift aus- bzw. einzuschalten.
Um das Menü zu verlassen,
drücken Sie die Taste MENU 7.
Bei der Einstellung „SCRL OFF“ wird die
Titelinformation in Abschnitten von jeweils
8 Zeichen im Display 6 angezeigt. Dabei
wird jeder Textabschnitt sowie Titelnummer
und Spielzeit im kontinuierlichen Wechsel
für jeweils 5 Sekunden anzeigt.
Hinweis:
Die Einstellung „SCRL ON/OFF“ wirkt
sich entsprechend auch auf die Anzeige
von MP3-Titelinformationen (ID3-Tags)
im MP3-Betrieb aus.
Titel wählen
Drücken Sie die Taste bzw. 8,
um zum vorherigen bzw. nächsten Titel
zu wechseln.
Bei einmaligem Drücken der Taste
8
wird der aktuelle Titel erneut gestartet.
쏅
쏅
쏅
쏅
쏅
CD-Betrieb
01_CalaisMP48_de.indd 2001_CalaisMP48_de.indd 20 11.06.2008 15:11:43 Uhr11.06.2008 15:11:43 Uhr

21
DEUTSCH
Schneller Suchlauf (hörbar)
Für einen schnellen Suchlauf rückwärts
bzw. vorwärts
halten Sie die Taste bzw. 8 ge-
drückt, bis Sie zur gewünschten Stelle
gelangen.
Zufallswiedergabe der Titel
(MIX)
Drücken Sie die Taste 3 <.
Im Display 6 wird kurz „MIX CD“ angezeigt
und das MIX-Symbol erscheint. Die nächs-
ten Titel werden zufällig ausgewählt.
MIX beenden
Drücken Sie erneut die Taste 3 <.
Im Display 6 wird kurz „MIX OFF“ ange-
zeigt und das MIX-Symbol erlischt. Die
Wiedergabe wird normal fortgesetzt.
Titel anspielen (SCAN)
Um alle Titel der CD für jeweils ca. 10
Sekunden anspielen zu lassen,
drücken Sie die Taste 4 <.
Im Display wird kurz „SCAN TRK“ ange-
zeigt. Während des Anspielens blinkt
die Anzeige „CD“. Die Titelnummer und
Spielzeit des aktuellen Titels bzw. dessen
Titelinformationen werden angezeigt.
SCAN beenden, Titel weiterhören
Um den Scanvorgang zu beenden,
drücken Sie erneut die Taste 4 <.
Im Display wird kurz „SCAN OFF“ angezeigt.
Der aktuelle Titel wird weitergespielt.
쏅
쏅
쏅
쏅
쏅
Titel wiederholen (RPT)
Drücken Sie die Taste 2 <.
Im Display wird kurz „RPT TRK“ angezeigt
und das RPT-Symbol erscheint. Der aktu-
elle Titel wird wiederholt, bis RPT deak-
tivert wird.
RPT beenden
Drücken Sie erneut die Taste 2 <.
Im Display 6 wird kurz „RPT OFF“ an-
gezeigt und das RPT-Symbol erlischt. Die
Wiedergabe wird normal fortgesetzt.
Wiedergabe unterbrechen
(PAUSE)
Drücken Sie die Taste 1 <.
Im Display 6 wird „PAUSE“ angezeigt.
Pause aufheben
Drücken Sie während der Pause die
Taste 1 <.
Die Wiedergabe wird fortgesetzt.
CD entnehmen
Hinweis:
Sie können CDs auch ausschieben las-
sen, wenn das Gerät ausgeschaltet ist
oder eine andere Audioquelle aktiv ist.
Drücken Sie die CD-Auswurftaste 4.
Die CD wird ausgeschoben. Im Display wird
kurz „CD EJECT“ angezeigt.
Hinweis:
Der Ausschub der CD darf nicht behin-
dert oder unterstützt werden.
Entnehmen Sie die CD.
Das CD-Symbol erlischt.
쏅
쏅
쏅
쏅
쏅
쏅
CD-Betrieb
01_CalaisMP48_de.indd 2101_CalaisMP48_de.indd 21 11.06.2008 15:11:43 Uhr11.06.2008 15:11:43 Uhr

22
Hinweis:
Wenn Sie eine ausgeschobene CD
nicht entnehmen, wird sie nach ca. 10
Sekunden automatisch wieder einge-
zogen.
MP3-/WMA-Betrieb
Sie können mit diesem Autoradio auch
CD-Rs und CD-RWs mit MP3- und WMA-
Musikdateien abspielen. Außerdem können
Sie über das optionale C‘n‘C-fähige USB-
Interface USB-Datenträger anschließen
und auf dem USB-Datenträger gespeicher-
te MP3-/WMA-Dateien abspielen.
Dieses Kapitel geht nur auf das Abspielen
von MP3-Dateien ein, da die Bedienung
bei MP3- und WMA-Dateien identisch
ist. In diesem Kapitel bezieht sich die
Bezeichnung „MP3-Datenträger“ so-
wohl auf CD-R/RW als auch auf USB-
Datenträger wie z. B. USB-Sticks.
Hinweise:
WMA-Dateien mit Digital Rights
Management (DRM) aus Online-
Musicshops können mit diesem Gerät
nicht abgespielt werden.
WMA-Dateien können nur sicher
wiedergegeben werden, wenn diese
mit dem Windows Media-Player ab
Version 8 erstellt wurden.
Vorbereitung eines MP3-
Datenträgers
Vorbereitung einer MP3-CD
Durch die Kombination von CD-Brenner,
CD-Brenn-Software und CD-Rohling kann
es zu Problemen mit der Abspielbarkeit der
CDs kommen. Wenn Probleme mit selbst-
gebrannten CDs auftreten, sollten Sie
beim Typ der CD-Rohlinge auf einen ande-
ren Hersteller oder eine andere Farbe der
Rohlinge wechseln.
Das Format der CD muss ISO 9660 Level 1
bzw. Level 2 oder Joliet sein. Alle anderen
•
•
CD-Betrieb MP3-/WMA-Betrieb
01_CalaisMP48_de.indd 2201_CalaisMP48_de.indd 22 11.06.2008 15:11:43 Uhr11.06.2008 15:11:43 Uhr

23
DEUTSCH
Formate können nicht zuverlässig abge-
spielt werden.
Beim Erzeugen (Codieren) der MP3-/WMA-
Dateien aus den Audiodateien sollten Sie
Bitraten von 32 bis zu 320 kbps für MP3-
Dateien bzw. von 32 bis zu 192 kbps für
WMA-Dateien verwenden.
Dieses Gerät unterstützt bis zu 252
Verzeichnisse und bis zu 255 Dateien pro
Verzeichnis. Dabei darf die CD insgesamt
maximal 512 Verzeichnisse und Dateien
enthalten. Die Verzeichnisse und Titel auf
der CD können einzeln angewählt werden.
D01
D02
T001
T005
T004
T003
T002
D03
T001
T006
T005
T004
T003
T002
T011
T007
T008
T009
T010
D04
T001
T006
T005
T004
T003
T002
A
B
A Verzeichnisse
B Titel · Dateien
Jedes Verzeichnis kann mit dem PC benannt
werden. Der Name des Verzeichnisses
kann im Display des Gerätes angezeigt
werden. Nehmen Sie die Benennung
der Verzeichnisse und Titel/Dateien ent-
sprechend Ihrer CD-Brenn-Software vor.
Hinweise dazu fi nden Sie in der Anleitung
der Software.
Hinweise:
Verzichten Sie beim Benennen der
Dateien (Ver zeichnisse und Titel) auf
Um laute und Sonderzeichen.
Verwenden Sie Dateinamen mit
mehr als 16 Zeichen (einschließlich
„.MP3“ bzw. „.WMA“), verringert sich
die maximale Anzahl von Titeln und
Verzeichnissen.
Wenn Sie auf eine bestimmte Reihenfolge
Ihrer Dateien Wert legen: Speichern Sie
die Dateien in der Reihenfolge auf den
Datenträger, in der sie später abgespielt
werden sollen. Das Gerät spielt die Dateien
in der Reihenfolge ab, in der sie physikalisch
auf dem Datenträger gespeichert sind.
Für das Abspielen der Dateien in die-
sem Gerät müssen die MP3-Dateien die
Dateiendung „.MP3“ bzw. die WMA-Dateien
die Dateiendung „.WMA“ tragen.
Hinweise:
Um eine ungestörte Wiedergabe zu ge-
währleisten,
versuchen Sie nicht, andere als MP3-
Dateien mit der Dateiendung „.MP3“
zu versehen und abzuspielen! Diese
ungültigen Dateien werden während
der Wiedergabe ignoriert.
verwenden Sie keine „gemischten“
CDs mit Nicht-MP3-Daten und MP3-
Titeln (das Gerät liest während der
MP3-Wiedergabe nur MP3-Dateien).
verwenden Sie keine Mix-Mode CDs
mit CD-Audio-Titeln und MP3-Titeln.
Wenn Sie versuchen eine Mix-Mode-
•
•
•
•
•
MP3-/WMA-Betrieb
01_CalaisMP48_de.indd 2301_CalaisMP48_de.indd 23 11.06.2008 15:11:43 Uhr11.06.2008 15:11:43 Uhr

24
CD abzuspielen, werden nur die CD-
Audio-Titel abgespielt.
Vorbereitung eines USB-Datenträgers
Damit das Gerät einen USB-Datenträger
erkennt, muss dieser als Massenspeicher
(Mass Storage Device) spezifi ziert und im
Dateisystem FAT16 oder FAT32 formatiert
sein sowie MP3- oder WMA-Dateien enthal-
ten.
Sie können auf einem USB-Datenträger
maximal 1500 Dateien (Verzeichnisse
und Titel) anlegen. Die Verzeichnisse und
die Titel können mit diesem Gerät einzeln
angewählt werden. Verwenden Sie für
die Dateinamen mehr als 24 Zeichen (ein-
schließlich „.MP3“ bzw. „.WMA“), verringert
sich diese maximale Anzahl der Dateien.
Blaupunkt kann nicht für die einwandfreie
Funktion aller auf dem Markt erhältlichen
USB-Datenträger garantieren.
ID3-Tags
MP3-Titel können zusätzliche Informationen
wie Interpret, Titelname und Album enthal-
ten (ID3-Tags). Dieses Gerät kann ID3-Tags
der Version 1 und der Version 2 im Display
anzeigen.
MP3-Betrieb starten
MP3-Betrieb von CD starten
Bei einer MP3-CD wird der MP3-Betrieb
wie der normale CD-Betrieb gestartet.
Lesen Sie dazu den Abschnitt „CD-Betrieb
starten“ im Kapitel „CD-Betrieb“.
Im Display 6 werden die Nummer des ak-
tuellen Titels (z. B. „T12“) und die Spielzeit
sowie Titelinformationen (ID3-Tags) bzw.
der Dateiname angezeigt. Bei Wechsel
in ein anderes Verzeichnis wird kurz die
Verzeichnissnummer (z. B. „DIR 02“) an-
gezeigt.
USB-Datenträger anschließen und MP3-
Betrieb starten
Um einen USB-Datenträger (z. B. USB-
Stick oder USB-Festplatte) anschließen
zu können, muss das optionale Blaupunkt-
USB-Interface an der Rückseite des Geräts
(Kammer C3) angeschlossen werden. Sie
können das USB-Kabel des Interfaces z. B.
in das Handschuhfach oder an eine geeig-
nete Stelle der Mittelkonsole verlegen.
Hinweise:
Wenn Sie das Blaupunkt-USB-
Interface an das Gerät anschließen,
muss der AUX-Eingang entsprechend
eingestellt werden. lesen Sie dazu den
Abschnitt „AUX-Eingang einstellen“
im Kapitel „Externe Audioquellen“.
Schalten Sie das Gerät stets aus,
bevor Sie den USB-Datenträger an-
schließen oder abziehen, damit der
Datenträger korrekt an- und abge-
meldet wird.
Schließen Sie den USB-Datenträger an
das USB-Kabel des USB-Interfaces an.
Sobald ein USB-Datenträger angeschlos-
sen ist, kann er mit der Taste SRC > aus-
gewählt werden. Im Display erscheint dann
„USB“.
Anzeige von Titelinformationen
(ID3-Tags)
Falls der MP3-Datenträger ID3-Tags zur
Verfügung stellt, wird die Information zu
jedem Titel bei Start des Titels einmal als
Laufschrift im Display 6 angezeigt. Falls
•
•
쏅
MP3-/WMA-Betrieb
01_CalaisMP48_de.indd 2401_CalaisMP48_de.indd 24 11.06.2008 15:11:43 Uhr11.06.2008 15:11:43 Uhr

25
DEUTSCH
keine ID3-Tags mit den MP3-Dateien ge-
speichert wurden, wird der Dateiname an-
gezeigt.
Hinweis:
Lesen Sie zum Speichern von ID3-Tags
auch die Anleitung zu Ihrer PC-MP3-
Software bzw. Brenn-Software.
Titelinformationen einmalig als Lauftext
anzeigen
Drücken Sie die Taste 5 <.
Die ID3-Tags zum aktuellen Titel werden
einmal als Laufschrift im Display 6 ange-
zeigt.
Hinweis:
Diese Funktion steht nicht zur
Verfügung, wenn die Anzeige von
Titelinformationen als Laufschrift
ausgeschaltet ist. Lesen dazu im
Kapitel „CD-Betrieb“, Unterkapitel
„Anzeige von Titelinformationen (CD-
Text)“ den Abschnitt „Anzeige von
Titelinformationen als Laufschrift ein-/
ausschalten“.
Verzeichnis wählen
Um auf- bzw. abwärts zu einem anderen
Verzeichnis zu wechseln,
drücken Sie die Taste
bzw. 8.
Hinweise:
Alle Verzeichnisse, die keine MP3-
Dateien enthalten, werden automa-
tisch übersprungen.
Das Gerät behandelt alle Verzeichnis-
se und Unterverzeichnisse, als ob sie
auf einer Ebene liegen würden. Durch
wiederholtes Drücken der Taste
쏅
쏅
•
•
bzw. 8 gelangen Sie so auch in
alle Unterverzeichnisse.
Titel/Dateien wählen
Um ab- bzw. aufwärts zu einem anderen
Titel/einer Datei im aktuellen Verzeichnis
zu wechseln,
drücken Sie Taste
bzw. 8.
Bei einmaligem Drücken der Taste
8
wird der aktuelle Titel erneut gestartet.
Schneller Suchlauf
Für einen schnellen Suchlauf rückwärts
bzw. vorwärts
halten Sie die Taste
bzw. 8 ge-
drückt, bis Sie zur gewünschten Stelle
gelangen.
Hinweis:
Im USB-Betrieb stoppt der schnelle
Suchlauf rückwärts jeweils am Anfang
des aktuellen Titels.
Titel in zufälliger Reihenfolge
abspielen (MIX)
Um die Titel des aktuellen Verzeichnisses in
zufälliger Reihenfolge abzuspielen,
drücken Sie die Taste 3 < so oft, bis
„MIX DIR“ bzw. „MIX FLD“ im Display
6 angezeigt wird.
Das MIX-Symbol erscheint im Display 6.
Um alle Titel des MP3-Datenträgers in zufäl-
liger Reihenfolge abzuspielen,
drücken Sie die Taste 3 < so oft, bis
„MIX ALL“ im Display 6 angezeigt
wird.
Das MIX-Symbol erscheint im Display 6.
쏅
쏅
쏅
쏅
MP3-/WMA-Betrieb
01_CalaisMP48_de.indd 2501_CalaisMP48_de.indd 25 11.06.2008 15:11:44 Uhr11.06.2008 15:11:44 Uhr

26
MIX beenden
Um das Abspielen in zufälliger Reihenfolge
zu beenden,
drücken Sie die Taste 3 < so oft, bis
„MIX OFF“ im Display 6 angezeigt
wird.
Das MIX-Symbol im Display 6 erlischt.
Titel anspielen (SCAN)
Um alle Titel des MP3-Datenträgers in auf-
steigender Reihenfolge für jeweils ca. 10
Sekunden anzuspielen,
drücken Sie die Taste 4 < so oft, bis
„SCAN TRK“ im Display 6 erscheint.
Während des Anspielens blinkt die Anzeige
„MP3“ bzw. „USB“.
Um im USB-Betrieb alle Titel des aktuellen
Verzeichnisses anzuspielen,
drücken Sie die Taste 4 < so oft, bis
„SCAN FLD“ im Display 6 erscheint.
Während des Anspielens blinkt die Anzeige
„USB“.
SCAN beenden
Um das Anspielen zu beenden,
drücken Sie die Taste 4 < so oft, bis
„SCAN OFF“ im Display 6 erscheint.
Der aktuell angespielte Titel wird weiterge-
spielt.
Einzelne Titel oder ganze
Verzeichnisse wiederholt
abspielen (REPEAT)
Um den aktuellen Titel zu wiederholen,
drücken Sie die Taste 2 < so oft, bis
„RPT TRK“ im Display 6 angezeigt
wird.
Das RPT-Symbol erscheint im Display 6.
쏅
쏅
쏅
쏅
쏅
Um das aktuelle Verzeichnis zu wiederho-
len,
drücken Sie die Taste 2 < so oft, bis
„RPT DIR“ bzw. „RPT FLD“ im Display
6 angezeigt wird.
Das RPT-Symbol erscheint im Display 6.
REPEAT beenden
Um die Wiederholung zu beenden,
drücken Sie die Taste 2 < so oft, bis
„RPT OFF“ im Display 6 angezeigt
wird.
Das RPT-Symbol im Display 6 erlischt.
Wiedergabe unterbrechen
(PAUSE)
Drücken Sie die Taste 1 <.
Im Display 6 wird „PAUSE“ angezeigt.
Pause aufheben
Drücken Sie während der Pause die
Taste 1 <.
Die Wiedergabe wird fortgesetzt.
쏅
쏅
쏅
쏅
MP3-/WMA-Betrieb
01_CalaisMP48_de.indd 2601_CalaisMP48_de.indd 26 11.06.2008 15:11:44 Uhr11.06.2008 15:11:44 Uhr

27
DEUTSCH
CD-Wechsler-Betrieb
An das Gerät können optional die Blaupunkt-
CD-Wechsler CDC A08 T und IDC A09 an-
geschlossen werden (Kammer C3 auf der
Geräterückseite).
Achtung!
Der CD-Wechsler wird normaler-
weise vom Gerät mir einer 12 V-
Betriebsspannung versorgt.
Wird der CD-Wechsler CDC A 08 T
(24 Volt) angeschlossen, so muss
die Span nungsversorgung am
Steckverbinder im Anschlusskabel
des CD-Wechslers getrennt wer-
den (Kammer C3/Pin 15). Der CD-
Wechsler ist mit einer eigenen 24 Volt-
Betriebsspannung zu versorgen.
Hinweise:
Wenn Sie einen CD-Wechsler an das
Gerät anschließen, muss der AUX-
Eingang entsprechend eingestellt
werden. lesen Sie dazu den Abschnitt
„AUX-Eingang einstellen“ im Kapitel
„Externe Audioquellen“.
Informationen über den Umgang mit
CDs, das Einlegen von CDs und zur
Handhabung des CD-Wechslers fi n-
den Sie in der Bedienungsanleitung
Ihres CD-Wechslers.
CD-Wechsler-Betrieb starten
Drücken Sie SRC > so oft, bis im
Display 6 „CHANGER“ angezeigt
wird.
Die Wiedergabe beginnt mit der ersten CD,
die der CD-Wechsler erkennt. Im Display
6 werden die Nummer der aktuellen CD
(z. B. „D02“) und des aktuellen Titels (z. B.
„T07“) sowie die Spielzeit angezeigt.
•
•
쏅
CD wählen
Um auf- bzw. abwärts zu einer anderen CD
zu wechseln,
drücken Sie die Taste
bzw. 8.
Titel wählen
Um ab- bzw. aufwärts zu einem anderen
Titel auf der aktuellen CD zu wechseln,
drücken Sie die Taste
bzw. 8.
Schneller Suchlauf (hörbar)
Für einen schnellen Suchlauf rückwärts
bzw. vorwärts
halten Sie die Taste
bzw. 8 ge-
drückt, bis Sie zu der gewünschten
Stelle gelangen.
Einzelne Titel oder ganze CDs
wiederholt abspielen (RPT)
Um den aktuellen Titel zu wiederholen,
drücken Sie die Taste 2 < so oft, bis
„RPT TRK“ im Display 6 angezeigt
wird.
Das RPT-Symbol erscheint im Display 6.
Um die aktuelle CD zu wiederholen,
drücken Sie die Taste 2 < so oft, bis
„RPT CD“ im Display 6 angezeigt
wird.
Das RPT-Symbol erscheint im Display 6.
REPEAT beenden
Um die Wiederholung zu beenden,
drücken Sie die Taste 2 < so oft, bis
„RPT OFF“ im Display 6 angezeigt
wird.
Das RPT-Symbol im Display 6 erlischt.
쏅
쏅
쏅
쏅
쏅
쏅
CD-Wechsler-Betrieb
01_CalaisMP48_de.indd 2701_CalaisMP48_de.indd 27 11.06.2008 15:11:44 Uhr11.06.2008 15:11:44 Uhr

28
Titel in zufälliger Reihenfolge
abspielen (MIX)
Um die Titel der aktuellen CD in zufälliger
Reihenfolge abzuspielen,
drücken Sie die Taste 3 < so oft, bis
„MIX CD“ im Display 6 angezeigt
wird.
Das MIX-Symbol erscheint im Display 6.
Um die Titel aller eingelegten CDs in zufäl-
liger Reihenfolge abzuspielen,
drücken Sie die Taste 3 < so oft, bis
„MIX ALL“ im Display 6 angezeigt
wird.
Das MIX-Symbol erscheint im Display 6.
MIX beenden
Um das Abspielen in zufälliger Reihenfolge
zu beenden,
drücken Sie die Taste 3 < so oft, bis
„MIX OFF“ im Display 6 angezeigt
wird.
Das MIX-Symbol im Display 6 erlischt.
Alle Titel aller CDs anspielen
(SCAN)
Um alle Titel aller eingelegten CDs in auf-
steigender Reihenfolge für jeweils ca. 10
Sekunden anzuspielen,
drücken Sie die Taste 4 <.
Im Display 6 erscheint kurz „SCAN TRK“.
Während des Anspielens blinkt die Anzeige
der CD-Nummer.
SCAN beenden
Um das Anspielen zu beenden,
drücken Sie erneut die Taste 4 <.
쏅
쏅
쏅
쏅
쏅
Im Display 6 erscheint kurz „SCAN OFF“.
Der aktuell angespielte Titel wird weiterge-
spielt.
Wiedergabe unterbrechen
(PAUSE)
Drücken Sie die Taste 1 <.
Im Display 6 erscheint „PAUSE“.
Pause aufheben
Drücken Sie während der Pause die
Taste 1 <.
Die Wiedergabe wird fortgesetzt.
쏅
쏅
CD-Wechsler-Betrieb
01_CalaisMP48_de.indd 2801_CalaisMP48_de.indd 28 11.06.2008 15:11:44 Uhr11.06.2008 15:11:44 Uhr

29
DEUTSCH
IR-Fernbedienung RC 10 P
Mit der optionalen IR-Fernbedienung kön-
nen Sie die wichtigsten Funktionen des
Gerätes steuern.
Fernbedienungsempfänger
In der Kappe des Gerätes befi ndet sich
der Infrarot-Empfänger 9 für die Fern-
be dienung. Vor Verwendung der Fern be-
dienung muss der Empfänger eingeschaltet
werden:
Drücken Sie die Taste MENU 7.
Drücken Sie die Taste
bzw. 8 so
oft, bis „IR“ und die aktuelle Einstellung
„ON“ (ein) bzw. „OFF“ (aus) im Display
6 angezeigt werden.
Drücken Sie die Taste
bzw. 8,
um IR aus- bzw. einzuschalten.
Um das Menü zu verlassen,
drücken Sie die Taste MENU 7.
C
F
G
H
E
D
B
A
@
쏅
쏅
쏅
쏅
Funktionen der Fernbedienung
Allgemein:
Taste Funktion
ON H Gerät ein-/ausschalten
(länger drücken)
Mute (kurz drücken)
Menü verlassen
SRC @ Quellenumschaltung
V+ B Lautstärke anheben
V- A Lautstärke absenken
OK G Menü aufrufen bzw. ver-
lassen
E Menüpunkt auswählen
C Menüpunkt auswählen
F Menüeinstellung ändern
D Menüeinstellung ändern
Im Radiobetrieb:
Taste Funktion
F Aufrufen der gespeicher-
ten Sender
D Wahl des Wellenbereichs/
der Speicherebene
E Suchlauf aufwärts
C Suchlauf abwärts
Im CD-Betrieb:
Taste Funktion
F Nächsten Titel wählen
D Vorherigen Titel wählen
IR-Fernbedienung
01_CalaisMP48_de.indd 2901_CalaisMP48_de.indd 29 11.06.2008 15:11:44 Uhr11.06.2008 15:11:44 Uhr

30
CD-Changer-Betrieb
Taste Funktion
F Nächsten Titel spielen
D Vorherigen Titel spielen
E Nächste CD spielen
C Vorherige CD spielen
MP3-Betrieb-Betrieb
Taste Funktion
F Nächsten Titel spielen
D Vorherigen Titel spielen
E Nächstes Verzeichnis
spielen
C Vorheriges Verzeichnis
spielen
Vorverstärkerausgang
Sie können an das Gerät einen Verstärker
zum Betrieb eines Tiefbass-Lautsprechers
(Subwoofer) anschließen. Dazu muss der
Verstärker an der Geräterückseite (Kammer
C1) angeschlossen werden. Der Pegel des
Subwoofers kann im Audio-Menü einge-
stellt werden:
Drücken Sie die Taste AUD :.
Drücken Sie die Taste
oder 8 so
oft, bis „SUB WOOF“ angezeigt wird.
Nach ca. 2 Sekunden werden „SUBW“ und
die aktuelle Einstellung im Display 6 an-
gezeigt.
Drücken Sie die Taste
bzw. 8,
um den Pegel für den Subwoofer zwi-
schen 0 und 7 einzustellen.
Hinweis:
Sie müssen nicht auf die Anzeige der
aktuellen Einstellung warten, um sie
durch Drücken der Taste
bzw. 8
zu ändern.
Um das Menü zu verlassen,
drücken Sie die Taste AUD :.
쏅
쏅
쏅
쏅
IR-Fernbedienung Vorverstärkerausgang
01_CalaisMP48_de.indd 3001_CalaisMP48_de.indd 30 11.06.2008 15:11:45 Uhr11.06.2008 15:11:45 Uhr

31
DEUTSCH
Externe Audioquellen
Sie können über den AUX-Eingang verschie-
dene Arten von externen Audioquellen an
das Gerät anschließen. Der AUX-Eingang
muss für die jeweils angeschlossene exter-
ne Audioquelle eingestellt werden:
Einstellung „AUX“ für externe
Audioquellen wie z. B. tragbare CD-
Spieler, MiniDisc-Spieler oder MP3-
Spieler.
Einstellung „CDC“ für die Blaupunkt-CD-
Wechsler CDC A 08 T und IDC A 09.
Einstellung „USB“ für das USB-Interface
von Blaupunkt.
Zur Einstellung des AUX-Eingangs lesen
Sie bitte den folgenden Abschnitt „AUX-
Eingang einstellen“.
Hinweis:
Zum Anschluss einer externen
Audioquelle benötigen Sie ein
Adapterkabel. Dieses Kabel (Blaupunkt-
Nr. 7 607 897 093) können Sie über
Ihren Blaupunkt-Fachhändler bezie-
hen.
AUX-Eingang einstellen
Drücken Sie die Taste MENU 7.
Drücken Sie die Taste
oder 8 so
oft, bis „SRC SEL“ angezeigt wird.
Nach ca. 2 Sekunden werden „SRC“ und
die aktuelle Einstellung „CDC“, „USB“ bzw.
„AUX“ im Display 6 angezeigt.
Drücken Sie die Taste
bzw. 8,
um eine andere Einstellung zu wählen.
Hinweis:
Die Reihenfolge der Einstellungen im
Menü ist „CDC“ – „USB“ – „AUX“:
•
•
•
쏅
쏅
쏅
Bei der aktuellen Einstellung „CDC“
können Sie durch Drücken der Taste
8 die Einstellung „USB“ wählen.
Bei der aktuellen Einstellung „USB“
können Sie durch Drücken der Taste
8 die Einstellung „CDC“ oder
durch Drücken der Taste
8 die
Einstellung „AUX“ wählen.
Bei der aktuellen Einstellung „AUX“
können Sie durch Drücken der Taste
8 die Einstellung „USB“ wählen.
Nach jedem Wechsel der Einstellung
erfolgt ein automatisches Ausschalten
des Gerätes. Um zwischen den
Einstellungen „CDC“ und „AUX“ zu
wechslen, müssen Sie daher zunächst
die Einstellung „USB“ wählen und nach
dem automatischen Ausschalten das
Gerät wieder einschalten. Wiederholen
Sie dann den Einstellvorgang, um zur
gewünschten Einstellung „AUX“ bzw.
„CDC“ zu gelangen.
Der Hinweis „AUTO SWITCH OFF IN 10
SECONDS“ wird angezeigt. Das Gerät
schaltet sich nach ca. 10 Sekunden auto-
matisch aus.
Schalten Sie das Gerät durch Drücken
der Ein-/Aus-Taste 3 wieder ein
Das Gerät wird im Radiobetrieb mit der ge-
wählten Einstellung eingeschaltet.
Hinweis:
Wenn Sie die AUX-Einstellung gewählt
haben, können Sie den AUX-Eingang
mit der Taste SRC > anwählen. Im
Display wird dann „AUX“ angezeigt.
Wenn Sie die CDC- bzw. USB-
Einstellung gewählt haben, können
Sie die Audioquelle mit der Taste SRC
> nur anwählen, wenn ein entspre-
•
•
•
쏅
Externe Audioquellen
01_CalaisMP48_de.indd 3101_CalaisMP48_de.indd 31 11.06.2008 15:11:45 Uhr11.06.2008 15:11:45 Uhr

32
chendes Gerät (CD-Wechsler bzw.
USB-Interface) angeschlossen ist.
Pegel des AUX-Eingangs
einstellen
Wenn Sie den AUX-Eingang für den
Anschluss externer Audioquellen auf „AUX“
eingestellt haben, können Sie den Pegel der
externen Audioquelle an den Pegel der ge-
räteeigenen Audioquellen (wie z. B. CD und
Radio) anpassen.
Hinweis:
Sie können den Pegel für den AUX-
Eingang nur einstellen, wenn AUX als
Audioquelle angewählt ist.
Drücken Sie ggf. die Taste SRC >
so oft, bis „AUX“ im Display angezeigt
wird.
Drücken Sie die Taste MENU 7.
Drücken Sie die Taste
bzw. 8
so oft, bis „GAIN“ und die aktuelle
Einstellung angezeigt werden.
Drücken Sie die Taste
bzw. 8,
um die Pegelanpassung zwischen –9
und +9 einzustellen.
Um das Menü zu verlassen,
drücken Sie die Taste MENU 7.
쏅
쏅
쏅
쏅
쏅
Werkseinstellungen
wiederherstellen (RESET)
Sie haben die Möglichkeit, die ursprüng-
lichen Werkseinstellungen des Gerätes
wiederherzustellen:
Halten Sie die Taste AUD : länger als
ca. 10 Sekunden gedrückt.
Ein Bestätigungston ertönt und im Display
6 wird kurz „RESET“ angezeigt. Alle Menü-
und Audiomenü-Einstellungen werden auf
die Werkseinstellungen zurückgesetzt.
Hinweis:
Auf den Stationstasten gespeicherte
Sender werden nicht gelöscht.
쏅
Externe Audioquellen Werkseinstellungen
01_CalaisMP48_de.indd 3201_CalaisMP48_de.indd 32 11.06.2008 15:11:45 Uhr11.06.2008 15:11:45 Uhr

33
DEUTSCH
Technische Daten
Betriebsspannung
24 Volt
Verstärker
Ausgangsleistung: 2 x 20 Watt Sinus
an 4 Ohm
Line-Ausgang: 2 x 2,0 Volt eff
Aux-Eingang: 2 x 2,0 Volt eff
Tuner
Wellenbereiche Europa:
UKW (FM): 87,5 - 108 MHz
MW : 531 - 1602 kHz
LW : 153 - 279 kHz
Wellenbereiche Amerika:
FM: 87,7 - 107,9 MHz
AM : 530 - 1710 kHz
FM -Übertragungsbereich:
30 -15 000 Hz
CD
Übertragungsbereich:
20 - 20 000 Hz
Änderungen vorbehalten!
Technische Daten
01_CalaisMP48_de.indd 3301_CalaisMP48_de.indd 33 11.06.2008 15:11:45 Uhr11.06.2008 15:11:45 Uhr

34
1 Volume control
2 BND button
Short press: Selects the memory bank
or waveband
Long press: Starts the Travelstore func-
tion (FMT or MWT/LWT)
3 On/Off button
Short press: Switches the device on
In operation: Muting (Mute)
Long press: Switches the device off
4 CD eject button
5 CD tray
6 Display
7 MENU button
Calls up the menus for basic settings.
8 Multifunction rocker
9 Infrared receiver for IR remote control
(optional)
: AUD button
Short press: Opens Audio menu for
setting bass, treble, balance, fader and
loudness
Long press (10 sec.): Restores factory
settings
; TA button
Switches priority for traffi c information
on/off
Cancels an ongoing traffi c announce-
ment
< Keys 1 - 6
= RDS button
Switching the convenient RDS function
on/off
> SRC button
Source selection between radio and (if
inserted, connected or switched on)
CD, MP3, CD changer and AUX
? Code LED
Controls
02_CalaisMP48_gb.indd 3402_CalaisMP48_gb.indd 34 11.06.2008 15:12:26 Uhr11.06.2008 15:12:26 Uhr

35
ENGLISH
Important notes ...............................37
Use as directed ..............................37
Remote control (option)..................37
CD changer (option) .......................37
USB interface (option)....................37
Disposal of old unit ........................37
CODE theft protection ......................38
Switching code query on/off (CODE) ...38
Entering the code number after a
voltage interruption ........................ 39
Switching on/off .............................. 39
Switching on/off with the
On/Off button ...............................39
Switching on/off via vehicle ignition ... 39
Switch-on with CD insertion ............39
Adjusting the switch-off time ...........40
Switching on via telephone (option) .....40
Switch-on with the IR remote
control RC 10 P (optional) ............... 40
Adjusting the volume .......................40
Mute (MUTE) .................................40
Telephone/Navigation Audio ............40
Switching the confi rmation beep
(BEEP) on/off................................41
Adjusting the maximum
power-on volume (ON VOL) .............41
Setting the speed-dependent
volume adjustment (GALA) .............42
Sound ............................................. 42
Adjusting the treble ........................42
Adjusting the bass .........................42
Adjusting the middle ......................43
Adjusting the left/right volume
distribution (BAL) ..........................43
Adjusting the front/rear volume
distribution (FAD) ..........................43
Time ...............................................44
Displaying the time ........................44
Setting the time .............................44
Selecting 12/24-hour clock mode .... 44
Adjusting the time zone (TIMEZONE)....44
Radio mode .....................................45
Switching to radio mode .................45
Convenient RDS functions (AF, REG) ....45
Selecting the waveband/
memory bank ................................45
Tuning into a station .......................46
Storing stations .............................46
Listening to stored stations .............47
Scanning receivable stations
(BANDSCAN) ................................ 47
Programme type (PTY) ...................47
Treble reduction feature during interfer-
ence (HICUT) ................................48
Switching radio text on/off ..............48
Traffi c information ........................... 49
Switching traffi c information
priority on/off ...............................49
Setting the volume increase for
traffi c announcements ....................49
Cancelling traffi c announcements ....49
Contents
02_CalaisMP48_gb.indd 3502_CalaisMP48_gb.indd 35 11.06.2008 15:12:26 Uhr11.06.2008 15:12:26 Uhr

36
CD mode .........................................50
Starting the CD mode .....................50
Display of track information
(CD text) ......................................50
Selecting tracks .............................51
Fast searching (audible) ..................51
Random track play (MIX) .................51
Scanning tracks (SCAN)..................51
Repeating tracks (RPT) ...................51
Interrupting playback (PAUSE) .........52
Ejecting a CD.................................52
MP3/WMA mode .............................52
Preparing an MP3 data carrier ......... 52
Switching to MP3 mode ..................54
Display of track information
(ID3 tags) ..................................... 54
Selecting a directory ...................... 55
Selecting tracks/fi les ......................55
Fast searching ...............................55
Random track play (MIX) .................55
Scanning tracks (SCAN)..................56
Repeating individual tracks or
whole directories (REPEAT) .............56
Interrupting playback (PAUSE) .........56
CD changer mode ............................57
Switching to CD changer mode ........ 57
Selecting CDs ................................ 57
Selecting tracks .............................57
Fast searching (audible) ..................57
Repeating individual tracks or
whole CDs (RPT) ...........................57
Random track play (MIX) .................58
Scanning all tracks on all CDs
(SCAN) ........................................58
Interrupting playback (PAUSE) .........58
IR remote control RC 10 P ................59
Remote control receiver ..................59
Functions of the remote control........59
Preamplifi er output ......................... 60
External audio sources .....................61
Adjusting the AUX input ..................61
Adjusting the level of the AUX input...62
Restoring factory settings (RESET) ...62
Technical data ................................. 63
Operating voltage .......................... 63
Amplifi er ......................................63
Tuner ...........................................63
CD ...............................................63
ISO connection .............................. 281
Contents
02_CalaisMP48_gb.indd 3602_CalaisMP48_gb.indd 36 11.06.2008 15:12:26 Uhr11.06.2008 15:12:26 Uhr

37
ENGLISH
Important notes
Important notes
Before placing your device into operation,
carefully read these instructions and famil-
iarise yourself with the device. Keep these
instructions in the vehicle for subsequent
questions.
Use as directed
The device is designed for operation in a
commercial vehicle with 24-V vehicle sys-
tem voltage and for installation in a 1-DIN
slot.
Road safety
Road safety has absolute priority.
Only operate your device if the road and traf-
fi c conditions allow you to do so. Familiarise
yourself with the device before setting off
on your journey. You should always be able
to hear police, fi re and ambulance sirens in
good time from inside your vehicle. For this
reason, listen to your car sound system at a
suitable volume level during your journey.
Remote control (option)
The remote control RC 10 P allows operat-
ing the most important functions. An infra-
red remote control is available as an acces-
sory (Blaupunkt no. 7 607 591 512).
CD changer (option)
You can connect the CD changer CDC A08 T
(Blaupunkt no. 7 607 274 002) or IDC A09
(Blaupunkt no. 7 607 274 005). The CD
changers are available as accessories.
USB interface (option)
You can connect the Blaupunkt USB in-
terface to play MP3/WMA fi les from a
USB data carrier. The USB interface is
available as an accessory (Blaupunkt no.
7 607 541 576).
Disposal of old unit
Do not dispose of your old device in
the household trash!
Use the return and collection sys-
tems available to dispose of the old device.
02_CalaisMP48_gb.indd 3702_CalaisMP48_gb.indd 37 11.06.2008 15:12:27 Uhr11.06.2008 15:12:27 Uhr

38
Theft protection
CODE theft protection
Your device is equipped with a four-digit
code number for protection against theft.
This number must be entered whenever the
device has been separated from the operat-
ing voltage of the vehicle. The code query
is deactivated by default, but it can be ac-
tivated.
Note:
If the code query is activated, the Code
LED ? starts fl ashing if the device as
well as the vehicle ignition are switched
off.
The code number is located in the radio
pass for your device.
Note:
Never keep the radio pass inside the
vehicle!
Switching code query on/off
(CODE)
Press the MENU button 7.
Press the
or button 8 repea-
tedly until "CODE" and the current
setting "ON" or "OFF" appear on the
display 6.
Press the
or button 8.
The display 6 shows "0000". Enter the
code:
Note:
If you enter the wrong code number,
"0000" is shown again on the display
6. You can repeat the entry twice.
After the third incorrect entry, the de-
vice is locked for 1 hour. During this
time, the display 6 shows "WAIT
쏅
쏅
쏅
1HR". If you switch off the device dur-
ing this wait period, you have to wait
again for a full hour after switching it
on again.
Press the station button 1 < repeat-
edly until the fi rst digit of your code
number appears on the display 6.
Press the station button 2 < repeat-
edly until the second digit of your code
number appears on the display 6.
Press the station button 3 < repeat-
edly until the third digit of your code
number appears on the display 6.
Press the station button 4 < repeat-
edly until the fourth digit of your code
number appears on the display 6.
Once the correct code number appears
on the display 6, press and hold the
station button 5 < for longer than
2 seconds.
The display 6 shows "CODE" again and
the current setting "ON" or "OFF".
Press the
or button 8 to switch
the code query on or off.
To exit the menu,
press the MENU button 7.
쏅
쏅
쏅
쏅
쏅
쏅
쏅
02_CalaisMP48_gb.indd 3802_CalaisMP48_gb.indd 38 11.06.2008 15:12:27 Uhr11.06.2008 15:12:27 Uhr

39
ENGLISH
Entering the code number after a
voltage interruption
Switch on the device.
The display 6 fi rst shows "CODE" and
then "0000". You can enter the code:
Note:
If you enter the wrong code number,
"0000" is shown again on the display
6. You can repeat the entry twice.
After the third incorrect entry, the de-
vice is locked for 1 hour. During this
time, the display 6 shows "WAIT
1HR". If you switch off the device dur-
ing this wait period, you have to wait
again for a full hour after switching it
on again.
Enter the code number as described
in the section "Switching code query
on/off".
Once the correct code number appears
on the display 6, press and hold the
station button 5 < for longer than
2 seconds.
The device switches on.
쏅
쏅
쏅
Switching on/off
There are various ways of switching the de-
vice on/off:
Switching on/off with the On/Off
button
For switch-on, press the On/Off but-
ton 3.
To switch off the device, press and hold
down the On/Off button 3 for longer
than 2 seconds.
Note:
To protect the vehicle battery, the de-
vice is automatically switched off after
an adjustable time period if the vehicle
ignition is switched off (see the section
"Adjusting the switch-off time" in this
chapter).
Switching on/off via vehicle
ignition
If the device is connected to the vehicle’s
ignition and you did not switch the device
off by pressing the On/Off button 3, it is
switched on or off with the vehicle ignition
Switch-on with CD insertion
To switch it on with the CD insertion,
insert a CD with its printed side up into
the CD tray 5 until you feel a slight re-
sistance.
The CD is automatically pulled in, and the
device starts in CD mode.
쏅
쏅
쏅
Theft protection Switching on/off
02_CalaisMP48_gb.indd 3902_CalaisMP48_gb.indd 39 11.06.2008 15:12:27 Uhr11.06.2008 15:12:27 Uhr

40
Adjusting the switch-off time
Press the MENU button 7.
Press the
or button 8 repeated-
ly until "HOUR" and the current setting
appear on the display 6.
Adjust the switch-off time with the
or
button 8 in 5-minute increments
between 5 and 60 minutes.
To exit the menu,
press the MENU button 7.
Switching on via telephone
(option)
If the phone is activated with switched-
off device, the device switches on. After
switching off the phone, the device is auto-
matically switched off again. This requires
that the phone is properly connected to the
device.
Switch-on with the IR remote
control RC 10 P (optional)
For switch-on, press the ON button H
on the IR remote control RC 10 P.
Note:
The IR receiver of the device must be
switched on for you to be able to use
the IR remote control. For further de-
tails, please read the section "Remote
control receiver" in the chapter "IR re-
mote control RC 10 P".
쏅
쏅
쏅
쏅
쏅
Adjusting the volume
You can adjust the system volume in incre-
ments from 0 (off) to 32 (maximum).
To increase the system volume, turn
the volume control 1 clockwise.
To reduce the system volume, turn the
volume control 1 counterclockwise.
Mute (MUTE)
You can mute the system volume abruptly.
Briefl y press the 3 button.
Cancelling mute
To return to your previously set volume
level,
briefl y press the 3 button again.
Telephone/Navigation Audio
Muting during telephone mode If your
car sound system is connected with a cell
phone or navigation system, the car sound
system is muted when a call is incoming or
during a voice output of the navigation. The
call or the voice output is played back via
the loudspeakers of the car sound system.
For this purpose, the cell phone or the navi-
gation system must be connected to the car
sound system (chamber C2 on the rear side
of the device).
You can fi nd out from your Blaupunkt dealer
which navigation systems can be used with
your car sound system.
If a call is incoming or a navigation an-
nouncement takes place, the display shows
"PHONE".
쏅
쏅
쏅
쏅
Switching on/off Volume
02_CalaisMP48_gb.indd 4002_CalaisMP48_gb.indd 40 11.06.2008 15:12:27 Uhr11.06.2008 15:12:27 Uhr

41
ENGLISH
Adjusting the volume for Telephone/
Navigation Audio (PHONEVOL)
You can set the volume level at which the
telephone calls or navigation announce-
ments are mixed in.
Press the MENU button 7.
Press the
or button 8 repeat-
edly until "PHONEVOL" is displayed.
After approx. 2 seconds, "VOL" and the cur-
rent setting are shown on the display 6.
Press the
or button 8 to adjust
the volume between 0 and 32.
Note:
You do not have to wait for the display
of the current setting to change it by
pressing the
or button 8.
To exit the menu,
press the MENU button 7.
Note:
Using the volume control 1, you can
also adjust the volume during a tel-
ephone call or a navigation announce-
ment. The adjusted volume is automati-
cally saved.
Switching the confi rmation beep
(BEEP) on/off
For certain actions, e.g. long press of a but-
ton, a confi rmation beep sounds. You can
switch off the confi rmation beep:
Press the MENU button 7.
Press the
or button 8 repeat-
edly until "BEEP" and the current set-
ting "ON" or "OFF" appear on the dis-
play 6.
쏅
쏅
쏅
쏅
쏅
쏅
Press the
or button 8 to switch
the beep on or off.
To exit the menu,
press the MENU button 7.
Adjusting the maximum power-
on volume (ON VOL)
When you switch on the device, it plays at
the previously selected volume. However,
if you adjusted the volume before switch-
off to be higher than maximum power-on
volume, the volume is automatically limited
to the adjusted power-on volume when you
switch it on again.
Note:
To protect your hearing, the maximum
power-on volume is limited to the value
25.
Press the MENU button 7.
Press the
or button 8 repeat-
edly until "ON VOL" appears.
After approx. 2 seconds, "VOL" and the cur-
rent setting are shown on the display 6.
Press the
or button 8 to adjust
the maximum power-on volume be-
tween 5 and 25.
Note:
You do not have to wait for the display
of the current setting to change it by
pressing the
or button 8.
To exit the menu,
press the MENU button 7.
쏅
쏅
쏅
쏅
쏅
쏅
Volume
02_CalaisMP48_gb.indd 4102_CalaisMP48_gb.indd 41 11.06.2008 15:12:27 Uhr11.06.2008 15:12:27 Uhr

42
Setting the speed-dependent
volume adjustment (GALA)
This function automatically adjusts the vol-
ume of the car sound system to the speed
driven and the associated driving noises.
For example, at an increased speed, the
volume is automatically increased to com-
pensate for the increased driving noise
(e.g. due to airstream).
For this purpose, the vehicle must provide
the speedometer signal and the car sound
system must be connected accordingly.
You can adjust the automatic volume in-
crease in 6 increments (OFF, 1-5).
Press the MENU button 7.
Press the
or button 8 repeated-
ly until "GALA" appears on the display
with the current setting.
Press the
or button 8 to adjust
the volume adjustment between "OFF"
and 5.
To exit the menu,
press the MENU button 7.
쏅
쏅
쏅
쏅
Sound
Adjusting the treble
Press the AUD button :.
Press the
or button 8 repeat-
edly until "TREBLE" appears.
Press and hold down the
or button
8 for longer than 2 seconds.
"FREQ" and the currently set treble fre-
quency appear briefl y on the display.
To select a different treble frequency be-
tween 10.0 kHz and 17.5 kHz,
press the
or button 8.
To adjust the treble,
press the
or button 8 repeat-
edly until "GAIN" appears.
After approx. 2 seconds, "GAIN" and the
current setting are shown on the display.
Press the
or button 8 to adjust
the treble between –7 and +7.
To exit the menu,
press the AUD button :.
Adjusting the bass
Press the AUD button :.
Press the
or button 8 repeat-
edly until "BASS" appears.
Press and hold down the
or button
8 for longer than 2 seconds.
"FREQ" and the currently set bass frequen-
cy appear briefl y on the display.
To select a different bass frequency be-
tween 60 Hz and 200 Hz,
press the
or button 8.
쏅
쏅
쏅
쏅
쏅
쏅
쏅
쏅
쏅
쏅
쏅
Volume Sound
02_CalaisMP48_gb.indd 4202_CalaisMP48_gb.indd 42 11.06.2008 15:12:27 Uhr11.06.2008 15:12:27 Uhr

43
ENGLISH
To adjust the quality factor for the middle,
press the
or button 8 repeat-
edly until "Q-FACTOR" appears.
After approx. 2 seconds, "Q" and the cur-
rent setting are shown on the display.
Press the
or button 8 to adjust
the quality factor between 0.5 and
1.25.
To exit the menu,
press the AUD button :.
Adjusting the left/right volume
distribution (BAL)
Press the AUD button :.
Press the
or button 8 repeat-
edly until "BAL" appears on the display
with the current setting.
Press the
or button 8 to adjust
the left/right volume distribution be-
tween –10 and +10.
To exit the menu,
press the AUD button :.
Adjusting the front/rear volume
distribution (FAD)
Note
The rear loudspeakers must be con-
nected via an additional amplifi er.
Press the AUD button :.
Press the
or button 8 repeat-
edly until "FAD" appears on the display
with the current setting.
Press the
or button 8 to adjust
the front/rear volume distribution be-
tween –10 and +10.
To exit the menu,
press the AUD button :.
쏅
쏅
쏅
쏅
쏅
쏅
쏅
쏅
쏅
쏅
쏅
To adjust the bass level,
press the
or button 8 repeat-
edly until "GAIN" appears.
After approx. 2 seconds, "GAIN" and the
current setting are shown on the display.
Press the
or button 8 to adjust
the bass level between –7 and +7.
To adjust the quality factor for bass,
press the
or button 8 repeat-
edly until "Q-FACTOR" appears.
After approx. 2 seconds, "Q" and the cur-
rent setting are shown on the display.
Press the
or button 8 to adjust
the quality factor between 1.0 and
2.0.
To exit the menu,
press the AUD button :.
Adjusting the middle
Press the AUD button :.
Press the
or button 8 repeat-
edly until "MIDDLE" appears.
Press and hold down the
or but-
ton 8 for longer than 2 seconds.
"FREQ" and the currently set centre fre-
quency appear briefl y on the display.
To select a different centre frequency be-
tween 500 Hz and 2.5 kHz,
press the
or button 8.
To adjust the middle level,
press the
or button 8 repeat-
edly until "GAIN" appears.
After approx. 2 seconds, "GAIN" and the
current setting are shown on the display.
Press the
or button 8 to adjust
the middle level between –7 and +7.
쏅
쏅
쏅
쏅
쏅
쏅
쏅
쏅
쏅
쏅
쏅
Sound
02_CalaisMP48_gb.indd 4302_CalaisMP48_gb.indd 43 11.06.2008 15:12:28 Uhr11.06.2008 15:12:28 Uhr

44
Time
Displaying the time
To show the time for approx. 10 seconds on
the display,
press and hold down the MENU button
7 for longer than 2 seconds.
Setting the time
Press the MENU button 7.
Press the
or button 8 repeat-
edly until "TIMESET" appears on the
display 6.
After approx. 2 seconds, the current time
appears on the display 6. In 24-hour
mode, "24H" appears in front of the time,
and in 12-hour mode "AM" or "PM". The
hours fl ash and can be adjusted.
To adjust hours or minutes,
press the
or button 8.
To switch between hours and minutes,
press the 6 button <.
Note:
You do not have to wait for the display
of the current setting to change it by
pressing the
or button 8.
To exit the menu,
press the MENU button 7.
Selecting 12/24-hour clock
mode
Press the MENU button 7.
Press the
or button 8 repeat-
edly until "24H MODE" or "12H MODE"
appears on the display 6.
Press the
or button 8 to select
among the modes.
쏅
쏅
쏅
쏅
쏅
쏅
쏅
쏅
쏅
To exit the menu,
press the MENU button 7.
Adjusting the time zone
(TIMEZONE)
If you move across time zones, you can ad-
just the time difference to the currently set
time in 1-hour increments. This allows you
to correct the display of the time for the cur-
rently valid time zone without having to re-
adjust the time itself.
Press the MENU button 7.
Press the
or button 8 repeat-
edly until "TIMEZONE" appears.
After approx. 2 seconds, "ZONE" and
the current setting are shown on the dis-
play 6.
Press the
or button 8 to adjust
the time difference in increments of
1 hour between –12 and +12.
Note:
You do not have to wait for the display
of the current setting to change it by
pressing the
or button 8.
To exit the menu,
press the MENU button 7.
쏅
쏅
쏅
쏅
쏅
Time
02_CalaisMP48_gb.indd 4402_CalaisMP48_gb.indd 44 11.06.2008 15:12:28 Uhr11.06.2008 15:12:28 Uhr

45
ENGLISH
Radio mode
This device is equipped with an RDS radio
receiver. Almost all of the receivable FM
stations broadcast a signal that not only
carries the programme but also additional
information such as the station name and
programme type (PTY).
The station name appears on the display
6 as soon as the tuner receives it.
Switching to radio mode
If you are in a different operating mode,
press the BND button 2,
or
press the SRC button > repeat-
edly until "RADIO" appears on the dis-
play 6.
The display 6 shows the current frequen-
cy or the station name.
Convenient RDS functions
(AF, REG)
The convenient RDS functions AF
(Alternative Frequency) and REG (Regional)
expand the performance spectrum of your
radio device:
AF: If the convenient RDS function is
activated, the device automatically
searches in the background for the best
receivable frequency of the set station.
REG: At certain times, some radio sta-
tions divide their programme into re-
gional programmes providing different
content. The activated REG function
prevents the device from switching to
alternative frequencies of the adjusted
station that are transmitting a different
programme content.
쏅
쏅
•
•
Note:
REG must be switched on or off sepa-
rately in the menu.
Switching the RDS function on/off
To use the RDS functions AF and REG,
press the RDS button =.
The convenient RDS functions are active
if the RDS symbol appears on the dis-
play 6.
Switching REG on/off
Press the MENU button 7.
Press the
or button 8 repeatedly
until "REG" and the current setting "ON"
or "OFF" appear on the display 6.
Press the
or button 8 to switch
REG on or off.
To exit the menu,
press the MENU button 7.
Note:
The setting REG ON/OFF takes effect
only if the RDS function is activated.
Selecting the waveband/memory
bank
This device can be used to receive pro-
grams of the frequency bands FM, MW and
LW (Europe) or FM and AM (NAFTA). There
are three memory banks available for the
FM waveband (FM1, FM2 and FMT) and
one for each of the MW and LW or AM wave-
bands. An additional memory bank MWT/
LWT or AMT is also available. Six stations
can be stored in each memory bank.
To toggle among the wavebands or memory
banks,
press the BND button 2.
쏅
쏅
쏅
쏅
쏅
쏅
Radio mode
02_CalaisMP48_gb.indd 4502_CalaisMP48_gb.indd 45 11.06.2008 15:12:28 Uhr11.06.2008 15:12:28 Uhr

46
Tuning into a station
There are various ways of tuning into a sta-
tion.
Automatic station seek tuning
Press the
or button 8.
The radio tunes into the next receivable
station.
Notes:
If the priority for traffi c information is
activated, the next traffi c information
station is selected.
If PTY is activated, the next station
of the selected programme type is
selected.
Setting the sensitivity of station seek
tuning
You can select whether only strong stations
should be tuned into with low sensitivity or
also weak stations with high sensitivity:
Press the MENU button 7.
Press the
or button 8 repeated-
ly until "SENS" and the current setting
"LO" (low sensitivity) or "DX" (high sen-
sitivity) appear on the display 6.
Press the
or button 8 to change
between the settings "LO" and "DX".
To exit the menu,
press the MENU button 7.
Tuning into stations manually
To change the set frequency in small incre-
ments,
press the
or button 8.
To change the set frequency quickly,
쏅
•
•
쏅
쏅
쏅
쏅
쏅
press and hold down the
or but-
ton 8.
Note:
You can only tune into stations manu-
ally if the RDS function and PTY are
switched off.
Browsing through broadcasting
networks (FM only)
If a radio station provides several pro-
grammes, you have the option of browsing
through its so-called "broadcasting net-
work".
Press the
or button 8 to switch
to the next station on the broadcasting
network.
Note:
Scrolling through broadcasting net-
works is possible only if the RDS func-
tion is switched on and PTY is switched
off. When using this feature, you will
only be able to switch to stations that
you have received once before already.
You can use the Travelstore function (T-
STORE) for this purpose.
Storing stations
Storing stations manually
Select the desired memory bank or
waveband.
Tune into the station.
Press and hold the station button 1 - 6
< for longer than 2 seconds to assign
the station to that button.
The confi rmation beep sounds. The station
is stored on the selected station button.
쏅
쏅
쏅
쏅
쏅
Radio mode
02_CalaisMP48_gb.indd 4602_CalaisMP48_gb.indd 46 11.06.2008 15:12:28 Uhr11.06.2008 15:12:28 Uhr

47
ENGLISH
Storing stations automatically
(T-STORE)
You can automatically store the six strong-
est stations in the region. For the FM wave-
band, the stations are stored in the FMT
memory bank, for the MW and LW wave-
bands in the MWT/LWT memory bank, and
for the AM waveband in the AMT memory
bank.
Note:
Any stations that were previously stored
in this memory bank are replaced by
newly found stations.
Select the desired waveband.
Press and hold down the BND but-
ton 2 for longer than two seconds.
The storing procedure begins. The dis-
play 6 shows "T-STORE". After the proc-
ess has completed, the radio will play the
station that is stored in memory location
one of the FMT, MWT/LWT or AMT memory
bank.
Listening to stored stations
Select the memory bank or waveband.
Press the station button 1 - 6 < where
the desired station is stored.
Scanning receivable stations
(BANDSCAN)
The Bandscan function allows you to scan
all receivable stations each for approx.
10 seconds.
Starting Bandscan
Press and hold down the
or but-
ton 8 for longer than 2 seconds.
쏅
쏅
쏅
쏅
쏅
"BANDSCAN" briefl y appears on the dis-
play. The device searches for stations in
the current waveband. Every station found
is played for approx. 10 seconds. At the
same time, the display shows the current
frequency or the station name.
Ending Bandscan
Press the
or button 8.
The scan process is stopped. The device
remains tuned to the previously played sta-
tion.
Programme type (PTY)
Besides transmitting the station name,
some FM stations also provide informa-
tion on the type of programme that they are
broadcasting. For example, the programme
types can be:
CULTURE TRAVEL JAZZ SPORTS
NEWS POP ROCK MUSIC
You can use the PTY function to select sta-
tions of a particular programme type.
If PTY is switched on and a PTY seek tuning
has been started, the device automatically
changes from the current station or from
another operating mode to the station with
the selected programme type.
Switching PTY on/off
Press the MENU button 7.
Press the
or button 8 repeatedly
until "PTY" and the current setting "ON"
or "OFF" appear on the display 6.
Press the
or button 8 to switch
PTY on or off.
To exit the menu,
press the MENU button 7.
쏅
쏅
쏅
쏅
쏅
Radio mode
02_CalaisMP48_gb.indd 4702_CalaisMP48_gb.indd 47 11.06.2008 15:12:29 Uhr11.06.2008 15:12:29 Uhr

48
Selecting a programme type and
starting seek tuning
Press the
or button 8 repeat-
edly until the desired programme type
is displayed.
Press the
or button 8 to start
seek tuning.
If a station with the selected programme
type is found, it is tuned into.
Treble reduction feature during
interference (HICUT)
The HICUT function results in improved
playback in case of weak radio reception. If
reception interferences are present, the in-
terference level is automatically reduced.
To switch HICUT on or off,
press the MENU button 7.
Press the
or button 8 repeat-
edly until "HICUT" and the current set-
ting "ON" or "OFF" appear on the dis-
play 6.
Press the
or button 8 to switch
HICUT on or off.
To exit the menu,
press the MENU button 7.
Switching radio text on/off
Some radio stations use the RDS signal to
transmit advertisement or other informa-
tion instead of the station name. This radio
text appears on the display 6.
To switch the display of radio text on or off,
press the MENU button 7.
Press the
or button 8 repeat-
edly until "RADIOTXT" appears.
쏅
쏅
쏅
쏅
쏅
쏅
쏅
쏅
After approx. 2 seconds, the current set-
ting "TEXT ON" or "TEXT OFF" appears on
the display 6.
Press the
or button 8 to switch
the display of radio text on or off.
Note:
You do not have to wait for the display
of the current setting to change it by
pressing the
or button 8.
To exit the menu,
press the MENU button 7.
쏅
쏅
Radio mode
02_CalaisMP48_gb.indd 4802_CalaisMP48_gb.indd 48 11.06.2008 15:12:29 Uhr11.06.2008 15:12:29 Uhr

49
ENGLISH
Traffi c information
Switching traffi c information
priority on/off
To switch the priority for traffi c information
on or off in any operating mode,
press the TA button ;.
Note:
In the operating modes CD, MP3, CD
changer and AUX, this function is avail-
able only if the FM waveband was tuned
to last.
The priority for traffi c announcements is ac-
tivated if the display 6 shows the TA sym-
bol. As soon as the device receives a traffi c
announcement, it is switched through. The
display 6 shows "TRAFFIC" for the dura-
tion of the announcement.
Note:
You will hear a warning beep,
if you leave the reception area of a
traffi c information station that the
system is tuned into while listening
to the traffi c information station or
a CD, and the subsequent automatic
seek tuning cannot fi nd a new traffi c
information station.
if you retune the radio from a traffi c
information station to a station that
does not broadcast traffi c informa-
tion.
If you hear the warning beep, you can
either switch off traffi c information pri-
ority or tune into a station that broad-
casts traffi c information.
쏅
•
•
Setting the volume increase for
traffi c announcements
You can adjust how many volume levels
the traffi c announcements are played back
louder than the adjusted volume:
Press the MENU button 7.
Press the
or button 8 repeat-
edly until "TA VOL" appears.
After approx. 2 seconds, "VOL" and the cur-
rent setting are shown on the display 6.
Press the
or button 8 to ad-
just the volume increase between 0
and 10.
Note:
You do not have to wait for the display
of the current setting to change it by
pressing the
or button 8.
To exit the menu,
press the MENU button 7.
Note:
Using the volume control 1, you can
adjust the volume during a traffi c an-
nouncement for the duration of that
announcement.
Cancelling traffi c
announcements
To cancel an ongoing traffi c announcement
and return to the previously playing audio
source,
press the TA button ;.
The priority for traffi c announcement re-
mains activated.
쏅
쏅
쏅
쏅
쏅
Traffi c information
02_CalaisMP48_gb.indd 4902_CalaisMP48_gb.indd 49 11.06.2008 15:12:29 Uhr11.06.2008 15:12:29 Uhr

50
CD mode
You can use this device to play standard au-
dio CDs, CD-Rs and CD-RWs with a diame-
ter of 12 cm. To avoid problems when play-
ing self-burned CDs, you should not burn
CDs at speeds greater than 16-speed.
Risk of severe damage to
the CD drive!
CD singles with a diameter of 8 cm and non-
circular contoured CDs (shape CDs) must
not be used.
Handle the CD with care and avoid scratch-
es and damages on the CD. If possible, only
grasp the CD at the edge. If a CD should
ever accumulate dirt, clean it with a lint-free
cloth without using solvents. Always wipe
the CD from the inside to the outside.
Do not expose the CD to direct sunlight, and
keep the CD in a protective case outside the
device.
Do not affi x any labels onto the CD. Label
the CD only with suitable commercial mark-
ers.
We accept no responsibility for any damage
to the CD drive that may occur as a result of
the use of unsuitable or damaged CDs.
To ensure proper functioning, use only CDs
with the Compact-Disc logo. Copy-pro-
tected CDs can cause playback problems.
Blaupunkt cannot guarantee the proper
functioning of copy-protected CDs!
Starting the CD mode
If there is no CD inserted in the drive,
gently insert the CD with its printed
side up into the CD tray until you feel
some resistance.
The drive draws in the CD automatically.
The display 6 shows the CD symbol.
Note:
You must not hinder or assist the drive
as it draws in the CD.
The CD starts playing. The display 6
shows the number of the current track (e.g.
"T12") and the playing time as well as track
information (CD text).
If a CD is already inserted in the drive,
press the SRC button > repeatedly
until "CD" appears on the display 6.
Playback begins from the point at which it
was last interrupted.
Display of track information
(CD text)
If the CD provides CD text, the information
for every track is shown once on the dis-
play 6 as scrolling text at the start of the
track.
Displaying track information once as
scrolling text
Press the 5 button <.
The CD text for the current track is shown
once as scrolling text on the display 6.
Note:
This function is not available if the
display of CD text as scrolling text is
switched off (see the following sec-
tion).
쏅
쏅
쏅
CD mode
02_CalaisMP48_gb.indd 5002_CalaisMP48_gb.indd 50 11.06.2008 15:12:29 Uhr11.06.2008 15:12:29 Uhr

51
ENGLISH
Switching the display of track
information as scrolling text on/off
To switch the display of track information as
scrolling text on or off,
press the MENU button 7.
Press the
or button 8 repeated-
ly until "SCRL" and the current setting
"ON" or "OFF" appear on the display
6.
Press the
or button 8 to switch
scrolling text on or off.
To exit the menu,
press the MENU button 7.
With the setting "SCRL OFF", the track in-
formation is shown in segments of 8 char-
acters each on the display 6. For this pur-
pose, every text segment as well as track
number and playing time are intermittently
displayed for 5 seconds each.
Note:
The setting "SCRL ON/OFF" also affects
the display of MP3 track information
(ID3 tags) in MP3 mode accordingly.
Selecting tracks
Press the or button 8 to change
to the previous or next track.
If you press the
button 8 once, the cur-
rent track will be played again from the be-
ginning.
Fast searching (audible)
To fast search backwards or forwards,
press and hold down the
or but-
ton 8 until you reach the desired po-
sition.
쏅
쏅
쏅
쏅
쏅
쏅
Random track play (MIX)
Press the 3 button <.
The display 6 briefl y shows "MIX CD" and
the MIX symbol appears. The next tracks
are selected in random order.
Cancelling MIX
Press the 3 button < again.
The display 6 briefl y shows "MIX OFF" and
the MIX symbol disappears. Normal play-
back is then resumed.
Scanning tracks (SCAN)
To scan all the tracks of the CD for approx.
10 seconds each,
press the 4 button <.
"SCAN TRK" briefl y appears on the display.
During the scanning, the "CD" display fl ash-
es. The track number and playing time of
the current track or its track information is
displayed.
Cancelling SCAN and continuing
listening to a track
To end the scan process,
press the 4 button < again.
"SCAN OFF" briefl y appears on the display.
The current track continues playing.
Repeating tracks (RPT)
Press the 2 button <.
"RPT TRK" appears briefl y on the display
and the RPT symbol is displayed. The cur-
rent track is repeated continuously until you
deactivate RPT.
쏅
쏅
쏅
쏅
쏅
CD mode
02_CalaisMP48_gb.indd 5102_CalaisMP48_gb.indd 51 11.06.2008 15:12:29 Uhr11.06.2008 15:12:29 Uhr

52
Exiting RPT
Press the 2 button < again.
The display 6 briefl y shows "RPT OFF"
and the RPT symbol disappears. Normal
playback is then resumed.
Interrupting playback (PAUSE)
Press the 1 button <.
The display 6 shows "PAUSE".
Cancelling pause
During the pause, press the 1 but-
ton <.
Playback is continued.
Ejecting a CD
Note:
You can also eject CDs whilst the device
is switched off or another audio source
is activated.
Press the CD eject button 4.
The CD is ejected. "CD EJECT" appears
briefl y on the display.
Note:
You must not hinder or assist the drive
as it ejects the CD.
Remove the CD.
The CD symbol disappears.
Note:
If you do not remove an ejected CD, it
is automatically pulled in again after ap-
prox. 10 seconds.
쏅
쏅
쏅
쏅
쏅
MP3/WMA mode
You can also use this car sound system to
play CD-Rs and CD-RWs that contain MP3
and WMA music fi les. In addition, you can
connect USB data carriers via the optional
C‘n‘C-capable USB interface and play back
MP3/WMA fi les stored on the USB data
carrier.
This chapters deals only with playing
MP3 fi les since the operation for MP3
and WMA fi les is identical. In this chap-
ter, the designation "MP3 data carrier"
refers to CD-R/RW as well as USB data
carriers such as USB sticks.
Notes:
WMA fi les with Digital Rights
Management (DRM) from online mu-
sic shops cannot be played with this
device.
WMA fi les can only be played back
safely if they were created with
Windows Media Player version 8 or
later.
Preparing an MP3 data carrier
Preparing an MP3 CD
The various combinations of CD burners,
CD burning software and CD blanks may
lead to problems arising with the device’s
ability to play certain CDs. If problems oc-
cur with your own burned CDs, you should
try another brand of CD blank or choose an-
other colour of CD blank.
The format of the CD must be ISO 9660
Level 1/Level 2 or Joliet. Other formats can-
not be played reliably.
•
•
CD mode MP3/WMA mode
02_CalaisMP48_gb.indd 5202_CalaisMP48_gb.indd 52 11.06.2008 15:12:30 Uhr11.06.2008 15:12:30 Uhr

53
ENGLISH
When creating (coding) MP3/WMA fi les
from audio fi les, you should use bit rates
from 32 to 320 kbit/s for MP3 fi les or 32 to
192 kbps for WMA fi les.
This device supports up to 252 directories
and up to 255 fi les per directory. At the
same time, the CD may contain a total of up
to 512 directories and fi les. The directories
and tracks on the CD can be selected indi-
vidually.
D01
D02
T001
T005
T004
T003
T002
D03
T001
T006
T005
T004
T003
T002
T011
T007
T008
T009
T010
D04
T001
T006
T005
T004
T003
T002
A
B
A Directories
B Tracks · Files
You can name each directory using a PC.
The device is capable of displaying the di-
rectory name. Name the directories and
tracks/fi les using your CD burner software.
The software’s instruction manual will pro-
vide details on how to do this.
Notes:
When naming fi les (directories and
tracks) you should avoid using ac-
cents and special characters.
If you use fi le names with more than
16 characters (including ".MP3" or
".WMA"), the maximum number of
tracks and directories is reduced.
If you like your fi les to be in the specifi c or-
der, save the fi les on the data carrier in the
desired sequence in which you want to play
them later. The devices plays back the fi les
in the order in which they were physically
stored on the data carrier.
To play back fi les in this device, the MP3 fi les
must have the fi le extension ".MP3" and the
WMA fi les the fi le extension ".WMA".
Notes:
To ensure uninterrupted playback,
do not try changing the fi le extension
to ".MP3" of any fi les other than MP3
fi les and then attempt to play them!
The device will ignore these invalid
fi les during playback.
Do not use "mixed" CDs containing
both non-MP3 data and MP3 tracks
(the device only reads MP3 fi les dur-
ing MP3 playback).
Do not use mix-mode CDs contain-
ing both CD-audio tracks and MP3
tracks. If you try playing a mix-mode
CD, the device will only play the CD-
audio tracks.
Preparing a USB data carrier
For the device to recognise a USB data car-
rier, it must be specifi ed as mass storage
device and formatted using the FAT16 or
•
•
•
•
•
MP3/WMA mode
02_CalaisMP48_gb.indd 5302_CalaisMP48_gb.indd 53 11.06.2008 15:12:30 Uhr11.06.2008 15:12:30 Uhr

54
FAT32 fi le system and contain MP3 or WMA
fi les.
You can created up to 1,500 fi les on a USB
data carrier (directories and tracks). The
directories and tracks can be selected in-
dividually with this device. If you use fi le
names with more than 24 characters (in-
cluding ".MP3" or ".WMA"), this maximum
number of fi les is reduced.
Blaupunkt cannot guarantee the proper
functioning of all USB data carriers avail-
able on the market.
ID3 tags
MP3 tracks can contain additional infor-
mation such as the artist, album and track
name (ID3 tags). This device can display
ID3 tags of version 1 and 2.
Switching to MP3 mode
Activating the MP3 mode of CD
For an MP3 CD, the MP3 mode is activated
in the same way as the normal CD mode.
For further information, please read the
section entitled "Starting the CD mode" in
the "CD mode" chapter.
The display 6 shows the number of the
current track (e.g. "T12") and the playing
time as well as track information (ID3 tags)
or the fi le name. When changing to another
directory, the directory number (e.g. "DIR
02") is briefl y displayed.
Connect USB data carrier and start MP3
mode
To be able to connect a USB data carrier
(e.g. a USB stick or USB hard disk), the
optional Blaupunkt USB interface must be
connected to the rear side of the device
(chamber C3). You can route the USB ca-
ble of the interface, e.g. into the glove com-
partment or to a suitable place of the centre
console.
Notes:
If you connect the Blaupunkt USB in-
terface to the device, the AUX input
must be adjusted accordingly. For
further details, please read the sec-
tion "Adjusting the AUX input" in the
chapter "External audio sources".
Always switch off the device before
connecting or disconnecting the USB
data carrier so that the data carrier
is correctly registered and unregis-
tered.
Connect the USB device with the USB
cable of the USB interface.
As soon as a USB data carrier is connected,
it can be selected with the SRC button >.
The display shows "USB".
Display of track information
(ID3 tags)
If the MP3 data carrier provides ID3 tags,
the information for every track is shown
once on the display 6 as scrolling text at
the start of the track. If no ID3 tags were
stored with the MP3 fi les, the fi le name is
displayed.
Note:
For storing ID3 tags, please also read
the instructions for your PC MP3 soft-
ware or burner software.
•
•
쏅
MP3/WMA mode
02_CalaisMP48_gb.indd 5402_CalaisMP48_gb.indd 54 11.06.2008 15:12:30 Uhr11.06.2008 15:12:30 Uhr

55
ENGLISH
Displaying track information once as
scrolling text
Press the 5 button <.
The ID3 tags for the current track are shown
once as scrolling text on the display 6.
Note:
This function is not available if the dis-
play of track information as scrolling
text is switched off. In the chapter "CD
mode", subchapter "Display of track in-
formation (CD text)", please read the
section "Switching the display of track
information as scrolling text on/off".
Selecting a directory
To move up or down to another directory,
press the
or button 8.
Notes:
The device will automatically skip any
directories that do not contain MP3
fi les.
The device treats all directories and
subdirectories as if they were located
on one level. Repeatedly pressing the
or button 8 will also bring you
to all subdirectories.
Selecting tracks/fi les
To move up or down to another track/fi le in
the current directory,
press the
or button 8.
If you press the
button 8 once, the cur-
rent track will be played again from the be-
ginning.
쏅
쏅
•
•
쏅
Fast searching
To fast search backwards or forwards,
press and hold down the
or but-
ton 8 until you reach the desired po-
sition.
Note:
In USB mode, the fast searching re-
verse stops at the beginning of the cur-
rent track each time.
Random track play (MIX)
To play the tracks in the current directory in
random order,
press the 3 button < repeatedly until
"MIX DIR" or "MIX FLD" appears on the
display 6.
The MIX symbol appears on the display
6.
To play all the tracks of the MP3 data carrier
in random order,
press the 3 button < repeatedly until
"MIX ALL" appears on the display 6.
The MIX symbol appears on the display
6.
Cancelling MIX
To end the playback in random order,
press the 3 button < repeatedly until
"MIX OFF" appears on the display 6.
The MIX symbol on the display 6 disap-
pears.
쏅
쏅
쏅
쏅
MP3/WMA mode
02_CalaisMP48_gb.indd 5502_CalaisMP48_gb.indd 55 11.06.2008 15:12:30 Uhr11.06.2008 15:12:30 Uhr

56
Scanning tracks (SCAN)
To scan all the tracks of the MP3 data car-
rier in ascending order for approx. 10 sec-
onds each,
press the 4 button < repeatedly
until "SCAN TRK" appears on the
display 6.
During the scanning, the "MP3" or "USB"
display fl ashes.
To scan all the tracks in the current direc-
tory in USB mode,
press the 4 button < repeatedly
until "SCAN FLD" appears on the
display 6.
During the scanning, the "USB" display
fl ashes.
Stopping Scan
To stop scanning,
press the 4 button < repeatedly
until "SCAN OFF" appears on the
display 6.
The currently scanned track will then con-
tinue to be played normally.
Repeating individual tracks or
whole directories (REPEAT)
To repeat the current track,
press the 2 button < repeatedly until
"RPT TRK" appears on the display 6.
The RPT symbol appears on the display
6.
To repeat the current directory,
press the 2 button < repeatedly until
"RPT DIR" or "RPT FLD" appears on the
display 6.
The RPT symbol appears on the display
6.
쏅
쏅
쏅
쏅
쏅
Cancelling REPEAT
To quit the repeat,
press the 2 button < repeatedly until
"RPT OFF" appears on the display 6.
The RPT symbol on the display 6 disap-
pears.
Interrupting playback (PAUSE)
Press the 1 button <.
The display 6 shows "PAUSE".
Cancelling pause
During the pause, press the 1 button
<.
Playback is continued.
쏅
쏅
쏅
MP3/WMA mode
02_CalaisMP48_gb.indd 5602_CalaisMP48_gb.indd 56 11.06.2008 15:12:30 Uhr11.06.2008 15:12:30 Uhr

57
ENGLISH
CD changer mode
You can connect the Blaupunkt CD chang-
ers CDC A08 T and IDC A09 to the device
as options (chamber C3 on the rear side of
the device).
Caution!
The CD changer is usually supplied
by the device with a 12-V operating
voltage.
If the CD changer CDC A 08 T (24 volt)
is connected, the voltage supply at
the plug connector of the connecting
cable of the CD changer must be split
(Chamber C3/Pin 15). The CD changer
must be supplied with a separate 24-
volt operating voltage.
Notes:
If you connect a CD changer to the
device, the AUX input must be adjust-
ed accordingly. For further details,
please read the section "Adjusting the
AUX input" in the chapter "External
audio sources".
Information on handling CDs, insert-
ing CDs and operating the CD changer
can be found in the operating instruc-
tions supplied with your CD changer.
Switching to CD changer mode
Press the SRC button > repeatedly un-
til the display 6 shows "CHANGER".
The device starts playing the fi rst CD that
the CD changer detects. The display 6
shows the number of the current CD (e.g.
"D02") and the current track (e.g. "T07") as
well as the playing time.
•
•
쏅
Selecting CDs
To move up or down to another CD,
press the
or button 8.
Selecting tracks
To move down or up to another track on the
current CD,
press the
or button 8.
Fast searching (audible)
To fast search backwards or forwards,
press and hold down the
or but-
ton 8 until you reach the desired po-
sition.
Repeating individual tracks or
whole CDs (RPT)
To repeat the current track,
press the 2 button < repeatedly until
"RPT TRK" appears on the display 6.
The RPT symbol appears on the display
6.
To repeat the current CD,
press the 2 button < repeatedly until
"RPT CD" appears on the display 6.
The RPT symbol appears on the display
6.
Cancelling REPEAT
To quit the repeat,
press the 2 button < repeatedly until
"RPT OFF" appears on the display 6.
The RPT symbol on the display 6 disap-
pears.
쏅
쏅
쏅
쏅
쏅
쏅
CD changer mode
02_CalaisMP48_gb.indd 5702_CalaisMP48_gb.indd 57 11.06.2008 15:12:30 Uhr11.06.2008 15:12:30 Uhr

58
Random track play (MIX)
To play the tracks on the current CD in ran-
dom order,
press the 3 button < repeatedly until
"MIX CD" appears on the display 6.
The MIX symbol appears on the display
6.
To play the tracks on all inserted CDs in ran-
dom order,
press the 3 button < repeatedly until
"MIX ALL" appears on the display 6.
The MIX symbol appears on the display
6.
Cancelling MIX
To end the playback in random order,
press the 3 button < repeatedly until
"MIX OFF" appears on the display 6.
The MIX symbol on the display 6 disap-
pears.
Scanning all tracks on all CDs
(SCAN)
To scan all the tracks of all inserted CDs in
ascending order for approx. 10 seconds
each,
press the 4 button <.
The display 6 briefl y shows "SCAN TRK".
During the scanning, the display of the CD
number fl ashes.
Stopping Scan
To stop scanning,
press the 4 button < again.
The display 6 briefl y shows "SCAN OFF".
The currently scanned track will then con-
tinue to be played normally.
쏅
쏅
쏅
쏅
쏅
Interrupting playback (PAUSE)
Press the 1 button <.
The display 6 shows "PAUSE".
Cancelling pause
During the pause, press the 1 button
<.
Playback is continued.
쏅
쏅
CD changer mode
02_CalaisMP48_gb.indd 5802_CalaisMP48_gb.indd 58 11.06.2008 15:12:31 Uhr11.06.2008 15:12:31 Uhr

59
ENGLISH
IR remote control RC 10 P
The optional IR remote control allows con-
trolling the most important functions of the
device.
Remote control receiver
The cap of the device contains the infrared
receiver 9 for the remote control. Before
using the remote control, the receiver must
be switched on:
Press the MENU button 7.
Press the
or button 8 repeated-
ly until "IR" and the current setting "ON"
or "OFF" appear on the display 6.
Press the
or button 8 to switch
IR on or off.
To exit the menu,
press the MENU button 7.
C
F
G
H
E
D
B
A
@
쏅
쏅
쏅
쏅
Functions of the remote control
General:
Button Function
ON H Switches the device on/
off (press longer)
Mute (short press)
Exit the menu
SRC @ Switches sources
V+ B Increases the volume
V- A Decreases the volume
OK G Calls up or exits a menu
E Selects a menu item
C Selects a menu item
F Changes a menu setting
D Changes a menu setting
In radio mode:
Button Function
F Calls up the stored sta-
tions
D Selects the waveband/
memory bank
E Seek tuning forward
C Seek tuning reverse
In CD mode:
Button Function
F Selects the next track
D Selects the previous track
IR remote control
02_CalaisMP48_gb.indd 5902_CalaisMP48_gb.indd 59 11.06.2008 15:12:31 Uhr11.06.2008 15:12:31 Uhr

60
CD changer mode
Button Function
F Plays the next track
D Plays the previous track
E Plays the next CD
C Plays the previous CD
MP3 mode
Button Function
F Plays the next track
D Plays the previous track
E Plays the next directory
C Plays the previous direc-
tory
Preamplifi er output
You can connect an amplifi er to the device
to operate a low-bass loudspeaker (sub-
woofer). To do so, the amplifi er must be
connected to the rear side of the device
(chamber C1). The level of the subwoofer
can be adjusted in the Audio menu:
Press the AUD button :.
Press the
or button 8 repeat-
edly until "SUB WOOF" appears.
After approx. 2 seconds, "SUBW" and
the current setting are shown on the dis-
play 6.
Press the
or button 8 to adjust
the level for the subwoofer between 0
and 7.
Note:
You do not have to wait for the display
of the current setting to change it by
pressing the
or button 8.
To exit the menu,
press the AUD button :.
쏅
쏅
쏅
쏅
IR remote control Preamplifi er output
02_CalaisMP48_gb.indd 6002_CalaisMP48_gb.indd 60 11.06.2008 15:12:31 Uhr11.06.2008 15:12:31 Uhr

61
ENGLISH
External audio sources
You can connect different types of external
audio sources to the device via the AUX in-
put: The AUX input must be adjusted for the
connected external audio source in each
case:
"AUX" setting for external audio
sources, such as portable CD players,
MiniDisc players or MP3 players.
"CDC" setting for the Blaupunkt CD
changers CDC A 08 T and IDC A 09.
"USB" setting for the USB interface
from Blaupunkt.
For the setting of the AUX input, please read
the following section "Adjusting the AUX in-
put".
Note:
If you want to connect an external audio
source, you will need an adapter cable.
You can obtain this cable (Blaupunkt no.
7 607 897 093) from your Blaupunkt
dealer.
Adjusting the AUX input
Press the MENU button 7.
Press the
or button 8 repeat-
edly until "SRC SEL" appears.
After approx. 2 seconds, "SRC" and the
current setting "CDC", "USB"or "AUX" are
shown on the display 6.
Press the
or button 8 to select
another setting.
Note:
The order of the settings in the menu is
"CDC" – "USB" – "AUX":
•
•
•
쏅
쏅
쏅
With "CDC" as the current setting, you
can select the "USB" setting by press-
ing the
button 8.
With "USB" as the current setting, you
can select the "CDC" setting by press-
ing the
button 8 or the "AUX" set-
ting by pressing the
button 8.
With "AUX" as the current setting, you
can select the "USB" setting by press-
ing the
button 8.
After every change of the setting, the
device is automatically switched off. To
switch between the settings "CDC" and
"AUX", you must, therefore, fi rst select
the "USB" setting and then switch on
the device again after the automatic
switch-off. Next, repeat the setting
process to obtain the desired setting
"AUX" or "CDC".
The note "AUTO SWITCH OFF IN 10
SECONDS" is displayed. The device auto-
matically switches off after approx. 10 sec-
onds.
Press the On/Off button 3 to switch
the device on again.
The device is switched on in radio mode
with the selected setting.
Note:
If you selected the AUX setting, you
can select the AUX input with the SRC
button >. "AUX" then appears on the
display.
If you selected the setting CDC or USB,
you can select the audio source with the
SRC button > only if a corresponding
device (CD changer or USB interface)
is connected.
•
•
•
쏅
External audio sources
02_CalaisMP48_gb.indd 6102_CalaisMP48_gb.indd 61 11.06.2008 15:12:31 Uhr11.06.2008 15:12:31 Uhr

62
Adjusting the level of the AUX
input
If you adjusted the AUX input to "AUX" for
connecting external audio sources, you can
adjust the level of the external audio source
to the level of the audio source of the device
(such as CD and radio).
Note:
You can adjust the level for the AUX
input only if AUX is selected as audio
source.
If necessary, press the SRC button >
repeatedly until "AUX" appears on the
display.
Press the MENU button 7.
Press the
or button 8 repeated-
ly until "GAIN" appears on the display
with the current setting.
Press the
or button 8 to adjust
the level adjustment between –9 and
+9.
To exit the menu,
press the MENU button 7.
쏅
쏅
쏅
쏅
쏅
Restoring factory settings
(RESET)
You can restore the original factory settings
of the device.
Press and hold down the AUD button
: for longer than approx. 10 sec-
onds.
A confi rmation beep sounds and the display
6 briefl y shows "RESET". All the menu and
audio menu settings are reset to the factory
settings.
Note:
Stations stored at the station buttons
are not deleted.
쏅
External audio sources Factory settings
02_CalaisMP48_gb.indd 6202_CalaisMP48_gb.indd 62 11.06.2008 15:12:32 Uhr11.06.2008 15:12:32 Uhr

63
ENGLISH
Technical data
Operating voltage
24 volt
Amplifi er
Output power: 2 x 20 watt sine
at 4 ohm
Line output: 2 x 2.0 Vpp
AUX input: 2 x 2.0 Vpp
Tuner
Wavebands in Europe:
FM: 87.5 - 108 MHz
MW: 531 - 1602 kHz
LW: 153 - 279 kHz
Wavebands in America:
FM: 87.7 - 107.9 MHz
AM: 530 - 1710 kHz
FM frequency response:
30 - 15,000 Hz
CD
Frequency response:
20 - 20,000 Hz
Subject to changes!
Technical data
02_CalaisMP48_gb.indd 6302_CalaisMP48_gb.indd 63 11.06.2008 15:12:32 Uhr11.06.2008 15:12:32 Uhr

64
1 Bouton de réglage du volume
2 Touche BND
Pression brève : sélection du niveau de
mémoire ou de la gamme d'ondes
Pression prolongée : démarrage de
la fonction Travelstore (FMT ou MWT
(OM)/LWT (OL))
3 Touche marche/arrêt
Pression brève : mise en marche de
l'appareil
En fonctionnement : coupure du son
(Mute)
Pression prolongée : arrêt de l'appareil
4 Touche d'éjection du CD
5 Fente d'insertion du CD
6 Ecran
7 Touche MENU
Appel du menu pour les réglages de
base.
8 Touche multifonction
9 Récepteur infrarouge (IR) pour télé-
commande infrarouge (option)
: Touche AUD
Pression brève : ouverture du menu
audio pour le réglage des graves, des
aiguës, de la balance, du fader et du
loudness
Pression prolongée (10 s) : retour aux
réglage d'usine
; Touche TA
Activation et désactivation de la prio-
rité aux informations routières
Interruption de la diffusion d'une infor-
mation routière
< Bloc de touches 1 - 6
= Touche RDS
Activation et désactivation des fonc-
tions confort RDS
> Touche SRC
Sélection de la source : radio ou
(si support introduit ou appareil rac-
cordé et en marche) CD, MP3, chan-
geur de CD et AUX
? Code LED
Eléments de commande
03_CalaisMP48_fr.indd 6403_CalaisMP48_fr.indd 64 11.06.2008 15:13:18 Uhr11.06.2008 15:13:18 Uhr

65
FRANÇAIS
Remarques importantes ...................67
Utilisation conforme .......................67
Télécommande (option) .................67
Changeur de CD (option) ................67
Interface USB (option) ...................67
Elimination des anciens appareils ..... 67
Protection antivol (CODE) ................68
Activation et désactivation de la
demande d'entrée du code (CODE) ..68
Entrée du code après une interruption
de la tension d'alimentation .............69
Mise en marche et arrêt....................69
Mise en marche et arrêt avec la
touche marche/arrêt ...................... 69
Mise en marche et arrêt par
l'intermédiaire du contact du
véhicule .......................................69
Mise en marche par insertion
d'un CD ........................................69
Réglage de la temporisation à l'arrêt .....70
Mise en marche par le téléphone
(option)........................................70
Mise en marche avec la télécommande
IR (infrarouge) RC 10 P (option) ...... 70
Réglage du volume sonore ................70
Coupure du son (MUTE) .................. 70
Sortie audio du téléphone ou du
système de navigation ....................70
Activation et désactivation du bip
de confi rmation (BEEP) ..................71
Réglage du volume sonore maximal
à la mise en marche (ON VOL) ..........71
Réglage de l'adaptation du volume
en fonction de la vitesse (GALA) ......72
Tonalité ...........................................72
Réglage des aiguës .........................72
Réglage des graves ......................... 72
Réglage du médium ........................ 73
Réglage de la répartition gauche/
droite du volume sonore (BAL) .........73
Réglage de la répartition avant/
arrière du volume sonore (FAD) .......74
Heure ..............................................74
Affi chage de l'heure ........................74
Réglage de l'heure ..........................74
Sélection du mode d'affi chage
12/24 heures ................................ 75
Réglage du fuseau horaire
(TIMEZONE) .................................75
Mode radio ......................................75
Activation du mode radio ................75
Fonctions confort RDS (AF, REG) .....75
Sélection de la gamme d'ondes
ou du niveau de mémoire ................76
Réglage des stations.......................76
Mémorisation des stations ..............77
Appel des stations mémorisées ........ 78
Balayage des stations qui peuvent
être reçues (BANDSCAN) ................78
Type de programme (PTY) ...............78
Abaissement du niveau des aiguës
en cas de perturbation (HICUT) ....... 78
Activation et désactivation de
l'affi chage du texte radio .................79
Informations routières .....................79
Activation et désactivation de la
priorité aux informations routières .... 79
Réglage du relèvement du volume
sonore pour les informations
routières.......................................80
Interruption des informations
routières.......................................80
Table des matières
03_CalaisMP48_fr.indd 6503_CalaisMP48_fr.indd 65 11.06.2008 15:13:19 Uhr11.06.2008 15:13:19 Uhr

66
Mode CD .........................................80
Démarrage du mode CD .................. 81
Affi chage des informations sur
les titres (texte de CD) .................... 81
Sélection des titres ........................82
Recherche rapide (audible) .............82
Lecture aléatoire des titres (MIX) ......82
Balayage des titres (SCAN) .............. 82
Répétition de la lecture d'un titre
(RPT) ...........................................82
Interruption de la lecture (PAUSE) ....83
Retrait du CD ................................ 83
Mode MP3/WMA .............................83
Préparation d'un support de
données MP3 ................................83
Démarrage du mode MP3................85
Affi chage des informations sur les
titres (balises ID3) .........................85
Sélection des répertoires ................86
Sélection des titres et des fi chiers ....86
Recherche rapide ..........................86
Lecture des titres dans un ordre
aléatoire (MIX) ..............................86
Balayage des titres (SCAN) .............. 87
Lecture répétée de titres ou de
répertoires entiers (REPEAT) ........... 87
Interruption de la lecture (PAUSE) ....87
Mode changeur de CD ......................88
Démarrage du mode changeur
de CD ...........................................88
Sélection des CD ...........................88
Sélection des titres ........................88
Recherche rapide (audible) .............88
Répétition de la lecture d'un titre
ou d'un CD entier (RPT) ..................88
Lecture des titres dans un ordre
aléatoire (MIX) ..............................89
Balayage de tous les titres de tous
les CD (SCAN) ...............................89
Interruption de la lecture (PAUSE) ....89
Télécommande IR RC 10 P ................90
Récepteur de télécommande ...........90
Fonctions de la télécommande .........90
Sortie du préamplifi cateur ...............91
Sources audio externes ....................92
Réglage de l'entrée AUX ..................92
Réglage du niveau de l'entrée AUX ....93
Retour aux réglages d'usine
(RESET) ..........................................93
Caractéristiques techniques ............. 94
Tension de service ......................... 94
Amplifi cateur ................................ 94
Tuner ...........................................94
CD ...............................................94
Raccordement ISO .........................281
Table des matières
03_CalaisMP48_fr.indd 6603_CalaisMP48_fr.indd 66 11.06.2008 15:13:19 Uhr11.06.2008 15:13:19 Uhr

67
FRANÇAIS
Remarques importantes
Remarques importantes
Avant de mettre l'appareil en service,
veuillez lire attentivement le présent mode
d'emploi et vous familiariser avec l'appareil.
Conservez ce mode d'emploi dans le véhi-
cule pour toute question ultérieure.
Utilisation conforme
L'appareil est conçu pour fonctionner dans
un véhicule utilitaire disposant d'une ten-
sion de bord de 24 V et pour être intégré
dans une baie DIN simple.
Sécurité routière
La sécurité routière est impéra-
tive. Utilisez uniquement votre appareil si
la situation routière le permet. Familiarisez-
vous avec l'appareil avant de prendre la
route. Les avertisseurs sonores de la po-
lice, des sapeurs-pompiers et des services
de secours doivent pouvoir être perçus à
temps dans le véhicule. Lorsque le véhicule
roule, réglez par conséquent un volume so-
nore raisonnable.
Télécommande (option)
La télécommande RC 10 P permet de
contrôler les principales fonctions de l'ap-
pareil. Il s'agit d'une télécommande infra-
rouge disponible en tant qu'accessoire (réf.
Blaupunkt 7 607 591 512).
Changeur de CD (option)
Vous pouvez raccorder les changeurs de
CD CDC A08 T (réf. Blaupunkt 7 607 274
002) ou IDC A09 (réf. Blaupunkt 7 607 274
005). Ces changeurs de CD sont disponi-
bles en tant qu'accessoires.
Interface USB (option)
Vous pouvez raccorder l'interface USB
Blaupunkt pour lire les fi chiers MP3/WMA
mémorisés sur un support de données USB.
L'interface USB est disponible en tant qu'ac-
cessoire (réf. Blaupunkt 7 607 541 576).
Elimination des anciens
appareils
Ne jetez pas votre ancien appareil
avec les ordures ménagères !
Utilisez les systèmes mis à votre dis-
position pour le retour ou la collecte des an-
ciens appareils en vue de leur élimination.
03_CalaisMP48_fr.indd 6703_CalaisMP48_fr.indd 67 11.06.2008 15:13:20 Uhr11.06.2008 15:13:20 Uhr

68
Protection antivol
Protection antivol (CODE)
Votre appareil est protégé contre le vol par
un code à quatre chiffres. Ce code doit
toujours être entré lorsque l'appareil a été
débranché du réseau de bord. La demande
d'entrée du code est désactivée d'usine,
mais elle peut être activée.
Remarque :
Si la demande d'entrée du code est ac-
tivée, le Code LED ? se met à cligno-
ter non seulement lorsque l'appareil est
arrêté, mais aussi lorsque le contact est
coupé.
Vous trouverez le code dans le passeport de
l'appareil.
Remarque :
Ne conservez jamais le passeport de
l'appareil dans le véhicule !
Activation et désactivation de
la demande d'entrée du code
(CODE)
Appuyez sur la touche MENU 7.
Appuyez sur la touche
ou 8
autant de fois qu'il est nécessaire pour
faire apparaître « CODE » et le réglage
actuel « ON » (activé) ou « OFF » (dés-
activé) sur l'écran 6.
Appuyez sur la touche
ou 8.
« 0000 » apparaît sur l'écran 6. Entrez le
code :
Remarque :
Si vous entrez un code erroné, « 0000 »
réapparaît sur l'écran 6. Vous pou-
vez encore rentrer deux fois un code.
Après trois entrées erronées du code,
쏅
쏅
쏅
l'appareil est bloqué pendant 1 heure.
Pendant ce temps, le message « WAIT
1HR » est affi ché sur l'écran 6. Si
vous arrêtez l'appareil pendant ce
temps d'attente, vous devrez attendre
une heure pleine avant de pouvoir le re-
mettre en marche.
Appuyez sur la touche de présélection
1 < autant de fois qu'il est nécessaire
pour faire apparaître le premier chiffre
du code sur l'écran 6.
Appuyez sur la touche de présélection
2 < autant de fois qu'il est nécessaire
pour faire apparaître le deuxième chif-
fre du code sur l'écran 6.
Appuyez sur la touche de présélection
3 < autant de fois qu'il est nécessaire
pour faire apparaître le troisième chif-
fre du code sur l'écran 6.
Appuyez sur la touche de présélection
4 < autant de fois qu'il est nécessaire
pour faire apparaître le quatrième chif-
fre du code sur l'écran 6.
Lorsque le code correct est affi ché sur
l'écran 6, appuyez sur la touche de
présélection 5 < et maintenez-la ap-
puyée pendant plus de 2 secondes.
« CODE » apparaît de nouveau sur l'écran
6 avec le réglage actuel « ON » (activé) ou
« OFF » (désactivé).
Appuyez sur la touche
ou 8 pour
activer ou désactiver la demande d'en-
trée du code.
Pour quitter le menu,
appuyez sur la touche MENU 7.
쏅
쏅
쏅
쏅
쏅
쏅
쏅
03_CalaisMP48_fr.indd 6803_CalaisMP48_fr.indd 68 11.06.2008 15:13:20 Uhr11.06.2008 15:13:20 Uhr

69
FRANÇAIS
Entrée du code après une
interruption de la tension
d'alimentation
Mettez l'appareil en marche.
« CODE » apparaît d'abord sur l'écran 6,
puis « 0000 ». Vous pouvez alors entrer le
code :
Remarque :
Si vous entrez un code erroné, « 0000 »
réapparaît sur l'écran 6. Vous pou-
vez encore rentrer deux fois un code.
Après trois entrées erronées du code,
l'appareil est bloqué pendant 1 heure.
Pendant ce temps, le message « WAIT
1HR » est affi ché sur l'écran 6. Si
vous arrêtez l'appareil pendant ce
temps d'attente, vous devrez attendre
une heure pleine avant de pouvoir le re-
mettre en marche.
Entrez le code comme décrit dans la
section « Activation et désactivation de
la demande d'entrée du code ».
Lorsque le code correct est affi ché sur
l'écran 6, appuyez sur la touche de
présélection 5 < et maintenez-la ap-
puyée pendant plus de 2 secondes.
L'appareil se met en marche.
쏅
쏅
쏅
Mise en marche et arrêt
Diverses possibilités vous sont offertes pour
mettre en marche ou arrêter l'appareil :
Mise en marche et arrêt avec la
touche marche/arrêt
Pour mettre l'appareil en marche, ap-
puyez sur le touche marche/arrêt 3.
Pour arrêter l'appareil, appuyez sur la
touche marche/arrêt 3 et maintenez-
la appuyée pendant plus de 2 secon-
des.
Remarque :
Pour protéger la batterie du véhicule,
l'appareil s'arrête automatiquement
au bout d'un temps réglable après
le contact a été coupé (voir section
« Réglage de la temporisation à l'ar-
rêt »).
Mise en marche et arrêt par
l'intermédiaire du contact du
véhicule
Si l'appareil est correctement relié au
contacteur d'allumage du véhicule et s'il n'a
pas été arrêté par l'intermédiaire de la tou-
che marche/arrêt 3, il est mis en marche
ou arrêté au moment où le contact est mis
ou coupé.
Mise en marche par insertion
d'un CD
Pour mettre l'appareil en marche par inser-
tion d'un CD,
introduisez le CD dans la fente d'inser-
tion du CD 5, avec la face imprimée
tournée vers le haut, jusqu'à ce que
vous rencontriez une résistance.
쏅
쏅
쏅
Protection antivol Mise en marche et arrêt
03_CalaisMP48_fr.indd 6903_CalaisMP48_fr.indd 69 11.06.2008 15:13:20 Uhr11.06.2008 15:13:20 Uhr

70
Le CD est entraîné automatiquement dans le
lecteur, l'appareil démarre dans le mode CD.
Réglage de la temporisation à
l'arrêt
Appuyez sur la touche MENU 7.
Appuyez sur la touche
ou 8
autant de fois qu'il est nécessaire pour
faire apparaître « HOUR » et le réglage
actuel sur l'écran 6.
Appuyez sur la touche
ou 8 pour
régler la temporisation à l'arrêt entre 5
et 60 minutes par paliers de 5 minutes.
Pour quitter le menu,
appuyez sur la touche MENU 7.
Mise en marche par le téléphone
(option)
L'appareil étant arrêté, il se met en marche
lorsque le téléphone est activé. Après la dé-
sactivation du téléphone, l'appareil est de
nouveau arrêté automatiquement à condi-
tion que le téléphone soit relié correcte-
ment à l'appareil.
Mise en marche avec la
télécommande IR (infrarouge)
RC 10 P (option)
Pour mettre l'appareil en marche, ap-
puyez sur la touche ON H de la télé-
commande IR RC 10 P.
Remarque :
Pour que vous puissiez utiliser la télé-
commande IR, le récepteur IR de l'ap-
pareil doit être en marche. Consultez
pour cela la section « Récepteur de
télécommande » dans le chapitre
« Télécommande IR RC 10 P ».
쏅
쏅
쏅
쏅
쏅
Réglage du volume sonore
Le volume sonore du système est réglable
par pas de 0 (arrêt) à 32 (maximum).
Pour augmenter le volume sonore du
système, tournez le bouton de réglage
du volume 1 vers la droite.
Pour diminuer le volume sonore du sys-
tème, tournez le bouton de réglage du
volume 1 vers la gauche.
Coupure du son (MUTE)
Vous pouvez diminuer rapidement le volu-
me sonore du système (Mute).
Appuyez brièvement sur la touche 3.
Annulation de la réduction du volume
sonore
Pour réactiver le volume sonore précédent,
appuyez de nouveau brièvement sur la
touche 3.
Sortie audio du téléphone ou du
système de navigation
Coupure du son en mode téléphone Lorsque
l'autoradio est relié à un téléphone portable
ou à un système de navigation, le son est cou-
pé en cas d'appel entrant ou de sortie vocale
du système de navigation. La communication
téléphonique ou la sortie vocale du système
de navigation s'effectuent par l'intermédiaire
des haut-parleurs du système audio.
Le téléphone portable ou le système de na-
vigation doivent pour cela être raccordés à
l'autoradio (alvéole C2 sur la face arrière de
l'appareil).
Consultez votre revendeur Blaupunkt pour
connaître les systèmes de navigation utili-
sables avec votre autoradio.
쏅
쏅
쏅
쏅
Mise en marche et arrêt Volume sonore
03_CalaisMP48_fr.indd 7003_CalaisMP48_fr.indd 70 11.06.2008 15:13:20 Uhr11.06.2008 15:13:20 Uhr

71
FRANÇAIS
Lors d'un appel entrant ou de sortie vocale
du système de navigation, « PHONE » appa-
raît sur l'écran.
Réglage du volume sonore pour le
téléphone ou le système de navigation
(PHONEVOL)
Vous pouvez régler le volume sonore pour le
téléphone et le système de navigation :
Appuyez sur la touche MENU 7.
Appuyez sur la touche
ou 8 autant
de fois qu'il est nécessaire pour faire ap-
paraître « PHONEVOL » sur l'écran.
« VOL » et le réglage actuel apparaissent au
bout de 2 secondes environ sur l'écran 6.
Appuyez sur la touche
ou 8 pour
régler le volume sonore entre 0 et 32.
Remarque :
Vous n'avez pas besoin d'attendre l'af-
fi chage du réglage actuel pour le mo-
difi er en appuyant sur la touche
ou
8.
Pour quitter le menu,
appuyez sur la touche MENU 7.
Remarque :
Vous pouvez également régler le volu-
me sonore en cours de communication
téléphonique ou de sortie vocale du
système de navigation avec le bouton
de réglage du volume 1. Le volume
sonore réglé est mémorisé automati-
quement.
Activation et désactivation du
bip de confi rmation (BEEP)
Pour certaines actions, par ex. la pression
prolongée sur une touche, un bip de confi r-
쏅
쏅
쏅
쏅
mation retentit. Vous pouvez désactiver le
bip de confi rmation :
Appuyez sur la touche MENU 7.
Appuyez sur la touche
ou 8
autant de fois qu'il est nécessaire pour
faire apparaître « BEEP » et le réglage
actuel « ON » (activé) ou « OFF » (dé-
sactivé) sur l'écran 6.
Appuyez sur la touche
ou 8 pour
activer ou désactiver le bip de confi r-
mation.
Pour quitter le menu,
appuyez sur la touche MENU 7.
Réglage du volume sonore maximal
à la mise en marche (ON VOL)
Lorsque vous mettez l'appareil en marche,
il fonctionne avec le dernier volume sonore
réglé. Si, avant d'arrêter l'appareil, vous
avez réglé le volume sonore plus haut que
le volume sonore maximal à la mise en mar-
che, le volume sonore sera automatique-
ment limité au volume sonore maximal à la
mise en marche réglé lorsque vous remet-
trez l'appareil en marche.
Remarque :
Afi n de protéger l'ouïe, le volume so-
nore à la mise en marche est limité à la
valeur de 25.
Appuyez sur la touche MENU 7.
Appuyez sur la touche
ou 8
autant de fois qu'il est nécessaire pour
faire apparaître « ON VOL » sur l'écran.
« VOL » et le réglage actuel apparaissent au
bout de 2 secondes environ sur l'écran 6.
Appuyez sur la touche
ou 8 pour
régler le volume sonore maximal à la
mise en marche entre 5 et 25.
쏅
쏅
쏅
쏅
쏅
쏅
쏅
Volume sonore
03_CalaisMP48_fr.indd 7103_CalaisMP48_fr.indd 71 11.06.2008 15:13:20 Uhr11.06.2008 15:13:20 Uhr

72
Remarque :
Vous n'avez pas besoin d'attendre l'af-
fi chage du réglage actuel pour le mo-
difi er en appuyant sur la touche
ou
8.
Pour quitter le menu,
appuyez sur la touche MENU 7.
Réglage de l'adaptation du volume
en fonction de la vitesse (GALA)
Cette fonction adapte le volume sonore de
l'autoradio automatiquement en fonction
de la vitesse et, par suite, des bruits de mar-
che qui lui sont liés. Lorsque la vitesse aug-
mente par exemple, le volume sonore est
relevé automatiquement pour compenser
les bruits de marche plus importants (par
ex. les bruits aérodynamiques).
Le signal tachymétrique de votre véhicule
doit pour cela être disponible et l'autoradio
doit être raccordé en conséquence.
Le relèvement automatique du volume so-
nore est réglable sur 6 niveaux (OFF (arrêt),
1-5).
Appuyez sur la touche MENU 7.
Appuyez sur la touche
ou 8
autant de fois qu'il est nécessaire pour
faire apparaître « GALA » et le réglage
actuel sur l'écran.
Appuyez sur la touche
ou 8 pour
régler l'adaptation du volume sonore
entre « OFF » (arrêt) et 5.
Pour quitter le menu,
appuyez sur la touche MENU 7.
쏅
쏅
쏅
쏅
쏅
Tonalité
Réglage des aiguës
Appuyez sur la touche AUD :.
Appuyez sur la touche
ou 8
autant de fois qu'il est nécessaire pour
faire apparaître « TREBLE » sur l'écran.
Appuyez sur la touche
ou 8 et
maintenez-la appuyée pendant plus de
2 secondes.
« FREQ » et la fréquence aiguë actuellement
sélectionnée sont affi chés.
Pour sélectionner une autre fréquence
aiguë entre 10,0 kHz et 17,5 kHz,
appuyez sur la touche
ou 8.
Pour régler le niveau des aiguës,
appuyez sur la touche
ou 8
autant de fois qu'il est nécessaire pour
faire apparaître « GAIN » sur l'écran.
« GAIN » et le réglage actuel apparaissent
au bout de 2 secondes environ sur l'écran.
Appuyez sur la touche
ou 8 pour
régler le niveau des aiguës entre –7 et
+7.
Pour quitter le menu,
appuyez sur la touche AUD :.
Réglage des graves
Appuyez sur la touche AUD :.
Appuyez sur la touche
ou 8
autant de fois qu'il est nécessaire pour
faire apparaître « BASS » sur l'écran.
Appuyez sur la touche
ou 8 et
maintenez-la appuyée pendant plus de
2 secondes.
« FREQ » et la fréquence grave actuellement
sélectionnée sont affi chés.
쏅
쏅
쏅
쏅
쏅
쏅
쏅
쏅
쏅
쏅
Volume sonore Tonalité
03_CalaisMP48_fr.indd 7203_CalaisMP48_fr.indd 72 11.06.2008 15:13:20 Uhr11.06.2008 15:13:20 Uhr

73
FRANÇAIS
Pour sélectionner une autre fréquence
moyenne entre 500 Hz et 2,5 kHz,
appuyez sur la touche
ou 8.
Pour régler le niveau du médium,
appuyez sur la touche ou 8
autant de fois qu'il est nécessaire pour
faire apparaître « GAIN » sur l'écran.
« GAIN » et le réglage actuel apparaissent
au bout de 2 secondes environ sur l'écran.
Appuyez sur la touche
ou 8 pour
régler le niveau du médium entre –7 et
+7.
Pour régler le facteur de qualité pour le mé-
dium,
appuyez sur la touche
ou 8
autant de fois qu'il est nécessaire
pour faire apparaître « Q FACTOR » sur
l'écran.
« Q » et le réglage actuel apparaissent au
bout de 2 secondes environ sur l'écran.
Appuyez sur la touche
ou 8 pour
régler le facteur de qualité entre 0,5 et
1,25.
Pour quitter le menu,
appuyez sur la touche AUD :.
Réglage de la répartition gauche/
droite du volume sonore (BAL)
Appuyez sur la touche AUD :.
Appuyez sur la touche
ou 8
autant de fois qu'il est nécessaire pour
faire apparaître « BAL » et le réglage ac-
tuel sur l'écran.
Appuyez sur la touche
ou 8 pour
régler la répartition gauche/droite du
volume sonore entre 10 et +10.
쏅
쏅
쏅
쏅
쏅
쏅
쏅
쏅
쏅
Pour sélectionner une autre fréquence gra-
ve entre 60 Hz et 200 Hz,
appuyez sur la touche
ou 8.
Pour régler le niveau des graves,
appuyez sur la touche
ou 8
autant de fois qu'il est nécessaire pour
faire apparaître « GAIN » sur l'écran.
« GAIN » et le réglage actuel apparaissent
au bout de 2 secondes environ sur l'écran.
Appuyez sur la touche
ou 8 pour
régler le niveau des graves entre –7 et
+7.
Pour régler le facteur de qualité pour les
graves,
appuyez sur la touche
ou 8
autant de fois qu'il est nécessaire
pour faire apparaître « Q FACTOR » sur
l'écran.
« Q » et le réglage actuel apparaissent au
bout de 2 secondes environ sur l'écran.
Appuyez sur la touche
ou 8 pour
régler le facteur de qualité entre 1,0 et
2,0.
Pour quitter le menu,
appuyez sur la touche AUD :.
Réglage du médium
Appuyez sur la touche AUD :.
Appuyez sur la touche
ou 8
autant de fois qu'il est nécessaire pour
faire apparaître « MIDDLE » sur l'écran.
Appuyez sur la touche
ou 8 et
maintenez-la appuyée pendant plus de
2 secondes.
« FREQ » et la fréquence moyenne actuelle-
ment sélectionnée sont affi chés.
쏅
쏅
쏅
쏅
쏅
쏅
쏅
쏅
쏅
Tonalité
03_CalaisMP48_fr.indd 7303_CalaisMP48_fr.indd 73 11.06.2008 15:13:21 Uhr11.06.2008 15:13:21 Uhr

74
Pour quitter le menu,
appuyez sur la touche AUD :.
Réglage de la répartition avant/
arrière du volume sonore (FAD)
Remarque
Les haut-parleurs arrière doivent être
raccordés à un amplifi cateur addition-
nel.
Appuyez sur la touche AUD :.
Appuyez sur la touche
ou 8
autant de fois qu'il est nécessaire pour
faire apparaître « FAD » et le réglage ac-
tuel sur l'écran.
Appuyez sur la touche
ou 8 pour
régler la répartition avant/arrière du vo-
lume sonore entre –10 et +10.
Pour quitter le menu,
appuyez sur la touche AUD :.
쏅
쏅
쏅
쏅
쏅
Heure
Affi chage de l'heure
Pour faire apparaître l'heure pendant 10 se-
condes environ sur l'écran,
appuyez sur la touche MENU 7 et
maintenez-la appuyée pendant plus de
2 secondes.
Réglage de l'heure
Appuyez sur la touche MENU 7.
Appuyez sur la touche
ou 8
autant de fois qu'il est nécessaire pour
faire apparaître « TIMESET » sur l'écran
6.
L'heure apparaît sur l'écran 6 au bout de
2 secondes environ. Dans le mode d'affi -
chage sur 24 heures, l'heure est précédée
de « 24H » et dans le mode d'affi chage sur
12 heures, elle est précédée de « AM » (ma-
tin) ou « PM » (après-midi). Le nombre des
heures clignote et peut être réglé.
Pour régler le nombre des heures ou le nom-
bre des minutes,
appuyez sur la touche
ou 8.
Pour commuter entre le nombre des heures
et le nombre des minutes,
appuyez sur la touche 6 <.
Remarque :
Vous n'avez pas besoin d'attendre l'affi -
chage de l'heure actuelle pour modifi er
celle-ci en appuyant sur la touche
ou
8.
Pour quitter le menu,
appuyez sur la touche MENU 7.
쏅
쏅
쏅
쏅
쏅
쏅
Tonalité Heure
03_CalaisMP48_fr.indd 7403_CalaisMP48_fr.indd 74 11.06.2008 15:13:21 Uhr11.06.2008 15:13:21 Uhr

75
FRANÇAIS
Sélection du mode d'affi chage
12/24 heures
Appuyez sur la touche MENU 7.
Appuyez sur la touche
ou 8
autant de fois qu'il est nécessaire pour
faire apparaître « 24H MODE » ou
« 12H MODE » sur l'écran 6.
Appuyez sur la touche
ou 8 pour
passer d'un mode à l'autre.
Pour quitter le menu,
appuyez sur la touche MENU 7.
Réglage du fuseau horaire
(TIMEZONE)
Dans le cas où vous passez dans un autre fu-
seau horaire, vous pouvez régler le décalage
horaire par rapport à l'heure réglée actuelle-
ment par pas de 1 heure. Vous pouvez ainsi
corriger l'affi chage de l'heure en fonction du
fuseau horaire dans lequel vous vous trouvez
sans devoir régler de nouveau l'heure.
Appuyez sur la touche MENU 7.
Appuyez sur la touche
ou 8 autant
de fois qu'il est nécessaire pour faire ap-
paraître « TIMEZONE » sur l'écran.
« ZONE » et le réglage actuel apparaissent au
bout de 2 secondes environ sur l'écran 6.
Appuyez sur la touche
ou 8 pour
régler le décalage horaire par pas de 1
heure entre –12 et +12.
Remarque :
Vous n'avez pas besoin d'attendre l'af-
fi chage du réglage actuel pour le mo-
difi er en appuyant sur la touche
ou
8.
Pour quitter le menu,
appuyez sur la touche MENU 7.
쏅
쏅
쏅
쏅
쏅
쏅
쏅
쏅
Mode radio
Cet appareil est équipé d'un récepteur RDS.
La plupart des stations FM reçues émettent
un signal qui contient, en plus du program-
me, des informations telles que le nom de la
station et le type de programme (PTY).
Le nom de la station est affi ché sur l'écran
6 dès qu'il peut être reçu.
Activation du mode radio
Si vous vous trouvez dans un autre mode
opératoire,
appuyez sur la touche BND 2,
ou
appuyez sur la touche SRC > autant
de fois qu'il est nécessaire pour faire
apparaître « RADIO » sur l'écran 6.
La fréquence actuelle, ou le nom de la sta-
tion, est affi ché sur l'écran 6.
Fonctions confort RDS (AF, REG)
Les fonctions confort RDS AF (fréquence al-
ternative) et REG (régional) viennent com-
pléter les fonctions de votre autoradio :
AF : lorsque cette fonction confort RDS
est activée, l'appareil recherche auto-
matiquement en arrière-plan la fré-
quence alternative de la station réglée
qui fournit le signal le plus puissant.
REG : quelques stations partagent à
certaines heures leur programme avec
des programmes régionaux différents.
La fonction REG empêche que l'appa-
reil ne change sur les fréquences alter-
natives de la station réglée qui diffusent
un autre programme régional.
쏅
쏅
•
•
Heure Mode radio
03_CalaisMP48_fr.indd 7503_CalaisMP48_fr.indd 75 11.06.2008 15:13:21 Uhr11.06.2008 15:13:21 Uhr

76
Remarque :
REG doit être activé ou désactivé sépa-
rément dans le menu.
Activation et désactivation des
fonctions confort RDS
Pour utiliser les fonctions RDS AF et
REG, appuyez sur la touche RDS =.
Lorsque les fonctions confort RDS sont
activées, le symbole RDS est affi ché sur
l'écran 6.
Activation et désactivation de la
fonction REG
Appuyez sur la touche MENU 7.
Appuyez sur la touche
ou 8
autant de fois qu'il est nécessaire pour
faire apparaître « REG » et le réglage ac-
tuel « ON » (activé) ou « OFF » (désac-
tivé) sur l'écran 6.
Appuyez sur la touche
ou 8 pour
désactiver ou activer la fonction REG.
Pour quitter le menu,
appuyez sur la touche MENU 7.
Remarque :
Le réglage REG ON/OFF a un effet uni-
quement lorsque les fonctions confort
RDS sont activées.
Sélection de la gamme d'ondes
ou du niveau de mémoire
Cet appareil vous permet de recevoir des
programmes des bandes de fréquence FM,
OM (MW) et GO (LW) (pour l'EUROPE) ou FM
et AM (pour les pays NAFTA). Trois niveaux
de mémoire sont disponibles pour la gamme
d'ondes FM (FM1, FM2 et FMT) et un pour
chacune des gammes d'ondes OM et OL ou
쏅
쏅
쏅
쏅
쏅
AM. Un niveau de mémoire additionnel MWT
(OM)/LWT (OL) ou AMT est en outre dispo-
nible. Six stations peuvent être mémorisées
sur chaque niveau de mémoire.
Pour passer d'une gamme d'ondes ou d'un
niveau de mémoire à l'autre,
appuyez sur la touche BND 2.
Réglage des stations
Vous avez plusieurs possibilités pour le ré-
glage des stations.
Recherche automatique des stations
Appuyez sur la touche
ou 8.
L'autoradio se règle sur la station suivante
qui peut être reçue.
Remarque :
Si la priorité pour les informations
routières est activée, la station sui-
vante qui diffuse des informations
routières est réglée.
Si la fonction PTY est activée, la sta-
tion suivante proposant le type de
programme sélectionné est réglée.
Réglage de la sensibilité de la recherche
de station
Vous pouvez régler l'autoradio de manière
à ce qu'il se règle uniquement sur les sta-
tions puissantes (sensibilité réduite) ou, au
contraire, aussi sur les stations faibles (sen-
sibilité élevée).
Appuyez sur la touche MENU 7.
Appuyez sur la touche
ou 8
autant de fois qu'il est nécessaire pour
faire apparaître « SENS » et le réglage
actuel « LO » (sensibilité réduite) ou
« DX » (sensibilité élevée) sur l'écran 6.
쏅
쏅
•
•
쏅
쏅
Mode radio
03_CalaisMP48_fr.indd 7603_CalaisMP48_fr.indd 76 11.06.2008 15:13:21 Uhr11.06.2008 15:13:21 Uhr

77
FRANÇAIS
Appuyez sur la touche ou 8 pour
commuter entre les réglages « LO » et
« DX ».
Pour quitter le menu,
appuyez sur la touche MENU 7.
Recherche manuelle des stations
Pour modifi er la fréquence réglée par petits
pas,
appuyez sur la touche
ou 8.
Pour modifi er rapidement la fréquence ré-
glée,
appuyez sur la touche
ou 8 et
maintenez-la appuyée.
Remarque :
La recherche manuelle des stations
est possible uniquement lorsque les
fonctions confort RDS et PTY sont dé-
sactivées.
Défi lement des chaînes de stations
(uniquement en FM)
Si une station offre plusieurs programmes,
vous avez la possibilité de parcourir ce que
l'on appelle la « chaîne de stations ».
Appuyez sur la touche
ou 8 pour
passer à la station suivante de la chaîne
de stations.
Remarque :
Vous pouvez parcourir la chaîne de sta-
tions uniquement lorsque les fonctions
confort RDS et PTY sont désactivées.
Vous ne pouvez ainsi changer que sur
des stations qui ont déjà été reçues une
fois. Utilisez par ex. pour cela la fonc-
tion Travelstore (T-STORE).
쏅
쏅
쏅
쏅
쏅
Mémorisation des stations
Mémorisation manuelle des stations
Sélectionnez la gamme d'ondes ou le
niveau de mémoire souhaité.
Réglez la station souhaitée.
Appuyez sur la touche de présélection
1 - 6 < à laquelle vous souhaitez affec-
ter la station et maintenez-la appuyée
pendant plus de 2 secondes.
Le bip de confi rmation retentit. La station est
affectée à la touche de présélection choisie.
Mémorisation automatique de stations
(T-STORE)
Vous avez la possibilité de mémoriser auto-
matiquement les 6 stations FM les plus
puissantes de la région. Dans le cas de la
gamme d'ondes FM, la mémorisation s'ef-
fectue sur le niveau de mémoire FMT, dans
le cas des gammes d'ondes OM et OL, elle
s'effectue sur le niveau de mémoire MWT
(OM)/LWT (OL) et, dans le cas de la gamme
d'ondes AM, elle s'effectue sur le niveau de
mémoire AMT.
Remarque :
Les stations mémorisées auparavant
sur ce niveau sont remplacées par les
nouvelles stations.
Sélectionnez la gamme d'ondes sou-
haitée.
Appuyez sur la touche BND 2 et main-
tenez-la appuyée pendant plus de 2 se-
condes.
La mémorisation démarre. « T–STORE »
apparaît sur l'écran 6. Une fois la mémo-
risation terminée, la station qui fi gure à la
première place du niveau de mémoire FMT,
MWT (OM)/LWT (OL) ou AMT est diffusée.
쏅
쏅
쏅
쏅
쏅
Mode radio
03_CalaisMP48_fr.indd 7703_CalaisMP48_fr.indd 77 11.06.2008 15:13:22 Uhr11.06.2008 15:13:22 Uhr

78
Appel des stations mémorisées
Sélectionnez le niveau de mémoire ou
la gamme d'ondes.
Appuyez sur la touche de présélection
1 - 6 < à laquelle la station souhaitée
est affectée.
Balayage des stations qui peuvent
être reçues (BANDSCAN)
La fonction Bandscan vous permet d'écou-
ter successivement toutes les stations qui
peuvent être reçues pendant env. 10 se-
condes chacune.
Démarrage du balayage des stations
Appuyez sur la touche
ou 8 et
maintenez-la appuyée pendant plus de
2 secondes.
« BANDSCAN » apparaît un court instant sur
l'écran. L'appareil recherche les stations
dans la gamme d'ondes actuelle. Chaque
station trouvée est diffusée pendant env.
10 secondes. La fréquence actuelle, ou le
nom de la station, est affi ché pendant ce
temps sur l'écran.
Arrêt du balayage des stations
Appuyez sur la touche
ou 8.
La fonction de balayage est arrêtée. La sta-
tion diffusée en dernier reste réglée.
Type de programme (PTY)
En plus de leur nom, certaines stations FM
transmettent également des informations
sur le type de programme qu'elles diffu-
sent. Ces types de programmes sont par
exemple :
CULTURE VOYAGE JAZZ SPORT
NOUVELLES POP ROCK MUSIQUE
쏅
쏅
쏅
쏅
La fonction PTY vous permet de sélection-
ner directement des stations diffusant un
certain type de programme.
Lorsque la fonction PTY est activée et
qu'une recherche PTY est démarrée, l'ap-
pareil passe automatiquement de la station
actuelle ou d'un autre mode de fonctionne-
ment à la station qui diffuse le type de pro-
gramme sélectionné.
Activation et désactivation de la
fonction PTY
Appuyez sur la touche MENU 7.
Appuyez sur la touche
ou 8
autant de fois qu'il est nécessaire pour
faire apparaître « PTY » et le réglage ac-
tuel « ON » (activé) ou « OFF » (désac-
tivé) sur l'écran 6.
Appuyez sur la touche
ou 8 pour
désactiver ou activer la fonction PTY.
Pour quitter le menu,
appuyez sur la touche MENU 7.
Sélection d'un type de programme et
démarrage de la recherche
Appuyez sur la touche
ou 8 autant
de fois qu'il est nécessaire pour faire ap-
paraître le type de programme souhaité.
Appuyez sur la touche
ou 8 pour
démarrer la recherche.
Lorsqu'une station qui diffuse le type de
programme sélectionné est trouvée, l'ap-
pareil se règle sur celle-ci.
Abaissement du niveau des aiguës
en cas de perturbation (HICUT)
La fonction HiCut améliore la reproduction
en cas de mauvaise réception. Elle réduit
automatiquement le niveau de perturbation.
쏅
쏅
쏅
쏅
쏅
쏅
Mode radio
03_CalaisMP48_fr.indd 7803_CalaisMP48_fr.indd 78 11.06.2008 15:13:22 Uhr11.06.2008 15:13:22 Uhr

79
FRANÇAIS
Pour activer ou désactiver la fonction HICUT,
appuyez sur la touche MENU 7.
Appuyez sur la touche
ou 8
autant de fois qu'il est nécessaire pour
faire apparaître « HICUT » et le réglage
actuel « ON » (activé) ou « OFF » (dé-
sactivé) sur l'écran 6.
Appuyez sur la touche
ou 8 pour
désactiver ou activer la fonction HICUT.
Pour quitter le menu,
appuyez sur la touche MENU 7.
Activation et désactivation de
l'affi chage du texte radio
Certains stations radio utilisent le signal
RDS pour transmettre de la publicité ou
d'autres informations à la place de leur nom.
Ce texte radio est affi ché sur l'écran 6.
Pour activer ou désactiver l'affi chage du
texte radio,
appuyez sur la touche MENU 7.
Appuyez sur la touche
ou 8
autant de fois qu'il est nécessaire
pour faire apparaître « RADIOTXT » sur
l'écran.
Le réglage actuel, « TEXT ON » (activé) ou
« TEXT OFF » (désactivé), apparaît au bout
de 2 secondes environ sur l'écran 6.
Appuyez sur la touche
ou 8 pour
activer ou désactiver l'affi chage du tex-
te radio.
Remarque :
Vous n'avez pas besoin d'attendre l'af-
fi chage du réglage actuel pour le mo-
difi er en appuyant sur la touche
ou
8.
Pour quitter le menu,
appuyez sur la touche MENU 7.
쏅
쏅
쏅
쏅
쏅
쏅
쏅
쏅
Informations routières
Activation et désactivation de
la priorité aux informations
routières
Pour activer ou désactiver la priorité aux
informations routières dans n'importe quel
mode de fonctionnement,
appuyez sur la touche TA ;.
Remarque :
Dans les modes de fonctionnement
CD, MP3, changeur de CD et AUX, cet-
te fonction est disponible uniquement
si la gamme d'ondes réglée en dernier
était FM.
Lorsque le symbole TA est affi ché sur l'écran
6, la priorité aux informations routières
est activée. Dès que l'appareil reçoit une in-
formation routière, il la diffuse. « TRAFFIC »
est affi ché sur l'écran 6 pendant la durée
du message.
Remarque :
Vous entendez un bip d'avertissement,
lorsque vous quittez la zone de cou-
verture de la station diffusant des in-
formations routières réglée alors qu'un
message d'information routière est en
cours de diffusion ou que vous écoutez
un CD et qu'ensuite la recherche auto-
matique ne trouve aucune autre station
diffusant des informations routières.
lorsque vous passez d'une station
diffusant des informations routières
à une station ne diffusant pas d'infor-
mations routières.
Désactivez alors la priorité aux informa-
tions routières ou réglez une station dif-
fusant des informations routières.
쏅
•
•
Mode radio Informations routières
03_CalaisMP48_fr.indd 7903_CalaisMP48_fr.indd 79 11.06.2008 15:13:22 Uhr11.06.2008 15:13:22 Uhr

80
Réglage du relèvement du
volume sonore pour les
informations routières
Vous pouvez régler de combien de niveaux
vous souhaitez augmenter le volume sonore
actuel pour la diffusion d'informations rou-
tières :
Appuyez sur la touche MENU 7.
Appuyez sur la touche
ou 8
autant de fois qu'il est nécessaire pour
faire apparaître « TA VOL » sur l'écran.
« VOL » et le réglage actuel apparaissent au
bout de 2 secondes environ sur l'écran 6.
Appuyez sur la touche
ou 8 pour
régler le relèvement du volume sonore
entre 0 et 10.
Remarque :
Vous n'avez pas besoin d'attendre l'affi -
chage du réglage actuel pour le modifi er
en appuyant sur la touche
ou 8.
Pour quitter le menu,
appuyez sur la touche MENU 7.
Remarque :
Vous pouvez également régler le vo-
lume sonore pendant la diffusion d'une
information routière avec le bouton de
réglage 1 pour la durée de la diffusion
de l'information routière.
Interruption des informations
routières
Pour interrompre une information routière
en cours de diffusion et revenir à la source
audio écoutée précédemment,
appuyez sur la touche TA ;.
La fonction de diffusion prioritaire reste
activée.
쏅
쏅
쏅
쏅
쏅
Mode CD
Cet appareil vous permet de lire les CD
audio, CD-R et CD-RW disponibles dans le
commerce d'un diamètre de 12 cm. Pour
éviter les problèmes de lecture, il est re-
commandé de ne pas graver les CD à une
vitesse supérieure à 16x.
Risque d'endommage-
ment du lecteur CD !
Les CD single de 8 cm de diamètre et les
« shape CD » (de forme autre que circulai-
re) ne doivent pas être utilisés.
Manipulez les CD avec soin et évitez de les
rayer ou de les endommager. Saisissez les
CD autant que possible uniquement par le
bord. Si un CD est encrassé, nettoyez-le
avec un chiffon non pelucheux sans addi-
tion de solvant. Essuyez les CD en passant
toujours le chiffon du centre vers l'exté-
rieur.
N'exposez pas les CD directement aux
rayons du soleil, conservez les CD en de-
hors de l'appareil dans une pochette de
protection.
Ne collez pas d'étiquette sur les CD. Ecrivez
sur les CD uniquement avec les crayons
prévus à cet effet qui se trouvent dans le
commerce.
Nous déclinons toute responsabilité en cas
d'endommagement du lecteur de CD dû à
l'utilisation de CD abîmés ou inappropriés.
Pour éviter tout problème de fonctionne-
ment, utilisez uniquement de CD portant
le logo Compact-Disc. Des problèmes de
lecture sont possibles avec les CD équipés
d'une protection contre la copie. Blaupunkt
Informations routières Mode CD
03_CalaisMP48_fr.indd 8003_CalaisMP48_fr.indd 80 11.06.2008 15:13:22 Uhr11.06.2008 15:13:22 Uhr

81
FRANÇAIS
ne peut garantir le bon fonctionnement de
ses appareils avec des CD protégés contre
la copie !
Démarrage du mode CD
S'il n'y a pas de CD dans le lecteur,
introduisez le CD sans forcer dans la
fente d'insertion du CD, avec la face im-
primée tournée vers le haut, jusqu'à ce
que vous rencontriez une résistance.
Le CD est entraîné automatiquement dans
le lecteur. Le symbole CD est affi ché sur
l'écran 6.
Remarque :
L'introduction du CD doit s'effectuer
sans entrave et sans intervention de
votre part.
La lecture du CD commence. Le numéro
du titre actuel (par ex. « T12 ») et la durée
de lecture ainsi que des informations sur le
titre (texte de CD) sont affi chés sur l'écran
6.
Si un CD est déjà introduit dans le lecteur,
appuyez sur la touche SRC > autant
de fois qu'il est nécessaire pour faire
apparaître « CD » sur l'écran 6.
La lecture démarre à l'endroit où elle a été
interrompue.
Affi chage des informations sur
les titres (texte de CD)
Dans le cas où du texte de CD est disponible
sur le CD, les informations sur le titre défi -
lent une fois sur l'écran 6 au moment où la
lecture du titre démarre.
쏅
쏅
Affi chage unique des informations sur
les titres avec défi lement du texte
Appuyez sur la touche 5 <.
Le texte de CD relatif au titre actuel défi le
une fois sur l'écran 6.
Remarque :
Cette fonction n'est pas disponible lors-
que l'affi chage des informations sur les
titres avec défi lement du texte de CD
est désactivé (voir section suivante).
Activation et désactivation de
l'affi chage des informations sur les
titres avec défi lement du texte
Pour activer ou désactiver l'affi chage des
informations sur les titres avec défi lement
du texte,
appuyez sur la touche MENU 7.
Appuyez sur la touche
ou 8
autant de fois qu'il est nécessaire pour
faire apparaître « SCRL » et le réglage
actuel « ON » (activé) ou « OFF » (dé-
sactivé) sur l'écran 6.
Appuyez sur la touche
ou 8 pour
désactiver ou activer le défi lement du
texte.
Pour quitter le menu,
appuyez sur la touche MENU 7.
Avec le réglage « SCRL OFF », les informa-
tions sur les titres apparaissent par sections
de 8 caractères sur l'écran 6. Chaque sec-
tion de texte ainsi que le numéro du titre et
la durée de lecture sont affi chés en boucle
pendant 5 secondes chacun.
쏅
쏅
쏅
쏅
쏅
Mode CD
03_CalaisMP48_fr.indd 8103_CalaisMP48_fr.indd 81 11.06.2008 15:13:23 Uhr11.06.2008 15:13:23 Uhr

82
Remarque :
Le réglage « SCRL ON/OFF » a égale-
ment un effet sur l'affi chage des infor-
mations sur les titres MP3 (balises ID3)
en mode MP3.
Sélection des titres
Appuyez sur la touche ou 8 pour
passer au titre suivant ou au titre pré-
cédent.
Une seule pression sur la touche
8 re-
démarre la lecture du titre en cours depuis
le début.
Recherche rapide (audible)
Pour une recherche rapide de titres précé-
dents ou suivants,
appuyez sur la touche
ou 8 et
maintenez-la appuyée jusqu'à ce que
vous ayez atteint l'endroit souhaité.
Lecture aléatoire des titres
(MIX)
Appuyez sur la touche 3 <.
« MIX CD » apparaît un court instant sur
l'écran 6 et le symbole MIX est affi ché.
Le titre suivant est sélectionné de manière
aléatoire.
Arrêt de la fonction MIX
Appuyez de nouveau sur la touche 3
<.
« MIX OFF » apparaît un court instant sur
l'écran 6 et le symbole MIX disparaît. La
lecture se poursuit normalement.
쏅
쏅
쏅
쏅
Balayage des titres (SCAN)
Pour écouter le début (pendant 10 secon-
des environ) de tous les titres du CD,
appuyez sur la touche 4 <.
« SCAN TRK » apparaît un court instant sur
l'écran. L'affi chage de « CD » sur l'écran cli-
gnote pendant la lecture. Le numéro de titre
et la durée de lecture du titre actuel ou les
informations sur ce titre sont affi chés.
Arrêt du balayage (SCAN), écoute du
titre en cours
Pour arrêter le balayage des titres,
appuyez de nouveau sur la touche 4
<.
« SCAN OFF » apparaît un court instant sur
l'écran. Le titre actuel continue d'être lu.
Répétition de la lecture d'un titre
(RPT)
Appuyez sur la touche 2 <.
« RPT TRK » apparaît un court instant sur
l'écran et le symbole RPT est affi ché. Le ti-
tre actuel est répété jusqu'à ce que RPT soit
désactivé.
Arrêt de la répétition RPT
Appuyez de nouveau sur la touche 2
<.
« RPT OFF » apparaît un court instant sur
l'écran 6 et le symbole RPT disparaît. La
lecture se poursuit normalement.
쏅
쏅
쏅
쏅
Mode CD
03_CalaisMP48_fr.indd 8203_CalaisMP48_fr.indd 82 11.06.2008 15:13:23 Uhr11.06.2008 15:13:23 Uhr

83
FRANÇAIS
Interruption de la lecture
(PAUSE)
Appuyez sur la touche 1 <.
« PAUSE » apparaît sur l'écran 6.
Annulation de la pause
Appuyez sur la touche 1 < pendant la
pause.
La lecture se poursuit.
Retrait du CD
Remarque :
Vous pouvez également éjecter le CD
lorsque l'appareil est arrêté ou qu'une
autre source audio est active.
Appuyez sur la touche d'éjection du CD
4.
Le CD sort. « CD EJECT » apparaît un court
instant sur l'écran.
Remarque :
L'éjection du CD ne doit pas être em-
pêchée ni assistée par une quelconque
intervention.
Retirez le CD.
Le symbole CD disparaît.
Remarque :
Si vous ne retirez pas le CD, il sera
réinséré automatiquement au bout de
10 secondes environ.
쏅
쏅
쏅
쏅
Mode MP3/WMA
Cet autoradio permet également de lire les
CD-R et CD-RW sur lesquels des fi chiers
musicaux MP3 et WMA sont enregistrés.
Vous pouvez en outre raccorder un support
de données USB par l'intermédiaire de l'in-
terface USB compatible C‘n‘C optionnel et
lire les fi chiers MP3/WMA enregistrés sur le
support de données USB.
Ce chapitre décrit uniquement la lecture
des fi chiers MP3, celle des fi chiers WMA
étant identique. Dans ce chapitre, la dé-
signation « support de données MP3 » se
réfère aussi bien aux CD-R/RW qu'aux
supports de données USB, par ex. les
clés USB.
Remarque :
Les fi chiers WMA avec Digital Rights
Management (DRM) venant des
Online Musicshops (boutiques en li-
gne) ne peuvent pas être lus par cet
autoradio.
Les fi chiers WMA peuvent être lus
en toute sécurité uniquement s'ils
ont été créés avec Windows Media-
Player, version 8 ou plus.
Préparation d'un support de
données MP3
Préparation d'un CD MP3
La combinaison « graveur CD », « logiciel
de gravure de CD » et « CD vierge » peut
occasionner des problèmes de lecture de
CD. Si des problèmes surviennent avec des
CD gravés par soi-même, il est conseillé de
choisir des CD vierges d'un autre fabricant
ou des CD vierges d'une autre couleur.
•
•
Mode CD Mode MP3/WMA
03_CalaisMP48_fr.indd 8303_CalaisMP48_fr.indd 83 11.06.2008 15:13:23 Uhr11.06.2008 15:13:23 Uhr

84
Le format du CD doit être ISO 9660 level 1/
level 2 ou Joliet. Les autres formats ne peu-
vent pas être lus en toute fi abilité.
En créant (codant) les fi chiers MP3/WMA
à partir des fi chiers audio, il est conseillé
d'utiliser des débits binaires de 32 à 320
kbit/s pour les fi chiers MP3 et de 32 à 192
kbps pour les fi chiers WMA.
Cet appareil reconnaît jusqu'à 252 réper-
toires et jusqu'à 255 fi chiers par répertoire.
Le CD peut contenir en tout un maximum de
512 répertoires et fi chiers. Les répertoires
et les titres du CD peuvent être sélection-
nés séparément.
D01
D02
T001
T005
T004
T003
T002
D03
T001
T006
T005
T004
T003
T002
T011
T007
T008
T009
T010
D04
T001
T006
T005
T004
T003
T002
A
B
A Répertoires
B Titres · Fichiers
Vous pouvez attribuer un nom à chaque
répertoire avec votre PC. Le nom du réper-
toire peut être affi ché sur l'écran de l'auto-
radio. Nommez les répertoires et les titres
ou les fi chiers conformément au logiciel de
gravure que vous utilisez. Pour de plus am-
ples informations, consultez le guide d'utili-
sation du logiciel.
Remarque :
Il est conseillé de ne pas utiliser de ca-
ractères spéciaux (trémas, accents,
etc.) dans les noms des fi chiers.
Si vous utilisez des noms de fi chier
de plus de 16 caractères (y compris
l'extension « .MP3 » ou « .WMA »), le
nombre maximal de titres et de réper-
toires diminue d'autant.
Si vous attachez une importance à l'ordre
des fi chiers, enregistrez-les sur le support
de données dans l'ordre selon lequel vous
souhaitez les lire ultérieurement. L'appareil
lit les fi chiers dans l'ordre selon lequel ils
ont été enregistrés physiquement sur le
support de données.
Pour la lecture des fi chiers par cet appareil,
les fi chiers MP3 doivent avoir l'extension
« .MP3 » et les fi chiers WMA l'extension
« .WMA ».
Remarque :
Pour garantir une lecture sans problè-
mes,
n'essayez pas d'ajouter l'extension
« .MP3 » à des fi chiers autres que
les fi chiers MP3 et de les lire ! Ces
fi chiers non valides sont ignorés pen-
dant la lecture.
n'utilisez pas de CD « mixtes » conte-
nant à la fois des fi chiers non MP3 et
des titres MP3 (seuls les fi chiers MP3
seront reconnus par l'appareil pen-
dant la lecture MP3).
•
•
•
•
Mode MP3/WMA
03_CalaisMP48_fr.indd 8403_CalaisMP48_fr.indd 84 11.06.2008 15:13:23 Uhr11.06.2008 15:13:23 Uhr

85
FRANÇAIS
n'utilisez pas de CD mixtes contenant
à la fois des fi chiers audio CD et des
titres MP3. Seuls les titres audio CD
d'un CD mixte seront lus.
Préparation d'un support de données USB
Afi n que l'appareil reconnaisse le support
de données USB, ce dernier doit être spé-
cifi é comme mémoire de masse (Mass
Storage Device) et formaté selon le systè-
me de fi chiers FAT16 ou FAT32 et contenir
des fi chiers MP3 ou WMA.
Vous pouvez mémoriser au maximum 1500
fi chiers (répertoires et titres ) dans le support
de données USB. Les répertoires et les titres
peuvent être sélectionnés individuellement
avec cet appareil. Si vous utilisez des noms
de fi chier de plus de 24 caractères (y compris
l'extension « .MP3 » ou « .WMA »), le nombre
maximal de fi chiers diminue d'autant.
Blaupunkt ne peut pas garantir le fonction-
nement sans problème de l'ensemble des
supports USB disponibles sur le marché.
Balises ID3
Les titres MP3 peuvent aussi contenir des
informations telles que le nom de l'interprè-
te, le titre et le nom de l'album (balises ID3).
Cet appareil peut affi cher les balises ID3 de
la version 1 et de la version 2 sur l'écran.
Démarrage du mode MP3
Activation du mode MP3 sur CD
Le mode CD MP3 est activé comme le mode
CD normal. Pour plus de détails, consultez
la section « Démarrage du mode CD » du
chapitre « Mode CD ».
Le numéro du titre actuel (par ex. « T12 »)
et la durée de lecture ainsi que des infor-
• mations sur le titre (balises ID3) ou le nom
du fi chier sont affi chés sur l'écran 6. Lors
du passage à un autre répertoire, le numéro
de celui-ci (par ex. « DIR 02 ») apparaît un
court instant.
Raccordement du support de données
USB et activation du mode MP3
Pour pouvoir brancher un support de don-
nées USB (par ex. une clé USB ou un dis-
que dur USB), l'interface USB Blaupunkt
optionnelle doit être raccordée sur la face
arrière de l'appareil (alvéole C3). Vous
pouvez poser le câble USB de l'interface
de manière à ce qu'il aille par ex. jusqu'à la
boîte à gants ou à un endroit approprié de la
console centrale.
Remarque :
Lorsque vous raccordez une interface
USB Blaupunkt à l'appareil, l'entrée
AUX doit être réglée en conséquen-
ce. Consultez pour cela la section
« Réglage de l'entrée AUX » dans le
chapitre « Sources audio externes ».
Arrêtez l'appareil avant de brancher ou
de débrancher le support de données
USB afi n que celui-ci puisse être enre-
gistré ou désenregistré correctement.
Raccordez le support de données USB
au câble USB de l'interface USB.
Dès qu'un support de données USB est rac-
cordé, vous pouvez le sélectionner avec la
touche SRC >. « USB » apparaît alors sur
l'écran.
Affi chage des informations sur
les titres (balises ID3)
Dans le cas où des balises ID3 sont dispo-
nibles sur le support de données MP3, les
•
•
쏅
Mode MP3/WMA
03_CalaisMP48_fr.indd 8503_CalaisMP48_fr.indd 85 11.06.2008 15:13:23 Uhr11.06.2008 15:13:23 Uhr

86
informations sur le titre défi lent une fois sur
l'écran 6 au moment où la lecture du titre
démarre. Dans le cas où aucune balise ID3
n'a été enregistrée avec le fi chier MP3, le
nom du fi chier est affi ché.
Remarque :
Pour enregistrer des balises ID3,
consultez la notice d'utilisation de vo-
tre logiciel MP3 pour PC ou de votre
logiciel de gravure.
Affi chage unique des informations sur
les titres avec défi lement du texte
Appuyez sur la touche 5 <.
Les balises ID3 relatives au titre actuel défi -
lent une fois sur l'écran 6.
Remarque :
Cette fonction n'est pas disponible
lorsque l'affi chage des informations
sur les titres avec défi lement du texte
est désactivé. Consultez pour cela la
section « Activation et désactivation
de l'affi chage des informations sur les
titres avec défi lement du texte » dans
le paragraphe « Affi chage des informa-
tions sur les titres (texte de CD) » du
chapitre « Mode CD ».
Sélection des répertoires
Pour passer à un répertoire précédent ou
suivant,
appuyez sur la touche
ou 8.
Remarque :
Tous les répertoires ne contenant pas
de fi chiers MP3 seront automatique-
ment ignorés.
쏅
쏅
•
L'appareil traite tous les répertoires
et sous-répertoires comme s'ils se
trouvaient sur un niveau. Vous pou-
vez également accéder à tous les
sous-répertoires en appuyant autant
de fois que nécessaire sur la touche
ou 8.
Sélection des titres et des fi chiers
Pour passer à un titre ou fi chier précédent
ou suivant du répertoire sélectionné,
appuyez sur la touche
ou 8.
Une seule pression sur la touche
8 re-
démarre la lecture du titre en cours depuis
le début.
Recherche rapide
Pour une recherche rapide de titres précé-
dents ou suivants,
appuyez sur la touche
ou 8 et
maintenez-la appuyée jusqu'à ce que
vous ayez atteint l'endroit souhaité.
Remarque :
Dans le mode USB, la recherche rapide
en arrière s'arrête au début du titre ac-
tuel.
Lecture des titres dans un ordre
aléatoire (MIX)
Pour que les titres du répertoire sélectionné
soient lus dans un ordre aléatoire,
appuyez sur la touche 3 < autant de
fois qu'il est nécessaire pour faire ap-
paraître « MIX DIR » ou « MIX FLD » sur
l'écran 6.
Le symbole MIX apparaît sur l'écran 6.
•
쏅
쏅
쏅
Mode MP3/WMA
03_CalaisMP48_fr.indd 8603_CalaisMP48_fr.indd 86 11.06.2008 15:13:23 Uhr11.06.2008 15:13:23 Uhr

87
FRANÇAIS
Pour écouter tous les titres du support de
données MP3 dans un ordre aléatoire,
appuyez sur la touche 3 < autant de
fois qu'il est nécessaire pour faire appa-
raître « MIX ALL » sur l'écran 6.
Le symbole MIX apparaît sur l'écran 6.
Arrêt de la fonction MIX
Pour arrêter la lecture des titres dans un or-
dre aléatoire,
appuyez sur la touche 3 < autant de
fois qu'il est nécessaire pour faire appa-
raître « MIX OFF » sur l'écran 6.
Le symbole MIX disparaît de l'écran 6.
Balayage des titres (SCAN)
Pour écouter le début (pendant 10 secon-
des environ) de tous les titres du support
de données MP3 dans un ordre croissant,
appuyez sur la touche 4 < autant de
fois qu'il est nécessaire pour faire appa-
raître « SCAN TRK » sur l'écran 6.
L'affi chage de « MP3 » ou « USB » sur l'écran
clignote pendant la lecture.
Pour lire tous les titres du répertoire actuel
en mode USB,
appuyez sur la touche 4 < autant de
fois qu'il est nécessaire pour faire appa-
raître « SCAN FLD » sur l'écran 6.
L'affi chage de « USB » sur l'écran clignote
pendant la lecture.
Arrêt du balayage (SCAN)
Pour arrêter le balayage des titres,
appuyez sur la touche 4 < autant de
fois qu'il est nécessaire pour faire appa-
raître « SCAN OFF » sur l'écran 6.
쏅
쏅
쏅
쏅
쏅
Vous continuez d'entendre le titre dont le
début était en cours de lecture.
Lecture répétée de titres ou de
répertoires entiers (REPEAT)
Pour répéter le titre actuel,
appuyez sur la touche 2 < autant de
fois qu'il est nécessaire pour faire appa-
raître « RPT TRK » sur l'écran 6.
Le symbole RPT apparaît sur l'écran 6.
Pour répéter le répertoire actuel,
appuyez sur la touche 2 < autant de
fois qu'il est nécessaire pour faire ap-
paraître « RPT DIR » ou « RPT FLD » sur
l'écran 6.
Le symbole RPT apparaît sur l'écran 6.
Arrêt de REPEAT
Pour arrêter la répétition,
appuyez sur la touche 2 < autant de
fois qu'il est nécessaire pour faire appa-
raître « RPT OFF » sur l'écran 6.
Le symbole RPT disparaît de l'écran 6.
Interruption de la lecture
(PAUSE)
Appuyez sur la touche 1 <.
« PAUSE » apparaît sur l'écran 6.
Annulation de la pause
Appuyez sur la touche 1 < pendant la
pause.
La lecture se poursuit.
쏅
쏅
쏅
쏅
쏅
Mode MP3/WMA
03_CalaisMP48_fr.indd 8703_CalaisMP48_fr.indd 87 11.06.2008 15:13:24 Uhr11.06.2008 15:13:24 Uhr

88
Mode changeur de CD
Vous pouvez raccorder les changeurs de
CD optionnels Blaupunkt CDC A08 T et
IDC A09 à votre appareil (alvéole C3 sur la
face arrière de l'appareil).
Attention !
Le changeur de CD est normalement
alimenté avec une tension de 12 V par
l'appareil.
Si le changeur de CD CDC A 08 T
(24 V) est raccordé, la sortie de la ten-
sion d'alimentation (alvéole C3/broche
15) doit être coupée dans le câble de
raccordement du changeur de CD. Le
changeur de CD doit être alimenté avec
une tension séparée de 24 volts.
Remarque :
Lorsque vous raccordez un chan-
geur de CD à l'appareil, l'entrée
AUX doit être réglée en conséquen-
ce. Consultez pour cela la section
« Réglage de l'entrée AUX » dans le
chapitre « Sources audio externes ».
Pour toutes informations sur la mani-
pulation des CD, leur insertion et l'uti-
lisation du changeur de CD, reportez-
vous au manuel d'utilisation de votre
changeur de CD.
Démarrage du mode changeur
de CD
Appuyez sur la touche SRC > autant
de fois qu'il est nécessaire pour faire
apparaître « CHANGER » sur l'écran
6.
La lecture commence par le premier CD
identifi é par le changeur de CD. Le numéro
du CD actuel (par ex. « D02 ») et du titre ac-
•
•
쏅
tuel (par ex. « T07 ») ainsi que la durée de
lecture sont affi chés sur l'écran 6.
Sélection des CD
Pour passer à un CD précédent ou suivant,
appuyez sur la touche
ou 8.
Sélection des titres
Pour passer à un tire précédent ou suivant
du CD actuel,
appuyez sur la touche
ou 8.
Recherche rapide (audible)
Pour une recherche rapide de titres précé-
dents ou suivants,
appuyez sur la touche
ou 8 et
maintenez-la appuyée jusqu'à ce que
vous ayez atteint l'endroit souhaité.
Répétition de la lecture d'un titre
ou d'un CD entier (RPT)
Pour répéter le titre actuel,
appuyez sur la touche 2 < autant de
fois qu'il est nécessaire pour faire appa-
raître « RPT TRK » sur l'écran 6.
Le symbole RPT apparaît sur l'écran 6.
Pour répéter la lecture du CD actuel,
appuyez sur la touche 2 < autant de
fois qu'il est nécessaire pour faire appa-
raître « RPT CD » sur l'écran 6.
Le symbole RPT apparaît sur l'écran 6.
Arrêt de REPEAT
Pour arrêter la répétition,
appuyez sur la touche 2 < autant de
fois qu'il est nécessaire pour faire appa-
raître « RPT OFF » sur l'écran 6.
Le symbole RPT disparaît de l'écran 6.
쏅
쏅
쏅
쏅
쏅
쏅
Mode changeur de CD
03_CalaisMP48_fr.indd 8803_CalaisMP48_fr.indd 88 11.06.2008 15:13:24 Uhr11.06.2008 15:13:24 Uhr

89
FRANÇAIS
Lecture des titres dans un ordre
aléatoire (MIX)
Pour que les titres du CD sélectionné soient
lus dans un ordre aléatoire,
appuyez sur la touche 3 < autant de
fois qu'il est nécessaire pour faire appa-
raître « MIX CD » sur l'écran 6.
Le symbole MIX apparaît sur l'écran 6.
Pour écouter les titres de tous les CD intro-
duits dans un ordre aléatoire,
appuyez sur la touche 3 < autant de
fois qu'il est nécessaire pour faire appa-
raître « MIX ALL » sur l'écran 6.
Le symbole MIX apparaît sur l'écran 6.
Arrêt de la fonction MIX
Pour arrêter la lecture des titres dans un or-
dre aléatoire,
appuyez sur la touche 3 < autant de
fois qu'il est nécessaire pour faire appa-
raître « MIX OFF » sir l'écran 6.
Le symbole MIX disparaît de l'écran 6.
Balayage de tous les titres de
tous les CD (SCAN)
Pour écouter le début (pendant 10 secon-
des environ) de tous les titres de tous les
CD introduits dans un ordre croissant,
appuyez sur la touche 4 <.
« SCAN TRK » apparaît un court instant sur
l'écran 6. L'affi chage du numéro du CD
sur l'écran clignote pendant la lecture.
Arrêt du balayage (SCAN)
Pour arrêter le balayage des titres,
appuyez de nouveau sur la touche 4
<.
쏅
쏅
쏅
쏅
쏅
« SCAN OFF » apparaît un court instant sur
l'écran 6. Vous continuez d'entendre le ti-
tre dont le début était en cours de lecture.
Interruption de la lecture
(PAUSE)
Appuyez sur la touche 1 <.
« PAUSE » apparaît sur l'écran 6.
Annulation de la pause
Appuyez sur la touche 1 < pendant la
pause.
La lecture se poursuit.
쏅
쏅
Mode changeur de CD
03_CalaisMP48_fr.indd 8903_CalaisMP48_fr.indd 89 11.06.2008 15:13:24 Uhr11.06.2008 15:13:24 Uhr

90
Télécommande IR RC 10 P
La télécommande infrarouge (IR) vous per-
met de contrôler les fonctions les plus im-
portantes de l'appareil.
Récepteur de télécommande
Le récepteur infrarouge 9 pour la télé-
commande se trouve sur la face avant de
l'appareil. Avant de pouvoir utiliser la télé-
commande, le récepteur doit être activé :
Appuyez sur la touche MENU 7.
Appuyez sur la touche
ou 8
autant de fois qu'il est nécessaire pour
faire apparaître « IR » et le réglage ac-
tuel « ON » (activé) ou « OFF » (désac-
tivé) sur l'écran 6.
Appuyez sur la touche
ou 8 pour
désactiver ou activer le récepteur IR.
Pour quitter le menu,
appuyez sur la touche MENU 7.
C
F
G
H
E
D
B
A
@
쏅
쏅
쏅
쏅
Fonctions de la télécommande
En général :
Touche Fonction
ON H Mise en marche et arrêt
de l'appareil (pression
prolongée)
Mute (pression brève)
Sortie du menu
SRC @ Commutation des sources
V+ B Augmentation du volume
sonore
V- A Diminution du volume
sonore
OK G Appel ou sortie du menu
E Sélection de l'option de
menu
C Sélection de l'option de
menu
F Modifi cation du réglage
dans le menu
D Modifi cation du réglage
dans le menu
Dans le mode radio :
Touche Fonction
F Appel des stations préré-
glées
D Sélection de la gamme
d'ondes/du niveau de
mémoire
E Recherche vers le haut
C Recherche vers le bas
Télécommande IR
03_CalaisMP48_fr.indd 9003_CalaisMP48_fr.indd 90 11.06.2008 15:13:24 Uhr11.06.2008 15:13:24 Uhr

91
FRANÇAIS
Dans le mode CD :
Touche Fonction
F Sélection du titre suivant
D Sélection du titre précé-
dent
Dans le mode changeur de CD :
Touche Fonction
F Lecture du titre suivant
D Lecture du titre précédent
E Lecture du CD suivant
C Lecture du CD précédent
Dans le mode MP3 :
Touche Fonction
F Lecture du titre suivant
D Lecture du titre précédent
E Lecture du répertoire
suivant
C Lecture du répertoire
précédent
Sortie du préamplifi cateur
Vous pouvez raccorder à l'appareil un
amplifi cateur pour l'utilisation d'un haut-
parleur d'extrême grave (subwoofer).
L'amplifi cateur doit pour cela être raccordé
sur la face arrière de l'appareil (alvéole C1).
Vous pouvez régler le niveau du subwoofer
dans le menu audio :
Appuyez sur la touche AUD :.
Appuyez sur la touche
ou 8
autant de fois qu'il est nécessaire pour
faire apparaître « SUB WOOF » sur
l'écran.
« SUBW » et le réglage actuel apparais-
sent au bout de 2 secondes environ sur
l'écran 6.
Appuyez sur la touche
ou 8 pour
régler le niveau pour le subwoofer entre
0 et 7.
Remarque :
Vous n'avez pas besoin d'attendre l'af-
fi chage du réglage actuel pour le mo-
difi er en appuyant sur la touche
ou
8.
Pour quitter le menu,
appuyez sur la touche AUD :.
쏅
쏅
쏅
쏅
Télécommande IR Sortie du préamplifi cateur
03_CalaisMP48_fr.indd 9103_CalaisMP48_fr.indd 91 11.06.2008 15:13:24 Uhr11.06.2008 15:13:24 Uhr

92
Sources audio externes
Vous pouvez raccorder différents types de
source audio externe à l'entrée AUX de l'ap-
pareil. L'entrée AUX doit être réglée pour la
source audio externe raccordée :
Réglage « AUX » pour les sources audio
externes telles qu'un lecteur de CD por-
table, un lecteur de MiniDisc ou un lec-
teur MP3.
Réglage « CDC » pour les changeurs CD
Blaupunkt CDC A 08 T et IDC A 09.
Réglage « USB » pour l'interface USB
de Blaupunkt.
Pour le réglage de l'entrée AUX, consultez
la section suivante « Réglage de l'entrée
AUX ».
Remarque :
Si vous souhaiter raccorder une sour-
ce audio externe, vous avez besoin
d'un câble d'adaptation. Vous pouvez
vous procurer ce câble (réf. Blaupunkt
7 607 897 093) auprès d'un reven-
deur Blaupunkt.
Réglage de l'entrée AUX
Appuyez sur la touche MENU 7.
Appuyez sur la touche
ou 8
autant de fois qu'il est nécessaire
pour faire apparaître « SRC SEL » sur
l'écran.
« SRC » et le réglage actuel « CDC », « USB »
ou « AUX » apparaît au bout de 2 secondes
sur l'écran 6.
Appuyez sur la touche
ou 8 pour
sélectionner un autre réglage.
•
•
•
쏅
쏅
쏅
Remarque :
L'ordre des réglages dans le menu est
« CDC » – « USB » – « AUX » :
Lorsque le réglage actuel est « CDC »,
vous pouvez sélectionner le réglage
« USB » en appuyant sur la touche
8.
Lorsque le réglage actuel est « USB »,
vous pouvez sélectionner le réglage
« CDC » en appuyant sur la touche
8 ou le réglage « AUX » ou en ap-
puyant sur la touche
8.
Lorsque le réglage actuel est « AUX »,
vous pouvez sélectionner le réglage
« USB » en appuyant sur la touche
8.
Après chaque changement de réglage,
l'appareil s'arrête automatiquement.
Pour commuter entre les réglages
« CDC » et « AUX », vous devez par
conséquent sélectionner d'abord le ré-
glage « USB » et remettre l'appareil en
marche après que celui-ci se soit arrêté
automatiquement. Répéter ensuite la
procédure de réglage pour accéder au
réglage souhaité, « AUX » ou « CDC ».
Le message « AUTO SWITCH OFF IN 10
SECONDS » (arrêt automatique dans 10
secondes) est affi ché. L'appareil s'arrête
automatiquement au bout de 10 secondes
environ.
Remettez l'appareil en marche avec la
touche marche/arrêt 3.
L'appareil se met en marche dans le mode
radio avec le réglage sélectionné.
•
•
•
쏅
Sources audio externes
03_CalaisMP48_fr.indd 9203_CalaisMP48_fr.indd 92 11.06.2008 15:13:25 Uhr11.06.2008 15:13:25 Uhr

93
FRANÇAIS
Remarque :
Lorsque vous avez choisi le réglage
AUX, vous pouvez sélectionner l'entrée
AUX avec la touche SRC >. « AUX »
est ensuite affi ché sur l'écran.
Lorsque vous avez choisi le réglage
CDC ou USB, vous pouvez sélectionner
la source audio avec la touche SRC >
uniquement si un appareil approprié
(changeur de CD ou interface USB) est
raccordé.
Réglage du niveau de l'entrée
AUX
Lorsque vous avez réglé l'entrée AUX sur
« AUX » pour le raccordement d'une source
audio externe, vous pouvez adapter le ni-
veau de la source audio externe au niveau
des sources audio propres de l'appareil
(par ex. le CD ou la radio).
Remarque :
Vous pouvez régler le niveau pour l'en-
trée AUX uniquement lorsque AUX est
sélectionné comme source audio.
Appuyez au besoin sur la touche SRC
> autant de fois qu'il est nécessai-
re pour faire apparaître « AUX » sur
l'écran.
Appuyez sur la touche MENU 7.
Appuyez sur la touche
ou 8
autant de fois qu'il est nécessaire pour
faire apparaître « GAIN » et le réglage
actuel sur l'écran.
Appuyez sur la touche
ou 8 pour
régler l'adaptation de niveau entre –9
et +9.
Pour quitter le menu,
appuyez sur la touche MENU 7.
쏅
쏅
쏅
쏅
쏅
Retour aux réglages d'usine
(RESET)
Vous avez la possibilité de revenir aux régla-
ges d'usine de l'appareil :
Appuyez sur la touche AUD : et
maintenez-la appuyée pendant plus de
10 secondes.
Un bip de confi rmation retentit et « RESET »
apparaît un court instant sur l'écran 6.
Tous les réglages d'usine dans les menus et
pour la sortie audio sont repris.
Remarque :
Les stations affectées aux touches de
présélection ne sont pas effacées.
쏅
Sources audio externes Réglages d'usine
03_CalaisMP48_fr.indd 9303_CalaisMP48_fr.indd 93 11.06.2008 15:13:25 Uhr11.06.2008 15:13:25 Uhr

94
Caractéristiques
techniques
Tension de service
24 volts
Amplifi cateur
Puissance de sortie : 2 x 20 watts sinus
sur 4 ohms
Sortie Line : 2 x 2,0 volts eff.
Entrée Aux : 2 x 2,0 volts eff.
Tuner
Gamme d'ondes Europe :
FM : 87,5 - 108 MHz
OM : 531 - 1602 kHz
OL : 153 - 279 kHz
Gamme d'ondes Amérique :
FM : 87,7 - 107,9 MHz
AM : 530 - 1710 kHz
FM - Bande passante :
30 -15 000 Hz
CD
Bande passante : 20 - 20 000 Hz
Sous réserve de modifi cations !
Caractéristiques techniques
03_CalaisMP48_fr.indd 9403_CalaisMP48_fr.indd 94 11.06.2008 15:13:25 Uhr11.06.2008 15:13:25 Uhr

95
ITALIANO
1 Regolatore del volume
2 Tasto BND
Premuto brevemente: selezione del li-
vello di memoria o della gamma di lun-
ghezze d’onda
Premuto a lungo: avvio della funzione
Travelstore (FMT o MWT/LWT)
3 Tasto On/Off
Premuto brevemente: accensione del-
l'apparecchio.
Durante l'uso: modalità silenziosa
(Mute)
Premuto a lungo: spegnimento dell'au-
toradio.
4 Tasto estrazione CD
5 Vano CD
6 Display
7 Tasto MENU
Richiamo del menu delle impostazioni
di base.
8 Tasto multifunzione
9 Ricevitore a infrarossi per telecomando
a infrarossi (opzionale)
: Tasto AUD
Premuto brevemente: apertura del
menu audio per regolazione dei bassi,
degli alti, del balance, del fader e della
funzione loudness
Premuto a lungo (10 sec.): ripristino
delle impostazioni di fabbrica
; Tasto TA
Inserimento e disinserimento della
priorità per le informazioni sul traffi co
Interruzione di un messaggio sul traffi -
co in corso di trasmissione
< Blocco dei tasti 1 - 6
= Tasto RDS
Attivazione e disattivazione della fun-
zione comfort RDS
> Tasto SRC
Selezione delle fonti tra radio e (se
inserito, acceso o attivato) CD, MP3,
multilettore CD, e AUX.
? Code LED
Elementi di comando
04_CalaisMP48_it.indd 9504_CalaisMP48_it.indd 95 11.06.2008 15:14:14 Uhr11.06.2008 15:14:14 Uhr

96
Avvertenze importanti .....................98
Uso conforme alle norme ................98
Telecomando (opzionale) ................98
Multilettore CD (opzionale) .............98
Interfaccia USB (opzionale) ............. 98
Smaltimento del vecchio apparecchio ..98
Protezione antifurto CODE ...............99
Attivazione e disattivazione della
richiesta del codice (CODE) ............ 99
Immissione del codice numerico
dopo un'interruzione di tensione ....100
Accensione e spegnimento .............100
Accensione e spegnimento con
tasto On/Off ................................100
Spegnimento e accensione tramite
l'accensione d'auto.......................100
Attivazione tramite inserimento
di CD .........................................100
Impostazione del tempo di
spegnimento ............................... 101
Accensione dell'apparecchio
mediante telefono (opzionale) .......101
Attivazione con il telecomando a
infrarossi RC 10 P (opzionale) .......101
Regolazione del volume ..................101
Modalità silenziosa (MUTE) ...........101
Audio del telefono/della navigazione . 101
Attivazione/disattivazione del
segnale acustico di conferma
(BEEP) .......................................102
Impostazione del volume massimo
al momento dell'accensione
(ON VOL) ....................................102
Adattamento del volume in funzione
della rumorosità (GALA) ............... 103
Suono ...........................................103
Impostare gli alti .......................... 103
Impostazione dei bassi .................103
Impostazione dei medi ..................104
Regolazione del bilanciamento del
volume a sinistra/destra (BAL) .......104
Regolazione del bilanciamento
del volume tra zona anteriore/
posteriore (FAD) ..........................104
Ora ............................................... 105
Indicazione dell'ora ......................105
Impostazione dell'ora ................... 105
Selezione di modalità 12/24 ore ....105
Impostazione del fuso orario
(TIMEZONE) ...............................106
Esercizio radio ...............................106
Attivazione dell'esercizio radio .......106
Funzione comfort RDS (AF, REG) .... 106
Selezione gamma di lunghezze
d'onda/livello di memoria ..............107
Sintonizzazione di una stazione ......107
Memorizzazione di una stazione .....108
Richiamo di una stazione
memorizzata ............................... 109
Breve ascolto delle stazioni
ricevibili (BANDSCAN)..................109
Tipo di programma (PTY) .............. 109
Abbassamento degli acuti in
presenza di disturbi (HICUT) .........109
Attivazione e disattivazione
Radiotext ....................................110
Informazioni sul traffi co .................110
Attivazione e disattivazione della
precedenza per le informazioni sul
traffi co .......................................110
Impostazione dell'aumento del
volume per le informazioni sul
traffi co .......................................111
Eliminazione delle informazioni
sul traffi co .................................. 111
Indice
04_CalaisMP48_it.indd 9604_CalaisMP48_it.indd 96 11.06.2008 15:14:15 Uhr11.06.2008 15:14:15 Uhr

97
ITALIANO
Esercizio CD ..................................111
Avvio dell'esercizio CD .................. 112
Visualizzazione di informazioni
sul brano (testo del CD) ................112
Selezione di un brano ...................113
Ricerca rapida automatica (udibile) ... 113
Riproduzione dei brani in ordine
casuale (MIX) ..............................113
Breve ascolto dei brani (SCAN) ......113
Ripetizione di un brano (RPT) ........113
Interruzione della riproduzione
(PAUSE) ..................................... 113
Estrazione del CD ........................ 113
Esercizio MP3/WMA ......................114
Preparazione di un supporto MP3 .. 114
Avvio dell'esercizio MP3................116
Visualizzazione di informazioni
sul brano (tag ID3) .......................116
Scegliere una directory ................. 117
Selezione di brani/fi le ................... 117
Ricerca rapida automatica .............117
Riproduzione dei brani in ordine
casuale (MIX) ..............................117
Breve ascolto dei brani (SCAN) ......118
Ripetizione di singoli brani o di
intere directory (REPEAT) .............118
Interruzione della riproduzione
(PAUSE) ..................................... 118
Modalità multilettore CD ................ 119
Avvio dell'esercizio del
multilettore CD ............................ 119
Selezione di un CD .......................119
Selezione di un brano ...................119
Ricerca rapida automatica (udibile) ... 119
Ripetizione di singoli brani o di
interi CD (RPT) ............................119
Riproduzione dei brani in ordine
casuale (MIX) ..............................120
Breve ascolto dei brani di tutti i
CD (SCAN) .................................120
Interruzione della riproduzione
(PAUSE) ..................................... 120
Telecomando a infrarossi RC 10 P ...121
Ricevitore del telecomando ...........121
Funzioni del telecomando .............121
Uscita preamplifi catore ..................122
Fonti audio esterne ........................123
Impostazione dell'ingresso AUX......123
Impostazione del livello
dell'ingresso AUX .........................124
Ripristino delle impostazioni
di fabbrica (RESET) ........................124
Dati tecnici .................................... 125
Tensione di esercizio ....................125
Amplifi catori ...............................125
Tuner .........................................125
CD .............................................125
Collegamento ISO .......................... 281
Indice
04_CalaisMP48_it.indd 9704_CalaisMP48_it.indd 97 11.06.2008 15:14:15 Uhr11.06.2008 15:14:15 Uhr

98
Avvertenze importanti
Avvertenze importanti
Prima di mettere in funzione l'apparecchio,
leggere accuratamente questo manuale e
impratichirsi con il funzionamento dell'ap-
parecchio. Conservare questo manuale nel
veicolo, per poterlo consultare se necessa-
rio.
Uso conforme alle norme
L'apparecchio è destinato ad essere utiliz-
zato su veicoli industriali con rete di bordo
da 24 V e ad essere montato in un vano 1
DIN.
Sicurezza stradale
La sicurezza stradale ha priorità
assoluta. Utilizzate l’apparecchio soltanto
quando la situazione del traffi co stradale
lo permette. Prima di mettersi in viaggio,
familiarizzare con le operazioni da eseguire
con l’apparecchio. Deve essere garantita la
ricezione tempestiva dei segnali di avverti-
mento della polizia, dei vigili del fuoco e del
pronto soccorso. Durante il viaggio quindi il
volume del programma deve essere sempre
adeguato.
Telecomando (opzionale)
Il telecomando RC 10 P consente di coman-
dare le più importanti funzioni. Come acces-
sorio è disponibile un telecomando a infra-
rossi (codice Blaupunkt 7 607 591 512).
Multilettore CD (opzionale)
È possibile collegare un multiletto-
re CD CDC A08 T (codice Blaupunkt
7 607 274 002) o IDC A09 (codice
Blaupunkt 7 607 274 005). I multilettori
CD sono disponibili come accessori.
Interfaccia USB (opzionale)
L'interfaccia USB Blaupunkt può essere col-
legata per riprodurre fi le MP3/WMA da un
supporto USB. L'interfaccia USB è dispo-
nibile come accessorio (codice Blaupunkt
7 607 541 576).
Smaltimento del vecchio
apparecchio
Non smaltire la propria vecchia au-
toradio nei rifi uti domestici!
Per lo smaltimento del vecchio ap-
parecchio, utilizzare i sistemi di restituzio-
ne e raccolta disponibili.
04_CalaisMP48_it.indd 9804_CalaisMP48_it.indd 98 11.06.2008 15:14:15 Uhr11.06.2008 15:14:15 Uhr

99
ITALIANO
Protezione antifurto
Protezione antifurto CODE
Come protezione antifurto, l'apparecchio
è bloccato mediante un codice numerico a
quattro cifre. Questo numero deve sempre
venire inserito nei casi in cui l'apparecchio
venga scollegato dalla tensione di esercizio
del veicolo. La richiesta del codice non è at-
tiva sugli apparecchi provenienti dalla fab-
brica, ma può venire attivata.
Nota:
Se è attivata la richiesta del codice,
il Code LED ? a lampeggiare anche
qualora sia l'apparecchio che l'accen-
sione del veicolo siano disinseriti.
Il codice numerico è riportato sulla tessera
del sistema radio.
Nota:
Non conservare la tessera del sistema
radio a bordo del veicolo!
Attivazione e disattivazione della
richiesta del codice (CODE)
Premere il tasto MENU 7.
Premere una o più volte il tasto
o
8, fi no a quando sul display 6 viene
visualizzato "CODE" e appare l'impo-
stazione attuale "ON" (acceso) o "OFF"
(spento).
Premere il tasto
o 8.
Sul display compare 6 "0000". Inserire il
codice:
Nota:
Se si inserisce un numero di codice er-
rato, sul display compare nuovamente
"0000" 6. L'immissione del codice
numerico può essere ripetuta per al-
쏅
쏅
쏅
tre due volte. Dopo la terza immissio-
ne errata del codice, il funzionamento
dell'apparecchio si blocca per 1 ora,
durante la quale sul display compare
la scritta "WAIT 1HR" 6. Se durante
questo arco di tempo si spegne l'appa-
recchio, alla riaccensione sarà neces-
sario attendere un'altra ora completa.
Premere una o più volte il tasto stazio-
ne 1 < fi no a quando sul display 6
viene visualizzata la prima cifra del pro-
prio numero di codice.
Premere una o più volte il tasto stazio-
ne 2 < fi no a quando sul display 6
viene visualizzata la seconda cifra del
proprio numero di codice.
Premere una o più volte il tasto stazio-
ne 3 < fi no a quando sul display 6
viene visualizzata la terza cifra del pro-
prio numero di codice.
Premere una o più volte il tasto stazio-
ne 4 < fi no a quando sul display 6
viene visualizzata la quarta cifra del
proprio numero di codice.
Quando il numero di codice visualizzato
sul display 6 è quello corretto, tenere
premuto il tasto stazione 5 < per più
di 2 secondi.
Sul display 6 compaiono nuovamente la
scritta "CODE" e l'impostazione "ON" (acce-
so) o "OFF" (spento) a seconda dell'impo-
stazione attuale.
Premere il tasto
o 8 per disatti-
vare o attivare la richiesta del codice.
Per uscire dal menu,
premere il tasto MENU 7.
쏅
쏅
쏅
쏅
쏅
쏅
쏅
04_CalaisMP48_it.indd 9904_CalaisMP48_it.indd 99 11.06.2008 15:14:15 Uhr11.06.2008 15:14:15 Uhr

100
Immissione del codice numerico
dopo un'interruzione di tensione
Accendere la radio.
Sul display 6 compare dapprima la scritta
"CODE" e successivamente le cifre "0000".
Il codice può essere inserito:
Nota:
Se si inserisce un numero di codice er-
rato, sul display compare nuovamente
"0000" 6. L'immissione del codice
numerico può essere ripetuta per al-
tre due volte. Dopo la terza immissio-
ne errata del codice, il funzionamento
dell'apparecchio si blocca per 1 ora,
durante la quale sul display compare
la scritta "WAIT 1HR" 6. Se durante
questo arco di tempo si spegne l'appa-
recchio, alla riaccensione sarà neces-
sario attendere un'altra ora completa.
Inserire il numero di codice come de-
scritto al capitolo "Attivazione e disatti-
vazione della richiesta del codice".
Quando il numero di codice visualizzato
sul display 6 è quello corretto, tenere
premuto il tasto stazione 5 < per più
di 2 secondi.
L'apparecchio si accende.
쏅
쏅
쏅
Accensione e spegnimento
Sono disponibili diverse possibilità di ac-
censione e spegnimento dell'apparecchio:
Accensione e spegnimento con
tasto On/Off
Per l'accensione premere il tasto On/
Off 3.
Per spegnere l'autoradio tenere pre-
muto il tasto On/Off 3 per più di due
secondi.
Nota:
Per proteggere la batteria del veicolo,
ad accensione disinserita l'apparecchio
si spegne automaticamente dopo un
periodo di tempo che può essere impo-
stato (vedi il paragrafo "Impostazione
del tempo di spegnimento" in questo
capitolo).
Spegnimento e accensione
tramite l'accensione d'auto
Se l'apparecchio è collegato all'accensione
del veicolo e non è stato spento con il tasto
On/Off 3 la radio viene accesa e spen-
ta contemporaneamente all'inserimento/
disinserimento dell'accensione.
Attivazione tramite inserimento
di CD
Per attivare l'apparecchio mediante l'inseri-
mento di un CD,
spingere un CD nel vano CD 5 con il
lato stampato rivolto verso l'alto fi nché
si percepisce una leggera resistenza.
Il CD viene inserito automaticamente in
sede, l'apparecchio inizia a funzionare in
esercizio CD.
쏅
쏅
쏅
Protezione antifurto Accensione e spegnimento
04_CalaisMP48_it.indd 10004_CalaisMP48_it.indd 100 11.06.2008 15:14:15 Uhr11.06.2008 15:14:15 Uhr

101
ITALIANO
Impostazione del tempo di
spegnimento
Premere il tasto MENU 7.
Premere una o più volte il tasto
o
8 fi no a quando sul display 6 viene
visualizzato "HOUR" insieme all'impo-
stazione attuale.
Premere il tasto
o 8 per imposta-
re il tempo di spegnimento ad intervalli
di 5 minuti tra 5 e 60 minuti.
Per uscire dal menu,
premere il tasto MENU 7.
Accensione dell'apparecchio
mediante telefono (opzionale)
Quando si attiva il telefono mentre l'appa-
recchio è spento, esso si accende. Quando
si disattiva il telefono, anche l'apparecchio
si spegne automaticamente, a condizione
che il telefono sia correttamente collegato
con l'apparecchio.
Attivazione con il telecomando a
infrarossi RC 10 P (opzionale)
Per l'attivazione premere il tasto ON H
sul telecomando a infrarossi RC 10 P.
Nota:
Per poter utilizzare il telecomando
a infrarossi, deve essere attivato il
ricevitore a infrarossi dell'apparec-
chio. Leggere al riguardo il paragrafo
"Ricevitore del telecomando" al capito-
lo "Telecomando a infrarossi RC 10 P".
쏅
쏅
쏅
쏅
쏅
Regolazione del volume
Il volume è regolabile per gradi da 0 (off) a
32 (massimo).
Per aumentare il volume del sistema,
girare verso destra il regolatore del vo-
lume 1.
Per diminuire il volume del sistema, gi-
rare verso sinistra il regolatore del vo-
lume 1.
Modalità silenziosa (MUTE)
Il volume può essere portato in modalità si-
lenziosa immediatamente (Mute).
Premere brevemente il tasto 3.
Disattivazione della funzione Mute
Per riattivare il livello di volume precedente-
mente ascoltato,
premere di nuovo brevemente il tasto 3.
Audio del telefono/della
navigazione
Modalità silenziosa durante l'utilizzo del te-
lefono Se l'autoradio è collegata con un te-
lefono mobile o un sistema di navigazione,
in presenza di una telefonata in arrivo o di
un messaggio vocale del sistema di naviga-
zione, l'autoradio passa alla modalità silen-
ziosa. La comunicazione telefonica o il mes-
saggio vocale vengono riprodotti attraverso
gli altoparlanti dell'autoradio.
Per attivare questa funzione, il telefono mo-
bile o il sistema di navigazione devono es-
sere collegati all'autoradio (settore C2 sul
retro dell'apparecchio).
Per sapere quali sistemi di navigazione
è possibile collegare alla propria autora-
dio, rivolgersi al rivenditore specializzato
Blaupunkt di zona.
쏅
쏅
쏅
쏅
Accensione e spegnimento Volume
04_CalaisMP48_it.indd 10104_CalaisMP48_it.indd 101 11.06.2008 15:14:15 Uhr11.06.2008 15:14:15 Uhr

102
Quando viene ricevuta una chiamata o vie-
ne trasmesso un messaggio di navigazione,
sul display compare "PHONE".
Impostazione del volume per l'audio del
telefono e del sistema di navigazione
(PHONEVOL)
Il volume delle conversazioni telefoniche o
dei messaggi vocali del sistema di naviga-
zione è regolabile:
Premere il tasto MENU 7.
Premere una o più volte il tasto
o
8 fi nché viene visualizzato
"PHONEVOL".
Dopo 2 secondi circa sul display 6 com-
paiono la scritta "VOL" e l'impostazione at-
tuale.
Premere il tasto
o 8 per imposta-
re il volume tra 0 e 32.
Nota:
Per modifi care le impostazioni attuali
premendo il tasto
o 8 non è ne-
cessario attendere che esse vengano
visualizzate.
Per uscire dal menu,
premere il tasto MENU 7.
Nota:
Il volume può essere impostato agen-
do sul regolatore del volume 1 anche
durante una conversazione telefonica
o durante l'emissione dei messaggi di
navigazione. Il volume impostato viene
automaticamente memorizzato.
쏅
쏅
쏅
쏅
Attivazione/disattivazione del
segnale acustico di conferma
(BEEP)
All'effettuazione di determinate azioni, ad
es. quando un tasto viene premuto per un
tempo maggiore, si attiva un segnale acu-
stico (Beep). Il segnale acustico può essere
disattivato:
Premere il tasto MENU 7.
Premere una o più volte il tasto
o
8, fi no a quando sul display 6 viene
visualizzato "BEEP" e appare l'imposta-
zione attuale "ON" (acceso) o "OFF"
(spento).
Premere il tasto
o 8 per disat-
tivare o attivare il segnale acustico
(Beep).
Per uscire dal menu,
premere il tasto MENU 7.
Impostazione del volume
massimo al momento
dell'accensione (ON VOL)
Quando si accende l'apparecchio, il volume
è l'ultimo scelto. Tuttavia, se prima dello
spegnimento è stato impostato un volume
più alto rispetto al volume massimo al mo-
mento dell'accensione, alla riaccensione
questo viene automaticamente limitato in
base al valore impostato.
Nota:
Per proteggere da una rumorosità ec-
cessiva, il volume massimo al momento
dell'accensione è limitato al valore 25.
Premere il tasto MENU 7.
Premere una o più volte il tasto
o
8 fi no a quando appare "ON VOL".
쏅
쏅
쏅
쏅
쏅
쏅
Volume
04_CalaisMP48_it.indd 10204_CalaisMP48_it.indd 102 11.06.2008 15:14:16 Uhr11.06.2008 15:14:16 Uhr

103
ITALIANO
Dopo 2 secondi circa sul display 6 com-
paiono la scritta "VOL" e l'impostazione at-
tuale.
Premere il tasto
o 8 per imposta-
re il volume tra 5 e 25.
Nota:
Per modifi care le impostazioni attuali
premendo il tasto
o 8 non è neces-
sario attendere che vengano visualizzate.
Per uscire dal menu,
premere il tasto MENU 7.
Adattamento del volume in
funzione della rumorosità
(GALA)
Questa funzione consente di adeguare au-
tomaticamente il volume dell'autoradio alla
velocità di marcia e quindi ai rumori di mar-
cia correlati. Per esempio a mano a mano
che aumenta la velocità, il volume viene
automaticamente alzato, per controbilan-
ciare la maggiore rumorosità (ad es. dovuta
al vento).
Affi nché questo accada il veicolo deve por-
re a disposizione il segnale tachimetrico e
l'autoradio deve essere collegata in modo
opportuno.
L’aumento automatico del volume è regola-
bile su sei livelli (OFF(spento) 1-5).
Premere il tasto MENU 7.
Premere una o più volte il tasto
o 8
fi no a quando viene visualizzato "GALA"
insieme all'impostazione attuale.
Premere il tasto
o 8 per imposta-
re l'adattamento del volume tra "OFF"
(spento) e 5.
Per uscire dal menu,
premere il tasto MENU 7.
쏅
쏅
쏅
쏅
쏅
쏅
Suono
Impostare gli alti
Premere il tasto AUD :
Premere una o più volte il tasto
o
8 fi nché viene visualizzato "TREBLE".
Tenere premuto il tasto
o 8 per
più di 2 secondi.
Sul display compare brevemente "FREQ" e
quindi viene visualizzata la frequenza degli
alti selezionata al momento.
Per selezionare un'altra frequenza degli alti
compresa tra 10,0 kHz e 17,5 kHz,
premere il tasto
o 8.
Per impostare il livello degli alti,
premere una o più volte il tasto
o
8 fi nché viene visualizzato "GAIN".
Dopo circa 2 secondi compaiono la scritta
"GAIN" e l'impostazione attiva al momento.
Premere il tasto
o 8 per imposta-
re il livello degli alti tra –7 e +7.
Per uscire dal menu,
premere il tasto AUD :
Impostazione dei bassi
Premere il tasto AUD :
Premere una o più volte il tasto
o
8 fi nché viene visualizzato "BASS".
Tenere premuto il tasto
o 8 per
più di 2 secondi.
Sul display compare brevemente "FREQ" e
quindi la frequenza dei bassi selezionata al
momento.
Per selezionare un'altra frequenza dei bassi
compresa tra 60 kHz e 200 kHz,
premere il tasto
o 8.
쏅
쏅
쏅
쏅
쏅
쏅
쏅
쏅
쏅
쏅
쏅
Volume Suono
04_CalaisMP48_it.indd 10304_CalaisMP48_it.indd 103 11.06.2008 15:14:16 Uhr11.06.2008 15:14:16 Uhr

104
Premere il tasto o 8 per imposta-
re il livello dei medi tra –7 e +7.
Per impostare il fattore qualità per i medi,
premere una o più volte il tasto
o
8 fi nché viene visualizzato "Q
FACTOR".
Dopo circa 2 secondi compaiono "Q" e l'im-
postazione attiva al momento.
Premere il tasto
o 8 per imposta-
re il fattore di qualità tra 0,5 e 1,25.
Per uscire dal menu,
premere il tasto AUD :
Regolazione del bilanciamento
del volume a sinistra/destra
(BAL)
Premere il tasto AUD :
Premere una o più volte il tasto
o
8 fi no a quando viene visualizzato
"BAL" insieme all'impostazione attua-
le.
Premere il tasto
o 8 per imposta-
re il bilanciamento del volume sinistra/
destra tra – 10 e +10.
Per uscire dal menu,
premere il tasto AUD :
Regolazione del bilanciamento
del volume tra zona anteriore/
posteriore (FAD)
Nota
Gli altoparlanti posteriori devono veni-
re collegati mediante un amplifi catore
supplementare.
Premere il tasto AUD :
쏅
쏅
쏅
쏅
쏅
쏅
쏅
쏅
쏅
Per impostare il livello dei bassi,
premere una o più volte il tasto
o
8 fi nché viene visualizzato "GAIN".
Dopo circa 2 secondi compaiono la scritta
"GAIN" e l'impostazione attiva al momento.
Premere il tasto
o 8 per imposta-
re il livello dei bassi tra –7 e +7.
Per impostare il fattore qualità per i bassi,
premere una o più volte il tasto
o
8 fi nché viene visualizzato "Q
FACTOR".
Dopo circa 2 secondi compaiono "Q" e l'im-
postazione attiva al momento.
Premere il tasto
o 8 per imposta-
re il fattore di qualità tra 1,0 e 2,0.
Per uscire dal menu,
premere il tasto AUD :
Impostazione dei medi
Premere il tasto AUD :
Premere una o più volte il tasto
o
8 fi nché viene visualizzato
"MIDDLE".
Tenere premuto il tasto
o 8 per
più di 2 secondi.
Sul display compare brevemente "FREQ" e
quindi viene visualizzata la frequenza dei
medi selezionata al momento.
Per selezionare un'altra frequenza dei medi
compresa tra 500 kHz e 2,5 kHz,
premere il tasto
o 8.
Per impostare il livello dei medi,
premere una o più volte il tasto
o
8 fi nché viene visualizzato "GAIN".
Dopo circa 2 secondi compaiono la scritta
"GAIN" e l'impostazione attiva al momento.
쏅
쏅
쏅
쏅
쏅
쏅
쏅
쏅
쏅
쏅
Suono
04_CalaisMP48_it.indd 10404_CalaisMP48_it.indd 104 11.06.2008 15:14:16 Uhr11.06.2008 15:14:16 Uhr

105
ITALIANO
Premere una o più volte il tasto o
8 fi no a quando viene visualizzato
"FAD" insieme all'impostazione attuale.
Premere il tasto
o 8, per regola-
re il bilanciamento del volume davanti e
dietro tra – 10 e +10.
Per uscire dal menu,
premere il tasto AUD :
쏅
쏅
쏅
Ora
Indicazione dell'ora
Per visualizzare l'ora sul display per circa
10 secondi,
tenere premuto il tasto MENU 7 per
più di 2 secondi.
Impostazione dell'ora
Premere il tasto MENU 7.
Premere una o più volte il tasto
o
8, fi no a quando sul display 6 viene
visualizzato "TIMESET".
Dopo circa 2 secondi l'ora attuale viene
visualizzata sul display 6. Prima dell'ora,
nella modalità 24 ore compare "24H" e nel-
la modalità 12 ore compare "AM" o "PM".
Lampeggiano le ore, che si possono impo-
stare.
Per impostare le ore o i minuti,
premere il tasto
o 8.
Per commutare tra ore e minuti,
premere il tasto 6 <.
Nota:
Per modifi care le impostazioni attuali
premendo il tasto
o 8 non è ne-
cessario attendere che venga visualiz-
zata l'ora attuale.
Per uscire dal menu,
premere il tasto MENU 7.
Selezione di modalità 12/24 ore
Premere il tasto MENU 7.
Premere una o più volte il tasto
o
8 fi nché sul display 6 appare "24H
MODE" o "12H MODE".
쏅
쏅
쏅
쏅
쏅
쏅
쏅
쏅
Suono Ora
04_CalaisMP48_it.indd 10504_CalaisMP48_it.indd 105 11.06.2008 15:14:16 Uhr11.06.2008 15:14:16 Uhr

106
Per eseguire la commutazione tra le
diverse modalità premere il tasto
o
8.
Per uscire dal menu,
premere il tasto MENU 7.
Impostazione del fuso orario
(TIMEZONE)
Se durante il viaggio si percorrono zone
aventi diversi fusi orari, è possibile regolare
la differenza di fuso rispetto all'ora imposta-
ta al momento con passi di 1 ora per volta.
In questo modo è possibile correggere l'ora
indicata per il fuso orario valido di volta in
volta senza dover impostare nuovamente
l'ora medesima.
Premere il tasto MENU 7.
Premere una o più volte il tasto
o
8 fi nché viene visualizzato
"TIMEZONE".
Dopo 2 secondi circa sul display 6 com-
paiono "ZONE" e l'impostazione attuale.
Premere il tasto
o 8 per imposta-
re la differenza di fuso orario in passi di
1 ora per volta tra –12 e +12.
Nota:
Per modifi care le impostazioni attuali
premendo il tasto
o 8 non è ne-
cessario attendere che vengano visua-
lizzate.
Per uscire dal menu,
premere il tasto MENU 7.
쏅
쏅
쏅
쏅
쏅
쏅
Esercizio radio
Questo apparecchio è dotato di un ricevi-
tore
radio RDS. Quasi tutte le stazioni FM
trasmettono un segnale che, oltre al pro-
gramma radio, contiene anche informazio-
ni come il nome della stazione ed il tipo di
programma (PTY).
Non appena una stazione è ricevibile, viene
visualizzato sul display 6 il nome di questa
stazione.
Attivazione dell'esercizio radio
Se ci si trova in un'altra modalità di esercizio,
premere il tasto BND 2,
oppure
premere una o più volte il tasto SRC >
fi no a quando sul display 6 viene vi-
sualizzato "RADIO".
Sul display 6 viene visualizzata la frequen-
za attuale o il nome della stazione.
Funzione comfort RDS (AF, REG)
Le funzioni comfort RDS AF (frequenza al-
ternativa) e REG (regionale) ampliano la
gamma delle prestazioni dell'apparecchio
radio.
AF: con funzione comfort RDS attivata,
l'apparecchio cerca automaticamente
in sottofondo la migliore frequenza di
ricezione per la stazione sintonizzata.
REG: in determinate ore del giorno al-
cune stazioni suddividono il loro pro-
gramma in diversi programmi regionali
con differenti contenuti. Quando la fun-
zione REG è attivata, si impedisce che
l'apparecchio si disponga su frequenze
alternative della stazione impostata,
che hanno una differente programma-
zione.
쏅
쏅
•
•
Ora Esercizio radio
04_CalaisMP48_it.indd 10604_CalaisMP48_it.indd 106 11.06.2008 15:14:17 Uhr11.06.2008 15:14:17 Uhr

107
ITALIANO
Nota:
La funzione REG deve essere attivata o
disattivata a parte nel menu.
Attivazione e disattivazione della
funzione comfort RDS
Per utilizzare le funzioni RDS AF e REG,
premere il tasto RDS =.
Le funzioni comfort RDS sono attive, quan-
do sul display 6 viene visualizzato il sim-
bolo RDS.
Inserimento e disinserimento della
funzione REG
Premere il tasto MENU 7.
Premere una o più volte il tasto
o
8, fi no a quando sul display 6 vie-
ne visualizzato "REG" e appare l'impo-
stazione attuale "ON" (acceso) o "OFF"
(spento).
Premere il tasto
o 8 per disatti-
vare o attivare la funzione REG.
Per uscire dal menu,
premere il tasto MENU 7.
Nota:
L'impostazione REG ON/OFF ha valo-
re esclusivamente quando è attivata la
funzione RDS.
Selezione gamma di lunghezze
d'onda/livello di memoria
Con questo apparecchio è possibile riceve-
re programmi delle gamme di frequenze FM
(UKW), OM (MW) e OL (LW) (Europa) o FM
e AM (NAFTA). Per la gamma di lunghezze
d’onda FM sono disponibili tre livelli di me-
moria FM1, FM2 e FMT, mentre su ognuna
delle gamme di lunghezze d'onda OM (MW)
쏅
쏅
쏅
쏅
쏅
e OL (LW) o AM è disponibile un singolo li-
vello di memoria. Vi è inoltre un ulteriore li-
vello di memoria MWT/LWT o AMT. Su ogni
livello di memoria si possono memorizzare
6 stazioni.
Per passare dalla gamma di lunghezze d'on-
da ai livelli di memoria e viceversa,
premere il tasto BND 2.
Sintonizzazione di una stazione
Ci sono diverse possibilità di sintonizzazio-
ne di una stazione.
Ricerca automatica di stazione
Premere il tasto
o 8.
La radio si sintonizza su una delle prossime
stazioni ricevibili.
Note:
Se è attivata la priorità alle informa-
zioni sul traffi co, viene impostata la
successiva stazione che trasmette
informazioni.
Se è attivatala funzione PTY, viene im-
postata la successiva stazione relati-
va al tipo di programma scelto.
Impostazione della sensibilità della
ricerca automatica delle stazioni
È possibile scegliere se in presenza di una
bassa sensibilità debbano essere imposta-
te solo stazioni forti o se in presenza di alta
sensibilità debbano essere impostate an-
che stazioni deboli.
Premere il tasto MENU 7.
Premere una o più volte il tasto
o
8, fi no a quando sul display 6 viene
visualizzato "SENS" e appare l'imposta-
zione attuale "LO" (bassa sensibilità) o
"DX" (alta sensibilità).
쏅
쏅
•
•
쏅
쏅
Esercizio radio
04_CalaisMP48_it.indd 10704_CalaisMP48_it.indd 107 11.06.2008 15:14:17 Uhr11.06.2008 15:14:17 Uhr

108
Premere il tasto o 8 per commu-
tare tra le impostazioni "LO" e "DX".
Per uscire dal menu,
premere il tasto MENU 7.
Sintonizzazione manuale
Per modifi care per gradi la frequenza impo-
stata,
premere il tasto
o 8.
Per modifi care rapidamente la frequenza
impostata,
tenere premuto il tasto
o 8.
Nota:
La sintonizzazione manuale è possibi-
le soltanto con le funzioni RDS e PTY
spente.
Scorrere all'interno di una catena di
stazioni (solo FM)
Se una stazione trasmette più programmi,
è possibile sfogliare una cosiddetta "catena
di stazioni".
Premere il tasto
o 8 per passare
alla stazione successiva della catena di
stazioni.
Nota:
È possibile sfogliare le catene di stazio-
ni solo se sono state attivate le funzioni
RDS e PTY. In questo caso sarà possi-
bile sintonizzarsi su stazioni che sia-
no state già ascoltate in precedenza.
A questo scopo utilizzare la funzione
Travelstore (T-STORE).
쏅
쏅
쏅
쏅
쏅
Memorizzazione di una stazione
Memorizzazione manuale di una
stazione
Selezionare il livello di memoria o la
gamma di lunghezze d'onda desiderati.
Impostare la stazione.
Tenere premuto per più di 2 secondi il
tasto stazione 1 - 6 <, sul quale deve
venire memorizzata la stazione.
Risuona il segnale acustico di conferma. La
stazione è memorizzata sul tasto stazione
scelto.
Memorizzazione automatica di una
stazione (T-STORE)
È possibile memorizzare automaticamente
le 6 stazioni di maggiore potenza della re-
gione. Per la gamma di lunghezze d'onda
FM la memorizzazione avviene sul livello di
memoria FMT, per le gamme di lunghezze
d'onda OM (MW) e OL (LW) avviene sul li-
vello di memoria MWT/LWT e per la gamma
di lunghezze d'onda AM sul livello di memo-
ria AMT.
Nota:
Le stazioni memorizzate in precedenza
su questo livello vengono sostituite dal-
le nuove stazioni trovate.
Scegliere la gamma di lunghezze d’on-
da desiderata.
Tenere premuto il tasto BND 2 per più
di due secondi.
Ha inizio la memorizzazione. Sul display 6
compare "T-STORE". Dopo che è stata ulti-
mata la memorizzazione, la stazione viene
riprodotta sul posto di memoria uno del li-
vello di memoria FMT, MWT/LWT o AMT.
쏅
쏅
쏅
쏅
쏅
Esercizio radio
04_CalaisMP48_it.indd 10804_CalaisMP48_it.indd 108 11.06.2008 15:14:17 Uhr11.06.2008 15:14:17 Uhr

109
ITALIANO
Richiamo di una stazione
memorizzata
Selezionare il livello di memoria o la
gamma di lunghezze d'onda.
Premere il tasto stazione 1 - 6 < sul
quale è memorizzata la stazione desi-
derata.
Breve ascolto delle stazioni
ricevibili (BANDSCAN)
Con la funzione Bandscan è possibile ascol-
tare tutte le stazioni ricevibili per ca. 10 se-
condi.
Avvio della funzione Bandscan
Tenere premuto il tasto
o 8 per
più di 2 secondi.
Sul display compare brevemente
"BANDSCAN". L'apparecchio ricerca le
stazioni nella gamma di lunghezze d'onda
del momento. Ogni stazione trovata vie-
ne ascoltata per ca. 10 secondi e ne vie-
ne visualizzata la frequenza impostata o il
nome.
Termine della funzione Bandscan
Premere il tasto
o 8.
Viene terminata la scansione. Rimane im-
postata l'ultima stazione su cui ci si è sin-
tonizzati.
Tipo di programma (PTY)
Oltre al nome della stazione, alcune stazioni
FM forniscono anche informazioni sul tipo
di programma trasmesso. Le denominazio-
ni dei tipi di programma possono essere ad
es.:
CULTURA VIAGGI JAZZ SPORT
NOTIZIARIO POP ROCK MUSICA
쏅
쏅
쏅
쏅
Con la funzione PTY è possibile selezionare
stazioni che trasmettono proprio il tipo di
programma ricercato.
Se è attivata la funzione PTY ed è stata
avviata la ricerca automatica PTY, l'appa-
recchio si porta automaticamente dalla
stazione ascoltata al momento, o da un'al-
tra modalità, alla stazione con il tipo di pro-
gramma scelto.
Attivazione e disattivazione PTY
Premere il tasto MENU 7.
Premere una o più volte il tasto
o
8, fi no a quando sul display 6 viene
visualizzato "PTY" e appare l'imposta-
zione attuale "ON" (acceso) o "OFF"
(spento).
Premere il tasto
o 8 per disatti-
vare o attivare la funzione PTY.
Per uscire dal menu,
premere il tasto MENU 7.
Selezione del tipo di programma e avvio
della ricerca automatica
Premere una o più volte il tasto
o
8, fi no a quando sul display viene in-
dicato il tipo di programma desiderato.
Premere il tasto
o 8 per avviare
la ricerca automatica.
Se viene trovata una stazione con il tipo di
programma scelto, questa viene impostata.
Abbassamento degli acuti in
presenza di disturbi (HICUT)
La funzione Hicut migliora la riproduzione
in caso di disturbi nella ricezione radio.
Quando la ricezione è disturbata, il livello
di disturbo viene abbassato automatica-
mente.
쏅
쏅
쏅
쏅
쏅
쏅
Esercizio radio
04_CalaisMP48_it.indd 10904_CalaisMP48_it.indd 109 11.06.2008 15:14:17 Uhr11.06.2008 15:14:17 Uhr

110
Per attivare o disattivare la funzione HICUT,
premere il tasto MENU 7.
Premere una o più volte il tasto
o
8, fi no a quando sul display 6 viene
visualizzato "HICUT" e appare l'impo-
stazione attuale "ON" (acceso) o "OFF"
(spento).
Premere il tasto
o 8 per disatti-
vare o attivare la funzione HICUT.
Per uscire dal menu,
premere il tasto MENU 7.
Attivazione e disattivazione
Radiotext
Alcune stazioni utilizzano il segnale RDS per
trasmettere pubblicità o altre informazioni
al posto del nome della stazione. Questo
Radiotext compare sul display 6.
Per attivare/disattivare la visualizzazione
del radiotext,
premere il tasto MENU 7.
Premere una o più volte il tasto
o
8 fi nché viene visualizzato
"RADIOTXT".
Dopo 2 secondi circa sul display 6 com-
pare "TEXT ON" (attivato) o "TEXT OFF"
(disattivato).
Premere il tasto
o 8 per disat-
tivare o attivare la visualizzazione del
radiotext.
Nota:
Per modifi care le impostazioni attuali
premendo il tasto
o 8 non è ne-
cessario attendere che vengano visua-
lizzate.
Per uscire dal menu,
premere il tasto MENU 7.
쏅
쏅
쏅
쏅
쏅
쏅
쏅
쏅
Informazioni sul traffi co
Attivazione e disattivazione della
precedenza per le informazioni
sul traffi co
Per attivare o disattivare la priorità delle in-
formazioni sul traffi co in tutte le modalità,
premere il tasto TA ;.
Nota:
Nelle modalità CD, MP3, multilettore
CD ed AUX questa funzione è disponi-
bile solo se precedentemente è stata
impostata la gamma di lunghezze d'on-
da FM.
La precedenza per le informazioni sul traf-
fi co è attivata quando sul display 6 viene
visualizzato il simbolo TA. Le informazioni
sul traffi co vengono trasmesse non appena
l'apparecchio le riceve. Per tutta la durata
delle informazioni, sul display 6 compare
la scritta "TRAFFIC".
Nota:
Si sente un avvertimento acustico,
quando, durante l’ascolto della sta-
zione che trasmette informazioni sul
traffi co o di un CD, si esce dall’area di
trasmissione della stazione che tra-
smette tale informazioni e con la suc-
cessiva ricerca automatica non viene
individuata alcuna nuova stazione.
se si passa da una stazione che tra-
smette informazioni sul traffi co ad
un'altra che invece non trasmette tali
informazioni.
In tali casi disinserire la priorità per le
informazioni sul traffi co, oppure sinto-
nizzarsi su una stazione che trasmette
informazioni sul traffi co stradale.
쏅
•
•
Esercizio radio Informazioni sul traffi co
04_CalaisMP48_it.indd 11004_CalaisMP48_it.indd 110 11.06.2008 15:14:18 Uhr11.06.2008 15:14:18 Uhr

111
ITALIANO
Impostazione dell'aumento del
volume per le informazioni sul
traffi co
Il livello con il quale le informazioni sul traf-
fi co verranno riprodotte ad un volume più
alto rispetto a quello impostato può essere
regolato:
Premere il tasto MENU 7.
Premere una o più volte il tasto
o
8 fi no a quando appare "TA VOL".
Dopo 2 secondi circa sul display 6 com-
paiono la scritta "VOL" e l'impostazione at-
tuale.
Premere il tasto
o 8 per imposta-
re l'aumento del volume tra 0 e 10.
Nota:
Per modifi care le impostazioni attuali
premendo il tasto
o 8 non è ne-
cessario attendere che vengano visua-
lizzate.
Per uscire dal menu,
premere il tasto MENU 7.
Nota:
Il volume si può regolare con il regolato-
re del volume 1 durante la trasmissio-
ne di informazioni sul traffi co, per tutta
la durata delle informazioni.
Eliminazione delle informazioni
sul traffi co
Per interrompere la trasmissione delle in-
formazioni sul traffi co e tornare alla fonte
audio ascoltata in precedenza,
premere il tasto TA ;.
La precedenza dei comunicati sul traffi co
rimane attiva.
쏅
쏅
쏅
쏅
쏅
Esercizio CD
Con questo apparecchio è possibile ripro-
durre i normali CD audio, CD-R e CD-RW
reperibili sul mercato, con diametro di 12
cm. Per evitare problemi nella riproduzio-
ne, non masterizzare i CD a velocità supe-
riori a 16x.
Danneggiamento del
lettore CD!
Non si possono riprodurre i "single CD" con
diametro di 8 cm e neppure i CD sagomati
(shape CD).
Trattare il CD con accuratezza e evitare
danni e graffi sul CD. Se possibile, afferrare
il CD soltanto dal bordo. Per pulire un CD
sporco utilizzare un panno morbido privo di
fi lamenti senza alcun solvente. Pulire il CD
sempre dall'interno verso l'esterno.
Non esporre il CD direttamente ai raggi del
sole e conservarlo separato dall'apparec-
chio in una custodia.
Non incollare etichette sulla superfi cie del
CD. Tracciare il CD solo con un apposi-
to pennarello comunemente reperibile in
commercio.
Non ci assumiamo nessuna responsabilità
per danni al lettore CD conseguenti all’im-
piego di CD inadatti o danneggiati.
Per un corretto funzionamento del lettore,
utilizzare esclusivamente CD con il logo
Compact Disc. I CD con protezione da co-
piatura possono causare diffi coltà di ripro-
duzione. Blaupunkt non può garantire il fun-
zionamento perfetto di CD protetti contro la
copiatura!
Informazioni sul traffi co Esercizio CD
04_CalaisMP48_it.indd 11104_CalaisMP48_it.indd 111 11.06.2008 15:14:18 Uhr11.06.2008 15:14:18 Uhr

112
Avvio dell'esercizio CD
Quando nel lettore non è inserito alcun CD,
senza usar forza, spingere il CD nel suo
drive, con lato stampato rivolto verso
l’alto, fi no ad avvertire una resistenza.
Il CD viene inserito automaticamente nel
lettore. Il simbolo del CD compare sul dis-
play 6.
Nota:
Non bisogna né ostacolare l'introduzio-
ne del CD né spingere.
Inizia la riproduzione del CD. Sul display 6
vengono visualizzati il numero del brano in
corso (ad es. "T12") e la durata di riprodu-
zione e le informazioni relative al brano (te-
sto del CD).
Se nel lettore è già inserito un CD,
premere una o più volte il tasto SRC >
fi no a quando sul display 6 viene in-
dicato "CD".
La riproduzione riprende dal punto in cui
era stata interrotta.
Visualizzazione di informazioni
sul brano (testo del CD)
Se sul CD è disponibile il testo, le informa-
zioni relative a ciascun brano vengono vi-
sualizzate sul display 6 per una sola volta
come testo scorrevole all'avvio del brano.
Visualizzazione delle informazioni sul
brano per una sola volta come testo
scorrevole
Premere il tasto 5 <.
Il testo del CD relativo al brano in corso vie-
ne visualizzato una sola volta come testo
scorrevole sul display 6.
쏅
쏅
쏅
Nota:
Questa funzione non è disponibile se la
visualizzazione del testo del CD come
testo scorrevole è disattivata (vedi pa-
ragrafo seguente).
Attivazione/disattivazione della
visualizzazione delle informazioni sul
brano come testo scorrevole
Per attivare o disattivare la visualizzazione
delle informazioni sul brano come testo
scorrevole,
premere il tasto MENU 7.
Premere una o più volte il tasto
o
8, fi no a quando sul display 6 viene
visualizzato "SCRL" e appare l'imposta-
zione attuale "ON" (acceso) o "OFF"
(spento).
Premere il tasto
o 8 per disatti-
vare o attivare il testo scorrevole.
Per uscire dal menu,
premere il tasto MENU 7.
Con l'impostazione "SCRL OFF" le informa-
zioni sul brano compaiono sul display 6 in
gruppi di 8 caratteri alla volta. I vari gruppi
di caratteri, il numero del brano e la dura-
ta di riproduzione vengono visualizzati per
5 secondi ciascuno in modo alterno e con-
tinuo.
Nota:
Nell'esercizio MP3, l'impostazione
"SCRL ON/OFF" ha effetto anche sulla
visualizzazione delle informazioni sul
brano MP3 (Tag ID3).
쏅
쏅
쏅
쏅
Esercizio CD
04_CalaisMP48_it.indd 11204_CalaisMP48_it.indd 112 11.06.2008 15:14:18 Uhr11.06.2008 15:14:18 Uhr

113
ITALIANO
Selezione di un brano
Premere il tasto o 8 per passare
al brano precedente o successivo.
Se si preme una volta il tasto 8, viene
avviato di nuovo il brano in ascolto.
Ricerca rapida automatica
(udibile)
Per avviare una ricerca rapida automatica
indietro o in avanti,
tenere premuto il tasto
o 8 fi no a
raggiungere il punto desiderato.
Riproduzione dei brani in ordine
casuale (MIX)
Premere il tasto 3 <.
Sul display 6 appare brevemente "MIX
CD" e viene visualizzato il simbolo MIX. I
brani successivi vengono selezionati in or-
dine casuale.
Fine di MIX
Premere nuovamente il tasto 3 <.
Sul display 6 appare brevemente "MIX
OFF" e il simbolo MIX scompare. La ripro-
duzione prosegue normalmente.
Breve ascolto dei brani (SCAN)
Per ascoltare brevemente tutti i brani del
CD per circa 10 secondi caduno,
premere il tasto 4 <.
Sul display compare brevemente "SCAN
TRK". Durante il breve ascolto dei brani
lampeggia l'indicazione "CD". Vengono vi-
sualizzati il numero e la durata di ciascun
brano riprodotto o le relative informazioni
sul brano.
쏅
쏅
쏅
쏅
쏅
Fine dello SCAN, riproduzione di brano
continua
Per terminare il processo di scansione,
premere nuovamente il tasto 4 <.
Sul display compare brevemente "SCAN
OFF". Continua la riproduzione del brano
attualmente in ascolto.
Ripetizione di un brano (RPT)
Premere il tasto 2 <.
Sul display appare brevemente "RPT TRK"
e viene visualizzato il simbolo RPT. Il brano
in ascolto viene ripetuto fi no a quando non
viene disattivato RPT.
Termine della funzione RPT
Premere nuovamente il tasto 2 <.
Sul display 6 appare brevemente "RPT
OFF" e scompare il simbolo RPT. La ripro-
duzione prosegue normalmente.
Interruzione della riproduzione
(PAUSE)
Premere il tasto 1 <.
Sul display 6 compare "PAUSE".
Eliminare Pause
In modalità Pause premere il tasto 1
<.
La riproduzione continua.
Estrazione del CD
Nota:
È anche possibile estrarre i CD quando
l'apparecchio è spento oppure quando
è attiva un'altra fonte audio.
쏅
쏅
쏅
쏅
쏅
Esercizio CD
04_CalaisMP48_it.indd 11304_CalaisMP48_it.indd 113 11.06.2008 15:14:18 Uhr11.06.2008 15:14:18 Uhr

114
Premere il tasto estrazione CD 4.
Il CD viene espulso. Sul display compare
brevemente "CD EJECT".
Nota:
Non bisogna né ostacolare l’estrazione
del CD né spingere.
Estrarre il CD.
Il simbolo CD scompare.
Nota:
Se non si preleva un CD fuoriuscito dal
lettore, dopo 10 secondi circa questo
verrà automaticamente reinserito.
쏅
쏅
Esercizio MP3/WMA
Con questa autoradio si possono riprodur-
re anche CD-R e CD-RW con fi le musicali
MP3 e WMA. Inoltre, tramite l'interfaccia
opzionale USB C‘n‘C è possibile collegare
supporti USB e riprodurre fi le MP3/WMA
memorizzati su supporti USB.
Questo capitolo è dedicato solo all'ascol-
to di fi le MP3. Lo modalità di riproduzio-
ne dei fi le WMA risulta infatti identica a
quella degli MP3. In questo capitolo la
denominazione "supporto MP3" si rife-
risce sia a CD-R/RW che a supporti USB
quali ad es. le chiavette USB.
Note:
Questo apparecchio non permette
di riprodurre i fi le WMA con Digital
Rights Management (DRM) prove-
nienti dai musicshop online.
I fi le WMA possono essere riprodot-
ti in sicurezza soltanto se sono stati
creati con Windows Media-Player nel-
la versione 8 o superiori.
Preparazione di un supporto
MP3
Preparazione di un CD MP3
La combinazione di masterizzatore CD, sof-
tware di masterizzazione e CD vergine com-
porta a volte problemi nella riproduzione
dei CD. Se insorgono dei problemi coi CD
masterizzati in proprio, cambiare il produt-
tore di CD registrabile oppure il colore del
CD vergine.
Il formato del CD deve essere ISO 9660
Level 1 o Level 2 oppure Joliet. Per tutti gli
altri formati non può venire garantita una
buona riproduzione.
•
•
Esercizio CD Esercizio MP3/WMA
04_CalaisMP48_it.indd 11404_CalaisMP48_it.indd 114 11.06.2008 15:14:18 Uhr11.06.2008 15:14:18 Uhr

115
ITALIANO
Nella creazione (codifi ca) di fi le MP3/WMA
da fi le audio devono essere utilizzati bitrati
da 32 a 320 kbps per i fi le MP3 e da 32 fi no
a 192 kbps per i fi le WMA.
Questo apparecchio supporta fi no a 252 di-
rectory e fi no a 255 fi le per directory. Il CD
pertanto può contenere complessivamente
una quantità massima di 512 directory e
fi le. Le directory e i titoli dei CD possono
essere selezionati singolarmente.
D01
D02
T001
T005
T004
T003
T002
D03
T001
T006
T005
T004
T003
T002
T011
T007
T008
T009
T010
D04
T001
T006
T005
T004
T003
T002
A
B
A Directory
B Brano · File
Con il PC è possibile assegnare nomi alle va-
rie directory. Il nome della directory può es-
sere visualizzato sul display dell'autoradio.
Eseguire la denominazione delle directory e
dei brani in corrispondenza del vostro sof-
tware di masterizzazione. Consultare a tal
proposito le istruzioni d'uso del software.
Note:
Quando si assegnano nomi ai fi le (alle
directory ed ai brani), non utilizzare
caratteri speciali e vocali con dieresi.
Se vengono utilizzati nomi di fi le con
più di 16 caratteri (compreso ".MP3"
o ".WMA"), il numero massimo dei
brani e delle directory diminuisce.
Se si hanno preferenze nella successione
dei fi le: salvare i fi le sul supporto dati nello
stesso ordine in cui si desidera che vengano
riprodotti. L'autoradio riprodurrà i fi le nel-
l'ordine in cui sono stati salvati sul supporto
dati.
Per essere riprodotti con questa autoradio i
fi le MP3 devono avere estensione ".MP3" e
i fi le WMA estensione ".WMA".
Note:
Al fi ne di garantire una riproduzione
senza disturbi osservare le seguenti
regole,
non cercare di aggiungere ad un fi le
qualsiasi (cioè non MP3) l'estensione
".MP3" e di riprodurlo! Nella ripro-
duzione questi altri fi le non vengono
presi in considerazione;
non impiegare CD "misti", contenenti
fi le non MP3 e brani MP3 (durante la
riproduzione l'apparecchio legge sol-
tanto i fi le MP3);
non impiegare CD Mix-Mode, con bra-
ni audio CD e brani MP3. Se si cerca di
riprodurre un CD Mix-Mode, vengono
riprodotti soltanto i brani CD audio.
•
•
•
•
•
Esercizio MP3/WMA
04_CalaisMP48_it.indd 11504_CalaisMP48_it.indd 115 11.06.2008 15:14:19 Uhr11.06.2008 15:14:19 Uhr

116
Preparazione di un supporto USB
Affi nché l'apparecchio riconosca il suppor-
to USB, questo deve essere defi nito come
memoria di massa (Mass Storage Device),
formattata nel sistema FAT16 o FAT32 e
contenere fi le MP3 o WMA.
Un supporto USB può contenere al mas-
simo 1500 fi le (directory e brani). Con
questa autoradio le directory e i brani pos-
sono essere selezionati singolarmente. Se
vengono utilizzati nomi di fi le con più di 24
caratteri (compreso ".MP3" o ".WMA"), il
numero massimo dei brani e delle directory
diminuisce.
Blaupunkt non può garantire il perfetto fun-
zionamento di tutti i supporti USB disponi-
bili sul mercato.
Tag ID3
Per ogni brano di MP3 si possono visualiz-
zare anche informazioni aggiuntive, come
interprete, titolo e album (tag ID3). Questa
autoradio può visualizzare sul display i tag
ID3 delle versioni 1 e 2.
Avvio dell'esercizio MP3
Avvio dell'esercizio MP3 del CD
L'esercizio MP3 di un CD MP3 si avvia come
il normale esercizio CD. Leggere a riguardo
quanto riportato sotto "Avvio dell'esercizio
CD" nel capitolo "Esercizio CD".
Sul display 6 vengono visualizzati i numeri
dei brani correnti (ad es. "T12") e la durata
di riproduzione e le informazioni relative al
brano (tag ID3) o il nome del fi le. Quando si
passa ad un'altra directory, compare breve-
mente il numero della directory medesima
(ad es. "DIR 02").
Collegamento di un supporto USB e
avvio dell'esercizio MP3
Per poter collegare un supporto USB (ad
esempio una chiavetta USB), l' interfaccia
USB opzionale deve essere collegata al re-
tro dell'autoradio (settore C3). Il cavo USB
dell'interfaccia può essere collocato nel
cassetto portaoggetti, ad esempio, o in un
altro punto adatto della consolle centrale.
Note:
Quando si collega l'interfaccia USB
Blaupunkt all'apparecchio, deve veni-
re regolato di conseguenza l'ingresso
AUX. Leggere a riguardo il paragrafo
"Impostazione dell'ingresso AUX" al
capitolo "Fonti audio esterne".
Spegnere sempre l'apparecchio
prima di collegare o rimuovere un
supporto USB, affi nché la memoria
venga correttamente riconosciuta e
disattivata.
Collegare il supporto dati USB al cavo
USB dell'interfaccia.
Con il tasto SRC > è possibile selezionare
un supporto USB non appena collegato. Sul
display viene visualizzato "USB".
Visualizzazione di informazioni
sul brano (tag ID3)
Se è disponibile il supporto MP3 tag ID3, le
informazioni relative a ciascun brano ven-
gono visualizzate sul display 6 per una
sola volta come testo scorrevole all'avvio
del brano. Se con i fi le MP3 non sono stati
memorizzati i tag ID3, verrà visualizzato il
nome del fi le.
•
•
쏅
Esercizio MP3/WMA
04_CalaisMP48_it.indd 11604_CalaisMP48_it.indd 116 11.06.2008 15:14:19 Uhr11.06.2008 15:14:19 Uhr

117
ITALIANO
Nota:
A riguardo della memorizzazione dei
tag ID3 leggere anche le istruzioni re-
lative al proprio software PC-MP3 o al
software di masterizzazione.
Visualizzazione delle informazioni sul
brano per una sola volta come testo
scorrevole
Premere il tasto 5 <.
I tag ID3 relativi al brano in corso vengono
visualizzati una volta come testo scorrevole
sul display 6.
Nota:
Questa funzione non è disponibile
quando è disattivata la visualizzazio-
ne delle informazioni sul brano come
testo scorrevole. Leggere a riguardo il
paragrafo "Attivazione e disattivazione
della visualizzazione delle informazioni
sul brano come testo scorrevole" al sot-
tocapitolo "Visualizzazione di informa-
zioni sul brano (testo CD)" del capitolo
"Esercizio CD".
Scegliere una directory
Per passare ad un'altra directory, prece-
dente o successiva,
premere il tasto
o 8.
Note:
Vengono saltate automaticamente
tutte le directory senza fi le MP3.
L'apparecchio considera tutte le di-
rectory e sottodirectory come se fos-
sero su un unico livello. Premendo
una o più volte il tasto
o 8 si
passa direttamente anche a tutte le
sottodirectory.
쏅
쏅
•
•
Selezione di brani/fi le
Nell'attuale directory, per passare da un
brano/fi le ad un altro precedente o succes-
sivo,
premere il tasto
o 8.
Se si preme una volta il tasto
8, viene
avviato di nuovo il brano in ascolto.
Ricerca rapida automatica
Per avviare una ricerca rapida automatica
indietro o in avanti,
tenere premuto il tasto
o 8 fi no a
raggiungere il punto desiderato.
Nota:
Nella modalità USB la ricerca rapida
automatica indietro si ferma ogni volta
all'inizio del brano in corso.
Riproduzione dei brani in ordine
casuale (MIX)
Per riprodurre in ordine casuale i brani del-
l'attuale directory,
premere una o più volte il tasto 3 <
fi nché sul display 6 viene visualizzato
"MIX DIR" o "MIX FLD".
Il simbolo del MIX compare sul display 6.
Per ascoltare tutti i brani del supporto MP3
in ordine casuale,
premere una o più volte il tasto 3 <,
fi no a quando sul display 6 viene vi-
sualizzato "MIX ALL".
Il simbolo del MIX compare sul display 6.
쏅
쏅
쏅
쏅
Esercizio MP3/WMA
04_CalaisMP48_it.indd 11704_CalaisMP48_it.indd 117 11.06.2008 15:14:19 Uhr11.06.2008 15:14:19 Uhr

118
Fine di MIX
Per terminare l'ascolto dei brani in ordine
casuale,
premere una o più volte il tasto 3 <,
fi no a quando sul display 6 viene vi-
sualizzato "MIX OFF".
Sul display 6 scompare il simbolo MIX.
Breve ascolto dei brani (SCAN)
Per ascoltare i primi 10 secondi di ogni
brano del supporto MP3 inserito in ordine
crescente,
premere una o più volte il tasto 4 <
fi nché sul display 6 appare "SCAN
TRK".
Durante il breve ascolto dei brani lampeggia
l'indicazione "MP3" o "USB".
Per ascoltare brevemente tutti i brani della
directory in corso in modalità USB,
premere una o più volte il tasto 4 <
fi nché sul display 6 appare "SCAN
FLD".
Durante il breve ascolto dei brani lampeggia
l'indicazione "USB".
Fine della funzione SCAN
Per terminare il breve ascolto,
premere una o più volte il tasto 4 <
fi nché sul display 6 appare "SCAN
OFF".
Continua la riproduzione del brano attual-
mente in breve ascolto.
쏅
쏅
쏅
쏅
Ripetizione di singoli brani o di
intere directory (REPEAT)
Se si desidera ripetere il titolo corrente,
premere una o più volte il tasto 2 <,
fi no a quando sul display 6 viene vi-
sualizzato "RPT TRK".
Il simbolo RPT compare sul display 6.
Per ripetere la riproduzione della directory
in corso,
premere una o più volte il tasto 2 <
fi nché sul display 6 viene visualizzato
"RPT DIR" o "RPT FLD".
Il simbolo RPT compare sul display 6.
Disattivare la funzione REPEAT
Per terminare la ripetizione,
premere una o più volte il tasto 2 <,
fi no a quando sul display 6 viene vi-
sualizzato "RPT OFF".
Sul display 6 scompare il simbolo RPT.
Interruzione della riproduzione
(PAUSE)
Premere il tasto 1 <.
Sul display 6 compare "PAUSE".
Eliminare Pause
In modalità Pause premere il tasto 1
<.
La riproduzione continua.
쏅
쏅
쏅
쏅
쏅
Esercizio MP3/WMA
04_CalaisMP48_it.indd 11804_CalaisMP48_it.indd 118 11.06.2008 15:14:19 Uhr11.06.2008 15:14:19 Uhr

119
ITALIANO
Modalità multilettore CD
All'apparecchio possono venire collegati,
se desiderato, i multilettori CD Blaupunkt
CDC A08 T e IDC A09 (settore C3 sulla par-
te posteriore dell'apparecchio).
Attenzione!
Il multilettore CD viene normalmente
alimentato dall'apparecchio con ten-
sione di esercizio a 12 V.
Se si collega il multilettore CD
CDC A 08 T (24 Volt), è necessario
scollegare l'alimentazione di tensione al
connettore del cavo di collegamento del
multilettore CD (settore C3/Pin 15). Il
multilettore CD deve essere alimentato
con tensione di esercizio a 24 volt sua
propria.
Note:
Quando si collega un multilettore
CD all'apparecchio, deve venire re-
golato di conseguenza l'ingresso
AUX. Leggere a riguardo il paragrafo
"Impostazione dell'ingresso AUX" al
capitolo "Fonti audio esterne".
Per informazioni circa l'utilizzo dei
CD, l'inserimento dei CD e l'uso del
multilettore CD consultare le istruzio-
ni d'uso del proprio multilettore CD.
Avvio dell'esercizio del
multilettore CD
Premere una o più volte SRC > fi no a
quando sul display 6 viene visualizza-
to "CHANGER".
La riproduzione inizia con il primo CD che
viene riconosciuto dal multilettore. Sul di-
splay 6 vengono visualizzati il numero del
CD corrente (ad es. "D02") e del brano in
•
•
쏅
corso (ad es. "T072") e la durata di ripro-
duzione.
Selezione di un CD
Per cambiare CD in su o in giù,
premere il tasto
o 8.
Selezione di un brano
Per passare da un brano all’altro del CD cor-
rente, in su o in giù,
premere il tasto
o 8.
Ricerca rapida automatica
(udibile)
Per avviare una ricerca rapida automatica
indietro o avanti,
tenere premuto il tasto
o 8 fi no a
raggiungere il punto desiderato.
Ripetizione di singoli brani o di
interi CD (RPT)
Se si desidera ripetere il titolo corrente,
premere una o più volte il tasto 2 <,
fi no a quando sul display 6 viene vi-
sualizzato "RPT TRK".
Il simbolo RPT compare sul display 6.
Per ripetere la riproduzione dell’intero CD,
premere una o più volte il tasto 2 <,
fi no a quando sul display 6 viene vi-
sualizzato "RPT CD".
Il simbolo RPT compare sul display 6.
Disattivare la funzione REPEAT
Per terminare la ripetizione,
premere una o più volte il tasto 2 <,
fi no a quando sul display 6 viene vi-
sualizzato "RPT OFF".
Sul display 6 scompare il simbolo RPT.
쏅
쏅
쏅
쏅
쏅
쏅
Modalità multilettore CD
04_CalaisMP48_it.indd 11904_CalaisMP48_it.indd 119 11.06.2008 15:14:19 Uhr11.06.2008 15:14:19 Uhr

120
Riproduzione dei brani in ordine
casuale (MIX)
È possibile ascoltare i brani dell'attuale CD
in ordine casuale,
premere una o più volte il tasto 3 <,
fi no a quando sul display 6 viene vi-
sualizzato "MIX CD".
Il simbolo del MIX compare sul display 6.
Per ascoltare in ordine casuale i brani di tut-
ti i CD inseriti,
premere una o più volte il tasto 3 <,
fi no a quando sul display 6 viene vi-
sualizzato "MIX ALL".
Il simbolo del MIX compare sul display 6.
Fine di MIX
Per terminare l'ascolto dei brani in ordine
casuale,
premere una o più volte il tasto 3 <,
fi no a quando sul display 6 viene vi-
sualizzato "MIX OFF".
Sul display 6 scompare il simbolo MIX.
Breve ascolto dei brani di tutti i
CD (SCAN)
Per ascoltare i primi 10 secondi di ogni bra-
no del CD inserito in ordine crescente,
premere il tasto 4 <.
Sul display 6 compare brevemente "SCAN
TRK". Durante il breve ascolto dei brani lam-
peggia l'indicazione del numero del CD.
Fine della funzione SCAN
Per terminare il breve ascolto,
premere nuovamente il tasto 4 <.
Sul display 6 compare brevemente "SCAN
OFF". Continua la riproduzione del brano
attualmente in breve ascolto.
쏅
쏅
쏅
쏅
쏅
Interruzione della riproduzione
(PAUSE)
Premere il tasto 1 <.
Sul display 6 viene visualizzato "PAUSE".
Eliminare Pause
In modalità Pause premere il tasto 1
<.
La riproduzione continua.
쏅
쏅
Modalità multilettore CD
04_CalaisMP48_it.indd 12004_CalaisMP48_it.indd 120 11.06.2008 15:14:19 Uhr11.06.2008 15:14:19 Uhr

121
ITALIANO
Telecomando a infrarossi
RC 10 P
Con il telecomando a infrarossi opzionale è
possibile comandare le funzioni principali
dell'apparecchio.
Ricevitore del telecomando
Il ricevitore a infrarossi 9 per il telecoman-
do si trova sulla parte superiore dell'appa-
recchio. Prima di utilizzare il telecomando è
necessario inserire il ricevitore:
Premere il tasto MENU 7.
Premere una o più volte il tasto
o
8, fi no a quando sul display 6
viene visualizzato "IR" e appare l'impo-
stazione attuale "ON" (acceso) o "OFF"
(spento).
Premere il tasto
o 8 per disatti-
vare o attivare la funzione IR.
Per uscire dal menu,
premere il tasto MENU 7.
C
F
G
H
E
D
B
A
@
쏅
쏅
쏅
쏅
Funzioni del telecomando
Funzioni generali:
Tasto Funzione
ON H Disattivazione/attivazione
apparecchio (premuto più
a lungo)
Mute (premuto breve-
mente)
Chiusura del menu
SRC @ Commutazione fonti
V+ B Aumento del volume
V- A Abbassamento del volume
OK G Richiamo o abbandono
del menu
E Selezione di voce del
menu
C Selezione di voce del
menu
F Modifi ca impostazione
menu
D Modifi ca impostazione
menu
In esercizio radio:
Tasto Funzione
F Richiamo delle stazioni
memorizzate
D Scelta della gamma di lun-
ghezze d'onda/del livello
di memoria
E Ricerca automatica avanti
C Ricerca automatica indietro
Telecomando a infrarossi
04_CalaisMP48_it.indd 12104_CalaisMP48_it.indd 121 11.06.2008 15:14:19 Uhr11.06.2008 15:14:19 Uhr

122
In esercizio CD:
Tasto Funzione
F Scelta brano successivo
D Scelta brano precedente
Esercizio CD-changer:
Tasto Funzione
F Ascolto brano successivo
D Ascolto brano precedente
E Ascolto CD successivo
C Ascolto CD precedente
Modalità esercizio MP3:
Tasto Funzione
F Ascolto brano successivo
D Ascolto brano precedente
E Ascolto directory succes-
siva
C Ascolto directory prece-
dente
Uscita preamplifi catore
È possibile collegare un amplifi catore al-
l'apparecchio per l'applicazione di un alto-
parlante dei bassi profondi (subwoofer).
Per attivare questa funzione, l'amplifi cato-
re deve essere collegato sul lato posteriore
dell'apparecchio (settore C1). Nel menu
audio è possibile regolare il livello del sub-
woofer:
Premere il tasto AUD :
Premere una o più volte il tasto
o
8 fi nché viene visualizzato "SUB
WOOF".
Dopo 2 secondi circa sul display 6 com-
paiono la scritta "SUBW" e l'impostazione
attuale.
Premere il tasto
o 8 per imposta-
re il livello del subwoofer tra 0 e 7.
Nota:
Per modifi care le impostazioni attuali
premendo il tasto
o 8 non è ne-
cessario attendere che esse vengano
visualizzate.
Per uscire dal menu,
premere il tasto AUD :
쏅
쏅
쏅
쏅
Telecomando a infrarossi Uscita preamplifi catore
04_CalaisMP48_it.indd 12204_CalaisMP48_it.indd 122 11.06.2008 15:14:20 Uhr11.06.2008 15:14:20 Uhr

123
ITALIANO
Fonti audio esterne
L'entrata AUX consente di collegare all'ap-
parecchio diversi tipi di fonti audio esterne.
L'ingresso AUX deve venire regolato ogni
volta in base alla fonte audio esterna colle-
gata:
Impostazione "AUX" per fonti audio
esterne come ad es. lettori CD portati-
li, lettori MiniDisc o lettori MP3.
Impostazione "CDC" per multilettori CD
Blaupunkt CDC A 08 T e IDC A 09.
Impostazione "USB" per l'interfaccia
USB di Blaupunkt.
Per l'impostazione dell'ingresso AUX con-
sultare il paragrafo "Impostazione dell'in-
gresso AUX" che segue.
Nota:
Per il collegamento di una fonte audio
esterna utilizzare un cavo di adatta-
mento. Questo cavo (codice Blaupunkt
7 607 897 093) può essere acquista-
to presso il rivenditore specializzato
Blaupunkt di zona.
Impostazione dell'ingresso AUX
Premere il tasto MENU 7.
Premere una o più volte il tasto
o
8 fi nché viene visualizzato "SRC
SEL".
Dopo 2 secondi circa sul display 6 com-
paiono "SRC" e l'impostazione attuale
"CDC", "USB" o "AUX".
Per selezionare un' altra impostazione
premere il tasto
o 8.
•
•
•
쏅
쏅
쏅
Nota:
La sequenza delle impostazioni nel
menu è "CDC" – "USB" – "AUX":
In presenza dell'impostazione "CDC"
premendo il tasto
8 è possibile
scegliere l'impostazione "USB".
In presenza dell'impostazione "USB"
premendo il tasto
8 è possibile
scegliere l'impostazione "CDC" oppu-
re, premendo il tasto
8 l'imposta-
zione "AUX".
In presenza dell'impostazione "AUX"
premendo il tasto
8 è possibile
scegliere l'impostazione "USB".
Ogni volta che si varia l'impostazione
ha luogo una disattivazione automatica
dell'apparecchio. Pertanto, per passa-
re dall'impostazione "CDC" all'imposta-
zione "AUX" e viceversa, è necessario
prima scegliere l'impostazione "USB"
e quindi riaccendere l'apparecchio
dopo il suo spegnimento automatico.
Ripetere quindi la procedura di impo-
stazione per giungere all'impostazione
"AUX" o "CDC" desiderata.
Comparirà la scritta "AUTO SWITCH OFF IN
10 SECONDS". Dopo circa 10 secondi l'ap-
parecchio si disattiva automaticamente.
Spegnere e riaccendere l'autoradio
premendo il tasto On/Off 3.
L'apparecchio viene inserito in modalità ra-
dio con l'impostazione scelta.
Nota:
Se si è scelta l'impostazione AUX, è
possibile selezionare l'ingresso AUX
con il tasto SRC >. Sul display viene
quindi visualizzato "AUX".
•
•
•
쏅
Fonti audio esterne
04_CalaisMP48_it.indd 12304_CalaisMP48_it.indd 123 11.06.2008 15:14:20 Uhr11.06.2008 15:14:20 Uhr

124
Se si è scelta l'impostazione CDC o
USB, è possibile selezionare la fonte
audio con il tasto SRC > solo se vi è
un relativo apparecchio collegato (mul-
tilettore CD o interfaccia USB).
Impostazione del livello
dell'ingresso AUX
Se si è impostato su "AUX" l'ingresso AUX
per il collegamento di una fonte audio ester-
na, è possibile adattare il livello della fonte
audio esterna a quello della fonte audio
propria dell'apparecchio (quali ad es. CD
e radio).
Nota:
Il livello dell'ingresso AUX può essere
impostato solo se la fonte audio sele-
zionata è AUX.
Premere all'occorrenza una o più volte il
tasto SRC > fi no a quando sul display
viene visualizzato "AUX".
Premere il tasto MENU 7.
Premere all'occorrenza una o più volte
il tasto
o 8 fi no a quando viene
visualizzato "GAIN" insieme all'impo-
stazione attuale.
Premere il tasto
o 8 per imposta-
re l'adattamento del livello tra –9 e +9.
Per uscire dal menu,
premere il tasto MENU 7.
쏅
쏅
쏅
쏅
쏅
Ripristino delle
impostazioni di fabbrica
(RESET)
Le impostazioni originali di fabbrica dell'au-
toradio possono essere ripristinate:
Tenere premuto il tasto AUD : per più
di ca. 10 secondi.
Viene emesso un segnale acustico di con-
ferma e sul display 6 compare brevemen-
te "RESET". Tutte le impostazioni dei menu
e dei menu audio vengono ripristinate ai va-
lori di fabbrica.
Nota:
Le stazioni memorizzate sui tasti sta-
zione non vengono cancellate.
쏅
Fonti audio esterne Impostazioni di fabbrica
04_CalaisMP48_it.indd 12404_CalaisMP48_it.indd 124 11.06.2008 15:14:20 Uhr11.06.2008 15:14:20 Uhr

125
ITALIANO
Dati tecnici
Tensione di esercizio
24 Volt
Amplifi catori
Potenza di uscita: 2 x 20 Watt sinusoi-
dali a 4 Ohm
Uscita Line: 2 x 2,0 Volt eff
Uscita Aux: 2 x 2,0 Volt eff
Tuner
Gamme d'onda Europa:
FM : 87,5 - 108 MHz
OM: 531 - 1602 kHz
OL: 153 - 279 kHz
Gamme di lunghezze d'onda America:
FM: 87,7 - 107,9 MHz
AM: 530 - 1710 kHz
Gamma di trasmissione FM:
30 -15 000 Hz
CD
Gamma di trasmissione:
20 - 20.000 Hz
Con riserva di modifi che!
Dati tecnici
04_CalaisMP48_it.indd 12504_CalaisMP48_it.indd 125 11.06.2008 15:14:20 Uhr11.06.2008 15:14:20 Uhr

126
1 Regulador del volumen
2 Tecla BND
Pulsación breve: selección del nivel de
memoria o bien de la banda de ondas
Pulsación prolongada: iniciar la función
Travelstore (FMT o MWT/LWT)
3 Tecla On/Off
Pulsación breve: conexión del equipo
En funcionamiento: supresión del soni-
do (función Mute)
Pulsación prolongada: desconexión del
equipo
4 Tecla de expulsión del CD
5 Ranura de CD
6 Pantalla
7 Tecla MENU
Abrir los menús de los ajustes básicos.
8 Báscula multifunción
9 Receptor de infrarrojos para mando
a distancia por infrarrojos (opcional)
: Tecla AUD
Pulsación breve: menú de audio para
el ajuste de graves, agudos, balance,
fader y abrir función Loudness
Pulsación prolongada (10 seg.): resta-
blecer ajustes de fábrica
; Tecla TA
Activar y desactivar la preferencia para
las noticias de tráfi co
Interrupción de una noticia de tráfi co
en curso
< Bloque de teclas 1 - 6
= Tecla RDS
Activar y desactivar la función de con-
fort RDS
> Tecla SRC
Selección de fuente entre radio y
(si está insertado, conectado o activa-
do) CD, MP3, cambiadiscos y AUX.
? Code-LED
Elementos de mando
05_CalaisMP48_es.indd 12605_CalaisMP48_es.indd 126 11.06.2008 15:15:07 Uhr11.06.2008 15:15:07 Uhr

127
ESPAÑOL
Indicaciones importantes ...............129
Uso según las normas ...................129
Mando a distancia (opcional) .........129
Cambiadiscos (opcional) ..............129
Interfaz USB (opcional) ................ 129
Desecho de equipos antiguos ........129
Seguro antirrobo mediante CODE ... 130
Activar y desactivar la petición de
código (CODE) ............................ 130
Introducir el código después de
una interrupción en el suministro
de tensión...................................131
Conexión/desconexión...................131
Conectar y desconectar el equipo
con la tecla On/Off .......................131
Conectar y desconectar mediante
el encendido del vehículo ..............131
Conectar mediante la inserción
de un CD .................................... 131
Ajustar tiempo de desconexión ...... 132
Conectar con el teléfono (opcional) ... 132
Conectar con el mando a distancia
por infrarrojos RC 10 P (opcional) ..132
Regular el volumen ........................132
Supresión del sonido (MUTE) ........132
Sonido del teléfono/sistema de
navegación .................................132
Activar/desactivar el tono de
confi rmación (BEEP) .................... 133
Ajustar el volumen máximo de
encendido (ON VOL) ....................133
Ajustar la adaptación del volumen
en función del ruido (GALA) ..........134
Sonido ..........................................134
Ajuste de los agudos .....................134
Regular los graves ........................ 134
Ajustar los medios .......................135
Ajustar la distribución del volumen a
izquierda/derecha (BAL) ................ 135
Ajustar la distribución del volumen
delante/detrás (FAD) ....................136
Hora .............................................136
Mostrar la hora ............................ 136
Ajustar la hora ............................. 136
Seleccionar el modo de hora
12/24 h .....................................136
Ajustar el huso horario
(TIMEZONE) ...............................137
Modo de radio ............................... 137
Activar el modo de radio ...............137
Función de confort RDS (AF, REG) ..137
Seleccionar la banda de ondas/
el nivel de memoria ......................138
Sintonización de emisoras.............138
Memorizar emisoras ..................... 139
Escuchar emisoras memorizadas ... 139
Explorar las emisoras que se
pueden sintonizar (BANDSCAN) ....140
Tipo de programa (PTY) ................140
Reducción de los tonos agudos en
función de las distorsiones (HICUT) .. 140
Activar y desactivar radiotexto .......141
Noticias de tráfi co .........................141
Activar y desactivar la preferencia
para las noticias de tráfi co ............. 141
Ajustar la subida de volumen para
las noticias de tráfi co ....................142
Suprimir las noticias de tráfi co .......142
Índice
05_CalaisMP48_es.indd 12705_CalaisMP48_es.indd 127 11.06.2008 15:15:08 Uhr11.06.2008 15:15:08 Uhr

128
Modo de CD ................................... 142
Iniciar el modo de CD ................... 143
Indicación de la información de
los títulos (texto del CD)................143
Selección del título.......................143
Búsqueda rápida (audible) ............144
Reproducción aleatoria de los
títulos (MIX) ................................ 144
Explorar los títulos (SCAN) ............144
Repetición de un título (RPT) .........144
Interrumpir la reproducción
(PAUSE) ..................................... 144
Extraer el CD ...............................144
Modo MP3/WMA ........................... 145
Preparar un soporte de datos MP3...145
Iniciar el modo MP3 ..................... 147
Indicación de la información de
los títulos (etiquetas ID3) ..............147
Seleccionar un directorio ..............148
Seleccionar títulos/archivos ..........148
Búsqueda rápida .........................148
Reproducir títulos en orden
aleatorio (MIX) ............................ 148
Explorar los títulos (SCAN) ............149
Reproducir repetidamente un
título o un directorio completo
(REPEAT) ................................... 149
Interrumpir la reproducción
(PAUSE) ..................................... 149
Modo de cambiadiscos ...................150
Activar el modo de cambiadiscos ... 150
Seleccionar un CD .......................150
Selección del título.......................150
Búsqueda rápida (audible) ............150
Repetición de un único título o
un CD completo (RPT) ..................150
Reproducir títulos en orden
aleatorio (MIX) ............................ 151
Explorar todos los títulos de todos
los CD (SCAN) ............................. 151
Interrumpir la reproducción
(PAUSE) ..................................... 151
Mando a distancia por infrarrojos
RC 10 P .........................................152
Receptor del mando a distancia .....152
Funciones del mando a distancia ....152
Salida del preamplifi cador ..............153
Fuentes de sonido externas ............154
Ajustar la entrada AUX ..................154
Ajustar el nivel de la entrada AUX ...155
Restablecer los ajustes de fábrica
(RESET) ........................................155
Datos técnicos ...............................156
Tensión de funcionamiento ............ 156
Amplifi cador ............................... 156
Sintonizador ...............................156
CD .............................................156
Conexión ISO .................................281
Índice
05_CalaisMP48_es.indd 12805_CalaisMP48_es.indd 128 11.06.2008 15:15:08 Uhr11.06.2008 15:15:08 Uhr

129
ESPAÑOL
Indicaciones importantes
Indicaciones importantes
Antes de poner en funcionamiento el equi-
po, lea detenidamente estas instrucciones
para familiarizarse con el equipo. Guárdelas
en el vehículo para futuras consultas.
Uso según las normas
El equipo está concebido para su utilización
en un vehículo con una tensión de red de
24 V y el montaje en una ranura DIN 1.
Seguridad vial
La seguridad vial tiene prioridad
absoluta. Manipule el equipo únicamen-
te si la situación del tráfi co lo permite.
Familiarícese con él y con la forma de mane-
jarlo antes de comenzar el viaje. Las señales
de alarma de la policía, de los bomberos o
de los equipos de salvamento han de poder
escucharse a tiempo dentro del vehículo.
Por ello, escuche su programa a un volumen
moderado cuando esté circulando.
Mando a distancia (opcional)
Con el mando a distancia RC 10 P se pue-
den controlar las funcionas más importan-
tes. Se encuentra disponible un mando a
distancia por infrarrojos como accesorio
(Blaupunkt n.º 7 607 591 512).
Cambiadiscos (opcional)
Puede conectar el cambiadiscos CDC
A08 T (Blaupunkt n.º 7 607 274 002) o
IDC A09 (Blaupunkt n.º 7 607 274 005).
El cambiadiscos se encuentra disponible
como accesorio.
Interfaz USB (opcional)
Puede conectar la interfaz USB de
Blaupunkt para reproducir archivos MP3 o
WMA desde un soporte de datos USB. La
interfaz USB se encuentra disponible como
accesorio (Blaupunkt n.º 7 607 541 576).
Desecho de equipos antiguos
No deseche los equipos antiguos
junto a los residuos domésticos.
Para desechar equipos antiguos,
utilice el sistema de recogida y devolución
disponible.
05_CalaisMP48_es.indd 12905_CalaisMP48_es.indd 129 11.06.2008 15:15:08 Uhr11.06.2008 15:15:08 Uhr

130
Seguro antirrobo
Seguro antirrobo mediante
CODE
Su equipo está equipado con código de
cuatro cifras como protección antirrobo.
Este código debe introducirse cada vez que
se desconecte el equipo de la tensión de
funcionamiento del vehículo. La petición de
código viene desactivada de fábrica, pero
se puede activar.
Nota:
Si la petición de código se encuentra
activada, el regulador del volumen 1
comienza a parpadear cuando el equi-
po y el encendido del vehículo están
desconectados.
El código se encuentra en la identifi cación
de la radio de su equipo.
Nota:
¡No guarde nunca la identifi cación del
equipo en el vehículo!
Activar y desactivar la petición
de código (CODE)
Pulse la tecla MENU 7.
Pulse la tecla
o 8 hasta que apa-
rezca la indicación "CODE" y el ajuste
actual "ON" (activado) o bien "OFF" en
la pantalla 6.
Pulse la tecla
o 8.
En la pantalla 6 se muestra la indicación
"0000". Introduzca el código:
Nota:
Si introduce un código incorrecto,
se mostrará de nuevo la indicación
"0000" en la pantalla 6. Puede repe-
tir la introducción del código dos veces
쏅
쏅
쏅
más. Después del tercer intento fallido
se bloquea el equipo durante una hora.
En este tiempo se muestra la indicación
"WAIT 1HR" en la pantalla 6. Si des-
conecta el equipo durante este tiempo
de espera, deberá esperar otra hora
completa cuando vuelva a conectarlo.
Pulse la tecla de estación 1 < hasta
que aparezca el primer dígito de su có-
digo en la pantalla 6.
Pulse la tecla de estación 2 < hasta
que aparezca el segundo dígito de su
código en la pantalla 6.
Pulse la tecla de estación 3 < hasta
que aparezca el tercer dígito de su có-
digo en la pantalla 6.
Pulse la tecla de estación 4 < hasta
que aparezca el cuarto dígito de su có-
digo en la pantalla 6.
Cuando se muestre el código correcto
en la pantalla 6, mantenga la tecla de
estación 5 < pulsada durante más de
2 segundos.
En la pantalla 6 se mostrará de nuevo la
indicación "CODE" y el ajuste actual "ON"
(activado) o "OFF" (desactivado).
Pulse la tecla
, o bien 8 para des-
activar o activar la petición de código.
Para salir del menú,
pulse la tecla MENU 7.
쏅
쏅
쏅
쏅
쏅
쏅
쏅
05_CalaisMP48_es.indd 13005_CalaisMP48_es.indd 130 11.06.2008 15:15:08 Uhr11.06.2008 15:15:08 Uhr

131
ESPAÑOL
Introducir el código después de
una interrupción en el suministro
de tensión
Conecte el equipo.
En la pantalla 6 aparece primero la indi-
cación "CODE" y después "0000". Puede
introducir el código:
Nota:
Si introduce un código incorrecto,
se mostrará de nuevo la indicación
"0000" en la pantalla 6. Puede repe-
tir la introducción del código dos veces
más. Después del tercer intento fallido
se bloquea el equipo durante una hora.
En este tiempo se muestra la indicación
"WAIT 1HR" en la pantalla 6. Si des-
conecta el equipo durante este tiempo
de espera, deberá esperar otra hora
completa cuando vuelva a conectarlo.
Introduzca el código tal como se indica
en el apartado "Activar y desactivar la
petición de código".
Cuando se muestre el código correcto
en la pantalla 6, mantenga la tecla de
estación 5 < pulsada durante más de
2 segundos.
El equipo se enciende.
쏅
쏅
쏅
Conexión/desconexión
Para conectar y desconectar el equipo, Vd.
tiene diferentes posibilidades:
Conectar y desconectar el
equipo con la tecla On/Off
Para conectar el equipo, pulse la tecla
On/Off 3.
Para desconectarlo, mantenga pulsa-
da la tecla On/Off 3 durante más de
2 segundos.
Nota:
Para proteger la batería del vehículo,
el equipo se desconecta automática-
mente con el encendido del vehículo
desconectado una vez transcurrido
un tiempo ajustable (véase apartado
"Ajustar tiempo de desconexión" en
este capítulo).
Conectar y desconectar
mediante el encendido del
vehículo
Si el equipo está debidamente conectado al
encendido del vehículo y no lo desconectó
previamente con la tecla On/Off 3 podrá
conectarlo y desconectarlo con el encendi-
do del vehículo.
Conectar mediante la inserción
de un CD
Para conectar mediante la inserción de un
CD,
coloque el disco en la ranura de CD 5,
con la cara impresa hacia arriba hasta
notar cierta resistencia.
쏅
쏅
쏅
Seguro antirrobo Conexión/desconexión
05_CalaisMP48_es.indd 13105_CalaisMP48_es.indd 131 11.06.2008 15:15:09 Uhr11.06.2008 15:15:09 Uhr

132
El CD se inserta automáticamente, el equi-
po inicia el modo de CD.
Ajustar tiempo de desconexión
Pulse la tecla MENU 7.
Pulse la tecla
o 8 hasta que apa-
rezca la indicación "HOUR" y el ajuste
actual en la pantalla 6.
Ajuste el tiempo de desconexión con la
tecla
o bien 8 en pasos de 5 mi-
nutos entre los 5 y los 60 minutos.
Para salir del menú,
pulse la tecla MENU 7.
Conectar con el teléfono
(opcional)
En este caso, si el equipo está desconecta-
do y se activa el teléfono, el equipo también
se conecta. Después de desconectar el te-
léfono, el equipo se vuelve a desconectar
automáticamente. La condición previa es
que el teléfono se encuentre debidamente
conectado al equipo.
Conectar con el mando a
distancia por infrarrojos RC 10 P
(opcional)
Para conectar pulse la tecla ON H
del mando a distancia por infrarrojos
RC 10 P.
Nota:
El receptor de infrarrojos del equipo
debe estar conectado para que pue-
da utilizar el mando a distancia por
infrarrojos. Para ello lea el apartado
"Receptor del mando a distancia" en el
capítulo "Mando a distancia por infra-
rrojos RC 10 P".
쏅
쏅
쏅
쏅
쏅
Regular el volumen
El volumen del sistema se puede regular en
pasos de 0 (desactivado) a 32 (máximo).
Para aumentar el volumen del sistema,
gire el regulador del volumen 1 hacia
la derecha.
Para reducir el volumen del sistema,
gire el regulador del volumen del siste-
ma 1 hacia la izquierda.
Supresión del sonido (MUTE)
Si lo desea, puede suprimir repentinamen-
te el volumen del sistema (función Mute).
Pulse brevemente la tecla 3.
Desactivar la supresión del sonido
(Mute)
Para volver a activar el volumen anterior,
vuelva a pulsar brevemente la tecla
3.
Sonido del teléfono/sistema de
navegación
Supresión del sonido durante el servicio de
teléfono. Si la radio está conectada a un te-
léfono móvil o a un sistema de navegación y
recibe una llamada o una indicación de voz
de la navegación, se suprime el sonido del
equipo de radio. La conversación telefónica
o la indicación de voz se reproduce a través
de los altavoces de la radio.
Para ello es necesario conectar el teléfono
móvil o el sistema de navegación a la radio
(cámara C2 en la parte trasera del equipo).
Para saber qué sistemas de navegación
pueden conectarse a su radio, pregunte a
su proveedor Blaupunkt.
쏅
쏅
쏅
쏅
Conexión/desconexión Volumen
05_CalaisMP48_es.indd 13205_CalaisMP48_es.indd 132 11.06.2008 15:15:09 Uhr11.06.2008 15:15:09 Uhr

133
ESPAÑOL
Al recibir una llamada o cuando se produce
una indicación de navegación, la pantalla
muestra la indicación "PHONE".
Ajustar el volumen para el sonido
del teléfono/sistema de navegación
(PHONEVOL)
El volumen de las conversaciones telefóni-
cas o de las indicaciones de voz de la nave-
gación es regulable:
Pulse la tecla MENU 7.
Pulse la tecla
o 8 hasta que se
muestre la indicación "PHONEVOL".
Transcurridos unos 2 segundos se mostrará
la indicación "VOL" y el ajuste actual en la
pantalla 6.
Pulse la tecla
o 8 para ajustar el
volumen entre 0 y 32.
Nota:
No tendrá que esperar a la indicación
del ajuste actual para poderlo modifi -
car mediante la tecla
o 8.
Para salir del menú,
pulse la tecla MENU 7.
Nota:
También puede regular el volumen du-
rante una conversación telefónica o un
mensaje de navegación mediante el
regulador del volumen 1. El volumen
ajustado se guarda automáticamente.
Activar/desactivar el tono de
confi rmación (BEEP)
Después de determinadas acciones, p. ej.
una pulsación más larga de una tecla, se
emite un tono de confi rmación (pitido).
Puede desactivar el tono de confi rmación:
쏅
쏅
쏅
쏅
Pulse la tecla MENU 7.
Pulse la tecla
o 8 hasta que apa-
rezca la indicación "BEEP" y el ajuste
actual "ON" (activado) o bien "OFF" en
la pantalla 6.
Pulse la tecla
o 8 para desactivar
o activar el pitido.
Para salir del menú,
pulse la tecla MENU 7.
Ajustar el volumen máximo de
encendido (ON VOL)
Si conecta el equipo, éste reproduce en el
último volumen seleccionado. Si a pesar de
todo ha ajustado el volumen antes de des-
conectarlo a uno mayor que el volumen de
conexión máximo, dicho volumen se volverá
a limitar de forma automática al volumen de
conexión ajustado al volver a conectarlo.
Nota:
Como protección auditiva, el volumen
máximo de encendido está limitado al
valor 25.
Pulse la tecla MENU 7.
Pulse repetidas veces la tecla
o
8 hasta que en la pantalla se muestre
la indicación "ON VOL".
Transcurridos unos 2 segundos se mostrará
la indicación "VOL" y el ajuste actual en la
pantalla 6.
Pulse la tecla
o 8 para ajustar
el volumen máximo de encendido entre
5 y 25.
Nota:
No tendrá que esperar a la indicación
del ajuste actual para poderlo modifi -
car mediante la tecla
o 8.
쏅
쏅
쏅
쏅
쏅
쏅
쏅
Volumen
05_CalaisMP48_es.indd 13305_CalaisMP48_es.indd 133 11.06.2008 15:15:09 Uhr11.06.2008 15:15:09 Uhr

134
Para salir del menú,
pulse la tecla MENU 7.
Ajustar la adaptación del
volumen en función del ruido
(GALA)
Con esta función, el volumen de la radio del
automóvil se ajusta automáticamente a la
velocidad de conducción y al nivel de rui-
do generado por el vehículo. Por ejemplo,
cuando aumenta la velocidad el volumen
sube automáticamente para contrarrestar
ruidos fuertes (por ejemplo, el viento en
contra).
Para ello el vehículo debe habilitar la señal
del tacómetro y la radio del automóvil estar
correspondientemente conectada.
La adaptación automática del volumen pue-
de regularse en 6 niveles (OFF (desactiva-
do), 1-5).
Pulse la tecla MENU 7.
Pulse la tecla
o 8 hasta que en
la pantalla aparezca la indicación
"GALA" y se muestre el ajuste actual.
Pulse la tecla
o 8 para ajustar
la adaptación del volumen entre "OFF"
(desactivado) y 5.
Para salir del menú,
pulse la tecla MENU 7.
쏅
쏅
쏅
쏅
쏅
Sonido
Ajuste de los agudos
Pulse la tecla AUD :.
Pulse repetidas veces la tecla
o
8 hasta que en la pantalla se muestre
la indicación "TREBLE".
Mantenga pulsada la tecla
o 8
durante más de 2 segundos.
En la pantalla aparece brevemente "FREQ"
y después la frecuencia de agudos selec-
cionada.
Para seleccionar otra frecuencia de agudos
entre 10,0 kHz y 17,5 kHz,
pulse la tecla
o 8.
Para ajustar el nivel de agudos,
pulse repetidas veces la tecla
o
8 hasta que en la pantalla se muestre
la indicación "GAIN".
Transcurridos unos 2 segundos se mostrará
la indicación "GAIN" y el ajuste actual.
Pulse la tecla
o 8 para ajustar el
nivel de agudos entre –7 y +7.
Para salir del menú,
pulse la tecla AUD :.
Regular los graves
Pulse la tecla AUD :.
Pulse repetidas veces la tecla
o
8 hasta que en la pantalla se muestre
la indicación "BASS".
Mantenga pulsada la tecla
o 8
durante más de 2 segundos.
En la pantalla aparece brevemente "FREQ"
y después la frecuencia de graves seleccio-
nada.
쏅
쏅
쏅
쏅
쏅
쏅
쏅
쏅
쏅
쏅
Volumen Sonido
05_CalaisMP48_es.indd 13405_CalaisMP48_es.indd 134 11.06.2008 15:15:09 Uhr11.06.2008 15:15:09 Uhr

135
ESPAÑOL
Para ajustar el nivel de medios,
pulse repetidas veces la tecla
o
8 hasta que en la pantalla se muestre
la indicación "GAIN".
Transcurridos unos 2 segundos se mostrará
la indicación "GAIN" y el ajuste actual.
Pulse la tecla
o 8 para ajustar el
nivel de medios entre –7 y +7.
Para ajustar el factor de calidad del medio,
pulse repetidas veces la tecla
o
8 hasta que en la pantalla se muestre
la indicación "Q FACTOR".
Transcurridos unos 2 segundos se mostrará
la indicación "Q" y el ajuste actual.
Pulse la tecla
o 8 para ajustar el
factor de calidad entre 0,5 y 1,25.
Para salir del menú,
pulse la tecla AUD :.
Ajustar la distribución del volumen
a izquierda/derecha (BAL)
Pulse la tecla AUD :.
Pulse la tecla
o 8 hasta que en
la pantalla aparezca la indicación "BAL"
y se muestre el ajuste actual.
Pulse la tecla
o 8 para ajustar la
distribución del volumen a la izquierda/
derecha entre –10 y +10.
Para salir del menú,
pulse la tecla AUD :.
쏅
쏅
쏅
쏅
쏅
쏅
쏅
쏅
쏅
Para seleccionar otra frecuencia de graves
entre 60 Hz y 200 Hz,
pulse la tecla
o 8.
Para ajustar el nivel de graves,
pulse repetidas veces la tecla
o
8 hasta que en la pantalla se muestre
la indicación "GAIN".
Transcurridos unos 2 segundos se mostrará
la indicación "GAIN" y el ajuste actual.
Pulse la tecla
o 8 para ajustar el
nivel de graves entre –7 y +7.
Para ajustar el factor de calidad del grave,
pulse repetidas veces la tecla
o
8 hasta que en la pantalla se muestre
la indicación "Q FACTOR".
Transcurridos unos 2 segundos se mostrará
la indicación "Q" y el ajuste actual.
Pulse la tecla
o 8 para ajustar el
factor de calidad entre 1,0 y 2,0.
Para salir del menú,
pulse la tecla AUD :.
Ajustar los medios
Pulse la tecla AUD :.
Pulse repetidas veces la tecla
o
8 hasta que en la pantalla se muestre
la indicación "MIDDLE".
Mantenga pulsada la tecla
o 8
durante más de 2 segundos.
En la pantalla aparece brevemente "FREQ"
y después la frecuencia de medios selec-
cionada.
Para seleccionar otra frecuencia de medios
entre 500 Hz y 2,5 kHz,
pulse la tecla
o 8.
쏅
쏅
쏅
쏅
쏅
쏅
쏅
쏅
쏅
쏅
Sonido
05_CalaisMP48_es.indd 13505_CalaisMP48_es.indd 135 11.06.2008 15:15:09 Uhr11.06.2008 15:15:09 Uhr

136
Ajustar la distribución del
volumen delante/detrás (FAD)
Nota
Los altavoces traseros deben conec-
tarse a través de un amplifi cador adi-
cional.
Pulse la tecla AUD :.
Pulse la tecla
o 8 hasta que en
la pantalla aparezca la indicación "FAD"
y se muestre el ajuste actual.
Pulse la tecla
o 8 para ajustar la
distribución del volumen delante/de-
trás entre –10 y +10.
Para salir del menú,
pulse la tecla AUD :.
쏅
쏅
쏅
쏅
Hora
Mostrar la hora
Para mostrar la hora en la pantalla durante
unos 10 segundos,
mantenga pulsada la tecla MENU 7
durante más de 2 segundos.
Ajustar la hora
Pulse la tecla MENU 7.
Pulse la tecla
o 8 hasta que
aparezca la indicación "TIMESET" en la
pantalla 6.
Después de aprox. 2 segundos se muestra
la hora actual en la pantalla 6. Delante de
la hora se muestra en el modo de 24 horas
la indicación "24H" y en el modo de 12 ho-
ras la indicación "AM" o "PM". Las horas
parpadean, lo que signifi ca que se pueden
modifi car.
Para ajustar las horas y los minutos,
pulse la tecla
o 8.
Para cambiar de horas a minutos,
pulse la tecla 6 <.
Nota:
No tendrá que esperar a la indicación
de la hora actual para poderlo modifi -
car mediante la tecla
o 8.
Para salir del menú,
pulse la tecla MENU 7.
Seleccionar el modo de hora
12/24 h
Pulse la tecla MENU 7.
Pulse la tecla
o 8 hasta que apa-
rezca la indicación "24H MODE" o "12H
MODE" en la pantalla 6.
쏅
쏅
쏅
쏅
쏅
쏅
쏅
쏅
Sonido Hora
05_CalaisMP48_es.indd 13605_CalaisMP48_es.indd 136 11.06.2008 15:15:10 Uhr11.06.2008 15:15:10 Uhr

137
ESPAÑOL
Pulse la tecla o 8 para elegir
el modo deseado.
Para salir del menú,
pulse la tecla MENU 7.
Ajustar el huso horario
(TIMEZONE)
Si se desplaza por diferentes husos hora-
rios, puede ajustar la diferencia horaria con
la hora actual en pasos de una hora. De este
modo puede corregir la indicación de la
hora del huso horario actualmente vigente,
sin tener que modifi car la hora de nuevo.
Pulse la tecla MENU 7.
Pulse repetidas veces la tecla
o
8 hasta que en la pantalla se muestre
la indicación "TIMEZONE".
Transcurridos unos 2 segundos se mostrará
la indicación "ZONE" y el ajuste actual en la
pantalla 6.
Pulse la tecla
o 8 para ajustar la
diferencia horaria en pasos de una hora
entre –12 y +12.
Nota:
No tendrá que esperar a la indicación
del ajuste actual para poderlo modifi -
car mediante la tecla
o 8.
Para salir del menú,
pulse la tecla MENU 7.
쏅
쏅
쏅
쏅
쏅
쏅
Modo de radio
Este equipo está dotado de un radiorrecep-
tor RDS. Casi todas las emisoras sintoniza-
das retransmiten una señal que contiene
información como, por ejemplo, el nombre
de la emisora y el tipo de programa (PTY),
además del programa radiofónico.
En cuanto se recibe el nombre de la emiso-
ra, éste se visualiza en la pantalla 6.
Activar el modo de radio
Si se encuentra en un modo de funciona-
miento distinto,
pulse la tecla BND 2,
o
pulse la tecla SRC > hasta que apa-
rezca la indicación "RADIO" en la pan-
talla 6.
En la pantalla 6 se muestra la frecuencia
actual o bien el nombre de la emisora.
Función de confort RDS (AF, REG)
Las funciones de confort RDS AF (frecuen-
cia alternativa) y REG (regional) amplían la
gama de prestaciones que le ofrece su equi-
po de radio:
AF: si la función de confort RDS está
activa, el equipo busca automática-
mente y en segundo plano la frecuen-
cia que mejor se recibe de la emisora
sintonizada.
REG: A determinadas horas, algunas
emisoras dividen su programación en
emisiones regionales de diferente con-
tenido. La función REG activa impide
que el equipo cambie a frecuencias al-
ternativas de la emisora ajustada que
dispongan de otra programación.
쏅
쏅
•
•
Hora Modo de radio
05_CalaisMP48_es.indd 13705_CalaisMP48_es.indd 137 11.06.2008 15:15:10 Uhr11.06.2008 15:15:10 Uhr

138
Nota:
La función REG debe desactivarse o
activarse por separado en el menú.
Activar y desactivar la función de
confort RDS
Para aprovechar las funciones RDS, AF
y REG, pulse la tecla RDS =.
Cuando las funciones de confort RDS estás
activas, se muestra el símbolo RDS en la
pantalla 6.
Activar y desactivar la función REG
Pulse la tecla MENU 7.
Pulse la tecla
o 8 hasta que apa-
rezca la indicación "REG" y el ajuste ac-
tual "ON" (activado) o bien "OFF" en la
pantalla 6.
Pulse la tecla
o 8 para desactivar
o activar la función REG.
Para salir del menú,
pulse la tecla MENU 7.
Nota:
El ajuste REG ON/OFF sólo tiene efec-
to cuando la función RDS se encuentra
activada.
Seleccionar la banda de ondas/
el nivel de memoria
Este equipo puede sintonizar programas
de las bandas de frecuencia FM, OM y OL
(Europa) o bien FM y AM (países integran-
tes de NAFTA). Para la banda de ondas FM
hay tres niveles de memoria FM1, FM2 y
FMT y para las bandas OM y OL o AM, uno
respectivamente. Adicionalmente se en-
cuentra disponible otro nivel de memoria
쏅
쏅
쏅
쏅
쏅
adicional OMT/OLT o AMT. En cada nivel de
memoria pueden memorizarse 6 emisoras.
Para cambiar entre bandas de ondas o nive-
les de memoria,
pulse la tecla BND 2.
Sintonización de emisoras
Existen varias posibilidades de sintonizar
emisoras.
Búsqueda automática de emisoras
Pulse la tecla
o 8.
La radio sintoniza la primera emisora que
tenga sufi ciente intensidad.
Notas:
Si se ha activado la preferencia de
las noticias de tráfi co, se ajusta la si-
guiente emisora de radiotráfi co.
Si se ha activado PTY, se ajusta la si-
guiente emisora del tipo de programa
seleccionado.
Modifi car la sensibilidad de la búsqueda
automática de emisoras
Puede elegir si con una sensibilidad baja
sólo se reciben emisoras con mayor inten-
sidad de recepción o si con una sensibilidad
alta también se reciben emisoras con me-
nor intensidad de recepción.
Pulse la tecla MENU 7.
Pulse la tecla
o 8 hasta que apa-
rezca la indicación "SENS" y el ajuste
actual "LO" (mayor intensidad de re-
cepción) o "DX" (menor intensidad de
recepción) en la pantalla 6.
Pulse la tecla
o 8 para cambiar
entre los ajustes "LO" y "DX".
쏅
쏅
•
•
쏅
쏅
쏅
Modo de radio
05_CalaisMP48_es.indd 13805_CalaisMP48_es.indd 138 11.06.2008 15:15:10 Uhr11.06.2008 15:15:10 Uhr

139
ESPAÑOL
Para salir del menú,
pulse la tecla MENU 7.
Sintonización manual
Para modifi car gradualmente la frecuencia
ajustada,
pulse la tecla
o 8.
Para modifi car rápidamente la frecuencia
ajustada,
mantenga pulsada la tecla
o 8
Nota:
Para sintonizar emisoras manualmen-
te, la función de confort RDS y la fun-
ción PTY deben estar desactivadas.
Hojear las cadenas de emisoras
(sólo FM)
Cuando una emisora ofrece varios progra-
mas, tiene la posibilidad de "hojear" esa
"cadena de emisoras".
Pulse la tecla
o 8 para pasar a
la siguiente emisora de esa cadena de
emisoras.
Nota:
Sólo es posible hojear en la cadena de
emisoras cuando la función RDS se en-
cuentra activada y la PTY desactivada.
Recuerde que sólo puede cambiar a
emisoras que ya haya sintonizado algu-
na vez. Para ello utilice, p. ej. la función
Travelstore (T-STORE).
Memorizar emisoras
Memorización manual de emisora
Seleccione el nivel de memoria o la
banda de ondas deseados.
Sintonice la emisora.
쏅
쏅
쏅
쏅
쏅
쏅
Mantenga pulsada durante más de
2 segundos la tecla de estación 1- 6 en
la que desee memorizar la emisora.
Se emitirá el tono de confi rmación. La emi-
sora se encuentra memorizada en la tecla
de estación seleccionada.
Memorizar automáticamente la emisora
(T-STORE)
El usuario puede memorizar automática-
mente las seis emisoras con mayor intensi-
dad de recepción de la región. Para la ban-
da de ondas FM la memorización se efectúa
en el nivel de memoria FMT, para las bandas
de ondas OM y OL en el nivel de memoria
OMT/OLT y para la banda de ondas AM en
el nivel de memoria AMT.
Nota:
Las emisoras que ya estuvieran memo-
rizadas en ese nivel se reemplazan por
las recién memorizadas.
Seleccione la banda de ondas desea-
da.
Mantenga pulsada la tecla BND 2 du-
rante más de 2 segundos.
Comienza el proceso de memorización. En
la pantalla 6 se visualiza "T-STORE". Al
concluir el proceso de memorización, sue-
na la emisora memorizada en la posición del
nivel de memoria FMT, OMT/OLT o AMT.
Escuchar emisoras memorizadas
Seleccionar el nivel de memoria o la
banda de ondas.
Pulse la tecla de estación 1 - 6 <, en
la que se encuentra memorizada la emi-
sora deseada.
쏅
쏅
쏅
쏅
쏅
Modo de radio
05_CalaisMP48_es.indd 13905_CalaisMP48_es.indd 139 11.06.2008 15:15:10 Uhr11.06.2008 15:15:10 Uhr

140
Explorar las emisoras que se
pueden sintonizar (BANDSCAN)
Con la función bandscan se pueden explo-
rar durante aprox. 10 segundos todas las
emisoras que se pueden sintonizar.
Iniciar bandscan
Mantenga pulsada la tecla
o 8
durante más de 2 segundos.
En la pantalla aparece brevemente la indica-
ción "BANDSCAN". El equipo busca emiso-
ras en la banda de ondas actual. Cada una
de las emisoras encontradas se reproduce
durante aprox. 10 segundos. Se muestra la
frecuencia ajustada o bien el nombre de la
emisora.
Finalizar bandscan
Pulse la tecla
o 8.
El proceso de Scan fi naliza. Queda ajustada
la última emisora escuchada.
Tipo de programa (PTY)
Además del nombre, algunas emisoras FM
también envían información sobre el tipo
de programa. Estos tipos de programa pue-
den ser, por ejemplo:
CULTURA VIAJES JAZZ DEPORTES
NOTICIAS POP ROCK MÚSICA
La función PTY permite seleccionar direc-
tamente emisoras con un determinado tipo
de programa.
Cuando se encuentra activada la función
PTY y se ha iniciado la búsqueda PTY, el
equipo cambia automáticamente de la emi-
sora actual, o bien de otro modo de servi-
cio, hacia la emisora con el tipo de progra-
ma seleccionado.
쏅
쏅
Activar y desactivar la función PTY
Pulse la tecla MENU 7.
Pulse la tecla
o 8 hasta que apa-
rezca la indicación "PTY" y el ajuste ac-
tual "ON" (activado) o bien "OFF" en la
pantalla 6.
Pulse la tecla
, o bien 8 para des-
activar o activar la función PTY.
Para salir del menú,
pulse la tecla MENU 7.
Seleccionar un tipo de programa e
iniciar la búsqueda automática
Pulse repetidas veces la tecla
o
8 hasta que en la pantalla aparezca el
tipo de programa.
Pulse la tecla
o 8 para iniciar la
búsqueda.
Si se encuentra una emisora con el tipo de
programa seleccionado, éste se ajustará.
Reducción de los tonos agudos
en función de las distorsiones
(HICUT)
La función HiCut provoca una mejora en la
reproducción cuando la recepción es de
mala calidad. Cuando existen interferen-
cias de recepción, se reduce automática-
mente el nivel de distorsión.
Para activar o desactivar HICUT,
pulse la tecla MENU 7.
Pulse la tecla
o 8 hasta que apa-
rezca la indicación "HICUT" y el ajuste
actual "ON" (activado) o bien "OFF" en
la pantalla 6.
Pulse la tecla
, o bien 8 para des-
activar o activar la función HICUT.
쏅
쏅
쏅
쏅
쏅
쏅
쏅
쏅
쏅
Modo de radio
05_CalaisMP48_es.indd 14005_CalaisMP48_es.indd 140 11.06.2008 15:15:10 Uhr11.06.2008 15:15:10 Uhr

141
ESPAÑOL
Para salir del menú,
pulse la tecla MENU 7.
Activar y desactivar radiotexto
Algunas emisoras de radio utilizan la señal
RDS para transmitir publicidad y otro tipo
de información en lugar del nombre de la
emisora. Este radiotexto se visualiza en la
pantalla 6.
Para activar o desactivar la visualización del
radiotexto,
pulse la tecla MENU 7.
pulse repetidas veces la tecla
o
8 hasta que en la pantalla se muestre
la indicación "RADIOTXT".
Transcurridos unos 2 segundos se indica el
ajuste actual "TEXT ON" (activado) o "TEXT
OFF" (desactivado) en la pantalla 6.
Pulse la tecla
o 8 para desactivar
o activar la indicación de radiotexto.
Nota:
No tendrá que esperar a la indicación
del ajuste actual para poderlo modifi -
car mediante la tecla
o 8.
Para salir del menú,
pulse la tecla MENU 7.
쏅
쏅
쏅
쏅
쏅
Noticias de tráfi co
Activar y desactivar la
preferencia para las noticias de
tráfi co
Para activar o desactivar la preferencia por
las noticias de tráfi co en cualquier modo de
servicio,
pulse la tecla TA ;.
Nota:
En los modos de servicio CD, MP3,
cambiadiscos y AUX esta función sólo
se encuentra disponible cuando se ha-
bía ajustado la banda de ondas FM en
último lugar.
La preferencia para las noticias de tráfi co
está activada cuando en la pantalla 6 se
indica el símbolo TA. En cuanto el equipo re-
cibe una noticia de tráfi co, ésta se transmi-
tirá. En la pantalla 6 se muestra durante la
transmisión la indicación "TRAFFIC".
Nota:
El tono de aviso suena
al salir del área de emisión de la emi-
sora de radiotráfi co sintonizada mien-
tras se está escuchando la emisora de
radiotráfi co o un CD y la nueva bús-
queda automática no encuentra nin-
guna otra emisora que retransmita
noticias de tráfi co.
al cambiar de una emisora de radio-
tráfi co a otra emisora sin noticias de
tráfi co.
En dicho caso, desactive la prioridad
para las noticias de tráfi co o sintonice
otra emisora que retransmita noticias
de tráfi co.
쏅
•
•
Modo de radio Noticias de tráfi co
05_CalaisMP48_es.indd 14105_CalaisMP48_es.indd 141 11.06.2008 15:15:11 Uhr11.06.2008 15:15:11 Uhr

142
Ajustar la subida de volumen
para las noticias de tráfi co
Puede ajustar cuántos niveles de volumen
desea que se eleve el volumen ajustado
durante la transmisión de las noticias de
tráfi co:
Pulse la tecla MENU 7.
Pulse repetidas veces la tecla
o
8 hasta que en la pantalla se muestre
la indicación "TA VOL".
Transcurridos unos 2 segundos se mostrará
la indicación "VOL" y el ajuste actual en la
pantalla 6.
Pulse la tecla
o 8 para ajustar
la subida de volumen entre 0 y 10.
Nota:
No tendrá que esperar a la indicación
del ajuste actual para poderlo modifi -
car mediante la tecla
o 8.
Para salir del menú,
pulse la tecla MENU 7.
Nota:
Recuerde que con el regulador del
volumen 1 también puede ajustar el
volumen de las noticias de tráfi co du-
rante el tiempo de emisión.
Suprimir las noticias de tráfi co
Para interrumpir una noticia de tráfi co en
curso y regresar a la fuente de sonido an-
terior,
pulse la tecla TA ;.
La preferencia para noticias de tráfi co per-
manece activa.
쏅
쏅
쏅
쏅
쏅
Modo de CD
Este equipo permite reproducir CD de au-
dio, CD-R y CD-RW convencionales con
diámetros de 12 cm. Para evitar problemas
de reproducción, le recomendamos no gra-
bar los CD a una velocidad superior a 16x.
¡Peligro de estropear la
unidad de CD!
Los discos single de 8 cm de diámetro y los
discos contorneados (shape CD) no son ap-
tos para este equipo.
Trate los CDs con cuidado y evite arañarlos
o deteriorarlos. Siempre que sea posible,
manipule el CD sólo por los bordes. Si el
CD está sucio, límpielo con un paño que no
suelte pelusas y que no contenga disolven-
tes. Limpie siempre los CD desde el centro
hacia afuera.
No exponga los CD a la luz directa del sol y
guarde los CD que no estén en el equipo en
una funda protectora.
No pegue etiquetas en los CD. Escriba en
los CD sólo con rotuladores convencionales
adecuados.
El fabricante no asume ninguna responsabi-
lidad sobre los daños causados en la unidad
de CD por haber utilizado CD inapropiados
o deteriorados.
Para un funcionamiento adecuado, utilice
exclusivamente los CD con el logo Compact-
Disc. Los CD con protección contra copia
pueden provocar difi cultades durante la re-
producción. Blaupunkt no puede garantizar
el funcionamiento correcto de los CD con
protección anticopia.
Noticias de tráfi co Modo de CD
05_CalaisMP48_es.indd 14205_CalaisMP48_es.indd 142 11.06.2008 15:15:11 Uhr11.06.2008 15:15:11 Uhr

143
ESPAÑOL
Iniciar el modo de CD
Si la unidad de CD está vacía,
coloque el disco en la ranura de CD con
la cara impresa hacia arriba y, sin ejer-
cer fuerza, empuje hasta notar cierta
resistencia.
El CD entra automáticamente en la unidad.
En la pantalla 6 aparece el símbolo de CD.
Nota:
La introducción del CD no se debe obs-
taculizar ni apoyar.
El disco comienza a sonar. En la pantalla 6
se muestra el número del título actual (p. ej.,
"T12") y el tiempo de reproducción, así como
la información de los títulos (texto del CD).
Con un disco ya colocado en la unidad de CD,
pulse la tecla SRC > hasta que apa-
rezca la indicación "CD" en la pantalla
6.
La reproducción comienza en el punto en el
que se interrumpió.
Indicación de la información de
los títulos (texto del CD)
Si el CD dispone de texto del CD, la infor-
mación de cada título se mostrará al iniciar
el título una única vez en forma de texto en
movimiento en la pantalla 6.
Mostrar la información de los títulos una
única vez como texto en movimiento
Pulse la tecla 5 <.
El texto del CD del título actual se muestra
una única vez como texto en movimiento en
la pantalla 6.
Nota:
Esta función no se encuentra disponi-
ble cuando la indicación del texto del
쏅
쏅
쏅
CD en forma de texto en movimiento se
ha desactivado (véase siguiente apar-
tado).
Activar/desactivar la indicación de la
información de los títulos como texto en
movimiento
Para activar o desactivar la indicación de
la información de los títulos como texto en
movimiento,
pulse la tecla MENU 7.
Pulse la tecla
o 8 hasta que apa-
rezca la indicación "SCRL" y el ajuste
actual "ON" (activado) o bien "OFF" en
la pantalla 6.
Pulse la tecla
o 8 para desactivar
o activar el texto en movimiento.
Para salir del menú,
pulse la tecla MENU 7.
Al ajustar "SCRL OFF" se muestra la infor-
mación de los títulos en apartados de res-
pectivamente 8 caracteres en la pantalla
6. Cada apartado de texto, número de
título y tiempo de reproducción se muestra
en un cambio continuo durante 5 segun-
dos.
Nota:
El ajuste "SCRL ON/OFF" tiene el co-
rrespondiente efecto sobre la indica-
ción de la información de los títulos de
MP3 (etiquetas ID3) en el modo MP3.
Selección del título
Pulse la tecla o 8 para cambiar al
título anterior o al siguiente.
Pulsando una sola vez la tecla
8 se ini-
cia de nuevo la reproducción del título que
está sonando.
쏅
쏅
쏅
쏅
쏅
Modo de CD
05_CalaisMP48_es.indd 14305_CalaisMP48_es.indd 143 11.06.2008 15:15:11 Uhr11.06.2008 15:15:11 Uhr

144
Búsqueda rápida (audible)
Para realizar una búsqueda rápida hacia de-
lante o hacia atrás
mantenga pulsada la tecla o 8,
hasta que llegue a la posición deseada.
Reproducción aleatoria de los
títulos (MIX)
Pulse la tecla 3 <.
En la pantalla 6 aparece brevemente la
indicación "MIX CD" y también se muestra
el símbolo MIX. Los siguientes títulos se se-
leccionan de forma aleatoria.
Finalizar la función MIX
Vuelva a pulsar la tecla 3 <.
En la pantalla 6 aparece brevemente la in-
dicación "MIX OFF" y también desaparece
el símbolo MIX. La reproducción continúa
de forma normal.
Explorar los títulos (SCAN)
Para explorar todos los títulos del CD du-
rante aprox. 10 segundos cada uno,
pulse la tecla 4 <.
En la pantalla aparece la indicación "SCAN
TRK" durante unos segundos. Durante la ex-
ploración parpadea la indicación "CD". Se
muestran el número de título y el tiempo de
reproducción del título actual, o bien la in-
formación correspondiente del título.
Finalizar la función SCAN, seguir
escuchando un título
Para fi nalizar el proceso de Scan,
vuelva a pulsar la tecla 4 <.
쏅
쏅
쏅
쏅
쏅
En la pantalla aparece la indicación "SCAN
OFF" durante unos segundos. Continúa la
reproducción del título actual.
Repetición de un título (RPT)
Pulse la tecla 2 <.
En la pantalla aparece brevemente la indi-
cación "RPT TRK" y se muestra el símbolo
RPT. El título actual se estará repitiendo
hasta que Vd. desactive la función RPT.
Finalizar RPT
Vuelva a pulsar la tecla 2 <.
En la pantalla 6 aparece brevemente "RPT
OFF" y la símbolo RPT desaparece. La re-
producción continúa de forma normal.
Interrumpir la reproducción
(PAUSE)
Pulse la tecla 1 <.
En la pantalla 6 se visualiza "PAUSE".
Anular la pausa
Durante la pausa pulse la tecla 1 <.
La reproducción continua.
Extraer el CD
Nota:
Los CD también se pueden expulsar
cuando el equipo está desconectado o
cuando hay otra fuente de sonido acti-
vada.
Pulse la tecla de expulsión del CD 4.
El CD es expulsado. En la pantalla se mues-
tra brevemente "CD EJECT".
쏅
쏅
쏅
쏅
쏅
Modo de CD
05_CalaisMP48_es.indd 14405_CalaisMP48_es.indd 144 11.06.2008 15:15:11 Uhr11.06.2008 15:15:11 Uhr

145
ESPAÑOL
Nota:
La expulsión del CD no se debe obsta-
culizar ni asistir en modo alguno.
Extraiga el CD.
El símbolo CD se apaga.
Nota:
Si no retira un CD extraído, se volverá
a insertar automáticamente tras aprox.
10 segundos.
쏅
Modo MP3/WMA
Con esta autorradio también puede repro-
ducir los DVD, CD-R y CD-RW con archivos
musicales en formato MP3 y WMA. Además
puede conectar a través de la interfaz USB
opcional y compatible con C‘n‘C soportes
de datos USB y reproducir en estos últimos
los archivos MP3/WMA almacenados.
En este capítulo sólo se trata la reproduc-
ción de los archivos MP3, ya que el fun-
cionamiento de los archivos MP3 y WMA
es idéntico. En este capítulo el término
"soporte de datos MP3" se refi ere tanto
a CD-R/RW como también a soportes de
datos USB, como p. ej. un lápiz USB.
Notas:
Los archivos WMA con "Digital Rights
Management" (DRM) procedentes de
tiendas de música online no se pue-
den reproducir con este equipo.
La reproducción segura de archivos
WMA sólo puede garantizarse si éstos
han sido creados con la versión 8 de
Windows Media Player o posterior.
Preparar un soporte de datos MP3
Preparar un CD MP3
Si la combinación de grabadora, software
para grabar los CD y CD virgen no es la apro-
piada, pueden presentarse problemas a la
hora de reproducir los CD. Si se presenta al-
gún problema con los CD grabados en casa,
le recomendamos cambiar a CD vírgenes de
otro fabricante o de otro color.
El formato del CD tiene que ser ISO 9660
de nivel 1 ó 2 o bien Joliet. Con todos los
demás formatos no hay ninguna garantía de
que los CD se reproduzcan correctamente.
•
•
Modo de CD Modo MP3/WMA
05_CalaisMP48_es.indd 14505_CalaisMP48_es.indd 145 11.06.2008 15:15:11 Uhr11.06.2008 15:15:11 Uhr

146
A la hora de crear (codifi car) archivos MP3/
WMA a partir de los archivos de audio, es
recomendable seleccionar una velocidad
binaria de 32 a 320 kbps para los archivos
MP3 o bien una velocidad de 32 a 192 kbps
para los archivos WMA.
Este equipo soporta hasta 252 directorios
y hasta 255 archivos por directorio. El CD
pueden contener en total un máximo de
512 directorios y archivos. Los directorios
y los títulos del CD se pueden seleccionar
de uno en uno.
D01
D02
T001
T005
T004
T003
T002
D03
T001
T006
T005
T004
T003
T002
T011
T007
T008
T009
T010
D04
T001
T006
T005
T004
T003
T002
A
B
A Directorios
B Títulos · Archivos
A cada directorio le puede asignar un nom-
bre en el PC. Después, el nombre del direc-
torio puede verse en la pantalla del equipo.
Seleccione el nombre de los directorios y
de los títulos/archivos con el software de
grabación. Para más detalles, consulte el
manual del software.
Notas:
Evite el uso de símbolos especiales a
la hora de asignar un nombre a los ar-
chivos (directorios y títulos).
Si utiliza nombres de archivo con más
de 16 caracteres (incluyendo la ter-
minación ".MP3" o ".WMA"), la capa-
cidad máxima para albergar títulos y
directorios se reduce.
Si desea que los archivos sigan un orden
concreto, guárdelos en el soporte de datos
en el orden en que desee reproducirlos pos-
teriormente. El equipo reproduce los archi-
vos siguiendo el orden físico en el que están
memorizados en el soporte de datos.
Para poderlos reproducir en este equipo,
los archivos deben tener la terminación
".MP3" en los archivos MP3 y la terminación
".WMA" en los archivos WMA.
Notas:
Para disfrutar de una reproducción sin
perturbaciones,
no intente asignar la extensión ".MP3"
a archivos de otro formato para repro-
ducirlos en el equipo. El equipo igno-
rará los archivos no válidos durante la
reproducción.
no utilice CD "mixtos" que contengan
datos y títulos de un formato diferen-
te a MP3 (en el modo MP3, el equipo
sólo lee archivos MP3).
no utilice CD en modo mixto que con-
tengan títulos de audio CD y títulos
MP3. Si intenta reproducir un CD en
modo mixto, el equipo sólo leerá los
títulos de audio CD.
•
•
•
•
•
Modo MP3/WMA
05_CalaisMP48_es.indd 14605_CalaisMP48_es.indd 146 11.06.2008 15:15:12 Uhr11.06.2008 15:15:12 Uhr

147
ESPAÑOL
Preparar un soporte de datos USB
Para que el equipo reconozca un soporte
de datos USB, éste debe estar especifi cado
como dispositivo de almacenamiento masi-
vo (Mass Storage Device) y formateado en
los sistemas de archivos FAT16 o FAT32 y
contener archivos MP3 o WMA.
En un soporte de datos USB se pueden
crear un máximo de 1.500 archivos (direc-
torios y títulos). Este equipo permite selec-
cionar los directorios y los títulos de uno en
uno. Si utiliza nombres de archivo con más
de 24 caracteres (incluyendo la termina-
ción ".MP3" o ".WMA"), la capacidad máxi-
ma indicada de los archivos se reduce.
Blaupunkt no puede garantizar el funcio-
namiento correcto de todos los soportes
de datos USB que pueden adquirirse en el
mercado.
Etiquetas ID3
Los títulos MP3 pueden contener informa-
ción adicional como, por ejemplo, el intér-
prete, el nombre del título y el álbum (eti-
quetas ID3). Este equipo puede visualizar
etiquetas ID3 de la versión 1 y de la 2 en la
pantalla.
Iniciar el modo MP3
Iniciar el modo MP3 del CD
Si se utiliza un CD MP3, el modo MP3 se ini-
cia igual que el modo de CD normal. Para
más detalles, lea el apartado "Iniciar el
modo de CD" en el capítulo "Modo de CD".
En la pantalla 6 se muestra el número del
título actual (p. ej., "T12") y el tiempo de re-
producción, así como la información de los
títulos (etiquetas ID3) o el nombre de archi-
vo. Al cambiar a otro directorio se muestra
brevemente el número de directorio (p. ej.
"DIR 02").
Conectar el soporte de datos USB e
iniciar el modo MP3
Para poder conectar un soporte de datos
USB (por ejemplo, un lápiz USB o un dis-
co duro USB), se debe conectar la inter-
faz USB opcional de Blaupunkt en la parte
posterior del equipo (cámara C3). Puede
tender el cable USB de la interfaz hasta el
interior de la guantera, por ejemplo, o en un
lugar apropiado de la consola central.
Notas:
Si conecta la interfaz USB de
Blaupunkt al equipo, debe ajustar-
se correspondientemente la entra-
da AUX. Para ello lea el apartado
"Ajustar la entrada AUX" en el capítulo
"Fuentes de sonido externas".
Desconecte siempre el equipo antes
de conectar o extraer el soporte de
datos USB para que éste inicie la se-
sión y la fi nalice correctamente.
Conecte el soporte de datos USB al
cable USB de la interfaz USB.
Tras la conexión de un soporte de datos
USB, éste se puede seleccionar con la tecla
SRC >. En la pantalla aparece la indica-
ción "USB".
Indicación de la información de
los títulos (etiquetas ID3)
Si el soporte de datos MP3 dispone de eti-
quetas ID3, la información de cada título se
mostrará al iniciar el título una única vez en
forma de texto en movimiento en la pantalla
•
•
쏅
Modo MP3/WMA
05_CalaisMP48_es.indd 14705_CalaisMP48_es.indd 147 11.06.2008 15:15:12 Uhr11.06.2008 15:15:12 Uhr

148
6. Si no se han almacenado etiquetas ID3
con los archivos MP3, se muestra el nom-
bre del archivo.
Nota:
Para la memorización de las etiquetas
ID3 lea también el manual de su soft-
ware MP3 para PC o el software para
grabar.
Mostrar la información de los títulos una
única vez como texto en movimiento
Pulse la tecla 5 <.
Las etiquetas ID3 del título actual se mues-
tran una única vez como texto en movimien-
to en la pantalla 6.
Nota:
Esta función no se encuentra disponi-
ble cuando la indicación de la informa-
ción de los títulos en forma de texto en
movimiento se ha desactivado. Para
más información, lea en el capítulo
"Modo de CD", subcapítulo "Indicación
de la información de los títulos (texto
del CD)" el apartado "Activar/desacti-
var la indicación de la información de
los títulos como texto en movimiento".
Seleccionar un directorio
Para cambiar a otro directorio de nivel su-
perior o inferior,
pulse la tecla
o 8.
Notas:
El equipo salta automáticamente to-
dos los directorios que no contienen
archivos MP3,
El equipo procesa todos los directo-
rios y subdirectorios como si se en-
contraran en un mismo nivel. Si pulsa
쏅
쏅
•
•
repetidamente la tecla
o 8,
puede acceder a todos los subdirec-
torios.
Seleccionar títulos/archivos
Para cambiar a otro título/archivo anterior o
siguiente del directorio seleccionado,
pulse la tecla
o 8.
Pulsando una sola vez la tecla
8 se ini-
cia de nuevo la reproducción del título que
está sonando.
Búsqueda rápida
Para realizar una búsqueda rápida hacia de-
lante o hacia atrás
mantenga pulsada la tecla
o 8,
hasta que llegue a la posición deseada.
Nota:
En el modo USB la búsqueda rápida
hacia atrás se detiene en cada caso al
principio del título actual.
Reproducir títulos en orden
aleatorio (MIX)
Para reproducir en orden aleatorio todos
los títulos del directorio seleccionado,
pulse la tecla 3 < hasta que aparezca
la indicación "MIX DIR" o "MIX FLD" en
la pantalla 6.
El símbolo MIX aparece en la pantalla 6.
Para reproducir en orden aleatorio todos
los títulos del soporte de datos MP3,
pulse la tecla 3 < hasta que aparezca
la indicación "MIX ALL" en la pantalla
6.
El símbolo MIX aparece en la pantalla 6.
쏅
쏅
쏅
쏅
Modo MP3/WMA
05_CalaisMP48_es.indd 14805_CalaisMP48_es.indd 148 11.06.2008 15:15:12 Uhr11.06.2008 15:15:12 Uhr

149
ESPAÑOL
Finalizar la función MIX
Para fi nalizar la reproducción en orden
aleatorio,
pulse la tecla 3 < hasta que aparezca
la indicación "MIX OFF" en la pantalla
6.
El símbolo MIX desaparece de la pantalla
6.
Explorar los títulos (SCAN)
Para reproducir todos los títulos del sopor-
te de datos MP3 en orden ascendente du-
rante aprox. 10 segundos,
pulse la tecla 4 < hasta que aparezca
la indicación "SCAN TRK" en la pantalla
6.
Durante la exploración parpadea la indica-
ción "MP3" o "USB".
Para explorar en el modo USB todos los títu-
los del directorio actual,
pulse la tecla 4 < hasta que aparezca
la indicación "SCAN FLD" en la pantalla
6.
Durante la exploración parpadea la indica-
ción "USB".
Finalizar la función SCAN
Para terminar la exploración,
pulse la tecla 4 < hasta que aparezca
la indicación "SCAN OFF" en la pantalla
6.
El título que está sonando sigue reprodu-
ciéndose.
쏅
쏅
쏅
쏅
Reproducir repetidamente un
título o un directorio completo
(REPEAT)
Para repetir el título seleccionado en ese
momento,
pulse la tecla 2 < hasta que aparezca
la indicación "RPT TRK" en la pantalla
6.
El símbolo RPT aparece en la pantalla 6.
Para repetir el directorio seleccionado en
ese momento,
pulse la tecla 2 < hasta que aparezca
la indicación "RPT DIR" o "RPT FLD" en
la pantalla 6.
El símbolo RPT aparece en la pantalla 6.
Finalizar la función REPEAT
Para fi nalizar la repetición,
pulse la tecla 2 < hasta que aparezca
la indicación "RPT OFF" en la pantalla
6.
El símbolo RPT desaparece de la pantalla
6.
Interrumpir la reproducción
(PAUSE)
Pulse la tecla 1 <.
En la pantalla 6 se visualiza "PAUSE".
Anular la pausa
Durante la pausa pulse la tecla 1 <.
La reproducción continua.
쏅
쏅
쏅
쏅
쏅
Modo MP3/WMA
05_CalaisMP48_es.indd 14905_CalaisMP48_es.indd 149 11.06.2008 15:15:12 Uhr11.06.2008 15:15:12 Uhr

150
Modo de cambiadiscos
Se pueden conectar opcionalmente al equi-
po los cambiadiscos Blaupunkt CDC A08 T
y IDC A09 (cámara C3 en la parte trasera
del equipo).
¡Atención!
El equipo alimenta normalmente al
cambiadiscos con una tensión de fun-
cionamiento de 12 voltios.
Si se conecta el cambiadiscos
CDC A 08 T (24 voltios), debe cortarse
el suministro de corriente del conector
en el cable de conexión del cambiadis-
cos (cámara C3/clavija 15). El cam-
biadiscos debe alimentarse con una
tensión de funcionamiento propia de
24 voltios.
Notas:
Si conecta un cambiadiscos al equipo,
debe ajustarse correspondientemente
la entrada AUX. Para ello lea el aparta-
do "Ajustar la entrada AUX" en el capí-
tulo "Fuentes de sonido externas".
Si desea obtener más información so-
bre el manejo de CD, su colocación en
el cambiadiscos y el manejo de este
último, consulte el manual de instruc-
ciones del cambiadiscos.
Activar el modo de cambiadiscos
pulse la tecla SRC > hasta que apa-
rezca la indicación "CHANGER" en la
pantalla 6.
La reproducción comienza con el primer
CD detectado por el cambiadiscos. En
la pantalla 6 se muestra el número del
CD actual (p. ej., "D02") y el título actual
(p. ej. "T07"), así como el tiempo de repro-
ducción.
•
•
쏅
Seleccionar un CD
Para cambiar a otro CD anterior o siguiente,
pulse la tecla
o 8.
Selección del título
Para cambiar a otro título posterior o ante-
rior del CD seleccionado,
pulse la tecla
o 8.
Búsqueda rápida (audible)
Para realizar una búsqueda rápida hacia de-
lante o hacia atrás
mantenga pulsada la tecla
o 8
hasta que llegue a la posición deseada.
Repetición de un único título
o un CD completo (RPT)
Para repetir el título seleccionado en ese
momento,
pulse la tecla 2 < hasta que aparezca
la indicación "RPT TRK" en la pantalla
6.
El símbolo RPT aparece en la pantalla 6.
Para repetir el CD seleccionado en esos mo-
mentos,
pulse la tecla 2 < hasta que aparez-
ca la indicación "RPT CD" en la pantalla
6.
El símbolo RPT aparece en la pantalla 6.
Finalizar la función REPEAT
Para fi nalizar la repetición,
pulse la tecla 2 < hasta que aparezca
la indicación "RPT OFF" en la pantalla
6.
El símbolo RPT desaparece de la pantalla
6.
쏅
쏅
쏅
쏅
쏅
쏅
Modo de cambiadiscos
05_CalaisMP48_es.indd 15005_CalaisMP48_es.indd 150 11.06.2008 15:15:12 Uhr11.06.2008 15:15:12 Uhr

151
ESPAÑOL
Reproducir títulos en orden
aleatorio (MIX)
Para reproducir en orden aleatorio todos
los títulos del CD seleccionado,
pulse la tecla 3 < hasta que aparez-
ca la indicación "MIX CD" en la pantalla
6.
El símbolo MIX aparece en la pantalla 6.
Para reproducir en orden aleatorio los títu-
los de todos los CD,
pulse la tecla 3 < hasta que aparezca
la indicación "MIX ALL" en la pantalla
6.
El símbolo MIX aparece en la pantalla 6.
Finalizar la función MIX
Para fi nalizar la reproducción en orden
aleatorio,
pulse la tecla 3 < hasta que aparezca
la indicación "MIX OFF" en la pantalla
6.
El símbolo MIX desaparece de la pantalla
6.
Explorar todos los títulos de
todos los CD (SCAN)
Para reproducir todos los títulos del CD
introducido en orden ascendente durante
aprox. 10 segundos,
pulse la tecla 4 <.
En la pantalla 6 aparece brevemente la
indicación "SCAN TRK". Durante la explo-
ración parpadea la indicación del número
de CD.
Finalizar la función SCAN
Para terminar la exploración,
vuelva a pulsar la tecla 4 <.
쏅
쏅
쏅
쏅
쏅
En la pantalla 6 aparece brevemente la
indicación "SCAN OFF". El título que está
sonando sigue reproduciéndose.
Interrumpir la reproducción
(PAUSE)
Pulse la tecla 1 <.
En la pantalla 6 se muestra la indicación
"PAUSE".
Anular la pausa
Durante la pausa pulse la tecla 1 <.
La reproducción continua.
쏅
쏅
Modo de cambiadiscos
05_CalaisMP48_es.indd 15105_CalaisMP48_es.indd 151 11.06.2008 15:15:12 Uhr11.06.2008 15:15:12 Uhr

152
Mando a distancia por
infrarrojos RC 10 P
Con el mando a distancia por infrarrojos
opcional puede controlar las funciones más
importantes del equipo.
Receptor del mando a distancia
En la tapa del equipo se encuentra un re-
ceptor de infrarrojos 9 para el mando a
distancia. Antes de utilizar el mando a dis-
tancia debe conectarse el receptor:
Pulse la tecla MENU 7.
Pulse la tecla
o 8 hasta que apa-
rezca la indicación "IR" y el ajuste actual
"ON" (activado) o bien "OFF" en la pan-
talla 6.
Pulse la tecla
o 8 para desactivar
o activar la función IR.
Para salir del menú,
pulse la tecla MENU 7.
C
F
G
H
E
D
B
A
@
쏅
쏅
쏅
쏅
Funciones del mando a distancia
Información general:
Tecla Función
ON H Conectar y desconectar
equipo (pulsar prolonga-
damente)
Supresión del sonido
(pulsar brevemente)
Salir de menú
SRC @ Conmutación de fuentes
V+ B Subir volumen
V- A Bajar volumen
OK G Abrir menú o salir de
menú
E Seleccionar opción de
menú
C Seleccionar opción de
menú
F Modifi car el ajuste de
menú
D Modifi car el ajuste de
menú
En el modo de radio:
Tecla Función
F Abrir la emisora memori-
zada
D Selección de la banda de
ondas/del nivel de memo-
ria
E Búsqueda ascendente
C Búsqueda descendente
Mando a distancia por infrarrojos
05_CalaisMP48_es.indd 15205_CalaisMP48_es.indd 152 11.06.2008 15:15:13 Uhr11.06.2008 15:15:13 Uhr

153
ESPAÑOL
En el modo de CD:
Tecla Función
F Seleccionar título siguien-
te
D Seleccionar título anterior
Modo de cambiadiscos:
Tecla Función
F Reproducir título siguien-
te
D Reproducir título anterior
E Reproducir siguiente CD
C Reproducir anterior CD
Modo MP3:
Tecla Función
F Reproducir título siguien-
te
D Reproducir título anterior
E Reproducir siguiente
directorio
C Reproducir anterior
directorio
Salida del preamplifi cador
Puede conectar al equipo un amplifi ca-
dor para un altavoz de graves profundos
(Subwoofer). Este amplifi cador debe co-
nectarse a la parte trasera del equipo (cá-
mara C1). El nivel del Subwoofer puede
ajustarse en el menú de audio:
Pulse la tecla AUD :.
Pulse repetidas veces la tecla
o
8 hasta que en la pantalla aparezca la
indicación "SUB WOOF".
Transcurridos unos 2 segundos se mostrará
la indicación "SUBW" y el ajuste actual en la
pantalla 6.
Pulse la tecla
o 8 para ajustar el
nivel del Subwoofer entre 0 y 7.
Nota:
No es necesario que espere a la indica-
ción del ajuste actual para poderlo mo-
difi car mediante la tecla
o 8.
Para salir del menú,
pulse la tecla AUD :.
쏅
쏅
쏅
쏅
Mando a distancia por infrarrojos Salida del preamplifi cador
05_CalaisMP48_es.indd 15305_CalaisMP48_es.indd 153 11.06.2008 15:15:13 Uhr11.06.2008 15:15:13 Uhr

154
Fuentes de sonido externas
En la entrada AUX se pueden conectar al
equipo diferentes tipos de fuentes de soni-
do externas. La entrada AUX debe ajustarse
en cada caso para la correspondiente fuen-
te de sonido externa conectada:
Ajuste "AUX" para las fuentes de soni-
do externas, como p. ej. reproducto-
res de CD portátiles, reproductores de
MiniDisc o reproductores de MP3.
Ajuste "CDC" para los cambiadiscos
Blaupunkt CDC A 08 T y IDC A 09.
Ajuste "USB" para la interfaz USB de
Blaupunkt.
Para ajustar la entrada AUX, lea el siguiente
apartado "Ajustar la entrada AUX".
Nota:
Para conectar una fuente de sonido
externa se necesita un cable adap-
tador. Este cable (Blaupunkt n.º:
7 607 897 093) se puede adquirir en
el proveedor Blaupunkt.
Ajustar la entrada AUX
Pulse la tecla MENU 7.
Pulse repetidas veces la tecla
o
8 hasta que se muestre la indicación
"SRC SEL".
Transcurridos unos 2 segundos se mostrará
la indicación "SRC" y el ajuste actual "CDC",
"USB" o "AUX" en la pantalla 6.
Pulse la tecla
o 8 para elegir otro
ajuste.
•
•
•
쏅
쏅
쏅
Nota:
La secuencia de los ajustes en el menú
es "CDC" – "USB" – "AUX":
En el ajuste actual "CDC" puede se-
leccionar el ajuste "USB" pulsando la
tecla
8.
En el ajuste actual "USB" puede se-
leccionar el ajuste "CDC" pulsando la
tecla
8 o el ajuste "AUX" pulsando
la tecla
8.
En el ajuste actual "AUX" puede se-
leccionar el ajuste "USB" pulsando la
tecla
8.
Tras cada cambio de ajuste el equi-
po se desconecta automáticamente.
Para cambiar entre los ajustes "CDC"
y "AUX", debe seleccionar primero el
ajuste "USB" y tras la desconexión au-
tomática conectar de nuevo el equipo.
Repita entonces la operación de ajuste
para acceder al ajuste deseado "AUX" o
"CDC".
Se mostrará la nota "AUTO SWITCH OFF IN
10 SECONDS". El equipo se desconecta au-
tomáticamente tras aprox. 10 segundos.
Vuelva a conectar el equipo pulsando la
tecla On/Off 3
El equipo se conecta en el modo de radio
con el ajuste seleccionado.
Nota:
Si ha seleccionado el ajuste AUX, pue-
de elegir la entrada AUX con la tecla
SRC >. En la pantalla se muestra la
indicación "AUX".
Si ha seleccionado el ajuste CDC o USB,
puede elegir la fuente de sonido con la
tecla SRC > solamente si se encuen-
tra conectado un equipo correspon-
diente (cambiadiscos o interfaz USB).
•
•
•
쏅
Fuentes de sonido externas
05_CalaisMP48_es.indd 15405_CalaisMP48_es.indd 154 11.06.2008 15:15:13 Uhr11.06.2008 15:15:13 Uhr

155
ESPAÑOL
Ajustar el nivel de la entrada
AUX
Si ha ajustado la entrada AUX para la co-
nexión de fuentes de sonido externas en
"AUX", puede adaptar el nivel de la fuente
de sonido externa al nivel de las fuentes de
sonido propias (como p. ej., CD y radio).
Nota:
Sólo puede ajustar el nivel de la entra-
da AUX, si ha seleccionado AUX como
fuente de sonido.
Pulse, en caso necesario, la tecla SRC
> hasta que aparezca la indicación
"AUX" en la pantalla.
Pulse la tecla MENU 7.
Pulse la tecla
o 8 hasta que en la
pantalla aparezca la indicación "GAIN"
y se muestre el ajuste actual.
Pulse la tecla
o 8 para ajustar la
adaptación del nivel entre –9 y +9.
Para salir del menú,
pulse la tecla MENU 7.
쏅
쏅
쏅
쏅
쏅
Restablecer los ajustes de
fábrica (RESET)
Tiene la posibilidad de restablecer el equi-
po con los ajustes de fábrica originales:
Mantenga pulsada la tecla AUD :
durante más de 10 segundos.
Se emitirá un tono de confi rmación y en
la pantalla 6 se mostrará brevemente
la indicación "RESET". Todos los ajustes
de menú y menú de audio se restablecen a
los ajustes de fábrica.
Nota:
Las emisoras memorizadas en las
teclas de estación no se borrarán.
쏅
Fuentes de sonido externas Ajustes de fábrica
05_CalaisMP48_es.indd 15505_CalaisMP48_es.indd 155 11.06.2008 15:15:13 Uhr11.06.2008 15:15:13 Uhr

156
Datos técnicos
Tensión de funcionamiento
24 voltios
Amplifi cador
Potencia de salida: 2 x 20 W sinusoidal
en 4 ohmios
Salida Line: 2 x 2,0 voltios
efectivos
Entrada AUX: 2 x 2,0 voltios
efectivos
Sintonizador
Banda de ondas en Europa:
FM: 87,5 - 108 MHz
OM: 531 - 1602 kHz
OL: 153 - 279 kHz
Bandas de ondas en América:
FM: 87,7 - 107,9 MHz
AM: 530 - 1710 kHz
Respuesta FM: 30 -15 000 Hz
CD
Respuesta: 20 - 20 000 Hz
¡Sujeto a modifi caciones!
Datos técnicos
05_CalaisMP48_es.indd 15605_CalaisMP48_es.indd 156 11.06.2008 15:15:13 Uhr11.06.2008 15:15:13 Uhr

157
PORTUGUÊS
1 Regulador do volume
2 Tecla BND
Toque breve: selecção dos níveis de
memória ou da banda
Toque longo: iniciar a função Travelstore
(FMT ou MWT/LWT)
3 Tecla de ligar/desligar
Toque breve: ligar o aparelho
Durante o funcionamento: silenciador
(Mute)
Toque longo: desligar o aparelho
4 Tecla de ejecção do CD
5 Compartimento para CD
6 Visor
7 Tecla MENU
Chamar o menu para os ajustes bási-
cos.
8 Tecla multifunções
9 Receptor de infravermelhos para tele-
comando de IV (opcional)
: Tecla AUD
Toque breve: abrir o menu de áudio
para ajuste de baixos, agudos, Balance,
Fader e Loudness
Toque longo (10 seg.): repor os ajustes
de fábrica
; Tecla TA
Ligar/desligar da prioridade dos bole-
tins de trânsito
Interrupção de um boletim de trânsito
em curso
< Bloco de teclas 1 - 6
= Tecla RDS
Ligar/desligar a função de conveniên-
cia RDS
> Tecla SRC
Selecção da fonte entre rádio e (se in-
serido, conectado ou ligado) CD, MP3,
leitor multi-CD e AUX.
? Code LED
Elementos de comando
06_CalaisMP48_pt.indd 15706_CalaisMP48_pt.indd 157 11.06.2008 15:15:46 Uhr11.06.2008 15:15:46 Uhr

158
Informações importantes ............... 160
Utilização de acordo com as
disposições legais ........................ 160
Segurança na estrada .......160
Telecomando (opção) ....... 160
Leitor multi-CD (opção) ....160
Interface USB (opção) ..................160
Remoção de aparelhos usados .......160
Protecção anti-roubo CODE ............161
Ligar/desligar a solicitação do
código (CODE) ............................ 161
Introduzir o código numérico após
interrupção da tensão ................... 162
Ligar/desligar ................................162
Ligar/desligar com a tecla de ligar/
desligar ...................................... 162
Desligar/ligar através da ignição do
automóvel ...................................162
Ligar com a introdução de um CD ... 162
Ajustar o tempo de desactivação .... 163
Ligar pelo telefone (opção)............163
Ligar com o telecomando de IV
RC 10 P (opção) ..........................163
Regular o volume ...........................163
Silenciador (MUTE) ......................163
Silenciador do rádio durante
telefonema/navegação áudio .........163
Ligar/desligar o sinal sonoro de
confi rmação (BEEP) .....................164
Regular o volume inicial máximo
(ON VOL) ....................................164
Regular a adaptação do volume em
função do ruído (GALA): ...............165
Som .............................................. 165
Regular os agudos ........................ 165
Regular os baixos .........................165
Ajustar os médios ........................166
Regular a distribuição do som à
esquerda/direita (BAL) .................166
Regular a distribuição do som à
frente/atrás (FAD)........................ 166
Relógio .......................................167
Chamar a indicação do relógio .......167
Acertar o relógio ..........................167
Seleccionar o modo do relógio
12/24 horas ............................... 167
Regular o fuso horário
(TIMEZONE) ...............................168
Modo de rádio ............................... 168
Ligar o rádio ................................ 168
Função de conveniência RDS
(AF, REG) ...................................168
Seleccionar a banda e/ou o nível
de memória ................................169
Sintonizar as estações .................. 169
Memorizar as estações .................170
Ouvir uma estação memorizada .....170
Tocar brevemente as estações
sintonizáveis (BANDSCAN) ...........171
Tipo de programa (PTY) ................171
Atenuação dos agudos em função
de interferências (HICUT) ............. 171
Ligar/desligar radiotexto ...............172
Boletins de trânsito ........................ 172
Ligar/desligar a prioridade dos
boletins de trânsito ......................172
Regular o aumento do volume dos
boletins de trânsito ......................173
Ocultar os boletins de trânsito .......173
Índice
06_CalaisMP48_pt.indd 15806_CalaisMP48_pt.indd 158 11.06.2008 15:15:47 Uhr11.06.2008 15:15:47 Uhr

159
PORTUGUÊS
Modo de CD ................................... 173
Perigo de destruição da
unidade de CD! ............... 173
Iniciar o modo de CD ........174
Indicação de informações da faixa
(texto de CD) ..............................174
Escolher uma faixa .......................174
Busca rápida (com som) ...............175
Leitura de faixas numa ordem
aleatória (MIX) ............................175
Tocar o início das faixas (SCAN) .....175
Repetição de faixas (RPT) .............175
Interromper a reprodução
(PAUSE) ..................................... 175
Retirar um CD..............................175
Modo de MP3/WMA .......................176
Preparação de um suporte de
dados MP3 ................................. 176
Iniciar o modo de MP3 .................. 178
Indicação de informações da faixa
(tags ID3) ................................... 178
Escolher um directório..................179
Seleccionar a faixa/fi cheiro ........... 179
Busca rápida ............................... 179
Leitura de faixas numa ordem
aleatória (MIX) ............................179
Tocar o início das faixas (SCAN) .....180
Repetição de faixas individuais ou
de directórios completos
(REPEAT) ................................... 180
Interromper a reprodução
(PAUSE) ..................................... 180
Modo de leitor multi-CD .................181
Iniciar o modo multi-CD ................181
Escolher um CD ........................... 181
Escolher uma faixa .......................181
Busca rápida (com som) ...............181
Repetição de faixas individuais ou
de CDs completos (RPT) ...............181
Leitura de faixas numa ordem
aleatória (MIX) ............................181
Tocar o início de todas as faixas de
cada CD (SCAN) ..........................182
Interromper a reprodução
(PAUSE) ..................................... 182
Telecomando de IV RC 10 P ............183
Receptor do telecomando .............183
Funções do telecomando ..............183
Saída do pré-amplifi cador ..............184
Fontes áudio externas ....................185
Confi gurar a entrada AUX ..............185
Ajustar o nível da entrada AUX ....... 186
Repor os ajustes de fábrica
(RESET) ........................................186
Dados técnicos .............................. 187
Tensão de funcionamento .............187
Amplifi cador ............................... 187
Sintonizador ...............................187
CD .............................................187
Ligação ISO ...................................281
Índice
06_CalaisMP48_pt.indd 15906_CalaisMP48_pt.indd 159 11.06.2008 15:15:47 Uhr11.06.2008 15:15:47 Uhr

160
Informações importantes
Informações importantes
Antes de colocar o aparelho em funciona-
mento, leia atentamente estas instruções e
familiarize-se com ele. Guarde estas instru-
ções no veículo, para questões que possam
surgir posteriormente.
Utilização de acordo com as
disposições legais
O aparelho foi concebido para utilização
num veículo utilitário com tensão da rede
de bordo de 24 V e para a montagem numa
abertura DIN 1.
Segurança na estrada
A segurança na estrada tem prio-
ridade máxima. Manipule o seu aparelho
só quando a situação do trânsito o permi-
tir. Familiarize-se com o funcionamento do
aparelho antes de iniciar a viagem. Terá de
estar em condições de ouvir, a tempo, os si-
nais da polícia, dos bombeiros e das ambu-
lâncias, a bordo do seu veículo. Por conse-
guinte, durante a viagem, ouça o programa
sempre num volume adequado à situação.
Telecomando (opção)
Com o telecomando RC 10 P, podem ope-
rar-se as funções mais importantes. Como
acessório, está disponível um teleco-
mando por infravermelhos (Blaupunkt nº
7 607 591 512).
Leitor multi-CD (opção)
Pode conectar o leitor multi-CD CDC
A08 T (Blaupunkt nº 7 607 274 002) ou
IDC A09 (Blaupunkt nº 7 607 274 005).
Os leitores multi-CD estão disponíveis
como acessórios.
Interface USB (opção)
Pode conectar a interface USB Blaupunkt
para reproduzir fi cheiros MP3/WMA de um
suporte de dados USB. A interface USB
está disponível como acessório (Blaupunkt
nº 7 607 541 576).
Remoção de aparelhos usados
Não remova o seu aparelho usado
juntamente com o lixo doméstico!
Para a remoção do aparelho usado,
recorra por favor aos sistemas de devolu-
ção e recolha que estão à sua disposição.
06_CalaisMP48_pt.indd 16006_CalaisMP48_pt.indd 160 11.06.2008 15:15:47 Uhr11.06.2008 15:15:47 Uhr

161
PORTUGUÊS
Protecção anti-roubo
Protecção anti-roubo CODE
O seu aparelho está equipado com um códi-
go numérico de quatro dígitos para protec-
ção contra roubo. Este número tem de ser
sempre introduzido depois de se desligar
o aparelho da tensão de funcionamento do
veículo. A solicitação do código está desac-
tivada de fábrica, mas pode ser activada.
Nota:
Se a solicitação de código estiver ac-
tiva, o Code LED ? começa a piscar
quando estão desligados tanto o apare-
lho como a ignição do automóvel.
Encontrará o código numérico no cartão do
seu rádio.
Nota:
Nunca guarde o cartão do rádio no
veículo!
Ligar/desligar a solicitação do
código (CODE)
Prima a tecla MENU 7.
Prima as vezes necessárias a tecla
ou
8, até "CODE" e o ajuste actu-
al "ON" (ligado) ou "OFF" (desligado)
aparecerem no visor 6.
Prima a tecla
ou 8.
O visor 6 indica "0000". Introduza o
código:
Nota:
Se introduzir um código numérico erra-
do, o visor volta a indicar "0000" 6.
Ainda pode repetir a introdução duas
vezes. Após a terceira introdução erra-
da, o aparelho fi ca bloqueado durante
1 hora. Durante esse período, o visor
indica "WAIT 1HR" 6. Se desligar o
쏅
쏅
쏅
aparelho durante este tempo de espe-
ra, terá de aguardar novamente uma
hora completa após a reactivação.
Prima as vezes necessárias a tecla de
pré-selecção 1 <, até o primeiro al-
garismo do seu código numérico apa-
recer no visor 6.
Prima as vezes necessárias a tecla de
pré-selecção 2 <, até o segundo al-
garismo do seu código numérico apa-
recer no visor 6.
Prima as vezes necessárias a tecla de
pré-selecção 3 <, até o terceiro alga-
rismo do seu código numérico apare-
cer no visor 6.
Prima as vezes necessárias a tecla de
pré-selecção 4 <, até o quarto alga-
rismo do seu código numérico apare-
cer no visor 6.
Quando o código numérico correcto
aparecer no visor 6, mantenha a te-
cla de pré-selecção 5 < premida por
mais de 2 segundos.
No visor 6 são novamente indicados
"CODE" e o ajuste actual "ON" (ligado) ou
"OFF" (desligado).
Prima a tecla
ou 8, para desligar
ou ligar a solicitação de código.
Para abandonar o menu,
prima a tecla MENU 7.
쏅
쏅
쏅
쏅
쏅
쏅
쏅
06_CalaisMP48_pt.indd 16106_CalaisMP48_pt.indd 161 11.06.2008 15:15:47 Uhr11.06.2008 15:15:47 Uhr

162
Introduzir o código numérico
após interrupção da tensão
Ligue o aparelho.
No visor 6 aparece primeiro "CODE" e de-
pois "0000". Pode introduzir o código:
Nota:
Se introduzir um código numérico erra-
do, o visor volta a indicar "0000" 6.
Ainda pode repetir a introdução duas
vezes. Após a terceira introdução erra-
da, o aparelho fi ca bloqueado durante
1 hora. Durante esse período, o visor
indica "WAIT 1HR" 6. Se desligar o
aparelho durante este tempo de espe-
ra, terá de aguardar novamente uma
hora completa após a reactivação.
Introduza o código numérico tal como
descrito no parágrafo "Ligar/desligar a
solicitação do código".
Quando o código numérico correcto
aparecer no visor 6, mantenha a te-
cla de pré-selecção 5 < premida por
mais de 2 segundos.
O aparelho liga-se.
쏅
쏅
쏅
Ligar/desligar
Há várias possibilidades para ligar e desli-
gar o aparelho:
Ligar/desligar com a tecla de
ligar/desligar
Para ligar, prima a tecla de ligar/desli-
gar 3.
Para desligar, mantenha a tecla de li-
gar/desligar 3 premida por mais de
dois segundos.
Nota:
Para proteger a bateria do automóvel, o
aparelho é automaticamente desligado
com a ignição do automóvel desligada,
após um período de tempo regulável
(consultar o parágrafo "Ajustar o tempo
de desactivação" neste capítulo).
Desligar/ligar através da ignição
do automóvel
Se o aparelho estiver conectado à ignição
do automóvel e se não for desligado com a
tecla 3, ele liga-se e desliga-se juntamen-
te com a ignição do automóvel.
Ligar com a introdução de um CD
Para ligar com a introdução de um CD,
insira um CD no compartimento para
CD, com o lado impresso para cima
5, até sentir uma ligeira resistência.
O disco é recolhido automaticamente, o
aparelho liga-se no modo de CD.
쏅
쏅
쏅
Protecção anti-roubo Ligar/desligar
06_CalaisMP48_pt.indd 16206_CalaisMP48_pt.indd 162 11.06.2008 15:15:47 Uhr11.06.2008 15:15:47 Uhr

163
PORTUGUÊS
Ajustar o tempo de desactivação
Prima a tecla MENU 7.
Prima as vezes necessárias a tecla
ou
8, até "HOUR" e a opção actu-
almente seleccionada aparecerem no
visor 6.
Regule o tempo de desactivação com a
tecla
ou 8 em passos de 5 minu-
tos, entre 5 e 60 minutos.
Para abandonar o menu,
prima a tecla MENU 7.
Ligar pelo telefone (opção)
Se, com o aparelho desligado, se activar o
telefone, o aparelho liga-se. Depois de des-
ligar o telefone, o aparelho desliga-se de
novo, automaticamente. É condição obri-
gatória que o telefone esteja correctamente
ligado ao aparelho.
Ligar com o telecomando de IV
RC 10 P (opção)
Para ligar, prima a tecla ON H no tele-
comando de IV RC 10 P.
Nota:
O receptor de infravermelhos do apa-
relho tem de estar ligado para que
possa utilizar o telecomando de IV.
Para tal, leia também o parágrafo
"Receptor do telecomando" no capítulo
"Telecomando de IV RC 10 P".
쏅
쏅
쏅
쏅
쏅
Regular o volume
O volume do sistema pode ser regulado em
passos de 0 (desligado) a 32 (máximo).
Para aumentar o volume do sistema,
rode o regulador do volume 1 para a
direita.
Para baixar o volume do sistema, rode
o regulador do volume 1 para a es-
querda.
Silenciador (MUTE)
Pode silenciar o volume do sistema de for-
ma repentina (Mute).
Prima brevemente a tecla 3.
Desligar o silenciador (Mute)
Para voltar a activar o volume anteriormen-
te ouvido,
volte a premir brevemente a tecla 3.
Silenciador do rádio durante
telefonema/navegação áudio
Silenciador durante a utilização do telefone
Se o seu auto-rádio estiver ligado a um tele-
móvel ou sistema de navegação, o volume
do auto-rádio é suprimido no momento em
que uma chamada dá entrada ou em que
é emitida uma recomendação acústica do
sistema de navegação. O telefonema ou a
recomendação acústica são reproduzidos
através dos altifalantes do auto-rádio.
Para o efeito, é necessário que o telemóvel
ou o sistema de navegação estejam ligados
ao auto-rádio (conector C2 na parte de trás
do aparelho).
Para saber quais sistemas de navegação
são compatíveis com o seu auto-rádio, diri-
ja-se a um revendedor Blaupunkt.
쏅
쏅
쏅
쏅
Ligar/desligar Volume
06_CalaisMP48_pt.indd 16306_CalaisMP48_pt.indd 163 11.06.2008 15:15:48 Uhr11.06.2008 15:15:48 Uhr

164
Se receber uma chamada ou for emitida
uma mensagem do sistema de navegação,
é indicado "PHONE" no visor.
Regular o volume para o silenciador do
rádio durante telefonema/navegação
áudio (PHONEVOL)
O volume das chamadas telefónicas ou das
recomendações acústicas do sistema de
navegação pode ser ajustado:
Prima a tecla MENU 7.
Prima as vezes necessárias a tecla
ou
8, até "PHONEVOL" ser indi-
cado.
Após aprox. 2 segundos, são apresentados
no visor 6 "VOL" e o ajuste actual.
Prima a tecla
ou 8 para regular o
volume entre 0 e 32.
Nota:
Não precisa aguardar pela indicação do
ajuste actual para o alterar premindo a
tecla
ou 8.
Para abandonar o menu,
prima a tecla MENU 7.
Nota:
Também pode regular o volume du-
rante uma chamada telefónica ou uma
mensagem de navegação usando o re-
gulador 1. O volume regulado é me-
morizado automaticamente.
Ligar/desligar o sinal sonoro de
confi rmação (BEEP)
Ao efectuar determinadas acções, p. ex., ao
premir longamente um tecla, soa um sinal
sonoro de confi rmação (Beep). Pode desli-
gar o sinal sonoro de confi rmação:
쏅
쏅
쏅
쏅
Prima a tecla MENU 7.
Prima as vezes necessárias a tecla
ou
8, até "BEEP" e o ajuste actu-
al "ON" (ligado) ou "OFF" (desligado)
aparecerem no visor 6.
Prima a tecla
ou 8 para desligar
ou ligar o "Beep".
Para abandonar o menu,
prima a tecla MENU 7.
Regular o volume inicial máximo
(ON VOL)
Quando liga o aparelho, este reproduz o vo-
lume de som seleccionado em último lugar.
No entanto, se, antes de desligar o apare-
lho, regular um volume mais elevado do
que o volume inicial máximo, o volume será
automaticamente limitado ao volume inicial
regulado quando voltar a ligar o aparelho.
Nota:
Para proteger a audição, o volume
inicial máximo está limitado ao valor
"25".
Prima a tecla MENU 7.
Prima as vezes necessárias a tecla
ou
8, até "ON VOL" aparecer no
visor.
Após aprox. 2 segundos, são apresentados
no visor 6 "VOL" e o ajuste actual.
Prima a tecla
ou 8 para regular o
volume inicial máximo entre 5 e 25.
Nota:
Não precisa aguardar pela indicação do
ajuste actual para o alterar premindo a
tecla
ou 8.
Para abandonar o menu,
prima a tecla MENU 7.
쏅
쏅
쏅
쏅
쏅
쏅
쏅
쏅
Volume
06_CalaisMP48_pt.indd 16406_CalaisMP48_pt.indd 164 11.06.2008 15:15:48 Uhr11.06.2008 15:15:48 Uhr

165
PORTUGUÊS
Regular a adaptação do volume
em função do ruído (GALA):
Esta função faz com que o volume do auto-
rádio seja adaptado automaticamente à ve-
locidade do seu automóvel e aos ruídos de
condução daí resultantes. Por exemplo, o
volume é automaticamente aumentado de
acordo com a velocidade, para compensar
os ruídos de condução que aumentam de
intensidade (p. ex. através de ar desloca-
do).
Para o efeito, é necessário que o seu veícu-
lo disponibilize o sinal do velocímetro e o
auto-rádio esteja devidamente conectado.
O aumento automático do volume pode
ser regulado em 6 níveis (OFF (desligado),
1-5).
Prima a tecla MENU 7.
Prima as vezes necessárias a tecla
ou
8, até "GALA" e o ajuste actual
aparecerem.
Prima a tecla
ou 8 para regular a
adaptação do volume entre "OFF" (des-
ligado) e 5.
Para abandonar o menu,
prima a tecla MENU 7.
쏅
쏅
쏅
쏅
Som
Regular os agudos
Prima a tecla AUD :.
Prima as vezes necessárias a tecla
ou
8, até "TREBLE" ser indicado.
Mantenha a tecla
ou 8 premida
por mais de 2 segundos.
No visor, aparece brevemente "FREQ" e,
de seguida, a frequência de agudos actual-
mente seleccionada.
Para seleccionar outra frequência de agu-
dos entre 10,0 kHz e 17,5 kHz,
prima a tecla
ou 8.
Para ajustar o nível de agudos,
prima as vezes necessárias a tecla
ou
8, até "GAIN" ser indicado.
Após aprox. 2 segundos, são apresentados
"GAIN" e o ajuste actual.
Prima a tecla
ou 8 para ajustar o
nível de agudos entre –7 e +7.
Para abandonar o menu,
prima a tecla AUD :.
Regular os baixos
Prima a tecla AUD :.
Prima as vezes necessárias a tecla
ou
8, até "BASS" ser indicado.
Mantenha a tecla
ou 8 premida
por mais de 2 segundos.
No visor, aparece brevemente "FREQ" e, de
seguida, a frequência de baixos actualmen-
te seleccionada.
Para seleccionar outra frequência de baixos
entre 60 kHz e 200 kHz,
prima a tecla
ou 8.
쏅
쏅
쏅
쏅
쏅
쏅
쏅
쏅
쏅
쏅
쏅
Volume Som
06_CalaisMP48_pt.indd 16506_CalaisMP48_pt.indd 165 11.06.2008 15:15:48 Uhr11.06.2008 15:15:48 Uhr

166
Prima a tecla ou 8 para ajustar o
nível de médios entre –7 e +7.
Para escolher o factor de qualidade para os
médios,
prima as vezes necessárias a tecla
ou
8, até "Q FACTOR" ser indicado.
Após aprox. 2 segundos, são apresentados
"Q" e o ajuste actual.
Prima a tecla
ou 8 para ajustar o
factor de qualidade entre 0,5 e 1,25.
Para abandonar o menu,
prima a tecla AUD :.
Regular a distribuição do som à
esquerda/direita (BAL)
Prima a tecla AUD :.
Prima as vezes necessárias a tecla
ou
8, até "BAL" e o ajuste actual
aparecerem.
Prima a tecla
ou 8 para regular a
distribuição do som à esquerda/direita
entre –10 e +10.
Para abandonar o menu,
prima a tecla AUD :.
Regular a distribuição do som à
frente/atrás (FAD)
Nota
Os altifalantes traseiros têm de ser li-
gados através de um amplifi cador adi-
cional.
Prima a tecla AUD :.
Prima as vezes necessárias a tecla
ou
8, até "FAD" e o ajuste actual
aparecerem.
쏅
쏅
쏅
쏅
쏅
쏅
쏅
쏅
쏅
쏅
Para ajustar o nível de baixos,
prima as vezes necessárias a tecla
ou
8, até "GAIN" ser indicado.
Após aprox. 2 segundos, são apresentados
"GAIN" e o ajuste actual.
Prima a tecla
ou 8 para ajustar o
nível de baixos entre –7 e +7.
Para escolher o factor de qualidade para os
baixos,
prima as vezes necessárias a tecla
ou
8, até "Q FACTOR" ser indicado.
Após aprox. 2 segundos, são apresentados
"Q" e o ajuste actual.
Prima a tecla
ou 8 para ajustar o
factor de qualidade entre 1,0 e 2,0.
Para abandonar o menu,
prima a tecla AUD :.
Ajustar os médios
Prima a tecla AUD :.
Prima as vezes necessárias a tecla
ou
8, até "MIDDLE" ser indicado.
Mantenha a tecla
ou 8 premida
por mais de 2 segundos.
No visor, aparece brevemente "FREQ" e, de
seguida, a frequência central actualmente
seleccionada.
Para seleccionar outra frequência central
entre 500 kHz e 2,5 kHz,
prima a tecla
ou 8.
Para ajustar o nível de médios,
prima as vezes necessárias a tecla
ou
8, até "GAIN" ser indicado.
Após aprox. 2 segundos, são apresentados
"GAIN" e o ajuste actual.
쏅
쏅
쏅
쏅
쏅
쏅
쏅
쏅
쏅
쏅
Som
06_CalaisMP48_pt.indd 16606_CalaisMP48_pt.indd 166 11.06.2008 15:15:48 Uhr11.06.2008 15:15:48 Uhr

167
PORTUGUÊS
Prima a tecla ou 8 para regular a
distribuição do som à frente/atrás en-
tre –10 e +10.
Para abandonar o menu,
prima a tecla AUD :.
쏅
쏅
Relógio
Chamar a indicação do relógio
Para apresentar o relógio no visor durante
aprox. 10 segundos,
mantenha a tecla MENU 7 premida
por mais de 2 segundos.
Acertar o relógio
Prima a tecla MENU 7.
Prima as vezes necessárias a tecla
ou
8, até "TIMESET" ser apresen-
tado no visor 6.
Após aprox. 2 segundos aparece a hora ac-
tual no visor 6. Antes da hora, é apresen-
tado "24H" no modo de 24 horas e "AM" ou
"PM" no modo de 12 horas. As horas pis-
cam indicando que podem ser acertadas.
Para acertar as horas ou os minutos,
prima a tecla
ou 8.
Para comutar entre horas e minutos,
prima a tecla 6 <.
Nota:
Não precisa aguardar pela indicação da
hora actual para a alterar premindo a
tecla
ou 8.
Para abandonar o menu,
prima a tecla MENU 7.
Seleccionar o modo do relógio
12/24 horas
Prima a tecla MENU 7.
Prima as vezes necessárias a tecla
ou
8, até "24 H MODE" ou "12 H
MODE" aparecer no visor 6.
Prima a tecla
ou 8 para mudar
entre os modos.
쏅
쏅
쏅
쏅
쏅
쏅
쏅
쏅
쏅
Som Relógio
06_CalaisMP48_pt.indd 16706_CalaisMP48_pt.indd 167 11.06.2008 15:15:49 Uhr11.06.2008 15:15:49 Uhr

168
Para abandonar o menu,
prima a tecla MENU 7.
Regular o fuso horário
(TIMEZONE)
Caso se desloque através de vários fusos
horários, pode regular a diferença horária
da hora actualmente ajustada em passos
de 1 hora. Desta forma, pode corrigir a in-
dicação do relógio para o fuso horário ac-
tualmente válido, sem que tenha de acertar
novamente as horas em si.
Prima a tecla MENU 7.
Prima as vezes necessárias a tecla
ou
8, até "TIMEZONE" ser indica-
do.
Após aprox. 2 segundos, são apresentados
no visor 6 "ZONE" e o ajuste actual.
Prima a tecla
ou 8 para ajustar a
diferença horária em passos de 1 hora
entre –12 e +12.
Nota:
Não precisa aguardar pela indicação do
ajuste actual para o alterar premindo a
tecla
ou 8.
Para abandonar o menu,
prima a tecla MENU 7.
쏅
쏅
쏅
쏅
쏅
Modo de rádio
Este aparelho está equipado com um recep-
tor de rádio RDS. Quase todas as estações
sintonizáveis em FM transmitem um sinal
que, para além do programa, contém in-
formações adicionais, como, por exemplo,
o nome da estação ou o tipo de programa
transmitido (PTY).
O nome da estação é exibido no visor 6,
logo que seja captado.
Ligar o rádio
Se se encontrar num outro modo de funcio-
namento,
prima a tecla BND 2,
ou
prima as vezes necessárias a tecla SRC
>, até "RADIO" aparecer no visor 6.
No visor 6 é indicada a frequência actual
ou o nome da estação.
Função de conveniência RDS
(AF, REG)
As funções de conveniência RDS AF (fre-
quência alternativa) e REG (regional) am-
pliam o espectro de potência do seu rádio:
AF: se a função de conveniência RDS
estiver activa, o aparelho procura au-
tomaticamente, num plano de fundo,
a frequência com melhor recepção da
estação sintonizada.
REG: algumas estações, a determinada
hora, subdividem os programas em vá-
rios programas regionais, com conteú-
dos diferentes. Com a função REG ac-
tivada, evita-se que o aparelho comute
para frequências alternativas da estação
sintonizada com programas diferentes.
쏅
쏅
•
•
Relógio Modo de rádio
06_CalaisMP48_pt.indd 16806_CalaisMP48_pt.indd 168 11.06.2008 15:15:49 Uhr11.06.2008 15:15:49 Uhr

169
PORTUGUÊS
Nota:
O REG deve ser ligado ou desligado se-
paradamente no menu.
Ligar/desligar a função de
conveniência RDS
Se desejar usar as funções RDS (AF e
REG), prima a tecla RDS =.
As funções de conveniência RDS estão ac-
tivas quando o símbolo RDS aparece no
visor 6
Ligar/desligar a função REG
Prima a tecla MENU 7.
Prima as vezes necessárias a tecla
ou
8, até "REG" e o ajuste actu-
al "ON" (ligado) ou "OFF" (desligado)
aparecerem no visor 6.
Prima a tecla
ou 8 para desligar
ou ligar REG.
Para abandonar o menu,
prima a tecla MENU 7.
Nota:
O ajuste REG ON/OFF só actua se a fun-
ção RDS estiver activa.
Seleccionar a banda e/ou o nível
de memória
Este aparelho permite-lhe captar progra-
mas das faixas de frequência FM, MW e LW
(Europa) ou FM e AM (NAFTA). Para a ban-
da FM, está disponível uma memória com
três níveis (FM1, FM2 e FMT) e, para cada
uma das bandas MW e LW ou AM, um nível.
Adicionalmente, existe um outro nível de
memória MWT/LWT ou AMT. Em cada nível
podem guardar-se 6 estações emissoras
diferentes.
쏅
쏅
쏅
쏅
쏅
Para comutar entre as bandas ou os níveis
de memória,
prima a tecla BND 2.
Sintonizar as estações
Há várias possibilidades para sintonizar as
estações emissoras.
Sintonização automática
Prima a tecla
ou 8.
O aparelho sintoniza a próxima estação que
consiga captar.
Notas:
Se a prioridade dos boletins de trân-
sito estiver ligada, é sintonizada a
estação com boletins de trânsito se-
guinte.
Se a função PTY estiver ligada, é sin-
tonizada a estação do tipo de progra-
ma seleccionado seguinte.
Defi nir a sensibilidade de sintonia
automática
Pode seleccionar se, com baixa sensibilida-
de, pretende ajustar apenas emissoras de
sinal forte ou, com elevada sensibilidade,
também emissoras de sinal fraco.
Prima a tecla MENU 7.
Prima as vezes necessárias a tecla
ou
8, até "SENS" e o ajuste actu-
al "LO" (baixa sensibilidade) ou "DX"
(elevada sensibilidade) aparecerem no
visor 6.
Prima a tecla
ou 8 para mudar
entre os ajustes "LO" e "DX".
Para abandonar o menu,
prima a tecla MENU 7.
쏅
쏅
•
•
쏅
쏅
쏅
쏅
Modo de rádio
06_CalaisMP48_pt.indd 16906_CalaisMP48_pt.indd 169 11.06.2008 15:15:49 Uhr11.06.2008 15:15:49 Uhr

170
Sintonia manual
Para alterar a frequência ajustada em pe-
quenos passos,
prima a tecla
ou 8.
Para alterar rapidamente a frequência ajus-
tada,
mantenha a tecla
ou 8 premida.
Nota:
A sintonização manual das estações só
é possível, enquanto as funções RDS e
PTY estão desactivadas.
Percorrer as cadeias de estações
(só em FM)
Quando uma estação disponibiliza vários
programas, é possível percorrer esta desig-
nada "cadeia de estações".
Prima a tecla
ou 8 para mudar
para a próxima estação pertencente à
mesma cadeia de estações.
Nota:
Só é possível percorrer as cadeias de
estações enquanto a função RDS esti-
ver ligada e a função PTY desligada. Só
poderá mudar para as estações que já
tenha recebido anteriormente. Para o
efeito, use, p. ex., a função Travelstore
(T-STORE).
Memorizar as estações
Memorizar as estações manualmente
Seleccione o nível de memória ou ban-
da pretendidos.
Sintonize a estação.
쏅
쏅
쏅
쏅
쏅
Prima a tecla de pré-selecção 1 - 6 <
na qual pretende memorizar a estação,
e mantenha-a premida por mais de
2 segundos.
Ouve-se o sinal sonoro de confi rmação.
A estação é memorizada na tecla de pré-
selecção seleccionada.
Memorizar as estações
automaticamente (T-STORE)
As 6 estações mais fortes na região podem
ser guardadas automaticamente na me-
mória. Para a banda FM, a memorização é
efectuada no nível de memória FMT; para
as bandas MW e LW, nos níveis MWT/LWT;
e, para a banda AM, no nível de memória
AMT.
Nota:
Para o efeito, as estações memorizadas
anteriormente neste nível são substitu-
ídas pelas novas estações sintoniza-
das.
Seleccione a banda pretendida.
Mantenha a tecla BND 2 premida por
mais de dois segundos.
Inicia-se a memorização. No visor 6, é
indicado "T-STORE". Uma vez terminada
a memorização, o aparelho toca a estação
guardada na posição um do nível de memó-
ria FMT, MWT/LWT ou AMT.
Ouvir uma estação memorizada
Seleccione o nível de memória ou a
banda pretendida.
Prima a tecla de pré-selecção 1 - 6 <
na qual está memorizada a estação pre-
tendida.
쏅
쏅
쏅
쏅
쏅
Modo de rádio
06_CalaisMP48_pt.indd 17006_CalaisMP48_pt.indd 170 11.06.2008 15:15:49 Uhr11.06.2008 15:15:49 Uhr

171
PORTUGUÊS
Tocar brevemente as estações
sintonizáveis (BANDSCAN)
A função Bandscan permite-lhe tocar todas
as estações sintonizáveis durante cerca de
10 segundos.
Iniciar Bandscan
Mantenha a tecla
ou 8 premida
por mais de 2 segundos.
O visor indica "BANDSCAN" por breves mo-
mentos. O aparelho procura estações na
banda actual. Cada estação sintonizada é
reproduzida durante aprox. 10 segundos.
Ao mesmo tempo, é indicada a frequência
sintonizada ou o nome da estação.
Terminar Bandscan
Prima a tecla
ou 8.
O modo Scan é terminado. A estação sinto-
nizada em último lugar permanece sintoni-
zada.
Tipo de programa (PTY)
Algumas estações em FM, juntamente com
o seu nome, transmitem informações adi-
cionais sobre o tipo de programa transmi-
tido. Os tipos de programa incluem, por
exemplo:
CULTURA VIAGENS JAZZ DESPORTO
NOTÍCIAS POP ROCK MÚSICA
A função PTY facilita-lhe a busca de esta-
ções que transmitem determinados tipos
de programa.
Com a função PTY ligada, e tendo-se inicia-
do uma busca PTY, o aparelho muda auto-
maticamente da estação actual ou de outro
modo de funcionamento para a estação
com o tipo de programa seleccionado.
쏅
쏅
Ligar/desligar a função PTY
Prima a tecla MENU 7.
Prima as vezes necessárias a tecla
ou
8, até "PTY" e o ajuste actu-
al "ON" (ligado) ou "OFF" (desligado)
aparecerem no visor 6.
Prima a tecla
ou 8, para desligar
ou ligar a função PTY.
Para abandonar o menu,
prima a tecla MENU 7.
Seleccionar um tipo de programa e
iniciar a busca
Prima as vezes necessárias a tecla
ou
8, até o tipo de programa pre-
tendido aparecer no visor.
Prima a tecla
ou 8 para iniciar a
busca.
Caso seja encontrada uma estação com o
tipo de programa seleccionado, ela é sin-
tonizada.
Atenuação dos agudos em
função de interferências (HICUT)
A função Hicut permite-lhe melhorar a re-
produção quando a recepção começa a fi -
car fraca. Se existirem perturbações na re-
cepção, o nível de ruído é automaticamente
reduzido.
Para ligar ou desligar HICUT,
prima a tecla MENU 7.
Prima as vezes necessárias a tecla
ou
8, até "HICUT" e o ajuste actu-
al "ON" (ligado) ou "OFF" (desligado)
aparecerem no visor 6.
Prima a tecla
ou 8 para desligar
ou ligar o HICUT.
쏅
쏅
쏅
쏅
쏅
쏅
쏅
쏅
쏅
Modo de rádio
06_CalaisMP48_pt.indd 17106_CalaisMP48_pt.indd 171 11.06.2008 15:15:50 Uhr11.06.2008 15:15:50 Uhr

172
Para abandonar o menu,
prima a tecla MENU 7.
Ligar/desligar radiotexto
Algumas estações de rádio aproveitam o
sinal RDS para transmitir publicidade ou
outras informações em vez do nome. Este
radiotexto é indicado no visor 6.
Para ligar ou desligar a indicação de radio-
texto,
prima a tecla MENU 7.
Prima as vezes necessárias a tecla
ou
8, até "RADIOTXT" ser indicado.
Após aprox. 2 segundos, é indicado o ajus-
te actual "TEXT ON" (ligado) ou "TEXT OFF"
(desligado) no visor 6.
Prima a tecla
ou 8 para desligar
ou ligar a indicação do radiotexto.
Nota:
Não precisa aguardar pela indicação do
ajuste actual para o alterar premindo a
tecla
ou 8.
Para abandonar o menu,
prima a tecla MENU 7.
쏅
쏅
쏅
쏅
쏅
Boletins de trânsito
Ligar/desligar a prioridade dos
boletins de trânsito
Para ligar ou desligar a prioridade dos bo-
letins de trânsito em cada modo de funcio-
namento,
prima a tecla TA ;.
Nota:
Nos modos de funcionamento CD,
MP3, leitor multi-CD e AUX, esta fun-
ção só está disponível se, por último,
estava sintonizada a banda FM.
A prioridade dos boletins de trânsito está
activa, enquanto o símbolo TA é apresenta-
do no visor 6. Assim que o aparelho rece-
be um boletim de trânsito, este é emitido.
No visor 6, é apresentado "TRAFFIC" du-
rante o boletim.
Nota:
Soa um sinal sonoro,
quando, durante a escuta da estação
com boletins de trânsito ou de um
CD, abandona a zona de emissão da
estação sintonizada que transmite
boletins de trânsito e o aparelho, na
busca automática subsequente, não
encontra uma nova estação que dis-
ponibilize este serviço.
quando mudar de uma estação com
boletins de trânsito para uma estação
que não disponibiliza este serviço.
Nestes casos, desligue a prioridade dos
boletins de trânsito ou mude para uma
estação que suporta este serviço.
쏅
•
•
Modo de rádio Boletins de trânsito
06_CalaisMP48_pt.indd 17206_CalaisMP48_pt.indd 172 11.06.2008 15:15:50 Uhr11.06.2008 15:15:50 Uhr

173
PORTUGUÊS
Regular o aumento do volume
dos boletins de trânsito
Pode regular em quantos níveis de volume
mais alto deverão ser emitidos os boletins
de trânsito em relação ao volume ajustado:
Prima a tecla MENU 7.
Prima as vezes necessárias a tecla
ou
8, até "TA VOL" aparecer no
visor.
Após aprox. 2 segundos, são apresentados
no visor 6 "VOL" e o ajuste actual.
Prima a tecla
ou 8 para regular o
aumento do volume entre 0 e 10.
Nota:
Não precisa aguardar pela indicação do
ajuste actual para o alterar premindo a
tecla
ou 8.
Para abandonar o menu,
prima a tecla MENU 7.
Nota:
O volume dos boletins de trânsito pode
ser regulado durante um boletim usan-
do-se o regulador 1.
Ocultar os boletins de trânsito
Para interromper um boletim de trânsito em
curso e para regressar à fonte áudio ante-
riormente escutada,
prima a tecla TA ;.
A prioridade dos boletins de trânsito per-
manece ligada.
쏅
쏅
쏅
쏅
쏅
Modo de CD
Este aparelho permite a leitura de CDs de
áudio, CD-Rs e CD-RWs comerciais, com
um diâmetro de 12 cm. Por forma a evitar
problemas durante a leitura, não deve gra-
var os seus CDs a uma velocidade superior
a 16X.
Perigo de destruição da
unidade de CD!
Não é permitido ler CDs single com um di-
âmetro de 8 cm, nem os CDs de contornos
realçados ("shape CDs").
Trate o CD com cuidado e evite riscos e da-
nos no CD. Se possível, segure no CD ape-
nas pelos bordos. Se o CD fi car sujo, limpe-
o com um pano que não largue pêlos, sem
adição de solventes. Limpe sempre o CD de
dentro para fora.
Não exponha o CD à incidência directa da
luz do Sol, e guarde o CD fora do aparelho,
numa capa de protecção.
Não cole quaisquer etiquetas no CD.
Legende os CD apenas com marcadores
adequados, correntes no mercado.
Não assumimos qualquer responsabilidade
por danifi cações na unidade de CD causa-
das pela utilização de CDs impróprios ou
danifi cados.
Para um funcionamento correcto, utili-
ze apenas CDs com o logotipo "Compact
Disc". O CDs protegidos contra cópia po-
dem causar difi culdades de reprodução. A
Blaupunkt não pode garantir um funciona-
mento correcto de CDs protegidos contra
cópia!
Boletins de trânsito Modo de CD
06_CalaisMP48_pt.indd 17306_CalaisMP48_pt.indd 173 11.06.2008 15:15:50 Uhr11.06.2008 15:15:50 Uhr

174
Iniciar o modo de CD
Não havendo nenhum disco na unidade,
insira o CD no compartimento para CD,
sem exercer qualquer força, com o lado
impresso para cima, até sentir uma re-
sistência.
O disco é recolhido automaticamente para
dentro da unidade. No visor 6 aparece o
símbolo de CD.
Nota:
A recolha do CD não deve ser impedida
nem apoiada.
O aparelho começa a reproduzir o CD. No
visor 6, são apresentados o número da
faixa actual (p. ex., "T12") e o tempo de re-
produção, bem como informações da faixa
(texto de CD).
Havendo já um CD na unidade,
prima as vezes necessárias a tecla SRC
>, até "CD" aparecer no visor 6.
O leitor começa a leitura a partir do ponto
em que foi interrompido.
Indicação de informações da
faixa (texto de CD)
Se o CD disponibilizar texto de CD, a infor-
mação sobre cada faixa é apresentada no
início da faixa, uma vez, como texto rolante,
no visor 6.
Apresentar informações da faixa uma
vez como texto rolante
Prima a tecla 5 <.
O texto de CD relativo à faixa actual é apre-
sentado uma vez como texto rolante no vi-
sor 6.
쏅
쏅
쏅
Nota:
Esta função não está disponível se a
indicação de texto de CD como texto
rolante estiver desligada (consultar o
parágrafo seguinte).
Ligar/desligar a indicação de
informações da faixa como texto rolante
Para ligar ou desligar a indicação de infor-
mações da faixa como texto rolante,
prima a tecla MENU 7.
Prima as vezes necessárias a tecla
ou
8, até "SCRL" e o ajuste actu-
al "ON" (ligado) ou "OFF" (desligado)
aparecerem no visor 6.
Prima a tecla
ou 8 para ligar ou
desligar o texto rolante.
Para abandonar o menu,
prima a tecla MENU 7.
Com o ajuste "SCRL OFF", a informação da
faixa é apresentada no visor 6 em pará-
grafos de 8 caracteres. Nessa ocasião, cada
parágrafo de texto, bem como o número da
faixa e o tempo de reprodução, são apre-
sentados em mudança contínua durante
5 segundos, respectivamente.
Nota:
O ajuste "SCRL ON/OFF" também ac-
tua em conformidade na indicação de
informações da faixa MP3 (tags ID3) no
modo de MP3.
Escolher uma faixa
Prima a tecla ou 8 para mudar
para a faixa anterior ou seguinte.
Premindo uma única vez a tecla
8, a fai-
xa actual volta a ser lida.
쏅
쏅
쏅
쏅
쏅
Modo de CD
06_CalaisMP48_pt.indd 17406_CalaisMP48_pt.indd 174 11.06.2008 15:15:50 Uhr11.06.2008 15:15:50 Uhr

175
PORTUGUÊS
Busca rápida (com som)
Para efectuar uma busca rápida para trás
ou para a frente,
mantenha a tecla ou 8 premida
até alcançar o ponto pretendido.
Leitura de faixas numa ordem
aleatória (MIX)
Prima a tecla 3 <.
No visor 6, surge brevemente "MIX CD" e
o símbolo MIX. As faixas seguintes são se-
leccionadas aleatoriamente.
Terminar a função MIX
Prima novamente a tecla 3 <.
No visor 6, surge brevemente "MIX OFF"
e o símbolo MIX apaga-se. A leitura prosse-
gue de forma normal.
Tocar o início das faixas (SCAN)
Para reproduzir cada uma das faixas do CD
durante aprox. 10 segundos,
prima a tecla 4 <.
O visor indica "SCAN TRK" por breves mo-
mentos. Durante a reprodução, a indicação
"CD" pisca. Apresenta-se o número da faixa
e o tempo de reprodução da faixa actual ou
as respectivas informações da faixa.
Terminar a busca SCAN, continuar a
ouvir uma faixa
Para terminar o modo Scan,
prima novamente a tecla 4 <.
O visor indica "SCAN OFF" por breves mo-
mentos. Prossegue a reprodução da faixa
actual.
쏅
쏅
쏅
쏅
쏅
Repetição de faixas (RPT)
Prima a tecla 2 <.
A informação "RPT TRK" surge brevemente
no visor e o símbolo RPT é apresentado. O
leitor repete a faixa actual, até se desactivar
a função RPT.
Terminar a função RPT
Prima novamente a tecla 2 <.
A informação "RPT OFF" 6 surge breve-
mente no visor e o símbolo RPT apaga-se. A
leitura prossegue de forma normal.
Interromper a reprodução
(PAUSE)
Prima a tecla 1 <.
No visor 6 é indicado "PAUSE".
Cancelar a pausa
Durante a pausa, prima a tecla 1 <.
A reprodução prossegue.
Retirar um CD
Nota:
Também poderá extrair os CDs quando
o aparelho está desligado ou se estiver
activa uma outra fonte áudio.
Prima a tecla de ejecção do CD 4.
O disco é ejectado. O visor indica breve-
mente "CD EJECT".
Nota:
A ejecção do CD não deve ser impedida
nem apoiada.
Retire o CD.
O símbolo CD apaga-se.
쏅
쏅
쏅
쏅
쏅
쏅
Modo de CD
06_CalaisMP48_pt.indd 17506_CalaisMP48_pt.indd 175 11.06.2008 15:15:50 Uhr11.06.2008 15:15:50 Uhr

176
Nota:
Se não retirar um CD ejectado, ele volta
a ser automaticamente recolhido após
aprox. 10 segundos.
Modo de MP3/WMA
Este auto-rádio permite-lhe a leitura de CD-
Rs e CD-RWS com fi cheiros de música MP3 e
WMA. Além disso, e através da interface USB
opcional C‘n‘C, pode conectar suportes de
dados USB e reproduzir fi cheiros MP3/WMA
memorizados no suporte de dados USB.
Este capítulo refere apenas a reprodução
de fi cheiros MP3, pois a utilização com
fi cheiros MP3 e WMA é idêntica. Neste
capítulo, a designação "suporte de dados
MP3" refere-se tanto ao CD-R/RW como a
suportes de dados USB como, p. ex., cane-
tas USB.
Notas:
Com este aparelho, não é possível re-
produzir fi cheiros WMA com gestão
de direitos de autor (Digital Rights
Management - DRM) de lojas de mú-
sica online.
Os fi cheiros WMA só podem ser re-
produzidos com segurança se tive-
rem sido criados com o Windows
Media Player, a partir da versão 8.
Preparação de um suporte de
dados MP3
Preparação de um CD MP3
A combinação entre gravador de CD, "sof-
tware" de gravação e CDs virgem pode ori-
ginar problemas na reprodução de CDs. No
caso de problemas com CDs auto-grava-
dos, recomendamos que mude de marca
ou a cor dos CDs virgem.
O formato do CD tem de ser ISO 9660 ní-
vel 1 ou nível 2 ou Joliet. Todos os restan-
tes formatos não podem ser lidos de forma
fi ável.
•
•
Modo de CD Modo de MP3/WMA
06_CalaisMP48_pt.indd 17606_CalaisMP48_pt.indd 176 11.06.2008 15:15:51 Uhr11.06.2008 15:15:51 Uhr

177
PORTUGUÊS
Ao criar (codifi car) os fi cheiros MP3/WMA
a partir de fi cheiros áudio, deverá usar ta-
xas de bits de 32 a 320 kbps para fi cheiros
MP3 ou de 32 a 192 kbps para fi cheiros
WMA.
Este aparelho suporta até 252 directórios e
até 255 fi cheiros por directório. O CD pode-
rá ter um total máximo de 512 directórios e
fi cheiros. Os directórios e faixas no CD po-
dem ser seleccionados individualmente.
D01
D02
T001
T005
T004
T003
T002
D03
T001
T006
T005
T004
T003
T002
T011
T007
T008
T009
T010
D04
T001
T006
T005
T004
T003
T002
A
B
A Directórios
B Faixas · Ficheiros
A cada directório pode dar-se um nome
através do computador. O nome do directó-
rio poderá ser exibido no visor do aparelho.
Proceda à designação dos directórios e fai-
xas/fi cheiros de acordo com o seu "softwa-
re" de gravação. Para mais informações,
consulte as instruções do seu "software".
Notas:
Para a designação dos fi cheiros (di-
rectórios e faixas), evitem a utilização
de acentos e caracteres especiais.
Se utilizar nomes de fi cheiros com
mais de 16 caracteres (inclusive
".MP3" ou ".WMA"), reduz-se a quanti-
dade máxima de faixas e directórios.
Se der importância a uma determinada se-
quência dos seus fi cheiros: memorize os fi -
cheiros no suporte de dados na sequência
em que pretende reproduzi-los mais tarde.
O aparelho reproduz os fi cheiros na se-
quência em que foram gravados no suporte
de dados.
Para a reprodução dos fi cheiros neste apa-
relho, os fi cheiros MP3 devem ter a exten-
são ".MP3" e os fi cheiros WMA, a extensão
".WMA".
Notas:
Para garantir uma reprodução sem pro-
blemas,
não tente alterar para ".MP3" a ter-
minação de fi cheiros que não sejam
fi cheiros MP3, nem tente reproduzir
estes fi cheiros! Estes fi cheiros invá-
lidos serão suprimidos durante a re-
produção.
não utilize CDs "misturados" que con-
tenham simultaneamente dados MP3
e não MP3 (durante a reprodução em
MP3, o aparelho só reproduz os fi -
cheiros MP3).
não use CDs gravados no modo misto,
que contenham faixas áudio mistura-
das com faixas MP3. Se tentar repro-
duzir um disco misturado, o aparelho
só reproduz as faixas de áudio.
•
•
•
•
•
Modo de MP3/WMA
06_CalaisMP48_pt.indd 17706_CalaisMP48_pt.indd 177 11.06.2008 15:15:51 Uhr11.06.2008 15:15:51 Uhr

178
Preparação de um suporte de dados USB
Para que o aparelho reconheça um suporte
de dados USB, este deve estar especifi ca-
do como dispositivo de armazenamento em
massa (Mass Storage Device), formatado
no sistema de fi cheiros FAT16 ou FAT32,
bem como possuir fi cheiros MP3 ou WMA.
Num suporte de dados USB, pode criar,
no máximo, 1500 fi cheiros (directórios e
faixas). Este aparelho permite seleccionar
individualmente os directórios e as faixas.
Se utilizar mais de 24 caracteres (inclusive
".MP3" ou ".WMA") para os nomes dos fi -
cheiros, reduz-se a quantidade máxima de
fi cheiros.
A Blaupunkt não pode garantir um funcio-
namento correcto de todos os suportes de
dados USB disponíveis no mercado.
"Tags ID3"
As faixas MP3 podem conter informações
adicionais, tais como o nome do artista,
faixa ou álbum (tags ID3). Este aparelho
permite a exibição no visor de "tags ID3" da
versão 1 e da versão 2.
Iniciar o modo de MP3
Iniciar o modo de MP3 de CD
Num CD MP3, o modo de MP3 é iniciado
como o modo de CD convencional. Para tal,
leia o parágrafo "Iniciar o modo de CD" no
capítulo "Modo de CD".
No visor 6 são apresentados o número da
faixa actual (p. ex., "T12") e o tempo de re-
produção, bem como informações da faixa
(tags ID3) ou o nome do fi cheiro. Ao mu-
dar para um outro directório, é brevemen-
te apresentado o número do directório (p.
ex., "DIR 02").
Ligar um suporte de dados USB e iniciar
o modo de MP3
Para poder ligar um suporte de dados USB
(p. ex. caneta USB ou disco rígido USB), a
interface USB Blaupunkt opcional tem de
ser conectada à parte traseira do aparelho
(conector C3). Pode instalar o cabo USB da
interface, p. ex., no porta-luvas ou num lo-
cal adequado da consola central.
Notas:
Ao conectar a interface USB Blaupunkt
ao aparelho, a entrada AUX tem de es-
tar devidamente confi gurada. Para o
efeito, leia o parágrafo "Confi gurar a
entrada AUX" no capítulo "Fontes áu-
dio externas".
Desligue sempre o aparelho antes de
conectar ou desconectar o suporte
de dados USB, para que o suporte de
dados seja correctamente reconheci-
do e removido.
Conecte o suporte de dados USB ao
cabo USB da interface USB.
Logo que esteja conectado um suporte de
dados USB, ele pode ser seleccionado com
a tecla SRC >. No visor aparece então
"USB".
Indicação de informações da
faixa (tags ID3)
Se o suporte de dados MP3 disponibilizar
tags ID3, a informação sobre cada faixa é
apresentada no início da faixa, uma vez,
como texto rolante, no visor 6. Se não
tiverem sido memorizados nenhuns tags
ID3 com os fi cheiros MP3, é apresentado o
nome do fi cheiro.
•
•
쏅
Modo de MP3/WMA
06_CalaisMP48_pt.indd 17806_CalaisMP48_pt.indd 178 11.06.2008 15:15:51 Uhr11.06.2008 15:15:51 Uhr

179
PORTUGUÊS
Nota:
Para memorizar tags ID3, leia também
as instruções do seu "software" de PC
para MP3 ou "software" de gravação.
Apresentar informações da faixa uma
vez como texto rolante
Prima a tecla 5 <.
Os tags ID3 relativos à faixa actual são apre-
sentados uma vez como texto rolante no vi-
sor 6.
Nota:
Esta função não está disponível se a in-
dicação de informações da faixa como
texto rolante estiver desactivada. Para
o efeito, leia o capítulo "Modo de CD",
subcapítulo "Indicação de informa-
ções da faixa (texto de CD)", parágrafo
"Ligar/desligar a indicação de informa-
ções da faixa como texto rolante".
Escolher um directório
Para mudar para um novo directório, por or-
dem ascendente ou descendente,
prima a tecla
ou 8.
Notas:
Todos os directórios que não conte-
nham fi cheiros em MP3 são suprimi-
dos automaticamente.
O aparelho processa todos os direc-
tórios e subdirectórios como se se
encontrassem num nível. Premindo
repetidamente a tecla
ou 8,
também acede a todos os subdirec-
tórios.
쏅
쏅
•
•
Seleccionar a faixa/fi cheiro
Para mudar, por ordem descendente ou as-
cendente, para uma nova faixa ou um novo
fi cheiro no directório aberto,
prima a tecla
ou 8.
Premindo uma única vez a tecla
8, a fai-
xa actual volta a ser lida.
Busca rápida
Para efectuar uma busca rápida para trás
ou para a frente,
mantenha a tecla
ou 8 premida
até alcançar o ponto pretendido.
Nota:
No modo de USB, a busca rápida para
trás pára respectivamente no início da
faixa actual.
Leitura de faixas numa ordem
aleatória (MIX)
Para ouvir as faixas do directório aberto,
numa ordem variável, aleatoriamente se-
leccionada pelo aparelho,
prima as vezes necessárias a tecla 3
<, até "MIX DIR" ou "MIX FLD" apare-
cer no visor 6.
O símbolo MIX aparece no visor 6.
Para reproduzir todas as faixas do suporte
de dados MP3 numa ordem aleatória,
prima as vezes necessárias a tecla 3 <,
até "MIX ALL" aparecer no visor 6.
O símbolo MIX aparece no visor 6.
쏅
쏅
쏅
쏅
Modo de MP3/WMA
06_CalaisMP48_pt.indd 17906_CalaisMP48_pt.indd 179 11.06.2008 15:15:51 Uhr11.06.2008 15:15:51 Uhr

180
Terminar a função MIX
Para terminar a reprodução numa ordem
aleatória,
prima as vezes necessárias a tecla 3 <,
até "MIX OFF" aparecer no visor 6.
O símbolo MIX apaga-se no visor 6.
Tocar o início das faixas (SCAN)
Para reproduzir todas as faixas do suporte
de dados MP3 numa ordem ascendente du-
rante aprox. 10 segundos,
prima as vezes necessárias a tecla 4 <,
até "SCAN TRK" aparecer no visor 6.
Durante a reprodução, pisca a indicação
"MP3" ou "USB".
Para, no modo de USB, tocar brevemente
todas as faixas do directório actual,
prima as vezes necessárias a tecla 4 <,
até "SCAN FLD" aparecer no visor 6.
Durante a reprodução, a indicação "USB"
pisca.
Terminar a função SCAN
Para terminar a reprodução do início das
faixas,
prima as vezes necessárias a tecla 4 <,
até "SCAN OFF" aparecer no visor 6.
O aparelho continua a ler a faixa que está a
ser tocada.
Repetição de faixas individuais
ou de directórios completos
(REPEAT)
Para repetir a faixa que está a ser tocada,
prima as vezes necessárias a tecla 2 <,
até "RPT TRK" aparecer no visor 6.
O símbolo RPT aparece no visor 6.
쏅
쏅
쏅
쏅
쏅
Para repetir o directório actual,
prima as vezes necessárias a tecla 2
<, até "RPT DIR" ou "RPT FLD" apare-
cer no visor 6.
O símbolo RPT aparece no visor 6.
Terminar REPEAT
Para terminar a repetição,
prima as vezes necessárias a tecla 2 <,
até "RPT OFF" aparecer no visor 6.
O símbolo RPT apaga-se no visor 6.
Interromper a reprodução
(PAUSE)
Prima a tecla 1 <.
No visor 6 é indicado "PAUSE".
Cancelar a pausa
Durante a pausa, prima a tecla 1 <.
A reprodução prossegue.
쏅
쏅
쏅
쏅
Modo de MP3/WMA
06_CalaisMP48_pt.indd 18006_CalaisMP48_pt.indd 180 11.06.2008 15:15:51 Uhr11.06.2008 15:15:51 Uhr

181
PORTUGUÊS
Modo de leitor multi-CD
É possível conectar, opcionalmente, ao
aparelho os leitores multi-CD Blaupunkt
CDC A08 T e IDC A09 (conector C3 na par-
te de trás do aparelho).
Atenção!
Normalmente, o leitor multi-CD é ali-
mentado pelo aparelho com uma ten-
são de funcionamento de 12 V.
Se se conectar o leitor multi-CD
CDC A 08 T (24 V), é necessário se-
parar a alimentação eléctrica na fi cha
de ligação no cabo de ligação do leitor
multi-CD (conector C3/Pin 15). O lei-
tor multi-CD deve ser alimentado com
uma tensão de funcionamento própria
de 24 V.
Notas:
Ao conectar um leitor multi-CD ao
aparelho, a entrada AUX tem de es-
tar devidamente confi gurada. Para o
efeito, leia o parágrafo "Confi gurar a
entrada AUX" no capítulo "Fontes áu-
dio externas".
Para informações sobre o tratamento
dos CDs, a inserção de CDs e o manu-
seamento do leitor multi-CD, queira
consultar as instruções de serviço do
seu leitor multi-CD.
Iniciar o modo multi-CD
Prima as vezes necessárias SRC >,
até aparecer "CHANGER" no visor 6.
O leitor começa a reproduzir o primeiro CD
que conseguir identifi car. No visor 6 são
apresentados o número do CD actual (p. ex.
"D02") e a faixa actual (p. ex. "T07"), bem
como o tempo de reprodução.
•
•
쏅
Escolher um CD
Para mudar para um novo CD, por ordem
ascendente ou descendente,
prima a tecla
ou 8.
Escolher uma faixa
Para mudar, por ordem ascendente ou des-
cendente, para uma nova faixa no CD actu-
al,
prima a tecla
ou 8.
Busca rápida (com som)
Para efectuar uma busca rápida para trás
ou para a frente,
mantenha a tecla
ou 8 premida
até alcançar o ponto pretendido.
Repetição de faixas individuais
ou de CDs completos (RPT)
Para repetir a faixa que está a ser tocada,
prima as vezes necessárias a tecla 2 <,
até "RPT TRK" aparecer no visor 6.
O símbolo RPT aparece no visor 6.
Para repetir o CD que está a ser tocado,
prima as vezes necessárias a tecla 2 <,
até "RPT CD" aparecer no visor 6.
O símbolo RPT aparece no visor 6.
Terminar REPEAT
Para terminar a repetição,
prima as vezes necessárias a tecla 2 <,
até "RPT OFF" aparecer no visor 6.
O símbolo RPT apaga-se no visor 6.
Leitura de faixas numa ordem
쏅
쏅
쏅
쏅
쏅
쏅
Modo de leitor multi-CD
06_CalaisMP48_pt.indd 18106_CalaisMP48_pt.indd 181 11.06.2008 15:15:51 Uhr11.06.2008 15:15:51 Uhr

182
aleatória (MIX)
Para ouvir as faixas do disco que está a ser
tocado, numa ordem variável, aleatoria-
mente seleccionada pelo aparelho,
prima as vezes necessárias a tecla 3 <,
até "MIX CD" aparecer no visor 6.
O símbolo MIX aparece no visor 6.
Para ouvir as faixas de todos os CDs inseri-
dos, numa ordem aleatória,
prima as vezes necessárias a tecla 3 <,
até "MIX ALL" aparecer no visor 6.
O símbolo MIX aparece no visor 6.
Terminar a função MIX
Para terminar a reprodução numa ordem
aleatória,
prima as vezes necessárias a tecla 3 <,
até "MIX OFF" aparecer no visor 6.
O símbolo MIX apaga-se no visor 6.
Tocar o início de todas as faixas
de cada CD (SCAN)
Para ouvir, numa ordem ascendente, todas
as faixas de todos os CDs inseridos durante
aprox. 10 segundos,
prima a tecla 4 <.
No visor 6 é brevemente indicado "SCAN
TRK". Durante a reprodução, pisca a indica-
ção do número de CD.
Terminar a função SCAN
Para terminar a reprodução do início das
faixas,
prima novamente a tecla 4 <.
No visor 6 é brevemente indicado "SCAN
OFF". O aparelho continua a ler a faixa que
está a ser tocada.
쏅
쏅
쏅
쏅
쏅
Interromper a reprodução
(PAUSE)
Prima a tecla 1 <.
No visor 6 aparece "PAUSE".
Cancelar a pausa
Durante a pausa, prima a tecla 1 <.
A reprodução prossegue.
쏅
쏅
Modo de leitor multi-CD
06_CalaisMP48_pt.indd 18206_CalaisMP48_pt.indd 182 11.06.2008 15:15:52 Uhr11.06.2008 15:15:52 Uhr

183
PORTUGUÊS
Telecomando de IV RC 10 P
Com o telecomando de IV opcional, pode
comandar as funções mais importantes do
aparelho.
Receptor do telecomando
Na tampa do aparelho, encontra-se o re-
ceptor de infravermelhos 9 para o teleco-
mando. Antes de utilizar o telecomando, é
necessário ligar o receptor:
Prima a tecla MENU 7.
Prima as vezes necessárias a tecla
ou
8, até "IR" e o ajuste actual "ON"
(ligado) ou "OFF" (desligado) aparece-
rem no visor 6.
Prima a tecla
ou 8 para desligar
ou ligar IV.
Para abandonar o menu,
prima a tecla MENU 7.
C
F
G
H
E
D
B
A
@
쏅
쏅
쏅
쏅
Funções do telecomando
Gerais:
Tecla Função
ON H Ligar (desligar o apare-
lho (premir longamente)
Mute (premir brevemente)
Abandonar menu
SRC @ Comutação da fonte
V+ B Aumentar o volume
V- A Baixar o volume
OK G Chamar ou abandonar o
menu
E Seleccionar a opção de
menu
C Seleccionar a opção de
menu
F Alterar o ajuste de menu
D Alterar o ajuste de menu
No modo de rádio:
Tecla Função
F Chamar a estação memo-
rizada
D Seleccionar a banda/o
nível de memória
E Busca para cima
C Busca para baixo
Telecomando de IV
06_CalaisMP48_pt.indd 18306_CalaisMP48_pt.indd 183 11.06.2008 15:15:52 Uhr11.06.2008 15:15:52 Uhr

184
No modo de CD:
Tecla Função
F Seleccionar a faixa se-
guinte
D Seleccionar a faixa ante-
rior
Modo de CD-Changer:
Tecla Função
F Reproduzir a faixa seguinte
D Reproduzir a faixa ante-
rior
E Reproduzir o CD seguinte
C Reproduzir o CD anterior
Modo de MP3:
Tecla Função
F Reproduzir a faixa seguinte
D Reproduzir a faixa ante-
rior
E Reproduzir o directório
seguinte
C Reproduzir o directório
anterior
Saída do pré-amplifi cador
Pode ligar ao aparelho um amplifi cador
para utilização de um altifalante de graves
fundos (subwoofer). Para tal, o amplifi ca-
dor tem de ser conectado à parte de trás do
aparelho (conector C1). O nível do subwoo-
fer pode ser regulado no menu de áudio:
Prima a tecla AUD :.
Prima as vezes necessárias a tecla
ou
8, até "SUB WOOF" ser indi-
cado.
Após aprox. 2 segundos, são apresentados
no visor 6 "SUBW" e o ajuste actual.
Prima a tecla
ou 8 para regular o
nível para o subwoofer entre 0 e 7.
Nota:
Não precisa aguardar pela indicação do
ajuste actual para o alterar premindo a
tecla
ou 8.
Para abandonar o menu,
prima a tecla AUD :.
쏅
쏅
쏅
쏅
Telecomando de IV Saída do pré-amplifi cador
06_CalaisMP48_pt.indd 18406_CalaisMP48_pt.indd 184 11.06.2008 15:15:52 Uhr11.06.2008 15:15:52 Uhr

185
PORTUGUÊS
Fontes áudio externas
Fontes áudio externas
Através da entrada AUX, pode conectar vá-
rios tipos de fontes áudio externas ao apa-
relho. A entrada AUX tem de estar confi gu-
rada para a respectiva fonte áudio externa
conectada:
Confi guração "AUX" para fontes áudio
externas como, p. ex., leitores portá-
teis de CD, leitores de MiniDisc ou lei-
tores MP3.
Confi guração "CDC" para os leito-
res multi-CD Blaupunkt CDC A 08 T e
IDC A 09.
Confi guração "USB" para a interface
USB da Blaupunkt.
Para confi gurar a entrada AUX, leia o pará-
grafo seguinte, "Confi gurar a entrada AUX".
Nota:
Para a ligação de uma fonte áudio exter-
na, precisa de um cabo adaptador. Este
cabo (Blaupunkt nº 7 607 897 093)
pode adquirir-se num revendedor da
Blaupunkt.
Confi gurar a entrada AUX
Prima a tecla MENU 7.
Prima as vezes necessárias a tecla
ou
8, até "SRC SEL" ser indicado.
Após aprox. 2 segundos, "SRC" e o ajuste
actual "CDC", "USB" ou "AUX" são apresen-
tados no visor 6.
Prima a tecla
ou 8 para seleccio-
nar outro ajuste.
•
•
•
쏅
쏅
쏅
Nota:
A sequência de ajustes no menu é
"CDC" – "USB" – "AUX":
Com o ajuste actual "CDC", pode se-
leccionar o ajuste "USB" premindo a
tecla
8.
Com o ajuste actual "USB", pode se-
leccionar o ajuste "CDC" premindo a
tecla
8 ou o ajuste "AUX" premin-
do a tecla
8.
Com o ajuste actual "AUX", pode se-
leccionar o ajuste "USB" premindo a
tecla
8.
A cada mudança de ajuste, o aparelho
é automaticamente desactivado. Para
mudar entre os ajustes "CDC" e "AUX",
deve, por isso, seleccionar primeiro o
ajuste "USB" e, depois da desactivação
automática do aparelho, voltar a ligá-
lo. Repita então o ajuste para aceder ao
ajuste pretendido "AUX" ou "CDC".
É apresentada a indicação "AUTO SWITCH
OFF IN 10 SECONDS". O aparelho desliga-
se automaticamente após aprox. 10 segun-
dos.
Volte a ligar o aparelho premindo a te-
cla de ligar/desligar 3
O aparelho é ligado no modo de rádio com o
ajuste seleccionado.
Nota:
Se tiver seleccionado o ajuste AUX,
pode seleccionar a entrada AUX com a
tecla SRC >. No visor aparece então
"AUX".
•
•
•
쏅
06_CalaisMP48_pt.indd 18506_CalaisMP48_pt.indd 185 11.06.2008 15:15:52 Uhr11.06.2008 15:15:52 Uhr

186
Fontes áudio externas Ajustes de fábrica
Se tiver seleccionado o ajuste CDC ou
USB, só pode seleccionar a fonte áudio
com a tecla SRC > se estiver conecta-
do um aparelho correspondente (leitor
multi-CD ou interface USB).
Ajustar o nível da entrada AUX
Se tiver confi gurado a entrada AUX para a
ligação de fontes áudio externas em "AUX",
pode adaptar o nível da fonte áudio externa
ao nível da fonte áudio do próprio aparelho
(como, p. ex., CD e rádio).
Nota:
Só pode ajustar o nível para a entrada
AUX se estiver seleccionado AUX como
fonte áudio.
Se necessário, prima as vezes necessá-
rias a tecla SRC >, até "AUX" aparecer
no visor.
Prima a tecla MENU 7.
Prima as vezes necessárias a tecla
ou
8, até "GAIN" e o ajuste actual
aparecerem.
Prima a tecla
ou 8 para ajustar a
adaptação do nível entre –9 e +9.
Para abandonar o menu,
prima a tecla MENU 7.
쏅
쏅
쏅
쏅
쏅
Repor os ajustes de fábrica
(RESET)
Tem a possibilidade de repor os ajustes de
fábrica originais do aparelho:
Mantenha a tecla AUD : premida por
mais de aprox. 10 segundos.
Soa um sinal de confi rmação e no visor 6
aparece brevemente "RESET". Todos os
ajustes de menu e menu áudio são repostos
nos ajustes de fábrica.
Nota:
As estações memorizadas nas teclas de
pré-selecção não são apagadas.
쏅
06_CalaisMP48_pt.indd 18606_CalaisMP48_pt.indd 186 11.06.2008 15:15:52 Uhr11.06.2008 15:15:52 Uhr

187
PORTUGUÊS
Dados técnicos
Dados técnicos
Tensão de funcionamento
24 V
Amplifi cador
Potência de saída: 2 x 20 Watt seno
em 4 Ohm
Saída Line: 2 x 2,0 Volt rms
Entrada AUX: 2 x 2,0 Volt rms
Sintonizador
Bandas na Europa:
FM: 87,5 - 108 MHz
MW: 531 - 1602 kHz
LW: 153 - 279 kHz
Bandas na América:
FM: 87,7 - 107,9 MHz
AM: 530 - 1710 kHz
FM - faixa de transmissão:
30 - 15 000 Hz
CD
Resposta em frequência:
20 - 20 000 Hz
Reservado o direito a alterações!
06_CalaisMP48_pt.indd 18706_CalaisMP48_pt.indd 187 11.06.2008 15:15:53 Uhr11.06.2008 15:15:53 Uhr

188
1 Volumeregelaar
2 BND-toets
Kort indrukken: keuze van het geheu-
genniveau resp. het golfgebied
Lang indrukken: starten van de
Travelstore-functie (FMT of MWT/LWT)
3 Aan-/uit-toets
Kort indrukken: inschakelen van het ap-
paraat
In bedrijf: geluidsonderdrukking (Mute)
Lang indrukken: uitschakelen van het
apparaat
4 CD-uitwerpknop
5 CD-opening
6 Display
7 MENU-toets
Oproepen van de menu's voor de basis-
instellingen.
8 Multifunctionele tuimelschakelaar
9 Infrarood ontvanger voor IR-afstands-
bediening (optie)
: AUD-toets
Kort indrukken: audio-menu voor in-
stelling van lage tonen, hoge tonen, ba-
lans, fader en loudness openen
Lang indrukken (10 sec.): fabrieksin-
stellingen herstellen
; TA-toets
In-/uitschakelen van de voorrang voor
verkeersinformatie
Onderbreken van actuele verkeersin-
formatie
< Toetsenblok 1 - 6
= RDS-toets
RDS-comfortfunctie in-/uitschakelen
> SRC-toets
Bron kiezen tussen radio en (indien
geplaatst, aangesloten resp. ingescha-
keld) CD, MP3, CD-wisselaar en AUX
? Code LED
Bedieningselementen
07_CalaisMP48_nl.indd 18807_CalaisMP48_nl.indd 188 11.06.2008 15:17:20 Uhr11.06.2008 15:17:20 Uhr

189
NEDERLANDS
Belangrijke opmerkingen ...............191
Correct gebruik ...........................191
Verkeersveiligheid .......................191
Afstandsbediening (optie) ............191
CD-wisselaar (optie) .................... 191
USB-interface (optie) ...................191
Afvoer afgedankte apparaten .........191
Diefstalbeveiliging CODE ...............192
Codevraag in-/uitschakelen
(CODE) ...................................... 192
Codenummer na spannings-
onderbreking invoeren..................193
In-/uitschakelen ............................193
In-/uitschakelen met de aan-/
uit-toets .....................................193
In-/uitschakelen via het contact
van het voertuig ...........................193
Inschakelen door plaatsen van
een CD .......................................193
Uitschakeltijd instellen .................. 194
Inschakelen via telefoon (optie) .....194
Inschakelen met de IR-afstands-
bediening RC 10 P (optie) .............194
Volume instellen ............................194
Geluidsonderdrukking (MUTE) .......194
Telefoon-/navigatie-audio ..............194
Bevestigingstoon (BEEP) in-/
uitschakelen ...............................195
Maximale inschakelvolume i
nstellen (ON VOL) ........................ 195
Snelheidsafhankelijke volume-
aanpassing instellen (GALA): ......... 196
Klankkleur ....................................196
Hoge tonen instellen .....................196
Lage tonen instellen .....................196
Middentonen instellen ..................197
Volumeverdeling links/rechts
instellen (BAL) ............................ 197
Volumeverhouding voor/achter
instellen (FAD) ............................197
Kloktijd .........................................198
Tijd weergeven ............................198
Tijd instellen ...............................198
Klokmodus 12/24 uur kiezen ......... 198
Tijdzone instellen (TIMEZONE) ......199
Radioweergave ..............................199
Radioweergave inschakelen ........... 199
RDS-comfortfunctie (AF, REG) .......199
Golfgebied/geheugenniveau
kiezen ........................................ 200
Zenders instellen .........................200
Zenders opslaan ..........................201
Geprogrammeerde zenders
oproepen....................................201
Ontvangbare zenders kort
weergeven (BANDSCAN) ..............202
Programmatype (PTY) .................. 202
Storingsafhankelijke demping
van de hoge tonen (HICUT) ............ 202
Radiotekst in-/uitschakelen ...........203
Verkeersinformatie ........................203
Voorrang voor verkeersinformatie
in-/uitschakelen ...........................203
Volumeversterking voor verkeers-
informatie instellen ......................204
Verkeersbericht onderdrukken ....... 204
Inhoudsopgave
07_CalaisMP48_nl.indd 18907_CalaisMP48_nl.indd 189 11.06.2008 15:17:21 Uhr11.06.2008 15:17:21 Uhr

190
CD-weergave .................................204
Gevaar voor vernieling van de
CD-speler! ................................. 204
CD-weergave starten ....................205
Weergeven van titelinformatie
(CD-tekst) ..................................205
Titel kiezen ................................. 205
Snelle zoekdoorloop (hoorbaar) ....206
Willekeurige weergave van de
titels (MIX) ..................................206
Titels kort weergeven (SCAN) ........ 206
Titel herhalen (RPT) .....................206
Weergave onderbreken (PAUSE) .... 206
CD verwijderen ............................ 206
MP3-/WMA-weergave .................... 207
Voorbereiding van een
MP3-datadrager ..........................207
MP3-weergave starten ..................209
Weergeven van titelinformatie
(ID3-tags) ...................................209
Map kiezen .................................210
Titels/bestanden kiezen ................ 210
Snelle zoekdoorloop ....................210
Titels in willekeurige volgorde
weergeven (MIX) .......................... 210
Titels kort weergeven (SCAN) ........ 211
Losse titels of hele mappen
herhaald afspelen (REPEAT) .......... 211
Weergave onderbreken (PAUSE) .... 211
Weergave van CD-wisselaar ........... 212
Weergave van CD-wisselaar
starten ....................................... 212
CD kiezen ...................................212
Titel kiezen ................................. 212
Snelle zoekdoorloop (hoorbaar) ....212
Afzonderlijke titels of de hele CD
herhaald afspelen (RPT) ............... 212
Titels in willekeurige volgorde
weergeven (MIX) .......................... 213
Alle titels van alle CD's kort
weergeven (SCAN) ....................... 213
Weergave onderbreken (PAUSE) .... 213
IR-afstandsbediening RC 10 P ........ 214
Afstandsbedieningsontvanger .......214
Functies van de afstandsbediening .214
Voorversterkeruitgang ...................215
Externe audiobronnen....................216
AUX-ingang instellen .....................216
Niveau van de AUX-ingang instellen .217
Fabrieksinstellingen herstellen
(RESET) ........................................217
Technische gegevens .....................218
Bedrijfsspanning .........................218
Versterker ...................................218
Tuner .........................................218
CD .............................................218
ISO-aansluiting ..............................281
Inhoudsopgave
07_CalaisMP48_nl.indd 19007_CalaisMP48_nl.indd 190 11.06.2008 15:17:21 Uhr11.06.2008 15:17:21 Uhr

191
NEDERLANDS
Belangrijke opmerkingen
Belangrijke opmerkingen
Lees deze handleiding zorgvuldig en zorg
dat u vertrouwd raakt met het apparaat
voordat u het in bedrijf neemt. Bewaar deze
handleiding voor latere vragen in het voer-
tuig.
Correct gebruik
Het apparaat is voor gebruik in een voertuig
met 24 V boorspanning ontworpen en moet
in een 1-DIN-schacht worden ingebouwd.
Verkeersveiligheid
De verkeersveiligheid gaat vóór
alles. Bedien het apparaat uitsluitend wan-
neer de verkeerssituatie dit toelaat. Maak
uzelf voor het begin van de rit vertrouwd
met het apparaat. De akoestische waar-
schuwingssignalen van politie, brandweer
en reddingsdiensten moeten in het voertuig
tijdig te horen zijn. Beluister daarom tijdens
het rijden uw programma daarom alleen
met een gepast geluidsvolume.
Afstandsbediening (optie)
Met de afstandsbediening RC 10 P kunnen
de belangrijkste functies worden bediend.
Een infrarood afstandsbediening is als toe-
behoren (Blaupunktnr. 7 607 591 512)
leverbaar.
CD-wisselaar (optie)
U kunt de CD-wisselaar CDC A08 T
(Blaupunktnr. 7 607 274 002) of IDC A09
(Blaupunktnr. 7 607 274 005) aansluiten.
De CD-wisselaars zijn als toebehoren lever-
baar.
USB-interface (optie)
U kunt de Blaupunkt-USB-interface aan-
sluiten, om MP3-/WMA-bestanden van
een USB-datadrager af te spelen. De USB-
interface is als toebehoren (Blaupunktnr.
7 607 541 576) leverbaar.
Afvoer afgedankte apparaten
Voer uw afgedankte apparaat niet af
met het huisvuil!
Gebruik voor het afvoeren van het
oude apparaat de beschikbare retour- en
verzamelsystemen.
07_CalaisMP48_nl.indd 19107_CalaisMP48_nl.indd 191 11.06.2008 15:17:21 Uhr11.06.2008 15:17:21 Uhr

192
Diefstalbeveiliging
Diefstalbeveiliging CODE
Uw apparaat is ter bescherming tegen dief-
stal uitgerust met een viercijferig codenum-
mer. Dit nummer moet altijd ingevoerd wor-
den, wanneer het apparaat van de voedings-
spanning van het voertuit is losgemaakt. De
codevraag is af fabriek uitgeschakeld, maar
kan wel worden ingeschakeld.
Opmerking:
Wanneer de codevraag is ingeschakeld,
begint de Code LED ? te knipperen
wanneer zowel het apparaat als ook de
voertuigontsteking zijn uitgeschakeld.
Het codenummer vindt u in de radiopas van
uw apparaat.
Opmerking:
Bewaar de radiopas nooit in het voer-
tuig!
Codevraag in-/uitschakelen
(CODE)
Druk op de toets MENU 7.
Druk net zo vaak op de toets
of
8 tot in het display 6 "CODE" en
de actuele instelling "ON" (aan) resp.
"OFF" (uit) wordt weergegeven.
Druk op de toets
of 8.
Op het display 6 wordt "0000" weergege-
ven. Voer de code in:
Opmerking:
Wanneer u een verkeerde code invoert,
wordt opnieuw "0000" in het display
6 weergegeven. U kunt de invoer nog
tweemaal herhalen. Na de derde fou-
tieve invoer wordt het apparaat gedu-
쏅
쏅
쏅
rende een uur geblokkeerd. Gedurende
deze periode wordt "WAIT 1HR" in het
display 6 weergegeven. Wanneer u
het apparaat binnen deze wachttijd uit-
schakelt, moet u na het herinschakelen
weer een uur wachten.
Druk zo vaak op de voorkeuzetoets 1
<, tot het eerste getal van uw code in
het display 6 verschijnt.
Druk zo vaak op de voorkeuzetoets 2
<, tot het tweede getal van uw code
in het display 6 verschijnt.
Druk zo vaak op de voorkeuzetoets 3
<, tot het derde getal van uw code in
het display 6 verschijnt.
Druk zo vaak op de voorkeuzetoets 4
<, tot het vierde getal van uw code in
het display 6 verschijnt.
Wanneer het juiste codenummer in het
display 6 wordt getoond, houdt u de
voorkeuzetoets 5 < langer dan 2 se-
conden ingedrukt.
In het display 6 worden opnieuw "CODE"
en de actuele instelling "ON" (aan) of "OFF"
(uit) weergegeven.
Druk op de toets
resp. 8, om de
codevraag uit- resp. in te schakelen.
Om het menu te verlaten,
drukt u op de toets MENU 7.
쏅
쏅
쏅
쏅
쏅
쏅
쏅
07_CalaisMP48_nl.indd 19207_CalaisMP48_nl.indd 192 11.06.2008 15:17:21 Uhr11.06.2008 15:17:21 Uhr

193
NEDERLANDS
Codenummer na
spanningsonderbreking
invoeren
Schakel het apparaat aan.
In het display 6 verschijnt eerst "CODE"
en dan "0000". U kunt de code invoeren:
Opmerking:
Wanneer u een verkeerde code invoert,
wordt opnieuw "0000" in het display
6 weergegeven. U kunt de invoer nog
tweemaal herhalen. Na de derde fou-
tieve invoer wordt het apparaat gedu-
rende een uur geblokkeerd. Gedurende
deze periode wordt "WAIT 1HR" in het
display 6 weergegeven. Wanneer u
het apparaat binnen deze wachttijd uit-
schakelt, moet u na het herinschakelen
weer een uur wachten.
Voer het codenummer in zoals beschre-
ven in paragraaf "Codevraag in-/uit-
schakelen".
Wanneer het juiste codenummer in het
display 6 wordt getoond, houdt u de
voorkeuzetoets 5 < langer dan 2 se-
conden ingedrukt.
Het apparaat wordt ingeschakeld.
쏅
쏅
쏅
In-/uitschakelen
Om het apparaat in of uit te schakelen hebt
u de verschillende mogelijkheden:
In-/uitschakelen met de aan-/uit-
toets
Voor het inschakelen drukt u op de aan-/
uit-toets 3.
Om het apparaat uit te schakelen houdt
u aan-/uit-toets 3 langer dan twee se-
conden ingedrukt.
Opmerking:
Ter bescherming van de voertuigaccu
wordt het apparaat bij uitgeschakelde
voertuigontsteking automatisch na een
instelbare tijd uitgeschakeld (zie par.
"Uitschakeltijd instellen" in dit hoofd-
stuk).
In-/uitschakelen via het contact
van het voertuig
Wanneer het apparaat correct met het con-
tactslot van de auto is verbonden en niet
met aan/uit-toets 3 is uitgeschakeld,
wordt het met het contact in- en uitgescha-
keld.
Inschakelen door plaatsen van
een CD
Voor het inschakelen via het CD-vak,
schuift u een CD met de bedrukte zijde
naar boven in de CD-opening 5 totdat
u een weerstand voelt.
De CD wordt automatisch naar binnen ge-
trokken, het apparaat start in CD-weer-
gave.
쏅
쏅
쏅
Diefstalbeveiliging In-/uitschakelen
07_CalaisMP48_nl.indd 19307_CalaisMP48_nl.indd 193 11.06.2008 15:17:21 Uhr11.06.2008 15:17:21 Uhr

194
Uitschakeltijd instellen
Druk op de toets MENU 7.
Druk zo vaak op de toets
of 8,
tot "HOUR" en de actuele instelling op
het display 6 worden weergegeven.
Stel de uitschakeltijd met de toets
resp.
8 in stappen van 5 minuten
in tussen 5 en 60 minuten.
Om het menu te verlaten,
drukt u op de toets MENU 7.
Inschakelen via telefoon (optie)
Wanneer bij het uitschakelen van het appa-
raat de telefoon wordt geactiveerd, scha-
kelt het apparaat in. Na het uitschakelen
van de telefoon wordt het apparaat auto-
matisch weer uitgeschakeld. Voorwaarde
is, dat de telefoon correct met het apparaat
is verbonden.
Inschakelen met de
IR-afstandsbediening RC 10 P
(optie)
Voor het inschakelen drukt u op de
toets ON H op de IR-afstandsbedie-
ning RC 10 P.
Opmerking:
De IR-ontvanger van het apparaat moet
ingeschakeld zijn, zodat u de IR-af-
standsbediening kunt gebruiken. Lees
daarvoor de paragraaf "Afstandsbedi
eningsontvanger" in het hoofdstuk "IR
afstandsbediening RC 10 P".
쏅
쏅
쏅
쏅
쏅
Volume instellen
Het systeemvolume kan in stappen van 0
(uit) tot 32 (maximaal) worden ingesteld.
Om het systeemvolume te verhogen,
draait u de volumeregelaar 1 naar
rechts.
Om het systeemvolume te verlagen,
draait u de volumeregelaar 1 naar
links.
Geluidsonderdrukking (MUTE)
U kunt het systeemvolume in één keer on-
derdrukken (mute).
Druk kort op de toets 3.
Mute opheffen
Om het eerder beluisterde volume weer te
activeren,
drukt u opnieuw kort op de toets 3.
Telefoon-/navigatie-audio
Geluidsonderdrukking tijdens telefoneren
Wanneer uw autoradio is verbonden met
een mobiele telefoon of een navigatiesy-
steem, wordt bij een inkomend gesprek een
gesproken mededeling van de navigatie het
geluid van de autoradio onderdrukt. het ge-
sprek of de gesproken mededeling wordt
via de autoradioluidspreker weergegeven.
Hiervoor moet de telefoon of het navigatie-
systeem op de autoradio zijn aangesloten
(kamer C2 op de achterzijde van het ap-
paraat).
Welke navigatiesystemen op uw autora-
dio kunnen worden aangesloten, kan uw
Blaupunkt-dealer u vertellen.
Wanneer een gesprek wordt aangenomen
of er is een gesproken mededeling van
쏅
쏅
쏅
쏅
In-/uitschakelen Volume
07_CalaisMP48_nl.indd 19407_CalaisMP48_nl.indd 194 11.06.2008 15:17:21 Uhr11.06.2008 15:17:21 Uhr

195
NEDERLANDS
het navigatiesysteem, wordt in het display
"PHONE" weergegeven.
Volume voor telefoon-/navigatie-audio
instellen (PHONEVOL)
Het volume van telefoongesprekken of ge-
sproken mededelingen van de navigatie is
instelbaar:
Druk op de toets MENU 7.
Druk zo vaak op de toets
of 8,
tot "PHONEVOL" wordt weergegeven.
Na ca. 2 seconden worden "VOL" en de ac-
tuele instelling op het display 6 weerge-
geven.
Druk op de toets
resp. 8, om het
volume in te stellen tussen 0 en 32.
Opmerking:
U hoeft niet op de aanwijzing van de
actuele instelling te wachten, om deze
door indrukken van de toets
resp.
8 te veranderen.
Om het menu te verlaten,
drukt u op de toets MENU 7.
Opmerking:
U kunt het volume ook tijdens een te-
lefoongesprek of een navigatiemelding
met de volumeregelaar 1 instellen.
Het ingestelde volume wordt automa-
tisch opgeslagen.
Bevestigingstoon (BEEP) in-/
uitschakelen
Na bepaalde acties, bijv. langer indrukken
van een toets, klinkt een bevestigingstoon
(pieptoon). U kunt de bevestigingstoon uit-
schakelen:
쏅
쏅
쏅
쏅
Druk op de toets MENU 7.
Druk net zo vaak op de toets
of
8 tot in het display 6 "BEEP" en
de actuele instelling "ON" (aan) resp.
"OFF" (uit) wordt weergegeven.
Druk op de toets
resp. 8, om de
pieptoon uit- resp. in te schakelen.
Om het menu te verlaten,
drukt u op de toets MENU 7.
Maximale inschakelvolume
instellen (ON VOL)
Wanneer u het apparaat inschakelt, be-
gint deze met het laatst gekozen volume.
Wanneer u het volume voor het uitschake-
len echter hoger dan het maximale inscha-
kelvolume heeft ingesteld, dan wordt het
volume bij herinschakelen automatisch be-
grensd tot het inschakelvolume.
Opmerking:
Om het gehoor te beschermen, is het
maximale inschakelvolume begrensd
op de waarde "25".
Druk op de toets MENU 7.
Druk zo vaak op de toets
of 8
totdat "ON VOL" wordt weergegeven.
Na ca. 2 seconden worden "VOL" en de ac-
tuele instelling op het display 6 weerge-
geven.
Druk op de toets
resp. 8, om het
maximale inschakelvolume in te stellen
tussen 5 en 25.
Opmerking:
U hoeft niet op de aanwijzing van de
actuele instelling te wachten, om deze
door indrukken van de toets
resp.
8 te veranderen.
쏅
쏅
쏅
쏅
쏅
쏅
쏅
Volume
07_CalaisMP48_nl.indd 19507_CalaisMP48_nl.indd 195 11.06.2008 15:17:21 Uhr11.06.2008 15:17:21 Uhr

196
Om het menu te verlaten,
drukt u op de toets MENU 7.
Snelheidsafhankelijke volume-
aanpassing instellen (GALA):
Met deze functie wordt het volume van de
autoradio automatisch aangepast aan de
rijsnelheid en de daaraan gekoppelde rij-
geluiden. Zo wordt bijvoorbeeld bij een toe-
nemende snelheid het volume automatisch
verhoogd, ter compensatie van de luidere
rijgeluiden (bijv. als gevolg van de rijwind).
Daarvoor moet uw voertuig het snelheids-
metersignaal ter beschikking stellen en de
autoradio moet overeenkomstig zijn aange-
sloten.
De automatische volume-versterking is in
6 stappen (OFF (uit), 1-5) instelbaar.
Druk op de toets MENU 7.
Druk zo vaak op de toets
of 8,
tot "GALA" en de actuele instelling op
het display worden weergegeven.
Druk op de toets
resp. 8, om de
volumeaanpassing in te stellen tussen
"OFF" (uit) en 5.
Om het menu te verlaten,
drukt u op de toets MENU 7.
쏅
쏅
쏅
쏅
쏅
Klankkleur
Hoge tonen instellen
Druk op de toets AUD :.
Druk zo vaak op de toets
of 8
totdat "TREBLE" wordt weergegeven.
Houdt de toets
resp. 8 langer
dan 2 seconden ingedrukt.
In het display wordt kort "FREQ" getoond en
daarna de gekozen hoge frequentie.
Om een andere hoge frequentie tussen
10,0 kHz en 17,5 kHz te kiezen,
drukt u op de toets
resp. 8.
Om het niveau van de hoge tonen in te stel-
len,
drukt u zo vaak op de toets
of 8
totdat "GAIN" wordt weergegeven.
Na ca. 2 seconden worden "GAIN" en de ac-
tuele instelling getoond.
Druk op de toets
resp. 8, om het
niveau van de hoge tonen in te stellen
tussen –7 en +7.
Om het menu te verlaten,
drukt u op de toets AUD :.
Lage tonen instellen
Druk op de toets AUD :.
Druk zo vaak op de toets
of 8
totdat "BASS" wordt weergegeven.
Houdt de toets
resp. 8 langer
dan 2 seconden ingedrukt.
In het display wordt kort "FREQ" getoond en
daarna de gekozen basfrequentie.
Om een andere basfrequentie tussen 60 Hz
en 200 Hz te kiezen,
drukt u op de toets
resp. 8.
쏅
쏅
쏅
쏅
쏅
쏅
쏅
쏅
쏅
쏅
쏅
Volume Klankkleur
07_CalaisMP48_nl.indd 19607_CalaisMP48_nl.indd 196 11.06.2008 15:17:22 Uhr11.06.2008 15:17:22 Uhr

197
NEDERLANDS
Na ca. 2 seconden worden "GAIN" en de ac-
tuele instelling getoond.
Druk op de toets resp. 8, om het
niveau van de middentonen in te stellen
tussen –7 en +7.
Om de kwaliteitsfactor voor de middento-
nen in te stellen,
drukt u zo vaak op de toets
of 8
totdat "Q FACTOR" wordt weergege-
ven.
Na ca. 2 seconden worden "Q" en de actu-
ele instelling getoond.
Druk op de toets
resp. 8, om het
niveau van de kwaliteitsfactor in te stel-
len tussen 0,5 en 1,25.
Om het menu te verlaten,
drukt u op de toets AUD :.
Volumeverdeling links/rechts
instellen (BAL)
Druk op de toets AUD :.
Druk zo vaak op de toets
of 8,
tot "BAL" en de actuele instelling op het
display worden weergegeven.
Druk op de toets
resp. 8, om de
volumeverdeling links/rechts tussen
10 en +10 in te stellen.
Om het menu te verlaten,
drukt u op de toets AUD :.
Volumeverhouding voor/achter
instellen (FAD)
Opmerking
De achterste luidsprekers moeten via
een extra versterker zijn aangesloten.
Druk op de toets AUD :.
쏅
쏅
쏅
쏅
쏅
쏅
쏅
쏅
쏅
Om het niveau van de lage tonen in te stel-
len,
drukt u zo vaak op de toets
of 8
totdat "GAIN" wordt weergegeven.
Na ca. 2 seconden worden "GAIN" en de ac-
tuele instelling getoond.
Druk op de toets
resp. 8, om het
niveau van de lage tonen in te stellen
tussen –7 en +7.
Om de kwaliteitsfactor voor de lage tonen
in te stellen,
drukt u zo vaak op de toets
of 8
totdat "Q FACTOR" wordt weergege-
ven.
Na ca. 2 seconden worden "Q" en de actu-
ele instelling getoond.
Druk op de toets
resp. 8, om het
niveau van de kwaliteitsfactor in te stel-
len tussen 1,0 en 2,0.
Om het menu te verlaten,
drukt u op de toets AUD :.
Middentonen instellen
Druk op de toets AUD :.
Druk zo vaak op de toets
of 8
totdat "MIDDLE" wordt weergegeven.
Houdt de toets
resp. 8 langer
dan 2 seconden ingedrukt.
In het display wordt kort "FREQ" getoond en
daarna de gekozen middenfrequentie.
Om een andere middenfrequentie tussen
500 Hz en 2,5 kHz te kiezen,
drukt u op de toets
resp. 8.
Om het niveau van de middentonen in te
stellen,
drukt u zo vaak op de toets
of 8
totdat "GAIN" wordt weergegeven.
쏅
쏅
쏅
쏅
쏅
쏅
쏅
쏅
쏅
쏅
Klankkleur
07_CalaisMP48_nl.indd 19707_CalaisMP48_nl.indd 197 11.06.2008 15:17:22 Uhr11.06.2008 15:17:22 Uhr

198
Druk zo vaak op de toets of 8,
tot "FAD" en de actuele instelling op het
display worden weergegeven.
Druk op de toets
resp. 8, om de
volumeverdeling voor/achter tussen
–10 en +10 in te stellen.
Om het menu te verlaten,
drukt u op de toets AUD :.
쏅
쏅
쏅
Kloktijd
Tijd weergeven
Om de kloktijd wordt gedurende ca. 10 s op
het display weer te geven,
houdt u de toets MENU 7 langer dan
2 seconden ingedrukt.
Tijd instellen
Druk op de toets MENU 7.
Druk zo vaak op de toets
of
8 totdat "TIMESET" op het display 6
wordt weergegeven.
Na ca. 2 seconden wordt de actuele tijd op
het display 6 weergegeven. Voor de wordt
in 24-uurs modus "24H" en in 12-uurs mo-
dus "AM" resp. "PM" weergegeven. De uren
knipperen en kunnen worden ingesteld.
Om de uren resp. minuten in te stellen,
drukt u op de toets
resp. 8.
Om tussen uren en minuten om te schake-
len,
drukt u op de toets 6 <.
Opmerking:
U hoeft niet op de aanwijzing van de
actuele tijd te wachten, om deze door
indrukken van de toets
resp. 8
te veranderen.
Om het menu te verlaten,
drukt u op de toets MENU 7.
Klokmodus 12/24 uur kiezen
Druk op de toets MENU 7.
Druk zo vaak op de toets
of 8,
tot "24 H MODE" resp. "12 H MODE" in
het display 6 wordt getoond.
쏅
쏅
쏅
쏅
쏅
쏅
쏅
쏅
Klankkleur Kloktijd
07_CalaisMP48_nl.indd 19807_CalaisMP48_nl.indd 198 11.06.2008 15:17:22 Uhr11.06.2008 15:17:22 Uhr

199
NEDERLANDS
Druk op de toets resp. 8, om
tussen de modi om te schakelen.
Om het menu te verlaten,
drukt u op de toets MENU 7.
Tijdzone instellen (TIMEZONE)
Indien u zich over tijdzones beweegt, kunt
u het tijdverschil met de actueel ingestelde
tijd in stappen van 1 uur instellen. Op deze
manier kunt u de weergave van de tijd voor
de actueel geldende tijdzone corrigeren,
zonder de tijd zelf opnieuw te hoeven in-
stellen.
Druk op de toets MENU 7.
Druk zo vaak op de toets
of 8
totdat "TIMEZONE" wordt weergege-
ven.
Na ca. 2 seconden worden "ZONE" en de
actuele instelling op het display 6 weer-
gegeven.
Druk op de toets
resp. 8, om het
tijdverschil in stappen van 1 uur tussen
–12 en +12 in te stellen.
Opmerking:
U hoeft niet op de aanwijzing van de
actuele instelling te wachten, om deze
door indrukken van de toets
resp.
8 te veranderen.
Om het menu te verlaten,
drukt u op de toets MENU 7.
쏅
쏅
쏅
쏅
쏅
쏅
Radioweergave
Dit apparaat is uitgerust met een RDS-ra-
dio-ontvanger. Praktisch alle ontvangbare
FM-zenders zenden een signaal uit dat
naast het programma ook informatie bevat
zoals de naam van de zender en het pro-
grammatype (PTY).
De naam van de zender wordt, zodra deze
wordt ontvangen, op het display 6 weer-
gegeven.
Radioweergave inschakelen
Wanneer u zich in een andere weergave-
soort bevindt,
drukt u op de toets BND 2.
of
drukt u op zo vaak op de toets SRC
>, tot "RADIO" op het display 6 ver-
schijnt.
In het display 6 wordt de actuele frequen-
tie resp. de zendernaam getoond.
RDS-comfortfunctie (AF, REG)
De RDS-comfortfuncties AF (alternatieve
frequentie) en REG (Regional) vergroten
het prestatiespectrum van uw radio.
AF: wanneer de RDS-comfortfunctie is
geactiveerd, zoekt de radio in de ach-
tergrond automatisch naar de beste te
ontvangen frequentie van de ingestel-
de zenders.
REG: Sommige zenders verdelen hun
programma op bepaalde tijden in regi-
onale programma's met verschillende
inhoud. De geactiveerde REG-functie
voorkomt dat het apparaat naar alter-
natieve frequenties van de ingestelde
zender omschakelt met een andere
programma-inhoud.
쏅
쏅
•
•
Kloktijd Radioweergave
07_CalaisMP48_nl.indd 19907_CalaisMP48_nl.indd 199 11.06.2008 15:17:22 Uhr11.06.2008 15:17:22 Uhr

200
Opmerking:
REG moet afzonderlijk in het menu wor-
den in- resp. uitgeschakeld.
RDS-comfortfunctie in- of uitschakelen
Om de RDS-functies AF en REG te ge-
bruiken, drukt u op de toets RDS =.
De RDS-comfortfuncties zijn actief, wan-
neer het RDS-symbool op het display 6
wordt weergegeven.
REG in-/uitschakelen
Druk op de toets MENU 7.
Druk net zo vaak op de toets
of 8
tot in het display 6 "REG" en de actue-
le instelling "ON" (aan) resp. "OFF" (uit)
6 wordt weergegeven.
Druk op de toets
resp. 8, om
REG uit- resp. in te schakelen.
Om het menu te verlaten,
drukt u op de toets MENU 7.
Opmerking:
De instelling REG ON/OFF heeft alleen
effect, wanneer de RDS-functie is geac-
tiveerd.
Golfgebied/geheugenniveau
kiezen
Met dit apparaat kunt u programma's in de
frequentiebanden FM (UKW), MW en LW
(Europa) resp. FM en AM (NAFTA) ontvan-
gen. Voor het golfgebied FM zijn drie geheu-
genniveaus (FM1, FM2 en FMT) en voor de
golfgebieden MW en LW resp. AM elk één
geheugenniveau beschikbaar. Bovendien
is er een geheugenniveau MWT/LWT resp.
AMT. Op elk geheugenniveau kunnen 6 zen-
ders worden geprogrammeerd.
쏅
쏅
쏅
쏅
쏅
Om tussen de geheugenniveaus resp. golf-
gebieden om te schakelen,
drukt u op de toets BND 2.
Zenders instellen
U hebt verschillende mogelijkheden om
zenders in te stellen.
Automatische zoekafstemming
Druk op de toets
resp. 8.
De eerstvolgende ontvangbare zender
wordt ingesteld.
Opmerkingen:
Is de voorrang voor verkeersinfor-
matie ingeschakeld, dan wordt de
volgende verkeersinformatiezender
ingesteld.
Is PTY ingeschakeld, dan wordt de
volgende zender met het gekozen
programmatype ingesteld.
Gevoeligheid van de zoekafstemming
instellen
U kunt kiezen, of bij lagere gevoeligheid al-
leen krachtige of bij hogere gevoeligheid
ook zwakkere zenders moeten worden in-
gesteld.
Druk op de toets MENU 7.
Druk zo vaak op de toets
of 8,
tot "SENS" en de actuele instelling
"LO" (geringe gevoeligheid) resp. "DX"
(hoge gevoeligheid) in het display 6
wordt weergegeven.
Druk op de toets
resp. 8, om
tussen de instellingen "LO" en "DX" te
wisselen.
쏅
쏅
•
•
쏅
쏅
쏅
Radioweergave
07_CalaisMP48_nl.indd 20007_CalaisMP48_nl.indd 200 11.06.2008 15:17:23 Uhr11.06.2008 15:17:23 Uhr

201
NEDERLANDS
Om het menu te verlaten,
drukt u op de toets MENU 7.
Handmatig afstemmen op zenders
Om de ingestelde frequentie in kleine stap-
pen te veranderen,
drukt u op de toets
of 8.
Om de ingestelde frequentie snel te veran-
deren,
houdt u de toets
of 8 inge-
drukt.
Opmerking:
Het handmatig zenders instellen is al-
leen mogelijk wanneer de RDS-functie
en PTY zijn gedeactiveerd.
Bladeren in zenderketens (alleen FM)
Wanneer een zender meerdere program-
ma's biedt, kunt u bladeren in deze zgn.
"zenderketen".
Druk op de toets
of 8, om naar
de volgende zender van de zenderke-
ten te gaan.
Opmerking:
Het bladeren door zenderketens is al-
leen mogelijk, wanneer de RDS-functie
is ingeschakeld en PTY is uitgescha-
keld. U kunt zo alleen wisselen tussen
zenders die u al eerder ontvangen hebt.
Gebruik daarvoor bijv. de Travelstore-
functie (T-STORE).
Zenders opslaan
Zenders handmatig programmeren
Kies het gewenste golfgebied resp. het
geheugenniveau.
Stel de zender in.
쏅
쏅
쏅
쏅
쏅
쏅
Houd de voorkeuzetoets 1 - 6 <waar-
op de zender moet worden opgeslagen,
langer dan 2 seconden ingedrukt.
De bevestigingstoon klinkt. De zender is
onder de gekozen voorkeuzetoets opgesla-
gen.
Zender automatisch opslaan (T-STORE)
U kunt de 6 sterkste zenders uit de regio
automatisch programmeren. Voor het golf-
gebied FM volgt het opslaan op het geheu-
genniveau FMT, voor de golfgebieden MW
en LW op de geheugenniveaus MWT/LWT
en voor het golfgebied AM op het geheu-
genniveau AMT.
Opmerking:
Eerder op dit niveau opgeslagen zen-
ders worden daarbij door de nieuw ge-
vonden zenders vervangen.
Kies het gewenste golfgebied.
Houd de toets BND 2 langer dan 2 se-
conden ingedrukt.
Het programmeren begint. Op het display
6 wordt "T-STORE" weergegeven. Nadat
de procedure is afgerond, wordt de zender
op geheugenpositie één van geheugenni-
veau FMT, MWT/LWT resp. AMT weergege-
ven.
Geprogrammeerde zenders
oproepen
Kies het geheugenniveau resp. het golf-
gebied.
Druk op de voorkeuzetoets 1 - 6 <,
waaronder de gewenste zender is op-
geslagen.
쏅
쏅
쏅
쏅
쏅
Radioweergave
07_CalaisMP48_nl.indd 20107_CalaisMP48_nl.indd 201 11.06.2008 15:17:23 Uhr11.06.2008 15:17:23 Uhr

202
Ontvangbare zenders kort
weergeven (BANDSCAN)
Met de bandscan-functie kunt u alle ont-
vangbare zenders gedurende 10 seconden
weergeven.
Bandscan starten
Houdt de toets
resp. 8 langer
dan 2 seconden ingedrukt.
Op het display wordt kort "BANDSCAN"
weergegeven. Het apparaat zoekt in het
actuele golfgebied naar zenders. Iedere ge-
vonden zender wordt gedurende 10 secon-
den kort weergegeven. Daarbij wordt de
ingestelde frequentie resp. de zendernaam
getoond.
Bandscan afsluiten
Druk op de toets
resp. 8.
De scanprocedure wordt beëindigd. De
laatst afgespeelde zender blijft ingesteld.
Programmatype (PTY)
Naast de naam van de zender geven som-
mige FM-zenders ook informatie door over
de inhoud van hun programma's. Zulke pro-
grammatypes kunnen bv. zijn:
CULTUUR REIZEN JAZZ SPORT
NIEUWS POP ROCK MUZIEK
Met de PTY-functie kunt u gericht zenders
met een bepaald programmatype kiezen.
Wanneer PTY is ingeschakeld en een PTY-
zoekdoorloop is gestart, schakelt het ap-
paraat automatisch van de actuele zender
resp. vanuit een andere weergavesoort
naar de zender met het gekozen program-
matype.
쏅
쏅
PTY in-/uitschakelen
Druk op de toets MENU 7.
Druk net zo vaak op de toets
of
8 tot in het display 6 "PTY" en de ac-
tuele instelling "ON" (aan) resp. "OFF"
(uit) wordt weergegeven.
Druk op de toets
resp. 8, om
PTY uit- resp. in te schakelen.
Om het menu te verlaten,
drukt u op de toets MENU 7.
Programmatype kiezen en zoekdoorloop
starten
Druk zo vaak op toets
of 8 dat
het gewenste programmatype wordt
weergegeven.
Druk op de toets
resp. 8, om de
zoekdoorloop te starten.
Indien een zender met het gekozen pro-
grammatype wordt gevonden, wordt deze
ingesteld.
Storingsafhankelijke demping
van de hoge tonen (HICUT)
De HiCut-functie zorgt voor een weerga-
veverbetering bij slechte radio-ontvangst.
Wanneer ontvangststoringen aanwezig zijn,
wordt automatisch de storing afgezwakt.
Om HICUT in- resp. uit te schakelen,
drukt u op de toets MENU 7.
Druk net zo vaak op de toets
of
8 tot in het display 6 "HICUT" en
de actuele instelling "ON" (aan) resp.
"OFF" (uit) wordt weergegeven.
Druk op de toets
resp. 8, om
HICUT uit- resp. in te schakelen.
Om het menu te verlaten,
drukt u op de toets MENU 7.
쏅
쏅
쏅
쏅
쏅
쏅
쏅
쏅
쏅
쏅
Radioweergave
07_CalaisMP48_nl.indd 20207_CalaisMP48_nl.indd 202 11.06.2008 15:17:23 Uhr11.06.2008 15:17:23 Uhr

203
NEDERLANDS
Radiotekst in-/uitschakelen
Bepaalde radiozenders gebruiken het RDS-
signaal om reclame en ander informatie in
plaats van de zendernaam over te dragen.
Deze radiotekst wordt in het display 6
weergegeven.
Om de weergave van radiotekst in en uit te
schakelen,
drukt u op de toets MENU 7.
Druk zo vaak op de toets
of 8
totdat "RADIOTXT" wordt weergege-
ven.
Na ca. 2 seconden wordt de actuele instel-
ling "TEXT ON" (aan) resp. "TEXT OFF" (uit)
op het display 6 weergegeven.
Druk op de toets
resp. 8, om de
weergave van radiotekst uit- resp. in te
schakelen.
Opmerking:
U hoeft niet op de aanwijzing van de
actuele instelling te wachten, om deze
door indrukken van de toets
resp.
8 te veranderen.
Om het menu te verlaten,
drukt u op de toets MENU 7.
쏅
쏅
쏅
쏅
Verkeersinformatie
Voorrang voor
verkeersinformatie in-/
uitschakelen
Om de voorrang voor verkeersinformatie in
iedere weergavesoort in resp. uit te scha-
kelen,
drukt u op de toets TA <.
Opmerking:
In de weergavesoorten CD, MP3, CD-
wisselaar en AUX staat deze functie al-
leen ter beschikking, wanneer daarvoor
het golfgebied FM was ingesteld.
De voorrang voor verkeersinformatie is ge-
activeerd wanneer het TA-symbool op het
display 6 verlicht is. Zodra het apparaat
een verkeersbericht ontvangt, wordt deze
doorgegeven. In het display 6 wordt ge-
durende de melding "TRAFFIC" weergege-
ven.
Opmerking:
U hoort een waarschuwingstoon,
wanneer u bij het beluisteren van een
verkeersinformatiezender of van een
CD het uitzendgebied van de ingestel-
de verkeersinformatiezender verlaat
en de daarop volgende automatische
zoekdoorloop geen nieuwe verkeers-
informatiezender vindt.
wanneer u van een zender met ver-
keersinformatie wisselt naar een zen-
der zonder verkeersinformatie.
Schakel dan ofwel de voorrang voor
verkeersinformatie uit of stel een zen-
der met verkeersinformatie in.
쏅
•
•
Radioweergave Verkeersinformatie
07_CalaisMP48_nl.indd 20307_CalaisMP48_nl.indd 203 11.06.2008 15:17:23 Uhr11.06.2008 15:17:23 Uhr

204
Volumeversterking voor
verkeersinformatie instellen
U kunt instellen met hoeveel volumestap-
pen verkeersbericht luider dan het ingestel-
de volume moeten worden doorgegeven:
Druk op de toets MENU 7.
Druk zo vaak op de toets
of 8
totdat "TA VOL" wordt weergegeven.
Na ca. 2 seconden worden "VOL" en de ac-
tuele instelling op het display 6 weerge-
geven.
Druk op de toets
resp. 8, om de
volumeversterking in te stellen tussen
0 en 10.
Opmerking:
U hoeft niet op de aanwijzing van de
actuele instelling te wachten, om deze
door indrukken van de toets
resp.
8 te veranderen.
Om het menu te verlaten,
drukt u op de toets MENU 7.
Opmerking:
U kunt tijdens het verkeersbericht het
volume voor de duur van het verkeers-
bericht ook instellen met de volumere-
gelaar 1.
Verkeersbericht onderdrukken
Om een lopend verkeersbericht te onder-
breken en naar de eerder beluisterde au-
diobron terug te keren,
drukt u op de toets TA ;.
De voorrang voor verkeersinformatie blijft
ingeschakeld.
쏅
쏅
쏅
쏅
쏅
CD-weergave
Met dit apparaat kunt u normaal in de
handel verkrijgbare audio-CD's, CD-r's en
CD-rw's met een doorsnede van 12 cm af-
spelen. Om problemen bij het afspelen te
voorkomen mag u zelf gemaakte CD's niet
sneller branden dan 16-speed.
Gevaar voor vernieling
van de CD-speler!
Single-CD's met een doorsnede van 8 cm en
CD's met afwijkende vormen (Shape CD's)
mogen niet worden gebruikt.
Behandel de CD met zorg en voorkom kras-
sen en beschadigingen op de CD. Houd de
CD, indien mogelijk, alleen vast aan de rand.
Wanneer een CD eenmaal vuil is, reinigt u
met een pluisvrije doek zonder toevoeging
van oplosmiddelen. Veeg de CD altijd van
binnenuit naar buiten af.
Stel de CD niet bloot aan direct zonlicht en
bewaar de CD buiten het apparaat in een
beschermend doosje.
Plak geen etiketten op de CD. Schrijf alleen
op de CD met daarvoor in de handel speci-
aal bedoelde stiften.
Wij aanvaarden geen aansprakelijkheid voor
beschadigingen aan de CD-speler door on-
geschikte of beschadigde CD's.
Voor optimaal functioneren moet u alleen
CD's gebruiken met het Compact-Disc-logo.
Er kunnen afspeelmoeilijkheden ontstaan
bij CD's met kopieerbeveiliging. Blaupunkt
kan het goed functioneren van CD's met ko-
pieerbeveiliging niet garanderen.
Verkeersinformatie CD-weergave
07_CalaisMP48_nl.indd 20407_CalaisMP48_nl.indd 204 11.06.2008 15:17:23 Uhr11.06.2008 15:17:23 Uhr

205
NEDERLANDS
CD-weergave starten
Wanneer er geen CD in de speler zit,
schuift u de CD met de bedrukte zijde
naar boven zonder forceren in de CD-
opening totdat u een weerstand voelt.
De CD wordt automatisch naar binnen in de
CD-speler getransporteerd. Op het display
6 wordt het CD-symbool weergegeven.
Opmerking:
Het transport van de CD mag niet wor-
den gehinderd of geholpen.
De CD-weergave begint. Op het display 6
worden de nummers van de actuele titels
(bijv. "T12") en de speeltijd en de titelinfor-
matie (CD-tekst) weergegeven.
Wanneer er reeds een CD in de speler zit,
drukt u zo vaak op de toets SRC > tot-
dat "CD" op het display 6 verschijnt.
De weergave start op de plaats waar deze
werd onderbroken.
Weergeven van titelinformatie
(CD-tekst)
Indien de CD tekst ter beschikking stelt,
wordt de informatie over iedere titel bij het
starten van de titel als lichtkant op het dis-
play 6 weergegeven.
Titelinformatie eenmalig als lichtkrant
weergeven
Druk op de toets 5 <.
De CD-tekst van de actuele titel wordt een-
maal als lichtkrant op het display 6 weer-
gegeven.
Opmerking:
Deze functie staat niet ter beschikking,
wanneer de weergave van CD-tekst als
쏅
쏅
쏅
lichtkrant is uitgeschakeld (zie volgen-
de par. agraaf).
Weergave van titelinformatie als
lichtkrant in-/uitschakelen
Om de weergave van titelinformatie als
lichtkrant in- resp. uit te schakelen,
drukt u op de toets MENU 7.
Druk net zo vaak op de toets
of
8 tot in het display 6 "SCRL" en
de actuele instelling "ON" (aan) resp.
"OFF" (uit) wordt weergegeven.
Druk op de toets
resp. 8, om de
lichtkrant uit- resp. in te schakelen.
Om het menu te verlaten,
drukt u op de toets MENU 7.
Bij de instelling "SCRL OFF" wordt de ti-
telinformatie in delen van telkens 8 tekens
op het display 6 weergegeven. Daarbij
wordt iedere tekstdeel en titelnummer en
speeltijd constant afwisselend gedurende
telkens 5 seconden weergegeven.
Opmerking:
De instelling "SCRL ON/OFF" heeft
hetzelfde effect op de weergave van
MP3-titelinformatie (ID3-tags) in MP3-
weergave.
Titel kiezen
Druk op de toets resp. 8, om de
volgende, resp. vorige titel te kiezen.
Wanneer toets
8 eenmaal wordt inge-
drukt, wordt de actuele titel opnieuw ge-
start.
쏅
쏅
쏅
쏅
쏅
CD-weergave
07_CalaisMP48_nl.indd 20507_CalaisMP48_nl.indd 205 11.06.2008 15:17:23 Uhr11.06.2008 15:17:23 Uhr

206
Snelle zoekdoorloop (hoorbaar)
Voor een snelle zoekdoorloop achteruit
resp. vooruit,
houdt u de toets resp. 8 inge-
drukt, tot u bij de gewenste positie
komt.
Willekeurige weergave van de
titels (MIX)
Druk op de toets 3 <.
Op het display 6 wordt kort "MIX CD"
weergegeven en het MIX-symbool ver-
schijnt. De volgende titels worden willekeu-
rig gekozen.
MIX beëindigen
Druk opnieuw op de toets 3 <.
Op het display 6 wordt kort "MIX OFF"
weergegeven en het MIX-symbool verdwijnt.
De weergave wordt normaal voortgezet.
Titels kort weergeven (SCAN)
Om alle titels van de CD gedurende telkens
ca. 10 seconden te laten weergeven,
drukt u op de toets 4 <.
Op het display wordt kort "SCAN TRK" weer-
gegeven. Tijdens het kort weergeven knip-
pert de weergave "CD". De titelnummers en
de speeltijd van de actuele titel resp. de ti-
telinformatie daarvan wordt weergegeven.
SCAN beëindigen, titel verder
beluisteren
Om de scanprocedure te beëindigen,
drukt u opnieuw op de toets 4 <.
Op het display wordt kort "SCAN OFF"
weergegeven. De actuele titel wordt verder
afgespeeld.
쏅
쏅
쏅
쏅
쏅
Titel herhalen (RPT)
Druk op de toets 2 <.
"RPT TRK" verschijnt kort op het display, het
RPT-symbool wordt weergegeven. De actu-
ele titel wordt herhaald totdat RPT wordt
gedeactiveerd.
RPT afsluiten
Druk opnieuw op de toets 2 <.
"RPT OFF" verschijnt kort op het display
6, het RPT-symbool verdwijnt. De weer-
gave wordt normaal voortgezet.
Weergave onderbreken (PAUSE)
Druk op de toets 1 <.
Op het display 6 wordt "PAUSE" weerge-
geven.
Pauze opheffen
Druk gedurende de pauze op de toets
1 <.
De weergave wordt voortgezet.
CD verwijderen
Opmerking:
U kunt ook CD's naar buiten laten schui-
ven wanneer het apparaat is uitgescha-
keld of er een andere audiobron actief
is.
Druk op de CD-uitwerptoets 4.
De CD wordt naar buiten geschoven. Op
het display wordt kort "CD EJECT" weerge-
geven.
쏅
쏅
쏅
쏅
쏅
CD-weergave
07_CalaisMP48_nl.indd 20607_CalaisMP48_nl.indd 206 11.06.2008 15:17:24 Uhr11.06.2008 15:17:24 Uhr

207
NEDERLANDS
Opmerking:
Het uitschuiven van de CD mag niet
worden gehinderd of geholpen.
Neem de CD uit.
Het CD-symbool verdwijnt.
Opmerking:
Wanneer u een uitgeschoven CD niet
uitneemt, wordt deze na ca. 10 secon-
den weer automatisch ingeschoven.
쏅
MP3-/WMA-weergave
U kunt met deze autoradio ook CD-R's en
CD-RW's met MP3- en WMA-muziekbe-
standen afspelen. Bovendien kunt u via de
optionele C‘n‘C-compatibel USB-interface
USB-datadragers aansluiten en op de USB-
datadrager opgeslagen MP3-/WMA-bestan-
den afspelen.
Dit hoofdstuk behandelt alleen het af-
spelen van MP3-bestanden, omdat de
bediening bij MP3- en WMA-bestanden
identiek is. In dit hoofdstuk heeft de
naam "MP3-datadrager" betrekking zo-
wel op CD-R/RW's als ook op USB-data-
dragers zoals bijv. USB-sticks.
Opmerkingen:
WMA-bestanden met Digital Rights
Management (DRM) uit online-mu-
sicshops kunnen met dit apparaat
niet worden afgespeeld.
WMA-bestanden kunnen alleen be-
trouwbaar worden afgespeeld, wan-
neer deze met Windows Media-Player
vanaf versie 8 zijn aangemaakt.
Voorbereiding van een MP3-
datadrager
Voorbereiding van een MP3-CD
Door de combinatie van CD-writer, CD-
schrijfsoftware en onbeschreven CD kun-
nen problemen optreden bij de weergave
van de CD's. Wanneer er problemen optre-
den met zelfgebrande CD's, dient u over te
schakelen op een ander merk of een andere
kleur basis-CD's.
De opmaak van de CD moet ISO 9660
level 1, level 2 of Joliet zijn. Alle andere
•
•
CD-weergave MP3-/WMA-weergave
07_CalaisMP48_nl.indd 20707_CalaisMP48_nl.indd 207 11.06.2008 15:17:24 Uhr11.06.2008 15:17:24 Uhr

208
soorten kunnen niet betrouwbaar worden
afgespeeld.
Bij het aanmaken (coderen) van de MP3-/
WMA-bestanden uit de audiobestanden
moet u bitrates van 32 tot 320 kbps voor
MP3-bestanden resp. van 32 tot 192 kbps
voor WMA-bestanden gebruiken.
Dit apparaat ondersteunt tot 252 mappen
en tot 255 bestanden per map. Daarbij mag
de CD in totaal maximaal 512 mappen en
bestanden bevatten. De mappen en titels
op de CD kunnen afzonderlijk worden ge-
kozen.
D01
D02
T001
T005
T004
T003
T002
D03
T001
T006
T005
T004
T003
T002
T011
T007
T008
T009
T010
D04
T001
T006
T005
T004
T003
T002
A
B
A Mappen
B Titel · Bestanden
U kunt elke map met de PC een naam geven.
De naam van de map kan op het display van
het apparaat worden weergegeven. Geef
de mappen en titels/bestanden namen vol-
gens de werkwijze van uw CD-schrijfsoft-
ware. Opmerkingen daarvoor vindt u in de
handleiding van de software.
Opmerkingen:
Gebruik bij de naamgeving van de be-
standen (map en titel) geen umlauts
en speciale tekens.
Gebruik van bestandsnamen van
meer dan 16 tekens (incl. ".MP3"
resp. ".WMA"), vermindert het maxi-
male aantal titels en mappen.
Wanneer u waarde hecht aan een bepaalde
volgorde van uw bestanden: sla de bestan-
den op de datadrager op in de volgorde
waarin deze later worden afgespeeld. Het
apparaat speelt de bestanden af in de volg-
orde, waarin deze fysisch op de datadrager
zijn opgeslagen.
Voor het afspelen van de bestanden in dit
apparaat moeten de MP3-bestanden de ex-
tensie ".MP3" resp. de WMA-bestanden de
extensie ".WMA" hebben.
Opmerkingen:
Om ongestoorde weergave te garande-
ren,
probeer niet om andere bestanden
dan MP3-bestanden te voorzien van
de extensie ".MP3" en deze vervol-
gens af te spelen! Deze ongeldige be-
standen worden tijdens de weergave
genegeerd.
gebruik geen gemengde CD's met
MP3-bestanden en niet-MP3-bestan-
den (het apparaat leest tijdens MP3-
weergave alleen MP3-bestanden).
gebruik geen mix-mode-CD's met
audiotitels en MP3-titels. Als u pro-
•
•
•
•
•
MP3-/WMA-weergave
07_CalaisMP48_nl.indd 20807_CalaisMP48_nl.indd 208 11.06.2008 15:17:24 Uhr11.06.2008 15:17:24 Uhr

209
NEDERLANDS
beert een mix-mode-CD af te spelen,
worden alleen de CD-audiotitels afge-
speeld.
Voorbereiding van een USB-datadrager
Om te zorgen dat het apparaat de USB-da-
tadrager herkent, moet deze als massage-
heugen (Mass Storage Device) zijn gespe-
cifi ceerd, in het bestandssysteem FAT16 of
FAT32 zijn geformatteerd en MP3- of WMA-
bestanden bevatten.
U kunt op een USB-datadrager maximaal
1500 bestanden (mappen en titels) aan-
maken. De mappen en de titels kunnen met
dit apparaat afzonderlijk worden gekozen.
Gebruik van bestandsnamen van meer dan
24 tekens (incl. ".MP3" resp. ".WMA"), ver-
mindert het maximale aantal bestanden.
Blaupunkt kan het optimaal functioneren
van alle op de markt verkrijgbare USB-da-
tadragers niet garanderen.
ID3-tags
MP3-titels kunnen extra informatie bevat-
ten, zoals uitvoerende, titelnaam en album
(ID3-tag). Dit apparaat kan ID3-tags van
versie 1 en versie 2 op het display weerge-
ven.
MP3-weergave starten
MP3-weergave van CD starten
Bij een MP3-CD wordt de MP3-weergave
gestart zoals de normale CD-weergave.
Lees hiervoor het gedeelte "CD-weergave
starten" in het hoofdstuk "CD-weergave".
Op het display 6 worden de nummers van
de actuele titels (bijv. "T12") en de speeltijd
en de titelinformatie (ID3-tags) resp. de be-
standsnaam weergegeven. Bij het overgaan
naar een andere map wordt kort het map-
nummer (bijv. "DIR 02") weergegeven.
USB-datadrager aansluiten en MP3-
weergave starten
Om een USB-datadrager (bijv. USB-stick of
een USB-harde schijf) aan te kunnen slui-
ten, moet de optionele Blaupunkt USB-in-
terface aan de achterzijde van het apparaat
(kamer C3) worden aangesloten zoals in
de inbouwhandleiding staat beschreven. U
kunt de USB-kabel van de interface bijvoor-
beeld in het handschoenencompartiment
of op een andere geschikte plaats op de
middenconsole bewaren.
Opmerkingen:
Wanneer u de Blaupunkt-USB-inter-
face op het apparaat aansluit, moet
de AUX-ingang overeenkomstig wor-
den ingesteld. Lees daarvoor de pa-
ragraaf "AUX-ingang instellen" in het
hoofdstuk "Externe audiobronnen".
Schakel het apparaat altijd uit, voor-
dat u de USB-datadrager aansluit of
uitneemt, zodat de datadrager cor-
rect wordt aangemeld en afgemeld.
Sluit de USB-datadrager aan op de
USB-kabel van de USB-interface.
Zodra een USB-datadrager is aangesloten,
kan deze met de toets SRC > worden ge-
selecteerd. Op het display verschijnt dan
"USB".
Weergeven van titelinformatie
(ID3-tags)
Indien de MP3-datadrager ID3-tags ter be-
schikking stelt, wordt de informatie over ie-
dere titel bij het starten van de titel als licht-
kant op het display 6 weergegeven. Indien
•
•
쏅
MP3-/WMA-weergave
07_CalaisMP48_nl.indd 20907_CalaisMP48_nl.indd 209 11.06.2008 15:17:24 Uhr11.06.2008 15:17:24 Uhr

210
er geen ID3-tags met de MP3-bestanden
zijn opgeslagen, wordt de bestandsnaam
weergegeven.
Opmerking:
Lees voor het opslaan van ID3-tags ook
de handleiding van uw PC-MP3-soft-
ware resp. de brandersoftware.
Titelinformatie eenmalig als lichtkrant
weergeven
Druk op de toets 5 <.
De ID3-tags van de actuele titel worden
eenmaal als lichtkrant op het display 6
weergegeven.
Opmerking:
Deze functie staat niet ter beschikking,
wanneer de weergave van titelinforma-
tie als lichtkrant is uitgeschakeld. Lees
daarvoor in hoofdstuk "CD-weergave",
paragraaf "Weergave van titelinforma-
tie (CD-tekst)" het deel "Weergave van
titelinformatie als lichtkrant in- uitscha-
kelen".
Map kiezen
Om op- resp. neerwaarts naar een andere
map te gaan,
drukt u op de toets
resp. 8.
Opmerkingen:
Alle mappen die geen MP3-bestan-
den bevatten, worden automatisch
overgeslagen.
Het apparaat behandelt alle mappen
en submappen alsof deze op één ni-
veau liggen. Door herhaaldelijk druk-
ken op de toets
resp. 8 komt u
ook in alle submappen.
쏅
쏅
•
•
Titels/bestanden kiezen
Om op- of neerwaarts naar een andere ti-
tel/een ander bestand van de actuele map
te gaan,
drukt u op de toets
resp. 8.
Wanneer toets
8 eenmaal wordt inge-
drukt, wordt de actuele titel opnieuw ge-
start.
Snelle zoekdoorloop
Voor een snelle zoekdoorloop achteruit
resp. vooruit,
houdt u de toets
resp. 8 inge-
drukt, tot u bij de gewenste positie
komt.
Opmerking:
In USB-weergave stopt de snelle zoek-
doorloop achterwaarts steeds bij het
begin van de actuele titel.
Titels in willekeurige volgorde
weergeven (MIX)
Om de titels van de actuele mappen in wil-
lekeurige volgorde te laten weergeven,
drukt u zo vaak op de toets 3 <, tot
"MIX DIR" resp. "MIX FLD" op het dis-
play 6 wordt weergegeven.
Het MIX-symbool verschijnt op het display
6.
Om alle titels van de MP3-datadrager in wil-
lekeurige volgorde te laten weergeven,
drukt u zo vaak op toets 3 <, tot "MIX
ALL" op het display 6 wordt weerge-
geven.
Het MIX-symbool verschijnt op het display
6.
쏅
쏅
쏅
쏅
MP3-/WMA-weergave
07_CalaisMP48_nl.indd 21007_CalaisMP48_nl.indd 210 11.06.2008 15:17:24 Uhr11.06.2008 15:17:24 Uhr

211
NEDERLANDS
MIX beëindigen
Om het afspelen in willekeurige volgorde te
beeindigen,
drukt u zo vaak op toets 3 <, tot "MIX
OFF" op het display 6 wordt weerge-
geven.
Het MIX-symbool op het display 6 ver-
dwijnt.
Titels kort weergeven (SCAN)
Om alle titels van de MP3-datadrager
in oplopende volgorde elk gedurende ca.
10 seconden af te laten spelen,
drukt u zo vaak op de toets 4 <, tot
"SCAN TRK" op het display 6 ver-
schijnt.
Tijdens het kort weergeven knippert de
weergave "MP3" resp. "USB".
Om in USB-bedrijf alle titels van de actuele
mappen kort weer te geven,
drukt u zo vaak op de toets 4 <, tot
"SCAN FLD" op het display 6 ver-
schijnt.
Tijdens het kort weergeven knippert de
weergave "USB".
SCAN beëindigen
Om de korte weergave te beëindigen,
drukt u zo vaak op de toets 4 <, tot
"SCAN OFF" op het display 6 ver-
schijnt.
De actueel weergegeven titel wordt verder
afgespeeld.
쏅
쏅
쏅
쏅
Losse titels of hele mappen
herhaald afspelen (REPEAT)
Om de actuele titel te herhalen,
drukt u zo vaak op toets 2 <, tot "RPT
TRK" op het display 6 wordt weerge-
geven.
Het RPT-symbool verschijnt op het display
6.
Om de actuele map te herhalen,
drukt u zo vaak op de toets 2 <, tot
"RPT DIR" resp. "RPT FLD" op het dis-
play 6 wordt weergegeven.
Het RPT-symbool verschijnt op het display
6.
REPEAT beëindigen
Om de herhaling te beëindigen,
drukt u zo vaak op toets 2 <, tot "RPT
OFF" op het display 6 wordt weerge-
geven.
Het RPT-symbool op het display 6 ver-
dwijnt.
Weergave onderbreken (PAUSE)
Druk op de toets 1 <.
Op het display 6 wordt "PAUSE" weerge-
geven.
Pauze opheffen
Druk gedurende de pauze op de toets
1 <.
De weergave wordt voortgezet.
쏅
쏅
쏅
쏅
쏅
MP3-/WMA-weergave
07_CalaisMP48_nl.indd 21107_CalaisMP48_nl.indd 211 11.06.2008 15:17:24 Uhr11.06.2008 15:17:24 Uhr

212
Weergave van CD-wisselaar
Op het apparaat kan optioneel de Blaupunkt-
CD-wisselaar CDC A08 T en IDC A09 wor-
den aangesloten (kamer C3 aan achterzijde
apparaat).
Let op!
De CD-wisselaar wordt normaal ge-
sproken door het apparaat met een
12 V voeding gevoed.
Wanneer de CD-wisselaar CDC A 08 T
(24 Volt) wordt aangesloten, dan moet
de voeding op de connector in de aan-
sluitkabel van de CD-wisselaar worden
gescheiden (kamer C3/Pin 15). De CD-
wisselaar moet met een eigen 24 V voe-
ding worden gevoed.
Opmerkingen:
Wanneer u een CD-wisselaar op het
apparaat aansluit, moet de AUX-in-
gang overeenkomstig worden inge-
steld. Lees daarvoor de paragraaf
"AUX-ingang instellen" in het hoofd-
stuk "Externe audiobronnen".
Informatie over de behandeling van
CD's, het plaatsen van CD's en voor
de bediening van de CD-wisselaar
vindt u in de gebruiksaanwijzing van
uw CD-wisselaar.
Weergave van CD-wisselaar
starten
Druk zo vaak op de toets SRC > tot-
dat "CHANGER" op het display 6 ver-
schijnt.
De weergave begint met de eerste CD die
de CD-wisselaar herkent. Op het display
6 worden de nummers van de actuele CD
•
•
쏅
(bijv. "D02") en de speeltijd en de actuele
titel (bijv. "T07) weergegeven.
CD kiezen
Om omhoog of naar beneden naar een
andere CD te gaan,
drukt u op de toets
resp. 8.
Titel kiezen
Om op- of neerwaarts naar een andere titel
van de actuele CD te gaan,
drukt u op de toets
resp. 8.
Snelle zoekdoorloop (hoorbaar)
Voor een snelle zoekdoorloop achteruit
resp. vooruit,
houdt u de toets
resp. 8 inge-
drukt, tot u bij de gewenste positie
komt.
Afzonderlijke titels of de hele CD
herhaald afspelen (RPT)
Om de actuele titel te herhalen,
drukt u zo vaak op toets 2 <, tot "RPT
TRK" op het display 6 wordt weerge-
geven.
Het RPT-symbool verschijnt op het display
6.
Om de actuele CD te herhalen,
drukt u zo vaak op toets 2 <, tot "RPT
CD" op het display 6 wordt weerge-
geven.
Het RPT-symbool verschijnt op het display
6.
쏅
쏅
쏅
쏅
쏅
Weergave van CD-wisselaar
07_CalaisMP48_nl.indd 21207_CalaisMP48_nl.indd 212 11.06.2008 15:17:24 Uhr11.06.2008 15:17:24 Uhr

213
NEDERLANDS
REPEAT beëindigen
Om de herhaling te beëindigen,
drukt u zo vaak op toets 2 <, tot
"RPT OFF" op het display 6 wordt
weergegeven.
Het RPT-symbool op het display 6 ver-
dwijnt.
Titels in willekeurige volgorde
weergeven (MIX)
Om de titels van de actuele CD in willekeu-
rige volgorde weer te geven,
drukt u zo vaak op toets 3 <, tot "MIX
CD" op het display 6 wordt weerge-
geven.
Het MIX-symbool verschijnt op het display
6.
Om de titels van alle geplaatste cd's in wil-
lekeurige volgorde weer te geven,
drukt u zo vaak op toets 3 <, tot "MIX
ALL" op het display 6 wordt weerge-
geven.
Het MIX-symbool verschijnt op het display
6.
MIX beëindigen
Om het afspelen in willekeurige volgorde te
beeindigen,
drukt u zo vaak op toets 3 <, tot "MIX
OFF" op het display 6 wordt weerge-
geven.
Het MIX-symbool op het display 6 ver-
dwijnt.
쏅
쏅
쏅
쏅
Alle titels van alle CD's kort
weergeven (SCAN)
Om alle titels van alle geplaatste CD's
in oplopende volgorde elk gedurende ca.
10 seconden af te laten spelen,
drukt u op de toets 4 <.
Op het display 6 verschijnt kort "SCAN
TRK". Tijdens het kort weergeven knippert
de weergave van het CD-nummer.
Scan beëindigen
Om de korte weergave te beëindigen,
drukt u opnieuw op de toets 4 <.
Op het display 6 verschijnt kort "SCAN
OFF". De actueel weergegeven titel wordt
verder afgespeeld.
Weergave onderbreken (PAUSE)
Druk op de toets 1 <.
Op het display 6 verschijnt "PAUSE".
Pauze opheffen
Druk gedurende de pauze op de toets
1 <.
De weergave wordt voortgezet.
쏅
쏅
쏅
쏅
Weergave van CD-wisselaar
07_CalaisMP48_nl.indd 21307_CalaisMP48_nl.indd 213 11.06.2008 15:17:24 Uhr11.06.2008 15:17:24 Uhr

214
IR-afstandsbediening RC 10 P
Met de optionele IR-afstandsbediening
kunt u de belangrijkste functies van het ap-
paraat regelen.
Afstandsbedieningsontvanger
In de kap van het apparaat bevindt zich de
infraroodontvanger 9 voor de afstands-
bediening. Voor gebruik van de afstands-
bediening moet de ontvanger worden inge-
schakeld:
Druk op de toets MENU 7.
Druk net zo vaak op de toets
resp.
8 tot in het display 6 "IR" en de ac-
tuele instelling "ON" (aan) resp. "OFF"
(uit) wordt weergegeven.
Druk op de toets
resp. 8, om IR
uit- resp. in te schakelen.
Om het menu te verlaten,
drukt u op de toets MENU 7.
C
F
G
H
E
D
B
A
@
쏅
쏅
쏅
쏅
Functies van de
afstandsbediening
Algemeen:
Toets Functie
ON H Apparaat in-/uitschakelen
(lang indrukken)
Mute (kort indrukken)
Menu verlaten
SRC @ Bronomschakeling
V+ B Volume verhogen
V- A Volume verlagen
OK G Menu oproepen resp.
verlaten
E Menupunt selecteren
C Menupunt selecteren
F Menu-instelling veranderen
D Menu-instelling veranderen
Bij radioweergave
Toets Functie
F Oproepen opgeslagen
zender
D Keuze golfgebied/geheu-
genniveau
E Zoekdoorloop voorwaarts
C Zoekdoorloop neerwaarts
Bij CD-weergave
Toets Functie
F Volgende titel kiezen
D Voorgaande titel kiezen
IR-afstandsbediening
07_CalaisMP48_nl.indd 21407_CalaisMP48_nl.indd 214 11.06.2008 15:17:24 Uhr11.06.2008 15:17:24 Uhr

215
NEDERLANDS
CD-wisselaar-bedrijf
Toets Functie
F Volgende titel spelen,
snelle zoekdoorloop
D Voorgaande titel spelen
E Volgende CD spelen
C Voorgaande CD spelen
MP3-weergave-bedrijf
Toets Functie
F Volgende titel spelen,
snelle zoekdoorloop
D Voorgaande titel spelen
E Volgende map spelen
C Voorgaande map spelen
Voorversterkeruitgang
U kunt op het apparaat een versterker
aansluiten voor het aansturen van een
Subwoofer. Daarvoor moet de versterker
op de achterzijde van het apparaat (aanslui-
ting C1) worden aangesloten. Het niveau
van de Subwoofer kan in het audio-menu
worden ingesteld:
Druk op de toets AUD :.
Druk net zo vaak op de toets
of
8 totdat "SUB WOOF" wordt weerge-
ven.
Na ca. 2 seconden worden "SUBW" en de
actuele instelling in het display 6 weerge-
ven.
Druk op de toets
resp. 8, om het
niveau voor de Subwoofer in te stellen
tussen 0 en 7.
Opmerking:
U hoeft niet op de weergave van de
actuele instelling te wachten om deze
door op de toets
resp. 8 te druk-
ken te wijzigen.
Om het menu te verlaten,
drukt u op de toets AUD :.
쏅
쏅
쏅
쏅
IR-afstandsbediening Voorversterkeruitgang
07_CalaisMP48_nl.indd 21507_CalaisMP48_nl.indd 215 11.06.2008 15:17:25 Uhr11.06.2008 15:17:25 Uhr

216
Externe audiobronnen
U kunt via de AUX-ingang verschillende
soorten externe audiobronnen op het ap-
paraat aansluiten. De AUX-ingang moet
voor de betreffende aangesloten audiobron
ingesteld worden:
Instelling "AUX" voor externe audio-
bronnen zoals bijv. draagbare CD-spe-
ler, MiniDisc-speler of MP3-speler.
Instelling "CDC" voor de Blaupunkt-CD-
wisselaar CDC A 08 T en IDC A 09.
Instelling "USB" voor de USB-interface
van Blaupunkt.
Voor de instelling van de AUX-ingang leest
u de volgende paragraaf "AUX-ingang instel-
len".
Opmerking:
Voor het aansluiten van een externe
audiobron hebt u een adapterka-
bel nodig. Deze kabel (Blaupunkt-nr.
7 607 897 093) is verkrijgbaar bij uw
Blaupunkt-vakhandel.
AUX-ingang instellen
Druk op de toets MENU 7.
Druk zo vaak op de toets
of 8
totdat "SRC SEL" wordt weergegeven.
Na ca. 2 seconden worden "SRC" en de ac-
tuele instelling "CDC", "USB" resp. "AUX" op
het display 6 weergegeven.
Druk op de toets
resp. 8, om een
andere instelling te kiezen.
Opmerking:
De volgorde van de instellingen in het
menu is "CDC" – "USB" – "AUX":
•
•
•
쏅
쏅
쏅
Bij de actuele instelling "CDC" kunt u
door indrukken van de toets
8 de
instelling "USB" kiezen.
Bij de actuele instelling "USB" kunt
u door indrukken van de toets
8
de instelling "CDC" of door indrukken
van de toets
8 de instelling "AUX"
kiezen.
Bij de actuele instelling "AUX" kunt u
door indrukken van de toets
8 de
instelling "USB" kiezen.
Na iedere verandering van de instelling
volgt automatisch uitschakelen van het
apparaat. Om tussen de instellingen
"CDC" en "AUX" te schakelen, moet u
daarom eerst de instelling "USB" kiezen
en na het automatisch uitschakelen het
instrument weer inschakelen. Herhaal
dan de instelprocedure, om bij de ge-
wenste instelling "AUX" resp. "CDC" te
komen.
De opmerking "AUTO SWITCH OFF IN
10 SECONDS" wordt getoond. Het apparaat
schakelt zichzelf na 10 s automatisch uit.
Schakel het apparaat door indrukken
van de aan-/uit-toets 3 weer aan.
Het apparaat wordt in radioweergave met
de gekozen instelling ingeschakeld.
Opmerking:
Wanneer u de AUX-instelling heeft ge-
kozen, kunt u de AUX-ingang met de
toets SRC > kiezen. Op het display
wordt dan "AUX" getoond.
Wanneer u de CDC- resp. USB-instel-
ling heeft gekozen, kunt u de audiobron
met de toets SRC > alleen kiezen,
wanneer een bijbehorend apparaat
(CD-wisselaar resp. USB-interface) is
aangesloten.
•
•
•
쏅
Externe audiobronnen
07_CalaisMP48_nl.indd 21607_CalaisMP48_nl.indd 216 11.06.2008 15:17:25 Uhr11.06.2008 15:17:25 Uhr

217
NEDERLANDS
Niveau van de AUX-ingang
instellen
Wanneer u de AUX-ingang voor de aanslui-
ting van een externe audiobron op "AUX"
heeft ingesteld, kunt u het niveau van de
externe audiobron op het niveau van de ap-
paraateigen audiobron (zoals bijv. CD en
radio) aanpassen.
Opmerking:
U kunt het niveau voor de AUX-ingang
alleen instellen, wanneer AUX als au-
diobron is gekozen.
Druk evt. zo vaak op de toets SRC
>, tot "AUX" op het display wordt ge-
toond.
Druk op de toets MENU 7.
Druk zo vaak op de toets
resp.
8, tot "GAIN" en de actuele instelling
op het display worden weergegeven.
Druk op de toets
resp. 8, om de
niveau-aanpassing in te stellen tussen
–9 en +9.
Om het menu te verlaten,
drukt u op de toets MENU 7.
쏅
쏅
쏅
쏅
쏅
Fabrieksinstellingen
herstellen (RESET)
U heeft de mogelijkheid, de oorspronke-
lijke fabrieksinstellingen van het apparaat
te herstellen.
Houdt de toets AUD : langer dan
ca. 10 seconden ingedrukt.
Een bevestigingstoon klinkt en op het dis-
play 6 wordt kort "RESET" weergegeven.
Alle menu- en audiomenu-instellingen wor-
den naar de fabrieksinstellingen terugge-
zet.
Opmerking:
Op de voorkeuzetoetsen opgeslagen
zenders worden niet gewist.
쏅
Externe audiobronnen Fabrieksinstellingen
07_CalaisMP48_nl.indd 21707_CalaisMP48_nl.indd 217 11.06.2008 15:17:25 Uhr11.06.2008 15:17:25 Uhr

218
Technische gegevens
Bedrijfsspanning
24 Volt
Versterker
Uitgangsvermogen: 2 x 20 Watt sinus
aan 4 Ohm
Line-uitgang: 2 x 2,0 Volt eff
AUX-ingang: 2 x 2,0 Volt eff
Tuner
Golfgebied Europa:
FM: 87,5 - 108 MHz
MW : 531 - 1602 kHz
LW: 153 - 279 kHz
Golfgebied Amerika:
FM: 87,7 - 107,9 MHz
AM: 530 - 1710 kHz
Frequentiebereik FM:
30 -15 000 Hz
CD
Frequentiebereik: 20 - 20 000 Hz
Wijzigingen voorbehouden!
Technische gegevens
07_CalaisMP48_nl.indd 21807_CalaisMP48_nl.indd 218 11.06.2008 15:17:25 Uhr11.06.2008 15:17:25 Uhr

219
SVENSKA
1 Volymreglage
2 BND-knapp
Kort tryckning: Val av minnesnivå resp.
våglängdsområde
Lång tryckning: Starta Travelstore(rese)-
funktionen (FMT eller MVT/LVT)
3 På/av-knapp
Kort tryckning: Slå på apparaten
Under drift: Ljudavstängning (Mute)
Lång tryckning: Slå av apparaten
4 CD-utmatningsknappen
5 CD-fack
6 Display
7 MENU-knapp
Öppna menyn för grundinställningar.
8 Multifunktionsvippströmbrytare
9 Infraröd-mottagare för IR-fjärrkontrol
(tillval)
: AUD-knapp
Kort tryckning: Öppna audio-menyn
för inställning av bas, diskant, balans,
fading och volym
Lång tryckning (10 s): Återställa fa-
briksinställningar
; TA-knapp
Aktivera/avaktivera prioritet för trafi k-
meddelanden
Avbryta ett trafi kmeddelande
< Knappsats 1 - 6
= RDS-knapp
Aktivera/avaktivera RDS-komfortfunk-
tion
> SRC-knapp
Välj källa mellan radio och CD samt
(förutsatt att de är anslutna resp. akti-
verade) CD, MP3, CD-växlare och AUX
? Code LED
Knappar och reglage
08_CalaisMP48_sw.indd 21908_CalaisMP48_sw.indd 219 11.06.2008 15:18:16 Uhr11.06.2008 15:18:16 Uhr

220
Viktiga anvisningar ........................222
Användning .................................222
Trafi ksäkerhet .............................222
Fjärrkontroll (tillval) .....................222
CD-växlare (tillval) .......................222
USB-gränssnitt (tillval) .................222
Källsortering ...............................222
Stöldskydd CODE...........................223
Aktivera/avaktivera kodfråga
(CODE) ...................................... 223
Lägga in kodnummer efter
strömavbrott ............................... 224
Till-/frånkoppling ...........................224
Till-/frånkoppling med på-/
av-knapp ....................................224
Från-/tillkoppling via
fordonständningen ......................224
Tillkoppling genom CD-inmatning ...224
Ställa in avslagningstid..................225
Slå på via telefon (tillval) ...............225
Tillkoppling med IR-fjärrkontroll
RC 10 P (tillval) ...........................225
Ställa in volym ...............................225
Ljudavstängning (MUTE) ...............225
Ljudhantering vid telefon/
navigering ...................................225
Till-/frånkoppling av ljudsignal
(BEEP) .......................................226
Att ställa in max startvolym
(ON VOL) ....................................226
Ställa in bullerberoende
volymanpassning (GALA) ..............227
Klangbild ......................................227
Ställa in diskant ...........................227
Ställa in bas ................................ 227
Ställa in mellanregister .................228
Ställa in volymbalans vänster/
höger (BAL) ................................228
Ställa in volymbalans framåt/
bakåt (FAD) ................................ 228
Tid ................................................229
Visa tid .......................................229
Ställa in tid ..................................229
Välja 12- eller 24-timmars visning ..229
Ställa in tidszon (TIMEZONE) .........230
Radio ............................................ 230
Slå på radion ...............................230
RDS-komfortfunktioner (AF, REG) ..230
Välja våglängdsområde/
minnesnivå .................................231
Ställa in stationer .........................231
Lagra stationer ............................232
Välja lagrade stationer ..................232
Presentera mottagningsbara
stationer (BANDSCAN) .................233
Programtyp (PTY) ........................233
Brusanpassad diskantsänkning
(HICUT) ......................................233
Aktivera/avaktivera radiotext .........234
Trafi kradio ....................................234
Aktivera/avaktivera prioritet för
trafi kmeddelanden ......................234
Ställa in volymanpassning av
trafi kmeddelanden ......................235
Tona ut trafi kmeddelanden ............ 235
Innehåll
08_CalaisMP48_sw.indd 22008_CalaisMP48_sw.indd 220 11.06.2008 15:18:16 Uhr11.06.2008 15:18:16 Uhr

221
SVENSKA
CD ................................................ 235
Fara för allvarlig skada på
CD-läsaren! ................................235
Starta CD-läge .............................236
Visa spårinformation (CD-text) ...... 236
Välj spår .....................................236
Snabbspolning (medhörning) ........237
Slumpspelning (MIX) ....................237
Presentera spår (SCAN) ................237
Upprepa spår (RPT) .....................237
Avbryta spelning (PAUSE) .............237
Ta ut CD-skiva .............................237
MP3/WMA ....................................238
Förbereda ett MP3-datamedium ....238
Starta MP3 ................................. 240
Visning av spårinformation
(CD-taggar) ................................240
Välj mapp ................................... 241
Välja spår/fi l ................................241
Snabbsökning ............................. 241
Spela titlar i slumpvis
ordningsföljd (MIX) ......................241
Presentera spår (SCAN) ................241
Upprepa enskilda spår eller hela
mappar (REPEAT) ........................ 242
Avbryta spelning (PAUSE) .............242
CD-växlare ....................................243
Starta CD-växlare .........................243
Välja CD-skiva ............................. 243
Välj spår .....................................243
Snabbspolning (medhörning) ........243
Spela enstaka spår eller hela
CD-skivor fl era gånger (RPT) .........243
Spela titlar i slumpvis
ordningsföljd (MIX) ......................244
Presentera samtliga spår på alla
skivor (SCAN) ............................. 244
Avbryta spelning (PAUSE) .............244
IR-fjärrkontroll RC 10 P .................. 245
Fjärrkontrollmottagare ..................245
Funktioner i frjärrkontrollen ...........245
Förförstärkarutgång ...................... 246
Externa ljudkällor ..........................247
Ställa in AUX-ingång .....................247
Ställa in nivå på AUX-ingången ....... 248
Återställa fabriksinställningar
(RESET) ........................................248
Tekniska data ................................249
Driftsspänning ............................249
Förstärkare ................................. 249
Tuner .........................................249
CD .............................................249
ISO-anslutning...............................281
Innehåll
08_CalaisMP48_sw.indd 22108_CalaisMP48_sw.indd 221 11.06.2008 15:18:16 Uhr11.06.2008 15:18:16 Uhr

222
Viktiga anvisningar
Viktiga anvisningar
Innan du använder din apparat bör du läsa
dessa instruktioner noggrant och bekanta
dig med apparaten. Spara instruktionerna i
bilen för eventuella framtida frågor.
Användning
Apparaten är gjord för att användas i ett
nyttofordon med 24 V nätspänning och för
montering i ett 1-DIN-fack.
Trafi ksäkerhet
Trafi ksäkerheten måste alltid gå
före allt annat. Använd endast apparaten
när trafi ksituationen tillåter det. Lär känna
din apparat innan du börjar. Ljudsignaler
från utryckningsfordon ska kunna uppfat-
tas tydligt i fordonet, och i tillräckligt god
tid. Anpassa volymen därefter.
Fjärrkontroll (tillval)
Med fjärrkontrollen RC 10 P kan du styra
de viktigaste funktionerna. En infraförd-
fjärrkontroll fi nns att köpa som tillbehör
(Blaupunkt-nr. 7 607 591 512).
CD-växlare (tillval)
Du kan ansluta CD-växlaren CDC A08 T
(Blaupunkt-nr. 7 607 274 002) eller
IDC A09 (Blaupunkt-nr. 7 607 274 005).
CD-växlarna fi nns att köpa som tillbehör.
USB-gränssnitt (tillval)
Du kan ansluta Blaupunkt-USB-gränssnit-
tet, för att spela av MP3-/WMA-fi ler från
ett USB-minne. Ett USB-gränssnitt fi nns
att köpa som tillbehör (Blaupunkt-nr.
7 607 541 576).
Källsortering
Kasta inte uttjänta apparater i hus-
hållssoporna!
Lämna produkten till ett återvin-
nings- eller insamlingsställe.
08_CalaisMP48_sw.indd 22208_CalaisMP48_sw.indd 222 11.06.2008 15:18:17 Uhr11.06.2008 15:18:17 Uhr

223
SVENSKA
Stöldskydd
Stöldskydd CODE
Apparaten är skyddad mot stöld med ett
fyrsiffrigt kodnummer. Detta nummer mås-
te alltid matas in, när apparaten har varit
bortkopplad från fordonets driftsspänning.
Kodfrågan är avaktiverad från fabriken,
men kan aktiveras.
Observera!
Om kodfrågan är aktiverad, börjar Code
LED ? blinka när både apparaten och
fordonets tändning är avslagna.
Kodnumret fi nns i radiopasset, som tillhör
apparaten.
Observera!
Förvara aldrig radiopasset i fordonet!
Aktivera/avaktivera kodfråga
(CODE)
Tryck på knappen MENU 7.
Tryck på knappen
eller 8 (ev.
fl era gånger) tills "CODE" och den aktu-
ella inställningen "ON" (på) eller "OFF"
(av) visas i teckenfönstret 6.
Tryck på knappen
eller 8.
I teckenfönstret 6 visas "0000". Lägg in
koden:
Observera!
Om du lägger in fel kodnummer, vi-
sas "0000" i teckenfönstret 6 igen.
Du kan lägga in koden två gånger till.
Efter den tredje inmatningen av fel kod,
spärras apparaten en hel timme. Under
denna tid visas "WAIT 1HR" i tecken-
쏅
쏅
쏅
fönstret 6. Om du slår av apparaten
under denna väntetid, måste du vänta
en hel timme när du har slagit på den
igen.
Tryck på stationsknappen 1 < (ev. fl e-
ra gånger) tills den första siffran i kod-
numret visas i teckenfönstret 6.
Tryck på stationsknappen 2 < (ev. fl e-
ra gånger) tills den andra siffran i kod-
numret visas i teckenfönstret 6.
Tryck på stationsknappen 3 < (ev. fl e-
ra gånger) tills den tredje siffran i kod-
numret visas i teckenfönstret 6.
Tryck på stationsknappen 4 < (ev. fl e-
ra gånger) tills den fjärde siffran i kod-
numret visas i teckenfönstret 6.
När rätt kodnummer visas i tecken-
fönstret 6, håll stationsknappen 5
< intryckt under längre tid än 2 sek-
under.
I teckenfönstret 6 visas återigen "CODE"
och den aktuella inställningen "ON" (på) el-
ler "OFF" (av).
Tryck på knappen
resp. 8, för att
avaktivera resp. aktivera kodfrågan.
För att stänga menyn,
tryck på knappen MENU 7.
쏅
쏅
쏅
쏅
쏅
쏅
쏅
08_CalaisMP48_sw.indd 22308_CalaisMP48_sw.indd 223 11.06.2008 15:18:17 Uhr11.06.2008 15:18:17 Uhr

224
Lägga in kodnummer efter
strömavbrott
Slå på apparaten.
I teckenfönstret 6 visas först "CODE" och
därefter "0000". Du kan lägga in koden:
Observera!
Om du lägger in fel kodnummer, vi-
sas "0000" i teckenfönstret 6 igen.
Du kan lägga in koden två gånger till.
Efter den tredje inmatningen av fel kod,
spärras apparaten en hel timme. Under
denna tid visas "WAIT 1HR" i tecken-
fönstret 6. Om du slår av apparaten
under denna väntetid, måste du vänta
en hel timme när du har slagit på den
igen.
Lägg in kodnumret enligt beskrivningen
i avsnittet "Aktivera/avaktivera kodfrå-
ga".
När rätt kodnummer visas i tecken-
fönstret 6, håll stationsknappen 5
< intryckt under längre tid än 2 sek-
under.
Apparaten kopplas till.
쏅
쏅
쏅
Till-/frånkoppling
Du kan koppla apparaten till/från på olika
sätt:
Till-/frånkoppling med på-/av-
knapp
Tryck på på-/av-knappen 3 för att
koppla till apparaten.
När du vill koppla från apparaten håller
du på/av-knappen 3 intryckt längre
än två sekunder.
Observera!
Som skydd för fordonsbatteriet kopp-
las apparaten automatiskt från en in-
ställbar tid efter tändningsfrånslag (se
avsnittet "Ställa in avslagningstid" i det
här kapitlet).
Från-/tillkoppling via
fordonständningen
När apparaten inte frånkopplas med på-/
av-knappen 3, kopplas den från/till när
fordonets tändning slås från/till (detta för-
utsätter att apparaten är ansluten till tänd-
ningen).
Tillkoppling genom CD-
inmatning
För tillkoppling med CD-inmatning,
lägg in en CD med den tryckta sidan
uppåt i läsaren och skjut in den i CD-
facket 5, tills du känner ett lätt mot-
stånd .
CD:n dras in automatiskt, apparaten startar
i CD-läge.
쏅
쏅
쏅
Stöldskydd Till-/frånkoppling
08_CalaisMP48_sw.indd 22408_CalaisMP48_sw.indd 224 11.06.2008 15:18:17 Uhr11.06.2008 15:18:17 Uhr

225
SVENSKA
Ställa in avslagningstid
Tryck på knappen MENU 7.
Tryck på knappen
eller 8 (ev.
fl era gånger) tills "HOUR" och den aktu-
ella inställningen visas i teckenfönstret
6.
Ställ in frånkopplingstiden med knap-
pen
eller 8 mellan 5 och 60 mi-
nuter, i steg om 5 minuter.
För att stänga menyn,
tryck på knappen MENU 7.
Slå på via telefon (tillval)
Om telefonen slås på när apparaten är av-
stängd slås apparaten på. När man stänger
av telefonen stängs apparaten automatiskt
av. Detta under förutsättning att telefonen
är korrekt ansluten till apparaten.
Tillkoppling med IR-fjärrkontroll
RC 10 P (tillval)
För tillkoppling tryck på knappen ON
H på IR-fjärrkontrollen RC 10 P.
Observera!
Apparatens IR-mottagare måste vara
på, för att IR-fjärrkontrollen ska kun-
na användas. Läs om detta i avsnittet
"Fjärrkontrollmottagare" i kapitlet "IR-
fjärrkontroll RC 10 P".
쏅
쏅
쏅
쏅
쏅
Ställa in volym
Systemets volym kan ställas in i steg mellan
0 (avstängd) och 32 (max).
För att öka volymen i systemet, vrid
volymreglaget 1 åt höger.
För att minska volymen i systemet, vrid
volymreglaget 1 åt vänster.
Ljudavstängning (MUTE)
Du kan stänga av ljudet i systemet helt med
en knapptryckning (Mute).
Tryck kort på knappen 3.
Återställa ljudnivå
För att återgå till den volym som var inställd
innan ljudet dämpades bort,
tryck en gång till på knappen 3.
Ljudhantering vid telefon/
navigering
Ljudavstängning vid telefonsamtal Om din
bilradio är ansluten till en mobiltelefon eller
ett navigeringssystem, dämpas bilradion
vid ett inkommande samtal eller vid synte-
tiskt tal från navigeringen. Samtalet eller
det syntetiska talmeddelandet återges via
bilradions högtalare.
Detta förutsätter att mobiltelefonen resp.
navigeringssystemet är felfritt anslutet till
bilradion (grupp C2 på apparatens bak-
sida).
Fråga din Blaupunkt fackhandel vilken typ
av navigeringssystem som kan anslutas.
쏅
쏅
쏅
쏅
Till-/frånkoppling Volym
08_CalaisMP48_sw.indd 22508_CalaisMP48_sw.indd 225 11.06.2008 15:18:17 Uhr11.06.2008 15:18:17 Uhr

226
Vid ett inkommande samtal eller vid ett na-
vigeringsmeddelande visas "PHONE" i teck-
enfönstret.
Ställa in volymen vid ljudhantering
telefon-/navigering (PHONEVOL)
Volymen på telefonsamtal eller syntetiska
talmeddelanden kan ställas in:
Tryck på knappen MENU 7.
Tryck på
eller 8 (ev. fl era gång-
er) tills "PHONEVOL" visas.
Efter ca. 2 sekunder visas "VOL" och den
aktuella inställningen i teckenfönstret 6.
Tryck på
eller 8, för att ställa in
volymen mellan 0 och 32.
Observera!
Du behöver inte vänta på att den aktu-
ella inställningen ska visas för att kunna
ändra den genom tryckning på
eller
8.
För att stänga menyn,
tryck på knappen MENU 7.
Observera!
Du kan även ställa in volymen under ett
telefonsamtal eller ett navigeringsmed-
delande med volymreglaget 1. Den
inställda volymen sparas automatiskt.
Till-/frånkoppling av ljudsignal
(BEEP)
Efter vissa åtgärder, t.ex. lång tryckning på
en knapp, hörs en ljudsignal (Beep) som
bekräftelse. Ljudsignalen kan kopplas från:
Tryck på knappen MENU 7.
Tryck på knappen
eller 8 (ev.
fl era gånger) tills "BEEP" och den aktu-
쏅
쏅
쏅
쏅
쏅
쏅
ella inställningen "ON" (på) eller "OFF"
(av) visas i teckenfönstret 6.
Tryck på knappen
resp. 8, för att
avaktivera resp. aktivera ljudsignalen.
För att stänga menyn,
tryck på knappen MENU 7.
Att ställa in max startvolym
(ON VOL)
När du slår på apparaten spelar den med se-
nast valda volym. Om du ställer in en högre
volym än den maximala startvolymen innan
du slår av apparaten begränsas dock voly-
men automatiskt till den inställda startvoly-
men nästa gång du kopplar till apparaten.
Observera!
Max startvolym är begränsad till värdet
"25" för att skydda din hörsel.
Tryck på knappen MENU 7.
Tryck på knappen
eller 8 (ev.
fl era gånger) tills "ON VOL" visas i teck-
enfönstret.
Efter ca. 2 sekunder visas "VOL" och den
aktuella inställningen i teckenfönstret 6.
Tryck på knappen
eller 8, för att
ställa in max tillslagsvolym mellan 5 och
25.
Observera!
Du behöver inte vänta på att den aktu-
ella inställningen ska visas för att kunna
ändra den genom tryckning på
eller
8.
För att stänga menyn,
tryck på knappen MENU 7.
쏅
쏅
쏅
쏅
쏅
쏅
Volym
08_CalaisMP48_sw.indd 22608_CalaisMP48_sw.indd 226 11.06.2008 15:18:17 Uhr11.06.2008 15:18:17 Uhr

227
SVENSKA
Ställa in bullerberoende
volymanpassning (GALA)
Med denna funktion anpassas bilradiovo-
lymen automatiskt till bilens hastighet och
de ljud som hör ihop med den. Exempelvis
ökas volymen automatiskt vid ökande has-
tighet, för att utjämna det ökande bullret
(t.ex. från fartvinden).
För detta måste fordonet ställa hastighets-
mätarsignalen till förfogande och bilradion
vara ansluten till denna.
Den automatiska volymanpassningen kan
ställas in i 6 steg (OFF (av), 1-5).
Tryck på knappen MENU 7.
Tryck på knappen
eller 8 (ev.
fl era gånger) tills "GALA" och den aktu-
ella inställningen visas.
Tryck på knappen
eller 8, för
att ställa in volymanpassningen mellan
"OFF" (av) och 5.
För att stänga menyn,
tryck på knappen MENU 7.
쏅
쏅
쏅
쏅
Klangbild
Ställa in diskant
Tryck på knappen AUD :.
Tryck på knappen
eller 8 (ev.
fl era gånger) tills "TREBLE" visas.
Håll knappen
eller 8 intryckt
längre än 2 sekunder.
I teckenfönstret visas kort "FREQ" och där-
efter den valda diskantfrekvensen.
För att välja en annan diskantfrekvens
mellan 10,0 och 17,5 kHz,
tryck på knappen
eller 8.
För att ställa in diskantnivån,
tryck på knappen
eller 8 (ev.
fl era gånger) tills "GAIN" visas.
Efter ca. 2 sekunder visas "GAIN" och den
aktuella inställningen.
Tryck på
eller 8, för att ställa in
diskantnivån mellan –7 och +7.
För att stänga menyn,
tryck på knappen AUD :.
Ställa in bas
Tryck på knappen AUD :.
Tryck på knappen
eller 8 (ev.
fl era gånger) tills "BASS" visas.
Håll knappen
eller 8 intryckt
längre än 2 sekunder.
I teckenfönstret visas kort "FREQ" och där-
efter den valda basfrekvensen.
För att välja en annan basfrekvens mellan
60 och 200 Hz,
tryck på knappen
eller 8.
쏅
쏅
쏅
쏅
쏅
쏅
쏅
쏅
쏅
쏅
쏅
Volym Klangbild
08_CalaisMP48_sw.indd 22708_CalaisMP48_sw.indd 227 11.06.2008 15:18:17 Uhr11.06.2008 15:18:17 Uhr

228
Tryck på eller 8, för att ställa in
mellanregisternivån mellan –7 och +7.
För att ställa in kvalitetsfaktorn för mellan-
registret,
tryck på
eller 8 (ev. fl era gång-
er) tills "Q FACTOR" visas.
Efter ca. 2 sekunder visas "Q" och den aktu-
ella inställningen.
Tryck på
eller 8, för att ställa in
kvalitetsfaktorn mellan 0,5 och 1,25.
För att stänga menyn,
tryck på knappen AUD :.
Ställa in volymbalans vänster/
höger (BAL)
Tryck på knappen AUD :.
Tryck på
eller 8 (ev. fl era gång-
er) tills "BAL" och den aktuella inställ-
ningen visas.
Tryck på knappen
eller 8, för att
ställa in volymbalansen vänster/höger
mellan –10 och +10
För att stänga menyn,
tryck på knappen AUD :.
Ställa in volymbalans framåt/
bakåt (FAD)
Observera
De bakre högtalarna måste anslutas via
en extraförstärkare.
Tryck på knappen AUD :.
Tryck på
eller 8 (ev. fl era gång-
er) tills "FAD" och den aktuella inställ-
ningen visas.
쏅
쏅
쏅
쏅
쏅
쏅
쏅
쏅
쏅
쏅
För att ställa in basnivån,
tryck på knappen
eller 8 (ev.
fl era gånger) tills "GAIN" visas.
Efter ca. 2 sekunder visas "GAIN" och den
aktuella inställningen.
Tryck på knappen
eller 8, för att
ställa in basnivån mellan –7 och +7.
För att ställa in kvalitetsfaktorn för basen,
tryck på
eller 8 (ev. fl era gång-
er) tills "Q FACTOR" visas.
Efter ca. 2 sekunder visas "Q" och den aktu-
ella inställningen.
Tryck på
eller 8, för att ställa in
kvalitetsfaktorn mellan 1,0 och 2,0.
För att stänga menyn,
tryck på knappen AUD :.
Ställa in mellanregister
Tryck på knappen AUD :.
Tryck på
eller 8 (ev. fl era gång-
er) tills "MIDDLE" visas.
Håll knappen
eller 8 intryckt
längre än 2 sekunder.
I teckenfönstret visas kort "FREQ" och där-
efter den valda mellanregisterfrekvensen.
För att välja en annan mellanregisterfrek-
vens mellan 500 Hz och 2,5 kHz,
tryck på knappen
eller 8.
För att ställa in mellanregisternivån,
tryck på knappen
eller 8 (ev.
fl era gånger) tills "GAIN" visas.
Efter ca. 2 sekunder visas "GAIN" och den
aktuella inställningen.
쏅
쏅
쏅
쏅
쏅
쏅
쏅
쏅
쏅
쏅
Klangbild
08_CalaisMP48_sw.indd 22808_CalaisMP48_sw.indd 228 11.06.2008 15:18:18 Uhr11.06.2008 15:18:18 Uhr

229
SVENSKA
Tryck på eller 8, för att ställa in
volymbalansen fram/bak mellan –10
och +10.
För att stänga menyn,
tryck på knappen AUD :.
쏅
쏅
Tid
Visa tid
För att visa tiden ca 10 sekunder i tecken-
fönstret.
Håll knappen MENU 7 intryckt mer är
2 sekunder.
Ställa in tid
Tryck på knappen MENU 7.
Tryck på
eller 8 (ev. fl era gång-
er) tills "TIMESET" visas i teckenfönst-
ret 6.
Efter ca 2 sekunder visas aktuell tid i teck-
enfönstret 6. Framför tiden visas "24H"
i 24-timmarsläge och "AM" eller "PM"
i 12-timmarsläge. Aktuell timme visas blin-
kande och kan ändras.
För att ställa in timmar resp. minuter,
tryck på knappen
eller 8.
För att växla mellan timmar och minuter,
tryck på knappen 6 <.
Observera!
Du behöver inte vänta på att den aktu-
ella inställningen ska visas för att kunna
ändra den genom tryckning på
eller
8.
För att stänga menyn,
tryck på knappen MENU 7.
Välja 12- eller 24-timmars
visning
Tryck på knappen MENU 7.
Tryck på
eller 8 (ev. fl era gång-
er) tills "24H MODE" eller "12H MODE"
visas i teckenfönstret 6.
쏅
쏅
쏅
쏅
쏅
쏅
쏅
쏅
Klangbild Tid
08_CalaisMP48_sw.indd 22908_CalaisMP48_sw.indd 229 11.06.2008 15:18:18 Uhr11.06.2008 15:18:18 Uhr

230
Tryck på eller 8, för att växla mel-
lan lägena.
För att stänga menyn,
tryck på knappen MENU 7.
Ställa in tidszon (TIMEZONE)
Om du kör över tidszoner, kan du ställa in
tidsskillnaden i förhållande till den inställ-
da tiden i steg om 1 timme. På det sättet
kan du ändra tidvisningen för den aktuella
tidszonen, utan att själv behöva ställa om
tiden.
Tryck på knappen MENU 7.
Tryck på
eller 8 (ev. fl era gång-
er) tills "TIMEZONE" visas.
Efter ca. 2 sekunder visas "ZONE" och den
aktuella inställningen i teckenfönstret 6.
Tryck på
eller 8, för att ställa in
tidsskillnaden i steg om 1 timme mellan
–12 och +12.
Observera!
Du behöver inte vänta på att den aktu-
ella inställningen ska visas för att kunna
ändra den genom tryckning på
eller
8.
För att stänga menyn,
tryck på knappen MENU 7.
쏅
쏅
쏅
쏅
쏅
쏅
Radio
Denna apparat är utrustad med en RDS-
radiomottagare. Nästan alla FM-stationer
sänder förutom själva programmet även
ohörbar extrainformation, t.ex. stationens
namn eller programtyp (PTY).
Om RDS-stationen sänder sitt namn, visas
detta direkt i teckenfönstret 6.
Slå på radion
Om du befi nner dig i ett annat driftläge,
tryck på knappen BND 2
eller
tryck på knappen SRC > (ev. fl era
gånger) tills "RADIO" visas i tecken-
fönstret 6.
I teckenfönstret 6 visas den aktuella frek-
vensen och stationens namn.
RDS-komfortfunktioner
(AF, REG)
RDS-komfortfunktionerna AF (alternativ
frekvens) och REG (regional) utökar radio-
apparatens möjligheter.
AF: När RDS-komfortfunktionen är ak-
tiverad, söker apparaten automatiskt i
bakgrunden efter den bästa frekvens
som kan mottas från den inställda sta-
tionen.
REG: En del sändare delar tidvis upp
sina program i regionalprogram med
olika innehåll. Den aktiverade REG-
funktionen förhindrar att apparaten
växlar till alternativa frekvenser från
den inställda stationen, som har ett an-
nat programinnehåll.
쏅
쏅
•
•
Tid Radio
08_CalaisMP48_sw.indd 23008_CalaisMP48_sw.indd 230 11.06.2008 15:18:18 Uhr11.06.2008 15:18:18 Uhr

231
SVENSKA
Observera!
REG måste aktiveras och avaktiveras
separat i menyn.
Aktivera/avaktivera RDS-
komfortfunktion
För att använda RDS-funktionerna AF
och REG, tryck på knappen RDS =.
RDS-komfortfunktionerna är aktiva när
symbolen RDS visas i teckenfönstret 6.
Aktivera/avaktivera REG
Tryck på knappen MENU 7.
Tryck på knappen
eller 8 (ev.
fl era gånger) tills "REG" och den aktu-
ella inställningen "ON" (på) eller "OFF"
(av) visas i teckenfönstret 6.
Tryck på knappen
resp. 8, för att
avaktivera resp. aktivera REG.
För att stänga menyn,
tryck på knappen MENU 7.
Observera!
Inställningen REG ON/OFF fungerar
bara under förutsättning att RDS-funk-
tionen är aktiverad.
Välja våglängdsområde/
minnesnivå
Med denna apparat kan man ta emot sta-
tioner på FM-bandet (UKV), MV och LV (för
EUROPA) resp. FM och AM (NAFTA-län-
der). För våglängdsområde FM fi nns tre
minnesnivåer, FM1, FM2 och FMT och för
våglängdsområdena MV och LV resp. AM
fi nns en minnesnivå för varje. Dessutom
fi nns ytterligare en minnesnivå MVT/LVT
resp. AMT. På varje minnesnivå kan upp till
sex stationer lagras.
쏅
쏅
쏅
쏅
쏅
Så här växlar du mellan våglängdsområde-
na resp. minnesnivåerna,
tryck på knappen BND 2
Ställa in stationer
Du kan ställa in en station på olika sätt.
Automatisk stationssökning
Tryck på knappen eller 8.
Närmasta station inom mottagningsområ-
det väljs.
Observera!
Om prioritet för trafi kradio är aktive-
rad, ställs närmaste trafi kradiosta-
tion in.
Om PTY är aktiverad, ställs närmaste
station in, som har vald programtyp.
Ställa in känslighet vid stationssökning
Du kan välja, om endast starka stationer ska
ställas in vid låg känslighet eller även svaga
stationer ska ställas in vid hög känslighet.
Tryck på knappen MENU 7.
Tryck på knappen
eller 8 (ev.
fl era gånger) tills "SENS" och den aktu-
ella inställningen "LO" (låg känslighet)
resp."DX" (hög känslighet) visas i teck-
enfönstret 6.
Tryck på knappen
resp. 8, för
att växla mellan inställningarna "LO"
och "DX".
För att stänga menyn,
tryck på knappen MENU 7.
쏅
쏅
•
•
쏅
쏅
쏅
쏅
Radio
08_CalaisMP48_sw.indd 23108_CalaisMP48_sw.indd 231 11.06.2008 15:18:18 Uhr11.06.2008 15:18:18 Uhr

232
Manuell stationsinställning
För att ändra den inställda frekvensen i små
etapper,
tryck på knappen
eller 8.
För att ändra den inställda frekvensen
snabbt,
håll knappen
eller 8 intryckt
Observera!
Den manuella stationsinställningen går
bara att göra när RDS-funktionen och
PTY är avaktiverade.
Hoppa mellan samverkande stationer
(endast FM)
Om fl era stationer hör till samma organisa-
tion, kan du hoppa mellan dessa samver-
kande stationer.
Tryck på knappen
eller 8, för att
byta till nästa station bland de samver-
kande stationerna.
Observera!
Att hoppa mellan samverkande sta-
tioner går bara när RDS-funktionen
är aktiverad och PTY är avaktive-
rad. Du kan bara hoppa till stationer
som radion tagit emot tidigare.
Använd t.ex. Travelstore(rese)-funktio-
nen (T-STORE) för detta.
Lagra stationer
Lagra stationer manuellt
Välj önskad minnesnivå resp. våg-
längdsområde.
Ställ in stationen.
쏅
쏅
쏅
쏅
쏅
Tryck på en av stationsknapparna 1 - 6
<, som stationen ska lagras på, i mer
än 2 sekunder.
Ljudsignalen hörs. Stationen är lagrad på
den valda stationsknappen.
Lagra stationer automatiskt
(T-STORE)
Du kan automatiskt lagra de 6 starkaste sta-
tionerna i regionen. För våglängdsområde
FM görs lagringen på minnesnivå FMT, för
våglängdsområdena MV och LV på minnes-
nivå MVT/LVT samt för våglängdsområde
AM på minnesnivå AMT.
Observera!
Stationer som tidigare är lagrade på
denna nivå, ersätts då av nyfunna sta-
tioner.
Välj önskat våglängdsområde.
Håll knappen BND 2 intryckt längre
än två sekunder.
Lagringen startar. I teckenfönstret 6 visas
"T-STORE". När förloppet är klart, spelas
stationen på minnesplats ett på minnesni-
vån FMT, MVT/LVT resp. AMT.
Välja lagrade stationer
Välj minnesnivå resp. våglängdsom-
råde.
Tryck på den stationsknapp 1 - 6 <,
där önskad station är lagrad.
쏅
쏅
쏅
쏅
쏅
Radio
08_CalaisMP48_sw.indd 23208_CalaisMP48_sw.indd 232 11.06.2008 15:18:19 Uhr11.06.2008 15:18:19 Uhr

233
SVENSKA
Presentera mottagningsbara
stationer (BANDSCAN)
Med Bandscan-funktionen kan du presen-
tera alla mottagningsbara stationer i ca.
10 sekunder.
Starta Bandscan
Håll knappen
eller 8 intryckt
längre än 2 sekunder.
I teckenfönstret visas kort "BANDSCAN".
Apparaten söker efter stationer inom aktu-
ellt våglängdsområde. Varje funnen station
spelas upp i ca 10 sekunder. Samtidigt vi-
sas den inställda frekvensen och stationens
namn.
Avsluta Bandscan
Tryck på knappen
eller 8.
Presentationen avslutas. Den senast inställ-
da stationen förblir inställd.
Programtyp (PTY)
Vissa FM-stationer sänder förutom själva
programmet även ohörbar extrainforma-
tion om programinnehållets typ. Bl.a. fi nns
följande programtyper:
KULTUR RESA JAZZ SPORT
NYHETER POP ROCK MUSIK
Med hjälp av PTY-funktionen kan Du välja ut
stationer som sänder en särskild program-
typ.
När PTY är aktiverad och en PTY-sökning
blivit startad, växlar apparaten automatiskt
från den aktuella stationen eller från ett an-
nat driftläge till stationen med den valda
programtypen.
쏅
쏅
Aktivera/avaktivera PTY
Tryck på knappen MENU 7.
Tryck på knappen
eller 8 (ev.
fl era gånger) tills "PTY" och den aktu-
ella inställningen "ON" (på) eller "OFF"
(av) visas i teckenfönstret 6.
Tryck på knappen
resp. 8, för att
avaktivera resp. aktivera PTY.
För att stänga menyn,
tryck på knappen MENU 7.
Välja programtyp och starta sökning
Tryck på
eller 8 (ev. fl era gång-
er) tills önskad programtyp visas.
Tryck på
resp. 8, för att starta
sökningen.
Om en station hittas med den valda pro-
gramtypen, ställs denna station in.
Brusanpassad diskantsänkning
(HICUT)
HiCut-funktionen förbättrar spelningen vid
dålig radiomottagning. Vid mottagnings-
störningar minskas bruset automatiskt.
För att aktivera/avaktivera HICUT,
tryck på knappen MENU 7.
Tryck på
eller 8 (ev. fl era gång-
er) tills "HICUT" och den aktuella in-
ställningen "ON" (på) eller "OFF" (av)
visas i teckenfönstret 6.
Tryck på
resp. 8, för att avakti-
vera resp. aktivera HICUT.
För att stänga menyn,
tryck på knappen MENU 7.
쏅
쏅
쏅
쏅
쏅
쏅
쏅
쏅
쏅
쏅
Radio
08_CalaisMP48_sw.indd 23308_CalaisMP48_sw.indd 233 11.06.2008 15:18:19 Uhr11.06.2008 15:18:19 Uhr

234
Aktivera/avaktivera radiotext
Vissa radiostationer använder RDS-signa-
len för att överföra reklam eller annan infor-
mation i stället för stationens namn. Denna
radiotext visas i teckenfönstret 6.
För att aktivera eller avaktivera visning av
radiotext,
tryck på knappen MENU 7.
Tryck på
eller 8 (ev. fl era gång-
er) tills "RADIOTXT" visas.
Efter ca. 2 sekunder visas den aktuella in-
ställningen "TEXT ON" (på) eller "TEXT OFF"
(av) i teckenfönstret 6.
Tryck på
resp. 8, för att avaktive-
ra resp. aktivera visning av radiotext.
Observera!
Du behöver inte vänta på att den aktu-
ella inställningen ska visas för att kunna
ändra den genom tryckning på
eller
8.
För att stänga menyn,
tryck på knappen MENU 7.
쏅
쏅
쏅
쏅
Trafi kradio
Aktivera/avaktivera prioritet för
trafi kmeddelanden
För att aktivera resp. avaktivera prioritet för
trafi kradio i alla driftlägen,
tryck på knappen TA ;.
Observera!
I driftlägena CD, MP3, CD-växlare och
AUX är denna funktion endast tillgäng-
lig, om våglängdsområde FM var inställt
senast.
Prioriteten för trafi kmeddelanden är aktive-
rad, när TA-symbolen visas i teckenfönstret
6. Så snart apparaten tar mot ett trafi k-
meddelande, släpps det fram. I tecken-
fönstret 6 visas "TRAFFIC" under tiden
som meddelandet läses.
Observera!
En varningssignal hörs om
du lyssnar på trafi kradiostation eller
en CD och lämnar mottagningsområ-
det för den inställda trafi kradiostatio-
nen och om den då startade automa-
tiska sökningen inte hittar någon ny
trafi kradiostation.
du byter från en trafi kradiostation till
en station utan trafi kradiofunktion.
I dessa fall kan du antingen avaktivera
prioritet för trafi kmeddelanden eller
byta till en trafi kradiostation.
쏅
•
•
Radio Trafi kradio
08_CalaisMP48_sw.indd 23408_CalaisMP48_sw.indd 234 11.06.2008 15:18:19 Uhr11.06.2008 15:18:19 Uhr

235
SVENSKA
Ställa in volymanpassning av
trafi kmeddelanden
Du kan ställa in, med hur många volymsteg
trafi kmeddelanden ska ökas i förhållande
till den inställda volymen:
Tryck på knappen MENU 7.
Tryck på knappen
eller 8 (ev.
fl era gånger) tills "TA VOL" visas i teck-
enfönstret.
Efter ca. 2 sekunder visas "VOL" och den
aktuella inställningen i teckenfönstret 6.
Tryck på
eller 8, för att ställa in
volymanpassningen mellan 0 och 10.
Observera!
Du behöver inte vänta på att den aktu-
ella inställningen ska visas för att kunna
ändra den genom tryckning på
eller
8.
För att stänga menyn,
tryck på knappen MENU 7.
Observera!
Du kan justera volymen för trafi kmed-
delanden direkt under pågående med-
delande med volymreglaget 1. När
meddelandet är slut återställs den ur-
sprungliga volymen.
Tona ut trafi kmeddelanden
För att avbryta ett pågående trafi kmedde-
lande och återgå till en ljudkälla, som du
lyssnade på tidigare,
tryck på knappen TA ;.
Prioritet för trafi kmeddelanden är fortfa-
rande aktiverad.
쏅
쏅
쏅
쏅
쏅
CD
Med denna apparat kan du spela vanliga
ljudskivor och skrivbara skivor (CD-R, CD-
RW) med diameter 12 cm. För att undvika
problem vid spelningen bör du inte själv
bränna CD-skivor med högre hastighet än
16x.
Fara för allvarlig skada på
CD-läsaren!
Använd aldrig CD-singlar (CD-skivor med
diameter 8 cm) eller CD-skivor med avvi-
kande form ("shape-CD").
Hantera CD:n försiktigt och undvik att repa
eller på annat sätt skada CD:n. Lyft CD:n
om möjligt bara i kanten. Om en CD skulle
bli smutsig, rengör den med en luddfri trasa
utan lösningsmedel. Torka alltid av en CD
inifrån och utåt
Utsätt inte CD:n för direkt solljus och för-
vara den i ett fodral när den inte ligger i ap-
paraten.
Klistra inga etiketter på CD:n. Skriv på CD:n
med lämpliga fi ltpennor.
Vi tar inget ansvar för skador på CD-läsaren
på grund av olämpliga eller skadade CD-ski-
vor.
Använd endast CD-skivor med Compact-
Disc-logo för bästa möjliga funktion. CD-
skivor med kopieringsskydd kan leda till
problem vid avspelningen. Blaupunkt ga-
ranterar inte funktionen vid spelning av ko-
pieringsskyddade CD-skivor!
Trafi kradio CD
08_CalaisMP48_sw.indd 23508_CalaisMP48_sw.indd 235 11.06.2008 15:18:19 Uhr11.06.2008 15:18:19 Uhr

236
Starta CD-läge
Om ingen CD-skiva fi nns i läsaren,
lägg in CD:n med den tryckta sidan upp-
åt i läsaren och skjut in den i CD-facket
tills du känner ett visst motstånd.
CD-skivan åker då automatiskt in i enheten.
CD-symbolen visas i teckenfönstret 6.
Observera!
Rör inte enheten medan den drar in
skivan.
CD:n börjar spela. I teckenfönstret 6 visas
numret på det aktuella spåret (t.ex. "T12")
och speltiden samt information om spår
(CD-text).
Om det redan ligger en CD-skiva i läsaren,
tryck på knappen SRC > (ev. fl era
gånger) tills "CD" visas i teckenfönstret
6.
Spelningen av skivan återupptas där den
avbröts.
Visa spårinformation (CD-text)
Om CD:n visar CD-texten, visas informatio-
nen en gång för varje spår när spåret startar
som löpande text i teckenfönstret 6.
Visa spårinformation en gång som
löpande text
Tryck på knappen 5 <.
CD-texten för det aktuella spåret visas en
gång som löpande text i teckenfönstret 6.
쏅
쏅
쏅
Observera!
Denna funktion är inte tillgänglig om
visning av CD-text som löpande text är
avaktiverad (se nästa avsnitt).
Aktivera/avaktivera visning av
spårinformation som löpande text
För att aktivera eller avaktivera visning av
spårinformation som löpande text,
tryck på knappen MENU 7.
Tryck på
eller 8 (ev. fl era gång-
er) tills "SCRL" och den aktuella inställ-
ningen "ON" (på) eller "OFF" (av) visas i
teckenfönstret 6.
Tryck på
resp. 8, för att avakti-
vera resp. aktivera löpande text.
För att stänga menyn,
tryck på knappen MENU 7.
Vid inställningen "SCRL OFF" visas spår-
information i avsnitt om 8 tecken i tecken-
fönstret 6. Varje textavsnitt samt spår-
nummer och speltid visas i kontinuerlig
växling med 5 sekunders intervall.
Observera!
Inställningen "SCRL ON/OFF" fungerar
på samma sätt vid visning av MP3-spår-
information (ID3-taggar) i MP3-läge.
Välj spår
Tryck på eller 8, för att växla till
föregående eller nästa spår.
För att återstarta aktuellt spår från början:
Tryck en gång på
8.
쏅
쏅
쏅
쏅
쏅
CD
08_CalaisMP48_sw.indd 23608_CalaisMP48_sw.indd 236 11.06.2008 15:18:20 Uhr11.06.2008 15:18:20 Uhr

237
SVENSKA
Snabbspolning (medhörning)
För att snabbt spola framåt eller bakåt
håll knappen
eller 8 intryckt tills
du kommer till önskat ställe.
Slumpspelning (MIX)
Tryck på knappen 3 <.
I teckenfönstret 6 visas kort "MIX CD" och
symbolen MIX visas. De följande spåren
väljs slumpvis.
Avsluta slumpspelning (MIX)
Tryck en gång till på knappen 3 <.
I teckenfönstret 6 visas kort "MIX OFF"
och symbolen MIX slocknar. Spelningen
fortsätter på vanligt vis.
Presentera spår (SCAN)
För att presentera alla spår på CD:n i
10 sekunder,
tryck på knappen 4 <.
I teckenfönstret visas kort "SCAN TRK".
Under presentationen blinkar "CD"-vis-
ningen. Spårnumret och speltiden för det
aktuella spåret samt dess spårinformation
visas.
Avsluta presentationen SCAN, fortsätt
lyssna på spår
För att avsluta presentationen,
tryck en gång till på knappen 4 <.
I teckenfönstret visas kort "SCAN OFF". Det
aktuella spåret spelas vidare.
쏅
쏅
쏅
쏅
쏅
Upprepa spår (RPT)
Tryck på knappen 2 <.
"RPT TRK" visas kort i teckenfönstret och
symbolen RPT visas. Det aktuella spåret
upprepas sedan tills funktionen avaktive-
ras.
Avsluta RPT
Tryck en gång till på knappen 2 <.
"RPT OFF" visas kort i teckenfönstret 6
och RPT-symbolen slocknar. Spelningen
fortsätter på vanligt vis.
Avbryta spelning (PAUSE)
Tryck på knappen 1 <.
I teckenfönstret 6 visas "PAUSE".
Återuppta spelning
Tryck på knapp 1 < under avbrottet.
Spelningen fortsätter.
Ta ut CD-skiva
Observera!
Det går att mata ut skivor även om ap-
paraten är avslagen eller om du spelar
upp ljud från någon annan källa.
Tryck på CD-utmatningsknappen 4.
CD-skivan matas ut. I teckenfönstret visas
nu kort "CD EJECT".
Observera!
Rör inte enheten medan den för ut ski-
van!
Ta ut CD-skivan.
CD-symbolen slocknar.
쏅
쏅
쏅
쏅
쏅
쏅
CD
08_CalaisMP48_sw.indd 23708_CalaisMP48_sw.indd 237 11.06.2008 15:18:20 Uhr11.06.2008 15:18:20 Uhr

238
Observera!
Om du inte tar ut den utmatade skivan
dras den automatiskt in igen efter ca
10 sekunder.
MP3/WMA
Med den här bilradion kan du även lyssna på
CD-R-skivor och CD-RW-skivor med MP3-
och WMA-musikfi ler. Dessutom kan du an-
sluta ett USB-minne till USB-gränssnittet
(tillval, med C‘n‘C-funktion) och spela MP3-
/WMA-fi ler, som är sparade i USB-minnet.
Detta kapitel handlar bara om uppspel-
ning av MP3-fi ler eftersom manövrering
bland MP3- och WMA-fi ler fungerar på
samma sätt. I detta kapitel gäller benäm-
ningen "MP3-datamedium" både CD-R/
RW och USB-datamedium i form av USB-
minnen.
Observera!
WMA-musikfi ler som är försedda med
Digital Rights Management (DRM, di-
gitalt kopieringsskydd) från online-
musiktjänster kan inte spelas i den
här apparaten.
Återgivningen av WMA-fi ler kan bara
garanteras om de har skapats med
Windows Media-Player version 8.
Förbereda ett MP3-datamedium
Förbereda MP3-CD
Kombinationen CD-brännare, CD-brännar-
programvara och skrivbara CD-skivor kan
leda till problem vid spelningen av skivor-
na. Om problem med hembrända CD-skivor
uppstår, bör du byta till ett annat märke el-
ler annan färg på skivorna du använder.
CD-skivans format måste motsvara ISO
9660 nivå 1 eller nivå 2 eller Joliet. Inga
andra format kan spelas på ett tillförlitligt
sätt.
•
•
CD MP3/WMA
08_CalaisMP48_sw.indd 23808_CalaisMP48_sw.indd 238 11.06.2008 15:18:20 Uhr11.06.2008 15:18:20 Uhr

239
SVENSKA
När du skapar (kodar) MP3-/WMA-fi ler från
ljudfi ler bör du använda en bitrate mellan
32 till 320 kbps för MP3-fi ler en bitrate
mellan 32 och 192 kbps för WMA-fi ler.
Denna apparat stöder upp till 252 mappar
och upp till 255 fi ler per mapp. När det gäl-
ler en CD får den totalt innehålla max 512
mappar och fi ler. Mapparna och spåren på
CD:n kan väljas och spelas upp separat.
D01
D02
T001
T005
T004
T003
T002
D03
T001
T006
T005
T004
T003
T002
T011
T007
T008
T009
T010
D04
T001
T006
T005
T004
T003
T002
A
B
A Mappar
B Spår · Filer
Varje mapp kan namnges med PC:n.
Mappens namn kan visas i teckenfönst-
ret. Varje mapp och varje spår resp. fi l kan
namnges i datorn med hjälp av CD-bränna-
rens programvara. Hur du gör detta står i
programvarans bruksanvisning.
Observera!
Undvik specialtecken (liksom å, ä, ö)
när du namnger mappar och spår/fi -
ler.
Om du använder fi lnamn med mer
än 16 tecken (gällande ".MP3" resp.
".WMA") minskar max antal tillåtna
spår och mappar.
Om du vill att dina fi ler ska ligga i en viss
ordning bör du lagra fi lerna på datamediet
i den ordning du senare vill spela dem.
Apparaten spelar upp fi lerna i den ordning
som du har sparat dem i datamediet.
För att kunna spela upp fi lerna på denna
apparat måste MP3-fi lerna ha fi ländelsen
".MP3" och WMA-fi lerna måste ha fi ländel-
sen ".WMA".
Observera!
För att garantera störningsfri spelning,
namnge inte andra än verkliga MP3-fi -
ler med tillägget ".MP3" för att sedan
försöka spela dem. Dessa fi ler är ogil-
tiga och ignoreras när skivan spelas.
använd inga "blandade" CD-skivor
med icke-MP3-fi ler och MP3-fi ler (un-
der MP3-spelningen läser apparaten
endast MP3-fi ler).
använd inga mix-mode-CD med CD-
ljudspår och MP3-spår. Om du försö-
ker att spela en mix-mode-CD, kom-
mer bara ljudspåren att spelas.
•
•
•
•
•
MP3/WMA
08_CalaisMP48_sw.indd 23908_CalaisMP48_sw.indd 239 11.06.2008 15:18:20 Uhr11.06.2008 15:18:20 Uhr

240
Förbereda en USB-enhet
För att apparaten ska känna igen USB-enhe-
ten måste den specifi ceras som massminne
(Mass Storage Device), vara formaterat i fi l-
systemet FAT16 eller FAT32 och innehålla
MP3- eller WMA-fi ler.
På en USB-enhet kan du skapa max 1500
fi ler (mappar och spår). Mapparna och
spåren kan väljas separat med denna ap-
parat. Om du använder fi lnamn med mer än
24 tecken (gällande ".MP3" resp. ".WMA")
minskar max antal tillåtna fi ler.
Blaupunkt kan inte garantera att alla USB-
enheter som fi nns på marknaden fungerar
felfritt.
ID3-taggar
MP3-spår kan innehålla extra information
som till exempel artist, titel och album (ID3-
taggar). Denna apparat kan visa ID3-taggar
av version 1 och version 2 i teckenfönstret.
Starta MP3
Starta MP3-uppspelning från CD
En skiva med MP3-fi ler startas som en
vanlig CD. Mer information fi nns i avsnittet
"Starta CD-läge" i kapitlet "CD".
I teckenfönstret 6 visas numret på det
aktuella spåret (t.ex. "T12") och spelti-
den samt information om spår (ID3-tag-
gar) resp. fi lnamn. Vid växling till en annan
mapp, visas kort mappnumret (t.ex. "DIR
02").
Ansluta USB-enhet och spela upp MP3-
fi ler
För att kunna ansluta ett USB-datamedi-
um (t.ex. USB-minne eller USB-hårddisk),
måste du ansluta USB-gränssnittet (tillval
från Blaupunkt) på baksidan av apparaten
(grupp C3). Gränssnittets USB-kabel kan
du sedan förvara i exempelvis handskfacket
eller ett lämpligt ställe i mittkonsolen.
Observera!
När du ansluter Blaupunkt-USB-
gränssnittet till apparaten, måste
AUX-ingången ställas in för detta. Läs
mer i avsnittet "Ställa in AUX-ingång" i
kapitlet "Externa ljudkällor".
Slå alltid av apparaten innan du an-
sluter eller kopplar bort USB-enheten
så att enheten alltid registreras resp.
stoppas på ett korrekt sätt.
Anslut USB-datamediet till USB-gräns-
snittet med hjälp av USB-kabeln.
Så snart ett USB-datamedium är anslutet,
kan det väljas med knappen SRC >. "USB"
visas då i teckenfönstret.
Visning av spårinformation
(CD-taggar)
Om MP3-datamediet visar ID3-taggar, vi-
sas informationen en gång för varje spår
när spåret startar som löpande text i teck-
enfönstret 6. Om inga ID3-taggar har
sparats med MP3-fi lerna, visas i stället fi l-
namnet.
Observera!
Läs mer om att spara ID3-taggar i anvis-
ningen för PC-MP3-programvaran eller
programvaran för brännaren.
Visa spårinformation en gång som
löptext
Tryck på knappen 5 <.
ID-taggarna för det aktuella spåret visas en
gång som löpande text i teckenfönstret 6.
•
•
쏅
쏅
MP3/WMA
08_CalaisMP48_sw.indd 24008_CalaisMP48_sw.indd 240 11.06.2008 15:18:20 Uhr11.06.2008 15:18:20 Uhr

241
SVENSKA
Observera!
Denna funktion är inte tillgänglig, när
visningen av spårinformation i form
av löpande text är avaktiverad. Lär om
detta i kapitlet "CD", avsnittet "Visa
spårinformation (CD-text)" avsnittet
"Aktivera/avaktiva visning av spårinfor-
mation som löpande text".
Välj mapp
För att fl ytta uppåt eller nedåt till en annan
mapp,
tryck på knappen
eller 8.
Observera!
Apparaten ignorerar alla mappar som
inte innehåller mp3-fi ler.
Apparaten hanterar alla mappar och
undermappar som om de låg på sam-
ma nivå. Genom upprepade tryck-
ningar på
eller 8 kan du även
på det sättet öppna alla undermap-
par.
Välja spår/fi l
För att fl ytta nedåt eller uppåt till annat spår
(fi l) i aktuell mapp,
tryck på
eller 8.
För att återstarta aktuellt spår från början,
tryck en gång på
8.
Snabbsökning
För att snabbt spola framåt eller bakåt
håll knappen
eller 8 intryckt tills
du kommer till önskat ställe.
쏅
•
•
쏅
쏅
Observera!
I USB-läge stoppar snabbsökningen
bakåt i början av det aktuella spåret.
Spela titlar i slumpvis
ordningsföljd (MIX)
Om du vill låta slumpen avgöra i vilken ord-
ningsföljd spåren i aktuell mapp ska spe-
las,
tryck på knappen 3 < (ev. fl era gång-
er) tills "MIX DIR" eller "MIX FLD" visas i
teckenfönstret 6.
MIX-symbolen visas i teckenfönstret 6.
Om du vill att alla spår på MP3-datamediet
ska spelas i slumpvis ordningsföljd,
tryck på knappen 3 < (ev. fl era gång-
er) tills "MIX ALL" visas i teckenfönstret
6.
MIX-symbolen visas i teckenfönstret 6.
Avsluta slumpspelning (MIX)
För att avsluta spelning i slumpvis ordnings-
följd,
tryck på knappen 3 < (ev. fl era gång-
er) tills "MIX OFF" visas i teckenfönstret
6.
MIX-symbolen i teckenfönstret 6 slock-
nar.
Presentera spår (SCAN)
För att presentera alla spår i MP3-datame-
diet i stigande ordningsföljd i vardera ca.
10 sekunder,
tryck på knappen 4 < (ev. fl era gång-
er) tills "SCAN TRK" visas i teckenfönst-
ret 6.
쏅
쏅
쏅
쏅
MP3/WMA
08_CalaisMP48_sw.indd 24108_CalaisMP48_sw.indd 241 11.06.2008 15:18:20 Uhr11.06.2008 15:18:20 Uhr

242
Under presentationen blinkar visningen
"MP3" eller "USB".
För att presentera alla spår i den aktuella
mappen i USB-läge,
tryck på knappen 4 < (ev. fl era gång-
er) tills "SCAN FLD" visas i teckenfönst-
ret 6.
Under presentationen blinkar "USB"-vis-
ningen.
Avsluta SCAN
Om du vill avbryta presentationen,
tryck på knappen 4 < (ev. fl era gång-
er) tills "SCAN OFF" visas i teckenfönst-
ret 6.
Det spår som just presenteras fortsätter att
spela.
Upprepa enskilda spår eller hela
mappar (REPEAT)
För att upprepa aktuellt spår,
tryck på knappen 2 < (ev. fl era gång-
er) tills "RPT TRK" visas i teckenfönstret
6.
RPT-symbolen visas i teckenfönstret 6.
För att repetera aktuell mapp,
tryck på knappen 2 < (ev. fl era gång-
er) tills "RPT DIR" eller "RPT FLD" visas
i teckenfönstret 6.
RPT-symbolen visas i teckenfönstret 6.
Avsluta upprepning (REPEAT)
För att avsluta repetitionen,
tryck på knappen 2 < (ev. fl era gång-
er) tills "RPT OFF" visas i teckenfönst-
ret 6.
RPT-symbolen i teckenfönstret 6 slock-
nar.
쏅
쏅
쏅
쏅
쏅
Avbryta spelning (PAUSE)
Tryck på knappen 1 <.
I teckenfönstret 6 visas "PAUSE".
Återuppta spelning
Tryck på knapp 1 < under avbrottet.
Spelningen fortsätter.
쏅
쏅
MP3/WMA
08_CalaisMP48_sw.indd 24208_CalaisMP48_sw.indd 242 11.06.2008 15:18:21 Uhr11.06.2008 15:18:21 Uhr

243
SVENSKA
CD-växlare
Till apparaten kan som tillval anslutas
Blaupunkt-CD-växlare CDC A08 T och
IDC A09 (grupp C3 på apparatens bak-
sida).
Observera!
CD-växlaren får i normala fall sin ström-
försörjning från apparaten (12 V drifts-
spänning).
Om CD-växlaren CDC A 08 T (24 volt)
ansluts, måste spänningsmatningen i
stickkontakten på CD-växlarens anslut-
ningskabel lossas (grupp C3/pin 15).
CD-växlaren måste försörjas med en
egen 24 volts driftsspänning.
Observera!
När du ansluter en CD-växlare till ap-
paraten, måste AUX-ingången ställas
in för detta. Läs mer i avsnittet "Ställa
in AUX-ingång" i kapitlet "Externa ljud-
källor".
Information om hantering av CD-ski-
vor, hur man lägger i skivorna och
allmänt hanterar CD-växlaren, fi nns i
bruksanvisningen för CD-växlaren.
Starta CD-växlare
Tryck på knappen SRC > (ev. fl era
gånger) tills "CHANGER" visas i tecken-
fönstret 6.
Spelningen startar med den första spelbara
CD-skivan i CD-växlaren. I teckenfönstret
6 visas numret på den aktuella CD:n (t.ex.
"D02") och på det aktuella spåret (t.ex.
"T07") samt speltiden.
•
•
쏅
Välja CD-skiva
För att fl ytta uppåt eller nedåt till en annan
CD-skiva,
tryck på knappen
eller 8.
Välj spår
För att byta till ett annat spår på aktuell CD-
skiva,
tryck på knappen
eller 8.
Snabbspolning (medhörning)
För att snabbt spola framåt eller bakåt
håll knappen
eller 8 intryckt tills
du kommer till önskat ställe.
Spela enstaka spår eller hela CD-
skivor fl era gånger (RPT)
För att upprepa aktuellt spår,
tryck på knappen 2 < (ev. fl era gång-
er) tills "RPT TRK" visas i teckenfönstret
6.
RPT-symbolen visas i teckenfönstret 6.
För att upprepa aktuell CD-skiva,
tryck på knappen 2 < (ev. fl era gång-
er) tills "RPT CD" visas i teckenfönstret
6.
RPT-symbolen visas i teckenfönstret 6.
Avsluta upprepning (REPEAT)
För att avsluta repetitionen,
tryck på knappen 2 < (ev. fl era gång-
er) tills "RPT OFF" visas i teckenfönst-
ret 6.
RPT-symbolen i teckenfönstret 6 slock-
nar.
쏅
쏅
쏅
쏅
쏅
쏅
CD-växlare
08_CalaisMP48_sw.indd 24308_CalaisMP48_sw.indd 243 11.06.2008 15:18:21 Uhr11.06.2008 15:18:21 Uhr

244
Spela titlar i slumpvis
ordningsföljd (MIX)
Om Du vill låta en slumpgenerator avgöra
i vilken ordningsföljd den aktuella skivans
spår ska spelas,
tryck på knappen 3 < (ev. fl era gång-
er) tills "MIX CD" visas i teckenfönstret
6.
MIX-symbolen visas i teckenfönstret 6.
Om du vill att spåren från samtliga skivor i
magasinet ska spelas i slumpvis ordnings-
följd,
tryck på knappen 3 < (ev. fl era gång-
er) tills "MIX ALL" visas i teckenfönstret
6.
MIX-symbolen visas i teckenfönstret 6.
Avsluta slumpspelning (MIX)
För att avsluta spelning i slumpvis ordnings-
följd,
tryck på knappen 3 < (ev. fl era gång-
er) tills "MIX OFF" visas i teckenfönstret
6.
MIX-symbolen i teckenfönstret 6 slock-
nar.
Presentera samtliga spår på alla
skivor (SCAN)
För att presentera alla spår i en ilagd CD i
stigande ordningsföljd i vardera ca. 10 sek-
under,
tryck på knappen 4 <.
"SCAN TRK" visas kort i teckenfönstret 6.
Under presentationen blinkar CD-numret.
쏅
쏅
쏅
쏅
Avsluta SCAN
Om du vill avbryta presentationen,
tryck en gång till på knappen 4 <.
"SCAN OFF" visas kort i teckenfönstret 6.
Det spår som just presenteras fortsätter att
spela.
Avbryta spelning (PAUSE)
Tryck på knappen 1 <.
"PAUSE" visas i teckenfönstret 6.
Återuppta spelning
Tryck på knapp 1 < under avbrottet.
Spelningen fortsätter.
쏅
쏅
쏅
CD-växlare
08_CalaisMP48_sw.indd 24408_CalaisMP48_sw.indd 244 11.06.2008 15:18:21 Uhr11.06.2008 15:18:21 Uhr

245
SVENSKA
IR-fjärrkontroll RC 10 P
Du kan styra de viktigaste funktionerna i ap-
paraten med IR-fjärrkontrollen (tillval).
Fjärrkontrollmottagare
Infraröd-mottagaren 9 för fjärrkontrollen
sitter i apparatens kåpa. Innan fjärrkontrol-
len används, måste mottagaren vara påsla-
gen:
Tryck på knappen MENU 7.
Tryck på
eller 8 (ev. fl era gång-
er) tills "IR" och den aktuella inställ-
ningen "ON" (på) eller "OFF" (av) visas i
teckenfönstret 6.
Tryck på
resp. 8, för att koppla
till och från IR.
För att stänga menyn,
tryck på knappen MENU 7.
C
F
G
H
E
D
B
A
@
쏅
쏅
쏅
쏅
Funktioner i frjärrkontrollen
Allmänt:
Knapp Funktion
ON H Till-/frånkoppling av ap-
paraten (tryck längre)
Mute (kort tryckning)
Stänga menyn
SRC @ Koppla om källa
V+ B Höja volymen
V- A Sänka volymen
OK G Öppna och stänga menyn
E Välja menyalternativ
C Välja menyalternativ
F Ändra menyinställning
D Ändra menyinställning
I radioläge:
Knapp Funktion
F Öppna lagrad station
D Välja väglängdsområde/
minnesnivå
E Sökning uppåt
C Sökning nedåt
I CD-läge:
Knapp Funktion
F Välja nästa spår
D Välja föregående spår,
snabbsökning nedåt
IR-fjärrkontroll
08_CalaisMP48_sw.indd 24508_CalaisMP48_sw.indd 245 11.06.2008 15:18:21 Uhr11.06.2008 15:18:21 Uhr

246
CD-växlarläge
Knapp Funktion
F Spela nästa spår
D Spela föregående spår
E Spela nästa CD
C Spela föregående CD
MP3-läge
Knapp Funktion
F Spela nästa spår
D Spela föregående spår
E Spela nästa mapp
C Spela föregående mapp
Förförstärkarutgång
Du kan ansluta en förstärkare till apparaten
för att driva en subwoofer. För att kunna göra
detta skall förstärkaren anslutas till grupp
C1 på apparatens baksida. Subwooferns
nivå kan ställas in i audio-menyn:
Tryck på knappen AUD :.
Tryck på knappen
eller 8 ev. fl e-
ra gånger tills "SUB WOOF" visas.
Efter ca. 2 sekunder visas "SUBW" och den
aktuella inställningen i teckenfönstret 6.
Tryck på knappen
resp. 8, för att
ställa in nivån på subwoofern på mellan
0 och 7.
Observera:
Du behöver inte vänta på visningen av
den aktuella inställningen för att kunna
ändra den genom att trycka på knap-
pen
resp. 8.
För att stänga menyn,
tryck på knappen AUD :.
쏅
쏅
쏅
쏅
IR-fjärrkontroll Förförstärkarutgång
08_CalaisMP48_sw.indd 24608_CalaisMP48_sw.indd 246 11.06.2008 15:18:21 Uhr11.06.2008 15:18:21 Uhr

247
SVENSKA
Externa ljudkällor
Olika typer av externa ljudkällor kan anslu-
tas till apparaten via AUX-ingången: AUX-in-
gången måste ställas in för den för tillfället
anslutna externa ljudkällan:
Inställning "AUX" för externa ljudkäl-
lor som t.ex. bärbara CD-spelare,
MiniDisc-spelare eller MP3-spelare.
Inställning "CDC" för Blaupunkt-CD-
växlare CDC A 08 T och IDC A 09.
Inställning "USB" för USB-gränssnittet
från Blaupunkt.
För inställning av AUX-ingången, läs följan-
de avsnitt "Ställa in AUX-ingång".
Observera!
För att ansluta en extern ljudkälla
behöver du även en passande adap-
terkabel Denna kabel (Blaupunkt-nr
7 607 897 093) kan du köpa hos när-
maste Blaupunkt-återförsäljare.
Ställa in AUX-ingång
Tryck på knappen MENU 7.
Tryck på
eller 8 (ev. fl era gång-
er) tills "SRC SEL" visas.
Efter ca. 2 sekunder visas "SRC" och den
aktuella inställningen "CDC", "USB" eller
"AUX" i teckenfönstret 6.
Tryck på
eller 8, för att välja en
annan inställning.
Observera!
I menyn är ordningsföljden för inställ-
ningarna "CDC" – "USB" – "AUX":
Vid den aktuella inställningen "CDC"
kan du välja inställningen "USB" ge-
nom att trycka på knappen
8.
•
•
•
쏅
쏅
쏅
•
Vid den aktuella inställningen "USB"
kan du välja inställningen "CDC"
genom att trycka på knappen
8
eller inställningen "AUX" genom att
trycka på knappen
8.
Vid den aktuella inställningen "AUX"
kan du välja inställningen "USB" ge-
nom att trycka på knappen
8.
Varje gång en inställning är ändrad,
kopplas apparaten automatiskt från.
För att växla mellan inställningarna
"CDC" och "AUX", måste du därför först
välja inställningen "USB" och koppla till
apparaten igen efter den automatiska
frånkopplingen. Upprepa därefter in-
ställningsförloppet, för att komma till
önskad inställning "AUX" eller "CDC".
Anvisningen "AUTO SWITCH OFF IN
10 SECONDS" visas. Efter ca 10 sekunder
kopplas apparaten från automatiskt.
Koppla till apparaten igen med på-/
avknappen 3.
Apparaten kopplas till i radioläge med den
valda inställningen.
Observera!
Om du har valt AUX-inställningen, kan
du välja AUX-ingången med knappen
SRC >. "AUX" visas då i teckenfönst-
ret.
Om du har valt CDC- eller USB-inställ-
ningen, kan du bara välja ljudkällan
med knappen SRC >, om en motsva-
rande apparat (CD-växlare eller USB-
gränssnitt) är ansluten.
•
•
쏅
Externa ljudkällor
08_CalaisMP48_sw.indd 24708_CalaisMP48_sw.indd 247 11.06.2008 15:18:21 Uhr11.06.2008 15:18:21 Uhr

248
Ställa in nivå på AUX-ingången
När du har ställt in AUX-ingången för anslut-
ning av en extern ljudkälla på "AUX", kan du
anpassa nivån i den externa ljudkällan till ni-
vån i ljudkällan som tillhör apparaten (som
t.ex. CD och radio).
Observera!
Du kan bara ställa in nivån på AUX-in-
gången, om AUX är vald som ljudkälla.
Tryck vid behov på knappen SRC >
(ev. fl era gånger) tills "AUX" visas i teck-
enfönstret.
Tryck på knappen MENU 7.
Tryck på
eller 8 (ev. fl era gång-
er) tills "GAIN" och den aktuella inställ-
ningen visas.
Tryck på
eller 8, för att ställa in
nivåanpassningen mellan –9 och +9.
För att stänga menyn,
tryck på knappen MENU 7.
쏅
쏅
쏅
쏅
쏅
Återställa
fabriksinställningar
(RESET)
Du har möjlighet att återställa apparatens
inställningar till fabriksinställningar.
Håll knappen AUD : intryckt i minst
10 sekunder.
En ljudsignal hörs och i teckenfönstret 6
visas kort "RESET". Alla meny- och ljudme-
nyinställningar återställs till fabriksinställ-
ningarna.
Observera!
Stationer som är lagrade på stations-
knapparna raderas inte.
쏅
Externa ljudkällor Fabriksinställningar
08_CalaisMP48_sw.indd 24808_CalaisMP48_sw.indd 248 11.06.2008 15:18:22 Uhr11.06.2008 15:18:22 Uhr

249
SVENSKA
Tekniska data
Driftsspänning
24 Volt
Förstärkare
Uteffekt: 2 x 20 Watt sinus
vid 4 Ohm
Line-utgång: 2 x 2,0 Volt eff
Aux-ingång: 2 x 2,0 Volt eff
Tuner
Europeiska våglängdsintervall:
FM: 87,5 - 108 MHz
MV: 531 - 1602 kHz
LV: 153 - 279 kHz
Våglängdsområden Amerika:
FM: 87,7 - 107,9 MHz
AM: 530 - 1710 kHz
FM - ljudfrekvensomfång:
30 -15 000 Hz
CD
Ljudfrekvensomfång:
20 - 20 000 Hz
Med förbehåll för ändringar!
Tekniska data
08_CalaisMP48_sw.indd 24908_CalaisMP48_sw.indd 249 11.06.2008 15:18:22 Uhr11.06.2008 15:18:22 Uhr

250
1 Ses seviyesi ayarlayıcısı
2 BND tuşu
Kısa basma: Hafıza düzeyi veya frekans
bandı seçimi
Uzun basma: Travelstore fonksiyonu-
nun başlatılması (FMT veya MWT/LWT)
3 Açma/kapama tuşu
Kısa basma: Cihazın açılması
Kullanımda: Ses kapatma modu (Mute)
Uzun basma: Cihazın kapatılması
4 CD çıkartma düğmesi
5 CD yuvası
6 Ekran
7 MENU tuşu
Ana ayarlar için menünün çağrılması.
8 Çok fonksiyonlu tuş
9 IR uzaktan kumandası için enfraruj alı-
cısı (opsiyonel)
: AUD tuşu
Kısa basma: Basların, tizlerin, balansın
ve fader ayarları için ve ses şiddetinin
açılması için audio menüsü
Uzun basma (10 saniye): Fabrika ayar-
larını tekrar oluşturulması
; TA tuşu
Trafi k yayını için önceliğinin açılması/
kapatılması
Devam eden bir trafi k duyurusunun ip-
tal edilmesi
< Tuş bloğu 1 - 6
= RDS tuşu
RDS konfor fonksiyonunun açılması/ka-
patılması
> SRC tuşu
Radyo ve (monte edilmiş, bağlı ise veya
açık ise) CD, MP3, CD değiştirici ve
AUX kaynakları arasında geçiş.
? Code LED
Kumanda elemanları
09_CalaisMP48_tr.indd 25009_CalaisMP48_tr.indd 250 11.06.2008 15:19:00 Uhr11.06.2008 15:19:00 Uhr

TÜRKÇE
251
Önemli bilgiler ............................... 253
Kullanım alanı .............................. 253
Trafi k emniyeti ............................. 253
Uzaktan kumanda (opsiyonel) ........253
CD değiştirici (opsiyonel) ..............253
USB arabirimi (opsiyonel) .............253
Eski cihazın imhası ....................... 253
Alarm CODE .................................. 254
Kod sorgulamasının açılması/
kapatılması (CODE) .....................254
Gerilim kesintisinden sonra kod
numarası girilmelidir ....................255
Açma/kapama ...............................255
Açma/kapama tuşu ile açma/
kapama ...................................... 255
Araç kontağı ile açma/kapama .......255
CD bölümüyle açmak ....................255
Kapatma zamanını ayarlama ..........256
Telefon üzerinden açma (opsiyonel) 256
IR uzaktan kumanda RC 10 P ile
açmak (opsiyonel) .......................256
Ses seviyesini ayarlama ................. 256
Ses kapatma modu (MUTE) ........... 256
Telefon Audio/Navigasyon Audio ....256
Onay tonunun (BEEP) açılması/
kapatılması .................................257
Maksimum açma ses seviyesi ayarı
(ON VOL) ....................................257
Gürültüye bağlı ses seviyesi
uyarlama ayarı (GALA) ..................257
Akustik .........................................258
Tizlerin ayarlanması......................258
Basların ayarlanması ....................258
Orta seslerin ayarlanması ..............259
Sol/sağ ses seviyesi dağılımı ayarı
(BAL) .........................................259
Ön/arka ses seviyesi dağılımı ayarı
(FAD) ......................................... 259
Saat ..............................................260
Saati gösterme ............................260
Saatin ayarlanması .......................260
12/24 saat modu seçimi ...............260
Zaman dilimi ayarı (TIMEZONE)......260
Radyo işletimi ................................ 261
Radyo işletiminin açılması .............261
RDS konfor fonksiyonları (AF, REG) 261
Frekans bandı/hafıza düzeyi seçme 261
İstasyon ayarı .............................. 262
İstasyon kaydı .............................262
Kayıtlı istasyonların çağrılması .......263
Alınabilen istasyonların kısa süreli
çalınması (BANDSCAN) ................263
Program tipi (PTY) .......................263
Arızaya bağlı tiz düşüşü (HICUT) .....264
Radyo metninin açılması/
kapatılması .................................264
Trafi k yayını .................................. 265
Trafi k yayını önceliğini açma/
kapama ...................................... 265
Trafi k duyuruları için ses seviyesini
otomatik artırma ayarlanmışsa .......265
Trafi k duyurularının gizlenmesi ....... 265
İçindekiler
09_CalaisMP48_tr.indd 25109_CalaisMP48_tr.indd 251 11.06.2008 15:19:01 Uhr11.06.2008 15:19:01 Uhr

252
CD işletimi ....................................266
CD sürücüsünde arıza tehlikesi! .....266
CD işletiminin başlatılması ............266
Parça bilgileri göstergesi
(CD metni) .................................. 266
Parça seçimi ...............................267
Hızlı arama işlemi (duyulur şekilde) 267
Parçanın rastgele sırayla çalınması
(MIX) .........................................267
Parçanın çalınması (SCAN) ............267
Parçanın tekrarlanması (RPT) ........267
İşletimi kesmek
(PAUSE (ara verme)) ....................268
CD'yi çıkarma ..............................268
MP3/WMA işletimi ......................... 268
Bir MP3 veri taşıyıcısının hazırlığı ...268
MP3 işletiminin başlatılması ..........270
Parça bilgileri göstergesi
(ID3 taglar) ................................. 270
Dizin seçimi ................................271
Parçaların/dosyaların seçilmesi ......271
Hızlı arama işlemi .........................271
Parçanın rastgele sırayla çalınması
(MIX) .........................................271
Parçanın çalınması (SCAN) ............271
Her bir parçanın ayrı olarak veya
dizinin tamamının tekrar çalınması
(REPEAT) ................................... 272
İşletimi kesmek
(PAUSE (ara verme)) ....................272
CD değiştirici işletimi .....................273
CD değiştirici işletiminin
başlatılması ................................273
CD seçimi ...................................273
Parça seçimi ...............................273
Hızlı arama işlemi (duyulur şekilde) 273
Her bir parçanın ayrı olarak veya
tüm CD'nin tekrar çalınması (RPT) ..273
Parçanın rastgele sırayla çalınması
(MIX) .........................................274
Bütün CD'lerdeki parçaların
tamamının çalınması (SCAN) .........274
İşletimi kesmek
(PAUSE (ara verme)) ....................274
IR uzaktan kumandası RC 10 P ........275
Uzaktan kumanda alıcısı ................275
Uzaktan kumandanın fonksiyonları .275
Ön amplifi katör çıkışı .....................276
Harici audio kaynakları ................... 277
AUX girişinin ayarlanması .............. 277
AUX girişinin seviyesinin
ayarlanması ................................277
Fabrika ayarlarına geri dön
(RESET) ........................................278
Teknik veriler ................................279
İşletme gerilimi ............................279
Amplifi katör ................................279
Radyo alıcısı ................................279
CD .............................................279
ISO bağlantısı ................................ 281
İçindekiler
09_CalaisMP48_tr.indd 25209_CalaisMP48_tr.indd 252 11.06.2008 15:19:01 Uhr11.06.2008 15:19:01 Uhr

TÜRKÇE
253
Önemli bilgiler
Önemli bilgiler
Cihazınızı çalıştırmadan önce bu kullanım
kılavuzunu ayrıntılı şekilde okuyunuz ve ci-
hazı iyice tanıyınız. Daha sonra gerekli ola-
bileceği için bu kullanım kılavuzunu aracı-
nızda muhafaza ediniz.
Kullanım alanı
Cihaz, 24 V elektrik gerilimine sahip ticari
araçlarda kullanılmak için tasarlanmıştır ve
bir 1-DIN-kanalına monte edilmelidir.
Trafi k emniyeti
Trafi k emniyeti en önemli faktördür.
Cihazınızı sadece trafi k şartları buna izin ve-
riyorsa kullanınız. Sürüşe başlamadan önce
cihazı iyice tanıyınız. Araçta polis, itfaiye ve
kurtarma hizmetlerinin sesli ikaz sinyalleri
zamanında algılanabilmelidir. Bu nedenle
sürüş esnasında programınızı uygun bir ses
seviyesinde dinleyiniz.
Uzaktan kumanda (opsiyonel)
RC 10 P uzaktan kumandasıyla en önemli
fonksiyonlar uzaktan kumanda edilebilir.
Enfraruj bir uzaktan kumanda aksesuar
(Blaupunkt No. 7 607 591 512) olarak alı-
nabilir.
CD değiştirici (opsiyonel)
CDC A08 T (Blaupunkt No. 7 607 274 002)
veya IDC A09 (Blaupunkt No.
7 607 274 005) CD değiştiricileri bağla-
yabilirsiniz. CD değiştirici aksesuar olarak
alınabilir.
USB arabirimi (opsiyonel)
MP3/WMA dosyalarını bir USB veri taşıyı-
cıdan çalmak için Blaupunkt USB arabirimi
bağlayabilirsiniz. USB arabirimi, aksesuar
(Blaupunkt No. 7 607 541 576) olarak alı-
nabilir.
Eski cihazın imhası
Eski cihazınızı lütfen evdeki çöpe at-
mayınız!
Eski cihazınızın imhası için mevcut
geri verme veya toplama sistemlerini kulla-
nınız.
09_CalaisMP48_tr.indd 25309_CalaisMP48_tr.indd 253 11.06.2008 15:19:01 Uhr11.06.2008 15:19:01 Uhr

254
Alarm
Alarm CODE
Cihazınız hırsızlığa karşı koruma amacıyla
dört haneli bir kod numarasıyla donatılmış-
tır. Cihaz aracın işletme geriliminden her
ayrıldığında bu numaranın yeniden girilme-
si gerekir. Kod sorgulaması fabrika ayarla-
rında kapatılmıştır, ama açılabilir.
Uyarı:
Hem cihaz hem de araç kontağı kapa-
lı olduğunda kod sorgulaması açıksa
Code LED ? yanıp sönmeye başlar.
Kod numarasını cihazınızın radyo kitapçı-
ğında bulabilirsiniz.
Uyarı:
Radyo kitapçığını asla araçta muhafaza
etmeyiniz!
Kod sorgulamasının açılması/
kapatılması (CODE)
MENU 7 tuşuna basınız.
tuşuna veya 8 tuşuna yeterin-
ce çok defa bastığınızda 6 ekranda
"CODE" güncel ayarının "ON" (açık)
veya "OFF" (kapalı) olduğu görüntüle-
necektir.
veya 8 tuşuna basınız.
Ekranda 6 "0000" gösterilir. Kodu giriniz:
Uyarı:
Yanlış kod numarası girerseniz ekran-
da 6 yine "0000" gösterilir. Bundan
sonra 2 defa daha giriş yapabilirsiniz.
Üçüncü hatalı girişten sonra cihaz 1
saat süreyle bloke edilir. Bu süre boyun-
ca 6 ekranda "WAIT 1HR" mesajı gös-
terilir. Cihazı bu bekleme süresi sırasın-
쏅
쏅
쏅
da kapatırsanız yeniden açtıktan sonra
tam bir saat beklemeniz gerekecektir.
İstasyonu tuşuna 1 < yeterince çok
defa basarsanız 6 ekranda kod numa-
ranızın ilk rakamı görünür.
İstasyonu tuşuna 2 < yeterince çok
defa basarsanız 6 ekranda kod numa-
ranızın ikinci rakamı görünür.
İstasyonu tuşuna 3 < yeterince çok
defa basarsanız 6 ekranda kod numa-
ranızın üçüncü rakamı görünür.
İstasyonu tuşuna 4 < yeterince çok
defa basarsanız 6 ekranda kod numa-
ranızın dördüncü rakamı görünür.
Ekranda 6 doğru kod numarası göste-
rildiğinde istasyon tuşunu 5 < 2 sani-
yeden uzun süre basılı tutunuz.
Ekranda 6 yeniden "CODE" ve güncel ayar
"ON" (açık) veya "OFF" (kapalı) gösterilir.
Kod sorgulamasını açmak veya kapat-
mak için
tuşuna veya 8 tuşuna
basınız.
Menüden çıkmak için,
MENU 7 tuşuna basınız.
쏅
쏅
쏅
쏅
쏅
쏅
쏅
09_CalaisMP48_tr.indd 25409_CalaisMP48_tr.indd 254 11.06.2008 15:19:01 Uhr11.06.2008 15:19:01 Uhr

TÜRKÇE
255
Gerilim kesintisinden sonra kod
numarası girilmelidir
Cihazı açınız.
Ekranda 6 önce "CODE", ardından "0000"
gösterilir. Kodu girebilirsiniz:
Uyarı:
Yanlış kod numarası girerseniz ekran-
da 6 yine "0000" gösterilir. Bundan
sonra 2 defa daha giriş yapabilirsiniz.
Üçüncü hatalı girişten sonra cihaz 1
saat süreyle bloke edilir. Bu süre boyun-
ca 6 ekranda "WAIT 1HR" mesajı gös-
terilir. Cihazı bu bekleme süresi sırasın-
da kapatırsanız yeniden açtıktan sonra
tam bir saat beklemeniz gerekecektir.
Kod numarasını, "Kod sorgulamasının
açılması/kapatılması" bölümünde tarif
edildiği gibi giriniz.
Ekranda 6 doğru kod numarası göste-
rildiğinde istasyon tuşunu 5 < 2 sani-
yeden uzun süre basılı tutunuz.
Cihaz açılır.
쏅
쏅
쏅
Açma/kapama
Cihazın açılması/kapatılması için farklı se-
çenekler bulunur.
Açma/kapama tuşu ile açma/
kapama
Cihazı açmak için açma/kapama tuşu-
na 3 basınız.
Kapatmak için açma/kapama 3 tuşunu
iki saniyeden uzun süre basılı tutunuz.
Uyarı:
Araç akümülatörünü korumak için araç
kontağı kapalıyken cihaz otomatik ola-
rak ayarlanabilir bir süre sonunda ka-
patılır (bakınız bu bölümdeki "Kapatma
zamanını ayarlama" başlığı).
Araç kontağı ile açma/kapama
Cihaz, araç kontağı ile bağlanmışsa ve açma/
kapatma tuşu 3 ile kapatılmamışsa kontak
vasıtasıyla açılabilir veya kapatılabilir.
CD bölümüyle açmak
CD bölümüyle açmak için,
bir CD'yi yazılı tarafı üstte olacak şekil-
de kuvvet harcamadan bir direnç fark
edinceye kadar CD 5 yuvasına itiniz.
CD otomatik olarak içeri alınır ve alet CD iş-
letiminde çalışmaya başlar.
쏅
쏅
쏅
Alarm Açma/kapama
09_CalaisMP48_tr.indd 25509_CalaisMP48_tr.indd 255 11.06.2008 15:19:01 Uhr11.06.2008 15:19:01 Uhr

256
Kapatma zamanını ayarlama
MENU 7 tuşuna basınız.
tuşuna veya 8 tuşuna yeterin-
ce çok defa basarak "HOUR" ve güncel
ayarın ekranda 6 gösterilmesini sağ-
layınız.
tuşuyla veya 8 tuşuyla kapan-
ma zamanını 5 dakikalık adımlara 5 ile
60 dakika arasında bir değere ayarla-
yabilirsiniz.
Menüden çıkmak için,
MENU 7 tuşuna basınız.
Telefon üzerinden açma
(opsiyonel)
Cihaz kapalıyken telefon devreye alınırsa,
cihaz tekrar açılır. Telefon kapatıldıktan
sonra cihaz tekrar otomatik olarak kapanır.
Bunun için ön koşul telefonun cihaz ile düz-
gün biçimde bağlanmasıdır.
IR uzaktan kumanda RC 10 P ile
açmak (opsiyonel)
Açmak için ON H tuşuna basınız, bu
tuş RC 10 P IR uzaktan kumandası üze-
rindedir.
Uyarı:
IR uzaktan kumandasını kullanabilme-
niz için cihazın IR alıcısı açık olmalı-
dır. Bunun için "IR uzaktan kumandası
RC 10 P" bölümündeki "Uzaktan ku-
manda alıcısı" başlığını okuyunuz.
쏅
쏅
쏅
쏅
쏅
Ses seviyesini ayarlama
Sistem ses seviyesi, 0 (kapalı) ile 32 (mak-
simum) kademeleri arasında ayarlanabilir.
Sistem ses seviyesini artırmak için
ses seviyesi ayarlayıcısını 1 sağa
çeviriniz.
Sistem ses seviyesini azaltmak için
ses seviyesi ayarlayıcısını 1 sola
çeviriniz.
Ses kapatma modu (MUTE)
İsterseniz sistem ses seviyesini ani olarak
kapatabilirsiniz (Mute).
3 tuşuna kısa süreyle basınız.
Mute fonksiyonun kaldırılması
Önceki ses seviyesini yeniden aktifl eştir-
mek için,
3 tuşuna kısa süreyle yeniden basınız.
Telefon Audio/Navigasyon Audio
Telefon işletimi sırasında ses kapatma
modu Araç radyonuz bir mobil telefon veya
navigasyon sistemiyle bağlantılı ise çağrı
geldiğinde veya navigasyon sesli uyarısı
durumunda araç radyosunun sesi kapatılır.
Konuşma ya da sesli uyarı, araç radyosu ho-
parlörleri üzerinden duyulur.
Bunun için mobil telefon veya navigasyon
sistemi araç radyosuna bağlanmış olmalıdır
(cihaz arka tarafındaki hücre C2).
Araç radyonuzda hangi navigasyon sistemi-
nin kullanılabileceğini Blaupunkt yetkili satı-
cısından öğrenebilirsiniz.
Bir çağrı geldiğinde veya navigasyon sesli
bir uyarı başlattığında ekranda "PHONE"
görüntülenir.
쏅
쏅
쏅
쏅
Açma/kapama Ses seviyesi
09_CalaisMP48_tr.indd 25609_CalaisMP48_tr.indd 256 11.06.2008 15:19:01 Uhr11.06.2008 15:19:01 Uhr

TÜRKÇE
257
Telefon/navigasyon audio ses
seviyesinin ayarlanması (PHONEVOL)
Telefon görüşmelerinin veya sesli navigas-
yon uyarılarının ses seviyesi ayarlanabilir:
MENU 7 tuşuna basınız.
"PHONEVOL" gösterilinceye kadar
tuşuna veya
8 basınız.
Yaklaşık 2 saniye sonra "VOL" ve güncel
ayar ekranda 6 gösterilir.
Ses seviyesini 0 ve 32 arasında ayarla-
mak için
veya 8 tuşuna basınız.
Uyarı:
tuşuna veya 8 tuşuna basarak
değişiklik yapmak için güncel ayarın
ekranda gösterilmesini beklemenize
gerek yoktur.
Menüden çıkmak için,
MENU 7 tuşuna basınız.
Uyarı:
Ses seviyesini telefon konuşmasın sıra-
sında veya bir navigasyon sesli uyarısı
sırasında da ses seviyesi ayarlayıcısıyla
1 ayarlayabilirsiniz. Ayarlanan ses se-
viyesi otomatik olarak kaydedilir.
Onay tonunun (BEEP) açılması/
kapatılması
Bir tuşa uzun süre basmak gibi belirli bazı
aksiyonlar sonucunda bir onay tonu (Beep)
duyulur. Bu onay tonunu kapatabilirsiniz:
MENU 7 tuşuna basınız.
veya 8 tuşuna yeterince çok
defa bastığınızda ekranda 6 "BEEP"
ve güncel ayarın "ON" (açık) veya "OFF"
(kapalı) olduğu görüntülenecektir.
Beep sesini açmak veya kapatmak için
tuşuna veya 8 tuşuna basınız.
쏅
쏅
쏅
쏅
쏅
쏅
쏅
Menüden çıkmak için,
MENU 7 tuşuna basınız.
Maksimum açma ses seviyesi
ayarı (ON VOL)
Açılışta, cihaz en son seçilen ses seviyesi-
ni çalar. Cihazın ses seviyesi, kapanmadan
önce maksimum açılma ses seviyesinden
yüksek ise, cihaz tekrar açıldığında ses se-
viyesi otomatik olarak ayarlanan açılma ses
seviyesine kadar düşer.
Uyarı:
Kulakların zarar görmemesi için açılma
anındaki maksimum ses seviyesi "25"
değerinde sınırlandırılmıştır.
MENU 7 tuşuna basınız.
veya 8 tuşuna, ekranda "ON
VOL" gösterilinceye kadar basınız.
Yaklaşık 2 saniye sonra "VOL" ve güncel
ayar ekranda 6 gösterilir.
Azami açma ses seviyesi değerini 5 ve
25 arasında ayarlamak için
veya
8 tuşuna basınız.
Uyarı:
tuşuna veya 8 tuşuna basarak
değişiklik yapmak için güncel ayarın
ekranda gösterilmesini beklemenize
gerek yoktur.
Menüden çıkmak için,
MENU 7 tuşuna basınız.
Gürültüye bağlı ses seviyesi
uyarlama ayarı (GALA)
Bu fonksiyon ile araç radyosunun ses sevi-
yesi sürüş hızına ve buna bağlı sürüş gürül-
tülerine göre uyarlanır. Örneğin hız artarken
ses seviyesi de otomatik olarak artar, böy-
쏅
쏅
쏅
쏅
쏅
Ses seviyesi
09_CalaisMP48_tr.indd 25709_CalaisMP48_tr.indd 257 11.06.2008 15:19:02 Uhr11.06.2008 15:19:02 Uhr

258
lece daha yüksek sürüş gürültüleri (örneğin
sürüş nedeniyle oluşan rüzgar) dengelen-
miş olur.
Bunun için aracınızda takometre sinyali
mevcut olmalıdır ve araç radyosuna bağlı
olmalıdır.
Ses seviyesinin otomatik olarak artırılması
6 kademede (OFF (kapalı), 1-5) ayarlana-
bilir.
MENU 7 tuşuna basınız.
Ekranda "GALA" ve güncel ayar görün-
tülenene kadar
veya 8 tuşlarına
arka arkaya basınız.
Ses seviyesi uyarlama değerini "OFF"
(kapalı) ile ve 5 arasında ayarlamak için
veya 8 tuşuna basınız.
Menüden çıkmak için,
MENU 7 tuşuna basınız.
쏅
쏅
쏅
쏅
Akustik
Tizlerin ayarlanması
AUD : tuşuna basınız.
veya 8 tuşuna, ekranda
"TREBLE" gösterilinceye kadar basınız.
tuşunu veya 8 tuşunu 2 saniye-
den uzun süre basılı tutunuz.
Ekranda kısa süre "FREQ" ve sonra güncel
seçilen tiz frekansı gösterilir.
10,0 kHz ve 17,5 kHz arasında bir tiz fre-
kansı seçmek için,
tuşuna veya 8 tuşuna basınız.
Tiz seviyesini ayarlamak için,
veya 8 tuşuna, ekranda "GAIN"
gösterilinceye kadar basınız.
Yaklaşık 2 saniye sonra "GAIN" ve güncel
ayar gösterilir.
Tiz seviyesini –7 ve +7 arasında ayarla-
mak için
veya 8 tuşuna basınız.
Menüden çıkmak için,
AUD : tuşuna basınız.
Basların ayarlanması
AUD : tuşuna basınız.
veya 8 tuşuna, ekranda "BASS"
gösterilinceye kadar basınız.
tuşunu veya 8 tuşunu 2 saniye-
den uzun süre basılı tutunuz.
Ekranda kısa süre "FREQ" ve sonra güncel
seçilen bas frekansı gösterilir.
60 kHz ve 200 kHz arasında bir bas frekansı
seçmek için,
tuşuna veya 8 tuşuna basınız.
쏅
쏅
쏅
쏅
쏅
쏅
쏅
쏅
쏅
쏅
쏅
Ses seviyesi Akustik
09_CalaisMP48_tr.indd 25809_CalaisMP48_tr.indd 258 11.06.2008 15:19:02 Uhr11.06.2008 15:19:02 Uhr

TÜRKÇE
259
Orta sesin kalite faktörünü ayarlamak için,
veya 8 tuşuna, ekranda "Q
FACTOR" gösterilinceye kadar basınız.
Yaklaşık 2 saniye sonra "Q" ve güncel ayar
gösterilir.
Kalite faktörünü 0,5 ve 1,25 arasında
ayarlamak için
veya 8 tuşuna
basınız.
Menüden çıkmak için,
AUD : tuşuna basınız.
Sol/sağ ses seviyesi dağılımı
ayarı (BAL)
AUD : tuşuna basınız.
Ekranda "BAL" ve güncel ayar görüntü-
lenene kadar
veya 8 tuşlarına
arka arkaya basınız.
Sol/sağ ses seviyesi dağılımını –10 ve
+10 arasında ayarlamak için
veya
8 tuşuna basınız.
Menüden çıkmak için,
AUD : tuşuna basınız.
Ön/arka ses seviyesi dağılımı
ayarı (FAD)
Not
Arka hoparlörlere ilave bir amplifi katör
bağlanmalıdır.
AUD : tuşuna basınız.
Ekranda "FAD" ve güncel ayar görüntü-
lenene kadar
veya 8 tuşlarına
arka arkaya basınız.
Ön/arka ses seviyesi dağılımını –10 ve
+10 arasında ayarlamak için
veya
8 tuşuna basınız.
Menüden çıkmak için,
AUD : tuşuna basınız.
쏅
쏅
쏅
쏅
쏅
쏅
쏅
쏅
쏅
쏅
쏅
Bas seviyesini ayarlamak için,
veya 8 tuşuna, ekranda "GAIN"
gösterilinceye kadar basınız.
Yaklaşık 2 saniye sonra "GAIN" ve güncel
ayar gösterilir.
Bas seviyesini –7 ve +7 arasında ayarla-
mak için
veya 8 tuşuna basınız.
Basın kalite faktörünü ayarlamak için,
veya 8 tuşuna, ekranda "Q
FACTOR" gösterilinceye kadar basınız.
Yaklaşık 2 saniye sonra "Q" ve güncel ayar
gösterilir.
Kalite faktörünü 1,0 ve 2,0 arasında
ayarlamak için
veya 8 tuşuna
basınız.
Menüden çıkmak için,
AUD : tuşuna basınız.
Orta seslerin ayarlanması
AUD : tuşuna basınız.
veya 8 tuşuna, ekranda
"MIDDLE" gösterilinceye kadar basınız.
tuşunu veya 8 tuşunu 2 saniye-
den uzun süre basılı tutunuz.
Ekranda kısa süre "FREQ" ve sonra güncel
seçilen orta frekans gösterilir.
500 Hz ve 2,5 kHz arasında bir orta frekans
seçmek için,
tuşuna veya 8 tuşuna basınız.
Orta ses seviyesini ayarlamak için,
veya 8 tuşuna, ekranda "GAIN"
gösterilinceye kadar basınız.
Yaklaşık 2 saniye sonra "GAIN" ve güncel
ayar gösterilir.
Orta ses seviyesini –7 ve +7 arasında
ayarlamak için
veya 8 tuşuna
basınız.
쏅
쏅
쏅
쏅
쏅
쏅
쏅
쏅
쏅
쏅
쏅
Akustik
09_CalaisMP48_tr.indd 25909_CalaisMP48_tr.indd 259 11.06.2008 15:19:02 Uhr11.06.2008 15:19:02 Uhr

260
Saat
Saati gösterme
Saati yakl. 10 saniye için ekranda görüntü-
lemek için,
MENU 7 tuşunu 2 saniyeden uzun bir
süre için basılı tutunuz.
Saatin ayarlanması
MENU 7 tuşuna basınız.
tuşuna veya 8 tuşuna yeterince
çok defa basarak "TIMESET" yazısının
ekranda 6 gösterilmesini sağlayınız.
Yaklaşık 2 saniye sonra ekranda 6 gün-
cel saat gösterilir. Saatten önce 24 saat
modunda "24H" ve 12 saat modunda "AM"
veya "PM" gösterilir. Saatler yanıp söner ve
ayarlanabilir.
Saati veya dakikayı ayarlamak için,
tuşuna veya 8 tuşuna basınız.
Saat ve dakika arasında geçiş yapmak için,
6 < tuşuna basınız.
Uyarı:
veya 8 tuşuna basarak değişiklik
yapmak için güncel saatin ekranda gös-
terilmesini beklemenize gerek yoktur.
Menüden çıkmak için,
MENU 7 tuşuna basınız.
12/24 saat modu seçimi
MENU 7 tuşuna basınız.
tuşuna veya 8 tuşuna yeterin-
ce çok defa basarak ekranda 6 "24H
MODE" veya "12H MODE" mesajının
görünmesini sağlayınız.
tuşuna veya 8 tuşuna basarak
modu değiştirebilirsiniz.
쏅
쏅
쏅
쏅
쏅
쏅
쏅
쏅
쏅
Menüden çıkmak için,
MENU 7 tuşuna basınız.
Zaman dilimi ayarı (TIMEZONE)
Zaman dilimleri arasında geçiş yapıyor-
sanız ayarlanmış olan güncel saat ile olan
saat farklarını 1 saatlik adımlarla ayarlaya-
bilirsiniz. Böylece saati ayarlamak zorunda
kalmadan gösterilen saatin geçerli saat dili-
mine göre düzeltilmesi mümkün olur.
MENU 7 tuşuna basınız.
veya 8 tuşuna, ekranda
"TIMEZONE" gösterilinceye kadar ba-
sınız.
Yaklaşık 2 saniye sonra "ZONE" ve güncel
ayar ekranda 6 gösterilir.
tuşuna veya 8 tuşuna basarak
saat farkını –12 ve +12 arasında 1 sa-
atlik adımlara ayarlayabilirsiniz.
Uyarı:
tuşuna veya 8 tuşuna basarak
değişiklik yapmak için güncel ayarın
ekranda gösterilmesini beklemenize
gerek yoktur.
Menüden çıkmak için,
MENU 7 tuşuna basınız.
쏅
쏅
쏅
쏅
쏅
Saat
09_CalaisMP48_tr.indd 26009_CalaisMP48_tr.indd 260 11.06.2008 15:19:03 Uhr11.06.2008 15:19:03 Uhr

TÜRKÇE
261
Radyo işletimi
Bu cihaz bir RDS-radyo alıcısı ile donatıl-
mıştır. Alınan FM istasyonlarından bir çoğu
programın yanı sıra istasyon ismi ve prog-
ram tipi (PTY) gibi bilgileri de içeren bir sin-
yal gönderir.
Alınabiliyorsa istasyon ismi ekranda 6
gösterilir.
Radyo işletiminin açılması
Başka bir işletim uygulamasında bulunuyor-
sanız,
BND 2 tuşuna basınız,
veya
SRC > tuşuna birçok defa basarak
"RADIO" yazısının ekranda 6 görün-
mesini sağlayınız.
Ekranda 6 güncel frekans veya istasyon
adı görünür.
RDS konfor fonksiyonları
(AF, REG)
RDS konfor fonksiyonları AF (Alternatif fre-
kans) ve REG (yerel), radyo cihazınızın size
sağladıklarını artırır.
AF: RDS konfor fonksiyonu devrede
ise cihaz arka planda otomatik olarak,
ayarlı istasyonun en iyi alınabilen fre-
kansını arar.
REG: Bazı istasyonlar belirli sürelerde
programı, çeşitli içeriklerle bölgesel
programlarda yayınlamaktadır. REG
fonksiyonu devredeyken cihazın ayar-
lanan istasyonun farklı program içerik-
lerine sahip alternatif frekanslara geç-
mesi önlenir.
쏅
쏅
•
•
Uyarı:
REG özellikle menüden açılmalı ve ka-
patılmalıdır.
RDS konfor fonksiyonlarını açma veya
kapama
RDS fonksiyonları olan AF ve REG'i kul-
lanmak için RDS = tuşuna basınız.
Ekranda 6 RDS sembolü görüntülenirse
RDS konfor fonksiyonları aktiftir.
REG açma/kapama
MENU 7 tuşuna basınız.
veya 8 tuşuna yeterince çok
defa bastığınızda ekranda 6 "REG"
ve güncel ayarın "ON" (açık) veya "OFF"
(kapalı) olduğu görüntülenecektir.
REG özelliğini açmak veya kapatmak
için
tuşuna veya 8 tuşuna basınız.
Menüden çıkmak için,
MENU 7 tuşuna basınız.
Uyarı:
REG ON/OFF ayarı ancak RDS fonksiyo-
nu devrede ise etkili olur.
Frekans bandı/hafıza düzeyi
seçme
Bu cihaz ile FM, MW ve LW (Avrupa) veya FM
ve AM (NAFTA ülkeleri için) frekans bantla-
rındaki istasyonları alabilirsiniz. FM frekans
bandı için 3 hafıza düzeyi (FM1, FM2 ve
FMT) ve MW ile LW veya AM frekans bant-
larının her biri için bir hafıza düzeyi mevcut-
tur. İlave olarak MWT/LWT veya AMT için bir
hafıza düzeni daha mevcuttur. Her hafıza
düzlemine 6 istasyon kaydedilebilir.
쏅
쏅
쏅
쏅
쏅
Radyo işletimi
09_CalaisMP48_tr.indd 26109_CalaisMP48_tr.indd 261 11.06.2008 15:19:03 Uhr11.06.2008 15:19:03 Uhr

262
Hafıza düzeyleri veya frekans bantları ara-
sında geçiş yapmak için,
BND 2 tuşuna basınız.
İstasyon ayarı
İstasyon ayarlamak için çeşitli yöntemler
vardır.
Otomatik istasyon arama işlemi
tuşuna veya 8 tuşuna basınız.
Alınabilen bir sonraki istasyon ayarlanır.
Notlar:
Trafi k mesajı için öncelik belirlen-
diyse sonraki trafi k mesajı istasyonu
ayarlanır.
PTY açıksa seçilen program tipindeki
sonraki istasyon ayarlanır.
İstasyon arama işlemi hassasiyetini
ayarlama
Düşük hassasiyeti seçerek sadece kuvvetli
sinyal veren istasyonları seçebilir veya yük-
sek hassasiyeti seçerek zayıf sinyal veren
istasyonların da dahil edilmesini sağlayabi-
lirsiniz.
MENU 7 tuşuna basınız.
veya 8 tuşuna yeterince çok
defa bastığınızda ekranda 6 "SENS"
ve güncel ayarın "LO" (düşük hassasi-
yet) veya "DX" (yüksek hassasiyet) ol-
duğu görüntülenecektir.
"LO" ve "DX" arasında geçiş yapmak için
veya 8 tuşuna basınız.
Menüden çıkmak için,
MENU 7 tuşuna basınız.
쏅
쏅
•
•
쏅
쏅
쏅
쏅
Manüel istasyon ayarlama
Ayarlanan frekansı kısa adımlarda değiştir-
mek için,
veya 8 tuşuna basınız.
Ayarlanan frekansı hızlı bir şekilde değiştir-
mek için,
tuşunu veya 8 tuşunu basılı
tutunuz.
Uyarı:
Manüel istasyon ayarlama, sadece RDS
fonksiyonu ve PTY devre dışı bırakılmış-
sa yapılabilir.
İstasyon zincirinde bir sonrakine geçme
(sadece FM)
Bir istasyonun birden fazla programı varsa
bu "Verici zinciri" içinde geçiş yapabilirsi-
niz.
Verici zincirinin bir sonraki istasyonu-
na geçmek için
veya 8 tuşuna
basınız.
Uyarı:
Verici zinciri içinde geçiş yapabilmek
için RDS fonksiyonunun açık ve PTY'nin
kapalı olması gereklidir. Sadece daha
önce bir defa alınmış olan istasyon-
lara geçiş yapabilirsiniz. Bunun için
Travelstore fonksiyonu kullanılmalıdır
(T-STORE).
İstasyon kaydı
İstasyonun manüel olarak kaydedilmesi
İstediğiniz hafıza düzeyini veya frekans
bandını seçiniz.
İstediğiniz istasyonu ayarlayınız.
쏅
쏅
쏅
쏅
쏅
Radyo işletimi
09_CalaisMP48_tr.indd 26209_CalaisMP48_tr.indd 262 11.06.2008 15:19:03 Uhr11.06.2008 15:19:03 Uhr

TÜRKÇE
263
1 - 6 < arasındaki istasyon tuşların-
dan istasyonu kaydetmek istediğiniz
tuşu 2 saniyeden uzun süre basılı tutu-
nuz.
Onay tonu duyulur. İstasyon seçilen istas-
yon tuşuna kaydedilmiştir.
İstasyonun otomatik olarak
kaydedilmesi (T-STORE)
Bölgenin en güçlü 6 istasyonunu otomatik
olarak kaydedebilirsiniz. FM frekans ban-
dı için bu kaydetme FMT hafıza düzeyinde
gerçekleşir, MW ve LW frekans bantları için
MWT/LWT ve AM frekans bandında ise AMT
hafıza düzeyinde saklanır.
Uyarı:
Bu düzeyde daha evvel kaydedilen is-
tasyonların yerine yeni bulunanlar kay-
dedilir.
İstediğiniz frekans bandını seçiniz.
BND 2 tuşunu iki saniyeden uzun ba-
sılı tutunuz.
Kayıt başlar. Ekranda 6 "T-STORE" gös-
terilir. İşlem tamamlandıktan sonra FMT,
MWT/LWT veya AMT hafıza düzeyindeki bi-
rinci istasyon çalınır.
Kayıtlı istasyonların çağrılması
Hafıza düzlemini veya frekans bandını
seçiniz.
İstediğiniz istasyonun kayıtlı olduğu is-
tasyon tuşuna 1 - 6 < basınız.
Alınabilen istasyonların kısa
süreli çalınması (BANDSCAN)
Bandscan fonksiyonu ile tüm alınabilen is-
tasyonları yaklaşık 10 saniye süreyle çala-
bilirsiniz.
쏅
쏅
쏅
쏅
쏅
Bandscan'ın başlatılması
tuşunu veya 8 tuşunu 2 saniye-
den uzun süre basılı tutunuz.
Ekranda kısa süre "BANDSCAN" gösterilir.
Cihaz güncel frekans bandında istasyonları
arar. Bulunan her verici yaklaşık 10 saniye
için çalınır. Bu sırada ekranda ayarlanan fre-
kans veya istasyon adı görünür.
Bandscan'ın sonlandırılması
tuşuna veya 8 tuşuna basınız.
Tarama işlemi sona erer. En son çalınan is-
tasyon çalmaya devam eder.
Program tipi (PTY)
İstasyon isimlerinin yanında ayrıca bazı FM
istasyonları, programlarının tipleri hakkın-
da bilgiler de aktarmaktadır. Bu tür program
tipleri aşağıdakiler gibi olabilir:
KÜLTÜR SEYAHAT JAZZ SPOR
HABER POP ROCK MÜZİK
PTY fonksiyonu ile belirli bir program tipin-
deki bir istasyonu seçebilirsiniz.
PTY devredeyse ve bir PTY araması başlatıl-
dıysa cihaz otomatik olarak güncel istasyon-
dan veya başka bir işletim türünden seçilen
program tipinde yayın yapan bir istasyona
geçer.
PTY açma/kapama
MENU 7 tuşuna basınız.
veya 8 tuşuna yeterince çok
defa bastığınızda ekranda 6 "PTY" ve
güncel ayarın "ON" (açık) veya "OFF"
(kapalı) olduğu gösterilecektir.
PTY özelliğini açmak veya kapatmak için
tuşuna veya 8 tuşuna basınız.
쏅
쏅
쏅
쏅
쏅
Radyo işletimi
09_CalaisMP48_tr.indd 26309_CalaisMP48_tr.indd 263 11.06.2008 15:19:03 Uhr11.06.2008 15:19:03 Uhr

264
Menüden çıkmak için,
MENU 7 tuşuna basınız.
Program tipi seçimi ve arama işlemini
başlatma
İstene program tipi gösterilene kadar
veya
8 tuşuna ardı ardına basınız.
Arama işlemini başlatmak için
veya
8 tuşuna basınız.
Seçilen program tipinde bir istasyon bulu-
nursa bu istasyon ayarlanacaktır.
Arızaya bağlı tiz düşüşü (HICUT)
HiCut fonksiyonu radyo alışının kötü olması
durumunda ses çıkışını düzeltir. Alış esna-
sında parazitlenmeler oluşuyorsa, otomatik
olarak parazit seviyesi düşürülür.
HICUT'u açmak veya kapatmak için,
MENU 7 tuşuna basınız.
veya 8 tuşuna yeterince çok
defa bastığınızda ekranda 6 "HICUT"
ve güncel ayarın "ON" (açık) veya "OFF"
(kapalı) olduğu görüntülenecektir.
HICUT özelliğini açmak veya kapatmak
için
tuşuna veya 8 tuşuna basınız.
Menüden çıkmak için,
MENU 7 tuşuna basınız.
Radyo metninin açılması/
kapatılması
Bazı radyo istasyonları RDS sinyalini verici
adı yerine reklam veya başka bilgileri aktar-
mak için kullanırlar. Bu radyo metni ekranda
6 gösterilir.
Radyo metni göstergesini açmak veya ka-
patmak için,
MENU 7 tuşuna basınız.
쏅
쏅
쏅
쏅
쏅
쏅
쏅
쏅
veya 8 tuşuna, ekranda
"RADIOTXT" gösterilinceye kadar basınız.
Yaklaşık 2 saniye sonra güncel ayar "TEXT
ON" (açık) veya "TEXT OFF" (kapalı) ekran-
da 6 gösterilir.
Radyo metni görüntüsünü açmak veya
kapatmak için
tuşuna veya 8 tu-
şuna basınız.
Uyarı:
tuşuna veya 8 tuşuna basarak
değişiklik yapmak için güncel ayarın
ekranda gösterilmesini beklemenize
gerek yoktur.
Menüden çıkmak için,
MENU 7 tuşuna basınız.
쏅
쏅
쏅
Radyo işletimi
09_CalaisMP48_tr.indd 26409_CalaisMP48_tr.indd 264 11.06.2008 15:19:03 Uhr11.06.2008 15:19:03 Uhr

TÜRKÇE
265
Trafi k yayını
Trafi k yayını önceliğini açma/
kapama
Trafi k mesajı önceliğini tüm işletim türlerin-
de açmak veya kapatmak için,
TA ; tuşuna basınız.
Uyarı:
CD, MP3, CD değiştirici ve AUX iş-
letim türlerinde bu fonksiyon ancak
son ayarlanan frekans bandı FM ise kul-
lanılabilir.
Ekranda 6 TA sembolü görüntülendiğinde
trafi k duyuruları önceliği devrededir. Cihaz
bir trafi k duyurusu aldığı anda bu duyuru-
ya geçer. Ekranda 6 bu duyuru süresince
"TRAFFIC" mesajı gösterilir.
Uyarı:
Aşağıdaki durumlarda bir ikaz sesi du-
yarsınız,
trafi k yayın istasyonu veya CD dinler-
ken ayarlanan trafi k yayın istasyonu-
nun istasyon bölgesinden çıkarsanız
ve bunun üzerine otomatik arama
işlemine rağmen yeni bir trafi k yayın
istasyonu bulunmazsa.
bir trafi k yayın istasyonundan, trafi k
yayını olmayan bir istasyona geçer-
seniz.
Bu durumda trafi k yayını önceliğine ge-
çiniz veya trafi k yayını olan bir istasyo-
na geçiniz.
쏅
•
•
Trafi k duyuruları için ses
seviyesini otomatik artırma
ayarlanmışsa
Trafi k duyurularının ayarlanan ses seviye-
sinden kaç ses seviyesi kademesi kadar
daha yüksek olması gerektiğini ayarlayabi-
lirsiniz:
MENU 7 tuşuna basınız.
veya 8 tuşuna, ekranda "TA
VOL" gösterilinceye kadar basınız.
Yaklaşık 2 saniye sonra "VOL" ve güncel
ayar ekranda 6 gösterilir.
Ses seviyesi otomatik artışını 0 ve 10
arasında ayarlamak için
veya 8
tuşuna basınız.
Uyarı:
tuşuna veya 8 tuşuna basarak
değişiklik yapmak için güncel ayarın
ekranda gösterilmesini beklemenize
gerek yoktur.
Menüden çıkmak için,
MENU 7 tuşuna basınız.
Uyarı:
Ses seviyesini trafi k duyurusu sırasında
da ses seviyesi ayarlayıcısı 1 ile trafi k
duyurusu süresi boyunca ayarlayabilir-
siniz.
Trafi k duyurularının gizlenmesi
Devam eden bir trafi k duyurusunu iptal et-
mek ve önceden dinlediğiniz audio kaynağı-
na geri dönmek için,
TA ; tuşuna basınız.
Trafi k duyurularını öne alma fonksiyonu
devrede kalır.
쏅
쏅
쏅
쏅
쏅
Trafi k yayını
09_CalaisMP48_tr.indd 26509_CalaisMP48_tr.indd 265 11.06.2008 15:19:04 Uhr11.06.2008 15:19:04 Uhr

266
CD işletimi
Bu cihaz ile piyasada satılan 12 cm çaplı
Audio CD'leri, CD-R'leri (yazılabilir CD) ve
CD-RW'leri (tekrar yazılabilir CD) çalabilir-
siniz. Çalma esnasında problem yaşama-
mak için kendi CD'lerinizi 16 kattan daha
hızlı yakmayınız.
CD sürücüsünde arıza
tehlikesi!
8 cm çaplı single CD'ler ve kenarları yu-
varlak olmayan CD'ler (Shape CD'ler) kulla-
nılamaz.
CD'yi dikkatli kullanınız ve CD'nin çizilmesi-
ni ve hasar görmesini önleyiniz. CD'yi müm-
kün olduğu kadar sadece kenarından tutu-
nuz. Bir CD kirlenmiş ise, yumuşak ve tüy
bırakmayan çözücü madde içermeyen bir
bezle temizleyiniz. CD'yi her zaman içten
dışa doğru siliniz
CD'yi doğrudan güneş ışığına maruz bırak-
mayınız ve CD'yi cihazın dışında koruyucu
bir kılıf içerisinde muhafaza ediniz.
CD'nin üzerine etiket yapıştırmayınız.
CD'lerin üzerine sadece buna uygun olan ve
piyasada satılan kalemlerle yazınız.
Uygun olmayan veya hasarlı CD'ler sebebiy-
le CD sürücüsünde oluşan hasarlar için hiç
bir sorumluluk üstlenmiyoruz.
Kusursuz fonksiyon için sadece Compact-
Disc logosu olan CD'leri tercih ediniz.
Kopyalama koruması olan CD'lerin çalınma-
sında zorluklar meydana gelebilir. Blaupunkt,
kopyalama koruması olan CD'lerin kusursuz
çalışmasını garanti edemez.
CD işletiminin başlatılması
Sürücüde CD yoksa,
CD'yi yazılı tarafı üstte olacak şekil-
de kuvvet harcamadan bir direnç fark
edinceye kadar CD yuvasına itiniz.
CD otomatik olarak sürücüye çekilir.
Ekranda 6 CD sembolü gösterilir.
Uyarı:
CD'nin içeriye çekilmesi engellenme-
meli veya desteklenmemelidir.
CD çalmaya başlar. Ekranda 6 güncel par-
çanın numarası (örneğin"T12") ve çalma
süresinin yanı sıra parça bilgileri de (CD
metni) gösterilir.
Sürücüde önceden bir CD varsa,
SRC > tuşuna birden çok defa basa-
rak ekranda 6 "CD" mesajının göste-
rilmesini sağlayınız.
İşletim, kaldığı yerden başlar.
Parça bilgileri göstergesi
(CD metni)
CD içinde CD metni mevcutsa her parça-
ya ilişkin bilgiler parçanın başladığı sırada
bir defa kayan metin olarak ekranda 6
gösterilir.
Parça bilgileri bir defa kayan metin
olarak gösterilir
5 < tuşuna basınız.
Güncel parçaya ilişkin CD metni ekranda
6 bir defa kayan metin olarak gösterilir.
Uyarı:
CD metninin kayan yazı olarak gösteril-
mesi kapatılmış ise bu fonksiyon kulla-
nılamaz (bakınız sonraki bölüm).
쏅
쏅
쏅
CD işletimi
09_CalaisMP48_tr.indd 26609_CalaisMP48_tr.indd 266 11.06.2008 15:19:04 Uhr11.06.2008 15:19:04 Uhr

TÜRKÇE
267
Parça bilgilerinin kayan metin olarak
gösterilmesinin açılması/kapatılması
Parça bilgilerinin kayan metin olarak göste-
rilmesini açılması/kapatılması için,
MENU 7 tuşuna basınız.
veya 8 tuşuna yeterince çok
defa bastığınızda ekranda 6 "SCRL"
ve güncel ayarın "ON" (açık) veya "OFF"
(kapalı) olduğu görüntülenecektir.
Kayan metin özelliğini açmak veya ka-
patmak için
tuşuna veya 8 tuşu-
na basınız.
Menüden çıkmak için,
MENU 7 tuşuna basınız.
"SCRL OFF" ayarında parça bilgisi 8 karak-
terlik bölümler halinde ekranda 6 göste-
rilir. Bu sırada her metin bölümü ve parça
numarası ile çalma süresi sürekli değişerek
5'er saniye gösterilir.
Uyarı:
"SCRL ON/OFF" ayarı MP3 işletiminde
de MP3 parça bilgilerinin (ID3 taglar)
gösterilmesini de etkiler.
Parça seçimi
Bir sonraki veya önceki parçaya geç-
mek için
tuşuna veya 8 tuşuna
basınız.
8 tuşa bir defa basıldığında güncel par-
ça yeniden başlatılır.
Hızlı arama işlemi
(duyulur şekilde)
Geriye veya ileriye doğru hızlı arama işlemi
için
tuşunu veya 8 tuşunu basılı tuta-
rak istediğiniz konuma getiriniz.
쏅
쏅
쏅
쏅
쏅
쏅
Parçanın rastgele sırayla
çalınması (MIX)
3 < tuşuna basınız.
Ekranda 6 kısa süre "MIX CD" mesajı gös-
terilir ve MIX sembolü görünür. Sonraki par-
çalar rastgele seçilir.
MIX sona erdirme
3 < tuşuna yeniden basınız.
Ekranda 6 kısa süreyle "MIX OFF" gösteri-
lir ve MIX sembolü söner. Çalma işlemi nor-
mal şekilde devam eder.
Parçanın çalınması (SCAN)
CD'deki tüm parçaları yakl. 10'ar saniye çal-
mak için,
4 < tuşuna basınız.
Ekranda kısa süre için "SCAN TRK" görüntü-
lenir. Çalma sırasında "CD" göstergesi yanıp
söner. Parça numarası ve çalınan parçanın
çalma süresi ve parça bilgileri gösterilir.
SCAN kapatma, parçayı dinlemeye
devam etme
Tarama işlemini sona erdirmek için,
4 < tuşuna yeniden basınız.
Ekranda kısa süre için "SCAN OFF" görüntü-
lenir. Güncel parça çalmaya devam eder.
Parçanın tekrarlanması (RPT)
2 < tuşuna basınız.
Ekranda kısa süre "RPT TRK" belirir ve RPT
sembolü görüntülenir. Güncel parça, RPT
devre dışı bırakılıncaya kadar tekrarlanır.
쏅
쏅
쏅
쏅
쏅
CD işletimi
09_CalaisMP48_tr.indd 26709_CalaisMP48_tr.indd 267 11.06.2008 15:19:04 Uhr11.06.2008 15:19:04 Uhr

268
RPT'nin sona erdirmesi
2 < tuşuna yeniden basınız.
Ekranda 6 kısa süreyle "RPT OFF" gösteri-
lir ve RPT sembolü söner. Çalma işlemi nor-
mal şekilde devam eder.
İşletimi kesmek
(PAUSE (ara verme))
1 < tuşuna basınız.
Ekranda 6 "PAUSE" gösterilir.
Ara verme fonksiyonunun kaldırılması
Ara verme esnasında 1 < tuşuna
basınız.
Çalma işlemi devam eder.
CD'yi çıkarma
Uyarı:
Cihaz kapatılmışsa veya başka bir audio
kaynağı aktifse CD'lerin dışarı çıkarıl-
masını sağlayabilirsiniz.
CD çıkartma düğmesine 4 basınız.
CD dışarı itilir. Ekranda kısa süre için "CD
EJECT" görüntülenir.
Uyarı:
CD, dışarı çıkarken engellenmemeli
veya desteklenmemelidir.
CD'yi çıkartınız.
CD sembolü söner.
Uyarı:
Dışarı çıkartılan CD alınmazsa, yakl.
10 saniye sonra otomatik olarak yeni-
den içeri çekilir.
쏅
쏅
쏅
쏅
쏅
MP3/WMA işletimi
Bu araç radyosu ile MP3 ve WMA müzik dos-
yaları içeren CD-R'leri ve CD-RW'leri de ça-
labilirsiniz. Ayrıca opsiyonel C‘n‘C uyumlu
USB birimine USB veri taşıyıcı bağlayabilir-
siniz ve USB veri taşıyıcıda saklanan MP3/
WMA dosyalarını çalabilirsiniz.
MP3 ve WMA dosyalarının kullanımı aynı
olduğu için bu bölümde sadece MP3 dos-
yalarının çalınması açıklanmaktadır. Bu
bölümdeki "MP3 veri taşıyıcı" tanımı CD-
R/RW'nin yanı sıra USB stikler gibi USB
veri taşıyıcıları da kapsar.
Notlar:
Online-Music marketlerden alınan
Digital Rights Management (DRM)
olan WMA dosyaları bu cihaz ile çalı-
namaz.
WMA dosyaları, sadece Windows
Media-Player sürüm 8'den itibaren
oluşturulduysa güvenli bir şekilde ça-
lınabilir.
Bir MP3 veri taşıyıcısının
hazırlığı
MP3 CD hazırlığı
CD yazma, CD yazma yazılımı ve boş CD
kombinasyonu sebebiyle CD'lerin işletimin-
de aksaklıklar meydana gelebilir. Sizin tara-
fınızdan yazılan CD'lerde problemler mey-
dana gelmesi durumunda CD ham maddesi
tipini, diğer bir üreticinin ürünü ile veya ham
maddenin başka bir rengi ile değiştiriniz.
CD formatı ISO 9660 seviye 1 veya seviye
2 ya da Joliet olmalıdır. Diğer tüm formatlar
güvenilir şekilde çalınamaz.
•
•
CD işletimi MP3/WMA işletimi
09_CalaisMP48_tr.indd 26809_CalaisMP48_tr.indd 268 11.06.2008 15:19:04 Uhr11.06.2008 15:19:04 Uhr

TÜRKÇE
269
Audio dosyalarından MP3/WMA dosyala-
rının oluşturulması (kodlanması) sırasında
MP3 dosyaları için 32 ile 320 kbps arasın-
da veya WMA dosyaları için 32 ile 192 kbps
arasında bit oranları kullanılmalıdır.
Bu cihaz azami 252 dizini ve her dizinde
azami 255 dosyayı destekler. Bu durumda
CD en fazla 512 dizin ve dosya içerebilir.
CD üzerindeki bu dizin ve başlıkların her
biri ayrı olarak seçilebilir.
D01
D02
T001
T005
T004
T003
T002
D03
T001
T006
T005
T004
T003
T002
T011
T007
T008
T009
T010
D04
T001
T006
T005
T004
T003
T002
A
B
A Dizinler
B Parçalar · Dosyalar
Her dizin PC ile düzenlenebilir. Dizinlerin
ismi cihaz ekranında gösterilebilir. CD yaz-
ma yazılımınıza uygun olarak dizinleri ve
parçaları/dosyaları tanımlayınız. Konu hak-
kındaki bilgileri yazılımın kullanım kılavu-
zunda bulabilirsiniz.
Notlar:
Dosyalar (dizinler ve başlıklar) belir-
lenirken noktalı harfl er ve özel işaret-
ler kullanılmamalıdır.
Dosya adı için 16 karakterden (".MP3"
veya ".WMA" dahil) fazla karakter kul-
lanırsanız, başlıkların ve dizinlerin
maksimum adet sayısı azalır.
Dosyalarınızın belirli bir sıra izlemesini ter-
cih ediyorsanız: Dosyaları, daha sonra çal-
mak istediğiniz sırayla veri taşıyıcısına kay-
dedin. Cihaz dosyaları, veri taşıyıcısındaki
fi ziksel sıralama kaydına göre çalar.
Bu cihazda dosyaların çalınması için MP3
dosyaları ".MP3" dosya uzantısını veya
WMA dosyaları ".WMA" dosya uzantısını ta-
şımalıdır.
Notlar:
Hatasız şekilde çalınmasını sağlamak
için,
".MP3" dosya uzantılı olarak başka
MP3 dosyalarını kullanmaya çalış-
mayınız ve çaldırmayınız! Bu geçer-
siz dosyalar çalma sırasında göz ardı
edilir.
MP3 dosyası olmayan ve MP3 dosyası
parçaları olan "karışık" CD'leri kullan-
mayınız (cihaz MP3 çalınması sırasın-
da sadece MP3 dosyalarını okur).
CD audio parçaları ve MP3 parçaları
olan Mix modlu CD'leri kullanmayınız.
Mix modlu bir CD çaldırmayı deneme-
niz durumunda sadece CD audio par-
çaları çalınır.
Bir USB veri taşıyıcısının hazırlığı
Cihazın USB veri taşıyıcısını tanıması için
bunun hafıza donanımında (Mass Storage
•
•
•
•
•
MP3/WMA işletimi
09_CalaisMP48_tr.indd 26909_CalaisMP48_tr.indd 269 11.06.2008 15:19:04 Uhr11.06.2008 15:19:04 Uhr

270
Device) özelleştirilmesi ve dosya sistemin-
de FAT16 veya FAT32 formatlanmış ve ay-
rıca MP3 veya WMA dosyası olarak mevcut
olması gerekir.
Bu USB veri taşıyıcısı üzerine en fazla
1500 dosya (dizin ve başlık) oluşturabilir-
siniz. Bu cihaz ile dizin ve başlıkların her biri
ayrı olarak seçilebilir. Dosya adı için 24 ka-
rakterden (".MP3" veya ".WMA" dahil) fazla
karakter kullanırsanız, dosyaların maksi-
mum adet sayısı azalır.
Blaupunkt, piyasada satılan tüm USB veri
taşıyıcılarını çalmayı garanti edemez.
ID3-taglar
MP3 parçalarında yorumcu, parça ve albüm
ismi gibi ilave bilgiler de bulunabilir (ID3 ta-
nım no). Bu cihaz versiyon 1 ve versiyon 2
için ID3 tanım no'ları ekranda gösterebilir.
MP3 işletiminin başlatılması
CD'nin MP3 işletimi başlatma
Bir MP3-CD'sinde MP3 işletimi, normal CD
işletimi gibi başlatılır. Bunun için "CD işleti-
mi" bölümünde "CD işletiminin başlatılma-
sı" kısmını okuyunuz.
Ekranda 6 güncel parçanın numarası (ör-
neğin "T12") ve çalma süresinin yanı sıra
parça bilgileri de (ID3 tagı) veya dosya adı
gösterilir. Başka bir dizine geçildiğinde kısa
süre dizin numarası (örn. "DIR 02") göste-
rilir.
USB veri taşıyıcısını bağlama ve MP3
işletimini başlatma
Bir USB veri taşıyıcısını (USB stik veya
USB hard disk) bağlamak için opsiyonel
Blaupunkt USB arabirimi cihazın arka tara-
fına (hücre C3) bağlanmalıdır. Arabirimin
USB kablosu örn. torpido gözüne veya orta
konsoldaki uygun bir yere döşenebilir.
Notlar:
Blaupunkt USB arabirimini cihaza
bağladığınızda AUX girişi de buna uy-
gun olarak ayarlanmalıdır. Bunun için
"Harici audio kaynakları" bölümünde-
ki "AUX girişinin ayarlanması" başlığı-
nı okuyunuz.
USB veri taşıyıcısının doğru şekilde
kaydedilmesi ve kaydının silinmesi
için USB veri taşıyıcısını bağlamadan
veya çıkarmadan önce mutlaka cihazı
kapatınız.
USB veri taşıyıcısını, USB arabiriminin
USB kablosuna bağlayınız.
Cihaza bir USB veri taşıyıcısı bağlandığı za-
man bu cihaz SRC > tuşu ile seçilebilir.
Ekranda "USB" yazısı belirir.
Parça bilgileri göstergesi
(ID3 taglar)
MP3 veri taşıyıcı içinde ID3 taglar mevcutsa
her parçaya ilişkin bilgiler parçanın başladı-
ğı sırada bir defa kayan metin olarak ekran-
da 6 gösterilir. MP3 dosyalarında ID3 tag-
lar kaydedilmemişse dosya adı gösterilir.
Uyarı:
ID3 taglarının kaydedilmesi konusunda
PC-MP3 yazılımınızın veya yazdırma ya-
zılımınızın kılavuzuna bakınız.
Parça bilgileri bir defa kayan metin
olarak gösterilir
5 < tuşuna basınız.
Güncel parçaya ilişkin ID3 taglar ekranda
6 bir defa kayan metin olarak gösterilir.
•
•
쏅
쏅
MP3/WMA işletimi
09_CalaisMP48_tr.indd 27009_CalaisMP48_tr.indd 270 11.06.2008 15:19:04 Uhr11.06.2008 15:19:04 Uhr

TÜRKÇE
271
Uyarı:
Parça bilgisinin kayan metin olarak
gösterilmesi kapatıldıysa bu fonksiyon
kullanılamaz. Bunun için "CD işletimi"
bölümü, "Parça bilgileri göstergesi (CD
metni)" alt bölümündeki "Parça bilgi-
lerinin kayan metin olarak gösterilme-
sinin açılması/kapatılması" başlığını
okuyunuz.
Dizin seçimi
İleriye veya geriye doğru başka bir dizini
seçmek için,
tuşuna veya 8 tuşuna basınız.
Notlar:
MP3 dosyası bulunmayan bütün di-
zinler otomatik olarak atlanır.
Cihaz tüm dizinleri ve alt dizinleri aynı
seviyedeymiş gibi işler.
veya 8
tuşunun tekrarlı şekilde basılması ile
tüm alt dizinlere ulaşırsınız.
Parçaların/dosyaların seçilmesi
Güncel dizinde yukarıya veya aşağıya doğ-
ru başka bir parçaya/dosyaya geçiş yapmak
için,
tuşuna veya 8 tuşuna basınız.
8 tuşa bir defa basıldığında güncel par-
ça yeniden başlatılır.
Hızlı arama işlemi
Geriye veya ileriye doğru hızlı arama işlemi
için
tuşunu veya 8 tuşunu basılı tuta-
rak istediğiniz konuma getiriniz.
쏅
•
•
쏅
쏅
Uyarı:
USB işletiminde güncel parçanın baş-
langıcında geriye doğru hızlı arama iş-
lemi durur.
Parçanın rastgele sırayla
çalınması (MIX)
Güncel dizin parçalarını rastgele sırayla çal-
mak için,
3 < tuşuna arka arkaya basarak "MIX
DIR" veya "MIX FLD" mesajının ekranda
6 görünmesini sağlayınız.
Ekranda 6 MIX sembolü görünür.
MP3 veri taşıyıcısındaki bütün parçaları
rastgele sırayla çalmak için,
3 < tuşuna arka arkaya basarak ek-
randa 6 "MIX ALL mesajının görün-
mesini sağlayınız.
Ekranda 6 MIX sembolü görünür.
MIX sona erdirme
Rastgele sırayla çalmayı sonlandırmak için,
3 < tuşuna arka arkaya basarak ek-
randa 6 "MIX OFF" mesajının görün-
mesini sağlayınız.
Ekrandaki 6 MIX sembolü söner.
Parçanın çalınması (SCAN)
MP3 veri taşıyıcısındaki tüm parçaları artan
sıralamayla yaklaşık 10'ar saniye çalınması
için,
4 < tuşuna arka arkaya basarak ek-
randa 6 "SCAN TRK" mesajının gö-
rünmesini sağlayınız.
Çalma sırasında "MP3" veya "USB" göster-
gesi yanıp söner.
USB işletiminde güncel dizinin tüm parçala-
rını çalmak için,
쏅
쏅
쏅
쏅
MP3/WMA işletimi
09_CalaisMP48_tr.indd 27109_CalaisMP48_tr.indd 271 11.06.2008 15:19:05 Uhr11.06.2008 15:19:05 Uhr

272
4 < tuşuna arka arkaya basarak ek-
randa 6 "SCAN FLD" mesajının gö-
rünmesini sağlayınız.
Çalma sırasında "USB" göstergesi yanıp sö-
ner.
SCAN sona erdirme
Çaldırmayı sona erdirmek için,
4 < tuşuna arka arkaya basarak ek-
randa 6 "SCAN OFF" mesajının gö-
rünmesini sağlayınız.
Güncel çalan parça çalmaya devam eder.
Her bir parçanın ayrı olarak
veya dizinin tamamının tekrar
çalınması (REPEAT)
Güncel parçanın tekrarlanması için,
2 < tuşuna arka arkaya basarak ek-
randa 6 "RPT TRK" mesajının görün-
mesini sağlayınız.
Ekranda 6 RPT sembolü görünür.
Güncel dizini tekrar etmek için,
2 < tuşuna arka arkaya basarak "RPT
DIR" veya "RPT FLD" mesajının ekranda
6 görünmesini sağlayınız.
Ekranda 6 RPT sembolü görünür.
REPEAT sona erdirme
Tekrarlama işlemini sonlandırmak için,
2 < tuşuna arka arkaya basarak ek-
randa 6 "RPT OFF" mesajının görün-
mesini sağlayınız.
Ekrandaki 6 RPT sembolü söner.
쏅
쏅
쏅
쏅
쏅
İşletimi kesmek
(PAUSE (ara verme))
1 < tuşuna basınız.
Ekranda 6 "PAUSE" gösterilir.
Ara verme fonksiyonunun kaldırılması
Ara verme esnasında 1 < tuşuna ba-
sınız.
Çalma işlemi devam eder.
쏅
쏅
MP3/WMA işletimi
09_CalaisMP48_tr.indd 27209_CalaisMP48_tr.indd 272 11.06.2008 15:19:05 Uhr11.06.2008 15:19:05 Uhr

TÜRKÇE
273
CD değiştirici işletimi
Cihaza opsiyonel olarak CDC A08 T ve
IDC A09 Blaupunkt CD değiştiricileri de
bağlanabilir (cihazın arka tarafındaki C3
hücresi).
Dikkat!
CD değiştirici normalde cihaz tarafın-
dan 12 V işletme gerilimiyle beslenir.
CD değiştirici CDC A 08 T (24 Volt)
bağlanırsa CD değiştirici bağlantı kab-
losu soket bağlantısındaki gerilim bes-
lemesi ayrılmalıdır (hücre C3/pin 15).
CD değiştirici ayrıca 24 Volt işletme ge-
rilimiyle beslenmelidir.
Notlar:
CD değiştiriciyi cihaza bağladığınızda
AUX girişi de buna uygun olarak ayar-
lanmalıdır. Bunun için "Harici audio
kaynakları" bölümündeki "AUX girişi-
nin ayarlanması" başlığını okuyunuz.
CD'ler, CD'lerin takılması ve CD değiş-
tirici kullanımı hakkındaki bilgileri, CD
değiştiricinizin kullanım kılavuzunda
bulabilirsiniz.
CD değiştirici işletiminin
başlatılması
SRC > tuşuna yeterince çok defa ba-
sarak ekranda 6 "CHANGER" mesajı-
nın gösterilmesini sağlayınız.
CD değiştiricinin tanıdığı ilk CD çalma-
ya başlar. Ekranda 6 güncel CD'nin nu-
marası (örn. "D02"), parçanın numarası
(örneğin"T07") ve çalma süresi gösterilir.
•
•
쏅
CD seçimi
İleriye veya geriye doğru başka bir CD seç-
mek için,
tuşuna veya 8 tuşuna basınız.
Parça seçimi
Güncel CD'de yukarıya veya aşağıya doğru
başka bir parçaya geçiş yapmak için,
tuşuna veya 8 tuşuna basınız.
Hızlı arama işlemi
(duyulur şekilde)
Geriye veya ileriye doğru hızlı arama işlemi
için
tuşunu veya 8 tuşunu basılı tuta-
rak istediğiniz konuma getiriniz.
Her bir parçanın ayrı olarak veya
tüm CD'nin tekrar çalınması
(RPT)
Güncel parçanın tekrarlanması için,
2 < tuşuna arka arkaya basarak ek-
randa 6 "RPT TRK" mesajının görün-
mesini sağlayınız.
Ekranda 6 RPT sembolü görünür.
Güncel CD'nin tekrarlanması için,
2 < tuşuna arka arkaya basarak ek-
randa 6 "RPT CD" mesajının görün-
mesini sağlayınız.
Ekranda 6 RPT sembolü görünür.
REPEAT sona erdirme
Tekrarlama işlemini sonlandırmak için,
2 < tuşuna arka arkaya basarak ek-
randa 6 "RPT OFF" mesajının görün-
mesini sağlayınız.
Ekrandaki 6 RPT sembolü söner.
쏅
쏅
쏅
쏅
쏅
쏅
CD değiştirici işletimi
09_CalaisMP48_tr.indd 27309_CalaisMP48_tr.indd 273 11.06.2008 15:19:05 Uhr11.06.2008 15:19:05 Uhr

274
Parçanın rastgele sırayla
çalınması (MIX)
Güncel CD parçalarını rastgele sırayla çal-
mak için,
3 < tuşuna arka arkaya basarak ek-
randa 6 "MIX CD" mesajının görün-
mesini sağlayınız.
Ekranda 6 MIX sembolü görünür.
Takılan bütün CD'lerdeki parçaları rastgele
sırayla çaldırmak için,
3 < tuşuna arka arkaya basarak ek-
randa 6 "MIX ALL mesajının görün-
mesini sağlayınız.
Ekranda 6 MIX sembolü görünür.
MIX sona erdirme
Rastgele sırayla çalmayı sonlandırmak için,
3 < tuşuna arka arkaya basarak ek-
randa 6 "MIX OFF" mesajının görün-
mesini sağlayınız.
Ekrandaki 6 MIX sembolü söner.
Bütün CD'lerdeki parçaların
tamamının çalınması (SCAN)
Takılan CD'deki tüm parçaların artan sırala-
mayla yaklaşık 10'ar saniye çalınması için,
4 < tuşuna basınız.
Ekranda 6 kısa süre "SCAN TRK" görünür.
Çalma sırasında CD numarası göstergesi ya-
nıp söner.
SCAN sona erdirme
Çaldırmayı sona erdirmek için,
4 < tuşuna yeniden basınız.
Ekranda 6 kısa süre "SCAN OFF" görünür.
Güncel çalan parça çalmaya devam eder.
쏅
쏅
쏅
쏅
쏅
İşletimi kesmek
(PAUSE (ara verme))
1 < tuşuna basınız.
Ekranda 6 "PAUSE" görünür.
Ara verme fonksiyonunun kaldırılması
Ara verme esnasında 1 < tuşuna ba-
sınız.
Çalma işlemi devam eder.
쏅
쏅
CD değiştirici işletimi
09_CalaisMP48_tr.indd 27409_CalaisMP48_tr.indd 274 11.06.2008 15:19:05 Uhr11.06.2008 15:19:05 Uhr

TÜRKÇE
275
IR uzaktan kumandası
RC 10 P
Opsiyonel IR uzaktan kumanda ile cihazın
en önemli fonksiyonlarını kumanda edebi-
lirsiniz.
Uzaktan kumanda alıcısı
Cihazın kapağında uzaktan kumanda için
bir enfraruj alıcı 9 mevcuttur. Uzaktan
kumandanın kullanımından önce alıcı açıl-
malıdır:
MENU 7 tuşuna basınız.
veya 8 tuşuna yeterince çok
defa bastığınızda ekranda 6 "IR" ve
güncel ayarın "ON" (açık) veya "OFF"
(kapalı) olduğu görüntülenecektir.
IR özelliğini açmak veya kapatmak için
tuşuna veya 8 tuşuna basınız.
Menüden çıkmak için,
MENU 7 tuşuna basınız.
C
F
G
H
E
D
B
A
@
쏅
쏅
쏅
쏅
Uzaktan kumandanın
fonksiyonları
Genel:
Tuş Fonksiyonu
ON H Cihazı açar/kapatır
(uzun basma)
Mute (kısa basma)
Menüden çıkış
SRC @ Kaynak değiştirmek
V+ B Ses seviyesini yükseltir
V- A Ses seviyesini düşürür
OK G Menüyü çağırır veya me-
nüden çıkar
E Menü seçeneğini seçer
C Menü seçeneğini seçer
F Menü seçeneğini seçer
D Menü seçeneğini seçer
Radyo işletiminde:
Tuş fonksiyonu
F Kaydedilen istasyonu
çağırır
D Frekans bandı/hafıza
düzeyi seçimi
E İleriye doğru arama
C Geriye doğru arama
CD işletiminde:
Tuş Fonksiyonu
F Sonraki parçayı seçer
F Önceki parçayı seçer
IR uzaktan kumandası
09_CalaisMP48_tr.indd 27509_CalaisMP48_tr.indd 275 11.06.2008 15:19:05 Uhr11.06.2008 15:19:05 Uhr

276
CD değiştirici işletimi:
Tuş Fonksiyonu
F Sonraki parçayı çalar
F Önceki parçayı çalar
E Sonraki CD'yi çalar
C Önceki CD'yi çalar
MP3 işletimi:
Tuş Fonksiyonu
F Sonraki parçayı çalar
F Önceki parçayı çalar
E Sonraki dizini çalar
C Önceki dizini çalar
Ön amplifi katör çıkışı
Derin bas hoparlörün (subwoofer) çalıştı-
rılması için bu cihaza bir amplifi katör bağ-
layabilirsiniz. Bunun için amplifi katör ciha-
zın yan tarafına (hücre C1) bağlanmalıdır.
Subwoofers seviyesi audio menüsünden
ayarlanabilir:
AUD tuşuna basınız :.
veya 8 tuşuna, ekranda "SUB
WOOF" görününceye kadar basınız.
Yaklaşık 2 saniye sonra "SUBW" ve güncel
ayar ekranda 6 gösterilir.
Subwoofer seviyesini 0 ve 7 arasında
ayarlamak için
veya 8 tuşuna
basınız.
Uyarı:
tuşuna veya 8 tuşuna basarak
değişiklik yapmak için güncel ayarın
ekranda gösterilmesini beklemenize
gerek yoktur.
Menüden çıkmak için,
AUD tuşuna basınız :.
쏅
쏅
쏅
쏅
IR uzaktan kumandas Ön amplifi katör çıkışı
09_CalaisMP48_tr.indd 27609_CalaisMP48_tr.indd 276 11.06.2008 15:19:06 Uhr11.06.2008 15:19:06 Uhr

TÜRKÇE
277
Harici audio kaynakları
AUX girişi üzerinden farklı harici audio kay-
naklarını cihaza bağlayabilirsiniz. AUX giri-
şi o anda bağlanan harici audio kaynağına
göre ayarlanmış olmalıdır:
Taşınabilir CD çalar, MiniDisc çalar veya
MP3 çalar gibi harici audio kaynakları
için "AUX" ayarı.
Blaupunkt CD değiştirici CDC A 08 T ve
IDC A 09 için "CDC" ayarı.
Blaupunkt USB arabirimi için "USB"
ayarı.
AUX girişinin ayarlanması için lütfen "AUX
girişinin ayarlanması" bölümünü okuyunuz.
Uyarı:
Harici bir audio kaynağı bağlantısı için
bir adaptör kablosu gereklidir. Bu kab-
loyu (Blaupunkt No.: 7 607 897 093)
Blaupunkt satıcınızdan temin edebilir-
siniz.
AUX girişinin ayarlanması
MENU 7 tuşuna basınız.
veya 8 tuşuna, ekranda "SRC
SEL" gösterilinceye kadar basınız.
Yaklaşık 2 saniye sonra "SRC" ve güncel
ayar "CDC", "USB" veya "AUX" ekranda 6
gösterilir.
veya 8 tuşuna basarak diğer bir
ayar seçilebilir.
Uyarı:
Menüdeki ayarların sırası "CDC" –
"USB" – "AUX":
"CDC" güncel ayarında
8 tuşuna
basarak "USB" ayarı seçilebilir.
•
•
•
쏅
쏅
쏅
•
"USB" güncel ayarında
8 tuşuna
basarak "CDC" ayarını veya
8 tu-
şuna basarak "AUX" ayarını seçebilir-
siniz.
"AUX" güncel ayarında
8 tuşuna
basarak "USB" ayarı seçilebilir.
Her ayar değişikliğinden sonra cihaz
otomatik olarak kapanır. "CDC" ve
"AUX" ayarları arasında geçiş yapmak
istiyorsanız önce "USB" ayarını seçmeli
ve cihaz otomatik olarak kapatıldıktan
sonra yeniden açmalısınız. Daha sonra
istediğiniz "AUX" veya "CDC" ayarına
geçmek için ayar işlemeni yinelemeniz
gerekecektir.
"AUTO SWITCH OFF IN 10 SECONDS" uya-
rısı gösterilir. Cihaz yaklaşık 10 saniye son-
ra otomatik olarak kapanır.
Açma/kapama tuşuna 3 basarak ciha-
zı yeniden açınız
Cihaz radyo işletiminde seçilen ayarla açılır.
Uyarı:
AUX ayarını seçtiyseniz AUX girişini
SRC > tuşuyla seçebilirsiniz. Ekranda
"AUX" yazısı görüntülenir.
CDC veya USB ayarını seçtiyseniz audio
kaynağını ancak uygun bir cihaz (CD
değiştirici veya USB arabirimi) bağlıysa
SRC > tuşuyla seçebilirsiniz.
AUX girişinin seviyesinin
ayarlanması
Harici audio kaynakları bağlantısının AUX
girişini "AUX" olarak ayarladıysanız harici
audio kaynağının seviyesini cihaza uygun
audio kaynağının (örneğin CD ve radyo) se-
viyesinden ayarlanabilir.
•
•
쏅
Harici audio kaynakları
09_CalaisMP48_tr.indd 27709_CalaisMP48_tr.indd 277 11.06.2008 15:19:06 Uhr11.06.2008 15:19:06 Uhr

278
Uyarı:
AUX girişinin seviyesini ancak AUX au-
dio kaynağı olarak seçilmişse ayarlaya-
bilirsiniz.
Gerekirse ekranda "AUX" görünene ka-
dar SRC > tuşuna basınız.
MENU 7 tuşuna basınız.
Ekranda "GAIN" ve güncel ayar görün-
tülenene kadar
veya 8 tuşlarına
arka arkaya basınız.
Seviyeyi –9 ve +9 arasında ayarlamak
için
veya 8 tuşuna basınız.
Menüden çıkmak için,
MENU 7 tuşuna basınız.
쏅
쏅
쏅
쏅
쏅
Fabrika ayarlarına geri dön
(RESET)
İsterseniz cihazı fabrika ayarlarına geri ala-
bilirsiniz.
AUD : tuşunu 10 saniyeden uzun ba-
sılı tutunuz.
Bir onay tonu duyulur ve ekranda 6 kısa
süre "RESET" gösterilir. Tüm menü ve audio
menüsü ayarları fabrika ayarlarına geriye
alınır.
Uyarı:
İstasyon tuşuna kaydedilen istasyonlar
silinmez.
쏅
Harici audio kaynakları Fabrika ayarları
09_CalaisMP48_tr.indd 27809_CalaisMP48_tr.indd 278 11.06.2008 15:19:06 Uhr11.06.2008 15:19:06 Uhr

TÜRKÇE
279
Teknik veriler
İşletme gerilimi
24 Volt
Amplifi katör
Çıkış gücü: 2 x 20 Watt, Sinus
4 Ohm
Line çıkışı: 2 x 2,0 Volt eff
AUX girişi: 2 x 2,0 Volt eff
Radyo alıcısı
Avrupa frekans bandı:
UKW (FM): 87,5 - 108 MHz
MW: 531 - 1602 kHz
LW: 153 - 279 kHz
Amerika frekans bantları:
FM: 87,7 - 107,9 MHz
AM: 530 - 1710 kHz
FM - Aktarım aralığı: 30 - 15 000 Hz
CD
Çekim alanı: 20 - 20 000 Hz
Değişiklikler saklıdır!
Teknik veriler
09_CalaisMP48_tr.indd 27909_CalaisMP48_tr.indd 279 11.06.2008 15:19:06 Uhr11.06.2008 15:19:06 Uhr

280
09_CalaisMP48_tr.indd 28009_CalaisMP48_tr.indd 280 11.06.2008 15:19:06 Uhr11.06.2008 15:19:06 Uhr

281
TÜRKÇE
ENGLISH DEUTSCHFRANÇAISITALIANOESPAÑOL
PORTUGUÊSNEDERLANDS
SVENSKA
ISO Connector
A POWER SUPPLY CONNECTOR
1 –
2 GALA
3 –
4 IGNITION
5 ANTENNA SUPPLY (12V OUT, I max 100mA)
6 DIM
7 BATTERY
8 GND
B SPEAKER CONNECTOR
1 –
2 –
3 SPEAKER RF +
4 SPEAKER RF –
5 SPEAKER LF +
6 SPEAKER LF –
7 –
8 –
C1 PREAMP CONNECTOR
1 LINE OUT LF
2 LINE OUT RF
3 LINE OUT GND
4 SUBWOOFER-OUT
5 SUBWOOFER-OUT GND
6 EXT. AMP. ON (12V OUT, I max 100mA)
C2 PHONE CONNECTOR
7 PHONE AF IN
8 PHONE GND
9 PHONE MUTE ( LOW ACTIVE)
10 –
11 –
12 –
C3 AUX CONNECTOR
13 DATA IN
14 DATA OUT
15 UB (12V OUT)
16 REMOTE (12V OUT, I max 100mA)
17 DATA GND
18 AF GND
19 AF LEFT
20 AF RIGHT
1
2
3
4
5
6
7
8
1
2
3
4
5
6
7
8
C
B
A
14
7
10 13
16
19
3
6
9
12
15
18
2
58
11
14 17
20
C-1 C-2 C-3
10_ISO_AnschlCalxxLG.indd 28110_ISO_AnschlCalxxLG.indd 281 11.06.2008 15:10:37 Uhr11.06.2008 15:10:37 Uhr

Blaupunkt GmbH, Robert-Bosch-Straße 200, D-31139 Hildesheim
8622406084
/
05/08 - CM-AS/SCS1 (
de, gb, fr, it, es, pt, nl, sw, tr)
11_Rueckseite_Cal.indd 28211_Rueckseite_Cal.indd 282 11.06.2008 15:10:20 Uhr11.06.2008 15:10:20 Uhr
Documenttranscriptie
www.blaupunkt-professional-systems.com Truck Entertainment Calais MP48 7 620 000 033 Bedienungs- und Einbauanleitung Operating and installation instructions Mode d’emploi et de montage Istruzioni d’uso e di installazione Instrucciones de manejo e instalación Instruções de serviço e de montagem Gebruiksaanwijzing en inbouwhandleiding Bruks- och monteringsanvisning Kullanım ve montaj kılavuzu 01_CalaisMP48_de.indd 1 11.06.2008 15:11:38 Uhr 2 4 3 1 15 5 14 13 12 6 7 11 10 9 8 2 01_CalaisMP48_de.indd 2 11.06.2008 15:11:40 Uhr 1 Lautstärkeregler < Tastenblock 1 - 6 2 BND-Taste Kurzdruck: Wahl der Speicherebene bzw. des Wellenbereichs Langdruck: Start der Travelstore-Funktion (FMT oder MWT/LWT) = RDS-Taste RDS Komfortfunktion ein-/ausschalten 3 Ein-/Aus-Taste Kurzdruck: Einschalten des Gerätes Im Betrieb: Stummschaltung (Mute) Langdruck: Ausschalten des Gerätes > SRC-Taste Quellenwahl zwischen Radio und (wenn eingelegt, angeschlossen bzw. eingeschaltet) CD, MP3, CD-Wechsler und AUX DEUTSCH Bedienelemente ? Code LED 4 CD-Auswurftaste 5 CD-Schacht 6 Display 7 MENU-Taste Aufrufen der Menüs für die Grundeinstellungen. 8 Multifunktionswippe 9 Infrarot-Empfänger für IR-Fernbedienung (optional) : AUD-Taste Kurzdruck: Audio-Menü zur Einstellung von Bässen, Höhen, Balance, Fader und Loudness öffnen Langdruck (10 Sek.): Werkseinstellungen wiederherstellen ; TA-Taste Ein-/Ausschalten des Vorrangs für Verkehrsfunk Abbruch einer laufenden Verkehrsfunkdurchsage 3 01_CalaisMP48_de.indd 3 11.06.2008 15:11:40 Uhr Inhaltsverzeichnis Wichtige Hinweise ............................. 6 Bestimmungsgemäßer Gebrauch ....... 6 Fernbedienung (Option) ................... 6 CD-Wechsler (Option) ...................... 6 USB-Interface (Option)..................... 6 Altgerät-Entsorgung ......................... 6 Diebstahlschutz CODE ....................... 7 Code-Abfrage ein-/ausschalten (CODE) .......................................... 7 Code-Nummer nach Spannungsunterbrechung eingeben ... 8 Ein-/Ausschalten ............................... 8 Ein-/Ausschalten mit der Ein-/Aus-Taste ................................. 8 Aus-/Einschalten über die Fahrzeugzündung ............................ 8 Einschalten durch CD-Einschub ......... 8 Ausschaltzeit einstellen .................... 9 Einschalten durch Telefon (Option)..... 9 Einschalten mit der IR-Fernbedienung RC 10 P (Option) ... 9 Lautstärke einstellen ......................... 9 Stummschaltung (MUTE) .................. 9 Telefon-/Navigation-Audio ................. 9 Bestätigungston (BEEP) ein-/ausschalten ............................ 10 Maximale Einschaltlautstärke einstellen (ON VOL)........................ 10 Geräuschabhängige Lautstärkeanpassung einstellen (GALA) ........... 11 Klang .............................................. 11 Höhen einstellen ............................ 11 Bässe einstellen............................. 11 Mitten einstellen ............................ 12 Lautstärkeverteilung links/rechts einstellen (BAL) ............................. 12 Lautstärkeverteilung vorn/hinten einstellen (FAD)............................. 12 Uhrzeit............................................ 13 Uhrzeit anzeigen ............................ 13 Uhrzeit einstellen ........................... 13 Uhrmodus 12/24 Std. wählen ......... 13 Zeitzone einstellen (TIMEZONE)....... 14 Radiobetrieb ................................... 14 Radiobetrieb einschalten ................ 14 RDS-Komfortfunktion (AF, REG) ....... 14 Wellenbereich/Speicherebene wählen ......................................... 15 Sender einstellen ........................... 15 Sender speichern .......................... 16 Gespeicherte Sender abrufen .......... 16 Empfangbare Sender anspielen (BANDSCAN) ................................ 17 Programm-Typ (PTY) ...................... 17 Störabhängige Höhenabsenkung (HICUT)........................................ 17 Radiotext ein-/ausschalten .............. 18 Verkehrsfunk .................................. 18 Vorrang für Verkehrsfunk ein-/ ausschalten ........................... 18 Lautstärkeanhebung für Verkehrsdurchsagen einstellen ........ 19 Verkehrsdurchsagen ausblenden...... 19 4 01_CalaisMP48_de.indd 4 11.06.2008 15:11:40 Uhr CD-Betrieb ...................................... 19 CD-Betrieb starten ......................... 20 Anzeige von Titelinformationen (CD-Text) ...................................... 20 Titel wählen .................................. 20 Schneller Suchlauf (hörbar) ............ 21 Zufallswiedergabe der Titel (MIX) ..... 21 Titel anspielen (SCAN).................... 21 Titel wiederholen (RPT) .................. 21 Wiedergabe unterbrechen (PAUSE) ....................................... 21 CD entnehmen .............................. 21 MP3-/WMA-Betrieb ......................... 22 Vorbereitung eines MP3-Datenträgers ......................... 22 MP3-Betrieb starten....................... 24 Anzeige von Titelinformationen (ID3-Tags) .................................... 24 Verzeichnis wählen ........................ 25 Titel/Dateien wählen ...................... 25 Schneller Suchlauf ......................... 25 Titel in zufälliger Reihenfolge abspielen (MIX) ............................. 25 Titel anspielen (SCAN).................... 26 Einzelne Titel oder ganze Verzeichnisse wiederholt abspielen (REPEAT) ....................... 26 Wiedergabe unterbrechen (PAUSE) ....................................... 26 CD-Wechsler-Betrieb ....................... 27 CD-Wechsler-Betrieb starten ........... 27 CD wählen .................................... 27 Titel wählen .................................. 27 Schneller Suchlauf (hörbar) ............ 27 Einzelne Titel oder ganze CDs wiederholt abspielen (RPT) ............. 27 Titel in zufälliger Reihenfolge abspielen (MIX) ............................. 28 Alle Titel aller CDs anspielen (SCAN) ........................................ 28 Wiedergabe unterbrechen (PAUSE) ....................................... 28 IR-Fernbedienung RC 10 P................ 29 Fernbedienungsempfänger ............. 29 Funktionen der Fernbedienung ........ 29 Vorverstärkerausgang ..................... 30 Externe Audioquellen....................... 31 AUX-Eingang einstellen ................... 31 Pegel des AUX-Eingangs einstellen.... 32 Werkseinstellungen wiederherstellen (RESET) ................ 32 Technische Daten ............................ 33 Betriebsspannung.......................... 33 Verstärker..................................... 33 Tuner ........................................... 33 CD ............................................... 33 ISO connector................................ 281 DEUTSCH Inhaltsverzeichnis 5 01_CalaisMP48_de.indd 5 11.06.2008 15:11:40 Uhr Wichtige Hinweise Wichtige Hinweise USB-Interface (Option) Bevor Sie Ihr Gerät in Betrieb nehmen, lesen Sie diese Anleitung sorgfältig und machen Sie sich mit dem Gerät vertraut. Bewahren Sie diese Anleitung für spätere Fragen im Fahrzeug auf. Sie können das Blaupunkt-USB-Interface anschließen, um MP3-/WMA-Dateien von einem USB-Datenträger abzuspielen. Das USB-Interface ist als Zubehör (BlaupunktNr. 7 607 541 576) erhältlich. Bestimmungsgemäßer Gebrauch Altgerät-Entsorgung Das Gerät ist für den Betrieb in einem Nutzfahrzeug mit 24-V-Bordnetzspannung und für den Einbau in einen 1-DIN-Schacht konzipiert. Entsorgen Sie Ihr Altgerät bitte nicht in den Hausmüll! Nutzen Sie zur Entsorgung des Altgerätes die zur Verfügung stehenden Rückgabe- und Sammelsysteme. Verkehrssicherheit Die Verkehrssicherheit ist oberstes Gebot. Bedienen Sie Ihr Gerät nur, wenn es die Verkehrslage zulässt. Machen Sie sich vor Fahrtantritt mit dem Gerät vertraut. Akustische Warnsignale von Polizei, Feuerwehr und Rettungsdiensten müssen im Fahrzeug rechtzeitig wahrgenommen werden können. Hören Sie deshalb während der Fahrt Ihr Programm in angemessener Lautstärke. Fernbedienung (Option) Mit der Fernbedienung RC 10 P können die wichtigsten Funktionen bedient werden. Eine Infrarot-Fernbedienung ist als Zubehör (Blaupunkt-Nr. 7 607 591 512) erhältlich. CD-Wechsler (Option) Sie können den CD-Wechsler CDC A08 T (Blaupunkt-Nr. 7 607 274 002) oder IDC A09 (Blaupunkt-Nr. 7 607 274 005) anschließen. Die CD-Wechsler sind als Zubehör erhältlich. 6 01_CalaisMP48_de.indd 6 11.06.2008 15:11:40 Uhr Diebstahlschutz CODE Ihr Gerät ist zum Schutz gegen Diebstahl mit einer vierstelligen Code-Nummer ausgestattet. Diese Nummer muss immer dann eingegeben werden, wenn das Gerät von der Betriebsspannung des Fahrzeugs getrennt wurde. Die Code-Abfrage ist werkseitig ausgeschaltet, kann aber eingeschaltet werden. Hinweis: Ist die Code-Abfrage eingeschaltet, beginnt die Code LED ? zu blinken wenn sowohl das Gerät als auch die Fahrzeugzündung ausgeschaltet sind. Die Code-Nummer finden Sie im RadioPass zu Ihrem Gerät. Hinweis: Bewahren Sie den Radio-Pass niemals im Fahrzeug auf! Code-Abfrage ein-/ausschalten (CODE) 쏅 Drücken Sie die Taste MENU 7. oder 8 쏅 Drücken Sie die Taste so oft, bis „CODE“ und die aktuelle Einstellung „ON“ (ein) oder „OFF“ (aus) im Display 6 angezeigt werden. 쏅 Drücken Sie die Taste oder 8. Im Display 6 wird „0000“ angezeigt. Geben Sie den Code ein: Zeit wird „WAIT 1HR“ im Display 6 angezeigt. Wenn Sie das Gerät in dieser Wartezeit ausschalten, müssen Sie nach dem Wiedereinschalten wieder eine volle Stunde warten. 쏅 Drücken Sie die Stationstaste 1 < so oft, bis die erste Zahl Ihrer CodeNummer im Display 6 erscheint. 쏅 Drücken Sie die Stationstaste 2 < so oft, bis die zweite Zahl Ihrer CodeNummer im Display 6 erscheint. 쏅 Drücken Sie die Stationstaste 3 < so oft, bis die dritte Zahl Ihrer CodeNummer im Display 6 erscheint. 쏅 Drücken Sie die Stationstaste 4 < so oft, bis die vierte Zahl Ihrer CodeNummer im Display 6 erscheint. 쏅 Wenn die richtige Code-Nummer im Display 6 angezeigt wird, halten Sie die Stationstaste 5 < länger als 2 Sekunden gedrückt. Im Display 6 werden erneut „CODE“ und die aktuelle Einstellung „ON“ (ein) oder „OFF“ (aus) angezeigt. 쏅 Drücken Sie die Taste bzw. 8, um die Code-Abfrage aus- bzw. einzuschalten. Um das Menü zu verlassen, 쏅 drücken Sie die Taste MENU 7. DEUTSCH Diebstahlschutz Hinweis: Wenn Sie eine falsche Code-Nummer eingeben, wird erneut „0000“ im Display 6 angezeigt. Sie können die Eingabe noch zweimal wiederholen. Nach der dritten Fehleingabe wird das Gerät für 1 Stunde gesperrt. In dieser 7 01_CalaisMP48_de.indd 7 11.06.2008 15:11:40 Uhr Diebstahlschutz Code-Nummer nach Spannungsunterbrechung eingeben 쏅 Schalten Sie das Gerät ein. Im Display 6 erscheint erst „CODE“ und dann „0000“. Sie können den Code eingeben: Hinweis: Wenn Sie eine falsche Code-Nummer eingeben, wird erneut „0000“ im Display 6 angezeigt. Sie können die Eingabe noch zweimal wiederholen. Nach der dritten Fehleingabe wird das Gerät für 1 Stunde gesperrt. In dieser Zeit wird „WAIT 1HR“ im Display 6 angezeigt. Wenn Sie das Gerät in dieser Wartezeit ausschalten, müssen Sie nach dem Wiedereinschalten wieder eine volle Stunde warten. 쏅 Geben Sie die Code-Nummer wie im Abschnitt „Code-Abfrage ein-/ausschalten“ beschrieben ein. 쏅 Wenn die richtige Code-Nummer im Display 6 angezeigt wird, halten Sie die Stationstaste 5 < länger als 2 Sekunden gedrückt. Das Gerät wird eingeschaltet. Ein-/Ausschalten Ein-/Ausschalten Zum Ein- bzw. Ausschalten des Geräts stehen Ihnen verschiedene Möglichkeiten zur Verfügung: Ein-/Ausschalten mit der Ein/Aus-Taste 쏅 Zum Einschalten drücken Sie die Ein/Aus-Taste 3. 쏅 Zum Ausschalten halten Sie die Ein-/ Aus-Taste 3 länger als zwei Sekunden gedrückt. Hinweis: Zum Schutz der Fahrzeugbatterie wird das Gerät bei ausgeschalteter Fahrzeugzündung automatisch nach einer einstellbaren Zeit ausgeschaltet (siehe Abschnitt „Ausschaltzeit einstellen“ in diesem Kapitel). Aus-/Einschalten über die Fahrzeugzündung Wenn das Gerät mit der Fahrzeugzündung verbunden ist und es nicht mit der Ein-/AusTaste 3 ausgeschaltet wurde, wird es mit der Fahrzeugzündung ein- bzw. ausgeschaltet. Einschalten durch CD-Einschub Zum Einschalten mit dem CD-Einschub, 쏅 schieben Sie eine CD mit der bedruckten Seite nach oben in den CD-Schacht 5, bis Sie einen leichten Widerstand spüren. Die CD wird automatisch eingezogen, das Gerät startet im CD-Betrieb. 8 01_CalaisMP48_de.indd 8 11.06.2008 15:11:40 Uhr Lautstärke Ausschaltzeit einstellen Lautstärke einstellen 쏅 Drücken Sie die Taste MENU 7. oder 8 쏅 Drücken Sie die Taste so oft, bis „HOUR“ und die aktuelle Einstellung im Display 6 angezeigt werden. 쏅 Stellen Sie die Ausschaltzeit mit der bzw. 8 in 5-MinutenTaste Schritten zwischen 5 und 60 Minuten ein. Um das Menü zu verlassen, 쏅 drücken Sie die Taste MENU 7. Die Systemlautstärke ist in Schritten von 0 (aus) bis 32 (maximal) regelbar. 쏅 Um die Systemlautstärke zu erhöhen, drehen Sie den Lautstärkeregler 1 nach rechts. 쏅 Um die Systemlautstärke zu verringern, drehen Sie den Lautstärkeregler 1 nach links. Einschalten durch Telefon (Option) Wenn bei ausgeschaltetem Gerät das Telefon aktiviert wird, schaltet sich das Gerät ein. Nach dem Ausschalten des Telefons wird das Gerät automatisch wieder ausgeschaltet. Vorraussetzung ist, dass das Telefon ordnungsgemäß mit dem Gerät verbunden ist. Einschalten mit der IRFernbedienung RC 10 P (Option) 쏅 Zum Einschalten drücken Sie die Taste ON H auf der IR-Fernbedienung RC 10 P. Hinweis: Der IR-Empfänger des Gerätes muss eingeschaltet sein, damit Sie die IRFernbedienung verwenden können. Lesen Sie dazu den Abschnitt „Fernbedienungsempfänger“ im Kapitel „IR Fernbedienung RC 10 P“. DEUTSCH Ein-/Ausschalten Stummschaltung (MUTE) Sie können die Systemlautstärke schlagartig stummzuschalten (Mute). 쏅 Drücken Sie kurz die Taste 3. Mute aufheben Um die vorher gehörte Lautstärke wieder zu aktivieren, 쏅 drücken Sie erneut kurz die Taste 3. Telefon-/Navigation-Audio Stummschaltung während Telefonbetrieb Wenn Ihr Autoradio mit einem Mobiltelefon oder Navigationssystem verbunden ist, wird bei einem eingehenden Anruf oder einer Sprachausgabe der Navigation das Autoradiogerät stummgeschaltet. Das Gespräch oder die Sprachausgabe wird über die Autoradiolautsprecher wiedergegeben. Dazu muss das Mobiltelefon oder das Navigationssystem an das Autoradio angeschlossen sein (Kammer C2 auf der Geräterückseite). Welche Navigationssysteme an Ihrem Autoradio verwendet werden können, erfahren Sie von Ihrem Blaupunkt-Fachhändler. 9 01_CalaisMP48_de.indd 9 11.06.2008 15:11:40 Uhr Lautstärke Wenn ein Anruf eingeht oder eine Navigationsdurchsage stattfindet, wird im Display „PHONE“ angezeigt. Lautstärke für Telefon-/NavigationAudio einstellen (PHONEVOL) Die Lautstärke von Telefongesprächen oder Sprachausgaben der Navigation ist einstellbar: 쏅 Drücken Sie die Taste MENU 7. 쏅 Drücken Sie dieTaste oder 8 so oft, bis „PHONEVOL“ angezeigt wird. Nach ca. 2 Sekunden werden „VOL“ und die aktuelle Einstellung im Display 6 angezeigt. 쏅 Drücken Sie die Taste bzw. 8, um die Lautstärke zwischen 0 und 32 einzustellen. Hinweis: Sie müssen nicht auf die Anzeige der aktuellen Einstellung warten, um sie durch Drücken der Taste bzw. 8 zu ändern. Um das Menü zu verlassen, 쏅 drücken Sie die Taste MENU 7. Hinweis: Sie können die Lautstärke auch während eines Telefongesprächs oder einer Navigationsdurchsage mit dem Lautstärkeregler 1 einstellen. Die eingestellte Lautstärke wird automatisch gespeichert. Bestätigungston (BEEP) ein-/ ausschalten Auf bestimmte Aktionen, z. B. längeres Drücken einer Taste, ertönt ein Bestätigungston (Beep). Sie können den Bestätigungston abschalten: 쏅 Drücken Sie die Taste MENU 7. oder 8 쏅 Drücken Sie die Taste so oft, bis „BEEP“ und die aktuelle Einstellung „ON“ (ein) bzw. „OFF“ (aus) im Display 6 angezeigt werden. 쏅 Drücken Sie die Taste bzw. 8, um den Beep aus- bzw. einzuschalten. Um das Menü zu verlassen, 쏅 drücken Sie die Taste MENU 7. Maximale Einschaltlautstärke einstellen (ON VOL) Wenn Sie das Gerät einschalten, spielt es in der zuletzt gewählten Lautstärke. Wenn Sie die Lautstärke vor dem Ausschalten jedoch höher als die maximale Einschaltlautstärke eingestellt hatten, wird die Lautstärke beim Wiedereinschalten automatisch auf die eingestellte Einschaltlautstärke begrenzt. Hinweis: Um das Gehör zu schützen, ist die maximale Einschaltlautstärke auf den Wert 25 begrenzt. 쏅 Drücken Sie die Taste MENU 7. 쏅 Drücken Sie die Taste oder 8 so oft, bis „ON VOL“ angezeigt wird. Nach ca. 2 Sekunden werden „VOL“ und die aktuelle Einstellung im Display 6 angezeigt. 쏅 Drücken Sie die Taste bzw. 8, um die maximale Einschaltlautstärke zwischen 5 und 25 einzustellen. Hinweis: Sie müssen nicht auf die Anzeige der aktuellen Einstellung warten, um sie 10 01_CalaisMP48_de.indd 10 11.06.2008 15:11:41 Uhr durch Drücken der Taste bzw. zu ändern. Um das Menü zu verlassen, 쏅 drücken Sie die Taste MENU 7. Klang 8 Geräuschabhängige Lautstärkeanpassung einstellen (GALA) Mit dieser Funktion wird die Lautstärke des Autoradios automatisch der gefahrenen Geschwindigkeit und den damit verbundenen Fahrgeräuschen angepasst. Zum Beispiel wird bei steigender Geschwindigkeit die Lautstärke automatisch angehoben, um die lauteren Fahrgeräusche (z. B. durch Fahrtwind) auszugleichen. Dazu muss Ihr Fahrzeug das Tachometersignal zur Verfügung stellen und das Autoradio entsprechend angeschlossen sein. Die automatische Lautstärkeanhebung ist in 6 Stufen (OFF (aus), 1-5) einstellbar. 쏅 Drücken Sie die Taste MENU 7. oder 8 쏅 Drücken Sie die Taste so oft, bis „GALA“ und die aktuelle Einstellung angezeigt werden. 쏅 Drücken Sie die Taste bzw. 8, um die Lautstärkeanpassung zwischen „OFF“ (aus) und 5 einzustellen. Um das Menü zu verlassen, 쏅 drücken Sie die Taste MENU 7. Klang Höhen einstellen 쏅 Drücken Sie die Taste AUD :. 쏅 Drücken Sie die Taste oder 8 so oft, bis TREBLE“ angezeigt wird. 쏅 Halten Sie die Taste bzw. 8 länger als 2 Sekunden gedrückt. Im Display wird kurz „FREQ“ und dann die aktuell ausgewählte Höhenfrequenz angezeigt. Um eine andere Höhenfrequenz zwischen 10,0 kHz und 17,5 kHz auszuwählen, 쏅 drücken Sie die Taste bzw. 8. Um den Höhenpegel einzustellen, 쏅 drücken Sie die Taste oder 8 so oft, bis „GAIN“ angezeigt wird. Nach ca. 2 Sekunden werden „GAIN“ und die aktuelle Einstellung angezeigt. 쏅 Drücken Sie die Taste bzw. 8, um den Höhenpegel zwischen –7 und +7 einzustellen. Um das Menü zu verlassen, 쏅 drücken Sie die Taste AUD :. DEUTSCH Lautstärke Bässe einstellen 쏅 Drücken Sie die Taste AUD :. 쏅 Drücken Sie die Taste oder 8 so oft, bis „BASS“ angezeigt wird. 쏅 Halten Sie die Taste bzw. 8 länger als 2 Sekunden gedrückt. Im Display wird kurz „FREQ“ und dann die aktuell ausgewählte Bassfrequenz angezeigt. Um eine andere Bassfrequenz zwischen 60 Hz und 200 Hz auszuwählen, 쏅 drücken Sie die Taste bzw. 8. 11 01_CalaisMP48_de.indd 11 11.06.2008 15:11:41 Uhr Klang Um den Basspegel einzustellen, 쏅 drücken Sie die Taste oder 8 so oft, bis „GAIN“ angezeigt wird. Nach ca. 2 Sekunden werden „GAIN“ und die aktuelle Einstellung angezeigt. 쏅 Drücken Sie die Taste bzw. 8, um den Basspegel zwischen –7 und +7 einzustellen. Um den Gütefaktor für den Bass einzustellen, 쏅 drücken Sie die Taste oder 8 so oft, bis „Q FACTOR“ angezeigt wird. Nach ca. 2 Sekunden werden „Q“ und die aktuelle Einstellung angezeigt. 쏅 Drücken Sie die Taste bzw. 8, um den Gütefaktor zwischen 1,0 und 2,0 einzustellen. Um das Menü zu verlassen, 쏅 drücken Sie die Taste AUD :. Mitten einstellen 쏅 Drücken Sie die Taste AUD :. 쏅 Drücken Sie die Taste oder 8 so oft, bis „MIDDLE“ angezeigt wird. 쏅 Halten Sie die Taste bzw. 8 länger als 2 Sekunden gedrückt. Im Display wird kurz „FREQ“ und dann die aktuell ausgewählte Mittenfrequenz angezeigt. Um eine andere Mittenfrequenz zwischen 500 Hz und 2,5 kHz auszuwählen, 쏅 drücken Sie die Taste bzw. 8. Um den Mittenpegel einzustellen, 쏅 drücken Sie die Taste oder 8 so oft, bis „GAIN“ angezeigt wird. Nach ca. 2 Sekunden werden „GAIN“ und die aktuelle Einstellung angezeigt. 쏅 Drücken Sie die Taste bzw. 8, um den Mittenpegel zwischen –7 und +7 einzustellen. Um den Gütefaktor für die Mitten einzustellen, 쏅 drücken Sie die Taste oder 8 so oft, bis „Q FACTOR“ angezeigt wird. Nach ca. 2 Sekunden werden „Q“ und die aktuelle Einstellung angezeigt. 쏅 Drücken Sie die Taste bzw. 8, um den Gütefaktor zwischen 0,5 und 1,25 einzustellen. Um das Menü zu verlassen, 쏅 drücken Sie die Taste AUD :. Lautstärkeverteilung links/ rechts einstellen (BAL) 쏅 Drücken Sie die Taste AUD :. oder 8 쏅 Drücken Sie die Taste so oft, bis „BAL“ und die aktuelle Einstellung angezeigt werden. 쏅 Drücken Sie die Taste bzw. 8, um die Lautstärkeverteilung links/rechts zwischen –10 und +10 einzustellen. Um das Menü zu verlassen, 쏅 drücken Sie die Taste AUD :. Lautstärkeverteilung vorn/ hinten einstellen (FAD) Hinweis Die hinteren Lautsprecher müssen über einen zusätzlichen Verstärker angeschlossen werden. 쏅 Drücken Sie die Taste AUD :. oder 8 쏅 Drücken Sie die Taste so oft, bis „FAD“ und die aktuelle Einstellung angezeigt werden. 12 01_CalaisMP48_de.indd 12 11.06.2008 15:11:41 Uhr 쏅 Drücken Sie die Taste bzw. 8, um die Lautstärkeverteilung vorn/hinten zwischen –10 und +10 einzustellen. Um das Menü zu verlassen, 쏅 drücken Sie die Taste AUD :. Uhrzeit Uhrzeit Uhrzeit anzeigen Um die Uhrzeit für ca. 10 Sekunden im Display einzublenden, 쏅 halten Sie die Taste MENU 7 länger als 2 Sekunden gedrückt. DEUTSCH Klang Uhrzeit einstellen 쏅 Drücken Sie die Taste MENU 7. 쏅 Drücken Sie die Taste oder 8 so oft, bis „TIMESET“ im Display 6 angezeigt werden. Nach ca. 2 Sekunden wird die aktuelle Uhrzeit im Display 6 angezeigt. Vor der Uhrzeit wird im 24-Std.-Modus „24H“ und im 12-Std.-Modus „AM“ bzw. „PM“ angezeigt. Die Stunden blinken und können eingestellt werden. Um die Stunden bzw. Minuten einzustellen, 쏅 drücken Sie die Taste bzw. 8. Um zwischen Stunden und Minuten zu wechseln, 쏅 drücken Sie die Taste 6 <. Hinweis: Sie müssen nicht auf die Anzeige der aktuellen Uhrzeit warten, um sie durch Drücken der Taste bzw. 8 zu ändern. Um das Menü zu verlassen, 쏅 drücken Sie die Taste MENU 7. Uhrmodus 12/24 Std. wählen 쏅 Drücken Sie die Taste MENU 7. 쏅 Drücken Sie die Taste oder 8 so oft, bis „24H MODE“ bzw. „12H MODE“ im Display 6 angezeigt wird. 13 01_CalaisMP48_de.indd 13 11.06.2008 15:11:41 Uhr Uhrzeit 쏅 Drücken Sie die Taste bzw. 8, um zwischen den Modi zu wechseln. Um das Menü zu verlassen, 쏅 drücken Sie die Taste MENU 7. Zeitzone einstellen (TIMEZONE) Falls Sie sich über Zeitzonen hinweg bewegen, können Sie den Zeitunterschied zur aktuell eingestellten Uhrzeit in 1-Std.Schritten einstellen. Auf diese Weise können Sie die Anzeige der Uhrzeit für die aktuell gültige Zeitzone korrigieren, ohne die Uhrzeit selbst neu einstellen zu müssen. 쏅 Drücken Sie die Taste MENU 7. 쏅 Drücken Sie die Taste oder 8 so oft, bis „TIMEZONE“ angezeigt wird. Nach ca. 2 Sekunden werden „ZONE“ und die aktuelle Einstellung im Display 6 angezeigt. 쏅 Drücken Sie die Taste bzw. 8, um den Zeitunterschied in Schritten von 1 Std. zwischen –12 und +12 einzustellen. Hinweis: Sie müssen nicht auf die Anzeige der aktuellen Einstellung warten, um sie durch Drücken der Taste bzw. 8 zu ändern. Um das Menü zu verlassen, 쏅 drücken Sie die Taste MENU 7. Radiobetrieb Radiobetrieb Dieses Gerät ist mit einem RDS-Radioempfänger ausgestattet. Fast alle zu empfangenden FM-Sender senden ein Signal aus, das neben dem Programm auch Informationen wie den Sendernamen und den Programm-Typ (PTY) enthält. Der Sendername wird, sobald er empfangbar ist, im Display 6 angezeigt. Radiobetrieb einschalten Wenn Sie sich in einer anderen Betriebsart befinden, 쏅 drücken Sie die Taste BND 2, oder 쏅 drücken Sie die Taste SRC > so oft, bis „RADIO“ im Display 6 erscheint. Im Display 6 wird die aktuelle Frequenz bzw.der Sendername angezeigt. RDS-Komfortfunktion (AF, REG) Die RDS-Komfortfunktionen AF (Alternativfrequenz) und REG (Regional) erweitern das Leistungsspektrum Ihres Radiogerätes: • AF: Wenn die RDS-Komfortfunktion aktiviert ist, sucht das Gerät im Hintergrund automatisch nach der am besten zu empfangenden Frequenz des eingestellten Senders. • REG: Einige Sender teilen zu bestimmten Zeiten ihr Programm in Regionalprogramme mit unterschiedlichem Inhalt auf. Mit aktivierter REGFunktion wird verhindert, dass das Gerät auf Alternativfrequenzen des eingestellten Senders wechselt, die einen anderen Programminhalt haben. 14 01_CalaisMP48_de.indd 14 11.06.2008 15:11:42 Uhr Hinweis: REG muss gesondert im Menü ein- bzw. ausgeschaltet werden. RDS-Komfortfunktion ein-bzw. ausschalten 쏅 Um die RDS-Funktionen AF und REG zu nutzen, drücken Sie die Taste RDS =. Die RDS-Komfortfunktionen sind aktiv, wenn das RDS-Symbol im Display 6 angezeigt wird. REG ein-/ausschalten 쏅 Drücken Sie die Taste MENU 7. oder 8 쏅 Drücken Sie die Taste so oft, bis „REG“ und die aktuelle Einstellung „ON“ (ein) bzw. „OFF“ (aus) im Display 6 angezeigt werden. 쏅 Drücken Sie die Taste bzw. 8, um REG aus- bzw. einzuschalten. Um das Menü zu verlassen, 쏅 drücken Sie die Taste MENU 7. Hinweis: Die Einstellung REG ON/OFF wirkt sich nur aus, wenn die RDS-Funktion aktiviert ist. Wellenbereich/Speicherebene wählen Mit diesem Gerät können Sie Programme der Frequenzbänder FM, MW und LW (Europa) bzw. FM und AM (NAFTA) empfangen. Für den Wellenbereich FM stehen drei Speicherebenen FM1, FM2 und FMT und für die Wellenbereiche MW und LW bzw. AM je eine Speicherebene zur Verfügung. Zusätzlich gibt es eine weitere Speicherebene MWT/LWT bzw. AMT. Auf jeder Speicherebene können 6 Sender gespeichert werden. Um zwischen den Wellenbereichen bzw. Speicherebenen umzuschalten, 쏅 drücken Sie die Taste BND 2. DEUTSCH Radiobetrieb Sender einstellen Sie haben verschiedene Möglichkeiten, Sender einzustellen. Automatischer Sendersuchlauf 쏅 Drücken Sie die Taste bzw. 8. Der nächste empfangbare Sender wird eingestellt. Hinweise: • Ist der Vorrang für Verkehrsfunk eingeschaltet, wird der nächste Verkehrsfunksender eingestellt. • Ist PTY eingeschaltet, wird der nächste Sender des gewählten Programmtyps eingestellt. Empfindlichkeit des Sendersuchlaufs einstellen Sie können wählen, ob bei geringer Empfindlichkeit nur starke oder bei hoher Empfindlichkeit auch schwache Sender eingestellt werden sollen. 쏅 Drücken Sie die Taste MENU 7. oder 쏅 Drücken Sie die Taste 8 8 so oft, bis „SENS“ und die aktuelle Einstellung „LO“ (geringe Empfindlichkeit) bzw. „DX“ (hohe Empfindlichkeit) im Display 6 angezeigt werden. 쏅 Drücken Sie die Taste bzw. 8, um zwischen den Einstellungen „LO“ und „DX“ zu wechseln. 15 01_CalaisMP48_de.indd 15 11.06.2008 15:11:42 Uhr Radiobetrieb Um das Menü zu verlassen, 쏅 drücken Sie die Taste MENU 7. Manuelle Senderabstimmung Um die eingestellte Frequenz in kleinen Schritten zu ändern, 쏅 drücken Sie die Taste oder 8. Um die eingestellte Frequenz schnell zu ändern, 쏅 halten Sie die Taste oder 8 gedrückt Hinweis: Die manuelle Senderabstimmung ist nur möglich, wenn die RDS-Funktion und PTY ausgeschaltet sind. Blättern in Senderketten (nur FM) Stellt ein Sender mehrere Programme zur Verfügung, können Sie in dieser sog. „Senderkette“ blättern. 쏅 Drücken Sie die Taste oder 8, um zum nächsten Sender der Senderkette zu wechseln. Hinweis: Das Blättern in Senderketten ist nur möglich, wenn die RDS-Funktion eingeschaltet und PTY ausgeschaltet ist. Sie können so nur zu Sendern wechseln, die Sie schon einmal empfangen haben. Verwenden Sie dazu z. B. die Travelstore-Funktion (T-STORE). Sender speichern Sender manuell speichern 쏅 Wählen Sie die gewünschte Speicherebene bzw. den Wellenbereich. 쏅 Stellen Sie den Sender ein. 쏅 Halten Sie die Stationstaste 1 - 6 <, auf die der Sender gespeichert werden soll, länger als 2 Sekunden gedrückt. Der Bestätigungston ertönt. Der Sender ist auf der gewählten Stationstaste gespeichert. Sender automatisch speichern (T-STORE) Sie können die 6 stärksten Sender aus der Region automatisch speichern. Für den Wellenbereich FM erfolgt die Speicherung auf der Speicherebene FMT, für die Wellenbereiche MW und LW auf der Speicherebene MWT/LWT und für den Wellenbereich AM auf der Speicherebene AMT. Hinweis: Zuvor auf dieser Ebene gespeicherte Sender werden dabei durch neu gefundene Sender ersetzt. 쏅 Wählen Sie den gewünschten Wellenbereich. 쏅 Halten Sie die Taste BND 2 länger als zwei Sekunden gedrückt. Die Speicherung beginnt. Im Display 6 wird „T-STORE“ angezeigt. Nachdem der Vorgang abgeschlossen ist, wird der Sender auf Speicherplatz eins der Speicherebene FMT, MWT/LWT bzw. AMT gespielt. Gespeicherte Sender abrufen 쏅 Wählen Sie die Speicherebene bzw. den Wellenbereich. 쏅 Drücken Sie die Stationstaste 1 - 6 <, auf der gewünschte Sender gespeichert ist. 16 01_CalaisMP48_de.indd 16 11.06.2008 15:11:42 Uhr Empfangbare Sender anspielen (BANDSCAN) Mit der Bandscan-Funktion können Sie alle empfangbaren Sender für jeweils ca. 10 Sekunden anspielen lassen. Bandscan starten 쏅 Halten Sie die Taste bzw. 8 länger als 2 Sekunden gedrückt. Im Display wird kurz „BANDSCAN“ angezeigt. Das Gerät sucht im aktuellen Wellenbereich nach Sendern. Jeder gefundene Sender wird für ca. 10 Sekunden angespielt. Dabei wird die eingestellte Frequenz bzw. der Sendername angezeigt. Bandscan beenden 쏅 Drücken Sie die Taste bzw. 8. Der Scanvorgang wird beendet. Der zuletzt gespielte Sender bleibt eingestellt. Programm-Typ (PTY) Neben dem Sendernamen übermitteln einige FM-Sender auch Informationen über den Typ ihres Programms. Solche ProgrammTypen können z. B. sein: KULTUR REISE JAZZ SPORT NACHRICH POP ROCK MUSIK Mit der PTY-Funktion können Sie gezielt Sender eines bestimmten Programm-Typs auswählen. Wenn PTY eingeschaltet ist und ein PTYSuchlauf gestartet wurde, wechselt das Gerät automatisch vom aktuellen Sender bzw. aus einer anderen Betriebsart zu dem Sender mit dem gewählten Programm-Typ. PTY ein-/ausschalten 쏅 Drücken Sie die Taste MENU 7. oder 8 쏅 Drücken Sie die Taste so oft, bis „PTY“ und die aktuelle Einstellung „ON“ (ein) bzw. „OFF“ (aus) im Display 6 angezeigt werden. 쏅 Drücken Sie die Taste bzw. 8, um PTY aus- bzw. einzuschalten. Um das Menü zu verlassen, 쏅 drücken Sie die Taste MENU 7. DEUTSCH Radiobetrieb Programm-Typ auswählen und Suchlauf starten 쏅 Drücken Sie die Taste oder 8 so oft, bis der gewünschte Programm-Typ angezeigt wird. 쏅 Drücken Sie die Taste bzw. 8, um den Suchlauf zu starten. Falls ein Sender mit dem gewählten Programm-Typ gefunden wird, wird dieser eingestellt. Störabhängige Höhenabsenkung (HICUT) Die Hicut-Funktion bewirkt eine Wiedergabeverbesserung bei schlechtem Radioempfang. Wenn Empfangsstörungen vorhanden sind, wird automatisch der Störpegel abgesenkt. Um HICUT ein- bzw. ausschalten, 쏅 drücken Sie die Taste MENU 7. oder 8 쏅 Drücken Sie die Taste so oft, bis „HICUT“ und die aktuelle Einstellung „ON“ (ein) bzw. „OFF“ (aus) im Display 6 angezeigt werden. 쏅 Drücken Sie die Taste bzw. 8, um HICUT aus- bzw. einzuschalten. Um das Menü zu verlassen, 쏅 drücken Sie die Taste MENU 7. 17 01_CalaisMP48_de.indd 17 11.06.2008 15:11:42 Uhr Radiobetrieb Radiotext ein-/ausschalten Einige Radiosender benutzen das RDSSignal dazu, Werbung oder andere Informationen anstelle ihres Sendernamens zu übermitteln. Dieser Radiotext wird im Display 6 angezeigt. Um die Anzeige von Radiotext ein- bzw. ausschalten, 쏅 drücken Sie die Taste MENU 7. 쏅 Drücken Sie die Taste oder 8 so oft, bis „RADIOTXT“ angezeigt wird. Nach ca. 2 Sekunden wird die aktuelle Einstellung „TEXT ON“ (ein) bzw. „TEXT OFF“ (aus) im Display 6 angezeigt. 쏅 Drücken Sie die Taste bzw. 8, um die Anzeige von Radiotext aus- bzw. einzuschalten. Hinweis: Sie müssen nicht auf die Anzeige der aktuellen Einstellung warten, um sie durch Drücken der Taste bzw. 8 zu ändern. Um das Menü zu verlassen, 쏅 drücken Sie die Taste MENU 7. Verkehrsfunk Verkehrsfunk Vorrang für Verkehrsfunk ein-/ ausschalten Um den Vorrang für Verkehrsfunk in jeder Betriebsart ein- bzw. auszuschalten, 쏅 drücken Sie die Taste TA ;. Hinweis: In den Betriebsarten CD, MP3, CDWechsler und AUX steht diese Funktion nur zur Verfügung, wenn zuletzt der Wellenbereich FM eingestellt war. Der Vorrang für Verkehrsdurchsagen ist aktiviert, wenn im Display 6 das TASymbol angezeigt wird. Sobald das Gerät eine Verkehrsdurchsage empfängt, wird sie durchgestellt. Im Display 6 wird für die Dauer der Durchsage „TRAFFIC“ angezeigt. Hinweis: Sie hören einen Warnton, • wenn Sie beim Hören des Verkehrsfunksenders oder einer CD den Sendebereich des eingestellten Verkehrsfunksenders verlassen und der darauf folgende automatische Suchlauf keinen neuen Verkehrsfunksender findet. • wenn Sie von einem Verkehrsfunksender zu einem Sender ohne Verkehrsfunk wechseln. Schalten Sie dann entweder den Vorrang für Verkehrsfunk aus oder wechseln Sie zu einem Sender mit Verkehrsfunk. 18 01_CalaisMP48_de.indd 18 11.06.2008 15:11:42 Uhr Lautstärkeanhebung für Verkehrsdurchsagen einstellen Sie können einstellen, um wie viele Lautstärkestufen Verkehrsdurchsagen lauter als die eingestellte Lautstärke wiedergegeben werden: 쏅 Drücken Sie die Taste MENU 7. 쏅 Drücken Sie die Taste oder 8 so oft, bis „TA VOL“ angezeigt wird. Nach ca. 2 Sekunden werden „VOL“ und die aktuelle Einstellung im Display 6 angezeigt. 쏅 Drücken Sie die Taste bzw. 8, um die Lautstärkeanhebung zwischen 0 und 10 einzustellen. Hinweis: Sie müssen nicht auf die Anzeige der aktuellen Einstellung warten, um sie durch Drücken der Taste bzw. 8 zu ändern. Um das Menü zu verlassen, 쏅 drücken Sie die Taste MENU 7. Hinweis: Sie können während einer Verkehrsdurchsage die Lautstärke mit dem Lautstärkeregler 1 für die Dauer der Durchsage einstellen. Verkehrsdurchsagen ausblenden Um eine laufende Verkehrsdurchsage abzubrechen und zur zuvor gehörten Audioquelle zurückzukehren, 쏅 drücken Sie die Taste TA ;. Der Vorrang für Verkehrsdurchsagen bleibt eingeschaltet. CD-Betrieb CD-Betrieb Sie können mit diesem Gerät handelsübliche Audio-CDs, CD-Rs und CD-RWs mit einem Durchmesser von 12 cm abspielen. Um Probleme beim Abspielen zu vermeiden, sollten Sie selbst erstellte CDs nicht schneller als 16fach brennen. DEUTSCH Verkehrsfunk Zerstörungsgefahr des CD-Laufwerks! Single-CDs mit einem Durchmesser von 8 cm und unrund konturierte CDs (ShapeCDs) dürfen nicht verwendet werden. Behandeln Sie die CD sorgsam und vermeiden Sie Kratzer und Beschädigungen auf der CD. Fassen Sie die CD, wenn möglich, nur am Rand an. Sollte einmal eine CD verschmutzt sein, so reinigen Sie diese mit einem fusselfreien Tuch ohne Zusatz von Lösungsmitteln. Wischen Sie die CD immer von innen nach außen ab. Setzen Sie die CD nicht direkter Sonnenstrahlung aus, und bewahren Sie die CD außerhalb des Gerätes in einer Schutzhülle auf. Kleben sie keine Etiketten auf die CD. Beschriften Sie die CD nur mit den dafür geeigneten, handelsüblichen Stiften. Für Beschädigungen des CD-Laufwerks durch ungeeignete oder beschädigte CDs übernehmen wir keine Haftung. Für eine einwandfreie Funktion verwenden Sie nur CDs mit dem Compact-DiscLogo. CDs mit Kopierschutz können zu Abspielschwierigkeiten führen. Blaupunkt kann die einwandfreie Funktion von kopiergeschützten CDs nicht gewährleisten! 19 01_CalaisMP48_de.indd 19 11.06.2008 15:11:43 Uhr CD-Betrieb CD-Betrieb starten Wenn keine CD im Laufwerk ist, 쏅 schieben Sie die CD mit der bedruckten Seite nach oben ohne Kraftaufwand in den CD-Schacht, bis Sie einen Widerstand spüren. Die CD wird automatisch in das Laufwerk eingezogen. Im Display 6 erscheint das CD-Symbol. Hinweis: Der Einzug der CD darf nicht behindert oder unterstützt werden. Die CD-Wiedergabe beginnt. Im Display 6 werden die Nummer des aktuellen Titels (z. B. „T12“) und die Spielzeit sowie Titelinformationen (CD-Text) angezeigt. Wenn bereits eine CD im Laufwerk ist, 쏅 drücken Sie die Taste SRC > so oft, bis „CD“ im Display 6 erscheint. Die Wiedergabe startet an der Stelle, an der sie unterbrochen wurde. Anzeige von Titelinformationen (CD-Text) Falls die CD CD-Text zur Verfügung stellt, wird die Information zu jedem Titel beim Start des Titels einmal als Laufschrift im Display 6 angezeigt. Titelinformationen einmalig als Lauftext anzeigen 쏅 Drücken Sie die Taste 5 <. Der CD-Text zum aktuellen Titel wird einmal als Laufschrift im Display 6 angezeigt. Text als Laufschrift ausgeschaltet ist (siehe folgenden Abschnitt). Anzeige von Titelinformationen als Laufschrift ein-/ausschalten Um die Anzeige von Titelinformationen als Laufschrift ein- bzw auszuschalten, 쏅 drücken Sie die Taste MENU 7. oder 8 쏅 Drücken Sie die Taste so oft, bis „SCRL“ und die aktuelle Einstellung „ON“ (ein) bzw. „OFF“ (aus) im Display 6 angezeigt werden. 쏅 Drücken Sie die Taste bzw. 8, um Laufschrift aus- bzw. einzuschalten. Um das Menü zu verlassen, 쏅 drücken Sie die Taste MENU 7. Bei der Einstellung „SCRL OFF“ wird die Titelinformation in Abschnitten von jeweils 8 Zeichen im Display 6 angezeigt. Dabei wird jeder Textabschnitt sowie Titelnummer und Spielzeit im kontinuierlichen Wechsel für jeweils 5 Sekunden anzeigt. Hinweis: Die Einstellung „SCRL ON/OFF“ wirkt sich entsprechend auch auf die Anzeige von MP3-Titelinformationen (ID3-Tags) im MP3-Betrieb aus. Titel wählen 쏅 Drücken Sie die Taste bzw. 8, um zum vorherigen bzw. nächsten Titel zu wechseln. Bei einmaligem Drücken der Taste 8 wird der aktuelle Titel erneut gestartet. Hinweis: Diese Funktion steht nicht zur Verfügung, wenn die Anzeige von CD20 01_CalaisMP48_de.indd 20 11.06.2008 15:11:43 Uhr Schneller Suchlauf (hörbar) Titel wiederholen (RPT) Für einen schnellen Suchlauf rückwärts bzw. vorwärts 쏅 halten Sie die Taste bzw. 8 gedrückt, bis Sie zur gewünschten Stelle gelangen. 쏅 Drücken Sie die Taste 2 <. Im Display wird kurz „RPT TRK“ angezeigt und das RPT-Symbol erscheint. Der aktuelle Titel wird wiederholt, bis RPT deaktivert wird. Zufallswiedergabe der Titel (MIX) RPT beenden 쏅 Drücken Sie erneut die Taste 2 <. Im Display 6 wird kurz „RPT OFF“ angezeigt und das RPT-Symbol erlischt. Die Wiedergabe wird normal fortgesetzt. 쏅 Drücken Sie die Taste 3 <. Im Display 6 wird kurz „MIX CD“ angezeigt und das MIX-Symbol erscheint. Die nächsten Titel werden zufällig ausgewählt. MIX beenden 쏅 Drücken Sie erneut die Taste 3 <. Im Display 6 wird kurz „MIX OFF“ angezeigt und das MIX-Symbol erlischt. Die Wiedergabe wird normal fortgesetzt. Titel anspielen (SCAN) Um alle Titel der CD für jeweils ca. 10 Sekunden anspielen zu lassen, 쏅 drücken Sie die Taste 4 <. Im Display wird kurz „SCAN TRK“ angezeigt. Während des Anspielens blinkt die Anzeige „CD“. Die Titelnummer und Spielzeit des aktuellen Titels bzw. dessen Titelinformationen werden angezeigt. SCAN beenden, Titel weiterhören Um den Scanvorgang zu beenden, 쏅 drücken Sie erneut die Taste 4 <. Im Display wird kurz „SCAN OFF“ angezeigt. Der aktuelle Titel wird weitergespielt. DEUTSCH CD-Betrieb Wiedergabe unterbrechen (PAUSE) 쏅 Drücken Sie die Taste 1 <. Im Display 6 wird „PAUSE“ angezeigt. Pause aufheben 쏅 Drücken Sie während der Pause die Taste 1 <. Die Wiedergabe wird fortgesetzt. CD entnehmen Hinweis: Sie können CDs auch ausschieben lassen, wenn das Gerät ausgeschaltet ist oder eine andere Audioquelle aktiv ist. 쏅 Drücken Sie die CD-Auswurftaste 4. Die CD wird ausgeschoben. Im Display wird kurz „CD EJECT“ angezeigt. Hinweis: Der Ausschub der CD darf nicht behindert oder unterstützt werden. 쏅 Entnehmen Sie die CD. Das CD-Symbol erlischt. 21 01_CalaisMP48_de.indd 21 11.06.2008 15:11:43 Uhr CD-Betrieb Hinweis: Wenn Sie eine ausgeschobene CD nicht entnehmen, wird sie nach ca. 10 Sekunden automatisch wieder eingezogen. MP3-/WMA-Betrieb MP3-/WMA-Betrieb Sie können mit diesem Autoradio auch CD-Rs und CD-RWs mit MP3- und WMAMusikdateien abspielen. Außerdem können Sie über das optionale C‘n‘C-fähige USBInterface USB-Datenträger anschließen und auf dem USB-Datenträger gespeicherte MP3-/WMA-Dateien abspielen. Dieses Kapitel geht nur auf das Abspielen von MP3-Dateien ein, da die Bedienung bei MP3- und WMA-Dateien identisch ist. In diesem Kapitel bezieht sich die Bezeichnung „MP3-Datenträger“ sowohl auf CD-R/RW als auch auf USBDatenträger wie z. B. USB-Sticks. Hinweise: • WMA-Dateien mit Digital Rights Management (DRM) aus OnlineMusicshops können mit diesem Gerät nicht abgespielt werden. • WMA-Dateien können nur sicher wiedergegeben werden, wenn diese mit dem Windows Media-Player ab Version 8 erstellt wurden. Vorbereitung eines MP3Datenträgers Vorbereitung einer MP3-CD Durch die Kombination von CD-Brenner, CD-Brenn-Software und CD-Rohling kann es zu Problemen mit der Abspielbarkeit der CDs kommen. Wenn Probleme mit selbstgebrannten CDs auftreten, sollten Sie beim Typ der CD-Rohlinge auf einen anderen Hersteller oder eine andere Farbe der Rohlinge wechseln. Das Format der CD muss ISO 9660 Level 1 bzw. Level 2 oder Joliet sein. Alle anderen 22 01_CalaisMP48_de.indd 22 11.06.2008 15:11:43 Uhr Formate können nicht zuverlässig abgespielt werden. Beim Erzeugen (Codieren) der MP3-/WMADateien aus den Audiodateien sollten Sie Bitraten von 32 bis zu 320 kbps für MP3Dateien bzw. von 32 bis zu 192 kbps für WMA-Dateien verwenden. Dieses Gerät unterstützt bis zu 252 Verzeichnisse und bis zu 255 Dateien pro Verzeichnis. Dabei darf die CD insgesamt maximal 512 Verzeichnisse und Dateien enthalten. Die Verzeichnisse und Titel auf der CD können einzeln angewählt werden. D01 A D02 D03 T001 T002 T003 T004 T005 T001 T002 T003 T004 T005 T006 D04 T001 T002 T003 T004 T005 T006 T007 T008 T009 T010 T011 B A Verzeichnisse B Titel · Dateien Jedes Verzeichnis kann mit dem PC benannt werden. Der Name des Verzeichnisses kann im Display des Gerätes angezeigt werden. Nehmen Sie die Benennung der Verzeichnisse und Titel/Dateien ent- sprechend Ihrer CD-Brenn-Software vor. Hinweise dazu finden Sie in der Anleitung der Software. Hinweise: • Verzichten Sie beim Benennen der Dateien (Verzeichnisse und Titel) auf Umlaute und Sonderzeichen. • Verwenden Sie Dateinamen mit mehr als 16 Zeichen (einschließlich „.MP3“ bzw. „.WMA“), verringert sich die maximale Anzahl von Titeln und Verzeichnissen. Wenn Sie auf eine bestimmte Reihenfolge Ihrer Dateien Wert legen: Speichern Sie die Dateien in der Reihenfolge auf den Datenträger, in der sie später abgespielt werden sollen. Das Gerät spielt die Dateien in der Reihenfolge ab, in der sie physikalisch auf dem Datenträger gespeichert sind. Für das Abspielen der Dateien in diesem Gerät müssen die MP3-Dateien die Dateiendung „.MP3“ bzw. die WMA-Dateien die Dateiendung „.WMA“ tragen. DEUTSCH MP3-/WMA-Betrieb Hinweise: Um eine ungestörte Wiedergabe zu gewährleisten, • versuchen Sie nicht, andere als MP3Dateien mit der Dateiendung „.MP3“ zu versehen und abzuspielen! Diese ungültigen Dateien werden während der Wiedergabe ignoriert. • verwenden Sie keine „gemischten“ CDs mit Nicht-MP3-Daten und MP3Titeln (das Gerät liest während der MP3-Wiedergabe nur MP3-Dateien). • verwenden Sie keine Mix-Mode CDs mit CD-Audio-Titeln und MP3-Titeln. Wenn Sie versuchen eine Mix-Mode23 01_CalaisMP48_de.indd 23 11.06.2008 15:11:43 Uhr MP3-/WMA-Betrieb CD abzuspielen, werden nur die CDAudio-Titel abgespielt. Vorbereitung eines USB-Datenträgers Damit das Gerät einen USB-Datenträger erkennt, muss dieser als Massenspeicher (Mass Storage Device) spezifiziert und im Dateisystem FAT16 oder FAT32 formatiert sein sowie MP3- oder WMA-Dateien enthalten. Sie können auf einem USB-Datenträger maximal 1500 Dateien (Verzeichnisse und Titel) anlegen. Die Verzeichnisse und die Titel können mit diesem Gerät einzeln angewählt werden. Verwenden Sie für die Dateinamen mehr als 24 Zeichen (einschließlich „.MP3“ bzw. „.WMA“), verringert sich diese maximale Anzahl der Dateien. Blaupunkt kann nicht für die einwandfreie Funktion aller auf dem Markt erhältlichen USB-Datenträger garantieren. ID3-Tags MP3-Titel können zusätzliche Informationen wie Interpret, Titelname und Album enthalten (ID3-Tags). Dieses Gerät kann ID3-Tags der Version 1 und der Version 2 im Display anzeigen. MP3-Betrieb starten MP3-Betrieb von CD starten Bei einer MP3-CD wird der MP3-Betrieb wie der normale CD-Betrieb gestartet. Lesen Sie dazu den Abschnitt „CD-Betrieb starten“ im Kapitel „CD-Betrieb“. Im Display 6 werden die Nummer des aktuellen Titels (z. B. „T12“) und die Spielzeit sowie Titelinformationen (ID3-Tags) bzw. der Dateiname angezeigt. Bei Wechsel in ein anderes Verzeichnis wird kurz die Verzeichnissnummer (z. B. „DIR 02“) angezeigt. USB-Datenträger anschließen und MP3Betrieb starten Um einen USB-Datenträger (z. B. USBStick oder USB-Festplatte) anschließen zu können, muss das optionale BlaupunktUSB-Interface an der Rückseite des Geräts (Kammer C3) angeschlossen werden. Sie können das USB-Kabel des Interfaces z. B. in das Handschuhfach oder an eine geeignete Stelle der Mittelkonsole verlegen. Hinweise: • Wenn Sie das Blaupunkt-USBInterface an das Gerät anschließen, muss der AUX-Eingang entsprechend eingestellt werden. lesen Sie dazu den Abschnitt „AUX-Eingang einstellen“ im Kapitel „Externe Audioquellen“. • Schalten Sie das Gerät stets aus, bevor Sie den USB-Datenträger anschließen oder abziehen, damit der Datenträger korrekt an- und abgemeldet wird. 쏅 Schließen Sie den USB-Datenträger an das USB-Kabel des USB-Interfaces an. Sobald ein USB-Datenträger angeschlossen ist, kann er mit der Taste SRC > ausgewählt werden. Im Display erscheint dann „USB“. Anzeige von Titelinformationen (ID3-Tags) Falls der MP3-Datenträger ID3-Tags zur Verfügung stellt, wird die Information zu jedem Titel bei Start des Titels einmal als Laufschrift im Display 6 angezeigt. Falls 24 01_CalaisMP48_de.indd 24 11.06.2008 15:11:43 Uhr keine ID3-Tags mit den MP3-Dateien gespeichert wurden, wird der Dateiname angezeigt. Hinweis: Lesen Sie zum Speichern von ID3-Tags auch die Anleitung zu Ihrer PC-MP3Software bzw. Brenn-Software. Titelinformationen einmalig als Lauftext anzeigen 쏅 Drücken Sie die Taste 5 <. Die ID3-Tags zum aktuellen Titel werden einmal als Laufschrift im Display 6 angezeigt. Hinweis: Diese Funktion steht nicht zur Verfügung, wenn die Anzeige von Titelinformationen als Laufschrift ausgeschaltet ist. Lesen dazu im Kapitel „CD-Betrieb“, Unterkapitel „Anzeige von Titelinformationen (CDText)“ den Abschnitt „Anzeige von Titelinformationen als Laufschrift ein-/ ausschalten“. Verzeichnis wählen Um auf- bzw. abwärts zu einem anderen Verzeichnis zu wechseln, 쏅 drücken Sie die Taste bzw. 8. Hinweise: • Alle Verzeichnisse, die keine MP3Dateien enthalten, werden automatisch übersprungen. • Das Gerät behandelt alle Verzeichnisse und Unterverzeichnisse, als ob sie auf einer Ebene liegen würden. Durch wiederholtes Drücken der Taste bzw. 8 gelangen Sie so auch in alle Unterverzeichnisse. Titel/Dateien wählen DEUTSCH MP3-/WMA-Betrieb Um ab- bzw. aufwärts zu einem anderen Titel/einer Datei im aktuellen Verzeichnis zu wechseln, 쏅 drücken Sie Taste bzw. 8. Bei einmaligem Drücken der Taste 8 wird der aktuelle Titel erneut gestartet. Schneller Suchlauf Für einen schnellen Suchlauf rückwärts bzw. vorwärts 쏅 halten Sie die Taste bzw. 8 gedrückt, bis Sie zur gewünschten Stelle gelangen. Hinweis: Im USB-Betrieb stoppt der schnelle Suchlauf rückwärts jeweils am Anfang des aktuellen Titels. Titel in zufälliger Reihenfolge abspielen (MIX) Um die Titel des aktuellen Verzeichnisses in zufälliger Reihenfolge abzuspielen, 쏅 drücken Sie die Taste 3 < so oft, bis „MIX DIR“ bzw. „MIX FLD“ im Display 6 angezeigt wird. Das MIX-Symbol erscheint im Display 6. Um alle Titel des MP3-Datenträgers in zufälliger Reihenfolge abzuspielen, 쏅 drücken Sie die Taste 3 < so oft, bis „MIX ALL“ im Display 6 angezeigt wird. Das MIX-Symbol erscheint im Display 6. 25 01_CalaisMP48_de.indd 25 11.06.2008 15:11:44 Uhr MP3-/WMA-Betrieb MIX beenden Um das Abspielen in zufälliger Reihenfolge zu beenden, 쏅 drücken Sie die Taste 3 < so oft, bis „MIX OFF“ im Display 6 angezeigt wird. Das MIX-Symbol im Display 6 erlischt. Titel anspielen (SCAN) Um alle Titel des MP3-Datenträgers in aufsteigender Reihenfolge für jeweils ca. 10 Sekunden anzuspielen, 쏅 drücken Sie die Taste 4 < so oft, bis „SCAN TRK“ im Display 6 erscheint. Während des Anspielens blinkt die Anzeige „MP3“ bzw. „USB“. Um im USB-Betrieb alle Titel des aktuellen Verzeichnisses anzuspielen, 쏅 drücken Sie die Taste 4 < so oft, bis „SCAN FLD“ im Display 6 erscheint. Während des Anspielens blinkt die Anzeige „USB“. SCAN beenden Um das Anspielen zu beenden, 쏅 drücken Sie die Taste 4 < so oft, bis „SCAN OFF“ im Display 6 erscheint. Der aktuell angespielte Titel wird weitergespielt. Um das aktuelle Verzeichnis zu wiederholen, 쏅 drücken Sie die Taste 2 < so oft, bis „RPT DIR“ bzw. „RPT FLD“ im Display 6 angezeigt wird. Das RPT-Symbol erscheint im Display 6. REPEAT beenden Um die Wiederholung zu beenden, 쏅 drücken Sie die Taste 2 < so oft, bis „RPT OFF“ im Display 6 angezeigt wird. Das RPT-Symbol im Display 6 erlischt. Wiedergabe unterbrechen (PAUSE) 쏅 Drücken Sie die Taste 1 <. Im Display 6 wird „PAUSE“ angezeigt. Pause aufheben 쏅 Drücken Sie während der Pause die Taste 1 <. Die Wiedergabe wird fortgesetzt. Einzelne Titel oder ganze Verzeichnisse wiederholt abspielen (REPEAT) Um den aktuellen Titel zu wiederholen, 쏅 drücken Sie die Taste 2 < so oft, bis „RPT TRK“ im Display 6 angezeigt wird. Das RPT-Symbol erscheint im Display 6. 26 01_CalaisMP48_de.indd 26 11.06.2008 15:11:44 Uhr CD-Wechsler-Betrieb CD wählen An das Gerät können optional die BlaupunktCD-Wechsler CDC A08 T und IDC A09 angeschlossen werden (Kammer C3 auf der Geräterückseite). Um auf- bzw. abwärts zu einer anderen CD zu wechseln, 쏅 drücken Sie die Taste bzw. 8. Achtung! Der CD-Wechsler wird normalerweise vom Gerät mir einer 12 VBetriebsspannung versorgt. Wird der CD-Wechsler CDC A 08 T (24 Volt) angeschlossen, so muss die Spannungsversorgung am Steckverbinder im Anschlusskabel des CD-Wechslers getrennt werden (Kammer C3/Pin 15). Der CDWechsler ist mit einer eigenen 24 VoltBetriebsspannung zu versorgen. Hinweise: • Wenn Sie einen CD-Wechsler an das Gerät anschließen, muss der AUXEingang entsprechend eingestellt werden. lesen Sie dazu den Abschnitt „AUX-Eingang einstellen“ im Kapitel „Externe Audioquellen“. • Informationen über den Umgang mit CDs, das Einlegen von CDs und zur Handhabung des CD-Wechslers finden Sie in der Bedienungsanleitung Ihres CD-Wechslers. CD-Wechsler-Betrieb starten 쏅 Drücken Sie SRC > so oft, bis im Display 6 „CHANGER“ angezeigt wird. Die Wiedergabe beginnt mit der ersten CD, die der CD-Wechsler erkennt. Im Display 6 werden die Nummer der aktuellen CD (z. B. „D02“) und des aktuellen Titels (z. B. „T07“) sowie die Spielzeit angezeigt. DEUTSCH CD-Wechsler-Betrieb Titel wählen Um ab- bzw. aufwärts zu einem anderen Titel auf der aktuellen CD zu wechseln, 쏅 drücken Sie die Taste bzw. 8. Schneller Suchlauf (hörbar) Für einen schnellen Suchlauf rückwärts bzw. vorwärts 쏅 halten Sie die Taste bzw. 8 gedrückt, bis Sie zu der gewünschten Stelle gelangen. Einzelne Titel oder ganze CDs wiederholt abspielen (RPT) Um den aktuellen Titel zu wiederholen, 쏅 drücken Sie die Taste 2 < so oft, bis „RPT TRK“ im Display 6 angezeigt wird. Das RPT-Symbol erscheint im Display 6. Um die aktuelle CD zu wiederholen, 쏅 drücken Sie die Taste 2 < so oft, bis „RPT CD“ im Display 6 angezeigt wird. Das RPT-Symbol erscheint im Display 6. REPEAT beenden Um die Wiederholung zu beenden, 쏅 drücken Sie die Taste 2 < so oft, bis „RPT OFF“ im Display 6 angezeigt wird. Das RPT-Symbol im Display 6 erlischt. 27 01_CalaisMP48_de.indd 27 11.06.2008 15:11:44 Uhr CD-Wechsler-Betrieb Titel in zufälliger Reihenfolge abspielen (MIX) Um die Titel der aktuellen CD in zufälliger Reihenfolge abzuspielen, 쏅 drücken Sie die Taste 3 < so oft, bis „MIX CD“ im Display 6 angezeigt wird. Das MIX-Symbol erscheint im Display 6. Um die Titel aller eingelegten CDs in zufälliger Reihenfolge abzuspielen, 쏅 drücken Sie die Taste 3 < so oft, bis „MIX ALL“ im Display 6 angezeigt wird. Das MIX-Symbol erscheint im Display 6. Im Display 6 erscheint kurz „SCAN OFF“. Der aktuell angespielte Titel wird weitergespielt. Wiedergabe unterbrechen (PAUSE) 쏅 Drücken Sie die Taste 1 <. Im Display 6 erscheint „PAUSE“. Pause aufheben 쏅 Drücken Sie während der Pause die Taste 1 <. Die Wiedergabe wird fortgesetzt. MIX beenden Um das Abspielen in zufälliger Reihenfolge zu beenden, 쏅 drücken Sie die Taste 3 < so oft, bis „MIX OFF“ im Display 6 angezeigt wird. Das MIX-Symbol im Display 6 erlischt. Alle Titel aller CDs anspielen (SCAN) Um alle Titel aller eingelegten CDs in aufsteigender Reihenfolge für jeweils ca. 10 Sekunden anzuspielen, 쏅 drücken Sie die Taste 4 <. Im Display 6 erscheint kurz „SCAN TRK“. Während des Anspielens blinkt die Anzeige der CD-Nummer. SCAN beenden Um das Anspielen zu beenden, 쏅 drücken Sie erneut die Taste 4 <. 28 01_CalaisMP48_de.indd 28 11.06.2008 15:11:44 Uhr IR-Fernbedienung RC 10 P Mit der optionalen IR-Fernbedienung können Sie die wichtigsten Funktionen des Gerätes steuern. Fernbedienungsempfänger In der Kappe des Gerätes befindet sich der Infrarot-Empfänger 9 für die Fernbedienung. Vor Verwendung der Fernbedienung muss der Empfänger eingeschaltet werden: 쏅 Drücken Sie die Taste MENU 7. 쏅 Drücken Sie die Taste bzw. 8 so oft, bis „IR“ und die aktuelle Einstellung „ON“ (ein) bzw. „OFF“ (aus) im Display 6 angezeigt werden. 쏅 Drücken Sie die Taste bzw. 8, um IR aus- bzw. einzuschalten. Um das Menü zu verlassen, 쏅 drücken Sie die Taste MENU 7. E Funktionen der Fernbedienung Allgemein: Taste Funktion ON H Gerät ein-/ausschalten (länger drücken) Mute (kurz drücken) Menü verlassen SRC @ Quellenumschaltung V+ B Lautstärke anheben V- A Lautstärke absenken OK G Menü aufrufen bzw. verlassen E Menüpunkt auswählen C Menüpunkt auswählen F Menüeinstellung ändern D Menüeinstellung ändern Im Radiobetrieb: Taste D F C B G H A @ DEUTSCH IR-Fernbedienung Funktion F Aufrufen der gespeicherten Sender D Wahl des Wellenbereichs/ der Speicherebene E Suchlauf aufwärts C Suchlauf abwärts Im CD-Betrieb: Taste Funktion F Nächsten Titel wählen D Vorherigen Titel wählen 29 01_CalaisMP48_de.indd 29 11.06.2008 15:11:44 Uhr IR-Fernbedienung Vorverstärkerausgang CD-Changer-Betrieb Vorverstärkerausgang Taste Sie können an das Gerät einen Verstärker zum Betrieb eines Tiefbass-Lautsprechers (Subwoofer) anschließen. Dazu muss der Verstärker an der Geräterückseite (Kammer C1) angeschlossen werden. Der Pegel des Subwoofers kann im Audio-Menü eingestellt werden: 쏅 Drücken Sie die Taste AUD :. 쏅 Drücken Sie die Taste oder 8 so oft, bis „SUB WOOF“ angezeigt wird. Nach ca. 2 Sekunden werden „SUBW“ und die aktuelle Einstellung im Display 6 angezeigt. 쏅 Drücken Sie die Taste bzw. 8, um den Pegel für den Subwoofer zwischen 0 und 7 einzustellen. Funktion F Nächsten Titel spielen D Vorherigen Titel spielen E Nächste CD spielen C Vorherige CD spielen MP3-Betrieb-Betrieb Taste Funktion F Nächsten Titel spielen D Vorherigen Titel spielen E Nächstes Verzeichnis spielen C Vorheriges Verzeichnis spielen Hinweis: Sie müssen nicht auf die Anzeige der aktuellen Einstellung warten, um sie durch Drücken der Taste bzw. 8 zu ändern. Um das Menü zu verlassen, 쏅 drücken Sie die Taste AUD :. 30 01_CalaisMP48_de.indd 30 11.06.2008 15:11:45 Uhr Externe Audioquellen Sie können über den AUX-Eingang verschiedene Arten von externen Audioquellen an das Gerät anschließen. Der AUX-Eingang muss für die jeweils angeschlossene externe Audioquelle eingestellt werden: • Einstellung „AUX“ für externe Audioquellen wie z. B. tragbare CDSpieler, MiniDisc-Spieler oder MP3Spieler. • Einstellung „CDC“ für die Blaupunkt-CDWechsler CDC A 08 T und IDC A 09. • Einstellung „USB“ für das USB-Interface von Blaupunkt. Zur Einstellung des AUX-Eingangs lesen Sie bitte den folgenden Abschnitt „AUXEingang einstellen“. Hinweis: Zum Anschluss einer externen Audioquelle benötigen Sie ein Adapterkabel. Dieses Kabel (BlaupunktNr. 7 607 897 093) können Sie über Ihren Blaupunkt-Fachhändler beziehen. AUX-Eingang einstellen 쏅 Drücken Sie die Taste MENU 7. 쏅 Drücken Sie die Taste oder 8 so oft, bis „SRC SEL“ angezeigt wird. Nach ca. 2 Sekunden werden „SRC“ und die aktuelle Einstellung „CDC“, „USB“ bzw. „AUX“ im Display 6 angezeigt. 쏅 Drücken Sie die Taste bzw. 8, um eine andere Einstellung zu wählen. Hinweis: Die Reihenfolge der Einstellungen im Menü ist „CDC“ – „USB“ – „AUX“: • Bei der aktuellen Einstellung „CDC“ können Sie durch Drücken der Taste 8 die Einstellung „USB“ wählen. • Bei der aktuellen Einstellung „USB“ können Sie durch Drücken der Taste 8 die Einstellung „CDC“ oder durch Drücken der Taste 8 die Einstellung „AUX“ wählen. • Bei der aktuellen Einstellung „AUX“ können Sie durch Drücken der Taste 8 die Einstellung „USB“ wählen. Nach jedem Wechsel der Einstellung erfolgt ein automatisches Ausschalten des Gerätes. Um zwischen den Einstellungen „CDC“ und „AUX“ zu wechslen, müssen Sie daher zunächst die Einstellung „USB“ wählen und nach dem automatischen Ausschalten das Gerät wieder einschalten. Wiederholen Sie dann den Einstellvorgang, um zur gewünschten Einstellung „AUX“ bzw. „CDC“ zu gelangen. Der Hinweis „AUTO SWITCH OFF IN 10 SECONDS“ wird angezeigt. Das Gerät schaltet sich nach ca. 10 Sekunden automatisch aus. 쏅 Schalten Sie das Gerät durch Drücken der Ein-/Aus-Taste 3 wieder ein Das Gerät wird im Radiobetrieb mit der gewählten Einstellung eingeschaltet. DEUTSCH Externe Audioquellen Hinweis: Wenn Sie die AUX-Einstellung gewählt haben, können Sie den AUX-Eingang mit der Taste SRC > anwählen. Im Display wird dann „AUX“ angezeigt. Wenn Sie die CDC- bzw. USBEinstellung gewählt haben, können Sie die Audioquelle mit der Taste SRC > nur anwählen, wenn ein entspre31 01_CalaisMP48_de.indd 31 11.06.2008 15:11:45 Uhr Externe Audioquellen chendes Gerät (CD-Wechsler bzw. USB-Interface) angeschlossen ist. Pegel des AUX-Eingangs einstellen Wenn Sie den AUX-Eingang für den Anschluss externer Audioquellen auf „AUX“ eingestellt haben, können Sie den Pegel der externen Audioquelle an den Pegel der geräteeigenen Audioquellen (wie z. B. CD und Radio) anpassen. Hinweis: Sie können den Pegel für den AUXEingang nur einstellen, wenn AUX als Audioquelle angewählt ist. 쏅 Drücken Sie ggf. die Taste SRC > so oft, bis „AUX“ im Display angezeigt wird. 쏅 Drücken Sie die Taste MENU 7. bzw. 8 쏅 Drücken Sie die Taste so oft, bis „GAIN“ und die aktuelle Einstellung angezeigt werden. 쏅 Drücken Sie die Taste bzw. 8, um die Pegelanpassung zwischen –9 und +9 einzustellen. Um das Menü zu verlassen, 쏅 drücken Sie die Taste MENU 7. Werkseinstellungen Werkseinstellungen wiederherstellen (RESET) Sie haben die Möglichkeit, die ursprünglichen Werkseinstellungen des Gerätes wiederherzustellen: 쏅 Halten Sie die Taste AUD : länger als ca. 10 Sekunden gedrückt. Ein Bestätigungston ertönt und im Display 6 wird kurz „RESET“ angezeigt. Alle Menüund Audiomenü-Einstellungen werden auf die Werkseinstellungen zurückgesetzt. Hinweis: Auf den Stationstasten gespeicherte Sender werden nicht gelöscht. 32 01_CalaisMP48_de.indd 32 11.06.2008 15:11:45 Uhr Technische Daten DEUTSCH Technische Daten Betriebsspannung 24 Volt Verstärker Ausgangsleistung: Line-Ausgang: Aux-Eingang: 2 x 20 Watt Sinus an 4 Ohm 2 x 2,0 Volt eff 2 x 2,0 Volt eff Tuner Wellenbereiche Europa: UKW (FM): 87,5 - 108 MHz MW : 531 - 1602 kHz LW : 153 - 279 kHz Wellenbereiche Amerika: FM: 87,7 - 107,9 MHz AM : 530 - 1710 kHz FM -Übertragungsbereich: 30 -15 000 Hz CD Übertragungsbereich: 20 - 20 000 Hz Änderungen vorbehalten! 33 01_CalaisMP48_de.indd 33 11.06.2008 15:11:45 Uhr Controls 1 Volume control < Keys 1 - 6 2 BND button Short press: Selects the memory bank or waveband Long press: Starts the Travelstore function (FMT or MWT/LWT) = RDS button Switching the convenient RDS function on/off 3 On/Off button Short press: Switches the device on In operation: Muting (Mute) Long press: Switches the device off > SRC button Source selection between radio and (if inserted, connected or switched on) CD, MP3, CD changer and AUX ? Code LED 4 CD eject button 5 CD tray 6 Display 7 MENU button Calls up the menus for basic settings. 8 Multifunction rocker 9 Infrared receiver for IR remote control (optional) : AUD button Short press: Opens Audio menu for setting bass, treble, balance, fader and loudness Long press (10 sec.): Restores factory settings ; TA button Switches priority for traffic information on/off Cancels an ongoing traffic announcement 34 02_CalaisMP48_gb.indd 34 11.06.2008 15:12:26 Uhr Important notes............................... 37 Use as directed.............................. 37 Remote control (option).................. 37 CD changer (option)....................... 37 USB interface (option).................... 37 Disposal of old unit ........................ 37 CODE theft protection...................... 38 Switching code query on/off (CODE) ...38 Entering the code number after a voltage interruption........................ 39 Switching on/off .............................. 39 Switching on/off with the On/Off button ............................... 39 Switching on/off via vehicle ignition ... 39 Switch-on with CD insertion ............ 39 Adjusting the switch-off time ........... 40 Switching on via telephone (option) .....40 Switch-on with the IR remote control RC 10 P (optional)............... 40 Adjusting the volume ....................... 40 Mute (MUTE)................................. 40 Telephone/Navigation Audio ............ 40 Switching the confirmation beep (BEEP) on/off................................ 41 Adjusting the maximum power-on volume (ON VOL) ............. 41 Setting the speed-dependent volume adjustment (GALA) ............. 42 Sound ............................................. 42 Adjusting the treble ........................ 42 Adjusting the bass ......................... 42 Adjusting the middle ...................... 43 Adjusting the left/right volume distribution (BAL) .......................... 43 Adjusting the front/rear volume distribution (FAD) .......................... 43 Time ............................................... 44 Displaying the time ........................ 44 Setting the time ............................. 44 Selecting 12/24-hour clock mode .... 44 Adjusting the time zone (TIMEZONE)....44 Radio mode ..................................... 45 Switching to radio mode ................. 45 Convenient RDS functions (AF, REG) ....45 Selecting the waveband/ memory bank ................................ 45 Tuning into a station ....................... 46 Storing stations ............................. 46 Listening to stored stations ............. 47 Scanning receivable stations (BANDSCAN) ................................ 47 Programme type (PTY) ................... 47 Treble reduction feature during interference (HICUT) ................................ 48 Switching radio text on/off .............. 48 Traffic information........................... 49 Switching traffic information priority on/off ............................... 49 Setting the volume increase for traffic announcements.................... 49 Cancelling traffic announcements .... 49 ENGLISH Contents 35 02_CalaisMP48_gb.indd 35 11.06.2008 15:12:26 Uhr Contents CD mode ......................................... 50 Starting the CD mode ..................... 50 Display of track information (CD text) ...................................... 50 Selecting tracks ............................. 51 Fast searching (audible).................. 51 Random track play (MIX) ................. 51 Scanning tracks (SCAN).................. 51 Repeating tracks (RPT) ................... 51 Interrupting playback (PAUSE)......... 52 Ejecting a CD................................. 52 MP3/WMA mode ............................. 52 Preparing an MP3 data carrier ......... 52 Switching to MP3 mode .................. 54 Display of track information (ID3 tags) ..................................... 54 Selecting a directory ...................... 55 Selecting tracks/files ...................... 55 Fast searching ............................... 55 Random track play (MIX) ................. 55 Scanning tracks (SCAN).................. 56 Repeating individual tracks or whole directories (REPEAT) ............. 56 Interrupting playback (PAUSE)......... 56 CD changer mode ............................ 57 Switching to CD changer mode ........ 57 Selecting CDs................................ 57 Selecting tracks ............................. 57 Fast searching (audible).................. 57 Repeating individual tracks or whole CDs (RPT) ........................... 57 Random track play (MIX) ................. 58 Scanning all tracks on all CDs (SCAN) ........................................ 58 Interrupting playback (PAUSE)......... 58 IR remote control RC 10 P ................ 59 Remote control receiver .................. 59 Functions of the remote control........ 59 Preamplifier output ......................... 60 External audio sources ..................... 61 Adjusting the AUX input .................. 61 Adjusting the level of the AUX input... 62 Restoring factory settings (RESET) ... 62 Technical data ................................. 63 Operating voltage .......................... 63 Amplifier ...................................... 63 Tuner ........................................... 63 CD ............................................... 63 ISO connection .............................. 281 36 02_CalaisMP48_gb.indd 36 11.06.2008 15:12:26 Uhr Important notes USB interface (option) Before placing your device into operation, carefully read these instructions and familiarise yourself with the device. Keep these instructions in the vehicle for subsequent questions. You can connect the Blaupunkt USB interface to play MP3/WMA files from a USB data carrier. The USB interface is available as an accessory (Blaupunkt no. 7 607 541 576). Use as directed Disposal of old unit The device is designed for operation in a commercial vehicle with 24-V vehicle system voltage and for installation in a 1-DIN slot. Do not dispose of your old device in the household trash! Use the return and collection systems available to dispose of the old device. ENGLISH Important notes Road safety Road safety has absolute priority. Only operate your device if the road and traffic conditions allow you to do so. Familiarise yourself with the device before setting off on your journey. You should always be able to hear police, fire and ambulance sirens in good time from inside your vehicle. For this reason, listen to your car sound system at a suitable volume level during your journey. Remote control (option) The remote control RC 10 P allows operating the most important functions. An infrared remote control is available as an accessory (Blaupunkt no. 7 607 591 512). CD changer (option) You can connect the CD changer CDC A08 T (Blaupunkt no. 7 607 274 002) or IDC A09 (Blaupunkt no. 7 607 274 005). The CD changers are available as accessories. 37 02_CalaisMP48_gb.indd 37 11.06.2008 15:12:27 Uhr Theft protection CODE theft protection Your device is equipped with a four-digit code number for protection against theft. This number must be entered whenever the device has been separated from the operating voltage of the vehicle. The code query is deactivated by default, but it can be activated. Note: If the code query is activated, the Code LED ? starts flashing if the device as well as the vehicle ignition are switched off. The code number is located in the radio pass for your device. Note: Never keep the radio pass inside the vehicle! Switching code query on/off (CODE) 쏅 Press the MENU button 7. or button 8 repea쏅 Press the tedly until "CODE" and the current setting "ON" or "OFF" appear on the display 6. 쏅 Press the or button 8. The display 6 shows "0000". Enter the code: 1HR". If you switch off the device during this wait period, you have to wait again for a full hour after switching it on again. 쏅 Press the station button 1 < repeatedly until the first digit of your code number appears on the display 6. 쏅 Press the station button 2 < repeatedly until the second digit of your code number appears on the display 6. 쏅 Press the station button 3 < repeatedly until the third digit of your code number appears on the display 6. 쏅 Press the station button 4 < repeatedly until the fourth digit of your code number appears on the display 6. 쏅 Once the correct code number appears on the display 6, press and hold the station button 5 < for longer than 2 seconds. The display 6 shows "CODE" again and the current setting "ON" or "OFF". 쏅 Press the or button 8 to switch the code query on or off. To exit the menu, 쏅 press the MENU button 7. Note: If you enter the wrong code number, "0000" is shown again on the display 6. You can repeat the entry twice. After the third incorrect entry, the device is locked for 1 hour. During this time, the display 6 shows "WAIT 38 02_CalaisMP48_gb.indd 38 11.06.2008 15:12:27 Uhr Theft protection 쏅 Switch on the device. The display 6 first shows "CODE" and then "0000". You can enter the code: Note: If you enter the wrong code number, "0000" is shown again on the display 6. You can repeat the entry twice. After the third incorrect entry, the device is locked for 1 hour. During this time, the display 6 shows "WAIT 1HR". If you switch off the device during this wait period, you have to wait again for a full hour after switching it on again. 쏅 Enter the code number as described in the section "Switching code query on/off". 쏅 Once the correct code number appears on the display 6, press and hold the station button 5 < for longer than 2 seconds. The device switches on. Switching on/off There are various ways of switching the device on/off: Switching on/off with the On/Off button 쏅 For switch-on, press the On/Off button 3. 쏅 To switch off the device, press and hold down the On/Off button 3 for longer than 2 seconds. ENGLISH Entering the code number after a voltage interruption Switching on/off Note: To protect the vehicle battery, the device is automatically switched off after an adjustable time period if the vehicle ignition is switched off (see the section "Adjusting the switch-off time" in this chapter). Switching on/off via vehicle ignition If the device is connected to the vehicle’s ignition and you did not switch the device off by pressing the On/Off button 3, it is switched on or off with the vehicle ignition Switch-on with CD insertion To switch it on with the CD insertion, 쏅 insert a CD with its printed side up into the CD tray 5 until you feel a slight resistance. The CD is automatically pulled in, and the device starts in CD mode. 39 02_CalaisMP48_gb.indd 39 11.06.2008 15:12:27 Uhr Switching on/off Volume Adjusting the switch-off time Adjusting the volume 쏅 Press the MENU button 7. 쏅 Press the or button 8 repeatedly until "HOUR" and the current setting appear on the display 6. 쏅 Adjust the switch-off time with the or button 8 in 5-minute increments between 5 and 60 minutes. To exit the menu, 쏅 press the MENU button 7. You can adjust the system volume in increments from 0 (off) to 32 (maximum). 쏅 To increase the system volume, turn the volume control 1 clockwise. 쏅 To reduce the system volume, turn the volume control 1 counterclockwise. Switching on via telephone (option) If the phone is activated with switchedoff device, the device switches on. After switching off the phone, the device is automatically switched off again. This requires that the phone is properly connected to the device. Switch-on with the IR remote control RC 10 P (optional) 쏅 For switch-on, press the ON button H on the IR remote control RC 10 P. Note: The IR receiver of the device must be switched on for you to be able to use the IR remote control. For further details, please read the section "Remote control receiver" in the chapter "IR remote control RC 10 P". Mute (MUTE) You can mute the system volume abruptly. 쏅 Briefly press the 3 button. Cancelling mute To return to your previously set volume level, 쏅 briefly press the 3 button again. Telephone/Navigation Audio Muting during telephone mode If your car sound system is connected with a cell phone or navigation system, the car sound system is muted when a call is incoming or during a voice output of the navigation. The call or the voice output is played back via the loudspeakers of the car sound system. For this purpose, the cell phone or the navigation system must be connected to the car sound system (chamber C2 on the rear side of the device). You can find out from your Blaupunkt dealer which navigation systems can be used with your car sound system. If a call is incoming or a navigation announcement takes place, the display shows "PHONE". 40 02_CalaisMP48_gb.indd 40 11.06.2008 15:12:27 Uhr Volume Note: You do not have to wait for the display of the current setting to change it by pressing the or button 8. To exit the menu, 쏅 press the MENU button 7. Note: Using the volume control 1, you can also adjust the volume during a telephone call or a navigation announcement. The adjusted volume is automatically saved. Switching the confirmation beep (BEEP) on/off For certain actions, e.g. long press of a button, a confirmation beep sounds. You can switch off the confirmation beep: 쏅 Press the MENU button 7. or button 8 repeat쏅 Press the edly until "BEEP" and the current setting "ON" or "OFF" appear on the display 6. 쏅 Press the or button 8 to switch the beep on or off. To exit the menu, 쏅 press the MENU button 7. Adjusting the maximum poweron volume (ON VOL) When you switch on the device, it plays at the previously selected volume. However, if you adjusted the volume before switchoff to be higher than maximum power-on volume, the volume is automatically limited to the adjusted power-on volume when you switch it on again. ENGLISH Adjusting the volume for Telephone/ Navigation Audio (PHONEVOL) You can set the volume level at which the telephone calls or navigation announcements are mixed in. 쏅 Press the MENU button 7. or button 8 repeat쏅 Press the edly until "PHONEVOL" is displayed. After approx. 2 seconds, "VOL" and the current setting are shown on the display 6. 쏅 Press the or button 8 to adjust the volume between 0 and 32. Note: To protect your hearing, the maximum power-on volume is limited to the value 25. 쏅 Press the MENU button 7. or button 8 repeat쏅 Press the edly until "ON VOL" appears. After approx. 2 seconds, "VOL" and the current setting are shown on the display 6. 쏅 Press the or button 8 to adjust the maximum power-on volume between 5 and 25. Note: You do not have to wait for the display of the current setting to change it by pressing the or button 8. To exit the menu, 쏅 press the MENU button 7. 41 02_CalaisMP48_gb.indd 41 11.06.2008 15:12:27 Uhr Volume Sound Setting the speed-dependent volume adjustment (GALA) Sound This function automatically adjusts the volume of the car sound system to the speed driven and the associated driving noises. For example, at an increased speed, the volume is automatically increased to compensate for the increased driving noise (e.g. due to airstream). For this purpose, the vehicle must provide the speedometer signal and the car sound system must be connected accordingly. You can adjust the automatic volume increase in 6 increments (OFF, 1-5). 쏅 Press the MENU button 7. 쏅 Press the or button 8 repeatedly until "GALA" appears on the display with the current setting. 쏅 Press the or button 8 to adjust the volume adjustment between "OFF" and 5. To exit the menu, 쏅 press the MENU button 7. Adjusting the treble 쏅 Press the AUD button :. 쏅 Press the or button 8 repeatedly until "TREBLE" appears. 쏅 Press and hold down the or button 8 for longer than 2 seconds. "FREQ" and the currently set treble frequency appear briefly on the display. To select a different treble frequency between 10.0 kHz and 17.5 kHz, 쏅 press the or button 8. To adjust the treble, 쏅 press the or button 8 repeatedly until "GAIN" appears. After approx. 2 seconds, "GAIN" and the current setting are shown on the display. 쏅 Press the or button 8 to adjust the treble between –7 and +7. To exit the menu, 쏅 press the AUD button :. Adjusting the bass 쏅 Press the AUD button :. or button 8 repeat쏅 Press the edly until "BASS" appears. 쏅 Press and hold down the or button 8 for longer than 2 seconds. "FREQ" and the currently set bass frequency appear briefly on the display. To select a different bass frequency between 60 Hz and 200 Hz, 쏅 press the or button 8. 42 02_CalaisMP48_gb.indd 42 11.06.2008 15:12:27 Uhr To adjust the bass level, 쏅 press the or button 8 repeatedly until "GAIN" appears. After approx. 2 seconds, "GAIN" and the current setting are shown on the display. 쏅 Press the or button 8 to adjust the bass level between –7 and +7. To adjust the quality factor for bass, or button 8 repeat쏅 press the edly until "Q-FACTOR" appears. After approx. 2 seconds, "Q" and the current setting are shown on the display. 쏅 Press the or button 8 to adjust the quality factor between 1.0 and 2.0. To exit the menu, 쏅 press the AUD button :. Adjusting the middle 쏅 Press the AUD button :. or button 8 repeat쏅 Press the edly until "MIDDLE" appears. 쏅 Press and hold down the or button 8 for longer than 2 seconds. "FREQ" and the currently set centre frequency appear briefly on the display. To select a different centre frequency between 500 Hz and 2.5 kHz, 쏅 press the or button 8. To adjust the middle level, or button 8 repeat쏅 press the edly until "GAIN" appears. After approx. 2 seconds, "GAIN" and the current setting are shown on the display. 쏅 Press the or button 8 to adjust the middle level between –7 and +7. To adjust the quality factor for the middle, or button 8 repeat쏅 press the edly until "Q-FACTOR" appears. After approx. 2 seconds, "Q" and the current setting are shown on the display. 쏅 Press the or button 8 to adjust the quality factor between 0.5 and 1.25. To exit the menu, 쏅 press the AUD button :. ENGLISH Sound Adjusting the left/right volume distribution (BAL) 쏅 Press the AUD button :. or button 8 repeat쏅 Press the edly until "BAL" appears on the display with the current setting. 쏅 Press the or button 8 to adjust the left/right volume distribution between –10 and +10. To exit the menu, 쏅 press the AUD button :. Adjusting the front/rear volume distribution (FAD) Note The rear loudspeakers must be connected via an additional amplifier. 쏅 Press the AUD button :. or button 8 repeat쏅 Press the edly until "FAD" appears on the display with the current setting. 쏅 Press the or button 8 to adjust the front/rear volume distribution between –10 and +10. To exit the menu, 쏅 press the AUD button :. 43 02_CalaisMP48_gb.indd 43 11.06.2008 15:12:28 Uhr Time Time Displaying the time To show the time for approx. 10 seconds on the display, 쏅 press and hold down the MENU button 7 for longer than 2 seconds. Setting the time 쏅 Press the MENU button 7. or button 8 repeat쏅 Press the edly until "TIMESET" appears on the display 6. After approx. 2 seconds, the current time appears on the display 6. In 24-hour mode, "24H" appears in front of the time, and in 12-hour mode "AM" or "PM". The hours flash and can be adjusted. To adjust hours or minutes, 쏅 press the or button 8. To switch between hours and minutes, 쏅 press the 6 button <. Note: You do not have to wait for the display of the current setting to change it by pressing the or button 8. To exit the menu, 쏅 press the MENU button 7. To exit the menu, 쏅 press the MENU button 7. Adjusting the time zone (TIMEZONE) If you move across time zones, you can adjust the time difference to the currently set time in 1-hour increments. This allows you to correct the display of the time for the currently valid time zone without having to readjust the time itself. 쏅 Press the MENU button 7. or button 8 repeat쏅 Press the edly until "TIMEZONE" appears. After approx. 2 seconds, "ZONE" and the current setting are shown on the display 6. 쏅 Press the or button 8 to adjust the time difference in increments of 1 hour between –12 and +12. Note: You do not have to wait for the display of the current setting to change it by pressing the or button 8. To exit the menu, 쏅 press the MENU button 7. Selecting 12/24-hour clock mode 쏅 Press the MENU button 7. or button 8 repeat쏅 Press the edly until "24H MODE" or "12H MODE" appears on the display 6. 쏅 Press the or button 8 to select among the modes. 44 02_CalaisMP48_gb.indd 44 11.06.2008 15:12:28 Uhr Radio mode This device is equipped with an RDS radio receiver. Almost all of the receivable FM stations broadcast a signal that not only carries the programme but also additional information such as the station name and programme type (PTY). The station name appears on the display 6 as soon as the tuner receives it. Switching to radio mode If you are in a different operating mode, 쏅 press the BND button 2, or 쏅 press the SRC button > repeatedly until "RADIO" appears on the display 6. The display 6 shows the current frequency or the station name. Convenient RDS functions (AF, REG) The convenient RDS functions AF (Alternative Frequency) and REG (Regional) expand the performance spectrum of your radio device: • AF: If the convenient RDS function is activated, the device automatically searches in the background for the best receivable frequency of the set station. • REG: At certain times, some radio stations divide their programme into regional programmes providing different content. The activated REG function prevents the device from switching to alternative frequencies of the adjusted station that are transmitting a different programme content. Note: REG must be switched on or off separately in the menu. Switching the RDS function on/off 쏅 To use the RDS functions AF and REG, press the RDS button =. The convenient RDS functions are active if the RDS symbol appears on the display 6. ENGLISH Radio mode Switching REG on/off 쏅 Press the MENU button 7. 쏅 Press the or button 8 repeatedly until "REG" and the current setting "ON" or "OFF" appear on the display 6. 쏅 Press the or button 8 to switch REG on or off. To exit the menu, 쏅 press the MENU button 7. Note: The setting REG ON/OFF takes effect only if the RDS function is activated. Selecting the waveband/memory bank This device can be used to receive programs of the frequency bands FM, MW and LW (Europe) or FM and AM (NAFTA). There are three memory banks available for the FM waveband (FM1, FM2 and FMT) and one for each of the MW and LW or AM wavebands. An additional memory bank MWT/ LWT or AMT is also available. Six stations can be stored in each memory bank. To toggle among the wavebands or memory banks, 쏅 press the BND button 2. 45 02_CalaisMP48_gb.indd 45 11.06.2008 15:12:28 Uhr Radio mode Tuning into a station There are various ways of tuning into a station. Automatic station seek tuning 쏅 Press the or button 8. The radio tunes into the next receivable station. Notes: • If the priority for traffic information is activated, the next traffic information station is selected. • If PTY is activated, the next station of the selected programme type is selected. Setting the sensitivity of station seek tuning You can select whether only strong stations should be tuned into with low sensitivity or also weak stations with high sensitivity: 쏅 Press the MENU button 7. 쏅 Press the or button 8 repeatedly until "SENS" and the current setting "LO" (low sensitivity) or "DX" (high sensitivity) appear on the display 6. 쏅 Press the or button 8 to change between the settings "LO" and "DX". To exit the menu, 쏅 press the MENU button 7. Tuning into stations manually To change the set frequency in small increments, 쏅 press the or button 8. To change the set frequency quickly, 쏅 press and hold down the ton 8. or but- Note: You can only tune into stations manually if the RDS function and PTY are switched off. Browsing through broadcasting networks (FM only) If a radio station provides several programmes, you have the option of browsing through its so-called "broadcasting network". 쏅 Press the or button 8 to switch to the next station on the broadcasting network. Note: Scrolling through broadcasting networks is possible only if the RDS function is switched on and PTY is switched off. When using this feature, you will only be able to switch to stations that you have received once before already. You can use the Travelstore function (TSTORE) for this purpose. Storing stations Storing stations manually 쏅 Select the desired memory bank or waveband. 쏅 Tune into the station. 쏅 Press and hold the station button 1 - 6 < for longer than 2 seconds to assign the station to that button. The confirmation beep sounds. The station is stored on the selected station button. 46 02_CalaisMP48_gb.indd 46 11.06.2008 15:12:28 Uhr Storing stations automatically (T-STORE) You can automatically store the six strongest stations in the region. For the FM waveband, the stations are stored in the FMT memory bank, for the MW and LW wavebands in the MWT/LWT memory bank, and for the AM waveband in the AMT memory bank. Note: Any stations that were previously stored in this memory bank are replaced by newly found stations. 쏅 Select the desired waveband. 쏅 Press and hold down the BND button 2 for longer than two seconds. The storing procedure begins. The display 6 shows "T-STORE". After the process has completed, the radio will play the station that is stored in memory location one of the FMT, MWT/LWT or AMT memory bank. Listening to stored stations 쏅 Select the memory bank or waveband. 쏅 Press the station button 1 - 6 < where the desired station is stored. Scanning receivable stations (BANDSCAN) The Bandscan function allows you to scan all receivable stations each for approx. 10 seconds. Starting Bandscan 쏅 Press and hold down the or button 8 for longer than 2 seconds. "BANDSCAN" briefly appears on the display. The device searches for stations in the current waveband. Every station found is played for approx. 10 seconds. At the same time, the display shows the current frequency or the station name. Ending Bandscan 쏅 Press the or button 8. The scan process is stopped. The device remains tuned to the previously played station. ENGLISH Radio mode Programme type (PTY) Besides transmitting the station name, some FM stations also provide information on the type of programme that they are broadcasting. For example, the programme types can be: CULTURE TRAVEL JAZZ SPORTS NEWS POP ROCK MUSIC You can use the PTY function to select stations of a particular programme type. If PTY is switched on and a PTY seek tuning has been started, the device automatically changes from the current station or from another operating mode to the station with the selected programme type. Switching PTY on/off 쏅 Press the MENU button 7. 쏅 Press the or button 8 repeatedly until "PTY" and the current setting "ON" or "OFF" appear on the display 6. 쏅 Press the or button 8 to switch PTY on or off. To exit the menu, 쏅 press the MENU button 7. 47 02_CalaisMP48_gb.indd 47 11.06.2008 15:12:29 Uhr Radio mode Selecting a programme type and starting seek tuning or button 8 repeat쏅 Press the edly until the desired programme type is displayed. 쏅 Press the or button 8 to start seek tuning. If a station with the selected programme type is found, it is tuned into. Treble reduction feature during interference (HICUT) After approx. 2 seconds, the current setting "TEXT ON" or "TEXT OFF" appears on the display 6. 쏅 Press the or button 8 to switch the display of radio text on or off. Note: You do not have to wait for the display of the current setting to change it by pressing the or button 8. To exit the menu, 쏅 press the MENU button 7. The HICUT function results in improved playback in case of weak radio reception. If reception interferences are present, the interference level is automatically reduced. To switch HICUT on or off, 쏅 press the MENU button 7. or button 8 repeat쏅 Press the edly until "HICUT" and the current setting "ON" or "OFF" appear on the display 6. 쏅 Press the or button 8 to switch HICUT on or off. To exit the menu, 쏅 press the MENU button 7. Switching radio text on/off Some radio stations use the RDS signal to transmit advertisement or other information instead of the station name. This radio text appears on the display 6. To switch the display of radio text on or off, 쏅 press the MENU button 7. or button 8 repeat쏅 Press the edly until "RADIOTXT" appears. 48 02_CalaisMP48_gb.indd 48 11.06.2008 15:12:29 Uhr Traffic information Setting the volume increase for traffic announcements Switching traffic information priority on/off You can adjust how many volume levels the traffic announcements are played back louder than the adjusted volume: 쏅 Press the MENU button 7. or button 8 repeat쏅 Press the edly until "TA VOL" appears. After approx. 2 seconds, "VOL" and the current setting are shown on the display 6. or button 8 to ad쏅 Press the just the volume increase between 0 and 10. To switch the priority for traffic information on or off in any operating mode, 쏅 press the TA button ;. Note: In the operating modes CD, MP3, CD changer and AUX, this function is available only if the FM waveband was tuned to last. The priority for traffic announcements is activated if the display 6 shows the TA symbol. As soon as the device receives a traffic announcement, it is switched through. The display 6 shows "TRAFFIC" for the duration of the announcement. Note: You will hear a warning beep, • if you leave the reception area of a traffic information station that the system is tuned into while listening to the traffic information station or a CD, and the subsequent automatic seek tuning cannot find a new traffic information station. • if you retune the radio from a traffic information station to a station that does not broadcast traffic information. If you hear the warning beep, you can either switch off traffic information priority or tune into a station that broadcasts traffic information. ENGLISH Traffic information Note: You do not have to wait for the display of the current setting to change it by pressing the or button 8. To exit the menu, 쏅 press the MENU button 7. Note: Using the volume control 1, you can adjust the volume during a traffic announcement for the duration of that announcement. Cancelling traffic announcements To cancel an ongoing traffic announcement and return to the previously playing audio source, 쏅 press the TA button ;. The priority for traffic announcement remains activated. 49 02_CalaisMP48_gb.indd 49 11.06.2008 15:12:29 Uhr CD mode CD mode Starting the CD mode You can use this device to play standard audio CDs, CD-Rs and CD-RWs with a diameter of 12 cm. To avoid problems when playing self-burned CDs, you should not burn CDs at speeds greater than 16-speed. If there is no CD inserted in the drive, 쏅 gently insert the CD with its printed side up into the CD tray until you feel some resistance. The drive draws in the CD automatically. The display 6 shows the CD symbol. Risk of severe damage to the CD drive! CD singles with a diameter of 8 cm and noncircular contoured CDs (shape CDs) must not be used. Handle the CD with care and avoid scratches and damages on the CD. If possible, only grasp the CD at the edge. If a CD should ever accumulate dirt, clean it with a lint-free cloth without using solvents. Always wipe the CD from the inside to the outside. Do not expose the CD to direct sunlight, and keep the CD in a protective case outside the device. Do not affix any labels onto the CD. Label the CD only with suitable commercial markers. We accept no responsibility for any damage to the CD drive that may occur as a result of the use of unsuitable or damaged CDs. To ensure proper functioning, use only CDs with the Compact-Disc logo. Copy-protected CDs can cause playback problems. Blaupunkt cannot guarantee the proper functioning of copy-protected CDs! Note: You must not hinder or assist the drive as it draws in the CD. The CD starts playing. The display 6 shows the number of the current track (e.g. "T12") and the playing time as well as track information (CD text). If a CD is already inserted in the drive, 쏅 press the SRC button > repeatedly until "CD" appears on the display 6. Playback begins from the point at which it was last interrupted. Display of track information (CD text) If the CD provides CD text, the information for every track is shown once on the display 6 as scrolling text at the start of the track. Displaying track information once as scrolling text 쏅 Press the 5 button <. The CD text for the current track is shown once as scrolling text on the display 6. Note: This function is not available if the display of CD text as scrolling text is switched off (see the following section). 50 02_CalaisMP48_gb.indd 50 11.06.2008 15:12:29 Uhr CD mode Note: The setting "SCRL ON/OFF" also affects the display of MP3 track information (ID3 tags) in MP3 mode accordingly. Selecting tracks 쏅 Press the or button 8 to change to the previous or next track. If you press the button 8 once, the current track will be played again from the beginning. Fast searching (audible) To fast search backwards or forwards, 쏅 press and hold down the or button 8 until you reach the desired position. Random track play (MIX) 쏅 Press the 3 button <. The display 6 briefly shows "MIX CD" and the MIX symbol appears. The next tracks are selected in random order. Cancelling MIX 쏅 Press the 3 button < again. The display 6 briefly shows "MIX OFF" and the MIX symbol disappears. Normal playback is then resumed. ENGLISH Switching the display of track information as scrolling text on/off To switch the display of track information as scrolling text on or off, 쏅 press the MENU button 7. 쏅 Press the or button 8 repeatedly until "SCRL" and the current setting "ON" or "OFF" appear on the display 6. 쏅 Press the or button 8 to switch scrolling text on or off. To exit the menu, 쏅 press the MENU button 7. With the setting "SCRL OFF", the track information is shown in segments of 8 characters each on the display 6. For this purpose, every text segment as well as track number and playing time are intermittently displayed for 5 seconds each. Scanning tracks (SCAN) To scan all the tracks of the CD for approx. 10 seconds each, 쏅 press the 4 button <. "SCAN TRK" briefly appears on the display. During the scanning, the "CD" display flashes. The track number and playing time of the current track or its track information is displayed. Cancelling SCAN and continuing listening to a track To end the scan process, 쏅 press the 4 button < again. "SCAN OFF" briefly appears on the display. The current track continues playing. Repeating tracks (RPT) 쏅 Press the 2 button <. "RPT TRK" appears briefly on the display and the RPT symbol is displayed. The current track is repeated continuously until you deactivate RPT. 51 02_CalaisMP48_gb.indd 51 11.06.2008 15:12:29 Uhr CD mode Exiting RPT 쏅 Press the 2 button < again. The display 6 briefly shows "RPT OFF" and the RPT symbol disappears. Normal playback is then resumed. Interrupting playback (PAUSE) 쏅 Press the 1 button <. The display 6 shows "PAUSE". Cancelling pause 쏅 During the pause, press the 1 button <. Playback is continued. Ejecting a CD Note: You can also eject CDs whilst the device is switched off or another audio source is activated. 쏅 Press the CD eject button 4. The CD is ejected. "CD EJECT" appears briefly on the display. Note: You must not hinder or assist the drive as it ejects the CD. 쏅 Remove the CD. The CD symbol disappears. Note: If you do not remove an ejected CD, it is automatically pulled in again after approx. 10 seconds. MP3/WMA mode MP3/WMA mode You can also use this car sound system to play CD-Rs and CD-RWs that contain MP3 and WMA music files. In addition, you can connect USB data carriers via the optional C‘n‘C-capable USB interface and play back MP3/WMA files stored on the USB data carrier. This chapters deals only with playing MP3 files since the operation for MP3 and WMA files is identical. In this chapter, the designation "MP3 data carrier" refers to CD-R/RW as well as USB data carriers such as USB sticks. Notes: • WMA files with Digital Rights Management (DRM) from online music shops cannot be played with this device. • WMA files can only be played back safely if they were created with Windows Media Player version 8 or later. Preparing an MP3 data carrier Preparing an MP3 CD The various combinations of CD burners, CD burning software and CD blanks may lead to problems arising with the device’s ability to play certain CDs. If problems occur with your own burned CDs, you should try another brand of CD blank or choose another colour of CD blank. The format of the CD must be ISO 9660 Level 1/Level 2 or Joliet. Other formats cannot be played reliably. 52 02_CalaisMP48_gb.indd 52 11.06.2008 15:12:30 Uhr When creating (coding) MP3/WMA files from audio files, you should use bit rates from 32 to 320 kbit/s for MP3 files or 32 to 192 kbps for WMA files. This device supports up to 252 directories and up to 255 files per directory. At the same time, the CD may contain a total of up to 512 directories and files. The directories and tracks on the CD can be selected individually. D01 A D02 D03 T001 T002 T003 T004 T005 T001 T002 T003 T004 T005 T006 D04 T001 T002 T003 T004 T005 T006 T007 T008 T009 T010 T011 B A Directories B Tracks · Files You can name each directory using a PC. The device is capable of displaying the directory name. Name the directories and tracks/files using your CD burner software. The software’s instruction manual will provide details on how to do this. Notes: • When naming files (directories and tracks) you should avoid using accents and special characters. • If you use file names with more than 16 characters (including ".MP3" or ".WMA"), the maximum number of tracks and directories is reduced. If you like your files to be in the specific order, save the files on the data carrier in the desired sequence in which you want to play them later. The devices plays back the files in the order in which they were physically stored on the data carrier. To play back files in this device, the MP3 files must have the file extension ".MP3" and the WMA files the file extension ".WMA". ENGLISH MP3/WMA mode Notes: To ensure uninterrupted playback, • do not try changing the file extension to ".MP3" of any files other than MP3 files and then attempt to play them! The device will ignore these invalid files during playback. • Do not use "mixed" CDs containing both non-MP3 data and MP3 tracks (the device only reads MP3 files during MP3 playback). • Do not use mix-mode CDs containing both CD-audio tracks and MP3 tracks. If you try playing a mix-mode CD, the device will only play the CDaudio tracks. Preparing a USB data carrier For the device to recognise a USB data carrier, it must be specified as mass storage device and formatted using the FAT16 or 53 02_CalaisMP48_gb.indd 53 11.06.2008 15:12:30 Uhr MP3/WMA mode FAT32 file system and contain MP3 or WMA files. You can created up to 1,500 files on a USB data carrier (directories and tracks). The directories and tracks can be selected individually with this device. If you use file names with more than 24 characters (including ".MP3" or ".WMA"), this maximum number of files is reduced. Blaupunkt cannot guarantee the proper functioning of all USB data carriers available on the market. ID3 tags MP3 tracks can contain additional information such as the artist, album and track name (ID3 tags). This device can display ID3 tags of version 1 and 2. Switching to MP3 mode Activating the MP3 mode of CD For an MP3 CD, the MP3 mode is activated in the same way as the normal CD mode. For further information, please read the section entitled "Starting the CD mode" in the "CD mode" chapter. The display 6 shows the number of the current track (e.g. "T12") and the playing time as well as track information (ID3 tags) or the file name. When changing to another directory, the directory number (e.g. "DIR 02") is briefly displayed. Connect USB data carrier and start MP3 mode To be able to connect a USB data carrier (e.g. a USB stick or USB hard disk), the optional Blaupunkt USB interface must be connected to the rear side of the device (chamber C3). You can route the USB cable of the interface, e.g. into the glove compartment or to a suitable place of the centre console. Notes: • If you connect the Blaupunkt USB interface to the device, the AUX input must be adjusted accordingly. For further details, please read the section "Adjusting the AUX input" in the chapter "External audio sources". • Always switch off the device before connecting or disconnecting the USB data carrier so that the data carrier is correctly registered and unregistered. 쏅 Connect the USB device with the USB cable of the USB interface. As soon as a USB data carrier is connected, it can be selected with the SRC button >. The display shows "USB". Display of track information (ID3 tags) If the MP3 data carrier provides ID3 tags, the information for every track is shown once on the display 6 as scrolling text at the start of the track. If no ID3 tags were stored with the MP3 files, the file name is displayed. Note: For storing ID3 tags, please also read the instructions for your PC MP3 software or burner software. 54 02_CalaisMP48_gb.indd 54 11.06.2008 15:12:30 Uhr MP3/WMA mode Note: This function is not available if the display of track information as scrolling text is switched off. In the chapter "CD mode", subchapter "Display of track information (CD text)", please read the section "Switching the display of track information as scrolling text on/off". Selecting a directory To move up or down to another directory, 쏅 press the or button 8. Notes: • The device will automatically skip any directories that do not contain MP3 files. • The device treats all directories and subdirectories as if they were located on one level. Repeatedly pressing the or button 8 will also bring you to all subdirectories. Selecting tracks/files To move up or down to another track/file in the current directory, 쏅 press the or button 8. If you press the button 8 once, the current track will be played again from the beginning. Fast searching To fast search backwards or forwards, 쏅 press and hold down the or button 8 until you reach the desired position. Note: In USB mode, the fast searching reverse stops at the beginning of the current track each time. ENGLISH Displaying track information once as scrolling text 쏅 Press the 5 button <. The ID3 tags for the current track are shown once as scrolling text on the display 6. Random track play (MIX) To play the tracks in the current directory in random order, 쏅 press the 3 button < repeatedly until "MIX DIR" or "MIX FLD" appears on the display 6. The MIX symbol appears on the display 6. To play all the tracks of the MP3 data carrier in random order, 쏅 press the 3 button < repeatedly until "MIX ALL" appears on the display 6. The MIX symbol appears on the display 6. Cancelling MIX To end the playback in random order, 쏅 press the 3 button < repeatedly until "MIX OFF" appears on the display 6. The MIX symbol on the display 6 disappears. 55 02_CalaisMP48_gb.indd 55 11.06.2008 15:12:30 Uhr MP3/WMA mode Scanning tracks (SCAN) To scan all the tracks of the MP3 data carrier in ascending order for approx. 10 seconds each, 쏅 press the 4 button < repeatedly until "SCAN TRK" appears on the display 6. During the scanning, the "MP3" or "USB" display flashes. To scan all the tracks in the current directory in USB mode, 쏅 press the 4 button < repeatedly until "SCAN FLD" appears on the display 6. During the scanning, the "USB" display flashes. Cancelling REPEAT To quit the repeat, 쏅 press the 2 button < repeatedly until "RPT OFF" appears on the display 6. The RPT symbol on the display 6 disappears. Interrupting playback (PAUSE) 쏅 Press the 1 button <. The display 6 shows "PAUSE". Cancelling pause 쏅 During the pause, press the 1 button <. Playback is continued. Stopping Scan To stop scanning, 쏅 press the 4 button < repeatedly until "SCAN OFF" appears on the display 6. The currently scanned track will then continue to be played normally. Repeating individual tracks or whole directories (REPEAT) To repeat the current track, 쏅 press the 2 button < repeatedly until "RPT TRK" appears on the display 6. The RPT symbol appears on the display 6. To repeat the current directory, 쏅 press the 2 button < repeatedly until "RPT DIR" or "RPT FLD" appears on the display 6. The RPT symbol appears on the display 6. 56 02_CalaisMP48_gb.indd 56 11.06.2008 15:12:30 Uhr CD changer mode Selecting CDs You can connect the Blaupunkt CD changers CDC A08 T and IDC A09 to the device as options (chamber C3 on the rear side of the device). To move up or down to another CD, 쏅 press the or button 8. Caution! The CD changer is usually supplied by the device with a 12-V operating voltage. If the CD changer CDC A 08 T (24 volt) is connected, the voltage supply at the plug connector of the connecting cable of the CD changer must be split (Chamber C3/Pin 15). The CD changer must be supplied with a separate 24volt operating voltage. Notes: • If you connect a CD changer to the device, the AUX input must be adjusted accordingly. For further details, please read the section "Adjusting the AUX input" in the chapter "External audio sources". • Information on handling CDs, inserting CDs and operating the CD changer can be found in the operating instructions supplied with your CD changer. Switching to CD changer mode 쏅 Press the SRC button > repeatedly until the display 6 shows "CHANGER". The device starts playing the first CD that the CD changer detects. The display 6 shows the number of the current CD (e.g. "D02") and the current track (e.g. "T07") as well as the playing time. Selecting tracks To move down or up to another track on the current CD, 쏅 press the or button 8. ENGLISH CD changer mode Fast searching (audible) To fast search backwards or forwards, 쏅 press and hold down the or button 8 until you reach the desired position. Repeating individual tracks or whole CDs (RPT) To repeat the current track, 쏅 press the 2 button < repeatedly until "RPT TRK" appears on the display 6. The RPT symbol appears on the display 6. To repeat the current CD, 쏅 press the 2 button < repeatedly until "RPT CD" appears on the display 6. The RPT symbol appears on the display 6. Cancelling REPEAT To quit the repeat, 쏅 press the 2 button < repeatedly until "RPT OFF" appears on the display 6. The RPT symbol on the display 6 disappears. 57 02_CalaisMP48_gb.indd 57 11.06.2008 15:12:30 Uhr CD changer mode Random track play (MIX) Interrupting playback (PAUSE) To play the tracks on the current CD in random order, 쏅 press the 3 button < repeatedly until "MIX CD" appears on the display 6. The MIX symbol appears on the display 6. To play the tracks on all inserted CDs in random order, 쏅 press the 3 button < repeatedly until "MIX ALL" appears on the display 6. The MIX symbol appears on the display 6. 쏅 Press the 1 button <. The display 6 shows "PAUSE". Cancelling pause 쏅 During the pause, press the 1 button <. Playback is continued. Cancelling MIX To end the playback in random order, 쏅 press the 3 button < repeatedly until "MIX OFF" appears on the display 6. The MIX symbol on the display 6 disappears. Scanning all tracks on all CDs (SCAN) To scan all the tracks of all inserted CDs in ascending order for approx. 10 seconds each, 쏅 press the 4 button <. The display 6 briefly shows "SCAN TRK". During the scanning, the display of the CD number flashes. Stopping Scan To stop scanning, 쏅 press the 4 button < again. The display 6 briefly shows "SCAN OFF". The currently scanned track will then continue to be played normally. 58 02_CalaisMP48_gb.indd 58 11.06.2008 15:12:31 Uhr IR remote control The optional IR remote control allows controlling the most important functions of the device. Remote control receiver The cap of the device contains the infrared receiver 9 for the remote control. Before using the remote control, the receiver must be switched on: 쏅 Press the MENU button 7. 쏅 Press the or button 8 repeatedly until "IR" and the current setting "ON" or "OFF" appear on the display 6. 쏅 Press the or button 8 to switch IR on or off. To exit the menu, 쏅 press the MENU button 7. Functions of the remote control General: Button Function ON H Switches the device on/ off (press longer) Mute (short press) Exit the menu SRC @ Switches sources V+ B Increases the volume V- A Decreases the volume OK E G Calls up or exits a menu E Selects a menu item C Selects a menu item F Changes a menu setting D Changes a menu setting ENGLISH IR remote control RC 10 P In radio mode: Button D F C B G Calls up the stored stations D Selects the waveband/ memory bank E Seek tuning forward C Seek tuning reverse H A @ Function F In CD mode: Button Function F Selects the next track D Selects the previous track 59 02_CalaisMP48_gb.indd 59 11.06.2008 15:12:31 Uhr IR remote control Preamplifier output CD changer mode Preamplifier output Button You can connect an amplifier to the device to operate a low-bass loudspeaker (subwoofer). To do so, the amplifier must be connected to the rear side of the device (chamber C1). The level of the subwoofer can be adjusted in the Audio menu: 쏅 Press the AUD button :. or button 8 repeat쏅 Press the edly until "SUB WOOF" appears. After approx. 2 seconds, "SUBW" and the current setting are shown on the display 6. 쏅 Press the or button 8 to adjust the level for the subwoofer between 0 and 7. Function F Plays the next track D Plays the previous track E Plays the next CD C Plays the previous CD MP3 mode Button Function F Plays the next track D Plays the previous track E Plays the next directory C Plays the previous directory Note: You do not have to wait for the display of the current setting to change it by pressing the or button 8. To exit the menu, 쏅 press the AUD button :. 60 02_CalaisMP48_gb.indd 60 11.06.2008 15:12:31 Uhr External audio sources You can connect different types of external audio sources to the device via the AUX input: The AUX input must be adjusted for the connected external audio source in each case: • "AUX" setting for external audio sources, such as portable CD players, MiniDisc players or MP3 players. • "CDC" setting for the Blaupunkt CD changers CDC A 08 T and IDC A 09. • "USB" setting for the USB interface from Blaupunkt. For the setting of the AUX input, please read the following section "Adjusting the AUX input". Note: If you want to connect an external audio source, you will need an adapter cable. You can obtain this cable (Blaupunkt no. 7 607 897 093) from your Blaupunkt dealer. Adjusting the AUX input 쏅 Press the MENU button 7. or button 8 repeat쏅 Press the edly until "SRC SEL" appears. After approx. 2 seconds, "SRC" and the current setting "CDC", "USB"or "AUX" are shown on the display 6. 쏅 Press the or button 8 to select another setting. Note: The order of the settings in the menu is "CDC" – "USB" – "AUX": • With "CDC" as the current setting, you can select the "USB" setting by pressing the button 8. • With "USB" as the current setting, you can select the "CDC" setting by pressing the button 8 or the "AUX" setting by pressing the button 8. • With "AUX" as the current setting, you can select the "USB" setting by pressing the button 8. After every change of the setting, the device is automatically switched off. To switch between the settings "CDC" and "AUX", you must, therefore, first select the "USB" setting and then switch on the device again after the automatic switch-off. Next, repeat the setting process to obtain the desired setting "AUX" or "CDC". The note "AUTO SWITCH OFF IN 10 SECONDS" is displayed. The device automatically switches off after approx. 10 seconds. 쏅 Press the On/Off button 3 to switch the device on again. The device is switched on in radio mode with the selected setting. ENGLISH External audio sources Note: If you selected the AUX setting, you can select the AUX input with the SRC button >. "AUX" then appears on the display. If you selected the setting CDC or USB, you can select the audio source with the SRC button > only if a corresponding device (CD changer or USB interface) is connected. 61 02_CalaisMP48_gb.indd 61 11.06.2008 15:12:31 Uhr External audio sources Factory settings Adjusting the level of the AUX input Restoring factory settings (RESET) If you adjusted the AUX input to "AUX" for connecting external audio sources, you can adjust the level of the external audio source to the level of the audio source of the device (such as CD and radio). You can restore the original factory settings of the device. 쏅 Press and hold down the AUD button : for longer than approx. 10 seconds. A confirmation beep sounds and the display 6 briefly shows "RESET". All the menu and audio menu settings are reset to the factory settings. Note: You can adjust the level for the AUX input only if AUX is selected as audio source. 쏅 If necessary, press the SRC button > repeatedly until "AUX" appears on the display. 쏅 Press the MENU button 7. 쏅 Press the or button 8 repeatedly until "GAIN" appears on the display with the current setting. 쏅 Press the or button 8 to adjust the level adjustment between –9 and +9. To exit the menu, 쏅 press the MENU button 7. Note: Stations stored at the station buttons are not deleted. 62 02_CalaisMP48_gb.indd 62 11.06.2008 15:12:32 Uhr Technical data Technical data Operating voltage ENGLISH 24 volt Amplifier Output power: Line output: AUX input: 2 x 20 watt sine at 4 ohm 2 x 2.0 Vpp 2 x 2.0 Vpp Tuner Wavebands in Europe: FM: 87.5 - 108 MHz MW: 531 - 1602 kHz LW: 153 - 279 kHz Wavebands in America: FM: 87.7 - 107.9 MHz AM: 530 - 1710 kHz FM frequency response: 30 - 15,000 Hz CD Frequency response: 20 - 20,000 Hz Subject to changes! 63 02_CalaisMP48_gb.indd 63 11.06.2008 15:12:32 Uhr Eléments de commande 1 Bouton de réglage du volume 2 Touche BND Pression brève : sélection du niveau de mémoire ou de la gamme d'ondes Pression prolongée : démarrage de la fonction Travelstore (FMT ou MWT (OM)/LWT (OL)) 3 Touche marche/arrêt Pression brève : mise en marche de l'appareil En fonctionnement : coupure du son (Mute) Pression prolongée : arrêt de l'appareil ; Touche TA Activation et désactivation de la priorité aux informations routières Interruption de la diffusion d'une information routière < Bloc de touches 1 - 6 = Touche RDS Activation et désactivation des fonctions confort RDS 4 Touche d'éjection du CD > Touche SRC Sélection de la source : radio ou (si support introduit ou appareil raccordé et en marche) CD, MP3, changeur de CD et AUX 5 Fente d'insertion du CD ? Code LED 6 Ecran 7 Touche MENU Appel du menu pour les réglages de base. 8 Touche multifonction 9 Récepteur infrarouge (IR) pour télécommande infrarouge (option) : Touche AUD Pression brève : ouverture du menu audio pour le réglage des graves, des aiguës, de la balance, du fader et du loudness Pression prolongée (10 s) : retour aux réglage d'usine 64 03_CalaisMP48_fr.indd 64 11.06.2008 15:13:18 Uhr Remarques importantes ................... 67 Utilisation conforme ....................... 67 Télécommande (option) ................. 67 Changeur de CD (option) ................ 67 Interface USB (option) ................... 67 Elimination des anciens appareils ..... 67 Protection antivol (CODE) ................ 68 Activation et désactivation de la demande d'entrée du code (CODE) .. 68 Entrée du code après une interruption de la tension d'alimentation ............. 69 Mise en marche et arrêt.................... 69 Mise en marche et arrêt avec la touche marche/arrêt ...................... 69 Mise en marche et arrêt par l'intermédiaire du contact du véhicule ....................................... 69 Mise en marche par insertion d'un CD ........................................ 69 Réglage de la temporisation à l'arrêt .....70 Mise en marche par le téléphone (option)........................................ 70 Mise en marche avec la télécommande IR (infrarouge) RC 10 P (option) ...... 70 Réglage du volume sonore ................ 70 Coupure du son (MUTE) .................. 70 Sortie audio du téléphone ou du système de navigation .................... 70 Activation et désactivation du bip de confirmation (BEEP) .................. 71 Réglage du volume sonore maximal à la mise en marche (ON VOL) .......... 71 Réglage de l'adaptation du volume en fonction de la vitesse (GALA) ...... 72 Tonalité ........................................... 72 Réglage des aiguës ......................... 72 Réglage des graves......................... 72 Réglage du médium ........................ 73 Réglage de la répartition gauche/ droite du volume sonore (BAL)......... 73 Réglage de la répartition avant/ arrière du volume sonore (FAD) ....... 74 Heure.............................................. 74 Affichage de l'heure........................ 74 Réglage de l'heure .......................... 74 Sélection du mode d'affichage 12/24 heures................................ 75 Réglage du fuseau horaire (TIMEZONE) ................................. 75 Mode radio ...................................... 75 Activation du mode radio ................ 75 Fonctions confort RDS (AF, REG) ..... 75 Sélection de la gamme d'ondes ou du niveau de mémoire ................ 76 Réglage des stations....................... 76 Mémorisation des stations .............. 77 Appel des stations mémorisées........ 78 Balayage des stations qui peuvent être reçues (BANDSCAN) ................ 78 Type de programme (PTY)............... 78 Abaissement du niveau des aiguës en cas de perturbation (HICUT) ....... 78 Activation et désactivation de l'affichage du texte radio ................. 79 Informations routières ..................... 79 Activation et désactivation de la priorité aux informations routières.... 79 Réglage du relèvement du volume sonore pour les informations routières....................................... 80 Interruption des informations routières....................................... 80 FRANÇAIS Table des matières 65 03_CalaisMP48_fr.indd 65 11.06.2008 15:13:19 Uhr Table des matières Mode CD ......................................... 80 Démarrage du mode CD .................. 81 Affichage des informations sur les titres (texte de CD) .................... 81 Sélection des titres ........................ 82 Recherche rapide (audible) ............. 82 Lecture aléatoire des titres (MIX)...... 82 Balayage des titres (SCAN).............. 82 Répétition de la lecture d'un titre (RPT) ........................................... 82 Interruption de la lecture (PAUSE) .... 83 Retrait du CD ................................ 83 Mode MP3/WMA ............................. 83 Préparation d'un support de données MP3 ................................ 83 Démarrage du mode MP3................ 85 Affichage des informations sur les titres (balises ID3) ......................... 85 Sélection des répertoires ................ 86 Sélection des titres et des fichiers .... 86 Recherche rapide .......................... 86 Lecture des titres dans un ordre aléatoire (MIX) .............................. 86 Balayage des titres (SCAN).............. 87 Lecture répétée de titres ou de répertoires entiers (REPEAT) ........... 87 Interruption de la lecture (PAUSE) .... 87 Mode changeur de CD ...................... 88 Démarrage du mode changeur de CD........................................... 88 Sélection des CD ........................... 88 Sélection des titres ........................ 88 Recherche rapide (audible) ............. 88 Répétition de la lecture d'un titre ou d'un CD entier (RPT) .................. 88 Lecture des titres dans un ordre aléatoire (MIX) .............................. 89 Balayage de tous les titres de tous les CD (SCAN) ............................... 89 Interruption de la lecture (PAUSE) .... 89 Télécommande IR RC 10 P ................ 90 Récepteur de télécommande ........... 90 Fonctions de la télécommande......... 90 Sortie du préamplificateur ............... 91 Sources audio externes .................... 92 Réglage de l'entrée AUX .................. 92 Réglage du niveau de l'entrée AUX .... 93 Retour aux réglages d'usine (RESET) .......................................... 93 Caractéristiques techniques ............. 94 Tension de service ......................... 94 Amplificateur ................................ 94 Tuner ........................................... 94 CD ............................................... 94 Raccordement ISO ......................... 281 66 03_CalaisMP48_fr.indd 66 11.06.2008 15:13:19 Uhr Remarques importantes Interface USB (option) Avant de mettre l'appareil en service, veuillez lire attentivement le présent mode d'emploi et vous familiariser avec l'appareil. Conservez ce mode d'emploi dans le véhicule pour toute question ultérieure. Vous pouvez raccorder l'interface USB Blaupunkt pour lire les fichiers MP3/WMA mémorisés sur un support de données USB. L'interface USB est disponible en tant qu'accessoire (réf. Blaupunkt 7 607 541 576). Utilisation conforme Elimination des anciens appareils L'appareil est conçu pour fonctionner dans un véhicule utilitaire disposant d'une tension de bord de 24 V et pour être intégré dans une baie DIN simple. Sécurité routière Ne jetez pas votre ancien appareil avec les ordures ménagères ! Utilisez les systèmes mis à votre disposition pour le retour ou la collecte des anciens appareils en vue de leur élimination. FRANÇAIS Remarques importantes La sécurité routière est impérative. Utilisez uniquement votre appareil si la situation routière le permet. Familiarisezvous avec l'appareil avant de prendre la route. Les avertisseurs sonores de la police, des sapeurs-pompiers et des services de secours doivent pouvoir être perçus à temps dans le véhicule. Lorsque le véhicule roule, réglez par conséquent un volume sonore raisonnable. Télécommande (option) La télécommande RC 10 P permet de contrôler les principales fonctions de l'appareil. Il s'agit d'une télécommande infrarouge disponible en tant qu'accessoire (réf. Blaupunkt 7 607 591 512). Changeur de CD (option) Vous pouvez raccorder les changeurs de CD CDC A08 T (réf. Blaupunkt 7 607 274 002) ou IDC A09 (réf. Blaupunkt 7 607 274 005). Ces changeurs de CD sont disponibles en tant qu'accessoires. 67 03_CalaisMP48_fr.indd 67 11.06.2008 15:13:20 Uhr Protection antivol Protection antivol (CODE) Votre appareil est protégé contre le vol par un code à quatre chiffres. Ce code doit toujours être entré lorsque l'appareil a été débranché du réseau de bord. La demande d'entrée du code est désactivée d'usine, mais elle peut être activée. Remarque : Si la demande d'entrée du code est activée, le Code LED ? se met à clignoter non seulement lorsque l'appareil est arrêté, mais aussi lorsque le contact est coupé. Vous trouverez le code dans le passeport de l'appareil. Remarque : Ne conservez jamais le passeport de l'appareil dans le véhicule ! Activation et désactivation de la demande d'entrée du code (CODE) 쏅 Appuyez sur la touche MENU 7. ou 8 쏅 Appuyez sur la touche autant de fois qu'il est nécessaire pour faire apparaître « CODE » et le réglage actuel « ON » (activé) ou « OFF » (désactivé) sur l'écran 6. 쏅 Appuyez sur la touche ou 8. « 0000 » apparaît sur l'écran 6. Entrez le code : Remarque : Si vous entrez un code erroné, « 0000 » réapparaît sur l'écran 6. Vous pouvez encore rentrer deux fois un code. Après trois entrées erronées du code, l'appareil est bloqué pendant 1 heure. Pendant ce temps, le message « WAIT 1HR » est affiché sur l'écran 6. Si vous arrêtez l'appareil pendant ce temps d'attente, vous devrez attendre une heure pleine avant de pouvoir le remettre en marche. 쏅 Appuyez sur la touche de présélection 1 < autant de fois qu'il est nécessaire pour faire apparaître le premier chiffre du code sur l'écran 6. 쏅 Appuyez sur la touche de présélection 2 < autant de fois qu'il est nécessaire pour faire apparaître le deuxième chiffre du code sur l'écran 6. 쏅 Appuyez sur la touche de présélection 3 < autant de fois qu'il est nécessaire pour faire apparaître le troisième chiffre du code sur l'écran 6. 쏅 Appuyez sur la touche de présélection 4 < autant de fois qu'il est nécessaire pour faire apparaître le quatrième chiffre du code sur l'écran 6. 쏅 Lorsque le code correct est affiché sur l'écran 6, appuyez sur la touche de présélection 5 < et maintenez-la appuyée pendant plus de 2 secondes. « CODE » apparaît de nouveau sur l'écran 6 avec le réglage actuel « ON » (activé) ou « OFF » (désactivé). 쏅 Appuyez sur la touche ou 8 pour activer ou désactiver la demande d'entrée du code. Pour quitter le menu, 쏅 appuyez sur la touche MENU 7. 68 03_CalaisMP48_fr.indd 68 11.06.2008 15:13:20 Uhr Entrée du code après une interruption de la tension d'alimentation 쏅 Mettez l'appareil en marche. « CODE » apparaît d'abord sur l'écran 6, puis « 0000 ». Vous pouvez alors entrer le code : Remarque : Si vous entrez un code erroné, « 0000 » réapparaît sur l'écran 6. Vous pouvez encore rentrer deux fois un code. Après trois entrées erronées du code, l'appareil est bloqué pendant 1 heure. Pendant ce temps, le message « WAIT 1HR » est affiché sur l'écran 6. Si vous arrêtez l'appareil pendant ce temps d'attente, vous devrez attendre une heure pleine avant de pouvoir le remettre en marche. 쏅 Entrez le code comme décrit dans la section « Activation et désactivation de la demande d'entrée du code ». 쏅 Lorsque le code correct est affiché sur l'écran 6, appuyez sur la touche de présélection 5 < et maintenez-la appuyée pendant plus de 2 secondes. L'appareil se met en marche. Mise en marche et arrêt Mise en marche et arrêt Diverses possibilités vous sont offertes pour mettre en marche ou arrêter l'appareil : Mise en marche et arrêt avec la touche marche/arrêt 쏅 Pour mettre l'appareil en marche, appuyez sur le touche marche/arrêt 3. 쏅 Pour arrêter l'appareil, appuyez sur la touche marche/arrêt 3 et maintenezla appuyée pendant plus de 2 secondes. FRANÇAIS Protection antivol Remarque : Pour protéger la batterie du véhicule, l'appareil s'arrête automatiquement au bout d'un temps réglable après le contact a été coupé (voir section « Réglage de la temporisation à l'arrêt »). Mise en marche et arrêt par l'intermédiaire du contact du véhicule Si l'appareil est correctement relié au contacteur d'allumage du véhicule et s'il n'a pas été arrêté par l'intermédiaire de la touche marche/arrêt 3, il est mis en marche ou arrêté au moment où le contact est mis ou coupé. Mise en marche par insertion d'un CD Pour mettre l'appareil en marche par insertion d'un CD, 쏅 introduisez le CD dans la fente d'insertion du CD 5, avec la face imprimée tournée vers le haut, jusqu'à ce que vous rencontriez une résistance. 69 03_CalaisMP48_fr.indd 69 11.06.2008 15:13:20 Uhr Mise en marche et arrêt Le CD est entraîné automatiquement dans le lecteur, l'appareil démarre dans le mode CD. Réglage de la temporisation à l'arrêt 쏅 Appuyez sur la touche MENU 7. ou 8 쏅 Appuyez sur la touche autant de fois qu'il est nécessaire pour faire apparaître « HOUR » et le réglage actuel sur l'écran 6. 쏅 Appuyez sur la touche ou 8 pour régler la temporisation à l'arrêt entre 5 et 60 minutes par paliers de 5 minutes. Pour quitter le menu, 쏅 appuyez sur la touche MENU 7. Mise en marche par le téléphone (option) L'appareil étant arrêté, il se met en marche lorsque le téléphone est activé. Après la désactivation du téléphone, l'appareil est de nouveau arrêté automatiquement à condition que le téléphone soit relié correctement à l'appareil. Mise en marche avec la télécommande IR (infrarouge) RC 10 P (option) 쏅 Pour mettre l'appareil en marche, appuyez sur la touche ON H de la télécommande IR RC 10 P. Remarque : Pour que vous puissiez utiliser la télécommande IR, le récepteur IR de l'appareil doit être en marche. Consultez pour cela la section « Récepteur de télécommande » dans le chapitre « Télécommande IR RC 10 P ». Volume sonore Réglage du volume sonore Le volume sonore du système est réglable par pas de 0 (arrêt) à 32 (maximum). 쏅 Pour augmenter le volume sonore du système, tournez le bouton de réglage du volume 1 vers la droite. 쏅 Pour diminuer le volume sonore du système, tournez le bouton de réglage du volume 1 vers la gauche. Coupure du son (MUTE) Vous pouvez diminuer rapidement le volume sonore du système (Mute). 쏅 Appuyez brièvement sur la touche 3. Annulation de la réduction du volume sonore Pour réactiver le volume sonore précédent, 쏅 appuyez de nouveau brièvement sur la touche 3. Sortie audio du téléphone ou du système de navigation Coupure du son en mode téléphone Lorsque l'autoradio est relié à un téléphone portable ou à un système de navigation, le son est coupé en cas d'appel entrant ou de sortie vocale du système de navigation. La communication téléphonique ou la sortie vocale du système de navigation s'effectuent par l'intermédiaire des haut-parleurs du système audio. Le téléphone portable ou le système de navigation doivent pour cela être raccordés à l'autoradio (alvéole C2 sur la face arrière de l'appareil). Consultez votre revendeur Blaupunkt pour connaître les systèmes de navigation utilisables avec votre autoradio. 70 03_CalaisMP48_fr.indd 70 11.06.2008 15:13:20 Uhr Lors d'un appel entrant ou de sortie vocale du système de navigation, « PHONE » apparaît sur l'écran. Réglage du volume sonore pour le téléphone ou le système de navigation (PHONEVOL) Vous pouvez régler le volume sonore pour le téléphone et le système de navigation : 쏅 Appuyez sur la touche MENU 7. 쏅 Appuyez sur la touche ou 8 autant de fois qu'il est nécessaire pour faire apparaître « PHONEVOL » sur l'écran. « VOL » et le réglage actuel apparaissent au bout de 2 secondes environ sur l'écran 6. 쏅 Appuyez sur la touche ou 8 pour régler le volume sonore entre 0 et 32. Remarque : Vous n'avez pas besoin d'attendre l'affichage du réglage actuel pour le modifier en appuyant sur la touche ou 8. Pour quitter le menu, 쏅 appuyez sur la touche MENU 7. Remarque : Vous pouvez également régler le volume sonore en cours de communication téléphonique ou de sortie vocale du système de navigation avec le bouton de réglage du volume 1. Le volume sonore réglé est mémorisé automatiquement. Activation et désactivation du bip de confirmation (BEEP) Pour certaines actions, par ex. la pression prolongée sur une touche, un bip de confir- mation retentit. Vous pouvez désactiver le bip de confirmation : 쏅 Appuyez sur la touche MENU 7. ou 8 쏅 Appuyez sur la touche autant de fois qu'il est nécessaire pour faire apparaître « BEEP » et le réglage actuel « ON » (activé) ou « OFF » (désactivé) sur l'écran 6. 쏅 Appuyez sur la touche ou 8 pour activer ou désactiver le bip de confirmation. Pour quitter le menu, 쏅 appuyez sur la touche MENU 7. FRANÇAIS Volume sonore Réglage du volume sonore maximal à la mise en marche (ON VOL) Lorsque vous mettez l'appareil en marche, il fonctionne avec le dernier volume sonore réglé. Si, avant d'arrêter l'appareil, vous avez réglé le volume sonore plus haut que le volume sonore maximal à la mise en marche, le volume sonore sera automatiquement limité au volume sonore maximal à la mise en marche réglé lorsque vous remettrez l'appareil en marche. Remarque : Afin de protéger l'ouïe, le volume sonore à la mise en marche est limité à la valeur de 25. 쏅 Appuyez sur la touche MENU 7. ou 8 쏅 Appuyez sur la touche autant de fois qu'il est nécessaire pour faire apparaître « ON VOL » sur l'écran. « VOL » et le réglage actuel apparaissent au bout de 2 secondes environ sur l'écran 6. 쏅 Appuyez sur la touche ou 8 pour régler le volume sonore maximal à la mise en marche entre 5 et 25. 71 03_CalaisMP48_fr.indd 71 11.06.2008 15:13:20 Uhr Volume sonore Remarque : Vous n'avez pas besoin d'attendre l'affichage du réglage actuel pour le modifier en appuyant sur la touche ou 8. Pour quitter le menu, 쏅 appuyez sur la touche MENU 7. Réglage de l'adaptation du volume en fonction de la vitesse (GALA) Cette fonction adapte le volume sonore de l'autoradio automatiquement en fonction de la vitesse et, par suite, des bruits de marche qui lui sont liés. Lorsque la vitesse augmente par exemple, le volume sonore est relevé automatiquement pour compenser les bruits de marche plus importants (par ex. les bruits aérodynamiques). Le signal tachymétrique de votre véhicule doit pour cela être disponible et l'autoradio doit être raccordé en conséquence. Le relèvement automatique du volume sonore est réglable sur 6 niveaux (OFF (arrêt), 1-5). 쏅 Appuyez sur la touche MENU 7. ou 8 쏅 Appuyez sur la touche autant de fois qu'il est nécessaire pour faire apparaître « GALA » et le réglage actuel sur l'écran. 쏅 Appuyez sur la touche ou 8 pour régler l'adaptation du volume sonore entre « OFF » (arrêt) et 5. Pour quitter le menu, 쏅 appuyez sur la touche MENU 7. Tonalité Tonalité Réglage des aiguës 쏅 Appuyez sur la touche AUD :. ou 8 쏅 Appuyez sur la touche autant de fois qu'il est nécessaire pour faire apparaître « TREBLE » sur l'écran. 쏅 Appuyez sur la touche ou 8 et maintenez-la appuyée pendant plus de 2 secondes. « FREQ » et la fréquence aiguë actuellement sélectionnée sont affichés. Pour sélectionner une autre fréquence aiguë entre 10,0 kHz et 17,5 kHz, 쏅 appuyez sur la touche ou 8. Pour régler le niveau des aiguës, ou 8 쏅 appuyez sur la touche autant de fois qu'il est nécessaire pour faire apparaître « GAIN » sur l'écran. « GAIN » et le réglage actuel apparaissent au bout de 2 secondes environ sur l'écran. 쏅 Appuyez sur la touche ou 8 pour régler le niveau des aiguës entre –7 et +7. Pour quitter le menu, 쏅 appuyez sur la touche AUD :. Réglage des graves 쏅 Appuyez sur la touche AUD :. ou 8 쏅 Appuyez sur la touche autant de fois qu'il est nécessaire pour faire apparaître « BASS » sur l'écran. 쏅 Appuyez sur la touche ou 8 et maintenez-la appuyée pendant plus de 2 secondes. « FREQ » et la fréquence grave actuellement sélectionnée sont affichés. 72 03_CalaisMP48_fr.indd 72 11.06.2008 15:13:20 Uhr Pour sélectionner une autre fréquence grave entre 60 Hz et 200 Hz, 쏅 appuyez sur la touche ou 8. Pour régler le niveau des graves, ou 8 쏅 appuyez sur la touche autant de fois qu'il est nécessaire pour faire apparaître « GAIN » sur l'écran. « GAIN » et le réglage actuel apparaissent au bout de 2 secondes environ sur l'écran. 쏅 Appuyez sur la touche ou 8 pour régler le niveau des graves entre –7 et +7. Pour régler le facteur de qualité pour les graves, ou 8 쏅 appuyez sur la touche autant de fois qu'il est nécessaire pour faire apparaître « Q FACTOR » sur l'écran. « Q » et le réglage actuel apparaissent au bout de 2 secondes environ sur l'écran. 쏅 Appuyez sur la touche ou 8 pour régler le facteur de qualité entre 1,0 et 2,0. Pour quitter le menu, 쏅 appuyez sur la touche AUD :. Pour sélectionner une autre fréquence moyenne entre 500 Hz et 2,5 kHz, 쏅 appuyez sur la touche ou 8. Pour régler le niveau du médium, ou 8 쏅 appuyez sur la touche autant de fois qu'il est nécessaire pour faire apparaître « GAIN » sur l'écran. « GAIN » et le réglage actuel apparaissent au bout de 2 secondes environ sur l'écran. 쏅 Appuyez sur la touche ou 8 pour régler le niveau du médium entre –7 et +7. Pour régler le facteur de qualité pour le médium, ou 8 쏅 appuyez sur la touche autant de fois qu'il est nécessaire pour faire apparaître « Q FACTOR » sur l'écran. « Q » et le réglage actuel apparaissent au bout de 2 secondes environ sur l'écran. 쏅 Appuyez sur la touche ou 8 pour régler le facteur de qualité entre 0,5 et 1,25. Pour quitter le menu, 쏅 appuyez sur la touche AUD :. Réglage du médium Réglage de la répartition gauche/ droite du volume sonore (BAL) 쏅 Appuyez sur la touche AUD :. ou 8 쏅 Appuyez sur la touche autant de fois qu'il est nécessaire pour faire apparaître « MIDDLE » sur l'écran. 쏅 Appuyez sur la touche ou 8 et maintenez-la appuyée pendant plus de 2 secondes. « FREQ » et la fréquence moyenne actuellement sélectionnée sont affichés. FRANÇAIS Tonalité 쏅 Appuyez sur la touche AUD :. ou 8 쏅 Appuyez sur la touche autant de fois qu'il est nécessaire pour faire apparaître « BAL » et le réglage actuel sur l'écran. 쏅 Appuyez sur la touche ou 8 pour régler la répartition gauche/droite du volume sonore entre 10 et +10. 73 03_CalaisMP48_fr.indd 73 11.06.2008 15:13:21 Uhr Tonalité Pour quitter le menu, 쏅 appuyez sur la touche AUD :. Réglage de la répartition avant/ arrière du volume sonore (FAD) Remarque Les haut-parleurs arrière doivent être raccordés à un amplificateur additionnel. 쏅 Appuyez sur la touche AUD :. ou 8 쏅 Appuyez sur la touche autant de fois qu'il est nécessaire pour faire apparaître « FAD » et le réglage actuel sur l'écran. 쏅 Appuyez sur la touche ou 8 pour régler la répartition avant/arrière du volume sonore entre –10 et +10. Pour quitter le menu, 쏅 appuyez sur la touche AUD :. Heure Heure Affichage de l'heure Pour faire apparaître l'heure pendant 10 secondes environ sur l'écran, 쏅 appuyez sur la touche MENU 7 et maintenez-la appuyée pendant plus de 2 secondes. Réglage de l'heure 쏅 Appuyez sur la touche MENU 7. ou 8 쏅 Appuyez sur la touche autant de fois qu'il est nécessaire pour faire apparaître « TIMESET » sur l'écran 6. L'heure apparaît sur l'écran 6 au bout de 2 secondes environ. Dans le mode d'affichage sur 24 heures, l'heure est précédée de « 24H » et dans le mode d'affichage sur 12 heures, elle est précédée de « AM » (matin) ou « PM » (après-midi). Le nombre des heures clignote et peut être réglé. Pour régler le nombre des heures ou le nombre des minutes, 쏅 appuyez sur la touche ou 8. Pour commuter entre le nombre des heures et le nombre des minutes, 쏅 appuyez sur la touche 6 <. Remarque : Vous n'avez pas besoin d'attendre l'affichage de l'heure actuelle pour modifier celle-ci en appuyant sur la touche ou 8. Pour quitter le menu, 쏅 appuyez sur la touche MENU 7. 74 03_CalaisMP48_fr.indd 74 11.06.2008 15:13:21 Uhr Heure 쏅 Appuyez sur la touche MENU 7. ou 8 쏅 Appuyez sur la touche autant de fois qu'il est nécessaire pour faire apparaître « 24H MODE » ou « 12H MODE » sur l'écran 6. 쏅 Appuyez sur la touche ou 8 pour passer d'un mode à l'autre. Pour quitter le menu, 쏅 appuyez sur la touche MENU 7. Réglage du fuseau horaire (TIMEZONE) Dans le cas où vous passez dans un autre fuseau horaire, vous pouvez régler le décalage horaire par rapport à l'heure réglée actuellement par pas de 1 heure. Vous pouvez ainsi corriger l'affichage de l'heure en fonction du fuseau horaire dans lequel vous vous trouvez sans devoir régler de nouveau l'heure. 쏅 Appuyez sur la touche MENU 7. 쏅 Appuyez sur la touche ou 8 autant de fois qu'il est nécessaire pour faire apparaître « TIMEZONE » sur l'écran. « ZONE » et le réglage actuel apparaissent au bout de 2 secondes environ sur l'écran 6. 쏅 Appuyez sur la touche ou 8 pour régler le décalage horaire par pas de 1 heure entre –12 et +12. Remarque : Vous n'avez pas besoin d'attendre l'affichage du réglage actuel pour le modifier en appuyant sur la touche ou 8. Pour quitter le menu, 쏅 appuyez sur la touche MENU 7. Mode radio Cet appareil est équipé d'un récepteur RDS. La plupart des stations FM reçues émettent un signal qui contient, en plus du programme, des informations telles que le nom de la station et le type de programme (PTY). Le nom de la station est affiché sur l'écran 6 dès qu'il peut être reçu. Activation du mode radio Si vous vous trouvez dans un autre mode opératoire, 쏅 appuyez sur la touche BND 2, ou 쏅 appuyez sur la touche SRC > autant de fois qu'il est nécessaire pour faire apparaître « RADIO » sur l'écran 6. La fréquence actuelle, ou le nom de la station, est affiché sur l'écran 6. FRANÇAIS Sélection du mode d'affichage 12/24 heures Mode radio Fonctions confort RDS (AF, REG) Les fonctions confort RDS AF (fréquence alternative) et REG (régional) viennent compléter les fonctions de votre autoradio : • AF : lorsque cette fonction confort RDS est activée, l'appareil recherche automatiquement en arrière-plan la fréquence alternative de la station réglée qui fournit le signal le plus puissant. • REG : quelques stations partagent à certaines heures leur programme avec des programmes régionaux différents. La fonction REG empêche que l'appareil ne change sur les fréquences alternatives de la station réglée qui diffusent un autre programme régional. 75 03_CalaisMP48_fr.indd 75 11.06.2008 15:13:21 Uhr Mode radio Remarque : REG doit être activé ou désactivé séparément dans le menu. Activation et désactivation des fonctions confort RDS 쏅 Pour utiliser les fonctions RDS AF et REG, appuyez sur la touche RDS =. Lorsque les fonctions confort RDS sont activées, le symbole RDS est affiché sur l'écran 6. Activation et désactivation de la fonction REG 쏅 Appuyez sur la touche MENU 7. ou 8 쏅 Appuyez sur la touche autant de fois qu'il est nécessaire pour faire apparaître « REG » et le réglage actuel « ON » (activé) ou « OFF » (désactivé) sur l'écran 6. 쏅 Appuyez sur la touche ou 8 pour désactiver ou activer la fonction REG. Pour quitter le menu, 쏅 appuyez sur la touche MENU 7. Remarque : Le réglage REG ON/OFF a un effet uniquement lorsque les fonctions confort RDS sont activées. Sélection de la gamme d'ondes ou du niveau de mémoire Cet appareil vous permet de recevoir des programmes des bandes de fréquence FM, OM (MW) et GO (LW) (pour l'EUROPE) ou FM et AM (pour les pays NAFTA). Trois niveaux de mémoire sont disponibles pour la gamme d'ondes FM (FM1, FM2 et FMT) et un pour chacune des gammes d'ondes OM et OL ou AM. Un niveau de mémoire additionnel MWT (OM)/LWT (OL) ou AMT est en outre disponible. Six stations peuvent être mémorisées sur chaque niveau de mémoire. Pour passer d'une gamme d'ondes ou d'un niveau de mémoire à l'autre, 쏅 appuyez sur la touche BND 2. Réglage des stations Vous avez plusieurs possibilités pour le réglage des stations. Recherche automatique des stations 쏅 Appuyez sur la touche ou 8. L'autoradio se règle sur la station suivante qui peut être reçue. Remarque : • Si la priorité pour les informations routières est activée, la station suivante qui diffuse des informations routières est réglée. • Si la fonction PTY est activée, la station suivante proposant le type de programme sélectionné est réglée. Réglage de la sensibilité de la recherche de station Vous pouvez régler l'autoradio de manière à ce qu'il se règle uniquement sur les stations puissantes (sensibilité réduite) ou, au contraire, aussi sur les stations faibles (sensibilité élevée). 쏅 Appuyez sur la touche MENU 7. ou 8 쏅 Appuyez sur la touche autant de fois qu'il est nécessaire pour faire apparaître « SENS » et le réglage actuel « LO » (sensibilité réduite) ou « DX » (sensibilité élevée) sur l'écran 6. 76 03_CalaisMP48_fr.indd 76 11.06.2008 15:13:21 Uhr Mode radio Recherche manuelle des stations Pour modifier la fréquence réglée par petits pas, 쏅 appuyez sur la touche ou 8. Pour modifier rapidement la fréquence réglée, 쏅 appuyez sur la touche ou 8 et maintenez-la appuyée. Remarque : La recherche manuelle des stations est possible uniquement lorsque les fonctions confort RDS et PTY sont désactivées. Défilement des chaînes de stations (uniquement en FM) Si une station offre plusieurs programmes, vous avez la possibilité de parcourir ce que l'on appelle la « chaîne de stations ». 쏅 Appuyez sur la touche ou 8 pour passer à la station suivante de la chaîne de stations. Remarque : Vous pouvez parcourir la chaîne de stations uniquement lorsque les fonctions confort RDS et PTY sont désactivées. Vous ne pouvez ainsi changer que sur des stations qui ont déjà été reçues une fois. Utilisez par ex. pour cela la fonction Travelstore (T-STORE). 03_CalaisMP48_fr.indd 77 Mémorisation des stations Mémorisation manuelle des stations 쏅 Sélectionnez la gamme d'ondes ou le niveau de mémoire souhaité. 쏅 Réglez la station souhaitée. 쏅 Appuyez sur la touche de présélection 1 - 6 < à laquelle vous souhaitez affecter la station et maintenez-la appuyée pendant plus de 2 secondes. Le bip de confirmation retentit. La station est affectée à la touche de présélection choisie. FRANÇAIS 쏅 Appuyez sur la touche ou 8 pour commuter entre les réglages « LO » et « DX ». Pour quitter le menu, 쏅 appuyez sur la touche MENU 7. Mémorisation automatique de stations (T-STORE) Vous avez la possibilité de mémoriser automatiquement les 6 stations FM les plus puissantes de la région. Dans le cas de la gamme d'ondes FM, la mémorisation s'effectue sur le niveau de mémoire FMT, dans le cas des gammes d'ondes OM et OL, elle s'effectue sur le niveau de mémoire MWT (OM)/LWT (OL) et, dans le cas de la gamme d'ondes AM, elle s'effectue sur le niveau de mémoire AMT. Remarque : Les stations mémorisées auparavant sur ce niveau sont remplacées par les nouvelles stations. 쏅 Sélectionnez la gamme d'ondes souhaitée. 쏅 Appuyez sur la touche BND 2 et maintenez-la appuyée pendant plus de 2 secondes. La mémorisation démarre. « T–STORE » apparaît sur l'écran 6. Une fois la mémorisation terminée, la station qui figure à la première place du niveau de mémoire FMT, MWT (OM)/LWT (OL) ou AMT est diffusée. 77 11.06.2008 15:13:22 Uhr Mode radio Appel des stations mémorisées 쏅 Sélectionnez le niveau de mémoire ou la gamme d'ondes. 쏅 Appuyez sur la touche de présélection 1 - 6 < à laquelle la station souhaitée est affectée. Balayage des stations qui peuvent être reçues (BANDSCAN) La fonction Bandscan vous permet d'écouter successivement toutes les stations qui peuvent être reçues pendant env. 10 secondes chacune. Démarrage du balayage des stations 쏅 Appuyez sur la touche ou 8 et maintenez-la appuyée pendant plus de 2 secondes. « BANDSCAN » apparaît un court instant sur l'écran. L'appareil recherche les stations dans la gamme d'ondes actuelle. Chaque station trouvée est diffusée pendant env. 10 secondes. La fréquence actuelle, ou le nom de la station, est affiché pendant ce temps sur l'écran. Arrêt du balayage des stations 쏅 Appuyez sur la touche ou 8. La fonction de balayage est arrêtée. La station diffusée en dernier reste réglée. Type de programme (PTY) En plus de leur nom, certaines stations FM transmettent également des informations sur le type de programme qu'elles diffusent. Ces types de programmes sont par exemple : CULTURE VOYAGE JAZZ SPORT NOUVELLES POP ROCK MUSIQUE La fonction PTY vous permet de sélectionner directement des stations diffusant un certain type de programme. Lorsque la fonction PTY est activée et qu'une recherche PTY est démarrée, l'appareil passe automatiquement de la station actuelle ou d'un autre mode de fonctionnement à la station qui diffuse le type de programme sélectionné. Activation et désactivation de la fonction PTY 쏅 Appuyez sur la touche MENU 7. ou 8 쏅 Appuyez sur la touche autant de fois qu'il est nécessaire pour faire apparaître « PTY » et le réglage actuel « ON » (activé) ou « OFF » (désactivé) sur l'écran 6. 쏅 Appuyez sur la touche ou 8 pour désactiver ou activer la fonction PTY. Pour quitter le menu, 쏅 appuyez sur la touche MENU 7. Sélection d'un type de programme et démarrage de la recherche 쏅 Appuyez sur la touche ou 8 autant de fois qu'il est nécessaire pour faire apparaître le type de programme souhaité. 쏅 Appuyez sur la touche ou 8 pour démarrer la recherche. Lorsqu'une station qui diffuse le type de programme sélectionné est trouvée, l'appareil se règle sur celle-ci. Abaissement du niveau des aiguës en cas de perturbation (HICUT) La fonction HiCut améliore la reproduction en cas de mauvaise réception. Elle réduit automatiquement le niveau de perturbation. 78 03_CalaisMP48_fr.indd 78 11.06.2008 15:13:22 Uhr Pour activer ou désactiver la fonction HICUT, 쏅 appuyez sur la touche MENU 7. ou 8 쏅 Appuyez sur la touche autant de fois qu'il est nécessaire pour faire apparaître « HICUT » et le réglage actuel « ON » (activé) ou « OFF » (désactivé) sur l'écran 6. 쏅 Appuyez sur la touche ou 8 pour désactiver ou activer la fonction HICUT. Pour quitter le menu, 쏅 appuyez sur la touche MENU 7. Activation et désactivation de l'affichage du texte radio Certains stations radio utilisent le signal RDS pour transmettre de la publicité ou d'autres informations à la place de leur nom. Ce texte radio est affiché sur l'écran 6. Pour activer ou désactiver l'affichage du texte radio, 쏅 appuyez sur la touche MENU 7. ou 8 쏅 Appuyez sur la touche autant de fois qu'il est nécessaire pour faire apparaître « RADIOTXT » sur l'écran. Le réglage actuel, « TEXT ON » (activé) ou « TEXT OFF » (désactivé), apparaît au bout de 2 secondes environ sur l'écran 6. 쏅 Appuyez sur la touche ou 8 pour activer ou désactiver l'affichage du texte radio. Remarque : Vous n'avez pas besoin d'attendre l'affichage du réglage actuel pour le modifier en appuyant sur la touche ou 8. Pour quitter le menu, 쏅 appuyez sur la touche MENU 7. Informations routières Informations routières Activation et désactivation de la priorité aux informations routières Pour activer ou désactiver la priorité aux informations routières dans n'importe quel mode de fonctionnement, 쏅 appuyez sur la touche TA ;. Remarque : Dans les modes de fonctionnement CD, MP3, changeur de CD et AUX, cette fonction est disponible uniquement si la gamme d'ondes réglée en dernier était FM. Lorsque le symbole TA est affiché sur l'écran 6, la priorité aux informations routières est activée. Dès que l'appareil reçoit une information routière, il la diffuse. « TRAFFIC » est affiché sur l'écran 6 pendant la durée du message. FRANÇAIS Mode radio Remarque : Vous entendez un bip d'avertissement, • lorsque vous quittez la zone de couverture de la station diffusant des informations routières réglée alors qu'un message d'information routière est en cours de diffusion ou que vous écoutez un CD et qu'ensuite la recherche automatique ne trouve aucune autre station diffusant des informations routières. • lorsque vous passez d'une station diffusant des informations routières à une station ne diffusant pas d'informations routières. Désactivez alors la priorité aux informations routières ou réglez une station diffusant des informations routières. 79 03_CalaisMP48_fr.indd 79 11.06.2008 15:13:22 Uhr Informations routières Réglage du relèvement du volume sonore pour les informations routières Vous pouvez régler de combien de niveaux vous souhaitez augmenter le volume sonore actuel pour la diffusion d'informations routières : 쏅 Appuyez sur la touche MENU 7. ou 8 쏅 Appuyez sur la touche autant de fois qu'il est nécessaire pour faire apparaître « TA VOL » sur l'écran. « VOL » et le réglage actuel apparaissent au bout de 2 secondes environ sur l'écran 6. 쏅 Appuyez sur la touche ou 8 pour régler le relèvement du volume sonore entre 0 et 10. Remarque : Vous n'avez pas besoin d'attendre l'affichage du réglage actuel pour le modifier en appuyant sur la touche ou 8. Pour quitter le menu, 쏅 appuyez sur la touche MENU 7. Remarque : Vous pouvez également régler le volume sonore pendant la diffusion d'une information routière avec le bouton de réglage 1 pour la durée de la diffusion de l'information routière. Interruption des informations routières Pour interrompre une information routière en cours de diffusion et revenir à la source audio écoutée précédemment, 쏅 appuyez sur la touche TA ;. La fonction de diffusion prioritaire reste activée. Mode CD Mode CD Cet appareil vous permet de lire les CD audio, CD-R et CD-RW disponibles dans le commerce d'un diamètre de 12 cm. Pour éviter les problèmes de lecture, il est recommandé de ne pas graver les CD à une vitesse supérieure à 16x. Risque d'endommagement du lecteur CD ! Les CD single de 8 cm de diamètre et les « shape CD » (de forme autre que circulaire) ne doivent pas être utilisés. Manipulez les CD avec soin et évitez de les rayer ou de les endommager. Saisissez les CD autant que possible uniquement par le bord. Si un CD est encrassé, nettoyez-le avec un chiffon non pelucheux sans addition de solvant. Essuyez les CD en passant toujours le chiffon du centre vers l'extérieur. N'exposez pas les CD directement aux rayons du soleil, conservez les CD en dehors de l'appareil dans une pochette de protection. Ne collez pas d'étiquette sur les CD. Ecrivez sur les CD uniquement avec les crayons prévus à cet effet qui se trouvent dans le commerce. Nous déclinons toute responsabilité en cas d'endommagement du lecteur de CD dû à l'utilisation de CD abîmés ou inappropriés. Pour éviter tout problème de fonctionnement, utilisez uniquement de CD portant le logo Compact-Disc. Des problèmes de lecture sont possibles avec les CD équipés d'une protection contre la copie. Blaupunkt 80 03_CalaisMP48_fr.indd 80 11.06.2008 15:13:22 Uhr Mode CD Démarrage du mode CD S'il n'y a pas de CD dans le lecteur, 쏅 introduisez le CD sans forcer dans la fente d'insertion du CD, avec la face imprimée tournée vers le haut, jusqu'à ce que vous rencontriez une résistance. Le CD est entraîné automatiquement dans le lecteur. Le symbole CD est affiché sur l'écran 6. Remarque : L'introduction du CD doit s'effectuer sans entrave et sans intervention de votre part. La lecture du CD commence. Le numéro du titre actuel (par ex. « T12 ») et la durée de lecture ainsi que des informations sur le titre (texte de CD) sont affichés sur l'écran 6. Si un CD est déjà introduit dans le lecteur, 쏅 appuyez sur la touche SRC > autant de fois qu'il est nécessaire pour faire apparaître « CD » sur l'écran 6. La lecture démarre à l'endroit où elle a été interrompue. Affichage des informations sur les titres (texte de CD) Dans le cas où du texte de CD est disponible sur le CD, les informations sur le titre défilent une fois sur l'écran 6 au moment où la lecture du titre démarre. Affichage unique des informations sur les titres avec défilement du texte 쏅 Appuyez sur la touche 5 <. Le texte de CD relatif au titre actuel défile une fois sur l'écran 6. Remarque : Cette fonction n'est pas disponible lorsque l'affichage des informations sur les titres avec défilement du texte de CD est désactivé (voir section suivante). Activation et désactivation de l'affichage des informations sur les titres avec défilement du texte Pour activer ou désactiver l'affichage des informations sur les titres avec défilement du texte, 쏅 appuyez sur la touche MENU 7. ou 8 쏅 Appuyez sur la touche autant de fois qu'il est nécessaire pour faire apparaître « SCRL » et le réglage actuel « ON » (activé) ou « OFF » (désactivé) sur l'écran 6. 쏅 Appuyez sur la touche ou 8 pour désactiver ou activer le défilement du texte. Pour quitter le menu, 쏅 appuyez sur la touche MENU 7. Avec le réglage « SCRL OFF », les informations sur les titres apparaissent par sections de 8 caractères sur l'écran 6. Chaque section de texte ainsi que le numéro du titre et la durée de lecture sont affichés en boucle pendant 5 secondes chacun. FRANÇAIS ne peut garantir le bon fonctionnement de ses appareils avec des CD protégés contre la copie ! 81 03_CalaisMP48_fr.indd 81 11.06.2008 15:13:23 Uhr Mode CD Remarque : Le réglage « SCRL ON/OFF » a également un effet sur l'affichage des informations sur les titres MP3 (balises ID3) en mode MP3. Sélection des titres 쏅 Appuyez sur la touche ou 8 pour passer au titre suivant ou au titre précédent. Une seule pression sur la touche 8 redémarre la lecture du titre en cours depuis le début. Recherche rapide (audible) Pour une recherche rapide de titres précédents ou suivants, 쏅 appuyez sur la touche ou 8 et maintenez-la appuyée jusqu'à ce que vous ayez atteint l'endroit souhaité. Lecture aléatoire des titres (MIX) 쏅 Appuyez sur la touche 3 <. « MIX CD » apparaît un court instant sur l'écran 6 et le symbole MIX est affiché. Le titre suivant est sélectionné de manière aléatoire. Arrêt de la fonction MIX 쏅 Appuyez de nouveau sur la touche 3 <. « MIX OFF » apparaît un court instant sur l'écran 6 et le symbole MIX disparaît. La lecture se poursuit normalement. Balayage des titres (SCAN) Pour écouter le début (pendant 10 secondes environ) de tous les titres du CD, 쏅 appuyez sur la touche 4 <. « SCAN TRK » apparaît un court instant sur l'écran. L'affichage de « CD » sur l'écran clignote pendant la lecture. Le numéro de titre et la durée de lecture du titre actuel ou les informations sur ce titre sont affichés. Arrêt du balayage (SCAN), écoute du titre en cours Pour arrêter le balayage des titres, 쏅 appuyez de nouveau sur la touche 4 <. « SCAN OFF » apparaît un court instant sur l'écran. Le titre actuel continue d'être lu. Répétition de la lecture d'un titre (RPT) 쏅 Appuyez sur la touche 2 <. « RPT TRK » apparaît un court instant sur l'écran et le symbole RPT est affiché. Le titre actuel est répété jusqu'à ce que RPT soit désactivé. Arrêt de la répétition RPT 쏅 Appuyez de nouveau sur la touche 2 <. « RPT OFF » apparaît un court instant sur l'écran 6 et le symbole RPT disparaît. La lecture se poursuit normalement. 82 03_CalaisMP48_fr.indd 82 11.06.2008 15:13:23 Uhr Mode CD 쏅 Appuyez sur la touche 1 <. « PAUSE » apparaît sur l'écran 6. Annulation de la pause 쏅 Appuyez sur la touche 1 < pendant la pause. La lecture se poursuit. Retrait du CD Remarque : Vous pouvez également éjecter le CD lorsque l'appareil est arrêté ou qu'une autre source audio est active. 쏅 Appuyez sur la touche d'éjection du CD 4. Le CD sort. « CD EJECT » apparaît un court instant sur l'écran. Remarque : L'éjection du CD ne doit pas être empêchée ni assistée par une quelconque intervention. 쏅 Retirez le CD. Le symbole CD disparaît. Remarque : Si vous ne retirez pas le CD, il sera réinséré automatiquement au bout de 10 secondes environ. Mode MP3/WMA Cet autoradio permet également de lire les CD-R et CD-RW sur lesquels des fichiers musicaux MP3 et WMA sont enregistrés. Vous pouvez en outre raccorder un support de données USB par l'intermédiaire de l'interface USB compatible C‘n‘C optionnel et lire les fichiers MP3/WMA enregistrés sur le support de données USB. Ce chapitre décrit uniquement la lecture des fichiers MP3, celle des fichiers WMA étant identique. Dans ce chapitre, la désignation « support de données MP3 » se réfère aussi bien aux CD-R/RW qu'aux supports de données USB, par ex. les clés USB. FRANÇAIS Interruption de la lecture (PAUSE) Mode MP3/WMA Remarque : • Les fichiers WMA avec Digital Rights Management (DRM) venant des Online Musicshops (boutiques en ligne) ne peuvent pas être lus par cet autoradio. • Les fichiers WMA peuvent être lus en toute sécurité uniquement s'ils ont été créés avec Windows MediaPlayer, version 8 ou plus. Préparation d'un support de données MP3 Préparation d'un CD MP3 La combinaison « graveur CD », « logiciel de gravure de CD » et « CD vierge » peut occasionner des problèmes de lecture de CD. Si des problèmes surviennent avec des CD gravés par soi-même, il est conseillé de choisir des CD vierges d'un autre fabricant ou des CD vierges d'une autre couleur. 83 03_CalaisMP48_fr.indd 83 11.06.2008 15:13:23 Uhr Mode MP3/WMA Le format du CD doit être ISO 9660 level 1/ level 2 ou Joliet. Les autres formats ne peuvent pas être lus en toute fiabilité. En créant (codant) les fichiers MP3/WMA à partir des fichiers audio, il est conseillé d'utiliser des débits binaires de 32 à 320 kbit/s pour les fichiers MP3 et de 32 à 192 kbps pour les fichiers WMA. Cet appareil reconnaît jusqu'à 252 répertoires et jusqu'à 255 fichiers par répertoire. Le CD peut contenir en tout un maximum de 512 répertoires et fichiers. Les répertoires et les titres du CD peuvent être sélectionnés séparément. D01 A D02 D03 T001 T002 T003 T004 T005 T001 T002 T003 T004 T005 T006 D04 T001 T002 T003 T004 T005 T006 T007 T008 T009 T010 T011 B A Répertoires B Titres · Fichiers Vous pouvez attribuer un nom à chaque répertoire avec votre PC. Le nom du répertoire peut être affiché sur l'écran de l'autoradio. Nommez les répertoires et les titres ou les fichiers conformément au logiciel de gravure que vous utilisez. Pour de plus amples informations, consultez le guide d'utilisation du logiciel. Remarque : • Il est conseillé de ne pas utiliser de caractères spéciaux (trémas, accents, etc.) dans les noms des fichiers. • Si vous utilisez des noms de fichier de plus de 16 caractères (y compris l'extension « .MP3 » ou « .WMA »), le nombre maximal de titres et de répertoires diminue d'autant. Si vous attachez une importance à l'ordre des fichiers, enregistrez-les sur le support de données dans l'ordre selon lequel vous souhaitez les lire ultérieurement. L'appareil lit les fichiers dans l'ordre selon lequel ils ont été enregistrés physiquement sur le support de données. Pour la lecture des fichiers par cet appareil, les fichiers MP3 doivent avoir l'extension « .MP3 » et les fichiers WMA l'extension « .WMA ». Remarque : Pour garantir une lecture sans problèmes, • n'essayez pas d'ajouter l'extension « .MP3 » à des fichiers autres que les fichiers MP3 et de les lire ! Ces fichiers non valides sont ignorés pendant la lecture. • n'utilisez pas de CD « mixtes » contenant à la fois des fichiers non MP3 et des titres MP3 (seuls les fichiers MP3 seront reconnus par l'appareil pendant la lecture MP3). 84 03_CalaisMP48_fr.indd 84 11.06.2008 15:13:23 Uhr Mode MP3/WMA Préparation d'un support de données USB Afin que l'appareil reconnaisse le support de données USB, ce dernier doit être spécifié comme mémoire de masse (Mass Storage Device) et formaté selon le système de fichiers FAT16 ou FAT32 et contenir des fichiers MP3 ou WMA. Vous pouvez mémoriser au maximum 1500 fichiers (répertoires et titres ) dans le support de données USB. Les répertoires et les titres peuvent être sélectionnés individuellement avec cet appareil. Si vous utilisez des noms de fichier de plus de 24 caractères (y compris l'extension « .MP3 » ou « .WMA »), le nombre maximal de fichiers diminue d'autant. Blaupunkt ne peut pas garantir le fonctionnement sans problème de l'ensemble des supports USB disponibles sur le marché. Balises ID3 Les titres MP3 peuvent aussi contenir des informations telles que le nom de l'interprète, le titre et le nom de l'album (balises ID3). Cet appareil peut afficher les balises ID3 de la version 1 et de la version 2 sur l'écran. Démarrage du mode MP3 Activation du mode MP3 sur CD Le mode CD MP3 est activé comme le mode CD normal. Pour plus de détails, consultez la section « Démarrage du mode CD » du chapitre « Mode CD ». Le numéro du titre actuel (par ex. « T12 ») et la durée de lecture ainsi que des infor- mations sur le titre (balises ID3) ou le nom du fichier sont affichés sur l'écran 6. Lors du passage à un autre répertoire, le numéro de celui-ci (par ex. « DIR 02 ») apparaît un court instant. Raccordement du support de données USB et activation du mode MP3 Pour pouvoir brancher un support de données USB (par ex. une clé USB ou un disque dur USB), l'interface USB Blaupunkt optionnelle doit être raccordée sur la face arrière de l'appareil (alvéole C3). Vous pouvez poser le câble USB de l'interface de manière à ce qu'il aille par ex. jusqu'à la boîte à gants ou à un endroit approprié de la console centrale. FRANÇAIS • n'utilisez pas de CD mixtes contenant à la fois des fichiers audio CD et des titres MP3. Seuls les titres audio CD d'un CD mixte seront lus. Remarque : • Lorsque vous raccordez une interface USB Blaupunkt à l'appareil, l'entrée AUX doit être réglée en conséquence. Consultez pour cela la section « Réglage de l'entrée AUX » dans le chapitre « Sources audio externes ». • Arrêtez l'appareil avant de brancher ou de débrancher le support de données USB afin que celui-ci puisse être enregistré ou désenregistré correctement. 쏅 Raccordez le support de données USB au câble USB de l'interface USB. Dès qu'un support de données USB est raccordé, vous pouvez le sélectionner avec la touche SRC >. « USB » apparaît alors sur l'écran. Affichage des informations sur les titres (balises ID3) Dans le cas où des balises ID3 sont disponibles sur le support de données MP3, les 85 03_CalaisMP48_fr.indd 85 11.06.2008 15:13:23 Uhr Mode MP3/WMA informations sur le titre défilent une fois sur l'écran 6 au moment où la lecture du titre démarre. Dans le cas où aucune balise ID3 n'a été enregistrée avec le fichier MP3, le nom du fichier est affiché. Remarque : Pour enregistrer des balises ID3, consultez la notice d'utilisation de votre logiciel MP3 pour PC ou de votre logiciel de gravure. Affichage unique des informations sur les titres avec défilement du texte 쏅 Appuyez sur la touche 5 <. Les balises ID3 relatives au titre actuel défilent une fois sur l'écran 6. Remarque : Cette fonction n'est pas disponible lorsque l'affichage des informations sur les titres avec défilement du texte est désactivé. Consultez pour cela la section « Activation et désactivation de l'affichage des informations sur les titres avec défilement du texte » dans le paragraphe « Affichage des informations sur les titres (texte de CD) » du chapitre « Mode CD ». Sélection des répertoires Pour passer à un répertoire précédent ou suivant, 쏅 appuyez sur la touche ou 8. Remarque : • Tous les répertoires ne contenant pas de fichiers MP3 seront automatiquement ignorés. • L'appareil traite tous les répertoires et sous-répertoires comme s'ils se trouvaient sur un niveau. Vous pouvez également accéder à tous les sous-répertoires en appuyant autant de fois que nécessaire sur la touche ou 8. Sélection des titres et des fichiers Pour passer à un titre ou fichier précédent ou suivant du répertoire sélectionné, 쏅 appuyez sur la touche ou 8. Une seule pression sur la touche 8 redémarre la lecture du titre en cours depuis le début. Recherche rapide Pour une recherche rapide de titres précédents ou suivants, 쏅 appuyez sur la touche ou 8 et maintenez-la appuyée jusqu'à ce que vous ayez atteint l'endroit souhaité. Remarque : Dans le mode USB, la recherche rapide en arrière s'arrête au début du titre actuel. Lecture des titres dans un ordre aléatoire (MIX) Pour que les titres du répertoire sélectionné soient lus dans un ordre aléatoire, 쏅 appuyez sur la touche 3 < autant de fois qu'il est nécessaire pour faire apparaître « MIX DIR » ou « MIX FLD » sur l'écran 6. Le symbole MIX apparaît sur l'écran 6. 86 03_CalaisMP48_fr.indd 86 11.06.2008 15:13:23 Uhr Mode MP3/WMA Arrêt de la fonction MIX Pour arrêter la lecture des titres dans un ordre aléatoire, 쏅 appuyez sur la touche 3 < autant de fois qu'il est nécessaire pour faire apparaître « MIX OFF » sur l'écran 6. Le symbole MIX disparaît de l'écran 6. Balayage des titres (SCAN) Pour écouter le début (pendant 10 secondes environ) de tous les titres du support de données MP3 dans un ordre croissant, 쏅 appuyez sur la touche 4 < autant de fois qu'il est nécessaire pour faire apparaître « SCAN TRK » sur l'écran 6. L'affichage de « MP3 » ou « USB » sur l'écran clignote pendant la lecture. Pour lire tous les titres du répertoire actuel en mode USB, 쏅 appuyez sur la touche 4 < autant de fois qu'il est nécessaire pour faire apparaître « SCAN FLD » sur l'écran 6. L'affichage de « USB » sur l'écran clignote pendant la lecture. Arrêt du balayage (SCAN) Pour arrêter le balayage des titres, 쏅 appuyez sur la touche 4 < autant de fois qu'il est nécessaire pour faire apparaître « SCAN OFF » sur l'écran 6. Vous continuez d'entendre le titre dont le début était en cours de lecture. Lecture répétée de titres ou de répertoires entiers (REPEAT) Pour répéter le titre actuel, 쏅 appuyez sur la touche 2 < autant de fois qu'il est nécessaire pour faire apparaître « RPT TRK » sur l'écran 6. Le symbole RPT apparaît sur l'écran 6. Pour répéter le répertoire actuel, 쏅 appuyez sur la touche 2 < autant de fois qu'il est nécessaire pour faire apparaître « RPT DIR » ou « RPT FLD » sur l'écran 6. Le symbole RPT apparaît sur l'écran 6. FRANÇAIS Pour écouter tous les titres du support de données MP3 dans un ordre aléatoire, 쏅 appuyez sur la touche 3 < autant de fois qu'il est nécessaire pour faire apparaître « MIX ALL » sur l'écran 6. Le symbole MIX apparaît sur l'écran 6. Arrêt de REPEAT Pour arrêter la répétition, 쏅 appuyez sur la touche 2 < autant de fois qu'il est nécessaire pour faire apparaître « RPT OFF » sur l'écran 6. Le symbole RPT disparaît de l'écran 6. Interruption de la lecture (PAUSE) 쏅 Appuyez sur la touche 1 <. « PAUSE » apparaît sur l'écran 6. Annulation de la pause 쏅 Appuyez sur la touche 1 < pendant la pause. La lecture se poursuit. 87 03_CalaisMP48_fr.indd 87 11.06.2008 15:13:24 Uhr Mode changeur de CD Mode changeur de CD Vous pouvez raccorder les changeurs de CD optionnels Blaupunkt CDC A08 T et IDC A09 à votre appareil (alvéole C3 sur la face arrière de l'appareil). Attention ! Le changeur de CD est normalement alimenté avec une tension de 12 V par l'appareil. Si le changeur de CD CDC A 08 T (24 V) est raccordé, la sortie de la tension d'alimentation (alvéole C3/broche 15) doit être coupée dans le câble de raccordement du changeur de CD. Le changeur de CD doit être alimenté avec une tension séparée de 24 volts. Remarque : • Lorsque vous raccordez un changeur de CD à l'appareil, l'entrée AUX doit être réglée en conséquence. Consultez pour cela la section « Réglage de l'entrée AUX » dans le chapitre « Sources audio externes ». • Pour toutes informations sur la manipulation des CD, leur insertion et l'utilisation du changeur de CD, reportezvous au manuel d'utilisation de votre changeur de CD. tuel (par ex. « T07 ») ainsi que la durée de lecture sont affichés sur l'écran 6. Sélection des CD Pour passer à un CD précédent ou suivant, 쏅 appuyez sur la touche ou 8. Sélection des titres Pour passer à un tire précédent ou suivant du CD actuel, 쏅 appuyez sur la touche ou 8. Recherche rapide (audible) Pour une recherche rapide de titres précédents ou suivants, 쏅 appuyez sur la touche ou 8 et maintenez-la appuyée jusqu'à ce que vous ayez atteint l'endroit souhaité. Répétition de la lecture d'un titre ou d'un CD entier (RPT) Démarrage du mode changeur de CD Pour répéter le titre actuel, 쏅 appuyez sur la touche 2 < autant de fois qu'il est nécessaire pour faire apparaître « RPT TRK » sur l'écran 6. Le symbole RPT apparaît sur l'écran 6. Pour répéter la lecture du CD actuel, 쏅 appuyez sur la touche 2 < autant de fois qu'il est nécessaire pour faire apparaître « RPT CD » sur l'écran 6. Le symbole RPT apparaît sur l'écran 6. 쏅 Appuyez sur la touche SRC > autant de fois qu'il est nécessaire pour faire apparaître « CHANGER » sur l'écran 6. La lecture commence par le premier CD identifié par le changeur de CD. Le numéro du CD actuel (par ex. « D02 ») et du titre ac- Arrêt de REPEAT Pour arrêter la répétition, 쏅 appuyez sur la touche 2 < autant de fois qu'il est nécessaire pour faire apparaître « RPT OFF » sur l'écran 6. Le symbole RPT disparaît de l'écran 6. 88 03_CalaisMP48_fr.indd 88 11.06.2008 15:13:24 Uhr Mode changeur de CD Pour que les titres du CD sélectionné soient lus dans un ordre aléatoire, 쏅 appuyez sur la touche 3 < autant de fois qu'il est nécessaire pour faire apparaître « MIX CD » sur l'écran 6. Le symbole MIX apparaît sur l'écran 6. Pour écouter les titres de tous les CD introduits dans un ordre aléatoire, 쏅 appuyez sur la touche 3 < autant de fois qu'il est nécessaire pour faire apparaître « MIX ALL » sur l'écran 6. Le symbole MIX apparaît sur l'écran 6. « SCAN OFF » apparaît un court instant sur l'écran 6. Vous continuez d'entendre le titre dont le début était en cours de lecture. Interruption de la lecture (PAUSE) 쏅 Appuyez sur la touche 1 <. « PAUSE » apparaît sur l'écran 6. Annulation de la pause 쏅 Appuyez sur la touche 1 < pendant la pause. La lecture se poursuit. FRANÇAIS Lecture des titres dans un ordre aléatoire (MIX) Arrêt de la fonction MIX Pour arrêter la lecture des titres dans un ordre aléatoire, 쏅 appuyez sur la touche 3 < autant de fois qu'il est nécessaire pour faire apparaître « MIX OFF » sir l'écran 6. Le symbole MIX disparaît de l'écran 6. Balayage de tous les titres de tous les CD (SCAN) Pour écouter le début (pendant 10 secondes environ) de tous les titres de tous les CD introduits dans un ordre croissant, 쏅 appuyez sur la touche 4 <. « SCAN TRK » apparaît un court instant sur l'écran 6. L'affichage du numéro du CD sur l'écran clignote pendant la lecture. Arrêt du balayage (SCAN) Pour arrêter le balayage des titres, 쏅 appuyez de nouveau sur la touche 4 <. 89 03_CalaisMP48_fr.indd 89 11.06.2008 15:13:24 Uhr Télécommande IR Télécommande IR RC 10 P La télécommande infrarouge (IR) vous permet de contrôler les fonctions les plus importantes de l'appareil. Récepteur de télécommande Le récepteur infrarouge 9 pour la télécommande se trouve sur la face avant de l'appareil. Avant de pouvoir utiliser la télécommande, le récepteur doit être activé : 쏅 Appuyez sur la touche MENU 7. ou 8 쏅 Appuyez sur la touche autant de fois qu'il est nécessaire pour faire apparaître « IR » et le réglage actuel « ON » (activé) ou « OFF » (désactivé) sur l'écran 6. 쏅 Appuyez sur la touche ou 8 pour désactiver ou activer le récepteur IR. Pour quitter le menu, 쏅 appuyez sur la touche MENU 7. Fonctions de la télécommande En général : Touche ON H Mise en marche et arrêt de l'appareil (pression prolongée) Mute (pression brève) Sortie du menu SRC @ Commutation des sources V+ B Augmentation du volume sonore V- A Diminution du volume sonore OK E D A @ G Appel ou sortie du menu E Sélection de l'option de menu C Sélection de l'option de menu F Modification du réglage dans le menu D Modification du réglage dans le menu F C B Fonction G H Dans le mode radio : Touche Fonction F Appel des stations préréglées D Sélection de la gamme d'ondes/du niveau de mémoire E Recherche vers le haut C Recherche vers le bas 90 03_CalaisMP48_fr.indd 90 11.06.2008 15:13:24 Uhr Sortie du préamplificateur Dans le mode CD : Sortie du préamplificateur Touche Vous pouvez raccorder à l'appareil un amplificateur pour l'utilisation d'un hautparleur d'extrême grave (subwoofer). L'amplificateur doit pour cela être raccordé sur la face arrière de l'appareil (alvéole C1). Vous pouvez régler le niveau du subwoofer dans le menu audio : 쏅 Appuyez sur la touche AUD :. ou 8 쏅 Appuyez sur la touche autant de fois qu'il est nécessaire pour faire apparaître « SUB WOOF » sur l'écran. « SUBW » et le réglage actuel apparaissent au bout de 2 secondes environ sur l'écran 6. 쏅 Appuyez sur la touche ou 8 pour régler le niveau pour le subwoofer entre 0 et 7. Fonction F Sélection du titre suivant D Sélection du titre précédent Dans le mode changeur de CD : Touche Fonction F Lecture du titre suivant D Lecture du titre précédent E Lecture du CD suivant C Lecture du CD précédent Dans le mode MP3 : Touche Fonction F Lecture du titre suivant D Lecture du titre précédent E Lecture du répertoire suivant C Lecture du répertoire précédent FRANÇAIS Télécommande IR Remarque : Vous n'avez pas besoin d'attendre l'affichage du réglage actuel pour le modifier en appuyant sur la touche ou 8. Pour quitter le menu, 쏅 appuyez sur la touche AUD :. 91 03_CalaisMP48_fr.indd 91 11.06.2008 15:13:24 Uhr Sources audio externes Sources audio externes Vous pouvez raccorder différents types de source audio externe à l'entrée AUX de l'appareil. L'entrée AUX doit être réglée pour la source audio externe raccordée : • Réglage « AUX » pour les sources audio externes telles qu'un lecteur de CD portable, un lecteur de MiniDisc ou un lecteur MP3. • Réglage « CDC » pour les changeurs CD Blaupunkt CDC A 08 T et IDC A 09. • Réglage « USB » pour l'interface USB de Blaupunkt. Pour le réglage de l'entrée AUX, consultez la section suivante « Réglage de l'entrée AUX ». Remarque : Si vous souhaiter raccorder une source audio externe, vous avez besoin d'un câble d'adaptation. Vous pouvez vous procurer ce câble (réf. Blaupunkt 7 607 897 093) auprès d'un revendeur Blaupunkt. Réglage de l'entrée AUX 쏅 Appuyez sur la touche MENU 7. ou 8 쏅 Appuyez sur la touche autant de fois qu'il est nécessaire pour faire apparaître « SRC SEL » sur l'écran. « SRC » et le réglage actuel « CDC », « USB » ou « AUX » apparaît au bout de 2 secondes sur l'écran 6. 쏅 Appuyez sur la touche ou 8 pour sélectionner un autre réglage. Remarque : L'ordre des réglages dans le menu est « CDC » – « USB » – « AUX » : • Lorsque le réglage actuel est « CDC », vous pouvez sélectionner le réglage « USB » en appuyant sur la touche 8. • Lorsque le réglage actuel est « USB », vous pouvez sélectionner le réglage « CDC » en appuyant sur la touche 8 ou le réglage « AUX » ou en appuyant sur la touche 8. • Lorsque le réglage actuel est « AUX », vous pouvez sélectionner le réglage « USB » en appuyant sur la touche 8. Après chaque changement de réglage, l'appareil s'arrête automatiquement. Pour commuter entre les réglages « CDC » et « AUX », vous devez par conséquent sélectionner d'abord le réglage « USB » et remettre l'appareil en marche après que celui-ci se soit arrêté automatiquement. Répéter ensuite la procédure de réglage pour accéder au réglage souhaité, « AUX » ou « CDC ». Le message « AUTO SWITCH OFF IN 10 SECONDS » (arrêt automatique dans 10 secondes) est affiché. L'appareil s'arrête automatiquement au bout de 10 secondes environ. 쏅 Remettez l'appareil en marche avec la touche marche/arrêt 3. L'appareil se met en marche dans le mode radio avec le réglage sélectionné. 92 03_CalaisMP48_fr.indd 92 11.06.2008 15:13:25 Uhr Remarque : Lorsque vous avez choisi le réglage AUX, vous pouvez sélectionner l'entrée AUX avec la touche SRC >. « AUX » est ensuite affiché sur l'écran. Lorsque vous avez choisi le réglage CDC ou USB, vous pouvez sélectionner la source audio avec la touche SRC > uniquement si un appareil approprié (changeur de CD ou interface USB) est raccordé. Réglage du niveau de l'entrée AUX Lorsque vous avez réglé l'entrée AUX sur « AUX » pour le raccordement d'une source audio externe, vous pouvez adapter le niveau de la source audio externe au niveau des sources audio propres de l'appareil (par ex. le CD ou la radio). Réglages d'usine Retour aux réglages d'usine (RESET) Vous avez la possibilité de revenir aux réglages d'usine de l'appareil : 쏅 Appuyez sur la touche AUD : et maintenez-la appuyée pendant plus de 10 secondes. Un bip de confirmation retentit et « RESET » apparaît un court instant sur l'écran 6. Tous les réglages d'usine dans les menus et pour la sortie audio sont repris. Remarque : Les stations affectées aux touches de présélection ne sont pas effacées. FRANÇAIS Sources audio externes Remarque : Vous pouvez régler le niveau pour l'entrée AUX uniquement lorsque AUX est sélectionné comme source audio. 쏅 Appuyez au besoin sur la touche SRC > autant de fois qu'il est nécessaire pour faire apparaître « AUX » sur l'écran. 쏅 Appuyez sur la touche MENU 7. ou 8 쏅 Appuyez sur la touche autant de fois qu'il est nécessaire pour faire apparaître « GAIN » et le réglage actuel sur l'écran. 쏅 Appuyez sur la touche ou 8 pour régler l'adaptation de niveau entre –9 et +9. Pour quitter le menu, 쏅 appuyez sur la touche MENU 7. 93 03_CalaisMP48_fr.indd 93 11.06.2008 15:13:25 Uhr Caractéristiques techniques Caractéristiques techniques Tension de service 24 volts Amplificateur Puissance de sortie : 2 x 20 watts sinus sur 4 ohms Sortie Line : 2 x 2,0 volts eff. Entrée Aux : 2 x 2,0 volts eff. Tuner Gamme d'ondes Europe : FM : 87,5 - 108 MHz OM : 531 - 1602 kHz OL : 153 - 279 kHz Gamme d'ondes Amérique : FM : 87,7 - 107,9 MHz AM : 530 - 1710 kHz FM - Bande passante : 30 -15 000 Hz CD Bande passante : 20 - 20 000 Hz Sous réserve de modifications ! 94 03_CalaisMP48_fr.indd 94 11.06.2008 15:13:25 Uhr Elementi di comando 1 Regolatore del volume < Blocco dei tasti 1 - 6 2 Tasto BND Premuto brevemente: selezione del livello di memoria o della gamma di lunghezze d’onda Premuto a lungo: avvio della funzione Travelstore (FMT o MWT/LWT) = Tasto RDS Attivazione e disattivazione della funzione comfort RDS ? Code LED ITALIANO 3 Tasto On/Off Premuto brevemente: accensione dell'apparecchio. Durante l'uso: modalità silenziosa (Mute) Premuto a lungo: spegnimento dell'autoradio. > Tasto SRC Selezione delle fonti tra radio e (se inserito, acceso o attivato) CD, MP3, multilettore CD, e AUX. 4 Tasto estrazione CD 5 Vano CD 6 Display 7 Tasto MENU Richiamo del menu delle impostazioni di base. 8 Tasto multifunzione 9 Ricevitore a infrarossi per telecomando a infrarossi (opzionale) : Tasto AUD Premuto brevemente: apertura del menu audio per regolazione dei bassi, degli alti, del balance, del fader e della funzione loudness Premuto a lungo (10 sec.): ripristino delle impostazioni di fabbrica ; Tasto TA Inserimento e disinserimento della priorità per le informazioni sul traffico Interruzione di un messaggio sul traffico in corso di trasmissione 95 04_CalaisMP48_it.indd 95 11.06.2008 15:14:14 Uhr Indice Avvertenze importanti ..................... 98 Uso conforme alle norme ................ 98 Telecomando (opzionale) ................ 98 Multilettore CD (opzionale) ............. 98 Interfaccia USB (opzionale) ............. 98 Smaltimento del vecchio apparecchio ..98 Protezione antifurto CODE ............... 99 Attivazione e disattivazione della richiesta del codice (CODE) ............ 99 Immissione del codice numerico dopo un'interruzione di tensione .... 100 Accensione e spegnimento ............. 100 Accensione e spegnimento con tasto On/Off ................................ 100 Spegnimento e accensione tramite l'accensione d'auto....................... 100 Attivazione tramite inserimento di CD ......................................... 100 Impostazione del tempo di spegnimento ............................... 101 Accensione dell'apparecchio mediante telefono (opzionale) ....... 101 Attivazione con il telecomando a infrarossi RC 10 P (opzionale) ....... 101 Regolazione del volume.................. 101 Modalità silenziosa (MUTE) ........... 101 Audio del telefono/della navigazione . 101 Attivazione/disattivazione del segnale acustico di conferma (BEEP) ....................................... 102 Impostazione del volume massimo al momento dell'accensione (ON VOL).................................... 102 Adattamento del volume in funzione della rumorosità (GALA) ............... 103 Suono ........................................... 103 Impostare gli alti .......................... 103 Impostazione dei bassi ................. 103 Impostazione dei medi.................. 104 Regolazione del bilanciamento del volume a sinistra/destra (BAL)....... 104 Regolazione del bilanciamento del volume tra zona anteriore/ posteriore (FAD) .......................... 104 Ora ............................................... 105 Indicazione dell'ora ...................... 105 Impostazione dell'ora ................... 105 Selezione di modalità 12/24 ore .... 105 Impostazione del fuso orario (TIMEZONE) ............................... 106 Esercizio radio ............................... 106 Attivazione dell'esercizio radio ....... 106 Funzione comfort RDS (AF, REG).... 106 Selezione gamma di lunghezze d'onda/livello di memoria .............. 107 Sintonizzazione di una stazione ...... 107 Memorizzazione di una stazione ..... 108 Richiamo di una stazione memorizzata ............................... 109 Breve ascolto delle stazioni ricevibili (BANDSCAN).................. 109 Tipo di programma (PTY) .............. 109 Abbassamento degli acuti in presenza di disturbi (HICUT) ......... 109 Attivazione e disattivazione Radiotext .................................... 110 Informazioni sul traffico ................. 110 Attivazione e disattivazione della precedenza per le informazioni sul traffico ....................................... 110 Impostazione dell'aumento del volume per le informazioni sul traffico ....................................... 111 Eliminazione delle informazioni sul traffico .................................. 111 96 04_CalaisMP48_it.indd 96 11.06.2008 15:14:15 Uhr Esercizio CD .................................. 111 Avvio dell'esercizio CD .................. 112 Visualizzazione di informazioni sul brano (testo del CD) ................ 112 Selezione di un brano ................... 113 Ricerca rapida automatica (udibile)... 113 Riproduzione dei brani in ordine casuale (MIX) .............................. 113 Breve ascolto dei brani (SCAN) ...... 113 Ripetizione di un brano (RPT) ........ 113 Interruzione della riproduzione (PAUSE) ..................................... 113 Estrazione del CD ........................ 113 Esercizio MP3/WMA ...................... 114 Preparazione di un supporto MP3 .. 114 Avvio dell'esercizio MP3................ 116 Visualizzazione di informazioni sul brano (tag ID3) ....................... 116 Scegliere una directory ................. 117 Selezione di brani/file ................... 117 Ricerca rapida automatica ............. 117 Riproduzione dei brani in ordine casuale (MIX) .............................. 117 Breve ascolto dei brani (SCAN) ...... 118 Ripetizione di singoli brani o di intere directory (REPEAT) ............. 118 Interruzione della riproduzione (PAUSE) ..................................... 118 Modalità multilettore CD ................ 119 Avvio dell'esercizio del multilettore CD ............................ 119 Selezione di un CD ....................... 119 Selezione di un brano ................... 119 Ricerca rapida automatica (udibile)... 119 Ripetizione di singoli brani o di interi CD (RPT) ............................ 119 Riproduzione dei brani in ordine casuale (MIX) .............................. 120 Breve ascolto dei brani di tutti i CD (SCAN) ................................. 120 Interruzione della riproduzione (PAUSE) ..................................... 120 Telecomando a infrarossi RC 10 P ... 121 Ricevitore del telecomando ........... 121 Funzioni del telecomando ............. 121 Uscita preamplificatore.................. 122 Fonti audio esterne ........................ 123 Impostazione dell'ingresso AUX...... 123 Impostazione del livello dell'ingresso AUX ......................... 124 Ripristino delle impostazioni di fabbrica (RESET)........................ 124 Dati tecnici .................................... 125 Tensione di esercizio .................... 125 Amplificatori ............................... 125 Tuner ......................................... 125 CD ............................................. 125 Collegamento ISO .......................... 281 ITALIANO Indice 97 04_CalaisMP48_it.indd 97 11.06.2008 15:14:15 Uhr Avvertenze importanti Avvertenze importanti Interfaccia USB (opzionale) Prima di mettere in funzione l'apparecchio, leggere accuratamente questo manuale e impratichirsi con il funzionamento dell'apparecchio. Conservare questo manuale nel veicolo, per poterlo consultare se necessario. L'interfaccia USB Blaupunkt può essere collegata per riprodurre file MP3/WMA da un supporto USB. L'interfaccia USB è disponibile come accessorio (codice Blaupunkt 7 607 541 576). Uso conforme alle norme L'apparecchio è destinato ad essere utilizzato su veicoli industriali con rete di bordo da 24 V e ad essere montato in un vano 1 DIN. Sicurezza stradale Smaltimento del vecchio apparecchio Non smaltire la propria vecchia autoradio nei rifiuti domestici! Per lo smaltimento del vecchio apparecchio, utilizzare i sistemi di restituzione e raccolta disponibili. La sicurezza stradale ha priorità assoluta. Utilizzate l’apparecchio soltanto quando la situazione del traffico stradale lo permette. Prima di mettersi in viaggio, familiarizzare con le operazioni da eseguire con l’apparecchio. Deve essere garantita la ricezione tempestiva dei segnali di avvertimento della polizia, dei vigili del fuoco e del pronto soccorso. Durante il viaggio quindi il volume del programma deve essere sempre adeguato. Telecomando (opzionale) Il telecomando RC 10 P consente di comandare le più importanti funzioni. Come accessorio è disponibile un telecomando a infrarossi (codice Blaupunkt 7 607 591 512). Multilettore CD (opzionale) È possibile collegare un multilettore CD CDC A08 T (codice Blaupunkt 7 607 274 002) o IDC A09 (codice Blaupunkt 7 607 274 005). I multilettori CD sono disponibili come accessori. 98 04_CalaisMP48_it.indd 98 11.06.2008 15:14:15 Uhr Protezione antifurto CODE Come protezione antifurto, l'apparecchio è bloccato mediante un codice numerico a quattro cifre. Questo numero deve sempre venire inserito nei casi in cui l'apparecchio venga scollegato dalla tensione di esercizio del veicolo. La richiesta del codice non è attiva sugli apparecchi provenienti dalla fabbrica, ma può venire attivata. Nota: Se è attivata la richiesta del codice, il Code LED ? a lampeggiare anche qualora sia l'apparecchio che l'accensione del veicolo siano disinseriti. Il codice numerico è riportato sulla tessera del sistema radio. Nota: Non conservare la tessera del sistema radio a bordo del veicolo! Attivazione e disattivazione della richiesta del codice (CODE) 쏅 Premere il tasto MENU 7. 쏅 Premere una o più volte il tasto o 8, fino a quando sul display 6 viene visualizzato "CODE" e appare l'impostazione attuale "ON" (acceso) o "OFF" (spento). 쏅 Premere il tasto o 8. Sul display compare 6 "0000". Inserire il codice: Nota: Se si inserisce un numero di codice errato, sul display compare nuovamente "0000" 6. L'immissione del codice numerico può essere ripetuta per al- tre due volte. Dopo la terza immissione errata del codice, il funzionamento dell'apparecchio si blocca per 1 ora, durante la quale sul display compare la scritta "WAIT 1HR" 6. Se durante questo arco di tempo si spegne l'apparecchio, alla riaccensione sarà necessario attendere un'altra ora completa. 쏅 Premere una o più volte il tasto stazione 1 < fino a quando sul display 6 viene visualizzata la prima cifra del proprio numero di codice. 쏅 Premere una o più volte il tasto stazione 2 < fino a quando sul display 6 viene visualizzata la seconda cifra del proprio numero di codice. 쏅 Premere una o più volte il tasto stazione 3 < fino a quando sul display 6 viene visualizzata la terza cifra del proprio numero di codice. 쏅 Premere una o più volte il tasto stazione 4 < fino a quando sul display 6 viene visualizzata la quarta cifra del proprio numero di codice. 쏅 Quando il numero di codice visualizzato sul display 6 è quello corretto, tenere premuto il tasto stazione 5 < per più di 2 secondi. Sul display 6 compaiono nuovamente la scritta "CODE" e l'impostazione "ON" (acceso) o "OFF" (spento) a seconda dell'impostazione attuale. 쏅 Premere il tasto o 8 per disattivare o attivare la richiesta del codice. Per uscire dal menu, 쏅 premere il tasto MENU 7. ITALIANO Protezione antifurto 99 04_CalaisMP48_it.indd 99 11.06.2008 15:14:15 Uhr Protezione antifurto Immissione del codice numerico dopo un'interruzione di tensione 쏅 Accendere la radio. Sul display 6 compare dapprima la scritta "CODE" e successivamente le cifre "0000". Il codice può essere inserito: Nota: Se si inserisce un numero di codice errato, sul display compare nuovamente "0000" 6. L'immissione del codice numerico può essere ripetuta per altre due volte. Dopo la terza immissione errata del codice, il funzionamento dell'apparecchio si blocca per 1 ora, durante la quale sul display compare la scritta "WAIT 1HR" 6. Se durante questo arco di tempo si spegne l'apparecchio, alla riaccensione sarà necessario attendere un'altra ora completa. 쏅 Inserire il numero di codice come descritto al capitolo "Attivazione e disattivazione della richiesta del codice". 쏅 Quando il numero di codice visualizzato sul display 6 è quello corretto, tenere premuto il tasto stazione 5 < per più di 2 secondi. L'apparecchio si accende. Accensione e spegnimento Accensione e spegnimento Sono disponibili diverse possibilità di accensione e spegnimento dell'apparecchio: Accensione e spegnimento con tasto On/Off 쏅 Per l'accensione premere il tasto On/ Off 3. 쏅 Per spegnere l'autoradio tenere premuto il tasto On/Off 3 per più di due secondi. Nota: Per proteggere la batteria del veicolo, ad accensione disinserita l'apparecchio si spegne automaticamente dopo un periodo di tempo che può essere impostato (vedi il paragrafo "Impostazione del tempo di spegnimento" in questo capitolo). Spegnimento e accensione tramite l'accensione d'auto Se l'apparecchio è collegato all'accensione del veicolo e non è stato spento con il tasto On/Off 3 la radio viene accesa e spenta contemporaneamente all'inserimento/ disinserimento dell'accensione. Attivazione tramite inserimento di CD Per attivare l'apparecchio mediante l'inserimento di un CD, 쏅 spingere un CD nel vano CD 5 con il lato stampato rivolto verso l'alto finché si percepisce una leggera resistenza. Il CD viene inserito automaticamente in sede, l'apparecchio inizia a funzionare in esercizio CD. 100 04_CalaisMP48_it.indd 100 11.06.2008 15:14:15 Uhr Accensione e spegnimento 쏅 Premere il tasto MENU 7. 쏅 Premere una o più volte il tasto o 8 fino a quando sul display 6 viene visualizzato "HOUR" insieme all'impostazione attuale. 쏅 Premere il tasto o 8 per impostare il tempo di spegnimento ad intervalli di 5 minuti tra 5 e 60 minuti. Per uscire dal menu, 쏅 premere il tasto MENU 7. Accensione dell'apparecchio mediante telefono (opzionale) Quando si attiva il telefono mentre l'apparecchio è spento, esso si accende. Quando si disattiva il telefono, anche l'apparecchio si spegne automaticamente, a condizione che il telefono sia correttamente collegato con l'apparecchio. Attivazione con il telecomando a infrarossi RC 10 P (opzionale) 쏅 Per l'attivazione premere il tasto ON H sul telecomando a infrarossi RC 10 P. Nota: Per poter utilizzare il telecomando a infrarossi, deve essere attivato il ricevitore a infrarossi dell'apparecchio. Leggere al riguardo il paragrafo "Ricevitore del telecomando" al capitolo "Telecomando a infrarossi RC 10 P". Regolazione del volume Il volume è regolabile per gradi da 0 (off) a 32 (massimo). 쏅 Per aumentare il volume del sistema, girare verso destra il regolatore del volume 1. 쏅 Per diminuire il volume del sistema, girare verso sinistra il regolatore del volume 1. Modalità silenziosa (MUTE) Il volume può essere portato in modalità silenziosa immediatamente (Mute). 쏅 Premere brevemente il tasto 3. Disattivazione della funzione Mute Per riattivare il livello di volume precedentemente ascoltato, 쏅 premere di nuovo brevemente il tasto 3. ITALIANO Impostazione del tempo di spegnimento Volume Audio del telefono/della navigazione Modalità silenziosa durante l'utilizzo del telefono Se l'autoradio è collegata con un telefono mobile o un sistema di navigazione, in presenza di una telefonata in arrivo o di un messaggio vocale del sistema di navigazione, l'autoradio passa alla modalità silenziosa. La comunicazione telefonica o il messaggio vocale vengono riprodotti attraverso gli altoparlanti dell'autoradio. Per attivare questa funzione, il telefono mobile o il sistema di navigazione devono essere collegati all'autoradio (settore C2 sul retro dell'apparecchio). Per sapere quali sistemi di navigazione è possibile collegare alla propria autoradio, rivolgersi al rivenditore specializzato Blaupunkt di zona. 101 04_CalaisMP48_it.indd 101 11.06.2008 15:14:15 Uhr Volume Quando viene ricevuta una chiamata o viene trasmesso un messaggio di navigazione, sul display compare "PHONE". Attivazione/disattivazione del segnale acustico di conferma (BEEP) Impostazione del volume per l'audio del telefono e del sistema di navigazione (PHONEVOL) Il volume delle conversazioni telefoniche o dei messaggi vocali del sistema di navigazione è regolabile: 쏅 Premere il tasto MENU 7. 쏅 Premere una o più volte il tasto 8 finché viene visualizzato o "PHONEVOL". Dopo 2 secondi circa sul display 6 compaiono la scritta "VOL" e l'impostazione attuale. 쏅 Premere il tasto o 8 per impostare il volume tra 0 e 32. All'effettuazione di determinate azioni, ad es. quando un tasto viene premuto per un tempo maggiore, si attiva un segnale acustico (Beep). Il segnale acustico può essere disattivato: 쏅 Premere il tasto MENU 7. 쏅 Premere una o più volte il tasto o 8, fino a quando sul display 6 viene visualizzato "BEEP" e appare l'impostazione attuale "ON" (acceso) o "OFF" (spento). 쏅 Premere il tasto o 8 per disattivare o attivare il segnale acustico (Beep). Per uscire dal menu, 쏅 premere il tasto MENU 7. Nota: Per modificare le impostazioni attuali premendo il tasto o 8 non è necessario attendere che esse vengano visualizzate. Per uscire dal menu, 쏅 premere il tasto MENU 7. Nota: Il volume può essere impostato agendo sul regolatore del volume 1 anche durante una conversazione telefonica o durante l'emissione dei messaggi di navigazione. Il volume impostato viene automaticamente memorizzato. Impostazione del volume massimo al momento dell'accensione (ON VOL) Quando si accende l'apparecchio, il volume è l'ultimo scelto. Tuttavia, se prima dello spegnimento è stato impostato un volume più alto rispetto al volume massimo al momento dell'accensione, alla riaccensione questo viene automaticamente limitato in base al valore impostato. Nota: Per proteggere da una rumorosità eccessiva, il volume massimo al momento dell'accensione è limitato al valore 25. 쏅 Premere il tasto MENU 7. 쏅 Premere una o più volte il tasto o 8 fino a quando appare "ON VOL". 102 04_CalaisMP48_it.indd 102 11.06.2008 15:14:16 Uhr Volume Nota: Per modificare le impostazioni attuali premendo il tasto o 8 non è necessario attendere che vengano visualizzate. Per uscire dal menu, 쏅 premere il tasto MENU 7. Adattamento del volume in funzione della rumorosità (GALA) Questa funzione consente di adeguare automaticamente il volume dell'autoradio alla velocità di marcia e quindi ai rumori di marcia correlati. Per esempio a mano a mano che aumenta la velocità, il volume viene automaticamente alzato, per controbilanciare la maggiore rumorosità (ad es. dovuta al vento). Affinché questo accada il veicolo deve porre a disposizione il segnale tachimetrico e l'autoradio deve essere collegata in modo opportuno. L’aumento automatico del volume è regolabile su sei livelli (OFF(spento) 1-5). 쏅 Premere il tasto MENU 7. 쏅 Premere una o più volte il tasto o 8 fino a quando viene visualizzato "GALA" insieme all'impostazione attuale. 쏅 Premere il tasto o 8 per impostare l'adattamento del volume tra "OFF" (spento) e 5. Per uscire dal menu, 쏅 premere il tasto MENU 7. Suono Impostare gli alti 쏅 Premere il tasto AUD : 쏅 Premere una o più volte il tasto o 8 finché viene visualizzato "TREBLE". 쏅 Tenere premuto il tasto o 8 per più di 2 secondi. Sul display compare brevemente "FREQ" e quindi viene visualizzata la frequenza degli alti selezionata al momento. Per selezionare un'altra frequenza degli alti compresa tra 10,0 kHz e 17,5 kHz, 쏅 premere il tasto o 8. Per impostare il livello degli alti, 쏅 premere una o più volte il tasto o 8 finché viene visualizzato "GAIN". Dopo circa 2 secondi compaiono la scritta "GAIN" e l'impostazione attiva al momento. 쏅 Premere il tasto o 8 per impostare il livello degli alti tra –7 e +7. Per uscire dal menu, 쏅 premere il tasto AUD : ITALIANO Dopo 2 secondi circa sul display 6 compaiono la scritta "VOL" e l'impostazione attuale. 쏅 Premere il tasto o 8 per impostare il volume tra 5 e 25. Suono Impostazione dei bassi 쏅 Premere il tasto AUD : 쏅 Premere una o più volte il tasto o 8 finché viene visualizzato "BASS". 쏅 Tenere premuto il tasto o 8 per più di 2 secondi. Sul display compare brevemente "FREQ" e quindi la frequenza dei bassi selezionata al momento. Per selezionare un'altra frequenza dei bassi compresa tra 60 kHz e 200 kHz, 쏅 premere il tasto o 8. 103 04_CalaisMP48_it.indd 103 11.06.2008 15:14:16 Uhr Suono Per impostare il livello dei bassi, 쏅 premere una o più volte il tasto o 8 finché viene visualizzato "GAIN". Dopo circa 2 secondi compaiono la scritta "GAIN" e l'impostazione attiva al momento. 쏅 Premere il tasto o 8 per impostare il livello dei bassi tra –7 e +7. Per impostare il fattore qualità per i bassi, o 쏅 premere una o più volte il tasto 8 finché viene visualizzato "Q FACTOR". Dopo circa 2 secondi compaiono "Q" e l'impostazione attiva al momento. 쏅 Premere il tasto o 8 per impostare il fattore di qualità tra 1,0 e 2,0. Per uscire dal menu, 쏅 premere il tasto AUD : Impostazione dei medi 쏅 Premere il tasto AUD : 쏅 Premere una o più volte il tasto 8 finché viene visualizzato o "MIDDLE". 쏅 Tenere premuto il tasto o 8 per più di 2 secondi. Sul display compare brevemente "FREQ" e quindi viene visualizzata la frequenza dei medi selezionata al momento. Per selezionare un'altra frequenza dei medi compresa tra 500 kHz e 2,5 kHz, 쏅 premere il tasto o 8. Per impostare il livello dei medi, 쏅 premere una o più volte il tasto o 8 finché viene visualizzato "GAIN". Dopo circa 2 secondi compaiono la scritta "GAIN" e l'impostazione attiva al momento. 쏅 Premere il tasto o 8 per impostare il livello dei medi tra –7 e +7. Per impostare il fattore qualità per i medi, o 쏅 premere una o più volte il tasto 8 finché viene visualizzato "Q FACTOR". Dopo circa 2 secondi compaiono "Q" e l'impostazione attiva al momento. 쏅 Premere il tasto o 8 per impostare il fattore di qualità tra 0,5 e 1,25. Per uscire dal menu, 쏅 premere il tasto AUD : Regolazione del bilanciamento del volume a sinistra/destra (BAL) 쏅 Premere il tasto AUD : 쏅 Premere una o più volte il tasto o 8 fino a quando viene visualizzato "BAL" insieme all'impostazione attuale. 쏅 Premere il tasto o 8 per impostare il bilanciamento del volume sinistra/ destra tra – 10 e +10. Per uscire dal menu, 쏅 premere il tasto AUD : Regolazione del bilanciamento del volume tra zona anteriore/ posteriore (FAD) Nota Gli altoparlanti posteriori devono venire collegati mediante un amplificatore supplementare. 쏅 Premere il tasto AUD : 104 04_CalaisMP48_it.indd 104 11.06.2008 15:14:16 Uhr Suono 쏅 Premere una o più volte il tasto o 8 fino a quando viene visualizzato "FAD" insieme all'impostazione attuale. 쏅 Premere il tasto o 8, per regolare il bilanciamento del volume davanti e dietro tra – 10 e +10. Per uscire dal menu, 쏅 premere il tasto AUD : Ora Ora Indicazione dell'ora Per visualizzare l'ora sul display per circa 10 secondi, 쏅 tenere premuto il tasto MENU 7 per più di 2 secondi. 쏅 Premere il tasto MENU 7. 쏅 Premere una o più volte il tasto o 8, fino a quando sul display 6 viene visualizzato "TIMESET". Dopo circa 2 secondi l'ora attuale viene visualizzata sul display 6. Prima dell'ora, nella modalità 24 ore compare "24H" e nella modalità 12 ore compare "AM" o "PM". Lampeggiano le ore, che si possono impostare. Per impostare le ore o i minuti, 쏅 premere il tasto o 8. Per commutare tra ore e minuti, 쏅 premere il tasto 6 <. ITALIANO Impostazione dell'ora Nota: Per modificare le impostazioni attuali premendo il tasto o 8 non è necessario attendere che venga visualizzata l'ora attuale. Per uscire dal menu, 쏅 premere il tasto MENU 7. Selezione di modalità 12/24 ore 쏅 Premere il tasto MENU 7. 쏅 Premere una o più volte il tasto o 8 finché sul display 6 appare "24H MODE" o "12H MODE". 105 04_CalaisMP48_it.indd 105 11.06.2008 15:14:16 Uhr Ora 쏅 Per eseguire la commutazione tra le diverse modalità premere il tasto o 8. Per uscire dal menu, 쏅 premere il tasto MENU 7. Impostazione del fuso orario (TIMEZONE) Se durante il viaggio si percorrono zone aventi diversi fusi orari, è possibile regolare la differenza di fuso rispetto all'ora impostata al momento con passi di 1 ora per volta. In questo modo è possibile correggere l'ora indicata per il fuso orario valido di volta in volta senza dover impostare nuovamente l'ora medesima. 쏅 Premere il tasto MENU 7. 쏅 Premere una o più volte il tasto 8 finché viene visualizzato o "TIMEZONE". Dopo 2 secondi circa sul display 6 compaiono "ZONE" e l'impostazione attuale. 쏅 Premere il tasto o 8 per impostare la differenza di fuso orario in passi di 1 ora per volta tra –12 e +12. Nota: Per modificare le impostazioni attuali premendo il tasto o 8 non è necessario attendere che vengano visualizzate. Per uscire dal menu, 쏅 premere il tasto MENU 7. Esercizio radio Esercizio radio Questo apparecchio è dotato di un ricevitore radio RDS. Quasi tutte le stazioni FM trasmettono un segnale che, oltre al programma radio, contiene anche informazioni come il nome della stazione ed il tipo di programma (PTY). Non appena una stazione è ricevibile, viene visualizzato sul display 6 il nome di questa stazione. Attivazione dell'esercizio radio Se ci si trova in un'altra modalità di esercizio, 쏅 premere il tasto BND 2, oppure 쏅 premere una o più volte il tasto SRC > fino a quando sul display 6 viene visualizzato "RADIO". Sul display 6 viene visualizzata la frequenza attuale o il nome della stazione. Funzione comfort RDS (AF, REG) Le funzioni comfort RDS AF (frequenza alternativa) e REG (regionale) ampliano la gamma delle prestazioni dell'apparecchio radio. • AF: con funzione comfort RDS attivata, l'apparecchio cerca automaticamente in sottofondo la migliore frequenza di ricezione per la stazione sintonizzata. • REG: in determinate ore del giorno alcune stazioni suddividono il loro programma in diversi programmi regionali con differenti contenuti. Quando la funzione REG è attivata, si impedisce che l'apparecchio si disponga su frequenze alternative della stazione impostata, che hanno una differente programmazione. 106 04_CalaisMP48_it.indd 106 11.06.2008 15:14:17 Uhr Esercizio radio Attivazione e disattivazione della funzione comfort RDS 쏅 Per utilizzare le funzioni RDS AF e REG, premere il tasto RDS =. Le funzioni comfort RDS sono attive, quando sul display 6 viene visualizzato il simbolo RDS. Inserimento e disinserimento della funzione REG 쏅 Premere il tasto MENU 7. 쏅 Premere una o più volte il tasto o 8, fino a quando sul display 6 viene visualizzato "REG" e appare l'impostazione attuale "ON" (acceso) o "OFF" (spento). 쏅 Premere il tasto o 8 per disattivare o attivare la funzione REG. Per uscire dal menu, 쏅 premere il tasto MENU 7. Nota: L'impostazione REG ON/OFF ha valore esclusivamente quando è attivata la funzione RDS. Selezione gamma di lunghezze d'onda/livello di memoria Con questo apparecchio è possibile ricevere programmi delle gamme di frequenze FM (UKW), OM (MW) e OL (LW) (Europa) o FM e AM (NAFTA). Per la gamma di lunghezze d’onda FM sono disponibili tre livelli di memoria FM1, FM2 e FMT, mentre su ognuna delle gamme di lunghezze d'onda OM (MW) e OL (LW) o AM è disponibile un singolo livello di memoria. Vi è inoltre un ulteriore livello di memoria MWT/LWT o AMT. Su ogni livello di memoria si possono memorizzare 6 stazioni. Per passare dalla gamma di lunghezze d'onda ai livelli di memoria e viceversa, 쏅 premere il tasto BND 2. Sintonizzazione di una stazione Ci sono diverse possibilità di sintonizzazione di una stazione. Ricerca automatica di stazione 쏅 Premere il tasto o 8. La radio si sintonizza su una delle prossime stazioni ricevibili. ITALIANO Nota: La funzione REG deve essere attivata o disattivata a parte nel menu. Note: • Se è attivata la priorità alle informazioni sul traffico, viene impostata la successiva stazione che trasmette informazioni. • Se è attivatala funzione PTY, viene impostata la successiva stazione relativa al tipo di programma scelto. Impostazione della sensibilità della ricerca automatica delle stazioni È possibile scegliere se in presenza di una bassa sensibilità debbano essere impostate solo stazioni forti o se in presenza di alta sensibilità debbano essere impostate anche stazioni deboli. 쏅 Premere il tasto MENU 7. 쏅 Premere una o più volte il tasto o 8, fino a quando sul display 6 viene visualizzato "SENS" e appare l'impostazione attuale "LO" (bassa sensibilità) o "DX" (alta sensibilità). 107 04_CalaisMP48_it.indd 107 11.06.2008 15:14:17 Uhr Esercizio radio 쏅 Premere il tasto o 8 per commutare tra le impostazioni "LO" e "DX". Per uscire dal menu, 쏅 premere il tasto MENU 7. Sintonizzazione manuale Per modificare per gradi la frequenza impostata, 쏅 premere il tasto o 8. Per modificare rapidamente la frequenza impostata, 쏅 tenere premuto il tasto o 8. Nota: La sintonizzazione manuale è possibile soltanto con le funzioni RDS e PTY spente. Scorrere all'interno di una catena di stazioni (solo FM) Se una stazione trasmette più programmi, è possibile sfogliare una cosiddetta "catena di stazioni". 쏅 Premere il tasto o 8 per passare alla stazione successiva della catena di stazioni. Nota: È possibile sfogliare le catene di stazioni solo se sono state attivate le funzioni RDS e PTY. In questo caso sarà possibile sintonizzarsi su stazioni che siano state già ascoltate in precedenza. A questo scopo utilizzare la funzione Travelstore (T-STORE). Memorizzazione di una stazione Memorizzazione manuale di una stazione 쏅 Selezionare il livello di memoria o la gamma di lunghezze d'onda desiderati. 쏅 Impostare la stazione. 쏅 Tenere premuto per più di 2 secondi il tasto stazione 1 - 6 <, sul quale deve venire memorizzata la stazione. Risuona il segnale acustico di conferma. La stazione è memorizzata sul tasto stazione scelto. Memorizzazione automatica di una stazione (T-STORE) È possibile memorizzare automaticamente le 6 stazioni di maggiore potenza della regione. Per la gamma di lunghezze d'onda FM la memorizzazione avviene sul livello di memoria FMT, per le gamme di lunghezze d'onda OM (MW) e OL (LW) avviene sul livello di memoria MWT/LWT e per la gamma di lunghezze d'onda AM sul livello di memoria AMT. Nota: Le stazioni memorizzate in precedenza su questo livello vengono sostituite dalle nuove stazioni trovate. 쏅 Scegliere la gamma di lunghezze d’onda desiderata. 쏅 Tenere premuto il tasto BND 2 per più di due secondi. Ha inizio la memorizzazione. Sul display 6 compare "T-STORE". Dopo che è stata ultimata la memorizzazione, la stazione viene riprodotta sul posto di memoria uno del livello di memoria FMT, MWT/LWT o AMT. 108 04_CalaisMP48_it.indd 108 11.06.2008 15:14:17 Uhr Esercizio radio 쏅 Selezionare il livello di memoria o la gamma di lunghezze d'onda. 쏅 Premere il tasto stazione 1 - 6 < sul quale è memorizzata la stazione desiderata. Breve ascolto delle stazioni ricevibili (BANDSCAN) Con la funzione Bandscan è possibile ascoltare tutte le stazioni ricevibili per ca. 10 secondi. Avvio della funzione Bandscan 쏅 Tenere premuto il tasto o 8 per più di 2 secondi. Sul display compare brevemente "BANDSCAN". L'apparecchio ricerca le stazioni nella gamma di lunghezze d'onda del momento. Ogni stazione trovata viene ascoltata per ca. 10 secondi e ne viene visualizzata la frequenza impostata o il nome. Termine della funzione Bandscan 쏅 Premere il tasto o 8. Viene terminata la scansione. Rimane impostata l'ultima stazione su cui ci si è sintonizzati. Tipo di programma (PTY) Oltre al nome della stazione, alcune stazioni FM forniscono anche informazioni sul tipo di programma trasmesso. Le denominazioni dei tipi di programma possono essere ad es.: CULTURA VIAGGI JAZZ SPORT NOTIZIARIO POP ROCK MUSICA Con la funzione PTY è possibile selezionare stazioni che trasmettono proprio il tipo di programma ricercato. Se è attivata la funzione PTY ed è stata avviata la ricerca automatica PTY, l'apparecchio si porta automaticamente dalla stazione ascoltata al momento, o da un'altra modalità, alla stazione con il tipo di programma scelto. Attivazione e disattivazione PTY 쏅 Premere il tasto MENU 7. 쏅 Premere una o più volte il tasto o 8, fino a quando sul display 6 viene visualizzato "PTY" e appare l'impostazione attuale "ON" (acceso) o "OFF" (spento). 쏅 Premere il tasto o 8 per disattivare o attivare la funzione PTY. Per uscire dal menu, 쏅 premere il tasto MENU 7. ITALIANO Richiamo di una stazione memorizzata Selezione del tipo di programma e avvio della ricerca automatica 쏅 Premere una o più volte il tasto o 8, fino a quando sul display viene indicato il tipo di programma desiderato. 쏅 Premere il tasto o 8 per avviare la ricerca automatica. Se viene trovata una stazione con il tipo di programma scelto, questa viene impostata. Abbassamento degli acuti in presenza di disturbi (HICUT) La funzione Hicut migliora la riproduzione in caso di disturbi nella ricezione radio. Quando la ricezione è disturbata, il livello di disturbo viene abbassato automaticamente. 109 04_CalaisMP48_it.indd 109 11.06.2008 15:14:17 Uhr Esercizio radio Per attivare o disattivare la funzione HICUT, 쏅 premere il tasto MENU 7. 쏅 Premere una o più volte il tasto o 8, fino a quando sul display 6 viene visualizzato "HICUT" e appare l'impostazione attuale "ON" (acceso) o "OFF" (spento). 쏅 Premere il tasto o 8 per disattivare o attivare la funzione HICUT. Per uscire dal menu, 쏅 premere il tasto MENU 7. Attivazione e disattivazione Radiotext Alcune stazioni utilizzano il segnale RDS per trasmettere pubblicità o altre informazioni al posto del nome della stazione. Questo Radiotext compare sul display 6. Per attivare/disattivare la visualizzazione del radiotext, 쏅 premere il tasto MENU 7. 쏅 Premere una o più volte il tasto 8 finché viene visualizzato o "RADIOTXT". Dopo 2 secondi circa sul display 6 compare "TEXT ON" (attivato) o "TEXT OFF" (disattivato). 쏅 Premere il tasto o 8 per disattivare o attivare la visualizzazione del radiotext. Nota: Per modificare le impostazioni attuali premendo il tasto o 8 non è necessario attendere che vengano visualizzate. Per uscire dal menu, 쏅 premere il tasto MENU 7. Informazioni sul traffico Informazioni sul traffico Attivazione e disattivazione della precedenza per le informazioni sul traffico Per attivare o disattivare la priorità delle informazioni sul traffico in tutte le modalità, 쏅 premere il tasto TA ;. Nota: Nelle modalità CD, MP3, multilettore CD ed AUX questa funzione è disponibile solo se precedentemente è stata impostata la gamma di lunghezze d'onda FM. La precedenza per le informazioni sul traffico è attivata quando sul display 6 viene visualizzato il simbolo TA. Le informazioni sul traffico vengono trasmesse non appena l'apparecchio le riceve. Per tutta la durata delle informazioni, sul display 6 compare la scritta "TRAFFIC". Nota: Si sente un avvertimento acustico, • quando, durante l’ascolto della stazione che trasmette informazioni sul traffico o di un CD, si esce dall’area di trasmissione della stazione che trasmette tale informazioni e con la successiva ricerca automatica non viene individuata alcuna nuova stazione. • se si passa da una stazione che trasmette informazioni sul traffico ad un'altra che invece non trasmette tali informazioni. In tali casi disinserire la priorità per le informazioni sul traffico, oppure sintonizzarsi su una stazione che trasmette informazioni sul traffico stradale. 110 04_CalaisMP48_it.indd 110 11.06.2008 15:14:18 Uhr Informazioni sul traffico Il livello con il quale le informazioni sul traffico verranno riprodotte ad un volume più alto rispetto a quello impostato può essere regolato: 쏅 Premere il tasto MENU 7. 쏅 Premere una o più volte il tasto o 8 fino a quando appare "TA VOL". Dopo 2 secondi circa sul display 6 compaiono la scritta "VOL" e l'impostazione attuale. 쏅 Premere il tasto o 8 per impostare l'aumento del volume tra 0 e 10. Nota: Per modificare le impostazioni attuali premendo il tasto o 8 non è necessario attendere che vengano visualizzate. Per uscire dal menu, 쏅 premere il tasto MENU 7. Nota: Il volume si può regolare con il regolatore del volume 1 durante la trasmissione di informazioni sul traffico, per tutta la durata delle informazioni. Eliminazione delle informazioni sul traffico Per interrompere la trasmissione delle informazioni sul traffico e tornare alla fonte audio ascoltata in precedenza, 쏅 premere il tasto TA ;. La precedenza dei comunicati sul traffico rimane attiva. Esercizio CD Con questo apparecchio è possibile riprodurre i normali CD audio, CD-R e CD-RW reperibili sul mercato, con diametro di 12 cm. Per evitare problemi nella riproduzione, non masterizzare i CD a velocità superiori a 16x. Danneggiamento del lettore CD! Non si possono riprodurre i "single CD" con diametro di 8 cm e neppure i CD sagomati (shape CD). Trattare il CD con accuratezza e evitare danni e graffi sul CD. Se possibile, afferrare il CD soltanto dal bordo. Per pulire un CD sporco utilizzare un panno morbido privo di filamenti senza alcun solvente. Pulire il CD sempre dall'interno verso l'esterno. Non esporre il CD direttamente ai raggi del sole e conservarlo separato dall'apparecchio in una custodia. Non incollare etichette sulla superficie del CD. Tracciare il CD solo con un apposito pennarello comunemente reperibile in commercio. Non ci assumiamo nessuna responsabilità per danni al lettore CD conseguenti all’impiego di CD inadatti o danneggiati. ITALIANO Impostazione dell'aumento del volume per le informazioni sul traffico Esercizio CD Per un corretto funzionamento del lettore, utilizzare esclusivamente CD con il logo Compact Disc. I CD con protezione da copiatura possono causare difficoltà di riproduzione. Blaupunkt non può garantire il funzionamento perfetto di CD protetti contro la copiatura! 111 04_CalaisMP48_it.indd 111 11.06.2008 15:14:18 Uhr Esercizio CD Avvio dell'esercizio CD Quando nel lettore non è inserito alcun CD, 쏅 senza usar forza, spingere il CD nel suo drive, con lato stampato rivolto verso l’alto, fino ad avvertire una resistenza. Il CD viene inserito automaticamente nel lettore. Il simbolo del CD compare sul display 6. Nota: Non bisogna né ostacolare l'introduzione del CD né spingere. Inizia la riproduzione del CD. Sul display 6 vengono visualizzati il numero del brano in corso (ad es. "T12") e la durata di riproduzione e le informazioni relative al brano (testo del CD). Se nel lettore è già inserito un CD, 쏅 premere una o più volte il tasto SRC > fino a quando sul display 6 viene indicato "CD". La riproduzione riprende dal punto in cui era stata interrotta. Visualizzazione di informazioni sul brano (testo del CD) Se sul CD è disponibile il testo, le informazioni relative a ciascun brano vengono visualizzate sul display 6 per una sola volta come testo scorrevole all'avvio del brano. Visualizzazione delle informazioni sul brano per una sola volta come testo scorrevole 쏅 Premere il tasto 5 <. Il testo del CD relativo al brano in corso viene visualizzato una sola volta come testo scorrevole sul display 6. Nota: Questa funzione non è disponibile se la visualizzazione del testo del CD come testo scorrevole è disattivata (vedi paragrafo seguente). Attivazione/disattivazione della visualizzazione delle informazioni sul brano come testo scorrevole Per attivare o disattivare la visualizzazione delle informazioni sul brano come testo scorrevole, 쏅 premere il tasto MENU 7. 쏅 Premere una o più volte il tasto o 8, fino a quando sul display 6 viene visualizzato "SCRL" e appare l'impostazione attuale "ON" (acceso) o "OFF" (spento). 쏅 Premere il tasto o 8 per disattivare o attivare il testo scorrevole. Per uscire dal menu, 쏅 premere il tasto MENU 7. Con l'impostazione "SCRL OFF" le informazioni sul brano compaiono sul display 6 in gruppi di 8 caratteri alla volta. I vari gruppi di caratteri, il numero del brano e la durata di riproduzione vengono visualizzati per 5 secondi ciascuno in modo alterno e continuo. Nota: Nell'esercizio MP3, l'impostazione "SCRL ON/OFF" ha effetto anche sulla visualizzazione delle informazioni sul brano MP3 (Tag ID3). 112 04_CalaisMP48_it.indd 112 11.06.2008 15:14:18 Uhr Esercizio CD 쏅 Premere il tasto o 8 per passare al brano precedente o successivo. Se si preme una volta il tasto 8, viene avviato di nuovo il brano in ascolto. Ricerca rapida automatica (udibile) Per avviare una ricerca rapida automatica indietro o in avanti, 쏅 tenere premuto il tasto o 8 fino a raggiungere il punto desiderato. Riproduzione dei brani in ordine casuale (MIX) 쏅 Premere il tasto 3 <. Sul display 6 appare brevemente "MIX CD" e viene visualizzato il simbolo MIX. I brani successivi vengono selezionati in ordine casuale. Fine di MIX 쏅 Premere nuovamente il tasto 3 <. Sul display 6 appare brevemente "MIX OFF" e il simbolo MIX scompare. La riproduzione prosegue normalmente. Breve ascolto dei brani (SCAN) Per ascoltare brevemente tutti i brani del CD per circa 10 secondi caduno, 쏅 premere il tasto 4 <. Sul display compare brevemente "SCAN TRK". Durante il breve ascolto dei brani lampeggia l'indicazione "CD". Vengono visualizzati il numero e la durata di ciascun brano riprodotto o le relative informazioni sul brano. Fine dello SCAN, riproduzione di brano continua Per terminare il processo di scansione, 쏅 premere nuovamente il tasto 4 <. Sul display compare brevemente "SCAN OFF". Continua la riproduzione del brano attualmente in ascolto. Ripetizione di un brano (RPT) 쏅 Premere il tasto 2 <. Sul display appare brevemente "RPT TRK" e viene visualizzato il simbolo RPT. Il brano in ascolto viene ripetuto fino a quando non viene disattivato RPT. Termine della funzione RPT 쏅 Premere nuovamente il tasto 2 <. Sul display 6 appare brevemente "RPT OFF" e scompare il simbolo RPT. La riproduzione prosegue normalmente. ITALIANO Selezione di un brano Interruzione della riproduzione (PAUSE) 쏅 Premere il tasto 1 <. Sul display 6 compare "PAUSE". Eliminare Pause 쏅 In modalità Pause premere il tasto 1 <. La riproduzione continua. Estrazione del CD Nota: È anche possibile estrarre i CD quando l'apparecchio è spento oppure quando è attiva un'altra fonte audio. 113 04_CalaisMP48_it.indd 113 11.06.2008 15:14:18 Uhr Esercizio CD 쏅 Premere il tasto estrazione CD 4. Il CD viene espulso. Sul display compare brevemente "CD EJECT". Nota: Non bisogna né ostacolare l’estrazione del CD né spingere. 쏅 Estrarre il CD. Il simbolo CD scompare. Nota: Se non si preleva un CD fuoriuscito dal lettore, dopo 10 secondi circa questo verrà automaticamente reinserito. Esercizio MP3/WMA Esercizio MP3/WMA Con questa autoradio si possono riprodurre anche CD-R e CD-RW con file musicali MP3 e WMA. Inoltre, tramite l'interfaccia opzionale USB C‘n‘C è possibile collegare supporti USB e riprodurre file MP3/WMA memorizzati su supporti USB. Questo capitolo è dedicato solo all'ascolto di file MP3. Lo modalità di riproduzione dei file WMA risulta infatti identica a quella degli MP3. In questo capitolo la denominazione "supporto MP3" si riferisce sia a CD-R/RW che a supporti USB quali ad es. le chiavette USB. Note: • Questo apparecchio non permette di riprodurre i file WMA con Digital Rights Management (DRM) provenienti dai musicshop online. • I file WMA possono essere riprodotti in sicurezza soltanto se sono stati creati con Windows Media-Player nella versione 8 o superiori. Preparazione di un supporto MP3 Preparazione di un CD MP3 La combinazione di masterizzatore CD, software di masterizzazione e CD vergine comporta a volte problemi nella riproduzione dei CD. Se insorgono dei problemi coi CD masterizzati in proprio, cambiare il produttore di CD registrabile oppure il colore del CD vergine. Il formato del CD deve essere ISO 9660 Level 1 o Level 2 oppure Joliet. Per tutti gli altri formati non può venire garantita una buona riproduzione. 114 04_CalaisMP48_it.indd 114 11.06.2008 15:14:18 Uhr Nella creazione (codifica) di file MP3/WMA da file audio devono essere utilizzati bitrati da 32 a 320 kbps per i file MP3 e da 32 fino a 192 kbps per i file WMA. Questo apparecchio supporta fino a 252 directory e fino a 255 file per directory. Il CD pertanto può contenere complessivamente una quantità massima di 512 directory e file. Le directory e i titoli dei CD possono essere selezionati singolarmente. D01 A D02 D03 T001 T002 T003 T004 T005 T001 T002 T003 T004 T005 T006 D04 T001 T002 T003 T004 T005 T006 T007 T008 T009 T010 T011 B A Directory B Brano · File Con il PC è possibile assegnare nomi alle varie directory. Il nome della directory può essere visualizzato sul display dell'autoradio. Eseguire la denominazione delle directory e dei brani in corrispondenza del vostro software di masterizzazione. Consultare a tal proposito le istruzioni d'uso del software. Note: • Quando si assegnano nomi ai file (alle directory ed ai brani), non utilizzare caratteri speciali e vocali con dieresi. • Se vengono utilizzati nomi di file con più di 16 caratteri (compreso ".MP3" o ".WMA"), il numero massimo dei brani e delle directory diminuisce. Se si hanno preferenze nella successione dei file: salvare i file sul supporto dati nello stesso ordine in cui si desidera che vengano riprodotti. L'autoradio riprodurrà i file nell'ordine in cui sono stati salvati sul supporto dati. Per essere riprodotti con questa autoradio i file MP3 devono avere estensione ".MP3" e i file WMA estensione ".WMA". ITALIANO Esercizio MP3/WMA Note: Al fine di garantire una riproduzione senza disturbi osservare le seguenti regole, • non cercare di aggiungere ad un file qualsiasi (cioè non MP3) l'estensione ".MP3" e di riprodurlo! Nella riproduzione questi altri file non vengono presi in considerazione; • non impiegare CD "misti", contenenti file non MP3 e brani MP3 (durante la riproduzione l'apparecchio legge soltanto i file MP3); • non impiegare CD Mix-Mode, con brani audio CD e brani MP3. Se si cerca di riprodurre un CD Mix-Mode, vengono riprodotti soltanto i brani CD audio. 115 04_CalaisMP48_it.indd 115 11.06.2008 15:14:19 Uhr Esercizio MP3/WMA Preparazione di un supporto USB Affinché l'apparecchio riconosca il supporto USB, questo deve essere definito come memoria di massa (Mass Storage Device), formattata nel sistema FAT16 o FAT32 e contenere file MP3 o WMA. Un supporto USB può contenere al massimo 1500 file (directory e brani). Con questa autoradio le directory e i brani possono essere selezionati singolarmente. Se vengono utilizzati nomi di file con più di 24 caratteri (compreso ".MP3" o ".WMA"), il numero massimo dei brani e delle directory diminuisce. Blaupunkt non può garantire il perfetto funzionamento di tutti i supporti USB disponibili sul mercato. Tag ID3 Per ogni brano di MP3 si possono visualizzare anche informazioni aggiuntive, come interprete, titolo e album (tag ID3). Questa autoradio può visualizzare sul display i tag ID3 delle versioni 1 e 2. Avvio dell'esercizio MP3 Avvio dell'esercizio MP3 del CD L'esercizio MP3 di un CD MP3 si avvia come il normale esercizio CD. Leggere a riguardo quanto riportato sotto "Avvio dell'esercizio CD" nel capitolo "Esercizio CD". Sul display 6 vengono visualizzati i numeri dei brani correnti (ad es. "T12") e la durata di riproduzione e le informazioni relative al brano (tag ID3) o il nome del file. Quando si passa ad un'altra directory, compare brevemente il numero della directory medesima (ad es. "DIR 02"). Collegamento di un supporto USB e avvio dell'esercizio MP3 Per poter collegare un supporto USB (ad esempio una chiavetta USB), l' interfaccia USB opzionale deve essere collegata al retro dell'autoradio (settore C3). Il cavo USB dell'interfaccia può essere collocato nel cassetto portaoggetti, ad esempio, o in un altro punto adatto della consolle centrale. Note: • Quando si collega l'interfaccia USB Blaupunkt all'apparecchio, deve venire regolato di conseguenza l'ingresso AUX. Leggere a riguardo il paragrafo "Impostazione dell'ingresso AUX" al capitolo "Fonti audio esterne". • Spegnere sempre l'apparecchio prima di collegare o rimuovere un supporto USB, affinché la memoria venga correttamente riconosciuta e disattivata. 쏅 Collegare il supporto dati USB al cavo USB dell'interfaccia. Con il tasto SRC > è possibile selezionare un supporto USB non appena collegato. Sul display viene visualizzato "USB". Visualizzazione di informazioni sul brano (tag ID3) Se è disponibile il supporto MP3 tag ID3, le informazioni relative a ciascun brano vengono visualizzate sul display 6 per una sola volta come testo scorrevole all'avvio del brano. Se con i file MP3 non sono stati memorizzati i tag ID3, verrà visualizzato il nome del file. 116 04_CalaisMP48_it.indd 116 11.06.2008 15:14:19 Uhr Esercizio MP3/WMA Visualizzazione delle informazioni sul brano per una sola volta come testo scorrevole 쏅 Premere il tasto 5 <. I tag ID3 relativi al brano in corso vengono visualizzati una volta come testo scorrevole sul display 6. Nota: Questa funzione non è disponibile quando è disattivata la visualizzazione delle informazioni sul brano come testo scorrevole. Leggere a riguardo il paragrafo "Attivazione e disattivazione della visualizzazione delle informazioni sul brano come testo scorrevole" al sottocapitolo "Visualizzazione di informazioni sul brano (testo CD)" del capitolo "Esercizio CD". Scegliere una directory Per passare ad un'altra directory, precedente o successiva, 쏅 premere il tasto o 8. Note: • Vengono saltate automaticamente tutte le directory senza file MP3. • L'apparecchio considera tutte le directory e sottodirectory come se fossero su un unico livello. Premendo una o più volte il tasto o 8 si passa direttamente anche a tutte le sottodirectory. Selezione di brani/file Nell'attuale directory, per passare da un brano/file ad un altro precedente o successivo, 쏅 premere il tasto o 8. Se si preme una volta il tasto 8, viene avviato di nuovo il brano in ascolto. Ricerca rapida automatica Per avviare una ricerca rapida automatica indietro o in avanti, 쏅 tenere premuto il tasto o 8 fino a raggiungere il punto desiderato. Nota: Nella modalità USB la ricerca rapida automatica indietro si ferma ogni volta all'inizio del brano in corso. ITALIANO Nota: A riguardo della memorizzazione dei tag ID3 leggere anche le istruzioni relative al proprio software PC-MP3 o al software di masterizzazione. Riproduzione dei brani in ordine casuale (MIX) Per riprodurre in ordine casuale i brani dell'attuale directory, 쏅 premere una o più volte il tasto 3 < finché sul display 6 viene visualizzato "MIX DIR" o "MIX FLD". Il simbolo del MIX compare sul display 6. Per ascoltare tutti i brani del supporto MP3 in ordine casuale, 쏅 premere una o più volte il tasto 3 <, fino a quando sul display 6 viene visualizzato "MIX ALL". Il simbolo del MIX compare sul display 6. 117 04_CalaisMP48_it.indd 117 11.06.2008 15:14:19 Uhr Esercizio MP3/WMA Fine di MIX Per terminare l'ascolto dei brani in ordine casuale, 쏅 premere una o più volte il tasto 3 <, fino a quando sul display 6 viene visualizzato "MIX OFF". Sul display 6 scompare il simbolo MIX. Breve ascolto dei brani (SCAN) Per ascoltare i primi 10 secondi di ogni brano del supporto MP3 inserito in ordine crescente, 쏅 premere una o più volte il tasto 4 < finché sul display 6 appare "SCAN TRK". Durante il breve ascolto dei brani lampeggia l'indicazione "MP3" o "USB". Per ascoltare brevemente tutti i brani della directory in corso in modalità USB, 쏅 premere una o più volte il tasto 4 < finché sul display 6 appare "SCAN FLD". Durante il breve ascolto dei brani lampeggia l'indicazione "USB". Fine della funzione SCAN Per terminare il breve ascolto, 쏅 premere una o più volte il tasto 4 < finché sul display 6 appare "SCAN OFF". Continua la riproduzione del brano attualmente in breve ascolto. Ripetizione di singoli brani o di intere directory (REPEAT) Se si desidera ripetere il titolo corrente, 쏅 premere una o più volte il tasto 2 <, fino a quando sul display 6 viene visualizzato "RPT TRK". Il simbolo RPT compare sul display 6. Per ripetere la riproduzione della directory in corso, 쏅 premere una o più volte il tasto 2 < finché sul display 6 viene visualizzato "RPT DIR" o "RPT FLD". Il simbolo RPT compare sul display 6. Disattivare la funzione REPEAT Per terminare la ripetizione, 쏅 premere una o più volte il tasto 2 <, fino a quando sul display 6 viene visualizzato "RPT OFF". Sul display 6 scompare il simbolo RPT. Interruzione della riproduzione (PAUSE) 쏅 Premere il tasto 1 <. Sul display 6 compare "PAUSE". Eliminare Pause 쏅 In modalità Pause premere il tasto 1 <. La riproduzione continua. 118 04_CalaisMP48_it.indd 118 11.06.2008 15:14:19 Uhr Modalità multilettore CD All'apparecchio possono venire collegati, se desiderato, i multilettori CD Blaupunkt CDC A08 T e IDC A09 (settore C3 sulla parte posteriore dell'apparecchio). Attenzione! Il multilettore CD viene normalmente alimentato dall'apparecchio con tensione di esercizio a 12 V. Se si collega il multilettore CD CDC A 08 T (24 Volt), è necessario scollegare l'alimentazione di tensione al connettore del cavo di collegamento del multilettore CD (settore C3/Pin 15). Il multilettore CD deve essere alimentato con tensione di esercizio a 24 volt sua propria. Note: • Quando si collega un multilettore CD all'apparecchio, deve venire regolato di conseguenza l'ingresso AUX. Leggere a riguardo il paragrafo "Impostazione dell'ingresso AUX" al capitolo "Fonti audio esterne". • Per informazioni circa l'utilizzo dei CD, l'inserimento dei CD e l'uso del multilettore CD consultare le istruzioni d'uso del proprio multilettore CD. Avvio dell'esercizio del multilettore CD 쏅 Premere una o più volte SRC > fino a quando sul display 6 viene visualizzato "CHANGER". La riproduzione inizia con il primo CD che viene riconosciuto dal multilettore. Sul display 6 vengono visualizzati il numero del CD corrente (ad es. "D02") e del brano in corso (ad es. "T072") e la durata di riproduzione. Selezione di un CD Per cambiare CD in su o in giù, 쏅 premere il tasto o 8. Selezione di un brano Per passare da un brano all’altro del CD corrente, in su o in giù, 쏅 premere il tasto o 8. Ricerca rapida automatica (udibile) Per avviare una ricerca rapida automatica indietro o avanti, 쏅 tenere premuto il tasto o 8 fino a raggiungere il punto desiderato. ITALIANO Modalità multilettore CD Ripetizione di singoli brani o di interi CD (RPT) Se si desidera ripetere il titolo corrente, 쏅 premere una o più volte il tasto 2 <, fino a quando sul display 6 viene visualizzato "RPT TRK". Il simbolo RPT compare sul display 6. Per ripetere la riproduzione dell’intero CD, 쏅 premere una o più volte il tasto 2 <, fino a quando sul display 6 viene visualizzato "RPT CD". Il simbolo RPT compare sul display 6. Disattivare la funzione REPEAT Per terminare la ripetizione, 쏅 premere una o più volte il tasto 2 <, fino a quando sul display 6 viene visualizzato "RPT OFF". Sul display 6 scompare il simbolo RPT. 119 04_CalaisMP48_it.indd 119 11.06.2008 15:14:19 Uhr Modalità multilettore CD Riproduzione dei brani in ordine casuale (MIX) Interruzione della riproduzione (PAUSE) È possibile ascoltare i brani dell'attuale CD in ordine casuale, 쏅 premere una o più volte il tasto 3 <, fino a quando sul display 6 viene visualizzato "MIX CD". Il simbolo del MIX compare sul display 6. Per ascoltare in ordine casuale i brani di tutti i CD inseriti, 쏅 premere una o più volte il tasto 3 <, fino a quando sul display 6 viene visualizzato "MIX ALL". Il simbolo del MIX compare sul display 6. 쏅 Premere il tasto 1 <. Sul display 6 viene visualizzato "PAUSE". Eliminare Pause 쏅 In modalità Pause premere il tasto 1 <. La riproduzione continua. Fine di MIX Per terminare l'ascolto dei brani in ordine casuale, 쏅 premere una o più volte il tasto 3 <, fino a quando sul display 6 viene visualizzato "MIX OFF". Sul display 6 scompare il simbolo MIX. Breve ascolto dei brani di tutti i CD (SCAN) Per ascoltare i primi 10 secondi di ogni brano del CD inserito in ordine crescente, 쏅 premere il tasto 4 <. Sul display 6 compare brevemente "SCAN TRK". Durante il breve ascolto dei brani lampeggia l'indicazione del numero del CD. Fine della funzione SCAN Per terminare il breve ascolto, 쏅 premere nuovamente il tasto 4 <. Sul display 6 compare brevemente "SCAN OFF". Continua la riproduzione del brano attualmente in breve ascolto. 120 04_CalaisMP48_it.indd 120 11.06.2008 15:14:19 Uhr Telecomando a infrarossi Con il telecomando a infrarossi opzionale è possibile comandare le funzioni principali dell'apparecchio. Funzioni del telecomando Funzioni generali: Tasto Funzione ON H Disattivazione/attivazione apparecchio (premuto più a lungo) Mute (premuto brevemente) Chiusura del menu SRC @ Commutazione fonti V+ B Aumento del volume V- A Abbassamento del volume OK G Richiamo o abbandono del menu E Selezione di voce del menu C Selezione di voce del menu F Modifica impostazione menu D Modifica impostazione menu Ricevitore del telecomando Il ricevitore a infrarossi 9 per il telecomando si trova sulla parte superiore dell'apparecchio. Prima di utilizzare il telecomando è necessario inserire il ricevitore: 쏅 Premere il tasto MENU 7. o 쏅 Premere una o più volte il tasto 8, fino a quando sul display 6 viene visualizzato "IR" e appare l'impostazione attuale "ON" (acceso) o "OFF" (spento). 쏅 Premere il tasto o 8 per disattivare o attivare la funzione IR. Per uscire dal menu, 쏅 premere il tasto MENU 7. E D F C B G H ITALIANO Telecomando a infrarossi RC 10 P In esercizio radio: Tasto Funzione F Richiamo delle stazioni memorizzate D Scelta della gamma di lunghezze d'onda/del livello di memoria E Ricerca automatica avanti C Ricerca automatica indietro A @ 121 04_CalaisMP48_it.indd 121 11.06.2008 15:14:19 Uhr Telecomando a infrarossi In esercizio CD: Tasto Uscita preamplificatore Funzione F Scelta brano successivo D Scelta brano precedente Esercizio CD-changer: Tasto Funzione F Ascolto brano successivo D Ascolto brano precedente E Ascolto CD successivo C Ascolto CD precedente Modalità esercizio MP3: Tasto Uscita preamplificatore Funzione F Ascolto brano successivo D Ascolto brano precedente E Ascolto directory successiva C Ascolto directory precedente È possibile collegare un amplificatore all'apparecchio per l'applicazione di un altoparlante dei bassi profondi (subwoofer). Per attivare questa funzione, l'amplificatore deve essere collegato sul lato posteriore dell'apparecchio (settore C1). Nel menu audio è possibile regolare il livello del subwoofer: 쏅 Premere il tasto AUD : o 쏅 Premere una o più volte il tasto 8 finché viene visualizzato "SUB WOOF". Dopo 2 secondi circa sul display 6 compaiono la scritta "SUBW" e l'impostazione attuale. 쏅 Premere il tasto o 8 per impostare il livello del subwoofer tra 0 e 7. Nota: Per modificare le impostazioni attuali premendo il tasto o 8 non è necessario attendere che esse vengano visualizzate. Per uscire dal menu, 쏅 premere il tasto AUD : 122 04_CalaisMP48_it.indd 122 11.06.2008 15:14:20 Uhr Fonti audio esterne L'entrata AUX consente di collegare all'apparecchio diversi tipi di fonti audio esterne. L'ingresso AUX deve venire regolato ogni volta in base alla fonte audio esterna collegata: • Impostazione "AUX" per fonti audio esterne come ad es. lettori CD portatili, lettori MiniDisc o lettori MP3. • Impostazione "CDC" per multilettori CD Blaupunkt CDC A 08 T e IDC A 09. • Impostazione "USB" per l'interfaccia USB di Blaupunkt. Per l'impostazione dell'ingresso AUX consultare il paragrafo "Impostazione dell'ingresso AUX" che segue. Nota: Per il collegamento di una fonte audio esterna utilizzare un cavo di adattamento. Questo cavo (codice Blaupunkt 7 607 897 093) può essere acquistato presso il rivenditore specializzato Blaupunkt di zona. Impostazione dell'ingresso AUX 쏅 Premere il tasto MENU 7. 쏅 Premere una o più volte il tasto o 8 finché viene visualizzato "SRC SEL". Dopo 2 secondi circa sul display 6 compaiono "SRC" e l'impostazione attuale "CDC", "USB" o "AUX". 쏅 Per selezionare un' altra impostazione premere il tasto o 8. Nota: La sequenza delle impostazioni nel menu è "CDC" – "USB" – "AUX": • In presenza dell'impostazione "CDC" premendo il tasto 8 è possibile scegliere l'impostazione "USB". • In presenza dell'impostazione "USB" premendo il tasto 8 è possibile scegliere l'impostazione "CDC" oppure, premendo il tasto 8 l'impostazione "AUX". • In presenza dell'impostazione "AUX" premendo il tasto 8 è possibile scegliere l'impostazione "USB". Ogni volta che si varia l'impostazione ha luogo una disattivazione automatica dell'apparecchio. Pertanto, per passare dall'impostazione "CDC" all'impostazione "AUX" e viceversa, è necessario prima scegliere l'impostazione "USB" e quindi riaccendere l'apparecchio dopo il suo spegnimento automatico. Ripetere quindi la procedura di impostazione per giungere all'impostazione "AUX" o "CDC" desiderata. Comparirà la scritta "AUTO SWITCH OFF IN 10 SECONDS". Dopo circa 10 secondi l'apparecchio si disattiva automaticamente. 쏅 Spegnere e riaccendere l'autoradio premendo il tasto On/Off 3. L'apparecchio viene inserito in modalità radio con l'impostazione scelta. ITALIANO Fonti audio esterne Nota: Se si è scelta l'impostazione AUX, è possibile selezionare l'ingresso AUX con il tasto SRC >. Sul display viene quindi visualizzato "AUX". 123 04_CalaisMP48_it.indd 123 11.06.2008 15:14:20 Uhr Fonti audio esterne Se si è scelta l'impostazione CDC o USB, è possibile selezionare la fonte audio con il tasto SRC > solo se vi è un relativo apparecchio collegato (multilettore CD o interfaccia USB). Impostazione del livello dell'ingresso AUX Se si è impostato su "AUX" l'ingresso AUX per il collegamento di una fonte audio esterna, è possibile adattare il livello della fonte audio esterna a quello della fonte audio propria dell'apparecchio (quali ad es. CD e radio). Nota: Il livello dell'ingresso AUX può essere impostato solo se la fonte audio selezionata è AUX. 쏅 Premere all'occorrenza una o più volte il tasto SRC > fino a quando sul display viene visualizzato "AUX". 쏅 Premere il tasto MENU 7. 쏅 Premere all'occorrenza una o più volte il tasto o 8 fino a quando viene visualizzato "GAIN" insieme all'impostazione attuale. 쏅 Premere il tasto o 8 per impostare l'adattamento del livello tra –9 e +9. Per uscire dal menu, 쏅 premere il tasto MENU 7. Impostazioni di fabbrica Ripristino delle impostazioni di fabbrica (RESET) Le impostazioni originali di fabbrica dell'autoradio possono essere ripristinate: 쏅 Tenere premuto il tasto AUD : per più di ca. 10 secondi. Viene emesso un segnale acustico di conferma e sul display 6 compare brevemente "RESET". Tutte le impostazioni dei menu e dei menu audio vengono ripristinate ai valori di fabbrica. Nota: Le stazioni memorizzate sui tasti stazione non vengono cancellate. 124 04_CalaisMP48_it.indd 124 11.06.2008 15:14:20 Uhr Dati tecnici Dati tecnici Tensione di esercizio 24 Volt Amplificatori Potenza di uscita: Uscita Line: Uscita Aux: 2 x 20 Watt sinusoidali a 4 Ohm 2 x 2,0 Volt eff 2 x 2,0 Volt eff Tuner ITALIANO Gamme d'onda Europa: FM : 87,5 - 108 MHz OM: 531 - 1602 kHz OL: 153 - 279 kHz Gamme di lunghezze d'onda America: FM: 87,7 - 107,9 MHz AM: 530 - 1710 kHz Gamma di trasmissione FM: 30 -15 000 Hz CD Gamma di trasmissione: 20 - 20.000 Hz Con riserva di modifiche! 125 04_CalaisMP48_it.indd 125 11.06.2008 15:14:20 Uhr Elementos de mando 1 Regulador del volumen < Bloque de teclas 1 - 6 2 Tecla BND Pulsación breve: selección del nivel de memoria o bien de la banda de ondas Pulsación prolongada: iniciar la función Travelstore (FMT o MWT/LWT) = Tecla RDS Activar y desactivar la función de confort RDS 3 Tecla On/Off Pulsación breve: conexión del equipo En funcionamiento: supresión del sonido (función Mute) Pulsación prolongada: desconexión del equipo > Tecla SRC Selección de fuente entre radio y (si está insertado, conectado o activado) CD, MP3, cambiadiscos y AUX. ? Code-LED 4 Tecla de expulsión del CD 5 Ranura de CD 6 Pantalla 7 Tecla MENU Abrir los menús de los ajustes básicos. 8 Báscula multifunción 9 Receptor de infrarrojos para mando a distancia por infrarrojos (opcional) : Tecla AUD Pulsación breve: menú de audio para el ajuste de graves, agudos, balance, fader y abrir función Loudness Pulsación prolongada (10 seg.): restablecer ajustes de fábrica ; Tecla TA Activar y desactivar la preferencia para las noticias de tráfico Interrupción de una noticia de tráfico en curso 126 05_CalaisMP48_es.indd 126 11.06.2008 15:15:07 Uhr Indicaciones importantes ............... 129 Uso según las normas ................... 129 Mando a distancia (opcional) ......... 129 Cambiadiscos (opcional) .............. 129 Interfaz USB (opcional) ................ 129 Desecho de equipos antiguos ........ 129 Seguro antirrobo mediante CODE ... 130 Activar y desactivar la petición de código (CODE) ............................ 130 Introducir el código después de una interrupción en el suministro de tensión................................... 131 Conexión/desconexión................... 131 Conectar y desconectar el equipo con la tecla On/Off ....................... 131 Conectar y desconectar mediante el encendido del vehículo .............. 131 Conectar mediante la inserción de un CD .................................... 131 Ajustar tiempo de desconexión ...... 132 Conectar con el teléfono (opcional)... 132 Conectar con el mando a distancia por infrarrojos RC 10 P (opcional) .. 132 Regular el volumen ........................ 132 Supresión del sonido (MUTE) ........ 132 Sonido del teléfono/sistema de navegación ................................. 132 Activar/desactivar el tono de confirmación (BEEP) .................... 133 Ajustar el volumen máximo de encendido (ON VOL) .................... 133 Ajustar la adaptación del volumen en función del ruido (GALA) .......... 134 Sonido .......................................... 134 Ajuste de los agudos..................... 134 Regular los graves ........................ 134 Ajustar los medios ....................... 135 Ajustar la distribución del volumen a izquierda/derecha (BAL) ................ 135 Ajustar la distribución del volumen delante/detrás (FAD).................... 136 Hora ............................................. 136 Mostrar la hora ............................ 136 Ajustar la hora ............................. 136 Seleccionar el modo de hora 12/24 h ..................................... 136 Ajustar el huso horario (TIMEZONE) ............................... 137 Modo de radio ............................... 137 Activar el modo de radio ............... 137 Función de confort RDS (AF, REG) .. 137 Seleccionar la banda de ondas/ el nivel de memoria ...................... 138 Sintonización de emisoras............. 138 Memorizar emisoras ..................... 139 Escuchar emisoras memorizadas ... 139 Explorar las emisoras que se pueden sintonizar (BANDSCAN) .... 140 Tipo de programa (PTY) ................ 140 Reducción de los tonos agudos en función de las distorsiones (HICUT) .. 140 Activar y desactivar radiotexto ....... 141 Noticias de tráfico ......................... 141 Activar y desactivar la preferencia para las noticias de tráfico............. 141 Ajustar la subida de volumen para las noticias de tráfico.................... 142 Suprimir las noticias de tráfico ....... 142 ESPAÑOL Índice 127 05_CalaisMP48_es.indd 127 11.06.2008 15:15:08 Uhr Índice Modo de CD ................................... 142 Iniciar el modo de CD ................... 143 Indicación de la información de los títulos (texto del CD)................ 143 Selección del título....................... 143 Búsqueda rápida (audible) ............ 144 Reproducción aleatoria de los títulos (MIX) ................................ 144 Explorar los títulos (SCAN) ............ 144 Repetición de un título (RPT) ......... 144 Interrumpir la reproducción (PAUSE) ..................................... 144 Extraer el CD ............................... 144 Modo MP3/WMA ........................... 145 Preparar un soporte de datos MP3... 145 Iniciar el modo MP3 ..................... 147 Indicación de la información de los títulos (etiquetas ID3) .............. 147 Seleccionar un directorio .............. 148 Seleccionar títulos/archivos .......... 148 Búsqueda rápida ......................... 148 Reproducir títulos en orden aleatorio (MIX) ............................ 148 Explorar los títulos (SCAN) ............ 149 Reproducir repetidamente un título o un directorio completo (REPEAT) ................................... 149 Interrumpir la reproducción (PAUSE) ..................................... 149 Modo de cambiadiscos ................... 150 Activar el modo de cambiadiscos ... 150 Seleccionar un CD ....................... 150 Selección del título....................... 150 Búsqueda rápida (audible) ............ 150 Repetición de un único título o un CD completo (RPT) .................. 150 Reproducir títulos en orden aleatorio (MIX) ............................ 151 Explorar todos los títulos de todos los CD (SCAN) ............................. 151 Interrumpir la reproducción (PAUSE) ..................................... 151 Mando a distancia por infrarrojos RC 10 P ......................................... 152 Receptor del mando a distancia ..... 152 Funciones del mando a distancia .... 152 Salida del preamplificador.............. 153 Fuentes de sonido externas ............ 154 Ajustar la entrada AUX .................. 154 Ajustar el nivel de la entrada AUX ... 155 Restablecer los ajustes de fábrica (RESET) ........................................ 155 Datos técnicos ............................... 156 Tensión de funcionamiento............ 156 Amplificador ............................... 156 Sintonizador ............................... 156 CD ............................................. 156 Conexión ISO................................. 281 128 05_CalaisMP48_es.indd 128 11.06.2008 15:15:08 Uhr Indicaciones importantes Indicaciones importantes Interfaz USB (opcional) Antes de poner en funcionamiento el equipo, lea detenidamente estas instrucciones para familiarizarse con el equipo. Guárdelas en el vehículo para futuras consultas. Puede conectar la interfaz USB de Blaupunkt para reproducir archivos MP3 o WMA desde un soporte de datos USB. La interfaz USB se encuentra disponible como accesorio (Blaupunkt n.º 7 607 541 576). El equipo está concebido para su utilización en un vehículo con una tensión de red de 24 V y el montaje en una ranura DIN 1. Seguridad vial La seguridad vial tiene prioridad absoluta. Manipule el equipo únicamente si la situación del tráfico lo permite. Familiarícese con él y con la forma de manejarlo antes de comenzar el viaje. Las señales de alarma de la policía, de los bomberos o de los equipos de salvamento han de poder escucharse a tiempo dentro del vehículo. Por ello, escuche su programa a un volumen moderado cuando esté circulando. Desecho de equipos antiguos No deseche los equipos antiguos junto a los residuos domésticos. Para desechar equipos antiguos, utilice el sistema de recogida y devolución disponible. ESPAÑOL Uso según las normas Mando a distancia (opcional) Con el mando a distancia RC 10 P se pueden controlar las funcionas más importantes. Se encuentra disponible un mando a distancia por infrarrojos como accesorio (Blaupunkt n.º 7 607 591 512). Cambiadiscos (opcional) Puede conectar el cambiadiscos CDC A08 T (Blaupunkt n.º 7 607 274 002) o IDC A09 (Blaupunkt n.º 7 607 274 005). El cambiadiscos se encuentra disponible como accesorio. 129 05_CalaisMP48_es.indd 129 11.06.2008 15:15:08 Uhr Seguro antirrobo Seguro antirrobo mediante CODE Su equipo está equipado con código de cuatro cifras como protección antirrobo. Este código debe introducirse cada vez que se desconecte el equipo de la tensión de funcionamiento del vehículo. La petición de código viene desactivada de fábrica, pero se puede activar. Nota: Si la petición de código se encuentra activada, el regulador del volumen 1 comienza a parpadear cuando el equipo y el encendido del vehículo están desconectados. El código se encuentra en la identificación de la radio de su equipo. Nota: ¡No guarde nunca la identificación del equipo en el vehículo! Activar y desactivar la petición de código (CODE) 쏅 Pulse la tecla MENU 7. 쏅 Pulse la tecla o 8 hasta que aparezca la indicación "CODE" y el ajuste actual "ON" (activado) o bien "OFF" en la pantalla 6. 쏅 Pulse la tecla o 8. En la pantalla 6 se muestra la indicación "0000". Introduzca el código: más. Después del tercer intento fallido se bloquea el equipo durante una hora. En este tiempo se muestra la indicación "WAIT 1HR" en la pantalla 6. Si desconecta el equipo durante este tiempo de espera, deberá esperar otra hora completa cuando vuelva a conectarlo. 쏅 Pulse la tecla de estación 1 < hasta que aparezca el primer dígito de su código en la pantalla 6. 쏅 Pulse la tecla de estación 2 < hasta que aparezca el segundo dígito de su código en la pantalla 6. 쏅 Pulse la tecla de estación 3 < hasta que aparezca el tercer dígito de su código en la pantalla 6. 쏅 Pulse la tecla de estación 4 < hasta que aparezca el cuarto dígito de su código en la pantalla 6. 쏅 Cuando se muestre el código correcto en la pantalla 6, mantenga la tecla de estación 5 < pulsada durante más de 2 segundos. En la pantalla 6 se mostrará de nuevo la indicación "CODE" y el ajuste actual "ON" (activado) o "OFF" (desactivado). 쏅 Pulse la tecla , o bien 8 para desactivar o activar la petición de código. Para salir del menú, 쏅 pulse la tecla MENU 7. Nota: Si introduce un código incorrecto, se mostrará de nuevo la indicación "0000" en la pantalla 6. Puede repetir la introducción del código dos veces 130 05_CalaisMP48_es.indd 130 11.06.2008 15:15:08 Uhr Introducir el código después de una interrupción en el suministro de tensión 쏅 Conecte el equipo. En la pantalla 6 aparece primero la indicación "CODE" y después "0000". Puede introducir el código: Nota: Si introduce un código incorrecto, se mostrará de nuevo la indicación "0000" en la pantalla 6. Puede repetir la introducción del código dos veces más. Después del tercer intento fallido se bloquea el equipo durante una hora. En este tiempo se muestra la indicación "WAIT 1HR" en la pantalla 6. Si desconecta el equipo durante este tiempo de espera, deberá esperar otra hora completa cuando vuelva a conectarlo. 쏅 Introduzca el código tal como se indica en el apartado "Activar y desactivar la petición de código". 쏅 Cuando se muestre el código correcto en la pantalla 6, mantenga la tecla de estación 5 < pulsada durante más de 2 segundos. El equipo se enciende. Conexión/desconexión Conexión/desconexión Para conectar y desconectar el equipo, Vd. tiene diferentes posibilidades: Conectar y desconectar el equipo con la tecla On/Off 쏅 Para conectar el equipo, pulse la tecla On/Off 3. 쏅 Para desconectarlo, mantenga pulsada la tecla On/Off 3 durante más de 2 segundos. Nota: Para proteger la batería del vehículo, el equipo se desconecta automáticamente con el encendido del vehículo desconectado una vez transcurrido un tiempo ajustable (véase apartado "Ajustar tiempo de desconexión" en este capítulo). ESPAÑOL Seguro antirrobo Conectar y desconectar mediante el encendido del vehículo Si el equipo está debidamente conectado al encendido del vehículo y no lo desconectó previamente con la tecla On/Off 3 podrá conectarlo y desconectarlo con el encendido del vehículo. Conectar mediante la inserción de un CD Para conectar mediante la inserción de un CD, 쏅 coloque el disco en la ranura de CD 5, con la cara impresa hacia arriba hasta notar cierta resistencia. 131 05_CalaisMP48_es.indd 131 11.06.2008 15:15:09 Uhr Conexión/desconexión El CD se inserta automáticamente, el equipo inicia el modo de CD. Ajustar tiempo de desconexión 쏅 Pulse la tecla MENU 7. 쏅 Pulse la tecla o 8 hasta que aparezca la indicación "HOUR" y el ajuste actual en la pantalla 6. 쏅 Ajuste el tiempo de desconexión con la tecla o bien 8 en pasos de 5 minutos entre los 5 y los 60 minutos. Para salir del menú, 쏅 pulse la tecla MENU 7. Conectar con el teléfono (opcional) En este caso, si el equipo está desconectado y se activa el teléfono, el equipo también se conecta. Después de desconectar el teléfono, el equipo se vuelve a desconectar automáticamente. La condición previa es que el teléfono se encuentre debidamente conectado al equipo. Conectar con el mando a distancia por infrarrojos RC 10 P (opcional) 쏅 Para conectar pulse la tecla ON H del mando a distancia por infrarrojos RC 10 P. Nota: El receptor de infrarrojos del equipo debe estar conectado para que pueda utilizar el mando a distancia por infrarrojos. Para ello lea el apartado "Receptor del mando a distancia" en el capítulo "Mando a distancia por infrarrojos RC 10 P". Volumen Regular el volumen El volumen del sistema se puede regular en pasos de 0 (desactivado) a 32 (máximo). 쏅 Para aumentar el volumen del sistema, gire el regulador del volumen 1 hacia la derecha. 쏅 Para reducir el volumen del sistema, gire el regulador del volumen del sistema 1 hacia la izquierda. Supresión del sonido (MUTE) Si lo desea, puede suprimir repentinamente el volumen del sistema (función Mute). 쏅 Pulse brevemente la tecla 3. Desactivar la supresión del sonido (Mute) Para volver a activar el volumen anterior, 쏅 vuelva a pulsar brevemente la tecla 3. Sonido del teléfono/sistema de navegación Supresión del sonido durante el servicio de teléfono. Si la radio está conectada a un teléfono móvil o a un sistema de navegación y recibe una llamada o una indicación de voz de la navegación, se suprime el sonido del equipo de radio. La conversación telefónica o la indicación de voz se reproduce a través de los altavoces de la radio. Para ello es necesario conectar el teléfono móvil o el sistema de navegación a la radio (cámara C2 en la parte trasera del equipo). Para saber qué sistemas de navegación pueden conectarse a su radio, pregunte a su proveedor Blaupunkt. 132 05_CalaisMP48_es.indd 132 11.06.2008 15:15:09 Uhr Volumen Ajustar el volumen para el sonido del teléfono/sistema de navegación (PHONEVOL) El volumen de las conversaciones telefónicas o de las indicaciones de voz de la navegación es regulable: 쏅 Pulse la tecla MENU 7. 쏅 Pulse la tecla o 8 hasta que se muestre la indicación "PHONEVOL". Transcurridos unos 2 segundos se mostrará la indicación "VOL" y el ajuste actual en la pantalla 6. 쏅 Pulse la tecla o 8 para ajustar el volumen entre 0 y 32. Nota: No tendrá que esperar a la indicación del ajuste actual para poderlo modificar mediante la tecla o 8. Para salir del menú, 쏅 pulse la tecla MENU 7. Nota: También puede regular el volumen durante una conversación telefónica o un mensaje de navegación mediante el regulador del volumen 1. El volumen ajustado se guarda automáticamente. Activar/desactivar el tono de confirmación (BEEP) Después de determinadas acciones, p. ej. una pulsación más larga de una tecla, se emite un tono de confirmación (pitido). Puede desactivar el tono de confirmación: 쏅 Pulse la tecla MENU 7. 쏅 Pulse la tecla o 8 hasta que aparezca la indicación "BEEP" y el ajuste actual "ON" (activado) o bien "OFF" en la pantalla 6. 쏅 Pulse la tecla o 8 para desactivar o activar el pitido. Para salir del menú, 쏅 pulse la tecla MENU 7. Ajustar el volumen máximo de encendido (ON VOL) Si conecta el equipo, éste reproduce en el último volumen seleccionado. Si a pesar de todo ha ajustado el volumen antes de desconectarlo a uno mayor que el volumen de conexión máximo, dicho volumen se volverá a limitar de forma automática al volumen de conexión ajustado al volver a conectarlo. Nota: Como protección auditiva, el volumen máximo de encendido está limitado al valor 25. 쏅 Pulse la tecla MENU 7. 쏅 Pulse repetidas veces la tecla o 8 hasta que en la pantalla se muestre la indicación "ON VOL". Transcurridos unos 2 segundos se mostrará la indicación "VOL" y el ajuste actual en la pantalla 6. 쏅 Pulse la tecla o 8 para ajustar el volumen máximo de encendido entre 5 y 25. ESPAÑOL Al recibir una llamada o cuando se produce una indicación de navegación, la pantalla muestra la indicación "PHONE". Nota: No tendrá que esperar a la indicación del ajuste actual para poderlo modificar mediante la tecla o 8. 133 05_CalaisMP48_es.indd 133 11.06.2008 15:15:09 Uhr Volumen Para salir del menú, 쏅 pulse la tecla MENU 7. Ajustar la adaptación del volumen en función del ruido (GALA) Con esta función, el volumen de la radio del automóvil se ajusta automáticamente a la velocidad de conducción y al nivel de ruido generado por el vehículo. Por ejemplo, cuando aumenta la velocidad el volumen sube automáticamente para contrarrestar ruidos fuertes (por ejemplo, el viento en contra). Para ello el vehículo debe habilitar la señal del tacómetro y la radio del automóvil estar correspondientemente conectada. La adaptación automática del volumen puede regularse en 6 niveles (OFF (desactivado), 1-5). 쏅 Pulse la tecla MENU 7. 쏅 Pulse la tecla o 8 hasta que en la pantalla aparezca la indicación "GALA" y se muestre el ajuste actual. 쏅 Pulse la tecla o 8 para ajustar la adaptación del volumen entre "OFF" (desactivado) y 5. Para salir del menú, 쏅 pulse la tecla MENU 7. Sonido Sonido Ajuste de los agudos 쏅 Pulse la tecla AUD :. 쏅 Pulse repetidas veces la tecla o 8 hasta que en la pantalla se muestre la indicación "TREBLE". 쏅 Mantenga pulsada la tecla o 8 durante más de 2 segundos. En la pantalla aparece brevemente "FREQ" y después la frecuencia de agudos seleccionada. Para seleccionar otra frecuencia de agudos entre 10,0 kHz y 17,5 kHz, 쏅 pulse la tecla o 8. Para ajustar el nivel de agudos, 쏅 pulse repetidas veces la tecla o 8 hasta que en la pantalla se muestre la indicación "GAIN". Transcurridos unos 2 segundos se mostrará la indicación "GAIN" y el ajuste actual. 쏅 Pulse la tecla o 8 para ajustar el nivel de agudos entre –7 y +7. Para salir del menú, 쏅 pulse la tecla AUD :. Regular los graves 쏅 Pulse la tecla AUD :. 쏅 Pulse repetidas veces la tecla o 8 hasta que en la pantalla se muestre la indicación "BASS". 쏅 Mantenga pulsada la tecla o 8 durante más de 2 segundos. En la pantalla aparece brevemente "FREQ" y después la frecuencia de graves seleccionada. 134 05_CalaisMP48_es.indd 134 11.06.2008 15:15:09 Uhr Para seleccionar otra frecuencia de graves entre 60 Hz y 200 Hz, 쏅 pulse la tecla o 8. Para ajustar el nivel de graves, 쏅 pulse repetidas veces la tecla o 8 hasta que en la pantalla se muestre la indicación "GAIN". Transcurridos unos 2 segundos se mostrará la indicación "GAIN" y el ajuste actual. 쏅 Pulse la tecla o 8 para ajustar el nivel de graves entre –7 y +7. Para ajustar el factor de calidad del grave, 쏅 pulse repetidas veces la tecla o 8 hasta que en la pantalla se muestre la indicación "Q FACTOR". Transcurridos unos 2 segundos se mostrará la indicación "Q" y el ajuste actual. 쏅 Pulse la tecla o 8 para ajustar el factor de calidad entre 1,0 y 2,0. Para salir del menú, 쏅 pulse la tecla AUD :. Ajustar los medios 쏅 Pulse la tecla AUD :. 쏅 Pulse repetidas veces la tecla o 8 hasta que en la pantalla se muestre la indicación "MIDDLE". 쏅 Mantenga pulsada la tecla o 8 durante más de 2 segundos. En la pantalla aparece brevemente "FREQ" y después la frecuencia de medios seleccionada. Para seleccionar otra frecuencia de medios entre 500 Hz y 2,5 kHz, 쏅 pulse la tecla o 8. Para ajustar el nivel de medios, 쏅 pulse repetidas veces la tecla o 8 hasta que en la pantalla se muestre la indicación "GAIN". Transcurridos unos 2 segundos se mostrará la indicación "GAIN" y el ajuste actual. 쏅 Pulse la tecla o 8 para ajustar el nivel de medios entre –7 y +7. Para ajustar el factor de calidad del medio, 쏅 pulse repetidas veces la tecla o 8 hasta que en la pantalla se muestre la indicación "Q FACTOR". Transcurridos unos 2 segundos se mostrará la indicación "Q" y el ajuste actual. 쏅 Pulse la tecla o 8 para ajustar el factor de calidad entre 0,5 y 1,25. Para salir del menú, 쏅 pulse la tecla AUD :. Ajustar la distribución del volumen a izquierda/derecha (BAL) ESPAÑOL Sonido 쏅 Pulse la tecla AUD :. 쏅 Pulse la tecla o 8 hasta que en la pantalla aparezca la indicación "BAL" y se muestre el ajuste actual. 쏅 Pulse la tecla o 8 para ajustar la distribución del volumen a la izquierda/ derecha entre –10 y +10. Para salir del menú, 쏅 pulse la tecla AUD :. 135 05_CalaisMP48_es.indd 135 11.06.2008 15:15:09 Uhr Sonido Ajustar la distribución del volumen delante/detrás (FAD) Nota Los altavoces traseros deben conectarse a través de un amplificador adicional. 쏅 Pulse la tecla AUD :. 쏅 Pulse la tecla o 8 hasta que en la pantalla aparezca la indicación "FAD" y se muestre el ajuste actual. 쏅 Pulse la tecla o 8 para ajustar la distribución del volumen delante/detrás entre –10 y +10. Para salir del menú, 쏅 pulse la tecla AUD :. Hora Hora Mostrar la hora Para mostrar la hora en la pantalla durante unos 10 segundos, 쏅 mantenga pulsada la tecla MENU 7 durante más de 2 segundos. Ajustar la hora 쏅 Pulse la tecla MENU 7. o 8 hasta que 쏅 Pulse la tecla aparezca la indicación "TIMESET" en la pantalla 6. Después de aprox. 2 segundos se muestra la hora actual en la pantalla 6. Delante de la hora se muestra en el modo de 24 horas la indicación "24H" y en el modo de 12 horas la indicación "AM" o "PM". Las horas parpadean, lo que significa que se pueden modificar. Para ajustar las horas y los minutos, 쏅 pulse la tecla o 8. Para cambiar de horas a minutos, 쏅 pulse la tecla 6 <. Nota: No tendrá que esperar a la indicación de la hora actual para poderlo modificar mediante la tecla o 8. Para salir del menú, 쏅 pulse la tecla MENU 7. Seleccionar el modo de hora 12/24 h 쏅 Pulse la tecla MENU 7. 쏅 Pulse la tecla o 8 hasta que aparezca la indicación "24H MODE" o "12H MODE" en la pantalla 6. 136 05_CalaisMP48_es.indd 136 11.06.2008 15:15:10 Uhr Hora Ajustar el huso horario (TIMEZONE) Si se desplaza por diferentes husos horarios, puede ajustar la diferencia horaria con la hora actual en pasos de una hora. De este modo puede corregir la indicación de la hora del huso horario actualmente vigente, sin tener que modificar la hora de nuevo. 쏅 Pulse la tecla MENU 7. 쏅 Pulse repetidas veces la tecla o 8 hasta que en la pantalla se muestre la indicación "TIMEZONE". Transcurridos unos 2 segundos se mostrará la indicación "ZONE" y el ajuste actual en la pantalla 6. 쏅 Pulse la tecla o 8 para ajustar la diferencia horaria en pasos de una hora entre –12 y +12. Nota: No tendrá que esperar a la indicación del ajuste actual para poderlo modificar mediante la tecla o 8. Para salir del menú, 쏅 pulse la tecla MENU 7. Modo de radio Este equipo está dotado de un radiorreceptor RDS. Casi todas las emisoras sintonizadas retransmiten una señal que contiene información como, por ejemplo, el nombre de la emisora y el tipo de programa (PTY), además del programa radiofónico. En cuanto se recibe el nombre de la emisora, éste se visualiza en la pantalla 6. Activar el modo de radio Si se encuentra en un modo de funcionamiento distinto, 쏅 pulse la tecla BND 2, o 쏅 pulse la tecla SRC > hasta que aparezca la indicación "RADIO" en la pantalla 6. En la pantalla 6 se muestra la frecuencia actual o bien el nombre de la emisora. ESPAÑOL o 8 para elegir 쏅 Pulse la tecla el modo deseado. Para salir del menú, 쏅 pulse la tecla MENU 7. Modo de radio Función de confort RDS (AF, REG) Las funciones de confort RDS AF (frecuencia alternativa) y REG (regional) amplían la gama de prestaciones que le ofrece su equipo de radio: • AF: si la función de confort RDS está activa, el equipo busca automáticamente y en segundo plano la frecuencia que mejor se recibe de la emisora sintonizada. • REG: A determinadas horas, algunas emisoras dividen su programación en emisiones regionales de diferente contenido. La función REG activa impide que el equipo cambie a frecuencias alternativas de la emisora ajustada que dispongan de otra programación. 137 05_CalaisMP48_es.indd 137 11.06.2008 15:15:10 Uhr Modo de radio Nota: La función REG debe desactivarse o activarse por separado en el menú. Activar y desactivar la función de confort RDS 쏅 Para aprovechar las funciones RDS, AF y REG, pulse la tecla RDS =. Cuando las funciones de confort RDS estás activas, se muestra el símbolo RDS en la pantalla 6. Activar y desactivar la función REG 쏅 Pulse la tecla MENU 7. 쏅 Pulse la tecla o 8 hasta que aparezca la indicación "REG" y el ajuste actual "ON" (activado) o bien "OFF" en la pantalla 6. 쏅 Pulse la tecla o 8 para desactivar o activar la función REG. Para salir del menú, 쏅 pulse la tecla MENU 7. Nota: El ajuste REG ON/OFF sólo tiene efecto cuando la función RDS se encuentra activada. Seleccionar la banda de ondas/ el nivel de memoria Este equipo puede sintonizar programas de las bandas de frecuencia FM, OM y OL (Europa) o bien FM y AM (países integrantes de NAFTA). Para la banda de ondas FM hay tres niveles de memoria FM1, FM2 y FMT y para las bandas OM y OL o AM, uno respectivamente. Adicionalmente se encuentra disponible otro nivel de memoria adicional OMT/OLT o AMT. En cada nivel de memoria pueden memorizarse 6 emisoras. Para cambiar entre bandas de ondas o niveles de memoria, 쏅 pulse la tecla BND 2. Sintonización de emisoras Existen varias posibilidades de sintonizar emisoras. Búsqueda automática de emisoras 쏅 Pulse la tecla o 8. La radio sintoniza la primera emisora que tenga suficiente intensidad. Notas: • Si se ha activado la preferencia de las noticias de tráfico, se ajusta la siguiente emisora de radiotráfico. • Si se ha activado PTY, se ajusta la siguiente emisora del tipo de programa seleccionado. Modificar la sensibilidad de la búsqueda automática de emisoras Puede elegir si con una sensibilidad baja sólo se reciben emisoras con mayor intensidad de recepción o si con una sensibilidad alta también se reciben emisoras con menor intensidad de recepción. 쏅 Pulse la tecla MENU 7. 쏅 Pulse la tecla o 8 hasta que aparezca la indicación "SENS" y el ajuste actual "LO" (mayor intensidad de recepción) o "DX" (menor intensidad de recepción) en la pantalla 6. 쏅 Pulse la tecla o 8 para cambiar entre los ajustes "LO" y "DX". 138 05_CalaisMP48_es.indd 138 11.06.2008 15:15:10 Uhr Modo de radio Sintonización manual Para modificar gradualmente la frecuencia ajustada, 쏅 pulse la tecla o 8. Para modificar rápidamente la frecuencia ajustada, 쏅 mantenga pulsada la tecla o 8 Nota: Para sintonizar emisoras manualmente, la función de confort RDS y la función PTY deben estar desactivadas. Hojear las cadenas de emisoras (sólo FM) Cuando una emisora ofrece varios programas, tiene la posibilidad de "hojear" esa "cadena de emisoras". 쏅 Pulse la tecla o 8 para pasar a la siguiente emisora de esa cadena de emisoras. Nota: Sólo es posible hojear en la cadena de emisoras cuando la función RDS se encuentra activada y la PTY desactivada. Recuerde que sólo puede cambiar a emisoras que ya haya sintonizado alguna vez. Para ello utilice, p. ej. la función Travelstore (T-STORE). Memorizar emisoras Memorización manual de emisora 쏅 Seleccione el nivel de memoria o la banda de ondas deseados. 쏅 Sintonice la emisora. 쏅 Mantenga pulsada durante más de 2 segundos la tecla de estación 1- 6 en la que desee memorizar la emisora. Se emitirá el tono de confirmación. La emisora se encuentra memorizada en la tecla de estación seleccionada. Memorizar automáticamente la emisora (T-STORE) El usuario puede memorizar automáticamente las seis emisoras con mayor intensidad de recepción de la región. Para la banda de ondas FM la memorización se efectúa en el nivel de memoria FMT, para las bandas de ondas OM y OL en el nivel de memoria OMT/OLT y para la banda de ondas AM en el nivel de memoria AMT. Nota: Las emisoras que ya estuvieran memorizadas en ese nivel se reemplazan por las recién memorizadas. 쏅 Seleccione la banda de ondas deseada. 쏅 Mantenga pulsada la tecla BND 2 durante más de 2 segundos. Comienza el proceso de memorización. En la pantalla 6 se visualiza "T-STORE". Al concluir el proceso de memorización, suena la emisora memorizada en la posición del nivel de memoria FMT, OMT/OLT o AMT. ESPAÑOL Para salir del menú, 쏅 pulse la tecla MENU 7. Escuchar emisoras memorizadas 쏅 Seleccionar el nivel de memoria o la banda de ondas. 쏅 Pulse la tecla de estación 1 - 6 <, en la que se encuentra memorizada la emisora deseada. 139 05_CalaisMP48_es.indd 139 11.06.2008 15:15:10 Uhr Modo de radio Explorar las emisoras que se pueden sintonizar (BANDSCAN) Con la función bandscan se pueden explorar durante aprox. 10 segundos todas las emisoras que se pueden sintonizar. Iniciar bandscan 쏅 Mantenga pulsada la tecla o 8 durante más de 2 segundos. En la pantalla aparece brevemente la indicación "BANDSCAN". El equipo busca emisoras en la banda de ondas actual. Cada una de las emisoras encontradas se reproduce durante aprox. 10 segundos. Se muestra la frecuencia ajustada o bien el nombre de la emisora. Finalizar bandscan 쏅 Pulse la tecla o 8. El proceso de Scan finaliza. Queda ajustada la última emisora escuchada. Tipo de programa (PTY) Además del nombre, algunas emisoras FM también envían información sobre el tipo de programa. Estos tipos de programa pueden ser, por ejemplo: CULTURA VIAJES JAZZ DEPORTES NOTICIAS POP ROCK MÚSICA La función PTY permite seleccionar directamente emisoras con un determinado tipo de programa. Cuando se encuentra activada la función PTY y se ha iniciado la búsqueda PTY, el equipo cambia automáticamente de la emisora actual, o bien de otro modo de servicio, hacia la emisora con el tipo de programa seleccionado. Activar y desactivar la función PTY 쏅 Pulse la tecla MENU 7. 쏅 Pulse la tecla o 8 hasta que aparezca la indicación "PTY" y el ajuste actual "ON" (activado) o bien "OFF" en la pantalla 6. 쏅 Pulse la tecla , o bien 8 para desactivar o activar la función PTY. Para salir del menú, 쏅 pulse la tecla MENU 7. Seleccionar un tipo de programa e iniciar la búsqueda automática 쏅 Pulse repetidas veces la tecla o 8 hasta que en la pantalla aparezca el tipo de programa. 쏅 Pulse la tecla o 8 para iniciar la búsqueda. Si se encuentra una emisora con el tipo de programa seleccionado, éste se ajustará. Reducción de los tonos agudos en función de las distorsiones (HICUT) La función HiCut provoca una mejora en la reproducción cuando la recepción es de mala calidad. Cuando existen interferencias de recepción, se reduce automáticamente el nivel de distorsión. Para activar o desactivar HICUT, 쏅 pulse la tecla MENU 7. 쏅 Pulse la tecla o 8 hasta que aparezca la indicación "HICUT" y el ajuste actual "ON" (activado) o bien "OFF" en la pantalla 6. 쏅 Pulse la tecla , o bien 8 para desactivar o activar la función HICUT. 140 05_CalaisMP48_es.indd 140 11.06.2008 15:15:10 Uhr Para salir del menú, 쏅 pulse la tecla MENU 7. Activar y desactivar radiotexto Algunas emisoras de radio utilizan la señal RDS para transmitir publicidad y otro tipo de información en lugar del nombre de la emisora. Este radiotexto se visualiza en la pantalla 6. Para activar o desactivar la visualización del radiotexto, 쏅 pulse la tecla MENU 7. 쏅 pulse repetidas veces la tecla o 8 hasta que en la pantalla se muestre la indicación "RADIOTXT". Transcurridos unos 2 segundos se indica el ajuste actual "TEXT ON" (activado) o "TEXT OFF" (desactivado) en la pantalla 6. 쏅 Pulse la tecla o 8 para desactivar o activar la indicación de radiotexto. Nota: No tendrá que esperar a la indicación del ajuste actual para poderlo modificar mediante la tecla o 8. Para salir del menú, 쏅 pulse la tecla MENU 7. Noticias de tráfico Noticias de tráfico Activar y desactivar la preferencia para las noticias de tráfico Para activar o desactivar la preferencia por las noticias de tráfico en cualquier modo de servicio, 쏅 pulse la tecla TA ;. Nota: En los modos de servicio CD, MP3, cambiadiscos y AUX esta función sólo se encuentra disponible cuando se había ajustado la banda de ondas FM en último lugar. La preferencia para las noticias de tráfico está activada cuando en la pantalla 6 se indica el símbolo TA. En cuanto el equipo recibe una noticia de tráfico, ésta se transmitirá. En la pantalla 6 se muestra durante la transmisión la indicación "TRAFFIC". ESPAÑOL Modo de radio Nota: El tono de aviso suena • al salir del área de emisión de la emisora de radiotráfico sintonizada mientras se está escuchando la emisora de radiotráfico o un CD y la nueva búsqueda automática no encuentra ninguna otra emisora que retransmita noticias de tráfico. • al cambiar de una emisora de radiotráfico a otra emisora sin noticias de tráfico. En dicho caso, desactive la prioridad para las noticias de tráfico o sintonice otra emisora que retransmita noticias de tráfico. 141 05_CalaisMP48_es.indd 141 11.06.2008 15:15:11 Uhr Noticias de tráfico Ajustar la subida de volumen para las noticias de tráfico Puede ajustar cuántos niveles de volumen desea que se eleve el volumen ajustado durante la transmisión de las noticias de tráfico: 쏅 Pulse la tecla MENU 7. 쏅 Pulse repetidas veces la tecla o 8 hasta que en la pantalla se muestre la indicación "TA VOL". Transcurridos unos 2 segundos se mostrará la indicación "VOL" y el ajuste actual en la pantalla 6. 쏅 Pulse la tecla o 8 para ajustar la subida de volumen entre 0 y 10. Nota: No tendrá que esperar a la indicación del ajuste actual para poderlo modificar mediante la tecla o 8. Para salir del menú, 쏅 pulse la tecla MENU 7. Nota: Recuerde que con el regulador del volumen 1 también puede ajustar el volumen de las noticias de tráfico durante el tiempo de emisión. Suprimir las noticias de tráfico Para interrumpir una noticia de tráfico en curso y regresar a la fuente de sonido anterior, 쏅 pulse la tecla TA ;. La preferencia para noticias de tráfico permanece activa. Modo de CD Modo de CD Este equipo permite reproducir CD de audio, CD-R y CD-RW convencionales con diámetros de 12 cm. Para evitar problemas de reproducción, le recomendamos no grabar los CD a una velocidad superior a 16x. ¡Peligro de estropear la unidad de CD! Los discos single de 8 cm de diámetro y los discos contorneados (shape CD) no son aptos para este equipo. Trate los CDs con cuidado y evite arañarlos o deteriorarlos. Siempre que sea posible, manipule el CD sólo por los bordes. Si el CD está sucio, límpielo con un paño que no suelte pelusas y que no contenga disolventes. Limpie siempre los CD desde el centro hacia afuera. No exponga los CD a la luz directa del sol y guarde los CD que no estén en el equipo en una funda protectora. No pegue etiquetas en los CD. Escriba en los CD sólo con rotuladores convencionales adecuados. El fabricante no asume ninguna responsabilidad sobre los daños causados en la unidad de CD por haber utilizado CD inapropiados o deteriorados. Para un funcionamiento adecuado, utilice exclusivamente los CD con el logo CompactDisc. Los CD con protección contra copia pueden provocar dificultades durante la reproducción. Blaupunkt no puede garantizar el funcionamiento correcto de los CD con protección anticopia. 142 05_CalaisMP48_es.indd 142 11.06.2008 15:15:11 Uhr Modo de CD Si la unidad de CD está vacía, 쏅 coloque el disco en la ranura de CD con la cara impresa hacia arriba y, sin ejercer fuerza, empuje hasta notar cierta resistencia. El CD entra automáticamente en la unidad. En la pantalla 6 aparece el símbolo de CD. Nota: La introducción del CD no se debe obstaculizar ni apoyar. El disco comienza a sonar. En la pantalla 6 se muestra el número del título actual (p. ej., "T12") y el tiempo de reproducción, así como la información de los títulos (texto del CD). Con un disco ya colocado en la unidad de CD, 쏅 pulse la tecla SRC > hasta que aparezca la indicación "CD" en la pantalla 6. La reproducción comienza en el punto en el que se interrumpió. Indicación de la información de los títulos (texto del CD) Si el CD dispone de texto del CD, la información de cada título se mostrará al iniciar el título una única vez en forma de texto en movimiento en la pantalla 6. Mostrar la información de los títulos una única vez como texto en movimiento 쏅 Pulse la tecla 5 <. El texto del CD del título actual se muestra una única vez como texto en movimiento en la pantalla 6. Nota: Esta función no se encuentra disponible cuando la indicación del texto del CD en forma de texto en movimiento se ha desactivado (véase siguiente apartado). Activar/desactivar la indicación de la información de los títulos como texto en movimiento Para activar o desactivar la indicación de la información de los títulos como texto en movimiento, 쏅 pulse la tecla MENU 7. 쏅 Pulse la tecla o 8 hasta que aparezca la indicación "SCRL" y el ajuste actual "ON" (activado) o bien "OFF" en la pantalla 6. 쏅 Pulse la tecla o 8 para desactivar o activar el texto en movimiento. Para salir del menú, 쏅 pulse la tecla MENU 7. Al ajustar "SCRL OFF" se muestra la información de los títulos en apartados de respectivamente 8 caracteres en la pantalla 6. Cada apartado de texto, número de título y tiempo de reproducción se muestra en un cambio continuo durante 5 segundos. ESPAÑOL Iniciar el modo de CD Nota: El ajuste "SCRL ON/OFF" tiene el correspondiente efecto sobre la indicación de la información de los títulos de MP3 (etiquetas ID3) en el modo MP3. Selección del título 쏅 Pulse la tecla o 8 para cambiar al título anterior o al siguiente. Pulsando una sola vez la tecla 8 se inicia de nuevo la reproducción del título que está sonando. 143 05_CalaisMP48_es.indd 143 11.06.2008 15:15:11 Uhr Modo de CD Búsqueda rápida (audible) Para realizar una búsqueda rápida hacia delante o hacia atrás 쏅 mantenga pulsada la tecla o 8, hasta que llegue a la posición deseada. Reproducción aleatoria de los títulos (MIX) 쏅 Pulse la tecla 3 <. En la pantalla 6 aparece brevemente la indicación "MIX CD" y también se muestra el símbolo MIX. Los siguientes títulos se seleccionan de forma aleatoria. Finalizar la función MIX 쏅 Vuelva a pulsar la tecla 3 <. En la pantalla 6 aparece brevemente la indicación "MIX OFF" y también desaparece el símbolo MIX. La reproducción continúa de forma normal. Explorar los títulos (SCAN) Para explorar todos los títulos del CD durante aprox. 10 segundos cada uno, 쏅 pulse la tecla 4 <. En la pantalla aparece la indicación "SCAN TRK" durante unos segundos. Durante la exploración parpadea la indicación "CD". Se muestran el número de título y el tiempo de reproducción del título actual, o bien la información correspondiente del título. Finalizar la función SCAN, seguir escuchando un título Para finalizar el proceso de Scan, 쏅 vuelva a pulsar la tecla 4 <. En la pantalla aparece la indicación "SCAN OFF" durante unos segundos. Continúa la reproducción del título actual. Repetición de un título (RPT) 쏅 Pulse la tecla 2 <. En la pantalla aparece brevemente la indicación "RPT TRK" y se muestra el símbolo RPT. El título actual se estará repitiendo hasta que Vd. desactive la función RPT. Finalizar RPT 쏅 Vuelva a pulsar la tecla 2 <. En la pantalla 6 aparece brevemente "RPT OFF" y la símbolo RPT desaparece. La reproducción continúa de forma normal. Interrumpir la reproducción (PAUSE) 쏅 Pulse la tecla 1 <. En la pantalla 6 se visualiza "PAUSE". Anular la pausa 쏅 Durante la pausa pulse la tecla 1 <. La reproducción continua. Extraer el CD Nota: Los CD también se pueden expulsar cuando el equipo está desconectado o cuando hay otra fuente de sonido activada. 쏅 Pulse la tecla de expulsión del CD 4. El CD es expulsado. En la pantalla se muestra brevemente "CD EJECT". 144 05_CalaisMP48_es.indd 144 11.06.2008 15:15:11 Uhr Modo de CD Nota: Si no retira un CD extraído, se volverá a insertar automáticamente tras aprox. 10 segundos. Modo MP3/WMA Con esta autorradio también puede reproducir los DVD, CD-R y CD-RW con archivos musicales en formato MP3 y WMA. Además puede conectar a través de la interfaz USB opcional y compatible con C‘n‘C soportes de datos USB y reproducir en estos últimos los archivos MP3/WMA almacenados. En este capítulo sólo se trata la reproducción de los archivos MP3, ya que el funcionamiento de los archivos MP3 y WMA es idéntico. En este capítulo el término "soporte de datos MP3" se refiere tanto a CD-R/RW como también a soportes de datos USB, como p. ej. un lápiz USB. Notas: • Los archivos WMA con "Digital Rights Management" (DRM) procedentes de tiendas de música online no se pueden reproducir con este equipo. • La reproducción segura de archivos WMA sólo puede garantizarse si éstos han sido creados con la versión 8 de Windows Media Player o posterior. ESPAÑOL Nota: La expulsión del CD no se debe obstaculizar ni asistir en modo alguno. 쏅 Extraiga el CD. El símbolo CD se apaga. Modo MP3/WMA Preparar un soporte de datos MP3 Preparar un CD MP3 Si la combinación de grabadora, software para grabar los CD y CD virgen no es la apropiada, pueden presentarse problemas a la hora de reproducir los CD. Si se presenta algún problema con los CD grabados en casa, le recomendamos cambiar a CD vírgenes de otro fabricante o de otro color. El formato del CD tiene que ser ISO 9660 de nivel 1 ó 2 o bien Joliet. Con todos los demás formatos no hay ninguna garantía de que los CD se reproduzcan correctamente. 145 05_CalaisMP48_es.indd 145 11.06.2008 15:15:11 Uhr Modo MP3/WMA A la hora de crear (codificar) archivos MP3/ WMA a partir de los archivos de audio, es recomendable seleccionar una velocidad binaria de 32 a 320 kbps para los archivos MP3 o bien una velocidad de 32 a 192 kbps para los archivos WMA. Este equipo soporta hasta 252 directorios y hasta 255 archivos por directorio. El CD pueden contener en total un máximo de 512 directorios y archivos. Los directorios y los títulos del CD se pueden seleccionar de uno en uno. D01 A D02 D03 T001 T002 T003 T004 T005 T001 T002 T003 T004 T005 T006 D04 T001 T002 T003 T004 T005 T006 T007 T008 T009 T010 T011 B A Directorios B Títulos · Archivos A cada directorio le puede asignar un nombre en el PC. Después, el nombre del directorio puede verse en la pantalla del equipo. Seleccione el nombre de los directorios y de los títulos/archivos con el software de grabación. Para más detalles, consulte el manual del software. Notas: • Evite el uso de símbolos especiales a la hora de asignar un nombre a los archivos (directorios y títulos). • Si utiliza nombres de archivo con más de 16 caracteres (incluyendo la terminación ".MP3" o ".WMA"), la capacidad máxima para albergar títulos y directorios se reduce. Si desea que los archivos sigan un orden concreto, guárdelos en el soporte de datos en el orden en que desee reproducirlos posteriormente. El equipo reproduce los archivos siguiendo el orden físico en el que están memorizados en el soporte de datos. Para poderlos reproducir en este equipo, los archivos deben tener la terminación ".MP3" en los archivos MP3 y la terminación ".WMA" en los archivos WMA. Notas: Para disfrutar de una reproducción sin perturbaciones, • no intente asignar la extensión ".MP3" a archivos de otro formato para reproducirlos en el equipo. El equipo ignorará los archivos no válidos durante la reproducción. • no utilice CD "mixtos" que contengan datos y títulos de un formato diferente a MP3 (en el modo MP3, el equipo sólo lee archivos MP3). • no utilice CD en modo mixto que contengan títulos de audio CD y títulos MP3. Si intenta reproducir un CD en modo mixto, el equipo sólo leerá los títulos de audio CD. 146 05_CalaisMP48_es.indd 146 11.06.2008 15:15:12 Uhr Modo MP3/WMA Etiquetas ID3 Los títulos MP3 pueden contener información adicional como, por ejemplo, el intérprete, el nombre del título y el álbum (etiquetas ID3). Este equipo puede visualizar etiquetas ID3 de la versión 1 y de la 2 en la pantalla. Iniciar el modo MP3 Iniciar el modo MP3 del CD Si se utiliza un CD MP3, el modo MP3 se inicia igual que el modo de CD normal. Para más detalles, lea el apartado "Iniciar el modo de CD" en el capítulo "Modo de CD". En la pantalla 6 se muestra el número del título actual (p. ej., "T12") y el tiempo de reproducción, así como la información de los títulos (etiquetas ID3) o el nombre de archi- vo. Al cambiar a otro directorio se muestra brevemente el número de directorio (p. ej. "DIR 02"). Conectar el soporte de datos USB e iniciar el modo MP3 Para poder conectar un soporte de datos USB (por ejemplo, un lápiz USB o un disco duro USB), se debe conectar la interfaz USB opcional de Blaupunkt en la parte posterior del equipo (cámara C3). Puede tender el cable USB de la interfaz hasta el interior de la guantera, por ejemplo, o en un lugar apropiado de la consola central. Notas: • Si conecta la interfaz USB de Blaupunkt al equipo, debe ajustarse correspondientemente la entrada AUX. Para ello lea el apartado "Ajustar la entrada AUX" en el capítulo "Fuentes de sonido externas". • Desconecte siempre el equipo antes de conectar o extraer el soporte de datos USB para que éste inicie la sesión y la finalice correctamente. 쏅 Conecte el soporte de datos USB al cable USB de la interfaz USB. Tras la conexión de un soporte de datos USB, éste se puede seleccionar con la tecla SRC >. En la pantalla aparece la indicación "USB". ESPAÑOL Preparar un soporte de datos USB Para que el equipo reconozca un soporte de datos USB, éste debe estar especificado como dispositivo de almacenamiento masivo (Mass Storage Device) y formateado en los sistemas de archivos FAT16 o FAT32 y contener archivos MP3 o WMA. En un soporte de datos USB se pueden crear un máximo de 1.500 archivos (directorios y títulos). Este equipo permite seleccionar los directorios y los títulos de uno en uno. Si utiliza nombres de archivo con más de 24 caracteres (incluyendo la terminación ".MP3" o ".WMA"), la capacidad máxima indicada de los archivos se reduce. Blaupunkt no puede garantizar el funcionamiento correcto de todos los soportes de datos USB que pueden adquirirse en el mercado. Indicación de la información de los títulos (etiquetas ID3) Si el soporte de datos MP3 dispone de etiquetas ID3, la información de cada título se mostrará al iniciar el título una única vez en forma de texto en movimiento en la pantalla 147 05_CalaisMP48_es.indd 147 11.06.2008 15:15:12 Uhr Modo MP3/WMA 6. Si no se han almacenado etiquetas ID3 con los archivos MP3, se muestra el nombre del archivo. Nota: Para la memorización de las etiquetas ID3 lea también el manual de su software MP3 para PC o el software para grabar. Mostrar la información de los títulos una única vez como texto en movimiento 쏅 Pulse la tecla 5 <. Las etiquetas ID3 del título actual se muestran una única vez como texto en movimiento en la pantalla 6. Nota: Esta función no se encuentra disponible cuando la indicación de la información de los títulos en forma de texto en movimiento se ha desactivado. Para más información, lea en el capítulo "Modo de CD", subcapítulo "Indicación de la información de los títulos (texto del CD)" el apartado "Activar/desactivar la indicación de la información de los títulos como texto en movimiento". Seleccionar un directorio Para cambiar a otro directorio de nivel superior o inferior, 쏅 pulse la tecla o 8. Notas: • El equipo salta automáticamente todos los directorios que no contienen archivos MP3, • El equipo procesa todos los directorios y subdirectorios como si se encontraran en un mismo nivel. Si pulsa o 8, repetidamente la tecla puede acceder a todos los subdirectorios. Seleccionar títulos/archivos Para cambiar a otro título/archivo anterior o siguiente del directorio seleccionado, 쏅 pulse la tecla o 8. Pulsando una sola vez la tecla 8 se inicia de nuevo la reproducción del título que está sonando. Búsqueda rápida Para realizar una búsqueda rápida hacia delante o hacia atrás 쏅 mantenga pulsada la tecla o 8, hasta que llegue a la posición deseada. Nota: En el modo USB la búsqueda rápida hacia atrás se detiene en cada caso al principio del título actual. Reproducir títulos en orden aleatorio (MIX) Para reproducir en orden aleatorio todos los títulos del directorio seleccionado, 쏅 pulse la tecla 3 < hasta que aparezca la indicación "MIX DIR" o "MIX FLD" en la pantalla 6. El símbolo MIX aparece en la pantalla 6. Para reproducir en orden aleatorio todos los títulos del soporte de datos MP3, 쏅 pulse la tecla 3 < hasta que aparezca la indicación "MIX ALL" en la pantalla 6. El símbolo MIX aparece en la pantalla 6. 148 05_CalaisMP48_es.indd 148 11.06.2008 15:15:12 Uhr Modo MP3/WMA Explorar los títulos (SCAN) Para reproducir todos los títulos del soporte de datos MP3 en orden ascendente durante aprox. 10 segundos, 쏅 pulse la tecla 4 < hasta que aparezca la indicación "SCAN TRK" en la pantalla 6. Durante la exploración parpadea la indicación "MP3" o "USB". Para explorar en el modo USB todos los títulos del directorio actual, 쏅 pulse la tecla 4 < hasta que aparezca la indicación "SCAN FLD" en la pantalla 6. Durante la exploración parpadea la indicación "USB". Finalizar la función SCAN Para terminar la exploración, 쏅 pulse la tecla 4 < hasta que aparezca la indicación "SCAN OFF" en la pantalla 6. El título que está sonando sigue reproduciéndose. Reproducir repetidamente un título o un directorio completo (REPEAT) Para repetir el título seleccionado en ese momento, 쏅 pulse la tecla 2 < hasta que aparezca la indicación "RPT TRK" en la pantalla 6. El símbolo RPT aparece en la pantalla 6. Para repetir el directorio seleccionado en ese momento, 쏅 pulse la tecla 2 < hasta que aparezca la indicación "RPT DIR" o "RPT FLD" en la pantalla 6. El símbolo RPT aparece en la pantalla 6. Finalizar la función REPEAT Para finalizar la repetición, 쏅 pulse la tecla 2 < hasta que aparezca la indicación "RPT OFF" en la pantalla 6. El símbolo RPT desaparece de la pantalla 6. ESPAÑOL Finalizar la función MIX Para finalizar la reproducción en orden aleatorio, 쏅 pulse la tecla 3 < hasta que aparezca la indicación "MIX OFF" en la pantalla 6. El símbolo MIX desaparece de la pantalla 6. Interrumpir la reproducción (PAUSE) 쏅 Pulse la tecla 1 <. En la pantalla 6 se visualiza "PAUSE". Anular la pausa 쏅 Durante la pausa pulse la tecla 1 <. La reproducción continua. 149 05_CalaisMP48_es.indd 149 11.06.2008 15:15:12 Uhr Modo de cambiadiscos Modo de cambiadiscos Seleccionar un CD Se pueden conectar opcionalmente al equipo los cambiadiscos Blaupunkt CDC A08 T y IDC A09 (cámara C3 en la parte trasera del equipo). Para cambiar a otro CD anterior o siguiente, 쏅 pulse la tecla o 8. ¡Atención! El equipo alimenta normalmente al cambiadiscos con una tensión de funcionamiento de 12 voltios. Si se conecta el cambiadiscos CDC A 08 T (24 voltios), debe cortarse el suministro de corriente del conector en el cable de conexión del cambiadiscos (cámara C3/clavija 15). El cambiadiscos debe alimentarse con una tensión de funcionamiento propia de 24 voltios. Para cambiar a otro título posterior o anterior del CD seleccionado, 쏅 pulse la tecla o 8. Notas: • Si conecta un cambiadiscos al equipo, debe ajustarse correspondientemente la entrada AUX. Para ello lea el apartado "Ajustar la entrada AUX" en el capítulo "Fuentes de sonido externas". • Si desea obtener más información sobre el manejo de CD, su colocación en el cambiadiscos y el manejo de este último, consulte el manual de instrucciones del cambiadiscos. Para repetir el título seleccionado en ese momento, 쏅 pulse la tecla 2 < hasta que aparezca la indicación "RPT TRK" en la pantalla 6. El símbolo RPT aparece en la pantalla 6. Para repetir el CD seleccionado en esos momentos, 쏅 pulse la tecla 2 < hasta que aparezca la indicación "RPT CD" en la pantalla 6. El símbolo RPT aparece en la pantalla 6. Activar el modo de cambiadiscos 쏅 pulse la tecla SRC > hasta que aparezca la indicación "CHANGER" en la pantalla 6. La reproducción comienza con el primer CD detectado por el cambiadiscos. En la pantalla 6 se muestra el número del CD actual (p. ej., "D02") y el título actual (p. ej. "T07"), así como el tiempo de reproducción. 150 05_CalaisMP48_es.indd 150 Selección del título Búsqueda rápida (audible) Para realizar una búsqueda rápida hacia delante o hacia atrás 쏅 mantenga pulsada la tecla o 8 hasta que llegue a la posición deseada. Repetición de un único título o un CD completo (RPT) Finalizar la función REPEAT Para finalizar la repetición, 쏅 pulse la tecla 2 < hasta que aparezca la indicación "RPT OFF" en la pantalla 6. El símbolo RPT desaparece de la pantalla 6. 11.06.2008 15:15:12 Uhr Modo de cambiadiscos Reproducir títulos en orden aleatorio (MIX) Para reproducir en orden aleatorio todos los títulos del CD seleccionado, 쏅 pulse la tecla 3 < hasta que aparezca la indicación "MIX CD" en la pantalla 6. El símbolo MIX aparece en la pantalla 6. Para reproducir en orden aleatorio los títulos de todos los CD, 쏅 pulse la tecla 3 < hasta que aparezca la indicación "MIX ALL" en la pantalla 6. El símbolo MIX aparece en la pantalla 6. En la pantalla 6 aparece brevemente la indicación "SCAN OFF". El título que está sonando sigue reproduciéndose. Interrumpir la reproducción (PAUSE) 쏅 Pulse la tecla 1 <. En la pantalla 6 se muestra la indicación "PAUSE". Anular la pausa 쏅 Durante la pausa pulse la tecla 1 <. La reproducción continua. ESPAÑOL Finalizar la función MIX Para finalizar la reproducción en orden aleatorio, 쏅 pulse la tecla 3 < hasta que aparezca la indicación "MIX OFF" en la pantalla 6. El símbolo MIX desaparece de la pantalla 6. Explorar todos los títulos de todos los CD (SCAN) Para reproducir todos los títulos del CD introducido en orden ascendente durante aprox. 10 segundos, 쏅 pulse la tecla 4 <. En la pantalla 6 aparece brevemente la indicación "SCAN TRK". Durante la exploración parpadea la indicación del número de CD. Finalizar la función SCAN Para terminar la exploración, 쏅 vuelva a pulsar la tecla 4 <. 151 05_CalaisMP48_es.indd 151 11.06.2008 15:15:12 Uhr Mando a distancia por infrarrojos Funciones del mando a distancia Mando a distancia por infrarrojos RC 10 P Con el mando a distancia por infrarrojos opcional puede controlar las funciones más importantes del equipo. Información general: Tecla Función ON H Conectar y desconectar equipo (pulsar prolongadamente) Supresión del sonido (pulsar brevemente) Salir de menú SRC @ Conmutación de fuentes V+ B Subir volumen V- A Bajar volumen OK G Abrir menú o salir de menú E Seleccionar opción de menú C Seleccionar opción de menú F Modificar el ajuste de menú D Modificar el ajuste de menú Receptor del mando a distancia En la tapa del equipo se encuentra un receptor de infrarrojos 9 para el mando a distancia. Antes de utilizar el mando a distancia debe conectarse el receptor: 쏅 Pulse la tecla MENU 7. 쏅 Pulse la tecla o 8 hasta que aparezca la indicación "IR" y el ajuste actual "ON" (activado) o bien "OFF" en la pantalla 6. 쏅 Pulse la tecla o 8 para desactivar o activar la función IR. Para salir del menú, 쏅 pulse la tecla MENU 7. E D F C B A @ G H En el modo de radio: Tecla Función F Abrir la emisora memorizada D Selección de la banda de ondas/del nivel de memoria E Búsqueda ascendente C Búsqueda descendente 152 05_CalaisMP48_es.indd 152 11.06.2008 15:15:13 Uhr Salida del preamplificador En el modo de CD: Salida del preamplificador Tecla Puede conectar al equipo un amplificador para un altavoz de graves profundos (Subwoofer). Este amplificador debe conectarse a la parte trasera del equipo (cámara C1). El nivel del Subwoofer puede ajustarse en el menú de audio: 쏅 Pulse la tecla AUD :. 쏅 Pulse repetidas veces la tecla o 8 hasta que en la pantalla aparezca la indicación "SUB WOOF". Transcurridos unos 2 segundos se mostrará la indicación "SUBW" y el ajuste actual en la pantalla 6. 쏅 Pulse la tecla o 8 para ajustar el nivel del Subwoofer entre 0 y 7. Función F Seleccionar título siguiente D Seleccionar título anterior Modo de cambiadiscos: Tecla Función F Reproducir título siguiente D Reproducir título anterior E Reproducir siguiente CD C Reproducir anterior CD Modo MP3: Tecla Función F Reproducir título siguiente D Reproducir título anterior E Reproducir siguiente directorio C Reproducir anterior directorio Nota: No es necesario que espere a la indicación del ajuste actual para poderlo modificar mediante la tecla o 8. Para salir del menú, 쏅 pulse la tecla AUD :. ESPAÑOL Mando a distancia por infrarrojos 153 05_CalaisMP48_es.indd 153 11.06.2008 15:15:13 Uhr Fuentes de sonido externas Fuentes de sonido externas En la entrada AUX se pueden conectar al equipo diferentes tipos de fuentes de sonido externas. La entrada AUX debe ajustarse en cada caso para la correspondiente fuente de sonido externa conectada: • Ajuste "AUX" para las fuentes de sonido externas, como p. ej. reproductores de CD portátiles, reproductores de MiniDisc o reproductores de MP3. • Ajuste "CDC" para los cambiadiscos Blaupunkt CDC A 08 T y IDC A 09. • Ajuste "USB" para la interfaz USB de Blaupunkt. Para ajustar la entrada AUX, lea el siguiente apartado "Ajustar la entrada AUX". Nota: Para conectar una fuente de sonido externa se necesita un cable adaptador. Este cable (Blaupunkt n.º: 7 607 897 093) se puede adquirir en el proveedor Blaupunkt. Ajustar la entrada AUX 쏅 Pulse la tecla MENU 7. 쏅 Pulse repetidas veces la tecla o 8 hasta que se muestre la indicación "SRC SEL". Transcurridos unos 2 segundos se mostrará la indicación "SRC" y el ajuste actual "CDC", "USB" o "AUX" en la pantalla 6. 쏅 Pulse la tecla o 8 para elegir otro ajuste. Nota: La secuencia de los ajustes en el menú es "CDC" – "USB" – "AUX": • En el ajuste actual "CDC" puede seleccionar el ajuste "USB" pulsando la tecla 8. • En el ajuste actual "USB" puede seleccionar el ajuste "CDC" pulsando la tecla 8 o el ajuste "AUX" pulsando la tecla 8. • En el ajuste actual "AUX" puede seleccionar el ajuste "USB" pulsando la tecla 8. Tras cada cambio de ajuste el equipo se desconecta automáticamente. Para cambiar entre los ajustes "CDC" y "AUX", debe seleccionar primero el ajuste "USB" y tras la desconexión automática conectar de nuevo el equipo. Repita entonces la operación de ajuste para acceder al ajuste deseado "AUX" o "CDC". Se mostrará la nota "AUTO SWITCH OFF IN 10 SECONDS". El equipo se desconecta automáticamente tras aprox. 10 segundos. 쏅 Vuelva a conectar el equipo pulsando la tecla On/Off 3 El equipo se conecta en el modo de radio con el ajuste seleccionado. Nota: Si ha seleccionado el ajuste AUX, puede elegir la entrada AUX con la tecla SRC >. En la pantalla se muestra la indicación "AUX". Si ha seleccionado el ajuste CDC o USB, puede elegir la fuente de sonido con la tecla SRC > solamente si se encuentra conectado un equipo correspondiente (cambiadiscos o interfaz USB). 154 05_CalaisMP48_es.indd 154 11.06.2008 15:15:13 Uhr Fuentes de sonido externas Ajustes de fábrica Ajustar el nivel de la entrada AUX Restablecer los ajustes de fábrica (RESET) Si ha ajustado la entrada AUX para la conexión de fuentes de sonido externas en "AUX", puede adaptar el nivel de la fuente de sonido externa al nivel de las fuentes de sonido propias (como p. ej., CD y radio). Tiene la posibilidad de restablecer el equipo con los ajustes de fábrica originales: 쏅 Mantenga pulsada la tecla AUD : durante más de 10 segundos. Se emitirá un tono de confirmación y en la pantalla 6 se mostrará brevemente la indicación "RESET". Todos los ajustes de menú y menú de audio se restablecen a los ajustes de fábrica. Nota: Las emisoras memorizadas en las teclas de estación no se borrarán. ESPAÑOL Nota: Sólo puede ajustar el nivel de la entrada AUX, si ha seleccionado AUX como fuente de sonido. 쏅 Pulse, en caso necesario, la tecla SRC > hasta que aparezca la indicación "AUX" en la pantalla. 쏅 Pulse la tecla MENU 7. 쏅 Pulse la tecla o 8 hasta que en la pantalla aparezca la indicación "GAIN" y se muestre el ajuste actual. 쏅 Pulse la tecla o 8 para ajustar la adaptación del nivel entre –9 y +9. Para salir del menú, 쏅 pulse la tecla MENU 7. 155 05_CalaisMP48_es.indd 155 11.06.2008 15:15:13 Uhr Datos técnicos Datos técnicos Tensión de funcionamiento 24 voltios Amplificador Potencia de salida: Salida Line: Entrada AUX: 2 x 20 W sinusoidal en 4 ohmios 2 x 2,0 voltios efectivos 2 x 2,0 voltios efectivos Sintonizador Banda de ondas en Europa: FM: 87,5 - 108 MHz OM: 531 - 1602 kHz OL: 153 - 279 kHz Bandas de ondas en América: FM: 87,7 - 107,9 MHz AM: 530 - 1710 kHz Respuesta FM: 30 -15 000 Hz CD Respuesta: 20 - 20 000 Hz ¡Sujeto a modificaciones! 156 05_CalaisMP48_es.indd 156 11.06.2008 15:15:13 Uhr Elementos de comando 1 Regulador do volume < Bloco de teclas 1 - 6 2 Tecla BND Toque breve: selecção dos níveis de memória ou da banda Toque longo: iniciar a função Travelstore (FMT ou MWT/LWT) = Tecla RDS Ligar/desligar a função de conveniência RDS 3 Tecla de ligar/desligar Toque breve: ligar o aparelho Durante o funcionamento: silenciador (Mute) Toque longo: desligar o aparelho > Tecla SRC Selecção da fonte entre rádio e (se inserido, conectado ou ligado) CD, MP3, leitor multi-CD e AUX. ? Code LED 4 Tecla de ejecção do CD 5 Compartimento para CD 6 Visor 7 Tecla MENU Chamar o menu para os ajustes básicos. 8 Tecla multifunções PORTUGUÊS 9 Receptor de infravermelhos para telecomando de IV (opcional) : Tecla AUD Toque breve: abrir o menu de áudio para ajuste de baixos, agudos, Balance, Fader e Loudness Toque longo (10 seg.): repor os ajustes de fábrica ; Tecla TA Ligar/desligar da prioridade dos boletins de trânsito Interrupção de um boletim de trânsito em curso 157 06_CalaisMP48_pt.indd 157 11.06.2008 15:15:46 Uhr Índice Informações importantes ............... 160 Utilização de acordo com as disposições legais ........................ 160 Segurança na estrada ....... 160 Telecomando (opção) ....... 160 Leitor multi-CD (opção) .... 160 Interface USB (opção) .................. 160 Remoção de aparelhos usados ....... 160 Protecção anti-roubo CODE ............ 161 Ligar/desligar a solicitação do código (CODE) ............................ 161 Introduzir o código numérico após interrupção da tensão................... 162 Ligar/desligar................................ 162 Ligar/desligar com a tecla de ligar/ desligar ...................................... 162 Desligar/ligar através da ignição do automóvel................................... 162 Ligar com a introdução de um CD ... 162 Ajustar o tempo de desactivação .... 163 Ligar pelo telefone (opção)............ 163 Ligar com o telecomando de IV RC 10 P (opção) .......................... 163 Regular o volume ........................... 163 Silenciador (MUTE) ...................... 163 Silenciador do rádio durante telefonema/navegação áudio ......... 163 Ligar/desligar o sinal sonoro de confirmação (BEEP) ..................... 164 Regular o volume inicial máximo (ON VOL).................................... 164 Regular a adaptação do volume em função do ruído (GALA): ............... 165 Som .............................................. 165 Regular os agudos ........................ 165 Regular os baixos ......................... 165 Ajustar os médios ........................ 166 Regular a distribuição do som à esquerda/direita (BAL) ................. 166 Regular a distribuição do som à frente/atrás (FAD)........................ 166 Relógio....................................... 167 Chamar a indicação do relógio ....... 167 Acertar o relógio .......................... 167 Seleccionar o modo do relógio 12/24 horas ............................... 167 Regular o fuso horário (TIMEZONE) ............................... 168 Modo de rádio ............................... 168 Ligar o rádio ................................ 168 Função de conveniência RDS (AF, REG) ................................... 168 Seleccionar a banda e/ou o nível de memória ................................ 169 Sintonizar as estações .................. 169 Memorizar as estações ................. 170 Ouvir uma estação memorizada ..... 170 Tocar brevemente as estações sintonizáveis (BANDSCAN) ........... 171 Tipo de programa (PTY) ................ 171 Atenuação dos agudos em função de interferências (HICUT) ............. 171 Ligar/desligar radiotexto ............... 172 Boletins de trânsito........................ 172 Ligar/desligar a prioridade dos boletins de trânsito ...................... 172 Regular o aumento do volume dos boletins de trânsito ...................... 173 Ocultar os boletins de trânsito ....... 173 158 06_CalaisMP48_pt.indd 158 11.06.2008 15:15:47 Uhr Modo de CD ................................... 173 Perigo de destruição da unidade de CD! ............... 173 Iniciar o modo de CD ........ 174 Indicação de informações da faixa (texto de CD) .............................. 174 Escolher uma faixa ....................... 174 Busca rápida (com som) ............... 175 Leitura de faixas numa ordem aleatória (MIX) ............................ 175 Tocar o início das faixas (SCAN) ..... 175 Repetição de faixas (RPT) ............. 175 Interromper a reprodução (PAUSE) ..................................... 175 Retirar um CD.............................. 175 Modo de MP3/WMA ....................... 176 Preparação de um suporte de dados MP3 ................................. 176 Iniciar o modo de MP3 .................. 178 Indicação de informações da faixa (tags ID3) ................................... 178 Escolher um directório.................. 179 Seleccionar a faixa/ficheiro ........... 179 Busca rápida ............................... 179 Leitura de faixas numa ordem aleatória (MIX) ............................ 179 Tocar o início das faixas (SCAN) ..... 180 Repetição de faixas individuais ou de directórios completos (REPEAT) ................................... 180 Interromper a reprodução (PAUSE) ..................................... 180 Modo de leitor multi-CD ................. 181 Iniciar o modo multi-CD ................ 181 Escolher um CD ........................... 181 Escolher uma faixa ....................... 181 Busca rápida (com som) ............... 181 Repetição de faixas individuais ou de CDs completos (RPT) ............... 181 Leitura de faixas numa ordem aleatória (MIX) ............................ 181 Tocar o início de todas as faixas de cada CD (SCAN) .......................... 182 Interromper a reprodução (PAUSE) ..................................... 182 Telecomando de IV RC 10 P ............ 183 Receptor do telecomando ............. 183 Funções do telecomando .............. 183 Saída do pré-amplificador .............. 184 Fontes áudio externas .................... 185 Configurar a entrada AUX .............. 185 Ajustar o nível da entrada AUX ....... 186 Repor os ajustes de fábrica (RESET) ........................................ 186 Dados técnicos .............................. 187 Tensão de funcionamento ............. 187 Amplificador ............................... 187 Sintonizador ............................... 187 CD ............................................. 187 Ligação ISO ................................... 281 PORTUGUÊS Índice 159 06_CalaisMP48_pt.indd 159 11.06.2008 15:15:47 Uhr Informações importantes Informações importantes Interface USB (opção) Antes de colocar o aparelho em funcionamento, leia atentamente estas instruções e familiarize-se com ele. Guarde estas instruções no veículo, para questões que possam surgir posteriormente. Pode conectar a interface USB Blaupunkt para reproduzir ficheiros MP3/WMA de um suporte de dados USB. A interface USB está disponível como acessório (Blaupunkt nº 7 607 541 576). Utilização de acordo com as disposições legais Remoção de aparelhos usados O aparelho foi concebido para utilização num veículo utilitário com tensão da rede de bordo de 24 V e para a montagem numa abertura DIN 1. Não remova o seu aparelho usado juntamente com o lixo doméstico! Para a remoção do aparelho usado, recorra por favor aos sistemas de devolução e recolha que estão à sua disposição. Segurança na estrada A segurança na estrada tem prioridade máxima. Manipule o seu aparelho só quando a situação do trânsito o permitir. Familiarize-se com o funcionamento do aparelho antes de iniciar a viagem. Terá de estar em condições de ouvir, a tempo, os sinais da polícia, dos bombeiros e das ambulâncias, a bordo do seu veículo. Por conseguinte, durante a viagem, ouça o programa sempre num volume adequado à situação. Telecomando (opção) Com o telecomando RC 10 P, podem operar-se as funções mais importantes. Como acessório, está disponível um telecomando por infravermelhos (Blaupunkt nº 7 607 591 512). Leitor multi-CD (opção) Pode conectar o leitor multi-CD CDC A08 T (Blaupunkt nº 7 607 274 002) ou IDC A09 (Blaupunkt nº 7 607 274 005). Os leitores multi-CD estão disponíveis como acessórios. 160 06_CalaisMP48_pt.indd 160 11.06.2008 15:15:47 Uhr Protecção anti-roubo CODE O seu aparelho está equipado com um código numérico de quatro dígitos para protecção contra roubo. Este número tem de ser sempre introduzido depois de se desligar o aparelho da tensão de funcionamento do veículo. A solicitação do código está desactivada de fábrica, mas pode ser activada. Nota: Se a solicitação de código estiver activa, o Code LED ? começa a piscar quando estão desligados tanto o aparelho como a ignição do automóvel. Encontrará o código numérico no cartão do seu rádio. Nota: Nunca guarde o cartão do rádio no veículo! Ligar/desligar a solicitação do código (CODE) 쏅 Prima a tecla MENU 7. 쏅 Prima as vezes necessárias a tecla ou 8, até "CODE" e o ajuste actual "ON" (ligado) ou "OFF" (desligado) aparecerem no visor 6. 쏅 Prima a tecla ou 8. O visor 6 indica "0000". Introduza o código: aparelho durante este tempo de espera, terá de aguardar novamente uma hora completa após a reactivação. 쏅 Prima as vezes necessárias a tecla de pré-selecção 1 <, até o primeiro algarismo do seu código numérico aparecer no visor 6. 쏅 Prima as vezes necessárias a tecla de pré-selecção 2 <, até o segundo algarismo do seu código numérico aparecer no visor 6. 쏅 Prima as vezes necessárias a tecla de pré-selecção 3 <, até o terceiro algarismo do seu código numérico aparecer no visor 6. 쏅 Prima as vezes necessárias a tecla de pré-selecção 4 <, até o quarto algarismo do seu código numérico aparecer no visor 6. 쏅 Quando o código numérico correcto aparecer no visor 6, mantenha a tecla de pré-selecção 5 < premida por mais de 2 segundos. No visor 6 são novamente indicados "CODE" e o ajuste actual "ON" (ligado) ou "OFF" (desligado). 쏅 Prima a tecla ou 8, para desligar ou ligar a solicitação de código. Para abandonar o menu, 쏅 prima a tecla MENU 7. PORTUGUÊS Protecção anti-roubo Nota: Se introduzir um código numérico errado, o visor volta a indicar "0000" 6. Ainda pode repetir a introdução duas vezes. Após a terceira introdução errada, o aparelho fica bloqueado durante 1 hora. Durante esse período, o visor indica "WAIT 1HR" 6. Se desligar o 161 06_CalaisMP48_pt.indd 161 11.06.2008 15:15:47 Uhr Protecção anti-roubo Introduzir o código numérico após interrupção da tensão 쏅 Ligue o aparelho. No visor 6 aparece primeiro "CODE" e depois "0000". Pode introduzir o código: Nota: Se introduzir um código numérico errado, o visor volta a indicar "0000" 6. Ainda pode repetir a introdução duas vezes. Após a terceira introdução errada, o aparelho fica bloqueado durante 1 hora. Durante esse período, o visor indica "WAIT 1HR" 6. Se desligar o aparelho durante este tempo de espera, terá de aguardar novamente uma hora completa após a reactivação. 쏅 Introduza o código numérico tal como descrito no parágrafo "Ligar/desligar a solicitação do código". 쏅 Quando o código numérico correcto aparecer no visor 6, mantenha a tecla de pré-selecção 5 < premida por mais de 2 segundos. O aparelho liga-se. Ligar/desligar Ligar/desligar Há várias possibilidades para ligar e desligar o aparelho: Ligar/desligar com a tecla de ligar/desligar 쏅 Para ligar, prima a tecla de ligar/desligar 3. 쏅 Para desligar, mantenha a tecla de ligar/desligar 3 premida por mais de dois segundos. Nota: Para proteger a bateria do automóvel, o aparelho é automaticamente desligado com a ignição do automóvel desligada, após um período de tempo regulável (consultar o parágrafo "Ajustar o tempo de desactivação" neste capítulo). Desligar/ligar através da ignição do automóvel Se o aparelho estiver conectado à ignição do automóvel e se não for desligado com a tecla 3, ele liga-se e desliga-se juntamente com a ignição do automóvel. Ligar com a introdução de um CD Para ligar com a introdução de um CD, 쏅 insira um CD no compartimento para CD, com o lado impresso para cima 5, até sentir uma ligeira resistência. O disco é recolhido automaticamente, o aparelho liga-se no modo de CD. 162 06_CalaisMP48_pt.indd 162 11.06.2008 15:15:47 Uhr Ligar/desligar Volume Ajustar o tempo de desactivação Regular o volume 쏅 Prima a tecla MENU 7. 쏅 Prima as vezes necessárias a tecla ou 8, até "HOUR" e a opção actualmente seleccionada aparecerem no visor 6. 쏅 Regule o tempo de desactivação com a tecla ou 8 em passos de 5 minutos, entre 5 e 60 minutos. Para abandonar o menu, 쏅 prima a tecla MENU 7. O volume do sistema pode ser regulado em passos de 0 (desligado) a 32 (máximo). 쏅 Para aumentar o volume do sistema, rode o regulador do volume 1 para a direita. 쏅 Para baixar o volume do sistema, rode o regulador do volume 1 para a esquerda. Se, com o aparelho desligado, se activar o telefone, o aparelho liga-se. Depois de desligar o telefone, o aparelho desliga-se de novo, automaticamente. É condição obrigatória que o telefone esteja correctamente ligado ao aparelho. Ligar com o telecomando de IV RC 10 P (opção) 쏅 Para ligar, prima a tecla ON H no telecomando de IV RC 10 P. Nota: O receptor de infravermelhos do aparelho tem de estar ligado para que possa utilizar o telecomando de IV. Para tal, leia também o parágrafo "Receptor do telecomando" no capítulo "Telecomando de IV RC 10 P". Pode silenciar o volume do sistema de forma repentina (Mute). 쏅 Prima brevemente a tecla 3. Desligar o silenciador (Mute) Para voltar a activar o volume anteriormente ouvido, 쏅 volte a premir brevemente a tecla 3. Silenciador do rádio durante telefonema/navegação áudio Silenciador durante a utilização do telefone Se o seu auto-rádio estiver ligado a um telemóvel ou sistema de navegação, o volume do auto-rádio é suprimido no momento em que uma chamada dá entrada ou em que é emitida uma recomendação acústica do sistema de navegação. O telefonema ou a recomendação acústica são reproduzidos através dos altifalantes do auto-rádio. Para o efeito, é necessário que o telemóvel ou o sistema de navegação estejam ligados ao auto-rádio (conector C2 na parte de trás do aparelho). Para saber quais sistemas de navegação são compatíveis com o seu auto-rádio, dirija-se a um revendedor Blaupunkt. PORTUGUÊS Ligar pelo telefone (opção) Silenciador (MUTE) 163 06_CalaisMP48_pt.indd 163 11.06.2008 15:15:48 Uhr Volume Se receber uma chamada ou for emitida uma mensagem do sistema de navegação, é indicado "PHONE" no visor. Regular o volume para o silenciador do rádio durante telefonema/navegação áudio (PHONEVOL) O volume das chamadas telefónicas ou das recomendações acústicas do sistema de navegação pode ser ajustado: 쏅 Prima a tecla MENU 7. 쏅 Prima as vezes necessárias a tecla 8, até "PHONEVOL" ser indiou cado. Após aprox. 2 segundos, são apresentados no visor 6 "VOL" e o ajuste actual. 쏅 Prima a tecla ou 8 para regular o volume entre 0 e 32. Nota: Não precisa aguardar pela indicação do ajuste actual para o alterar premindo a tecla ou 8. Para abandonar o menu, 쏅 prima a tecla MENU 7. Nota: Também pode regular o volume durante uma chamada telefónica ou uma mensagem de navegação usando o regulador 1. O volume regulado é memorizado automaticamente. Ligar/desligar o sinal sonoro de confirmação (BEEP) Ao efectuar determinadas acções, p. ex., ao premir longamente um tecla, soa um sinal sonoro de confirmação (Beep). Pode desligar o sinal sonoro de confirmação: 쏅 Prima a tecla MENU 7. 쏅 Prima as vezes necessárias a tecla ou 8, até "BEEP" e o ajuste actual "ON" (ligado) ou "OFF" (desligado) aparecerem no visor 6. 쏅 Prima a tecla ou 8 para desligar ou ligar o "Beep". Para abandonar o menu, 쏅 prima a tecla MENU 7. Regular o volume inicial máximo (ON VOL) Quando liga o aparelho, este reproduz o volume de som seleccionado em último lugar. No entanto, se, antes de desligar o aparelho, regular um volume mais elevado do que o volume inicial máximo, o volume será automaticamente limitado ao volume inicial regulado quando voltar a ligar o aparelho. Nota: Para proteger a audição, o volume inicial máximo está limitado ao valor "25". 쏅 Prima a tecla MENU 7. 쏅 Prima as vezes necessárias a tecla 8, até "ON VOL" aparecer no ou visor. Após aprox. 2 segundos, são apresentados no visor 6 "VOL" e o ajuste actual. 쏅 Prima a tecla ou 8 para regular o volume inicial máximo entre 5 e 25. Nota: Não precisa aguardar pela indicação do ajuste actual para o alterar premindo a tecla ou 8. Para abandonar o menu, 쏅 prima a tecla MENU 7. 164 06_CalaisMP48_pt.indd 164 11.06.2008 15:15:48 Uhr Som Regular a adaptação do volume em função do ruído (GALA): Som Esta função faz com que o volume do autorádio seja adaptado automaticamente à velocidade do seu automóvel e aos ruídos de condução daí resultantes. Por exemplo, o volume é automaticamente aumentado de acordo com a velocidade, para compensar os ruídos de condução que aumentam de intensidade (p. ex. através de ar deslocado). Para o efeito, é necessário que o seu veículo disponibilize o sinal do velocímetro e o auto-rádio esteja devidamente conectado. O aumento automático do volume pode ser regulado em 6 níveis (OFF (desligado), 1-5). 쏅 Prima a tecla MENU 7. 쏅 Prima as vezes necessárias a tecla ou 8, até "GALA" e o ajuste actual aparecerem. 쏅 Prima a tecla ou 8 para regular a adaptação do volume entre "OFF" (desligado) e 5. Para abandonar o menu, 쏅 prima a tecla MENU 7. Regular os agudos 쏅 Prima a tecla AUD :. 쏅 Prima as vezes necessárias a tecla ou 8, até "TREBLE" ser indicado. 쏅 Mantenha a tecla ou 8 premida por mais de 2 segundos. No visor, aparece brevemente "FREQ" e, de seguida, a frequência de agudos actualmente seleccionada. Para seleccionar outra frequência de agudos entre 10,0 kHz e 17,5 kHz, 쏅 prima a tecla ou 8. Para ajustar o nível de agudos, 쏅 prima as vezes necessárias a tecla ou 8, até "GAIN" ser indicado. Após aprox. 2 segundos, são apresentados "GAIN" e o ajuste actual. 쏅 Prima a tecla ou 8 para ajustar o nível de agudos entre –7 e +7. Para abandonar o menu, 쏅 prima a tecla AUD :. Regular os baixos PORTUGUÊS Volume 쏅 Prima a tecla AUD :. 쏅 Prima as vezes necessárias a tecla ou 8, até "BASS" ser indicado. 쏅 Mantenha a tecla ou 8 premida por mais de 2 segundos. No visor, aparece brevemente "FREQ" e, de seguida, a frequência de baixos actualmente seleccionada. Para seleccionar outra frequência de baixos entre 60 kHz e 200 kHz, 쏅 prima a tecla ou 8. 165 06_CalaisMP48_pt.indd 165 11.06.2008 15:15:48 Uhr Som Para ajustar o nível de baixos, 쏅 prima as vezes necessárias a tecla ou 8, até "GAIN" ser indicado. Após aprox. 2 segundos, são apresentados "GAIN" e o ajuste actual. 쏅 Prima a tecla ou 8 para ajustar o nível de baixos entre –7 e +7. Para escolher o factor de qualidade para os baixos, 쏅 prima as vezes necessárias a tecla ou 8, até "Q FACTOR" ser indicado. Após aprox. 2 segundos, são apresentados "Q" e o ajuste actual. 쏅 Prima a tecla ou 8 para ajustar o factor de qualidade entre 1,0 e 2,0. Para abandonar o menu, 쏅 prima a tecla AUD :. Ajustar os médios 쏅 Prima a tecla AUD :. 쏅 Prima as vezes necessárias a tecla ou 8, até "MIDDLE" ser indicado. 쏅 Mantenha a tecla ou 8 premida por mais de 2 segundos. No visor, aparece brevemente "FREQ" e, de seguida, a frequência central actualmente seleccionada. Para seleccionar outra frequência central entre 500 kHz e 2,5 kHz, 쏅 prima a tecla ou 8. Para ajustar o nível de médios, 쏅 prima as vezes necessárias a tecla ou 8, até "GAIN" ser indicado. Após aprox. 2 segundos, são apresentados "GAIN" e o ajuste actual. 쏅 Prima a tecla ou 8 para ajustar o nível de médios entre –7 e +7. Para escolher o factor de qualidade para os médios, 쏅 prima as vezes necessárias a tecla ou 8, até "Q FACTOR" ser indicado. Após aprox. 2 segundos, são apresentados "Q" e o ajuste actual. 쏅 Prima a tecla ou 8 para ajustar o factor de qualidade entre 0,5 e 1,25. Para abandonar o menu, 쏅 prima a tecla AUD :. Regular a distribuição do som à esquerda/direita (BAL) 쏅 Prima a tecla AUD :. 쏅 Prima as vezes necessárias a tecla ou 8, até "BAL" e o ajuste actual aparecerem. 쏅 Prima a tecla ou 8 para regular a distribuição do som à esquerda/direita entre –10 e +10. Para abandonar o menu, 쏅 prima a tecla AUD :. Regular a distribuição do som à frente/atrás (FAD) Nota Os altifalantes traseiros têm de ser ligados através de um amplificador adicional. 쏅 Prima a tecla AUD :. 쏅 Prima as vezes necessárias a tecla ou 8, até "FAD" e o ajuste actual aparecerem. 166 06_CalaisMP48_pt.indd 166 11.06.2008 15:15:48 Uhr Som 쏅 Prima a tecla ou 8 para regular a distribuição do som à frente/atrás entre –10 e +10. Para abandonar o menu, 쏅 prima a tecla AUD :. Relógio Relógio Chamar a indicação do relógio Para apresentar o relógio no visor durante aprox. 10 segundos, 쏅 mantenha a tecla MENU 7 premida por mais de 2 segundos. Nota: Não precisa aguardar pela indicação da hora actual para a alterar premindo a tecla ou 8. Para abandonar o menu, 쏅 prima a tecla MENU 7. PORTUGUÊS Acertar o relógio 쏅 Prima a tecla MENU 7. 쏅 Prima as vezes necessárias a tecla ou 8, até "TIMESET" ser apresentado no visor 6. Após aprox. 2 segundos aparece a hora actual no visor 6. Antes da hora, é apresentado "24H" no modo de 24 horas e "AM" ou "PM" no modo de 12 horas. As horas piscam indicando que podem ser acertadas. Para acertar as horas ou os minutos, 쏅 prima a tecla ou 8. Para comutar entre horas e minutos, 쏅 prima a tecla 6 <. Seleccionar o modo do relógio 12/24 horas 쏅 Prima a tecla MENU 7. 쏅 Prima as vezes necessárias a tecla ou 8, até "24 H MODE" ou "12 H MODE" aparecer no visor 6. 쏅 Prima a tecla ou 8 para mudar entre os modos. 167 06_CalaisMP48_pt.indd 167 11.06.2008 15:15:49 Uhr Relógio Para abandonar o menu, 쏅 prima a tecla MENU 7. Regular o fuso horário (TIMEZONE) Caso se desloque através de vários fusos horários, pode regular a diferença horária da hora actualmente ajustada em passos de 1 hora. Desta forma, pode corrigir a indicação do relógio para o fuso horário actualmente válido, sem que tenha de acertar novamente as horas em si. 쏅 Prima a tecla MENU 7. 쏅 Prima as vezes necessárias a tecla ou 8, até "TIMEZONE" ser indicado. Após aprox. 2 segundos, são apresentados no visor 6 "ZONE" e o ajuste actual. 쏅 Prima a tecla ou 8 para ajustar a diferença horária em passos de 1 hora entre –12 e +12. Nota: Não precisa aguardar pela indicação do ajuste actual para o alterar premindo a tecla ou 8. Para abandonar o menu, 쏅 prima a tecla MENU 7. Modo de rádio Modo de rádio Este aparelho está equipado com um receptor de rádio RDS. Quase todas as estações sintonizáveis em FM transmitem um sinal que, para além do programa, contém informações adicionais, como, por exemplo, o nome da estação ou o tipo de programa transmitido (PTY). O nome da estação é exibido no visor 6, logo que seja captado. Ligar o rádio Se se encontrar num outro modo de funcionamento, 쏅 prima a tecla BND 2, ou 쏅 prima as vezes necessárias a tecla SRC >, até "RADIO" aparecer no visor 6. No visor 6 é indicada a frequência actual ou o nome da estação. Função de conveniência RDS (AF, REG) As funções de conveniência RDS AF (frequência alternativa) e REG (regional) ampliam o espectro de potência do seu rádio: • AF: se a função de conveniência RDS estiver activa, o aparelho procura automaticamente, num plano de fundo, a frequência com melhor recepção da estação sintonizada. • REG: algumas estações, a determinada hora, subdividem os programas em vários programas regionais, com conteúdos diferentes. Com a função REG activada, evita-se que o aparelho comute para frequências alternativas da estação sintonizada com programas diferentes. 168 06_CalaisMP48_pt.indd 168 11.06.2008 15:15:49 Uhr Modo de rádio Ligar/desligar a função de conveniência RDS 쏅 Se desejar usar as funções RDS (AF e REG), prima a tecla RDS =. As funções de conveniência RDS estão activas quando o símbolo RDS aparece no visor 6 Ligar/desligar a função REG 쏅 Prima a tecla MENU 7. 쏅 Prima as vezes necessárias a tecla 8, até "REG" e o ajuste actuou al "ON" (ligado) ou "OFF" (desligado) aparecerem no visor 6. 쏅 Prima a tecla ou 8 para desligar ou ligar REG. Para abandonar o menu, 쏅 prima a tecla MENU 7. Nota: O ajuste REG ON/OFF só actua se a função RDS estiver activa. Seleccionar a banda e/ou o nível de memória Este aparelho permite-lhe captar programas das faixas de frequência FM, MW e LW (Europa) ou FM e AM (NAFTA). Para a banda FM, está disponível uma memória com três níveis (FM1, FM2 e FMT) e, para cada uma das bandas MW e LW ou AM, um nível. Adicionalmente, existe um outro nível de memória MWT/LWT ou AMT. Em cada nível podem guardar-se 6 estações emissoras diferentes. Para comutar entre as bandas ou os níveis de memória, 쏅 prima a tecla BND 2. Sintonizar as estações Há várias possibilidades para sintonizar as estações emissoras. Sintonização automática 쏅 Prima a tecla ou 8. O aparelho sintoniza a próxima estação que consiga captar. Notas: • Se a prioridade dos boletins de trânsito estiver ligada, é sintonizada a estação com boletins de trânsito seguinte. • Se a função PTY estiver ligada, é sintonizada a estação do tipo de programa seleccionado seguinte. Definir a sensibilidade de sintonia automática Pode seleccionar se, com baixa sensibilidade, pretende ajustar apenas emissoras de sinal forte ou, com elevada sensibilidade, também emissoras de sinal fraco. 쏅 Prima a tecla MENU 7. 쏅 Prima as vezes necessárias a tecla ou 8, até "SENS" e o ajuste actual "LO" (baixa sensibilidade) ou "DX" (elevada sensibilidade) aparecerem no visor 6. 쏅 Prima a tecla ou 8 para mudar entre os ajustes "LO" e "DX". Para abandonar o menu, 쏅 prima a tecla MENU 7. PORTUGUÊS Nota: O REG deve ser ligado ou desligado separadamente no menu. 169 06_CalaisMP48_pt.indd 169 11.06.2008 15:15:49 Uhr Modo de rádio Sintonia manual Para alterar a frequência ajustada em pequenos passos, 쏅 prima a tecla ou 8. Para alterar rapidamente a frequência ajustada, 쏅 mantenha a tecla ou 8 premida. 쏅 Prima a tecla de pré-selecção 1 - 6 < na qual pretende memorizar a estação, e mantenha-a premida por mais de 2 segundos. Ouve-se o sinal sonoro de confirmação. A estação é memorizada na tecla de préselecção seleccionada. Nota: A sintonização manual das estações só é possível, enquanto as funções RDS e PTY estão desactivadas. Memorizar as estações automaticamente (T-STORE) As 6 estações mais fortes na região podem ser guardadas automaticamente na memória. Para a banda FM, a memorização é efectuada no nível de memória FMT; para as bandas MW e LW, nos níveis MWT/LWT; e, para a banda AM, no nível de memória AMT. Percorrer as cadeias de estações (só em FM) Quando uma estação disponibiliza vários programas, é possível percorrer esta designada "cadeia de estações". 쏅 Prima a tecla ou 8 para mudar para a próxima estação pertencente à mesma cadeia de estações. Nota: Só é possível percorrer as cadeias de estações enquanto a função RDS estiver ligada e a função PTY desligada. Só poderá mudar para as estações que já tenha recebido anteriormente. Para o efeito, use, p. ex., a função Travelstore (T-STORE). Memorizar as estações Memorizar as estações manualmente 쏅 Seleccione o nível de memória ou banda pretendidos. 쏅 Sintonize a estação. Nota: Para o efeito, as estações memorizadas anteriormente neste nível são substituídas pelas novas estações sintonizadas. 쏅 Seleccione a banda pretendida. 쏅 Mantenha a tecla BND 2 premida por mais de dois segundos. Inicia-se a memorização. No visor 6, é indicado "T-STORE". Uma vez terminada a memorização, o aparelho toca a estação guardada na posição um do nível de memória FMT, MWT/LWT ou AMT. Ouvir uma estação memorizada 쏅 Seleccione o nível de memória ou a banda pretendida. 쏅 Prima a tecla de pré-selecção 1 - 6 < na qual está memorizada a estação pretendida. 170 06_CalaisMP48_pt.indd 170 11.06.2008 15:15:49 Uhr Modo de rádio A função Bandscan permite-lhe tocar todas as estações sintonizáveis durante cerca de 10 segundos. Iniciar Bandscan 쏅 Mantenha a tecla ou 8 premida por mais de 2 segundos. O visor indica "BANDSCAN" por breves momentos. O aparelho procura estações na banda actual. Cada estação sintonizada é reproduzida durante aprox. 10 segundos. Ao mesmo tempo, é indicada a frequência sintonizada ou o nome da estação. Terminar Bandscan 쏅 Prima a tecla ou 8. O modo Scan é terminado. A estação sintonizada em último lugar permanece sintonizada. Ligar/desligar a função PTY 쏅 Prima a tecla MENU 7. 쏅 Prima as vezes necessárias a tecla 8, até "PTY" e o ajuste actuou al "ON" (ligado) ou "OFF" (desligado) aparecerem no visor 6. 쏅 Prima a tecla ou 8, para desligar ou ligar a função PTY. Para abandonar o menu, 쏅 prima a tecla MENU 7. Seleccionar um tipo de programa e iniciar a busca 쏅 Prima as vezes necessárias a tecla ou 8, até o tipo de programa pretendido aparecer no visor. 쏅 Prima a tecla ou 8 para iniciar a busca. Caso seja encontrada uma estação com o tipo de programa seleccionado, ela é sintonizada. Tipo de programa (PTY) Algumas estações em FM, juntamente com o seu nome, transmitem informações adicionais sobre o tipo de programa transmitido. Os tipos de programa incluem, por exemplo: CULTURA VIAGENS JAZZ DESPORTO NOTÍCIAS POP ROCK MÚSICA A função PTY facilita-lhe a busca de estações que transmitem determinados tipos de programa. Com a função PTY ligada, e tendo-se iniciado uma busca PTY, o aparelho muda automaticamente da estação actual ou de outro modo de funcionamento para a estação com o tipo de programa seleccionado. Atenuação dos agudos em função de interferências (HICUT) A função Hicut permite-lhe melhorar a reprodução quando a recepção começa a ficar fraca. Se existirem perturbações na recepção, o nível de ruído é automaticamente reduzido. Para ligar ou desligar HICUT, 쏅 prima a tecla MENU 7. 쏅 Prima as vezes necessárias a tecla ou 8, até "HICUT" e o ajuste actual "ON" (ligado) ou "OFF" (desligado) aparecerem no visor 6. 쏅 Prima a tecla ou 8 para desligar ou ligar o HICUT. PORTUGUÊS Tocar brevemente as estações sintonizáveis (BANDSCAN) 171 06_CalaisMP48_pt.indd 171 11.06.2008 15:15:50 Uhr Modo de rádio Boletins de trânsito Para abandonar o menu, 쏅 prima a tecla MENU 7. Boletins de trânsito Ligar/desligar radiotexto Ligar/desligar a prioridade dos boletins de trânsito Algumas estações de rádio aproveitam o sinal RDS para transmitir publicidade ou outras informações em vez do nome. Este radiotexto é indicado no visor 6. Para ligar ou desligar a indicação de radiotexto, 쏅 prima a tecla MENU 7. 쏅 Prima as vezes necessárias a tecla ou 8, até "RADIOTXT" ser indicado. Após aprox. 2 segundos, é indicado o ajuste actual "TEXT ON" (ligado) ou "TEXT OFF" (desligado) no visor 6. 쏅 Prima a tecla ou 8 para desligar ou ligar a indicação do radiotexto. Nota: Não precisa aguardar pela indicação do ajuste actual para o alterar premindo a tecla ou 8. Para abandonar o menu, 쏅 prima a tecla MENU 7. Para ligar ou desligar a prioridade dos boletins de trânsito em cada modo de funcionamento, 쏅 prima a tecla TA ;. Nota: Nos modos de funcionamento CD, MP3, leitor multi-CD e AUX, esta função só está disponível se, por último, estava sintonizada a banda FM. A prioridade dos boletins de trânsito está activa, enquanto o símbolo TA é apresentado no visor 6. Assim que o aparelho recebe um boletim de trânsito, este é emitido. No visor 6, é apresentado "TRAFFIC" durante o boletim. Nota: Soa um sinal sonoro, • quando, durante a escuta da estação com boletins de trânsito ou de um CD, abandona a zona de emissão da estação sintonizada que transmite boletins de trânsito e o aparelho, na busca automática subsequente, não encontra uma nova estação que disponibilize este serviço. • quando mudar de uma estação com boletins de trânsito para uma estação que não disponibiliza este serviço. Nestes casos, desligue a prioridade dos boletins de trânsito ou mude para uma estação que suporta este serviço. 172 06_CalaisMP48_pt.indd 172 11.06.2008 15:15:50 Uhr Boletins de trânsito Pode regular em quantos níveis de volume mais alto deverão ser emitidos os boletins de trânsito em relação ao volume ajustado: 쏅 Prima a tecla MENU 7. 쏅 Prima as vezes necessárias a tecla 8, até "TA VOL" aparecer no ou visor. Após aprox. 2 segundos, são apresentados no visor 6 "VOL" e o ajuste actual. 쏅 Prima a tecla ou 8 para regular o aumento do volume entre 0 e 10. Nota: Não precisa aguardar pela indicação do ajuste actual para o alterar premindo a tecla ou 8. Para abandonar o menu, 쏅 prima a tecla MENU 7. Nota: O volume dos boletins de trânsito pode ser regulado durante um boletim usando-se o regulador 1. Ocultar os boletins de trânsito Para interromper um boletim de trânsito em curso e para regressar à fonte áudio anteriormente escutada, 쏅 prima a tecla TA ;. A prioridade dos boletins de trânsito permanece ligada. Modo de CD Este aparelho permite a leitura de CDs de áudio, CD-Rs e CD-RWs comerciais, com um diâmetro de 12 cm. Por forma a evitar problemas durante a leitura, não deve gravar os seus CDs a uma velocidade superior a 16X. Perigo de destruição da unidade de CD! Não é permitido ler CDs single com um diâmetro de 8 cm, nem os CDs de contornos realçados ("shape CDs"). Trate o CD com cuidado e evite riscos e danos no CD. Se possível, segure no CD apenas pelos bordos. Se o CD ficar sujo, limpeo com um pano que não largue pêlos, sem adição de solventes. Limpe sempre o CD de dentro para fora. Não exponha o CD à incidência directa da luz do Sol, e guarde o CD fora do aparelho, numa capa de protecção. Não cole quaisquer etiquetas no CD. Legende os CD apenas com marcadores adequados, correntes no mercado. Não assumimos qualquer responsabilidade por danificações na unidade de CD causadas pela utilização de CDs impróprios ou danificados. PORTUGUÊS Regular o aumento do volume dos boletins de trânsito Modo de CD Para um funcionamento correcto, utilize apenas CDs com o logotipo "Compact Disc". O CDs protegidos contra cópia podem causar dificuldades de reprodução. A Blaupunkt não pode garantir um funcionamento correcto de CDs protegidos contra cópia! 173 06_CalaisMP48_pt.indd 173 11.06.2008 15:15:50 Uhr Modo de CD Iniciar o modo de CD Não havendo nenhum disco na unidade, 쏅 insira o CD no compartimento para CD, sem exercer qualquer força, com o lado impresso para cima, até sentir uma resistência. O disco é recolhido automaticamente para dentro da unidade. No visor 6 aparece o símbolo de CD. Nota: A recolha do CD não deve ser impedida nem apoiada. O aparelho começa a reproduzir o CD. No visor 6, são apresentados o número da faixa actual (p. ex., "T12") e o tempo de reprodução, bem como informações da faixa (texto de CD). Havendo já um CD na unidade, 쏅 prima as vezes necessárias a tecla SRC >, até "CD" aparecer no visor 6. O leitor começa a leitura a partir do ponto em que foi interrompido. Indicação de informações da faixa (texto de CD) Se o CD disponibilizar texto de CD, a informação sobre cada faixa é apresentada no início da faixa, uma vez, como texto rolante, no visor 6. Apresentar informações da faixa uma vez como texto rolante 쏅 Prima a tecla 5 <. O texto de CD relativo à faixa actual é apresentado uma vez como texto rolante no visor 6. Nota: Esta função não está disponível se a indicação de texto de CD como texto rolante estiver desligada (consultar o parágrafo seguinte). Ligar/desligar a indicação de informações da faixa como texto rolante Para ligar ou desligar a indicação de informações da faixa como texto rolante, 쏅 prima a tecla MENU 7. 쏅 Prima as vezes necessárias a tecla ou 8, até "SCRL" e o ajuste actual "ON" (ligado) ou "OFF" (desligado) aparecerem no visor 6. 쏅 Prima a tecla ou 8 para ligar ou desligar o texto rolante. Para abandonar o menu, 쏅 prima a tecla MENU 7. Com o ajuste "SCRL OFF", a informação da faixa é apresentada no visor 6 em parágrafos de 8 caracteres. Nessa ocasião, cada parágrafo de texto, bem como o número da faixa e o tempo de reprodução, são apresentados em mudança contínua durante 5 segundos, respectivamente. Nota: O ajuste "SCRL ON/OFF" também actua em conformidade na indicação de informações da faixa MP3 (tags ID3) no modo de MP3. Escolher uma faixa 쏅 Prima a tecla ou 8 para mudar para a faixa anterior ou seguinte. Premindo uma única vez a tecla 8, a faixa actual volta a ser lida. 174 06_CalaisMP48_pt.indd 174 11.06.2008 15:15:50 Uhr Modo de CD Busca rápida (com som) Repetição de faixas (RPT) Para efectuar uma busca rápida para trás ou para a frente, 쏅 mantenha a tecla ou 8 premida até alcançar o ponto pretendido. 쏅 Prima a tecla 2 <. A informação "RPT TRK" surge brevemente no visor e o símbolo RPT é apresentado. O leitor repete a faixa actual, até se desactivar a função RPT. 쏅 Prima a tecla 3 <. No visor 6, surge brevemente "MIX CD" e o símbolo MIX. As faixas seguintes são seleccionadas aleatoriamente. Terminar a função MIX 쏅 Prima novamente a tecla 3 <. No visor 6, surge brevemente "MIX OFF" e o símbolo MIX apaga-se. A leitura prossegue de forma normal. Tocar o início das faixas (SCAN) Para reproduzir cada uma das faixas do CD durante aprox. 10 segundos, 쏅 prima a tecla 4 <. O visor indica "SCAN TRK" por breves momentos. Durante a reprodução, a indicação "CD" pisca. Apresenta-se o número da faixa e o tempo de reprodução da faixa actual ou as respectivas informações da faixa. Terminar a busca SCAN, continuar a ouvir uma faixa Para terminar o modo Scan, 쏅 prima novamente a tecla 4 <. O visor indica "SCAN OFF" por breves momentos. Prossegue a reprodução da faixa actual. Terminar a função RPT 쏅 Prima novamente a tecla 2 <. A informação "RPT OFF" 6 surge brevemente no visor e o símbolo RPT apaga-se. A leitura prossegue de forma normal. Interromper a reprodução (PAUSE) 쏅 Prima a tecla 1 <. No visor 6 é indicado "PAUSE". Cancelar a pausa 쏅 Durante a pausa, prima a tecla 1 <. A reprodução prossegue. Retirar um CD Nota: Também poderá extrair os CDs quando o aparelho está desligado ou se estiver activa uma outra fonte áudio. 쏅 Prima a tecla de ejecção do CD 4. O disco é ejectado. O visor indica brevemente "CD EJECT". PORTUGUÊS Leitura de faixas numa ordem aleatória (MIX) Nota: A ejecção do CD não deve ser impedida nem apoiada. 쏅 Retire o CD. O símbolo CD apaga-se. 175 06_CalaisMP48_pt.indd 175 11.06.2008 15:15:50 Uhr Modo de CD Nota: Se não retirar um CD ejectado, ele volta a ser automaticamente recolhido após aprox. 10 segundos. Modo de MP3/WMA Modo de MP3/WMA Este auto-rádio permite-lhe a leitura de CDRs e CD-RWS com ficheiros de música MP3 e WMA. Além disso, e através da interface USB opcional C‘n‘C, pode conectar suportes de dados USB e reproduzir ficheiros MP3/WMA memorizados no suporte de dados USB. Este capítulo refere apenas a reprodução de ficheiros MP3, pois a utilização com ficheiros MP3 e WMA é idêntica. Neste capítulo, a designação "suporte de dados MP3" refere-se tanto ao CD-R/RW como a suportes de dados USB como, p. ex., canetas USB. Notas: • Com este aparelho, não é possível reproduzir ficheiros WMA com gestão de direitos de autor (Digital Rights Management - DRM) de lojas de música online. • Os ficheiros WMA só podem ser reproduzidos com segurança se tiverem sido criados com o Windows Media Player, a partir da versão 8. Preparação de um suporte de dados MP3 Preparação de um CD MP3 A combinação entre gravador de CD, "software" de gravação e CDs virgem pode originar problemas na reprodução de CDs. No caso de problemas com CDs auto-gravados, recomendamos que mude de marca ou a cor dos CDs virgem. O formato do CD tem de ser ISO 9660 nível 1 ou nível 2 ou Joliet. Todos os restantes formatos não podem ser lidos de forma fiável. 176 06_CalaisMP48_pt.indd 176 11.06.2008 15:15:51 Uhr Modo de MP3/WMA D01 A D02 D03 T001 T002 T003 T004 T005 T001 T002 T003 T004 T005 T006 D04 T001 T002 T003 T004 T005 T006 T007 T008 T009 T010 T011 B A Directórios B Faixas · Ficheiros A cada directório pode dar-se um nome através do computador. O nome do directório poderá ser exibido no visor do aparelho. Proceda à designação dos directórios e faixas/ficheiros de acordo com o seu "software" de gravação. Para mais informações, consulte as instruções do seu "software". Notas: • Para a designação dos ficheiros (directórios e faixas), evitem a utilização de acentos e caracteres especiais. • Se utilizar nomes de ficheiros com mais de 16 caracteres (inclusive ".MP3" ou ".WMA"), reduz-se a quantidade máxima de faixas e directórios. Se der importância a uma determinada sequência dos seus ficheiros: memorize os ficheiros no suporte de dados na sequência em que pretende reproduzi-los mais tarde. O aparelho reproduz os ficheiros na sequência em que foram gravados no suporte de dados. Para a reprodução dos ficheiros neste aparelho, os ficheiros MP3 devem ter a extensão ".MP3" e os ficheiros WMA, a extensão ".WMA". Notas: Para garantir uma reprodução sem problemas, • não tente alterar para ".MP3" a terminação de ficheiros que não sejam ficheiros MP3, nem tente reproduzir estes ficheiros! Estes ficheiros inválidos serão suprimidos durante a reprodução. • não utilize CDs "misturados" que contenham simultaneamente dados MP3 e não MP3 (durante a reprodução em MP3, o aparelho só reproduz os ficheiros MP3). • não use CDs gravados no modo misto, que contenham faixas áudio misturadas com faixas MP3. Se tentar reproduzir um disco misturado, o aparelho só reproduz as faixas de áudio. PORTUGUÊS Ao criar (codificar) os ficheiros MP3/WMA a partir de ficheiros áudio, deverá usar taxas de bits de 32 a 320 kbps para ficheiros MP3 ou de 32 a 192 kbps para ficheiros WMA. Este aparelho suporta até 252 directórios e até 255 ficheiros por directório. O CD poderá ter um total máximo de 512 directórios e ficheiros. Os directórios e faixas no CD podem ser seleccionados individualmente. 177 06_CalaisMP48_pt.indd 177 11.06.2008 15:15:51 Uhr Modo de MP3/WMA Preparação de um suporte de dados USB Para que o aparelho reconheça um suporte de dados USB, este deve estar especificado como dispositivo de armazenamento em massa (Mass Storage Device), formatado no sistema de ficheiros FAT16 ou FAT32, bem como possuir ficheiros MP3 ou WMA. Num suporte de dados USB, pode criar, no máximo, 1500 ficheiros (directórios e faixas). Este aparelho permite seleccionar individualmente os directórios e as faixas. Se utilizar mais de 24 caracteres (inclusive ".MP3" ou ".WMA") para os nomes dos ficheiros, reduz-se a quantidade máxima de ficheiros. A Blaupunkt não pode garantir um funcionamento correcto de todos os suportes de dados USB disponíveis no mercado. "Tags ID3" As faixas MP3 podem conter informações adicionais, tais como o nome do artista, faixa ou álbum (tags ID3). Este aparelho permite a exibição no visor de "tags ID3" da versão 1 e da versão 2. Iniciar o modo de MP3 Iniciar o modo de MP3 de CD Num CD MP3, o modo de MP3 é iniciado como o modo de CD convencional. Para tal, leia o parágrafo "Iniciar o modo de CD" no capítulo "Modo de CD". No visor 6 são apresentados o número da faixa actual (p. ex., "T12") e o tempo de reprodução, bem como informações da faixa (tags ID3) ou o nome do ficheiro. Ao mudar para um outro directório, é brevemente apresentado o número do directório (p. ex., "DIR 02"). Ligar um suporte de dados USB e iniciar o modo de MP3 Para poder ligar um suporte de dados USB (p. ex. caneta USB ou disco rígido USB), a interface USB Blaupunkt opcional tem de ser conectada à parte traseira do aparelho (conector C3). Pode instalar o cabo USB da interface, p. ex., no porta-luvas ou num local adequado da consola central. Notas: • Ao conectar a interface USB Blaupunkt ao aparelho, a entrada AUX tem de estar devidamente configurada. Para o efeito, leia o parágrafo "Configurar a entrada AUX" no capítulo "Fontes áudio externas". • Desligue sempre o aparelho antes de conectar ou desconectar o suporte de dados USB, para que o suporte de dados seja correctamente reconhecido e removido. 쏅 Conecte o suporte de dados USB ao cabo USB da interface USB. Logo que esteja conectado um suporte de dados USB, ele pode ser seleccionado com a tecla SRC >. No visor aparece então "USB". Indicação de informações da faixa (tags ID3) Se o suporte de dados MP3 disponibilizar tags ID3, a informação sobre cada faixa é apresentada no início da faixa, uma vez, como texto rolante, no visor 6. Se não tiverem sido memorizados nenhuns tags ID3 com os ficheiros MP3, é apresentado o nome do ficheiro. 178 06_CalaisMP48_pt.indd 178 11.06.2008 15:15:51 Uhr Modo de MP3/WMA Apresentar informações da faixa uma vez como texto rolante 쏅 Prima a tecla 5 <. Os tags ID3 relativos à faixa actual são apresentados uma vez como texto rolante no visor 6. Nota: Esta função não está disponível se a indicação de informações da faixa como texto rolante estiver desactivada. Para o efeito, leia o capítulo "Modo de CD", subcapítulo "Indicação de informações da faixa (texto de CD)", parágrafo "Ligar/desligar a indicação de informações da faixa como texto rolante". Escolher um directório Para mudar para um novo directório, por ordem ascendente ou descendente, 쏅 prima a tecla ou 8. Notas: • Todos os directórios que não contenham ficheiros em MP3 são suprimidos automaticamente. • O aparelho processa todos os directórios e subdirectórios como se se encontrassem num nível. Premindo ou 8, repetidamente a tecla também acede a todos os subdirectórios. Seleccionar a faixa/ficheiro Para mudar, por ordem descendente ou ascendente, para uma nova faixa ou um novo ficheiro no directório aberto, 쏅 prima a tecla ou 8. Premindo uma única vez a tecla 8, a faixa actual volta a ser lida. Busca rápida Para efectuar uma busca rápida para trás ou para a frente, 쏅 mantenha a tecla ou 8 premida até alcançar o ponto pretendido. Nota: No modo de USB, a busca rápida para trás pára respectivamente no início da faixa actual. Leitura de faixas numa ordem aleatória (MIX) Para ouvir as faixas do directório aberto, numa ordem variável, aleatoriamente seleccionada pelo aparelho, 쏅 prima as vezes necessárias a tecla 3 <, até "MIX DIR" ou "MIX FLD" aparecer no visor 6. O símbolo MIX aparece no visor 6. Para reproduzir todas as faixas do suporte de dados MP3 numa ordem aleatória, 쏅 prima as vezes necessárias a tecla 3 <, até "MIX ALL" aparecer no visor 6. O símbolo MIX aparece no visor 6. PORTUGUÊS Nota: Para memorizar tags ID3, leia também as instruções do seu "software" de PC para MP3 ou "software" de gravação. 179 06_CalaisMP48_pt.indd 179 11.06.2008 15:15:51 Uhr Modo de MP3/WMA Terminar a função MIX Para terminar a reprodução numa ordem aleatória, 쏅 prima as vezes necessárias a tecla 3 <, até "MIX OFF" aparecer no visor 6. O símbolo MIX apaga-se no visor 6. Tocar o início das faixas (SCAN) Para reproduzir todas as faixas do suporte de dados MP3 numa ordem ascendente durante aprox. 10 segundos, 쏅 prima as vezes necessárias a tecla 4 <, até "SCAN TRK" aparecer no visor 6. Durante a reprodução, pisca a indicação "MP3" ou "USB". Para, no modo de USB, tocar brevemente todas as faixas do directório actual, 쏅 prima as vezes necessárias a tecla 4 <, até "SCAN FLD" aparecer no visor 6. Durante a reprodução, a indicação "USB" pisca. Para repetir o directório actual, 쏅 prima as vezes necessárias a tecla 2 <, até "RPT DIR" ou "RPT FLD" aparecer no visor 6. O símbolo RPT aparece no visor 6. Terminar REPEAT Para terminar a repetição, 쏅 prima as vezes necessárias a tecla 2 <, até "RPT OFF" aparecer no visor 6. O símbolo RPT apaga-se no visor 6. Interromper a reprodução (PAUSE) 쏅 Prima a tecla 1 <. No visor 6 é indicado "PAUSE". Cancelar a pausa 쏅 Durante a pausa, prima a tecla 1 <. A reprodução prossegue. Terminar a função SCAN Para terminar a reprodução do início das faixas, 쏅 prima as vezes necessárias a tecla 4 <, até "SCAN OFF" aparecer no visor 6. O aparelho continua a ler a faixa que está a ser tocada. Repetição de faixas individuais ou de directórios completos (REPEAT) Para repetir a faixa que está a ser tocada, 쏅 prima as vezes necessárias a tecla 2 <, até "RPT TRK" aparecer no visor 6. O símbolo RPT aparece no visor 6. 180 06_CalaisMP48_pt.indd 180 11.06.2008 15:15:51 Uhr Modo de leitor multi-CD Modo de leitor multi-CD Escolher um CD É possível conectar, opcionalmente, ao aparelho os leitores multi-CD Blaupunkt CDC A08 T e IDC A09 (conector C3 na parte de trás do aparelho). Para mudar para um novo CD, por ordem ascendente ou descendente, 쏅 prima a tecla ou 8. Notas: • Ao conectar um leitor multi-CD ao aparelho, a entrada AUX tem de estar devidamente configurada. Para o efeito, leia o parágrafo "Configurar a entrada AUX" no capítulo "Fontes áudio externas". • Para informações sobre o tratamento dos CDs, a inserção de CDs e o manuseamento do leitor multi-CD, queira consultar as instruções de serviço do seu leitor multi-CD. Iniciar o modo multi-CD 쏅 Prima as vezes necessárias SRC >, até aparecer "CHANGER" no visor 6. O leitor começa a reproduzir o primeiro CD que conseguir identificar. No visor 6 são apresentados o número do CD actual (p. ex. "D02") e a faixa actual (p. ex. "T07"), bem como o tempo de reprodução. Escolher uma faixa Para mudar, por ordem ascendente ou descendente, para uma nova faixa no CD actual, 쏅 prima a tecla ou 8. Busca rápida (com som) Para efectuar uma busca rápida para trás ou para a frente, 쏅 mantenha a tecla ou 8 premida até alcançar o ponto pretendido. Repetição de faixas individuais ou de CDs completos (RPT) Para repetir a faixa que está a ser tocada, 쏅 prima as vezes necessárias a tecla 2 <, até "RPT TRK" aparecer no visor 6. O símbolo RPT aparece no visor 6. Para repetir o CD que está a ser tocado, 쏅 prima as vezes necessárias a tecla 2 <, até "RPT CD" aparecer no visor 6. O símbolo RPT aparece no visor 6. PORTUGUÊS Atenção! Normalmente, o leitor multi-CD é alimentado pelo aparelho com uma tensão de funcionamento de 12 V. Se se conectar o leitor multi-CD CDC A 08 T (24 V), é necessário separar a alimentação eléctrica na ficha de ligação no cabo de ligação do leitor multi-CD (conector C3/Pin 15). O leitor multi-CD deve ser alimentado com uma tensão de funcionamento própria de 24 V. Terminar REPEAT Para terminar a repetição, 쏅 prima as vezes necessárias a tecla 2 <, até "RPT OFF" aparecer no visor 6. O símbolo RPT apaga-se no visor 6. Leitura de faixas numa ordem 181 06_CalaisMP48_pt.indd 181 11.06.2008 15:15:51 Uhr Modo de leitor multi-CD aleatória (MIX) Para ouvir as faixas do disco que está a ser tocado, numa ordem variável, aleatoriamente seleccionada pelo aparelho, 쏅 prima as vezes necessárias a tecla 3 <, até "MIX CD" aparecer no visor 6. O símbolo MIX aparece no visor 6. Para ouvir as faixas de todos os CDs inseridos, numa ordem aleatória, 쏅 prima as vezes necessárias a tecla 3 <, até "MIX ALL" aparecer no visor 6. O símbolo MIX aparece no visor 6. Interromper a reprodução (PAUSE) 쏅 Prima a tecla 1 <. No visor 6 aparece "PAUSE". Cancelar a pausa 쏅 Durante a pausa, prima a tecla 1 <. A reprodução prossegue. Terminar a função MIX Para terminar a reprodução numa ordem aleatória, 쏅 prima as vezes necessárias a tecla 3 <, até "MIX OFF" aparecer no visor 6. O símbolo MIX apaga-se no visor 6. Tocar o início de todas as faixas de cada CD (SCAN) Para ouvir, numa ordem ascendente, todas as faixas de todos os CDs inseridos durante aprox. 10 segundos, 쏅 prima a tecla 4 <. No visor 6 é brevemente indicado "SCAN TRK". Durante a reprodução, pisca a indicação do número de CD. Terminar a função SCAN Para terminar a reprodução do início das faixas, 쏅 prima novamente a tecla 4 <. No visor 6 é brevemente indicado "SCAN OFF". O aparelho continua a ler a faixa que está a ser tocada. 182 06_CalaisMP48_pt.indd 182 11.06.2008 15:15:52 Uhr Telecomando de IV Com o telecomando de IV opcional, pode comandar as funções mais importantes do aparelho. Receptor do telecomando Na tampa do aparelho, encontra-se o receptor de infravermelhos 9 para o telecomando. Antes de utilizar o telecomando, é necessário ligar o receptor: 쏅 Prima a tecla MENU 7. 쏅 Prima as vezes necessárias a tecla ou 8, até "IR" e o ajuste actual "ON" (ligado) ou "OFF" (desligado) aparecerem no visor 6. 쏅 Prima a tecla ou 8 para desligar ou ligar IV. Para abandonar o menu, 쏅 prima a tecla MENU 7. Funções do telecomando Gerais: Tecla ON H Ligar (desligar o aparelho (premir longamente) Mute (premir brevemente) Abandonar menu SRC @ Comutação da fonte V+ B Aumentar o volume V- A Baixar o volume OK G Chamar ou abandonar o menu E Seleccionar a opção de menu C Seleccionar a opção de menu F Alterar o ajuste de menu D Alterar o ajuste de menu E No modo de rádio: D F C B A @ Função G H Tecla Função F Chamar a estação memorizada D Seleccionar a banda/o nível de memória E Busca para cima C Busca para baixo PORTUGUÊS Telecomando de IV RC 10 P 183 06_CalaisMP48_pt.indd 183 11.06.2008 15:15:52 Uhr Telecomando de IV Saída do pré-amplificador No modo de CD: Saída do pré-amplificador Tecla Pode ligar ao aparelho um amplificador para utilização de um altifalante de graves fundos (subwoofer). Para tal, o amplificador tem de ser conectado à parte de trás do aparelho (conector C1). O nível do subwoofer pode ser regulado no menu de áudio: 쏅 Prima a tecla AUD :. 쏅 Prima as vezes necessárias a tecla 8, até "SUB WOOF" ser indiou cado. Após aprox. 2 segundos, são apresentados no visor 6 "SUBW" e o ajuste actual. 쏅 Prima a tecla ou 8 para regular o nível para o subwoofer entre 0 e 7. Função F Seleccionar a faixa seguinte D Seleccionar a faixa anterior Modo de CD-Changer: Tecla Função F Reproduzir a faixa seguinte D Reproduzir a faixa anterior E Reproduzir o CD seguinte C Reproduzir o CD anterior Modo de MP3: Tecla Função F Reproduzir a faixa seguinte D Reproduzir a faixa anterior E Reproduzir o directório seguinte C Reproduzir o directório anterior Nota: Não precisa aguardar pela indicação do ajuste actual para o alterar premindo a tecla ou 8. Para abandonar o menu, 쏅 prima a tecla AUD :. 184 06_CalaisMP48_pt.indd 184 11.06.2008 15:15:52 Uhr Fontes áudio externas Através da entrada AUX, pode conectar vários tipos de fontes áudio externas ao aparelho. A entrada AUX tem de estar configurada para a respectiva fonte áudio externa conectada: • Configuração "AUX" para fontes áudio externas como, p. ex., leitores portáteis de CD, leitores de MiniDisc ou leitores MP3. • Configuração "CDC" para os leitores multi-CD Blaupunkt CDC A 08 T e IDC A 09. • Configuração "USB" para a interface USB da Blaupunkt. Para configurar a entrada AUX, leia o parágrafo seguinte, "Configurar a entrada AUX". Nota: Para a ligação de uma fonte áudio externa, precisa de um cabo adaptador. Este cabo (Blaupunkt nº 7 607 897 093) pode adquirir-se num revendedor da Blaupunkt. Configurar a entrada AUX 쏅 Prima a tecla MENU 7. 쏅 Prima as vezes necessárias a tecla ou 8, até "SRC SEL" ser indicado. Após aprox. 2 segundos, "SRC" e o ajuste actual "CDC", "USB" ou "AUX" são apresentados no visor 6. 쏅 Prima a tecla ou 8 para seleccionar outro ajuste. Nota: A sequência de ajustes no menu é "CDC" – "USB" – "AUX": • Com o ajuste actual "CDC", pode seleccionar o ajuste "USB" premindo a tecla 8. • Com o ajuste actual "USB", pode seleccionar o ajuste "CDC" premindo a tecla 8 ou o ajuste "AUX" premindo a tecla 8. • Com o ajuste actual "AUX", pode seleccionar o ajuste "USB" premindo a tecla 8. A cada mudança de ajuste, o aparelho é automaticamente desactivado. Para mudar entre os ajustes "CDC" e "AUX", deve, por isso, seleccionar primeiro o ajuste "USB" e, depois da desactivação automática do aparelho, voltar a ligálo. Repita então o ajuste para aceder ao ajuste pretendido "AUX" ou "CDC". É apresentada a indicação "AUTO SWITCH OFF IN 10 SECONDS". O aparelho desligase automaticamente após aprox. 10 segundos. 쏅 Volte a ligar o aparelho premindo a tecla de ligar/desligar 3 O aparelho é ligado no modo de rádio com o ajuste seleccionado. PORTUGUÊS Fontes áudio externas Nota: Se tiver seleccionado o ajuste AUX, pode seleccionar a entrada AUX com a tecla SRC >. No visor aparece então "AUX". 185 06_CalaisMP48_pt.indd 185 11.06.2008 15:15:52 Uhr Fontes áudio externas Se tiver seleccionado o ajuste CDC ou USB, só pode seleccionar a fonte áudio com a tecla SRC > se estiver conectado um aparelho correspondente (leitor multi-CD ou interface USB). Ajustar o nível da entrada AUX Se tiver configurado a entrada AUX para a ligação de fontes áudio externas em "AUX", pode adaptar o nível da fonte áudio externa ao nível da fonte áudio do próprio aparelho (como, p. ex., CD e rádio). Nota: Só pode ajustar o nível para a entrada AUX se estiver seleccionado AUX como fonte áudio. 쏅 Se necessário, prima as vezes necessárias a tecla SRC >, até "AUX" aparecer no visor. 쏅 Prima a tecla MENU 7. 쏅 Prima as vezes necessárias a tecla ou 8, até "GAIN" e o ajuste actual aparecerem. 쏅 Prima a tecla ou 8 para ajustar a adaptação do nível entre –9 e +9. Para abandonar o menu, 쏅 prima a tecla MENU 7. Ajustes de fábrica Repor os ajustes de fábrica (RESET) Tem a possibilidade de repor os ajustes de fábrica originais do aparelho: 쏅 Mantenha a tecla AUD : premida por mais de aprox. 10 segundos. Soa um sinal de confirmação e no visor 6 aparece brevemente "RESET". Todos os ajustes de menu e menu áudio são repostos nos ajustes de fábrica. Nota: As estações memorizadas nas teclas de pré-selecção não são apagadas. 186 06_CalaisMP48_pt.indd 186 11.06.2008 15:15:52 Uhr Dados técnicos Dados técnicos Tensão de funcionamento 24 V Amplificador Potência de saída: Saída Line: Entrada AUX: 2 x 20 Watt seno em 4 Ohm 2 x 2,0 Volt rms 2 x 2,0 Volt rms Sintonizador Bandas na Europa: FM: MW: LW: 87,5 - 108 MHz 531 - 1602 kHz 153 - 279 kHz PORTUGUÊS Bandas na América: FM: 87,7 - 107,9 MHz AM: 530 - 1710 kHz FM - faixa de transmissão: 30 - 15 000 Hz CD Resposta em frequência: 20 - 20 000 Hz Reservado o direito a alterações! 187 06_CalaisMP48_pt.indd 187 11.06.2008 15:15:53 Uhr Bedieningselementen 1 Volumeregelaar < Toetsenblok 1 - 6 2 BND-toets Kort indrukken: keuze van het geheugenniveau resp. het golfgebied Lang indrukken: starten van de Travelstore-functie (FMT of MWT/LWT) = RDS-toets RDS-comfortfunctie in-/uitschakelen 3 Aan-/uit-toets Kort indrukken: inschakelen van het apparaat In bedrijf: geluidsonderdrukking (Mute) Lang indrukken: uitschakelen van het apparaat > SRC-toets Bron kiezen tussen radio en (indien geplaatst, aangesloten resp. ingeschakeld) CD, MP3, CD-wisselaar en AUX ? Code LED 4 CD-uitwerpknop 5 CD-opening 6 Display 7 MENU-toets Oproepen van de menu's voor de basisinstellingen. 8 Multifunctionele tuimelschakelaar 9 Infrarood ontvanger voor IR-afstandsbediening (optie) : AUD-toets Kort indrukken: audio-menu voor instelling van lage tonen, hoge tonen, balans, fader en loudness openen Lang indrukken (10 sec.): fabrieksinstellingen herstellen ; TA-toets In-/uitschakelen van de voorrang voor verkeersinformatie Onderbreken van actuele verkeersinformatie 188 07_CalaisMP48_nl.indd 188 11.06.2008 15:17:20 Uhr Belangrijke opmerkingen ............... 191 Correct gebruik ........................... 191 Verkeersveiligheid ....................... 191 Afstandsbediening (optie) ............ 191 CD-wisselaar (optie) .................... 191 USB-interface (optie) ................... 191 Afvoer afgedankte apparaten ......... 191 Diefstalbeveiliging CODE ............... 192 Codevraag in-/uitschakelen (CODE) ...................................... 192 Codenummer na spanningsonderbreking invoeren.................. 193 In-/uitschakelen ............................ 193 In-/uitschakelen met de aan-/ uit-toets ..................................... 193 In-/uitschakelen via het contact van het voertuig ........................... 193 Inschakelen door plaatsen van een CD ....................................... 193 Uitschakeltijd instellen.................. 194 Inschakelen via telefoon (optie) ..... 194 Inschakelen met de IR-afstandsbediening RC 10 P (optie) ............. 194 Volume instellen ............................ 194 Geluidsonderdrukking (MUTE)....... 194 Telefoon-/navigatie-audio.............. 194 Bevestigingstoon (BEEP) in-/ uitschakelen ............................... 195 Maximale inschakelvolume i nstellen (ON VOL) ........................ 195 Snelheidsafhankelijke volumeaanpassing instellen (GALA): ......... 196 Klankkleur .................................... 196 Hoge tonen instellen ..................... 196 Lage tonen instellen ..................... 196 Middentonen instellen .................. 197 Volumeverdeling links/rechts instellen (BAL) ............................ 197 Volumeverhouding voor/achter instellen (FAD) ............................ 197 Kloktijd ......................................... 198 Tijd weergeven ............................ 198 Tijd instellen ............................... 198 Klokmodus 12/24 uur kiezen......... 198 Tijdzone instellen (TIMEZONE) ...... 199 Radioweergave .............................. 199 Radioweergave inschakelen........... 199 RDS-comfortfunctie (AF, REG) ....... 199 Golfgebied/geheugenniveau kiezen ........................................ 200 Zenders instellen ......................... 200 Zenders opslaan .......................... 201 Geprogrammeerde zenders oproepen.................................... 201 Ontvangbare zenders kort weergeven (BANDSCAN) .............. 202 Programmatype (PTY) .................. 202 Storingsafhankelijke demping van de hoge tonen (HICUT)............ 202 Radiotekst in-/uitschakelen ........... 203 Verkeersinformatie........................ 203 Voorrang voor verkeersinformatie in-/uitschakelen ........................... 203 Volumeversterking voor verkeersinformatie instellen ...................... 204 Verkeersbericht onderdrukken....... 204 NEDERLANDS Inhoudsopgave 189 07_CalaisMP48_nl.indd 189 11.06.2008 15:17:21 Uhr Inhoudsopgave CD-weergave ................................. 204 Gevaar voor vernieling van de CD-speler! ................................. 204 CD-weergave starten .................... 205 Weergeven van titelinformatie (CD-tekst) .................................. 205 Titel kiezen ................................. 205 Snelle zoekdoorloop (hoorbaar) .... 206 Willekeurige weergave van de titels (MIX) .................................. 206 Titels kort weergeven (SCAN) ........ 206 Titel herhalen (RPT) ..................... 206 Weergave onderbreken (PAUSE) .... 206 CD verwijderen............................ 206 MP3-/WMA-weergave .................... 207 Voorbereiding van een MP3-datadrager .......................... 207 MP3-weergave starten .................. 209 Weergeven van titelinformatie (ID3-tags)................................... 209 Map kiezen ................................. 210 Titels/bestanden kiezen ................ 210 Snelle zoekdoorloop .................... 210 Titels in willekeurige volgorde weergeven (MIX).......................... 210 Titels kort weergeven (SCAN) ........ 211 Losse titels of hele mappen herhaald afspelen (REPEAT) .......... 211 Weergave onderbreken (PAUSE) .... 211 Weergave van CD-wisselaar ........... 212 Weergave van CD-wisselaar starten ....................................... 212 CD kiezen ................................... 212 Titel kiezen ................................. 212 Snelle zoekdoorloop (hoorbaar) .... 212 Afzonderlijke titels of de hele CD herhaald afspelen (RPT) ............... 212 Titels in willekeurige volgorde weergeven (MIX).......................... 213 Alle titels van alle CD's kort weergeven (SCAN)....................... 213 Weergave onderbreken (PAUSE) .... 213 IR-afstandsbediening RC 10 P ........ 214 Afstandsbedieningsontvanger ....... 214 Functies van de afstandsbediening . 214 Voorversterkeruitgang................... 215 Externe audiobronnen.................... 216 AUX-ingang instellen..................... 216 Niveau van de AUX-ingang instellen. 217 Fabrieksinstellingen herstellen (RESET) ........................................ 217 Technische gegevens ..................... 218 Bedrijfsspanning ......................... 218 Versterker................................... 218 Tuner ......................................... 218 CD ............................................. 218 ISO-aansluiting .............................. 281 190 07_CalaisMP48_nl.indd 190 11.06.2008 15:17:21 Uhr Belangrijke opmerkingen Belangrijke opmerkingen USB-interface (optie) Lees deze handleiding zorgvuldig en zorg dat u vertrouwd raakt met het apparaat voordat u het in bedrijf neemt. Bewaar deze handleiding voor latere vragen in het voertuig. U kunt de Blaupunkt-USB-interface aansluiten, om MP3-/WMA-bestanden van een USB-datadrager af te spelen. De USBinterface is als toebehoren (Blaupunktnr. 7 607 541 576) leverbaar. Correct gebruik Afvoer afgedankte apparaten Het apparaat is voor gebruik in een voertuig met 24 V boorspanning ontworpen en moet in een 1-DIN-schacht worden ingebouwd. Voer uw afgedankte apparaat niet af met het huisvuil! Gebruik voor het afvoeren van het oude apparaat de beschikbare retour- en verzamelsystemen. Verkeersveiligheid De verkeersveiligheid gaat vóór alles. Bedien het apparaat uitsluitend wanneer de verkeerssituatie dit toelaat. Maak uzelf voor het begin van de rit vertrouwd met het apparaat. De akoestische waarschuwingssignalen van politie, brandweer en reddingsdiensten moeten in het voertuig tijdig te horen zijn. Beluister daarom tijdens het rijden uw programma daarom alleen met een gepast geluidsvolume. Afstandsbediening (optie) NEDERLANDS Met de afstandsbediening RC 10 P kunnen de belangrijkste functies worden bediend. Een infrarood afstandsbediening is als toebehoren (Blaupunktnr. 7 607 591 512) leverbaar. CD-wisselaar (optie) U kunt de CD-wisselaar CDC A08 T (Blaupunktnr. 7 607 274 002) of IDC A09 (Blaupunktnr. 7 607 274 005) aansluiten. De CD-wisselaars zijn als toebehoren leverbaar. 191 07_CalaisMP48_nl.indd 191 11.06.2008 15:17:21 Uhr Diefstalbeveiliging Diefstalbeveiliging CODE Uw apparaat is ter bescherming tegen diefstal uitgerust met een viercijferig codenummer. Dit nummer moet altijd ingevoerd worden, wanneer het apparaat van de voedingsspanning van het voertuit is losgemaakt. De codevraag is af fabriek uitgeschakeld, maar kan wel worden ingeschakeld. Opmerking: Wanneer de codevraag is ingeschakeld, begint de Code LED ? te knipperen wanneer zowel het apparaat als ook de voertuigontsteking zijn uitgeschakeld. Het codenummer vindt u in de radiopas van uw apparaat. Opmerking: Bewaar de radiopas nooit in het voertuig! Codevraag in-/uitschakelen (CODE) 쏅 Druk op de toets MENU 7. 쏅 Druk net zo vaak op de toets of 8 tot in het display 6 "CODE" en de actuele instelling "ON" (aan) resp. "OFF" (uit) wordt weergegeven. 쏅 Druk op de toets of 8. Op het display 6 wordt "0000" weergegeven. Voer de code in: rende een uur geblokkeerd. Gedurende deze periode wordt "WAIT 1HR" in het display 6 weergegeven. Wanneer u het apparaat binnen deze wachttijd uitschakelt, moet u na het herinschakelen weer een uur wachten. 쏅 Druk zo vaak op de voorkeuzetoets 1 <, tot het eerste getal van uw code in het display 6 verschijnt. 쏅 Druk zo vaak op de voorkeuzetoets 2 <, tot het tweede getal van uw code in het display 6 verschijnt. 쏅 Druk zo vaak op de voorkeuzetoets 3 <, tot het derde getal van uw code in het display 6 verschijnt. 쏅 Druk zo vaak op de voorkeuzetoets 4 <, tot het vierde getal van uw code in het display 6 verschijnt. 쏅 Wanneer het juiste codenummer in het display 6 wordt getoond, houdt u de voorkeuzetoets 5 < langer dan 2 seconden ingedrukt. In het display 6 worden opnieuw "CODE" en de actuele instelling "ON" (aan) of "OFF" (uit) weergegeven. 쏅 Druk op de toets resp. 8, om de codevraag uit- resp. in te schakelen. Om het menu te verlaten, 쏅 drukt u op de toets MENU 7. Opmerking: Wanneer u een verkeerde code invoert, wordt opnieuw "0000" in het display 6 weergegeven. U kunt de invoer nog tweemaal herhalen. Na de derde foutieve invoer wordt het apparaat gedu- 192 07_CalaisMP48_nl.indd 192 11.06.2008 15:17:21 Uhr Diefstalbeveiliging 쏅 Schakel het apparaat aan. In het display 6 verschijnt eerst "CODE" en dan "0000". U kunt de code invoeren: Opmerking: Wanneer u een verkeerde code invoert, wordt opnieuw "0000" in het display 6 weergegeven. U kunt de invoer nog tweemaal herhalen. Na de derde foutieve invoer wordt het apparaat gedurende een uur geblokkeerd. Gedurende deze periode wordt "WAIT 1HR" in het display 6 weergegeven. Wanneer u het apparaat binnen deze wachttijd uitschakelt, moet u na het herinschakelen weer een uur wachten. 쏅 Voer het codenummer in zoals beschreven in paragraaf "Codevraag in-/uitschakelen". 쏅 Wanneer het juiste codenummer in het display 6 wordt getoond, houdt u de voorkeuzetoets 5 < langer dan 2 seconden ingedrukt. Het apparaat wordt ingeschakeld. In-/uitschakelen Om het apparaat in of uit te schakelen hebt u de verschillende mogelijkheden: In-/uitschakelen met de aan-/uittoets 쏅 Voor het inschakelen drukt u op de aan-/ uit-toets 3. 쏅 Om het apparaat uit te schakelen houdt u aan-/uit-toets 3 langer dan twee seconden ingedrukt. Opmerking: Ter bescherming van de voertuigaccu wordt het apparaat bij uitgeschakelde voertuigontsteking automatisch na een instelbare tijd uitgeschakeld (zie par. "Uitschakeltijd instellen" in dit hoofdstuk). In-/uitschakelen via het contact van het voertuig Wanneer het apparaat correct met het contactslot van de auto is verbonden en niet met aan/uit-toets 3 is uitgeschakeld, wordt het met het contact in- en uitgeschakeld. Inschakelen door plaatsen van een CD NEDERLANDS Codenummer na spanningsonderbreking invoeren In-/uitschakelen Voor het inschakelen via het CD-vak, 쏅 schuift u een CD met de bedrukte zijde naar boven in de CD-opening 5 totdat u een weerstand voelt. De CD wordt automatisch naar binnen getrokken, het apparaat start in CD-weergave. 193 07_CalaisMP48_nl.indd 193 11.06.2008 15:17:21 Uhr In-/uitschakelen Volume Uitschakeltijd instellen Volume instellen 쏅 Druk op de toets MENU 7. 쏅 Druk zo vaak op de toets of 8, tot "HOUR" en de actuele instelling op het display 6 worden weergegeven. 쏅 Stel de uitschakeltijd met de toets resp. 8 in stappen van 5 minuten in tussen 5 en 60 minuten. Om het menu te verlaten, 쏅 drukt u op de toets MENU 7. Het systeemvolume kan in stappen van 0 (uit) tot 32 (maximaal) worden ingesteld. 쏅 Om het systeemvolume te verhogen, draait u de volumeregelaar 1 naar rechts. 쏅 Om het systeemvolume te verlagen, draait u de volumeregelaar 1 naar links. Inschakelen via telefoon (optie) U kunt het systeemvolume in één keer onderdrukken (mute). 쏅 Druk kort op de toets 3. Wanneer bij het uitschakelen van het apparaat de telefoon wordt geactiveerd, schakelt het apparaat in. Na het uitschakelen van de telefoon wordt het apparaat automatisch weer uitgeschakeld. Voorwaarde is, dat de telefoon correct met het apparaat is verbonden. Inschakelen met de IR-afstandsbediening RC 10 P (optie) 쏅 Voor het inschakelen drukt u op de toets ON H op de IR-afstandsbediening RC 10 P. Opmerking: De IR-ontvanger van het apparaat moet ingeschakeld zijn, zodat u de IR-afstandsbediening kunt gebruiken. Lees daarvoor de paragraaf "Afstandsbedi eningsontvanger" in het hoofdstuk "IR afstandsbediening RC 10 P". Geluidsonderdrukking (MUTE) Mute opheffen Om het eerder beluisterde volume weer te activeren, 쏅 drukt u opnieuw kort op de toets 3. Telefoon-/navigatie-audio Geluidsonderdrukking tijdens telefoneren Wanneer uw autoradio is verbonden met een mobiele telefoon of een navigatiesysteem, wordt bij een inkomend gesprek een gesproken mededeling van de navigatie het geluid van de autoradio onderdrukt. het gesprek of de gesproken mededeling wordt via de autoradioluidspreker weergegeven. Hiervoor moet de telefoon of het navigatiesysteem op de autoradio zijn aangesloten (kamer C2 op de achterzijde van het apparaat). Welke navigatiesystemen op uw autoradio kunnen worden aangesloten, kan uw Blaupunkt-dealer u vertellen. Wanneer een gesprek wordt aangenomen of er is een gesproken mededeling van 194 07_CalaisMP48_nl.indd 194 11.06.2008 15:17:21 Uhr Volume Volume voor telefoon-/navigatie-audio instellen (PHONEVOL) Het volume van telefoongesprekken of gesproken mededelingen van de navigatie is instelbaar: 쏅 Druk op de toets MENU 7. 쏅 Druk zo vaak op de toets of 8, tot "PHONEVOL" wordt weergegeven. Na ca. 2 seconden worden "VOL" en de actuele instelling op het display 6 weergegeven. 쏅 Druk op de toets resp. 8, om het volume in te stellen tussen 0 en 32. Opmerking: U hoeft niet op de aanwijzing van de actuele instelling te wachten, om deze door indrukken van de toets resp. 8 te veranderen. Om het menu te verlaten, 쏅 drukt u op de toets MENU 7. Opmerking: U kunt het volume ook tijdens een telefoongesprek of een navigatiemelding met de volumeregelaar 1 instellen. Het ingestelde volume wordt automatisch opgeslagen. Bevestigingstoon (BEEP) in-/ uitschakelen Na bepaalde acties, bijv. langer indrukken van een toets, klinkt een bevestigingstoon (pieptoon). U kunt de bevestigingstoon uitschakelen: 쏅 Druk op de toets MENU 7. 쏅 Druk net zo vaak op de toets of 8 tot in het display 6 "BEEP" en de actuele instelling "ON" (aan) resp. "OFF" (uit) wordt weergegeven. 쏅 Druk op de toets resp. 8, om de pieptoon uit- resp. in te schakelen. Om het menu te verlaten, 쏅 drukt u op de toets MENU 7. Maximale inschakelvolume instellen (ON VOL) Wanneer u het apparaat inschakelt, begint deze met het laatst gekozen volume. Wanneer u het volume voor het uitschakelen echter hoger dan het maximale inschakelvolume heeft ingesteld, dan wordt het volume bij herinschakelen automatisch begrensd tot het inschakelvolume. Opmerking: Om het gehoor te beschermen, is het maximale inschakelvolume begrensd op de waarde "25". 쏅 Druk op de toets MENU 7. 쏅 Druk zo vaak op de toets of 8 totdat "ON VOL" wordt weergegeven. Na ca. 2 seconden worden "VOL" en de actuele instelling op het display 6 weergegeven. 쏅 Druk op de toets resp. 8, om het maximale inschakelvolume in te stellen tussen 5 en 25. NEDERLANDS het navigatiesysteem, wordt in het display "PHONE" weergegeven. Opmerking: U hoeft niet op de aanwijzing van de actuele instelling te wachten, om deze door indrukken van de toets resp. 8 te veranderen. 195 07_CalaisMP48_nl.indd 195 11.06.2008 15:17:21 Uhr Volume Om het menu te verlaten, 쏅 drukt u op de toets MENU 7. Snelheidsafhankelijke volumeaanpassing instellen (GALA): Met deze functie wordt het volume van de autoradio automatisch aangepast aan de rijsnelheid en de daaraan gekoppelde rijgeluiden. Zo wordt bijvoorbeeld bij een toenemende snelheid het volume automatisch verhoogd, ter compensatie van de luidere rijgeluiden (bijv. als gevolg van de rijwind). Daarvoor moet uw voertuig het snelheidsmetersignaal ter beschikking stellen en de autoradio moet overeenkomstig zijn aangesloten. De automatische volume-versterking is in 6 stappen (OFF (uit), 1-5) instelbaar. 쏅 Druk op de toets MENU 7. 쏅 Druk zo vaak op de toets of 8, tot "GALA" en de actuele instelling op het display worden weergegeven. 쏅 Druk op de toets resp. 8, om de volumeaanpassing in te stellen tussen "OFF" (uit) en 5. Om het menu te verlaten, 쏅 drukt u op de toets MENU 7. Klankkleur Klankkleur Hoge tonen instellen 쏅 Druk op de toets AUD :. 쏅 Druk zo vaak op de toets of 8 totdat "TREBLE" wordt weergegeven. 쏅 Houdt de toets resp. 8 langer dan 2 seconden ingedrukt. In het display wordt kort "FREQ" getoond en daarna de gekozen hoge frequentie. Om een andere hoge frequentie tussen 10,0 kHz en 17,5 kHz te kiezen, 쏅 drukt u op de toets resp. 8. Om het niveau van de hoge tonen in te stellen, 쏅 drukt u zo vaak op de toets of 8 totdat "GAIN" wordt weergegeven. Na ca. 2 seconden worden "GAIN" en de actuele instelling getoond. 쏅 Druk op de toets resp. 8, om het niveau van de hoge tonen in te stellen tussen –7 en +7. Om het menu te verlaten, 쏅 drukt u op de toets AUD :. Lage tonen instellen 쏅 Druk op de toets AUD :. 쏅 Druk zo vaak op de toets of 8 totdat "BASS" wordt weergegeven. 쏅 Houdt de toets resp. 8 langer dan 2 seconden ingedrukt. In het display wordt kort "FREQ" getoond en daarna de gekozen basfrequentie. Om een andere basfrequentie tussen 60 Hz en 200 Hz te kiezen, 쏅 drukt u op de toets resp. 8. 196 07_CalaisMP48_nl.indd 196 11.06.2008 15:17:22 Uhr Klankkleur Middentonen instellen 쏅 Druk op de toets AUD :. 쏅 Druk zo vaak op de toets of 8 totdat "MIDDLE" wordt weergegeven. 쏅 Houdt de toets resp. 8 langer dan 2 seconden ingedrukt. In het display wordt kort "FREQ" getoond en daarna de gekozen middenfrequentie. Om een andere middenfrequentie tussen 500 Hz en 2,5 kHz te kiezen, 쏅 drukt u op de toets resp. 8. Om het niveau van de middentonen in te stellen, 쏅 drukt u zo vaak op de toets of 8 totdat "GAIN" wordt weergegeven. Na ca. 2 seconden worden "GAIN" en de actuele instelling getoond. 쏅 Druk op de toets resp. 8, om het niveau van de middentonen in te stellen tussen –7 en +7. Om de kwaliteitsfactor voor de middentonen in te stellen, 쏅 drukt u zo vaak op de toets of 8 totdat "Q FACTOR" wordt weergegeven. Na ca. 2 seconden worden "Q" en de actuele instelling getoond. 쏅 Druk op de toets resp. 8, om het niveau van de kwaliteitsfactor in te stellen tussen 0,5 en 1,25. Om het menu te verlaten, 쏅 drukt u op de toets AUD :. Volumeverdeling links/rechts instellen (BAL) 쏅 Druk op de toets AUD :. 쏅 Druk zo vaak op de toets of 8, tot "BAL" en de actuele instelling op het display worden weergegeven. 쏅 Druk op de toets resp. 8, om de volumeverdeling links/rechts tussen 10 en +10 in te stellen. Om het menu te verlaten, 쏅 drukt u op de toets AUD :. NEDERLANDS Om het niveau van de lage tonen in te stellen, 쏅 drukt u zo vaak op de toets of 8 totdat "GAIN" wordt weergegeven. Na ca. 2 seconden worden "GAIN" en de actuele instelling getoond. 쏅 Druk op de toets resp. 8, om het niveau van de lage tonen in te stellen tussen –7 en +7. Om de kwaliteitsfactor voor de lage tonen in te stellen, 쏅 drukt u zo vaak op de toets of 8 totdat "Q FACTOR" wordt weergegeven. Na ca. 2 seconden worden "Q" en de actuele instelling getoond. 쏅 Druk op de toets resp. 8, om het niveau van de kwaliteitsfactor in te stellen tussen 1,0 en 2,0. Om het menu te verlaten, 쏅 drukt u op de toets AUD :. Volumeverhouding voor/achter instellen (FAD) Opmerking De achterste luidsprekers moeten via een extra versterker zijn aangesloten. 쏅 Druk op de toets AUD :. 197 07_CalaisMP48_nl.indd 197 11.06.2008 15:17:22 Uhr Klankkleur 쏅 Druk zo vaak op de toets of 8, tot "FAD" en de actuele instelling op het display worden weergegeven. 쏅 Druk op de toets resp. 8, om de volumeverdeling voor/achter tussen –10 en +10 in te stellen. Om het menu te verlaten, 쏅 drukt u op de toets AUD :. Kloktijd Kloktijd Tijd weergeven Om de kloktijd wordt gedurende ca. 10 s op het display weer te geven, 쏅 houdt u de toets MENU 7 langer dan 2 seconden ingedrukt. Tijd instellen 쏅 Druk op de toets MENU 7. of 쏅 Druk zo vaak op de toets 8 totdat "TIMESET" op het display 6 wordt weergegeven. Na ca. 2 seconden wordt de actuele tijd op het display 6 weergegeven. Voor de wordt in 24-uurs modus "24H" en in 12-uurs modus "AM" resp. "PM" weergegeven. De uren knipperen en kunnen worden ingesteld. Om de uren resp. minuten in te stellen, 쏅 drukt u op de toets resp. 8. Om tussen uren en minuten om te schakelen, 쏅 drukt u op de toets 6 <. Opmerking: U hoeft niet op de aanwijzing van de actuele tijd te wachten, om deze door indrukken van de toets resp. 8 te veranderen. Om het menu te verlaten, 쏅 drukt u op de toets MENU 7. Klokmodus 12/24 uur kiezen 쏅 Druk op de toets MENU 7. 쏅 Druk zo vaak op de toets of 8, tot "24 H MODE" resp. "12 H MODE" in het display 6 wordt getoond. 198 07_CalaisMP48_nl.indd 198 11.06.2008 15:17:22 Uhr Kloktijd Tijdzone instellen (TIMEZONE) Indien u zich over tijdzones beweegt, kunt u het tijdverschil met de actueel ingestelde tijd in stappen van 1 uur instellen. Op deze manier kunt u de weergave van de tijd voor de actueel geldende tijdzone corrigeren, zonder de tijd zelf opnieuw te hoeven instellen. 쏅 Druk op de toets MENU 7. 쏅 Druk zo vaak op de toets of 8 totdat "TIMEZONE" wordt weergegeven. Na ca. 2 seconden worden "ZONE" en de actuele instelling op het display 6 weergegeven. 쏅 Druk op de toets resp. 8, om het tijdverschil in stappen van 1 uur tussen –12 en +12 in te stellen. Opmerking: U hoeft niet op de aanwijzing van de actuele instelling te wachten, om deze door indrukken van de toets resp. 8 te veranderen. Om het menu te verlaten, 쏅 drukt u op de toets MENU 7. 07_CalaisMP48_nl.indd 199 Radioweergave Dit apparaat is uitgerust met een RDS-radio-ontvanger. Praktisch alle ontvangbare FM-zenders zenden een signaal uit dat naast het programma ook informatie bevat zoals de naam van de zender en het programmatype (PTY). De naam van de zender wordt, zodra deze wordt ontvangen, op het display 6 weergegeven. Radioweergave inschakelen Wanneer u zich in een andere weergavesoort bevindt, 쏅 drukt u op de toets BND 2. of 쏅 drukt u op zo vaak op de toets SRC >, tot "RADIO" op het display 6 verschijnt. In het display 6 wordt de actuele frequentie resp. de zendernaam getoond. RDS-comfortfunctie (AF, REG) De RDS-comfortfuncties AF (alternatieve frequentie) en REG (Regional) vergroten het prestatiespectrum van uw radio. • AF: wanneer de RDS-comfortfunctie is geactiveerd, zoekt de radio in de achtergrond automatisch naar de beste te ontvangen frequentie van de ingestelde zenders. • REG: Sommige zenders verdelen hun programma op bepaalde tijden in regionale programma's met verschillende inhoud. De geactiveerde REG-functie voorkomt dat het apparaat naar alternatieve frequenties van de ingestelde zender omschakelt met een andere programma-inhoud. 199 NEDERLANDS 쏅 Druk op de toets resp. 8, om tussen de modi om te schakelen. Om het menu te verlaten, 쏅 drukt u op de toets MENU 7. Radioweergave 11.06.2008 15:17:22 Uhr Radioweergave Opmerking: REG moet afzonderlijk in het menu worden in- resp. uitgeschakeld. RDS-comfortfunctie in- of uitschakelen 쏅 Om de RDS-functies AF en REG te gebruiken, drukt u op de toets RDS =. De RDS-comfortfuncties zijn actief, wanneer het RDS-symbool op het display 6 wordt weergegeven. REG in-/uitschakelen 쏅 Druk op de toets MENU 7. 쏅 Druk net zo vaak op de toets of 8 tot in het display 6 "REG" en de actuele instelling "ON" (aan) resp. "OFF" (uit) 6 wordt weergegeven. 쏅 Druk op de toets resp. 8, om REG uit- resp. in te schakelen. Om het menu te verlaten, 쏅 drukt u op de toets MENU 7. Opmerking: De instelling REG ON/OFF heeft alleen effect, wanneer de RDS-functie is geactiveerd. Golfgebied/geheugenniveau kiezen Met dit apparaat kunt u programma's in de frequentiebanden FM (UKW), MW en LW (Europa) resp. FM en AM (NAFTA) ontvangen. Voor het golfgebied FM zijn drie geheugenniveaus (FM1, FM2 en FMT) en voor de golfgebieden MW en LW resp. AM elk één geheugenniveau beschikbaar. Bovendien is er een geheugenniveau MWT/LWT resp. AMT. Op elk geheugenniveau kunnen 6 zenders worden geprogrammeerd. Om tussen de geheugenniveaus resp. golfgebieden om te schakelen, 쏅 drukt u op de toets BND 2. Zenders instellen U hebt verschillende mogelijkheden om zenders in te stellen. Automatische zoekafstemming 쏅 Druk op de toets resp. 8. De eerstvolgende ontvangbare zender wordt ingesteld. Opmerkingen: • Is de voorrang voor verkeersinformatie ingeschakeld, dan wordt de volgende verkeersinformatiezender ingesteld. • Is PTY ingeschakeld, dan wordt de volgende zender met het gekozen programmatype ingesteld. Gevoeligheid van de zoekafstemming instellen U kunt kiezen, of bij lagere gevoeligheid alleen krachtige of bij hogere gevoeligheid ook zwakkere zenders moeten worden ingesteld. 쏅 Druk op de toets MENU 7. 쏅 Druk zo vaak op de toets of 8, tot "SENS" en de actuele instelling "LO" (geringe gevoeligheid) resp. "DX" (hoge gevoeligheid) in het display 6 wordt weergegeven. 쏅 Druk op de toets resp. 8, om tussen de instellingen "LO" en "DX" te wisselen. 200 07_CalaisMP48_nl.indd 200 11.06.2008 15:17:23 Uhr Radioweergave Handmatig afstemmen op zenders Om de ingestelde frequentie in kleine stappen te veranderen, 쏅 drukt u op de toets of 8. Om de ingestelde frequentie snel te veranderen, of 8 inge쏅 houdt u de toets drukt. Opmerking: Het handmatig zenders instellen is alleen mogelijk wanneer de RDS-functie en PTY zijn gedeactiveerd. Bladeren in zenderketens (alleen FM) Wanneer een zender meerdere programma's biedt, kunt u bladeren in deze zgn. "zenderketen". 쏅 Druk op de toets of 8, om naar de volgende zender van de zenderketen te gaan. Opmerking: Het bladeren door zenderketens is alleen mogelijk, wanneer de RDS-functie is ingeschakeld en PTY is uitgeschakeld. U kunt zo alleen wisselen tussen zenders die u al eerder ontvangen hebt. Gebruik daarvoor bijv. de Travelstorefunctie (T-STORE). Zenders opslaan Zenders handmatig programmeren 쏅 Kies het gewenste golfgebied resp. het geheugenniveau. 쏅 Stel de zender in. 쏅 Houd de voorkeuzetoets 1 - 6 <waarop de zender moet worden opgeslagen, langer dan 2 seconden ingedrukt. De bevestigingstoon klinkt. De zender is onder de gekozen voorkeuzetoets opgeslagen. Zender automatisch opslaan (T-STORE) U kunt de 6 sterkste zenders uit de regio automatisch programmeren. Voor het golfgebied FM volgt het opslaan op het geheugenniveau FMT, voor de golfgebieden MW en LW op de geheugenniveaus MWT/LWT en voor het golfgebied AM op het geheugenniveau AMT. Opmerking: Eerder op dit niveau opgeslagen zenders worden daarbij door de nieuw gevonden zenders vervangen. 쏅 Kies het gewenste golfgebied. 쏅 Houd de toets BND 2 langer dan 2 seconden ingedrukt. Het programmeren begint. Op het display 6 wordt "T-STORE" weergegeven. Nadat de procedure is afgerond, wordt de zender op geheugenpositie één van geheugenniveau FMT, MWT/LWT resp. AMT weergegeven. Geprogrammeerde zenders oproepen NEDERLANDS Om het menu te verlaten, 쏅 drukt u op de toets MENU 7. 쏅 Kies het geheugenniveau resp. het golfgebied. 쏅 Druk op de voorkeuzetoets 1 - 6 <, waaronder de gewenste zender is opgeslagen. 201 07_CalaisMP48_nl.indd 201 11.06.2008 15:17:23 Uhr Radioweergave Ontvangbare zenders kort weergeven (BANDSCAN) Met de bandscan-functie kunt u alle ontvangbare zenders gedurende 10 seconden weergeven. Bandscan starten 쏅 Houdt de toets resp. 8 langer dan 2 seconden ingedrukt. Op het display wordt kort "BANDSCAN" weergegeven. Het apparaat zoekt in het actuele golfgebied naar zenders. Iedere gevonden zender wordt gedurende 10 seconden kort weergegeven. Daarbij wordt de ingestelde frequentie resp. de zendernaam getoond. Bandscan afsluiten 쏅 Druk op de toets resp. 8. De scanprocedure wordt beëindigd. De laatst afgespeelde zender blijft ingesteld. PTY in-/uitschakelen 쏅 Druk op de toets MENU 7. 쏅 Druk net zo vaak op de toets of 8 tot in het display 6 "PTY" en de actuele instelling "ON" (aan) resp. "OFF" (uit) wordt weergegeven. 쏅 Druk op de toets resp. 8, om PTY uit- resp. in te schakelen. Om het menu te verlaten, 쏅 drukt u op de toets MENU 7. Programmatype kiezen en zoekdoorloop starten 쏅 Druk zo vaak op toets of 8 dat het gewenste programmatype wordt weergegeven. 쏅 Druk op de toets resp. 8, om de zoekdoorloop te starten. Indien een zender met het gekozen programmatype wordt gevonden, wordt deze ingesteld. Programmatype (PTY) Naast de naam van de zender geven sommige FM-zenders ook informatie door over de inhoud van hun programma's. Zulke programmatypes kunnen bv. zijn: CULTUUR REIZEN JAZZ SPORT NIEUWS POP ROCK MUZIEK Met de PTY-functie kunt u gericht zenders met een bepaald programmatype kiezen. Wanneer PTY is ingeschakeld en een PTYzoekdoorloop is gestart, schakelt het apparaat automatisch van de actuele zender resp. vanuit een andere weergavesoort naar de zender met het gekozen programmatype. Storingsafhankelijke demping van de hoge tonen (HICUT) De HiCut-functie zorgt voor een weergaveverbetering bij slechte radio-ontvangst. Wanneer ontvangststoringen aanwezig zijn, wordt automatisch de storing afgezwakt. Om HICUT in- resp. uit te schakelen, 쏅 drukt u op de toets MENU 7. 쏅 Druk net zo vaak op de toets of 8 tot in het display 6 "HICUT" en de actuele instelling "ON" (aan) resp. "OFF" (uit) wordt weergegeven. 쏅 Druk op de toets resp. 8, om HICUT uit- resp. in te schakelen. Om het menu te verlaten, 쏅 drukt u op de toets MENU 7. 202 07_CalaisMP48_nl.indd 202 11.06.2008 15:17:23 Uhr Radiotekst in-/uitschakelen Bepaalde radiozenders gebruiken het RDSsignaal om reclame en ander informatie in plaats van de zendernaam over te dragen. Deze radiotekst wordt in het display 6 weergegeven. Om de weergave van radiotekst in en uit te schakelen, 쏅 drukt u op de toets MENU 7. 쏅 Druk zo vaak op de toets of 8 totdat "RADIOTXT" wordt weergegeven. Na ca. 2 seconden wordt de actuele instelling "TEXT ON" (aan) resp. "TEXT OFF" (uit) op het display 6 weergegeven. 쏅 Druk op de toets resp. 8, om de weergave van radiotekst uit- resp. in te schakelen. Opmerking: U hoeft niet op de aanwijzing van de actuele instelling te wachten, om deze door indrukken van de toets resp. 8 te veranderen. Om het menu te verlaten, 쏅 drukt u op de toets MENU 7. Verkeersinformatie Verkeersinformatie Voorrang voor verkeersinformatie in-/ uitschakelen Om de voorrang voor verkeersinformatie in iedere weergavesoort in resp. uit te schakelen, 쏅 drukt u op de toets TA <. Opmerking: In de weergavesoorten CD, MP3, CDwisselaar en AUX staat deze functie alleen ter beschikking, wanneer daarvoor het golfgebied FM was ingesteld. De voorrang voor verkeersinformatie is geactiveerd wanneer het TA-symbool op het display 6 verlicht is. Zodra het apparaat een verkeersbericht ontvangt, wordt deze doorgegeven. In het display 6 wordt gedurende de melding "TRAFFIC" weergegeven. Opmerking: U hoort een waarschuwingstoon, • wanneer u bij het beluisteren van een verkeersinformatiezender of van een CD het uitzendgebied van de ingestelde verkeersinformatiezender verlaat en de daarop volgende automatische zoekdoorloop geen nieuwe verkeersinformatiezender vindt. • wanneer u van een zender met verkeersinformatie wisselt naar een zender zonder verkeersinformatie. Schakel dan ofwel de voorrang voor verkeersinformatie uit of stel een zender met verkeersinformatie in. NEDERLANDS Radioweergave 203 07_CalaisMP48_nl.indd 203 11.06.2008 15:17:23 Uhr Verkeersinformatie Volumeversterking voor verkeersinformatie instellen U kunt instellen met hoeveel volumestappen verkeersbericht luider dan het ingestelde volume moeten worden doorgegeven: 쏅 Druk op de toets MENU 7. 쏅 Druk zo vaak op de toets of 8 totdat "TA VOL" wordt weergegeven. Na ca. 2 seconden worden "VOL" en de actuele instelling op het display 6 weergegeven. 쏅 Druk op de toets resp. 8, om de volumeversterking in te stellen tussen 0 en 10. Opmerking: U hoeft niet op de aanwijzing van de actuele instelling te wachten, om deze door indrukken van de toets resp. 8 te veranderen. Om het menu te verlaten, 쏅 drukt u op de toets MENU 7. Opmerking: U kunt tijdens het verkeersbericht het volume voor de duur van het verkeersbericht ook instellen met de volumeregelaar 1. Verkeersbericht onderdrukken Om een lopend verkeersbericht te onderbreken en naar de eerder beluisterde audiobron terug te keren, 쏅 drukt u op de toets TA ;. De voorrang voor verkeersinformatie blijft ingeschakeld. CD-weergave CD-weergave Met dit apparaat kunt u normaal in de handel verkrijgbare audio-CD's, CD-r's en CD-rw's met een doorsnede van 12 cm afspelen. Om problemen bij het afspelen te voorkomen mag u zelf gemaakte CD's niet sneller branden dan 16-speed. Gevaar voor vernieling van de CD-speler! Single-CD's met een doorsnede van 8 cm en CD's met afwijkende vormen (Shape CD's) mogen niet worden gebruikt. Behandel de CD met zorg en voorkom krassen en beschadigingen op de CD. Houd de CD, indien mogelijk, alleen vast aan de rand. Wanneer een CD eenmaal vuil is, reinigt u met een pluisvrije doek zonder toevoeging van oplosmiddelen. Veeg de CD altijd van binnenuit naar buiten af. Stel de CD niet bloot aan direct zonlicht en bewaar de CD buiten het apparaat in een beschermend doosje. Plak geen etiketten op de CD. Schrijf alleen op de CD met daarvoor in de handel speciaal bedoelde stiften. Wij aanvaarden geen aansprakelijkheid voor beschadigingen aan de CD-speler door ongeschikte of beschadigde CD's. Voor optimaal functioneren moet u alleen CD's gebruiken met het Compact-Disc-logo. Er kunnen afspeelmoeilijkheden ontstaan bij CD's met kopieerbeveiliging. Blaupunkt kan het goed functioneren van CD's met kopieerbeveiliging niet garanderen. 204 07_CalaisMP48_nl.indd 204 11.06.2008 15:17:23 Uhr CD-weergave Wanneer er geen CD in de speler zit, 쏅 schuift u de CD met de bedrukte zijde naar boven zonder forceren in de CDopening totdat u een weerstand voelt. De CD wordt automatisch naar binnen in de CD-speler getransporteerd. Op het display 6 wordt het CD-symbool weergegeven. Opmerking: Het transport van de CD mag niet worden gehinderd of geholpen. De CD-weergave begint. Op het display 6 worden de nummers van de actuele titels (bijv. "T12") en de speeltijd en de titelinformatie (CD-tekst) weergegeven. Wanneer er reeds een CD in de speler zit, 쏅 drukt u zo vaak op de toets SRC > totdat "CD" op het display 6 verschijnt. De weergave start op de plaats waar deze werd onderbroken. Weergeven van titelinformatie (CD-tekst) Indien de CD tekst ter beschikking stelt, wordt de informatie over iedere titel bij het starten van de titel als lichtkant op het display 6 weergegeven. Titelinformatie eenmalig als lichtkrant weergeven 쏅 Druk op de toets 5 <. De CD-tekst van de actuele titel wordt eenmaal als lichtkrant op het display 6 weergegeven. lichtkrant is uitgeschakeld (zie volgende par. agraaf). Weergave van titelinformatie als lichtkrant in-/uitschakelen Om de weergave van titelinformatie als lichtkrant in- resp. uit te schakelen, 쏅 drukt u op de toets MENU 7. 쏅 Druk net zo vaak op de toets of 8 tot in het display 6 "SCRL" en de actuele instelling "ON" (aan) resp. "OFF" (uit) wordt weergegeven. 쏅 Druk op de toets resp. 8, om de lichtkrant uit- resp. in te schakelen. Om het menu te verlaten, 쏅 drukt u op de toets MENU 7. Bij de instelling "SCRL OFF" wordt de titelinformatie in delen van telkens 8 tekens op het display 6 weergegeven. Daarbij wordt iedere tekstdeel en titelnummer en speeltijd constant afwisselend gedurende telkens 5 seconden weergegeven. Opmerking: De instelling "SCRL ON/OFF" heeft hetzelfde effect op de weergave van MP3-titelinformatie (ID3-tags) in MP3weergave. Titel kiezen 쏅 Druk op de toets resp. 8, om de volgende, resp. vorige titel te kiezen. Wanneer toets 8 eenmaal wordt ingedrukt, wordt de actuele titel opnieuw gestart. NEDERLANDS CD-weergave starten Opmerking: Deze functie staat niet ter beschikking, wanneer de weergave van CD-tekst als 205 07_CalaisMP48_nl.indd 205 11.06.2008 15:17:23 Uhr CD-weergave Snelle zoekdoorloop (hoorbaar) Titel herhalen (RPT) Voor een snelle zoekdoorloop achteruit resp. vooruit, 쏅 houdt u de toets resp. 8 ingedrukt, tot u bij de gewenste positie komt. 쏅 Druk op de toets 2 <. "RPT TRK" verschijnt kort op het display, het RPT-symbool wordt weergegeven. De actuele titel wordt herhaald totdat RPT wordt gedeactiveerd. Willekeurige weergave van de titels (MIX) RPT afsluiten 쏅 Druk opnieuw op de toets 2 <. "RPT OFF" verschijnt kort op het display 6, het RPT-symbool verdwijnt. De weergave wordt normaal voortgezet. 쏅 Druk op de toets 3 <. Op het display 6 wordt kort "MIX CD" weergegeven en het MIX-symbool verschijnt. De volgende titels worden willekeurig gekozen. MIX beëindigen 쏅 Druk opnieuw op de toets 3 <. Op het display 6 wordt kort "MIX OFF" weergegeven en het MIX-symbool verdwijnt. De weergave wordt normaal voortgezet. Titels kort weergeven (SCAN) Om alle titels van de CD gedurende telkens ca. 10 seconden te laten weergeven, 쏅 drukt u op de toets 4 <. Op het display wordt kort "SCAN TRK" weergegeven. Tijdens het kort weergeven knippert de weergave "CD". De titelnummers en de speeltijd van de actuele titel resp. de titelinformatie daarvan wordt weergegeven. SCAN beëindigen, titel verder beluisteren Om de scanprocedure te beëindigen, 쏅 drukt u opnieuw op de toets 4 <. Op het display wordt kort "SCAN OFF" weergegeven. De actuele titel wordt verder afgespeeld. Weergave onderbreken (PAUSE) 쏅 Druk op de toets 1 <. Op het display 6 wordt "PAUSE" weergegeven. Pauze opheffen 쏅 Druk gedurende de pauze op de toets 1 <. De weergave wordt voortgezet. CD verwijderen Opmerking: U kunt ook CD's naar buiten laten schuiven wanneer het apparaat is uitgeschakeld of er een andere audiobron actief is. 쏅 Druk op de CD-uitwerptoets 4. De CD wordt naar buiten geschoven. Op het display wordt kort "CD EJECT" weergegeven. 206 07_CalaisMP48_nl.indd 206 11.06.2008 15:17:24 Uhr CD-weergave Opmerking: Het uitschuiven van de CD mag niet worden gehinderd of geholpen. 쏅 Neem de CD uit. Het CD-symbool verdwijnt. Opmerking: Wanneer u een uitgeschoven CD niet uitneemt, wordt deze na ca. 10 seconden weer automatisch ingeschoven. MP3-/WMA-weergave MP3-/WMA-weergave U kunt met deze autoradio ook CD-R's en CD-RW's met MP3- en WMA-muziekbestanden afspelen. Bovendien kunt u via de optionele C‘n‘C-compatibel USB-interface USB-datadragers aansluiten en op de USBdatadrager opgeslagen MP3-/WMA-bestanden afspelen. Dit hoofdstuk behandelt alleen het afspelen van MP3-bestanden, omdat de bediening bij MP3- en WMA-bestanden identiek is. In dit hoofdstuk heeft de naam "MP3-datadrager" betrekking zowel op CD-R/RW's als ook op USB-datadragers zoals bijv. USB-sticks. Voorbereiding van een MP3datadrager Voorbereiding van een MP3-CD Door de combinatie van CD-writer, CDschrijfsoftware en onbeschreven CD kunnen problemen optreden bij de weergave van de CD's. Wanneer er problemen optreden met zelfgebrande CD's, dient u over te schakelen op een ander merk of een andere kleur basis-CD's. De opmaak van de CD moet ISO 9660 level 1, level 2 of Joliet zijn. Alle andere NEDERLANDS Opmerkingen: • WMA-bestanden met Digital Rights Management (DRM) uit online-musicshops kunnen met dit apparaat niet worden afgespeeld. • WMA-bestanden kunnen alleen betrouwbaar worden afgespeeld, wanneer deze met Windows Media-Player vanaf versie 8 zijn aangemaakt. 207 07_CalaisMP48_nl.indd 207 11.06.2008 15:17:24 Uhr MP3-/WMA-weergave soorten kunnen niet betrouwbaar worden afgespeeld. Bij het aanmaken (coderen) van de MP3-/ WMA-bestanden uit de audiobestanden moet u bitrates van 32 tot 320 kbps voor MP3-bestanden resp. van 32 tot 192 kbps voor WMA-bestanden gebruiken. Dit apparaat ondersteunt tot 252 mappen en tot 255 bestanden per map. Daarbij mag de CD in totaal maximaal 512 mappen en bestanden bevatten. De mappen en titels op de CD kunnen afzonderlijk worden gekozen. D01 A D02 D03 T001 T002 T003 T004 T005 T001 T002 T003 T004 T005 T006 D04 T001 T002 T003 T004 T005 T006 T007 T008 T009 T010 T011 B A Mappen B Titel · Bestanden U kunt elke map met de PC een naam geven. De naam van de map kan op het display van het apparaat worden weergegeven. Geef de mappen en titels/bestanden namen vol- gens de werkwijze van uw CD-schrijfsoftware. Opmerkingen daarvoor vindt u in de handleiding van de software. Opmerkingen: • Gebruik bij de naamgeving van de bestanden (map en titel) geen umlauts en speciale tekens. • Gebruik van bestandsnamen van meer dan 16 tekens (incl. ".MP3" resp. ".WMA"), vermindert het maximale aantal titels en mappen. Wanneer u waarde hecht aan een bepaalde volgorde van uw bestanden: sla de bestanden op de datadrager op in de volgorde waarin deze later worden afgespeeld. Het apparaat speelt de bestanden af in de volgorde, waarin deze fysisch op de datadrager zijn opgeslagen. Voor het afspelen van de bestanden in dit apparaat moeten de MP3-bestanden de extensie ".MP3" resp. de WMA-bestanden de extensie ".WMA" hebben. Opmerkingen: Om ongestoorde weergave te garanderen, • probeer niet om andere bestanden dan MP3-bestanden te voorzien van de extensie ".MP3" en deze vervolgens af te spelen! Deze ongeldige bestanden worden tijdens de weergave genegeerd. • gebruik geen gemengde CD's met MP3-bestanden en niet-MP3-bestanden (het apparaat leest tijdens MP3weergave alleen MP3-bestanden). • gebruik geen mix-mode-CD's met audiotitels en MP3-titels. Als u pro- 208 07_CalaisMP48_nl.indd 208 11.06.2008 15:17:24 Uhr MP3-/WMA-weergave Voorbereiding van een USB-datadrager Om te zorgen dat het apparaat de USB-datadrager herkent, moet deze als massageheugen (Mass Storage Device) zijn gespecificeerd, in het bestandssysteem FAT16 of FAT32 zijn geformatteerd en MP3- of WMAbestanden bevatten. U kunt op een USB-datadrager maximaal 1500 bestanden (mappen en titels) aanmaken. De mappen en de titels kunnen met dit apparaat afzonderlijk worden gekozen. Gebruik van bestandsnamen van meer dan 24 tekens (incl. ".MP3" resp. ".WMA"), vermindert het maximale aantal bestanden. Blaupunkt kan het optimaal functioneren van alle op de markt verkrijgbare USB-datadragers niet garanderen. ID3-tags MP3-titels kunnen extra informatie bevatten, zoals uitvoerende, titelnaam en album (ID3-tag). Dit apparaat kan ID3-tags van versie 1 en versie 2 op het display weergeven. MP3-weergave starten MP3-weergave van CD starten Bij een MP3-CD wordt de MP3-weergave gestart zoals de normale CD-weergave. Lees hiervoor het gedeelte "CD-weergave starten" in het hoofdstuk "CD-weergave". Op het display 6 worden de nummers van de actuele titels (bijv. "T12") en de speeltijd en de titelinformatie (ID3-tags) resp. de bestandsnaam weergegeven. Bij het overgaan naar een andere map wordt kort het mapnummer (bijv. "DIR 02") weergegeven. USB-datadrager aansluiten en MP3weergave starten Om een USB-datadrager (bijv. USB-stick of een USB-harde schijf) aan te kunnen sluiten, moet de optionele Blaupunkt USB-interface aan de achterzijde van het apparaat (kamer C3) worden aangesloten zoals in de inbouwhandleiding staat beschreven. U kunt de USB-kabel van de interface bijvoorbeeld in het handschoenencompartiment of op een andere geschikte plaats op de middenconsole bewaren. Opmerkingen: • Wanneer u de Blaupunkt-USB-interface op het apparaat aansluit, moet de AUX-ingang overeenkomstig worden ingesteld. Lees daarvoor de paragraaf "AUX-ingang instellen" in het hoofdstuk "Externe audiobronnen". • Schakel het apparaat altijd uit, voordat u de USB-datadrager aansluit of uitneemt, zodat de datadrager correct wordt aangemeld en afgemeld. 쏅 Sluit de USB-datadrager aan op de USB-kabel van de USB-interface. Zodra een USB-datadrager is aangesloten, kan deze met de toets SRC > worden geselecteerd. Op het display verschijnt dan "USB". NEDERLANDS beert een mix-mode-CD af te spelen, worden alleen de CD-audiotitels afgespeeld. Weergeven van titelinformatie (ID3-tags) Indien de MP3-datadrager ID3-tags ter beschikking stelt, wordt de informatie over iedere titel bij het starten van de titel als lichtkant op het display 6 weergegeven. Indien 209 07_CalaisMP48_nl.indd 209 11.06.2008 15:17:24 Uhr MP3-/WMA-weergave er geen ID3-tags met de MP3-bestanden zijn opgeslagen, wordt de bestandsnaam weergegeven. Opmerking: Lees voor het opslaan van ID3-tags ook de handleiding van uw PC-MP3-software resp. de brandersoftware. Titelinformatie eenmalig als lichtkrant weergeven 쏅 Druk op de toets 5 <. De ID3-tags van de actuele titel worden eenmaal als lichtkrant op het display 6 weergegeven. Opmerking: Deze functie staat niet ter beschikking, wanneer de weergave van titelinformatie als lichtkrant is uitgeschakeld. Lees daarvoor in hoofdstuk "CD-weergave", paragraaf "Weergave van titelinformatie (CD-tekst)" het deel "Weergave van titelinformatie als lichtkrant in- uitschakelen". Map kiezen Om op- resp. neerwaarts naar een andere map te gaan, 쏅 drukt u op de toets resp. 8. Opmerkingen: • Alle mappen die geen MP3-bestanden bevatten, worden automatisch overgeslagen. • Het apparaat behandelt alle mappen en submappen alsof deze op één niveau liggen. Door herhaaldelijk drukken op de toets resp. 8 komt u ook in alle submappen. Titels/bestanden kiezen Om op- of neerwaarts naar een andere titel/een ander bestand van de actuele map te gaan, 쏅 drukt u op de toets resp. 8. Wanneer toets 8 eenmaal wordt ingedrukt, wordt de actuele titel opnieuw gestart. Snelle zoekdoorloop Voor een snelle zoekdoorloop achteruit resp. vooruit, 쏅 houdt u de toets resp. 8 ingedrukt, tot u bij de gewenste positie komt. Opmerking: In USB-weergave stopt de snelle zoekdoorloop achterwaarts steeds bij het begin van de actuele titel. Titels in willekeurige volgorde weergeven (MIX) Om de titels van de actuele mappen in willekeurige volgorde te laten weergeven, 쏅 drukt u zo vaak op de toets 3 <, tot "MIX DIR" resp. "MIX FLD" op het display 6 wordt weergegeven. Het MIX-symbool verschijnt op het display 6. Om alle titels van de MP3-datadrager in willekeurige volgorde te laten weergeven, 쏅 drukt u zo vaak op toets 3 <, tot "MIX ALL" op het display 6 wordt weergegeven. Het MIX-symbool verschijnt op het display 6. 210 07_CalaisMP48_nl.indd 210 11.06.2008 15:17:24 Uhr MP3-/WMA-weergave Titels kort weergeven (SCAN) Om alle titels van de MP3-datadrager in oplopende volgorde elk gedurende ca. 10 seconden af te laten spelen, 쏅 drukt u zo vaak op de toets 4 <, tot "SCAN TRK" op het display 6 verschijnt. Tijdens het kort weergeven knippert de weergave "MP3" resp. "USB". Om in USB-bedrijf alle titels van de actuele mappen kort weer te geven, 쏅 drukt u zo vaak op de toets 4 <, tot "SCAN FLD" op het display 6 verschijnt. Tijdens het kort weergeven knippert de weergave "USB". SCAN beëindigen Om de korte weergave te beëindigen, 쏅 drukt u zo vaak op de toets 4 <, tot "SCAN OFF" op het display 6 verschijnt. De actueel weergegeven titel wordt verder afgespeeld. Losse titels of hele mappen herhaald afspelen (REPEAT) Om de actuele titel te herhalen, 쏅 drukt u zo vaak op toets 2 <, tot "RPT TRK" op het display 6 wordt weergegeven. Het RPT-symbool verschijnt op het display 6. Om de actuele map te herhalen, 쏅 drukt u zo vaak op de toets 2 <, tot "RPT DIR" resp. "RPT FLD" op het display 6 wordt weergegeven. Het RPT-symbool verschijnt op het display 6. REPEAT beëindigen Om de herhaling te beëindigen, 쏅 drukt u zo vaak op toets 2 <, tot "RPT OFF" op het display 6 wordt weergegeven. Het RPT-symbool op het display 6 verdwijnt. Weergave onderbreken (PAUSE) 쏅 Druk op de toets 1 <. Op het display 6 wordt "PAUSE" weergegeven. Pauze opheffen 쏅 Druk gedurende de pauze op de toets 1 <. De weergave wordt voortgezet. NEDERLANDS MIX beëindigen Om het afspelen in willekeurige volgorde te beeindigen, 쏅 drukt u zo vaak op toets 3 <, tot "MIX OFF" op het display 6 wordt weergegeven. Het MIX-symbool op het display 6 verdwijnt. 211 07_CalaisMP48_nl.indd 211 11.06.2008 15:17:24 Uhr Weergave van CD-wisselaar Weergave van CD-wisselaar Op het apparaat kan optioneel de BlaupunktCD-wisselaar CDC A08 T en IDC A09 worden aangesloten (kamer C3 aan achterzijde apparaat). Let op! De CD-wisselaar wordt normaal gesproken door het apparaat met een 12 V voeding gevoed. Wanneer de CD-wisselaar CDC A 08 T (24 Volt) wordt aangesloten, dan moet de voeding op de connector in de aansluitkabel van de CD-wisselaar worden gescheiden (kamer C3/Pin 15). De CDwisselaar moet met een eigen 24 V voeding worden gevoed. Opmerkingen: • Wanneer u een CD-wisselaar op het apparaat aansluit, moet de AUX-ingang overeenkomstig worden ingesteld. Lees daarvoor de paragraaf "AUX-ingang instellen" in het hoofdstuk "Externe audiobronnen". • Informatie over de behandeling van CD's, het plaatsen van CD's en voor de bediening van de CD-wisselaar vindt u in de gebruiksaanwijzing van uw CD-wisselaar. Weergave van CD-wisselaar starten 쏅 Druk zo vaak op de toets SRC > totdat "CHANGER" op het display 6 verschijnt. De weergave begint met de eerste CD die de CD-wisselaar herkent. Op het display 6 worden de nummers van de actuele CD (bijv. "D02") en de speeltijd en de actuele titel (bijv. "T07) weergegeven. CD kiezen Om omhoog of naar beneden naar een andere CD te gaan, 쏅 drukt u op de toets resp. 8. Titel kiezen Om op- of neerwaarts naar een andere titel van de actuele CD te gaan, 쏅 drukt u op de toets resp. 8. Snelle zoekdoorloop (hoorbaar) Voor een snelle zoekdoorloop achteruit resp. vooruit, 쏅 houdt u de toets resp. 8 ingedrukt, tot u bij de gewenste positie komt. Afzonderlijke titels of de hele CD herhaald afspelen (RPT) Om de actuele titel te herhalen, 쏅 drukt u zo vaak op toets 2 <, tot "RPT TRK" op het display 6 wordt weergegeven. Het RPT-symbool verschijnt op het display 6. Om de actuele CD te herhalen, 쏅 drukt u zo vaak op toets 2 <, tot "RPT CD" op het display 6 wordt weergegeven. Het RPT-symbool verschijnt op het display 6. 212 07_CalaisMP48_nl.indd 212 11.06.2008 15:17:24 Uhr Weergave van CD-wisselaar Titels in willekeurige volgorde weergeven (MIX) Om de titels van de actuele CD in willekeurige volgorde weer te geven, 쏅 drukt u zo vaak op toets 3 <, tot "MIX CD" op het display 6 wordt weergegeven. Het MIX-symbool verschijnt op het display 6. Om de titels van alle geplaatste cd's in willekeurige volgorde weer te geven, 쏅 drukt u zo vaak op toets 3 <, tot "MIX ALL" op het display 6 wordt weergegeven. Het MIX-symbool verschijnt op het display 6. MIX beëindigen Om het afspelen in willekeurige volgorde te beeindigen, 쏅 drukt u zo vaak op toets 3 <, tot "MIX OFF" op het display 6 wordt weergegeven. Het MIX-symbool op het display 6 verdwijnt. Alle titels van alle CD's kort weergeven (SCAN) Om alle titels van alle geplaatste CD's in oplopende volgorde elk gedurende ca. 10 seconden af te laten spelen, 쏅 drukt u op de toets 4 <. Op het display 6 verschijnt kort "SCAN TRK". Tijdens het kort weergeven knippert de weergave van het CD-nummer. Scan beëindigen Om de korte weergave te beëindigen, 쏅 drukt u opnieuw op de toets 4 <. Op het display 6 verschijnt kort "SCAN OFF". De actueel weergegeven titel wordt verder afgespeeld. Weergave onderbreken (PAUSE) 쏅 Druk op de toets 1 <. Op het display 6 verschijnt "PAUSE". Pauze opheffen 쏅 Druk gedurende de pauze op de toets 1 <. De weergave wordt voortgezet. NEDERLANDS REPEAT beëindigen Om de herhaling te beëindigen, 쏅 drukt u zo vaak op toets 2 <, tot "RPT OFF" op het display 6 wordt weergegeven. Het RPT-symbool op het display 6 verdwijnt. 213 07_CalaisMP48_nl.indd 213 11.06.2008 15:17:24 Uhr IR-afstandsbediening IR-afstandsbediening RC 10 P Functies van de Met de optionele IR-afstandsbediening kunt u de belangrijkste functies van het apparaat regelen. afstandsbediening Afstandsbedieningsontvanger Toets In de kap van het apparaat bevindt zich de infraroodontvanger 9 voor de afstandsbediening. Voor gebruik van de afstandsbediening moet de ontvanger worden ingeschakeld: 쏅 Druk op de toets MENU 7. 쏅 Druk net zo vaak op de toets resp. 8 tot in het display 6 "IR" en de actuele instelling "ON" (aan) resp. "OFF" (uit) wordt weergegeven. 쏅 Druk op de toets resp. 8, om IR uit- resp. in te schakelen. Om het menu te verlaten, 쏅 drukt u op de toets MENU 7. ON H Apparaat in-/uitschakelen (lang indrukken) Mute (kort indrukken) Menu verlaten SRC @ Bronomschakeling V+ B Volume verhogen V- A Volume verlagen OK G Menu oproepen resp. verlaten E Menupunt selecteren Algemeen: E Functie C Menupunt selecteren F Menu-instelling veranderen D Menu-instelling veranderen Bij radioweergave Toets D F C B G F Oproepen opgeslagen zender D Keuze golfgebied/geheugenniveau E Zoekdoorloop voorwaarts C Zoekdoorloop neerwaarts H A @ Functie Bij CD-weergave Toets Functie F Volgende titel kiezen D Voorgaande titel kiezen 214 07_CalaisMP48_nl.indd 214 11.06.2008 15:17:24 Uhr Voorversterkeruitgang CD-wisselaar-bedrijf Voorversterkeruitgang Toets U kunt op het apparaat een versterker aansluiten voor het aansturen van een Subwoofer. Daarvoor moet de versterker op de achterzijde van het apparaat (aansluiting C1) worden aangesloten. Het niveau van de Subwoofer kan in het audio-menu worden ingesteld: 쏅 Druk op de toets AUD :. 쏅 Druk net zo vaak op de toets of 8 totdat "SUB WOOF" wordt weergeven. Na ca. 2 seconden worden "SUBW" en de actuele instelling in het display 6 weergeven. 쏅 Druk op de toets resp. 8, om het niveau voor de Subwoofer in te stellen tussen 0 en 7. Functie F Volgende titel spelen, snelle zoekdoorloop D Voorgaande titel spelen E Volgende CD spelen C Voorgaande CD spelen MP3-weergave-bedrijf Toets Functie F Volgende titel spelen, snelle zoekdoorloop D Voorgaande titel spelen E Volgende map spelen C Voorgaande map spelen Opmerking: U hoeft niet op de weergave van de actuele instelling te wachten om deze door op de toets resp. 8 te drukken te wijzigen. Om het menu te verlaten, 쏅 drukt u op de toets AUD :. NEDERLANDS IR-afstandsbediening 215 07_CalaisMP48_nl.indd 215 11.06.2008 15:17:25 Uhr Externe audiobronnen Externe audiobronnen U kunt via de AUX-ingang verschillende soorten externe audiobronnen op het apparaat aansluiten. De AUX-ingang moet voor de betreffende aangesloten audiobron ingesteld worden: • Instelling "AUX" voor externe audiobronnen zoals bijv. draagbare CD-speler, MiniDisc-speler of MP3-speler. • Instelling "CDC" voor de Blaupunkt-CDwisselaar CDC A 08 T en IDC A 09. • Instelling "USB" voor de USB-interface van Blaupunkt. Voor de instelling van de AUX-ingang leest u de volgende paragraaf "AUX-ingang instellen". Opmerking: Voor het aansluiten van een externe audiobron hebt u een adapterkabel nodig. Deze kabel (Blaupunkt-nr. 7 607 897 093) is verkrijgbaar bij uw Blaupunkt-vakhandel. AUX-ingang instellen 쏅 Druk op de toets MENU 7. 쏅 Druk zo vaak op de toets of 8 totdat "SRC SEL" wordt weergegeven. Na ca. 2 seconden worden "SRC" en de actuele instelling "CDC", "USB" resp. "AUX" op het display 6 weergegeven. 쏅 Druk op de toets resp. 8, om een andere instelling te kiezen. Opmerking: De volgorde van de instellingen in het menu is "CDC" – "USB" – "AUX": • Bij de actuele instelling "CDC" kunt u door indrukken van de toets 8 de instelling "USB" kiezen. • Bij de actuele instelling "USB" kunt u door indrukken van de toets 8 de instelling "CDC" of door indrukken van de toets 8 de instelling "AUX" kiezen. • Bij de actuele instelling "AUX" kunt u door indrukken van de toets 8 de instelling "USB" kiezen. Na iedere verandering van de instelling volgt automatisch uitschakelen van het apparaat. Om tussen de instellingen "CDC" en "AUX" te schakelen, moet u daarom eerst de instelling "USB" kiezen en na het automatisch uitschakelen het instrument weer inschakelen. Herhaal dan de instelprocedure, om bij de gewenste instelling "AUX" resp. "CDC" te komen. De opmerking "AUTO SWITCH OFF IN 10 SECONDS" wordt getoond. Het apparaat schakelt zichzelf na 10 s automatisch uit. 쏅 Schakel het apparaat door indrukken van de aan-/uit-toets 3 weer aan. Het apparaat wordt in radioweergave met de gekozen instelling ingeschakeld. Opmerking: Wanneer u de AUX-instelling heeft gekozen, kunt u de AUX-ingang met de toets SRC > kiezen. Op het display wordt dan "AUX" getoond. Wanneer u de CDC- resp. USB-instelling heeft gekozen, kunt u de audiobron met de toets SRC > alleen kiezen, wanneer een bijbehorend apparaat (CD-wisselaar resp. USB-interface) is aangesloten. 216 07_CalaisMP48_nl.indd 216 11.06.2008 15:17:25 Uhr Externe audiobronnen Fabrieksinstellingen Niveau van de AUX-ingang instellen Fabrieksinstellingen herstellen (RESET) Wanneer u de AUX-ingang voor de aansluiting van een externe audiobron op "AUX" heeft ingesteld, kunt u het niveau van de externe audiobron op het niveau van de apparaateigen audiobron (zoals bijv. CD en radio) aanpassen. U heeft de mogelijkheid, de oorspronkelijke fabrieksinstellingen van het apparaat te herstellen. 쏅 Houdt de toets AUD : langer dan ca. 10 seconden ingedrukt. Een bevestigingstoon klinkt en op het display 6 wordt kort "RESET" weergegeven. Alle menu- en audiomenu-instellingen worden naar de fabrieksinstellingen teruggezet. Opmerking: Op de voorkeuzetoetsen opgeslagen zenders worden niet gewist. NEDERLANDS Opmerking: U kunt het niveau voor de AUX-ingang alleen instellen, wanneer AUX als audiobron is gekozen. 쏅 Druk evt. zo vaak op de toets SRC >, tot "AUX" op het display wordt getoond. 쏅 Druk op de toets MENU 7. resp. 쏅 Druk zo vaak op de toets 8, tot "GAIN" en de actuele instelling op het display worden weergegeven. 쏅 Druk op de toets resp. 8, om de niveau-aanpassing in te stellen tussen –9 en +9. Om het menu te verlaten, 쏅 drukt u op de toets MENU 7. 217 07_CalaisMP48_nl.indd 217 11.06.2008 15:17:25 Uhr Technische gegevens Technische gegevens Bedrijfsspanning 24 Volt Versterker Uitgangsvermogen: Line-uitgang: AUX-ingang: 2 x 20 Watt sinus aan 4 Ohm 2 x 2,0 Volt eff 2 x 2,0 Volt eff Tuner Golfgebied Europa: FM: MW : LW: 87,5 - 108 MHz 531 - 1602 kHz 153 - 279 kHz Golfgebied Amerika: FM: 87,7 - 107,9 MHz AM: 530 - 1710 kHz Frequentiebereik FM: 30 -15 000 Hz CD Frequentiebereik: 20 - 20 000 Hz Wijzigingen voorbehouden! 218 07_CalaisMP48_nl.indd 218 11.06.2008 15:17:25 Uhr Knappar och reglage 1 Volymreglage < Knappsats 1 - 6 2 BND-knapp Kort tryckning: Val av minnesnivå resp. våglängdsområde Lång tryckning: Starta Travelstore(rese)funktionen (FMT eller MVT/LVT) = RDS-knapp Aktivera/avaktivera RDS-komfortfunktion 3 På/av-knapp Kort tryckning: Slå på apparaten Under drift: Ljudavstängning (Mute) Lång tryckning: Slå av apparaten > SRC-knapp Välj källa mellan radio och CD samt (förutsatt att de är anslutna resp. aktiverade) CD, MP3, CD-växlare och AUX ? Code LED 4 CD-utmatningsknappen 5 CD-fack 6 Display 7 MENU-knapp Öppna menyn för grundinställningar. 8 Multifunktionsvippströmbrytare 9 Infraröd-mottagare för IR-fjärrkontrol (tillval) : AUD-knapp Kort tryckning: Öppna audio-menyn för inställning av bas, diskant, balans, fading och volym Lång tryckning (10 s): Återställa fabriksinställningar SVENSKA ; TA-knapp Aktivera/avaktivera prioritet för trafikmeddelanden Avbryta ett trafikmeddelande 219 08_CalaisMP48_sw.indd 219 11.06.2008 15:18:16 Uhr Innehåll Viktiga anvisningar ........................ 222 Användning................................. 222 Trafiksäkerhet ............................. 222 Fjärrkontroll (tillval) ..................... 222 CD-växlare (tillval) ....................... 222 USB-gränssnitt (tillval) ................. 222 Källsortering ............................... 222 Stöldskydd CODE........................... 223 Aktivera/avaktivera kodfråga (CODE) ...................................... 223 Lägga in kodnummer efter strömavbrott ............................... 224 Till-/frånkoppling........................... 224 Till-/frånkoppling med på-/ av-knapp .................................... 224 Från-/tillkoppling via fordonständningen ...................... 224 Tillkoppling genom CD-inmatning ... 224 Ställa in avslagningstid.................. 225 Slå på via telefon (tillval) ............... 225 Tillkoppling med IR-fjärrkontroll RC 10 P (tillval) ........................... 225 Ställa in volym ............................... 225 Ljudavstängning (MUTE) ............... 225 Ljudhantering vid telefon/ navigering................................... 225 Till-/frånkoppling av ljudsignal (BEEP) ....................................... 226 Att ställa in max startvolym (ON VOL).................................... 226 Ställa in bullerberoende volymanpassning (GALA) .............. 227 Klangbild ...................................... 227 Ställa in diskant ........................... 227 Ställa in bas ................................ 227 Ställa in mellanregister ................. 228 Ställa in volymbalans vänster/ höger (BAL) ................................ 228 Ställa in volymbalans framåt/ bakåt (FAD) ................................ 228 Tid ................................................ 229 Visa tid ....................................... 229 Ställa in tid.................................. 229 Välja 12- eller 24-timmars visning .. 229 Ställa in tidszon (TIMEZONE) ......... 230 Radio ............................................ 230 Slå på radion ............................... 230 RDS-komfortfunktioner (AF, REG) .. 230 Välja våglängdsområde/ minnesnivå ................................. 231 Ställa in stationer ......................... 231 Lagra stationer ............................ 232 Välja lagrade stationer .................. 232 Presentera mottagningsbara stationer (BANDSCAN) ................. 233 Programtyp (PTY) ........................ 233 Brusanpassad diskantsänkning (HICUT)...................................... 233 Aktivera/avaktivera radiotext ......... 234 Trafikradio .................................... 234 Aktivera/avaktivera prioritet för trafikmeddelanden ...................... 234 Ställa in volymanpassning av trafikmeddelanden ...................... 235 Tona ut trafikmeddelanden ............ 235 220 08_CalaisMP48_sw.indd 220 11.06.2008 15:18:16 Uhr Innehåll CD-växlare .................................... 243 Starta CD-växlare......................... 243 Välja CD-skiva ............................. 243 Välj spår ..................................... 243 Snabbspolning (medhörning) ........ 243 Spela enstaka spår eller hela CD-skivor flera gånger (RPT) ......... 243 Spela titlar i slumpvis ordningsföljd (MIX) ...................... 244 Presentera samtliga spår på alla skivor (SCAN) ............................. 244 Avbryta spelning (PAUSE) ............. 244 IR-fjärrkontroll RC 10 P .................. 245 Fjärrkontrollmottagare.................. 245 Funktioner i frjärrkontrollen ........... 245 Förförstärkarutgång ...................... 246 Externa ljudkällor .......................... 247 Ställa in AUX-ingång ..................... 247 Ställa in nivå på AUX-ingången ....... 248 Återställa fabriksinställningar (RESET) ........................................ 248 Tekniska data ................................ 249 Driftsspänning ............................ 249 Förstärkare ................................. 249 Tuner ......................................... 249 CD ............................................. 249 ISO-anslutning............................... 281 SVENSKA CD ................................................ 235 Fara för allvarlig skada på CD-läsaren! ................................ 235 Starta CD-läge ............................. 236 Visa spårinformation (CD-text) ...... 236 Välj spår ..................................... 236 Snabbspolning (medhörning) ........ 237 Slumpspelning (MIX) .................... 237 Presentera spår (SCAN)................ 237 Upprepa spår (RPT) ..................... 237 Avbryta spelning (PAUSE) ............. 237 Ta ut CD-skiva ............................. 237 MP3/WMA .................................... 238 Förbereda ett MP3-datamedium .... 238 Starta MP3 ................................. 240 Visning av spårinformation (CD-taggar) ................................ 240 Välj mapp ................................... 241 Välja spår/fil ................................ 241 Snabbsökning ............................. 241 Spela titlar i slumpvis ordningsföljd (MIX) ...................... 241 Presentera spår (SCAN)................ 241 Upprepa enskilda spår eller hela mappar (REPEAT) ........................ 242 Avbryta spelning (PAUSE) ............. 242 221 08_CalaisMP48_sw.indd 221 11.06.2008 15:18:16 Uhr Viktiga anvisningar Viktiga anvisningar Källsortering Innan du använder din apparat bör du läsa dessa instruktioner noggrant och bekanta dig med apparaten. Spara instruktionerna i bilen för eventuella framtida frågor. Kasta inte uttjänta apparater i hushållssoporna! Lämna produkten till ett återvinnings- eller insamlingsställe. Användning Apparaten är gjord för att användas i ett nyttofordon med 24 V nätspänning och för montering i ett 1-DIN-fack. Trafiksäkerhet Trafiksäkerheten måste alltid gå före allt annat. Använd endast apparaten när trafiksituationen tillåter det. Lär känna din apparat innan du börjar. Ljudsignaler från utryckningsfordon ska kunna uppfattas tydligt i fordonet, och i tillräckligt god tid. Anpassa volymen därefter. Fjärrkontroll (tillval) Med fjärrkontrollen RC 10 P kan du styra de viktigaste funktionerna. En infrafördfjärrkontroll finns att köpa som tillbehör (Blaupunkt-nr. 7 607 591 512). CD-växlare (tillval) Du kan ansluta CD-växlaren CDC A08 T (Blaupunkt-nr. 7 607 274 002) eller IDC A09 (Blaupunkt-nr. 7 607 274 005). CD-växlarna finns att köpa som tillbehör. USB-gränssnitt (tillval) Du kan ansluta Blaupunkt-USB-gränssnittet, för att spela av MP3-/WMA-filer från ett USB-minne. Ett USB-gränssnitt finns att köpa som tillbehör (Blaupunkt-nr. 7 607 541 576). 222 08_CalaisMP48_sw.indd 222 11.06.2008 15:18:17 Uhr Stöldskydd Stöldskydd CODE Apparaten är skyddad mot stöld med ett fyrsiffrigt kodnummer. Detta nummer måste alltid matas in, när apparaten har varit bortkopplad från fordonets driftsspänning. Kodfrågan är avaktiverad från fabriken, men kan aktiveras. Observera! Om kodfrågan är aktiverad, börjar Code LED ? blinka när både apparaten och fordonets tändning är avslagna. Kodnumret finns i radiopasset, som tillhör apparaten. Observera! Förvara aldrig radiopasset i fordonet! Aktivera/avaktivera kodfråga (CODE) 쏅 Tryck på knappen MENU 7. eller 8 (ev. 쏅 Tryck på knappen flera gånger) tills "CODE" och den aktuella inställningen "ON" (på) eller "OFF" (av) visas i teckenfönstret 6. 쏅 Tryck på knappen eller 8. I teckenfönstret 6 visas "0000". Lägg in koden: fönstret 6. Om du slår av apparaten under denna väntetid, måste du vänta en hel timme när du har slagit på den igen. 쏅 Tryck på stationsknappen 1 < (ev. flera gånger) tills den första siffran i kodnumret visas i teckenfönstret 6. 쏅 Tryck på stationsknappen 2 < (ev. flera gånger) tills den andra siffran i kodnumret visas i teckenfönstret 6. 쏅 Tryck på stationsknappen 3 < (ev. flera gånger) tills den tredje siffran i kodnumret visas i teckenfönstret 6. 쏅 Tryck på stationsknappen 4 < (ev. flera gånger) tills den fjärde siffran i kodnumret visas i teckenfönstret 6. 쏅 När rätt kodnummer visas i teckenfönstret 6, håll stationsknappen 5 < intryckt under längre tid än 2 sekunder. I teckenfönstret 6 visas återigen "CODE" och den aktuella inställningen "ON" (på) eller "OFF" (av). 쏅 Tryck på knappen resp. 8, för att avaktivera resp. aktivera kodfrågan. För att stänga menyn, 쏅 tryck på knappen MENU 7. SVENSKA Observera! Om du lägger in fel kodnummer, visas "0000" i teckenfönstret 6 igen. Du kan lägga in koden två gånger till. Efter den tredje inmatningen av fel kod, spärras apparaten en hel timme. Under denna tid visas "WAIT 1HR" i tecken- 223 08_CalaisMP48_sw.indd 223 11.06.2008 15:18:17 Uhr Stöldskydd Lägga in kodnummer efter strömavbrott 쏅 Slå på apparaten. I teckenfönstret 6 visas först "CODE" och därefter "0000". Du kan lägga in koden: Observera! Om du lägger in fel kodnummer, visas "0000" i teckenfönstret 6 igen. Du kan lägga in koden två gånger till. Efter den tredje inmatningen av fel kod, spärras apparaten en hel timme. Under denna tid visas "WAIT 1HR" i teckenfönstret 6. Om du slår av apparaten under denna väntetid, måste du vänta en hel timme när du har slagit på den igen. 쏅 Lägg in kodnumret enligt beskrivningen i avsnittet "Aktivera/avaktivera kodfråga". 쏅 När rätt kodnummer visas i teckenfönstret 6, håll stationsknappen 5 < intryckt under längre tid än 2 sekunder. Apparaten kopplas till. Till-/frånkoppling Till-/frånkoppling Du kan koppla apparaten till/från på olika sätt: Till-/frånkoppling med på-/avknapp 쏅 Tryck på på-/av-knappen 3 för att koppla till apparaten. 쏅 När du vill koppla från apparaten håller du på/av-knappen 3 intryckt längre än två sekunder. Observera! Som skydd för fordonsbatteriet kopplas apparaten automatiskt från en inställbar tid efter tändningsfrånslag (se avsnittet "Ställa in avslagningstid" i det här kapitlet). Från-/tillkoppling via fordonständningen När apparaten inte frånkopplas med på-/ av-knappen 3, kopplas den från/till när fordonets tändning slås från/till (detta förutsätter att apparaten är ansluten till tändningen). Tillkoppling genom CDinmatning För tillkoppling med CD-inmatning, 쏅 lägg in en CD med den tryckta sidan uppåt i läsaren och skjut in den i CDfacket 5, tills du känner ett lätt motstånd . CD:n dras in automatiskt, apparaten startar i CD-läge. 224 08_CalaisMP48_sw.indd 224 11.06.2008 15:18:17 Uhr Till-/frånkoppling Volym Ställa in avslagningstid Ställa in volym 쏅 Tryck på knappen MENU 7. eller 8 (ev. 쏅 Tryck på knappen flera gånger) tills "HOUR" och den aktuella inställningen visas i teckenfönstret 6. 쏅 Ställ in frånkopplingstiden med knappen eller 8 mellan 5 och 60 minuter, i steg om 5 minuter. För att stänga menyn, 쏅 tryck på knappen MENU 7. Systemets volym kan ställas in i steg mellan 0 (avstängd) och 32 (max). 쏅 För att öka volymen i systemet, vrid volymreglaget 1 åt höger. 쏅 För att minska volymen i systemet, vrid volymreglaget 1 åt vänster. Om telefonen slås på när apparaten är avstängd slås apparaten på. När man stänger av telefonen stängs apparaten automatiskt av. Detta under förutsättning att telefonen är korrekt ansluten till apparaten. Tillkoppling med IR-fjärrkontroll RC 10 P (tillval) 쏅 För tillkoppling tryck på knappen ON H på IR-fjärrkontrollen RC 10 P. Observera! Apparatens IR-mottagare måste vara på, för att IR-fjärrkontrollen ska kunna användas. Läs om detta i avsnittet "Fjärrkontrollmottagare" i kapitlet "IRfjärrkontroll RC 10 P". Du kan stänga av ljudet i systemet helt med en knapptryckning (Mute). 쏅 Tryck kort på knappen 3. Återställa ljudnivå För att återgå till den volym som var inställd innan ljudet dämpades bort, 쏅 tryck en gång till på knappen 3. Ljudhantering vid telefon/ navigering Ljudavstängning vid telefonsamtal Om din bilradio är ansluten till en mobiltelefon eller ett navigeringssystem, dämpas bilradion vid ett inkommande samtal eller vid syntetiskt tal från navigeringen. Samtalet eller det syntetiska talmeddelandet återges via bilradions högtalare. Detta förutsätter att mobiltelefonen resp. navigeringssystemet är felfritt anslutet till bilradion (grupp C2 på apparatens baksida). Fråga din Blaupunkt fackhandel vilken typ av navigeringssystem som kan anslutas. SVENSKA Slå på via telefon (tillval) Ljudavstängning (MUTE) 225 08_CalaisMP48_sw.indd 225 11.06.2008 15:18:17 Uhr Volym Vid ett inkommande samtal eller vid ett navigeringsmeddelande visas "PHONE" i teckenfönstret. Ställa in volymen vid ljudhantering telefon-/navigering (PHONEVOL) Volymen på telefonsamtal eller syntetiska talmeddelanden kan ställas in: 쏅 Tryck på knappen MENU 7. 쏅 Tryck på eller 8 (ev. flera gånger) tills "PHONEVOL" visas. Efter ca. 2 sekunder visas "VOL" och den aktuella inställningen i teckenfönstret 6. 쏅 Tryck på eller 8, för att ställa in volymen mellan 0 och 32. Observera! Du behöver inte vänta på att den aktuella inställningen ska visas för att kunna ändra den genom tryckning på eller 8. För att stänga menyn, 쏅 tryck på knappen MENU 7. Observera! Du kan även ställa in volymen under ett telefonsamtal eller ett navigeringsmeddelande med volymreglaget 1. Den inställda volymen sparas automatiskt. Till-/frånkoppling av ljudsignal (BEEP) Efter vissa åtgärder, t.ex. lång tryckning på en knapp, hörs en ljudsignal (Beep) som bekräftelse. Ljudsignalen kan kopplas från: 쏅 Tryck på knappen MENU 7. eller 8 (ev. 쏅 Tryck på knappen flera gånger) tills "BEEP" och den aktu- ella inställningen "ON" (på) eller "OFF" (av) visas i teckenfönstret 6. 쏅 Tryck på knappen resp. 8, för att avaktivera resp. aktivera ljudsignalen. För att stänga menyn, 쏅 tryck på knappen MENU 7. Att ställa in max startvolym (ON VOL) När du slår på apparaten spelar den med senast valda volym. Om du ställer in en högre volym än den maximala startvolymen innan du slår av apparaten begränsas dock volymen automatiskt till den inställda startvolymen nästa gång du kopplar till apparaten. Observera! Max startvolym är begränsad till värdet "25" för att skydda din hörsel. 쏅 Tryck på knappen MENU 7. eller 8 (ev. 쏅 Tryck på knappen flera gånger) tills "ON VOL" visas i teckenfönstret. Efter ca. 2 sekunder visas "VOL" och den aktuella inställningen i teckenfönstret 6. 쏅 Tryck på knappen eller 8, för att ställa in max tillslagsvolym mellan 5 och 25. Observera! Du behöver inte vänta på att den aktuella inställningen ska visas för att kunna ändra den genom tryckning på eller 8. För att stänga menyn, 쏅 tryck på knappen MENU 7. 226 08_CalaisMP48_sw.indd 226 11.06.2008 15:18:17 Uhr Volym Klangbild Ställa in bullerberoende volymanpassning (GALA) Klangbild Med denna funktion anpassas bilradiovolymen automatiskt till bilens hastighet och de ljud som hör ihop med den. Exempelvis ökas volymen automatiskt vid ökande hastighet, för att utjämna det ökande bullret (t.ex. från fartvinden). För detta måste fordonet ställa hastighetsmätarsignalen till förfogande och bilradion vara ansluten till denna. Den automatiska volymanpassningen kan ställas in i 6 steg (OFF (av), 1-5). 쏅 Tryck på knappen MENU 7. eller 8 (ev. 쏅 Tryck på knappen flera gånger) tills "GALA" och den aktuella inställningen visas. eller 8, för 쏅 Tryck på knappen att ställa in volymanpassningen mellan "OFF" (av) och 5. För att stänga menyn, 쏅 tryck på knappen MENU 7. Ställa in diskant 쏅 Tryck på knappen AUD :. 쏅 Tryck på knappen eller 8 (ev. flera gånger) tills "TREBLE" visas. 쏅 Håll knappen eller 8 intryckt längre än 2 sekunder. I teckenfönstret visas kort "FREQ" och därefter den valda diskantfrekvensen. För att välja en annan diskantfrekvens mellan 10,0 och 17,5 kHz, 쏅 tryck på knappen eller 8. För att ställa in diskantnivån, 쏅 tryck på knappen eller 8 (ev. flera gånger) tills "GAIN" visas. Efter ca. 2 sekunder visas "GAIN" och den aktuella inställningen. 쏅 Tryck på eller 8, för att ställa in diskantnivån mellan –7 och +7. För att stänga menyn, 쏅 tryck på knappen AUD :. 쏅 Tryck på knappen AUD :. eller 8 (ev. 쏅 Tryck på knappen flera gånger) tills "BASS" visas. 쏅 Håll knappen eller 8 intryckt längre än 2 sekunder. I teckenfönstret visas kort "FREQ" och därefter den valda basfrekvensen. För att välja en annan basfrekvens mellan 60 och 200 Hz, 쏅 tryck på knappen eller 8. SVENSKA Ställa in bas 227 08_CalaisMP48_sw.indd 227 11.06.2008 15:18:17 Uhr Klangbild För att ställa in basnivån, eller 8 (ev. 쏅 tryck på knappen flera gånger) tills "GAIN" visas. Efter ca. 2 sekunder visas "GAIN" och den aktuella inställningen. 쏅 Tryck på knappen eller 8, för att ställa in basnivån mellan –7 och +7. För att ställa in kvalitetsfaktorn för basen, 쏅 tryck på eller 8 (ev. flera gånger) tills "Q FACTOR" visas. Efter ca. 2 sekunder visas "Q" och den aktuella inställningen. 쏅 Tryck på eller 8, för att ställa in kvalitetsfaktorn mellan 1,0 och 2,0. För att stänga menyn, 쏅 tryck på knappen AUD :. Ställa in mellanregister 쏅 Tryck på knappen AUD :. 쏅 Tryck på eller 8 (ev. flera gånger) tills "MIDDLE" visas. eller 8 intryckt 쏅 Håll knappen längre än 2 sekunder. I teckenfönstret visas kort "FREQ" och därefter den valda mellanregisterfrekvensen. För att välja en annan mellanregisterfrekvens mellan 500 Hz och 2,5 kHz, 쏅 tryck på knappen eller 8. För att ställa in mellanregisternivån, eller 8 (ev. 쏅 tryck på knappen flera gånger) tills "GAIN" visas. Efter ca. 2 sekunder visas "GAIN" och den aktuella inställningen. 쏅 Tryck på eller 8, för att ställa in mellanregisternivån mellan –7 och +7. För att ställa in kvalitetsfaktorn för mellanregistret, 쏅 tryck på eller 8 (ev. flera gånger) tills "Q FACTOR" visas. Efter ca. 2 sekunder visas "Q" och den aktuella inställningen. 쏅 Tryck på eller 8, för att ställa in kvalitetsfaktorn mellan 0,5 och 1,25. För att stänga menyn, 쏅 tryck på knappen AUD :. Ställa in volymbalans vänster/ höger (BAL) 쏅 Tryck på knappen AUD :. 쏅 Tryck på eller 8 (ev. flera gånger) tills "BAL" och den aktuella inställningen visas. 쏅 Tryck på knappen eller 8, för att ställa in volymbalansen vänster/höger mellan –10 och +10 För att stänga menyn, 쏅 tryck på knappen AUD :. Ställa in volymbalans framåt/ bakåt (FAD) Observera De bakre högtalarna måste anslutas via en extraförstärkare. 쏅 Tryck på knappen AUD :. 쏅 Tryck på eller 8 (ev. flera gånger) tills "FAD" och den aktuella inställningen visas. 228 08_CalaisMP48_sw.indd 228 11.06.2008 15:18:18 Uhr Klangbild 쏅 Tryck på eller 8, för att ställa in volymbalansen fram/bak mellan –10 och +10. För att stänga menyn, 쏅 tryck på knappen AUD :. Tid Tid Visa tid För att visa tiden ca 10 sekunder i teckenfönstret. 쏅 Håll knappen MENU 7 intryckt mer är 2 sekunder. Ställa in tid 쏅 Tryck på knappen MENU 7. 쏅 Tryck på eller 8 (ev. flera gånger) tills "TIMESET" visas i teckenfönstret 6. Efter ca 2 sekunder visas aktuell tid i teckenfönstret 6. Framför tiden visas "24H" i 24-timmarsläge och "AM" eller "PM" i 12-timmarsläge. Aktuell timme visas blinkande och kan ändras. För att ställa in timmar resp. minuter, 쏅 tryck på knappen eller 8. För att växla mellan timmar och minuter, 쏅 tryck på knappen 6 <. Välja 12- eller 24-timmars visning 쏅 Tryck på knappen MENU 7. 쏅 Tryck på eller 8 (ev. flera gånger) tills "24H MODE" eller "12H MODE" visas i teckenfönstret 6. SVENSKA Observera! Du behöver inte vänta på att den aktuella inställningen ska visas för att kunna ändra den genom tryckning på eller 8. För att stänga menyn, 쏅 tryck på knappen MENU 7. 229 08_CalaisMP48_sw.indd 229 11.06.2008 15:18:18 Uhr Tid 쏅 Tryck på eller 8, för att växla mellan lägena. För att stänga menyn, 쏅 tryck på knappen MENU 7. Ställa in tidszon (TIMEZONE) Om du kör över tidszoner, kan du ställa in tidsskillnaden i förhållande till den inställda tiden i steg om 1 timme. På det sättet kan du ändra tidvisningen för den aktuella tidszonen, utan att själv behöva ställa om tiden. 쏅 Tryck på knappen MENU 7. 쏅 Tryck på eller 8 (ev. flera gånger) tills "TIMEZONE" visas. Efter ca. 2 sekunder visas "ZONE" och den aktuella inställningen i teckenfönstret 6. 쏅 Tryck på eller 8, för att ställa in tidsskillnaden i steg om 1 timme mellan –12 och +12. Observera! Du behöver inte vänta på att den aktuella inställningen ska visas för att kunna ändra den genom tryckning på eller 8. För att stänga menyn, 쏅 tryck på knappen MENU 7. Radio Radio Denna apparat är utrustad med en RDSradiomottagare. Nästan alla FM-stationer sänder förutom själva programmet även ohörbar extrainformation, t.ex. stationens namn eller programtyp (PTY). Om RDS-stationen sänder sitt namn, visas detta direkt i teckenfönstret 6. Slå på radion Om du befinner dig i ett annat driftläge, 쏅 tryck på knappen BND 2 eller 쏅 tryck på knappen SRC > (ev. flera gånger) tills "RADIO" visas i teckenfönstret 6. I teckenfönstret 6 visas den aktuella frekvensen och stationens namn. RDS-komfortfunktioner (AF, REG) RDS-komfortfunktionerna AF (alternativ frekvens) och REG (regional) utökar radioapparatens möjligheter. • AF: När RDS-komfortfunktionen är aktiverad, söker apparaten automatiskt i bakgrunden efter den bästa frekvens som kan mottas från den inställda stationen. • REG: En del sändare delar tidvis upp sina program i regionalprogram med olika innehåll. Den aktiverade REGfunktionen förhindrar att apparaten växlar till alternativa frekvenser från den inställda stationen, som har ett annat programinnehåll. 230 08_CalaisMP48_sw.indd 230 11.06.2008 15:18:18 Uhr Radio Aktivera/avaktivera RDSkomfortfunktion 쏅 För att använda RDS-funktionerna AF och REG, tryck på knappen RDS =. RDS-komfortfunktionerna är aktiva när symbolen RDS visas i teckenfönstret 6. Aktivera/avaktivera REG 쏅 Tryck på knappen MENU 7. eller 8 (ev. 쏅 Tryck på knappen flera gånger) tills "REG" och den aktuella inställningen "ON" (på) eller "OFF" (av) visas i teckenfönstret 6. 쏅 Tryck på knappen resp. 8, för att avaktivera resp. aktivera REG. För att stänga menyn, 쏅 tryck på knappen MENU 7. Observera! Inställningen REG ON/OFF fungerar bara under förutsättning att RDS-funktionen är aktiverad. Välja våglängdsområde/ minnesnivå Med denna apparat kan man ta emot stationer på FM-bandet (UKV), MV och LV (för EUROPA) resp. FM och AM (NAFTA-länder). För våglängdsområde FM finns tre minnesnivåer, FM1, FM2 och FMT och för våglängdsområdena MV och LV resp. AM finns en minnesnivå för varje. Dessutom finns ytterligare en minnesnivå MVT/LVT resp. AMT. På varje minnesnivå kan upp till sex stationer lagras. Så här växlar du mellan våglängdsområdena resp. minnesnivåerna, 쏅 tryck på knappen BND 2 Ställa in stationer Du kan ställa in en station på olika sätt. Automatisk stationssökning 쏅 Tryck på knappen eller 8. Närmasta station inom mottagningsområdet väljs. Observera! • Om prioritet för trafikradio är aktiverad, ställs närmaste trafikradiostation in. • Om PTY är aktiverad, ställs närmaste station in, som har vald programtyp. Ställa in känslighet vid stationssökning Du kan välja, om endast starka stationer ska ställas in vid låg känslighet eller även svaga stationer ska ställas in vid hög känslighet. 쏅 Tryck på knappen MENU 7. eller 8 (ev. 쏅 Tryck på knappen flera gånger) tills "SENS" och den aktuella inställningen "LO" (låg känslighet) resp."DX" (hög känslighet) visas i teckenfönstret 6. 쏅 Tryck på knappen resp. 8, för att växla mellan inställningarna "LO" och "DX". För att stänga menyn, 쏅 tryck på knappen MENU 7. SVENSKA Observera! REG måste aktiveras och avaktiveras separat i menyn. 231 08_CalaisMP48_sw.indd 231 11.06.2008 15:18:18 Uhr Radio Manuell stationsinställning För att ändra den inställda frekvensen i små etapper, 쏅 tryck på knappen eller 8. För att ändra den inställda frekvensen snabbt, 쏅 håll knappen eller 8 intryckt Observera! Den manuella stationsinställningen går bara att göra när RDS-funktionen och PTY är avaktiverade. Hoppa mellan samverkande stationer (endast FM) Om flera stationer hör till samma organisation, kan du hoppa mellan dessa samverkande stationer. 쏅 Tryck på knappen eller 8, för att byta till nästa station bland de samverkande stationerna. Observera! Att hoppa mellan samverkande stationer går bara när RDS-funktionen är aktiverad och PTY är avaktiverad. Du kan bara hoppa till stationer som radion tagit emot tidigare. Använd t.ex. Travelstore(rese)-funktionen (T-STORE) för detta. Lagra stationer 쏅 Tryck på en av stationsknapparna 1 - 6 <, som stationen ska lagras på, i mer än 2 sekunder. Ljudsignalen hörs. Stationen är lagrad på den valda stationsknappen. Lagra stationer automatiskt (T-STORE) Du kan automatiskt lagra de 6 starkaste stationerna i regionen. För våglängdsområde FM görs lagringen på minnesnivå FMT, för våglängdsområdena MV och LV på minnesnivå MVT/LVT samt för våglängdsområde AM på minnesnivå AMT. Observera! Stationer som tidigare är lagrade på denna nivå, ersätts då av nyfunna stationer. 쏅 Välj önskat våglängdsområde. 쏅 Håll knappen BND 2 intryckt längre än två sekunder. Lagringen startar. I teckenfönstret 6 visas "T-STORE". När förloppet är klart, spelas stationen på minnesplats ett på minnesnivån FMT, MVT/LVT resp. AMT. Välja lagrade stationer 쏅 Välj minnesnivå resp. våglängdsområde. 쏅 Tryck på den stationsknapp 1 - 6 <, där önskad station är lagrad. Lagra stationer manuellt 쏅 Välj önskad minnesnivå resp. våglängdsområde. 쏅 Ställ in stationen. 232 08_CalaisMP48_sw.indd 232 11.06.2008 15:18:19 Uhr Radio Med Bandscan-funktionen kan du presentera alla mottagningsbara stationer i ca. 10 sekunder. Starta Bandscan eller 8 intryckt 쏅 Håll knappen längre än 2 sekunder. I teckenfönstret visas kort "BANDSCAN". Apparaten söker efter stationer inom aktuellt våglängdsområde. Varje funnen station spelas upp i ca 10 sekunder. Samtidigt visas den inställda frekvensen och stationens namn. Avsluta Bandscan 쏅 Tryck på knappen eller 8. Presentationen avslutas. Den senast inställda stationen förblir inställd. Aktivera/avaktivera PTY 쏅 Tryck på knappen MENU 7. eller 8 (ev. 쏅 Tryck på knappen flera gånger) tills "PTY" och den aktuella inställningen "ON" (på) eller "OFF" (av) visas i teckenfönstret 6. 쏅 Tryck på knappen resp. 8, för att avaktivera resp. aktivera PTY. För att stänga menyn, 쏅 tryck på knappen MENU 7. Välja programtyp och starta sökning 쏅 Tryck på eller 8 (ev. flera gånger) tills önskad programtyp visas. 쏅 Tryck på resp. 8, för att starta sökningen. Om en station hittas med den valda programtypen, ställs denna station in. Programtyp (PTY) Brusanpassad diskantsänkning (HICUT) Vissa FM-stationer sänder förutom själva programmet även ohörbar extrainformation om programinnehållets typ. Bl.a. finns följande programtyper: KULTUR RESA JAZZ SPORT NYHETER POP ROCK MUSIK Med hjälp av PTY-funktionen kan Du välja ut stationer som sänder en särskild programtyp. När PTY är aktiverad och en PTY-sökning blivit startad, växlar apparaten automatiskt från den aktuella stationen eller från ett annat driftläge till stationen med den valda programtypen. HiCut-funktionen förbättrar spelningen vid dålig radiomottagning. Vid mottagningsstörningar minskas bruset automatiskt. För att aktivera/avaktivera HICUT, 쏅 tryck på knappen MENU 7. 쏅 Tryck på eller 8 (ev. flera gånger) tills "HICUT" och den aktuella inställningen "ON" (på) eller "OFF" (av) visas i teckenfönstret 6. 쏅 Tryck på resp. 8, för att avaktivera resp. aktivera HICUT. För att stänga menyn, 쏅 tryck på knappen MENU 7. SVENSKA Presentera mottagningsbara stationer (BANDSCAN) 233 08_CalaisMP48_sw.indd 233 11.06.2008 15:18:19 Uhr Radio Aktivera/avaktivera radiotext Vissa radiostationer använder RDS-signalen för att överföra reklam eller annan information i stället för stationens namn. Denna radiotext visas i teckenfönstret 6. För att aktivera eller avaktivera visning av radiotext, 쏅 tryck på knappen MENU 7. 쏅 Tryck på eller 8 (ev. flera gånger) tills "RADIOTXT" visas. Efter ca. 2 sekunder visas den aktuella inställningen "TEXT ON" (på) eller "TEXT OFF" (av) i teckenfönstret 6. 쏅 Tryck på resp. 8, för att avaktivera resp. aktivera visning av radiotext. Observera! Du behöver inte vänta på att den aktuella inställningen ska visas för att kunna ändra den genom tryckning på eller 8. För att stänga menyn, 쏅 tryck på knappen MENU 7. Trafikradio Trafikradio Aktivera/avaktivera prioritet för trafikmeddelanden För att aktivera resp. avaktivera prioritet för trafikradio i alla driftlägen, 쏅 tryck på knappen TA ;. Observera! I driftlägena CD, MP3, CD-växlare och AUX är denna funktion endast tillgänglig, om våglängdsområde FM var inställt senast. Prioriteten för trafikmeddelanden är aktiverad, när TA-symbolen visas i teckenfönstret 6. Så snart apparaten tar mot ett trafikmeddelande, släpps det fram. I teckenfönstret 6 visas "TRAFFIC" under tiden som meddelandet läses. Observera! En varningssignal hörs om • du lyssnar på trafikradiostation eller en CD och lämnar mottagningsområdet för den inställda trafikradiostationen och om den då startade automatiska sökningen inte hittar någon ny trafikradiostation. • du byter från en trafikradiostation till en station utan trafikradiofunktion. I dessa fall kan du antingen avaktivera prioritet för trafikmeddelanden eller byta till en trafikradiostation. 234 08_CalaisMP48_sw.indd 234 11.06.2008 15:18:19 Uhr Trafikradio Du kan ställa in, med hur många volymsteg trafikmeddelanden ska ökas i förhållande till den inställda volymen: 쏅 Tryck på knappen MENU 7. eller 8 (ev. 쏅 Tryck på knappen flera gånger) tills "TA VOL" visas i teckenfönstret. Efter ca. 2 sekunder visas "VOL" och den aktuella inställningen i teckenfönstret 6. 쏅 Tryck på eller 8, för att ställa in volymanpassningen mellan 0 och 10. Observera! Du behöver inte vänta på att den aktuella inställningen ska visas för att kunna ändra den genom tryckning på eller 8. För att stänga menyn, 쏅 tryck på knappen MENU 7. Observera! Du kan justera volymen för trafikmeddelanden direkt under pågående meddelande med volymreglaget 1. När meddelandet är slut återställs den ursprungliga volymen. Tona ut trafikmeddelanden För att avbryta ett pågående trafikmeddelande och återgå till en ljudkälla, som du lyssnade på tidigare, 쏅 tryck på knappen TA ;. Prioritet för trafikmeddelanden är fortfarande aktiverad. CD Med denna apparat kan du spela vanliga ljudskivor och skrivbara skivor (CD-R, CDRW) med diameter 12 cm. För att undvika problem vid spelningen bör du inte själv bränna CD-skivor med högre hastighet än 16x. Fara för allvarlig skada på CD-läsaren! Använd aldrig CD-singlar (CD-skivor med diameter 8 cm) eller CD-skivor med avvikande form ("shape-CD"). Hantera CD:n försiktigt och undvik att repa eller på annat sätt skada CD:n. Lyft CD:n om möjligt bara i kanten. Om en CD skulle bli smutsig, rengör den med en luddfri trasa utan lösningsmedel. Torka alltid av en CD inifrån och utåt Utsätt inte CD:n för direkt solljus och förvara den i ett fodral när den inte ligger i apparaten. Klistra inga etiketter på CD:n. Skriv på CD:n med lämpliga filtpennor. Vi tar inget ansvar för skador på CD-läsaren på grund av olämpliga eller skadade CD-skivor. Använd endast CD-skivor med CompactDisc-logo för bästa möjliga funktion. CDskivor med kopieringsskydd kan leda till problem vid avspelningen. Blaupunkt garanterar inte funktionen vid spelning av kopieringsskyddade CD-skivor! SVENSKA Ställa in volymanpassning av trafikmeddelanden CD 235 08_CalaisMP48_sw.indd 235 11.06.2008 15:18:19 Uhr CD Starta CD-läge Om ingen CD-skiva finns i läsaren, 쏅 lägg in CD:n med den tryckta sidan uppåt i läsaren och skjut in den i CD-facket tills du känner ett visst motstånd. CD-skivan åker då automatiskt in i enheten. CD-symbolen visas i teckenfönstret 6. Observera! Rör inte enheten medan den drar in skivan. CD:n börjar spela. I teckenfönstret 6 visas numret på det aktuella spåret (t.ex. "T12") och speltiden samt information om spår (CD-text). Om det redan ligger en CD-skiva i läsaren, 쏅 tryck på knappen SRC > (ev. flera gånger) tills "CD" visas i teckenfönstret 6. Spelningen av skivan återupptas där den avbröts. Visa spårinformation (CD-text) Om CD:n visar CD-texten, visas informationen en gång för varje spår när spåret startar som löpande text i teckenfönstret 6. Visa spårinformation en gång som löpande text 쏅 Tryck på knappen 5 <. CD-texten för det aktuella spåret visas en gång som löpande text i teckenfönstret 6. Observera! Denna funktion är inte tillgänglig om visning av CD-text som löpande text är avaktiverad (se nästa avsnitt). Aktivera/avaktivera visning av spårinformation som löpande text För att aktivera eller avaktivera visning av spårinformation som löpande text, 쏅 tryck på knappen MENU 7. 쏅 Tryck på eller 8 (ev. flera gånger) tills "SCRL" och den aktuella inställningen "ON" (på) eller "OFF" (av) visas i teckenfönstret 6. 쏅 Tryck på resp. 8, för att avaktivera resp. aktivera löpande text. För att stänga menyn, 쏅 tryck på knappen MENU 7. Vid inställningen "SCRL OFF" visas spårinformation i avsnitt om 8 tecken i teckenfönstret 6. Varje textavsnitt samt spårnummer och speltid visas i kontinuerlig växling med 5 sekunders intervall. Observera! Inställningen "SCRL ON/OFF" fungerar på samma sätt vid visning av MP3-spårinformation (ID3-taggar) i MP3-läge. Välj spår 쏅 Tryck på eller 8, för att växla till föregående eller nästa spår. För att återstarta aktuellt spår från början: Tryck en gång på 8. 236 08_CalaisMP48_sw.indd 236 11.06.2008 15:18:20 Uhr CD Snabbspolning (medhörning) Upprepa spår (RPT) För att snabbt spola framåt eller bakåt 쏅 håll knappen eller 8 intryckt tills du kommer till önskat ställe. 쏅 Tryck på knappen 2 <. "RPT TRK" visas kort i teckenfönstret och symbolen RPT visas. Det aktuella spåret upprepas sedan tills funktionen avaktiveras. 쏅 Tryck på knappen 3 <. I teckenfönstret 6 visas kort "MIX CD" och symbolen MIX visas. De följande spåren väljs slumpvis. Avsluta slumpspelning (MIX) 쏅 Tryck en gång till på knappen 3 <. I teckenfönstret 6 visas kort "MIX OFF" och symbolen MIX slocknar. Spelningen fortsätter på vanligt vis. Presentera spår (SCAN) För att presentera alla spår på CD:n i 10 sekunder, 쏅 tryck på knappen 4 <. I teckenfönstret visas kort "SCAN TRK". Under presentationen blinkar "CD"-visningen. Spårnumret och speltiden för det aktuella spåret samt dess spårinformation visas. Avsluta presentationen SCAN, fortsätt lyssna på spår För att avsluta presentationen, 쏅 tryck en gång till på knappen 4 <. I teckenfönstret visas kort "SCAN OFF". Det aktuella spåret spelas vidare. Avsluta RPT 쏅 Tryck en gång till på knappen 2 <. "RPT OFF" visas kort i teckenfönstret 6 och RPT-symbolen slocknar. Spelningen fortsätter på vanligt vis. Avbryta spelning (PAUSE) 쏅 Tryck på knappen 1 <. I teckenfönstret 6 visas "PAUSE". Återuppta spelning 쏅 Tryck på knapp 1 < under avbrottet. Spelningen fortsätter. Ta ut CD-skiva Observera! Det går att mata ut skivor även om apparaten är avslagen eller om du spelar upp ljud från någon annan källa. 쏅 Tryck på CD-utmatningsknappen 4. CD-skivan matas ut. I teckenfönstret visas nu kort "CD EJECT". Observera! Rör inte enheten medan den för ut skivan! 쏅 Ta ut CD-skivan. CD-symbolen slocknar. SVENSKA Slumpspelning (MIX) 237 08_CalaisMP48_sw.indd 237 11.06.2008 15:18:20 Uhr CD MP3/WMA Observera! Om du inte tar ut den utmatade skivan dras den automatiskt in igen efter ca 10 sekunder. MP3/WMA Med den här bilradion kan du även lyssna på CD-R-skivor och CD-RW-skivor med MP3och WMA-musikfiler. Dessutom kan du ansluta ett USB-minne till USB-gränssnittet (tillval, med C‘n‘C-funktion) och spela MP3/WMA-filer, som är sparade i USB-minnet. Detta kapitel handlar bara om uppspelning av MP3-filer eftersom manövrering bland MP3- och WMA-filer fungerar på samma sätt. I detta kapitel gäller benämningen "MP3-datamedium" både CD-R/ RW och USB-datamedium i form av USBminnen. Observera! • WMA-musikfiler som är försedda med Digital Rights Management (DRM, digitalt kopieringsskydd) från onlinemusiktjänster kan inte spelas i den här apparaten. • Återgivningen av WMA-filer kan bara garanteras om de har skapats med Windows Media-Player version 8. Förbereda ett MP3-datamedium Förbereda MP3-CD Kombinationen CD-brännare, CD-brännarprogramvara och skrivbara CD-skivor kan leda till problem vid spelningen av skivorna. Om problem med hembrända CD-skivor uppstår, bör du byta till ett annat märke eller annan färg på skivorna du använder. CD-skivans format måste motsvara ISO 9660 nivå 1 eller nivå 2 eller Joliet. Inga andra format kan spelas på ett tillförlitligt sätt. 238 08_CalaisMP48_sw.indd 238 11.06.2008 15:18:20 Uhr MP3/WMA D01 A D02 D03 T001 T002 T003 T004 T005 T001 T002 T003 T004 T005 T006 D04 T001 T002 T003 T004 T005 T006 T007 T008 T009 T010 T011 B A Mappar B Spår · Filer Varje mapp kan namnges med PC:n. Mappens namn kan visas i teckenfönstret. Varje mapp och varje spår resp. fil kan namnges i datorn med hjälp av CD-brännarens programvara. Hur du gör detta står i programvarans bruksanvisning. Observera! • Undvik specialtecken (liksom å, ä, ö) när du namnger mappar och spår/filer. • Om du använder filnamn med mer än 16 tecken (gällande ".MP3" resp. ".WMA") minskar max antal tillåtna spår och mappar. Om du vill att dina filer ska ligga i en viss ordning bör du lagra filerna på datamediet i den ordning du senare vill spela dem. Apparaten spelar upp filerna i den ordning som du har sparat dem i datamediet. För att kunna spela upp filerna på denna apparat måste MP3-filerna ha filändelsen ".MP3" och WMA-filerna måste ha filändelsen ".WMA". Observera! För att garantera störningsfri spelning, • namnge inte andra än verkliga MP3-filer med tillägget ".MP3" för att sedan försöka spela dem. Dessa filer är ogiltiga och ignoreras när skivan spelas. • använd inga "blandade" CD-skivor med icke-MP3-filer och MP3-filer (under MP3-spelningen läser apparaten endast MP3-filer). • använd inga mix-mode-CD med CDljudspår och MP3-spår. Om du försöker att spela en mix-mode-CD, kommer bara ljudspåren att spelas. SVENSKA När du skapar (kodar) MP3-/WMA-filer från ljudfiler bör du använda en bitrate mellan 32 till 320 kbps för MP3-filer en bitrate mellan 32 och 192 kbps för WMA-filer. Denna apparat stöder upp till 252 mappar och upp till 255 filer per mapp. När det gäller en CD får den totalt innehålla max 512 mappar och filer. Mapparna och spåren på CD:n kan väljas och spelas upp separat. 239 08_CalaisMP48_sw.indd 239 11.06.2008 15:18:20 Uhr MP3/WMA Förbereda en USB-enhet För att apparaten ska känna igen USB-enheten måste den specificeras som massminne (Mass Storage Device), vara formaterat i filsystemet FAT16 eller FAT32 och innehålla MP3- eller WMA-filer. På en USB-enhet kan du skapa max 1500 filer (mappar och spår). Mapparna och spåren kan väljas separat med denna apparat. Om du använder filnamn med mer än 24 tecken (gällande ".MP3" resp. ".WMA") minskar max antal tillåtna filer. Blaupunkt kan inte garantera att alla USBenheter som finns på marknaden fungerar felfritt. ID3-taggar MP3-spår kan innehålla extra information som till exempel artist, titel och album (ID3taggar). Denna apparat kan visa ID3-taggar av version 1 och version 2 i teckenfönstret. Starta MP3 från Blaupunkt) på baksidan av apparaten (grupp C3). Gränssnittets USB-kabel kan du sedan förvara i exempelvis handskfacket eller ett lämpligt ställe i mittkonsolen. Observera! • När du ansluter Blaupunkt-USBgränssnittet till apparaten, måste AUX-ingången ställas in för detta. Läs mer i avsnittet "Ställa in AUX-ingång" i kapitlet "Externa ljudkällor". • Slå alltid av apparaten innan du ansluter eller kopplar bort USB-enheten så att enheten alltid registreras resp. stoppas på ett korrekt sätt. 쏅 Anslut USB-datamediet till USB-gränssnittet med hjälp av USB-kabeln. Så snart ett USB-datamedium är anslutet, kan det väljas med knappen SRC >. "USB" visas då i teckenfönstret. Visning av spårinformation (CD-taggar) Starta MP3-uppspelning från CD En skiva med MP3-filer startas som en vanlig CD. Mer information finns i avsnittet "Starta CD-läge" i kapitlet "CD". I teckenfönstret 6 visas numret på det aktuella spåret (t.ex. "T12") och speltiden samt information om spår (ID3-taggar) resp. filnamn. Vid växling till en annan mapp, visas kort mappnumret (t.ex. "DIR 02"). Om MP3-datamediet visar ID3-taggar, visas informationen en gång för varje spår när spåret startar som löpande text i teckenfönstret 6. Om inga ID3-taggar har sparats med MP3-filerna, visas i stället filnamnet. Ansluta USB-enhet och spela upp MP3filer För att kunna ansluta ett USB-datamedium (t.ex. USB-minne eller USB-hårddisk), måste du ansluta USB-gränssnittet (tillval Visa spårinformation en gång som löptext 쏅 Tryck på knappen 5 <. ID-taggarna för det aktuella spåret visas en gång som löpande text i teckenfönstret 6. Observera! Läs mer om att spara ID3-taggar i anvisningen för PC-MP3-programvaran eller programvaran för brännaren. 240 08_CalaisMP48_sw.indd 240 11.06.2008 15:18:20 Uhr MP3/WMA Välj mapp För att flytta uppåt eller nedåt till en annan mapp, 쏅 tryck på knappen eller 8. Observera! • Apparaten ignorerar alla mappar som inte innehåller mp3-filer. • Apparaten hanterar alla mappar och undermappar som om de låg på samma nivå. Genom upprepade tryckningar på eller 8 kan du även på det sättet öppna alla undermappar. Välja spår/fil För att flytta nedåt eller uppåt till annat spår (fil) i aktuell mapp, 쏅 tryck på eller 8. För att återstarta aktuellt spår från början, tryck en gång på 8. Snabbsökning För att snabbt spola framåt eller bakåt 쏅 håll knappen eller 8 intryckt tills du kommer till önskat ställe. Observera! I USB-läge stoppar snabbsökningen bakåt i början av det aktuella spåret. Spela titlar i slumpvis ordningsföljd (MIX) Om du vill låta slumpen avgöra i vilken ordningsföljd spåren i aktuell mapp ska spelas, 쏅 tryck på knappen 3 < (ev. flera gånger) tills "MIX DIR" eller "MIX FLD" visas i teckenfönstret 6. MIX-symbolen visas i teckenfönstret 6. Om du vill att alla spår på MP3-datamediet ska spelas i slumpvis ordningsföljd, 쏅 tryck på knappen 3 < (ev. flera gånger) tills "MIX ALL" visas i teckenfönstret 6. MIX-symbolen visas i teckenfönstret 6. Avsluta slumpspelning (MIX) För att avsluta spelning i slumpvis ordningsföljd, 쏅 tryck på knappen 3 < (ev. flera gånger) tills "MIX OFF" visas i teckenfönstret 6. MIX-symbolen i teckenfönstret 6 slocknar. Presentera spår (SCAN) För att presentera alla spår i MP3-datamediet i stigande ordningsföljd i vardera ca. 10 sekunder, 쏅 tryck på knappen 4 < (ev. flera gånger) tills "SCAN TRK" visas i teckenfönstret 6. SVENSKA Observera! Denna funktion är inte tillgänglig, när visningen av spårinformation i form av löpande text är avaktiverad. Lär om detta i kapitlet "CD", avsnittet "Visa spårinformation (CD-text)" avsnittet "Aktivera/avaktiva visning av spårinformation som löpande text". 241 08_CalaisMP48_sw.indd 241 11.06.2008 15:18:20 Uhr MP3/WMA Under presentationen blinkar visningen "MP3" eller "USB". För att presentera alla spår i den aktuella mappen i USB-läge, 쏅 tryck på knappen 4 < (ev. flera gånger) tills "SCAN FLD" visas i teckenfönstret 6. Under presentationen blinkar "USB"-visningen. Avbryta spelning (PAUSE) 쏅 Tryck på knappen 1 <. I teckenfönstret 6 visas "PAUSE". Återuppta spelning 쏅 Tryck på knapp 1 < under avbrottet. Spelningen fortsätter. Avsluta SCAN Om du vill avbryta presentationen, 쏅 tryck på knappen 4 < (ev. flera gånger) tills "SCAN OFF" visas i teckenfönstret 6. Det spår som just presenteras fortsätter att spela. Upprepa enskilda spår eller hela mappar (REPEAT) För att upprepa aktuellt spår, 쏅 tryck på knappen 2 < (ev. flera gånger) tills "RPT TRK" visas i teckenfönstret 6. RPT-symbolen visas i teckenfönstret 6. För att repetera aktuell mapp, 쏅 tryck på knappen 2 < (ev. flera gånger) tills "RPT DIR" eller "RPT FLD" visas i teckenfönstret 6. RPT-symbolen visas i teckenfönstret 6. Avsluta upprepning (REPEAT) För att avsluta repetitionen, 쏅 tryck på knappen 2 < (ev. flera gånger) tills "RPT OFF" visas i teckenfönstret 6. RPT-symbolen i teckenfönstret 6 slocknar. 242 08_CalaisMP48_sw.indd 242 11.06.2008 15:18:21 Uhr CD-växlare CD-växlare Välja CD-skiva Till apparaten kan som tillval anslutas Blaupunkt-CD-växlare CDC A08 T och IDC A09 (grupp C3 på apparatens baksida). För att flytta uppåt eller nedåt till en annan CD-skiva, 쏅 tryck på knappen eller 8. Observera! • När du ansluter en CD-växlare till apparaten, måste AUX-ingången ställas in för detta. Läs mer i avsnittet "Ställa in AUX-ingång" i kapitlet "Externa ljudkällor". • Information om hantering av CD-skivor, hur man lägger i skivorna och allmänt hanterar CD-växlaren, finns i bruksanvisningen för CD-växlaren. Starta CD-växlare 쏅 Tryck på knappen SRC > (ev. flera gånger) tills "CHANGER" visas i teckenfönstret 6. Spelningen startar med den första spelbara CD-skivan i CD-växlaren. I teckenfönstret 6 visas numret på den aktuella CD:n (t.ex. "D02") och på det aktuella spåret (t.ex. "T07") samt speltiden. Välj spår För att byta till ett annat spår på aktuell CDskiva, 쏅 tryck på knappen eller 8. Snabbspolning (medhörning) För att snabbt spola framåt eller bakåt 쏅 håll knappen eller 8 intryckt tills du kommer till önskat ställe. Spela enstaka spår eller hela CDskivor flera gånger (RPT) För att upprepa aktuellt spår, 쏅 tryck på knappen 2 < (ev. flera gånger) tills "RPT TRK" visas i teckenfönstret 6. RPT-symbolen visas i teckenfönstret 6. För att upprepa aktuell CD-skiva, 쏅 tryck på knappen 2 < (ev. flera gånger) tills "RPT CD" visas i teckenfönstret 6. RPT-symbolen visas i teckenfönstret 6. Avsluta upprepning (REPEAT) För att avsluta repetitionen, 쏅 tryck på knappen 2 < (ev. flera gånger) tills "RPT OFF" visas i teckenfönstret 6. RPT-symbolen i teckenfönstret 6 slocknar. SVENSKA Observera! CD-växlaren får i normala fall sin strömförsörjning från apparaten (12 V driftsspänning). Om CD-växlaren CDC A 08 T (24 volt) ansluts, måste spänningsmatningen i stickkontakten på CD-växlarens anslutningskabel lossas (grupp C3/pin 15). CD-växlaren måste försörjas med en egen 24 volts driftsspänning. 243 08_CalaisMP48_sw.indd 243 11.06.2008 15:18:21 Uhr CD-växlare Spela titlar i slumpvis ordningsföljd (MIX) Om Du vill låta en slumpgenerator avgöra i vilken ordningsföljd den aktuella skivans spår ska spelas, 쏅 tryck på knappen 3 < (ev. flera gånger) tills "MIX CD" visas i teckenfönstret 6. MIX-symbolen visas i teckenfönstret 6. Om du vill att spåren från samtliga skivor i magasinet ska spelas i slumpvis ordningsföljd, 쏅 tryck på knappen 3 < (ev. flera gånger) tills "MIX ALL" visas i teckenfönstret 6. MIX-symbolen visas i teckenfönstret 6. Avsluta SCAN Om du vill avbryta presentationen, 쏅 tryck en gång till på knappen 4 <. "SCAN OFF" visas kort i teckenfönstret 6. Det spår som just presenteras fortsätter att spela. Avbryta spelning (PAUSE) 쏅 Tryck på knappen 1 <. "PAUSE" visas i teckenfönstret 6. Återuppta spelning 쏅 Tryck på knapp 1 < under avbrottet. Spelningen fortsätter. Avsluta slumpspelning (MIX) För att avsluta spelning i slumpvis ordningsföljd, 쏅 tryck på knappen 3 < (ev. flera gånger) tills "MIX OFF" visas i teckenfönstret 6. MIX-symbolen i teckenfönstret 6 slocknar. Presentera samtliga spår på alla skivor (SCAN) För att presentera alla spår i en ilagd CD i stigande ordningsföljd i vardera ca. 10 sekunder, 쏅 tryck på knappen 4 <. "SCAN TRK" visas kort i teckenfönstret 6. Under presentationen blinkar CD-numret. 244 08_CalaisMP48_sw.indd 244 11.06.2008 15:18:21 Uhr IR-fjärrkontroll IR-fjärrkontroll RC 10 P Funktioner i frjärrkontrollen Du kan styra de viktigaste funktionerna i apparaten med IR-fjärrkontrollen (tillval). Allmänt: Fjärrkontrollmottagare Knapp Infraröd-mottagaren 9 för fjärrkontrollen sitter i apparatens kåpa. Innan fjärrkontrollen används, måste mottagaren vara påslagen: 쏅 Tryck på knappen MENU 7. 쏅 Tryck på eller 8 (ev. flera gånger) tills "IR" och den aktuella inställningen "ON" (på) eller "OFF" (av) visas i teckenfönstret 6. 쏅 Tryck på resp. 8, för att koppla till och från IR. För att stänga menyn, 쏅 tryck på knappen MENU 7. ON H Till-/frånkoppling av apparaten (tryck längre) Mute (kort tryckning) Stänga menyn SRC @ Koppla om källa V+ B Höja volymen V- A Sänka volymen OK E Funktion G Öppna och stänga menyn E Välja menyalternativ C Välja menyalternativ F Ändra menyinställning D Ändra menyinställning I radioläge: Knapp F C B G H A @ Funktion F Öppna lagrad station D Välja väglängdsområde/ minnesnivå E Sökning uppåt C Sökning nedåt I CD-läge: Knapp SVENSKA D Funktion F Välja nästa spår D Välja föregående spår, snabbsökning nedåt 245 08_CalaisMP48_sw.indd 245 11.06.2008 15:18:21 Uhr IR-fjärrkontroll Förförstärkarutgång CD-växlarläge Knapp Förförstärkarutgång Funktion F Spela nästa spår D Spela föregående spår E Spela nästa CD C Spela föregående CD MP3-läge Knapp Funktion F Spela nästa spår D Spela föregående spår E Spela nästa mapp C Spela föregående mapp Du kan ansluta en förstärkare till apparaten för att driva en subwoofer. För att kunna göra detta skall förstärkaren anslutas till grupp C1 på apparatens baksida. Subwooferns nivå kan ställas in i audio-menyn: 쏅 Tryck på knappen AUD :. 쏅 Tryck på knappen eller 8 ev. flera gånger tills "SUB WOOF" visas. Efter ca. 2 sekunder visas "SUBW" och den aktuella inställningen i teckenfönstret 6. 쏅 Tryck på knappen resp. 8, för att ställa in nivån på subwoofern på mellan 0 och 7. Observera: Du behöver inte vänta på visningen av den aktuella inställningen för att kunna ändra den genom att trycka på knappen resp. 8. För att stänga menyn, 쏅 tryck på knappen AUD :. 246 08_CalaisMP48_sw.indd 246 11.06.2008 15:18:21 Uhr Externa ljudkällor Olika typer av externa ljudkällor kan anslutas till apparaten via AUX-ingången: AUX-ingången måste ställas in för den för tillfället anslutna externa ljudkällan: • Inställning "AUX" för externa ljudkällor som t.ex. bärbara CD-spelare, MiniDisc-spelare eller MP3-spelare. • Inställning "CDC" för Blaupunkt-CDväxlare CDC A 08 T och IDC A 09. • Inställning "USB" för USB-gränssnittet från Blaupunkt. För inställning av AUX-ingången, läs följande avsnitt "Ställa in AUX-ingång". Observera! För att ansluta en extern ljudkälla behöver du även en passande adapterkabel Denna kabel (Blaupunkt-nr 7 607 897 093) kan du köpa hos närmaste Blaupunkt-återförsäljare. Ställa in AUX-ingång 쏅 Tryck på knappen MENU 7. 쏅 Tryck på eller 8 (ev. flera gånger) tills "SRC SEL" visas. Efter ca. 2 sekunder visas "SRC" och den aktuella inställningen "CDC", "USB" eller "AUX" i teckenfönstret 6. 쏅 Tryck på eller 8, för att välja en annan inställning. Observera! I menyn är ordningsföljden för inställningarna "CDC" – "USB" – "AUX": • Vid den aktuella inställningen "CDC" kan du välja inställningen "USB" genom att trycka på knappen 8. • Vid den aktuella inställningen "USB" kan du välja inställningen "CDC" genom att trycka på knappen 8 eller inställningen "AUX" genom att trycka på knappen 8. • Vid den aktuella inställningen "AUX" kan du välja inställningen "USB" genom att trycka på knappen 8. Varje gång en inställning är ändrad, kopplas apparaten automatiskt från. För att växla mellan inställningarna "CDC" och "AUX", måste du därför först välja inställningen "USB" och koppla till apparaten igen efter den automatiska frånkopplingen. Upprepa därefter inställningsförloppet, för att komma till önskad inställning "AUX" eller "CDC". Anvisningen "AUTO SWITCH OFF IN 10 SECONDS" visas. Efter ca 10 sekunder kopplas apparaten från automatiskt. 쏅 Koppla till apparaten igen med på-/ avknappen 3. Apparaten kopplas till i radioläge med den valda inställningen. Observera! Om du har valt AUX-inställningen, kan du välja AUX-ingången med knappen SRC >. "AUX" visas då i teckenfönstret. Om du har valt CDC- eller USB-inställningen, kan du bara välja ljudkällan med knappen SRC >, om en motsvarande apparat (CD-växlare eller USBgränssnitt) är ansluten. SVENSKA Externa ljudkällor 247 08_CalaisMP48_sw.indd 247 11.06.2008 15:18:21 Uhr Externa ljudkällor Ställa in nivå på AUX-ingången När du har ställt in AUX-ingången för anslutning av en extern ljudkälla på "AUX", kan du anpassa nivån i den externa ljudkällan till nivån i ljudkällan som tillhör apparaten (som t.ex. CD och radio). Observera! Du kan bara ställa in nivån på AUX-ingången, om AUX är vald som ljudkälla. 쏅 Tryck vid behov på knappen SRC > (ev. flera gånger) tills "AUX" visas i teckenfönstret. 쏅 Tryck på knappen MENU 7. 쏅 Tryck på eller 8 (ev. flera gånger) tills "GAIN" och den aktuella inställningen visas. 쏅 Tryck på eller 8, för att ställa in nivåanpassningen mellan –9 och +9. För att stänga menyn, 쏅 tryck på knappen MENU 7. Fabriksinställningar Återställa fabriksinställningar (RESET) Du har möjlighet att återställa apparatens inställningar till fabriksinställningar. 쏅 Håll knappen AUD : intryckt i minst 10 sekunder. En ljudsignal hörs och i teckenfönstret 6 visas kort "RESET". Alla meny- och ljudmenyinställningar återställs till fabriksinställningarna. Observera! Stationer som är lagrade på stationsknapparna raderas inte. 248 08_CalaisMP48_sw.indd 248 11.06.2008 15:18:22 Uhr Tekniska data Tekniska data Driftsspänning 24 Volt Förstärkare Uteffekt: Line-utgång: Aux-ingång: 2 x 20 Watt sinus vid 4 Ohm 2 x 2,0 Volt eff 2 x 2,0 Volt eff Tuner Europeiska våglängdsintervall: FM: 87,5 - 108 MHz MV: 531 - 1602 kHz LV: 153 - 279 kHz Våglängdsområden Amerika: FM: 87,7 - 107,9 MHz AM: 530 - 1710 kHz FM - ljudfrekvensomfång: 30 -15 000 Hz CD Ljudfrekvensomfång: SVENSKA 20 - 20 000 Hz Med förbehåll för ändringar! 249 08_CalaisMP48_sw.indd 249 11.06.2008 15:18:22 Uhr Kumanda elemanları 1 Ses seviyesi ayarlayıcısı < Tuş bloğu 1 - 6 2 BND tuşu Kısa basma: Hafıza düzeyi veya frekans bandı seçimi Uzun basma: Travelstore fonksiyonunun başlatılması (FMT veya MWT/LWT) = RDS tuşu RDS konfor fonksiyonunun açılması/kapatılması 3 Açma/kapama tuşu Kısa basma: Cihazın açılması Kullanımda: Ses kapatma modu (Mute) Uzun basma: Cihazın kapatılması > SRC tuşu Radyo ve (monte edilmiş, bağlı ise veya açık ise) CD, MP3, CD değiştirici ve AUX kaynakları arasında geçiş. ? Code LED 4 CD çıkartma düğmesi 5 CD yuvası 6 Ekran 7 MENU tuşu Ana ayarlar için menünün çağrılması. 8 Çok fonksiyonlu tuş 9 IR uzaktan kumandası için enfraruj alıcısı (opsiyonel) : AUD tuşu Kısa basma: Basların, tizlerin, balansın ve fader ayarları için ve ses şiddetinin açılması için audio menüsü Uzun basma (10 saniye): Fabrika ayarlarını tekrar oluşturulması ; TA tuşu Trafik yayını için önceliğinin açılması/ kapatılması Devam eden bir trafik duyurusunun iptal edilmesi 250 09_CalaisMP48_tr.indd 250 11.06.2008 15:19:00 Uhr İçindekiler Akustik ......................................... 258 Tizlerin ayarlanması...................... 258 Basların ayarlanması .................... 258 Orta seslerin ayarlanması .............. 259 Sol/sağ ses seviyesi dağılımı ayarı (BAL) ......................................... 259 Ön/arka ses seviyesi dağılımı ayarı (FAD) ......................................... 259 Saat .............................................. 260 Saati gösterme ............................ 260 Saatin ayarlanması ....................... 260 12/24 saat modu seçimi ............... 260 Zaman dilimi ayarı (TIMEZONE)...... 260 Radyo işletimi................................ 261 Radyo işletiminin açılması ............. 261 RDS konfor fonksiyonları (AF, REG) 261 Frekans bandı/hafıza düzeyi seçme 261 İstasyon ayarı .............................. 262 İstasyon kaydı ............................. 262 Kayıtlı istasyonların çağrılması ....... 263 Alınabilen istasyonların kısa süreli çalınması (BANDSCAN) ................ 263 Program tipi (PTY) ....................... 263 Arızaya bağlı tiz düşüşü (HICUT) ..... 264 Radyo metninin açılması/ kapatılması ................................. 264 Trafik yayını .................................. 265 Trafik yayını önceliğini açma/ kapama ...................................... 265 Trafik duyuruları için ses seviyesini otomatik artırma ayarlanmışsa ....... 265 Trafik duyurularının gizlenmesi....... 265 TÜRKÇE Önemli bilgiler ............................... 253 Kullanım alanı .............................. 253 Trafik emniyeti ............................. 253 Uzaktan kumanda (opsiyonel)........ 253 CD değiştirici (opsiyonel) .............. 253 USB arabirimi (opsiyonel) ............. 253 Eski cihazın imhası ....................... 253 Alarm CODE .................................. 254 Kod sorgulamasının açılması/ kapatılması (CODE) ..................... 254 Gerilim kesintisinden sonra kod numarası girilmelidir .................... 255 Açma/kapama ............................... 255 Açma/kapama tuşu ile açma/ kapama ...................................... 255 Araç kontağı ile açma/kapama ....... 255 CD bölümüyle açmak .................... 255 Kapatma zamanını ayarlama .......... 256 Telefon üzerinden açma (opsiyonel) 256 IR uzaktan kumanda RC 10 P ile açmak (opsiyonel) ....................... 256 Ses seviyesini ayarlama ................. 256 Ses kapatma modu (MUTE) ........... 256 Telefon Audio/Navigasyon Audio .... 256 Onay tonunun (BEEP) açılması/ kapatılması ................................. 257 Maksimum açma ses seviyesi ayarı (ON VOL).................................... 257 Gürültüye bağlı ses seviyesi uyarlama ayarı (GALA) .................. 257 251 09_CalaisMP48_tr.indd 251 11.06.2008 15:19:01 Uhr İçindekiler CD işletimi .................................... 266 CD sürücüsünde arıza tehlikesi! ..... 266 CD işletiminin başlatılması ............ 266 Parça bilgileri göstergesi (CD metni).................................. 266 Parça seçimi ............................... 267 Hızlı arama işlemi (duyulur şekilde) 267 Parçanın rastgele sırayla çalınması (MIX) ......................................... 267 Parçanın çalınması (SCAN)............ 267 Parçanın tekrarlanması (RPT) ........ 267 İşletimi kesmek (PAUSE (ara verme)) .................... 268 CD'yi çıkarma .............................. 268 MP3/WMA işletimi......................... 268 Bir MP3 veri taşıyıcısının hazırlığı ... 268 MP3 işletiminin başlatılması .......... 270 Parça bilgileri göstergesi (ID3 taglar) ................................. 270 Dizin seçimi ................................ 271 Parçaların/dosyaların seçilmesi...... 271 Hızlı arama işlemi ......................... 271 Parçanın rastgele sırayla çalınması (MIX) ......................................... 271 Parçanın çalınması (SCAN)............ 271 Her bir parçanın ayrı olarak veya dizinin tamamının tekrar çalınması (REPEAT) ................................... 272 İşletimi kesmek (PAUSE (ara verme)) .................... 272 CD değiştirici işletimi ..................... 273 CD değiştirici işletiminin başlatılması ................................ 273 CD seçimi ................................... 273 Parça seçimi ............................... 273 Hızlı arama işlemi (duyulur şekilde) 273 Her bir parçanın ayrı olarak veya tüm CD'nin tekrar çalınması (RPT) .. 273 Parçanın rastgele sırayla çalınması (MIX) ......................................... 274 Bütün CD'lerdeki parçaların tamamının çalınması (SCAN) ......... 274 İşletimi kesmek (PAUSE (ara verme)) .................... 274 IR uzaktan kumandası RC 10 P ........ 275 Uzaktan kumanda alıcısı ................ 275 Uzaktan kumandanın fonksiyonları . 275 Ön amplifikatör çıkışı ..................... 276 Harici audio kaynakları................... 277 AUX girişinin ayarlanması .............. 277 AUX girişinin seviyesinin ayarlanması ................................ 277 Fabrika ayarlarına geri dön (RESET) ........................................ 278 Teknik veriler ................................ 279 İşletme gerilimi ............................ 279 Amplifikatör ................................ 279 Radyo alıcısı ................................ 279 CD ............................................. 279 ISO bağlantısı ................................ 281 252 09_CalaisMP48_tr.indd 252 11.06.2008 15:19:01 Uhr Önemli bilgiler Önemli bilgiler USB arabirimi (opsiyonel) Cihazınızı çalıştırmadan önce bu kullanım kılavuzunu ayrıntılı şekilde okuyunuz ve cihazı iyice tanıyınız. Daha sonra gerekli olabileceği için bu kullanım kılavuzunu aracınızda muhafaza ediniz. MP3/WMA dosyalarını bir USB veri taşıyıcıdan çalmak için Blaupunkt USB arabirimi bağlayabilirsiniz. USB arabirimi, aksesuar (Blaupunkt No. 7 607 541 576) olarak alınabilir. Kullanım alanı Eski cihazın imhası Cihaz, 24 V elektrik gerilimine sahip ticari araçlarda kullanılmak için tasarlanmıştır ve bir 1-DIN-kanalına monte edilmelidir. Eski cihazınızı lütfen evdeki çöpe atmayınız! Eski cihazınızın imhası için mevcut geri verme veya toplama sistemlerini kullanınız. Trafik emniyeti Trafik emniyeti en önemli faktördür. Cihazınızı sadece trafik şartları buna izin veriyorsa kullanınız. Sürüşe başlamadan önce cihazı iyice tanıyınız. Araçta polis, itfaiye ve kurtarma hizmetlerinin sesli ikaz sinyalleri zamanında algılanabilmelidir. Bu nedenle sürüş esnasında programınızı uygun bir ses seviyesinde dinleyiniz. Uzaktan kumanda (opsiyonel) RC 10 P uzaktan kumandasıyla en önemli fonksiyonlar uzaktan kumanda edilebilir. Enfraruj bir uzaktan kumanda aksesuar (Blaupunkt No. 7 607 591 512) olarak alınabilir. CD değiştirici (opsiyonel) TÜRKÇE CDC A08 T (Blaupunkt No. 7 607 274 002) veya IDC A09 (Blaupunkt No. 7 607 274 005) CD değiştiricileri bağlayabilirsiniz. CD değiştirici aksesuar olarak alınabilir. 253 09_CalaisMP48_tr.indd 253 11.06.2008 15:19:01 Uhr Alarm Alarm CODE Cihazınız hırsızlığa karşı koruma amacıyla dört haneli bir kod numarasıyla donatılmıştır. Cihaz aracın işletme geriliminden her ayrıldığında bu numaranın yeniden girilmesi gerekir. Kod sorgulaması fabrika ayarlarında kapatılmıştır, ama açılabilir. Uyarı: Hem cihaz hem de araç kontağı kapalı olduğunda kod sorgulaması açıksa Code LED ? yanıp sönmeye başlar. Kod numarasını cihazınızın radyo kitapçığında bulabilirsiniz. Uyarı: Radyo kitapçığını asla araçta muhafaza etmeyiniz! Kod sorgulamasının açılması/ kapatılması (CODE) 쏅 MENU 7 tuşuna basınız. tuşuna veya 8 tuşuna yeterin쏅 ce çok defa bastığınızda 6 ekranda "CODE" güncel ayarının "ON" (açık) veya "OFF" (kapalı) olduğu görüntülenecektir. veya 8 tuşuna basınız. 쏅 Ekranda 6 "0000" gösterilir. Kodu giriniz: da kapatırsanız yeniden açtıktan sonra tam bir saat beklemeniz gerekecektir. 쏅 İstasyonu tuşuna 1 < yeterince çok defa basarsanız 6 ekranda kod numaranızın ilk rakamı görünür. 쏅 İstasyonu tuşuna 2 < yeterince çok defa basarsanız 6 ekranda kod numaranızın ikinci rakamı görünür. 쏅 İstasyonu tuşuna 3 < yeterince çok defa basarsanız 6 ekranda kod numaranızın üçüncü rakamı görünür. 쏅 İstasyonu tuşuna 4 < yeterince çok defa basarsanız 6 ekranda kod numaranızın dördüncü rakamı görünür. 쏅 Ekranda 6 doğru kod numarası gösterildiğinde istasyon tuşunu 5 < 2 saniyeden uzun süre basılı tutunuz. Ekranda 6 yeniden "CODE" ve güncel ayar "ON" (açık) veya "OFF" (kapalı) gösterilir. 쏅 Kod sorgulamasını açmak veya kapatmak için tuşuna veya 8 tuşuna basınız. Menüden çıkmak için, 쏅 MENU 7 tuşuna basınız. Uyarı: Yanlış kod numarası girerseniz ekranda 6 yine "0000" gösterilir. Bundan sonra 2 defa daha giriş yapabilirsiniz. Üçüncü hatalı girişten sonra cihaz 1 saat süreyle bloke edilir. Bu süre boyunca 6 ekranda "WAIT 1HR" mesajı gösterilir. Cihazı bu bekleme süresi sırasın- 254 09_CalaisMP48_tr.indd 254 11.06.2008 15:19:01 Uhr Alarm Gerilim kesintisinden sonra kod numarası girilmelidir 쏅 Cihazı açınız. Ekranda 6 önce "CODE", ardından "0000" gösterilir. Kodu girebilirsiniz: Uyarı: Yanlış kod numarası girerseniz ekranda 6 yine "0000" gösterilir. Bundan sonra 2 defa daha giriş yapabilirsiniz. Üçüncü hatalı girişten sonra cihaz 1 saat süreyle bloke edilir. Bu süre boyunca 6 ekranda "WAIT 1HR" mesajı gösterilir. Cihazı bu bekleme süresi sırasında kapatırsanız yeniden açtıktan sonra tam bir saat beklemeniz gerekecektir. 쏅 Kod numarasını, "Kod sorgulamasının açılması/kapatılması" bölümünde tarif edildiği gibi giriniz. 쏅 Ekranda 6 doğru kod numarası gösterildiğinde istasyon tuşunu 5 < 2 saniyeden uzun süre basılı tutunuz. Cihaz açılır. Açma/kapama Açma/kapama Cihazın açılması/kapatılması için farklı seçenekler bulunur. Açma/kapama tuşu ile açma/ kapama 쏅 Cihazı açmak için açma/kapama tuşuna 3 basınız. 쏅 Kapatmak için açma/kapama 3 tuşunu iki saniyeden uzun süre basılı tutunuz. Uyarı: Araç akümülatörünü korumak için araç kontağı kapalıyken cihaz otomatik olarak ayarlanabilir bir süre sonunda kapatılır (bakınız bu bölümdeki "Kapatma zamanını ayarlama" başlığı). Araç kontağı ile açma/kapama Cihaz, araç kontağı ile bağlanmışsa ve açma/ kapatma tuşu 3 ile kapatılmamışsa kontak vasıtasıyla açılabilir veya kapatılabilir. CD bölümüyle açmak TÜRKÇE CD bölümüyle açmak için, 쏅 bir CD'yi yazılı tarafı üstte olacak şekilde kuvvet harcamadan bir direnç fark edinceye kadar CD 5 yuvasına itiniz. CD otomatik olarak içeri alınır ve alet CD işletiminde çalışmaya başlar. 255 09_CalaisMP48_tr.indd 255 11.06.2008 15:19:01 Uhr Açma/kapama Ses seviyesi Kapatma zamanını ayarlama Ses seviyesini ayarlama 쏅 MENU 7 tuşuna basınız. tuşuna veya 8 tuşuna yeterin쏅 ce çok defa basarak "HOUR" ve güncel ayarın ekranda 6 gösterilmesini sağlayınız. tuşuyla veya 8 tuşuyla kapan쏅 ma zamanını 5 dakikalık adımlara 5 ile 60 dakika arasında bir değere ayarlayabilirsiniz. Menüden çıkmak için, 쏅 MENU 7 tuşuna basınız. Sistem ses seviyesi, 0 (kapalı) ile 32 (maksimum) kademeleri arasında ayarlanabilir. 쏅 Sistem ses seviyesini artırmak için ses seviyesi ayarlayıcısını 1 sağa çeviriniz. 쏅 Sistem ses seviyesini azaltmak için ses seviyesi ayarlayıcısını 1 sola çeviriniz. Telefon üzerinden açma (opsiyonel) Cihaz kapalıyken telefon devreye alınırsa, cihaz tekrar açılır. Telefon kapatıldıktan sonra cihaz tekrar otomatik olarak kapanır. Bunun için ön koşul telefonun cihaz ile düzgün biçimde bağlanmasıdır. IR uzaktan kumanda RC 10 P ile açmak (opsiyonel) 쏅 Açmak için ON H tuşuna basınız, bu tuş RC 10 P IR uzaktan kumandası üzerindedir. Uyarı: IR uzaktan kumandasını kullanabilmeniz için cihazın IR alıcısı açık olmalıdır. Bunun için "IR uzaktan kumandası RC 10 P" bölümündeki "Uzaktan kumanda alıcısı" başlığını okuyunuz. Ses kapatma modu (MUTE) İsterseniz sistem ses seviyesini ani olarak kapatabilirsiniz (Mute). 쏅 3 tuşuna kısa süreyle basınız. Mute fonksiyonun kaldırılması Önceki ses seviyesini yeniden aktifleştirmek için, 쏅 3 tuşuna kısa süreyle yeniden basınız. Telefon Audio/Navigasyon Audio Telefon işletimi sırasında ses kapatma modu Araç radyonuz bir mobil telefon veya navigasyon sistemiyle bağlantılı ise çağrı geldiğinde veya navigasyon sesli uyarısı durumunda araç radyosunun sesi kapatılır. Konuşma ya da sesli uyarı, araç radyosu hoparlörleri üzerinden duyulur. Bunun için mobil telefon veya navigasyon sistemi araç radyosuna bağlanmış olmalıdır (cihaz arka tarafındaki hücre C2). Araç radyonuzda hangi navigasyon sisteminin kullanılabileceğini Blaupunkt yetkili satıcısından öğrenebilirsiniz. Bir çağrı geldiğinde veya navigasyon sesli bir uyarı başlattığında ekranda "PHONE" görüntülenir. 256 09_CalaisMP48_tr.indd 256 11.06.2008 15:19:01 Uhr Ses seviyesi Uyarı: tuşuna veya 8 tuşuna basarak değişiklik yapmak için güncel ayarın ekranda gösterilmesini beklemenize gerek yoktur. Menüden çıkmak için, 쏅 MENU 7 tuşuna basınız. Uyarı: Ses seviyesini telefon konuşmasın sırasında veya bir navigasyon sesli uyarısı sırasında da ses seviyesi ayarlayıcısıyla 1 ayarlayabilirsiniz. Ayarlanan ses seviyesi otomatik olarak kaydedilir. Onay tonunun (BEEP) açılması/ kapatılması Bir tuşa uzun süre basmak gibi belirli bazı aksiyonlar sonucunda bir onay tonu (Beep) duyulur. Bu onay tonunu kapatabilirsiniz: 쏅 MENU 7 tuşuna basınız. veya 8 tuşuna yeterince çok 쏅 defa bastığınızda ekranda 6 "BEEP" ve güncel ayarın "ON" (açık) veya "OFF" (kapalı) olduğu görüntülenecektir. 쏅 Beep sesini açmak veya kapatmak için tuşuna veya 8 tuşuna basınız. Menüden çıkmak için, 쏅 MENU 7 tuşuna basınız. Maksimum açma ses seviyesi ayarı (ON VOL) Açılışta, cihaz en son seçilen ses seviyesini çalar. Cihazın ses seviyesi, kapanmadan önce maksimum açılma ses seviyesinden yüksek ise, cihaz tekrar açıldığında ses seviyesi otomatik olarak ayarlanan açılma ses seviyesine kadar düşer. Uyarı: Kulakların zarar görmemesi için açılma anındaki maksimum ses seviyesi "25" değerinde sınırlandırılmıştır. 쏅 MENU 7 tuşuna basınız. veya 8 tuşuna, ekranda "ON 쏅 VOL" gösterilinceye kadar basınız. Yaklaşık 2 saniye sonra "VOL" ve güncel ayar ekranda 6 gösterilir. 쏅 Azami açma ses seviyesi değerini 5 ve 25 arasında ayarlamak için veya 8 tuşuna basınız. Uyarı: tuşuna veya 8 tuşuna basarak değişiklik yapmak için güncel ayarın ekranda gösterilmesini beklemenize gerek yoktur. Menüden çıkmak için, 쏅 MENU 7 tuşuna basınız. Gürültüye bağlı ses seviyesi uyarlama ayarı (GALA) Bu fonksiyon ile araç radyosunun ses seviyesi sürüş hızına ve buna bağlı sürüş gürültülerine göre uyarlanır. Örneğin hız artarken ses seviyesi de otomatik olarak artar, böy- TÜRKÇE Telefon/navigasyon audio ses seviyesinin ayarlanması (PHONEVOL) Telefon görüşmelerinin veya sesli navigasyon uyarılarının ses seviyesi ayarlanabilir: 쏅 MENU 7 tuşuna basınız. 쏅 "PHONEVOL" gösterilinceye kadar tuşuna veya 8 basınız. Yaklaşık 2 saniye sonra "VOL" ve güncel ayar ekranda 6 gösterilir. 쏅 Ses seviyesini 0 ve 32 arasında ayarlamak için veya 8 tuşuna basınız. 257 09_CalaisMP48_tr.indd 257 11.06.2008 15:19:02 Uhr Ses seviyesi lece daha yüksek sürüş gürültüleri (örneğin sürüş nedeniyle oluşan rüzgar) dengelenmiş olur. Bunun için aracınızda takometre sinyali mevcut olmalıdır ve araç radyosuna bağlı olmalıdır. Ses seviyesinin otomatik olarak artırılması 6 kademede (OFF (kapalı), 1-5) ayarlanabilir. 쏅 MENU 7 tuşuna basınız. 쏅 Ekranda "GALA" ve güncel ayar görüntülenene kadar veya 8 tuşlarına arka arkaya basınız. 쏅 Ses seviyesi uyarlama değerini "OFF" (kapalı) ile ve 5 arasında ayarlamak için veya 8 tuşuna basınız. Menüden çıkmak için, 쏅 MENU 7 tuşuna basınız. Akustik Akustik Tizlerin ayarlanması 쏅 AUD : tuşuna basınız. 쏅 veya 8 tuşuna, ekranda "TREBLE" gösterilinceye kadar basınız. 쏅 tuşunu veya 8 tuşunu 2 saniyeden uzun süre basılı tutunuz. Ekranda kısa süre "FREQ" ve sonra güncel seçilen tiz frekansı gösterilir. 10,0 kHz ve 17,5 kHz arasında bir tiz frekansı seçmek için, 쏅 tuşuna veya 8 tuşuna basınız. Tiz seviyesini ayarlamak için, 쏅 veya 8 tuşuna, ekranda "GAIN" gösterilinceye kadar basınız. Yaklaşık 2 saniye sonra "GAIN" ve güncel ayar gösterilir. 쏅 Tiz seviyesini –7 ve +7 arasında ayarlamak için veya 8 tuşuna basınız. Menüden çıkmak için, 쏅 AUD : tuşuna basınız. Basların ayarlanması 쏅 AUD : tuşuna basınız. veya 8 tuşuna, ekranda "BASS" 쏅 gösterilinceye kadar basınız. 쏅 tuşunu veya 8 tuşunu 2 saniyeden uzun süre basılı tutunuz. Ekranda kısa süre "FREQ" ve sonra güncel seçilen bas frekansı gösterilir. 60 kHz ve 200 kHz arasında bir bas frekansı seçmek için, tuşuna veya 8 tuşuna basınız. 쏅 258 09_CalaisMP48_tr.indd 258 11.06.2008 15:19:02 Uhr Akustik Orta seslerin ayarlanması 쏅 AUD : tuşuna basınız. veya 8 tuşuna, ekranda 쏅 "MIDDLE" gösterilinceye kadar basınız. tuşunu veya 8 tuşunu 2 saniye쏅 den uzun süre basılı tutunuz. Ekranda kısa süre "FREQ" ve sonra güncel seçilen orta frekans gösterilir. 500 Hz ve 2,5 kHz arasında bir orta frekans seçmek için, tuşuna veya 8 tuşuna basınız. 쏅 Orta ses seviyesini ayarlamak için, veya 8 tuşuna, ekranda "GAIN" 쏅 gösterilinceye kadar basınız. Yaklaşık 2 saniye sonra "GAIN" ve güncel ayar gösterilir. 쏅 Orta ses seviyesini –7 ve +7 arasında veya 8 tuşuna ayarlamak için basınız. Orta sesin kalite faktörünü ayarlamak için, veya 8 tuşuna, ekranda "Q 쏅 FACTOR" gösterilinceye kadar basınız. Yaklaşık 2 saniye sonra "Q" ve güncel ayar gösterilir. 쏅 Kalite faktörünü 0,5 ve 1,25 arasında veya 8 tuşuna ayarlamak için basınız. Menüden çıkmak için, 쏅 AUD : tuşuna basınız. Sol/sağ ses seviyesi dağılımı ayarı (BAL) 쏅 AUD : tuşuna basınız. 쏅 Ekranda "BAL" ve güncel ayar görüntüveya 8 tuşlarına lenene kadar arka arkaya basınız. 쏅 Sol/sağ ses seviyesi dağılımını –10 ve +10 arasında ayarlamak için veya 8 tuşuna basınız. Menüden çıkmak için, 쏅 AUD : tuşuna basınız. Ön/arka ses seviyesi dağılımı ayarı (FAD) Not Arka hoparlörlere ilave bir amplifikatör bağlanmalıdır. 쏅 AUD : tuşuna basınız. 쏅 Ekranda "FAD" ve güncel ayar görüntüveya 8 tuşlarına lenene kadar arka arkaya basınız. 쏅 Ön/arka ses seviyesi dağılımını –10 ve +10 arasında ayarlamak için veya 8 tuşuna basınız. Menüden çıkmak için, 쏅 AUD : tuşuna basınız. TÜRKÇE Bas seviyesini ayarlamak için, veya 8 tuşuna, ekranda "GAIN" 쏅 gösterilinceye kadar basınız. Yaklaşık 2 saniye sonra "GAIN" ve güncel ayar gösterilir. 쏅 Bas seviyesini –7 ve +7 arasında ayarlamak için veya 8 tuşuna basınız. Basın kalite faktörünü ayarlamak için, veya 8 tuşuna, ekranda "Q 쏅 FACTOR" gösterilinceye kadar basınız. Yaklaşık 2 saniye sonra "Q" ve güncel ayar gösterilir. 쏅 Kalite faktörünü 1,0 ve 2,0 arasında veya 8 tuşuna ayarlamak için basınız. Menüden çıkmak için, 쏅 AUD : tuşuna basınız. 259 09_CalaisMP48_tr.indd 259 11.06.2008 15:19:02 Uhr Saat Saat Saati gösterme Saati yakl. 10 saniye için ekranda görüntülemek için, 쏅 MENU 7 tuşunu 2 saniyeden uzun bir süre için basılı tutunuz. Saatin ayarlanması 쏅 MENU 7 tuşuna basınız. tuşuna veya 8 tuşuna yeterince 쏅 çok defa basarak "TIMESET" yazısının ekranda 6 gösterilmesini sağlayınız. Yaklaşık 2 saniye sonra ekranda 6 güncel saat gösterilir. Saatten önce 24 saat modunda "24H" ve 12 saat modunda "AM" veya "PM" gösterilir. Saatler yanıp söner ve ayarlanabilir. Saati veya dakikayı ayarlamak için, tuşuna veya 8 tuşuna basınız. 쏅 Saat ve dakika arasında geçiş yapmak için, 쏅 6 < tuşuna basınız. Uyarı: veya 8 tuşuna basarak değişiklik yapmak için güncel saatin ekranda gösterilmesini beklemenize gerek yoktur. Menüden çıkmak için, 쏅 MENU 7 tuşuna basınız. Menüden çıkmak için, 쏅 MENU 7 tuşuna basınız. Zaman dilimi ayarı (TIMEZONE) Zaman dilimleri arasında geçiş yapıyorsanız ayarlanmış olan güncel saat ile olan saat farklarını 1 saatlik adımlarla ayarlayabilirsiniz. Böylece saati ayarlamak zorunda kalmadan gösterilen saatin geçerli saat dilimine göre düzeltilmesi mümkün olur. 쏅 MENU 7 tuşuna basınız. veya 8 tuşuna, ekranda 쏅 "TIMEZONE" gösterilinceye kadar basınız. Yaklaşık 2 saniye sonra "ZONE" ve güncel ayar ekranda 6 gösterilir. tuşuna veya 8 tuşuna basarak 쏅 saat farkını –12 ve +12 arasında 1 saatlik adımlara ayarlayabilirsiniz. Uyarı: tuşuna veya 8 tuşuna basarak değişiklik yapmak için güncel ayarın ekranda gösterilmesini beklemenize gerek yoktur. Menüden çıkmak için, 쏅 MENU 7 tuşuna basınız. 12/24 saat modu seçimi 쏅 MENU 7 tuşuna basınız. tuşuna veya 8 tuşuna yeterin쏅 ce çok defa basarak ekranda 6 "24H MODE" veya "12H MODE" mesajının görünmesini sağlayınız. tuşuna veya 8 tuşuna basarak 쏅 modu değiştirebilirsiniz. 260 09_CalaisMP48_tr.indd 260 11.06.2008 15:19:03 Uhr Radyo işletimi Bu cihaz bir RDS-radyo alıcısı ile donatılmıştır. Alınan FM istasyonlarından bir çoğu programın yanı sıra istasyon ismi ve program tipi (PTY) gibi bilgileri de içeren bir sinyal gönderir. Alınabiliyorsa istasyon ismi ekranda 6 gösterilir. Radyo işletiminin açılması Başka bir işletim uygulamasında bulunuyorsanız, 쏅 BND 2 tuşuna basınız, veya 쏅 SRC > tuşuna birçok defa basarak "RADIO" yazısının ekranda 6 görünmesini sağlayınız. Ekranda 6 güncel frekans veya istasyon adı görünür. RDS konfor fonksiyonları (AF, REG) RDS konfor fonksiyonları AF (Alternatif frekans) ve REG (yerel), radyo cihazınızın size sağladıklarını artırır. • AF: RDS konfor fonksiyonu devrede ise cihaz arka planda otomatik olarak, ayarlı istasyonun en iyi alınabilen frekansını arar. • REG: Bazı istasyonlar belirli sürelerde programı, çeşitli içeriklerle bölgesel programlarda yayınlamaktadır. REG fonksiyonu devredeyken cihazın ayarlanan istasyonun farklı program içeriklerine sahip alternatif frekanslara geçmesi önlenir. Uyarı: REG özellikle menüden açılmalı ve kapatılmalıdır. RDS konfor fonksiyonlarını açma veya kapama 쏅 RDS fonksiyonları olan AF ve REG'i kullanmak için RDS = tuşuna basınız. Ekranda 6 RDS sembolü görüntülenirse RDS konfor fonksiyonları aktiftir. REG açma/kapama 쏅 MENU 7 tuşuna basınız. veya 8 tuşuna yeterince çok 쏅 defa bastığınızda ekranda 6 "REG" ve güncel ayarın "ON" (açık) veya "OFF" (kapalı) olduğu görüntülenecektir. 쏅 REG özelliğini açmak veya kapatmak için tuşuna veya 8 tuşuna basınız. Menüden çıkmak için, 쏅 MENU 7 tuşuna basınız. Uyarı: REG ON/OFF ayarı ancak RDS fonksiyonu devrede ise etkili olur. Frekans bandı/hafıza düzeyi seçme Bu cihaz ile FM, MW ve LW (Avrupa) veya FM ve AM (NAFTA ülkeleri için) frekans bantlarındaki istasyonları alabilirsiniz. FM frekans bandı için 3 hafıza düzeyi (FM1, FM2 ve FMT) ve MW ile LW veya AM frekans bantlarının her biri için bir hafıza düzeyi mevcuttur. İlave olarak MWT/LWT veya AMT için bir hafıza düzeni daha mevcuttur. Her hafıza düzlemine 6 istasyon kaydedilebilir. TÜRKÇE Radyo işletimi 261 09_CalaisMP48_tr.indd 261 11.06.2008 15:19:03 Uhr Radyo işletimi Hafıza düzeyleri veya frekans bantları arasında geçiş yapmak için, 쏅 BND 2 tuşuna basınız. İstasyon ayarı İstasyon ayarlamak için çeşitli yöntemler vardır. Otomatik istasyon arama işlemi tuşuna veya 8 tuşuna basınız. 쏅 Alınabilen bir sonraki istasyon ayarlanır. Notlar: • Trafik mesajı için öncelik belirlendiyse sonraki trafik mesajı istasyonu ayarlanır. • PTY açıksa seçilen program tipindeki sonraki istasyon ayarlanır. İstasyon arama işlemi hassasiyetini ayarlama Düşük hassasiyeti seçerek sadece kuvvetli sinyal veren istasyonları seçebilir veya yüksek hassasiyeti seçerek zayıf sinyal veren istasyonların da dahil edilmesini sağlayabilirsiniz. 쏅 MENU 7 tuşuna basınız. veya 8 tuşuna yeterince çok 쏅 defa bastığınızda ekranda 6 "SENS" ve güncel ayarın "LO" (düşük hassasiyet) veya "DX" (yüksek hassasiyet) olduğu görüntülenecektir. 쏅 "LO" ve "DX" arasında geçiş yapmak için veya 8 tuşuna basınız. Menüden çıkmak için, 쏅 MENU 7 tuşuna basınız. Manüel istasyon ayarlama Ayarlanan frekansı kısa adımlarda değiştirmek için, veya 8 tuşuna basınız. 쏅 Ayarlanan frekansı hızlı bir şekilde değiştirmek için, tuşunu veya 8 tuşunu basılı 쏅 tutunuz. Uyarı: Manüel istasyon ayarlama, sadece RDS fonksiyonu ve PTY devre dışı bırakılmışsa yapılabilir. İstasyon zincirinde bir sonrakine geçme (sadece FM) Bir istasyonun birden fazla programı varsa bu "Verici zinciri" içinde geçiş yapabilirsiniz. 쏅 Verici zincirinin bir sonraki istasyonuna geçmek için veya 8 tuşuna basınız. Uyarı: Verici zinciri içinde geçiş yapabilmek için RDS fonksiyonunun açık ve PTY'nin kapalı olması gereklidir. Sadece daha önce bir defa alınmış olan istasyonlara geçiş yapabilirsiniz. Bunun için Travelstore fonksiyonu kullanılmalıdır (T-STORE). İstasyon kaydı İstasyonun manüel olarak kaydedilmesi 쏅 İstediğiniz hafıza düzeyini veya frekans bandını seçiniz. 쏅 İstediğiniz istasyonu ayarlayınız. 262 09_CalaisMP48_tr.indd 262 11.06.2008 15:19:03 Uhr Radyo işletimi İstasyonun otomatik olarak kaydedilmesi (T-STORE) Bölgenin en güçlü 6 istasyonunu otomatik olarak kaydedebilirsiniz. FM frekans bandı için bu kaydetme FMT hafıza düzeyinde gerçekleşir, MW ve LW frekans bantları için MWT/LWT ve AM frekans bandında ise AMT hafıza düzeyinde saklanır. Uyarı: Bu düzeyde daha evvel kaydedilen istasyonların yerine yeni bulunanlar kaydedilir. 쏅 İstediğiniz frekans bandını seçiniz. 쏅 BND 2 tuşunu iki saniyeden uzun basılı tutunuz. Kayıt başlar. Ekranda 6 "T-STORE" gösterilir. İşlem tamamlandıktan sonra FMT, MWT/LWT veya AMT hafıza düzeyindeki birinci istasyon çalınır. Kayıtlı istasyonların çağrılması 쏅 Hafıza düzlemini veya frekans bandını seçiniz. 쏅 İstediğiniz istasyonun kayıtlı olduğu istasyon tuşuna 1 - 6 < basınız. Alınabilen istasyonların kısa süreli çalınması (BANDSCAN) Bandscan fonksiyonu ile tüm alınabilen istasyonları yaklaşık 10 saniye süreyle çalabilirsiniz. Bandscan'ın başlatılması tuşunu veya 8 tuşunu 2 saniye쏅 den uzun süre basılı tutunuz. Ekranda kısa süre "BANDSCAN" gösterilir. Cihaz güncel frekans bandında istasyonları arar. Bulunan her verici yaklaşık 10 saniye için çalınır. Bu sırada ekranda ayarlanan frekans veya istasyon adı görünür. Bandscan'ın sonlandırılması tuşuna veya 8 tuşuna basınız. 쏅 Tarama işlemi sona erer. En son çalınan istasyon çalmaya devam eder. Program tipi (PTY) İstasyon isimlerinin yanında ayrıca bazı FM istasyonları, programlarının tipleri hakkında bilgiler de aktarmaktadır. Bu tür program tipleri aşağıdakiler gibi olabilir: KÜLTÜR SEYAHAT JAZZ SPOR HABER POP ROCK MÜZİK PTY fonksiyonu ile belirli bir program tipindeki bir istasyonu seçebilirsiniz. PTY devredeyse ve bir PTY araması başlatıldıysa cihaz otomatik olarak güncel istasyondan veya başka bir işletim türünden seçilen program tipinde yayın yapan bir istasyona geçer. PTY açma/kapama 쏅 MENU 7 tuşuna basınız. veya 8 tuşuna yeterince çok 쏅 defa bastığınızda ekranda 6 "PTY" ve güncel ayarın "ON" (açık) veya "OFF" (kapalı) olduğu gösterilecektir. 쏅 PTY özelliğini açmak veya kapatmak için tuşuna veya 8 tuşuna basınız. TÜRKÇE 쏅 1 - 6 < arasındaki istasyon tuşlarından istasyonu kaydetmek istediğiniz tuşu 2 saniyeden uzun süre basılı tutunuz. Onay tonu duyulur. İstasyon seçilen istasyon tuşuna kaydedilmiştir. 263 09_CalaisMP48_tr.indd 263 11.06.2008 15:19:03 Uhr Radyo işletimi Menüden çıkmak için, 쏅 MENU 7 tuşuna basınız. Program tipi seçimi ve arama işlemini başlatma 쏅 İstene program tipi gösterilene kadar veya 8 tuşuna ardı ardına basınız. 쏅 Arama işlemini başlatmak için veya 8 tuşuna basınız. Seçilen program tipinde bir istasyon bulunursa bu istasyon ayarlanacaktır. Arızaya bağlı tiz düşüşü (HICUT) HiCut fonksiyonu radyo alışının kötü olması durumunda ses çıkışını düzeltir. Alış esnasında parazitlenmeler oluşuyorsa, otomatik olarak parazit seviyesi düşürülür. HICUT'u açmak veya kapatmak için, 쏅 MENU 7 tuşuna basınız. veya 8 tuşuna yeterince çok 쏅 defa bastığınızda ekranda 6 "HICUT" ve güncel ayarın "ON" (açık) veya "OFF" (kapalı) olduğu görüntülenecektir. 쏅 HICUT özelliğini açmak veya kapatmak için tuşuna veya 8 tuşuna basınız. Menüden çıkmak için, 쏅 MENU 7 tuşuna basınız. veya 8 tuşuna, ekranda "RADIOTXT" gösterilinceye kadar basınız. Yaklaşık 2 saniye sonra güncel ayar "TEXT ON" (açık) veya "TEXT OFF" (kapalı) ekranda 6 gösterilir. 쏅 Radyo metni görüntüsünü açmak veya kapatmak için tuşuna veya 8 tuşuna basınız. 쏅 Uyarı: tuşuna veya 8 tuşuna basarak değişiklik yapmak için güncel ayarın ekranda gösterilmesini beklemenize gerek yoktur. Menüden çıkmak için, 쏅 MENU 7 tuşuna basınız. Radyo metninin açılması/ kapatılması Bazı radyo istasyonları RDS sinyalini verici adı yerine reklam veya başka bilgileri aktarmak için kullanırlar. Bu radyo metni ekranda 6 gösterilir. Radyo metni göstergesini açmak veya kapatmak için, 쏅 MENU 7 tuşuna basınız. 264 09_CalaisMP48_tr.indd 264 11.06.2008 15:19:03 Uhr Trafik yayını Trafik yayını önceliğini açma/ kapama Trafik mesajı önceliğini tüm işletim türlerinde açmak veya kapatmak için, 쏅 TA ; tuşuna basınız. Uyarı: CD, MP3, CD değiştirici ve AUX işletim türlerinde bu fonksiyon ancak son ayarlanan frekans bandı FM ise kullanılabilir. Ekranda 6 TA sembolü görüntülendiğinde trafik duyuruları önceliği devrededir. Cihaz bir trafik duyurusu aldığı anda bu duyuruya geçer. Ekranda 6 bu duyuru süresince "TRAFFIC" mesajı gösterilir. Uyarı: Aşağıdaki durumlarda bir ikaz sesi duyarsınız, • trafik yayın istasyonu veya CD dinlerken ayarlanan trafik yayın istasyonunun istasyon bölgesinden çıkarsanız ve bunun üzerine otomatik arama işlemine rağmen yeni bir trafik yayın istasyonu bulunmazsa. • bir trafik yayın istasyonundan, trafik yayını olmayan bir istasyona geçerseniz. Bu durumda trafik yayını önceliğine geçiniz veya trafik yayını olan bir istasyona geçiniz. Trafik duyuruları için ses seviyesini otomatik artırma ayarlanmışsa Trafik duyurularının ayarlanan ses seviyesinden kaç ses seviyesi kademesi kadar daha yüksek olması gerektiğini ayarlayabilirsiniz: 쏅 MENU 7 tuşuna basınız. veya 8 tuşuna, ekranda "TA 쏅 VOL" gösterilinceye kadar basınız. Yaklaşık 2 saniye sonra "VOL" ve güncel ayar ekranda 6 gösterilir. 쏅 Ses seviyesi otomatik artışını 0 ve 10 arasında ayarlamak için veya 8 tuşuna basınız. Uyarı: tuşuna veya 8 tuşuna basarak değişiklik yapmak için güncel ayarın ekranda gösterilmesini beklemenize gerek yoktur. Menüden çıkmak için, 쏅 MENU 7 tuşuna basınız. Uyarı: Ses seviyesini trafik duyurusu sırasında da ses seviyesi ayarlayıcısı 1 ile trafik duyurusu süresi boyunca ayarlayabilirsiniz. Trafik duyurularının gizlenmesi Devam eden bir trafik duyurusunu iptal etmek ve önceden dinlediğiniz audio kaynağına geri dönmek için, 쏅 TA ; tuşuna basınız. Trafik duyurularını öne alma fonksiyonu devrede kalır. TÜRKÇE Trafik yayını 265 09_CalaisMP48_tr.indd 265 11.06.2008 15:19:04 Uhr CD işletimi CD işletimi CD işletiminin başlatılması Bu cihaz ile piyasada satılan 12 cm çaplı Audio CD'leri, CD-R'leri (yazılabilir CD) ve CD-RW'leri (tekrar yazılabilir CD) çalabilirsiniz. Çalma esnasında problem yaşamamak için kendi CD'lerinizi 16 kattan daha hızlı yakmayınız. Sürücüde CD yoksa, 쏅 CD'yi yazılı tarafı üstte olacak şekilde kuvvet harcamadan bir direnç fark edinceye kadar CD yuvasına itiniz. CD otomatik olarak sürücüye çekilir. Ekranda 6 CD sembolü gösterilir. CD sürücüsünde arıza tehlikesi! 8 cm çaplı single CD'ler ve kenarları yuvarlak olmayan CD'ler (Shape CD'ler) kullanılamaz. CD'yi dikkatli kullanınız ve CD'nin çizilmesini ve hasar görmesini önleyiniz. CD'yi mümkün olduğu kadar sadece kenarından tutunuz. Bir CD kirlenmiş ise, yumuşak ve tüy bırakmayan çözücü madde içermeyen bir bezle temizleyiniz. CD'yi her zaman içten dışa doğru siliniz CD'yi doğrudan güneş ışığına maruz bırakmayınız ve CD'yi cihazın dışında koruyucu bir kılıf içerisinde muhafaza ediniz. CD'nin üzerine etiket yapıştırmayınız. CD'lerin üzerine sadece buna uygun olan ve piyasada satılan kalemlerle yazınız. Uygun olmayan veya hasarlı CD'ler sebebiyle CD sürücüsünde oluşan hasarlar için hiç bir sorumluluk üstlenmiyoruz. Kusursuz fonksiyon için sadece CompactDisc logosu olan CD'leri tercih ediniz. Kopyalama koruması olan CD'lerin çalınmasında zorluklar meydana gelebilir. Blaupunkt, kopyalama koruması olan CD'lerin kusursuz çalışmasını garanti edemez. Uyarı: CD'nin içeriye çekilmesi engellenmemeli veya desteklenmemelidir. CD çalmaya başlar. Ekranda 6 güncel parçanın numarası (örneğin"T12") ve çalma süresinin yanı sıra parça bilgileri de (CD metni) gösterilir. Sürücüde önceden bir CD varsa, 쏅 SRC > tuşuna birden çok defa basarak ekranda 6 "CD" mesajının gösterilmesini sağlayınız. İşletim, kaldığı yerden başlar. Parça bilgileri göstergesi (CD metni) CD içinde CD metni mevcutsa her parçaya ilişkin bilgiler parçanın başladığı sırada bir defa kayan metin olarak ekranda 6 gösterilir. Parça bilgileri bir defa kayan metin olarak gösterilir 쏅 5 < tuşuna basınız. Güncel parçaya ilişkin CD metni ekranda 6 bir defa kayan metin olarak gösterilir. Uyarı: CD metninin kayan yazı olarak gösterilmesi kapatılmış ise bu fonksiyon kullanılamaz (bakınız sonraki bölüm). 266 09_CalaisMP48_tr.indd 266 11.06.2008 15:19:04 Uhr CD işletimi Uyarı: "SCRL ON/OFF" ayarı MP3 işletiminde de MP3 parça bilgilerinin (ID3 taglar) gösterilmesini de etkiler. Parça seçimi 쏅 Bir sonraki veya önceki parçaya geçmek için tuşuna veya 8 tuşuna basınız. 8 tuşa bir defa basıldığında güncel parça yeniden başlatılır. Hızlı arama işlemi (duyulur şekilde) Geriye veya ileriye doğru hızlı arama işlemi için tuşunu veya 8 tuşunu basılı tuta쏅 rak istediğiniz konuma getiriniz. Parçanın rastgele sırayla çalınması (MIX) 쏅 3 < tuşuna basınız. Ekranda 6 kısa süre "MIX CD" mesajı gösterilir ve MIX sembolü görünür. Sonraki parçalar rastgele seçilir. MIX sona erdirme 쏅 3 < tuşuna yeniden basınız. Ekranda 6 kısa süreyle "MIX OFF" gösterilir ve MIX sembolü söner. Çalma işlemi normal şekilde devam eder. Parçanın çalınması (SCAN) CD'deki tüm parçaları yakl. 10'ar saniye çalmak için, 쏅 4 < tuşuna basınız. Ekranda kısa süre için "SCAN TRK" görüntülenir. Çalma sırasında "CD" göstergesi yanıp söner. Parça numarası ve çalınan parçanın çalma süresi ve parça bilgileri gösterilir. SCAN kapatma, parçayı dinlemeye devam etme Tarama işlemini sona erdirmek için, 쏅 4 < tuşuna yeniden basınız. Ekranda kısa süre için "SCAN OFF" görüntülenir. Güncel parça çalmaya devam eder. Parçanın tekrarlanması (RPT) 쏅 2 < tuşuna basınız. Ekranda kısa süre "RPT TRK" belirir ve RPT sembolü görüntülenir. Güncel parça, RPT devre dışı bırakılıncaya kadar tekrarlanır. TÜRKÇE Parça bilgilerinin kayan metin olarak gösterilmesinin açılması/kapatılması Parça bilgilerinin kayan metin olarak gösterilmesini açılması/kapatılması için, 쏅 MENU 7 tuşuna basınız. veya 8 tuşuna yeterince çok 쏅 defa bastığınızda ekranda 6 "SCRL" ve güncel ayarın "ON" (açık) veya "OFF" (kapalı) olduğu görüntülenecektir. 쏅 Kayan metin özelliğini açmak veya kapatmak için tuşuna veya 8 tuşuna basınız. Menüden çıkmak için, 쏅 MENU 7 tuşuna basınız. "SCRL OFF" ayarında parça bilgisi 8 karakterlik bölümler halinde ekranda 6 gösterilir. Bu sırada her metin bölümü ve parça numarası ile çalma süresi sürekli değişerek 5'er saniye gösterilir. 267 09_CalaisMP48_tr.indd 267 11.06.2008 15:19:04 Uhr CD işletimi MP3/WMA işletimi RPT'nin sona erdirmesi 쏅 2 < tuşuna yeniden basınız. Ekranda 6 kısa süreyle "RPT OFF" gösterilir ve RPT sembolü söner. Çalma işlemi normal şekilde devam eder. İşletimi kesmek (PAUSE (ara verme)) 쏅 1 < tuşuna basınız. Ekranda 6 "PAUSE" gösterilir. Ara verme fonksiyonunun kaldırılması 쏅 Ara verme esnasında 1 < tuşuna basınız. Çalma işlemi devam eder. CD'yi çıkarma Uyarı: Cihaz kapatılmışsa veya başka bir audio kaynağı aktifse CD'lerin dışarı çıkarılmasını sağlayabilirsiniz. 쏅 CD çıkartma düğmesine 4 basınız. CD dışarı itilir. Ekranda kısa süre için "CD EJECT" görüntülenir. Uyarı: CD, dışarı çıkarken engellenmemeli veya desteklenmemelidir. 쏅 CD'yi çıkartınız. CD sembolü söner. Uyarı: Dışarı çıkartılan CD alınmazsa, yakl. 10 saniye sonra otomatik olarak yeniden içeri çekilir. MP3/WMA işletimi Bu araç radyosu ile MP3 ve WMA müzik dosyaları içeren CD-R'leri ve CD-RW'leri de çalabilirsiniz. Ayrıca opsiyonel C‘n‘C uyumlu USB birimine USB veri taşıyıcı bağlayabilirsiniz ve USB veri taşıyıcıda saklanan MP3/ WMA dosyalarını çalabilirsiniz. MP3 ve WMA dosyalarının kullanımı aynı olduğu için bu bölümde sadece MP3 dosyalarının çalınması açıklanmaktadır. Bu bölümdeki "MP3 veri taşıyıcı" tanımı CDR/RW'nin yanı sıra USB stikler gibi USB veri taşıyıcıları da kapsar. Notlar: • Online-Music marketlerden alınan Digital Rights Management (DRM) olan WMA dosyaları bu cihaz ile çalınamaz. • WMA dosyaları, sadece Windows Media-Player sürüm 8'den itibaren oluşturulduysa güvenli bir şekilde çalınabilir. Bir MP3 veri taşıyıcısının hazırlığı MP3 CD hazırlığı CD yazma, CD yazma yazılımı ve boş CD kombinasyonu sebebiyle CD'lerin işletiminde aksaklıklar meydana gelebilir. Sizin tarafınızdan yazılan CD'lerde problemler meydana gelmesi durumunda CD ham maddesi tipini, diğer bir üreticinin ürünü ile veya ham maddenin başka bir rengi ile değiştiriniz. CD formatı ISO 9660 seviye 1 veya seviye 2 ya da Joliet olmalıdır. Diğer tüm formatlar güvenilir şekilde çalınamaz. 268 09_CalaisMP48_tr.indd 268 11.06.2008 15:19:04 Uhr MP3/WMA işletimi D01 A D02 D03 T001 T002 T003 T004 T005 T001 T002 T003 T004 T005 T006 D04 T001 T002 T003 T004 T005 T006 T007 T008 T009 T010 T011 B A Dizinler B Parçalar · Dosyalar Her dizin PC ile düzenlenebilir. Dizinlerin ismi cihaz ekranında gösterilebilir. CD yazma yazılımınıza uygun olarak dizinleri ve parçaları/dosyaları tanımlayınız. Konu hakkındaki bilgileri yazılımın kullanım kılavuzunda bulabilirsiniz. Notlar: • Dosyalar (dizinler ve başlıklar) belirlenirken noktalı harfler ve özel işaretler kullanılmamalıdır. • Dosya adı için 16 karakterden (".MP3" veya ".WMA" dahil) fazla karakter kullanırsanız, başlıkların ve dizinlerin maksimum adet sayısı azalır. Dosyalarınızın belirli bir sıra izlemesini tercih ediyorsanız: Dosyaları, daha sonra çalmak istediğiniz sırayla veri taşıyıcısına kaydedin. Cihaz dosyaları, veri taşıyıcısındaki fiziksel sıralama kaydına göre çalar. Bu cihazda dosyaların çalınması için MP3 dosyaları ".MP3" dosya uzantısını veya WMA dosyaları ".WMA" dosya uzantısını taşımalıdır. Notlar: Hatasız şekilde çalınmasını sağlamak için, • ".MP3" dosya uzantılı olarak başka MP3 dosyalarını kullanmaya çalışmayınız ve çaldırmayınız! Bu geçersiz dosyalar çalma sırasında göz ardı edilir. • MP3 dosyası olmayan ve MP3 dosyası parçaları olan "karışık" CD'leri kullanmayınız (cihaz MP3 çalınması sırasında sadece MP3 dosyalarını okur). • CD audio parçaları ve MP3 parçaları olan Mix modlu CD'leri kullanmayınız. Mix modlu bir CD çaldırmayı denemeniz durumunda sadece CD audio parçaları çalınır. Bir USB veri taşıyıcısının hazırlığı Cihazın USB veri taşıyıcısını tanıması için bunun hafıza donanımında (Mass Storage TÜRKÇE Audio dosyalarından MP3/WMA dosyalarının oluşturulması (kodlanması) sırasında MP3 dosyaları için 32 ile 320 kbps arasında veya WMA dosyaları için 32 ile 192 kbps arasında bit oranları kullanılmalıdır. Bu cihaz azami 252 dizini ve her dizinde azami 255 dosyayı destekler. Bu durumda CD en fazla 512 dizin ve dosya içerebilir. CD üzerindeki bu dizin ve başlıkların her biri ayrı olarak seçilebilir. 269 09_CalaisMP48_tr.indd 269 11.06.2008 15:19:04 Uhr MP3/WMA işletimi Device) özelleştirilmesi ve dosya sisteminde FAT16 veya FAT32 formatlanmış ve ayrıca MP3 veya WMA dosyası olarak mevcut olması gerekir. Bu USB veri taşıyıcısı üzerine en fazla 1500 dosya (dizin ve başlık) oluşturabilirsiniz. Bu cihaz ile dizin ve başlıkların her biri ayrı olarak seçilebilir. Dosya adı için 24 karakterden (".MP3" veya ".WMA" dahil) fazla karakter kullanırsanız, dosyaların maksimum adet sayısı azalır. Blaupunkt, piyasada satılan tüm USB veri taşıyıcılarını çalmayı garanti edemez. ID3-taglar MP3 parçalarında yorumcu, parça ve albüm ismi gibi ilave bilgiler de bulunabilir (ID3 tanım no). Bu cihaz versiyon 1 ve versiyon 2 için ID3 tanım no'ları ekranda gösterebilir. MP3 işletiminin başlatılması CD'nin MP3 işletimi başlatma Bir MP3-CD'sinde MP3 işletimi, normal CD işletimi gibi başlatılır. Bunun için "CD işletimi" bölümünde "CD işletiminin başlatılması" kısmını okuyunuz. Ekranda 6 güncel parçanın numarası (örneğin "T12") ve çalma süresinin yanı sıra parça bilgileri de (ID3 tagı) veya dosya adı gösterilir. Başka bir dizine geçildiğinde kısa süre dizin numarası (örn. "DIR 02") gösterilir. USB veri taşıyıcısını bağlama ve MP3 işletimini başlatma Bir USB veri taşıyıcısını (USB stik veya USB hard disk) bağlamak için opsiyonel Blaupunkt USB arabirimi cihazın arka tarafına (hücre C3) bağlanmalıdır. Arabirimin USB kablosu örn. torpido gözüne veya orta konsoldaki uygun bir yere döşenebilir. Notlar: • Blaupunkt USB arabirimini cihaza bağladığınızda AUX girişi de buna uygun olarak ayarlanmalıdır. Bunun için "Harici audio kaynakları" bölümündeki "AUX girişinin ayarlanması" başlığını okuyunuz. • USB veri taşıyıcısının doğru şekilde kaydedilmesi ve kaydının silinmesi için USB veri taşıyıcısını bağlamadan veya çıkarmadan önce mutlaka cihazı kapatınız. 쏅 USB veri taşıyıcısını, USB arabiriminin USB kablosuna bağlayınız. Cihaza bir USB veri taşıyıcısı bağlandığı zaman bu cihaz SRC > tuşu ile seçilebilir. Ekranda "USB" yazısı belirir. Parça bilgileri göstergesi (ID3 taglar) MP3 veri taşıyıcı içinde ID3 taglar mevcutsa her parçaya ilişkin bilgiler parçanın başladığı sırada bir defa kayan metin olarak ekranda 6 gösterilir. MP3 dosyalarında ID3 taglar kaydedilmemişse dosya adı gösterilir. Uyarı: ID3 taglarının kaydedilmesi konusunda PC-MP3 yazılımınızın veya yazdırma yazılımınızın kılavuzuna bakınız. Parça bilgileri bir defa kayan metin olarak gösterilir 쏅 5 < tuşuna basınız. Güncel parçaya ilişkin ID3 taglar ekranda 6 bir defa kayan metin olarak gösterilir. 270 09_CalaisMP48_tr.indd 270 11.06.2008 15:19:04 Uhr MP3/WMA işletimi Dizin seçimi İleriye veya geriye doğru başka bir dizini seçmek için, tuşuna veya 8 tuşuna basınız. 쏅 Notlar: • MP3 dosyası bulunmayan bütün dizinler otomatik olarak atlanır. • Cihaz tüm dizinleri ve alt dizinleri aynı seviyedeymiş gibi işler. veya 8 tuşunun tekrarlı şekilde basılması ile tüm alt dizinlere ulaşırsınız. Parçaların/dosyaların seçilmesi Güncel dizinde yukarıya veya aşağıya doğru başka bir parçaya/dosyaya geçiş yapmak için, 쏅 tuşuna veya 8 tuşuna basınız. 8 tuşa bir defa basıldığında güncel parça yeniden başlatılır. Hızlı arama işlemi Geriye veya ileriye doğru hızlı arama işlemi için 쏅 tuşunu veya 8 tuşunu basılı tutarak istediğiniz konuma getiriniz. Uyarı: USB işletiminde güncel parçanın başlangıcında geriye doğru hızlı arama işlemi durur. Parçanın rastgele sırayla çalınması (MIX) Güncel dizin parçalarını rastgele sırayla çalmak için, 쏅 3 < tuşuna arka arkaya basarak "MIX DIR" veya "MIX FLD" mesajının ekranda 6 görünmesini sağlayınız. Ekranda 6 MIX sembolü görünür. MP3 veri taşıyıcısındaki bütün parçaları rastgele sırayla çalmak için, 쏅 3 < tuşuna arka arkaya basarak ekranda 6 "MIX ALL mesajının görünmesini sağlayınız. Ekranda 6 MIX sembolü görünür. MIX sona erdirme Rastgele sırayla çalmayı sonlandırmak için, 쏅 3 < tuşuna arka arkaya basarak ekranda 6 "MIX OFF" mesajının görünmesini sağlayınız. Ekrandaki 6 MIX sembolü söner. Parçanın çalınması (SCAN) MP3 veri taşıyıcısındaki tüm parçaları artan sıralamayla yaklaşık 10'ar saniye çalınması için, 쏅 4 < tuşuna arka arkaya basarak ekranda 6 "SCAN TRK" mesajının görünmesini sağlayınız. Çalma sırasında "MP3" veya "USB" göstergesi yanıp söner. USB işletiminde güncel dizinin tüm parçalarını çalmak için, TÜRKÇE Uyarı: Parça bilgisinin kayan metin olarak gösterilmesi kapatıldıysa bu fonksiyon kullanılamaz. Bunun için "CD işletimi" bölümü, "Parça bilgileri göstergesi (CD metni)" alt bölümündeki "Parça bilgilerinin kayan metin olarak gösterilmesinin açılması/kapatılması" başlığını okuyunuz. 271 09_CalaisMP48_tr.indd 271 11.06.2008 15:19:05 Uhr MP3/WMA işletimi 쏅 4 < tuşuna arka arkaya basarak ekranda 6 "SCAN FLD" mesajının görünmesini sağlayınız. Çalma sırasında "USB" göstergesi yanıp söner. SCAN sona erdirme Çaldırmayı sona erdirmek için, 쏅 4 < tuşuna arka arkaya basarak ekranda 6 "SCAN OFF" mesajının görünmesini sağlayınız. Güncel çalan parça çalmaya devam eder. İşletimi kesmek (PAUSE (ara verme)) 쏅 1 < tuşuna basınız. Ekranda 6 "PAUSE" gösterilir. Ara verme fonksiyonunun kaldırılması 쏅 Ara verme esnasında 1 < tuşuna basınız. Çalma işlemi devam eder. Her bir parçanın ayrı olarak veya dizinin tamamının tekrar çalınması (REPEAT) Güncel parçanın tekrarlanması için, 쏅 2 < tuşuna arka arkaya basarak ekranda 6 "RPT TRK" mesajının görünmesini sağlayınız. Ekranda 6 RPT sembolü görünür. Güncel dizini tekrar etmek için, 쏅 2 < tuşuna arka arkaya basarak "RPT DIR" veya "RPT FLD" mesajının ekranda 6 görünmesini sağlayınız. Ekranda 6 RPT sembolü görünür. REPEAT sona erdirme Tekrarlama işlemini sonlandırmak için, 쏅 2 < tuşuna arka arkaya basarak ekranda 6 "RPT OFF" mesajının görünmesini sağlayınız. Ekrandaki 6 RPT sembolü söner. 272 09_CalaisMP48_tr.indd 272 11.06.2008 15:19:05 Uhr CD değiştirici işletimi CD değiştirici işletimi CD seçimi Cihaza opsiyonel olarak CDC A08 T ve IDC A09 Blaupunkt CD değiştiricileri de bağlanabilir (cihazın arka tarafındaki C3 hücresi). İleriye veya geriye doğru başka bir CD seçmek için, tuşuna veya 8 tuşuna basınız. 쏅 Notlar: • CD değiştiriciyi cihaza bağladığınızda AUX girişi de buna uygun olarak ayarlanmalıdır. Bunun için "Harici audio kaynakları" bölümündeki "AUX girişinin ayarlanması" başlığını okuyunuz. • CD'ler, CD'lerin takılması ve CD değiştirici kullanımı hakkındaki bilgileri, CD değiştiricinizin kullanım kılavuzunda bulabilirsiniz. CD değiştirici işletiminin başlatılması 쏅 SRC > tuşuna yeterince çok defa basarak ekranda 6 "CHANGER" mesajının gösterilmesini sağlayınız. CD değiştiricinin tanıdığı ilk CD çalmaya başlar. Ekranda 6 güncel CD'nin numarası (örn. "D02"), parçanın numarası (örneğin"T07") ve çalma süresi gösterilir. Parça seçimi Güncel CD'de yukarıya veya aşağıya doğru başka bir parçaya geçiş yapmak için, tuşuna veya 8 tuşuna basınız. 쏅 Hızlı arama işlemi (duyulur şekilde) Geriye veya ileriye doğru hızlı arama işlemi için tuşunu veya 8 tuşunu basılı tuta쏅 rak istediğiniz konuma getiriniz. Her bir parçanın ayrı olarak veya tüm CD'nin tekrar çalınması (RPT) Güncel parçanın tekrarlanması için, 쏅 2 < tuşuna arka arkaya basarak ekranda 6 "RPT TRK" mesajının görünmesini sağlayınız. Ekranda 6 RPT sembolü görünür. Güncel CD'nin tekrarlanması için, 쏅 2 < tuşuna arka arkaya basarak ekranda 6 "RPT CD" mesajının görünmesini sağlayınız. Ekranda 6 RPT sembolü görünür. REPEAT sona erdirme Tekrarlama işlemini sonlandırmak için, 쏅 2 < tuşuna arka arkaya basarak ekranda 6 "RPT OFF" mesajının görünmesini sağlayınız. Ekrandaki 6 RPT sembolü söner. TÜRKÇE Dikkat! CD değiştirici normalde cihaz tarafından 12 V işletme gerilimiyle beslenir. CD değiştirici CDC A 08 T (24 Volt) bağlanırsa CD değiştirici bağlantı kablosu soket bağlantısındaki gerilim beslemesi ayrılmalıdır (hücre C3/pin 15). CD değiştirici ayrıca 24 Volt işletme gerilimiyle beslenmelidir. 273 09_CalaisMP48_tr.indd 273 11.06.2008 15:19:05 Uhr CD değiştirici işletimi Parçanın rastgele sırayla çalınması (MIX) İşletimi kesmek (PAUSE (ara verme)) Güncel CD parçalarını rastgele sırayla çalmak için, 쏅 3 < tuşuna arka arkaya basarak ekranda 6 "MIX CD" mesajının görünmesini sağlayınız. Ekranda 6 MIX sembolü görünür. Takılan bütün CD'lerdeki parçaları rastgele sırayla çaldırmak için, 쏅 3 < tuşuna arka arkaya basarak ekranda 6 "MIX ALL mesajının görünmesini sağlayınız. Ekranda 6 MIX sembolü görünür. 쏅 1 < tuşuna basınız. Ekranda 6 "PAUSE" görünür. Ara verme fonksiyonunun kaldırılması 쏅 Ara verme esnasında 1 < tuşuna basınız. Çalma işlemi devam eder. MIX sona erdirme Rastgele sırayla çalmayı sonlandırmak için, 쏅 3 < tuşuna arka arkaya basarak ekranda 6 "MIX OFF" mesajının görünmesini sağlayınız. Ekrandaki 6 MIX sembolü söner. Bütün CD'lerdeki parçaların tamamının çalınması (SCAN) Takılan CD'deki tüm parçaların artan sıralamayla yaklaşık 10'ar saniye çalınması için, 쏅 4 < tuşuna basınız. Ekranda 6 kısa süre "SCAN TRK" görünür. Çalma sırasında CD numarası göstergesi yanıp söner. SCAN sona erdirme Çaldırmayı sona erdirmek için, 쏅 4 < tuşuna yeniden basınız. Ekranda 6 kısa süre "SCAN OFF" görünür. Güncel çalan parça çalmaya devam eder. 274 09_CalaisMP48_tr.indd 274 11.06.2008 15:19:05 Uhr IR uzaktan kumandası IR uzaktan kumandası RC 10 P Uzaktan kumandanın fonksiyonları Opsiyonel IR uzaktan kumanda ile cihazın en önemli fonksiyonlarını kumanda edebilirsiniz. Genel: Uzaktan kumanda alıcısı ON H Cihazı açar/kapatır (uzun basma) Mute (kısa basma) Menüden çıkış SRC @ Kaynak değiştirmek V+ B Ses seviyesini yükseltir V- A Ses seviyesini düşürür OK G Menüyü çağırır veya menüden çıkar E Menü seçeneğini seçer Cihazın kapağında uzaktan kumanda için bir enfraruj alıcı 9 mevcuttur. Uzaktan kumandanın kullanımından önce alıcı açılmalıdır: 쏅 MENU 7 tuşuna basınız. veya 8 tuşuna yeterince çok 쏅 defa bastığınızda ekranda 6 "IR" ve güncel ayarın "ON" (açık) veya "OFF" (kapalı) olduğu görüntülenecektir. 쏅 IR özelliğini açmak veya kapatmak için tuşuna veya 8 tuşuna basınız. Menüden çıkmak için, 쏅 MENU 7 tuşuna basınız. Tuş Fonksiyonu C Menü seçeneğini seçer F Menü seçeneğini seçer D Menü seçeneğini seçer E Radyo işletiminde: Tuş F C B G H A @ fonksiyonu F Kaydedilen istasyonu çağırır D Frekans bandı/hafıza düzeyi seçimi E İleriye doğru arama C Geriye doğru arama CD işletiminde: Tuş Fonksiyonu F Sonraki parçayı seçer F Önceki parçayı seçer TÜRKÇE D 275 09_CalaisMP48_tr.indd 275 11.06.2008 15:19:05 Uhr IR uzaktan kumandas Ön amplifikatör çıkışı CD değiştirici işletimi: Ön amplifikatör çıkışı Tuş Derin bas hoparlörün (subwoofer) çalıştırılması için bu cihaza bir amplifikatör bağlayabilirsiniz. Bunun için amplifikatör cihazın yan tarafına (hücre C1) bağlanmalıdır. Subwoofers seviyesi audio menüsünden ayarlanabilir: 쏅 AUD tuşuna basınız :. veya 8 tuşuna, ekranda "SUB 쏅 WOOF" görününceye kadar basınız. Yaklaşık 2 saniye sonra "SUBW" ve güncel ayar ekranda 6 gösterilir. 쏅 Subwoofer seviyesini 0 ve 7 arasında veya 8 tuşuna ayarlamak için basınız. Fonksiyonu F Sonraki parçayı çalar F Önceki parçayı çalar E Sonraki CD'yi çalar C Önceki CD'yi çalar MP3 işletimi: Tuş Fonksiyonu F Sonraki parçayı çalar F Önceki parçayı çalar E Sonraki dizini çalar C Önceki dizini çalar Uyarı: tuşuna veya 8 tuşuna basarak değişiklik yapmak için güncel ayarın ekranda gösterilmesini beklemenize gerek yoktur. Menüden çıkmak için, 쏅 AUD tuşuna basınız :. 276 09_CalaisMP48_tr.indd 276 11.06.2008 15:19:06 Uhr Harici audio kaynakları AUX girişi üzerinden farklı harici audio kaynaklarını cihaza bağlayabilirsiniz. AUX girişi o anda bağlanan harici audio kaynağına göre ayarlanmış olmalıdır: • Taşınabilir CD çalar, MiniDisc çalar veya MP3 çalar gibi harici audio kaynakları için "AUX" ayarı. • Blaupunkt CD değiştirici CDC A 08 T ve IDC A 09 için "CDC" ayarı. • Blaupunkt USB arabirimi için "USB" ayarı. AUX girişinin ayarlanması için lütfen "AUX girişinin ayarlanması" bölümünü okuyunuz. Uyarı: Harici bir audio kaynağı bağlantısı için bir adaptör kablosu gereklidir. Bu kabloyu (Blaupunkt No.: 7 607 897 093) Blaupunkt satıcınızdan temin edebilirsiniz. AUX girişinin ayarlanması 쏅 MENU 7 tuşuna basınız. veya 8 tuşuna, ekranda "SRC 쏅 SEL" gösterilinceye kadar basınız. Yaklaşık 2 saniye sonra "SRC" ve güncel ayar "CDC", "USB" veya "AUX" ekranda 6 gösterilir. veya 8 tuşuna basarak diğer bir 쏅 ayar seçilebilir. Uyarı: Menüdeki ayarların sırası "CDC" – "USB" – "AUX": • "CDC" güncel ayarında 8 tuşuna basarak "USB" ayarı seçilebilir. • "USB" güncel ayarında 8 tuşuna basarak "CDC" ayarını veya 8 tuşuna basarak "AUX" ayarını seçebilirsiniz. • "AUX" güncel ayarında 8 tuşuna basarak "USB" ayarı seçilebilir. Her ayar değişikliğinden sonra cihaz otomatik olarak kapanır. "CDC" ve "AUX" ayarları arasında geçiş yapmak istiyorsanız önce "USB" ayarını seçmeli ve cihaz otomatik olarak kapatıldıktan sonra yeniden açmalısınız. Daha sonra istediğiniz "AUX" veya "CDC" ayarına geçmek için ayar işlemeni yinelemeniz gerekecektir. "AUTO SWITCH OFF IN 10 SECONDS" uyarısı gösterilir. Cihaz yaklaşık 10 saniye sonra otomatik olarak kapanır. 쏅 Açma/kapama tuşuna 3 basarak cihazı yeniden açınız Cihaz radyo işletiminde seçilen ayarla açılır. Uyarı: AUX ayarını seçtiyseniz AUX girişini SRC > tuşuyla seçebilirsiniz. Ekranda "AUX" yazısı görüntülenir. CDC veya USB ayarını seçtiyseniz audio kaynağını ancak uygun bir cihaz (CD değiştirici veya USB arabirimi) bağlıysa SRC > tuşuyla seçebilirsiniz. AUX girişinin seviyesinin ayarlanması Harici audio kaynakları bağlantısının AUX girişini "AUX" olarak ayarladıysanız harici audio kaynağının seviyesini cihaza uygun audio kaynağının (örneğin CD ve radyo) seviyesinden ayarlanabilir. TÜRKÇE Harici audio kaynakları 277 09_CalaisMP48_tr.indd 277 11.06.2008 15:19:06 Uhr Harici audio kaynakları Uyarı: AUX girişinin seviyesini ancak AUX audio kaynağı olarak seçilmişse ayarlayabilirsiniz. 쏅 Gerekirse ekranda "AUX" görünene kadar SRC > tuşuna basınız. 쏅 MENU 7 tuşuna basınız. 쏅 Ekranda "GAIN" ve güncel ayar görüntülenene kadar veya 8 tuşlarına arka arkaya basınız. 쏅 Seviyeyi –9 ve +9 arasında ayarlamak için veya 8 tuşuna basınız. Menüden çıkmak için, 쏅 MENU 7 tuşuna basınız. Fabrika ayarları Fabrika ayarlarına geri dön (RESET) İsterseniz cihazı fabrika ayarlarına geri alabilirsiniz. 쏅 AUD : tuşunu 10 saniyeden uzun basılı tutunuz. Bir onay tonu duyulur ve ekranda 6 kısa süre "RESET" gösterilir. Tüm menü ve audio menüsü ayarları fabrika ayarlarına geriye alınır. Uyarı: İstasyon tuşuna kaydedilen istasyonlar silinmez. 278 09_CalaisMP48_tr.indd 278 11.06.2008 15:19:06 Uhr Teknik veriler Teknik veriler İşletme gerilimi 24 Volt Amplifikatör Çıkış gücü: Line çıkışı: AUX girişi: 2 x 20 Watt, Sinus 4 Ohm 2 x 2,0 Volt eff 2 x 2,0 Volt eff Radyo alıcısı Avrupa frekans bandı: UKW (FM): 87,5 - 108 MHz MW: 531 - 1602 kHz LW: 153 - 279 kHz Amerika frekans bantları: FM: 87,7 - 107,9 MHz AM: 530 - 1710 kHz FM - Aktarım aralığı: 30 - 15 000 Hz CD 20 - 20 000 Hz TÜRKÇE Çekim alanı: Değişiklikler saklıdır! 279 09_CalaisMP48_tr.indd 279 11.06.2008 15:19:06 Uhr 280 09_CalaisMP48_tr.indd 280 11.06.2008 15:19:06 Uhr A 8 16 13 15 12 11 14 1 3 5 7 2 4 6 8 1 3 5 7 2 4 6 8 19 18 17 20 C1 1 2 3 4 5 6 DEUTSCH ENGLISH – – SPEAKER SPEAKER SPEAKER SPEAKER – – FRANÇAIS SPEAKER CONNECTOR 1 2 3 4 5 6 7 8 ITALIANO RF + RF – LF + LF – PREAMP CONNECTOR LINE OUT LF LINE OUT RF LINE OUT GND SUBWOOFER-OUT SUBWOOFER-OUT GND EXT. AMP. ON (12V OUT, I max 100mA) C2 PHONE CONNECTOR 7 8 9 10 11 12 PHONE AF IN PHONE GND PHONE MUTE ( LOW ACTIVE) – – – C3 AUX CONNECTOR 13 14 15 16 17 18 19 20 DATA IN DATA OUT UB (12V OUT) REMOTE (12V OUT, I max 100mA) DATA GND AF GND AF LEFT AF RIGHT ESPAÑOL 10 9 6 5 2 B 7 4 3 B PORTUGUÊS 1 C-3 – GALA – IGNITION ANTENNA SUPPLY (12V OUT, I max 100mA) DIM BATTERY GND NEDERLANDS C C-2 POWER SUPPLY CONNECTOR 1 2 3 4 5 6 7 8 SVENSKA C-1 A TÜRKÇE ISO Connector 281 10_ISO_AnschlCalxxLG.indd 281 11.06.2008 15:10:37 Uhr 05/08 - CM-AS/SCS1 (de, gb, fr, it, es, pt, nl, sw, tr) 8622406084 Blaupunkt GmbH, Robert-Bosch-Straße 200, D-31139 Hildesheim 11_Rueckseite_Cal.indd 282 / 11.06.2008 15:10:20 Uhr-
 1
1
-
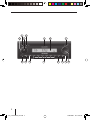 2
2
-
 3
3
-
 4
4
-
 5
5
-
 6
6
-
 7
7
-
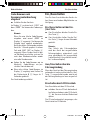 8
8
-
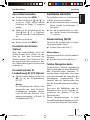 9
9
-
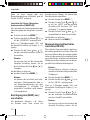 10
10
-
 11
11
-
 12
12
-
 13
13
-
 14
14
-
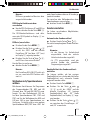 15
15
-
 16
16
-
 17
17
-
 18
18
-
 19
19
-
 20
20
-
 21
21
-
 22
22
-
 23
23
-
 24
24
-
 25
25
-
 26
26
-
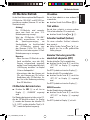 27
27
-
 28
28
-
 29
29
-
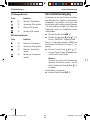 30
30
-
 31
31
-
 32
32
-
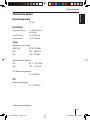 33
33
-
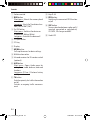 34
34
-
 35
35
-
 36
36
-
 37
37
-
 38
38
-
 39
39
-
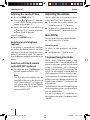 40
40
-
 41
41
-
 42
42
-
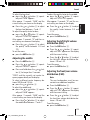 43
43
-
 44
44
-
 45
45
-
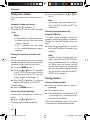 46
46
-
 47
47
-
 48
48
-
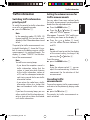 49
49
-
 50
50
-
 51
51
-
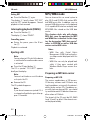 52
52
-
 53
53
-
 54
54
-
 55
55
-
 56
56
-
 57
57
-
 58
58
-
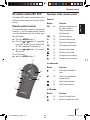 59
59
-
 60
60
-
 61
61
-
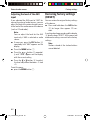 62
62
-
 63
63
-
 64
64
-
 65
65
-
 66
66
-
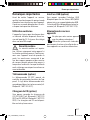 67
67
-
 68
68
-
 69
69
-
 70
70
-
 71
71
-
 72
72
-
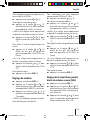 73
73
-
 74
74
-
 75
75
-
 76
76
-
 77
77
-
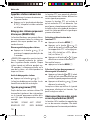 78
78
-
 79
79
-
 80
80
-
 81
81
-
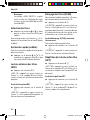 82
82
-
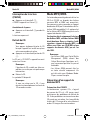 83
83
-
 84
84
-
 85
85
-
 86
86
-
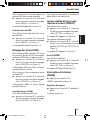 87
87
-
 88
88
-
 89
89
-
 90
90
-
 91
91
-
 92
92
-
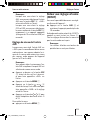 93
93
-
 94
94
-
 95
95
-
 96
96
-
 97
97
-
 98
98
-
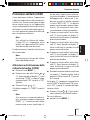 99
99
-
 100
100
-
 101
101
-
 102
102
-
 103
103
-
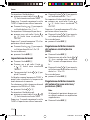 104
104
-
 105
105
-
 106
106
-
 107
107
-
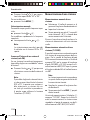 108
108
-
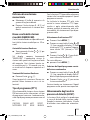 109
109
-
 110
110
-
 111
111
-
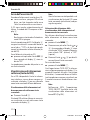 112
112
-
 113
113
-
 114
114
-
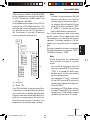 115
115
-
 116
116
-
 117
117
-
 118
118
-
 119
119
-
 120
120
-
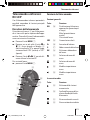 121
121
-
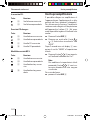 122
122
-
 123
123
-
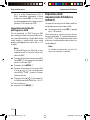 124
124
-
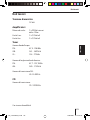 125
125
-
 126
126
-
 127
127
-
 128
128
-
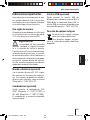 129
129
-
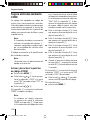 130
130
-
 131
131
-
 132
132
-
 133
133
-
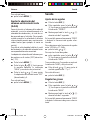 134
134
-
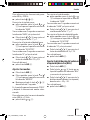 135
135
-
 136
136
-
 137
137
-
 138
138
-
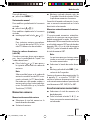 139
139
-
 140
140
-
 141
141
-
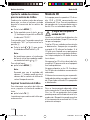 142
142
-
 143
143
-
 144
144
-
 145
145
-
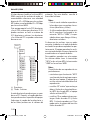 146
146
-
 147
147
-
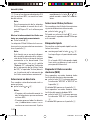 148
148
-
 149
149
-
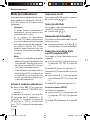 150
150
-
 151
151
-
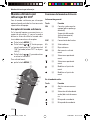 152
152
-
 153
153
-
 154
154
-
 155
155
-
 156
156
-
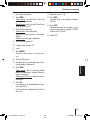 157
157
-
 158
158
-
 159
159
-
 160
160
-
 161
161
-
 162
162
-
 163
163
-
 164
164
-
 165
165
-
 166
166
-
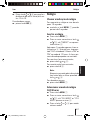 167
167
-
 168
168
-
 169
169
-
 170
170
-
 171
171
-
 172
172
-
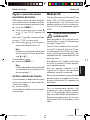 173
173
-
 174
174
-
 175
175
-
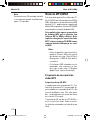 176
176
-
 177
177
-
 178
178
-
 179
179
-
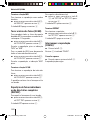 180
180
-
 181
181
-
 182
182
-
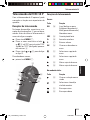 183
183
-
 184
184
-
 185
185
-
 186
186
-
 187
187
-
 188
188
-
 189
189
-
 190
190
-
 191
191
-
 192
192
-
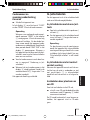 193
193
-
 194
194
-
 195
195
-
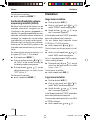 196
196
-
 197
197
-
 198
198
-
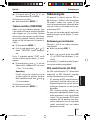 199
199
-
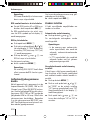 200
200
-
 201
201
-
 202
202
-
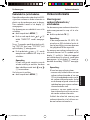 203
203
-
 204
204
-
 205
205
-
 206
206
-
 207
207
-
 208
208
-
 209
209
-
 210
210
-
 211
211
-
 212
212
-
 213
213
-
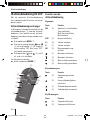 214
214
-
 215
215
-
 216
216
-
 217
217
-
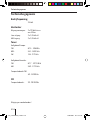 218
218
-
 219
219
-
 220
220
-
 221
221
-
 222
222
-
 223
223
-
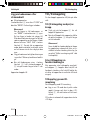 224
224
-
 225
225
-
 226
226
-
 227
227
-
 228
228
-
 229
229
-
 230
230
-
 231
231
-
 232
232
-
 233
233
-
 234
234
-
 235
235
-
 236
236
-
 237
237
-
 238
238
-
 239
239
-
 240
240
-
 241
241
-
 242
242
-
 243
243
-
 244
244
-
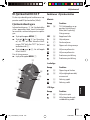 245
245
-
 246
246
-
 247
247
-
 248
248
-
 249
249
-
 250
250
-
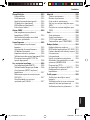 251
251
-
 252
252
-
 253
253
-
 254
254
-
 255
255
-
 256
256
-
 257
257
-
 258
258
-
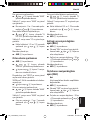 259
259
-
 260
260
-
 261
261
-
 262
262
-
 263
263
-
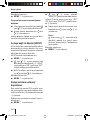 264
264
-
 265
265
-
 266
266
-
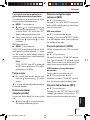 267
267
-
 268
268
-
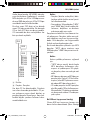 269
269
-
 270
270
-
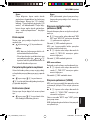 271
271
-
 272
272
-
 273
273
-
 274
274
-
 275
275
-
 276
276
-
 277
277
-
 278
278
-
 279
279
-
 280
280
-
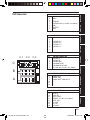 281
281
-
 282
282


Blaupunkt Calais MP48 de handleiding
- Categorie
- Auto media-ontvangers
- Type
- de handleiding
in andere talen
- English: Blaupunkt Calais MP48 Owner's manual
- italiano: Blaupunkt Calais MP48 Manuale del proprietario
- français: Blaupunkt Calais MP48 Le manuel du propriétaire
- español: Blaupunkt Calais MP48 El manual del propietario
- Deutsch: Blaupunkt Calais MP48 Bedienungsanleitung
- português: Blaupunkt Calais MP48 Manual do proprietário
- svenska: Blaupunkt Calais MP48 Bruksanvisning
- Türkçe: Blaupunkt Calais MP48 El kitabı
Gerelateerde papieren
-
Blaupunkt Toronto 400 BT de handleiding
-
-
-
-
-
-
-
-
Blaupunkt ATLANTA 110 de handleiding
-