Samlexpower E-XPERT MODULAR de handleiding
- Type
- de handleiding

EN
NL
WARNING
WARNING
WARNING
WARNING
WARNING
LET OP
LET OP
LET OP
LET OP
LET OP
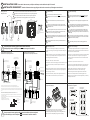
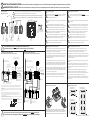
INSTALLATION GUIDE Please read this document very carefully to avoid battery monitor malfunction and/or fire hazards!
INSTALLATIE VOORSCHRIFT Bestudeer dit document uiterst zorgvuldig om schade aan de accumonitor en/of brandgevaar te voorkomen!
Montage CDU + Shunt
Mounting CDU + Shunt
Installing the shunt into the positive line may damage the battery monitor!
The shunt must always be installed into the negative line!
All fuses must be located as close as possible to the battery terminals.
All thick lines in the connection diagrams on the left, represent the main
current lines. These lines must be wired with a wire type which can handle
the full battery current!
The battery negative terminal may only contain one cable, which is the one
going to the shunt. If there are other cables connected to this terminal as
well, this may result in wrong readings on the display.
Always connect the battery negative terminal to the ‘BATTERY -’ stud of the
shunt. Connecting this terminal to the ‘- SYSTEM’ stud, will result in wrong
readings on the display.
De shunt moet altijd worden opgenomen in de minleiding. De accumonitor
kan beschadigen wanneer de shunt in de plusleiding wordt opgenomen!
Alle zekeringen moeten zo dicht mogelijk bij de accupolen geplaatst worden.
Alle vet getekende lijnen in de aansluitschema’s aan de linkerzijde geven het
hoofdstroom circuit aan. Deze lijnen dienen bedraad te worden met een kabel
diameter welke geschikt is voor de maximale accu stroom.
De minpool van de accu mag maar één kabel bevatten, namelijk de kabel
welke op de shunt moet worden aangesloten. Wanneer er ook nog andere
kabels op de minpool aangesloten zijn, zal dit leiden tot foutieve waarden op
het display.
Sluit de minpool van de accu altijd aan op de ‘BATTERY -’ bout van de shunt.
Wanneer de minpool wordt aangesloten op de ‘- SYSTEM’ bout, zal dit leiden
tot foutieve waarden op het display.
battery monitor
status
B1
ALARM
(SUP PLY)
B2
B3
QLINK
88mm
88mm
CDU
CDU
Rubber washer
Rubber pakking
Mounting panel
Montage paneel
Sluitmoer
Locking nut
Gebruik geen montage schroeven met
verzonken kop.
Do not use mounting screws with
countersunk heads.
36mm
OR
OF
Supply cable (included)
Voedingskabel (bijgesloten)
1)
Programmable alarm contact
1)
Programmeerbaar alarm contact
Additional QLINK port
3)
for accessory control
Extra QLINK poort
3)
voor accessoire besturing
2)
Temperature sensor input
2)
Temperatuur sensor ingang
Active shunt
Actieve shunt
Battery negative (system ground)
accu negatief (systeem min)
CDU Cable (included)
CDU Kabel (bijgesloten)
CDU (Control & Display Unit)
CDU (Bedienings- en display unit)
Battery positive (to load)
accu positief (naar belasting)
4)
12V, 24V or 48V
battery
4)
12V, 24V of 48V
accu
Main battery positive (to load)
Hoofd accu positief (naar belasting)
Battery negative (system ground)
accu negatief (systeem min)
12V, 24V or 48V
Main battery
12V, 24V of 48V
Hoofd accu
12V, 24V or 48V
Auxiliary battery 2
12V, 24V of 48V
‚Auxiliary’ accu 2
12V, 24V or 48V
Auxiliary battery 3
12V, 24V of 48V
‚Auxiliary’ accu 3
Aux battery 2 positive
‚Aux’ accu 2 positief
Aux battery 3 positive
‚Aux’ accu 3 positief
Keep these cables
as short as possible!
Houd deze kabels
zo kort mogelijk!
3 x M8 busbar
Aansluitschema voor een opstelling met één accu
Connection diagram of single battery setup
Aansluitschema voor een opstelling met meerdere accu's
Connection diagram of a multi battery setup
+B1 +B2 +B3
+B1
1A-5A fuse
1A-5A zekering
+ +
+
+
-
-
Installation warnings Installatie waarschuwingen
EN
NL
!
Always disconnect the battery negative cable first before installation.
Ontkoppel altijd eerst de minleiding van de accu voor aanvang van de installatie.
!
Always connect the battery negative cable last when the installation has been completed.
Sluit de minleiding van de accu altijd als laatste aan wanneer de installatie voltooid is.
WARNING LET OP
Make sure that the batteries you install are in good health and preferably
fully charged.
Installeer alleen ‘gezonde’, bij voorkeur reeds volledig opgeladen accu's.
batteries.
• Wear proper, non-absorbent gloves, complete eye protection, and clothing
minutes and get medical attention immediately.
• Never smoke or allow a spark or flame near batteries.
protection. Avoid touching your eyes and wiping your forehead while working near
acid enters your eye, immediately flood it with running cold water for at least 15
• If battery acid contacts skin or clothing, wash immediately with soap and water. If
• Use extra caution to reduce the risk of dropping a metal tool on the battery. It could
spark or short circuit the battery or other electrical parts and could cause an
explosion.
• Remove all personal metal items, like rings, bracelets, and watches when working
metal to skin, causing a severe burn.
battery first. Make sure all accessories are off so you don't cause an arc.
• If you need to remove a battery, always remove the negative terminal from the
with batteries. Batteries can produce a short circuit current high enough to weld
General battery precautions Algemene accu waarschuwingen
EN
NL
• Draag fatsoenlijke niet geleidende handschoenen, een veiligheidsbril en eventuele
het loskoppelen te voorkomen.
af met water en zeep. Wanneer dit zuur in uw ogen komt, spoel uw ogen dan
• Voorkom roken en open vuur of vonken in de buurt van accu’s.
• Verwijder metalen sieraden zoals ringen, kettingen en horloges wanneer
voor verdere hulp.
• Wanneer accu zuur in aanraking komt met de huid of kleding, spoel deze onmiddelijk
kortsluitstromen genereren welke tot ernstige brandwonden kunnen leiden.
loskoppelen. Zorg er voor dat alle accu verbruikers uitgeschakeld zijn, om vonken bij
• Voorkom het risico van vallende metalen gereedschappen op de accupolen. Dit kan
ogen en de huid met vervuilde handschoenen.
minimaal 15 minuten met koud stromend water schoon en waarschuw een dokter
vonken en kortsluitingen veroorzaken, wat kan resulteren in gevaarlijke explosies.
werkzaamheden worden verricht aan accu’s. Accu’s kunnen zeer hoge
kleding protectie wanneer met accu’s gewerkt wordt. Voorkom het aanraken van de
• Wanneer een accu verwijderd moet worden, de minleiding altijd als eerste
Common battery configurations
Veel voorkomende accu configuraties
12V
100Ah
12V
100Ah
12V
100Ah
12V
100Ah
12V
100Ah
12V
100Ah
12V
100Ah
12V
100Ah
12V
100Ah
12V
100Ah
12V
100Ah
12V
100Ah
12V
100Ah
12V
100Ah
12V
200Ah
24V
200Ah
48V
200Ah
Generic Modular Batmon installation guide rev2endf
12V configuration
12V configuratie
24V configuration
24V configuratie
48V configuration
48V configuratie
5mm
Active shunt
Actieve shunt
Keep these cables
as short as possible!
Houd deze kabels
zo kort mogelijk!
1)
Normally open or normally closed potential free relay contact. Contact ratings 5A@30Vdc or 1A@70Vdc.
1)
Normaal geopend of normaal gesloten potentiaalvrij relais contact. Contact specificaties 5A@30Vdc of 1A@70Vdc.
2)
Battery temperature sensor is optional and should be attached to the main battery. Sensor kits are offered in lengths of 3m and 10m.
2)
Accutemperatuursensor is optioneel en moet worden aangebracht op de hoofd accu. Sensor kits worden aangeboden in lengten van 3m
en 10m.
3)
Naast accessoires, kan de extra QLINK poort ook gebruikt worden voor het aansluiten van een tweede CDU.
3)
Besides accessories, the additional QLINK port can also be used to connect to a second CDU.
Plaatsing van rubber afdekkapjes
Placement of rubber covers
Zie hierboven hoe ongebruikte aansluitingen op de actieve shunt afgedekt kunnen
worden. Een selectie van rubber afdekkapjes is bijgesloten in de verpakking.
Please see the above illustration on how to cover unused ports of the active shunt
module. A selection of rubber cover parts is included in the package.
Both the active shunt and the rear side of the CDU must be located in a dry environment
De actieve shunt en de achterzijde van de CDU moeten zich in een droge omgeving bevinden
!
4)
Voor meer informatie over ‚middelpunts’ spanningsmeting voor 24V en 48V accubanken, zie de online gebruiksaanwijzing welke
beschikbaar is op onze website.
manual available on our website.
4)
For more information on the midpoint voltage measurement capability for 24V and 48V battery banks, please see the online owner’s
Link Plate (50mm pitch)
Stel het frontpaneel van de CDU niet langdurig bloot aan water en/of direct zonlicht
Do not expose the CDU front panel to water and/or direct sunlight for a prolonged time
!
52 - 54mm
0.5 - 13mm
11 - 24mm
Nut | Moer
Spring washer | Veerring
Washer | Ring
Cable lug | Krimpoog
5)
Assembly sequence of nut, washers and cable lug:
5)
Assemblage volgorde voor moer, ringen en krimpoog:
5)
5)
Pagina wordt geladen...
Documenttranscriptie
EN INSTALLATION GUIDE Please read this document very carefully to avoid battery monitor malfunction and/or fire hazards! NL INSTALLATIE VOORSCHRIFT Bestudeer dit document uiterst zorgvuldig om schade aan de accumonitor en/of brandgevaar te voorkomen! Mounting CDU + Shunt Montage CDU + Shunt Both the active shunt and the rear side of the CDU must be located in a dry environment De actieve shunt en de achterzijde van de CDU moeten zich in een droge omgeving bevinden ! ! 52 - 54mm 88mm Installation warnings WARNING WARNING 88mm B1 (SUPPLY) QLINK Do not use mounting screws with countersunk heads. Gebruik geen montage schroeven met verzonken kop. status ALARM WARNING battery monitor WARNING Rubber washer Rubber pakking Mounting panel Montage paneel Active shunt Actieve shunt Locking nut Sluitmoer All thick lines in the connection diagrams on the left, represent the main current lines. These lines must be wired with a wire type which can handle the full battery current! The battery negative terminal may only contain one cable, which is the one going to the shunt. If there are other cables connected to this terminal as well, this may result in wrong readings on the display. Always connect the battery negative terminal to the ‘BATTERY -’ stud of the shunt. Connecting this terminal to the ‘- SYSTEM’ stud, will result in wrong readings on the display. Always disconnect the battery negative cable first before installation. Ontkoppel altijd eerst de minleiding van de accu voor aanvang van de installatie. Connection diagram of single battery setup Aansluitschema voor een opstelling met één accu + EN Connection diagram of a multi battery setup Aansluitschema voor een opstelling met meerdere accu's + CDU (Control & Display Unit) CDU (Bedienings- en display unit) Battery positive (to load) accu positief (naar belasting) Active shunt Actieve shunt Battery negative (system ground) accu negatief (systeem min) - 5) 12V, 24V or 48V4) battery 4) 12V, 24V of 48V accu - 12V, 24V or 48V Main battery 12V, 24V of 48V Hoofd accu Additional QLINK port for accessory control3) Extra QLINK poort 3) voor accessoire besturing General battery precautions Sluit de minpool van de accu altijd aan op de ‘BATTERY -’ bout van de shunt. Wanneer de minpool wordt aangesloten op de ‘- SYSTEM’ bout, zal dit leiden tot foutieve waarden op het display. Installeer alleen ‘gezonde’, bij voorkeur reeds volledig opgeladen accu's. LET OP NL Algemene accu waarschuwingen • Wear proper, non-absorbent gloves, complete eye protection, and clothing protection. Avoid touching your eyes and wiping your forehead while working near batteries. • Draag fatsoenlijke niet geleidende handschoenen, een veiligheidsbril en eventuele kleding protectie wanneer met accu’s gewerkt wordt. Voorkom het aanraken van de ogen en de huid met vervuilde handschoenen. • If battery acid contacts skin or clothing, wash immediately with soap and water. If acid enters your eye, immediately flood it with running cold water for at least 15 minutes and get medical attention immediately. • Wanneer accu zuur in aanraking komt met de huid of kleding, spoel deze onmiddelijk af met water en zeep. Wanneer dit zuur in uw ogen komt, spoel uw ogen dan minimaal 15 minuten met koud stromend water schoon en waarschuw een dokter voor verdere hulp. • Use extra caution to reduce the risk of dropping a metal tool on the battery. It could spark or short circuit the battery or other electrical parts and could cause an explosion. • Voorkom het risico van vallende metalen gereedschappen op de accupolen. Dit kan vonken en kortsluitingen veroorzaken, wat kan resulteren in gevaarlijke explosies. • Remove all personal metal items, like rings, bracelets, and watches when working with batteries. Batteries can produce a short circuit current high enough to weld metal to skin, causing a severe burn. • Verwijder metalen sieraden zoals ringen, kettingen en horloges wanneer werkzaamheden worden verricht aan accu’s. Accu’s kunnen zeer hoge kortsluitstromen genereren welke tot ernstige brandwonden kunnen leiden. • If you need to remove a battery, always remove the negative terminal from the battery first. Make sure all accessories are off so you don't cause an arc. • Wanneer een accu verwijderd moet worden, de minleiding altijd als eerste loskoppelen. Zorg er voor dat alle accu verbruikers uitgeschakeld zijn, om vonken bij het loskoppelen te voorkomen. Placement of rubber covers Plaatsing van rubber afdekkapjes Common battery configurations Veel voorkomende accu configuraties Link Plate (50mm pitch) Battery negative (system ground) accu negatief (systeem min) 5) LET OP De minpool van de accu mag maar één kabel bevatten, namelijk de kabel welke op de shunt moet worden aangesloten. Wanneer er ook nog andere kabels op de minpool aangesloten zijn, zal dit leiden tot foutieve waarden op het display. • Voorkom roken en open vuur of vonken in de buurt van accu’s. Keep these cables as short as possible! Houd deze kabels zo kort mogelijk! CDU Cable (included) CDU Kabel (bijgesloten) LET OP Alle vet getekende lijnen in de aansluitschema’s aan de linkerzijde geven het hoofdstroom circuit aan. Deze lijnen dienen bedraad te worden met een kabel diameter welke geschikt is voor de maximale accu stroom. • Never smoke or allow a spark or flame near batteries. Main battery positive (to load) Hoofd accu positief (naar belasting) Keep these cables as short as possible! Houd deze kabels zo kort mogelijk! LET OP Make sure that the batteries you install are in good health and preferably fully charged. WARNING ! Alle zekeringen moeten zo dicht mogelijk bij de accupolen geplaatst worden. LET OP B2 B3 CDU CDU De shunt moet altijd worden opgenomen in de minleiding. De accumonitor kan beschadigen wanneer de shunt in de plusleiding wordt opgenomen! All fuses must be located as close as possible to the battery terminals. 5mm Installatie waarschuwingen LET OP WARNING OR OF NL The shunt must always be installed into the negative line! Installing the shunt into the positive line may damage the battery monitor! Do not expose the CDU front panel to water and/or direct sunlight for a prolonged time Stel het frontpaneel van de CDU niet langdurig bloot aan water en/of direct zonlicht 11 - 24mm 0.5 - 13mm 36mm EN 1) +B1 1A-5A fuse 1A-5A zekering 1) 1) 2) 2) 3) 3) Programmable alarm contact 1) Programmeerbaar alarm contact +B1 Temperature sensor input2) 2) Temperatuur sensor ingang Normally open or normally closed potential free relay contact. Contact ratings 5A@30Vdc or 1A@70Vdc. Normaal geopend of normaal gesloten potentiaalvrij relais contact. Contact specificaties 5A@30Vdc of 1A@70Vdc. 3 x M8 busbar Besides accessories, the additional QLINK port can also be used to connect to a second CDU. Naast accessoires, kan de extra QLINK poort ook gebruikt worden voor het aansluiten van een tweede CDU. Assembly sequence of nut, washers and cable lug: Assemblage volgorde voor moer, ringen en krimpoog: 12V 100Ah 12V, 24V or 48V Auxiliary battery 2 12V, 24V of 48V ‚Auxiliary’ accu 2 Nut | Moer Spring washer | Veerring Washer | Ring Cable lug | Krimpoog 48V configuration 48V configuratie 12V configuration 12V configuratie Battery temperature sensor is optional and should be attached to the main battery. Sensor kits are offered in lengths of 3m and 10m. Accutemperatuursensor is optioneel en moet worden aangebracht op de hoofd accu. Sensor kits worden aangeboden in lengten van 3m en 10m. For more information on the midpoint voltage measurement capability for 24V and 48V battery banks, please see the online owner’s manual available on our website. 4) Voor meer informatie over ‚middelpunts’ spanningsmeting voor 24V en 48V accubanken, zie de online gebruiksaanwijzing welke beschikbaar is op onze website. 5) +B3 Supply cable (included) Voedingskabel (bijgesloten) 4) 5) +B2 + 12V 100Ah 12V 200Ah 12V 100Ah 12V 100Ah 12V 100Ah 12V 100Ah 12V, 24V or 48V Auxiliary battery 3 12V, 24V of 48V ‚Auxiliary’ accu 3 Aux battery 2 positive ‚Aux’ accu 2 positief + 24V configuration 24V configuratie Aux battery 3 positive ‚Aux’ accu 3 positief 12V 100Ah 48V 200Ah 12V 100Ah 12V 100Ah 12V 100Ah 12V 100Ah 12V 100Ah 24V 200Ah ! Always connect the battery negative cable last when the installation has been completed. Sluit de minleiding van de accu altijd als laatste aan wanneer de installatie voltooid is. Please see the above illustration on how to cover unused ports of the active shunt module. A selection of rubber cover parts is included in the package. Zie hierboven hoe ongebruikte aansluitingen op de actieve shunt afgedekt kunnen worden. Een selectie van rubber afdekkapjes is bijgesloten in de verpakking. 12V 100Ah 12V 100Ah Generic Modular Batmon installation guide rev2endf-
 1
1
-
 2
2


Samlexpower E-XPERT MODULAR de handleiding
- Type
- de handleiding
in andere talen
Gerelateerde papieren
Andere documenten
-
 Victron BMV-700 & BMV-700H Handleiding
-
Victron energy SmartShunt de handleiding
-
Victron energy VE.Bus BMS de handleiding
-
Mastervolt BattMan Lite Handleiding
-
-
-
-
