
FR-984
FR-985
FR-986
FR-994
FR-995
FR-996
Digital Surround Sound Receiver
Audio
Audio

English
HOME CINEMA PACKAGES MX 980, MX 999
Additionally to the standard supplies the Home Cinema
packages MX 980, MX 999 contain:
– a subwoofer including a connection cable and a mains
cable
– 5 loudspeakers including 5 speaker cables
– a coaxial cable for video connection with a DVD player or a
TV set
– a quick installation card
For the standard supplies of your receiver see chapter
“GENERAL INFORMATION / Scope of supply” in the
instruction manual.
• Install the subwoofer wherever you like because with the
bass sound range reproduced from the subwoofer (below
150 Hz) human hearing cannot detect the direction and
position where the sound is being produced.
• Also, since the feeling of stereo is lost with bass
frequencies, a single subwoofer is enough for reproducing
the bass of stereo channels.
• To obtain a better bass reproduction, we recommend that
you place the subwoofer on a solid floor where resonance
is unlikely to occur.
• Always place the subwoofer vertically, keeping a few
centimeters away from the wall.
• Do not place any object on the subwoofer or sit on it.
• If the subwoofer is placed in the center of a room, the bass
could be extremely weakened. This is due to the influence
of the standing wave of the room. If this happens, move the
subwoofer away from the center of the room or eliminate
the cause of the standing wave by installing a bookshelf on
the wall, etc.
Important!
Before you operate the subwoofer, complete the preparation
procedures. Switch on your receiver and select the sound
source.
The type plate is located on the rear of the subwoofer.
1 Use the cinch cable supplied to connect AUDIO IN to
SUBWOOFER PRE-OUT on the receiver.
2 Check whether the mains voltage as shown on the type
plate corresponds to your local mains voltage. If it does not,
consult your dealer or service organization.
3 After all connections have been made, connect the
AC mains cable to the receiver or the wall outlet.
To disconnect the subwoofer from the mains completely,
remove the mains plug from the wall socket.
1 To activate the subwoofer, set the on/off switch at the rear
of the subwoofer to ON position.
2 Rotate VOLUME clockwise until there is a click.
yThe LED indicator lights up in green.
If the subwoofer is not to be used for a longer period of time,
it is advisable to set the on/off switch to OFF position.
• Rotate VOLUME anticlockwise until there is a click.
yThe LED indicator light turns red.
You can adjust the subwoofer to suit the sound level of your
front speakers. Reinforcing the bass sound gives you a
greater sense of atmosphere.
1 Adjust the VOLUME on the receiver until the sound from
the front speakers is not distorted. If it is distorted, the
sound from the subwoofer will also be distorted.
2 Play your favourite songs. Male vocal tunes containing bass
sounds are most suitable for adjustment.
3 Adjust the VOLUME on the subwoofer to determine the
loudness of the bass sound from the subwoofer.
• Use PHASE SELECTOR located
at the rear of the subwoofer to
select the phase polarity.
Selecting the polarity at either 0° or 180° may determine
better bass reproduction effect in certain listening
environments (depending on the type of front speakers and the
position of the subwoofer). It may also change the expanse
and tightness of sound, and affect the feeling of sound field.
• Select the setting that provides the sound you prefer when
listening in your usual listening position. Repeat the
adjustment for volume and phase polarity to suit your
preference.
Once you have adjusted the subwoofer to the settings you
desire, use the VOLUME control on the receiver to adjust the
volume of the subwoofer and the other speakers. You do not
need to adjust the subwoofer settings again even when you
change the volume level of the receiver.
PHASE
SELECTOR
0
0
0
180
Phase selector
Volume adjustment
Switching the subwoofer to standby mode
Switching the subwoofer on
Connections
Subwoofer setup
Scope of supply
SUBWOOFER
SURROUND
(REAR)
LEFT
LEFT
RIGHT
CENTER
FRONT
RIGHT
FRONT
SURROUND
(REAR)

English
HOME CINEMA PACKAGES MX 980, MX 999
If the receiver is used at very high power it can produce
distortions which may seriously damage your speakers. If
distortions occur, reduce the volume and the tone controls to
a level where the sound is acceptable again.
To avoid overheating of the set a safety circuit has
been built in. Therefore your set may disconnect under
extreme conditions. If this happens, switch the set off
and let it cool down before reusing it. After having let
the set cool down switch the set on again and select
the desired source by turning SOURCE SELECT.
For optimum sound performance of your Home Cinema
System we recommend the following settings on your
receiver:
* SPEAKR SETUP
SUBW PRESENT: YES
* SPEAKR SIZES
FRONT SIZE: SMALL
CENTER SIZE: SMALL
REAR SIZE: SMALL
* VOL BALANCE
VOL FRONT-L: 0
VOL FRONT-R: 0
VOL CENTER: -10
VOL REAR-L: +5
VOL REAR-R: +5
BASS: 0
TREBLE: 0
LOUDNESS: off
When connecting a DVD player to COAX 1 IN, make sure that
the digital output of your DVD player is set to “ON” or “ALL”
(please read the instruction manual of your DVD player).
Subject to modification without notice.
Front speakers
System................................................................2-way shielded
Impedance............................................................................8 Ω
Speaker drivers.........................................3" fullrange, 1" piezo
Reproduction frequency response......................150 Hz–20 kHz
Dimensions (MX 980), w × h × d.................95 × 150 × 97 mm
Dimensions (MX 999), w × h × d.................95 × 150 × 91 mm
Weight.............................................................................0.45 kg
Center speaker
System................................................................2-way shielded
Impedance............................................................................8 Ω
Speaker drivers..................................2 × 3" fullrange, 1" piezo
Reproduction frequency response......................150 Hz–20 kHz
Dimensions (MX 980), w × h × d.................250 × 94 × 92 mm
Dimensions (MX 999), w × h × d.................250 × 94 × 86 mm
Weight.............................................................................0.92 kg
Surround speakers
System..............................................................................2-way
Impedance............................................................................8 Ω
Speaker drivers.........................................3" fullrange, 1" piezo
Reproduction frequency response......................150 Hz–20 kHz
Dimensions (MX 980), w × h × d.................95 × 150 × 97 mm
Dimensions (MX 999), w × h × d.................95 × 150 × 91 mm
Weight.............................................................................0.45 kg
Active subwoofer with wOOx technology for MX 980 –
not magnetically shielded design
Subwoofer............................................................................6.5"
Output power..................................................50 W RMS (4 Ω)
THD.....................................................................10% at 100 Hz
Reproduction frequency response .......................40 Hz–150 Hz
Phase switch.................................................................0°, 180°
Input sensitivity (subwoofer in)................................200 mVrms
AC power................................................................230 V/50 Hz
Power consumption.............................40 W (at
1
⁄8 rated power)
Dimensions, w × h × d ............................200 × 310 × 370 mm
Weight...............................................................................6.8 kg
Active subwoofer with wOOx technology for MX 999 –
not magnetically shielded design
Subwoofer............................................................................6.5"
Output power.................................................100 W RMS (4 Ω)
THD.....................................................................10% at 100 Hz
Reproduction frequency response .......................40 Hz–150 Hz
Phase switch.................................................................0°, 180°
Input sensitivity (subwoofer in)................................200 mVrms
AC power................................................................230 V/50 Hz
Power consumption.............................52 W (at
1
⁄
8 rated power)
Dimensions, w × h × d ............................200 × 310 × 370 mm
Weight...............................................................................8.4 kg
Technical data of speakers and subwoofer
Digital sound from a DVD player
Recommended settings
Power handling
3103 306 1862.1 MX 980/MX 999 VieUrs0147

Français
En plus des éléments standard fournis, les ensembles
MX 980, MX 999 comprennent :
– un subwoofer avec un câble de raccordement et un câble
d’alimentation secteur
– 5 haut-parleurs y compris 5 câbles pour les haut-parleurs
– un câble coaxial pour une connexion vidéo avec un lecteur
DVD ou un téléviseur
– une notice d’installation rapide
Pour la liste des éléments standard fournis avec votre
récepteur, voir le chapitre « GENERALITES/Produits livrés avec
l’equipement » dans le manuel d’utilisation.
• Installez le subwoofer où vous plaira, car avec la gamme
des graves reproduite par le subwoofer (en-dessous de
150 Hz), l’ouïe humaine ne parvient pas à détecter le sens
ni la position d’où vient le son.
• De plus, comme la sensation stéréo se perd à basses
fréquences, un simple subwoofer suffit à la reproduction
des basses des canaux stéréo.
• Pour obtenir une meilleure reproduction des graves, nous
recommandons de disposer le subwoofer sur un sol solide
où il y a peu de chance que des résonances aient lieu.
• Placez toujours le subwoofer en position ver ticale et à
quelques centimètres du mur.
• Ne placez pas un objet sur le subwoofer ni ne vous asseyez
dessus.
• Si le subwoofer est disposé au centre d’une pièce, les
graves peuvent être extrêmement affaiblis. Ce phénomène
est dû à l’onde verticale régnant dans la pièce. Dans ce
cas, déplacez le subwoofer du centre de cette pièce pour
éliminer la cause de l’onde ver ticale, par exemple en
disposant un rayon à livres au mur, etc.
Important!
Avant d’actionner le subwoofer, achevez les procédures de
préparation. Allumez votre récepteur et choisissez la source sonore.
La plaquette signalétique est située à l‘arrière du subwoofer.
1 Utilisez le câble cinch compris à la livraison pour brancher
AUDIO IN avec SUBWOOFER PRE-OUT au récepteur.
2 Vérifiez si la tension secteur référencée sur la plaquette
signalétique correspond à votre tension secteur locale. Si
ce n‘est pas le cas, consultez votre concessionnaire ou
l‘organisation de service après-vente.
3 Après avoir effectué tous les raccords, raccordez le cordon
d'alimentation CA au récepteur ou à la prise murale.
Pour débrancher complètement le subwoofer du secteur,
retirez la fiche d’alimentation de la prise de courant.
1 Pour mettre en marche le caisson de basses, mettez le
sélecteur de marche/arrêt situé à l ’arrière du caisson de
basses en position « ON ».
2 Tournez VOLUME vers la droite jusqu’à ce qu’un déclic se
fasse entendre.
yL’indicateur vert s’allume.
Si le caisson de basses ne sera pas utilisé pendant une
période prolongée, nous vous conseillons de mettre le
sélecteur de marche/arrêt en position « OFF ».
• Tournez VOLUME vers la gauche jusqu’à ce qu’un déclic se
fasse entendre.
yL’indicateur passe au rouge.
Il vous est possible de régler le subwoofer en fonction du
niveau de son de vos haut- parleurs avant. L’accentuation des
graves vous donne une plus grande sensation d’atmosphère.
1
Réglez le VOLUME sur le récepteur jusqu'à ce que le son provenant
des haut-parleurs de devant ne soit plus déformé. S'il est déformé,
le son provenant du subwoofer sera également déformé.
2 Faites jouer votre musique favorite. Une voix mâle
contenant des graves convient le mieux au réglage.
3 Réglez le VOLUME sur le subwoofer pour déterminer la
portée du son grave émis par le subwoofer.
• Utilisez PHASE SELECTOR
disposé à l’arrière du
subwoofer pour sélectionner
la polarité de phase.
La sélection de polarité à 0° ou 180° permet de mieux déterminer
l’effet de reproduction des graves dans certains endroits d’écoute
(selon le type de haut- parleurs avant et la position du subwoofer).
Ceci peut également modifier la charge et la densité du son et
affecter la sensation du champ de sonorité.
• Sélectionnez le réglage correspondant à votre préférence
d’écoute dans votre position d’écoute normale. Répétez le
réglage pour le volume et la polarité de phase en fonction
de vos préférences.
Une fois que vous avez procédé aux réglages souhaités pour le
subwoofer, utilisez le réglage du VOLUME sur le récepteur pour
régler le volume du subwoofer et des autres haut-parleurs.
Vous n'avez pas besoin de changer les réglages du subwoofer
même si vous modifiez le volume du récepteur.
PHASE
SELECTOR
0
0
0
180
Sélecteur de phase
Réglage de volume
Mise en mode de veille du subwoofer
Mise en service du subwoofer
Connecteurs
Disposition du subwoofer
Produits livrés avec l'équipement
SUBWOOFER
SURROUND
(REAR)
LEFT
LEFT
RIGHT
CENTER
FRONT
RIGHT
FRONT
SURROUND
(REAR)
ENSEMBLES HOME CINEMA MX 980, MX 999

Si le récepteur est utilisé à une puissance trop élevée, des
distorsions peuvent avoir lieu, lesquelles peuvent sérieusement
endommager vos enceintes. En cas de distorsions, réduisez le
volume et les commandes de tonalité à un niveau de son acceptable.
Pour éviter tout problème de surchauffe, cet appareil est
doté d’un circuit de sécurité intégré. L’appareil s’arrête
automatiquement dans des conditions de fonctionnement
extrêmes. Si tel était le cas, mettez l’appareil hors
tension pour permettre le refroidissement de l’appareil
avant de le réutiliser. Après avoir laissé l’appareil
refroidir allumez l’appareil de nouveau et choisissez la
source désirée en tournant SOURCE SELECT.
Pour une performance du son optimale sur votre Home
Cinema System, nous recommandons les réglages suivants
sur votre amplificateur :
* SPEAKR SETUP
SUBW PRESENT : YES
* SPEAKR SIZES
FRONT SIZE : SMALL
CENTER SIZE : SMALL
REAR SIZE : SMALL
* VOL BALANCE
VOL FRONT-L : 0
VOL FRONT-R : 0
VOL CENTER : -10
VOL REAR-L : +5
VOL REAR-R : +5
BASS : 0
TREBLE : 0
LOUNDNESS : désactivé
Quand vous connectez un lecteur de DVD à COAX 1 IN,
assurez-vous que la sortie digitale de votre lecteur de DVD
est réglée sur « ON » ou « ALL » (veuillez vous référer au
manuel de votre lecteur de DVD).
Sujet à modifications sans avis préalable.
Enceintes avant
Système.......................................................protégé à 2 circuits
Impédance............................................................................8 Ω
Moteurs des haut-parleurs...............3" longue bande, 1" piezo
Réponse en fréquence de reproduction.............150 Hz–20 kHz
Dimensions (MX 980), l × h × p...................95 × 150 × 97 mm
Dimensions (MX 999), l × h × p...................95 × 150 × 91 mm
Poids................................................................................0,45 kg
Enceinte centrale
Système.......................................................protégé à 2 circuits
Impédance............................................................................8 Ω
Moteurs des haut-parleurs.........2 × 3" longue bande, 1" piezo
Réponse en fréquence de reproduction.............150 Hz–20 kHz
Dimensions (MX 980), l × h × p...................250 × 94 × 92 mm
Dimensions (MX 999), l × h × p...................250 × 94 × 86 mm
Poids................................................................................0,92 kg
Haut-parleurs surround
Système...........................................................................2 voies
Impédance............................................................................8 Ω
Moteurs des haut-parleurs...............3" longue bande, 1" piezo
Réponse en fréquence de reproduction.............150 Hz–20 kHz
Dimensions (MX 980), l × h × p...................95 × 150 × 97 mm
Dimensions (MX 999), l × h × p...................95 × 150 × 91 mm
Poids................................................................................0,45 kg
Subwoofer actif doté de la technologie wOOx pour le
MX 980 – modèle non pourvu d’un blindage magnétique
Subwoofer............................................................................6,5"
Puissance de sortie.........................................50 W RMS (4 Ω)
DHT.......................................................................10% à 100 Hz
Réponse en fréquence de reproduction...............40 Hz–150 Hz
Inverseur de phase........................................................0°, 180°
Sensibilité d'entrée (entrée subwoofer)..................200 mVrms
Alimentation CA......................................................230 V/50 Hz
Consommation de puissance...40 W (
1
⁄8 de la puissance nominale)
Dimensions, l × h × p ..............................200 × 310 × 370 mm
Poids..................................................................................6,8 kg
Subwoofer actif doté de la technologie wOOx pour le
MX 999 – modèle non pourvu d’un blindage magnétique
Subwoofer............................................................................6,5"
Puissance de sortie.......................................100 W RMS (4 Ω)
DHT.......................................................................10% à 100 Hz
Réponse en fréquence de reproduction...............40 Hz–150 Hz
Inverseur de phase........................................................0°, 180°
Sensibilité d'entrée (entrée subwoofer)..................200 mVrms
Alimentation CA......................................................230 V/50 Hz
Consommation de puissance...52 W (
1
⁄8 de la puissance nominale)
Dimensions, l × h × p ..............................200 × 310 × 370 mm
Poids..................................................................................8,4 kg
Données techniques des haut-parleurs et
du subwoofer
Son digital à partir d’un lecteur de DVD
Réglages recommandés
Manipulation de la puissance
Français
ENSEMBLES HOME CINEMA MX 980, MX 999
3103 306 1862.1 MX 980/MX 999 VieUrs0147

Español
Además de los suministros estándar, los paquetes de Home
Cinema MX 980, MX 999 contienen:
– un subwoofer con un cable de conexión y cable de red
– 5 altavoces con 5 cables de altavoces
– un cable coaxial para la conexión del video con un
reproductor de DVD o con un aparato de televisión
– una tarjeta de instalación rápida
Para los suministros estándar de su receptor, ver capítulo
«INFORMACIÓN GENERAL/Lista de componentes» en el
manual de instrucciones.
• El subwoofer puede ser instalado en cualquier parte debido
a que la gama desonidos graves que reproduce (por debajo
de 150 Hz), el oído humano no puede detectarla dirección o
la posición de la que viene el sonido.
• Además, como la sensación de estéreo se pierde con las
frecuencias de graves. Basta con un sólo subwoofer para
reproducir los graves y los canales de estéreo.
• Para obtener una reproducción mejor de graves, se
recomienda instalar el subwoofer en una superficie sólida
que no produzca resonancia.
• Coloque siempre el subwoofer ver ticalmente, pero
guardando una distancia de algunos centímetros de la pared.
• No coloque ningún objeto encima del subwoofer o se
siente en él.
• Si se coloca el subwoofer en el centro de la habitación, el
efecto de los graves puede debilitarse debido a la influencia
de las ondas estacionarias de la habitación. En tal caso,
retírelo del centro de la habitación o trate de solucionar el
problema, colocando una estantería en la pared.
¡Importante!
Antes de poner en funcionamiento el subwoofer, acabe todos
los preparativos. Encienda su receptor y seleccione la fuente
de sonido.
La placa tipo está situada en la parte posterior del subwoofer.
1 Utilice el cable cinch suministrado para conectar AUDIO IN
con SUBWOOFER PRE-OUT en el receptor.
2 Compruebe que la tensión indicada en la placa tipo
corresponde con el voltaje de la red local. De lo contrario,
consulte con su distribuidor u organización de servicio.
3 Una vez realizadas todas las conexiones, conecte el cable
de CA al receptor o a la toma de corriente.
Para desconectar por completo el subwoofer de la red, retirar
el conector de la toma de red de la pared.
1 Para activar el subwoofer, posicione el selector de
activación/desactivación situado en la parte trasera del
subwoofer su «ON».
2 De vueltas a VOLUME en dirección de las agujas del reloj
hasta que oiga un clic.
yEl indicador LED se enciende en verde.
Si no va a utilizar el subwoofer durante mucho tiempo,
recomendamos posicionar el selector de activación/
desactivación su «OFF».
• Dé vueltas a VOLUME en dirección contraria a las agujas
del reloj hasta que oiga un clic.
yEl indicador LED se vuelve rojo.
Se puede ajustar el volumen del subwoofer para acoplarlo al nivel
de sonido de los altavoces frontales. Si refuerza el sonido de los
graves puede conseguir una mejora en el entorno acústico.
1 Ajuste el VOLUMEN del receptor hasta que el sonido de los
altavoces frontales no suene distorsionado. Si el sonido
está distorsionado también lo estará el sonido procedente
del subwoofer y del resto de altavoces.
2 Reproduzca sus canciones favoritas. Las entonaciones
vocales masculinas con sonidos graves son las más
apropiadas para el ajuste.
3 Ajuste VOLUME en el subwoofer para determinar el volumen
del sonido de los graves provenientes del subwoofer.
•
Utilice PHASE SELECTOR, el cual
está ubicado en la parte posterior
del subwoofer para seleccionar
la polaridad de fase.
En ciertos entornos acústicos la escucha del efecto de
reproducción de los graves se puede mejorar si selecciona la
polaridad a 0° o a 180° (dependiendo del tipo de altavoces
frontales y de la posición del subwoofer). También puede
influir en el gasto de energía y hermeticidad del sonido y
afectar a la percepción del campo de sonido.
• Seleccione el ajuste que le ofrezca la calidad de sonido que
prefiere en la posición normal de escucha. Repita el ajuste
de volumen y polaridad de la fase hasta que consiga uno
que le guste.
Una vez haya realizado en el subwoofer los ajustes que
desee, utilice el control del VOLUMEN que hay en el
receptor para ajustar el volumen del subwoofer y de los
demás altavoces. No es necesario que repita los ajustes
del subwoofer incluso aunque modifique el volumen del
receptor.
PHASE
SELECTOR
0
0
0
180
Selector de fase
Ajuste de volumen
Para poner el subwoofer en el modo de espera
Encendido del subwoofer
Conexiones
Instalación del subwoofer
Lista de componentes
SUBWOOFER
SURROUND
(REAR)
LEFT
LEFT
RIGHT
CENTER
FRONT
RIGHT
FRONT
SURROUND
(REAR)
PAQUETES HOME CINEMA MX 980, MX 999

Español
Si se utiliza el receptor con el volumen demasiado alto, se
pueden producir distorsiones que causen daño a los altavoces.
En caso de distorsiones, reduzca el volumen y los controles de
tono a un nivel razonable.
Para evitar el recalentamiento del aparato, hay un
circuito de seguridad incorporado. Por lo tanto su
aparato puede apagarse bajo condiciones extremas.
Si esto ocurre, desconecte el aparato y espere hasta
que se enfrie antes de volver a usarlo. Después de dejar
que el aparato se enfríe, encienda de nuevo el aparato y
seleccione la fuente deseada girando SOURCE SELECT.
Para un rendimiento óptimo del sonido de su Sistema Home
Cinema, le recomendamos la siguientes configuraciones en su
receptor:
* SPEAKR SETUP
SUBW PRESENT: YES
* SPEAKR SIZES
FRONT SIZE: SMALL
CENTER SIZE: SMALL
REAR SIZE: SMALL
* VOL BALANCE
VOL FRONT-L: 0
VOL FRONT-R: 0
VOL CENTER: -10
VOL REAR-L: +5
VOL REAR-R: +5
BASS: 0
TREBLE: 0
LOUDNESS: desconectado
Si conecta un reproductor de DVD a un COAX 1 IN, asegúrese
de que la salida digital de su reproductor de DVD está en
«ON» o «ALL» (por favor, lea el manual de instrucciones de su
reproductor de DVD).
Sujeto a modificaciones sin previo aviso.
Altavoces frontales
Sistema...................................................protección de dos vías
Impedancia...........................................................................8 Ω
Controladores de altavoz...................alcance total 3", piezo 1"
Respuesta de frecuencia de reproducción.........150 Hz–20 kHz
Dimensiones (MX 980),
anch. × alt. × profun....................................95 × 150 × 97 mm
Dimensiones (MX 999),
anch. × alt. × profun....................................95 × 150 × 91 mm
Peso.................................................................................0,45 kg
Alvatoz central
Sistema...................................................protección de dos vías
Impedancia...........................................................................8 Ω
Controladores de altavoz.............alcance total 2 × 3", piezo 1"
Respuesta de frecuencia de reproducción.........150 Hz–20 kHz
Dimensiones (MX 980),
anch. × alt. × profun....................................250 × 94 × 92 mm
Dimensiones (MX 999),
anch. × alt. × profun....................................250 × 94 × 86 mm
Peso.................................................................................0,92 kg
Altavoces surround
Sistema..........................................................................dos vías
Impedancia...........................................................................8 Ω
Controladores de altavoz...................alcance total 3", piezo 1"
Respuesta de frecuencia de reproducción.........150 Hz–20 kHz
Dimensiones (MX 980),
anch. × alt. × profun....................................95 × 150 × 97 mm
Dimensiones (MX 999),
anch. × alt. × profun....................................95 × 150 × 91 mm
Peso.................................................................................0,45 kg
Altavoz de graves activo con tecnología wOOx para
MX 980 – diseño no magnéticamente sellado
Subwoofer............................................................................6,5"
Potencia de salida...........................................50 W RMS (4 Ω)
THD.......................................................................10% a 100 Hz
Respuesta de frecuencia de reproducción...........40 Hz–150 Hz
Interruptor de fase........................................................0°, 180°
Sensibilidad de entrada (entrada subwoofer).........200 mVrms
Potencia CA.............................................................230 V/50 Hz
Consumo de energía..........40 W (a
1
⁄8 de potencia de régimen)
Dimensiones, anch. × alt. × profun.........200 × 310 × 370 mm
Peso...................................................................................6,8 kg
Altavoz de graves activo con tecnología wOOx para
MX 999 – diseño no magnéticamente sellado
Subwoofer............................................................................6,5"
Potencia de salida.........................................100 W RMS (4 Ω)
THD.......................................................................10% a 100 Hz
Respuesta de frecuencia de reproducción...........40 Hz–150 Hz
Interruptor de fase........................................................0°, 180°
Sensibilidad de entrada (entrada subwoofer).........200 mVrms
Potencia CA.............................................................230 V/50 Hz
Consumo de energía..........52 W (a
1
⁄8 de potencia de régimen)
Dimensiones, anch. × alt. × profun.........200 × 310 × 370 mm
Peso...................................................................................8,4 kg
Datos técnicos de los altavoces
y altavoz de graves
Sonido digital del reproductor de DVD
Configuraciones recomendadas
Capacidad de potencia
3103 306 1862.1 MX 980/MX 999 VieUrs0147
PAQUETES HOME CINEMA MX 980, MX 999

Deutsch
HOME-CINEMA-PAKETE MX 980, MX 999
Zusätzlich zur Grundausstattung enthalten die
Home-Cinema-Pakete MX 980, MX 999:
– einen Subwoofer mit Anschlusskabel und Netzkabel
– 5 Lautspecher mit 5 Lautsprecherkabeln
– ein Koaxialkabel für die Videoverbindung mit einem
DVD-Spieler oder einem Fernseher
– eine Kurzanleitung zur Installation.
Die Liste der Grundaustattung Ihres Receivers finden Sie im
Kapitel „ALLGEMEINE INFORMATIONEN / Lieferumfang” in
der Bedienungsanleitung.
• Sie können den Subwoofer an jedem beliebigen Platz
aufstellen, denn durch den niedrigen Bass, der vom
Subwoofer produziert wird (unter 150Hz), kann das
menschliche Gehör den Ursprung des Klanges nicht orten.
• Da der Stereo-Effekt bei Bass-Frequenzen verloren geht, ist
ein Subwoofer ausreichend, um den Bass von Stereo-Kanälen
wiederzugeben.
• Um eine bessere Bass-Wiedergabe zu erreichen, sollten Sie
den Subwoofer auf eine stabile Fläche stellen, damit keine
Resonanz auftreten kann.
• Stellen Sie den Subwoofer immer aufrecht und lassen Sie
ein paar Zentimeter zur Wand frei.
• Stellen Sie nichts auf den Subwoofer und setzen Sie sich
nicht darauf.
• Wenn der Subwoofer in der Mitte eines Raumes steht,
kann der Bass stark abgeschwächt sein. Der Grund dafür
könnte die Ausbildung einer stehenden Welle im Raum
sein. Wenn das der Fall ist, rücken Sie den Subwoofer aus
der Mitte des Raumes oder beseitigen Sie den Grund der
stehenden Welle, indem Sie z.B. ein Bücherregal an die
Wand montieren.
Wichtig!
Bevor Sie den Subwoofer in Betrieb nehmen, schließen Sie
alle Vorbereitungsarbeiten ab. Schalten Sie Ihren Receiver ein
und wählen Sie ein Ausgangsgerät.
Das Typenschild befindet sich an der Rückseite des
Subwoofers.
1 Verwenden Sie das mitgelieferte Cinch-Kabel, um AUDIO IN
mit SUBWOOFER PRE-OUT am Receiver zu verbinden.
2 Überprüfen Sie, ob die am Typenschild angegebene
Spannung mit der örtlichen Netzspannung übereinstimmt.
Wenn dies nicht der Fall ist, wenden Sie sich an Ihren
Fachhändler oder an Ihre Servicestelle.
3 Nachdem alle Anschlüsse vorgenommen wurden, schließen
Sie das Netzkabel an den Receiver oder die Netzsteckdose an.
Um den Subwoofer vollständig vom Netz zu trennen, ziehen
Sie den Stecker aus der Steckdose.
1 Zum Einschalten des Subwoofers den „On/Off“-Schalter auf
der Rückseite des Subwoofers auf „ON“ stellen.
2
Drehen Sie VOLUME im Uhrzeigersinn bis Sie ein Klicken hören.
yDie LED-Anzeige leuchtet grün.
Wenn der Subwoofer über längere Zeit nicht benutzt wird,
empfiehlt es sich, den „On/Off“-Schalter auf „OFF“ zu stellen.
• Drehen Sie VOLUME gegen den Uhrzeigersinn bis Sie ein
Klicken hören.
yDie LED-Anzeige leuchtet rot.
Sie können den Subwoofer an das Klangniveau der vorderen
Lautsprecher angleichen. Ein verstärkter Bass erzeugt eine
größere Klang-Atmosphäre.
1 Stellen Sie die Lautstärke mittels VOLUME am Receiver so
ein, dass der Klang der vorderen Lautsprecher nicht verzerrt
wird. Denn falls dies der Fall ist, wird der Klang des
Subwoofers auch verzerrt.
2 Spielen Sie Ihre bevorzugte Musik. Um die Einstellung
vorzunehmen eignen sich am besten Musikpassagen mit
männlichen Singstimmen und Bassklängen.
3 Stellen Sie die Lautstärke der Bass-Wiedergabe mittels
VOLUME am Subwoofer ein.
• Verwenden Sie PHASE SELECTOR
auf der Rückseite des
Subwoofers, um die Phase
zu wählen.
Durch die Wahl der Phase 0° oder 180° kann eine bessere
Basswiedergabe in bestimmten Umgebungen (abhängig von der
Art der vorderen Lautsprecher und der Position des Subwoofers)
erzielt werden. Auch kann das Volumen und die Dichte des Klanges
verändert und der Charakter eines Klangfeldes beeinflusst werden.
• Wählen Sie die Einstellung, die Sie bevorzugen, wenn Sie in
Ihrer gewohnten Hörposition Musik hören. Wiederholen Sie
die Einstellung von Lautstärke und Phase, bis sie Ihnen zusagt.
Wenn der Subwoofer nach Ihren Wünschen eingestellt ist,
verwenden Sie VOLUME am Receiver, um die Lautstärke des
Subwoofers und der anderen Lautsprecher zu regeln. Wenn
Sie die Lautstärke des Receivers ändern, müssen die
Subwoofer-Einstellungen nicht erneut durchgeführt werden.
PHASE
SELECTOR
0
0
0
180
Phasenschalter
Einstellen der Lautstärke
Ausschalten des Subwoofers
Einschalten des Subwoofers
Anschlüsse
Aufstellen des Subwoofers
Lieferumfang
SUBWOOFER
SURROUND
(REAR)
LEFT
LEFT
RIGHT
CENTER
FRONT
RIGHT
FRONT
SURROUND
(REAR)

Deutsch
HOME-CINEMA-PAKETE MX 980, MX 999
Wenn der Receiver mit sehr hoher Leistung verwendet wird,
so kann dies Verzerrungen produzieren, die Ihre Lautsprecher
ernsthaft beschädigen können. Falls Verzerrungen auftreten,
reduzieren Sie die Lautstärke und die Ton-Bedienelemente auf
eine Stufe, bei der der Klang wieder akzeptabel ist.
Um eine Überhitzung des Gerätes zu vermeiden, wurde
eine Sicherheitsschaltung eingebaut. Aus diesem Grund
kann es passieren, dass ihr Gerät unter extremen
Bedingungen abschaltet. Wenn dies passiert, schalten
Sie das Gerät aus und lassen Sie es auskühlen bevor Sie
es wieder verwenden. Nachdem das Gerät ausgekühlt
ist, schalten Sie es wieder ein und wählen Sie ein
Ausgangsgerät durch Drehen von SOURCE SELECT.
Um den besten Klang Ihres Home-Cinema-Systems zu
erzielen, empfehlen wir folgende Einstellungen an Ihrem
Receiver:
* SPEAKR SETUP
SUBW PRESENT: YES
* SPEAKR SIZES
FRONT SIZE: SMALL
CENTER SIZE: SMALL
REAR SIZE: SMALL
* VOL BALANCE
VOL FRONT-L: 0
VOL FRONT-R: 0
VOL CENTER: -10
VOL REAR-L: +5
VOL REAR-R: +5
BASS: 0
TREBLE: 0
LOUDNESS: ausgeschaltet
Wenn Sie einen DVD-Spieler an COAX 1 IN anschließen,
vergewissern Sie sich, dass der digitale Ausgang Ihres DVD-
Spielers auf „ON“ oder „ALL“ gesetzt ist (bitte lesen Sie die
Bedienungsanleitung Ihres DVD-Spielers).
Änderungen vorbehalten.
Vordere Lautsprecher
System........................................................2-Weg abgeschirmt
Impedanz..............................................................................8 Ω
Lautsprechertreiber.................................3" Breitband, 1" Piezo
Frequenzgang......................................................150 Hz–20 kHz
Abmessungen (MX 980), b × h × t..............95 × 150 × 97 mm
Abmessungen (MX 999), b × h × t..............95 × 150 × 91 mm
Gewicht...........................................................................0,45 kg
Center-Lautsprecher
System........................................................2-Weg abgeschirmt
Impedanz..............................................................................8 Ω
Lautsprechertreiber...........................2 × 3" Breitband, 1" Piezo
Frequenzgang......................................................150 Hz–20 kHz
Abmessungen (MX 980), b × h × t..............250 × 94 × 92 mm
Abmessungen (MX 999), b × h × t..............250 × 94 × 86 mm
Gewicht...........................................................................0,92 kg
Surround-Lautsprecher
System .............................................................................2-Weg
Impedanz..............................................................................8 Ω
Lautsprechertreiber.................................3" Breitband, 1" Piezo
Frequenzgang......................................................150 Hz–20 kHz
Abmessungen (MX 980), b × h × t..............95 × 150 × 97 mm
Abmessungen (MX 999), b × h × t..............95 × 150 × 91 mm
Gewicht...........................................................................0,45 kg
Aktiver Subwoofer mit wOOx-Technologie für MX 980
– magnetisch nicht abgeschirmt
Subwoofer............................................................................6,5"
Ausgangsleistung............................................50 W RMS (4 Ω)
Klirrfaktor..........................................................10% bei 100 Hz
Frequenzgang.......................................................40 Hz–150 Hz
Phasenschalter..............................................................0°, 180°
Eingangsempfindlichkeit (Subwoofer-Eingang).......200 mVrms
Stromversorgung.....................................................230 V/50 Hz
Stromverbrauch ..........................40 W (bei
1
⁄8 Nominalleistung)
Abmessungen, b × h × t..........................200 × 310 × 370 mm
Gewicht.............................................................................6,8 kg
Aktiver Subwoofer mit wOOx-Technologie für MX 999
– magnetisch nicht abgeschirmt
Subwoofer............................................................................6.5"
Ausgangsleistung..........................................100 W RMS (4 Ω)
Klirrfaktor..........................................................10% bei 100 Hz
Frequenzgang.......................................................40 Hz–150 Hz
Phasenschalter..............................................................0°, 180°
Eingangsempfindlichkeit (Subwoofer-Eingang).......200 mVrms
Stromversorgung.....................................................230 V/50 Hz
Stromverbrauch ..........................52 W (bei
1
⁄
8 Nominalleistung)
Abmessungen, b × h × t..........................200 × 310 × 370 mm
Gewicht.............................................................................8,4 kg
Technische Daten der Lautsprecher und des
Subwoofers
Digitaler Klang von einem DVD-Spieler
Empfohlene Einstellungen
Handhabung der Leistung
3103 306 1862.1 MX 980/MX 999 VieUrs0147

Nederlands
HOME CINEMA-PAKKETTEN MX 980, MX 999
Naast de standaardbenodigdheden bevatten de
Home Cinema-pakketten MX 980, MX 999:
– een subwoofer compleet met een aansluitkabel en een
voedingskabel
– 5 luidsprekers met 5 luidsprekerkabels
– een coaxiale kabel voor videoaansluiting op een DVD-speler
of TV-toestel
– een kaart voor snelle installatie
Voor de standaardbenodigdheden van uw ontvanger zie
hoofdstuk „ALGEMENE INFORMATIE / Inhoud van de doos” in
de gebruiksaanwijzing.
• U kunt de subwoofer neerzetten waar u wilt, want met het
lagetonengeluid dat uit de subwoofer wordt weergegeven
(onder 150 Hz) kan het menselijk oor niet bepalen uit welke
richting of van welke plaats het geluid komt.
• Omdat het effect van stereo door lagetonenfrequenties
verloren gaat, is bovendien een enkele subwoofer
voldoende voor weergave van de lage tonen van
stereokanalen.
• Voor betere lagetonenweergave raden wij u aan de
subwoofer op een stevige ondergrond te plaatsen waar
weinig kans op resonantie bestaat.
• Zet de subwoofer altijd rechtop neer, op enkele centimeters
afstand uit de muur.
• Zet geen voorwerpen op de subwoofer en ga er niet op
zitten.
• Als de subwoofer in het midden van een kamer wordt gezet,
kunnen de lage tonen buitengewoon verzwakt worden. Dit
komt door de invloed van de staande golf van de kamer.
Verplaats in dit geval de subwoofer uit het midden van de
kamer of neem de oorzaak van de staande golf weg door
een boekenplank aan de muur te bevestigen, etc.
Belangrijk!
Voordat u de subwoofer in werking stelt, moet u de
voorbereidende werkzaamheden afmaken. Zet uw ontvanger
aan en kies de geluidsbron.
Het typeplaatje bevindt zich op de achterzijde van de
subwoofer.
1 Gebruik de meegeleverde cinchkabel om AUDIO IN aan te
sluiten op SUBWOOFER PRE-OUT bij de ontvanger.
2 Controleer of de netspanning, die op het typeplaatje is
aangegeven, overeenkomt met de netspanning bij u thuis. Is
dit niet het geval, raadpleeg dan uw dealer of servicedienst.
3 Als alle aansluitingen gemaakt zijn, sluit u het netsnoer aan
op de ontvanger of het stopcontact.
Om de subwoofer volledig elektrisch uit te schakelen,
verwijdert u de stekker uit het stopcontact.
1 Om de subwoofer in te schakelen moet u de aan/uit-
schakelaar op de achterkant van de subwoofer op „ON”
zetten.
2 Draai VOLUME rechtsom tot u een klik hoort.
yHet LED-lampje licht groen op.
Als u de subwoofer gedurende langere tijd niet zult gebruiken
dan raden wij u aan de aan/uit-schakelaar op „OFF” te zetten.
• Draai VOLUME linksom tot u een klik hoort.
yHet LED-lampje wordt rood.
U kunt de subwoofer aanpassen aan het geluidsniveau van
uw voorste luidsprekers. Versterking van de lage tonen zorgt
voor een sfeervoller geluid.
1 Stel het VOLUME op de ontvanger zo in dat het geluid uit de
voorste luidsprekers niet vervormd is. Is het wel vervormd,
dan zal het geluid uit de subwoofer ook vervormd zijn.
2 Speel uw favoriete liedjes af. Mannelijke zangstemmen
met basgeluid lenen zich het best voor het instellen.
3 Stel met het VOLUME op de subwoofer de geluidssterkte
voor de weergave van lage tonen uit de subwoofer in.
• Gebruik PHASE SELECTOR
op de achterzijde van de
subwoofer om de
fasepolariteit te kiezen.
Door de polariteit op 0° of 180° te selecteren kan het effect van
de weergave van de lage tonen in bepaalde luisteromgevingen
worden verbeterd (afhankelijk van het type van de voorste
luidsprekers en de plaats van de subwoofer). Hierdoor kan ook
het bereik en de densiteit van het geluid veranderen, en het
effect van de geluidssterkte worden beïnvloed.
•
Kies de instelling die het door u gewenste geluid geeft als u op
uw gebruikelijke plaats naar de muziek luistert. Stel volume en
fasepolariteit bij tot u het door u gewenste resultaat bereikt.
Als u de subwoofer heeft ingesteld op de door u gewenste
instellingen, gebruikt u de VOLUME-knop op de ontvanger om het
volume van de subwoofer en de andere luidsprekers in te stellen.
U hoeft de instellingen van de subwoofer niet opnieuw vast te
leggen, ook al wijzigt u het volumeniveau van de ontvanger.
PHASE
SELECTOR
0
0
0
180
Fasekeuzeschakelaar
Volume-instelling
De subwoofer op standby zetten
De subwoofer aanzetten
Aansluitingen
Opstelling van de subwoofer
Inhoud van de doos
SUBWOOFER
SURROUND
(REAR)
LEFT
LEFT
RIGHT
CENTER
FRONT
RIGHT
FRONT
SURROUND
(REAR)

Nederlands
HOME CINEMA-PAKKETTEN MX 980, MX 999
Als de receiver te hard wordt gezet (extreem hoog
uitgangsvermogen) dan kunnen er vervormingen optreden die
uw luidsprekers ernstig kunnen beschadigen. Als u
vervormingen bemerkt, zet het volume en de tonenregeling
dan op een zodanig niveau dat het geluid weer goed klinkt.
Om oververhitting van het apparaat te voorkomen is een
beveiliging ingebouwd. Daardoor kan het heel uitzonderlijk
gebeuren dat uw apparaat automatisch uitgeschakeld
wordt. Schakel in zo’n geval het apparaat uit en laat het
afkoelen voor u het opnieuw gebruikt. Na het toestel te
hebben laten afkoelen zet u het toestel weer aan en kiest
de gewenste bron door SOURCE SELECT te verdraaien.
Voor optimale geluidsweergave van uw Home Cinema
Systeem adviseren wij de volgende instellingen op uw
ontvanger:
* SPEAKR SETUP
SUBW PRESENT: YES
* SPEAKR SIZES
FRONT SIZE: SMALL
CENTER SIZE: SMALL
REAR SIZE: SMALL
* VOL BALANCE
VOL FRONT-L: 0
VOL FRONT-R: 0
VOL CENTER: -10
VOL REAR-L: +5
VOL REAR-R: +5
BASS: 0
TREBLE: 0
LOUDNESS: uit
Zorg er bij het aansluiten van een dvd-speler op COAX 1 IN
voor dat de digitale uitgang van uw dvd-speler op „ON“ of
„ALL“ staat (lees a.u.b. de gebruiksaanwijzing van uw dvd-
speler).
Wijzigingen zonder voorafgaande kennisgeving voorbehouden.
Voorste luidsprekers
Systeem.....................................................2-zijdig afgeschermd
Impedantie............................................................................8 Ω
Besturingen luidsprekers.....................3" totaalbereik, 1" piëzo
Frequentiebereik weergave................................150 Hz–20 kHz
Afmetingen (MX 980), b × h × d..................95 × 150 × 97 mm
Afmetingen (MX 999), b × h × d..................95 × 150 × 91 mm
Gewicht...........................................................................0,45 kg
Middelste luidspreker
Systeem.....................................................2-zijdig afgeschermd
Impedantie............................................................................8 Ω
Besturingen luidsprekers..............2 × 3" totaalbereik, 1" piëzo
Frequentiebereik weergave................................150 Hz–20 kHz
Afmetingen (MX 980), b × h × d..................250 × 94 × 92 mm
Afmetingen (MX 999), b × h × d..................250 × 94 × 86 mm
Gewicht...........................................................................0,92 kg
Luidsprekers voor quadrafonisch effect
Systeem............................................................................2-weg
Impedantie............................................................................8 Ω
Besturingen luidsprekers.....................3" totaalbereik, 1" piëzo
Frequentiebereik weergave................................150 Hz–20 kHz
Afmetingen (MX 980), b × h × d..................95 × 150 × 97 mm
Afmetingen (MX 999), b × h × d..................95 × 150 × 91 mm
Gewicht...........................................................................0,45 kg
Actieve subwoofer met wOOx techniek voor MX 980 –
niet magnetisch afgeschermde uitvoering
Subwoofer............................................................................6,5"
Uitgangsvermogen..........................................50 W RMS (4 Ω)
Totale harmonische vervorming.........................10% bij 100 Hz
Frequentiebereik weergave..................................40 Hz–150 Hz
Faseschakelaar..............................................................0°, 180°
Ingangsgevoeligheid (subwoofer in)........................200 mVrms
Wisselstroomvermogen..........................................230 V/50 Hz
Opgenomen vermogen...........40 W (bij
1
⁄8 nominaal vermogen)
Afmetingen, b × h × d .............................200 × 310 × 370 mm
Gewicht.............................................................................6,8 kg
Actieve subwoofer met wOOx techniek voor MX 999 –
niet magnetisch afgeschermde uitvoering
Subwoofer............................................................................6,5"
Uitgangsvermogen........................................100 W RMS (4 Ω)
Totale harmonische vervorming.........................10% bij 100 Hz
Frequentiebereik weergave..................................40 Hz–150 Hz
Faseschakelaar..............................................................0°, 180°
Ingangsgevoeligheid (subwoofer in)........................200 mVrms
Wisselstroomvermogen..........................................230 V/50 Hz
Opgenomen vermogen...........52 W (bij
1
⁄
8 nominaal vermogen)
Afmetingen, b × h × d .............................200 × 310 × 370 mm
Gewicht.............................................................................8,4 kg
Technische gegevens van luidsprekers en
subwoofer
Digitaal geluid vanaf een dvd-speler
Aanbevolen instellingen
Uitgangsvermogen
3103 306 1862.1 MX 980/MX 999 VieUrs0147

Italiano
SISTEMI HOME CINEMA MX 980, MX 999
Oltre ai componenti standard, i sistemi Home Cinema MX 980
e MX 999 contengono:
– un subwoofer, compreso un cavo di collegamento e un cavo
di rete
– 5 altoparlanti, compresi 5 cavi per altoparlanti
– cavo coassiale per collegamento video ad un lettore DVD
o ad un impianto TV
– una scheda di installazione rapida
Per informazioni sui componenti standard del ricevitore, ved. il
capitolo «INFORMAZIONI GENERALI / Materiale in dotazione»
nel manuale di istruzioni.
• Il subwoofer può essere installato in qualsiasi posizione
perché con la gamma di bassi riprodotta dal subwoofer
(inferiore a 150 Hz) l’udito dell’uomo non è in grado di
rilevare la direzione e la posizione di produzione del suono.
• Inoltre, dal momento che la sensazione stereo va persa con
le frequenze dei bassi, un singolo subwoofer è sufficiente
per riprodurre i bassi dei canali stereo.
• Per una migliore riproduzione dei bassi si consiglia di
posizionare il subwoofer su una superficie solida non
soggetta a risonanza.
• Posizionare sempre il subwoofer in verticale, mantenendo
una distanza di alcuni centimetri dalla parete.
• Non posizionare alcun oggetto e non sedersi sul subwoofer.
• Se il subwoofer viene posizionato al centro di una stanza,
la riproduzione dei bassi può risultare estremamente
attenuata. Ciò è dovuto all’influenza dell’onda stazionaria
della stanza. In questo caso, spostare il subwoofer dal
centro della stanza o eliminare la causa dell’onda
stazionaria montando una mensola alla parete, ecc.
Importante!
Prima di iniziare ad utilizzare il subwoofer, completare le
procedure preliminari. Attivare il ricevitore e selezionare la
sorgente sonora.
La targhetta con l’indicazione del tipo si trova sul retro
del subwoofer.
1 Utilizzare il cavo cinch fornito in dotazione per collegare
AUDIO IN a SUBWOOFER PRE-OUT sul ricevitore.
2
Controllare che la tensione di rete indicata sulla targhetta con
l’indicazione del tipo corrisponda alla tensione di rete locale. In
caso contrario, consultare il rivenditore o il centro assistenza.
3 Dopo avere eseguito tutti i collegamenti, collegare il cavo
di alimentazione CA al ricevitore o alla presa a parete.
Per scollegare completamente il subwoofer dalla rete,
estrarre la spina di rete dalla presa a parete.
1 Per attivare il subwoofer, impostare l’interruttore di
attivazione/disattivazione sulla parte posteriore del
subwoofer in posizione «ON».
2 Ruotare VOLUME in senso orario fino ad udire un clic.
yL’indicatore LED si illumina di luce verde.
Se non è previsto l’uso del subwoofer per un periodo di tempo
più lungo, si consiglia di impostare l’interruttore di
attivazione/disattivazione su «OFF».
• Ruotare VOLUME in senso antiorario fino ad udire un clic.
yL’indicatore LED si illumina di luce rossa.
È possibile regolare il subwoofer per adeguarlo al livello
sonoro degli altoparlanti frontali. Rafforzando i bassi si
ottiene un suono più avvolgente.
1 Regolare VOLUME sul ricevitore fino ad eliminare ogni
distorsione dal suono proveniente dagli altoparlanti
anteriori. Se il suono proveniente dagli altoparlanti è
ancora distorto, anche il suono del subwoofer sarà distorto.
2
Ascoltate i vostri brani preferiti. Brani di voci maschili contenenti
suoni bassi sono più adatte per eseguire la regolazione.
3 Regolare VOLUME sul subwoofer per determinare
l’intensità dei bassi provenienti dal subwoofer.
• Utilizzare il selettore PHASE
SELECTOR posto nella parte
posteriore del subwoofer per
selezionare la polarità di fase.
La selezione della polarità su 0° o 180° può determinare una
migliore riproduzione dei bassi in determinati ambienti di ascolto
(a seconda del tipo di altoparlanti frontali e della posizione del
subwoofer). Inoltre può determinare l’espansione e la
contrazione del suono e influenzare la resa del campo sonoro.
• Selezionare l’impostazione che permette di ottenere il suono
desiderato posizionandosi nell’abituale punto di ascolto
all’interno della stanza. Ripetere la regolazione del volume e
della polarità di fase per adeguarle alle proprie preferenze.
Una volta regolato il subwoofer sulle impostazioni desiderate,
utilizzare il comando VOLUME sul ricevitore per regolare il
volume del subwoofer e degli altri altoparlanti. Non sarà
necessario regolare nuovamente le impostazioni del subwoofer,
neppure se verrà modificato il livello del volume del ricevitore.
PHASE
SELECTOR
0
0
0
180
Selettore di fase
Regolazione del volume
Attivazione del subwoofer in modalità standby
Attivazione del subwoofer
Collegamenti
Installazione subwoofer
Materiale in dotazione
SUBWOOFER
SURROUND
(REAR)
LEFT
LEFT
RIGHT
CENTER
FRONT
RIGHT
FRONT
SURROUND
(REAR)

Italiano
SISTEMI HOME CINEMA MX 980, MX 999
Se l’alimentazione utilizzata per il ricevitore è molto alta, può
generare distorsioni, in grado di danneggiare gravemente gli
altoparlanti. In caso di distorsione, ridurre ad un livello sonoro
accettabile i comandi di tono e volume.
Per evitare il surriscaldamento l’apparecchio è dotato
di un circuito di sicurezza. Perciò, in condizioni
eccezionali, il vostro apparecchio può spegnersi.
Se questo accade, spegnete l’apparecchio, dangoli
il tempo di raffreddarsi prima di tornarlo a usare. Dopo
avere lasciato raffreddare l’apparecchio, accenderlo
nuovamente e selezionare la sorgente desiderata
ruotando SOURCE SELECT.
Per ottenere un’ottima resa sonora dal sistema Home Cinema,
si consiglia di effettuare le seguenti impostazioni sul
ricevitore:
* SPEAKR SETUP
SUBW PRESENT: YES
* SPEAKR SIZES
FRONT SIZE: SMALL
CENTER SIZE: SMALL
REAR SIZE: SMALL
* VOL BALANCE
VOL FRONT-L: 0
VOL FRONT-R: 0
VOL CENTER: -10
VOL REAR-L: +5
VOL REAR-R: +5
BASS: 0
TREBLE: 0
LOUDNESS: disattivato
Per la connessione di un lettore DVD a COAX 1 IN, assicurarsi
che l’uscita digitale del lettore DVD sia impostata su «ON» o
«ALL» (leggere il manuale di istruzioni sul lettore DVD).
Soggetti a modifiche senza preavviso.
Altoparlanti frontali
Sistema..........................................................schermato a 2 vie
Impedenza............................................................................8 Ω
Driver altoparlanti.............................3" gamma piena, 1" piezo
Risposta in frequenza.........................................150 Hz–20 kHz
Dimensioni (MX 980), l × h × p...................95 × 150 × 97 mm
Dimensioni (MX 999), l × h × p...................95 × 150 × 91 mm
Peso.................................................................................0,45 kg
Altoparlante centrale
Sistema..........................................................schermato a 2 vie
Impedenza............................................................................8 Ω
Driver altoparlanti......................2 × 3" gamma piena, 1" piezo
Risposta in frequenza.........................................150 Hz–20 kHz
Dimensioni (MX 980), l × h × p...................250 × 94 × 92 mm
Dimensioni (MX 999), l × h × p...................250 × 94 × 86 mm
Peso.................................................................................0,92 kg
Altoparlanti surround
Sistema...............................................................................2 vie
Impedenza............................................................................8 Ω
Driver altoparlanti.............................3" gamma piena, 1" piezo
Risposta in frequenza.........................................150 Hz–20 kHz
Dimensioni (MX 980), l × h × p...................95 × 150 × 97 mm
Dimensioni (MX 999), l × h × p...................95 × 150 × 91 mm
Peso.................................................................................0,45 kg
Subwoofer attivo con tecnologia wOOx per MX 980 –
struttura non schermata magneticamente
Subwoofer............................................................................6,5"
Potenza di uscita.............................................50 W RMS (4 Ω)
THD.......................................................................10% a 100 Hz
Risposta in frequenza...........................................40 Hz–150 Hz
Selettore di fase ...........................................................0°, 180°
Sensibilità di ingresso (subwoofer in).....................200 mVrms
Potenza CA..............................................................230 V/50 Hz
Consumo di potenza....................40 W (a
1
⁄8 potenza nominale)
Dimensioni, l × h × p...............................200 × 310 × 370 mm
Peso...................................................................................6,8 kg
Subwoofer attivo con tecnologia wOOx per MX 999 –
struttura non schermata magneticamente
Subwoofer............................................................................6,5"
Potenza di uscita...........................................100 W RMS (4 Ω)
THD.......................................................................10% a 100 Hz
Risposta in frequenza...........................................40 Hz–150 Hz
Selettore di fase ...........................................................0°, 180°
Sensibilità di ingresso (subwoofer in).....................200 mVrms
Potenza CA..............................................................230 V/50 Hz
Consumo di potenza....................52 W (a
1
⁄
8 potenza nominale)
Dimensioni, l × h × p...............................200 × 310 × 370 mm
Peso...................................................................................8,4 kg
Dati tecnici relativi ad altoparlanti e subwoofer
Suono digitale da un lettore DVD
Impostazioni consigliate
Controllo dell‘alimentazione
3103 306 1862.1 MX 980/MX 999 VieUrs0147

Svenska
HEMMABIO-PAKETEN MX 980, MX 999
Förutom standardutrustningen innehåller HemmaBio-paketen
MX 980, MX 999:
– en subwoofer inklusive en anslutningskabel och en nätkabel
– 5 högtalare inklusive 5 högtalarkablar
– en koaxialkabel för videoanslutning med en DVD-spelare
eller en TV-apparat
– ett snabbinstallationskort
För standardutrustningen till din receiver se kapitel ”ALLMAN
INFORMATION/Vad som medföljer” i instruktionsmanualen.
• Installera subwoofern var du vill eftersom med
basljudsräckvidden reproducerad från en subwoofer (under
150 Hz) kan det mänskliga örat inte upptäcka riktningen och
positionen där ljudet produceras.
• Eftersom känslan av stereo förloras med basfrekvenser, är
en enda subwoofer tillräcklig för att reproducera basen från
stereokanaler.
• För att uppnå en bättre basreproduktion, rekommenderar vi
att du placerar subwoofern på ett stabilt golv där resonans
ej förmodas uppstå.
• Placera alltid subwoofern vertikalt, med ett par centimeters
avstånd från väggen.
• Placera ej något föremål på subwoofern eller sitt på den.
• Om subwoofern är placerad i mitten av ett rum, kan basen
bli extremt försvagad. Detta orsakas av påverkan av den
stående vågen i rummet. Om detta händer, flytta
subwoofern bort från mitten av rummet eller avlägsna
orsaken till den stående vågen genom att installera en
bokhylla på väggen, etc.
Viktigt!
Innan du använder subwoofern, avsluta
förberedelseåtgärderna. Koppla på din receiver och välj
ljudkälla.
Typplåten finns på baksidan av subwoofern.
1 Använd den medföljande säkringskabeln för att ansluta
AUDIO IN till SUBWOOFER PRE-OUT på receivern.
2 Kontrollera att strömstyrkan på typplåten överensstämmer
med den lokala strömstyrkan. Om inte, rådfråga din
försäljare eller serviceorganisation.
3 Efter det att alla anslutningar är gjorda, anslut
växelströmsladden till receivern eller vägguttaget.
För att koppla ur subwoofern helt från kraftnätet, dra ur
starkströmkontakten från vägguttaget.
1 Sätt på/av-brytaren på subwooferns baksida i läge
”ON”(PÅ) för att sätta på subwoofern.
2 Vrid medsols på VOLUME tills du hör ett klick.
yLED-indikatorn lyser grön.
Om subwoofern inte ska användas under en längre period
rekommenderas det av sätta på/av-brytaren i läge ”OFF” (AV).
• Vrid motsols på VOLUME tills du hör ett klick.
yLED-indikatorn skiftar till rött.
Du kan justera subwoofern till att passa ihop med
fronthögtalarnas ljudnivå. Förstärkt basljud ger dig en större
känsla av atmosfär.
1 Justera VOLUME på receivern tills ljudet från
fronthögtalarna inte är förvrängt. Om det är förvrängt,
kommer ljudet från subwoofern också att bli förvrängt.
2 Spela din favoritmusik. Manliga sångröster innehållande
bastoner är mest lämpliga för justering.
3 Justera VOLUME på subwoofern för att avgöra ljudstyrkan
på basljudet från subwoofern.
• Använd PHASE SELECTOR
placerad på baksidan av
subwoofern för att välja
faspolaritet.
Val av polaritet på antingen 0° eller 180° kan avgöra bättre
basreproduktionseffekt i vissa avlyssningsmiljöer (beroende
på typen av fronthögtalare och positionen av subwoofern).
Den kan också ändra expansionen och tätheten på ljudet, och
påverka känslan av ljudfältet.
• Välj den inställning som ger det ljud du föredrar när du lyssnar
i din vanliga avlyssningsposition. Repetera justeringen för
volym och faspolaritet till att passa din preferens.
När du har justerat subwoofern till den inställning du önskar,
använd VOLUME-kontrollen på receivern för att justera
volymen på subwoofern och de andra högtalarna. Du behöver
inte justera subwoofer-inställningarna igen även när du
ändrar ljudnivån på receivern.
PHASE
SELECTOR
0
0
0
180
Fasväljare
Volymjustering
Koppla subwoofern till standby-läge
Koppla på subwoofern
Anslutningar
Subwoofer-installation
Vad som medföljer
SUBWOOFER
SURROUND
(REAR)
LEFT
LEFT
RIGHT
CENTER
FRONT
RIGHT
FRONT
SURROUND
(REAR)

Svenska
HEMMABIO-PAKETEN MX 980, MX 999
Om mottagaren används vid mycket hög effekt kan den orsaka
förvrängningar som kan ge allvarliga skador på dina
högtalare. Om ljudet låter förvrängt måste du minska volymen
och tonreglaget till en nivå som ger acceptabelt ljud.
För att undvika att apparaten överhettas har en
skyddskrets byggts in. Apparaten kan därför under
extrema förhållanden kopplas bort. Om detta händer
skall apparaten stängas av, låt den sedan svalna innan
den används igen. Efter att ha låtit apparaten kyla ner
koppla på apparaten igen och välj den önskade
funktionen genom att vrida på SOURCE SELECT.
För optimal ljudåtergivning på ditt HemmaBio-system
rekommenderar vi följande inställningar på din mottagare:
* SPEAKR SETUP
SUBW PRESENT: YES
* SPEAKR SIZES
FRONT SIZE: SMALL
CENTER SIZE: SMALL
REAR SIZE: SMALL
* VOL BALANCE
VOL FRONT-L: 0
VOL FRONT-R: 0
VOL CENTER: -10
VOL REAR-L: +5
VOL REAR-R: +5
BASS: 0
TREBLE: 0
LOUDNESS: av
När en DVD-spelare ansluts till COAX 1 IN, se till att den
digitala ingången på din DVD-spelare är ställd på "ON" eller
"ALL" (var vänlig läs instruktionsmanualen till din DVD-spelare).
Förbehållen ändringar utan förvarning.
Främre högtalare
System..............................................................2-vägavskärmad
Impedans..............................................................................8 Ω
Högtalardrivrör..........................................3" fullskalig, 1" piezo
Frekvensåtergivning............................................150 Hz–20 kHz
Dimensioner (MX 980), w × h × d...............95 × 150 × 97 mm
Dimensioner (MX 999), w × h × d...............95 × 150 × 91 mm
Vikt..................................................................................0,45 kg
Mitthögtalare
System..............................................................2-vägavskärmad
Impedans..............................................................................8 Ω
Högtalardrivrör...................................2 × 3" fullskalig, 1" piezo
Frekvensåtergivning............................................150 Hz–20 kHz
Dimensioner (MX 980), w × h × d...............250 × 94 × 92 mm
Dimensioner (MX 999), w × h × d...............250 × 94 × 86 mm
Vikt..................................................................................0,92 kg
Surround-högtalare
System ...............................................................................2-väg
Impedans..............................................................................8 Ω
Högtalardrivrör..........................................3" fullskalig, 1" piezo
Frekvensåtergivning............................................150 Hz–20 kHz
Dimensioner (MX 980), w × h × d...............95 × 150 × 97 mm
Dimensioner (MX 999), w × h × d...............95 × 150 × 91 mm
Vikt..................................................................................0,45 kg
Aktiv subwoofer med w00x-teknologi för MX 980 – inte
magnetiskt avskärmad design
Subwoofer............................................................................6,5"
Uteffekt............................................................50 W RMS (4 Ω)
THD....................................................................10% vid 100 Hz
Frekvensåtergivning.............................................40 Hz–150 Hz
Fasväxlare.....................................................................0°, 180°
Ingångskänslighet (subwoofer på)...........................200 mVrms
Växelströmstyrka....................................................230 V/50 Hz
Strömförbrukning .................................40 W (vid
1
⁄8 märkeffekt)
Dimensioner, w × h × d...........................200 × 310 × 370 mm
Vikt....................................................................................6,8 kg
Aktiv subwoofer med w00x-teknologi för MX 999 – inte
magnetiskt avskärmad design
Subwoofer............................................................................6.5"
Uteffekt..........................................................100 W RMS (4 Ω)
THD....................................................................10% vid 100 Hz
Frekvensåtergivning.............................................40 Hz–150 Hz
Fasväxlare.....................................................................0°, 180°
Ingångskänslighet (subwoofer på )..........................200 mVrms
Växelströmstyrka....................................................230 V/50 Hz
Strömförbrukning .................................52 W (vid
1
⁄
8 märkeffekt)
Dimensioner , w × h × d..........................200 × 310 × 370 mm
Vikt....................................................................................8,4 kg
Tekniska data till högtalare och subwoofer
Digitalt ljud från en DVD-spelare
Rekommenderade inställningar
Strömhantering
3103 306 1862.1 MX 980/MX 999 VieUrs0147

Dansk
HOME CINEMA SÆT MX 980, MX 999
Hjemmebio-sættene MX 980, MX 999 indeholder ud over
standardudstyret følgende dele:
– en subwoofer inklusive en tilslutningsledning og en el-
netledning
– 5 højttalere inklusive 5 højttalerledninger
– et koaksialkabel til tilslutning til en DVD afspiller eller et TV
– lynvejledning i installation
Se kapitlet »GENEREL INFORMATION / Medleverede dele«
i instruktionshåndbogen for at få en oversigt over det udstyr,
der som standard følger med din modtager.
• Du kan opstille subwooferen, lige hvor du vil, for i det
område af baslyde, der gengives af subwooferen (under
150 Hz) er det ikke muligt for menneskets hørelse at
opfatte, hvor lydkilden befinder sig.
• Desuden vil en enkelt subwoofer være tilsltrækkelig til at
gengive stereokanalernes bas, da stereofornemmelsen går
tabt ved basfrekvenserne.
• For at få en bedre basgengivelse anbefaler vi dig at
anbringe subwooferen på et solidt gulv, hvor der er ringe
sandsynlighed for resonans.
• Subwooferen skal altid anbringes lodret med nogle
centimeters afstand til væggen.
• Der må ikke anbringes nogen genstande oven på
subwooferen og man må heller ikke sætte sig på den.
• Hvis subwooferen anbringes midt i et lokale, kan det
medføre at bassen reduceres meget kraftigt. Dette skyldes
lokalets stående bølge. Hvis dette sker, skal subwooferen
flyttes fra midten af lokalet eller årsagen til den stående
bølge skal fjernes ved f.eks. at anbringe en boghylde på
væggen.
Vigtigt!
Inden du går i gang med at betjene subwooferen, skal alle
forberedelser være afsluttede. Tænd for receiveren og vælg
den passende lydkilde.
Typeskiltet er anbragt på bagsiden af subwooferen.
1 Brug den medfølgende klemmeledning til at tilslutte
AUDIO IN til SUBWOOFER PRE-OUT på receiveren.
2 Se efter, om den netspænding, der er angivet på typeskiltet
svarer til din lokale netspænding. Hvis den ikke gør det, må
du spørge din forhandler eller serviceorganisation til råds.
3 Når alle andre tilslutninger er udført, skal AC netledningen
sættes i receiveren eller stikkontakten i væggen.
For helt at afbryde strømforsyningen til subwooferen skal
stikket trækkes ud af stikkontakten i væggen.
1 Subwoofer-højttaleren aktiveres ved at sætte tænd/sluk-
kontakten på bagsiden af subwoofer’en i stilling »ON«.
2 Drej på VOLUME i retning med uret, indtil du hører et klik.
yLED lampen lyser grønt.
Hvis subwoofer’en ikke skal bruges i længere tid, tilrådes det
at sætte tænd/sluk-kontakten i stilling »OFF«.
• Drej på VOLUME i retning mod uret, indtil du hører et klik.
yLED lampen lyser rødt.
Du kan justere subwooferen, så lydstyrken tilpasses til
niveauet i dine fronthøjttalere. Når baslyden styrkes, får du en
mere stemningsmættet følelse.
1 Indstil VOLUME på receiver så lyden i højttalerne foran ikke
længere forvrænges. Hvis lyden forvrænges, bliver lyden
i subwooferen også forvrænget.
2 Spil dine yndlingssange. Numre med mandlige sangere og
med baslyde egner sig bedst til at foretage denne indstilling.
3 Indstil VOLUME på subwooferen for at fastlægge lydstyrken
for baslyden fra subwooferen.
• Brug PHASE SELECTOR, der er
anbragt på bagsiden af
subwooferen, til at vælge
fasepolariteten.
Hvis der vælges en polaritet på enten 0° eller 180° kan det
forbedre basgengivelsen i bestemte lydlige omgivelser
(afhængigt af hvilken type fronthøjttalere der benyttes og hvor
subwooferen placeres). Samtidig kan man ændre lydens
udbredelse og tæthed samt påvirke fornemmelsen af et lydfelt.
• Vælg den indstilling, der giver dig den lyd, du foretrækker, når
du lytter fra din sædvanlige lytteposition. Gentag reguleringen
af lydstyrken og fasepolariteten, så de passer til dine ønsker.
Når du har reguleret subwooferen, så den har de indstillinger,
du vil have, skal du bruge VOLUME knappen på modtageren til
at regulere lydstyrken i subwooferen og de andre højttalere.
Du behøver ikke at regulere indstillingerne på subwooferen
igen, selv om du ændrer lydstyrkeniveauet på receiveren.
PHASE
SELECTOR
0
0
0
180
Fasevælger
Regulering af lydstyrken
Sådan stilles subwooferen på standby
Sådan tændes subwooferen
Tilslutninger
Opstilling af subwoofer
Medleverede dele
SUBWOOFER
SURROUND
(REAR)
LEFT
LEFT
RIGHT
CENTER
FRONT
RIGHT
FRONT
SURROUND
(REAR)

Dansk
HOME CINEMA SÆT MX 980, MX 999
Hvis receiveren anvendes med meget høj effekt, kan det
fremkalde forvrængninger, som alvorligt kan beskadige
højttalerne. Hvis der opstår forvrængninger, skal lydstyrken og
tonekontrolknapperne reduceres til et niveau, hvor lyden er
acceptabel igen.
For at undgå at sættet bliver for varmt er der indbygget
en sikkerheds kredsløb. Derfor kan dit sæt slutte fra
under ekstreme omstændigheder. Hvis dette sker sluk
for sættet og lad det køle af før du bruger det igen. Når
du har ladet apparatet afkøle skal du tænde for det
igen og vælge den ønskede kilde ved at dreje på
SOURCE SELECT.
For at få den optimale lydgengivelse med dit Home Cinema
System anbefaler vi følgende indstillinger på din receiver:
* SPEAKR SETUP
SUBW PRESENT: YES
* SPEAKR SIZES
FRONT SIZE: SMALL
CENTER SIZE: SMALL
REAR SIZE: SMALL
* VOL BALANCE
VOL FRONT-L: 0
VOL FRONT-R: 0
VOL CENTER: -10
VOL REAR-L: +5
VOL REAR-R: +5
BASS: 0
TREBLE: 0
LOUDNESS: fra
Når du tilslutter en DVD afspiller til COAX 1 IN, skal du sikre
dig, at den digitale udgang på din DVD afspiller er stillet på
»ON« eller »ALL« (læs betjeningsvejledningen til din DVD
afspiller).
Ret til ændringer uden varsel forbeholdes.
Fronthøjttalere
System.........................................................tovejs afskærmede
Impedans..............................................................................8 Ω
Højttaler drivers..................................3" fuldt område, 1" piezo
Gengivelse af frekvenskarakteristik...................150 Hz–20 kHz
Mål (MX 980), w × h × d.............................95 × 150 × 97 mm
Mål (MX 999), w × h × d.............................95 × 150 × 91 mm
Vægt................................................................................0,45 kg
Centerhøjttaler
System.........................................................tovejs afskærmede
Impedans..............................................................................8 Ω
Højttaler drivers...........................2 × 3" fuldt område, 1" piezo
Gengivelse af frekvenskarakteristik...................150 Hz–20 kHz
Mål (MX 980), w × h × d.............................250 × 94 × 92 mm
Mål (MX 999), w × h × d.............................250 × 94 × 86 mm
Vægt................................................................................0,92 kg
Surroundhøjttalere
System...............................................................................tovejs
Impedans..............................................................................8 Ω
Højttaler drivers..................................3" fuldt område, 1" piezo
Gengivelse af frekvenskarakteristik...................150 Hz–20 kHz
Mål (MX 980), w × h × d.............................95 × 150 × 97 mm
Mål (MX 999), w × h × d.............................95 × 150 × 91 mm
Vægt................................................................................0,45 kg
Aktiv subwoofer med wOOx teknologi til MX 980 – ikke
magnetisk afskærmet udformning
Subwoofer............................................................................6,5"
Udgangseffekt.................................................50 W RMS (4 Ω)
THD...................................................................10% ved 100 Hz
Gengivelse af frekvenskarakteristik.....................40 Hz–150 Hz
Fasevælger....................................................................0°, 180°
Indgangsfølsomhed (sobwoofer indgang)................200 mVrms
Vekselstrøm strømforsyning...................................230 V/50 Hz
Strømforbrug....................................40 W (ved
1
⁄8 mærkeeffekt)
Mål, w × h × d.........................................200 × 310 × 370 mm
Vægt..................................................................................6,8 kg
Aktiv subwoofer med wOOx teknologi til MX 999 – ikke
magnetisk afskærmet udformning
Subwoofer............................................................................6,5"
Udgangseffekt...............................................100 W RMS (4 Ω)
THD...................................................................10% ved 100 Hz
Gengivelse af frekvenskarakteristik.....................40 Hz–150 Hz
Fasevælger....................................................................0°, 180°
Indgangsfølsomhed (sobwoofer indgang )...............200 mVrms
Vekselstrøm strømforsyning...................................230 V/50 Hz
Strømforbrug....................................52 W (ved
1
⁄
8 mærkeeffekt)
Mål, w × h × d.........................................200 × 310 × 370 mm
Vægt..................................................................................8,4 kg
Tekniske specifikationer for højttalere og
subwoofer
Digital lyd fra en DVD afspiller
Anbefalede indstillinger
Effektregulering
3103 306 1862.1 MX 980/MX 999 VieUrs0147

Suomi
KOTITEATTERIPAKETIT MX 980, MX 999
Perusvarusteiden lisäksi Kotiteatteri paketit MX 980, MX 999
sisältävät:
– subwooferin sisältäen liitäntäkaapelin ja verkkojohdon
– 5 kaiutinta sisältäen 5 kaiutinkaapelia
– coaxaalisen kaapelin videoliitäntää varten DVD-soittimen
tai TV-vastaanottimen yhteydessä
– pika-asennuskortin
Laitteesi perusvarusteista katso käyttöohjeen lukua
”YLEISTIETOJA / Toimituksen sisältö”.
• Voit sijoittaa subwooferin mihin tahansa haluat, koska
ihmiskorva ei kykene jäljittämään, mistä suunnasta ja
asennosta subwooferin toistamat bassoäänisarjat (alle
150 Hz) kantautuvat.
• Edellisen ohella stereovaikutelma katoaa bassotaajuuksien
vuoksi, näin ollen yksi ainoa subwoofer riittää
stereokanavien bassontoistoon.
• Paremman bassontoiston saavuttamiseksi suosittelemme,
että subwoofer sijoitetaan kiinteälle kohdalle lattiaa, jossa
resonanssia ei todennäköisesti esiinny.
• Sijoita subwoofer aina pystysuoraan, muutaman sentin
päähän seinästä.
• Älä sijoita muita kohteita subwooferin päälle tai älä istu
sen päällä.
• Jos subwoofer sijoitetaan keskelle huonetta, basso saattaa
heikentyä huomattavasti. Tämä johtuu huoneen seisovasta
aallosta. Jos näin käy, siirrä subwoofer pois keskeltä
huonetta tai eliminoi seisovan aallon aiheuttaja
sijoittamalla kirjahylly seinälle tms.
Tärkeää!
Ennen kuin käytät subwooferia, päätä valmistelutoimenpiteet.
Kytke laitteesi päälle ja valitse äänilähde.
Tyyppikilpi sijaitsee subwooferin takaosassa.
1 Käytä mukanatoimitettua RCA-kaapelia yhdistääksesi
AUDIO IN laite SUBWOOFER PRE-OUT liitäntään.
2 Tarkista vastaako tyyppikilven ilmoittama verkkojännite
paikallista verkkojännitettä Jos näin ei ole, ota yhteys
myyjääsi tai huolto-organisaatioon.
3 Tehtyäsi kaikki liitännät, liitä verkkojohdin vastaanottimeesi
tai pistorasiaan.
Kytkeäksesi subwoofer kokonaan pois verkkovirrasta, poista
virtajohdon pistoke pistorasiasta.
1 Subwoofer aktivoidaan asettamalla subwooferin takana
oleva kytkin asentoon “ON”.
2
Käännä VOLUME säädintä myötäpäivään kunnes se naksahtaa.
yLED merkkivalo välähtää vihreänä.
Jos subwooferia ei ole tarkoitus käyttää pitkään aikaan,
kannattaa kytkin asettaa asentoon “OFF”.
• Käännä VOLUME säädintä vastapäivään kunnes se naksahtaa.
yLED merkkivalo muuttuu punaiseksi.
Voit säätää subwooferia vastaamaan etukaiuttimiesi
äänentasoa. Bassoäänen vahvistaminen saa aikaan
suuremman tilantunteen.
1 Säädä laitteesi VOLUME säädintä kunnes etukaiuttimien
ääni ei säröydy. Jos se säröytyy, subwooferin äänikin
saattaa säröytyä.
2 Soita lempikappaleitasi. Äänen säätämiseen soveltuvat
parhaiten miesäänet, joissa on bassoääniä.
3 Säädä subwooferin VOLUME säädintä määrittelemään
subwooferin bassoäänten voimakkuus.
• Käytä PHASE SELECTOR valinta,
joka sijaitsee subwooferin
takaosassa valitaksesi
astepolarisaatio.
Valitsemalla polaarisuudeksi joko 0° tai 180° voit saada
aikaan paremman bassontoiston tietyissä
kuunteluympäristöissä (riippuen etukaiuttimien tyypistä ja
subwooferin sijainnista). Tämä saattaa myös laajentaa äänen
tiukkuutta ja vaikuttaa äänikentän aistimiseen.
• Valitse säädös, joka saa aikaan haluamasi äänen
kuunnellessasi tavallisessa kuunteluasennossa. Toista
äänensäädöt ja astepolarisaatio vastaamaan toiveitasi.
Kun olet säätänyt subwooferin halutuille säädöksille, käytä
vastaanottimesi VOLUME säädintä säätämään subwooferin ja
muiden kaiuttimien äänentaso. Sinun ei tarvitse säätää
subwooferin asetuksia uudelleen siinäkään tapauksessa, jos
muutat vastaanottimesi äänentasoa.
PHASE
SELECTOR
0
0
0
180
Astevalin
Äänensäätö
Subwooferin kytkeminen valmiustilaan
Subwooferin päälle kytkeminen
Liitännät
Subwooferin sijoittaminen
Toimituksen sisältö
SUBWOOFER
SURROUND
(REAR)
LEFT
LEFT
RIGHT
CENTER
FRONT
RIGHT
FRONT
SURROUND
(REAR)

Suomi
KOTITEATTERIPAKETIT MX 980, MX 999
Jos vastaanotinta käytetään hyvin suurella teholla, voi
aiheutua särinää, joka voi vakavasti vaurioittaa kaiuttimiasi.
Jos aiheutuu särinää, vähennä äänenvoimakkuutta ja säädä
äänisäätimet tasolle, jolla ääni on hyväksyttävä.
Laitteen ylikuumentumisen estämiseksi siihen on
sisäänrakennettu turvapiiri. Näin ollen laite voi irtikytkeytyä
äärimmäisen vaikeissa olosuhteissa. Jos näin käy, irikytke
laite ja anna sen viilentyä ennen sen uudelleenkäyttämistä.
Annettuasi laitteen viilentyä, kytke laite uudelleen päälle ja
valitse kääntämällä SOURCE SELECT haluttu lähde.
Kotiteatterilaitteen optimaalisen äänentoiston
saavuttamiseksi suosittelemme laitteelle seuraavia asetuksia:
* SPEAKR SETUP
SUBW PRESENT: YES
* SPEAKR SIZES
FRONT SIZE: SMALL
CENTER SIZE: SMALL
REAR SIZE: SMALL
* VOL BALANCE
VOL FRONT-L: 0
VOL FRONT-R: 0
VOL CENTER: -10
VOL REAR-L: +5
VOL REAR-R: +5
BASS: 0
TREBLE: 0
LOUDNESS: pois päältä
Kun yhdistät DVD-soittimen COAX 1 IN liittimeen varmista,
että DVD-soittimen digitaalinen lähtöliitin on asetettu ”ON”
tai ”ALL” (lue DVD-soittimen käyttöohje).
Pidätämme oikeuden muutoksiin ilman eri ilmoitusta.
Etukaiuttimet
Järjestelmä...........................................................2-tie suojatut
Impedanssi...........................................................................8 Ω
Kaiutinohjaimet...............................................3" täysi, 1" piezo
Toistotaajuus.......................................................150 Hz–20 kHz
Mitat (MX 980), p × k × s............................95 × 150 × 97 mm
Mitat (MX 999), p × k × s............................95 × 150 × 91 mm
Paino................................................................................0,45 kg
Keskikaiuttimet
Järjestelmä...........................................................2-tie suojatut
Impedanssi...........................................................................8 Ω
Kaiutinohjaimet.........................................2 × 3" täysi, 1" piezo
Toistotaajuus.......................................................150 Hz–20 kHz
Mitat (MX 980), p × k × s............................250 × 94 × 92 mm
Mitat (MX 999), p × k × s............................250 × 94 × 86 mm
Paino................................................................................0,92 kg
Takakaiuttimet
Järjestelmä..........................................................................2-tie
Impedanssi...........................................................................8 Ω
Kaiutinohjaimet...............................................3" täysi, 1" piezo
Toistotaajuus.......................................................150 Hz–20 kHz
Mitat (MX 980), p × k × s............................95 × 150 × 97 mm
Mitat (MX 999), p × k × s............................95 × 150 × 91 mm
Paino................................................................................0,45 kg
Aktiivinen subwoofer wOOx teknologialla MX 980 –
ei magneettisesti suojattu malli
Subwoofer............................................................................6,5"
Äänentoisto.....................................................50 W RMS (4 Ω)
THD..................................................................10% 100 herzillä
Toistotaajuus........................................................40 Hz–150 Hz
Astevalin.......................................................................0°, 180°
Tuloherkkyys (subwoofer in).....................................200 mVrms
Käyttöjännite...........................................................230 V/50 Hz
Virrankulutus....................................................40 W (
1
⁄8 teholla)
Mitat, p × k × s........................................200 × 310 × 370 mm
Paino..................................................................................6,8 kg
Aktiivinen subwoofer wOOx teknologialla MX 999 –
ei magneettisesti suojattu malli
Subwoofer............................................................................6,5"
Äänentoisto...................................................100 W RMS (4 Ω)
THD..................................................................10% 100 herzillä
Toistotaajuus........................................................40 Hz–150 Hz
Astevalin.......................................................................0°, 180°
Tuloherkkyys (subwoofer in).....................................200 mVrms
Käyttöjännite...........................................................230 V/50 Hz
Virrankulutus....................................................52 W (
1
⁄
8 teholla)
Mitat, p × k × s........................................200 × 310 × 370 mm
Paino..................................................................................8,4 kg
Kaiuttimien ja subwooferin tekniset tiedot
DVD-soittimen digitaalinen ääni
Suositellut asetukset
Tehon käsittely
3103 306 1862.1 MX 980/MX 999 VieUrs0147

Português
PACOTES DE HOME CINEMA MX 980, MX 999
Adicionalmente aos fornecimentos standard, os pacotes de
Cinema em Casa MX 980, MX 999 contêm:
– um subwoofer, incluindo um cabo de ligação e um cabo de
alimentação
– 5 altifalantes, incluindo 5 cabos de altifalante
– um cabo coaxial para ligação vídeo a um leitor de DVD ou
a um aparelho de TV
– um cartão de instalação rápida
Para os fornecimentos standard do seu receptor, consulte
o capítulo «INFORMAÇÃO GERAL / Equipamento fornecido»,
no manual de instruções.
• Instale o subwoofer onde desejar, porque com a gama de
sons graves reproduzidos pelo subwoofer (abaixo dos
150 Hz), o ouvido humano não consegue detectar
a direcção e a posição de onde o som está a ser produzido.
• Também, dado que a sensação de estereofonia perde-se
com as frequências graves, é suficiente um único
subwoofer para reproduzir os graves de canais
estereofónicos.
• Para obter uma melhor reprodução dos graves,
recomendamos que coloque o subwoofer numa superfície
sólida no chão, onde é pouco provável que ocorram
ressonâncias.
• Coloque sempre o subwoofer na vertical, mantendo-o
afastado alguns centímetros da parede.
• Não coloque nenhum objecto sobre o subwoofer nem se
sente nele.
• Se o subwoofer for colocado no centro de uma sala, os
graves podem ser extremamente enfraquecidos. Isto
deve-se à influência da onda estacionária da sala. Se isto
suceder, desloque o subwoofer do centro do quarto ou
elimine a causa da onda estacionária, instalando uma
estante de prateleiras na parede, etc.
Importante!
Antes de utilizar o subwoofer, conclua os procedimentos de
preparação. Ligue o seu receptor e seleccione a fonte de som.
A placa do tipo está localizada na retaguarda do subwoofer.
1 Utilize o cabo com fichas cinch fornecido, para ligar
AUDIO IN a SUBWOOFER PRE-OUT no receptor.
2 Verifique se a tensão de alimentação indicada na placa do
tipo corresponde à tensão de alimentação da sua área. Se
não corresponder, consulte o seu revendedor ou serviço de
assistência.
3 Depois de efectuadas todas as ligações, ligue o cabo de
alimentação AC ao receptor ou à tomada na parede.
Para desligar totalmente o subwoofer da alimentação, retire
o cabo de alimentação da tomada na parede.
1 Para activar o subwoofer, coloque o comando de ligar/
desligar na parte traseira do subwoofer na posição «ON».
2 Rode VOLUME no sentido dos ponteiros do relógio até ouvir
um estalido.
yO indicador LED acende-se a verde.
Se o subwoofer não for utilizado por um período prolongado
de tempo, recomenda-se a que o comando de ligar/desligar
fique na posição «OFF».
• Rode VOLUME no sentido contrário ao dos ponteiros do
relógio até ouvir um estalido.
yO indicador LED fica vermelho.
Pode ajustar o subwoofer para harmonizar o nível de som dos
altifalantes frontais. Reforçando os sons graves obtém um
maior percepção ambiental.
1 Regule o VOLUME no receptor até que o som dos
altifalantes frontais não esteja distorcido. Se estiver
distorcido, o som do subwoofer também estará distorcido.
2 Reproduza as suas canções favoritas. Melodias vocais de
intérpretes masculinos que contenham sons graves, são as
mais adequadas para efectuar este ajuste.
3 Regule o VOLUME no subwoofer para definir a ampliação
dos graves do subwoofer.
• Utilize o PHASE SELECTOR
situado na retaguarda do
subwoofer para seleccionar
a polaridade de fase.
Seleccionando a polaridade 0° ou 180°, poderá estabelecer um
melhor efeito de reprodução dos graves em certos ambientes de
audição (conforme o tipo dos altifalantes frontais e a posição do
subwoofer). Também poderá alterar a expansão e o estreitamento
do som, assim como afectar a sensação do campo sonoro.
• Seleccione a polaridade que lhe proporcionar um som mais
agradável quando estiver na sua posição habitual de
audição. Repita a regulação do volume e da polaridade de
fase até conseguir o som que lhe agrade mais.
Uma vez regulado o subwoofer para o ajuste desejado, utilize
o controlo VOLUME do receptor para ajustar o volume do
subwoofer e dos outros altifalantes. Não é necessário voltar
a regular os ajustes do subwoofer, mesmo depois de alterar
o nível de volume do receptor.
PHASE
SELECTOR
0
0
0
180
Selector de fase
Regulação do volume
Comutar o subwoofer para o modo de espera
Ligar o subwoofer
Ligações
Instalação do subwoofer
Equipamento fornecido
SUBWOOFER
SURROUND
(REAR)
LEFT
LEFT
RIGHT
CENTER
FRONT
RIGHT
FRONT
SURROUND
(REAR)

Português
PACOTES DE HOME CINEMA MX 980, MX 999
Se o receptor for utilizado a uma potência muito alta, poderá
produzir distorções que poderão danificar seriamente os
altifalantes. Se ocorrerem distorções, reduza o volume e os
comandos de tom para um nível a que o som volte a ser
aceitável.
Para evitar o sobre-aquecimento do aparelho, este
dispõe de um circuito de segurança incorporado. Por
este motivo, o seu aparelho pode-se desligar em
condições extremas. Se tal acontecer, desligue o
aparelho e deixe que arrefeça antes de o voltar a utilizar.
Após ter deixado o aparelho arrefecer, volte a ligá-lo e
seleccione a fonte desejada rodando SOURCE SELECT.
Para um desempenho sonoro óptimo do seu sistema de Home
Cinema, recomendamos as seguintes definições no seu
receptor:
* SPEAKR SETUP
SUBW PRESENT: YES
* SPEAKR SIZES
FRONT SIZE: SMALL
CENTER SIZE: SMALL
REAR SIZE: SMALL
* VOL BALANCE
VOL FRONT-L: 0
VOL FRONT-R: 0
VOL CENTER: -10
VOL REAR-L: +5
VOL REAR-R: +5
BASS: 0
TREBLE: 0
LOUDNESS: desactivado
Quando ligar um leitor de DVD a COAX 1 IN, certifique-se de
que a entrada digital do seu leitor de DVD está definida para
«ON» ou «ALL» (consulte o manual de instruções do seu leitor
de DVD).
Sujeito a alterações sem aviso prévio.
Altifalantes frontais
Sistema.............................................................2 vias, blindado
Impedância...........................................................................8 Ω
Cones do altifalante....3" de gama completa, 1" piezoeléctrico
Resposta de frequência na reprodução.............150 Hz–20 kHz
Dimensões (MX 980), L × A × P..................95 × 150 × 97 mm
Dimensões (MX 999), L × A × P..................95 × 150 × 91 mm
Peso.................................................................................0,45 kg
Altifalante central
Sistema.............................................................2 vias, blindado
Impedância...........................................................................8 Ω
Cones do altifalante.......2 × 3" de gama completa, 1" piezoeléctrico
Resposta de frequência na reprodução.............150 Hz–20 kHz
Dimensões (MX 980), L × A × P..................250 × 94 × 92 mm
Dimensões (MX 999), L × A × P..................250 × 94 × 86 mm
Peso.................................................................................0,92 kg
Altifalantes de som envolvente
Sistema..............................................................................2 vias
Impedância...........................................................................8 Ω
Cones do altifalante....3" de gama completa, 1" piezoeléctrico
Resposta de frequência na reprodução.............150 Hz–20 kHz
Dimensões (MX 980), L × A × P..................95 × 150 × 97 mm
Dimensões (MX 999), L × A × P..................95 × 150 × 91 mm
Peso.................................................................................0,45 kg
Subwoofer activo com tecnologia w00x para o MX 980
– design não blindado magneticamente
Subwoofer............................................................................6,5"
Potência de saída............................................50 W RMS (4 Ω)
Limiar....................................................................10% a 100 Hz
Resposta de frequência na reprodução...............40 Hz–150 Hz
Comutador de fase........................................................0°, 180°
Sensibilidade de entrada (entrada de subwoofer).......200 mVrms
Tensão de alimentação AC.....................................230 V/50 Hz
Consumo de energia...............40 W (a
1
⁄8 da potência nominal)
Dimensões, L × A × P..............................200 × 310 × 370 mm
Peso...................................................................................6,8 kg
Subwoofer activo com tecnologia w00x para o MX 999
– design não blindado magneticamente
Subwoofer............................................................................6,5"
Potência de saída..........................................100 W RMS (4 Ω)
Limiar....................................................................10% a 100 Hz
Resposta de frequência na reprodução...............40 Hz–150 Hz
Comutador de fase........................................................0°, 180°
Sensibilidade de entrada (entrada de subwoofer ).....200 mVrms
Tensão de alimentação AC.....................................230 V/50 Hz
Consumo de energia...............52 W (a
1
⁄
8 da potência nominal)
Dimensões, L × A × P..............................200 × 310 × 370 mm
Peso...................................................................................8,4 kg
Dados técnicos dos altifalantes e subwoofer
Som digital de um leitor de DVD
Definições recomendadas
Aceitação de potência
3103 306 1862.1 MX 980/MX 999 VieUrs0147

∂ÏÏËÓÈο
™Y™THMATA HOME CINEMA MX 980, MX 999
EÎÙfi˜ ·fi ÙȘ ‚·ÛÈΤ˜ ·ÚÔ¯¤˜ Ù· Û˘ÛÙ‹Ì·Ù· Home Cinema
MX 980, MX 999 ÂÚȤ¯Ô˘Ó:
– ¤Ó· ˘ÔÁÔ‡ÊÂÚ Û˘ÌÂÚÈÏ·Ì‚·ÓÔ̤ÓÔ˘ ÙÔ˘ ηψ‰›Ô˘ Û‡Ó‰ÂÛ˘
Î·È ÙÔ˘ ηψ‰›Ô˘ ËÏÂÎÙÚÈÎÔ‡ ‰ÈÎÙ‡Ô˘
– 5 ˯›· Û˘ÌÂÚÈÏ·Ì‚·ÓÔÌ¤ÓˆÓ ÙˆÓ 5 ηψ‰›ˆÓ ÙÔ˘˜
– ¤Ó· ÔÌÔ·ÍÔÓÈÎfi ηÏÒ‰ÈÔ ÁÈ· Û‡Ó‰ÂÛË ‚›ÓÙÂÔ Ì ¤Ó· DVD
·Ó··Ú·ÁˆÁ‹˜ ‹ ÌÈ· Û˘Û΢‹ ÙËÏÂfiÚ·Û˘
– ÌÈ· οÚÙ· ÁÚ‹ÁÔÚ˘ ÂÁηٿÛÙ·Û˘
°È· ÙȘ ‚·ÛÈΤ˜ ·ÚÔ¯¤˜ ÙÔ˘ ‰¤ÎÙË Û·˜ ‚Ϥ ÎÂÊ¿Ï·ÈÔ
«°∂¡I∫∂™ ¶§∏ƒOºOƒI∂™ / ∫·Ù¿ÏÔÁÔ˜ Û˘ÌÂÚÈÏ·Ì‚·ÓÔ̤ӈÓ
ÂÍ·ÚÙËÌ¿ÙˆÓ» ÛÙÔ ÂÁ¯ÂÈÚ›‰ÈÔ Ô‰ËÁÈÒÓ.
ñ EÁηٷÛÙ‹ÛÙ ÙÔ ˘ÔÁÔ‡ÊÂÚ ÔÔ˘‰‹ÔÙ ÂÈı˘Ì›Ù ÁÈ·Ù› ÌÂ
ÙËÓ Ë¯ËÙÈ΋ ÂÌ‚¤ÏÂÈ· Ì¿ÛÔ˘ Ô˘ ·Ó··Ú¿ÁÂÈ ÙÔ ˘ÔÁÔ‡ÊÂÚ
(οو ÙˆÓ 150 Hz) Ë ·ÓıÚÒÈÓË ·ÎÔ‹ ‰ÂÓ ÌÔÚ› Ó· ·ÓȯÓ‡ÛÂÈ
ÙËÓ Î·Ù‡ı˘ÓÛË Î·È ÙË ı¤ÛË ·fi fiÔ˘ ·Ú¿ÁÂÙ·È Ô ‹¯Ô˜.
ñ E›Û˘, ηıÒ˜ Ë ÛÙÂÚÂÔʈÓÈ΋ ·›ÛıËÛË ¯¿ÓÂÙ·È ÛÙȘ
Û˘¯ÓfiÙËÙ˜ ÙˆÓ Ì¿ÛˆÓ, ¤Ó· ÌfiÓÔ ˘ÔÁÔ‡ÊÂÚ Â›Ó·È ·ÚÎÂÙfi ÁÈ·
ÙËÓ ·Ó··Ú·ÁˆÁ‹ ÙˆÓ Ì¿ÛˆÓ ÙˆÓ ÛÙÂÚÂÔʈÓÈÎÒÓ Î·Ó·ÏÈÒÓ.
ñ °È· Ó· ¤¯ÂÙ ηχÙÂÚË ·Ó··Ú·ÁˆÁ‹ ÙˆÓ Ì¿ÛˆÓ, Û·˜
Û˘ÓÈÛÙԇ̠ӷ ÙÔÔıÂÙ‹ÛÂÙ ÙÔ ˘ÔÁÔ‡ÊÂÚ Û ÛÙÂÚÂfi ¿ÙˆÌ·,
fiÔ˘ Â›Ó·È ·›ı·ÓÔ Ó· Û˘Ì‚Â› Û˘ÓÙÔÓÈÛÌfi˜.
ñ TÔÔıÂÙ›Ù ÙÔ ˘ÔÁÔ‡ÊÂÚ ¿ÓÙ· οıÂÙ·, ‰È·ÙËÚÒÓÙ·˜ ÙÔ
ÌÂÚÈο ÂηÙÔÛÙ¿ Ì·ÎÚÈ¿ ·fi ÙÔÓ ÙÔ›¯Ô.
ñ MËÓ ÙÔÔıÂÙ›Ù ·ÓÙÈΛÌÂÓ· ¿ӈ ÛÙÔ ˘ÔÁÔ‡ÊÂÚ Î·È ÌËÓ
οıÂÛÙ Û ·˘Ùfi.
ñ E¿Ó ÙÔ ˘ÔÁÔ‡ÊÂÚ ÙÔÔıÂÙËı› ÛÙÔ Î¤ÓÙÚÔ ÙÔ˘ ‰ˆÌ·Ù›Ô˘, Ù·
Ì¿Û· ÌÔÚ› Ó· Â›Ó·È È‰È·›ÙÂÚ· ÂÍ·ÛıÂÓË̤ӷ. A˘Ùfi ÔÊ›ÏÂÙ·È
ÛÙËÓ ÂÈÚÚÔ‹ ÙÔ˘ ÛÙ¿ÛÈÌÔ˘ ·̷ÙÔ˜ ÙÔ˘ ‰ˆÌ·Ù›Ô˘. E¿Ó Û˘Ì‚Â›
·˘Ùfi, ÌÂÙ·ÎÈÓ‹ÛÙ ÙÔ ˘ÔÁÔ‡ÊÂÚ Ì·ÎÚÈ¿ ·fi ÙÔ Î¤ÓÙÚÔ ÙÔ˘
‰ˆÌ·Ù›Ô˘ ‹ ·ÔÌ·ÎÚ‡ÓÂÙ ÙËÓ ·ÈÙ›· ÙÔ˘ ÛÙ¿ÛÈÌÔ˘ ·̷ÙÔ˜
ÙÔÔıÂÙÒÓÙ·˜ ¤Ó· Ú¿ÊÈ ÛÙÔÓ ÙÔ›¯Ô, ÎÙÏ.
™ËÌ·ÓÙÈÎfi!
¶ÚÈÓ ÏÂÈÙÔ˘ÚÁ‹ÛÂÙ ÙÔ ˘ÔÁÔ‡ÊÂÚ, ÔÏÔÎÏËÚÒÛÙ ÙȘ ‰È·‰Èηۛ˜
ÚÔÂÙÔÈÌ·Û›·˜. EÓÂÚÁÔÔÈ‹ÛÙ ÙÔ ‰¤ÎÙË Û·˜ Î·È ÂÈϤÍÙ ÙËÓ
ËÁ‹ ‹¯Ô˘.
H ÈӷΛ‰· Ù‡Ô˘ ‚Ú›ÛÎÂÙ·È ÛÙÔ ›Ûˆ ̤ÚÔ˜ ÙÔ˘ ˘ÔÁÔ‡ÊÂÚ.
1 XÚËÛÈÌÔÔÈ‹ÛÙ ÙÔ Î·ÏÒ‰ÈÔ cinch Ô˘ ·Ú¤¯ÂÙ·È ÁÈ· ÙË
Û‡Ó‰ÂÛË ÙÔ˘ AUDIO IN Ì ÙÔ SUBWOOFER PRE-OUT ÛÙÔ ‰¤ÎÙË.
2 EϤÁÍÙ ·Ó Ë Ù¿ÛË ÙÔ˘ Ú‡̷ÙÔ˜ Ô˘ ‰ËÏÒÓÂÙ·È ÛÙËÓ ÈӷΛ‰·
Ù‡Ô˘ ·ÓÙÈÛÙÔȯ› Ì ÙËÓ ÙÔÈ΋. AÓ fi¯È, Û˘Ì‚Ô˘Ï¢Ù›Ù ÙÔÓ
ÚÔÌËıÂ˘Ù‹ Û·˜ ‹ ÙËÓ ˘ËÚÂÛ›· Â͢ËÚ¤ÙËÛ˘.
3 AÊÔ‡ ÔÏÔÎÏËÚˆıÔ‡Ó ÔÈ Û˘Ó‰¤ÛÂȘ, Û˘Ó‰¤ÛÙ ÙÔ Î·ÏÒ‰ÈÔ
ÂÓ·ÏÏ·ÛÛfiÌÂÓÔ˘ Ú‡̷ÙÔ˜ ÛÙÔ ‰¤ÎÙË ‹ ÛÙËÓ ·ÚÔ¯‹ ÙÔ˘ ÙÔ›¯Ô˘.
°È· Ó· ·ÔÛ˘Ó‰¤ÛÂÙ ÙÂÏ›ˆ˜ ÙÔ ˘ÔÁÔ‡ÊÂÚ ·fi ÙÔ ËÏÂÎÙÚÈÎfi
‰›ÎÙ˘Ô, ‚Á¿ÏÙ ÙÔ ‚‡ÛÌ· ‰ÈÎÙ‡Ô˘ ·fi ÙËÓ ˘Ô‰Ô¯‹ ÙÔ›¯Ô˘.
1 °È· Ó· ÂÓÂÚÁÔÔÈ‹ÛÂÙ ÙÔ ˘ÔÁÔ‡ÊÂÚ, ı¤ÛÙ ÙÔÓ ‰È·ÎfiÙË
ÂÓÂÚÁÔÔ›ËÛ˘/·ÂÓÂÚÁÔÔ›ËÛ˘ ÔÙÔ ›Ûˆ ̤ÚÔ˜ ÙÔ˘
˘ÔÁÔ‡ÊÂÚ ÔÙË ı¤ÛË «ON» (∂ÓÂÚÁÔÔ›ËÛË).
2 ¶ÂÚÈÛÙÚ¤„Ù ÙÔ VOLUME ‰ÂÍÈfiÛÙÚÔÊ· ̤¯ÚÈ Ó· ·ÎÔ˘ÛÙ› ÎÏÈÎ.
yH ¤Ó‰ÂÈÍË LED Á›ÓÂÙ·È Ú¿ÛÈÓË.
∂¿Ó ÙÔ ˘ÔÁÔ‡ÊÂÚ ‰ÂÓ ÚfiÎÂÈÙ·È Ó· ¯ÚËÛÈÌÔÔÈËı› ÁÈ· ÌÂÁ¿ÏÔ
¯ÚÔÓÈÎfi ‰È¿ÛÙËÌ·, Û˘ÓÈÛÙ¿Ù·È Ó· ı¤ÛÂÙ ÙÔÓ ‰È·ÎfiÙË ÂÓÂÚÁÔÔ›ËÛ˘/
·ÂÓÂÚÁÔÔ›ËÛ˘ ÛÙË ı¤ÛË «OFF» (∞ÂÓÂÚÁÔÔ›ËÛË).
ñ ¶ÂÚÈÛÙÚ¤„Ù ÙÔ VOLUME ·ÚÈÛÙÂÚfiÛÙÚÔÊ· ̤¯ÚÈ Ó· ·ÎÔ˘ÛÙ› ÎÏÈÎ.
yH ¤Ó‰ÂÈÍË LED Á›ÓÂÙ·È ÎfiÎÎÈÓË.
MÔÚ›Ù ӷ Ú˘ıÌ›ÛÂÙ ÙÔ ˘ÔÁÔ‡ÊÂÚ ÒÛÙ ӷ ·ÓÙ·ÔÎÚ›ÓÂÙ·È
ÛÙË ÛÙ¿ıÌË ‹¯Ô˘ ÙˆÓ ÌÚÔÛÙÈÓÒÓ Ë¯Â›ˆÓ Û·˜. EÓÈÛ¯‡ÔÓÙ·˜ ÙÔÓ
‹¯Ô ÙˆÓ Ì¿ÛˆÓ ‰ËÌÈÔ˘ÚÁ›Ù ηχÙÂÚË ·ÙÌfiÛÊ·ÈÚ·.
1 P˘ıÌ›ÛÙ ÙÔ VOLUME ÛÙÔ ‰¤ÎÙË ÒÛÙ ӷ ÌËÓ ·Ú·ÌÔÚÊÒÓÂÙ·È
Ô ‹¯Ô˜ ÙˆÓ ÌÚÔÛÙÈÓÒÓ Ë¯Â›ˆÓ. E¿Ó ·Ú·ÌÔÚÊÒÓÂÙ·È, ÙfiÙ ı·
·Ú·ÌÔÚÊÒÓÂÙ·È Î·È Ô ‹¯Ô˜ ·fi ÙÔ ˘ÔÁÔ‡ÊÂÚ.
2 ¶·›ÍÙ ٷ ·Á·Ë̤ӷ Û·˜ ÙÚ·ÁÔ‡‰È·. AÚÛÂÓÈÎÔ› ʈÓËÙÈÎÔ› ÙfiÓÔÈ
Ì ̿ÛÔ˘˜ ‹¯Ô˘˜ Â›Ó·È Î·Ù·ÏÏËÏfiÙÂÚÔÈ ÁÈ· Ú‡ıÌÈÛË.
3 P˘ıÌ›ÛÙ ÙÔ VOLUME ÛÙÔ ˘ÔÁÔ‡ÊÂÚ ÁÈ· Ó· ηıÔÚÈÛÙ› Ë
·ÎÔ˘ÛÙfiÙËÙ· ÙˆÓ Ì¿ÛˆÓ Ô˘ ·Ú¿ÁÔÓÙ·È ·fi ÙÔ ˘ÔÁÔ‡ÊÂÚ.
ñ XÚËÛÈÌÔÔÈ‹ÛÙÂ ÙÔ
PHASE SELECTOR ÛÙÔ ›Ûˆ
̤ÚÔ˜ ÙÔ˘ ˘ÔÁÔ‡ÊÂÚ ÁÈ·
ÂÈÏÔÁ‹ ÔÏÈÎfiÙËÙ·˜ Ê¿Û˘.
H ÂÈÏÔÁ‹ ÔÏÈÎfiÙËÙ·˜ ›Ù Û 0
Æ Â›Ù Û 180Æ ÌÔÚ› Ó· ¤¯ÂÈ
ηχÙÂÚÔ ·ÔÙ¤ÏÂÛÌ· ·Ó··Ú·ÁˆÁ‹˜ Ì¿ÛˆÓ Û ÔÚÈṲ̂ӷ
·ÎÔ˘ÛÙÈο ÂÚÈ‚¿ÏÏÔÓÙ· (·Ó¿ÏÔÁ· Ì ÙÔÓ Ù‡Ô ÌÚÔÛÙÈÓÒÓ Ë¯Â›ˆÓ
Î·È ÙË ı¤ÛË ÙÔ˘ ˘ÔÁÔ‡ÊÂÚ). MÔÚ› ›Û˘ Ó· ·ÏÏ¿ÍÂÈ ÙËÓ
¤ÎÙ·ÛË Î·È ÙË ÛÙÂÁ·ÓfiÙËÙ· ÙÔ˘ ‹¯Ô˘ Î·È Ó· ÂËÚ¿ÛÂÈ ÙËÓ
·›ÛıËÛË ÙÔ˘ ˯ËÙÈÎÔ‡ ‰›Ô˘.
ñ EÈϤÍÙ ÙË Ú‡ıÌÈÛË Ô˘ Û·˜ ‰›ÓÂÈ ÙÔÓ ‹¯Ô Ô˘ ÚÔÙÈÌ¿Ù fiÙ·Ó
·ÎÔ‡Ù ÌÔ˘ÛÈ΋ ÛÙË Û˘ÓËıÈṲ̂ÓË Û·˜ ı¤ÛË. E·Ó·Ï¿‚ÂÙ ÙË
Ú‡ıÌÈÛË ÁÈ· ÙËÓ ¤ÓÙ·ÛË Î·È ÙËÓ ÔÏÈÎfiÙËÙ· Ê¿Û˘ Û‡Ìʈӷ ÌÂ
ÙȘ ÚÔÙÈÌ‹ÛÂȘ Û·˜.
MÂÙ¿ ÙËÓ ÂÈı˘ÌËÙ‹ Ú‡ıÌÈÛË ÙÔ˘ ˘ÔÁÔ‡ÊÂÚ, ¯ÚËÛÈÌÔÔÈ‹ÛÙ ÙÔÓ
¤ÏÂÁ¯Ô VOLUME ÛÙÔ ‰¤ÎÙË ÁÈ· Ó· ÚÔÛ·ÚÌfiÛÂÙ ÙËÓ ¤ÓÙ·ÛË ÙÔ˘
˘ÔÁÔ‡ÊÂÚ Î·È ÙˆÓ ¿ÏÏˆÓ Ë¯Â›ˆÓ. ¢ÂÓ ··ÈÙÂ›Ù·È ÂÎ Ó¤Ô˘
ÚÔÛ·ÚÌÔÁ‹ ÙˆÓ Ú˘ıÌ›ÛÂˆÓ ÙÔ˘ ˘ÔÁÔ‡ÊÂÚ ·ÎfiÌË Î·È fiÙ·Ó
·ÏÏ¿˙ÂÙ ÙË ÛÙ¿ıÌË ¤ÓÙ·Û˘ ÙÔ˘ ‰¤ÎÙË.
PHASE
SELECTOR
0
0
0
180
EÈÏÔÁ¤·˜ Ê¿Û˘
P‡ıÌÈÛË ¤ÓÙ·Û˘
£¤ÛË ÙÔ˘ ˘ÔÁÔ‡ÊÂÚ Û ÏÂÈÙÔ˘ÚÁ›· ·Ó·ÌÔÓ‹˜
EÓÂÚÁÔÔ›ËÛË ÙÔ˘ ˘ÔÁÔ‡ÊÂÚ
™˘Ó‰¤ÛÂȘ
EÁηٿÛÙ·ÛË ˘ÔÁÔ‡ÊÂÚ
∫·Ù¿ÏÔÁÔ˜ Û˘ÌÂÚÈÏ·Ì‚·ÓÔÌ¤ÓˆÓ ÂÍ·ÚÙËÌ¿ÙˆÓ
SUBWOOFER
SURROUND
(REAR)
LEFT
LEFT
RIGHT
CENTER
FRONT
RIGHT
FRONT
SURROUND
(REAR)

∂ÏÏËÓÈο
™Y™THMATA HOME CINEMA MX 980, MX 999
OÙ·Ó Ô ‰¤ÎÙ˘ ¯ÚËÛÈÌÔÔÈÂ›Ù·È Û Ôχ ˘„ËÏ‹ ÈÛ¯‡ ÌÔÚ› Ó·
‰ËÌÈÔ˘ÚÁ‹ÛÂÈ ·Ú·ÌÔÚÊÒÛÂȘ Ô˘ ÂÓ‰¤¯ÂÙ·È Ó· ÚÔÍÂÓ‹ÛÔ˘Ó
ÛÔ‚·Ú¤˜ ˙ËÌȤ˜ ÛÙ· ˯›· Û·˜. ∂¿Ó Û˘Ì‚Â› ·˘Ùfi, ηÙ‚¿ÛÙ ÙËÓ
¤ÓÙ·ÛË Î·È ÙÔÓ ÙfiÓÔ Û οÔÈÔ ·Ô‰ÂÎÙfi ›‰Ô.
°È· ÙËÓ ·ÔÊ˘Á‹ Ù˘ ˘ÂÚı¤ÚÌ·ÓÛ‹˜ Ù˘, Ë Û˘Û΢‹ ¤¯ÂÈ
ÂÍÔÏÈÛÙ› Ì ÂÓۈ̷و¤ÓÔ Î‡Îψ̷ ·ÛÊ·Ï›·˜. °È’ ·˘Ùfi
οو ·fi ·ÎÚ·›Â˜ Û˘Óı‹Î˜, ÂÓ‰¤¯ÂÙ·È Ó· ·ÔÛ˘Ó‰Âı› Ë
Û˘Û΢‹ Û·˜. ∞Ó Û˘Ì‚Â› ·˘Ùfi, Û‚‹ÛÙ ÙË Û˘Û΢‹ ηÈ
·Ê‹ÛÙÂ ÙËÓ Ó· ÎÚ˘ÒÛÂÈ ÚÔÙÔ‡ ÙËÓ Í·Ó·¯ÚËÛÈÌÔÔÈ‹ÛÂÙÂ.
∞ÊÔ‡ ÎÚ˘ÒÛÂÈ Ë Û˘Û΢‹ ÂÓÂÚÁÔÔÈ‹ÛÙ ÙËÓ Í·Ó¿ ηÈ
ÂÈϤÍÙ ÙËÓ ÂÈı˘ÌËÙ‹ ËÁ‹ Û˘ÓÙÔÓ›˙ÔÓÙ·˜ SOURCE SELECT.
°È· ‚¤ÏÙÈÛÙË ·fi‰ÔÛË ‹¯Ô˘ ÙÔ˘ ™˘ÛÙ‹Ì·Ùfi˜ Û·˜ Home Cinema,
Û·˜ Û˘ÓÈÛÙԇ̠ÙȘ ·ÎfiÏÔ˘ı˜ Ú˘ıÌ›ÛÂȘ ÛÙÔÓ ‰¤ÎÙË Û·˜:
* SPEAKR SETUP
SUBW PRESENT: YES
* SPEAKR SIZES
FRONT SIZE: SMALL
CENTER SIZE: SMALL
REAR SIZE: SMALL
* VOL BALANCE
VOL FRONT-L: 0
VOL FRONT-R: 0
VOL CENTER: -10
VOL REAR-L: +5
VOL REAR-R: +5
BASS: 0
TREBLE: 0
LOUDNESS: ÂÎÙfi˜
ŸÙ·Ó Û˘Ó‰¤ÂÙ ¤Ó· DVD ·Ó··Ú·ÁˆÁ‹˜ Û COAX 1 IN,
‚‚·Èˆı›Ù fiÙÈ Ë „ËÊȷ΋ ¤ÍÔ‰Ô˜ ÙÔ˘ DVD ·Ó··Ú·ÁˆÁ‹˜ Û·˜
‚Ú›ÛÎÂÙ·È ÛÙÔ «ON» ‹ «ALL» (·Ú·Î·Ïԇ̠‰È·‚¿ÛÙ ÙÔ
ÂÁ¯ÂÈÚ›‰ÈÔ Ô‰ËÁÈÒÓ ÙÔ˘ DVD ·Ó··Ú·ÁˆÁ‹˜ Û·˜).
YfiÎÂÈÙ·È Û ÙÚÔÔÔ›ËÛË ¯ˆÚ›˜ ÚÔÂȉÔÔ›ËÛË.
EÌÚfiÛıÈ· ˯›·
™‡ÛÙËÌ· .....................................................2 ‰ÚfiÌˆÓ Ì ıˆÚ¿ÎÈÛË
E̤‰ËÛË.................................................................................8 Ω
O‰ËÁÔ› Ë¯Â›Ô˘.................................3" Ï‹ÚÔ˘˜ ÂÚÈÔ¯‹˜, 1" piezo
AÓ··Ú·ÁˆÁ‹ ·fiÎÚÈÛ˘ Û˘¯ÓfiÙËÙ·˜ ....................150 Hz–20 kHz
¢È·ÛÙ¿ÛÂȘ (MX 980), × ˘ × ‚.......................95 × 150 × 97 mm
¢È·ÛÙ¿ÛÂȘ (MX 999), × ˘ × ‚.......................95 × 150 × 91 mm
B¿ÚÔ˜.................................................................................0,45 kg
KÂÓÙÚÈÎfi ˯›Ô
™‡ÛÙËÌ· .....................................................2 ‰ÚfiÌˆÓ Ì ıˆÚ¿ÎÈÛË
E̤‰ËÛË.................................................................................8 Ω
O‰ËÁÔ› Ë¯Â›Ô˘ ..........................2 × 3" Ï‹ÚÔ˘˜ ÂÚÈÔ¯‹˜, 1" piezo
AÓ··Ú·ÁˆÁ‹ ·fiÎÚÈÛ˘ Û˘¯ÓfiÙËÙ·˜ ....................150 Hz–20 kHz
¢È·ÛÙ¿ÛÂȘ (MX 980), × ˘ × ‚.......................250 × 94 × 92 mm
¢È·ÛÙ¿ÛÂȘ (MX 999), × ˘ × ‚.......................250 × 94 × 86 mm
B¿ÚÔ˜.................................................................................0,92 kg
¶ÂÚÈÊÂÚÂȷο ˯›·
™‡ÛÙËÌ· ..........................................................................2 ‰ÚfïÓ
E̤‰ËÛË.................................................................................8 Ω
O‰ËÁÔ› Ë¯Â›Ô˘.................................3" Ï‹ÚÔ˘˜ ÂÚÈÔ¯‹˜, 1" piezo
AÓ··Ú·ÁˆÁ‹ ·fiÎÚÈÛ˘ Û˘¯ÓfiÙËÙ·˜ ....................150 Hz–20 kHz
¢È·ÛÙ¿ÛÂȘ (MX 980), × ˘ × ‚.......................95 × 150 × 97 mm
¢È·ÛÙ¿ÛÂȘ (MX 999), × ˘ × ‚.......................95 × 150 × 91 mm
B¿ÚÔ˜.................................................................................0,45 kg
∂ÓÂÚÁfi ˘ÔÁÔ‡ÊÂÚ Ù¯ÓÔÏÔÁ›·˜ wOOx ÁÈ· MX 980 – Û¯¤‰ÈÔ ¯ˆÚ›˜
Ì·ÁÓËÙÈ΋ ıˆÚ¿ÎÈÛË
YÔÁÔ‡ÊÂÚ...............................................................................6,5"
IÛ¯‡˜ ÂÍfi‰Ô˘.......................................................50 W RMS (4 Ω)
¶·Ú·ÌfiÚʈÛË THD ................................................10% Û 100 Hz
AÓ··Ú·ÁˆÁ‹ ·fiÎÚÈÛ˘ Û˘¯ÓfiÙËÙ·˜ ......................40 Hz–150 Hz
¢È·ÎfiÙ˘ Ê¿Û˘ .............................................................0Æ, 180Æ
E˘·ÈÛıËÛ›· ÂÈÛfi‰Ô˘ (˘ÔÁÔ‡ÊÂÚ ÂÓÙfi˜) ......................200 mVrms
EÓ·ÏÏ·ÛÛfiÌÂÓÔ Ú‡̷ ................................................230 V/50 Hz
K·Ù·Ó¿ÏˆÛË Ú‡̷ÙÔ˜ ...............40 W (ÛÂ
1
/8 ÔÓÔÌ·ÛÙÈ΋˜ ÈÛ¯‡Ô˜)
¢È·ÛÙ¿ÛÂȘ, × ˘ × ‚ ..................................200 × 310 × 370 mm
B¿ÚÔ˜...................................................................................6,8 kg
∂ÓÂÚÁfi ˘ÔÁÔ‡ÊÂÚ Ù¯ÓÔÏÔÁ›·˜ wOOx ÁÈ· MX 999 – Û¯¤‰ÈÔ ¯ˆÚ›˜
Ì·ÁÓËÙÈ΋ ıˆÚ¿ÎÈÛË
YÔÁÔ‡ÊÂÚ...............................................................................6.5"
IÛ¯‡˜ ÂÍfi‰Ô˘ .....................................................100 W RMS (4 Ω)
¶·Ú·ÌfiÚʈÛË THD ................................................10% Û 100 Hz
AÓ··Ú·ÁˆÁ‹ ·fiÎÚÈÛ˘ Û˘¯ÓfiÙËÙ·˜ ......................40 Hz–150 Hz
¢È·ÎfiÙ˘ Ê¿Û˘ .............................................................0Æ, 180Æ
E˘·ÈÛıËÛ›· ÂÈÛfi‰Ô˘ (˘ÔÁÔ‡ÊÂÚ ÂÓÙfi˜) ......................200 mVrms
EÓ·ÏÏ·ÛÛfiÌÂÓÔ Ú‡̷ ................................................230 V/50 Hz
K·Ù·Ó¿ÏˆÛË Ú‡̷ÙÔ˜ ...............52 W (ÛÂ
1
/
8 ÔÓÔÌ·ÛÙÈ΋˜ ÈÛ¯‡Ô˜)
¢È·ÛÙ¿ÛÂȘ, × ˘ × ‚ ..................................200 × 310 × 370 mm
B¿ÚÔ˜...................................................................................8,4 kg
∆¯ÓÈο ÛÙÔȯ›· ÙˆÓ Ë¯Â›ˆÓ Î·È ÙˆÓ ˘ÔÁÔ‡ÊÂÚ
æËÊÈ·Îfi˜ ‹¯Ô˜ ·fi ¤Ó· DVD ·Ó··Ú·ÁˆÁ‹˜
™˘ÓÈÛÙÒÌÂÓ˜ Ú˘ıÌ›ÛÂȘ
¢È·¯Â›ÚÈÛË ÈÛ¯‡Ô˜
3103 306 1862.1 MX 980/MX 999 VieUrs0147

Polski
ZESTAWY KINA DOMOWEGO MX 980, MX 999
Zestawy Kina Domowego MX 980, MX 999, poza
standardowym wyposa¿eniem, zawierajå:
Рsubwoofer z kablem poŒczeniowym i kablem zasilania
– 5 kolumn g¬oœnikowych z 5 kablami g¬oœnikowymi
– kabel koncentryczny dla pod¬åczenia sygna¬u wideo
z odtwarzacza DVD lub telewizora
– instrukcjê szybkiej instalacji sprzêtu
Opis standardowego wyposa¿enia Twojego odbiornika
znajduje siê w rozdziale „INFORMACJE OGÓLNE /
Wyposa¿enie“ instrukcji obs¬ugi urzådzenia.
• Subwoofer mo¿na umieœciæ w dowolnym miejscu, poniewa¿
w zakresie przenoszonych przez subwoofer dŸwiêków
basowych (poni¿ej 150 Hz) s¬uch ludzki nie rozpoznaje
kierunku ani miejsca rozchodzenia siê dŸwiêku.
• Poniewa¿ efekt stereofoniczny nie jest odczuwany w niskich
czêstotliwoœciach, pojedynczy subwoofer w zupe¬noœci
wystarczy dla przenoszenia dŸwiêków basowych z obu
kana¬ów stereo.
• Dla uzyskania lepszego efektu dŸwiêkowego, zalecamy
umieszczenie subwoofera na pod¬odze lub na innej twardej
powierzchni w celu unikniêcia drgañ rezonansowych.
• Subwoofer nale¿y zawsze stawiaæ pionowo, zachowujåc
odlegoœæ kilku centymetrów od œciany.
• Nie wolno umieszczaæ ¿adnych przedmiotów na obudowie
subwoofera ani na nim siadaæ.
• Je¿eli subwoofer znajduje siê na œrodku pomieszczenia,
dŸwiêki basowe mogå ulec silnemu st¬umieniu. Nastêpuje
to wskutek powstania fali stojåcej w pomieszczeniu. Je¿eli
dojdzie do t¬umienia basów, nale¿y przesunåæ subwoofer ze
œrodka pomieszczenia lub usunåæ przyczynê powstawania
fali stojåcej przez zainstalowanie pó¬ki na œcianie, itp.
Wa¿ne!
Przed w¬åczeniem subwoofera nale¿y zakoñczyæ pod¬åczanie
g¬oœnika. Nastêpnie mo¿emy w¬åczyæ urzådzenie i wybraæ
Ÿród¬o sygna¬u.
Tabliczka znamionowa znajduje siê z ty¬u subwoofera.
1 Za pomocå kabla cinch po¬åcz gniazdko AUDIO IN
z gniazdkiem SUBWOOFER PRE-OUT odbiornika.
2 SprawdŸ, czy napiêcie zasilania na tabliczce znamionowej
jest identyczne z napiêciem sieciowym. W innym przypadku
zasiêgnij porady u sprzedawcy lub w serwisie.
3 Po dokonaniu wszystkich po¬åczeñ, pod¬åcz kabel zasilania
odbiornika do gniazdka wysokiego napiêcia.
Aby ca¬kowicie wy¬åczyæ zasilanie subwoofera nale¿y wyjåæ
kabel zasilania z gniazdka.
1 Aby uaktywniæ subwoofer, ustaw wy¬åcznik z tylu obudowy
g¬oœnika w pozycji w¬åczonej (ON).
2 Obróæ pokrêt¬o VOLUME w prawo a¿ do us¬yszenia cichego
trzasku.
yZapali siê zielony wskaŸnik LED.
Je¿eli g¬oœnik subwoofer nie bêdzie u¿ywany przez d¬u¿szy
czasu, zaleca siê ustawienie wy¬åcznika w pozycji wy¬åczonej
(OFF).
• Obróæ pokrêt¬em VOLUME w lewo do us¬yszenia cichego
trzasku.
yWskaŸnik LED zmieni kolor na czerwony.
Natê¿enie dŸwiêku subwoofera mo¿emy dopasowaæ do poziomu
dŸwiêku przednich kolumn g¬oœnikowych. Odpowiednie natê¿enie
basów znacznie poprawia odbiór wra¿eñ dŸwiêkowych.
1 Najpierw pokrêt¬em VOLUME nale¿y ustawiæ natê¿enie
dŸwiêku kolumn przednich, aby dŸwiêk by¬ s¬yszalny bez
zniekszta¬ceñ. W innym przypadku równie¿ z subwoofera
bêdzie dobiega¬ zniekszta¬cony dŸwiêk.
2 Regulacjê wykonajmy s¬uchajåc dobrze nam znanych
utworów. Do regulacji basów najlepiej nadajå siê wokaliœci
z g¬êbokim tembrem g¬osu.
3 Pokrêt¬em VOLUME na subwooferze regulujemy natê¿enie
dŸwiêku z g¬oœnika.
• Prze¬åcznik PHASE SELECTOR
z ty¬u subwoofera pozwala na
zmianê polaryzacji fazy.
Wybranie polaryzacji 0° lub 180° mo¿e daæ w wyniku lepsze
przenoszenie dŸwiêków niskich w okreœlonych warunkach
otoczenia (w zale¿noœci od rodzaju kolumn przednich oraz
pozycji subwoofera). Zmiana polaryzacji fazy mo¿e równie¿
wp¬ynåæ na dynamikê i rozchodzenie siê dŸwiêku, zmieniajåc
odczuwanie pola dŸwiêkowego.
• Wybierzmy takå polaryzacjê, która zapewnia lepsze dla
ucha brzmienie dŸwiêku w miejscu, gdzie zazwyczaj
bêdziemy siedzieæ podczas s¬uchania. Doboru dokonajmy po
kilku próbach ze zmianå polaryzacji i natê¿enia dŸwiêku.
Po ustawieniu parametrów subwoofera, regulacjê si¬y g¬osu
ca¬ego zestawu – zarówno subwoofera, jak i pozosta¬ych
kolumn g¬oœnikowych – umo¿liwia pokrêt¬o VOLUME na
odbiorniku. Nie musimy regulowaæ subwoofera za ka¿dym
razem, gdy chcemy zmieniæ si¬ê g¬osu odbiornika.
PHASE
SELECTOR
0
0
0
180
Dobór fazy
Regulacja si¬y g¬osu
WyŒczenie subwoofera do czuwania
WŒczenie subwoofera
PoŒczenia
Ustawienie subwoofera
Wyposa¿enie
SUBWOOFER
SURROUND
(REAR)
LEFT
LEFT
RIGHT
CENTER
FRONT
RIGHT
FRONT
SURROUND
(REAR)

Polski
ZESTAWY KINA DOMOWEGO MX 980, MX 999
Ustawienie odbiornika na du¿å si¬ê g¬osu mo¿e prowadziæ do
zniekszta¬ceñ, gro¿åcych trwa¬ym uszkodzeniem g¬oœników.
W razie zniekszta¬ceñ nale¿y zmniejszyæ si¬ê i barwê g¬osu do
poziomu, w którym zniekszta¬cenia ustanå.
Urzådzenia posiada fabrycznie wbudowany obwód
bezpieczeñstwa, zapobiegajåcy przegrzaniu. Dlatego w
skrajnych warunkach mo¿e dojœæ do samoczynnego
wy¬åczenia odbiornika. Je¿eli do tego dojdzie, nale¿y
wy¬åczyæ zasilanie i odczekaæ, a¿ zestaw ulegnie
sch¬odzeniu. Po pozostawieniu urzådzenia do
ostygniêcia w¬åcz je ponownie i wybierz Ÿród¬o
sygna¬u obracajåc pokrêt¬em SOURCE SELECT.
Dla uzyskania najlepszych efektów dŸwiêkowych w Zestawie
Kina Domowego, zalecamy wybór nastêpujåcych ustawieñ na
odbiorniku:
* SPEAKR SETUP
SUBW PRESENT: YES
* SPEAKR SIZES
FRONT SIZE: SMALL
CENTER SIZE: SMALL
REAR SIZE: SMALL
* VOL BALANCE
VOL FRONT-L: 0
VOL FRONT-R: 0
VOL CENTER: -10
VOL REAR-L: +5
VOL REAR-R: +5
BASS: 0
TREBLE: 0
LOUDNESS: off (wyŒczone)
Pod¬åczajåc odtwarzacz DVD do gniazdka COAX 1 IN, upewnij
siê, ¿e wyjœcie cyfrowe odtwarzacza DVD ustawione jest na
„ON“ lub „ALL“ (skorzystaj z instrukcji u¿ytkownika
odtwarzacza DVD).
Producent zastrzega prawo do wprowadzania zmian bez
uprzedzenia.
Kolumny przednie
System.....................................................2-dro¿ny, ekranowany
Impedancja...........................................................................8 Ω
G¬oœniki......................3" szerokopasmowy, 1" piezoelektryczny
Czêstotliwoœæ przenoszona.................................150 Hz–20 kHz
Wymiary (MX 980), szer. x wys. x d¬. ..........95 × 150 × 97 mm
Wymiary (MX 999), szer. x wys. x d¬. ..........95 × 150 × 91 mm
Waga...............................................................................0,45 kg
Kolumna œrodkowa
System.....................................................2-dro¿ny, ekranowany
Impedancja...........................................................................8 Ω
G¬oœniki ...............2 × 3" szerokopasmowy, 1" piezoelektryczny
Czêstotliwoœæ przenoszona.................................150 Hz–20 kHz
Wymiary (MX 980), szer. x wys. x d¬. ..........250 × 94 × 92 mm
Wymiary (MX 999), szer. x wys. x d¬. ..........250 × 94 × 86 mm
Waga...............................................................................0,92 kg
Kolumny surround
System...........................................................................2-dro¿ny
Impedancja...........................................................................8 Ω
G¬oœniki......................3" szerokopasmowy, 1" piezoelektryczny
Czêstotliwoœæ przenoszona.................................150 Hz–20 kHz
Wymiary (MX 980), szer. x wys. x d¬. ..........95 × 150 × 97 mm
Wymiary (MX 999), szer. x wys. x d¬. ..........95 × 150 × 91 mm
Waga...............................................................................0,45 kg
Aktywny subwoofer z technologiå wOOx dla MX 980 –
uk¬ad nie izolowany magnetycznie
Subwoofer ............................................................................6,5"
Moc wyjœciowa ...............................................50 W RMS (4 Ω)
THD..................................................................10% przy 100 Hz
Czêstotliwoœæ przenoszona ..................................40 Hz–150 Hz
Zmiana fazy ...................................................................0°, 180°
Czu¬oœæ wejœciowa (subwoofer in)...........................200 mVrms
Zasilanie..................................................................230 V/50 Hz
Zu¿ycie energii ..........................40 W (przy obciå¿eniu
1
⁄8 mocy)
Wymiary, szer. x wys. x d¬. ......................200 × 310 × 370 mm
Waga.................................................................................6,8 kg
Aktywny subwoofer z technologiå wOOx dla MX 999 –
uk¬ad nie izolowany magnetycznie
Subwoofer ............................................................................6,5"
Moc wyjœciowa .............................................100 W RMS (4 Ω)
THD..................................................................10% przy 100 Hz
Czêstotliwoœæ przenoszona ..................................40 Hz–150 Hz
Zmiana fazy ...................................................................0°, 180°
Czu¬oœæ wejœciowa (subwoofer in)...........................200 mVrms
Zasilanie..................................................................230 V/50 Hz
Zu¿ycie energii ..........................52 W (przy obciå¿eniu
1
⁄8 mocy)
Wymiary, szer. x wys. x d¬. ......................200 × 310 × 370 mm
Waga.................................................................................8,4 kg
Parametry techniczne kolumn g¬oœnikowych
i subwoofera
DŸwiêk cyfrowy z odtwarzacza DVD
Zalecane ustawienia
Nadmierne natê¿enie dŸwiêku
3103 306 1862.1 MX 980/MX 999 VieUrs0147

2
DICHIARAZIONE DI CONFORMITA’
Si dichiara che gli apparecchi FR 984/FR 985/FR 986 e
FR 994/FR 995/FR 996 Philips rispondono alle prescrizioni
dell’art. 2 comma 1 del D. M. 28 Agosto 1995 n. 548.
Philips Consumer Electronics
Philips, Glaslaan 2
5616 JB Eindhoven, The Netherlands
Italia
Typeskilt finnes på apparatens bakside.
Observer: Nettbryteren er sekundert innkoplet. Den
innebygde netdelen er derfor ikke frakoplet nettet så lenge
apparatet er tilsluttet nettkontakten.
For å redusere faren for brann eller elektrisk støt, skal
apparatet ikke utsettes for regn eller fuktighet.
Norge
Important notes for users in the U.K.
Mains plug
This apparatus is fitted with an approved 13 Amp plug.
To change a fuse in this type of plug proceed as follows:
1 Remove fuse cover and fuse.
2
Fix new fuse which should be a
BS1362
5 Amp, A.S.T.A. or BSI approved type.
3 Refit the fuse cover.
If the fitted plug is not suitable for your socket outlets, it
should be cut off and an appropriate plug fitted in its place.
If the mains plug contains a fuse, this should have a value
of 5 Amp. If a plug without a fuse is used, the fuse at the
distribution board should not be greater than 5 Amp.
Note: The severed plug must be disposed of to avoid a
possible shock hazard should it be inserted into a 13 Amp
socket elsewhere.
How to connect a plug
The wires in the mains lead are coloured with the following
code: blue = neutral (N), brown = live (L).
As these colours may not correspond with the colour
mark
ings identifying the terminals in your plug, proceed as
follows:
• Connect the blue wire to the terminal marked N or
coloured black.
• Connect the brown wire to the terminal marked L or
coloured red.
•
Do not connect either wire to the earth terminal in the
plug,
marked E (or e) or coloured green (or green and
yellow).
Before replacing the plug cover, make certain that the cord
grip is clamped over the sheath of the lead - not simply over
the two wires.
Copyright in the U.K.
Recording and playback of material may require consent.
See
Copyright Act 1956 and The Performer’s Protection Acts
1958 to 1972.

3
English....................................................4
Français.................................................26
Español.................................................48
Deutsch.................................................70
Nederlands...........................................92
EnglishFrançaisEspañolDeutschNederlands
Italiano
Italiano................................................114

GENERAL INFORMATION
4
This receiver is supplied including:
– a remote control
– 2 batteries for the remote control, size AA
– a coaxial cable for audio connection with a DVD player
– a system bus cable for the CINEMA LINK connection
– a loop antenna
– a wire antenna
– this instruction booklet
If you have stacked the components of your system, the
receiver must be on top. Place the receiver on a flat,
hard, stabile surface. Do not cover any vents and leave
50 cm above and 10 cm left and right of the receiver
free for ventilation.
For good reception the loop antenna should not be placed on
top of or beneath VCRs, CD recorders, DVD players, TVs and
other radiation sources.
All redundant packing material has been omitted. We have
done our utmost to make the packaging easily separable into
three mono materials: cardboard (box), polystyrene foam
(buffer) and polyethylene (bags, protective foam sheet).
Your set consists of materials which can be recycled if
disassembled by a specialized company. Please observe the
local regulations regarding the disposal of packing materials,
exhausted batteries and old equipment.
Manufactured under license from Dolby Laboratories.
“DOLBY”, “DOLBY DIGITAL”, “PRO LOGIC” and the double-D
symbol 2 are trademarks of Dolby Laboratories. Confidential
unpublished works. © 1992–1997 Dolby Laboratories. All
rights reserved.
“DTS” and “DTS Digital Surround” are trademarks of Digital
Theater Systems, Inc. Copyright 1996 Theater Systems, Inc.
All Rights Reserved.
Clean the receiver with a soft,
slightly dampened, lint-free cloth. Do
not use any cleaning agents as they
may have a corrosive effect.
Do not expose the receiver to
humidity, rain, sand or excessive heat
(caused by heating equipment or
direct sunlight).
Maintenance
Trademark acknowledgment
Environmental information
Setup
Scope of supply
English
General information
Scope of supply..................................................................................4
Setup..................................................................................................4
Environmental information.................................................................4
Trademark acknowledgment..............................................................4
Maintenance......................................................................................4
Controls.................................................................................................5
Remote control
Remote control usage........................................................................6
Remote control buttons.....................................................................7
Programming the universal remote control
(FR 985, FR 986, FR 995, FR 996 only)...............................................8
Connectors............................................................................................9
Connections
Analogue audio connections...........................................................10
Digital audio connections................................................................10
System control bus, CINEMA LINK .................................................11
Video connections............................................................................11
Mains ...............................................................................................12
Power handling................................................................................12
Speaker connections........................................................................12
TV as the center speaker.................................................................12
Antenna connections.......................................................................12
Headphones .....................................................................................12
System setup
Positioning of the speakers.............................................................13
Speaker setup and testing...............................................................13
Receiver adjustment........................................................................13
Display.................................................................................................14
Menus
Receiver menu...........................................................................15–16
TV menu...........................................................................................16
Activating CINEMA LINK.................................................................16
Source selection
SOURCE SELECT...............................................................................17
6 CHANNEL-DVD/SACD INPUT selection.......................................17
Reassigning a source selection.......................................................17
Using one source selection for two or more appliances................17
About 6 CHANNEL-DVD/SACD INPUT............................................17
Playback, recording
Playing a source...............................................................................18
Adjusting the sound.........................................................................18
Recording from a source..................................................................18
Recording from the digital output ...................................................18
Surround sound
About surround sound......................................................................19
Switching surround sound...............................................................19
Surround sound settings..................................................................20
Tuner
Tuning to radio stations...................................................................21
Switching FM sensitivity.................................................................21
Storing radio stations......................................................................21
Tuning to stored radio stations........................................................22
Resorting stored radio stations.......................................................22
Naming radio stations.....................................................................22
Clearing station names....................................................................22
RDS R..............................................................................................23
RDS News and Traffic Announcement............................................23
Technical data
Receiver............................................................................................24
Troubleshooting
Warning............................................................................................25
Troubleshooting................................................................................25
This set complies with the radio interference
requirements of the European Community.
As an ENERGY STAR
®
partner, Philips has determined that
this product meets the ENERGY STAR
®
guidelines for energy efficiency.

CONTROLS
5
1 POWER / STANDBY.......Switches the receiver on and off.
2 CINEMA LINK................Switches the system control bus
between the receiver and the TV
on and off.
3 ..........................................Sensor for the infrared remote
control.
4 VIRTUAL..........................Control light for virtual surround.
5 HALL................................Control light for HALL.
6 ..........................................Display
7 SOURCE SELECT............Selects the different audio and
video connectors.
Reactivates the receiver from
standby.
8 VOLUME..........................Increases and decreases the
volume level.
9 FRONT AV.......................Selects the FRONT AV / GAME
input (FR 995, FR 996 only).
0 TREBLE............................Adjusts the treble when used in
combination with VOLUME.
! BASS...............................Adjusts the bass when used in
combination with VOLUME.
@ LOUDNESS.....................Switches LOUDNESS on and off.
# NEXT 2 ...........................TUNER: searches radio stations.
MENU: switches to the next
menu level.
$ ENTER / OK.....................Confirms selected menu values.
% TUNER PRESET X MENU NAVIGATOR
TUNER: switches to the next and
previous stored radio station.
MENU: moves upwards and
downwards.
^ 1 PREV. / EXIT...............TUNER: searches radio stations.
MENU: switches to the previous
menu level.
& SETUP MENU ................Switches the menu on and off.
* SENS. ..............................Switches between low and high
tuner sensitivity.
( NEWS/TA........................Switches the RDS news and
RDS traffic announcement on
and off.
) TUNER AM/FM..............Switches the wavebands of the
tuner.
¡ RADIO TEXT...................Scrolls through the different RDS
information.
™ SURR. MODE..................Switches through the different
speaker configurations.
£ VIRTUAL MODE.............Scrolls through the different
virtual surround sound modes.
≤ SURROUND ON/OFF.....Switches between the last
selected surround mode and
stereo.
English
T
A
1 234 56 7
8
9
0
!
@#$%^&*()¡™£≤

REMOTE CONTROL
6
Open the battery compartment
of the remote control and insert
2 alkaline batteries, type AA
(R06, UM-3).
Remove batteries if they are flat
or the remote control is not going
to be used for a long time.
Batteries contain chemical substances, so they should
be disposed of properly.
The buttons on the remote control work the same way as the
corresponding ones on the receiver.
Important!
You have to press a source button for longer than 1 second to
switch the sound source on the receiver. Pressing a source
button for less than 1 second will only switch the remote
control to use the commands for the selected product.
The remote control remains tuned to the selected source until
another source button on the remote control is pressed. This
enables you to operate additional sources (i. e. winding a
tape) without changing the source on the receiver.
Remote control usage
English
DVD
2
H
AA
TV
Ç
É
MENU
OK
GUIDE
NEWS/TA
5
1
3
2
4
6
7
9
8
0
MUTE
TUNER
CD CDR/TAPE
DVD
SAT
VCR
TV
PHONO
CABLE BOX
REC CANCEL FR.D. INDEX
íë
CHANNEL/TRACK LOUDNESS
VIRTUALNIGHT
DISC
SURROUND
SURROUND
SUBW.
T-C
Å
+
-
+
-
REAR
CHANNEL
SUB WOOFER
TEST TONE
ON/
OFF
AUDIO
ON/
OFF
MODE
MODE
CINEMA GO

REMOTE CONTROL
7
H MUTE .....................Mutes the sound of the receiver in all
modes, except TV.
Mutes the sound of your Philips TV set
if your remote control is in TV mode.
2 ................................Switches the source selected on your
remote control (e.g. VCR, TV) to standby.
When pressed longer than 2 seconds,
the receiver switches to standby.
PHONO, TUNER, CD,
CDR/TAPE, TV,
VCR, SAT, DVD..............Switches the remote control to the
commands of the different products.
Selects the sources if pressed longer
than 1 second. SAT only works with
digital satellite receivers.
Reactivates the receiver from standby.
1–0................................Keys in numbers for tracks, stations or
frequencies. Numbers consisting of
two figures must be keyed in within
2 seconds.
CINEMA GO..........
Activates CINEMA LINK on the TV.
CABLE BOX...................Without function.
MENU GUIDE ..............TUNER: Switches the receiver menu
on and off.
DVD, TV: Switches the DVD/TV menu
on and off.
OK.................................Confirms menu options.
Arrow buttons..............TUNER: Moves in the menus.
Right/left arrows are tuning up/down.
CD, CDR: Left/right arrows are
searching backwards/forwards,
up/down arrows are selecting the
next/previous track.
+A...........................Increases the receiver volume.
-A...........................Decreases the receiver volume.
i NEWS/TA.................Switches the functions NEWS and
TRAFFIC ANNOUNCEMENT on and off.
TV: Switches teletext on and off.
SAT: Switches the information text on
and off.
ÉATV......................Increases the TV volume.
CD, CDR, VCR, DVD: Starts playback.
ÇATV......................Decreases the TV volume.
CD, CDR, VCR, DVD: Stops playback.
í
CHANNEL/TRACK
...Selects the previous preset tuner
station.
VCR: Rewinds the tape.
CD, CDR, DVD: Selects the previous
track.
TV: Selects the previous channel.
ë
CHANNEL/TRACK
...Selects the next preset tuner station.
VCR: Fast forwards the tape.
CD, CDR, DVD: Selects the next track.
TV: Selects the next channel.
LOUDNESS...................Switches LOUDNESS on and off.
SUBW. ON/OFF ............Switches the subwoofer on and off.
REC, DVD AUDIO..........CDR, VCR: Starts recording.
DVD: Switches audio tracks.
CANCEL, DVD ...........CD, CDR, SAT, VCR: Clears a
program, cancels selections.
DVD: Switches the view angle.
FR.D., DVD Å .............TUNER: Switches to FREQUENCY
DIRECT.
CD, CDR, VCR, DVD: Pauses playback.
INDEX, DVD T-C............VCR: Switches the index search on
and off.
SAT: Switches the themes on and off.
DVD: Switches between title and
chapter.
DISC..............................CD-, CDR-, DVD-Changers:
Switches to the next disc.
NIGHT...........................Switches NIGHT MODE on and off.
VIRTUAL MODE............Scrolls through the different virtual
surround sound modes.
SURROUND ON/OFF....
Switches SURROUND SOUND on and off.
+/- SUBWOOFER...Increases/decreases the subwoofer
volume.
+/- REAR...............Increases/decreases the volume of the
rear speakers. While test tone is on,
the volume of the speakers you are
hearing can be increased/decreased
with these buttons.
SURROUND MODE.......Scrolls through the different surround
modes.
TEST TONE...................Switches the test tone on and off.
While test tone is on, the volume of
the speakers you are hearing can be
increased/decreased with
+/- REAR.
Remote control buttons
English

REMOTE CONTROL
8
You can identify the universal remote control by the
inscription Multibrand/Universal.
The universal remote control must be programmed to use the
codes for your appliances of different brands. This is done by
keying in a 4-digit code or by scanning the codes until the
correct one is found. We recommend to using the 4-digit
code. This method is faster and more reliable. The code
scanning method should only be used if you cannot find the
code for one of your appliances. The code table can be found
at the end of the booklet.
Important!
The buttons of the remote control must be used for
programming, not the buttons of the receiver or other
appliances.
Programming with the 4-digit code
1 Keep the source button for the appliance which should be
controlled and2 pressed for 3 seconds.
2 Key in the 4-digit code for the appliance (codetable at the
end of the booklet).
Notes: – If more than 4 digits are entered, the remote
control will recognize only the ones keyed in first.
– If you do not key in a code within 30 seconds the
remote control will switch off the programming
function without changing the code.
– To program a new appliance, simply overwrite the
old code by entering a new one.
Scanning the codetable
1 Switch on the appliance which should be controlled.
2 Keep the source button for the appliance which should be
controlled and2 pressed for 3 seconds.
3 Press and release 2 again.
yThe remote control sends the codes for channel up or
standby (depending on the selected source) for one
brand after the other.
4 As soon as the appliance reacts – switches to the next
channel or to standby – press 2 to confirm the code.
yThe identified code will be used.
• If the set does not react within 2 minutes, the code for this
appliance is not stored in the remote control. The code of
the remote control will remain unchanged.
Note: When taking out the batteries of the remote control for
more than 1 minute the codes must be reprogrammed.
Once you have found and tested the codes for your various
appliances, you may want to write them down here.
PHONO..........................................
TUNER...........................................
CD .................................................
CDR/TAPE .....................................
TV..................................................
VCR ...............................................
SAT................................................
DVD...............................................
Resetting the remote control
1 Keep one of the source buttons and 2 pressed for
3 seconds.
2 Key in the 3-digit code 981.
yThe remote control is now reset to all its original Philips
codes.
Programming the universal remote control
(FR 985, FR 986, FR 995, FR 996 only)
English

CONNECTORS
9
Connectors Connectors name Connect to:
6.3 mm headphone socket 1 PHONES A headphone with a 6.3 mm plug.
at the front
Audio and video inputs 2 FRONT AV / GAME Left and right audio out sockets of appliances such as video cameras
at the front and game consoles.
(FR 995, FR 996 only)
3 FRONT AV / GAME
Video out sockets of appliances such as video cameras and game consoles.
FRONT SPEAKERS 4 R, L Right and left front speaker.
5 CENTER Center speaker.
SURROUND SPEAKERS 6 R, L Right and left surround speaker.
AUDIO IN/OUT 8 CDR/TAPE OUT Input of a CD recorder or a tape deck.
9 CDR/TAPE IN Output of a CD recorder or a tape deck.
0 CD IN Output of a CD player.
! SAT IN Output of a satellite system.
@ VCR OUT Input of a video recorder.
# VCR IN Output of a video recorder.
$ TV IN Output of a TV.
% PHONO IN Output of a turntable with MM coil.
¡ PHONO GND f Ground cable of a turntable.
6 CHANNEL / DVD INPUT ^
6CHANNEL/ DVDINPUT
6 channel output of appliances such as DVD or laserdisc players.
DIGITAL AUDIO IN/OUT & COAX 1 IN Coaxial output of digital appliances (default input for source DVD).
* COAX 2 IN Coaxial output of digital appliances.
( COAX OUT
Coaxial input of digital appliances such as CD recorders or MD recorders.
) OPTICAL IN Optical output of digital appliances such as DVD players, CD players,
CD recorders or MD players (FR 984, FR 985, FR 986, FR 994 only).
) OPTICAL 1 (2) IN Optical output of digital appliances such as DVD players, CD players,
CD recorders or MD players (FR 995, FR 996 only).
VIDEO IN/OUT ™ S-VIDEO S-Video inputs/outputs of video appliances for better video quality
(FR 994, FR 995, FR 996 only).
£ DVD IN Output of a DVD player.
≤ MON OUT Input of a monitor (e. g. the TV).
§ VCR IN Output of a video recorder.
≥ VCR OUT Input of a video recorder (for recording).
ª SAT IN Output of a satellite system.
Antenna connectors ∞
AM LOOP
Frame antenna supplied.
• FM 75 Ω Wire antenna supplied or exterior antenna.
Preamplified outputs 7 CENTER PRE-OUT Input of a TV when it is used as the center speaker (only possible
when the CINEMA LINK system bus is connected).
º
SUBWOOFER PRE-OUT
Input of a powered subwoofer.
System control bus ⁄ CINEMA LINK System control bus sockets of a Philips TV with CINEMA LINK.
Mains outlets ¤ AC OUTLET Supplies same voltage as mains. Up to 100 W total permitted load.
(not on all versions)
Mains lead ‹ After all other connections have been made, connect the
mains lead to the wall socket.
English
ANTENNA
FM 75 Ω
A
M
L
O
O
P
VIDEO IN/OUT
C
A
U
TIO
N
R
IS
K
O
F
E
L
E
C
T
R
IC
S
H
O
C
K
D
O
N
O
T
O
P
E
N
AVIS
RISQUE DE CHOC ELECTRIQUE
NE P
AS OUVRIR
D
e
s
i
g
n
e
d
a
n
d
d
e
v
e
l
o
p
e
d
b
y
P
h
i
l
i
p
s
i
nt
h
e
E
u
r
o
p
e
a
n
C
o
m
m
u
n
i
t
y
.
M
a
n
u
f
a
c
t
u
r
e
d
u
n
d
e
r
l
i
c
e
n
s
e
f
r
o
m
D
o
l
b
y
L
a
b
o
r
a
t
o
r
i
e
s
.
”
D
O
L
B
Y
“
,
”
D
O
L
B
Y
D
I
G
I
T
A
L
“
,
”
P
R
O
L
O
G
I
C
“
a
n
d
t
h
e
d
o
u
b
l
e
-
D
S
y
m
b
o
l
a
r
e
t
r
a
d
e
m
a
r
k
s
o
f
D
o
l
b
y
L
a
b
o
r
a
t
o
r
i
e
s
.
C
o
n
f
i
d
e
n
t
i
a
l
U
n
p
u
b
l
i
s
h
e
d
W
o
r
k
s
.
©
1
9
9
2
–
1
9
9
7
D
o
l
b
y
L
a
b
o
r
a
t
o
r
i
e
s
.
A
l
l
r
i
g
h
t
s
r
e
s
e
r
v
e
d
.
M
a
n
u
f
a
c
t
u
r
e
d
u
n
d
e
r
l
i
c
e
n
s
e
f
r
o
m
D
i
g
i
t
a
l
T
h
e
a
t
e
r
S
y
s
t
e
m
s
.
I
n
c
.
U
S
P
a
t
.
N
o
.
5
,
4
5
1
,
9
4
2
a
n
d
o
t
h
e
r
w
o
r
l
d
-
w
i
d
e
p
a
t
e
n
t
s
i
s
s
u
e
d
a
n
d
p
e
n
d
i
n
g
.
”
D
T
S
“
a
n
d
”
D
T
S
D
i
g
i
t
a
l
S
u
r
r
o
u
n
d
“
a
r
e
t
r
a
d
e
m
a
r
k
s
o
f
D
i
g
i
t
a
l
T
h
e
a
t
e
r
S
y
s
t
e
m
s
,
I
n
c
.
C
o
p
y
r
i
g
h
t
1
9
9
6
D
i
g
i
t
a
l
T
h
e
a
t
e
r
S
y
s
t
e
m
s
,
I
n
c
.
A
l
l
R
i
g
h
t
s
R
e
s
e
r
v
e
d
.
SURROUND
SPEAKERS
L
E
A
C
H
S
P
E
A
K
E
R
≥ 6
Ω
R
R
L
F
R
O
N
T
S
P
E
A
K
E
R
S
E
A
C
H
S
P
E
A
K
E
R
≥
6
Ω
PHONO GND.
C
E
N
T
E
R
IN
PLA
Y
IN
IN
OUT
REC
IN
PLA
Y
OUT
REC
C
O
A
X
O
U
T
D
IG
I
T
A
L
A
U
D
IO
I
N
/
O
U
T
O
P
T
IC
A
L
1
IN
C
O
A
X
2
IN
PHONO
VCRTV
SA
T
CD
CDR/T
APE
AUDIO IN/OUT
IN
IN
P
R
E
-O
U
T
C
E
N
T
ER
OUT
REC
IN
PLA
Y
DVD
IN
MON
OUT
VCR
SAT
IN
S
U
B
W
O
O
F
E
R
P
R
E
-
O
U
T
C
IN
E
M
A
L
IN
K
ANTENNA
A
M
L
O
O
P
O
P
T
IC
A
L
2
IN
CENTER
SUBW
.
6 CHANNEL/
DVD INPUT
C
O
A
X
1
IN
L
R
S-VIDEO
DVD
MON
VCR
SAT
VCR
OUT
IN
TO
T
AL
100
W
M
A
X. SW
ITC
H
ED
A
C O
U
TL
E
T
4567890!@#$
¤‹
⁄
%^
&
*
(
)
¡
™£≤∞§≥•ªº
12
3

CONNECTIONS
10
English
Digital audio connections
Analogue audio connections
DIGITAL
AUDIO
IN/OUT
PHONO
VCRTV SAT CD CDR/TAPE
AUDIO IN/OUT
IN IN
IN
PLAY
OUT
REC
IN IN
IN
PLAY
OUT
REC
PRE-OUT
CENTER
CAUTION
RISK OF ELECTRIC SHOCK
DO NOT OPEN
AVIS
RISQUE DE CHOC ELECTRIQUE
NE PAS OUVRIR
PHONO GND.
SURROUND
SPEAKERS
R
L
EACH SPEAKER ≥ 6 Ω
CENTER
R L
FRONT
SPEAKERS
EACH SPEAKER ≥ 6 Ω
AM LOOP
DVD
IN
MON
OUT
VCR
SAT
IN
PRE-OUT
CINEMA
LINK
SUBWOOFER
IN
PLAY
OUT
REC
OPTICAL 1
IN
COAX
OUT
COAX 2
IN
R
L
SURR.
CENTER SUBW.
FRONT
6 CHANNEL /
DVD INPUT
OPTICAL 2
IN
COAX 1
IN
Designed and developed by Philips in the European
Community.
Manufactured under license from Dolby Laboratories.
”DOLBY“, ”DOLBY DIGITAL“, ”PRO LOGIC“ and the
double-D Symbol are trademarks of Dolby
Laboratories. Confidential Unpublished Works.
©1992–1997 Dolby Laboratories. All rights reserved.
Manufactured under license from Digital Theater
Systems. Inc. US Pat. No. 5,451,942 and other world-
wide patents issued and pending. ”DTS“ and ”DTS
Digital Surround“ are trademarks of Digital Theater
Systems, Inc. Copyright 1996 Digital Theater Systems,
Inc. All Rights Reserved.
2
VIDEO IN/OUT
S-VIDEO
DVD MON SAT
VCRVCR
IN OUT
ANTENNA
FM 75 Ω
DVD PLAYER
CD RECORDER
CD PLAYER
There are analogue and digital connectors available on some
appliances. If possible use the digital connection; usually this
will result in better sound quality. See “Reassigning a source
selection” on how to use the digital connectors of the receiver.
Because of a different kind of output signal, the use of Dolby
Digital Laserdisc requires an optional AC-3 RF demodulator.
DTS Digital Surround
TM
is a discrete 5.1-channel digital audio
format available on CD, LD, and DVD software which consequently
cannot be decoded and played back inside most CD, LD, or DVD
players. For this reason, when DTS-encoded software is played
back through the analog outputs of the CD, LD, or DVD player,
excessive noise will be exhibited. To avoid possible damage to the
audio system, proper precautions should be taken by the customer
if the analog outputs are connected directly to the receiver.
To enjoy DTS Digital Surround
TM
playback, a DTS-compatible player
has to be connected to one of the digital inputs of the receiver.
DIGITAL
AUDIO
IN/OUT
PHONO VCRTV SAT CD CDR/TAPE
AUDIO IN/OUT
IN
IN
IN
PLAY
OUT
REC
IN IN
IN
PLAY
OUT
REC
PRE-OUT
CENTER
CAUTION
RISK OF ELECTRIC SHOCK
DO NOT OPEN
AVIS
RISQUE DE CHOC ELECTRIQUE
NE PAS OUVRIR
Designed and developed by Philips in the European
Community.
Manufactured under license from DolbyLaboratories.
”DOLBY“, ” DOLBY DIGITAL“, ” PRO LOGIC“ and the
double-D Symbol are trademarks of Dolby
Laboratories. Confidential Unpublished Works.
©1992–1997 Dolby Laboratories. All rights reserved.
Manufactured under license from Digital Theater
Systems. Inc. US Pat. No. 5,451,942 and other world-
wide patents issued and pending. ” DTS“ and ”DTS
Digital Surround“ are trademarks of Digital Theater
Systems, Inc. Copyright 1996 Digital Theater Systems,
Inc. All Rights Reserved.
PHONO GND.
SURROUND
SPEAKERS
R
L
EACH SPEAKER ≥ 6 Ω
CENTER
R L
FRONT
SPEAKERS
EACH SPEAKER ≥ 6 Ω
AM LOOP
VIDEO IN/OUT
DVD
IN
MON
OUT
VCR
SAT
IN
PRE-OUT
CINEMA
LINK
SUBWOOFER
S-VIDEO
DVD MON SAT
VCR
VCR
IN
PLAY
OUT
REC
IN OUT
OPTICAL 1
IN
COAX
OUT
COAX 2
IN
R
L
SURR.
CENTER SUBW.
FRONT
6 CHANNEL /
DVD INPUT
OPTICAL 2
IN
COAX 1
IN
FM 75 Ω
ANTENNA
AUDIO
OUT
TURNTABLE
AUDIO IN
AUDIO OUT
IN
OUT
VCR
SAT RECEIVER
CD RECORDER
CD PLAYER
MONITOR / TV
POWERED
SUBWOOFER

CONNECTIONS
11
English
System control bus, CINEMA LINK
Video connections
If the receiver and your Philips TV (or even better in addition
a Philips VCR or DVD player) with Cinemalink are connected
with the CINEMA LINK system bus control, some extra
system benefits are offered:
– Upon starting a source, the system will automatically
switch to that input.
– You may control the system via the TV screen. Depending
on the language of the TV, this can be done in your
preferred language.
– The TV can function as the center speaker of your system,
making a separate center speaker unnecessary. (The
cable A has to be purchased separately.)
– By pressing the standby button on the remote control, you
can switch the complete system to standby.
DIGITAL
AUDIO
IN/OUT
PHONO
VCRTV SAT CD
CDR/TAPE
AUDIO IN/OUT
IN IN
IN
PLAY
OUT
REC
IN IN
IN
PLAY
OUT
REC
PRE-OUT
CENTER
CAUTION
RISK OF ELECTRIC SHOCK
DO NOT OPEN
AVIS
RISQUE DE CHOC ELECTRIQUE
NE PAS OUVRIR
Designed and developed by Philips in the European
Community.
Manufactured under license from DolbyLaboratories.
”DOLBY“, ” DOLBY DIGITAL“, ” PRO LOGIC“ and the
double-D Symbol are trademarks of Dolby
Laboratories. Confidential Unpublished Works.
©1992–1997 Dolby Laboratories. All rights reserved.
Manufactured under license from Digital Theater
Systems. Inc. US Pat. No. 5,451,942 and other world-
wide patents issued and pending. ” DTS“ and ”DTS
Digital Surround“ are trademarks of Digital Theater
Systems, Inc. Copyright 1996 Digital Theater Systems,
Inc. All Rights Reserved.
PHONO GND.
SURROUND
SPEAKERS
R
L
EACH SPEAKER ≥ 6 Ω
CENTER
R L
FRONT
SPEAKERS
EACH SPEAKER ≥ 6 Ω
AM LOOP
VIDEO IN/OUT
DVD
IN
MON
OUT
VCR
SAT
IN
PRE-OUT
CINEMA
LINK
SUBWOOFER
S-VIDEO
DVD MON SAT
VCRVCR
IN
PLAY
OUT
REC
IN OUT
OPTICAL 1
IN
COAX
OUT
COAX 2
IN
R
L
SURR.
CENTER SUBW.
FRONT
6 CHANNEL /
DVD INPUT
OPTICAL 2
IN
COAX 1
IN
FM 75 Ω
ANTENNA
TO TV IN
TO VCR IN
TV
AUX
EXT 1 EXT 2 EXT 3
DVD PLAYER
VCR
TV
DIGIT
AL
OUT
CINEMA LINK
A
optional
(TV = CENTER)
DIGITAL
AUDIO
IN/OUT
PHONO VCRTV SAT CD CDR/TAPE
AUDIO IN/OUT
IN IN
IN
PLAY
OUT
REC
IN IN
IN
PLAY
OUT
REC
PRE-OUT
CENTER
CAUTION
RISK OF ELECTRIC SHOCK
DO NOT OPEN
AVIS
RISQUE DE CHOC ELECTRIQUE
NE PAS OUVRIR
Designed and developed by Philips in the European
Community.
Manufactured under license from DolbyLaboratories.
”DOLBY“, ”DOLBY DIGITAL“, ”PRO LOGIC“ and the
double-D Symbol are trademarks of Dolby
Laboratories. Confidential Unpublished Works.
©1992–1997 Dolby Laboratories. All rights reserved.
Manufactured under license from Digital Theater
Systems. Inc. US Pat. No. 5,451,942 and other world-
wide patents issued and pending. ”DTS“ and ”DTS
Digital Surround“ are trademarks of Digital Theater
Systems, Inc. Copyright 1996 Digital Theater Systems,
Inc. All Rights Reserved.
PHONO GND.
SURROUND
SPEAKERS
R
L
EACH SPEAKER ≥ 6 Ω
CENTER
R L
FRONT
SPEAKERS
EACH SPEAKER ≥ 6 Ω
AM LOOP
VIDEO IN/OUT
DVD
IN
MON
OUT
VCR
SAT
IN
PRE-OUT
CINEMA
LINK
SUBWOOFER
S-VIDEO
DVD MON SAT
VCR
VCR
IN
PLAY
OUT
REC
IN OUT
OPTICAL 1
IN
COAX
OUT
COAX 2
IN
R
L
SURR.
CENTER SUBW.
FRONT
6 CHANNEL /
DVD INPUT
OPTICAL 2
IN
COAX 1
IN
FM 75 Ω
ANTENNA
DVD PLAYER
MONITOR / TV
VIDEO IN
VIDEO OUT
VCR
SAT RECEIVER

CONNECTIONS
12
The type plate is located on the rear of the receiver.
1 Check whether the mains voltage as shown on the type
plate corresponds to your local mains voltage. If it does not,
consult your dealer or service organization.
2 Connect the mains cable to the wall socket.
To disconnect the set from the mains completely, remove the
mains plug from the wall socket.
For users in the U. K.: please follow the instructions on
page 2.
If the receiver is used at very high power it can produce
distortions which may seriously damage your speakers. If
distortions occur, reduce the volume and the tone controls to
a level where the sound is acceptable again.
To avoid overheating of the set a safety circuit has
been built in. Therefore your set may disconnect under
extreme conditions. If this happens, switch the set off
and let it cool down before reusing it. After having let
the set cool down switch the set on again and select
the desired source by turning SOURCE SELECT.
Some of the speaker connections on the receiver are screw
connectors and some are click-fit connectors. Use them as
shown below.
1 Always connect the coloured (or marked) wire to the
coloured terminal and the black (or unmarked) wire to the
black terminal.
2 Connect:
– Left front speaker to L (red and black)
– Right front speaker to R (red and black)
– Center speaker to CENTER (blue and black)
– Left surround speaker to SURROUND L (grey and black)
– Right surround speaker to SURROUND R (grey and black)
You may use your Philips TV with CINEMA LINK as the center
speaker. For TVs with a scart connector an additional audio
cinch-to-scart cable is needed. For TV’s with cinch connectors
additional cinch cables are needed. These cables must be
connected to the blue CENTER PRE-OUT connector on the
back. Look into the instruction manual of your TV on how to
use it as the center speaker.
AM (MW) antenna
The loop antenna supplied is for indoor use only. Position the
antenna as far away as possible from the receiver, the TV, the
cables, a DVD player, a VCR and other radiation sources.
1 Fit the plug of the frame antenna to AM LOOP as shown
below.
2 Turn the antenna for optimum reception.
FM antenna
The wire antenna supplied can only be used to receive nearby
stations. For better reception we recommend using a cable
antenna system or an outdoor antenna.
1 Fit the supplied wire antenna to FM 75 Ω as shown below.
2 Move the antenna in different positions for optimum
reception.
• If you are using a cable antenna system or an outdoor
antenna, fit the antenna plug to FM 75 Ω instead of the
wire antenna.
Connecting headphones to PHONES will switch off the
speakers. The receiver switches to STEREO and surround
sound will be reduced to a stereo signal which is reproducible
by standard headphones.
Disconnecting the headphones switches on the speakers
again. If you wish to enjoy surround sound again, switch the
receiver back to surround sound.
Headphones
FM 75 Ω
FM 75 Ω
AM
LO
O
P
ANTENNA
Antenna connections
TV as the center speaker
8 mm
1
2
3
1
2
3
7 mm
Speaker connections
Power handling
Mains
English

SYSTEM SETUP
13
General hints for positioning
Avoid positioning the speakers in a corner or on the floor as
this will boost the bass tones too much. Placing the speakers
behind curtains, furniture, etc. will reduce the treble
response. The listener should always be able to ”see” the
speakers.
Each room has different acoustic characteristics and the
positioning possibilities are often limited. You can find the
best position for your speakers by referring to the picture
above.
As a minimum we recommend 5 speakers (2 front, a center,
2 surround) for good surround sound. It is possible to
reproduce some kind of surround sound with fewer speakers.
This is done by redirecting the signals which are foreseen for
the missing speakers to the existing ones. See “Menus” on
how to set up the receiver correctly for the number and size
of the speakers used.
Positioning the front speakers
The front speakers should be placed right and left in front of
the listening position like usual stereo speakers.
Positioning the center speaker
The center speaker should be placed in the center between
the two front speakers, e. g. underneath or on top of the TV.
The best height for the center speaker is the height of the
listener’s ears (while seated).
Positioning the surround speakers
The surround speakers should face each other and be in line
with, or slightly behind the listener.
Positioning the subwoofer
A subwoofer can be used to enhance the bass performance of
your system dramatically. The subwoofer can be positioned
anywhere in the room, because it is not possible to locate the
source of deep tones. Nevertheless, you should not place the
subwoofer in the middle of a room, since the bass could be
severely weakened. Do not place any object on the
subwoofer.
The relative volume of the speakers must be adjusted for
optimal surround sound. You should be at your usual listening
position when adjusting the speaker volume. See “Receiver
menu” on how to set up the receiver for the used speakers.
Ideally, the volume in the listening position should be the
same from all speakers.
1 Press POWER / STANDBY to switch on the receiver.
2 Press TEST TONE on the remote control.
yA test tone coming from the different speakers, except
the subwoofer, is heard.
3 Press +/- REAR on the remote control to
increase/decrease the volume of the actual speaker. The
best result is achieved when all speakers have equal
volume in the listening position.
4 Press TEST TONE on the remote control.
yThe test tone stops.
Note: If you are not completely satisfied with the volume
settings, we recommend making minor adjustments to
them during surround sound playback.
Once the number and position of loudspeakers has been
fixed, you can adjust the initial receiver settings for optimal
surround sound with the actual setup:
1 Set which speakers have been connected to the receiver
(see “Menu structure/* SPEAKR SETUP”).
Note:
The initial setting of your receiver is:
two front speakers left and right: present (cannot be altered)
center speaker: present
two rear speakers: present
subwoofer: present.
2
Select the size of the speakers (SMALL or LARGE)
(see “Menu structure/* SPEAKR SIZES”).
Select SMALL if your speaker is able to reproduce low notes
down to at least 80–100 Hz. Select LARGE if your speaker is
able to reproduce low notes down to at least 50 Hz. (As a rule of
thumb, a LARGE speaker has a cone diameter of at least 12 cms
(5 inches).) See the specification sheets of your loudspeakers.
Note: For FR 985, FR 986, FR 995, FR 996 the initial setting is:
all speakers to LARGE.
For FR 984, FR 994 the initial setting is:
all speakers to SMALL.
3 Set the distance from the speakers to the listener’s position
(see “Menu structure/* SPK DISTANCE”).
Receiver adjustment
Speaker setup and testing
Positioning of the speakers
English
SUBWOOFER
SURROUND
(REAR)
LEFT
LEFT
RIGHT
CENTER
FRONT
RIGHT
FRONT
SURROUND
(REAR)

DISPLAY
14
The display of the receiver is divided into 4 sections, which
are to be used for the following:
Speaker diagram
A rectangle with a letter in it shows that a speaker has been
selected in the setup menu. However, the subwoofer indicator
will only light when a subwoofer signal is available. If only a
letter is shown, this speaker is not used and its sound is
reproduced by the other speakers.
.......virtual surround sound
SURROUND.................surround sound is reproduced
DIGITAL SURROUND ....digital surround sound is reproduced
L, R ...........................front left and right speaker
C...............................center speaker
SL, SR .......................surround speakers
SW............................subwoofer
Menu indication
These signs show you if the menu is on or off and indicate in
which direction you may move.
MMEENNUU .......................menu is on
1..............................You may move backwards to the previous
menu topic using 1 PREV. / EXIT (“left”
key on the remote control).
3 .............................You may move up in an option list using
X MENU NAVIGATOR (“up” key on the
remote control).
4 .............................You may move down in an option list
using X MENU NAVIGATOR (“down” key
on the remote control).
2..............................You may move forward to the next menu
topic using NEXT 2 (“right” key on the
remote control).
OOKK.............................You may confirm the displayed value.
Status lights
Signs show you various settings and information about the
status of the receiver.
PRESET......................Tuner is tuned to a preset radio station.
SENS HI.....................Tuner is switched to high sensitivity.
SENS LO..................Tuner is switched to low sensitivity.
CCIINNEEMMAA LLIINNKK OONN ......CINEMA LINK is active
STEREO......................An FM station is being received in stereo.
R.............................An RDS station is being received.
EON...........................An RDS station with EON is being
received.
HALL..........................HALL effect is on.
TA .............................RDS traffic announcement is on
NEWS........................RDS news announcement is on
ANA ..........................Analogue input is being used for the
playing source.
NNIIGGHHTT .......................NIGHTMODE is on.
COAX
1
......................Coaxial digital input COAX 1 is being
used for the playing source.
COAX
2
.....................Coaxial digital input COAX 2 is being
used for the playing source.
DDOOWWNNMMIIXX.................Incoming multi channel signals are being
reduced to fewer output signals
(depending on the number of speakers).
OPT...........................Optical digital input OPTICAL IN is being
used for the playing source
(FR 984, FR 985, FR 986, FR 994 only).
OPT
1
........................Optical digital input OPTICAL 1 IN is
being used for the playing source
(FR 995, FR 996 only).
OPT 2 .......................Optical digital input OPTICAL 2 IN is
being used for the playing source
(FR 995, FR 996 only).
LOUDNESS .................LOUDNESS is switched on.
Information area
This area is used for feedback of the receiver, tuner
frequencies, menu options, values and scrolling text
messages.
AA
TV
Ç
É
MENU
OK
GUIDE
NEWS/TA
0
Display
English

MENUS
15
The receiver is equipped with a menu system. The menu is
used for the setup of the receiver. The different menu options
are related to each other in a logical way. Let’s assume you
have no center speaker connected, and therefore switched
CENTER SPEAKR to NO. If you try to use VOL CENTER,
a message will be scrolled that this is not possible
(INSTALL CENTER SPEAKER).
The menu always works the same way. Arrows in the display
show you the possible moving directions.
1 Press SETUP MENU.
yMENU, and * EFFECTS is displayed.
• You can exit the menu at any time by pressing
SETUP MENU.
2 Turn X MENU NAVIGATOR until the desired option (or a
value) is displayed.
3 Press NEXT 2 to choose the displayed option (or
ENTER / OK to confirm a value).
• You can leave any option (values remain unchanged) by
pressing 1 PREV. / EXIT.
Menu structure
* EFFECTS
Switches sound effects.
VIRT SURR
virtual surround: 0…100 %
* VOL BALANCE
Adjusts the relative volume balance between the
connected speakers.
TEST TONE
Test tone: on/off
VOL FRONT-L
Volume front left speaker: –50…+50
VOL FRONT-R
Volume front right speaker: –50…+50
VOL CENTER
Volume center speaker: –50…+50
VOL REAR-L
Volume rear left speaker: –50…+50
VOL REAR-R
Volume rear right speaker: –50…+50
VOL SUBWOOFER
Volume subwoofer: –50…+50
Note: When using the 6 CHANNEL / DVD INPUT the values
below cannot be changed.
* SPEAKR SETUP
Selects the used speakers.
SUBW PRESENT
Subwoofer present: yes/no
CENTER SPEAKR
Center speaker present: yes/no
REAR SPEAKER
Rear speakers present: yes/no
* SPEAKR SIZES
Chooses the speaker sizes of the used speakers, for
optimal sound reproduction. LARGE indicates a speaker
which can reproduce frequencies lower than 50 Hz. If
SUBW PRESENT is set to NO, FRONT SIZE can only
be set to LARGE. If FRONT SIZE is set to SMALL,
CENTER SIZE can only be set to SMALL and
consequently a subwoofer must be connected.
FRONT SIZE
Left and right front speakers: small/large
CENTER SIZE
Center speaker: small/large
REAR SIZE
Rear speakers: small/large
* SPK DISTANCE
Distance between the usual listening position and the
speakers. This defines the delay time for the surround sound.
DISTANCE L/R
Distance to front speakers: 1…10 m
DISTANCE CNTR
Distance to center speaker: 1…10 m
DISTANCE REAR
Distance to rear speakers: 1…10 m
Receiver menu
English

MENUS
16
* SELECT INPUT
Assigns the audio input connectors to the different source
selections chosen with SOURCE SELECT (see “SOURCE
SELECTION” for details).
COAX1
Digital coaxial input 1, COAX 1 IN
COAX2
Digital coaxial input 2, COAX 2 IN
OPT (FR 984, FR 985, FR 986, FR 994 only)
Digital optical input, OPTICAL IN
OPT 1 (FR 995, FR 996 only)
Digital optical input, OPTICAL 1 IN
OPT 2 (FR 995, FR 996 only)
Digital optical input, OPTICAL 2 IN
SAT IN
Analogue audio input SAT IN
VCR IN
Analogue audio input VCR IN
TV IN
Analogue audio input TV IN
CDR IN
Analogue audio input CDR IN
CD IN
Analogue audio input CD IN
6 CH IN
Analogue audio input 6 CHANNEL / DVD INPUT
* TUNER
Setup for preset radio stations (see “TUNER” for details).
AUTO INSTALL
Stores radio stations automatically
MAN INSTALL
Stores radio stations manually
GIVE NAME
Allows to assign names to stored radio stations
RESHUFFLE
Resorts stored radio stations
If the receiver is connected to a Philips CINEMA LINK TV via
the CINEMA LINK system control bus sockets (see
“CONNECTIONS”), you may use the TV to set up the system.
An option called RECEIVER will be added to the TV menu.
If CINEMA LINKis on, adjustments on the receiver will be
shown on the TV screen for a few seconds. Consult the
instruction booklet of your TV on how to use the TV menu.
The options offered may vary by TV model.
Switching the connection
• Press CINEMA LINK to switch the connection between the
receiver and the TV either on or off.
yIf the connection is switched on, CINEMA LINK ON is
displayed.
Note: We recommend switching CINEMA LINK off during
recording. This avoids unwanted interruptions due to
switching TV functions.
If CINEMA LINK is switched on and the TV menu is active,
TV MENU is displayed and the menu and sound functions on
the receiver are locked.
• Press
CINEMA GO on the remote control.
y
The TV sends a play command to the CINEMA LINK DVD
player, if present. The DVD player will start playing and the
receiver automatically switches to the best CINEMA LINK
sound.
•
If no DVD player is connected or if the DVD player has no disc
loaded, the TV will send a play command to the CINEMA LINK
video recorder, if present.
y
The video recorder will start playing and the audio receiver
selects the best CINEMA LINK sound.
•
If no video recorder source is connected or tape is loaded, the
TV will select the last watched TV channel.
Activating CINEMA LINK
TV menu
English

SOURCE SELECTION
17
When selecting a source by turning SOURCE SELECT, the
audio and video inputs with the corresponding name are
activated. The incoming signal is reproduced by all audio and
– if the source includes a video signal – video outputs of the
receiver. It is possible to reassign a source selection to other
than these standard inputs.
Source selected........Connectors used
DVD...............................COAX 1 digital audio input and
DVD IN video input
PHONO..........................PHONO IN audio input
TUNER..........................The tuner part of the receiver is used,
all inputs are switched off.
CD.................................CD IN audio input
CDR/TAPE.....................CDR/TAPE IN audio input
TV..................................TV IN audio input and
no video input
VCR...............................VCR IN audio input and
VCR IN video input
SAT ...............................SAT IN audio input and
SAT IN video input
The 6 CHANNEL / DVD INPUT connectors can be assigned to
any of the available sources (excluding TUNER and PHONO).
The assignment can be done via the * SELECT INPUT
option in the menu. See below for more details.
If a source is selected with SOURCE SELECTthe standard
audio input is used. To change this, the source selection must
be reassigned to another audio input.
Example: Reassigning CD from the analogue CD IN audio
input to the digital COAX 2 IN audio input.
1 Choose * SELECT INPUT from the menu and press
NEXT 2.
2 Turn SOURCE SELECT to select the source which should be
reassigned (e. g. CD).
yThe name of the source is displayed and the light of the
source flashes.
3 Turn X MENU NAVIGATOR to select the input connectors
which should be used (e. g. CD -> COAX2).
4 Press ENTER / OK to confirm your selection.
ySTORED is displayed briefly.
5 This source selection is now using the chosen audio input
(e. g. CD uses the COAX 2 IN input connectors, COAX 2
lights when switching to CD).
You may assign more than one source to a source selection.
This can be useful when products are connected one after the
other in a chain.
Example: A VCR is connected to the TV but only the TV is
connected to the receiver. Both SOURCE SELECT
settings, TV as well as VCR, have to use the TV
input connectors.
1 Choose * SELECT INPUT from the menu and press
NEXT 2.
2 Turn SOURCE SELECT to select the source which should be
reassigned (e. g. VCR).
yThe name of the source is displayed and the light of the
source flashes.
3 Turn X MENU NAVIGATOR to select the input connectors
which should be used (e. g. VCR -> TV IN).
4 Press ENTER / OK to confirm your selection.
ySTORED is displayed briefly.
5
This source selection is now using the chosen audio input (e. g.
VCR uses the TV IN input connectors, VCR <TV IN> is
displayed briefly when switching to VCR).
The 6 CHANNEL / DVD INPUT can be used to connect a
device with a built-in multichannel decoder (e.g. Dolby Digital,
DTS, etc.) and 6-channel output connector, i. e. a high end
DVD/SACD player.
When using the 6 CHANNEL / DVD INPUT audio input, the
receiver works as a multichannel amplifier. The source
reproduces surround sound and sends it to the receiver
divided into the necessary channels. Therefore the
SURROUND ON/OFF, HALL and SURR. MODE button have no
effect since the provided signal is already multichannel.
From a source which is connected to the 6 CHANNEL / DVD
INPUT audio input cannot be recorded.
About 6 CHANNEL-DVD/SACD INPUT
Using one source selection for two or more
appliances
Reassigning a source selection
6 CHANNEL-DVD/SACD INPUT selection
SOURCE SELECT
English

PLAYBACK, RECORDING
18
1 Press POWER / STANDBY to switch on the receiver.
2 Turn SOURCE SELECT to select a source.
yThe name of the source is displayed.
• You can select the FRONT AV / GAME input by pressing
FRONT AV (FR 995, FR 996 only).
3 Start playback of the source as usual.
• Turn VOLUME to adjust the volume.
yVOLUME and the volume level between 0 and 50 is
displayed.
1 Press BASS or TREBLE.
yBASS or TREBLE and the actual value are displayed
briefly. Then TURN VOLUME KNOB TO CHANGE is
scrolled.
2 Turn VOLUME to adjust the bass or treble.
yBASS or TREBLE and the actual value are displayed.
Note: If VOLUME is not turned within 5 seconds or if any
other control is used, the bass or treble adjustment is
switched off.
• If a subwoofer is connected, press SUBW. ON/OFF to
increase the bass performance.
Note: In case of digital surround sound, a subwoofer signal
will only be available when supported by the source
material.
• Press LOUDNESS to switch loudness either on or off.
yLOUDNESS is displayed if loudness is on.
If you wish to record from a source you must select it with
SOURCE SELECT. The incoming signal is reproduced by all
audio and – if the source includes a video signal – video
outputs of the receiver. The sound settings do not affect the
recording.
1 Turn SOURCE SELECT (or press FRONT AV – FR 995, FR 996
only) to select the source you want to record from.
yThe name of the source is displayed.
2 Prepare the desired recording appliance. It must be
connected to one of the outputs of the receiver.
3 Start recording on the recording appliance.
4 Start the playback of the source as usual.
Notes: – The audio and video signal of VCR IN is not
reproduced by VCR OUT. The same applies to the
audio signal of CDR/TAPE IN to CDR/TAPE OUT.
– We recommend not to use the digital output
COAX OUT of the receiver to record from an
analogue source. Use the analogue output
CDR/TAPE instead.
– From a source which is connected to the
6 CHANNEL / DVD INPUT audio input cannot be
recorded.
It is possible to connect a digital recorder to the digital output of
the receiver. In this way, all signals coming from the digital
inputs can be recorded directly on the connected audio recorder.
The receiver will also convert all signals coming from the
analogue inputs to the digital output.
The receiver can be used to record digitally a multichannel
surround sound audio signal (Dolby Digital, DTS or MPEG) from,
for example, DVD to CD-R. The receiver will convert the digital
multichannel signal into a stereo signal without loss of relevant
sound information.
Notes: – When recording a Dolby Digital, DTS or MPEG signal,
each track must be recorded individually.
– Digital recording is not possible when the digital
source material is copy-protected.
Recording from the digital output
Recording from a source
Adjusting the sound
Playing a source
English

SURROUND SOUND
19
Surround sound gives you a complete new listening sensation.
You will have the feeling of being in the middle of the action,
because sound is coming from everywhere around you. Look
out for TV broadcasts, audio and video tapes and discs with
the 3, 1, or marks
which are encoded for multichannel surround sound. You
should prefer Dolby Digital, DTS or MPEG Multichannel to get
the best out of your receiver.
Your receiver is able to reproduce DTS surround sound. DTS is
a premium multichannel surround sound system available on
DVD discs, laserdiscs and audio discs. Consult your software
dealer on the availability of DTS software in your region.
Notice that DVD discs do not always carry full multichannel
surround. To be sure that a disc is multichannel encoded
consult your dealer.
Most ordinary stereo tapes and discs can be replayed using
surround sound settings with good results. If the reproduction
is distorted in surround mode, switch to normal stereo mode.
The availabilty of the various surround sound modes
described depends on the number of speakers used and the
incoming sound information.
With surround sound on, you can switch through the different
surround modes. Note that the possibilities are related to
speaker setup defined in the receivers menu.
If a digital surround signal is detected, the receiver will scroll
either DOLBY DIGITAL, DTS or MPEG.
1 Press SURROUND ON/OFF to switch on the surround sound.
yThe surround mode in use is scrolled.
2 Press SURR. MODE repeatedly to listen to the different
surround modes (if available).
yThe chosen mode and the speakers used are displayed.
If the incoming multichannel signals are reduced to
fewer output signals, DOWNMIX is displayed.
3 Press VIRTUAL MODEas often as necessary to switch
through the virtual surround sound modes:
1 × to activate 3D SURRUOND
2 × to activate MULTI FRONT
3 × to activate MULTI REAR
4 × to activate NATURAL SURROUND
yA light indicates if a virtual surround sound mode is on.
-signs indicate which virtual surround sound mode is
active.
4 Press SURROUND ON/OFF to switch off the surround
sound.
ySURROUND OFF is scrolled.
Switching surround sound
About surround sound
English

SURROUND SOUND
20
HALL
The sound reproduction is enhanced and a slight echo is
added. This gives the impression of being in a large room.
Can only be used in stereo mode.
SURROUND
The surround mode enables normal surround sound reproduction
with 4 or 5 speakers. Depending on the source material, Dolby
Surround Pro Logic, Dolby Digital, DTS or MPEG is reproduced.
PRO LOGIC, DOLBY DIGITAL, DTS, MPEG
In addition to SURROUND, the surround mode used –
depending on the source material – will be displayed. In case
of digital surround, the sound format AC-3 (for Dolby Digital),
DTS or MPEG (for MPEG 2 Multichannel) will be displayed,
followed by the sound channels, available on the source (e. g.
DVD).
Example: AC-3 3/2.1 Dolby Digital, 3 front channels,
2 surround channels and a subwoofer
channel.
MPEG 2/0.0
MPEG Multichannel, stereo sound only.
AC-3 3/1.0 Dolby Digital, 3 front channels,
1 (mono) surround channel without
subwoofer signal.
DTS 3/2.1 DTS, 3 front channels, 2 surround
channels and a subwoofer channel.
FRONT-3 STEREO
The surround sound is muted. 3 Stereo lets you listen to
surround sound without using the surround speakers.
STEREO
All sound is reproduced and played through the front left and
right speakers. This enables standard stereo reproduction.
Virtual Surround
Your receiver is able to reproduce one or more forms of virtual
surround sound. Virtual surround gives a more real life sound
impression by creating phantom speakers in addition to or
instead of real speakers. The position of the listener
influences the surround effect. The area where the effect is
best is shown in grey.
The level of virtual surround sound effect can be adjusted in
the setup menu. The following surround sound modes are
available:
3D SURROUND
No rear speakers are needed. The sound of the rear channel
is simulated by the front speakers. Surround sound is
simulated through the front left, right and center speakers.
MULTI FRONT
Phantom speakers are created next to the left and right front
speaker.
MULTI REAR
Phantom speakers are created next to the left and right rear
speaker.
NATURAL SURROUND
Phantom speakers are created next to the left and right front
and rear speakers.
Note: The availability of MULTI FRONT and
MULTI REAR depends on the sound channels on the
source material.
NIGHT MODE (only on the remote control)
The loud parts of the sound are lowered and the soft
passages are raised. You can enjoy surround sound without
disturbing sleeping children or neighbours. Night mode only
works with Dolby Digital and MPEG, and only if supported by
the source material.
LEFT
CENTER
FRONT
RIGHT
FRONT
Surround sound settings
English

21
English
TUNER
You can search for radio stations by scanning the frequency
band. You can also key in the frequency of a known radio
station. If an FM station is being broadcast and received in
stereo, STEREO is shown.
Searching for radio stations
1 Turn SOURCE SELECT to select the tuner.
yTUNER is displayed.
2 Select a waveband by pressing TUNER AM/FM repeatedly.
yThe selected waveband is displayed.
3 Keep 1 or 2 pressed for approximately 1 second.
ySEARCH is displayed and the tuner tunes to a station
with sufficient strength.
4 Repeat this procedure until you find the desired station.
• To fine tune to a weak transmitter, briefly press 1 or 2 as
often as necessary for optimum reception.
Tuning to a radio station by frequency (with the remote
control only)
1 Press TUNER.
yTUNER is displayed.
2 Press FR. D..
y_ is displayed.
3 Use 1–0 to key in the frequency of a radio station.
Note: Only valid numbers within the frequency range of the
tuner can be keyed in.
You can switch the tuner to a lower search sensitivity, to
search only for stations with a strong signal (FM only).
1 Turn SOURCE SELECT to select the tuner.
yTUNER is displayed.
2 Press SENS. on the receiver.
yEither SENS HI or SENS LO is displayed for 5 seconds.
Note: While searching for radio stations, the actual sensitivity
is displayed. In this case, SENS LO means the tuner is
only looking for radio stations with a strong signal.
You may store up to 30 radio stations in the memory. The
receiver can select and program radio stations by itself or you
can choose them yourself.
Automatic programming
1 Choose * TUNER from the menu and press NEXT 2.
2 Choose AUTO INSTALL and press NEXT 2.
yThe preset number where programming will start, the
waveband and AUTO are displayed.
3 Turn TUNER PRESET X to change the preset number where
programming should start.
4 Use TUNER AM/FM to switch to the desired waveband.
5 Press ENTER / OK to start programming.
yAUTO INSTALL flashes and all available radio
stations are programmed, this may take a few minutes.
Programming is done when AUTO INSTALL stops
flashing.
Manual programming
1 Choose * TUNER from the menu and press NEXT 2.
2 Choose MAN INSTALL and press NEXT 2.
yA preset number, the waveband and the frequency are
displayed.
3 Turn TUNER PRESET X to change to the preset number
where the radio station should be stored.
4 Tune to the desired radio station (see “Searching for radio
stations”).
5 Press ENTER / OK to confirm your selection.
ySTORED is displayed briefly. The radio station is
programmed at the chosen preset number.
6 Select and store all desired radio stations this way.
Storing radio stations
Switching FM sensitivity
Tuning to radio stations

22
English
TUNER
1 Turn SOURCE SELECT to TUNER to select the tuner.
yTUNER is displayed.
2 Turn TUNER PRESET X to select a preset radio station.
yPRESET, the preset number and station are displayed.
After programming radio stations, you might want to change
their sequence. RESHUFFLE allows you to exchange the
positions of presets.
1 Choose * TUNER from the menu and press NEXT 2.
2 Choose RESHUFFLE and press NEXT 2.
yPRESET, a preset number and station are displayed.
3 Turn TUNER PRESET X to select a preset station.
4 Press ENTER / OK to confirm the selection.
yThe selected preset number SWAP <-> and a second
preset number are displayed.
5 Turn TUNER PRESET X to select the other preset station.
6 Press ENTER / OK to confirm the exchange.
yRESHUFFLED is displayed briefly and these two
preset numbers are swapped.
It is possible to assign a name to any of the preset radio
stations. RDS station names also can be overwritten.
1 Choose * TUNER from the menu and press NEXT 2.
2 Choose GIVE NAME and press NEXT 2.
yA preset radio station is displayed.
3 Turn TUNER PRESET X to select the preset to be renamed.
4 Press ENTER / OK to confirm your selection.
yThe existing name or ________ is displayed.
5 Turn TUNER PRESET X to select a letter and NEXT 2 or
1 PREV. to move to the next or previous position.
6 After you have entered the entire name, press ENTER / OK
to confirm.
ySTORED is displayed and the name is stored.
Note: If you want to use the transmitted RDS station name
again, simply clear the given name.
1 Use the menu option * TUNER, choose GIVE NAME.
yA preset radio station is displayed.
2 Turn X MENU NAVIGATOR to select the name to be
cleared.
3 Press ENTER / OK to confirm your selection.
4 Press 1 PREV. while the first letter is flashing.
y CL is flashing to the left of the station name.
5 Press ENTER / OK to clear the station name.
Or, if you have changed your mind,
press 1 PREV. to leave the station name as it is.
Clearing station names
Naming radio stations
Resorting stored radio stations
Tuning to stored radio stations

23
English
TUNER
Radio Data System is a service that allows FM stations to
send additional information. If you are receiving an RDS
station, R and the station name are displayed.
Switching through different RDS information
• Press RADIO TEXT on the receiver repeatedly to switch
through the following information (if available):
– Radio text messages
– RDS clock
– Frequency
– Station name
Note: The time signal broadcasted from certain RDS stations
may not always be accurate.
It is possible to set up the tuner in such a way that any
playback is interrupted by news or traffic information of a
chosen RDS station. Announcement functions only work if the
necessary RDS signals are being broadcast.
If RDS stations are also carrying an EON signal (Enhanced
Other Networks), EON is displayed. This signal enables the
tuner to search not only the chosen RDS station, but the
whole EON station network for news and traffic information.
1 Tune to the desired RDS station.
2 Press NEWS/TA:
Once to display NEWS, this switches on the news
announcement function.
Twice to display TA, this switches on the traffic
announcement function.
Three times to display TA and NEWS, this switches on both
announcement functions.
3 Select and play any other source as usual.
y While news or traffic information is being broadcast
the receiver will switch to tuner and NEWS or TA will
flash.
4 Press NEWS/TA until the display indication disappears to
switch off the function(s).
or
Press NEWS/TA during an announcement to switch off the
function(s).
Note: Be sure to switch the news and traffic announcement
off during recording, otherwise these announcements
also will be recorded.
RDS News and Traffic AnnouncementRDS R

TECHNICAL DATA
24
Subject to modification without notice.
General
Power consumption (FR 984, FR 985, FR 986).................210 W
Power consumption (FR 994, FR 995, FR 996).................255 W
Standby power consumption............................................< 2 W
Dimensions, w × h × d ............................435 × 135 × 350 mm
Weight (FR 984, FR 985, FR 986)......................................8.6 kg
Weight (FR 994, FR 995, FR 996)......................................9.4 kg
Amplifier part (0.7 % THD, 6 Ω, 1 kHz)
Output power, stereo mode
(FR 984, FR 985, FR 986) (DIN)....................................2 × 60 W
Output power, surround mode (FR 984, FR 985, FR 986)
Front......................................................................2 × 60 W
Center..........................................................................60 W
Surround................................................................2 × 60 W
Output power, stereo mode
(FR 994, FR 995, FR 996) (DIN)...................................2 × 100 W
Output power, surround mode (FR 994, FR 995, FR 996)
Front....................................................................2 × 100 W
Center........................................................................100 W
Surround..............................................................2 × 100 W
Bass..................................................................±9 dB at 100 Hz
Treble ................................................................±9 dB at 10 kHz
Loudness....+6 dB at 100 Hz (-30 dB); +3 dB at 10 kHz (-30 dB)
Total harmonic distortion.........................0.05 % at 1 kHz, 5 W
Frequency response..................................20–20,000 Hz, ±1 dB
S/N ratio........................................................................≥ 82 dB
Stereo separation (1 kHz)..............................................≥ 45 dB
Crosstalk (1 kHz)...........................................................≤ -65 dB
Inputs
Linear inputs.......................................................250 mV/47 kΩ
6 CH....................................................................250 mV/40 kΩ
Front AV (FR 995, FR 996 only)...........................250 mV/22 kΩ
Phono......................................................................5 mV/47 kΩ
Digital coaxial...............................................75 Ω acc. IEC 958
Digital optical..................................................................Toslink
Digital sampling frequency
(FR 984, FR 985, FR 986 only).............32 kHz, 44.1 kHz, 48 kHz
Digital sampling frequency
(FR 994, FR 995, FR 996 only)...32 kHz, 44.1 kHz, 48 kHz, 96 kHz
Outputs
Power supply AC outlets (switched)...........totally max. 100 W
Linear outputs.......................................................250 mV/1 kΩ
Digital coaxial...............................................75 Ω acc. IEC 958
Digital output sampling frequencies
Analogue in.........................................................out 48 kHz
Digital in 32 kHz..................................................out 32 kHz
Digital in 44.1 kHz............................................out 44.1 kHz
Digital in 48 kHz..................................................out 48 kHz
Digital in 96 kHz (FR 994, FR 995, FR 996 only)...out 48 kHz
Subwoofer pre-out....................................................0.8 V/1 kΩ
Center pre-out...........................................................0.8 V/1 kΩ
Headphones....................................8–600 Ω (3 V e.m.f., 60 Ω)
Speakers...........................................................................≥ 6 Ω
Tuner part
Wave range
FM..............................................................87.5–108.0 MHz
MW...............................................................531–1,602 kHz
LW....................................................................153–279 kHz
Sensitivity
Stereo FM..................................................................41 dBf
Mono FM....................................................................15 dBf
Total harmonic distortion
Stereo FM...................................................................0.3 %
Mono FM...................................................................0.85 %
Frequency response...................................63–12,500 Hz ±1 dB
S/N ratio
Stereo FM....................................................................55 dB
Mono FM.....................................................................60 dB
Channel separation.............................................35 dB at 1 kHz
Receiver
English

25
English
TROUBLESHOOTING
PROBLEM POSSIBLE CAUSE SOLUTION
Set does not work The overheating safety circuit Switch the set off and let it cool down. After
and is in standby mode has been activated. having let the set cool down switch it on again
and select a source by rotating SOURCE SELECT
or pressing a source key on the remote control.
No sound VOLUME is not correctly adjusted. Adjust the VOLUME.
Headphones are connected. Disconnect headphones.
The wrong source is selected. Turn SOURCE SELECT to select the correct
source.
No sound on the One speaker is wrongly connected. Connect the speaker properly.
left or right side
A speaker cable is damaged. Replace the cable.
Volume balance in the receiver menu is Adjust VOL FRONT-L and VOL FRONT-R
wrongly adjusted. in the receiver menu.
Poor sound or no sound at SURROUND mode is not switched on. Press SURROUND ON/OFF to switch on the
the center or surround surround sound.
speakers
Surround and/or center speakers are not Connect the speakers properly.
(properly) connected.
Surround and/or center speakers are switched Set speaker present to YES.
off in the SPEAKR SETUP menu.
A speaker cable is damaged. Replace the cable.
Poor bass sound Speakers are not in phase. Connect the coloured (or marked) wires to the
coloured terminals and the black (or unmarked)
wires to the black terminals.
Bad sound Badly matching setting for the given type of Correct the sound settings on the receiver.
music or sound.
Surround sound level is The level of the surround sound is not Adjust the level of the surround sound on
too low or too high properly adjusted. the receiver.
Center sound level is too The sound level of the center channel is not Adjust the level of the center channel
low or too high properly adjusted. on the receiver.
Only center speaker is A mono signal is reproduced. Choose a different sound source or switch off
heard in Dolby Surround surround sound.
Pro Logic
Bad radio reception, Receiver or antenna is positioned near a Change the position of the interfering unit
automatic programming radiation source such as a TV, CD player, or try to switch it off.
does not work properly CD recorder, DVD player, etc.
No digital recording The sampling frequency is not accepted by Make sure the digital recorder can handle
possible via digital output the digital recorder. sampling frequencies between 32 kHz and 48 kHz
or make the recording via analogue output.
Whole recording appears The DVD player does not provide track Record each track individually or use the
as one track when information. “manual track increment” feature on the recorder.
recording from DVD disc
WARNING
Under no circumstances should you try to repair the
set yourself as this will invalidate the guarantee. Do
not open the set as there is a risk of electric shock.
If a fault occurs, first check the points listed, before taking
the set for repair.
If you are unable to solve a problem by following these hints,
consult your dealer or service center.

GENERALITES
26
Cet équipement comprend :
– une télécommande
– 2 piles pour télécommande, type AA
– un câble coaxial pour les connexions audio avec un
lecteur DVD
– un câble bus pour connexion CINEMA LINK
– une antenne-cadre
– une antenne à câble
– ce manuel d‘utilisation
Si vous avez empilé les composants de votre système,
le récepteur doit se trouver en haut. Placez le
récepteur sur une surface plane, dure et stable. Ne
couvrez aucun orifice de ventilation et maintenez un
encombrement de 50 cm au-dessus de l‘équipement et
de 10 cm à gauche et à droite du récepteur pour
assurer une ventilation adéquate.
Pour obtenir une réception optimale, l‘antenne-cadre ne devra pas
être placée au-dessous et sur des VCR, des enregistreurs CD, des
lecteurs DVD, des téléviseurs et d‘autres sources de radiation.
Tous les matériaux d‘emballage superflus ont été supprimés.
Nous avons fait notre possible afin que l‘emballage soit
facilement séparable en trois types de matériaux : carton
(boîte), polystyrène expansible (matériel tampon) et
polyéthylène (sachets, feuille de protection en mousse).
Votre appareil est composé de matériaux pouvant être recyclés
et réutilisés s‘il est démonté par une firme spécialisée.
Veuillez observer les règlements locaux en vigueur sur la
manière de vous débarrasser des anciens matériaux
d‘emballage, des piles usées et de votre ancien appareil.
Fabriqués sous licence des Laboratoires Dolby. « DOLBY »,
« DOLBY DIGITAL », « PRO LOGIC » et le symbole double-D
2 sont des marques déposées des Laboratoires Dolby.
Travaux confidentiels non publiés. © 1992–1997 Dolby
Laboratories. Tous droits réservés.
« DTS » et « DTS Digital Surround » sont des marques
déposées de Digital Systems Inc. Copyright 1996 Theater
Systems, Inc. Tous droits réservés.
Nettoyez le récepteur avec un chiffon
doux non pelucheux légèrement
humidifié. N‘utilisez pas d‘agents de
nettoyage, ceux-ci pouvant avoir un
effet abrasif.
N‘exposez pas le récepteur à
l‘humidité, à la pluie, au sable ou à
une chaleur excessive (causée par un
équipement de chauffage ou par
exposition directe aux rayons du soleil).
Entretien
Admission des marques déposées
Informations relatives à l'environnement
Mise en place
Produits livrés avec l'équipement
Généralités
Produits livrés avec l'équipement....................................................26
Mise en place ..................................................................................26
Informations relatives à l'environnement........................................26
Admission des marques déposées..................................................26
Entretien...........................................................................................26
Commandes........................................................................................27
Télécommande
Utilisation de la télécommande.......................................................28
Boutons de la télécommande..........................................................29
Programmation de la télécommande universelle
(
uniquement pour FR 985, FR 986, FR 995, FR 996)
................................30
Connecteurs .......................................................................................31
Connexions
Connexions audio analogiques........................................................32
Connexions audio numériques.........................................................32
Bus de commande système, CINEMA LINK....................................33
Connexions vidéo.............................................................................33
Secteur.............................................................................................34
Manipulation de la puissance.........................................................34
Connexions des enceintes...............................................................34
Téléviseur faisant fonction d'enceinte centrale..............................34
Connexions d’antenne......................................................................34
Ecouteurs..........................................................................................34
Installation du système
Positionnement des enceintes.........................................................35
Mise en place et test des enceintes...............................................35
Réglage du récepteur.......................................................................35
Affichage.............................................................................................36
Menus
Menu récepteur.........................................................................37–38
Menu téléviseur...............................................................................38
Pour activer CINEMA LINK..............................................................38
Sélection de source
SOURCE SELECT...............................................................................39
Sélection 6 CHANNEL-DVD/SACD INPUT.......................................39
Réattribution d'une sélection de source..........................................39
Utilisation d'une sélection de source
Pour deux ou plusieurs applications................................................39
A propos de 6 CHANNEL-DVD/SACD INPUT..................................39
A propos de la lecture, enregistrement
Lecture d'une source........................................................................40
Réglage du son ................................................................................40
Enregistrement d'une source...........................................................40
Enregistrement à partir d’une sortie numérique.............................40
Son surround
A propos du son surround................................................................41
Mise en service du son surround....................................................41
Réglages du son surround...............................................................42
Syntoniseur
Syntonisation des stations radio.....................................................43
Sélection de sensibilité FM.............................................................43
Mémorisation des stations radio.....................................................43
Syntonisation des stations radio mémorisées................................44
Modification des stations radio mémorisées..................................44
Dénomination des stations radio.....................................................44
Effacement des noms de station.....................................................44
RDS R..............................................................................................45
Informations et radioguidage RDS..................................................45
Caractéristiques techniques
Récepteur.........................................................................................46
Dépistage des anomalies
Avertissement..................................................................................47
Dépistage des anomalies................................................................47
Français
Cet appareil est conforme aux normes de la Communauté
européenne en matière d’interférences radio.
En tant que partenaire d´ENERGY STAR
®
, Philips a
déterminé que ce produit répond aux lignes
directrices d´ENERGY STAR
®
én matière de
rendement énergétique.

COMMANDES
27
1 POWER / STANDBY.......Bouton de marche/arrêt de
l‘équipement.
2 CINEMA LINK................Mise en/hors service bus de
commande système entre
l‘équipement et le téléviseur.
3 ..........................................Capteur pour télécommande
infrarouges.
4 VIRTUAL..........................Témoin du surround virtuel.
5 HALL................................Témoin de commande pour HALL.
6 ..........................................Affichage
7 SOURCE SELECT............Sélectionne les différents
connecteurs audio et vidéo.
Réactive le récepteur du mode
veille.
8 VOLUME..........................Pour augmenter et réduire le
niveau de volume.
9 FRONT AV.......................Pour sélectionner l‘entrée
FRONT AV / GAME (uniquement
pour FR 995, FR 996).
0 TREBLE............................Pour régler les aiguës en
combinaison avec VOLUME.
! BASS...............................Pour régler les graves en
combinaison avec VOLUME.
@ LOUDNESS.....................Pour mettre en/hors service
LOUDNESS.
# NEXT 2 ...........................TUNER : pour rechercher les
stations radio.
MENU : pour passer au niveau
de menu suivant.
$ ENTER / OK.....................Pour confirmer les valeurs de
menu sélectionnées.
% TUNER PRESET X MENU NAVIGATOR
TUNER : pour sélectionner la
station radio mémorisée suivante
et précédente.
MENU : pour passer en avant et
en arrière.
^ 1 PREV. / EXIT...............TUNER : pour rechercher les
stations radio.
MENU : pour passer au niveau
de menu précédent.
& SETUP MENU ................Pour mettre en/hors service le
menu.
* SENS. ..............................Pour opter entre la sensibilité
basse et haute du syntoniseur.
( NEWS/TA........................
Pour mettre en/hors service les
informations et radioguidages RDS.
) TUNER AM/FM..............Pour sélectionner les bandes de
fréquence du synthétiseur.
¡ RADIO TEXT...................Pour passer en revue les
différentes informations RDS.
™ SURR. MODE..................Passe d’une configuration des
haut-parleurs à l’autre.
£ VIRTUAL MODE.............Effectue un balayage des
différents modes de son
surround virtuel.
≤ SURROUND ON/OFF.....Passe du dernier mode surround
choisi au mode stéréo, et vice-
versa.
T
A
1 234 56 7
8
9
0
!
@#$%^&*()¡™£≤
Français

TELECOMMANDE
28
Ouvrez le compartiment piles de
la télécommande et insérez 2 piles
alcaline, type AA (R06, UM-3).
Retirez les piles si elles sont à
plat ou si la télécommande ne
sera pas utilisée pendant une
période prolongée.
Les piles contiennent des substances chimiques, donc
elles devront être mises proprement au rebut.
Les touches de la télécommande fonctionnent de la même
manière que les touches correspondantes sur le récepteur.
Important!
Vous devez appuyer pendant plus d’1 seconde sur un bouton
de sélection de source pour faire passer le récepteur sur cette
source sonore. En appuyant sur le bouton de sélection de
source pendant moins d’1 seconde, la télécommande passe
simplement au mode de contrôle du produit choisi.
La télécommande reste ne service sur la source sélectionnée
jusqu‘à ce qu‘un autre bouton de source soit sollicité au
niveau de la télécommande. Ceci permet de solliciter des
sources complémentaires par exemple l‘enroulement d‘une
cassette sans modifier la source au niveau de l‘équipement.
Utilisation de la télécommande
DVD
2
H
AA
TV
Ç
É
MENU
OK
GUIDE
NEWS/TA
5
1
3
2
4
6
7
9
8
0
MUTE
TUNER
CD CDR/TAPE
DVD
SAT
VCR
TV
PHONO
CABLE BOX
REC CANCEL FR.D. INDEX
íë
CHANNEL/TRACK LOUDNESS
VIRTUALNIGHT
DISC
SURROUND
SURROUND
SUBW.
T-C
Å
+
-
+
-
REAR
CHANNEL
SUB WOOFER
TEST TONE
ON/
OFF
AUDIO
ON/
OFF
MODE
MODE
CINEMA GO
Français

TELECOMMANDE
29
H MUTE .....................Coupe le son du récepteur dans tous
les modes, sauf en mode TV.
Coupe le son de votre téléviseur
Philips si votre télécommande est en
mode TV.
2 ................................Fait passer la source sélectionnée sur
votre télécommande (par ex. VCR, TV)
en veille.
Le récepteur passe en veille lorsque
l’on appuie sur cette touche pendant
plus de 2 secondes.
PHONO, TUNER, CD,
CDR/TAPE, TV,
VCR, SAT, DVD..............Pour solliciter la télécommande au
niveau des divers produits. Sélectionne
les sources s’il est enfoncé plus
d’1 seconde. SAT fonctionne
uniquement avec des récepteurs
satellite numériques.
Réactive le récepteur du mode veille.
1–0 ...............................Boutons référencés pour pistes, stations
ou fréquences. Les numéros sont
composés de deux chiffres à solliciter
dans les 2 secondes.
CINEMA GO..........
Active CINEMA LINK sur la TV.
CABLE BOX...................Pas de fonction.
MENU GUIDE ..............TUNER : Active/désactive le menu du
récepteur.
DVD, TV : Active/désactive le menu
DVD/TV.
OK.................................Pour confirmer les options du menu.
Boutons fléchés............
TUNER : Pour se déplacer dans les
menus. Les flèches droite/gauche sont
réglées sur vers le haut/vers le bas.
CD, CDR : Les flèches gauche/droite font
une recherche vers l‘arrière/vers l‘avant,
les flèches haut/bas sélectionnent la
piste suivante/précédente.
+A...........................Pour augmenter le volume du récepteur.
-A...........................Pour réduire le volume du récepteur.
i NEWS/TA.................
Pour mettre en/hors service les fonctions
NEWS et TRAFFIC ANNOUNCEMENT.
TV : Pour mettre en/hors service le
télétexte.
SAT : Pour mettre en/hors service le
texte d‘information.
ÉATV......................Pour augmenter le volume TV.
CD, CDR, VCR, DVD : Pour démarrer
la lecture.
ÇATV......................Pour diminuer le volume TV.
CD, CDR, VCR, DVD : Pour arrêter la
lecture.
í
CHANNEL/TRACK
...
Pour sélectionner la station radio
présélectionnée précédente.
VCR : Pour rebobiner la cassette.
CD, CDR, DVD : Pour sélectionner la
piste précédente.
TV: Pour sélectionner le canal précédent.
ë
CHANNEL/TRACK
...Pour sélectionner la station radio
présélectionnée suivante.
VCR : Bobinage rapide de la cassette.
CD, CDR, DVD : Pour sélectionner la
piste suivante.
TV: Pour sélectionner le canal suivant.
LOUDNESS...................Pour mettre en/hors service
LOUDNESS.
SUBW. ON/OFF ............Active/désactive le subwoofer.
REC, DVD AUDIO..........CDR, VCR : Pour démarrer
l‘enregistrement.
DVD : Pour sélectionner les pistes audio.
CANCEL, DVD ...........CD, CDR, SAT, VCR : Pour effacer un
programme, éliminer les sélections.
DVD : Pour solliciter l‘angle de vision.
FR.D., DVD Å .............TUNER : Pour solliciter FREQUENCY
DIRECT.
CD, CDR, VCR, DVD : Pour
interrompre la lecture.
INDEX, DVD T-C............VCR : Pour mettre en/hors service la
recherche d‘index.
SAT : Pour mettre en/hors service les
thèmes.
DVD : Pour sélectionner entre titre et
chapitre.
DISC..............................Changeurs CD-, CDR-, DVD :
Pour passer au disque suivant.
NIGHT...........................
Pour mettre en/hors service NIGHT MODE.
VIRTUAL MODE............Effectue un balayage des différents
modes de son surround virtuel.
SURROUND ON/OFF....Pour mettre en/hors service
SURROUND SOUND.
+/- SUBWOOFER...Augmente/réduit le volume subwoofer.
+/- REAR ...............Augmente/réduit le volume des
enceintes arrière. Si la tonalité test est
en service, le volume des enceintes
que vous entendez peut être
augmenté/réduit à l‘aide de ces
boutons.
SURROUND MODE.......Pour passer en revue les différents
modes surround.
TEST TONE...................Pour mettre en/hors service la tonalité
test. Si la tonalité test est en service,
le volume des enceintes que vous
entendez peut être augmenté/réduit à
l‘aide de +/- REAR.
Boutons de la télécommande
Français

TELECOMMANDE
30
Il vous est possible d‘identifier la télécommande universelle
par l‘inscription Multibrand/Universal.
La télécommande universelle doit être programmée à l‘usage
des codes pour les utilisations des différentes marques. Pour
ce faire, introduisez un code à 4 chiffres ou balayez les codes
jusqu‘à ce que le code correct soit trouvé. Nous vous
recommandons d‘utiliser le code à 4 chiffres. Cette méthode
est plus rapide et bien plus fiable. La méthode de balayage
des codes ne doit en fait être utilisée que dans le cas où vous
ne trouviez pas le code pour une de vos applications. A la fin
de ce manuel, vous trouverez la table des codes.
Important!
Les boutons de la télécommande doivent être utilisés pour la
programmation, pas les boutons du récepteur ou des autres
applications.
Programmation avec le code à 4 chiffres
1 Maintenez enfoncés le bouton de source de l‘application que
vous désirez commander et 2 pendant plus de 3 secondes.
2 Introduisez le code à 4 chiffres pour l‘application (voir table
des codes à la fin du manuel).
Remarques :– Si vous introduisez plus de 4 chiffres, la
télécommande ne reconnaîtra que les quatre
premiers.
– Si vous n‘introduisez pas un code pendant
30 secondes, la télécommande mettra
automatiquement la fonction de programmation
hors service sans que le code ne soit modifié.
– Pour programmer une nouvelle application,
effacez simplement l’ancien code en en
introduisant un nouveau.
Balayage de la table des codes
1 Mettez en service l‘application à commander.
2 Maintenez enfoncés le bouton de source de l‘ application
que vous désirez commander et 2 pendant plus de
3 secondes.
3 Appuyez sur et relâchez à nouveau 2.
yLa télécommande envoie les codes pour le canal suivant
ou le mode de veille (selon la source sélectionnée) pour
une marque après l‘autre.
4 Dès que l‘application réagit, – passe automatiquement au
canal suivant ou en mode de veille – relâchez 2 pour
confirmer le code.
yLe code identifié sera utilisé.
• Si l‘équipement ne réagit pas pendant 2 minutes, le code pour
cette application n‘est pas enregistré dans la télécommande.
Le code de la télécommande restera donc inchangé.
Remarque : Si vous enlevez les piles de la télécommande
pendant plus de 1 minute, les codes devront être
reprogrammés.
Une fois que les codes ont été trouvés et testés pour les
diverses applications, il est certainement bon d‘en prendre
note ci-dessous.
PHONO..........................................
TUNER...........................................
CD .................................................
CDR/TAPE .....................................
TV..................................................
VCR ...............................................
SAT................................................
DVD...............................................
Réinitialisation de la télécommande
1 Maintenez enfoncé un des boutons de source et 2
pendant 3 secondes.
2 Introduisez le code à 3 chiffres 981.
yLa télécommande est dès lors réinitialisée pour tous les
codes Philips d’origine.
Programmation de la télécommande universelle
(uniquement pour FR 985, FR 986, FR 995, FR 996)
Français

CONNECTEURS
31
Connecteurs Nom des connecteurs Connectez à :
Douille écouteur 6,3 mm à l‘avant.1 PHONES Ecouteur avec fiche 6,3 mm.
Entrées audio et vidéo à l‘avant 2 FRONT AV / GAME
Prises de sortie audio gauche et droite pour des appareils tels que
(uniquement pour FR 995, FR 996).
caméras vidéo et consoles de jeux.
3 FRONT AV / GAME
Prises de sortie vidéo pour des appareils tels que caméras vidéo et
consoles de jeux.
FRONT SPEAKERS 4 R, L Enceinte avant droite et gauche.
5 CENTER Enceinte central.
SURROUND SPEAKERS 6 R, L Enceinte surround droite et gauche.
AUDIO IN/OUT 8 CDR/TAPE OUT Entrée d‘un enregistreur CD ou d‘une platine cassette.
9 CDR/TAPE IN Sortie d‘un enregistreur CD ou d‘une platine cassette.
0 CD IN Sortie d‘un lecteur CD.
! SAT IN Sortie d‘un système satellite.
@ VCR OUT Entrée d‘un enregistreur vidéo.
# VCR IN Sortie d‘un enregistreur vidéo.
$ TV IN Sortie d‘un téléviseur.
% PHONO IN Sortie d’un tourne-disques avec bobine MM.
¡ PHONO GND f Câble de terre d’un tourne-disques.
Entrée à 6 canaux ^
6CHANNEL/ DVDINPUT
Sortie à 6 canaux des applications telles que DVD ou lecteurs Laserdisc
DIGITAL AUDIO IN/OUT & COAX 1 IN
Sortie coaxiale des applications numériques (entrée par défaut pour le
DVD source).
* COAX 2 IN Sortie coaxiale des applications numériques.
( COAX OUT Entrée coaxiale des applications numériques telles que les enregistreurs
CD ou les enregistreurs MD.
) OPTICAL IN
Sortie optique des applications numériques telles que lecteurs DVD,
lecteurs CD, enregistreurs CD ou lecteurs MD (uniquement pour FR 984,
FR 985, FR 986, FR 994).
) OPTICAL 1 (2) IN Sortie optique des applications numériques telles que lecteurs DVD, lecteurs
CD, enregistreurs CD ou lecteurs MD (uniquement pour FR 995, FR 996).
VIDEO IN/OUT ™ S-VIDEO
Entrées/sorties S-Video des appareils vidéo, permettant une
meilleure qualité vidéo (uniquement pour FR 994, FR 995, FR 996).
£ DVD IN Sortie d‘un lecteur DVD.
≤ MON OUT Entrée d‘un moniteur (par ex. le téléviseur).
§ VCR IN Sortie d‘un enregistreur vidéo.
≥ VCR OUT Entrée d‘un enregistreur vidéo (pour enregistrement).
ª SAT IN Sortie d‘un système satellite.
Connecteurs d‘antenne ∞ AM LOOP Antenne-cadre comprise dans la livraison.
• FM 75 Ω Antenne câblée ou antenne extérieure.
Sorties préamplifiées 7 CENTER PRE-OUT Entrée d‘un téléviseur utilisé comme enceinte central (uniquement
possible lorsque le bus de système CINEMA LINK a été connecté).
º SUBWOOFER PRE-OUT Entrée d‘un subwoofer alimenté.
Bus de commande système ⁄ CINEMA LINK Douille de commande système d‘un téléviseur Philips avec CINEMA LINK.
Sorties secteur (pas valable ¤ AC OUTLET Alimente la même tension que le secteur. Charge totale utilisée
pour toutes les versions) jusqu‘à 100 W.
Cordon secteur ‹ Une fois que toutes les autres connexions ont été faites,
branchez le cordon secteur à la prise murale.
ANTENNA
FM 75 Ω
A
M
L
O
O
P
VIDEO IN/OUT
C
A
U
TIO
N
R
IS
K
O
F
E
L
E
C
T
R
IC
S
H
O
C
K
D
O
N
O
T
O
P
E
N
AVIS
RISQUE DE CHOC ELECTRIQUE
NE P
AS OUVRIR
D
e
s
i
g
n
e
d
a
n
d
d
e
v
e
l
o
p
e
d
b
y
P
h
i
l
i
p
s
i
nt
h
e
E
u
r
o
p
e
a
n
C
o
m
m
u
n
i
t
y
.
M
a
n
u
f
a
c
t
u
r
e
d
u
n
d
e
r
l
i
c
e
n
s
e
f
r
o
m
D
o
l
b
y
L
a
b
o
r
a
t
o
r
i
e
s
.
”
D
O
L
B
Y
“
,
”
D
O
L
B
Y
D
I
G
I
T
A
L
“
,
”
P
R
O
L
O
G
I
C
“
a
n
d
t
h
e
d
o
u
b
l
e
-
D
S
y
m
b
o
l
a
r
e
t
r
a
d
e
m
a
r
k
s
o
f
D
o
l
b
y
L
a
b
o
r
a
t
o
r
i
e
s
.
C
o
n
f
i
d
e
n
t
i
a
l
U
n
p
u
b
l
i
s
h
e
d
W
o
r
k
s
.
©
1
9
9
2
–
1
9
9
7
D
o
l
b
y
L
a
b
o
r
a
t
o
r
i
e
s
.
A
l
l
r
i
g
h
t
s
r
e
s
e
r
v
e
d
.
M
a
n
u
f
a
c
t
u
r
e
d
u
n
d
e
r
l
i
c
e
n
s
e
f
r
o
m
D
i
g
i
t
a
l
T
h
e
a
t
e
r
S
y
s
t
e
m
s
.
I
n
c
.
U
S
P
a
t
.
N
o
.
5
,
4
5
1
,
9
4
2
a
n
d
o
t
h
e
r
w
o
r
l
d
-
w
i
d
e
p
a
t
e
n
t
s
i
s
s
u
e
d
a
n
d
p
e
n
d
i
n
g
.
”
D
T
S
“
a
n
d
”
D
T
S
D
i
g
i
t
a
l
S
u
r
r
o
u
n
d
“
a
r
e
t
r
a
d
e
m
a
r
k
s
o
f
D
i
g
i
t
a
l
T
h
e
a
t
e
r
S
y
s
t
e
m
s
,
I
n
c
.
C
o
p
y
r
i
g
h
t
1
9
9
6
D
i
g
i
t
a
l
T
h
e
a
t
e
r
S
y
s
t
e
m
s
,
I
n
c
.
A
l
l
R
i
g
h
t
s
R
e
s
e
r
v
e
d
.
SURROUND
SPEAKERS
L
E
A
C
H
S
P
E
A
K
E
R
≥ 6
Ω
R
R
L
F
R
O
N
T
S
P
E
A
K
E
R
S
E
A
C
H
S
P
E
A
K
E
R
≥
6
Ω
PHONO GND.
C
E
N
T
E
R
IN
PLA
Y
IN
IN
OUT
REC
IN
PLA
Y
OUT
REC
C
O
A
X
O
U
T
D
IG
I
T
A
L
A
U
D
IO
I
N
/
O
U
T
O
P
T
IC
A
L
1
IN
C
O
A
X
2
IN
PHONO
VCRTV
SA
T
CD
CDR/T
APE
AUDIO IN/OUT
IN
IN
P
R
E
-O
U
T
C
E
N
T
ER
OUT
REC
IN
PLA
Y
DVD
IN
MON
OUT
VCR
SAT
IN
S
U
B
W
O
O
F
E
R
P
R
E
-
O
U
T
C
IN
E
M
A
L
IN
K
ANTENNA
A
M
L
O
O
P
O
P
T
IC
A
L
2
IN
CENTER
SUBW
.
6 CHANNEL/
DVD INPUT
C
O
A
X
1
IN
L
R
S-VIDEO
DVD
MON
VCR
SAT
VCR
OUT
IN
TO
T
AL
100
W
M
A
X. SW
ITC
H
ED
A
C O
U
TL
E
T
4567890!@#$
¤‹
⁄
%^
&
*
(
)
¡
™£≤∞§≥•ªº
12
3
Français

CONNEXIONS
32
Français
Connexions audio numériques
Connexions audio analogiques
DIGITAL
AUDIO
IN/OUT
PHONO
VCRTV SAT CD CDR/TAPE
AUDIO IN/OUT
IN IN
IN
PLAY
OUT
REC
IN IN
IN
PLAY
OUT
REC
PRE-OUT
CENTER
CAUTION
RISK OF ELECTRIC SHOCK
DO NOT OPEN
AVIS
RISQUE DE CHOC ELECTRIQUE
NE PAS OUVRIR
PHONO GND.
SURROUND
SPEAKERS
R
L
EACH SPEAKER ≥ 6 Ω
CENTER
R L
FRONT
SPEAKERS
EACH SPEAKER ≥ 6 Ω
AM LOOP
DVD
IN
MON
OUT
VCR
SAT
IN
PRE-OUT
CINEMA
LINK
SUBWOOFER
IN
PLAY
OUT
REC
OPTICAL 1
IN
COAX
OUT
COAX 2
IN
R
L
SURR.
CENTER SUBW.
FRONT
6 CHANNEL /
DVD INPUT
OPTICAL 2
IN
COAX 1
IN
Designed and developed by Philips in the European
Community.
Manufactured under license from Dolby Laboratories.
”DOLBY“, ”DOLBY DIGITAL“, ”PRO LOGIC“ and the
double-D Symbol are trademarks of Dolby
Laboratories. Confidential Unpublished Works.
©1992–1997 Dolby Laboratories. All rights reserved.
Manufactured under license from Digital Theater
Systems. Inc. US Pat. No. 5,451,942 and other world-
wide patents issued and pending. ”DTS“ and ”DTS
Digital Surround“ are trademarks of Digital Theater
Systems, Inc. Copyright 1996 Digital Theater Systems,
Inc. All Rights Reserved.
2
VIDEO IN/OUT
S-VIDEO
DVD MON SAT
VCRVCR
IN OUT
ANTENNA
FM 75 Ω
DVD PLAYER
CD RECORDER
CD PLAYER
Il existe des connecteurs analogiques et numériques pour
certaines applications. Si possible, utilisez une connexion
numérique; en effet ceci donne en général une meilleure qualité
du son. Voir « Reattribution d‘une sélection de source » pour
déterminer l‘usage des connecteurs numériques de l‘équipement.
Etant donné que le signal de sortie est différent, l‘usage d‘un Dolby
Digital Laserdisc requiert un démodulateur AC-3 RF en option.
Le DTS Digital Surround
TM
est un format audio numérique
discret répondant à la norme 5.1 disponible pour les logiciels
de CD, LD et DVD, et qui, par conséquent, ne peut être
décodé et lu par la plupart des lecteur CD, LD ou DVD. Pour
cette raison, lorsqu’un logiciel encodé en DTS est lu par les
sorties analogiques du lecteur de CD, de LD ou de DVD, un
bruit excessif se fera entendre. Pour éviter tout dommage
éventuel au système audio, le client doit prendre les
précautions qui s’imposent si les sorties analogiques sont
reliées directement au récepteur.
Afin de bénéficier d’une lecture en DTS Digital Surround
TM
, un
lecteur compatible avec la norme DTS doit être relié à l’une
des entrées numériques du récepteur.
DIGITAL
AUDIO
IN/OUT
PHONO VCRTV SAT CD CDR/TAPE
AUDIO IN/OUT
IN
IN
IN
PLAY
OUT
REC
IN IN
IN
PLAY
OUT
REC
PRE-OUT
CENTER
CAUTION
RISK OF ELECTRIC SHOCK
DO NOT OPEN
AVIS
RISQUE DE CHOC ELECTRIQUE
NE PAS OUVRIR
Designed and developed by Philips in the European
Community.
Manufactured under license from DolbyLaboratories.
”DOLBY“, ” DOLBY DIGITAL“, ” PRO LOGIC“ and the
double-D Symbol are trademarks of Dolby
Laboratories. Confidential Unpublished Works.
©1992–1997 Dolby Laboratories. All rights reserved.
Manufactured under license from Digital Theater
Systems. Inc. US Pat. No. 5,451,942 and other world-
wide patents issued and pending. ” DTS“ and ”DTS
Digital Surround“ are trademarks of Digital Theater
Systems, Inc. Copyright 1996 Digital Theater Systems,
Inc. All Rights Reserved.
PHONO GND.
SURROUND
SPEAKERS
R
L
EACH SPEAKER ≥ 6 Ω
CENTER
R L
FRONT
SPEAKERS
EACH SPEAKER ≥ 6 Ω
AM LOOP
VIDEO IN/OUT
DVD
IN
MON
OUT
VCR
SAT
IN
PRE-OUT
CINEMA
LINK
SUBWOOFER
S-VIDEO
DVD MON SAT
VCR
VCR
IN
PLAY
OUT
REC
IN OUT
OPTICAL 1
IN
COAX
OUT
COAX 2
IN
R
L
SURR.
CENTER SUBW.
FRONT
6 CHANNEL /
DVD INPUT
OPTICAL 2
IN
COAX 1
IN
FM 75 Ω
ANTENNA
AUDIO
OUT
TURNTABLE
AUDIO IN
AUDIO OUT
IN
OUT
VCR
SAT RECEIVER
CD RECORDER
CD PLAYER
MONITOR / TV
POWERED
SUBWOOFER

CONNEXIONS
33
Bus de commande système, CINEMA LINK
Connexions vidéo
Français
DIGITAL
AUDIO
IN/OUT
PHONO
VCRTV SAT CD
CDR/TAPE
AUDIO IN/OUT
IN IN
IN
PLAY
OUT
REC
IN IN
IN
PLAY
OUT
REC
PRE-OUT
CENTER
CAUTION
RISK OF ELECTRIC SHOCK
DO NOT OPEN
AVIS
RISQUE DE CHOC ELECTRIQUE
NE PAS OUVRIR
Designed and developed by Philips in the European
Community.
Manufactured under license from DolbyLaboratories.
”DOLBY“, ” DOLBY DIGITAL“, ” PRO LOGIC“ and the
double-D Symbol are trademarks of Dolby
Laboratories. Confidential Unpublished Works.
©1992–1997 Dolby Laboratories. All rights reserved.
Manufactured under license from Digital Theater
Systems. Inc. US Pat. No. 5,451,942 and other world-
wide patents issued and pending. ” DTS“ and ”DTS
Digital Surround“ are trademarks of Digital Theater
Systems, Inc. Copyright 1996 Digital Theater Systems,
Inc. All Rights Reserved.
PHONO GND.
SURROUND
SPEAKERS
R
L
EACH SPEAKER ≥ 6 Ω
CENTER
R L
FRONT
SPEAKERS
EACH SPEAKER ≥ 6 Ω
AM LOOP
VIDEO IN/OUT
DVD
IN
MON
OUT
VCR
SAT
IN
PRE-OUT
CINEMA
LINK
SUBWOOFER
S-VIDEO
DVD MON SAT
VCRVCR
IN
PLAY
OUT
REC
IN OUT
OPTICAL 1
IN
COAX
OUT
COAX 2
IN
R
L
SURR.
CENTER SUBW.
FRONT
6 CHANNEL /
DVD INPUT
OPTICAL 2
IN
COAX 1
IN
FM 75 Ω
ANTENNA
TO TV IN
TO VCR IN
TV
AUX
EXT 1 EXT 2 EXT 3
DVD PLAYER
VCR
TV
DIGIT
AL
OUT
CINEMA LINK
A
optional
(TV = CENTER)
DIGITAL
AUDIO
IN/OUT
PHONO VCRTV SAT CD CDR/TAPE
AUDIO IN/OUT
IN IN
IN
PLAY
OUT
REC
IN IN
IN
PLAY
OUT
REC
PRE-OUT
CENTER
CAUTION
RISK OF ELECTRIC SHOCK
DO NOT OPEN
AVIS
RISQUE DE CHOC ELECTRIQUE
NE PAS OUVRIR
Designed and developed by Philips in the European
Community.
Manufactured under license from DolbyLaboratories.
”DOLBY“, ”DOLBY DIGITAL“, ”PRO LOGIC“ and the
double-D Symbol are trademarks of Dolby
Laboratories. Confidential Unpublished Works.
©1992–1997 Dolby Laboratories. All rights reserved.
Manufactured under license from Digital Theater
Systems. Inc. US Pat. No. 5,451,942 and other world-
wide patents issued and pending. ”DTS“ and ”DTS
Digital Surround“ are trademarks of Digital Theater
Systems, Inc. Copyright 1996 Digital Theater Systems,
Inc. All Rights Reserved.
PHONO GND.
SURROUND
SPEAKERS
R
L
EACH SPEAKER ≥ 6 Ω
CENTER
R L
FRONT
SPEAKERS
EACH SPEAKER ≥ 6 Ω
AM LOOP
VIDEO IN/OUT
DVD
IN
MON
OUT
VCR
SAT
IN
PRE-OUT
CINEMA
LINK
SUBWOOFER
S-VIDEO
DVD MON SAT
VCR
VCR
IN
PLAY
OUT
REC
IN OUT
OPTICAL 1
IN
COAX
OUT
COAX 2
IN
R
L
SURR.
CENTER SUBW.
FRONT
6 CHANNEL /
DVD INPUT
OPTICAL 2
IN
COAX 1
IN
FM 75 Ω
ANTENNA
DVD PLAYER
MONITOR / TV
VIDEO IN
VIDEO OUT
VCR
SAT RECEIVER
Si le récepteur et votre téléviseur Philips (et mieux encore si
à cela s’ajoute un magnétoscope ou un lecteur DVD Philips)
sont reliés, par un Cinemalink, à la commande du bus
système CINEMA LINK, le système offre certains avantages
supplémentaires :
– Au démarrage d‘une source, le système passe
automatiquement à l‘entrée concernée.
–
Il vous est possible de contrôler le système à partir de
l‘équipement du téléviseur. Selon la langue au niveau du
téléviseur, ceci peut être réalisé dans la langue de votre choix.
– Le téléviseur peut fonctionner comme enceinte central de
votre système, de sorte qu‘il n‘est pas nécessaire de prévoir
une enceinte centrale séparée. (Le câble A doit être
acheté séparément.)
– Vous pouvez mettre l’ensemble du système en mode veille
en appuyant sur le bouton de veille de la télécommande.

CONNEXIONS
34
La plaquette signalétique est située à l‘arrière de
l‘équipement.
1 Vérifiez si la tension secteur référencée sur la plaquette
signalétique correspond à votre tension secteur locale. Si
ce n‘est pas le cas, consultez votre concessionnaire ou
l‘organisation de service après-vente.
2 Branchez le câble secteur à la prise murale.
Pour débrancher complètement l’appareil du secteur, retirez la
fiche d’alimentation de la prise de courant.
Si le récepteur est utilisé à une puissance trop élevée, des
distorsions peuvent avoir lieu, lesquelles peuvent sérieusement
endommager vos enceintes. En cas de distorsions, réduisez le
volume et les commandes de tonalité à un niveau de son acceptable.
Pour éviter tout problème de surchauffe, cet appareil est
doté d’un circuit de sécurité intégré. L’appareil s’arrête
automatiquement dans des conditions de fonctionnement
extrêmes. Si tel était le cas, mettez l’appareil hors
tension pour permettre le refroidissement de l’appareil
avant de le réutiliser. Après avoir laissé l’appareil
refroidir allumez l’appareil de nouveau et choisissez la
source désirée en tournant SOURCE SELECT.
Certaines connexions d‘enceinte de l‘équipement sont des
connecteurs à vis ou à clips. Pratiquez comme illustré ci-
dessous.
1 Connectez toujours le fil en couleurs (ou référencé) à la borne
en couleurs et le fil noir (ou non référencé) à la borne noire.
2 Connectez :
– L‘enceinte avant gauche à L (rouge et noir)
– L‘enceinte avant droite à R (rouge et noir)
– L‘enceinte central à CENTER (bleu et noir)
– L‘enceinte surround gauche à SURROUND L (gris et noir)
– L‘enceinte surround droite à SURROUND R (gris et noir)
Vous pouvez utiliser votre téléviseur Philips avec CINEMA LINK
comme enceinte centrale. Pour les téléviseurs équipés d‘un
connecteur scart, un câble cinch-to-scart audio supplémentaire
est requis. Pour les téléviseurs avec connecteurs cinch, des
câbles cinch complémentaires sont requis. Ces câbles doivent
être connectés au connecteur bleu CENTER PRE-OUT à
l’arrière. Référez-vous au manuel de votre téléviseur pour
savoir comment il peut faire fonction d‘enceinte centrale.
Antenne AM (MW)
L‘antenne-cadre comprise à la livraison est uniquement
destinée à l‘usage intérieur. Positionnez l‘antenne aussi loin
que possible du récepteur, du téléviseur, des câbles, d‘un
lecteur DVD, d‘un VCR et d‘autres sources de radiation.
1 Introduisez la fiche de l‘antenne-cadre dans AM LOOP
comme illustré ci-dessous.
2 Tournez l‘antenne pour optimaliser la réception.
Antenne FM
L‘antenne-câble comprise à la livraison peut uniquement être
utilisée pour recevoir des stations proches. Pour améliorer la
réception, nous recommandons l‘usage d‘un système
d‘antenne par câble ou d‘une antenne extérieure.
1 Fixez l‘antenne-câble comprise à la livraison à FM 75 Ω
comme illustré ci-dessous.
2 Déplacez l‘antenne dans différentes positions pour
optimaliser la réception.
• Si vous utilisez un système d‘antenne par câble ou une
antenne extérieure, introduisez la fiche d‘antenne dans la
prise FM 75 Ω en lieu et place de l‘antenne prévue.
Connectez les écouteurs sur PHONES signifie que les
enceintes sont mises hors service. Le récepteur passe à
STEREO et le son surround est réduit à un signal stéréo qui
est reproduit à travers les écouteurs surround.
Le fait de débrancher les écouteurs remet automatiquement
les enceintes en service. Si vous désirez jouir à nouveau du
son surround, réglez à nouveau le récepteur sur son surround.
Ecouteurs
FM 75 Ω
FM 75 Ω
A
M
LO
O
P
ANTENNA
Connexions d‘antenne
Téléviseur faisant fonction d‘enceinte centrale
8 mm
1
2
3
1
2
3
7 mm
Connexions des enceintes
Manipulation de la puissance
Secteur
Français

INSTALLATION DU SYSTEME
35
Conseils de positionnement généraux
Evitez de placer les enceintes dans un coin ou à même le sol,
car cela amplifierait trop les basses. Le fait de placer les
enceintes derrière les rideaux, des meubles, etc. réduira la
reproduction des aiguës et diminuera considérablement l‘effet
stéréo. L‘auditeur doit toujours « voir » les enceintes.
Chaque pièce offre des caractéristiques acoustiques différentes
et les possibilités de positionnement sont souvent limitées.
Pour trouver la position idéale pour vos enceintes, reportez-
vous au schéma ci-dessus.
Nous recommandons pour obtenir un bon son surround d‘utiliser
au minimum 5 enceintes (2 à l‘avant, un central, 2 surround). Il
est possible de produire certains types de son surround avec un
nombre réduit d‘enceintes. Ceci se fait en dirigeant à nouveau
les signaux prévus à partir des enceintes manquantes vers les
enceintes en place. Voir « Menus » pour la mise en place
correcte de l‘équipement au niveau du nombre et de la
dimension des enceintes utilisées.
Positionnement des enceintes avant
Les enceintes avant doivent être disposées à droite et à
gauche dans la même position d‘écoute que dans le cas
d‘enceintes stéréo.
Positionnement de l‘enceinte centrale
L‘enceinte centrale devrait être placée au centre entre les
deux enceintes avant, par exemple sous ou au-dessus du
téléviseur. L‘idéal serait que l‘enceinte centrale se trouve à
hauteur des oreilles de l‘auditeur (lorsqu‘il est assis).
Positionnement des enceintes surround
Les enceintes surround doivent se trouver en face l‘une de
l‘autre et être en ligne ou légèrement derrière l‘auditeur.
Positionnement du subwoofer
Un subwoofer peut servir à améliorer sérieusement les
performances des graves de votre équipement. Le subwoofer
peut être disposé à n‘importe quel endroit de la pièce, car il
n‘est pas possible de localiser la source des tonalités profondes.
Néanmoins, vous ne devez jamais placer le subwoofer au milieu
d‘une pièce, car ceci affaiblit fortement les graves. De plus, ne
placez jamais un objet sur le subwoofer.
Le volume relatif des enceintes doit être ajusté dans le but d‘obtenir
un son surround optimal. Vous devez vous mettre dans votre position
d‘écoute habituelle au moment du réglage du volume de l‘enceinte.
Référez-vous à « Menu récepteur » pour le réglage en fonction des
enceintes utilisées. Idéalement, le volume et la position d’écoute
doivent être les mêmes à partir de tous les haut-parleurs.
1 Appuyez sur POWER / STANDBY pour mettre en service le
récepteur.
2 Appuyez sur TEST TONE de la télécommande.
yUne tonalité de test en provenance des différents haut-
parleurs se fait entendre à l’exception du subwoofer.
3 Appuyez sur +/- REAR de la télécommande pour
augmenter/réduire le volume de l‘enceinte actuelle. Le
meilleur résultat est obtenu avec un volume égal pour tous
les haut-parleurs à partir de la position d’écoute.
4 Appuyez sur TEST TONE de la télécommande.
yLa tonalité test s‘arrête.
Remarque : Si vous n‘êtes pas entièrement satisfait(e) des
réglages de volume, nous vous recommandons de faire
des petits réglages pendant la lecture du son surround.
Dès que le nombre et la position des haut-parleurs ont été
déterminés, vous pouvez effectuer les premiers réglages du
récepteur afin d’obtenir un son surround optimal
correspondant à votre installation :
1 Réglez les haut-parleurs qui ont été reliés au récepteur (voir
« Structure de menu / * SPEAKR SETUP »).
Remarque : La réglage d’origine de votre récepteur se
présente comme suit :
deux haut-parleurs avant gauche et droit :
présents (ne peuvent être modifiés)
haut-parleur central : présent
deux haut-parleurs arrière : présents
subwoofer : présent
2 Sélectionnez la taille des haut-parleurs (SMALL ou LARGE)
(voir « Structure de menu / * SPEAKR SIZES »).
Sélectionnez SMALL si votre haut-parleur peut reproduire
des sons graves jusqu’à 80 à 100 Hz au minimum.
Sélectionnez LARGE si votre haut-parleur peut reproduire
des sons graves jusqu’à 50 Hz au minimum. (En règle
générale, un grand haut-parleur (LARGE) présente un
diamètre du cône de l’ordre de 12 cm au minimum.)
Consultez les fiches de caractéristiques de vos haut-parleurs.
Remarque : Pour le FR 985, FR 986, FR 996 le réglage
d’origine est : tous les haut-parleurs sur LARGE.
Pour FR 984, FR 994, le réglage d’origine est :
tous les haut-parleurs sur SMALL.
3 Régler la distance entre les haut-parleurs et l’auditeur (voir
« Structure de menu / * SPK DISTANCE »).
Réglage du récepteur
Mise en place et test des enceintes
Positionnement des enceintes
SUBWOOFER
SURROUND
(REAR)
LEFT
LEFT
RIGHT
CENTER
FRONT
RIGHT
FRONT
SURROUND
(REAR)
Français

36
Français
AFFICHAGE
L‘affichage du récepteur est divisé en 4 sections, qui seront
utilisées pour ce qui suit :
Schéma des enceintes
Un rectangle présentant une lettre indique qu’un haut-parleur a été
sélectionné dans le menu d’installation. Néanmoins, l’indicateur de
subwoofer ne s’allumera que si un signal subwoofer est
disponible.
Si une seule lettre est affichée, cette enceinte n‘est pas
utilisée et le son reproduit passe par les autres enceintes.
......son surround virtuel
SURROUND.................son surround reproduit
DIGITAL SURROUND ....son surround numérique reproduit
L, R ...........................enceinte avant gauche et droite
C...............................enceinte centrale
SL, SR .......................enceintes surround
SW............................subwoofer
Indication de menu
Ces signes vous montrent que le menu a été sollicité ou non et
indiquent la direction dans laquelle vous pouvez vous déplacer.
MMEENNUU .......................le menu est sollicité
1..............................
vous pouvez retourner en arrière au menu
précédent en faisant usage de 1 PREV. / EXIT
(touche « gauche » de télécommande)
3 .............................vous pouvez vous déplacer vers le haut
dans une liste d‘option en faisant appel à
X MENU NAVIGATOR (touche « vers le
haut » de télécommande)
4 .............................vous pouvez vous déplacer vers le bas
dans une liste d‘options en faisant appel
à X MENU NAVIGATOR (touche « vers le
bas » de télécommande)
2..............................vous pouvez vous déplacer vers l‘avant vers
le menu suivant en faisant appel à NEXT 2
(touche « droite » de télécommande)
OOKK.............................vous pouvez confirmer la valeur affichée
Voyants de statut
Ces signes vous indiquent les divers réglages et les diverses
informations à propos du statut du récepteur.
PRESET......................syntoniseur syntonisé sur une station
radio préréglée
SENS HI.....................syntoniseur réglé sur haute sensibilité
SENS LO..................syntoniseur réglé sur basse sensibilité
CCIINNEEMMAA LLIINNKK OONN ......CINEMA LINK activé
STEREO......................station FM recevant en stéréo
R.............................une station RDS est en réception
EON...........................une station RDS avec EON est en
réception
HALL..........................l‘effet HALL est en service
TA .............................les radioguidages RDS sont en service
NEWS........................les nouvelles RDS sont en service
ANA ..........................l‘entrée analogique est utilisée pour la
source de lecture
NNIIGGHHTT .......................NIGHTMODE est en service
COAX 1......................entrée numérique coaxiale COAX 1 est
utilisée pour la source de lecture
COAX 2.....................entrée numérique coaxiale COAX 2 est
utilisée pour la source de lecture
DDOOWWNNMMIIXX.................les signaux multi canaux d‘entrée ont été
réduits à un minimum de signaux de
sortie (selon le nombre d‘enceintes)
OPT...........................
entrée numérique optique OPTICAL IN est
utilisée pour la source de lecture (uniquement
pour FR 984, FR 985, FR 986, FR 994)
OPT 1 ........................entrée numérique optique OPTICAL 1 IN
est utilisée pour la source de lecture
(uniquement pour FR 995, FR 996)
OPT
2
.......................entrée numérique optique OPTICAL 2 IN
est utilisée pour la source de lecture
(uniquement pour FR 995, FR 996)
LOUDNESS .................LOUDNESS est en service
Zone d‘information
Cette zone sert de feedback au récepteur, de fréquences de
syntoniseur, d‘options menu, de valeurs et de messages de
texte à dérouler.
AA
TV
Ç
É
MENU
OK
GUIDE
NEWS/TA
0
Affichage

37
Français
MENUS
Le récepteur est équipé d‘un système de menu. Le menu sert à
l‘installation du récepteur. Les diverses options de menu se
rapportent l‘une à l‘autre d‘une façon logique. A supposer que
vous n‘ayez pas d‘enceinte centrale et que CENTER
SPEAKR (enceinte centrale) est réglée sur NO (non). Si vous
essayez d‘utiliser VOL CENTER (volume central), un
message sera déroulé pour vous avertir que ce n‘est pas
possible (INSTALL CENTER SPEAKER – installez
enceinte centrale).
Le menu fonctionne toujours de la même façon. Des flèches dans
l‘affichage vous indiquent les directions de déplacement possibles.
1 Appuyez sur SETUP MENU.
yMENU, et * EFFECTS sont affichés.
• Vous pouvez sortir du menu à chaque moment
arbitraire en appuyant sur SETUP MENU.
2 Tournez au X MENU NAVIGATOR jusqu‘à ce qu‘une option
(ou une valeur voulue) soient affichées.
3 Appuyez sur NEXT 2 pour sélectionner l‘option affichée (ou
ENTER / OK pour confirmer une valeur).
• Vous pouvez quitter toute option (les valeurs restent alors
inchangées) en appuyant sur 1 PREV. / EXIT.
Structure de menu
* EFFECTS (effets)
Sollicite les effets de son.
VIRT SURR
surround virtuel: 0…100 %
* VOL BALANCE (volume balance)
Permet de régler la balance relative du volume entre les
enceintes connectées.
TEST TONE
Tonalité test : on/off (marche/arrêt)
VOL FRONT-L
Volume enceinte avant gauche : –50…+50
VOL FRONT-R
Volume enceinte avant droite : –50…+50
VOL CENTER
Volume enceinte centrale : –50…+50
VOL REAR-L
Volume enceinte arrière gauche : –50…+50
VOL REAR-R
Volume enceinte arrière droite : –50…+50
VOL SUBWOOFER
Volume subwoofer : –50…+50
Remarque : Les valeurs reprises ci-dessous ne peuvent être
modifiées lorsque l’on utilise l’entrée
6 CHANNEL / DVD INPUT.
* SPEAKR SETUP (installation enceintes)
Permet de sélectionner les enceintes utilisées.
SUBW PRESENT
Présence de subwoofer : yes/no (oui/non)
CENTER SPEAKR
Présence d‘une enceinte centrale : yes/no (oui/non)
REAR SPEAKER
Présence des enceintes arrière : yes/no (oui/non)
* SPEAKR SIZES (taille des enceintes)
Permet de sélectionner les tailles des enceintes utilisées au
service d‘une reproduction de son optimale. LARGE indique un
haut-parleur qui peut reproduire des fréquences inférieures à 50
Hz. Si SUBW PRESENT est réglé sur NO, FRONT SIZE peut
uniquement être réglé sur LARGE. Si FRONT SIZE est réglé
sur SMALL, CENTER SIZE peut uniquement être réglé sur
SMALL et en conséquence, un subwoofer doit être connecté.
FRONT SIZE
Enceinte avant gauche et droite : small/large
(petit/grand)
CENTER SIZE
Enceinte centrale : small/large (petit/grand)
REAR SIZE
Enceintes arrière : small/large (petit/grand)
* SPK DISTANCE (distance entre les enceintes)
Distance entre la position d‘écoute habituelle et les
enceintes. Ceci définit le retard du son surround.
DISTANCE L/R
Distance aux enceintes avant : 1…10 m
DISTANCE CNTR
Distance à l‘enceinte centrale : 1…10 m
DISTANCE REAR
Distance aux enceintes arrière : 1…10 m
Entrée audio analogique CD IN
Menu récepteur

38
Français
MENUS
* SELECT INPUT (selection d‘entrée)
Détermine les connecteurs d‘entrée audio pour les différentes
sélections de source, sélectionnez avec SOURCE SELECT (voir
« SELECTION DE SOURCE » pour des informations détaillées).
COAX1
Entrée coaxiale numérique 1, COAX 1 IN
COAX2
Entrée coaxiale numérique 2, COAX 2 IN
OPT (uniquement pour FR 984, FR 985, FR 986, FR 994)
Entrée optique numérique, OPTICAL IN
OPT 1 (uniquement pour FR 995, FR 996)
Entrée optique numérique, OPTICAL 1 IN
OPT 2 (uniquement pour FR 995, FR 996)
Entrée optique numérique, OPTICAL 2 IN
SAT IN
Entrée audio analogique SAT IN
VCR IN
Entrée audio analogique VCR IN
TV IN
Entrée audio analogique TV IN
CDR IN
Entrée audio analogique CDR IN
CD IN
Entrée audio analogique CD IN
6 CH IN
Entrée audio analogique 6 CHANNEL / DVD INPUT
* TUNER (syntoniseur)
Installation des stations radio préréglées (voir
« SYNTONISEUR » pour les informations détaillées).
AUTO INSTALL
Mémorise automatiquement les stations radio
MAN INSTALL
Mémorise manuellement les stations radio
GIVE NAME
Permet d‘attribuer des noms aux stations radio
mémorisées
RESHUFFLE
Recours aux stations radio mémorisées
Si le récepteur est connecté à un téléviseur CINEMA LINK
Philips par les douilles de système CINEMA LINK (voir
« CONNEXIONS »), vous pouvez faire appel à votre téléviseur
pour installer le système. Une option appelée RECEIVER sera
ajoutée au menu du téléviseur.
Si le mode CINEMA LINK est sollicité, les réglages sur le
récepteur seront affichés à l‘écran pendant quelques
secondes. Consulter le manuel d‘instructions de votre
téléviseur pour utiliser adéquatement le menu téléviseur. Les
options offertes peuvent varier selon le modèle de votre
téléviseur.
Réalisation de la connexion
• Appuyez sur CINEMA LINK pour réaliser la connexion entre
le récepteur et le téléviseur ou pour l‘enlever.
ySi la connexion est réalisée, CINEMA LINK ON est affiché.
Remarque : Nous recommandons de mettre l‘option CINEMA
LINK hors service pendant l‘enregistrement. Ceci
prévient des interruptions indésirables à la suite
de l‘emploi de certaines fonctions du téléviseur.
Si CINEMA LINK a été sollicité et que le menu téléviseur est
activé, TV MENU est affiché et les fonctions de menu et de
son du récepteur sont bloquées.
•
Appuyez sur CINEMA GO sur la télécommande.
y
La TV envoie un ordre de lecture au lecteur de DVD
CINEMA LINK, si présent. Le lecteur de DVD commence la
lecture et le récepteur passe automatiquement au son
CINEMA LINK le meilleur.
•
Si aucun lecteur de DVD n’est connecté ou si le lecteur de
DVD n’a pas de disque en cours de lecture, la TV envoie un
ordre de lecture au magnétoscope CINEMA LINK, si présent.
y
Le magnétoscope commence la lecture et le récepteur
audio choisit le son CINEMA LINK le meilleur.
•
S’il n’y a aucune source magnétoscope connectée ou aucune
cassette en cours de lecture, la TV choisit la chaîne TV
regardée en dernier.
Pour activer CINEMA LINK
Menu téléviseur

39
Français
SELECTION DE SOURCE
Lorsque vous sélectionnez une source en tournant au SOURCE
SELECT, les entrées audio et vidéo de dénomination
correspondante sont activées. Le signal d‘entrée est reproduit
par toutes les sorties audio et – si la source comprend un signal
vidéo – par les sorties vidéo du récepteur. Il est possible de
réattribuer la sélection de source à d‘autres que ces entrées
standard.
Source sélectionnée
...Connecteurs utilisés
DVD...............................Entrée audio numérique COAX 1 et
entrée vidéo DVD IN
PHONO..........................Entrée audio PHONO IN
TUNER..........................La section de syntoniseur du récepteur
est sollicitée, toutes les entrées sont
hors service.
CD.................................Entrée audio CD IN
CDR/TAPE.....................Entrée audio CDR/TAPE IN
TV..................................Entrée audio TV IN et
aucune entrée vidéo
VCR...............................Entrée audio VCR IN et
entrée vidéo VCR IN
SAT ...............................Entrée audio SAT IN et
entrée vidéo SAT IN
Les connecteurs 6 CHANNEL / DVD INPUT peuvent être
affectés à n’importe quelle source disponible (sauf TUNER et
PHONO). L’affectation s’effectue grâce à l’option
* SELECT INPUT dans le menu. Voir ci-dessous pour
plus de détails.
Si une source a été sélectionnée avec SOURCE SELECT,
l‘entrée audio standard est utilisée. Pour changer ceci, il faut
attribuer la sélection de source à une autre entrée audio.
Exemple : Réattribuez CD de l‘entrée audio CD IN analogique
à l‘entrée audio COAX 2 IN numérique.
1 Sélectionnez * SELECT INPUT à partir du menu et
appuyez sur NEXT 2.
2 Tournez au SOURCE SELECT pour sélectionner la source à
réattribuer (par ex. CD).
yLe nom de la source est affichée et le témoin de la
source clignote.
3 Tournez au X MENU NAVIGATOR pour sélectionner les
connecteurs d‘entrée qui devraient être utilisés
(par ex. CD -> COAX2).
4 Appuyez sur ENTER / OK pour confirmer votre sélection.
ySTORED est affiché brièvement.
5 Cette sélection de source utilise dès lors l‘entrée audio
sélectionnée (par ex. CD utilisant les connecteurs d‘entrée
COAX 2 IN,
COAX 2 s‘allume lorsque CD est sollicité).
Il vous est possible d‘attribuer plus d‘une source à une
sélection de source. Ceci peut être utile lorsque des produits
sont connectés l‘un après l‘autre en chaîne.
Exemple : Un VCR est connecté au téléviseur, mais seul le
téléviseur est connecté lui au récepteur. Les deux
réglages SOURCE SELECT, tant pour le téléviseur
que pour le VCR, doivent donc utiliser des
connecteurs d‘entrée du téléviseur en question.
1 Sélectionnez * SELECT INPUT à partir du menu et
appuyez sur NEXT 2.
2 Tournez au SOURCE SELECT pour sélectionner la source à
réattribuer (par ex VCR).
yLe nom de la source est affichée et le témoin de la
source clignote.
3 Tournez au X MENU NAVIGATOR pour sélectionner les
connecteurs d‘entrée qui devraient être utilisés
(par ex VCR -> TV IN).
4 Appuyez sur ENTER / OK pour confirmer votre sélection.
ySTORED est affiché brièvement.
5 Cette sélection de source utilise dès lors l‘entrée audio
sélectionnée (par ex. VCR utilisant les connecteurs
d‘entrée, VCR <TV IN> s‘affiche brièvement lorsque
VCR est sollicité).
La prise 6 CHANNEL / DVD INPUT peut servir à brancher un
appareil doté d’un décodeur multicanal intégré (par ex. Dolby
Digital, DTS, etc.) et un connecteur de sortie à 6 canaux, en
l’occurrence, un lecteur DVD/SACD haut de gamme.
Si l‘on fait appel à l‘entrée audio 6 CHANNEL / DVD INPUT, le
récepteur fonctionne comme un amplificateur multicanal. La
source reproduit le son surround et l‘envoie au récepteur
divisé par le nombre de canaux nécessaires. A ce moment, le
bouton SURROUND ON/OFF, HALL et SURR. MODE n‘a aucun
effet, car le signal produit est déjà un signal multicanal.
Il n‘est pas possible d‘enregistrer à partir d‘une source à
l‘entrée audio 6 CHANNEL / DVD INPUT.
A propos de 6 CHANNEL-DVD/SACD INPUT
Utilisation d‘une sélection de source pour
deux ou plusieurs applications
Réattribution d‘une sélection de source
Sélection 6 CHANNEL-DVD/SACD INPUT
SOURCE SELECT

40
Français
A PROPOS DE LA LECTURE, ENREGISTREMENT
1 Appuyez sur POWER / STANDBY pour enclencher le
récepteur.
2 Tournez à SOURCE SELECT pour sélectionner une source.
yLe nom de la source est affiché.
• Vous pouvez sélectionner l‘entrée FRONT AV / GAME en
appuyant sur FRONT AV (uniquement pour FR 995, FR 996).
3 Démarrez la lecture de la source comme d‘habitude.
• Tournez à VOLUME pour régler le volume.
yVOLUME et le niveau du volume entre 0 et 50 sont
affichés.
1 Appuyez sur BASS ou TREBLE.
yBASS ou TREBLE et la valeur actuelle sont affichés
brièvement. Ensuite se déroule TURN VOLUME
KNOB TO CHANGE.
2 Tournez à VOLUME pour régler les graves ou les aiguës.
yBASS ou TREBLE et la valeur actuelle sont affichés.
Remarque : Si VOLUME n‘a pas été tourné pendant 5 secondes
ou qu‘aucune autre commande n‘a été utilisée, le
réglage des graves ou des aiguës est mis hors
service.
• Si un subwoofer est branché, appuyez sur SUBW. ON/OFF
pour améliorer la reproduction des basses.
Remarque : Dans le cas d’un son surround numérique, le
signal du subwoofer ne sera disponible que s’il
est supporté par la source.
• Appuyez sur LOUDNESS pour agir sur la sonorité
(marche/arrêt).
yLOUDNESS est affiché dès que la sonorité a été
enclenchée.
Si vous désirez enregistrer à partir d‘une source, il vous faut
sélectionner avec SOURCE SELECT. Le signal d‘entrée est
reproduit par toutes les sorties audio et – si la source dispose
d‘un signal vidéo – par les sorties vidéo du récepteur. Les
réglages de son n‘affectent pas l‘enregistrement.
1 Tournez à SOURCE SELECT (ou appuyez sur FRONT AV –
uniquement pour FR 995, FR 996) pour sélectionner la
source à partir de laquelle vous désirez effectuer
l‘enregistrement.
yLe nom de la source est affiché.
2 Préparez l‘application d‘enregistrement requise. Elle doit
être connectée à une des sorties du récepteur.
3 Démarrez l‘enregistrement par l‘application sélectionnée.
4 Démarrez la lecture de la source de la façon habituelle.
Remarques : – Le signal audio et vidéo du VCR IN n‘est pas
reproduit par VCR OUT. Ceci s‘applique
également au signal audio de CDR/TAPE IN
vers CDR/TAPE OUT.
– Nous vous recommandons de ne pas utiliser la
sortie numérique COAX OUT du récepteur pour
enregistrer à partir d‘une source analogique.
Uilisez la sortie analogique CDR/TAPE.
– Il n‘est pas possible d‘enregistrer à partir
d‘une source à l‘entrée audio 6 CHANNEL /
DVD INPUT.
Il est possible de connecter un enregistreur numérique à la
sortie numérique du récepteur. De cette façon, tous les
signaux en provenance des entrées numériques peuvent être
enregistrés directement sur l’enregistreur audio connecté. Le
récepteur convertira également tous les signaux en
provenance des entrées analogiques à la sortie numérique.
Le récepteur peut servir à enregistrer de façon numérique un
signal audio surround multicanal (Dolby Digital, DTS ou MPEG)
par exemple à partir d’un DVD sur un CD-R. Le récepteur
convertira le signal multicanal numérique en un signal stéréo
sans perdre aucune information de son propice.
Remarques : – Lors de l’enregistrement d’un signal Dolby
Digital, DTS ou MPEG, chaque piste doit être
enregistrée de façon individuelle.
– L’enregistrement numérique est impossible
lorsque la source numérique est protégée
contre les copies.
Enregistrement à partir d’une sortie numérique
Enregistrement d‘une source
Réglage du son
Lecture d‘une source

41
Français
SON SURROUND
Le son surround vous donne une sensation d‘écoute toute
nouvelle et complète. Vous aurez la sensation d‘être au centre
de l‘action, car le son vient de tous les côtés autour de vous.
Prêtez attention que des programmes de télévision, les bandes
audio et vidéo ainsi que les disques avec 31,
ou soient codés pour le son
surround multicanal. Pour obtenir le meilleur de votre
récepteur, choisissez Dolby Digital, DTS ou MPEG
Multichannel.
Votre récepteur peut reproduire le son surround DTS. Le DTS
est un système audio multicanal de première qualité disponible
sur les disques DVD, les disques laser et les disques audio.
Adressez-vous à votre revendeur de logiciels pour connaître la
disponibilité des logiciels DTS dans votre région.
Il convient de remarquer que les disques DVD ne disposent
pas toujours d’un son surround intégral multicanal. Pour être
sûr qu‘un disque est du type multicanal, consultez votre
revendeur.
Les bandes stéréo ordinaires et des disques peuvent être lus en
utilisant les réglages de son surround et ceci donne d‘excellents
résultats. Si la reproduction présente des distorsions en mode
surround, repassez en mode stéréo normal.
La disponibilité des différents modes de son surround décrits
dépend du nombre d‘enceintes utilisées et des informations
de son à l‘entrée.
Avec le son surround en service, vous pouvez opter pour
différents modes. A remarquer que les possibilités dépendent
de la disposition des enceintes définie dans le menu du
récepteur.
Si un signal surround numérique est détecté, le récepteur fera
défiler l’indication DOLBY DIGITAL, DTS ou MPEG.
1 Appuyez sur SURROUND ON/OFF pour mettre le son
surround en service.
yLe mode surround en usage est déroulé.
2 Appuyez sur SURR. MODE à plusieurs reprises pour écouter
les différents modes surround (si prévus).
yLe mode sélectionné et les enceintes utilisées sont
affichés si les signaux du canal d‘entrée sont réduits à
un nombre inférieur de signaux de sortie, DOWNMIX est
affiché.
3 Appuyez sur VIRTUAL MODE autant de fois que nécessaire
pour faire défiler les différents modes audio surround
virtuel :
1 × pour activer le mode 3D SURROUND
2 × pour activer le mode MULTI FRONT
3 × pour activer le mode MULTI REAR
4 × pour activer le mode NATURAL SURROUND
y Un témoin indique si le mode de son surround virtuel
est activé. Le symbole indique le mode audio
surround virtuel qui est activé.
4 Appuyez sur SURROUND ON/OFF pour mettre le son
surround hors service.
ySURROUND OFF est déroulé.
Mise en service du son surroundA propos du son surround

SON SURROUND
42
HALL
La reproduction du son est augmentée et un léger écho est
ajouté. Ceci donne l‘impression de se trouver dans une
grande pièce. Uniquement à utiliser en mode stéréo.
SURROUND
Le mode surround permet de réaliser la reproduction du son
surround normal par 4 ou 5 enceintes.
En fonction de la source,
la reproduction se fait selon les systèmes Dolby Surround Pro
Logic, Dolby Digital, DTS ou MPEG.
PRO LOGIC, DOLBY DIGITAL, DTS, MPEG
En plus de l‘essai SURROUND, le mode utilisé – en fonction
du matériel de source – peut être affiché. Dans le cas d’un
surround numérique, le format sonore AC-3 (pour le Dolby
Digital), DTS ou MPEG (pour le MPEG 2 Multicanal) sera
affiché et suivi des canaux sonores disponibles à la source
(par ex. DVD).
Exemple : AC-3 3/2.1
Dolby Digital, 3 canaux avant, 2 canaux
surround et un canal subwoofer.
MPEG 2/0.0 MPEG Multicanal, uniquement son
stéréo.
AC-3 3/1.0
Dolby Digital, 3 canaux avant, 1 canal
(mono) surround sans signal subwoofer.
DTS 3/2. DTS,
3 canaux avant, 2 canaux
surround et un canal subwoofer.
FRONT-3 STEREO
Le son surround est en sourdine. 3 Stereo vous font écouter le
son surround sans utiliser les enceintes surround.
STEREO
Tout le son est reproduit et joué à travers les enceintes avant
gauche et droite. Ceci autorise la reproduction stéréo standard.
Surround Virtuel
Votre récepteur est capable de reproduire une ou plusieurs
formes de sons surround virtuel. Le surround virtuel donne
une impression sonore plus réaliste en créant des haut-
parleurs imaginaires en plus ou à la place des haut-parleurs
réels. La position de l’auditeur influence l’effet de surround.
La zone où l’effet est le meilleur est reprise en gris.
Le niveau d’effet sonore surround virtuel peut être réglé dans le
menu de configuration. Les modes sonores surround suivants
sont disponibles :
3D SURROUND
Il ne faut aucun haut-parleur arrière. Les haut-parleurs avant
simulent le son du canal arrière. Le son surround est simulé
grâce aux haut-parleurs avant gauche, droit et central.
MULTI FRONT
Des haut-parleurs imaginaires sont créés à côté des haut-
parleurs avant gauche et droit.
MULTI REAR
Des haut-parleurs imaginaires sont créés à côté des haut-
parleurs arrière gauche et droit.
NATURAL SURROUND
Des haut-parleurs imaginaires sont créés à côté des haut-
parleurs avant et arrière gauche et droit.
Remarque : La disponibilité des modes MULTI FRONT et
MULTI REAR dépend des canaux sonores
présents à la source.
NIGHT MODE (uniquement sur la télécommande)
Les parties fortes du son sont réduites et les passages de faible
volume augmentés. Vous pouvez donc jouir du son surround sans
déranger les enfants qui dorment ou les voisins. Le mode de
nuité fonctionne uniquement en combinaison avec Dolby Digital
et MPEG, à condition d‘être supporté par le matériel de source.
LEFT
CENTER
FRONT
RIGHT
FRONT
Réglages du son surround
Français

43
Français
SYNTONISEUR
Vous pouvez rechercher les stations radio en balayant la
fréquence. Il vous est également possible de choisir la
fréquence d‘une station radio connue. Si une station FM est
émise et reçue en stéréo, alors STEREO est affichée.
Recherche des stations radio
1 Tournez au SOURCE SELECT pour sélectionner le
syntoniseur.
yTUNER est affiché.
2 Sélectionnez une fréquence en appuyant à plusieurs
reprises sur TUNER AM/FM.
yLa fréquence sélectionnée est affichée.
3 Maintenez 1 ou 2 enfoncé pendant environ 1 seconde.
ySEARCH est affiché et le syntoniseur choisit une
station dont le signal est suffisamment puissant.
4 Répétez cette procédure jusqu‘à ce que vous ayez trouvé la
station de votre choix.
•
Pour la syntonisation fine sur un émetteur faible, appuyez
brièvement sur 1 ou 2 jusqu‘à obtenir une réception optimale.
Syntonisation sur une station radio par fréquence
(uniquement possible avec télécommande)
1 Appuyez sur TUNER.
yTUNER est affiché.
2 Appuyez sur FR. D..
y_ est affiché.
3 Utilisez 1–0 pour choisir la fréquence d‘une station radio.
Remarque : Seuls les numéros valables dans la gamme de
fréquence en question du syntoniseur peuvent
être sélectionnés.
Il vous est toujours possible de régler le syntoniseur sur une
sensibilité de recherche inférieure, pour rechercher les
stations dont le signal est fort (uniquement pour FM).
1
Tournez à SOURCE SELECT pour sélectionner le syntoniseur.
yTUNER est affiché.
2 Appuyez sur SENS. du récepteur.
ySoit SENS HI ou SENS LO est affiché pendant 5 secondes.
Remarque : Lorsqu‘on recherche une station radio, la sensibilité
actuelle est affichée. Dans ce cas, SENS LO signifie
que le syntoniseur recherche uniquement les
stations radio ayant un signal puissant.
Il vous est possible de mémoriser jusqu‘à 30 stations radio. Le
récepteur peut sélectionner et programmer lui-même les
stations radio ou vous pouvez émettre votre choix particulier.
Programmation automatique
1 Sélectionnez * TUNER du menu et appuyez sur NEXT 2.
2 Sélectionnez AUTO INSTALL et appuyez sur NEXT 2.
yLe numéro présélectionné où la programmation
démarre, la fréquence et AUTO sont affichés.
3 Tournez au TUNER PRESET X pour changer le numéro
présélectionné là où la programmation doit démarrer.
4 Utilisez TUNER AM/FM pour sélectionner la fréquence
désirée.
5 Appuyez sur ENTER / OK pour démarrer la programmation.
yAUTO INSTALL clignote et toutes les stations radio
disponibles sont programmées; ceci peut durer
quelques minutes. La programmation est terminée dès
que AUTO INSTALL s‘arrête de clignoter.
Programmation manuelle
1 Sélectionnez * TUNER du menu et appuyez sur NEXT 2.
2 Sélectionnez MAN INSTALL et appuyez sur NEXT 2.
yLe numéro présélectionné, la gamme d‘onde et la
fréquence sont affichés.
3 Tournez au TUNER PRESET X pour changer le numéro
présélectionné là où la station de radio doit être mémorisée.
4 Réglez sur la station radio désirée (voir « Recherche des
stations radio »).
5 Appuyez sur ENTER / OK pour confirmer votre sélection.
ySTORED est affiché brièvement. La station radio est
programmée sur le numéro préréglé sélectionné.
6 Sélectionnez et mémorisez toutes les stations radio
désirées de la même façon.
Mémorisation des stations radio
Sélection de sensibilité FM
Syntonisation des stations radio

1 Tournez SOURCE SELECT sur TUNER pour sélectionner le
syntoniseur.
yTUNER est affiché.
2 Tournez à TUNER PRESET X pour sélectionner une station
radio présélectionnée.
y
PRESET
, le numéro présélectionné et la station sont
affichés.
Après la programmation des stations radio, peut être que
vous désirez modifier leur ordre. RESHUFFLE permet de
changer les positions des préréglages.
1 Sélectionnez * TUNER du menu et appuyez sur NEXT 2.
2 Sélectionnez RESHUFFLE et appuyez sur NEXT 2.
yPRESET, un numéro présélectionné et la station sont
affichés.
3 Tournez à TUNER PRESET X pour sélectionner une station.
4 Appuyez sur ENTER / OK pour confirmer la sélection.
yLe numéro présélectionné SWAP <-> et un second
numéro présélectionné sont affichés.
5 Tournez à TUNER PRESET X pour sélectionner l‘autre
station présélectionnée.
6 Appuyez sur ENTER / OK pour confirmer le changement.
yRESHUFFLED est affiché brièvement et ces deux
numéros présélectionnés sont alternés.
Il est également possible d‘attribuer un nom à chacune des
stations radio présélectionnées. Tous les noms de station RDS
peuvent être repris.
1 Sélectionnez * TUNER du menu et appuyez sur NEXT 2.
2 Sélectionnez GIVE NAME (donner un nom) et appuyez sur
NEXT 2.
yUne station radio présélectionnée est affichée.
3 Tournez à TUNER PRESET X pour sélectionner la station à
renommer.
4 Appuyez sur ENTER / OK pour confirmer votre sélection.
yLe nom existant ou ________ est affichée.
5 Tournez à TUNER PRESET X pour sélectionner une lettre et
NEXT 2 ou 1 PREV. pour passer à la position suivante ou
précédente.
6 Après avoir introduit le nom entier, appuyez sur ENTER / OK
pour confirmer.
ySTORED est affiché et le nom mémorisé.
Remarque : Si vous désirez utiliser à nouveau le nom de la
station RDS émise, effacez simplement le nom
donné.
1 Utilisez le menu option * TUNER, sélectionnez
GIVE NAME.
yUne station présélectionnée est affichée.
2 Tournez à X MENU NAVIGATOR pour sélectionner le nom à
effacer.
3 Appuyez sur ENTER / OK pour confirmer votre sélection.
4 Appuyez sur 1 PREV. alors que la première lettre clignote.
y CL clignote à gauche du nom de la station.
5 Appuyez sur ENTER / OK pour effacer le nom de la station.
Ou si vous changez d‘avis,
appuyez sur 1 PREV. pour maintenir le nom de la station.
Effacement des noms de station
Dénomination des stations radio
Modification des stations radio mémorisées
Syntonisation des stations radio mémorisées
44
Français
SYNTONISEUR

SYNTONISEUR
45
Radio Data System est un service qui permet aux stations FM
d‘émettre des informations supplémentaires. Si vous recevez
le signal d‘une station RDS, R et le nom de la station sont
affichés.
Passage en revue des différentes informations RDS
• Appuyez sur RADIO TEXT à plusieurs reprises sur le
récepteur pour passer aux informations suivantes (si
disponibles) :
– Messages de texte radio
– Heure RDS
– Fréquence
– Nom de l‘émetteur
Remarque : Il est possible que le signal horaire transmis à
partir des certaines stations RDS ne soit pas
toujours précis.
Vous pouvez régler la radio de telle façon que l‘écoute soit
immédiatement interrompue s‘il y a des informations ou un
radioguidage en provenance d‘un émetteur RDS. Ces
émissions ne fonctionnent que si les signaux RDS sont
diffusés en cours d‘émission.
Si les émetteurs RDS sont également dotés d‘un signal EON
(Enhanced Other Networks) EON est affiché. Ce signal ne
permet pas seulement au syntoniseur de rechercher un
émetteur RDS sélectionné, mais également le réseau EON
intégral pour les informations et le radioguidage.
1 Sélectionnez l‘émetteur RDS souhaité.
2 Appuyez sur NEWS/TA :
Une fois pour afficher NEWS, correspondant à la fonction
d‘informations.
Deux fois pour afficher TA, correspondant à la fonction de
radioguidage.
Trois fois pour afficher TA et NEWS, correspondant aux
deux fonctions précitées.
3 Sélectionnez et sollicitez n‘importe quelle autre source de
la façon habituelle.
y Si les informations ou le radioguidage sont en cours, le
récepteur passera à la fonction syntoniseur et NEWS ou
TA se met à clignoter.
4 Appuyez sur NEWS/TA jusqu‘à ce que l‘affichage
disparaisse pour mettre hors service la(les) fonction(s).
ou
Appuyez sur NEWS/TA pendant une annonce pour mettre
hors service la(les) fonction(s).
Remarque : Assurez-vous de bien mettre hors service les
informations et le radioguidage pendant
l‘enregistrement, car ceci serait également
enregistré.
Informations et radioguidage RDS
RDS R
Français

46
Français
CARACTERISTIQUES TECHNIQUES
Sujet à modifications sans avis préalable.
Généralités
Consommation de puissance (FR 984, FR 985, FR 986)....210 W
Consommation de puissance (FR 994, FR 995, FR 996)....255 W
Consommation de puissance en veille.............................< 2 W
Dimensions, l × h × p ..............................435 × 135 × 350 mm
Poids (FR 984, FR 985, FR 986).........................................8,6 kg
Poids (FR 994, FR 995, FR 996).........................................9,4 kg
Section amplificateur (0,7 % THD, 6 Ω, 1 kHz)
Puissance de sortie, mode stéréo
(FR 984, FR 985, FR 986) (DIN)....................................2 × 60 W
Puissance de sortie, mode surround (FR 984, FR 985, FR 986)
Avant.....................................................................2 × 60 W
Centrale.......................................................................60 W
Surround................................................................2 × 60 W
Puissance de sortie, mode stéréo
(FR 994, FR 995, FR 996) (DIN)..................................2 × 100 W
Puissance de sortie, mode surround (FR 994, FR 995, FR 996)
Avant...................................................................2 × 100 W
Centrale.....................................................................100 W
Surround..............................................................2 × 100 W
Graves................................................................±9 dB à 100 Hz
Aiguës................................................................±9 dB à 10 kHz
Sonorités......+6 dB à 100 Hz (-30 dB); +3 dB à 10 kHz (-30 dB)
Distorsion harmonique totale...................0,05 % à 1 kHz, 5 W
Réponse de fréquence..............................20–20 000 Hz, ±1 dB
Rapport Signal/Bruit (1kHz)...........................................≥ 82 dB
Séparation stéréo (1kHz)................................................≥ 45 dB
Parasitage.....................................................................≤ -65 dB
Entrées
Entrées linéaires.................................................250 mV/47 kΩ
6 CH....................................................................250 mV/40 kΩ
Front AV (uniquement FR 995, FR 996)...............250 mV/22 kΩ
Tourne-disque.........................................................5 mV/47 kΩ
Coaxial numérique.............................75 Ω conforme à IEC 958
Optique numérique..........................................................Toslink
Fréquence d‘échantillonnage numérique
(FR 984, FR 985, FR 986).....................32 kHz, 44,1 kHz, 48 kHz
Fréquence d‘échantillonnage numérique
(FR 994, FR 995, FR 996)........32 kHz, 44,1 kHz, 48 kHz, 96 kHz
Sorties
Sortie interactive d‘alimentation (en service)...total 100 W max.
Sorties linéaires....................................................250 mV/1 kΩ
Coaxial numérique.............................75 Ω conforme à IEC 958
Fréquences d’échantillonnage de la sortie numérique
Entrée analogique...........................................sortie 48 kHz
Entrée numérique 32 kHz................................sortie 32 kHz
Entrée numérique 44,1 kHz..........................sortie 44,1 kHz
Entrée numérique 48 kHz................................sortie 48 kHz
Entrée numérique 96 kHz
(uniquement FR 994, FR 995, FR 996).............sortie 48 kHz
Pré-sortie subwoofer................................................0,8 V/1 kΩ
Pré-sortie centre.......................................................0,8 V/1 kΩ
Ecouteurs........................................8–600 Ω (3 V f.m.e., 60 Ω)
Enceintes...........................................................................≥ 6 Ω
Section syntoniseur
Gamme de fréquence
FM..............................................................87,5–108,0 MHz
MW...............................................................531–1 602 kHz
LW....................................................................153–279 kHz
Sensibilité
Stéréo FM..................................................................41 dBf
Mono FM....................................................................15 dBf
Distorsion harmonique totale
Stéréo FM...................................................................0,3 %
Mono FM...................................................................0,85 %
Réponse de fréquence...............................63–12 500 Hz ±1 dB
Rapport Signal/Bruit
Stéréo FM....................................................................55 dB
Mono FM.....................................................................60 dB
Séparation de canal.............................................35 dB à 1 kHz
Récepteur

47
DEPISTAGE DES ANOMALIES
PROBLEME CAUSE POSSIBLE SOLUTION
L
’appareil ne marche pas Le circuit anti-surchauffe est activé. Eteignez l’appareil et laissez-le refroidir. Après
et en mode veille avoir laissé l’appareil refroidir, allumez-le de
nouveau et sélectionnez une source en faisant
SOURCE SELECT ou en appuyant sur une touche
source sur la télécommande.
Pas de son Le VOLUME n‘est pas réglé correctement. Réglez le VOLUME.
Ecouteurs branchés. Débranchez les écouteurs.
La source incorrecte a été sélectionnée. Tournez SOURCE SELECT pour sélectionner la
bonne source.
Aucun son n‘est audible Une des enceintes est mal branchée. Branchez l‘enceinte correctement.
du côté gauche ou du côté
Un fil d‘enceinte est endommagé. Remplacez le fil.
droit
La commande de balance de volume dans Réglez VOL FRONT-L et VOL FRONT-R
le menu de récepteur est mal réglée. dans le menu de récepteur.
Son insuffisant ou absence Le mode SURROUND n‘est pas activé. Appuyez sur SURROUND ON/OFF pour
de son dans les enceintes mettre l‘équipement en mode surround.
centrale ou surround
Les enceintes surround et/ou Branchez les enceintes correctement.
centrale ne sont pas (bien) branchées.
Les enceintes surround et/ou centrale ont Sélectionnez YES pour les enceintes présentes.
été activées dans le menu SPEAKR SETUP.
Un fil d‘enceinte est endommagé. Remplacez le fil.
Les graves sont mauvaises Les enceintes ne sont pas en phase.
Branchez les enceintes correctement en reliant les
fils colorés (ou référencés) aux borne
colorées
et
les fils noirs (ou non référencés) aux bornes noires.
Mauvais son Mauvais réglage pour le type de musique Modifiez les réglages sonores sur le récepteur.
ou de son émis.
Le niveau du son surround Le niveau de son surround n‘est pas bien réglé.Réglez le niveau du son surround au niveau du
est trop faible ou trop fort récepteur.
Le niveau du son central Le niveau du son central n‘est pas bien réglé.Réglez le niveau du canal central au niveau du
est trop faible ou trop fort récepteur.
Seule l‘enceinte centrale Un signal mono est reproduit. Sélectionnez une source de son différente
est audible en Dolby ou désactivez le son surround.
Surround Pro Logic
Mauvaise réception radio,
Le récepteur ou l‘antenne sont positionnés
Modifiez la position de l‘unité interférant
programmation
tout
près d‘une source d‘émission par exemple ou essayez de la mettre hors service.
automatique ne fonctionne téléviseur, lecteur CD, enregistreur CD,
pas adéquatement lecteur DVD, etc.
Pas d’enregistrement La fréquence d’échantillonnage n’est pas Assurez-vous que l’enregistreur numérique puisse
numérique possible par acceptée par l’enregistreur numérique. traiter des fréquences d’échantillonnage comprises
la sortie numérique entre 32 et 48 kHz, ou procédez à l’enregistrement
par la sortie analogique.
L’ensemble de Le lecteur de DVD ne fournit pas d’informations Enregistrez chaque piste individuellement ou utilisez
l’enregistrement se présente relatives aux pistes. l’option « manual track increment
»
de l’enregistreur.
comme une seule piste en
cas d’enregistrement
à partir d’un DVD
AVERTISSEMENT
Ne tentez jamais de réparer quoique ce soit vous-
même, ceci annulerait votre garantie. N‘ouvrez pas
l‘équipement au risque de chocs électriques.
Dans le cas d'une anomalie de fonctionnement, commencez
par vérifier les points ci-dessous avant de donner votre
appareil à réparer.
Si vous ne parvenez pas à résoudre le problème en suivant
ces instructions, veuillez consulter votre fournisseur ou votre
centre SAV.
Français

INFORMACIÓN GENERAL
48
Este receptor viene acompañado de los siguientes componentes:
– Un mando a distancia
– 2 pilas para el mando a distancia, tamaño AA
– Un cable digital para conexión de audio con un reproductor
de DVD
–
Un cable de sistema en bus para la conexión de CINEMA LINK
– Una antena de cuadro
– Una antena alámbrica
– Este manual de instrucciones
Si ha colocado los componentes de su sistema uno
encima de otro, el receptor deberá ponerlo en la parte
de arriba. Coloque el receptor en una superficie lisa,
firme y estable. No cubra ninguna de las ranuras de
ventilación y deje 50 cms. de distancia libre por
encima y 10 cms. a la izquierda y a la derecha del
receptor para permitir una ventilación adecuada.
Para obtener una recepción buena, la antena de cuadro no
debe situarse encima o al lado de VCRs, grabadores de CD,
reproductores DVD, televisores u otras fuentes de radiación.
Se ha prescindido de cualquier material de embalaje
innecesario. Hemos puesto el mayor empeño para que el
embalaje sea fácilmente separable en tres materiales: cartón
(caja), poliestireno expandible (amortiguación) y polietileno
(bolsas, plancha protectora de espuma).
Los materiales que componen el equipo se pueden reciclar y
reutilizar si son desmontados por una empresa especializada.
Observe las normas locales concernientes a la eliminación de los
materiales de embalaje, pilas usadas y equipos desechables.
Fabricado con autorización de Dolby Laboratories. «DOLBY»,
«DOLBY DIGITAL», «PRO LOGIC» y el símbolo de doble-D 2
son marcas registradas de Dolby Laboratories. Trabajos
confidenciales y no publicados. © 1992–1997 Dolby
Laboratories. Todos los derechos reservados.
«DTS» y «DTS Digital Surround» son marcas comerciales de
Digital Theater Systems, Inc. Copyright 1996 de Theater
Systems. Inc. Reservados todos los derechos.
Limpie el receptor con un paño suave
ligeramente humedecido y sin
pelusas. No utilice productos de
limpieza que puedan tener un efecto
corrosivo.
No exponga el receptor a la humedad,
lluvia, arena o calor excesivo (causado
por sistemas calefactores o exposición
directa a la luz solar).
Mantenimiento
Reconocimiento de marcas registradas
Información medioambiental
Configuración
Lista de componentes
Información general
Lista de componentes......................................................................48
Configuración...................................................................................48
Información medioambiental...........................................................48
Reconocimiento de marcas registradas..........................................48
Mantenimiento.................................................................................48
Controles.............................................................................................49
Mando a distancia
Utilización del mando a distancia ...................................................50
Botones del mando a distancia.......................................................51
Programación del mando a distancia Universal
(sólo con FR 985, FR 986, FR 995, FR 996)........................................52
Conectores..........................................................................................53
Conexiones
Conexiones de audio analógicas.....................................................54
Conexiones de audio digitales.........................................................54
Sistema de control en bus, CINEMA LINK......................................55
Conexiones de vídeo........................................................................55
Alimentación....................................................................................56
Capacidad de potencia ....................................................................56
Conexiones de los altavoces...........................................................56
El TV como altavoz central ..............................................................56
Conexiones de las antenas..............................................................56
Auriculares.......................................................................................56
Configuración del sistema
Emplazamiento de los altavoces.....................................................57
Configuración y prueba de los altavoces........................................57
Ajuste del receptor..........................................................................57
Pantalla...............................................................................................58
Menús
Menú del receptor.....................................................................59–60
Menú del TV.....................................................................................60
Activado de CINEMA LINK..............................................................60
Selección de fuente
SOURCE SELECT...............................................................................61
Selección 6 CHANNEL-DVD/SACD INPUT......................................61
Para reasignar una selección de fuente..........................................61
Utilización de una selección de fuente para dos o más aparatos...61
Acerca de 6 CHANNEL-DVD/SACD INPUT......................................61
Reproducción, Grabación
Reproducción de una fuente............................................................62
Ajuste del sonido.............................................................................62
Grabación de una fuente.................................................................62
Grabación de la salida digital..........................................................62
Sonido envolvente
Acerca del sonido envolvente..........................................................63
Activación del sonido envolvente....................................................63
Ajustes del sonido envolvente.........................................................64
Sintonizador
Para sintonizar las emisoras de radio.............................................65
Activación de la sensibilidad FM ....................................................65
Almacenamiento de emisoras de radio...........................................65
Para sintonizar con emisoras almacenadas....................................66
Para reordenar emisoras de radio almacenadas.............................66
Para asignar un nombre a una emisora...........................................66
Para borrar los nombres de las emisoras........................................66
RDS R..............................................................................................67
RDS noticias y información de tráfico.............................................67
Datos técnicos
Receptor...........................................................................................68
Solución de problemas
Advertencia......................................................................................69
Solución de problemas....................................................................69
Español
Este reproductor cumple las normas para interferencias
de radio establecidas por la Comunidad Europea.
Como socio de ENERGY STAR
®
, Philips ha establecido que
este producto cumple las directrices de
ENERGY STAR
®
sobre rendimiento energético.

CONTROLES
49
1 POWER / STANDBY.......Enciende/apaga el receptor.
2 CINEMA LINK................Activa/desactiva el sistema de
control en bus entre el receptor
y el televisor.
3 ..........................................Detector para el mando a
distancia de infrarrojos.
4 VIRTUAL..........................Luz de control para sonido
ambiental virtual.
5 HALL................................Indicación luminosa de control
de HALL.
6 ..........................................Pantalla
7 SOURCE SELECT............Selecciona los diversos
conectores de audio y vídeo.
Reactiva el receptor del modo de
espera.
8 VOLUME..........................Aumenta o disminuye el nivel de
volumen.
9 FRONT AV.......................Selecciona la entrada FRONT AV/
GAME (sólo con FR 995, FR 996).
0 TREBLE............................Ajusta los agudos cuando se
utiliza VOLUME.
! BASS...............................Ajusta los graves cuando se
utiliza VOLUME.
@ LOUDNESS.....................Activa/desactiva LOUDNESS.
# NEXT 2 ...........................TUNER: Busca las emisoras de
radio.
MENU: Pasa al siguiente nivel
del menú.
$ ENTER / OK.....................Confirma los valores
seleccionados del menú.
% TUNER PRESET X MENU NAVIGATOR
TUNER: Selecciona la emisora
presintonizada anterior/posterior.
MENU: Se mueve hacia arriba o
hacia abajo en el menú.
^ 1 PREV. / EXIT...............TUNER: Busca las emisoras.
MENU: Pasa al nivel anterior del
menú.
& SETUP MENU ................Activa/desactiva el menú.
* SENS. ..............................Selector de sensibilidad baja o
alta del sintonizador.
( NEWS/TA........................Activa o desactiva las funciones
de noticias RDS y la información
de tráfico RDS.
) TUNER AM/FM..............Selector de bandas del
sintonizador.
¡ RADIO TEXT...................Repasa los diferentes tipos de
información RDS.
™ SURR. MODE..................Cambia entre las diferentes
configuraciones del altavoz.
£ VIRTUAL MODE.............Cambia entre los distinos modos
de sonido ambiental virtual.
≤ SURROUND ON/OFF.....Cambia entre los últimos modos
ambiental y estéreo
seleccionados.
T
A
1 234 56 7
8
9
0
!
@#$%^&*()¡™£≤
Español

MANDO A DISTANCIA
50
Abra el compartimento de las
pilas del mando a distancia e
introduzca 2 pilas alcalinas, tipo
AA (R06, UM-3).
Si las pilas están desgastadas o
no va a utilizar el mando a
distancia durante un largo
período, extráigalas del compartimento.
Las pilas contienen sustancias químicas peligrosas,
cuando las vaya a tirar, hágalo conforme a la
normativa vigente.
Los botones del mando a distancia funcionan de la misma
manera que los correspondientes en el receptor.
¡Importante!
Debe pulsar un botón de origen durante más de 1 segundo
para cambiar el origen del sonido en el receptor. Si lo pulsa
durante un tiempo inferior a 1 segundo, sólo cambiará para
que el mando a distancia utilice los comandos del producto
seleccionado.
El mando a distancia permanece sintonizado con la fuente
seleccionada hasta que se pulse otra fuente diferente. Esto
permite utilizar fuentes adicionales (p. ej. el rebobinado de
una cinta) sin necesidad de cambiar de fuente en el receptor.
Utilización del mando a distancia
Español
DVD
2
H
AA
TV
Ç
É
MENU
OK
GUIDE
NEWS/TA
5
1
3
2
4
6
7
9
8
0
MUTE
TUNER
CD CDR/TAPE
DVD
SAT
VCR
TV
PHONO
CABLE BOX
REC CANCEL FR.D. INDEX
íë
CHANNEL/TRACK LOUDNESS
VIRTUALNIGHT
DISC
SURROUND
SURROUND
SUBW.
T-C
Å
+
-
+
-
REAR
CHANNEL
SUB WOOFER
TEST TONE
ON/
OFF
AUDIO
ON/
OFF
MODE
MODE
CINEMA GO

MANDO A DISTANCIA
51
H MUTE .....................Anula el sonido del receptor en todos
los modos, excepto el de TV.
Anula el sonido del equipo de TV
Philips, si el mando a distancia está
en modo TV.
2 ................................Cambia el origen seleccionado en el
mando a distancia (p. ej., VCR o TV) al
modo de espera.
Cuando se pulsa durante más de
2 segundos, el receptor cambia al
modo de espera.
PHONO, TUNER, CD,
CDR/TAPE, TV,
VCR, SAT, DVD..............Cambia en el mando a distancia las
órdenes para manejar cada uno de los
aparatos. Selecciona los orígenes si se
pulsa durante más de 1 segundo. SAT
solamente funciona con receptores de
satélite digitales.
Reactiva el receptor del modo de
espera.
1–0...............................Para teclear los números de las pistas,
emisoras o frecuencias. Los números
de dos dígitos deberán teclearse antes
de que pasen 2 segundos.
CINEMA GO..........
Activa CINEMA LINK en el TV.
CABLE BOX...................Sin función.
MENU GUIDE ..............TUNER: Activa y desactiva el menú
del receptor.
DVD, TV: Activa y desactiva el menú
DVD/TV.
OK.................................Confirma las opciones del menú.
Botones de flecha........TUNER: Se desplaza por los menús.
Las flechas derecha/izquierda son para
sintonizar hacia arriba o hacia abajo.
CD, CDR: Las flechas izquierda/derecha
son para la búsqueda hacia atrás o
hacia adelante, las flechas arriba/abajo
son para seleccionar la pista
siguiente/anterior.
+A...........................Aumenta el volumen del receptor.
-A...........................Disminuye el volumen del receptor.
i NEWS/TA.................Activa/desactiva las funciones NEWS
y TRAFFIC ANNOUNCEMENT.
TV: Activa/desactiva el teletexto.
SAT: Activa/desactiva el texto de
información.
ÉATV......................Aumenta el volumen del televisor.
CD, CDR, VCR, DVD: Inicia la
reproducción.
ÇATV......................Disminuye el volumen del televisor.
CD, CDR, VCR, DVD: Detiene la
reproducción.
í
CHANNEL/TRACK
...Selecciona la emisora presintonizada
anterior.
VCR: Rebobina la cinta.
CD, CDR, DVD: Selecciona la pista
anterior.
TV: Selecciona el canal anterior.
ë
CHANNEL/TRACK
...Selecciona la siguiente emisora
presintonizada.
VCR: Avanza rápidamente la cinta.
CD, CDR, DVD: Selecciona la pista
siguiente.
TV: Selecciona el canal siguiente.
LOUDNESS...................Activa/desactiva LOUDNESS.
SUBW. ON/OFF ............Enciende y apaga el subaltavoz para
bajas frecuencias.
REC, DVD AUDIO..........CDR, VCR: Inicia la grabación.
DVD: Selecciona las pistas de audio.
CANCEL, DVD ...........CD, CDR, SAT, VCR: Borra un
programa, cancela las selecciones.
DVD: Selecciona el ángulo de visión.
FR.D., DVD Å .............TUNER: Selecciona FREQUENCY
DIRECT
.
CD, CDR, VCR, DVD: Interrumpe la
reproducción.
INDEX, DVD T-C............VCR: Activa/desactiva la búsqueda
del índice.
SAT: Activa/desactiva los temas.
DVD: Selecciona el título o el capítulo.
DISC..............................CD-, CDR-, Cambiadores-DVD:
Selecciona el disco siguiente.
NIGHT...........................Activa/desactiva NIGHT MODE.
VIRTUAL MODE............Se desplaza a través de los distintos
modos de sonido ambiental virtual.
SURROUND ON/OFF....Activa/desactiva SURROUND SOUND.
+/- SUBWOOFER...Aumenta/disminuye el volumen del
subwoofer.
+/- REAR ...............Aumenta/disminuye el volumen de los
altavoces posteriores. Cuando utilice la
prueba de sonido (test tone) se puede
aumentar o disminuir con estos botones
el volumen de los altavoces que está
probando.
SURROUND MODE.......Realiza un rastreo por los diferentes
modos de sonido envolvente.
TEST TONE...................Activa/desactiva la prueba de sonido.
Cuando esté utilizando la prueba de
sonido se puede aumentar/disminuir
el volumen de los altavoces que esté
probando con +/- REAR.
Botones del mando a distancia
Español

MANDO A DISTANCIA
52
Se puede identificar este mando por la inscripción
Multibrand/Universal.
El mando a distancia Universal deberá programarse para utilizar
los códigos de las diferentes marcas de aparatos. Esto se
realiza por medio de la introducción de un código de 4 dígitos o
realizando una búsqueda de códigos hasta que se encuentre el
correcto. Recomendamos la utilización del código de 4 dígitos.
Es el método más rápido y el más seguro. El método de
búsqueda de códigos deberá utilizarse únicamente si no puede
encontrar el código correspondiente a su aparato. La tabla de
códigos se encuentra al final del manual.
¡Importante!
Para la programación se deberán utilizar los botones del
mando a distancia, no los del receptor o los de otros aparatos.
Programación con el código de 4-dígitos
1 Mantenga pulsados el botón de fuente del aparato que
desea manejar y 2 durante 3 segundos.
2 Teclee el código de 4 dígitos del aparato (tabla de códigos
al final del manual).
Advertencias: – Si se introducen más de 4 dígitos, el mando
a distancia aceptará sólo los cuatro primeros.
– Si no introduce ningún código durante
30 segundos, el mando a distancia desactivará
la función de programación sin cambiar el
código ya existente.
– Para programar un aparato nuevo, simplemente
escriba el código nuevo sobre el antiguo.
Búsqueda en la tabla de códigos
1 Encienda el aparato que desea manejar.
2 Mantenga pulsados el botón de fuente del aparato que
desea manejar y 2 durante 3 segundos.
3 Pulse y suelte de nuevo 2.
yEl mando a distancia envía los códigos de «canal arriba»
o de espera dependiendo de la fuente que se haya
seleccionado para cada una de las marcas de aparatos.
4 Tan pronto como el aparato responda – cambie al próximo
canal o se ponga en espera – suelte el botón 2 para
confirmar el código.
ySe utilizará el código identificado.
•
Si el aparato no responde en 2 minutos, significa que el código
de ese aparato no está almacenado en la memoria del mando
a distancia. El código del mando a distancia no cambiará.
Advertencia: Si extrae las pilas del mando a distancia durante
más de 1 minuto, tendrá que programar los
códigos de nuevo.
Una vez que haya encontrado y comprobado los códigos de
cada uno de los aparatos, puede anotarlos aquí abajo.
PHONO..........................................
TUNER...........................................
CD .................................................
CDR/TAPE .....................................
TV..................................................
VCR ...............................................
SAT................................................
DVD...............................................
Para reajustar el mando a distancia
1 Mantenga pulsados uno de los botones de fuente y 2
durante 3 segundos.
2 Introduzca el código de 3 dígitos 981.
yEl mando a distancia está ahora reajustado con todos
los códigos originales Philips.
Programación del mando a distancia Universal
(sólo con FR 985, FR 986, FR 995, FR 996)
Español

CONECTORES
53
Conectores Nombre del conector Conexiones
Toma de auriculares de 1 PHONES Para la toma de auriculares de 6,3 mm en la parte frontal.
6,3 mm en la parte frontal.
Entradas de audio y vídeo 2 FRONT AV / GAME Enchufes de salida de audio izquierdo y derecho para aparatos
de la parte frontal como cámaras de vídeo y consolas de videojuegos.
(sólo con FR 995, FR 996).
3 FRONT AV / GAME Enchufes de salida de vídeo para aparatos como cámaras de vídeo
y consolas de videojuegos.
FRONT SPEAKERS 4 R, L Para los altavoces frontales izquierdo y derecho.
5 CENTER Para el altavoz central.
SURROUND SPEAKERS 6 R, L Para los altavoces envolventes izquierdo y derecho.
AUDIO IN/OUT 8 CDR/TAPE OUT Para la entrada de una grabadora de CD o una platina de cintas.
9 CDR/TAPE IN Para la salida de una grabadora de CD o una platina de cintas.
0 CD IN Para la salida de un reproductor de CD.
! SAT IN Para la salida de un sistema de satélite.
@ VCR OUT Para la entrada de una grabadora de vídeo.
# VCR IN Para la salida de una grabadora de vídeo.
$ TV IN Para la salida del televisor.
% PHONO IN Para la salida de un giradiscos de bobina MM.
¡ PHONO GND f Cable a tierra del giradiscos.
Entrada de 6-canales ^
6CHANNEL/ DVDINPUT
Para la salida de 6-canales de aparatos como DVD o reproductores
de discos láser.
DIGITAL AUDIO IN/OUT & COAX 1 IN Para la salida coaxial de aparatos digitales (entrada predeterminada
para fuentes de DVD).
* COAX 2 IN Para la salida coaxial de aparatos digitales.
( COAX OUT
Para la entrada coaxial de aparatos digitales como grabadoras de CD o MD.
) OPTICAL IN Para la salida óptica de aparatos digitales como reproductores DVD,
reproductores de CD, grabadoras de CD o reproductores MD
(sólo con FR 984, FR 985, FR 986, FR 994).
) OPTICAL 1 (2) IN
Para la salida óptica de aparatos digitales como reproductores DVD, reproductores
de CD, grabadoras de CD o reproductores MD (sólo con FR 995, FR 996).
VIDEO IN/OUT ™S-VIDEO Entradas y salidas de vídeo S para aparatos de vídeo para obtener
una mejor calidad de vídeo (sólo con FR 994, FR 995, FR 996).
£ DVD IN Para la salida de un reproductor DVD.
≤ MON OUT Para la entrada de un monitor (p. ej. de TV).
§ VCR IN Para la salida de una grabadora de vídeo.
≥ VCR OUT Para la entrada de una grabadora de vídeo (para la grabación).
ª SAT IN Para la salida de un sistema satélite.
Conectores de antena ∞ AM LOOP Para la antena de cuadro incluida.
• FM 75 Ω Para la antena alámbrica incluida o antena exterior.
Salidas preamplificadas 7 CENTER PRE-OUT
Para la entrada de un televisor cuando se utiliza como altavoz central (es
posible sólo cuando se tiene conectado un sistema en bus CINEMA LINK).
º
SUBWOOFER PRE-OUT
Para la entrada de un subwoofer activo.
Sistema de control en bus ⁄ CINEMA LINK Para salidas del Sistema de control en bus de un televisor Philips
con CINEMA LINK.
Para salidas de alimentación ¤ AC OUTLET Aplica el mismo voltaje que el de la red de alimentación. Se permite
(no en todas las versiones) una carga de hasta 100 W en total.
Cable de alimentación ‹ Después de efectuar todas las conexiones, conecte el cable de
alimentación al enchufe mural.
Español
ANTENNA
FM 75 Ω
A
M
L
O
O
P
VIDEO IN/OUT
C
A
U
TIO
N
R
IS
K
O
F
E
L
E
C
T
R
IC
S
H
O
C
K
D
O
N
O
T
O
P
E
N
AVIS
RISQUE DE CHOC ELECTRIQUE
NE P
AS OUVRIR
D
e
s
i
g
n
e
d
a
n
d
d
e
v
e
l
o
p
e
d
b
y
P
h
i
l
i
p
s
i
nt
h
e
E
u
r
o
p
e
a
n
C
o
m
m
u
n
i
t
y
.
M
a
n
u
f
a
c
t
u
r
e
d
u
n
d
e
r
l
i
c
e
n
s
e
f
r
o
m
D
o
l
b
y
L
a
b
o
r
a
t
o
r
i
e
s
.
”
D
O
L
B
Y
“
,
”
D
O
L
B
Y
D
I
G
I
T
A
L
“
,
”
P
R
O
L
O
G
I
C
“
a
n
d
t
h
e
d
o
u
b
l
e
-
D
S
y
m
b
o
l
a
r
e
t
r
a
d
e
m
a
r
k
s
o
f
D
o
l
b
y
L
a
b
o
r
a
t
o
r
i
e
s
.
C
o
n
f
i
d
e
n
t
i
a
l
U
n
p
u
b
l
i
s
h
e
d
W
o
r
k
s
.
©
1
9
9
2
–
1
9
9
7
D
o
l
b
y
L
a
b
o
r
a
t
o
r
i
e
s
.
A
l
l
r
i
g
h
t
s
r
e
s
e
r
v
e
d
.
M
a
n
u
f
a
c
t
u
r
e
d
u
n
d
e
r
l
i
c
e
n
s
e
f
r
o
m
D
i
g
i
t
a
l
T
h
e
a
t
e
r
S
y
s
t
e
m
s
.
I
n
c
.
U
S
P
a
t
.
N
o
.
5
,
4
5
1
,
9
4
2
a
n
d
o
t
h
e
r
w
o
r
l
d
-
w
i
d
e
p
a
t
e
n
t
s
i
s
s
u
e
d
a
n
d
p
e
n
d
i
n
g
.
”
D
T
S
“
a
n
d
”
D
T
S
D
i
g
i
t
a
l
S
u
r
r
o
u
n
d
“
a
r
e
t
r
a
d
e
m
a
r
k
s
o
f
D
i
g
i
t
a
l
T
h
e
a
t
e
r
S
y
s
t
e
m
s
,
I
n
c
.
C
o
p
y
r
i
g
h
t
1
9
9
6
D
i
g
i
t
a
l
T
h
e
a
t
e
r
S
y
s
t
e
m
s
,
I
n
c
.
A
l
l
R
i
g
h
t
s
R
e
s
e
r
v
e
d
.
SURROUND
SPEAKERS
L
E
A
C
H
S
P
E
A
K
E
R
≥ 6
Ω
R
R
L
F
R
O
N
T
S
P
E
A
K
E
R
S
E
A
C
H
S
P
E
A
K
E
R
≥
6
Ω
PHONO GND.
C
E
N
T
E
R
IN
PLA
Y
IN
IN
OUT
REC
IN
PLA
Y
OUT
REC
C
O
A
X
O
U
T
D
IG
I
T
A
L
A
U
D
IO
I
N
/
O
U
T
O
P
T
IC
A
L
1
IN
C
O
A
X
2
IN
PHONO
VCRTV
SA
T
CD
CDR/T
APE
AUDIO IN/OUT
IN
IN
P
R
E
-O
U
T
C
E
N
T
ER
OUT
REC
IN
PLA
Y
DVD
IN
MON
OUT
VCR
SAT
IN
S
U
B
W
O
O
F
E
R
P
R
E
-
O
U
T
C
IN
E
M
A
L
IN
K
ANTENNA
A
M
L
O
O
P
O
P
T
IC
A
L
2
IN
CENTER
SUBW
.
6 CHANNEL/
DVD INPUT
C
O
A
X
1
IN
L
R
S-VIDEO
DVD
MON
VCR
SAT
VCR
OUT
IN
TO
T
AL
100
W
M
A
X. SW
ITC
H
ED
A
C O
U
TL
E
T
4567890!@#$
¤‹
⁄
%^
&
*
(
)
¡
™£≤∞§≥•ªº
12
3

CONEXIONES
54
Español
Conexiones de audio digitales
Conexiones de audio analógicas
DIGITAL
AUDIO
IN/OUT
PHONO
VCRTV SAT CD CDR/TAPE
AUDIO IN/OUT
IN IN
IN
PLAY
OUT
REC
IN IN
IN
PLAY
OUT
REC
PRE-OUT
CENTER
CAUTION
RISK OF ELECTRIC SHOCK
DO NOT OPEN
AVIS
RISQUE DE CHOC ELECTRIQUE
NE PAS OUVRIR
PHONO GND.
SURROUND
SPEAKERS
R
L
EACH SPEAKER ≥ 6 Ω
CENTER
R L
FRONT
SPEAKERS
EACH SPEAKER ≥ 6 Ω
AM LOOP
DVD
IN
MON
OUT
VCR
SAT
IN
PRE-OUT
CINEMA
LINK
SUBWOOFER
IN
PLAY
OUT
REC
OPTICAL 1
IN
COAX
OUT
COAX 2
IN
R
L
SURR.
CENTER SUBW.
FRONT
6 CHANNEL /
DVD INPUT
OPTICAL 2
IN
COAX 1
IN
Designed and developed by Philips in the European
Community.
Manufactured under license from Dolby Laboratories.
”DOLBY“, ”DOLBY DIGITAL“, ”PRO LOGIC“ and the
double-D Symbol are trademarks of Dolby
Laboratories. Confidential Unpublished Works.
©1992–1997 Dolby Laboratories. All rights reserved.
Manufactured under license from Digital Theater
Systems. Inc. US Pat. No. 5,451,942 and other world-
wide patents issued and pending. ”DTS“ and ”DTS
Digital Surround“ are trademarks of Digital Theater
Systems, Inc. Copyright 1996 Digital Theater Systems,
Inc. All Rights Reserved.
2
VIDEO IN/OUT
S-VIDEO
DVD MON SAT
VCRVCR
IN OUT
ANTENNA
FM 75 Ω
DVD PLAYER
CD RECORDER
CD PLAYER
Algunos aparatos poseen conectores analógicos y digitales.
Siempre que sea posible utilice la conexión digital; obtendrá
una calidad mejor de sonido. Para aprender a utilizar los
conectores digitales del receptor vea «Para reasignar una
selección de fuente».
Se necesita un desmodulador AC-3 RF opcional para utilizar Dolby
Digital Laserdisc, ya que las señales de salida son diferentes.
DTS Digital Surround
TM
es un formato de audio digital discreto
de 5.1 canales disponible en software CD, LD y DVD que, en
consecuencia, no se puede descodificar y reproducir en la
mayoría de los reproductores de CD, LD o DVD. Por este motivo,
cuando se reproduce el software codificado DTS mediante las
salidas analógicas de CD, LD o DVD, se producirá un ruido
excesivo. Para evitar que se produzcan daños en el sistema de
audio, el cliente debe tomar las debidas precauciones, si están
conectados los sistemas de salida analógicos directamente
al receptor.
Para disfrutar de las reproducciones DTS Digital Surround
TM
, hay
que conectar un reproductor compatible con DTS a una de las
entradas digitales del receptor.
DIGITAL
AUDIO
IN/OUT
PHONO VCRTV SAT CD CDR/TAPE
AUDIO IN/OUT
IN
IN
IN
PLAY
OUT
REC
IN IN
IN
PLAY
OUT
REC
PRE-OUT
CENTER
CAUTION
RISK OF ELECTRIC SHOCK
DO NOT OPEN
AVIS
RISQUE DE CHOC ELECTRIQUE
NE PAS OUVRIR
Designed and developed by Philips in the European
Community.
Manufactured under license from DolbyLaboratories.
”DOLBY“, ” DOLBY DIGITAL“, ” PRO LOGIC“ and the
double-D Symbol are trademarks of Dolby
Laboratories. Confidential Unpublished Works.
©1992–1997 Dolby Laboratories. All rights reserved.
Manufactured under license from Digital Theater
Systems. Inc. US Pat. No. 5,451,942 and other world-
wide patents issued and pending. ” DTS“ and ”DTS
Digital Surround“ are trademarks of Digital Theater
Systems, Inc. Copyright 1996 Digital Theater Systems,
Inc. All Rights Reserved.
PHONO GND.
SURROUND
SPEAKERS
R
L
EACH SPEAKER ≥ 6 Ω
CENTER
R L
FRONT
SPEAKERS
EACH SPEAKER ≥ 6 Ω
AM LOOP
VIDEO IN/OUT
DVD
IN
MON
OUT
VCR
SAT
IN
PRE-OUT
CINEMA
LINK
SUBWOOFER
S-VIDEO
DVD MON SAT
VCR
VCR
IN
PLAY
OUT
REC
IN OUT
OPTICAL 1
IN
COAX
OUT
COAX 2
IN
R
L
SURR.
CENTER SUBW.
FRONT
6 CHANNEL /
DVD INPUT
OPTICAL 2
IN
COAX 1
IN
FM 75 Ω
ANTENNA
AUDIO
OUT
TURNTABLE
AUDIO IN
AUDIO OUT
IN
OUT
VCR
SAT RECEIVER
CD RECORDER
CD PLAYER
MONITOR / TV
POWERED
SUBWOOFER

CONEXIONES
55
Español
Sistema de control en bus, CINEMA LINK
Conexiones de vídeo
Si el receptor y la TV Philips (o incluso mejor, añadiendo un
reproductor de vídeo o de DVD Philips) con Cinemalink están
conectados con el control de barra del sistema CINEMA
LINK, se ofrecen beneficios extras para el sistema:
– Cuando inicie una fuente, el sistema selecciona
automáticamente esa entrada.
– Se puede controlar el sistema por medio de la pantalla del
televisor. Independientemente del idioma del televisor, Vd.
puede elegir el idioma que prefiera.
– El televisor puede hacer las veces de altavoz central del
sistema, haciendo innecesario el uso de un altavoz central.
(El cable A debe comprarse aparte).
– Puede poner en espera todo el sistema pulsando el botón
de puesta en espera en el mando a distancia.
DIGITAL
AUDIO
IN/OUT
PHONO
VCRTV SAT CD
CDR/TAPE
AUDIO IN/OUT
IN IN
IN
PLAY
OUT
REC
IN IN
IN
PLAY
OUT
REC
PRE-OUT
CENTER
CAUTION
RISK OF ELECTRIC SHOCK
DO NOT OPEN
AVIS
RISQUE DE CHOC ELECTRIQUE
NE PAS OUVRIR
Designed and developed by Philips in the European
Community.
Manufactured under license from DolbyLaboratories.
”DOLBY“, ” DOLBY DIGITAL“, ” PRO LOGIC“ and the
double-D Symbol are trademarks of Dolby
Laboratories. Confidential Unpublished Works.
©1992–1997 Dolby Laboratories. All rights reserved.
Manufactured under license from Digital Theater
Systems. Inc. US Pat. No. 5,451,942 and other world-
wide patents issued and pending. ” DTS“ and ”DTS
Digital Surround“ are trademarks of Digital Theater
Systems, Inc. Copyright 1996 Digital Theater Systems,
Inc. All Rights Reserved.
PHONO GND.
SURROUND
SPEAKERS
R
L
EACH SPEAKER ≥ 6 Ω
CENTER
R L
FRONT
SPEAKERS
EACH SPEAKER ≥ 6 Ω
AM LOOP
VIDEO IN/OUT
DVD
IN
MON
OUT
VCR
SAT
IN
PRE-OUT
CINEMA
LINK
SUBWOOFER
S-VIDEO
DVD MON SAT
VCRVCR
IN
PLAY
OUT
REC
IN OUT
OPTICAL 1
IN
COAX
OUT
COAX 2
IN
R
L
SURR.
CENTER SUBW.
FRONT
6 CHANNEL /
DVD INPUT
OPTICAL 2
IN
COAX 1
IN
FM 75 Ω
ANTENNA
TO TV IN
TO VCR IN
TV
AUX
EXT 1 EXT 2 EXT 3
DVD PLAYER
VCR
TV
DIGIT
AL
OUT
CINEMA LINK
A
optional
(TV = CENTER)
DIGITAL
AUDIO
IN/OUT
PHONO VCRTV SAT CD CDR/TAPE
AUDIO IN/OUT
IN IN
IN
PLAY
OUT
REC
IN IN
IN
PLAY
OUT
REC
PRE-OUT
CENTER
CAUTION
RISK OF ELECTRIC SHOCK
DO NOT OPEN
AVIS
RISQUE DE CHOC ELECTRIQUE
NE PAS OUVRIR
Designed and developed by Philips in the European
Community.
Manufactured under license from DolbyLaboratories.
”DOLBY“, ”DOLBY DIGITAL“, ”PRO LOGIC“ and the
double-D Symbol are trademarks of Dolby
Laboratories. Confidential Unpublished Works.
©1992–1997 Dolby Laboratories. All rights reserved.
Manufactured under license from Digital Theater
Systems. Inc. US Pat. No. 5,451,942 and other world-
wide patents issued and pending. ”DTS“ and ”DTS
Digital Surround“ are trademarks of Digital Theater
Systems, Inc. Copyright 1996 Digital Theater Systems,
Inc. All Rights Reserved.
PHONO GND.
SURROUND
SPEAKERS
R
L
EACH SPEAKER ≥ 6 Ω
CENTER
R L
FRONT
SPEAKERS
EACH SPEAKER ≥ 6 Ω
AM LOOP
VIDEO IN/OUT
DVD
IN
MON
OUT
VCR
SAT
IN
PRE-OUT
CINEMA
LINK
SUBWOOFER
S-VIDEO
DVD MON SAT
VCR
VCR
IN
PLAY
OUT
REC
IN OUT
OPTICAL 1
IN
COAX
OUT
COAX 2
IN
R
L
SURR.
CENTER SUBW.
FRONT
6 CHANNEL /
DVD INPUT
OPTICAL 2
IN
COAX 1
IN
FM 75 Ω
ANTENNA
DVD PLAYER
MONITOR / TV
VIDEO IN
VIDEO OUT
VCR
SAT RECEIVER

CONEXIONES
56
La placa tipo está situada en la parte posterior del
receptor.
1 Compruebe que la tensión indicada en la placa tipo
corresponde con el voltaje de la red local. De lo contrario,
consulte con su distribuidor u organización de servicio
2 Conecte el cable de alimentación al enchufe mural.
Para desconectar por completo el equipo de la red, retirar el
conector de la toma de red de la pared.
Si se utiliza el receptor con el volumen demasiado alto, se
pueden producir distorsiones que causen daño a los altavoces.
En caso de distorsiones, reduzca el volumen y los controles de
tono a un nivel razonable.
Para evitar el recalentamiento del aparato, hay un
circuito de seguridad incorporado. Por lo tanto su
aparato puede apagarse bajo condiciones extremas. Si
esto ocurre, desconecte el aparato y espere hasta que
se enfrie antes de volver a usarlo. Después de dejar
que el aparato se enfríe, encienda de nuevo el aparato y
seleccione la fuente deseada girando SOURCE SELECT.
Algunas de las conexiones de los altavoces del receptor son
conexiones a tornillo y otras son conexiones de acoplamiento
con clic y palanca. Siga las instrucciones que se indican a
continuación.
1 Conecte siempre el cable de color (o marcado) al terminal
del mismo color y el cable negro (o sin marcar) al terminal
de color negro.
2 Conecte:
– El altavoz frontal izquierdo al terminal L (rojo y negro)
– El altavoz frontal derecho al terminal R (rojo y negro)
– El altavoz central a CENTER (azul y negro)
– El altavoz envolvente izquierdo a SURROUND L (gris y
negro)
– El altavoz envolvente derecho a SURROUND R (gris y
negro)
Puede utilizar su televisor Philips con CINEMA LINK como un
altavoz central. Para un televisor con una conexión tipo
«scart» (de alfileres) se necesita un cable adicional de audio
«cinch-to-scart». Para un televisor con conexiones «cinch» (de
clavijas) se necesitan cables «cinch» adicionales. Estos cables
deben conectarse al conector azul CENTER PRE-OUT en la
parte posterior. Mire el manual de instrucciones de su
televisor para utilizarlo como altavoz central.
Antena AM (MW)
La antena de cuadro suministrada es sólo para uso interior.
Coloque la antena tan lejos como sea posible del receptor, el
televisor, los cables, el reproductor DVD, el VCR y otras
fuentes de radiación.
1 Introduzca la clavija de la antena de cuadro en AM LOOP
como se muestra abajo.
2 Gire y mueva la antena para obtener la mejor recepción.
Antena FM
La antena alámbrica suministrada sólo puede utilizarse para
recibir emisoras cercanas. Para obtener una recepción mejor
le recomendamos que utilice un sistema de antena por cable
o una antena exterior.
1 Conecte la antena alámbrica suministrada al terminal
FM 75 Ω como se indica a continuación.
2 Coloque la antena en diferentes posiciones hasta obtener
una recepción óptima.
• Si utiliza un sistema de antena por cable o una antena
exterior, conecte la clavija al terminal FM 75 Ω en vez de la
antena alámbrica.
La conexión de los auriculares al terminal PHONES silencia
los altavoces. El receptor selecciona STEREO y el sonido
envolvente se convierte en una señal de estéreo reducida
para que los auriculares normales puedan reproducirla.
Al desconectar los auriculares, los altavoces se activan otra
vez. Si desea disfrutar de nuevo del sonido envolvente
selecciónelo de vuelta en el receptor.
Auriculares
FM 75 Ω
FM 75 Ω
AM
LO
O
P
ANTENNA
Conexiones de las antenas
El TV como altavoz central
8 mm
1
2
3
1
2
3
7 mm
Conexiones de los altavoces
Capacidad de potencia
Alimentación
Español

CONFIGURACIÓN DEL SISTEMA
57
Indicaciones generales sobre el emplazamiento
Evite la colocación de los altavoces en una esquina o en el
suelo, ya que esto reforzará demasiado los tonos graves. La
respuesta de los agudos disminuirá si coloca los altavoces
detrás de cortinas, muebles etc. La persona que escucha
deberá tener siempre los altavoces «a la vista».
Cada habitación tiene características acústicas diferentes y
las posibilidades de emplazamiento son a menudo reducidas.
Vea el dibujo de arriba para obtener el mejor emplazamiento
de los altavoces.
Para obtener un sonido envolvente de calidad recomendamos
como mínimo la utilización de 5 altavoces (2 frontales, uno
central, y 2 envolventes). Se puede obtener un sonido
envolvente con menos altavoces. Esto se consigue reorientando
las señales de los altavoces que faltan hacia los existentes. Lea
«Menús» para realizar la configuración correcta en el receptor
sobre el número y tamaño de los altavoces utilizados.
Emplazamiento de los altavoces frontales
Los altavoces frontales deberán emplazarse en la parte
frontal derecha e izquierda de la posición normal de escucha,
como si se tratara de los altavoces estéreo normales.
Emplazamiento del altavoz central
El altavoz central deberá emplazarse en el centro, entre los
dos altavoces frontales, por ej. debajo o encima del televisor.
La altura ideal del altavoz central es a la altura de los oídos
del que escucha (sentado).
Emplazamiento de los altavoces envolventes
Los altavoces envolventes deberán emplazarse uno en frente
del otro y estar alineados o ligeramente por detrás de la
persona que escucha.
Emplazamiento del subwoofer
El subwoofer se utiliza para mejorar considerablemente el
sonido de los graves de su sistema. El subwoofer puede
colocarse en cualquier parte de la habitación, ya que no es
posible localizar la dirección de los tonos graves. De todas
formas, no coloque el subwoofer en el centro de la
habitación, ya que esto podría debilitar el sonido de los
graves. No coloque ningún objeto encima del subwoofer.
Para obtener un sonido envolvente óptimo, debe ajustarse el
volumen de los altavoces. Cuando ajuste el volumen de los
altavoces deberá situarse en su posición normal de escucha.
Vea «Menú del receptor» para aprender a configurar en el
receptor los altavoces utilizados. Lo ideal es que el volumen en
la posición de escucha sea el mismo para todos los altavoces.
1 Pulse POWER / STANDBY para encender el receptor.
2 Pulse TEST TONE en el mando a distancia.
ySe escucha un sonido de prueba de cada uno de los
altavoces excepto del subwoofer.
3 Pulse +/- REAR en el mando a distancia para
aumentar/disminuir el volumen del altavoz que emite la
señal en ese momento. Poniendo todos los altavoces al
mismo volumen en la posición de escucha se obtiene una
calidad mejor.
4 Pulse TEST TONE en el mando a distancia.
yLa señal de prueba se para.
Advertencia: Si no está completamente satisfecho con los
ajustes de volumen, le recomendamos que los
cambie cuando utilice el sonido envolvente.
Una vez establecidos el número de altavoces y su colocación,
puede ajustar la configuración inicial del receptor para
obtener un sonido ambiental óptimo con la configuración real:
1 Defina qué altavoces se han conectado al receptor
(consulte «Estructura del menú/* SPEAKR SETUP»).
Advertencia: La configuración inicial del receptor es:
dos altavoces frontales, izquierdo y derecho:
presente (no se puede modificar)
altavoz central: presente
dos altavoces traseros: presente
subaltavoz de bajas frecuencias: presente
2 Seleccione el tamaño de los altavoces (SMALL o LARGE)
(consulte «Estructura del menú/* SPEAKR SIZES»).
Seleccione SMALL, si el altavoz puede reproducir notas
bajas hasta un mínimo de 80–100 Hz. Seleccione LARGE,
si el altavoz puede reproducir notas bajas hasta un mínimo
de 50 Hz. (Por norma general, un altavoz LARGE tiene un
diámetro cónico de como mínimo 12 cm (5 pulgadas).)
Consulte las hojas de especificaciones de los altavoces.
Advertencia: Para FR 985, FR 986, FR 995, FR 996 la
configuración inicial es:
todos los altavoces en LARGE.
Para FR 984, FR 994 la configuración inicial es:
todos los altavoces en SMALL.
3
Establezca la distancia de los altavoces a la posición de los
oyentes (consulte «Estructura del menú/* SPK DISTANCE»)
Ajuste del receptor
Configuración y prueba de los altavoces
Emplazamiento de los altavoces
Español
SUBWOOFER
SURROUND
(REAR)
LEFT
LEFT
RIGHT
CENTER
FRONT
RIGHT
FRONT
SURROUND
(REAR)

58
Español
PANTALLA
La pantalla del receptor está dividida en 4 secciones que se
utilizan para lo siguiente:
Dibujo de los altavoces
En el menú de ajustes, un rectángulo con una letra es
indicación de que se ha seleccionado un altavoz. De cualquier
forma, el indicador del subwoofer se encenderá sólo cuando
se disponga de una señal de subwoofer.Si sólo aparece la
letra, no se está utilizando ese altavoz y los sonidos se
reorientan hacia otros altavoces.
......sonido ambiental virtual
SURROUND.................reproducción del sonido envolvente
DIGITAL SURROUND ....reproducción del sonido envolvente digital
L, R ...........................altavoces frontales izquierdo y derecho
C...............................altavoz central
SL, SR .......................altavoces envolventes
SW............................subwoofer
Indicación de menú
Estas señales muestran si el menú está activado o
desactivado y la dirección que puede seguir.
MMEENNUU .......................el menú está activado
1..............................puede moverse hacia atrás al tema del
menú anterior con 1 PREV. / EXIT (el
botón «izquierdo» en el mando a distancia)
3 .............................puede subir en la lista de opciones con
X MENU NAVIGATOR (el botón «arriba»
en el mando a distancia)
4 .............................puede bajar en la lista de opciones con
X MENU NAVIGATOR (el botón «abajo»
del mando a distancia)
2..............................
puede bajar en la lista de opciones con NEXT
2 (el botón «abajo» del mando a distancia)
OOKK.............................puede confirmar el valor en pantalla
Indicadores luminosos de estado
Son signos que muestran los diversos ajustes y la información
sobre el estado del receptor.
PRESET......................el sintonizador sintoniza con una emisora
preseleccionada
SENS HI.....................el sintonizador selecciona el modo de alta
sensibilidad
SENS LO..................el sintonizador selecciona el modo de
baja sensibilidad
CCIINNEEMMAA LLIINNKK OONN ......está activado CINEMA LINK
STEREO......................se está utilizando uno de los ajustes de
sonido preseleccionados del receptor
R.............................se está sintonizando una emisora RDS
EON...........................se está sintonizando una emisora RDS
con EON
HALL..........................está activado el efecto HALL
TA .............................la información de tráfico RDS está
activada
NEWS........................está activada la información de noticias
RDS
ANA ..........................se está utilizando la entrada analógica
para la fuente de reproducción
NNIIGGHHTT .......................NIGHT MODE está activado
COAX 1......................está en uso la entrada digital coaxial
COAX 1 para la fuente de reproducción
COAX 2.....................está en uso la entrada digital coaxial
COAX 2 para la fuente de reproducción
DDOOWWNNMMIIXX.................las señales de entrada multicanal se
reducen a menos señales de salida
(dependiendo del número de altavoces)
OPT...........................está en uso la entrada óptico digital
OPTICAL IN para la fuente de
reproducción (sólo con FR 984, FR 985,
FR 986, FR 994).
OPT
1
........................está en uso la entrada óptico digital
OPTICAL 1 IN para la fuente de
reproducción (sólo con FR 995, FR 996).
OPT
2
.......................está en uso la entrada óptico digital
OPTICAL 2 IN para la fuente de
reproducción (sólo con FR 995, FR 996).
LOUDNESS .................LOUDNESS está activado
Área de información
Este área se utiliza para la retroinformación del receptor, las
frecuencias del sintonizador, las opciones del menú, los
valores y el rastreo de los mensajes de texto.
AA
TV
Ç
É
MENU
OK
GUIDE
NEWS/TA
0
Pantalla

59
Español
MENÚS
El receptor está equipado con un sistema de menú. El menú se
utiliza para la configuración del receptor. Las diferentes opciones
del menú están interrelacionadas unas con otras siguiendo una
lógica. Supongamos que no tiene un altavoz central conectado, y
por consiguiente CENTER SPEAKR (altavoz central) está en
la posición NO (no). Si trata de utilizar VOL CENTER (volumen
central), aparecerá un mensaje diciendo que eso no es posible
(INSTALL CENTER SPEAKER - Instale un altavoz central).
El menú siempre funciona de la misma manera. Las flechas de la
pantalla le indican las direcciones en las que se puede desplazar.
1 Pulse SETUP MENU.
yAparece en pantalla MENU, y * EFFECTS.
• Puede salir del menú en cualquier momento pulsando
SETUP MENU.
2 Gire X MENU NAVIGATOR hasta que la opción deseada (o
el valor) aparezca en pantalla.
3 Pulse NEXT 2 para elegir la opción en pantalla (o ENTER / OK
para confirmar el valor).
• Puede abandonar cualquier opción (los valores
permanecerán intactos) pulsando 1 PREV. / EXIT.
Estructura del menú
* EFFECTS (efectos)
Activa los efectos de sonido.
VIRT SURR
ambiente virtual: 0…100 %
* VOL BALANCE (equilibrio de volumen)
Ajusta el equilibrio de volumen relativo entre los altavoces
conectados.
TEST TONE
Prueba de sonido: on/off (activar/desactivar)
VOL FRONT-L
Volumen del altavoz frontal izquierdo: –50…+50
VOL FRONT-R
Volumen del altavoz frontal derecho: –50…+50
VOL CENTER
Volumen del altavoz central: –50…+50
VOL REAR-L
Volumen del altavoz posterior izquierdo: –50…+50
VOL REAR-R
Volumen del altavoz posterior derecho: –50…+50
VOL SUBWOOFER
Volumen del subwoofer: –50…+50
Advertencia: Cuando se utilice la entrada 6 CHANNEL / DVD
INPUT, no se pueden cambiar los valores.
* SPEAKR SETUP (configuración de los altavoces)
Selecciona los altavoces utilizados.
SUBW PRESENT
Utilización del subwoofer: yes/no (si/no)
CENTER SPEAKR
Utilización del altavoz central: yes/no (si/no)
REAR SPEAKER
Utilización de los altavoces posteriores: yes/no (si/no)
* SPEAKR SIZES (tamaño de los altavoces)
Selecciona el tamaño de los altavoces utilizados, con el fin de
obtener una reproducción de sonido óptima. LARGE significa
que un altavoz puede reproducir frecuencias por debajo de 50
Hz. Si SUBW PRESENT está en la posición NO, FRONT
SIZE sólo puede ajustarse a LARGE. Si FRONT SIZE
está en SMALL, CENTER SIZE sólo puede ajustarse a
SMALL y consecuentemente debe conectarse un subwoofer.
FRONT SIZE
Altavoces frontales izquierdo y derecho: small/large
(pequeños/grandes)
CENTER SIZE
Altavoz central: small/large (pequeño/grande)
REAR SIZE
Altavoces posteriores: small/large (pequeño/grande)
* SPK DISTANCE (distancia de los altavoces)
Distancia entre los altavoces y la posición de escucha
normal. Aquí se especifica el tiempo de retraso del sonido
envolvente.
DISTANCE L/R
Distancia de los altavoces frontales: 1…10 m
DISTANCE CNTR
Distancia del altavoz central: 1…10 m
DISTANCE REAR
Distancia de los altavoces posteriores: 1…10 m
Menú del receptor

60
Español
MENÚS
* SELECT INPUT (selección de entrada)
Asigna los conectores de entrada audio a las diferentes
selecciones de fuente elegidas con SOURCE SELECT (Vea
«SELECCIÓN DE FUENTE» para obtener más detalles).
COAX1
Entrada coaxial digital 1, COAX 1 IN
COAX2
Entrada coaxial digital 2, COAX 2 IN
OPT (sólo con FR 984, FR 985, FR 986, FR 994)
Entrada óptica digital, OPTICAL IN
OPT 1 (sólo con FR 995, FR 996)
Entrada óptica digital, OPTICAL 1 IN
OPT 2 (sólo con FR 995, FR 996)
Entrada óptica digital, OPTICAL 2 IN
SAT IN
Entrada analógica audio SAT IN
VCR IN
Entrada analógica audio VCR IN
TV IN
Entrada analógica audio TV IN
CDR IN
Entrada analógica audio CDR IN
CD IN
Entrada analógica audio CD IN
6 CH IN
Entrada analógica de audio 6 CHANNEL / DVD INPUT
* TUNER (sintonizador)
Configuración de emisoras presintonizadas (Vea
«SINTONIZADOR» para más detalles).
AUTO INSTALL
Almacena emisoras de radio automáticamente
MAN INSTALL
Almacena emisoras de radio manualmente
GIVE NAME
Permite dar un nombre a las emisoras de radio
RESHUFFLE
Reordena las emisoras almacenadas
Si el receptor está conectado a un televisor Philips CINEMA
LINK a través de un sistema de control de clavijas en bus
CINEMA LINK (Vea «CONEXIONES»), se puede utilizar el
televisor para configurar el sistema. Se añadirá al menú del
televisor una opción llamada RECEIVER.
Si la función CINEMA LINK está activada, los ajustes del
receptor aparecerán en la pantalla del TV durante unos
segundos. Consulte el manual de instrucciones de su TV para
aprender a utilizar el menú. Las opciones disponibles pueden
variar según el modelo del TV.
Activación/desactivación de la conexión
• Pulse CINEMA LINK para activar/desactivar la conexión
entre el receptor y el TV.
ySi se activa la conexión, aparece en pantalla
CINEMA LINK ON.
Advertencia: Durante la grabación se recomienda desactivar
CINEMA LINK. Esto evita las interrupciones no
deseadas cuando se cambian las funciones del TV.
Si están activados CINEMA LINK y el menú del TV, aparece
en pantalla TV MENU y el menú y las funciones de sonido
del receptor se bloquean.
•
Pulse CINEMA GO en el mando a distancia.
y
El TV enviará una orden de reproducción al reproductor de
DVD CINEMA LINK, si lo hubiera. El reproductor de DVD
comenzará la reproducción y el receptor se cambiará
automáticamente al mejor sonido CINEMA LINK.
•
Si el reproductor de DVD no estuviera conectado o no tuviera
disco, el TV enviará una orden de reproducción al video, si lo
hubiera.
y
El video comenzará la reproducción y el receptor de audio
seleccionará el mejor sonido CINEMA LINK.
•
Si la fuente del video no estuviera conectada o no tuviera
cinta, el TV seleccionará el último canal de TV que haya visto.
Activado de CINEMA LINK
Menú del TV

61
Español
SELECCIÓN DE FUENTE
Cuando seleccione una fuente dando vueltas a SOURCE
SELECT, se activan las entradas de audio y vídeo
correspondientes a ese nombre. Todas las salidas de audio y
vídeo (si la fuente incluye una señal de vídeo) del receptor,
reproducen la señal de entrada. Es posible reasignar una
selección de fuente a cualquier otra entrada diferente aparte
de las ya mencionadas.
Fuente seleccionada
...
Conectores utilizados
DVD...............................Entrada digital audio COAX 1 y
entrada vídeo DVD IN
PHONO..........................Entrada audio PHONO IN
TUNER..........................Utiliza el sintonizador, todas las
entradas se desactivan.
CD.................................Entrada audio CD IN
CDR/TAPE.....................Entrada audio CDR/TAPE IN
TV..................................Entrada audio TV IN y
sin entrada vídeo
VCR...............................Entrada audio VCR IN y
entrada vídeo VCR IN
SAT ...............................Entrada audio SAT IN y
entrada vídeo SAT IN
Los conectores 6 CHANNEL / DVD INPUT se pueden asignar a
cualquiera de las fuentes disponibles (excluyendo TUNER y
PHONO). La asignación puede realizarse mediante la opción *
SELECT INPUT del menú. Consulte más abajo para
obtener detalles.
Si selecciona una fuente con SOURCE SELECT el aparato
utiliza la entrada audio estándar. Para poder modificar esto la
selección de fuente tiene que ser reasignada a otra entrada
audio.
Ejemplo: Para cambiar la entrada audio analógica CD IN
asignada a CD a la entrada audio digital COAX 2 IN.
1 Seleccione * SELECT INPUT del menú y pulse NEXT 2.
2 Gire SOURCE SELECT para seleccionar la fuente que desea
reasignar (p. ej. CD).
yAparece en pantalla el nombre de la fuente y la
indicación luminosa correspondiente parpadea.
3 Gire X MENU NAVIGATOR para seleccionar los conectores
de entrada que se van a utilizar (p. ej. CD -> COAX2).
4 Pulse ENTER / OK para confirmar la selección.
ySTORED aparece en pantalla brevemente.
5 Esta selección de fuente utiliza ahora la entrada audio elegida
(p. ej. CD utiliza los conectores de entrada COAX 2 IN,
COAX 2
se enciende cuando se cambia a CD).
Se pueden asignar varias fuentes a una selección de fuente.
Esto es de utilidad cuando se tienen conectados en cadena
varios aparatos.
Ejemplo: Tenemos conectado un VCR al TV, pero sólo el
televisor está conectado al receptor. Los dos ajustes
de SOURCE SELECT, TV y VCR, deberán utilizar los
conectores de entrada del televisor.
1 Seleccione * SELECT INPUT en el menú y pulse
NEXT 2.
2 Gire SOURCE SELECT para seleccionar la fuente que
necesite volver reasignar (por ej. VCR).
yAparece en pantalla el nombre de la fuente y la
indicación luminosa correspondiente comienza a
parpadear.
3 Gire X MENU NAVIGATOR para seleccionar los conectores de
entrada que se deberán utilizar (por. ej. VCR -> TV IN).
4 Pulse ENTER / OK para confirmar la selección.
ySTORED aparece en pantalla brevemente.
5 Esta selección de fuente está ahora preparada para utilizar
la entrada audio elegida (por ej. VCR utilizará los
conectores de entrada TV IN; cuando seleccione VCR,
aparecerá en pantalla brevemente VCR <TV IN>.
Se puede utilizar 6 CHANNEL / DVD INPUT para conectar un
aparato con un decodificador multicanal y un conector de
salida de 6 canales, por ej. un reproductor DVD/SACD de alta
superioridad.
Cuando utilice la entrada audio 6 CHANNEL / DVD INPUT, el
receptor funcionará como un amplificador multicanal. La
fuente reproduce sonido envolvente y lo envía al receptor
dividido en los canales necesarios. Por esta razón los botones
SURROUND ON/OFF, HALL y SURR. MODE no tienen efecto
alguno puesto que la señal que se recibe es ya multicanal.
No se puede grabar de una fuente que esté conectada a la
entrada audio 6 CHANNEL / DVD INPUT.
Acerca de 6 CHANNEL-DVD/SACD INPUT
Utilización de una selección de fuente para
dos o más aparatos
Para reasignar una selección de fuente
Selección 6 CHANNEL-DVD/SACD INPUT
SOURCE SELECT

62
Español
REPRODUCCIÓN, GRABACIÓN
1 Pulse POWER / STANDBY para encender el receptor.
2 Gire SOURCE SELECT para seleccionar la fuente.
yEl nombre de la fuente aparece en pantalla.
• Para seleccionar la entrada FRONT AV / GAME pulse
FRONT AV
(sólo con FR 995, FR 996)
.
3 Inicie la reproducción normal de la fuente.
• Gire VOLUME para ajustar el volumen.
yAparece en pantalla VOLUME junto con el nivel de
volumen de 0 a 50.
1 Pulse BASS o TREBLE.
yAparecen en pantalla brevemente BASS o TREBLE
junto con el valor actual. A continuación aparece TURN
VOLUME KNOB TO CHANGE.
2 Gire VOLUME para ajustar los sonidos graves o los agudos.
yAparece en pantalla BASS o TREBLE junto al valor
actual.
Advertencia: Si no gira VOLUME o no utiliza ningún otro
control durante 5 segundos, se apaga el ajuste
de graves o agudos.
• Si hay un subaltavoz de bajos conectado, pulse
SUBW. ON/OFF para aumentar el rendimiento de los graves.
Advertencia: En caso de sonido ambiental digital, sólo se
dispondrá de una señal de subaltavoz para bajas
frecuencias cuando lo admita el material de
origen.
• Pulse LOUDNESS para activar/desactivar la sonoridad.
yLOUDNESS aparece en pantalla (si está activada).
Si desea grabar de una fuente, debe seleccionarla con
SOURCE SELECT. Todas las salidas audio y vídeo (si la fuente
incluye una señal de vídeo) del receptor reproducen la señal
de entrada. El ajustes del sonido no afectan a la grabación.
1 Gire SOURCE SELECT (o pulse FRONT AV –
sólo con FR 995,
FR 996)
para seleccionar la fuente de la que quiere grabar.
yAparece en pantalla el nombre de la fuente.
2 Prepare la grabadora que vaya a utilizar. Debe conectarla a
una de las salidas del receptor.
3 Comience la grabación en la grabadora.
4 Inicie la reproducción normal de la fuente.
Advertencias: – VCR OUT no reproduce la señal de audio y
vídeo de VCR IN. Lo mismo ocurre entre
CDR/TAPE OUT y la señal de audio de
CDR/TAPE IN.
– Le recomendamos que no utilice la salida
digital COAX OUT del receptor para grabar de
una fuente analógica. Utilice la salida
analógica CDR/TAPE.
– No se puede grabar de una fuente que esté
conectada a la entrada audio 6 CHANNEL /
DVD INPUT.
Se puede conectar una grabadora digital a la salida digital del
receptor. De esta forma, la grabadora digital conectada puede
grabar directamente todas las señales provenientes de las
entradas digitales. El receptor convertirá también todas las
señales provenientes de las entradas analógicas a la salida
digital.
El receptor puede utilizarse para grabar digitalmente una
señal de audio de sonido envolvente multicanal (Dolby Digital,
DTS o MPEG), por ej. de DVD a CD-R. El receptor convertirá la
señal multicanal digital en una señal estéreo sin ninguna
pérdida importante de información de sonido.
Advertencias: – Cuando se grabe una señal Dolby Digital,
DTS o MPEG, debe grabarse cada pista
individualmente.
– No se puede realizar la grabación digital si el
material de origen digital está protegido
contra copia.
Grabación de la salida digital
Grabación de una fuente
Ajuste del sonido
Reproducción de una fuente

63
Español
EL SONIDO ENVOLVENTE
El sonido envolvente le ofrece una calidad de sonido
innovadora. Le dará la sensación de hallarse en medio de la
acción, ya que el sonido se reproduce a su alrededor. Procure
utilizar programas de TV, cintas de vídeo o audio y discos con
los símbolos 3, 1,
o
que estén codificados para el sonido envolvente
multicanal. Para obtener el mejor rendimiento del receptor,
elija Dolby Digital, DTS o MPEG.
Su receptor puede reproducir sonido envolvente DTS. El DTS
es un sistema de sonido envolvente multicanal disponible en
los discos de DVD, láser y de audio. Consulte a un proveedor
de software sobre la disponibilidad del software DTS en su
zona.
Tenga en cuenta que los discos de DVD no siempre llevan
sonido envolvente multicanal completo. Para asegurarse de
que el disco sea de codificación multicanal, consulte con su
distribuidor.
Con sonido envolvente, la mayoría de discos y cintas estéreo
ofrecen una reproducción satisfactoria. Si escucha
distorsiones durante la reproducción de dicha modalidad,
cambie a la modalidad de estéreo normal.
La disponibilidad de las diferentes modalidades de sonido
envolvente depende del número de altavoces instalados y la
información del sonido de entrada.
Con el sonido envolvente activado, se puede cambiar de una
modalidad a otra. Su funcionamiento depende de la
configuración de los altavoces en el menú del receptor.
Si se detecta una señal de sonido ambiental, el receptor se
desplazará a DOLBY DIGITAL, a DTS o a MPEG.
1 Pulse SURROUND ON/OFF para activar el sonido envolvente.
yApparace la modalidad de sonido envolvente en uso.
2 Pulse SURR. MODE repetidamente para escuchar las
diferentes modalidades de sonido envolvente (si se dispone
de ellas).
yAparecen en pantalla el modo y los altavoces
seleccionados. Si las señales de entrada multicanal se
reducen a unas pocas señales de salida, aparece en
pantalla DOWNMIX.
3 Pulse VIRTUAL MODE las veces que necesite para cambiar
entre los modos de sonido ambiental virtual:
1 x para activar 3D SURROUND
2 x para activar MULTI FRONT
3 x para activar MULTI REAR
4 x para activar NATURAL SURROUND
y Una luz indica si se ha activado un modo de sonido
ambiental virtual. Los signos indican que está activo
uno de estos modos.
4 Pulse SURROUND ON/OFF para desactivar el sonido
envolvente.
yAparece SURROUND OFF.
Activación del sonido envolventeAcerca del sonido envolvente

EL SONIDO ENVOLVENTE
64
HALL
Esta modalidad realza la reproducción del sonido y añade un
ligero eco. Esto produce la sensación de estar en una habitación
grande. Sólo puede utilizarse en la modalidad de estéreo.
SURROUND
La modalidad de sonido envolvente permite la reproducción
de sonido con 4 o 5 altavoces. En función del material
de origen, se reproducirá Dolby Surround Pro Logic,
Dolby Digital, DTS o MPEG.
PRO LOGIC, DOLBY DIGITAL, DTS, MPEG
Además de SURROUND, aparecerá en pantalla la modalidad
que se esté utilizando (esto dependerá de la fuente). En el
caso de sonido digital ambiente, se mostrará el formato de
sonido AC-3 (para Dolby Digital), DTS o MPEG (para MPEG 2
multicanal), seguido por los canales de sonido, disponible en
el origen (p. ej. DVD).
Ejemplo:AC-3 3/2.1 Dolby Digital, 3 canales frontales,
2 canales envolventes y un canal
subwoofer.
MPEG 2/0.0 MPEG multicanal, sólo de sonido
estéreo.
AC-3 3/1.0 Dolby Digital, 3 canales frontales,
1 canal de sonido envolvente (mono)
sin señal subwoofer.
DTS 3/2.1 DTS, 3 canales frontales, 2 canales
envolventes y un canal subwoofer.
FRONT-3 STEREO
Surround sound se silencia y 3 Stereo reproduce el sonido sin
utilizar los altavoces posteriores.
STEREO
Los altavoces frontales derecho, izquierdo y central
reproducen todo el sonido. Esto permite la reproducción
estándar de sonido en estéreo.
Ambiente virtual
El receptor puede reproducir uno o más formatos de sonido
ambiental virtual. El sonido ambiental virtual proporciona una
impresión de sonido más real creando altavoces fantasma en
lugar o además de los reales. La posición de los oyentes
influye en el efecto ambiental. El área en donde se obtiene un
mejor efecto aparece en gris.
El nivel del efecto de sonido ambiental virtual se puede
ajustar en el menú de configuración. Se dispone de los
siguientes modos de sonido ambiental:
3D SURROUND
No se necesitan altavoces traseros. El sonido del canal
posterior lo simulan los altavoces delanteros. El sonido
ambiental se simula mediante los altavoces frontales
izquierdo, derecho y central.
MULTI FRONT
Los altavoces fantasmas se crean al lado de los altavoces
delanteros derecho e izquierdo.
MULTI REAR
Los altavoces fantasmas se crean al lado de los altavoces
traseros derecho e izquierdo.
NATURAL SURROUND
Los altavoces fantasma se crean al lado de los altavoces
delanteros y traseros derecho e izquierdo.
Advertencia: La disponibilidad de MULTI FRONT y
MULTI REAR depende de los canales de
sonido en el material de origen.
NIGHT MODE (sólo en el mando a distancia)
Los sonidos agudos se moderan y los sonidos débiles se elevan.
Con esta modalidad puede disfrutar de sonido envolvente sin
despertar a los niños o molestar a los vecinos. El modo nocturno
funciona sólo con Dolby Digital y MPEG, y únicamente cuando
sea compatible con las posibilidades de la fuente.
LEFT
CENTER
FRONT
RIGHT
FRONT
Ajustes del sonido envolvente
Español

65
Español
SINTONIZADOR
Se pueden buscar las emisoras de radio efectuando un
barrido por la banda de frecuencias. También se puede teclear
la frecuencia de una emisora conocida. Si se emite una
emisora FM y se recibe en estéreo, aparece
STEREO.
Búsqueda de emisoras de radio
1 Gire SOURCE SELECT para seleccionar el sintonizador.
yAparece en pantalla TUNER.
2 Seleccione una banda de frecuencias pulsando
repetidamente TUNER AM/FM.
yLa banda de frecuencias seleccionada aparece en
pantalla.
3 Mantenga pulsado 1 o 2 durante aproximadamente
1 segundo.
yAparece en pantalla SEARCH y el sintonizador
sintoniza con una emisora que tenga suficiente fuerza.
4 Repita el procedimiento hasta que encuentre la emisora
que desee.
• Para realizar una sintonización fina (precisa) para una
emisora débil, pulse 1 o 2 tantas veces como sea
necesario hasta que consiga una recepción óptima.
Para sintonizar con una emisora de radio con la
frecuencia (sólo con el mando a distancia)
1 Pulse TUNER.
yAparece en pantalla TUNER.
2 Pulse FR. D..
yAparece en pantalla _.
3 Utilice las teclas del 1 al 0 para introducir la frecuencia de
la emisora.
Advertencia: Sólo se deben teclear los números que entren
dentro de los márgenes de frecuencias del
sintonizador.
Se puede seleccionar en el sintonizador una búsqueda de baja
sensibilidad para encontrar sólo las emisoras de señales
fuertes (sólo FM).
1 Gire SOURCE SELECT para seleccionar el sintonizador.
yAparece en pantalla TUNER.
2 Pulse SENS. en el receptor.
yAparece en pantalla o bien SENS HI o SENS LO durante
5 segundos.
Advertencia: Cuando busque emisoras de radio, aparecerá en
la pantalla la sensibilidad utilizada. En este
caso,
SENS LO significa que el sintonizador está
sólo buscando las emisoras de radio de señales
fuertes.
Se pueden almacenar en la memoria un total de 30 emisoras
de radio. El receptor puede seleccionar y programar en la
memoria automáticamente o las puede elegir Vd.
Programación automática
1 Seleccione * TUNER en el menú y pulse NEXT 2.
2 Seleccione AUTO INSTALL y pulse NEXT 2.
yAparecen en pantalla el número preseleccionado desde
el cual se iniciará la programación, la banda de
frecuencia y AUTO.
3 Gire TUNER PRESET X para cambiar el número de
preselección desde el que desea iniciar la programación.
4 Utilice TUNER AM/FM para cambiar a la banda de
frecuencias deseada.
5 Pulse ENTER / OK para comenzar la programación.
yAUTO INSTALL parpadea y todas las emisoras de
radio disponibles se programan. Realizar esto le tomará
unos pocos minutos. Cuando se detenga el parpadeo de
AUTO INSTALL se habrá llevado a cabo la
programación.
Programación manual
1 Seleccione * TUNER en el menú y pulse NEXT 2.
2 Seleccione MAN INSTALL y pulse NEXT 2.
yAparecen en pantalla el número preseleccionado, la
banda y la frecuencia.
3 Gire TUNER PRESET X para cambiar al número de
preselección donde desea almacenar la emisora.
4 Sintonice con la emisora de radio deseada (vea «Búsqueda
de emisoras de radio»).
5 Pulse ENTER / OK para confirmar la selección.
yAparece brevemente en pantalla STORED. La emisora
queda programada en el número de presintonía elegido.
6 Seleccione y almacene todas las emisoras que desee de la
misma manera.
Almacenamiento de emisoras de radio
Activación de la sensibilidad FM
Para sintonizar las emisoras de radio

66
Español
SINTONIZADOR
1 Gire SOURCE SELECT y elija TUNER para seleccionar el
sintonizador.
yAparece en pantalla TUNER.
2 Gire TUNER PRESET X para seleccionar la emisora
preseleccionada.
yAparecen en pantalla PRESET, el número de preselección
y la emisora.
Quizá desee cambiar el orden de las emisoras después de la
programación. En tal caso, con RESHUFFLE puede efectuar
el cambio de las emisoras presintonizadas.
1 Seleccione * TUNER en el menú y pulse NEXT 2.
2 Seleccione RESHUFFLE y pulse NEXT 2.
yAparecen en pantalla PRESET, el número de preselección
y la emisora.
3 Gire TUNER PRESET X para elegir una emisora
preseleccionada.
4 Pulse ENTER / OK para confirmar la selección.
yAparecen en pantalla el número de preselección
elegido, SWAP <-> y un segundo número de
preselección.
5 Gire TUNER PRESET X para seleccionar la otra emisora
preseleccionada.
6 Pulse ENTER / OK para confirmar el cambio.
yAparece brevemente en pantalla RESHUFFLED y los
números de preselección se intercambian.
Se pueden nombrar cualquiera de las emisoras
preseleccionadas. También se puede cambiar el nombre de
las emisoras RDS.
1 Seleccione * TUNER en el menú y pulse NEXT 2.
2 Seleccione GIVE NAME (asignar nombre) y pulse NEXT 2.
yAparece en pantalla la emisora preseleccionada.
3 Gire TUNER PRESET X para cambiar el nombre de la
emisora preseleccionada.
4 Pulse ENTER / OK para confirmar la selección.
yAparece en pantalla el nombre de la emisora actual
o ________.
5 Gire TUNER PRESET X para seleccionar una letra y NEXT 2
o 1 PREV. para pasar a la posición siguiente o a la anterior.
6 Una vez introducido el nombre completo, pulse ENTER / OK
para confirmar.
yAparece en pantalla STORED y el nombre se
almacena.
Advertencia: Si desea utilizar otra vez el nombre original de
una emisora RDS, simplemente borre el nombre
que le dio.
1 Utilice la opción del menú * TUNER, seleccione
GIVE NAME.
yAparece en pantalla una emisora de radio
preseleccionada.
2 Gire X MENU NAVIGATOR para seleccionar el nombre que
desea borrar.
3 Pulse ENTER / OK para confirmar la selección.
4 Pulse 1 PREV. mientras parpadea la primera letra.
y CL parpadea a la izquierda del nombre de la emisora.
5 Pulse ENTER / OK para borrar el nombre de la emisora.
O, si cambia de idea,
pulse 1 PREV. para dejar como está el nombre de la emisora.
Para borrar los nombres de las emisoras
Para asignar un nombre a una emisora
Para reordenar emisoras de radioalmacenadas
Para sintonizar con emisoras almacenadas

SINTONIZADOR
67
Radio Data System es un servicio que permite a las emisoras
de FM enviar información adicional. Si está sintonizando una
emisora RDS, aparecen en pantalla R y el nombre de la
emisora.
Para visualizar los diferentes datos RDS
• Pulse RADIO TEXT repetidamente en el receptor para
repasar la siguiente información (si está disponible):
– Mensajes de texto de radio
– Reloj RDS
– Frecuencias
– Nombre de la emisora
Advertencia: La señal de la hora emitida por algunas
emisoras RDS es en ocasiones imprecisa.
Es posible ajustar el sintonizador de tal manera que
interrumpa la reproducción cada vez que hay noticias o
información de tráfico en una emisora RDS seleccionada.
Estas funciones de información solamente funcionan si se
están emitiendo las señales necesarias RDS.
Si las emisoras RDS llevan también una señal EON (Enhanced
Other Networks), aparece en pantalla EON. Esta señal permite
que el sintonizador busque información de tráfico y noticias
no sólo en la emisora RDS seleccionada, sino también por
toda la red de emisoras EON.
1 Sintonice con la emisora RDS que desee.
2 Pulse NEWS/TA:
Una vez para mostrar NEWS, esto activa la función de
información de noticias.
Dos veces para mostrar TA, esto activa la función de
información del tráfico.
Tres veces para mostrar TA y NEWS, esto activa ambas
funciones de información.
3 Seleccione y reproduzca cualquier otra fuente como lo haría
normalmente.
y Mientras se están emitiendo las noticias o la
información de tráfico, el receptor seleccionará el
sintonizador y NEWS o TA parpadearán.
4 Pulse NEWS/TA hasta que la indicación de la pantalla
desaparezca para desactivar la o las funciones.
o
Pulse NEWS/TA en el momento de la emisión de la
información para desactivar la o las funciones.
Advertencia: Asegúrese de desactivar la información de tráfico
y las noticias cuando realice una grabación, de lo
contrario, éstas también se grabarán.
RDS noticias y información de tráficoRDS R
Español

68
Español
DATOS TÉCNICOS
Sujeto a modificaciones sin previo aviso.
General
Consumo de energía (FR 984, FR 985, FR 986) ...............210 W
Consumo de energía (FR 994, FR 995, FR 996) ...............255 W
Consumo de energía en espera........................................< 2 W
Dimensiones, anch. × alt. × profun.........435 × 135 × 350 mm
Peso (FR 984, FR 985, FR 986)..........................................8,6 kg
Peso (FR 994, FR 995, FR 996)..........................................9,4 kg
Amplificador (0,7 % THD, 6 Ω, 1 kHz)
Energía de salida, modo estéreo
(FR 984, FR 985, FR 986) (DIN)....................................2 × 60 W
Energía de salida, modo envolvente (FR 984, FR 985, FR 986)
Frontal...................................................................2 × 60 W
Central.........................................................................60 W
Envolvente.............................................................2 × 60 W
Energía de salida, modo estéreo
(FR 994, FR 995, FR 996) (DIN)..................................2 × 100 W
Energía de salida, modo envolvente (FR 994, FR 995, FR 996)
Frontal.................................................................2 × 100 W
Central.......................................................................100 W
Envolvente...........................................................2 × 100 W
Graves ...............................................................±9 dB a 100 Hz
Agudos...............................................................±9 dB a 10 kHz
Sonoridad.....+6 dB a 100 Hz (-30 dB); +3 dB a 10 kHz (-30 dB)
Distorsión armónica total..........................0,05 % a 1 kHz, 5 W
Respuesta de frecuencia..........................20–20.000 Hz, ±1 dB
Relación S/N..................................................................≥ 82 dB
Separación estéreo (1 kHz)............................................≥ 45 dB
Diafonía (1 kHz).............................................................≤ -65 dB
Entradas
Entradas lineales................................................250 mV/47 kΩ
6 CH....................................................................250 mV/40 kΩ
Front AV (sólo con FR 995, FR 996)....................250 mV/22 kΩ
Fonógrafo................................................................5 mV/47 kΩ
Coaxial digital..............................................75 Ω conf. IEC 958
Óptico-digital...................................................................Toslink
Frecuencia de muestreo digital
(FR 984, FR 985, FR 986).....................32 kHz, 44,1 kHz, 48 kHz
Frecuencia de muestreo digital
(FR 994, FR 995, FR 996)........32 kHz, 44,1 kHz, 48 kHz, 96 kHz
Salidas
Alimentación AC (conectados).......................total máx. 100 W
Salidas lineales....................................................250 mV/1 kΩ
Coaxial digital..............................................75 Ω conf. IEC 958
Frecuencias de muestreo de salida digital
Entrada analógica......................................salida de 48 kHz
Entrada digital de 32 kHz..........................salida de 32 kHz
Entrada digital de 44,1 kHz....................salida de 44,1 kHz
Entrada digital de 48 kHz..........................salida de 48 kHz
Entrada digital de 96 kHz
(sólo con FR 994, FR 995, FR 996) ............salida de 48 kHz
Pre-salida subwoofer................................................0,8 V/1 kΩ
Pre-salida center.......................................................0,8 V/1 kΩ
Auriculares......................................8–600 Ω (3 V e.m.f., 60 Ω)
Altavoces..........................................................................≥ 6 Ω
Sintonizador
Gama de frecuencias
FM..............................................................87,5–108,0 MHz
MW...............................................................531–1.602 kHz
LW....................................................................153–279 kHz
Sensibilidad
Estéreo FM.................................................................41 dBf
Mono FM....................................................................15 dBf
Distorsión armónica total
Estéreo FM..................................................................0,3 %
Mono FM...................................................................0,85 %
Respuesta de frecuencia...........................63–12.500 Hz ±1 dB
Relación S/N
Estéreo FM..................................................................55 dB
Mono FM.....................................................................60 dB
Separación de canales.........................................35 dB a 1 kHz
Receptor

69
Español
SOLUCIÓN DE PROBLEMAS
PROBLEMA CAUSA POSIBLE SOLUCIÓN
No funciona y está en El circuito de seguridad para Apague el aparato y déjelo enfriar. Después de
modo de espera sobrecalentamiento ha sido activado. dejar que el aparato se enfríe, enciéndalo de
nuevo y seleccione una fuente girando
SOURCE SELECT o pulsando una tecla fuente en
el mando a distancia.
No hay sonido VOLUME no está bien ajustado. Ajuste VOLUME.
Los auriculares están conectados. Desconecte los auriculares.
Se ha elegido una fuente equivocada. Gire SOURCE SELECT para seleccionar la
fuente correcta.
No hay sonido en el lado Uno de los altavoces está mal colocado. Conecte correctamente el altavoz.
derecho o izquierdo
El cable de uno de los altavoces está dañado. Cambie el cable.
En el menú del receptor, los ajustes de Ajuste VOL FRONT-L y VOL FRONT-R
equilibrio del volumen no son correctos. en dicho menú.
Sonido débil o ausencia No está activado SURROUND. Pulse SURROUND ON/OFF para activar el sonido
total de sonido en el envolvente.
altavoz central o los
Surround y/o los altavoces centrales Conecte correctamente los altavoces.
altavoces posteriores
no están (debidamente) conectados.
Los altavoces envolventes y/o el altavoz Seleccione YES para los altavoces utilizados.
central no están activados en el menú
SPEAKR SETUP.
El cable del altavoz está dañado. Cambie el cable.
El sonido de los graves Los altavoces no están bien conectados. Conecte los cables de color (o marcados) a las
es débil terminales del mismo color y los cables negros
(o sin marcar) a las terminales negras.
El sonido es de poca El ajuste elegido no es el correcto para el Corrija los ajustes del sonido del receptor.
calidad tipo de música o sonido.
El nivel de sonido El nivel del sonido envolvente no está Regule el nivel de sonido envolvente del
envolvente es demasiado debidamente regulado. receptor.
bajo o demasiado alto
El nivel de sonido central El nivel de sonido del canal central no está Ajuste el nivel de sonido del canal central del
es demasiado bajo o debidamente ajustado. receptor.
demasiado alto
En la modalidad de Dolby Se está reproduciendo una señal mono. Seleccione una fuente de sonido diferente o
Surround Pro Logic, sólo desactive el sonido envolvente.
se oye el altavoz central
La recepción de la radio El receptor o la antena están emplazados Cambie de posición el aparato que produce las
no es buena, la cerca de una fuente de radiación como puede interferencias o apáguelo.
programación automática ser un TV, reproductor de CD, grabadora de CD,
no funciona correctamente reproductor DVD , etc.
No se puede realizar una La frecuencia de muestreo no es aceptada por Compruebe que la grabadora digital acepta
grabación digital mediante la grabadora digital. frecuencias de muestreo entre 32 kHz, 48 kHz o
la salida digital realice la grabación a través de la salida digital.
Cuando se graba desde El reproductor de DVD no suministra Grabe cada pista por separado o utilice
un DVD, toda la grabación información sobre la pista. «incremento de pista manual» de la grabadora.
completa aparece como
una sola pista.
ADVERTENCIA
No trate de reparar el aparato Vd. mismo bajo ningún
pretexto, ya que podría invalidar la garantía. No abra
el aparato o podría sufrir una descarga eléctrica.
Si se produce un fallo, comprobar en primer lugar los puntos
listados a continuación antes de llevar el equipo a reparar.
Si el usuario no es capaz de resolver un problema mediante
el seguimiento de estas ayudas, debe consultar al comercio
distribuidor o centro de servicio.

ALLGEMEINE INFORMATIONEN
70
Dieser Receiver wird geliefert mit:
– einer Fernbedienung
– 2 Batterien für die Fernbedienung, Type AA
–
einem Koaxialkabel für den Audioanschluss eines DVD-Spielers
– einem Systembus-Kabel für den CINEMA LINK-Anschluss
– einer Rahmenantenne
– einer Drahtantenne
– diesem Anleitungshandbuch
Falls Sie die Komponenten ihres Systems
aufeinandergestellt haben, so muss der Receiver obenauf
sein. Stellen Sie den Receiver auf eine flache, harte,
stabile Fläche. Bedecken Sie die Entlüftungsschlitze nicht
und lassen Sie 50 cm über und 10 cm links und rechts
neben dem Receiver zur Ventilation frei.
Die Rahmenantenne sollte zwecks gutem Empfanges nicht auf
oder unter Videorekordern, CD-Rekordern, DVD-Spielern, TVs
und anderen Strahlungsquellen plaziert werden.
Überflüssiges Verpackungsmaterial wurde vermieden. Wir haben
unser Möglichstes getan, die Verpackung in drei Materialien
trennbar zu machen: Wellpappe (Schachtel), expandiertes
Polystyrol (Puffer) und Polyethylen (Säcke, Schaumstofffolien).
Ihr Gerät besteht aus Materialien, die von darauf spezialisierten
Betrieben wiederverwertet werden können. Bitte informieren Sie
sich darüber, wie Sie Verpackungsmaterialien, leere Batterien
und alte Geräte entsprechend den örtlichen Bestimmungen
entsorgen können.
Erzeugt unter Lizenz von Dolby Laboratories. „DOLBY“,
„DOLBY DIGITAL“, „PRO LOGIC“ und das Doppel-D-Symbol
2 sind Warenzeichen der Dolby Laboratories. Vertrauliche
unveröffentlichte Arbeiten. © 1992–1997 Dolby Laboratories.
Alle Rechte vorbehalten.
„DTS” und „DTS Digital Surround” sind Warenzeichen der
Digital Theater Systems, Inc. Copyright 1996 Theater
Systems, Inc. Alle Rechte vorbehalten.
Reinigen Sie den Receiver mit
einem weichen, feuchten und
fusselfreien Tuch. Verwenden Sie
keine Reinigungsmittel, da diese das
Gehäuse angreifen können.
Setzen Sie den Receiver nicht
Feuchtigkeit, Regen, Sand oder
extremer Hitze (verursacht durch
Heizgeräte oder direktes Sonnenlicht)
aus.
Wartung
Warenzeichen-Anerkennung
Umweltinformationen
Aufstellung
Lieferumfang
Allgemeine Informationen
Lieferumfang....................................................................................70
Aufstellung.......................................................................................70
Umweltinformationen......................................................................70
Warenzeichen-Anerkennung............................................................70
Wartung ...........................................................................................70
Bedienelemente ................................................................................71
Fernbedienung
Verwendung der Fernbedienung......................................................72
Tasten der Fernbedienung................................................................73
Programmieren der universellen Fernbedienung
(nur bei FR 985, FR 986, FR 995, FR 996) ........................................74
Anschlüsse.........................................................................................75
Anschlüsse
Analoge Audioanschlüsse................................................................76
Digitale Audioanschlüsse................................................................76
System-Kontrollbus, CINEMA LINK.................................................77
Videoanschlüsse ..............................................................................77
Netzbetrieb.......................................................................................78
Handhabung der Leistung................................................................78
Lautsprecheranschlüsse...................................................................78
TV als Center-Lautsprecher..............................................................78
Antennenanschlüsse........................................................................78
Kopfhörer..........................................................................................78
Aufbau der Anlage
Positionierung der Lautsprecher......................................................79
Einstellen und Testen der Lautsprecher..........................................79
Einstellen des Receivers..................................................................79
Anzeige................................................................................................80
Menüs
Receiver-Menü...........................................................................81–82
TV-Menü...........................................................................................82
CINEMA LINK aktivieren..................................................................82
Wahl eines Ausgangsgerätes
SOURCE SELECT...............................................................................83
6 CHANNEL-DVD/SACD INPUT-Auswahl........................................83
Zuteilen einer Ausgangsgerätewahl...............................................83
Verwendung einer Ausgangsgerätewahl für zwei oder mehr Geräte
...83
Einige Worte zu 6 CHANNEL-DVD/SACD INPUT............................83
Wiedergabe, Aufnahme
Spielen eines Ausgangsgerätes......................................................84
Einstellen des Klanges.....................................................................84
Aufnehmen von einem Ausgangsgerät...........................................84
Aufnehmen vom digitalen Ausgang................................................84
Surround-Sound
Einige Worte zu Surround-Sound....................................................85
Durch Surround-Sound schalten......................................................85
Surround-Sound Einstellungen........................................................86
Radio
Einstellen der Radiosender..............................................................87
Umstellen der FM-Empfindlichkeit..................................................87
Speichern von Radiosendern...........................................................87
Einstellen gespeicherter Radiosender.............................................88
Umsortieren gespeicherter Radiosender.........................................88
Benennen der Radiosender..............................................................88
Löschen von Sendernamen..............................................................88
RDS R..............................................................................................89
RDS-Nachrichten- und Verkehrsdurchsage.....................................89
Technische Daten
Receiver............................................................................................90
Fehlerbehebung
Warnung...........................................................................................91
Fehlerbehebung................................................................................91
Dieses Gerät entspricht den Funkentstörungsvorschriften
der Europäischen Gemeinschaft.
Deutsch
Als ein ENERGY STAR
®
-Partner hat Philips festgelegt,
dass dieses Produkt den ENERGY STAR
®
-
Richtlinien für Energie-Effizienz entspricht.

BEDIENELEMENTE
71
1 POWER / STANDBY.......Schaltet den Receiver ein und
aus.
2 CINEMA LINK................Schaltet den System Kontrollbus
zwischen Receiver und TV ein
und aus.
3 ..........................................Sensor für die Infrarot
Fernbedienung.
4 VIRTUAL..........................Kontrolllicht für virtuellen
Surround.
5 HALL................................Kontrolllicht für HALL.
6 ..........................................Anzeige
7 SOURCE SELECT............Wählt die verschiedenen Audio-
und Videoanschlüsse.
Reaktiviert den Receiver aus
dem Bereitschaftsmodus.
8 VOLUME..........................Erhöht und verringert die
Lautstärke.
9 FRONT AV.......................Wählt den FRONT AV / GAME
Eingang (nur FR 995, FR 996).
0 TREBLE............................Regelt die Höhen bei Verwendung
in Kombination mit VOLUME.
! BASS...............................Regelt den Bass bei Verwendung
in Kombination mit VOLUME.
@ LOUDNESS.....................Schaltet LOUDNESS ein und aus.
# NEXT 2 ...........................TUNER: sucht Radiosender.
MENU: schaltet zur nächsten
Menüebene.
$ ENTER / OK.....................Bestätigt die gewählten Werte
im Menü.
% TUNER PRESET X MENU NAVIGATOR
TUNER: schaltet zum nächsten
und vorangegangenen
gespeicherten Radiosender.
MENU: bewegt im Menü
aufwärts und abwärts.
^ 1 PREV. / EXIT...............TUNER: sucht Radiosender.
MENU: schaltet zur vorher-
gehenden Menüebene.
& SETUP MENU ................Schaltet das Menü ein und aus.
* SENS. ..............................Schaltet zwischen niedriger und
hoher Radio-Empfindlichkeit um.
( NEWS/TA........................Schaltet die RDS-Nachrichten
und RDS-Verkehrsdurchsagen
ein und aus.
) TUNER AM/FM..............Schaltet die Wellenbereiche des
Radios um.
¡ RADIO TEXT...................Schaltet durch die verschiedenen
RDS-Informationen.
™ SURR. MODE..................Schaltet durch die verschiedenen
Lautsprecherkonfigurationen.
£ VIRTUAL MODE.............Schaltet durch die
verschiedenenen virtuellen
Surround-Sound-Modi.
≤ SURROUND ON/OFF.....Schaltet zwischen dem zuletzt
gewählten Surround-Modus und
Stereo.
T
A
1 234 56 7
8
9
0
!
@#$%^&*()¡™£≤
Deutsch

FERNBEDIENUNG
72
Öffnen Sie das Batteriefach der
Fernbedienung und legen Sie
2 Alkaline-Batterien der Type AA
(R06, UM-3) ein.
Entfernen Sie die Batterien,
wenn Sie leer sind oder die
Fernbedienung für längere Zeit
nicht verwendet wird.
Entsorgungshinweis
Bitte werfen Sie nur entladene Batterien in die Sammelboxen
beim Handel oder den Kommunen.
Entladen sind die Batterien in der Regel dann, wenn
– das Gerät abschaltet und/oder in der Anzeige ein
entsprechender Hinweis erscheint, oder
– nach längerer Gebrauchsdauer der Batterien das Gerät nicht
mehr einwandfrei funktioniert.
Um sicherzugehen, kleben Sie die Batteriepole z. B. mit einem
Klebestreifen ab oder geben Sie die Batterien einzeln in einen
Plastikbeutel.
Batterien enthalten chemische Substanzen, deshalb
sollten sie ordnungsgemäß entsorgt werden.
Die Tasten der Fernbedienung funktionieren gleich wie die
entsprechenden Tasten am Receiver.
Wichtig!
Sie müssen einen Ausgangsgeräteknopf länger als 1 Sekunde
drücken, um auf diese Tonquelle am Receiver zu schalten.
Das Drücken eines Ausgangsgeräteknopfes für weniger als
1 Sekunde schaltet die Fernbedienung nur für den Gebrauch
der Bedienelemente des gewählten Produktes um.
Die Fernbedienung bleibt solange auf das ausgewählte
Ausgangsgerät eingestellt, bis ein anderer Ausgangs-
geräteknopf auf der Fernbedienung gedrückt wird. Dies
ermöglicht Ihnen die Bedienung zusätzlicher Ausgangsgeräte
(z. B. spulen einer Kassette), ohne dabei die Tonquelle am
Receiver zu wechseln.
Verwendung der Fernbedienung
Deutsch
DVD
2
H
AA
TV
Ç
É
MENU
OK
GUIDE
NEWS/TA
5
1
3
2
4
6
7
9
8
0
MUTE
TUNER
CD CDR/TAPE
DVD
SAT
VCR
TV
PHONO
CABLE BOX
REC CANCEL FR.D. INDEX
íë
CHANNEL/TRACK LOUDNESS
VIRTUALNIGHT
DISC
SURROUND
SURROUND
SUBW.
T-C
Å
+
-
+
-
REAR
CHANNEL
SUB WOOFER
TEST TONE
ON/
OFF
AUDIO
ON/
OFF
MODE
MODE
CINEMA GO

FERNBEDIENUNG
73
H MUTE .....................Schaltet den Ton des Receivers in allen
Modi, außer dem TV-Modus, still.
Schaltet den Ton Ihres Philips TV still,
wenn die Fernbedienung im TV-Modus
ist.
2 ................................Schaltet das auf der Fernbedienung
gewählte Ausgangsgerät (z.B. VCR,
TV) auf Bereitschaft.
Schaltet den Receiver in Bereitschaft,
wenn diese Taste länger als
2 Sekunden gedrückt wird.
PHONO, TUNER, CD,
CDR/TAPE, TV,
VCR, SAT, DVD Schaltet die Fernbedienung auf die
Bedienelemente der verschiedenen
Produkte. Wählt die Ausgangsgeräte,
sofern länger als 1 Sekunde gedrückt
wird. SAT funktioniert nur mit digitalen
Satelliten-Receivern.
Reaktiviert den Receiver aus dem
Bereitschaftsmodus.
1–0................................Nummerntasten für Titel, Sender oder
Frequenzen. Zwei- oder mehrstellige
Nummern müssen innerhalb von
2 Sekunden eingegeben werden.
CINEMA GO..........
Aktiviert CINEMA LINK am TV.
CABLE BOX...................Ohne Funktion.
MENU GUIDE ..............TUNER: Schaltet das Receiver Menü
ein und aus.
DVD, TV: Schaltet das DVD/TV Menü
ein und aus.
OK.................................Bestätigt Menü-Optionen.
Pfeilförmige Tasten......TUNER: Bewegt sich innerhalb der
Menüs. Rechts-/Links-Pfeile schalten
hinauf/hinunter.
CD, CDR: Links-/Rechts-Pfeile suchen
rückwärts/vorwärts, Hinauf-/Hinunter-
Pfeile suchen den nächsten/
vorhergegangenen Titel.
+A...........................Erhöht die Receiver-Lautstärke.
-A...........................Verringert die Receiver-Lautstärke.
i NEWS/TA.................Schaltet die Funktionen NEWS und
TRAFFIC ANNOUNCEMENT ein und aus.
TV: Schaltet Teletext ein und aus.
SAT: Schaltet den Informationstext ein
und aus.
ÉATV......................Erhöht die TV-Lautstärke.
CD, CDR, VCR, DVD: Startet die
Wiedergabe.
ÇATV......................Verringert die TV-Lautstärke.
CD, CDR, VCR, DVD: Stoppt die
Wiedergabe.
í
CHANNEL/TRACK
...Wählt den vorigen gespeicherten
Radiosender.
VCR: Spult das Band zurück.
CD, CDR, DVD: Wählt den
vorhergehenden Titel.
TV: Wählt den vorhergehenden Kanal.
ë
CHANNEL/TRACK
...Wählt den nächsten gespeicherten
Radiosender.
VCR: Spult das Band vor.
CD, CDR, DVD: Wählt den nächsten
Titel.
TV: Wählt den nächsten Kanal.
LOUDNESS...................Schaltet LOUDNESS ein und aus.
SUBW. ON/OFF ............Schaltet den Subwoofer ein und aus.
REC, DVD AUDIO..........CDR, VCR: Startet die Aufnahme.
DVD: Schaltet zwischen Audiospuren.
CANCEL, DVD ...........CD, CDR, SAT, VCR: Löscht ein
Programm, storniert Auswahlen.
DVD: Schaltet den Blickwinkel um.
FR.D., DVD Å .............TUNER: Schaltet auf FREQUENCY
DIRECT.
CD, CDR, VCR, DVD: Unterbricht die
Wiedergabe.
INDEX, DVD T-C............VCR: Schaltet die Index-Suche ein und
aus.
SAT: Schaltet die Themen ein und aus.
DVD: Schaltet zwischen Titel und
Kapitel.
DISC..............................CD-, CDR-, DVD-Wechsler: Schaltet
zur nächsten Disc.
NIGHT...........................Schaltet NIGHT MODE ein und aus.
VIRTUAL MODE............Schaltet durch die verschiedenen
virtuellen Surround-Sound-Modi.
SURROUND ON/OFF....Schaltet SURROUND SOUND ein und
aus.
+/- SUBWOOFER...Erhöht/verringert die Subwoofer-
Lautstärke.
+/- REAR ...............Erhöht/verringert die Lautstärke der
rückwärtigen Lautsprecher. Während
der Testton an ist, kann die Lautstärke
der Lautsprecher, die Sie hören mit
diesen Tasten erhöht/verringert werden.
SURROUND MODE.......Schaltet durch die verschiedenen
Surround-Modi.
TEST TONE...................Schaltet den Testton ein und aus.
Während der Testton an ist, kann die
Lautstärke der Lautsprecher, die Sie
hören, mit +/- REAR
erhöht/verringert werden.
Tasten der Fernbedienung
Deutsch

FERNBEDIENUNG
74
Sie können die universelle Fernbedienung an der Aufschrift
Multibrand/Universal erkennen.
Die universelle Fernbedienung muss auf die Verwendung der Codes
ihrer unterschiedlichen Markengeräte programmiert werden. Dies
geschieht durch Eingabe eines 4-stelligen Codes oder durch
Probieren der Codes bis der richtige gefunden wird. Wir empfehlen
die Verwendung des 4-stelligen Codes. Diese Methode ist schneller
und zuverlässiger. Die Methode der Code-Suche sollte nur verwendet
werden, wenn Sie den Code für eines Ihrer Geräte nicht finden
können. Die Code-Tabelle finden Sie am Ende des Handbuches.
Wichtig!
Zur Programmierung müssen die Tasten auf der
Fernbedienung und nicht die Tasten am Receiver oder an
anderen Geräten verwendet werden.
Programmieren mit dem 4-stelligen Code
1 Halten Sie den Ausgangsgeräteknopf für das Gerät, welches
bedient werden soll, und 2 für 3 Sekunden gedrückt.
2 Geben Sie den 4-stelligen Code für das Gerät ein
(Code-Tabelle am Ende des Handbuches).
Anmerkungen:– Wenn mehr als 4 Stellen eingegeben
werden, erkennt die Fernbedienung nur die
zuerst eingegebenen.
–
Wenn Sie für 30 Sekunden keinen Code
eingeben, schaltet die Fernbedienung die
Programmfunktion ab, ohne den Code zu ändern.
– Um einen neuen Code zu programmieren,
überschreiben Sie einfach den alten durch
die Eingabe des neuen.
Absuchen der Code-Tabelle
1 Schalten Sie das Gerät, das bedient werden soll, ein.
2 Halten Sie den Ausgangsgeräteknopf für das Gerät, das
bedient werden soll, und 2 für 3 Sekunden gedrückt.
3 Drücken Sie nochmals 2 und lassen Sie wieder los.
yDie Fernbedienung sendet für eine Marke nach der
anderen die Codes für „nächster Kanal“ oder
„Bereitschaft“ (abhängig vom gewählten Ausgangsgerät).
4 Sobald das Gerät reagiert – indem es zum nächsten Kanal
oder auf Bereitschaft schaltet – drücken Sie 2, um den
Code zu verwenden.
yDer identifizierte Code wird ab nun verwendet.
• Wenn das Gerät für 2 Minuten nicht reagiert, ist der Code
dafür nicht in der Fernbedienung gespeichert. Der Code der
Fernbedienung bleibt unverändert.
Anmerkung: Wenn Sie die Batterien aus der Fernbedienung
für länger als 1 Minute entfernen, müssen die
Codes wieder programmiert werden.
Sie können die gefundenen und getesteten Codes Ihrer
verschiedenen Geräte hier niederschreiben.
PHONO..........................................
TUNER...........................................
CD .................................................
CDR/TAPE .....................................
TV..................................................
VCR ...............................................
SAT................................................
DVD...............................................
Zurücksetzen der Fernbedienung
1 Halten Sie den Ausgangsgeräteknopf für das Gerät, das
bedient werden soll, und 2 für 3 Sekunden gedrückt.
2 Geben Sie den 3-stelligen Code 981 ein.
yDie Fernbedienung ist nun auf alle ihre ursprünglichen
Philips-Codes zurückgesetzt.
Programmieren der universellen Fernbedienung
(nur bei FR 985, FR 986, FR 995, FR 996)
Deutsch

ANSCHLÜSSE
75
Anschlüsse Name des Anschlusses Anzuschließen an:
6,3 mm Kopfhörerbuchse 1 PHONES Einen Kopfhörer mit 6,3-mm-Stecker.
an der Vorderseite.
Audio- und Videoeingänge 2 FRONT AV / GAME Linke und rechte Audio-Ausgangsbuchse von Geräten wie
an der Vorderseite Videokameras und Videospielen.
(nur FR 995, FR 996).
3 FRONT AV / GAME Video-Ausgangsbuchsen von Geräten wie Videokameras und
Videospielen.
FRONT SPEAKERS 4 R, L Rechten und linken vorderen Lautsprecher.
5 CENTER Center-Lautsprecher.
SURROUND SPEAKERS 6 R, L Rechten und linken Surround-Lautsprecher.
AUDIO IN/OUT 8 CDR/TAPE OUT Eingang eines CD-Rekorders oder eines Kassettendecks.
9 CDR/TAPE IN Ausgang eines CD-Rekorders oder eines Kassettendecks.
0 CD IN Ausgang eines CD-Spielers.
! SAT IN Ausgang eines Satellitensystems.
@ VCR OUT Eingang eines Videorekorders.
# VCR IN Ausgang eines Videorekorders.
$ TV IN TV-Ausgang.
% PHONO IN Ausgang eines Plattenspielers mit MM-Abnehmer.
¡ PHONO GND f Erdungskabel eines Plattenspielers.
6-Kanal-Eingang ^
6CHANNEL/ DVDINPUT
6-Kanal-Ausgang von Geräten wie DVD- oder Laserdisc-Spielern.
DIGITAL AUDIO IN/OUT & COAX 1 IN
Koaxialen Ausgang von digitalen Geräten (Standardeinstellung für DVD).
* COAX 2 IN Koaxialen Ausgang von digitalen Geräten.
( COAX OUT Koaxialen Eingang von digitalen Geräten wie CD-Rekordern oder
MD-Rekordern.
) OPTICAL IN
Optischen Ausgang von digitalen Geräten wie DVD-Spielern, CD-Spielern,
CD-Rekordern oder MD-Spielern (nur FR 984, FR 985, FR 986, FR 994).
) OPTICAL 1 (2) IN Optischen Ausgang von digitalen Geräten wie DVD-Spielern,
CD-Spielern, CD-Rekordern oder MD-Spielern (nur FR 995, FR 996).
VIDEO IN/OUT ™ S-VIDEO S-Video-Eingänge/Ausgänge von Videogeräten für eine bessere
Videoqualität (nur FR 994, FR 995, FR 996).
£ DVD IN Ausgang eines DVD-Spielers.
≤ MON OUT Eingang eines Monitors (z. B. TV).
§ VCR IN Ausgang eines Videorekorders.
≥ VCR OUT Eingang eines Videorekorders (zum Aufnehmen).
ª SAT IN Ausgang eines Satellitensystems.
Antennenanschlüsse ∞
AM LOOP
Mitgelieferte Rahmenantenne.
• FM 75 Ω Mitgelieferte Drahtantenne oder Außenantenne.
Vorverstärkte Ausgänge 7 CENTER PRE-OUT TV-Eingang, wenn er als Center-Lautsprecher verwendet wird (nur
dann möglich, wenn der CINEMA LINK-Systembus angeschlossen ist).
º
SUBWOOFER PRE-OUT
Eingang eines aktiven Subwoofers.
System-Kontrollbus ⁄ CINEMA LINK System-Kontrollbusbuchse eines Philips TVs mit CINEMALINK.
Netzsteckdosen ¤ AC OUTLET Liefert gleiche Spannung wie das Netz. Bis zu 100 W
(nicht bei allen Versionen) gesamtzulässige Belastung.
Netzkabel ‹ Nachdem alle Anschlüsse gemacht wurden, schließen
Sie das Netzkabel an die Netzsteckdose an.
Deutsch
ANTENNA
FM 75 Ω
A
M
L
O
O
P
VIDEO IN/OUT
C
A
U
TIO
N
R
IS
K
O
F
E
L
E
C
T
R
IC
S
H
O
C
K
D
O
N
O
T
O
P
E
N
AVIS
RISQUE DE CHOC ELECTRIQUE
NE P
AS OUVRIR
D
e
s
i
g
n
e
d
a
n
d
d
e
v
e
l
o
p
e
d
b
y
P
h
i
l
i
p
s
i
nt
h
e
E
u
r
o
p
e
a
n
C
o
m
m
u
n
i
t
y
.
M
a
n
u
f
a
c
t
u
r
e
d
u
n
d
e
r
l
i
c
e
n
s
e
f
r
o
m
D
o
l
b
y
L
a
b
o
r
a
t
o
r
i
e
s
.
”
D
O
L
B
Y
“
,
”
D
O
L
B
Y
D
I
G
I
T
A
L
“
,
”
P
R
O
L
O
G
I
C
“
a
n
d
t
h
e
d
o
u
b
l
e
-
D
S
y
m
b
o
l
a
r
e
t
r
a
d
e
m
a
r
k
s
o
f
D
o
l
b
y
L
a
b
o
r
a
t
o
r
i
e
s
.
C
o
n
f
i
d
e
n
t
i
a
l
U
n
p
u
b
l
i
s
h
e
d
W
o
r
k
s
.
©
1
9
9
2
–
1
9
9
7
D
o
l
b
y
L
a
b
o
r
a
t
o
r
i
e
s
.
A
l
l
r
i
g
h
t
s
r
e
s
e
r
v
e
d
.
M
a
n
u
f
a
c
t
u
r
e
d
u
n
d
e
r
l
i
c
e
n
s
e
f
r
o
m
D
i
g
i
t
a
l
T
h
e
a
t
e
r
S
y
s
t
e
m
s
.
I
n
c
.
U
S
P
a
t
.
N
o
.
5
,
4
5
1
,
9
4
2
a
n
d
o
t
h
e
r
w
o
r
l
d
-
w
i
d
e
p
a
t
e
n
t
s
i
s
s
u
e
d
a
n
d
p
e
n
d
i
n
g
.
”
D
T
S
“
a
n
d
”
D
T
S
D
i
g
i
t
a
l
S
u
r
r
o
u
n
d
“
a
r
e
t
r
a
d
e
m
a
r
k
s
o
f
D
i
g
i
t
a
l
T
h
e
a
t
e
r
S
y
s
t
e
m
s
,
I
n
c
.
C
o
p
y
r
i
g
h
t
1
9
9
6
D
i
g
i
t
a
l
T
h
e
a
t
e
r
S
y
s
t
e
m
s
,
I
n
c
.
A
l
l
R
i
g
h
t
s
R
e
s
e
r
v
e
d
.
SURROUND
SPEAKERS
L
E
A
C
H
S
P
E
A
K
E
R
≥ 6
Ω
R
R
L
F
R
O
N
T
S
P
E
A
K
E
R
S
E
A
C
H
S
P
E
A
K
E
R
≥
6
Ω
PHONO GND.
C
E
N
T
E
R
IN
PLA
Y
IN
IN
OUT
REC
IN
PLA
Y
OUT
REC
C
O
A
X
O
U
T
D
IG
I
T
A
L
A
U
D
IO
I
N
/
O
U
T
O
P
T
IC
A
L
1
IN
C
O
A
X
2
IN
PHONO
VCRTV
SA
T
CD
CDR/T
APE
AUDIO IN/OUT
IN
IN
P
R
E
-O
U
T
C
E
N
T
ER
OUT
REC
IN
PLA
Y
DVD
IN
MON
OUT
VCR
SAT
IN
S
U
B
W
O
O
F
E
R
P
R
E
-
O
U
T
C
IN
E
M
A
L
IN
K
ANTENNA
A
M
L
O
O
P
O
P
T
IC
A
L
2
IN
CENTER
SUBW
.
6 CHANNEL/
DVD INPUT
C
O
A
X
1
IN
L
R
S-VIDEO
DVD
MON
VCR
SAT
VCR
OUT
IN
TO
T
AL
100
W
M
A
X. SW
ITC
H
ED
A
C O
U
TL
E
T
4567890!@#$
¤‹
⁄
%^
&
*
(
)
¡
™£≤∞§≥•ªº
12
3

ANSCHLÜSSE
76
Deutsch
Digitale Audioanschlüsse
Analoge Audioanschlüsse
DIGITAL
AUDIO
IN/OUT
PHONO
VCRTV SAT CD CDR/TAPE
AUDIO IN/OUT
IN IN
IN
PLAY
OUT
REC
IN IN
IN
PLAY
OUT
REC
PRE-OUT
CENTER
CAUTION
RISK OF ELECTRIC SHOCK
DO NOT OPEN
AVIS
RISQUE DE CHOC ELECTRIQUE
NE PAS OUVRIR
PHONO GND.
SURROUND
SPEAKERS
R
L
EACH SPEAKER ≥ 6 Ω
CENTER
R L
FRONT
SPEAKERS
EACH SPEAKER ≥ 6 Ω
AM LOOP
DVD
IN
MON
OUT
VCR
SAT
IN
PRE-OUT
CINEMA
LINK
SUBWOOFER
IN
PLAY
OUT
REC
OPTICAL 1
IN
COAX
OUT
COAX 2
IN
R
L
SURR.
CENTER SUBW.
FRONT
6 CHANNEL /
DVD INPUT
OPTICAL 2
IN
COAX 1
IN
Designed and developed by Philips in the European
Community.
Manufactured under license from Dolby Laboratories.
”DOLBY“, ”DOLBY DIGITAL“, ”PRO LOGIC“ and the
double-D Symbol are trademarks of Dolby
Laboratories. Confidential Unpublished Works.
©1992–1997 Dolby Laboratories. All rights reserved.
Manufactured under license from Digital Theater
Systems. Inc. US Pat. No. 5,451,942 and other world-
wide patents issued and pending. ”DTS“ and ”DTS
Digital Surround“ are trademarks of Digital Theater
Systems, Inc. Copyright 1996 Digital Theater Systems,
Inc. All Rights Reserved.
2
VIDEO IN/OUT
S-VIDEO
DVD MON SAT
VCRVCR
IN OUT
ANTENNA
FM 75 Ω
DVD PLAYER
CD RECORDER
CD PLAYER
Manche Geräte sind mit analogen und digitalen Anschlüssen
ausgestattet. Sofern möglich, verwenden Sie den digitalen
Anschluss, da dies für gewöhnlich eine bessere Klangqualität
ergibt. Siehe „Zuteilen einer Ausgangsgerätewahl“ über den
Gebrauch des digitalen Anschlusses des Receivers.
Aufgrund der Verschiedenartigkeit des Ausgangssignals
erfordert der Gebrauch einer Dolby Digital-Laserdisc einen
optionalen AC-3 RF-Demodulator.
DTS Digital Surround
TM
ist ein aus einzelnen Teilen bestehendes,
digitales 5,1-Kanal-Audioformat, das auf CD-, LD- und DVD-
Software vorhanden ist, und kann daher von den meisten CD-,
LD- und DVD-Spieler nicht decodiert und wiedergegeben
werden. Wenn DTS-codierte Software durch die analogen
Ausgänge des CD-, LD- oder DVD-Spielers wiedergegeben wird,
kommt es daher zu starker Lärmentwicklung. Um mögliche
Schäden an der Anlage zu vermeiden, sollte der Kunde die
richtigen Vorkehrungen treffen, wenn die analogen Ausgänge
direkt an den Receiver angeschlossen werden.
Um in den vollen Genuss der DTS Digital Surround
TM
-Wiedergabe
zu kommen, muss ein DTS-kompatibles Gerät an einen der
digitalen Eingänge des Receivers angeschlossen werden.
DIGITAL
AUDIO
IN/OUT
PHONO VCRTV SAT CD CDR/TAPE
AUDIO IN/OUT
IN
IN
IN
PLAY
OUT
REC
IN IN
IN
PLAY
OUT
REC
PRE-OUT
CENTER
CAUTION
RISK OF ELECTRIC SHOCK
DO NOT OPEN
AVIS
RISQUE DE CHOC ELECTRIQUE
NE PAS OUVRIR
Designed and developed by Philips in the European
Community.
Manufactured under license from DolbyLaboratories.
”DOLBY“, ” DOLBY DIGITAL“, ” PRO LOGIC“ and the
double-D Symbol are trademarks of Dolby
Laboratories. Confidential Unpublished Works.
©1992–1997 Dolby Laboratories. All rights reserved.
Manufactured under license from Digital Theater
Systems. Inc. US Pat. No. 5,451,942 and other world-
wide patents issued and pending. ” DTS“ and ”DTS
Digital Surround“ are trademarks of Digital Theater
Systems, Inc. Copyright 1996 Digital Theater Systems,
Inc. All Rights Reserved.
PHONO GND.
SURROUND
SPEAKERS
R
L
EACH SPEAKER ≥ 6 Ω
CENTER
R L
FRONT
SPEAKERS
EACH SPEAKER ≥ 6 Ω
AM LOOP
VIDEO IN/OUT
DVD
IN
MON
OUT
VCR
SAT
IN
PRE-OUT
CINEMA
LINK
SUBWOOFER
S-VIDEO
DVD MON SAT
VCR
VCR
IN
PLAY
OUT
REC
IN OUT
OPTICAL 1
IN
COAX
OUT
COAX 2
IN
R
L
SURR.
CENTER SUBW.
FRONT
6 CHANNEL /
DVD INPUT
OPTICAL 2
IN
COAX 1
IN
FM 75 Ω
ANTENNA
AUDIO
OUT
TURNTABLE
AUDIO IN
AUDIO OUT
IN
OUT
VCR
SAT RECEIVER
CD RECORDER
CD PLAYER
MONITOR / TV
POWERED
SUBWOOFER

ANSCHLÜSSE
77
Deutsch
System-Kontrollbus, CINEMA LINK
Videoanschlüsse
DIGITAL
AUDIO
IN/OUT
PHONO
VCRTV SAT CD
CDR/TAPE
AUDIO IN/OUT
IN IN
IN
PLAY
OUT
REC
IN IN
IN
PLAY
OUT
REC
PRE-OUT
CENTER
CAUTION
RISK OF ELECTRIC SHOCK
DO NOT OPEN
AVIS
RISQUE DE CHOC ELECTRIQUE
NE PAS OUVRIR
Designed and developed by Philips in the European
Community.
Manufactured under license from DolbyLaboratories.
”DOLBY“, ” DOLBY DIGITAL“, ” PRO LOGIC“ and the
double-D Symbol are trademarks of Dolby
Laboratories. Confidential Unpublished Works.
©1992–1997 Dolby Laboratories. All rights reserved.
Manufactured under license from Digital Theater
Systems. Inc. US Pat. No. 5,451,942 and other world-
wide patents issued and pending. ” DTS“ and ”DTS
Digital Surround“ are trademarks of Digital Theater
Systems, Inc. Copyright 1996 Digital Theater Systems,
Inc. All Rights Reserved.
PHONO GND.
SURROUND
SPEAKERS
R
L
EACH SPEAKER ≥ 6 Ω
CENTER
R L
FRONT
SPEAKERS
EACH SPEAKER ≥ 6 Ω
AM LOOP
VIDEO IN/OUT
DVD
IN
MON
OUT
VCR
SAT
IN
PRE-OUT
CINEMA
LINK
SUBWOOFER
S-VIDEO
DVD MON SAT
VCRVCR
IN
PLAY
OUT
REC
IN OUT
OPTICAL 1
IN
COAX
OUT
COAX 2
IN
R
L
SURR.
CENTER SUBW.
FRONT
6 CHANNEL /
DVD INPUT
OPTICAL 2
IN
COAX 1
IN
FM 75 Ω
ANTENNA
TO TV IN
TO VCR IN
TV
AUX
EXT 1 EXT 2 EXT 3
DVD PLAYER
VCR
TV
DIGIT
AL
OUT
CINEMA LINK
A
optional
(TV = CENTER)
DIGITAL
AUDIO
IN/OUT
PHONO VCRTV SAT CD CDR/TAPE
AUDIO IN/OUT
IN IN
IN
PLAY
OUT
REC
IN IN
IN
PLAY
OUT
REC
PRE-OUT
CENTER
CAUTION
RISK OF ELECTRIC SHOCK
DO NOT OPEN
AVIS
RISQUE DE CHOC ELECTRIQUE
NE PAS OUVRIR
Designed and developed by Philips in the European
Community.
Manufactured under license from DolbyLaboratories.
”DOLBY“, ”DOLBY DIGITAL“, ”PRO LOGIC“ and the
double-D Symbol are trademarks of Dolby
Laboratories. Confidential Unpublished Works.
©1992–1997 Dolby Laboratories. All rights reserved.
Manufactured under license from Digital Theater
Systems. Inc. US Pat. No. 5,451,942 and other world-
wide patents issued and pending. ”DTS“ and ”DTS
Digital Surround“ are trademarks of Digital Theater
Systems, Inc. Copyright 1996 Digital Theater Systems,
Inc. All Rights Reserved.
PHONO GND.
SURROUND
SPEAKERS
R
L
EACH SPEAKER ≥ 6 Ω
CENTER
R L
FRONT
SPEAKERS
EACH SPEAKER ≥ 6 Ω
AM LOOP
VIDEO IN/OUT
DVD
IN
MON
OUT
VCR
SAT
IN
PRE-OUT
CINEMA
LINK
SUBWOOFER
S-VIDEO
DVD MON SAT
VCR
VCR
IN
PLAY
OUT
REC
IN OUT
OPTICAL 1
IN
COAX
OUT
COAX 2
IN
R
L
SURR.
CENTER SUBW.
FRONT
6 CHANNEL /
DVD INPUT
OPTICAL 2
IN
COAX 1
IN
FM 75 Ω
ANTENNA
DVD PLAYER
MONITOR / TV
VIDEO IN
VIDEO OUT
VCR
SAT RECEIVER
Falls der Receiver und Ihr Philips TV-Gerät (oder noch besser
zusätzlich ein Philips VCR oder DVD-Spieler) mit Cinemalink
an den CINEMA LINK-System-Kontrollbus angeschlossen
sind, werden einige zusätzliche Leistungen angeboten:
– Beim Starten eines Ausgangsgerätes schaltet das System
automatisch auf diesen Eingang.
– Sie können das System über den TV-Bildschirm steuern.
Abhängig von der Sprache des TVs, können Sie dies in Ihrer
bevorzugten Sprache tun.
– Da der TV als Center-Lautsprecher fungieren kann, erübrigt
sich ein separater Center-Lautsprecher. (Das Kabel A muss
separat gekauft werden.)
– Durch Drücken der Bereitschaft-Taste auf der Fernbedienung
können Sie das komplette System in Bereitschaft schalten.

ANSCHLÜSSE
78
Das Typenschild befindet sich an der Rückseite des
Receivers.
1 Prüfen Sie, ob die am Typenschild angegebene Spannung
mit der örtlichen Netzspannung übereinstimmt. Sollte dies
nicht der Fall sein, wenden Sie sich an Ihren Fachhändler
oder an Ihre Servicestelle.
2 Schließen Sie das Netzkabel an die Netzsteckdose an.
Um das Gerät vollständig vom Netz zu trennen, ziehen Sie den
Stecker aus der Steckdose.
Wenn der Receiver mit sehr hoher Leistung verwendet wird,
so kann dies Verzerrungen produzieren, die Ihre Lautsprecher
ernsthaft beschädigen können. Falls Verzerrungen auftreten,
reduzieren Sie die Lautstärke und die Ton-Bedienelemente auf
eine Stufe, bei der der Klang wieder akzeptabel ist.
Um eine Überhitzung des Gerätes zu vermeiden, wurde
eine Sicherheitsschaltung eingebaut. Aus diesem Grund
kann es passieren, dass ihr Gerät unter extremen
Bedingungen abschaltet. Wenn dies passiert, schalten
Sie das Gerät aus und lassen Sie es auskühlen bevor Sie
es wieder verwenden. Nachdem das Gerät ausgekühlt
ist, schalten Sie es wieder ein und wählen Sie ein
Ausgangsgerät durch Drehen von SOURCE SELECT.
Einige der Lautsprecheranschlüsse am Receiver sind
Schraubklemmen, andere Schnappklemmen. Verwenden Sie
diese wie unten abgebildet.
1 Verbinden Sie immer die farbige (oder markierte) Ader mit
der farbigen Klemme, und die schwarze (oder unmarkierte)
Ader mit der schwarzen Klemme.
2 Verbinden Sie:
– den linken vorderen Lautsprecher mit L (rot und schwarz)
– den rechten vorderen Lautsprecher mit R (rot und schwarz)
– den Center-Lautsprecher mit CENTER (blau und schwarz)
– den linken Surround-Lautsprecher mit SURROUND L (grau
und schwarz)
– den rechten Surround-Lautsprecher mit SURROUND R
(grau und schwarz)
Sie können Ihren Philips TV mit CINEMA LINK als Center-
Lautsprecher verwenden. Für TVs mit einem Scart-Anschluss
wird ein zusätzliches Audio-Cinch-an-Scart-Kabel benötigt. Für
TVs mit Cinch-Anschlüssen werden zusätzliche Cinch-Kabel
benötigt. Diese Kabel müssen am blauen CENTER PRE-OUT-
Anschluss an der Rückseite angeschlossen werden. Befolgen
Sie die Bedienungsanleitung Ihres TV’s bezüglich der
Verwendung als Center-Lautsprecher.
AM (MW) Antenne
Die mitgelieferte Rahmenantenne ist ausschließlich für den
Gebrauch in Räumen bestimmt. Positionieren Sie die Antenne
soweit entfernt wie möglich vom Receiver, dem TV, den Kabeln,
einem DVD-Spieler, einem VCR und anderen Strahlungsquellen.
1 Verbinden Sie den Stecker der Rahmenantenne mit
AM LOOP wie unten abgebildet.
2 Richten Sie die Antenne für optimalen Empfang aus.
FM Antenne
Die mitgelieferte Drahtantenne kann nur zum Empfang naher
Sender verwendet werden. Für einen besseren Empfang
empfehlen wir die Verwendung eines Kabelantennen-Systems
oder einer Außenantenne.
1 Stecken Sie die mitgelieferte Drahtantenne an FM 75 Ω
wie unten abgebildet an.
2 Bewegen Sie die Antenne in verschiedene Richtungen, um
einen optimalen Empfang zu erhalten.
• Falls Sie ein Kabelantennen-System oder eine
Außenantenne verwenden, verbinden Sie anstelle der
Drahtantenne den Antennenstecker mit FM 75 Ω.
Werden die Kopfhörer an PHONES angeschlossen, so werden
die Lautsprecher ausgeschaltet. Der Receiver schaltet auf
STEREO und der Surround-Sound wird auf ein Stereosignal
reduziert, das von Standardkopfhörern reproduzierbar ist.
Das Abstecken der Kopfhörer schaltet die Lautsprecher
wieder ein. Wenn Sie wieder in den Genuss von Surround-
Sound kommen möchten, schalten Sie den Receiver zurück
auf Surround-Sound.
Kopfhörer
FM 75 Ω
FM 75 Ω
A
M
LO
O
P
ANTENNA
Antennenanschlüsse
TV als Center-Lautsprecher
8 mm
1
2
3
1
2
3
7 mm
Lautsprecheranschlüsse
Handhabung der Leistung
Netzbetrieb
Deutsch

AUFBAU DER ANLAGE
79
Generelle Hinweise zur Positionierung
Vermeiden Sie es, die Lautsprecher in einer Ecke oder am
Boden aufzustellen, da dies die Bässe zu sehr verstärken
würde. Die Plazierung der Lautsprecher hinter Vorhängen,
Möbeln etc. verringert die Wiedergabe der Höhen. Der
Zuhörer sollte die Lautsprecher immer „sehen“.
Jeder Raum hat verschiedene akustische Eigenschaften und
die Möglichkeiten der Positionierung sind oft begrenzt. Das
oben gezeigte Bild hilft Ihnen, die beste Position für Ihre
Lautsprecher zu finden.
Für einen guten Surround-Sound empfehlen wir mindestens
5 Lautsprecher (2 vordere, einen Center-, 2 Surround-). Es ist
möglich, eine Art von Surround-Sound mit weniger
Lautsprechern zu reproduzieren. Signale, welche für die
fehlenden Lautsprecher bestimmt sind, werden dabei an die
existierenden Lautsprecher umgelenkt. Siehe „Menüs“ zur
korrekten Einstellung des Receivers hinsichtlich der Anzahl
und Größe der verwendeten Lautsprecher.
Positionierung der vorderen Lautsprecher
Die vorderen Lautsprecher sollten wie gewöhnliche
Stereo-Lautsprecher rechts und links in Front zur Hörposition
plaziert werden.
Positionierung des Center-Lautsprechers
Der Center-Lautsprecher sollte in der Mitte zwischen den
zwei vorderen Lautsprechern, z. B. unterhalb oder auf dem TV,
plaziert werden. Die Ohrhöhe des Zuhörers (in Sitzposition) ist
die beste Höhe für den Center-Lautsprecher.
Positionierung der Surround-Lautsprecher
Die Surround-Lautsprecher sollten einander gegenüberstehen
und sich in einer Linie mit dem Zuhörer oder etwas hinter dem
Zuhörer befinden.
Positionierung des Subwoofers
Ein Subwoofer kann zur eindrucksvollen Verstärkung des
Bassklanges verwendet werden. Der Subwoofer kann
irgendwo im Raum positioniert werden, da es nicht möglich
ist, den Ursprung tiefer Töne zu lokalisieren. Nichtsdestotrotz
sollten Sie den Subwoofer nicht in die Raummitte stellen, da
der Bass stark abgeschwächt werden könnte. Plazieren Sie
keine Gegenstände auf dem Subwoofer.
Für einen optimalen Surround-Sound muss die relative
Lautstärke der Lautsprecher eingestellt werden. Während Sie
die Lautsprecherlautstärke einstellen, sollten Sie sich in Ihrer
gewohnten Hörposition befinden. Zur Einstellung des
Receivers hinsichtlich der verwendeten Lautsprecher siehe
„Receiver-Menü“. Idealerweise sollte die Lautstärke in der
Hörposition von allen Lautsprechern gleich sein.
1
Drücken Sie POWER / STANDBY, um den Receiver einzuschalten.
2 Drücken Sie TEST TONE auf der Fernbedienung.
y Ein Testton aus allen Lautsprechern, ausgenommen
dem Subwoofer, ist zu hören.
3
Drücken Sie +/- REAR auf der Fernbedienung, um die
Lautstärke des jeweiligen Lautsprechers zu erhöhen/verringern.
Sie erzielen das beste Ergebnis, wenn alle Lautsprecher in
gewohnter Hörposition die gleiche Lautstärke haben.
4 Drücken Sie TEST TONE auf der Fernbedienung.
y Der Testton hört auf.
Anmerkung: Falls Sie mit den Einstellungen der Lautstärke
nicht vollständig zufrieden sind, empfehlen wir
Ihnen, geringfügige Änderungen während der
Surround-Sound-Wiedergabe vorzunehmen.
Wenn die Anzahl und die Position der Lautsprecher bestimmt
worden ist, können Sie die Ausgangseinstellungen des Receivers
für optimalen Surround-Sound folgendermaßen vornehmen:
1
Stellen Sie ein, welche Lautsprecher an den Receiver
angeschlossen sind (siehe „Menüstruktur/* SPEAKR SETUP“).
Anm.: Die Werkseinstellung Ihres Receivers ist:
zwei vordere Lautsprecher, links und rechts: vorhanden
(kann nicht geändert werden)
Center-Lautsprecher: vorhanden
zwei rückwärtige Lautsprecher: vorhanden
Subwoofer: vorhanden.
2
Wählen Sie die Größe der Lautsprecher (SMALL oder LARGE)
(siehe „
Menüstruktur
/* SPEAKR SIZES“).
Wählen Sie SMALL, wenn Ihr Lautsprecher niedrige Töne
bis zu mindestens 80–100 Hz wiedergeben kann. Wählen
Sie LARGE, wenn Ihr Lautsprecher niedrige Töne bis zu
mindestens 50 Hz wiedergeben kann. (Als Faustregel gilt,
dass ein LARGE-Lautsprecher einen Konus-Durchmesser
von mindestens 12 cm (5 Zoll) hat.) Bitte beachten Sie die
Spezifikationsangaben Ihrer Lautsprecher.
Anm.: Werkseinstellung für FR 985, FR 986, FR 995, FR 996:
alle Lautsprecher auf LARGE.
Werkseinstellung für FR 984, FR 994:
alle Lautsprecher auf SMALL.
3
Stellen Sie die Entfernung zwischen den Lautsprechern und der
Hörposition ein (siehe „Menüstruktur/* SPK DISTANCE“).
Einstellen des Receivers
Einstellen und Testen der Lautsprecher
Positionierung der Lautsprecher
Deutsch
SUBWOOFER
SURROUND
(REAR)
LEFT
LEFT
RIGHT
CENTER
FRONT
RIGHT
FRONT
SURROUND
(REAR)

80
Deutsch
ANZEIGE
Die Anzeige des Receivers ist in 4 Bereiche geteilt, die
folgende Verwendung haben:
Lautsprecher-Diagramm
Ein Rechteck mit einem Buchstaben darin zeigt an, dass ein
Lautsprecher im Receiver-Menü ausgewählt wurde. Die
Subwooferanzeige leuchtet jedoch nur wenn ein
Subwoofersignal vorhanden ist. Wenn nur ein Buchstabe
gezeigt wird, ist dieser Lautsprecher nicht in Gebrauch und
sein Klang wird von den anderen Lautsprechern reproduziert.
.......Virtueller Surround-Sound
SURROUND.................Surround-Sound wird reproduziert.
DIGITAL SURROUND ....Digitaler Surround-Sound wird reproduziert.
L, R ...........................Vorderer linker und rechter Lautsprecher
C...............................Center-Lautsprecher
SL, SR .......................Surround-Lautsprecher
SW............................Subwoofer
Menü-Anzeige
Diese Zeichen zeigen Ihnen, ob das Menü an oder aus ist, und
geben an, in welche Richtung Sie gehen können.
MMEENNUU .......................Menü ist an.
1..............................Durch Verwendung von 1 PREV. / EXIT
können Sie zur vorhergehenden
Menüebene zurückgehen („links“ Taste
auf der Fernbedienung).
3 .............................Durch Verwendung von
X MENU NAVIGATOR können Sie sich in
einer Optionsliste aufwärts bewegen
(„aufwärts“ Taste auf der Fernbedienung).
4 .............................Durch Verwendung von
X MENU NAVIGATOR können Sie sich in
einer Optionsliste abwärts bewegen
(„abwärts“ Taste auf der Fernbedienung).
2..............................Durch Verwendung von NEXT 2 können
Sie zur nächsten Menüebene vorgehen
(„rechts“ Taste auf der Fernbedienung).
OOKK.............................
Sie können den angezeigten Wert bestätigen.
Kontrolllichter
Zeichen zeigen Ihnen verschiedene Einstellungen und
Informationen über den Status des Receivers.
PRESET......................Radio ist auf einen gespeicherten
Radiosender eingestellt.
SENS HI.....................Radio ist auf hohe Empfindlichkeit
geschaltet.
SENS LO..................Radio ist auf geringe Empfindlichkeit
geschaltet.
CCIINNEEMMAA LLIINNKK OONN ......CINEMA LINK ist aktiv.
STEREO......................Ein FM-Sender wird in Stereo empfangen.
R.............................Ein RDS-Sender wird empfangen.
EON...........................Ein RDS-Sender mit EON wird empfangen.
HALL..........................HALL-Effekt ist an.
TA .............................RDS-Verkehrsdurchsage ist an.
NEWS........................RDS-Nachrichtendurchsage ist an.
ANA ..........................Ein analoger Eingang wird für das
spielende Ausgangsgerät verwendet.
NNIIGGHHTT .......................NIGHTMODE ist an.
COAX
1
......................Der koaxiale digitale Eingang COAX 1
wird für das spielende Ausgangsgerät
verwendet.
COAX
2
.....................Der koaxiale digitale Eingang COAX 2
wird für das spielende Ausgangsgerät
verwendet.
DDOOWWNNMMIIXX.................Eingehende Mehrkanalsignale werden
auf weniger Ausgangssignale reduziert
(abhängig von der Lautsprecheranzahl).
OPT...........................Der optische digitale Eingang OPTICAL IN
wird für das spielende Ausgangsgerät
verwendet (nur FR 984, FR 985, FR 986,
FR 994).
OPT 1 ........................Der optische digitale Eingang OPTICAL 1 IN
wird für das spielende Ausgangsgerät
verwendet (nur FR 995, FR 996).
OPT 2 ........................Der optische digitale Eingang OPTICAL 2 IN
wird für das spielende Ausgangsgerät
verwendet (nur FR 995, FR 996).
LOUDNESS .................LOUDNESS ist eingeschaltet.
Informationsfeld
Dieses Feld wird für Meldungen des Receivers, für das Radio,
für Frequenzen, Menüoptionen, Werte und Textanzeigen
verwendet.
AA
TV
Ç
É
MENU
OK
GUIDE
NEWS/TA
0
Anzeige

81
Deutsch
MENÜS
Der Receiver ist mit einem Menüsystem ausgestattet. Das
Menü wird zum Einstellen des Receivers verwendet.
Die verschiedenen Menüoptionen sind miteinander auf
logische Weise verbunden. Angenommen Sie haben den
Center-Lautsprecher nicht angeschlossen und deshalb
CENTER SPEAKR (Center-Laut-sprecher) auf NO (nein)
geschaltet. Wenn Sie nun versuchen VOL CENTER (Center-
Lautstärke) zu benützen, wird eine Nachricht, dass dies nicht
möglich ist, erscheinen (INSTALL CENTER SPEAKER –
Center-Lautsprecher installieren).
Das Menü funktioniert immer auf die gleiche Weise. Pfeile in
der Anzeige zeigen Ihnen die möglichen Bewegungsrichtungen
an.
1 Drücken Sie SETUP MENU.
yMENU, und * EFFECTS werden angezeigt.
• Sie können das Menü jederzeit durch Drücken von
SETUP MENU verlassen.
2 Drehen Sie X MENU NAVIGATOR bis die gewünschte
Option (oder ein Wert) angezeigt wird.
3 Drücken Sie NEXT 2, um die angezeigte Option zu wählen
(oder ENTER / OK, um einen Wert zu bestätigen).
• Sie können jede Option (Werte bleiben unverändert) durch
Drücken von 1 PREV. / EXIT verlassen.
Menüstruktur
* EFFECTS (Effekte)
Schaltet Klangeffekte.
VIRT SURR
virtueller Surround: 0…100 %
* VOL BALANCE (Lautstärkebalance)
Regelt die relative Lautstärkebalance zwischen den
angeschlossenen Lautsprechern.
TEST TONE
Testton: on/off (ein/aus)
VOL FRONT-L
Lautstärke vorderer linker Lautsprecher: –50…+50
VOL FRONT-R
Lautstärke vorderer rechter Lautsprecher: –50…+50
VOL CENTER
Lautstärke Center-Lautsprecher: –50…+50
VOL REAR-L
Lautstärke rückwärtiger linker Lautsprecher: –50…+50
VOL REAR-R
Lautstärke rückwärtiger rechter Lautsprecher: –50…+50
VOL SUBWOOFER
Lautstärke Subwoofer: –50…+50
Anmerkung: Bei Verwendung des 6 CHANNEL / DVD
INPUT-Eingangs können die unten
angeführten Werte nicht geändert werden.
* SPEAKR SETUP (Lautsprecherinstallation)
Wählt die verwendeten Lautsprecher.
SUBW PRESENT
Subwoofer präsent: yes/no (ja/nein)
CENTER SPEAKR
Center-Lautsprecher präsent: yes/no (ja/nein)
REAR SPEAKER
Rückwärtige Lautsprecher präsent: yes/no (ja/nein)
* SPEAKR SIZES (Größe der Lautsprecher)
Wählt die Lautsprechergröße der verwendeten Lautsprecher
zur optimalen Klangwiedergabe. LARGE gilt für
Lautsprecher die Frequenzen unter 50 Hz wiedergeben
können. Wenn SUBW PRESENT auf NO eingestellt ist,
kann FRONT SIZE nur auf LARGE eingestellt werden.
Wenn FRONT SIZE auf SMALL eingestellt ist, kann
CENTER SIZE nur auf SMALL eingestellt werden und
folglich muss ein Subwoofer angeschlossen sein.
FRONT SIZE
Linker und rechter vorderer Lautsprecher: small / large
(klein/groß)
CENTER SIZE
Center-Lautsprecher: small / large (klein/groß)
REAR SIZE
Rückwärtige Lautsprecher: small / large (klein/groß)
* SPK DISTANCE
Abstand zwischen gewohnter Hörposition und Lautsprechern. Es
wird die Verzögerungszeit für den Surround-Sound festgelegt.
DISTANCE L/R
Abstand zu den vorderen Lautsprechern: 1…10 m
DISTANCE CNTR
Abstand zum Center-Lautsprecher: 1…10 m
DISTANCE REAR
Abstand zu den rückwärtigen Lautsprechern: 1…10 m
Receiver-Menü

82
Deutsch
MENÜS
* SELECT INPUT
Teilt die Audioeingangsanschlüsse den verschiedenen
Ausgangsgerätewahlen, die mit SOURCESELECT gewählt
wurden, zu (nähere Informationen siehe „WAHL EINES
AUSGANGSGERÄTES“).
COAX1
Digitaler koaxialer Eingang 1, COAX 1 IN
COAX2
Digitaler koaxialer Eingang 2, COAX 2 IN
OPT (nur FR 984, FR 985, FR 986, FR 994)
Digitaler optischer Eingang, OPTICAL IN
OPT 1 (nur FR 995, FR 996)
Digitaler optischer Eingang, OPTICAL 1 IN
OPT 2 (nur FR 995, FR 996)
Digitaler optischer Eingang, OPTICAL 2 IN
SAT IN
Analoger Audioeingang SAT IN
VCR IN
Analoger Audioeingang VCR IN
TV IN
Analoger Audioeingang TV IN
CDR IN
Analoger Audioeingang CDR IN
CD IN
Analoger Audioeingang CD IN
6 CH IN
Analoger Audioeingang 6 CHANNEL /DVD INPUT
* TUNER (Radio)
Einstellung für gespeicherte Radiosender (nähere
Informationen siehe „RADIO“ ).
AUTO INSTALL
Speichert Radiosender automatisch
MAN INSTALL
Speichert Radiosender händisch
GIVE NAME
Ermöglicht gespeicherten Radiosendern Namen zuzuteilen
RESHUFFLE
Sortiert gespeicherte Radiosender um
Wenn der Receiver über die CINEMALINK-System-
Kontrollbusanschlüsse (siehe „ANSCHLÜSSE“) an ein Philips
CINEMA LINK-TV angeschlossen ist, können Sie den TV zum
Einstellen des Systems verwenden. Eine Option namens
RECEIVER wird dem TV-Menü hinzugefügt.
Wenn CINEMALINK aktiv ist, werden Einstellungen am
Receiver für einige Sekunden am TV-Bildschirm gezeigt.
Befolgen Sie die Bedienungsanleitung Ihres TV’s bezüglich der
Verwendung des TV-Menüs. Die angebotenen Optionen
können je nach Modell des TV’s variieren.
Schalten der Verbindung
• Drücken Sie CINEMA LINK, um die Verbindung zwischen
Receiver und TV entweder ein- oder auszuschalten.
yWenn die Verbindung eingeschaltet ist, wird
CINEMA LINK ON angezeigt.
Anmerkung: Wir empfehlen CINEMA LINK während der
Aufnahme auszuschalten. Dies verhindert
unerwünschte Unterbrechungen durch Schalten
der TV-Funktionen.
Wenn CINEMALINK eingeschaltet ist und das TV-Menü aktiv
ist, wird TV MENU angezeigt und das Menü und die
Klangfunktionen am Receiver sind gesperrt.
• Drücken Sie
CINEMA GO auf der Fernbedienung.
yDer Fernseher sendet den Befehl zu spielen an den
CINEMA-LINK-DVD-Spieler, falls vorhanden. Der
DVD-Spieler beginnt zu spielen und der Receiver schaltet
automatisch zum besten CINEMA-LINK-Klang.
• Wenn kein DVD-Spieler angeschlossen ist oder der
DVD-Spieler keine Disk geladen hat, sendet der Fernseher
den Befehl zu spielen an den
CINEMA-LINK-Videorekorder,
falls vorhanden.
yDer Videorekorder
beginnt zu spielen und der Receiver
schaltet automatisch zum besten CINEMA-LINK-Klang.
• Wenn kein Videorekorder angeschlossen oder keine
Videokassette geladen ist, wählt der Fernseher den zuletzt
gewählten TV-Kanal.
CINEMA LINK aktivieren
TV-Menü

83
Deutsch
WAHL EINES AUSGANGSGERÄTES
Beim Wählen eines Ausgangsgerätes durch Drehen von
SOURCE SELECT werden die Audio- und Videoeingänge mit
den entsprechenden Namen aktiviert. Das eingehende Signal
wird von allen Audio- und – wenn das Ausgangsgerät ein
Videosignal beinhaltet – Videoausgängen des Receivers
reproduziert. Es ist möglich das gewählte Ausgangsgerät
anderen als diesen Standardeingängen zuzuordnen.
Ausgangsgerät..........Verwendete Anschlüsse
DVD...............................COAX 1 digitaler Audioeingang und
DVD IN Videoeingang
PHONO..........................PHONO IN Audioeingang
TUNER..........................Der Radioteil des Receivers wird
verwendet, alle Eingänge sind
ausgeschaltet.
CD.................................CD IN Audioeingang
CDR/TAPE.....................CDR/TAPE IN Audioeingang
TV..................................TV IN Audioeingang und
kein Videoeingang
VCR...............................VCR IN Audioeingang und
VCR IN Videoeingang
SAT ...............................SAT IN Audioeingang und
SAT IN Videoeingang
Die 6 CHANNEL / DVD INPUT-Anschlüsse können jedem der
vorhandenen Ausgangsgeräte zugeteilt werden
(ausgenommen TUNER und PHONO). Die Zuteilung kann über
die * SELECT INPUT-Option im Menü erfolgen. Weitere
Informationen lesen Sie unten.
Wenn ein Ausgangsgerät mit SOURCESELECT gewählt wird,
so wird der Standard-Audioeingang verwendet. Um dies zu
ändern, muss die Ausgangsgerätewahl einem anderen
Audioeingang zugeordnet werden.
Beispiel: CD vom CD IN Audioeingang zum digitalen
COAX 2 IN Audioeingang zuordnen.
1 Wählen Sie * SELECT INPUT vom Menü und drücken
Sie NEXT 2.
2 Drehen Sie SOURCE SELECT, um das Ausgangsgerät zu
wählen, das zugeordnet werden soll (z. B. CD).
yDer Name des Ausgangsgerätes wird angezeigt und das
Licht des Ausgangsgerätes blinkt.
3 Drehen Sie X MENU NAVIGATOR, um die zu verwendenden
Eingangsanschlüsse zu wählen (z. B. CD -> COAX2).
4 Drücken Sie ENTER / OK, um die Auswahl zu bestätigen.
ySTORED wird kurz angezeigt.
5 Dieses Ausgangsgerät verwendet nun den gewählten
Audioeingang (z. B. CD verwendet den COAX 2 IN
Eingangsanschluss, COAX 2 leuchtet, wenn auf CD
geschaltet wird).
Sie können mehr als ein Ausgangsgerät einer Ausgangs-
gerätewahl zuteilen. Dies ist dann praktisch, wenn Produkte
nacheinander in einer Reihe angeschlossen sind.
Beispiel: Ein VCR ist an den TV angeschlossen, aber nur der
TV ist am Receiver angeschlossen. Beide SOURCE
SELECT-Einstellungen, sowohl TV als VCR, müssen
den TV-Eingang benützen.
1 Wählen Sie * SELECT INPUT vom Menü und drücken
Sie NEXT 2.
2 Drehen Sie SOURCE SELECT, um das Ausgangsgerät
auszuwählen, das zugeordnet werden soll (z. B. VCR).
yDer Name des Ausgangsgerätes wird angezeigt und das
Licht des Ausgangsgerätes blinkt.
3 Drehen Sie X MENU NAVIGATOR, um den zu verwendenden
Eingang zu wählen (z. B. VCR -> TV IN).
4 Drücken Sie ENTER / OK, um Ihre Auswahl zu bestätigen.
ySTORED wird kurz angezeigt.
5 Diese Ausgangsgerätewahl verwendet nun den gewählten
Audioeingang (z. B. VCR verwendet den TV IN-Eingang,
VCR <TV IN> wird kurz angezeigt, wenn man auf VCR
schaltet).
6 CHANNEL / DVD INPUT kann dazu verwendet werden, um
ein Gerät mit einem eingebauten Mehrkanal-Decoder (z.B.
Dolby Digital, DTS, etc.) und einem 6-Kanal-Ausgang zu
verbinden, z. B. einen High-End-DVD/SACD-Spieler.
Wenn Sie den 6 CHANNEL / DVD INPUT Audioeingang
verwenden, hat der Receiver die Funktion eines Mehrkanal-
Verstärkers. Das Ausgangsgerät reproduziert Surround-Sound
und sendet ihn, in die notwendigen Kanäle aufgesplittet, zum
Receiver. Aus diesem Grund haben SURROUND ON/OFF, HALL
und SURR. MODE keine Wirkung, da das gelieferte Signal
bereits ein Mehrkanal-Signal ist.
Von einem Ausgangsgerät, das an den 6 CHANNEL / DVD
INPUT-Audioeingang angeschlossen ist, kann nicht
aufgenommen werden.
Einige Worte zu 6 CHANNEL-DVD/SACD INPUT
Verwendung einer Ausgangerätewahl für
zwei oder mehr Geräte
Zuteilen einer Ausgangsgerätewahl
6 CHANNEL-DVD/SACD INPUT-Auswahl
SOURCE SELECT

84
Deutsch
WIEDERGABE, AUFNAHME
1 Drücken Sie POWER / STANDBY, um den Receiver
einzuschalten.
2 Drehen Sie SOURCE SELECT, um ein Ausgangsgerät zu
wählen.
yDer Name des Ausgangsgerätes wird angezeigt.
• Durch Drücken von FRONT AV können Sie den
FRONT AV / GAME Eingang wählen (nur FR 995, FR 996).
3 Starten Sie die Wiedergabe des Ausgangsgerätes wie
gewohnt.
• Drehen Sie VOLUME, um die Lautstärke zu regeln.
yVOLUME und die Lautstärke zwischen 0 und 50 wird
angezeigt.
1 Drücken Sie BASS oder TREBLE.
yBASS oder TREBLE und der aktuelle Wert werden
kurz angezeigt. Dann erscheint TURN VOLUME
KNOB TO CHANGE.
2 Drehen Sie VOLUME, um den Bass oder die Höhen
einzustellen.
yBASS oder TREBLE und der aktuelle Wert werden
angezeigt.
Anmerkung: Die Bass- oder Höhenregelung wird
ausgeschaltet, wenn VOLUME innerhalb von
5 Sekunden nicht gedreht wird oder irgendein
anderes Bedienelement verwendet wird.
• Wenn ein Subwoofer angeschlossen ist, drücken Sie
SUBW. ON/OFF um den Bass zu verstärken.
Anmerkung: Bei digitalem Surround-Sound ist nur dann ein
Subwoofersignal vorhanden, wenn es vom
Ausgangsmaterial unterstützt wird.
• Drücken Sie LOUDNESS, um Loudness ein- oder
auszuschalten.
yLOUDNESS wird angezeigt, wenn Loudness eingeschaltet
ist.
Wenn Sie von einem Ausgangsgerät aufnehmen wollen,
müssen Sie sie mit SOURCE SELECT wählen. Das eingehende
Signal wird von allen Audio- und – falls das Ausgangsgerät
ein Videosignal beinhaltet – Videoausgängen des Receivers
reproduziert. Die Klangeinstellungen beeinflussen die
Aufnahme nicht.
1 Drehen Sie SOURCE SELECT (oder drücken Sie FRONT AV –
nur FR 995, FR 996), um das Ausgangsgerät, von dem Sie
aufnehmen möchten, auszuwählen.
yDer Name des Ausgangsgerätes wird angezeigt.
2 Treffen Sie die erforderlichen Vorbereitungen am
gewünschten Aufnahmegerät. Es muss an einem der
Receiverausgänge angeschlossen sein.
3 Starten Sie die Aufnahme am Aufnahmegerät.
4 Starten Sie die Wiedergabe am Ausgangsgerät.
Anmerkungen: – Das Audio- und Videosignal von VCR IN wird
von VCR OUT nicht reproduziert. Dasselbe
gilt für das Audiosignal von CDR/TAPE IN zu
CDR/TAPE OUT.
– Wir empfehlen, den digitalen Ausgang
COAX OUT des Receivers für die Aufnahme
von einem analogen Ausgangsgerät nicht zu
verwenden. Verwenden Sie stattdessen den
analogen Ausgang CDR/TAPE.
– Von einem Ausgangsgerät, das an den
6 CHANNEL / DVD INPUT-Audioeingang
angeschlossen ist, kann nicht aufgenommen
werden.
Es ist möglich ein digitales Aufnahmegerät an den digitalen
Ausgang des Receivers anzuschließen. Auf diese Art können
alle Signale, die von den digitalen Eingängen kommen, direkt
am angeschlossenen digitalen Aufnahmegerät aufgezeichnet
werden. Der Receiver wandelt auch alle Signale, die von
analogen Eingängen kommen, auf den digitalen Ausgang um.
Der Receiver kann dazu verwendet werden um ein Mehrkanal-
Surround-Sound-Audiosignal (Dolby Digital, DTS oder MPEG),
von z. B. einer DVD auf eine CD-R, digital aufzunehmen. Der
Receiver wandelt das digitale Mehrkanalsignal ohne Verlust
relevanter Klanginformation auf ein Stereosignal um.
Anmerkungen: – Wenn ein Dolby Digital-, DTS- oder MPEG-
Signal aufgenommen wird, muss jeder Titel
einzeln aufgenommen werden.
– Digitales Aufnehmen ist nicht möglich, wenn
das digitale Ausgangsmaterial
kopiergeschützt ist.
Aufnehmen vom digitalen Ausgang
Aufnehmen von einem Ausgangsgerät
Einstellen des Klanges
Spielen eines Ausgangsgerätes

85
Deutsch
SURROUND SOUND
Surround-Sound offenbart Ihnen ein komplett neues Hörerlebnis.
Sie werden das Gefühl haben, sich inmitten des Geschehens zu
befinden, da der Klang von allen Seiten kommt. Achten Sie auf
TV-Sendungen, Audio- und Videokassetten und -discs mit den
3, 1, oder Zeichen,
welche für Mehrkanal-Surround-Sound kodiert sind. Sie sollten
Dolby Digital, DTS oder MPEG-Mehrkanal bevorzugen, um das
Optimum aus Ihrem Receiver zu holen.
Ihr Receiver kann DTS-Surround-Sound reproduzieren. DTS ist
ein hochwertiges Mehrkanal-Surround-Sound-System
erhältlich auf DVD-Discs, Laserdiscs und Audiodiscs. Fragen
Sie Ihren Software-Fachhändler nach der Verfügbarkeit von
DTS-Software in Ihrer Region.
Berücksichtigen Sie, dass DVD-Discs nicht immer mit vollem
Mehrkanal-Surround-Sound versehen sind. Um sicher zu gehen,
dass die Disc mehrkanalkodiert ist, fragen Sie Ihren
Fachhändler.
Die meisten gewöhnlichen Stereo-Kassetten und -Discs
können mit gutem Ergebnis unter Verwendung von Surround-
Klangeinstellungen abgespielt werden. Falls die Wiedergabe
im Surround-Modus verzerrt ist, schalten Sie auf normalen
Stereo-Modus.
Die Verfügbarkeit der verschiedenen beschriebenen Surround-
Sound-Modi ist abhängig von der Anzahl der verwendeten
Lautsprecher und der eingehenden Klanginformation.
Ist Surround-Sound eingeschaltet, so können Sie durch die
verschiedenen Surround-Sound-Modi schalten. Berücksichtigen
Sie dabei, dass die Möglichkeiten in Zusammenhang mit der
Lautsprechereinstellung stehen, die im Menü des Receivers
definiert ist.
Wenn ein digitales Surround-Signal festgestellt wird, zeigt
der Receiver entweder DOLBY DIGITAL, DTS oder
MPEG an.
1 Drücken Sie SURROUND ON/OFF, um den Surround-Sound
einzuschalten.
yDer verwendete Surround-Modus wird angezeigt.
2 Drücken Sie wiederholt SURR. MODE, um sich die
unterschiedlichen Surround-Modi anzuhören (sofern
verfügbar).
yDer gewählte Modus und die verwendeten Lautsprecher
werden angezeigt. Falls die eingehenden Mehrkanal-
Signale auf weniger Ausgangssignale reduziert werden,
wird DOWNMIX angezeigt.
3 Drücken Sie so oft wie notwendig VIRTUAL MODE, um
durch die virtuellen Surround-Sound-Modi zu schalten:
1 × um 3D SURRUOND zu aktivieren
2 × um MULTI FRONT zu aktivieren
3 × um MULTI REAR zu aktivieren
4 × um NATURAL SURROUND zu aktivieren
yEin Licht zeigt an, wenn ein virtueller Surround-Sound-
Modus aktiviert ist. -Zeichen zeigen an, welcher
virtuelle Surround-Sound-Modus aktiviert ist.
4 Drücken Sie SURROUND ON/OFF, um den Surround-Sound
auszuschalten.
ySURROUND OFF wird angezeigt.
Durch Surround-Sound schalten
Einige Worte zu Surround-Sound

SURROUND SOUND
86
HALL
Die Klangwiedergabe wird verstärkt und ein leichtes Echo wird
hinzugefügt. Dies vermittelt den Eindruck, sich in einem großen
Raum zu befinden. Es kann nur im Stereo-Modus verwendet
werden.
SURROUND
Der Surround-Modus ermöglicht normale Surround-
Klangwiedergabe mit 4 oder 5 Lautsprechern. Abhängig vom
Ausgangsmaterial wird Dolby Surround Pro Logic, Dolby
Digital, DTS oder MPEG reproduziert.
PRO LOGIC, DOLBY DIGITAL, MPEG, DTS
Zusätzlich zu SURROUND wird der verwendete Surround-
Modus – abhängig vom Ausgangsmaterial – angezeigt. Bei
Digital Surround wird das Klangformat AC-3 (für Dolby
Digital), DTS oder MPEG (für MPEG 2-Multikanal), gefolgt von
den auf der Tonquelle vorhandenen Kanälen (z. B. DVD).
Beispiele:AC-3 3/2.1 Dolby Digital, 3 vordere Kanäle,
2rückwärtige Kanäle und ein
Subwooferkanal.
MPEG 2/0.0 MPEG-Multikanal, nur Stereoklang.
AC-3 3/1.0 Dolby Digital, 3 vordere Kanäle,
1 (Mono) rückwärtiger Kanal ohne
Subwoofersignal.
DTS 3/2.1 DTS, 3 vordere Kanäle, 2 rückwärtige
Kanäle und einen Subwooferkanal.
FRONT-3 STEREO
Der Surround-Sound wird stummgeschaltet. 3 Stereo lässt Sie
Surround-Sound ohne Verwendung der Surround-Lautsprecher
hören.
STEREO
Der gesamte Klang wird vom vorderen linken und rechten
Lautsprecher wiedergegeben. Dies ermöglicht eine Standard-
Stereo-Wiedergabe.
Virtueller Surround
Ihr Receiver kann eine oder mehrere Arten von virtuellem
Surround-Sound wiedergeben. Virtueller Surround erweckt
einen realistischeren Klangeindruck indem „Phantom-
Lautsprecher” zusätzlich zu oder anstatt von echten
Lautsprechern geschaffen werden. Die Position des Hörers
beeinflusst den Surround-Effekt. Der Bereich, bei dem Effekt
am besten zur Geltung kommt, ist grau angezeichnet.
Der Surround-Sound-Effekt kann im Receivermenü eingestellt
werden. Es gibt folgende Surround-Sound-Modi:
3D SURROUND
Es werden keine rückwärtigen Lautsprecher benötigt. Der
Klang des rückwärtigen Kanals wird von den vorderen
Lautsprechern simuliert. Surround-Sound wird von den
vorderen rechten, linken und zentralen Lautsprechern
simuliert.
MULTI FRONT
„Phantom-Lautsprecher“ werden neben dem vorderen linken
und rechten Lautsprecher geschaffen.
MULTI REAR
„Phantom-Lautsprecher“ werden neben dem rückwärtigen
linken und rechten Lautsprecher geschaffen.
NATURAL SURROUND
„Phantom-Lautsprecher“ werden neben den vorderen und
rückwärtigen, linken und rechten Lautsprechern geschaffen.
Anmerkung: Die Verfügbarkeit von MULTI FRONT und
MULTI REAR hängt von den Klangkanälen am
Ausgangsmaterial ab.
NIGHT MODE (nur auf der Fernbedienung)
Die lauten Stellen werden abgeschwächt und die leisen
Passagen werden angehoben. Sie können Surround-Sound
genießen, ohne dabei schlafende Kinder oder Nachbarn zu
stören. Der Night Mode (Nacht-Modus) funktioniert nur mit
Dolby Digital und MPEG, und dies nur, sofern vom
Ausgangsmaterial geliefert.
LEFT
CENTER
FRONT
RIGHT
FRONT
Surround-Sound Einstellungen
Deutsch

87
Deutsch
RADIO
Sie können durch Abtasten des Frequenzbandes nach
Radiosendern suchen. Sie können auch die Frequenz eines
Ihnen bekannten Radiosenders eingeben. Wenn ein FM-Sender
gesendet und in Stereo empfangen wird, erscheint STEREO.
Nach Radiosendern suchen
1 Drehen Sie SOURCE SELECT, um das Radio auszuwählen.
yTUNER wird angezeigt.
2 Wählen Sie einen Wellenbereich durch wiederholtes Drücken
von TUNER AM/FM.
yDer gewählte Wellenbereich wird angezeigt.
3 Halten Sie 1 oder 2 für ungefähr 1 Sekunde gedrückt.
ySEARCH wird angezeigt und das Radio stellt einen
Sender mit ausreichender Stärke ein.
4 Wiederholen Sie diesen Vorgang, bis Sie den gewünschten
Sender finden.
• Um die Feineinstellung eines schwachen Senders
vorzunehmen, drücken Sie sooft wie nötig kurz 1 oder 2,
um einen optimalen Empfang zu erhalten.
Einen Radiosender mit Frequenz einstellen (nur mit der
Fernbedienung)
1 Drücken Sie TUNER.
yTUNER wird angezeigt.
2 Drücken Sie FR. Dw
y_ wird angezeigt.
3 Verwenden Sie 1–0, um die Frequenz eines Radiosenders
einzugeben.
Anmerkung: Es können nur gültige Zahlen innerhalb des
Frequenzbereiches des Radios eingegeben werden.
Sie können das Radio auf eine niedrigere Suchempfindlichkeit
umstellen, sodass nur nach Sendern mit einem starken Signal
gesucht wird (nur FM).
1 Drehen Sie SOURCE SELECT, um das Radio auszuwählen.
yTUNER wird angezeigt.
2 Drücken Sie SENS. am Receiver.
yEntweder SENS HI oder SENS LO wird für 5 Sekunden
angezeigt.
Anmerkung: Während nach Radiosendern gesucht wird, wird
die aktuelle Sensitivität angezeigt. In diesem Fall
bedeutet SENS LO, dass das Radio nur nach
Sendern mit einem starken Signal sucht.
Sie können bis zu 30 Radiosender speichern. Der Receiver
kann Sender selbständig auswählen und programmieren oder
Sie wählen sie selbst aus.
Automatisch programmieren
1 Wählen Sie * TUNER aus dem Menü und drücken Sie
NEXT 2.
2 Wählen Sie AUTO INSTALL und drücken Sie NEXT 2.
yDie Speicherplatznummer bei der das Programmieren
begonnen wird, der Wellenbereich und AUTO werden
angezeigt.
3 Drehen Sie TUNER PRESET X, um die Speicherplatznummer,
bei der das Programmieren beginnen soll, zu ändern.
4 Verwenden Sie TUNER AM/FM, um auf den gewünschten
Wellenbereich zu schalten.
5 Drücken Sie ENTER / OK, um das Programmieren zu starten.
yAUTO INSTALL blinkt und alle verfügbaren
Radiosender werden programmiert, was einige Minuten
dauern kann. Das Programmieren ist beendet, wenn
AUTO INSTALL aufhört zu blinken.
Händisch programmieren
1 Wählen Sie * TUNER aus dem Menü und drücken Sie
NEXT 2.
2 Wählen Sie MAN INSTALL und drücken Sie NEXT 2.
yEine Speicherplatznummer, der Wellenbereich und die
Frequenz werden angezeigt.
3 Drehen Sie TUNER PRESET X, um die Speicherplatznummer,
auf welcher der Radiosender gespeichert werden soll, zu
ändern.
4 Stellen Sie einen gewünschten Radiosender ein (siehe
„Nach Radiosendern suchen“).
5 Drücken Sie ENTER / OK, um Ihre Auswahl zu bestätigen.
ySTORED wird kurz angezeigt. Der Radiosender wird auf
die gewählte Speicherplatznummer programmiert.
6 Wählen und speichern Sie alle gewünschten Radiosender
auf diese Weise.
Speichern von Radiosendern
Umstellen der FM-Empfindlichkeit
Einstellen von Radiosendern

88
Deutsch
RADIO
1 Drehen Sie SOURCE SELECT auf TUNER, um das Radio
auszuwählen.
yTUNER wird angezeigt.
2 Drehen Sie TUNER PRESET X, um einen gespeicherten
Radiosender auszuwählen.
yPRESET, die Speicherplatznummer und der gespeicherte
Sender werden angezeigt.
Nachdem Sie Radiosender programmiert haben, möchten Sie
vielleicht deren Reihenfolge ändern. Mit RESHUFFLE
können Sie die Positionen der Sender austauschen.
1 Wählen Sie * TUNER aus dem Menü und drücken Sie
NEXT 2.
2 Wählen Sie RESHUFFLE und drücken Sie NEXT 2.
yPRESET, eine Speicherplatznummer und ein
gespeicherter Sender werden angezeigt.
3 Drehen Sie TUNER PRESET X, um einen gespeicherten
Sender auszuwählen.
4 Drücken Sie ENTER / OK, um die Auswahl zu bestätigen.
yDie gewählte Speicherplatznummer SWAP <-> und
eine zweite Speicherplatznummer werden angezeigt.
5 Drehen Sie TUNER PRESET X, um die andere
Speicherplatznummer zu wählen.
6 Drücken Sie ENTER / OK, um den Austausch zu bestätigen.
yRESHUFFLED wird kurz angezeigt und die beiden
Speicherplatznummern sind ausgetauscht.
Es ist möglich, jedem der gespeicherten Radiosender einen
Namen zuzuteilen. Auch RDS-Sendernamen können
überschrieben werden.
1 Wählen Sie * TUNER aus dem Menü und drücken Sie
NEXT 2.
2 Wählen Sie GIVE NAME (Namen geben) und drücken Sie
NEXT 2.
yEin gespeicherter Radiosender wird angezeigt.
3 Drehen Sie TUNER PRESET X, um den zu benennenden
Sender zu wählen.
4 Drücken Sie ENTER / OK, um Ihre Auswahl zu bestätigen.
yDer existierende Name oder ________ wird angezeigt.
5 Drehen Sie TUNER PRESET X, um einen Buchstaben zu
wählen und NEXT 2 oder 1 PREV., um zur nächsten oder
vorhergehenden Position zu gelangen.
6 Nachdem Sie den ganzen Namen eingegeben haben,
drücken Sie ENTER / OK, um zu bestätigen.
ySTORED wird angezeigt und der Name ist gespeichert.
Anmerkung: Wenn Sie den übertragenen RDS-Sendernamen
wieder verwenden wollen, löschen Sie einfach
den zugeteilten Namen.
1 Verwenden Sie die Menüoption * TUNER, wählen Sie
GIVE NAME.
yEin gespeicherter Radiosender wird angezeigt.
2 Drehen Sie X MENU NAVIGATOR, um den zu löschenden
Namen auszuwählen.
3 Drücken Sie ENTER / OK, um Ihre Auswahl zu bestätigen.
4 Drücken Sie 1 PREV. während der erste Buchstabe blinkt.
y CL blinkt links vom Sendernamen.
5 Drücken Sie ENTER / OK, um den Sendernamen zu löschen.
Oder, falls Sie Ihre Absicht geändert haben,
drücken Sie 1 PREV., um den Sendernamen unverändert zu
lassen.
Löschen von Sendernamen
Benennen von Radiosendern
Umsortieren gespeicherter Radiosender
Einstellen gespeicherter Radiosender

RADIO
89
Radio Data System ist ein Service, das FM-Sendern erlaubt,
zusätzliche Informationen zu senden. Wenn Sie einen RDS-Sender
empfangen, werden R und der Sendername angezeigt.
Umschalten zwischen verschiedenen RDS Informationen
• Drücken Sie wiederholt RADIO TEXT am Receiver, um
zwischen folgenden Informationen (sofern vorhanden)
umzuschalten:
– Radiotextmeldungen
– RDS-Uhr
– Frequenz
– Sendername
Anmerkung: Das von gewissen RDS-Sendern übertragene
Zeitsignal kann manchmal ungenau sein.
Sie können das Radio so einstellen, dass jede Wiedergabe von
den Nachrichten oder Verkehrsinformationen eines gewählten
RDS-Senders unterbrochen wird. Die Durchsagen funktionieren
nur, wenn die notwendigen RDS-Signale gesendet werden.
Wenn RDS-Sender auch ein EON Signal (Enhanced Other
Networks) übertragen, wird EON angezeigt. Dieses Signal
ermöglicht dem Radio nicht nur auf einem gewählten
RDS-Sender nach Nachrichten oder Verkehrsinformationen zu
suchen, sondern innerhalb des ganzen EON Sendernetzwerkes.
1 Schalten Sie den gewünschten RDS-Sender ein.
2 Drücken Sie NEWS/TA:
Einmal um NEWS anzuzeigen; die Funktion der
Nachrichtendurchsage ist eingeschaltet.
Zweimal um TA anzuzeigen; die Funktion der
Verkehrsdurchsage ist eingeschaltet.
Dreimal um TA und NEWS anzuzeigen, beide Funktionen der
Durchsage sind eingeschaltet.
3 Wählen und spielen Sie jedes andere Ausgangsgerät wie
gewohnt.
y Während Nachrichten oder Verkehrsdurchsagen
gesendet werden schaltet der Receiver auf Radio und
NEWS oder TA blinkt.
4 Drücken Sie NEWS/TA bis die Displayanzeige
verschwindet, um die Funktion(en) auszuschalten.
oder
Drücken Sie NEWS/TA während einer Durchsage, um die
Funktion(en) auszuschalten.
Anmerkung: Stellen Sie sicher, dass Sie die Nachrichten- und
Verkehrsdurchsage während des Aufnehmens
ausschalten, da diese Durchsagen sonst auch
aufgenommen werden.
RDS-Nachrichten- und VerkehrsdurchsageRDS R
Deutsch

90
Deutsch
TECHNISCHE DATEN
Änderungen vorbehalten.
Allgemein
Stromverbrauch (FR 984, FR 985, FR 986).......................210 W
Stromverbrauch (FR 994, FR 995, FR 996).......................255 W
Stromverbrauch in Bereitschaft........................................< 2 W
Abmessungen, b × h × t..........................435 × 135 × 350 mm
Gewicht (FR 984, FR 985, FR 986)....................................8,6 kg
Gewicht (FR 994, FR 995, FR 996)....................................9,4 kg
Verstärkerteil (0,7 % THD, 6 Ω, 1 kHz)
Ausgangsleistung, Stereo-Modus
(FR 984, FR 985, FR 986) (DIN)....................................2 × 60 W
Ausgangsleistung, Surround-Modus (FR 984, FR 985, FR 986)
Front......................................................................2 × 60 W
Center..........................................................................60 W
Surround................................................................2 × 60 W
Ausgangsleistung, Stereo-Modus
(FR 994, FR 995, FR 996) (DIN)..................................2 × 100 W
Ausgangsleistung, Surround-Modus (FR 994, FR 995, FR 996)
Front....................................................................2 × 100 W
Center........................................................................100 W
Surround..............................................................2 × 100 W
Bass.................................................................±9 dB bei 100 Hz
Höhen..............................................................±9 dB bei 10 kHz
Loudness...+6 dB bei 100 Hz (-30 dB); +3 dB bei 10 kHz (-30 dB)
Klirrfaktor................................................0,05 % bei 1 kHz, 5 W
Frequenzgang............................................20–20.000 Hz, ±1 dB
Signal-Rauschabstand...................................................≥ 82 dB
Stereokanal-Trennung (1 kHz)........................................≥ 45 dB
Kreuzkopplung (1 kHz)...................................................≤ -65 dB
Eingänge
Lineare Eingänge................................................250 mV/47 kΩ
6 CH....................................................................250 mV/40 kΩ
Front AV (nur FR 995, FR 996).............................250 mV/22 kΩ
Phono......................................................................5 mV/47 kΩ
Digital koaxial ..........................................75 Ω entspr. IEC 958
Digital optisch..................................................................Toslink
Digitale Sampling-Rate
(FR 984, FR 985, FR 986).......................32 kHz, 44,1 kHz, 48 kHz
Digitale Sampling-Rate
(FR 994, FR 995, FR 996)..........32 kHz, 44,1 kHz, 48 kHz, 96 kHz
Ausgänge
Stromanschlüsse (geschaltet)........................total max. 100 W
Lineare Ausgänge.................................................250 mV/1 kΩ
Digital koaxial ..........................................75 Ω entspr. IEC 958
Digitalausgang, Sampling-Frequenzen
Analog ein...........................................................aus 48 kHz
Digitaleingang 32 kHz.........................................aus 32 kHz
Digitaleingang 44.1 kHz...................................aus 44,1 kHz
Digitaleingang 48 kHz.........................................aus 48 kHz
Digitaleingang 96 kHz (nur FR 994, FR 995, FR 996)...aus 48 kHz
Subwoofer pre-out....................................................0,8 V/1 kΩ
Center pre-out...........................................................0,8 V/1 kΩ
Kopfhörer........................................8–600 Ω (3 V e.m.f., 60 Ω)
Lautsprecher.....................................................................≥ 6 Ω
Radioteil
Frequenzbereich
FM..............................................................87,5–108,0 MHz
MW...............................................................531–1.602 kHz
LW....................................................................153–279 kHz
Sensitivität
Stereo FM..................................................................41 dBf
Mono FM....................................................................15 dBf
Klirrfaktor
Stereo FM...................................................................0,3 %
Mono FM...................................................................0,85 %
Frequenzgang.............................................63–12.500 Hz ±1 dB
Signal-Rauschabstand
Stereo FM....................................................................55 dB
Mono FM.....................................................................60 dB
Kanaltrennung...................................................35 dB bei 1 kHz
Receiver

91
Deutsch
FEHLERBEHEBUNG
PROBLEM MÖGLICHE URSACHE LÖSUNG
Gerät funktioniert nicht Die Sicherheitsschaltung Schalten Sie das Gerät aus und lassen Sie es
und ist im (Überhitzungsschutz) wurde aktiviert. abkühlen. Nachdem das Gerät abgekühlt ist,
Bereitschaftsmodus schalten Sie es wieder ein und wählen ein
Ausgangsgerät durch Drehen von SOURCE SELECT
oder Drücken einer Ausgangsgerätewahltaste
auf der Fernbedienung.
Kein Ton VOLUME ist nicht richtig eingestellt. Stellen Sie VOLUME ein.
Kopfhörer sind angeschlossen. Stecken Sie die Kopfhörer ab.
Das falsche Ausgangsgerät ist gewählt. Drehen Sie SOURCE SELECT, um das richtige
Ausgangsgerät zu wählen.
Kein Ton auf der Ein Lautsprecher ist falsch angeschlossen. Schließen Sie den Lautsprecher korrekt an.
linken oder rechten Seite
Ein Lautsprecherkabel ist beschädigt. Ersetzen Sie das Kabel.
Lautstärkebalance im Receiver-Menü ist Stellen Sie VOL FRONT-L und
falsch eingestellt. VOL FRONT-R im Receiver-Menü ein.
Schlechter Ton oder kein SURROUND-Modus ist nicht eingeschaltet. Drücken Sie SURROUND ON/OFF, um den
Ton beim Center- oder den Surround-Sound einzuschalten.
Surround-Lautsprechern
Surround- und/oder Center-Lautsprecher Schließen Sie die Lautsprecher korrekt an.
sind nicht (richtig) angeschlossen.
Surround- und/oder Center-Lautsprecher sind Stellen Sie den gegenwärtigen Lautsprecher auf
im Menü SPEAKR SETUP ausgeschaltet. YES.
Ein Lautsprecherkabel ist beschädigt. Ersetzen Sie das Kabel.
Schlechter Bassklang Lautsprecher sind nicht phasengleich.
Schließen Sie die farbigen (oder markierten) Adern
an die farbigen Klemmen und die schwarzen (oder
unmarkierten) Adern an die schwarzen Klemmen an.
Schlechter Klang Schlecht passende Einstellung für die Korrigieren Sie die Klangeinstellungen am
vorhandene Art der Musik oder des Klanges. Receiver.
Der Grad des Surround- Der Grad des Surround-Sounds ist nicht Stellen Sie den Grad des Surround-Sounds am
Klanges ist zu niedrig oder richtig eingestellt. Receiver ein.
zu hoch
Der Grad des Center-Klanges
Der Grad des Center-Klanges ist nicht Stellen Sie den Grad des Center-Klanges am
ist zu niedrigoder zu hoch
richtig eingestellt. Receiver ein.
Nur der Center-Lautsprecher
Ein Monosignal wird reproduziert. Wählen Sie ein anderes Ausgangsgerät oder
wird in Dolby Surround schalten Sie den Surround-Sound aus.
Pro Logic gehört
Schlechter Radioempfang, Receiver oder die Antenne ist nahe einer Ändern Sie die Position des störenden Gerätes
automatisches Strahlungsquelle wie TV, CD-Spieler, oder versuchen Sie, es auszuschalten.
Programmieren funktioniert CD-Rekorder, DVD-Spieler, etc. positioniert.
nicht einwandfrei
Digitale Aufnahme über Die Sampling-Frequenz wird vom Vergewissern Sie sich, dass der digitale Rekorder
digitalen Ausgang digitalen Rekorder nicht akzeptiert. Sampling-Frequenzen zwischen 32 kHz und
nicht möglich 48 kHz verträgt, oder nehmen Sie über den
analogen Ausgang auf.
Die gesamt Aufnahme
Der DVD-Spieler liefert keine Nehmen Sie jeden Titel individuell auf, oder
erscheint als ein Titel bei
Titelinformation. benutzen Sie die „manuelle Titel-Zuwachs-
Aufnahme von einer DVD-Disc
Funktion” auf Ihrem Rekorder.
WARNUNG
Versuchen Sie unter keinen Umständen das Gerät
selbst zu reparieren, da die Garantie dadurch ihre
Gültigkeit verliert. Versuchen Sie nicht das Gerät zu
öffnen, da Sie hiermit einen elektrischen Schlag
riskieren.
Wenn ein Fehler auftritt, prüfen Sie zuerst die nachstehenden
Hinweise bevor Sie das Gerät zur Reparatur bringen.
Wenn Sie ein Problem trotz dieser Hinweise nicht lösen
können, wenden Sie sich an Ihren Fachhändler oder eine
Service-Stelle.

ALGEMENE INFORMATIE
92
Deze receiver wordt als volgt geleverd:
– een afstandsbediening
– 2 batterijen voor de afstandsbediening, type AA
– een coaxiale kabel voor audio-aansluiting op een
DVD-speler
– een systeembuskabel voor de aansluitbus CINEMA LINK
– een raamantenne
– een draadantenne
– deze gebruiksaanwijzing
Als u de verschillende apparaten van uw systeem
gestapeld heeft dan moet de receiver bovenop
geplaatst worden. Plaats de receiver op een vlakke,
harde, stabiele ondergrond. Dek de ventilatieopeningen
nooit af en laat 50 cm ventilatieruimte vrij aan de
bovenkant en 10 cm links en rechts van de receiver.
Voor een goede ontvangst mag de raamantenne niet bovenop
of onder een videorecorder, cd-recorder, DVD-speler, tv of een
andere stralingsbron geplaatst worden.
Wij hebben alle overbodig verpakkingsmateriaal weggelaten
en ervoor gezorgd dat de verpakking gemakkelijk in drie
materialen te scheiden is: karton (doos), polystyreenschuim
(buffer) en polyethyleen (zakken, beschermfolie).
Uw systeem bestaat uit materialen die door een
gespecialiseerd bedrijf gerecycleerd en hergebruikt kunnen
worden. Informeer waar u verpakkingsmateriaal, lege
batterijen en oude apparatuur kunt inleveren.
Vervaardigd onder licentie van Dolby Laboratories. „DOLBY”,
„DOLBY DIGITAL”, „PRO LOGIC” en het dubbele D-symbool
2 zijn handelsmerken van Dolby Laboratories.
Vertrouwelijke ongepubliceerde werken. © 1992–1997 Dolby
Laboratories. Alle rechten voorbehouden.
„DTS” en „DTS Digital Surround” zijn handelsmerken van
Digital Theater Systems, Inc. Copyright 1996 Theater
Systems, Inc. Alle rechten voorbehouden.
U kunt de receiver schoonmaken met
een zachte, licht bevochtigde
pluisvrije doek. Gebruik geen
schoonmaakmiddelen want die
kunnen het apparaat beschadigen.
Bescherm de receiver tegen vocht,
regen, zand of extreem hoge
temperaturen (zoals bij verwarmings-
apparatuur of in de felle zon).
Onderhoud
Handelsmerk
Met het oog op het milieu…
Opstellen
Inhoud van de doos
Algemene informatie
Inhoud van de doos..........................................................................92
Opstellen..........................................................................................92
Met het oog op het milieu...............................................................92
Handelsmerk ....................................................................................92
Onderhoud........................................................................................92
Bedieningsknoppen..........................................................................93
Afstandsbediening
Gebruik van de afstandsbediening..................................................94
Toetsen op de afstandsbediening....................................................95
Programmeren van de universele afstandsbediening
(enkel bij FR 985, FR 986, FR 995, FR 996)........................................96
Aansluitbussen..................................................................................97
Aansluitingen
Analoge audio-aansluitingen...........................................................98
Digitale audioaansluitingen.............................................................98
Systeembus, CINEMA LINK.............................................................99
Videoaansluitingen ..........................................................................99
Netaansluiting................................................................................100
Uitgangsvermogen.........................................................................100
Luidsprekeraansluitingen...............................................................100
Uw tv als middenluidspreker.........................................................100
Antenneaansluitingen....................................................................100
Hoofdtelefoon ................................................................................100
Installeren van het systeem
Opstellen van de luidsprekers.......................................................101
Instellen en testen van de luidsprekers........................................101
Receiverinstelling...........................................................................101
Display...............................................................................................102
Menu’s
Receiver-menu.......................................................................103–104
TV-menu.........................................................................................104
CINEMA LINK in werking stellen ..................................................104
Bronkeuze
SOURCE SELECT.............................................................................105
6 CHANNEL-DVD/SACD INPUT-selectie .......................................105
Een andere ingang toekennen aan een bron.................................105
Dezelfde ingang gebruiken voor twee of meerdere apparaten....105
De ingang 6 CHANNEL-DVD/SACD INPUT ...................................105
Afspelen, opnemen
Afspelen van een bron...................................................................106
Instellen van het geluid.................................................................106
Opnemen van een geluidsbron......................................................106
Opnemen via de digitale uitgang...................................................106
Surround Sound
Over surround sound......................................................................107
Inschakelen van het surround-geluid.............................................107
Surround sound-instellingen..........................................................108
Tuner
Afstemmen op een radiozender.....................................................109
Instellen van de FM-gevoeligheid.................................................109
Programmeren van radiozenders...................................................109
Afstemmen op een geprogrammeerde zender..............................110
Herschikken van de geprogrammeerde zenders ...........................110
Een naam geven aan een zender...................................................110
Wissen van een zendernaam.........................................................110
RDS R............................................................................................111
RDS-nieuwsbericht en -verkeersinformatie..................................111
Technische gegevens
Receiver..........................................................................................112
Verhelpen van storingen
Waarschuwing...............................................................................113
Verhelpen van storingen................................................................113
Nederlands
Dit apparaat voldoet aan de radio-ontstoringseisen
van de Europese Gemeenschap.
Als ENERGY STAR
®
-partner heeft, Philips vastgesteld dat dit
product voldoet aan de ENERGY STAR
®
-richtlijnen
voor efficiënt energiegebruik.

BEDIENINGSKNOPPEN
93
1 POWER / STANDBY.......Om de receiver aan en uit te
zetten.
2 CINEMA LINK................Om de systeembus tussen de
receiver en de tv in en uit te
schakelen.
3 ..........................................Sensor voor de
infraroodafstandsbediening.
4 VIRTUAL..........................Controlelampje voor virtuele
surround sound.
5 HALL................................Controlelampje voor de
HALL-functie.
6 ..........................................Display
7 SOURCE SELECT............Om te kiezen tussen de
verschillende audio- en
videoaansluitingen.
Stelt de receiver weer in
werking vanuit standby.
8 VOLUME..........................Om het volumeniveau hoger of
lager in te stellen.
9 FRONT AV.......................Om de ingang FRONT AV / GAME
te kiezen (enkel bij FR 995,
FR 996).
0 TREBLE............................Om, indien gebruikt combinatie
met VOLUME, de hoge tonen in te
stellen.
! BASS...............................Om, indien gebruikt combinatie
met VOLUME, de lage tonen in
te stellen.
@ LOUDNESS.....................Om de LOUDNESS-functie in en
uit te schakelen.
# NEXT 2 ...........................TUNER: om een zender te zoeken.
MENU: om naar het volgende
menuniveau te gaan.
$ ENTER / OK.....................Om de keuzes binnen een menu
te bevestigen.
% TUNER PRESET X MENU NAVIGATOR
TUNER: om de volgende of
vorige geprogrammeerde zender
te kiezen.
MENU: om naar boven en
beneden te lopen in een menu.
^ 1 PREV. / EXIT...............TUNER: om een zender te zoeken.
MENU: om naar het vorige
menuniveau te gaan.
& SETUP MENU ................Om het menu te openen en te
sluiten.
* SENS. ..............................Om een hoge of lage
afstemgevoeligheid in te stellen.
( NEWS/TA........................Om de RDS-nieuwsbericht- en
RDS-verkeersinformatiefuncties
in en uit te schakelen.
) TUNER AM/FM..............Om het golfgebied van de tuner
te kiezen.
¡ RADIO TEXT...................Om door de verschillende
soorten RDS-informatie te lopen.
™ SURR. MODE..................Doorloopt de verschillende
luidsprekerconfiguraties.
£ VIRTUAL MODE.............Doorloopt de verschillende
virtuele surround sound modi.
≤ SURROUND ON/OFF.....Schakelt tussen de laatst
geselecteerde surround modus
en stereo.
T
A
1 234 56 7
8
9
0
!
@#$%^&*()¡™£≤
Nederlands

AFSTANDSBEDIENING
94
Open het batterijvak van de
afstandsbediening en plaats er
2 alkalinebatterijen in, type AA
(R06, UM-3).
Verwijder de batterijen als ze leeg
zijn of als u de afstandsbediening
gedurende langere tijd niet zult
gebruiken.
De toetsen op de afstandsbediening hebben dezelfde functie
als overeenkomstige toetsen op de receiver.
Belangrijk!
U moet gedurende meer dan 1 seconde op een bronknop
drukken om de geluidsbron op de receiver te veranderen. Als
u minder dan 1 seconde op een bronknop drukt, dan zal de
afstandsbediening alleen worden omgeschakeld op gebruik
van bedieningsfuncties voor het geselecteerde product.
De afstandsbediening blijft ingesteld op de gekozen bron totdat
u een andere bronkeuzetoets op de afstandsbediening indrukt.
Zo kunt u andere bronnen bedienen (bijvoorbeeld een cassette
spoelen) zonder dat u de bron op de receiver verandert.
Batterijen niet weggooien,
maar inleveren als KCA.
ñ
Gebruik van de afstandsbediening
DVD
2
H
AA
TV
Ç
É
MENU
OK
GUIDE
NEWS/TA
5
1
3
2
4
6
7
9
8
0
MUTE
TUNER
CD CDR/TAPE
DVD
SAT
VCR
TV
PHONO
CABLE BOX
REC CANCEL FR.D. INDEX
íë
CHANNEL/TRACK LOUDNESS
VIRTUALNIGHT
DISC
SURROUND
SURROUND
SUBW.
T-C
Å
+
-
+
-
REAR
CHANNEL
SUB WOOFER
TEST TONE
ON/
OFF
AUDIO
ON/
OFF
MODE
MODE
CINEMA GO
Nederlands

AFSTANDSBEDIENING
95
H MUTE .....................Dempt het geluid van de receiver in
alle standen, behalve TV.
Dempt het geluid van uw Philips TV-
toestel als uw afstandsbediening op
TV-stand is ingesteld.
2 ................................Schakelt de op uw afstandsbediening
geselecteerde bron om (bijv.
videorecorder, TV) op standby.
Als deze toets langer dan 2 seconden
wordt ingedrukt, schakelt de receiver
over op standby.
PHONO, TUNER,
CD, CDR/TAPE,
TV, VCR, SAT, DVD........Om de afstandsbediening in te stellen
voor het bedienen van de verschillende
apparaten. Selecteert de bronnen
indien langer dan 1 seconde ingedrukt.
SAT werkt enkel bij digitale
satellietontvangers.
Stelt de receiver weer in werking vanuit
standby.
1–0................................Om cijfers in te toetsen voor
cd-nummers, radiozenders of
frequenties. Nummers die uit twee
cijfers bestaan, moeten binnen
2 seconden ingetoetst worden.
CINEMA GO..........
Stelt CINEMA LINK op de tv in werking.
CABLE BOX...................Zonder functie.
MENU GUIDE ..............TUNER: Schakelt het receivermenu
aan en uit.
DVD, TV: Schakelt het DVD/TV-menu
aan en uit.
OK.................................Om de keuzes binnen een menu te
bevestigen.
Pijltjestoetsen...............TUNER: Om door een menu te lopen.
Pijltjes naar rechts/links dienen voor
hogere/lagere frequentie.
CD, CDR: Pijltjes naar links/rechts
dienen voor het zoeken naar een
vorige/volgende passage,
omhoog/omlaag zijn om naar een
vorig/volgend nummer te gaan.
+A...........................Om het volume van de receiver harder
te zetten.
-A...........................Om het volume van de receiver zachter
te zetten.
iNEWS/TA .................
Om NEWS en TRAFFIC ANNOUNCEMENT
in en uit te schakelen.
TV: Om teletekst in en uit te schakelen.
SAT: Om de informatietekst in en uit
te schakelen.
ÉATV......................
Om het volume van de tv harder te zetten.
CD, CDR, VCR, DVD: Om het
afspelen te starten.
ÇATV......................
Om het volume van de tv zachter te zetten.
CD, CDR, VCR, DVD: Om het
afspelen te beëindigen.
í
CHANNEL/TRACK
...Om de vorige geprogrammeerde
zender te kiezen.
VCR: Om de cassette terug te spoelen.
CD, CDR, DVD: Om het vorige
nummer te kiezen.
TV: Om het vorige kanaal te kiezen.
ë
CHANNEL/TRACK
...Om de volgende geprogrammeerde
zender te kiezen.
VCR: Om de cassette door te spoelen.
CD, CDR, DVD: Om het volgende
nummer te kiezen.
TV: Om het volgende kanaal te kiezen.
LOUDNESS...................Om de LOUDNESS-functie in en uit te
schakelen.
SUBW. ON/OFF ............Schakelt de subwoofer aan en uit.
REC, DVD AUDIO..........CDR, VCR: Om het opnemen te starten.
DVD: Om een ander audionummer te
kiezen.
CANCEL, DVD ...........CD, CDR, SAT, VCR: Om een
programma te wissen, om een keuze
ongedaan te maken.
DVD: Om de gezichtshoek te wijzigen.
FR.D., DVD Å .............TUNER: Om FREQUENCY DIRECT te
kiezen.
CD, CDR, VCR, DVD: Om het
afspelen te onderbreken.
INDEX, DVD T-C............VCR:Om het zoeken in de index in en
uit te schakelen.
SAT: Om de thema’s in en uit te
schakelen.
DVD: Om te kiezen tussen titel en
hoofdstuk.
DISC..............................CD-, CDR-, DVD-wisselaars: Om naar
de volgende disk te gaan.
NIGHT...........................Om NIGHT MODE in en uit te schakelen.
VIRTUAL MODE............Doorloopt de verschillende virtuele
surround sound modi.
SURROUND ON/OFF....Om SURROUND SOUND in en uit te
schakelen.
+/- SUBWOOFER...Om het volume van de subwoofer
harder/zachter te zetten.
+/- REAR ...............
Om het volume van de achterluidsprekers
harder/zachter te zetten. Als de testtoon
aanstaat, kunt u met deze toetsen het
volume van de luidsprekers die u hoort
harder/zachter zetten.
SURROUND MODE.......Om door de verschillende surround-
instellingen te lopen.
TEST TONE...................Om de testtoon in en uit te schakelen.
Als de testtoon aanstaat, kunt u met
+/- REAR het volume van de
luidsprekers die u hoort harder/zachter
zetten.
Toetsen op de afstandsbediening
Nederlands

AFSTANDSBEDIENING
96
U herkent de universele afstandsbediening aan het opschrift
Multibrand/Universal.
Om de codes te gebruiken voor uw apparatuur van verschillende
merken dient de universele afstandsbediening geprogrammeerd te
worden. U doet dit door de 4-cijferige code in te toetsen of door de
codes te scannen tot u de juiste code gevonden heeft. Wij raden u
aan het intoetsen van de 4-cijferige code te gebruiken. Dit gaat
sneller en is betrouwbaarder. Het scannen van de codes kunt u betere
alleen gebruiken als u de code voor één van uw apparaten niet kunt
vinden. De codelijst vindt u achterin deze gebruiksaanwijzing.
Belangrijk!
Voor het programmeren moet u de toetsen van de
afstandsbediening gebruiken, niet de toetsen van de receiver
of de andere apparaten.
Programmeren met de 4-cijferige code
1 Houd de bronkeuzetoets van het apparaat dat u wilt
bedienen en 2 gedurende 3 seconden ingedrukt.
2 Toets de 4-cijferige code voor het apparaat in (de codelijst
vindt u achterin deze gebruiksaanwijzing).
Opmerkingen: – Als u meer dan 4-cijfers intoetst dan herkent
de afstands-bediening enkel die, die u het
eerst ingetoetst heeft.
– Als u 30 seconden lang geen enkele code
intoetst dan beëindigt de afstandsbediening
het programmeren zonder de code te wijzigen.
– Om een nieuw apparaat te programmeren,
geeft u gewoon een nieuwe code op die de
oude code overschrijft.
Scannen van de codes
1 Zet het apparaat aan dat u wilt bedienen.
2 Houd de bronkeuzetoets van het apparaat dat u wilt
bedienen en 2 gedurende 3 seconden ingedrukt.
3 Druk op 2 en laat opnieuw los.
yDe afstandsbediening stuurt de codes voor ‘volgende
zender’ of voor ‘stand-by’ (afhankelijk van de gekozen
geluidsbron) van het ene merk na het andere.
4 Druk, zodra het apparaat reageert (de volgende zender kiest
of stand-by schakelt) op 2 om de code te bevestigen.
yDe geïdentificeerde code wordt gebruikt.
•
Als het apparaat gedurende 2 minuten niet reageert dan is de
code voor dit apparaat niet opgeslagen in de afstands-
bediening. De code van de afstandsbediening blijft ongewijzigd.
Opmerking: Als u de batterijen langer dan 1 minuut uit de
afstandsbediening haalt dan moeten de codes
opnieuw geprogrammeerd worden.
Als u de codes voor uw verschillende apparaten gevonden en
getest heeft dan kunt u ze hier opschrijven.
PHONO..........................................
TUNER...........................................
CD .................................................
CDR/TAPE .....................................
TV..................................................
VCR ...............................................
SAT................................................
DVD...............................................
Resetten van de afstandsbediening
1 Houd één van de bronkeuzetoetsen en 2 ingedrukt
gedurende 3 seconden.
2 Toets de 3-cijferige code 981 in.
yAlle oorspronkelijke Philips-codes zijn nu weer
teruggezet op de afstandsbediening.
Programmeren van de universele
afstandsbediening
(enkel bij FR 985, FR 986, FR 995, FR 996)
Nederlands

AANSLUITBUSSEN
97
Aansluitbussen Naam van de aansluitbus Voor het aansluiten van:
6,3 mm-hoofdtelefoonbus 1 PHONES Een hoofdtelefoon met 6,3 mm-stekker.
op de voorkant.
Audio- en video-ingangen op 2 FRONT AV / GAME Linker en rechter audio-uitgangen van toestellen zoals videocamera’s
de voorkant en spelconsoles.
(enkel bij FR 995, FR 996).
3 FRONT AV / GAME Video-uitgangen van toestellen zoals videocamera’s en spelconsoles.
FRONT SPEAKERS 4 R, L Een rechter- en linkervoorluidspreker.
5 CENTER Een middenluidspreker.
SURROUND SPEAKERS 6 R, L Een rechter- en linker-surround-luidspreker.
AUDIO IN/OUT 8 CDR/TAPE OUT De ingang van een cd-recorder of een cassettedeck.
9 CDR/TAPE IN De uitgang van een cd-recorder of een cassettedeck.
0 CD IN De uitgang van een cd-speler.
! SAT IN De uitgang van een satellietsysteem.
@ VCR OUT De ingang van een videorecorder.
# VCR IN De uitgang van een videorecorder.
$ TV IN De uitgang van een tv.
% PHONO IN De uitgang van een platenspeler met MM-element.
¡ PHONO GND f De aarddraad van een platenspeler.
6-kanaals ingang ^
6CHANNEL/ DVDINPUT
De 6-kanaalsuitgang van apparaten zoals een DVD- of laserdiskspeler.
DIGITAL AUDIO IN/OUT & COAX 1 IN
De coax-uitgang van digitale apparatuur (standaardingang voor DVD bron)
* COAX 2 IN De coax-uitgang van digitale apparatuur.
( COAX OUT De coax-ingang van digitale apparatuur zoals een cd-recorder of
MD-recorder.
) OPTICAL IN
De optische uitgang van digitale apparatuur zoals een DVD-speler, cd-speler,
cd-recorder of MD-speler (enkel bij FR 984, FR 985, FR 986, FR 994).
) OPTICAL 1 (2) IN De optische uitgang van digitale apparatuur zoals een DVD-speler,
cd-speler, cd-recorder of MD-speler (enkel bij FR 995, FR 996).
VIDEO IN/OUT ™ S-VIDEO S-Video-ingangen/uitgangen van videotoestellen voor betere
beeldkwaliteit (enkel bij FR 994, FR 995, FR 996).
£ DVD IN De uitgang van een DVD-speler.
≤ MON OUT De ingang van een monitor (bijvoorbeeld de tv).
§ VCR IN De uitgang van een videorecorder.
≥ VCR OUT De ingang van een videorecorder (voor opnames).
ª SAT IN De uitgang van een satellietsysteem.
Antenneaansluitingen ∞
AM LOOP
De bijgeleverde raamantenne.
• FM 75 Ω De bijgeleverde draadantenne of buitenantenne.
Uitgangen met voorversterking 7 CENTER PRE-OUT
De ingang van een tv wanneer deze gebruikt wordt als middenluidspreker
(enkel mogelijk wanneer de systeembus CINEMA LINK aangesloten is).
º
SUBWOOFER PRE-OUT
De ingang van een actieve subwoofer.
Systeembus ⁄ CINEMA LINK De systeembusaansluitingen van een Philips-tv met CINEMA LINK.
Netaansluitingen (niet bij ¤ AC OUTLET Levert dezelfde spanning als het net. Maximaal aan te sluiten
alle modellen) vermogen 100 W.
Netsnoer ‹ Steek, nadat u alle andere aansluitingen gemaakt heeft, de
stekker van het netsnoer in het stopcontact.
ANTENNA
FM 75 Ω
A
M
L
O
O
P
VIDEO IN/OUT
C
A
U
TIO
N
R
IS
K
O
F
E
L
E
C
T
R
IC
S
H
O
C
K
D
O
N
O
T
O
P
E
N
AVIS
RISQUE DE CHOC ELECTRIQUE
NE P
AS OUVRIR
D
e
s
i
g
n
e
d
a
n
d
d
e
v
e
l
o
p
e
d
b
y
P
h
i
l
i
p
s
i
nt
h
e
E
u
r
o
p
e
a
n
C
o
m
m
u
n
i
t
y
.
M
a
n
u
f
a
c
t
u
r
e
d
u
n
d
e
r
l
i
c
e
n
s
e
f
r
o
m
D
o
l
b
y
L
a
b
o
r
a
t
o
r
i
e
s
.
”
D
O
L
B
Y
“
,
”
D
O
L
B
Y
D
I
G
I
T
A
L
“
,
”
P
R
O
L
O
G
I
C
“
a
n
d
t
h
e
d
o
u
b
l
e
-
D
S
y
m
b
o
l
a
r
e
t
r
a
d
e
m
a
r
k
s
o
f
D
o
l
b
y
L
a
b
o
r
a
t
o
r
i
e
s
.
C
o
n
f
i
d
e
n
t
i
a
l
U
n
p
u
b
l
i
s
h
e
d
W
o
r
k
s
.
©
1
9
9
2
–
1
9
9
7
D
o
l
b
y
L
a
b
o
r
a
t
o
r
i
e
s
.
A
l
l
r
i
g
h
t
s
r
e
s
e
r
v
e
d
.
M
a
n
u
f
a
c
t
u
r
e
d
u
n
d
e
r
l
i
c
e
n
s
e
f
r
o
m
D
i
g
i
t
a
l
T
h
e
a
t
e
r
S
y
s
t
e
m
s
.
I
n
c
.
U
S
P
a
t
.
N
o
.
5
,
4
5
1
,
9
4
2
a
n
d
o
t
h
e
r
w
o
r
l
d
-
w
i
d
e
p
a
t
e
n
t
s
i
s
s
u
e
d
a
n
d
p
e
n
d
i
n
g
.
”
D
T
S
“
a
n
d
”
D
T
S
D
i
g
i
t
a
l
S
u
r
r
o
u
n
d
“
a
r
e
t
r
a
d
e
m
a
r
k
s
o
f
D
i
g
i
t
a
l
T
h
e
a
t
e
r
S
y
s
t
e
m
s
,
I
n
c
.
C
o
p
y
r
i
g
h
t
1
9
9
6
D
i
g
i
t
a
l
T
h
e
a
t
e
r
S
y
s
t
e
m
s
,
I
n
c
.
A
l
l
R
i
g
h
t
s
R
e
s
e
r
v
e
d
.
SURROUND
SPEAKERS
L
E
A
C
H
S
P
E
A
K
E
R
≥ 6
Ω
R
R
L
F
R
O
N
T
S
P
E
A
K
E
R
S
E
A
C
H
S
P
E
A
K
E
R
≥
6
Ω
PHONO GND.
C
E
N
T
E
R
IN
PLA
Y
IN
IN
OUT
REC
IN
PLA
Y
OUT
REC
C
O
A
X
O
U
T
D
IG
I
T
A
L
A
U
D
IO
I
N
/
O
U
T
O
P
T
IC
A
L
1
IN
C
O
A
X
2
IN
PHONO
VCRTV
SA
T
CD
CDR/T
APE
AUDIO IN/OUT
IN
IN
P
R
E
-O
U
T
C
E
N
T
ER
OUT
REC
IN
PLA
Y
DVD
IN
MON
OUT
VCR
SAT
IN
S
U
B
W
O
O
F
E
R
P
R
E
-
O
U
T
C
IN
E
M
A
L
IN
K
ANTENNA
A
M
L
O
O
P
O
P
T
IC
A
L
2
IN
CENTER
SUBW
.
6 CHANNEL/
DVD INPUT
C
O
A
X
1
IN
L
R
S-VIDEO
DVD
MON
VCR
SAT
VCR
OUT
IN
TO
T
AL
100
W
M
A
X. SW
ITC
H
ED
A
C O
U
TL
E
T
4567890!@#$
¤‹
⁄
%^
&
*
(
)
¡
™£≤∞§≥•ªº
12
3
Nederlands

AANSLUITINGEN
98
Nederlands
Digitale audioaansluitingen
Analoge audio-aansluitingen
DIGITAL
AUDIO
IN/OUT
PHONO
VCRTV SAT CD CDR/TAPE
AUDIO IN/OUT
IN IN
IN
PLAY
OUT
REC
IN IN
IN
PLAY
OUT
REC
PRE-OUT
CENTER
CAUTION
RISK OF ELECTRIC SHOCK
DO NOT OPEN
AVIS
RISQUE DE CHOC ELECTRIQUE
NE PAS OUVRIR
PHONO GND.
SURROUND
SPEAKERS
R
L
EACH SPEAKER ≥ 6 Ω
CENTER
R L
FRONT
SPEAKERS
EACH SPEAKER ≥ 6 Ω
AM LOOP
DVD
IN
MON
OUT
VCR
SAT
IN
PRE-OUT
CINEMA
LINK
SUBWOOFER
IN
PLAY
OUT
REC
OPTICAL 1
IN
COAX
OUT
COAX 2
IN
R
L
SURR.
CENTER SUBW.
FRONT
6 CHANNEL /
DVD INPUT
OPTICAL 2
IN
COAX 1
IN
Designed and developed by Philips in the European
Community.
Manufactured under license from Dolby Laboratories.
”DOLBY“, ”DOLBY DIGITAL“, ”PRO LOGIC“ and the
double-D Symbol are trademarks of Dolby
Laboratories. Confidential Unpublished Works.
©1992–1997 Dolby Laboratories. All rights reserved.
Manufactured under license from Digital Theater
Systems. Inc. US Pat. No. 5,451,942 and other world-
wide patents issued and pending. ”DTS“ and ”DTS
Digital Surround“ are trademarks of Digital Theater
Systems, Inc. Copyright 1996 Digital Theater Systems,
Inc. All Rights Reserved.
2
VIDEO IN/OUT
S-VIDEO
DVD MON SAT
VCRVCR
IN OUT
ANTENNA
FM 75 Ω
DVD PLAYER
CD RECORDER
CD PLAYER
Sommige apparaten hebben analoge en digitale aansluitingen.
Gebruik waar mogelijk de digitale aansluiting; normaal geeft dit
een betere geluidskwaliteit. Zie „Een andere ingang toekennen
aan een bron” voor het gebruik van de digitale aansluitingen
van de receiver.
Vanwege een andere soort uitgangssignaal is bij het gebruik
van een Dolby Digital Laserdisk een aparte AC-3
RF-demodulator nodig.
DTS Digital Surround
TM
is een discreet „5.1-channel“ digitaal
audioformaat dat beschikbaar is op CD’s, LD’s en DVD’s die
bijgevolg niet kunnen worden gedecodeerd en afgespeeld in
de meeste CD-, LD- of DVD-spelers. Om deze reden zal bij het
afspelen van disks met DTS-codering via de analoge
uitgangen van de CD-, LD- of DVD-speler overmatige ruis te
horen zijn. Om mogelijke schade aan het audiosysteem te
vermijden, moeten de nodige voorzorgen worden genomen
door de klant als de analoge uitgangen rechtstreeks op de
receiver worden aangesloten.
Om te kunnen genieten van „DTS Digital SurroundTM“-
weergave, moet een DTS-compatibele speler worden
aangesloten op één van de digitale ingangen van de receiver.
DIGITAL
AUDIO
IN/OUT
PHONO VCRTV SAT CD CDR/TAPE
AUDIO IN/OUT
IN
IN
IN
PLAY
OUT
REC
IN IN
IN
PLAY
OUT
REC
PRE-OUT
CENTER
CAUTION
RISK OF ELECTRIC SHOCK
DO NOT OPEN
AVIS
RISQUE DE CHOC ELECTRIQUE
NE PAS OUVRIR
Designed and developed by Philips in the European
Community.
Manufactured under license from DolbyLaboratories.
”DOLBY“, ” DOLBY DIGITAL“, ” PRO LOGIC“ and the
double-D Symbol are trademarks of Dolby
Laboratories. Confidential Unpublished Works.
©1992–1997 Dolby Laboratories. All rights reserved.
Manufactured under license from Digital Theater
Systems. Inc. US Pat. No. 5,451,942 and other world-
wide patents issued and pending. ” DTS“ and ”DTS
Digital Surround“ are trademarks of Digital Theater
Systems, Inc. Copyright 1996 Digital Theater Systems,
Inc. All Rights Reserved.
PHONO GND.
SURROUND
SPEAKERS
R
L
EACH SPEAKER ≥ 6 Ω
CENTER
R L
FRONT
SPEAKERS
EACH SPEAKER ≥ 6 Ω
AM LOOP
VIDEO IN/OUT
DVD
IN
MON
OUT
VCR
SAT
IN
PRE-OUT
CINEMA
LINK
SUBWOOFER
S-VIDEO
DVD MON SAT
VCR
VCR
IN
PLAY
OUT
REC
IN OUT
OPTICAL 1
IN
COAX
OUT
COAX 2
IN
R
L
SURR.
CENTER SUBW.
FRONT
6 CHANNEL /
DVD INPUT
OPTICAL 2
IN
COAX 1
IN
FM 75 Ω
ANTENNA
AUDIO
OUT
TURNTABLE
AUDIO IN
AUDIO OUT
IN
OUT
VCR
SAT RECEIVER
CD RECORDER
CD PLAYER
MONITOR / TV
POWERED
SUBWOOFER

AANSLUITINGEN
99
Systeembus, CINEMA LINK
Videoaansluitingen
Nederlands
DIGITAL
AUDIO
IN/OUT
PHONO
VCRTV SAT CD
CDR/TAPE
AUDIO IN/OUT
IN IN
IN
PLAY
OUT
REC
IN IN
IN
PLAY
OUT
REC
PRE-OUT
CENTER
CAUTION
RISK OF ELECTRIC SHOCK
DO NOT OPEN
AVIS
RISQUE DE CHOC ELECTRIQUE
NE PAS OUVRIR
Designed and developed by Philips in the European
Community.
Manufactured under license from DolbyLaboratories.
”DOLBY“, ” DOLBY DIGITAL“, ” PRO LOGIC“ and the
double-D Symbol are trademarks of Dolby
Laboratories. Confidential Unpublished Works.
©1992–1997 Dolby Laboratories. All rights reserved.
Manufactured under license from Digital Theater
Systems. Inc. US Pat. No. 5,451,942 and other world-
wide patents issued and pending. ” DTS“ and ”DTS
Digital Surround“ are trademarks of Digital Theater
Systems, Inc. Copyright 1996 Digital Theater Systems,
Inc. All Rights Reserved.
PHONO GND.
SURROUND
SPEAKERS
R
L
EACH SPEAKER ≥ 6 Ω
CENTER
R L
FRONT
SPEAKERS
EACH SPEAKER ≥ 6 Ω
AM LOOP
VIDEO IN/OUT
DVD
IN
MON
OUT
VCR
SAT
IN
PRE-OUT
CINEMA
LINK
SUBWOOFER
S-VIDEO
DVD MON SAT
VCRVCR
IN
PLAY
OUT
REC
IN OUT
OPTICAL 1
IN
COAX
OUT
COAX 2
IN
R
L
SURR.
CENTER SUBW.
FRONT
6 CHANNEL /
DVD INPUT
OPTICAL 2
IN
COAX 1
IN
FM 75 Ω
ANTENNA
TO TV IN
TO VCR IN
TV
AUX
EXT 1 EXT 2 EXT 3
DVD PLAYER
VCR
TV
DIGIT
AL
OUT
CINEMA LINK
A
optional
(TV = CENTER)
DIGITAL
AUDIO
IN/OUT
PHONO VCRTV SAT CD CDR/TAPE
AUDIO IN/OUT
IN IN
IN
PLAY
OUT
REC
IN IN
IN
PLAY
OUT
REC
PRE-OUT
CENTER
CAUTION
RISK OF ELECTRIC SHOCK
DO NOT OPEN
AVIS
RISQUE DE CHOC ELECTRIQUE
NE PAS OUVRIR
Designed and developed by Philips in the European
Community.
Manufactured under license from DolbyLaboratories.
”DOLBY“, ”DOLBY DIGITAL“, ”PRO LOGIC“ and the
double-D Symbol are trademarks of Dolby
Laboratories. Confidential Unpublished Works.
©1992–1997 Dolby Laboratories. All rights reserved.
Manufactured under license from Digital Theater
Systems. Inc. US Pat. No. 5,451,942 and other world-
wide patents issued and pending. ”DTS“ and ”DTS
Digital Surround“ are trademarks of Digital Theater
Systems, Inc. Copyright 1996 Digital Theater Systems,
Inc. All Rights Reserved.
PHONO GND.
SURROUND
SPEAKERS
R
L
EACH SPEAKER ≥ 6 Ω
CENTER
R L
FRONT
SPEAKERS
EACH SPEAKER ≥ 6 Ω
AM LOOP
VIDEO IN/OUT
DVD
IN
MON
OUT
VCR
SAT
IN
PRE-OUT
CINEMA
LINK
SUBWOOFER
S-VIDEO
DVD MON SAT
VCR
VCR
IN
PLAY
OUT
REC
IN OUT
OPTICAL 1
IN
COAX
OUT
COAX 2
IN
R
L
SURR.
CENTER SUBW.
FRONT
6 CHANNEL /
DVD INPUT
OPTICAL 2
IN
COAX 1
IN
FM 75 Ω
ANTENNA
DVD PLAYER
MONITOR / TV
VIDEO IN
VIDEO OUT
VCR
SAT RECEIVER
Als de receiver en uw Philips TV (of nog beter met extra Philips
VCR of DVD-speler) met CinemaLink worden aangesloten op het
CINEMA LINK-systeembussturing, worden enige extra
systeemmogelijkheden geboden:
– Wanneer u een geluidsbron inschakelt dan schakelt het
systeem automatisch naar die ingang.
– U kunt het systeem bedienen via het tv-scherm. Afhankelijk
van de talen waarover uw tv beschikt, kan dat in een taal naar
keuze.
– De tv kan dienst doen als middenluidspreker van uw systeem
zodat u geen aparte middenluidspreker nodig heeft. (De kabel
A moet afzonderlijk worden aangekocht.)
– Door op de standby-knop van de afstandsbediening te drukken,
kunt u het volledige systeem overschakelen op standby.

AANSLUITINGEN
100
Het typeplaatje bevindt zich op de achterkant van de
receiver.
1 Controleer of de netspanning op het typeplaatje overeenkomt
met de plaatselijke netspanning. Is dit niet het geval, neem
dan contact op met uw leverancier of serviceorganisatie.
2 Verbind het netsnoer met het stopcontact.
Om het toestel volledig van het net te scheiden moet de
netstekker uit de muurcontactdoos worden getrokken.
Als de receiver te hard wordt gezet (extreem hoog
uitgangsvermogen) dan kunnen er vervormingen optreden die
uw luidsprekers ernstig kunnen beschadigen. Als u
vervormingen bemerkt, zet het volume en de tonenregeling
dan op een zodanig niveau dat het geluid weer goed klinkt.
Om oververhitting van het apparaat te voorkomen is een
beveiliging ingebouwd. Daardoor kan het heel uitzonderlijk
gebeuren dat uw apparaat automatisch uitgeschakeld
wordt. Schakel in zo’n geval het apparaat uit en laat het
afkoelen voor u het opnieuw gebruikt. Na het toestel te
hebben laten afkoelen zet u het toestel weer aan en kiest
de gewenste bron door SOURCE SELECT te verdraaien.
Voor de luidsprekers zitten op de receiver een aantal
schroefaansluitigen en een aantal klemaansluitingen. Sluit
aan zoals hieronder aangegeven.
1 Sluit altijd de gekleurde (of gemerkte) draad aan op de
gekleurde aansluiting en de zwarte (of niet-gemerkte) draad
op de zwarte aansluiting.
2 Verbind:
– De linkervoorluidspreker met L (rood en zwart)
– De rechtervoorluidspreker met R (rood en zwart)
– De middenluidspreker met (blauw en zwart)
– De linker-surround-luidspreker met SURROUND L (grijs en
zwart)
– De rechter-surround-luidspreker met SURROUND R (grijs
en zwart)
U kunt uw Philips-tv met CINEMA LINK als middenluidspreker
gebruiken. Voor tv’s met een scart-aansluiting heeft u een extra
audioverloopkabel (van cinch naar scart) nodig. Voor tv’s met cinch-
aansluitingen heeft u extra cinch-kabels nodig. Deze kabels moeten
aangesloten worden op de blauwe CENTER PRE-OUT-aansluiting op
de achterkant. Kijk in de gebruiksaanwijzing van uw tv om te weten
hoe u uw tv als middenluidspreker kunt gebruiken.
AM (MW)-antenne
De raamantenne is uitsluitend voor gebruik binnenshuis.
Plaats de antenne zo ver mogelijk uit de buurt van de receiver,
de tv, de kabels, een DVD-speler, een viderecorder of andere
stralingsbronnen.
1 Sluit de stekker van de raamantenne aan op AM LOOP
zoals hieronder aangegeven.
2 Draai de antenne voor een zo goed mogelijke ontvangst.
FM-antenne
De bijgeleverde draadantenne dient enkel voor het ontvangen
van zenders in de buurt. Voor een betere ontvangst adviseren
wij u gebruik te maken van het kabelantennesysteem of van
een buitenantenne.
1 Sluit de bijgeleverde draadantenne aan op FM 75 Ω zoals
hieronder aangegeven.
2 Zet de antenne in verschillende standen voor een zo goed
mogelijke ontvangst.
• Als u gebruik maakt van het kabelantennesysteem of van
een buitenantenne, sluit deze dan aan op FM 75 Ω in
plaats van de draadantenne.
Als u een hoofdtelefoon aansluit op PHONES dan worden de
luidsprekers uitgeschakeld. De receiver gaat over op STEREO en
het surround-geluid wordt teruggebracht tot een stereosignaal dat
wel weergegeven kan worden door een gewone hoofdtelefoon.
Zodra u de stekker van de hoofdtelefoon uit de receiver haalt,
worden de luidsprekers weer ingeschakeld. Wilt u opnieuw
surround-geluid horen, stel de receiver dan terug in op
Surround Sound.
Hoofdtelefoon
FM 75 Ω
FM 75 Ω
AM
LO
O
P
ANTENNA
Antenneaansluitingen
Uw tv als middenluidspreker
8 mm
1
2
3
1
2
3
7 mm
Luidsprekeraansluitingen
Uitgangsvermogen
Netaansluiting
Nederlands

INSTALLEREN VAN HET SYSTEEM
101
Algemene tips voor het opstellen
Plaats uw luidsprekers bij voorkeur niet in een hoek of op de
grond, want dan worden de bassen te sterk. Als u de
luidsprekers achter een gordijn, meubels enzovoort plaatst
dan worden de hoge tonen verzwakt. De luisteraar moet de
luidsprekers vanuit de luisterpositie steeds kunnen „zien”.
Elke ruimte heeft andere akoestische kenmerken en de
mogelijkheden voor het opstellen zijn vaak beperkt. U vindt de
beste opstelling voor uw luidsprekers aan de hand van de
illustratie hierboven.
Voor een goed surround-geluid adviseren wij minimaal
5 luidsprekers (2 voor, één midden, 2 achter). U kunt ook met
minder luidsprekers een soort surround-geluid verkrijgen. Dit
door de signalen die bestemd zijn voor de ontbrekende
luidsprekers naar de bestaande te leiden. Zie „Menu’s” voor
het correct installeren van de receiver voor het aantal
luidsprekers en de grootte van de gebruikte luidsprekers.
Opstellen van de voorluidsprekers
De voorluidsprekers moeten links en rechts voor de luisterplek
geplaatst worden zoals gewone stereoluidsprekers.
Opstellen van de middenluidspreker
De centrale luidspreker moet in het midden tussen de twee
voorste luidsprekers geplaatst worden bijvoorbeeld onder of
op de tv. De beste hoogte voor de middenluidspreker is op
oorhoogte (terwijl u zit).
Opstellen van de surround-luidsprekers
De surround-luidsprekers moeten tegenover elkaar staan en
een rechte lijn vormen met de luisterplek, of ietwat achter de
luisterplek staan.
Opstellen van de subwoofer
Met een subwoofer kunt u de weergave van de lage tonen
flink versterken. De subwoofer kan overal in de kamer
opgesteld worden aangezien het niet mogelijk is te herkennen
waar de lage tonen vandaan komen. Maar plaats de
subwoofer bij voorkeur niet in het midden van de kamer
omdat de lage tonen dan weer verzwakt kunnen worden.
Plaats niets op de subwoofer.
Voor een optimaal surround-geluid moet het relatieve volume
van de luidsprekers ingesteld worden. Zorg ervoor dat u op de
normale luisterplek zit wanneer u het volume van de
luidsprekers instelt. Zie „Receiver-menu” voor het installeren
van de gebruikte luidsprekers. Als ideale instelling moet het
volume in de luistersituatie gelijk zijn uit alle luidsprekers.
1 Druk op POWER / STANDBY om de receiver aan te zetten.
2 Druk op TEST TONE op de afstandsbediening.
yU hoort een testtoon afkomstig van de verschillende
luidsprekers, behalve de subwoofer.
3 Druk op +/- REAR op de afstandsbediening om het
volume van de huidige luidspreker harder/ zachter te zetten.
Het beste resultaat krijgt u wanneer het volume alle
luidsprekers even hard staat vanaf de luisterplek.
4 Druk op TEST TONE op de afstandsbediening.
yDe testtoon stopt.
Opmerking: Als u niet helemaal tevreden bent met de volume-
instellingen dan kunt u het beste kleine wijzigingen
aanbrengen tijdens surround sound-weergave.
Zodra het aantal en de positie van de luidsprekers werd
vastgelegd, kunt u de basisinstellingen van de receiver uitvoeren
voor optimale rondomklank met de uiteindelijke opstelling:
1 Stel in welke luidsprekers werden aangesloten op de
receiver (zie „Menustructuur: * SPEAKR SETUP”).
Opmerking: De basisinstelling van uw receiver is:
twee voorluidsprekers links en rechts: aanwezig
(kan niet worden gewijzigd)
middenluidspreker: aanwezig
twee achterluidsprekers: aanwezig
subwoofer: aanwezig.
2 Selecteer het formaat van de luidsprekers (SMALL (klein) of
LARGE (groot)) (zie „Menustructuur:
* SPEAKR SIZES“
).
Selecteer SMALL als uw luidspreker lage noten kan
weergeven tot minstens 80–100 Hz. Selecteer LARGE als uw
luidspreker lage noten kan weergeven tot minstens 50 Hz.
(Als vuistregel kunnen we stellen dat een LARGE (grote)
luidspreker een conusdiameter van minstens 12 cm (5 inches)
heeft.) Zie de specificatiebladen van uw luidsprekers.
Opmerking: De begininstelling voor FR 985, FR 986, FR 995,
FR 996 is:
alle luidsprekers op LARGE.
De begininstelling voor FR 984, FR 994 is:
alle luidsprekers op SMALL.
3 Stel de afstand van de luidsprekers tot de luisterpositie in
(zie „Menustructuur:
*
SPK DISTANCE”).
Receiverinstelling
Instellen en testen van de luidsprekers
Opstellen van de luidsprekers
SUBWOOFER
SURROUND
(REAR)
LEFT
LEFT
RIGHT
CENTER
FRONT
RIGHT
FRONT
SURROUND
(REAR)
Nederlands

102
Nederlands
DISPLAY
Het display van de receiver bestaat uit 4 delen, die voor de
volgende informatie gebruikt worden:
Luidsprekerdiagram
Een rechthoekje met een letter erin geeft aan dat een
bepaalde luidspreker gekozen werd in het installatiemenu. De
subwoofer-indicatie echter, brandt enkel als er een
subwoofer-signaal aanwezig is. Verschijnt alleen een letter
dan wordt deze luidspreker niet gebruikt en wordt het geluid
ervan weergegeven door de andere luidsprekers.
......virtuele surround sound
SURROUND.................surround sound-weergave
DIGITAL SURROUND ....digitale surround sound-weergave
L, R ...........................linker- en rechtervoorluidspreker
C...............................middenluidspreker
SL, SR .......................surround-luidsprekers
SW............................subwoofer
Menu-indicaties
Deze indicaties laten u zien of het menu al dan niet geopend
is en geven aan in welke richting u kunt gaan.
MMEENNUU .......................het menu is geopend
1..............................u kunt terugkeren naar het vorige onder-
werp in het menu met 1 PREV. / EXIT
(toets „naar links” op de afstandsbediening)
3 .............................
u kunt naar boven lopen binnen een lijst van
mogelijkheden met X MENU NAVIGATOR
(toets „omhoog” op de afstandsbediening)
4 .............................
u kunt naar beneden lopen binnen een lijst
van mogelijkheden met X MENU NAVIGATOR
(toets „omlaag” op de afstandsbediening)
2..............................u kunt verdergaan naar het volgende
onderwerp in het menu met NEXT 2 (toets
„naar rechts” op de afstandsbediening)
OOKK.............................om de weergegeven keuzemogelijkheid te
bevestigen
Statusindicators
Deze indicators laten u de verschillende receiver-instellingen
zien en geven er informatie over.
PRESET.....................de tuner is afgestemd op een
geprogrammeerde radiozender
SENS HI....................de tuner is ingesteld op „hoge
afstemgevoeligheid”
SENS LO.................de tuner is ingesteld op „lage
afstemgevoeligheid”
CCIINNEEMMAA LLIINNKK OONN.....CINEMA LINK is ingeschakeld
STEREO.....................er wordt een FM-zender ontvangen in
stereo
R............................er wordt een RDS-zender ontvangen
EON .........................er wordt een RDS-zender met EON
ontvangen
HALL ........................het HALL-effect is ingeschakeld
TA ............................RDS-verkeersinformatie is ingeschakeld
NEWS.......................RDS-nieuwsberichten is ingeschakeld
ANA.........................de geluidsbron die aan het spelen is, is
aangesloten op een analoge ingang
NNIIGGHHTT......................NIGHT MODE is ingeschakeld
COAX 1.....................de geluidsbron die aan het spelen is, is
aangesloten op de digitale coax-ingang
COAX 1
COAX 2....................
de geluidsbron die aan het spelen is, is
aangesloten op digitale coax-ingang COAX 2
DDOOWWNNMMIIXX................de inkomende meerkanaalssignalen
worden teruggebracht tot een kleiner
aantal uitgaande signalen (afhankelijk van
het aantal luidsprekers)
OPT..........................de geluidsbron die aan het spelen is, is
aangesloten op de digitale optische
ingang OPTICAL IN (enkel bij FR 984,
FR 985, FR 986, FR 994).
OPT 1.......................de geluidsbron die aan het spelen is, is
aangesloten op de digitale optische
ingang OPTICAL 1 IN (enkel bij FR 995,
FR 996).
OPT 2......................de geluidsbron die aan het spelen is, is
aangesloten op de digitale optische
ingang OPTICAL 2 IN (enkel bij FR 995,
FR 996).
LOUDNESS................de LOUDNESS-functie is ingeschakeld
Informatiegedeelte
Dit gedeelte wordt gebruikt voor informatie over de receiver,
tunerfrequenties, keuzemogelijkheden in een menu,
instellingen en lopende tekstboodschappen.
AA
TV
Ç
É
MENU
OK
GUIDE
NEWS/TA
0
Display

103
Nederlands
MENU’S
De receiver is voorzien van een menusysteem. De verschillende
menuopties zijn op een logische manier aan elkaar gerelateerd.
Veronderstel dat u geen middenluidspreker aangesloten heeft en
dus CENTER SPEAKR (middenluidspreker) op NO (no) gezet
heeft. Probeert u vervolgens VOL CENTER (volume midden) te
gebruiken dan loopt een boodschap in het display om u te laten
weten dat dit niet mogelijk is (INSTALL CENTER
SPEAKER - installeer middenluidspreker).
Het menu werkt steeds op dezelfde manier. De pijltjes in het
display geven aan in welke richting u kunt lopen.
1 Druk op SETUP MENU.
yIn het display verschijnt MENU, en * EFFECTS.
• U kunt het menu op elk moment afsluiten door op
SETUP MENU te drukken.
2 Draai X MENU NAVIGATOR tot de gewenste
keuzemogelijkheid (of instelling) in het display verschijnt.
3 Druk op NEXT 2 om de keuzemogelijkheid in het display te
kiezen (of ENTER / OK om de instelling te bevestigen).
• U kunt elke keuzemogelijkheid verlaten (de instellingen
blijven dan ongewijzigd) door op 1 PREV. / EXIT te drukken.
Menustructuur
* EFFECTS (effecten)
Inschakelen van geluidseffecten.
VIRT SURR
virtuele surround: 0…100 %
* VOL BALANCE (volume balance)
Instellen van de relatieve volumebalans tussen de
aangesloten luidsprekers.
TEST TONE
Testtoon: on/off (aan/uit)
VOL FRONT-L
Volume linkervoorluidspreker: –50…+50
VOL FRONT-R
Volume rechtervoorluidspreker: –50…+50
VOL CENTER
Volume middenluidspreker: –50…+50
VOL REAR-L
Volume linkerachterluidspreker: –50…+50
VOL REAR-R
Volume rechterachterluidspreker: –50…+50
VOL SUBWOOFER
Volume subwoofer: –50…+50
Opmerking: Bij gebruik van de 6 CHANNEL / DVD INPUT-
ingang kunnen de onderstaande waarden niet
worden gewijzigd.
* SPEAKR SETUP (luidsprekeropstelling)
Kiezen van de gebruikte luidsprekers.
SUBW PRESENT
Subwoofer aanwezig: yes/no (ja/neen)
CENTER SPEAKR
Middenluidspreker aanwezig: yes/no (ja/neen)
REAR SPEAKER
Achterluidsprekers aanwezig: yes/no (ja/neen)
* SPEAKR SIZES (grootte van de luidsprekers)
Kiezen van de grootte van de gebruikte luidsprekers, voor een
optimale geluidsweergave. LARGE wordt gebruikt voor
luidsprekers die frequenties lager dan 50 Hz kunnen weergeven.
Als SUBW PRESENT op NO staat dan kan FRONT SIZE
enkel op LARGE gezet worden. Als FRONT SIZEop SMALL
staat dan kan CENTER SIZE enkel op SMALL gezet worden
en dient dus een subwoofer aangesloten te worden.
FRONT SIZE
Left and right front luidsprekers: small/large
(klein/groot)
CENTER SIZE
Middenluidspreker: small/large (klein/groot)
REAR SIZE
Achterluidsprekers: small/large (klein/groot)
* SPK DISTANCE (afstand tot de luidsprekers)
De afstand tussen de normale luisterplek en de luidsprekers.
Op die manier wordt de vertragingstijd voor het surround-
geluid bepaald.
DISTANCE L/R
Afstand tot de voorluidsprekers: 1…10 m
DISTANCE CNTR
Afstand tot de middenluidspreker: 1…10 m
DISTANCE REAR
Afstand tot de achterluidsprekers: 1…10 m
Receiver-menu

104
Nederlands
MENU’S
* SELECT INPUT (ingang kiezen)
Toekennen van de audio-ingangen aan de diverse bronnen
die gekozen worden met SOURCE SELECT (zie
„BRONKEUZE” voor meer informatie).
COAX1
Digitale coax-ingang 1, COAX 1 IN
COAX2
Digitale coax-ingang 2, COAX 2 IN
OPT (enkel bij FR 984, FR 985, FR 986, FR 994)
Digitale optische ingang, OPTICAL IN
OPT 1 (enkel bij FR 995, FR 996)
Digitale optische ingang, OPTICAL 1 IN
OPT 2 (enkel bij FR 995, FR 996)
Digitale optische ingang, OPTICAL 2 IN
SAT IN
Analoge audio-ingang SAT IN
VCR IN
Analoge audio-ingang VCR IN
TV IN
Analoge audio-ingang TV IN
CDR IN
Analoge audio-ingang CDR IN
CD IN
Analoge audio-ingang CD IN
6 CH IN
Analoge audio-ingang 6 CHANNEL / DVD INPUT
* TUNER (tuner)
Instellingen voor geprogrammeerde radiozenders (zie
„TUNER” voor meer informatie).
AUTO INSTALL
Automatisch programmeren van radiozenders
MAN INSTALL
Handmatig programmeren van radiozenders
GIVE NAME
Geven van een naam aan een geprogrammeerde zender
RESHUFFLE
Herschikken van de geprogrammeerde zenders
Als de receiver aangesloten is op een Philips CINEMA LINK-tv
via de systeembusaansluitingen CINEMA LINK (zie
„AANSLUITINGEN") dan kunt u het systeem via de tv
installeren. Aan het menu wordt dan de keuzemogelijkheid
RECEIVER toegevoegd.
Als CINEMA LINK ingeschakeld is dan verschijnen de
instellingen van de receiver gedurende een paar seconden op
het tv-scherm. In de gebruiksaanwijzing van uw tv vindt u hoe
u het tv-menu moet gebruiken. De mogelijkheden kunnen per
tv-model verschillen.
Inschakelen van de aansluiting
• Druk op CINEMA LINK om de aansluiting tussen de receiver
en de tv in of uit te schakelen.
yAls de aansluiting ingeschakeld is dan verschijnt in het
display CINEMA LINK ON.
Opmerking: We raden u aan CINEMA LINK uit te schakelen
wanneer u gaat opnemen. Zo voorkomt u
ongewenste onderbrekingen door veranderingen
in de tv-instellingen.
Als CINEMA LINK ingeschakeld is en het tv-menu is geopend
dan verschijnt in het display TV MENU en de menu- en
geluidsfuncties op de receiver worden geblokkeerd.
• Druk op de afstandsbediening op
CINEMA GO.
yDe tv stuurt een afspeelopdracht naar de CINEMA LINK
dvd-speler, indien aanwezig. De dvd-speler begint met
afspelen en de receiver schakelt automatisch naar het
beste CINEMA LINK geluid.
• Als er geen dvd-speler is aangesloten of als er geen disk in
de dvd-speler is geladen, stuurt de tv een afspeelopdracht
naar de CINEMA LINK videorecorder, indien aanwezig.
yDe videorecorder begint met afspelen en de audio-
receiver kiest het beste CINEMA LINK geluid.
• Als er geen videorecorderbron is aangesloten of band is
geladen kiest de tv het laatst bekeken tv-kanaal.
CINEMA LINK in werking stellen
TV-menu

105
Nederlands
BRONKEUZE
Wanneer u een bron kiest door SOURCE SELECT te draaien,
worden de audio- en video-ingangen met de bijbehorende naam
geactiveerd. Het inkomend signaal wordt weergegeven door alle
audio- en – indien de bron ook een videosignaal geeft – video-
uitgangen van de receiver. Het is ook mogelijk een andere dan
deze standaardingangen aan een gekozen bron toe te kennen.
Gekozen bron.............Gebruikte aansluitbus
DVD...............................Digitale audio-ingang COAX 1 en
video-ingang DVD IN
PHONO..........................Audio-ingang PHONO IN
TUNER..........................Het tuner-gedeelte van de receiver is
in gebruik, alle ingangen zijn
uitgeschakeld.
CD.................................Audio-ingang CD IN
CDR/TAPE.....................Audio-ingang CDR/TAPE IN
TV..................................Audio-ingang TV IN en
geen video-ingang
VCR...............................Audio-ingang VCR IN en
video-ingang VCR IN
SAT ...............................Audio-ingang SAT IN en
video-ingang SAT IN
De 6 CHANNEL / DVD INPUT-aansluitingen kunnen worden
toegewezen aan om het even welke van de beschikbare
bronnen (uitgezonderd TUNER en PHONO). De toewijzing kan
gebeuren via de * SELECT INPUT optie in het menu. Zie
hieronder voor verdere details.
Wanneer een bron gekozen wordt met SOURCE SELECT dan
wordt de standaardaudio-ingang gebruikt. Om dit te wijzigen
moet een andere audio-uitgang toegekend worden aan de
gekozen bron.
Voorbeeld: De digitale audio-ingang COAX 2 IN toekennen
aan CD in plaats van CD IN.
1 Kies in het menu * SELECT INPUT en druk op NEXT 2.
2 Draai SOURCE SELECT om de bron te kiezen waaraan u een
andere ingang wilt toekennen (bijvoorbeeld CD).
yIn het display verschijnt de naam van de bron en de
indicator die bij de bron hoort, knippert.
3 Draai X MENU NAVIGATOR om de ingang te kiezen die
gebruikt moet gaan worden (bijvoorbeeld CD -> COAX2).
4 Druk op ENTER / OK om uw keuze te bevestigen.
yIn het display verschijnt kort STORED.
5 Vanaf nu wordt de ingestelde audio-ingang gebruikt
wanneer deze bron gekozen wordt (bijvoorbeeld bij CD
wordt de ingang COAX 2 IN gebruikt; wanneer u CD kiest,
begint COAX 2 te branden).
U kunt dezelfde ingang gebruiken voor meerdere bronnen. Dit
is handig wanneer verschillende apparaten in een keten met
elkaar verbonden zijn.
Voorbeeld: Een videorecorder is verbonden met een tv maar
alleen de tv is aangesloten op de receiver.
Wanneer u met SOURCE SELECT de tv of de
videorecorder kiest, moeten deze beiden de
ingangen van de tv gebruiken.
1 Kies in het menu * SELECT INPUT en druk op NEXT 2.
2 Draai SOURCE SELECT om de bron te kiezen waaraan u
meerdere ingangen wilt toekennen (bijvoorbeeld VCR).
yIn het display verschijnt de naam van de bron en de
indicator die bij de bron hoort, knippert.
3 Draai X MENU NAVIGATOR om de ingang te kiezen die
gebruikt moet gaan worden (bijvoorbeeld VCR -> TV IN).
4 Druk op ENTER / OK om uw keuze te bevestigen.
yIn het display verschijnt kort STORED.
5 Vanaf nu wordt de ingestelde audio-ingang gebruikt
wanneer u deze bron gekozen wordt (bijvoorbeeld VCR
wordt de ingang TV IN gebruikt; wanneer u VCR kiest,
verschijnt in het display kort VCR <TV IN>).
De 6 CHANNEL / DVD INPUT kan worden gebruikt voor
aansluiting van een toestel met een ingebouwde meerkanalen-
decoder (bijv. Dolby Digital, DTS enz.) en 6-kanalen uitgang,
bijv. van een hoogwaardige DVD/SACD-speler.
Wanneer de audio-ingang 6 CHANNEL / DVD INPUT gebruikt
wordt dan doet de receiver dienst als meerkanaalsversterker.
De bron produceert een surround-geluid en stuurt dit naar de
receiver verdeeld in de nodige kanalen. Daarom hebben de
toetsen SURROUND ON/OFF, HALL en SURR. MODE ook geen
effect aangezien het aangeboden signaal reeds meerkanaals is.
De bron die aangesloten is op de audio-ingang 6 CHANNEL /
DVD INPUT kan niet opgenomen worden.
De ingang 6 CHANNEL-DVD/SACD INPUT
Dezelfde ingang gebruiken voor twee of
meerdere apparaten
Een andere ingang toekennen aan een bron
6 CHANNEL-DVD/SACD INPUT-selectie
SOURCE SELECT

106
Nederlands
AFSPELEN, OPNEMEN
1 Druk op POWER / STANDBY om de receiver aan te zetten.
2 Draai SOURCE SELECT om een bron te kiezen.
yIn het display verschijnt de naam van de bron.
• U kunt de ingang FRONT AV / GAME kiezen door op
FRONT AV te drukken (enkel bij FR 995, FR 996).
3 Start het afspelen van de bron zoals u dat altijd doet.
• Draai VOLUME om het volume in te stellen.
yIn het display verschijnt VOLUME en het volumeniveau
tussen 0 en 50.
1 Druk op BASS of TREBLE.
yIn het display verschijnt kort BASS of TREBLE en de
huidige instelling. Daarna loopt door het display TURN
VOLUME KNOB TO CHANGE.
2 Draai VOLUME om de lage of hoge tonen in te stellen.
yIn het display verschijnt kort BASS of TREBLE en de
huidige instelling.
Opmerking: Als VOLUME of een andere knop gedurende
5 seconden niet gebruikt wordt dan wordt het
instellen van de lage of hoge tonen afgesloten.
• Als een subwoofer is aangesloten, druk dan op
SUBW. ON/OFF om de lagetonenweergave te verhogen.
Opmerking: Bij digitale surround sound zal alleen een
subwoofersignaal beschikbaar zijn indien
ondersteund door het bronmateriaal.
• Druk op LOUDNESS om de loudness-functie in of uit te
schakelen.
yIs de loudness-functie ingeschakeld dan verschijnt
LOUDNESS in het display.
Als u een geluidsbron wilt opnemen dan moet u deze kiezen met
SOURCE SELECT. Het inkomende signaal wordt weergegeven
door alle audio- en – indien de geluidsbron ook een videosignaal
heeft – video-uitgangen van de receiver. De klankinstellingen
hebben geen invloed op de opname.
1 Draai SOURCE SELECT (of druk op FRONT AV – enkel bij FR
995, FR 996) om de geluidsbron te kiezen die u wilt
opnemen.
yIn het display verschijnt de naam van de geluidsbron.
2 Zet het apparaat waarmee u wilt opnemen klaar. Het
apparaat moet aangesloten zijn op één van de uitgangen
van de receiver.
3 Start de opname op het apparaat waarmee u opneemt.
4 Start het afspelen op de geluidsbron op de gebruikelijke
manier.
Opmerkingen: – Het audio- en videosignaal van VCR IN wordt
niet weergegeven door VCR OUT. Hetzelfde
geldt voor het audiosignaal van CDR/TAPE IN
door CDR/TAPE OUT.
– Wij adviseren u niet de digitale uitgang
COAX OUT van de receiver te gebruiken om
op te nemen van een analoge geluidsbron.
Gebruik in plaats daarvan de analoge uitgang
CDR/TAPE.
– De bron die aangesloten is op de audio-ingang
6 CHANNEL / DVD INPUT kan niet opgenomen
worden.
U kunt een digitale recorder aansluiten op de digitale uitgang
van de receiver. Zo kunnen alle signalen die binnenkomen
langs de digitale ingangen rechtstreeks opgenomen worden op
de aangesloten audiorecorder. De receiver zet ook alle
signalen van de analoge ingangen om naar de digitale uitgang.
De receiver kan gebruikt worden om een meerkanaals
surround sound-audiosignaal digitaal op te nemen (Dolby
Digital, DTS of MPEG) van, bijvoorbeeld, DVD naar CD-R. De
receiver zet het digitale meerkanaals signaal om in een
stereosignaal zonder verlies van relevante geluidsinformatie.
Opmerkingen: – Bij opname van een Dolby Digital-, DTS- of
MPEG-signaal moet elke titel individueel
worden opgenomen.
– Digitale opname is niet mogelijk als het
digitale bronmateriaal tegen kopiëren is
beveiligd.
Opnemen via de digitale uitgang
Opnemen van een geluidsbron
Instellen van het geluid
Afspelen van een bron

107
Nederlands
SURROUND SOUND
Surround sound biedt u een compleet nieuwe luisterervaring.
U zult het gevoel hebben dat u zich ten midden van de actie
bevindt want het geluid komt van overal om u heen. Let op
tv-uitzendingen, audio- en videocassettes en cd’s met het logo
3, 1, of deze zijn
gecodeerd voor een meerkanaals surround-weergave. U kiest
het beste voor Dolby Digital, DTS of MPEG om het maximum
uit uw receiver te halen.
Uw receiver is geschikt voor weergave van DTS surround
sound. DTS is een uitmuntend meerkanalen surround
soundsysteem dat beschikbaar is op DVD discs, laserdiscs en
audio CD’s. Raadpleeg uw softwaredealer in verband met de
beschikbaarheid van DTS-software in uw regio.
Merk wel dat DVD-discs niet altijd volwaardige meerkanalen
surround bevatten. Informeer bij uw leverancier om zeker te
weten of een disk voor meerdere kanalen gecodeerd is.
De meest gewone stereocassettes en cd’s geven, als ze met
surround-geluid afgespeeld worden, een goed resultaat.
Mocht de weergave bij surround-weergave vervormd klinken,
schakel dan over op normale stereoweergave.
De beschikbaarheid van de verschillende surround-
instellingen die beschreven staan, hangt af van het aantal
luidsprekers dat gebruikt wordt en van de inkomende
geluidsinformatie.
Wanneer het surround-geluid ingeschakeld is, kunt u kiezen
uit de verschillende surroundinstellingen. De mogelijkheden
zijn afhankelijk van de luidsprekeropstelling zoals die
gedefinieerd is in het receivermenu.
Als een digitaal surroundsignaal wordt gedetecteerd, zal de
receiver DOLBY DIGITAL, DTS of MPEG weergeven.
1 Druk op SURROUND ON/OFF om het surround-geluid in te
schakelen.
yDe gebruikte surround-instelling loopt door het display.
2 Druk herhaaldelijk op SURR. MODE om naar de verschillende
(beschikbare) surround-instellingen te luisteren.
yDe gekozen instelling en de gebruikte luidsprekers
verschijnen in het display. Als de inkomende
meerkanaalssignalen teruggebracht worden tot een
kleiner aantal uitgaande signalen dan verschijnt in het
display DOWNMIX.
3 Druk zo dikwijls als nodig op VIRTUAL MODE om de virtuele
surround sound modi te doorlopen:
1 × om 3D SURROUND te activeren
2 × om MULTI FRONT te activeren
3 × om MULTI REAR te activeren
4 × om NATURAL SURROUND te activeren
yEen lampje geeft aan of een virtuele surround sound
modus is ingeschakeld. -tekens geven aan welke
virtuele surround sound modus actief is.
4 Druk op SURROUND ON/OFF om het surround-geluid in of
uit te schakelen.
ySURROUND OFF loopt door het display.
Inschakelen van het surround-geluid
Over surround sound

SURROUND SOUND
108
HALL
De geluidsweergave wordt benadrukt en er wordt een lichte
echo toegevoegd. U krijgt zo de indruk dat u zich in een grote
ruimte bevindt. Kan enkel gebruikt worden bij stereo.
SURROUND
Met de surround-instelling kunt u een normaal surround-
geluid weergeven via 4 of 5 luidsprekers. Afhankelijk van het
bronmateriaal wordt Dolby Surround Pro Logic, Dolby Digital
DTS of MPEG weergegeven.
PRO LOGIC, DOLBY DIGITAL,
DTS,
MPEG
Behalve SURROUND, wordt ook de gebruikte surround-weergave
– afhankelijk van de gebruikte geluidsbron of -drager – in het
display weergegeven.
In geval van digitale surround sound
wordt het soundformaat AC-3 (voor Dolby Digital), DTS of
MPEG (voor MPEG 2 Multichannel) weergegeven, gevolgd
door de geluidskanalen die op de bron beschikbaar zijn
(bijv. DVD).
Voorbeeld: AC-3 3/2.1 Dolby Digital, 3 voorste kanalen,
2 surround-kanalen en een
subwoofer-kanaal.
MPEG 2/0.0 MPEG meerkanaals, enkel
stereogeluid.
AC-3 3/1.0 Dolby Digital, 3 voorste kanalen,
1 (mono-) surround-kanaal zonder
subwoofer-signaal.
DTS 3/2.1 DTS, 3 voorste kanalen,
2 surround-kanalen en een
subwoofer-kanaal.
FRONT-3 STEREO
Het surround-geluid wordt uitgeschakeld. Bij 3 Stereo luistert u naar
een surround-geluid zonder de surround-luidsprekers te gebruiken.
STEREO
Alle geluid wordt weergegeven en afgespeeld via de linker-
en rechtervoorluidsprekers. Op die manier is normale
stereoweergave mogelijk.
Virtuele surround
Uw receiver is in staat om één of meer vormen van virtuele
surround sound weer te geven. Virtuele surround geeft een
meer realistische klankindruk door schijnluidsprekers te
creëren naast of in plaats van echte luidsprekers. De positie
van de luisteraar beïnvloedt het surroundeffect. De zone waar
het effect het beste te horen is werd grijs gekleurd.
Het niveau van het virtuele surround soundeffect kan worden
geregeld in het instelmenu. De volgende surround sound modi
zijn beschikbaar:
3D SURROUND
Hiervoor zijn geen achterluidsprekers vereist. De
geluidsweergave van het achterkanaal wordt gesimuleerd
door de voorluidsprekers. Surround sound wordt gesimuleerd
via de linker en rechter voorluidsprekers en de
middenluidspreker.
MULTI FRONT
Schijnluidsprekers worden gecreëerd naast de linker en
rechter voorluidsprekers.
MULTI REAR
Schijnluidsprekers worden gecreëerd naast de linker en
rechter achterluidsprekers.
NATURAL SURROUND
Schijnluidsprekers worden gecreëerd naast de linker en
rechter voor- en achterluidsprekers.
Opmerking: De beschikbaarheid van MULTI FRONT en
MULTI REAR is afhankelijk van de
geluidsweergavekanalen op het bronmateriaal.
NIGHT MODE (enkel met de afstandsbediening)
De harde gedeeltes van het geluid worden zachter en de zachte
passage worden harder weergegeven. Zo kunt u van een surround-
geluid genieten zonder dat u slapende kinderen of de buren stoort.
De nachtstand werkt enkel bij Dolby Digital en MPEG, en op
voorwaarde dat de geluidsbron of -drager hiervoor geschikt is.
LEFT
CENTER
FRONT
RIGHT
FRONT
Surround sound-instellingen
Nederlands

109
Nederlands
TUNER
U kunt radiozenders zoeken door de frequentieband te scannen.
Als u de frequentie van een zender kent, kunt u die ook
rechtstreeks intoetsen. Als een FM-zender in stereo uitgezonden
en ontvangen wordt dan verschijnt in het display STEREO.
Zoeken naar een radiozender
1 Draai SOURCE SELECT om de tuner te kiezen.
yIn het display verschijnt TUNER.
2 Druk herhaaldelijk op TUNER AM/FM om het golfgebied te
kiezen.
yIn het display verschijnt het gekozen golfgebied.
3 Houd 1 of 2 ongeveer 1 seconde ingedrukt.
yIn het display verschijnt SEARCH en de tuner stemt af
op een zender van voldoende sterkte.
4 Herhaal deze handelingen tot u de gewenste zender
gevonden heeft.
• Om af te stemmen op een zwakke zender: druk zo vaak als
nodig kort op 1 of 2 tot de ontvangst optimaal is.
Afstemmen op een radiozender door de frequentie in te
toetsen (enkel met de afstandsbediening)
1 Druk op TUNER.
yIn het display verschijnt TUNER.
2 Druk op FR. D..
yIn het display verschijnt _.
3 Toets met 1–0 de frequentie van een radiozender in.
Opmerking: Enkel geldige frequenties binnen het bereik van
de tuner kunnen ingetoetst worden.
U kunt de afstemgevoeligheid van de tuner laag instellen
zodat enkel naar zenders met een sterk signaal gezocht wordt
(enkel FM).
1 Draai SOURCE SELECT om de tuner te kiezen.
yIn het display verschijnt TUNER.
2 Druk op SENS. op de receiver.
yIn het display verschijnt gedurende 5 seconden SENS HI
of SENS LO.
Opmerking: Tijdens het zoeken naar een radiozender ziet u in
het display de huidige gevoeligheid. In dit geval
betekent SENS LO dat de tuner enkel radiozenders
met een sterk signaal zoekt.
U kunt in het totaal 30 radiozenders programmeren. De
receiver kan de zenders automatisch zoeken en programmeren
maar u kunt dit ook zelf doen.
Automatisch programmeren
1 Kies * TUNER uit het menu en druk op NEXT 2.
2 Kies AUTO INSTALL en druk op NEXT 2.
yIn het display verschijnen het zendernummer waarmee
het programmeren begonnen zal worden, het golfgebied
en AUTO.
3 Draai TUNER PRESET X om het zendernummer waarmee
het programmeren begonnen moet worden te wijzigen.
4 Kies het gewenste golfgebied met TUNER AM/FM.
5 Druk op ENTER / OK om het programmeren te starten.
yAUTO INSTALL knippert en alle beschikbare zenders
worden geprogrammeerd; dit kan enkele minuten duren.
Het programmeren is klaar als AUTO INSTALL
ophoudt met knipperen.
Handmatig programmeren
1 Kies * TUNER uit het menu en druk op NEXT 2.
2 Kies MAN INSTALL en druk op NEXT 2.
yIn het display verschijnen een zendernummer, het
golfgebied en de frequentie.
3 Draai TUNER PRESET X om het zendernummer waaronder u
de zender wilt opslaan te wijzigen.
4 Stem af op de gewenste radiozender (zie „Afstemmen op
een radiozender”).
5 Druk op ENTER / OK om uw keuze te bevestigen.
yIn het display verschijnt kort STORED. De radiozender is
nu geprogrammeerd onder het gekozen zendernummer.
6 Kies en programmeer op dezelfde manier alle gewenste
zenders.
Programmeren van radiozenders
Instellen van de FM-gevoeligheid
Afstemmen op een radiozender

110
Nederlands
TUNER
1 Draai SOURCE SELECT op TUNER om de tuner te kiezen.
yIn het display verschijnt TUNER.
2 Draai TUNER PRESET X om een geprogrammeerde zender
te kiezen.
yIn het display verschijnen PRESET, het zendernummer en
de zender.
Het kan zijn dat u na het programmeren de volgorde van de
geprogrammeerde zenders wilt wijzigen. Met RESHUFFLE
kunt u de zenders van plaats verwisselen.
1 Kies * TUNER uit het menu en druk op NEXT 2.
2 Kies RESHUFFLE en druk op NEXT 2.
yIn het display verschijnen PRESET, een zendernummer en
de zender.
3 Draai TUNER PRESET X om een geprogrammeerde zender
te kiezen.
4 Druk op ENTER / OK om uw keuze te bevestigen.
yIn het display verschijnen het gekozen zendernummer
SWAP <-> en een tweede zendernummer.
5 Draai TUNER PRESET X om het nieuwe zendernummer te
kiezen.
6 Druk op ENTER / OK om het wisselen van plaats te
bevestigen.
yIn het display verschijnt kort RESHUFFLED en de
twee zenders zijn van plaats gewisseld.
U heeft de mogelijkheid om elke geprogrammeerde
radiozender zelf een naam te geven. Ook RDS-zenders kunt u
een andere naam geven.
1 Kies * TUNER uit het menu en druk op NEXT 2.
2 Kies GIVE NAME (naam geven) en druk op NEXT 2.
yIn het display verschijnt een geprogrammeerde zender.
3 Draai TUNER PRESET X om de zender te kiezen die u een
andere naam wilt geven.
4 Druk op ENTER / OK om uw keuze te bevestigen.
yIn het display verschijnt de bestaande naam
of ________.
5 Draai TUNER PRESET X om een letter te kiezen en NEXT 2
of 1 PREV. om naar de volgende of vorige positie te gaan.
6 Druk, nadat u de hele naam ingegeven heeft, op
ENTER / OK om te bevestigen.
yIn het display verschijnt STORED en de naam is
opgeslagen.
Opmerking: Wilt u opnieuw de RDS-zendernaam gebruiken,
wis dan de naam die u zelf gegeven heeft.
1 Kies uit het menu * TUNER, en kies GIVE NAME.
yIn het display verschijnt een geprogrammeerde zender.
2 Draai X MENU NAVIGATOR om de naam te kiezen die u wil
wissen.
3 Druk op ENTER / OK om uw keuze te bevestigen.
4 Druk op 1 PREV. terwijl de eerste letter knippert.
y CL knippert links van de zendernaam.
5 Druk op ENTER / OK om de zendernaam te wissen.
Of, als u van gedachte verandert,
druk op 1 PREV. om de zendernaam te laten staan.
Wissen van een zendernaam
Een naam geven aan een zender
Herschikken van de geprogrammeerde zenders
Afstemmen op een geprogrammeerde zender

TUNER
111
Radio Data System is een dienst van de zendstations waarbij
FM-zenders extra informatie uitzenden. Als u en RDS-zender
ontvangt dan verschijnen in het display R en de zendernaam.
De verschillende soorten RDS-informatie
• Druk herhaaldelijk op RADIO TEXT op de receiver om de
volgende soorten informatie in het display te laten
verschijnen (indien beschikbaar):
– Tekstboodschappen
– De RDS-tijd
– De frequentie
– De zendernaam
Opmerking: Het tijdssignaal dat door bepaalde RDS-zenders
uitgestuurd wordt, is niet altjid even nauwkeurig.
U kunt de tuner zo instellen dat het geluid onderbroken wordt
wanneer een RDS-zender een nieuwsbericht of
verkeersinformatie verstuurt. Deze functies werken enkel
indien de vereiste RDS-signalen uitgezonden worden.
Als een RDS-zender tevens een EON-signaal (Enhanced Other
Networks) meestuurt dan verschijnt in het display EON. Dit
signaal stelt de tuner in staat niet alleen bij de gekozen RDS-
zender, maar over het hele golfbereik van de EON-zender op
zoek te gaan naar nieuwsberichten en verkeersinformatie.
1 Stem af op de gewenste RDS-zender.
2 Druk op NEWS/TA:
Eenmaal zodat NEWS in het display verschijnt; hiermee
wordt de nieuwsberichtfunctie ingeschakeld.
Tweemaal zodat TA in het display verschijnt; hiermee
wordt de verkeersinformatiefunctie ingeschakeld.
Driemaal zodat TA en NEWS in het display verschijnen;
hiermee worden beide berichtenfuncties ingeschakeld.
3 Zet een van de geluidsbronnen aan op de normale manier.
y Terwijl een nieuwsbericht of verkeersinformatie
uitgezonden wordt, schakelt de receiver over op de
tuner en in het display knippert NEWS of TA.
4 Druk op NEWS/TA tot de indicatie uit het display verdwijnt
om de functie(s) uit te schakelen.
of
Druk op NEWS/TA tijdens een bericht om de functie(s) uit
te schakelen.
Opmerking: Let erop dat u de nieuwsbericht- en
verkeersinformatiefunctie uitschakelt als u gaat
opnemen want anders worden deze berichten ook
opgenomen.
RDS-nieuwsbericht en -verkeersinformatieRDS R
Nederlands

112
Nederlands
TECHNISCHE GEGEVENS
Wijzigingen voorbehouden zonder kennisgeving.
Algemeen
Stroomverbruik (FR 984, FR 985, FR 986)........................210 W
Stroomverbruik (FR 994, FR 995, FR 996)........................255 W
Stroomverbruik in stand-by ..............................................< 2 W
Afmetingen, b × h × d .............................435 × 135 × 350 mm
Gewicht (FR 984, FR 985, FR 986)....................................8,6 kg
Gewicht (FR 994, FR 995, FR 996)....................................9,4 kg
Versterkergedeelte (0,7 % THD, 6 Ω, 1 kHz)
Uitgangsvermogen, bij stereo
(FR 984, FR 985, FR 986) (DIN)....................................2 × 60 W
Uitgangsvermogen, bij surround
(FR 984, FR 985, FR 986)
Voor.......................................................................2 × 60 W
Midden.........................................................................60 W
Surround................................................................2 × 60 W
Uitgangsvermogen, bij stereo
(FR 994, FR 995, FR 996) (DIN)..................................2 × 100 W
Uitgangsvermogen, bij surround
(FR 994, FR 995, FR 996)
Voor.....................................................................2 × 100 W
Midden.......................................................................100 W
Surround..............................................................2 × 100 W
Lage tonen.......................................................±9 dB bij 100 Hz
Hoge tonen.......................................................±9 dB bij 10 kHz
Loudness...+6 dB bij 100 Hz (-30 dB); +3 dB bij 10 kHz (-30 dB)
Totale harmonische vervorming..............0,05 % bij 1 kHz, 5 W
Frequentiebereik.......................................20–20 000 Hz, ±1 dB
Signaal/ruis-verhouding ................................................≥ 82 dB
Kanaalscheiding (1 kHz).................................................≥ 45 dB
Overspraak (1 kHz)........................................................≤ -65 dB
Ingangen
Lijningangen .......................................................250 mV/47 kΩ
6 CH....................................................................250 mV/40 kΩ
Front AV (enkel FR 995, FR 996).........................250 mV/22 kΩ
Phono......................................................................5 mV/47 kΩ
Digitaal, coax..........................................75 Ω volgens IEC 958
Digitaal optisch................................................................Toslink
Digitale bemonsteringsfrequentie
(FR 984, FR 985, FR 986).....................32 kHz, 44,1 kHz, 48 kHz
Digitale bemonsteringsfrequentie
(FR 994, FR 995, FR 996)........32 kHz, 44,1 kHz, 48 kHz, 96 kHz
Uitgangen
Netuitgangen (geschakeld) ..........................totaal max. 100 W
Lijnuitgangen........................................................250 mV/1 kΩ
Digitaal coax...........................................75 Ω volgens IEC 958
Digitale uitgang-samplingfrequenties
Analoog in............................................................uit 48 kHz
Digitaal in 32 kHz.................................................uit 32 kHz
Digitaal in 44,1 kHz...........................................uit 44,1 kHz
Digitaal in 48 kHz.................................................uit 48 kHz
Digitaal in 96 kHz
(enkel bij FR 994, FR 995, FR 996).......................uit 48 kHz
Subwoofer pre-out....................................................0,8 V/1 kΩ
Center pre-out...........................................................0,8 V/1 kΩ
Hoofdtelefoon.................................8–600 Ω (3 V e.m.f., 60 Ω)
Luidsprekers......................................................................≥ 6 Ω
Tuner
Golfbereik
FM..............................................................87,5–108,0 MHz
MW...............................................................531–1 602 kHz
LW....................................................................153–279 kHz
Gevoeligheid
Stereo FM..................................................................41 dBf
Mono FM....................................................................15 dBf
Totale harmonische vervorming
Stereo FM...................................................................0,3 %
Mono FM...................................................................0,85 %
Frequentiebereik........................................63–12 500 Hz ±1 dB
Signaal/ruis-verhouding
Stereo FM....................................................................55 dB
Mono FM.....................................................................60 dB
Kanaalscheiding.................................................35 dB bij 1 kHz
Receiver

113
Nederlands
VERHELPEN VAN STORINGEN
PROBLEEM MOGELIJKE OORZAAK OPLOSSING
Toestel werkt niet De oververhittingbeveiliging is geactiveerd. Schakel het toestel uit en laat het afkoelen. Na
en is in standby het toestel te hebben laten afkoelen zet u het
weer aan en kiest een bron door SOURCE SELECT
te verdraaien of op de afstandsbediening een
brontoets in te drukken.
Geen geluid Het VOLUME staat te zacht. Stel het VOLUME in.
De hoofdtelefoon is aangesloten. Maak de hoofdtelefoon los.
U heeft de verkeerde bron gekozen. Draai SOURCE SELECT om de juiste bron te
kiezen.
Geen geluid van Eén van de luidsprekers is verkeerd aangesloten. Sluit de luidspreker goed aan.
links of van rechts
Eén van de luidsprekerkabels is beschadigd. Vervang de luidsprekerkabel.
De volumebalans in het receiver-menu is Stel VOL FRONT-L en VOL FRONT-R in
verkeerd ingesteld. in het receiver-menu.
Zwak of geen geluid uit de De SURROUND-functie is niet ingeschakeld. Druk op SURROUND ON/OFF om het surround-
midden- of de surround geluid in te schakelen.
-luidsprekers
De surround- en/of middenluidsprekers zijn Sluit de luidsprekers goed aan.
niet (goed) aangesloten.
De surround- en/of middenluidsprekers zijn Kies YES voor de aanwezige luidsprekers.
uitgeschakeld in SPEAKR SETUP menu.
Eén van de luidsprekerkabels is beschadigd. Vervang de luidsprekerkabel.
Zwakke basweergave De luidsprekers zijn niet in fase aangesloten. Sluit de gekleurde (of gemerkte) draden aan op
de gekleurde aansluitingen en de zwarte (of niet
gemerkte) draden op de zwarte aansluitingen.
Slecht geluid De instellingen zijn niet geschikt voor het type Wijzig de klankinstellingen op de receiver.
muziek of geluid.
Het surround-geluidsniveau Het niveau van het surround-geluid Stel het niveau van het surround-geluid in op de
is te laag of te hoog is niet goed ingesteld. receiver.
Het middengeluidsniveau Het geluidsniveau van het middenkanaal is Stel het niveau van het middenkanaal in op de
is te laag of te hoog niet goed ingesteld. receiver.
U hoort bij Dolby Surround Het signaal wordt mono weergegeven. Kies een andere geluidsbron of schakel het
Pro Logic enkel de surround-geluid uit.
middenluidspreker
Slechte radio-ontvangst, De receiver of de antenne bevindt zich te Zet het apparaat dat storing veroorzaakt op een
het automatisch dicht bij een stralingsbron zoals een tv, andere plek of zet het uit.
programmeren werkt niet cd-speler, cd-recorder, DVD-speler enzovoort.
correct
Geen digitale opname De samplingfrequentie wordt niet aanvaard
Ga na of de digitale recorder samplingfrequenties
mogelijk via digitale door de digitale recorder. van 32 kHz tot 48 kHz wel kan verwerken of
uitgang. maak de opname via analoge uitgang.
De volledige opname De DVD-speler verstrekt geen titelinformatie. Neem elke titel afzonderlijk op of gebruik de
verschijnt als één titel „manuele titelverhoging”-functie op de recorder.
bij opname van DVD.
WAARSCHUWING
Probeer in geen geval zelf iets te repareren want dan
vervalt de garantie. Maak het apparaat niet open want
dan loopt u het risico een elektrische schok te krijgen.
Als zich een probleem voordoet, controleer dan eerst de punten
op de onderstaande lijst voor u het systeem in reparatie geeft.
Kunt u het probleem niet oplossen aan de hand van deze
aanwijzingen, raadpleeg dan uw leverancier of
serviceorganisatie.

INFORMAZIONI GENERALI
114
Questo ricevitore viene fornito completo di:
– un telecomando
– 2 batterie per il telecomando, formato AA
– un cavo coassiale per la connessione audio con un
DVD player
– un cavo bus di sistema per il collegamento CINEMA LINK
– un’antenna a telaio
– un’antenna metallica
– questo manuale di istruzioni
Se i componenti del sistema sono impilati, il ricevitore
deve essere posizionato in cima ad essi. Poggiare il
ricevitore su una superficie in piano, solida e stabile.
Non coprire le aperture di ventilazione e lasciare una
distanza libera per la ventilazione pari a 50 cm al di
sopra ed a 10 cm a sinistra e a destra del ricevitore.
Per una buona ricezione, non posizionare l’antenna a telaio al
di sopra o al di sotto di VCR, registratori CD, lettori DVD, TV
ed altre sorgenti di radiazioni.
Non è stato utilizzato materiale d’imballaggio in eccesso. È stato
fatto il possibile per rendere il materiale d’imballaggio facilmente
scomponibile in tre monomateriali: cartone (scatola), polistirene
espanso (paracolpi) e polietilene (buste, fogli protettivi in espanso).
L’apparecchio è composto da materiali che possono essere
riciclati, se smontati da una ditta specializzata. Rispettare le
norme locali sullo smaltimento dei materiali di imballaggio,
batterie esaurite ed apparecchiature obsolete.
Prodotto sotto licenza della Dolby Laboratories. «DOLBY»,
«DOLBY DIGITAL», «PRO LOGIC» ed il simbolo a doppia D 2
sono nomi di fabbrica della Dolby Laboratories. Opere
riservate inedite. © 1992–1997 Dolby Laboratories. Tutti i
diritti riservati.
«DTS» e «DTS Digital Surround» sono prodotti della Digital
Theater Systems, Inc. Copyright 1996 Theater Systems, Inc.
Tutti i diritti riservati.
Pulire il ricevitore con un panno
morbido e non peloso, leggermente
inumidito. Non usare detergenti,
perché possono avere un’azione
corrosiva.
Non esporre il ricevitore ad umidità,
pioggia, sabbia o calore eccessivo
(generato dall’impianto di
riscaldamento o dai raggi solari diretti).
Manutenzione
Riconoscimento dei marchi di fabbrica
Informazioni ambientali
Regolazione
Materiale in dotazione
Informazioni generali
Materiale in dotazione...................................................................114
Regolazione....................................................................................114
Informazioni ambientali.................................................................114
Riconoscimento dei marchi di fabbrica.........................................114
Manutenzione ................................................................................114
Comandi ............................................................................................115
Telecomando
Uso del telecomando.....................................................................116
Pulsanti del telecomando..............................................................117
Programmazione del telecomando universale
(solo per FR 985, FR 986, FR 995, FR 996).....................................118
Connettori .........................................................................................119
Collegamenti
Connessioni audio analogiche.......................................................120
Collegamenti audio digitali............................................................120
Bus di controllo sistema, CINEMA LINK.......................................121
Collegamenti video........................................................................121
Rete................................................................................................122
Controllo dell’alimentazione..........................................................122
Collegamenti degli altoparlanti.....................................................122
TV come altoparlante centrale......................................................122
Collegamenti dell’antenna.............................................................122
Cuffie..............................................................................................122
Regolazione del sistema
Posizionamento degli altoparlanti.................................................123
Regolazione e test degli altoparlanti.............................................123
Regolazione del ricevitore.............................................................123
Display...............................................................................................124
Menu
Menu del ricevitore...............................................................125–126
Menu della TV................................................................................126
Attivazione di CINEMA LINK.........................................................126
Selezione sorgente
SOURCE SELECT.............................................................................127
Selezione 6 CHANNEL-DVD/SACD INPUT....................................127
Riassegnazione della selezione di una sorgente..........................127
Uso di una selezione di sorgente per due o più apparecchi.........127
Informazioni su 6 CHANNEL-DVD/SACD INPUT...........................127
Riproduzione, registrazione
Riproduzione di una sorgente........................................................128
Regolazione del suono...................................................................128
Registrazione da una sorgente......................................................128
Registrazione dalla uscita digitale................................................128
Suono surround
Informazioni sul suono surround....................................................129
Attivazione del suono surround.....................................................129
Regolazioni del suono surround.....................................................130
Sintonizzatore
Sintonizzazione sulle stazioni radio...............................................131
Attivazione della sensibilità FM....................................................131
Memorizzazione delle stazioni radio.............................................131
Sintonizzazione sulle stazioni radio memorizzate.........................132
Riordinamento delle stazioni radio memorizzate..........................132
Denominazione delle stazioni radio...............................................132
Cancellazione dei nomi delle stazioni...........................................132
RDS R............................................................................................133
Notiziario RDS ed Informazioni sul traffico...................................133
Dati tecnici
Ricevitore .......................................................................................134
Individuazione dei malfunzionamenti
Attenzione......................................................................................135
Individuazione dei malfunzionamenti............................................135
Italiano
Questo apparecchio soddisfa i requisiti previsti
dalle normative della Comunità Europea in materia
di radiointerferenze.
Come partner ENERGY STAR
®
Philips ha constatato che questo
prodotto soddisfa le direttive ENERGY STAR
®
in materia di efficienza energetica.

COMANDI
115
1 POWER / STANDBY.......Accende e spegne il ricevitore.
2 CINEMA LINK................Accende e spegne il bus di
controllo del sistema tra il
ricevitore e la TV.
3 ..........................................Sensore per il telecomando a
raggi infrarossi.
4 VIRTUAL..........................Luce di controllo per il surround
virtuale.
5 HALL................................Indicatore luminoso di controllo
per HALL.
6 ..........................................Display
7 SOURCE SELECT............Seleziona i diversi connettori
audio e video.
Riattiva il ricevitore dalla
condizione di standby.
8 VOLUME..........................Aumenta e diminuisce il livello
del volume.
9 FRONT AV.......................Seleziona l’entrata FRONT AV /
GAME (solo per FR 995, FR 996).
0 TREBLE............................Regola i toni acuti, se utilizzato
con VOLUME.
! BASS...............................Regola i toni bassi, se utilizzato
con VOLUME.
@ LOUDNESS.....................Accende e spegne LOUDNESS.
# NEXT 2 ...........................TUNER: ricerca le stazioni radio.
MENU: porta al livello
successivo di menu.
$ ENTER / OK.....................Conferma i valori di menu
selezionati.
% TUNER PRESET X MENU NAVIGATOR
TUNER: porta alla precedente o
successiva stazione radio
memorizzata.
MENU: sposta verso l’alto e
verso il basso.
^ 1 PREV. / EXIT...............TUNER: ricerca le stazioni radio.
MENU: porta al livello
precedente di menu.
& SETUP MENU ................Attiva e disattiva il menu.
* SENS. ..............................Sposta fra sensibilità alta e
bassa del sintonizzatore.
( NEWS/TA........................Attiva e disattiva il notiziario RDS
e le informazioni sul traffico RDS.
) TUNER AM/FM..............Sposta fra le gamme di lunghezze
d’onda del sintonizzatore.
¡ RADIO TEXT...................Scorre le diverse informazioni
RDS.
™ SURR. MODE..................Si sposta attraverso le diverse
configurazioni dell’altoparlante.
£ VIRTUAL MODE.............Lista delle diverse tipologie di
suono surround virtuale.
≤ SURROUND ON/OFF.....Si sposta tra le tipologie
surround e stereo selezionate
per ultime.
T
A
1 234 56 7
8
9
0
!
@#$%^&*()¡™£≤
Italiano

TELECOMANDO
116
Aprire il comparto batterie del
telecomando ed inserirvi
2 batterie alcaline di tipo AA
(R06, UM-3).
Estrarre le batterie esaurite o se
si pensa di non utilizzare il
telecomando per lungo tempo.
Le batterie contengono sostanze chimiche, pertanto
devono essere smaltite in modo corretto.
I pulsanti sul telecomando funzionano come quelli
corrispondenti sul ricevitore.
Importante!
Per spostare la sorgente del suono sul ricevitore bisogna
premere il tasto relativo per più di 1 secondo. Se lo si preme
per meno di 1 secondo si trasferisce al telecomando la
gestione dei comandi per il prodotto selezionato.
Il telecomando resta sintonizzato sulla sorgente selezionata
sino a quando non si preme un altro pulsante dello stesso. Ciò
consente di azionare delle sorgenti aggiuntive (ad esempio di
avvolgere un nastro), senza cambiare la sorgente sul ricevitore.
Uso del telecomando
DVD
2
H
AA
TV
Ç
É
MENU
OK
GUIDE
NEWS/TA
5
1
3
2
4
6
7
9
8
0
MUTE
TUNER
CD CDR/TAPE
DVD
SAT
VCR
TV
PHONO
CABLE BOX
REC CANCEL FR.D. INDEX
íë
CHANNEL/TRACK LOUDNESS
VIRTUALNIGHT
DISC
SURROUND
SURROUND
SUBW.
T-C
Å
+
-
+
-
REAR
CHANNEL
SUB WOOFER
TEST TONE
ON/
OFF
AUDIO
ON/
OFF
MODE
MODE
CINEMA GO
Italiano

TELECOMANDO
117
H MUTE .......................Disattiva l’audio del ricevitore in tutte
le modalità, tranne TV.
Disattiva l’audio del televisore Philips
se il telecomando è in modalità TV.
2 ................................Mette in standby la sorgente
selezionata sul telecomando (ad es.
VCR, TV).
Se premuto per più di 2 secondi, il
ricevitore passa in standby.
PHONO, TUNER, CD,
CDR/TAPE, TV,
VCR, SAT, DVD..............Sposta il telecomando sui comandi dei
diversi prodotti. Seleziona le sorgenti
se premuto per più di 1 secondo. SAT
funziona solo con ricevitori satellitari
digitali.
Riattiva il ricevitore dalla condizione di
standby.
1–0................................Immette i numeri di brani, stazioni o
frequenze. I numeri composti da due
cifre devono essere immessi entro
2 secondi.
CINEMA GO..........
Attiva CINEMA LINK sulla TV.
CABLE BOX...................Senza funzione.
MENU GUIDE ..............TUNER: attiva e disattiva il menu del
ricevitore.
DVD, TV: attiva e disattiva il menu
DVD/TV.
OK.................................Conferma le opzioni del menu.
Pulsanti con le frecce...TUNER: Consente di spostarsi
attraverso il menu. Le frecce verso
sinistra/verso destra spostano nella
sintonia verso l’alto/il basso.
CD, CDR: Le frecce verso sinistra/verso
destra ricercano indietro/in avanti, le
frecce verso l’alto/il basso selezionano
il brano successivo/precedente.
+A...........................Aumenta il volume del ricevitore.
-A...........................Diminuisce il volume del ricevitore.
iNEWS/TA.................Attiva e disattiva le funzioni NEWS e
TRAFFIC ANNOUNCEMENT.
TV: Attiva e disattiva il televideo.
SAT: Attiva e disattiva il testo
informativo.
ÉATV......................Aumenta il volume della TV.
CD, CDR, VCR, DVD: Avvia la
riproduzione.
ÇATV......................Diminuisce il volume della TV.
CD, CDR, VCR, DVD: Arresta la
riproduzione.
í
CHANNEL/TRACK
...Seleziona la precedente stazione del
sintonizzatore preimpostata.
VCR: Riavvolge il nastro.
CD, CDR, DVD: Seleziona il brano
precedente.
TV: Seleziona il canale precedente.
ë
CHANNEL/TRACK
...Seleziona la successiva stazione del
sintonizzatore preimpostata.
VCR: Avvolge velocemente in avanti il
nastro.
CD, CDR, DVD: Seleziona il brano
successivo.
TV: Seleziona il canale successivo.
LOUDNESS...................Attiva e disattiva LOUDNESS.
SUBW. ON/OFF ............Attiva e disattiva i bassi.
REC, DVD AUDIO..........CDR, VCR: Avvia la registrazione.
DVD: Attiva i brani audio.
CANCEL, DVD ...........CD, CDR, SAT, VCR: Elimina un
programma, annulla le selezioni.
DVD: Attiva l’angolo di visualizzazione.
FR.D., DVD Å .............TUNER: Sposta su FREQUENCY DIRECT.
CD, CDR, VCR, DVD: Arresta
momentaneamente la riproduzione.
INDEX, DVD T-C............VCR: Attiva e disattiva la ricerca
dell’indice.
SAT: Attiva e disattiva gli argomenti.
DVD: Sposta tra titolo e capitolo.
DISC..............................Variatori di CD-, CDR-, DVD:
Sposta al disco successivo.
NIGHT...........................Attiva e disattiva NIGHT MODE.
VIRTUAL MODE............Scorrimento delle diverse tipologie di
suono surround virtuale.
SURROUND ON/OFF....Attiva e disattiva SURROUND SOUND.
+/- SUBWOOFER...Aumenta/diminuisce il volume dei
subwoofer.
+/- REAR ...............Aumenta/diminuisce il volume degli
altoparlanti posteriori. Mentre è attivo il
rivelatore acustico di test, è possibile
aumentare/diminuire con questi pulsanti
il volume degli altoparlanti in funzione.
SURROUND MODE.......Scorre attraverso i diversi modi
surround.
TEST TONE...................Attiva e disattiva il rivelatore acustico
di test. Mentre è attivo il rivelatore
acustico di test, è possibile
aumentare/diminuire con +/- REAR
il volume degli altoparlanti in funzione.
Pulsanti del telecomando
Italiano

TELECOMANDO
118
Un telecomando universale si distingue mediante la dicitura
Multibrand/Universal.
Programmare il telecomando universale in modo da utilizzare i
codici degli apparecchi di marche diverse. Ciò avviene
immettendo un codice a 4 cifre, oppure eseguendo una
scansione dei codici, sino ad individuare quello esatto. Noi
consigliamo di usare il codice a 4 cifre, poiché questo metodo
è più rapido ed affidabile. Utilizzare il metodo di scansione
dei codici solo se non si riesce ad individuare il codice
relativo ad un apparecchio. La tabella dei codici è riportata in
fondo al presente manuale.
Importante!
Per programmare, utilizzare solo i pulsanti del telecomando,
non quelli del ricevitore o di altri apparecchi.
Programmazione con il codice a 4 cifre
1 Mantenere premuti per 3 secondi il pulsante sorgente
relativo all’apparecchio da controllare e 2.
2 Immettere il codice a 4 cifre relativo all’apparecchio (la
tabella dei codici è riportata in fondo al presente manuale).
Note: – Se si immettono più di 4 cifre, il telecomando
riconosce soltanto quelle immesse per prime.
– Se non si immette alcun codice per 30 secondi, il
telecomando disattiva la funzione di programmazione
senza cambiare il codice.
– Per programmare un nuovo apparecchio, basta
sovrascrivere il vecchio codice digitandone uno nuovo.
Scansione della tabella dei codici
1 Accendere l’apparecchio che si desidera controllare.
2 Mantenere premuti per 3 secondi il pulsante sorgente
relativo all’apparecchio da controllare e 2.
3 Premere e rilasciare nuovamente 2.
yIl telecomando invia i codici per ricercare il canale
successivo o per portarsi in modo standby (secondo la
sorgente selezionata), una marca dopo l’altra.
4 Non appena l’apparecchio risponde – si sintonizza sul
canale successivo o si mette in modo standby – premere
2 per confermare il codice.
yVerrà utilizzato il codice identificato.
• Se l’apparecchio non reagisce entro 2 minuti, il codice di
questo apparecchio non è memorizzato nel telecomando. Il
codice del telecomando resta invariato.
Nota: Se si estraggono le batterie dal telecomando per un
tempo superiore a 1 minuto, è necessario
riprogrammare i codici.
Annotare qui i codici individuati e testati per diversi apparecchi.
PHONO..........................................
TUNER...........................................
CD .................................................
CDR/TAPE .....................................
TV..................................................
VCR ...............................................
SAT................................................
DVD...............................................
Ripristino del telecomando
1 Tenere premuto i tasti di fonte e 2 per 3 secondi.
2 Digitare il codice a 3 cifre 981.
yA questo punto il telecomando è ripristinato per tutti i
codici originali Philips.
Programmazione del telecomando universale
(solo per FR 985, FR 986, FR 995, FR 996)
Italiano

CONNETTORI
119
Connettori Nome del connettore Collegare a:
Presa cuffie 6,3 mm 1 PHONES Cuffia con spina da 6,3 mm.
anteriormente.
Ingressi audio e video 2 FRONT AV / GAME Prese audio di destra e di sinistra per accessori quali le video
anteriormente camere e le consolle dei giochi.
(solo per FR 995, FR 996).
3 FRONT AV / GAME
Prese video per accessori quali le video camere e le consolle dei giochi.
FRONT SPEAKERS 4 R, L Altoparlante anteriore sinistro e destro.
5 CENTER Altoparlante centrale.
SURROUND SPEAKERS 6 R, L Altoparlante surround sinistro e destro.
AUDIO IN/OUT 8 CDR/TAPE OUT Entrata di un registratore CD o di una piastra di registrazione.
9 CDR/TAPE IN Uscita di un registratore CD o di una piastra di registrazione.
0 CD IN Uscita di un lettore di CD.
! SAT IN Uscita di un sistema satellitare.
@ VCR OUT Entrata di un videoregistratore.
# VCR IN Uscita di un videoregistratore.
$ TV IN Uscita di una TV.
% PHONO IN Uscita di un giradischi con bobina MM.
¡ PHONO GND f Cavo di massa di un giradischi.
Entrata a 6 canali ^
6CHANNEL/ DVDINPUT
Uscita a 6 canali di apparecchiature, come riproduttori DVD o di
dischi laser.
DIGITAL AUDIO IN/OUT & COAX 1 IN
Uscita coassiale di apparecchi digitali (ingresso difettoso sorgente DVD).
* COAX 2 IN
Uscita coassiale di apparecchi digitali.
( COAX OUT Entrata coassiale di apparecchi digitali, come registratori CD o MD.
) OPTICAL IN
Uscita ottica di apparecchi digitali, come riproduttori DVD, lettori di CD,
registratori CD o riproduttori MD (solo per FR 984, FR 985, FR 986, FR 994).
) OPTICAL 1 (2) IN Uscita ottica di apparecchi digitali, come riproduttori DVD, lettori di
CD, registratori CD o riproduttori MD (solo per FR 995, FR 996).
VIDEO IN/OUT ™ S-VIDEO Ingressi/uscite dell’S-Video per gli accessori del video atti a
migliorarne la qualità (solo per FR 994, FR 995, FR 996).
£ DVD IN Uscita di un riproduttore DVD.
≤ MON OUT Entrata di un monitor (ad es. la TV).
§ VCR IN Uscita di un videoregistratore.
≥ VCR OUT Entrata di un videoregistratore (per registrare).
ª SAT IN Uscita di un sistema satellitare.
Connettori dell’antenna ∞
AM LOOP
Antenna a telaio in dotazione.
• FM 75 Ω Antenna metallica in dotazione o antenna esterna.
Uscite preamplificate 7 CENTER PRE-OUT Entrata di una TV, se utilizzata come altoparlante centrale (possibile
solo se è collegato il bus di sistema CINEMA LINK).
º
SUBWOOFER PRE-OUT
Entrata di un subwoofer alimentato.
Bus di controllo del sistema ⁄ CINEMA LINK Prese bus di controllo del sistema di una TV Philips con CINEMA LINK.
Prese di alimentazione (non ¤ AC OUTLET Alimenta la stessa tensione di rete. Carico totale massimo
su tutte le versioni) consentito di 100 W.
Conduttore di rete ‹ Dopo avere eseguito tutti gli altri collegamenti,
collegare questo conduttore di rete alla presa a muro.
ANTENNA
FM 75 Ω
A
M
L
O
O
P
VIDEO IN/OUT
C
A
U
TIO
N
R
IS
K
O
F
E
L
E
C
T
R
IC
S
H
O
C
K
D
O
N
O
T
O
P
E
N
AVIS
RISQUE DE CHOC ELECTRIQUE
NE P
AS OUVRIR
D
e
s
i
g
n
e
d
a
n
d
d
e
v
e
l
o
p
e
d
b
y
P
h
i
l
i
p
s
i
nt
h
e
E
u
r
o
p
e
a
n
C
o
m
m
u
n
i
t
y
.
M
a
n
u
f
a
c
t
u
r
e
d
u
n
d
e
r
l
i
c
e
n
s
e
f
r
o
m
D
o
l
b
y
L
a
b
o
r
a
t
o
r
i
e
s
.
”
D
O
L
B
Y
“
,
”
D
O
L
B
Y
D
I
G
I
T
A
L
“
,
”
P
R
O
L
O
G
I
C
“
a
n
d
t
h
e
d
o
u
b
l
e
-
D
S
y
m
b
o
l
a
r
e
t
r
a
d
e
m
a
r
k
s
o
f
D
o
l
b
y
L
a
b
o
r
a
t
o
r
i
e
s
.
C
o
n
f
i
d
e
n
t
i
a
l
U
n
p
u
b
l
i
s
h
e
d
W
o
r
k
s
.
©
1
9
9
2
–
1
9
9
7
D
o
l
b
y
L
a
b
o
r
a
t
o
r
i
e
s
.
A
l
l
r
i
g
h
t
s
r
e
s
e
r
v
e
d
.
M
a
n
u
f
a
c
t
u
r
e
d
u
n
d
e
r
l
i
c
e
n
s
e
f
r
o
m
D
i
g
i
t
a
l
T
h
e
a
t
e
r
S
y
s
t
e
m
s
.
I
n
c
.
U
S
P
a
t
.
N
o
.
5
,
4
5
1
,
9
4
2
a
n
d
o
t
h
e
r
w
o
r
l
d
-
w
i
d
e
p
a
t
e
n
t
s
i
s
s
u
e
d
a
n
d
p
e
n
d
i
n
g
.
”
D
T
S
“
a
n
d
”
D
T
S
D
i
g
i
t
a
l
S
u
r
r
o
u
n
d
“
a
r
e
t
r
a
d
e
m
a
r
k
s
o
f
D
i
g
i
t
a
l
T
h
e
a
t
e
r
S
y
s
t
e
m
s
,
I
n
c
.
C
o
p
y
r
i
g
h
t
1
9
9
6
D
i
g
i
t
a
l
T
h
e
a
t
e
r
S
y
s
t
e
m
s
,
I
n
c
.
A
l
l
R
i
g
h
t
s
R
e
s
e
r
v
e
d
.
SURROUND
SPEAKERS
L
E
A
C
H
S
P
E
A
K
E
R
≥ 6
Ω
R
R
L
F
R
O
N
T
S
P
E
A
K
E
R
S
E
A
C
H
S
P
E
A
K
E
R
≥
6
Ω
PHONO GND.
C
E
N
T
E
R
IN
PLA
Y
IN
IN
OUT
REC
IN
PLA
Y
OUT
REC
C
O
A
X
O
U
T
D
IG
I
T
A
L
A
U
D
IO
I
N
/
O
U
T
O
P
T
IC
A
L
1
IN
C
O
A
X
2
IN
PHONO
VCRTV
SA
T
CD
CDR/T
APE
AUDIO IN/OUT
IN
IN
P
R
E
-O
U
T
C
E
N
T
ER
OUT
REC
IN
PLA
Y
DVD
IN
MON
OUT
VCR
SAT
IN
S
U
B
W
O
O
F
E
R
P
R
E
-
O
U
T
C
IN
E
M
A
L
IN
K
ANTENNA
A
M
L
O
O
P
O
P
T
IC
A
L
2
IN
CENTER
SUBW
.
6 CHANNEL/
DVD INPUT
C
O
A
X
1
IN
L
R
S-VIDEO
DVD
MON
VCR
SAT
VCR
OUT
IN
TO
T
AL
100
W
M
A
X. SW
ITC
H
ED
A
C O
U
TL
E
T
4567890!@#$
¤‹
⁄
%^
&
*
(
)
¡
™£≤∞§≥•ªº
12
3
Italiano

COLLEGAMENTI
120
Italiano
Collegamenti audio digitali
Connessioni audio analogiche
DIGITAL
AUDIO
IN/OUT
PHONO
VCRTV SAT CD CDR/TAPE
AUDIO IN/OUT
IN IN
IN
PLAY
OUT
REC
IN IN
IN
PLAY
OUT
REC
PRE-OUT
CENTER
CAUTION
RISK OF ELECTRIC SHOCK
DO NOT OPEN
AVIS
RISQUE DE CHOC ELECTRIQUE
NE PAS OUVRIR
PHONO GND.
SURROUND
SPEAKERS
R
L
EACH SPEAKER ≥ 6 Ω
CENTER
R L
FRONT
SPEAKERS
EACH SPEAKER ≥ 6 Ω
AM LOOP
DVD
IN
MON
OUT
VCR
SAT
IN
PRE-OUT
CINEMA
LINK
SUBWOOFER
IN
PLAY
OUT
REC
OPTICAL 1
IN
COAX
OUT
COAX 2
IN
R
L
SURR.
CENTER SUBW.
FRONT
6 CHANNEL /
DVD INPUT
OPTICAL 2
IN
COAX 1
IN
Designed and developed by Philips in the European
Community.
Manufactured under license from Dolby Laboratories.
”DOLBY“, ”DOLBY DIGITAL“, ”PRO LOGIC“ and the
double-D Symbol are trademarks of Dolby
Laboratories. Confidential Unpublished Works.
©1992–1997 Dolby Laboratories. All rights reserved.
Manufactured under license from Digital Theater
Systems. Inc. US Pat. No. 5,451,942 and other world-
wide patents issued and pending. ”DTS“ and ”DTS
Digital Surround“ are trademarks of Digital Theater
Systems, Inc. Copyright 1996 Digital Theater Systems,
Inc. All Rights Reserved.
2
VIDEO IN/OUT
S-VIDEO
DVD MON SAT
VCRVCR
IN OUT
ANTENNA
FM 75 Ω
DVD PLAYER
CD RECORDER
CD PLAYER
Su alcuni apparecchi sono presenti dei connettori sia analogici che
digitali. Se possibile, utilizzare il collegamento digitale, perché di
solito questo genera una migliore qualità sonora. Per informazioni
sulle modalità di utilizzo dei connettori digitali del ricevitore,
vedere «Riassegnazione della selezione di una sorgente».
Se si utilizza un disco laser digitale Dolby, è necessario un
demodulatore opzionale AC-3 RF, a causa di un diverso tipo di
segnale di uscita.
DTS Digital Surround™ è un formato audio digitale discreto a
5,1 canali disponibile con software CD, LD e DVD, che, di
conseguenza, non può essere decodificato e riprodotto nella
maggior parte dei lettori CD, LD, o DVD. Per questo motivo,
quando il software DTS codificato viene riprodotto attraverso
le uscite analogiche del lettore CD, LD o DVD, il suono
risulterà particolarmente disturbato. Per evitare eventuali
danni al sistema audio, è opportuno che il cliente prenda le
dovute precauzioni, se le uscite analogiche sono collegate
direttamente al ricevitore.
Per ottenere una riproduzione in DTS Digital Surround™, è
necessario collegare ad una delle entrate digitali del
ricevitore un lettore DTS compatibile.
DIGITAL
AUDIO
IN/OUT
PHONO VCRTV SAT CD CDR/TAPE
AUDIO IN/OUT
IN
IN
IN
PLAY
OUT
REC
IN IN
IN
PLAY
OUT
REC
PRE-OUT
CENTER
CAUTION
RISK OF ELECTRIC SHOCK
DO NOT OPEN
AVIS
RISQUE DE CHOC ELECTRIQUE
NE PAS OUVRIR
Designed and developed by Philips in the European
Community.
Manufactured under license from DolbyLaboratories.
”DOLBY“, ” DOLBY DIGITAL“, ” PRO LOGIC“ and the
double-D Symbol are trademarks of Dolby
Laboratories. Confidential Unpublished Works.
©1992–1997 Dolby Laboratories. All rights reserved.
Manufactured under license from Digital Theater
Systems. Inc. US Pat. No. 5,451,942 and other world-
wide patents issued and pending. ” DTS“ and ”DTS
Digital Surround“ are trademarks of Digital Theater
Systems, Inc. Copyright 1996 Digital Theater Systems,
Inc. All Rights Reserved.
PHONO GND.
SURROUND
SPEAKERS
R
L
EACH SPEAKER ≥ 6 Ω
CENTER
R L
FRONT
SPEAKERS
EACH SPEAKER ≥ 6 Ω
AM LOOP
VIDEO IN/OUT
DVD
IN
MON
OUT
VCR
SAT
IN
PRE-OUT
CINEMA
LINK
SUBWOOFER
S-VIDEO
DVD MON SAT
VCR
VCR
IN
PLAY
OUT
REC
IN OUT
OPTICAL 1
IN
COAX
OUT
COAX 2
IN
R
L
SURR.
CENTER SUBW.
FRONT
6 CHANNEL /
DVD INPUT
OPTICAL 2
IN
COAX 1
IN
FM 75 Ω
ANTENNA
AUDIO
OUT
TURNTABLE
AUDIO IN
AUDIO OUT
IN
OUT
VCR
SAT RECEIVER
CD RECORDER
CD PLAYER
MONITOR / TV
POWERED
SUBWOOFER

COLLEGAMENTI
121
Bus di controllo sistema, CINEMA LINK
Collegamenti video
Italiano
DIGITAL
AUDIO
IN/OUT
PHONO
VCRTV SAT CD
CDR/TAPE
AUDIO IN/OUT
IN IN
IN
PLAY
OUT
REC
IN IN
IN
PLAY
OUT
REC
PRE-OUT
CENTER
CAUTION
RISK OF ELECTRIC SHOCK
DO NOT OPEN
AVIS
RISQUE DE CHOC ELECTRIQUE
NE PAS OUVRIR
Designed and developed by Philips in the European
Community.
Manufactured under license from DolbyLaboratories.
”DOLBY“, ” DOLBY DIGITAL“, ” PRO LOGIC“ and the
double-D Symbol are trademarks of Dolby
Laboratories. Confidential Unpublished Works.
©1992–1997 Dolby Laboratories. All rights reserved.
Manufactured under license from Digital Theater
Systems. Inc. US Pat. No. 5,451,942 and other world-
wide patents issued and pending. ” DTS“ and ”DTS
Digital Surround“ are trademarks of Digital Theater
Systems, Inc. Copyright 1996 Digital Theater Systems,
Inc. All Rights Reserved.
PHONO GND.
SURROUND
SPEAKERS
R
L
EACH SPEAKER ≥ 6 Ω
CENTER
R L
FRONT
SPEAKERS
EACH SPEAKER ≥ 6 Ω
AM LOOP
VIDEO IN/OUT
DVD
IN
MON
OUT
VCR
SAT
IN
PRE-OUT
CINEMA
LINK
SUBWOOFER
S-VIDEO
DVD MON SAT
VCRVCR
IN
PLAY
OUT
REC
IN OUT
OPTICAL 1
IN
COAX
OUT
COAX 2
IN
R
L
SURR.
CENTER SUBW.
FRONT
6 CHANNEL /
DVD INPUT
OPTICAL 2
IN
COAX 1
IN
FM 75 Ω
ANTENNA
TO TV IN
TO VCR IN
TV
AUX
EXT 1 EXT 2 EXT 3
DVD PLAYER
VCR
TV
DIGIT
AL
OUT
CINEMA LINK
A
optional
(TV = CENTER)
DIGITAL
AUDIO
IN/OUT
PHONO VCRTV SAT CD CDR/TAPE
AUDIO IN/OUT
IN IN
IN
PLAY
OUT
REC
IN IN
IN
PLAY
OUT
REC
PRE-OUT
CENTER
CAUTION
RISK OF ELECTRIC SHOCK
DO NOT OPEN
AVIS
RISQUE DE CHOC ELECTRIQUE
NE PAS OUVRIR
Designed and developed by Philips in the European
Community.
Manufactured under license from DolbyLaboratories.
”DOLBY“, ”DOLBY DIGITAL“, ”PRO LOGIC“ and the
double-D Symbol are trademarks of Dolby
Laboratories. Confidential Unpublished Works.
©1992–1997 Dolby Laboratories. All rights reserved.
Manufactured under license from Digital Theater
Systems. Inc. US Pat. No. 5,451,942 and other world-
wide patents issued and pending. ”DTS“ and ”DTS
Digital Surround“ are trademarks of Digital Theater
Systems, Inc. Copyright 1996 Digital Theater Systems,
Inc. All Rights Reserved.
PHONO GND.
SURROUND
SPEAKERS
R
L
EACH SPEAKER ≥ 6 Ω
CENTER
R L
FRONT
SPEAKERS
EACH SPEAKER ≥ 6 Ω
AM LOOP
VIDEO IN/OUT
DVD
IN
MON
OUT
VCR
SAT
IN
PRE-OUT
CINEMA
LINK
SUBWOOFER
S-VIDEO
DVD MON SAT
VCR
VCR
IN
PLAY
OUT
REC
IN OUT
OPTICAL 1
IN
COAX
OUT
COAX 2
IN
R
L
SURR.
CENTER SUBW.
FRONT
6 CHANNEL /
DVD INPUT
OPTICAL 2
IN
COAX 1
IN
FM 75 Ω
ANTENNA
DVD PLAYER
MONITOR / TV
VIDEO IN
VIDEO OUT
VCR
SAT RECEIVER
Se il ricevitore e la vostra TV Philips (o meglio ancora in
aggiunta un VCR Philips o un DVD player) con Cinemalink
sono connessi al sistema di controllo CINEMA LINK vengono
offerti alcuni vantaggi extra:
– In seguito all’attivazione di una sorgente, il sistema si
commuta automaticamente su quell’entrata.
– Il sistema può essere controllato mediante schermo TV
nella lingua preferita, secondo la lingua della TV.
– La TV può funzionare come altoparlante centrale del
sistema, rendendo inutile l’uso di un altoparlante centrale
separato. (Il cavo A deve essere acquistato
separatamente.)
– Premendo il tasto di standby sul telecomando si posiziona
l’intero sistema in standby.

COLLEGAMENTI
122
La piastrina del modello si trova sul retro del ricevitore.
1 Controllare che la tensione di rete indicata sulla piastrina del
modello corrisponda alla tensione di rete locale. Se ciò non
dovesse essere, consultare il rivenditore o il centro assistenza.
2 Collegare il cavo di rete alla presa a muro.
Per scollegare completamente l’apparecchio dalla rete,
togliere la spina di rete dalla presa a parete.
Se l’alimentazione utilizzata per il ricevitore è molto alta, può
generare distorsioni, in grado di danneggiare gravemente gli
altoparlanti. In caso di distorsione, ridurre ad un livello sonoro
accettabile i comandi di tono e volume.
Per evitare il surriscaldamento l’apparecchio è dotato
di un circuito di sicurezza. Perciò, in condizioni
eccezionali, il vostro apparecchio può spegnersi.
Se questo accade, spegnete l’apparecchio, dangoli
il tempo di raffreddarsi prima di tornarlo a usare. Dopo
avere lasciato raffreddare l’apparecchio, accenderlo
nuovamente e selezionare la sorgente desiderata
ruotando SOURCE SELECT.
Alcuni collegamenti degli altoparlanti sul ricevitore sono
connettori a vite, mentre altri sono connettori sono con
inserimento a scatto. Essi devono essere utilizzati nel modo
indicato di seguito.
1 Collegare sempre il filo colorato (o contrassegnato) al
terminale colorato ed il filo nero (o non contrassegnato) al
terminale nero.
2 Collegare:
– Altoparlante anteriore sinistro a L (rosso e nero)
– Altoparlante anteriore destro a R (rosso e nero)
– Altoparlante centrale a CENTER (blu e nero)
– Altoparlante surround sinistro a SURROUND L (grigio e
nero)
– Altoparlante surround destro a SURROUND R (grigio e nero)
La TV Philips può essere utilizzata con CINEMA LINK come
altoparlante centrale. Per le TV dotate di presa scart, è
necessario un cavo audio aggiuntivo cinch-to-scart. Per le TV
dotate di prese cinch, sono necessari cavi cinch aggiuntivi.
Questi cavi devono esser collegati al connettore blu CENTER
PRE-OUT posto sul retro. Per maggiori informazioni sulle
modalità di utilizzo della TV come altoparlante centrale, fare
riferimento al manuale d’istruzioni dell’apparecchio.
Antenna AM (MW)
L’antenna a telaio in dotazione è destinata al solo uso interno.
Posizionare l’antenna alla massima distanza possibile da ricevitore,
TV, cavi, lettore DVD, VCR e da altre sorgenti di radiazioni.
1 Inserire la spina dell’antenna a telaio in AM LOOP nel modo
indicato di seguito.
2 Ruotare l’antenna sino ad ottenere la migliore ricezione.
Antenna FM
L’antenna metallica in dotazione può essere utilizzata solo per
ricevere stazioni vicine. Per una migliore ricezione,
consigliamo di utilizzare un’antenna a cavo o da esterni.
1 Inserire l’antenna metallica in dotazione in FM 75 Ω nel
modo indicato di seguito.
2 Ruotare l’antenna in diverse posizioni, sino ad ottenere la
migliore ricezione.
• Se si usa un’antenna a cavo o esterna, inserirne la spina in
FM 75 Ω, invece di collegare l’antenna metallica.
Il collegamento delle cuffie a PHONES disattiva gli
altoparlanti. Il ricevitore si posiziona su STEREO ed il suono
surround viene ridotto ad un segnale stereo riproducibile
mediante le cuffie standard.
Se si scollegano le cuffie, si riattivano gli altoparlanti. Per
riascoltare il suono in surround, riportare il ricevitore su
surround.
Cuffie
FM 75 Ω
FM 75 Ω
AM
LO
O
P
ANTENNA
Collegamenti dell’antenna
TV come altoparlante centrale
8 mm
1
2
3
1
2
3
7 mm
Collegamenti degli altoparlanti
Controllo dell‘alimentazione
Rete
Italiano

REGOLAZIONE DEL SISTEMA
123
Informazioni di carattere generale sul posizionamento
Evitare di posizionare gli altoparlanti in un angolo o sul
pavimento, per non potenziare troppo i toni bassi. La
collocazione degli altoparlanti dietro tende, mobili, ecc. ridurrà,
invece, la risposta dei toni acuti. L’ascoltatore dovrà sempre
«vedere» gli altoparlanti.
Ogni stanza presenta caratteristiche acustiche differenti, con
possibilità di sistemazione degli altoparlanti spesso limitate. La
migliore posizione di questi è indicata nella figura precedente.
Per ottenere un buon suono surround, consigliamo almeno
5 altoparlanti (2 anteriori, uno centrale, 2 surround). È anche
possibile riprodurre un tipo di suono surround utilizzando un
numero minore di altoparlanti e ridirigendo sugli altoparlanti
presenti i segnali previsti per quelli mancanti. Per informazioni
sulle modalità di impostazione corretta del ricevitore, in
relazione al numero ed alle dimensioni degli altoparlanti
utilizzati, vedere la sezione «Menu».
Posizionamento degli altoparlanti anteriori
Posizionare gli altoparlanti anteriori a sinistra e a destra di
fronte alla posizione di ascolto, come i normali altoparlanti
stereo.
Posizionamento dell’altoparlante centrale
Posizionare l’altoparlante centrale al centro tra i due anteriori,
ad es. sotto o sopra la TV. L’altezza ottimale per l’altoparlante
centrale è quella corrispondente alle orecchie dell’ascoltatore
(seduto).
Posizionamento degli altoparlanti surround
Gli altoparlanti surround devono essere posti uno di fronte
all’altro ed essere allineati con l’ascoltatore, o leggermente
dietro ad esso.
Posizionamento del subwoofer
Un subwoofer può essere utilizzato per migliorare notevolmente
la riproduzione dei toni bassi del sistema. Il subwoofer può
essere posizionato in un punto qualsiasi della stanza, poiché
non è possibile individuare la sorgente dei toni bassi. Tuttavia,
esso non dovrà essere collocato al centro della stanza, per non
indebolire notevolmente i bassi. Non poggiare oggetti al di
sopra di esso.
Regolare il volume relativo degli altoparlanti, in modo da ricevere
al meglio il suono surround. Per regolare il volume, porsi nella
posizione d’ascolto abituale. Per maggiori informazioni sulle
modalità di regolazione del ricevitore per gli altoparlanti utilizzati,
vedere la sezione «Menu del ricevitore». L’ideale è che il volume
nella posizione di ascolto sia uguale da tutti gli altoparlanti.
1 Premere POWER / STANDBY per accendere il ricevitore.
2 Premere TEST TONE sul telecomando.
ySi sente un tono di prova proveniente dai diversi
altoparlanti, eccetto il subwoofer.
3 Premere +/- REAR sul telecomando per aumentare/
diminuire il volume dell’altoparlante in funzione. I migliori
risultati si ottengono quando tutti gli altoparlanti hanno un
volume uguale nella posizione d’ascolto.
4 Premere TEST TONE sul telecomando.
yIl segnale acustico di test si arresta.
Nota: Se non si è del tutto soddisfatti delle regolazioni del
volume, consigliamo di eseguire ulteriori piccole modifiche
dello stesso durante la riproduzione del suono surround.
Una volta determinati il numero e la posizione degli altoparlanti, è
possibile regolare le impostazioni del ricevitore iniziale per creare
un eccezionale effetto surround, con l’installazione effettiva:
1 Stabilire quali altoparlanti sono stati collegati al ricevitore
(vedi „Struttura del menu/* SPEAKR SETUP”).
Nota: L’impostazione iniziale del ricevitore è:
due altoparlanti anteriori sinistro e destro: presenti
(non possono essere modificati)
altoparlante centrale: presente
due altoparlanti posteriori: presenti
altoparlante per toni bassi: presente
2 Selezionare la dimensione degli altoparlanti (SMALL o
LARGE) (vedi „Struttura del menu/*
SPEAKR SIZES
”).
Selezionare SMALL se l’altoparlante è in grado di
riprodurre toni bassi fino ad almeno 80–100 Hz. Selezionare
LARGE se l’altoparlante è in grado di riprodurre toni bassi
fino ad almeno 50 Hz. (Di norma, un altoparlante LARGE ha
un diametro del cono di almeno 12 cm (5 pollici).)
Consultare le schede tecniche degli altoparlanti.
Nota: FR 985, FR 986, FR 995, FR 996:
L´impostazione iniziale del ricevitore è:
tutti gli altoparlanti regolati su LARGE.
FR 984, FR 994: L´impostazione iniziale del ricevitore è:
tutti gli altoparlanti regolati su SMALL.
3 Impostare la distanza fra gli altoparlanti e la posizione
dell’ascoltatore (vedi „Struttura del menu/
* SPK DISTANCE”).
Regolazione del ricevitore
Regolazione e test degli altoparlanti
Posizionamento degli altoparlanti
SUBWOOFER
SURROUND
(REAR)
LEFT
LEFT
RIGHT
CENTER
FRONT
RIGHT
FRONT
SURROUND
(REAR)
Italiano

124
Italiano
DISPLAY
Il display del ricevitore si divide in 4 sezioni, da utilizzare
come segue:
Diagramma dell’altoparlante
Un rettangolo contenente una lettera indica che un altoparlante
è stato selezionato nel menu di installazione. Tuttavia,
l’indicatore del subwoofer si accende solo quando è disponibile
un segnale subwoofer. Se è indicata solo una lettera, questo
altoparlante non è utilizzato ed il suono è riprodotto dagli altri.
......suono surround virtuale
SURROUND.................riproduzione del suono surround
DIGITAL SURROUND ....riproduzione del suono surround digitale
L, R ...........................altoparlante anteriore sinistro e destro
C...............................altoparlante centrale
SL
, SR
.......................altoparlanti surround
SW............................il subwoofer
Indicazioni del menu
Questi indicatori segnalano se il menu è acceso o spento,
nonché la direzione in cui ci si può spostare.
MMEENNUU .......................il menu è acceso
1..............................per spostarsi indietro sull’elemento
precedente del menu, mediante
1 PREV. / EXIT (tasto «sinistra» del
telecomando)
3 .............................per spostarsi in alto in un elenco di
opzioni, mediante X MENU NAVIGATOR
(tasto «alto» del telecomando)
4 .............................per spostarsi in basso in un elenco di
opzioni, mediante X MENU NAVIGATOR
(tasto «basso» del telecomando)
2..............................per spostarsi in avanti sull’elemento
successivo del menu, mediante NEXT 2
(tasto «destra» del telecomando)
OOKK.............................per confermare il valore visualizzato
Indicatori luminosi di stato
Questi indicatori segnalano le diverse impostazioni e le
informazioni sullo stato del ricevitore.
PRESET......................il sintonizzatore è sintonizzato su una
stazione radio preimpostata
SENS HI.....................il sintonizzatore è regolato su alta
sensibilità
SENS LO..................il sintonizzatore è regolato su bassa
sensibilità
CCIINNEEMMAA LLIINNKK OONN ......CINEMA LINK è attivo
STEREO......................ricezione di una stazione FM in stereo
R.............................ricezione di una stazione RDS
EON...........................ricezione di una stazione RDS con EON
HALL..........................effetto HALL attivo
TA .............................funzione informazioni sul traffico RDS
attiva
NEWS........................funzione notiziario RDS attiva
ANA ..........................uso di entrata analogica per la sorgente
di riproduzione
NNIIGGHHTT .......................funzione NIGHT MODE attiva
COAX
1
......................uso dell’entrata digitale coassiale COAX 1
per la sorgente di riproduzione
COAX
2
.....................uso dell’entrata digitale coassiale COAX 2
per la sorgente di riproduzione
DDOOWWNNMMIIXX.................riduzione dei segnali multicanale in entrata
in un minore numero di segnali in uscita
(secondo il numero degli altoparlanti)
OPT...........................uso dell’entrata digitale ottica OPTICAL IN
per la sorgente di riproduzione
(solo per FR 984, FR 985, FR 986, FR 994).
OPT 1 ........................uso dell’entrata digitale ottica
OPTICAL 1 IN per la sorgente di
riproduzione (solo per FR 995, FR 996).
OPT 2 .......................uso dell’entrata digitale ottica
OPTICAL 2 IN per la sorgente di
riproduzione (solo per FR 995, FR 996).
LOUDNESS .................funzione LOUDNESS attiva
Area informativa
Quest’area viene utilizzata per informazioni su ricevitore,
frequenze del sintonizzatore, opzioni di menu, valori e per lo
scorrimento dei messaggi di testo.
AA
TV
Ç
É
MENU
OK
GUIDE
NEWS/TA
0
Display

125
Italiano
MENU
Il ricevitore è dotato di un sistema di menu, che viene utilizzato
per impostare il ricevitore. Le diverse opzioni di menu sono
correlate le une alle altre secondo un procedimento logico.
Supponiamo che non vi sia alcun altoparlante centrale collegato
e che, pertanto, CENTER SPEAKR (altoparlante centrale) sia
impostato su NO (no). Se si cerca di utilizzare VOL CENTER
(volume centrare), appare un messaggio che informa l’utente che
questa operazione non è possibile (INSTALL CENTER
SPEAKER - installare altoparlante centrale).
Il menu opera sempre allo stesso modo. Le frecce visualizzate
sul display indicano le direzioni di spostamento possibili.
1 Premere SETUP MENU.
yMENU, ed * EFFECTS vengono visualizzati.
• Si può abbandonare il menu in qualsiasi momento,
premendo SETUP MENU.
2 Ruotare X MENU NAVIGATOR sino a visualizzare l’opzione
(o il valore) desiderato.
3 Premere NEXT 2 per selezionare l’opzione visualizzata (o
ENTER / OK per confermare un valore).
• Si può abbandonare un’opzione (lasciandone invariati i
valori) premendo 1 PREV. / EXIT.
Struttura del menu
* EFFECTS (effetti)
Attiva gli effetti sonori.
VIRT SURR
surround virtuale: 0…100 %
* VOL BALANCE (bilanciare il volume)
Regola l’equilibrio di volume relativo tra gli altoparlanti collegati.
TEST TONE
Rivelatore acustico di test: on/off (attivato/disattivato)
VOL FRONT-L
Volume altoparlante anteriore sinistro: –50…+50
VOL FRONT-R
Volume altoparlante anteriore destro: –50…+50
VOL CENTER
Volume altoparlante centrale: –50…+50
VOL REAR-L
Volume altoparlante posteriore sinistro: –50…+50
VOL REAR-R
Volume altoparlante posteriore destro: –50…+50
VOL SUBWOOFER
Volume subwoofer: –50…+50
Nota: Quando si usa l’ingresso 6 CHANNEL / DVD INPUT,
i valori in basso non possono essere variati.
* SPEAKR SETUP (regolazione altoparlanti)
Seleziona gli altoparlanti utilizzati.
SUBW PRESENT
Subwoofer presente: yes/no (si/no)
CENTER SPEAKR
Altoparlante centrale presente: yes/no (si/no)
REAR SPEAKER
Altoparlanti posteriori presenti: yes/no (si/no)
* SPEAKR SIZES (dimensioni degli altoparlanti)
Seleziona le dimensioni degli altoparlanti utilizzati, per generare
una riproduzione sonora ottimale. LARGE indica un altoparlante
può riprodurre frequenza inferiori a 50 Hz. Se SUBW
PRESENT è impostato a NO, FRONT SIZE può essere
impostato solo a LARGE. Se FRONT SIZE viene impostato a
SMALL, CENTER SIZE può essere impostato solo a SMALL
e di conseguenza deve essere collegato un subwoofer.
FRONT SIZE
Altoparlanti anteriori sinistro e destro: small/large
(piccoli/grandi)
CENTER SIZE
Altoparlante centrale: small/large (piccolo/grande)
REAR SIZE
Altoparlanti posteriori: small/large (piccoli/grandi)
* SPK DISTANCE (distanza degli altoparlanti)
La distanza fra la posizione di ascolto abituale e gli alto-
parlanti. Definisce il tempo di ritardo per il suono surround.
DISTANCE L/R
Distanza dagli altoparlanti anteriori: 1…10 m
DISTANCE CNTR
Distanza dall’altoparlante centrale: 1…10 m
DISTANCE REAR
Distanza dagli altoparlanti posteriori: 1…10 m
Menu del ricevitore

126
Italiano
MENUS
* SELECT INPUT (selezione ingresso)
Assegna i connettori di entrata audio alle diverse selezioni
di sorgente selezionate con SOURCE SELECT (per maggiori
informazioni, vedere «SELEZIONE SORGENTE»).
COAX1
Entrata digitale coassiale 1, COAX 1 IN
COAX2
Entrata digitale coassiale 2, COAX 2 IN
OPT (solo per FR 984, FR 985, FR 986, FR 994)
Entrata digitale ottica, OPTICAL IN
OPT 1 (solo per FR 995, FR 996)
Entrata digitale ottica, OPTICAL 1 IN
OPT 2 (solo per FR 995, FR 996)
Entrata digitale ottica, OPTICAL 2 IN
SAT IN
Entrata audio analogica SAT IN
VCR IN
Entrata audio analogica VCR IN
TV IN
Entrata audio analogica TV IN
CDR IN
Entrata audio analogica CDR IN
CD IN
Entrata audio analogica CD IN
6 CH IN
Ingresso audio analogico 6 CHANNEL / DVD INPUT
* TUNER (sintonizzatore)
Regolazione delle stazioni radio preimpostate (per
maggiori informazioni, vedere «SINTONIZZATORE»).
AUTO INSTALL
Memorizza automaticamente le stazioni radio
MAN INSTALL
Consente di assegnare dei nomi alle stazioni radio memorizzate
GIVE NAME
Consente di assegnare dei nomi alle stazioni radio memorizzate
RESHUFFLE
Riseleziona le stazioni radio memorizzate
Se il ricevitore è collegato ad una TV Philips CINEMA LINK
tramite le prese bus di controllo del sistema CINEMA LINK
(vedere «COLLEGAMENTI»), si può utilizzare la TV per
impostare il sistema. In questo caso, il menu della TV
comprende un’opzione denominata RECEIVER.
Se l’opzione CINEMA LINK è attiva, sullo schermo della TV
appaiono per pochi secondi le impostazioni del ricevitore. Per
maggiori informazioni sull’utilizzo del menu della TV,
consultare il manuale di istruzioni dell’apparecchio. Le opzioni
offerte possono variare secondo il tipo di modello della TV.
Attivazione del collegamento
• Premere CINEMA LINK per attivare e disattivare il
collegamento tra il ricevitore e la TV.
ySe il collegamento è attivato, è visualizzato
CINEMA LINK ON.
Nota: Consigliamo di disattivare CINEMA LINK durante la
registrazione, per evitare interruzioni indesiderate
dovute all’attivazione delle funzioni della TV.
Se l’opzione CINEMA LINK ed il menu della TV sono attivi,
viene visualizzato TV MENU ed il menu e le funzioni sonore
del ricevitore sono bloccati.
• Premere
CINEMA GO
sul telecomando
.
yLa TV invia un comando di riproduzione al lettore DVD di
CINEMA LINK, se presente. Il lettore DVD comincerà la
riproduzione e il ricevitore passerà automaticamente al
migliore suono di CINEMA LINK.
• Se non è collegato nessun lettore DVD o se non è stato
caricato nessun disco nel lettore DVD, la TV invierà un
comando di riproduzione al videoregistratore di CINEMA
LINK, se presente.
yIl videoregistratore comincerà la riproduzione e il ricevitore
audio selezionerà il miglior suono di CINEMA LINK.
• Se non è collegato nessun videoregistratore o se non è
stata caricata nessuna cassetta, la TV selezionerà l’ultimo
canale TV guardato.
Attivazione di CINEMA LINK
Menu della TV

127
Italiano
SELEZIONE SORGENTE
Quando si seleziona una sorgente ruotando SOURCE SELECT, si
attivano le entrate audio e video con il nome corrispondente.
Il segnale in entrata viene riprodotto da tutte le uscite audio e
video - se la sorgente include un segnale video - del ricevitore.
La selezione di una sorgente può essere riassegnata ad entrate
standard diverse da queste.
Sorgente selezionata
......
Connettori utilizzati
DVD.................................Entrata audio digitale COAX 1 e
entrata video DVD IN
PHONO............................Entrata audio PHONO IN
TUNER.............................Se si utilizza la parte sintonizzatore
del ricevitore, vengono disattivate
tutte le entrate.
CD....................................Entrata audio CD IN
CDR/TAPE........................Entrata audio CDR/TAPE IN
TV....................................Entrata audio TV IN e
nessuna entrata video
VCR..................................Entrata audio VCR IN e
entrata video VCR IN
SAT..................................Entrata audio SAT IN e
entrata video SAT IN
I connettori 6 CHANNEL / DVD INPUT possono essere
assegnati a tutte le sorgenti disponibili (fatta eccezione per
TUNER e PHONO). L’assegnazione può essere effettuata
attraverso l’opzione del menu * SELECT INPUT. Vedi
sotto per maggiori dettagli.
Se si seleziona una sorgente mediante SOURCE SELECT, si
utilizza l’entrata audio standard. Per cambiarla, riassegnare
ad un’altra entrata audio la selezione della sorgente.
Esempio: Riassegnazione di CD dall’entrata audio analogica
CD IN all’entrata audio digitale COAX 2 IN.
1
Selezionare * SELECT INPUT dal menu e premere NEXT 2.
2 Ruotare SOURCE SELECT per selezionare la sorgente che si
desidera riassegnare (ad es. CD).
yIl nome della sorgente viene visualizzato e l’indicatore
luminoso della sorgente lampeggia.
3 Ruotare X MENU NAVIGATOR per selezionare i connettori
di entrata da utilizzare (ad es. CD -> COAX2).
4 Premere ENTER / OK per confermare la selezione.
ySTORED appare brevemente.
5 La sorgente selezionata usa ora l’entrata audio scelta (ad
es. CD usa i connettori di entrata COAX 2 IN, COAX 2 si
illumina in seguito all’attivazione di CD).
Ad una selezione si possono assegnare più sorgenti. Ciò è
utile se i prodotti sono collegati in catena, uno dopo l’altro.
Esempio: Un VCR è collegato alla TV, ma solo la TV è
collegata al ricevitore. Entrambe le impostazioni
SOURCE SELECT, della TV come del VCR, devono
utilizzare i connettori di entrata della TV.
1 Selezionare * SELECT INPUT dal menu e premere
NEXT 2.
2 Ruotare SOURCE SELECT per selezionare la sorgente che si
desidera riassegnare (ad es. VCR).
yIl nome della sorgente viene visualizzato e l’indicatore
luminoso della sorgente lampeggia.
3 Ruotare X MENU NAVIGATOR per selezionare i connettori
di entrata da utilizzare (ad es. VCR -> TV IN).
4 Premere ENTER / OK per confermare la selezione.
ySTORED appare brevemente.
5 La sorgente selezionata usa ora l’entrata audio scelta (ad
es. VCR usa i connettori di entrata TV IN, VCR <TV IN>
si illumina brevemente in seguito all’attivazione di VCR).
Il 6 CHANNEL / DVD INPUT può essere utilizzato per connettere
un dispositivo con un decoder multicanale incorporato (per
esempio il Dolby Digital, il DTS. ecc.) e un connettore in uscita
a 6 canali cioè un DVD/SACD player high end.
Se si utilizza l’entrata audio 6 CHANNEL / DVD INPUT, il
ricevitore opera come un amplificatore multicanale. La sorgente
riproduce il suono surround e lo invia al ricevitore diviso nei
canali necessari. Pertanto, il pulsante SURROUND ON/OFF,
HALL e SURR. MODE non ha alcun effetto, perché il segnale
emesso è già multicanale.
Da una sorgente collegata all’entrata audio 6 CHANNEL /DVD IN
non è possibile registrare.
Informazioni su 6 CHANNEL-DVD/SACD INPUT
Uso di una selezione di sorgente per due o
più apparecchi
Riassegnazione della selezione di una sorgente
Selezione 6 CHANNEL-DVD/SACD INPUT
SOURCE SELECT

128
Italiano
RIPRODUZIONE, REGISTRAZIONE
1 Premere POWER / STANDBY per attivare il ricevitore.
2 Ruotare SOURCE SELECT per selezionare una sorgente.
yIl nome della sorgente viene visualizzato.
• Si può selezionare l’entrata FRONT AV / GAME se si preme
FRONT AV (solo per FR 995, FR 996).
3 Avviare la lettura della sorgente secondo il procedimento
abituale.
• Ruotare VOLUME per regolare volume.
yVOLUME ed il livello del volume compreso fra 0 e 50
vengono visualizzati.
1 Premere BASS o TREBLE.
yBASS o TREBLE ed il valore effettivo vengono
visualizzati brevemente. Scorre, quindi, TURN VOLUME
KNOB TO CHANGE.
2 Ruotare VOLUME per regolare i toni bassi o acuti.
yBASS o TREBLE ed il valore effettivo vengono
visualizzati.
Nota: Se non si ruota VOLUME per 5 secondi e non si utilizza
un altro comando, la regolazione dei toni bassi o acuti
viene disattivata.
• Se è connesso un altoparlante dei bassi, premere SUBW.
ON/OFF per aumentare la resa dei bassi.
Nota: Nel caso del suono sourround digitale, un segnale dei
bassi sarà disponibile solo se supportato dal materiale
d’origine.
• Premere LOUDNESS per attivare o disattivare il livello sonoro.
yLOUDNESS viene visualizzato se il livello sonoro è attivo.
Per registrare da una sorgente, è necessario selezionarla
mediante SOURCE SELECT. Il segnale in entrata viene
riprodotto da tutte le uscite audio e video - se la sorgente
include un segnale video - del ricevitore. Le impostazioni
sonore non interessano la registrazione.
1 Ruotare SOURCE SELECT (o premere FRONT AV – solo per
FR 995, FR 996) per selezionare la sorgente da cui si
desidera registrare.
yViene visualizzato il nome della sorgente.
2 Preparare l’apparecchio desiderato per la registrazione e
collegarlo ad una delle uscite del ricevitore.
3 Avviare la registrazione sull’apparecchio.
4 Avviare la lettura della sorgente secondo il procedimento
abituale.
Note: – Il segnale audio e video di VCR IN non è riprodotto
mediante VCR OUT. Lo stesso vale per il segnale
audio di CDR/TAPE IN su CDR/TAPE OUT.
– Raccomandiamo di non usare l’uscita digitale
COAX OUT del ricevitore per registrare da una sorgente
analogica. Usare, invece, l’uscita analogica CDR/TAPE.
– Da una sorgente collegata all’entrata audio
6 CHANNEL / DVD INPUT non è possibile registrare.
Si può collegare un registratore digitale all’uscita digitale del
ricevitore. In questo modo, tutti i segnali provenienti dagli
ingressi digitali possono essere registrati direttamente sul
registratore audio. Il ricevitore convertirà anche tutti i segnali
provenienti dagli ingressi analogici a uscite digitali.
Il ricevitore può essere usato per registrare digitalmente un
segnale suono audio di surround multicanale (Dolby Digital,
DTS o MPEG) da, ad esempio, DVD a CD-R. Il ricevitore
convertirà il segnale digitale multicanale in segnale stereo
senza perdita di rilevanti informazioni del suono.
Note: – Quando si registra un segnale Dolby Digital, DTS o
MPEG ogni traccia deve essere registrata
individualmente.
– La registrazione digitale non è possibile quando il
materiale originario digitale è protetto.
Registrazione dalla uscita digitale
Registrazione da una sorgente
Regolazione del suono
Riproduzione di una sorgente

129
Italiano
SUONO SURROUND
Il suono surround genera all’ascolto una sensazione
completamente nuova. Si ha, infatti, la sensazione di essere al
centro dell’azione, perché il suono arriva da tutti i punti intorno
a sé. Ricercate le trasmissioni TV, audio e video cassette e
dischi contraddistinti dai simboli 3, 1, o
, che rappresentano il suono surround
multicanale. Per ottenere il meglio dal vostro ricevitore è
preferibile il Dolby Digital, il DTS o il MPEG.
Il vostro ricevitore è in grado di riprodurre il suono DTS
surround. Il DTS è un sistema sofisticato di suono surround
multicanale disponibile su dischi DVD, su dischi laser e su
dischi audio. Consultate il vostro rivenditore per la
disponibilità del software DTS nella vostra regione.
Tenere presente che i dischi DVD non producono sempre un
surround multicanale completo. Consultare il rivenditore
autorizzato, per essere certi che un disco abbia la codifica
multicanale.
La maggior parte dei dischi e delle cassette stereo più comuni
può essere riprodotta con buoni risultati mediante le
impostazioni sonore surround. Se la riproduzione è distorta in
modo surround, passare al normale modo stereo.
La disponibilità dei diversi modi sonori surround descritti
dipende dal numero di altoparlanti utilizzati e dalle
informazioni sonore in entrata.
Se il suono surround è attivo, è possibile commutarsi tra i
diversi modi surround. Notare che le possibilità dipendono dalle
impostazioni degli altoparlanti definite nel menu del ricevitore.
Se si rileva un segnale digitale di surround il ricevitore
seleziona il DOLBY DIGITAL o il DTS o il MPEG.
1 Premere SURROUND ON/OFF per attivare il suono surround.
yViene eseguito lo scorrimento del modo surround in uso.
2 Premere ripetutamente SURR. MODE per ascoltare i diversi
modi surround (se disponibili).
yVengono selezionati il modo selezionato e gli
altoparlanti utilizzati. Se i segnali multicanali in entrata
si riducono in un numero inferiore di segnali in uscita,
viene visualizzato DOWNMIX.
3 Premere VIRTUAL MODE un numero di volte necessario per
spostarvi sulle diverse tipologie virtuali del suono surround:
1 volta per attivare 3D SURROUND
2 volta per attivare MULTI FRONT
3 volta per attivare MULTI REAR
4 volta per attivare NATURAL SURROUND
yUna spia indica se è attivato un suono surround virtuale.
Questo simbolo indica quale tipologia di suono
surround virtuale è attivata.
4 Premere SURROUND ON/OFF per disattivare il suono
surround.
ySURROUND OFF scorre sul display.
Attivazione del suono surround
Informazioni sul suono surround

SUONO SURROUND
130
HALL
La riproduzione sonora è potenziata e viene aggiunta una
leggera eco, per dare l’impressione a chi ascolta di trovarsi in
un ambiente spazioso. Può essere usato solo in modo stereo.
SURROUND
Il modo surround consente la normale riproduzione sonora in
modo surround con 4 o 5 altoparlanti. A seconda del
materiale d’origine viene riprodotto il Dolby Surround Pro
Logic, il Dolby Digital il DTS o il MPEG.
PRO LOGIC, DOLBY DIGITAL, DTS, MPEG
In aggiunta a SURROUND, viene visualizzato anche il modo
surround utilizzato – a seconda del materiale sorgente. Nel
caso di surround digitale verrà segnalato sul display il
formato sound AC-3 (per il Dolby Digital) , il DTS o il MPEG
(per MPEG 2 Multichannel) seguiti dai canali di sound
disponibili nella sorgente (ad esempio DVD).
Esempio: AC-3 3/2.1 Dolby Digital, 3 canali frontali,
2 canali surround ed un canale
subwoofer.
MPEG 2/0.0 MPEG Multicanale, solo suono
stereo.
AC-3 3/1.0 Dolby Digital, 3 canali frontali,
1 canale (mono) surround senza
segnale subwoofer.
DTS 3/2.1 DTS, 3 canali frontali, 2 canali
surround ed un canale subwoofer.
FRONT-3 STEREO
Il suono surround sound viene messo in sordina. 3 Stereo consente
l’ascolto del suono surround senza usare gli altoparlanti surround.
STEREO
Tutto il suono viene riprodotto ed emesso attraverso gli
altoparlanti anteriori destro e sinistro, per abilitare la
riproduzione stereo standard.
Surround virtuale
Il vostro ricevitore è in grado di riprodurre una o più forme di
suono surround virtuale. Il surround virtuale produce
un’impressione di suono realistico creando degli altoparlanti
fantasma in aggiunta o in sostituzione degli altoparlanti reali.
La posizione dell’ascoltatore influenza l’effetto del surround.
L’area nella quale l’effetto è migliore è segnalata in grigio.
Il livello dell’effetto del suono surround virtuale può essere
regolato nel menu. Sono disponibili le seguenti tipologie di
suono surround:
3D SURROUND
Non c’è bisogno di altoparlanti posteriori. Il suono del canale
posteriore è simulato dagli altoparlanti anteriori. Il suono
surround è simulato dagli altoparlanti anteriori di sinistra,
destra e centrali.
MULTI FRONT
Vengono creati degli altoparlanti fantasma vicino agli
altoparlanti anteriori di destra e di sinistra.
MULTI REAR
Vengono creati degli altoparlanti fantasma vicino agli
altoparlanti posteriori di destra e di sinistra.
NATURAL SURROUND
Vengono creati degli altoparlanti fantasma vicino agli
altoparlanti anteriori e posteriori di destra e di sinistra.
Nota: La disponibilità del MULTI FRONT e MULTI REAR
dipende dai canali del suono sul materiale d’origine.
NIGHT MODE (solo sul telecomando)
I suoni alti vengono abbassati, mentre i passaggi con effetto
sonoro basso vengono potenziati. Si può ascoltare il suono in
modo surround, senza disturbare i vicini o i bambini addormentati.
La riproduzione in modo notte è possibile solo con Dolby Digital e
MPEG ed è supportata solo dal materiale sorgente.
LEFT
CENTER
FRONT
RIGHT
FRONT
Regolazione del suono surround
Italiano

131
Italiano
SINTONIZZATORE
Si possono ricercare le stazioni radio eseguendo una
scansione della gamma delle frequenze. È anche possibile
immettere la frequenza di una stazione radio conosciuta. Se
una stazione FM viene trasmessa e ricevuta in stereofonia,
viene visualizzato STEREO.
Ricerca delle stazioni radio
1 Ruotare SOURCE SELECT per selezionare il sintonizzatore.
yTUNER viene visualizzato.
2 Selezionare una gamma di lunghezze d’onda, premendo
ripetutamente TUNER AM/FM.
yViene visualizzata la gamma delle lunghezze d’onda
selezionata.
3 Tenere premuto 1 o 2 per circa 1 secondo.
ySEARCH viene visualizzato ed il sintonizzatore si
sintonizza su una stazione sufficientemente potente.
4 Ripetere questa procedura sino ad individuare la stazione
desiderata.
• Per sintonizzarsi su un trasmettitore debole, premere
brevemente 1 o 2, tante volte quante sono necessarie per
ottenere un’ottima ricezione.
Sintonizzazione su una stazione radio in base alla
frequenza (solo con il telecomando)
1 Premere TUNER.
yTUNER viene visualizzato.
2 Premere FR. D..
y_ viene visualizzato.
3 Usare i tasti da 1 a 0, per immettere la frequenza di una
stazione radio.
Nota: Si possono immettere solo numeri validi, compresi
nella gamma delle frequenze del sintonizzatore.
È possibile commutare il sintonizzatore su una sensibilità di
ricerca minore, in modo da ricercare solo le stazioni con un
forte segnale (solo per FM).
1 Ruotare SOURCE SELECT per selezionare il sintonizzatore.
yTUNER viene visualizzato.
2 Premere SENS. sul ricevitore.
ySENS HI o SENS LO appare per 5 secondi.
Nota: Durante la ricerca delle stazioni radio, viene visualizzata
la sensibilità effettiva. In questo caso,
SENS LO significa
che il sintonizzatore sta ricercando solo le stazioni radio
con un forte segnale.
Si possono inserire in memoria 30 stazioni radio. Il ricevitore
può selezionare e programmare da solo le stazioni radio, o
queste possono essere scelte dall’utente.
Programmazione automatica
1 Scegliere * TUNER dal menu e premere NEXT 2.
2 Scegliere AUTO INSTALL e premere NEXT 2.
yVengono visualizzati il numero preimpostato di inizio
della programmazione, la gamma delle lunghezze
d’onda e AUTO.
3 Ruotare TUNER PRESET X per cambiare il numero
preimpostato di inizio della programmazione.
4 Usare TUNER AM/FM per portarsi sulla gamma delle
lunghezze d’onda.
5 Premere ENTER / OK per avviare la programmazione.
yAUTO INSTALL lampeggia e tutte le stazioni radio
disponibili vengono programmate. Il procedimento può
durare pochi minuti e AUTO INSTALL smette di
lampeggiare al termine dello stesso.
Programmazione manuale
1 Scegliere * TUNER dal menu e premere NEXT 2.
2 Scegliere MAN INSTALL e premere NEXT 2.
yVengono visualizzati un numero preimpostato, la gamma
delle lunghezze d’onda e la frequenza.
3 Ruotare TUNER PRESET X per cambiare un numero
preimpostato, in cui memorizzare la stazione radio.
4 Sintonizzarsi sulla stazione radio desiderata (vedere
«Ricerca delle stazioni radio»).
5 Premere ENTER / OK per confermare la selezione.
ySTORED viene visualizzato brevemente. La stazione
radio viene programmata sul numero preimpostato
selezionato.
6 Selezionare e memorizzare tutte le stazioni radio desiderate
secondo questo procedimento.
Memorizzazione delle stazioni radio
Attivazione della sensibilità FM
Sintonizzazione sulle stazioni radio

132
Italiano
SINTONIZZATORE
1 Ruotare SOURCE SELECT su TUNER per selezionare il
sintonizzatore.
yTUNER viene visualizzato.
2 Ruotare TUNER PRESET X per selezionare una stazione
radio preimpostata.
yPRESET, il numero preimpostato e la stazione vengono
visualizzati.
Dopo aver programmato le stazioni radio, è possibile
cambiarne la sequenza. RESHUFFLE consente di cambiare
le posizioni dei valori preimpostati.
1 Scegliere * TUNER dal menu e premere NEXT 2.
2 Scegliere RESHUFFLE e premere NEXT 2.
yPRESET, il numero preimpostato e la stazione vengono
visualizzati.
3 Ruotare TUNER PRESET X per selezionare una stazione
preimpostata.
4 Premere ENTER / OK per confermare la selezione.
yIl numero preimpostato selezionato SWAP <-> ed un
secondo numero preimpostato vengono visualizzati.
5 Ruotare TUNER PRESET X per selezionare l’altra stazione
preimpostata.
6 Premere ENTER / OK per confermare il cambio.
yRESHUFFLED viene visualizzato brevemente ed i due
numeri preselezionati vengono cambiati.
Si può assegnare un nome ad una qualsiasi stazione radio
preimpostata. Inoltre, si possono sovrascrivere i nomi delle
stazioni RDS.
1 Scegliere * TUNER dal menu, quindi premere NEXT 2.
2 Scegliere GIVE NAME (indica nome), quindi premere
NEXT 2.
yViene visualizzata una stazione radio preimpostata.
3 Ruotare TUNER PRESET X per selezionare la stazione radio
da ridenominare.
4 Premere ENTER / OK per confermare la scelta.
yViene visualizzato il nome esistente o ________.
5 Ruotare TUNER PRESET X per selezionare una lettera e
NEXT 2 o 1 PREV. per portarsi sulla posizione precedente o
su quella successiva.
6 Dopo avere immesso il nome completo, premere ENTER / OK
per confermare.
ySTORED viene visualizzato ed il nome viene memorizzato.
Nota: Per utilizzare nuovamente il nome della stazione RDS
trasmessa, è sufficiente cancellare il nome indicato.
1
Usare l’opzione di menu * TUNER e scegliere GIVE NAME.
yViene visualizzata una stazione radio preimpostata.
2 Ruotare X MENU NAVIGATOR per selezionare il nome da
cancellare.
3 Premere ENTER / OK per confermare la scelta.
4 Premere 1 PREV. mentre la prima lettera lampeggia.
y CL lampeggia alla sinistra del nome della stazione.
5 Premere ENTER / OK per cancellare il nome della stazione.
Oppure, se si è cambiata idea,
premere 1 PREV. per lasciare invariato il nome della stazione.
Cancellazione dei nomi delle stazioni
Denominazione delle stazioni radio
Riordinamento delle stazioni radio memorizzate
Sintonizzazione sulle stazioni radio memorizzate

SINTONIZZATORE
133
Radio Data System è un servizio che consente alle stazioni
FM di inviare informazioni aggiuntive. Se si riceve una
stazione RDS, vengono visualizzati R ed il nome della
stazione.
Spostamento attraverso le diverse informazioni RDS
• Premere ripetutamente RADIO TEXT sul ricevitore, per
spostarsi attraverso le seguenti informazioni (se
disponibili):
– Messaggi di testo della radio
– Orologio RDS
– Frequenza
– Nome della stazione
Nota: Il segnale orario trasmesso da alcune stazioni RDS
potrebbe non essere sempre accurato.
È possibile impostare il sintonizzatore in modo che qualsiasi
riproduzione venga interrotta dal notiziario o dalle
informazioni sul traffico di una stazione RDS selezionata. La
funzione di Informazioni è attiva solo se vengono trasmessi i
segnali RDS necessari.
Se le stazioni RDS supportano anche un segnale EON
(Enhanced Other Networks), viene visualizzato EON. Questo
segnale abilita il sintonizzatore ad eseguire una ricerca non
solo nella stazione RDS selezionata, ma in tutta la rete di
stazioni EON, per individuare il notiziario e le informazioni sul
traffico.
1 Sintonizzarsi sulla stazione RDS desiderata.
2 Premere NEWS/TA:
Una volta per visualizzare NEWS ed attivare la funzione
notiziario.
Due volte per visualizzare TA ed attivare la funzione
informazioni sul traffico.
Tre volte per visualizzare TA e NEWS ed attivare entrambe
le funzioni.
3 Selezionare e riprodurre qualsiasi altra sorgente secondo il
procedimento abituale.
y Durante la trasmissione del notiziario o delle
informazioni sul traffico, il ricevitore si mette in modo
sintonizzatore e NEWS o TA lampeggia.
4 Premere NEWS/TA sino a quando l’indicazione del display
scompare e si disattivano le funzioni.
oppure
Premere NEWS/TA durante un annuncio, per disattivare le
funzioni.
Nota: Verificare di avere disattivato le funzioni notiziario ed
informazioni sul traffico durante la registrazione; in
caso contrario, i relativi annunci verranno registrati.
Notiziario RDS ed Informazioni sul trafficoRDS R
Italiano

134
Italiano
DATI TECNICI
Soggetto a variazioni senza preavviso.
Informazioni generali
Consumo di potenza (FR 984, FR 985, FR 986)................210 W
Consumo di potenza (FR 994, FR 995, FR 996)................255 W
Consumo di potenza in modo standby.............................< 2 W
Dimensioni, l × a × p...............................435 × 135 × 350 mm
Peso (FR 984, FR 985, FR 986)..........................................8,6 kg
Peso (FR 994, FR 995, FR 996)..........................................9,4 kg
Amplificatore (0,7 % THD, 6 Ω, 1 kHz)
Potenza di uscita, modo stereo
(FR 984, FR 985, FR 986) (DIN)....................................2 × 60 W
Potenza di uscita, modo surround (FR 984, FR 985, FR 986)
Anteriore...............................................................2 × 60 W
Centro..........................................................................60 W
Surround................................................................2 × 60 W
Potenza di uscita, modo stereo
(FR 994, FR 995, FR 996) (DIN)..................................2 × 100 W
Potenza di uscita, modo surround (FR 994, FR 995, FR 996)
Anteriore.............................................................2 × 100 W
Centro........................................................................100 W
Surround..............................................................2 × 100 W
Bassi...................................................................±9 dB a 100 Hz
Acuti...................................................................±9 dB a 10 kHz
Emissione sonora
...
+6 dB a 100 Hz (-30 dB); +3 dB a 10 kHz (-30 dB)
Distorsione armonica totale......................0,05 % a 1 kHz, 5 W
Risposta in frequenza...............................20–20.000 Hz, ±1 dB
Rapporto S/N.................................................................≥ 82 dB
Separazione stereo (1kHz).............................................≥ 45 dB
Diafonia (1 kHz)........................................................... ≤ -65 dB
Entrate
Entrate lineari.....................................................250 mV/47 kΩ
6 CH....................................................................250 mV/40 kΩ
Front AV (solo per FR 995, FR 996).....................250 mV/22 kΩ
Phono......................................................................5 mV/47 kΩ
Digitale coassiale........................................75 Ω conf. IEC 958
Digitale ottica..................................................................Toslink
Frequenza di campionamento digitale
(FR 984, FR 985, FR 986)......................32 kHz, 44,1 kHz, 48 kHz
Frequenza di campionamento digitale
(FR 994, FR 995, FR 996)........32 kHz, 44,1 kHz, 48 kHz, 96 kHz
Uscite
Prese di alimentazione AC (collegato)........mass. 100 W totali
Uscite lineari.........................................................250 mV/1 kΩ
Digitale coassiale .......................................75 Ω conf. IEC 958
Frequenze tipo dell’uscita digitale
Analogico in........................................................out 48 kHz
Digitale in 32 kHz................................................out 32 kHz
Digitale in 44,1 kHz..........................................out 44,1 kHz
Digitale in 48 kHz................................................out 48 kHz
Digitale in 96 kHz
(solo per FR 994, FR 995, FR 996).......................out 48 kHz
Subwoofer pre-out....................................................0,8 V/1 kΩ
Centro pre-out...........................................................0,8 V/1 kΩ
Cuffie..............................................8–600 Ω (3 V f.m.e., 60 Ω)
Altoparlanti.......................................................................≥ 6 Ω
Sintonizzatore
Gamma delle lunghezza d’onda
FM..............................................................87,5–108,0 MHz
MW...............................................................531–1.602 kHz
LW....................................................................153–279 kHz
Sensibilità
Stereo FM..................................................................41 dBf
Mono FM....................................................................15 dBf
Distorsione armonica totale
Stereo FM...................................................................0,3 %
Mono FM...................................................................0,85 %
Risposta in frequenza................................63–12.500 Hz ±1 dB
Rapporto S/N
Stereo FM....................................................................55 dB
Mono FM.....................................................................60 dB
Separazione dei canali.........................................35 dB a 1 kHz
Ricevitore

135
INDIVIDUAZIONE DEI MALFUNZIONAMENTI
PROBLEMA POSSIBILE CAUSA SOLUZIONE
L’apparecchio non funziona Si è attivato il circuito di sicurezza per Spegnere l’apparecchio e farlo raffreddare. Dopo
ed è in modalità standby surriscaldamento. averlo fatto raffreddare, accenderlo nuovamente
e selezionare una sorgente ruotando
SOURCE SELECT o premendo il tasto relativo
a una sorgente sul telecomando.
Nessun suono Il VOLUME non è regolato correttamente. Regolare il VOLUME.
Sono collegate le cuffie. Scollegare le cuffie.
È stata selezionata la sorgente sbagliata. Ruotare SOURCE SELECT per selezionare la
sorgente corretta.
Nessun suono dal lato Un altoparlante è collegato male. Collegare bene l’altoparlante.
destro o sinistro
Il cavo di un altoparlante è danneggiato. Sostituire il cavo.
L’equilibrio del volume nel menu del Regolare VOL FRONT-L e VOL FRONT-R
ricevitore è regolato male. nel menu del ricevitore.
Suono scadente o nessun Il modo SURROUND non è attivato. Premere SURROUND ON/OFF per attivare il
suono dagli altoparlanti modo surround.
surround o centrale.
Gli altoparlanti surround e/o quello centrale Collegare bene gli altoparlanti.
non sono collegati (bene).
Gli altoparlanti surround e/o centrale sono Selezionare YES per attivare gli altoparlanti.
disattivati in menu SPEAKR SETUP.
Il cavo di un altoparlante è danneggiato. Sostituire il cavo.
Suono basso scadente Gli altoparlanti non sono in fase. Collegare i fili colorati (o contrassegnati) ai
terminali colorati ed i fili neri (o non
contrassegnati) ai terminali neri.
Suono scadente. Regolazione inadeguata al tipo di musica o Correggere le regolazioni sonore sul ricevitore.
di suono indicato.
Livello del suono surround Il livello del suono surround non è regolato bene. Regolare il livello del suono surround sul
troppo alto o troppo basso. ricevitore.
Livello del suono centrale Il livello sonoro del canale centrale non è Regolare il livello del canale centrale sul
troppo alto o troppo basso. regolato bene. ricevitore.
Un solo altoparlante Il segnale riprodotto è mono. Scegliere una sorgente sonora diversa o
centrale è attivo in Dolby disattivare il suono surround.
Surround Pro Logic
Ricezione radio scadente, Il ricevitore o l’antenna sono posizionati Cambiare la posizione dell’unità che causa
programmazione accanto ad una sorgente di radiazioni come l’interferenza o spegnerla.
automatica malfunzionante. TV, lettore di CD, registratore di CD,
lettore DVD, ecc.
Non è possibile la La frequenza tipo non è accettata dal Assicuratevi che il registratore digitale possa
registrazione digitale registratore digitale. utilizzare frequenze tra 32 kHz e 48 kHz o
attraverso l’uscita digitale effettuate la registrazione per uscita analogica.
Un’intera registrazione Il DVD player non fornisce informazioni sulla Registrare ogni traccia individualmente oppure
appare come unica traccia traccia. usare la configurazione «manual track
se registrata da DVD increment» sul registratore.
AVVERTENZA
Non cercare in nessun caso di riparare da soli un
qualsiasi elemento dell’apparecchio, per non
invalidare la garanzia. Non aprire l’apparecchio, per
non correre il rischio di scosse elettriche.
Se si verifica un guasto, scorrere la lista di controllo riportata
di seguito prima di far riparare l’apparecchio.
Se non si è in grado di risolvere un problema seguendo
questi suggerimenti, rivolgersi al rivenditore o al centro di
assistenza.
Italiano

136
ABC...............................0030, 0035, 0038, 0040, 0028, 0034,
0041, 0044
Allegro..........................0180, 0342
Antronix........................0049, 0234
Archer...........................0049, 0180, 0234, 0824
Belcor............................0083
Bell & Howell...............0041
Cable Star.....................0083
Cabletenna...................0049
Cableview.....................0049
Century.........................0180
Citizen...........................0180, 0342
Colour Voice.................0052, 0058
Comtronics....................0067
Contec...........................0046
Digi...............................0664
Eastern..........................0029
Emerson........................0824
Everquest......................0042, 0067
Focus.............................0427
France Telecom.............0923
GC Electronics..............0083, 0234
Garrard..........................0180
Gemini..........................0269, 0042
General Instrument......0303, 0503, 0038, 0837
GoldStar........................0067, 0171
Goodmind.....................0824
Hamlin..........................0047, 0036, 0286, 0061
Hitachi..........................0038
Hytex.............................0034
Jasco............................0042, 0180, 0342
Jerrold..........................0030, 0039, 0303, 0038, 0041, 0042,
0051, 0503, 0837
Linsay............................0467
Magnavox.....................0054, 0041
Memorex......................0027
Movie Time...................0090, 0183
NAP...............................0034
NSC...............................0183, 0090
Novaplex.......................0645
Oak................................0046, 0034
Optimus........................0048
Panasonic.....................0048, 0134, 0027
Panther.........................0664
Paragon.........................0027
Philips...........................0052, 0058, 0269, 0317, 0054, 0180
Pioneer..........................0171, 0050, 0560
Popular Mechanics.......0427
Proscan.........................0048
Pulsar............................0027
Quasar..........................0027
RCA...............................0048
Radio Shack..................0824, 0042, 0342, 0910
Realistic........................0234
Recoton.........................0427
Regal.............................0286, 0047
Regency........................0029
Rembrandt....................0038
Runco............................0027
SL Marx........................0067
Samsung.......................0067, 0171
Scientific Atlanta.........0035, 0044, 0504
Seam.............................0537
Signal............................0042, 0067
Signature......................0038
Sprucer.........................0048
Starcom........................0030, 0042
Stargate........................0067, 0042, 0824
Starquest......................0042
Sylvania........................0028
TFC................................0337
TV86..............................0090
Tandy ............................0285
TeleCaption...................0248
Teleview .......................0067
Texscan.........................0028
Timeless........................0445
Tocom ...........................0039, 0040
Toshiba .........................0027
Tusa ..............................0042
Unika.............................0234, 0180, 0049
United Artists...............0034
Universal.......................0234, 0049, 0083, 0218, 0180
Viewstar.......................0285, 0054, 0090
Westminster.................0132
Zenith............................0027, 0552, 0081, 0035, 0042, 0234
Zentek...........................0427
ADC...............................0045
Adcom...........................0261, 0182
Aiwa.............................0151, 0039, 0184
Akai...............................0183
Anthem.........................0924
Audio Alchemy.............0221
Audio-Technica.............0197
BSR...............................0272, 0221
Burmester.....................0447
California Audio Lab.....0056
Carrera..........................0221
Carver...........................0184, 0206, 0464
Craig.............................0642
Crown...........................0149
Curtis Mathes...............0056
DAK...............................0272
DBX...............................0281
DKK...............................0027
Denon...........................0030, 0061, 0900
Emerson........................0182, 0191, 0332, 0496
Fisher............................0115, 0206, 0201, 0369
GE.................................0036
Garrard..........................0307, 0272, 0420, 0447, 0452
Genexxa........................0059, 0191, 0332
GoldStar........................0444
Harman/Kardon............0200, 0184, 0453
Hitachi..........................0059, 0182
JVC...............................0099, 0682, 0685
Kenwood.......................0055, 0217, 0708, 0853, 0064
Kodak............................0314
Krell..............................0184
Kyocera.........................0045
CD
CABLE BOX
English Français Español Deutsch Nederlands Italiano

137
LXI.................................0332
Linn...............................0184
Luxman.........................0120
MCS..............................0056, 0070
MGA.............................0110
MTC..............................0447
Magnavox.....................0184, 0553, 0332
Marantz........................0184, 0056, 0207, 0462
McIntosh.......................0314
Mission.........................0184
Mitsubishi.....................0110
NAD..............................0046
NEC...............................0261, 0070
NSM.............................0184
Nakamichi.....................0174
Nikko.............................0197, 0191, 0201
Onkyo............................0128, 0895
Optimus........................0447, 0495, 0059, 0453, 0206, 0223,
0464, 0202, 0332, 0064, 0114, 0172,
0221, 0307, 0369, 0027
Panasonic.....................0056, 0394, 0330, 0779
Parasound.....................0447, 0221
Philips...........................0184, 0314
Pioneer..........................0059, 0495, 0271, 0332
Proscan.........................0080
Proton...........................0184
QED...............................0184
Quasar..........................0056
RCA...............................0080, 0332, 0036, 0182, 0206, 0791
Realistic........................0182, 0202, 0191, 0206, 0207, 0447
Rotel.............................0184, 0447, 0924
SAE...............................0184
STS...............................0045
Sansui...........................0229, 0184, 0332
Sanyo............................0114, 0206
Scott.............................0191, 0182, 0332
Sears.............................0332
Sharp............................0064, 0207, 0888
Sherwood.....................0141, 0207, 0223, 0453
Shure............................0070
Sony..............................0027, 0212, 0631, 0517, 0632
Soundesign...................0172, 0452
Sylvania........................0184
Tascam..........................0447
Teac ..............................0420, 0447, 0201, 0207
Technics........................0056, 0330, 0234
Toshiba .........................0046
Vector Research...........0221, 0444
Victor............................0099
Wards...........................0080, 0184
Yamaha.........................0214, 0063, 0197
Yorx...............................0488
Zenith............................0642
Aiwa.............................0224, 0227, 0056
Akai...............................0310
Carver...........................0056
Denon...........................0103
Fisher............................0101
Garrard..........................0335, 0466
Harman/Kardon............0209, 0056
JVC...............................0271, 0300
Kenwood.......................0098, 0097, 0260
Magnavox.....................0056
Marantz........................0056, 0036
Mitsubishi.....................0310
NAD..............................0171
Onkyo............................0162, 0163, 0309
Optimus........................0247, 0054, 0364, 0466
Panasonic.....................0256
Philips...........................0056
Pioneer..........................0054, 0247, 0126
Proscan.........................0053
RCA...............................0053
Revox............................0217
Sansui...........................0036, 0056
Sharp............................0258
Sherwood.....................0364
Sony..............................0270, 0197, 0318
Teac ..............................0335, 0316
Technics........................0256
Victor............................0300
Wards...........................0054
Yamaha.........................0121, 0124
Harman/Kardon............0609
JVC...............................0585
Kenwood.......................0561
Magnavox.....................0530
Mitsubishi.....................0548
Onkyo............................0530
Optimus........................0552
Panasonic.....................0517
Philips...........................0566, 0530
Pioneer..........................0552, 0598
Proscan.........................0549
RCA...............................0549
Samsung.......................0600
Sony..............................0560
Technics........................0517
Thomson.......................0578
Toshiba .........................0530
Yamaha.........................0572, 0517
Zenith............................0618, 0530
A-Mark..........................0030
AOC...............................0079, 0030, 0212, 0046, 0057
Abex..............................0059
Admiral.........................0120
Adventura.....................0073
Aiko...............................0119
Akai...............................0057
Alaron...........................0206
Allegro..........................0747, 0801
Ambassador..................0204
Ampro...........................0778
Anam............................0207
Anam National.............0082
Archer...........................0030
TV
DVD
TAPE
EnglishFrançaisEspañolDeutschNederlandsItaliano

138
Audiovox.......................0119, 0030, 0207, 0478, 0650
Aumark.........................0087
Baysonic.......................0207
Belcor............................0046
Bell & Howell...............0043, 0181
Bradford........................0207
Brockwood....................0046
Broksonic......................0030, 0263, 0490
CCE...............................0064, 0244
CXC...............................0207
Candle...........................0213, 0073, 0057, 0083
Capehart.......................0079
Carnivale.......................0057
Carver...........................0081
Celebrity.......................0027
Cineral..........................0478, 0119
Citizen...........................0213, 0073, 0083, 0057, 0066, 0087,
0119, 0307
Clairtone.......................0212
Concerto.......................0083
Contec...........................0184, 0207, 0212
Craig.............................0207
Crosley..........................0081
Crown...........................0066, 0207
Curtis Mathes...............
0087, 0057, 0181, 0043, 0066, 0074, 0078,
0081, 0083, 0120, 0172, 0193, 0478, 0493
Daewoo........................0119, 0650, 0046, 0651, 0478, 0066
Daytron.........................0046, 0066
Denon...........................0172
Dumont.........................0044, 0046
Dwin.............................0747, 0801
Dynatech.......................0244
Electroband...................0027, 0212
Electrohome..................0408
Emerson........................0263, 0207, 0205, 0206, 0490, 0204,
0309, 0307, 0651, 0066, 0212, 0650,
0046, 0065, 0181
Envision........................0057
Fisher............................0181, 0186
Fujitsu...........................0206
Funai.............................0207, 0198, 0206
Futuretech.....................0207
GE.................................0048, 0054, 0074, 0082, 0078, 0205,
0162, 0309, 0478, 0120
Gibralter........................0044, 0046, 0057
Go Video.......................0087
GoldStar........................
0028, 0205, 0057, 0046, 0059, 0066, 0083
Gradiente......................0083, 0080
Grundig.........................0064, 0222
Grunpy..........................0206, 0207
Hallmark.......................0205
Harley Davidson...........0206
Harman/Kardon............0081
Harvard.........................0207
Hitachi..........................0172, 0178, 0065, 0083, 0059
Infinity...........................0081
Inteq..............................0044
JBL................................0081
JCB...............................0027
JVC...............................0080
Janeil............................0073
KEC...............................0207
KTV...............................0307, 0207, 0212, 0244, 0066, 0057
Kaypani.........................0079
Kenwood.......................0057, 0046
Kloss.............................0073, 0051
LG..................................0083
LXI.................................0181, 0205, 0074, 0044, 0081, 0183
Loewe...........................0539
Logik.............................0043
Luxman.........................0083
MEI...............................0212
MGA.............................0177, 0046, 0057, 0205
MTC..............................0087, 0046, 0057, 0212, 0083
Magnavox.....................0081, 0214, 0051, 0123, 0047, 0213,
0057, 0413, 0206
Majestic........................0043
Marantz........................0081, 0064, 0057
Matsushita...................0078, 0277
Megatron......................0030, 0172, 0205
Memorex......................
0205, 0043, 0083, 0087, 0177, 0181, 0277
Midland........................0044, 0059, 0066, 0074, 0078, 0162
Minutz...........................0048
Mitsubishi.....................0177, 0046, 0205, 0120
Motorola.......................0082, 0120
Multitech......................0244, 0207
NAD..............................0183, 0193, 0205
NEC...............................0057, 0046, 0083, 0524
NTC...............................0119
Nikko.............................
0205, 0044, 0074, 0057, 0119, 0181, 0183
Noshi............................0045
Onwa............................0207
Optimus........................0277, 0193, 0181
Optonica.......................0120, 0192
Orion.............................0263, 0206, 0490
Panasonic.....................0078, 0277, 0082, 0028, 0074, 0080,
0081, 0087, 0120, 0172, 0177, 0181,
0183, 0192, 0205
Penney..........................0074, 0057, 0087, 0048, 0054, 0162,
0045, 0205, 0078, 0066, 0046, 0030,
0059, 0083, 0183
Philco............................0047, 0046, 0057, 0081, 0123, 0172,
0490, 0051, 0213, 0214
Philips...........................0081, 0044, 0047, 0066, 0064, 0027,
0045, 0046, 0048, 0051, 0054, 0079
Pilot...............................0046, 0057, 0066
Pioneer..........................0193, 0065
Portland........................0119, 0046, 0066
Prism.............................0078
Proscan.........................0074, 0057
Proton...........................0493, 0205, 0030, 0079
Pulsar............................0044, 0046
Quasar..........................0078, 0082, 0277, 0192
RCA...............................0074, 0045, 0162, 0046, 0065, 0078,
0117, 0120
Radio Shack..................0192, 0207, 0205, 0057, 0066, 0046,
0181, 0059, 0074, 0083
Realistic........................0192, 0207, 0181, 0057, 0066, 0205,
0046, 0059, 0083
Rhapsody......................0212
Runco............................0044, 0524, 0057
SSS...............................0046, 0207
Sampo...........................0057, 0059, 0066, 0079
English Français Español Deutsch Nederlands Italiano

139
Samsung.......................0087, 0059, 0205, 0046, 0057, 0066,
0083, 0064
Samsux.........................0066
Sansei...........................0478
Sansui...........................0490
Sanyo............................0181, 0186, 0173
Scimitsu........................0046
Scotch...........................0205
Scott.............................0263, 0205, 0206, 0207, 0046
Sears.............................0186, 0181, 0173, 0183, 0081, 0083,
0198, 0205, 0074, 0206
Semivox........................0207
Semp.............................0183
Sharp............................0192, 0120, 0413, 0066, 0184
Shogun..........................0046
Signature......................0043
Simpson........................0213, 0214
Sony..............................0027, 0138, 0107
Soundesign...................0205, 0207, 0206, 0213
Spectricon.....................0030
Squareview...................0198
Starlite..........................0207
Supre-Macy..................0073
Supreme.......................0027
Sylvania........................0081, 0047, 0123, 0057, 0408, 0051,
0213, 0214
Symphonic....................0198
TMK..............................0083, 0204, 0205
Tandy ............................0120
Tatung...........................0030, 0082
Technics........................0078, 0277, 0044, 0074
Technol Ace..................0206
Techwood .....................0030, 0078, 0083
Teknika..........................0213, 0043, 0206, 0046, 0066, 0081,
0207, 0083, 0119, 0177, 0087
Telefunken....................0083
Toshiba .........................0183, 0087, 0181
Tosonic..........................0212
Totevision .....................0066
Trical.............................0184
Universal.......................0054, 0048
Vector Research...........0057
Victor............................0080
Vidikron.........................0081
Vidtech..........................0046, 0205
Viking............................0073
Wards...........................0081, 0192, 0205, 0183, 0043, 0047,
0048, 0123, 0138, 0214, 0054, 0107,
0206, 0046, 0057, 0083, 0162
White Westinghouse...0651, 0650
Yamaha.........................0046, 0057
Zenith............................0044, 0043, 0119, 0173
Zonda............................0030
Admiral.........................0075
Adventura.....................0027
Aiko...............................0305
Aiwa.............................0334, 0027, 0064
Akai...............................0133, 0080, 0088, 0068
American High..............0062
Asha..............................0267
Audiovox.......................0064
Beaumark......................0267
Bell & Howell...............0131
Blaupunkt......................0033
Broksonic......................0211, 0148, 0388, 0029, 0236, 0238,
0322, 0506
CCE...............................0099, 0305
Calix..............................0064
Canon............................0062
Capehart.......................0047
Carver...........................0108
Cineral..........................0305
Citizen...........................0305, 0064
Colt...............................0099
Craig.............................0064, 0074, 0099, 0267, 0298
Curtis Mathes...............0062, 0068, 0087, 0189
Cybernex.......................0078, 0267
Daewoo........................0305, 0588, 0047, 0072
Daytron.........................0047
Denon...........................0069
Dynatech.......................0027
Electrohome..................0064
Electrophonic................0064
Emerex..........................0059
Emerson........................
0211, 0029, 0148, 0236, 0063, 0238, 0305,
0321, 0115, 0235, 0506, 0088, 0239, 0588,
0095, 0322, 0388, 0027, 0064, 0070
Fisher............................0074, 0131, 0081, 0093
Fuji................................0060, 0062
Funai.............................0027
GE.................................0062, 0087, 0229, 0075, 0267
Garrard..........................0027
Go Video.......................0459, 0553
GoldStar........................0064, 0065
Gradiente......................0035, 0027
HI-Q...............................0074
Harley Davidson...........0027
Harman/Kardon............0108, 0065
Harwood.......................0095, 0099
Headquarter..................0073
Hitachi..........................0069, 0132, 0027, 0068
JVC...............................0094, 0035, 0068
Jensen..........................0068
KEC...............................0064, 0305
KLH...............................0099
Kenwood.......................0068, 0094, 0065, 0073
Kodak............................0062, 0064
LXI.................................0064
Lloyd's...........................0027, 0235
Logik.............................0099
MEI...............................0062
MGA.............................0070, 0088, 0267
MGN Technology..........0267
MTC..............................0027, 0267
Magnasonic..................0305
Magnavox.....................0062, 0108, 0027, 0066, 0176
Magnin.........................0267
Marantz........................0108, 0065, 0062
Marta............................0064
Matsushita...................0062, 0481, 0189
Memorex......................0131, 0074, 0027, 0064, 0062, 0075,
0267, 0334, 0073, 0066
VCR
EnglishFrançaisEspañolDeutschNederlandsItaliano

140
Metz..............................0033, 0064, 0189, 0323
Minolta.........................0132, 0069
Mitsubishi.....................0070, 0088, 0094, 0075
Motorola.......................0062, 0075
Multitech......................0027, 0099
NAD..............................0085
NAP...............................0060, 0061, 0062, 0064, 0066, 0069,
0093, 0132
NEC...............................0065, 0067, 0068, 0094, 0131
Nikko.............................0064
Nikon............................0061, 0280
Noblex..........................0267
Olympus........................0062
Optimus........................
0085, 0075, 0064, 0459, 0131, 0189, 0481
Optonica.......................0089
Orion.............................0506, 0322, 0029, 0211
Panasonic.....................0062, 0104, 0189, 0252, 0481
Penney..........................
0062, 0267, 0064, 0065, 0069, 0067, 0081
Pentax...........................0069, 0132
Philco............................0062, 0506, 0236
Philips...........................0108, 0062, 0089
Pilot...............................0064
Pioneer..........................0085, 0094
Portland........................0047
Profitronic.....................0267
Proscan.........................0087, 0229
Protec............................0099
Pulsar............................0066, 0078
Quarter..........................0073
Quartz...........................0073
Quasar..........................0062, 0189, 0104, 0481
RCA...............................0087, 0176, 0229, 0069, 0132, 0104,
0133, 0062, 0075, 0267
Radio Shack..................0027
Radix.............................0064
Randex..........................0064
Realistic........................0074, 0027, 0131, 0075, 0064, 0062,
0089, 0073, 0093
Ricoh.............................0061, 0280
Runco............................0066
STS...............................0069
Samsung.......................0267, 0072, 0080, 0078
Sanky............................0066, 0075
Sansui...........................0506, 0068, 0298, 0027, 0094
Sanyo............................0073, 0074, 0131, 0267
Scott.............................
0211, 0148, 0238, 0072, 0237, 0239, 0070
Sears.............................0069, 0132, 0081, 0073, 0064, 0074,
0131, 0027, 0062, 0093
Semp.............................0072
Sharp............................0075, 0089
Shintom........................0099
Shogun..........................0078, 0267
Signature......................0062
Singer...........................0099
Sony..............................0060, 0061, 0059, 0280, 0062, 0027
Sunpak..........................0280
Sylvania........................0062, 0108, 0027, 0070
Symphonic....................0027
TMK..............................0063, 0235, 0267
Tatung...........................0068
Teac ..............................0027, 0068
Technics........................0062, 0189, 0066, 0087, 0229
Teknika..........................0027, 0062, 0064
Thomas.........................0027
Toshiba .........................0072, 0239, 0237, 0093, 0070
Totevision .....................0064, 0267
Unitech.........................0267
Vector ...........................0072
Vector Research...........0065, 0067
Video Concepts.............0067, 0088, 0072
Videosonic....................0267
Wards...........................0062, 0075, 0089, 0027, 0087, 0074,
0072, 0267, 0239, 0069, 0099, 0176,
0108
White Westinghouse...0305
XR-1000........................0099, 0027, 0062
Yamaha.........................0065, 0068
Zenith............................0066, 0060, 0061, 0027, 0506
AlphaStar......................0799
Astro Industries............0122
BSR...............................0122
Capetronic....................0122
Channel Master............0045, 0239
Chaparral......................0080, 0236, 0243
DX Antenna..................0068
Drake............................0091, 0272, 0045
Echostar........................0307, 0802, 0175, 0186, 0296
Expressvu......................0802
General Instrument......0388, 0896, 0654
Grundig.........................0200
HTS...............................0802
Hitachi..........................0846
Homecable....................0265
Hughes Network Syst....0776
Hytek.............................0122
IQ..................................0237
IQ Prism........................0237
JVC...............................0802
Janeil............................0179
Jerrold..........................0388, 0654
Legend..........................0296
Macom..........................0045
Magnavox.....................0749, 0751
Memorex......................0296, 0751
Next Level ....................0896
Panasonic.....................0179, 0728
Philips...........................0227, 0126, 0749, 0751
President.......................0101
Primestar......................0654, 0388
Proscan.........................0593
RCA...............................0593, 0170, 0882
Radio Shack..................0593
Realistic........................0079
STS...............................0237, 0068
Sony..............................0666
Star Choice...................0896
Star Trak.......................0207
Toshiba .........................0109, 0817
Uniden..........................
0265, 0397, 0079, 0101, 0751, 0103, 0749
Zenith............................0091, 0883, 0272
SAT
English Français Español Deutsch Nederlands Italiano

141

142

143

3103 306 1859.1
FR 984/FR 985/FR 986
FR 994/FR 995/FR 996 VieUrs0147
English Français Español Deutsch Nederlands Italiano
Meet Philips at the Internet
http://www. philips.com
W
Documenttranscriptie
Digital Surround Sound Receiver 984 FR-985 FR-986 FR- 994 FR-995 FR-996 FR- Audio Scope of supply Additionally to the standard supplies the Home Cinema packages MX 980, MX 999 contain: – a subwoofer including a connection cable and a mains cable – 5 loudspeakers including 5 speaker cables – a coaxial cable for video connection with a DVD player or a TV set – a quick installation card For the standard supplies of your receiver see chapter “GENERAL INFORMATION / Scope of supply” in the instruction manual. NT 3 After all connections have been made, connect the AC mains cable to the receiver or the wall outlet. To disconnect the subwoofer from the mains completely, remove the mains plug from the wall socket. Switching the subwoofer on 1 To activate the subwoofer, set the on/off switch at the rear of the subwoofer to ON position. 2 Rotate VOLUME clockwise until there is a click. y The LED indicator lights up in green. Subwoofer setup CENTER FR ON T If the subwoofer is not to be used for a longer period of time, it is advisable to set the on/off switch to OFF position. LEFT RIGHT BW O OF ER FRO 2 Check whether the mains voltage as shown on the type plate corresponds to your local mains voltage. If it does not, consult your dealer or service organization. Switching the subwoofer to standby mode SU • Rotate VOLUME anticlockwise until there is a click. y The LED indicator light turns red. SURROUND (REAR) LEFT RIGHT SURROUND (REAR) • Install the subwoofer wherever you like because with the bass sound range reproduced from the subwoofer (below 150 Hz) human hearing cannot detect the direction and position where the sound is being produced. • Also, since the feeling of stereo is lost with bass frequencies, a single subwoofer is enough for reproducing the bass of stereo channels. • To obtain a better bass reproduction, we recommend that you place the subwoofer on a solid floor where resonance is unlikely to occur. • Always place the subwoofer vertically, keeping a few centimeters away from the wall. • Do not place any object on the subwoofer or sit on it. • If the subwoofer is placed in the center of a room, the bass could be extremely weakened. This is due to the influence of the standing wave of the room. If this happens, move the subwoofer away from the center of the room or eliminate the cause of the standing wave by installing a bookshelf on the wall, etc. Important! Before you operate the subwoofer, complete the preparation procedures. Switch on your receiver and select the sound source. Connections The type plate is located on the rear of the subwoofer. 1 Use the cinch cable supplied to connect AUDIO IN to SUBWOOFER PRE-OUT on the receiver. Volume adjustment You can adjust the subwoofer to suit the sound level of your front speakers. Reinforcing the bass sound gives you a greater sense of atmosphere. 1 Adjust the VOLUME on the receiver until the sound from the front speakers is not distorted. If it is distorted, the sound from the subwoofer will also be distorted. 2 Play your favourite songs. Male vocal tunes containing bass sounds are most suitable for adjustment. 3 Adjust the VOLUME on the subwoofer to determine the loudness of the bass sound from the subwoofer. Phase selector • Use PHASE SELECTOR located PHASE at the rear of the subwoofer to SELECTOR select the phase polarity. 0 0 0 180 Selecting the polarity at either 0° or 180° may determine better bass reproduction effect in certain listening environments (depending on the type of front speakers and the position of the subwoofer). It may also change the expanse and tightness of sound, and affect the feeling of sound field. • Select the setting that provides the sound you prefer when listening in your usual listening position. Repeat the adjustment for volume and phase polarity to suit your preference. Once you have adjusted the subwoofer to the settings you desire, use the VOLUME control on the receiver to adjust the volume of the subwoofer and the other speakers. You do not need to adjust the subwoofer settings again even when you change the volume level of the receiver. English HOME CINEMA PACKAGES MX 980, MX 999 HOME CINEMA PACKAGES MX 980, MX 999 English Power handling Technical data of speakers and subwoofer If the receiver is used at very high power it can produce distortions which may seriously damage your speakers. If distortions occur, reduce the volume and the tone controls to a level where the sound is acceptable again. Subject to modification without notice. To avoid overheating of the set a safety circuit has been built in. Therefore your set may disconnect under extreme conditions. If this happens, switch the set off and let it cool down before reusing it. After having let the set cool down switch the set on again and select the desired source by turning SOURCE SELECT. Recommended settings For optimum sound performance of your Home Cinema System we recommend the following settings on your receiver: * SPEAKR SETUP SUBW PRESENT: YES Center speaker System................................................................2-way shielded Impedance ............................................................................8 Ω Speaker drivers ..................................2 × 3" fullrange, 1" piezo Reproduction frequency response......................150 Hz–20 kHz Dimensions (MX 980), w × h × d.................250 × 94 × 92 mm Dimensions (MX 999), w × h × d.................250 × 94 × 86 mm Weight.............................................................................0.92 kg Surround speakers System ..............................................................................2-way Impedance ............................................................................8 Ω Speaker drivers .........................................3" fullrange, 1" piezo Reproduction frequency response......................150 Hz–20 kHz Dimensions (MX 980), w × h × d.................95 × 150 × 97 mm Dimensions (MX 999), w × h × d.................95 × 150 × 91 mm Weight.............................................................................0.45 kg * SPEAKR SIZES FRONT SIZE: SMALL CENTER SIZE: SMALL REAR SIZE: SMALL * VOL BALANCE VOL FRONT-L: 0 VOL FRONT-R: 0 VOL CENTER: -10 VOL REAR-L: +5 VOL REAR-R: +5 BASS: 0 TREBLE: 0 LOUDNESS: off Digital sound from a DVD player When connecting a DVD player to COAX 1 IN, make sure that the digital output of your DVD player is set to “ON” or “ALL” (please read the instruction manual of your DVD player). 3103 306 1862.1 Front speakers System................................................................2-way shielded Impedance ............................................................................8 Ω Speaker drivers .........................................3" fullrange, 1" piezo Reproduction frequency response......................150 Hz–20 kHz Dimensions (MX 980), w × h × d.................95 × 150 × 97 mm Dimensions (MX 999), w × h × d.................95 × 150 × 91 mm Weight.............................................................................0.45 kg Active subwoofer with wOOx technology for MX 980 – not magnetically shielded design Subwoofer ............................................................................6.5" Output power ..................................................50 W RMS (4 Ω) THD .....................................................................10% at 100 Hz Reproduction frequency response .......................40 Hz–150 Hz Phase switch .................................................................0°, 180° Input sensitivity (subwoofer in)................................200 mVrms AC power ................................................................230 V/50 Hz Power consumption.............................40 W (at 1⁄8 rated power) Dimensions, w × h × d ............................200 × 310 × 370 mm Weight...............................................................................6.8 kg Active subwoofer with wOOx technology for MX 999 – not magnetically shielded design Subwoofer ............................................................................6.5" Output power.................................................100 W RMS (4 Ω) THD .....................................................................10% at 100 Hz Reproduction frequency response .......................40 Hz–150 Hz Phase switch .................................................................0°, 180° Input sensitivity (subwoofer in)................................200 mVrms AC power ................................................................230 V/50 Hz Power consumption.............................52 W (at 1⁄8 rated power) Dimensions, w × h × d ............................200 × 310 × 370 mm Weight...............................................................................8.4 kg MX 980/MX 999 VieUrs0147 ENSEMBLES HOME CINEMA MX 980, MX 999 3 Après avoir effectué tous les raccords, raccordez le cordon d'alimentation CA au récepteur ou à la prise murale. En plus des éléments standard fournis, les ensembles MX 980, MX 999 comprennent : – un subwoofer avec un câble de raccordement et un câble d’alimentation secteur – 5 haut-parleurs y compris 5 câbles pour les haut-parleurs – un câble coaxial pour une connexion vidéo avec un lecteur DVD ou un téléviseur – une notice d’installation rapide Pour la liste des éléments standard fournis avec votre récepteur, voir le chapitre « GENERALITES/Produits livrés avec l’equipement » dans le manuel d’utilisation. Disposition du subwoofer NT FRO CENTER FR ON T R FE Mise en service du subwoofer 1 Pour mettre en marche le caisson de basses, mettez le sélecteur de marche/arrêt situé à l ’arrière du caisson de basses en position « ON ». 2 Tournez VOLUME vers la droite jusqu’à ce qu’un déclic se fasse entendre. y L’indicateur vert s’allume. Si le caisson de basses ne sera pas utilisé pendant une période prolongée, nous vous conseillons de mettre le sélecteur de marche/arrêt en position « OFF ». Mise en mode de veille du subwoofer LEFT RIGHT • Tournez VOLUME vers la gauche jusqu’à ce qu’un déclic se fasse entendre. y L’indicateur passe au rouge. SU BW OO Pour débrancher complètement le subwoofer du secteur, retirez la fiche d’alimentation de la prise de courant. Français Produits livrés avec l'équipement SURROUND (REAR) LEFT RIGHT SURROUND (REAR) • Installez le subwoofer où vous plaira, car avec la gamme des graves reproduite par le subwoofer (en-dessous de 150 Hz), l’ouïe humaine ne parvient pas à détecter le sens ni la position d’où vient le son. • De plus, comme la sensation stéréo se perd à basses fréquences, un simple subwoofer suffit à la reproduction des basses des canaux stéréo. • Pour obtenir une meilleure reproduction des graves, nous recommandons de disposer le subwoofer sur un sol solide où il y a peu de chance que des résonances aient lieu. • Placez toujours le subwoofer en position ver ticale et à quelques centimètres du mur. • Ne placez pas un objet sur le subwoofer ni ne vous asseyez dessus. • Si le subwoofer est disposé au centre d’une pièce, les graves peuvent être extrêmement affaiblis. Ce phénomène est dû à l’onde verticale régnant dans la pièce. Dans ce cas, déplacez le subwoofer du centre de cette pièce pour éliminer la cause de l’onde ver ticale, par exemple en disposant un rayon à livres au mur, etc. Important! Avant d’actionner le subwoofer, achevez les procédures de préparation. Allumez votre récepteur et choisissez la source sonore. Connecteurs La plaquette signalétique est située à l‘arrière du subwoofer. 1 Utilisez le câble cinch compris à la livraison pour brancher AUDIO IN avec SUBWOOFER PRE-OUT au récepteur. 2 Vérifiez si la tension secteur référencée sur la plaquette signalétique correspond à votre tension secteur locale. Si ce n‘est pas le cas, consultez votre concessionnaire ou l‘organisation de service après-vente. Réglage de volume Il vous est possible de régler le subwoofer en fonction du niveau de son de vos haut- parleurs avant. L’accentuation des graves vous donne une plus grande sensation d’atmosphère. 1 Réglez le VOLUME sur le récepteur jusqu'à ce que le son provenant des haut-parleurs de devant ne soit plus déformé. S'il est déformé, le son provenant du subwoofer sera également déformé. 2 Faites jouer votre musique favorite. Une voix mâle contenant des graves convient le mieux au réglage. 3 Réglez le VOLUME sur le subwoofer pour déterminer la portée du son grave émis par le subwoofer. Sélecteur de phase • Utilisez PHASE SELECTOR disposé à l’arrière du subwoofer pour sélectionner la polarité de phase. PHASE SELECTOR 0 0 0 180 La sélection de polarité à 0° ou 180° permet de mieux déterminer l’effet de reproduction des graves dans certains endroits d’écoute (selon le type de haut- parleurs avant et la position du subwoofer). Ceci peut également modifier la charge et la densité du son et affecter la sensation du champ de sonorité. • Sélectionnez le réglage correspondant à votre préférence d’écoute dans votre position d’écoute normale. Répétez le réglage pour le volume et la polarité de phase en fonction de vos préférences. Une fois que vous avez procédé aux réglages souhaités pour le subwoofer, utilisez le réglage du VOLUME sur le récepteur pour régler le volume du subwoofer et des autres haut-parleurs. Vous n'avez pas besoin de changer les réglages du subwoofer même si vous modifiez le volume du récepteur. ENSEMBLES HOME CINEMA MX 980, MX 999 Manipulation de la puissance Si le récepteur est utilisé à une puissance trop élevée, des distorsions peuvent avoir lieu, lesquelles peuvent sérieusement endommager vos enceintes. En cas de distorsions, réduisez le volume et les commandes de tonalité à un niveau de son acceptable. Français Pour éviter tout problème de surchauffe, cet appareil est doté d’un circuit de sécurité intégré. L’appareil s’arrête automatiquement dans des conditions de fonctionnement extrêmes. Si tel était le cas, mettez l’appareil hors tension pour permettre le refroidissement de l’appareil avant de le réutiliser. Après avoir laissé l’appareil refroidir allumez l’appareil de nouveau et choisissez la source désirée en tournant SOURCE SELECT. Réglages recommandés Pour une performance du son optimale sur votre Home Cinema System, nous recommandons les réglages suivants sur votre amplificateur : Sujet à modifications sans avis préalable. Enceintes avant Système.......................................................protégé à 2 circuits Impédance ............................................................................8 Ω Moteurs des haut-parleurs ...............3" longue bande, 1" piezo Réponse en fréquence de reproduction .............150 Hz–20 kHz Dimensions (MX 980), l × h × p...................95 × 150 × 97 mm Dimensions (MX 999), l × h × p...................95 × 150 × 91 mm Poids................................................................................0,45 kg Enceinte centrale Système.......................................................protégé à 2 circuits Impédance ............................................................................8 Ω Moteurs des haut-parleurs.........2 × 3" longue bande, 1" piezo Réponse en fréquence de reproduction .............150 Hz–20 kHz Dimensions (MX 980), l × h × p...................250 × 94 × 92 mm Dimensions (MX 999), l × h × p...................250 × 94 × 86 mm Poids................................................................................0,92 kg Haut-parleurs surround Système...........................................................................2 voies Impédance ............................................................................8 Ω Moteurs des haut-parleurs ...............3" longue bande, 1" piezo Réponse en fréquence de reproduction .............150 Hz–20 kHz Dimensions (MX 980), l × h × p...................95 × 150 × 97 mm Dimensions (MX 999), l × h × p...................95 × 150 × 91 mm Poids................................................................................0,45 kg * SPEAKR SETUP SUBW PRESENT : YES * SPEAKR SIZES FRONT SIZE : SMALL CENTER SIZE : SMALL REAR SIZE : SMALL * VOL BALANCE VOL FRONT-L : 0 VOL FRONT-R : 0 VOL CENTER : -10 VOL REAR-L : +5 VOL REAR-R : +5 Subwoofer actif doté de la technologie wOOx pour le MX 980 – modèle non pourvu d’un blindage magnétique Subwoofer ............................................................................6,5" Puissance de sortie .........................................50 W RMS (4 Ω) DHT.......................................................................10% à 100 Hz Réponse en fréquence de reproduction...............40 Hz–150 Hz Inverseur de phase........................................................0°, 180° Sensibilité d'entrée (entrée subwoofer) ..................200 mVrms Alimentation CA......................................................230 V/50 Hz Consommation de puissance...40 W (1⁄8 de la puissance nominale) Dimensions, l × h × p ..............................200 × 310 × 370 mm Poids..................................................................................6,8 kg BASS : 0 TREBLE : 0 LOUNDNESS : désactivé Son digital à partir d’un lecteur de DVD Quand vous connectez un lecteur de DVD à COAX 1 IN, assurez-vous que la sortie digitale de votre lecteur de DVD est réglée sur « ON » ou « ALL » (veuillez vous référer au manuel de votre lecteur de DVD). 3103 306 1862.1 Données techniques des haut-parleurs et du subwoofer Subwoofer actif doté de la technologie wOOx pour le MX 999 – modèle non pourvu d’un blindage magnétique Subwoofer ............................................................................6,5" Puissance de sortie .......................................100 W RMS (4 Ω) DHT.......................................................................10% à 100 Hz Réponse en fréquence de reproduction...............40 Hz–150 Hz Inverseur de phase........................................................0°, 180° Sensibilité d'entrée (entrée subwoofer) ..................200 mVrms Alimentation CA......................................................230 V/50 Hz Consommation de puissance...52 W (1⁄8 de la puissance nominale) Dimensions, l × h × p ..............................200 × 310 × 370 mm Poids..................................................................................8,4 kg MX 980/MX 999 VieUrs0147 PAQUETES HOME CINEMA MX 980, MX 999 3 Una vez realizadas todas las conexiones, conecte el cable de CA al receptor o a la toma de corriente. Además de los suministros estándar, los paquetes de Home Cinema MX 980, MX 999 contienen: – un subwoofer con un cable de conexión y cable de red – 5 altavoces con 5 cables de altavoces – un cable coaxial para la conexión del video con un reproductor de DVD o con un aparato de televisión – una tarjeta de instalación rápida Para los suministros estándar de su receptor, ver capítulo «INFORMACIÓN GENERAL/Lista de componentes» en el manual de instrucciones. Instalación del subwoofer T ON FR ON T Encendido del subwoofer 1 Para activar el subwoofer, posicione el selector de activación/desactivación situado en la parte trasera del subwoofer su «ON». 2 De vueltas a VOLUME en dirección de las agujas del reloj hasta que oiga un clic. y El indicador LED se enciende en verde. Si no va a utilizar el subwoofer durante mucho tiempo, recomendamos posicionar el selector de activación/ desactivación su «OFF». LEFT RIGHT BW OO FE R FR CENTER Para desconectar por completo el subwoofer de la red, retirar el conector de la toma de red de la pared. Para poner el subwoofer en el modo de espera SU • Dé vueltas a VOLUME en dirección contraria a las agujas del reloj hasta que oiga un clic. y El indicador LED se vuelve rojo. SURROUND (REAR) LEFT RIGHT SURROUND (REAR) • El subwoofer puede ser instalado en cualquier parte debido a que la gama desonidos graves que reproduce (por debajo de 150 Hz), el oído humano no puede detectarla dirección o la posición de la que viene el sonido. • Además, como la sensación de estéreo se pierde con las frecuencias de graves. Basta con un sólo subwoofer para reproducir los graves y los canales de estéreo. • Para obtener una reproducción mejor de graves, se recomienda instalar el subwoofer en una superficie sólida que no produzca resonancia. • Coloque siempre el subwoofer ver ticalmente, pero guardando una distancia de algunos centímetros de la pared. • No coloque ningún objeto encima del subwoofer o se siente en él. • Si se coloca el subwoofer en el centro de la habitación, el efecto de los graves puede debilitarse debido a la influencia de las ondas estacionarias de la habitación. En tal caso, retírelo del centro de la habitación o trate de solucionar el problema, colocando una estantería en la pared. ¡Importante! Antes de poner en funcionamiento el subwoofer, acabe todos los preparativos. Encienda su receptor y seleccione la fuente de sonido. Conexiones La placa tipo está situada en la parte posterior del subwoofer. 1 Utilice el cable cinch suministrado para conectar AUDIO IN con SUBWOOFER PRE-OUT en el receptor. 2 Compruebe que la tensión indicada en la placa tipo corresponde con el voltaje de la red local. De lo contrario, consulte con su distribuidor u organización de servicio. Ajuste de volumen Se puede ajustar el volumen del subwoofer para acoplarlo al nivel de sonido de los altavoces frontales. Si refuerza el sonido de los graves puede conseguir una mejora en el entorno acústico. 1 Ajuste el VOLUMEN del receptor hasta que el sonido de los altavoces frontales no suene distorsionado. Si el sonido está distorsionado también lo estará el sonido procedente del subwoofer y del resto de altavoces. 2 Reproduzca sus canciones favoritas. Las entonaciones vocales masculinas con sonidos graves son las más apropiadas para el ajuste. 3 Ajuste VOLUME en el subwoofer para determinar el volumen del sonido de los graves provenientes del subwoofer. Selector de fase • Utilice PHASE SELECTOR, el cual PHASE está ubicado en la parte posterior del subwoofer para seleccionar SELECTOR 0 0 la polaridad de fase. 0 180 En ciertos entornos acústicos la escucha del efecto de reproducción de los graves se puede mejorar si selecciona la polaridad a 0° o a 180° (dependiendo del tipo de altavoces frontales y de la posición del subwoofer). También puede influir en el gasto de energía y hermeticidad del sonido y afectar a la percepción del campo de sonido. • Seleccione el ajuste que le ofrezca la calidad de sonido que prefiere en la posición normal de escucha. Repita el ajuste de volumen y polaridad de la fase hasta que consiga uno que le guste. Una vez haya realizado en el subwoofer los ajustes que desee, utilice el control del VOLUMEN que hay en el receptor para ajustar el volumen del subwoofer y de los demás altavoces. No es necesario que repita los ajustes del subwoofer incluso aunque modifique el volumen del receptor. Español Lista de componentes PAQUETES HOME CINEMA MX 980, MX 999 Capacidad de potencia Si se utiliza el receptor con el volumen demasiado alto, se pueden producir distorsiones que causen daño a los altavoces. En caso de distorsiones, reduzca el volumen y los controles de tono a un nivel razonable. Español Para evitar el recalentamiento del aparato, hay un circuito de seguridad incorporado. Por lo tanto su aparato puede apagarse bajo condiciones extremas. Si esto ocurre, desconecte el aparato y espere hasta que se enfrie antes de volver a usarlo. Después de dejar que el aparato se enfríe, encienda de nuevo el aparato y seleccione la fuente deseada girando SOURCE SELECT. Configuraciones recomendadas Para un rendimiento óptimo del sonido de su Sistema Home Cinema, le recomendamos la siguientes configuraciones en su receptor: * SPEAKR SETUP SUBW PRESENT: YES * SPEAKR SIZES FRONT SIZE: SMALL CENTER SIZE: SMALL REAR SIZE: SMALL Datos técnicos de los altavoces y altavoz de graves Sujeto a modificaciones sin previo aviso. Altavoces frontales Sistema...................................................protección de dos vías Impedancia ...........................................................................8 Ω Controladores de altavoz ...................alcance total 3", piezo 1" Respuesta de frecuencia de reproducción.........150 Hz–20 kHz Dimensiones (MX 980), anch. × alt. × profun. ...................................95 × 150 × 97 mm Dimensiones (MX 999), anch. × alt. × profun. ...................................95 × 150 × 91 mm Peso.................................................................................0,45 kg Alvatoz central Sistema...................................................protección de dos vías Impedancia ...........................................................................8 Ω Controladores de altavoz.............alcance total 2 × 3", piezo 1" Respuesta de frecuencia de reproducción.........150 Hz–20 kHz Dimensiones (MX 980), anch. × alt. × profun. ...................................250 × 94 × 92 mm Dimensiones (MX 999), anch. × alt. × profun. ...................................250 × 94 × 86 mm Peso.................................................................................0,92 kg Altavoces surround Sistema..........................................................................dos vías Impedancia ...........................................................................8 Ω Controladores de altavoz ...................alcance total 3", piezo 1" Respuesta de frecuencia de reproducción.........150 Hz–20 kHz Dimensiones (MX 980), anch. × alt. × profun. ...................................95 × 150 × 97 mm Dimensiones (MX 999), anch. × alt. × profun. ...................................95 × 150 × 91 mm Peso.................................................................................0,45 kg * VOL BALANCE VOL FRONT-L: 0 VOL FRONT-R: 0 VOL CENTER: -10 VOL REAR-L: +5 VOL REAR-R: +5 BASS: 0 TREBLE: 0 LOUDNESS: desconectado Sonido digital del reproductor de DVD Si conecta un reproductor de DVD a un COAX 1 IN, asegúrese de que la salida digital de su reproductor de DVD está en «ON» o «ALL» (por favor, lea el manual de instrucciones de su reproductor de DVD). Altavoz de graves activo con tecnología wOOx para MX 980 – diseño no magnéticamente sellado Subwoofer ............................................................................6,5" Potencia de salida...........................................50 W RMS (4 Ω) THD.......................................................................10% a 100 Hz Respuesta de frecuencia de reproducción...........40 Hz–150 Hz Interruptor de fase ........................................................0°, 180° Sensibilidad de entrada (entrada subwoofer) .........200 mVrms Potencia CA.............................................................230 V/50 Hz Consumo de energía ..........40 W (a 1⁄8 de potencia de régimen) Dimensiones, anch. × alt. × profun. ........200 × 310 × 370 mm Peso...................................................................................6,8 kg Altavoz de graves activo con tecnología wOOx para MX 999 – diseño no magnéticamente sellado Subwoofer ............................................................................6,5" Potencia de salida.........................................100 W RMS (4 Ω) THD.......................................................................10% a 100 Hz Respuesta de frecuencia de reproducción...........40 Hz–150 Hz Interruptor de fase ........................................................0°, 180° Sensibilidad de entrada (entrada subwoofer) .........200 mVrms Potencia CA.............................................................230 V/50 Hz Consumo de energía ..........52 W (a 1⁄8 de potencia de régimen) Dimensiones, anch. × alt. × profun. ........200 × 310 × 370 mm Peso...................................................................................8,4 kg 3103 306 1862.1 MX 980/MX 999 VieUrs0147 HOME-CINEMA-PAKETE MX 980, MX 999 Zusätzlich zur Grundausstattung enthalten die Home-Cinema-Pakete MX 980, MX 999: – einen Subwoofer mit Anschlusskabel und Netzkabel – 5 Lautspecher mit 5 Lautsprecherkabeln – ein Koaxialkabel für die Videoverbindung mit einem DVD-Spieler oder einem Fernseher – eine Kurzanleitung zur Installation. Die Liste der Grundaustattung Ihres Receivers finden Sie im Kapitel „ALLGEMEINE INFORMATIONEN / Lieferumfang” in der Bedienungsanleitung. Aufstellen des Subwoofers NT FR ON T LEFT RIGHT BW OO FE R FRO CENTER 2 Überprüfen Sie, ob die am Typenschild angegebene Spannung mit der örtlichen Netzspannung übereinstimmt. Wenn dies nicht der Fall ist, wenden Sie sich an Ihren Fachhändler oder an Ihre Servicestelle. 3 Nachdem alle Anschlüsse vorgenommen wurden, schließen Sie das Netzkabel an den Receiver oder die Netzsteckdose an. Um den Subwoofer vollständig vom Netz zu trennen, ziehen Sie den Stecker aus der Steckdose. Einschalten des Subwoofers 1 Zum Einschalten des Subwoofers den „On/Off“-Schalter auf der Rückseite des Subwoofers auf „ON“ stellen. 2 Drehen Sie VOLUME im Uhrzeigersinn bis Sie ein Klicken hören. y Die LED-Anzeige leuchtet grün. Wenn der Subwoofer über längere Zeit nicht benutzt wird, empfiehlt es sich, den „On/Off“-Schalter auf „OFF“ zu stellen. SU Ausschalten des Subwoofers SURROUND (REAR) LEFT RIGHT SURROUND (REAR) • Sie können den Subwoofer an jedem beliebigen Platz aufstellen, denn durch den niedrigen Bass, der vom Subwoofer produziert wird (unter 150Hz), kann das menschliche Gehör den Ursprung des Klanges nicht orten. • Da der Stereo-Effekt bei Bass-Frequenzen verloren geht, ist ein Subwoofer ausreichend, um den Bass von Stereo-Kanälen wiederzugeben. • Um eine bessere Bass-Wiedergabe zu erreichen, sollten Sie den Subwoofer auf eine stabile Fläche stellen, damit keine Resonanz auftreten kann. • Stellen Sie den Subwoofer immer aufrecht und lassen Sie ein paar Zentimeter zur Wand frei. • Stellen Sie nichts auf den Subwoofer und setzen Sie sich nicht darauf. • Wenn der Subwoofer in der Mitte eines Raumes steht, kann der Bass stark abgeschwächt sein. Der Grund dafür könnte die Ausbildung einer stehenden Welle im Raum sein. Wenn das der Fall ist, rücken Sie den Subwoofer aus der Mitte des Raumes oder beseitigen Sie den Grund der stehenden Welle, indem Sie z.B. ein Bücherregal an die Wand montieren. Wichtig! Bevor Sie den Subwoofer in Betrieb nehmen, schließen Sie alle Vorbereitungsarbeiten ab. Schalten Sie Ihren Receiver ein und wählen Sie ein Ausgangsgerät. Anschlüsse Das Typenschild befindet sich an der Rückseite des Subwoofers. 1 Verwenden Sie das mitgelieferte Cinch-Kabel, um AUDIO IN mit SUBWOOFER PRE-OUT am Receiver zu verbinden. • Drehen Sie VOLUME gegen den Uhrzeigersinn bis Sie ein Klicken hören. y Die LED-Anzeige leuchtet rot. Einstellen der Lautstärke Sie können den Subwoofer an das Klangniveau der vorderen Lautsprecher angleichen. Ein verstärkter Bass erzeugt eine größere Klang-Atmosphäre. 1 Stellen Sie die Lautstärke mittels VOLUME am Receiver so ein, dass der Klang der vorderen Lautsprecher nicht verzerrt wird. Denn falls dies der Fall ist, wird der Klang des Subwoofers auch verzerrt. 2 Spielen Sie Ihre bevorzugte Musik. Um die Einstellung vorzunehmen eignen sich am besten Musikpassagen mit männlichen Singstimmen und Bassklängen. 3 Stellen Sie die Lautstärke der Bass-Wiedergabe mittels VOLUME am Subwoofer ein. Phasenschalter • Verwenden Sie PHASE SELECTOR PHASE auf der Rückseite des SELECTOR Subwoofers, um die Phase 0 0 zu wählen. 0 180 Durch die Wahl der Phase 0° oder 180° kann eine bessere Basswiedergabe in bestimmten Umgebungen (abhängig von der Art der vorderen Lautsprecher und der Position des Subwoofers) erzielt werden. Auch kann das Volumen und die Dichte des Klanges verändert und der Charakter eines Klangfeldes beeinflusst werden. • Wählen Sie die Einstellung, die Sie bevorzugen, wenn Sie in Ihrer gewohnten Hörposition Musik hören. Wiederholen Sie die Einstellung von Lautstärke und Phase, bis sie Ihnen zusagt. Wenn der Subwoofer nach Ihren Wünschen eingestellt ist, verwenden Sie VOLUME am Receiver, um die Lautstärke des Subwoofers und der anderen Lautsprecher zu regeln. Wenn Sie die Lautstärke des Receivers ändern, müssen die Subwoofer-Einstellungen nicht erneut durchgeführt werden. Deutsch Lieferumfang HOME-CINEMA-PAKETE MX 980, MX 999 Handhabung der Leistung Wenn der Receiver mit sehr hoher Leistung verwendet wird, so kann dies Verzerrungen produzieren, die Ihre Lautsprecher ernsthaft beschädigen können. Falls Verzerrungen auftreten, reduzieren Sie die Lautstärke und die Ton-Bedienelemente auf eine Stufe, bei der der Klang wieder akzeptabel ist. Um eine Überhitzung des Gerätes zu vermeiden, wurde eine Sicherheitsschaltung eingebaut. Aus diesem Grund kann es passieren, dass ihr Gerät unter extremen Bedingungen abschaltet. Wenn dies passiert, schalten Sie das Gerät aus und lassen Sie es auskühlen bevor Sie es wieder verwenden. Nachdem das Gerät ausgekühlt ist, schalten Sie es wieder ein und wählen Sie ein Ausgangsgerät durch Drehen von SOURCE SELECT. Deutsch Empfohlene Einstellungen Um den besten Klang Ihres Home-Cinema-Systems zu erzielen, empfehlen wir folgende Einstellungen an Ihrem Receiver: Änderungen vorbehalten. Vordere Lautsprecher System ........................................................2-Weg abgeschirmt Impedanz ..............................................................................8 Ω Lautsprechertreiber .................................3" Breitband, 1" Piezo Frequenzgang......................................................150 Hz–20 kHz Abmessungen (MX 980), b × h × t ..............95 × 150 × 97 mm Abmessungen (MX 999), b × h × t ..............95 × 150 × 91 mm Gewicht ...........................................................................0,45 kg Center-Lautsprecher System ........................................................2-Weg abgeschirmt Impedanz ..............................................................................8 Ω Lautsprechertreiber...........................2 × 3" Breitband, 1" Piezo Frequenzgang......................................................150 Hz–20 kHz Abmessungen (MX 980), b × h × t ..............250 × 94 × 92 mm Abmessungen (MX 999), b × h × t ..............250 × 94 × 86 mm Gewicht ...........................................................................0,92 kg Surround-Lautsprecher System .............................................................................2-Weg Impedanz ..............................................................................8 Ω Lautsprechertreiber .................................3" Breitband, 1" Piezo Frequenzgang......................................................150 Hz–20 kHz Abmessungen (MX 980), b × h × t ..............95 × 150 × 97 mm Abmessungen (MX 999), b × h × t ..............95 × 150 × 91 mm Gewicht ...........................................................................0,45 kg * SPEAKR SETUP SUBW PRESENT: YES * SPEAKR SIZES FRONT SIZE: SMALL CENTER SIZE: SMALL REAR SIZE: SMALL * VOL BALANCE VOL FRONT-L: 0 VOL FRONT-R: 0 VOL CENTER: -10 VOL REAR-L: +5 VOL REAR-R: +5 Aktiver Subwoofer mit wOOx-Technologie für MX 980 – magnetisch nicht abgeschirmt Subwoofer ............................................................................6,5" Ausgangsleistung............................................50 W RMS (4 Ω) Klirrfaktor ..........................................................10% bei 100 Hz Frequenzgang .......................................................40 Hz–150 Hz Phasenschalter..............................................................0°, 180° Eingangsempfindlichkeit (Subwoofer-Eingang) .......200 mVrms Stromversorgung.....................................................230 V/50 Hz Stromverbrauch ..........................40 W (bei 1⁄8 Nominalleistung) Abmessungen, b × h × t ..........................200 × 310 × 370 mm Gewicht .............................................................................6,8 kg BASS: 0 TREBLE: 0 LOUDNESS: ausgeschaltet Digitaler Klang von einem DVD-Spieler Wenn Sie einen DVD-Spieler an COAX 1 IN anschließen, vergewissern Sie sich, dass der digitale Ausgang Ihres DVDSpielers auf „ON“ oder „ALL“ gesetzt ist (bitte lesen Sie die Bedienungsanleitung Ihres DVD-Spielers). 3103 306 1862.1 Technische Daten der Lautsprecher und des Subwoofers Aktiver Subwoofer mit wOOx-Technologie für MX 999 – magnetisch nicht abgeschirmt Subwoofer ............................................................................6.5" Ausgangsleistung..........................................100 W RMS (4 Ω) Klirrfaktor ..........................................................10% bei 100 Hz Frequenzgang .......................................................40 Hz–150 Hz Phasenschalter..............................................................0°, 180° Eingangsempfindlichkeit (Subwoofer-Eingang) .......200 mVrms Stromversorgung.....................................................230 V/50 Hz Stromverbrauch ..........................52 W (bei 1⁄8 Nominalleistung) Abmessungen, b × h × t ..........................200 × 310 × 370 mm Gewicht .............................................................................8,4 kg MX 980/MX 999 VieUrs0147 HOME CINEMA-PAKKETTEN MX 980, MX 999 Inhoud van de doos Naast de standaardbenodigdheden bevatten de Home Cinema-pakketten MX 980, MX 999: – een subwoofer compleet met een aansluitkabel en een voedingskabel – 5 luidsprekers met 5 luidsprekerkabels – een coaxiale kabel voor videoaansluiting op een DVD-speler of TV-toestel – een kaart voor snelle installatie Voor de standaardbenodigdheden van uw ontvanger zie hoofdstuk „ALGEMENE INFORMATIE / Inhoud van de doos” in de gebruiksaanwijzing. Opstelling van de subwoofer NT ON T Om de subwoofer volledig elektrisch uit te schakelen, verwijdert u de stekker uit het stopcontact. De subwoofer aanzetten 1 Om de subwoofer in te schakelen moet u de aan/uitschakelaar op de achterkant van de subwoofer op „ON” zetten. Als u de subwoofer gedurende langere tijd niet zult gebruiken dan raden wij u aan de aan/uit-schakelaar op „OFF” te zetten. SU De subwoofer op standby zetten SURROUND (REAR) LEFT RIGHT SURROUND (REAR) • U kunt de subwoofer neerzetten waar u wilt, want met het lagetonengeluid dat uit de subwoofer wordt weergegeven (onder 150 Hz) kan het menselijk oor niet bepalen uit welke richting of van welke plaats het geluid komt. • Omdat het effect van stereo door lagetonenfrequenties verloren gaat, is bovendien een enkele subwoofer voldoende voor weergave van de lage tonen van stereokanalen. • Voor betere lagetonenweergave raden wij u aan de subwoofer op een stevige ondergrond te plaatsen waar weinig kans op resonantie bestaat. • Zet de subwoofer altijd rechtop neer, op enkele centimeters afstand uit de muur. • Zet geen voorwerpen op de subwoofer en ga er niet op zitten. • Als de subwoofer in het midden van een kamer wordt gezet, kunnen de lage tonen buitengewoon verzwakt worden. Dit komt door de invloed van de staande golf van de kamer. Verplaats in dit geval de subwoofer uit het midden van de kamer of neem de oorzaak van de staande golf weg door een boekenplank aan de muur te bevestigen, etc. Belangrijk! Voordat u de subwoofer in werking stelt, moet u de voorbereidende werkzaamheden afmaken. Zet uw ontvanger aan en kies de geluidsbron. Aansluitingen Het typeplaatje bevindt zich op de achterzijde van de subwoofer. 1 Gebruik de meegeleverde cinchkabel om AUDIO IN aan te sluiten op SUBWOOFER PRE-OUT bij de ontvanger. • Draai VOLUME linksom tot u een klik hoort. y Het LED-lampje wordt rood. Volume-instelling U kunt de subwoofer aanpassen aan het geluidsniveau van uw voorste luidsprekers. Versterking van de lage tonen zorgt voor een sfeervoller geluid. 1 Stel het VOLUME op de ontvanger zo in dat het geluid uit de voorste luidsprekers niet vervormd is. Is het wel vervormd, dan zal het geluid uit de subwoofer ook vervormd zijn. 2 Speel uw favoriete liedjes af. Mannelijke zangstemmen met basgeluid lenen zich het best voor het instellen. 3 Stel met het VOLUME op de subwoofer de geluidssterkte voor de weergave van lage tonen uit de subwoofer in. Fasekeuzeschakelaar • Gebruik PHASE SELECTOR op de achterzijde van de subwoofer om de fasepolariteit te kiezen. PHASE SELECTOR 0 0 0 180 Door de polariteit op 0° of 180° te selecteren kan het effect van de weergave van de lage tonen in bepaalde luisteromgevingen worden verbeterd (afhankelijk van het type van de voorste luidsprekers en de plaats van de subwoofer). Hierdoor kan ook het bereik en de densiteit van het geluid veranderen, en het effect van de geluidssterkte worden beïnvloed. • Kies de instelling die het door u gewenste geluid geeft als u op uw gebruikelijke plaats naar de muziek luistert. Stel volume en fasepolariteit bij tot u het door u gewenste resultaat bereikt. Als u de subwoofer heeft ingesteld op de door u gewenste instellingen, gebruikt u de VOLUME-knop op de ontvanger om het volume van de subwoofer en de andere luidsprekers in te stellen. U hoeft de instellingen van de subwoofer niet opnieuw vast te leggen, ook al wijzigt u het volumeniveau van de ontvanger. Nederlands FE OO RIGHT BW LEFT 3 Als alle aansluitingen gemaakt zijn, sluit u het netsnoer aan op de ontvanger of het stopcontact. 2 Draai VOLUME rechtsom tot u een klik hoort. y Het LED-lampje licht groen op. FR R FRO CENTER 2 Controleer of de netspanning, die op het typeplaatje is aangegeven, overeenkomt met de netspanning bij u thuis. Is dit niet het geval, raadpleeg dan uw dealer of servicedienst. HOME CINEMA-PAKKETTEN MX 980, MX 999 Uitgangsvermogen Als de receiver te hard wordt gezet (extreem hoog uitgangsvermogen) dan kunnen er vervormingen optreden die uw luidsprekers ernstig kunnen beschadigen. Als u vervormingen bemerkt, zet het volume en de tonenregeling dan op een zodanig niveau dat het geluid weer goed klinkt. Om oververhitting van het apparaat te voorkomen is een beveiliging ingebouwd. Daardoor kan het heel uitzonderlijk gebeuren dat uw apparaat automatisch uitgeschakeld wordt. Schakel in zo’n geval het apparaat uit en laat het afkoelen voor u het opnieuw gebruikt. Na het toestel te hebben laten afkoelen zet u het toestel weer aan en kiest de gewenste bron door SOURCE SELECT te verdraaien. Aanbevolen instellingen Voor optimale geluidsweergave van uw Home Cinema Systeem adviseren wij de volgende instellingen op uw ontvanger: Nederlands * SPEAKR SETUP SUBW PRESENT: YES Wijzigingen zonder voorafgaande kennisgeving voorbehouden. Voorste luidsprekers Systeem.....................................................2-zijdig afgeschermd Impedantie............................................................................8 Ω Besturingen luidsprekers.....................3" totaalbereik, 1" piëzo Frequentiebereik weergave................................150 Hz–20 kHz Afmetingen (MX 980), b × h × d..................95 × 150 × 97 mm Afmetingen (MX 999), b × h × d..................95 × 150 × 91 mm Gewicht ...........................................................................0,45 kg Middelste luidspreker Systeem.....................................................2-zijdig afgeschermd Impedantie............................................................................8 Ω Besturingen luidsprekers ..............2 × 3" totaalbereik, 1" piëzo Frequentiebereik weergave................................150 Hz–20 kHz Afmetingen (MX 980), b × h × d..................250 × 94 × 92 mm Afmetingen (MX 999), b × h × d..................250 × 94 × 86 mm Gewicht ...........................................................................0,92 kg Luidsprekers voor quadrafonisch effect Systeem ............................................................................2-weg Impedantie............................................................................8 Ω Besturingen luidsprekers.....................3" totaalbereik, 1" piëzo Frequentiebereik weergave................................150 Hz–20 kHz Afmetingen (MX 980), b × h × d..................95 × 150 × 97 mm Afmetingen (MX 999), b × h × d..................95 × 150 × 91 mm Gewicht ...........................................................................0,45 kg * SPEAKR SIZES FRONT SIZE: SMALL CENTER SIZE: SMALL REAR SIZE: SMALL * VOL BALANCE VOL FRONT-L: 0 VOL FRONT-R: 0 VOL CENTER: -10 VOL REAR-L: +5 VOL REAR-R: +5 BASS: 0 TREBLE: 0 LOUDNESS: uit Digitaal geluid vanaf een dvd-speler Zorg er bij het aansluiten van een dvd-speler op COAX 1 IN voor dat de digitale uitgang van uw dvd-speler op „ON“ of „ALL“ staat (lees a.u.b. de gebruiksaanwijzing van uw dvdspeler). 3103 306 1862.1 Technische gegevens van luidsprekers en subwoofer Actieve subwoofer met wOOx techniek voor MX 980 – niet magnetisch afgeschermde uitvoering Subwoofer ............................................................................6,5" Uitgangsvermogen ..........................................50 W RMS (4 Ω) Totale harmonische vervorming.........................10% bij 100 Hz Frequentiebereik weergave..................................40 Hz–150 Hz Faseschakelaar..............................................................0°, 180° Ingangsgevoeligheid (subwoofer in) ........................200 mVrms Wisselstroomvermogen..........................................230 V/50 Hz Opgenomen vermogen ...........40 W (bij 1⁄8 nominaal vermogen) Afmetingen, b × h × d .............................200 × 310 × 370 mm Gewicht .............................................................................6,8 kg Actieve subwoofer met wOOx techniek voor MX 999 – niet magnetisch afgeschermde uitvoering Subwoofer ............................................................................6,5" Uitgangsvermogen ........................................100 W RMS (4 Ω) Totale harmonische vervorming.........................10% bij 100 Hz Frequentiebereik weergave..................................40 Hz–150 Hz Faseschakelaar..............................................................0°, 180° Ingangsgevoeligheid (subwoofer in) ........................200 mVrms Wisselstroomvermogen..........................................230 V/50 Hz Opgenomen vermogen ...........52 W (bij 1⁄8 nominaal vermogen) Afmetingen, b × h × d .............................200 × 310 × 370 mm Gewicht .............................................................................8,4 kg MX 980/MX 999 VieUrs0147 SISTEMI HOME CINEMA MX 980, MX 999 Materiale in dotazione Oltre ai componenti standard, i sistemi Home Cinema MX 980 e MX 999 contengono: – un subwoofer, compreso un cavo di collegamento e un cavo di rete – 5 altoparlanti, compresi 5 cavi per altoparlanti – cavo coassiale per collegamento video ad un lettore DVD o ad un impianto TV – una scheda di installazione rapida Per informazioni sui componenti standard del ricevitore, ved. il capitolo «INFORMAZIONI GENERALI / Materiale in dotazione» nel manuale di istruzioni. Installazione subwoofer NT CENTER FR ON T Per scollegare completamente il subwoofer dalla rete, estrarre la spina di rete dalla presa a parete. Attivazione del subwoofer 1 Per attivare il subwoofer, impostare l’interruttore di attivazione/disattivazione sulla parte posteriore del subwoofer in posizione «ON». Se non è previsto l’uso del subwoofer per un periodo di tempo più lungo, si consiglia di impostare l’interruttore di attivazione/disattivazione su «OFF». SU Attivazione del subwoofer in modalità standby SURROUND (REAR) LEFT RIGHT SURROUND (REAR) • Il subwoofer può essere installato in qualsiasi posizione perché con la gamma di bassi riprodotta dal subwoofer (inferiore a 150 Hz) l’udito dell’uomo non è in grado di rilevare la direzione e la posizione di produzione del suono. • Inoltre, dal momento che la sensazione stereo va persa con le frequenze dei bassi, un singolo subwoofer è sufficiente per riprodurre i bassi dei canali stereo. • Per una migliore riproduzione dei bassi si consiglia di posizionare il subwoofer su una superficie solida non soggetta a risonanza. • Posizionare sempre il subwoofer in verticale, mantenendo una distanza di alcuni centimetri dalla parete. • Non posizionare alcun oggetto e non sedersi sul subwoofer. • Se il subwoofer viene posizionato al centro di una stanza, la riproduzione dei bassi può risultare estremamente attenuata. Ciò è dovuto all’influenza dell’onda stazionaria della stanza. In questo caso, spostare il subwoofer dal centro della stanza o eliminare la causa dell’onda stazionaria montando una mensola alla parete, ecc. Importante! Prima di iniziare ad utilizzare il subwoofer, completare le procedure preliminari. Attivare il ricevitore e selezionare la sorgente sonora. Collegamenti La targhetta con l’indicazione del tipo si trova sul retro del subwoofer. 1 Utilizzare il cavo cinch fornito in dotazione per collegare AUDIO IN a SUBWOOFER PRE-OUT sul ricevitore. • Ruotare VOLUME in senso antiorario fino ad udire un clic. y L’indicatore LED si illumina di luce rossa. Regolazione del volume È possibile regolare il subwoofer per adeguarlo al livello sonoro degli altoparlanti frontali. Rafforzando i bassi si ottiene un suono più avvolgente. 1 Regolare VOLUME sul ricevitore fino ad eliminare ogni distorsione dal suono proveniente dagli altoparlanti anteriori. Se il suono proveniente dagli altoparlanti è ancora distorto, anche il suono del subwoofer sarà distorto. 2 Ascoltate i vostri brani preferiti. Brani di voci maschili contenenti suoni bassi sono più adatte per eseguire la regolazione. 3 Regolare VOLUME sul subwoofer per determinare l’intensità dei bassi provenienti dal subwoofer. Selettore di fase • Utilizzare il selettore PHASE PHASE SELECTOR posto nella parte SELECTOR posteriore del subwoofer per 0 0 selezionare la polarità di fase. 0 180 La selezione della polarità su 0° o 180° può determinare una migliore riproduzione dei bassi in determinati ambienti di ascolto (a seconda del tipo di altoparlanti frontali e della posizione del subwoofer). Inoltre può determinare l’espansione e la contrazione del suono e influenzare la resa del campo sonoro. • Selezionare l’impostazione che permette di ottenere il suono desiderato posizionandosi nell’abituale punto di ascolto all’interno della stanza. Ripetere la regolazione del volume e della polarità di fase per adeguarle alle proprie preferenze. Una volta regolato il subwoofer sulle impostazioni desiderate, utilizzare il comando VOLUME sul ricevitore per regolare il volume del subwoofer e degli altri altoparlanti. Non sarà necessario regolare nuovamente le impostazioni del subwoofer, neppure se verrà modificato il livello del volume del ricevitore. Italiano FE OO RIGHT BW LEFT 3 Dopo avere eseguito tutti i collegamenti, collegare il cavo di alimentazione CA al ricevitore o alla presa a parete. 2 Ruotare VOLUME in senso orario fino ad udire un clic. y L’indicatore LED si illumina di luce verde. R FRO 2 Controllare che la tensione di rete indicata sulla targhetta con l’indicazione del tipo corrisponda alla tensione di rete locale. In caso contrario, consultare il rivenditore o il centro assistenza. SISTEMI HOME CINEMA MX 980, MX 999 Controllo dell‘alimentazione Dati tecnici relativi ad altoparlanti e subwoofer Se l’alimentazione utilizzata per il ricevitore è molto alta, può generare distorsioni, in grado di danneggiare gravemente gli altoparlanti. In caso di distorsione, ridurre ad un livello sonoro accettabile i comandi di tono e volume. Soggetti a modifiche senza preavviso. Per evitare il surriscaldamento l’apparecchio è dotato di un circuito di sicurezza. Perciò, in condizioni eccezionali, il vostro apparecchio può spegnersi. Se questo accade, spegnete l’apparecchio, dangoli il tempo di raffreddarsi prima di tornarlo a usare. Dopo avere lasciato raffreddare l’apparecchio, accenderlo nuovamente e selezionare la sorgente desiderata ruotando SOURCE SELECT. Impostazioni consigliate Per ottenere un’ottima resa sonora dal sistema Home Cinema, si consiglia di effettuare le seguenti impostazioni sul ricevitore: * SPEAKR SETUP SUBW PRESENT: YES Italiano * SPEAKR SIZES FRONT SIZE: SMALL CENTER SIZE: SMALL REAR SIZE: SMALL Altoparlante centrale Sistema ..........................................................schermato a 2 vie Impedenza ............................................................................8 Ω Driver altoparlanti ......................2 × 3" gamma piena, 1" piezo Risposta in frequenza .........................................150 Hz–20 kHz Dimensioni (MX 980), l × h × p ...................250 × 94 × 92 mm Dimensioni (MX 999), l × h × p ...................250 × 94 × 86 mm Peso.................................................................................0,92 kg Altoparlanti surround Sistema ...............................................................................2 vie Impedenza ............................................................................8 Ω Driver altoparlanti .............................3" gamma piena, 1" piezo Risposta in frequenza .........................................150 Hz–20 kHz Dimensioni (MX 980), l × h × p ...................95 × 150 × 97 mm Dimensioni (MX 999), l × h × p ...................95 × 150 × 91 mm Peso.................................................................................0,45 kg Subwoofer attivo con tecnologia wOOx per MX 980 – struttura non schermata magneticamente Subwoofer ............................................................................6,5" Potenza di uscita .............................................50 W RMS (4 Ω) THD.......................................................................10% a 100 Hz Risposta in frequenza...........................................40 Hz–150 Hz Selettore di fase ...........................................................0°, 180° Sensibilità di ingresso (subwoofer in) .....................200 mVrms Potenza CA..............................................................230 V/50 Hz Consumo di potenza ....................40 W (a 1⁄8 potenza nominale) Dimensioni, l × h × p ...............................200 × 310 × 370 mm Peso...................................................................................6,8 kg * VOL BALANCE VOL FRONT-L: 0 VOL FRONT-R: 0 VOL CENTER: -10 VOL REAR-L: +5 VOL REAR-R: +5 BASS: 0 TREBLE: 0 LOUDNESS: disattivato Suono digitale da un lettore DVD Per la connessione di un lettore DVD a COAX 1 IN, assicurarsi che l’uscita digitale del lettore DVD sia impostata su «ON» o «ALL» (leggere il manuale di istruzioni sul lettore DVD). 3103 306 1862.1 Altoparlanti frontali Sistema ..........................................................schermato a 2 vie Impedenza ............................................................................8 Ω Driver altoparlanti .............................3" gamma piena, 1" piezo Risposta in frequenza .........................................150 Hz–20 kHz Dimensioni (MX 980), l × h × p ...................95 × 150 × 97 mm Dimensioni (MX 999), l × h × p ...................95 × 150 × 91 mm Peso.................................................................................0,45 kg Subwoofer attivo con tecnologia wOOx per MX 999 – struttura non schermata magneticamente Subwoofer ............................................................................6,5" Potenza di uscita ...........................................100 W RMS (4 Ω) THD.......................................................................10% a 100 Hz Risposta in frequenza...........................................40 Hz–150 Hz Selettore di fase ...........................................................0°, 180° Sensibilità di ingresso (subwoofer in) .....................200 mVrms Potenza CA..............................................................230 V/50 Hz Consumo di potenza ....................52 W (a 1⁄8 potenza nominale) Dimensioni, l × h × p ...............................200 × 310 × 370 mm Peso...................................................................................8,4 kg MX 980/MX 999 VieUrs0147 HEMMABIO-PAKETEN MX 980, MX 999 Vad som medföljer Förutom standardutrustningen innehåller HemmaBio-paketen MX 980, MX 999: – en subwoofer inklusive en anslutningskabel och en nätkabel – 5 högtalare inklusive 5 högtalarkablar – en koaxialkabel för videoanslutning med en DVD-spelare eller en TV-apparat – ett snabbinstallationskort För standardutrustningen till din receiver se kapitel ”ALLMAN INFORMATION/Vad som medföljer” i instruktionsmanualen. T FR ON T LEFT RIGHT SU BW För att koppla ur subwoofern helt från kraftnätet, dra ur starkströmkontakten från vägguttaget. Koppla på subwoofern 2 Vrid medsols på VOLUME tills du hör ett klick. y LED-indikatorn lyser grön. Om subwoofern inte ska användas under en längre period rekommenderas det av sätta på/av-brytaren i läge ”OFF” (AV). Koppla subwoofern till standby-läge SURROUND (REAR) LEFT RIGHT SURROUND (REAR) • Installera subwoofern var du vill eftersom med basljudsräckvidden reproducerad från en subwoofer (under 150 Hz) kan det mänskliga örat inte upptäcka riktningen och positionen där ljudet produceras. • Eftersom känslan av stereo förloras med basfrekvenser, är en enda subwoofer tillräcklig för att reproducera basen från stereokanaler. • För att uppnå en bättre basreproduktion, rekommenderar vi att du placerar subwoofern på ett stabilt golv där resonans ej förmodas uppstå. • Placera alltid subwoofern vertikalt, med ett par centimeters avstånd från väggen. • Placera ej något föremål på subwoofern eller sitt på den. • Om subwoofern är placerad i mitten av ett rum, kan basen bli extremt försvagad. Detta orsakas av påverkan av den stående vågen i rummet. Om detta händer, flytta subwoofern bort från mitten av rummet eller avlägsna orsaken till den stående vågen genom att installera en bokhylla på väggen, etc. Viktigt! Innan du använder subwoofern, avsluta förberedelseåtgärderna. Koppla på din receiver och välj ljudkälla. Anslutningar Typplåten finns på baksidan av subwoofern. 1 Använd den medföljande säkringskabeln för att ansluta AUDIO IN till SUBWOOFER PRE-OUT på receivern. • Vrid motsols på VOLUME tills du hör ett klick. y LED-indikatorn skiftar till rött. Volymjustering Du kan justera subwoofern till att passa ihop med fronthögtalarnas ljudnivå. Förstärkt basljud ger dig en större känsla av atmosfär. 1 Justera VOLUME på receivern tills ljudet från fronthögtalarna inte är förvrängt. Om det är förvrängt, kommer ljudet från subwoofern också att bli förvrängt. 2 Spela din favoritmusik. Manliga sångröster innehållande bastoner är mest lämpliga för justering. 3 Justera VOLUME på subwoofern för att avgöra ljudstyrkan på basljudet från subwoofern. Fasväljare • Använd PHASE SELECTOR placerad på baksidan av subwoofern för att välja faspolaritet. PHASE SELECTOR 0 0 0 180 Val av polaritet på antingen 0° eller 180° kan avgöra bättre basreproduktionseffekt i vissa avlyssningsmiljöer (beroende på typen av fronthögtalare och positionen av subwoofern). Den kan också ändra expansionen och tätheten på ljudet, och påverka känslan av ljudfältet. • Välj den inställning som ger det ljud du föredrar när du lyssnar i din vanliga avlyssningsposition. Repetera justeringen för volym och faspolaritet till att passa din preferens. När du har justerat subwoofern till den inställning du önskar, använd VOLUME-kontrollen på receivern för att justera volymen på subwoofern och de andra högtalarna. Du behöver inte justera subwoofer-inställningarna igen även när du ändrar ljudnivån på receivern. Svenska OO FE R CENTER 3 Efter det att alla anslutningar är gjorda, anslut växelströmsladden till receivern eller vägguttaget. 1 Sätt på/av-brytaren på subwooferns baksida i läge ”ON”(PÅ) för att sätta på subwoofern. Subwoofer-installation N FRO 2 Kontrollera att strömstyrkan på typplåten överensstämmer med den lokala strömstyrkan. Om inte, rådfråga din försäljare eller serviceorganisation. HEMMABIO-PAKETEN MX 980, MX 999 Strömhantering Tekniska data till högtalare och subwoofer Om mottagaren används vid mycket hög effekt kan den orsaka förvrängningar som kan ge allvarliga skador på dina högtalare. Om ljudet låter förvrängt måste du minska volymen och tonreglaget till en nivå som ger acceptabelt ljud. Förbehållen ändringar utan förvarning. För att undvika att apparaten överhettas har en skyddskrets byggts in. Apparaten kan därför under extrema förhållanden kopplas bort. Om detta händer skall apparaten stängas av, låt den sedan svalna innan den används igen. Efter att ha låtit apparaten kyla ner koppla på apparaten igen och välj den önskade funktionen genom att vrida på SOURCE SELECT. Rekommenderade inställningar För optimal ljudåtergivning på ditt HemmaBio-system rekommenderar vi följande inställningar på din mottagare: * SPEAKR SETUP SUBW PRESENT: YES Mitthögtalare System..............................................................2-vägavskärmad Impedans ..............................................................................8 Ω Högtalardrivrör...................................2 × 3" fullskalig, 1" piezo Frekvensåtergivning............................................150 Hz–20 kHz Dimensioner (MX 980), w × h × d ...............250 × 94 × 92 mm Dimensioner (MX 999), w × h × d ...............250 × 94 × 86 mm Vikt ..................................................................................0,92 kg Surround-högtalare System ...............................................................................2-väg Impedans ..............................................................................8 Ω Högtalardrivrör..........................................3" fullskalig, 1" piezo Frekvensåtergivning............................................150 Hz–20 kHz Dimensioner (MX 980), w × h × d ...............95 × 150 × 97 mm Dimensioner (MX 999), w × h × d ...............95 × 150 × 91 mm Vikt ..................................................................................0,45 kg * SPEAKR SIZES FRONT SIZE: SMALL CENTER SIZE: SMALL REAR SIZE: SMALL * VOL BALANCE VOL FRONT-L: 0 VOL FRONT-R: 0 VOL CENTER: -10 VOL REAR-L: +5 VOL REAR-R: +5 Svenska BASS: 0 TREBLE: 0 LOUDNESS: av Digitalt ljud från en DVD-spelare När en DVD-spelare ansluts till COAX 1 IN, se till att den digitala ingången på din DVD-spelare är ställd på "ON" eller "ALL" (var vänlig läs instruktionsmanualen till din DVD-spelare). 3103 306 1862.1 Främre högtalare System..............................................................2-vägavskärmad Impedans ..............................................................................8 Ω Högtalardrivrör..........................................3" fullskalig, 1" piezo Frekvensåtergivning............................................150 Hz–20 kHz Dimensioner (MX 980), w × h × d ...............95 × 150 × 97 mm Dimensioner (MX 999), w × h × d ...............95 × 150 × 91 mm Vikt ..................................................................................0,45 kg Aktiv subwoofer med w00x-teknologi för MX 980 – inte magnetiskt avskärmad design Subwoofer ............................................................................6,5" Uteffekt............................................................50 W RMS (4 Ω) THD....................................................................10% vid 100 Hz Frekvensåtergivning .............................................40 Hz–150 Hz Fasväxlare .....................................................................0°, 180° Ingångskänslighet (subwoofer på) ...........................200 mVrms Växelströmstyrka ....................................................230 V/50 Hz Strömförbrukning .................................40 W (vid 1⁄8 märkeffekt) Dimensioner, w × h × d ...........................200 × 310 × 370 mm Vikt ....................................................................................6,8 kg Aktiv subwoofer med w00x-teknologi för MX 999 – inte magnetiskt avskärmad design Subwoofer ............................................................................6.5" Uteffekt..........................................................100 W RMS (4 Ω) THD....................................................................10% vid 100 Hz Frekvensåtergivning .............................................40 Hz–150 Hz Fasväxlare .....................................................................0°, 180° Ingångskänslighet (subwoofer på ) ..........................200 mVrms Växelströmstyrka ....................................................230 V/50 Hz Strömförbrukning .................................52 W (vid 1⁄8 märkeffekt) Dimensioner , w × h × d..........................200 × 310 × 370 mm Vikt ....................................................................................8,4 kg MX 980/MX 999 VieUrs0147 HOME CINEMA SÆT MX 980, MX 999 Medleverede dele Hjemmebio-sættene MX 980, MX 999 indeholder ud over standardudstyret følgende dele: – en subwoofer inklusive en tilslutningsledning og en elnetledning – 5 højttalere inklusive 5 højttalerledninger – et koaksialkabel til tilslutning til en DVD afspiller eller et TV – lynvejledning i installation Se kapitlet »GENEREL INFORMATION / Medleverede dele« i instruktionshåndbogen for at få en oversigt over det udstyr, der som standard følger med din modtager. Opstilling af subwoofer NT ON T For helt at afbryde strømforsyningen til subwooferen skal stikket trækkes ud af stikkontakten i væggen. Sådan tændes subwooferen 1 Subwoofer-højttaleren aktiveres ved at sætte tænd/slukkontakten på bagsiden af subwoofer’en i stilling »ON«. Hvis subwoofer’en ikke skal bruges i længere tid, tilrådes det at sætte tænd/sluk-kontakten i stilling »OFF«. SU Sådan stilles subwooferen på standby SURROUND (REAR) LEFT RIGHT SURROUND (REAR) • Du kan opstille subwooferen, lige hvor du vil, for i det område af baslyde, der gengives af subwooferen (under 150 Hz) er det ikke muligt for menneskets hørelse at opfatte, hvor lydkilden befinder sig. • Desuden vil en enkelt subwoofer være tilsltrækkelig til at gengive stereokanalernes bas, da stereofornemmelsen går tabt ved basfrekvenserne. • For at få en bedre basgengivelse anbefaler vi dig at anbringe subwooferen på et solidt gulv, hvor der er ringe sandsynlighed for resonans. • Subwooferen skal altid anbringes lodret med nogle centimeters afstand til væggen. • Der må ikke anbringes nogen genstande oven på subwooferen og man må heller ikke sætte sig på den. • Hvis subwooferen anbringes midt i et lokale, kan det medføre at bassen reduceres meget kraftigt. Dette skyldes lokalets stående bølge. Hvis dette sker, skal subwooferen flyttes fra midten af lokalet eller årsagen til den stående bølge skal fjernes ved f.eks. at anbringe en boghylde på væggen. Vigtigt! Inden du går i gang med at betjene subwooferen, skal alle forberedelser være afsluttede. Tænd for receiveren og vælg den passende lydkilde. Tilslutninger Typeskiltet er anbragt på bagsiden af subwooferen. 1 Brug den medfølgende klemmeledning til at tilslutte AUDIO IN til SUBWOOFER PRE-OUT på receiveren. • Drej på VOLUME i retning mod uret, indtil du hører et klik. y LED lampen lyser rødt. Regulering af lydstyrken Du kan justere subwooferen, så lydstyrken tilpasses til niveauet i dine fronthøjttalere. Når baslyden styrkes, får du en mere stemningsmættet følelse. 1 Indstil VOLUME på receiver så lyden i højttalerne foran ikke længere forvrænges. Hvis lyden forvrænges, bliver lyden i subwooferen også forvrænget. 2 Spil dine yndlingssange. Numre med mandlige sangere og med baslyde egner sig bedst til at foretage denne indstilling. 3 Indstil VOLUME på subwooferen for at fastlægge lydstyrken for baslyden fra subwooferen. Fasevælger • Brug PHASE SELECTOR, der er PHASE anbragt på bagsiden af SELECTOR subwooferen, til at vælge 0 0 fasepolariteten. 0 180 Hvis der vælges en polaritet på enten 0° eller 180° kan det forbedre basgengivelsen i bestemte lydlige omgivelser (afhængigt af hvilken type fronthøjttalere der benyttes og hvor subwooferen placeres). Samtidig kan man ændre lydens udbredelse og tæthed samt påvirke fornemmelsen af et lydfelt. • Vælg den indstilling, der giver dig den lyd, du foretrækker, når du lytter fra din sædvanlige lytteposition. Gentag reguleringen af lydstyrken og fasepolariteten, så de passer til dine ønsker. Når du har reguleret subwooferen, så den har de indstillinger, du vil have, skal du bruge VOLUME knappen på modtageren til at regulere lydstyrken i subwooferen og de andre højttalere. Du behøver ikke at regulere indstillingerne på subwooferen igen, selv om du ændrer lydstyrkeniveauet på receiveren. Dansk FE OO RIGHT BW LEFT 3 Når alle andre tilslutninger er udført, skal AC netledningen sættes i receiveren eller stikkontakten i væggen. 2 Drej på VOLUME i retning med uret, indtil du hører et klik. y LED lampen lyser grønt. FR R FRO CENTER 2 Se efter, om den netspænding, der er angivet på typeskiltet svarer til din lokale netspænding. Hvis den ikke gør det, må du spørge din forhandler eller serviceorganisation til råds. HOME CINEMA SÆT MX 980, MX 999 Effektregulering Hvis receiveren anvendes med meget høj effekt, kan det fremkalde forvrængninger, som alvorligt kan beskadige højttalerne. Hvis der opstår forvrængninger, skal lydstyrken og tonekontrolknapperne reduceres til et niveau, hvor lyden er acceptabel igen. For at undgå at sættet bliver for varmt er der indbygget en sikkerheds kredsløb. Derfor kan dit sæt slutte fra under ekstreme omstændigheder. Hvis dette sker sluk for sættet og lad det køle af før du bruger det igen. Når du har ladet apparatet afkøle skal du tænde for det igen og vælge den ønskede kilde ved at dreje på SOURCE SELECT. Anbefalede indstillinger For at få den optimale lydgengivelse med dit Home Cinema System anbefaler vi følgende indstillinger på din receiver: * SPEAKR SETUP SUBW PRESENT: YES Ret til ændringer uden varsel forbeholdes. Fronthøjttalere System .........................................................tovejs afskærmede Impedans ..............................................................................8 Ω Højttaler drivers..................................3" fuldt område, 1" piezo Gengivelse af frekvenskarakteristik ...................150 Hz–20 kHz Mål (MX 980), w × h × d .............................95 × 150 × 97 mm Mål (MX 999), w × h × d .............................95 × 150 × 91 mm Vægt................................................................................0,45 kg Centerhøjttaler System .........................................................tovejs afskærmede Impedans ..............................................................................8 Ω Højttaler drivers...........................2 × 3" fuldt område, 1" piezo Gengivelse af frekvenskarakteristik ...................150 Hz–20 kHz Mål (MX 980), w × h × d .............................250 × 94 × 92 mm Mål (MX 999), w × h × d .............................250 × 94 × 86 mm Vægt................................................................................0,92 kg Surroundhøjttalere System...............................................................................tovejs Impedans ..............................................................................8 Ω Højttaler drivers..................................3" fuldt område, 1" piezo Gengivelse af frekvenskarakteristik ...................150 Hz–20 kHz Mål (MX 980), w × h × d .............................95 × 150 × 97 mm Mål (MX 999), w × h × d .............................95 × 150 × 91 mm Vægt................................................................................0,45 kg * SPEAKR SIZES FRONT SIZE: SMALL CENTER SIZE: SMALL REAR SIZE: SMALL * VOL BALANCE VOL FRONT-L: 0 VOL FRONT-R: 0 VOL CENTER: -10 VOL REAR-L: +5 VOL REAR-R: +5 BASS: 0 TREBLE: 0 LOUDNESS: fra Dansk Digital lyd fra en DVD afspiller Når du tilslutter en DVD afspiller til COAX 1 IN, skal du sikre dig, at den digitale udgang på din DVD afspiller er stillet på »ON« eller »ALL« (læs betjeningsvejledningen til din DVD afspiller). 3103 306 1862.1 Tekniske specifikationer for højttalere og subwoofer Aktiv subwoofer med wOOx teknologi til MX 980 – ikke magnetisk afskærmet udformning Subwoofer ............................................................................6,5" Udgangseffekt .................................................50 W RMS (4 Ω) THD...................................................................10% ved 100 Hz Gengivelse af frekvenskarakteristik.....................40 Hz–150 Hz Fasevælger....................................................................0°, 180° Indgangsfølsomhed (sobwoofer indgang)................200 mVrms Vekselstrøm strømforsyning ...................................230 V/50 Hz Strømforbrug ....................................40 W (ved 1⁄8 mærkeeffekt) Mål, w × h × d .........................................200 × 310 × 370 mm Vægt..................................................................................6,8 kg Aktiv subwoofer med wOOx teknologi til MX 999 – ikke magnetisk afskærmet udformning Subwoofer ............................................................................6,5" Udgangseffekt ...............................................100 W RMS (4 Ω) THD...................................................................10% ved 100 Hz Gengivelse af frekvenskarakteristik.....................40 Hz–150 Hz Fasevælger....................................................................0°, 180° Indgangsfølsomhed (sobwoofer indgang )...............200 mVrms Vekselstrøm strømforsyning ...................................230 V/50 Hz Strømforbrug ....................................52 W (ved 1⁄8 mærkeeffekt) Mål, w × h × d .........................................200 × 310 × 370 mm Vægt..................................................................................8,4 kg MX 980/MX 999 VieUrs0147 KOTITEATTERIPAKETIT MX 980, MX 999 Toimituksen sisältö Perusvarusteiden lisäksi Kotiteatteri paketit MX 980, MX 999 sisältävät: – subwooferin sisältäen liitäntäkaapelin ja verkkojohdon – 5 kaiutinta sisältäen 5 kaiutinkaapelia – coaxaalisen kaapelin videoliitäntää varten DVD-soittimen tai TV-vastaanottimen yhteydessä – pika-asennuskortin Laitteesi perusvarusteista katso käyttöohjeen lukua ”YLEISTIETOJA / Toimituksen sisältö”. T FR ON T LEFT RIGHT SU BW Kytkeäksesi subwoofer kokonaan pois verkkovirrasta, poista virtajohdon pistoke pistorasiasta. Subwooferin päälle kytkeminen 2 Käännä VOLUME säädintä myötäpäivään kunnes se naksahtaa. y LED merkkivalo välähtää vihreänä. Jos subwooferia ei ole tarkoitus käyttää pitkään aikaan, kannattaa kytkin asettaa asentoon “OFF”. Subwooferin kytkeminen valmiustilaan SURROUND (REAR) LEFT RIGHT SURROUND (REAR) • Voit sijoittaa subwooferin mihin tahansa haluat, koska ihmiskorva ei kykene jäljittämään, mistä suunnasta ja asennosta subwooferin toistamat bassoäänisarjat (alle 150 Hz) kantautuvat. • Edellisen ohella stereovaikutelma katoaa bassotaajuuksien vuoksi, näin ollen yksi ainoa subwoofer riittää stereokanavien bassontoistoon. • Paremman bassontoiston saavuttamiseksi suosittelemme, että subwoofer sijoitetaan kiinteälle kohdalle lattiaa, jossa resonanssia ei todennäköisesti esiinny. • Sijoita subwoofer aina pystysuoraan, muutaman sentin päähän seinästä. • Älä sijoita muita kohteita subwooferin päälle tai älä istu sen päällä. • Jos subwoofer sijoitetaan keskelle huonetta, basso saattaa heikentyä huomattavasti. Tämä johtuu huoneen seisovasta aallosta. Jos näin käy, siirrä subwoofer pois keskeltä huonetta tai eliminoi seisovan aallon aiheuttaja sijoittamalla kirjahylly seinälle tms. Tärkeää! Ennen kuin käytät subwooferia, päätä valmistelutoimenpiteet. Kytke laitteesi päälle ja valitse äänilähde. Liitännät Tyyppikilpi sijaitsee subwooferin takaosassa. 1 Käytä mukanatoimitettua RCA-kaapelia yhdistääksesi AUDIO IN laite SUBWOOFER PRE-OUT liitäntään. • Käännä VOLUME säädintä vastapäivään kunnes se naksahtaa. y LED merkkivalo muuttuu punaiseksi. Äänensäätö Voit säätää subwooferia vastaamaan etukaiuttimiesi äänentasoa. Bassoäänen vahvistaminen saa aikaan suuremman tilantunteen. 1 Säädä laitteesi VOLUME säädintä kunnes etukaiuttimien ääni ei säröydy. Jos se säröytyy, subwooferin äänikin saattaa säröytyä. 2 Soita lempikappaleitasi. Äänen säätämiseen soveltuvat parhaiten miesäänet, joissa on bassoääniä. 3 Säädä subwooferin VOLUME säädintä määrittelemään subwooferin bassoäänten voimakkuus. Astevalin • Käytä PHASE SELECTOR valinta, PHASE joka sijaitsee subwooferin SELECTOR takaosassa valitaksesi 0 0 astepolarisaatio. 0 180 Valitsemalla polaarisuudeksi joko 0° tai 180° voit saada aikaan paremman bassontoiston tietyissä kuunteluympäristöissä (riippuen etukaiuttimien tyypistä ja subwooferin sijainnista). Tämä saattaa myös laajentaa äänen tiukkuutta ja vaikuttaa äänikentän aistimiseen. • Valitse säädös, joka saa aikaan haluamasi äänen kuunnellessasi tavallisessa kuunteluasennossa. Toista äänensäädöt ja astepolarisaatio vastaamaan toiveitasi. Kun olet säätänyt subwooferin halutuille säädöksille, käytä vastaanottimesi VOLUME säädintä säätämään subwooferin ja muiden kaiuttimien äänentaso. Sinun ei tarvitse säätää subwooferin asetuksia uudelleen siinäkään tapauksessa, jos muutat vastaanottimesi äänentasoa. Suomi OO FE R CENTER 3 Tehtyäsi kaikki liitännät, liitä verkkojohdin vastaanottimeesi tai pistorasiaan. 1 Subwoofer aktivoidaan asettamalla subwooferin takana oleva kytkin asentoon “ON”. Subwooferin sijoittaminen N FRO 2 Tarkista vastaako tyyppikilven ilmoittama verkkojännite paikallista verkkojännitettä Jos näin ei ole, ota yhteys myyjääsi tai huolto-organisaatioon. KOTITEATTERIPAKETIT MX 980, MX 999 Tehon käsittely Kaiuttimien ja subwooferin tekniset tiedot Jos vastaanotinta käytetään hyvin suurella teholla, voi aiheutua särinää, joka voi vakavasti vaurioittaa kaiuttimiasi. Jos aiheutuu särinää, vähennä äänenvoimakkuutta ja säädä äänisäätimet tasolle, jolla ääni on hyväksyttävä. Pidätämme oikeuden muutoksiin ilman eri ilmoitusta. Laitteen ylikuumentumisen estämiseksi siihen on sisäänrakennettu turvapiiri. Näin ollen laite voi irtikytkeytyä äärimmäisen vaikeissa olosuhteissa. Jos näin käy, irikytke laite ja anna sen viilentyä ennen sen uudelleenkäyttämistä. Annettuasi laitteen viilentyä, kytke laite uudelleen päälle ja valitse kääntämällä SOURCE SELECT haluttu lähde. Suositellut asetukset Kotiteatterilaitteen optimaalisen äänentoiston saavuttamiseksi suosittelemme laitteelle seuraavia asetuksia: * SPEAKR SETUP SUBW PRESENT: YES Keskikaiuttimet Järjestelmä ...........................................................2-tie suojatut Impedanssi ...........................................................................8 Ω Kaiutinohjaimet.........................................2 × 3" täysi, 1" piezo Toistotaajuus.......................................................150 Hz–20 kHz Mitat (MX 980), p × k × s ............................250 × 94 × 92 mm Mitat (MX 999), p × k × s ............................250 × 94 × 86 mm Paino................................................................................0,92 kg Takakaiuttimet Järjestelmä..........................................................................2-tie Impedanssi ...........................................................................8 Ω Kaiutinohjaimet ...............................................3" täysi, 1" piezo Toistotaajuus.......................................................150 Hz–20 kHz Mitat (MX 980), p × k × s ............................95 × 150 × 97 mm Mitat (MX 999), p × k × s ............................95 × 150 × 91 mm Paino................................................................................0,45 kg * SPEAKR SIZES FRONT SIZE: SMALL CENTER SIZE: SMALL REAR SIZE: SMALL * VOL BALANCE VOL FRONT-L: 0 VOL FRONT-R: 0 VOL CENTER: -10 VOL REAR-L: +5 VOL REAR-R: +5 BASS: 0 TREBLE: 0 LOUDNESS: pois päältä DVD-soittimen digitaalinen ääni Kun yhdistät DVD-soittimen COAX 1 IN liittimeen varmista, että DVD-soittimen digitaalinen lähtöliitin on asetettu ”ON” tai ”ALL” (lue DVD-soittimen käyttöohje). Suomi 3103 306 1862.1 Etukaiuttimet Järjestelmä ...........................................................2-tie suojatut Impedanssi ...........................................................................8 Ω Kaiutinohjaimet ...............................................3" täysi, 1" piezo Toistotaajuus.......................................................150 Hz–20 kHz Mitat (MX 980), p × k × s ............................95 × 150 × 97 mm Mitat (MX 999), p × k × s ............................95 × 150 × 91 mm Paino................................................................................0,45 kg Aktiivinen subwoofer wOOx teknologialla MX 980 – ei magneettisesti suojattu malli Subwoofer ............................................................................6,5" Äänentoisto .....................................................50 W RMS (4 Ω) THD..................................................................10% 100 herzillä Toistotaajuus ........................................................40 Hz–150 Hz Astevalin .......................................................................0°, 180° Tuloherkkyys (subwoofer in) .....................................200 mVrms Käyttöjännite...........................................................230 V/50 Hz Virrankulutus ....................................................40 W (1⁄8 teholla) Mitat, p × k × s ........................................200 × 310 × 370 mm Paino..................................................................................6,8 kg Aktiivinen subwoofer wOOx teknologialla MX 999 – ei magneettisesti suojattu malli Subwoofer ............................................................................6,5" Äänentoisto ...................................................100 W RMS (4 Ω) THD..................................................................10% 100 herzillä Toistotaajuus ........................................................40 Hz–150 Hz Astevalin .......................................................................0°, 180° Tuloherkkyys (subwoofer in) .....................................200 mVrms Käyttöjännite...........................................................230 V/50 Hz Virrankulutus ....................................................52 W (1⁄8 teholla) Mitat, p × k × s ........................................200 × 310 × 370 mm Paino..................................................................................8,4 kg MX 980/MX 999 VieUrs0147 PACOTES DE HOME CINEMA MX 980, MX 999 Equipamento fornecido Adicionalmente aos fornecimentos standard, os pacotes de Cinema em Casa MX 980, MX 999 contêm: – um subwoofer, incluindo um cabo de ligação e um cabo de alimentação – 5 altifalantes, incluindo 5 cabos de altifalante – um cabo coaxial para ligação vídeo a um leitor de DVD ou a um aparelho de TV – um cartão de instalação rápida Para os fornecimentos standard do seu receptor, consulte o capítulo «INFORMAÇÃO GERAL / Equipamento fornecido», no manual de instruções. Instalação do subwoofer NT CENTER FR ON T LEFT RIGHT SU BW 3 Depois de efectuadas todas as ligações, ligue o cabo de alimentação AC ao receptor ou à tomada na parede. Para desligar totalmente o subwoofer da alimentação, retire o cabo de alimentação da tomada na parede. Ligar o subwoofer 1 Para activar o subwoofer, coloque o comando de ligar/ desligar na parte traseira do subwoofer na posição «ON». 2 Rode VOLUME no sentido dos ponteiros do relógio até ouvir um estalido. y O indicador LED acende-se a verde. Se o subwoofer não for utilizado por um período prolongado de tempo, recomenda-se a que o comando de ligar/desligar fique na posição «OFF». Comutar o subwoofer para o modo de espera SURROUND (REAR) LEFT RIGHT SURROUND (REAR) • Instale o subwoofer onde desejar, porque com a gama de sons graves reproduzidos pelo subwoofer (abaixo dos 150 Hz), o ouvido humano não consegue detectar a direcção e a posição de onde o som está a ser produzido. • Também, dado que a sensação de estereofonia perde-se com as frequências graves, é suficiente um único subwoofer para reproduzir os graves de canais estereofónicos. • Para obter uma melhor reprodução dos graves, recomendamos que coloque o subwoofer numa superfície sólida no chão, onde é pouco provável que ocorram ressonâncias. • Coloque sempre o subwoofer na vertical, mantendo-o afastado alguns centímetros da parede. • Não coloque nenhum objecto sobre o subwoofer nem se sente nele. • Se o subwoofer for colocado no centro de uma sala, os graves podem ser extremamente enfraquecidos. Isto deve-se à influência da onda estacionária da sala. Se isto suceder, desloque o subwoofer do centro do quarto ou elimine a causa da onda estacionária, instalando uma estante de prateleiras na parede, etc. Importante! Antes de utilizar o subwoofer, conclua os procedimentos de preparação. Ligue o seu receptor e seleccione a fonte de som. Ligações A placa do tipo está localizada na retaguarda do subwoofer. 1 Utilize o cabo com fichas cinch fornecido, para ligar AUDIO IN a SUBWOOFER PRE-OUT no receptor. • Rode VOLUME no sentido contrário ao dos ponteiros do relógio até ouvir um estalido. y O indicador LED fica vermelho. Regulação do volume Pode ajustar o subwoofer para harmonizar o nível de som dos altifalantes frontais. Reforçando os sons graves obtém um maior percepção ambiental. 1 Regule o VOLUME no receptor até que o som dos altifalantes frontais não esteja distorcido. Se estiver distorcido, o som do subwoofer também estará distorcido. 2 Reproduza as suas canções favoritas. Melodias vocais de intérpretes masculinos que contenham sons graves, são as mais adequadas para efectuar este ajuste. 3 Regule o VOLUME no subwoofer para definir a ampliação dos graves do subwoofer. Selector de fase • Utilize o PHASE SELECTOR situado na retaguarda do subwoofer para seleccionar a polaridade de fase. PHASE SELECTOR 0 0 0 180 Seleccionando a polaridade 0° ou 180°, poderá estabelecer um melhor efeito de reprodução dos graves em certos ambientes de audição (conforme o tipo dos altifalantes frontais e a posição do subwoofer). Também poderá alterar a expansão e o estreitamento do som, assim como afectar a sensação do campo sonoro. • Seleccione a polaridade que lhe proporcionar um som mais agradável quando estiver na sua posição habitual de audição. Repita a regulação do volume e da polaridade de fase até conseguir o som que lhe agrade mais. Uma vez regulado o subwoofer para o ajuste desejado, utilize o controlo VOLUME do receptor para ajustar o volume do subwoofer e dos outros altifalantes. Não é necessário voltar a regular os ajustes do subwoofer, mesmo depois de alterar o nível de volume do receptor. Português OO FE R FRO 2 Verifique se a tensão de alimentação indicada na placa do tipo corresponde à tensão de alimentação da sua área. Se não corresponder, consulte o seu revendedor ou serviço de assistência. PACOTES DE HOME CINEMA MX 980, MX 999 Aceitação de potência Dados técnicos dos altifalantes e subwoofer Se o receptor for utilizado a uma potência muito alta, poderá produzir distorções que poderão danificar seriamente os altifalantes. Se ocorrerem distorções, reduza o volume e os comandos de tom para um nível a que o som volte a ser aceitável. Sujeito a alterações sem aviso prévio. Para evitar o sobre-aquecimento do aparelho, este dispõe de um circuito de segurança incorporado. Por este motivo, o seu aparelho pode-se desligar em condições extremas. Se tal acontecer, desligue o aparelho e deixe que arrefeça antes de o voltar a utilizar. Após ter deixado o aparelho arrefecer, volte a ligá-lo e seleccione a fonte desejada rodando SOURCE SELECT. Definições recomendadas Para um desempenho sonoro óptimo do seu sistema de Home Cinema, recomendamos as seguintes definições no seu receptor: Altifalante central Sistema .............................................................2 vias, blindado Impedância ...........................................................................8 Ω Cones do altifalante.......2 × 3" de gama completa, 1" piezoeléctrico Resposta de frequência na reprodução .............150 Hz–20 kHz Dimensões (MX 980), L × A × P ..................250 × 94 × 92 mm Dimensões (MX 999), L × A × P ..................250 × 94 × 86 mm Peso.................................................................................0,92 kg Altifalantes de som envolvente Sistema..............................................................................2 vias Impedância ...........................................................................8 Ω Cones do altifalante....3" de gama completa, 1" piezoeléctrico Resposta de frequência na reprodução .............150 Hz–20 kHz Dimensões (MX 980), L × A × P ..................95 × 150 × 97 mm Dimensões (MX 999), L × A × P ..................95 × 150 × 91 mm Peso.................................................................................0,45 kg * SPEAKR SETUP SUBW PRESENT: YES * SPEAKR SIZES FRONT SIZE: SMALL CENTER SIZE: SMALL REAR SIZE: SMALL * VOL BALANCE VOL FRONT-L: 0 VOL FRONT-R: 0 VOL CENTER: -10 VOL REAR-L: +5 VOL REAR-R: +5 Subwoofer activo com tecnologia w00x para o MX 980 – design não blindado magneticamente Subwoofer ............................................................................6,5" Potência de saída............................................50 W RMS (4 Ω) Limiar....................................................................10% a 100 Hz Resposta de frequência na reprodução ...............40 Hz–150 Hz Comutador de fase........................................................0°, 180° Sensibilidade de entrada (entrada de subwoofer).......200 mVrms Tensão de alimentação AC .....................................230 V/50 Hz Consumo de energia ...............40 W (a 1⁄8 da potência nominal) Dimensões, L × A × P ..............................200 × 310 × 370 mm Peso...................................................................................6,8 kg BASS: 0 TREBLE: 0 LOUDNESS: desactivado Som digital de um leitor de DVD Quando ligar um leitor de DVD a COAX 1 IN, certifique-se de que a entrada digital do seu leitor de DVD está definida para «ON» ou «ALL» (consulte o manual de instruções do seu leitor de DVD). Português 3103 306 1862.1 Altifalantes frontais Sistema .............................................................2 vias, blindado Impedância ...........................................................................8 Ω Cones do altifalante....3" de gama completa, 1" piezoeléctrico Resposta de frequência na reprodução .............150 Hz–20 kHz Dimensões (MX 980), L × A × P ..................95 × 150 × 97 mm Dimensões (MX 999), L × A × P ..................95 × 150 × 91 mm Peso.................................................................................0,45 kg Subwoofer activo com tecnologia w00x para o MX 999 – design não blindado magneticamente Subwoofer ............................................................................6,5" Potência de saída..........................................100 W RMS (4 Ω) Limiar....................................................................10% a 100 Hz Resposta de frequência na reprodução ...............40 Hz–150 Hz Comutador de fase........................................................0°, 180° Sensibilidade de entrada (entrada de subwoofer ) .....200 mVrms Tensão de alimentação AC .....................................230 V/50 Hz Consumo de energia ...............52 W (a 1⁄8 da potência nominal) Dimensões, L × A × P ..............................200 × 310 × 370 mm Peso...................................................................................8,4 kg MX 980/MX 999 VieUrs0147 ™Y™THMATA HOME CINEMA MX 980, MX 999 ∫·Ù¿ÏÔÁÔ˜ Û˘ÌÂÚÈÏ·Ì‚·ÓÔÌ¤ÓˆÓ ÂÍ·ÚÙËÌ¿ÙˆÓ EÎÙfi˜ ·fi ÙȘ ‚·ÛÈΤ˜ ·ÚÔ¯¤˜ Ù· Û˘ÛÙ‹Ì·Ù· Home Cinema MX 980, MX 999 ÂÚȤ¯Ô˘Ó: – ¤Ó· ˘ÔÁÔ‡ÊÂÚ Û˘ÌÂÚÈÏ·Ì‚·ÓÔ̤ÓÔ˘ ÙÔ˘ ηψ‰›Ô˘ Û‡Ó‰ÂÛ˘ Î·È ÙÔ˘ ηψ‰›Ô˘ ËÏÂÎÙÚÈÎÔ‡ ‰ÈÎÙ‡Ô˘ – 5 ˯›· Û˘ÌÂÚÈÏ·Ì‚·ÓÔÌ¤ÓˆÓ ÙˆÓ 5 ηψ‰›ˆÓ ÙÔ˘˜ – ¤Ó· ÔÌÔ·ÍÔÓÈÎfi ηÏÒ‰ÈÔ ÁÈ· Û‡Ó‰ÂÛË ‚›ÓÙÂÔ Ì ¤Ó· DVD ·Ó··Ú·ÁˆÁ‹˜ ‹ ÌÈ· Û˘Û΢‹ ÙËÏÂfiÚ·Û˘ – ÌÈ· οÚÙ· ÁÚ‹ÁÔÚ˘ ÂÁηٿÛÙ·Û˘ °È· ÙȘ ‚·ÛÈΤ˜ ·ÚÔ¯¤˜ ÙÔ˘ ‰¤ÎÙË Û·˜ ‚Ϥ ÎÂÊ¿Ï·ÈÔ «°∂¡I∫∂™ ¶§∏ƒOºOƒI∂™ / ∫·Ù¿ÏÔÁÔ˜ Û˘ÌÂÚÈÏ·Ì‚·ÓÔÌ¤ÓˆÓ ÂÍ·ÚÙËÌ¿ÙˆÓ» ÛÙÔ ÂÁ¯ÂÈÚ›‰ÈÔ Ô‰ËÁÈÒÓ. EÁηٿÛÙ·ÛË ˘ÔÁÔ‡ÊÂÚ NT CENTER FR ON T EÓÂÚÁÔÔ›ËÛË ÙÔ˘ ˘ÔÁÔ‡ÊÂÚ 1 °È· Ó· ÂÓÂÚÁÔÔÈ‹ÛÂÙ ÙÔ ˘ÔÁÔ‡ÊÂÚ, ı¤ÛÙ ÙÔÓ ‰È·ÎfiÙË ÂÓÂÚÁÔÔ›ËÛ˘/·ÂÓÂÚÁÔÔ›ËÛ˘ ÔÙÔ ›Ûˆ ̤ÚÔ˜ ÙÔ˘ ˘ÔÁÔ‡ÊÂÚ ÔÙË ı¤ÛË «ON» (∂ÓÂÚÁÔÔ›ËÛË). 2 ¶ÂÚÈÛÙÚ¤„Ù ÙÔ VOLUME ‰ÂÍÈfiÛÙÚÔÊ· ̤¯ÚÈ Ó· ·ÎÔ˘ÛÙ› ÎÏÈÎ. y H ¤Ó‰ÂÈÍË LED Á›ÓÂÙ·È Ú¿ÛÈÓË. SU £¤ÛË ÙÔ˘ ˘ÔÁÔ‡ÊÂÚ Û ÏÂÈÙÔ˘ÚÁ›· ·Ó·ÌÔÓ‹˜ ñ ¶ÂÚÈÛÙÚ¤„Ù ÙÔ VOLUME ·ÚÈÛÙÂÚfiÛÙÚÔÊ· ̤¯ÚÈ Ó· ·ÎÔ˘ÛÙ› ÎÏÈÎ. y H ¤Ó‰ÂÈÍË LED Á›ÓÂÙ·È ÎfiÎÎÈÓË. P‡ıÌÈÛË ¤ÓÙ·Û˘ SURROUND (REAR) LEFT RIGHT SURROUND (REAR) MÔÚ›Ù ӷ Ú˘ıÌ›ÛÂÙ ÙÔ ˘ÔÁÔ‡ÊÂÚ ÒÛÙ ӷ ·ÓÙ·ÔÎÚ›ÓÂÙ·È ÛÙË ÛÙ¿ıÌË ‹¯Ô˘ ÙˆÓ ÌÚÔÛÙÈÓÒÓ Ë¯Â›ˆÓ Û·˜. EÓÈÛ¯‡ÔÓÙ·˜ ÙÔÓ ‹¯Ô ÙˆÓ Ì¿ÛˆÓ ‰ËÌÈÔ˘ÚÁ›Ù ηχÙÂÚË ·ÙÌfiÛÊ·ÈÚ·. ñ EÁηٷÛÙ‹ÛÙ ÙÔ ˘ÔÁÔ‡ÊÂÚ ÔÔ˘‰‹ÔÙ ÂÈı˘Ì›Ù ÁÈ·Ù› Ì ÙËÓ Ë¯ËÙÈ΋ ÂÌ‚¤ÏÂÈ· Ì¿ÛÔ˘ Ô˘ ·Ó··Ú¿ÁÂÈ ÙÔ ˘ÔÁÔ‡ÊÂÚ (οو ÙˆÓ 150 Hz) Ë ·ÓıÚÒÈÓË ·ÎÔ‹ ‰ÂÓ ÌÔÚ› Ó· ·ÓȯÓ‡ÛÂÈ ÙËÓ Î·Ù‡ı˘ÓÛË Î·È ÙË ı¤ÛË ·fi fiÔ˘ ·Ú¿ÁÂÙ·È Ô ‹¯Ô˜. 1 P˘ıÌ›ÛÙ ÙÔ VOLUME ÛÙÔ ‰¤ÎÙË ÒÛÙ ӷ ÌËÓ ·Ú·ÌÔÚÊÒÓÂÙ·È Ô ‹¯Ô˜ ÙˆÓ ÌÚÔÛÙÈÓÒÓ Ë¯Â›ˆÓ. E¿Ó ·Ú·ÌÔÚÊÒÓÂÙ·È, ÙfiÙ ı· ·Ú·ÌÔÚÊÒÓÂÙ·È Î·È Ô ‹¯Ô˜ ·fi ÙÔ ˘ÔÁÔ‡ÊÂÚ. ñ E›Û˘, ηıÒ˜ Ë ÛÙÂÚÂÔʈÓÈ΋ ·›ÛıËÛË ¯¿ÓÂÙ·È ÛÙȘ Û˘¯ÓfiÙËÙ˜ ÙˆÓ Ì¿ÛˆÓ, ¤Ó· ÌfiÓÔ ˘ÔÁÔ‡ÊÂÚ Â›Ó·È ·ÚÎÂÙfi ÁÈ· ÙËÓ ·Ó··Ú·ÁˆÁ‹ ÙˆÓ Ì¿ÛˆÓ ÙˆÓ ÛÙÂÚÂÔʈÓÈÎÒÓ Î·Ó·ÏÈÒÓ. 2 ¶·›ÍÙ ٷ ·Á·Ë̤ӷ Û·˜ ÙÚ·ÁÔ‡‰È·. AÚÛÂÓÈÎÔ› ʈÓËÙÈÎÔ› ÙfiÓÔÈ Ì ̿ÛÔ˘˜ ‹¯Ô˘˜ Â›Ó·È Î·Ù·ÏÏËÏfiÙÂÚÔÈ ÁÈ· Ú‡ıÌÈÛË. ñ °È· Ó· ¤¯ÂÙ ηχÙÂÚË ·Ó··Ú·ÁˆÁ‹ ÙˆÓ Ì¿ÛˆÓ, Û·˜ Û˘ÓÈÛÙԇ̠ӷ ÙÔÔıÂÙ‹ÛÂÙ ÙÔ ˘ÔÁÔ‡ÊÂÚ Û ÛÙÂÚÂfi ¿ÙˆÌ·, fiÔ˘ Â›Ó·È ·›ı·ÓÔ Ó· Û˘Ì‚Â› Û˘ÓÙÔÓÈÛÌfi˜. 3 P˘ıÌ›ÛÙ ÙÔ VOLUME ÛÙÔ ˘ÔÁÔ‡ÊÂÚ ÁÈ· Ó· ηıÔÚÈÛÙ› Ë ·ÎÔ˘ÛÙfiÙËÙ· ÙˆÓ Ì¿ÛˆÓ Ô˘ ·Ú¿ÁÔÓÙ·È ·fi ÙÔ ˘ÔÁÔ‡ÊÂÚ. ñ TÔÔıÂÙ›Ù ÙÔ ˘ÔÁÔ‡ÊÂÚ ¿ÓÙ· οıÂÙ·, ‰È·ÙËÚÒÓÙ·˜ ÙÔ ÌÂÚÈο ÂηÙÔÛÙ¿ Ì·ÎÚÈ¿ ·fi ÙÔÓ ÙÔ›¯Ô. EÈÏÔÁ¤·˜ Ê¿Û˘ ñ MËÓ ÙÔÔıÂÙ›Ù ·ÓÙÈΛÌÂÓ· ¿ӈ ÛÙÔ ˘ÔÁÔ‡ÊÂÚ Î·È ÌËÓ Î¿ıÂÛÙ Û ·˘Ùfi. ñ E¿Ó ÙÔ ˘ÔÁÔ‡ÊÂÚ ÙÔÔıÂÙËı› ÛÙÔ Î¤ÓÙÚÔ ÙÔ˘ ‰ˆÌ·Ù›Ô˘, Ù· Ì¿Û· ÌÔÚ› Ó· Â›Ó·È È‰È·›ÙÂÚ· ÂÍ·ÛıÂÓË̤ӷ. A˘Ùfi ÔÊ›ÏÂÙ·È ÛÙËÓ ÂÈÚÚÔ‹ ÙÔ˘ ÛÙ¿ÛÈÌÔ˘ ·̷ÙÔ˜ ÙÔ˘ ‰ˆÌ·Ù›Ô˘. E¿Ó Û˘Ì‚Â› ·˘Ùfi, ÌÂÙ·ÎÈÓ‹ÛÙ ÙÔ ˘ÔÁÔ‡ÊÂÚ Ì·ÎÚÈ¿ ·fi ÙÔ Î¤ÓÙÚÔ ÙÔ˘ ‰ˆÌ·Ù›Ô˘ ‹ ·ÔÌ·ÎÚ‡ÓÂÙ ÙËÓ ·ÈÙ›· ÙÔ˘ ÛÙ¿ÛÈÌÔ˘ ·̷ÙÔ˜ ÙÔÔıÂÙÒÓÙ·˜ ¤Ó· Ú¿ÊÈ ÛÙÔÓ ÙÔ›¯Ô, ÎÙÏ. ™ËÌ·ÓÙÈÎfi! ¶ÚÈÓ ÏÂÈÙÔ˘ÚÁ‹ÛÂÙ ÙÔ ˘ÔÁÔ‡ÊÂÚ, ÔÏÔÎÏËÚÒÛÙ ÙȘ ‰È·‰Èηۛ˜ ÚÔÂÙÔÈÌ·Û›·˜. EÓÂÚÁÔÔÈ‹ÛÙ ÙÔ ‰¤ÎÙË Û·˜ Î·È ÂÈϤÍÙ ÙËÓ ËÁ‹ ‹¯Ô˘. ™˘Ó‰¤ÛÂȘ H ÈӷΛ‰· Ù‡Ô˘ ‚Ú›ÛÎÂÙ·È ÛÙÔ ›Ûˆ ̤ÚÔ˜ ÙÔ˘ ˘ÔÁÔ‡ÊÂÚ. 1 XÚËÛÈÌÔÔÈ‹ÛÙ ÙÔ Î·ÏÒ‰ÈÔ cinch Ô˘ ·Ú¤¯ÂÙ·È ÁÈ· ÙË Û‡Ó‰ÂÛË ÙÔ˘ AUDIO IN Ì ÙÔ SUBWOOFER PRE-OUT ÛÙÔ ‰¤ÎÙË. 2 EϤÁÍÙ ·Ó Ë Ù¿ÛË ÙÔ˘ Ú‡̷ÙÔ˜ Ô˘ ‰ËÏÒÓÂÙ·È ÛÙËÓ ÈӷΛ‰· Ù‡Ô˘ ·ÓÙÈÛÙÔȯ› Ì ÙËÓ ÙÔÈ΋. AÓ fi¯È, Û˘Ì‚Ô˘Ï¢Ù›Ù ÙÔÓ ÚÔÌËıÂ˘Ù‹ Û·˜ ‹ ÙËÓ ˘ËÚÂÛ›· Â͢ËÚ¤ÙËÛ˘. ñ XÚËÛÈÌÔÔÈ‹ÛÙ ÙÔ PHASE SELECTOR ÛÙÔ ›Ûˆ ̤ÚÔ˜ ÙÔ˘ ˘ÔÁÔ‡ÊÂÚ ÁÈ· ÂÈÏÔÁ‹ ÔÏÈÎfiÙËÙ·˜ Ê¿Û˘. PHASE SELECTOR 0 0 0 180 H ÂÈÏÔÁ‹ ÔÏÈÎfiÙËÙ·˜ ›Ù Û 0Æ Â›Ù Û 180Æ ÌÔÚ› Ó· ¤¯ÂÈ Î·Ï‡ÙÂÚÔ ·ÔÙ¤ÏÂÛÌ· ·Ó··Ú·ÁˆÁ‹˜ Ì¿ÛˆÓ Û ÔÚÈṲ̂ӷ ·ÎÔ˘ÛÙÈο ÂÚÈ‚¿ÏÏÔÓÙ· (·Ó¿ÏÔÁ· Ì ÙÔÓ Ù‡Ô ÌÚÔÛÙÈÓÒÓ Ë¯Â›ˆÓ Î·È ÙË ı¤ÛË ÙÔ˘ ˘ÔÁÔ‡ÊÂÚ). MÔÚ› ›Û˘ Ó· ·ÏÏ¿ÍÂÈ ÙËÓ Â¤ÎÙ·ÛË Î·È ÙË ÛÙÂÁ·ÓfiÙËÙ· ÙÔ˘ ‹¯Ô˘ Î·È Ó· ÂËÚ¿ÛÂÈ ÙËÓ ·›ÛıËÛË ÙÔ˘ ˯ËÙÈÎÔ‡ ‰›Ô˘. ñ EÈϤÍÙ ÙË Ú‡ıÌÈÛË Ô˘ Û·˜ ‰›ÓÂÈ ÙÔÓ ‹¯Ô Ô˘ ÚÔÙÈÌ¿Ù fiÙ·Ó ·ÎÔ‡Ù ÌÔ˘ÛÈ΋ ÛÙË Û˘ÓËıÈṲ̂ÓË Û·˜ ı¤ÛË. E·Ó·Ï¿‚ÂÙ ÙË Ú‡ıÌÈÛË ÁÈ· ÙËÓ ¤ÓÙ·ÛË Î·È ÙËÓ ÔÏÈÎfiÙËÙ· Ê¿Û˘ Û‡Ìʈӷ Ì ÙȘ ÚÔÙÈÌ‹ÛÂȘ Û·˜. MÂÙ¿ ÙËÓ ÂÈı˘ÌËÙ‹ Ú‡ıÌÈÛË ÙÔ˘ ˘ÔÁÔ‡ÊÂÚ, ¯ÚËÛÈÌÔÔÈ‹ÛÙ ÙÔÓ ¤ÏÂÁ¯Ô VOLUME ÛÙÔ ‰¤ÎÙË ÁÈ· Ó· ÚÔÛ·ÚÌfiÛÂÙ ÙËÓ ¤ÓÙ·ÛË ÙÔ˘ ˘ÔÁÔ‡ÊÂÚ Î·È ÙˆÓ ¿ÏÏˆÓ Ë¯Â›ˆÓ. ¢ÂÓ ··ÈÙÂ›Ù·È ÂÎ Ó¤Ô˘ ÚÔÛ·ÚÌÔÁ‹ ÙˆÓ Ú˘ıÌ›ÛÂˆÓ ÙÔ˘ ˘ÔÁÔ‡ÊÂÚ ·ÎfiÌË Î·È fiÙ·Ó ·ÏÏ¿˙ÂÙ ÙË ÛÙ¿ıÌË ¤ÓÙ·Û˘ ÙÔ˘ ‰¤ÎÙË. ∂ÏÏËÓÈο FE OO RIGHT BW LEFT °È· Ó· ·ÔÛ˘Ó‰¤ÛÂÙ ÙÂÏ›ˆ˜ ÙÔ ˘ÔÁÔ‡ÊÂÚ ·fi ÙÔ ËÏÂÎÙÚÈÎfi ‰›ÎÙ˘Ô, ‚Á¿ÏÙ ÙÔ ‚‡ÛÌ· ‰ÈÎÙ‡Ô˘ ·fi ÙËÓ ˘Ô‰Ô¯‹ ÙÔ›¯Ô˘. ∂¿Ó ÙÔ ˘ÔÁÔ‡ÊÂÚ ‰ÂÓ ÚfiÎÂÈÙ·È Ó· ¯ÚËÛÈÌÔÔÈËı› ÁÈ· ÌÂÁ¿ÏÔ ¯ÚÔÓÈÎfi ‰È¿ÛÙËÌ·, Û˘ÓÈÛÙ¿Ù·È Ó· ı¤ÛÂÙ ÙÔÓ ‰È·ÎfiÙË ÂÓÂÚÁÔÔ›ËÛ˘/ ·ÂÓÂÚÁÔÔ›ËÛ˘ ÛÙË ı¤ÛË «OFF» (∞ÂÓÂÚÁÔÔ›ËÛË). R FRO 3 AÊÔ‡ ÔÏÔÎÏËÚˆıÔ‡Ó ÔÈ Û˘Ó‰¤ÛÂȘ, Û˘Ó‰¤ÛÙ ÙÔ Î·ÏÒ‰ÈÔ ÂÓ·ÏÏ·ÛÛfiÌÂÓÔ˘ Ú‡̷ÙÔ˜ ÛÙÔ ‰¤ÎÙË ‹ ÛÙËÓ ·ÚÔ¯‹ ÙÔ˘ ÙÔ›¯Ô˘. ™Y™THMATA HOME CINEMA MX 980, MX 999 ¢È·¯Â›ÚÈÛË ÈÛ¯‡Ô˜ ∆¯ÓÈο ÛÙÔȯ›· ÙˆÓ Ë¯Â›ˆÓ Î·È ÙˆÓ ˘ÔÁÔ‡ÊÂÚ OÙ·Ó Ô ‰¤ÎÙ˘ ¯ÚËÛÈÌÔÔÈÂ›Ù·È Û Ôχ ˘„ËÏ‹ ÈÛ¯‡ ÌÔÚ› Ó· ‰ËÌÈÔ˘ÚÁ‹ÛÂÈ ·Ú·ÌÔÚÊÒÛÂȘ Ô˘ ÂÓ‰¤¯ÂÙ·È Ó· ÚÔÍÂÓ‹ÛÔ˘Ó ÛÔ‚·Ú¤˜ ˙ËÌȤ˜ ÛÙ· ˯›· Û·˜. ∂¿Ó Û˘Ì‚Â› ·˘Ùfi, ηÙ‚¿ÛÙ ÙËÓ ¤ÓÙ·ÛË Î·È ÙÔÓ ÙfiÓÔ Û οÔÈÔ ·Ô‰ÂÎÙfi ›‰Ô. YfiÎÂÈÙ·È Û ÙÚÔÔÔ›ËÛË ¯ˆÚ›˜ ÚÔÂȉÔÔ›ËÛË. °È· ÙËÓ ·ÔÊ˘Á‹ Ù˘ ˘ÂÚı¤ÚÌ·ÓÛ‹˜ Ù˘, Ë Û˘Û΢‹ ¤¯ÂÈ ÂÍÔÏÈÛÙ› Ì ÂÓۈ̷و¤ÓÔ Î‡Îψ̷ ·ÛÊ·Ï›·˜. °È’ ·˘Ùfi οو ·fi ·ÎÚ·›Â˜ Û˘Óı‹Î˜, ÂÓ‰¤¯ÂÙ·È Ó· ·ÔÛ˘Ó‰Âı› Ë Û˘Û΢‹ Û·˜. ∞Ó Û˘Ì‚Â› ·˘Ùfi, Û‚‹ÛÙ ÙË Û˘Û΢‹ Î·È ·Ê‹ÛÙ ÙËÓ Ó· ÎÚ˘ÒÛÂÈ ÚÔÙÔ‡ ÙËÓ Í·Ó·¯ÚËÛÈÌÔÔÈ‹ÛÂÙÂ. ∞ÊÔ‡ ÎÚ˘ÒÛÂÈ Ë Û˘Û΢‹ ÂÓÂÚÁÔÔÈ‹ÛÙ ÙËÓ Í·Ó¿ Î·È ÂÈϤÍÙ ÙËÓ ÂÈı˘ÌËÙ‹ ËÁ‹ Û˘ÓÙÔÓ›˙ÔÓÙ·˜ SOURCE SELECT. ™˘ÓÈÛÙÒÌÂÓ˜ Ú˘ıÌ›ÛÂȘ °È· ‚¤ÏÙÈÛÙË ·fi‰ÔÛË ‹¯Ô˘ ÙÔ˘ ™˘ÛÙ‹Ì·Ùfi˜ Û·˜ Home Cinema, Û·˜ Û˘ÓÈÛÙԇ̠ÙȘ ·ÎfiÏÔ˘ı˜ Ú˘ıÌ›ÛÂȘ ÛÙÔÓ ‰¤ÎÙË Û·˜: EÌÚfiÛıÈ· ˯›· ™‡ÛÙËÌ· .....................................................2 ‰ÚfiÌˆÓ Ì ıˆÚ¿ÎÈÛË E̤‰ËÛË.................................................................................8 Ω O‰ËÁÔ› Ë¯Â›Ô˘ .................................3" Ï‹ÚÔ˘˜ ÂÚÈÔ¯‹˜, 1" piezo AÓ··Ú·ÁˆÁ‹ ·fiÎÚÈÛ˘ Û˘¯ÓfiÙËÙ·˜ ....................150 Hz–20 kHz ¢È·ÛÙ¿ÛÂȘ (MX 980), × ˘ × ‚.......................95 × 150 × 97 mm ¢È·ÛÙ¿ÛÂȘ (MX 999), × ˘ × ‚.......................95 × 150 × 91 mm B¿ÚÔ˜.................................................................................0,45 kg KÂÓÙÚÈÎfi Ë¯Â›Ô ™‡ÛÙËÌ· .....................................................2 ‰ÚfiÌˆÓ Ì ıˆÚ¿ÎÈÛË E̤‰ËÛË.................................................................................8 Ω O‰ËÁÔ› Ë¯Â›Ô˘ ..........................2 × 3" Ï‹ÚÔ˘˜ ÂÚÈÔ¯‹˜, 1" piezo AÓ··Ú·ÁˆÁ‹ ·fiÎÚÈÛ˘ Û˘¯ÓfiÙËÙ·˜ ....................150 Hz–20 kHz ¢È·ÛÙ¿ÛÂȘ (MX 980), × ˘ × ‚.......................250 × 94 × 92 mm ¢È·ÛÙ¿ÛÂȘ (MX 999), × ˘ × ‚.......................250 × 94 × 86 mm B¿ÚÔ˜.................................................................................0,92 kg ¶ÂÚÈÊÂÚÂȷο ˯›· ™‡ÛÙËÌ· ..........................................................................2 ‰ÚfiÌˆÓ E̤‰ËÛË.................................................................................8 Ω O‰ËÁÔ› Ë¯Â›Ô˘ .................................3" Ï‹ÚÔ˘˜ ÂÚÈÔ¯‹˜, 1" piezo AÓ··Ú·ÁˆÁ‹ ·fiÎÚÈÛ˘ Û˘¯ÓfiÙËÙ·˜ ....................150 Hz–20 kHz ¢È·ÛÙ¿ÛÂȘ (MX 980), × ˘ × ‚.......................95 × 150 × 97 mm ¢È·ÛÙ¿ÛÂȘ (MX 999), × ˘ × ‚.......................95 × 150 × 91 mm B¿ÚÔ˜.................................................................................0,45 kg * SPEAKR SETUP SUBW PRESENT: YES * SPEAKR SIZES FRONT SIZE: SMALL CENTER SIZE: SMALL REAR SIZE: SMALL * VOL BALANCE VOL FRONT-L: 0 VOL FRONT-R: 0 VOL CENTER: -10 VOL REAR-L: +5 VOL REAR-R: +5 ∂ÓÂÚÁfi ˘ÔÁÔ‡ÊÂÚ Ù¯ÓÔÏÔÁ›·˜ wOOx ÁÈ· MX 980 – Û¯¤‰ÈÔ ¯ˆÚ›˜ Ì·ÁÓËÙÈ΋ ıˆÚ¿ÎÈÛË YÔÁÔ‡ÊÂÚ...............................................................................6,5" IÛ¯‡˜ ÂÍfi‰Ô˘.......................................................50 W RMS (4 Ω) ¶·Ú·ÌfiÚʈÛË THD ................................................10% Û 100 Hz AÓ··Ú·ÁˆÁ‹ ·fiÎÚÈÛ˘ Û˘¯ÓfiÙËÙ·˜ ......................40 Hz–150 Hz ¢È·ÎfiÙ˘ Ê¿Û˘ .............................................................0Æ, 180Æ E˘·ÈÛıËÛ›· ÂÈÛfi‰Ô˘ (˘ÔÁÔ‡ÊÂÚ ÂÓÙfi˜) ......................200 mVrms EÓ·ÏÏ·ÛÛfiÌÂÓÔ Ú‡̷ ................................................230 V/50 Hz K·Ù·Ó¿ÏˆÛË Ú‡̷ÙÔ˜ ...............40 W (Û 1/8 ÔÓÔÌ·ÛÙÈ΋˜ ÈÛ¯‡Ô˜) ¢È·ÛÙ¿ÛÂȘ, × ˘ × ‚ ..................................200 × 310 × 370 mm B¿ÚÔ˜...................................................................................6,8 kg BASS: 0 TREBLE: 0 LOUDNESS: ÂÎÙfi˜ æËÊÈ·Îfi˜ ‹¯Ô˜ ·fi ¤Ó· DVD ·Ó··Ú·ÁˆÁ‹˜ ŸÙ·Ó Û˘Ó‰¤ÂÙ ¤Ó· DVD ·Ó··Ú·ÁˆÁ‹˜ Û COAX 1 IN, ‚‚·Èˆı›Ù fiÙÈ Ë „ËÊȷ΋ ¤ÍÔ‰Ô˜ ÙÔ˘ DVD ·Ó··Ú·ÁˆÁ‹˜ Û·˜ ‚Ú›ÛÎÂÙ·È ÛÙÔ «ON» ‹ «ALL » (·Ú·Î·Ïԇ̠‰È·‚¿ÛÙ ÙÔ ÂÁ¯ÂÈÚ›‰ÈÔ Ô‰ËÁÈÒÓ ÙÔ˘ DVD ·Ó··Ú·ÁˆÁ‹˜ Û·˜). ∂ÓÂÚÁfi ˘ÔÁÔ‡ÊÂÚ Ù¯ÓÔÏÔÁ›·˜ wOOx ÁÈ· MX 999 – Û¯¤‰ÈÔ ¯ˆÚ›˜ Ì·ÁÓËÙÈ΋ ıˆÚ¿ÎÈÛË YÔÁÔ‡ÊÂÚ...............................................................................6.5" IÛ¯‡˜ ÂÍfi‰Ô˘ .....................................................100 W RMS (4 Ω) ¶·Ú·ÌfiÚʈÛË THD ................................................10% Û 100 Hz AÓ··Ú·ÁˆÁ‹ ·fiÎÚÈÛ˘ Û˘¯ÓfiÙËÙ·˜ ......................40 Hz–150 Hz ¢È·ÎfiÙ˘ Ê¿Û˘ .............................................................0Æ, 180Æ E˘·ÈÛıËÛ›· ÂÈÛfi‰Ô˘ (˘ÔÁÔ‡ÊÂÚ ÂÓÙfi˜) ......................200 mVrms EÓ·ÏÏ·ÛÛfiÌÂÓÔ Ú‡̷ ................................................230 V/50 Hz K·Ù·Ó¿ÏˆÛË Ú‡̷ÙÔ˜ ...............52 W (Û 1/8 ÔÓÔÌ·ÛÙÈ΋˜ ÈÛ¯‡Ô˜) ¢È·ÛÙ¿ÛÂȘ, × ˘ × ‚ ..................................200 × 310 × 370 mm B¿ÚÔ˜...................................................................................8,4 kg ∂ÏÏËÓÈο 3103 306 1862.1 MX 980/MX 999 VieUrs0147 ZESTAWY KINA DOMOWEGO MX 980, MX 999 3 Po dokonaniu wszystkich po¬åczeñ, pod¬åcz kabel zasilania odbiornika do gniazdka wysokiego napiêcia. Wyposa¿enie Zestawy Kina Domowego MX 980, MX 999, poza standardowym wyposa¿eniem, zawierajå: – subwoofer z kablem po¬åczeniowym i kablem zasilania – 5 kolumn g¬oœnikowych z 5 kablami g¬oœnikowymi – kabel koncentryczny dla pod¬åczenia sygna¬u wideo z odtwarzacza DVD lub telewizora – instrukcjê szybkiej instalacji sprzêtu Opis standardowego wyposa¿enia Twojego odbiornika znajduje siê w rozdziale „INFORMACJE OGÓLNE / Wyposa¿enie“ instrukcji obs¬ugi urzådzenia. Ustawienie subwoofera NT CENTER FR ON T LEFT RIGHT W¬åczenie subwoofera 1 Aby uaktywniæ subwoofer, ustaw wy¬åcznik z tylu obudowy g¬oœnika w pozycji w¬åczonej (ON). 2 Obróæ pokrêt¬o VOLUME w prawo a¿ do us¬yszenia cichego trzasku. y Zapali siê zielony wskaŸnik LED. Je¿eli g¬oœnik subwoofer nie bêdzie u¿ywany przez d¬u¿szy czasu, zaleca siê ustawienie wy¬åcznika w pozycji wy¬åczonej (OFF). Wy¬åczenie subwoofera do czuwania • Obróæ pokrêt¬em VOLUME w lewo do us¬yszenia cichego trzasku. y WskaŸnik LED zmieni kolor na czerwony. SURROUND (REAR) LEFT RIGHT SURROUND (REAR) • Subwoofer mo¿na umieœciæ w dowolnym miejscu, poniewa¿ w zakresie przenoszonych przez subwoofer dŸwiêków basowych (poni¿ej 150 Hz) s¬uch ludzki nie rozpoznaje kierunku ani miejsca rozchodzenia siê dŸwiêku. • Poniewa¿ efekt stereofoniczny nie jest odczuwany w niskich czêstotliwoœciach, pojedynczy subwoofer w zupe¬noœci wystarczy dla przenoszenia dŸwiêków basowych z obu kana¬ów stereo. • Dla uzyskania lepszego efektu dŸwiêkowego, zalecamy umieszczenie subwoofera na pod¬odze lub na innej twardej powierzchni w celu unikniêcia drgañ rezonansowych. • Subwoofer nale¿y zawsze stawiaæ pionowo, zachowujåc odlegoœæ kilku centymetrów od œciany. • Nie wolno umieszczaæ ¿adnych przedmiotów na obudowie subwoofera ani na nim siadaæ. • Je¿eli subwoofer znajduje siê na œrodku pomieszczenia, dŸwiêki basowe mogå ulec silnemu st¬umieniu. Nastêpuje to wskutek powstania fali stojåcej w pomieszczeniu. Je¿eli dojdzie do t¬umienia basów, nale¿y przesunåæ subwoofer ze œrodka pomieszczenia lub usunåæ przyczynê powstawania fali stojåcej przez zainstalowanie pó¬ki na œcianie, itp. Wa¿ne! Przed w¬åczeniem subwoofera nale¿y zakoñczyæ pod¬åczanie g¬oœnika. Nastêpnie mo¿emy w¬åczyæ urzådzenie i wybraæ Ÿród¬o sygna¬u. Po¬åczenia Tabliczka znamionowa znajduje siê z ty¬u subwoofera. 1 Za pomocå kabla cinch po¬åcz gniazdko AUDIO IN z gniazdkiem SUBWOOFER PRE-OUT odbiornika. 2 SprawdŸ, czy napiêcie zasilania na tabliczce znamionowej jest identyczne z napiêciem sieciowym. W innym przypadku zasiêgnij porady u sprzedawcy lub w serwisie. Regulacja si¬y g¬osu Natê¿enie dŸwiêku subwoofera mo¿emy dopasowaæ do poziomu dŸwiêku przednich kolumn g¬oœnikowych. Odpowiednie natê¿enie basów znacznie poprawia odbiór wra¿eñ dŸwiêkowych. 1 Najpierw pokrêt¬em VOLUME nale¿y ustawiæ natê¿enie dŸwiêku kolumn przednich, aby dŸwiêk by¬ s¬yszalny bez zniekszta¬ceñ. W innym przypadku równie¿ z subwoofera bêdzie dobiega¬ zniekszta¬cony dŸwiêk. 2 Regulacjê wykonajmy s¬uchajåc dobrze nam znanych utworów. Do regulacji basów najlepiej nadajå siê wokaliœci z g¬êbokim tembrem g¬osu. 3 Pokrêt¬em VOLUME na subwooferze regulujemy natê¿enie dŸwiêku z g¬oœnika. Dobór fazy • Prze¬åcznik PHASE SELECTOR z ty¬u subwoofera pozwala na zmianê polaryzacji fazy. PHASE SELECTOR 0 0 0 180 Wybranie polaryzacji 0° lub 180° mo¿e daæ w wyniku lepsze przenoszenie dŸwiêków niskich w okreœlonych warunkach otoczenia (w zale¿noœci od rodzaju kolumn przednich oraz pozycji subwoofera). Zmiana polaryzacji fazy mo¿e równie¿ wp¬ynåæ na dynamikê i rozchodzenie siê dŸwiêku, zmieniajåc odczuwanie pola dŸwiêkowego. • Wybierzmy takå polaryzacjê, która zapewnia lepsze dla ucha brzmienie dŸwiêku w miejscu, gdzie zazwyczaj bêdziemy siedzieæ podczas s¬uchania. Doboru dokonajmy po kilku próbach ze zmianå polaryzacji i natê¿enia dŸwiêku. Po ustawieniu parametrów subwoofera, regulacjê si¬y g¬osu ca¬ego zestawu – zarówno subwoofera, jak i pozosta¬ych kolumn g¬oœnikowych – umo¿liwia pokrêt¬o VOLUME na odbiorniku. Nie musimy regulowaæ subwoofera za ka¿dym razem, gdy chcemy zmieniæ si¬ê g¬osu odbiornika. Polski SU BW OO FE R FRO Aby ca¬kowicie wy¬åczyæ zasilanie subwoofera nale¿y wyjåæ kabel zasilania z gniazdka. ZESTAWY KINA DOMOWEGO MX 980, MX 999 Nadmierne natê¿enie dŸwiêku Ustawienie odbiornika na du¿å si¬ê g¬osu mo¿e prowadziæ do zniekszta¬ceñ, gro¿åcych trwa¬ym uszkodzeniem g¬oœników. W razie zniekszta¬ceñ nale¿y zmniejszyæ si¬ê i barwê g¬osu do poziomu, w którym zniekszta¬cenia ustanå. Urzådzenia posiada fabrycznie wbudowany obwód bezpieczeñstwa, zapobiegajåcy przegrzaniu. Dlatego w skrajnych warunkach mo¿e dojœæ do samoczynnego wy¬åczenia odbiornika. Je¿eli do tego dojdzie, nale¿y wy¬åczyæ zasilanie i odczekaæ, a¿ zestaw ulegnie sch¬odzeniu. Po pozostawieniu urzådzenia do ostygniêcia w¬åcz je ponownie i wybierz Ÿród¬o sygna¬u obracajåc pokrêt¬em SOURCE SELECT. Zalecane ustawienia Dla uzyskania najlepszych efektów dŸwiêkowych w Zestawie Kina Domowego, zalecamy wybór nastêpujåcych ustawieñ na odbiorniku: * SPEAKR SETUP SUBW PRESENT: YES Parametry techniczne kolumn g¬oœnikowych i subwoofera Producent zastrzega prawo do wprowadzania zmian bez uprzedzenia. Kolumny przednie System.....................................................2-dro¿ny, ekranowany Impedancja ...........................................................................8 Ω G¬oœniki ......................3" szerokopasmowy, 1" piezoelektryczny Czêstotliwoœæ przenoszona.................................150 Hz–20 kHz Wymiary (MX 980), szer. x wys. x d¬. ..........95 × 150 × 97 mm Wymiary (MX 999), szer. x wys. x d¬. ..........95 × 150 × 91 mm Waga...............................................................................0,45 kg Kolumna œrodkowa System.....................................................2-dro¿ny, ekranowany Impedancja ...........................................................................8 Ω G¬oœniki ...............2 × 3" szerokopasmowy, 1" piezoelektryczny Czêstotliwoœæ przenoszona.................................150 Hz–20 kHz Wymiary (MX 980), szer. x wys. x d¬. ..........250 × 94 × 92 mm Wymiary (MX 999), szer. x wys. x d¬. ..........250 × 94 × 86 mm Waga...............................................................................0,92 kg Kolumny surround System...........................................................................2-dro¿ny Impedancja ...........................................................................8 Ω G¬oœniki ......................3" szerokopasmowy, 1" piezoelektryczny Czêstotliwoœæ przenoszona.................................150 Hz–20 kHz Wymiary (MX 980), szer. x wys. x d¬. ..........95 × 150 × 97 mm Wymiary (MX 999), szer. x wys. x d¬. ..........95 × 150 × 91 mm Waga...............................................................................0,45 kg * SPEAKR SIZES FRONT SIZE: SMALL CENTER SIZE: SMALL REAR SIZE: SMALL * VOL BALANCE VOL FRONT-L: 0 VOL FRONT-R: 0 VOL CENTER: -10 VOL REAR-L: +5 VOL REAR-R: +5 BASS: 0 TREBLE: 0 LOUDNESS: off (wy¬åczone) DŸwiêk cyfrowy z odtwarzacza DVD Pod¬åczajåc odtwarzacz DVD do gniazdka COAX 1 IN, upewnij siê, ¿e wyjœcie cyfrowe odtwarzacza DVD ustawione jest na „ON“ lub „ALL“ (skorzystaj z instrukcji u¿ytkownika odtwarzacza DVD). Aktywny subwoofer z technologiå wOOx dla MX 980 – uk¬ad nie izolowany magnetycznie Subwoofer ............................................................................6,5" Moc wyjœciowa ...............................................50 W RMS (4 Ω) THD ..................................................................10% przy 100 Hz Czêstotliwoœæ przenoszona ..................................40 Hz–150 Hz Zmiana fazy ...................................................................0°, 180° Czu¬oœæ wejœciowa (subwoofer in)...........................200 mVrms Zasilanie..................................................................230 V/50 Hz Zu¿ycie energii ..........................40 W (przy obciå¿eniu 1⁄8 mocy) Wymiary, szer. x wys. x d¬. ......................200 × 310 × 370 mm Waga.................................................................................6,8 kg Aktywny subwoofer z technologiå wOOx dla MX 999 – uk¬ad nie izolowany magnetycznie Subwoofer ............................................................................6,5" Moc wyjœciowa .............................................100 W RMS (4 Ω) THD ..................................................................10% przy 100 Hz Czêstotliwoœæ przenoszona ..................................40 Hz–150 Hz Zmiana fazy ...................................................................0°, 180° Czu¬oœæ wejœciowa (subwoofer in)...........................200 mVrms Zasilanie..................................................................230 V/50 Hz Zu¿ycie energii ..........................52 W (przy obciå¿eniu 1⁄8 mocy) Wymiary, szer. x wys. x d¬. ......................200 × 310 × 370 mm Waga.................................................................................8,4 kg Polski 3103 306 1862.1 MX 980/MX 999 VieUrs0147 Important notes for users in the U.K. Italia Mains plug DICHIARAZIONE DI CONFORMITA’ This apparatus is fitted with an approved 13 Amp plug. To change a fuse in this type of plug proceed as follows: 1 Remove fuse cover and fuse. 2 Fix new fuse which should be a BS1362 5 Amp, A.S.T.A. or BSI approved type. 3 Refit the fuse cover. If the fitted plug is not suitable for your socket outlets, it should be cut off and an appropriate plug fitted in its place. If the mains plug contains a fuse, this should have a value of 5 Amp. If a plug without a fuse is used, the fuse at the distribution board should not be greater than 5 Amp. Note: The severed plug must be disposed of to avoid a possible shock hazard should it be inserted into a 13 Amp socket elsewhere. How to connect a plug The wires in the mains lead are coloured with the following code: blue = neutral (N), brown = live (L). As these colours may not correspond with the colour markings identifying the terminals in your plug, proceed as follows: • Connect the blue wire to the terminal marked N or coloured black. • Connect the brown wire to the terminal marked L or coloured red. • Do not connect either wire to the earth terminal in the plug, marked E (or e) or coloured green (or green and yellow). Before replacing the plug cover, make certain that the cord grip is clamped over the sheath of the lead - not simply over the two wires. Copyright in the U.K. Recording and playback of material may require consent. See Copyright Act 1956 and The Performer’s Protection Acts 1958 to 1972. 2 Si dichiara che gli apparecchi FR 984/FR 985/FR 986 e FR 994/FR 995/FR 996 Philips rispondono alle prescrizioni dell’art. 2 comma 1 del D. M. 28 Agosto 1995 n. 548. Philips Consumer Electronics Philips, Glaslaan 2 5616 JB Eindhoven, The Netherlands Norge Typeskilt finnes på apparatens bakside. Observer: Nettbryteren er sekundert innkoplet. Den innebygde netdelen er derfor ikke frakoplet nettet så lenge apparatet er tilsluttet nettkontakten. For å redusere faren for brann eller elektrisk støt, skal apparatet ikke utsettes for regn eller fuktighet. English Français English ....................................................4 Español Français.................................................26 Deutsch Español .................................................48 Nederlands Deutsch.................................................70 Italiano Nederlands ...........................................92 Italiano................................................114 3 GENERAL INFORMATION English General information Scope of supply..................................................................................4 Setup ..................................................................................................4 Environmental information.................................................................4 Trademark acknowledgment..............................................................4 Maintenance ......................................................................................4 Controls .................................................................................................5 Remote control Remote control usage........................................................................6 Remote control buttons .....................................................................7 Programming the universal remote control (FR 985, FR 986, FR 995, FR 996 only) ...............................................8 Scope of supply This receiver is supplied including: – a remote control – 2 batteries for the remote control, size AA – a coaxial cable for audio connection with a DVD player – a system bus cable for the CINEMA LINK connection – a loop antenna – a wire antenna – this instruction booklet Connectors............................................................................................9 Connections Analogue audio connections ...........................................................10 Digital audio connections ................................................................10 System control bus, CINEMA LINK .................................................11 Video connections............................................................................11 Mains ...............................................................................................12 Power handling ................................................................................12 Speaker connections........................................................................12 TV as the center speaker .................................................................12 Antenna connections .......................................................................12 Headphones .....................................................................................12 System setup Positioning of the speakers .............................................................13 Speaker setup and testing...............................................................13 Receiver adjustment ........................................................................13 Display.................................................................................................14 Menus Receiver menu ...........................................................................15–16 TV menu ...........................................................................................16 Activating CINEMA LINK .................................................................16 Source selection SOURCE SELECT...............................................................................17 6 CHANNEL-DVD/SACD INPUT selection .......................................17 Reassigning a source selection .......................................................17 Using one source selection for two or more appliances ................17 About 6 CHANNEL-DVD/SACD INPUT ............................................17 Playback, recording Playing a source ...............................................................................18 Adjusting the sound .........................................................................18 Recording from a source..................................................................18 Recording from the digital output ...................................................18 Surround sound About surround sound......................................................................19 Switching surround sound ...............................................................19 Surround sound settings..................................................................20 Tuner Tuning to radio stations ...................................................................21 Switching FM sensitivity .................................................................21 Storing radio stations ......................................................................21 Tuning to stored radio stations........................................................22 Resorting stored radio stations .......................................................22 Naming radio stations .....................................................................22 Clearing station names....................................................................22 RDS R..............................................................................................23 RDS News and Traffic Announcement ............................................23 Technical data Receiver............................................................................................24 Troubleshooting Warning............................................................................................25 Troubleshooting................................................................................25 As an ENERGY STAR® partner, Philips has determined that this product meets the ENERGY STAR® guidelines for energy efficiency. This set complies with the radio interference requirements of the European Community. 4 Setup If you have stacked the components of your system, the receiver must be on top. Place the receiver on a flat, hard, stabile surface. Do not cover any vents and leave 50 cm above and 10 cm left and right of the receiver free for ventilation. For good reception the loop antenna should not be placed on top of or beneath VCRs, CD recorders, DVD players, TVs and other radiation sources. Environmental information All redundant packing material has been omitted. We have done our utmost to make the packaging easily separable into three mono materials: cardboard (box), polystyrene foam (buffer) and polyethylene (bags, protective foam sheet). Your set consists of materials which can be recycled if disassembled by a specialized company. Please observe the local regulations regarding the disposal of packing materials, exhausted batteries and old equipment. Trademark acknowledgment Manufactured under license from Dolby Laboratories. “DOLBY”, “DOLBY DIGITAL”, “PRO LOGIC” and the double-D symbol 2 are trademarks of Dolby Laboratories. Confidential unpublished works. © 1992–1997 Dolby Laboratories. All rights reserved. “DTS” and “DTS Digital Surround” are trademarks of Digital Theater Systems, Inc. Copyright 1996 Theater Systems, Inc. All Rights Reserved. Maintenance Clean the receiver with a soft, slightly dampened, lint-free cloth. Do not use any cleaning agents as they may have a corrosive effect. Do not expose the receiver to humidity, rain, sand or excessive heat (caused by heating equipment or direct sunlight). CONTROLS 2 3 4 5 6 7 English 1 8 T 9 0 A ! ≤ £ ™ ¡ )( * & ^ % $ 1 POWER / STANDBY.......Switches the receiver on and off. 2 CINEMA LINK ................Switches the system control bus between the receiver and the TV on and off. 3 ..........................................Sensor for the infrared remote control. 4 VIRTUAL..........................Control light for virtual surround. 5 HALL ................................Control light for HALL. 6 ..........................................Display 7 SOURCE SELECT............Selects the different audio and video connectors. Reactivates the receiver from standby. 8 VOLUME..........................Increases and decreases the volume level. 9 FRONT AV.......................Selects the FRONT AV / GAME input (FR 995, FR 996 only). 0 TREBLE............................Adjusts the treble when used in combination with VOLUME. ! BASS ...............................Adjusts the bass when used in combination with VOLUME. @ LOUDNESS .....................Switches LOUDNESS on and off. # NEXT 2 ...........................TUNER: searches radio stations. MENU: switches to the next menu level. $ ENTER / OK.....................Confirms selected menu values. # @ % TUNER PRESET X MENU NAVIGATOR TUNER: switches to the next and previous stored radio station. MENU: moves upwards and downwards. ^ 1 PREV. / EXIT ...............TUNER: searches radio stations. MENU: switches to the previous menu level. & SETUP MENU ................Switches the menu on and off. * SENS. ..............................Switches between low and high tuner sensitivity. ( NEWS/TA........................Switches the RDS news and RDS traffic announcement on and off. ) TUNER AM/FM ..............Switches the wavebands of the tuner. ¡ RADIO TEXT ...................Scrolls through the different RDS information. ™ SURR. MODE..................Switches through the different speaker configurations. £ VIRTUAL MODE .............Scrolls through the different virtual surround sound modes. ≤ SURROUND ON/OFF .....Switches between the last selected surround mode and stereo. 5 REMOTE CONTROL English Remote control usage Open the battery compartment of the remote control and insert 2 alkaline batteries, type AA (R06, UM-3). Remove batteries if they are flat or the remote control is not going to be used for a long time. MUTE PHONO TUNER CD CDR/TAPE TV VCR SAT DVD Batteries contain chemical substances, so they should be disposed of properly. The buttons on the remote control work the same way as the corresponding ones on the receiver. Important! You have to press a source button for longer than 1 second to switch the sound source on the receiver. Pressing a source button for less than 1 second will only switch the remote control to use the commands for the selected product. 2 H 1 2 3 4 5 6 7 8 9 CINEMA GO CABLE BOX 0 GUIDE The remote control remains tuned to the selected source until another source button on the remote control is pressed. This enables you to operate additional sources (i. e. winding a tape) without changing the source on the receiver. OK MENU É A ATV NEWS/TA Ç CHANNEL/TRACK LOUDNESS SUBW. ON/ OFF í ë REC CANCEL AUDIO DVD NIGHT INDEX Å T-C VIRTUAL SURROUND DISC + FR.D. MODE REAR SURROUND + MODE SUB WOOFER - TEST TONE CHANNEL 6 ON/ OFF Remote control buttons H MUTE .....................Mutes the sound of the receiver in all modes, except TV. Mutes the sound of your Philips TV set if your remote control is in TV mode. 2 ................................Switches the source selected on your remote control (e.g. VCR, TV) to standby. When pressed longer than 2 seconds, the receiver switches to standby. PHONO, TUNER, CD, CDR/TAPE, TV, VCR, SAT, DVD..............Switches the remote control to the commands of the different products. Selects the sources if pressed longer than 1 second. SAT only works with digital satellite receivers. Reactivates the receiver from standby. 1–0................................Keys in numbers for tracks, stations or frequencies. Numbers consisting of two figures must be keyed in within 2 seconds. CINEMA GO..........Activates CINEMA LINK on the TV. CABLE BOX ...................Without function. MENU GUIDE ..............TUNER: Switches the receiver menu on and off. DVD, TV: Switches the DVD/TV menu on and off. OK .................................Confirms menu options. Arrow buttons ..............TUNER: Moves in the menus. Right/left arrows are tuning up/down. CD, CDR: Left/right arrows are searching backwards/forwards, up/down arrows are selecting the next/previous track. +A ...........................Increases the receiver volume. -A ...........................Decreases the receiver volume. NEWS/TA.................Switches the functions NEWS and TRAFFIC ANNOUNCEMENT on and off. TV: Switches teletext on and off. SAT: Switches the information text on and off. ÉATV ......................Increases the TV volume. CD, CDR, VCR, DVD: Starts playback. ÇATV ......................Decreases the TV volume. CD, CDR, VCR, DVD: Stops playback. i í CHANNEL/TRACK ...Selects the previous preset tuner station. VCR: Rewinds the tape. CD, CDR, DVD: Selects the previous track. TV: Selects the previous channel. ë CHANNEL/TRACK ...Selects the next preset tuner station. VCR: Fast forwards the tape. CD, CDR, DVD: Selects the next track. TV: Selects the next channel. LOUDNESS ...................Switches LOUDNESS on and off. SUBW. ON/OFF ............Switches the subwoofer on and off. REC, DVD AUDIO..........CDR, VCR: Starts recording. DVD: Switches audio tracks. CANCEL, DVD ...........CD, CDR, SAT, VCR: Clears a program, cancels selections. DVD: Switches the view angle. FR.D., DVD Å .............TUNER: Switches to FREQUENCY DIRECT. CD, CDR, VCR, DVD: Pauses playback. INDEX, DVD T-C............VCR: Switches the index search on and off. SAT: Switches the themes on and off. DVD: Switches between title and chapter. DISC..............................CD-, CDR-, DVD-Changers: Switches to the next disc. NIGHT ...........................Switches NIGHT MODE on and off. VIRTUAL MODE ............Scrolls through the different virtual surround sound modes. SURROUND ON/OFF ....Switches SURROUND SOUND on and off. +/- SUBWOOFER...Increases/decreases the subwoofer volume. +/- REAR ...............Increases/decreases the volume of the rear speakers. While test tone is on, the volume of the speakers you are hearing can be increased/decreased with these buttons. SURROUND MODE.......Scrolls through the different surround modes. TEST TONE ...................Switches the test tone on and off. While test tone is on, the volume of the speakers you are hearing can be increased/decreased with +/- REAR. 7 English REMOTE CONTROL REMOTE CONTROL English Programming the universal remote control (FR 985, FR 986, FR 995, FR 996 only) You can identify the universal remote control by the inscription Multibrand/Universal. The universal remote control must be programmed to use the codes for your appliances of different brands. This is done by keying in a 4-digit code or by scanning the codes until the correct one is found. We recommend to using the 4-digit code. This method is faster and more reliable. The code scanning method should only be used if you cannot find the code for one of your appliances. The code table can be found at the end of the booklet. Important! The buttons of the remote control must be used for programming, not the buttons of the receiver or other appliances. Once you have found and tested the codes for your various appliances, you may want to write them down here. PHONO .......................................... TUNER........................................... CD ................................................. CDR/TAPE ..................................... TV .................................................. VCR ............................................... SAT................................................ DVD ............................................... Programming with the 4-digit code 1 Keep the source button for the appliance which should be controlled and2 pressed for 3 seconds. Resetting the remote control 1 Keep one of the source buttons and 2 pressed for 3 seconds. 2 Key in the 4-digit code for the appliance (codetable at the end of the booklet). 2 Key in the 3-digit code 981. y The remote control is now reset to all its original Philips codes. Notes: – If more than 4 digits are entered, the remote control will recognize only the ones keyed in first. – If you do not key in a code within 30 seconds the remote control will switch off the programming function without changing the code. – To program a new appliance, simply overwrite the old code by entering a new one. Scanning the codetable 1 Switch on the appliance which should be controlled. 2 Keep the source button for the appliance which should be controlled and2 pressed for 3 seconds. 3 Press and release 2 again. y The remote control sends the codes for channel up or standby (depending on the selected source) for one brand after the other. 4 As soon as the appliance reacts – switches to the next channel or to standby – press 2 to confirm the code. y The identified code will be used. • If the set does not react within 2 minutes, the code for this appliance is not stored in the remote control. The code of the remote control will remain unchanged. Note: When taking out the batteries of the remote control for more than 1 minute the codes must be reprogrammed. 8 CONNECTORS A ANTENN A ANTENN ¡ LET . P AM LOO UT VIDEO IN/O S-VIDEO DIGITAL AUDIO IN/OUT 2 OPTICAL IN DVD MON VCR VCR C A U TI CINEMA LINK SAT R L/ 6 CHANNE T DVD INPU SUBW. DVD IN MON OUT FER SUBWOO T PRE-OU OUT IN OUT IN VCR REC PLAY SAT IN CENTER UT AUDIO IN/O SAT COAX OUT CDR/TAP CENTER E CD VCR PHONO TV R COAX 2 IN EACH L COAX 1 IN R IN IN IN PLAY OUT REC IN IN IN PLAY L SPEAKE R≥6Ω SURROUND SPEAKERS AUDIO IN/OUT 6 CHANNEL / DVD INPUT DIGITAL AUDIO IN/OUT VIDEO IN/OUT Antenna connectors Preamplified outputs System control bus Mains outlets (not on all versions) Mains lead CHOC ELE R VRI 100W TOTAL MAX. SWI TCHED OUT REC ^ % $ # @ ! 09 8 7 6 Connectors 6.3 mm headphone socket at the front Audio and video inputs at the front (FR 995, FR 996 only) FRONT SPEAKERS QUE DE OU RIS n NE PAS Europea ips in the by Phil s. eloped oratorie the d and dev Dolby Lab Designeity. se from O LOGIC“ and Dol by er licen Commun tured und DIGITAL“, ”PRema rks of ks. LBY Manufac are trad shed Wor rved. “, ”DO rese ts ”DOLBY-D Sym bol ntial Unpubli righ ater ories. All Dig ital The dou ble ories. Confide r worldLaborat Laborat 997 Dolby er lice nse from 2 and othe ”DT S ©1992–1 ture d und No. 5,451,94. ”DT S“ and ater Man ufacInc. US Pat.and pen ding of Digital The s, s. System System nts issu ed trademarks Theater nd“ areht 1996 Digital wid e pate Surrou Digital s, Inc. Copyrig d. System Rights Reserve All Inc. AV IS ND SURROURS SPEAKE CENTER T PRE-OU ON SHOCK ELECTRIC RISK OF NOT OPEN E DO CTRIQU L 1 OPTICAL IN ) ( * & AC OUT FRONT RS SPEAKE 6Ω AKER ≥ EACH SPE FM 75 Ω PHONO GND ‹ English ¤ ™£≤∞§ ≥•ª º ⁄ Connectors name 1 PHONES 5 4 3 2 1 Connect to: A headphone with a 6.3 mm plug. 2 FRONT AV / GAME Left and right audio out sockets of appliances such as video cameras and game consoles. 3 FRONT AV / GAME Video out sockets of appliances such as video cameras and game consoles. 4 R, L Right and left front speaker. 5 CENTER Center speaker. 6 R, L Right and left surround speaker. 8 CDR/TAPE OUT Input of a CD recorder or a tape deck. 9 CDR/TAPE IN Output of a CD recorder or a tape deck. 0 CD IN Output of a CD player. ! SAT IN Output of a satellite system. @ VCR OUT Input of a video recorder. # VCR IN Output of a video recorder. $ TV IN Output of a TV. % PHONO IN Output of a turntable with MM coil. ¡ PHONO GND f Ground cable of a turntable. ^ 6 CHANNEL / DVD INPUT 6 channel output of appliances such as DVD or laserdisc players. & COAX 1 IN Coaxial output of digital appliances (default input for source DVD). * COAX 2 IN Coaxial output of digital appliances. ( COAX OUT Coaxial input of digital appliances such as CD recorders or MD recorders. ) OPTICAL IN Optical output of digital appliances such as DVD players, CD players, CD recorders or MD players (FR 984, FR 985, FR 986, FR 994 only). ) OPTICAL 1 (2) IN Optical output of digital appliances such as DVD players, CD players, CD recorders or MD players (FR 995, FR 996 only). ™ S-VIDEO S-Video inputs/outputs of video appliances for better video quality (FR 994, FR 995, FR 996 only). £ DVD IN Output of a DVD player. ≤ MON OUT Input of a monitor (e. g. the TV). § VCR IN Output of a video recorder. ≥ VCR OUT Input of a video recorder (for recording). ª SAT IN Output of a satellite system. ∞ AM LOOP Frame antenna supplied. • FM 75 Ω Wire antenna supplied or exterior antenna. 7 CENTER PRE-OUT Input of a TV when it is used as the center speaker (only possible when the CINEMA LINK system bus is connected). º SUBWOOFER PRE-OUT Input of a powered subwoofer. ⁄ CINEMA LINK System control bus sockets of a Philips TV with CINEMA LINK. ¤ AC OUTLET Supplies same voltage as mains. Up to 100 W total permitted load. ‹ After all other connections have been made, connect the mains lead to the wall socket. 9 CONNECTIONS English Analogue audio connections There are analogue and digital connectors available on some appliances. If possible use the digital connection; usually this will result in better sound quality. See “Reassigning a source selection” on how to use the digital connectors of the receiver. back through the analog outputs of the CD, LD, or DVD player, excessive noise will be exhibited. To avoid possible damage to the audio system, proper precautions should be taken by the customer if the analog outputs are connected directly to the receiver. Because of a different kind of output signal, the use of Dolby Digital Laserdisc requires an optional AC-3 RF demodulator. To enjoy DTS Digital SurroundTM playback, a DTS-compatible player has to be connected to one of the digital inputs of the receiver. DTS Digital SurroundTM is a discrete 5.1-channel digital audio format available on CD, LD, and DVD software which consequently cannot be decoded and played back inside most CD, LD, or DVD players. For this reason, when DTS-encoded software is played ANTENNA PHONO GND. FM 75 Ω AM LOOP DIGITAL AUDIO IN/OUT OPTICAL 2 IN DVD VIDEO IN/OUT S-VIDEO MON VCR FRONT SPEAKERS EACH SPEAKER ≥ 6 Ω SAT VCR CINEMA LINK OPTICAL 1 IN IN 6 CHANNEL / DVD INPUT CENTER SUBW. OUT SUBWOOFER DVD IN MON OUT IN OUT PLAY VCR REC PHONO TV VCR SAT IN PRE-OUT CENTER R CAUTION L COAX OUT MONITOR / TV RISK OF ELECTRIC SHOCK DO NOT OPEN COAX 2 IN AUDIO OUT SURR. FRONT AUDIO IN/OUT SAT CD CENTER PRE-OUT CDR/TAPE AVIS SURROUND SPEAKERS R IN IN IN PLAY IN OUT REC IN PLAY IN R OUT REC L EACH SPEAKER ≥ 6 Ω TURNTABLE RISQUE DE CHOC ELECTRIQUE NE PAS OUVRIR Designed and developed by Philips in the European Community. Manufactured under license from Dolby Laboratories. ”DOLBY“, ”DOLBY DIGITAL“, ”PRO LOGIC“ and the double-D Symbol are trademarks of Dolby Laboratories. Confidential Unpublished Works. ©1992–1997 Dolby Laboratories. All rights reserved. Manufactured under license from Digital Theater Systems. Inc. US Pat. No. 5,451,942 and other worldwide patents issued and pending. ”DTS“ and ”DTS Digital Surround“ are trademarks of Digital Theater Systems, Inc. Copyright 1996 Digital Theater Systems, Inc. All Rights Reserved. L COAX 1 IN CD RECORDER IN POWERED SUBWOOFER OUT VCR AUDIO OUT CD PLAYER AUDIO IN SAT RECEIVER Digital audio connections CD RECORDER ANTENNA PHONO GND. FM 75 Ω AM LOOP DIGITAL AUDIO IN/OUT OPTICAL 2 IN CD PLAYER DVD VIDEO IN/OUT S-VIDEO MON VCR FRONT SPEAKERS VCR EACH SPEAKER ≥ 6 Ω SAT CINEMA LINK OPTICAL 1 IN IN 6 CHANNEL / DVD INPUT CENTER SUBW. OUT SUBWOOFER DVD IN MON OUT IN OUT PLAY VCR REC SAT IN PRE-OUT CENTER R CAUTION L COAX OUT RISK OF ELECTRIC SHOCK DO NOT OPEN COAX 2 IN SURR. FRONT PHONO AUDIO IN/OUT VCR SAT TV CD CDR/TAPE CENTER PRE-OUT SURROUND SPEAKERS L COAX 1 IN R IN DVD PLAYER 10 IN IN PLAY OUT REC IN IN IN PLAY OUT REC R L EACH SPEAKER ≥ 6 Ω AVIS RISQUE DE CHOC ELECTRIQUE NE PAS OUVRIR Designed and developed by Philips in the European Community. Manufactured under license from Dolby Laboratories. ”DOLBY“, ”DOLBY DIGITAL“, ”PRO LOGIC“ and the double-D Symbol 2 are trademarks of Dolby Laboratories. Confidential Unpublished Works. ©1992–1997 Dolby Laboratories. All rights reserved. Manufactured under license from Digital Theater Systems. Inc. US Pat. No. 5,451,942 and other worldwide patents issued and pending. ”DTS“ and ”DTS Digital Surround“ are trademarks of Digital Theater Systems, Inc. Copyright 1996 Digital Theater Systems, Inc. All Rights Reserved. System control bus, CINEMA LINK If the receiver and your Philips TV (or even better in addition a Philips VCR or DVD player) with Cinemalink are connected with the CINEMA LINK system bus control, some extra system benefits are offered: – Upon starting a source, the system will automatically switch to that input. – You may control the system via the TV screen. Depending on the language of the TV, this can be done in your preferred language. – The TV can function as the center speaker of your system, making a separate center speaker unnecessary. (The cable A has to be purchased separately.) – By pressing the standby button on the remote control, you can switch the complete system to standby. TV EXT 1 EXT 2 EXT 3 TV AUX DVD PLAYER DIGITAL OUT optional A (TV = CENTER) ANTENNA PHONO GND. FM 75 Ω AM LOOP DIGITAL AUDIO IN/OUT OPTICAL 2 IN VCR VIDEO IN/OUT S-VIDEO MON VCR DVD FRONT SPEAKERS VCR EACH SPEAKER ≥ 6 Ω SAT CINEMA LINK OPTICAL 1 IN IN 6 CHANNEL / DVD INPUT CENTER SUBW. OUT SUBWOOFER DVD IN MON OUT IN OUT PLAY VCR REC SAT IN PRE-OUT CENTER R CAUTION L COAX OUT RISK OF ELECTRIC SHOCK DO NOT OPEN COAX 2 IN SURR. FRONT PHONO AUDIO IN/OUT VCR SAT TV CENTER PRE-OUT CDR/TAPE CD AVIS SURROUND SPEAKERS R IN IN IN PLAY IN OUT REC IN PLAY IN R OUT REC RISQUE DE CHOC ELECTRIQUE NE PAS OUVRIR Designed and developed by Philips in the European Community. Manufactured under license from Dolby Laboratories. ”DOLBY“, ”DOLBY DIGITAL“, ”PRO LOGIC“ and the double-D Symbol are trademarks of Dolby Laboratories. Confidential Unpublished Works. ©1992–1997 Dolby Laboratories. All rights reserved. Manufactured under license from Digital Theater Systems. Inc. US Pat. No. 5,451,942 and other worldwide patents issued and pending. ”DTS“ and ”DTS Digital Surround“ are trademarks of Digital Theater Systems, Inc. Copyright 1996 Digital Theater Systems, Inc. All Rights Reserved. L COAX 1 IN L EACH SPEAKER ≥ 6 Ω CINEMA LINK TO TV IN TO VCR IN Video connections MONITOR / TV DVD PLAYER ANTENNA PHONO GND. FM 75 Ω AM LOOP DIGITAL AUDIO IN/OUT OPTICAL 2 IN DVD VIDEO IN/OUT S-VIDEO MON VCR FRONT SPEAKERS VCR EACH SPEAKER ≥ 6 Ω SAT CINEMA LINK OPTICAL 1 IN IN 6 CHANNEL / DVD INPUT CENTER SUBW. OUT SUBWOOFER DVD IN MON OUT IN OUT PLAY VCR REC SAT IN PRE-OUT CENTER R CAUTION L COAX OUT RISK OF ELECTRIC SHOCK DO NOT OPEN COAX 2 IN SURR. FRONT PHONO AUDIO IN/OUT VCR SAT TV CD CDR/TAPE CENTER PRE-OUT SURROUND SPEAKERS L COAX 1 IN R IN IN IN PLAY OUT REC IN IN IN PLAY OUT REC R L EACH SPEAKER ≥ 6 Ω AVIS RISQUE DE CHOC ELECTRIQUE NE PAS OUVRIR Designed and developed by Philips in the European Community. Manufactured under license from Dolby Laboratories. ”DOLBY“, ”DOLBY DIGITAL“, ”PRO LOGIC“ and the double-D Symbol are trademarks of Dolby Laboratories. Confidential Unpublished Works. ©1992–1997 Dolby Laboratories. All rights reserved. Manufactured under license from Digital Theater Systems. Inc. US Pat. No. 5,451,942 and other worldwide patents issued and pending. ”DTS“ and ”DTS Digital Surround“ are trademarks of Digital Theater Systems, Inc. Copyright 1996 Digital Theater Systems, Inc. All Rights Reserved. VCR VIDEO OUT VIDEO IN SAT RECEIVER 11 English CONNECTIONS CONNECTIONS English Mains TV as the center speaker The type plate is located on the rear of the receiver. You may use your Philips TV with CINEMA LINK as the center speaker. For TVs with a scart connector an additional audio cinch-to-scart cable is needed. For TV’s with cinch connectors additional cinch cables are needed. These cables must be connected to the blue CENTER PRE-OUT connector on the back. Look into the instruction manual of your TV on how to use it as the center speaker. 1 Check whether the mains voltage as shown on the type plate corresponds to your local mains voltage. If it does not, consult your dealer or service organization. 2 Connect the mains cable to the wall socket. To disconnect the set from the mains completely, remove the mains plug from the wall socket. For users in the U. K.: please follow the instructions on page 2. Power handling If the receiver is used at very high power it can produce distortions which may seriously damage your speakers. If distortions occur, reduce the volume and the tone controls to a level where the sound is acceptable again. Antenna connections AM (MW) antenna The loop antenna supplied is for indoor use only. Position the antenna as far away as possible from the receiver, the TV, the cables, a DVD player, a VCR and other radiation sources. 1 Fit the plug of the frame antenna to AM LOOP as shown below. 2 Turn the antenna for optimum reception. A To avoid overheating of the set a safety circuit has been built in. Therefore your set may disconnect under extreme conditions. If this happens, switch the set off and let it cool down before reusing it. After having let the set cool down switch the set on again and select the desired source by turning SOURCE SELECT. Speaker connections Some of the speaker connections on the receiver are screw connectors and some are click-fit connectors. Use them as shown below. P AM LOO FM antenna The wire antenna supplied can only be used to receive nearby stations. For better reception we recommend using a cable antenna system or an outdoor antenna. 1 Fit the supplied wire antenna to FM 75 Ω as shown below. 2 Move the antenna in different positions for optimum reception. 7m m 1 ANTENN 2 3 • If you are using a cable antenna system or an outdoor antenna, fit the antenna plug to FM 75 Ω instead of the wire antenna. FM 75 Ω m 8m 1 2 3 1 Always connect the coloured (or marked) wire to the coloured terminal and the black (or unmarked) wire to the black terminal. 2 Connect: – Left front speaker to L (red and black) – Right front speaker to R (red and black) – Center speaker to CENTER (blue and black) – Left surround speaker to SURROUND L (grey and black) – Right surround speaker to SURROUND R (grey and black) 12 FM 75 Ω Headphones Connecting headphones to PHONES will switch off the speakers. The receiver switches to STEREO and surround sound will be reduced to a stereo signal which is reproducible by standard headphones. Disconnecting the headphones switches on the speakers again. If you wish to enjoy surround sound again, switch the receiver back to surround sound. NT CENTER FR ON T LEFT RIGHT SU BW OO FE R FRO SURROUND (REAR) LEFT RIGHT SURROUND (REAR) Positioning of the speakers General hints for positioning Avoid positioning the speakers in a corner or on the floor as this will boost the bass tones too much. Placing the speakers behind curtains, furniture, etc. will reduce the treble response. The listener should always be able to ”see” the speakers. Each room has different acoustic characteristics and the positioning possibilities are often limited. You can find the best position for your speakers by referring to the picture above. As a minimum we recommend 5 speakers (2 front, a center, 2 surround) for good surround sound. It is possible to reproduce some kind of surround sound with fewer speakers. This is done by redirecting the signals which are foreseen for the missing speakers to the existing ones. See “Menus” on how to set up the receiver correctly for the number and size of the speakers used. Positioning the front speakers The front speakers should be placed right and left in front of the listening position like usual stereo speakers. Positioning the center speaker The center speaker should be placed in the center between the two front speakers, e. g. underneath or on top of the TV. The best height for the center speaker is the height of the listener’s ears (while seated). Positioning the surround speakers The surround speakers should face each other and be in line with, or slightly behind the listener. Positioning the subwoofer A subwoofer can be used to enhance the bass performance of your system dramatically. The subwoofer can be positioned anywhere in the room, because it is not possible to locate the source of deep tones. Nevertheless, you should not place the subwoofer in the middle of a room, since the bass could be severely weakened. Do not place any object on the subwoofer. Speaker setup and testing The relative volume of the speakers must be adjusted for optimal surround sound. You should be at your usual listening position when adjusting the speaker volume. See “Receiver menu” on how to set up the receiver for the used speakers. Ideally, the volume in the listening position should be the same from all speakers. 1 Press POWER / STANDBY to switch on the receiver. 2 Press TEST TONE on the remote control. y A test tone coming from the different speakers, except the subwoofer, is heard. 3 Press +/- REAR on the remote control to increase/decrease the volume of the actual speaker. The best result is achieved when all speakers have equal volume in the listening position. 4 Press TEST TONE on the remote control. y The test tone stops. Note: If you are not completely satisfied with the volume settings, we recommend making minor adjustments to them during surround sound playback. Receiver adjustment Once the number and position of loudspeakers has been fixed, you can adjust the initial receiver settings for optimal surround sound with the actual setup: 1 Set which speakers have been connected to the receiver (see “Menu structure/* SPEAKR SETUP”). Note: The initial setting of your receiver is: two front speakers left and right: present (cannot be altered) center speaker: present two rear speakers: present subwoofer: present. 2 Select the size of the speakers (SMALL or LARGE) (see “Menu structure/* SPEAKR SIZES”). Select SMALL if your speaker is able to reproduce low notes down to at least 80–100 Hz. Select LARGE if your speaker is able to reproduce low notes down to at least 50 Hz. (As a rule of thumb, a LARGE speaker has a cone diameter of at least 12 cms (5 inches).) See the specification sheets of your loudspeakers. Note: For FR 985, FR 986, FR 995, FR 996 the initial setting is: all speakers to LARGE. For FR 984, FR 994 the initial setting is: all speakers to SMALL. 3 Set the distance from the speakers to the listener’s position (see “Menu structure/* SPK DISTANCE”). 13 English SYSTEM SETUP DISPLAY Status lights English Display The display of the receiver is divided into 4 sections, which are to be used for the following: Speaker diagram Signs show you various settings and information about the status of the receiver. PRESET ......................Tuner is tuned to a preset radio station. is switched to high sensitivity. SENS LO ..................Tuner is switched to low sensitivity. C I N E M A L I N K O N ......CINEMA LINK is active STEREO ......................An FM station is being received in stereo. R.............................An RDS station is being received. EON ...........................An RDS station with EON is being received. HALL..........................HALL effect is on. TA .............................RDS traffic announcement is on NEWS ........................RDS news announcement is on ANA ..........................Analogue input is being used for the playing source. N I G H T .......................NIGHT MODE is on. COAX 1 ......................Coaxial digital input COAX 1 is being used for the playing source. COAX 2 .....................Coaxial digital input COAX 2 is being used for the playing source. D O W N M I X .................Incoming multi channel signals are being reduced to fewer output signals (depending on the number of speakers). OPT ...........................Optical digital input OPTICAL IN is being used for the playing source (FR 984, FR 985, FR 986, FR 994 only). OPT 1 ........................Optical digital input OPTICAL 1 IN is being used for the playing source (FR 995, FR 996 only). OPT 2 .......................Optical digital input OPTICAL 2 IN is being used for the playing source (FR 995, FR 996 only). LOUDNESS .................LOUDNESS is switched on. SENS HI .....................Tuner A rectangle with a letter in it shows that a speaker has been selected in the setup menu. However, the subwoofer indicator will only light when a subwoofer signal is available. If only a letter is shown, this speaker is not used and its sound is reproduced by the other speakers. .......virtual surround sound sound is reproduced DIGITAL SURROUND ....digital surround sound is reproduced L, R ...........................front left and right speaker C ...............................center speaker SL, SR .......................surround speakers SW ............................subwoofer SURROUND.................surround Menu indication These signs show you if the menu is on or off and indicate in which direction you may move. M E N U .......................menu is on 1..............................You may move backwards to the previous menu topic using 1 PREV. / EXIT (“left” key on the remote control). 3 .............................You may move up in an option list using X MENU NAVIGATOR (“up” key on the remote control). 4 .............................You may move down in an option list using X MENU NAVIGATOR (“down” key on the remote control). 2..............................You may move forward to the next menu topic using NEXT 2 (“right” key on the remote control). O K.............................You may confirm the displayed value. 0 GUIDE OK MENU É A ATV NEWS/TA 14 Ç Information area This area is used for feedback of the receiver, tuner frequencies, menu options, values and scrolling text messages. MENUS The receiver is equipped with a menu system. The menu is used for the setup of the receiver. The different menu options are related to each other in a logical way. Let’s assume you have no center speaker connected, and therefore switched CENTER SPEAKR to NO. If you try to use VOL CENTER, a message will be scrolled that this is not possible (INSTALL CENTER SPEAKER). The menu always works the same way. Arrows in the display show you the possible moving directions. 1 Press SETUP MENU. y MENU, and * EFFECTS is displayed. • You can exit the menu at any time by pressing SETUP MENU. 2 Turn X MENU NAVIGATOR until the desired option (or a value) is displayed. 3 Press NEXT 2 to choose the displayed option (or ENTER / OK to confirm a value). • You can leave any option (values remain unchanged) by pressing 1 PREV. / EXIT. Menu structure * EFFECTS Switches sound effects. VIRT SURR virtual surround: 0…100 % * VOL BALANCE Adjusts the relative volume balance between the connected speakers. TEST TONE Test tone: on/off VOL FRONT-L Volume front left speaker: –50…+50 VOL FRONT-R Volume front right speaker: –50…+50 VOL CENTER Volume center speaker: –50…+50 VOL REAR-L Volume rear left speaker: –50…+50 VOL REAR-R Volume rear right speaker: –50…+50 VOL SUBWOOFER Volume subwoofer: –50…+50 Note: When using the 6 CHANNEL / DVD INPUT the values below cannot be changed. English Receiver menu * SPEAKR SETUP Selects the used speakers. SUBW PRESENT Subwoofer present: yes/no CENTER SPEAKR Center speaker present: yes/no REAR SPEAKER Rear speakers present: yes/no * SPEAKR SIZES Chooses the speaker sizes of the used speakers, for optimal sound reproduction. LARGE indicates a speaker which can reproduce frequencies lower than 50 Hz. If SUBW PRESENT is set to NO, FRONT SIZE can only be set to LARGE. If FRONT SIZE is set to SMALL, CENTER SIZE can only be set to SMALL and consequently a subwoofer must be connected. FRONT SIZE Left and right front speakers: small/large CENTER SIZE Center speaker: small/large REAR SIZE Rear speakers: small/large * SPK DISTANCE Distance between the usual listening position and the speakers. This defines the delay time for the surround sound. DISTANCE L/ R Distance to front speakers: 1…10 m DISTANCE CNTR Distance to center speaker: 1…10 m DISTANCE REAR Distance to rear speakers: 1…10 m 15 MENUS English * SELECT INPUT Assigns the audio input connectors to the different source selections chosen with SOURCE SELECT (see “SOURCE SELECTION” for details). COAX1 Digital coaxial input 1, COAX 1 IN COAX2 Digital coaxial input 2, COAX 2 IN OPT (FR 984, FR 985, FR 986, FR 994 only) Digital optical input, OPTICAL IN OPT 1 (FR 995, FR 996 only) Digital optical input, OPTICAL 1 IN OPT 2 (FR 995, FR 996 only) Digital optical input, OPTICAL 2 IN SAT IN Analogue audio input SAT IN VCR IN Analogue audio input VCR IN TV IN Analogue audio input TV IN CDR IN Analogue audio input CDR IN CD IN Analogue audio input CD IN 6 CH IN Analogue audio input 6 CHANNEL / DVD INPUT * TUNER Setup for preset radio stations (see “TUNER” for details). AUTO INSTALL Stores radio stations automatically MAN INSTALL Stores radio stations manually GIVE NAME Allows to assign names to stored radio stations RESHUFFLE Resorts stored radio stations TV menu If the receiver is connected to a Philips CINEMA LINK TV via the CINEMA LINK system control bus sockets (see “CONNECTIONS”), you may use the TV to set up the system. An option called RECEIVER will be added to the TV menu. If CINEMA LINK is on, adjustments on the receiver will be shown on the TV screen for a few seconds. Consult the instruction booklet of your TV on how to use the TV menu. The options offered may vary by TV model. Switching the connection • Press CINEMA LINK to switch the connection between the receiver and the TV either on or off. y If the connection is switched on, CINEMA LINK ON is displayed. Note: We recommend switching CINEMA LINK off during recording. This avoids unwanted interruptions due to switching TV functions. If CINEMA LINK is switched on and the TV menu is active, TV MENU is displayed and the menu and sound functions on the receiver are locked. Activating CINEMA LINK CINEMA GO on the remote control. • Press y The TV sends a play command to the CINEMA LINK DVD player, if present. The DVD player will start playing and the receiver automatically switches to the best CINEMA LINK sound. • If no DVD player is connected or if the DVD player has no disc loaded, the TV will send a play command to the CINEMA LINK video recorder, if present. y The video recorder will start playing and the audio receiver selects the best CINEMA LINK sound. • If no video recorder source is connected or tape is loaded, the TV will select the last watched TV channel. 16 SOURCE SELECT When selecting a source by turning SOURCE SELECT, the audio and video inputs with the corresponding name are activated. The incoming signal is reproduced by all audio and – if the source includes a video signal – video outputs of the receiver. It is possible to reassign a source selection to other than these standard inputs. Source selected........Connectors used DVD...............................COAX 1 digital audio input and DVD IN video input PHONO..........................PHONO IN audio input TUNER ..........................The tuner part of the receiver is used, all inputs are switched off. CD .................................CD IN audio input CDR/TAPE .....................CDR/TAPE IN audio input TV..................................TV IN audio input and no video input VCR ...............................VCR IN audio input and VCR IN video input SAT ...............................SAT IN audio input and SAT IN video input 6 CHANNEL-DVD/SACD INPUT selection The 6 CHANNEL / DVD INPUT connectors can be assigned to any of the available sources (excluding TUNER and PHONO). The assignment can be done via the * SELECT INPUT option in the menu. See below for more details. Reassigning a source selection If a source is selected with SOURCE SELECT the standard audio input is used. To change this, the source selection must be reassigned to another audio input. Example: Reassigning CD from the analogue CD IN audio input to the digital COAX 2 IN audio input. 1 Choose * SELECT INPUT from the menu and press NEXT 2. 2 Turn SOURCE SELECT to select the source which should be reassigned (e. g. CD). y The name of the source is displayed and the light of the source flashes. Using one source selection for two or more appliances You may assign more than one source to a source selection. This can be useful when products are connected one after the other in a chain. Example: A VCR is connected to the TV but only the TV is connected to the receiver. Both SOURCE SELECT settings, TV as well as VCR, have to use the TV input connectors. 1 Choose * SELECT INPUT from the menu and press NEXT 2. 2 Turn SOURCE SELECT to select the source which should be reassigned (e. g. VCR). y The name of the source is displayed and the light of the source flashes. 3 Turn X MENU NAVIGATOR to select the input connectors which should be used (e. g. VCR -> TV IN). 4 Press ENTER / OK to confirm your selection. y STORED is displayed briefly. 5 This source selection is now using the chosen audio input (e. g. VCR uses the TV IN input connectors, VCR <TV IN> is displayed briefly when switching to VCR). About 6 CHANNEL-DVD/SACD INPUT The 6 CHANNEL / DVD INPUT can be used to connect a device with a built-in multichannel decoder (e.g. Dolby Digital, DTS, etc.) and 6-channel output connector, i. e. a high end DVD/SACD player. When using the 6 CHANNEL / DVD INPUT audio input, the receiver works as a multichannel amplifier. The source reproduces surround sound and sends it to the receiver divided into the necessary channels. Therefore the SURROUND ON/OFF, HALL and SURR. MODE button have no effect since the provided signal is already multichannel. From a source which is connected to the 6 CHANNEL / DVD INPUT audio input cannot be recorded. 3 Turn X MENU NAVIGATOR to select the input connectors which should be used (e. g. CD -> COAX2). 4 Press ENTER / OK to confirm your selection. y STORED is displayed briefly. 5 This source selection is now using the chosen audio input (e. g. CD uses the COAX 2 IN input connectors, COAX 2 lights when switching to CD). 17 English SOURCE SELECTION PLAYBACK, RECORDING English Playing a source Recording from a source 1 Press POWER / STANDBY to switch on the receiver. If you wish to record from a source you must select it with SOURCE SELECT. The incoming signal is reproduced by all audio and – if the source includes a video signal – video outputs of the receiver. The sound settings do not affect the recording. 2 Turn SOURCE SELECT to select a source. y The name of the source is displayed. • You can select the FRONT AV / GAME input by pressing FRONT AV (FR 995, FR 996 only). 3 Start playback of the source as usual. Adjusting the sound • Turn VOLUME to adjust the volume. y VOLUME and the volume level between 0 and 50 is displayed. 1 Press BASS or TREBLE. y BASS or TREBLE and the actual value are displayed briefly. Then TURN VOLUME KNOB TO CHANGE is scrolled. 2 Turn VOLUME to adjust the bass or treble. y BASS or TREBLE and the actual value are displayed. Note: If VOLUME is not turned within 5 seconds or if any other control is used, the bass or treble adjustment is switched off. 1 Turn SOURCE SELECT (or press FRONT AV – FR 995, FR 996 only) to select the source you want to record from. y The name of the source is displayed. 2 Prepare the desired recording appliance. It must be connected to one of the outputs of the receiver. 3 Start recording on the recording appliance. 4 Start the playback of the source as usual. Notes: – The audio and video signal of VCR IN is not reproduced by VCR OUT. The same applies to the audio signal of CDR/TAPE IN to CDR/TAPE OUT. – We recommend not to use the digital output COAX OUT of the receiver to record from an analogue source. Use the analogue output CDR/TAPE instead. – From a source which is connected to the 6 CHANNEL / DVD INPUT audio input cannot be recorded. • If a subwoofer is connected, press SUBW. ON/OFF to increase the bass performance. Recording from the digital output Note: In case of digital surround sound, a subwoofer signal will only be available when supported by the source material. It is possible to connect a digital recorder to the digital output of the receiver. In this way, all signals coming from the digital inputs can be recorded directly on the connected audio recorder. The receiver will also convert all signals coming from the analogue inputs to the digital output. • Press LOUDNESS to switch loudness either on or off. y LOUDNESS is displayed if loudness is on. The receiver can be used to record digitally a multichannel surround sound audio signal (Dolby Digital, DTS or MPEG) from, for example, DVD to CD-R. The receiver will convert the digital multichannel signal into a stereo signal without loss of relevant sound information. Notes: – When recording a Dolby Digital, DTS or MPEG signal, each track must be recorded individually. – Digital recording is not possible when the digital source material is copy-protected. 18 About surround sound Switching surround sound Surround sound gives you a complete new listening sensation. You will have the feeling of being in the middle of the action, because sound is coming from everywhere around you. Look out for TV broadcasts, audio and video tapes and discs with the 3, 1, or marks which are encoded for multichannel surround sound. You should prefer Dolby Digital, DTS or MPEG Multichannel to get the best out of your receiver. With surround sound on, you can switch through the different surround modes. Note that the possibilities are related to speaker setup defined in the receivers menu. Your receiver is able to reproduce DTS surround sound. DTS is a premium multichannel surround sound system available on DVD discs, laserdiscs and audio discs. Consult your software dealer on the availability of DTS software in your region. Notice that DVD discs do not always carry full multichannel surround. To be sure that a disc is multichannel encoded consult your dealer. Most ordinary stereo tapes and discs can be replayed using surround sound settings with good results. If the reproduction is distorted in surround mode, switch to normal stereo mode. The availabilty of the various surround sound modes described depends on the number of speakers used and the incoming sound information. If a digital surround signal is detected, the receiver will scroll either DOLBY DIGITAL, DTS or MPEG. 1 Press SURROUND ON/OFF to switch on the surround sound. y The surround mode in use is scrolled. 2 Press SURR. MODE repeatedly to listen to the different surround modes (if available). yThe chosen mode and the speakers used are displayed. If the incoming multichannel signals are reduced to fewer output signals, DOWNMIX is displayed. 3 Press VIRTUAL MODE as often as necessary to switch through the virtual surround sound modes: 1 × to activate 3D SURRUOND 2 × to activate MULTI FRONT 3 × to activate MULTI REAR 4 × to activate NATURAL SURROUND yA light indicates if a virtual surround sound mode is on. -signs indicate which virtual surround sound mode is active. 4 Press SURROUND ON/OFF to switch off the surround sound. y SURROUND OFF is scrolled. 19 English SURROUND SOUND SURROUND SOUND English Surround sound settings HALL The sound reproduction is enhanced and a slight echo is added. This gives the impression of being in a large room. Can only be used in stereo mode. SURROUND The surround mode enables normal surround sound reproduction with 4 or 5 speakers. Depending on the source material, Dolby Surround Pro Logic, Dolby Digital, DTS or MPEG is reproduced. PRO LOGIC, DOLBY DIGITAL, DTS, MPEG In addition to SURROUND, the surround mode used – depending on the source material – will be displayed. In case of digital surround, the sound format AC-3 (for Dolby Digital), DTS or MPEG (for MPEG 2 Multichannel) will be displayed, followed by the sound channels, available on the source (e. g. DVD). Example: AC-3 3/2.1 Dolby Digital, 3 front channels, 2 surround channels and a subwoofer channel. MPEG 2/0.0 MPEG Multichannel, stereo sound only. AC-3 3/1.0 Dolby Digital, 3 front channels, 1 (mono) surround channel without subwoofer signal. DTS 3/2.1 DTS, 3 front channels, 2 surround channels and a subwoofer channel. FRONT-3 STEREO The surround sound is muted. 3 Stereo lets you listen to surround sound without using the surround speakers. STEREO All sound is reproduced and played through the front left and right speakers. This enables standard stereo reproduction. Virtual Surround Your receiver is able to reproduce one or more forms of virtual surround sound. Virtual surround gives a more real life sound impression by creating phantom speakers in addition to or instead of real speakers. The position of the listener influences the surround effect. The area where the effect is best is shown in grey. NT FRO LEFT CENTER FR ON T RIGHT The level of virtual surround sound effect can be adjusted in the setup menu. The following surround sound modes are available: 3D SURROUND No rear speakers are needed. The sound of the rear channel is simulated by the front speakers. Surround sound is simulated through the front left, right and center speakers. MULTI FRONT Phantom speakers are created next to the left and right front speaker. MULTI REAR Phantom speakers are created next to the left and right rear speaker. NATURAL SURROUND Phantom speakers are created next to the left and right front and rear speakers. Note: The availability of MULTI FRONT and MULTI REAR depends on the sound channels on the source material. NIGHT MODE (only on the remote control) The loud parts of the sound are lowered and the soft passages are raised. You can enjoy surround sound without disturbing sleeping children or neighbours. Night mode only works with Dolby Digital and MPEG, and only if supported by the source material. 20 Tuning to radio stations Storing radio stations You can search for radio stations by scanning the frequency band. You can also key in the frequency of a known radio station. If an FM station is being broadcast and received in stereo, STEREO is shown. You may store up to 30 radio stations in the memory. The receiver can select and program radio stations by itself or you can choose them yourself. Searching for radio stations 1 Turn SOURCE SELECT to select the tuner. y TUNER is displayed. 2 Select a waveband by pressing TUNER AM/FM repeatedly. y The selected waveband is displayed. 3 Keep 1 or 2 pressed for approximately 1 second. y SEARCH is displayed and the tuner tunes to a station with sufficient strength. 4 Repeat this procedure until you find the desired station. Automatic programming 1 Choose * TUNER from the menu and press NEXT 2. 2 Choose AUTO INSTALL and press NEXT 2. y The preset number where programming will start, the waveband and AUTO are displayed. 3 Turn TUNER PRESET X to change the preset number where programming should start. 4 Use TUNER AM/FM to switch to the desired waveband. • To fine tune to a weak transmitter, briefly press 1 or 2 as often as necessary for optimum reception. 5 Press ENTER / OK to start programming. y AUTO INSTALL flashes and all available radio stations are programmed, this may take a few minutes. Programming is done when AUTO INSTALL stops flashing. Tuning to a radio station by frequency (with the remote control only) 1 Press TUNER. y TUNER is displayed. Manual programming 1 Choose * TUNER from the menu and press NEXT 2. 2 Press FR. D.. y _ is displayed. 3 Use 1–0 to key in the frequency of a radio station. Note: Only valid numbers within the frequency range of the tuner can be keyed in. Switching FM sensitivity 2 Choose MAN INSTALL and press NEXT 2. y A preset number, the waveband and the frequency are displayed. 3 Turn TUNER PRESET X to change to the preset number where the radio station should be stored. 4 Tune to the desired radio station (see “Searching for radio stations”). You can switch the tuner to a lower search sensitivity, to search only for stations with a strong signal (FM only). 5 Press ENTER / OK to confirm your selection. y STORED is displayed briefly. The radio station is programmed at the chosen preset number. 1 Turn SOURCE SELECT to select the tuner. y TUNER is displayed. 6 Select and store all desired radio stations this way. 2 Press SENS. on the receiver. y Either SENS HI or SENS LO is displayed for 5 seconds. Note: While searching for radio stations, the actual sensitivity is displayed. In this case, SENS LO means the tuner is only looking for radio stations with a strong signal. 21 English TUNER TUNER English Tuning to stored radio stations Naming radio stations 1 Turn SOURCE SELECT to TUNER to select the tuner. y TUNER is displayed. It is possible to assign a name to any of the preset radio stations. RDS station names also can be overwritten. 2 Turn TUNER PRESET X to select a preset radio station. y PRESET, the preset number and station are displayed. 1 Choose * TUNER from the menu and press NEXT 2. Resorting stored radio stations After programming radio stations, you might want to change their sequence. RESHUFFLE allows you to exchange the positions of presets. 1 Choose * TUNER from the menu and press NEXT 2. 2 Choose RESHUFFLE and press NEXT 2. y PRESET, a preset number and station are displayed. 3 Turn TUNER PRESET X to select a preset station. 4 Press ENTER / OK to confirm the selection. y The selected preset number SWAP <-> and a second preset number are displayed. 5 Turn TUNER PRESET X to select the other preset station. 6 Press ENTER / OK to confirm the exchange. y RESHUFFLED is displayed briefly and these two preset numbers are swapped. 2 Choose GIVE NAME and press NEXT 2. y A preset radio station is displayed. 3 Turn TUNER PRESET X to select the preset to be renamed. 4 Press ENTER / OK to confirm your selection. yThe existing name or ________ is displayed. 5 Turn TUNER PRESET X to select a letter and NEXT 2 or 1 PREV. to move to the next or previous position. 6 After you have entered the entire name, press ENTER / OK to confirm. y STORED is displayed and the name is stored. Note: If you want to use the transmitted RDS station name again, simply clear the given name. Clearing station names 1 Use the menu option * TUNER, choose GIVE NAME. y A preset radio station is displayed. 2 Turn X MENU NAVIGATOR to select the name to be cleared. 3 Press ENTER / OK to confirm your selection. 4 Press 1 PREV. while the first letter is flashing. y CL is flashing to the left of the station name. 5 Press ENTER / OK to clear the station name. Or, if you have changed your mind, press 1 PREV. to leave the station name as it is. 22 RDS R RDS News and Traffic Announcement Radio Data System is a service that allows FM stations to send additional information. If you are receiving an RDS station, R and the station name are displayed. It is possible to set up the tuner in such a way that any playback is interrupted by news or traffic information of a chosen RDS station. Announcement functions only work if the necessary RDS signals are being broadcast. Switching through different RDS information • Press RADIO TEXT on the receiver repeatedly to switch through the following information (if available): – Radio text messages – RDS clock – Frequency – Station name Note: The time signal broadcasted from certain RDS stations may not always be accurate. If RDS stations are also carrying an EON signal (Enhanced Other Networks), EON is displayed. This signal enables the tuner to search not only the chosen RDS station, but the whole EON station network for news and traffic information. 1 Tune to the desired RDS station. 2 Press NEWS/TA: Once to display NEWS, this switches on the news announcement function. Twice to display TA, this switches on the traffic announcement function. Three times to display TA and NEWS, this switches on both announcement functions. 3 Select and play any other source as usual. y While news or traffic information is being broadcast the receiver will switch to tuner and NEWS or TA will flash. 4 Press NEWS/TA until the display indication disappears to switch off the function(s). or Press NEWS/TA during an announcement to switch off the function(s). Note: Be sure to switch the news and traffic announcement off during recording, otherwise these announcements also will be recorded. 23 English TUNER TECHNICAL DATA English Receiver Subject to modification without notice. General Power consumption (FR 984, FR 985, FR 986).................210 W Power consumption (FR 994, FR 995, FR 996).................255 W Standby power consumption ............................................< 2 W Dimensions, w × h × d ............................435 × 135 × 350 mm Weight (FR 984, FR 985, FR 986) ......................................8.6 kg Weight (FR 994, FR 995, FR 996) ......................................9.4 kg Amplifier part (0.7 % THD, 6 Ω, 1 kHz) Output power, stereo mode (FR 984, FR 985, FR 986) (DIN) ....................................2 × 60 W Output power, surround mode (FR 984, FR 985, FR 986) Front ......................................................................2 × 60 W Center ..........................................................................60 W Surround................................................................2 × 60 W Output power, stereo mode (FR 994, FR 995, FR 996) (DIN) ...................................2 × 100 W Output power, surround mode (FR 994, FR 995, FR 996) Front ....................................................................2 × 100 W Center ........................................................................100 W Surround..............................................................2 × 100 W Bass ..................................................................±9 dB at 100 Hz Treble ................................................................±9 dB at 10 kHz Loudness ....+6 dB at 100 Hz (-30 dB); +3 dB at 10 kHz (-30 dB) Total harmonic distortion.........................0.05 % at 1 kHz, 5 W Frequency response ..................................20–20,000 Hz, ±1 dB S/N ratio ........................................................................≥ 82 dB Stereo separation (1 kHz) ..............................................≥ 45 dB Crosstalk (1 kHz) ...........................................................≤ -65 dB Inputs Linear inputs .......................................................250 mV/47 kΩ 6 CH ....................................................................250 mV/40 kΩ Front AV (FR 995, FR 996 only) ...........................250 mV/22 kΩ Phono ......................................................................5 mV/47 kΩ Digital coaxial ...............................................75 Ω acc. IEC 958 Digital optical ..................................................................Toslink Digital sampling frequency (FR 984, FR 985, FR 986 only) .............32 kHz, 44.1 kHz, 48 kHz Digital sampling frequency (FR 994, FR 995, FR 996 only) ...32 kHz, 44.1 kHz, 48 kHz, 96 kHz Outputs Power supply AC outlets (switched) ...........totally max. 100 W Linear outputs.......................................................250 mV/1 kΩ Digital coaxial ...............................................75 Ω acc. IEC 958 Digital output sampling frequencies Analogue in .........................................................out 48 kHz Digital in 32 kHz ..................................................out 32 kHz Digital in 44.1 kHz ............................................out 44.1 kHz Digital in 48 kHz ..................................................out 48 kHz Digital in 96 kHz (FR 994, FR 995, FR 996 only)...out 48 kHz Subwoofer pre-out....................................................0.8 V/1 kΩ Center pre-out...........................................................0.8 V/1 kΩ Headphones....................................8–600 Ω (3 V e.m.f., 60 Ω) Speakers ...........................................................................≥ 6 Ω 24 Tuner part Wave range FM..............................................................87.5–108.0 MHz MW...............................................................531–1,602 kHz LW....................................................................153–279 kHz Sensitivity Stereo FM ..................................................................41 dBf Mono FM....................................................................15 dBf Total harmonic distortion Stereo FM ...................................................................0.3 % Mono FM...................................................................0.85 % Frequency response ...................................63–12,500 Hz ±1 dB S/N ratio Stereo FM....................................................................55 dB Mono FM.....................................................................60 dB Channel separation .............................................35 dB at 1 kHz WARNING Under no circumstances should you try to repair the set yourself as this will invalidate the guarantee. Do not open the set as there is a risk of electric shock. If a fault occurs, first check the points listed, before taking the set for repair. If you are unable to solve a problem by following these hints, consult your dealer or service center. PROBLEM POSSIBLE CAUSE SOLUTION Set does not work and is in standby mode The overheating safety circuit has been activated. Switch the set off and let it cool down. After having let the set cool down switch it on again and select a source by rotating SOURCE SELECT or pressing a source key on the remote control. No sound VOLUME is not correctly adjusted. Adjust the VOLUME. Headphones are connected. Disconnect headphones. The wrong source is selected. Turn SOURCE SELECT to select the correct source. One speaker is wrongly connected. Connect the speaker properly. A speaker cable is damaged. Replace the cable. Volume balance in the receiver menu is wrongly adjusted. Adjust VOL FRONT-L and VOL FRONT-R in the receiver menu. No sound on the left or right side Poor sound or no sound at SURROUND mode is not switched on. the center or surround speakers Surround and/or center speakers are not (properly) connected. Press SURROUND ON/OFF to switch on the surround sound. Connect the speakers properly. Surround and/or center speakers are switched Set speaker present to YES. off in the SPEAKR SETUP menu. A speaker cable is damaged. Replace the cable. Poor bass sound Speakers are not in phase. Connect the coloured (or marked) wires to the coloured terminals and the black (or unmarked) wires to the black terminals. Bad sound Badly matching setting for the given type of music or sound. Correct the sound settings on the receiver. Surround sound level is too low or too high The level of the surround sound is not properly adjusted. Adjust the level of the surround sound on the receiver. Center sound level is too low or too high The sound level of the center channel is not properly adjusted. Adjust the level of the center channel on the receiver. Only center speaker is heard in Dolby Surround Pro Logic A mono signal is reproduced. Choose a different sound source or switch off surround sound. Bad radio reception, automatic programming does not work properly Receiver or antenna is positioned near a radiation source such as a TV, CD player, CD recorder, DVD player, etc. Change the position of the interfering unit or try to switch it off. No digital recording The sampling frequency is not accepted by possible via digital output the digital recorder. Make sure the digital recorder can handle sampling frequencies between 32 kHz and 48 kHz or make the recording via analogue output. Whole recording appears The DVD player does not provide track as one track when information. recording from DVD disc Record each track individually or use the “manual track increment” feature on the recorder. 25 English TROUBLESHOOTING GENERALITES Français Généralités Produits livrés avec l'équipement....................................................26 Mise en place ..................................................................................26 Informations relatives à l'environnement........................................26 Admission des marques déposées ..................................................26 Entretien...........................................................................................26 Commandes ........................................................................................27 Télécommande Utilisation de la télécommande.......................................................28 Boutons de la télécommande ..........................................................29 Programmation de la télécommande universelle (uniquement pour FR 985, FR 986, FR 995, FR 996) ................................30 Connecteurs .......................................................................................31 Connexions Connexions audio analogiques ........................................................32 Connexions audio numériques.........................................................32 Bus de commande système, CINEMA LINK ....................................33 Connexions vidéo .............................................................................33 Secteur .............................................................................................34 Manipulation de la puissance .........................................................34 Connexions des enceintes ...............................................................34 Téléviseur faisant fonction d'enceinte centrale..............................34 Connexions d’antenne......................................................................34 Ecouteurs..........................................................................................34 Installation du système Positionnement des enceintes.........................................................35 Mise en place et test des enceintes ...............................................35 Réglage du récepteur.......................................................................35 Affichage.............................................................................................36 Menus Menu récepteur.........................................................................37–38 Menu téléviseur ...............................................................................38 Pour activer CINEMA LINK ..............................................................38 Sélection de source SOURCE SELECT...............................................................................39 Sélection 6 CHANNEL-DVD/SACD INPUT.......................................39 Réattribution d'une sélection de source..........................................39 Utilisation d'une sélection de source Pour deux ou plusieurs applications................................................39 A propos de 6 CHANNEL-DVD/SACD INPUT ..................................39 A propos de la lecture, enregistrement Lecture d'une source........................................................................40 Réglage du son ................................................................................40 Enregistrement d'une source ...........................................................40 Enregistrement à partir d’une sortie numérique .............................40 Son surround A propos du son surround................................................................41 Mise en service du son surround ....................................................41 Réglages du son surround ...............................................................42 Syntoniseur Syntonisation des stations radio .....................................................43 Sélection de sensibilité FM .............................................................43 Mémorisation des stations radio.....................................................43 Syntonisation des stations radio mémorisées ................................44 Modification des stations radio mémorisées..................................44 Dénomination des stations radio.....................................................44 Effacement des noms de station .....................................................44 RDS R..............................................................................................45 Informations et radioguidage RDS ..................................................45 Caractéristiques techniques Récepteur .........................................................................................46 Dépistage des anomalies Avertissement ..................................................................................47 Dépistage des anomalies ................................................................47 En tant que partenaire d´ENERGY STAR®, Philips a déterminé que ce produit répond aux lignes directrices d´ENERGY STAR® én matière de rendement énergétique. Cet appareil est conforme aux normes de la Communauté européenne en matière d’interférences radio. 26 Produits livrés avec l'équipement Cet équipement comprend : – une télécommande – 2 piles pour télécommande, type AA – un câble coaxial pour les connexions audio avec un lecteur DVD – un câble bus pour connexion CINEMA LINK – une antenne-cadre – une antenne à câble – ce manuel d‘utilisation Mise en place Si vous avez empilé les composants de votre système, le récepteur doit se trouver en haut. Placez le récepteur sur une surface plane, dure et stable. Ne couvrez aucun orifice de ventilation et maintenez un encombrement de 50 cm au-dessus de l‘équipement et de 10 cm à gauche et à droite du récepteur pour assurer une ventilation adéquate. Pour obtenir une réception optimale, l‘antenne-cadre ne devra pas être placée au-dessous et sur des VCR, des enregistreurs CD, des lecteurs DVD, des téléviseurs et d‘autres sources de radiation. Informations relatives à l'environnement Tous les matériaux d‘emballage superflus ont été supprimés. Nous avons fait notre possible afin que l‘emballage soit facilement séparable en trois types de matériaux : carton (boîte), polystyrène expansible (matériel tampon) et polyéthylène (sachets, feuille de protection en mousse). Votre appareil est composé de matériaux pouvant être recyclés et réutilisés s‘il est démonté par une firme spécialisée. Veuillez observer les règlements locaux en vigueur sur la manière de vous débarrasser des anciens matériaux d‘emballage, des piles usées et de votre ancien appareil. Admission des marques déposées Fabriqués sous licence des Laboratoires Dolby. « DOLBY », « DOLBY DIGITAL », « PRO LOGIC » et le symbole double-D 2 sont des marques déposées des Laboratoires Dolby. Travaux confidentiels non publiés. © 1992–1997 Dolby Laboratories. Tous droits réservés. « DTS » et « DTS Digital Surround » sont des marques déposées de Digital Systems Inc. Copyright 1996 Theater Systems, Inc. Tous droits réservés. Entretien Nettoyez le récepteur avec un chiffon doux non pelucheux légèrement humidifié. N‘utilisez pas d‘agents de nettoyage, ceux-ci pouvant avoir un effet abrasif. N‘exposez pas le récepteur à l‘humidité, à la pluie, au sable ou à une chaleur excessive (causée par un équipement de chauffage ou par exposition directe aux rayons du soleil). COMMANDES 1 2 3 4 5 6 7 T Français 8 9 0 A ! ≤ £ ™ ¡ )( * & ^ % $ 1 POWER / STANDBY.......Bouton de marche/arrêt de l‘équipement. 2 CINEMA LINK ................Mise en/hors service bus de commande système entre l‘équipement et le téléviseur. 3 ..........................................Capteur pour télécommande infrarouges. 4 VIRTUAL..........................Témoin du surround virtuel. 5 HALL ................................Témoin de commande pour HALL. 6 ..........................................Affichage 7 SOURCE SELECT............Sélectionne les différents connecteurs audio et vidéo. Réactive le récepteur du mode veille. 8 VOLUME..........................Pour augmenter et réduire le niveau de volume. 9 FRONT AV.......................Pour sélectionner l‘entrée FRONT AV / GAME (uniquement pour FR 995, FR 996). 0 TREBLE............................Pour régler les aiguës en combinaison avec VOLUME. ! BASS ...............................Pour régler les graves en combinaison avec VOLUME. @ LOUDNESS .....................Pour mettre en/hors service LOUDNESS. # NEXT 2 ...........................TUNER : pour rechercher les stations radio. MENU : pour passer au niveau de menu suivant. $ ENTER / OK.....................Pour confirmer les valeurs de menu sélectionnées. # @ % TUNER PRESET X MENU NAVIGATOR TUNER : pour sélectionner la station radio mémorisée suivante et précédente. MENU : pour passer en avant et en arrière. ^ 1 PREV. / EXIT ...............TUNER : pour rechercher les stations radio. MENU : pour passer au niveau de menu précédent. & SETUP MENU ................Pour mettre en/hors service le menu. * SENS. ..............................Pour opter entre la sensibilité basse et haute du syntoniseur. ( NEWS/TA........................Pour mettre en/hors service les informations et radioguidages RDS. ) TUNER AM/FM ..............Pour sélectionner les bandes de fréquence du synthétiseur. ¡ RADIO TEXT ...................Pour passer en revue les différentes informations RDS. ™ SURR. MODE..................Passe d’une configuration des haut-parleurs à l’autre. £ VIRTUAL MODE .............Effectue un balayage des différents modes de son surround virtuel. ≤ SURROUND ON/OFF .....Passe du dernier mode surround choisi au mode stéréo, et viceversa. 27 TELECOMMANDE Utilisation de la télécommande Ouvrez le compartiment piles de la télécommande et insérez 2 piles alcaline, type AA (R06, UM-3). Français Retirez les piles si elles sont à plat ou si la télécommande ne sera pas utilisée pendant une période prolongée. MUTE 2 H PHONO TUNER CD CDR/TAPE TV VCR SAT DVD Les piles contiennent des substances chimiques, donc elles devront être mises proprement au rebut. Les touches de la télécommande fonctionnent de la même manière que les touches correspondantes sur le récepteur. Important ! Vous devez appuyer pendant plus d’1 seconde sur un bouton de sélection de source pour faire passer le récepteur sur cette source sonore. En appuyant sur le bouton de sélection de source pendant moins d’1 seconde, la télécommande passe simplement au mode de contrôle du produit choisi. 1 2 3 4 5 6 7 8 9 CINEMA GO CABLE BOX 0 GUIDE OK MENU La télécommande reste ne service sur la source sélectionnée jusqu‘à ce qu‘un autre bouton de source soit sollicité au niveau de la télécommande. Ceci permet de solliciter des sources complémentaires par exemple l‘enroulement d‘une cassette sans modifier la source au niveau de l‘équipement. É A ATV NEWS/TA Ç CHANNEL/TRACK LOUDNESS SUBW. ON/ OFF í ë REC CANCEL AUDIO DVD NIGHT INDEX Å T-C VIRTUAL SURROUND DISC + FR.D. MODE REAR SURROUND + MODE SUB WOOFER - TEST TONE CHANNEL 28 ON/ OFF Boutons de la télécommande H MUTE .....................Coupe le son du récepteur dans tous les modes, sauf en mode TV. Coupe le son de votre téléviseur Philips si votre télécommande est en mode TV. 2 ................................Fait passer la source sélectionnée sur votre télécommande (par ex. VCR, TV) en veille. Le récepteur passe en veille lorsque l’on appuie sur cette touche pendant plus de 2 secondes. PHONO, TUNER, CD, CDR/TAPE, TV, VCR, SAT, DVD..............Pour solliciter la télécommande au niveau des divers produits. Sélectionne les sources s’il est enfoncé plus d’1 seconde. SAT fonctionne uniquement avec des récepteurs satellite numériques. Réactive le récepteur du mode veille. 1–0 ...............................Boutons référencés pour pistes, stations ou fréquences. Les numéros sont composés de deux chiffres à solliciter dans les 2 secondes. CINEMA GO..........Active CINEMA LINK sur la TV. CABLE BOX ...................Pas de fonction. MENU GUIDE ..............TUNER : Active/désactive le menu du récepteur. DVD, TV : Active/désactive le menu DVD/TV. OK .................................Pour confirmer les options du menu. Boutons fléchés............TUNER : Pour se déplacer dans les menus. Les flèches droite/gauche sont réglées sur vers le haut/vers le bas. CD, CDR : Les flèches gauche/droite font une recherche vers l‘arrière/vers l‘avant, les flèches haut/bas sélectionnent la piste suivante/précédente. +A ...........................Pour augmenter le volume du récepteur. -A ...........................Pour réduire le volume du récepteur. NEWS/TA.................Pour mettre en/hors service les fonctions NEWS et TRAFFIC ANNOUNCEMENT. TV : Pour mettre en/hors service le télétexte. SAT : Pour mettre en/hors service le texte d‘information. ÉATV ......................Pour augmenter le volume TV. CD, CDR, VCR, DVD : Pour démarrer la lecture. ÇATV ......................Pour diminuer le volume TV. CD, CDR, VCR, DVD : Pour arrêter la lecture. i í CHANNEL/TRACK ...Pour sélectionner la station radio présélectionnée précédente. VCR : Pour rebobiner la cassette. CD, CDR, DVD : Pour sélectionner la piste précédente. TV: Pour sélectionner le canal précédent. ë CHANNEL/TRACK ...Pour sélectionner la station radio présélectionnée suivante. VCR : Bobinage rapide de la cassette. CD, CDR, DVD : Pour sélectionner la piste suivante. TV: Pour sélectionner le canal suivant. LOUDNESS ...................Pour mettre en/hors service LOUDNESS. SUBW. ON/OFF ............Active/désactive le subwoofer. REC, DVD AUDIO..........CDR, VCR : Pour démarrer l‘enregistrement. DVD : Pour sélectionner les pistes audio. CANCEL, DVD ...........CD, CDR, SAT, VCR : Pour effacer un programme, éliminer les sélections. DVD : Pour solliciter l‘angle de vision. FR.D., DVD Å .............TUNER : Pour solliciter FREQUENCY DIRECT. CD, CDR, VCR, DVD : Pour interrompre la lecture. INDEX, DVD T-C............VCR : Pour mettre en/hors service la recherche d‘index. SAT : Pour mettre en/hors service les thèmes. DVD : Pour sélectionner entre titre et chapitre. DISC..............................Changeurs CD-, CDR-, DVD : Pour passer au disque suivant. NIGHT ...........................Pour mettre en/hors service NIGHT MODE. VIRTUAL MODE ............Effectue un balayage des différents modes de son surround virtuel. SURROUND ON/OFF ....Pour mettre en/hors service SURROUND SOUND. +/- SUBWOOFER...Augmente/réduit le volume subwoofer. +/- REAR ...............Augmente/réduit le volume des enceintes arrière. Si la tonalité test est en service, le volume des enceintes que vous entendez peut être augmenté/réduit à l‘aide de ces boutons. SURROUND MODE.......Pour passer en revue les différents modes surround. TEST TONE ...................Pour mettre en/hors service la tonalité test. Si la tonalité test est en service, le volume des enceintes que vous entendez peut être augmenté/réduit à l‘aide de +/- REAR. 29 Français TELECOMMANDE TELECOMMANDE Programmation de la télécommande universelle (uniquement pour FR 985, FR 986, FR 995, FR 996) Il vous est possible d‘identifier la télécommande universelle par l‘inscription Multibrand/Universal. Français La télécommande universelle doit être programmée à l‘usage des codes pour les utilisations des différentes marques. Pour ce faire, introduisez un code à 4 chiffres ou balayez les codes jusqu‘à ce que le code correct soit trouvé. Nous vous recommandons d‘utiliser le code à 4 chiffres. Cette méthode est plus rapide et bien plus fiable. La méthode de balayage des codes ne doit en fait être utilisée que dans le cas où vous ne trouviez pas le code pour une de vos applications. A la fin de ce manuel, vous trouverez la table des codes. Important! Une fois que les codes ont été trouvés et testés pour les diverses applications, il est certainement bon d‘en prendre note ci-dessous. PHONO .......................................... TUNER........................................... CD ................................................. CDR/TAPE ..................................... TV .................................................. VCR ............................................... Les boutons de la télécommande doivent être utilisés pour la programmation, pas les boutons du récepteur ou des autres applications. SAT................................................ Programmation avec le code à 4 chiffres 1 Maintenez enfoncés le bouton de source de l‘application que vous désirez commander et 2 pendant plus de 3 secondes. Réinitialisation de la télécommande 1 Maintenez enfoncé un des boutons de source et 2 pendant 3 secondes. 2 Introduisez le code à 4 chiffres pour l‘application (voir table des codes à la fin du manuel). 2 Introduisez le code à 3 chiffres 981. y La télécommande est dès lors réinitialisée pour tous les codes Philips d’origine. Remarques : – Si vous introduisez plus de 4 chiffres, la télécommande ne reconnaîtra que les quatre premiers. – Si vous n‘introduisez pas un code pendant 30 secondes, la télécommande mettra automatiquement la fonction de programmation hors service sans que le code ne soit modifié. – Pour programmer une nouvelle application, effacez simplement l’ancien code en en introduisant un nouveau. Balayage de la table des codes 1 Mettez en service l‘application à commander. 2 Maintenez enfoncés le bouton de source de l‘ application que vous désirez commander et 2 pendant plus de 3 secondes. 3 Appuyez sur et relâchez à nouveau 2. y La télécommande envoie les codes pour le canal suivant ou le mode de veille (selon la source sélectionnée) pour une marque après l‘autre. 4 Dès que l‘application réagit, – passe automatiquement au canal suivant ou en mode de veille – relâchez 2 pour confirmer le code. y Le code identifié sera utilisé. • Si l‘équipement ne réagit pas pendant 2 minutes, le code pour cette application n‘est pas enregistré dans la télécommande. Le code de la télécommande restera donc inchangé. Remarque : Si vous enlevez les piles de la télécommande pendant plus de 1 minute, les codes devront être reprogrammés. 30 DVD ............................................... CONNECTEURS ¤ ™£≤∞§ ≥•ª º ⁄ A ANTENN A ANTENN P AM LOO UT VIDEO IN/O S-VIDEO DIGITAL AUDIO IN/OUT 2 OPTICAL IN DVD MON VCR VCR C A U TI CINEMA LINK SAT R L/ 6 CHANNE T DVD INPU SUBW. DVD IN MON OUT FER SUBWOO T PRE-OU OUT IN OUT IN VCR REC PLAY SAT IN CENTER UT AUDIO IN/O SAT COAX OUT CDR/TAP CENTER E CD VCR PHONO TV R COAX 2 IN EACH L COAX 1 IN R IN IN IN PLAY OUT REC IN IN IN PLAY L SPEAKE R≥6Ω QUE DE CHOC ELE R VRI OU RIS n NE PAS Europea ips in the by Phil s. eloped oratorie the d and dev Dolby Lab Designeity. se from O LOGIC“ and Dol by er licen Commun tured und DIGITAL“, ”PRema rks of ks. LBY Manufac are trad shed Wor rved. “, ”DO rese ts ”DOLBY-D Sym bol ntial Unpubli righ ater ories. All Dig ital The dou ble ories. Confide r worldLaborat Laborat 997 Dolby er lice nse from 2 and othe ”DT S ©1992–1 ture d und No. 5,451,94. ”DT S“ and ater Man ufacInc. US Pat.and pen ding of Digital The s, s. System System nts issu ed trademarks Theater nd“ areht 1996 Digital wid e pate Surrou Digital s, Inc. Copyrig d. System Rights Reserve All Inc. AV IS ND SURROURS SPEAKE CENTER T PRE-OU ON SHOCK ELECTRIC RISK OF NOT OPEN E DO CTRIQU L 1 OPTICAL IN ) ( * & LET . 100W TOTAL MAX. SWI Français ¡ AC OUT FRONT RS SPEAKE 6Ω AKER ≥ EACH SPE FM 75 Ω PHONO GND ‹ TCHED OUT REC ^ % $ # @ ! 09 8 7 6 5 4 3 2 1 Connecteurs Nom des connecteurs Douille écouteur 6,3 mm à l‘avant. 1 PHONES Entrées audio et vidéo à l‘avant 2 FRONT AV / GAME (uniquement pour FR 995, FR 996). 3 FRONT AV / GAME FRONT SPEAKERS SURROUND SPEAKERS AUDIO IN/OUT Entrée à 6 canaux DIGITAL AUDIO IN/OUT VIDEO IN/OUT Connecteurs d‘antenne Sorties préamplifiées Bus de commande système Sorties secteur (pas valable pour toutes les versions) Cordon secteur Connectez à : Ecouteur avec fiche 6,3 mm. Prises de sortie audio gauche et droite pour des appareils tels que caméras vidéo et consoles de jeux. Prises de sortie vidéo pour des appareils tels que caméras vidéo et consoles de jeux. 4 R, L Enceinte avant droite et gauche. 5 CENTER Enceinte central. 6 R, L Enceinte surround droite et gauche. 8 CDR/TAPE OUT Entrée d‘un enregistreur CD ou d‘une platine cassette. 9 CDR/TAPE IN Sortie d‘un enregistreur CD ou d‘une platine cassette. 0 CD IN Sortie d‘un lecteur CD. ! SAT IN Sortie d‘un système satellite. @ VCR OUT Entrée d‘un enregistreur vidéo. # VCR IN Sortie d‘un enregistreur vidéo. $ TV IN Sortie d‘un téléviseur. % PHONO IN Sortie d’un tourne-disques avec bobine MM. ¡ PHONO GND f Câble de terre d’un tourne-disques. ^ 6 CHANNEL / DVD INPUT Sortie à 6 canaux des applications telles que DVD ou lecteurs Laserdisc & COAX 1 IN Sortie coaxiale des applications numériques (entrée par défaut pour le DVD source). * COAX 2 IN Sortie coaxiale des applications numériques. ( COAX OUT Entrée coaxiale des applications numériques telles que les enregistreurs CD ou les enregistreurs MD. Sortie optique des applications numériques telles que lecteurs DVD, ) OPTICAL IN lecteurs CD, enregistreurs CD ou lecteurs MD (uniquement pour FR 984, FR 985, FR 986, FR 994). ) OPTICAL 1 (2) IN Sortie optique des applications numériques telles que lecteurs DVD, lecteurs CD, enregistreurs CD ou lecteurs MD (uniquement pour FR 995, FR 996). ™ S-VIDEO Entrées/sorties S-Video des appareils vidéo, permettant une meilleure qualité vidéo (uniquement pour FR 994, FR 995, FR 996). £ DVD IN Sortie d‘un lecteur DVD. ≤ MON OUT Entrée d‘un moniteur (par ex. le téléviseur). § VCR IN Sortie d‘un enregistreur vidéo. ≥ VCR OUT Entrée d‘un enregistreur vidéo (pour enregistrement). ª SAT IN Sortie d‘un système satellite. ∞ AM LOOP Antenne-cadre comprise dans la livraison. • FM 75 Ω Antenne câblée ou antenne extérieure. 7 CENTER PRE-OUT Entrée d‘un téléviseur utilisé comme enceinte central (uniquement possible lorsque le bus de système CINEMA LINK a été connecté). º SUBWOOFER PRE-OUT Entrée d‘un subwoofer alimenté. ⁄ CINEMA LINK Douille de commande système d‘un téléviseur Philips avec CINEMA LINK. ¤ AC OUTLET Alimente la même tension que le secteur. Charge totale utilisée jusqu‘à 100 W. ‹ Une fois que toutes les autres connexions ont été faites, branchez le cordon secteur à la prise murale. 31 CONNEXIONS Connexions audio analogiques Français Il existe des connecteurs analogiques et numériques pour certaines applications. Si possible, utilisez une connexion numérique; en effet ceci donne en général une meilleure qualité du son. Voir « Reattribution d‘une sélection de source » pour déterminer l‘usage des connecteurs numériques de l‘équipement. décodé et lu par la plupart des lecteur CD, LD ou DVD. Pour cette raison, lorsqu’un logiciel encodé en DTS est lu par les sorties analogiques du lecteur de CD, de LD ou de DVD, un bruit excessif se fera entendre. Pour éviter tout dommage éventuel au système audio, le client doit prendre les précautions qui s’imposent si les sorties analogiques sont reliées directement au récepteur. Etant donné que le signal de sortie est différent, l‘usage d‘un Dolby Digital Laserdisc requiert un démodulateur AC-3 RF en option. Afin de bénéficier d’une lecture en DTS Digital SurroundTM, un lecteur compatible avec la norme DTS doit être relié à l’une des entrées numériques du récepteur. Le DTS Digital Surround est un format audio numérique discret répondant à la norme 5.1 disponible pour les logiciels de CD, LD et DVD, et qui, par conséquent, ne peut être TM ANTENNA PHONO GND. FM 75 Ω AM LOOP DIGITAL AUDIO IN/OUT OPTICAL 2 IN DVD VIDEO IN/OUT S-VIDEO MON VCR FRONT SPEAKERS EACH SPEAKER ≥ 6 Ω SAT VCR CINEMA LINK OPTICAL 1 IN IN 6 CHANNEL / DVD INPUT CENTER SUBW. OUT SUBWOOFER DVD IN MON OUT IN OUT PLAY VCR REC PHONO TV VCR SAT IN PRE-OUT CENTER R CAUTION L COAX OUT MONITOR / TV RISK OF ELECTRIC SHOCK DO NOT OPEN COAX 2 IN AUDIO OUT SURR. FRONT AUDIO IN/OUT SAT CD CENTER PRE-OUT CDR/TAPE AVIS SURROUND SPEAKERS R IN IN IN PLAY IN OUT REC IN PLAY IN R OUT REC L EACH SPEAKER ≥ 6 Ω TURNTABLE RISQUE DE CHOC ELECTRIQUE NE PAS OUVRIR Designed and developed by Philips in the European Community. Manufactured under license from Dolby Laboratories. ”DOLBY“, ”DOLBY DIGITAL“, ”PRO LOGIC“ and the double-D Symbol are trademarks of Dolby Laboratories. Confidential Unpublished Works. ©1992–1997 Dolby Laboratories. All rights reserved. Manufactured under license from Digital Theater Systems. Inc. US Pat. No. 5,451,942 and other worldwide patents issued and pending. ”DTS“ and ”DTS Digital Surround“ are trademarks of Digital Theater Systems, Inc. Copyright 1996 Digital Theater Systems, Inc. All Rights Reserved. L COAX 1 IN CD RECORDER IN POWERED SUBWOOFER OUT VCR AUDIO OUT CD PLAYER AUDIO IN SAT RECEIVER Connexions audio numériques CD RECORDER ANTENNA PHONO GND. FM 75 Ω AM LOOP DIGITAL AUDIO IN/OUT OPTICAL 2 IN CD PLAYER DVD VIDEO IN/OUT S-VIDEO MON VCR FRONT SPEAKERS VCR EACH SPEAKER ≥ 6 Ω SAT CINEMA LINK OPTICAL 1 IN IN 6 CHANNEL / DVD INPUT CENTER SUBW. OUT SUBWOOFER DVD IN MON OUT IN OUT PLAY VCR REC SAT IN PRE-OUT CENTER R CAUTION L COAX OUT RISK OF ELECTRIC SHOCK DO NOT OPEN COAX 2 IN SURR. FRONT PHONO AUDIO IN/OUT VCR SAT TV CD CDR/TAPE CENTER PRE-OUT SURROUND SPEAKERS L COAX 1 IN R IN DVD PLAYER 32 IN IN PLAY OUT REC IN IN IN PLAY OUT REC R L EACH SPEAKER ≥ 6 Ω AVIS RISQUE DE CHOC ELECTRIQUE NE PAS OUVRIR Designed and developed by Philips in the European Community. Manufactured under license from Dolby Laboratories. ”DOLBY“, ”DOLBY DIGITAL“, ”PRO LOGIC“ and the double-D Symbol 2 are trademarks of Dolby Laboratories. Confidential Unpublished Works. ©1992–1997 Dolby Laboratories. All rights reserved. Manufactured under license from Digital Theater Systems. Inc. US Pat. No. 5,451,942 and other worldwide patents issued and pending. ”DTS“ and ”DTS Digital Surround“ are trademarks of Digital Theater Systems, Inc. Copyright 1996 Digital Theater Systems, Inc. All Rights Reserved. CONNEXIONS Si le récepteur et votre téléviseur Philips (et mieux encore si à cela s’ajoute un magnétoscope ou un lecteur DVD Philips) sont reliés, par un Cinemalink, à la commande du bus système CINEMA LINK, le système offre certains avantages supplémentaires : – Au démarrage d‘une source, le système passe automatiquement à l‘entrée concernée. – Il vous est possible de contrôler le système à partir de l‘équipement du téléviseur. Selon la langue au niveau du téléviseur, ceci peut être réalisé dans la langue de votre choix. – Le téléviseur peut fonctionner comme enceinte central de votre système, de sorte qu‘il n‘est pas nécessaire de prévoir une enceinte centrale séparée. (Le câble A doit être acheté séparément.) – Vous pouvez mettre l’ensemble du système en mode veille en appuyant sur le bouton de veille de la télécommande. TV EXT 1 EXT 2 EXT 3 TV AUX DVD PLAYER DIGITAL OUT optional A (TV = CENTER) ANTENNA PHONO GND. FM 75 Ω AM LOOP DIGITAL AUDIO IN/OUT OPTICAL 2 IN VCR VIDEO IN/OUT S-VIDEO MON VCR DVD FRONT SPEAKERS VCR EACH SPEAKER ≥ 6 Ω SAT CINEMA LINK OPTICAL 1 IN IN 6 CHANNEL / DVD INPUT CENTER SUBW. OUT SUBWOOFER DVD IN MON OUT IN OUT PLAY VCR REC PHONO TV VCR SAT IN PRE-OUT CENTER R CAUTION L COAX OUT RISK OF ELECTRIC SHOCK DO NOT OPEN COAX 2 IN SURR. FRONT AUDIO IN/OUT SAT CENTER PRE-OUT CDR/TAPE CD AVIS SURROUND SPEAKERS R IN IN IN PLAY IN OUT REC IN PLAY IN R OUT REC RISQUE DE CHOC ELECTRIQUE NE PAS OUVRIR Designed and developed by Philips in the European Community. Manufactured under license from Dolby Laboratories. ”DOLBY“, ”DOLBY DIGITAL“, ”PRO LOGIC“ and the double-D Symbol are trademarks of Dolby Laboratories. Confidential Unpublished Works. ©1992–1997 Dolby Laboratories. All rights reserved. Manufactured under license from Digital Theater Systems. Inc. US Pat. No. 5,451,942 and other worldwide patents issued and pending. ”DTS“ and ”DTS Digital Surround“ are trademarks of Digital Theater Systems, Inc. Copyright 1996 Digital Theater Systems, Inc. All Rights Reserved. L COAX 1 IN L EACH SPEAKER ≥ 6 Ω CINEMA LINK TO TV IN TO VCR IN Connexions vidéo MONITOR / TV DVD PLAYER ANTENNA PHONO GND. FM 75 Ω AM LOOP DIGITAL AUDIO IN/OUT OPTICAL 2 IN DVD VIDEO IN/OUT S-VIDEO MON VCR FRONT SPEAKERS VCR EACH SPEAKER ≥ 6 Ω SAT CINEMA LINK OPTICAL 1 IN IN 6 CHANNEL / DVD INPUT CENTER SUBW. OUT SUBWOOFER DVD IN MON OUT IN OUT PLAY VCR REC SAT IN PRE-OUT CENTER R CAUTION L COAX OUT RISK OF ELECTRIC SHOCK DO NOT OPEN COAX 2 IN SURR. FRONT PHONO AUDIO IN/OUT VCR SAT TV CD CDR/TAPE CENTER PRE-OUT SURROUND SPEAKERS L COAX 1 IN R IN IN IN PLAY OUT REC IN IN IN PLAY OUT REC R L EACH SPEAKER ≥ 6 Ω AVIS RISQUE DE CHOC ELECTRIQUE NE PAS OUVRIR Designed and developed by Philips in the European Community. Manufactured under license from Dolby Laboratories. ”DOLBY“, ”DOLBY DIGITAL“, ”PRO LOGIC“ and the double-D Symbol are trademarks of Dolby Laboratories. Confidential Unpublished Works. ©1992–1997 Dolby Laboratories. All rights reserved. Manufactured under license from Digital Theater Systems. Inc. US Pat. No. 5,451,942 and other worldwide patents issued and pending. ”DTS“ and ”DTS Digital Surround“ are trademarks of Digital Theater Systems, Inc. Copyright 1996 Digital Theater Systems, Inc. All Rights Reserved. VCR VIDEO OUT VIDEO IN SAT RECEIVER 33 Français Bus de commande système, CINEMA LINK CONNEXIONS Français Secteur Téléviseur faisant fonction d‘enceinte centrale La plaquette signalétique est située à l‘arrière de l‘équipement. Vous pouvez utiliser votre téléviseur Philips avec CINEMA LINK comme enceinte centrale. Pour les téléviseurs équipés d‘un connecteur scart, un câble cinch-to-scart audio supplémentaire est requis. Pour les téléviseurs avec connecteurs cinch, des câbles cinch complémentaires sont requis. Ces câbles doivent être connectés au connecteur bleu CENTER PRE-OUT à l’arrière. Référez-vous au manuel de votre téléviseur pour savoir comment il peut faire fonction d‘enceinte centrale. 1 Vérifiez si la tension secteur référencée sur la plaquette signalétique correspond à votre tension secteur locale. Si ce n‘est pas le cas, consultez votre concessionnaire ou l‘organisation de service après-vente. 2 Branchez le câble secteur à la prise murale. Pour débrancher complètement l’appareil du secteur, retirez la fiche d’alimentation de la prise de courant. Manipulation de la puissance Si le récepteur est utilisé à une puissance trop élevée, des distorsions peuvent avoir lieu, lesquelles peuvent sérieusement endommager vos enceintes. En cas de distorsions, réduisez le volume et les commandes de tonalité à un niveau de son acceptable. Pour éviter tout problème de surchauffe, cet appareil est doté d’un circuit de sécurité intégré. L’appareil s’arrête automatiquement dans des conditions de fonctionnement extrêmes. Si tel était le cas, mettez l’appareil hors tension pour permettre le refroidissement de l’appareil avant de le réutiliser. Après avoir laissé l’appareil refroidir allumez l’appareil de nouveau et choisissez la source désirée en tournant SOURCE SELECT. Connexions des enceintes Certaines connexions d‘enceinte de l‘équipement sont des connecteurs à vis ou à clips. Pratiquez comme illustré cidessous. Connexions d‘antenne Antenne AM (MW) L‘antenne-cadre comprise à la livraison est uniquement destinée à l‘usage intérieur. Positionnez l‘antenne aussi loin que possible du récepteur, du téléviseur, des câbles, d‘un lecteur DVD, d‘un VCR et d‘autres sources de radiation. 1 Introduisez la fiche de l‘antenne-cadre dans AM LOOP comme illustré ci-dessous. 2 Tournez l‘antenne pour optimaliser la réception. A ANTENN P AM LOO Antenne FM L‘antenne-câble comprise à la livraison peut uniquement être utilisée pour recevoir des stations proches. Pour améliorer la réception, nous recommandons l‘usage d‘un système d‘antenne par câble ou d‘une antenne extérieure. 1 Fixez l‘antenne-câble comprise à la livraison à FM 75 Ω comme illustré ci-dessous. 7m m 2 Déplacez l‘antenne dans différentes positions pour optimaliser la réception. 1 2 3 • Si vous utilisez un système d‘antenne par câble ou une antenne extérieure, introduisez la fiche d‘antenne dans la prise FM 75 Ω en lieu et place de l‘antenne prévue. FM 75 Ω m 8m 1 2 FM 75 Ω 3 1 Connectez toujours le fil en couleurs (ou référencé) à la borne en couleurs et le fil noir (ou non référencé) à la borne noire. 2 Connectez : – L‘enceinte avant gauche à L (rouge et noir) – L‘enceinte avant droite à R (rouge et noir) – L‘enceinte central à CENTER (bleu et noir) – L‘enceinte surround gauche à SURROUND L (gris et noir) – L‘enceinte surround droite à SURROUND R (gris et noir) 34 Ecouteurs Connectez les écouteurs sur PHONES signifie que les enceintes sont mises hors service. Le récepteur passe à STEREO et le son surround est réduit à un signal stéréo qui est reproduit à travers les écouteurs surround. Le fait de débrancher les écouteurs remet automatiquement les enceintes en service. Si vous désirez jouir à nouveau du son surround, réglez à nouveau le récepteur sur son surround. INSTALLATION DU SYSTEME FR ON T LEFT RIGHT SU BW OO FE R CENTER SURROUND (REAR) LEFT RIGHT SURROUND (REAR) Positionnement des enceintes Conseils de positionnement généraux Evitez de placer les enceintes dans un coin ou à même le sol, car cela amplifierait trop les basses. Le fait de placer les enceintes derrière les rideaux, des meubles, etc. réduira la reproduction des aiguës et diminuera considérablement l‘effet stéréo. L‘auditeur doit toujours « voir » les enceintes. Chaque pièce offre des caractéristiques acoustiques différentes et les possibilités de positionnement sont souvent limitées. Pour trouver la position idéale pour vos enceintes, reportezvous au schéma ci-dessus. Nous recommandons pour obtenir un bon son surround d‘utiliser au minimum 5 enceintes (2 à l‘avant, un central, 2 surround). Il est possible de produire certains types de son surround avec un nombre réduit d‘enceintes. Ceci se fait en dirigeant à nouveau les signaux prévus à partir des enceintes manquantes vers les enceintes en place. Voir « Menus » pour la mise en place correcte de l‘équipement au niveau du nombre et de la dimension des enceintes utilisées. Positionnement des enceintes avant Les enceintes avant doivent être disposées à droite et à gauche dans la même position d‘écoute que dans le cas d‘enceintes stéréo. Positionnement de l‘enceinte centrale L‘enceinte centrale devrait être placée au centre entre les deux enceintes avant, par exemple sous ou au-dessus du téléviseur. L‘idéal serait que l‘enceinte centrale se trouve à hauteur des oreilles de l‘auditeur (lorsqu‘il est assis). Positionnement des enceintes surround Les enceintes surround doivent se trouver en face l‘une de l‘autre et être en ligne ou légèrement derrière l‘auditeur. Positionnement du subwoofer Un subwoofer peut servir à améliorer sérieusement les performances des graves de votre équipement. Le subwoofer peut être disposé à n‘importe quel endroit de la pièce, car il n‘est pas possible de localiser la source des tonalités profondes. Néanmoins, vous ne devez jamais placer le subwoofer au milieu d‘une pièce, car ceci affaiblit fortement les graves. De plus, ne placez jamais un objet sur le subwoofer. Mise en place et test des enceintes Le volume relatif des enceintes doit être ajusté dans le but d‘obtenir un son surround optimal. Vous devez vous mettre dans votre position d‘écoute habituelle au moment du réglage du volume de l‘enceinte. Référez-vous à « Menu récepteur » pour le réglage en fonction des enceintes utilisées. Idéalement, le volume et la position d’écoute doivent être les mêmes à partir de tous les haut-parleurs. 1 Appuyez sur POWER / STANDBY pour mettre en service le récepteur. 2 Appuyez sur TEST TONE de la télécommande. y Une tonalité de test en provenance des différents hautparleurs se fait entendre à l’exception du subwoofer. 3 Appuyez sur +/- REAR de la télécommande pour augmenter/réduire le volume de l‘enceinte actuelle. Le meilleur résultat est obtenu avec un volume égal pour tous les haut-parleurs à partir de la position d’écoute. 4 Appuyez sur TEST TONE de la télécommande. y La tonalité test s‘arrête. Remarque : Si vous n‘êtes pas entièrement satisfait(e) des réglages de volume, nous vous recommandons de faire des petits réglages pendant la lecture du son surround. Réglage du récepteur Dès que le nombre et la position des haut-parleurs ont été déterminés, vous pouvez effectuer les premiers réglages du récepteur afin d’obtenir un son surround optimal correspondant à votre installation : 1 Réglez les haut-parleurs qui ont été reliés au récepteur (voir « Structure de menu / * SPEAKR SETUP »). Remarque : La réglage d’origine de votre récepteur se présente comme suit : deux haut-parleurs avant gauche et droit : présents (ne peuvent être modifiés) haut-parleur central : présent deux haut-parleurs arrière : présents subwoofer : présent 2 Sélectionnez la taille des haut-parleurs (SMALL ou LARGE) (voir « Structure de menu / * SPEAKR SIZES »). Sélectionnez SMALL si votre haut-parleur peut reproduire des sons graves jusqu’à 80 à 100 Hz au minimum. Sélectionnez LARGE si votre haut-parleur peut reproduire des sons graves jusqu’à 50 Hz au minimum. (En règle générale, un grand haut-parleur (LARGE) présente un diamètre du cône de l’ordre de 12 cm au minimum.) Consultez les fiches de caractéristiques de vos haut-parleurs. Remarque : Pour le FR 985, FR 986, FR 996 le réglage d’origine est : tous les haut-parleurs sur LARGE. Pour FR 984, FR 994, le réglage d’origine est : tous les haut-parleurs sur SMALL. 3 Régler la distance entre les haut-parleurs et l’auditeur (voir « Structure de menu / * SPK DISTANCE »). 35 Français NT FRO AFFICHAGE Voyants de statut Affichage L‘affichage du récepteur est divisé en 4 sections, qui seront utilisées pour ce qui suit : Schéma des enceintes Français Ces signes vous indiquent les divers réglages et les diverses informations à propos du statut du récepteur. PRESET ......................syntoniseur Un rectangle présentant une lettre indique qu’un haut-parleur a été sélectionné dans le menu d’installation. Néanmoins, l’indicateur de subwoofer ne s’allumera que si un signal subwoofer est disponible.Si une seule lettre est affichée, cette enceinte n‘est pas utilisée et le son reproduit passe par les autres enceintes. ......son surround virtuel surround reproduit DIGITAL SURROUND ....son surround numérique reproduit L, R ...........................enceinte avant gauche et droite C ...............................enceinte centrale SL, SR .......................enceintes surround SW ............................subwoofer SURROUND.................son Indication de menu Ces signes vous montrent que le menu a été sollicité ou non et indiquent la direction dans laquelle vous pouvez vous déplacer. M E N U .......................le menu est sollicité 1..............................vous pouvez retourner en arrière au menu précédent en faisant usage de 1 PREV. / EXIT (touche « gauche » de télécommande) 3 .............................vous pouvez vous déplacer vers le haut dans une liste d‘option en faisant appel à X MENU NAVIGATOR (touche « vers le haut » de télécommande) 4 .............................vous pouvez vous déplacer vers le bas dans une liste d‘options en faisant appel à X MENU NAVIGATOR (touche « vers le bas » de télécommande) 2..............................vous pouvez vous déplacer vers l‘avant vers le menu suivant en faisant appel à NEXT 2 (touche « droite » de télécommande) O K.............................vous pouvez confirmer la valeur affichée 0 OK É A ATV NEWS/TA 36 Zone d‘information Cette zone sert de feedback au récepteur, de fréquences de syntoniseur, d‘options menu, de valeurs et de messages de texte à dérouler. GUIDE MENU syntonisé sur une station radio préréglée SENS HI .....................syntoniseur réglé sur haute sensibilité SENS LO ..................syntoniseur réglé sur basse sensibilité C I N E M A L I N K O N ......CINEMA LINK activé STEREO ......................station FM recevant en stéréo R.............................une station RDS est en réception EON ...........................une station RDS avec EON est en réception HALL..........................l‘effet HALL est en service TA .............................les radioguidages RDS sont en service NEWS ........................les nouvelles RDS sont en service ANA ..........................l‘entrée analogique est utilisée pour la source de lecture N I G H T .......................NIGHT MODE est en service COAX 1 ......................entrée numérique coaxiale COAX 1 est utilisée pour la source de lecture COAX 2 .....................entrée numérique coaxiale COAX 2 est utilisée pour la source de lecture D O W N M I X .................les signaux multi canaux d‘entrée ont été réduits à un minimum de signaux de sortie (selon le nombre d‘enceintes) OPT ...........................entrée numérique optique OPTICAL IN est utilisée pour la source de lecture (uniquement pour FR 984, FR 985, FR 986, FR 994) OPT 1 ........................entrée numérique optique OPTICAL 1 IN est utilisée pour la source de lecture (uniquement pour FR 995, FR 996) OPT 2 .......................entrée numérique optique OPTICAL 2 IN est utilisée pour la source de lecture (uniquement pour FR 995, FR 996) LOUDNESS .................LOUDNESS est en service Ç MENUS Le récepteur est équipé d‘un système de menu. Le menu sert à l‘installation du récepteur. Les diverses options de menu se rapportent l‘une à l‘autre d‘une façon logique. A supposer que vous n‘ayez pas d‘enceinte centrale et que CENTER SPEAKR (enceinte centrale) est réglée sur NO (non). Si vous essayez d‘utiliser VOL CENTER (volume central), un message sera déroulé pour vous avertir que ce n‘est pas possible (INSTALL CENTER SPEAKER – installez enceinte centrale). Le menu fonctionne toujours de la même façon. Des flèches dans l‘affichage vous indiquent les directions de déplacement possibles. 1 Appuyez sur SETUP MENU. y MENU, et * EFFECTS sont affichés. • Vous pouvez sortir du menu à chaque moment arbitraire en appuyant sur SETUP MENU. 2 Tournez au X MENU NAVIGATOR jusqu‘à ce qu‘une option (ou une valeur voulue) soient affichées. 3 Appuyez sur NEXT 2 pour sélectionner l‘option affichée (ou ENTER / OK pour confirmer une valeur). • Vous pouvez quitter toute option (les valeurs restent alors inchangées) en appuyant sur 1 PREV. / EXIT. Structure de menu * EFFECTS (effets) Sollicite les effets de son. VIRT SURR surround virtuel: 0…100 % * VOL BALANCE (volume balance) Permet de régler la balance relative du volume entre les enceintes connectées. TEST TONE Tonalité test : on/off (marche/arrêt) VOL FRONT-L Volume enceinte avant gauche : –50…+50 VOL FRONT-R Volume enceinte avant droite : –50…+50 VOL CENTER Volume enceinte centrale : –50…+50 VOL REAR-L Volume enceinte arrière gauche : –50…+50 VOL REAR-R Volume enceinte arrière droite : –50…+50 VOL SUBWOOFER Volume subwoofer : –50…+50 Remarque : Les valeurs reprises ci-dessous ne peuvent être modifiées lorsque l’on utilise l’entrée 6 CHANNEL / DVD INPUT. * SPEAKR SETUP (installation enceintes) Permet de sélectionner les enceintes utilisées. SUBW PRESENT Présence de subwoofer : yes/no (oui/non) CENTER SPEAKR Présence d‘une enceinte centrale : yes/no (oui/non) REAR SPEAKER Présence des enceintes arrière : yes/no (oui/non) Français Menu récepteur * SPEAKR SIZES (taille des enceintes) Permet de sélectionner les tailles des enceintes utilisées au service d‘une reproduction de son optimale. LARGE indique un haut-parleur qui peut reproduire des fréquences inférieures à 50 Hz. Si SUBW PRESENT est réglé sur NO, FRONT SIZE peut uniquement être réglé sur LARGE. Si FRONT SIZE est réglé sur SMALL, CENTER SIZE peut uniquement être réglé sur SMALL et en conséquence, un subwoofer doit être connecté. FRONT SIZE Enceinte avant gauche et droite : small/large (petit/grand) CENTER SIZE Enceinte centrale : small/large (petit/grand) REAR SIZE Enceintes arrière : small/large (petit/grand) * SPK DISTANCE (distance entre les enceintes) Distance entre la position d‘écoute habituelle et les enceintes. Ceci définit le retard du son surround. DISTANCE L/ R Distance aux enceintes avant : 1…10 m DISTANCE CNTR Distance à l‘enceinte centrale : 1…10 m DISTANCE REAR Distance aux enceintes arrière : 1…10 m Entrée audio analogique CD IN 37 MENUS Français * SELECT INPUT (selection d‘entrée) Détermine les connecteurs d‘entrée audio pour les différentes sélections de source, sélectionnez avec SOURCE SELECT (voir « SELECTION DE SOURCE » pour des informations détaillées). COAX1 Entrée coaxiale numérique 1, COAX 1 IN COAX2 Entrée coaxiale numérique 2, COAX 2 IN OPT (uniquement pour FR 984, FR 985, FR 986, FR 994) Entrée optique numérique, OPTICAL IN OPT 1 (uniquement pour FR 995, FR 996) Entrée optique numérique, OPTICAL 1 IN OPT 2 (uniquement pour FR 995, FR 996) Entrée optique numérique, OPTICAL 2 IN SAT IN Entrée audio analogique SAT IN VCR IN Entrée audio analogique VCR IN TV IN Entrée audio analogique TV IN CDR IN Entrée audio analogique CDR IN CD IN Entrée audio analogique CD IN 6 CH IN Entrée audio analogique 6 CHANNEL / DVD INPUT * TUNER (syntoniseur) Installation des stations radio préréglées (voir « SYNTONISEUR » pour les informations détaillées). AUTO INSTALL Mémorise automatiquement les stations radio MAN INSTALL Mémorise manuellement les stations radio GIVE NAME Permet d‘attribuer des noms aux stations radio mémorisées RESHUFFLE Recours aux stations radio mémorisées Menu téléviseur Si le récepteur est connecté à un téléviseur CINEMA LINK Philips par les douilles de système CINEMA LINK (voir « CONNEXIONS »), vous pouvez faire appel à votre téléviseur pour installer le système. Une option appelée RECEIVER sera ajoutée au menu du téléviseur. Si le mode CINEMA LINK est sollicité, les réglages sur le récepteur seront affichés à l‘écran pendant quelques secondes. Consulter le manuel d‘instructions de votre téléviseur pour utiliser adéquatement le menu téléviseur. Les options offertes peuvent varier selon le modèle de votre téléviseur. Réalisation de la connexion • Appuyez sur CINEMA LINK pour réaliser la connexion entre le récepteur et le téléviseur ou pour l‘enlever. y Si la connexion est réalisée, CINEMA LINK ON est affiché. Remarque : Nous recommandons de mettre l‘option CINEMA LINK hors service pendant l‘enregistrement. Ceci prévient des interruptions indésirables à la suite de l‘emploi de certaines fonctions du téléviseur. Si CINEMA LINK a été sollicité et que le menu téléviseur est activé, TV MENU est affiché et les fonctions de menu et de son du récepteur sont bloquées. Pour activer CINEMA LINK CINEMA GO sur la télécommande. • Appuyez sur y La TV envoie un ordre de lecture au lecteur de DVD CINEMA LINK, si présent. Le lecteur de DVD commence la lecture et le récepteur passe automatiquement au son CINEMA LINK le meilleur. • Si aucun lecteur de DVD n’est connecté ou si le lecteur de DVD n’a pas de disque en cours de lecture, la TV envoie un ordre de lecture au magnétoscope CINEMA LINK, si présent. y Le magnétoscope commence la lecture et le récepteur audio choisit le son CINEMA LINK le meilleur. • S’il n’y a aucune source magnétoscope connectée ou aucune cassette en cours de lecture, la TV choisit la chaîne TV regardée en dernier. 38 SELECTION DE SOURCE Lorsque vous sélectionnez une source en tournant au SOURCE SELECT, les entrées audio et vidéo de dénomination correspondante sont activées. Le signal d‘entrée est reproduit par toutes les sorties audio et – si la source comprend un signal vidéo – par les sorties vidéo du récepteur. Il est possible de réattribuer la sélection de source à d‘autres que ces entrées standard. Source sélectionnée...Connecteurs utilisés DVD...............................Entrée audio numérique COAX 1 et entrée vidéo DVD IN PHONO..........................Entrée audio PHONO IN TUNER ..........................La section de syntoniseur du récepteur est sollicitée, toutes les entrées sont hors service. CD .................................Entrée audio CD IN CDR/TAPE .....................Entrée audio CDR/TAPE IN TV..................................Entrée audio TV IN et aucune entrée vidéo VCR ...............................Entrée audio VCR IN et entrée vidéo VCR IN SAT ...............................Entrée audio SAT IN et entrée vidéo SAT IN Sélection 6 CHANNEL-DVD/SACD INPUT Les connecteurs 6 CHANNEL / DVD INPUT peuvent être affectés à n’importe quelle source disponible (sauf TUNER et PHONO). L’affectation s’effectue grâce à l’option * SELECT INPUT dans le menu. Voir ci-dessous pour plus de détails. Réattribution d‘une sélection de source Si une source a été sélectionnée avec SOURCE SELECT, l‘entrée audio standard est utilisée. Pour changer ceci, il faut attribuer la sélection de source à une autre entrée audio. Exemple : Réattribuez CD de l‘entrée audio CD IN analogique à l‘entrée audio COAX 2 IN numérique. 1 Sélectionnez * SELECT INPUT à partir du menu et appuyez sur NEXT 2. 2 Tournez au SOURCE SELECT pour sélectionner la source à réattribuer (par ex. CD). y Le nom de la source est affichée et le témoin de la source clignote. Utilisation d‘une sélection de source pour deux ou plusieurs applications Il vous est possible d‘attribuer plus d‘une source à une sélection de source. Ceci peut être utile lorsque des produits sont connectés l‘un après l‘autre en chaîne. Exemple : Un VCR est connecté au téléviseur, mais seul le téléviseur est connecté lui au récepteur. Les deux réglages SOURCE SELECT, tant pour le téléviseur que pour le VCR, doivent donc utiliser des connecteurs d‘entrée du téléviseur en question. 1 Sélectionnez * SELECT INPUT à partir du menu et appuyez sur NEXT 2. 2 Tournez au SOURCE SELECT pour sélectionner la source à réattribuer (par ex VCR). y Le nom de la source est affichée et le témoin de la source clignote. 3 Tournez au X MENU NAVIGATOR pour sélectionner les connecteurs d‘entrée qui devraient être utilisés (par ex VCR -> TV IN). 4 Appuyez sur ENTER / OK pour confirmer votre sélection. y STORED est affiché brièvement. 5 Cette sélection de source utilise dès lors l‘entrée audio sélectionnée (par ex. VCR utilisant les connecteurs d‘entrée, VCR <TV IN> s‘affiche brièvement lorsque VCR est sollicité). A propos de 6 CHANNEL-DVD/SACD INPUT La prise 6 CHANNEL / DVD INPUT peut servir à brancher un appareil doté d’un décodeur multicanal intégré (par ex. Dolby Digital, DTS, etc.) et un connecteur de sortie à 6 canaux, en l’occurrence, un lecteur DVD/SACD haut de gamme. Si l‘on fait appel à l‘entrée audio 6 CHANNEL / DVD INPUT, le récepteur fonctionne comme un amplificateur multicanal. La source reproduit le son surround et l‘envoie au récepteur divisé par le nombre de canaux nécessaires. A ce moment, le bouton SURROUND ON/OFF, HALL et SURR. MODE n‘a aucun effet, car le signal produit est déjà un signal multicanal. Il n‘est pas possible d‘enregistrer à partir d‘une source à l‘entrée audio 6 CHANNEL / DVD INPUT. 3 Tournez au X MENU NAVIGATOR pour sélectionner les connecteurs d‘entrée qui devraient être utilisés (par ex. CD -> COAX2). 4 Appuyez sur ENTER / OK pour confirmer votre sélection. y STORED est affiché brièvement. 5 Cette sélection de source utilise dès lors l‘entrée audio sélectionnée (par ex. CD utilisant les connecteurs d‘entrée COAX 2 IN, COAX 2 s‘allume lorsque CD est sollicité). 39 Français SOURCE SELECT A PROPOS DE LA LECTURE, ENREGISTREMENT Français Lecture d‘une source Enregistrement d‘une source 1 Appuyez sur POWER / STANDBY pour enclencher le récepteur. Si vous désirez enregistrer à partir d‘une source, il vous faut sélectionner avec SOURCE SELECT. Le signal d‘entrée est reproduit par toutes les sorties audio et – si la source dispose d‘un signal vidéo – par les sorties vidéo du récepteur. Les réglages de son n‘affectent pas l‘enregistrement. 2 Tournez à SOURCE SELECT pour sélectionner une source. y Le nom de la source est affiché. • Vous pouvez sélectionner l‘entrée FRONT AV / GAME en appuyant sur FRONT AV (uniquement pour FR 995, FR 996). 3 Démarrez la lecture de la source comme d‘habitude. Réglage du son • Tournez à VOLUME pour régler le volume. y VOLUME et le niveau du volume entre 0 et 50 sont affichés. 1 Appuyez sur BASS ou TREBLE. y BASS ou TREBLE et la valeur actuelle sont affichés brièvement. Ensuite se déroule TURN VOLUME KNOB TO CHANGE. 2 Tournez à VOLUME pour régler les graves ou les aiguës. y BASS ou TREBLE et la valeur actuelle sont affichés. Remarque : Si VOLUME n‘a pas été tourné pendant 5 secondes ou qu‘aucune autre commande n‘a été utilisée, le réglage des graves ou des aiguës est mis hors service. • Si un subwoofer est branché, appuyez sur SUBW. ON/OFF pour améliorer la reproduction des basses. Remarque : Dans le cas d’un son surround numérique, le signal du subwoofer ne sera disponible que s’il est supporté par la source. • Appuyez sur LOUDNESS pour agir sur la sonorité (marche/arrêt). y LOUDNESS est affiché dès que la sonorité a été enclenchée. 1 Tournez à SOURCE SELECT (ou appuyez sur FRONT AV – uniquement pour FR 995, FR 996) pour sélectionner la source à partir de laquelle vous désirez effectuer l‘enregistrement. y Le nom de la source est affiché. 2 Préparez l‘application d‘enregistrement requise. Elle doit être connectée à une des sorties du récepteur. 3 Démarrez l‘enregistrement par l‘application sélectionnée. 4 Démarrez la lecture de la source de la façon habituelle. Remarques : – Le signal audio et vidéo du VCR IN n‘est pas reproduit par VCR OUT. Ceci s‘applique également au signal audio de CDR/TAPE IN vers CDR/TAPE OUT. – Nous vous recommandons de ne pas utiliser la sortie numérique COAX OUT du récepteur pour enregistrer à partir d‘une source analogique. Uilisez la sortie analogique CDR/TAPE. – Il n‘est pas possible d‘enregistrer à partir d‘une source à l‘entrée audio 6 CHANNEL / DVD INPUT. Enregistrement à partir d’une sortie numérique Il est possible de connecter un enregistreur numérique à la sortie numérique du récepteur. De cette façon, tous les signaux en provenance des entrées numériques peuvent être enregistrés directement sur l’enregistreur audio connecté. Le récepteur convertira également tous les signaux en provenance des entrées analogiques à la sortie numérique. Le récepteur peut servir à enregistrer de façon numérique un signal audio surround multicanal (Dolby Digital, DTS ou MPEG) par exemple à partir d’un DVD sur un CD-R. Le récepteur convertira le signal multicanal numérique en un signal stéréo sans perdre aucune information de son propice. Remarques : – Lors de l’enregistrement d’un signal Dolby Digital, DTS ou MPEG, chaque piste doit être enregistrée de façon individuelle. – L’enregistrement numérique est impossible lorsque la source numérique est protégée contre les copies. 40 A propos du son surround Mise en service du son surround Le son surround vous donne une sensation d‘écoute toute nouvelle et complète. Vous aurez la sensation d‘être au centre de l‘action, car le son vient de tous les côtés autour de vous. Prêtez attention que des programmes de télévision, les bandes audio et vidéo ainsi que les disques avec 3 1, ou soient codés pour le son surround multicanal. Pour obtenir le meilleur de votre récepteur, choisissez Dolby Digital, DTS ou MPEG Multichannel. Avec le son surround en service, vous pouvez opter pour différents modes. A remarquer que les possibilités dépendent de la disposition des enceintes définie dans le menu du récepteur. Votre récepteur peut reproduire le son surround DTS. Le DTS est un système audio multicanal de première qualité disponible sur les disques DVD, les disques laser et les disques audio. Adressez-vous à votre revendeur de logiciels pour connaître la disponibilité des logiciels DTS dans votre région. Il convient de remarquer que les disques DVD ne disposent pas toujours d’un son surround intégral multicanal. Pour être sûr qu‘un disque est du type multicanal, consultez votre revendeur. Les bandes stéréo ordinaires et des disques peuvent être lus en utilisant les réglages de son surround et ceci donne d‘excellents résultats. Si la reproduction présente des distorsions en mode surround, repassez en mode stéréo normal. La disponibilité des différents modes de son surround décrits dépend du nombre d‘enceintes utilisées et des informations de son à l‘entrée. Si un signal surround numérique est détecté, le récepteur fera défiler l’indication DOLBY DIGITAL, DTS ou MPEG. 1 Appuyez sur SURROUND ON/OFF pour mettre le son surround en service. y Le mode surround en usage est déroulé. 2 Appuyez sur SURR. MODE à plusieurs reprises pour écouter les différents modes surround (si prévus). yLe mode sélectionné et les enceintes utilisées sont affichés si les signaux du canal d‘entrée sont réduits à un nombre inférieur de signaux de sortie, DOWNMIX est affiché. 3 Appuyez sur VIRTUAL MODE autant de fois que nécessaire pour faire défiler les différents modes audio surround virtuel : 1 × pour activer le mode 3D SURROUND 2 × pour activer le mode MULTI FRONT 3 × pour activer le mode MULTI REAR 4 × pour activer le mode NATURAL SURROUND y Un témoin indique si le mode de son surround virtuel est activé. Le symbole indique le mode audio surround virtuel qui est activé. 4 Appuyez sur SURROUND ON/OFF pour mettre le son surround hors service. y SURROUND OFF est déroulé. 41 Français SON SURROUND SON SURROUND Réglages du son surround HALL La reproduction du son est augmentée et un léger écho est ajouté. Ceci donne l‘impression de se trouver dans une grande pièce. Uniquement à utiliser en mode stéréo. Français SURROUND Le mode surround permet de réaliser la reproduction du son surround normal par 4 ou 5 enceintes. En fonction de la source, la reproduction se fait selon les systèmes Dolby Surround Pro Logic, Dolby Digital, DTS ou MPEG. Surround Virtuel Votre récepteur est capable de reproduire une ou plusieurs formes de sons surround virtuel. Le surround virtuel donne une impression sonore plus réaliste en créant des hautparleurs imaginaires en plus ou à la place des haut-parleurs réels. La position de l’auditeur influence l’effet de surround. La zone où l’effet est le meilleur est reprise en gris. NT FRO LEFT CENTER FR ON T RIGHT PRO LOGIC, DOLBY DIGITAL, DTS, MPEG En plus de l‘essai SURROUND, le mode utilisé – en fonction du matériel de source – peut être affiché. Dans le cas d’un surround numérique, le format sonore AC-3 (pour le Dolby Digital), DTS ou MPEG (pour le MPEG 2 Multicanal) sera affiché et suivi des canaux sonores disponibles à la source (par ex. DVD). Exemple : AC-3 3/2.1 Dolby Digital, 3 canaux avant, 2 canaux surround et un canal subwoofer. MPEG 2/0.0 MPEG Multicanal, uniquement son stéréo. AC-3 3/1.0 Dolby Digital, 3 canaux avant, 1 canal (mono) surround sans signal subwoofer. DTS 3/2. DTS, 3 canaux avant, 2 canaux surround et un canal subwoofer. FRONT-3 STEREO Le son surround est en sourdine. 3 Stereo vous font écouter le son surround sans utiliser les enceintes surround. STEREO Tout le son est reproduit et joué à travers les enceintes avant gauche et droite. Ceci autorise la reproduction stéréo standard. Le niveau d’effet sonore surround virtuel peut être réglé dans le menu de configuration. Les modes sonores surround suivants sont disponibles : 3D SURROUND Il ne faut aucun haut-parleur arrière. Les haut-parleurs avant simulent le son du canal arrière. Le son surround est simulé grâce aux haut-parleurs avant gauche, droit et central. MULTI FRONT Des haut-parleurs imaginaires sont créés à côté des hautparleurs avant gauche et droit. MULTI REAR Des haut-parleurs imaginaires sont créés à côté des hautparleurs arrière gauche et droit. NATURAL SURROUND Des haut-parleurs imaginaires sont créés à côté des hautparleurs avant et arrière gauche et droit. Remarque : La disponibilité des modes MULTI FRONT et MULTI REAR dépend des canaux sonores présents à la source. (uniquement sur la télécommande) Les parties fortes du son sont réduites et les passages de faible volume augmentés. Vous pouvez donc jouir du son surround sans déranger les enfants qui dorment ou les voisins. Le mode de nuité fonctionne uniquement en combinaison avec Dolby Digital et MPEG, à condition d‘être supporté par le matériel de source. NIGHT MODE 42 Syntonisation des stations radio Mémorisation des stations radio Vous pouvez rechercher les stations radio en balayant la fréquence. Il vous est également possible de choisir la fréquence d‘une station radio connue. Si une station FM est émise et reçue en stéréo, alors STEREO est affichée. Il vous est possible de mémoriser jusqu‘à 30 stations radio. Le récepteur peut sélectionner et programmer lui-même les stations radio ou vous pouvez émettre votre choix particulier. Recherche des stations radio 1 Tournez au SOURCE SELECT pour sélectionner le syntoniseur. y TUNER est affiché. Programmation automatique 1 Sélectionnez * TUNER du menu et appuyez sur NEXT 2. 2 Sélectionnez AUTO INSTALL et appuyez sur NEXT 2. y Le numéro présélectionné où la programmation démarre, la fréquence et AUTO sont affichés. 2 Sélectionnez une fréquence en appuyant à plusieurs reprises sur TUNER AM/FM. y La fréquence sélectionnée est affichée. 3 Tournez au TUNER PRESET X pour changer le numéro présélectionné là où la programmation doit démarrer. 3 Maintenez 1 ou 2 enfoncé pendant environ 1 seconde. y SEARCH est affiché et le syntoniseur choisit une station dont le signal est suffisamment puissant. 4 Utilisez TUNER AM/FM pour sélectionner la fréquence désirée. 4 Répétez cette procédure jusqu‘à ce que vous ayez trouvé la station de votre choix. • Pour la syntonisation fine sur un émetteur faible, appuyez brièvement sur 1 ou 2 jusqu‘à obtenir une réception optimale. Syntonisation sur une station radio par fréquence (uniquement possible avec télécommande) 1 Appuyez sur TUNER. y TUNER est affiché. 2 Appuyez sur FR. D.. y _ est affiché. 5 Appuyez sur ENTER / OK pour démarrer la programmation. y AUTO INSTALL clignote et toutes les stations radio disponibles sont programmées; ceci peut durer quelques minutes. La programmation est terminée dès que AUTO INSTALL s‘arrête de clignoter. Programmation manuelle 1 Sélectionnez * TUNER du menu et appuyez sur NEXT 2. 2 Sélectionnez MAN INSTALL et appuyez sur NEXT 2. y Le numéro présélectionné, la gamme d‘onde et la fréquence sont affichés. 3 Tournez au TUNER PRESET X pour changer le numéro présélectionné là où la station de radio doit être mémorisée. 3 Utilisez 1–0 pour choisir la fréquence d‘une station radio. Remarque : Seuls les numéros valables dans la gamme de fréquence en question du syntoniseur peuvent être sélectionnés. Sélection de sensibilité FM Il vous est toujours possible de régler le syntoniseur sur une sensibilité de recherche inférieure, pour rechercher les stations dont le signal est fort (uniquement pour FM). 4 Réglez sur la station radio désirée (voir « Recherche des stations radio »). 5 Appuyez sur ENTER / OK pour confirmer votre sélection. y STORED est affiché brièvement. La station radio est programmée sur le numéro préréglé sélectionné. 6 Sélectionnez et mémorisez toutes les stations radio désirées de la même façon. 1 Tournez à SOURCE SELECT pour sélectionner le syntoniseur. y TUNER est affiché. 2 Appuyez sur SENS. du récepteur. y Soit SENS HI ou SENS LO est affiché pendant 5 secondes. Remarque : Lorsqu‘on recherche une station radio, la sensibilité actuelle est affichée. Dans ce cas, SENS LO signifie que le syntoniseur recherche uniquement les stations radio ayant un signal puissant. 43 Français SYNTONISEUR SYNTONISEUR Français Syntonisation des stations radio mémorisées Dénomination des stations radio 1 Tournez SOURCE SELECT sur TUNER pour sélectionner le syntoniseur. y TUNER est affiché. Il est également possible d‘attribuer un nom à chacune des stations radio présélectionnées. Tous les noms de station RDS peuvent être repris. 2 Tournez à TUNER PRESET X pour sélectionner une station radio présélectionnée. y PRESET, le numéro présélectionné et la station sont affichés. 1 Sélectionnez * TUNER du menu et appuyez sur NEXT 2. Modification des stations radio mémorisées Après la programmation des stations radio, peut être que vous désirez modifier leur ordre. RESHUFFLE permet de changer les positions des préréglages. 1 Sélectionnez * TUNER du menu et appuyez sur NEXT 2. 2 Sélectionnez RESHUFFLE et appuyez sur NEXT 2. y PRESET, un numéro présélectionné et la station sont affichés. 3 Tournez à TUNER PRESET X pour sélectionner une station. 4 Appuyez sur ENTER / OK pour confirmer la sélection. y Le numéro présélectionné SWAP <-> et un second numéro présélectionné sont affichés. 5 Tournez à TUNER PRESET X pour sélectionner l‘autre station présélectionnée. 6 Appuyez sur ENTER / OK pour confirmer le changement. y RESHUFFLED est affiché brièvement et ces deux numéros présélectionnés sont alternés. 2 Sélectionnez GIVE NAME (donner un nom) et appuyez sur NEXT 2. y Une station radio présélectionnée est affichée. 3 Tournez à TUNER PRESET X pour sélectionner la station à renommer. 4 Appuyez sur ENTER / OK pour confirmer votre sélection. yLe nom existant ou ________ est affichée. 5 Tournez à TUNER PRESET X pour sélectionner une lettre et NEXT 2 ou 1 PREV. pour passer à la position suivante ou précédente. 6 Après avoir introduit le nom entier, appuyez sur ENTER / OK pour confirmer. y STORED est affiché et le nom mémorisé. Remarque : Si vous désirez utiliser à nouveau le nom de la station RDS émise, effacez simplement le nom donné. Effacement des noms de station 1 Utilisez le menu option * TUNER, sélectionnez GIVE NAME. y Une station présélectionnée est affichée. 2 Tournez à X MENU NAVIGATOR pour sélectionner le nom à effacer. 3 Appuyez sur ENTER / OK pour confirmer votre sélection. 4 Appuyez sur 1 PREV. alors que la première lettre clignote. y CL clignote à gauche du nom de la station. 5 Appuyez sur ENTER / OK pour effacer le nom de la station. Ou si vous changez d‘avis, appuyez sur 1 PREV. pour maintenir le nom de la station. 44 RDS R Informations et radioguidage RDS Radio Data System est un service qui permet aux stations FM d‘émettre des informations supplémentaires. Si vous recevez le signal d‘une station RDS, R et le nom de la station sont affichés. Vous pouvez régler la radio de telle façon que l‘écoute soit immédiatement interrompue s‘il y a des informations ou un radioguidage en provenance d‘un émetteur RDS. Ces émissions ne fonctionnent que si les signaux RDS sont diffusés en cours d‘émission. Passage en revue des différentes informations RDS • Appuyez sur RADIO TEXT à plusieurs reprises sur le récepteur pour passer aux informations suivantes (si disponibles) : – Messages de texte radio – Heure RDS – Fréquence – Nom de l‘émetteur Remarque : Il est possible que le signal horaire transmis à partir des certaines stations RDS ne soit pas toujours précis. Si les émetteurs RDS sont également dotés d‘un signal EON (Enhanced Other Networks) EON est affiché. Ce signal ne permet pas seulement au syntoniseur de rechercher un émetteur RDS sélectionné, mais également le réseau EON intégral pour les informations et le radioguidage. 1 Sélectionnez l‘émetteur RDS souhaité. 2 Appuyez sur NEWS/TA : Une fois pour afficher NEWS, correspondant à la fonction d‘informations. Deux fois pour afficher TA, correspondant à la fonction de radioguidage. Trois fois pour afficher TA et NEWS, correspondant aux deux fonctions précitées. 3 Sélectionnez et sollicitez n‘importe quelle autre source de la façon habituelle. y Si les informations ou le radioguidage sont en cours, le récepteur passera à la fonction syntoniseur et NEWS ou TA se met à clignoter. 4 Appuyez sur NEWS/TA jusqu‘à ce que l‘affichage disparaisse pour mettre hors service la(les) fonction(s). ou Appuyez sur NEWS/TA pendant une annonce pour mettre hors service la(les) fonction(s). Remarque : Assurez-vous de bien mettre hors service les informations et le radioguidage pendant l‘enregistrement, car ceci serait également enregistré. 45 Français SYNTONISEUR CARACTERISTIQUES TECHNIQUES Récepteur Sujet à modifications sans avis préalable. Français Généralités Consommation de puissance (FR 984, FR 985, FR 986)....210 W Consommation de puissance (FR 994, FR 995, FR 996)....255 W Consommation de puissance en veille.............................< 2 W Dimensions, l × h × p ..............................435 × 135 × 350 mm Poids (FR 984, FR 985, FR 986) .........................................8,6 kg Poids (FR 994, FR 995, FR 996) .........................................9,4 kg Section amplificateur (0,7 % THD, 6 Ω, 1 kHz) Puissance de sortie, mode stéréo (FR 984, FR 985, FR 986) (DIN) ....................................2 × 60 W Puissance de sortie, mode surround (FR 984, FR 985, FR 986) Avant .....................................................................2 × 60 W Centrale .......................................................................60 W Surround................................................................2 × 60 W Puissance de sortie, mode stéréo (FR 994, FR 995, FR 996) (DIN) ..................................2 × 100 W Puissance de sortie, mode surround (FR 994, FR 995, FR 996) Avant ...................................................................2 × 100 W Centrale .....................................................................100 W Surround..............................................................2 × 100 W Graves ................................................................±9 dB à 100 Hz Aiguës ................................................................±9 dB à 10 kHz Sonorités......+6 dB à 100 Hz (-30 dB); +3 dB à 10 kHz (-30 dB) Distorsion harmonique totale ...................0,05 % à 1 kHz, 5 W Réponse de fréquence ..............................20–20 000 Hz, ±1 dB Rapport Signal/Bruit (1kHz) ...........................................≥ 82 dB Séparation stéréo (1kHz)................................................≥ 45 dB Parasitage .....................................................................≤ -65 dB Entrées Entrées linéaires.................................................250 mV/47 kΩ 6 CH ....................................................................250 mV/40 kΩ Front AV (uniquement FR 995, FR 996)...............250 mV/22 kΩ Tourne-disque .........................................................5 mV/47 kΩ Coaxial numérique.............................75 Ω conforme à IEC 958 Optique numérique ..........................................................Toslink Fréquence d‘échantillonnage numérique (FR 984, FR 985, FR 986) .....................32 kHz, 44,1 kHz, 48 kHz Fréquence d‘échantillonnage numérique (FR 994, FR 995, FR 996) ........32 kHz, 44,1 kHz, 48 kHz, 96 kHz Sorties Sortie interactive d‘alimentation (en service)...total 100 W max. Sorties linéaires....................................................250 mV/1 kΩ Coaxial numérique.............................75 Ω conforme à IEC 958 Fréquences d’échantillonnage de la sortie numérique Entrée analogique ...........................................sortie 48 kHz Entrée numérique 32 kHz ................................sortie 32 kHz Entrée numérique 44,1 kHz ..........................sortie 44,1 kHz Entrée numérique 48 kHz ................................sortie 48 kHz Entrée numérique 96 kHz (uniquement FR 994, FR 995, FR 996).............sortie 48 kHz Pré-sortie subwoofer ................................................0,8 V/1 kΩ Pré-sortie centre .......................................................0,8 V/1 kΩ Ecouteurs ........................................8–600 Ω (3 V f.m.e., 60 Ω) Enceintes...........................................................................≥ 6 Ω 46 Section syntoniseur Gamme de fréquence FM..............................................................87,5–108,0 MHz MW...............................................................531–1 602 kHz LW....................................................................153–279 kHz Sensibilité Stéréo FM ..................................................................41 dBf Mono FM....................................................................15 dBf Distorsion harmonique totale Stéréo FM ...................................................................0,3 % Mono FM...................................................................0,85 % Réponse de fréquence ...............................63–12 500 Hz ±1 dB Rapport Signal/Bruit Stéréo FM....................................................................55 dB Mono FM.....................................................................60 dB Séparation de canal .............................................35 dB à 1 kHz AVERTISSEMENT Ne tentez jamais de réparer quoique ce soit vousmême, ceci annulerait votre garantie. N‘ouvrez pas l‘équipement au risque de chocs électriques. Dans le cas d'une anomalie de fonctionnement, commencez par vérifier les points ci-dessous avant de donner votre appareil à réparer. Si vous ne parvenez pas à résoudre le problème en suivant ces instructions, veuillez consulter votre fournisseur ou votre centre SAV. PROBLEME CAUSE POSSIBLE SOLUTION L’appareil ne marche pas et en mode veille Le circuit anti-surchauffe est activé. Eteignez l’appareil et laissez-le refroidir. Après avoir laissé l’appareil refroidir, allumez-le de nouveau et sélectionnez une source en faisant SOURCE SELECT ou en appuyant sur une touche source sur la télécommande. Pas de son Le VOLUME n‘est pas réglé correctement. Réglez le VOLUME. Ecouteurs branchés. Débranchez les écouteurs. La source incorrecte a été sélectionnée. Tournez SOURCE SELECT pour sélectionner la bonne source. Aucun son n‘est audible Une des enceintes est mal branchée. du côté gauche ou du côté Un fil d‘enceinte est endommagé. droit La commande de balance de volume dans le menu de récepteur est mal réglée. Branchez l‘enceinte correctement. Son insuffisant ou absence Le mode SURROUND n‘est pas activé. de son dans les enceintes centrale ou surround Les enceintes surround et/ou centrale ne sont pas (bien) branchées. Appuyez sur SURROUND ON/OFF pour mettre l‘équipement en mode surround. Remplacez le fil. Réglez VOL FRONT-L et VOL FRONT-R dans le menu de récepteur. Branchez les enceintes correctement. Les enceintes surround et/ou centrale ont Sélectionnez YES pour les enceintes présentes. été activées dans le menu SPEAKR SETUP. Un fil d‘enceinte est endommagé. Remplacez le fil. Les graves sont mauvaises Les enceintes ne sont pas en phase. Branchez les enceintes correctement en reliant les fils colorés (ou référencés) aux borne colorées et les fils noirs (ou non référencés) aux bornes noires. Mauvais son Modifiez les réglages sonores sur le récepteur. Mauvais réglage pour le type de musique ou de son émis. Le niveau du son surround Le niveau de son surround n‘est pas bien réglé. Réglez le niveau du son surround au niveau du est trop faible ou trop fort récepteur. Le niveau du son central Le niveau du son central n‘est pas bien réglé. est trop faible ou trop fort Réglez le niveau du canal central au niveau du récepteur. Seule l‘enceinte centrale est audible en Dolby Surround Pro Logic Un signal mono est reproduit. Sélectionnez une source de son différente ou désactivez le son surround. Mauvaise réception radio, programmation automatique ne fonctionne pas adéquatement Le récepteur ou l‘antenne sont positionnés Modifiez la position de l‘unité interférant tout près d‘une source d‘émission par exemple ou essayez de la mettre hors service. téléviseur, lecteur CD, enregistreur CD, lecteur DVD, etc. Pas d’enregistrement numérique possible par la sortie numérique La fréquence d’échantillonnage n’est pas acceptée par l’enregistreur numérique. L’ensemble de Le lecteur de DVD ne fournit pas d’informations l’enregistrement se présente relatives aux pistes. comme une seule piste en cas d’enregistrement à partir d’un DVD Assurez-vous que l’enregistreur numérique puisse traiter des fréquences d’échantillonnage comprises entre 32 et 48 kHz, ou procédez à l’enregistrement par la sortie analogique. Enregistrez chaque piste individuellement ou utilisez l’option « manual track increment » de l’enregistreur. 47 Français DEPISTAGE DES ANOMALIES INFORMACIÓN GENERAL Información general Lista de componentes......................................................................48 Configuración ...................................................................................48 Información medioambiental ...........................................................48 Reconocimiento de marcas registradas ..........................................48 Mantenimiento.................................................................................48 Controles.............................................................................................49 Mando a distancia Utilización del mando a distancia ...................................................50 Botones del mando a distancia .......................................................51 Programación del mando a distancia Universal (sólo con FR 985, FR 986, FR 995, FR 996) ........................................52 Lista de componentes Este receptor viene acompañado de los siguientes componentes: – Un mando a distancia – 2 pilas para el mando a distancia, tamaño AA – Un cable digital para conexión de audio con un reproductor de DVD – Un cable de sistema en bus para la conexión de CINEMA LINK – Una antena de cuadro – Una antena alámbrica – Este manual de instrucciones Conectores..........................................................................................53 Español Configuración Conexiones Conexiones de audio analógicas .....................................................54 Conexiones de audio digitales.........................................................54 Sistema de control en bus, CINEMA LINK ......................................55 Conexiones de vídeo ........................................................................55 Alimentación ....................................................................................56 Capacidad de potencia ....................................................................56 Conexiones de los altavoces ...........................................................56 El TV como altavoz central ..............................................................56 Conexiones de las antenas..............................................................56 Auriculares .......................................................................................56 Si ha colocado los componentes de su sistema uno encima de otro, el receptor deberá ponerlo en la parte de arriba. Coloque el receptor en una superficie lisa, firme y estable. No cubra ninguna de las ranuras de ventilación y deje 50 cms. de distancia libre por encima y 10 cms. a la izquierda y a la derecha del receptor para permitir una ventilación adecuada. Configuración del sistema Emplazamiento de los altavoces .....................................................57 Configuración y prueba de los altavoces ........................................57 Ajuste del receptor ..........................................................................57 Para obtener una recepción buena, la antena de cuadro no debe situarse encima o al lado de VCRs, grabadores de CD, reproductores DVD, televisores u otras fuentes de radiación. Pantalla ...............................................................................................58 Menús Menú del receptor.....................................................................59–60 Menú del TV.....................................................................................60 Activado de CINEMA LINK ..............................................................60 Selección de fuente SOURCE SELECT...............................................................................61 Selección 6 CHANNEL-DVD/SACD INPUT ......................................61 Para reasignar una selección de fuente..........................................61 Utilización de una selección de fuente para dos o más aparatos ...61 Acerca de 6 CHANNEL-DVD/SACD INPUT......................................61 Reproducción, Grabación Reproducción de una fuente............................................................62 Ajuste del sonido .............................................................................62 Grabación de una fuente .................................................................62 Grabación de la salida digital..........................................................62 Sonido envolvente Acerca del sonido envolvente..........................................................63 Activación del sonido envolvente....................................................63 Ajustes del sonido envolvente.........................................................64 Sintonizador Para sintonizar las emisoras de radio .............................................65 Activación de la sensibilidad FM ....................................................65 Almacenamiento de emisoras de radio...........................................65 Para sintonizar con emisoras almacenadas ....................................66 Para reordenar emisoras de radio almacenadas.............................66 Para asignar un nombre a una emisora...........................................66 Para borrar los nombres de las emisoras........................................66 RDS R..............................................................................................67 RDS noticias y información de tráfico.............................................67 Datos técnicos Receptor ...........................................................................................68 Solución de problemas Advertencia ......................................................................................69 Solución de problemas ....................................................................69 Como socio de ENERGY STAR®, Philips ha establecido que este producto cumple las directrices de ENERGY STAR® sobre rendimiento energético. Este reproductor cumple las normas para interferencias de radio establecidas por la Comunidad Europea. 48 Información medioambiental Se ha prescindido de cualquier material de embalaje innecesario. Hemos puesto el mayor empeño para que el embalaje sea fácilmente separable en tres materiales: cartón (caja), poliestireno expandible (amortiguación) y polietileno (bolsas, plancha protectora de espuma). Los materiales que componen el equipo se pueden reciclar y reutilizar si son desmontados por una empresa especializada. Observe las normas locales concernientes a la eliminación de los materiales de embalaje, pilas usadas y equipos desechables. Reconocimiento de marcas registradas Fabricado con autorización de Dolby Laboratories. «DOLBY», «DOLBY DIGITAL», «PRO LOGIC» y el símbolo de doble-D 2 son marcas registradas de Dolby Laboratories. Trabajos confidenciales y no publicados. © 1992–1997 Dolby Laboratories. Todos los derechos reservados. «DTS» y «DTS Digital Surround» son marcas comerciales de Digital Theater Systems, Inc. Copyright 1996 de Theater Systems. Inc. Reservados todos los derechos. Mantenimiento Limpie el receptor con un paño suave ligeramente humedecido y sin pelusas. No utilice productos de limpieza que puedan tener un efecto corrosivo. No exponga el receptor a la humedad, lluvia, arena o calor excesivo (causado por sistemas calefactores o exposición directa a la luz solar). CONTROLES 1 2 3 4 5 6 7 8 T 9 0 A ≤ £ ™ ¡ )( * & ^ % $ 1 POWER / STANDBY.......Enciende/apaga el receptor. 2 CINEMA LINK ................Activa/desactiva el sistema de control en bus entre el receptor y el televisor. 3 ..........................................Detector para el mando a distancia de infrarrojos. 4 VIRTUAL..........................Luz de control para sonido ambiental virtual. 5 HALL ................................Indicación luminosa de control de HALL. 6 ..........................................Pantalla 7 SOURCE SELECT............Selecciona los diversos conectores de audio y vídeo. Reactiva el receptor del modo de espera. 8 VOLUME..........................Aumenta o disminuye el nivel de volumen. 9 FRONT AV.......................Selecciona la entrada FRONT AV/ GAME (sólo con FR 995, FR 996). 0 TREBLE............................Ajusta los agudos cuando se utiliza VOLUME. ! BASS ...............................Ajusta los graves cuando se utiliza VOLUME. @ LOUDNESS .....................Activa/desactiva LOUDNESS. # NEXT 2 ...........................TUNER: Busca las emisoras de radio. MENU: Pasa al siguiente nivel del menú. $ ENTER / OK.....................Confirma los valores seleccionados del menú. # @ % TUNER PRESET X MENU NAVIGATOR TUNER: Selecciona la emisora presintonizada anterior/posterior. MENU: Se mueve hacia arriba o hacia abajo en el menú. ^ 1 PREV. / EXIT ...............TUNER: Busca las emisoras. MENU: Pasa al nivel anterior del menú. & SETUP MENU ................Activa/desactiva el menú. * SENS. ..............................Selector de sensibilidad baja o alta del sintonizador. ( NEWS/TA........................Activa o desactiva las funciones de noticias RDS y la información de tráfico RDS. ) TUNER AM/FM ..............Selector de bandas del sintonizador. ¡ RADIO TEXT ...................Repasa los diferentes tipos de información RDS. ™ SURR. MODE..................Cambia entre las diferentes configuraciones del altavoz. £ VIRTUAL MODE .............Cambia entre los distinos modos de sonido ambiental virtual. ≤ SURROUND ON/OFF .....Cambia entre los últimos modos ambiental y estéreo seleccionados. 49 Español ! MANDO A DISTANCIA Utilización del mando a distancia Abra el compartimento de las pilas del mando a distancia e introduzca 2 pilas alcalinas, tipo AA (R06, UM-3). Si las pilas están desgastadas o no va a utilizar el mando a distancia durante un largo período, extráigalas del compartimento. MUTE PHONO TUNER CD CDR/TAPE TV VCR SAT DVD Español Las pilas contienen sustancias químicas peligrosas, cuando las vaya a tirar, hágalo conforme a la normativa vigente. Los botones del mando a distancia funcionan de la misma manera que los correspondientes en el receptor. ¡Importante! Debe pulsar un botón de origen durante más de 1 segundo para cambiar el origen del sonido en el receptor. Si lo pulsa durante un tiempo inferior a 1 segundo, sólo cambiará para que el mando a distancia utilice los comandos del producto seleccionado. 2 H 1 2 3 4 5 6 7 8 9 CINEMA GO CABLE BOX 0 GUIDE OK MENU El mando a distancia permanece sintonizado con la fuente seleccionada hasta que se pulse otra fuente diferente. Esto permite utilizar fuentes adicionales (p. ej. el rebobinado de una cinta) sin necesidad de cambiar de fuente en el receptor. É A ATV NEWS/TA Ç CHANNEL/TRACK LOUDNESS SUBW. ON/ OFF í ë REC CANCEL AUDIO DVD NIGHT INDEX Å T-C VIRTUAL SURROUND DISC + FR.D. MODE REAR SURROUND + MODE SUB WOOFER - TEST TONE CHANNEL 50 ON/ OFF Botones del mando a distancia H MUTE .....................Anula el sonido del receptor en todos los modos, excepto el de TV. Anula el sonido del equipo de TV Philips, si el mando a distancia está en modo TV. 2 ................................Cambia el origen seleccionado en el mando a distancia (p. ej., VCR o TV) al modo de espera. Cuando se pulsa durante más de 2 segundos, el receptor cambia al modo de espera. PHONO, TUNER, CD, CDR/TAPE, TV, VCR, SAT, DVD..............Cambia en el mando a distancia las órdenes para manejar cada uno de los aparatos. Selecciona los orígenes si se pulsa durante más de 1 segundo. SAT solamente funciona con receptores de satélite digitales. Reactiva el receptor del modo de espera. 1–0 ...............................Para teclear los números de las pistas, emisoras o frecuencias. Los números de dos dígitos deberán teclearse antes de que pasen 2 segundos. CINEMA GO..........Activa CINEMA LINK en el TV. CABLE BOX ...................Sin función. MENU GUIDE ..............TUNER: Activa y desactiva el menú del receptor. DVD, TV: Activa y desactiva el menú DVD/TV. OK .................................Confirma las opciones del menú. Botones de flecha ........TUNER: Se desplaza por los menús. Las flechas derecha/izquierda son para sintonizar hacia arriba o hacia abajo. CD, CDR: Las flechas izquierda/derecha son para la búsqueda hacia atrás o hacia adelante, las flechas arriba/abajo son para seleccionar la pista siguiente/anterior. +A ...........................Aumenta el volumen del receptor. -A ...........................Disminuye el volumen del receptor. NEWS/TA.................Activa/desactiva las funciones NEWS y TRAFFIC ANNOUNCEMENT. TV: Activa/desactiva el teletexto. SAT: Activa/desactiva el texto de información. ÉATV ......................Aumenta el volumen del televisor. CD, CDR, VCR, DVD: Inicia la reproducción. ÇATV ......................Disminuye el volumen del televisor. CD, CDR, VCR, DVD: Detiene la reproducción. i í CHANNEL/TRACK ...Selecciona la emisora presintonizada anterior. VCR: Rebobina la cinta. CD, CDR, DVD: Selecciona la pista anterior. TV: Selecciona el canal anterior. ë CHANNEL/TRACK ...Selecciona la siguiente emisora presintonizada. VCR: Avanza rápidamente la cinta. CD, CDR, DVD: Selecciona la pista siguiente. TV: Selecciona el canal siguiente. LOUDNESS ...................Activa/desactiva LOUDNESS. SUBW. ON/OFF ............Enciende y apaga el subaltavoz para bajas frecuencias. REC, DVD AUDIO..........CDR, VCR: Inicia la grabación. DVD: Selecciona las pistas de audio. CANCEL, DVD ...........CD, CDR, SAT, VCR: Borra un programa, cancela las selecciones. DVD: Selecciona el ángulo de visión. FR.D., DVD Å .............TUNER: Selecciona FREQUENCY DIRECT. CD, CDR, VCR, DVD: Interrumpe la reproducción. INDEX, DVD T-C............VCR: Activa/desactiva la búsqueda del índice. SAT: Activa/desactiva los temas. DVD: Selecciona el título o el capítulo. DISC..............................CD-, CDR-, Cambiadores-DVD: Selecciona el disco siguiente. NIGHT ...........................Activa/desactiva NIGHT MODE. VIRTUAL MODE ............Se desplaza a través de los distintos modos de sonido ambiental virtual. SURROUND ON/OFF ....Activa/desactiva SURROUND SOUND. +/- SUBWOOFER...Aumenta/disminuye el volumen del subwoofer. +/- REAR ...............Aumenta/disminuye el volumen de los altavoces posteriores. Cuando utilice la prueba de sonido (test tone) se puede aumentar o disminuir con estos botones el volumen de los altavoces que está probando. SURROUND MODE.......Realiza un rastreo por los diferentes modos de sonido envolvente. TEST TONE ...................Activa/desactiva la prueba de sonido. Cuando esté utilizando la prueba de sonido se puede aumentar/disminuir el volumen de los altavoces que esté probando con +/- REAR. 51 Español MANDO A DISTANCIA MANDO A DISTANCIA Programación del mando a distancia Universal (sólo con FR 985, FR 986, FR 995, FR 996) Se puede identificar este mando por la inscripción Multibrand/Universal. Español El mando a distancia Universal deberá programarse para utilizar los códigos de las diferentes marcas de aparatos. Esto se realiza por medio de la introducción de un código de 4 dígitos o realizando una búsqueda de códigos hasta que se encuentre el correcto. Recomendamos la utilización del código de 4 dígitos. Es el método más rápido y el más seguro. El método de búsqueda de códigos deberá utilizarse únicamente si no puede encontrar el código correspondiente a su aparato. La tabla de códigos se encuentra al final del manual. Una vez que haya encontrado y comprobado los códigos de cada uno de los aparatos, puede anotarlos aquí abajo. PHONO .......................................... TUNER........................................... CD ................................................. CDR/TAPE ..................................... TV .................................................. VCR ............................................... ¡Importante! SAT................................................ Para la programación se deberán utilizar los botones del mando a distancia, no los del receptor o los de otros aparatos. DVD ............................................... Programación con el código de 4-dígitos 1 Mantenga pulsados el botón de fuente del aparato que desea manejar y 2 durante 3 segundos. Para reajustar el mando a distancia 1 Mantenga pulsados uno de los botones de fuente y 2 durante 3 segundos. 2 Teclee el código de 4 dígitos del aparato (tabla de códigos al final del manual). 2 Introduzca el código de 3 dígitos 981. y El mando a distancia está ahora reajustado con todos los códigos originales Philips. Advertencias: – Si se introducen más de 4 dígitos, el mando a distancia aceptará sólo los cuatro primeros. – Si no introduce ningún código durante 30 segundos, el mando a distancia desactivará la función de programación sin cambiar el código ya existente. – Para programar un aparato nuevo, simplemente escriba el código nuevo sobre el antiguo. Búsqueda en la tabla de códigos 1 Encienda el aparato que desea manejar. 2 Mantenga pulsados el botón de fuente del aparato que desea manejar y 2 durante 3 segundos. 3 Pulse y suelte de nuevo 2. y El mando a distancia envía los códigos de «canal arriba» o de espera dependiendo de la fuente que se haya seleccionado para cada una de las marcas de aparatos. 4 Tan pronto como el aparato responda – cambie al próximo canal o se ponga en espera – suelte el botón 2 para confirmar el código. y Se utilizará el código identificado. • Si el aparato no responde en 2 minutos, significa que el código de ese aparato no está almacenado en la memoria del mando a distancia. El código del mando a distancia no cambiará. Advertencia: Si extrae las pilas del mando a distancia durante más de 1 minuto, tendrá que programar los códigos de nuevo. 52 CONECTORES ¤ ™£≤∞§ ≥•ª º ⁄ A ANTENN A ANTENN P AM LOO UT VIDEO IN/O S-VIDEO DIGITAL AUDIO IN/OUT 2 OPTICAL IN DVD MON VCR VCR C A U TI CINEMA LINK SAT R L/ 6 CHANNE T DVD INPU SUBW. DVD IN MON OUT FER SUBWOO T PRE-OU OUT IN OUT IN VCR REC PLAY SAT IN CENTER UT AUDIO IN/O SAT COAX OUT CDR/TAP CENTER E CD VCR PHONO TV R COAX 2 IN EACH L COAX 1 IN R IN IN IN PLAY OUT REC IN IN IN PLAY L SPEAKE R≥6Ω CHOC ELE R VRI 100W TOTAL MAX. SWI TCHED OUT REC ^ % $ # @ ! 09 8 7 6 Conectores Toma de auriculares de 6,3 mm en la parte frontal. Entradas de audio y vídeo de la parte frontal (sólo con FR 995, FR 996). QUE DE OU RIS n NE PAS Europea ips in the by Phil s. eloped oratorie the d and dev Dolby Lab Designeity. se from O LOGIC“ and Dol by er licen Commun tured und DIGITAL“, ”PRema rks of ks. LBY Manufac are trad shed Wor rved. “, ”DO rese ts ”DOLBY-D Sym bol ntial Unpubli righ ater ories. All Dig ital The dou ble ories. Confide r worldLaborat Laborat 997 Dolby er lice nse from 2 and othe ”DT S ©1992–1 ture d und No. 5,451,94. ”DT S“ and ater Man ufacInc. US Pat.and pen ding of Digital The s, s. System System nts issu ed trademarks Theater nd“ areht 1996 Digital wid e pate Surrou Digital s, Inc. Copyrig d. System Rights Reserve All Inc. AV IS ND SURROURS SPEAKE CENTER T PRE-OU ON SHOCK ELECTRIC RISK OF NOT OPEN E DO CTRIQU L 1 OPTICAL IN ) ( * & LET . Nombre del conector 1 PHONES 5 4 3 2 1 Español ¡ AC OUT FRONT RS SPEAKE 6Ω AKER ≥ EACH SPE FM 75 Ω PHONO GND ‹ Conexiones Para la toma de auriculares de 6,3 mm en la parte frontal. 2 FRONT AV / GAME Enchufes de salida de audio izquierdo y derecho para aparatos como cámaras de vídeo y consolas de videojuegos. 3 FRONT AV / GAME Enchufes de salida de vídeo para aparatos como cámaras de vídeo y consolas de videojuegos. FRONT SPEAKERS 4 R, L Para los altavoces frontales izquierdo y derecho. 5 CENTER Para el altavoz central. SURROUND SPEAKERS 6 R, L Para los altavoces envolventes izquierdo y derecho. AUDIO IN/OUT 8 CDR/TAPE OUT Para la entrada de una grabadora de CD o una platina de cintas. 9 CDR/TAPE IN Para la salida de una grabadora de CD o una platina de cintas. 0 CD IN Para la salida de un reproductor de CD. ! SAT IN Para la salida de un sistema de satélite. @ VCR OUT Para la entrada de una grabadora de vídeo. # VCR IN Para la salida de una grabadora de vídeo. $ TV IN Para la salida del televisor. % PHONO IN Para la salida de un giradiscos de bobina MM. ¡ PHONO GND f Cable a tierra del giradiscos. Entrada de 6-canales ^ 6 CHANNEL / DVD INPUT Para la salida de 6-canales de aparatos como DVD o reproductores de discos láser. DIGITAL AUDIO IN/OUT & COAX 1 IN Para la salida coaxial de aparatos digitales (entrada predeterminada para fuentes de DVD). * COAX 2 IN Para la salida coaxial de aparatos digitales. ( COAX OUT Para la entrada coaxial de aparatos digitales como grabadoras de CD o MD. ) OPTICAL IN Para la salida óptica de aparatos digitales como reproductores DVD, reproductores de CD, grabadoras de CD o reproductores MD (sólo con FR 984, FR 985, FR 986, FR 994). ) OPTICAL 1 (2) IN Para la salida óptica de aparatos digitales como reproductores DVD, reproductores de CD, grabadoras de CD o reproductores MD (sólo con FR 995, FR 996). VIDEO IN/OUT ™S-VIDEO Entradas y salidas de vídeo S para aparatos de vídeo para obtener una mejor calidad de vídeo (sólo con FR 994, FR 995, FR 996). £ DVD IN Para la salida de un reproductor DVD. ≤ MON OUT Para la entrada de un monitor (p. ej. de TV). § VCR IN Para la salida de una grabadora de vídeo. ≥ VCR OUT Para la entrada de una grabadora de vídeo (para la grabación). ª SAT IN Para la salida de un sistema satélite. Conectores de antena ∞ AM LOOP Para la antena de cuadro incluida. • FM 75 Ω Para la antena alámbrica incluida o antena exterior. Salidas preamplificadas 7 CENTER PRE-OUT Para la entrada de un televisor cuando se utiliza como altavoz central (es posible sólo cuando se tiene conectado un sistema en bus CINEMA LINK). º SUBWOOFER PRE-OUT Para la entrada de un subwoofer activo. Sistema de control en bus ⁄ CINEMA LINK Para salidas del Sistema de control en bus de un televisor Philips con CINEMA LINK. Para salidas de alimentación ¤ AC OUTLET Aplica el mismo voltaje que el de la red de alimentación. Se permite (no en todas las versiones) una carga de hasta 100 W en total. Cable de alimentación ‹ Después de efectuar todas las conexiones, conecte el cable de alimentación al enchufe mural. 53 CONEXIONES Conexiones de audio analógicas Algunos aparatos poseen conectores analógicos y digitales. Siempre que sea posible utilice la conexión digital; obtendrá una calidad mejor de sonido. Para aprender a utilizar los conectores digitales del receptor vea «Para reasignar una selección de fuente». mayoría de los reproductores de CD, LD o DVD. Por este motivo, cuando se reproduce el software codificado DTS mediante las salidas analógicas de CD, LD o DVD, se producirá un ruido excesivo. Para evitar que se produzcan daños en el sistema de audio, el cliente debe tomar las debidas precauciones, si están conectados los sistemas de salida analógicos directamente al receptor. Se necesita un desmodulador AC-3 RF opcional para utilizar Dolby Digital Laserdisc, ya que las señales de salida son diferentes. Español Para disfrutar de las reproducciones DTS Digital SurroundTM, hay que conectar un reproductor compatible con DTS a una de las entradas digitales del receptor. DTS Digital SurroundTM es un formato de audio digital discreto de 5.1 canales disponible en software CD, LD y DVD que, en consecuencia, no se puede descodificar y reproducir en la ANTENNA PHONO GND. FM 75 Ω AM LOOP DIGITAL AUDIO IN/OUT OPTICAL 2 IN DVD VIDEO IN/OUT S-VIDEO MON VCR FRONT SPEAKERS EACH SPEAKER ≥ 6 Ω SAT VCR CINEMA LINK OPTICAL 1 IN IN 6 CHANNEL / DVD INPUT CENTER SUBW. OUT SUBWOOFER DVD IN MON OUT IN OUT PLAY VCR REC PHONO TV VCR SAT IN PRE-OUT CENTER R CAUTION L COAX OUT MONITOR / TV RISK OF ELECTRIC SHOCK DO NOT OPEN COAX 2 IN AUDIO OUT SURR. FRONT AUDIO IN/OUT SAT CD CENTER PRE-OUT CDR/TAPE AVIS SURROUND SPEAKERS R IN IN IN PLAY IN OUT REC IN PLAY IN R OUT REC L EACH SPEAKER ≥ 6 Ω TURNTABLE RISQUE DE CHOC ELECTRIQUE NE PAS OUVRIR Designed and developed by Philips in the European Community. Manufactured under license from Dolby Laboratories. ”DOLBY“, ”DOLBY DIGITAL“, ”PRO LOGIC“ and the double-D Symbol are trademarks of Dolby Laboratories. Confidential Unpublished Works. ©1992–1997 Dolby Laboratories. All rights reserved. Manufactured under license from Digital Theater Systems. Inc. US Pat. No. 5,451,942 and other worldwide patents issued and pending. ”DTS“ and ”DTS Digital Surround“ are trademarks of Digital Theater Systems, Inc. Copyright 1996 Digital Theater Systems, Inc. All Rights Reserved. L COAX 1 IN CD RECORDER IN POWERED SUBWOOFER OUT VCR AUDIO OUT CD PLAYER AUDIO IN SAT RECEIVER Conexiones de audio digitales CD RECORDER ANTENNA PHONO GND. FM 75 Ω AM LOOP DIGITAL AUDIO IN/OUT OPTICAL 2 IN CD PLAYER DVD VIDEO IN/OUT S-VIDEO MON VCR FRONT SPEAKERS VCR EACH SPEAKER ≥ 6 Ω SAT CINEMA LINK OPTICAL 1 IN IN 6 CHANNEL / DVD INPUT CENTER SUBW. OUT SUBWOOFER DVD IN MON OUT IN OUT PLAY VCR REC SAT IN PRE-OUT CENTER R CAUTION L COAX OUT RISK OF ELECTRIC SHOCK DO NOT OPEN COAX 2 IN SURR. FRONT PHONO AUDIO IN/OUT VCR SAT TV CD CDR/TAPE CENTER PRE-OUT SURROUND SPEAKERS L COAX 1 IN R IN DVD PLAYER 54 IN IN PLAY OUT REC IN IN IN PLAY OUT REC R L EACH SPEAKER ≥ 6 Ω AVIS RISQUE DE CHOC ELECTRIQUE NE PAS OUVRIR Designed and developed by Philips in the European Community. Manufactured under license from Dolby Laboratories. ”DOLBY“, ”DOLBY DIGITAL“, ”PRO LOGIC“ and the double-D Symbol 2 are trademarks of Dolby Laboratories. Confidential Unpublished Works. ©1992–1997 Dolby Laboratories. All rights reserved. Manufactured under license from Digital Theater Systems. Inc. US Pat. No. 5,451,942 and other worldwide patents issued and pending. ”DTS“ and ”DTS Digital Surround“ are trademarks of Digital Theater Systems, Inc. Copyright 1996 Digital Theater Systems, Inc. All Rights Reserved. CONEXIONES Si el receptor y la TV Philips (o incluso mejor, añadiendo un reproductor de vídeo o de DVD Philips) con Cinemalink están conectados con el control de barra del sistema CINEMA LINK, se ofrecen beneficios extras para el sistema: – Cuando inicie una fuente, el sistema selecciona automáticamente esa entrada. – Se puede controlar el sistema por medio de la pantalla del televisor. Independientemente del idioma del televisor, Vd. puede elegir el idioma que prefiera. – El televisor puede hacer las veces de altavoz central del sistema, haciendo innecesario el uso de un altavoz central. (El cable A debe comprarse aparte). – Puede poner en espera todo el sistema pulsando el botón de puesta en espera en el mando a distancia. TV EXT 1 EXT 2 EXT 3 TV AUX DVD PLAYER DIGITAL OUT optional A (TV = CENTER) ANTENNA PHONO GND. FM 75 Ω AM LOOP DIGITAL AUDIO IN/OUT OPTICAL 2 IN VCR VIDEO IN/OUT S-VIDEO MON VCR DVD FRONT SPEAKERS VCR EACH SPEAKER ≥ 6 Ω SAT CINEMA LINK OPTICAL 1 IN IN 6 CHANNEL / DVD INPUT CENTER SUBW. OUT SUBWOOFER DVD IN MON OUT IN OUT PLAY VCR REC SAT IN PRE-OUT CENTER R CAUTION L COAX OUT RISK OF ELECTRIC SHOCK DO NOT OPEN COAX 2 IN SURR. FRONT PHONO AUDIO IN/OUT VCR SAT TV CENTER PRE-OUT CDR/TAPE CD AVIS SURROUND SPEAKERS R IN IN IN PLAY IN OUT REC IN PLAY IN R OUT REC RISQUE DE CHOC ELECTRIQUE NE PAS OUVRIR Designed and developed by Philips in the European Community. Manufactured under license from Dolby Laboratories. ”DOLBY“, ”DOLBY DIGITAL“, ”PRO LOGIC“ and the double-D Symbol are trademarks of Dolby Laboratories. Confidential Unpublished Works. ©1992–1997 Dolby Laboratories. All rights reserved. Manufactured under license from Digital Theater Systems. Inc. US Pat. No. 5,451,942 and other worldwide patents issued and pending. ”DTS“ and ”DTS Digital Surround“ are trademarks of Digital Theater Systems, Inc. Copyright 1996 Digital Theater Systems, Inc. All Rights Reserved. L COAX 1 IN L EACH SPEAKER ≥ 6 Ω CINEMA LINK TO TV IN TO VCR IN Conexiones de vídeo MONITOR / TV DVD PLAYER ANTENNA PHONO GND. FM 75 Ω AM LOOP DIGITAL AUDIO IN/OUT OPTICAL 2 IN DVD VIDEO IN/OUT S-VIDEO MON VCR FRONT SPEAKERS VCR EACH SPEAKER ≥ 6 Ω SAT CINEMA LINK OPTICAL 1 IN IN 6 CHANNEL / DVD INPUT CENTER SUBW. OUT SUBWOOFER DVD IN MON OUT IN OUT PLAY VCR REC SAT IN PRE-OUT CENTER R CAUTION L COAX OUT RISK OF ELECTRIC SHOCK DO NOT OPEN COAX 2 IN SURR. FRONT PHONO AUDIO IN/OUT VCR SAT TV CD CDR/TAPE CENTER PRE-OUT SURROUND SPEAKERS L COAX 1 IN R IN IN IN PLAY OUT REC IN IN IN PLAY OUT REC R L EACH SPEAKER ≥ 6 Ω AVIS RISQUE DE CHOC ELECTRIQUE NE PAS OUVRIR Designed and developed by Philips in the European Community. Manufactured under license from Dolby Laboratories. ”DOLBY“, ”DOLBY DIGITAL“, ”PRO LOGIC“ and the double-D Symbol are trademarks of Dolby Laboratories. Confidential Unpublished Works. ©1992–1997 Dolby Laboratories. All rights reserved. Manufactured under license from Digital Theater Systems. Inc. US Pat. No. 5,451,942 and other worldwide patents issued and pending. ”DTS“ and ”DTS Digital Surround“ are trademarks of Digital Theater Systems, Inc. Copyright 1996 Digital Theater Systems, Inc. All Rights Reserved. VCR VIDEO OUT VIDEO IN SAT RECEIVER 55 Español Sistema de control en bus, CINEMA LINK CONEXIONES Alimentación El TV como altavoz central La placa tipo está situada en la parte posterior del receptor. Puede utilizar su televisor Philips con CINEMA LINK como un altavoz central. Para un televisor con una conexión tipo «scart» (de alfileres) se necesita un cable adicional de audio «cinch-to-scart». Para un televisor con conexiones «cinch» (de clavijas) se necesitan cables «cinch» adicionales. Estos cables deben conectarse al conector azul CENTER PRE-OUT en la parte posterior. Mire el manual de instrucciones de su televisor para utilizarlo como altavoz central. 1 Compruebe que la tensión indicada en la placa tipo corresponde con el voltaje de la red local. De lo contrario, consulte con su distribuidor u organización de servicio 2 Conecte el cable de alimentación al enchufe mural. Para desconectar por completo el equipo de la red, retirar el conector de la toma de red de la pared. Español Conexiones de las antenas Capacidad de potencia Si se utiliza el receptor con el volumen demasiado alto, se pueden producir distorsiones que causen daño a los altavoces. En caso de distorsiones, reduzca el volumen y los controles de tono a un nivel razonable. Para evitar el recalentamiento del aparato, hay un circuito de seguridad incorporado. Por lo tanto su aparato puede apagarse bajo condiciones extremas. Si esto ocurre, desconecte el aparato y espere hasta que se enfrie antes de volver a usarlo. Después de dejar que el aparato se enfríe, encienda de nuevo el aparato y seleccione la fuente deseada girando SOURCE SELECT. Antena AM (MW) La antena de cuadro suministrada es sólo para uso interior. Coloque la antena tan lejos como sea posible del receptor, el televisor, los cables, el reproductor DVD, el VCR y otras fuentes de radiación. 1 Introduzca la clavija de la antena de cuadro en AM LOOP como se muestra abajo. 2 Gire y mueva la antena para obtener la mejor recepción. A ANTENN P AM LOO Conexiones de los altavoces Algunas de las conexiones de los altavoces del receptor son conexiones a tornillo y otras son conexiones de acoplamiento con clic y palanca. Siga las instrucciones que se indican a continuación. 7m Antena FM La antena alámbrica suministrada sólo puede utilizarse para recibir emisoras cercanas. Para obtener una recepción mejor le recomendamos que utilice un sistema de antena por cable o una antena exterior. m 1 Conecte la antena alámbrica suministrada al terminal FM 75 Ω como se indica a continuación. 1 2 3 2 Coloque la antena en diferentes posiciones hasta obtener una recepción óptima. • Si utiliza un sistema de antena por cable o una antena exterior, conecte la clavija al terminal FM 75 Ω en vez de la antena alámbrica. m 8m 1 2 3 FM 75 Ω FM 75 Ω 1 Conecte siempre el cable de color (o marcado) al terminal del mismo color y el cable negro (o sin marcar) al terminal de color negro. 2 Conecte: – El altavoz frontal izquierdo al terminal L (rojo y negro) – El altavoz frontal derecho al terminal R (rojo y negro) – El altavoz central a CENTER (azul y negro) – El altavoz envolvente izquierdo a SURROUND L (gris y negro) – El altavoz envolvente derecho a SURROUND R (gris y negro) 56 Auriculares La conexión de los auriculares al terminal PHONES silencia los altavoces. El receptor selecciona STEREO y el sonido envolvente se convierte en una señal de estéreo reducida para que los auriculares normales puedan reproducirla. Al desconectar los auriculares, los altavoces se activan otra vez. Si desea disfrutar de nuevo del sonido envolvente selecciónelo de vuelta en el receptor. CONFIGURACIÓN DEL SISTEMA FR ON T LEFT RIGHT SU BW OO FE R CENTER SURROUND (REAR) LEFT RIGHT SURROUND (REAR) Emplazamiento de los altavoces Indicaciones generales sobre el emplazamiento Evite la colocación de los altavoces en una esquina o en el suelo, ya que esto reforzará demasiado los tonos graves. La respuesta de los agudos disminuirá si coloca los altavoces detrás de cortinas, muebles etc. La persona que escucha deberá tener siempre los altavoces «a la vista». Cada habitación tiene características acústicas diferentes y las posibilidades de emplazamiento son a menudo reducidas. Vea el dibujo de arriba para obtener el mejor emplazamiento de los altavoces. Para obtener un sonido envolvente de calidad recomendamos como mínimo la utilización de 5 altavoces (2 frontales, uno central, y 2 envolventes). Se puede obtener un sonido envolvente con menos altavoces. Esto se consigue reorientando las señales de los altavoces que faltan hacia los existentes. Lea «Menús» para realizar la configuración correcta en el receptor sobre el número y tamaño de los altavoces utilizados. Emplazamiento de los altavoces frontales Los altavoces frontales deberán emplazarse en la parte frontal derecha e izquierda de la posición normal de escucha, como si se tratara de los altavoces estéreo normales. Emplazamiento del altavoz central El altavoz central deberá emplazarse en el centro, entre los dos altavoces frontales, por ej. debajo o encima del televisor. La altura ideal del altavoz central es a la altura de los oídos del que escucha (sentado). Emplazamiento de los altavoces envolventes Los altavoces envolventes deberán emplazarse uno en frente del otro y estar alineados o ligeramente por detrás de la persona que escucha. Emplazamiento del subwoofer El subwoofer se utiliza para mejorar considerablemente el sonido de los graves de su sistema. El subwoofer puede colocarse en cualquier parte de la habitación, ya que no es posible localizar la dirección de los tonos graves. De todas formas, no coloque el subwoofer en el centro de la habitación, ya que esto podría debilitar el sonido de los graves. No coloque ningún objeto encima del subwoofer. Configuración y prueba de los altavoces Para obtener un sonido envolvente óptimo, debe ajustarse el volumen de los altavoces. Cuando ajuste el volumen de los altavoces deberá situarse en su posición normal de escucha. Vea «Menú del receptor» para aprender a configurar en el receptor los altavoces utilizados. Lo ideal es que el volumen en la posición de escucha sea el mismo para todos los altavoces. 1 Pulse POWER / STANDBY para encender el receptor. 2 Pulse TEST TONE en el mando a distancia. y Se escucha un sonido de prueba de cada uno de los altavoces excepto del subwoofer. 3 Pulse +/- REAR en el mando a distancia para aumentar/disminuir el volumen del altavoz que emite la señal en ese momento. Poniendo todos los altavoces al mismo volumen en la posición de escucha se obtiene una calidad mejor. 4 Pulse TEST TONE en el mando a distancia. y La señal de prueba se para. Advertencia: Si no está completamente satisfecho con los ajustes de volumen, le recomendamos que los cambie cuando utilice el sonido envolvente. Ajuste del receptor Una vez establecidos el número de altavoces y su colocación, puede ajustar la configuración inicial del receptor para obtener un sonido ambiental óptimo con la configuración real: 1 Defina qué altavoces se han conectado al receptor (consulte «Estructura del menú/* SPEAKR SETUP»). Advertencia: La configuración inicial del receptor es: dos altavoces frontales, izquierdo y derecho: presente (no se puede modificar) altavoz central: presente dos altavoces traseros: presente subaltavoz de bajas frecuencias: presente 2 Seleccione el tamaño de los altavoces (SMALL o LARGE) (consulte «Estructura del menú/* SPEAKR SIZES»). Seleccione SMALL, si el altavoz puede reproducir notas bajas hasta un mínimo de 80–100 Hz. Seleccione LARGE, si el altavoz puede reproducir notas bajas hasta un mínimo de 50 Hz. (Por norma general, un altavoz LARGE tiene un diámetro cónico de como mínimo 12 cm (5 pulgadas).) Consulte las hojas de especificaciones de los altavoces. Advertencia: Para FR 985, FR 986, FR 995, FR 996 la configuración inicial es: todos los altavoces en LARGE. Para FR 984, FR 994 la configuración inicial es: todos los altavoces en SMALL. 3 Establezca la distancia de los altavoces a la posición de los oyentes (consulte «Estructura del menú/* SPK DISTANCE») 57 Español NT FRO PANTALLA Indicadores luminosos de estado Pantalla La pantalla del receptor está dividida en 4 secciones que se utilizan para lo siguiente: Dibujo de los altavoces Son signos que muestran los diversos ajustes y la información sobre el estado del receptor. PRESET ......................el Español En el menú de ajustes, un rectángulo con una letra es indicación de que se ha seleccionado un altavoz. De cualquier forma, el indicador del subwoofer se encenderá sólo cuando se disponga de una señal de subwoofer.Si sólo aparece la letra, no se está utilizando ese altavoz y los sonidos se reorientan hacia otros altavoces. ......sonido ambiental virtual del sonido envolvente DIGITAL SURROUND ....reproducción del sonido envolvente digital L, R ...........................altavoces frontales izquierdo y derecho C ...............................altavoz central SL, SR .......................altavoces envolventes SW ............................subwoofer SURROUND.................reproducción Indicación de menú Estas señales muestran si el menú está activado o desactivado y la dirección que puede seguir. M E N U .......................el menú está activado 1..............................puede moverse hacia atrás al tema del menú anterior con 1 PREV. / EXIT (el botón «izquierdo» en el mando a distancia) 3 .............................puede subir en la lista de opciones con X MENU NAVIGATOR (el botón «arriba» en el mando a distancia) 4 .............................puede bajar en la lista de opciones con X MENU NAVIGATOR (el botón «abajo» del mando a distancia) 2..............................puede bajar en la lista de opciones con NEXT 2 (el botón «abajo» del mando a distancia) O K.............................puede confirmar el valor en pantalla sintonizador sintoniza con una emisora preseleccionada SENS HI .....................el sintonizador selecciona el modo de alta sensibilidad SENS LO ..................el sintonizador selecciona el modo de baja sensibilidad C I N E M A L I N K O N ......está activado CINEMA LINK STEREO ......................se está utilizando uno de los ajustes de sonido preseleccionados del receptor R.............................se está sintonizando una emisora RDS EON ...........................se está sintonizando una emisora RDS con EON HALL..........................está activado el efecto HALL TA .............................la información de tráfico RDS está activada NEWS ........................está activada la información de noticias RDS ANA ..........................se está utilizando la entrada analógica para la fuente de reproducción N I G H T .......................NIGHT MODE está activado COAX 1 ......................está en uso la entrada digital coaxial COAX 1 para la fuente de reproducción COAX 2 .....................está en uso la entrada digital coaxial COAX 2 para la fuente de reproducción D O W N M I X .................las señales de entrada multicanal se reducen a menos señales de salida (dependiendo del número de altavoces) OPT ...........................está en uso la entrada óptico digital OPTICAL IN para la fuente de reproducción (sólo con FR 984, FR 985, FR 986, FR 994). OPT 1 ........................está en uso la entrada óptico digital OPTICAL 1 IN para la fuente de reproducción (sólo con FR 995, FR 996). OPT 2 .......................está en uso la entrada óptico digital OPTICAL 2 IN para la fuente de reproducción (sólo con FR 995, FR 996). LOUDNESS .................LOUDNESS está activado Área de información 0 GUIDE OK MENU Este área se utiliza para la retroinformación del receptor, las frecuencias del sintonizador, las opciones del menú, los valores y el rastreo de los mensajes de texto. É A ATV NEWS/TA 58 Ç MENÚS El receptor está equipado con un sistema de menú. El menú se utiliza para la configuración del receptor. Las diferentes opciones del menú están interrelacionadas unas con otras siguiendo una lógica. Supongamos que no tiene un altavoz central conectado, y por consiguiente CENTER SPEAKR (altavoz central) está en la posición NO (no). Si trata de utilizar VOL CENTER (volumen central), aparecerá un mensaje diciendo que eso no es posible (INSTALL CENTER SPEAKER - Instale un altavoz central). El menú siempre funciona de la misma manera. Las flechas de la pantalla le indican las direcciones en las que se puede desplazar. 1 Pulse SETUP MENU. y Aparece en pantalla MENU, y * EFFECTS. • Puede salir del menú en cualquier momento pulsando SETUP MENU. 2 Gire X MENU NAVIGATOR hasta que la opción deseada (o el valor) aparezca en pantalla. 3 Pulse NEXT 2 para elegir la opción en pantalla (o ENTER / OK para confirmar el valor). • Puede abandonar cualquier opción (los valores permanecerán intactos) pulsando 1 PREV. / EXIT. Estructura del menú * EFFECTS (efectos) Activa los efectos de sonido. VIRT SURR ambiente virtual: 0…100 % * VOL BALANCE (equilibrio de volumen) Ajusta el equilibrio de volumen relativo entre los altavoces conectados. TEST TONE Prueba de sonido: on/off (activar/desactivar) VOL FRONT-L Volumen del altavoz frontal izquierdo: –50…+50 VOL FRONT-R Volumen del altavoz frontal derecho: –50…+50 VOL CENTER Volumen del altavoz central: –50…+50 VOL REAR-L Volumen del altavoz posterior izquierdo: –50…+50 VOL REAR-R Volumen del altavoz posterior derecho: –50…+50 VOL SUBWOOFER Volumen del subwoofer: –50…+50 Advertencia: Cuando se utilice la entrada 6 CHANNEL / DVD INPUT, no se pueden cambiar los valores. * SPEAKR SETUP (configuración de los altavoces) Selecciona los altavoces utilizados. SUBW PRESENT Utilización del subwoofer: yes/no (si/no) CENTER SPEAKR Utilización del altavoz central: yes/no (si/no) REAR SPEAKER Utilización de los altavoces posteriores: yes/no (si/no) * SPEAKR SIZES (tamaño de los altavoces) Selecciona el tamaño de los altavoces utilizados, con el fin de obtener una reproducción de sonido óptima. LARGE significa que un altavoz puede reproducir frecuencias por debajo de 50 Hz. Si SUBW PRESENT está en la posición NO, FRONT SIZE sólo puede ajustarse a LARGE. Si FRONT SIZE está en SMALL, CENTER SIZE sólo puede ajustarse a SMALL y consecuentemente debe conectarse un subwoofer. FRONT SIZE Altavoces frontales izquierdo y derecho: small/large (pequeños/grandes) CENTER SIZE Altavoz central: small/large (pequeño/grande) REAR SIZE Altavoces posteriores: small/large (pequeño/grande) * SPK DISTANCE (distancia de los altavoces) Distancia entre los altavoces y la posición de escucha normal. Aquí se especifica el tiempo de retraso del sonido envolvente. DISTANCE L/ R Distancia de los altavoces frontales: 1…10 m DISTANCE CNTR Distancia del altavoz central: 1…10 m DISTANCE REAR Distancia de los altavoces posteriores: 1…10 m 59 Español Menú del receptor MENÚS Español * SELECT INPUT (selección de entrada) Asigna los conectores de entrada audio a las diferentes selecciones de fuente elegidas con SOURCE SELECT (Vea «SELECCIÓN DE FUENTE» para obtener más detalles). COAX1 Entrada coaxial digital 1, COAX 1 IN COAX2 Entrada coaxial digital 2, COAX 2 IN OPT (sólo con FR 984, FR 985, FR 986, FR 994) Entrada óptica digital, OPTICAL IN OPT 1 (sólo con FR 995, FR 996) Entrada óptica digital, OPTICAL 1 IN OPT 2 (sólo con FR 995, FR 996) Entrada óptica digital, OPTICAL 2 IN SAT IN Entrada analógica audio SAT IN VCR IN Entrada analógica audio VCR IN TV IN Entrada analógica audio TV IN CDR IN Entrada analógica audio CDR IN CD IN Entrada analógica audio CD IN 6 CH IN Entrada analógica de audio 6 CHANNEL / DVD INPUT * TUNER (sintonizador) Configuración de emisoras presintonizadas (Vea «SINTONIZADOR» para más detalles). AUTO INSTALL Almacena emisoras de radio automáticamente MAN INSTALL Almacena emisoras de radio manualmente GIVE NAME Permite dar un nombre a las emisoras de radio RESHUFFLE Reordena las emisoras almacenadas Menú del TV Si el receptor está conectado a un televisor Philips CINEMA LINK a través de un sistema de control de clavijas en bus CINEMA LINK (Vea «CONEXIONES»), se puede utilizar el televisor para configurar el sistema. Se añadirá al menú del televisor una opción llamada RECEIVER. Si la función CINEMA LINK está activada, los ajustes del receptor aparecerán en la pantalla del TV durante unos segundos. Consulte el manual de instrucciones de su TV para aprender a utilizar el menú. Las opciones disponibles pueden variar según el modelo del TV. Activación/desactivación de la conexión • Pulse CINEMA LINK para activar/desactivar la conexión entre el receptor y el TV. y Si se activa la conexión, aparece en pantalla CINEMA LINK ON. Advertencia: Durante la grabación se recomienda desactivar CINEMA LINK. Esto evita las interrupciones no deseadas cuando se cambian las funciones del TV. Si están activados CINEMA LINK y el menú del TV, aparece en pantalla TV MENU y el menú y las funciones de sonido del receptor se bloquean. Activado de CINEMA LINK CINEMA GO en el mando a distancia. • Pulse y El TV enviará una orden de reproducción al reproductor de DVD CINEMA LINK, si lo hubiera. El reproductor de DVD comenzará la reproducción y el receptor se cambiará automáticamente al mejor sonido CINEMA LINK. • Si el reproductor de DVD no estuviera conectado o no tuviera disco, el TV enviará una orden de reproducción al video, si lo hubiera. y El video comenzará la reproducción y el receptor de audio seleccionará el mejor sonido CINEMA LINK. • Si la fuente del video no estuviera conectada o no tuviera cinta, el TV seleccionará el último canal de TV que haya visto. 60 SELECCIÓN DE FUENTE Cuando seleccione una fuente dando vueltas a SOURCE SELECT, se activan las entradas de audio y vídeo correspondientes a ese nombre. Todas las salidas de audio y vídeo (si la fuente incluye una señal de vídeo) del receptor, reproducen la señal de entrada. Es posible reasignar una selección de fuente a cualquier otra entrada diferente aparte de las ya mencionadas. Fuente seleccionada...Conectores utilizados DVD...............................Entrada digital audio COAX 1 y entrada vídeo DVD IN PHONO..........................Entrada audio PHONO IN TUNER ..........................Utiliza el sintonizador, todas las entradas se desactivan. CD .................................Entrada audio CD IN CDR/TAPE .....................Entrada audio CDR/TAPE IN TV..................................Entrada audio TV IN y sin entrada vídeo VCR ...............................Entrada audio VCR IN y entrada vídeo VCR IN SAT ...............................Entrada audio SAT IN y entrada vídeo SAT IN Selección 6 CHANNEL-DVD/SACD INPUT Los conectores 6 CHANNEL / DVD INPUT se pueden asignar a cualquiera de las fuentes disponibles (excluyendo TUNER y PHONO). La asignación puede realizarse mediante la opción * SELECT INPUT del menú. Consulte más abajo para obtener detalles. Para reasignar una selección de fuente Si selecciona una fuente con SOURCE SELECT el aparato utiliza la entrada audio estándar. Para poder modificar esto la selección de fuente tiene que ser reasignada a otra entrada audio. Ejemplo: Para cambiar la entrada audio analógica CD IN asignada a CD a la entrada audio digital COAX 2 IN. 1 Seleccione * SELECT INPUT del menú y pulse NEXT 2. 2 Gire SOURCE SELECT para seleccionar la fuente que desea reasignar (p. ej. CD). y Aparece en pantalla el nombre de la fuente y la indicación luminosa correspondiente parpadea. Utilización de una selección de fuente para dos o más aparatos Se pueden asignar varias fuentes a una selección de fuente. Esto es de utilidad cuando se tienen conectados en cadena varios aparatos. Ejemplo: Tenemos conectado un VCR al TV, pero sólo el televisor está conectado al receptor. Los dos ajustes de SOURCE SELECT, TV y VCR, deberán utilizar los conectores de entrada del televisor. Español SOURCE SELECT 1 Seleccione * SELECT INPUT en el menú y pulse NEXT 2. 2 Gire SOURCE SELECT para seleccionar la fuente que necesite volver reasignar (por ej. VCR). y Aparece en pantalla el nombre de la fuente y la indicación luminosa correspondiente comienza a parpadear. 3 Gire X MENU NAVIGATOR para seleccionar los conectores de entrada que se deberán utilizar (por. ej. VCR -> TV IN). 4 Pulse ENTER / OK para confirmar la selección. y STORED aparece en pantalla brevemente. 5 Esta selección de fuente está ahora preparada para utilizar la entrada audio elegida (por ej. VCR utilizará los conectores de entrada TV IN; cuando seleccione VCR, aparecerá en pantalla brevemente VCR <TV IN>. Acerca de 6 CHANNEL-DVD/SACD INPUT Se puede utilizar 6 CHANNEL / DVD INPUT para conectar un aparato con un decodificador multicanal y un conector de salida de 6 canales, por ej. un reproductor DVD/SACD de alta superioridad. Cuando utilice la entrada audio 6 CHANNEL / DVD INPUT, el receptor funcionará como un amplificador multicanal. La fuente reproduce sonido envolvente y lo envía al receptor dividido en los canales necesarios. Por esta razón los botones SURROUND ON/OFF, HALL y SURR. MODE no tienen efecto alguno puesto que la señal que se recibe es ya multicanal. No se puede grabar de una fuente que esté conectada a la entrada audio 6 CHANNEL / DVD INPUT. 3 Gire X MENU NAVIGATOR para seleccionar los conectores de entrada que se van a utilizar (p. ej. CD -> COAX2). 4 Pulse ENTER / OK para confirmar la selección. y STORED aparece en pantalla brevemente. 5 Esta selección de fuente utiliza ahora la entrada audio elegida (p. ej. CD utiliza los conectores de entrada COAX 2 IN, COAX 2 se enciende cuando se cambia a CD). 61 REPRODUCCIÓN, GRABACIÓN Reproducción de una fuente Grabación de una fuente 1 Pulse POWER / STANDBY para encender el receptor. Si desea grabar de una fuente, debe seleccionarla con SOURCE SELECT. Todas las salidas audio y vídeo (si la fuente incluye una señal de vídeo) del receptor reproducen la señal de entrada. El ajustes del sonido no afectan a la grabación. 2 Gire SOURCE SELECT para seleccionar la fuente. y El nombre de la fuente aparece en pantalla. • Para seleccionar la entrada FRONT AV / GAME pulse FRONT AV (sólo con FR 995, FR 996). 1 Gire SOURCE SELECT (o pulse FRONT AV – sólo con FR 995, FR 996) para seleccionar la fuente de la que quiere grabar. y Aparece en pantalla el nombre de la fuente. 3 Inicie la reproducción normal de la fuente. Español Ajuste del sonido 2 Prepare la grabadora que vaya a utilizar. Debe conectarla a una de las salidas del receptor. • Gire VOLUME para ajustar el volumen. y Aparece en pantalla VOLUME junto con el nivel de volumen de 0 a 50. 3 Comience la grabación en la grabadora. 1 Pulse BASS o TREBLE. y Aparecen en pantalla brevemente BASS o TREBLE junto con el valor actual. A continuación aparece TURN VOLUME KNOB TO CHANGE. Advertencias: – VCR OUT no reproduce la señal de audio y vídeo de VCR IN. Lo mismo ocurre entre CDR/TAPE OUT y la señal de audio de CDR/TAPE IN. – Le recomendamos que no utilice la salida digital COAX OUT del receptor para grabar de una fuente analógica. Utilice la salida analógica CDR/TAPE. – No se puede grabar de una fuente que esté conectada a la entrada audio 6 CHANNEL / DVD INPUT. 2 Gire VOLUME para ajustar los sonidos graves o los agudos. y Aparece en pantalla BASS o TREBLE junto al valor actual. Advertencia: Si no gira VOLUME o no utiliza ningún otro control durante 5 segundos, se apaga el ajuste de graves o agudos. • Si hay un subaltavoz de bajos conectado, pulse SUBW. ON/OFF para aumentar el rendimiento de los graves. Advertencia: En caso de sonido ambiental digital, sólo se dispondrá de una señal de subaltavoz para bajas frecuencias cuando lo admita el material de origen. • Pulse LOUDNESS para activar/desactivar la sonoridad. y LOUDNESS aparece en pantalla (si está activada). 4 Inicie la reproducción normal de la fuente. Grabación de la salida digital Se puede conectar una grabadora digital a la salida digital del receptor. De esta forma, la grabadora digital conectada puede grabar directamente todas las señales provenientes de las entradas digitales. El receptor convertirá también todas las señales provenientes de las entradas analógicas a la salida digital. El receptor puede utilizarse para grabar digitalmente una señal de audio de sonido envolvente multicanal (Dolby Digital, DTS o MPEG), por ej. de DVD a CD-R. El receptor convertirá la señal multicanal digital en una señal estéreo sin ninguna pérdida importante de información de sonido. Advertencias: – Cuando se grabe una señal Dolby Digital, DTS o MPEG, debe grabarse cada pista individualmente. – No se puede realizar la grabación digital si el material de origen digital está protegido contra copia. 62 EL SONIDO ENVOLVENTE Acerca del sonido envolvente Activación del sonido envolvente El sonido envolvente le ofrece una calidad de sonido innovadora. Le dará la sensación de hallarse en medio de la acción, ya que el sonido se reproduce a su alrededor. Procure utilizar programas de TV, cintas de vídeo o audio y discos con o los símbolos 3, 1, que estén codificados para el sonido envolvente multicanal. Para obtener el mejor rendimiento del receptor, elija Dolby Digital, DTS o MPEG. Con el sonido envolvente activado, se puede cambiar de una modalidad a otra. Su funcionamiento depende de la configuración de los altavoces en el menú del receptor. Tenga en cuenta que los discos de DVD no siempre llevan sonido envolvente multicanal completo. Para asegurarse de que el disco sea de codificación multicanal, consulte con su distribuidor. Con sonido envolvente, la mayoría de discos y cintas estéreo ofrecen una reproducción satisfactoria. Si escucha distorsiones durante la reproducción de dicha modalidad, cambie a la modalidad de estéreo normal. La disponibilidad de las diferentes modalidades de sonido envolvente depende del número de altavoces instalados y la información del sonido de entrada. 1 Pulse SURROUND ON/OFF para activar el sonido envolvente. y Apparace la modalidad de sonido envolvente en uso. 2 Pulse SURR. MODE repetidamente para escuchar las diferentes modalidades de sonido envolvente (si se dispone de ellas). yAparecen en pantalla el modo y los altavoces seleccionados. Si las señales de entrada multicanal se reducen a unas pocas señales de salida, aparece en pantalla DOWNMIX. 3 Pulse VIRTUAL MODE las veces que necesite para cambiar entre los modos de sonido ambiental virtual: 1 x para activar 3D SURROUND 2 x para activar MULTI FRONT 3 x para activar MULTI REAR 4 x para activar NATURAL SURROUND y Una luz indica si se ha activado un modo de sonido ambiental virtual. Los signos indican que está activo uno de estos modos. 4 Pulse SURROUND ON/OFF para desactivar el sonido envolvente. y Aparece SURROUND OFF. 63 Español Su receptor puede reproducir sonido envolvente DTS. El DTS es un sistema de sonido envolvente multicanal disponible en los discos de DVD, láser y de audio. Consulte a un proveedor de software sobre la disponibilidad del software DTS en su zona. Si se detecta una señal de sonido ambiental, el receptor se desplazará a DOLBY DIGITAL, a DTS o a MPEG. EL SONIDO ENVOLVENTE Ajustes del sonido envolvente HALL Esta modalidad realza la reproducción del sonido y añade un ligero eco. Esto produce la sensación de estar en una habitación grande. Sólo puede utilizarse en la modalidad de estéreo. SURROUND La modalidad de sonido envolvente permite la reproducción de sonido con 4 o 5 altavoces. En función del material de origen, se reproducirá Dolby Surround Pro Logic, Dolby Digital, DTS o MPEG. Ambiente virtual El receptor puede reproducir uno o más formatos de sonido ambiental virtual. El sonido ambiental virtual proporciona una impresión de sonido más real creando altavoces fantasma en lugar o además de los reales. La posición de los oyentes influye en el efecto ambiental. El área en donde se obtiene un mejor efecto aparece en gris. NT FRO LEFT CENTER FR ON T RIGHT Español PRO LOGIC, DOLBY DIGITAL, DTS, MPEG Además de SURROUND, aparecerá en pantalla la modalidad que se esté utilizando (esto dependerá de la fuente). En el caso de sonido digital ambiente, se mostrará el formato de sonido AC-3 (para Dolby Digital), DTS o MPEG (para MPEG 2 multicanal), seguido por los canales de sonido, disponible en el origen (p. ej. DVD). Ejemplo: AC-3 3/2.1 Dolby Digital, 3 canales frontales, 2 canales envolventes y un canal subwoofer. MPEG 2/0.0 MPEG multicanal, sólo de sonido estéreo. AC-3 3/1.0 Dolby Digital, 3 canales frontales, 1 canal de sonido envolvente (mono) sin señal subwoofer. DTS 3/2.1 DTS, 3 canales frontales, 2 canales envolventes y un canal subwoofer. FRONT-3 STEREO Surround sound se silencia y 3 Stereo reproduce el sonido sin utilizar los altavoces posteriores. STEREO Los altavoces frontales derecho, izquierdo y central reproducen todo el sonido. Esto permite la reproducción estándar de sonido en estéreo. El nivel del efecto de sonido ambiental virtual se puede ajustar en el menú de configuración. Se dispone de los siguientes modos de sonido ambiental: 3D SURROUND No se necesitan altavoces traseros. El sonido del canal posterior lo simulan los altavoces delanteros. El sonido ambiental se simula mediante los altavoces frontales izquierdo, derecho y central. MULTI FRONT Los altavoces fantasmas se crean al lado de los altavoces delanteros derecho e izquierdo. MULTI REAR Los altavoces fantasmas se crean al lado de los altavoces traseros derecho e izquierdo. NATURAL SURROUND Los altavoces fantasma se crean al lado de los altavoces delanteros y traseros derecho e izquierdo. Advertencia: La disponibilidad de MULTI FRONT y MULTI REAR depende de los canales de sonido en el material de origen. (sólo en el mando a distancia) Los sonidos agudos se moderan y los sonidos débiles se elevan. Con esta modalidad puede disfrutar de sonido envolvente sin despertar a los niños o molestar a los vecinos. El modo nocturno funciona sólo con Dolby Digital y MPEG, y únicamente cuando sea compatible con las posibilidades de la fuente. NIGHT MODE 64 SINTONIZADOR Para sintonizar las emisoras de radio Almacenamiento de emisoras de radio Se pueden buscar las emisoras de radio efectuando un barrido por la banda de frecuencias. También se puede teclear la frecuencia de una emisora conocida. Si se emite una emisora FM y se recibe en estéreo, aparece STEREO. Se pueden almacenar en la memoria un total de 30 emisoras de radio. El receptor puede seleccionar y programar en la memoria automáticamente o las puede elegir Vd. 2 Seleccione una banda de frecuencias pulsando repetidamente TUNER AM/FM. y La banda de frecuencias seleccionada aparece en pantalla. 3 Mantenga pulsado 1 o 2 durante aproximadamente 1 segundo. y Aparece en pantalla SEARCH y el sintonizador sintoniza con una emisora que tenga suficiente fuerza. 4 Repita el procedimiento hasta que encuentre la emisora que desee. • Para realizar una sintonización fina (precisa) para una emisora débil, pulse 1 o 2 tantas veces como sea necesario hasta que consiga una recepción óptima. Para sintonizar con una emisora de radio con la frecuencia (sólo con el mando a distancia) 1 Pulse TUNER. y Aparece en pantalla TUNER. Programación automática 1 Seleccione * TUNER en el menú y pulse NEXT 2. 2 Seleccione AUTO INSTALL y pulse NEXT 2. y Aparecen en pantalla el número preseleccionado desde el cual se iniciará la programación, la banda de frecuencia y AUTO. Español Búsqueda de emisoras de radio 1 Gire SOURCE SELECT para seleccionar el sintonizador. y Aparece en pantalla TUNER. 3 Gire TUNER PRESET X para cambiar el número de preselección desde el que desea iniciar la programación. 4 Utilice TUNER AM/FM para cambiar a la banda de frecuencias deseada. 5 Pulse ENTER / OK para comenzar la programación. y AUTO INSTALL parpadea y todas las emisoras de radio disponibles se programan. Realizar esto le tomará unos pocos minutos. Cuando se detenga el parpadeo de AUTO INSTALL se habrá llevado a cabo la programación. Programación manual 1 Seleccione * TUNER en el menú y pulse NEXT 2. 2 Seleccione MAN INSTALL y pulse NEXT 2. y Aparecen en pantalla el número preseleccionado, la banda y la frecuencia. 2 Pulse FR. D.. y Aparece en pantalla _. 3 Gire TUNER PRESET X para cambiar al número de preselección donde desea almacenar la emisora. 3 Utilice las teclas del 1 al 0 para introducir la frecuencia de la emisora. 4 Sintonice con la emisora de radio deseada (vea «Búsqueda de emisoras de radio»). Advertencia: Sólo se deben teclear los números que entren dentro de los márgenes de frecuencias del sintonizador. 5 Pulse ENTER / OK para confirmar la selección. y Aparece brevemente en pantalla STORED. La emisora queda programada en el número de presintonía elegido. Activación de la sensibilidad FM 6 Seleccione y almacene todas las emisoras que desee de la misma manera. Se puede seleccionar en el sintonizador una búsqueda de baja sensibilidad para encontrar sólo las emisoras de señales fuertes (sólo FM). 1 Gire SOURCE SELECT para seleccionar el sintonizador. y Aparece en pantalla TUNER. 2 Pulse SENS. en el receptor. y Aparece en pantalla o bien SENS HI o SENS LO durante 5 segundos. Advertencia: Cuando busque emisoras de radio, aparecerá en la pantalla la sensibilidad utilizada. En este caso, SENS LO significa que el sintonizador está sólo buscando las emisoras de radio de señales fuertes. 65 SINTONIZADOR Para sintonizar con emisoras almacenadas Para asignar un nombre a una emisora 1 Gire SOURCE SELECT y elija TUNER para seleccionar el sintonizador. y Aparece en pantalla TUNER. Se pueden nombrar cualquiera de las emisoras preseleccionadas. También se puede cambiar el nombre de las emisoras RDS. 2 Gire TUNER PRESET X para seleccionar la emisora preseleccionada. y Aparecen en pantalla PRESET, el número de preselección y la emisora. 1 Seleccione * TUNER en el menú y pulse NEXT 2. Español Para reordenar emisoras de radioalmacenadas Quizá desee cambiar el orden de las emisoras después de la programación. En tal caso, con RESHUFFLE puede efectuar el cambio de las emisoras presintonizadas. 1 Seleccione * TUNER en el menú y pulse NEXT 2. 2 Seleccione RESHUFFLE y pulse NEXT 2. y Aparecen en pantalla PRESET, el número de preselección y la emisora. 3 Gire TUNER PRESET X para elegir una emisora preseleccionada. 4 Pulse ENTER / OK para confirmar la selección. y Aparecen en pantalla el número de preselección elegido, SWAP <-> y un segundo número de preselección. 5 Gire TUNER PRESET X para seleccionar la otra emisora preseleccionada. 6 Pulse ENTER / OK para confirmar el cambio. y Aparece brevemente en pantalla RESHUFFLED y los números de preselección se intercambian. 2 Seleccione GIVE NAME (asignar nombre) y pulse NEXT 2. y Aparece en pantalla la emisora preseleccionada. 3 Gire TUNER PRESET X para cambiar el nombre de la emisora preseleccionada. 4 Pulse ENTER / OK para confirmar la selección. yAparece en pantalla el nombre de la emisora actual o ________. 5 Gire TUNER PRESET X para seleccionar una letra y NEXT 2 o 1 PREV. para pasar a la posición siguiente o a la anterior. 6 Una vez introducido el nombre completo, pulse ENTER / OK para confirmar. y Aparece en pantalla STORED y el nombre se almacena. Advertencia: Si desea utilizar otra vez el nombre original de una emisora RDS, simplemente borre el nombre que le dio. Para borrar los nombres de las emisoras 1 Utilice la opción del menú * TUNER, seleccione GIVE NAME. y Aparece en pantalla una emisora de radio preseleccionada. 2 Gire X MENU NAVIGATOR para seleccionar el nombre que desea borrar. 3 Pulse ENTER / OK para confirmar la selección. 4 Pulse 1 PREV. mientras parpadea la primera letra. y CL parpadea a la izquierda del nombre de la emisora. 5 Pulse ENTER / OK para borrar el nombre de la emisora. O, si cambia de idea, pulse 1 PREV. para dejar como está el nombre de la emisora. 66 RDS R RDS noticias y información de tráfico Radio Data System es un servicio que permite a las emisoras de FM enviar información adicional. Si está sintonizando una emisora RDS, aparecen en pantalla R y el nombre de la emisora. Es posible ajustar el sintonizador de tal manera que interrumpa la reproducción cada vez que hay noticias o información de tráfico en una emisora RDS seleccionada. Estas funciones de información solamente funcionan si se están emitiendo las señales necesarias RDS. Para visualizar los diferentes datos RDS • Pulse RADIO TEXT repetidamente en el receptor para repasar la siguiente información (si está disponible): – Mensajes de texto de radio – Reloj RDS – Frecuencias – Nombre de la emisora Si las emisoras RDS llevan también una señal EON (Enhanced Other Networks), aparece en pantalla EON. Esta señal permite que el sintonizador busque información de tráfico y noticias no sólo en la emisora RDS seleccionada, sino también por toda la red de emisoras EON. 1 Sintonice con la emisora RDS que desee. Advertencia: La señal de la hora emitida por algunas emisoras RDS es en ocasiones imprecisa. 2 Pulse NEWS/TA: Una vez para mostrar NEWS, esto activa la función de información de noticias. Dos veces para mostrar TA, esto activa la función de información del tráfico. Tres veces para mostrar TA y NEWS, esto activa ambas funciones de información. 3 Seleccione y reproduzca cualquier otra fuente como lo haría normalmente. y Mientras se están emitiendo las noticias o la información de tráfico, el receptor seleccionará el sintonizador y NEWS o TA parpadearán. 4 Pulse NEWS/TA hasta que la indicación de la pantalla desaparezca para desactivar la o las funciones. o Pulse NEWS/TA en el momento de la emisión de la información para desactivar la o las funciones. Advertencia: Asegúrese de desactivar la información de tráfico y las noticias cuando realice una grabación, de lo contrario, éstas también se grabarán. 67 Español SINTONIZADOR DATOS TÉCNICOS Receptor Sujeto a modificaciones sin previo aviso. General Consumo de energía (FR 984, FR 985, FR 986) ...............210 W Consumo de energía (FR 994, FR 995, FR 996) ...............255 W Consumo de energía en espera........................................< 2 W Dimensiones, anch. × alt. × profun. ........435 × 135 × 350 mm Peso (FR 984, FR 985, FR 986) ..........................................8,6 kg Peso (FR 994, FR 995, FR 996) ..........................................9,4 kg Español Amplificador (0,7 % THD, 6 Ω, 1 kHz) Energía de salida, modo estéreo (FR 984, FR 985, FR 986) (DIN) ....................................2 × 60 W Energía de salida, modo envolvente (FR 984, FR 985, FR 986) Frontal ...................................................................2 × 60 W Central .........................................................................60 W Envolvente.............................................................2 × 60 W Energía de salida, modo estéreo (FR 994, FR 995, FR 996) (DIN) ..................................2 × 100 W Energía de salida, modo envolvente (FR 994, FR 995, FR 996) Frontal .................................................................2 × 100 W Central .......................................................................100 W Envolvente...........................................................2 × 100 W Graves ...............................................................±9 dB a 100 Hz Agudos ...............................................................±9 dB a 10 kHz Sonoridad .....+6 dB a 100 Hz (-30 dB); +3 dB a 10 kHz (-30 dB) Distorsión armónica total..........................0,05 % a 1 kHz, 5 W Respuesta de frecuencia ..........................20–20.000 Hz, ±1 dB Relación S/N..................................................................≥ 82 dB Separación estéreo (1 kHz)............................................≥ 45 dB Diafonía (1 kHz).............................................................≤ -65 dB Entradas Entradas lineales ................................................250 mV/47 kΩ 6 CH ....................................................................250 mV/40 kΩ Front AV (sólo con FR 995, FR 996) ....................250 mV/22 kΩ Fonógrafo ................................................................5 mV/47 kΩ Coaxial digital..............................................75 Ω conf. IEC 958 Óptico-digital ...................................................................Toslink Frecuencia de muestreo digital (FR 984, FR 985, FR 986) .....................32 kHz, 44,1 kHz, 48 kHz Frecuencia de muestreo digital (FR 994, FR 995, FR 996) ........32 kHz, 44,1 kHz, 48 kHz, 96 kHz Salidas Alimentación AC (conectados) .......................total máx. 100 W Salidas lineales ....................................................250 mV/1 kΩ Coaxial digital..............................................75 Ω conf. IEC 958 Frecuencias de muestreo de salida digital Entrada analógica......................................salida de 48 kHz Entrada digital de 32 kHz ..........................salida de 32 kHz Entrada digital de 44,1 kHz ....................salida de 44,1 kHz Entrada digital de 48 kHz ..........................salida de 48 kHz Entrada digital de 96 kHz (sólo con FR 994, FR 995, FR 996) ............salida de 48 kHz Pre-salida subwoofer................................................0,8 V/1 kΩ Pre-salida center.......................................................0,8 V/1 kΩ Auriculares......................................8–600 Ω (3 V e.m.f., 60 Ω) Altavoces ..........................................................................≥ 6 Ω 68 Sintonizador Gama de frecuencias FM..............................................................87,5–108,0 MHz MW...............................................................531–1.602 kHz LW....................................................................153–279 kHz Sensibilidad Estéreo FM.................................................................41 dBf Mono FM....................................................................15 dBf Distorsión armónica total Estéreo FM..................................................................0,3 % Mono FM...................................................................0,85 % Respuesta de frecuencia ...........................63–12.500 Hz ±1 dB Relación S/N Estéreo FM ..................................................................55 dB Mono FM.....................................................................60 dB Separación de canales .........................................35 dB a 1 kHz SOLUCIÓN DE PROBLEMAS No trate de reparar el aparato Vd. mismo bajo ningún pretexto, ya que podría invalidar la garantía. No abra el aparato o podría sufrir una descarga eléctrica. Si se produce un fallo, comprobar en primer lugar los puntos listados a continuación antes de llevar el equipo a reparar. Si el usuario no es capaz de resolver un problema mediante el seguimiento de estas ayudas, debe consultar al comercio distribuidor o centro de servicio. PROBLEMA CAUSA POSIBLE SOLUCIÓN No funciona y está en modo de espera El circuito de seguridad para sobrecalentamiento ha sido activado. Apague el aparato y déjelo enfriar. Después de dejar que el aparato se enfríe, enciéndalo de nuevo y seleccione una fuente girando SOURCE SELECT o pulsando una tecla fuente en el mando a distancia. No hay sonido VOLUME no está bien ajustado. Ajuste VOLUME. Los auriculares están conectados. Desconecte los auriculares. Se ha elegido una fuente equivocada. Gire SOURCE SELECT para seleccionar la fuente correcta. Uno de los altavoces está mal colocado. Conecte correctamente el altavoz. El cable de uno de los altavoces está dañado. Cambie el cable. En el menú del receptor, los ajustes de equilibrio del volumen no son correctos. Ajuste VOL FRONT-L y VOL FRONT-R en dicho menú. No está activado SURROUND. Pulse SURROUND ON/OFF para activar el sonido envolvente. Surround y/o los altavoces centrales no están (debidamente) conectados. Conecte correctamente los altavoces. Los altavoces envolventes y/o el altavoz central no están activados en el menú SPEAKR SETUP. Seleccione YES para los altavoces utilizados. El cable del altavoz está dañado. Cambie el cable. El sonido de los graves es débil Los altavoces no están bien conectados. Conecte los cables de color (o marcados) a las terminales del mismo color y los cables negros (o sin marcar) a las terminales negras. El sonido es de poca calidad El ajuste elegido no es el correcto para el tipo de música o sonido. Corrija los ajustes del sonido del receptor. El nivel de sonido envolvente es demasiado bajo o demasiado alto El nivel del sonido envolvente no está debidamente regulado. Regule el nivel de sonido envolvente del receptor. No hay sonido en el lado derecho o izquierdo Sonido débil o ausencia total de sonido en el altavoz central o los altavoces posteriores El nivel de sonido central El nivel de sonido del canal central no está es demasiado bajo o debidamente ajustado. demasiado alto Ajuste el nivel de sonido del canal central del receptor. En la modalidad de Dolby Se está reproduciendo una señal mono. Surround Pro Logic, sólo se oye el altavoz central Seleccione una fuente de sonido diferente o desactive el sonido envolvente. La recepción de la radio no es buena, la programación automática no funciona correctamente El receptor o la antena están emplazados Cambie de posición el aparato que produce las cerca de una fuente de radiación como puede interferencias o apáguelo. ser un TV, reproductor de CD, grabadora de CD, reproductor DVD , etc. No se puede realizar una La frecuencia de muestreo no es aceptada por Compruebe que la grabadora digital acepta grabación digital mediante la grabadora digital. frecuencias de muestreo entre 32 kHz, 48 kHz o la salida digital realice la grabación a través de la salida digital. Cuando se graba desde El reproductor de DVD no suministra un DVD, toda la grabación información sobre la pista. completa aparece como una sola pista. Grabe cada pista por separado o utilice «incremento de pista manual» de la grabadora. 69 Español ADVERTENCIA ALLGEMEINE INFORMATIONEN Allgemeine Informationen Lieferumfang ....................................................................................70 Aufstellung.......................................................................................70 Umweltinformationen ......................................................................70 Warenzeichen-Anerkennung............................................................70 Wartung ...........................................................................................70 Bedienelemente ................................................................................71 Fernbedienung Verwendung der Fernbedienung......................................................72 Tasten der Fernbedienung................................................................73 Programmieren der universellen Fernbedienung (nur bei FR 985, FR 986, FR 995, FR 996) ........................................74 Anschlüsse .........................................................................................75 Deutsch Anschlüsse Analoge Audioanschlüsse................................................................76 Digitale Audioanschlüsse ................................................................76 System-Kontrollbus, CINEMA LINK.................................................77 Videoanschlüsse ..............................................................................77 Netzbetrieb.......................................................................................78 Handhabung der Leistung ................................................................78 Lautsprecheranschlüsse...................................................................78 TV als Center-Lautsprecher..............................................................78 Antennenanschlüsse........................................................................78 Kopfhörer..........................................................................................78 Aufbau der Anlage Positionierung der Lautsprecher......................................................79 Einstellen und Testen der Lautsprecher ..........................................79 Einstellen des Receivers..................................................................79 Anzeige................................................................................................80 Menüs Receiver-Menü...........................................................................81–82 TV-Menü...........................................................................................82 CINEMA LINK aktivieren..................................................................82 Wahl eines Ausgangsgerätes SOURCE SELECT...............................................................................83 6 CHANNEL-DVD/SACD INPUT-Auswahl ........................................83 Zuteilen einer Ausgangsgerätewahl ...............................................83 Verwendung einer Ausgangsgerätewahl für zwei oder mehr Geräte ...83 Einige Worte zu 6 CHANNEL-DVD/SACD INPUT ............................83 Wiedergabe, Aufnahme Spielen eines Ausgangsgerätes ......................................................84 Einstellen des Klanges.....................................................................84 Aufnehmen von einem Ausgangsgerät ...........................................84 Aufnehmen vom digitalen Ausgang ................................................84 Surround-Sound Einige Worte zu Surround-Sound ....................................................85 Durch Surround-Sound schalten......................................................85 Surround-Sound Einstellungen ........................................................86 Radio Einstellen der Radiosender ..............................................................87 Umstellen der FM-Empfindlichkeit ..................................................87 Speichern von Radiosendern ...........................................................87 Einstellen gespeicherter Radiosender.............................................88 Umsortieren gespeicherter Radiosender.........................................88 Benennen der Radiosender..............................................................88 Löschen von Sendernamen..............................................................88 RDS R..............................................................................................89 RDS-Nachrichten- und Verkehrsdurchsage .....................................89 Technische Daten Receiver............................................................................................90 Fehlerbehebung Warnung...........................................................................................91 Fehlerbehebung................................................................................91 Als ein ENERGY STAR®-Partner hat Philips festgelegt, dass dieses Produkt den ENERGY STAR®Richtlinien für Energie-Effizienz entspricht. Dieses Gerät entspricht den Funkentstörungsvorschriften der Europäischen Gemeinschaft. 70 Lieferumfang Dieser Receiver wird geliefert mit: – einer Fernbedienung – 2 Batterien für die Fernbedienung, Type AA – einem Koaxialkabel für den Audioanschluss eines DVD-Spielers – einem Systembus-Kabel für den CINEMA LINK-Anschluss – einer Rahmenantenne – einer Drahtantenne – diesem Anleitungshandbuch Aufstellung Falls Sie die Komponenten ihres Systems aufeinandergestellt haben, so muss der Receiver obenauf sein. Stellen Sie den Receiver auf eine flache, harte, stabile Fläche. Bedecken Sie die Entlüftungsschlitze nicht und lassen Sie 50 cm über und 10 cm links und rechts neben dem Receiver zur Ventilation frei. Die Rahmenantenne sollte zwecks gutem Empfanges nicht auf oder unter Videorekordern, CD-Rekordern, DVD-Spielern, TVs und anderen Strahlungsquellen plaziert werden. Umweltinformationen Überflüssiges Verpackungsmaterial wurde vermieden. Wir haben unser Möglichstes getan, die Verpackung in drei Materialien trennbar zu machen: Wellpappe (Schachtel), expandiertes Polystyrol (Puffer) und Polyethylen (Säcke, Schaumstofffolien). Ihr Gerät besteht aus Materialien, die von darauf spezialisierten Betrieben wiederverwertet werden können. Bitte informieren Sie sich darüber, wie Sie Verpackungsmaterialien, leere Batterien und alte Geräte entsprechend den örtlichen Bestimmungen entsorgen können. Warenzeichen-Anerkennung Erzeugt unter Lizenz von Dolby Laboratories. „DOLBY“, „DOLBY DIGITAL“, „PRO LOGIC“ und das Doppel-D-Symbol 2 sind Warenzeichen der Dolby Laboratories. Vertrauliche unveröffentlichte Arbeiten. © 1992–1997 Dolby Laboratories. Alle Rechte vorbehalten. „DTS” und „DTS Digital Surround” sind Warenzeichen der Digital Theater Systems, Inc. Copyright 1996 Theater Systems, Inc. Alle Rechte vorbehalten. Wartung Reinigen Sie den Receiver mit einem weichen, feuchten und fusselfreien Tuch. Verwenden Sie keine Reinigungsmittel, da diese das Gehäuse angreifen können. Setzen Sie den Receiver nicht Feuchtigkeit, Regen, Sand oder extremer Hitze (verursacht durch Heizgeräte oder direktes Sonnenlicht) aus. BEDIENELEMENTE 1 2 3 4 5 6 7 8 T 9 0 A ! 1 POWER / STANDBY.......Schaltet den Receiver ein und aus. 2 CINEMA LINK ................Schaltet den System Kontrollbus zwischen Receiver und TV ein und aus. 3 ..........................................Sensor für die Infrarot Fernbedienung. 4 VIRTUAL..........................Kontrolllicht für virtuellen Surround. 5 HALL ................................Kontrolllicht für HALL. 6 ..........................................Anzeige 7 SOURCE SELECT............Wählt die verschiedenen Audiound Videoanschlüsse. Reaktiviert den Receiver aus dem Bereitschaftsmodus. 8 VOLUME..........................Erhöht und verringert die Lautstärke. 9 FRONT AV.......................Wählt den FRONT AV / GAME Eingang (nur FR 995, FR 996). 0 TREBLE............................Regelt die Höhen bei Verwendung in Kombination mit VOLUME. ! BASS ...............................Regelt den Bass bei Verwendung in Kombination mit VOLUME. @ LOUDNESS .....................Schaltet LOUDNESS ein und aus. # NEXT 2 ...........................TUNER: sucht Radiosender. MENU: schaltet zur nächsten Menüebene. $ ENTER / OK.....................Bestätigt die gewählten Werte im Menü. # @ % TUNER PRESET X MENU NAVIGATOR TUNER: schaltet zum nächsten und vorangegangenen gespeicherten Radiosender. MENU: bewegt im Menü aufwärts und abwärts. ^ 1 PREV. / EXIT ...............TUNER: sucht Radiosender. MENU: schaltet zur vorhergehenden Menüebene. & SETUP MENU ................Schaltet das Menü ein und aus. * SENS. ..............................Schaltet zwischen niedriger und hoher Radio-Empfindlichkeit um. ( NEWS/TA........................Schaltet die RDS-Nachrichten und RDS-Verkehrsdurchsagen ein und aus. ) TUNER AM/FM ..............Schaltet die Wellenbereiche des Radios um. ¡ RADIO TEXT ...................Schaltet durch die verschiedenen RDS-Informationen. ™ SURR. MODE..................Schaltet durch die verschiedenen Lautsprecherkonfigurationen. £ VIRTUAL MODE .............Schaltet durch die verschiedenenen virtuellen Surround-Sound-Modi. ≤ SURROUND ON/OFF .....Schaltet zwischen dem zuletzt gewählten Surround-Modus und Stereo. 71 Deutsch ≤ £ ™ ¡ )( * & ^ % $ FERNBEDIENUNG Verwendung der Fernbedienung Öffnen Sie das Batteriefach der Fernbedienung und legen Sie 2 Alkaline-Batterien der Type AA (R06, UM-3) ein. Entfernen Sie die Batterien, wenn Sie leer sind oder die Fernbedienung für längere Zeit nicht verwendet wird. Deutsch Entsorgungshinweis Bitte werfen Sie nur entladene Batterien in die Sammelboxen beim Handel oder den Kommunen. Entladen sind die Batterien in der Regel dann, wenn – das Gerät abschaltet und/oder in der Anzeige ein entsprechender Hinweis erscheint, oder – nach längerer Gebrauchsdauer der Batterien das Gerät nicht mehr einwandfrei funktioniert. Um sicherzugehen, kleben Sie die Batteriepole z. B. mit einem Klebestreifen ab oder geben Sie die Batterien einzeln in einen Plastikbeutel. MUTE 2 H PHONO TUNER CD CDR/TAPE TV VCR SAT DVD 1 2 3 4 5 6 7 8 9 CINEMA GO CABLE BOX 0 GUIDE OK MENU Batterien enthalten chemische Substanzen, deshalb sollten sie ordnungsgemäß entsorgt werden. Die Tasten der Fernbedienung funktionieren gleich wie die entsprechenden Tasten am Receiver. É Wichtig! Sie müssen einen Ausgangsgeräteknopf länger als 1 Sekunde drücken, um auf diese Tonquelle am Receiver zu schalten. Das Drücken eines Ausgangsgeräteknopfes für weniger als 1 Sekunde schaltet die Fernbedienung nur für den Gebrauch der Bedienelemente des gewählten Produktes um. Die Fernbedienung bleibt solange auf das ausgewählte Ausgangsgerät eingestellt, bis ein anderer Ausgangsgeräteknopf auf der Fernbedienung gedrückt wird. Dies ermöglicht Ihnen die Bedienung zusätzlicher Ausgangsgeräte (z. B. spulen einer Kassette), ohne dabei die Tonquelle am Receiver zu wechseln. A ATV NEWS/TA CHANNEL/TRACK LOUDNESS SUBW. ON/ OFF í ë REC CANCEL AUDIO DVD NIGHT INDEX Å T-C VIRTUAL SURROUND DISC + FR.D. MODE - ON/ OFF REAR SURROUND + MODE SUB WOOFER TEST TONE CHANNEL 72 Ç Tasten der Fernbedienung H MUTE .....................Schaltet den Ton des Receivers in allen Modi, außer dem TV-Modus, still. Schaltet den Ton Ihres Philips TV still, wenn die Fernbedienung im TV-Modus ist. 2 ................................Schaltet das auf der Fernbedienung gewählte Ausgangsgerät (z.B. VCR, TV) auf Bereitschaft. Schaltet den Receiver in Bereitschaft, wenn diese Taste länger als 2 Sekunden gedrückt wird. PHONO, TUNER, CD, CDR/TAPE, TV, VCR, SAT, DVD Schaltet die Fernbedienung auf die Bedienelemente der verschiedenen Produkte. Wählt die Ausgangsgeräte, sofern länger als 1 Sekunde gedrückt wird. SAT funktioniert nur mit digitalen Satelliten-Receivern. Reaktiviert den Receiver aus dem Bereitschaftsmodus. 1–0................................Nummerntasten für Titel, Sender oder Frequenzen. Zwei- oder mehrstellige Nummern müssen innerhalb von 2 Sekunden eingegeben werden. CINEMA GO..........Aktiviert CINEMA LINK am TV. CABLE BOX ...................Ohne Funktion. MENU GUIDE ..............TUNER: Schaltet das Receiver Menü ein und aus. DVD, TV: Schaltet das DVD/TV Menü ein und aus. OK .................................Bestätigt Menü-Optionen. Pfeilförmige Tasten ......TUNER: Bewegt sich innerhalb der Menüs. Rechts-/Links-Pfeile schalten hinauf/hinunter. CD, CDR: Links-/Rechts-Pfeile suchen rückwärts/vorwärts, Hinauf-/HinunterPfeile suchen den nächsten/ vorhergegangenen Titel. +A ...........................Erhöht die Receiver-Lautstärke. -A ...........................Verringert die Receiver-Lautstärke. NEWS/TA.................Schaltet die Funktionen NEWS und TRAFFIC ANNOUNCEMENT ein und aus. TV: Schaltet Teletext ein und aus. SAT: Schaltet den Informationstext ein und aus. ÉATV ......................Erhöht die TV-Lautstärke. CD, CDR, VCR, DVD: Startet die Wiedergabe. ÇATV ......................Verringert die TV-Lautstärke. CD, CDR, VCR, DVD: Stoppt die Wiedergabe. i í CHANNEL/TRACK ...Wählt den vorigen gespeicherten Radiosender. VCR: Spult das Band zurück. CD, CDR, DVD: Wählt den vorhergehenden Titel. TV: Wählt den vorhergehenden Kanal. ë CHANNEL/TRACK ...Wählt den nächsten gespeicherten Radiosender. VCR: Spult das Band vor. CD, CDR, DVD: Wählt den nächsten Titel. TV: Wählt den nächsten Kanal. LOUDNESS ...................Schaltet LOUDNESS ein und aus. SUBW. ON/OFF ............Schaltet den Subwoofer ein und aus. REC, DVD AUDIO..........CDR, VCR: Startet die Aufnahme. DVD: Schaltet zwischen Audiospuren. CANCEL, DVD ...........CD, CDR, SAT, VCR: Löscht ein Programm, storniert Auswahlen. DVD: Schaltet den Blickwinkel um. FR.D., DVD Å .............TUNER: Schaltet auf FREQUENCY DIRECT. CD, CDR, VCR, DVD: Unterbricht die Wiedergabe. INDEX, DVD T-C............VCR: Schaltet die Index-Suche ein und aus. SAT: Schaltet die Themen ein und aus. DVD: Schaltet zwischen Titel und Kapitel. DISC..............................CD-, CDR-, DVD-Wechsler: Schaltet zur nächsten Disc. NIGHT ...........................Schaltet NIGHT MODE ein und aus. VIRTUAL MODE ............Schaltet durch die verschiedenen virtuellen Surround-Sound-Modi. SURROUND ON/OFF ....Schaltet SURROUND SOUND ein und aus. +/- SUBWOOFER...Erhöht/verringert die SubwooferLautstärke. +/- REAR ...............Erhöht/verringert die Lautstärke der rückwärtigen Lautsprecher. Während der Testton an ist, kann die Lautstärke der Lautsprecher, die Sie hören mit diesen Tasten erhöht/verringert werden. SURROUND MODE.......Schaltet durch die verschiedenen Surround-Modi. TEST TONE ...................Schaltet den Testton ein und aus. Während der Testton an ist, kann die Lautstärke der Lautsprecher, die Sie hören, mit +/- REAR erhöht/verringert werden. 73 Deutsch FERNBEDIENUNG FERNBEDIENUNG Programmieren der universellen Fernbedienung (nur bei FR 985, FR 986, FR 995, FR 996) Sie können die universelle Fernbedienung an der Aufschrift Multibrand/Universal erkennen. Die universelle Fernbedienung muss auf die Verwendung der Codes ihrer unterschiedlichen Markengeräte programmiert werden. Dies geschieht durch Eingabe eines 4-stelligen Codes oder durch Probieren der Codes bis der richtige gefunden wird. Wir empfehlen die Verwendung des 4-stelligen Codes. Diese Methode ist schneller und zuverlässiger. Die Methode der Code-Suche sollte nur verwendet werden, wenn Sie den Code für eines Ihrer Geräte nicht finden können. Die Code-Tabelle finden Sie am Ende des Handbuches. Wichtig! Deutsch Zur Programmierung müssen die Tasten auf der Fernbedienung und nicht die Tasten am Receiver oder an anderen Geräten verwendet werden. Sie können die gefundenen und getesteten Codes Ihrer verschiedenen Geräte hier niederschreiben. PHONO .......................................... TUNER........................................... CD ................................................. CDR/TAPE ..................................... TV .................................................. VCR ............................................... SAT................................................ DVD ............................................... Programmieren mit dem 4-stelligen Code 1 Halten Sie den Ausgangsgeräteknopf für das Gerät, welches bedient werden soll, und 2 für 3 Sekunden gedrückt. Zurücksetzen der Fernbedienung 1 Halten Sie den Ausgangsgeräteknopf für das Gerät, das bedient werden soll, und 2 für 3 Sekunden gedrückt. 2 Geben Sie den 4-stelligen Code für das Gerät ein (Code-Tabelle am Ende des Handbuches). 2 Geben Sie den 3-stelligen Code 981 ein. y Die Fernbedienung ist nun auf alle ihre ursprünglichen Philips-Codes zurückgesetzt. Anmerkungen: – Wenn mehr als 4 Stellen eingegeben werden, erkennt die Fernbedienung nur die zuerst eingegebenen. – Wenn Sie für 30 Sekunden keinen Code eingeben, schaltet die Fernbedienung die Programmfunktion ab, ohne den Code zu ändern. – Um einen neuen Code zu programmieren, überschreiben Sie einfach den alten durch die Eingabe des neuen. Absuchen der Code-Tabelle 1 Schalten Sie das Gerät, das bedient werden soll, ein. 2 Halten Sie den Ausgangsgeräteknopf für das Gerät, das bedient werden soll, und 2 für 3 Sekunden gedrückt. 3 Drücken Sie nochmals 2 und lassen Sie wieder los. y Die Fernbedienung sendet für eine Marke nach der anderen die Codes für „nächster Kanal“ oder „Bereitschaft“ (abhängig vom gewählten Ausgangsgerät). 4 Sobald das Gerät reagiert – indem es zum nächsten Kanal oder auf Bereitschaft schaltet – drücken Sie 2, um den Code zu verwenden. y Der identifizierte Code wird ab nun verwendet. • Wenn das Gerät für 2 Minuten nicht reagiert, ist der Code dafür nicht in der Fernbedienung gespeichert. Der Code der Fernbedienung bleibt unverändert. Anmerkung: Wenn Sie die Batterien aus der Fernbedienung für länger als 1 Minute entfernen, müssen die Codes wieder programmiert werden. 74 ANSCHLÜSSE ¤ ™£≤∞§ ≥•ª º ⁄ A ANTENN A ANTENN P AM LOO UT VIDEO IN/O S-VIDEO DIGITAL AUDIO IN/OUT 2 OPTICAL IN DVD MON VCR VCR C A U TI CINEMA LINK SAT R L/ 6 CHANNE T DVD INPU SUBW. DVD IN MON OUT FER SUBWOO T PRE-OU OUT IN OUT IN VCR REC PLAY SAT IN CENTER UT AUDIO IN/O SAT COAX OUT CDR/TAP CENTER E CD VCR PHONO TV R COAX 2 IN EACH L COAX 1 IN R IN IN IN PLAY OUT REC IN IN IN PLAY L SPEAKE R≥6Ω FRONT SPEAKERS SURROUND SPEAKERS AUDIO IN/OUT 6-Kanal-Eingang DIGITAL AUDIO IN/OUT VIDEO IN/OUT Antennenanschlüsse Vorverstärkte Ausgänge System-Kontrollbus Netzsteckdosen (nicht bei allen Versionen) Netzkabel CHOC ELE R VRI 100W TOTAL MAX. SWI TCHED OUT REC ^ % $ # @ ! 09 8 7 6 Anschlüsse 6,3 mm Kopfhörerbuchse an der Vorderseite. Audio- und Videoeingänge an der Vorderseite (nur FR 995, FR 996). QUE DE OU RIS n NE PAS Europea ips in the by Phil s. eloped oratorie the d and dev Dolby Lab Designeity. se from O LOGIC“ and Dol by er licen Commun tured und DIGITAL“, ”PRema rks of ks. LBY Manufac are trad shed Wor rved. “, ”DO rese ts ”DOLBY-D Sym bol ntial Unpubli righ ater ories. All Dig ital The dou ble ories. Confide r worldLaborat Laborat 997 Dolby er lice nse from 2 and othe ”DT S ©1992–1 ture d und No. 5,451,94. ”DT S“ and ater Man ufacInc. US Pat.and pen ding of Digital The s, s. System System nts issu ed trademarks Theater nd“ areht 1996 Digital wid e pate Surrou Digital s, Inc. Copyrig d. System Rights Reserve All Inc. AV IS ND SURROURS SPEAKE CENTER T PRE-OU ON SHOCK ELECTRIC RISK OF NOT OPEN E DO CTRIQU L 1 OPTICAL IN ) ( * & LET . Name des Anschlusses 1 PHONES 5 4 3 2 1 Anzuschließen an: Einen Kopfhörer mit 6,3-mm-Stecker. 2 FRONT AV / GAME Linke und rechte Audio-Ausgangsbuchse von Geräten wie Videokameras und Videospielen. 3 FRONT AV / GAME Video-Ausgangsbuchsen von Geräten wie Videokameras und Videospielen. 4 R, L Rechten und linken vorderen Lautsprecher. 5 CENTER Center-Lautsprecher. 6 R, L Rechten und linken Surround-Lautsprecher. 8 CDR/TAPE OUT Eingang eines CD-Rekorders oder eines Kassettendecks. 9 CDR/TAPE IN Ausgang eines CD-Rekorders oder eines Kassettendecks. 0 CD IN Ausgang eines CD-Spielers. ! SAT IN Ausgang eines Satellitensystems. @ VCR OUT Eingang eines Videorekorders. # VCR IN Ausgang eines Videorekorders. $ TV IN TV-Ausgang. % PHONO IN Ausgang eines Plattenspielers mit MM-Abnehmer. ¡ PHONO GND f Erdungskabel eines Plattenspielers. ^ 6 CHANNEL / DVD INPUT 6-Kanal-Ausgang von Geräten wie DVD- oder Laserdisc-Spielern. & COAX 1 IN Koaxialen Ausgang von digitalen Geräten (Standardeinstellung für DVD). * COAX 2 IN Koaxialen Ausgang von digitalen Geräten. ( COAX OUT Koaxialen Eingang von digitalen Geräten wie CD-Rekordern oder MD-Rekordern. ) OPTICAL IN Optischen Ausgang von digitalen Geräten wie DVD-Spielern, CD-Spielern, CD-Rekordern oder MD-Spielern (nur FR 984, FR 985, FR 986, FR 994). ) OPTICAL 1 (2) IN Optischen Ausgang von digitalen Geräten wie DVD-Spielern, CD-Spielern, CD-Rekordern oder MD-Spielern (nur FR 995, FR 996). ™ S-VIDEO S-Video-Eingänge/Ausgänge von Videogeräten für eine bessere Videoqualität (nur FR 994, FR 995, FR 996). £ DVD IN Ausgang eines DVD-Spielers. ≤ MON OUT Eingang eines Monitors (z. B. TV). § VCR IN Ausgang eines Videorekorders. ≥ VCR OUT Eingang eines Videorekorders (zum Aufnehmen). ª SAT IN Ausgang eines Satellitensystems. ∞ AM LOOP Mitgelieferte Rahmenantenne. • FM 75 Ω Mitgelieferte Drahtantenne oder Außenantenne. 7 CENTER PRE-OUT TV-Eingang, wenn er als Center-Lautsprecher verwendet wird (nur dann möglich, wenn der CINEMA LINK-Systembus angeschlossen ist). º SUBWOOFER PRE-OUT Eingang eines aktiven Subwoofers. ⁄ CINEMA LINK System-Kontrollbusbuchse eines Philips TVs mit CINEMA LINK. ¤ AC OUTLET Liefert gleiche Spannung wie das Netz. Bis zu 100 W gesamtzulässige Belastung. ‹ Nachdem alle Anschlüsse gemacht wurden, schließen Sie das Netzkabel an die Netzsteckdose an. 75 Deutsch ¡ AC OUT FRONT RS SPEAKE 6Ω AKER ≥ EACH SPE FM 75 Ω PHONO GND ‹ ANSCHLÜSSE Analoge Audioanschlüsse Manche Geräte sind mit analogen und digitalen Anschlüssen ausgestattet. Sofern möglich, verwenden Sie den digitalen Anschluss, da dies für gewöhnlich eine bessere Klangqualität ergibt. Siehe „Zuteilen einer Ausgangsgerätewahl“ über den Gebrauch des digitalen Anschlusses des Receivers. Software vorhanden ist, und kann daher von den meisten CD-, LD- und DVD-Spieler nicht decodiert und wiedergegeben werden. Wenn DTS-codierte Software durch die analogen Ausgänge des CD-, LD- oder DVD-Spielers wiedergegeben wird, kommt es daher zu starker Lärmentwicklung. Um mögliche Schäden an der Anlage zu vermeiden, sollte der Kunde die richtigen Vorkehrungen treffen, wenn die analogen Ausgänge direkt an den Receiver angeschlossen werden. Aufgrund der Verschiedenartigkeit des Ausgangssignals erfordert der Gebrauch einer Dolby Digital-Laserdisc einen optionalen AC-3 RF-Demodulator. Um in den vollen Genuss der DTS Digital SurroundTM-Wiedergabe zu kommen, muss ein DTS-kompatibles Gerät an einen der digitalen Eingänge des Receivers angeschlossen werden. DTS Digital Surround ist ein aus einzelnen Teilen bestehendes, digitales 5,1-Kanal-Audioformat, das auf CD-, LD- und DVDTM Deutsch ANTENNA PHONO GND. FM 75 Ω AM LOOP DIGITAL AUDIO IN/OUT OPTICAL 2 IN DVD VIDEO IN/OUT S-VIDEO MON VCR FRONT SPEAKERS EACH SPEAKER ≥ 6 Ω SAT VCR CINEMA LINK OPTICAL 1 IN IN 6 CHANNEL / DVD INPUT CENTER SUBW. OUT SUBWOOFER DVD IN MON OUT IN OUT PLAY VCR REC PHONO TV VCR SAT IN PRE-OUT CENTER R CAUTION L COAX OUT MONITOR / TV RISK OF ELECTRIC SHOCK DO NOT OPEN COAX 2 IN AUDIO OUT SURR. FRONT AUDIO IN/OUT SAT CD CENTER PRE-OUT CDR/TAPE AVIS SURROUND SPEAKERS R IN IN IN PLAY IN OUT REC IN PLAY IN R OUT REC L EACH SPEAKER ≥ 6 Ω TURNTABLE RISQUE DE CHOC ELECTRIQUE NE PAS OUVRIR Designed and developed by Philips in the European Community. Manufactured under license from Dolby Laboratories. ”DOLBY“, ”DOLBY DIGITAL“, ”PRO LOGIC“ and the double-D Symbol are trademarks of Dolby Laboratories. Confidential Unpublished Works. ©1992–1997 Dolby Laboratories. All rights reserved. Manufactured under license from Digital Theater Systems. Inc. US Pat. No. 5,451,942 and other worldwide patents issued and pending. ”DTS“ and ”DTS Digital Surround“ are trademarks of Digital Theater Systems, Inc. Copyright 1996 Digital Theater Systems, Inc. All Rights Reserved. L COAX 1 IN CD RECORDER IN POWERED SUBWOOFER OUT VCR AUDIO OUT CD PLAYER AUDIO IN SAT RECEIVER Digitale Audioanschlüsse CD RECORDER ANTENNA PHONO GND. FM 75 Ω AM LOOP DIGITAL AUDIO IN/OUT OPTICAL 2 IN CD PLAYER DVD VIDEO IN/OUT S-VIDEO MON VCR FRONT SPEAKERS VCR EACH SPEAKER ≥ 6 Ω SAT CINEMA LINK OPTICAL 1 IN IN 6 CHANNEL / DVD INPUT CENTER SUBW. OUT SUBWOOFER DVD IN MON OUT IN OUT PLAY VCR REC SAT IN PRE-OUT CENTER R CAUTION L COAX OUT RISK OF ELECTRIC SHOCK DO NOT OPEN COAX 2 IN SURR. FRONT PHONO AUDIO IN/OUT VCR SAT TV CD CDR/TAPE CENTER PRE-OUT SURROUND SPEAKERS L COAX 1 IN R IN DVD PLAYER 76 IN IN PLAY OUT REC IN IN IN PLAY OUT REC R L EACH SPEAKER ≥ 6 Ω AVIS RISQUE DE CHOC ELECTRIQUE NE PAS OUVRIR Designed and developed by Philips in the European Community. Manufactured under license from Dolby Laboratories. ”DOLBY“, ”DOLBY DIGITAL“, ”PRO LOGIC“ and the double-D Symbol 2 are trademarks of Dolby Laboratories. Confidential Unpublished Works. ©1992–1997 Dolby Laboratories. All rights reserved. Manufactured under license from Digital Theater Systems. Inc. US Pat. No. 5,451,942 and other worldwide patents issued and pending. ”DTS“ and ”DTS Digital Surround“ are trademarks of Digital Theater Systems, Inc. Copyright 1996 Digital Theater Systems, Inc. All Rights Reserved. ANSCHLÜSSE System-Kontrollbus, CINEMA LINK TV EXT 1 EXT 2 EXT 3 TV AUX DVD PLAYER DIGITAL OUT optional A (TV = CENTER) Deutsch Falls der Receiver und Ihr Philips TV-Gerät (oder noch besser zusätzlich ein Philips VCR oder DVD-Spieler) mit Cinemalink an den CINEMA LINK-System-Kontrollbus angeschlossen sind, werden einige zusätzliche Leistungen angeboten: – Beim Starten eines Ausgangsgerätes schaltet das System automatisch auf diesen Eingang. – Sie können das System über den TV-Bildschirm steuern. Abhängig von der Sprache des TVs, können Sie dies in Ihrer bevorzugten Sprache tun. – Da der TV als Center-Lautsprecher fungieren kann, erübrigt sich ein separater Center-Lautsprecher. (Das Kabel A muss separat gekauft werden.) – Durch Drücken der Bereitschaft-Taste auf der Fernbedienung können Sie das komplette System in Bereitschaft schalten. ANTENNA PHONO GND. FM 75 Ω AM LOOP DIGITAL AUDIO IN/OUT OPTICAL 2 IN VCR VIDEO IN/OUT S-VIDEO MON VCR DVD FRONT SPEAKERS VCR EACH SPEAKER ≥ 6 Ω SAT CINEMA LINK OPTICAL 1 IN IN 6 CHANNEL / DVD INPUT CENTER SUBW. OUT SUBWOOFER DVD IN MON OUT IN OUT PLAY VCR REC SAT IN PRE-OUT CENTER R CAUTION L COAX OUT RISK OF ELECTRIC SHOCK DO NOT OPEN COAX 2 IN SURR. FRONT PHONO AUDIO IN/OUT VCR SAT TV CENTER PRE-OUT CDR/TAPE CD AVIS SURROUND SPEAKERS R IN IN IN PLAY IN OUT REC IN PLAY IN R OUT REC RISQUE DE CHOC ELECTRIQUE NE PAS OUVRIR Designed and developed by Philips in the European Community. Manufactured under license from Dolby Laboratories. ”DOLBY“, ”DOLBY DIGITAL“, ”PRO LOGIC“ and the double-D Symbol are trademarks of Dolby Laboratories. Confidential Unpublished Works. ©1992–1997 Dolby Laboratories. All rights reserved. Manufactured under license from Digital Theater Systems. Inc. US Pat. No. 5,451,942 and other worldwide patents issued and pending. ”DTS“ and ”DTS Digital Surround“ are trademarks of Digital Theater Systems, Inc. Copyright 1996 Digital Theater Systems, Inc. All Rights Reserved. L COAX 1 IN L EACH SPEAKER ≥ 6 Ω CINEMA LINK TO TV IN TO VCR IN Videoanschlüsse MONITOR / TV DVD PLAYER ANTENNA PHONO GND. FM 75 Ω AM LOOP DIGITAL AUDIO IN/OUT OPTICAL 2 IN DVD VIDEO IN/OUT S-VIDEO MON VCR FRONT SPEAKERS VCR EACH SPEAKER ≥ 6 Ω SAT CINEMA LINK OPTICAL 1 IN IN 6 CHANNEL / DVD INPUT CENTER SUBW. OUT SUBWOOFER DVD IN MON OUT IN OUT PLAY VCR REC SAT IN PRE-OUT CENTER R CAUTION L COAX OUT RISK OF ELECTRIC SHOCK DO NOT OPEN COAX 2 IN SURR. FRONT PHONO AUDIO IN/OUT VCR SAT TV CD CDR/TAPE CENTER PRE-OUT SURROUND SPEAKERS L COAX 1 IN R IN IN IN PLAY OUT REC IN IN IN PLAY OUT REC R L EACH SPEAKER ≥ 6 Ω AVIS RISQUE DE CHOC ELECTRIQUE NE PAS OUVRIR Designed and developed by Philips in the European Community. Manufactured under license from Dolby Laboratories. ”DOLBY“, ”DOLBY DIGITAL“, ”PRO LOGIC“ and the double-D Symbol are trademarks of Dolby Laboratories. Confidential Unpublished Works. ©1992–1997 Dolby Laboratories. All rights reserved. Manufactured under license from Digital Theater Systems. Inc. US Pat. No. 5,451,942 and other worldwide patents issued and pending. ”DTS“ and ”DTS Digital Surround“ are trademarks of Digital Theater Systems, Inc. Copyright 1996 Digital Theater Systems, Inc. All Rights Reserved. VCR VIDEO OUT VIDEO IN SAT RECEIVER 77 ANSCHLÜSSE Netzbetrieb TV als Center-Lautsprecher Das Typenschild befindet sich an der Rückseite des Receivers. Sie können Ihren Philips TV mit CINEMA LINK als CenterLautsprecher verwenden. Für TVs mit einem Scart-Anschluss wird ein zusätzliches Audio-Cinch-an-Scart-Kabel benötigt. Für TVs mit Cinch-Anschlüssen werden zusätzliche Cinch-Kabel benötigt. Diese Kabel müssen am blauen CENTER PRE-OUTAnschluss an der Rückseite angeschlossen werden. Befolgen Sie die Bedienungsanleitung Ihres TV’s bezüglich der Verwendung als Center-Lautsprecher. 1 Prüfen Sie, ob die am Typenschild angegebene Spannung mit der örtlichen Netzspannung übereinstimmt. Sollte dies nicht der Fall sein, wenden Sie sich an Ihren Fachhändler oder an Ihre Servicestelle. 2 Schließen Sie das Netzkabel an die Netzsteckdose an. Um das Gerät vollständig vom Netz zu trennen, ziehen Sie den Stecker aus der Steckdose. Handhabung der Leistung Deutsch Wenn der Receiver mit sehr hoher Leistung verwendet wird, so kann dies Verzerrungen produzieren, die Ihre Lautsprecher ernsthaft beschädigen können. Falls Verzerrungen auftreten, reduzieren Sie die Lautstärke und die Ton-Bedienelemente auf eine Stufe, bei der der Klang wieder akzeptabel ist. Um eine Überhitzung des Gerätes zu vermeiden, wurde eine Sicherheitsschaltung eingebaut. Aus diesem Grund kann es passieren, dass ihr Gerät unter extremen Bedingungen abschaltet. Wenn dies passiert, schalten Sie das Gerät aus und lassen Sie es auskühlen bevor Sie es wieder verwenden. Nachdem das Gerät ausgekühlt ist, schalten Sie es wieder ein und wählen Sie ein Ausgangsgerät durch Drehen von SOURCE SELECT. Lautsprecheranschlüsse Einige der Lautsprecheranschlüsse am Receiver sind Schraubklemmen, andere Schnappklemmen. Verwenden Sie diese wie unten abgebildet. 7m m Antennenanschlüsse AM (MW) Antenne Die mitgelieferte Rahmenantenne ist ausschließlich für den Gebrauch in Räumen bestimmt. Positionieren Sie die Antenne soweit entfernt wie möglich vom Receiver, dem TV, den Kabeln, einem DVD-Spieler, einem VCR und anderen Strahlungsquellen. 1 Verbinden Sie den Stecker der Rahmenantenne mit AM LOOP wie unten abgebildet. 2 Richten Sie die Antenne für optimalen Empfang aus. A ANTENN P AM LOO FM Antenne Die mitgelieferte Drahtantenne kann nur zum Empfang naher Sender verwendet werden. Für einen besseren Empfang empfehlen wir die Verwendung eines Kabelantennen-Systems oder einer Außenantenne. 1 Stecken Sie die mitgelieferte Drahtantenne an FM 75 Ω wie unten abgebildet an. 2 Bewegen Sie die Antenne in verschiedene Richtungen, um einen optimalen Empfang zu erhalten. 1 2 3 • Falls Sie ein Kabelantennen-System oder eine Außenantenne verwenden, verbinden Sie anstelle der Drahtantenne den Antennenstecker mit FM 75 Ω. FM 75 Ω m 8m 1 2 3 1 Verbinden Sie immer die farbige (oder markierte) Ader mit der farbigen Klemme, und die schwarze (oder unmarkierte) Ader mit der schwarzen Klemme. 2 Verbinden Sie: – den linken vorderen Lautsprecher mit L (rot und schwarz) – den rechten vorderen Lautsprecher mit R (rot und schwarz) – den Center-Lautsprecher mit CENTER (blau und schwarz) – den linken Surround-Lautsprecher mit SURROUND L (grau und schwarz) – den rechten Surround-Lautsprecher mit SURROUND R (grau und schwarz) 78 FM 75 Ω Kopfhörer Werden die Kopfhörer an PHONES angeschlossen, so werden die Lautsprecher ausgeschaltet. Der Receiver schaltet auf STEREO und der Surround-Sound wird auf ein Stereosignal reduziert, das von Standardkopfhörern reproduzierbar ist. Das Abstecken der Kopfhörer schaltet die Lautsprecher wieder ein. Wenn Sie wieder in den Genuss von SurroundSound kommen möchten, schalten Sie den Receiver zurück auf Surround-Sound. AUFBAU DER ANLAGE NT CENTER FR ON T LEFT RIGHT SU BW OO FE R FRO SURROUND (REAR) LEFT RIGHT SURROUND (REAR) Einstellen und Testen der Lautsprecher Für einen optimalen Surround-Sound muss die relative Lautstärke der Lautsprecher eingestellt werden. Während Sie die Lautsprecherlautstärke einstellen, sollten Sie sich in Ihrer gewohnten Hörposition befinden. Zur Einstellung des Receivers hinsichtlich der verwendeten Lautsprecher siehe „Receiver-Menü“. Idealerweise sollte die Lautstärke in der Hörposition von allen Lautsprechern gleich sein. 1 Drücken Sie POWER / STANDBY, um den Receiver einzuschalten. Generelle Hinweise zur Positionierung Vermeiden Sie es, die Lautsprecher in einer Ecke oder am Boden aufzustellen, da dies die Bässe zu sehr verstärken würde. Die Plazierung der Lautsprecher hinter Vorhängen, Möbeln etc. verringert die Wiedergabe der Höhen. Der Zuhörer sollte die Lautsprecher immer „sehen“. Jeder Raum hat verschiedene akustische Eigenschaften und die Möglichkeiten der Positionierung sind oft begrenzt. Das oben gezeigte Bild hilft Ihnen, die beste Position für Ihre Lautsprecher zu finden. Für einen guten Surround-Sound empfehlen wir mindestens 5 Lautsprecher (2 vordere, einen Center-, 2 Surround-). Es ist möglich, eine Art von Surround-Sound mit weniger Lautsprechern zu reproduzieren. Signale, welche für die fehlenden Lautsprecher bestimmt sind, werden dabei an die existierenden Lautsprecher umgelenkt. Siehe „Menüs“ zur korrekten Einstellung des Receivers hinsichtlich der Anzahl und Größe der verwendeten Lautsprecher. Positionierung der vorderen Lautsprecher Die vorderen Lautsprecher sollten wie gewöhnliche Stereo-Lautsprecher rechts und links in Front zur Hörposition plaziert werden. Positionierung des Center-Lautsprechers Der Center-Lautsprecher sollte in der Mitte zwischen den zwei vorderen Lautsprechern, z. B. unterhalb oder auf dem TV, plaziert werden. Die Ohrhöhe des Zuhörers (in Sitzposition) ist die beste Höhe für den Center-Lautsprecher. Positionierung der Surround-Lautsprecher Die Surround-Lautsprecher sollten einander gegenüberstehen und sich in einer Linie mit dem Zuhörer oder etwas hinter dem Zuhörer befinden. Positionierung des Subwoofers Ein Subwoofer kann zur eindrucksvollen Verstärkung des Bassklanges verwendet werden. Der Subwoofer kann irgendwo im Raum positioniert werden, da es nicht möglich ist, den Ursprung tiefer Töne zu lokalisieren. Nichtsdestotrotz sollten Sie den Subwoofer nicht in die Raummitte stellen, da der Bass stark abgeschwächt werden könnte. Plazieren Sie keine Gegenstände auf dem Subwoofer. 2 Drücken Sie TEST TONE auf der Fernbedienung. y Ein Testton aus allen Lautsprechern, ausgenommen dem Subwoofer, ist zu hören. 3 Drücken Sie +/- REAR auf der Fernbedienung, um die Lautstärke des jeweiligen Lautsprechers zu erhöhen/verringern. Sie erzielen das beste Ergebnis, wenn alle Lautsprecher in gewohnter Hörposition die gleiche Lautstärke haben. 4 Drücken Sie TEST TONE auf der Fernbedienung. y Der Testton hört auf. Anmerkung: Falls Sie mit den Einstellungen der Lautstärke nicht vollständig zufrieden sind, empfehlen wir Ihnen, geringfügige Änderungen während der Surround-Sound-Wiedergabe vorzunehmen. Einstellen des Receivers Wenn die Anzahl und die Position der Lautsprecher bestimmt worden ist, können Sie die Ausgangseinstellungen des Receivers für optimalen Surround-Sound folgendermaßen vornehmen: 1 Stellen Sie ein, welche Lautsprecher an den Receiver angeschlossen sind (siehe „Menüstruktur/* SPEAKR SETUP“). Anm.: Die Werkseinstellung Ihres Receivers ist: zwei vordere Lautsprecher, links und rechts: vorhanden (kann nicht geändert werden) Center-Lautsprecher: vorhanden zwei rückwärtige Lautsprecher: vorhanden Subwoofer: vorhanden. 2 Wählen Sie die Größe der Lautsprecher (SMALL oder LARGE) (siehe „Menüstruktur/* SPEAKR SIZES“). Wählen Sie SMALL, wenn Ihr Lautsprecher niedrige Töne bis zu mindestens 80–100 Hz wiedergeben kann. Wählen Sie LARGE, wenn Ihr Lautsprecher niedrige Töne bis zu mindestens 50 Hz wiedergeben kann. (Als Faustregel gilt, dass ein LARGE-Lautsprecher einen Konus-Durchmesser von mindestens 12 cm (5 Zoll) hat.) Bitte beachten Sie die Spezifikationsangaben Ihrer Lautsprecher. Anm.: Werkseinstellung für FR 985, FR 986, FR 995, FR 996: alle Lautsprecher auf LARGE. Werkseinstellung für FR 984, FR 994: alle Lautsprecher auf SMALL. 3 Stellen Sie die Entfernung zwischen den Lautsprechern und der Hörposition ein (siehe „Menüstruktur/* SPK DISTANCE“). 79 Deutsch Positionierung der Lautsprecher ANZEIGE Kontrolllichter Anzeige Die Anzeige des Receivers ist in 4 Bereiche geteilt, die folgende Verwendung haben: Lautsprecher-Diagramm Zeichen zeigen Ihnen verschiedene Einstellungen und Informationen über den Status des Receivers. PRESET ......................Radio Ein Rechteck mit einem Buchstaben darin zeigt an, dass ein Lautsprecher im Receiver-Menü ausgewählt wurde. Die Subwooferanzeige leuchtet jedoch nur wenn ein Subwoofersignal vorhanden ist. Wenn nur ein Buchstabe gezeigt wird, ist dieser Lautsprecher nicht in Gebrauch und sein Klang wird von den anderen Lautsprechern reproduziert. Deutsch .......Virtueller Surround-Sound wird reproduziert. DIGITAL SURROUND ....Digitaler Surround-Sound wird reproduziert. L, R ...........................Vorderer linker und rechter Lautsprecher C ...............................Center-Lautsprecher SL, SR .......................Surround-Lautsprecher SW ............................Subwoofer SURROUND.................Surround-Sound Menü-Anzeige Diese Zeichen zeigen Ihnen, ob das Menü an oder aus ist, und geben an, in welche Richtung Sie gehen können. M E N U .......................Menü ist an. 1..............................Durch Verwendung von 1 PREV. / EXIT können Sie zur vorhergehenden Menüebene zurückgehen („links“ Taste auf der Fernbedienung). 3 .............................Durch Verwendung von X MENU NAVIGATOR können Sie sich in einer Optionsliste aufwärts bewegen („aufwärts“ Taste auf der Fernbedienung). 4 .............................Durch Verwendung von X MENU NAVIGATOR können Sie sich in einer Optionsliste abwärts bewegen („abwärts“ Taste auf der Fernbedienung). 2..............................Durch Verwendung von NEXT 2 können Sie zur nächsten Menüebene vorgehen („rechts“ Taste auf der Fernbedienung). O K.............................Sie können den angezeigten Wert bestätigen. ist auf einen gespeicherten Radiosender eingestellt. SENS HI .....................Radio ist auf hohe Empfindlichkeit geschaltet. SENS LO ..................Radio ist auf geringe Empfindlichkeit geschaltet. C I N E M A L I N K O N ......CINEMA LINK ist aktiv. STEREO ......................Ein FM-Sender wird in Stereo empfangen. R.............................Ein RDS-Sender wird empfangen. EON ...........................Ein RDS-Sender mit EON wird empfangen. HALL..........................HALL-Effekt ist an. TA .............................RDS-Verkehrsdurchsage ist an. NEWS ........................RDS-Nachrichtendurchsage ist an. ANA ..........................Ein analoger Eingang wird für das spielende Ausgangsgerät verwendet. N I G H T .......................NIGHT MODE ist an. COAX 1 ......................Der koaxiale digitale Eingang COAX 1 wird für das spielende Ausgangsgerät verwendet. COAX 2 .....................Der koaxiale digitale Eingang COAX 2 wird für das spielende Ausgangsgerät verwendet. D O W N M I X .................Eingehende Mehrkanalsignale werden auf weniger Ausgangssignale reduziert (abhängig von der Lautsprecheranzahl). OPT ...........................Der optische digitale Eingang OPTICAL IN wird für das spielende Ausgangsgerät verwendet (nur FR 984, FR 985, FR 986, FR 994). OPT 1 ........................Der optische digitale Eingang OPTICAL 1 IN wird für das spielende Ausgangsgerät verwendet (nur FR 995, FR 996). OPT 2 ........................Der optische digitale Eingang OPTICAL 2 IN wird für das spielende Ausgangsgerät verwendet (nur FR 995, FR 996). LOUDNESS .................LOUDNESS ist eingeschaltet. Informationsfeld 0 GUIDE OK MENU É A ATV NEWS/TA 80 Ç Dieses Feld wird für Meldungen des Receivers, für das Radio, für Frequenzen, Menüoptionen, Werte und Textanzeigen verwendet. MENÜS Der Receiver ist mit einem Menüsystem ausgestattet. Das Menü wird zum Einstellen des Receivers verwendet. Die verschiedenen Menüoptionen sind miteinander auf logische Weise verbunden. Angenommen Sie haben den Center-Lautsprecher nicht angeschlossen und deshalb CENTER SPEAKR (Center-Laut-sprecher) auf NO (nein) geschaltet. Wenn Sie nun versuchen VOL CENTER (CenterLautstärke) zu benützen, wird eine Nachricht, dass dies nicht möglich ist, erscheinen (INSTALL CENTER SPEAKER – Center-Lautsprecher installieren). Das Menü funktioniert immer auf die gleiche Weise. Pfeile in der Anzeige zeigen Ihnen die möglichen Bewegungsrichtungen an. 1 Drücken Sie SETUP MENU. y MENU, und * EFFECTS werden angezeigt. • Sie können das Menü jederzeit durch Drücken von SETUP MENU verlassen. 2 Drehen Sie X MENU NAVIGATOR bis die gewünschte Option (oder ein Wert) angezeigt wird. 3 Drücken Sie NEXT 2, um die angezeigte Option zu wählen (oder ENTER / OK, um einen Wert zu bestätigen). • Sie können jede Option (Werte bleiben unverändert) durch Drücken von 1 PREV. / EXIT verlassen. Menüstruktur * EFFECTS (Effekte) Schaltet Klangeffekte. VIRT SURR virtueller Surround: 0…100 % * VOL BALANCE (Lautstärkebalance) Regelt die relative Lautstärkebalance zwischen den angeschlossenen Lautsprechern. TEST TONE Testton: on/off (ein/aus) VOL FRONT-L Lautstärke vorderer linker Lautsprecher: –50…+50 VOL FRONT-R Lautstärke vorderer rechter Lautsprecher: –50…+50 VOL CENTER Lautstärke Center-Lautsprecher: –50…+50 VOL REAR-L Lautstärke rückwärtiger linker Lautsprecher: –50…+50 VOL REAR-R Lautstärke rückwärtiger rechter Lautsprecher: –50…+50 VOL SUBWOOFER Lautstärke Subwoofer: –50…+50 Anmerkung: Bei Verwendung des 6 CHANNEL / DVD INPUT-Eingangs können die unten angeführten Werte nicht geändert werden. * SPEAKR SETUP (Lautsprecherinstallation) Wählt die verwendeten Lautsprecher. SUBW PRESENT Subwoofer präsent: yes/no (ja/nein) CENTER SPEAKR Center-Lautsprecher präsent: yes/no (ja/nein) REAR SPEAKER Rückwärtige Lautsprecher präsent: yes/no (ja/nein) * SPEAKR SIZES (Größe der Lautsprecher) Wählt die Lautsprechergröße der verwendeten Lautsprecher zur optimalen Klangwiedergabe. LARGE gilt für Lautsprecher die Frequenzen unter 50 Hz wiedergeben können. Wenn SUBW PRESENT auf NO eingestellt ist, kann FRONT SIZE nur auf LARGE eingestellt werden. Wenn FRONT SIZE auf SMALL eingestellt ist, kann CENTER SIZE nur auf SMALL eingestellt werden und folglich muss ein Subwoofer angeschlossen sein. FRONT SIZE Linker und rechter vorderer Lautsprecher: small / large (klein/groß) CENTER SIZE Center-Lautsprecher: small / large (klein/groß) REAR SIZE Rückwärtige Lautsprecher: small / large (klein/groß) * SPK DISTANCE Abstand zwischen gewohnter Hörposition und Lautsprechern. Es wird die Verzögerungszeit für den Surround-Sound festgelegt. DISTANCE L/ R Abstand zu den vorderen Lautsprechern: 1…10 m DISTANCE CNTR Abstand zum Center-Lautsprecher: 1…10 m DISTANCE REAR Abstand zu den rückwärtigen Lautsprechern: 1…10 m 81 Deutsch Receiver-Menü MENÜS Deutsch * SELECT INPUT Teilt die Audioeingangsanschlüsse den verschiedenen Ausgangsgerätewahlen, die mit SOURCE SELECT gewählt wurden, zu (nähere Informationen siehe „WAHL EINES AUSGANGSGERÄTES“). COAX1 Digitaler koaxialer Eingang 1, COAX 1 IN COAX2 Digitaler koaxialer Eingang 2, COAX 2 IN OPT (nur FR 984, FR 985, FR 986, FR 994) Digitaler optischer Eingang, OPTICAL IN OPT 1 (nur FR 995, FR 996) Digitaler optischer Eingang, OPTICAL 1 IN OPT 2 (nur FR 995, FR 996) Digitaler optischer Eingang, OPTICAL 2 IN SAT IN Analoger Audioeingang SAT IN VCR IN Analoger Audioeingang VCR IN TV IN Analoger Audioeingang TV IN CDR IN Analoger Audioeingang CDR IN CD IN Analoger Audioeingang CD IN 6 CH IN Analoger Audioeingang 6 CHANNEL / DVD INPUT * TUNER (Radio) Einstellung für gespeicherte Radiosender (nähere Informationen siehe „RADIO“ ). AUTO INSTALL Speichert Radiosender automatisch MAN INSTALL Speichert Radiosender händisch GIVE NAME Ermöglicht gespeicherten Radiosendern Namen zuzuteilen RESHUFFLE Sortiert gespeicherte Radiosender um TV-Menü Wenn der Receiver über die CINEMA LINK-SystemKontrollbusanschlüsse (siehe „ANSCHLÜSSE“) an ein Philips CINEMA LINK-TV angeschlossen ist, können Sie den TV zum Einstellen des Systems verwenden. Eine Option namens RECEIVER wird dem TV-Menü hinzugefügt. Wenn CINEMA LINK aktiv ist, werden Einstellungen am Receiver für einige Sekunden am TV-Bildschirm gezeigt. Befolgen Sie die Bedienungsanleitung Ihres TV’s bezüglich der Verwendung des TV-Menüs. Die angebotenen Optionen können je nach Modell des TV’s variieren. Schalten der Verbindung • Drücken Sie CINEMA LINK, um die Verbindung zwischen Receiver und TV entweder ein- oder auszuschalten. yWenn die Verbindung eingeschaltet ist, wird CINEMA LINK ON angezeigt. Anmerkung: Wir empfehlen CINEMA LINK während der Aufnahme auszuschalten. Dies verhindert unerwünschte Unterbrechungen durch Schalten der TV-Funktionen. Wenn CINEMA LINK eingeschaltet ist und das TV-Menü aktiv ist, wird TV MENU angezeigt und das Menü und die Klangfunktionen am Receiver sind gesperrt. CINEMA LINK aktivieren CINEMA GO auf der Fernbedienung. • Drücken Sie y Der Fernseher sendet den Befehl zu spielen an den CINEMA-LINK-DVD-Spieler, falls vorhanden. Der DVD-Spieler beginnt zu spielen und der Receiver schaltet automatisch zum besten CINEMA-LINK-Klang. • Wenn kein DVD-Spieler angeschlossen ist oder der DVD-Spieler keine Disk geladen hat, sendet der Fernseher den Befehl zu spielen an den CINEMA-LINK-Videorekorder, falls vorhanden. y Der Videorekorder beginnt zu spielen und der Receiver schaltet automatisch zum besten CINEMA-LINK-Klang. • Wenn kein Videorekorder angeschlossen oder keine Videokassette geladen ist, wählt der Fernseher den zuletzt gewählten TV-Kanal. 82 WAHL EINES AUSGANGSGERÄTES Ausgangsgerät ..........Verwendete Anschlüsse DVD...............................COAX 1 digitaler Audioeingang und DVD IN Videoeingang PHONO..........................PHONO IN Audioeingang TUNER ..........................Der Radioteil des Receivers wird verwendet, alle Eingänge sind ausgeschaltet. CD .................................CD IN Audioeingang CDR/TAPE .....................CDR/TAPE IN Audioeingang TV..................................TV IN Audioeingang und kein Videoeingang VCR ...............................VCR IN Audioeingang und VCR IN Videoeingang SAT ...............................SAT IN Audioeingang und SAT IN Videoeingang 6 CHANNEL-DVD/SACD INPUT-Auswahl Die 6 CHANNEL / DVD INPUT-Anschlüsse können jedem der vorhandenen Ausgangsgeräte zugeteilt werden (ausgenommen TUNER und PHONO). Die Zuteilung kann über die * SELECT INPUT-Option im Menü erfolgen. Weitere Informationen lesen Sie unten. Zuteilen einer Ausgangsgerätewahl Wenn ein Ausgangsgerät mit SOURCE SELECT gewählt wird, so wird der Standard-Audioeingang verwendet. Um dies zu ändern, muss die Ausgangsgerätewahl einem anderen Audioeingang zugeordnet werden. Beispiel: CD vom CD IN Audioeingang zum digitalen COAX 2 IN Audioeingang zuordnen. 1 Wählen Sie * SELECT INPUT vom Menü und drücken Sie NEXT 2. 2 Drehen Sie SOURCE SELECT, um das Ausgangsgerät zu wählen, das zugeordnet werden soll (z. B. CD). y Der Name des Ausgangsgerätes wird angezeigt und das Licht des Ausgangsgerätes blinkt. Verwendung einer Ausgangerätewahl für zwei oder mehr Geräte Sie können mehr als ein Ausgangsgerät einer Ausgangsgerätewahl zuteilen. Dies ist dann praktisch, wenn Produkte nacheinander in einer Reihe angeschlossen sind. Beispiel: Ein VCR ist an den TV angeschlossen, aber nur der TV ist am Receiver angeschlossen. Beide SOURCE SELECT-Einstellungen, sowohl TV als VCR, müssen den TV-Eingang benützen. 1 Wählen Sie * SELECT INPUT vom Menü und drücken Sie NEXT 2. 2 Drehen Sie SOURCE SELECT, um das Ausgangsgerät auszuwählen, das zugeordnet werden soll (z. B. VCR). y Der Name des Ausgangsgerätes wird angezeigt und das Licht des Ausgangsgerätes blinkt. 3 Drehen Sie X MENU NAVIGATOR, um den zu verwendenden Eingang zu wählen (z. B. VCR -> TV IN). 4 Drücken Sie ENTER / OK, um Ihre Auswahl zu bestätigen. y STORED wird kurz angezeigt. 5 Diese Ausgangsgerätewahl verwendet nun den gewählten Audioeingang (z. B. VCR verwendet den TV IN-Eingang, VCR <TV IN> wird kurz angezeigt, wenn man auf VCR schaltet). Einige Worte zu 6 CHANNEL-DVD/SACD INPUT 6 CHANNEL / DVD INPUT kann dazu verwendet werden, um ein Gerät mit einem eingebauten Mehrkanal-Decoder (z.B. Dolby Digital, DTS, etc.) und einem 6-Kanal-Ausgang zu verbinden, z. B. einen High-End-DVD/SACD-Spieler. Wenn Sie den 6 CHANNEL / DVD INPUT Audioeingang verwenden, hat der Receiver die Funktion eines MehrkanalVerstärkers. Das Ausgangsgerät reproduziert Surround-Sound und sendet ihn, in die notwendigen Kanäle aufgesplittet, zum Receiver. Aus diesem Grund haben SURROUND ON/OFF, HALL und SURR. MODE keine Wirkung, da das gelieferte Signal bereits ein Mehrkanal-Signal ist. Von einem Ausgangsgerät, das an den 6 CHANNEL / DVD INPUT-Audioeingang angeschlossen ist, kann nicht aufgenommen werden. 3 Drehen Sie X MENU NAVIGATOR, um die zu verwendenden Eingangsanschlüsse zu wählen (z. B. CD -> COAX2). 4 Drücken Sie ENTER / OK, um die Auswahl zu bestätigen. y STORED wird kurz angezeigt. 5 Dieses Ausgangsgerät verwendet nun den gewählten Audioeingang (z. B. CD verwendet den COAX 2 IN Eingangsanschluss, COAX 2 leuchtet, wenn auf CD geschaltet wird). 83 Deutsch SOURCE SELECT Beim Wählen eines Ausgangsgerätes durch Drehen von SOURCE SELECT werden die Audio- und Videoeingänge mit den entsprechenden Namen aktiviert. Das eingehende Signal wird von allen Audio- und – wenn das Ausgangsgerät ein Videosignal beinhaltet – Videoausgängen des Receivers reproduziert. Es ist möglich das gewählte Ausgangsgerät anderen als diesen Standardeingängen zuzuordnen. WIEDERGABE, AUFNAHME Spielen eines Ausgangsgerätes Aufnehmen von einem Ausgangsgerät 1 Drücken Sie POWER / STANDBY, um den Receiver einzuschalten. Wenn Sie von einem Ausgangsgerät aufnehmen wollen, müssen Sie sie mit SOURCE SELECT wählen. Das eingehende Signal wird von allen Audio- und – falls das Ausgangsgerät ein Videosignal beinhaltet – Videoausgängen des Receivers reproduziert. Die Klangeinstellungen beeinflussen die Aufnahme nicht. 2 Drehen Sie SOURCE SELECT, um ein Ausgangsgerät zu wählen. y Der Name des Ausgangsgerätes wird angezeigt. • Durch Drücken von FRONT AV können Sie den FRONT AV / GAME Eingang wählen (nur FR 995, FR 996). 3 Starten Sie die Wiedergabe des Ausgangsgerätes wie gewohnt. Einstellen des Klanges Deutsch • Drehen Sie VOLUME, um die Lautstärke zu regeln. y VOLUME und die Lautstärke zwischen 0 und 50 wird angezeigt. 1 Drücken Sie BASS oder TREBLE. y BASS oder TREBLE und der aktuelle Wert werden kurz angezeigt. Dann erscheint TURN VOLUME KNOB TO CHANGE. 2 Drehen Sie VOLUME, um den Bass oder die Höhen einzustellen. y BASS oder TREBLE und der aktuelle Wert werden angezeigt. Anmerkung: Die Bass- oder Höhenregelung wird ausgeschaltet, wenn VOLUME innerhalb von 5 Sekunden nicht gedreht wird oder irgendein anderes Bedienelement verwendet wird. • Wenn ein Subwoofer angeschlossen ist, drücken Sie SUBW. ON/OFF um den Bass zu verstärken. Anmerkung: Bei digitalem Surround-Sound ist nur dann ein Subwoofersignal vorhanden, wenn es vom Ausgangsmaterial unterstützt wird. • Drücken Sie LOUDNESS, um Loudness ein- oder auszuschalten. y LOUDNESS wird angezeigt, wenn Loudness eingeschaltet ist. 1 Drehen Sie SOURCE SELECT (oder drücken Sie FRONT AV – nur FR 995, FR 996), um das Ausgangsgerät, von dem Sie aufnehmen möchten, auszuwählen. y Der Name des Ausgangsgerätes wird angezeigt. 2 Treffen Sie die erforderlichen Vorbereitungen am gewünschten Aufnahmegerät. Es muss an einem der Receiverausgänge angeschlossen sein. 3 Starten Sie die Aufnahme am Aufnahmegerät. 4 Starten Sie die Wiedergabe am Ausgangsgerät. Anmerkungen: – Das Audio- und Videosignal von VCR IN wird von VCR OUT nicht reproduziert. Dasselbe gilt für das Audiosignal von CDR/TAPE IN zu CDR/TAPE OUT. – Wir empfehlen, den digitalen Ausgang COAX OUT des Receivers für die Aufnahme von einem analogen Ausgangsgerät nicht zu verwenden. Verwenden Sie stattdessen den analogen Ausgang CDR/TAPE. – Von einem Ausgangsgerät, das an den 6 CHANNEL / DVD INPUT-Audioeingang angeschlossen ist, kann nicht aufgenommen werden. Aufnehmen vom digitalen Ausgang Es ist möglich ein digitales Aufnahmegerät an den digitalen Ausgang des Receivers anzuschließen. Auf diese Art können alle Signale, die von den digitalen Eingängen kommen, direkt am angeschlossenen digitalen Aufnahmegerät aufgezeichnet werden. Der Receiver wandelt auch alle Signale, die von analogen Eingängen kommen, auf den digitalen Ausgang um. Der Receiver kann dazu verwendet werden um ein MehrkanalSurround-Sound-Audiosignal (Dolby Digital, DTS oder MPEG), von z. B. einer DVD auf eine CD-R, digital aufzunehmen. Der Receiver wandelt das digitale Mehrkanalsignal ohne Verlust relevanter Klanginformation auf ein Stereosignal um. Anmerkungen: – Wenn ein Dolby Digital-, DTS- oder MPEGSignal aufgenommen wird, muss jeder Titel einzeln aufgenommen werden. – Digitales Aufnehmen ist nicht möglich, wenn das digitale Ausgangsmaterial kopiergeschützt ist. 84 SURROUND SOUND Einige Worte zu Surround-Sound Durch Surround-Sound schalten Surround-Sound offenbart Ihnen ein komplett neues Hörerlebnis. Sie werden das Gefühl haben, sich inmitten des Geschehens zu befinden, da der Klang von allen Seiten kommt. Achten Sie auf TV-Sendungen, Audio- und Videokassetten und -discs mit den 3, 1, oder Zeichen, welche für Mehrkanal-Surround-Sound kodiert sind. Sie sollten Dolby Digital, DTS oder MPEG-Mehrkanal bevorzugen, um das Optimum aus Ihrem Receiver zu holen. Ist Surround-Sound eingeschaltet, so können Sie durch die verschiedenen Surround-Sound-Modi schalten. Berücksichtigen Sie dabei, dass die Möglichkeiten in Zusammenhang mit der Lautsprechereinstellung stehen, die im Menü des Receivers definiert ist. Berücksichtigen Sie, dass DVD-Discs nicht immer mit vollem Mehrkanal-Surround-Sound versehen sind. Um sicher zu gehen, dass die Disc mehrkanalkodiert ist, fragen Sie Ihren Fachhändler. Die meisten gewöhnlichen Stereo-Kassetten und -Discs können mit gutem Ergebnis unter Verwendung von SurroundKlangeinstellungen abgespielt werden. Falls die Wiedergabe im Surround-Modus verzerrt ist, schalten Sie auf normalen Stereo-Modus. Die Verfügbarkeit der verschiedenen beschriebenen SurroundSound-Modi ist abhängig von der Anzahl der verwendeten Lautsprecher und der eingehenden Klanginformation. 1 Drücken Sie SURROUND ON/OFF, um den Surround-Sound einzuschalten. y Der verwendete Surround-Modus wird angezeigt. 2 Drücken Sie wiederholt SURR. MODE, um sich die unterschiedlichen Surround-Modi anzuhören (sofern verfügbar). yDer gewählte Modus und die verwendeten Lautsprecher werden angezeigt. Falls die eingehenden MehrkanalSignale auf weniger Ausgangssignale reduziert werden, wird DOWNMIX angezeigt. 3 Drücken Sie so oft wie notwendig VIRTUAL MODE, um durch die virtuellen Surround-Sound-Modi zu schalten: 1 × um 3D SURRUOND zu aktivieren 2 × um MULTI FRONT zu aktivieren 3 × um MULTI REAR zu aktivieren 4 × um NATURAL SURROUND zu aktivieren yEin Licht zeigt an, wenn ein virtueller Surround-SoundModus aktiviert ist. -Zeichen zeigen an, welcher virtuelle Surround-Sound-Modus aktiviert ist. 4 Drücken Sie SURROUND ON/OFF, um den Surround-Sound auszuschalten. y SURROUND OFF wird angezeigt. 85 Deutsch Ihr Receiver kann DTS-Surround-Sound reproduzieren. DTS ist ein hochwertiges Mehrkanal-Surround-Sound-System erhältlich auf DVD-Discs, Laserdiscs und Audiodiscs. Fragen Sie Ihren Software-Fachhändler nach der Verfügbarkeit von DTS-Software in Ihrer Region. Wenn ein digitales Surround-Signal festgestellt wird, zeigt der Receiver entweder DOLBY DIGITAL, DTS oder MPEG an. SURROUND SOUND Surround-Sound Einstellungen HALL Die Klangwiedergabe wird verstärkt und ein leichtes Echo wird hinzugefügt. Dies vermittelt den Eindruck, sich in einem großen Raum zu befinden. Es kann nur im Stereo-Modus verwendet werden. SURROUND Der Surround-Modus ermöglicht normale SurroundKlangwiedergabe mit 4 oder 5 Lautsprechern. Abhängig vom Ausgangsmaterial wird Dolby Surround Pro Logic, Dolby Digital, DTS oder MPEG reproduziert. Virtueller Surround Ihr Receiver kann eine oder mehrere Arten von virtuellem Surround-Sound wiedergeben. Virtueller Surround erweckt einen realistischeren Klangeindruck indem „PhantomLautsprecher” zusätzlich zu oder anstatt von echten Lautsprechern geschaffen werden. Die Position des Hörers beeinflusst den Surround-Effekt. Der Bereich, bei dem Effekt am besten zur Geltung kommt, ist grau angezeichnet. NT FRO LEFT CENTER FR ON T RIGHT Deutsch PRO LOGIC, DOLBY DIGITAL, MPEG, DTS Zusätzlich zu SURROUND wird der verwendete SurroundModus – abhängig vom Ausgangsmaterial – angezeigt. Bei Digital Surround wird das Klangformat AC-3 (für Dolby Digital), DTS oder MPEG (für MPEG 2-Multikanal), gefolgt von den auf der Tonquelle vorhandenen Kanälen (z. B. DVD). Beispiele: AC-3 3/2.1 Dolby Digital, 3 vordere Kanäle, 2 rückwärtige Kanäle und ein Subwooferkanal. MPEG 2/0.0 MPEG-Multikanal, nur Stereoklang. AC-3 3/1.0 Dolby Digital, 3 vordere Kanäle, 1 (Mono) rückwärtiger Kanal ohne Subwoofersignal. DTS 3/2.1 DTS, 3 vordere Kanäle, 2 rückwärtige Kanäle und einen Subwooferkanal. FRONT-3 STEREO Der Surround-Sound wird stummgeschaltet. 3 Stereo lässt Sie Surround-Sound ohne Verwendung der Surround-Lautsprecher hören. STEREO Der gesamte Klang wird vom vorderen linken und rechten Lautsprecher wiedergegeben. Dies ermöglicht eine StandardStereo-Wiedergabe. Der Surround-Sound-Effekt kann im Receivermenü eingestellt werden. Es gibt folgende Surround-Sound-Modi: 3D SURROUND Es werden keine rückwärtigen Lautsprecher benötigt. Der Klang des rückwärtigen Kanals wird von den vorderen Lautsprechern simuliert. Surround-Sound wird von den vorderen rechten, linken und zentralen Lautsprechern simuliert. MULTI FRONT „Phantom-Lautsprecher“ werden neben dem vorderen linken und rechten Lautsprecher geschaffen. MULTI REAR „Phantom-Lautsprecher“ werden neben dem rückwärtigen linken und rechten Lautsprecher geschaffen. NATURAL SURROUND „Phantom-Lautsprecher“ werden neben den vorderen und rückwärtigen, linken und rechten Lautsprechern geschaffen. Anmerkung: Die Verfügbarkeit von MULTI FRONT und MULTI REAR hängt von den Klangkanälen am Ausgangsmaterial ab. NIGHT MODE (nur auf der Fernbedienung) Die lauten Stellen werden abgeschwächt und die leisen Passagen werden angehoben. Sie können Surround-Sound genießen, ohne dabei schlafende Kinder oder Nachbarn zu stören. Der Night Mode (Nacht-Modus) funktioniert nur mit Dolby Digital und MPEG, und dies nur, sofern vom Ausgangsmaterial geliefert. 86 RADIO Einstellen von Radiosendern Speichern von Radiosendern Sie können durch Abtasten des Frequenzbandes nach Radiosendern suchen. Sie können auch die Frequenz eines Ihnen bekannten Radiosenders eingeben. Wenn ein FM-Sender gesendet und in Stereo empfangen wird, erscheint STEREO. Sie können bis zu 30 Radiosender speichern. Der Receiver kann Sender selbständig auswählen und programmieren oder Sie wählen sie selbst aus. 2 Wählen Sie einen Wellenbereich durch wiederholtes Drücken von TUNER AM/FM. y Der gewählte Wellenbereich wird angezeigt. 3 Halten Sie 1 oder 2 für ungefähr 1 Sekunde gedrückt. y SEARCH wird angezeigt und das Radio stellt einen Sender mit ausreichender Stärke ein. 4 Wiederholen Sie diesen Vorgang, bis Sie den gewünschten Sender finden. • Um die Feineinstellung eines schwachen Senders vorzunehmen, drücken Sie sooft wie nötig kurz 1 oder 2, um einen optimalen Empfang zu erhalten. Einen Radiosender mit Frequenz einstellen (nur mit der Fernbedienung) 1 Drücken Sie TUNER. y TUNER wird angezeigt. 2 Drücken Sie FR. Dw y _ wird angezeigt. 3 Verwenden Sie 1–0, um die Frequenz eines Radiosenders einzugeben. Anmerkung: Es können nur gültige Zahlen innerhalb des Frequenzbereiches des Radios eingegeben werden. Umstellen der FM-Empfindlichkeit Sie können das Radio auf eine niedrigere Suchempfindlichkeit umstellen, sodass nur nach Sendern mit einem starken Signal gesucht wird (nur FM). 1 Drehen Sie SOURCE SELECT, um das Radio auszuwählen. y TUNER wird angezeigt. Automatisch programmieren 1 Wählen Sie * TUNER aus dem Menü und drücken Sie NEXT 2. 2 Wählen Sie AUTO INSTALL und drücken Sie NEXT 2. y Die Speicherplatznummer bei der das Programmieren begonnen wird, der Wellenbereich und AUTO werden angezeigt. 3 Drehen Sie TUNER PRESET X, um die Speicherplatznummer, bei der das Programmieren beginnen soll, zu ändern. 4 Verwenden Sie TUNER AM/FM, um auf den gewünschten Wellenbereich zu schalten. 5 Drücken Sie ENTER / OK, um das Programmieren zu starten. y AUTO INSTALL blinkt und alle verfügbaren Radiosender werden programmiert, was einige Minuten dauern kann. Das Programmieren ist beendet, wenn AUTO INSTALL aufhört zu blinken. Händisch programmieren 1 Wählen Sie * TUNER aus dem Menü und drücken Sie NEXT 2. 2 Wählen Sie MAN INSTALL und drücken Sie NEXT 2. y Eine Speicherplatznummer, der Wellenbereich und die Frequenz werden angezeigt. 3 Drehen Sie TUNER PRESET X, um die Speicherplatznummer, auf welcher der Radiosender gespeichert werden soll, zu ändern. 4 Stellen Sie einen gewünschten Radiosender ein (siehe „Nach Radiosendern suchen“). 5 Drücken Sie ENTER / OK, um Ihre Auswahl zu bestätigen. y STORED wird kurz angezeigt. Der Radiosender wird auf die gewählte Speicherplatznummer programmiert. 6 Wählen und speichern Sie alle gewünschten Radiosender auf diese Weise. 2 Drücken Sie SENS. am Receiver. y Entweder SENS HI oder SENS LO wird für 5 Sekunden angezeigt. Anmerkung: Während nach Radiosendern gesucht wird, wird die aktuelle Sensitivität angezeigt. In diesem Fall bedeutet SENS LO, dass das Radio nur nach Sendern mit einem starken Signal sucht. 87 Deutsch Nach Radiosendern suchen 1 Drehen Sie SOURCE SELECT, um das Radio auszuwählen. y TUNER wird angezeigt. RADIO Einstellen gespeicherter Radiosender Benennen von Radiosendern 1 Drehen Sie SOURCE SELECT auf TUNER, um das Radio auszuwählen. y TUNER wird angezeigt. Es ist möglich, jedem der gespeicherten Radiosender einen Namen zuzuteilen. Auch RDS-Sendernamen können überschrieben werden. 2 Drehen Sie TUNER PRESET X, um einen gespeicherten Radiosender auszuwählen. y PRESET, die Speicherplatznummer und der gespeicherte Sender werden angezeigt. 1 Wählen Sie * TUNER aus dem Menü und drücken Sie NEXT 2. Umsortieren gespeicherter Radiosender 2 Wählen Sie GIVE NAME (Namen geben) und drücken Sie NEXT 2. y Ein gespeicherter Radiosender wird angezeigt. Deutsch Nachdem Sie Radiosender programmiert haben, möchten Sie vielleicht deren Reihenfolge ändern. Mit RESHUFFLE können Sie die Positionen der Sender austauschen. 3 Drehen Sie TUNER PRESET X, um den zu benennenden Sender zu wählen. 1 Wählen Sie * TUNER aus dem Menü und drücken Sie NEXT 2. 4 Drücken Sie ENTER / OK, um Ihre Auswahl zu bestätigen. yDer existierende Name oder ________ wird angezeigt. 2 Wählen Sie RESHUFFLE und drücken Sie NEXT 2. y PRESET, eine Speicherplatznummer und ein gespeicherter Sender werden angezeigt. 3 Drehen Sie TUNER PRESET X, um einen gespeicherten Sender auszuwählen. 4 Drücken Sie ENTER / OK, um die Auswahl zu bestätigen. y Die gewählte Speicherplatznummer SWAP <-> und eine zweite Speicherplatznummer werden angezeigt. 5 Drehen Sie TUNER PRESET X, um die andere Speicherplatznummer zu wählen. 6 Drücken Sie ENTER / OK, um den Austausch zu bestätigen. y RESHUFFLED wird kurz angezeigt und die beiden Speicherplatznummern sind ausgetauscht. 5 Drehen Sie TUNER PRESET X, um einen Buchstaben zu wählen und NEXT 2 oder 1 PREV., um zur nächsten oder vorhergehenden Position zu gelangen. 6 Nachdem Sie den ganzen Namen eingegeben haben, drücken Sie ENTER / OK, um zu bestätigen. y STORED wird angezeigt und der Name ist gespeichert. Anmerkung: Wenn Sie den übertragenen RDS-Sendernamen wieder verwenden wollen, löschen Sie einfach den zugeteilten Namen. Löschen von Sendernamen 1 Verwenden Sie die Menüoption * TUNER, wählen Sie GIVE NAME. y Ein gespeicherter Radiosender wird angezeigt. 2 Drehen Sie X MENU NAVIGATOR, um den zu löschenden Namen auszuwählen. 3 Drücken Sie ENTER / OK, um Ihre Auswahl zu bestätigen. 4 Drücken Sie 1 PREV. während der erste Buchstabe blinkt. y CL blinkt links vom Sendernamen. 5 Drücken Sie ENTER / OK, um den Sendernamen zu löschen. Oder, falls Sie Ihre Absicht geändert haben, drücken Sie 1 PREV., um den Sendernamen unverändert zu lassen. 88 RADIO RDS R RDS-Nachrichten- und Verkehrsdurchsage Radio Data System ist ein Service, das FM-Sendern erlaubt, zusätzliche Informationen zu senden. Wenn Sie einen RDS-Sender empfangen, werden R und der Sendername angezeigt. Sie können das Radio so einstellen, dass jede Wiedergabe von den Nachrichten oder Verkehrsinformationen eines gewählten RDS-Senders unterbrochen wird. Die Durchsagen funktionieren nur, wenn die notwendigen RDS-Signale gesendet werden. Anmerkung: Das von gewissen RDS-Sendern übertragene Zeitsignal kann manchmal ungenau sein. Wenn RDS-Sender auch ein EON Signal (Enhanced Other Networks) übertragen, wird EON angezeigt. Dieses Signal ermöglicht dem Radio nicht nur auf einem gewählten RDS-Sender nach Nachrichten oder Verkehrsinformationen zu suchen, sondern innerhalb des ganzen EON Sendernetzwerkes. 1 Schalten Sie den gewünschten RDS-Sender ein. 2 Drücken Sie NEWS/TA: Einmal um NEWS anzuzeigen; die Funktion der Nachrichtendurchsage ist eingeschaltet. Zweimal um TA anzuzeigen; die Funktion der Verkehrsdurchsage ist eingeschaltet. Dreimal um TA und NEWS anzuzeigen, beide Funktionen der Durchsage sind eingeschaltet. 3 Wählen und spielen Sie jedes andere Ausgangsgerät wie gewohnt. y Während Nachrichten oder Verkehrsdurchsagen gesendet werden schaltet der Receiver auf Radio und NEWS oder TA blinkt. 4 Drücken Sie NEWS/TA bis die Displayanzeige verschwindet, um die Funktion(en) auszuschalten. oder Drücken Sie NEWS/TA während einer Durchsage, um die Funktion(en) auszuschalten. Anmerkung: Stellen Sie sicher, dass Sie die Nachrichten- und Verkehrsdurchsage während des Aufnehmens ausschalten, da diese Durchsagen sonst auch aufgenommen werden. 89 Deutsch Umschalten zwischen verschiedenen RDS Informationen • Drücken Sie wiederholt RADIO TEXT am Receiver, um zwischen folgenden Informationen (sofern vorhanden) umzuschalten: – Radiotextmeldungen – RDS-Uhr – Frequenz – Sendername TECHNISCHE DATEN Receiver Deutsch Änderungen vorbehalten. Allgemein Stromverbrauch (FR 984, FR 985, FR 986) .......................210 W Stromverbrauch (FR 994, FR 995, FR 996) .......................255 W Stromverbrauch in Bereitschaft........................................< 2 W Abmessungen, b × h × t ..........................435 × 135 × 350 mm Gewicht (FR 984, FR 985, FR 986) ....................................8,6 kg Gewicht (FR 994, FR 995, FR 996) ....................................9,4 kg Verstärkerteil (0,7 % THD, 6 Ω, 1 kHz) Ausgangsleistung, Stereo-Modus (FR 984, FR 985, FR 986) (DIN) ....................................2 × 60 W Ausgangsleistung, Surround-Modus (FR 984, FR 985, FR 986) Front ......................................................................2 × 60 W Center ..........................................................................60 W Surround................................................................2 × 60 W Ausgangsleistung, Stereo-Modus (FR 994, FR 995, FR 996) (DIN) ..................................2 × 100 W Ausgangsleistung, Surround-Modus (FR 994, FR 995, FR 996) Front ....................................................................2 × 100 W Center ........................................................................100 W Surround..............................................................2 × 100 W Bass.................................................................±9 dB bei 100 Hz Höhen ..............................................................±9 dB bei 10 kHz Loudness ...+6 dB bei 100 Hz (-30 dB); +3 dB bei 10 kHz (-30 dB) Klirrfaktor................................................0,05 % bei 1 kHz, 5 W Frequenzgang ............................................20–20.000 Hz, ±1 dB Signal-Rauschabstand ...................................................≥ 82 dB Stereokanal-Trennung (1 kHz)........................................≥ 45 dB Kreuzkopplung (1 kHz)...................................................≤ -65 dB Eingänge Lineare Eingänge ................................................250 mV/47 kΩ 6 CH ....................................................................250 mV/40 kΩ Front AV (nur FR 995, FR 996).............................250 mV/22 kΩ Phono ......................................................................5 mV/47 kΩ Digital koaxial ..........................................75 Ω entspr. IEC 958 Digital optisch..................................................................Toslink Digitale Sampling-Rate (FR 984, FR 985, FR 986).......................32 kHz, 44,1 kHz, 48 kHz Digitale Sampling-Rate (FR 994, FR 995, FR 996)..........32 kHz, 44,1 kHz, 48 kHz, 96 kHz Ausgänge Stromanschlüsse (geschaltet) ........................total max. 100 W Lineare Ausgänge.................................................250 mV/1 kΩ Digital koaxial ..........................................75 Ω entspr. IEC 958 Digitalausgang, Sampling-Frequenzen Analog ein...........................................................aus 48 kHz Digitaleingang 32 kHz.........................................aus 32 kHz Digitaleingang 44.1 kHz...................................aus 44,1 kHz Digitaleingang 48 kHz.........................................aus 48 kHz Digitaleingang 96 kHz (nur FR 994, FR 995, FR 996)...aus 48 kHz Subwoofer pre-out....................................................0,8 V/1 kΩ Center pre-out...........................................................0,8 V/1 kΩ Kopfhörer ........................................8–600 Ω (3 V e.m.f., 60 Ω) Lautsprecher .....................................................................≥ 6 Ω 90 Radioteil Frequenzbereich FM..............................................................87,5–108,0 MHz MW...............................................................531–1.602 kHz LW....................................................................153–279 kHz Sensitivität Stereo FM ..................................................................41 dBf Mono FM....................................................................15 dBf Klirrfaktor Stereo FM ...................................................................0,3 % Mono FM...................................................................0,85 % Frequenzgang .............................................63–12.500 Hz ±1 dB Signal-Rauschabstand Stereo FM....................................................................55 dB Mono FM.....................................................................60 dB Kanaltrennung ...................................................35 dB bei 1 kHz FEHLERBEHEBUNG WARNUNG Versuchen Sie unter keinen Umständen das Gerät selbst zu reparieren, da die Garantie dadurch ihre Gültigkeit verliert. Versuchen Sie nicht das Gerät zu öffnen, da Sie hiermit einen elektrischen Schlag riskieren. Wenn ein Fehler auftritt, prüfen Sie zuerst die nachstehenden Hinweise bevor Sie das Gerät zur Reparatur bringen. Wenn Sie ein Problem trotz dieser Hinweise nicht lösen können, wenden Sie sich an Ihren Fachhändler oder eine Service-Stelle. MÖGLICHE URSACHE LÖSUNG Gerät funktioniert nicht und ist im Bereitschaftsmodus Die Sicherheitsschaltung (Überhitzungsschutz) wurde aktiviert. Schalten Sie das Gerät aus und lassen Sie es abkühlen. Nachdem das Gerät abgekühlt ist, schalten Sie es wieder ein und wählen ein Ausgangsgerät durch Drehen von SOURCE SELECT oder Drücken einer Ausgangsgerätewahltaste auf der Fernbedienung. Kein Ton VOLUME ist nicht richtig eingestellt. Stellen Sie VOLUME ein. Kopfhörer sind angeschlossen. Stecken Sie die Kopfhörer ab. Das falsche Ausgangsgerät ist gewählt. Drehen Sie SOURCE SELECT, um das richtige Ausgangsgerät zu wählen. Kein Ton auf der Ein Lautsprecher ist falsch angeschlossen. linken oder rechten Seite Ein Lautsprecherkabel ist beschädigt. Lautstärkebalance im Receiver-Menü ist falsch eingestellt. Schlechter Ton oder kein SURROUND-Modus ist nicht eingeschaltet. Ton beim Center- oder den Surround-Lautsprechern Surround- und/oder Center-Lautsprecher sind nicht (richtig) angeschlossen. Surround- und/oder Center-Lautsprecher sind im Menü SPEAKR SETUP ausgeschaltet. Deutsch PROBLEM Schließen Sie den Lautsprecher korrekt an. Ersetzen Sie das Kabel. Stellen Sie VOL FRONT-L und VOL FRONT-R im Receiver-Menü ein. Drücken Sie SURROUND ON/OFF, um den Surround-Sound einzuschalten. Schließen Sie die Lautsprecher korrekt an. Stellen Sie den gegenwärtigen Lautsprecher auf YES. Ein Lautsprecherkabel ist beschädigt. Ersetzen Sie das Kabel. Schlechter Bassklang Lautsprecher sind nicht phasengleich. Schließen Sie die farbigen (oder markierten) Adern an die farbigen Klemmen und die schwarzen (oder unmarkierten) Adern an die schwarzen Klemmen an. Schlechter Klang Schlecht passende Einstellung für die vorhandene Art der Musik oder des Klanges. Korrigieren Sie die Klangeinstellungen am Receiver. Der Grad des SurroundDer Grad des Surround-Sounds ist nicht Klanges ist zu niedrig oder richtig eingestellt. zu hoch Stellen Sie den Grad des Surround-Sounds am Receiver ein. Der Grad des Center-Klanges Der Grad des Center-Klanges ist nicht ist zu niedrigoder zu hoch richtig eingestellt. Stellen Sie den Grad des Center-Klanges am Receiver ein. Nur der Center-Lautsprecher Ein Monosignal wird reproduziert. wird in Dolby Surround Pro Logic gehört Wählen Sie ein anderes Ausgangsgerät oder schalten Sie den Surround-Sound aus. Schlechter Radioempfang, Receiver oder die Antenne ist nahe einer automatisches Strahlungsquelle wie TV, CD-Spieler, Programmieren funktioniert CD-Rekorder, DVD-Spieler, etc. positioniert. nicht einwandfrei Ändern Sie die Position des störenden Gerätes oder versuchen Sie, es auszuschalten. Digitale Aufnahme über digitalen Ausgang nicht möglich Vergewissern Sie sich, dass der digitale Rekorder Sampling-Frequenzen zwischen 32 kHz und 48 kHz verträgt, oder nehmen Sie über den analogen Ausgang auf. Die Sampling-Frequenz wird vom digitalen Rekorder nicht akzeptiert. Die gesamt Aufnahme Der DVD-Spieler liefert keine erscheint als ein Titel bei Titelinformation. Aufnahme von einer DVD-Disc Nehmen Sie jeden Titel individuell auf, oder benutzen Sie die „manuelle Titel-ZuwachsFunktion” auf Ihrem Rekorder. 91 ALGEMENE INFORMATIE Algemene informatie Inhoud van de doos..........................................................................92 Opstellen ..........................................................................................92 Met het oog op het milieu...............................................................92 Handelsmerk ....................................................................................92 Onderhoud........................................................................................92 Bedieningsknoppen..........................................................................93 Afstandsbediening Gebruik van de afstandsbediening ..................................................94 Toetsen op de afstandsbediening....................................................95 Programmeren van de universele afstandsbediening (enkel bij FR 985, FR 986, FR 995, FR 996)........................................96 Aansluitbussen ..................................................................................97 Aansluitingen Analoge audio-aansluitingen...........................................................98 Digitale audioaansluitingen.............................................................98 Systeembus, CINEMA LINK.............................................................99 Videoaansluitingen ..........................................................................99 Netaansluiting................................................................................100 Uitgangsvermogen .........................................................................100 Luidsprekeraansluitingen...............................................................100 Uw tv als middenluidspreker .........................................................100 Antenneaansluitingen....................................................................100 Hoofdtelefoon ................................................................................100 Nederlands Installeren van het systeem Opstellen van de luidsprekers .......................................................101 Instellen en testen van de luidsprekers ........................................101 Receiverinstelling...........................................................................101 Inhoud van de doos Deze receiver wordt als volgt geleverd: – een afstandsbediening – 2 batterijen voor de afstandsbediening, type AA – een coaxiale kabel voor audio-aansluiting op een DVD-speler – een systeembuskabel voor de aansluitbus CINEMA LINK – een raamantenne – een draadantenne – deze gebruiksaanwijzing Opstellen Als u de verschillende apparaten van uw systeem gestapeld heeft dan moet de receiver bovenop geplaatst worden. Plaats de receiver op een vlakke, harde, stabiele ondergrond. Dek de ventilatieopeningen nooit af en laat 50 cm ventilatieruimte vrij aan de bovenkant en 10 cm links en rechts van de receiver. Voor een goede ontvangst mag de raamantenne niet bovenop of onder een videorecorder, cd-recorder, DVD-speler, tv of een andere stralingsbron geplaatst worden. Display...............................................................................................102 Menu’s Receiver-menu .......................................................................103–104 TV-menu .........................................................................................104 CINEMA LINK in werking stellen ..................................................104 Bronkeuze SOURCE SELECT.............................................................................105 6 CHANNEL-DVD/SACD INPUT-selectie .......................................105 Een andere ingang toekennen aan een bron.................................105 Dezelfde ingang gebruiken voor twee of meerdere apparaten ....105 De ingang 6 CHANNEL-DVD/SACD INPUT ...................................105 Afspelen, opnemen Afspelen van een bron...................................................................106 Instellen van het geluid .................................................................106 Opnemen van een geluidsbron ......................................................106 Opnemen via de digitale uitgang...................................................106 Surround Sound Over surround sound......................................................................107 Inschakelen van het surround-geluid.............................................107 Surround sound-instellingen..........................................................108 Tuner Afstemmen op een radiozender.....................................................109 Instellen van de FM-gevoeligheid .................................................109 Programmeren van radiozenders ...................................................109 Afstemmen op een geprogrammeerde zender ..............................110 Herschikken van de geprogrammeerde zenders ...........................110 Een naam geven aan een zender...................................................110 Wissen van een zendernaam.........................................................110 RDS R............................................................................................111 RDS-nieuwsbericht en -verkeersinformatie ..................................111 Technische gegevens Receiver..........................................................................................112 Verhelpen van storingen Waarschuwing ...............................................................................113 Verhelpen van storingen ................................................................113 Als ENERGY STAR®-partner heeft, Philips vastgesteld dat dit product voldoet aan de ENERGY STAR®-richtlijnen voor efficiënt energiegebruik. Dit apparaat voldoet aan de radio-ontstoringseisen van de Europese Gemeenschap. 92 Met het oog op het milieu… Wij hebben alle overbodig verpakkingsmateriaal weggelaten en ervoor gezorgd dat de verpakking gemakkelijk in drie materialen te scheiden is: karton (doos), polystyreenschuim (buffer) en polyethyleen (zakken, beschermfolie). Uw systeem bestaat uit materialen die door een gespecialiseerd bedrijf gerecycleerd en hergebruikt kunnen worden. Informeer waar u verpakkingsmateriaal, lege batterijen en oude apparatuur kunt inleveren. Handelsmerk Vervaardigd onder licentie van Dolby Laboratories. „DOLBY”, „DOLBY DIGITAL”, „PRO LOGIC” en het dubbele D-symbool 2 zijn handelsmerken van Dolby Laboratories. Vertrouwelijke ongepubliceerde werken. © 1992–1997 Dolby Laboratories. Alle rechten voorbehouden. „DTS” en „DTS Digital Surround” zijn handelsmerken van Digital Theater Systems, Inc. Copyright 1996 Theater Systems, Inc. Alle rechten voorbehouden. Onderhoud U kunt de receiver schoonmaken met een zachte, licht bevochtigde pluisvrije doek. Gebruik geen schoonmaakmiddelen want die kunnen het apparaat beschadigen. Bescherm de receiver tegen vocht, regen, zand of extreem hoge temperaturen (zoals bij verwarmingsapparatuur of in de felle zon). BEDIENINGSKNOPPEN 1 2 3 4 5 6 7 8 T 9 0 A ! 1 POWER / STANDBY.......Om de receiver aan en uit te zetten. 2 CINEMA LINK ................Om de systeembus tussen de receiver en de tv in en uit te schakelen. 3 ..........................................Sensor voor de infraroodafstandsbediening. 4 VIRTUAL..........................Controlelampje voor virtuele surround sound. 5 HALL ................................Controlelampje voor de HALL-functie. 6 ..........................................Display 7 SOURCE SELECT............Om te kiezen tussen de verschillende audio- en videoaansluitingen. Stelt de receiver weer in werking vanuit standby. 8 VOLUME..........................Om het volumeniveau hoger of lager in te stellen. 9 FRONT AV.......................Om de ingang FRONT AV / GAME te kiezen (enkel bij FR 995, FR 996). 0 TREBLE............................Om, indien gebruikt combinatie met VOLUME, de hoge tonen in te stellen. ! BASS ...............................Om, indien gebruikt combinatie met VOLUME, de lage tonen in te stellen. @ LOUDNESS .....................Om de LOUDNESS-functie in en uit te schakelen. # NEXT 2 ...........................TUNER: om een zender te zoeken. MENU: om naar het volgende menuniveau te gaan. $ ENTER / OK.....................Om de keuzes binnen een menu te bevestigen. # @ % TUNER PRESET X MENU NAVIGATOR TUNER: om de volgende of vorige geprogrammeerde zender te kiezen. MENU: om naar boven en beneden te lopen in een menu. ^ 1 PREV. / EXIT ...............TUNER: om een zender te zoeken. MENU: om naar het vorige menuniveau te gaan. & SETUP MENU ................Om het menu te openen en te sluiten. * SENS. ..............................Om een hoge of lage afstemgevoeligheid in te stellen. ( NEWS/TA........................Om de RDS-nieuwsbericht- en RDS-verkeersinformatiefuncties in en uit te schakelen. ) TUNER AM/FM ..............Om het golfgebied van de tuner te kiezen. ¡ RADIO TEXT ...................Om door de verschillende soorten RDS-informatie te lopen. ™ SURR. MODE..................Doorloopt de verschillende luidsprekerconfiguraties. £ VIRTUAL MODE .............Doorloopt de verschillende virtuele surround sound modi. ≤ SURROUND ON/OFF .....Schakelt tussen de laatst geselecteerde surround modus en stereo. 93 Nederlands ≤ £ ™ ¡ )( * & ^ % $ AFSTANDSBEDIENING Gebruik van de afstandsbediening Open het batterijvak van de afstandsbediening en plaats er 2 alkalinebatterijen in, type AA (R06, UM-3). Verwijder de batterijen als ze leeg zijn of als u de afstandsbediening gedurende langere tijd niet zult gebruiken. ñ MUTE 2 H PHONO TUNER CD CDR/TAPE TV VCR SAT DVD Batterijen niet weggooien, maar inleveren als KCA. De toetsen op de afstandsbediening hebben dezelfde functie als overeenkomstige toetsen op de receiver. 1 2 3 4 5 6 7 8 9 CINEMA GO CABLE BOX Belangrijk! Nederlands U moet gedurende meer dan 1 seconde op een bronknop drukken om de geluidsbron op de receiver te veranderen. Als u minder dan 1 seconde op een bronknop drukt, dan zal de afstandsbediening alleen worden omgeschakeld op gebruik van bedieningsfuncties voor het geselecteerde product. 0 GUIDE OK MENU De afstandsbediening blijft ingesteld op de gekozen bron totdat u een andere bronkeuzetoets op de afstandsbediening indrukt. Zo kunt u andere bronnen bedienen (bijvoorbeeld een cassette spoelen) zonder dat u de bron op de receiver verandert. É A ATV NEWS/TA Ç CHANNEL/TRACK LOUDNESS SUBW. ON/ OFF í ë REC CANCEL AUDIO DVD NIGHT INDEX Å T-C VIRTUAL SURROUND DISC + FR.D. MODE REAR SURROUND + MODE SUB WOOFER - TEST TONE CHANNEL 94 ON/ OFF Toetsen op de afstandsbediening H MUTE .....................Dempt het geluid van de receiver in alle standen, behalve TV. Dempt het geluid van uw Philips TVtoestel als uw afstandsbediening op TV-stand is ingesteld. 2 ................................Schakelt de op uw afstandsbediening geselecteerde bron om (bijv. videorecorder, TV) op standby. Als deze toets langer dan 2 seconden wordt ingedrukt, schakelt de receiver over op standby. PHONO, TUNER, CD, CDR/TAPE, TV, VCR, SAT, DVD........Om de afstandsbediening in te stellen voor het bedienen van de verschillende apparaten. Selecteert de bronnen indien langer dan 1 seconde ingedrukt. SAT werkt enkel bij digitale satellietontvangers. Stelt de receiver weer in werking vanuit standby. 1–0................................Om cijfers in te toetsen voor cd-nummers, radiozenders of frequenties. Nummers die uit twee cijfers bestaan, moeten binnen 2 seconden ingetoetst worden. CINEMA GO..........Stelt CINEMA LINK op de tv in werking. CABLE BOX ...................Zonder functie. MENU GUIDE ..............TUNER: Schakelt het receivermenu aan en uit. DVD, TV: Schakelt het DVD/TV-menu aan en uit. OK .................................Om de keuzes binnen een menu te bevestigen. Pijltjestoetsen...............TUNER: Om door een menu te lopen. Pijltjes naar rechts/links dienen voor hogere/lagere frequentie. CD, CDR: Pijltjes naar links/rechts dienen voor het zoeken naar een vorige/volgende passage, omhoog/omlaag zijn om naar een vorig/volgend nummer te gaan. +A ...........................Om het volume van de receiver harder te zetten. -A ...........................Om het volume van de receiver zachter te zetten. NEWS/TA .................Om NEWS en TRAFFIC ANNOUNCEMENT in en uit te schakelen. TV: Om teletekst in en uit te schakelen. SAT: Om de informatietekst in en uit te schakelen. ÉATV ......................Om het volume van de tv harder te zetten. CD, CDR, VCR, DVD: Om het afspelen te starten. ÇATV ......................Om het volume van de tv zachter te zetten. CD, CDR, VCR, DVD: Om het afspelen te beëindigen. i í CHANNEL/TRACK ...Om de vorige geprogrammeerde zender te kiezen. VCR: Om de cassette terug te spoelen. CD, CDR, DVD: Om het vorige nummer te kiezen. TV: Om het vorige kanaal te kiezen. ë CHANNEL/TRACK ...Om de volgende geprogrammeerde zender te kiezen. VCR: Om de cassette door te spoelen. CD, CDR, DVD: Om het volgende nummer te kiezen. TV: Om het volgende kanaal te kiezen. LOUDNESS ...................Om de LOUDNESS-functie in en uit te schakelen. SUBW. ON/OFF ............Schakelt de subwoofer aan en uit. REC, DVD AUDIO..........CDR, VCR: Om het opnemen te starten. DVD: Om een ander audionummer te kiezen. CANCEL, DVD ...........CD, CDR, SAT, VCR: Om een programma te wissen, om een keuze ongedaan te maken. DVD: Om de gezichtshoek te wijzigen. FR.D., DVD Å .............TUNER: Om FREQUENCY DIRECT te kiezen. CD, CDR, VCR, DVD: Om het afspelen te onderbreken. INDEX, DVD T-C............VCR: Om het zoeken in de index in en uit te schakelen. SAT: Om de thema’s in en uit te schakelen. DVD: Om te kiezen tussen titel en hoofdstuk. DISC..............................CD-, CDR-, DVD-wisselaars: Om naar de volgende disk te gaan. NIGHT ...........................Om NIGHT MODE in en uit te schakelen. VIRTUAL MODE ............Doorloopt de verschillende virtuele surround sound modi. SURROUND ON/OFF ....Om SURROUND SOUND in en uit te schakelen. +/- SUBWOOFER...Om het volume van de subwoofer harder/zachter te zetten. +/- REAR ...............Om het volume van de achterluidsprekers harder/zachter te zetten. Als de testtoon aanstaat, kunt u met deze toetsen het volume van de luidsprekers die u hoort harder/zachter zetten. SURROUND MODE.......Om door de verschillende surroundinstellingen te lopen. TEST TONE ...................Om de testtoon in en uit te schakelen. Als de testtoon aanstaat, kunt u met +/- REAR het volume van de luidsprekers die u hoort harder/zachter zetten. 95 Nederlands AFSTANDSBEDIENING AFSTANDSBEDIENING Programmeren van de universele afstandsbediening (enkel bij FR 985, FR 986, FR 995, FR 996) U herkent de universele afstandsbediening aan het opschrift Multibrand/Universal. Om de codes te gebruiken voor uw apparatuur van verschillende merken dient de universele afstandsbediening geprogrammeerd te worden. U doet dit door de 4-cijferige code in te toetsen of door de codes te scannen tot u de juiste code gevonden heeft. Wij raden u aan het intoetsen van de 4-cijferige code te gebruiken. Dit gaat sneller en is betrouwbaarder. Het scannen van de codes kunt u betere alleen gebruiken als u de code voor één van uw apparaten niet kunt vinden. De codelijst vindt u achterin deze gebruiksaanwijzing. Belangrijk! Voor het programmeren moet u de toetsen van de afstandsbediening gebruiken, niet de toetsen van de receiver of de andere apparaten. Nederlands Programmeren met de 4-cijferige code 1 Houd de bronkeuzetoets van het apparaat dat u wilt bedienen en 2 gedurende 3 seconden ingedrukt. 2 Toets de 4-cijferige code voor het apparaat in (de codelijst vindt u achterin deze gebruiksaanwijzing). Opmerkingen: – Als u meer dan 4-cijfers intoetst dan herkent de afstands-bediening enkel die, die u het eerst ingetoetst heeft. – Als u 30 seconden lang geen enkele code intoetst dan beëindigt de afstandsbediening het programmeren zonder de code te wijzigen. – Om een nieuw apparaat te programmeren, geeft u gewoon een nieuwe code op die de oude code overschrijft. Scannen van de codes 1 Zet het apparaat aan dat u wilt bedienen. 2 Houd de bronkeuzetoets van het apparaat dat u wilt bedienen en 2 gedurende 3 seconden ingedrukt. 3 Druk op 2 en laat opnieuw los. y De afstandsbediening stuurt de codes voor ‘volgende zender’ of voor ‘stand-by’ (afhankelijk van de gekozen geluidsbron) van het ene merk na het andere. 4 Druk, zodra het apparaat reageert (de volgende zender kiest of stand-by schakelt) op 2 om de code te bevestigen. y De geïdentificeerde code wordt gebruikt. • Als het apparaat gedurende 2 minuten niet reageert dan is de code voor dit apparaat niet opgeslagen in de afstandsbediening. De code van de afstandsbediening blijft ongewijzigd. Opmerking: Als u de batterijen langer dan 1 minuut uit de afstandsbediening haalt dan moeten de codes opnieuw geprogrammeerd worden. 96 Als u de codes voor uw verschillende apparaten gevonden en getest heeft dan kunt u ze hier opschrijven. PHONO .......................................... TUNER........................................... CD ................................................. CDR/TAPE ..................................... TV .................................................. VCR ............................................... SAT................................................ DVD ............................................... Resetten van de afstandsbediening 1 Houd één van de bronkeuzetoetsen en 2 ingedrukt gedurende 3 seconden. 2 Toets de 3-cijferige code 981 in. y Alle oorspronkelijke Philips-codes zijn nu weer teruggezet op de afstandsbediening. AANSLUITBUSSEN ¤ ™£≤∞§ ≥•ª º ⁄ A ANTENN A ANTENN P AM LOO UT VIDEO IN/O S-VIDEO DIGITAL AUDIO IN/OUT 2 OPTICAL IN DVD MON VCR VCR C A U TI CINEMA LINK SAT R L/ 6 CHANNE T DVD INPU SUBW. DVD IN MON OUT FER SUBWOO T PRE-OU OUT IN OUT IN VCR REC PLAY SAT IN CENTER UT AUDIO IN/O SAT COAX OUT CDR/TAP CENTER E CD VCR PHONO TV R COAX 2 IN EACH L COAX 1 IN R IN IN IN PLAY OUT REC IN IN IN PLAY L SPEAKE R≥6Ω CHOC ELE R VRI 100W TOTAL MAX. SWI TCHED OUT REC ^ % $ # @ ! 09 8 7 6 Aansluitbussen 6,3 mm-hoofdtelefoonbus op de voorkant. Audio- en video-ingangen op de voorkant (enkel bij FR 995, FR 996). QUE DE OU RIS n NE PAS Europea ips in the by Phil s. eloped oratorie the d and dev Dolby Lab Designeity. se from O LOGIC“ and Dol by er licen Commun tured und DIGITAL“, ”PRema rks of ks. LBY Manufac are trad shed Wor rved. “, ”DO rese ts ”DOLBY-D Sym bol ntial Unpubli righ ater ories. All Dig ital The dou ble ories. Confide r worldLaborat Laborat 997 Dolby er lice nse from 2 and othe ”DT S ©1992–1 ture d und No. 5,451,94. ”DT S“ and ater Man ufacInc. US Pat.and pen ding of Digital The s, s. System System nts issu ed trademarks Theater nd“ areht 1996 Digital wid e pate Surrou Digital s, Inc. Copyrig d. System Rights Reserve All Inc. AV IS ND SURROURS SPEAKE CENTER T PRE-OU ON SHOCK ELECTRIC RISK OF NOT OPEN E DO CTRIQU L 1 OPTICAL IN ) ( * & LET . 5 4 3 2 1 Naam van de aansluitbus Voor het aansluiten van: 1 PHONES Een hoofdtelefoon met 6,3 mm-stekker. 2 FRONT AV / GAME Linker en rechter audio-uitgangen van toestellen zoals videocamera’s en spelconsoles. 3 FRONT AV / GAME Video-uitgangen van toestellen zoals videocamera’s en spelconsoles. FRONT SPEAKERS 4 R, L Een rechter- en linkervoorluidspreker. 5 CENTER Een middenluidspreker. SURROUND SPEAKERS 6 R, L Een rechter- en linker-surround-luidspreker. AUDIO IN/OUT 8 CDR/TAPE OUT De ingang van een cd-recorder of een cassettedeck. 9 CDR/TAPE IN De uitgang van een cd-recorder of een cassettedeck. 0 CD IN De uitgang van een cd-speler. ! SAT IN De uitgang van een satellietsysteem. @ VCR OUT De ingang van een videorecorder. # VCR IN De uitgang van een videorecorder. $ TV IN De uitgang van een tv. % PHONO IN De uitgang van een platenspeler met MM-element. ¡ PHONO GND f De aarddraad van een platenspeler. 6-kanaals ingang ^ 6 CHANNEL / DVD INPUT De 6-kanaalsuitgang van apparaten zoals een DVD- of laserdiskspeler. DIGITAL AUDIO IN/OUT & COAX 1 IN De coax-uitgang van digitale apparatuur (standaardingang voor DVD bron) * COAX 2 IN De coax-uitgang van digitale apparatuur. ( COAX OUT De coax-ingang van digitale apparatuur zoals een cd-recorder of MD-recorder. ) OPTICAL IN De optische uitgang van digitale apparatuur zoals een DVD-speler, cd-speler, cd-recorder of MD-speler (enkel bij FR 984, FR 985, FR 986, FR 994). ) OPTICAL 1 (2) IN De optische uitgang van digitale apparatuur zoals een DVD-speler, cd-speler, cd-recorder of MD-speler (enkel bij FR 995, FR 996). VIDEO IN/OUT ™ S-VIDEO S-Video-ingangen/uitgangen van videotoestellen voor betere beeldkwaliteit (enkel bij FR 994, FR 995, FR 996). £ DVD IN De uitgang van een DVD-speler. ≤ MON OUT De ingang van een monitor (bijvoorbeeld de tv). § VCR IN De uitgang van een videorecorder. ≥ VCR OUT De ingang van een videorecorder (voor opnames). ª SAT IN De uitgang van een satellietsysteem. Antenneaansluitingen ∞ AM LOOP De bijgeleverde raamantenne. • FM 75 Ω De bijgeleverde draadantenne of buitenantenne. Uitgangen met voorversterking 7 CENTER PRE-OUT De ingang van een tv wanneer deze gebruikt wordt als middenluidspreker (enkel mogelijk wanneer de systeembus CINEMA LINK aangesloten is). º SUBWOOFER PRE-OUT De ingang van een actieve subwoofer. Systeembus ⁄ CINEMA LINK De systeembusaansluitingen van een Philips-tv met CINEMA LINK. Netaansluitingen (niet bij ¤ AC OUTLET Levert dezelfde spanning als het net. Maximaal aan te sluiten alle modellen) vermogen 100 W. Netsnoer ‹ Steek, nadat u alle andere aansluitingen gemaakt heeft, de stekker van het netsnoer in het stopcontact. 97 Nederlands ¡ AC OUT FRONT RS SPEAKE 6Ω AKER ≥ EACH SPE FM 75 Ω PHONO GND ‹ AANSLUITINGEN Analoge audio-aansluitingen Sommige apparaten hebben analoge en digitale aansluitingen. Gebruik waar mogelijk de digitale aansluiting; normaal geeft dit een betere geluidskwaliteit. Zie „Een andere ingang toekennen aan een bron” voor het gebruik van de digitale aansluitingen van de receiver. bijgevolg niet kunnen worden gedecodeerd en afgespeeld in de meeste CD-, LD- of DVD-spelers. Om deze reden zal bij het afspelen van disks met DTS-codering via de analoge uitgangen van de CD-, LD- of DVD-speler overmatige ruis te horen zijn. Om mogelijke schade aan het audiosysteem te vermijden, moeten de nodige voorzorgen worden genomen door de klant als de analoge uitgangen rechtstreeks op de receiver worden aangesloten. Vanwege een andere soort uitgangssignaal is bij het gebruik van een Dolby Digital Laserdisk een aparte AC-3 RF-demodulator nodig. Om te kunnen genieten van „DTS Digital SurroundTM“weergave, moet een DTS-compatibele speler worden aangesloten op één van de digitale ingangen van de receiver. DTS Digital Surround is een discreet „5.1-channel“ digitaal audioformaat dat beschikbaar is op CD’s, LD’s en DVD’s die TM ANTENNA PHONO GND. FM 75 Ω AM LOOP DIGITAL AUDIO IN/OUT OPTICAL 2 IN DVD VIDEO IN/OUT S-VIDEO MON VCR FRONT SPEAKERS EACH SPEAKER ≥ 6 Ω SAT VCR CINEMA LINK OPTICAL 1 IN IN 6 CHANNEL / DVD INPUT CENTER SUBW. OUT SUBWOOFER DVD IN MON OUT IN OUT PLAY VCR REC PHONO TV VCR SAT IN PRE-OUT CENTER R CAUTION L COAX OUT Nederlands MONITOR / TV RISK OF ELECTRIC SHOCK DO NOT OPEN COAX 2 IN AUDIO OUT SURR. FRONT AUDIO IN/OUT SAT CD CENTER PRE-OUT CDR/TAPE AVIS SURROUND SPEAKERS R IN IN IN PLAY IN OUT REC IN PLAY IN R OUT REC L EACH SPEAKER ≥ 6 Ω TURNTABLE RISQUE DE CHOC ELECTRIQUE NE PAS OUVRIR Designed and developed by Philips in the European Community. Manufactured under license from Dolby Laboratories. ”DOLBY“, ”DOLBY DIGITAL“, ”PRO LOGIC“ and the double-D Symbol are trademarks of Dolby Laboratories. Confidential Unpublished Works. ©1992–1997 Dolby Laboratories. All rights reserved. Manufactured under license from Digital Theater Systems. Inc. US Pat. No. 5,451,942 and other worldwide patents issued and pending. ”DTS“ and ”DTS Digital Surround“ are trademarks of Digital Theater Systems, Inc. Copyright 1996 Digital Theater Systems, Inc. All Rights Reserved. L COAX 1 IN CD RECORDER IN POWERED SUBWOOFER OUT VCR AUDIO OUT CD PLAYER AUDIO IN SAT RECEIVER Digitale audioaansluitingen CD RECORDER ANTENNA PHONO GND. FM 75 Ω AM LOOP DIGITAL AUDIO IN/OUT OPTICAL 2 IN CD PLAYER DVD VIDEO IN/OUT S-VIDEO MON VCR FRONT SPEAKERS VCR EACH SPEAKER ≥ 6 Ω SAT CINEMA LINK OPTICAL 1 IN IN 6 CHANNEL / DVD INPUT CENTER SUBW. OUT SUBWOOFER DVD IN MON OUT IN OUT PLAY VCR REC SAT IN PRE-OUT CENTER R CAUTION L COAX OUT RISK OF ELECTRIC SHOCK DO NOT OPEN COAX 2 IN SURR. FRONT PHONO AUDIO IN/OUT VCR SAT TV CD CDR/TAPE CENTER PRE-OUT SURROUND SPEAKERS L COAX 1 IN R IN DVD PLAYER 98 IN IN PLAY OUT REC IN IN IN PLAY OUT REC R L EACH SPEAKER ≥ 6 Ω AVIS RISQUE DE CHOC ELECTRIQUE NE PAS OUVRIR Designed and developed by Philips in the European Community. Manufactured under license from Dolby Laboratories. ”DOLBY“, ”DOLBY DIGITAL“, ”PRO LOGIC“ and the double-D Symbol 2 are trademarks of Dolby Laboratories. Confidential Unpublished Works. ©1992–1997 Dolby Laboratories. All rights reserved. Manufactured under license from Digital Theater Systems. Inc. US Pat. No. 5,451,942 and other worldwide patents issued and pending. ”DTS“ and ”DTS Digital Surround“ are trademarks of Digital Theater Systems, Inc. Copyright 1996 Digital Theater Systems, Inc. All Rights Reserved. AANSLUITINGEN Systeembus, CINEMA LINK Als de receiver en uw Philips TV (of nog beter met extra Philips VCR of DVD-speler) met CinemaLink worden aangesloten op het CINEMA LINK-systeembussturing, worden enige extra systeemmogelijkheden geboden: – Wanneer u een geluidsbron inschakelt dan schakelt het systeem automatisch naar die ingang. – U kunt het systeem bedienen via het tv-scherm. Afhankelijk van de talen waarover uw tv beschikt, kan dat in een taal naar keuze. – De tv kan dienst doen als middenluidspreker van uw systeem zodat u geen aparte middenluidspreker nodig heeft. (De kabel A moet afzonderlijk worden aangekocht.) – Door op de standby-knop van de afstandsbediening te drukken, kunt u het volledige systeem overschakelen op standby. TV EXT 1 EXT 2 EXT 3 TV AUX DVD PLAYER DIGITAL OUT optional A (TV = CENTER) ANTENNA PHONO GND. FM 75 Ω AM LOOP DIGITAL AUDIO IN/OUT OPTICAL 2 IN DVD FRONT SPEAKERS VCR EACH SPEAKER ≥ 6 Ω SAT CINEMA LINK OPTICAL 1 IN IN 6 CHANNEL / DVD INPUT CENTER SUBW. Nederlands VCR VIDEO IN/OUT S-VIDEO MON VCR OUT SUBWOOFER DVD IN MON OUT IN OUT PLAY VCR REC SAT IN PRE-OUT CENTER R CAUTION L COAX OUT RISK OF ELECTRIC SHOCK DO NOT OPEN COAX 2 IN SURR. FRONT PHONO AUDIO IN/OUT VCR SAT TV CENTER PRE-OUT CDR/TAPE CD AVIS SURROUND SPEAKERS R IN IN IN PLAY IN OUT REC IN PLAY IN R OUT REC RISQUE DE CHOC ELECTRIQUE NE PAS OUVRIR Designed and developed by Philips in the European Community. Manufactured under license from Dolby Laboratories. ”DOLBY“, ”DOLBY DIGITAL“, ”PRO LOGIC“ and the double-D Symbol are trademarks of Dolby Laboratories. Confidential Unpublished Works. ©1992–1997 Dolby Laboratories. All rights reserved. Manufactured under license from Digital Theater Systems. Inc. US Pat. No. 5,451,942 and other worldwide patents issued and pending. ”DTS“ and ”DTS Digital Surround“ are trademarks of Digital Theater Systems, Inc. Copyright 1996 Digital Theater Systems, Inc. All Rights Reserved. L COAX 1 IN L EACH SPEAKER ≥ 6 Ω CINEMA LINK TO TV IN TO VCR IN Videoaansluitingen MONITOR / TV DVD PLAYER ANTENNA PHONO GND. FM 75 Ω AM LOOP DIGITAL AUDIO IN/OUT OPTICAL 2 IN DVD VIDEO IN/OUT S-VIDEO MON VCR FRONT SPEAKERS VCR EACH SPEAKER ≥ 6 Ω SAT CINEMA LINK OPTICAL 1 IN IN 6 CHANNEL / DVD INPUT CENTER SUBW. OUT SUBWOOFER DVD IN MON OUT IN OUT PLAY VCR REC SAT IN PRE-OUT CENTER R CAUTION L COAX OUT RISK OF ELECTRIC SHOCK DO NOT OPEN COAX 2 IN SURR. FRONT PHONO AUDIO IN/OUT VCR SAT TV CD CDR/TAPE CENTER PRE-OUT SURROUND SPEAKERS L COAX 1 IN R IN IN IN PLAY OUT REC IN IN IN PLAY OUT REC R L EACH SPEAKER ≥ 6 Ω AVIS RISQUE DE CHOC ELECTRIQUE NE PAS OUVRIR Designed and developed by Philips in the European Community. Manufactured under license from Dolby Laboratories. ”DOLBY“, ”DOLBY DIGITAL“, ”PRO LOGIC“ and the double-D Symbol are trademarks of Dolby Laboratories. Confidential Unpublished Works. ©1992–1997 Dolby Laboratories. All rights reserved. Manufactured under license from Digital Theater Systems. Inc. US Pat. No. 5,451,942 and other worldwide patents issued and pending. ”DTS“ and ”DTS Digital Surround“ are trademarks of Digital Theater Systems, Inc. Copyright 1996 Digital Theater Systems, Inc. All Rights Reserved. VCR VIDEO OUT VIDEO IN SAT RECEIVER 99 AANSLUITINGEN Netaansluiting Uw tv als middenluidspreker Het typeplaatje bevindt zich op de achterkant van de receiver. U kunt uw Philips-tv met CINEMA LINK als middenluidspreker gebruiken. Voor tv’s met een scart-aansluiting heeft u een extra audioverloopkabel (van cinch naar scart) nodig. Voor tv’s met cinchaansluitingen heeft u extra cinch-kabels nodig. Deze kabels moeten aangesloten worden op de blauwe CENTER PRE-OUT-aansluiting op de achterkant. Kijk in de gebruiksaanwijzing van uw tv om te weten hoe u uw tv als middenluidspreker kunt gebruiken. 1 Controleer of de netspanning op het typeplaatje overeenkomt met de plaatselijke netspanning. Is dit niet het geval, neem dan contact op met uw leverancier of serviceorganisatie. 2 Verbind het netsnoer met het stopcontact. Om het toestel volledig van het net te scheiden moet de netstekker uit de muurcontactdoos worden getrokken. Uitgangsvermogen Als de receiver te hard wordt gezet (extreem hoog uitgangsvermogen) dan kunnen er vervormingen optreden die uw luidsprekers ernstig kunnen beschadigen. Als u vervormingen bemerkt, zet het volume en de tonenregeling dan op een zodanig niveau dat het geluid weer goed klinkt. Nederlands Om oververhitting van het apparaat te voorkomen is een beveiliging ingebouwd. Daardoor kan het heel uitzonderlijk gebeuren dat uw apparaat automatisch uitgeschakeld wordt. Schakel in zo’n geval het apparaat uit en laat het afkoelen voor u het opnieuw gebruikt. Na het toestel te hebben laten afkoelen zet u het toestel weer aan en kiest de gewenste bron door SOURCE SELECT te verdraaien. Luidsprekeraansluitingen Voor de luidsprekers zitten op de receiver een aantal schroefaansluitigen en een aantal klemaansluitingen. Sluit aan zoals hieronder aangegeven. 7m Antenneaansluitingen AM (MW)-antenne De raamantenne is uitsluitend voor gebruik binnenshuis. Plaats de antenne zo ver mogelijk uit de buurt van de receiver, de tv, de kabels, een DVD-speler, een viderecorder of andere stralingsbronnen. 1 Sluit de stekker van de raamantenne aan op AM LOOP zoals hieronder aangegeven. 2 Draai de antenne voor een zo goed mogelijke ontvangst. A ANTENN P AM LOO FM-antenne De bijgeleverde draadantenne dient enkel voor het ontvangen van zenders in de buurt. Voor een betere ontvangst adviseren wij u gebruik te maken van het kabelantennesysteem of van een buitenantenne. 1 Sluit de bijgeleverde draadantenne aan op FM 75 Ω zoals hieronder aangegeven. m 2 Zet de antenne in verschillende standen voor een zo goed mogelijke ontvangst. 1 2 3 • Als u gebruik maakt van het kabelantennesysteem of van een buitenantenne, sluit deze dan aan op FM 75 Ω in plaats van de draadantenne. FM 75 Ω m 8m 1 2 FM 75 Ω 3 1 Sluit altijd de gekleurde (of gemerkte) draad aan op de gekleurde aansluiting en de zwarte (of niet-gemerkte) draad op de zwarte aansluiting. 2 Verbind: – De linkervoorluidspreker met L (rood en zwart) – De rechtervoorluidspreker met R (rood en zwart) – De middenluidspreker met (blauw en zwart) – De linker-surround-luidspreker met SURROUND L (grijs en zwart) – De rechter-surround-luidspreker met SURROUND R (grijs en zwart) 100 Hoofdtelefoon Als u een hoofdtelefoon aansluit op PHONES dan worden de luidsprekers uitgeschakeld. De receiver gaat over op STEREO en het surround-geluid wordt teruggebracht tot een stereosignaal dat wel weergegeven kan worden door een gewone hoofdtelefoon. Zodra u de stekker van de hoofdtelefoon uit de receiver haalt, worden de luidsprekers weer ingeschakeld. Wilt u opnieuw surround-geluid horen, stel de receiver dan terug in op Surround Sound. INSTALLEREN VAN HET SYSTEEM FR ON T LEFT RIGHT SU BW OO FE R CENTER SURROUND (REAR) LEFT RIGHT SURROUND (REAR) Opstellen van de luidsprekers Algemene tips voor het opstellen Plaats uw luidsprekers bij voorkeur niet in een hoek of op de grond, want dan worden de bassen te sterk. Als u de luidsprekers achter een gordijn, meubels enzovoort plaatst dan worden de hoge tonen verzwakt. De luisteraar moet de luidsprekers vanuit de luisterpositie steeds kunnen „zien”. Elke ruimte heeft andere akoestische kenmerken en de mogelijkheden voor het opstellen zijn vaak beperkt. U vindt de beste opstelling voor uw luidsprekers aan de hand van de illustratie hierboven. Voor een goed surround-geluid adviseren wij minimaal 5 luidsprekers (2 voor, één midden, 2 achter). U kunt ook met minder luidsprekers een soort surround-geluid verkrijgen. Dit door de signalen die bestemd zijn voor de ontbrekende luidsprekers naar de bestaande te leiden. Zie „Menu’s” voor het correct installeren van de receiver voor het aantal luidsprekers en de grootte van de gebruikte luidsprekers. Instellen en testen van de luidsprekers Voor een optimaal surround-geluid moet het relatieve volume van de luidsprekers ingesteld worden. Zorg ervoor dat u op de normale luisterplek zit wanneer u het volume van de luidsprekers instelt. Zie „Receiver-menu” voor het installeren van de gebruikte luidsprekers. Als ideale instelling moet het volume in de luistersituatie gelijk zijn uit alle luidsprekers. 1 Druk op POWER / STANDBY om de receiver aan te zetten. 2 Druk op TEST TONE op de afstandsbediening. y U hoort een testtoon afkomstig van de verschillende luidsprekers, behalve de subwoofer. 3 Druk op +/- REAR op de afstandsbediening om het volume van de huidige luidspreker harder/ zachter te zetten. Het beste resultaat krijgt u wanneer het volume alle luidsprekers even hard staat vanaf de luisterplek. 4 Druk op TEST TONE op de afstandsbediening. y De testtoon stopt. Opmerking: Als u niet helemaal tevreden bent met de volumeinstellingen dan kunt u het beste kleine wijzigingen aanbrengen tijdens surround sound-weergave. Receiverinstelling Zodra het aantal en de positie van de luidsprekers werd vastgelegd, kunt u de basisinstellingen van de receiver uitvoeren voor optimale rondomklank met de uiteindelijke opstelling: Opstellen van de voorluidsprekers De voorluidsprekers moeten links en rechts voor de luisterplek geplaatst worden zoals gewone stereoluidsprekers. 1 Stel in welke luidsprekers werden aangesloten op de receiver (zie „Menustructuur: * SPEAKR SETUP”). Opstellen van de middenluidspreker De centrale luidspreker moet in het midden tussen de twee voorste luidsprekers geplaatst worden bijvoorbeeld onder of op de tv. De beste hoogte voor de middenluidspreker is op oorhoogte (terwijl u zit). Opmerking: De basisinstelling van uw receiver is: twee voorluidsprekers links en rechts: aanwezig (kan niet worden gewijzigd) middenluidspreker: aanwezig twee achterluidsprekers: aanwezig subwoofer: aanwezig. Opstellen van de surround-luidsprekers De surround-luidsprekers moeten tegenover elkaar staan en een rechte lijn vormen met de luisterplek, of ietwat achter de luisterplek staan. Opstellen van de subwoofer Met een subwoofer kunt u de weergave van de lage tonen flink versterken. De subwoofer kan overal in de kamer opgesteld worden aangezien het niet mogelijk is te herkennen waar de lage tonen vandaan komen. Maar plaats de subwoofer bij voorkeur niet in het midden van de kamer omdat de lage tonen dan weer verzwakt kunnen worden. Plaats niets op de subwoofer. 2 Selecteer het formaat van de luidsprekers (SMALL (klein) of LARGE (groot)) (zie „Menustructuur: * SPEAKR SIZES“). Selecteer SMALL als uw luidspreker lage noten kan weergeven tot minstens 80–100 Hz. Selecteer LARGE als uw luidspreker lage noten kan weergeven tot minstens 50 Hz. (Als vuistregel kunnen we stellen dat een LARGE (grote) luidspreker een conusdiameter van minstens 12 cm (5 inches) heeft.) Zie de specificatiebladen van uw luidsprekers. Opmerking: De begininstelling voor FR 985, FR 986, FR 995, FR 996 is: alle luidsprekers op LARGE. De begininstelling voor FR 984, FR 994 is: alle luidsprekers op SMALL. 3 Stel de afstand van de luidsprekers tot de luisterpositie in (zie „Menustructuur: * SPK DISTANCE”). 101 Nederlands NT FRO DISPLAY Statusindicators Display Het display van de receiver bestaat uit 4 delen, die voor de volgende informatie gebruikt worden: Luidsprekerdiagram Deze indicators laten u de verschillende receiver-instellingen zien en geven er informatie over. PRESET .....................de Een rechthoekje met een letter erin geeft aan dat een bepaalde luidspreker gekozen werd in het installatiemenu. De subwoofer-indicatie echter, brandt enkel als er een subwoofer-signaal aanwezig is. Verschijnt alleen een letter dan wordt deze luidspreker niet gebruikt en wordt het geluid ervan weergegeven door de andere luidsprekers. ......virtuele surround sound sound-weergave DIGITAL SURROUND ....digitale surround sound-weergave L, R ...........................linker- en rechtervoorluidspreker C ...............................middenluidspreker SL, SR .......................surround-luidsprekers SW ............................subwoofer SURROUND.................surround Nederlands Menu-indicaties Deze indicaties laten u zien of het menu al dan niet geopend is en geven aan in welke richting u kunt gaan. M E N U .......................het menu is geopend 1..............................u kunt terugkeren naar het vorige onderwerp in het menu met 1 PREV. / EXIT (toets „naar links” op de afstandsbediening) 3 .............................u kunt naar boven lopen binnen een lijst van mogelijkheden met X MENU NAVIGATOR (toets „omhoog” op de afstandsbediening) 4 .............................u kunt naar beneden lopen binnen een lijst van mogelijkheden met X MENU NAVIGATOR (toets „omlaag” op de afstandsbediening) 2..............................u kunt verdergaan naar het volgende onderwerp in het menu met NEXT 2 (toets „naar rechts” op de afstandsbediening) O K.............................om de weergegeven keuzemogelijkheid te bevestigen 0 Informatiegedeelte GUIDE OK MENU É A ATV NEWS/TA 102 tuner is afgestemd op een geprogrammeerde radiozender SENS HI ....................de tuner is ingesteld op „hoge afstemgevoeligheid” SENS LO .................de tuner is ingesteld op „lage afstemgevoeligheid” C I N E M A L I N K O N .....CINEMA LINK is ingeschakeld STEREO.....................er wordt een FM-zender ontvangen in stereo R............................er wordt een RDS-zender ontvangen EON .........................er wordt een RDS-zender met EON ontvangen HALL ........................het HALL-effect is ingeschakeld TA ............................RDS-verkeersinformatie is ingeschakeld NEWS .......................RDS-nieuwsberichten is ingeschakeld ANA .........................de geluidsbron die aan het spelen is, is aangesloten op een analoge ingang N I G H T ......................NIGHT MODE is ingeschakeld COAX 1 .....................de geluidsbron die aan het spelen is, is aangesloten op de digitale coax-ingang COAX 1 COAX 2 ....................de geluidsbron die aan het spelen is, is aangesloten op digitale coax-ingang COAX 2 D O W N M I X ................de inkomende meerkanaalssignalen worden teruggebracht tot een kleiner aantal uitgaande signalen (afhankelijk van het aantal luidsprekers) OPT ..........................de geluidsbron die aan het spelen is, is aangesloten op de digitale optische ingang OPTICAL IN (enkel bij FR 984, FR 985, FR 986, FR 994). OPT 1 .......................de geluidsbron die aan het spelen is, is aangesloten op de digitale optische ingang OPTICAL 1 IN (enkel bij FR 995, FR 996). OPT 2 ......................de geluidsbron die aan het spelen is, is aangesloten op de digitale optische ingang OPTICAL 2 IN (enkel bij FR 995, FR 996). LOUDNESS ................de LOUDNESS-functie is ingeschakeld Ç Dit gedeelte wordt gebruikt voor informatie over de receiver, tunerfrequenties, keuzemogelijkheden in een menu, instellingen en lopende tekstboodschappen. MENU’S De receiver is voorzien van een menusysteem. De verschillende menuopties zijn op een logische manier aan elkaar gerelateerd. Veronderstel dat u geen middenluidspreker aangesloten heeft en dus CENTER SPEAKR (middenluidspreker) op NO (no) gezet heeft. Probeert u vervolgens VOL CENTER (volume midden) te gebruiken dan loopt een boodschap in het display om u te laten weten dat dit niet mogelijk is (INSTALL CENTER SPEAKER - installeer middenluidspreker). Het menu werkt steeds op dezelfde manier. De pijltjes in het display geven aan in welke richting u kunt lopen. 1 Druk op SETUP MENU. y In het display verschijnt MENU, en * EFFECTS. • U kunt het menu op elk moment afsluiten door op SETUP MENU te drukken. 2 Draai X MENU NAVIGATOR tot de gewenste keuzemogelijkheid (of instelling) in het display verschijnt. 3 Druk op NEXT 2 om de keuzemogelijkheid in het display te kiezen (of ENTER / OK om de instelling te bevestigen). • U kunt elke keuzemogelijkheid verlaten (de instellingen blijven dan ongewijzigd) door op 1 PREV. / EXIT te drukken. Menustructuur * EFFECTS (effecten) Inschakelen van geluidseffecten. VIRT SURR virtuele surround: 0…100 % * VOL BALANCE (volume balance) Instellen van de relatieve volumebalans tussen de aangesloten luidsprekers. TEST TONE Testtoon: on/off (aan/uit) VOL FRONT-L Volume linkervoorluidspreker: –50…+50 VOL FRONT-R Volume rechtervoorluidspreker: –50…+50 VOL CENTER Volume middenluidspreker: –50…+50 VOL REAR-L Volume linkerachterluidspreker: –50…+50 VOL REAR-R Volume rechterachterluidspreker: –50…+50 VOL SUBWOOFER Volume subwoofer: –50…+50 Opmerking: Bij gebruik van de 6 CHANNEL / DVD INPUTingang kunnen de onderstaande waarden niet worden gewijzigd. * SPEAKR SETUP (luidsprekeropstelling) Kiezen van de gebruikte luidsprekers. SUBW PRESENT Subwoofer aanwezig: yes/no (ja/neen) CENTER SPEAKR Middenluidspreker aanwezig: yes/no (ja/neen) REAR SPEAKER Achterluidsprekers aanwezig: yes/no (ja/neen) * SPEAKR SIZES (grootte van de luidsprekers) Kiezen van de grootte van de gebruikte luidsprekers, voor een optimale geluidsweergave. LARGE wordt gebruikt voor luidsprekers die frequenties lager dan 50 Hz kunnen weergeven. Als SUBW PRESENT op NO staat dan kan FRONT SIZE enkel op LARGE gezet worden. Als FRONT SIZEop SMALL staat dan kan CENTER SIZE enkel op SMALL gezet worden en dient dus een subwoofer aangesloten te worden. FRONT SIZE Left and right front luidsprekers: small/large (klein/groot) CENTER SIZE Middenluidspreker: small/large (klein/groot) REAR SIZE Achterluidsprekers: small/large (klein/groot) * SPK DISTANCE (afstand tot de luidsprekers) De afstand tussen de normale luisterplek en de luidsprekers. Op die manier wordt de vertragingstijd voor het surroundgeluid bepaald. DISTANCE L/ R Afstand tot de voorluidsprekers: 1…10 m DISTANCE CNTR Afstand tot de middenluidspreker: 1…10 m DISTANCE REAR Afstand tot de achterluidsprekers: 1…10 m 103 Nederlands Receiver-menu MENU’S Nederlands * SELECT INPUT (ingang kiezen) Toekennen van de audio-ingangen aan de diverse bronnen die gekozen worden met SOURCE SELECT (zie „BRONKEUZE” voor meer informatie). COAX1 Digitale coax-ingang 1, COAX 1 IN COAX2 Digitale coax-ingang 2, COAX 2 IN OPT (enkel bij FR 984, FR 985, FR 986, FR 994) Digitale optische ingang, OPTICAL IN OPT 1 (enkel bij FR 995, FR 996) Digitale optische ingang, OPTICAL 1 IN OPT 2 (enkel bij FR 995, FR 996) Digitale optische ingang, OPTICAL 2 IN SAT IN Analoge audio-ingang SAT IN VCR IN Analoge audio-ingang VCR IN TV IN Analoge audio-ingang TV IN CDR IN Analoge audio-ingang CDR IN CD IN Analoge audio-ingang CD IN 6 CH IN Analoge audio-ingang 6 CHANNEL / DVD INPUT * TUNER (tuner) Instellingen voor geprogrammeerde radiozenders (zie „TUNER” voor meer informatie). AUTO INSTALL Automatisch programmeren van radiozenders MAN INSTALL Handmatig programmeren van radiozenders GIVE NAME Geven van een naam aan een geprogrammeerde zender RESHUFFLE Herschikken van de geprogrammeerde zenders TV-menu Als de receiver aangesloten is op een Philips CINEMA LINK-tv via de systeembusaansluitingen CINEMA LINK (zie „AANSLUITINGEN") dan kunt u het systeem via de tv installeren. Aan het menu wordt dan de keuzemogelijkheid RECEIVER toegevoegd. Als CINEMA LINK ingeschakeld is dan verschijnen de instellingen van de receiver gedurende een paar seconden op het tv-scherm. In de gebruiksaanwijzing van uw tv vindt u hoe u het tv-menu moet gebruiken. De mogelijkheden kunnen per tv-model verschillen. Inschakelen van de aansluiting • Druk op CINEMA LINK om de aansluiting tussen de receiver en de tv in of uit te schakelen. y Als de aansluiting ingeschakeld is dan verschijnt in het display CINEMA LINK ON. Opmerking: We raden u aan CINEMA LINK uit te schakelen wanneer u gaat opnemen. Zo voorkomt u ongewenste onderbrekingen door veranderingen in de tv-instellingen. Als CINEMA LINK ingeschakeld is en het tv-menu is geopend dan verschijnt in het display TV MENU en de menu- en geluidsfuncties op de receiver worden geblokkeerd. CINEMA LINK in werking stellen CINEMA GO. • Druk op de afstandsbediening op y De tv stuurt een afspeelopdracht naar de CINEMA LINK dvd-speler, indien aanwezig. De dvd-speler begint met afspelen en de receiver schakelt automatisch naar het beste CINEMA LINK geluid. • Als er geen dvd-speler is aangesloten of als er geen disk in de dvd-speler is geladen, stuurt de tv een afspeelopdracht naar de CINEMA LINK videorecorder, indien aanwezig. y De videorecorder begint met afspelen en de audioreceiver kiest het beste CINEMA LINK geluid. • Als er geen videorecorderbron is aangesloten of band is geladen kiest de tv het laatst bekeken tv-kanaal. 104 BRONKEUZE Wanneer u een bron kiest door SOURCE SELECT te draaien, worden de audio- en video-ingangen met de bijbehorende naam geactiveerd. Het inkomend signaal wordt weergegeven door alle audio- en – indien de bron ook een videosignaal geeft – videouitgangen van de receiver. Het is ook mogelijk een andere dan deze standaardingangen aan een gekozen bron toe te kennen. Dezelfde ingang gebruiken voor twee of meerdere apparaten U kunt dezelfde ingang gebruiken voor meerdere bronnen. Dit is handig wanneer verschillende apparaten in een keten met elkaar verbonden zijn. Voorbeeld: Een videorecorder is verbonden met een tv maar alleen de tv is aangesloten op de receiver. Wanneer u met SOURCE SELECT de tv of de videorecorder kiest, moeten deze beiden de ingangen van de tv gebruiken. Gekozen bron.............Gebruikte aansluitbus DVD...............................Digitale audio-ingang COAX 1 en video-ingang DVD IN PHONO..........................Audio-ingang PHONO IN TUNER ..........................Het tuner-gedeelte van de receiver is in gebruik, alle ingangen zijn uitgeschakeld. CD .................................Audio-ingang CD IN CDR/TAPE .....................Audio-ingang CDR/TAPE IN TV..................................Audio-ingang TV IN en geen video-ingang VCR ...............................Audio-ingang VCR IN en video-ingang VCR IN SAT ...............................Audio-ingang SAT IN en video-ingang SAT IN 2 Draai SOURCE SELECT om de bron te kiezen waaraan u meerdere ingangen wilt toekennen (bijvoorbeeld VCR). y In het display verschijnt de naam van de bron en de indicator die bij de bron hoort, knippert. 6 CHANNEL-DVD/SACD INPUT-selectie 5 Vanaf nu wordt de ingestelde audio-ingang gebruikt wanneer u deze bron gekozen wordt (bijvoorbeeld VCR wordt de ingang TV IN gebruikt; wanneer u VCR kiest, verschijnt in het display kort VCR <TV IN>). De 6 CHANNEL / DVD INPUT-aansluitingen kunnen worden toegewezen aan om het even welke van de beschikbare bronnen (uitgezonderd TUNER en PHONO). De toewijzing kan gebeuren via de * SELECT INPUT optie in het menu. Zie hieronder voor verdere details. Een andere ingang toekennen aan een bron Wanneer een bron gekozen wordt met SOURCE SELECT dan wordt de standaardaudio-ingang gebruikt. Om dit te wijzigen moet een andere audio-uitgang toegekend worden aan de gekozen bron. Voorbeeld: De digitale audio-ingang COAX 2 IN toekennen aan CD in plaats van CD IN. 1 Kies in het menu * SELECT INPUT en druk op NEXT 2. 2 Draai SOURCE SELECT om de bron te kiezen waaraan u een andere ingang wilt toekennen (bijvoorbeeld CD). y In het display verschijnt de naam van de bron en de indicator die bij de bron hoort, knippert. 1 Kies in het menu * SELECT INPUT en druk op NEXT 2. 3 Draai X MENU NAVIGATOR om de ingang te kiezen die gebruikt moet gaan worden (bijvoorbeeld VCR -> TV IN). Nederlands SOURCE SELECT 4 Druk op ENTER / OK om uw keuze te bevestigen. y In het display verschijnt kort STORED. De ingang 6 CHANNEL-DVD/SACD INPUT De 6 CHANNEL / DVD INPUT kan worden gebruikt voor aansluiting van een toestel met een ingebouwde meerkanalendecoder (bijv. Dolby Digital, DTS enz.) en 6-kanalen uitgang, bijv. van een hoogwaardige DVD/SACD-speler. Wanneer de audio-ingang 6 CHANNEL / DVD INPUT gebruikt wordt dan doet de receiver dienst als meerkanaalsversterker. De bron produceert een surround-geluid en stuurt dit naar de receiver verdeeld in de nodige kanalen. Daarom hebben de toetsen SURROUND ON/OFF, HALL en SURR. MODE ook geen effect aangezien het aangeboden signaal reeds meerkanaals is. De bron die aangesloten is op de audio-ingang 6 CHANNEL / DVD INPUT kan niet opgenomen worden. 3 Draai X MENU NAVIGATOR om de ingang te kiezen die gebruikt moet gaan worden (bijvoorbeeld CD -> COAX2). 4 Druk op ENTER / OK om uw keuze te bevestigen. y In het display verschijnt kort STORED. 5 Vanaf nu wordt de ingestelde audio-ingang gebruikt wanneer deze bron gekozen wordt (bijvoorbeeld bij CD wordt de ingang COAX 2 IN gebruikt; wanneer u CD kiest, begint COAX 2 te branden). 105 AFSPELEN, OPNEMEN Afspelen van een bron Opnemen van een geluidsbron 1 Druk op POWER / STANDBY om de receiver aan te zetten. Als u een geluidsbron wilt opnemen dan moet u deze kiezen met SOURCE SELECT. Het inkomende signaal wordt weergegeven door alle audio- en – indien de geluidsbron ook een videosignaal heeft – video-uitgangen van de receiver. De klankinstellingen hebben geen invloed op de opname. 2 Draai SOURCE SELECT om een bron te kiezen. y In het display verschijnt de naam van de bron. • U kunt de ingang FRONT AV / GAME kiezen door op FRONT AV te drukken (enkel bij FR 995, FR 996). 3 Start het afspelen van de bron zoals u dat altijd doet. Instellen van het geluid • Draai VOLUME om het volume in te stellen. y In het display verschijnt VOLUME en het volumeniveau tussen 0 en 50. 1 Druk op BASS of TREBLE. y In het display verschijnt kort BASS of TREBLE en de huidige instelling. Daarna loopt door het display TURN VOLUME KNOB TO CHANGE. Nederlands 2 Draai VOLUME om de lage of hoge tonen in te stellen. y In het display verschijnt kort BASS of TREBLE en de huidige instelling. Opmerking: Als VOLUME of een andere knop gedurende 5 seconden niet gebruikt wordt dan wordt het instellen van de lage of hoge tonen afgesloten. • Als een subwoofer is aangesloten, druk dan op SUBW. ON/OFF om de lagetonenweergave te verhogen. Opmerking: Bij digitale surround sound zal alleen een subwoofersignaal beschikbaar zijn indien ondersteund door het bronmateriaal. • Druk op LOUDNESS om de loudness-functie in of uit te schakelen. y Is de loudness-functie ingeschakeld dan verschijnt LOUDNESS in het display. 1 Draai SOURCE SELECT (of druk op FRONT AV – enkel bij FR 995, FR 996) om de geluidsbron te kiezen die u wilt opnemen. y In het display verschijnt de naam van de geluidsbron. 2 Zet het apparaat waarmee u wilt opnemen klaar. Het apparaat moet aangesloten zijn op één van de uitgangen van de receiver. 3 Start de opname op het apparaat waarmee u opneemt. 4 Start het afspelen op de geluidsbron op de gebruikelijke manier. Opmerkingen: – Het audio- en videosignaal van VCR IN wordt niet weergegeven door VCR OUT. Hetzelfde geldt voor het audiosignaal van CDR/TAPE IN door CDR/TAPE OUT. – Wij adviseren u niet de digitale uitgang COAX OUT van de receiver te gebruiken om op te nemen van een analoge geluidsbron. Gebruik in plaats daarvan de analoge uitgang CDR/TAPE. – De bron die aangesloten is op de audio-ingang 6 CHANNEL / DVD INPUT kan niet opgenomen worden. Opnemen via de digitale uitgang U kunt een digitale recorder aansluiten op de digitale uitgang van de receiver. Zo kunnen alle signalen die binnenkomen langs de digitale ingangen rechtstreeks opgenomen worden op de aangesloten audiorecorder. De receiver zet ook alle signalen van de analoge ingangen om naar de digitale uitgang. De receiver kan gebruikt worden om een meerkanaals surround sound-audiosignaal digitaal op te nemen (Dolby Digital, DTS of MPEG) van, bijvoorbeeld, DVD naar CD-R. De receiver zet het digitale meerkanaals signaal om in een stereosignaal zonder verlies van relevante geluidsinformatie. Opmerkingen: – Bij opname van een Dolby Digital-, DTS- of MPEG-signaal moet elke titel individueel worden opgenomen. – Digitale opname is niet mogelijk als het digitale bronmateriaal tegen kopiëren is beveiligd. 106 SURROUND SOUND Over surround sound Inschakelen van het surround-geluid Surround sound biedt u een compleet nieuwe luisterervaring. U zult het gevoel hebben dat u zich ten midden van de actie bevindt want het geluid komt van overal om u heen. Let op tv-uitzendingen, audio- en videocassettes en cd’s met het logo 3, 1, of deze zijn gecodeerd voor een meerkanaals surround-weergave. U kiest het beste voor Dolby Digital, DTS of MPEG om het maximum uit uw receiver te halen. Wanneer het surround-geluid ingeschakeld is, kunt u kiezen uit de verschillende surroundinstellingen. De mogelijkheden zijn afhankelijk van de luidsprekeropstelling zoals die gedefinieerd is in het receivermenu. Merk wel dat DVD-discs niet altijd volwaardige meerkanalen surround bevatten. Informeer bij uw leverancier om zeker te weten of een disk voor meerdere kanalen gecodeerd is. De meest gewone stereocassettes en cd’s geven, als ze met surround-geluid afgespeeld worden, een goed resultaat. Mocht de weergave bij surround-weergave vervormd klinken, schakel dan over op normale stereoweergave. De beschikbaarheid van de verschillende surroundinstellingen die beschreven staan, hangt af van het aantal luidsprekers dat gebruikt wordt en van de inkomende geluidsinformatie. 1 Druk op SURROUND ON/OFF om het surround-geluid in te schakelen. y De gebruikte surround-instelling loopt door het display. 2 Druk herhaaldelijk op SURR. MODE om naar de verschillende (beschikbare) surround-instellingen te luisteren. yDe gekozen instelling en de gebruikte luidsprekers verschijnen in het display. Als de inkomende meerkanaalssignalen teruggebracht worden tot een kleiner aantal uitgaande signalen dan verschijnt in het display DOWNMIX. 3 Druk zo dikwijls als nodig op VIRTUAL MODE om de virtuele surround sound modi te doorlopen: 1 × om 3D SURROUND te activeren 2 × om MULTI FRONT te activeren 3 × om MULTI REAR te activeren 4 × om NATURAL SURROUND te activeren yEen lampje geeft aan of een virtuele surround sound modus is ingeschakeld. -tekens geven aan welke virtuele surround sound modus actief is. 4 Druk op SURROUND ON/OFF om het surround-geluid in of uit te schakelen. y SURROUND OFF loopt door het display. 107 Nederlands Uw receiver is geschikt voor weergave van DTS surround sound. DTS is een uitmuntend meerkanalen surround soundsysteem dat beschikbaar is op DVD discs, laserdiscs en audio CD’s. Raadpleeg uw softwaredealer in verband met de beschikbaarheid van DTS-software in uw regio. Als een digitaal surroundsignaal wordt gedetecteerd, zal de receiver DOLBY DIGITAL, DTS of MPEG weergeven. SURROUND SOUND Surround sound-instellingen HALL De geluidsweergave wordt benadrukt en er wordt een lichte echo toegevoegd. U krijgt zo de indruk dat u zich in een grote ruimte bevindt. Kan enkel gebruikt worden bij stereo. SURROUND Met de surround-instelling kunt u een normaal surroundgeluid weergeven via 4 of 5 luidsprekers. Afhankelijk van het bronmateriaal wordt Dolby Surround Pro Logic, Dolby Digital DTS of MPEG weergegeven. PRO LOGIC, DOLBY DIGITAL, DTS, MPEG Behalve SURROUND, wordt ook de gebruikte surround-weergave – afhankelijk van de gebruikte geluidsbron of -drager – in het display weergegeven. In geval van digitale surround sound wordt het soundformaat AC-3 (voor Dolby Digital), DTS of MPEG (voor MPEG 2 Multichannel) weergegeven, gevolgd door de geluidskanalen die op de bron beschikbaar zijn (bijv. DVD). Nederlands Voorbeeld: AC-3 3/2.1 Dolby Digital, 3 voorste kanalen, 2 surround-kanalen en een subwoofer-kanaal. MPEG 2/0.0 MPEG meerkanaals, enkel stereogeluid. AC-3 3/1.0 Dolby Digital, 3 voorste kanalen, 1 (mono-) surround-kanaal zonder subwoofer-signaal. DTS 3/2.1 DTS, 3 voorste kanalen, 2 surround-kanalen en een subwoofer-kanaal. FRONT-3 STEREO Het surround-geluid wordt uitgeschakeld. Bij 3 Stereo luistert u naar een surround-geluid zonder de surround-luidsprekers te gebruiken. STEREO Alle geluid wordt weergegeven en afgespeeld via de linkeren rechtervoorluidsprekers. Op die manier is normale stereoweergave mogelijk. Virtuele surround Uw receiver is in staat om één of meer vormen van virtuele surround sound weer te geven. Virtuele surround geeft een meer realistische klankindruk door schijnluidsprekers te creëren naast of in plaats van echte luidsprekers. De positie van de luisteraar beïnvloedt het surroundeffect. De zone waar het effect het beste te horen is werd grijs gekleurd. NT FRO LEFT CENTER FR ON T RIGHT Het niveau van het virtuele surround soundeffect kan worden geregeld in het instelmenu. De volgende surround sound modi zijn beschikbaar: 3D SURROUND Hiervoor zijn geen achterluidsprekers vereist. De geluidsweergave van het achterkanaal wordt gesimuleerd door de voorluidsprekers. Surround sound wordt gesimuleerd via de linker en rechter voorluidsprekers en de middenluidspreker. MULTI FRONT Schijnluidsprekers worden gecreëerd naast de linker en rechter voorluidsprekers. MULTI REAR Schijnluidsprekers worden gecreëerd naast de linker en rechter achterluidsprekers. NATURAL SURROUND Schijnluidsprekers worden gecreëerd naast de linker en rechter voor- en achterluidsprekers. Opmerking: De beschikbaarheid van MULTI FRONT en MULTI REAR is afhankelijk van de geluidsweergavekanalen op het bronmateriaal. (enkel met de afstandsbediening) De harde gedeeltes van het geluid worden zachter en de zachte passage worden harder weergegeven. Zo kunt u van een surroundgeluid genieten zonder dat u slapende kinderen of de buren stoort. De nachtstand werkt enkel bij Dolby Digital en MPEG, en op voorwaarde dat de geluidsbron of -drager hiervoor geschikt is. NIGHT MODE 108 TUNER Afstemmen op een radiozender Programmeren van radiozenders U kunt radiozenders zoeken door de frequentieband te scannen. Als u de frequentie van een zender kent, kunt u die ook rechtstreeks intoetsen. Als een FM-zender in stereo uitgezonden en ontvangen wordt dan verschijnt in het display STEREO. U kunt in het totaal 30 radiozenders programmeren. De receiver kan de zenders automatisch zoeken en programmeren maar u kunt dit ook zelf doen. 2 Druk herhaaldelijk op TUNER AM/FM om het golfgebied te kiezen. y In het display verschijnt het gekozen golfgebied. 3 Houd 1 of 2 ongeveer 1 seconde ingedrukt. y In het display verschijnt SEARCH en de tuner stemt af op een zender van voldoende sterkte. 4 Herhaal deze handelingen tot u de gewenste zender gevonden heeft. • Om af te stemmen op een zwakke zender: druk zo vaak als nodig kort op 1 of 2 tot de ontvangst optimaal is. Afstemmen op een radiozender door de frequentie in te toetsen (enkel met de afstandsbediening) 1 Druk op TUNER. y In het display verschijnt TUNER. 2 Druk op FR. D.. y In het display verschijnt _. Automatisch programmeren 1 Kies * TUNER uit het menu en druk op NEXT 2. 2 Kies AUTO INSTALL en druk op NEXT 2. y In het display verschijnen het zendernummer waarmee het programmeren begonnen zal worden, het golfgebied en AUTO. 3 Draai TUNER PRESET X om het zendernummer waarmee het programmeren begonnen moet worden te wijzigen. 4 Kies het gewenste golfgebied met TUNER AM/FM. 5 Druk op ENTER / OK om het programmeren te starten. y AUTO INSTALL knippert en alle beschikbare zenders worden geprogrammeerd; dit kan enkele minuten duren. Het programmeren is klaar als AUTO INSTALL ophoudt met knipperen. Handmatig programmeren 1 Kies * TUNER uit het menu en druk op NEXT 2. 2 Kies MAN INSTALL en druk op NEXT 2. y In het display verschijnen een zendernummer, het golfgebied en de frequentie. 3 Toets met 1–0 de frequentie van een radiozender in. 3 Draai TUNER PRESET X om het zendernummer waaronder u de zender wilt opslaan te wijzigen. Opmerking: Enkel geldige frequenties binnen het bereik van de tuner kunnen ingetoetst worden. 4 Stem af op de gewenste radiozender (zie „Afstemmen op een radiozender”). Instellen van de FM-gevoeligheid 5 Druk op ENTER / OK om uw keuze te bevestigen. y In het display verschijnt kort STORED. De radiozender is nu geprogrammeerd onder het gekozen zendernummer. U kunt de afstemgevoeligheid van de tuner laag instellen zodat enkel naar zenders met een sterk signaal gezocht wordt (enkel FM). 1 Draai SOURCE SELECT om de tuner te kiezen. y In het display verschijnt TUNER. 6 Kies en programmeer op dezelfde manier alle gewenste zenders. 2 Druk op SENS. op de receiver. y In het display verschijnt gedurende 5 seconden SENS HI of SENS LO. Opmerking: Tijdens het zoeken naar een radiozender ziet u in het display de huidige gevoeligheid. In dit geval betekent SENS LO dat de tuner enkel radiozenders met een sterk signaal zoekt. 109 Nederlands Zoeken naar een radiozender 1 Draai SOURCE SELECT om de tuner te kiezen. y In het display verschijnt TUNER. TUNER Afstemmen op een geprogrammeerde zender Een naam geven aan een zender 1 Draai SOURCE SELECT op TUNER om de tuner te kiezen. y In het display verschijnt TUNER. U heeft de mogelijkheid om elke geprogrammeerde radiozender zelf een naam te geven. Ook RDS-zenders kunt u een andere naam geven. 2 Draai TUNER PRESET X om een geprogrammeerde zender te kiezen. y In het display verschijnen PRESET, het zendernummer en de zender. Herschikken van de geprogrammeerde zenders Het kan zijn dat u na het programmeren de volgorde van de geprogrammeerde zenders wilt wijzigen. Met RESHUFFLE kunt u de zenders van plaats verwisselen. 1 Kies * TUNER uit het menu en druk op NEXT 2. 2 Kies GIVE NAME (naam geven) en druk op NEXT 2. y In het display verschijnt een geprogrammeerde zender. 3 Draai TUNER PRESET X om de zender te kiezen die u een andere naam wilt geven. 1 Kies * TUNER uit het menu en druk op NEXT 2. 4 Druk op ENTER / OK om uw keuze te bevestigen. y In het display verschijnt de bestaande naam of ________. 2 Kies RESHUFFLE en druk op NEXT 2. y In het display verschijnen PRESET, een zendernummer en de zender. 5 Draai TUNER PRESET X om een letter te kiezen en NEXT 2 of 1 PREV. om naar de volgende of vorige positie te gaan. Nederlands 3 Draai TUNER PRESET X om een geprogrammeerde zender te kiezen. 4 Druk op ENTER / OK om uw keuze te bevestigen. y In het display verschijnen het gekozen zendernummer SWAP <-> en een tweede zendernummer. 5 Draai TUNER PRESET X om het nieuwe zendernummer te kiezen. 6 Druk op ENTER / OK om het wisselen van plaats te bevestigen. y In het display verschijnt kort RESHUFFLED en de twee zenders zijn van plaats gewisseld. 6 Druk, nadat u de hele naam ingegeven heeft, op ENTER / OK om te bevestigen. y In het display verschijnt STORED en de naam is opgeslagen. Opmerking: Wilt u opnieuw de RDS-zendernaam gebruiken, wis dan de naam die u zelf gegeven heeft. Wissen van een zendernaam 1 Kies uit het menu * TUNER, en kies GIVE NAME. y In het display verschijnt een geprogrammeerde zender. 2 Draai X MENU NAVIGATOR om de naam te kiezen die u wil wissen. 3 Druk op ENTER / OK om uw keuze te bevestigen. 4 Druk op 1 PREV. terwijl de eerste letter knippert. y CL knippert links van de zendernaam. 5 Druk op ENTER / OK om de zendernaam te wissen. Of, als u van gedachte verandert, druk op 1 PREV. om de zendernaam te laten staan. 110 TUNER RDS R RDS-nieuwsbericht en -verkeersinformatie Radio Data System is een dienst van de zendstations waarbij FM-zenders extra informatie uitzenden. Als u en RDS-zender ontvangt dan verschijnen in het display R en de zendernaam. U kunt de tuner zo instellen dat het geluid onderbroken wordt wanneer een RDS-zender een nieuwsbericht of verkeersinformatie verstuurt. Deze functies werken enkel indien de vereiste RDS-signalen uitgezonden worden. Opmerking: Het tijdssignaal dat door bepaalde RDS-zenders uitgestuurd wordt, is niet altjid even nauwkeurig. Als een RDS-zender tevens een EON-signaal (Enhanced Other Networks) meestuurt dan verschijnt in het display EON. Dit signaal stelt de tuner in staat niet alleen bij de gekozen RDSzender, maar over het hele golfbereik van de EON-zender op zoek te gaan naar nieuwsberichten en verkeersinformatie. 1 Stem af op de gewenste RDS-zender. 2 Druk op NEWS/TA: Eenmaal zodat NEWS in het display verschijnt; hiermee wordt de nieuwsberichtfunctie ingeschakeld. Tweemaal zodat TA in het display verschijnt; hiermee wordt de verkeersinformatiefunctie ingeschakeld. Driemaal zodat TA en NEWS in het display verschijnen; hiermee worden beide berichtenfuncties ingeschakeld. 3 Zet een van de geluidsbronnen aan op de normale manier. y Terwijl een nieuwsbericht of verkeersinformatie uitgezonden wordt, schakelt de receiver over op de tuner en in het display knippert NEWS of TA. 4 Druk op NEWS/TA tot de indicatie uit het display verdwijnt om de functie(s) uit te schakelen. of Druk op NEWS/TA tijdens een bericht om de functie(s) uit te schakelen. Opmerking: Let erop dat u de nieuwsbericht- en verkeersinformatiefunctie uitschakelt als u gaat opnemen want anders worden deze berichten ook opgenomen. 111 Nederlands De verschillende soorten RDS-informatie • Druk herhaaldelijk op RADIO TEXT op de receiver om de volgende soorten informatie in het display te laten verschijnen (indien beschikbaar): – Tekstboodschappen – De RDS-tijd – De frequentie – De zendernaam TECHNISCHE GEGEVENS Receiver Nederlands Wijzigingen voorbehouden zonder kennisgeving. Algemeen Stroomverbruik (FR 984, FR 985, FR 986) ........................210 W Stroomverbruik (FR 994, FR 995, FR 996) ........................255 W Stroomverbruik in stand-by ..............................................< 2 W Afmetingen, b × h × d .............................435 × 135 × 350 mm Gewicht (FR 984, FR 985, FR 986) ....................................8,6 kg Gewicht (FR 994, FR 995, FR 996) ....................................9,4 kg Versterkergedeelte (0,7 % THD, 6 Ω, 1 kHz) Uitgangsvermogen, bij stereo (FR 984, FR 985, FR 986) (DIN) ....................................2 × 60 W Uitgangsvermogen, bij surround (FR 984, FR 985, FR 986) Voor .......................................................................2 × 60 W Midden.........................................................................60 W Surround................................................................2 × 60 W Uitgangsvermogen, bij stereo (FR 994, FR 995, FR 996) (DIN) ..................................2 × 100 W Uitgangsvermogen, bij surround (FR 994, FR 995, FR 996) Voor .....................................................................2 × 100 W Midden.......................................................................100 W Surround..............................................................2 × 100 W Lage tonen .......................................................±9 dB bij 100 Hz Hoge tonen.......................................................±9 dB bij 10 kHz Loudness...+6 dB bij 100 Hz (-30 dB); +3 dB bij 10 kHz (-30 dB) Totale harmonische vervorming..............0,05 % bij 1 kHz, 5 W Frequentiebereik .......................................20–20 000 Hz, ±1 dB Signaal/ruis-verhouding ................................................≥ 82 dB Kanaalscheiding (1 kHz).................................................≥ 45 dB Overspraak (1 kHz) ........................................................≤ -65 dB Ingangen Lijningangen .......................................................250 mV/47 kΩ 6 CH ....................................................................250 mV/40 kΩ Front AV (enkel FR 995, FR 996) .........................250 mV/22 kΩ Phono ......................................................................5 mV/47 kΩ Digitaal, coax ..........................................75 Ω volgens IEC 958 Digitaal optisch................................................................Toslink Digitale bemonsteringsfrequentie (FR 984, FR 985, FR 986) .....................32 kHz, 44,1 kHz, 48 kHz Digitale bemonsteringsfrequentie (FR 994, FR 995, FR 996) ........32 kHz, 44,1 kHz, 48 kHz, 96 kHz Uitgangen Netuitgangen (geschakeld) ..........................totaal max. 100 W Lijnuitgangen ........................................................250 mV/1 kΩ Digitaal coax ...........................................75 Ω volgens IEC 958 Digitale uitgang-samplingfrequenties Analoog in ............................................................uit 48 kHz Digitaal in 32 kHz .................................................uit 32 kHz Digitaal in 44,1 kHz ...........................................uit 44,1 kHz Digitaal in 48 kHz .................................................uit 48 kHz Digitaal in 96 kHz (enkel bij FR 994, FR 995, FR 996) .......................uit 48 kHz Subwoofer pre-out....................................................0,8 V/1 kΩ Center pre-out...........................................................0,8 V/1 kΩ Hoofdtelefoon.................................8–600 Ω (3 V e.m.f., 60 Ω) Luidsprekers......................................................................≥ 6 Ω 112 Tuner Golfbereik FM..............................................................87,5–108,0 MHz MW...............................................................531–1 602 kHz LW....................................................................153–279 kHz Gevoeligheid Stereo FM ..................................................................41 dBf Mono FM....................................................................15 dBf Totale harmonische vervorming Stereo FM ...................................................................0,3 % Mono FM...................................................................0,85 % Frequentiebereik ........................................63–12 500 Hz ±1 dB Signaal/ruis-verhouding Stereo FM....................................................................55 dB Mono FM.....................................................................60 dB Kanaalscheiding .................................................35 dB bij 1 kHz VERHELPEN VAN STORINGEN WAARSCHUWING Probeer in geen geval zelf iets te repareren want dan vervalt de garantie. Maak het apparaat niet open want dan loopt u het risico een elektrische schok te krijgen. Als zich een probleem voordoet, controleer dan eerst de punten op de onderstaande lijst voor u het systeem in reparatie geeft. Kunt u het probleem niet oplossen aan de hand van deze aanwijzingen, raadpleeg dan uw leverancier of serviceorganisatie. PROBLEEM MOGELIJKE OORZAAK OPLOSSING Toestel werkt niet en is in standby De oververhittingbeveiliging is geactiveerd. Schakel het toestel uit en laat het afkoelen. Na het toestel te hebben laten afkoelen zet u het weer aan en kiest een bron door SOURCE SELECT te verdraaien of op de afstandsbediening een brontoets in te drukken. Geen geluid Het VOLUME staat te zacht. Stel het VOLUME in. De hoofdtelefoon is aangesloten. Maak de hoofdtelefoon los. U heeft de verkeerde bron gekozen. Draai SOURCE SELECT om de juiste bron te kiezen. Eén van de luidsprekers is verkeerd aangesloten. Sluit de luidspreker goed aan. Eén van de luidsprekerkabels is beschadigd. Vervang de luidsprekerkabel. De volumebalans in het receiver-menu is verkeerd ingesteld. Stel VOL FRONT-L en VOL FRONT-R in in het receiver-menu. Zwak of geen geluid uit de De SURROUND-functie is niet ingeschakeld. midden- of de surround -luidsprekers De surround- en/of middenluidsprekers zijn niet (goed) aangesloten. Druk op SURROUND ON/OFF om het surroundgeluid in te schakelen. Sluit de luidsprekers goed aan. De surround- en/of middenluidsprekers zijn uitgeschakeld in SPEAKR SETUP menu. Kies YES voor de aanwezige luidsprekers. Eén van de luidsprekerkabels is beschadigd. Vervang de luidsprekerkabel. Zwakke basweergave De luidsprekers zijn niet in fase aangesloten. Sluit de gekleurde (of gemerkte) draden aan op de gekleurde aansluitingen en de zwarte (of niet gemerkte) draden op de zwarte aansluitingen. Slecht geluid De instellingen zijn niet geschikt voor het type Wijzig de klankinstellingen op de receiver. muziek of geluid. Het surround-geluidsniveau Het niveau van het surround-geluid is te laag of te hoog is niet goed ingesteld. Stel het niveau van het surround-geluid in op de receiver. Het middengeluidsniveau Het geluidsniveau van het middenkanaal is is te laag of te hoog niet goed ingesteld. Stel het niveau van het middenkanaal in op de receiver. U hoort bij Dolby Surround Het signaal wordt mono weergegeven. Pro Logic enkel de middenluidspreker Kies een andere geluidsbron of schakel het surround-geluid uit. Slechte radio-ontvangst, De receiver of de antenne bevindt zich te het automatisch dicht bij een stralingsbron zoals een tv, programmeren werkt niet cd-speler, cd-recorder, DVD-speler enzovoort. correct Zet het apparaat dat storing veroorzaakt op een andere plek of zet het uit. Geen digitale opname mogelijk via digitale uitgang. De samplingfrequentie wordt niet aanvaard door de digitale recorder. Ga na of de digitale recorder samplingfrequenties van 32 kHz tot 48 kHz wel kan verwerken of maak de opname via analoge uitgang. De volledige opname verschijnt als één titel bij opname van DVD. De DVD-speler verstrekt geen titelinformatie. Neem elke titel afzonderlijk op of gebruik de „manuele titelverhoging”-functie op de recorder. 113 Nederlands Geen geluid van links of van rechts INFORMAZIONI GENERALI Italiano Informazioni generali Materiale in dotazione...................................................................114 Regolazione....................................................................................114 Informazioni ambientali .................................................................114 Riconoscimento dei marchi di fabbrica .........................................114 Manutenzione ................................................................................114 Comandi ............................................................................................115 Telecomando Uso del telecomando .....................................................................116 Pulsanti del telecomando ..............................................................117 Programmazione del telecomando universale (solo per FR 985, FR 986, FR 995, FR 996).....................................118 Connettori .........................................................................................119 Collegamenti Connessioni audio analogiche .......................................................120 Collegamenti audio digitali............................................................120 Bus di controllo sistema, CINEMA LINK .......................................121 Collegamenti video ........................................................................121 Rete ................................................................................................122 Controllo dell’alimentazione ..........................................................122 Collegamenti degli altoparlanti .....................................................122 TV come altoparlante centrale ......................................................122 Collegamenti dell’antenna.............................................................122 Cuffie..............................................................................................122 Regolazione del sistema Posizionamento degli altoparlanti .................................................123 Regolazione e test degli altoparlanti.............................................123 Regolazione del ricevitore .............................................................123 Display...............................................................................................124 Menu Menu del ricevitore...............................................................125 –126 Menu della TV................................................................................126 Attivazione di CINEMA LINK .........................................................126 Selezione sorgente SOURCE SELECT.............................................................................127 Selezione 6 CHANNEL-DVD/SACD INPUT ....................................127 Riassegnazione della selezione di una sorgente ..........................127 Uso di una selezione di sorgente per due o più apparecchi.........127 Informazioni su 6 CHANNEL-DVD/SACD INPUT ...........................127 Riproduzione, registrazione Riproduzione di una sorgente ........................................................128 Regolazione del suono ...................................................................128 Registrazione da una sorgente ......................................................128 Registrazione dalla uscita digitale ................................................128 Suono surround Informazioni sul suono surround....................................................129 Attivazione del suono surround .....................................................129 Regolazioni del suono surround.....................................................130 Sintonizzatore Sintonizzazione sulle stazioni radio...............................................131 Attivazione della sensibilità FM ....................................................131 Memorizzazione delle stazioni radio .............................................131 Sintonizzazione sulle stazioni radio memorizzate .........................132 Riordinamento delle stazioni radio memorizzate ..........................132 Denominazione delle stazioni radio...............................................132 Cancellazione dei nomi delle stazioni ...........................................132 RDS R............................................................................................133 Notiziario RDS ed Informazioni sul traffico...................................133 Dati tecnici Ricevitore .......................................................................................134 Individuazione dei malfunzionamenti Attenzione ......................................................................................135 Individuazione dei malfunzionamenti ............................................135 Come partner ENERGY STAR® Philips ha constatato che questo prodotto soddisfa le direttive ENERGY STAR® in materia di efficienza energetica. Questo apparecchio soddisfa i requisiti previsti dalle normative della Comunità Europea in materia di radiointerferenze. 114 Materiale in dotazione Questo ricevitore viene fornito completo di: – un telecomando – 2 batterie per il telecomando, formato AA – un cavo coassiale per la connessione audio con un DVD player – un cavo bus di sistema per il collegamento CINEMA LINK – un’antenna a telaio – un’antenna metallica – questo manuale di istruzioni Regolazione Se i componenti del sistema sono impilati, il ricevitore deve essere posizionato in cima ad essi. Poggiare il ricevitore su una superficie in piano, solida e stabile. Non coprire le aperture di ventilazione e lasciare una distanza libera per la ventilazione pari a 50 cm al di sopra ed a 10 cm a sinistra e a destra del ricevitore. Per una buona ricezione, non posizionare l’antenna a telaio al di sopra o al di sotto di VCR, registratori CD, lettori DVD, TV ed altre sorgenti di radiazioni. Informazioni ambientali Non è stato utilizzato materiale d’imballaggio in eccesso. È stato fatto il possibile per rendere il materiale d’imballaggio facilmente scomponibile in tre monomateriali: cartone (scatola), polistirene espanso (paracolpi) e polietilene (buste, fogli protettivi in espanso). L’apparecchio è composto da materiali che possono essere riciclati, se smontati da una ditta specializzata. Rispettare le norme locali sullo smaltimento dei materiali di imballaggio, batterie esaurite ed apparecchiature obsolete. Riconoscimento dei marchi di fabbrica Prodotto sotto licenza della Dolby Laboratories. «DOLBY», «DOLBY DIGITAL», «PRO LOGIC» ed il simbolo a doppia D 2 sono nomi di fabbrica della Dolby Laboratories. Opere riservate inedite. © 1992–1997 Dolby Laboratories. Tutti i diritti riservati. « DTS » e « DTS Digital Surround » sono prodotti della Digital Theater Systems, Inc. Copyright 1996 Theater Systems, Inc. Tutti i diritti riservati. Manutenzione Pulire il ricevitore con un panno morbido e non peloso, leggermente inumidito. Non usare detergenti, perché possono avere un’azione corrosiva. Non esporre il ricevitore ad umidità, pioggia, sabbia o calore eccessivo (generato dall’impianto di riscaldamento o dai raggi solari diretti). COMANDI 1 2 3 4 5 6 7 8 T 9 0 A ! 1 POWER / STANDBY.......Accende e spegne il ricevitore. 2 CINEMA LINK ................Accende e spegne il bus di controllo del sistema tra il ricevitore e la TV. 3 ..........................................Sensore per il telecomando a raggi infrarossi. 4 VIRTUAL..........................Luce di controllo per il surround virtuale. 5 HALL ................................Indicatore luminoso di controllo per HALL. 6 ..........................................Display 7 SOURCE SELECT............Seleziona i diversi connettori audio e video. Riattiva il ricevitore dalla condizione di standby. 8 VOLUME..........................Aumenta e diminuisce il livello del volume. 9 FRONT AV.......................Seleziona l’entrata FRONT AV / GAME (solo per FR 995, FR 996). 0 TREBLE............................Regola i toni acuti, se utilizzato con VOLUME. ! BASS ...............................Regola i toni bassi, se utilizzato con VOLUME. @ LOUDNESS .....................Accende e spegne LOUDNESS. # NEXT 2 ...........................TUNER: ricerca le stazioni radio. MENU: porta al livello successivo di menu. $ ENTER / OK.....................Conferma i valori di menu selezionati. # @ % TUNER PRESET X MENU NAVIGATOR TUNER: porta alla precedente o successiva stazione radio memorizzata. MENU: sposta verso l’alto e verso il basso. ^ 1 PREV. / EXIT ...............TUNER: ricerca le stazioni radio. MENU: porta al livello precedente di menu. & SETUP MENU ................Attiva e disattiva il menu. * SENS. ..............................Sposta fra sensibilità alta e bassa del sintonizzatore. ( NEWS/TA........................Attiva e disattiva il notiziario RDS e le informazioni sul traffico RDS. ) TUNER AM/FM ..............Sposta fra le gamme di lunghezze d’onda del sintonizzatore. ¡ RADIO TEXT ...................Scorre le diverse informazioni RDS. ™ SURR. MODE..................Si sposta attraverso le diverse configurazioni dell’altoparlante. £ VIRTUAL MODE .............Lista delle diverse tipologie di suono surround virtuale. ≤ SURROUND ON/OFF .....Si sposta tra le tipologie surround e stereo selezionate per ultime. 115 Italiano ≤ £ ™ ¡ )( * & ^ % $ TELECOMANDO Uso del telecomando Aprire il comparto batterie del telecomando ed inserirvi 2 batterie alcaline di tipo AA (R06, UM-3). Estrarre le batterie esaurite o se si pensa di non utilizzare il telecomando per lungo tempo. MUTE PHONO TUNER CD CDR/TAPE TV VCR SAT DVD Le batterie contengono sostanze chimiche, pertanto devono essere smaltite in modo corretto. I pulsanti sul telecomando funzionano come quelli corrispondenti sul ricevitore. Importante! Per spostare la sorgente del suono sul ricevitore bisogna premere il tasto relativo per più di 1 secondo. Se lo si preme per meno di 1 secondo si trasferisce al telecomando la gestione dei comandi per il prodotto selezionato. 2 H 1 2 3 4 5 6 7 8 9 CINEMA GO CABLE BOX 0 GUIDE Il telecomando resta sintonizzato sulla sorgente selezionata sino a quando non si preme un altro pulsante dello stesso. Ciò consente di azionare delle sorgenti aggiuntive (ad esempio di avvolgere un nastro), senza cambiare la sorgente sul ricevitore. OK MENU Italiano É A ATV NEWS/TA Ç CHANNEL/TRACK LOUDNESS SUBW. ON/ OFF í ë REC CANCEL AUDIO DVD NIGHT INDEX Å T-C VIRTUAL SURROUND DISC + FR.D. MODE REAR SURROUND + MODE SUB WOOFER - TEST TONE CHANNEL 116 ON/ OFF Pulsanti del telecomando H MUTE .......................Disattiva l’audio del ricevitore in tutte le modalità, tranne TV. Disattiva l’audio del televisore Philips se il telecomando è in modalità TV. 2 ................................Mette in standby la sorgente selezionata sul telecomando (ad es. VCR, TV). Se premuto per più di 2 secondi, il ricevitore passa in standby. PHONO, TUNER, CD, CDR/TAPE, TV, VCR, SAT, DVD..............Sposta il telecomando sui comandi dei diversi prodotti. Seleziona le sorgenti se premuto per più di 1 secondo. SAT funziona solo con ricevitori satellitari digitali. Riattiva il ricevitore dalla condizione di standby. 1–0................................Immette i numeri di brani, stazioni o frequenze. I numeri composti da due cifre devono essere immessi entro 2 secondi. CINEMA GO..........Attiva CINEMA LINK sulla TV. CABLE BOX ...................Senza funzione. MENU GUIDE ..............TUNER: attiva e disattiva il menu del ricevitore. DVD, TV: attiva e disattiva il menu DVD/TV. OK .................................Conferma le opzioni del menu. Pulsanti con le frecce...TUNER: Consente di spostarsi attraverso il menu. Le frecce verso sinistra/verso destra spostano nella sintonia verso l’alto/il basso. CD, CDR: Le frecce verso sinistra/verso destra ricercano indietro/in avanti, le frecce verso l’alto/il basso selezionano il brano successivo/precedente. +A ...........................Aumenta il volume del ricevitore. -A ...........................Diminuisce il volume del ricevitore. NEWS/TA .................Attiva e disattiva le funzioni NEWS e TRAFFIC ANNOUNCEMENT. TV: Attiva e disattiva il televideo. SAT: Attiva e disattiva il testo informativo. ÉATV ......................Aumenta il volume della TV. CD, CDR, VCR, DVD: Avvia la riproduzione. ÇATV ......................Diminuisce il volume della TV. CD, CDR, VCR, DVD: Arresta la riproduzione. i í CHANNEL/TRACK ...Seleziona la precedente stazione del sintonizzatore preimpostata. VCR: Riavvolge il nastro. CD, CDR, DVD: Seleziona il brano precedente. TV: Seleziona il canale precedente. ë CHANNEL/TRACK ...Seleziona la successiva stazione del sintonizzatore preimpostata. VCR: Avvolge velocemente in avanti il nastro. CD, CDR, DVD: Seleziona il brano successivo. TV: Seleziona il canale successivo. LOUDNESS ...................Attiva e disattiva LOUDNESS. SUBW. ON/OFF ............Attiva e disattiva i bassi. REC, DVD AUDIO..........CDR, VCR: Avvia la registrazione. DVD: Attiva i brani audio. CANCEL, DVD ...........CD, CDR, SAT, VCR: Elimina un programma, annulla le selezioni. DVD: Attiva l’angolo di visualizzazione. FR.D., DVD Å .............TUNER: Sposta su FREQUENCY DIRECT. CD, CDR, VCR, DVD: Arresta momentaneamente la riproduzione. INDEX, DVD T-C............VCR: Attiva e disattiva la ricerca dell’indice. SAT: Attiva e disattiva gli argomenti. DVD: Sposta tra titolo e capitolo. DISC..............................Variatori di CD-, CDR-, DVD: Sposta al disco successivo. NIGHT ...........................Attiva e disattiva NIGHT MODE. VIRTUAL MODE ............Scorrimento delle diverse tipologie di suono surround virtuale. SURROUND ON/OFF ....Attiva e disattiva SURROUND SOUND. +/- SUBWOOFER...Aumenta/diminuisce il volume dei subwoofer. +/- REAR ...............Aumenta/diminuisce il volume degli altoparlanti posteriori. Mentre è attivo il rivelatore acustico di test, è possibile aumentare/diminuire con questi pulsanti il volume degli altoparlanti in funzione. SURROUND MODE.......Scorre attraverso i diversi modi surround. TEST TONE ...................Attiva e disattiva il rivelatore acustico di test. Mentre è attivo il rivelatore acustico di test, è possibile aumentare/diminuire con +/- REAR il volume degli altoparlanti in funzione. 117 Italiano TELECOMANDO TELECOMANDO Programmazione del telecomando universale (solo per FR 985, FR 986, FR 995, FR 996) Un telecomando universale si distingue mediante la dicitura Multibrand/Universal. Programmare il telecomando universale in modo da utilizzare i codici degli apparecchi di marche diverse. Ciò avviene immettendo un codice a 4 cifre, oppure eseguendo una scansione dei codici, sino ad individuare quello esatto. Noi consigliamo di usare il codice a 4 cifre, poiché questo metodo è più rapido ed affidabile. Utilizzare il metodo di scansione dei codici solo se non si riesce ad individuare il codice relativo ad un apparecchio. La tabella dei codici è riportata in fondo al presente manuale. Importante! Per programmare, utilizzare solo i pulsanti del telecomando, non quelli del ricevitore o di altri apparecchi. Programmazione con il codice a 4 cifre 1 Mantenere premuti per 3 secondi il pulsante sorgente relativo all’apparecchio da controllare e 2. 2 Immettere il codice a 4 cifre relativo all’apparecchio (la tabella dei codici è riportata in fondo al presente manuale). Italiano Note: – Se si immettono più di 4 cifre, il telecomando riconosce soltanto quelle immesse per prime. – Se non si immette alcun codice per 30 secondi, il telecomando disattiva la funzione di programmazione senza cambiare il codice. – Per programmare un nuovo apparecchio, basta sovrascrivere il vecchio codice digitandone uno nuovo. Scansione della tabella dei codici 1 Accendere l’apparecchio che si desidera controllare. 2 Mantenere premuti per 3 secondi il pulsante sorgente relativo all’apparecchio da controllare e 2. 3 Premere e rilasciare nuovamente 2. y Il telecomando invia i codici per ricercare il canale successivo o per portarsi in modo standby (secondo la sorgente selezionata), una marca dopo l’altra. 4 Non appena l’apparecchio risponde – si sintonizza sul canale successivo o si mette in modo standby – premere 2 per confermare il codice. y Verrà utilizzato il codice identificato. • Se l’apparecchio non reagisce entro 2 minuti, il codice di questo apparecchio non è memorizzato nel telecomando. Il codice del telecomando resta invariato. Nota: Se si estraggono le batterie dal telecomando per un tempo superiore a 1 minuto, è necessario riprogrammare i codici. 118 Annotare qui i codici individuati e testati per diversi apparecchi. PHONO .......................................... TUNER........................................... CD ................................................. CDR/TAPE ..................................... TV .................................................. VCR ............................................... SAT................................................ DVD ............................................... Ripristino del telecomando 1 Tenere premuto i tasti di fonte e 2 per 3 secondi. 2 Digitare il codice a 3 cifre 981. y A questo punto il telecomando è ripristinato per tutti i codici originali Philips. CONNETTORI ¤ ™£≤∞§ ≥•ª º ⁄ A ANTENN A ANTENN P AM LOO UT VIDEO IN/O S-VIDEO DIGITAL AUDIO IN/OUT 2 OPTICAL IN DVD MON VCR VCR C A U TI CINEMA LINK SAT R L/ 6 CHANNE T DVD INPU SUBW. DVD IN MON OUT FER SUBWOO T PRE-OU OUT IN OUT IN VCR REC PLAY SAT IN CENTER UT AUDIO IN/O SAT COAX OUT CDR/TAP CENTER E CD VCR PHONO TV R COAX 2 IN EACH L COAX 1 IN R IN IN IN PLAY OUT REC IN IN IN PLAY L SPEAKE R≥6Ω FRONT SPEAKERS SURROUND SPEAKERS AUDIO IN/OUT Entrata a 6 canali DIGITAL AUDIO IN/OUT VIDEO IN/OUT Connettori dell’antenna Uscite preamplificate Bus di controllo del sistema Prese di alimentazione (non su tutte le versioni) Conduttore di rete CHOC ELE R VRI 100W TOTAL MAX. SWI TCHED OUT REC ^ % $ # @ ! 09 8 7 6 Connettori Presa cuffie 6,3 mm anteriormente. Ingressi audio e video anteriormente (solo per FR 995, FR 996). QUE DE OU RIS n NE PAS Europea ips in the by Phil s. eloped oratorie the d and dev Dolby Lab Designeity. se from O LOGIC“ and Dol by er licen Commun tured und DIGITAL“, ”PRema rks of ks. LBY Manufac are trad shed Wor rved. “, ”DO rese ts ”DOLBY-D Sym bol ntial Unpubli righ ater ories. All Dig ital The dou ble ories. Confide r worldLaborat Laborat 997 Dolby er lice nse from 2 and othe ”DT S ©1992–1 ture d und No. 5,451,94. ”DT S“ and ater Man ufacInc. US Pat.and pen ding of Digital The s, s. System System nts issu ed trademarks Theater nd“ areht 1996 Digital wid e pate Surrou Digital s, Inc. Copyrig d. System Rights Reserve All Inc. AV IS ND SURROURS SPEAKE CENTER T PRE-OU ON SHOCK ELECTRIC RISK OF NOT OPEN E DO CTRIQU L 1 OPTICAL IN ) ( * & LET . Nome del connettore 1 PHONES 5 4 3 2 1 Collegare a: Cuffia con spina da 6,3 mm. 2 FRONT AV / GAME Prese audio di destra e di sinistra per accessori quali le video camere e le consolle dei giochi. 3 FRONT AV / GAME Prese video per accessori quali le video camere e le consolle dei giochi. 4 R, L Altoparlante anteriore sinistro e destro. 5 CENTER Altoparlante centrale. 6 R, L Altoparlante surround sinistro e destro. 8 CDR/TAPE OUT Entrata di un registratore CD o di una piastra di registrazione. 9 CDR/TAPE IN Uscita di un registratore CD o di una piastra di registrazione. 0 CD IN Uscita di un lettore di CD. ! SAT IN Uscita di un sistema satellitare. @ VCR OUT Entrata di un videoregistratore. # VCR IN Uscita di un videoregistratore. $ TV IN Uscita di una TV. % PHONO IN Uscita di un giradischi con bobina MM. ¡ PHONO GND f Cavo di massa di un giradischi. ^ 6 CHANNEL / DVD INPUT Uscita a 6 canali di apparecchiature, come riproduttori DVD o di dischi laser. & COAX 1 IN Uscita coassiale di apparecchi digitali (ingresso difettoso sorgente DVD). * COAX 2 IN Uscita coassiale di apparecchi digitali. ( COAX OUT Entrata coassiale di apparecchi digitali, come registratori CD o MD. ) OPTICAL IN Uscita ottica di apparecchi digitali, come riproduttori DVD, lettori di CD, registratori CD o riproduttori MD (solo per FR 984, FR 985, FR 986, FR 994). ) OPTICAL 1 (2) IN Uscita ottica di apparecchi digitali, come riproduttori DVD, lettori di CD, registratori CD o riproduttori MD (solo per FR 995, FR 996). ™ S-VIDEO Ingressi/uscite dell’S-Video per gli accessori del video atti a migliorarne la qualità (solo per FR 994, FR 995, FR 996). £ DVD IN Uscita di un riproduttore DVD. ≤ MON OUT Entrata di un monitor (ad es. la TV). § VCR IN Uscita di un videoregistratore. ≥ VCR OUT Entrata di un videoregistratore (per registrare). ª SAT IN Uscita di un sistema satellitare. ∞ AM LOOP Antenna a telaio in dotazione. • FM 75 Ω Antenna metallica in dotazione o antenna esterna. 7 CENTER PRE-OUT Entrata di una TV, se utilizzata come altoparlante centrale (possibile solo se è collegato il bus di sistema CINEMA LINK). º SUBWOOFER PRE-OUT Entrata di un subwoofer alimentato. ⁄ CINEMA LINK Prese bus di controllo del sistema di una TV Philips con CINEMA LINK. ¤ AC OUTLET Alimenta la stessa tensione di rete. Carico totale massimo consentito di 100 W. ‹ Dopo avere eseguito tutti gli altri collegamenti, collegare questo conduttore di rete alla presa a muro. 119 Italiano ¡ AC OUT FRONT RS SPEAKE 6Ω AKER ≥ EACH SPE FM 75 Ω PHONO GND ‹ COLLEGAMENTI Connessioni audio analogiche Su alcuni apparecchi sono presenti dei connettori sia analogici che digitali. Se possibile, utilizzare il collegamento digitale, perché di solito questo genera una migliore qualità sonora. Per informazioni sulle modalità di utilizzo dei connettori digitali del ricevitore, vedere «Riassegnazione della selezione di una sorgente». conseguenza, non può essere decodificato e riprodotto nella maggior parte dei lettori CD, LD, o DVD. Per questo motivo, quando il software DTS codificato viene riprodotto attraverso le uscite analogiche del lettore CD, LD o DVD, il suono risulterà particolarmente disturbato. Per evitare eventuali danni al sistema audio, è opportuno che il cliente prenda le dovute precauzioni, se le uscite analogiche sono collegate direttamente al ricevitore. Se si utilizza un disco laser digitale Dolby, è necessario un demodulatore opzionale AC-3 RF, a causa di un diverso tipo di segnale di uscita. Per ottenere una riproduzione in DTS Digital Surround™, è necessario collegare ad una delle entrate digitali del ricevitore un lettore DTS compatibile. DTS Digital Surround™ è un formato audio digitale discreto a 5,1 canali disponibile con software CD, LD e DVD, che, di ANTENNA PHONO GND. FM 75 Ω AM LOOP DIGITAL AUDIO IN/OUT OPTICAL 2 IN DVD VIDEO IN/OUT S-VIDEO MON VCR FRONT SPEAKERS EACH SPEAKER ≥ 6 Ω SAT VCR CINEMA LINK OPTICAL 1 IN IN 6 CHANNEL / DVD INPUT CENTER SUBW. OUT SUBWOOFER DVD IN MON OUT IN OUT PLAY VCR REC PHONO TV VCR SAT IN PRE-OUT CENTER R CAUTION L COAX OUT MONITOR / TV RISK OF ELECTRIC SHOCK DO NOT OPEN COAX 2 IN AUDIO OUT SURR. FRONT AUDIO IN/OUT SAT CD CENTER PRE-OUT CDR/TAPE AVIS SURROUND SPEAKERS R IN IN IN PLAY IN OUT REC IN PLAY IN R OUT REC L EACH SPEAKER ≥ 6 Ω TURNTABLE RISQUE DE CHOC ELECTRIQUE NE PAS OUVRIR Designed and developed by Philips in the European Community. Manufactured under license from Dolby Laboratories. ”DOLBY“, ”DOLBY DIGITAL“, ”PRO LOGIC“ and the double-D Symbol are trademarks of Dolby Laboratories. Confidential Unpublished Works. ©1992–1997 Dolby Laboratories. All rights reserved. Manufactured under license from Digital Theater Systems. Inc. US Pat. No. 5,451,942 and other worldwide patents issued and pending. ”DTS“ and ”DTS Digital Surround“ are trademarks of Digital Theater Systems, Inc. Copyright 1996 Digital Theater Systems, Inc. All Rights Reserved. L COAX 1 IN CD RECORDER Italiano IN POWERED SUBWOOFER OUT VCR AUDIO OUT CD PLAYER AUDIO IN SAT RECEIVER Collegamenti audio digitali CD RECORDER ANTENNA PHONO GND. FM 75 Ω AM LOOP DIGITAL AUDIO IN/OUT OPTICAL 2 IN CD PLAYER DVD VIDEO IN/OUT S-VIDEO MON VCR FRONT SPEAKERS VCR EACH SPEAKER ≥ 6 Ω SAT CINEMA LINK OPTICAL 1 IN IN 6 CHANNEL / DVD INPUT CENTER SUBW. OUT SUBWOOFER DVD IN MON OUT IN OUT PLAY VCR REC SAT IN PRE-OUT CENTER R CAUTION L COAX OUT RISK OF ELECTRIC SHOCK DO NOT OPEN COAX 2 IN SURR. FRONT PHONO AUDIO IN/OUT VCR SAT TV CD CDR/TAPE CENTER PRE-OUT SURROUND SPEAKERS L COAX 1 IN R IN DVD PLAYER 120 IN IN PLAY OUT REC IN IN IN PLAY OUT REC R L EACH SPEAKER ≥ 6 Ω AVIS RISQUE DE CHOC ELECTRIQUE NE PAS OUVRIR Designed and developed by Philips in the European Community. Manufactured under license from Dolby Laboratories. ”DOLBY“, ”DOLBY DIGITAL“, ”PRO LOGIC“ and the double-D Symbol 2 are trademarks of Dolby Laboratories. Confidential Unpublished Works. ©1992–1997 Dolby Laboratories. All rights reserved. Manufactured under license from Digital Theater Systems. Inc. US Pat. No. 5,451,942 and other worldwide patents issued and pending. ”DTS“ and ”DTS Digital Surround“ are trademarks of Digital Theater Systems, Inc. Copyright 1996 Digital Theater Systems, Inc. All Rights Reserved. COLLEGAMENTI Bus di controllo sistema, CINEMA LINK Se il ricevitore e la vostra TV Philips (o meglio ancora in aggiunta un VCR Philips o un DVD player) con Cinemalink sono connessi al sistema di controllo CINEMA LINK vengono offerti alcuni vantaggi extra: – In seguito all’attivazione di una sorgente, il sistema si commuta automaticamente su quell’entrata. – Il sistema può essere controllato mediante schermo TV nella lingua preferita, secondo la lingua della TV. – La TV può funzionare come altoparlante centrale del sistema, rendendo inutile l’uso di un altoparlante centrale separato. (Il cavo A deve essere acquistato separatamente.) – Premendo il tasto di standby sul telecomando si posiziona l’intero sistema in standby. TV EXT 1 EXT 2 EXT 3 TV AUX DVD PLAYER DIGITAL OUT optional A (TV = CENTER) ANTENNA PHONO GND. FM 75 Ω AM LOOP DIGITAL AUDIO IN/OUT OPTICAL 2 IN VCR VIDEO IN/OUT S-VIDEO MON VCR DVD FRONT SPEAKERS VCR EACH SPEAKER ≥ 6 Ω SAT CINEMA LINK OPTICAL 1 IN IN 6 CHANNEL / DVD INPUT CENTER SUBW. OUT SUBWOOFER DVD IN MON OUT IN OUT PLAY VCR REC SAT IN PRE-OUT CENTER R CAUTION L COAX OUT RISK OF ELECTRIC SHOCK DO NOT OPEN COAX 2 IN SURR. FRONT PHONO AUDIO IN/OUT VCR SAT TV CENTER PRE-OUT CDR/TAPE CD AVIS SURROUND SPEAKERS R IN IN IN PLAY IN OUT REC IN PLAY IN R OUT REC RISQUE DE CHOC ELECTRIQUE NE PAS OUVRIR Designed and developed by Philips in the European Community. Manufactured under license from Dolby Laboratories. ”DOLBY“, ”DOLBY DIGITAL“, ”PRO LOGIC“ and the double-D Symbol are trademarks of Dolby Laboratories. Confidential Unpublished Works. ©1992–1997 Dolby Laboratories. All rights reserved. Manufactured under license from Digital Theater Systems. Inc. US Pat. No. 5,451,942 and other worldwide patents issued and pending. ”DTS“ and ”DTS Digital Surround“ are trademarks of Digital Theater Systems, Inc. Copyright 1996 Digital Theater Systems, Inc. All Rights Reserved. L COAX 1 IN L EACH SPEAKER ≥ 6 Ω Italiano CINEMA LINK TO TV IN TO VCR IN Collegamenti video MONITOR / TV DVD PLAYER ANTENNA PHONO GND. FM 75 Ω AM LOOP DIGITAL AUDIO IN/OUT OPTICAL 2 IN DVD VIDEO IN/OUT S-VIDEO MON VCR FRONT SPEAKERS VCR EACH SPEAKER ≥ 6 Ω SAT CINEMA LINK OPTICAL 1 IN IN 6 CHANNEL / DVD INPUT CENTER SUBW. OUT SUBWOOFER DVD IN MON OUT IN OUT PLAY VCR REC SAT IN PRE-OUT CENTER R CAUTION L COAX OUT RISK OF ELECTRIC SHOCK DO NOT OPEN COAX 2 IN SURR. FRONT PHONO AUDIO IN/OUT VCR SAT TV CD CDR/TAPE CENTER PRE-OUT SURROUND SPEAKERS L COAX 1 IN R IN IN IN PLAY OUT REC IN IN IN PLAY OUT REC R L EACH SPEAKER ≥ 6 Ω AVIS RISQUE DE CHOC ELECTRIQUE NE PAS OUVRIR Designed and developed by Philips in the European Community. Manufactured under license from Dolby Laboratories. ”DOLBY“, ”DOLBY DIGITAL“, ”PRO LOGIC“ and the double-D Symbol are trademarks of Dolby Laboratories. Confidential Unpublished Works. ©1992–1997 Dolby Laboratories. All rights reserved. Manufactured under license from Digital Theater Systems. Inc. US Pat. No. 5,451,942 and other worldwide patents issued and pending. ”DTS“ and ”DTS Digital Surround“ are trademarks of Digital Theater Systems, Inc. Copyright 1996 Digital Theater Systems, Inc. All Rights Reserved. VCR VIDEO OUT VIDEO IN SAT RECEIVER 121 COLLEGAMENTI Rete TV come altoparlante centrale La piastrina del modello si trova sul retro del ricevitore. La TV Philips può essere utilizzata con CINEMA LINK come altoparlante centrale. Per le TV dotate di presa scart, è necessario un cavo audio aggiuntivo cinch-to-scart. Per le TV dotate di prese cinch, sono necessari cavi cinch aggiuntivi. Questi cavi devono esser collegati al connettore blu CENTER PRE-OUT posto sul retro. Per maggiori informazioni sulle modalità di utilizzo della TV come altoparlante centrale, fare riferimento al manuale d’istruzioni dell’apparecchio. 1 Controllare che la tensione di rete indicata sulla piastrina del modello corrisponda alla tensione di rete locale. Se ciò non dovesse essere, consultare il rivenditore o il centro assistenza. 2 Collegare il cavo di rete alla presa a muro. Per scollegare completamente l’apparecchio dalla rete, togliere la spina di rete dalla presa a parete. Collegamenti dell’antenna Controllo dell‘alimentazione Se l’alimentazione utilizzata per il ricevitore è molto alta, può generare distorsioni, in grado di danneggiare gravemente gli altoparlanti. In caso di distorsione, ridurre ad un livello sonoro accettabile i comandi di tono e volume. Per evitare il surriscaldamento l’apparecchio è dotato di un circuito di sicurezza. Perciò, in condizioni eccezionali, il vostro apparecchio può spegnersi. Se questo accade, spegnete l’apparecchio, dangoli il tempo di raffreddarsi prima di tornarlo a usare. Dopo avere lasciato raffreddare l’apparecchio, accenderlo nuovamente e selezionare la sorgente desiderata ruotando SOURCE SELECT. Italiano Collegamenti degli altoparlanti Alcuni collegamenti degli altoparlanti sul ricevitore sono connettori a vite, mentre altri sono connettori sono con inserimento a scatto. Essi devono essere utilizzati nel modo indicato di seguito. 7m Antenna AM (MW) L’antenna a telaio in dotazione è destinata al solo uso interno. Posizionare l’antenna alla massima distanza possibile da ricevitore, TV, cavi, lettore DVD, VCR e da altre sorgenti di radiazioni. 1 Inserire la spina dell’antenna a telaio in AM LOOP nel modo indicato di seguito. 2 Ruotare l’antenna sino ad ottenere la migliore ricezione. A ANTENN P AM LOO Antenna FM L’antenna metallica in dotazione può essere utilizzata solo per ricevere stazioni vicine. Per una migliore ricezione, consigliamo di utilizzare un’antenna a cavo o da esterni. 1 Inserire l’antenna metallica in dotazione in FM 75 Ω nel modo indicato di seguito. m 2 Ruotare l’antenna in diverse posizioni, sino ad ottenere la migliore ricezione. 1 2 3 • Se si usa un’antenna a cavo o esterna, inserirne la spina in FM 75 Ω, invece di collegare l’antenna metallica. FM 75 Ω m 8m 1 2 3 1 Collegare sempre il filo colorato (o contrassegnato) al terminale colorato ed il filo nero (o non contrassegnato) al terminale nero. 2 Collegare: – Altoparlante anteriore sinistro a L (rosso e nero) – Altoparlante anteriore destro a R (rosso e nero) – Altoparlante centrale a CENTER (blu e nero) – Altoparlante surround sinistro a SURROUND L (grigio e nero) – Altoparlante surround destro a SURROUND R (grigio e nero) 122 FM 75 Ω Cuffie Il collegamento delle cuffie a PHONES disattiva gli altoparlanti. Il ricevitore si posiziona su STEREO ed il suono surround viene ridotto ad un segnale stereo riproducibile mediante le cuffie standard. Se si scollegano le cuffie, si riattivano gli altoparlanti. Per riascoltare il suono in surround, riportare il ricevitore su surround. REGOLAZIONE DEL SISTEMA FR ON T LEFT RIGHT SU BW OO FE R CENTER SURROUND (REAR) LEFT RIGHT SURROUND (REAR) Posizionamento degli altoparlanti Informazioni di carattere generale sul posizionamento Evitare di posizionare gli altoparlanti in un angolo o sul pavimento, per non potenziare troppo i toni bassi. La collocazione degli altoparlanti dietro tende, mobili, ecc. ridurrà, invece, la risposta dei toni acuti. L’ascoltatore dovrà sempre «vedere» gli altoparlanti. Ogni stanza presenta caratteristiche acustiche differenti, con possibilità di sistemazione degli altoparlanti spesso limitate. La migliore posizione di questi è indicata nella figura precedente. Per ottenere un buon suono surround, consigliamo almeno 5 altoparlanti (2 anteriori, uno centrale, 2 surround). È anche possibile riprodurre un tipo di suono surround utilizzando un numero minore di altoparlanti e ridirigendo sugli altoparlanti presenti i segnali previsti per quelli mancanti. Per informazioni sulle modalità di impostazione corretta del ricevitore, in relazione al numero ed alle dimensioni degli altoparlanti utilizzati, vedere la sezione «Menu». Posizionamento degli altoparlanti anteriori Posizionare gli altoparlanti anteriori a sinistra e a destra di fronte alla posizione di ascolto, come i normali altoparlanti stereo. Posizionamento dell’altoparlante centrale Posizionare l’altoparlante centrale al centro tra i due anteriori, ad es. sotto o sopra la TV. L’altezza ottimale per l’altoparlante centrale è quella corrispondente alle orecchie dell’ascoltatore (seduto). Posizionamento degli altoparlanti surround Gli altoparlanti surround devono essere posti uno di fronte all’altro ed essere allineati con l’ascoltatore, o leggermente dietro ad esso. Posizionamento del subwoofer Un subwoofer può essere utilizzato per migliorare notevolmente la riproduzione dei toni bassi del sistema. Il subwoofer può essere posizionato in un punto qualsiasi della stanza, poiché non è possibile individuare la sorgente dei toni bassi. Tuttavia, esso non dovrà essere collocato al centro della stanza, per non indebolire notevolmente i bassi. Non poggiare oggetti al di sopra di esso. Regolazione e test degli altoparlanti Regolare il volume relativo degli altoparlanti, in modo da ricevere al meglio il suono surround. Per regolare il volume, porsi nella posizione d’ascolto abituale. Per maggiori informazioni sulle modalità di regolazione del ricevitore per gli altoparlanti utilizzati, vedere la sezione «Menu del ricevitore». L’ideale è che il volume nella posizione di ascolto sia uguale da tutti gli altoparlanti. 1 Premere POWER / STANDBY per accendere il ricevitore. 2 Premere TEST TONE sul telecomando. y Si sente un tono di prova proveniente dai diversi altoparlanti, eccetto il subwoofer. 3 Premere +/- REAR sul telecomando per aumentare/ diminuire il volume dell’altoparlante in funzione. I migliori risultati si ottengono quando tutti gli altoparlanti hanno un volume uguale nella posizione d’ascolto. 4 Premere TEST TONE sul telecomando. y Il segnale acustico di test si arresta. Nota: Se non si è del tutto soddisfatti delle regolazioni del volume, consigliamo di eseguire ulteriori piccole modifiche dello stesso durante la riproduzione del suono surround. Regolazione del ricevitore Una volta determinati il numero e la posizione degli altoparlanti, è possibile regolare le impostazioni del ricevitore iniziale per creare un eccezionale effetto surround, con l’installazione effettiva: 1 Stabilire quali altoparlanti sono stati collegati al ricevitore (vedi „Struttura del menu/* SPEAKR SETUP”). Nota: L’impostazione iniziale del ricevitore è: due altoparlanti anteriori sinistro e destro: presenti (non possono essere modificati) altoparlante centrale: presente due altoparlanti posteriori: presenti altoparlante per toni bassi: presente 2 Selezionare la dimensione degli altoparlanti (SMALL o LARGE) (vedi „Struttura del menu/* SPEAKR SIZES”). Selezionare SMALL se l’altoparlante è in grado di riprodurre toni bassi fino ad almeno 80–100 Hz. Selezionare LARGE se l’altoparlante è in grado di riprodurre toni bassi fino ad almeno 50 Hz. (Di norma, un altoparlante LARGE ha un diametro del cono di almeno 12 cm (5 pollici).) Consultare le schede tecniche degli altoparlanti. Nota: FR 985, FR 986, FR 995, FR 996: L´impostazione iniziale del ricevitore è: tutti gli altoparlanti regolati su LARGE. FR 984, FR 994: L´impostazione iniziale del ricevitore è: tutti gli altoparlanti regolati su SMALL. 3 Impostare la distanza fra gli altoparlanti e la posizione dell’ascoltatore (vedi „Struttura del menu/ * SPK DISTANCE”). 123 Italiano NT FRO DISPLAY Indicatori luminosi di stato Display Il display del ricevitore si divide in 4 sezioni, da utilizzare come segue: Diagramma dell’altoparlante Questi indicatori segnalano le diverse impostazioni e le informazioni sullo stato del ricevitore. PRESET ......................il Un rettangolo contenente una lettera indica che un altoparlante è stato selezionato nel menu di installazione. Tuttavia, l’indicatore del subwoofer si accende solo quando è disponibile un segnale subwoofer. Se è indicata solo una lettera, questo altoparlante non è utilizzato ed il suono è riprodotto dagli altri. ......suono surround virtuale del suono surround DIGITAL SURROUND ....riproduzione del suono surround digitale L, R ...........................altoparlante anteriore sinistro e destro C ...............................altoparlante centrale SL, SR .......................altoparlanti surround SW ............................il subwoofer SURROUND.................riproduzione Indicazioni del menu Italiano Questi indicatori segnalano se il menu è acceso o spento, nonché la direzione in cui ci si può spostare. M E N U .......................il menu è acceso 1..............................per spostarsi indietro sull’elemento precedente del menu, mediante 1 PREV. / EXIT (tasto «sinistra» del telecomando) 3 .............................per spostarsi in alto in un elenco di opzioni, mediante X MENU NAVIGATOR (tasto «alto» del telecomando) 4 .............................per spostarsi in basso in un elenco di opzioni, mediante X MENU NAVIGATOR (tasto «basso» del telecomando) 2..............................per spostarsi in avanti sull’elemento successivo del menu, mediante NEXT 2 (tasto «destra » del telecomando) O K.............................per confermare il valore visualizzato sintonizzatore è sintonizzato su una stazione radio preimpostata SENS HI .....................il sintonizzatore è regolato su alta sensibilità SENS LO ..................il sintonizzatore è regolato su bassa sensibilità C I N E M A L I N K O N ......CINEMA LINK è attivo STEREO ......................ricezione di una stazione FM in stereo R.............................ricezione di una stazione RDS EON ...........................ricezione di una stazione RDS con EON HALL..........................effetto HALL attivo TA .............................funzione informazioni sul traffico RDS attiva NEWS ........................funzione notiziario RDS attiva ANA ..........................uso di entrata analogica per la sorgente di riproduzione N I G H T .......................funzione NIGHT MODE attiva COAX 1 ......................uso dell’entrata digitale coassiale COAX 1 per la sorgente di riproduzione COAX 2 .....................uso dell’entrata digitale coassiale COAX 2 per la sorgente di riproduzione D O W N M I X .................riduzione dei segnali multicanale in entrata in un minore numero di segnali in uscita (secondo il numero degli altoparlanti) OPT ...........................uso dell’entrata digitale ottica OPTICAL IN per la sorgente di riproduzione (solo per FR 984, FR 985, FR 986, FR 994). OPT 1 ........................uso dell’entrata digitale ottica OPTICAL 1 IN per la sorgente di riproduzione (solo per FR 995, FR 996). OPT 2 .......................uso dell’entrata digitale ottica OPTICAL 2 IN per la sorgente di riproduzione (solo per FR 995, FR 996). LOUDNESS .................funzione LOUDNESS attiva Area informativa 0 GUIDE OK MENU É A ATV NEWS/TA 124 Ç Quest’area viene utilizzata per informazioni su ricevitore, frequenze del sintonizzatore, opzioni di menu, valori e per lo scorrimento dei messaggi di testo. MENU Menu del ricevitore Nota: Quando si usa l’ingresso 6 CHANNEL / DVD INPUT, i valori in basso non possono essere variati. Il ricevitore è dotato di un sistema di menu, che viene utilizzato per impostare il ricevitore. Le diverse opzioni di menu sono correlate le une alle altre secondo un procedimento logico. Supponiamo che non vi sia alcun altoparlante centrale collegato e che, pertanto, CENTER SPEAKR (altoparlante centrale) sia impostato su NO (no). Se si cerca di utilizzare VOL CENTER (volume centrare), appare un messaggio che informa l’utente che questa operazione non è possibile (INSTALL CENTER SPEAKER - installare altoparlante centrale). * SPEAKR SETUP (regolazione altoparlanti) Seleziona gli altoparlanti utilizzati. SUBW PRESENT Subwoofer presente: yes/no (si/no) CENTER SPEAKR Altoparlante centrale presente: yes/no (si/no) REAR SPEAKER Altoparlanti posteriori presenti: yes/no (si/no) 1 Premere SETUP MENU. y MENU, ed * EFFECTS vengono visualizzati. • Si può abbandonare il menu in qualsiasi momento, premendo SETUP MENU. 2 Ruotare X MENU NAVIGATOR sino a visualizzare l’opzione (o il valore) desiderato. 3 Premere NEXT 2 per selezionare l’opzione visualizzata (o ENTER / OK per confermare un valore). • Si può abbandonare un’opzione (lasciandone invariati i valori) premendo 1 PREV. / EXIT. Struttura del menu * EFFECTS (effetti) Attiva gli effetti sonori. VIRT SURR surround virtuale: 0…100 % * VOL BALANCE (bilanciare il volume) Regola l’equilibrio di volume relativo tra gli altoparlanti collegati. TEST TONE Rivelatore acustico di test: on/off (attivato/disattivato) VOL FRONT-L Volume altoparlante anteriore sinistro: –50…+50 VOL FRONT-R Volume altoparlante anteriore destro: –50…+50 VOL CENTER Volume altoparlante centrale: –50…+50 VOL REAR-L Volume altoparlante posteriore sinistro: –50…+50 VOL REAR-R Volume altoparlante posteriore destro: –50…+50 VOL SUBWOOFER Volume subwoofer: –50…+50 * SPEAKR SIZES (dimensioni degli altoparlanti) Seleziona le dimensioni degli altoparlanti utilizzati, per generare una riproduzione sonora ottimale. LARGE indica un altoparlante può riprodurre frequenza inferiori a 50 Hz. Se SUBW PRESENT è impostato a NO, FRONT SIZE può essere impostato solo a LARGE. Se FRONT SIZE viene impostato a SMALL, CENTER SIZE può essere impostato solo a SMALL e di conseguenza deve essere collegato un subwoofer. FRONT SIZE Altoparlanti anteriori sinistro e destro: small/large (piccoli/grandi) CENTER SIZE Altoparlante centrale: small/large (piccolo/grande) REAR SIZE Altoparlanti posteriori: small/large (piccoli/grandi) * SPK DISTANCE (distanza degli altoparlanti) La distanza fra la posizione di ascolto abituale e gli altoparlanti. Definisce il tempo di ritardo per il suono surround. DISTANCE L/ R Distanza dagli altoparlanti anteriori: 1…10 m DISTANCE CNTR Distanza dall’altoparlante centrale: 1…10 m DISTANCE REAR Distanza dagli altoparlanti posteriori: 1…10 m 125 Italiano Il menu opera sempre allo stesso modo. Le frecce visualizzate sul display indicano le direzioni di spostamento possibili. MENUS * SELECT INPUT (selezione ingresso) Assegna i connettori di entrata audio alle diverse selezioni di sorgente selezionate con SOURCE SELECT (per maggiori informazioni, vedere «SELEZIONE SORGENTE»). COAX1 Entrata digitale coassiale 1, COAX 1 IN COAX2 Entrata digitale coassiale 2, COAX 2 IN OPT (solo per FR 984, FR 985, FR 986, FR 994) Entrata digitale ottica, OPTICAL IN OPT 1 (solo per FR 995, FR 996) Entrata digitale ottica, OPTICAL 1 IN OPT 2 (solo per FR 995, FR 996) Entrata digitale ottica, OPTICAL 2 IN SAT IN Entrata audio analogica SAT IN VCR IN Entrata audio analogica VCR IN TV IN Entrata audio analogica TV IN CDR IN Entrata audio analogica CDR IN CD IN Entrata audio analogica CD IN 6 CH IN Ingresso audio analogico 6 CHANNEL / DVD INPUT Italiano * TUNER (sintonizzatore) Regolazione delle stazioni radio preimpostate (per maggiori informazioni, vedere «SINTONIZZATORE»). AUTO INSTALL Memorizza automaticamente le stazioni radio MAN INSTALL Consente di assegnare dei nomi alle stazioni radio memorizzate GIVE NAME Consente di assegnare dei nomi alle stazioni radio memorizzate RESHUFFLE Riseleziona le stazioni radio memorizzate Menu della TV Se il ricevitore è collegato ad una TV Philips CINEMA LINK tramite le prese bus di controllo del sistema CINEMA LINK (vedere «COLLEGAMENTI»), si può utilizzare la TV per impostare il sistema. In questo caso, il menu della TV comprende un’opzione denominata RECEIVER. Se l’opzione CINEMA LINK è attiva, sullo schermo della TV appaiono per pochi secondi le impostazioni del ricevitore. Per maggiori informazioni sull’utilizzo del menu della TV, consultare il manuale di istruzioni dell’apparecchio. Le opzioni offerte possono variare secondo il tipo di modello della TV. Attivazione del collegamento • Premere CINEMA LINK per attivare e disattivare il collegamento tra il ricevitore e la TV. y Se il collegamento è attivato, è visualizzato CINEMA LINK ON. Nota: Consigliamo di disattivare CINEMA LINK durante la registrazione, per evitare interruzioni indesiderate dovute all’attivazione delle funzioni della TV. Se l’opzione CINEMA LINK ed il menu della TV sono attivi, viene visualizzato TV MENU ed il menu e le funzioni sonore del ricevitore sono bloccati. Attivazione di CINEMA LINK CINEMA GO sul telecomando. • Premere y La TV invia un comando di riproduzione al lettore DVD di CINEMA LINK, se presente. Il lettore DVD comincerà la riproduzione e il ricevitore passerà automaticamente al migliore suono di CINEMA LINK. • Se non è collegato nessun lettore DVD o se non è stato caricato nessun disco nel lettore DVD, la TV invierà un comando di riproduzione al videoregistratore di CINEMA LINK, se presente. y Il videoregistratore comincerà la riproduzione e il ricevitore audio selezionerà il miglior suono di CINEMA LINK. • Se non è collegato nessun videoregistratore o se non è stata caricata nessuna cassetta, la TV selezionerà l’ultimo canale TV guardato. 126 SELEZIONE SORGENTE Quando si seleziona una sorgente ruotando SOURCE SELECT, si attivano le entrate audio e video con il nome corrispondente. Il segnale in entrata viene riprodotto da tutte le uscite audio e video - se la sorgente include un segnale video - del ricevitore. La selezione di una sorgente può essere riassegnata ad entrate standard diverse da queste. Sorgente selezionata ......Connettori utilizzati DVD .................................Entrata audio digitale COAX 1 e entrata video DVD IN PHONO ............................Entrata audio PHONO IN TUNER.............................Se si utilizza la parte sintonizzatore del ricevitore, vengono disattivate tutte le entrate. CD....................................Entrata audio CD IN CDR/TAPE........................Entrata audio CDR/TAPE IN TV ....................................Entrata audio TV IN e nessuna entrata video VCR..................................Entrata audio VCR IN e entrata video VCR IN SAT..................................Entrata audio SAT IN e entrata video SAT IN Selezione 6 CHANNEL-DVD/SACD INPUT I connettori 6 CHANNEL / DVD INPUT possono essere assegnati a tutte le sorgenti disponibili (fatta eccezione per TUNER e PHONO). L’assegnazione può essere effettuata attraverso l’opzione del menu * SELECT INPUT. Vedi sotto per maggiori dettagli. Riassegnazione della selezione di una sorgente Se si seleziona una sorgente mediante SOURCE SELECT, si utilizza l’entrata audio standard. Per cambiarla, riassegnare ad un’altra entrata audio la selezione della sorgente. Esempio: Riassegnazione di CD dall’entrata audio analogica CD IN all’entrata audio digitale COAX 2 IN. 1 Selezionare * SELECT INPUT dal menu e premere NEXT 2. Uso di una selezione di sorgente per due o più apparecchi Ad una selezione si possono assegnare più sorgenti. Ciò è utile se i prodotti sono collegati in catena, uno dopo l’altro. Esempio: Un VCR è collegato alla TV, ma solo la TV è collegata al ricevitore. Entrambe le impostazioni SOURCE SELECT, della TV come del VCR, devono utilizzare i connettori di entrata della TV. 1 Selezionare * SELECT INPUT dal menu e premere NEXT 2. 2 Ruotare SOURCE SELECT per selezionare la sorgente che si desidera riassegnare (ad es. VCR). y Il nome della sorgente viene visualizzato e l’indicatore luminoso della sorgente lampeggia. 3 Ruotare X MENU NAVIGATOR per selezionare i connettori di entrata da utilizzare (ad es. VCR -> TV IN). 4 Premere ENTER / OK per confermare la selezione. y STORED appare brevemente. 5 La sorgente selezionata usa ora l’entrata audio scelta (ad es. VCR usa i connettori di entrata TV IN, VCR <TV IN> si illumina brevemente in seguito all’attivazione di VCR). Informazioni su 6 CHANNEL-DVD/SACD INPUT Il 6 CHANNEL / DVD INPUT può essere utilizzato per connettere un dispositivo con un decoder multicanale incorporato (per esempio il Dolby Digital, il DTS. ecc.) e un connettore in uscita a 6 canali cioè un DVD/SACD player high end. Se si utilizza l’entrata audio 6 CHANNEL / DVD INPUT, il ricevitore opera come un amplificatore multicanale. La sorgente riproduce il suono surround e lo invia al ricevitore diviso nei canali necessari. Pertanto, il pulsante SURROUND ON/OFF, HALL e SURR. MODE non ha alcun effetto, perché il segnale emesso è già multicanale. Da una sorgente collegata all’entrata audio 6 CHANNEL /DVD IN non è possibile registrare. 2 Ruotare SOURCE SELECT per selezionare la sorgente che si desidera riassegnare (ad es. CD). y Il nome della sorgente viene visualizzato e l’indicatore luminoso della sorgente lampeggia. 3 Ruotare X MENU NAVIGATOR per selezionare i connettori di entrata da utilizzare (ad es. CD -> COAX2). 4 Premere ENTER / OK per confermare la selezione. y STORED appare brevemente. 5 La sorgente selezionata usa ora l’entrata audio scelta (ad es. CD usa i connettori di entrata COAX 2 IN, COAX 2 si illumina in seguito all’attivazione di CD). 127 Italiano SOURCE SELECT RIPRODUZIONE, REGISTRAZIONE Riproduzione di una sorgente Registrazione da una sorgente 1 Premere POWER / STANDBY per attivare il ricevitore. Per registrare da una sorgente, è necessario selezionarla mediante SOURCE SELECT. Il segnale in entrata viene riprodotto da tutte le uscite audio e video - se la sorgente include un segnale video - del ricevitore. Le impostazioni sonore non interessano la registrazione. 2 Ruotare SOURCE SELECT per selezionare una sorgente. y Il nome della sorgente viene visualizzato. • Si può selezionare l’entrata FRONT AV / GAME se si preme FRONT AV (solo per FR 995, FR 996). 3 Avviare la lettura della sorgente secondo il procedimento abituale. Regolazione del suono • Ruotare VOLUME per regolare volume. y VOLUME ed il livello del volume compreso fra 0 e 50 vengono visualizzati. 1 Premere BASS o TREBLE. y BASS o TREBLE ed il valore effettivo vengono visualizzati brevemente. Scorre, quindi, TURN VOLUME KNOB TO CHANGE. 2 Ruotare VOLUME per regolare i toni bassi o acuti. y BASS o TREBLE ed il valore effettivo vengono visualizzati. Italiano Nota: Se non si ruota VOLUME per 5 secondi e non si utilizza un altro comando, la regolazione dei toni bassi o acuti viene disattivata. • Se è connesso un altoparlante dei bassi, premere SUBW. ON/OFF per aumentare la resa dei bassi. Nota: Nel caso del suono sourround digitale, un segnale dei bassi sarà disponibile solo se supportato dal materiale d’origine. • Premere LOUDNESS per attivare o disattivare il livello sonoro. y LOUDNESS viene visualizzato se il livello sonoro è attivo. 1 Ruotare SOURCE SELECT (o premere FRONT AV – solo per FR 995, FR 996) per selezionare la sorgente da cui si desidera registrare. y Viene visualizzato il nome della sorgente. 2 Preparare l’apparecchio desiderato per la registrazione e collegarlo ad una delle uscite del ricevitore. 3 Avviare la registrazione sull’apparecchio. 4 Avviare la lettura della sorgente secondo il procedimento abituale. Note: – Il segnale audio e video di VCR IN non è riprodotto mediante VCR OUT. Lo stesso vale per il segnale audio di CDR/TAPE IN su CDR/TAPE OUT. – Raccomandiamo di non usare l’uscita digitale COAX OUT del ricevitore per registrare da una sorgente analogica. Usare, invece, l’uscita analogica CDR/TAPE. – Da una sorgente collegata all’entrata audio 6 CHANNEL / DVD INPUT non è possibile registrare. Registrazione dalla uscita digitale Si può collegare un registratore digitale all’uscita digitale del ricevitore. In questo modo, tutti i segnali provenienti dagli ingressi digitali possono essere registrati direttamente sul registratore audio. Il ricevitore convertirà anche tutti i segnali provenienti dagli ingressi analogici a uscite digitali. Il ricevitore può essere usato per registrare digitalmente un segnale suono audio di surround multicanale (Dolby Digital, DTS o MPEG) da, ad esempio, DVD a CD-R. Il ricevitore convertirà il segnale digitale multicanale in segnale stereo senza perdita di rilevanti informazioni del suono. Note: – Quando si registra un segnale Dolby Digital, DTS o MPEG ogni traccia deve essere registrata individualmente. – La registrazione digitale non è possibile quando il materiale originario digitale è protetto. 128 SUONO SURROUND Informazioni sul suono surround Attivazione del suono surround Il suono surround genera all’ascolto una sensazione completamente nuova. Si ha, infatti, la sensazione di essere al centro dell’azione, perché il suono arriva da tutti i punti intorno a sé. Ricercate le trasmissioni TV, audio e video cassette e dischi contraddistinti dai simboli 3, 1, o , che rappresentano il suono surround multicanale. Per ottenere il meglio dal vostro ricevitore è preferibile il Dolby Digital, il DTS o il MPEG. Se il suono surround è attivo, è possibile commutarsi tra i diversi modi surround. Notare che le possibilità dipendono dalle impostazioni degli altoparlanti definite nel menu del ricevitore. Tenere presente che i dischi DVD non producono sempre un surround multicanale completo. Consultare il rivenditore autorizzato, per essere certi che un disco abbia la codifica multicanale. La maggior parte dei dischi e delle cassette stereo più comuni può essere riprodotta con buoni risultati mediante le impostazioni sonore surround. Se la riproduzione è distorta in modo surround, passare al normale modo stereo. La disponibilità dei diversi modi sonori surround descritti dipende dal numero di altoparlanti utilizzati e dalle informazioni sonore in entrata. 1 Premere SURROUND ON/OFF per attivare il suono surround. y Viene eseguito lo scorrimento del modo surround in uso. 2 Premere ripetutamente SURR. MODE per ascoltare i diversi modi surround (se disponibili). yVengono selezionati il modo selezionato e gli altoparlanti utilizzati. Se i segnali multicanali in entrata si riducono in un numero inferiore di segnali in uscita, viene visualizzato DOWNMIX. 3 Premere VIRTUAL MODE un numero di volte necessario per spostarvi sulle diverse tipologie virtuali del suono surround: 1 volta per attivare 3D SURROUND 2 volta per attivare MULTI FRONT 3 volta per attivare MULTI REAR 4 volta per attivare NATURAL SURROUND yUna spia indica se è attivato un suono surround virtuale. Questo simbolo indica quale tipologia di suono surround virtuale è attivata. Italiano Il vostro ricevitore è in grado di riprodurre il suono DTS surround. Il DTS è un sistema sofisticato di suono surround multicanale disponibile su dischi DVD, su dischi laser e su dischi audio. Consultate il vostro rivenditore per la disponibilità del software DTS nella vostra regione. Se si rileva un segnale digitale di surround il ricevitore seleziona il DOLBY DIGITAL o il DTS o il MPEG. 4 Premere SURROUND ON/OFF per disattivare il suono surround. y SURROUND OFF scorre sul display. 129 SUONO SURROUND Regolazione del suono surround HALL La riproduzione sonora è potenziata e viene aggiunta una leggera eco, per dare l’impressione a chi ascolta di trovarsi in un ambiente spazioso. Può essere usato solo in modo stereo. SURROUND Il modo surround consente la normale riproduzione sonora in modo surround con 4 o 5 altoparlanti. A seconda del materiale d’origine viene riprodotto il Dolby Surround Pro Logic, il Dolby Digital il DTS o il MPEG. PRO LOGIC, DOLBY DIGITAL, DTS, MPEG In aggiunta a SURROUND, viene visualizzato anche il modo surround utilizzato – a seconda del materiale sorgente. Nel caso di surround digitale verrà segnalato sul display il formato sound AC-3 (per il Dolby Digital) , il DTS o il MPEG (per MPEG 2 Multichannel) seguiti dai canali di sound disponibili nella sorgente (ad esempio DVD). Italiano Esempio: AC-3 3/2.1 Dolby Digital, 3 canali frontali, 2 canali surround ed un canale subwoofer. MPEG 2/0.0 MPEG Multicanale, solo suono stereo. AC-3 3/1.0 Dolby Digital, 3 canali frontali, 1 canale (mono) surround senza segnale subwoofer. DTS 3/2.1 DTS, 3 canali frontali, 2 canali surround ed un canale subwoofer. FRONT-3 STEREO Il suono surround sound viene messo in sordina. 3 Stereo consente l’ascolto del suono surround senza usare gli altoparlanti surround. STEREO Tutto il suono viene riprodotto ed emesso attraverso gli altoparlanti anteriori destro e sinistro, per abilitare la riproduzione stereo standard. Surround virtuale Il vostro ricevitore è in grado di riprodurre una o più forme di suono surround virtuale. Il surround virtuale produce un’impressione di suono realistico creando degli altoparlanti fantasma in aggiunta o in sostituzione degli altoparlanti reali. La posizione dell’ascoltatore influenza l’effetto del surround. L’area nella quale l’effetto è migliore è segnalata in grigio. NT FRO LEFT CENTER FR ON T RIGHT Il livello dell’effetto del suono surround virtuale può essere regolato nel menu. Sono disponibili le seguenti tipologie di suono surround: 3D SURROUND Non c’è bisogno di altoparlanti posteriori. Il suono del canale posteriore è simulato dagli altoparlanti anteriori. Il suono surround è simulato dagli altoparlanti anteriori di sinistra, destra e centrali. MULTI FRONT Vengono creati degli altoparlanti fantasma vicino agli altoparlanti anteriori di destra e di sinistra. MULTI REAR Vengono creati degli altoparlanti fantasma vicino agli altoparlanti posteriori di destra e di sinistra. NATURAL SURROUND Vengono creati degli altoparlanti fantasma vicino agli altoparlanti anteriori e posteriori di destra e di sinistra. Nota: La disponibilità del MULTI FRONT e MULTI REAR dipende dai canali del suono sul materiale d’origine. (solo sul telecomando) I suoni alti vengono abbassati, mentre i passaggi con effetto sonoro basso vengono potenziati. Si può ascoltare il suono in modo surround, senza disturbare i vicini o i bambini addormentati. La riproduzione in modo notte è possibile solo con Dolby Digital e MPEG ed è supportata solo dal materiale sorgente. NIGHT MODE 130 SINTONIZZATORE Si possono ricercare le stazioni radio eseguendo una scansione della gamma delle frequenze. È anche possibile immettere la frequenza di una stazione radio conosciuta. Se una stazione FM viene trasmessa e ricevuta in stereofonia, viene visualizzato STEREO. Ricerca delle stazioni radio 1 Ruotare SOURCE SELECT per selezionare il sintonizzatore. y TUNER viene visualizzato. 2 Selezionare una gamma di lunghezze d’onda, premendo ripetutamente TUNER AM/FM. y Viene visualizzata la gamma delle lunghezze d’onda selezionata. 3 Tenere premuto 1 o 2 per circa 1 secondo. y SEARCH viene visualizzato ed il sintonizzatore si sintonizza su una stazione sufficientemente potente. 4 Ripetere questa procedura sino ad individuare la stazione desiderata. • Per sintonizzarsi su un trasmettitore debole, premere brevemente 1 o 2, tante volte quante sono necessarie per ottenere un’ottima ricezione. Sintonizzazione su una stazione radio in base alla frequenza (solo con il telecomando) 1 Premere TUNER. y TUNER viene visualizzato. 2 Premere FR. D.. y _ viene visualizzato. 3 Usare i tasti da 1 a 0, per immettere la frequenza di una stazione radio. Nota: Si possono immettere solo numeri validi, compresi nella gamma delle frequenze del sintonizzatore. Attivazione della sensibilità FM È possibile commutare il sintonizzatore su una sensibilità di ricerca minore, in modo da ricercare solo le stazioni con un forte segnale (solo per FM). 1 Ruotare SOURCE SELECT per selezionare il sintonizzatore. y TUNER viene visualizzato. Nota: Durante la ricerca delle stazioni radio, viene visualizzata la sensibilità effettiva. In questo caso, SENS LO significa che il sintonizzatore sta ricercando solo le stazioni radio con un forte segnale. Memorizzazione delle stazioni radio Si possono inserire in memoria 30 stazioni radio. Il ricevitore può selezionare e programmare da solo le stazioni radio, o queste possono essere scelte dall’utente. Programmazione automatica 1 Scegliere * TUNER dal menu e premere NEXT 2. 2 Scegliere AUTO INSTALL e premere NEXT 2. y Vengono visualizzati il numero preimpostato di inizio della programmazione, la gamma delle lunghezze d’onda e AUTO. 3 Ruotare TUNER PRESET X per cambiare il numero preimpostato di inizio della programmazione. 4 Usare TUNER AM/FM per portarsi sulla gamma delle lunghezze d’onda. 5 Premere ENTER / OK per avviare la programmazione. y AUTO INSTALL lampeggia e tutte le stazioni radio disponibili vengono programmate. Il procedimento può durare pochi minuti e AUTO INSTALL smette di lampeggiare al termine dello stesso. Programmazione manuale 1 Scegliere * TUNER dal menu e premere NEXT 2. 2 Scegliere MAN INSTALL e premere NEXT 2. y Vengono visualizzati un numero preimpostato, la gamma delle lunghezze d’onda e la frequenza. 3 Ruotare TUNER PRESET X per cambiare un numero preimpostato, in cui memorizzare la stazione radio. 4 Sintonizzarsi sulla stazione radio desiderata (vedere «Ricerca delle stazioni radio»). 5 Premere ENTER / OK per confermare la selezione. y STORED viene visualizzato brevemente. La stazione radio viene programmata sul numero preimpostato selezionato. 6 Selezionare e memorizzare tutte le stazioni radio desiderate secondo questo procedimento. 2 Premere SENS. sul ricevitore. y SENS HI o SENS LO appare per 5 secondi. 131 Italiano Sintonizzazione sulle stazioni radio SINTONIZZATORE Sintonizzazione sulle stazioni radio memorizzate Denominazione delle stazioni radio 1 Ruotare SOURCE SELECT su TUNER per selezionare il sintonizzatore. y TUNER viene visualizzato. Si può assegnare un nome ad una qualsiasi stazione radio preimpostata. Inoltre, si possono sovrascrivere i nomi delle stazioni RDS. 2 Ruotare TUNER PRESET X per selezionare una stazione radio preimpostata. y PRESET, il numero preimpostato e la stazione vengono visualizzati. 1 Scegliere * TUNER dal menu, quindi premere NEXT 2. Riordinamento delle stazioni radio memorizzate Dopo aver programmato le stazioni radio, è possibile cambiarne la sequenza. RESHUFFLE consente di cambiare le posizioni dei valori preimpostati. 1 Scegliere * TUNER dal menu e premere NEXT 2. 2 Scegliere RESHUFFLE e premere NEXT 2. y PRESET, il numero preimpostato e la stazione vengono visualizzati. 2 Scegliere GIVE NAME (indica nome), quindi premere NEXT 2. y Viene visualizzata una stazione radio preimpostata. 3 Ruotare TUNER PRESET X per selezionare la stazione radio da ridenominare. 4 Premere ENTER / OK per confermare la scelta. yViene visualizzato il nome esistente o ________. 5 Ruotare TUNER PRESET X per selezionare una lettera e NEXT 2 o 1 PREV. per portarsi sulla posizione precedente o su quella successiva. Italiano 3 Ruotare TUNER PRESET X per selezionare una stazione preimpostata. 6 Dopo avere immesso il nome completo, premere ENTER / OK per confermare. y STORED viene visualizzato ed il nome viene memorizzato. 4 Premere ENTER / OK per confermare la selezione. y Il numero preimpostato selezionato SWAP <-> ed un secondo numero preimpostato vengono visualizzati. Nota: Per utilizzare nuovamente il nome della stazione RDS trasmessa, è sufficiente cancellare il nome indicato. 5 Ruotare TUNER PRESET X per selezionare l’altra stazione preimpostata. 6 Premere ENTER / OK per confermare il cambio. y RESHUFFLED viene visualizzato brevemente ed i due numeri preselezionati vengono cambiati. Cancellazione dei nomi delle stazioni 1 Usare l’opzione di menu * TUNER e scegliere GIVE NAME. y Viene visualizzata una stazione radio preimpostata. 2 Ruotare X MENU NAVIGATOR per selezionare il nome da cancellare. 3 Premere ENTER / OK per confermare la scelta. 4 Premere 1 PREV. mentre la prima lettera lampeggia. y CL lampeggia alla sinistra del nome della stazione. 5 Premere ENTER / OK per cancellare il nome della stazione. Oppure, se si è cambiata idea, premere 1 PREV. per lasciare invariato il nome della stazione. 132 SINTONIZZATORE RDS R Notiziario RDS ed Informazioni sul traffico Radio Data System è un servizio che consente alle stazioni FM di inviare informazioni aggiuntive. Se si riceve una stazione RDS, vengono visualizzati R ed il nome della stazione. È possibile impostare il sintonizzatore in modo che qualsiasi riproduzione venga interrotta dal notiziario o dalle informazioni sul traffico di una stazione RDS selezionata. La funzione di Informazioni è attiva solo se vengono trasmessi i segnali RDS necessari. Spostamento attraverso le diverse informazioni RDS • Premere ripetutamente RADIO TEXT sul ricevitore, per spostarsi attraverso le seguenti informazioni (se disponibili): – Messaggi di testo della radio – Orologio RDS – Frequenza – Nome della stazione Se le stazioni RDS supportano anche un segnale EON (Enhanced Other Networks), viene visualizzato EON. Questo segnale abilita il sintonizzatore ad eseguire una ricerca non solo nella stazione RDS selezionata, ma in tutta la rete di stazioni EON, per individuare il notiziario e le informazioni sul traffico. 1 Sintonizzarsi sulla stazione RDS desiderata. 2 Premere NEWS/TA: Una volta per visualizzare NEWS ed attivare la funzione notiziario. Due volte per visualizzare TA ed attivare la funzione informazioni sul traffico. Tre volte per visualizzare TA e NEWS ed attivare entrambe le funzioni. 3 Selezionare e riprodurre qualsiasi altra sorgente secondo il procedimento abituale. y Durante la trasmissione del notiziario o delle informazioni sul traffico, il ricevitore si mette in modo sintonizzatore e NEWS o TA lampeggia. 4 Premere NEWS/TA sino a quando l’indicazione del display scompare e si disattivano le funzioni. oppure Premere NEWS/TA durante un annuncio, per disattivare le funzioni. Nota: Verificare di avere disattivato le funzioni notiziario ed informazioni sul traffico durante la registrazione; in caso contrario, i relativi annunci verranno registrati. 133 Italiano Nota: Il segnale orario trasmesso da alcune stazioni RDS potrebbe non essere sempre accurato. DATI TECNICI Ricevitore Italiano Soggetto a variazioni senza preavviso. Informazioni generali Consumo di potenza (FR 984, FR 985, FR 986) ................210 W Consumo di potenza (FR 994, FR 995, FR 996) ................255 W Consumo di potenza in modo standby .............................< 2 W Dimensioni, l × a × p ...............................435 × 135 × 350 mm Peso (FR 984, FR 985, FR 986) ..........................................8,6 kg Peso (FR 994, FR 995, FR 996) ..........................................9,4 kg Amplificatore (0,7 % THD, 6 Ω, 1 kHz) Potenza di uscita, modo stereo (FR 984, FR 985, FR 986) (DIN) ....................................2 × 60 W Potenza di uscita, modo surround (FR 984, FR 985, FR 986) Anteriore ...............................................................2 × 60 W Centro ..........................................................................60 W Surround................................................................2 × 60 W Potenza di uscita, modo stereo (FR 994, FR 995, FR 996) (DIN) ..................................2 × 100 W Potenza di uscita, modo surround (FR 994, FR 995, FR 996) Anteriore .............................................................2 × 100 W Centro ........................................................................100 W Surround..............................................................2 × 100 W Bassi...................................................................±9 dB a 100 Hz Acuti ...................................................................±9 dB a 10 kHz Emissione sonora...+6 dB a 100 Hz (-30 dB); +3 dB a 10 kHz (-30 dB) Distorsione armonica totale......................0,05 % a 1 kHz, 5 W Risposta in frequenza ...............................20–20.000 Hz, ±1 dB Rapporto S/N .................................................................≥ 82 dB Separazione stereo (1kHz) .............................................≥ 45 dB Diafonia (1 kHz) ........................................................... ≤ -65 dB Entrate Entrate lineari .....................................................250 mV/47 kΩ 6 CH ....................................................................250 mV/40 kΩ Front AV (solo per FR 995, FR 996).....................250 mV/22 kΩ Phono ......................................................................5 mV/47 kΩ Digitale coassiale ........................................75 Ω conf. IEC 958 Digitale ottica ..................................................................Toslink Frequenza di campionamento digitale (FR 984, FR 985, FR 986) ......................32 kHz, 44,1 kHz, 48 kHz Frequenza di campionamento digitale (FR 994, FR 995, FR 996) ........32 kHz, 44,1 kHz, 48 kHz, 96 kHz Uscite Prese di alimentazione AC (collegato) ........mass. 100 W totali Uscite lineari.........................................................250 mV/1 kΩ Digitale coassiale .......................................75 Ω conf. IEC 958 Frequenze tipo dell’uscita digitale Analogico in ........................................................out 48 kHz Digitale in 32 kHz ................................................out 32 kHz Digitale in 44,1 kHz ..........................................out 44,1 kHz Digitale in 48 kHz ................................................out 48 kHz Digitale in 96 kHz (solo per FR 994, FR 995, FR 996) .......................out 48 kHz Subwoofer pre-out....................................................0,8 V/1 kΩ Centro pre-out...........................................................0,8 V/1 kΩ Cuffie ..............................................8–600 Ω (3 V f.m.e., 60 Ω) Altoparlanti .......................................................................≥ 6 Ω 134 Sintonizzatore Gamma delle lunghezza d’onda FM..............................................................87,5–108,0 MHz MW...............................................................531–1.602 kHz LW....................................................................153–279 kHz Sensibilità Stereo FM ..................................................................41 dBf Mono FM....................................................................15 dBf Distorsione armonica totale Stereo FM ...................................................................0,3 % Mono FM...................................................................0,85 % Risposta in frequenza ................................63–12.500 Hz ±1 dB Rapporto S/N Stereo FM....................................................................55 dB Mono FM.....................................................................60 dB Separazione dei canali .........................................35 dB a 1 kHz INDIVIDUAZIONE DEI MALFUNZIONAMENTI Non cercare in nessun caso di riparare da soli un qualsiasi elemento dell’apparecchio, per non invalidare la garanzia. Non aprire l’apparecchio, per non correre il rischio di scosse elettriche. PROBLEMA Se si verifica un guasto, scorrere la lista di controllo riportata di seguito prima di far riparare l’apparecchio. Se non si è in grado di risolvere un problema seguendo questi suggerimenti, rivolgersi al rivenditore o al centro di assistenza. POSSIBILE CAUSA SOLUZIONE L’apparecchio non funziona Si è attivato il circuito di sicurezza per ed è in modalità standby surriscaldamento. Spegnere l’apparecchio e farlo raffreddare. Dopo averlo fatto raffreddare, accenderlo nuovamente e selezionare una sorgente ruotando SOURCE SELECT o premendo il tasto relativo a una sorgente sul telecomando. Nessun suono Il VOLUME non è regolato correttamente. Regolare il VOLUME. Sono collegate le cuffie. Scollegare le cuffie. È stata selezionata la sorgente sbagliata. Ruotare SOURCE SELECT per selezionare la sorgente corretta. Un altoparlante è collegato male. Collegare bene l’altoparlante. Il cavo di un altoparlante è danneggiato. Sostituire il cavo. L’equilibrio del volume nel menu del ricevitore è regolato male. Regolare VOL FRONT-L e VOL FRONT-R nel menu del ricevitore. Nessun suono dal lato destro o sinistro Suono scadente o nessun Il modo SURROUND non è attivato. suono dagli altoparlanti surround o centrale. Gli altoparlanti surround e/o quello centrale non sono collegati (bene). Premere SURROUND ON/OFF per attivare il modo surround. Collegare bene gli altoparlanti. Gli altoparlanti surround e/o centrale sono disattivati in menu SPEAKR SETUP. Selezionare YES per attivare gli altoparlanti. Il cavo di un altoparlante è danneggiato. Sostituire il cavo. Suono basso scadente Gli altoparlanti non sono in fase. Collegare i fili colorati (o contrassegnati) ai terminali colorati ed i fili neri (o non contrassegnati) ai terminali neri. Suono scadente. Regolazione inadeguata al tipo di musica o di suono indicato. Correggere le regolazioni sonore sul ricevitore. Livello del suono surround Il livello del suono surround non è regolato bene. Regolare il livello del suono surround sul troppo alto o troppo basso. ricevitore. Livello del suono centrale Il livello sonoro del canale centrale non è troppo alto o troppo basso. regolato bene. Regolare il livello del canale centrale sul ricevitore. Un solo altoparlante centrale è attivo in Dolby Surround Pro Logic Scegliere una sorgente sonora diversa o disattivare il suono surround. Il segnale riprodotto è mono. Ricezione radio scadente, Il ricevitore o l’antenna sono posizionati programmazione accanto ad una sorgente di radiazioni come automatica malfunzionante. TV, lettore di CD, registratore di CD, lettore DVD, ecc. Cambiare la posizione dell’unità che causa l’interferenza o spegnerla. Non è possibile la La frequenza tipo non è accettata dal registrazione digitale registratore digitale. attraverso l’uscita digitale Assicuratevi che il registratore digitale possa utilizzare frequenze tra 32 kHz e 48 kHz o effettuate la registrazione per uscita analogica. Un’intera registrazione Il DVD player non fornisce informazioni sulla appare come unica traccia traccia. se registrata da DVD Registrare ogni traccia individualmente oppure usare la configurazione « manual track increment » sul registratore. 135 Italiano AVVERTENZA English CABLE BOX Français Español Deutsch Nederlands Italiano ABC...............................0030, 0035, 0038, 0040, 0028, 0034, 0041, 0044 Allegro ..........................0180, 0342 Antronix ........................0049, 0234 Archer ...........................0049, 0180, 0234, 0824 Belcor............................0083 Bell & Howell ...............0041 Cable Star.....................0083 Cabletenna ...................0049 Cableview.....................0049 Century .........................0180 Citizen...........................0180, 0342 Colour Voice .................0052, 0058 Comtronics....................0067 Contec...........................0046 Digi ...............................0664 Eastern..........................0029 Emerson........................0824 Everquest......................0042, 0067 Focus.............................0427 France Telecom.............0923 GC Electronics ..............0083, 0234 Garrard..........................0180 Gemini ..........................0269, 0042 General Instrument ......0303, 0503, 0038, 0837 GoldStar........................0067, 0171 Goodmind .....................0824 Hamlin ..........................0047, 0036, 0286, 0061 Hitachi ..........................0038 Hytex.............................0034 Jasco ............................0042, 0180, 0342 Jerrold ..........................0030, 0039, 0303, 0038, 0041, 0042, 0051, 0503, 0837 Linsay............................0467 Magnavox.....................0054, 0041 Memorex ......................0027 Movie Time...................0090, 0183 NAP...............................0034 NSC...............................0183, 0090 Novaplex.......................0645 Oak................................0046, 0034 Optimus ........................0048 Panasonic .....................0048, 0134, 0027 Panther .........................0664 Paragon.........................0027 Philips ...........................0052, 0058, 0269, 0317, 0054, 0180 Pioneer..........................0171, 0050, 0560 Popular Mechanics.......0427 Proscan .........................0048 Pulsar............................0027 Quasar ..........................0027 RCA...............................0048 Radio Shack..................0824, 0042, 0342, 0910 Realistic........................0234 Recoton.........................0427 Regal.............................0286, 0047 Regency ........................0029 Rembrandt ....................0038 Runco............................0027 SL Marx ........................0067 136 Samsung.......................0067, 0171 Scientific Atlanta .........0035, 0044, 0504 Seam.............................0537 Signal............................0042, 0067 Signature ......................0038 Sprucer .........................0048 Starcom ........................0030, 0042 Stargate........................0067, 0042, 0824 Starquest ......................0042 Sylvania ........................0028 TFC................................0337 TV86..............................0090 Tandy ............................0285 TeleCaption...................0248 Teleview .......................0067 Texscan.........................0028 Timeless........................0445 Tocom ...........................0039, 0040 Toshiba .........................0027 Tusa ..............................0042 Unika.............................0234, 0180, 0049 United Artists ...............0034 Universal.......................0234, 0049, 0083, 0218, 0180 Viewstar .......................0285, 0054, 0090 Westminster.................0132 Zenith............................0027, 0552, 0081, 0035, 0042, 0234 Zentek...........................0427 CD ADC...............................0045 Adcom...........................0261, 0182 Aiwa .............................0151, 0039, 0184 Akai...............................0183 Anthem .........................0924 Audio Alchemy .............0221 Audio-Technica.............0197 BSR ...............................0272, 0221 Burmester .....................0447 California Audio Lab.....0056 Carrera..........................0221 Carver ...........................0184, 0206, 0464 Craig .............................0642 Crown ...........................0149 Curtis Mathes...............0056 DAK...............................0272 DBX...............................0281 DKK...............................0027 Denon ...........................0030, 0061, 0900 Emerson........................0182, 0191, 0332, 0496 Fisher ............................0115, 0206, 0201, 0369 GE .................................0036 Garrard..........................0307, 0272, 0420, 0447, 0452 Genexxa........................0059, 0191, 0332 GoldStar........................0444 Harman/Kardon ............0200, 0184, 0453 Hitachi ..........................0059, 0182 JVC ...............................0099, 0682, 0685 Kenwood.......................0055, 0217, 0708, 0853, 0064 Kodak............................0314 Krell ..............................0184 Kyocera.........................0045 TAPE Aiwa .............................0224, 0227, 0056 Akai...............................0310 Carver ...........................0056 Denon ...........................0103 Fisher ............................0101 Garrard..........................0335, 0466 Nederlands Deutsch Español Français English Harman/Kardon ............0209, 0056 JVC ...............................0271, 0300 Kenwood.......................0098, 0097, 0260 Magnavox.....................0056 Marantz ........................0056, 0036 Mitsubishi.....................0310 NAD ..............................0171 Onkyo............................0162, 0163, 0309 Optimus ........................0247, 0054, 0364, 0466 Panasonic .....................0256 Philips ...........................0056 Pioneer..........................0054, 0247, 0126 Proscan .........................0053 RCA...............................0053 Revox ............................0217 Sansui...........................0036, 0056 Sharp ............................0258 Sherwood .....................0364 Sony..............................0270, 0197, 0318 Teac ..............................0335, 0316 Technics........................0256 Victor ............................0300 Wards ...........................0054 Yamaha.........................0121, 0124 DVD Harman/Kardon ............0609 JVC ...............................0585 Kenwood.......................0561 Magnavox.....................0530 Mitsubishi.....................0548 Onkyo............................0530 Optimus ........................0552 Panasonic .....................0517 Philips ...........................0566, 0530 Pioneer..........................0552, 0598 Proscan .........................0549 RCA...............................0549 Samsung.......................0600 Sony..............................0560 Technics........................0517 Thomson .......................0578 Toshiba .........................0530 Yamaha.........................0572, 0517 Zenith............................0618, 0530 Italiano LXI.................................0332 Linn ...............................0184 Luxman .........................0120 MCS..............................0056, 0070 MGA .............................0110 MTC ..............................0447 Magnavox.....................0184, 0553, 0332 Marantz ........................0184, 0056, 0207, 0462 McIntosh.......................0314 Mission.........................0184 Mitsubishi.....................0110 NAD ..............................0046 NEC...............................0261, 0070 NSM .............................0184 Nakamichi.....................0174 Nikko.............................0197, 0191, 0201 Onkyo............................0128, 0895 Optimus ........................0447, 0495, 0059, 0453, 0206, 0223, 0464, 0202, 0332, 0064, 0114, 0172, 0221, 0307, 0369, 0027 Panasonic .....................0056, 0394, 0330, 0779 Parasound.....................0447, 0221 Philips ...........................0184, 0314 Pioneer..........................0059, 0495, 0271, 0332 Proscan .........................0080 Proton ...........................0184 QED...............................0184 Quasar ..........................0056 RCA...............................0080, 0332, 0036, 0182, 0206, 0791 Realistic........................0182, 0202, 0191, 0206, 0207, 0447 Rotel .............................0184, 0447, 0924 SAE ...............................0184 STS ...............................0045 Sansui...........................0229, 0184, 0332 Sanyo............................0114, 0206 Scott .............................0191, 0182, 0332 Sears.............................0332 Sharp ............................0064, 0207, 0888 Sherwood .....................0141, 0207, 0223, 0453 Shure ............................0070 Sony..............................0027, 0212, 0631, 0517, 0632 Soundesign...................0172, 0452 Sylvania ........................0184 Tascam..........................0447 Teac ..............................0420, 0447, 0201, 0207 Technics........................0056, 0330, 0234 Toshiba .........................0046 Vector Research ...........0221, 0444 Victor ............................0099 Wards ...........................0080, 0184 Yamaha.........................0214, 0063, 0197 Yorx...............................0488 Zenith............................0642 TV A-Mark..........................0030 AOC...............................0079, 0030, 0212, 0046, 0057 Abex..............................0059 Admiral .........................0120 Adventura .....................0073 Aiko...............................0119 Akai...............................0057 Alaron ...........................0206 Allegro ..........................0747, 0801 Ambassador..................0204 Ampro ...........................0778 Anam ............................0207 Anam National .............0082 Archer ...........................0030 137 English Français Español Deutsch Nederlands Italiano Audiovox.......................0119, 0030, 0207, 0478, 0650 Aumark .........................0087 Baysonic .......................0207 Belcor............................0046 Bell & Howell ...............0043, 0181 Bradford........................0207 Brockwood....................0046 Broksonic ......................0030, 0263, 0490 CCE ...............................0064, 0244 CXC ...............................0207 Candle...........................0213, 0073, 0057, 0083 Capehart .......................0079 Carnivale.......................0057 Carver ...........................0081 Celebrity .......................0027 Cineral ..........................0478, 0119 Citizen...........................0213, 0073, 0083, 0057, 0066, 0087, 0119, 0307 Clairtone .......................0212 Concerto .......................0083 Contec...........................0184, 0207, 0212 Craig .............................0207 Crosley..........................0081 Crown ...........................0066, 0207 Curtis Mathes...............0087, 0057, 0181, 0043, 0066, 0074, 0078, 0081, 0083, 0120, 0172, 0193, 0478, 0493 Daewoo ........................0119, 0650, 0046, 0651, 0478, 0066 Daytron .........................0046, 0066 Denon ...........................0172 Dumont .........................0044, 0046 Dwin .............................0747, 0801 Dynatech.......................0244 Electroband...................0027, 0212 Electrohome..................0408 Emerson........................0263, 0207, 0205, 0206, 0490, 0204, 0309, 0307, 0651, 0066, 0212, 0650, 0046, 0065, 0181 Envision ........................0057 Fisher ............................0181, 0186 Fujitsu ...........................0206 Funai .............................0207, 0198, 0206 Futuretech.....................0207 GE .................................0048, 0054, 0074, 0082, 0078, 0205, 0162, 0309, 0478, 0120 Gibralter........................0044, 0046, 0057 Go Video .......................0087 GoldStar........................0028, 0205, 0057, 0046, 0059, 0066, 0083 Gradiente......................0083, 0080 Grundig .........................0064, 0222 Grunpy ..........................0206, 0207 Hallmark .......................0205 Harley Davidson ...........0206 Harman/Kardon ............0081 Harvard .........................0207 Hitachi ..........................0172, 0178, 0065, 0083, 0059 Infinity...........................0081 Inteq..............................0044 JBL................................0081 JCB ...............................0027 JVC ...............................0080 Janeil............................0073 KEC ...............................0207 138 KTV ...............................0307, 0207, 0212, 0244, 0066, 0057 Kaypani.........................0079 Kenwood.......................0057, 0046 Kloss .............................0073, 0051 LG..................................0083 LXI.................................0181, 0205, 0074, 0044, 0081, 0183 Loewe ...........................0539 Logik .............................0043 Luxman .........................0083 MEI ...............................0212 MGA .............................0177, 0046, 0057, 0205 MTC ..............................0087, 0046, 0057, 0212, 0083 Magnavox.....................0081, 0214, 0051, 0123, 0047, 0213, 0057, 0413, 0206 Majestic........................0043 Marantz ........................0081, 0064, 0057 Matsushita ...................0078, 0277 Megatron......................0030, 0172, 0205 Memorex ......................0205, 0043, 0083, 0087, 0177, 0181, 0277 Midland ........................0044, 0059, 0066, 0074, 0078, 0162 Minutz...........................0048 Mitsubishi.....................0177, 0046, 0205, 0120 Motorola.......................0082, 0120 Multitech ......................0244, 0207 NAD ..............................0183, 0193, 0205 NEC...............................0057, 0046, 0083, 0524 NTC...............................0119 Nikko.............................0205, 0044, 0074, 0057, 0119, 0181, 0183 Noshi ............................0045 Onwa ............................0207 Optimus ........................0277, 0193, 0181 Optonica .......................0120, 0192 Orion .............................0263, 0206, 0490 Panasonic .....................0078, 0277, 0082, 0028, 0074, 0080, 0081, 0087, 0120, 0172, 0177, 0181, 0183, 0192, 0205 Penney ..........................0074, 0057, 0087, 0048, 0054, 0162, 0045, 0205, 0078, 0066, 0046, 0030, 0059, 0083, 0183 Philco ............................0047, 0046, 0057, 0081, 0123, 0172, 0490, 0051, 0213, 0214 Philips ...........................0081, 0044, 0047, 0066, 0064, 0027, 0045, 0046, 0048, 0051, 0054, 0079 Pilot...............................0046, 0057, 0066 Pioneer..........................0193, 0065 Portland ........................0119, 0046, 0066 Prism.............................0078 Proscan .........................0074, 0057 Proton ...........................0493, 0205, 0030, 0079 Pulsar............................0044, 0046 Quasar ..........................0078, 0082, 0277, 0192 RCA...............................0074, 0045, 0162, 0046, 0065, 0078, 0117, 0120 Radio Shack..................0192, 0207, 0205, 0057, 0066, 0046, 0181, 0059, 0074, 0083 Realistic........................0192, 0207, 0181, 0057, 0066, 0205, 0046, 0059, 0083 Rhapsody ......................0212 Runco............................0044, 0524, 0057 SSS ...............................0046, 0207 Sampo...........................0057, 0059, 0066, 0079 VCR Admiral .........................0075 Adventura .....................0027 Aiko...............................0305 Aiwa .............................0334, 0027, 0064 Akai...............................0133, 0080, 0088, 0068 American High..............0062 Asha..............................0267 139 English Français Español Deutsch Nederlands Audiovox.......................0064 Beaumark......................0267 Bell & Howell ...............0131 Blaupunkt......................0033 Broksonic ......................0211, 0148, 0388, 0029, 0236, 0238, 0322, 0506 CCE ...............................0099, 0305 Calix..............................0064 Canon............................0062 Capehart .......................0047 Carver ...........................0108 Cineral ..........................0305 Citizen...........................0305, 0064 Colt ...............................0099 Craig .............................0064, 0074, 0099, 0267, 0298 Curtis Mathes...............0062, 0068, 0087, 0189 Cybernex.......................0078, 0267 Daewoo ........................0305, 0588, 0047, 0072 Daytron .........................0047 Denon ...........................0069 Dynatech.......................0027 Electrohome..................0064 Electrophonic................0064 Emerex..........................0059 Emerson........................0211, 0029, 0148, 0236, 0063, 0238, 0305, 0321, 0115, 0235, 0506, 0088, 0239, 0588, 0095, 0322, 0388, 0027, 0064, 0070 Fisher ............................0074, 0131, 0081, 0093 Fuji ................................0060, 0062 Funai .............................0027 GE .................................0062, 0087, 0229, 0075, 0267 Garrard..........................0027 Go Video .......................0459, 0553 GoldStar........................0064, 0065 Gradiente......................0035, 0027 HI-Q...............................0074 Harley Davidson ...........0027 Harman/Kardon ............0108, 0065 Harwood .......................0095, 0099 Headquarter..................0073 Hitachi ..........................0069, 0132, 0027, 0068 JVC ...............................0094, 0035, 0068 Jensen ..........................0068 KEC ...............................0064, 0305 KLH ...............................0099 Kenwood.......................0068, 0094, 0065, 0073 Kodak............................0062, 0064 LXI.................................0064 Lloyd's...........................0027, 0235 Logik .............................0099 MEI ...............................0062 MGA .............................0070, 0088, 0267 MGN Technology..........0267 MTC ..............................0027, 0267 Magnasonic..................0305 Magnavox.....................0062, 0108, 0027, 0066, 0176 Magnin .........................0267 Marantz ........................0108, 0065, 0062 Marta............................0064 Matsushita ...................0062, 0481, 0189 Memorex ......................0131, 0074, 0027, 0064, 0062, 0075, 0267, 0334, 0073, 0066 Italiano Samsung.......................0087, 0059, 0205, 0046, 0057, 0066, 0083, 0064 Samsux .........................0066 Sansei...........................0478 Sansui...........................0490 Sanyo............................0181, 0186, 0173 Scimitsu........................0046 Scotch...........................0205 Scott .............................0263, 0205, 0206, 0207, 0046 Sears.............................0186, 0181, 0173, 0183, 0081, 0083, 0198, 0205, 0074, 0206 Semivox ........................0207 Semp.............................0183 Sharp ............................0192, 0120, 0413, 0066, 0184 Shogun..........................0046 Signature ......................0043 Simpson........................0213, 0214 Sony..............................0027, 0138, 0107 Soundesign...................0205, 0207, 0206, 0213 Spectricon.....................0030 Squareview...................0198 Starlite..........................0207 Supre-Macy ..................0073 Supreme .......................0027 Sylvania ........................0081, 0047, 0123, 0057, 0408, 0051, 0213, 0214 Symphonic ....................0198 TMK ..............................0083, 0204, 0205 Tandy ............................0120 Tatung...........................0030, 0082 Technics........................0078, 0277, 0044, 0074 Technol Ace ..................0206 Techwood .....................0030, 0078, 0083 Teknika..........................0213, 0043, 0206, 0046, 0066, 0081, 0207, 0083, 0119, 0177, 0087 Telefunken ....................0083 Toshiba .........................0183, 0087, 0181 Tosonic..........................0212 Totevision .....................0066 Trical .............................0184 Universal.......................0054, 0048 Vector Research ...........0057 Victor ............................0080 Vidikron.........................0081 Vidtech..........................0046, 0205 Viking............................0073 Wards ...........................0081, 0192, 0205, 0183, 0043, 0047, 0048, 0123, 0138, 0214, 0054, 0107, 0206, 0046, 0057, 0083, 0162 White Westinghouse ...0651, 0650 Yamaha.........................0046, 0057 Zenith............................0044, 0043, 0119, 0173 Zonda............................0030 English Français Español Deutsch Nederlands Italiano Metz..............................0033, 0064, 0189, 0323 Minolta .........................0132, 0069 Mitsubishi.....................0070, 0088, 0094, 0075 Motorola.......................0062, 0075 Multitech ......................0027, 0099 NAD ..............................0085 NAP...............................0060, 0061, 0062, 0064, 0066, 0069, 0093, 0132 NEC...............................0065, 0067, 0068, 0094, 0131 Nikko.............................0064 Nikon ............................0061, 0280 Noblex ..........................0267 Olympus........................0062 Optimus ........................0085, 0075, 0064, 0459, 0131, 0189, 0481 Optonica .......................0089 Orion .............................0506, 0322, 0029, 0211 Panasonic .....................0062, 0104, 0189, 0252, 0481 Penney ..........................0062, 0267, 0064, 0065, 0069, 0067, 0081 Pentax...........................0069, 0132 Philco ............................0062, 0506, 0236 Philips ...........................0108, 0062, 0089 Pilot...............................0064 Pioneer..........................0085, 0094 Portland ........................0047 Profitronic .....................0267 Proscan .........................0087, 0229 Protec............................0099 Pulsar............................0066, 0078 Quarter..........................0073 Quartz ...........................0073 Quasar ..........................0062, 0189, 0104, 0481 RCA...............................0087, 0176, 0229, 0069, 0132, 0104, 0133, 0062, 0075, 0267 Radio Shack..................0027 Radix.............................0064 Randex..........................0064 Realistic........................0074, 0027, 0131, 0075, 0064, 0062, 0089, 0073, 0093 Ricoh.............................0061, 0280 Runco............................0066 STS ...............................0069 Samsung.......................0267, 0072, 0080, 0078 Sanky ............................0066, 0075 Sansui...........................0506, 0068, 0298, 0027, 0094 Sanyo............................0073, 0074, 0131, 0267 Scott .............................0211, 0148, 0238, 0072, 0237, 0239, 0070 Sears.............................0069, 0132, 0081, 0073, 0064, 0074, 0131, 0027, 0062, 0093 Semp.............................0072 Sharp ............................0075, 0089 Shintom ........................0099 Shogun..........................0078, 0267 Signature ......................0062 Singer ...........................0099 Sony..............................0060, 0061, 0059, 0280, 0062, 0027 Sunpak..........................0280 Sylvania ........................0062, 0108, 0027, 0070 Symphonic ....................0027 TMK ..............................0063, 0235, 0267 Tatung...........................0068 Teac ..............................0027, 0068 Technics........................0062, 0189, 0066, 0087, 0229 140 Teknika..........................0027, 0062, 0064 Thomas .........................0027 Toshiba .........................0072, 0239, 0237, 0093, 0070 Totevision .....................0064, 0267 Unitech .........................0267 Vector ...........................0072 Vector Research ...........0065, 0067 Video Concepts.............0067, 0088, 0072 Videosonic ....................0267 Wards ...........................0062, 0075, 0089, 0027, 0087, 0074, 0072, 0267, 0239, 0069, 0099, 0176, 0108 White Westinghouse ...0305 XR-1000 ........................0099, 0027, 0062 Yamaha.........................0065, 0068 Zenith............................0066, 0060, 0061, 0027, 0506 SAT AlphaStar......................0799 Astro Industries............0122 BSR ...............................0122 Capetronic ....................0122 Channel Master............0045, 0239 Chaparral ......................0080, 0236, 0243 DX Antenna ..................0068 Drake ............................0091, 0272, 0045 Echostar........................0307, 0802, 0175, 0186, 0296 Expressvu......................0802 General Instrument ......0388, 0896, 0654 Grundig .........................0200 HTS ...............................0802 Hitachi ..........................0846 Homecable....................0265 Hughes Network Syst....0776 Hytek.............................0122 IQ ..................................0237 IQ Prism ........................0237 JVC ...............................0802 Janeil............................0179 Jerrold ..........................0388, 0654 Legend ..........................0296 Macom..........................0045 Magnavox.....................0749, 0751 Memorex ......................0296, 0751 Next Level ....................0896 Panasonic .....................0179, 0728 Philips ...........................0227, 0126, 0749, 0751 President.......................0101 Primestar ......................0654, 0388 Proscan .........................0593 RCA...............................0593, 0170, 0882 Radio Shack..................0593 Realistic........................0079 STS ...............................0237, 0068 Sony..............................0666 Star Choice ...................0896 Star Trak .......................0207 Toshiba .........................0109, 0817 Uniden ..........................0265, 0397, 0079, 0101, 0751, 0103, 0749 Zenith............................0091, 0883, 0272 141 142 143 English Meet Philips at the Internet http://www. philips.com Français Español Deutsch Nederlands Italiano W 3103 306 1859.1 FR 984/FR 985/FR 986 FR 994/FR 995/FR 996 VieUrs0147-
 1
1
-
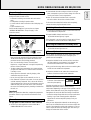 2
2
-
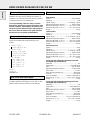 3
3
-
 4
4
-
 5
5
-
 6
6
-
 7
7
-
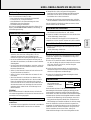 8
8
-
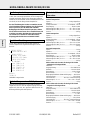 9
9
-
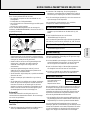 10
10
-
 11
11
-
 12
12
-
 13
13
-
 14
14
-
 15
15
-
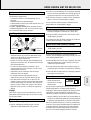 16
16
-
 17
17
-
 18
18
-
 19
19
-
 20
20
-
 21
21
-
 22
22
-
 23
23
-
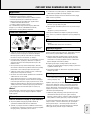 24
24
-
 25
25
-
 26
26
-
 27
27
-
 28
28
-
 29
29
-
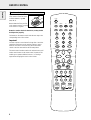 30
30
-
 31
31
-
 32
32
-
 33
33
-
 34
34
-
 35
35
-
 36
36
-
 37
37
-
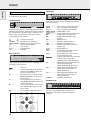 38
38
-
 39
39
-
 40
40
-
 41
41
-
 42
42
-
 43
43
-
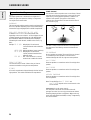 44
44
-
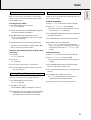 45
45
-
 46
46
-
 47
47
-
 48
48
-
 49
49
-
 50
50
-
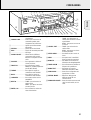 51
51
-
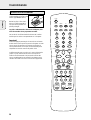 52
52
-
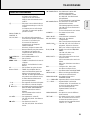 53
53
-
 54
54
-
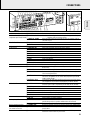 55
55
-
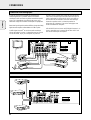 56
56
-
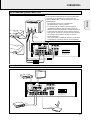 57
57
-
 58
58
-
 59
59
-
 60
60
-
 61
61
-
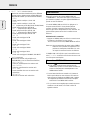 62
62
-
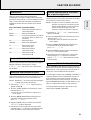 63
63
-
 64
64
-
 65
65
-
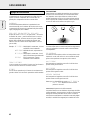 66
66
-
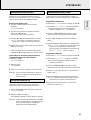 67
67
-
 68
68
-
 69
69
-
 70
70
-
 71
71
-
 72
72
-
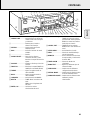 73
73
-
 74
74
-
 75
75
-
 76
76
-
 77
77
-
 78
78
-
 79
79
-
 80
80
-
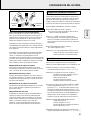 81
81
-
 82
82
-
 83
83
-
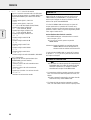 84
84
-
 85
85
-
 86
86
-
 87
87
-
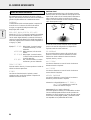 88
88
-
 89
89
-
 90
90
-
 91
91
-
 92
92
-
 93
93
-
 94
94
-
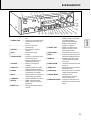 95
95
-
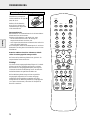 96
96
-
 97
97
-
 98
98
-
 99
99
-
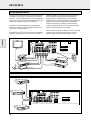 100
100
-
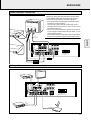 101
101
-
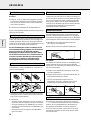 102
102
-
 103
103
-
 104
104
-
 105
105
-
 106
106
-
 107
107
-
 108
108
-
 109
109
-
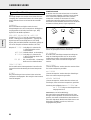 110
110
-
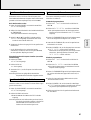 111
111
-
 112
112
-
 113
113
-
 114
114
-
 115
115
-
 116
116
-
 117
117
-
 118
118
-
 119
119
-
 120
120
-
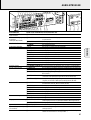 121
121
-
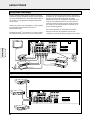 122
122
-
 123
123
-
 124
124
-
 125
125
-
 126
126
-
 127
127
-
 128
128
-
 129
129
-
 130
130
-
 131
131
-
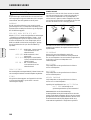 132
132
-
 133
133
-
 134
134
-
 135
135
-
 136
136
-
 137
137
-
 138
138
-
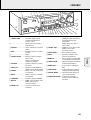 139
139
-
 140
140
-
 141
141
-
 142
142
-
 143
143
-
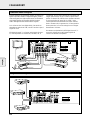 144
144
-
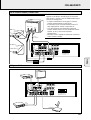 145
145
-
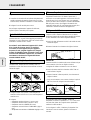 146
146
-
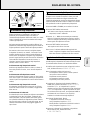 147
147
-
 148
148
-
 149
149
-
 150
150
-
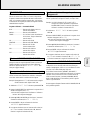 151
151
-
 152
152
-
 153
153
-
 154
154
-
 155
155
-
 156
156
-
 157
157
-
 158
158
-
 159
159
-
 160
160
-
 161
161
-
 162
162
-
 163
163
-
 164
164
-
 165
165
-
 166
166
-
 167
167
-
 168
168


in andere talen
- English: Philips FR-985 User manual
- italiano: Philips FR-985 Manuale utente
- français: Philips FR-985 Manuel utilisateur
- español: Philips FR-985 Manual de usuario
- Deutsch: Philips FR-985 Benutzerhandbuch
Gerelateerde papieren
Andere documenten
-
Rotel RC-995 de handleiding
-
-
JBL SCS 140 de handleiding
-
Pioneer S-W250S-W Handleiding
-
Heco Aleva 400 de handleiding
-
Denon AVR-1803 Operating Instructions Manual
-
Sony SS-FCR3000 Snelstartgids
-
NAD CI 980 Handleiding
-
Revox A77 de handleiding
-
AKG HEARO 999 AUDIOSPHERE II de handleiding