Saris MP1 Nfinity Trainer Platform Handleiding
- Categorie
- Fietsaccessoires
- Type
- Handleiding

MP1 user guide Customer Service
800.783.7257
saris.com
30675B MP1 Manualv1.indd 130675B MP1 Manualv1.indd 1 1/29/2021 2:45:03 PM1/29/2021 2:45:03 PM

2
2
TELL US WHAT YOU THINK
SARIS.COM/FEEDBACK
REGISTER YOUR PRODUCT FOR UPDATES
SARIS.COM/REGISTRATION
30675B MP1 Manualv1.indd 230675B MP1 Manualv1.indd 2 1/29/2021 2:45:23 PM1/29/2021 2:45:23 PM

3
Virtual Training makes it easy to bring the
outside in, whether you’re on a tablet,
desktop or phone.
VirtualTraining.Saris.com
30675B MP1 Manualv1.indd 330675B MP1 Manualv1.indd 3 1/29/2021 2:45:28 PM1/29/2021 2:45:28 PM

4
SAFETY AND COMPATIBILITY
Users are responsible for reading instructions completely before riding and complying with the instructions. The MP1 has been fit tested with many
common and popular trainers. Go to saris.com/MP1 for information on specific trainers. If your trainer is not listed, contact Saris customer support.
Before every ride on your MP1 always check the following:
• Trainer retention straps: Make sure your trainer is securely fastened to the MP1 with the trainer retention straps. Check for any damaged straps.
Ifdamaged, contact Saris support regarding replacement options.
• Wheel block retention straps: Confirm that the straps are secure and not damaged. If damaged, contact Saris support regarding replacement options.
• Wheel black hardware: Make sure the wheel block is still secured to the MP1 and that all necessary hardware is accounted for.
• Platform base: Before hopping on, confirm that the MP1 is level. If not, use the base feet to make the platform level.
• Bicycle skewers or thru axles: Confirm the thru axles and/or skewers of your bicycle are tightened to the recommended torque specifications of
your bicycle manufacturer.
EN
ES Los usuarios tienen la responsabilidad de leer todas las instrucciones antes de montar en la bicicleta, así como de cumplir dichas instrucciones. Se ha
probado la idoneidad del MP1 con muchos aparatos de entrenamiento habituales y populares. Visite saris.com/MP1 para obtener información sobre aparatos
de entrenamiento específicos. Si el aparato de entrenamiento no aparece en la lista, póngase en contacto con el servicio de atención al cliente de Saris.
Cada vez que utilice el MP1 compruebe siempre lo siguiente en primer lugar:
• Correas de sujeción del aparato de entrenamiento: asegúrese de que su aparato de entrenamiento: esté fijado de forma segura al MP1 con las
correas de sujeción del aparato de entrenamiento. Compruebe si hay alguna correa dañada. En caso de que haya daños, póngase en contacto
con el servicio de atención de Saris para conocer las opciones de sustitución.
• Correas de retención del bloque de ruedas: compruebe que las correas son seguras y no presentan daños. En caso de que haya daños, póngase
en contacto con el servicio de atención de Saris para conocer las opciones de sustitución.
• Tornillería del bloque de rueda: asegúrese de que el bloque de ruedas sigue fijado al MP1 y que dispone de toda la tornillería necesaria.
• Base de plataforma: antes de subirse a la bicicleta, compruebe que el MP1 esté nivelado. De lo contrario, utilice las patas de la base para nivelar
la plataforma.
• Espetones o ejes pasantes de la bicicleta: asegúrese de que los ejes pasantes o espetones de la bicicleta estén apretados según las
especificaciones de par recomendadas por el fabricante de la bicicleta.
30675B MP1 Manualv1.indd 430675B MP1 Manualv1.indd 4 1/29/2021 2:45:28 PM1/29/2021 2:45:28 PM

5
SAFETY AND COMPATIBILITY
FR
DE
Veillez à lire et respecter ces instructions dans leur totalité avant d’utiliser votre vélo. Le MP1 a été testé avec les trainers les plus courants du marché.
Rendez-vous sur saris.com/MP1 pour obtenir des informations sur un trainer spécifique. Si votre trainer ne figure pas dans la liste, contactez le service
clientèle Saris.
Avant chaque utilisation de votre MP1, vérifiez toujours les points suivants:
• Sangles de rétention du trainer: Assurez-vous que votre trainer est solidement fixé au MP1 à l’aide des sangles de rétention. Vérifiez la présence
éventuelle de sangles endommagées. Le cas échéant, contactez le service clientèle qui vous indiquera les options de remplacement.
• Sangles de rétention du bloc de roues: Vérifiez que les sangles sont bien sécurisées et non endommagées. Le cas échéant, contactez le service
clientèle qui vous indiquera les options de remplacement.
• Visserie du bloc de roues: Assurez-vous que le bloc de roues est bien sécurisé sur le MP1 et que la visserie est bien installée.
• Base de la plate-forme: Avant d’utiliser l’appareil, vérifiez que le MP1 est bien à niveau sur le sol. Sinon, mettez la plate-forme à niveau à l’aide
des pieds de la base.
• Broches ou axes traversants: Assurez-vous que les broches ou axes traversants sont serrés au couple recommandé par le fabricant de votre vélo.
Die Benutzer müssen alle Anweisungen durchlesen, bevor sie mit dem Fahren beginnen, und diese Anweisungen auch befolgen. Die MP1 wurde auf
ihre Eignung für zahlreiche handelsübliche und gebräuchliche Trainer getestet. Nähere Infos zu bestimmten Trainern findest du auf saris.com/MP1.
Wenndein Trainer dort nicht aufgelistet ist, kannst du dich an den Kundendienst von Saris wenden.
Vor jeder Fahrt auf der MP1 ist Folgendes zu kontrollieren:
• Trainer-Sicherungsgurte: Überprüfe, ob die Sicherungsgurte deinen Trainer fest auf der MP1 halten. Überprüfe jeden Gurt auf eventuelle Schäden.
Ist ein Gurt beschädigt, erkundige dich bitte beim Saris Kundendienst nach einem geeigneten Ersatz.
• Radblock-Sicherungsgurte: Überprüfe, ob die Gurte sicher befestigt und nicht beschädigt sind. Ist ein Gurt beschädigt, erkundige dich bitte beim
Saris Kundendienst nach einem geeigneten Ersatz.
• Radblock-Beschläge: Überprüfe, ob der Radblock nach wie vor sicher an der MP1 befestigt ist und alle nötigen Beschläge einwandfrei in Ordnung sind.
• Plattform-Basis: Überprüfe vor dem Aufsteigen, ob die MP1 eben ist. Wenn nicht, stelle die Plattform an den Standfüßen der Basis so ein, dass sie eben ist.
• Schnellspanner oder Steckachsen: Überprüfe, ob die Steckachsen und/oder Schnellspanner an deinem Fahrrad mit dem von deinem
Fahrradhersteller empfohlenen Drehmoment festgezogen sind.
30675B MP1 Manualv1.indd 530675B MP1 Manualv1.indd 5 1/29/2021 2:45:28 PM1/29/2021 2:45:28 PM

6
IT
NL
Gli utilizzatori sono tenuti a leggere le istruzioni integralmente prima di utilizzare il prodotto e a rispettarle. L’MP1 è stato testato per adattarsi ai rulli più
comuni e diusi. Consultare saris.com/MP1 per informazioni su rulli specifici. Se il tuo rullo non è in elenco, contatta l’assistenza clienti di Saris.
Prima di utilizzare l’MP1 controllare sempre i seguenti punti:
• Le cinghie di mantenimento del rullo: Accertarsi che il rullo sia fissato saldamente all’MP1 mediante le cinghie di mantenimento del rullo.
Controllare che non ci siano cinghie danneggiate. Se sono danneggiate, contattare l’assistenza Saris per conoscere le opzioni di sostituzione.
• Cinghie di mantenimento del blocco della ruota: Accertarsi che le cinghie siano fissate e non siano danneggiate. Se sono danneggiate,
contattarel’assistenza Saris per conoscere le opzioni di sostituzione.
• Elementi di fissaggio neri della ruota: Accertarsi che il blocco della ruota sia sempre fissato all’MP1 e siano presenti tutti gli elementi di fissaggio
necessari.
• Base della pedana: Prima di salire, accertarsi che l’MP1 sia in piano. In caso contrario usare i piedini della base per mettere in piano la pedana.
• Perni di bloccaggio della bici o perni passanti: Accertarsi che i perni passanti e/o i perni di bloccaggio della bici siano stretti alla coppia
raccomandata dal produttore della bici.
Gebruikers moeten de instructies volledig doorlezen voordat ze beginnen te trainen, en deze instructies opvolgen. De MP1 werd geschikt bevonden voor
gebruik met heel wat gangbare en populaire fietstrainers. Ga naar saris.com/MP1 voor informatie over specifieke trainers. Neem contact op met de
klantendienst van Saris als uw trainer niet in de lijst staat.
Controleer vóór elke rit altijd het volgende op uw MP1:
• Spanriemen van de trainer: zorg ervoor dat uw trainer goed op de MP1 is bevestigd met de spanriemen van de trainer. Controleer of de riemen
niet beschadigd zijn. Neem bij beschadiging contact op met de klantendienst van Saris voor vervangingsopties.
• Spanriemen van het wielblok: controleer of de riemen goed vastzitten en niet beschadigd zijn. Neem bij beschadiging contact op met de
klantendienst van Saris voor vervangingsopties.
• Bevestigingsmateriaal van het wielblok: zorg ervoor dat het wielblok nog steeds goed aan de MP1 is bevestigd en dat al het benodigde
bevestigingsmateriaal aanwezig is.
• Platformbasis: controleer of de MP1 waterpas staat voordat u erop springt. Gebruik anders de stelvoetjes aan de basis om het platform
waterpaste maken.
• Snelspanners of steekassen: controleer of de steekassen en/of snelspanners van uw fiets zijn aangedraaid tot het aanbevolen koppel
van uw fietsfabrikant.
30675B MP1 Manualv1.indd 630675B MP1 Manualv1.indd 6 1/29/2021 2:45:29 PM1/29/2021 2:45:29 PM

7
Przed jazdą użytkownicy mają obowiązek zapoznać się z całą instrukcją oraz stosować się do niej. MP1 został przetestowany na wielu zwykłych
i popularnych trenażerach. Aby uzyskać informacje o konkretnych trenażerach odwiedź na stronę saris.com/MP1. Jeśli twój trenażer nie znajduje się
na liście, skontaktuj się z obsługą klienta Saris.
Przed każdą jazdą na swoim MP1 zawsze sprawdź poniższe:
• Taśmy mocujące trenażer. Upewnij się, że trenażer jest bezpiecznie przymocowany do MP1 taśmami mocującymi trenażer. Sprawdź taśmy pod
kątem uszkodzeń. W przypadku uszkodzenia skontaktuj się z obsługą Saris w sprawie opcji wymiany.
• Taśmy przytrzymujące bloczki kół: Sprawdź, czy taśmy są zabezpieczone i nieuszkodzone. W przypadku uszkodzenia skontaktuj się z obsługą
Saris w sprawie opcji wymiany.
• Elementy mocujące bloczka koła: Upewnij się, że bloczek kół jest bezpiecznie przymocowany do MP1, a wszelkie niezbędne elementy mocujące
są uwzględnione.
• Podstawa platformy: Zanim wsiądziesz sprawdź, czy MP1 jest wypoziomowany. Jeśli nie, użyj nóżek podstawy, aby wypoziomować platformę.
• Szpikulce szybkozamykające lub osie przelotowe: Sprawdź, czy osie przelotowe i/lub szpikulce szybkozamykające w rowerze są dokręcone
momentem zalecanym przez producenta roweru.
PL
Používatelia zodpovedajú za úplné prečítanie pokynov pred prvou jazdou a za dodržiavanie týchto pokynov. Zariadenie MP1 bolo úspešne preskúšané
s mnohými bežnými aj populárnymi trenažérmi. Prejdite na stránku saris.com/MP1, kde nájdete informácie o konkrétnych trenažéroch. Ak svoj trenažér
v zozname nenájdete, obráťte sa na zákaznícku podporu spoločnosti Saris.
Pred každou jazdou na svojom zariadení MP1 vždy skontrolujte:
• Montážne pásy trenažéra: Skontrolujte, či je váš trenažér bezpečne pripevnený na zaradenie MP1 pomocou montážnych trenažéra. Skontrolujte
pásy, či nie sú poškodené. Ak sú poškodené, obráťte sa na podporu spoločnosti Saris a informujte sa o možnostiach ich výmeny.
• Montážne pásy pre kolesový blok: Skontrolujte, či sú pásy bezpečné a nepoškodené. Ak sú poškodené, obráťte sa na podporu spoločnosti Saris
a informujte sa o možnostiach ich výmeny.
• Hardvér pre kolesový blok: Skontrolujte, či je kolesový blok pevne pripevnený na zariadenie MP1 a či je k dispozícii všetok potrebný hardvér.
• Báza platformy: Pred nasadnutím skontrolujte, či je zariadenie MP1 vo vodorovnej rovine. Ak nie je, použite nohy bázy na vyrovnanie platformy
do vodorovnej roviny.
• Rýchloupínacie osky alebo rýchloupináky: Skontrolujte, či sú rýchloupínacie osky alebo rýchloupináky na vašom bicykli utiahnuté podľa
odporúčaných špecifikácií pre krútiaci moment od výrobcu vášho bicykla.
SK
30675B MP1 Manualv1.indd 730675B MP1 Manualv1.indd 7 1/29/2021 2:45:29 PM1/29/2021 2:45:29 PM

8
GENERAL SAFETY GUIDELINES
• Consult your physician before beginning or modifying any exercise program.
• Do not exceed 300lb weight limit. Excessive weight on the MP1 may cause failures and/or premature wear.
• Use MP1 only on a stable, level surface.
• Use caution while getting onto your bicycle.
• Do not put hands, body parts, or other objects near moving parts. Keep children and pets away from the MP1 while in use.
• The MP1’s only intended use is with static bicycle trainers. The MP1 is not intended for use with trainers that also incorporate movement.
• Do not modify the MP1. Except stickers, stickers on the deck might be cool. You be you. Just be careful not to slip on your stickers,
rhinestones, decoupage, or whatever else you decide to put on the deck.
• Keep the movement range around the MP1 clear of obstacles and be cautious if riding in a space with a low ceiling.
EN
ES • Consulte a un médico siempre antes de comenzar o modificar cualquier programa de ejercicios.
• No supere el límite de peso de 136 kg. Un peso excesivo sobre el MP1 podría provocar averías o un desgaste prematuro.
• Utilice el MP1 solo sobre una superficie estable y nivelada.
• Extreme la precaución al subirse a la bicicleta.
• No acerque las manos, partes del cuerpo u otros objetos a las piezas en movimiento. Mantenga alejados a los niños y animales del
MP1 cuando lo esté utilizando.
• El único uso previsto del MP1 es con aparatos de entrenamiento para bicicletas estáticas. El MP1 no está diseñado para ser utilizado
con entrenadores que también incorporen movimiento.
• No modifique el MP1. Excepto colocarle calcomanías, las calcomanías pueden quedar bien. Sea usted mismo. Sólo tenga cuidado de
no resbalar con las calcomanías, estrases, decoupage o cualquier otra cosa que decida poner sobre la cubierta.
• Mantenga el rango de movimiento alrededor del MP1 libre de obstáculos y tenga cuidado si lo utiliza en una habitación con techo bajo.
30675B MP1 Manualv1.indd 830675B MP1 Manualv1.indd 8 1/29/2021 2:45:29 PM1/29/2021 2:45:29 PM

9
FR
DE
• Consultez votre médecin avant de commencer ou de modifier votre programme d’exercices.
• Ne dépassez pas la limite de poids de 300lb. Tout poids excessif sur le MP1 peut provoquer des défaillances et/ou une usure prématurée.
• Utilisez le MP1 uniquement sur une surface plane et stable.
• Soyez prudent lorsque vous montez sur votre vélo.
• Ne placez pas vos mains, parties du corps ou autres objets à proximité de pièces en mouvement. Tenez les enfants et les animaux
decompagnie à distance du MP1 en cours d’utilisation.
• La seule utilisation prévue du MP1 concerne les trainers de vélo statiques. Le MP1 n’est pas destiné à être utilisé avec des trainers
intégrant également le mouvement.
• Ne modifiez pas votre MP1. Vous pouvez toutefois y ajouter des autocollants afin de le personnaliser! À vous de voir. Veillez toutefois
àne pas glisser sur les autocollants, strass et autres découpages qui décorent votre MP1.
• Ne gênez pas les déplacements autour du MP1 et soyez prudent si vous vous trouvez dans un espace où le plafond est bas.
• Sprich mit deinem Arzt, bevor du ein Übungsprogramm beginnst oder änderst.
• Überschreite in keinem Fall das Gewichtslimit von 136 kg („300 lbs“). Eine übermäßige Gewichtsbelastung der MP1 kann zu Bruch
und/oder vorzeitigem Verschleiß führen.
• Benutze die MP1 nur auf einer stabilen, ebenen Fläche.
• Beim Aufsteigen auf das Fahrrad ist Vorsicht geboten.
• Halte Hände, Körperteile und sämtliche Gegenstände immer fern von beweglichen Teilen. Kinder und Haustiere sind von der MP1
fernzuhalten, wenn sie benutzt wird.
• Der einzig zulässige Verwendungszweck der MP1 ist der Trainingseinsatz mit statischen Fahrradtrainern. Die MP1 ist nicht für den
Einsatz mit bewegungsfähigen Fahrradtrainern gedacht.
• Die MP1 darf nicht modifiziert werden. Erlaubt sind nur Sticker, mit denen du die Sichtfläche natürlich verschönern kannst. Sei du
selbst. Achte nur darauf, dass du nicht auf deinen Stickern, Strasssteinen, Aufklebern und sonstigen Verzierungen ausrutschst.
• Halte den Bewegungsbereich um die MP1 herum frei von Hindernissen und sei besonders vorsichtig, wenn du in einem Raum mit
niedriger Decke fährst.
30675B MP1 Manualv1.indd 930675B MP1 Manualv1.indd 9 1/29/2021 2:45:29 PM1/29/2021 2:45:29 PM

10
IT
NL
• Prima di iniziare o modificare un programma di esercizi, consultare un medico.
• Non superare il limite di peso di 300 libre. Un peso eccessivo sull’MP1 può causare danni e/o usura prematura.
• Utilizzare l’MP1 solo su una superficie stabile, piana.
• Fare attenzione quando si sale sulla bici.
• Non mettere le mani, le parti del corpo o altri oggetti vicino alle parti in movimento. Durante l’uso, tenere i bambini e gli animali
lontanidall’MP1.
• L’unico uso previsto dell’MP1 è con rulli per bicicletta statici. L’MP1 non va utilizzato con rulli che incorporano anche il movimento.
• Non modificare l’MP1. Fatta eccezione per gli adesivi, gli adesivi sulla pedana dovrebbero essere fantastici. Sii te stesso. Fai solo
attenzione a non scivolare su adesivi, strass, decoupage o qualsiasi altra cosa tu decida di mettere sulla pedana.
• Mantenere l’area di movimento intorno all’MP1 libera da ostacoli e prestare attenzione se si usa il rullo in uno spazio con un sotto basso.
• Consulteer uw arts, voordat u een trainingsprogramma start of wijzigt.
• Overschrijd de gewichtslimiet van 300 pond niet. Overgewicht op de MP1 kan storingen en/of vroegtijdige slijtage veroorzaken.
• Gebruik de MP1 alleen op een stabiele, vlakke ondergrond.
• Wees voorzichtig wanneer u op uw fiets stapt.
• Houd uw handen, lichaamsdelen of andere voorwerpen uit de buurt van bewegende delen. Houd kinderen en huisdieren uit de buurt
van de MP1 wanneer deze in gebruik is.
• De MP1 is alleen bedoeld voor gebruik met statische fietstrainers. De MP1 is niet bedoeld voor gebruik met trainers die ook
bewegingtoelaten.
• Maak geen wijzigingen aan de MP1. Stickers mag u natuurlijk wel op het deck kleven. Wees uzelf. Pas wel op dat u niet uitglijdt
op de stickers, strassteentjes, decoupage of hetgeen waarmee u het deck wilt versieren.
• Houd de bewegingsruimte rond de MP1 vrij van obstakels en wees voorzichtig als u in een ruimte met een laag plafond fietst.
30675B MP1 Manualv1.indd 1030675B MP1 Manualv1.indd 10 1/29/2021 2:45:29 PM1/29/2021 2:45:29 PM

11
• Przed rozpoczęciem lub modyfikacją jakiegokolwiek programu ćwiczeń skonsultuj się z lekarzem.
• Nie przekraczaj obciążenia wynoszącego 136 kg. Nadmierne obciążenie MP1 może powodować awarie i/lub przedwczesne zużycie.
• Korzystaj z MP1 tylko na stabilnej i równej powierzchni.
• Zachowaj ostrożność podczas wsiadania na rower.
• Nie umieszczaj rąk, części ciała ani innych przedmiotów w pobliżu ruchomych części. Podczas użytkowania trzymaj dzieci i zwierzęta
domowe z dala od MP1.
• Jedynym dopuszczalnym zastosowaniem MP1 jest trening ze stacjonarnymi trenażerami rowerowymi. MP1 nie jest przeznaczony
do użytku z ruchomymi trenażerami rowerowymi.
• Nie wolno modyfikować MP1. Możesz jednak dodać naklejki, aby go spersonalizować. To zależy od ciebie. Uważaj, aby nie poślizgnąć
się na naklejkach, dżetach, elementach decoupage i innych dekoracjach, które zdecydujesz się umieścić na platformie.
• Zachowaj przestrzeń umożliwiającą poruszanie się wokół MP1 z dala od przeszkód i zachowaj szczególną ostrożność podczas jazdy
w pomieszczeniu z niskim sufitem.
PL
• Predtým, ako začnete s novým programom alebo zmeníte svoj tréningový program, konzultujte to so svojím lekárom.
• Neprekračujte váhový limit 136 kg (300 lb). Vyššia hmotnosť na zariadení MP1 môže spôsobiť zlyhanie a/alebo predčasné opotrebovanie.
• Zariadenie MP1 používajte iba na stabilnom a vodorovnom povrchu.
• Pri nasadaní na bicykel si dávajte pozor.
• Neklaďte ruky, časti tela ani iné predmety do blízkosti pohyblivých častí. Deti a domáce zvieratá držte v bezpečnej vzdialenosti
od zariadenia MP1, keď ho používate.
• Používanie zariadenia MP1 je určené iba na použitie so stacionárnymi bicyklovými trenažérmi. Zariadenie MP1 nie je určené
na použitie s trenažérmi, ktoré zahŕňajú tiež pohyb.
• Zariadenie MP1 neupravujte. Okrem nálepiek, nálepky na doske môžu byť cool. Budte sami sebou. Len dávajte pozor, aby ste sa nepošmykli
na svojich nálepkách, kryštálikových aplikáciách, vystrihovačkách alebo na čomkoľvek, čím sa rozhodnete ozdobiť svoju dosku.
• Udržiavajte oblasť pohybu okolo zariadenia MP1 bez prekážok a dávajte pozor, ak jazdíte v priestore s nízkym stropom.
SK
30675B MP1 Manualv1.indd 1130675B MP1 Manualv1.indd 11 1/29/2021 2:45:29 PM1/29/2021 2:45:29 PM

12
d
Customer Service
800.783.7257
Saris.com
D
C
B
A
A
B
C
D
1
2
3
4
5
6
7
8
8
7
6
5
4
3
2
1
E
F
E
F
IMPERIAL:
1
INITIAL RELEASE
1
2X
2X
1X
2X
2X
SHORT
2X
MEDIUM
2X
LONG
2X
2X
1X
D
C
B
A
A
B
C
D
1
2
3
4
5
6
7
8
8
7
6
5
4
3
2
1
REVISIONS
REV.
DESCRIPTION
DATE
APP.
E
F
E
F
.XXX" = .005
.XX" = .020
.X" = .060
X" = .250
IMPERIAL:
UNLESS OTHERWISE SPECIFIED
DIMENSIONS ARE IN IMPERIAL UNITS
TOLERANCES ARE:
THE INFORMATION CONTAINED IN THIS DRAWING IS THE SOLE CONFIDENTIAL PROPERTY OF
SARIS CYCLING GROUP ANY REPRODUCTION IN PART OR WHOLE WITHOUT THE WRITTEN
PERMISSION OF SARIS CYCLING GROUP IS PROHIBITED.
CAD GENERATED DRAWING,
DO NOT MANUALLY UPDATE
DIMENSIONING PER ASME Y14.5M 1994
DATE:
VENDOR REPRESENTATIVE:
5253 VERONA ROAD
MADISON WI. 53711
1-800-783-7257
WWW.SARIS.COM
ANGLES
1
TFAWAWI - 9789 IS
TITLE:
11
2
1:2
DO NOT SCALE DRAWING
PURCHASING REP
MFG ENG
RESP ENG
CHECKED
DRAWN
APPROVALS
DATE
REV.
OF
SHEET
D
DWG. NO.
CAD FILE:
SIZE
SCALE
0.1512
CU./IN.
PART WEIGHT:
PART VOLUME:
MATERIAL:
SEE BOM
FINISH:
LBS.
N/A
STRAP,OMNIWRAP,18",MP1
1
INITIAL RELEASE
XXX
xx/x/xx
1
SEE BOM
2X
2X
1X
2X
2X
SHORT
2X
MEDIUM
2X
LONG
2X
2X
1X
D
C
B
A
A
B
C
D
1
2
3
4
5
6
7
8
8
7
6
5
4
3
2
1
REVISIONS
REV.
DESCRIPTION
DATE
APP.
E
F
E
F
.XXX" = .005
.XX" = .020
.X" = .060
X" = .250
IMPERIAL:
UNLESS OTHERWISE SPECIFIED
DIMENSIONS ARE IN IMPERIAL UNITS
TOLERANCES ARE:
THE INFORMATION CONTAINED IN THIS DRAWING IS THE SOLE CONFIDENTIAL PROPERTY OF
SARIS CYCLING GROUP ANY REPRODUCTION IN PART OR WHOLE WITHOUT THE WRITTEN
PERMISSION OF SARIS CYCLING GROUP IS PROHIBITED.
CAD GENERATED DRAWING,
DO NOT MANUALLY UPDATE
DIMENSIONING PER ASME Y14.5M 1994
DATE:
VENDOR REPRESENTATIVE:
5253 VERONA ROAD
MADISON WI. 53711
1-800-783-7257
WWW.SARIS.COM
ANGLES
1
TFAWAWI - 9789 IS
TITLE:
11
2
1:2
DO NOT SCALE DRAWING
PURCHASING REP
MFG ENG
RESP ENG
CHECKED
DRAWN
APPROVALS
DATE
REV.
OF
SHEET
D
DWG. NO.
CAD FILE:
SIZE
SCALE
0.1512
CU./IN.
PART WEIGHT:
PART VOLUME:
MATERIAL:
SEE BOM
FINISH:
LBS.
N/A
STRAP,OMNIWRAP,18",MP1
1
INITIAL RELEASE
XXX
xx/x/xx
1
SEE BOM
• Part Number: MP1
• SKU 9789T
• Max Fore-Aft-Travel: 9.5”
• Max Side-to-Side Tilt from Center: 6°
• Weight: 62lbs
• Dimensions: 6” tall x 63” long x 35 ½” wide
2x 2x
SHORT
1x
2X
2X
1X
2X
2X
SHORT
2X
MEDIUM
2X
LONG
2X
2X
1X
D
C
B
A
A
B
C
D
1
2
3
4
5
6
7
8
8
7
6
5
4
3
2
1
REVISIONS
REV.
DESCRIPTION
DATE
APP.
E
F
E
F
.XXX" = .005
.XX" = .020
.X" = .060
X" = .250
IMPERIAL:
UNLESS OTHERWISE SPECIFIED
DIMENSIONS ARE IN IMPERIAL UNITS
TOLERANCES ARE:
THE INFORMATION CONTAINED IN THIS DRAWING IS THE SOLE CONFIDENTIAL PROPERTY OF
SARIS CYCLING GROUP ANY REPRODUCTION IN PART OR WHOLE WITHOUT THE WRITTEN
PERMISSION OF SARIS CYCLING GROUP IS PROHIBITED.
CAD GENERATED DRAWING,
DO NOT MANUALLY UPDATE
DIMENSIONING PER ASME Y14.5M 1994
DATE:
VENDOR REPRESENTATIVE:
5253 VERONA ROAD
MADISON WI. 53711
1-800-783-7257
WWW.SARIS.COM
ANGLES
1
TFAWAWI - 9789 IS
TITLE:
11
2
1:2
DO NOT SCALE DRAWING
PURCHASING REP
MFG ENG
RESP ENG
CHECKED
DRAWN
APPROVALS
DATE
REV.
OF
SHEET
D
DWG. NO.
CAD FILE:
SIZE
SCALE
0.1512
CU./IN.
PART WEIGHT:
PART VOLUME:
MATERIAL:
SEE BOM
FINISH:
LBS.
N/A
STRAP,OMNIWRAP,18",MP1
1
INITIAL RELEASE
XXX
xx/x/xx
1
SEE BOM
2x1x
2x
1x
REVISIONS
DESCRIPTION
REV.
DATE
APP.
LBS.
FINISH:
Material <not specified>
MATERIAL:
PART VOLUME:
PART WEIGHT:
CU./IN.
0.0040
1
UNLESS OTHERWISE SPECIFIED
DIMENSIONS ARE IN IMPERIAL UNITS
TOLERANCES ARE:
CAD GENERATED DRAWING,
DO NOT MANUALLY UPDATE
DIMENSIONING PER ASME Y14.5M 1994
DATE:
VENDOR REPRESENTATIVE:
5253 VERONA ROAD
MADISON WI. 53711
1-800-783-7257
WWW.SARIS.COM
.XXX" = .005
.XX" = .020
.X" = .060
X" = .250
ANGLES
1
IMPERIAL:
4MM HEX
TITLE:
1
1
1:1
THE INFORMATION CONTAINED IN THIS DRAWING IS THE SOLE PROPERTY OF
SARIS CYCLING GROUP ANY REPRODUCTION IN PART OR WHOLE WITHOUT
THE WRITTEN PERMISSION OF SARIS CYCLING GROUP IS PROHIBITED.
DO NOT SCALE DRAWING
PURCHASING. REP.
MFG ENG
RESP ENG
CHECKED
DRAWN
APPROVALS
DATE
REV.
OF
SHEET
A
DWG. NO.
CAD FILE:
SIZE
SCALE
Description
1
INITIAL RELEASE
XXX
xx/x/xx
NONE
Tools Required | Herramientas Necesarias | Outils Nécessaires |
Erforderliche Werkzeuge | Attrezzi Necessari | Benodigd Gereedschap |
Wymagane narzędzia | Požadované nástroje
4mm Hex
30675B MP1 Manualv1.indd 1230675B MP1 Manualv1.indd 12 1/29/2021 2:45:31 PM1/29/2021 2:45:31 PM

13
D
C
B
A
A
B
C
D
1
2
3
4
5
6
7
8
8
7
6
5
4
3
2
1
E
F
E
F
IMPERIAL:
1
INITIAL RELEASE
1
BEFORE SET UP
Clean your MP1 before the first use and after every 30 hours of riding.
Limpie el MP1 antes del primer uso y después de cada 30 horas de uso.
Nettoyez votre MP1 avant la première utilisation et toutes les 30heures de conduite.
Reinige deinen MP1 vor der ersten Verwendung und nach jeweils 30 Fahrstunden.
Pulire l’MP1 prima del primo utilizzo e ogni 30 ore di funzionamento.
Reinig uw MP1 vóór het eerste gebruik en telkens na 30 uur fietsen.
Wyczyść MP1 przed pierwszym użyciem i po każdych 30 godzinach jazdy.
Pred prvým použitím a po každých 30 hodinách jazdy vyčistite svoje zariadenie MP1.
30675B MP1 Manualv1.indd 1330675B MP1 Manualv1.indd 13 1/29/2021 2:45:31 PM1/29/2021 2:45:31 PM

14
Maintain wear items on your MP1 for best results and longevity. Dirt and dust on the roller areas can degrade ride quality and accelerate
wear and tear.
Realice el mantenimiento de los elementos que se desgastan en el MP1 para conseguir un mejor resultado y una mayor vida útil. El polvo y
la suciedad en la zona de los rodillos pueden afectar a la calidad del uso y acelerar el desgaste.
Maintenez les articles d’usure sur votre MP1 pour de meilleurs résultats et une plus grande longévité. La saleté et la poussière sur les zones
de rouleaux peuvent dégrader la qualité de roulement et accélérer l’usure.
Die regelmäßige Wartung der Verschleißteile deines MP1 sorgt für optimale Ergebnisse und verlängert die Lebensdauer deines
Trainingsgeräts. Schmutz und Staub im Rollenbereich können das Fahrerlebnis beeinträchtigen und den Verschleiß begünstigen.
Sottoporre a manutenzione i componenti dell’MP1 soggetti a usura per risultati migliori e per una maggiore durata del prodotto. Sporco e
polvere sulle aree del rullo possono compromettere la qualità dell’allenamento e accelerare l’usura e il deterioramento.
De slijtonderdelen van uw MP1 hebben onderhoud nodig, voor een optimale werking en een lange levensduur. Door stof en vuil op de
rollenbank neemt de fietskwaliteit af en slijten de onderdelen sneller.
Aby uzyskać najlepsze efekty i trwałość konserwuj elementy eksploatacyjne w swoim MP1. Brud i kurz na powierzchniach rolek mogą
pogarszać jakość jazdy i przyspieszać zużycie.
Starajte sa o spotrebné diely svojho prístroja MP1 pre lepšie výsledky a dlhšiu životnosť. Nečistoty a prach v oblastiach valca môžu znížiť
kvalitu jazdy a urýchliť opotrebovanie.
EN
ES
FR
DE
IT
NL
PL
SK
30675B MP1 Manualv1.indd 1430675B MP1 Manualv1.indd 14 1/29/2021 2:45:32 PM1/29/2021 2:45:32 PM

15
Maintain wear items on your MP1 for best results and longevity. Dirt and dust on the roller areas can degrade ride quality and accelerate
wear and tear.
Realice el mantenimiento de los elementos que se desgastan en el MP1 para conseguir un mejor resultado y una mayor vida útil. El polvo y
la suciedad en la zona de los rodillos pueden afectar a la calidad del uso y acelerar el desgaste.
Maintenez les articles d’usure sur votre MP1 pour de meilleurs résultats et une plus grande longévité. La saleté et la poussière sur les zones
de rouleaux peuvent dégrader la qualité de roulement et accélérer l’usure.
Die regelmäßige Wartung der Verschleißteile deines MP1 sorgt für optimale Ergebnisse und verlängert die Lebensdauer deines
Trainingsgeräts. Schmutz und Staub im Rollenbereich können das Fahrerlebnis beeinträchtigen und den Verschleiß begünstigen.
Sottoporre a manutenzione i componenti dell’MP1 soggetti a usura per risultati migliori e per una maggiore durata del prodotto. Sporco e
polvere sulle aree del rullo possono compromettere la qualità dell’allenamento e accelerare l’usura e il deterioramento.
De slijtonderdelen van uw MP1 hebben onderhoud nodig, voor een optimale werking en een lange levensduur. Door stof en vuil op de
rollenbank neemt de fietskwaliteit af en slijten de onderdelen sneller.
Aby uzyskać najlepsze efekty i trwałość konserwuj elementy eksploatacyjne w swoim MP1. Brud i kurz na powierzchniach rolek mogą
pogarszać jakość jazdy i przyspieszać zużycie.
Starajte sa o spotrebné diely svojho prístroja MP1 pre lepšie výsledky a dlhšiu životnosť. Nečistoty a prach v oblastiach valca môžu znížiť
kvalitu jazdy a urýchliť opotrebovanie.
DE
IT
NL
PL
SK
1. Entferne die Polsterverpackung unter den seitlichen Rollen. Halte die Polster dafür fest und drück den MP1, um die Rollen ganz nach hinten zu
bewegen.
1. Rimuovere i supporti utilizzati per il trasporto dai rulli laterali aerrando il supporto e spingendo l’MP1 per portare i rulli nella posizione più
arretrata
1. Verwijder de transportblokjes onder de zijrollen door het blokje vast te houden en tegen de MP1 te duwen om de rollen in de achterste
stand te zetten.
1. Zdejmij podkładki transportowe spod rolek bocznych trzymając je i popychając MP1 w celu przesunięcia rolek do najbardziej wysunięte do
tyłu pozycji.
1. Odoberte prepravné podložky zospodu bočných valcov tak, že podržíte podložku a zatlačíte zariadenie MP1, aby sa valce posunuli do svojej
najzadnejšej polohy.
1. Remove the shipping pads from under the side
rollers by holding the pad and pushing the MP1 to move
the rollers to their most rear-ward position.
EN
ES 1. Retire las zapatas de envío debajo de los rodillos
laterales sujetando la zapata y empujando el MP1
para desplazar los rodillos a la posición más hacia atrás.
FR 1. Enlevez les coussinets de protection situés
en dessous des rouleaux latéraux en maintenant
le coussinet et poussant le MP1 afin d’amener
les rouleaux sur leur position la plus reculée.
30675B MP1 Manualv1.indd 1530675B MP1 Manualv1.indd 15 1/29/2021 2:45:32 PM1/29/2021 2:45:32 PM

16
WIPE
DE
IT
NL
PL
SK
2. Reinige Führung und Rolle auf jeder Seite mit dem mitgelieferten Silikonreinigungstuch.
2. Con il panno per la pulizia in silicone incluso, pulire la pista e il rullo da ciascun lato.
2. Veeg met het bijgeleverde siliconendoekje aan weerszijden over de baan en rol.
2. Dołączoną silikonową szmatką do czyszczenia przetrzyj prowadnicę i rolki z każdej strony.
2. Pomocou priloženej silikónovej čistiacej handričky vytrite dráhu a valec na každej strane.
2. With the included silicone cleaning cloth, wipe the
track and roller on each side.
EN
ES 2. Con el paño de limpieza de silicona incluido, limpie
la pista y el rodillo en cada lado.
FR 2. À l'aide de la lingette en silicone incluse, nettoyez
la piste et le rouleau de chaque côté.
30675B MP1 Manualv1.indd 1630675B MP1 Manualv1.indd 16 1/29/2021 2:45:33 PM1/29/2021 2:45:33 PM

17
3. Wipe the front and rear fore-aft tubes.
WIPE 3. Limpie los tubos longitudinales delantero
y trasero.
3. Nettoyez les tubes avant/arrière situés à l'avant
et à l'arrière.
3. Wisch die Vor- und Rücklaufrohre ab.
3. Pulire i tubi longitudinali anteriori e posteriori.
3. Veeg over de voorste en achterste buizen.
3. Przetrzyj przednie i tylne rurki.
3. Vytrite spredu a zozadu prednú a zadnú rúru.
EN
ES
FR
DE
IT
NL
PL
SK
2. Reinige Führung und Rolle auf jeder Seite mit dem mitgelieferten Silikonreinigungstuch.
2. Con il panno per la pulizia in silicone incluso, pulire la pista e il rullo da ciascun lato.
2. Pomocou priloženej silikónovej čistiacej handričky vytrite dráhu a valec na každej strane.
30675B MP1 Manualv1.indd 1730675B MP1 Manualv1.indd 17 1/29/2021 2:45:34 PM1/29/2021 2:45:34 PM

18
5. Store the silicone wipe back in its bag.
6. Clean the tracks again after 30 hours of use.
5. Guarde el paño de silicona nuevamente en su bolsa.
6. Vuelva a limpiar las pistas tras 30 horas de uso.
5. Rangez la lingette en silicone dans sa pochette.
6. Nettoyez les pistes toutes les 30heures d'utilisation.
5. Leg das Silikontuch anschließend wieder in
seine Verpackung.
6. Reinige die Führungen alle 30 Fahrstunden.
4. Move the MP1 into the most forward position
and wipe the tracks and tubes again.
WIPE
WIPE
4. Desplace el MP1 a la posición más adelantada
y vuelva a limpiar las pistas y los tubos de nuevo.
4. Amenez le PM1 jusqu'à la position la plus
avancée et nettoyez à nouveau les rails et les tubes.
4. Bring deinen MP1 in die vorderste Stellung
und wische die Führungen und Rohre erneut ab.
EN
ES
FR
DE
30675B MP1 Manualv1.indd 1830675B MP1 Manualv1.indd 18 1/29/2021 2:45:35 PM1/29/2021 2:45:35 PM

19
5. Store the silicone wipe back in its bag.
6. Clean the tracks again after 30 hours of use.
5. Guarde el paño de silicona nuevamente en su bolsa.
6. Vuelva a limpiar las pistas tras 30 horas de uso.
5. Rangez la lingette en silicone dans sa pochette.
6. Nettoyez les pistes toutes les 30heures d'utilisation.
5. Riporre il panno in silicone nella sua sacca.
6. Pulire di nuovo le piste dopo 30 ore di utilizzo.
5. Bewaar het siliconendoekje in het bijbehorende zakje.
6. Reinig de baan opnieuw na 30 uur fietsen.
5. Szmatkę silikonową umieść z powrotem w torebce.
6. Oczyść prowadnice rolkowe ponownie po 30 godzinach użytkowania.
5. Silikónovú handričku odložte späť do jej vrecúška.
6. Dráhy znova vyčistite po 30 hodinách používania.
4. Portare l’MP1 nella posizione più avanzata e pulire nuovamente le piste e i tubi.
4. Zet de MP1 in de voorste stand en veeg nogmaals over de baan en de buizen.
4. Przesuń MP1 do najbardziej wysuniętego do przodu położenia i ponownie wytrzyj prowadnice rolkowe i rurki.
4. Posuňte zariadenie MP1 čo najviac dopredu a znova vytrite dráhy a rúry.
IT
NL
PL
SK
30675B MP1 Manualv1.indd 1930675B MP1 Manualv1.indd 19 1/29/2021 2:45:35 PM1/29/2021 2:45:35 PM

20
SETUP & MOUNTING
1
The MP1 ships with four retention straps. Two straps are for securing a trainer to the MP1(See trainer fit guide at saris.com/MP1).
Two straps are for securing the front wheel of your bicycle to the wheel block. For the best experience, setup your MP1 on a clean,
non-slippery, and level surface.
EN
ES
El MP1 se suministra con cuatro correas de sujeción. Dos correas son para fijar un aparato de entrenamiento al MP1 (Consulte la guía
de adaptación de aparatos de entrenamiento en saris.com/MP1). Dos correas son para fijar la rueda delantera de la bicicleta al bloque
de rueda. Para conseguir la mejor experiencia, monte su MP1 sobre una superficie limpia, no deslizante y nivelada.
FR
Le MP1 est livré avec quatre sangles de rétention. Deux d’entre elles servent à arrimer un trainer au MP1 (Voir le Guide de
compatibilité du trainer sur saris.com/MP1). Deux des sangles permettent de fixer la roue avant de votre vélo au bloc de roues. Pour
une expérience optimale, installez votre MP1 sur une surface propre, non glissante età niveau.
IT
L’MP1 è fornito con 4 cinghie di mantenimento. Due cinghie servono per fissare il trainer all’MP1 (Nella maggior parte dei casi ne
bastano solo due. Consultare la guida al montaggio del rullo su saris.com/MP1). Due cinghie servono a fissare la ruota anteriore della
bicicletta al blocco della ruota. Per un’esperienza eccezionale, installare l’MP1 su una superficie pulita, non scivolosa e in piano.
NL
De MP1 wordt geleverd met vier spanriemen. Twee van deze riemen zijn bedoeld om een trainer op de MP1 te bevestigen (in de
meeste gevallen hebt u er maar twee nodig. Raadpleeg de Fit Guide van de trainer op saris.com/MP1). Twee van deze riemen zijn
bedoeld om het voorwiel van uw fiets aan het wielblok vast te maken. Voor de beste ervaring plaatst u uw MP1 op een schone, vlakke
ondergrond die niet glad is.
DE
Im Lieferumfang der MP1 sind 4 Sicherungsgurte enthalten. 2 Gurte dienen dazu, einen Trainer an der MP1 zu sichern (in den meisten
Fällen sind hierfür nur 2 Gurte erforderlich. Die Liste kompatibler Trainer findest du auf saris.com/MP1). 2 Gurte dienen dazu, das Vorderrad
deines Fahrrads am Radblock zu sichern. Am besten stellst du deine MP1 auf eine saubere, nicht rutschige, ebene Fläche.
30675B MP1 Manualv1.indd 2030675B MP1 Manualv1.indd 20 1/29/2021 2:45:35 PM1/29/2021 2:45:35 PM

21
MP1 jest dostarczany z czterema taśmami mocującymi. Dwie taśmy służą do mocowania trenażera do MP1 (patrz instrukcja
dopasowania trenażera na stronie saris.com/MP1). Dwie taśmy służą do mocowania przedniego koła roweru do bloczka koła.
Aby osiągnąć jak najlepsze efekty, ustaw MP1 na czystej, antypoślizgowej i poziomej powierzchni.
PL
Zariadenie MP1 sa dodáva s montážnymi pásmi. Dva pásy slúžia na pripevnenie trenažéra k zariadeniu MP1 (pozri príručku k fit
trenažéru na stránke saris.com/MP1). Dva pásy slúžia na pripevnenie predného kolesa bicykla ku kolesovému bloku. Aby ste mali
čo najlepší zážitok, zostavte svoje zariadenie MP1 na čistom, nešmykľavom a rovnom povrchu.
SK
SETUP & MOUNTING
30675B MP1 Manualv1.indd 2130675B MP1 Manualv1.indd 21 1/29/2021 2:45:35 PM1/29/2021 2:45:35 PM

22
2
D
C
B
A
A
B
C
D
1
2
3
4
5
6
7
8
8
7
6
5
4
3
2
1
E
F
E
F
IMPERIAL:
1
INITIAL RELEASE
1
D
C
B
A
A
B
C
D
1
2
3
4
5
6
7
8
8
7
6
5
4
3
2
1
E
F
E
F
IMPERIAL:
1
INITIAL RELEASE
1
30675B MP1 Manualv1.indd 2230675B MP1 Manualv1.indd 22 1/29/2021 2:45:36 PM1/29/2021 2:45:36 PM

23
Adjust the leveling feet of the MP1 so that each one makes contact with the floor. Level the MP1 by turning the feet in or out.
EN
ES Ajuste las patas de nivelación del MP1 de modo que cada una de ellas tenga contacto con el suelo. Nivele el MP1 girando las
patas hacia dentro o hacia fuera.
FR Ajustez les pieds réglables du MP1 de sorte que chacun soit en contact avec le sol. Mettez le MP1 à niveau en tournant les
pieds vers l’intérieur ou l’extérieur.
IT Sistemare i piedini di regolazione dell’MP1 in modo che siano tutti a contatto con il suolo. Per mettere in piano l’MP1 girare
ipiedini verso l’interno o l’esterno.
NL Stel de stelvoetjes van de MP1 zo af dat elk voetje contact maakt met de vloer. Zet de MP1 waterpas door de voetjes
omhoog of omlaag te draaien.
DE Stelle die höhenverstellbaren Standfüße der MP1 so ein, dass jeder von ihnen den Boden berührt. Gleiche die Höhen der MP1
aus, indem du die Standfüße nach innen oder außen drehst.
Wyreguluj nóżki poziomujące MP1, tak aby każda z nich stykała się z podłożem. Wypoziomuj MP1, obracając nóżki
do wewnątrz lub na zewnątrz.
PL
Upravte nivelizačné nohy zariadenia MP1 tak, aby každá z nich bola v kontakte s podlahou. Vyrovnajte zariadenie MP1
otáčaním nohy dovnútra alebo von.
SK
D
C
B
A
A
B
C
D
1
2
3
4
5
6
7
8
8
7
6
5
4
3
2
1
E
F
E
F
IMPERIAL:
1
INITIAL RELEASE
1
30675B MP1 Manualv1.indd 2330675B MP1 Manualv1.indd 23 1/29/2021 2:45:36 PM1/29/2021 2:45:36 PM

24
D
C
B
A
A
B
C
D
1
2
3
4
5
6
7
8
8
7
6
5
4
3
2
1
E
F
E
F
IMPERIAL:
1
INITIAL RELEASE
1
D
C
B
A
A
B
C
D
1
2
3
4
5
6
7
8
8
7
6
5
4
3
2
1
E
F
E
F
IMPERIAL:
1
INITIAL RELEASE
1
3
30675B MP1 Manualv1.indd 2430675B MP1 Manualv1.indd 24 1/29/2021 2:45:37 PM1/29/2021 2:45:37 PM

25
Set your trainer with all legs extended and locked on the back of the MP1. Do not secure the trainer fully until installing the
riser block and bike for proper alignment. Note:many trainers are asymmetric and will not sit directly in the middle of the MP1.
EN
ES Coloque el aparato de entrenamiento con todas las patas extendidas y fijadas en la parte posterior del MP1. No asegure
elaparato de entrenamiento por completo hasta instalar el soporte de elevación y la bicicleta para una correcta alineación.
Nota: muchos aparatos de entrenamiento son asimétricos y no encajarán directamente en la parte central del MP1.
FR Étirez et verrouillez les pattes à l’arrière du MP1. Ne fixez pas complètement le trainer avant d’avoir installé le plot
élévateur et le vélo pour un alignement correct. Remarque: de nombreux trainers sont asymétriques et ne permettent
pasune assise directe au milieu du MP1.
IT Installare il rullo con tutte le zampe estese e bloccate sulla parte posteriore dell’MP1. Non fissare completamente il rullo
prima di aver installato il blocco rialzo e la bici per un allineamento corretto. Nota: molti rulli sono asimmetrici e non si
troveranno direttamente al centro dell’MP1.
NL Plaats uw trainer met alle poten uitgestrekt en vergrendeld op de achterkant van de MP1. Zet de trainer niet volledig vast
totdat het stapelblok en de fiets zijn geïnstalleerd voor een juiste uitlijning. Opmerking: veel trainers zijn asymmetrisch en
staan dus niet recht in het midden van de MP1.
DE Setze deinen Trainer mit rundum ausgefahrenen Standfüßen auf und sichere ihn hinten an der MP1. Vollständig sichern
kannst du den Trainer erst, wenn der Anstiegsblock (Riser Block) und das Fahrrad korrekt angebracht und ausgerichtet
sind. Hinweis: Viele Trainer sind asymmetrisch und halten auf der MP1 nicht sofort die Mitte.
Ustaw trenażer z wyciągniętymi i zablokowanymi nóżkami z tyłu MP1. Nie mocuj całkowicie trenażera, dopóki bloczek
podnoszący i rower nie zostaną zainstalowane w celu prawidłowego ustawienia. Uwaga: wiele trenażerów jest
asymetrycznych i nie będzie pasować bezpośrednio na środku MP1.
PL
Nastavte svoj trenažér so všetkými nohami predĺženými a uzamknutými na chrbte zariadenia MP1. Trenažér zaistite
úplne až po inštalácii bloku podstavca a bicykla pre správne vyrovnanie. Poznámka: Mnoho trenažérov je asymetrických
a nebudú pasovať priamo do stredu zariadenia MP1.
SK
30675B MP1 Manualv1.indd 2530675B MP1 Manualv1.indd 25 1/29/2021 2:45:38 PM1/29/2021 2:45:38 PM

26
4
DETAIL U
SCALE 2 : 3
DETAIL V
SCALE 2 : 3
D
C
B
A
A
B
C
D
1
2
3
4
5
6
7
8
8
7
6
5
4
3
2
1
REVISIONS
REV.
DESCRIPTION
DATE
APP.
E
F
E
F
.XXX" = .005
.XX" = .020
.X" = .060
X" = .250
IMPERIAL:
UNLESS OTHERWISE SPECIFIED
DIMENSIONS ARE IN IMPERIAL UNITS
TOLERANCES ARE:
THE INFORMATION CONTAINED IN THIS DRAWING IS THE SOLE CONFIDENTIAL PROPERTY OF
SARIS CYCLING GROUP ANY REPRODUCTION IN PART OR WHOLE WITHOUT THE WRITTEN
PERMISSION OF SARIS CYCLING GROUP IS PROHIBITED.
CAD GENERATED DRAWING,
DO NOT MANUALLY UPDATE
DIMENSIONING PER ASME Y14.5M 1994
DATE:
VENDOR REPRESENTATIVE:
5253 VERONA ROAD
MADISON WI. 53711
1-800-783-7257
WWW.SARIS.COM
ANGLES
1
TFAWAWI - 9789 IS
TITLE:
11
5
1:3
DO NOT SCALE DRAWING
PURCHASING REP
MFG ENG
RESP ENG
CHECKED
DRAWN
APPROVALS
DATE
REV.
OF
SHEET
D
DWG. NO.
CAD FILE:
SIZE
SCALE
CU./IN.
PART WEIGHT:
PART VOLUME:
MATERIAL:
FINISH:
LBS.
1
INITIAL RELEASE
XXX
xx/x/xx
1
D
C
B
A
A
B
C
D
1
2
3
4
5
6
7
8
8
7
6
5
4
3
2
1
E
F
E
F
IMPERIAL:
1
INITIAL RELEASE
1
D
C
B
A
A
B
C
D
1
2
3
4
5
6
7
8
8
7
6
5
4
3
2
1
REVISIONS
REV.
DESCRIPTION
DATE
APP.
E
F
E
F
.XXX" = .005
.XX" = .020
.X" = .060
X" = .250
IMPERIAL:
UNLESS OTHERWISE SPECIFIED
DIMENSIONS ARE IN IMPERIAL UNITS
TOLERANCES ARE:
THE INFORMATION CONTAINED IN THIS DRAWING IS THE SOLE CONFIDENTIAL PROPERTY OF
SARIS CYCLING GROUP ANY REPRODUCTION IN PART OR WHOLE WITHOUT THE WRITTEN
PERMISSION OF SARIS CYCLING GROUP IS PROHIBITED.
CAD GENERATED DRAWING,
DO NOT MANUALLY UPDATE
DIMENSIONING PER ASME Y14.5M 1994
DATE:
VENDOR REPRESENTATIVE:
5253 VERONA ROAD
MADISON WI. 53711
1-800-783-7257
WWW.SARIS.COM
ANGLES
1
T-slot
TITLE:
1
1
1:2
DO NOT SCALE DRAWING
PURCHASING REP
MFG ENG
RESP ENG
CHECKED
DRAWN
APPROVALS
DATE
REV.
OF
SHEET
D
DWG. NO.
CAD FILE:
SIZE
SCALE
CU./IN.
PART WEIGHT:
PART VOLUME:
MATERIAL:
FINISH:
LBS.
1
INITIAL RELEASE
XXX
xx/x/xx
1
30675B MP1 Manualv1.indd 2630675B MP1 Manualv1.indd 26 1/29/2021 2:45:38 PM1/29/2021 2:45:38 PM

27
Place the wheel block onto the MP1. Insert the included wheel block hardware into the front channels of the platform deck.
You’ll secure the wheel block in a few steps. Until then, the wheel block will slide fore and aft until secured into position.
EN
ES Coloque el bloque de rueda en el MP1. Inserte los tornillos del bloque de rueda incluidos en los canales delanteros de
la cubierta de plataforma. El bloque de rueda se fija en unos cuantos pasos. Hasta ese momento, el bloque de rueda se
deslizará longitudinalmente hasta que se fije en su posición.
FR Placez le bloc de roues sur le MP1. Insérez la visserie du bloc de roues incluse dans les profilés avant de la plate-forme.
Voici comment sécuriser le bloc de roues en quelques étapes. Le bloc de roues glisse à présent d’avant en arrière.
IT Posizionare il blocco della ruota sull’MP1. Inserire gli elementi di fissaggio del blocco della ruota nei canali anteriori della
pedana. Per fissare il blocco della ruota saranno necessari pochi passaggi. Il blocco della ruota scorrerà longitudinalmente
fino al momento in cui sarà fissato.
NL Plaats het wielblok op de MP1. Breng het meegeleverde bevestigingsmateriaal voor het wielblok aan in de voorste sleuven
van het platformdeck. Het wielblok kan in een paar stappen worden vastgezet. Zolang dat niet is gebeurd, schuift het
wielblok naar voren en naar achteren totdat het in de juiste stand wordt vastgezet.
DE Setze den Radblock auf die MP1. Führe die mitgelieferten Beschlagteile des Radblocks in die vorderen Schlitze der
Plattform. Befestige den Radblock, der sich in wenigen Handgrien sicher fixieren lässt. Solange der Radblock nicht
festgesichert ist, kann er vor- und zurückgleiten. Du musst ihn also fixieren.
Umieść bloczek koła na MP1. Włóż dołączony bloczek koła w przednie kanały platformy. Bloczek koła zabezpiecza się
w kilku krokach. Do tego czasu bloczek koła będzie się przesuwać do przodu i do tyłu, aż zostanie zamocowany we
właściwym położeniu.
PL
Umiestnite kolesový blok na zariadenie MP1. Vložte priložený hardvér kolesového bloku do predných panelov dosky
platformy. Kolesový blok zaistíte pomocou niekoľkých krokov. Kolesový blok bude posúvať dopredu a dozadu dovtedy,
kým sa nezaistí vo svojej polohe.
SK
30675B MP1 Manualv1.indd 2730675B MP1 Manualv1.indd 27 1/29/2021 2:45:38 PM1/29/2021 2:45:38 PM

28
5
D
C
B
A
A
B
C
D
1
2
3
4
5
6
7
8
8
7
6
5
4
3
2
1
E
F
E
F
IMPERIAL:
1
INITIAL RELEASE
1
30675B MP1 Manualv1.indd 2830675B MP1 Manualv1.indd 28 1/29/2021 2:45:40 PM1/29/2021 2:45:40 PM

29
Install your bike onto your trainer following the bike trainer manufacturer’s instructions. Note: If rear wheel uses a quick
release skewer, use the included trainer skewer for a safe and secure fit of bike to trainer.
EN
ES Monte la bicicleta en el aparato de entrenamiento siguiendo las instrucciones del fabricante del aparato de entrenamiento
para bicicleta. Nota: si la rueda trasera utiliza un espetón de liberación rápida, utilice el espetón del aparato de
entrenamiento incluido para una fijación segura y correcta de la bicicleta al aparato de entrenamiento.
FR Installez votre vélo sur votre trainer en suivant les instructions du fabricant. Remarque: si la roue arrière est pourvue
d’unlevier de déblocage rapide, utilisez le levier du trainer pour un ajustement sûr du vélo sur ce dernier.
IT Installare la bici sul rullo rispettando le istruzioni del produttore del rullo. Nota: Se la ruota posteriore monta un perno
asblocco rapido, utilizzare il perno del rullo incluso per fissare in sicurezza la bici al rullo.
NL Plaats uw fiets op de trainer volgens de instructies van de fabrikant van de fietstrainer. Opmerking: Als het achterwiel
isvoorzien van een snelspanner, gebruik dan de meegeleverde snelspanner van de fietstrainer om de fiets afgemeten
opde trainer te bevestigen.
DE Setze dein Fahrrad auf deinen Trainer und befolge dabei die Anweisungen des Trainer-Herstellers. Hinweis: Wenn das
Hinterrad einen Schnellspanner hat, benutze dann den mitgelieferten Schnellspanner des Trainers, damit das Fahrrad
vollkommen sicher auf dem Trainer hält.
Zainstaluj rower na swoim trenażerze, postępując zgodnie z instrukcjami producenta. Uwaga: Jeśli w tylnym kole
zastosowano szpikulec szybkozamykający, użyj dołączonego szpikulca do trenażera, aby bezpiecznie i pewnie
przymocować rower do trenażera.
PL
Inštalujte svoj bicykel do trenažéra podľa pokynov výrobcu trenažéra pre bicykel. Poznámka: Ak má zadné koleso
rýchloupínaciu osku, použite priloženú osku trenažéra na bezpečné a zaistené pripevnenie bicykla ku trenažéru.
SK
30675B MP1 Manualv1.indd 2930675B MP1 Manualv1.indd 29 1/29/2021 2:45:40 PM1/29/2021 2:45:40 PM

30
6
TIGHTEN THIS
STRAP FIRST
D
C
B
A
A
B
C
D
1
2
3
4
5
6
7
8
8
7
6
5
4
3
2
1
REVISIONS
REV.
DESCRIPTION
DATE
APP.
E
F
E
F
.XXX" = .005
.XX" = .020
.X" = .060
X" = .250
IMPERIAL:
UNLESS OTHERWISE SPECIFIED
DIMENSIONS ARE IN IMPERIAL UNITS
TOLERANCES ARE:
THE INFORMATION CONTAINED IN THIS DRAWING IS THE SOLE CONFIDENTIAL PROPERTY OF
SARIS CYCLING GROUP ANY REPRODUCTION IN PART OR WHOLE WITHOUT THE WRITTEN
PERMISSION OF SARIS CYCLING GROUP IS PROHIBITED.
CAD GENERATED DRAWING,
DO NOT MANUALLY UPDATE
DIMENSIONING PER ASME Y14.5M 1994
DATE:
VENDOR REPRESENTATIVE:
5253 VERONA ROAD
MADISON WI. 53711
1-800-783-7257
WWW.SARIS.COM
ANGLES
1
TFAWAWI - 9789 IS
TITLE:
11
6
1:3
DO NOT SCALE DRAWING
PURCHASING REP
MFG ENG
RESP ENG
CHECKED
DRAWN
APPROVALS
DATE
REV.
OF
SHEET
D
DWG. NO.
CAD FILE:
SIZE
SCALE
CU./IN.
PART WEIGHT:
PART VOLUME:
MATERIAL:
FINISH:
LBS.
1
INITIAL RELEASE
XXX
xx/x/xx
1
Place the front wheel of your bike onto the wheel block
and secure it with the wheel block straps. Place climbing
block(s) under the wheel block to level your bike or simulate
an uphill grade.
EN
DE
NL
ES Coloque la rueda delantera de la bicicleta al bloque de rueda
y fíjela con las correas del bloque de rueda.
Coloque bloques de escalada debajo del bloque de ruedas
para nivelar su bicicleta o simular una pendiente cuesta
arriba.
FR Placez la roue avant de votre vélo sur le bloc de roues
etfixez-la à l’aide des sangles du bloc de roues. Placez des
blocs d’escalade sous le bloc de roues pour niveler votre
vélo ou simuler une pente ascendante.
IT Posizionare la ruota frontale della bici sul blocco della ruota
e fissarla con le cinghie del blocco della ruota. Posizionare il
/ i blocco / i rampicante / i sotto il blocco ruota per livellare
la bicicletta o simulare un grado di salita.
Plaats het voorwiel van uw fiets op het wielblok en maak
het vast met de wielblokriemen. Plaats klimblok (ken)
onder het wielblok om je fiets waterpas te zetten of een
bergopwaartse helling te simuleren.
Setze das Vorderrad deines Fahrrads auf den Radblock und
fixiere es mit den Radblock-Sicherungsgurten. Platzieren
Sie Kletterblöcke unter dem Radblock, um Ihr Fahrrad
auszurichten oder eine Steigung zu simulieren.
Umieść przednie koło roweru na bloczku koła i przymocuj
je taśmami. Umieść podstawkę(-i) pod koło pod bloczkiem
koła, aby wypoziomować rower lub symulować podjazd.
PL
Dajte predné koleso svojho bicykla na kolesový blok
a zaistite ho pomocou pásov kolesového bloku. Umiestnite
stupienkový(é) blok(y) pod kolesový blok na vyrovnanie
bicykla alebo simuláciu stupňa stúpania do kopca.
SK
30675B MP1 Manualv1.indd 3030675B MP1 Manualv1.indd 30 1/29/2021 2:45:42 PM1/29/2021 2:45:42 PM

31
7
D
C
B
A
A
B
C
D
1
2
3
4
5
6
7
8
8
7
6
5
4
3
2
1
E
F
E
F
IMPERIAL:
1
INITIAL RELEASE
1
D
C
B
A
A
B
C
D
1
2
3
4
5
6
7
8
8
7
6
5
4
3
2
1
E
F
E
F
IMPERIAL:
1
INITIAL RELEASE
1
Align your bike and trainer so that
your bike sits in a straight line on
the MP1.
EN
ES Alinee la bicicleta y el aparato de
entrenamiento de manera que la
bicicleta se asiente sobre una línea
recta en el MP1.
FR Alignez votre vélo sur le trainer,
afin que le tracé de l’assise du vélo
dessine une ligne droite sur le MP1.
IT Allineare bici e rullo in modo tale
che la bici si trovi in linea retta
sull’MP1.
NL Lijn uw fiets en trainer uit, zodat
uw fiets in een rechte lijn op de
MP1 staat.
DE Richte dein Fahrrad und den Trainer
so aus, dass das Fahrrad in einer
geraden Linie auf der MP1 steht.
Wyrównaj rower i trenażer, tak aby
rower znajdował się w linii prostej
na MP1.
PL
Zarovnajte bicykel a trenažér tak,
aby bicykel sedel na zariadení MP1
v priamej línii.
SK
Place the front wheel of your bike onto the wheel block
and secure it with the wheel block straps. Place climbing
block(s) under the wheel block to level your bike or simulate
an uphill grade.
Coloque la rueda delantera de la bicicleta al bloque de rueda
y fíjela con las correas del bloque de rueda.
Coloque bloques de escalada debajo del bloque de ruedas
para nivelar su bicicleta o simular una pendiente cuesta
arriba.
Placez la roue avant de votre vélo sur le bloc de roues
etfixez-la à l’aide des sangles du bloc de roues. Placez des
blocs d’escalade sous le bloc de roues pour niveler votre
vélo ou simuler une pente ascendante.
Umieść przednie koło roweru na bloczku koła i przymocuj
je taśmami. Umieść podstawkę(-i) pod koło pod bloczkiem
koła, aby wypoziomować rower lub symulować podjazd.
Dajte predné koleso svojho bicykla na kolesový blok
a zaistite ho pomocou pásov kolesového bloku. Umiestnite
stupienkový(é) blok(y) pod kolesový blok na vyrovnanie
bicykla alebo simuláciu stupňa stúpania do kopca.
30675B MP1 Manualv1.indd 3130675B MP1 Manualv1.indd 31 1/29/2021 2:45:44 PM1/29/2021 2:45:44 PM

32
D
C
B
A
A
B
C
D
1
2
3
4
5
6
7
8
8
7
6
5
4
3
2
1
E
F
E
F
IMPERIAL:
1
INITIAL RELEASE
1
8
D
C
B
A
A
B
C
D
1
2
3
4
5
6
7
8
8
7
6
5
4
3
2
1
REVISIONS
REV.
DESCRIPTION
DATE
APP.
E
F
E
F
.XXX" = .005
.XX" = .020
.X" = .060
X" = .250
IMPERIAL:
UNLESS OTHERWISE SPECIFIED
DIMENSIONS ARE IN IMPERIAL UNITS
TOLERANCES ARE:
THE INFORMATION CONTAINED IN THIS DRAWING IS THE SOLE CONFIDENTIAL PROPERTY OF
SARIS CYCLING GROUP ANY REPRODUCTION IN PART OR WHOLE WITHOUT THE WRITTEN
PERMISSION OF SARIS CYCLING GROUP IS PROHIBITED.
CAD GENERATED DRAWING,
DO NOT MANUALLY UPDATE
DIMENSIONING PER ASME Y14.5M 1994
DATE:
VENDOR REPRESENTATIVE:
5253 VERONA ROAD
MADISON WI. 53711
1-800-783-7257
WWW.SARIS.COM
ANGLES
1
TFAWAWI - 9789 IS
TITLE:
11
7
1:3
DO NOT SCALE DRAWING
PURCHASING REP
MFG ENG
RESP ENG
CHECKED
DRAWN
APPROVALS
DATE
REV.
OF
SHEET
D
DWG. NO.
CAD FILE:
SIZE
SCALE
CU./IN.
PART WEIGHT:
PART VOLUME:
MATERIAL:
FINISH:
LBS.
1
INITIAL RELEASE
XXX
xx/x/xx
1
D
C
B
A
A
B
C
D
1
2
3
4
5
6
7
8
8
7
6
5
4
3
2
1
E
F
E
F
IMPERIAL:
1
INITIAL RELEASE
1
D
C
B
A
A
B
C
D
1
2
3
4
5
6
7
8
8
7
6
5
4
3
2
1
REVISIONS
REV.
DESCRIPTION
DATE
APP.
E
F
E
F
.XXX" = .005
.XX" = .020
.X" = .060
X" = .250
IMPERIAL:
UNLESS OTHERWISE SPECIFIED
DIMENSIONS ARE IN IMPERIAL UNITS
TOLERANCES ARE:
THE INFORMATION CONTAINED IN THIS DRAWING IS THE SOLE CONFIDENTIAL PROPERTY OF
SARIS CYCLING GROUP ANY REPRODUCTION IN PART OR WHOLE WITHOUT THE WRITTEN
PERMISSION OF SARIS CYCLING GROUP IS PROHIBITED.
CAD GENERATED DRAWING,
DO NOT MANUALLY UPDATE
DIMENSIONING PER ASME Y14.5M 1994
DATE:
VENDOR REPRESENTATIVE:
5253 VERONA ROAD
MADISON WI. 53711
1-800-783-7257
WWW.SARIS.COM
ANGLES
1
TFAWAWI - 9789 IS
TITLE:
11
11
1:3
DO NOT SCALE DRAWING
PURCHASING REP
MFG ENG
RESP ENG
CHECKED
DRAWN
APPROVALS
DATE
REV.
OF
SHEET
D
DWG. NO.
CAD FILE:
SIZE
SCALE
CU./IN.
PART WEIGHT:
PART VOLUME:
MATERIAL:
FINISH:
LBS.
1
INITIAL RELEASE
XXX
xx/x/xx
1
30675B MP1 Manualv1.indd 3230675B MP1 Manualv1.indd 32 1/29/2021 2:45:46 PM1/29/2021 2:45:46 PM

33
Insert the appropriate trainer retention straps into the channels on the back of the MP1. Wheel-on trainers will generally use the rearmost channels,
with straps securing the trainer’s rear feet. Direct drive trainers will use retention straps on the front legs. Tighten retention strap hardware with
allen key and then secure the straps around the trainer. Ensure the trainer does not move side-to-side or slide forward or backward.
EN
ES Inserte las correas de sujeción del aparato de entrenamiento adecuadas en los canales de la parte posterior del MP1. Los aparatos de
entrenamiento sobre rueda generalmente utilizarán los canales situados más atrás, con las correas sujetando las patas traseras del aparato
de entrenamiento. Los aparatos de entrenamiento con transmisión directa utilizarán correas de sujeción en las patas delanteras. Apriete los
tornillos de la correa de sujeción con la llave Allen y, a continuación, fije las correas alrededor del aparato de entrenamiento. Asegúrese de
que el aparato de entrenamiento no se mueva de lado a lado ni se desplace hacia delante o hacia atrás.
FR Insérez les sangles de retenue appropriées du trainer dans les profilés à l’arrière du MP1. Les trainers pour roues utilisent généralement les
profilés les plus à l’arrière, avec les sangles maintenant les pieds arrière du trainer. Les trainers à entraînement direct utilisent des sangles
derétention placées sur les pattes avant. Serrez la sangle de rétention à l’aide d’une clé Allen, puis fixez les sangles autour du trainer.
Assurez-vous que le trainer ne bouge pas latéralement ou d’avant en arrière.
IT Inserire le cinghie di mantenimento appropriate del rullo nei canali nella parte posteriore dell’MP1. I rulli con fissaggio a telaio in genere
utilizzeranno i canali più posteriori, con cinghie che fissano il piedino posteriore del rullo. I rulli a trazione diretta utilizzeranno le cinghie di
mantenimento sui piedini anteriori. Stringere gli elementi di fissaggio delle cinghie di mantenimento con una chiave a brugola e quindi fissare
le cinghie intorno al rullo. Accertarsi che il rullo non si muova lateralmente o scivoli in avanti o indietro.
DE Führe die entsprechenden Trainer-Sicherungsgurte in die Schlitze hinten an der MP1 ein. Bei Wheel-on-Trainern sind in der Regel die Schlitze
ganz hinten zu benutzen, wobei die hinteren Standfüße des Trainers mit Gurten gesichert werden. Bei Direct-Drive-Trainern kommen die
Sicherungsgurte an den vorderen Standfüßen zum Einsatz. Befestige die Beschlagteile des Sicherungsgurts mit einem Innensechskantschlüssel
und sichere die Gurte dann um den Trainer. Achte darauf, dass der Trainer weder seitlich noch vor- und rückwärts verrutschen kann.
30675B MP1 Manualv1.indd 3330675B MP1 Manualv1.indd 33 1/29/2021 2:45:47 PM1/29/2021 2:45:47 PM

34
NL Steek de overeenkomstige spanbanden van de trainer in de sleuven aan de achterkant van de MP1. Bij trainers die het achterwiel van
uw fiets gebruiken (‘wheel-on’), worden doorgaans de achterste sleuven gebruikt. Daarbij worden de achterste poten van de trainer
met de riemen vastgemaakt. Bij trainers met een directe aandrijving worden de voorste poten met de riemen vastgemaakt. Draai het
bevestigingmateriaal van de spanriemen vast met een inbussleutel en maak vervolgens de riemen rond de trainer vast. Zorg ervoor dat
detrainer niet van links naar rechts beweegt of naar voren of achteren schuift.
Włóż odpowiednie taśmy mocujące trenażer w kanały z tyłu MP1. W przypadku trenażerów kołowych zwykle wykorzystuje się najbardziej
wysunięte do tyłu kanały, przy czym tylne nóżki trenażera są mocowane taśmami. Trenażery z napędem bezpośrednim wykorzystają taśmy
mocujące na przednich nóżkach. Dokręć elementy przytrzymujące taśmy mocujące za pomocą klucza imbusowego, a następnie przymocuj
taśmy wokół trenażera. Upewnij się, że trenażer nie przesuwa się na boki ani do przodu lub do tyłu.
PL
Vložte príslušné montážne pásy trenažéra do kanálov na zadnej časti zariadenia MP1. Trenažéry s kolesami budú vo všeobecnosti využívať
zadné kanály s pásmi zaisťujúcimi zadné nohy trenažéra. Trenažéry priamej jazdy budú využívať montážne pásy na predných nohách.
Utiahnite hardvér montážneho pásu pomocou imbusového kľúča a zaistite pásy okolo trenažéra. Skontrolujte, či sa trenažér nehýbe do strán,
ani neposúva dopredu či dozadu.
SK
30675B MP1 Manualv1.indd 3430675B MP1 Manualv1.indd 34 1/29/2021 2:45:47 PM1/29/2021 2:45:47 PM

35
9
TIGHTEN THIS
STRAP FIRST
D
C
B
A
A
B
C
D
1
2
3
4
5
6
7
8
8
7
6
5
4
3
2
1
REVISIONS
REV.
DESCRIPTION
DATE
APP.
E
F
E
F
.XXX" = .005
.XX" = .020
.X" = .060
X" = .250
IMPERIAL:
UNLESS OTHERWISE SPECIFIED
DIMENSIONS ARE IN IMPERIAL UNITS
TOLERANCES ARE:
THE INFORMATION CONTAINED IN THIS DRAWING IS THE SOLE CONFIDENTIAL PROPERTY OF
SARIS CYCLING GROUP ANY REPRODUCTION IN PART OR WHOLE WITHOUT THE WRITTEN
PERMISSION OF SARIS CYCLING GROUP IS PROHIBITED.
CAD GENERATED DRAWING,
DO NOT MANUALLY UPDATE
DIMENSIONING PER ASME Y14.5M 1994
DATE:
VENDOR REPRESENTATIVE:
5253 VERONA ROAD
MADISON WI. 53711
1-800-783-7257
WWW.SARIS.COM
ANGLES
1
TFAWAWI - 9789 IS
TITLE:
11
6
1:3
DO NOT SCALE DRAWING
PURCHASING REP
MFG ENG
RESP ENG
CHECKED
DRAWN
APPROVALS
DATE
REV.
OF
SHEET
D
DWG. NO.
CAD FILE:
SIZE
SCALE
CU./IN.
PART WEIGHT:
PART VOLUME:
MATERIAL:
FINISH:
LBS.
1
INITIAL RELEASE
XXX
xx/x/xx
1
Make sure riser block is positioned snugly against front
wheel. Tighten the wheel block with knobs. Fasten the
wheel block straps and make sure the metal rings do not
touch the front wheel’s rim.
EN
ES Asegúrese de que el bloque de elevación esté bien colocado
contra la rueda delantera. Apriete el bloque de rueda con
los pomos. Sujete las correas del bloque de la rueda y
asegúrese de que los anillos metálicos no toquen el borde
de la rueda delantera.
FR Assurez-vous que le plot élévateur est positionné contre
la roue avant. Serrez le bloc de roues à l’aide des
boutons. Serrez les sangles du bloc de roue et assurez-
vous que les anneaux métalliques ne touchent pas la
jante de la roue avant.
IT Accertarsi che il blocco rialzo sia posizionato perfettamente sulla ruota
anteriore. Stringere il blocco della ruota con lemanopole. Fissare le
cinghie del blocco ruota e assicurarsi che gli anelli di metallo non
tocchino il cerchione della ruota anteriore.
NL Controleer of het stapelblok goed tegen het voorwiel isgeplaatst. Draai
het wielblok vast met de knoppen enmaak. Maak de wielblokriemen
vast en zorg ervoor dat de metalen ringen de velg niet raken.
DE Achte darauf, dass der Anstiegsblock (Riser Block) fest am Vorderrad
sitzt. Fixiere die Radblöcke mit Drehknöpfen. Befestigen Sie die
Radblockgurte und stellen Sie sicher, dass die Metallringe die Felge des
Vorderrads nicht berühren.
Upewnij się, że podstawka pod przednie koło przylega
ściśle do przedniego koła. Zamocuj bloczek koła
za pomocą pokręteł. Przymocuj taśmy bloczka koła
i upewnij się, że metalowe pierścienie nie stykają się
z obręczą przedniego koła.
PL
Skontrolujte, či je blok podstavca pohodlne opretý
o predné koleso. Utiahnite kolesový blok pomocou
gombíkov. Utiahnite pásy kolesového bloku
a skontrolujte, či sa kovové prstence nedotýkajú ráfu
predného kolesa.
SK
Steek de overeenkomstige spanbanden van de trainer in de sleuven aan de achterkant van de MP1. Bij trainers die het achterwiel van
uw fiets gebruiken (‘wheel-on’), worden doorgaans de achterste sleuven gebruikt. Daarbij worden de achterste poten van de trainer
met de riemen vastgemaakt. Bij trainers met een directe aandrijving worden de voorste poten met de riemen vastgemaakt. Draai het
bevestigingmateriaal van de spanriemen vast met een inbussleutel en maak vervolgens de riemen rond de trainer vast. Zorg ervoor dat
detrainer niet van links naar rechts beweegt of naar voren of achteren schuift.
30675B MP1 Manualv1.indd 3530675B MP1 Manualv1.indd 35 1/29/2021 2:45:48 PM1/29/2021 2:45:48 PM

36
10 EN Get on bike and pedal for a few minutes to ensure everything is set up for your needs (i.e., leaning too far to the left or to
the right, are straps coming lose, is trainer stable on the platform, is the front wheel in line with your frame). Dismount bike
and adjust straps and leveling feet as needed.
ES Súbase a la bicicleta y pedalee unos minutos para asegurarse de que todo esté ajustado según sus necesidades (por ejemplo,
si se inclina demasiado a la izquierda o a la derecha, si las correas se aflojan, si el aparato de entrenamiento se mantiene
estable en la plataforma, si la rueda delantera está alineada con el cuadro). Desmonte la bicicleta y ajuste las correas y los
piesniveladores según sea necesario.
FR Montez sur le vélo et pédalez pendant quelques minutes pour vous assurer de l’ensemble des réglages. Penchez-vous
par exemple excessivement à gauche ou à droite, vérifiez si les sangles se détachent, contrôlez la stabilité du trainer sur
la plate-forme, vérifiez l’alignement de la roue avec le cadre, etc.). Descendez du vélo et ajustez les sangles et les patins
réglables si nécessaire.
IT Salire sulla bici e pedalare per qualche minuto per accertarsi che tutto sia installato in base alle proprie esigenze (controllare
cioè, inclinazione eccessiva verso sinistra o destra, cinghie allentate, rullo stabile sulla piattaforma, ruota anteriore in linea
con il telaio). Scendere dalla bici e regolare le cinghie e mettere in piano i piedini, se necessario.
NL Stap op de fiets en trap gedurende een paar minuten om te controleren of alles is ingesteld zoals u het wenst (d.w.z. te ver
naar links of naar rechts leunend, komen de riemen los, staat de trainer stabiel op het platform, is het voorwiel uitgelijnd
met uw frame). Stap van de fiets en verstel de riemen en stelvoetjes naar wens.
DE Steige auf das Fahrrad und pedaliere einige Minuten, um sicherzustellen, dass alles so eingestellt ist, wie du es brauchst
(d. h. überprüfe, ob du dich nicht zu weit nach links oder rechts lehnen musst, die Gurte sich nicht lösen, der Trainer stabil
auf der Plattform bleibt, das Vorderrad in einer Linie mit deinem Rahmen steht). Nimmt das Fahrrad notfalls wieder ab und
stelle die Gurte und die höhenverstellbaren Standfüße richtig ein.
30675B MP1 Manualv1.indd 3630675B MP1 Manualv1.indd 36 1/29/2021 2:45:48 PM1/29/2021 2:45:48 PM

37
PL Wsiądź na rower i pedał przez kilka minut, aby upewnić się, że wszystko jest ustawione odpowiednio do potrzeb
(tzn. sprawdź, czy nie musisz pochylać się zbyt mocno w lewo lub w prawo, czy taśmy nie uległy poluzowaniu, czy trenażer
pozostaje stabilny na platformie, czy przednie koło jest w jednej linii z ramą). W razie potrzeby zdejmij rower ponownie
i odpowiednio taśmy i nóżki poziomujące.
SK Nasadnite na bicykel a pedálujte niekoľko minút, aby ste sa uistili, či je všetko nastavené podľa vašich potrieb
(napr. nakláňanie príliš naľavo alebo napravo, uvoľnené pásy, stabilita trenažéra na platforme, predné koleso v jednej línii
s vaším rámom). Odmontuje bicykel a nastavte pásy a nivelizačné nohy podľa potreby.
30675B MP1 Manualv1.indd 3730675B MP1 Manualv1.indd 37 1/29/2021 2:45:48 PM1/29/2021 2:45:48 PM

38
11 Before each ride, check the MP1 straps and hardware, as well as your bike’s quick release skewers and/or thru
axles, to make sure that they are still secure.
After each ride, wipe down MP1 deck to remove any sweat and help protect MP1 finish. The MP1 finish is not
covered by warranty.
Maintain wear items on your MP1 for best results and longevity. Dirt and dust on the roller areas can degrade
ride quality and accelerate wear and tear. Use the included silicone cloth wipe to clean the roller tracks and tubes
after every 30 hours of riding (see page XX for instructions).
EN
ES Antes de cada uso, compruebe los tornillos y las correas del MP1, así como los espetones de liberación rápida
olos ejes pasantes de la bicicleta, para asegurarse de que siguen bien fijados.
Después de cada uso, limpie la cubierta del MP1 para quitar el sudor y ayudar a proteger el acabado del MP1.
Elacabado del MP1 no está cubierto por la garantía.
Mantenga los artículos de desgaste en su MP1 para obtener mejores resultados y longevidad. La suciedad y
el polvo en las áreas de los rodillos pueden degradar la calidad de manejo y acelerar el desgaste. Use el paño
de silicona incluido para limpiar las pistas y los tubos de los rodillos después de cada 30 horas de conducción
(consulte las instrucciones en la página XX).
FR Avant chaque utilisation, vérifiez les courroies et la visserie du MP1, ainsi que les broches et/ou les axes
traversants à serrage rapide, afin de vous assurer qu’ils sont toujours en place.
Après chaque utilisation, essuyez le pont du MP1, afin d’éliminer toute trace de sueur et d’en protéger
lerevêtement. Le revêtement du MP1 n’est pas couvert par la garantie.
Maintenez les articles d’usure sur votre MP1 pour de meilleurs résultats et une plus grande longévité. La saleté
et la poussière sur les zones des rouleaux peuvent dégrader la qualité de roulement et accélérer l’usure. Utilisez
la lingette en silicone incluse pour nettoyer les pistes de roulement et les tubes toutes les 30 heures de conduite
(voir page XX pour les instructions).
30675B MP1 Manualv1.indd 3830675B MP1 Manualv1.indd 38 1/29/2021 2:45:48 PM1/29/2021 2:45:48 PM

39
IT Prima dell’uso, controllare sempre le cinghie e gli elementi di fissaggio dell’MP1, i perni a sblocco rapido e/o
iperni passanti della bici, per assicurarsi che siano ancora fissati.
Dopo l’uso, pulire la pedana dell’MP1 per rimuovere il sudore e proteggere la finitura dell’MP1. La finitura
dell’MP1 non è coperta da garanzia.
Mantieni gli articoli di usura sul tuo MP1 per i migliori risultati e la longevità. Lo sporco e la polvere sulle aree dei
rulli possono degradare la qualità di guida e accelerare l’usura. Utilizzare il panno in silicone incluso per pulire le
piste dei rulli e i tubi ogni 30 ore di guida (vedere pagina XX per le istruzioni).
NL Controleer vóór elke rit de riemen en het bevestigingsmateriaal van de MP1, evenals de snelspanners en/of
steekassen van uw fiets, om ervoor te zorgen dat deze nog steeds goed vastzitten.
Veeg na elke rit zweet van het deck om de afwerking van de MP1 te beschermen. De afwerking van de MP1 valt
niet onder de garantie.
Houd slijtage-items op uw MP1 voor de beste resultaten en een lange levensduur. Vuil en stof op de walsgebieden
kunnen de rijkwaliteit verminderen en slijtage versnellen. Gebruik het meegeleverde siliconen doekje om de
rollenbanen en buizen na elke 30 uur rijden te reinigen (zie pagina XX voor instructies).
DE Überprüfe vor jeder Fahrt die Gurte und Beschlagteile an der MP1 sowie die Schnellspanner und/oder
Steckachsen an deinem Fahrrad, um sicherzustellen, dass sie immer noch fest sitzen.
Wische nach jeder Fahrt den Schweiß von der MP1-Plattform ab. So schützt du die Lackierung der MP1.
DieLackierung der MP1 ist nicht durch die Garantie gedeckt.
Pflegen Sie die Verschleißteile Ihres MP1, um optimale Ergebnisse und eine lange Lebensdauer zu erzielen.
Schmutz und Staub auf den Rollenbereichen können die Fahrqualität beeinträchtigen und den Verschleiß
beschleunigen. Verwenden Sie das mitgelieferte Silikontuch, um die Rollenbahnen und Schläuche alle 30 Stunden
zu reinigen (Anweisungen finden Sie auf Seite XX).
30675B MP1 Manualv1.indd 3930675B MP1 Manualv1.indd 39 1/29/2021 2:45:48 PM1/29/2021 2:45:48 PM

40
Przed każdą jazdą sprawdź taśmy i elementy mocujące MP1, a także szpikulce szybkozamykające i/lub osie
przelotowe roweru, aby upewnić się, że pozostają przymocowane.
Po każdej jeździe przetrzyj platformę MP1, aby usunąć pot i pomóc chronić wykończenie MP1. Wykończenie MP1
nie jest objęte gwarancją.
Aby uzyskać najlepsze efekty i trwałość konserwuj elementy eksploatacyjne w swoim MP1. Brud i kurz
na powierzchniach rolek mogą pogarszać jakość jazdy i przyspieszać zużycie. Użyj dołączonej szmatki
silikonowej, aby wyczyścić prowadnice rolkowe i rurki po każdych 30 godzinach jazdy (instrukcje na stronie XX).
PL
Pred každou jazdou skontrolujte pásy zariadenia MP1 a hardvér, tiež rýchloupínacie osky a/alebo rýchloupináky,
aby ste sa ubezpečili, že sú stále zaistené.
Po každej jazde vytrite dosku MP1, aby ste odstránili všetok pot a pomáhali chrániť lak zariadenia MP1.
Na lak zariadenia MP1 sa nevzťahuje záruka.
Starajte sa o spotrebné diely svojho prístroja MP1 pre lepšie výsledky a dlhšiu životnosť. Nečistoty a prach
v oblastiach valca môžu znížiť kvalitu jazdy a urýchliť opotrebovanie. Použite priloženú silikónovú handričku
na vyčistenie dráh valcov a rúr po každých 30 hodinách jazdy (pozri stranu XX s pokynmi).
SK
30675B MP1 Manualv1.indd 4030675B MP1 Manualv1.indd 40 1/29/2021 2:45:48 PM1/29/2021 2:45:48 PM

41
12 Adjusting/Fine Tune:
1. Leveling Feet
2. Spacer/Climbing Blocks
3. Smaller Wheels/Climbing Block Setting
EN
ES Ajuste/ajuste fino:
1. Pie nivelador
2. Bloques espaciadores/de ascenso
3. Ajuste de ruedas más pequeñas/bloque de ascenso
FR Ajustement/Réglages fins:
1. Patins réglables
2. Entretoise/Blocs d’élévation
3. Petites roues/réglage des blocs d’élévation
DE Stelle Folgendes ein oder justiere es:
1. höhenverstellbare Standfüße
2. Distanzblöcke (Spacer Blocks) / Kletterblöcke (Climbing Blocks)
3. Einstellung für kleinere Räder/Kletterblock
30675B MP1 Manualv1.indd 4130675B MP1 Manualv1.indd 41 1/29/2021 2:45:48 PM1/29/2021 2:45:48 PM

42
IT Regolazione/Regolazione fine:
1. Mettere in piano i piedini
2. Distanziatore/Simulatori di salita
3. Installazione ruote più piccole/Simulatore di salita
NL Verstellen/afstellen:
1. Stelvoetjes
2. Opvul-/klimblokken
3. Instelling kleinere wielen/klimblok
Regulacja/Dostrajanie:
1. Nóżki poziomujące
2. Klocek dystansowy/Podstawka do symulacji jazdy pod górę
3. Ustawienie mniejszych kółek/podstawki do symulacji jazdy pod górę
PL
Nastavenie/doladenie nastavení:
1. Nivelizačné nohy
2. Rozperné/stupienkové bloky
3. Nastavenie menších kolies/stupienkového bloku
SK
30675B MP1 Manualv1.indd 4230675B MP1 Manualv1.indd 42 1/29/2021 2:45:48 PM1/29/2021 2:45:48 PM

43
D
C
B
A
A
B
C
D
1
2
3
4
5
6
7
8
8
7
6
5
4
3
2
1
E
F
E
F
REVISIONS
DESCRIPTION
REV.
DATE
APP.
.XXX" = .006
.XX" = .010
.X" = .020
X" = .040
IMPERIAL:
UNLESS OTHERWISE SPECIFIED
DIMENSIONS ARE IN IMPERIAL UNITS
TOLERANCES ARE:
THE INFORMATION CONTAINED IN THIS DRAWING IS THE SOLE PROPERTY OF
SARIS CYCLING GROUP ANY REPRODUCTION IN PART OR WHOLE WITHOUT
THE WRITTEN PERMISSION OF SARIS CYCLING GROUP IS PROHIBITED.
CAD GENERATED DRAWING,
DO NOT MANUALLY UPDATE
DIMENSIONING PER ASME Y14.5M 1994
DATE:
VENDOR REPRESENTATIVE:
5253 VERONA ROAD
MADISON WI. 53711
1-800-783-7257
WWW.SARIS.COM
ANGLES
1
29969
TITLE:
1
1
1:2
DO NOT SCALE DRAWING
PURCHASING REP
MFG ENG
RESP ENG
CHECKED
DRAWN
APPROVALS
DATE
REV.
OF
SHEET
C
DWG. NO.
CAD FILE:
SIZE
SCALE
RISER BLOCK 2, MP1
1
1.3716
CU./IN.
PART WEIGHT:
PART VOLUME:
MATERIAL:
SEE BOM
SEE BOM
FINISH:
LBS.
32.1803
1
INITIAL RELEASE
XXX
xx/x/xx
13
30675B MP1 Manualv1.indd 4330675B MP1 Manualv1.indd 43 1/29/2021 2:45:49 PM1/29/2021 2:45:49 PM

44
The spacer blocks may be used for wheel on trainers or for smaller than 700c wheels or if you want to turn your
riser block into a climbing block. Threaded rods can be snapped in and out of the spacer block. It is recommended
to use both thumbs to snap in or release the threaded rods.
EN
NL
ES Se pueden utilizar bloques espaciadores para aparatos de entrenamiento sobre ruedas o para ruedas más
pequeñas de 700c o si desea transformar el bloque de elevación en un bloque de ascenso. Las varillas roscadas
se pueden insertar y extraer del bloque espaciador. Se recomienda utilizar los dos pulgares para encajar o soltar
las varillas roscadas.
FR Les blocs d’entretoise peuvent être utilisés pour les trainers pour roues, pour des roues inférieures à 700c ou encore
si vous souhaitez transformer votre plot élévateur en bloc d’élévation. Les tiges filetées peuvent être encliquetées
dans le bloc d’entretoise. Il est recommandé d’utiliser les deux pouces pour encliqueter ou libérer les tiges filetées.
IT I blocchi distanziatori vanno utilizzati per la ruota su rulli o per ruote di dimensioni inferiori a 700c o se si desidera
trasformare il blocco di rialzo in simulatore di salita. I tiranti filettati possono essere mossi dentro e fuori il blocco
distanziatore. Si raccomanda di usare entrambi i pollici per inserire o estrarre i tiranti filettati.
De opvulblokken kunnen worden gebruikt voor ‘wheel-on’-trainers of voor wielen die kleiner zijn dan 700c of als
u uw stapelblok als een klimblok wilt gebruiken. Draadstangen kunnen in en uit het opvulblok worden geklikt.
Hetwordt aanbevolen om beide duimen te gebruiken bij het vast- en losklikken van de draadstangen.
DE Die Distanzblöcke können für Wheel-on-Trainer oder für kleinere Räder als 700c eingesetzt werden oder
auch dann, wenn du deinen Anstiegsblock in einen Kletterblock umwandeln willst. Die Gewindestangen
lassen sich in den Distanzblock einrasten und wieder ausrasten. Es empfiehlt sich, die Gewindestangen mit
beiden Daumen einzudrücken oder zu lösen.
30675B MP1 Manualv1.indd 4430675B MP1 Manualv1.indd 44 1/29/2021 2:45:49 PM1/29/2021 2:45:49 PM

45
Klocki dystansowe można stosować do kół w trenażerach lub do kół mniejszych niż o średnicy 700 cm lub jeśli
chcesz zamienić podstawkę pod przednie koło na podstawkę do symulacji jazdy pod górę. Gwintowane trzpienie
można zatrzasnąć w bloku dystansowego. Zaleca się użyć obu kciuków do zatrzaskiwania lub zwalniania
gwintowanych trzpieni.
PL
Rozperné bloky sa môžu použiť pre kolesá na trenažéroch alebo pre menšie kolesá ako 700c alebo ak chcete
zmeniť blok podstavca na stupienkový blok. Závitové tyče sa dajú uchytiť dnu a von z rozperného bloku. Odporúča
sa použiť obe krídlové matice na uchytenie alebo uvoľnenie závitových tyčí.
SK
30675B MP1 Manualv1.indd 4530675B MP1 Manualv1.indd 45 1/29/2021 2:45:49 PM1/29/2021 2:45:49 PM

46
14
D
C
B
A
A
B
C
D
1
2
3
4
5
6
7
8
8
7
6
5
4
3
2
1
REVISIONS
REV.
DESCRIPTION
DATE
APP.
E
F
E
F
.XXX" = .005
.XX" = .020
.X" = .060
X" = .250
IMPERIAL:
UNLESS OTHERWISE SPECIFIED
DIMENSIONS ARE IN IMPERIAL UNITS
TOLERANCES ARE:
THE INFORMATION CONTAINED IN THIS DRAWING IS THE SOLE CONFIDENTIAL PROPERTY OF
SARIS CYCLING GROUP ANY REPRODUCTION IN PART OR WHOLE WITHOUT THE WRITTEN
PERMISSION OF SARIS CYCLING GROUP IS PROHIBITED.
CAD GENERATED DRAWING,
DO NOT MANUALLY UPDATE
DIMENSIONING PER ASME Y14.5M 1994
DATE:
VENDOR REPRESENTATIVE:
5253 VERONA ROAD
MADISON WI. 53711
1-800-783-7257
WWW.SARIS.COM
ANGLES
1
TFAWAWI - 9789 IS
TITLE:
11
4
1:3
DO NOT SCALE DRAWING
PURCHASING REP
MFG ENG
RESP ENG
CHECKED
DRAWN
APPROVALS
DATE
REV.
OF
SHEET
D
DWG. NO.
CAD FILE:
SIZE
SCALE
CU./IN.
PART WEIGHT:
PART VOLUME:
MATERIAL:
FINISH:
LBS.
1
INITIAL RELEASE
XXX
xx/x/xx
1
DIRECT DRIVE*WHEEL ON 700C
DIRECT DRIVE < 700C
*WHEEL ON < 700C
CONFIGURATIONS
30675B MP1 Manualv1.indd 4630675B MP1 Manualv1.indd 46 1/29/2021 2:45:50 PM1/29/2021 2:45:50 PM

47
If using a wheel on trainer, at least one spacer block is recommended to ensure the bike is level. If using wheels smaller than 700c or additional
front end rise is desired additional spacer blocks may be desired.
*NOTE: LOOP FRONT WHEEL STRAP THROUGH BOTH SPACER AND RISER BLOCK
EN
DE
ES Si utiliza un aparato de entrenamiento sobre rueda, se recomienda al menos un bloque separador para asegurarse de que la bicicleta esté
nivelada. Si utiliza ruedas más pequeñas que 700c o se desea una elevación adicional del extremo delantero, es posible que sean necesarios
bloques separadores adicionales.
*NOTA: PASE LA CORREA DE LA RUEDA DELANTERA TANTO POR EL BLOQUE ESPACIADOR COMO POR EL DE ELEVACIÓN.
FR Si vous utilisez un trainer pour roues, nous vous recommandons d’utiliser au moins un bloc d’entretoise pour la mise à niveau du vélo. Si vous
souhaitez utiliser des roues inférieures à 700c ou une élévation supplémentaire de l’extrémité avant, nous vous invitons àutiliser des blocs
d’entretoise supplémentaires.
*REMARQUE: FAITES UNE BOUCLE AVEC LA SANGLE DE ROUE AVANT EN LA PASSANT À TRAVERS L’ENTRETOISE ET LE PLOT ÉLÉVATEUR
IT Se si utilizza una ruota sul rullo, si raccomanda l’uso di almeno un blocco distanziatore per essere certi che la bici sia in piano. Sesiutilizzano
ruote di dimensioni inferiori a 700 c o si desidera un rialzo aggiuntivo nella parte anteriore, possono essere necessari altri blocchi distanziatori.
*NOTA: FAR PASSARE LA CINGHIA DELLA RUOTA ANTERIORE SIA NEL BLOCCO DISTANZIATORE CHE NEL BLOCCO DI RIALZO
NL Bij gebruik van een ‘wheel-on’-trainer wordt ten minste één opvulblok aanbevolen om ervoor te zorgen dat de fiets waterpas staat. Bij gebruik van
wielen die kleiner zijn dan 700c of wanneer vooraan een steilere helling gewenst is, kunnen extra opvulblokken van pas komen.
*OPMERKING: STEEK DE VOORWIELRIEM DOOR ZOWEL HET OPVULBLOK ALS HET STAPELBLOK
Wenn du einen Wheel-on-Trainer benutzt, empfiehlt es sich, mindestens 1 Distanzblock einzusetzen, damit das Fahrrad auf einer Höhe ist.
Wenn du kleinere Räder als 700c verwendest oder vorne einen zusätzlichen Anstiegsblock benutzen möchtest, sind unter Umständen weitere
Distanzblöcke erforderlich.
* HINWEIS: FÜHRE DEN SICHERUNGSGURT FÜR DAS VORDERRAD SOWOHL DURCH DEN DISTANZBLOCK (SPACER BLOCK) ALS AUCH DURCH DEN
ANSTIEGSBLOCK (RISER BLOCK).
D
C
B
A
A
B
C
D
1
2
3
4
5
6
7
8
8
7
6
5
4
3
2
1
REVISIONS
REV.
DESCRIPTION
DATE
APP.
E
F
E
F
.XXX" = .005
.XX" = .020
.X" = .060
X" = .250
IMPERIAL:
UNLESS OTHERWISE SPECIFIED
DIMENSIONS ARE IN IMPERIAL UNITS
TOLERANCES ARE:
THE INFORMATION CONTAINED IN THIS DRAWING IS THE SOLE CONFIDENTIAL PROPERTY OF
SARIS CYCLING GROUP ANY REPRODUCTION IN PART OR WHOLE WITHOUT THE WRITTEN
PERMISSION OF SARIS CYCLING GROUP IS PROHIBITED.
CAD GENERATED DRAWING,
DO NOT MANUALLY UPDATE
DIMENSIONING PER ASME Y14.5M 1994
DATE:
VENDOR REPRESENTATIVE:
5253 VERONA ROAD
MADISON WI. 53711
1-800-783-7257
WWW.SARIS.COM
ANGLES
1
TFAWAWI - 9789 IS
TITLE:
11
4
1:3
DO NOT SCALE DRAWING
PURCHASING REP
MFG ENG
RESP ENG
CHECKED
DRAWN
APPROVALS
DATE
REV.
OF
SHEET
D
DWG. NO.
CAD FILE:
SIZE
SCALE
CU./IN.
PART WEIGHT:
PART VOLUME:
MATERIAL:
FINISH:
LBS.
1
INITIAL RELEASE
XXX
xx/x/xx
1
30675B MP1 Manualv1.indd 4730675B MP1 Manualv1.indd 47 1/29/2021 2:45:50 PM1/29/2021 2:45:50 PM

48
Jeśli używasz koła na trenażerze, zaleca się przynajmniej jeden bloczek dystansowy, aby upewnić się, że rower jest wypoziomowany.
W przypadku kół mniejszych niż 700 cm lub w celu dodatkowego podniesienia przodu mogą być potrzebne dodatkowe bloczki dystansowe.
*UWAGA: PRZEŁÓŻ PĘTLĘ TAŚMY DO PRZEDNIEGO KOŁA PRZEZ KLOCEK DYSTANSOWY I PODSTAWKĘ POD KOŁO
PL
Ak používate koleso na trenažéri, odporúča sa minimálne jeden rozperný blok na zaistenie vyrovnania úrovne bicykla. Ak používate kolesá
menšie ako 700c alebo si želáte ďalšie zdvihnutie predného konca, môžete potrebovať ďalšie rozperné bloky.
*POZNÁMKA: NASAĎTE PÁS PREDNÉHO KOLESA NA ROZPERNÝ BLOK AJ BLOK PODSTAVCA.
SK
30675B MP1 Manualv1.indd 4830675B MP1 Manualv1.indd 48 1/29/2021 2:45:50 PM1/29/2021 2:45:50 PM

49
15 RECOMMENDED MAINTAINENCE
• Inspect the MP1 parts on a regular basis.
• Keep clean with a dry cloth. Do not use cleaning supplies on this unit.
• Clean tracks underneath the wood top with included silicone coated cleaning cloth. Clean/lube with
silocone cloth every 30 hours of use.
• Adjust fore/aft roller snugness as they wear
• See saris.com for instructional video
DE
EN
ES MANTENIMIENTO RECOMENDADO
• Inspeccione las piezas del MP1 con regularidad.
• Límpielo con un paño seco. No utilice productos de limpieza en este equipo.
• Limpie las pistas debajo de la tapa de madera con el paño de limpieza recubierto de silicona incluido.
Limpiar / lubricar con un paño de silicona cada 30 horas de uso.
• Revise el ajuste longitudinal del rodillo a medida que se desgaste
Consulte el vídeo de instrucciones en saris.com
FR RECOMMANDATION DE MAINTENANCE
• Inspectez régulièrement les pièces du MP1.
• Nettoyez-le avec un chiffon sec. N’utilisez pas de nettoyant.
• Nettoyez les rails sous le plateau en bois avec un chiffon de nettoyage enduit de silicone inclus.
Nettoyez / lubrifiez avec un chiffon en silicone toutes les 30 heures d’utilisation.
• Ajustez le serrage des rouleaux avant/arrière au fur et à mesure de leur utilisation.
Consultez les vidéos d’instructions sur saris.com
EMPFOHLENE WARTUNGEN
• Kontrolliere die Teile des MP1 regelmäßig.
• Halte den MP1 mit einem trockenen Tuch sauber. Verwende keine Reinigungsmittel.
• Reinigen Sie die Schienen unter der Holzplatte mit dem mitgelieferten silikonbeschichteten
Reinigungstuch. Alle 30 Stunden mit einem Silokontuch reinigen / schmieren.
• Justiere den engen Sitz der Vorwärts/Rückwärts-Rollen, da sie verschleißen.
Auf saris.com findest du ein Video-Tutorial.
30675B MP1 Manualv1.indd 4930675B MP1 Manualv1.indd 49 1/29/2021 2:45:50 PM1/29/2021 2:45:50 PM

50
IT MANUTENZIONE CONSIGLIATA
• Controllare regolarmente i componenti dell’MP1.
• Pulire con un panno asciutto. Non usare detergenti su questa unità.
• Pulisci i binari sotto il piano in legno con il panno per la pulizia rivestito in silicone incluso. Pulire /
lubrificare con un panno al silicone ogni 30 ore di utilizzo.
• Regolare longitudinalmente gli attacchi rullo poiché sono soggetti a usura
Vedere saris.com per il video con le istruzioni
NL AANBEVOLEN ONDERHOUD
• Inspecteer regelmatig de onderdelen van de MP1.
• Maak de trainer schoon met een droge doek. Gebruik geen schoonmaakmiddelen op dit trainingstoestel.
• Reinig sporen onder het houten blad met de meegeleverde schoonmaakdoek met siliconencoating.
Reinig / smeer om de 30 uur gebruik met een silocone doek.
• Zet de fietsrollen vooraan en achteraan vast, omdat deze slijten.
Ga naar saris.com voor een video met instructies.
ZALECANA KONSERWACJA
• Regularnie sprawdzaj części MP1.
• Czyść suchą szmatką. Nie należy używać środków czyszczących w tym urządzeniu.
• Wyczyść ścieżki pod drewnianym blatem za pomocą dołączonej silikonowej ściereczki do czyszczenia.
Czyść / smaruj szmatką silokonową co 30 godzin użytkowania.
• Dostosuj dopasowanie rolek z przodu/z tyłu podczas ich używania.
Film instruktażowy znajduje się na stronie saris.com
PL
ODPORÚČANÁ ÚDRŽBA
• Pravidelne kontrolujte diely zariadenia MP1.
• Udržiavajte ich v čistote pomocou suchej handričky. V prípade tejto jednotky nepoužívajte čistiace prostriedky.
• Stopy pod drevenou doskou vyčistite priloženou silikónovou poťahovou handričkou. Čistenie / mazanie
silikónovou handričkou každých 30 hodín používania.
• Nastavte priliehavosť valca dopredu/dozadu podľa opotrebovania.
Pozri inštruktážne video na stránke saris.com.
SK
30675B MP1 Manualv1.indd 5030675B MP1 Manualv1.indd 50 1/29/2021 2:45:51 PM1/29/2021 2:45:51 PM

51
EN
OFFICIAL WARRANTY TERMS
Saris Cycling Group, Inc (SCG), parent company of Saris, warrants our product to the original consumer to be free from
defects in materials and workmanship. Please retain your sales slip for your records as proof of purchase will be required
WARRANTY TERM
HOME USE
TRAINERS
MP1 Nfinity Trainer
Platform
• Frame: Lifetime
• Frame finish and decals not included in
warranty
• Bearings: 1 year
Any product or part thereof found to be defective within the term as set forth above will be replaced without charge provided
that: (1) its failure resulted from a defect in material or workmanship and not from normal wear and tear expected in the
use of the product; (2) the product was not misused, improperly assembled, improperly maintained or damaged by accident;
(3) there was no failure to follow instructions or warnings in Owner’s Manual; (4) no alterations or modifications were made;
and (5) the product or part is delivered, freight prepaid, to Saris Cycling Group or an authorized service center.
30675B MP1 Manualv1.indd 5130675B MP1 Manualv1.indd 51 1/29/2021 2:45:51 PM1/29/2021 2:45:51 PM

52
ES
Please call 1-800-783-7257 to obtain return authorization prior to return. SCG reserves the right to inspect any product
before issuing a replacement. SCG’s only obligation shall be to replace such products or parts that it determines are
defective.
Limitations
Saris warrants your product to be free of any defects in material or workmanship. This warranty does not apply to parts
that have been worn out through normal use or damaged through misuse, abuse, neglect, accident, or unauthorized
modification. Where applicable, incidental and consequential damages are not covered, and there are no other warranties,
expressed or implied. This warranty applies to the original owner only. Retain your receipt as proof of purchase.
The foregoing warranties are in lieu of and exclude all other warranties not expressly set forth herein, whether expressed
or implied by operation of law or otherwise. Other than as set forth above, SCG makes no warranty, whether express,
implied or statutory, with respect to any product, including, but not limited to, warranties of reliability, merchantability
fitness for a particular purpose, or those arising from any course of performance, dealing, usage or trade. SCG shall not
be liable for incidental or consequential losses, damages or expenses in connection with its products. SCG’s liability
hereunder is expressly limited to the replacement of goods not complying with this warranty or, at SCG’s election, to the
repayment of an amount of the purchase price of the product in question. Some states do not permit the exclusion or
limitation of implied warranties or incidental or consequential damages, so the preceding limitations and exclusions may
not apply to you.
Lifetime warranty available in North America only.
30675B MP1 Manualv1.indd 5230675B MP1 Manualv1.indd 52 1/29/2021 2:45:51 PM1/29/2021 2:45:51 PM

53
ES
TÉRMINOS DE GARANTÍA OFICIAL
Saris Cycling Group, Inc (SCG), empresa matriz de Saris, garantiza al comprador original que nuestros productos no
presentan defectos de material ni de mano de obra. Conserve la factura, ya que tendrá que presentar una prueba de
compra.
TÉRMINOS DE GARANTÍA
USO DOMÉSTICO
APARATOS DE
ENTRENAMIENTO
MP1 Nfinity Trainer
Platform
• Frame: Lifetime
• Frame finish and decals not included in
warranty
• Bearings: 1 year
Cualquier producto o parte del mismo que resulte ser defectuoso según los términos establecidos más arriba se
sustituirá gratuitamente siempre que: (1) el fallo se deba a un defecto del material o de la mano de obra y no al desgaste
normal que cabe esperar del uso del producto; (2) el producto no se haya utilizado de forma inadecuada;, no se haya
montado de forma incorrecta, no se haya realizado el mantenimiento correcto o se haya dañado por accidente; (2) no
se hayan seguido incorrectamente las instrucciones o advertencias del Manual de usuario; (4) no se hayan realizado
30675B MP1 Manualv1.indd 5330675B MP1 Manualv1.indd 53 1/29/2021 2:45:51 PM1/29/2021 2:45:51 PM

54
FR
alteraciones o modificaciones; y (5) el producto se haya enviado, con transporte prepagado, a Saris Cycling Group o a un
centro de servicio autorizado.
Llame al 1-800-783-7257 para obtener una autorización de devolución antes de la devolución. SCG se reserva el derecho
a inspeccionar cualquier producto antes de enviar otro de sustitución. La obligación de SCG se limita a la sustitución de
los productos o de las piezas que se determine que son defectuosos.
Limitaciones
Saris garantiza que el producto no presenta defectos en el material ni en la mano de obra. Esta garantía no es aplicable
a piezas que se hayan desgastado a través del uso normal o que se hayan dañado por un uso inadecuado, abuso,
negligencia, accidente o modificación no autorizada. Llegado el caso, los daños indirectos y resultantes no están
cubiertos y no hay ninguna otra garantía, expresa o implícita. Esta garantía es aplicable exclusivamente al propietario
original. Conserve el recibo como prueba de compra.
Las garantías precedentes sustituyen y excluyen a cualesquiera otras garantías no establecidas expresamente en
el presente documento, tanto expresas como implícitas previstas por la ley o de otro modo. Aparte de lo establecido
anteriormente, SCG no ofrece garantías de ningún tipo, ya sea expresa, implícita o estatutaria, con relación a ningún
producto, incluidas, entre otras, garantías de confiabilidad, comerciabilidad, adecuación para un propósito particular
o aquellas que pudieran surgir de prestaciones, convenios, uso o comercio. SCG no será responsable bajo ninguna
circunstancia de daños, pérdidas o gastos imprevistos o derivados con relación a sus productos. La responsabilidad
de SCG se limita expresamente a la sustitución de los productos que no cumplan esta garantía o, según el propio
criterio de SCG, al pago de una cantidad del precio de compra del producto en cuestión. Algunos estados no permiten la
exclusión o limitación de garantías implícitas o daños derivados o imprevistos, por tanto es posible que las limitaciones y
exclusiones precedentes no le afecten.
30675B MP1 Manualv1.indd 5430675B MP1 Manualv1.indd 54 1/29/2021 2:45:51 PM1/29/2021 2:45:51 PM

55
FR
CONDITIONS DE LA GARANTIE OFFICIELLE
Saris Cycling Group, Inc (SCG), société mère de Saris, garantit notre produit à l’acheteur d’origine contre tout vice
de matériau et de main-d’œuvre. Veuillez conserver votre ticket de vente au cas où une preuve d’achat vous serait
demandée.
CONDITION DE LA GARANTIE
UTILISATION PRIVÉE
TRAINERS
MP1 Nfinity Trainer
Platform
• Frame: Lifetime
• Frame finish and decals not included in
warranty
• Bearings: 1 year
Toute pièce ou tout produit se révélant défectueux dans le délai indiqué ci-dessus sera remplacé gratuitement dans
la mesure où: (1) sa défectuosité résulte d’un défaut matériel ou de main-d’œuvre et non d’une usure normale
découlant de son utilisation; (2) le produit n’a pas été utilisé de manière incorrecte, mal assemblé, mal entretenu ou
endommagé par accident; (3) il n’y a pas eu non-respect des consignes et des avertissements indiqués dans le manuel
du propriétaire; (4) le produit n’a subi aucune modification; et (5) le produit ou ses pièces sont envoyés, en port payé, à
Saris Cycling Group, Inc. ou à un centre de service autorisé.
30675B MP1 Manualv1.indd 5530675B MP1 Manualv1.indd 55 1/29/2021 2:45:51 PM1/29/2021 2:45:51 PM

56
DE
Veuillez appeler le 1-800-783-7257 pour obtenir une autorisation de retour avant de procéder à tout retour. SCG se
réserve le droit d’inspecter tout produit avant de procéder à un remplacement. La seule obligation de SCG est de
remplacer les pièces ou produits qu’ils détermine comme étant défectueux.
Limiations
Saris garantit votre produit comme étant sans défauts matériels ou de main-d’œuvre. Cette garantie ne s’applique
pas aux pièces s’usant du fait d’une utilisation normale ou endommagées par une mauvaise utilisation, une utilisation
abusive, une négligence, un accident ou des modifications non autorisées. S’il y a lieu, les dommages accidentels ou
indirects ne sont pas couverts, et il n’existe pas d’autre garantie, expresse ou implicite. Cette garantie s’applique à
l’acheteur d’origine uniquement. Conservez votre reçu comme preuve d’achat.
Les présentes garanties remplacent toutes les autres garanties non expressément stipulées ici, qu’elles soient
explicites ou implicites par l’effet de la loi. En dehors de ce qui est indiqué ci-dessus, SCG ne donne aucune garantie,
expresse, implicite ou statutaire, concernant tout produit, y compris, mais sans s’y limiter, les garanties de fiabilité,
la capacité marchande à un usage particulier ou celles découlant de performances, négociations, utilisations ou
commerces. SCG ne saurait être tenu responsable des pertes, dépenses ou dommages accidentels ou indirects
découlant de l’utilisation de ses produits. La responsabilité de SCG au titre du présent contrat est expressément limitée
au remplacement des produits non conformes à cette garantie ou, sur décision de SCG, au remboursement de tout
ou partie du prix d’achat du produit en question. Certains territoires n’autorisent pas l’exclusion ou la limitation des
garanties implicites ou des dommages accidentels ou indirects, aussi les exclusions et limitations susmentionnées
peuvent ne pas s’appliquer dans certains cas.
Garantie à vie disponible en Amérique du Nord uniquement.
30675B MP1 Manualv1.indd 5630675B MP1 Manualv1.indd 56 1/29/2021 2:45:51 PM1/29/2021 2:45:51 PM

57
DE
OFFIZIELLE GARANTIEBEDINGUNGEN
Saris Cycling Group, Inc (SCG), Muttergesellschaft von Saris, gewährt dem ursprünglichen Käufer eine Garantie in Bezug
auf Material- und Fertigungsfehler. Bitte bewahren Sie Ihren Kaufbeleg auf, da er als Kaufnachweis erforderlich ist.
LAUFZEIT DER GARANTIE
HEIMGEBRAUCH
TRAINER
MP1 Nfinity Trainer
Platform
• Frame: Lifetime
• Frame finish and decals not included in
warranty
• Bearings: 1 year
Alle Produkte oder Teile davon, die sich im oben genannten Zeitraum als fehlerhaft erweisen, werden unter folgenden
Voraussetzungen kostenlos ersetzt: (1) das Versagen ist auf einen Material- oder Verarbeitungsfehler und nicht auf
normalen, bei Verwendung des Produkts zu erwartenden Verschleiß zurückzuführen; (2) das Produkt wurde nicht
zweckentfremdet, unsachgemäß zusammengebaut, unsachgemäß gewartet oder durch einen Unfall beschädigt; (3)
das Versagen ist nicht auf Nichtbeachtung der Anweisungen oder Warnungen in der Betriebsanleitung zurückzuführen;
(4) es wurden keine Änderungen oder Modifikationen vorgenommen; (5) das Produkt oder Teil wird frachtfrei an die Saris
Cycling Group oder ein autorisiertes Servicezentrum gesendet.
30675B MP1 Manualv1.indd 5730675B MP1 Manualv1.indd 57 1/29/2021 2:45:51 PM1/29/2021 2:45:51 PM

58
Bitte fordern Sie telefonisch unter 1-800-783-7257 eine Rücksendegenehmigung an. SCG behält sich das Recht vor, jedes
Produkt zu prüfen, bevor es ersetzt wird. Die einzige Verpflichtung von SCG ist, Produkte oder Teile zu ersetzen, die das
Unternehmen für fehlerhaft ansieht.
Einschränkungen
Saris gewährleistet, dass das Produkt frei von Material- und Fertigungsfehlern ist. Diese Gewährleistung bezieht sich
nicht auf Verschleißteile oder Teile, die durch Missbrauch, falsche Benutzung, Fahrlässigkeit, Unfall oder unerlaubte
Änderungen beschädigt wurden. Sofern zutreffend, sind beiläufige und Folgeschäden nicht abgedeckt und es gibt keine
weiteren Gewährleistungen, weder ausdrücklich noch implizit. Diese Gewährleistung gilt nur für den ursprünglichen
Käufer. Bewahren Sie den Kaufbeleg auf.
Die oben genannten Garantien gelten anstatt aller anderen Garantien und schließen alle nicht ausdrücklich hier
genannten Garantien aus, ob ausdrücklich oder stillschweigend kraft Gesetzes oder aus anderen Gründen. SCG gewährt
keine andere als die oben genannte Garantie, weder ausdrücklich noch stillschweigend oder gesetzlich, in Bezug auf
ein Produkt, einschließlich, jedoch nicht beschränkt auf, Garantien der Zuverlässigkeit, Marktgängigkeit, Eignung für
einen bestimmten Zweck oder solche, die sich aus Leistung, Handel oder Verwendung in irgendeiner Form ergeben. SCG
haftet nicht für Neben- oder Folgeschäden, Verluste oder Aufwendungen im Zusammenhang mit seinen Produkten. Die
Haftung von SCG aus dieser Garantie beschränkt sich ausdrücklich auf den Ersatz von Waren, die dieser Garantie nicht
entsprechen, oder nach Wahl von SCG auf die Rückzahlung eines Betrags in Höhe des Kaufpreises für das betreffende
Produkt. In einigen Staaten ist der Ausschluss oder die Einschränkung stillschweigender Garantien oder von Neben-
oder Folgeschäden nicht gestattet. Deshalb gelten die oben genannten Einschränkungen oder Ausschlüsse für Sie
möglicherweise nicht.
Lebenslange Garantie gilt nur in Nordamerika.
30675B MP1 Manualv1.indd 5830675B MP1 Manualv1.indd 58 1/29/2021 2:45:51 PM1/29/2021 2:45:51 PM

59
IT
CONDIZIONI UFFICIALI DI GARANZIA
Saris Cycling Group, Inc (SCG), società madre di Saris, garantisce all’acquirente originario che il prodotto è esente
da difetti di produzione e manodopera. Conservare lo scontrino fiscale che varrà, in caso di assistenza, come prova
d’acquisto.
CONDIZIONI DI GARANZIA
USO A DOMICILIO
TRAINER
MP1 Nfinity Trainer
Platform
• Frame: Lifetime
• Frame finish and decals not included in
warranty
• Bearings: 1 year
Qualsiasi prodotto o componente ritenuto difettoso entro i termini definiti in precedenza sarà sostituito senza costi a
carico dell’acquirente a patto che: (1) il guasto sia causato da un difetto di materiale o di manodopera e non conseguenza
della normale usura e deterioramento conseguenti all’utilizzo del prodotto; (2) il prodotto non sia stato utilizzato in
maniera impropria, assemblato in maniera impropria, sottoposto a interventi di manutenzione impropri o danneggiato
da un incidente; (3) siano state rispettate le istruzioni e le avvertenze contenute nel Manuale utente; (4) non siano state
apportate alterazioni o modifiche; e (5) il prodotto venga inviato, con spese di spedizioni prepagate, a Saris Cycling Group
o a un centro di assistenza autorizzato.
30675B MP1 Manualv1.indd 5930675B MP1 Manualv1.indd 59 1/29/2021 2:45:51 PM1/29/2021 2:45:51 PM

60
Chiamare il numero 1-800-783-7257 per ottenere l’autorizzazione alla restituzione prima di effettuare il reso. SCG si
riserva il diritto di ispezionare il prodotto prima di procedere alla sostituzione. L’unico obbligo al quale è soggetta SCG è
di sostituire i prodotti o i componenti che essa ritiene essere difettosi.
Limitazioni
Saris garantisce che il prodotto è esente da difetti relativi sia al materiale che alla manodopera. Questa garanzia non
copre i componenti logorati dall’uso normale o che hanno subito dei danni a causa di uso scorretto, abuso, negligenza,
incidente o modifica non autorizzata. Non sono coperti danni conseguenziali e incidentali, laddove applicabile, e non
esistono altre garanzie espresse o implicite. Questa garanzia è valida esclusivamente per il proprietario originale.
Conservare la ricevuta come prova d’acquisto.
Le sopra citate garanzie sostituiscono ed escludono tutte le altre garanzie non espressamente citate nella presente,
siano esse espresse o implicite per effetto di legge o altro. Oltre a quanto specificato in precedenza, SCG non concede
alcuna garanzia, espressa, implicita o legale relativamente a qualsiasi prodotto, incluse, a titolo esemplificativo ma non
esaustivo, garanzie di affidabilità, commerciabilità e idoneità per uno scopo specifico o derivanti da esecuzione, trattative o
pratiche commerciali. SCG non sarà in alcun caso ritenuta responsabile di perdite, danni o spese, fortuite o conseguenti,
derivanti dai suoi prodotti. La responsabilità di SCG è espressamente limitata alla sostituzione dei prodotti non conformi
alla presente garanzia o, a discrezione di SCG, al rimborso di una parte del prezzo di acquisto del prodotto in questione.
Alcuni stati non consentono l’esclusione o la limitazione di garanzie implicite o danni fortuiti o conseguenti, quindi le
limitazioni di cui sopra potrebbero non essere applicabili.
Garanzia a vita disponibile unicamente in Nord America.
30675B MP1 Manualv1.indd 6030675B MP1 Manualv1.indd 60 1/29/2021 2:45:51 PM1/29/2021 2:45:51 PM

61
NL
OFFICIËLE GARANTIEVOORWAARDEN
Saris Cycling Group, Inc (SCG), het moederbedrijf van Saris, garandeert de oorspronkelijke koper dat ons product vrij
is van materiaal- en fabricagefouten. Bewaar de kassabon voor uw administratie. U hebt namelijk een aankoopbewijs
nodig.
GARANTIETERMIJN
THUISGEBRUIK
TRAININGSTOESTELLEN
MP1 Nfinity Trainer
Platform
• Frame: Lifetime
• Frame finish and decals not included in
warranty
• Bearings: 1 year
Een product of onderdeel daarvan dat binnen de hierboven vermelde termijn defect blijkt, wordt kosteloos vervangen, mits:
(1) het defect het gevolg is van een materiaal- of fabricagefout en niet van normale slijtage die bij gebruik van het product
te verwachten is; (2) het product niet verkeerd is gebruikt, niet verkeerd is gemonteerd, niet verkeerd is onderhouden en
niet per ongeluk is beschadigd; (3) de instructies of waarschuwingen in de gebruikershandleiding zijn opgevolgd; (4) het
product of onderdeel niet is gewijzigd of aangepast; en (5) het product of onderdeel franco wordt verzonden naar Saris
Cycling Group of een erkend servicecentrum.
30675B MP1 Manualv1.indd 6130675B MP1 Manualv1.indd 61 1/29/2021 2:45:51 PM1/29/2021 2:45:51 PM

62
Bel alvorens het product of onderdeel terug te sturen eerst 1-800-783-7257 voor toestemming. SCG behoudt zich het
recht voor om elk product te inspecteren alvorens een vervangingsproduct te verstrekken. SCG is alleen verplicht om
producten of onderdelen te vervangen waarvan SCG vaststelt dat deze defect zijn.
Beperkingen
Saris garandeert dat uw product zonder materiaal- en fabricagedefecten is. Deze garantie geldt niet voor onderdelen
die slijtage vertonen door normaal gebruik, of schade of verlies door verkeerd gebruik, verwaarlozing, misbruik, ongeval
of ongeoorloofde aanpassingen. Indien van toepassing, dan worden incidentele schade of gevolgschade niet gedekt en
er zijn geen andere expliciete of impliciete garanties. Deze garantie geldt uitsluitend voor de originele klant. Bewaar uw
bewijs van betaling als aankoopbewijs.
De bovenstaande garanties vervangen en sluiten alle andere garanties uit die hier niet nadrukkelijk zijn vermeld, hetzij
expliciet, hetzij impliciet door uitvoering van de wet of anderszins. Behalve zoals hierboven uiteengezet, geeft SCG
geen enkele garantie, hetzij expliciet, impliciet of wettelijk, met betrekking tot een product, met inbegrip van, maar niet
beperkt tot, garanties van betrouwbaarheid, verkoopbaarheid en geschiktheid voor een bepaald doel, of garanties die
voortvloeien uit de uitvoering, het gebruik of het verhandelen. SCG aanvaardt geen aansprakelijkheid voor incidentele
schade, gevolgschade en schade of kosten m.b.t. haar producten. Op grond van deze garantie is de aansprakelijkheid
van SCG nadrukkelijk beperkt tot vervanging van goederen die niet aan deze garantie voldoen of, naar keuze van SCG,
tot terugbetaling van een bedrag van de aankoopprijs van het product in kwestie. Sommige staten staan de uitsluiting
of beperking van impliciete garanties, incidentele schade of gevolgschade niet toe. De bovenstaande beperkingen en
uitsluitingen zijn in dat geval niet op u van toepassing.
Levenslange garantie alleen in Noord-Amerika.
30675B MP1 Manualv1.indd 6230675B MP1 Manualv1.indd 62 1/29/2021 2:45:51 PM1/29/2021 2:45:51 PM

63
PL
OFICJALNE WARUNKI GWARANCJI
Saris Cycling Group, Inc (SCG), spółka dominująca Saris, gwarantuje pierwotnemu konsumentowi, że nasz produkt jest
wolny od wad materiałowych i produkcyjnych. Prosimy zachować dowód sprzedaży z dokumentacją, ponieważ będzie
wymagany dowód zakupu.
OKRES GWARANCJI
UŻYTEK DOMOWY
TRENAŻERY
Platforma trenażera
MP1 Nfinity
• Rama: gwarancja dożywotnia
• Gwarancja nie obejmuje wykończenia ramy
i naklejek
• Łożyska: 1 rok
Każdy produkt lub jego element, które zostaną uznane za wadliwe w terminie określonym powyżej, zostanie wymieniony
bezpłatnie pod warunkiem, że: (1) jego uszkodzenie wynikało z wady materiałowej lub produkcyjnej, a nie z normalnego
zużycia oczekiwanego podczas użytkowania produktu; (2) produkt nie był niewłaściwie użytkowany, nieprawidłowo
montowany, niewłaściwie konserwowany lub uszkodzony w wyniku wypadku; (3) stosowano się do instrukcji lub ostrzeżeń
zawartych w instrukcji obsługi; (4) nie dokonano żadnych zmian ani modyfikacji; oraz (5) produkt lub jego element zostały
dostarczone, opłaconą przesyłką, do Saris Cycling Group lub autoryzowanego punktu serwisowego.
30675B MP1 Manualv1.indd 6330675B MP1 Manualv1.indd 63 1/29/2021 2:45:51 PM1/29/2021 2:45:51 PM

64
W celu uzyskania potwierdzenia zwrotu przed dokonaniem zwrotu prosimy o kontakt telefoniczny pod numerem
1-800-783-7257. SCG zastrzega sobie prawo do kontroli każdego produktu przed jego wymianą. SCG zobowiązuje się
wyłącznie do wymiany takich produktów lub elementów, które uzna za wadliwe.
Ograniczenia
Saris gwarantuje, że produkt jest wolny od wszelkich wad materiałowych i produkcyjnych. Niniejsza gwarancja
nie ma zastosowania do części, które uległy zużyciu w wyniku normalnego użytkowania lub uszkodzone w wyniku
niewłaściwego użytkowania, zaniedbania, wypadku lub niedozwolonych modyfikacji. W stosownych przypadkach gwarancja
nie obejmuje szkód przypadkowych i wynikowych oraz nie ma innych gwarancji, wyraźnych ani dorozumianych. Niniejsza
gwarancja dotyczy wyłącznie pierwotnego właściciela. Prosimy zachować paragon jako dowód zakupu.
Powyższe gwarancje zastępują i wykluczają wszelkie inne gwarancje, które nie zostały wyraźnie określone w niniejszym
dokumencie, bez względu na to, czy są to gwarancje wyraźne lub dorozumiane z mocy prawa lub w inny sposób.
Z wyjątkiem sytuacji opisanych powyżej, SCG nie udziela żadnych gwarancji, wyraźnych, dorozumianych lub ustawowych,
w odniesieniu do jakiegokolwiek produktu, w tym, między innymi, gwarancji niezawodności, przydatności handlowej
do określonego celu, ani gwarancji wynikających z jakiegokolwiek trybu działania, transakcji, użytkowania lub handlu.
SCG nie ponosi odpowiedzialności za przypadkowe lub wynikowe straty, szkody lub wydatki związane z jej produktami.
Odpowiedzialność SCG na mocy niniejszej umowy wyraźnie ogranicza się do wymiany towarów niezgodnych z niniejszą
gwarancją lub, według uznania SCG, do zwrotu kwoty ceny zakupu danego produktu. W niektórych państwach nie zezwala
się na wyłączenie lub ograniczenie gwarancji dorozumianych lub szkód przypadkowych i wynikowych, w związku z czym
powyższe ograniczenia i wykluczenia mogą nie mieć zastosowania.
Dożywotnia gwarancja jest dostępna tylko w Ameryce Północnej.
30675B MP1 Manualv1.indd 6430675B MP1 Manualv1.indd 64 1/29/2021 2:45:51 PM1/29/2021 2:45:51 PM

65
PODMIENKY ZÁKONNEJ ZÁRUKY
Saris Cycling Group, Inc (SCG), materská spoločnosť spoločnosti Saris, ručí pôvodnému spotrebiteľovi za to, že naše
výrobky sú bez chýb materiálu a spracovania. Odložte si doklad o zakúpení, keďže sa bude vyžadovať.
PODMIENKY ZÁRUKY
DOMÁCE POUŽÍVANIE
TRENAŽÉRY
Tréningová platforma
MP1 Nfinity Trainer
Platform
• Rám: Doživotná záruka
• Na lak rámu a potlače sa záruka
nevzťahuje.
• Ložiská: 1 rok
Výrobok alebo jeho súčasť, ktoré sa ukážu ako chybné v rámci podmienok stanovených vyššie, budú nahradené bezplatne
pod podmienkou, že: (1) ich zlyhanie bolo následkom chyby materiálu alebo spracovania, a nie bežného opotrebovania
očakávaného počas používania výrobku, (2) výrobok nebol nesprávne používaný, nesprávne zmontovaný, nesprávne
udržiavaný ani náhodne poškodený, (3) nedošlo k nedodržaniu pokynov alebo varovaní uvedených v príručke pre vlastníka,
(4) nedošlo k úpravám ani zmenám a (5) tento výrobok alebo diel sa doručia, s vyplatením nákladov, spoločnosti Saris
Cycling Group alebo autorizovanému servisnému stredisku.
SK
30675B MP1 Manualv1.indd 6530675B MP1 Manualv1.indd 65 1/29/2021 2:45:52 PM1/29/2021 2:45:52 PM

66
Zavolajte na číslo 1-800-783-7257, kde získate povolenie na vrátenie tovaru ešte pred jeho vrátením. Spoločnosť SCG si
vyhradzuje právo na kontrolu výrobkov pred ich výmenou. Jedinou povinnosťou spoločnosti SCG je vymeniť výrobky alebo
diely, ktoré sama určí ako chybné.
Obmedzenia záruky
Spoločnosť Saris ručí za to, že je váš výrobok bez chýb materiálu alebo spracovania. Táto záruka sa nevzťahuje na diely,
ktoré sa opotrebovali v priebehu bežného používania alebo poškodili v dôsledku nesprávneho používania, zneužitia,
zanedbania, nehody alebo nepovolenej úpravy. V prípade potreby, na vedľajšie alebo následné poškodenia sa nevzťahuje
táto záruka ani žiadne ďalšie záruky, výslovné ani implicitné. Táto záruka sa vzťahuje iba na pôvodného vlastníka.
Odložte si účet ako doklad o zakúpení.
Predchádzajúce záruky nahrádzajú a vylučujú všetky ostatné záruky, ktoré sa tu výslovne neuvádzajú, či už ide o výslovne
alebo implicitne ustanovené, zákonom uplatňované záruky alebo inak. Inak ako z predchádzajúcich uvedených dôvodov,
spoločnosť SCG neudeľuje, či už výslovne, implicitne, alebo zo zákona, v súvislosti s akýmkoľvek výrobkom vrátane, ale
nie iba, záruky na spoľahlivosť, vhodnosť na obchodovanie na konkrétne účely, ani záruky vyplývajúce z priebehu výkonu,
narábania, používania alebo obchodu. Spoločnosť SCG nebude zodpovedať za vedľajšie ani následné straty, poškodenia
ani výdavky súvisiace so svojimi výrobkami. Zodpovednosť spoločnosti SCG sa takto výslovne obmedzuje na výmenu
tovaru nespĺňajúceho podmienky tejto záruky alebo, podľa uváženia spoločnosti SCG, na vrátenie nákupnej sumy za daný
výrobok. Niektoré krajiny nepovoľujú vylúčenie alebo obmedzenie implicitných záruk alebo vedľajších či následných škôd,
pretosa vás predchádzajúce obmedzenia a výnimky nemusia týkať.
Doživotná záruka je k dispozícii iba v Severnej Amerike.
30675B MP1 Manualv1.indd 6630675B MP1 Manualv1.indd 66 1/29/2021 2:45:52 PM1/29/2021 2:45:52 PM

5253 Verona Road Madison, WI 53711
1-800-783-7257 30675A 4/20
30675B MP1 Manualv1.indd 6730675B MP1 Manualv1.indd 67 1/29/2021 2:45:52 PM1/29/2021 2:45:52 PM

68
30675B MP1 Manualv1.indd 6830675B MP1 Manualv1.indd 68 1/29/2021 2:45:52 PM1/29/2021 2:45:52 PM
-
 1
1
-
 2
2
-
 3
3
-
 4
4
-
 5
5
-
 6
6
-
 7
7
-
 8
8
-
 9
9
-
 10
10
-
 11
11
-
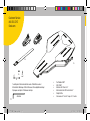 12
12
-
 13
13
-
 14
14
-
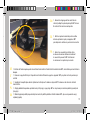 15
15
-
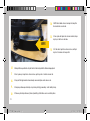 16
16
-
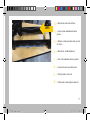 17
17
-
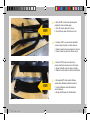 18
18
-
 19
19
-
 20
20
-
 21
21
-
 22
22
-
 23
23
-
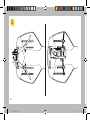 24
24
-
 25
25
-
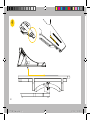 26
26
-
 27
27
-
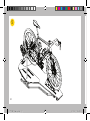 28
28
-
 29
29
-
 30
30
-
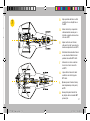 31
31
-
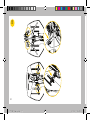 32
32
-
 33
33
-
 34
34
-
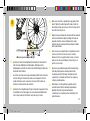 35
35
-
 36
36
-
 37
37
-
 38
38
-
 39
39
-
 40
40
-
 41
41
-
 42
42
-
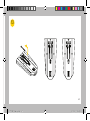 43
43
-
 44
44
-
 45
45
-
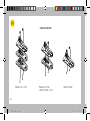 46
46
-
 47
47
-
 48
48
-
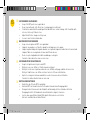 49
49
-
 50
50
-
 51
51
-
 52
52
-
 53
53
-
 54
54
-
 55
55
-
 56
56
-
 57
57
-
 58
58
-
 59
59
-
 60
60
-
 61
61
-
 62
62
-
 63
63
-
 64
64
-
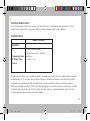 65
65
-
 66
66
-
 67
67
-
 68
68


Saris MP1 Nfinity Trainer Platform Handleiding
- Categorie
- Fietsaccessoires
- Type
- Handleiding
in andere talen
- italiano: Saris MP1 Nfinity Trainer Platform Manuale utente
- français: Saris MP1 Nfinity Trainer Platform Manuel utilisateur
- español: Saris MP1 Nfinity Trainer Platform Manual de usuario
- Deutsch: Saris MP1 Nfinity Trainer Platform Benutzerhandbuch
- slovenčina: Saris MP1 Nfinity Trainer Platform Používateľská príručka
- polski: Saris MP1 Nfinity Trainer Platform Instrukcja obsługi
Gerelateerde papieren
Andere documenten
-
Sony DPP-MP1 de handleiding
-
Philips CE600BT/12 Snelstartgids
-
Philips CE600BT/12 de handleiding
-
Philips CE600N/12 Handleiding
-
 ZyXEL Communications DMA2501 Snelstartgids
-
CycleOps 25418 Gebruikershandleiding
-
Sony VCT-MP1 de handleiding
-
Ricatech PR220 Handleiding
-
Ricatech RMC350 Handleiding
-
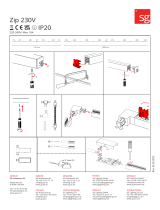 SG Lighting Zip 230V Handleiding

