Hornbach Drain box DN 50 Luxembourg Handleiding
- Type
- Handleiding

Einbauanleitung
Mounting instruction
Montagehandleiding
Instructions de montage
Istruzioni di montaggio
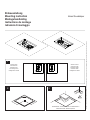
Ablauf Grundkörper
2
1
3
B
A
03700608 11/22 Rev. 00 Technische Änderungen vorbehalten / Technical modi ications reserved / Onder voorbehoud van technische wijzigingen / Modi ications techniques réservées / Modi iche techniche riservate
Unterbauelement / Substructure element / Onderbouwelement /
Elément de réhausse / Elemento di spessore
Anschluss links /
Connection left /
Aansluiting links /
Connexion gauche /
Collegamento a sinistra
Anschluss rechts /
Connection right /
Aansluiting rechts /
Connexion droite /
Collegamento a destra
1

Einbauanleitung
Mounting instruction
Montagehandleiding
Instructions de montage
Istruzioni di montaggio
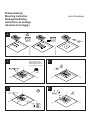
Ablauf Grundkörper
5
56
8
7
4
Fliesen-
Kleber
Fliesen-
Kleber
4
3
2
oder/either/of/ou/o
oder/either/of/ou/o
Randdämmstreifen /
Edge insulation strips /
Randdichtingsstroken /
Bande isolante de bord /
Fascia isolante di bordo

Einbauanleitung
Mounting instruction
Montagehandleiding
Instructions de montage
Istruzioni di montaggio
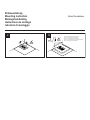
Ablauf Grundkörper
910
Achtung: Dichtmanschette nicht beschädigen.
Caution: Do not damage the sealing collar.
Let op: de afdichtingskraag niet beschadigen.
Attention : ne pas endommager les garnitures d‘étanchéité.
Attenzione: guarnizione non danneggiata.
4
5

Einbauanleitung
Mounting instruction
Montagehandleiding
Instructions de montage
Istruzioni di montaggio
Ablauf Grundkörper
Verwendung:
- Der richtige Sitz des Ablauf Grundkörper ist zu prüfen.
- Nur für den Einsatz im Innenbereich geeignet.
Die einschlägigen Verarbeitungsrichtlinien aller beteiligten
Gewerke sind zu berücksichtigen.
1
Beim Einbau können Unterbauelemente zum Höhenaus-
gleich verwendet werden.
Diese Unterbauelemente sind bauseits zu stellen ( z.B.
XPS, EPS). Die Unterkonstruktion ist so zu wählen, das
die Oberkante der Ablauf Grundkörper auf gleicher Höhe
mit dem Estrich liegt.
Die Oberkante der Ablauf Grundkörper darf nicht über den
Estrich herausragen!
2 Fixierung der Ablauf Grundkörper mitttels:
- Flex Fliesenkleber ächig auftragen
- Flex Fliesenkleber auf Batzen
- Geeigneter Montage- oder Konstruktionskleber punktuell
auftragen
3
Nach Installation der Ablaufgarnitur ist eine Dichtigkeitsprü-
fung durchzuführen.
4
Die Verarbeitungshinweise des Abdichtsystems sind zu
beachten.
5
Den durchsichtigen Deckel entfernen und Dichtmanschette
auf die Abdichtung umklappen.
Utilisation:
-The correct tting of the discharge element is to be checked.
-Suitable only for use indoor.
The relevant processing guidelines of all trades must be
observed.
1
Can be used to compensate for height when installing substrate
elements.
These substrate elements are to be provided by the customer
(e.g. XPS, EPS). The substructure must be chosen so that
the top edge of the installation frame is level with the screed.
The top edge of the installation frame is not allowed to project
above the screed!
2
Fixing the installation frame in place by:
- Applying Flex tile adhesive to the entire surface area
- Applying tile adhesive to battens
- Applying standard mounting or construction adhesive at
specic points
3
After the installation of the drain tting, a leakage test must
be carried out.
4
The processing instructions of the sealing system are to be
observed.
5
Remove the transparent cover and fold the sealing collar over
the seal.

Einbauanleitung
Mounting instruction
Montagehandleiding
Instructions de montage
Istruzioni di montaggio
Ablauf Grundkörper
Utilisation:
- L’ajustement correct de l’élément d’écoulement est à contrôler.
- Ne se prête qu’à l’installation à l’intérieur de bâtiments.
Les directives correspondantes de mise en oeuvre de tous
les métiers participants sont à observer.
1
Les éléments de sous-structure peuvent être utilisés pour la
compensation de hauteur lors de l’installation.
Ces éléments de sous-structure doivent être fournis par le
client (par ex. XPS, EPS). La sous-construction doit être
choisie de manière à ce que le bord supérieur de la boîte de
montage soit à la même hauteur que la chape.
Le bord supérieur de la boîte de montage ne doit pas dépas-
ser de la chape!
2
Fixation du boîtier de montage à l’aide de :
- Appliquer la colle pour carrelage Flex sur une grande surface
- Adhésif exible pour carrelage sur des limaces
- Appliquer de la colle de montage ou de construction appro
priée à certains endroits
3
Après installation de la garniture d’écoulement, procéder à un
essai d’étanchéité.
4
Respecter les instructions de mise en œuvre du système
d’étanchéité.
5
Retirer le couvercle transparent et replier le collier d’étanchéi-
té sur le joint.
Toepassing:
- De correcte zitting van het aoopelement moet worden gecontro-
leerd.
- Alleen geschikt voor toepassing in binnenruimte.
Met de betreffende verwerkingsrichtlijnen van alle betrokken
onderdelen moet rekening worden gehouden.
1
Bij inbouw kunnen onderbouwelementen worden gebruikt
voor hoogteverstelling.
De klant moet zelf voor deze onderbouwelementen zorgen (bijv.
XPS, EPS). Er moet een zodanige draagconstructie worden
gekozen, dat de bovenrand van de "Ablauf Grundkörper" op
gelijke hoogte ligt met de vloerbepleistering.
De bovenrand van de "Ablauf Grundkörper" mag niet boven de
vloerbepleistering uitsteken!
2 Fixeren van de "Ablauf Grundkörper" door middel van:
- Oppervlakkig aanbrengen van Flex tegellijm
- Flex tegellijm in dotten aanbrengen
- Geschikte montage- of constructielijm nauwkeurig aanbrengen
3
Na de installatie van de waterafvoer moet een di-
chtheidscontrole worden uitgevoerd.
4
De verwerkingsaanwijzingen van het afdichtsysteem moeten
worden opgevolgd.
5
De transparante deksel verwijderen en de afdichtingskraag
over de afdichting vouwen.

Einbauanleitung
Mounting instruction
Montagehandleiding
Instructions de montage
Istruzioni di montaggio
Ablauf Grundkörper
Uso:
- L’aggiustaggio corretto dell’elemento di scolo è da controllare.
- Adatto solo per l’uso interno.
Si deve osservare le istruzioni di lavorazione di tutti i mestieri
partecipanti.
1
In fase di installazione è possibile utilizzare gli elementi
sottostrutturali per la compensazione dell’altezza.
Questi elementi sottostrutturali devono essere predisposti dal
cliente (ad es. XPS, EPS). La sottostruttura deve essere scel-
ta in modo che il bordo superiore della scatola di montaggio
sia alla stessa altezza del massetto.
Il bordo superiore della scatola di montaggio non deve spor-
gere oltre il massetto!
2
Fissaggio della scatola di montaggio mediante:
- applicazione del collante per piastrelle Flex sulla supercie
- collante per piastrelle Flex a sovrapposizione
- applicare il collante di montaggio o costruzione in modo
puntuale
3
Dopo l’installazione dell’elemento di scarico, si deve proce-
dere ad una prova d’ermeticità.
4
Le istruzioni di lavorazione del sistema di guarnizione devono
essere osservate.
5
Rimuovere il coperchio trasparente e piegare la guarnizione
di tenuta di tenuta sull’isolamento.
WESKO GmbH Sanitär- und Baubedarf • Illbruckstraße 1 • 34537 Bad Wildungen
T 05621 - 801-333 • F 05621 - 801-309 • [email protected] • www.wesko-sanitaer.de
-
 1
1
-
 2
2
-
 3
3
-
 4
4
-
 5
5
-
 6
6


Hornbach Drain box DN 50 Luxembourg Handleiding
- Type
- Handleiding
in andere talen
Andere documenten
-
 Balmani 201218 Installatie gids
-
 Kessel SPZ 1000 Handleiding
-
STIEBEL ELTRON FTT 160-1120 C Operation Instruction
-
Dimplex HMTS de handleiding
-
Beem MIRAGE TORNADO CLEAN Handleiding
-
CAME COMPASS 001PSSPFMCCW Snelstartgids
-
Pentair JUNG PUMPEN BAUFIX 100 Handleiding
-
 Dallmer DallFlex Handleiding
-
Otto Bock 17AD100 Series Instructions For Use Manual
-
 DuschMaster D969260 Handleiding


