
VDPC174
192-CHANNEL DMX CONTROLLER WITH JOYSTICK
192-KANAALS DMX CONTROLLER MET JOYSTICK
CONTRÔLEUR DMX 192 CANAUX AVEC MANETTE
CONTROLADOR DMX DE 192 CANALES CON PALANCA DE CONTROL
DMX-CONTROLLER FÜR 192 KANÄLE MIT JOYSTICK
USER MANUAL
GEBRUIKERSHANDLEIDING
NOTICE D’EMPLOI
MANUAL DEL USUARIO
BEDIENUNGSANLEITUNG

VDPC174_v2 VELLEMAN
2

VDPC174_v2 VELLEMAN
3
VDPC174 – 192-CHANNEL DMX CONTROLLER WITH JOYSTICK
1. Introduction & Features
To all residents of the European Union
Important environmental information about this product
This symbol on the device or the package indicates that disposal of the device after its lifecycle could harm
the environment.
Do not dispose of the unit (or batteries) as unsorted municipal waste; it should be taken to a specialised
company for recycling.
This device should be returned to your distributor or to a local recycling service.
Respect the local environmental rules.
If in doubt, contact your local waste disposal authorities.
Thank you for buying the VDPC174! Please read the manual thoroughly before bringing this device into service.
If the device was damaged in transit, don't install or use it and contact your dealer.
2. Safety Instructions
• Damage caused by disregard of certain guidelines in this manual is not covered by the warranty and the dealer
will not accept responsibility for any ensuing defects or problems.
• A qualified technician should install and service this device.
• Do not switch the device on immediately after it has been exposed to changes in temperature. Protect the device
against damage by leaving it switched off until it has reached room temperature.
• Make sure that the available voltage does not exceed the voltage stated in the specifications of this manual.
• Do not crimp the power cord and protect it against damage. Have an authorised dealer replace it if necessary.
• Disconnect the device from the mains to clean it or when it is not in use. Handle the power cord by the plug only.
• Note that damage caused by user modifications to the device is not covered by the warranty.
• Keep the device away from children and unauthorised users.
3. General Guidelines
• This device is designed for professional use on stage, in discos, theatres, etc. The VDPC174 should only be used
indoors and be connected to a current of max. 9-12VDC / 500mA.
• Do not shake the device. Avoid brute force when installing or operating the device.
• Select a location where the device is protected against extreme heat (see “Technical Specifications”), dust and
moisture. Respect a minimum distance of 0.5m between the device’s light output and any illuminated surface.
• Familiarise yourself with the functions of the device before actually using it. Do not allow operation by unqualified
people. Any damage that may occur will most probably be due to unprofessional use of the device.
• Use the original packaging if the device is to be transported.
• All modifications of the device are forbidden for safety reasons.
• Only use the device for its intended purpose. All other uses may lead to short circuits, burns, electroshocks,
crash, etc. Using the device in an unauthorised way will void the warranty.
Be very careful during the installation: touching live wires can cause life-threatening electroshocks.
Keep this device away from rain and moisture.
Unplug the mains lead before opening the housing.

VDPC174_v2 VELLEMAN
4
4. Description
a. Front Panel (fig. 1)
1. Scanner Buttons (1 ~ 12)
Select the desired fixture.
2. Scene Buttons (1 ~ 8)
Press the scene buttons to load or store your scenes. There is a maximum of 240 programmable scenes.
3. Faders
These faders are used to control the intensity of channel 1 ~ 8 or channel 9 ~ 16, depending on the selected
page.
4. Page Select Button
Select page A (1 ~ 8) or page B (9 ~ 16).
5. Speed Slider
Adjust the chase speed within the range of 0.1 second to 10 minutes.
6. Fade Time Slider
Adjust the fade time. The fade time is the amount of time it takes for a scanner to move from one position to
another and for a dimmer to fade in or out.
7. LCD Display
Shows the current activity or programming status.
8. Pan Joystick
This joystick is used to control the pan of the scanner.
9. Tilt Joystick
This joystick is used to control the tilt of the scanner.
10. Program Button
Activate the program mode.
11. MIDI / REC
Used to control MIDI operation or to record programs.
12. Auto / Del
Activate the Music Mode or select the scenes and chases.
13. Music / Bank Copy
Activates the Program Mode
14. Bank Up / Down
Press the Up / Down button to select one of the 30 banks.
15. Tap / Display
Used to create a standard beat or to change the value mode between % and 0 ~ 255.
16. Blackout Button
Tap to momentarily pause the whole output.

VDPC174_v2 VELLEMAN
5
17. Chase Button (1 ~ 6)
These buttons are used for activating the chase of programmed scenes.
18. Fine Button
When Fine is on, the pan or tilt joystick will control the scanner in its smallest increment.
19. Mode Button
Pressing FINE and MODE simultaneously allows to activate the ASSIGN or REVERSE mode.
b. Rear Panel (fig. 2)
1. MIDI In
Receives MIDI data.
2. DMX Polarity Select
Select the DMX polarity.
3. DMX Out
This connector sends your DMX value to the DMX scanner or DMX pack.
4. DMX In
This connector accepts your DMX input signals.
5. DC Input
9-12VDC / 500mA.
6. Power Switch
Switch the power on or off.
7. AUDIO In
Accepts the audio signals between 0.1V ~ 1Vpp.
5. Use
a. Operation
• General
The VDPC174 allows you to program 12 scanners with 16 DMX channels each, 30 banks of 8 programmable
scenes, 6 chases of 240 scenes and all this by means of 8 channel sliders, a joystick and other buttons. By
means of the joystick you can easily and more accurately control the movement of a fixture. To increase your
ability to dazzle the audience, this unit allows you to assign and reverse DMX channels. In addition, two units can
set up communication so that they can send or receive a complete file dump.
• Display Information
The LCD display contains a maximum of 2 lines, each of 8 characters. Below are the definitions:

VDPC174_v2 VELLEMAN
6
LCD Display Description
Scene 1
Bank 1
Chase 1 is activated
The ninth step of a chase
DMX value (000 ~ 255)
The current speed is 1 minute and 54 seconds
The time of the last two taps is 4.25 seconds
Assign DMX channels 4 and 5
Reverse DMX channels 10 and 13
b. Setup
• Unit Setup
The unit is preset to allocate 16 channels per fixture. In order to assign your fixtures to the scanner buttons
located on the left side of the unit you will need to space your fixtures 16 DMX channels apart.
Use the following chart for DMX addressing:
Fixture Number Digital DMX Address Scanner DIP Switch Setting
1 1 1 is ON
2 17 1 and 5 are ON
3 33 1 and 6 are ON
4 19 1, 5 and 6 are ON
5 65 1 and 7 are ON
6 81 1, 5 and 7 are ON
7 97 1, 6 and 7 are ON
8 113 1, 5, 6 and 7 are ON
9 129 1 and 8 are ON
10 145 1, 5 and 8 are ON
11 161 1, 6 and 8 are ON
12 177 1, 5, 6 and 8 are ON
• Enabling the PROGRAM Mode
To enable the PROGRAM mode, hold the PROGRAM button for a few seconds until the LED is lit.
• Setting Up the Joystick
1. Press and hold the PROGRAM button until the LED is lit.
2. Press and hold the MODE and FINE buttons simultaneously. The assign LED should light. If the reverse LED
lights, press FINE and MODE again to enter the ASSIGN mode.
3. Use the bank UP and DOWN keys to select the axis you wish to assign (pan or tilt).
4. Use the TAP / DISPLAY button to select 16 or 8-channel mode.
5. Press the button corresponding to the scanner you wish to assign.
6. While holding the mode button press the scene number corresponding to the slider which controls the
movement (example: If the pan is controlled by slider number 4, press and hold the MODE button while
tapping scene button 4).
7. When finished, press the MODE and FINE buttons simultaneously again to exit the ASSIGN mode.
c. Scenes
• Programming a Scene
1. Enter the PROGRAM mode (See “Enabling the PROGRAM Mode”).
2. Check the blackout key and verify that the LED is not lit. If the LED is lit, press it once to exit the BLACKOUT
mode.

VDPC174_v2 VELLEMAN
7
3. Verify that the speed and fade time sliders are positioned at zero.
4. Press the scanner button corresponding to the unit you wish to control. You may control more than one
scanner at a time by pressing the button corresponding to the scanner(s) you wish to program.
5. Move the faders and the joystick to the desired position. If necessary, you may select page B to control
channels 9 ~ 16.
6. Tap the bank UP / DOWN button to choose the bank you want to store this scene into. There are a total of 30
banks you can select from. You may store up to 8 scenes in each bank.
7. Once all scanners are programmed into the desired position for one scene, tap the MIDI / REC button to
program this scene into the memory.
8. Tap the scene button you wish to store your scene into. All LEDs will flash three times. The LCD readout will
show the bank and scene.
9. To unselect the scanner(s) you have been programming and to switch to another scanner, simply press the
button of the scanner you have been programming again, deselecting it, and select another scanner.
10. Repeat steps 2 to 7 until all scenes have been programmed.
11. If you do not intend to continue programming at this time, press and hold the PROGRAM button for three
seconds to exit PROGRAM mode. The LED will go out indicating this selection.
• Example of a Scene Programme
1. Enable the PROGRAM mode.
2. Tap the SCANNER 1 button to turn on its fader control.
3. Verify that the page is set on page A. If not, press the PAGE SELECT button to select page A.
4. Move the first and second faders all the way up to their maximum value position.
5. Select bank 1 using the bank UP / DOWN buttons.
6. Press the MIDI / REC button.
7. Tap scene 1 to store the first scene.
8. Repeat steps 4 to 7 until all scenes have been programmed into bank 1.
9. Tap the SCANNER 1 button to turn off the fader control.
10. When finished, disable the PROGRAM mode. You can now manually tap through what you have just
programmed.
• Editing a Scene
1. Enable the PROGRAM mode.
2. Press the bank UP / DOWN button to select the bank containing the scene you wish to edit.
3. Select the scene you wish to edit by tapping its scene button.
4. Use the faders and/or joystick to make the desired adjustments to the scene.
5. Once you have completed the changes, tap the MIDI / REC button.
6. Tap the scene button that corresponds to the scene you’re editing. This will override the existing scene.
Be sure to select the same scene in steps 3 and 6, otherwise you may accidentally record over an existing scene.
• Copying Scanner Settings
This setting allows you to copy the settings of one scanner to another.
1. Press and hold down the scanner button you wish to copy.
2. While holding down the button, tap the button of the scanner you wish to copy the settings to.
• Copying a Scene
1. Enable the PROGRAM mode.
2. Tap the bank UP / DOWN button to select the bank containing the scene you wish to copy.
3. Select the scene you wish to copy by pressing its scene button.
4. Using the bank UP / DOWN button select the bank you wish to copy the scene to.
5. Tap the MIDI / REC button.
6. Tap the scene button you wish to copy the scene to.

VDPC174_v2 VELLEMAN
8
• Deleting a Scene
1. Enable the PROGRAM mode.
2. Press the desired SCENE button to select the scene you wish to delete.
3. Press and hold down the AUTO / DEL button. While holding the button, tap the SCENE button that
corresponds with the scene you wish to delete.
4. When the programmed scene is deleted, all DMX channel values will be set to 0.
• Deleting All Scenes
1. With unit switched off, press and hold down the PROGRAM and bank DOWN buttons at the same time.
2. Turn the unit back on and all scenes should be cleared.
• Copying a Bank of Scenes
1. Enable the PROGRAM mode.
2. Tap the bank UP / DOWN button until you reach the bank you wish to copy.
3. Tap the MIDI / REC button.
4. Tap the bank UP / DOWN button to select the bank you wish to copy to.
5. Tap the MUSIC / BANK COPY button, all LEDs will briefly flash three times indicating the function has been
completed.
6. Press the PROGRAM button for three seconds to exit PROGRAM mode.
d. Chases
• Programming a Chase
Scenes must have been programmed in order to program a chase. This function allows you to cycle through up to
240 scenes in a preselected order. It is recommended to delete all chases in the controller before programming
chases for the first time. See “Deleting All Chases”.
1. Enable the PROGRAM mode.
2. Tap the CHASE button to select the chase you wish to program.
3. Select a desired scene from the bank that has scenes stored inside it.
4. Tap the MIDI / REC button.
5. Repeat steps 3 to 4 until all desired scenes have been entered.
• Inserting a Bank of Scenes into a Chase
1. Enable the PROGRAM mode.
2. Select the chase you wish to program.
3. Use the bank UP / DOWN key to select the bank of scenes you wish to copy.
4. Tap the MUSIC / BANK COPY button.
5. Tap the MIDI / REC COPY button. All LEDs will flash three times indicating that the requested operation has
been performed.
• Adding a Step
1. Enable the PROGRAM mode.
2. Press the corresponding button to the chase you wish to add a step to.
3. Press the TAP / DISPLAY button, the LCD will show the current step.
4. Press the bank UP / DOWN button and scroll to the step you wish to insert the step after.
5. Press the MIDI / REC button. The segment display will read the step one step higher than before.
6. Tap the TAP / DISPLAY button again. The LCD shows the current chase, scene, and bank. Create a desired
scene and record it as a new step or select a previously programmed scene to add to the chase.
7. Once you have selected the scene you wish to add, press the MIDI / REC button again. All LEDs will flash
three times indicating the new step has been inserted into the chase.

VDPC174_v2 VELLEMAN
9
• Deleting a Step
1. Enable the PROGRAM mode.
2. Select the chase that contains the step you wish to delete.
3. Press the TAP / DISPLAY button, the LCD shows the current step.
4. Press the bank UP / DOWN button and scroll to the step you wish to delete.
5. Press the AUTO / DEL button to delete the step. All LEDs will flash three times indicating the requested
operation has been performed.
• Deleting a Chase
1. Press the button corresponding to the chase you wish to delete.
2. Press and hold down the AUTO / DEL button while holding down the CHASE button. All LEDs will flash three
times indicating that the requested operation has been performed.
• Deleting All Chases
1. With the power off, press and hold down the AUTO / DEL and bank DOWN buttons at the same time.
2. Reapply the power and all chases should be cleared.
e. Joystick / Channel Selection
• Setting-Up the Joystick
1. Press and hold the PROGRAM button until the LED is lit.
2. Press and hold the MODE and FINE buttons simultaneously. The ASSIGN LED should light. If the reverse
LED lights, press FINE and MODE again to enter the ASSIGN mode.
3. Use the bank UP and DOWN keys to select the axis you wish to assign (pan or tilt).
4. Use the TAP / DISPLAY button to select 16 or 8-channel mode.
5. Press the button corresponding to the scanner you wish to assign.
6. While holding the MODE button press the scene number corresponding to the slider which controls the
movement (example: If the pan is controlled by slider number 4, press and hold the MODE button while
tapping scene button 4).
7. When finished press the MODE and FINE buttons simultaneously again to exit ASSIGN mode.
• Reversing the Joystick Movement / DMX Channel
1. Enable the PROGRAM mode.
2. Press the FINE and MODE buttons to enter ASSIGN mode. Press the FINE and MODE buttons again to enter
REVERSE mode. The reverse LED lights up indicating the REVERSE mode is active.
3. Use bank UP / DOWN button to change between the pan and tilt. The corresponding LED lights indicating this
selection.
4. Press the TAP / DISPLAY button to change between 8-channel and 16-channel mode.
5. Press the SCANNER button to select the scanner.
6. While holding the MODE button, press the corresponding SCENE button of the channel you wish to reverse
(example: If you are reversing the scene on one scanner, once you verify that you are in reverse mode and the
tilt LED is lit, check to see which slider the tilt control is on. Hold the MODE button and press the SCENE
button that is same as the slider number for tilt (slider 5 / scene 5)).
7. Continue steps 3 to 7 as needed. You may reverse a maximum of 48 channels for 12 scanners.
• Deleting a Scanner of a DMX Channel
1. Activate the ASSIGN or REVERSE mode.
2. Tap the scanner button to select the scanner you wish to delete.
3. Press the MODE and AUTO / DEL buttons simultaneously. All LEDs will flash three times indicating the
requested operation has been performed.

VDPC174_v2 VELLEMAN
10
• Deleting All DMX Channels
1. Switch off the unit.
2. Press the MODE and AUTO / DEL buttons simultaneously.
3. While holding the two buttons, turn the power back on to the unit. All LEDs will flash briefly indicating the
requested operation has been performed.
• Displaying the DMX Channel
1. Press the FINE and MODE buttons simultaneously.
2. Press the FINE and MODE buttons again, lighting the reverse LED.
3. Press the SCANNER button that is set at the desired pan and tilt and the LCD will display the DMX values for
pan and tilt.
f. Fade Time
• Fade Time / Assigning a Fade Time
1. With the unit switched off, press the MODE and TAP / DISPLAY buttons simultaneously.
2. Switch on the unit, tap the TAP / DISPLAY button to change between FADE TIME and ASSIGN FADE TIME,
the LCD will display:
ALL ONLY
FD FD
CH X/Y
OR
TIME
TIME
3. Press the MODE and TAP / DISPLAY buttons simultaneously to store your setting into memory. If you do not
wish to save your setting, press the BLACKOUT key to exit this operation.
g. Playback
• Running Scenes
There are three modes in which you can run scenes and chases: MANUAL mode, AUTO mode and MUSIC
mode.
• Manual Mode
1. When the power is turned on, the unit enters manual mode automatically.
2. Check and verify that both the AUTO and MUSIC LEDs are off.
3. Use the bank UP / DOWN button to select the bank with the scenes you wish to run.
4. Press the SCENE button corresponding to the scene you wish to display.
• Auto Mode
This function allows you to run a bank of programmed scenes in sequence.
1. Press the AUTO / DEL button to enter into AUTO mode. The AUTO LED will light indicating the AUTO mode is
active.
2. Use the bank UP / DOWN button to select a bank of scenes to run.
3. After selecting the bank of scenes to run, you can use the SPEED slider and FADE TIME slider to adjust the
speed of the scene progression.
4. You can use the TAP SYNC / DISPLAY button to set the speed instead. The amount of time between the last
two taps will instruct the controller in the length of time between steps. This setting will stay in effect until the
speed slider is moved.
5. Press the AUTO / DISPLAY button to exit AUTO mode.
• Music Mode
1. Press the MUSIC / BANK COPY button to activate MUSIC mode.
2. Use the bank UP / DOWN button to select a bank of scenes you wish to run. The scenes selected will run
through sequentially to the beat of the music identified by the built-in microphone.
3. Tap the MUSIC / BANK COPY button again to exit MUSIC mode.

VDPC174_v2 VELLEMAN
11
h. Playing the Chases
• Manual Mode
1. When the power is turned on, the unit enters MANUAL mode automatically.
2. Select the chase you wish to run by pressing the corresponding chase button. Pressing this button a second
time will unselect the chase.
• Auto Mode
1. Press the AUTO / DEL button to activate AUTO mode.
2. Select the desired chase by pressing one of six CHASE buttons. Pressing this button a second time will
negate this selection.
3. Use the SPEED slider and FADE TIME slider to adjust the chase to your specifications.
• Music Mode
1. Press the MUSIC / BANK COPY button to activate MUSIC mode.
2. Select the desired chase by pressing one of six CHASE buttons, this will activate the chase and cause it to
respond to the rhythms of the music.
i. File Transfer
A file transfer allows the user to transfer all information stored in one VDPC174 to a second VDPC174 unit. Connect
the units using 3-pin XLR cables. The unit sending the information will have the cable plugged into the DMX OUT
plug while the receiving unit will have the cable running into the DMX IN plug.
• Sending a Dump File
1. With unit switched off, press and hold down the SCANNER 2 and 3 buttons and SCENE 1 button
simultaneously.
2. Turn the unit back on while pressing these three buttons, the LCD will read TRANSMIT indicating that the unit
is ready to send the files.
3. Press SCENE button 7 and 8 at the same time to send the dump file.
4. If an error occurs during the dump file, the LCD will read ERROR.
• Receiving a Dump File
1. With the unit switched off, press and hold down the SCANNER 8, 9 and SCENE button 2 at a time.
2. Apply the power again while pressing these three buttons. The LCD shows RECEIVE indicating this unit is
receiving the dump file.
3. When receiving is over, the unit will automatically return to NORMAL mode.
j. MIDI Channel Setting
1. Press and hold the MIDI / REC button for three seconds. The LCD shows the MIDI channel of last time.
2. Use the bank UP / DOWN button to select the DMX channel (01 ~ 16) to assign to the MIDI channel.
3. Press and hold the MIDI / REC button to save your settings. The LEDs will flash three times indicating that the
required operation has been performed.
6. Cleaning and Maintenance
1. All screws should be tightened and free of corrosion.
2. The housing, colour lenses, mounting supports and the installation location (e.g. ceiling, suspension, trussing)
should not be deformed, modified or tampered with e.g. do not drill extra holes in mounting supports, do not
change the location of the connections.
3. The electric power supply cables must not show any damage. Have a qualified technician maintain the device.
4. Disconnect the device from the mains prior to maintenance activities.
5. Wipe the device regularly with a moist, lint-free cloth. Do not use alcohol or solvents.
6. There are no user-serviceable parts.
7. Contact your dealer for spare parts if necessary.

VDPC174_v2 VELLEMAN
12
7. Technical Specifications
Power Supply 9-12VDC / 500mA
DMX IN / OUT 3-pin female / male XLR socket
MIDI IN 5-pin DIN socket
Dimensions 482 x 134 x 85m
Total Weight 2.7kg
Max. Ambient Temperature 45°C
For more info concerning this product, please visit our website www.hqpower.com
The information in this manual is subject to change without prior notice.
VDPC174 – 192-KANAALS DMX CONTROLLER MET JOYSTICK
1. Inleiding en kenmerken
Aan alle ingezetenen van de Europese Unie
Belangrijke milieu-informatie betreffende dit product
Dit symbool op het toestel of de verpakking geeft aan dat, als het na zijn levenscyclus wordt weggeworpen,
dit toestel schade kan toebrengen aan het milieu.
Gooi dit toestel (en eventuele batterijen) niet bij het gewone huishoudelijke afval; het moet bij een
gespecialiseerd bedrijf terechtkomen voor recyclage.
U moet dit toestel naar uw verdeler of naar een lokaal recyclagepunt brengen.
Respecteer de plaatselijke milieuwetgeving.
Hebt u vragen, contacteer dan de plaatselijke autoriteiten inzake verwijdering.
Dank u voor uw aankoop! Lees deze handleiding grondig voor u het toestel in gebruik neemt. Werd het toestel
beschadigd tijdens het transport, installeer het dan niet en raadpleeg uw dealer.
2. Veiligheidsinstructies
• De garantie geldt niet voor schade door het negeren van bepaalde richtlijnen in deze handleiding en uw dealer zal
de verantwoordelijkheid afwijzen voor defecten of problemen die hier rechtstreeks verband mee houden.
• Laat dit toestel installeren en onderhouden door een geschoolde technicus.
• Om beschadiging te vermijden, zet u het toestel best niet aan onmiddellijk nadat het werd blootgesteld aan
temperatuurschommelingen. Wacht tot het toestel op kamertemperatuur gekomen is.
• De beschikbare netspanning mag niet hoger zijn dan de spanning in de specificaties achteraan de handleiding.
• De voedingskabel mag niet omgeplooid of beschadigd zijn. Laat uw dealer zo nodig een nieuwe kabel plaatsen.
• Trek de stekker uit het stopcontact (trek niet aan de kabel!) voordat u het toestel reinigt en als u het niet gebruikt.
• Schade door wijzigingen die de gebruiker heeft aangebracht aan het toestel vallen niet onder de garantie.
• Houd dit toestel uit de buurt van kinderen en onbevoegden.
3. Algemene richtlijnen
• Dit toestel is ontworpen voor professioneel gebruik op podia, in disco's, enz. U mag dit toestel enkel binnenshuis
gebruiken en aansluiten op een spanning van maximum 9-12VDC / 500mA.
• Schud het toestel niet dooreen. Vermijd brute kracht tijdens de installatie en de bediening van dit toestel.
Wees voorzichtig bij de installatie: raak geen kabels aan die onder stroom staan om
dodelijke elektroshocks
te vermijden.
Bescherm dit toestel tegen regen en vochtigheid.
Verzeker u ervan dat het toestel niet aangesloten is op een stroombron alvorens het te openen.

VDPC174_v2 VELLEMAN
13
• Installeer het toestel weg van extreme temperaturen (zie “Technische specificaties”), vochtigheid en stof. Zorg
voor een minimumafstand van 0.5m tussen de lichtuitgang van het toestel en het belichte oppervlak.
• Leer eerst de functies van het toestel kennen voor u het gaat gebruiken. Ongeschoolde personen mogen dit
toestel niet gebruiken. Meestal is beschadiging het gevolg van onprofessioneel gebruik.
• Gebruik de oorspronkelijke verpakking wanneer u het toestel vervoert.
• Om veiligheidsredenen mag de gebruiker geen wijzigingen aanbrengen aan het toestel.
• Gebruik het toestel enkel waarvoor het gemaakt is. Andere toepassingen kunnen leiden tot kortsluitingen,
brandwonden, elektrische schokken, enz. Bij onoordeelkundig gebruik vervalt de garantie.
4. Omschrijving
a. Frontpaneel (zie fig. 1)
1. Scanner (1 ~ 12)
Kies het gewenste toestel.
2. Scene (1 ~ 8)
Druk op één van de knoppen om een scène te laden of te bewaren. Er zijn max. 240 programmeerbare scènes.
3. Faders
Deze faders worden gebruikt om de intensiteit van kanaal 1 ~ 8 of kanaal 9 ~ 16 te besturen, afhankelijk van de
geselecteerde pagina.
4. Page Select
Kies pagina A (1 ~ 8) of pagina B (9 ~ 16).
5. Speed-schuifknop
Regeling van de chase-snelheid tussen 0.1 seconde tot 10 minuten.
6. Fade Time-schuifknop
Regeling van de dimtijd. De dimtijd is de tijd die een scanner nodig heeft om van een positie naar de andere te
bewegen of de tijd die een dimmer nodig heeft om in of uit te faden.
7. LCD-display
Weergave van de huidige activiteit of programmastatus.
8. Joystick voor pan-regeling
Gebruik deze joystick om de pan van een scanner te besturen.
9. Joystick voor tilt-regeling
Gebruik deze joystick om de tilt van een scanner te besturen.
10. Program-knop
Activering van een programmamodus.
11. MIDI / REC
Besturing van de MIDI of opname van programma’s.
12. Auto / Del
Activering van de muziekbestuurde modus of selectie van de scènes en chases.
13. Music / Bank Copy
Activering van de programmamodus.
14. Bank Up / Down
Druk op de Up / Down-knop om één van de 30 banken te selecteren.
15. Tap / Display
Creëer een standaard ritme of om de waardemodus tussen % en 0 ~ 255 te wijzigen.
16. Blackout
Druk op deze knop op de uitgang te pauzeren.
17. Chase-knop (1 ~ 6)
Activering van de chase van de geprogrammeerde scènes.
18. Fine-knop
Wanneer deze is ingedrukt, dan kunt u met de pan of tilt joystick de scanner met de kleinste stappen besturen.
19. Mode-knop
Druk gelijktijdig op FINE en MODE om de ASSIGN- of REVERSE-modus in te schakelen.

VDPC174_v2 VELLEMAN
14
b. Achterpaneel (zie fig. 2)
1. MIDI In
Ontvangt MIDI-gegevens.
2. DMX Polarity Select
Keuze van de DMX-polariteit.
3. DMX Out
Deze aansluiting zendt uw DMX-waarde naar de DMX scanner of DMX pack.
4. DMX In
Deze aansluiting aanvaardt uw DMX ingangssignalen.
5. DC-ingang
9-12VDC / 500mA.
6. Voedingsschakelaar
In- of uitschakelen van het toestel.
7. AUDIO In
Aanvaardt audiosignalen tussen 0.1V ~ 1Vpp.
5. Gebruik
a. Bediening
• Algemeen
Met de VDPC174 kunt u 12 scanners van elk 16 DMX-kanalen programmeren, 30 banken met 8
programmeerbare scènes en 6 chases met 240 scènes, bestuurbaar aan de hand van 8 schuifknoppen, een
joystick en andere knoppen. Met de joystick kunt u op een gemakkelijke en nauwkeurige wijze de beweging van
een toestel besturen. Om uw publiek nog meer verrassen, kunt u DMX-kanalen toewijzen en zelfs omkeren.
Bovendien kunt u een complete file dump van een toestel naar een ander transfereren.
• Informatie op de display
Het LCD-scherm bestaat uit 2 regels, elk met 8 karakters. Hier zijn de omschrijvingen:
LCD -display Omschrijving
Scène 1
Bank 1
Chase 1 is ingeschakeld
Stap 9 van een chase
DMX-waarde (000 ~ 255)
De huidige snelheid is 1 minuut en 54 seconden
De tijd van de laatste twee drukacties is 4.25 seconden
Toekennen van kanalen 4 en 5
Omkeren van kanalen 10 en 13
b. Opstelling
• Opstelling van een toestel
De VDPC174 kent 16 kanalen per toestel toe. Om uw toestellen aan de scannerknoppen links van de controller
toe te wijzen, houd 16 kanalen vrij per ingegeven toestel.

VDPC174_v2 VELLEMAN
15
Geef het DMX-adres in volgens volgende tabel:
Toestelnummer Digitale DMX-adres Instelling van de DIP-schakelaars van de scanner
1 1 1 is ON
2 17 1 and 5 are ON
3 33 1 and 6 are ON
4 19 1, 5 and 6 are ON
5 65 1 and 7 are ON
6 81 1, 5 and 7 are ON
7 97 1, 6 and 7 are ON
8 113 1, 5, 6 and 7 are ON
9 129 1 and 8 are ON
10 145 1, 5 and 8 are ON
11 161 1, 6 and 8 are ON
12 177 1, 5, 6 and 8 are ON
• De PROGRAM-modus inschakelen
Om de mode in te schakelen, houd de PROGRAM-knop gedurende enkele seconden ingedrukt tot de LED
oplicht.
• De joystick instellen
1. Houd de PROGRAM-knop ingedrukt tot de LED oplicht.
2. Houd gelijktijdig de MODE- en de FINE-knop ingedrukt. De ASSIGN LED zou moeten oplichten. Wanneer de
REVERSE LED oplicht, druk opnieuw op de FINE- en MODE-knop om de ASSIGN-modus binnen te gaan.
3. Gebruik de UP- en DOWN-knop om de assen te bepalen (pan of tilt).
4. Gebruik de TAP / DISPLAY-knop om de 16- of 8-kanaalsmodus te kiezen.
5. Druk op de knop die met de toe te wijzen scanner overeenstemt.
6. Druk op een scènenummer overeenstemmend met de gewenste schuifknop terwijl u de MODE-knop ingedrukt
houdt (Voorbeeld: Wanneer u de pan met schuifknop 4 bestuurt, houd de MODE-knop ingedrukt en druk op
scèneknop 4#).
7. Druk vervolgens opnieuw gelijktijdig op de MODE- en FINE-knop om de ASSIGN-modus te verlaten.
c. Scènes
• Een scène programmeren
1. Ga de PROGRAM-modus binnen (zie “De PROGRAM-modus inschakelen”).
2. Controleer de BLACKOUT-knop en zorg dat de LED niet oplicht. Licht de LED toch op, druk dan éénmaal op
de knop om de BLACKOUT-modus te verlaten.
3. Zorg dat de SPEED- en FADE TIME-schuifknoppen op de nulinstelling staan.
4. Druk op de scannerknop overeenstemmend met het toestel die u wenst te besturen. U kunt meer dan één
scanner tegelijkertijd besturen door op de knoppen te drukken die met de toestellen overeenkomen.
5. Verplaats de faders en de joystick naar de gewenste positie. Selecteer indien nodig pagina B om kanalen 9 ~
16 te besturen.
6. Druk op de UP / DOWN-knop om de bank te selecteren waarin u de scène wenst op te slaan. U kunt kiezen
uit 30 banken. Elke bank kan tot scènes bevatten.
7. Wanneer u alle scanners zoals gewenst zijn ingegeven, druk op de MIDI / REC-knop om de scène in het
geheugen op te slaan.
8. Druk op de scèneknop waarin u de scène wenst op te slaan. Alle LEDs lichten driemaal op. Het LCD-scherm
geeft de bank en de scène weer.
9. Om de scanner(s) te wissen en om naar een andere scanner over te gaan, druk op de gewenste scannerknop,
vink de scanner uit en kies een andere.
10. Herhaal stap 2 tot 7 tot alle scanners geprogrammeerd zijn.
11. Wenst u verder geen andere toestellen meer in te geven, houd de PROGRAM-knop gedurende een drietal
seconden ingedrukt om de PROGRAM-modus te verlaten. De LED dooft.

VDPC174_v2 VELLEMAN
16
• Voorbeeld hoe een scène te programmeren
1. Schakel de PROGRAM-modus in.
2. Druk op SCANNER 1 zodat de fader ingeschakeld wordt.
3. Zorg dat pagina A geselecteerd staat. Zoniet, druk op PAGE SELECT om pagina A te selecteren.
4. Plaats de eerste en de tweede fader op hun maximumpositie.
5. Selecteer bank 1 met de UP / DOWN-knoppen.
6. Druk op MIDI / REC.
7. Druk op scène 1 om die op te slaan.
8. Herhaal stap 4 tot 7 tot alle scènes in bank 1 zijn geprogrammeerd.
9. Druk op SCANNER 1 om de fader uit te schakelen.
10. Om te beëindigen, schakel de PROGRAM-modus uit. U kunt nu manueel door uw programma’s bladeren.
• Een scène bewerken
1. Schakel de PROGRAM-modus in.
2. Druk op UP / DOWN om de bank die u wenst te bewerken te selecteren.
3. Selecteer de te bewerken scène door de overstemmende knop in te drukken.
4. Gebruik de faders en/of joystick om de scène aan te passen.
5. Druk nadien op de MIDI / REC-knop.
6. Druk op de scèneknop die met de bewerkte scène overeenkomt. De bestaande scène wordt overschreven.
Zorg dat u dezelfde scène kiest als in stap 3 en 6 om niet over een bestaande scène te schrijven.
• Scannerinstellingen kopiëren
Hiermee kunt u de instellingen van een scanner naar een andere scanner kopiëren.
1. Houd de gewenste scannerknop ingedrukt.
2. Druk, terwijl u de knop ingedrukt houdt, op de knop van de doelscanner.
• Een scène kopiëren
1. Schakel de PROGRAM-modus in.
2. Kies de gewenste bank met de te kopiëren scène met behulp van de UP / DOWN-knop.
3. Kies de te kopiëren scène door op de scèneknop te drukken.
4. Gebruik de UP / DOWN-knop om de bank te kiezen waarnaar u de scène wenst te kopiëren.
5. Druk op MIDI / REC.
6. Druk op de knop van de scène waarnaar u de scène wenst te kopiëren.
• Een scène wissen
1. Schakel de PROGRAM-modus in.
2. Druk op de gewenste SCENE-knop.
3. Houd de AUTO / DEL-knop ingedrukt en druk op de SCENE-knop van de te wissen scène.
4. Nadat u de scène hebt gewist, worden de waarden van het DMX-kanaal op 0 gezet.
• Alle scènes wissen
1. Houd met een uitgeschakeld toestel gelijktijdig de PROGRAM- en BANK DOWN-koppen ingedrukt.
2. Schakel nu het toestel in. Alle scènes zijn gewist.
• Een volledige bank met scènes kopiëren
1. Schakel de PROGRAM-modus in.
2. Druk op UP / DOWN tot u de gewenste bank wordt bereikt.
3. Druk op MIDI / REC.
4. Druk op UP / DOWN om de gewenste bank te selecteren.
5. Druk op MUSIC / BANK COPY, alle LEDs lichten eventjes op om aan te geven dat de functie voltooid is.
6. Om de modus te verlaten, houd de PROGRAM-knop gedurende een drietal seconden ingedrukt.

VDPC174_v2 VELLEMAN
17
d. Chases
• Een chase programmeren
Om een scène te kunnen programmeren, moet er eerst en vooral een scène bestaan. Deze functie laat u toe om
240 scènes in een vooraf bepaalde volgorde af te lopen. Het is aangeraden eerst alle chases te wissen vooraleer
u chases begint te programmeren. Zie “Alle scènes wissen”.
1. Schakel de PROGRAM-modus in.
2. Druk op CHASE om de gewenste chase te selecteren.
3. Selecteer de gewenste scène uit de bank.
4. Druk op MIDI / REC.
5. Herhaal stappen 3 tot 4 tot alle gewenste scènes ingegeven zijn.
• Een bank met scènes in een chase plaatsen
1. Schakel de PROGRAM-modus in.
2. Selecteer de chase die u wenst te programmeren.
3. Selecteer met UP / DOWN de bank die u wenst te kopiëren.
4. Druk op MUSIC / BANK COPY.
5. Druk op MIDI / REC COPY. Alle LEDs knipperen drie maal om aan te geven dat de opdracht is volbracht.
• Een stap toevoegen
1. Schakel de PROGRAM-modus in.
2. Druk op de knop van de toe te voegen chase.
3. Druk op TAP / DISPLAY, de LCD geeft de huidige stap weer.
4. Druk op UP / DOWN en rol naar de stap die u wenst in te voegen.
5. Druk MIDI / REC. De display geeft de stap na de vorige stap weer.
6. Druk opnieuw op TAP / DISPLAY. De LCD geeft de huidige chase, scène en bank weer. Creëer nu een scène
en registreer als een nieuwe stap of selecteer een bestaande scène en voeg deze toe aan de chase.
7. Wanneer u de gewenste scène hebt geselecteerd, druk opnieuw op MIDI / REC. Alle LEDs knipperen drie
maal om aan te geven dat de scène aan de chase is toegevoegd.
• Een stap wissen
1. Schakel de PROGRAM-modus in.
2. Selecteer de chase met de te wissen stap.
3. Druk op TAP / DISPLAY, de LCD geeft de huidige stap weer.
4. Druk op bank UP / DOWN en rol naar de stap die u wenst te wissen.
5. Druk op AUTO / DEL om de stap te wissen. Alle LEDs knipperen drie maal om aan te geven dat de opdracht
is volbracht.
• Een chase wissen
1. Druk op de knop overeenkomend met de te wissen chase.
2. Houd AUTO / DEL en de CHASE-knop ingedrukt. Alle LEDs knipperen drie maal om aan te geven dat de
opdracht is volbracht.
• Alle chases wissen
1. Met een uitgeschakeld toestel, houd AUTO / DEL en de DOWN-knop gelijktijdig ingedrukt.
2. Schakel het toestel opnieuw in. Alle chases zijn gewist.
e. Selecteren van de joystick / het kanaal
• De joystick instellen
1. Houd de PROGRAM-knop ingedrukt tot de LED oplicht.
2. Houd gelijktijdig de MODE- en de FINE-knop ingedrukt. De ASSIGN LED licht op. Licht de REVERSE LED op,
druk opnieuw op FINE en MODE om u in de ASSIGN-modus te begeven.

VDPC174_v2 VELLEMAN
18
3. Selecteer met UP en DOWN de as die u wenst toe te kennen (pan of tilt).
4. Gebruik de TAP / DISPLAY-knop om de 16- of 8-kanaals modus te selecteren.
5. Druk op de scanner die wenst toe te kennen.
6. Houd de MODE-knop ingedrukt en druk op de scène overeenkomend met de schuifknop die de beweging
bestuurt. (voorbeeld: de pan-beweging wordt bestuurd door schuifknop 4, houd MODE ingedrukt en druk op
scèneknop 4).
7. Om te beïndigen, druk gelijktijdig op MODE en FINE om de ASSIGN-modus te verlaten.
• De joystickbeweging / DMX-kanaal omkeren
1. Schakel de PROGRAM-modus in.
2. Druk op FINE en MODE om de ASSIGN-modus binnen te treden. Druk opnieuw op FINE en MODE om u in de
REVERSE-modus te begeven. De REVERSE LED licht op om aan te geven dat de REVERSE-modus actief
is.
3. Gebruik UP / DOWN om te kiezen tussen pan en tilt. De overeenstemmende LED licht op.
4. Druk op TAP / DISPLAY om te schakelen tussen de 8-kanaals en de 16-kanaals modus.
5. Druk op SCANNER en kies de scanner.
6. Houd MODE ingedrukt en druk op de overeenkomende SCENE-knop of kanaal die u wenst om te keren
(voorbeeld: wenst u de scène van een scanner om te keren, eens u in REVERSE-modus bent en de tilt-LED
oplicht, controleer dan op welke schuifknop de besturing van de tilt-beweging is aangesloten. Houd MODE
ingedrukt en druk op de SCENE-knop overeenkomend met de tilt-schuifknop (schuifknop 5 / scène 5)).
7. Herhaal stap 3 tot 7 indien gewenst. Er kunnen maximaal 48 kanalen of 12 scanners worden omgekeerd.
• Een scanner uit een DMX-kanaal wissen
1. Schakel de ASSIGN- of REVERSE-modus in.
2. Druk op de scannerknop en selecteer de te wissen scanner.
3. Druk gelijktijdig op MODE en AUTO / DEL. Alle LEDs knipperen drie maal om aan te geven dat de opdracht is
uitgebracht.
• Alle DMX-kanalen wissen
1. Schakel het toestel uit.
2. Druk gelijktijdig op MODE en AUTO / DEL.
3. Houd MODE en AUTO / DEL gelijktijdig ingedrukt en schakel het toestel in. Alle LEDs knipperen drie maal om
aan te geven dat de opdracht is uitgebracht.
• Het DMX-kanaal weergeven
1. Druk gelijktijdig op FINE en MODE.
2. Druk opnieuw op FINE en MODE. De REVERSE LED licht op.
3. Druk op de SCANNER-knop die op de gewenste pan en tilt ingesteld staat. De LCD geeft de DMX-waarden
weer voor de pan en tilt.
f. Fadingtijd
• Fadingtijd / een fadingtijd toekennen
1. Met een uitgeschakeld toestel, druk gelijktijdig op MODE en TAP / DISPLAY.
2. Schakel het toestel in en druk op TAP / DISPLAY om te kiezen tussen FADE TIME en ASSIGN FADE TIME.
De LCD geeft het volgende weer:
ALL ONLY
FD FD
CH X/Y
OR
TIME
TIME
3. Druk gelijktijdig op MODE en TAP / DISPLAY om de instelling op te slaan. Wenst u de instelling niet op te
slaan, druk op BLACKOUT om te verlaten.

VDPC174_v2 VELLEMAN
19
g. Weergave
• Weergave van scènes
Er zijn drie weergavemogelijkheden: MANUEEL, AUTOMATISCH en MUZIEKGESTUURD.
• Manuele modus
1. Het toestel begeeft zich automatisch in de manuele mode wanneer u het inschakelt.
2. Ga na of zowel de AUTO en de MUSIC LEDs niet oplichten.
3. Gebruik UP / DOWN om de bank met de scènes te selecteren.
4. Druk op de SCENE-knop die u wenst weer te geven.
• Automatische modus
Hiermee kunt u een bank met geprogrammeerde scènes sequentieel weergeven.
1. Druk op AUTO / DEL om de AUTO-modus binnen te treden. De AUTO LED licht op om aan te geven dat de
modus is geactiveerd.
2. Gebruik UP / DOWN om de bank met scènes te selecteren.
3. Nadat u de bank hebt gekozen, regel de progressiesnelheid met behulp van de SPEED- en de FADE TIME-
schuifknop.
4. Stel de snelheid met TAP SYNC / DISPLAY in. Het interval tussen twee drukacties zal gelijk staan aan het
interval tussen twee stappen. De instelling blijft actief tot u SPEED-schuifknop verplaatst.
5. Druk op AUTO / DISPLAY om de modus te verlaten.
• Muziekgestuurde modus
1. Druk op MUSIC / BANK COPY om de modus in te schakelen.
2. Gebruik UP / DOWN om de bank met scènes te selecteren die u wenst weer te geven. De geselecteerde
scènes worden sequentieel weergegeven op het muziekritme door de ingebouwde microfoon opgevangen.
3. Druk opnieuw op MUSIC / BANK COPY om de modus te verlaten.
h. De chases weergeven
• Manuele modus
1. Het toestel begeeft zich automatisch in de manuele mode wanneer u het inschakelt.
2. Selecteer de chase die u wenst weer te geven door op de overeenkomende chase-knop te drukken. Drukt u
opnieuw op deze knop, dan wordt de selectie van de chase tenietgedaan.
• Automatische modus
1. Druk op AUTO / DEL om de AUTO-modus in te schakelen.
2. Selecteer de gewenste chase door op één van de zes CHASE-knoppen te drukken. Drukt u opnieuw op
dezelfde knop, dan wordt de selectie van de chase tenietgedaan.
3. Gebruik de SPEED- en de FADE TIME-schuifknop om de chase naar wens in te stellen.
• Muziekgestuurde mode
1. Druk op MUSIC / BANK COPY om de modus in te schakelen.
2. Selecteer de gewenste chase door op de gewenste CHASE-knop te drukken. Dit schakelt de chase in en laat
hem bewegen op het ritme van de muziek.
i. Bestandsoverdracht
Een bestandsoverdracht laat toe alle informatie opgeslagen in uw VDPC174 naar een tweede VDPC174 te zenden.
Koppel de toestellen met 3-pin XLR-kabels als volgt: Koppel de DMX OUT van het zendtoestel met de DMX IN van
het ontvangsttoestel.

VDPC174_v2 VELLEMAN
20
• Een dump-bestand verzenden
1. Schakel het toestel uit en houd gelijktijdig SCANNER 2 en 3 en SCENE 1 ingedrukt.
2. Schakel het toestel terug in terwijl u de drie knoppen ingedrukt houdt. De LCD geeft TRANSMIT weer om aan
te geven dat het toestel klaar staat om de bestanden te verzenden.
3. Druk gelijktijdig op SCENE 7 en 8 om de bestanden te verzenden.
4. Bij een fout geeft de LCD ERROR weer..
• Een dump-bestand ontvangen
1. Schakel het toestel uit en houd gelijktijdig SCANNER 8 en 9 en SCENE 2 ingedrukt.
2. Schakel het toestel terug in terwijl u de drie knoppen ingedrukt houdt. De LCD geeft RECEIVE weer om aan te
geven dat het toestel de bestangen ontvangt.
3. Na het ontvangen van de bestanden keert het toestel automatisch naar de normale modus terug.
j. Instellen van het MIDI-kanaal
1. Houd MIDI / REC gedurende drie seconden ingedrukt. De LCD het laatste MIDI-kanaal weer.
2. Gebruik UP / DOWN om het DMX-kanaal (01 ~ 16) te selecteren die u naar het MIDI-kanaal wenst toe te
wijzen.
3. Houd MIDI / REC ingedrukt om de instellingen op te slaan. De LEDs knipperen drie maal om aan te geven dat
de opdracht is uitgevoerd.
6. Reiniging en onderhoud
1. Alle gebruikte schroeven moeten goed zijn aangespannen en mogen geen sporen van roest vertonen.
2. De behuizing, de lenzen, de montagebeugels en de montageplaats (bvb. het plafond of het gebinte) mogen niet
vervormd zijn of aangepast worden (geen extra gaten in montagebeugels, aansluitingen niet verplaatsen etc.)
3. De voedingskabels mogen niet beschadigd zijn. Laat het toestel onderhouden door een geschoolde technicus.
4. Ontkoppel het toestel van het lichtnet voor u aan onderhoudswerkzaamheden begint.
5. Maak het toestel geregeld schoon met een vochtige, niet pluizende doek. Gebruik geen alcohol of solvent.
6. De gebruiker mag geen onderdelen vervangen.
7. Bestel eventuele reserveonderdelen bij uw dealer.
7. Technische specificaties
Voeding 9-12VDC / 500mA
DMX IN / OUT 3-pin vrouwelijke / mannelijke XLR-stekker
MIDI IN 5-pin DIN-stekker
Afmetingen 482 x 134 x 85m
Gewicht 2.7kg
Max. omgevingstemperatuur 45°C
Voor meer informatie omtrent dit product, zie www.hqpower.com
De informatie in deze handleiding kan te allen tijde worden gewijzigd zonder voorafgaande kennisgeving.

VDPC174_v2 VELLEMAN
21
VDPC174 – CONTRÔLEUR DMX 192 CANAUX AVEC MANETTE
1. Introduction et caractéristiques
Aux résidents de l'Union européenne
Des informations environnementales importantes concernant ce produit
Ce symbole sur l'appareil ou l'emballage indique que l’élimination d’un appareil en fin de vie peut polluer
l'environnement.
Ne pas éliminer un appareil électrique ou électronique (et des piles éventuelles) parmi les déchets
municipaux non sujets au tri sélectif ; une déchetterie traitera l’appareil en question.
Renvoyer les équipements usagés à votre fournisseur ou à un service de recyclage local.
Il convient de respecter la réglementation locale relative à la protection de l’environnement.
Si vous avez des questions, contactez les autorités locales pour élimination.
Nous vous remercions de votre achat ! Lisez la présente notice attentivement avant la mise en service de l'appareil.
Si l’appareil a été endommagé pendant le transport, ne l'installez pas et consultez votre revendeur.
2. Prescriptions de sécurité
• La garantie ne s'applique pas aux dommages survenus en négligeant certaines directives de cette notice et votre
revendeur déclinera toute responsabilité pour les problèmes et les défauts qui en résultent.
• Confiez l'installation et l’entretien à un personnel qualifié.
• Ne branchez pas l'appareil après exposition à des variations de température. Afin d’éviter des dommages,
attendez jusqu’à ce que l'appareil ait atteint la température ambiante avant de l'utiliser.
• La tension réseau ne peut pas dépasser la tension mentionnée dans les spécifications à la fin de cette notice.
• Le câble d'alimentation ne peut pas être replissé ou endommagé. Demandez à votre revendeur de renouveler le
câble d'alimentation si nécessaire.
• Débranchez l’appareil s’il n’est pas utilisé ou pour le nettoyer. Tirez la fiche pour débrancher l'appareil ; non pas le câble.
• Les dommages occasionnés par des modifications à l'appareil par le client, ne tombent pas sous la garantie.
• Gardez votre VDPC174 hors de la portée de personnes non qualifiées et de jeunes enfants.
3. Directives générales
• Cet appareil a été développé pour usage professionnel dans des discothèques, des théâtres, etc. Employez cet
appareil à l'intérieur et connectez-le à une source de courant de max. 9-12VCC / 500mA.
• Évitez de secouer l'appareil et traitez l'appareil avec circonspection pendant l'installation et l'opération.
• Choisissez un endroit où l’appareil est protégé contre la poussière, l’humidité et des températures extrêmes (voir
« Spécifications techniques »). Respectez une distance minimum de 0.5m entre la sortie lumière de l’appareil
et la surface illuminée.
• Familiarisez-vous avec le fonctionnement de l'appareil avant de l’utiliser. Ne permettez pas aux personnes non
qualifiées d'opérer cet appareil. La plupart des dégâts sont causés par un usage non professionnel.
• Transportez l'appareil dans son emballage originel.
• Toute modification de l’appareil est interdite pour des raisons de sécurité.
• N’utilisez votre VDPC174 qu’à sa fonction prévue. Tout autre usage peut causer des courts-circuits, des brûlures,
des électrochocs etc. Un usage impropre annule d'office la garantie.
Soyez prudent lors de l'installation : toucher un câble sous tension peut causer des électrochocs mortels.
Protégez l'appareil contre la pluie et l'humidité.
Débranchez le câble d'alimentation avant d'ouvrir le boîtier.

VDPC174_v2 VELLEMAN
22
4. Description
a. Panneau frontal (voir ill. 1)
1. Boutons scanner (1 ~ 12)
Sélection de l’appareil.
2. Boutons scène (1 ~ 8)
Chargement ou sauvegarde d’un maximum de 240 scènes programmables.
3. Faders
Utilisez ces faders pour régler l’intensité des canaux 1 ~ 8 ou des canaux 9 ~ 16, en fonction de la page
sélectionnée.
4. Bouton de sélection de la page
Sélection de la page A (1 ~ 8) ou de la page B (9 ~ 16).
5. Glissière de vitesse « Speed »
Réglage de la vitesse de la poursuite de 0.1 seconde à 10 minutes.
6. Glissière de longueur du fondu « Fade Time »
Réglage de la longueur du fondu. La longueur du fondu se définit comme le délai employé par un scanner pour
se déplacer d’une position à l’autre et pour un variateur d’effectuer un fondu d’ouverture ou de fermeture.
7. Afficheur LCD
Affichage de l’activité actuelle ou le statut de programmation.
8. Manette « Pan »
Contrôle du panoramique du scanner.
9. Manette « Tilt »
Contrôle de l’inclinaison du scanner.
10. Bouton « Program »
Activation du mode de programmation.
11. MIDI / REC
Contrôle des opérations MIDI ou enregistrement des programmes.
12. Auto / Del
Activation du mode pilotage par la musique ou sélection des scènes et poursuites.
13. Music / Bank Copy
Activation du mode de programmation.
14. Bank Up / Down
Enfoncez le bouton ▲ ou ▼ pour sélectionner un des 30 bancs.
15. Tap / Display
Création d’un rythme standard ou sélection entre % et 0 ~ 255.
16. Bouton « Blackout »
Enfoncez ce bouton pour interrompre.
17. Bouton de poursuite (1 ~ 6)
Activation de la poursuite d’une scène programmée.
18. Bouton « Fine »
Enfoncez ce bouton pour régler le scanner en précision à l’aide de la manette « pan » ou « tilt ».
19. Bouton « Mode »
Activez le mode « ASSIGN » ou « REVERSE » en enfonçant simultanément les boutons « FINE » et « MODE ».
b. Panneau arrière (voir ill. 2)
1. MIDI In
Entrée des données MIDI.
2. DMX Polarity Select
Sélection de la polarité DMX.
3. DMX Out
Envoi de la valeur DMX vers le scanner DMX ou le pack DMX.

VDPC174_v2 VELLEMAN
23
4. DMX In
Entrée des signaux DMX.
5. DC Input
9-12VDC / 500mA.
6. Interrupteur de puissance
Switch the power on or off.
7. AUDIO In
Entrée des signaux audio entre 0.1V ~ 1Vpp.
5. Emploi
a. Opération
• En général
Le VDPC174 permet la programmation de 12 scanners à 16 canaux DMX, 30 bancs de 8 scènes
programmables, 6 poursuites de 240 scènes à l’aide de 8 glissières, d’une manette et d’autres boutons. Il est
possible de contrôler le mouvement d’un appareil plus facilement et précisément à l’aide de la manette. Pour
éblouir votre public, l’appareil vous permet d’allouer et d’inverser des canaux DMX. De surcroît, il est possible de
transférer la mémoire d’un appareil à un autre en les raccordant.
• L’affichage
L’afficheur LCD affiche sur deux lignes de 8 caractères. Veuillez trouver les définitions ci-dessous :
Affichage LCD Description
Scène 1
Banc 1
Poursuite 1 est activée
La 9ième étape d’une poursuite
Valeur DMX (000 ~ 255)
Vitesse actuelle de 1 minute et 54 secondes
Délai entre deux pressions de 4.25 secondes
Allocation des canaux DMX 4 et 5
Inversion des canaux DMX 10 et 13
b. Configuration
• Configuration de l’unité
Votre VDPC174 utilise 16 canaux pour chaque appareil connecté. Pour allouer les boutons scanner il faudra donc
compter 16 canaux DMX pour chaque appareil.
Référez-vous à la table ci-dessous pour l’adressage DMX :
Appareil Adresse DMX numérique Commutateurs DIP du scanner
1 1 1 sur ON
2 17 1 et 5 sur ON
3 33 1 et 6 sur ON
4 19 1, 5 et 6 sur ON
5 65 1 et 7 sur ON
6 81 1, 5 et 7 sur ON
7 97 1, 6 et 7 sur ON
8 113 1, 5, 6 et 7 sur ON
9 129 1 et 8 sur ON
10 145 1, 5 et 8 sur ON
11 161 1, 6 et 8 sur ON

VDPC174_v2 VELLEMAN
24
12 177 1, 5, 6 et 8 sur ON
• Activation du mode de programmation
Pour activer le mode de programmation, maintenez enfoncé le bouton « PROGRAM » pendant quelques
secondes jusqu’à ce que la LED s’allume.
• Configuration de la manette
1. Maintenez enfoncé le bouton « PROGRAM » jusqu’à ce que la LED s’allume.
2. Maintenez enfoncé les boutons « MODE » et « FINE » simultanément. La LED « ASSIGN » s’allume. Si la
LED « REVERSE » s’allume, renfoncez « FINE » et « MODE » pour accéder au mode « ASSIGN ».
3. Sélectionnez l’axe (pan ou tilt) à allouer à l’aide des boutons « UP » et « DOWN ».
4. Utilisez le bouton « TAP / DISPLAY » pour sélectionner le mode 16 ou 8 canaux.
5. Enfoncez le bouton correspondant au scanner à allouer.
6. En maintenant enfoncé le bouton du mode, enfoncez le bouton correspondant à la glissière contrôlant le
mouvement (exemple : Si le pan est contrôlé à partir de la glissière 4, maintenez enfoncé le bouton « MODE »
en enfonçant de scène 4).
7. Pour terminer, renfoncez simultanément les boutons « MODE » et « FINE » pour quitter le mode « ASSIGN ».
c. Les scènes
• Programmation d’une scène
1. Entrez dans le mode « PROGRAM » (voir « Activation du mode de programmation »).
2. Veillez à ce que la LED « BLACKOUT » ne s’allume pas. Si la LED s’allume, enfoncez le bouton pour quitter
le mode « BLACKOUT ».
3. Placez les glissières « SPEED » et « FADE TIME » en position minimale.
4. Enfoncez le bouton de scanner correspondant à l’appareil que vous désirez contrôler. Il est possible de
contrôler plusieurs scanners à la fois en enfonçant le bouton correspondant au(x) scanner(s) que vous désirez
contrôler.
5. Placez les glissières et la manette dans la position désirée. Sélectionnez la page B pour contrôler les canaux
9 ~ 16 si souhaité.
6. Enfoncez « UP / DOWN » pour choisir le banc de sauvegarde. Vous avez le choix entre 30 bancs de 8
scènes.
7. Une fois la position des scanners programmées, enfoncez le bouton « MIDI / REC » pour sauvegarder la
scène dans la mémoire.
8. Enfoncez le bouton de scène dans laquelle vous désirez sauvegarder la scène. Toutes les LEDs flasheront
trois fois. Le LCD affichera le banc et la scène.
9. Pour désélectionner le(s) scanner(s) programme(s) et pour passer à un autre scanner, enfoncez le bouton du
scanner programmé, annulez la sélection et sélectionnez un autre scanner.
10. Répétez les étapes 2 à 7 jusqu’à ce que toutes les scènes soient programmées.
11. Si vous ne désirez pas continuer la programmation, maintenez enfoncé le bouton « PROGRAM » pendant
trois secondes pour quitter le mode « PROGRAM ». La LED s’éteint.
• Exemple d’une programmation d’une scène
1. Activez le mode « PROGRAM ».
2. Enfoncez le bouton « SCANNER 1 » pour activer le contrôle du fondu.
3. Veillez à ce que la page A soit sélectionnée. Enfoncez « PAGE SELECT » pour sélectionner la page.
4. Placez la première et la deuxième glissière au maximum.
5. Sélectionnez le banc 1 à l’aide des boutons « UP / DOWN ».
6. Enfoncez le bouton « MIDI / REC ».

VDPC174_v2 VELLEMAN
25
7. Enfoncez le bouton de scène 1 pour sauvegarder la première scène.
8. Répétez les étapes 4 à 7 jusqu’à ce que toutes les scènes soient programmées dans le banc 1.
9. Enfoncez le bouton « SCANNER 1 » pour désactiver le contrôle du fondu.
10. Pour terminer, désactivez le mode « PROGRAM ». À présent, il est de parcourir votre programmation
manuellement.
• Éditer une scène
1. Activez le mode « PROGRAM ».
2. Pour sélectionner un banc contenant la scène à éditer, enfoncez « UP / DOWN ».
3. Sélectionnez la scène à éditer en enfonçant le bouton correspondant.
4. Utilisez les glissières et/ou la manette pour régler la scène.
5. Les réglages terminés, enfoncez le bouton « MIDI / REC ».
6. Enfoncez le bouton de scène correspondant à la scène éditée. Ceci écrasera la scène existante.
Dans les étapes 3 et 6, veillez à sélectionner la même scène pour ne pas effacer des scènes existantes.
• Copie de la configuration du scanner
Ceci vous permet de copier la configuration d’un scanner vers un autre.
1. Maintenez enfoncé le bouton de scanner à copier.
2. En maintenant le bouton de scanner enfoncé, enfoncez le bouton du scanner-cible.
• Copie d’une scène
1. Activez le mode « PROGRAM ».
2. Enfoncez le bouton UP / DOWN pour sélectionner le banc contenant la scène à copier.
3. Sélectionnez la scène en enfonçant le bouton correspondant.
4. Sélectionnez le banc dans lequel vous désirez copier la scène en utilisant les boutons « UP / DOWN ».
5. Enfoncez le bouton « MIDI / REC ».
6. Enfoncez le bouton de la scène que vous désirez copier.
• Effacement d’une scène
1. Activez le mode « PROGRAM ».
2. Enfoncez le bouton « SCENE » désiré pour sélectionner la scène à effacer.
3. Maintenez enfoncé le bouton « AUTO / DEL » en enfoncez le bouton « SCENE » correspondant à la scène à
effacer.
4. Une fois la scène effacée, toutes les valeurs des canaux DMX seront positionnées sur 0.
• Effacement de toutes les scènes
1. Débranchez l’appareil en maintenez simultanément enfoncé les boutons « PROGRAM » et « DOWN ».
2. Rebranchez l’appareil. Toutes les scènes ont été effacées.
• Copie d’un banc de scènes
1. Activez le mode « PROGRAM ».
2. Enfoncez UP / DOWN jusqu’à ce que le banc à copier apparaisse.
3. Enfoncez le bouton « MIDI / REC ».
4. Enfoncez UP / DOWN pour sélectionner le banc dans lequel vous désirez copier le banc.
5. Enfoncez « MUSIC / BANK COPY ». Toutes les LEDs flashent trois fois pour indiquer que l’opération est
réussite.
6. Maintenez enfoncé le bouton « PROGRAM » pendant trios secondes pour quitter le mode « PROGRAM ».

VDPC174_v2 VELLEMAN
26
d. Les poursuites
• Programmation d’une poursuite
Pour pouvoir programmer une poursuite, il faut d’abord programmer des scènes. Cette fonction vous permet de
parcourir entre les 240 scènes dans un ordre prédéfini. Il est conseillé de d’abord effacer toutes les poursuites
dans le contrôleur avant la première programmation des poursuites. Voir « Effacement de toutes les scènes ».
1. Activez le mode « PROGRAM ».
2. Enfoncez le bouton CHASE pour sélectionner la poursuite à programmer.
3. Sélectionnez votre scène dans le banc.
4. Enfoncez le bouton « MIDI / REC ».
5. Répétez les étapes 3 et 4 jusqu’à ce que toutes les scènes soient instaurées.
• Insertion d’un banc de scènes dans une poursuite
1. Activez le mode « PROGRAM ».
2. Sélectionnez la poursuite à programmer.
3. Utilisez les boutons UP / DOWN pour sélectionner le banc de scènes à copier.
4. Enfoncez le bouton MUSIC / BANK COPY.
5. Enfoncez le bouton MIDI / REC COPY. Toutes les LEDs flashent trois fois pour indiquer le complètement de
l’opération.
• Ajout d’une étape
1. Activez le mode « PROGRAM ».
2. Enfoncez le bouton correspondant à la poursuite à laquelle vous désirez ajouter une étape.
3. Enfoncez le bouton « TAP / DISPLAY ». L’afficheur LCD affiche l’étape actuelle.
4. Enfoncez UP / DOWN et défilez vers l’étape souhaitée.
5. Enfoncez le bouton « MIDI / REC ». L’afficheur affiche l’étape suivant à la précédente.
6. Renfoncez le bouton « TAP / DISPLAY ». Le LCD affiche la poursuite, la scène et le banc actuel. Créez une
scène et sauvegardez-la comme une nouvelle étape ou sélectionnez une scène programmée auparavant et
ajoutez-la à la poursuite.
7. Une fois la scène sélectionnée, renfoncez « MIDI / REC ». Toutes les LEDs flashent trois fois pour indiquer
que la nouvelle étape a été ajoutée dans la poursuite.
• Effacement d’une étape
1. Activez le mode « PROGRAM ».
2. Sélectionnez la poursuite contenant l’étape à effacer.
3. Enfoncez « TAP / DISPLAY ». Le LCD affiche l’étape actuelle.
4. Enfoncez le bouton UP / DOWN et défilez vers l’étape à effacer.
5. Enfoncez AUTO / DEL pour effacer l’étape. Toutes les LEDs flashent trois fois pour indiquer le complètement
de l’opération.
• Effacement d’une poursuite
1. Enfoncez le bouton correspondant à la poursuite que vous désirez effacer.
2. Maintenez enfoncé le bouton « AUTO / DEL » et enfoncez le bouton « CHASE ». Toutes les LEDs flashent
trois fois pour indiquer le complètement de l’opération.
• Effacement de toutes les poursuites
1. Débranchez l’appareil. Maintenez simultanément enfoncé « AUTO / DEL » et « DOWN ».
2. Rebranchez l’appareil. Toutes les poursuites ont été effacées.

VDPC174_v2 VELLEMAN
27
e. Sélection de la manette / du canal
• Configuration de la manette
1. Maintenez enfoncé « PROGRAM » jusqu’à ce que la LED s’allume.
2. Maintenez simultanément enfoncé les boutons « MODE » et « FINE ». La LED « ASSIGN » s’allume. Si la
LED « REVERSE » s’allume, renfoncez « FINE » et « MODE » pour entrer dans le mode « ASSIGN ».
3. Utilisez UP et DOWN pour sélectionner l’axe que vous désirez allouer (pan ou tilt).
4. Sélectionnez le mode 16 ou 8 canaux en utilisant le bouton « TAP / DISPLAY ».
5. Enfoncez le bouton correspondant au scanner que vous désirez allouer.
6. Maintenez enfoncé le bouton « MODE » et enfoncez le bouton de scène correspondant à la glissière
contrôlant le mouvement (exemple : Si le pan est contrôlé à partir de la glissière 4, maintenez enfoncé le
bouton « MODE » en enfonçant de scène 4).
7. Pour terminer, renfoncez simultanément « MODE » et « FINE » pour quitter le mode « ASSIGN ».
• Inversion du mouvement de la manette / canal DMX
1. Activez le mode « PROGRAM ».
2. Enfoncez « FINE » et « MODE » pour accéder au mode « ASSIGN ». Renfoncez « FINE » et « MODE » pour
accéder au mode « REVERSE ». La LED « REVERSE » s’allume pour indiquer l’activation du mode.
3. Utilisez « UP / DOWN » pour passer entre le pan et tilt. La LED correspondante s’allume pour indiquer la
sélection.
4. Enfoncez TAP / DISPLAY pour choisir entre le mode à 8 canaux et à 16 canaux.
5. Enfoncez le bouton « SCANNER » pour sélectionner le scanner.
6. Maintenez enfoncé le bouton « MODE » et enfoncez le bouton « SCENE » correspondant au canal que vous
désirez inverser (exemple : Si vous inversez la scène sur un scanner, entrez en mode « REVERSE » et
contrôlez que la LED tilt soit allumée, et vérifiez quelle glissière contrôle le mouvement tilt. Maintenez enfoncé
le bouton « HOLD » et enfoncez le bouton « SCENE » correspondant à la glissière (glissière 5 / scène 5)).
7. Répétez les étapes 3 à 7 si nécessaire. Il est possible d’inverser un maximum de 48 canaux et 12 scanners.
• Effacement d’un scanner du canal DMX
1. Activez le mode « ASSIGN » ou « REVERSE ».
2. Enfoncez le bouton « SCANNER » du scanner que vous désirez effacer.
3. Enfoncez simultanément les boutons « MODE » et « AUTO / DEL ». Toutes les LEDs flashent trois fois pour
indiquer le complètement de l’opération.
• Effacement de tous les canaux DMX
1. Débranchez l’appareil.
2. Enfoncez simultanément les boutons « MODE » et « AUTO / DEL ».
3. Maintenez enfoncé les deux boutons et rebranchez l’appareil. Toutes les LEDs flashent brièvement pour
indiquer le complètement de l’opération.
• Affichage du canal DMX
1. Enfoncez simultanément les boutons « FINE » et « MODE ».
2. Renfoncez les boutons « FINE » et « MODE ». La LED « REVERSE » s’allume.
3. Enfoncez le bouton « SCANNER » souhaité. Le LCD affiche les valeurs DMX pour les mouvements pan et tilt.
f. Délai du fondu
• Délai du fondu / attribution d’un délai de fondu
1. Débranchez l’appareil et enfoncez simultanément les boutons « MODE » et « TAP / DISPLAY ».
2. Rebranchez l’appareil. Enfoncez les boutons « TAP / DISPLAY » pour choisir entre « FADE TIME » et
« ASSIGN FADE TIME ». Le résultat s’affiche sur le LCD.

VDPC174_v2 VELLEMAN
28
ALL ONLY
FD FD
CH X/Y
OR
TIME
TIME
3. Enfoncez simultanément les boutons « MODE » et « TAP / DISPLAY » pour sauvegarder la configuration
dans la mémoire. Si vous ne souhaitez pas sauvegarder la configuration, enfoncez le bouton « BLACKOUT »
pour quitter.
g. Repassage
• Reproduction des scènes
Il est possible de jouer les scènes et les poursuites à partir de trois modes : le mode manuel (« MANUAL »), le
mode automatique (« AUTO ») et le mode piloté par la musique (« MUSIC »).
• Le mode manuel
1. L’appareil entre automatiquement en mode manuel dès la mise en marche.
2. Assurez-vous que les LEDs « AUTO » et « MUSIC » soient éteintes.
3. Utilisez les boutons « UP / DOWN » pour sélectionner le banc avec les scènes à reproduire.
4. Enfoncez le bouton « SCENE » correspondant à la scène que vous désirez afficher.
• Le mode automatique
Cette fonction permet la reproduction séquentielle de scènes.
1. Enfoncez le bouton « AUTO / DEL » pour accéder au mode « AUTO ». La LED « AUTO » s’allume indiquant
l’activation du mode « AUTO ».
2. Utilisez les boutons « UP / DOWN » pour sélectionner le banc avec les scènes à reproduire.
3. Après la sélection, utilisez les glissières « SPEED » et « FADE TIME » pour ajuster la vitesse de la
progression de la scène.
4. Il est également possible d’instaurer la vitesse à l’aide du bouton TAP SYNC / DISPLAY. Le délai entre deux
pressions définit ainsi le délai entre deux étapes. Ce réglage reste valable jusqu’à ce que la glissière soit
déplacée.
5. Enfoncez le bouton « AUTO / DISPLAY » pour quitter le mode « AUTO ».
• Le mode piloté par la musique
1. Enfoncez « MUSIC / BANK COPY » pour activer le mode « MUSIC ».
2. Utilisez le bouton « UP / DOWN » pour sélectionner le banc avec les scènes à reproduire. Les scènes
sélectionnées seront reproduites séquentiellement au rythme de la musique grâce au microphone intégré.
3. Renfoncez le bouton « MUSIC / BANK COPY » pour quitter le mode « MUSIC ».
h. Reproduction des poursuites
• Le mode manuel
1. L’appareil entre automatiquement en mode manuel dès la mise en marche.
2. Sélectionnez la poursuite que vous désirez reproduire en enfonçant le bouton de la poursuite correspondant.
Enfoncez ce bouton une seconde fois pour désélectionner la poursuite.
• Le mode automatique
1. Enfoncez le bouton « AUTO / DEL » pour accéder au mode « AUTO ».
2. Sélectionnez la poursuite en enfonçant un des six boutons « CHASE ». Enfoncez ce bouton une seconde fois
pour désélectionner la poursuite.
3. Utilisez les glissières « SPEED » et « FADE TIME » pour ajuster la poursuite selon vos spécifications.
• Le mode piloté par la musique
1. Enfoncez le bouton « MUSIC / BANK COPY » pour activer le mode « MUSIC ».
2. Sélectionnez la poursuite en enfonçant un des six boutons « CHASE ». Ceci activera la poursuite qui réagira
au rythme de la musique.

VDPC174_v2 VELLEMAN
29
i. Transfert de fichiers
Un transfert de fichiers permet de copier toutes les données sauvegardées dans un VDPC174 vers un deuxième
VDPC174. Raccordez les unités à l’aide de câbles XLR à trois broches. Branchez le câble à la connexion « DMX
OUT » de l’appareil transférant les données, branchez l’autre fiche du câble à la connexion « DMX IN » de l’appareil
recevant les données.
• Transfert d’une copie de fichiers
1. Débranchez l’appareil. Maintenez simultanément enfoncez les boutons « SCANNER 2 » et « 3 » et le bouton
« SCENE 1 ».
2. Rebranchez l’appareil en maintenant enfoncé ces trois boutons. Le LCD affiche « TRANSMIT », l’appareil est
prêt à transférer les données.
3. Enfoncez simultanément les boutons « SCENE 7 » et « 8 » pour effectuer le transfert.
4. Le LCD affiche « ERROR » en cas d’une erreur.
• Réception d’une copie de fichiers
1. Débranchez l’appareil. Maintenez simultanément enfoncez les boutons « SCANNER 8 » et « 9 » et le bouton
« SCENE 2 ».
2. Rebranchez l’appareil en maintenant enfoncé ces trois boutons. Le LCD affiche « RECEIVE », l’appareil reçoit
les données.
3. Une fois la réception terminée, l’appareil revient automatiquement en mode « NORMAL ».
j. MIDI Channel Setting
1. Maintenez enfoncé le bouton « MIDI / REC » pendant trois secondes. Le LCD affiche le dernier canal MIDI
utilisé.
2. Utilisez le bouton « UP / DOWN » pour sélectionner le canal DMX (01 ~ 16) à attribuer au canal MIDI.
3. Maintenez enfoncé « MIDI / REC » pour sauvegarder la configuration. Toutes les LEDs flashent trois fois pour
indiquer le complètement de l’opération.
6. Nettoyage et entretien
1. Serrez les écrous et les vis et vérifiez qu'ils ne rouillent pas.
2. Le boîtier, les lentilles, les supports de montage et la construction portante ne peuvent pas être déformés,
adaptés ou bricolés p.ex. pas de trous additionnels dans un support, ne pas déplacer les connexions etc.
3. Les câbles d'alimentation ne peuvent pas être endommagés. Un technicien qualifié doit entretenir l’appareil.
4. Débranchez l'appareil avant de le nettoyer.
5. Essuyez l'appareil régulièrement avec un chiffon humide non pelucheux. Evitez l'usage d'alcool et de solvants.
6. Il n’y a aucune pièce maintenable par l’utilisateur.
7. Commandez des pièces de rechange éventuelles chez votre revendeur.
7. Spécifications techniques
Alimentation 9-12VCC / 500mA
DMX IN / OUT femelle à 3 points / embase XLR mâle
MIDI IN embase DIN à 5 points
Dimensions 482 x 134 x 85m
Poids 2.7kg
Température amiante max. 45°C
Pour plus d’information concernant cet article, visitez notre site web www.hqpower.com
Toutes les informations présentées dans cette notice peuvent être modifiées sans notification préalable.

VDPC174_v2 VELLEMAN
30
VDPC174 – CONTROLADOR DMX DE 192 CANALES CON PALANCA DE CONTROL
1. Introducción y características
A los ciudadanos de la Unión Europea
Importantes informaciones sobre el medio ambiente concerniente este producto
Este símbolo en este aparato o el embalaje indica que, si tira las muestras inservibles, podrían dañar el
medio ambiente.
No tire este aparato (ni las pilas eventuales) en la basura doméstica; debe ir a una empresa especializada
en reciclaje. Devuelva este aparato a su distribuidor o a la unidad de reciclaje local.
Respete las leyes locales en relación con el medio ambiente.
Si tiene dudas, contacte con las autoridades locales para eliminación.
¡Gracias por haber comprado el VDPC174! Lea cuidadosamente las instrucciones del manual antes de usarlo.
Si el aparato ha sufrido algún daño en el transporte no lo instale y póngase en contacto con su distribuidor.
2. Instrucciones de seguridad
• Daños causados por descuido de las instrucciones de seguridad de este manual invalidarán su garantía y su
distribuidor no será responsable de ningún daño u otros problemas resultantes.
• La instalación y el mantenimiento deben ser realizados por personal especializado.
• No conecte el aparato si ha estado expuesto a grandes cambios de temperatura. Espere hasta que el aparato
llegue a la temperatura ambiente.
• Asegúrese de que la tensión de red no sea mayor que la tensión indicada en las especificaciones.
• No aplaste el cable de alimentación y protéjalo contra posibles daños causados por algún tipo de superficie
afilada. Si es necesario, pida a su distribuidor reemplazar el cable de alimentación.
• Desconecte siempre el aparato si no va a usarlo durante un largo período de tiempo o antes de limpiarlo. Tire
siempre del enchufe para desconectar el cable de red, nunca del propio cable.
• Los daños causados por modificaciones no autorizadas, no están cubiertos por la garantía.
• Mantenga el VDPC174 lejos del alcance de personas no capacitadas y niños.
3. Normas generales
• Este aparato ha sido diseñado para uso profesional en una discoteca, un teatro, etc. El VDPC174 sólo está
permitido para una conexión con una fuente de corriente de máx. 9-12VCC / 500mA.
• No agite el aparato. Evite usar excesiva fuerza durante la instalación y la reparación.
• Seleccione un lugar de montaje donde el aparato no esté expuesto a polvo, humedad y calor extremo (véase
“Especificaciones”). Respete una distancia de mín. 0.5m entre la salida de luz y el área iluminada.
• Familiarícese con el funcionamiento del aparato. Sólo personas cualificadas pueden manejar este aparato. La
mayoría de los daños son causados por un uso inadecuado.
• Transporte el aparato en su embalaje original.
• Por razones de seguridad, las modificaciones no autorizadas del aparato están prohibidas.
• Utilice sólo el VDPC174 para las aplicaciones descritas en este manual a fin de evitar p.ej. cortocircuitos,
quemaduras, descargas eléctricas, etc. Un uso desautorizado puede causar daños y anula la garantía
completamente.
Cuidado durante la instalación: puede sufrir una peligrosa descarga eléctrica al tocar los cables con un
voltaje peligroso.
No exponga este equipo a lluvia
ni
humedad
.
Desconecte el cable de alimentación de la red antes de abrir la caja
.

VDPC174_v2 VELLEMAN
31
4. Descripción
a. Panel frontal (véase fig. 1)
1. Botones escáner (1 ~ 12)
Seleccionar el aparato.
2. Botones escena (1 ~ 8)
Cargar o guardar máx. 240 escenas programables.
3. Faders
Utilice los faders para ajustar la intensidad de los canales 1 ~ 8 o los canales 9 ~ 16, en función del rango
seleccionado.
4. Botón de selección del rango
Seleccionar el rango A (1 ~ 8) o el rango B (9 ~ 16).
5. Deslizador de velocidad « Speed »
Ajustar la velocidad del chase (persecución) de 0.1 segundo a 10 minutos.
6. Deslizador del « Fade Time » (tiempo de fundido)
Ajustar el tiempo ‘fade’. El tiempo ‘fade’ se define como el tiempo utilizado por un escáner para desplazarse de
una posición a otra y por un dimmer para efectuar un ‘fade in’ o ‘fade out’.
7. Pantalla LCD
Visualizar la actividad actual o el estado de programación.
8. Palanca « Pan »
Controlar la rotación del escáner.
9. Palanca « Tilt »
Controlar la inclinación del escáner.
10. Botón « Program »
Activar el modo de programación.
11. MIDI / REC
Controlar las operaciones MIDI o la grabación de los programas.
12. Auto / Del
Activar el modo de control por la música o la selección de escenas y persecuciones.
13. Music / Bank Copy
Activar el modo de programación.
14. Bank Up / Down
Pulse el botón ▲ o ▼ para seleccionar uno de los 30 bancos.
15. Tap / Display
Crear un ritmo estándar o seleccionar entre % y 0 ~ 255.
16. Botón « Blackout »
Pulse este botón para interrumpir.
17. Botón « Chase » (1 ~ 6)
18. Activar el ‘chase’ de una escena programada.
19. Botón « Fine »
Pulse este botón para ajustar el escáner con los pasos más pequeños con la palanca « pan » o « tilt ».
20. Botón « Mode »
Active el modo « ASSIGN » o « REVERSE » al pulsar simultáneamente los botones « FINE » y « MODE ».
b. Panel trasero (véase fig. 2)
1. MIDI In
Entrada de datos MIDI.
2. DMX Polarity Select
Selección de la polaridad DMX.

VDPC174_v2 VELLEMAN
32
3. DMX Out
Envío del valor DMX al escáner DMX o el pack DMX.
4. DMX In
Entrada de las señales DMX.
5. DC Input
9-12VDC / 500mA.
6. Interruptor ON/OFF
Para activar y desactivar el aparato.
7. AUDIO In
Entrada de las señales audio entre 0.1V ~ 1Vpp.
5. Uso
a. Funcionamiento
• En general
El VDPC174 permite programar 12 escáneres de 16 canales DMX, 30 bancos de 8 escenas programables y 6
chases de 240 escenas con los 8 deslizadores, una palanca y otros botones. Con la palanca es posible controlar
el movimiento de un aparato de manera más fácil y precisa. Para sorprender aun más a su público, el aparato le
permite asignar e invertir los canales DMX. Además, es posible transferir la memoria de un aparato a otro al
conectarlos.
• La pantalla
La pantalla LCD visualiza en dos líneas de 8 caracteres. Véase las descripciones a continuación:
Pantalla LCD Descripción
Escena 1
Banco 1
Chase 1 está activado
El noveno paso de un chase
Valor DMX (000 ~ 255)
Velocidad actual de 1 minuto y 54 segundos
Tiempo de los últimos dos presiones es 4.25 segundos
Asignar los canales DMX 4 y 5
Invertir los canales DMX 10 y 13
b. Configuración
• Configurar un aparato
El VDPC174 utiliza 16 canales para cada aparato conectado. Por tanto, para asignar los aparatos a los botones
del escáner a la izquierda, mantenga libre 16 canales DMX para cada aparato.
Véase la siguiente lista para la dirección DMX:
Aparato Dirección DMX digital Conmutadores DIP del escáner
1 1 1 en la posición ON
2 17 1 y 5 en la posición ON
3 33 1 y 6 en la posición ON
4 19 1, 5 y 6 en la posición ON
5 65 1 y 7 en la posición ON
6 81 1, 5 y 7 en la posición ON

VDPC174_v2 VELLEMAN
33
7 97 1, 6 y 7 en la posición ON
8 113 1, 5, 6 y 7 en la posición ON
9 129 1 y 8 en la posición ON
10 145 1, 5 y 8 en la posición ON
11 161 1, 6 y 8 en la posición ON
12 177 1, 5, 6 y 8 en la posición ON
• Activar el modo de programación
Para activar el modo de programación, mantenga pulsado el botón « PROGRAM » durante algunos segundos
hasta que el LED se ilumine.
• Configurar la palanca
1. Mantenga pulsado el botón « PROGRAM » hasta que el LED se ilumine.
2. Mantenga pulsados los botones « MODE » y « FINE » simultáneamente. El LED « ASSIGN » se ilumina. Si el
LED « REVERSE » se ilumina, vuelva a pulsar « FINE » y « MODE » para entrar en el modo « ASSIGN ».
3. Determine los ejes (pan o tilt) con los botones « UP » y « DOWN ».
4. Utilice el botón « TAP / DISPLAY » para seleccionar el modo de 16 ó 8 canales.
5. Pulse el botón correspondiente con el scanner que quiere asignar.
6. Pulse un número de escena y el deslizador correspondiente mientras mantiene pulsado el botón « MODE »,
(ejemplo: Si controla el pan con deslizador 4, mantenga pulsado el botón « MODE » y pulse el botón de
escena 4).
7. Finalmente, vuelva a pulsar simultáneamente los botones « MODE » y « FINE » para salirse del modo
« ASSIGN ».
c. Las escenas
• Programar una escena
1. Entre en el modo « PROGRAM » (véase « Activar el modo de programación »).
2. Asegúrese de que el LED « BLACKOUT » no se ilumina. Si el LED se ilumina, pulse el botón para salirse del
modo « BLACKOUT ».
3. Ponga los deslizadores « SPEED » y « FADE TIME » en la posición mínima.
4. Pulse el botón de escáner correspondiente con el aparato que quiere controlar. Es posible controlar varios
escáneres a la vez al pulsar el botón correspondiente al(a los) escáner(es) que quiere controlar.
5. Ponga los deslizadores y la palanca en la posición deseada. Seleccione el rango B para controlar los canales
9 ~ 16 si fuera deseado.
6. Pulse « UP / DOWN » para seleccionar el banco de donde quiere guardar la escena. Puede seleccionar entre
30 bancos de 8 escenas.
7. Después de haber programado la posición de los escáneres, pulse el botón « MIDI / REC » para guardar la
escena en la memoria.
8. Pulse el botón de escena en la que quiere guardar la escena. Todos los LEDs parpadeará 3 veces. La
pantalla LCD visualizará el banco y la escena.
9. Para deseleccionar el(los) escáner(es) programado(s) y para ir a otro escáner, pulse el botón del escáner
programado, anule la selección y seleccione otro escáner.
10. Repita los pasos de 2 a 7 hasta que todas las escenas estén programadas.
11. Si quiere terminar la programación, mantenga pulsado el botón « PROGRAM » tres segundos para salirse del
modo « PROGRAM ». El LED se apaga.
• Ejemplo de una programación de una escena
1. Active el modo « PROGRAM ».
2. Pulse el botón « SCANNER 1 » para activar el fader.
3. Asegúrese de que el rango A esté seleccionado. Pulse « PAGE SELECT » para seleccionar el rango.
4. Ponga el primer y el segundo deslizador en la posición máxima.
5. Seleccione el banco 1 con los botones « UP / DOWN ».
6. Pulse el botón « MIDI / REC ».

VDPC174_v2 VELLEMAN
34
7. Pulse el botón de escena 1 para guardar la primera escena.
8. Repita los pasos de 4 a 7 hasta que todas las escenas estén programadas en el banco 1.
9. Pulse el botón « SCANNER 1 » para desactivar el fader.
10. Para terminar, desactive el modo « PROGRAM ». Ahora, puede hojear los programas manualmente.
• Editar una escena
1. Active el modo « PROGRAM ».
2. Para seleccionar un banco que contiene la escena que quiere editar, pulse « UP / DOWN ».
3. Seleccione la escena que quiere editar al pulsar el botón correspondiente.
4. Utilice los deslizadores y/o la palanca para ajustar la escena.
5. Después de haber terminado los ajustes, pulse el botón « MIDI / REC ».
6. Pulse el botón de escena que coincide con la escena editada. Esto borrará la escena existente.
En los pasos 3 y 6, asegúrese de que seleccione la misma escena para no borrar escenas existentes.
• Copiar la configuración del escáner
Esto le permite copiar la configuración de un escáner a otro.
1. Mantenga pulsado el botón de escáner que quiere copiar.
2. Al mantener pulsado el botón del escáner, pulse el botón del escáner objetivo.
• Copiar una escena
1. Active el modo « PROGRAM ».
2. Pulse el botón UP / DOWN para seleccionar el banco que contiene la escena que quiere copiar.
3. Seleccione la escena al pulsar el botón correspondiente.
4. Seleccione el banco al que quiere copiar la escena al utilizar los botones « UP / DOWN ».
5. Pulse el botón « MIDI / REC ».
6. Pulse el botón de la escena que quiere copiar.
• Borrar una escena
1. Active el modo « PROGRAM ».
2. Pulse el botón « SCENE » deseado para seleccionar la escena que quiere borrar.
3. Mantenga pulsado el botón « AUTO / DEL » y pulse el botón « SCENE » que coincide con la escena que
quiere borrar.
4. Después de haber borrado la escena, todos los valores de los canales DMX se pondrán en la posición 0.
• Borrar todas las escenas
1. Desconecte el aparato al mantener pulsado simultáneamente los botones « PROGRAM » y « DOWN ».
2. Vuelva a conectar el aparato. Todas las escenas han sido borradas.
• Copiar un banco con escenas
1. Active el modo « PROGRAM ».
2. Pulse UP / DOWN hasta que el banco que quiere copiar aparezca.
3. Pulse el botón « MIDI / REC ».
4. Pulse UP / DOWN para seleccionar el banco al que quiere copiar el banco.
5. Pulse « MUSIC / BANK COPY ». Todos los LEDs parpadean tres veces para indicar que la operación ha
salido bien.
6. Mantenga pulsado el botón « PROGRAM » durante tres segundos para salirse del modo « PROGRAM ».

VDPC174_v2 VELLEMAN
35
d. Chases (persecuciones)
• Programar un chase
Para poder programar un chase, primero, programe las escenas. Esta función le permite hojear en un orden
predefinido entre las 240 escenas. Aconsejamos borrar todos los chases del controlador antes de la primera
programación de los chases. Véase « Borrar todas las escenas ».
1. Active el modo « PROGRAM ».
2. Pulse el botón CHASE para seleccionar el chase que quiere programar.
3. Seleccione la escena en el banco.
4. Pulse el botón « MIDI / REC ».
5. Repita los pasos 3 y 4 hasta que todas las escenas estén introducidas.
• Introducir un banco de escenas en un chase
1. Active el modo « PROGRAM ».
2. Seleccione el chase que quiere programar.
3. Utilice los botones UP / DOWN para seleccionar el banco de escenas que quiere copiar.
4. Pulse el botón MUSIC / BANK COPY.
5. Pulse el botón MIDI / REC COPY. Todos los LEDs parpadean tres veces para indicar que la operación está
terminada.
• Añadir un paso
1. Active el modo « PROGRAM ».
2. Pulse el botón al que quiere añadir un paso.
3. Pulse el botón « TAP / DISPLAY ». La pantalla LCD visualiza el paso actual.
4. Pulse UP / DOWN y desplácese hacia el paso desado.
5. Pulse el botón « MIDI / REC ». La pantalla visualiza el paso que sigue al paso precedente.
6. Vuelva a pulsar el botón « TAP / DISPLAY ». La pantalla LCD visualiza el chase, la escena y el banco actual.
Crea una escena y guárdela como un nuevo paso o seleccione una escena programada existente y añadela
al chase.
7. Después de haber seleccionado la escena, vuelva a pulsar « MIDI / REC ». Todos los LEDs parpadean tres
veces para indicar que el nuevo paso ha sido añadido al chase.
• Borrar un paso
1. Active el modo « PROGRAM ».
2. Seleccione el chase que contiene el paso que quiere borrar.
3. Pulse « TAP / DISPLAY ». La pantalla LCD visualiza el paso actual.
4. Pulse el botón UP / DOWN y desplácese hacia el paso que quiere borrar.
5. Pulse AUTO / DEL para borrar el paso. Todos los LEDs parpadean tres veces para indicar que el paso ha
sido borrado.
• Borrar un chase
1. Pulse el botón que coincide con el chase que quiere borrar.
2. Mantenga pulsado el botón « AUTO / DEL » y pulse el botón « CHASE ». Todos los LEDs parpadean tres
veces para indicar que la operación está terminada.
• Borrar todos los chases
1. Desconecte el aparato. Mantenga pulsado simultáneamente « AUTO / DEL » y « DOWN ».
2. Vuelva a conectar el aparato. Todos los chases están borrados.

VDPC174_v2 VELLEMAN
36
e. Seleccionar la palanca / el canal
• Configurar la palanca
1. Mantenga pulsado « PROGRAM » hasta que el LED se ilumine.
2. Mantenga pulsado simultáneamente los botones « MODE » y « FINE ». El LED « ASSIGN » se ilumina. Si el
LED « REVERSE » se ilumina, vuelva a pulsar « FINE » y « MODE » para entrar en el modo « ASSIGN ».
3. Utilice UP y DOWN para seleccionar el eje que quiere asignar (pan o tilt).
4. Seleccione el modo de 16 ó 8 canales al utilizar el botón « TAP / DISPLAY ».
5. Pulse el botón que coincide con el escáner que quiere asignar.
6. Mantenga pulsado el botón « MODE » y pulse el botón de escena que coincide con el deslizador que controla
el movimiento (ejemplo: si el pan se controla por el deslizador 4, mantenga pulsado el botón « MODE » al
pulsar escena 4).
7. Para terminar, vuelva a pulsar simultáneamente « MODE » y « FINE » para salirse del modo « ASSIGN ».
• Invertir el movimiento de la palanca / el canal DMX
1. Active el modo « PROGRAM ».
2. Pulse « FINE » y « MODE » para entrar en el modo « ASSIGN ». Vuelva a pulsar « FINE » y « MODE » para
entrar en el modo « REVERSE ». El LED « REVERSE » se ilumina para indicar la activación del modo.
3. Utilice « UP / DOWN » para conmutar entre pan y tilt. El LED correspondiente se ilumina para indicar la
selección.
4. Pulse TAP / DISPLAY para seleccionar entre el modo de 8 canales y 16 canales.
5. Pulse el botón « SCANNER » para seleccionar el escáner.
6. Mantenga pulsado el botón « MODE » y pulse el botón « SCENE » que coincide con el canal que quiere
invertir (ejemplo: Si invierte la escena de un escáner, entre en el modo « REVERSE » y verifique que el LED
tilt esté iluminado, y verifique que deslizador controla el movimiento tilt. Mantenga pulsado el botón « HOLD »
y pulse el botón « SCENE » que coincide con el deslizador (deslizador 5 / escena 5)).
7. Repita los pasos de 3 a 7 si fuera necesario. Es posible invertir máx. 48 canales y 12 escáneres.
• Borrar un escáner del canal DMX
1. Active el modo « ASSIGN » o « REVERSE ».
2. Pulse el botón « SCANNER » del escáner que quiere borrar.
3. Pulse simultáneamente los botones « MODE » y « AUTO / DEL ». Todos los LEDs parpadean tres veces para
indicar que la operación está terminada.
• Borrar todos los canales DMX
1. Desconecte el aparato.
2. Pulse simultáneamente los botones « MODE » y « AUTO / DEL ».
3. Mantenga pulsado los dos botones y vuelva desconectar el aparato. Todos los LEDs parpadean brevemente
para indicar que la operación está terminada.
• Visualizar el canal DMX
1. Pulse simultáneamente los botones « FINE » y « MODE ».
2. Vuelva a pulsar los botones « FINE » et « MODE ». El LED « REVERSE » se ilumina.
3. Pulse el botón « SCANNER » deseado. La pantalla LCD visualiza los valores DMX para los movimientos pan
y tilt.
f. Fade time (tiempo de fundido)
• Fade time / atribuir un tiempo fade
1. Desconecte el aparato y pulse simultáneamente los botones « MODE » y « TAP / DISPLAY ».
2. Vuelva desconectar el aparato. Pulse los botones « TAP / DISPLAY » para seleccionar entre « FADE TIME »
y « ASSIGN FADE TIME ». El resultado se visualiza en la pantalla LCD.

VDPC174_v2 VELLEMAN
37
ALL ONLY
FD FD
CH X/Y
OR
TIME
TIME
3. Pulse simultáneamente los botones « MODE » y « TAP / DISPLAY » para guardar la configuración en la
memoria. Si no quiere guardar la configuración, pulse el botón « BLACKOUT » para salirse.
g. Reproducción
• Reproducir escenas
Es posible reproducir escenas y chases con tres modos: el modo manual (« MANUAL »), el modo automático
(« AUTO ») y el modo controlado por la música (« MUSIC »).
• El modo manual
1. El aparato entra automáticamente en el modo manual en cuanto lo active.
2. Asegúrese de que los LEDs « AUTO » y « MUSIC » estén apagados.
3. Utilice los botones « UP / DOWN » para seleccionar el banco con las escenas que quiere reproducir.
4. Pulse el botón « SCENE » que coincide con la escena que quiere visualizar.
• El modo automático
Esta función permite la reproducción secuencial de escenas.
1. Pulse el botón « AUTO / DEL » para entrar en el modo « AUTO ». El LED « AUTO » se ilumina indicando la
activación del modo « AUTO ».
2. Utilice los botones « UP / DOWN » para seleccionar el banco con las escenas que quiere reproducir.
3. Después de la selección, utilice los deslizadores « SPEED » y « FADE TIME » para ajustar la velocidad de la
progresión de la escena.
4. También es posible introducir la velocidad con el botón TAP SYNC / DISPLAY. El tiempo entre dos presiones
define el tiempo entre dos pasos. Este ajuste queda válido hasta que se desplace el deslizador.
5. Pulse el botón « AUTO / DISPLAY » para salirse del modo « AUTO ».
• El modo controlado por la música
1. Pulse « MUSIC / BANK COPY » para entrar en el modo « MUSIC ».
2. Utilice el botón « UP / DOWN » para seleccionar el banco con las escenas que quiere reproducir. Las
escenas seleccionadas se reproducirán de manera secuencial al ritmo de la música gracias al micrófono
incorporado.
3. Vuelva a pulsar el botón « MUSIC / BANK COPY » para salirse del modo « MUSIC ».
h. Reproducir chases
• El modo manual
1. El aparato entra automáticamente en el modo manual en cuanto lo active.
2. Seleccione el chase que quiere reproducir al pulsar el botón del chase correspondiente. Vuelva a pulsar este
botón para deseleccionar el chase.
• El modo automático
1. Pulse el botón « AUTO / DEL » para entrar en el modo « AUTO ».
2. Seleccione el chase al pulsar uno de los seis botones « CHASE ». Vuelva a pulsar este botón para
deseleccionar el chase.
3. Utilice los deslizadores « SPEED » y « FADE TIME » para ajustar el chase según sus especificaciones.
• El modo controlado por la música
1. Pulse el botón « MUSIC / BANK COPY » para activar el modo « MUSIC ».
2. Seleccione el chase al pulsar uno de los seis botones « CHASE ». Esto activará el chase que reaccionará al
ritmo de la música.

VDPC174_v2 VELLEMAN
38
i. Transmitir ficheros
Una transmisión de ficheros permite copiar todos los datos guardados en un VDPC174 a un segundo VDPC174.
Conecte los aparatos con los cables XLR de tres polos. Conecte el cable a la conexión « DMX OUT » de aparato
que transmite los datos, conecte el otro conector del cable a la conexión « DMX IN » del aparato que recibe los
datos.
• Transmitir una copia de ficheros
1. Desconecte el aparato. Mantenga pulsado simultáneamente los botones « SCANNER 2 » y « 3 » y el botón
« SCENE 1 ».
2. Vuelva a desconectar el aparato al mantener pulsado estos tres botones. La pantalla LCD visualiza
« TRANSMIT », el aparato está listo para transmitir los datos.
3. Pulse simultáneamente los botones « SCENE 7 » y « 8 » para efectuar la transmisión.
4. La pantalla LCD visualiza « ERROR » en caso de un error.
• Recibir una copia de ficheros
1. Desconecte el aparato. Mantenga pulsado simultáneamente los botones « SCANNER 8 » y « 9 » y el botón
« SCENE 2 ».
2. Vuelva a desconectar el aparato al mantener pulsado estos tres botones. La pantalla LCD visualiza
« RECEIVE », el aparato recibe los datos.
3. Después de haber terminado la recepción, el aparato vuelve automáticamente en el modo « NORMAL ».
j. Ajuste del canal MIDI
1. Mantenga pulsado el botón « MIDI / REC » durante tres segundos. La pantalla LCD visualiza el último canal
MIDI utilizado.
2. Utilice el botón « UP / DOWN » para seleccionar el canal DMX (01 ~ 16) que quiere atribuir al canal MIDI.
3. Mantenga pulsado « MIDI / REC » para guardar la configuración. Todos los LEDs parpadean tres veces para
indicar que la operación está terminada.
6. Limpieza y mantenimiento
1. Apriete bien las tuercas y los tornillos y verifique que no hay señales de oxidación.
2. No modifique la caja, los soportes y las conexiones p.ej. no taladre agujeros adicionales en un soporte o no
modifique las conexiones, etc.
3. No dañe los cables de alimentación. Contacte con un técnico especializado para instalar el aparato.
4. Desconecte el aparato de toda fuente antes de limpiarlo.
5. Limpie el aparato regularmente con un paño húmedo y sin pelusas. Evite el uso de alcohol y de disolventes.
6. El usuario no habrá de efectuar el mantenimiento de ninguna pieza.
7. Contacte con su distribuidor si necesita piezas de recambio.
7. Especificaciones
Alimentación 9-12VCC / 500mA
DMX IN / OUT hembra de 3 polos / XLR macho
MIDI IN DIN de 5 polos
Dimensiones 482 x 134 x 85m
Peso 2.7kg
Temperatura ambiente máx. 45°C
Para más información sobre este producto, visite nuestra página web www.hqpower.com
Se pueden modificar las especificaciones y el contenido de este manual sin previo aviso.

VDPC174_v2 VELLEMAN
39
VDPC174 – DMX-CONTROLLER FÜR 192 KANÄLE MIT JOYSTICK
1. Einführung & Eigenschaften
An alle Einwohner der Europäischen Union
Wichtige Umweltinformationen über dieses Produkt
Dieses Symbol auf dem Produkt oder der Verpackung zeigt an, dass die Entsorgung dieses Produktes nach
seinem Lebenszyklus der Umwelt Schaden zufügen kann.
Entsorgen Sie die Einheit (oder verwendeten Batterien) nicht als unsortiertes Hausmüll; die Einheit oder
verwendeten Batterien müssen von einer spezialisierten Firma zwecks Recycling entsorgt werden.
Diese Einheit muss an den Händler oder ein örtliches Recycling-Unternehmen retourniert werden.
Respektieren Sie die örtlichen Umweltvorschriften.
Falls Zweifel bestehen, wenden Sie sich für Entsorgungsrichtlinien an Ihre örtliche Behörde.
Danke für Ihren Ankauf! Bitte lesen Sie vor Inbetriebnahme diese Bedienungsanleitung sorgfältig durch. Überprüfen
Sie, ob Transportschäden vorliegen. Sollte dies der Fall sein, verwenden Sie das Gerät nicht und wenden Sie sich an
Ihren Händler.
2. Sicherheitsvorschriften
• Bei Schäden, die durch Nichtbeachtung der Bedienungsanleitung verursacht werden, erlischt der
Garantieanspruch. Für daraus resultierende Folgeschäden übernimmt der Hersteller keine Haftung.
• Installation und Wartung sind einer autorisierten Fachkraft vorbehalten.
• Nehmen Sie das Gerät erst in Betrieb, nachdem es von einem kalten in einen warmen Raum gebracht wurde.
Lassen Sie das Gerät solange ausgeschaltet, bis es die Zimmertemperatur erreicht hat.
• Vergewissern Sie sich, dass die anzuschließende Netzspannung nicht höher ist als die Netzspannung
beschrieben in dieser Bedienungsanleitung.
• Das Versorgungskabel darf nicht gequetscht oder beschädigt sein. Lassen Sie es von Ihrem Händler ersetzen.
• Trennen Sie das Gerät bei Nichtbenutzung und vor jeder Reinigung vom Netz. Fassen Sie dazu den Netzstecker
an der Grifffläche an und ziehen Sie nie an der Netzleitung.
• Beachten Sie, dass Schäden, die durch manuelle Veränderungen an diesem Gerät verursacht werden, nicht
unter den Garantieanspruch fallen.
• Halten Sie Kinder und Unbefugte vom Gerät fern.
3. Allgemeine Richtlinien
• Dieses Gerät ist entworfen für den professionellen Einsatz auf Bühnen, in Discotheken, usw. Sie dürfen dieses
Gerät nur im Innenbereich bei einer maximalen Spannung von max. 9-12VDC / 500mA verwenden.
• Vermeiden Sie Erschütterungen. Vermeiden Sie rohe Gewalt während der Installation und Bedienung des
Gerätes.
• Achten Sie bei der Wahl des Installationsortes darauf, dass das Gerät keinem Staub, keiner Feuchtigkeit und
extremen Temperaturen ausgesetzt wird. Sorgen Sie für einen Abstand von minimal 50cm zwischen dem Gerät
und einer beleuchteten Oberfläche.
• Nehmen Sie das Gerät erst in Betrieb, nachdem Sie sich mit seinen Funktionen vertraut gemacht haben. Lassen
Sie das Gerät nicht von Personen bedienen, die sich nicht mit dem Gerät auskennen. Meist ist die Beschädigung
des Gerätes das Ergebnis von unfachmännischer Bedienung.
• Verwenden Sie die Originalverpackung, wenn das Gerät transportiert werden soll.
Seien Sie vorsichtig bei der Installation: Fassen Sie keine stromführenden Kabel an, um ein
en
lebensgefährlichen elektrischen Schlag zu vermeiden.
Schützen Sie das Gerät vor Feuchtigkeit und Nässe.
Trennen Sie das Gerät vor dem Öffnen vom Netz.

VDPC174_v2 VELLEMAN
40
• Eigenmächtige Veränderungen sind aus Sicherheitsgründen verboten.
• Verwenden Sie das Gerät nur für Anwendungen beschrieben in dieser Bedienungsanleitung sonst kann dies zu
Schäden am Produkt führen und erlischt der Garantieanspruch. Jede andere Verwendung ist mit Gefahren wie
Kurzschluss, Brandwunden, elektrischem Schlag, Lampenexplosion, usw. verbunden.
4. Umschreibung
a. Frontplatte (siehe Abb. 1)
1. Scanner (1 ~ 12)
Wählen Sie das gewünschte Gerät.
2. Scene (1 ~ 8)
Drücken Sie eine der Tasten um eine Szene zu laden oder zu speichern. Es gibt max. 240 programmierbare
Szenen.
3. Faders
Diese Blendregler werden verwendet um die Intensität von Kanälen 1 ~ 8 oder Kanal 9 ~ 16 zu steuern, abhängig
von der gewählten Seite.
4. Page Select
Wählen Sie Seite A (1 ~ 8) oder Seite B (9 ~ 16).
5. Speed-Schiebeschalter
Regelung der Chase-Geschwindigkeit zwischen 0.1 Sekunde bis 10 Minuten.
6. Fade Time-Schiebeschalter
Regelung der Dimmzeit. Die Dimmzeit ist die Zeit, die der Scanner braucht um von der einen Position zu der
anderen Position zu bewegen oder die Zeit, die der Scanner braucht um ein- oder auszufaden.
7. LCD-Display
Wiedergabe der aktuellen Aktivität oder des aktuellen Programmstatus.
8. Joystick für Schwenkregelung
Verwenden Sie diesen Joystick um den Schwenk des Scanners zu steuern.
9. Joystick für Neigeregelung
Verwenden Sie diesen Joystick um die Neige des Scanners zu steuern.
10. Programmtaste
Aktivierung eines Programmmodus.
11. MIDI / REC
Steuerung von MIDI oder Aufnahme von Programmen.
12. Auto / Del
Aktivierung des musikgesteuerten Modus oder Auswahl der Szenen und Chases.
13. Music / Bank Copy
Aktivierung des Programmmodus.
14. Bank Up / Down
Drücken Sie die Up / Down-Taste um eine der 30 Banken zu selektieren.
15. Tap / Display
Zum Kreieren Sie einen standardmäßigen Rhythmus oder um den Wertmodus zwischen % und 0 ~ 255 zu
ändern.
16. Blackout
Drücken Sie diese Taste um den Ausgang zu pausieren.
17. Chase-Taste (1 ~ 6)
Chase-Aktivierung der programmierten Chases.
18. Fine-Taste
Wenn diese Taste gedrückt ist, können Sie mit dem Schwenk- oder Neigejoystick den Scanner mit den kleinsten
Schritten steuern.
19. Mode-Taste
Drücken Sie zur gleichen Zeit FINE und MODE um den ASSIGN- oder REVERSE-Modus einzuschalten.

VDPC174_v2 VELLEMAN
41
b. Rückplatte (siehe Abb. 2)
1. MIDI In
Empfängt MIDI-Daten.
2. DMX Polarity Select
Wahl der DMX-Polarität.
3. DMX Out
Dieser Anschluss sendet Ihren DMX-Wert an den DMX-Scanner oder DMX-Pack.
4. DMX In
Dieser Anschluss akzeptiert Ihre DMX-Eingangssignale.
5. DC-ingang
9-12VDC / 500mA.
6. Stromschalter
Ein- und Ausschalten des Gerätes.
7. AUDIO In
Akzeptiert Audiosignale zwischen 0.1V ~ 1Vpp.
5. Anwendung
a. Bedienung
• Allgemeines
Mit dem VDPC174 können Sie 12 Scanner von jeweils 16 DMX-Kanälen programmieren, 30 Banken mit 8
programmierbaren Szenen und 6 Chases mit 240 Szenen, steuerbar mit 8 Schiebeschaltern, einem Joystick und
anderen Tasten. Mit dem Joystick können Sie einfach und genau die Bewegung eines Gerätes steuern. Um das
Publikum zu überraschen, können Sie DMX-Kanäle zuteilen und sogar umkehren. Außerdem können Sie einen
ganzen File Dump von dem einen Gerät auf das andere übertragen.
• Information auf dem Display
Der LCD-Schirm besteht aus 2 Regeln, jeweils mit 8 Charaktern. Siehe Umschreibung:
LCD -Display Umschreibung
Szene 1
Bank 1
Chase 1 ist eingeschaltet
Schritt 9 einer Chase
DMX-Wert (000 ~ 255)
die heutige Geschwindigkeit ist 1 Minute und 54 Sekunden
die Zeit der letzten zwei Druckaktionen ist 4.25 Sekunden
Zuteilen der Kanäle 4 und 5
Umkehren der Kanäle 10 und 13
b. Aufstellung
• Gerät aufstellen
Der VDPC174 weist 16 Kanäle pro Gerät zu. Um Ihre Geräte an die Scannertaste links auf dem Steuergerät
zuzuweisen, halten Sie 16 Kanäle pro Gerät frei.

VDPC174_v2 VELLEMAN
42
Geben Sie die DMX-Adresse gemäß folgender Tabelle in:
Gerätenummer digitale DMX-Adresse Einstellung der DIP-Schalter des Scanners
1 1 1 ist ON
2 17 1 und 5 sind ON
3 33 1 und 6 sind ON
4 19 1, 5 und 6 sind ON
5 65 1 und 7 sind ON
6 81 1, 5 und 7 sind ON
7 97 1, 6 und 7 sind ON
8 113 1, 5, 6 und 7 sind ON
9 129 1 und 8 sind ON
10 145 1, 5 und 8 sind ON
11 161 1, 6 und 8 sind ON
12 177 1, 5, 6 und 8 sind ON
• Programmmodus einschalten
Zum Einschalten des Modus, halten Sie die PROGRAMM-Taste während einiger Sekunden gedrückt bis die LED
aufleuchtet.
• Joystick einstellen
1. Halten Sie die Programmtaste gedrückt bis die LED aufleuchtet.
2. Halten Sie MODE und FINE zur gleichen Zeit gedrückt. Die ASSIGN LED sollte aufleuchten. Wenn die
REVERSE LED aufleuchtet, drücken Sie erneut die FINE- und MODE-Taste um den ASSIGN-Modus zu
öffnen.
3. Verwenden Sie die UP- und DOWN-Taste um die Achsen zu bestimmen (Schwenk oder Neige).
4. Verwenden Sie die TAP / DISPLAY-Taste um den 16- oder 8-Kanalmodus zu wählen.
5. Drücken Sie die Taste, die dem zuzuweisenden Scanner entspricht.
6. Drücken Sie die Szenenummer, die dem gewünschten Schiebeschalter entspricht; während Sie die MODE-
Taste gedrückt halten (Beispiel: wenn Sie den Schwenk mit dem Schiebeschalter 4 steuern, halten Sie die
MODE-Taste gedrückt und drücken Sie Szenentaste 4#).
7. Drücken Sie danach gleichzeitig die MODE- und FINE-Taste um den ASSIGN-Modus zu verlassen.
c. Szenen
• Eine Szene programmieren
1. Öffnen Sie den Programmmodus (siehe “Programmmodus einschalten”).
2. Überprüfen Sie die BLACKOUT-Taste und sorgen Sie dafür, dass die LED nicht aufleuchtet. Sollte die LED
trotzdem aufleuchten, drücken Sie einmal die Taste um den BLACKOUT-Modus zu verlassen.
3. Sorgen Sie dafür, dass die SPEED- und FADE TIME-Schiebeschalter in der Nullposition stehen.
4. Drücken Sie die Scannertaste, die dem Gerät, den Sie steuern wollen, entspricht. Sie können verschiedene
Scanner zur gleichen Zeit steuern, indem Sie die verschiedenen entsprechenden Tasten drücken.
5. Stellen Sie die Blendregler und den Joystick in die gewünschte Position. Wählen Sie wenn nötig Seite B um
Kanäle 9 ~ 16 zu steuern.
6. Drücken Sie die UP / DOWN-Tasten um die Bank, in der Sie die Szene speichern wollen, zu selektieren. Sie
können aus 30 Banken wählen. Jede Bank kann bis zu 8 Szenen enthalten.
7. Wenn Sie alle Scanner nach Wunsch eingegeben haben, drücken Sie die MIDI / REC-Taste um die Szene zu
speichern.
8. Drücken Sie die Szenetaste wo Sie die Szene speichern wollen. Alle LEDs leuchten dreimal auf. Der LCD-
Schirm zeigt die Bank und die Szene an.
9. Um die Scanner zu löschen, drücken Sie die gewünschte Scannertaste, deaktivieren Sie den Scanner und
wählen Sie einen anderen.
10. Wiederholen Sie Schritt 2 bis 7 bis alle Scanner programmiert sind.
11. Wenn Sie keine anderen Geräte eingeben wollen, halten Sie die PROGRAMM-Taste einige Sekunden
gedrückt um den Programmmodus zu verlassen. Die LED erlischt.

VDPC174_v2 VELLEMAN
43
• Wie eine Szene programmieren
1. Schalten Sie den Programmmodus ein.
2. Drücken Sie SCANNER 1, sodass Fader eingeschaltet wird.
3. Sorgen Sie dafür, dass Seite A selektiert ist. Wenn das nicht der Fall ist, drücken Sie PAGE SELECT um Seite
A zu selektieren.
4. Stellen Sie den ersten und den zweiten Blendregler in die Maximalposition.
5. Wählen Sie Bank 1 mit den UP / DOWN-Tasten.
6. Drücken Sie MIDI / REC.
7. Drücken Sie Szene 1 zum Speichern.
8. Wiederholen Sie Schritte 4 bis 7 bis Szenen in Bank 1 programmiert sind.
9. Drücken Sie SCANNER 1 um den Blendregler auszuschalten.
10. Zum Beenden, schalten Sie den Programmmodus aus. Sie können jetzt manuell die Programme
durchblättern.
• Eine Szene bearbeiten
1. Schalten Sie den Programmmodus ein.
2. Drücken Sie UP / DOWN um die Bank, die Sie bearbeiten möchten, zu selektieren.
3. Wählen Sie die zu bearbeitende Szene, indem Sie die entsprechende Taste drücken.
4. Verwenden Sie die Blendregler und/oder Joystick um die Szene anzupassen.
5. Drücken Sie nachher die MIDI / REC-Taste.
6. Drücken Sie die Szenentaste, die der bearbeiteten Szene entspricht. Die bestehende Szene wird
überschrieben.
Sorgen Sie dafür, dass Sie dieselbe Szene wählen wie in den Schritten 3 und 6, damit Sie eine bestehende
Szene nicht überschreiben.
• Scannereinstellungen kopieren
Hier können Sie die Einstellungen von einem Scanner zum anderen Scanner kopieren.
1. Halten Sie die gewünschte Scannertaste gedrückt.
2. Drücken Sie, während Sie die Taste gedrückt halten, die Taste des Zielscanners.
• Eine Szene kopieren
1. Schalten Sie den Programmmodus ein.
2. Wählen Sie die gewünschte Bank mit der zu kopierenden Szene mithilfe der UP / DOWN-Taste.
3. Wählen Sie eine zu kopierende Szene, indem Sie die Szenetaste drücken.
4. Verwenden Sie die UP / DOWN-Taste um die Bank, nach der Sie die Szene kopieren wollen, zu wählen.
5. Drücken Sie MIDI / REC.
6. Drücken Sie die Taste der Szenen, nach der Sie die Szene kopieren wollen.
• Eine Szene löschen
1. Schalten Sie den Programmmodus ein.
2. Drücken Sie die gewünschte SCENE-Taste.
3. Halten Sie die AUTO / DEL-Taste gedrückt und drücken Sie die SCENE-Taste der zu löschenden Szene.
4. Wenn Sie die Szene gelöscht haben, werden Sie Werte des DMX-Kanals auf 0 gestellt.
• Alle Szenen löschen
1. Halten Sie bei einem ausgeschalteten Gerät gleichzeitig die PROGRAM- und BANK DOWN-Tasten gedrückt.
2. Schalten Sie das Gerät ein. Alle Szenen sind gelöscht.
• Eine vollständige Bank mit Szenen kopieren
1. Schalten Sie den Programmmodus ein.
2. Drücken Sie UP / DOWN bis Sie die gewünschte Bank erreicht haben.
3. Drücken Sie MIDI / REC.

VDPC174_v2 VELLEMAN
44
4. Drücken Sie UP / DOWN um die gewünschte Bank zu selektieren.
5. Drücken Sie MUSIC / BANK COPY, alle LEDs leuchten kurz auf, als Zeichen, dass die Funktion beendet ist.
6. Um den Modus zu verlassen, halten Sie die Programmtaste 3 Sekunden gedrückt.
d. Chases
• Eine Chase programmieren
Um eine Szene zu programmieren, sollte es zuerst eine Szene geben. Diese Funktion ermöglicht Ihnen, 240
Szenen in bestimmter Reihenfolge ablaufen zu lassen. Es ist empfehlenswert, zuerst alle Chases zu löschen,
bevor Sie die Chases programmieren. Siehe "Alle Szenen löschen".
1. Schalten Sie den Programmmodus ein.
2. Drücken Sie CHASE um die gewünschte Chase zu selektieren.
3. Wählen Sie die gewünschte Szene aus der Bank.
4. Drücken Sie MIDI / REC.
5. Wiederholen Sie die Schritte 3 bis 4 bis alle gewünschten Szenen eingegeben sind.
• Eine Bank mit Szenen in eine Chase bringen
1. Schalten Sie den Programmmodus ein.
2. Wählen Sie die Chase, die Sie programmieren wollen.
3. Wählen Sie mit UP / DOWN die Bank, die Sie kopieren wollen.
4. Drücken Sie MUSIC / BANK COPY.
5. Drücken Sie MIDI / REC COPY. Alle LEDs blinken dreimal um anzuzeigen, dass die Aufgabe vollendet ist.
• Einen Schritt hinzufügen
1. Schalten Sie den Programmmodus ein.
2. Drücken Sie die Taste der hinzuzufügenden Chase.
3. Drücken Sie TAP / DISPLAY, das LCD zeigt den aktuellen Schritt an.
4. Drücken Sie UP / DOWN und scrollen Sie zum Schritt, den Sie hinzufügen wollen.
5. Drücken Sie MIDI / REC. Das Display zeigt den Schritt nach dem vorigen Schritt.
6. Drücken Sie erneut TAP / DISPLAY. Das LCD zeigt die heutige Chase, Szene und Bank an. Schaffen Sie jetzt
eine Szene in registrieren Sie diese als einen neuen Schritt und fügen Sie ihn der Chase hinzu.
7. Wenn Sie eine gewünschte Szene selektiert haben, drücken Sie erneut MIDI / REC. Alle LEDs blinken
dreimal, als Anzeige, dass die Szene der Chase hinzugefügt wurde.
• Einen Schritt löschen
1. Schalten Sie den Programmmodus ein.
2. Selektieren Sie die Chase mit dem zu löschenden Schritt.
3. Drücken Sie TAP / DISPLAY, das LCD zeigt den heutigen Schritt.
4. Drücken Sie Bank UP / DOWN und scrollen Sie zum Schritt, den Sie löschen wollen.
5. Drücken Sie AUTO / DEL um den Schritt zu löschen. Alle LEDs blinken dreimal als Anzeige, dass die Aufgabe
ausgeführt ist.
• Eine Chase löschen
1. Drücken Sie die Taste, die der zu löschenden Chase entspricht.
2. Halten Sie AUTO / DEL und die CHASE-Taste gedrückt. Alle LEDs blinken dreimal als Anzeige, dass die
Aufgabe ausgeführt ist.
• Alle Chases löschen
1. Bei einem ausgeschalteten Gerät, halten Sie die AUTO / DEL und die DOWN-Taste zur gleichen Zeit
gedrückt.
2. Schalten Sie das Gerät erneut ein. Alle Chases sind gelöscht worden.

VDPC174_v2 VELLEMAN
45
e. Selektieren des Joysticks / des Kanals
• Joystick einstellen
1. Halten Sie die Programmtaste gedrückt bis die LED aufleuchtet.
2. Halten Sie gleichzeitig die MODE- und die FINE-Taste gedrückt. Die ASSIGN LED leuchtet auf. Wenn die
REVERSE LED leuchtet, drücken Sie erneut FINE und MODE um den ASSIGN-Modus zu öffnen.
3. Wählen Sie mit UP und DOWN die Achse, die Sie zuweisen wollen (Schwenk oder Neige).
4. Verwenden Sie die TAP / DISPLAY-Taste um den 16- oder 8-Kanal-Modus zu selektieren.
5. Drücken Sie den Scanner, den Sie zuweisen wollen.
6. Halten Sie die MODE-Taste gedrückt und drücken Sie die Szene, die dem Schiebschalter, der die Bewegung
steuert, entspricht (z.B. die Schwenkbewegung wird über Schiebeschalter 4 gesteuert, halten Sie MODE
gedrückt und drücken Sie Szenetaste 4).
7. Zum Beenden, drücken Sie gleichzeitig MODE und FINE um den ASSIGN-Modus zu verlassen.
• Die Joystickbewegung / DMX-Kanal umkehren
1. Schalten Sie den Programmmodus ein.
2. Drücken Sie FINE und MODE um den ASSIGN-Modus zu öffnen. Drücken Sie erneut FINE und MODE um
den REVERSE-Modus zu öffnen. Die REVERSE LED leuchtet auf als Anzeige, dass der REVERSE-Modus
aktiv ist.
3. Verwenden Sie die UP / DOWN-Taste um zwischen Schwenk und Neige zu wählen. Die entsprechende LED
leuchtet auf.
4. Drücken Sie TAP / DISPLAY um zwischen dem 8-Kanal- und dem 16-Kanal-Modus zu schalten.
5. Drücken Sie SCANNER und wählen Sie den Scanner.
6. Halten Sie MODE gedrückt und drücken Sie die entsprechende Szenentaste oder drücken Sie den Kanal, den
Sie umkehren wollen (Beispiel: wenn Sie eine Szene eines Scanners umkehren wollen, wenn Sie sich im
REVERSE-Modus befinden und den Neige-LED aufleuchtet, überprüfen Sie, an welchen Schiebeschalter die
Steuerung der Neigebewegung angeschlossen ist. Halten Sie MODE gedrückt und drücken Sie die
Szenentaste, die dem Neige-Schiebschalter entspricht (Schiebeschalter 5 / Szene 5)).
7. Wiederholen Sie Schritte 3 bis 7, falls nötig. Es können maximal 48 Kanäle oder 12 Scanner umgekehrt
werden.
• Einen Scanner aus einem DMX-Kanal löschen
1. Schalten Sie den ASSIGN- oder REVERSE-Modus ein.
2. Drücken Sie die Scannertaste und wählen Sie den zu löschenden Scanner.
3. Drücken Sie gleichzeitig MODE und AUTO / DEL. Alle LEDs blinken dreimal, als Anzeige, dass die Aufgabe
ausgeführt wurde.
• Alle DMX-Kanäle löschen
1. Schalten Sie das Gerät aus.
2. Drücken Sie zur gleichen Zeit auf MODE und AUTO / DEL.
3. Halten Sie MODE und AUTO / DEL gleichzeitig gedrückt und schalten Sie das Gerät ein. Alle LEDs blinken
dreimal, als Anzeige, dass die Aufgabe ausgeführt wurde.
• Den DMX-Kanal anzeigen
1. Drücken Sie gleichzeitig FINE und MODE.
2. Drücken Sie erneut FINE und MODE. Die REVERSE LED leuchtet auf.
3. Drücken Sie die SCANNER-Taste, die auf die gewünschte Schwenk- und Neigebewegung eingestellt ist. Das
LCD zeigt die DMX-Werte für Schwenk und Neige.
f. Fadingzeit
• Fadingzeit / Fadingzeit zuweisen
1. Bei einem ausgeschalteten Gerät, drücken Sie gleichzeitig MODE und TAP / DISPLAY.
2. Schalten Sie das Gerät ein und drücken Sie TAP / DISPLAY um zwischen FADE TIME und ASSIGN FADE
TIME zu wählen. Das LCD zeigt das folgende:

VDPC174_v2 VELLEMAN
46
ALL ONLY
FD FD
CH X/Y
OR
TIME
TIME
3. Drücken Sie gleichzeitig MODE und TAP / DISPLAY um die Einstellung zu speichern. Wenn Sie die
Einstellung nicht speichern wollen, drücken Sie BLACKOUT zum Verlassen.
g. Wiedergabe
• Wiedergabe von Szenen
Es gibt drei Wiedergabemöglichkeiten: MANUELL, AUTOMATISCH und MUSIKGESTEUERT
• Manueller Modus
1. Das Gerät schaltet automatisch in den manuellen Modus wenn Sie es einschalten.
2. Überprüfen Sie, ob sowohl die AUTO als die MUSIC LEDs nicht aufleuchten.
3. Verwenden Sie UP / DOWN um die Bank mit Szenen zu selektieren.
4. Drücken Sie die SCENE-Taste, die Sie zeigen wollen.
• Automatischer Modus
So können Sie eine Bank mit programmierten Szenen sequenziell wiedergeben.
1. Drücken Sie AUTO / DEL um den AUTO-Modus zu öffnen. Die AUTO LED leuchtet auf als Anzeige, dass der
Modus aktiviert ist.
2. Verwenden Sie UP / DOWN um die Bank mit Szenen zu selektieren.
3. Wenn Sie die Bank gewählt haben, regeln Sie die Ablaufgeschwindigkeit mithilfe des SPEED- und den FADE
TIME-Schiebeschalter.
4. Stellen Sie die Geschwindigkeit mit TAP SYNC / DISPLAY ein. Das Intervall zwischen zwei Tastendrücken ist
gleich dem Intervall zwischen zwei Schritten. Die Einstellung bleibt aktiv bis Sie den SPEED-Schiebeschalter
verstellen.
5. Drücken Sie AUTO / DISPLAY um den Modus zu verlassen.
• Musikgesteuerter Modus
1. Drücken Sie MUSIC / BANK COPY um den Modus einzuschalten.
2. Verwenden Sie UP / DOWN um die Bank mit Szenen, die Sie zeigen wollen, zu selektieren. Die selektierten
Szenen werden sequenziell im Takt der Musik, der vom eingebauten Mikrofon empfangen wird, gezeigt.
3. Drücken Sie erneut MUSIC / BANK COPY um den Modus zu verlassen.
h. Die Chases zeigen
• Manueller Modus
1. Das Gerät schaltet automatisch in den manuellen Modus wenn Sie es einschalten.
2. Wählen Sie die Chase, die Sie zeigen wollen, indem Sie die entsprechende Chasetaste drücken. Wenn Sie
erneut diese Taste drücken, wird die Auswahl der Chase aufgehoben.
• Automatischer Modus
1. Drücken Sie AUTO / DEL um den AUTO-Modus einzuschalten.
2. Wählen Sie die gewünschste Chase über eine der 6 CHASE-Tasten. Wenn Sie erneut dieselbe Taste
drücken, wird die Auswahl aufgehoben.
3. Verwenden Sie den SPEED- und FADE TIME-Schiebeschalter um die Chase nach Wunsch einzustellen.
• Musikgesteuerter Modus
1. Drücken Sie MUSIC / BANK COPY um den Modus einzuschalten.
2. Wählen Sie die gewünschte Chase mit der entsprechenden Chase-Taste. Das schaltet die Chase ein und
lässt sie im Takt der Musik bewegen.

VDPC174_v2 VELLEMAN
47
i. Dateiübertragung
Eine Dateiübertragung ermöglicht Ihnen, alle gespeicherten Informationen Ihres VDPC174 an einen zweiten
VDPC174 zu senden. Verbinden Sie die Geräte mit 3-poligen XLR-Kabeln: Verbinden Sie den DMX OUT des
Sendegerätes mit dem DMX IN des Empfangsgerätes.
• Eine Dumpdatei versenden
1. Schalten Sie das Gerät aus und halten Sie gleichzeitig SCANNER 2 und 3 und SCENE 1 gedrückt.
2. Schalten Sie das Gerät erneut ein während Sie die drei Tasten gedrückt halten. Das LCD zeigt TRANSMIT,
als Anzeige, dass das Gerät zum Versenden fertig ist.
3. Drücken Sie zur gleichen Zeit SCENE 7 und 8 um die Dateien zu versenden.
4. Bei einem Fehler zeigt der LCD-Schrim ERROR.
• Eine Dumpdatei empfangen
1. Schalten Sie das Gerät aus und halten Sie gleichzeitig SCANNER 8 und 9 und SCENE 2 gedrückt
2. Schalten Sie das Gerät erneut ein während Sie die drei Tasten gedrückt halten. Das LCD zeigt RECEIVE, als
Anzeige, dass das Gerät die Datei empfängt.
3. Nach dem Empfangen der Dateien kehrt das Gerät automatisch zum normalen Modus zurück.
j. Einstellen des MIDI-Kanals
1. Halten Sie MIDI / REC während drei Sekunden gedrückt. Das LCD zeigt den letzten MIDI-Kanal.
2. Verwenden Sie UP / DOWN um den DMX-Kanal (01 ~ 16), den Sie dem MIDI-Kanal zuweisen wollen, zu
selektieren.
3. Halten Sie MIDI / REC gedrückt um die Einstellungen zu speichern. Die LEDs blinken dreimal als Anzeige,
dass die Aufgabe ausgeführt wurde.
6. Reinigung & Wartung
1. Verwendete Schrauben müssen fest angespannt werden und dürfen keine Rostspuren zeigen.
2. Das Gehäuse, die Linsen, die Montagebügel und der Montageort (z.B. Decke oder Gebinde) dürfen nicht angepasst
werden, z.B. bohren Sie keine zusätzlichen Löcher in Montagebügel, verändern Sie die Anschlüsse nicht, usw.
3. Sorgen Sie dafür, dass die Netzkabel nicht beschädigt sind. Lassen Sie das Gerät von einer Fachkraft warten.
4. Trennen Sie das Gerät vom Netz ehe Sie mit den Servicearbeiten anfangen.
5. Verwenden Sie zur Reinigung ein feuchtes Tuch. Verwenden Sie auf keinen Fall Alkohol oder irgendwelche
Lösungsmittel.
6. Die Teile dürfen nicht eigenmächtig ersetzt werden, (außer der Sicherung) (siehe “Installation“).
7. Bestellen Sie eventuelle Ersatzteile bei Ihrem Fachhändler.
7. Technische Daten
Stromversorgung 9-12VDC / 500mA
DMX IN / OUT 3-polig XLR-Stecker/Buchse
MIDI IN 5-poliger DIN-Stecker
Abmessungen 482 x 134 x 85m
Gewicht 2.7kg
Max. Umgebungstemperatur 45°C
Für mehr Informationen zu diesem Produkt, siehe www.hqpower.com
Alle Änderungen vorbehalten.
Documenttranscriptie
VDPC174 192-CHANNEL DMX CONTROLLER WITH JOYSTICK 192-KANAALS DMX CONTROLLER MET JOYSTICK CONTRÔLEUR DMX 192 CANAUX AVEC MANETTE CONTROLADOR DMX DE 192 CANALES CON PALANCA DE CONTROL DMX-CONTROLLER FÜR 192 KANÄLE MIT JOYSTICK USER MANUAL GEBRUIKERSHANDLEIDING NOTICE D’EMPLOI MANUAL DEL USUARIO BEDIENUNGSANLEITUNG VDPC174_v2 2 VELLEMAN VDPC174 – 192-CHANNEL DMX CONTROLLER WITH JOYSTICK 1. Introduction & Features To all residents of the European Union Important environmental information about this product This symbol on the device or the package indicates that disposal of the device after its lifecycle could harm the environment. Do not dispose of the unit (or batteries) as unsorted municipal waste; it should be taken to a specialised company for recycling. This device should be returned to your distributor or to a local recycling service. Respect the local environmental rules. If in doubt, contact your local waste disposal authorities. Thank you for buying the VDPC174! Please read the manual thoroughly before bringing this device into service. If the device was damaged in transit, don't install or use it and contact your dealer. 2. Safety Instructions Be very careful during the installation: touching live wires can cause life-threatening electroshocks. Keep this device away from rain and moisture. Unplug the mains lead before opening the housing. • Damage caused by disregard of certain guidelines in this manual is not covered by the warranty and the dealer will not accept responsibility for any ensuing defects or problems. • A qualified technician should install and service this device. • Do not switch the device on immediately after it has been exposed to changes in temperature. Protect the device against damage by leaving it switched off until it has reached room temperature. • Make sure that the available voltage does not exceed the voltage stated in the specifications of this manual. • Do not crimp the power cord and protect it against damage. Have an authorised dealer replace it if necessary. • Disconnect the device from the mains to clean it or when it is not in use. Handle the power cord by the plug only. • Note that damage caused by user modifications to the device is not covered by the warranty. • Keep the device away from children and unauthorised users. 3. General Guidelines • This device is designed for professional use on stage, in discos, theatres, etc. The VDPC174 should only be used indoors and be connected to a current of max. 9-12VDC / 500mA. • Do not shake the device. Avoid brute force when installing or operating the device. • Select a location where the device is protected against extreme heat (see “Technical Specifications”), dust and moisture. Respect a minimum distance of 0.5m between the device’s light output and any illuminated surface. • Familiarise yourself with the functions of the device before actually using it. Do not allow operation by unqualified people. Any damage that may occur will most probably be due to unprofessional use of the device. • Use the original packaging if the device is to be transported. • All modifications of the device are forbidden for safety reasons. • Only use the device for its intended purpose. All other uses may lead to short circuits, burns, electroshocks, crash, etc. Using the device in an unauthorised way will void the warranty. VDPC174_v2 3 VELLEMAN 4. Description a. Front Panel (fig. 1) 1. Scanner Buttons (1 ~ 12) Select the desired fixture. 2. Scene Buttons (1 ~ 8) Press the scene buttons to load or store your scenes. There is a maximum of 240 programmable scenes. 3. Faders These faders are used to control the intensity of channel 1 ~ 8 or channel 9 ~ 16, depending on the selected page. 4. Page Select Button Select page A (1 ~ 8) or page B (9 ~ 16). 5. Speed Slider Adjust the chase speed within the range of 0.1 second to 10 minutes. 6. Fade Time Slider Adjust the fade time. The fade time is the amount of time it takes for a scanner to move from one position to another and for a dimmer to fade in or out. 7. LCD Display Shows the current activity or programming status. 8. Pan Joystick This joystick is used to control the pan of the scanner. 9. Tilt Joystick This joystick is used to control the tilt of the scanner. 10. Program Button Activate the program mode. 11. MIDI / REC Used to control MIDI operation or to record programs. 12. Auto / Del Activate the Music Mode or select the scenes and chases. 13. Music / Bank Copy Activates the Program Mode 14. Bank Up / Down Press the Up / Down button to select one of the 30 banks. 15. Tap / Display Used to create a standard beat or to change the value mode between % and 0 ~ 255. 16. Blackout Button Tap to momentarily pause the whole output. VDPC174_v2 4 VELLEMAN 17. Chase Button (1 ~ 6) These buttons are used for activating the chase of programmed scenes. 18. Fine Button When Fine is on, the pan or tilt joystick will control the scanner in its smallest increment. 19. Mode Button Pressing FINE and MODE simultaneously allows to activate the ASSIGN or REVERSE mode. b. Rear Panel (fig. 2) 1. MIDI In Receives MIDI data. 2. DMX Polarity Select Select the DMX polarity. 3. DMX Out This connector sends your DMX value to the DMX scanner or DMX pack. 4. DMX In This connector accepts your DMX input signals. 5. DC Input 9-12VDC / 500mA. 6. Power Switch Switch the power on or off. 7. AUDIO In Accepts the audio signals between 0.1V ~ 1Vpp. 5. Use a. Operation • General The VDPC174 allows you to program 12 scanners with 16 DMX channels each, 30 banks of 8 programmable scenes, 6 chases of 240 scenes and all this by means of 8 channel sliders, a joystick and other buttons. By means of the joystick you can easily and more accurately control the movement of a fixture. To increase your ability to dazzle the audience, this unit allows you to assign and reverse DMX channels. In addition, two units can set up communication so that they can send or receive a complete file dump. • Display Information The LCD display contains a maximum of 2 lines, each of 8 characters. Below are the definitions: VDPC174_v2 5 VELLEMAN LCD Display Description Scene 1 Bank 1 Chase 1 is activated The ninth step of a chase DMX value (000 ~ 255) The current speed is 1 minute and 54 seconds The time of the last two taps is 4.25 seconds Assign DMX channels 4 and 5 Reverse DMX channels 10 and 13 b. Setup • Unit Setup The unit is preset to allocate 16 channels per fixture. In order to assign your fixtures to the scanner buttons located on the left side of the unit you will need to space your fixtures 16 DMX channels apart. Use the following chart for DMX addressing: Fixture Number 1 2 3 4 5 6 7 8 9 10 11 12 Digital DMX Address 1 17 33 19 65 81 97 113 129 145 161 177 Scanner DIP Switch Setting 1 is ON 1 and 5 are ON 1 and 6 are ON 1, 5 and 6 are ON 1 and 7 are ON 1, 5 and 7 are ON 1, 6 and 7 are ON 1, 5, 6 and 7 are ON 1 and 8 are ON 1, 5 and 8 are ON 1, 6 and 8 are ON 1, 5, 6 and 8 are ON • Enabling the PROGRAM Mode To enable the PROGRAM mode, hold the PROGRAM button for a few seconds until the LED is lit. • Setting Up the Joystick 1. Press and hold the PROGRAM button until the LED is lit. 2. Press and hold the MODE and FINE buttons simultaneously. The assign LED should light. If the reverse LED lights, press FINE and MODE again to enter the ASSIGN mode. 3. Use the bank UP and DOWN keys to select the axis you wish to assign (pan or tilt). 4. Use the TAP / DISPLAY button to select 16 or 8-channel mode. 5. Press the button corresponding to the scanner you wish to assign. 6. While holding the mode button press the scene number corresponding to the slider which controls the movement (example: If the pan is controlled by slider number 4, press and hold the MODE button while tapping scene button 4). 7. When finished, press the MODE and FINE buttons simultaneously again to exit the ASSIGN mode. c. Scenes • Programming a Scene 1. Enter the PROGRAM mode (See “Enabling the PROGRAM Mode”). 2. Check the blackout key and verify that the LED is not lit. If the LED is lit, press it once to exit the BLACKOUT mode. VDPC174_v2 6 VELLEMAN 3. Verify that the speed and fade time sliders are positioned at zero. 4. Press the scanner button corresponding to the unit you wish to control. You may control more than one scanner at a time by pressing the button corresponding to the scanner(s) you wish to program. 5. Move the faders and the joystick to the desired position. If necessary, you may select page B to control channels 9 ~ 16. 6. Tap the bank UP / DOWN button to choose the bank you want to store this scene into. There are a total of 30 banks you can select from. You may store up to 8 scenes in each bank. 7. Once all scanners are programmed into the desired position for one scene, tap the MIDI / REC button to program this scene into the memory. 8. Tap the scene button you wish to store your scene into. All LEDs will flash three times. The LCD readout will show the bank and scene. 9. To unselect the scanner(s) you have been programming and to switch to another scanner, simply press the button of the scanner you have been programming again, deselecting it, and select another scanner. 10. Repeat steps 2 to 7 until all scenes have been programmed. 11. If you do not intend to continue programming at this time, press and hold the PROGRAM button for three seconds to exit PROGRAM mode. The LED will go out indicating this selection. • Example of a Scene Programme 1. Enable the PROGRAM mode. 2. Tap the SCANNER 1 button to turn on its fader control. 3. Verify that the page is set on page A. If not, press the PAGE SELECT button to select page A. 4. Move the first and second faders all the way up to their maximum value position. 5. Select bank 1 using the bank UP / DOWN buttons. 6. Press the MIDI / REC button. 7. Tap scene 1 to store the first scene. 8. Repeat steps 4 to 7 until all scenes have been programmed into bank 1. 9. Tap the SCANNER 1 button to turn off the fader control. 10. When finished, disable the PROGRAM mode. You can now manually tap through what you have just programmed. • Editing a Scene 1. Enable the PROGRAM mode. 2. Press the bank UP / DOWN button to select the bank containing the scene you wish to edit. 3. Select the scene you wish to edit by tapping its scene button. 4. Use the faders and/or joystick to make the desired adjustments to the scene. 5. Once you have completed the changes, tap the MIDI / REC button. 6. Tap the scene button that corresponds to the scene you’re editing. This will override the existing scene. Be sure to select the same scene in steps 3 and 6, otherwise you may accidentally record over an existing scene. • Copying Scanner Settings This setting allows you to copy the settings of one scanner to another. 1. Press and hold down the scanner button you wish to copy. 2. While holding down the button, tap the button of the scanner you wish to copy the settings to. • Copying a Scene 1. Enable the PROGRAM mode. 2. Tap the bank UP / DOWN button to select the bank containing the scene you wish to copy. 3. Select the scene you wish to copy by pressing its scene button. 4. Using the bank UP / DOWN button select the bank you wish to copy the scene to. 5. Tap the MIDI / REC button. 6. Tap the scene button you wish to copy the scene to. VDPC174_v2 7 VELLEMAN • Deleting a Scene 1. Enable the PROGRAM mode. 2. Press the desired SCENE button to select the scene you wish to delete. 3. Press and hold down the AUTO / DEL button. While holding the button, tap the SCENE button that corresponds with the scene you wish to delete. 4. When the programmed scene is deleted, all DMX channel values will be set to 0. • Deleting All Scenes 1. With unit switched off, press and hold down the PROGRAM and bank DOWN buttons at the same time. 2. Turn the unit back on and all scenes should be cleared. • Copying a Bank of Scenes 1. Enable the PROGRAM mode. 2. Tap the bank UP / DOWN button until you reach the bank you wish to copy. 3. Tap the MIDI / REC button. 4. Tap the bank UP / DOWN button to select the bank you wish to copy to. 5. Tap the MUSIC / BANK COPY button, all LEDs will briefly flash three times indicating the function has been completed. 6. Press the PROGRAM button for three seconds to exit PROGRAM mode. d. Chases • Programming a Chase Scenes must have been programmed in order to program a chase. This function allows you to cycle through up to 240 scenes in a preselected order. It is recommended to delete all chases in the controller before programming chases for the first time. See “Deleting All Chases”. 1. 2. 3. 4. 5. Enable the PROGRAM mode. Tap the CHASE button to select the chase you wish to program. Select a desired scene from the bank that has scenes stored inside it. Tap the MIDI / REC button. Repeat steps 3 to 4 until all desired scenes have been entered. • Inserting a Bank of Scenes into a Chase 1. Enable the PROGRAM mode. 2. Select the chase you wish to program. 3. Use the bank UP / DOWN key to select the bank of scenes you wish to copy. 4. Tap the MUSIC / BANK COPY button. 5. Tap the MIDI / REC COPY button. All LEDs will flash three times indicating that the requested operation has been performed. • Adding a Step 1. Enable the PROGRAM mode. 2. Press the corresponding button to the chase you wish to add a step to. 3. Press the TAP / DISPLAY button, the LCD will show the current step. 4. Press the bank UP / DOWN button and scroll to the step you wish to insert the step after. 5. Press the MIDI / REC button. The segment display will read the step one step higher than before. 6. Tap the TAP / DISPLAY button again. The LCD shows the current chase, scene, and bank. Create a desired scene and record it as a new step or select a previously programmed scene to add to the chase. 7. Once you have selected the scene you wish to add, press the MIDI / REC button again. All LEDs will flash three times indicating the new step has been inserted into the chase. VDPC174_v2 8 VELLEMAN • Deleting a Step 1. Enable the PROGRAM mode. 2. Select the chase that contains the step you wish to delete. 3. Press the TAP / DISPLAY button, the LCD shows the current step. 4. Press the bank UP / DOWN button and scroll to the step you wish to delete. 5. Press the AUTO / DEL button to delete the step. All LEDs will flash three times indicating the requested operation has been performed. • Deleting a Chase 1. Press the button corresponding to the chase you wish to delete. 2. Press and hold down the AUTO / DEL button while holding down the CHASE button. All LEDs will flash three times indicating that the requested operation has been performed. • Deleting All Chases 1. With the power off, press and hold down the AUTO / DEL and bank DOWN buttons at the same time. 2. Reapply the power and all chases should be cleared. e. Joystick / Channel Selection • Setting-Up the Joystick 1. Press and hold the PROGRAM button until the LED is lit. 2. Press and hold the MODE and FINE buttons simultaneously. The ASSIGN LED should light. If the reverse LED lights, press FINE and MODE again to enter the ASSIGN mode. 3. Use the bank UP and DOWN keys to select the axis you wish to assign (pan or tilt). 4. Use the TAP / DISPLAY button to select 16 or 8-channel mode. 5. Press the button corresponding to the scanner you wish to assign. 6. While holding the MODE button press the scene number corresponding to the slider which controls the movement (example: If the pan is controlled by slider number 4, press and hold the MODE button while tapping scene button 4). 7. When finished press the MODE and FINE buttons simultaneously again to exit ASSIGN mode. • Reversing the Joystick Movement / DMX Channel 1. Enable the PROGRAM mode. 2. Press the FINE and MODE buttons to enter ASSIGN mode. Press the FINE and MODE buttons again to enter REVERSE mode. The reverse LED lights up indicating the REVERSE mode is active. 3. Use bank UP / DOWN button to change between the pan and tilt. The corresponding LED lights indicating this selection. 4. Press the TAP / DISPLAY button to change between 8-channel and 16-channel mode. 5. Press the SCANNER button to select the scanner. 6. While holding the MODE button, press the corresponding SCENE button of the channel you wish to reverse (example: If you are reversing the scene on one scanner, once you verify that you are in reverse mode and the tilt LED is lit, check to see which slider the tilt control is on. Hold the MODE button and press the SCENE button that is same as the slider number for tilt (slider 5 / scene 5)). 7. Continue steps 3 to 7 as needed. You may reverse a maximum of 48 channels for 12 scanners. • Deleting a Scanner of a DMX Channel 1. Activate the ASSIGN or REVERSE mode. 2. Tap the scanner button to select the scanner you wish to delete. 3. Press the MODE and AUTO / DEL buttons simultaneously. All LEDs will flash three times indicating the requested operation has been performed. VDPC174_v2 9 VELLEMAN • Deleting All DMX Channels 1. Switch off the unit. 2. Press the MODE and AUTO / DEL buttons simultaneously. 3. While holding the two buttons, turn the power back on to the unit. All LEDs will flash briefly indicating the requested operation has been performed. • Displaying the DMX Channel 1. Press the FINE and MODE buttons simultaneously. 2. Press the FINE and MODE buttons again, lighting the reverse LED. 3. Press the SCANNER button that is set at the desired pan and tilt and the LCD will display the DMX values for pan and tilt. f. Fade Time • Fade Time / Assigning a Fade Time 1. With the unit switched off, press the MODE and TAP / DISPLAY buttons simultaneously. 2. Switch on the unit, tap the TAP / DISPLAY button to change between FADE TIME and ASSIGN FADE TIME, the LCD will display: ALL FD CH TIME OR ONLY FD X/Y TIME 3. Press the MODE and TAP / DISPLAY buttons simultaneously to store your setting into memory. If you do not wish to save your setting, press the BLACKOUT key to exit this operation. g. Playback • Running Scenes There are three modes in which you can run scenes and chases: MANUAL mode, AUTO mode and MUSIC mode. • Manual Mode 1. When the power is turned on, the unit enters manual mode automatically. 2. Check and verify that both the AUTO and MUSIC LEDs are off. 3. Use the bank UP / DOWN button to select the bank with the scenes you wish to run. 4. Press the SCENE button corresponding to the scene you wish to display. • Auto Mode This function allows you to run a bank of programmed scenes in sequence. 1. Press the AUTO / DEL button to enter into AUTO mode. The AUTO LED will light indicating the AUTO mode is active. 2. Use the bank UP / DOWN button to select a bank of scenes to run. 3. After selecting the bank of scenes to run, you can use the SPEED slider and FADE TIME slider to adjust the speed of the scene progression. 4. You can use the TAP SYNC / DISPLAY button to set the speed instead. The amount of time between the last two taps will instruct the controller in the length of time between steps. This setting will stay in effect until the speed slider is moved. 5. Press the AUTO / DISPLAY button to exit AUTO mode. • Music Mode 1. Press the MUSIC / BANK COPY button to activate MUSIC mode. 2. Use the bank UP / DOWN button to select a bank of scenes you wish to run. The scenes selected will run through sequentially to the beat of the music identified by the built-in microphone. 3. Tap the MUSIC / BANK COPY button again to exit MUSIC mode. VDPC174_v2 10 VELLEMAN h. Playing the Chases • Manual Mode 1. When the power is turned on, the unit enters MANUAL mode automatically. 2. Select the chase you wish to run by pressing the corresponding chase button. Pressing this button a second time will unselect the chase. • Auto Mode 1. Press the AUTO / DEL button to activate AUTO mode. 2. Select the desired chase by pressing one of six CHASE buttons. Pressing this button a second time will negate this selection. 3. Use the SPEED slider and FADE TIME slider to adjust the chase to your specifications. • Music Mode 1. Press the MUSIC / BANK COPY button to activate MUSIC mode. 2. Select the desired chase by pressing one of six CHASE buttons, this will activate the chase and cause it to respond to the rhythms of the music. i. File Transfer A file transfer allows the user to transfer all information stored in one VDPC174 to a second VDPC174 unit. Connect the units using 3-pin XLR cables. The unit sending the information will have the cable plugged into the DMX OUT plug while the receiving unit will have the cable running into the DMX IN plug. • Sending a Dump File 1. With unit switched off, press and hold down the SCANNER 2 and 3 buttons and SCENE 1 button simultaneously. 2. Turn the unit back on while pressing these three buttons, the LCD will read TRANSMIT indicating that the unit is ready to send the files. 3. Press SCENE button 7 and 8 at the same time to send the dump file. 4. If an error occurs during the dump file, the LCD will read ERROR. • Receiving a Dump File 1. With the unit switched off, press and hold down the SCANNER 8, 9 and SCENE button 2 at a time. 2. Apply the power again while pressing these three buttons. The LCD shows RECEIVE indicating this unit is receiving the dump file. 3. When receiving is over, the unit will automatically return to NORMAL mode. j. MIDI Channel Setting 1. Press and hold the MIDI / REC button for three seconds. The LCD shows the MIDI channel of last time. 2. Use the bank UP / DOWN button to select the DMX channel (01 ~ 16) to assign to the MIDI channel. 3. Press and hold the MIDI / REC button to save your settings. The LEDs will flash three times indicating that the required operation has been performed. 6. Cleaning and Maintenance 1. All screws should be tightened and free of corrosion. 2. The housing, colour lenses, mounting supports and the installation location (e.g. ceiling, suspension, trussing) should not be deformed, modified or tampered with e.g. do not drill extra holes in mounting supports, do not change the location of the connections. 3. The electric power supply cables must not show any damage. Have a qualified technician maintain the device. 4. Disconnect the device from the mains prior to maintenance activities. 5. Wipe the device regularly with a moist, lint-free cloth. Do not use alcohol or solvents. 6. There are no user-serviceable parts. 7. Contact your dealer for spare parts if necessary. VDPC174_v2 11 VELLEMAN 7. Technical Specifications Power Supply DMX IN / OUT MIDI IN Dimensions Total Weight Max. Ambient Temperature 9-12VDC / 500mA 3-pin female / male XLR socket 5-pin DIN socket 482 x 134 x 85m 2.7kg 45°C For more info concerning this product, please visit our website www.hqpower.com The information in this manual is subject to change without prior notice. VDPC174 – 192-KANAALS DMX CONTROLLER MET JOYSTICK 1. Inleiding en kenmerken Aan alle ingezetenen van de Europese Unie Belangrijke milieu-informatie betreffende dit product Dit symbool op het toestel of de verpakking geeft aan dat, als het na zijn levenscyclus wordt weggeworpen, dit toestel schade kan toebrengen aan het milieu. Gooi dit toestel (en eventuele batterijen) niet bij het gewone huishoudelijke afval; het moet bij een gespecialiseerd bedrijf terechtkomen voor recyclage. U moet dit toestel naar uw verdeler of naar een lokaal recyclagepunt brengen. Respecteer de plaatselijke milieuwetgeving. Hebt u vragen, contacteer dan de plaatselijke autoriteiten inzake verwijdering. Dank u voor uw aankoop! Lees deze handleiding grondig voor u het toestel in gebruik neemt. Werd het toestel beschadigd tijdens het transport, installeer het dan niet en raadpleeg uw dealer. 2. Veiligheidsinstructies Wees voorzichtig bij de installatie: raak geen kabels aan die onder stroom staan om dodelijke elektroshocks te vermijden. Bescherm dit toestel tegen regen en vochtigheid. Verzeker u ervan dat het toestel niet aangesloten is op een stroombron alvorens het te openen. • De garantie geldt niet voor schade door het negeren van bepaalde richtlijnen in deze handleiding en uw dealer zal de verantwoordelijkheid afwijzen voor defecten of problemen die hier rechtstreeks verband mee houden. • Laat dit toestel installeren en onderhouden door een geschoolde technicus. • Om beschadiging te vermijden, zet u het toestel best niet aan onmiddellijk nadat het werd blootgesteld aan temperatuurschommelingen. Wacht tot het toestel op kamertemperatuur gekomen is. • De beschikbare netspanning mag niet hoger zijn dan de spanning in de specificaties achteraan de handleiding. • De voedingskabel mag niet omgeplooid of beschadigd zijn. Laat uw dealer zo nodig een nieuwe kabel plaatsen. • Trek de stekker uit het stopcontact (trek niet aan de kabel!) voordat u het toestel reinigt en als u het niet gebruikt. • Schade door wijzigingen die de gebruiker heeft aangebracht aan het toestel vallen niet onder de garantie. • Houd dit toestel uit de buurt van kinderen en onbevoegden. 3. Algemene richtlijnen • Dit toestel is ontworpen voor professioneel gebruik op podia, in disco's, enz. U mag dit toestel enkel binnenshuis gebruiken en aansluiten op een spanning van maximum 9-12VDC / 500mA. • Schud het toestel niet dooreen. Vermijd brute kracht tijdens de installatie en de bediening van dit toestel. VDPC174_v2 12 VELLEMAN • Installeer het toestel weg van extreme temperaturen (zie “Technische specificaties”), vochtigheid en stof. Zorg voor een minimumafstand van 0.5m tussen de lichtuitgang van het toestel en het belichte oppervlak. • Leer eerst de functies van het toestel kennen voor u het gaat gebruiken. Ongeschoolde personen mogen dit toestel niet gebruiken. Meestal is beschadiging het gevolg van onprofessioneel gebruik. • Gebruik de oorspronkelijke verpakking wanneer u het toestel vervoert. • Om veiligheidsredenen mag de gebruiker geen wijzigingen aanbrengen aan het toestel. • Gebruik het toestel enkel waarvoor het gemaakt is. Andere toepassingen kunnen leiden tot kortsluitingen, brandwonden, elektrische schokken, enz. Bij onoordeelkundig gebruik vervalt de garantie. 4. Omschrijving a. Frontpaneel (zie fig. 1) 1. Scanner (1 ~ 12) Kies het gewenste toestel. 2. Scene (1 ~ 8) Druk op één van de knoppen om een scène te laden of te bewaren. Er zijn max. 240 programmeerbare scènes. 3. Faders Deze faders worden gebruikt om de intensiteit van kanaal 1 ~ 8 of kanaal 9 ~ 16 te besturen, afhankelijk van de geselecteerde pagina. 4. Page Select Kies pagina A (1 ~ 8) of pagina B (9 ~ 16). 5. Speed-schuifknop Regeling van de chase-snelheid tussen 0.1 seconde tot 10 minuten. 6. Fade Time-schuifknop Regeling van de dimtijd. De dimtijd is de tijd die een scanner nodig heeft om van een positie naar de andere te bewegen of de tijd die een dimmer nodig heeft om in of uit te faden. 7. LCD-display Weergave van de huidige activiteit of programmastatus. 8. Joystick voor pan-regeling Gebruik deze joystick om de pan van een scanner te besturen. 9. Joystick voor tilt-regeling Gebruik deze joystick om de tilt van een scanner te besturen. 10. Program-knop Activering van een programmamodus. 11. MIDI / REC Besturing van de MIDI of opname van programma’s. 12. Auto / Del Activering van de muziekbestuurde modus of selectie van de scènes en chases. 13. Music / Bank Copy Activering van de programmamodus. 14. Bank Up / Down Druk op de Up / Down-knop om één van de 30 banken te selecteren. 15. Tap / Display Creëer een standaard ritme of om de waardemodus tussen % en 0 ~ 255 te wijzigen. 16. Blackout Druk op deze knop op de uitgang te pauzeren. 17. Chase-knop (1 ~ 6) Activering van de chase van de geprogrammeerde scènes. 18. Fine-knop Wanneer deze is ingedrukt, dan kunt u met de pan of tilt joystick de scanner met de kleinste stappen besturen. 19. Mode-knop Druk gelijktijdig op FINE en MODE om de ASSIGN- of REVERSE-modus in te schakelen. VDPC174_v2 13 VELLEMAN b. Achterpaneel (zie fig. 2) 1. MIDI In Ontvangt MIDI-gegevens. 2. DMX Polarity Select Keuze van de DMX-polariteit. 3. DMX Out Deze aansluiting zendt uw DMX-waarde naar de DMX scanner of DMX pack. 4. DMX In Deze aansluiting aanvaardt uw DMX ingangssignalen. 5. DC-ingang 9-12VDC / 500mA. 6. Voedingsschakelaar In- of uitschakelen van het toestel. 7. AUDIO In Aanvaardt audiosignalen tussen 0.1V ~ 1Vpp. 5. Gebruik a. Bediening • Algemeen Met de VDPC174 kunt u 12 scanners van elk 16 DMX-kanalen programmeren, 30 banken met 8 programmeerbare scènes en 6 chases met 240 scènes, bestuurbaar aan de hand van 8 schuifknoppen, een joystick en andere knoppen. Met de joystick kunt u op een gemakkelijke en nauwkeurige wijze de beweging van een toestel besturen. Om uw publiek nog meer verrassen, kunt u DMX-kanalen toewijzen en zelfs omkeren. Bovendien kunt u een complete file dump van een toestel naar een ander transfereren. • Informatie op de display Het LCD-scherm bestaat uit 2 regels, elk met 8 karakters. Hier zijn de omschrijvingen: LCD -display Omschrijving Scène 1 Bank 1 Chase 1 is ingeschakeld Stap 9 van een chase DMX-waarde (000 ~ 255) De huidige snelheid is 1 minuut en 54 seconden De tijd van de laatste twee drukacties is 4.25 seconden Toekennen van kanalen 4 en 5 Omkeren van kanalen 10 en 13 b. Opstelling • Opstelling van een toestel De VDPC174 kent 16 kanalen per toestel toe. Om uw toestellen aan de scannerknoppen links van de controller toe te wijzen, houd 16 kanalen vrij per ingegeven toestel. VDPC174_v2 14 VELLEMAN Geef het DMX-adres in volgens volgende tabel: Toestelnummer 1 2 3 4 5 6 7 8 9 10 11 12 Digitale DMX-adres 1 17 33 19 65 81 97 113 129 145 161 177 Instelling van de DIP-schakelaars van de scanner 1 is ON 1 and 5 are ON 1 and 6 are ON 1, 5 and 6 are ON 1 and 7 are ON 1, 5 and 7 are ON 1, 6 and 7 are ON 1, 5, 6 and 7 are ON 1 and 8 are ON 1, 5 and 8 are ON 1, 6 and 8 are ON 1, 5, 6 and 8 are ON • De PROGRAM-modus inschakelen Om de mode in te schakelen, houd de PROGRAM-knop gedurende enkele seconden ingedrukt tot de LED oplicht. • De joystick instellen 1. Houd de PROGRAM-knop ingedrukt tot de LED oplicht. 2. Houd gelijktijdig de MODE- en de FINE-knop ingedrukt. De ASSIGN LED zou moeten oplichten. Wanneer de REVERSE LED oplicht, druk opnieuw op de FINE- en MODE-knop om de ASSIGN-modus binnen te gaan. 3. Gebruik de UP- en DOWN-knop om de assen te bepalen (pan of tilt). 4. Gebruik de TAP / DISPLAY-knop om de 16- of 8-kanaalsmodus te kiezen. 5. Druk op de knop die met de toe te wijzen scanner overeenstemt. 6. Druk op een scènenummer overeenstemmend met de gewenste schuifknop terwijl u de MODE-knop ingedrukt houdt (Voorbeeld: Wanneer u de pan met schuifknop 4 bestuurt, houd de MODE-knop ingedrukt en druk op scèneknop 4#). 7. Druk vervolgens opnieuw gelijktijdig op de MODE- en FINE-knop om de ASSIGN-modus te verlaten. c. Scènes • Een scène programmeren 1. Ga de PROGRAM-modus binnen (zie “De PROGRAM-modus inschakelen”). 2. Controleer de BLACKOUT-knop en zorg dat de LED niet oplicht. Licht de LED toch op, druk dan éénmaal op de knop om de BLACKOUT-modus te verlaten. 3. Zorg dat de SPEED- en FADE TIME-schuifknoppen op de nulinstelling staan. 4. Druk op de scannerknop overeenstemmend met het toestel die u wenst te besturen. U kunt meer dan één scanner tegelijkertijd besturen door op de knoppen te drukken die met de toestellen overeenkomen. 5. Verplaats de faders en de joystick naar de gewenste positie. Selecteer indien nodig pagina B om kanalen 9 ~ 16 te besturen. 6. Druk op de UP / DOWN-knop om de bank te selecteren waarin u de scène wenst op te slaan. U kunt kiezen uit 30 banken. Elke bank kan tot scènes bevatten. 7. Wanneer u alle scanners zoals gewenst zijn ingegeven, druk op de MIDI / REC-knop om de scène in het geheugen op te slaan. 8. Druk op de scèneknop waarin u de scène wenst op te slaan. Alle LEDs lichten driemaal op. Het LCD-scherm geeft de bank en de scène weer. 9. Om de scanner(s) te wissen en om naar een andere scanner over te gaan, druk op de gewenste scannerknop, vink de scanner uit en kies een andere. 10. Herhaal stap 2 tot 7 tot alle scanners geprogrammeerd zijn. 11. Wenst u verder geen andere toestellen meer in te geven, houd de PROGRAM-knop gedurende een drietal seconden ingedrukt om de PROGRAM-modus te verlaten. De LED dooft. VDPC174_v2 15 VELLEMAN • Voorbeeld hoe een scène te programmeren 1. Schakel de PROGRAM-modus in. 2. Druk op SCANNER 1 zodat de fader ingeschakeld wordt. 3. Zorg dat pagina A geselecteerd staat. Zoniet, druk op PAGE SELECT om pagina A te selecteren. 4. Plaats de eerste en de tweede fader op hun maximumpositie. 5. Selecteer bank 1 met de UP / DOWN-knoppen. 6. Druk op MIDI / REC. 7. Druk op scène 1 om die op te slaan. 8. Herhaal stap 4 tot 7 tot alle scènes in bank 1 zijn geprogrammeerd. 9. Druk op SCANNER 1 om de fader uit te schakelen. 10. Om te beëindigen, schakel de PROGRAM-modus uit. U kunt nu manueel door uw programma’s bladeren. • Een scène bewerken 1. Schakel de PROGRAM-modus in. 2. Druk op UP / DOWN om de bank die u wenst te bewerken te selecteren. 3. Selecteer de te bewerken scène door de overstemmende knop in te drukken. 4. Gebruik de faders en/of joystick om de scène aan te passen. 5. Druk nadien op de MIDI / REC-knop. 6. Druk op de scèneknop die met de bewerkte scène overeenkomt. De bestaande scène wordt overschreven. Zorg dat u dezelfde scène kiest als in stap 3 en 6 om niet over een bestaande scène te schrijven. • Scannerinstellingen kopiëren Hiermee kunt u de instellingen van een scanner naar een andere scanner kopiëren. 1. Houd de gewenste scannerknop ingedrukt. 2. Druk, terwijl u de knop ingedrukt houdt, op de knop van de doelscanner. • Een scène kopiëren 1. Schakel de PROGRAM-modus in. 2. Kies de gewenste bank met de te kopiëren scène met behulp van de UP / DOWN-knop. 3. Kies de te kopiëren scène door op de scèneknop te drukken. 4. Gebruik de UP / DOWN-knop om de bank te kiezen waarnaar u de scène wenst te kopiëren. 5. Druk op MIDI / REC. 6. Druk op de knop van de scène waarnaar u de scène wenst te kopiëren. • Een scène wissen 1. Schakel de PROGRAM-modus in. 2. Druk op de gewenste SCENE-knop. 3. Houd de AUTO / DEL-knop ingedrukt en druk op de SCENE-knop van de te wissen scène. 4. Nadat u de scène hebt gewist, worden de waarden van het DMX-kanaal op 0 gezet. • Alle scènes wissen 1. Houd met een uitgeschakeld toestel gelijktijdig de PROGRAM- en BANK DOWN-koppen ingedrukt. 2. Schakel nu het toestel in. Alle scènes zijn gewist. • Een volledige bank met scènes kopiëren 1. Schakel de PROGRAM-modus in. 2. Druk op UP / DOWN tot u de gewenste bank wordt bereikt. 3. Druk op MIDI / REC. 4. Druk op UP / DOWN om de gewenste bank te selecteren. 5. Druk op MUSIC / BANK COPY, alle LEDs lichten eventjes op om aan te geven dat de functie voltooid is. 6. Om de modus te verlaten, houd de PROGRAM-knop gedurende een drietal seconden ingedrukt. VDPC174_v2 16 VELLEMAN d. Chases • Een chase programmeren Om een scène te kunnen programmeren, moet er eerst en vooral een scène bestaan. Deze functie laat u toe om 240 scènes in een vooraf bepaalde volgorde af te lopen. Het is aangeraden eerst alle chases te wissen vooraleer u chases begint te programmeren. Zie “Alle scènes wissen”. 1. 2. 3. 4. 5. Schakel de PROGRAM-modus in. Druk op CHASE om de gewenste chase te selecteren. Selecteer de gewenste scène uit de bank. Druk op MIDI / REC. Herhaal stappen 3 tot 4 tot alle gewenste scènes ingegeven zijn. • Een bank met scènes in een chase plaatsen 1. Schakel de PROGRAM-modus in. 2. Selecteer de chase die u wenst te programmeren. 3. Selecteer met UP / DOWN de bank die u wenst te kopiëren. 4. Druk op MUSIC / BANK COPY. 5. Druk op MIDI / REC COPY. Alle LEDs knipperen drie maal om aan te geven dat de opdracht is volbracht. • Een stap toevoegen 1. Schakel de PROGRAM-modus in. 2. Druk op de knop van de toe te voegen chase. 3. Druk op TAP / DISPLAY, de LCD geeft de huidige stap weer. 4. Druk op UP / DOWN en rol naar de stap die u wenst in te voegen. 5. Druk MIDI / REC. De display geeft de stap na de vorige stap weer. 6. Druk opnieuw op TAP / DISPLAY. De LCD geeft de huidige chase, scène en bank weer. Creëer nu een scène en registreer als een nieuwe stap of selecteer een bestaande scène en voeg deze toe aan de chase. 7. Wanneer u de gewenste scène hebt geselecteerd, druk opnieuw op MIDI / REC. Alle LEDs knipperen drie maal om aan te geven dat de scène aan de chase is toegevoegd. • Een stap wissen 1. Schakel de PROGRAM-modus in. 2. Selecteer de chase met de te wissen stap. 3. Druk op TAP / DISPLAY, de LCD geeft de huidige stap weer. 4. Druk op bank UP / DOWN en rol naar de stap die u wenst te wissen. 5. Druk op AUTO / DEL om de stap te wissen. Alle LEDs knipperen drie maal om aan te geven dat de opdracht is volbracht. • Een chase wissen 1. Druk op de knop overeenkomend met de te wissen chase. 2. Houd AUTO / DEL en de CHASE-knop ingedrukt. Alle LEDs knipperen drie maal om aan te geven dat de opdracht is volbracht. • Alle chases wissen 1. Met een uitgeschakeld toestel, houd AUTO / DEL en de DOWN-knop gelijktijdig ingedrukt. 2. Schakel het toestel opnieuw in. Alle chases zijn gewist. e. Selecteren van de joystick / het kanaal • De joystick instellen 1. Houd de PROGRAM-knop ingedrukt tot de LED oplicht. 2. Houd gelijktijdig de MODE- en de FINE-knop ingedrukt. De ASSIGN LED licht op. Licht de REVERSE LED op, druk opnieuw op FINE en MODE om u in de ASSIGN-modus te begeven. VDPC174_v2 17 VELLEMAN 3. 4. 5. 6. Selecteer met UP en DOWN de as die u wenst toe te kennen (pan of tilt). Gebruik de TAP / DISPLAY-knop om de 16- of 8-kanaals modus te selecteren. Druk op de scanner die wenst toe te kennen. Houd de MODE-knop ingedrukt en druk op de scène overeenkomend met de schuifknop die de beweging bestuurt. (voorbeeld: de pan-beweging wordt bestuurd door schuifknop 4, houd MODE ingedrukt en druk op scèneknop 4). 7. Om te beïndigen, druk gelijktijdig op MODE en FINE om de ASSIGN-modus te verlaten. • De joystickbeweging / DMX-kanaal omkeren 1. Schakel de PROGRAM-modus in. 2. Druk op FINE en MODE om de ASSIGN-modus binnen te treden. Druk opnieuw op FINE en MODE om u in de REVERSE-modus te begeven. De REVERSE LED licht op om aan te geven dat de REVERSE-modus actief is. 3. Gebruik UP / DOWN om te kiezen tussen pan en tilt. De overeenstemmende LED licht op. 4. Druk op TAP / DISPLAY om te schakelen tussen de 8-kanaals en de 16-kanaals modus. 5. Druk op SCANNER en kies de scanner. 6. Houd MODE ingedrukt en druk op de overeenkomende SCENE-knop of kanaal die u wenst om te keren (voorbeeld: wenst u de scène van een scanner om te keren, eens u in REVERSE-modus bent en de tilt-LED oplicht, controleer dan op welke schuifknop de besturing van de tilt-beweging is aangesloten. Houd MODE ingedrukt en druk op de SCENE-knop overeenkomend met de tilt-schuifknop (schuifknop 5 / scène 5)). 7. Herhaal stap 3 tot 7 indien gewenst. Er kunnen maximaal 48 kanalen of 12 scanners worden omgekeerd. • Een scanner uit een DMX-kanaal wissen 1. Schakel de ASSIGN- of REVERSE-modus in. 2. Druk op de scannerknop en selecteer de te wissen scanner. 3. Druk gelijktijdig op MODE en AUTO / DEL. Alle LEDs knipperen drie maal om aan te geven dat de opdracht is uitgebracht. • Alle DMX-kanalen wissen 1. Schakel het toestel uit. 2. Druk gelijktijdig op MODE en AUTO / DEL. 3. Houd MODE en AUTO / DEL gelijktijdig ingedrukt en schakel het toestel in. Alle LEDs knipperen drie maal om aan te geven dat de opdracht is uitgebracht. • Het DMX-kanaal weergeven 1. Druk gelijktijdig op FINE en MODE. 2. Druk opnieuw op FINE en MODE. De REVERSE LED licht op. 3. Druk op de SCANNER-knop die op de gewenste pan en tilt ingesteld staat. De LCD geeft de DMX-waarden weer voor de pan en tilt. f. Fadingtijd • Fadingtijd / een fadingtijd toekennen 1. Met een uitgeschakeld toestel, druk gelijktijdig op MODE en TAP / DISPLAY. 2. Schakel het toestel in en druk op TAP / DISPLAY om te kiezen tussen FADE TIME en ASSIGN FADE TIME. De LCD geeft het volgende weer: ALL FD CH TIME OR ONLY FD X/Y TIME 3. Druk gelijktijdig op MODE en TAP / DISPLAY om de instelling op te slaan. Wenst u de instelling niet op te slaan, druk op BLACKOUT om te verlaten. VDPC174_v2 18 VELLEMAN g. Weergave • Weergave van scènes Er zijn drie weergavemogelijkheden: MANUEEL, AUTOMATISCH en MUZIEKGESTUURD. • Manuele modus 1. Het toestel begeeft zich automatisch in de manuele mode wanneer u het inschakelt. 2. Ga na of zowel de AUTO en de MUSIC LEDs niet oplichten. 3. Gebruik UP / DOWN om de bank met de scènes te selecteren. 4. Druk op de SCENE-knop die u wenst weer te geven. • Automatische modus Hiermee kunt u een bank met geprogrammeerde scènes sequentieel weergeven. 1. Druk op AUTO / DEL om de AUTO-modus binnen te treden. De AUTO LED licht op om aan te geven dat de modus is geactiveerd. 2. Gebruik UP / DOWN om de bank met scènes te selecteren. 3. Nadat u de bank hebt gekozen, regel de progressiesnelheid met behulp van de SPEED- en de FADE TIMEschuifknop. 4. Stel de snelheid met TAP SYNC / DISPLAY in. Het interval tussen twee drukacties zal gelijk staan aan het interval tussen twee stappen. De instelling blijft actief tot u SPEED-schuifknop verplaatst. 5. Druk op AUTO / DISPLAY om de modus te verlaten. • Muziekgestuurde modus 1. Druk op MUSIC / BANK COPY om de modus in te schakelen. 2. Gebruik UP / DOWN om de bank met scènes te selecteren die u wenst weer te geven. De geselecteerde scènes worden sequentieel weergegeven op het muziekritme door de ingebouwde microfoon opgevangen. 3. Druk opnieuw op MUSIC / BANK COPY om de modus te verlaten. h. De chases weergeven • Manuele modus 1. Het toestel begeeft zich automatisch in de manuele mode wanneer u het inschakelt. 2. Selecteer de chase die u wenst weer te geven door op de overeenkomende chase-knop te drukken. Drukt u opnieuw op deze knop, dan wordt de selectie van de chase tenietgedaan. • Automatische modus 1. Druk op AUTO / DEL om de AUTO-modus in te schakelen. 2. Selecteer de gewenste chase door op één van de zes CHASE-knoppen te drukken. Drukt u opnieuw op dezelfde knop, dan wordt de selectie van de chase tenietgedaan. 3. Gebruik de SPEED- en de FADE TIME-schuifknop om de chase naar wens in te stellen. • Muziekgestuurde mode 1. Druk op MUSIC / BANK COPY om de modus in te schakelen. 2. Selecteer de gewenste chase door op de gewenste CHASE-knop te drukken. Dit schakelt de chase in en laat hem bewegen op het ritme van de muziek. i. Bestandsoverdracht Een bestandsoverdracht laat toe alle informatie opgeslagen in uw VDPC174 naar een tweede VDPC174 te zenden. Koppel de toestellen met 3-pin XLR-kabels als volgt: Koppel de DMX OUT van het zendtoestel met de DMX IN van het ontvangsttoestel. VDPC174_v2 19 VELLEMAN • Een dump-bestand verzenden 1. Schakel het toestel uit en houd gelijktijdig SCANNER 2 en 3 en SCENE 1 ingedrukt. 2. Schakel het toestel terug in terwijl u de drie knoppen ingedrukt houdt. De LCD geeft TRANSMIT weer om aan te geven dat het toestel klaar staat om de bestanden te verzenden. 3. Druk gelijktijdig op SCENE 7 en 8 om de bestanden te verzenden. 4. Bij een fout geeft de LCD ERROR weer.. • Een dump-bestand ontvangen 1. Schakel het toestel uit en houd gelijktijdig SCANNER 8 en 9 en SCENE 2 ingedrukt. 2. Schakel het toestel terug in terwijl u de drie knoppen ingedrukt houdt. De LCD geeft RECEIVE weer om aan te geven dat het toestel de bestangen ontvangt. 3. Na het ontvangen van de bestanden keert het toestel automatisch naar de normale modus terug. j. Instellen van het MIDI-kanaal 1. Houd MIDI / REC gedurende drie seconden ingedrukt. De LCD het laatste MIDI-kanaal weer. 2. Gebruik UP / DOWN om het DMX-kanaal (01 ~ 16) te selecteren die u naar het MIDI-kanaal wenst toe te wijzen. 3. Houd MIDI / REC ingedrukt om de instellingen op te slaan. De LEDs knipperen drie maal om aan te geven dat de opdracht is uitgevoerd. 6. Reiniging en onderhoud 1. Alle gebruikte schroeven moeten goed zijn aangespannen en mogen geen sporen van roest vertonen. 2. De behuizing, de lenzen, de montagebeugels en de montageplaats (bvb. het plafond of het gebinte) mogen niet vervormd zijn of aangepast worden (geen extra gaten in montagebeugels, aansluitingen niet verplaatsen etc.) 3. De voedingskabels mogen niet beschadigd zijn. Laat het toestel onderhouden door een geschoolde technicus. 4. Ontkoppel het toestel van het lichtnet voor u aan onderhoudswerkzaamheden begint. 5. Maak het toestel geregeld schoon met een vochtige, niet pluizende doek. Gebruik geen alcohol of solvent. 6. De gebruiker mag geen onderdelen vervangen. 7. Bestel eventuele reserveonderdelen bij uw dealer. 7. Technische specificaties Voeding DMX IN / OUT MIDI IN Afmetingen Gewicht Max. omgevingstemperatuur 9-12VDC / 500mA 3-pin vrouwelijke / mannelijke XLR-stekker 5-pin DIN-stekker 482 x 134 x 85m 2.7kg 45°C Voor meer informatie omtrent dit product, zie www.hqpower.com De informatie in deze handleiding kan te allen tijde worden gewijzigd zonder voorafgaande kennisgeving. VDPC174_v2 20 VELLEMAN VDPC174 – CONTRÔLEUR DMX 192 CANAUX AVEC MANETTE 1. Introduction et caractéristiques Aux résidents de l'Union européenne Des informations environnementales importantes concernant ce produit Ce symbole sur l'appareil ou l'emballage indique que l’élimination d’un appareil en fin de vie peut polluer l'environnement. Ne pas éliminer un appareil électrique ou électronique (et des piles éventuelles) parmi les déchets municipaux non sujets au tri sélectif ; une déchetterie traitera l’appareil en question. Renvoyer les équipements usagés à votre fournisseur ou à un service de recyclage local. Il convient de respecter la réglementation locale relative à la protection de l’environnement. Si vous avez des questions, contactez les autorités locales pour élimination. Nous vous remercions de votre achat ! Lisez la présente notice attentivement avant la mise en service de l'appareil. Si l’appareil a été endommagé pendant le transport, ne l'installez pas et consultez votre revendeur. 2. Prescriptions de sécurité Soyez prudent lors de l'installation : toucher un câble sous tension peut causer des électrochocs mortels. Protégez l'appareil contre la pluie et l'humidité. Débranchez le câble d'alimentation avant d'ouvrir le boîtier. • La garantie ne s'applique pas aux dommages survenus en négligeant certaines directives de cette notice et votre revendeur déclinera toute responsabilité pour les problèmes et les défauts qui en résultent. • Confiez l'installation et l’entretien à un personnel qualifié. • Ne branchez pas l'appareil après exposition à des variations de température. Afin d’éviter des dommages, attendez jusqu’à ce que l'appareil ait atteint la température ambiante avant de l'utiliser. • La tension réseau ne peut pas dépasser la tension mentionnée dans les spécifications à la fin de cette notice. • Le câble d'alimentation ne peut pas être replissé ou endommagé. Demandez à votre revendeur de renouveler le câble d'alimentation si nécessaire. • Débranchez l’appareil s’il n’est pas utilisé ou pour le nettoyer. Tirez la fiche pour débrancher l'appareil ; non pas le câble. • Les dommages occasionnés par des modifications à l'appareil par le client, ne tombent pas sous la garantie. • Gardez votre VDPC174 hors de la portée de personnes non qualifiées et de jeunes enfants. 3. Directives générales • Cet appareil a été développé pour usage professionnel dans des discothèques, des théâtres, etc. Employez cet appareil à l'intérieur et connectez-le à une source de courant de max. 9-12VCC / 500mA. • Évitez de secouer l'appareil et traitez l'appareil avec circonspection pendant l'installation et l'opération. • Choisissez un endroit où l’appareil est protégé contre la poussière, l’humidité et des températures extrêmes (voir « Spécifications techniques »). Respectez une distance minimum de 0.5m entre la sortie lumière de l’appareil et la surface illuminée. • Familiarisez-vous avec le fonctionnement de l'appareil avant de l’utiliser. Ne permettez pas aux personnes non qualifiées d'opérer cet appareil. La plupart des dégâts sont causés par un usage non professionnel. • Transportez l'appareil dans son emballage originel. • Toute modification de l’appareil est interdite pour des raisons de sécurité. • N’utilisez votre VDPC174 qu’à sa fonction prévue. Tout autre usage peut causer des courts-circuits, des brûlures, des électrochocs etc. Un usage impropre annule d'office la garantie. VDPC174_v2 21 VELLEMAN 4. Description a. Panneau frontal (voir ill. 1) 1. Boutons scanner (1 ~ 12) Sélection de l’appareil. 2. Boutons scène (1 ~ 8) Chargement ou sauvegarde d’un maximum de 240 scènes programmables. 3. Faders Utilisez ces faders pour régler l’intensité des canaux 1 ~ 8 ou des canaux 9 ~ 16, en fonction de la page sélectionnée. 4. Bouton de sélection de la page Sélection de la page A (1 ~ 8) ou de la page B (9 ~ 16). 5. Glissière de vitesse « Speed » Réglage de la vitesse de la poursuite de 0.1 seconde à 10 minutes. 6. Glissière de longueur du fondu « Fade Time » Réglage de la longueur du fondu. La longueur du fondu se définit comme le délai employé par un scanner pour se déplacer d’une position à l’autre et pour un variateur d’effectuer un fondu d’ouverture ou de fermeture. 7. Afficheur LCD Affichage de l’activité actuelle ou le statut de programmation. 8. Manette « Pan » Contrôle du panoramique du scanner. 9. Manette « Tilt » Contrôle de l’inclinaison du scanner. 10. Bouton « Program » Activation du mode de programmation. 11. MIDI / REC Contrôle des opérations MIDI ou enregistrement des programmes. 12. Auto / Del Activation du mode pilotage par la musique ou sélection des scènes et poursuites. 13. Music / Bank Copy Activation du mode de programmation. 14. Bank Up / Down Enfoncez le bouton ▲ ou ▼ pour sélectionner un des 30 bancs. 15. Tap / Display Création d’un rythme standard ou sélection entre % et 0 ~ 255. 16. Bouton « Blackout » Enfoncez ce bouton pour interrompre. 17. Bouton de poursuite (1 ~ 6) Activation de la poursuite d’une scène programmée. 18. Bouton « Fine » Enfoncez ce bouton pour régler le scanner en précision à l’aide de la manette « pan » ou « tilt ». 19. Bouton « Mode » Activez le mode « ASSIGN » ou « REVERSE » en enfonçant simultanément les boutons « FINE » et « MODE ». b. Panneau arrière (voir ill. 2) 1. MIDI In Entrée des données MIDI. 2. DMX Polarity Select Sélection de la polarité DMX. 3. DMX Out Envoi de la valeur DMX vers le scanner DMX ou le pack DMX. VDPC174_v2 22 VELLEMAN 4. DMX In Entrée des signaux DMX. 5. DC Input 9-12VDC / 500mA. 6. Interrupteur de puissance Switch the power on or off. 7. AUDIO In Entrée des signaux audio entre 0.1V ~ 1Vpp. 5. Emploi a. Opération • En général Le VDPC174 permet la programmation de 12 scanners à 16 canaux DMX, 30 bancs de 8 scènes programmables, 6 poursuites de 240 scènes à l’aide de 8 glissières, d’une manette et d’autres boutons. Il est possible de contrôler le mouvement d’un appareil plus facilement et précisément à l’aide de la manette. Pour éblouir votre public, l’appareil vous permet d’allouer et d’inverser des canaux DMX. De surcroît, il est possible de transférer la mémoire d’un appareil à un autre en les raccordant. • L’affichage L’afficheur LCD affiche sur deux lignes de 8 caractères. Veuillez trouver les définitions ci-dessous : Affichage LCD Description Scène 1 Banc 1 Poursuite 1 est activée La 9ième étape d’une poursuite Valeur DMX (000 ~ 255) Vitesse actuelle de 1 minute et 54 secondes Délai entre deux pressions de 4.25 secondes Allocation des canaux DMX 4 et 5 Inversion des canaux DMX 10 et 13 b. Configuration • Configuration de l’unité Votre VDPC174 utilise 16 canaux pour chaque appareil connecté. Pour allouer les boutons scanner il faudra donc compter 16 canaux DMX pour chaque appareil. Référez-vous à la table ci-dessous pour l’adressage DMX : Appareil 1 2 3 4 5 6 7 8 9 10 11 VDPC174_v2 Adresse DMX numérique 1 17 33 19 65 81 97 113 129 145 161 Commutateurs DIP du scanner 1 sur ON 1 et 5 sur ON 1 et 6 sur ON 1, 5 et 6 sur ON 1 et 7 sur ON 1, 5 et 7 sur ON 1, 6 et 7 sur ON 1, 5, 6 et 7 sur ON 1 et 8 sur ON 1, 5 et 8 sur ON 1, 6 et 8 sur ON 23 VELLEMAN 12 177 1, 5, 6 et 8 sur ON • Activation du mode de programmation Pour activer le mode de programmation, maintenez enfoncé le bouton « PROGRAM » pendant quelques secondes jusqu’à ce que la LED s’allume. • Configuration de la manette 1. Maintenez enfoncé le bouton « PROGRAM » jusqu’à ce que la LED s’allume. 2. Maintenez enfoncé les boutons « MODE » et « FINE » simultanément. La LED « ASSIGN » s’allume. Si la LED « REVERSE » s’allume, renfoncez « FINE » et « MODE » pour accéder au mode « ASSIGN ». 3. Sélectionnez l’axe (pan ou tilt) à allouer à l’aide des boutons « UP » et « DOWN ». 4. Utilisez le bouton « TAP / DISPLAY » pour sélectionner le mode 16 ou 8 canaux. 5. Enfoncez le bouton correspondant au scanner à allouer. 6. En maintenant enfoncé le bouton du mode, enfoncez le bouton correspondant à la glissière contrôlant le mouvement (exemple : Si le pan est contrôlé à partir de la glissière 4, maintenez enfoncé le bouton « MODE » en enfonçant de scène 4). 7. Pour terminer, renfoncez simultanément les boutons « MODE » et « FINE » pour quitter le mode « ASSIGN ». c. Les scènes • Programmation d’une scène 1. Entrez dans le mode « PROGRAM » (voir « Activation du mode de programmation »). 2. Veillez à ce que la LED « BLACKOUT » ne s’allume pas. Si la LED s’allume, enfoncez le bouton pour quitter le mode « BLACKOUT ». 3. Placez les glissières « SPEED » et « FADE TIME » en position minimale. 4. Enfoncez le bouton de scanner correspondant à l’appareil que vous désirez contrôler. Il est possible de contrôler plusieurs scanners à la fois en enfonçant le bouton correspondant au(x) scanner(s) que vous désirez contrôler. 5. Placez les glissières et la manette dans la position désirée. Sélectionnez la page B pour contrôler les canaux 9 ~ 16 si souhaité. 6. Enfoncez « UP / DOWN » pour choisir le banc de sauvegarde. Vous avez le choix entre 30 bancs de 8 scènes. 7. Une fois la position des scanners programmées, enfoncez le bouton « MIDI / REC » pour sauvegarder la scène dans la mémoire. 8. Enfoncez le bouton de scène dans laquelle vous désirez sauvegarder la scène. Toutes les LEDs flasheront trois fois. Le LCD affichera le banc et la scène. 9. Pour désélectionner le(s) scanner(s) programme(s) et pour passer à un autre scanner, enfoncez le bouton du scanner programmé, annulez la sélection et sélectionnez un autre scanner. 10. Répétez les étapes 2 à 7 jusqu’à ce que toutes les scènes soient programmées. 11. Si vous ne désirez pas continuer la programmation, maintenez enfoncé le bouton « PROGRAM » pendant trois secondes pour quitter le mode « PROGRAM ». La LED s’éteint. • Exemple d’une programmation d’une scène 1. Activez le mode « PROGRAM ». 2. Enfoncez le bouton « SCANNER 1 » pour activer le contrôle du fondu. 3. Veillez à ce que la page A soit sélectionnée. Enfoncez « PAGE SELECT » pour sélectionner la page. 4. Placez la première et la deuxième glissière au maximum. 5. Sélectionnez le banc 1 à l’aide des boutons « UP / DOWN ». 6. Enfoncez le bouton « MIDI / REC ». VDPC174_v2 24 VELLEMAN 7. Enfoncez le bouton de scène 1 pour sauvegarder la première scène. 8. Répétez les étapes 4 à 7 jusqu’à ce que toutes les scènes soient programmées dans le banc 1. 9. Enfoncez le bouton « SCANNER 1 » pour désactiver le contrôle du fondu. 10. Pour terminer, désactivez le mode « PROGRAM ». À présent, il est de parcourir votre programmation manuellement. • Éditer une scène 1. Activez le mode « PROGRAM ». 2. Pour sélectionner un banc contenant la scène à éditer, enfoncez « UP / DOWN ». 3. Sélectionnez la scène à éditer en enfonçant le bouton correspondant. 4. Utilisez les glissières et/ou la manette pour régler la scène. 5. Les réglages terminés, enfoncez le bouton « MIDI / REC ». 6. Enfoncez le bouton de scène correspondant à la scène éditée. Ceci écrasera la scène existante. Dans les étapes 3 et 6, veillez à sélectionner la même scène pour ne pas effacer des scènes existantes. • Copie de la configuration du scanner Ceci vous permet de copier la configuration d’un scanner vers un autre. 1. Maintenez enfoncé le bouton de scanner à copier. 2. En maintenant le bouton de scanner enfoncé, enfoncez le bouton du scanner-cible. • Copie d’une scène 1. Activez le mode « PROGRAM ». 2. Enfoncez le bouton UP / DOWN pour sélectionner le banc contenant la scène à copier. 3. Sélectionnez la scène en enfonçant le bouton correspondant. 4. Sélectionnez le banc dans lequel vous désirez copier la scène en utilisant les boutons « UP / DOWN ». 5. Enfoncez le bouton « MIDI / REC ». 6. Enfoncez le bouton de la scène que vous désirez copier. • Effacement d’une scène 1. Activez le mode « PROGRAM ». 2. Enfoncez le bouton « SCENE » désiré pour sélectionner la scène à effacer. 3. Maintenez enfoncé le bouton « AUTO / DEL » en enfoncez le bouton « SCENE » correspondant à la scène à effacer. 4. Une fois la scène effacée, toutes les valeurs des canaux DMX seront positionnées sur 0. • Effacement de toutes les scènes 1. Débranchez l’appareil en maintenez simultanément enfoncé les boutons « PROGRAM » et « DOWN ». 2. Rebranchez l’appareil. Toutes les scènes ont été effacées. • Copie d’un banc de scènes 1. Activez le mode « PROGRAM ». 2. Enfoncez UP / DOWN jusqu’à ce que le banc à copier apparaisse. 3. Enfoncez le bouton « MIDI / REC ». 4. Enfoncez UP / DOWN pour sélectionner le banc dans lequel vous désirez copier le banc. 5. Enfoncez « MUSIC / BANK COPY ». Toutes les LEDs flashent trois fois pour indiquer que l’opération est réussite. 6. Maintenez enfoncé le bouton « PROGRAM » pendant trios secondes pour quitter le mode « PROGRAM ». VDPC174_v2 25 VELLEMAN d. Les poursuites • Programmation d’une poursuite Pour pouvoir programmer une poursuite, il faut d’abord programmer des scènes. Cette fonction vous permet de parcourir entre les 240 scènes dans un ordre prédéfini. Il est conseillé de d’abord effacer toutes les poursuites dans le contrôleur avant la première programmation des poursuites. Voir « Effacement de toutes les scènes ». 1. 2. 3. 4. 5. Activez le mode « PROGRAM ». Enfoncez le bouton CHASE pour sélectionner la poursuite à programmer. Sélectionnez votre scène dans le banc. Enfoncez le bouton « MIDI / REC ». Répétez les étapes 3 et 4 jusqu’à ce que toutes les scènes soient instaurées. • Insertion d’un banc de scènes dans une poursuite 1. Activez le mode « PROGRAM ». 2. Sélectionnez la poursuite à programmer. 3. Utilisez les boutons UP / DOWN pour sélectionner le banc de scènes à copier. 4. Enfoncez le bouton MUSIC / BANK COPY. 5. Enfoncez le bouton MIDI / REC COPY. Toutes les LEDs flashent trois fois pour indiquer le complètement de l’opération. • Ajout d’une étape 1. Activez le mode « PROGRAM ». 2. Enfoncez le bouton correspondant à la poursuite à laquelle vous désirez ajouter une étape. 3. Enfoncez le bouton « TAP / DISPLAY ». L’afficheur LCD affiche l’étape actuelle. 4. Enfoncez UP / DOWN et défilez vers l’étape souhaitée. 5. Enfoncez le bouton « MIDI / REC ». L’afficheur affiche l’étape suivant à la précédente. 6. Renfoncez le bouton « TAP / DISPLAY ». Le LCD affiche la poursuite, la scène et le banc actuel. Créez une scène et sauvegardez-la comme une nouvelle étape ou sélectionnez une scène programmée auparavant et ajoutez-la à la poursuite. 7. Une fois la scène sélectionnée, renfoncez « MIDI / REC ». Toutes les LEDs flashent trois fois pour indiquer que la nouvelle étape a été ajoutée dans la poursuite. • Effacement d’une étape 1. Activez le mode « PROGRAM ». 2. Sélectionnez la poursuite contenant l’étape à effacer. 3. Enfoncez « TAP / DISPLAY ». Le LCD affiche l’étape actuelle. 4. Enfoncez le bouton UP / DOWN et défilez vers l’étape à effacer. 5. Enfoncez AUTO / DEL pour effacer l’étape. Toutes les LEDs flashent trois fois pour indiquer le complètement de l’opération. • Effacement d’une poursuite 1. Enfoncez le bouton correspondant à la poursuite que vous désirez effacer. 2. Maintenez enfoncé le bouton « AUTO / DEL » et enfoncez le bouton « CHASE ». Toutes les LEDs flashent trois fois pour indiquer le complètement de l’opération. • Effacement de toutes les poursuites 1. Débranchez l’appareil. Maintenez simultanément enfoncé « AUTO / DEL » et « DOWN ». 2. Rebranchez l’appareil. Toutes les poursuites ont été effacées. VDPC174_v2 26 VELLEMAN e. Sélection de la manette / du canal • Configuration de la manette 1. Maintenez enfoncé « PROGRAM » jusqu’à ce que la LED s’allume. 2. Maintenez simultanément enfoncé les boutons « MODE » et « FINE ». La LED « ASSIGN » s’allume. Si la LED « REVERSE » s’allume, renfoncez « FINE » et « MODE » pour entrer dans le mode « ASSIGN ». 3. Utilisez UP et DOWN pour sélectionner l’axe que vous désirez allouer (pan ou tilt). 4. Sélectionnez le mode 16 ou 8 canaux en utilisant le bouton « TAP / DISPLAY ». 5. Enfoncez le bouton correspondant au scanner que vous désirez allouer. 6. Maintenez enfoncé le bouton « MODE » et enfoncez le bouton de scène correspondant à la glissière contrôlant le mouvement (exemple : Si le pan est contrôlé à partir de la glissière 4, maintenez enfoncé le bouton « MODE » en enfonçant de scène 4). 7. Pour terminer, renfoncez simultanément « MODE » et « FINE » pour quitter le mode « ASSIGN ». • Inversion du mouvement de la manette / canal DMX 1. Activez le mode « PROGRAM ». 2. Enfoncez « FINE » et « MODE » pour accéder au mode « ASSIGN ». Renfoncez « FINE » et « MODE » pour accéder au mode « REVERSE ». La LED « REVERSE » s’allume pour indiquer l’activation du mode. 3. Utilisez « UP / DOWN » pour passer entre le pan et tilt. La LED correspondante s’allume pour indiquer la sélection. 4. Enfoncez TAP / DISPLAY pour choisir entre le mode à 8 canaux et à 16 canaux. 5. Enfoncez le bouton « SCANNER » pour sélectionner le scanner. 6. Maintenez enfoncé le bouton « MODE » et enfoncez le bouton « SCENE » correspondant au canal que vous désirez inverser (exemple : Si vous inversez la scène sur un scanner, entrez en mode « REVERSE » et contrôlez que la LED tilt soit allumée, et vérifiez quelle glissière contrôle le mouvement tilt. Maintenez enfoncé le bouton « HOLD » et enfoncez le bouton « SCENE » correspondant à la glissière (glissière 5 / scène 5)). 7. Répétez les étapes 3 à 7 si nécessaire. Il est possible d’inverser un maximum de 48 canaux et 12 scanners. • Effacement d’un scanner du canal DMX 1. Activez le mode « ASSIGN » ou « REVERSE ». 2. Enfoncez le bouton « SCANNER » du scanner que vous désirez effacer. 3. Enfoncez simultanément les boutons « MODE » et « AUTO / DEL ». Toutes les LEDs flashent trois fois pour indiquer le complètement de l’opération. • Effacement de tous les canaux DMX 1. Débranchez l’appareil. 2. Enfoncez simultanément les boutons « MODE » et « AUTO / DEL ». 3. Maintenez enfoncé les deux boutons et rebranchez l’appareil. Toutes les LEDs flashent brièvement pour indiquer le complètement de l’opération. • Affichage du canal DMX 1. Enfoncez simultanément les boutons « FINE » et « MODE ». 2. Renfoncez les boutons « FINE » et « MODE ». La LED « REVERSE » s’allume. 3. Enfoncez le bouton « SCANNER » souhaité. Le LCD affiche les valeurs DMX pour les mouvements pan et tilt. f. Délai du fondu • Délai du fondu / attribution d’un délai de fondu 1. Débranchez l’appareil et enfoncez simultanément les boutons « MODE » et « TAP / DISPLAY ». 2. Rebranchez l’appareil. Enfoncez les boutons « TAP / DISPLAY » pour choisir entre « FADE TIME » et « ASSIGN FADE TIME ». Le résultat s’affiche sur le LCD. VDPC174_v2 27 VELLEMAN ALL FD CH TIME OR ONLY FD X/Y TIME 3. Enfoncez simultanément les boutons « MODE » et « TAP / DISPLAY » pour sauvegarder la configuration dans la mémoire. Si vous ne souhaitez pas sauvegarder la configuration, enfoncez le bouton « BLACKOUT » pour quitter. g. Repassage • Reproduction des scènes Il est possible de jouer les scènes et les poursuites à partir de trois modes : le mode manuel (« MANUAL »), le mode automatique (« AUTO ») et le mode piloté par la musique (« MUSIC »). • Le mode manuel 1. L’appareil entre automatiquement en mode manuel dès la mise en marche. 2. Assurez-vous que les LEDs « AUTO » et « MUSIC » soient éteintes. 3. Utilisez les boutons « UP / DOWN » pour sélectionner le banc avec les scènes à reproduire. 4. Enfoncez le bouton « SCENE » correspondant à la scène que vous désirez afficher. • Le mode automatique Cette fonction permet la reproduction séquentielle de scènes. 1. Enfoncez le bouton « AUTO / DEL » pour accéder au mode « AUTO ». La LED « AUTO » s’allume indiquant l’activation du mode « AUTO ». 2. Utilisez les boutons « UP / DOWN » pour sélectionner le banc avec les scènes à reproduire. 3. Après la sélection, utilisez les glissières « SPEED » et « FADE TIME » pour ajuster la vitesse de la progression de la scène. 4. Il est également possible d’instaurer la vitesse à l’aide du bouton TAP SYNC / DISPLAY. Le délai entre deux pressions définit ainsi le délai entre deux étapes. Ce réglage reste valable jusqu’à ce que la glissière soit déplacée. 5. Enfoncez le bouton « AUTO / DISPLAY » pour quitter le mode « AUTO ». • Le mode piloté par la musique 1. Enfoncez « MUSIC / BANK COPY » pour activer le mode « MUSIC ». 2. Utilisez le bouton « UP / DOWN » pour sélectionner le banc avec les scènes à reproduire. Les scènes sélectionnées seront reproduites séquentiellement au rythme de la musique grâce au microphone intégré. 3. Renfoncez le bouton « MUSIC / BANK COPY » pour quitter le mode « MUSIC ». h. Reproduction des poursuites • Le mode manuel 1. L’appareil entre automatiquement en mode manuel dès la mise en marche. 2. Sélectionnez la poursuite que vous désirez reproduire en enfonçant le bouton de la poursuite correspondant. Enfoncez ce bouton une seconde fois pour désélectionner la poursuite. • Le mode automatique 1. Enfoncez le bouton « AUTO / DEL » pour accéder au mode « AUTO ». 2. Sélectionnez la poursuite en enfonçant un des six boutons « CHASE ». Enfoncez ce bouton une seconde fois pour désélectionner la poursuite. 3. Utilisez les glissières « SPEED » et « FADE TIME » pour ajuster la poursuite selon vos spécifications. • Le mode piloté par la musique 1. Enfoncez le bouton « MUSIC / BANK COPY » pour activer le mode « MUSIC ». 2. Sélectionnez la poursuite en enfonçant un des six boutons « CHASE ». Ceci activera la poursuite qui réagira au rythme de la musique. VDPC174_v2 28 VELLEMAN i. Transfert de fichiers Un transfert de fichiers permet de copier toutes les données sauvegardées dans un VDPC174 vers un deuxième VDPC174. Raccordez les unités à l’aide de câbles XLR à trois broches. Branchez le câble à la connexion « DMX OUT » de l’appareil transférant les données, branchez l’autre fiche du câble à la connexion « DMX IN » de l’appareil recevant les données. • Transfert d’une copie de fichiers 1. Débranchez l’appareil. Maintenez simultanément enfoncez les boutons « SCANNER 2 » et « 3 » et le bouton « SCENE 1 ». 2. Rebranchez l’appareil en maintenant enfoncé ces trois boutons. Le LCD affiche « TRANSMIT », l’appareil est prêt à transférer les données. 3. Enfoncez simultanément les boutons « SCENE 7 » et « 8 » pour effectuer le transfert. 4. Le LCD affiche « ERROR » en cas d’une erreur. • Réception d’une copie de fichiers 1. Débranchez l’appareil. Maintenez simultanément enfoncez les boutons « SCANNER 8 » et « 9 » et le bouton « SCENE 2 ». 2. Rebranchez l’appareil en maintenant enfoncé ces trois boutons. Le LCD affiche « RECEIVE », l’appareil reçoit les données. 3. Une fois la réception terminée, l’appareil revient automatiquement en mode « NORMAL ». j. MIDI Channel Setting 1. Maintenez enfoncé le bouton « MIDI / REC » pendant trois secondes. Le LCD affiche le dernier canal MIDI utilisé. 2. Utilisez le bouton « UP / DOWN » pour sélectionner le canal DMX (01 ~ 16) à attribuer au canal MIDI. 3. Maintenez enfoncé « MIDI / REC » pour sauvegarder la configuration. Toutes les LEDs flashent trois fois pour indiquer le complètement de l’opération. 6. Nettoyage et entretien 1. Serrez les écrous et les vis et vérifiez qu'ils ne rouillent pas. 2. Le boîtier, les lentilles, les supports de montage et la construction portante ne peuvent pas être déformés, adaptés ou bricolés p.ex. pas de trous additionnels dans un support, ne pas déplacer les connexions etc. 3. Les câbles d'alimentation ne peuvent pas être endommagés. Un technicien qualifié doit entretenir l’appareil. 4. Débranchez l'appareil avant de le nettoyer. 5. Essuyez l'appareil régulièrement avec un chiffon humide non pelucheux. Evitez l'usage d'alcool et de solvants. 6. Il n’y a aucune pièce maintenable par l’utilisateur. 7. Commandez des pièces de rechange éventuelles chez votre revendeur. 7. Spécifications techniques Alimentation DMX IN / OUT MIDI IN Dimensions Poids Température amiante max. 9-12VCC / 500mA femelle à 3 points / embase XLR mâle embase DIN à 5 points 482 x 134 x 85m 2.7kg 45°C Pour plus d’information concernant cet article, visitez notre site web www.hqpower.com Toutes les informations présentées dans cette notice peuvent être modifiées sans notification préalable. VDPC174_v2 29 VELLEMAN VDPC174 – CONTROLADOR DMX DE 192 CANALES CON PALANCA DE CONTROL 1. Introducción y características A los ciudadanos de la Unión Europea Importantes informaciones sobre el medio ambiente concerniente este producto Este símbolo en este aparato o el embalaje indica que, si tira las muestras inservibles, podrían dañar el medio ambiente. No tire este aparato (ni las pilas eventuales) en la basura doméstica; debe ir a una empresa especializada en reciclaje. Devuelva este aparato a su distribuidor o a la unidad de reciclaje local. Respete las leyes locales en relación con el medio ambiente. Si tiene dudas, contacte con las autoridades locales para eliminación. ¡Gracias por haber comprado el VDPC174! Lea cuidadosamente las instrucciones del manual antes de usarlo. Si el aparato ha sufrido algún daño en el transporte no lo instale y póngase en contacto con su distribuidor. 2. Instrucciones de seguridad Cuidado durante la instalación: puede sufrir una peligrosa descarga eléctrica al tocar los cables con un voltaje peligroso. No exponga este equipo a lluvia ni humedad. Desconecte el cable de alimentación de la red antes de abrir la caja. • Daños causados por descuido de las instrucciones de seguridad de este manual invalidarán su garantía y su distribuidor no será responsable de ningún daño u otros problemas resultantes. • La instalación y el mantenimiento deben ser realizados por personal especializado. • No conecte el aparato si ha estado expuesto a grandes cambios de temperatura. Espere hasta que el aparato llegue a la temperatura ambiente. • Asegúrese de que la tensión de red no sea mayor que la tensión indicada en las especificaciones. • No aplaste el cable de alimentación y protéjalo contra posibles daños causados por algún tipo de superficie afilada. Si es necesario, pida a su distribuidor reemplazar el cable de alimentación. • Desconecte siempre el aparato si no va a usarlo durante un largo período de tiempo o antes de limpiarlo. Tire siempre del enchufe para desconectar el cable de red, nunca del propio cable. • Los daños causados por modificaciones no autorizadas, no están cubiertos por la garantía. • Mantenga el VDPC174 lejos del alcance de personas no capacitadas y niños. 3. Normas generales • Este aparato ha sido diseñado para uso profesional en una discoteca, un teatro, etc. El VDPC174 sólo está permitido para una conexión con una fuente de corriente de máx. 9-12VCC / 500mA. • No agite el aparato. Evite usar excesiva fuerza durante la instalación y la reparación. • Seleccione un lugar de montaje donde el aparato no esté expuesto a polvo, humedad y calor extremo (véase “Especificaciones”). Respete una distancia de mín. 0.5m entre la salida de luz y el área iluminada. • Familiarícese con el funcionamiento del aparato. Sólo personas cualificadas pueden manejar este aparato. La mayoría de los daños son causados por un uso inadecuado. • Transporte el aparato en su embalaje original. • Por razones de seguridad, las modificaciones no autorizadas del aparato están prohibidas. • Utilice sólo el VDPC174 para las aplicaciones descritas en este manual a fin de evitar p.ej. cortocircuitos, quemaduras, descargas eléctricas, etc. Un uso desautorizado puede causar daños y anula la garantía completamente. VDPC174_v2 30 VELLEMAN 4. Descripción a. Panel frontal (véase fig. 1) 1. Botones escáner (1 ~ 12) Seleccionar el aparato. 2. Botones escena (1 ~ 8) Cargar o guardar máx. 240 escenas programables. 3. Faders Utilice los faders para ajustar la intensidad de los canales 1 ~ 8 o los canales 9 ~ 16, en función del rango seleccionado. 4. Botón de selección del rango Seleccionar el rango A (1 ~ 8) o el rango B (9 ~ 16). 5. Deslizador de velocidad « Speed » Ajustar la velocidad del chase (persecución) de 0.1 segundo a 10 minutos. 6. Deslizador del « Fade Time » (tiempo de fundido) Ajustar el tiempo ‘fade’. El tiempo ‘fade’ se define como el tiempo utilizado por un escáner para desplazarse de una posición a otra y por un dimmer para efectuar un ‘fade in’ o ‘fade out’. 7. Pantalla LCD Visualizar la actividad actual o el estado de programación. 8. Palanca « Pan » Controlar la rotación del escáner. 9. Palanca « Tilt » Controlar la inclinación del escáner. 10. Botón « Program » Activar el modo de programación. 11. MIDI / REC Controlar las operaciones MIDI o la grabación de los programas. 12. Auto / Del Activar el modo de control por la música o la selección de escenas y persecuciones. 13. Music / Bank Copy Activar el modo de programación. 14. Bank Up / Down Pulse el botón ▲ o ▼ para seleccionar uno de los 30 bancos. 15. Tap / Display Crear un ritmo estándar o seleccionar entre % y 0 ~ 255. 16. Botón « Blackout » Pulse este botón para interrumpir. 17. Botón « Chase » (1 ~ 6) 18. Activar el ‘chase’ de una escena programada. 19. Botón « Fine » Pulse este botón para ajustar el escáner con los pasos más pequeños con la palanca « pan » o « tilt ». 20. Botón « Mode » Active el modo « ASSIGN » o « REVERSE » al pulsar simultáneamente los botones « FINE » y « MODE ». b. Panel trasero (véase fig. 2) 1. MIDI In Entrada de datos MIDI. 2. DMX Polarity Select Selección de la polaridad DMX. VDPC174_v2 31 VELLEMAN 3. DMX Out Envío del valor DMX al escáner DMX o el pack DMX. 4. DMX In Entrada de las señales DMX. 5. DC Input 9-12VDC / 500mA. 6. Interruptor ON/OFF Para activar y desactivar el aparato. 7. AUDIO In Entrada de las señales audio entre 0.1V ~ 1Vpp. 5. Uso a. Funcionamiento • En general El VDPC174 permite programar 12 escáneres de 16 canales DMX, 30 bancos de 8 escenas programables y 6 chases de 240 escenas con los 8 deslizadores, una palanca y otros botones. Con la palanca es posible controlar el movimiento de un aparato de manera más fácil y precisa. Para sorprender aun más a su público, el aparato le permite asignar e invertir los canales DMX. Además, es posible transferir la memoria de un aparato a otro al conectarlos. • La pantalla La pantalla LCD visualiza en dos líneas de 8 caracteres. Véase las descripciones a continuación: Pantalla LCD Descripción Escena 1 Banco 1 Chase 1 está activado El noveno paso de un chase Valor DMX (000 ~ 255) Velocidad actual de 1 minuto y 54 segundos Tiempo de los últimos dos presiones es 4.25 segundos Asignar los canales DMX 4 y 5 Invertir los canales DMX 10 y 13 b. Configuración • Configurar un aparato El VDPC174 utiliza 16 canales para cada aparato conectado. Por tanto, para asignar los aparatos a los botones del escáner a la izquierda, mantenga libre 16 canales DMX para cada aparato. Véase la siguiente lista para la dirección DMX: Aparato 1 2 3 4 5 6 VDPC174_v2 Dirección DMX digital 1 17 33 19 65 81 Conmutadores DIP del escáner 1 en la posición ON 1 y 5 en la posición ON 1 y 6 en la posición ON 1, 5 y 6 en la posición ON 1 y 7 en la posición ON 1, 5 y 7 en la posición ON 32 VELLEMAN 7 8 9 10 11 12 97 113 129 145 161 177 1, 6 y 7 en la posición ON 1, 5, 6 y 7 en la posición ON 1 y 8 en la posición ON 1, 5 y 8 en la posición ON 1, 6 y 8 en la posición ON 1, 5, 6 y 8 en la posición ON • Activar el modo de programación Para activar el modo de programación, mantenga pulsado el botón « PROGRAM » durante algunos segundos hasta que el LED se ilumine. • Configurar la palanca 1. Mantenga pulsado el botón « PROGRAM » hasta que el LED se ilumine. 2. Mantenga pulsados los botones « MODE » y « FINE » simultáneamente. El LED « ASSIGN » se ilumina. Si el LED « REVERSE » se ilumina, vuelva a pulsar « FINE » y « MODE » para entrar en el modo « ASSIGN ». 3. Determine los ejes (pan o tilt) con los botones « UP » y « DOWN ». 4. Utilice el botón « TAP / DISPLAY » para seleccionar el modo de 16 ó 8 canales. 5. Pulse el botón correspondiente con el scanner que quiere asignar. 6. Pulse un número de escena y el deslizador correspondiente mientras mantiene pulsado el botón « MODE », (ejemplo: Si controla el pan con deslizador 4, mantenga pulsado el botón « MODE » y pulse el botón de escena 4). 7. Finalmente, vuelva a pulsar simultáneamente los botones « MODE » y « FINE » para salirse del modo « ASSIGN ». c. Las escenas • Programar una escena 1. Entre en el modo « PROGRAM » (véase « Activar el modo de programación »). 2. Asegúrese de que el LED « BLACKOUT » no se ilumina. Si el LED se ilumina, pulse el botón para salirse del modo « BLACKOUT ». 3. Ponga los deslizadores « SPEED » y « FADE TIME » en la posición mínima. 4. Pulse el botón de escáner correspondiente con el aparato que quiere controlar. Es posible controlar varios escáneres a la vez al pulsar el botón correspondiente al(a los) escáner(es) que quiere controlar. 5. Ponga los deslizadores y la palanca en la posición deseada. Seleccione el rango B para controlar los canales 9 ~ 16 si fuera deseado. 6. Pulse « UP / DOWN » para seleccionar el banco de donde quiere guardar la escena. Puede seleccionar entre 30 bancos de 8 escenas. 7. Después de haber programado la posición de los escáneres, pulse el botón « MIDI / REC » para guardar la escena en la memoria. 8. Pulse el botón de escena en la que quiere guardar la escena. Todos los LEDs parpadeará 3 veces. La pantalla LCD visualizará el banco y la escena. 9. Para deseleccionar el(los) escáner(es) programado(s) y para ir a otro escáner, pulse el botón del escáner programado, anule la selección y seleccione otro escáner. 10. Repita los pasos de 2 a 7 hasta que todas las escenas estén programadas. 11. Si quiere terminar la programación, mantenga pulsado el botón « PROGRAM » tres segundos para salirse del modo « PROGRAM ». El LED se apaga. • Ejemplo de una programación de una escena 1. Active el modo « PROGRAM ». 2. Pulse el botón « SCANNER 1 » para activar el fader. 3. Asegúrese de que el rango A esté seleccionado. Pulse « PAGE SELECT » para seleccionar el rango. 4. Ponga el primer y el segundo deslizador en la posición máxima. 5. Seleccione el banco 1 con los botones « UP / DOWN ». 6. Pulse el botón « MIDI / REC ». VDPC174_v2 33 VELLEMAN 7. Pulse el botón de escena 1 para guardar la primera escena. 8. Repita los pasos de 4 a 7 hasta que todas las escenas estén programadas en el banco 1. 9. Pulse el botón « SCANNER 1 » para desactivar el fader. 10. Para terminar, desactive el modo « PROGRAM ». Ahora, puede hojear los programas manualmente. • Editar una escena 1. Active el modo « PROGRAM ». 2. Para seleccionar un banco que contiene la escena que quiere editar, pulse « UP / DOWN ». 3. Seleccione la escena que quiere editar al pulsar el botón correspondiente. 4. Utilice los deslizadores y/o la palanca para ajustar la escena. 5. Después de haber terminado los ajustes, pulse el botón « MIDI / REC ». 6. Pulse el botón de escena que coincide con la escena editada. Esto borrará la escena existente. En los pasos 3 y 6, asegúrese de que seleccione la misma escena para no borrar escenas existentes. • Copiar la configuración del escáner Esto le permite copiar la configuración de un escáner a otro. 1. Mantenga pulsado el botón de escáner que quiere copiar. 2. Al mantener pulsado el botón del escáner, pulse el botón del escáner objetivo. • Copiar una escena 1. Active el modo « PROGRAM ». 2. Pulse el botón UP / DOWN para seleccionar el banco que contiene la escena que quiere copiar. 3. Seleccione la escena al pulsar el botón correspondiente. 4. Seleccione el banco al que quiere copiar la escena al utilizar los botones « UP / DOWN ». 5. Pulse el botón « MIDI / REC ». 6. Pulse el botón de la escena que quiere copiar. • Borrar una escena 1. Active el modo « PROGRAM ». 2. Pulse el botón « SCENE » deseado para seleccionar la escena que quiere borrar. 3. Mantenga pulsado el botón « AUTO / DEL » y pulse el botón « SCENE » que coincide con la escena que quiere borrar. 4. Después de haber borrado la escena, todos los valores de los canales DMX se pondrán en la posición 0. • Borrar todas las escenas 1. Desconecte el aparato al mantener pulsado simultáneamente los botones « PROGRAM » y « DOWN ». 2. Vuelva a conectar el aparato. Todas las escenas han sido borradas. • Copiar un banco con escenas 1. Active el modo « PROGRAM ». 2. Pulse UP / DOWN hasta que el banco que quiere copiar aparezca. 3. Pulse el botón « MIDI / REC ». 4. Pulse UP / DOWN para seleccionar el banco al que quiere copiar el banco. 5. Pulse « MUSIC / BANK COPY ». Todos los LEDs parpadean tres veces para indicar que la operación ha salido bien. 6. Mantenga pulsado el botón « PROGRAM » durante tres segundos para salirse del modo « PROGRAM ». VDPC174_v2 34 VELLEMAN d. Chases (persecuciones) • Programar un chase Para poder programar un chase, primero, programe las escenas. Esta función le permite hojear en un orden predefinido entre las 240 escenas. Aconsejamos borrar todos los chases del controlador antes de la primera programación de los chases. Véase « Borrar todas las escenas ». 1. 2. 3. 4. 5. Active el modo « PROGRAM ». Pulse el botón CHASE para seleccionar el chase que quiere programar. Seleccione la escena en el banco. Pulse el botón « MIDI / REC ». Repita los pasos 3 y 4 hasta que todas las escenas estén introducidas. • Introducir un banco de escenas en un chase 1. Active el modo « PROGRAM ». 2. Seleccione el chase que quiere programar. 3. Utilice los botones UP / DOWN para seleccionar el banco de escenas que quiere copiar. 4. Pulse el botón MUSIC / BANK COPY. 5. Pulse el botón MIDI / REC COPY. Todos los LEDs parpadean tres veces para indicar que la operación está terminada. • Añadir un paso 1. Active el modo « PROGRAM ». 2. Pulse el botón al que quiere añadir un paso. 3. Pulse el botón « TAP / DISPLAY ». La pantalla LCD visualiza el paso actual. 4. Pulse UP / DOWN y desplácese hacia el paso desado. 5. Pulse el botón « MIDI / REC ». La pantalla visualiza el paso que sigue al paso precedente. 6. Vuelva a pulsar el botón « TAP / DISPLAY ». La pantalla LCD visualiza el chase, la escena y el banco actual. Crea una escena y guárdela como un nuevo paso o seleccione una escena programada existente y añadela al chase. 7. Después de haber seleccionado la escena, vuelva a pulsar « MIDI / REC ». Todos los LEDs parpadean tres veces para indicar que el nuevo paso ha sido añadido al chase. • Borrar un paso 1. Active el modo « PROGRAM ». 2. Seleccione el chase que contiene el paso que quiere borrar. 3. Pulse « TAP / DISPLAY ». La pantalla LCD visualiza el paso actual. 4. Pulse el botón UP / DOWN y desplácese hacia el paso que quiere borrar. 5. Pulse AUTO / DEL para borrar el paso. Todos los LEDs parpadean tres veces para indicar que el paso ha sido borrado. • Borrar un chase 1. Pulse el botón que coincide con el chase que quiere borrar. 2. Mantenga pulsado el botón « AUTO / DEL » y pulse el botón « CHASE ». Todos los LEDs parpadean tres veces para indicar que la operación está terminada. • Borrar todos los chases 1. Desconecte el aparato. Mantenga pulsado simultáneamente « AUTO / DEL » y « DOWN ». 2. Vuelva a conectar el aparato. Todos los chases están borrados. VDPC174_v2 35 VELLEMAN e. Seleccionar la palanca / el canal • Configurar la palanca 1. Mantenga pulsado « PROGRAM » hasta que el LED se ilumine. 2. Mantenga pulsado simultáneamente los botones « MODE » y « FINE ». El LED « ASSIGN » se ilumina. Si el LED « REVERSE » se ilumina, vuelva a pulsar « FINE » y « MODE » para entrar en el modo « ASSIGN ». 3. Utilice UP y DOWN para seleccionar el eje que quiere asignar (pan o tilt). 4. Seleccione el modo de 16 ó 8 canales al utilizar el botón « TAP / DISPLAY ». 5. Pulse el botón que coincide con el escáner que quiere asignar. 6. Mantenga pulsado el botón « MODE » y pulse el botón de escena que coincide con el deslizador que controla el movimiento (ejemplo: si el pan se controla por el deslizador 4, mantenga pulsado el botón « MODE » al pulsar escena 4). 7. Para terminar, vuelva a pulsar simultáneamente « MODE » y « FINE » para salirse del modo « ASSIGN ». • Invertir el movimiento de la palanca / el canal DMX 1. Active el modo « PROGRAM ». 2. Pulse « FINE » y « MODE » para entrar en el modo « ASSIGN ». Vuelva a pulsar « FINE » y « MODE » para entrar en el modo « REVERSE ». El LED « REVERSE » se ilumina para indicar la activación del modo. 3. Utilice « UP / DOWN » para conmutar entre pan y tilt. El LED correspondiente se ilumina para indicar la selección. 4. Pulse TAP / DISPLAY para seleccionar entre el modo de 8 canales y 16 canales. 5. Pulse el botón « SCANNER » para seleccionar el escáner. 6. Mantenga pulsado el botón « MODE » y pulse el botón « SCENE » que coincide con el canal que quiere invertir (ejemplo: Si invierte la escena de un escáner, entre en el modo « REVERSE » y verifique que el LED tilt esté iluminado, y verifique que deslizador controla el movimiento tilt. Mantenga pulsado el botón « HOLD » y pulse el botón « SCENE » que coincide con el deslizador (deslizador 5 / escena 5)). 7. Repita los pasos de 3 a 7 si fuera necesario. Es posible invertir máx. 48 canales y 12 escáneres. • Borrar un escáner del canal DMX 1. Active el modo « ASSIGN » o « REVERSE ». 2. Pulse el botón « SCANNER » del escáner que quiere borrar. 3. Pulse simultáneamente los botones « MODE » y « AUTO / DEL ». Todos los LEDs parpadean tres veces para indicar que la operación está terminada. • Borrar todos los canales DMX 1. Desconecte el aparato. 2. Pulse simultáneamente los botones « MODE » y « AUTO / DEL ». 3. Mantenga pulsado los dos botones y vuelva desconectar el aparato. Todos los LEDs parpadean brevemente para indicar que la operación está terminada. • Visualizar el canal DMX 1. Pulse simultáneamente los botones « FINE » y « MODE ». 2. Vuelva a pulsar los botones « FINE » et « MODE ». El LED « REVERSE » se ilumina. 3. Pulse el botón « SCANNER » deseado. La pantalla LCD visualiza los valores DMX para los movimientos pan y tilt. f. Fade time (tiempo de fundido) • Fade time / atribuir un tiempo fade 1. Desconecte el aparato y pulse simultáneamente los botones « MODE » y « TAP / DISPLAY ». 2. Vuelva desconectar el aparato. Pulse los botones « TAP / DISPLAY » para seleccionar entre « FADE TIME » y « ASSIGN FADE TIME ». El resultado se visualiza en la pantalla LCD. VDPC174_v2 36 VELLEMAN ALL FD CH TIME OR ONLY FD X/Y TIME 3. Pulse simultáneamente los botones « MODE » y « TAP / DISPLAY » para guardar la configuración en la memoria. Si no quiere guardar la configuración, pulse el botón « BLACKOUT » para salirse. g. Reproducción • Reproducir escenas Es posible reproducir escenas y chases con tres modos: el modo manual (« MANUAL »), el modo automático (« AUTO ») y el modo controlado por la música (« MUSIC »). • El modo manual 1. El aparato entra automáticamente en el modo manual en cuanto lo active. 2. Asegúrese de que los LEDs « AUTO » y « MUSIC » estén apagados. 3. Utilice los botones « UP / DOWN » para seleccionar el banco con las escenas que quiere reproducir. 4. Pulse el botón « SCENE » que coincide con la escena que quiere visualizar. • El modo automático Esta función permite la reproducción secuencial de escenas. 1. Pulse el botón « AUTO / DEL » para entrar en el modo « AUTO ». El LED « AUTO » se ilumina indicando la activación del modo « AUTO ». 2. Utilice los botones « UP / DOWN » para seleccionar el banco con las escenas que quiere reproducir. 3. Después de la selección, utilice los deslizadores « SPEED » y « FADE TIME » para ajustar la velocidad de la progresión de la escena. 4. También es posible introducir la velocidad con el botón TAP SYNC / DISPLAY. El tiempo entre dos presiones define el tiempo entre dos pasos. Este ajuste queda válido hasta que se desplace el deslizador. 5. Pulse el botón « AUTO / DISPLAY » para salirse del modo « AUTO ». • El modo controlado por la música 1. Pulse « MUSIC / BANK COPY » para entrar en el modo « MUSIC ». 2. Utilice el botón « UP / DOWN » para seleccionar el banco con las escenas que quiere reproducir. Las escenas seleccionadas se reproducirán de manera secuencial al ritmo de la música gracias al micrófono incorporado. 3. Vuelva a pulsar el botón « MUSIC / BANK COPY » para salirse del modo « MUSIC ». h. Reproducir chases • El modo manual 1. El aparato entra automáticamente en el modo manual en cuanto lo active. 2. Seleccione el chase que quiere reproducir al pulsar el botón del chase correspondiente. Vuelva a pulsar este botón para deseleccionar el chase. • El modo automático 1. Pulse el botón « AUTO / DEL » para entrar en el modo « AUTO ». 2. Seleccione el chase al pulsar uno de los seis botones « CHASE ». Vuelva a pulsar este botón para deseleccionar el chase. 3. Utilice los deslizadores « SPEED » y « FADE TIME » para ajustar el chase según sus especificaciones. • El modo controlado por la música 1. Pulse el botón « MUSIC / BANK COPY » para activar el modo « MUSIC ». 2. Seleccione el chase al pulsar uno de los seis botones « CHASE ». Esto activará el chase que reaccionará al ritmo de la música. VDPC174_v2 37 VELLEMAN i. Transmitir ficheros Una transmisión de ficheros permite copiar todos los datos guardados en un VDPC174 a un segundo VDPC174. Conecte los aparatos con los cables XLR de tres polos. Conecte el cable a la conexión « DMX OUT » de aparato que transmite los datos, conecte el otro conector del cable a la conexión « DMX IN » del aparato que recibe los datos. • Transmitir una copia de ficheros 1. Desconecte el aparato. Mantenga pulsado simultáneamente los botones « SCANNER 2 » y « 3 » y el botón « SCENE 1 ». 2. Vuelva a desconectar el aparato al mantener pulsado estos tres botones. La pantalla LCD visualiza « TRANSMIT », el aparato está listo para transmitir los datos. 3. Pulse simultáneamente los botones « SCENE 7 » y « 8 » para efectuar la transmisión. 4. La pantalla LCD visualiza « ERROR » en caso de un error. • Recibir una copia de ficheros 1. Desconecte el aparato. Mantenga pulsado simultáneamente los botones « SCANNER 8 » y « 9 » y el botón « SCENE 2 ». 2. Vuelva a desconectar el aparato al mantener pulsado estos tres botones. La pantalla LCD visualiza « RECEIVE », el aparato recibe los datos. 3. Después de haber terminado la recepción, el aparato vuelve automáticamente en el modo « NORMAL ». j. Ajuste del canal MIDI 1. Mantenga pulsado el botón « MIDI / REC » durante tres segundos. La pantalla LCD visualiza el último canal MIDI utilizado. 2. Utilice el botón « UP / DOWN » para seleccionar el canal DMX (01 ~ 16) que quiere atribuir al canal MIDI. 3. Mantenga pulsado « MIDI / REC » para guardar la configuración. Todos los LEDs parpadean tres veces para indicar que la operación está terminada. 6. Limpieza y mantenimiento 1. Apriete bien las tuercas y los tornillos y verifique que no hay señales de oxidación. 2. No modifique la caja, los soportes y las conexiones p.ej. no taladre agujeros adicionales en un soporte o no modifique las conexiones, etc. 3. No dañe los cables de alimentación. Contacte con un técnico especializado para instalar el aparato. 4. Desconecte el aparato de toda fuente antes de limpiarlo. 5. Limpie el aparato regularmente con un paño húmedo y sin pelusas. Evite el uso de alcohol y de disolventes. 6. El usuario no habrá de efectuar el mantenimiento de ninguna pieza. 7. Contacte con su distribuidor si necesita piezas de recambio. 7. Especificaciones Alimentación DMX IN / OUT MIDI IN Dimensiones Peso Temperatura ambiente máx. 9-12VCC / 500mA hembra de 3 polos / XLR macho DIN de 5 polos 482 x 134 x 85m 2.7kg 45°C Para más información sobre este producto, visite nuestra página web www.hqpower.com Se pueden modificar las especificaciones y el contenido de este manual sin previo aviso. VDPC174_v2 38 VELLEMAN VDPC174 – DMX-CONTROLLER FÜR 192 KANÄLE MIT JOYSTICK 1. Einführung & Eigenschaften An alle Einwohner der Europäischen Union Wichtige Umweltinformationen über dieses Produkt Dieses Symbol auf dem Produkt oder der Verpackung zeigt an, dass die Entsorgung dieses Produktes nach seinem Lebenszyklus der Umwelt Schaden zufügen kann. Entsorgen Sie die Einheit (oder verwendeten Batterien) nicht als unsortiertes Hausmüll; die Einheit oder verwendeten Batterien müssen von einer spezialisierten Firma zwecks Recycling entsorgt werden. Diese Einheit muss an den Händler oder ein örtliches Recycling-Unternehmen retourniert werden. Respektieren Sie die örtlichen Umweltvorschriften. Falls Zweifel bestehen, wenden Sie sich für Entsorgungsrichtlinien an Ihre örtliche Behörde. Danke für Ihren Ankauf! Bitte lesen Sie vor Inbetriebnahme diese Bedienungsanleitung sorgfältig durch. Überprüfen Sie, ob Transportschäden vorliegen. Sollte dies der Fall sein, verwenden Sie das Gerät nicht und wenden Sie sich an Ihren Händler. 2. Sicherheitsvorschriften Seien Sie vorsichtig bei der Installation: Fassen Sie keine stromführenden Kabel an, um einen lebensgefährlichen elektrischen Schlag zu vermeiden. Schützen Sie das Gerät vor Feuchtigkeit und Nässe. Trennen Sie das Gerät vor dem Öffnen vom Netz. • Bei Schäden, die durch Nichtbeachtung der Bedienungsanleitung verursacht werden, erlischt der Garantieanspruch. Für daraus resultierende Folgeschäden übernimmt der Hersteller keine Haftung. • Installation und Wartung sind einer autorisierten Fachkraft vorbehalten. • Nehmen Sie das Gerät erst in Betrieb, nachdem es von einem kalten in einen warmen Raum gebracht wurde. Lassen Sie das Gerät solange ausgeschaltet, bis es die Zimmertemperatur erreicht hat. • Vergewissern Sie sich, dass die anzuschließende Netzspannung nicht höher ist als die Netzspannung beschrieben in dieser Bedienungsanleitung. • Das Versorgungskabel darf nicht gequetscht oder beschädigt sein. Lassen Sie es von Ihrem Händler ersetzen. • Trennen Sie das Gerät bei Nichtbenutzung und vor jeder Reinigung vom Netz. Fassen Sie dazu den Netzstecker an der Grifffläche an und ziehen Sie nie an der Netzleitung. • Beachten Sie, dass Schäden, die durch manuelle Veränderungen an diesem Gerät verursacht werden, nicht unter den Garantieanspruch fallen. • Halten Sie Kinder und Unbefugte vom Gerät fern. 3. Allgemeine Richtlinien • Dieses Gerät ist entworfen für den professionellen Einsatz auf Bühnen, in Discotheken, usw. Sie dürfen dieses Gerät nur im Innenbereich bei einer maximalen Spannung von max. 9-12VDC / 500mA verwenden. • Vermeiden Sie Erschütterungen. Vermeiden Sie rohe Gewalt während der Installation und Bedienung des Gerätes. • Achten Sie bei der Wahl des Installationsortes darauf, dass das Gerät keinem Staub, keiner Feuchtigkeit und extremen Temperaturen ausgesetzt wird. Sorgen Sie für einen Abstand von minimal 50cm zwischen dem Gerät und einer beleuchteten Oberfläche. • Nehmen Sie das Gerät erst in Betrieb, nachdem Sie sich mit seinen Funktionen vertraut gemacht haben. Lassen Sie das Gerät nicht von Personen bedienen, die sich nicht mit dem Gerät auskennen. Meist ist die Beschädigung des Gerätes das Ergebnis von unfachmännischer Bedienung. • Verwenden Sie die Originalverpackung, wenn das Gerät transportiert werden soll. VDPC174_v2 39 VELLEMAN • Eigenmächtige Veränderungen sind aus Sicherheitsgründen verboten. • Verwenden Sie das Gerät nur für Anwendungen beschrieben in dieser Bedienungsanleitung sonst kann dies zu Schäden am Produkt führen und erlischt der Garantieanspruch. Jede andere Verwendung ist mit Gefahren wie Kurzschluss, Brandwunden, elektrischem Schlag, Lampenexplosion, usw. verbunden. 4. Umschreibung a. Frontplatte (siehe Abb. 1) 1. Scanner (1 ~ 12) Wählen Sie das gewünschte Gerät. 2. Scene (1 ~ 8) Drücken Sie eine der Tasten um eine Szene zu laden oder zu speichern. Es gibt max. 240 programmierbare Szenen. 3. Faders Diese Blendregler werden verwendet um die Intensität von Kanälen 1 ~ 8 oder Kanal 9 ~ 16 zu steuern, abhängig von der gewählten Seite. 4. Page Select Wählen Sie Seite A (1 ~ 8) oder Seite B (9 ~ 16). 5. Speed-Schiebeschalter Regelung der Chase-Geschwindigkeit zwischen 0.1 Sekunde bis 10 Minuten. 6. Fade Time-Schiebeschalter Regelung der Dimmzeit. Die Dimmzeit ist die Zeit, die der Scanner braucht um von der einen Position zu der anderen Position zu bewegen oder die Zeit, die der Scanner braucht um ein- oder auszufaden. 7. LCD-Display Wiedergabe der aktuellen Aktivität oder des aktuellen Programmstatus. 8. Joystick für Schwenkregelung Verwenden Sie diesen Joystick um den Schwenk des Scanners zu steuern. 9. Joystick für Neigeregelung Verwenden Sie diesen Joystick um die Neige des Scanners zu steuern. 10. Programmtaste Aktivierung eines Programmmodus. 11. MIDI / REC Steuerung von MIDI oder Aufnahme von Programmen. 12. Auto / Del Aktivierung des musikgesteuerten Modus oder Auswahl der Szenen und Chases. 13. Music / Bank Copy Aktivierung des Programmmodus. 14. Bank Up / Down Drücken Sie die Up / Down-Taste um eine der 30 Banken zu selektieren. 15. Tap / Display Zum Kreieren Sie einen standardmäßigen Rhythmus oder um den Wertmodus zwischen % und 0 ~ 255 zu ändern. 16. Blackout Drücken Sie diese Taste um den Ausgang zu pausieren. 17. Chase-Taste (1 ~ 6) Chase-Aktivierung der programmierten Chases. 18. Fine-Taste Wenn diese Taste gedrückt ist, können Sie mit dem Schwenk- oder Neigejoystick den Scanner mit den kleinsten Schritten steuern. 19. Mode-Taste Drücken Sie zur gleichen Zeit FINE und MODE um den ASSIGN- oder REVERSE-Modus einzuschalten. VDPC174_v2 40 VELLEMAN b. Rückplatte (siehe Abb. 2) 1. MIDI In Empfängt MIDI-Daten. 2. DMX Polarity Select Wahl der DMX-Polarität. 3. DMX Out Dieser Anschluss sendet Ihren DMX-Wert an den DMX-Scanner oder DMX-Pack. 4. DMX In Dieser Anschluss akzeptiert Ihre DMX-Eingangssignale. 5. DC-ingang 9-12VDC / 500mA. 6. Stromschalter Ein- und Ausschalten des Gerätes. 7. AUDIO In Akzeptiert Audiosignale zwischen 0.1V ~ 1Vpp. 5. Anwendung a. Bedienung • Allgemeines Mit dem VDPC174 können Sie 12 Scanner von jeweils 16 DMX-Kanälen programmieren, 30 Banken mit 8 programmierbaren Szenen und 6 Chases mit 240 Szenen, steuerbar mit 8 Schiebeschaltern, einem Joystick und anderen Tasten. Mit dem Joystick können Sie einfach und genau die Bewegung eines Gerätes steuern. Um das Publikum zu überraschen, können Sie DMX-Kanäle zuteilen und sogar umkehren. Außerdem können Sie einen ganzen File Dump von dem einen Gerät auf das andere übertragen. • Information auf dem Display Der LCD-Schirm besteht aus 2 Regeln, jeweils mit 8 Charaktern. Siehe Umschreibung: LCD -Display Umschreibung Szene 1 Bank 1 Chase 1 ist eingeschaltet Schritt 9 einer Chase DMX-Wert (000 ~ 255) die heutige Geschwindigkeit ist 1 Minute und 54 Sekunden die Zeit der letzten zwei Druckaktionen ist 4.25 Sekunden Zuteilen der Kanäle 4 und 5 Umkehren der Kanäle 10 und 13 b. Aufstellung • Gerät aufstellen Der VDPC174 weist 16 Kanäle pro Gerät zu. Um Ihre Geräte an die Scannertaste links auf dem Steuergerät zuzuweisen, halten Sie 16 Kanäle pro Gerät frei. VDPC174_v2 41 VELLEMAN Geben Sie die DMX-Adresse gemäß folgender Tabelle in: Gerätenummer 1 2 3 4 5 6 7 8 9 10 11 12 digitale DMX-Adresse 1 17 33 19 65 81 97 113 129 145 161 177 Einstellung der DIP-Schalter des Scanners 1 ist ON 1 und 5 sind ON 1 und 6 sind ON 1, 5 und 6 sind ON 1 und 7 sind ON 1, 5 und 7 sind ON 1, 6 und 7 sind ON 1, 5, 6 und 7 sind ON 1 und 8 sind ON 1, 5 und 8 sind ON 1, 6 und 8 sind ON 1, 5, 6 und 8 sind ON • Programmmodus einschalten Zum Einschalten des Modus, halten Sie die PROGRAMM-Taste während einiger Sekunden gedrückt bis die LED aufleuchtet. • Joystick einstellen 1. Halten Sie die Programmtaste gedrückt bis die LED aufleuchtet. 2. Halten Sie MODE und FINE zur gleichen Zeit gedrückt. Die ASSIGN LED sollte aufleuchten. Wenn die REVERSE LED aufleuchtet, drücken Sie erneut die FINE- und MODE-Taste um den ASSIGN-Modus zu öffnen. 3. Verwenden Sie die UP- und DOWN-Taste um die Achsen zu bestimmen (Schwenk oder Neige). 4. Verwenden Sie die TAP / DISPLAY-Taste um den 16- oder 8-Kanalmodus zu wählen. 5. Drücken Sie die Taste, die dem zuzuweisenden Scanner entspricht. 6. Drücken Sie die Szenenummer, die dem gewünschten Schiebeschalter entspricht; während Sie die MODETaste gedrückt halten (Beispiel: wenn Sie den Schwenk mit dem Schiebeschalter 4 steuern, halten Sie die MODE-Taste gedrückt und drücken Sie Szenentaste 4#). 7. Drücken Sie danach gleichzeitig die MODE- und FINE-Taste um den ASSIGN-Modus zu verlassen. c. Szenen • Eine Szene programmieren 1. Öffnen Sie den Programmmodus (siehe “Programmmodus einschalten”). 2. Überprüfen Sie die BLACKOUT-Taste und sorgen Sie dafür, dass die LED nicht aufleuchtet. Sollte die LED trotzdem aufleuchten, drücken Sie einmal die Taste um den BLACKOUT-Modus zu verlassen. 3. Sorgen Sie dafür, dass die SPEED- und FADE TIME-Schiebeschalter in der Nullposition stehen. 4. Drücken Sie die Scannertaste, die dem Gerät, den Sie steuern wollen, entspricht. Sie können verschiedene Scanner zur gleichen Zeit steuern, indem Sie die verschiedenen entsprechenden Tasten drücken. 5. Stellen Sie die Blendregler und den Joystick in die gewünschte Position. Wählen Sie wenn nötig Seite B um Kanäle 9 ~ 16 zu steuern. 6. Drücken Sie die UP / DOWN-Tasten um die Bank, in der Sie die Szene speichern wollen, zu selektieren. Sie können aus 30 Banken wählen. Jede Bank kann bis zu 8 Szenen enthalten. 7. Wenn Sie alle Scanner nach Wunsch eingegeben haben, drücken Sie die MIDI / REC-Taste um die Szene zu speichern. 8. Drücken Sie die Szenetaste wo Sie die Szene speichern wollen. Alle LEDs leuchten dreimal auf. Der LCDSchirm zeigt die Bank und die Szene an. 9. Um die Scanner zu löschen, drücken Sie die gewünschte Scannertaste, deaktivieren Sie den Scanner und wählen Sie einen anderen. 10. Wiederholen Sie Schritt 2 bis 7 bis alle Scanner programmiert sind. 11. Wenn Sie keine anderen Geräte eingeben wollen, halten Sie die PROGRAMM-Taste einige Sekunden gedrückt um den Programmmodus zu verlassen. Die LED erlischt. VDPC174_v2 42 VELLEMAN • Wie eine Szene programmieren 1. Schalten Sie den Programmmodus ein. 2. Drücken Sie SCANNER 1, sodass Fader eingeschaltet wird. 3. Sorgen Sie dafür, dass Seite A selektiert ist. Wenn das nicht der Fall ist, drücken Sie PAGE SELECT um Seite A zu selektieren. 4. Stellen Sie den ersten und den zweiten Blendregler in die Maximalposition. 5. Wählen Sie Bank 1 mit den UP / DOWN-Tasten. 6. Drücken Sie MIDI / REC. 7. Drücken Sie Szene 1 zum Speichern. 8. Wiederholen Sie Schritte 4 bis 7 bis Szenen in Bank 1 programmiert sind. 9. Drücken Sie SCANNER 1 um den Blendregler auszuschalten. 10. Zum Beenden, schalten Sie den Programmmodus aus. Sie können jetzt manuell die Programme durchblättern. • Eine Szene bearbeiten 1. Schalten Sie den Programmmodus ein. 2. Drücken Sie UP / DOWN um die Bank, die Sie bearbeiten möchten, zu selektieren. 3. Wählen Sie die zu bearbeitende Szene, indem Sie die entsprechende Taste drücken. 4. Verwenden Sie die Blendregler und/oder Joystick um die Szene anzupassen. 5. Drücken Sie nachher die MIDI / REC-Taste. 6. Drücken Sie die Szenentaste, die der bearbeiteten Szene entspricht. Die bestehende Szene wird überschrieben. Sorgen Sie dafür, dass Sie dieselbe Szene wählen wie in den Schritten 3 und 6, damit Sie eine bestehende Szene nicht überschreiben. • Scannereinstellungen kopieren Hier können Sie die Einstellungen von einem Scanner zum anderen Scanner kopieren. 1. Halten Sie die gewünschte Scannertaste gedrückt. 2. Drücken Sie, während Sie die Taste gedrückt halten, die Taste des Zielscanners. • Eine Szene kopieren 1. Schalten Sie den Programmmodus ein. 2. Wählen Sie die gewünschte Bank mit der zu kopierenden Szene mithilfe der UP / DOWN-Taste. 3. Wählen Sie eine zu kopierende Szene, indem Sie die Szenetaste drücken. 4. Verwenden Sie die UP / DOWN-Taste um die Bank, nach der Sie die Szene kopieren wollen, zu wählen. 5. Drücken Sie MIDI / REC. 6. Drücken Sie die Taste der Szenen, nach der Sie die Szene kopieren wollen. • Eine Szene löschen 1. Schalten Sie den Programmmodus ein. 2. Drücken Sie die gewünschte SCENE-Taste. 3. Halten Sie die AUTO / DEL-Taste gedrückt und drücken Sie die SCENE-Taste der zu löschenden Szene. 4. Wenn Sie die Szene gelöscht haben, werden Sie Werte des DMX-Kanals auf 0 gestellt. • Alle Szenen löschen 1. Halten Sie bei einem ausgeschalteten Gerät gleichzeitig die PROGRAM- und BANK DOWN-Tasten gedrückt. 2. Schalten Sie das Gerät ein. Alle Szenen sind gelöscht. • Eine vollständige Bank mit Szenen kopieren 1. Schalten Sie den Programmmodus ein. 2. Drücken Sie UP / DOWN bis Sie die gewünschte Bank erreicht haben. 3. Drücken Sie MIDI / REC. VDPC174_v2 43 VELLEMAN 4. Drücken Sie UP / DOWN um die gewünschte Bank zu selektieren. 5. Drücken Sie MUSIC / BANK COPY, alle LEDs leuchten kurz auf, als Zeichen, dass die Funktion beendet ist. 6. Um den Modus zu verlassen, halten Sie die Programmtaste 3 Sekunden gedrückt. d. Chases • Eine Chase programmieren Um eine Szene zu programmieren, sollte es zuerst eine Szene geben. Diese Funktion ermöglicht Ihnen, 240 Szenen in bestimmter Reihenfolge ablaufen zu lassen. Es ist empfehlenswert, zuerst alle Chases zu löschen, bevor Sie die Chases programmieren. Siehe "Alle Szenen löschen". 1. 2. 3. 4. 5. Schalten Sie den Programmmodus ein. Drücken Sie CHASE um die gewünschte Chase zu selektieren. Wählen Sie die gewünschte Szene aus der Bank. Drücken Sie MIDI / REC. Wiederholen Sie die Schritte 3 bis 4 bis alle gewünschten Szenen eingegeben sind. • Eine Bank mit Szenen in eine Chase bringen 1. Schalten Sie den Programmmodus ein. 2. Wählen Sie die Chase, die Sie programmieren wollen. 3. Wählen Sie mit UP / DOWN die Bank, die Sie kopieren wollen. 4. Drücken Sie MUSIC / BANK COPY. 5. Drücken Sie MIDI / REC COPY. Alle LEDs blinken dreimal um anzuzeigen, dass die Aufgabe vollendet ist. • Einen Schritt hinzufügen 1. Schalten Sie den Programmmodus ein. 2. Drücken Sie die Taste der hinzuzufügenden Chase. 3. Drücken Sie TAP / DISPLAY, das LCD zeigt den aktuellen Schritt an. 4. Drücken Sie UP / DOWN und scrollen Sie zum Schritt, den Sie hinzufügen wollen. 5. Drücken Sie MIDI / REC. Das Display zeigt den Schritt nach dem vorigen Schritt. 6. Drücken Sie erneut TAP / DISPLAY. Das LCD zeigt die heutige Chase, Szene und Bank an. Schaffen Sie jetzt eine Szene in registrieren Sie diese als einen neuen Schritt und fügen Sie ihn der Chase hinzu. 7. Wenn Sie eine gewünschte Szene selektiert haben, drücken Sie erneut MIDI / REC. Alle LEDs blinken dreimal, als Anzeige, dass die Szene der Chase hinzugefügt wurde. • Einen Schritt löschen 1. Schalten Sie den Programmmodus ein. 2. Selektieren Sie die Chase mit dem zu löschenden Schritt. 3. Drücken Sie TAP / DISPLAY, das LCD zeigt den heutigen Schritt. 4. Drücken Sie Bank UP / DOWN und scrollen Sie zum Schritt, den Sie löschen wollen. 5. Drücken Sie AUTO / DEL um den Schritt zu löschen. Alle LEDs blinken dreimal als Anzeige, dass die Aufgabe ausgeführt ist. • Eine Chase löschen 1. Drücken Sie die Taste, die der zu löschenden Chase entspricht. 2. Halten Sie AUTO / DEL und die CHASE-Taste gedrückt. Alle LEDs blinken dreimal als Anzeige, dass die Aufgabe ausgeführt ist. • Alle Chases löschen 1. Bei einem ausgeschalteten Gerät, halten Sie die AUTO / DEL und die DOWN-Taste zur gleichen Zeit gedrückt. 2. Schalten Sie das Gerät erneut ein. Alle Chases sind gelöscht worden. VDPC174_v2 44 VELLEMAN e. Selektieren des Joysticks / des Kanals • Joystick einstellen 1. Halten Sie die Programmtaste gedrückt bis die LED aufleuchtet. 2. Halten Sie gleichzeitig die MODE- und die FINE-Taste gedrückt. Die ASSIGN LED leuchtet auf. Wenn die REVERSE LED leuchtet, drücken Sie erneut FINE und MODE um den ASSIGN-Modus zu öffnen. 3. Wählen Sie mit UP und DOWN die Achse, die Sie zuweisen wollen (Schwenk oder Neige). 4. Verwenden Sie die TAP / DISPLAY-Taste um den 16- oder 8-Kanal-Modus zu selektieren. 5. Drücken Sie den Scanner, den Sie zuweisen wollen. 6. Halten Sie die MODE-Taste gedrückt und drücken Sie die Szene, die dem Schiebschalter, der die Bewegung steuert, entspricht (z.B. die Schwenkbewegung wird über Schiebeschalter 4 gesteuert, halten Sie MODE gedrückt und drücken Sie Szenetaste 4). 7. Zum Beenden, drücken Sie gleichzeitig MODE und FINE um den ASSIGN-Modus zu verlassen. • Die Joystickbewegung / DMX-Kanal umkehren 1. Schalten Sie den Programmmodus ein. 2. Drücken Sie FINE und MODE um den ASSIGN-Modus zu öffnen. Drücken Sie erneut FINE und MODE um den REVERSE-Modus zu öffnen. Die REVERSE LED leuchtet auf als Anzeige, dass der REVERSE-Modus aktiv ist. 3. Verwenden Sie die UP / DOWN-Taste um zwischen Schwenk und Neige zu wählen. Die entsprechende LED leuchtet auf. 4. Drücken Sie TAP / DISPLAY um zwischen dem 8-Kanal- und dem 16-Kanal-Modus zu schalten. 5. Drücken Sie SCANNER und wählen Sie den Scanner. 6. Halten Sie MODE gedrückt und drücken Sie die entsprechende Szenentaste oder drücken Sie den Kanal, den Sie umkehren wollen (Beispiel: wenn Sie eine Szene eines Scanners umkehren wollen, wenn Sie sich im REVERSE-Modus befinden und den Neige-LED aufleuchtet, überprüfen Sie, an welchen Schiebeschalter die Steuerung der Neigebewegung angeschlossen ist. Halten Sie MODE gedrückt und drücken Sie die Szenentaste, die dem Neige-Schiebschalter entspricht (Schiebeschalter 5 / Szene 5)). 7. Wiederholen Sie Schritte 3 bis 7, falls nötig. Es können maximal 48 Kanäle oder 12 Scanner umgekehrt werden. • Einen Scanner aus einem DMX-Kanal löschen 1. Schalten Sie den ASSIGN- oder REVERSE-Modus ein. 2. Drücken Sie die Scannertaste und wählen Sie den zu löschenden Scanner. 3. Drücken Sie gleichzeitig MODE und AUTO / DEL. Alle LEDs blinken dreimal, als Anzeige, dass die Aufgabe ausgeführt wurde. • Alle DMX-Kanäle löschen 1. Schalten Sie das Gerät aus. 2. Drücken Sie zur gleichen Zeit auf MODE und AUTO / DEL. 3. Halten Sie MODE und AUTO / DEL gleichzeitig gedrückt und schalten Sie das Gerät ein. Alle LEDs blinken dreimal, als Anzeige, dass die Aufgabe ausgeführt wurde. • Den DMX-Kanal anzeigen 1. Drücken Sie gleichzeitig FINE und MODE. 2. Drücken Sie erneut FINE und MODE. Die REVERSE LED leuchtet auf. 3. Drücken Sie die SCANNER-Taste, die auf die gewünschte Schwenk- und Neigebewegung eingestellt ist. Das LCD zeigt die DMX-Werte für Schwenk und Neige. f. Fadingzeit • Fadingzeit / Fadingzeit zuweisen 1. Bei einem ausgeschalteten Gerät, drücken Sie gleichzeitig MODE und TAP / DISPLAY. 2. Schalten Sie das Gerät ein und drücken Sie TAP / DISPLAY um zwischen FADE TIME und ASSIGN FADE TIME zu wählen. Das LCD zeigt das folgende: VDPC174_v2 45 VELLEMAN ALL FD CH TIME OR ONLY FD X/Y TIME 3. Drücken Sie gleichzeitig MODE und TAP / DISPLAY um die Einstellung zu speichern. Wenn Sie die Einstellung nicht speichern wollen, drücken Sie BLACKOUT zum Verlassen. g. Wiedergabe • Wiedergabe von Szenen Es gibt drei Wiedergabemöglichkeiten: MANUELL, AUTOMATISCH und MUSIKGESTEUERT • Manueller Modus 1. Das Gerät schaltet automatisch in den manuellen Modus wenn Sie es einschalten. 2. Überprüfen Sie, ob sowohl die AUTO als die MUSIC LEDs nicht aufleuchten. 3. Verwenden Sie UP / DOWN um die Bank mit Szenen zu selektieren. 4. Drücken Sie die SCENE-Taste, die Sie zeigen wollen. • Automatischer Modus So können Sie eine Bank mit programmierten Szenen sequenziell wiedergeben. 1. Drücken Sie AUTO / DEL um den AUTO-Modus zu öffnen. Die AUTO LED leuchtet auf als Anzeige, dass der Modus aktiviert ist. 2. Verwenden Sie UP / DOWN um die Bank mit Szenen zu selektieren. 3. Wenn Sie die Bank gewählt haben, regeln Sie die Ablaufgeschwindigkeit mithilfe des SPEED- und den FADE TIME-Schiebeschalter. 4. Stellen Sie die Geschwindigkeit mit TAP SYNC / DISPLAY ein. Das Intervall zwischen zwei Tastendrücken ist gleich dem Intervall zwischen zwei Schritten. Die Einstellung bleibt aktiv bis Sie den SPEED-Schiebeschalter verstellen. 5. Drücken Sie AUTO / DISPLAY um den Modus zu verlassen. • Musikgesteuerter Modus 1. Drücken Sie MUSIC / BANK COPY um den Modus einzuschalten. 2. Verwenden Sie UP / DOWN um die Bank mit Szenen, die Sie zeigen wollen, zu selektieren. Die selektierten Szenen werden sequenziell im Takt der Musik, der vom eingebauten Mikrofon empfangen wird, gezeigt. 3. Drücken Sie erneut MUSIC / BANK COPY um den Modus zu verlassen. h. Die Chases zeigen • Manueller Modus 1. Das Gerät schaltet automatisch in den manuellen Modus wenn Sie es einschalten. 2. Wählen Sie die Chase, die Sie zeigen wollen, indem Sie die entsprechende Chasetaste drücken. Wenn Sie erneut diese Taste drücken, wird die Auswahl der Chase aufgehoben. • Automatischer Modus 1. Drücken Sie AUTO / DEL um den AUTO-Modus einzuschalten. 2. Wählen Sie die gewünschste Chase über eine der 6 CHASE-Tasten. Wenn Sie erneut dieselbe Taste drücken, wird die Auswahl aufgehoben. 3. Verwenden Sie den SPEED- und FADE TIME-Schiebeschalter um die Chase nach Wunsch einzustellen. • Musikgesteuerter Modus 1. Drücken Sie MUSIC / BANK COPY um den Modus einzuschalten. 2. Wählen Sie die gewünschte Chase mit der entsprechenden Chase-Taste. Das schaltet die Chase ein und lässt sie im Takt der Musik bewegen. VDPC174_v2 46 VELLEMAN i. Dateiübertragung Eine Dateiübertragung ermöglicht Ihnen, alle gespeicherten Informationen Ihres VDPC174 an einen zweiten VDPC174 zu senden. Verbinden Sie die Geräte mit 3-poligen XLR-Kabeln: Verbinden Sie den DMX OUT des Sendegerätes mit dem DMX IN des Empfangsgerätes. • Eine Dumpdatei versenden 1. Schalten Sie das Gerät aus und halten Sie gleichzeitig SCANNER 2 und 3 und SCENE 1 gedrückt. 2. Schalten Sie das Gerät erneut ein während Sie die drei Tasten gedrückt halten. Das LCD zeigt TRANSMIT, als Anzeige, dass das Gerät zum Versenden fertig ist. 3. Drücken Sie zur gleichen Zeit SCENE 7 und 8 um die Dateien zu versenden. 4. Bei einem Fehler zeigt der LCD-Schrim ERROR. • Eine Dumpdatei empfangen 1. Schalten Sie das Gerät aus und halten Sie gleichzeitig SCANNER 8 und 9 und SCENE 2 gedrückt 2. Schalten Sie das Gerät erneut ein während Sie die drei Tasten gedrückt halten. Das LCD zeigt RECEIVE, als Anzeige, dass das Gerät die Datei empfängt. 3. Nach dem Empfangen der Dateien kehrt das Gerät automatisch zum normalen Modus zurück. j. Einstellen des MIDI-Kanals 1. Halten Sie MIDI / REC während drei Sekunden gedrückt. Das LCD zeigt den letzten MIDI-Kanal. 2. Verwenden Sie UP / DOWN um den DMX-Kanal (01 ~ 16), den Sie dem MIDI-Kanal zuweisen wollen, zu selektieren. 3. Halten Sie MIDI / REC gedrückt um die Einstellungen zu speichern. Die LEDs blinken dreimal als Anzeige, dass die Aufgabe ausgeführt wurde. 6. Reinigung & Wartung 1. Verwendete Schrauben müssen fest angespannt werden und dürfen keine Rostspuren zeigen. 2. Das Gehäuse, die Linsen, die Montagebügel und der Montageort (z.B. Decke oder Gebinde) dürfen nicht angepasst werden, z.B. bohren Sie keine zusätzlichen Löcher in Montagebügel, verändern Sie die Anschlüsse nicht, usw. 3. Sorgen Sie dafür, dass die Netzkabel nicht beschädigt sind. Lassen Sie das Gerät von einer Fachkraft warten. 4. Trennen Sie das Gerät vom Netz ehe Sie mit den Servicearbeiten anfangen. 5. Verwenden Sie zur Reinigung ein feuchtes Tuch. Verwenden Sie auf keinen Fall Alkohol oder irgendwelche Lösungsmittel. 6. Die Teile dürfen nicht eigenmächtig ersetzt werden, (außer der Sicherung) (siehe “Installation“). 7. Bestellen Sie eventuelle Ersatzteile bei Ihrem Fachhändler. 7. Technische Daten Stromversorgung DMX IN / OUT MIDI IN Abmessungen Gewicht Max. Umgebungstemperatur 9-12VDC / 500mA 3-polig XLR-Stecker/Buchse 5-poliger DIN-Stecker 482 x 134 x 85m 2.7kg 45°C Für mehr Informationen zu diesem Produkt, siehe www.hqpower.com Alle Änderungen vorbehalten. VDPC174_v2 47 VELLEMAN-
 1
1
-
 2
2
-
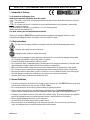 3
3
-
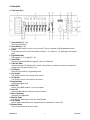 4
4
-
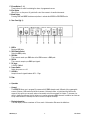 5
5
-
 6
6
-
 7
7
-
 8
8
-
 9
9
-
 10
10
-
 11
11
-
 12
12
-
 13
13
-
 14
14
-
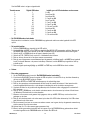 15
15
-
 16
16
-
 17
17
-
 18
18
-
 19
19
-
 20
20
-
 21
21
-
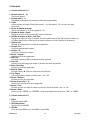 22
22
-
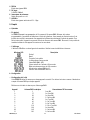 23
23
-
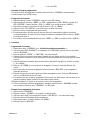 24
24
-
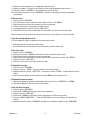 25
25
-
 26
26
-
 27
27
-
 28
28
-
 29
29
-
 30
30
-
 31
31
-
 32
32
-
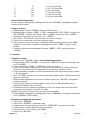 33
33
-
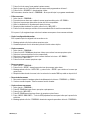 34
34
-
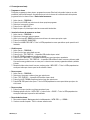 35
35
-
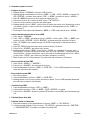 36
36
-
 37
37
-
 38
38
-
 39
39
-
 40
40
-
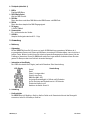 41
41
-
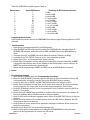 42
42
-
 43
43
-
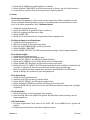 44
44
-
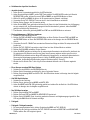 45
45
-
 46
46
-
 47
47


in andere talen
- English: HQ Power vdpc174 User manual
- français: HQ Power vdpc174 Manuel utilisateur
- español: HQ Power vdpc174 Manual de usuario
- Deutsch: HQ Power vdpc174 Benutzerhandbuch
Gerelateerde papieren
-
 HQ Power 192-channel DMX controller with joystick Specificatie
-
HQ Power VDPC145 Handleiding
-
 HQ Power VDPDMXC145 Handleiding
-
HQ-Power VDPC130 Handleiding
-
-
 HQ Power VDPC146 Handleiding
-
 HQ Power 24-channel DMX light control panel Handleiding
-
 HQ Power 6-channel DMX dimming console Specificatie
-
 Lite-Puter 6-channel DMX dimming console Specificatie
-
 HQ Power VDLC4000 Handleiding


Andere documenten
-
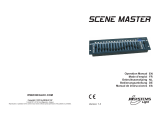 JBSYSTEMS SCENE MASTER de handleiding
-
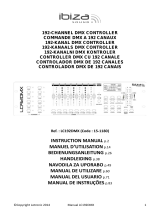 Ibiza Light & Sound LC192DMX de handleiding
-
Chauvet Obey 10 Handleiding
-
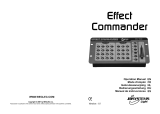 JBSYSTEMS EFFECT COMMANDER de handleiding
-
CHAUVET DJ Obey 70 DMX Controller Handleiding
-
-
-
Mc crypt 59 11 57 Handleiding
-
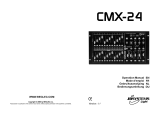 JBSYSTEMS CMX-24 de handleiding
-
Chauvet Obey 40 DMX Controller Handleiding


