ZEEGMA Grill Chef Electric Grill Handleiding
- Categorie
- Barbecues
- Type
- Handleiding

Grill Chef
User Manual
Bedienungsanleitung
Instrukcja obsługi
Manuale d’uso
Manuel de l’U lisateur
Manual de usuario
Handleiding
Посібник користувача
Vartotojo vadovas
Korisnički priručnik
EN DE PL IT FR
ES NL UK LT HR

A
B

C
D

EN
Introducon
Dear customer!
Thank you for placing trust in us and choosing Zeegma.
We provide you with a product perfect for everyday use thanks to
the use of high-quality materials and modern soluons.
We are convinced that the product will sasfy your requirements as
it has been designed with utmost care.
Before you use the product, please read this manual carefully.
Should you have any remarks or quesons concerning the product,
please do not hesitate to contact us:
Informaon about the device
Power: 2100 W
Power supply: 220-240V~ 50/60Hz
Important informaon
Please read this manual before operang the
device to familiarise yourself with its funcons
and use it as intended.
1.
This device can be used by children aged
8 years and older, and persons with limited
physical, sensory or mental abilities or
without experience and knowledge, if they
are supervised or instructed in the safe use of
the device and understand the risks involved.
2. Children should not play with the device.
Unsupervised children are not allowed to
clean and perform maintenance on the
device.

EN
3.
The device should only be connected to a
grounded socket outlet with characteriscs
that comply with the values indicated on
the device label.
4. The device has a grounded plug. Do not
use the device if the plug is not fully ed
into the electrical socket. Do not modify
the plug and do not use adapters.
5.
The device is for domesc use only. It
should not be used for other purposes
incompable with its intended use.
6.
Do not touch hot components of the device.
7. Do not immerse the device and its cables
in water or any other liquid.
8. Special care should be taken when using
the device when children or pets are
around. Children should not be allowed
to play with the device. Keep the device
and its cable out of the reach of children
under the age of 8.
9.
Always unplug the device from the power
source and allow it to cool down before
cleaning and aer use.
10. Do not use a damaged or malfunconing
device or one with a damaged power cable
or plug.

EN
11.
Do not repair or modify the device or
the cable. These operaons may only
be performed by an authorised service
centre.
12.
Use only original or manufacturer-
recommended spare parts.
13.
Do not pull or carry the device by holding
the cable. Do not place any objects on it.
Do not pull the cable over sharp edges
of walls and furniture and do not allow it
to come into contact with hot surfaces.
14.
Keep the device away from heat sources,
high temperatures, hot surfaces, direct
sunlight, sources of sparking, open ames.
15. Use the product placed horizontally on a
at and stable surface.
16.
Do not use sharp or metal accessories.
Use plasc or wood accessories (e.g. a
wooden spatula).
17.
The device is not intended to be controlled
by an external mer, a separate remote
control or other equipment that can switch
the device on automacally.

EN
Parts descripon (g. A)
1. Handle
2. Upper housing
3. Height adjustment lever
4. Open grill funcon buon
5. Control panel
6. Non-sck grill plate
7. Grill plate release buons
8. Lower housing
9. Drip tray
Before rst use
1. Peel o and remove any packaging components.
2. Clean the grill plates with a damp cloth or sponge and warm
water.
3. Dry the device with a cloth or kitchen towel.
Note! Do not clean the device directly under a stream of running water.
Note! When using the device for the rst me, a slight smoke or
unpleasant smell is possible. This does not aect the safe use of the
device. Unpleasant smells will cease with the next use of the product.
Operang manual
1. Connect the device to a power source. The device will emit a
single sound and the switch (8, g. B) will light up.
2. Press the switch. The buons on the control panel ash.
3.
Press the buon of your choice, depending on the type of meal
you are preparing (9-13, g. B), then press the OK buon (14,
g. B) or wait for the programme to switch on by itself aer
about 5 seconds. The selected buon will light up white and
the POWER LED (3, Fig. B) will ash red.
4. The device will start pre-heang for approximately 4 minutes.
Aer this me, the device will beep three mes and the READY
LED (4, g. B) will light up green. The device is ready for use.
5.
You can set the me and temperature of your choice (see:
Time and temperature sengs) or use one of the 5 preloaded
automac programmes - steak, chicken, sh, toast, burger.
6. Open the upper housing of the device, place the meal on the
grill plate and close the upper housing.
7. By seng the height adjustment lever (3, g. A) to the desired
posion, you can select the degree of lt of the lid (HIGH - big,
or LOW - small), or close the device completely. When closed,

EN
you can lock the device by moving the height adjustment lever
to the LOCK posion and unlock it by moving it to the OPEN
posion (g. C).
8.
When heang is complete, the device will beep three mes,
the grill plates will stop heang, the device will enter standby
mode and the switch (8, g. B) will ash.
If the device detects an electrical short or faulty installaon, the
light indicators will ash and the device will beep and switch o.
Time and temperature sengs
1. Bring the device out of standby mode by pressing the switch
(8, g. B).
2.
Press the desired buon, TEMP (1, g. B) to change the
temperature or TIMER (2, g. B) to change the heang me
of the meal. Then press the “+” or “-” buon to increase or
decrease the selected seng.
The device will enter the selected me/temperature mode aer
approximately 5 seconds.
There are 5 preloaded automac programmes with predened me
and temperature sengs – steak, chicken, sh, toast, burger.
Open grill funcon
To use the device in the open grill funcon, place the device on a
at surface and then press the open grill funcon buon (4, g. A)
while opening the device (g. D).
Time and temperature for selected meal types
Meal type Temperature RARE
(5, g. B)
MEDIUM
(6, g. B)
WELL-
DONE
(7, g. B)
Steak
(9, g. B)
230°C 02:30 03:30 05:00

EN
Chicken
(10, g. B)
220°C 03:00 05:00 07:00
Fish
(11, g. B)
200°C -04:30 06:00
Toast
(12, g. B)
210°C 02:30 03:30 04:30
Burger
(13, g. B)
220°C 03:00 04:00 05:00
Cleaning and maintenance
•
Before cleaning, the device should be switched o, disconnected
from the power source and le to cool down.
• Once cooled, the grill plates can be cleaned in the dishwasher
and under a direct stream of water, using mild cleaning agents
and a so, non-scratching cloth.
•
Never immerse the enre device in water or wash it in the
dishwasher. The outside of the device can be cleaned with a
so, damp cloth.
• Abrasives and metal utensils should not be used for cleaning,
which can damage the coang of the grill plates.
• Aer each use of the device, remove and empty the drip tray
(9, g. A). The tray should be washed with warm water using a
mild detergent and then dried with a so cloth.
The photos are for reference only, the actual look of the products may dier
from the ones shown in the pictures.

DE
Einführung
Sehr geehrter Kunde!
Wir möchten uns bei Ihnen bedanken, dass Sie uns vertraut und die
Zeegma-Marke gewählt haben.
Wir übergeben Ihnen das Produkt, dass sich dank hochqualitaver
Materialien und moderner technologischer Lösungen in dem täglichen
Bedarf perfekt bewährt.
Wir sind sicher, dass die sehr sorgfälge Ausführung Ihre Anforderungen
erfüllt.
Vor der Verwendung des Produkts machen Sie sich mit der vorliegenden
Bedienungsanleitung vertraut.
Falls Sie Anmerkungen oder Fragen haben, setzen Sie sich mit uns
in Verbindung: [email protected]
Gerätedaten
Leistung: 2100 W
Stromversorgung: 220-240V~ 50/60Hz
Wichge Informaon
Bie lesen Sie vor den Gebrauch des Geräts
die Anleitung, um sich mit seinen Funkonen
vertraut zu machen und es besmmungsgemäß
zu verwenden.
1.
Dieses Gerät darf von Kindern ab 8
Jahren und Personen mit eingeschränkten
körperlichen, sensorischen oder geisgen
Fähigkeiten oder ohne Erfahrung und/
oder Wissen verwendet werden, wenn
sie beaufsichgt oder in der sicheren
Verwendung des Geräts unterwiesen

DE
wurden und die damit verbundenen
Risiken verstehen.
2.
Kinder dürfen nicht mit dem Gerät spielen.
Kinder dürfen das Gerät nicht ohne
Aufsicht reinigen und warten.
3.
Das Gerät darf nur an eine geerdete
Steckdose angeschlossen werden, die
den auf dem Typeneke des Geräts
angegebenen Parametern entspricht.
4.
Das Gerät ist mit einem Schukostecker
ausgestattet. Das Gerät darf nicht
verwendet werden, wenn der Stecker nicht
völlig mit der Steckdose kompabel ist. Es
ist untersagt, den Stecker zu modizieren
oder einen Adapter zu verwenden.
5. Das Gerät ist nur für den Hausgebrauch
besmmt. Verwenden Sie das Gerät nicht
für andere Zwecke als besmmungsgemäß
vorgesehen.
6.
Berühren Sie keine heißen Teile des Geräts.
7.
Tauchen Sie das Gerät und seine Kabel
nicht in Wasser oder andere Flüssigkeiten.
8. Seien Sie besonders vorsichg, wenn Sie
das Gerät verwenden und Kinder oder
Hausere in der Nähe sind. Es ist untersagt,
Kinder mit dem Gerät spielen zu lassen.

DE
Halten Sie das Gerät und sein Netzkabel
von Kindern unter 8 Jahren fern.
9.
Vor der Reinigung und nach Gebrauch
ist das Gerät immer vom Stromnetz zu
trennen und abkühlen zu lassen.
10.
Benutzen Sie das Gerät niemals, wenn das
Netzkabel oder der Stecker beschädigt sind,
Funkonsstörungen aufgetreten sind oder
das Gerät in irgendeiner Weise beschädigt ist.
11.
Es ist untersagt, das Gerät bzw. das Kabel
instand zu setzen bzw. zu modizieren.
Diese Tägkeiten dürfen nur von einem
autorisierten Kundenservice durchgeführt
werden.
12.
Verwenden Sie nur Original- oder vom
Hersteller empfohlene Ersatzteile.
13.
Ziehen oder tragen Sie das Gerät nicht
am Kabel. Legen Sie keine Gegenstände
auf das Gerät ab. Ziehen Sie das Kabel
nicht über scharfe Kanten an Wänden und
Möbeln und lassen Sie es nicht mit heißen
Oberächen in Berührung kommen.
14.
Halten Sie das Gerät fern von Wärmequellen,
hohen Temperaturen, heißen Oberächen,
direkter Sonneneinstrahlung, Funken und
oenen Flammen.

DE
15. Vor Gebrauch ist das Produkt horizontal auf
eine ebene und stabile Oberäche zu stellen.
16.
Verwenden Sie keine scharfen oder
metallischen Zubehörteile. Verwenden
Sie Kunststo- oder Holzzubehör (z. B.
einen Holzspatel).
17. Das Gerät ist nicht dafür vorgesehen, mit
einem externen Timer, mit einer separaten
Fernbedienung oder mit einem anderen
Gerät gesteuert zu werden, die das Gerät
automasch einschalten können.
Produktbeschreibung (Abb. A)
1. Halterung
2. Obere Abdeckung
3. Höheneinstellgri
4. Funkonstaste „Oener
Grill“
5. Bedienfeld
6. Anha-Grillplae
7. Grillplaen-
Entriegelungstasten
8. Untere Abdeckung
9. Auangschale
Vor dem ersten Gebrauch
1. Alle Verpackungselemente abziehen und enernen.
2.
Grillplaen mit einem feuchten Tuch oder Schwamm und
warmem Wasser reinigen.
3. Das Gerät mit einem Tuch oder Küchentuch abtrocknen.
Hinweis! Das Gerät nicht direkt unter ießendem Wasser reinigen.
Hinweis! Bei der ersten Verwendung des Geräts kann es zu einer
leichten Rauchentwicklung kommen oder ein unangenehmer
Geruch entstehen. Die Sicherheit des Gerätes wird dadurch nicht
beeinträchtigt. Unangenehme Gerüche verschwinden bei der
nächsten Verwendung des Gerätes.

DE
Bedienungsanleitung
1.
Schließen Sie das Gerät an das Stromnetz an. Das Gerät gibt
einen einzelnen Piepton aus und die Einschalaste (8, Abb. B)
leuchtet auf.
2.
Betägen Sie Einschalaste. Die Tasten auf dem Bedienfeld
blinken.
3.
Betägen Sie je nach der gewünschten Speise die entsprechende
Taste (9-13, Abb. B), dann die Taste „OK“ (14, Abb. B) oder
warten Sie, bis das Programm nach ca. 5 Sekunden automasch
startet. Die ausgewählte Taste leuchtet weiß und die POWER-
LED (3, Abb. B) blinkt rot.
4.
Das Gerät beginnt mit dem Vorwärmen von ca. 4 Minuten. Nach
dieser Zeit piept das Gerät dreimal und die READY-LED (4, Abb.
B) leuchtet grün. Das Gerät ist jetzt betriebsbereit.
5.
Sie können die gewünschte Zeit und Temperatur einstellen
(siehe „Einstellung von Zeit und Temperatur“) oder ein der 5
vorinstallierten automaschen Programme wählen – Steak,
Hähnchen, Fisch, Toast oder Burger.
6.
Önen Sie die obere Abdeckung des Geräts, legen Sie das
Gericht auf die Grillplae und schließen Sie die Abdeckung
wieder.
7.
Mit dem Höheneinstellgri können Sie den gewünschten
Neigungsgrad der Abdeckung wählen (HIGH - groß bzw. LOW
- klein) oder das Gerät vollständig schließen. Sie können das
geschlossene Gerät verriegeln, indem Sie den Höheneinstellgri
in die Stellung LOCK bringen. Um es zu entriegeln, bringen Sie
den Höheneinstellgri in die Stellung OPEN (Abb. C).
8. Nach dem Aufwärmen piept das Gerät dreimal, die Grillplaen
werden nicht mehr erwärmt, das Gerät geht in den Standby-
Modus über und die Einschalaste (8, Abb. B) beginnt zu blinken.
Sollte das Gerät einen elektrischen Kurzschluss oder eine falsche
Installaon erkennen, blinken die Anzeigeleuchten, das Gerät gibt
einen Piepton aus und schaltet sich anschließend ab.
Einstellung von Zeit und Temperatur
1. Wecken Sie das Gerät aus dem Standby-Modus, indem Sie die
Einschalaste (8, Abb. B) betägen.

DE
2. Betägen Sie die ausgewählte Taste TEMP (1, Abb. B), um die
Temperatur zu ändern, oder die Taste TIMER (2, Abb. B), um die
Aufwärmzeit zu ändern. Betägen Sie dann die Taste „+“ oder „-“,
um die ausgewählte Einstellung zu erhöhen oder zu verringern.
Das Gerät wechselt in den ausgewählten Zeit-/Temperaturmodus
nach ca. 5 Sekunden.
Es stehen Ihnen 5 vorinstallierte automasche Programme mit
vordenierten Zeit- und Temperatureinstellungen zur Verfügung –
Steak, Hähnchen, Fisch, Toast und Burger.
Funkon „Oener Grill“
Um das Gerät in der Funkon „Oener Grill“ zu verwenden, stellen
Sie das Gerät auf eine ebene Fläche und betägen Sie dann die
Funkonstaste „Oener Grill“ (4, Abb. A), indem Sie zugleich das
Gerät önen (Abb. D).
Zeit- und Temperaturvorgaben für ausgewählte
Speisearten
Speiseart Tempe-
ratur
LEICHT
DURCHGE-
BRATEN
(5, Abb. B)
MEDIUM
(6,
Abb. B)
GUT
DURCHGE-
BRATEN
(7, Abb. B)
Steak
(9, Abb. B)
230°C 02:30 03:30 05:00
Hähnchen
(10, Abb. B)
220°C 03:00 05:00 07:00
Fisch
(11, Abb. B)
200°C -04:30 06:00
Toast (12,
Abb. B)
210°C 02:30 03:30 04:30
Burger (13,
Abb. B)
220°C 03:00 04:00 05:00

DE
Reinigung und Pege
•
Vor der Reinigung schalten Sie das Gerät aus, trennen Sie es
von der Stromquelle und lassen Sie es abkühlen.
•
Nach dem Abkühlen können die Grillplaen in der Spülmaschine
oder unter direktem Wasserstrahl mit milden Reinigungsmieln
und einem weichen, nicht kratzenden Tuch gereinigt werden.
• Es ist untersagt, das ganze Gerät in Wasser zu tauchen oder es
in der Spülmaschine zu reinigen. Die Außenseite des Geräts kann
mit einem weichen, feuchten Tuch gereinigt werden.
•
Verwenden Sie zur Reinigung keine scheuernden Materialien
oder Metallutensilien, da diese die Beschichtung der Grillplaen
beschädigen können.
•
Nach jedem Gebrauch des Gerätes ist die Auangschale
herauszunehmen und zu entleeren (9, Abb. A). Waschen Sie
die Schale mit warmem Wasser und milden Reinigungsmieln
und trocknen Sie sie dann mit einem weichen Tuch ab.
Die gezeigten Bilder dienen nur als Referenz. Das tatsächliche Produkt kann
von den Abbildungen abweichen.

PL
Wprowadzenie
Drogi Kliencie!
Dziękujemy za obdarzenie nas zaufaniem i wybranie marki Zeegma.
Oddajemy w Twoje ręce produkt idealny do codziennego użytkowania
dzięki wykorzystaniu wysokiej jakości materiałów i nowoczesnych
rozwiązań technicznych. Jesteśmy pewni, że ogromna staranność
wykonania sprawi, że spełni on Twoje wymagania.
Przed użyciem produktu zapoznaj się dokładnie z poniższą instrukcją
obsługi.
Jeśli masz jakiekolwiek uwagi lub pytania do zakupionego produktu,
skontaktuj się z nami: [email protected]
Informacje o urządzeniu
Moc: 2100 W
Zasilanie: 220-240V~ 50/60Hz
Ważne informacje
Prosimy o przeczytanie tej instrukcji przed
przystąpieniem do obsługi urządzenia, w celu
zapoznania się z jego funkcjami i wykorzystania
go zgodnie z przeznaczeniem.
1.
To urządzenie może być używane przez
dzieci w wieku 8 lat i starsze, oraz osoby
o ograniczonych zdolnościach zycznych,
sensorycznych lub umysłowych lub
bez doświadczenia i wiedzy, jeśli są
nadzorowane lub poinstruowane w
zakresie bezpiecznego użytkowania
urządzenia i rozumieją związane z tym
zagrożenia.

PL
2.
Dzieci nie powinny bawić się urządzeniem.
Dzieci bez nadzoru nie mogą wykonywać
czyszczenia i konserwacji urządzenia.
3.
Urządzenie należy podłączać wyłącznie do
gniazdka z uziemieniem o charakterystyce
zgodnej z wartościami podanymi na
etykiecie urządzenia.
4.
Urządzenie posiada wtyczkę z uziemieniem.
Nie korzystaj z urządzenia jeśli wtyczka
nie jest w pełni dopasowana do gniazdka
elektrycznego. Nie modykuj wtyczki i nie
używaj adapterów.
5.
Urządzenie służy wyłącznie do użytku
domowego. Nie należy używać go do innych
celów, niezgodnych z jego przeznaczeniem.
6. Nie należy dotykać gorących elementów
urządzenia.
7.
Nie zanurzaj urządzenia i jego przewodów
w wodzie lub w żadnym innym płynie.
8.
Należy zachować szczególną ostrożność
podczas korzystania z urządzenia, gdy w
pobliżu przebywają dzieci lub zwierzęta
domowe. Nie należy dopuszczać dzieci
do zabawy urządzeniem. Przechowuj
urządzenie i jego przewód poza zasięgiem
dzieci poniżej 8. roku życia.

PL
9. Przed czyszczeniem oraz po zakończeniu
korzystania z urządzenia należy zawsze
odłączyć urządzenie od źródła zasilania i
pozostawić do ostygnięcia.
10. Nie używaj urządzenia uszkodzonego lub
nieprawidłowo działającego ani urządzenia
z uszkodzonym przewodem zasilającym
lub wtyczką.
11.
Nie należy naprawiać oraz dokonywać
modykacji urządzenia oraz przewodu.
Czynności te może wykonywać tylko
autoryzowany serwis.
12.
Używaj wyłącznie oryginalnych lub
rekomendowanych przez producenta
części zamiennych.
13.
Nie ciągnij i nie przenoś urządzenia
trzymając za przewód. Nie kładź na nim
żadnych przedmiotów. Nie przeciągaj
przewodu przez ostre krawędzie ścian
i mebli oraz nie pozwalaj by stykał się z
gorącymi powierzchniami.
14.
Przechowuj urządzenie z dala od źródeł
ciepła, wysokich temperatur, gorących
powierzchni, bezpośredniego światła
słonecznego, źródeł iskrzenia, otwartego
ognia.

PL
15.
Należy korzystać z produktu ustawionego
poziomo na płaskiej i stabilnej powierzchni.
16. Nie wolno używać ostrych i metalowych
akcesoriów. Należy używać akcesoriów
z tworzywa sztucznego lub drewna (np.
drewniana łopatka).
17.
Urządzenie nie jest przeznaczone do
sterowania za pomocą zewnętrznego
wyłącznika czasowego, osobnego pilota
lub innego sprzętu, który może włączać
urządzenie automatycznie.
Opis części (rys. A)
1. Uchwyt
2. Górna obudowa
3. Dźwignia regulacji
wysokości
4. Przycisk funkcji otwartego
grilla
5. Panel sterowania
6. Nieprzywierająca płyta
grillowa
7. Przyciski zwalniające płyty
grillowe
8. Dolna obudowa
9. Tacka ociekowa
Przed pierwszym użyciem
1. Odklej i zdejmij wszelkie elementy opakowania.
2.
Wyczyść płyty grillowe za pomocą wilgotnej ściereczki lub gąbki
i ciepłej wody.
3.
Osusz urządzenie za pomocą ściereczki lub ręcznika kuchennego.
Uwaga! Nie należy czyścić urządzenia bezpośrednio pod strumieniem
bieżącej wody.
Uwaga! W czasie korzystania z urządzenia po raz pierwszy, możliwe
jest wydzielanie się delikatnego dymu lub nieprzyjemnego zapachu.
Nie ma to wpływu na bezpieczeństwo użytkowania urządzenia.
Nieprzyjemne zapachy ustaną wraz z kolejnym użyciem produktu.

PL
Instrukcja obsługi
1.
Podłącz urządzenie do źródła zasilania. Urządzenie wyda
pojedynczy dźwięk, a włącznik (8, rys. B) zaświeci się.
2.
Wciśnij włącznik. Przyciski znajdujące się na panelu sterowania
zamigają.
3.
Wciśnij wybrany przycisk, w zależności od rodzaju
przygotowywanego posiłku (9-13, rys. B), a następnie wciśnij
przycisk OK (14, rys. B) lub zaczekaj aż program włączy się
samoistnie po około 5 sekundach. Wybrany przycisk zaświeci się
na biało, a dioda POWER (3, rys. B) zacznie migać na czerwono.
4.
Urządzenie rozpocznie podgrzewanie wstępne trwające około 4
minut. Po tym czasie urządzenie wyda trzy sygnały dźwiękowe,
a dioda READY (4, rys. B) zaświeci się na zielono. Urządzenie
jest gotowe do pracy.
5. Możesz ustawić wybrany czas i temperaturę (patrz: Ustawienia
czasu i temperatury) lub skorzystać z jednego z 5 wgranych
automatycznych programów – stek, kurczak, ryba, tost, burger.
6. Otwórz górną obudowę urządzenia, umieść posiłek na płycie
grillowej i zamknij górną obudowę.
7. Ustawiając dźwignię regulacji wysokości (3, rys. A) na wybranej
pozycji, możesz wybrać stopień pochylenia pokrywy (HIGH –
duży, lub LOW – mały), lub zamknąć urządzenie całkowicie.
Zamknięte urządzenie możesz zablokować, ustawiając dźwignię
regulacji wysokości na pozycji LOCK i odblokować, przesuwając
na pozycję OPEN (rys. C).
8. Po zakończonym podgrzewaniu urządzenie wyda trzy sygnały
dźwiękowe, płyty grillowe przestaną się nagrzewać, urządzenie
przejdzie w tryb czuwania, a włącznik (8, rys. B) zacznie migać.
W przypadku wykrycia przez urządzenie zwarcia elektrycznego lub
błędnej instalacji, wskaźniki świetlne zamigają a urządzenie wyda
sygnał dźwiękowy i wyłączy się.
Ustawienia czasu i temperatury
1.
Wybudź urządzenie z trybu czuwania wciskając włącznik (8,
rys. B).
2.
Wciśnij wybrany przycisk, TEMP (1, rys. B) aby zmienić
temperaturę, lub TIMER (2, rys. B) aby zmienić czas podgrzewania

PL
posiłku. Następnie wciśnij przycisk „+” lub „-” aby zwiększyć lub
zmniejszyć wybrane ustawienia.
Urządzenie wejdzie w wybrany tryb czasu/temperatury po około
5 sekundach.
Istnieje możliwość skorzystania z 5 wgranych automatycznych
programów z predeniowanymi ustawieniami czasu i temperatury
– stek, kurczak, ryba, tost, burger.
Funkcja otwartego grilla
Aby użyć urządzenia w funkcji otwartego grilla, postaw urządzenie na
płaskiej powierzchni, a następnie wciśnij przycisk funkcji otwartego
grilla (4, rys. A), jednocześnie otwierając urządzenie (rys. D).
Czas i temperatura dla wybranych rodzajów posiłku
Rodzaj
posiłku
Temperatura SŁABO
WYSMA-
ŻONY
(5, rys. B)
ŚREDNI
(6, rys. B)
DOBRZE
WYSMA-
ŻONY
(7, rys. B)
Stek
(9, rys. B)
230°C 02:30 03:30 05:00
Kurczak
(10, rys. B)
220°C 03:00 05:00 07:00
Ryba
(11, rys. B)
200°C -04:30 06:00
Tost (12,
rys. B)
210°C 02:30 03:30 04:30
Burger
(13, rys. B)
220°C 03:00 04:00 05:00
Czyszczenie i konserwacja
• Przed czyszczeniem urządzenie należy wyłączyć, odłączyć od
źródła zasilania i pozostawić do ostygnięcia.

PL
•
Płyty grillowe po ostygnięciu mogą być czyszczone w zmywarce
oraz pod bezpośrednim strumieniem wody, z użyciem łagodnych
środków czyszczących i miękkiej, nierysującej ściereczki.
•
Nigdy nie należy zanurzać całego urządzenia w wodzie lub myć
w zmywarce. Zewnętrzna część urządzenia może być czyszczona
za pomocą miękkiej, wilgotnej ściereczki.
•
Do czyszczenia nie należy używać materiałów ściernych i
metalowych przyborów, które mogą uszkodzić powłokę płyt
grillowych.
• Po każdym użyciu urządzenia, wyjmij i opróżnij tackę ociekową
(9, rys. A). Tackę należy umyć ciepłą wodą z użyciem łagodnych
środków czyszczących, a następnie osuszyć za pomocą miękkiej
ściereczki.
Zdjęcia mają charakter poglądowy, rzeczywisty wygląd produktów może się
różnić od prezentowanego na zdjęciach.

IT
Introduzione
Genle Cliente!
Grazie per aver riposto in noi la Vostra ducia e aver scelto prodoo
di un marchio Zeegma.
Vi oriamo un prodoo perfeo per l’uso quodiano grazie all’ulizzo
di materiali di alta qualità e moderne soluzioni tecniche. Siamo sicuri
che la grande cura nell’esecuzione soddisferà le Vostre esigenze.
Prima di ulizzare il prodoo, leggere aentamente questa istruzione
d’uso.
Se avete commen o domande sul prodoo acquistato, contaateci:
Informazioni sul disposivo
Potenza: 2100 W
Alimentazione: 220-240V~ 50/60Hz
Informazioni importan
Prima di ulizzare il disposivo si prega di
leggere questo manuale di istruzioni per
familiarizzare con le sue funzioni e l’ulizzo
per la desnazione d’uso prevista.
1.
Questo disposivo può essere ulizzato
da bambini di età pari o superiore a 8 anni
e da persone con limitate capacità siche,
sensoriali o mentali o senza esperienza e
conoscenza, se supervisionate o addestrate
in relazione all’ulizzo del disposivo in
modo sicuro e dopo aver compreso i rischi
connessi all’ulizzo del disposivo.
2.
I bambini non devono giocare con il

IT
dispositivo. I bambini non sorvegliati
non devono eseguire la pulizia e la
manutenzione del disposivo.
3.
Il disposivo deve essere collegato solo
a una presa con messa a terra, con
caraerische conformi con i valori indica
sull’echea del disposivo.
4. Il disposivo dispone di spina con messa
a terra. Non ulizzare il disposivo se la
spina non è perfeamente adaa alla
presa elerica. Non modicare la spina e
non ulizzare adaatori.
5.
Il disposivo viene ulizzato esclusivamente
per l’uso domestico. Non utilizzare il
disposivo per altri scopi, incompabili
con la desnazione d’uso prevista.
6.
Non toccare le par calde del disposivo.
7. Non immergere il disposivo e i suoi cavi
in acqua o in qualsiasi altro liquido.
8. Prestare parcolare aenzione quando si
ulizza il disposivo in presenza di bambini
o animali domesci nelle vicinanze. Non
permeere ai bambini di giocare con il
disposivo. Conservare il disposivo ed
il suo cavo fuori dalla portata di bambini
di età inferiore a 8 anni.

IT
9. Prima della pulizia e dopo aver terminato
l’ulizzo, scollegare sempre il disposivo
dalla sorgente di alimentazione e lasciarlo
rareddare.
10.
Non ulizzare un disposivo danneggiato o
malfunzionante o un disposivo con un cavo
di alimentazione o una spina danneggia.
11.
Non riparare o modicare il disposivo o il suo
cavo. Queste avità possono essere svolte
solo da un centro di assistenza autorizzato.
12.
Ulizzare esclusivamente ricambi originali o
raccomanda dal produore del disposivo.
13.
Non rare o trasportare il disposivo
tendendolo per il cavo. Non posizionare
ogge sul disposivo. Non condurre il
cavo lungo spigoli vivi di pare e mobili
e non lasciarlo entrare in contao con
superci calde.
14.
Conservare il dispositivo lontano da
sorgen di calore, elevate temperature,
superci calde, luce solare direa, fon
di scinlle, amme libere.
15.
Utilizzare il prodotto posizionato
orizzontalmente su una supercie piana
e stabile.
16.
Non ulizzare accessori taglien o metallici.

IT
Ulizzare accessori in plasca o legno (ad
esempio una spatola di legno).
17.
Il disposivo non è desnato ad essere
comandato da un mer di spegnimento
esterno, un telecomando separato o altri
apparecchi che possono accendere
automacamente il disposivo.
Descrizione delle par (g. A)
1. Maniglia
2. Coperchio superiore
3. Leva di regolazione
dell’altezza
4. Pulsante della funzione
barbecue aperto
5. Pannello di comando
6. Piastra anaderente
7. Pulsan di rilascio delle
piastre
8. Rivesmento inferiore
9. Vaschea angoccia
Prima del primo ulizzo
1. Scollegare e rimuovere eventuali elemen dell’imballaggio.
2. Pulire le piastre della griglia con un panno umido o una spugna
e acqua epida.
3. Asciugare il disposivo con un panno o carta da cucina.
Aenzione! Non pulire il disposivo direamente soo un usso
di acqua corrente.
Aenzione! Quando si ulizza il disposivo per la prima volta è
possibile che questo emea del fumo o un odore sgradevole. Ciò non
inuisce sulla sicurezza d’ulizzo del disposivo. Gli odori sgradevoli
cesseranno al prossimo ulizzo del prodoo.
Istruzioni per l’uso
1.
Collegare il disposivo ad una sorgente di alimentazione. Il
disposivo emeerà un singolo suono e l’interruore (8, g.
B) si illuminerà.
2.
Premere l’interruore. I pulsan presen sul pannello di controllo
lampeggeranno.

IT
3.
Premere il pulsante scelto, a seconda del po di pasto preparato
(9-13, g. B), quindi premere il pulsante OK (14, g. B) o
aendere che il programma si accenda da solo dopo circa 5
secondi. Il pulsante selezionato si illuminerà di bianco e il LED
POWER (3, g. B) inizierà a lampeggiare in rosso.
4. Il disposivo inizierà il preriscaldamento della durata di circa 4
minu. Una volta trascorso questo tempo, il disposivo emeerà
tre segnali acusci e il LED READY (4, g. B) si illuminerà di
verde. Il disposivo sarà pronto per l’uso.
5.
È possibile impostare la durata e la temperatura scelta (vedi:
Regolazione della durata e della temperatura) o ulizzare uno
dei 5 programmi automaci precarica – bistecca, pollo, pesce,
pane tostato, hamburger.
6.
Aprire la parte superiore del disposivo, posizionare il cibo sulla
piastra della griglia e chiudere la parte superiore.
7.
Regolando la leva di regolazione dell’altezza (3, g. A) sulla
posizione scelta è possibile scegliere il grado di inclinazione
del coperchio (HIGH – alto o LOW – basso) o chiudere
completamente il disposivo. È possibile bloccare il disposivo
in posizione chiusa, impostando la leva di regolazione dell’altezza
sulla posizione LOCK e sbloccarla spostandola in posizione
OPEN (g. C).
8.
Dopo il riscaldamento, il disposivo emeerà tre segnali acusci,
le piastre della griglia cesseranno di riscaldarsi, il disposivo
entrerà in modalità standby e l’interruore (8, g. B) inizierà
a lampeggiare.
Se il disposivo rileva un cortocircuito elerico o un’installazione
errata, le spie luminose lampeggeranno e il disposivo emeerà un
segnale sonoro e si spegnerà.
Impostazione della durata e della temperatura
1.
Riattivare il dispositivo dalla modalità standby premendo
l’interruore (8, g. B).
2.
Premere il pulsante scelto, TEMP (1, g. B) per modicare la
temperatura, o TIMER (2, g. B) per modicare il tempo di
riscaldo del pasto. Quindi premere il pulsante „+” o „-” per
aumentare o diminuire le impostazioni selezionate.

IT
Il disposivo dopo circa 5 secondi entrerà nella modalità tempo/
temperatura selezionata.
È possibile utilizzare 5 programmi automatici precaricati con
impostazioni predenite di tempo e temperatura: bistecca, pollo,
pesce, pane tostato, hamburger.
Funzione grill aperto
Per ulizzare il disposivo in modalità grill aperto, posizionare il
disposivo su una supercie piana, quindi premere il pulsante funzione
grill aperto (4, g. A) aprendo il disposivo (g. D).
Tempo e temperatura per vari pi di cibi
Tipo di
cibo
Temperatura SCARSA-
MENTE
COTTO
(5, g. B)
COT-
TURA
MEDIA
(6, g. B)
BEN
COTTO
(7, g. B)
Bistecca
(9, g B)
230°C 02:30 03:30 05:00
Pollo
(10, g B)
220°C 03:00 05:00 07:00
Pesce
(11, g B)
200°C -04:30 06:00
Toast
(12, g B)
210°C 02:30 03:30 04:30
Hamburger
(13, g B)
220°C 03:00 04:00 05:00
Pulizia e manutenzione
•
Prima di procedere alla pulizia, il disposivo deve essere spento,
scollegato dalla sorgente di alimentazione e lasciato rareddare.
• Dopo il rareddamento, le piastre della griglia possono essere
pulite in lavastoviglie e sotto un flusso diretto di acqua,
ulizzando detergen delica e un panno morbido e angrao.

IT
•
Non immergere mai l’intero disposivo in acqua o lavarlo in
lavastoviglie. La parte esterna del disposivo può essere pulita
con un panno morbido e umido.
• Per la pulizia, non ulizzare materiali abrasivi e utensili metallici
che potrebbero danneggiare il rivesmento delle piastre della
griglia.
•
Dopo ogni ulizzo del disposivo, rimuovere e svuotare il vassoio
angoccia (9, g. A). Lavare il vassoio con acqua epida con
detergen delica e asciugare con un panno morbido.
Le immagini hanno caraere illustravo, l’aspeo reale dei prodo può
dierire da quello presentato nelle immagini.

FR
Introducon
Cher client !
Merci de nous faire conance et de choisir Zeegma.
Nous vous orons un produit idéalement adapté pour un usage
quodien grâce à l’ulisaon de matériaux de haute qualité et de
soluons techniques modernes.
Nous sommes sûrs qu’il répondra à vos exigences grâce au grand
soin apporté à sa fabricaon.
Veuillez lire aenvement les instrucons suivantes avant d’uliser
le produit.
Si vous avez des commentaires ou des quesons sur le produit que
vous avez acheté, veuillez nous contacter : support@zeegma.com
Informaons relaves à l’appareil
Puissance: 2100 W
Alimentaon: 220-240V~ 50/60Hz
Informaons importantes
Veuillez lire ce manuel avant d’uliser l’appareil
an de vous familiariser avec ses foncons et
de l’uliser conformément à l’usage prévu.
1. Cet appareil peut être ulisé par des enfants
âgés de 8 ans et plus, ainsi que par des
personnes dont les capacités physiques,
sensorielles ou mentales sont limitées ou qui
n’ont pas d’expérience et de connaissances,
à condion qu’elles soient supervisées ou
qu’elles aient reçu des instrucons pour
uliser l’appareil en toute sécurité et qu’elles
comprennent les risques encourus.

FR
2.
Les enfants ne doivent pas jouer avec
l’appareil. Les enfants non surveillés ne doivent
pas eectuer le neoyage et l’entreen de
l’appareil.
3.
Ne branchez l’appareil qu’à une prise de
courant avec mise à la terre dont la puissance
est compable avec les caractérisques
indiquées sur l’équee de l’appareil.
4. L’appareil est équipé d’une che avec mise à
la terre. N’ulisez pas l’appareil si la che n’est
pas parfaitement adaptée à la prise électrique.
Ne modiez pas la che et n’ulisez pas
d’adaptateurs.
5.
L’appareil est desné à un usage domesque
uniquement. Ne l’ulisez pas à d’autres ns
incompables avec son ulisaon prévue.
6.
Ne pas toucher les éléments chauds de
l’appareil.
7.
Ne pas immerger l’appareil et ses câbles dans
l’eau ou tout autre liquide.
8.
Faites parculièrement aenon lorsque
vous ulisez l’appareil en présence d’enfants
ou d’animaux domesques. Ne laissez pas les
enfants jouer avec l’appareil. Gardez l’appareil
et son cordon hors de portée des enfants de
moins de 8 ans.

FR
9.
Toujours débrancher l’appareil de la source
d’alimentaon et le laisser refroidir avant de
le neoyer et après ulisaon.
10.
N’ulisez pas un appareil endommagé, qui
ne fonconne pas correctement ou dont
le cordon d’alimentaon ou la che sont
endommagés.
11.
Ne pas réparer ni modier l’appareil ou le
câble. Ces opérations ne peuvent être
eectuées que par un centre de maintenance
agréé.
12.
N’utilisez que des pièces de rechange
originales ou recommandées par le fabricant.
13. Ne pas rer ou porter l’appareil par le câble.
Ne posez pas d’objets dessus. Ne rez pas
le câble le long des arêtes des murs et des
meubles et ne le laissez pas entrer en contact
avec des surfaces chaudes.
14.
Tenez l’appareil à l’écart des sources de
chaleur, des températures élevées, des
surfaces chaudes, des rayons directs du soleil,
des sources d’éncelles, des ammes.
15. Ulisez le produit placé horizontalement sur
une surface plane et stable.
16.
N’utilisez pas d’accessoires pointus ou
métalliques. Utilisez des accessoires en

FR
plasque ou en bois (par exemple une spatule
en bois).
17.
Cet appareil n’est pas destiné à être
commandé par une minuterie externe,
une télécommande séparée ou tout autre
équipement pouvant mere l’appareil en
marche automaquement.
Descripon des éléments (g. A)
1. Poignée
2. Boîer supérieur
3. Levier de réglage de la
hauteur
4. Bouton de foncon grill
ouvert
5. Panneau de contrôle
6. Plaque de grill
anadhésive
7. Boutons de déverrouillage
de la plaque de grill
8. Boîer inférieur
9. Bac de récupéraon
Avant la première ulisaon
1. Décoller et enlever tout élément d’emballage.
2.
Neoyez les plaques du grill avec un chion ou une éponge
humide et de l’eau chaude.
3. Séchez l’appareil avec un chion ou un essuie-tout.
Aenon ! Ne pas neoyer l’appareil directement sous un jet d’eau
courante.
Aenon ! Lors de la première ulisaon de l’appareil, il est possible
qu’une légère fumée ou une odeur désagréable soit émise. Cela
n’affecte pas la sécurité d’utilisation de l’appareil. Les odeurs
désagréables cesseront lors de la prochaine ulisaon du produit.
Instrucons d’ulisaon
1.
Connectez l’appareil à une source d’alimentaon. L’appareil
émera un seul bip et l’interrupteur (8, g. B) s’allumera.
2. Appuyez sur l’interrupteur. Les boutons situés sur le panneau
de contrôle clignotent.

FR
3.
Appuyez sur la touche séleconnée, en foncon du type d’aliment
à préparer (9-13, g. B), puis appuyez sur la touche OK (14, g.
B) ou aendez que le programme se mee en marche tout seul
après environ 5 secondes. Le bouton séleconné s’allume en
blanc et le voyant POWER (3, g. B) clignote en rouge.
4.
L’appareil commence à préchauer pendant environ 4 minutes.
Après ce laps de temps, l’appareil émet trois bips et le voyant
READY (4, g. B) s’allume en vert. L’appareil est prêt à fonconner.
5.
Vous pouvez régler l’heure et la température de votre choix
(voir Réglages de l’heure et de la température) ou uliser l’un
des 5 programmes automaques préchargés - steak, poulet,
poisson, toast, burger.
6.
Ouvrez le couvercle supérieur de l’appareil, placez le produit sur
la plaque du gril et fermez le couvercle supérieur.
7.
En plaçant le levier de réglage de la hauteur (3, g. A) dans
la position souhaitée, vous pouvez sélectionner le degré
d’inclinaison du couvercle (HIGH - haut, ou LOW - bas), ou
fermer complètement l’appareil. En posion fermée, vous pouvez
verrouiller l’appareil en plaçant le levier de réglage de la hauteur
sur la posion LOCK et le déverrouiller en le plaçant sur la
posion OPEN (g. C).
8. Lorsque la chaue est terminée, l’appareil émet trois bips, les
plaques du gril cessent de chauer, l’appareil passe en mode
veille et l’interrupteur (8, g. B) clignote.
Si l’appareil détecte un court-circuit électrique ou une installaon
défectueuse, les voyants lumineux clignotent, l’appareil émet un
bip et s’éteint.
Réglages du temps et de la température
1.
Faites sortir l’appareil du mode veille en appuyant sur
l’interrupteur (8, g. B).
2.
Appuyez sur le bouton séleconné, TEMP (1, g. B) pour modier
la température ou TIMER (2, g. B) pour modier le temps de
chauage du repas. Appuyez ensuite sur le bouton „+” ou „-”
pour augmenter ou diminuer le paramètre séleconné.
L’appareil passe au mode temps/température séleconné après
environ 5 secondes.

FR
Il y a 5 programmes automaques préprogrammés avec des réglages
de temps et de température prédénis - steak, poulet, poisson,
toast, burger.
Foncon grill ouvert
Pour uliser l’appareil en foncon grill ouvert, posez-le sur une surface
plane et appuyez sur le bouton de la foncon grill ouvert (4, g. A)
tout en ouvrant l’appareil (g. D).
Temps et température pour les types de produits
séleconnés
Type de
produit
Température FAIBLE-
MENT
GRILLÉ
(5, g. B)
MOYEN-
NEMENT
GRILLÉ
(6, g. B)
BIEN
GRILLÉ
(7, g. B)
Steak
(9, g. B)
230°C 02:30 03:30 05:00
Poulet
(10, g. B)
220°C 03:00 05:00 07:00
Poisson
(11, g. B)
200°C -04:30 06:00
Toast
(12, g. B)
210°C 02:30 03:30 04:30
Burger
(13, g. B)
220°C 03:00 04:00 05:00
Neoyage et entreen
•
Avant de procéder au neoyage, il convient d’éteindre l’appareil, de
le déconnecter de l’alimentaon électrique et de le laisser refroidir.
•
Une fois refroidies, les plaques du grill peuvent être neoyées au
lave-vaisselle et sous un jet d’eau direct, à l’aide de détergents
non agressifs et d’un chion doux et non graant.
•
Ne jamais plonger l’appareil ener dans l’eau ou le laver au
lave-vaisselle. L’extérieur de l’appareil peut être neoyé avec
un chion doux et humide.

FR
•
Il ne faut pas utiliser de produits abrasifs ni d’ustensiles
métalliques pour le neoyage, car ils peuvent endommager le
revêtement des plaques du grill.
• Après chaque ulisaon de l’appareil, rerez et videz le bac de
récupéraon (9, g. A). Lavez le bac à l’eau chaude en ulisant
un détergent non agressif, puis séchez-le avec un chion doux.
Les photos ne sont présentées qu’à tre d’illustraon. L’aspect réel des
produits peut diérer de celui des images.

ES
Introducción
¡Esmado Cliente!
Gracias por conar en nosotros y elegir la marca Zeegma.
Le ofrecemos un producto perfecto para el uso diario gracias al uso
de materiales de alta calidad y modernas soluciones técnicas.
Estamos seguros que el gran cuidado de la ejecución hará que cumpla
con sus requisitos.
Antes de ulizar el producto, lea atentamente el siguiente manual
de usuario.
Si ene algún comentario o pregunta sobre el producto comprado,
póngase en contacto con nosotros: [email protected]om
Información del disposivo
Potencia: 2100 W
Alimentación: 220-240V~ 50/60Hz
Información importante
Lea este manual antes de ulizar el aparato
para familiarizarse con sus funciones y ulizarlo
según lo previsto.
1.
Este aparato puede ser ulizado por niños
de 8 años o más de edad y por personas con
capacidades sicas, sensoriales o mentales
reducidas o con falta de experiencia y
conocimiento si están supervisados o
instruidos en el uso seguro del aparato y
comprenden los peligros involucrados.
2.
Los niños no deben jugar con el aparato.
No se permite que los niños sin supervisión
limpien o hagan el mantenimiento del aparato.

ES
3.
El aparato solo debe conectarse a una
toma con tierra con una característica
correspondiente a los valores indicados en
la equeta del aparato.
4.
El aparato ene un enchufe conectado a erra.
No ulice el aparato si el enchufe no encaja
completamente con la toma de corriente. No
modique el enchufe ni use adaptadores.
5.
Este aparato es solo para uso domésco. No
lo ulice para otros nes que no estén de
acuerdo con su propósito previsto.
6. No toque las partes calientes del aparato.
7. No sumerja el aparato ni sus cables en agua
o en ningún otro líquido.
8.
Tenga especial cuidado al usar el aparato
cuando haya niños o mascotas en su
proximidad. No permita que los niños jueguen
con el aparato. Mantenga el aparato y su
cable fuera del alcance de los niños menores
de 8 años de edad.
9. Desconecte siempre el aparato de la fuente
de alimentación y deje que se enfríe antes
de limpiarlo y después de usarlo.
10.
No ulice un aparato dañado o defectuoso
o con un cable de alimentación o enchufe
dañado.

ES
11. No repare ni modique el aparato o el cable.
Solo un centro de servicio autorizado puede
hacerlo.
12.
Ulice solo piezas de repuesto originales o
recomendadas por el fabricante.
13. No re ni mueva el aparato por el cable. No
coloque ningún objeto sobre el aparato. No
re del cable sobre los bordes alados de las
paredes o los muebles ni deje que entre en
contacto con supercies calientes.
14.
Almacene el aparato lejos de fuentes de calor,
altas temperaturas, supercies calientes, luz
solar directa, chispas, llamas abiertas.
15.
Ulice el producto colocado horizontalmente
sobre una supercie plana y estable.
16.
No ulice accesorios alados o metálicos.
Use accesorios de plásco o madera (por
ejemplo, una espátula de madera).
17.
El aparato no está diseñado para el control por
medio de un temporizador externo, mando
a distancia separado u otro equipo que pueda
encender el aparato automácamente.

ES
Descripción de las piezas (Fig. A)
1. Soporte
2. Carcasa superior
3. Palanca de ajuste de
altura
4. Botón de función de
parrilla abierta
5. Panel de control
6. Placa de la parrilla
anadherente
7. Botones de liberación de
las placas de la parrilla
8. Carcasa inferior
9. Bandeja de goteo
Antes del primer uso
1. Despegue y rere todos los elementos del embalaje.
2.
Limpie las placas de la parrilla con un paño húmedo o una
esponja y agua bia.
3. Seque el aparato con un paño o toalla de cocina.
¡Atención! No limpie el aparato directamente bajo un chorro de
agua corriente.
¡Atención! Cuando se uliza el aparato por primera vez, es posible
que emita un humo ligero o un olor desagradable. Esto no afecta a
la seguridad del aparato. Los olores desagradables desaparecerán
durante el próximo uso del producto.
Instrucciones de uso
1.
Conecte el aparato a la fuente de alimentación. El aparato
emirá un solo sonido y el interruptor (8, Fig. B) se encenderá.
2.
Pulse el interruptor. Los botones del panel de control parpadearán.
3.
Dependiendo del po de plato por preparar (9-13, Fig. B),
pulse el botón OK (14, Fig. B) o espere a que el programa
comience automácamente después de unos 5 segundos. El
botón seleccionado se iluminará en blanco y el LED de POWER
(ENCENDIDO) (3, Fig. B) parpadeará en rojo.
4. El aparato comenzará a precalentarse durante unos 4 minutos.
Después de este empo, emirá tres pidos y el LED de READY
(LISTO) (4, Fig. B) se iluminará en verde. El aparato está listo
para funcionar.
5.
Puede congurar el empo y la temperatura seleccionados (consulte:
Ajustes de empo y temperatura) o use uno de los 5 programas
automácos cargados: bistec, pollo, pescado, tostada, hamburguesa.

ES
6. Abra la carcasa superior del aparato, coloque el alimento en la
placa de la parrilla y cierre la carcasa superior.
7. Ajustando la palanca de ajuste de altura (3, Fig. A) a la posición
seleccionada, puede seleccionar el nivel de inclinación de la tapa
(HIGH - alto o LOW - bajo), o cerrar el aparato por completo.
Puede bloquear el aparato cerrado girando la palanca de ajuste
de altura a la posición de LOCK (BLOQUEO) y desbloquearlo
moviéndola a la posición de OPEN (ABRIR) (Fig. C).
8.
Cuando se haya completado el precalentamiento, el aparato emirá
tres pidos, las placas de la parrilla dejarán de calentarse, el aparato
entrará en modo de espera y el interruptor (8, Fig. B) parpadeará.
Si el aparato detecta un cortocircuito eléctrico o una instalación
defectuosa, las luces parpadearán y el disposivo emirá un pido
y se apagará.
Ajustes de empo y temperatura
1.
Despierte el aparato del modo de espera pulsando el interruptor
(8, Fig. B).
2. Pulse el botón seleccionado, TEMP (1, Fig. B) para cambiar la
temperatura, o TIMER (2, Fig. B) para cambiar el empo de
calentamiento del plato. A connuación, pulse el botón «+» o
«-» para aumentar o disminuir el ajuste seleccionado.
El aparato entrará en el modo de empo / temperatura seleccionado
después de unos 5 segundos.
Es posible ulizar 5 programas automácos precargados con ajustes
de empo y temperatura predenidos: bistec, pollo, pescado, tostada,
hamburguesa.
Función de parrilla abierta
Para usar el aparato como una parrilla abierta, coloque el aparato
en una supercie plana y luego pulse el botón de parrilla abierta (4,
Fig. A) mientras abre el aparato (Fig. D).

ES
Tiempo y temperatura para determinados pos de platos
Tipo de
plato
Tempera-
tura
POCO
HECHO
(5, Fig. B)
Medio
(6, Fig. B)
BIEN
HECHO
(7, Fig. B)
Bistec
(9, Fig. B)
230°C 02:30 03:30 05:00
Pollo
(10, Fig. B)
220°C 03:00 05:00 07:00
Pescado
(11, Fig. B)
200°C -04:30 06:00
Tostada
(12, Fig. B)
210°C 02:30 03:30 04:30
Hamburguesa
(13, Fig. B)
220°C 03:00 04:00 05:00
Limpieza y mantenimiento
• Desconecte siempre el aparato de la fuente de alimentación y
deje que se enfríe antes de limpiarlo.
•
Después del enfriamiento, las placas de la parrilla se pueden
limpiar en el lavavajillas y bajo un chorro de agua, ulizando
agentes de limpieza suaves y un paño suave que no deja rayas.
•
Nunca sumerja todo el aparato en agua ni lo lave en un
lavavajillas. El exterior del aparato se puede limpiar con un
paño suave y húmedo.
• No ulice abrasivos ni utensilios metálicos para la limpieza, ya
que pueden dañar el recubrimiento de las placas de la parrilla.
• Después de cada uso, rere y vacíe la bandeja de goteo (9, Fig.
A). La bandeja debe lavarse con agua bia y agentes de limpieza
suaves, y luego secarse con un paño suave.
Las fotos son para nes ilustravos, la apariencia real de los productos
puede diferir de la presentada en las fotos.

NL
Inleiding
Geachte Klant!
Wij danken u voor het vertrouwen in ons merk Zeegma.
Wij bieden u een product dat ideaal is voor dagelijks gebruik dankzij
de toepassing van hoogwaardige materialen en moderne technische
oplossingen. We zijn er zeker van dat de grote zorg bij de afwerking
aan uw eisen voldoet.
Lees deze handleiding zorgvuldig door voordat u het product gaat
gebruiken.
Hebt u opmerkingen of vragen over het product, neem dan contact
met ons op: [email protected]
Informae over het apparaat
Vermogen: 2100 W
Voeding: 220-240V~ 50/60Hz
Belangrijke gegevens
Lees alle bedieningsinstruces voor u uw
apparaat gebruikt om met zijn funces kennis
te maken en het voor het beoogde doel te
gebruiken.
1.
Dit apparaat kan gebruikt worden door
kinderen van 8 jaar en ouder en personen
met verminderdelichamelijke, zintuiglijke
en verstandelijke vaardigheden of die
onvoldoende ervaring of kennishebben,
indien zij onder toezicht staan of goed
geïnformeerd zijn en zij de risico’s begrijpen.
2.
De kinderen mogen niet met het apparaat
spelen. De kinderen mogen de reinigings-

NL
en onderhoudswerkzaamheden zonder
toezicht niet verrichten.
3.
Het apparaat moet worden aangesloten op
een geaard stopcontact, controleer of de
elektrische informae op het typeplaatje
met de apparaatlabel overeenkomt.
4.
Het apparaat is voorzien van een geaarde
stekker. Gebruik het apparaat niet als de
stekker niet goed in het stopcontact zit.
Pas de stekker niet aan en gebruik geen
adapters.
5.
Het apparaat is enkel bedoeld voor
huishoudelijk gebruik. Gebruik het
apparaat niet voor andere doeleinden dan
deze waarvoor het is ontworpen.
6.
Raak geen hete onderdelen van het
apparaat aan.
7.
Dompel het apparaat en de kabels niet
onder in water of een andere vloeistof.
8.
Wees uiterst voorzichg wanneer het
apparaat in de buurt van kinderen wordt
gebruikt. Laat kinderen niet met het
apparaat spelen. Houd het apparaat en het
snoer buiten bereik van kinderen jonger
dan 8 jaar.
9. Trek aljd de stekker uit het stopcontact

NL
en laat het apparaat aoelen voordat het
wordt schoongemaakt.
10.
Gebruik geen beschadigd of slecht
werkend apparaat of een apparaat met
een beschadigd netsnoer of beschadigde
stekker.
11.
Het apparaat en kabels niet repareren
of aanpassen. Het wordt enkel door een
erkend servicecentrum gedaan.
12.
Gebruik alleen originele toebehoren die
door de fabrikant zijn aanbevolen of
goedgekeurd.
13.
Draag, trek, draai niet aan het snoer. Plaats
er geen voorwerpen op. Trek de kabel
niet over scherpe randen van muren en
meubels en laat hem niet in contact komen
met hete oppervlakken.
14.
Gebruik het apparaat uit de buurt van
warmtebronnen, hoge temperaturen,
hete oppervlakken, direct zonlicht, vonken,
open vuur, olie en scherpe randen.
15.
Gebruik het product horizontaal op een
vlakke en stabiele ondergrond.
16.
Gebruik geen scherpe of metalen
accessoires. Gebruik plastic of houten
accessoires (bijvoorbeeld een houten spatel).

NL
17.
Het apparaat is niet bedoeld om te worden
bediend door middel van een externe
mer of aparte afstandsbediening of een
andere apparatuur die automasch kan
inschakelen.
Beschrijving van de onderdelen (a. A)
1. Handvat
2. Bovenste behuizing
3. Hendel voor het
verstellen van de hoogte
4. Funcetoets voor open grill
5. Besturingspaneel
6. Grillplaat met
anaanbaklaag
7. Ontgrendelknoppen voor
grillplaten
8. Onderste behuizing
9. Vetopvangbak
Vóór het eerste gebruik
1. Verwijder alle verpakkingsonderdelen.
2. Reinig de grillplaten met een vochge doek of spons en warm
water.
3. Droog het apparaat af met een doek of een keukenhanddoek.
Let op! Het apparaat mag niet onder waterstraal worden gereinigd.
Let op! Bij het eerste gebruik van het apparaat is een lichte rook of
onaangename geur mogelijk. Dit hee geen invloed op het veilige
gebruik van het apparaat. Onaangename geuren verdwijnen bij het
volgende gebruik van het product.
Gebruiksaanwijzing
1. Sluit het apparaat op energiebron aan. Het apparaat gee een
pieptoon en de schakelaar (8, a. B) licht op.
2.
Druk de schakelaar in. De knoppen op het bedieningspaneel
knipperen.
3.
Druk op de knop naar keuze, aankelijk van het gerecht dat
wordt bereid (9-13, a. B), en druk vervolgens op OK (14, a. B)
of wacht tot het programma na ca. 5 seconden vanzelf inschakelt.
De geselecteerde knop zal wit oplichten en de POWER LED
(3, A. B) zal rood knipperen.

NL
4.
Het apparaat begint gedurende ca. 4 minuten voor te verwarmen.
Na deze jd piept het apparaat driemaal en de LED READY (4,
a. B) licht groen op. Het apparaat is paraat.
5.
Stel de gewenste tijd en temperatuur in (zie Tijd- en
temperatuurinstellingen) of gebruik een van de 5
voorgeprogrammeerde automasche programma’s - steak, kip,
vis, toast, hamburger.
6. Open de bovenste grillplaat, plaats het gerecht op de grillplaat
en sluit het bovenste deksel.
7.
Door het hendel voor de hoogteverstelling (3, a. A) in de
gewenste stand te zeen, kan de he van het deksel van het
bovenste grillplat wordt gekozen (HOOG - hoog, of LAAG
- laag), of het apparaat kan volledig worden gesloten. In
gesloten stand kan het apparaat worden vergrendeld door het
hoogteverstelhendel in de stand LOCK te zeen en daarna
ontgrendeld door het hendel in de stand OPEN te zeen (a. C).
8.
Na het opwarmen gee het apparaat drie pieptonen, de
grillplaten stoppen met opwarmen, het apparaat gaat in stand-
by en de schakelaar (8, a. B) knippert.
Detecteert het apparaat een elektrische kortsluing of een foueve
installae, dan knipperen de lampjes, gee het een pieptoon en
schakelt het uit.
Tijd- en temperatuurinstellingen
1.
Schakel het apparaat uit de stand-by modus door op de
schakelaar (8, a. B) te drukken.
2.
Druk op de gewenste knop, TEMP (1, a. B) om de temperatuur
te wijzigen of TIMER (2, a. B) om de opwarmjd van het
gerecht te wijzigen. Druk vervolgens op de „+” of „-” knop om
de geselecteerde instelling te verhogen of te verlagen.
Het apparaat schakelt na ca. 5 seconden over naar de geselecteerde
jd-/temperatuurmodus.
Er zijn 5 automasche programma’s met voorgedenieerde jd- en
temperatuurinstellingen - steak, kip, vis, toast, hamburger.

NL
Open grill - funce
Om het apparaat in de open grill - funce te gebruiken, plaatst het op
een vlakke ondergrond en druk vervolgens op de open grillfunce-
knop (4, a. A) terwijl het apparaat wordt geopend (a. D).
Tijd en temperatuur voor geselecteerde gerechten
Type
gerecht
Temperatuur RARE
(5, a. B)
MEDIUM
(6, a. B)
WELL
DONE
(7, a. B)
Steak
(9, a. B)
230°C 02:30 03:30 05:00
Kip
(10, a. B)
220°C 03:00 05:00 07:00
Vis
(11, a. B)
200°C -04:30 06:00
Toast
(12, a. B)
210°C 02:30 03:30 04:30
Hamburger
(13, a. B)
220°C 03:00 04:00 05:00
Reiniging en onderhoud
•
Schakel het apparaat vóór het reinigen aljd uit, trek de
stekker uit het stopcontact en laat het apparaat volledig
aoelen.
•
De grillplaten kunnen in de vaatwasser en onder een directe
straal water worden gereinigd met een mild schoonmaakmiddel
en een zachte, niet krassende doek.
•
Dompel het apparaat nooit onder in water of in de vaatwasser.
De buitenkant van het apparaat kan met een vochge, zacht
doek worden gereinigd.
•
Gebruik geen agressieve reinigingsmiddelen en/of andere
harde voorwerpen om het apparaat te reinigen. Hierdoor kan
de coang van de grillplaten worden beschadigd.
• Na elk gebruik van het apparaat moet de vetopvangbak (9,
a. A) worden verwijderd en geleegd. De vetopvangbak

NL
moet met warm water en een mild reinigingsmiddel worden
gewassen en vervolgens met een zachte doek afgedroogd.
De aeeldingen dienen alleen ter illustrae, het werkelijke uiterlijk van de
producten kan van het uiterlijk op de aeeldingen verschillen.

UK
Вступне слово
Шановний клієнте!
Ми безмежно вдячні за те, що Ви довірились нам та вибрали
торгову марку Zeegma.
Завдяки використанню матеріалів найвищої якості та сучасних
технологічних рішень ми передаємо у Ваші руки виріб, ідеальний
для повсякденного використання.
Ми переконані, що завдяки незвичайній якості його виготовлення
він виправдає усі Ваші очікування.
Перед використанням виробу детально ознайомтесь з
нижченаведеною інструкцією обслуговування.
Якщо у вас виникли будь-які запитання або зауваження щодо
виробу, зв’яжіться з нами: [email protected]
Інформація про пристрій
Потужність: 2100 Вт
Джерело живлення: 220-240 В ~ 50 / 60 Гц
Важлива інформація
Будь ласка, прочитайте цю інструкцію
перед використанням пристрою, щоб
ознайомитися з його функціями та
використовувати його за призначенням.
1. Цим приладом можуть користуватися
діти віком від 8 років, а також особи з
обмеженими фізичними, сенсорними
чи розумовими здібностями або без
досвіду та знань, якщо вони перебувають
під наглядом або проінструктовані щодо
безпечного використання приладу та
розуміють пов’язану з цим небезпеку.

UK
2.
Діти не повинні гратися з пристроєм.
Дітям забороняється чистити та
обслуговувати пристрій без нагляду.
3. Обладнання слід підключати лише до
розетки із заземленням, яке відповідає
значенням, зазначеним на етикетці
пристрою.
4.
Прилад оснащений заземленою
вилкою. Не використовуйте прилад,
якщо вилка повністю не вставлена в
розетку. Не модифікуйте вилку та не
використовуйте адаптери.
5.
Прилад призначений лише для
домашнього використання. Не
використовуйте його для інших цілей,
крім тих, для яких він призначений.
6.
Не торкайтеся гарячих частин приладу.
7. Не занурюйте пристрій та його кабелі
у воду чи будь-яку іншу рідину.
8.
Будьте особливо обережні,
користуючись пристроєм, коли
поблизу знаходяться діти або домашні
тварини. Не дозволяйте дітям гратися з
приладом. Зберігайте пристрій та його
шнур у недоступному для дітей віком
до 8 років місці.

UK
9. Перед чищенням і після використання
пристрою завжди відключайте його
від джерела живлення та дайте йому
охолонути.
10.
Не використовуйте пошкоджений
або несправний прилад або прилад із
пошкодженим шнуром живлення чи
вилкою.
11.
Не ремонтуйте та не змінюйте пристрій
чи кабель. Ці дії можуть виконуватися
лише авторизованим сервісним
центром.
12. Використовуйте лише оригінальні або
рекомендовані виробником запасні
частини.
13.
Не тягніть і не переносьте пристрій
за шнур. Не кладіть на нього жодних
предметів. Не тягніть шнур за гострі
краї стін і меблів, а також не торкайтеся
гарячих поверхонь.
14.
Тримайте пристрій подалі від тепла,
високих температур, гарячих поверхонь,
прямих сонячних променів, іскор,
відкритого вогню.
15.
Використовуйте виріб горизонтально
на рівній і стійкій поверхні.

UK
16.
Не використовуйте гострі або металеві
аксесуари. Використовуйте пластикові
або дерев’яні аксесуари (наприклад,
дерев’яну лопатку).
17.
Пристрій не призначений для керування
за допомогою зовнішнього таймера,
окремого пульта дистанційного
керування або іншого обладнання, яке
може вмикати пристрій автоматично.
Опис частин (рис. A)
1. Ручка
2. Верхній корпус
3. Важіль регулювання
висоти
4. Кнопка відкриття гриля
5. Панель управління
6. Антипригарна пластина
для гриля
7. Кнопки розблокування
пластини гриля
8. Нижній корпус
9. Піддон для капель
Перед першим використанням
1. Очистіть і видаліть усі пакувальні матеріали.
2.
Очистіть пластини гриля вологою ганчіркою або губкою
та теплою водою.
3. Висушіть пристрій тканиною або кухонним рушником.
УВАГА! Не мийте пристрій безпосередньо під проточною водою.
УВАГА! При першому використанні приладу може виділятися
легкий дим або неприємний запах. Це не впливає на безпечне
використання пристрою. Неприємні запахи зникнуть при
наступному використанні засобу.
Посібник користувача
1.
Підключіть пристрій до джерела живлення. Пристрій видасть
один звуковий сигнал, і вимикач (8, рис. B) засвітиться.
2.
Натисніть вимикач. Кнопки на панелі керування блиматимуть.

UK
3.
Натисніть вибрану кнопку залежно від типу страви, що
готується (9-13, рис. B), потім натисніть кнопку OK (14, рис.
B) або зачекайте, доки програма автоматично запуститься
приблизно через 5 секунд. Вибрана кнопка світиться білим,
а світлодіод POWER (3, рис. B) блимає червоним.
4. Машина почне попереднє нагрівання протягом приблизно
4 хвилин. Після закінчення цього часу пристрій видасть три
звукові сигнали, а світлодіод READY (4, рис. B) засвітиться
зеленим. Апарат готовий до роботи.
5.
Ви можете встановити вибраний час і температуру (див.:
Налаштування часу та температури) або скористайтеся
однією з 5 попередньо завантажених автоматичних програм
- стейк, курка, риба, тости, бургер.
6.
Відкрийте верхню кришку приладу, покладіть страву на
плиту гриля і закрийте верхню кришку.
7.
Встановивши важіль регулювання висоти (3, рис. А) в
потрібне положення, можна вибрати ступінь нахилу кришки
(ВИСОКА - велика або НИЗЬКА - маленька), або повністю
закрити пристрій. У закритому стані ви можете заблокувати
пристрій, встановивши важіль регулювання висоти в
положення LOCK, і розблокувати його, перемістивши його
в положення OPEN (рис. C).
8. Після розігріву прилад видасть три звукові сигнали, плити
гриля перестануть нагріватися, прилад перейде в режим
очікування, а перемикач (8, рис. B) почне блимати.
Якщо пристрій виявить коротке електричне замикання або
неправильне встановлення, індикатори почнуть блимати,
пристрій видасть звуковий сигнал і вимкнеться.
Налаштування часу та температури
1.
Виведіть пристрій із режиму очікування, натиснувши вимикач
(8, мал. B).
2.
Натисніть вибрану кнопку, TEMP (1, рис. B), щоб змінити
температуру, або TIMER (2, рис. B), щоб змінити час
приготування. Потім натисніть кнопку «+» або «-», щоб
збільшити або зменшити вибрані налаштування.

UK
Пристрій увійде у вибраний режим часу/температури приблизно
через 5 секунд.
Ви можете використовувати 5 завантажених автоматичних
програм із заданим часом і температурою - стейк, курка, риба,
тости, бургер.
Функція відкритого гриля
Щоб використовувати прилад як відкритий гриль, поставте його
на рівну поверхню, потім натисніть кнопку функції відкриття
гриля (4, мал. A), відкриваючи прилад (мал. D).
Час і температура для вибраних видів страв
Тип страви
Температура
СЛАБО
ЗАСМАЖЕНИЙ
(5, рис. B)
СЕРЕДНІЙ
(6, мал. B)
ДОБРЕ
ЗАСМАЖЕНИЙ
(7, рис. B)
Стейк (9,
мал. B)
230°C 02:30 03:30 05:00
Курка (10,
рис. B)
220°C 03:00 05:00 07:00
Риба (11,
рис. B)
200°C -04:30 06:00
Тост (12,
рис. B)
210°C 02:30 03:30 04:30
Бургер
(13, рис.
B)
220°C 03:00 04:00 05:00
Очищення та обслуговування
• Перед чищенням пристрою вимкніть його, від’єднайте від
джерела живлення та дайте охолонути.

UK
•
Після охолодження пластини гриля можна мити в
посудомийній машині або під прямим струменем води,
використовуючи м’які миючі засоби та м’яку тканину, яка
не дряпає.
•
Ніколи не занурюйте весь пристрій у воду та не мийте його
в посудомийній машині. Зовнішню частину пристрою можна
чистити м’якою вологою тканиною.
•
Не використовуйте для чищення абразивні матеріали
або металеві пристрої, оскільки вони можуть пошкодити
покриття пластин гриля.
•
Після кожного використання приладу знімайте та
спорожняйте піддон для крапель (9, рис. A). Вимийте лоток
теплою водою з м’якими миючими засобами, потім витріть
насухо м’якою тканиною.
Фотографії наведені лише для ілюстрації, фактичний вигляд продукції
може відрізнятися від представленого на фотографіях.

LT
Įžanga
Gerbiamas Kliente!
Dėkojame, kad pasikėjote mumis ir pasirinkote „Zeegma“ prekės
ženklą.
Dėl aukštos kokybės medžiagų naudojimo ir modernių technologinių
sprendimų mes siūlome jums produktą, kuris puikiai nka naudo
kasdien.
Esame įsitikinę, kad dėka didelio rūpesčio puikiai atitiks Jūsų
reikalavimus.
Prieš naudodami gaminį, adžiai perskaitykite šį vartotojo vadovą.
Jei turite komentarų ar klausimų apie įsigytą produktą, susisiekite su
mumis: [email protected]
Informacija apie prietaisą
Galia: 2100 W
Mainimas: 220-240V~ 50/60Hz
Svarbi informacija
Prieš naudodami prietaisą, perskaitykite šį
vadovą, kad susipažintų su jo funkcijomis ir
naudotų jį pagal paskir.
1. Šį prietaisą gali naudo 8 metų ir vyresni
vaikai bei asmenys, turintys ribotų
fizinių, jutiminių ar protinių gebėjimų
arba neturintys pares ir žinių, jei jie
yra prižiūrimi arba yra instruktuo, kaip
saugiai naudo prietaisą ir supranta su
tuo susijusius pavojus.
2.
Vaikai neturėtų žais prietaisu. Neprižiūrimi
vaikai negali valy ir prižiūrė prietaiso.

LT
3.
Prietaisas turi bū prijungiamas k prie
lizdo, kurio įžeminimas anka eketėje
nurodytas vertes.
4.
Prietaisas turi kištuką su įžeminimu.
Nenaudokite prietaiso, kol jo kištukas nėra
iki galo įkištas į elektros lizdą. Nekeiskite
kištuko ir nenaudokite adapterių.
5.
Prietaisas skirtas naudoti tik buityje.
Neturėtų bū naudojamas kiems kslams
nei ems, kuriems jis skirtas.
6. Nelieskite karštų prietaiso dalių.
7.
Nenardinkite prietaiso ir jo laidų į vandenį
ar bet kokį kitą skys.
8.
Būkite ypač atsargūs, kai naudojate
prietaisą, kai šalia yra vaikų ar naminių
gyvūnų. Vaikams negalima leis žais
prietaisu. Prietaisą ir jo laidą laikykite iki
8 metų vaikams nepasiekiamoje vietoje.
9.
Prieš valydami ir po naudojimo prietaisą
visada atjunkite nuo mainimo šalnio ir
leiskite jam atvės.
10.
Nenaudokite pažeisto ar blogai veikiančio
prietaiso arba tokio su pažeistu mainimo
laidu arba kištuku.
11.
Netaisykite ir nekeiskite prietaiso ar laido.
Šias veiklas gali atlik k įgaliotas servisas.

LT
12.
Naudokite k originalias arba gamintojo
rekomenduojamas atsargines dalis.
13.
Netraukite ir neneškite prietaiso, laikydami
už laidą. Nedėkite ant jo jokių daiktų.
Netempkite laido per aštrius sienų ir
baldų kraštus ir neleiskite jam lies karštų
paviršių.
14.
Saugokite prietaisą toliau nuo karščio,
aukštos temperatūros, karštų paviršių,
esioginių saulės spindulių, kibirkščių,
atviros liepsnos.
15. Naudokite gaminį horizontaliai ant lygaus
ir stabilaus paviršiaus.
16.
Nenaudokite aštrių ar metalinių priedų.
Naudokite plastikinius arba medinius
priedus (pvz., medinę mentelę).
17.
Prietaisas nėra skirtas valdyti išoriniu
laikmačiu, atskiru nuotolinio valdymo pultu
ar kita įranga, kuri galėtų automaškai
įjung prietaisą.
Dalių aprašymas (A pav.)
1. Rankena
2. Viršunis korpusas
3. Aukščio reguliavimo svirs
4.
Adaryto grilio funkcijos
mygtukas
5. Valdymo skydelis
6.
Grilio plokštė su nelipnia
danga
7.
Grilio plokščių atleidimo
mygtukai
8. Apanis korpusas
9. Lašėjimo padėklas

LT
Prieš pirmą naudojimą
1. Nuimkite ir pašalinkite visus pakuotės elementus.
2. Nuvalykite grilio plokštes drėgna šluoste arba kempine ir šiltu
vandeniu.
3. Išdžiovinkite prietaisą šluoste arba virtuviniu rankšluosčiu.
Dėmesio! Nevalykite prietaiso esiai po tekančiu vandeniu.
Dėmesio! Naudodami prietaisą pirmą kartą, iš jo gali sklis nedideli
dūmai arba nemalonus kvapas. Tai neturi įtakos saugiam prietaiso
naudojimui. Nemalonūs kvapai išnyks kitą kartą naudodami gaminį.
Naudojimo vadovas
1.
Prijunkite prietaisą prie mainimo šalnio. Prietaisas skleis vieną
garsinį signalą ir užsidegs jungiklis (8, B pav.).
2. Paspauskite jungiklį. Valdymo skydelyje mirksės mygtukai.
3.
Paspauskite pasirinktą mygtuką, priklausomai nuo ruošiamo
paekalo po (9-13, B pav.), tada paspauskite mygtuką OK
(14, B pav.) arba palaukite, kol programa automaškai įsijungs
maždaug po 5 sekundžių. Pasirinktas mygtukas švies baltai, o
LED (3, B pav.) diodas mirksės raudonai.
4. Prietaisas pradės pradinį, maždaug 4 minučių, šildymą. Praėjus
šiam laikui, prietaisas tris kartus skleis garsinį signalą, o READY
diodas (4, B pav.) pradės švies žaliai. Prietaisas paruoštas darbui.
5.
Galite nustaty pasirinktą laiką ir temperatūrą (žr. Laiko ir
temperatūros nustatymai) arba naudokite vieną iš 5 iš anksto
įkeltų automanių programų – didkepsnis, višena, žuvis,
skrebus, mėsainis.
6.
Adarykite viršunį prietaiso korpusą, įdėkite paekalą ant grilio
plokštės ir uždarykite viršunį korpusą.
7. Nustačius aukščio reguliavimo svir (3, A pav.) į norimą padė,
galima pasirink dangtelio nuolydžio laipsnį (HIGH – didelis
arba LOW – mažas), arba visiškai uždary prietaisą. Uždarius
prietaisą galite užrakin, aukščio reguliavimo svir nustatę į
LOCK padė, o atrakin – perkeldami į OPEN padė (C pav.).
8. Pasibaigus šildymui, prietaisas tris kartus skleis garsinį signalą,
grilio plokštės nustos kain, prietaisas persijungs į budėjimo
režimą, o jungiklis (8, B pav.) pradės mirksė.

LT
Jei prietaisas apnka trumpąjį elektros jungimą arba neteisingą
instaliaciją, mirksės indikatoriaus lemputės, o prietaisas skleis garsinį
signalą ir išsijungs.
Laiko ir temperatūros nustatymas
1. Išjunkite prietaisą iš budėjimo režimo paspausdami jungiklį (8,
B pav.).
2. Paspauskite pasirinktą mygtuką TEMP (1, B pav.), kad pakeistų
temperatūrą, arba TIMER (2, B pav.), kad pakeistų paruošimo
laiką. Tada paspauskite mygtuką „+“ arba „-“, kad padidintų arba
sumažintų pasirinktus nustatymus.
Prietaisas įjungs pasirinktą laiko / temperatūros režimą maždaug po
5 sekundžių.
Galite naudo 5 iš anksto įkeltas automanes programas su iš anksto
nustatytais laiko ir temperatūros nustatymais – didkepsnis, višena,
žuvis, skrebus, mėsainis.
Adaryto grilio funkcija
Norėdami naudo prietaisą kaip adarytą grilį, pastatykite prietaisą
ant lygaus paviršiaus, tada adarydami prietaisą (D pav.) paspauskite
grilio adarymo funkcijos mygtuką (4, A pav.).
Laikas ir temperatūra pasirinkems paekalų pams
Paekalo
pas
Temperatūra MAŽAI
IŠKEPUS
(5, B pav.)
VIDUTI-
NIŠKAI
(6, B pav.)
GERAI
IŠKEPUS
(7, B pav.)
Didkepsnis
(9, B pav.)
230°C 02:30 03:30 05:00
Višta
(10, B pav.)
220°C 03:00 05:00 07:00
Žuvis
(11, B pav.)
200°C -04:30 06:00

LT
Skrebus
(12, B pav.)
210°C 02:30 03:30 04:30
Mėsainis
(13, B pav.)
220°C 03:00 04:00 05:00
Valymas ir priežiūra
•
Prieš valydami įrenginį, išjunkite jį, atjunkite nuo mainimo
šalnio ir leiskite atvės.
•
Atvėsus grilio plokštes galima plauti indaplovėje arba po
esiogine vandens srove, naudojant švelnias valymo priemones
ir minkštą, nebraižančią šluostę.
•
Niekada nemerkite viso prietaiso į vandenį ir nevalykite jo
indaplovėje. Prietaiso išorę galima valy minkšta, drėgna šluoste.
• Valymui nenaudokite abrazyvinių medžiagų ar metalinių indų,
nes jie gali pažeis grilio plokščių dangą.
•
Po kiekvieno prietaiso naudojimo išimkite ir ištušnkite lašėjimo
padėklą (9, A pav.). Išplaukite padėklą šiltu vandeniu ir švelniais
plovikliais, tada nusausinkite minkšta šluoste.
Nuotraukos skirtos k iliustracijai, kroji produktų išvaizda gali skirs nuo
pateiktos nuotraukose.

HR
Uvod
Poštovani kupci
Zahvaljujemo što ste nam ukazali povjerenje i odabrali marku Zeegma.
Dajemo vam proizvod koji je savršen za svakodnevnu upotrebu
zahvaljujući upotrebi visokokvalitetnih materijala i modernih tehničkih
rješenja.
Sigurni smo da će velika briga jekom izrade proizvod osigura
ispunjavanje vaših zahtjeva.
Prije uporabe proizvoda, pažljivo pročitajte ovaj korisnički priručnik.
Ako imate bilo kakvih nedoumica ili pitanja ili u vezi s kupljenim
proizvodom, kontakrajte nas: [email protected]om
Informacije o uređaju
Snaga: 2100 W
Napajanje: 220-240V~ 50/60Hz
Važne informacije
Prije uporabe uređaja pročitajte ovaj priručnik
kako biste se upoznali s njegovim funkcijama
i korisli ga prema namjeni.
1.
Ovaj uređaj smiju koris djeca od 8 godina
i starija, te osobe sa smanjenim zičkim,
osjelnim ili mentalnim sposobnosma ili
bez iskustva i znanja, ako su pod nadzorom
ili su upućeni u sigurnu upotrebu uređaja i
ako razumiju vezane s m opasnos.
2. Djeca se ne smiju igra s uređajem. Nije
dopušteno da djeca bez nadzora čiste i
održavaju uređaj.
3.
Uređaj treba spoji samo na učnicu s

HR
uzemljenjem koja je u skladu s vrijednosma
navedenim na naljepnici koja se nalazi na
uređaju.
4.
Uređaj je opremljen utikačem s
uzemljenjem. Nemojte koristiti uređaj
ako ukač nije u potpunos umetnut u
učnicu. Ne mijenjajte ukač i nemojte
koris adaptere.
5.
Uređaj je namijenjen isključivo za kućnu
upotrebu Ne smije se koris u druge
svrhe osim onih za koje je namijenjen
6. Ne dodirujte vruće dijelove uređaja
7. Nemojte uranja uređaj i njegove kabele
u vodu ili bilo koju drugu tekućinu
8.
Budite posebno oprezni kada koriste
uređaj kada su u blizini djeca ili kućni
ljubimci Djeci se ne smije dopus da se
igraju s uređajem Držite uređaj i njegov
kabel izvan dohvata djece mlađe od 8
godina
9.
Prije čišćenja i nakon uporabe uređaja
uvijek isključite uređaj iz struje i ostavite
ga da se ohladi
10.
Nemojte koris oštećen ili neispravan
uređaj ili uređaj s oštećenim kabelom za
napajanje ili ukačem

HR
11. Nemojte popravlja ili modicira uređaj
ili kabel. Ove radnje smije obavlja samo
ovlašteni servis.
12.
Koriste samo originalne rezervne dijelove
ili dijelove koje preporučuje proizvođač.
13.
Nemojte povlači ili nosi uređaj držeći
ga za kabel Ne stavljajte na njega nikakve
predmete Kabel nemojte povlači preko
oštrih rubova zidova i namještaja te ne
dopuste da dodiruje vruće površine
14.
Držite uređaj podalje od izvora topline,
visokih temperatura, vrućih površina,
izravne sunčeve svjetlos, iskri, otvorenog
plamena
15.
Koriste proizvod na ravnoj i stabilnoj
površini
16.
Nemojte koris oštre ili metalne dodatke.
Koriste plasčni ili drveni pribor (npr.
drvenu lopacu).
17.
Uređaj nije namijenjen za upravljanje
vanjskim merom, zasebnim daljinskim
upravljačem ili drugom opremom koja bi
mogla automatski uključi uređaj.

HR
Opis dijelova (slika. A)
1. Ručka
2. Gornje kućište
3. Poluga za podešavanje
visine
4. Tipka za funkciju
otvorenog rošlja
5. Upravljačka ploča
6. Neprianjajuća ploča za
rošlj
7. Tipke za otpuštanje ploča
za rošlj
8. Donje kućište
9. Posuda za kapanje
Prije prve uporabe
1. Odlijepite i uklonite sav materijal za pakiranje
2.
Očiste ploče rošlja vlažnom krpom ili spužvom i toplom vodom
3. Osušite uređaj krpom ili kuhinjskom krpom.
Pažnja! Ne čiste uređaj izravno pod tekućom vodom
Pažnja! Prilikom prve uporabe uređaja može se pojavi blagi dim ili
neugodan miris To ne utječe na sigurnu uporabu uređaja Neugodni
mirisi nestat će sljedećom upotrebom proizvoda
Korisnički priručnik
1. Spojite uređaj na izvor napajanja Uređaj će se jednom oglasi
zvučnim signalom i prekidač (8, sl. B) će zasvijetli.
2. Prisnite prekidač Gumbi na upravljačkoj ploči će trepta
3. Prisnite odabranu pku, ovisno o vrs hrane koja se priprema
(9-13, slika B), zam prisnite pku OK (14, slika B) ili pričekajte
da se program automatski pokrene nakon otprilike 5 sekundi
Odabrana pka će svijetli bijelo, a POWER LED (3, sl. B) će
treperi crveno
4. Uređaj će započe s predgrijavanjem otprilike 4 minute Nakon
tog vremena, uređaj će zapišta tri puta i READY LED (4, sl. B)
će svijetli zeleno Uređaj je spreman za rad
5.
Možete postavi željeno vrijeme i temperaturu (pogledajte:
Postavke vremena i temperature) ili koris jedan od 5 unaprijed
učitanih automatskih programa - odrezak, pilena, riba, tost,
hamburger
6.
Otvorite gornje kućište uređaja, stavite jelo na gril ploču i
zatvorite gornje kućište
7. Postavljanjem poluge za podešavanje visine (3, sl. A) u željeni

HR
položaj, možete odabra stupanj nagiba poklopca (VISOKO
- veliko ili NISKO - malo), ili potpuno zatvori uređaj Kada je
zatvoren, uređaj možete zaključa postavljanjem poluge za
podešavanje visine u položaj LOCK i otključa ga pomicanjem
u položaj OPEN (slika C)
8.
Nakon zagrijavanja uređaj će se oglasi tri zvučna signala, ploče
za rošlj će presta grija, uređaj će prijeći u stanje mirovanja
i prekidač (8, slika B) će poče trepta
Ako uređaj detekra električni kratki spoj ili neispravnu instalaciju,
indikatorske lampice će trepta, a uređaj će se oglasi zvučnim
signalom i isključi
Postavke vremena i temperature
1.
Probudite uređaj iz stanja pripravnos priskom na prekidač
(8, sl. B
2.
Prisnite odabranu pku, TEMP (1, sl. B) za promjenu temperature
ili TIMER (2, sl. B) za promjenu vremena kuhanja Zam prisnite
gumb „+” ili „-” za povećanje ili smanjenje odabranih postavki
Uređaj će ući u odabrani način vremena/temperature nakon otprilike
5 sekundi
Možete koris 5 unaprijed učitanih automatskih programa s unaprijed
deniranim postavkama vremena i temperature - odrezak, pilena,
riba, tost, burger
Funkcija otvorenog rošlja
Za korištenje uređaja kao otvorenog rošlja, postavite uređaj na
ravnu površinu, zam prisnite pku za otvaranje rošlja (4, slika A)
dok otvarate uređaj (slika D)

HR
Vrijeme i temperatura za odabrane vrste obroka
Vrsta
obroka
Temperatura SLABO
ISPEČEN
(5, slika. B)
SREDNJE
(6, slika. B)
DOBRO
ISPEČEN
(7, slika. B)
Odrezak
(9, slika. B)
230°C 02:30 03:30 05:00
Pilena (10,
slika. B)
220°C 03:00 05:00 07:00
Riba
(11, slika B)
200°C -04:30 06:00
Tost
(12, slika. B)
210°C 02:30 03:30 04:30
Burger
(13, slika. B)
220°C 03:00 04:00 05:00
Čišćenje i održavanje
•
Prije čišćenja uređaj isključite, odvojite od izvora napajanja i
ostavite da se ohladi.
•
Nakon što se ohlade, ploče za rošlj se mogu pra u perilici
posuđa ili pod izravnim mlazom vode, blagim sredstvima za
čišćenje i mekom krpom koja ne grebe
•
Nikada ne uranjajte cijeli uređaj u vodu ni ga perite u perilici
posuđa Vanjski dio uređaja može se čis mekom, vlažnom krpom
• Ne koriste abrazivna sredstva ili metalno posuđe za čišćenje,
jer mogu ošte premaz ploča za rošlj
•
Nakon svake uporabe uređaja, izvadite i ispraznite posudu za
kapanje (9, slika A) Operite pladanj toplom vodom i blagim
deterdženma, a zam ga osušite mekom krpom
Fotograje su samo za ilustraciju, stvarni izgled proizvoda može se
razlikova od prikazanog na fotograjama

EN: The product complies with requirements of EU direcves.
Pursuant to the Direcve 2012/19/EU, this product is subject to
selecve collecon. The product must not be disposed of along with
domesc waste as it may pose a threat to the environment and human
health. The worn-out product must be handed over to the electrics and
electronics recycling center.
DE: Das Produkt smmt mit den Richtlinien der Europäischen Union.
Gemäß der Richtlinie 2012/19/UE unterliegt das Produkt einer
getrennten Sammlung. Das Produkt darf man nicht zusammen mit
kommunalen Abfällen entsorgen, weil das die Gefahr für die Umwelt
und die Gesundheit der Menschen bilden kann. Das verbrauchte
Produkt soll man in einem entsprechenden Rücknahmepunkt für
Elektro- und Elektronik-Altgeräte zurückgeben.
PL: Produkt zgodny z wymaganiami dyrektyw Unii Europejskiej.
Zgodnie z Dyrektywą 2012/19/UE, niniejszy produkt podlega
zbiórce selektywnej. Produktu nie należy wyrzucać wraz z odpadami
komunalnymi, gdyż może stanowić on zagrożenie dla środowiska i
zdrowia ludzi. Zużyty produkt należy oddać do punktu recyklingu
urządzeń elektrycznych i elektronicznych.
IT: Prodoo conforme ai requisi delle direve dell’Unione Europea.
In conformità alla direva 2012/19/UE, questo prodoo è soggeo a
raccolta dierenziata. Il prodoo non deve essere smalto con i riu
domesci perché può costuire una minaccia per l’ambiente e la salute
umana. Si prega di restuire il vecchio prodoo al punto di raccolta
applicabile per il riciclaggio di apparecchiature eleriche ed eleroniche.
FR: Le produit est conforme aux exigences des direcves de l’Union
européenne. Conformément à la Direcve 2012/19/UE, le présent
produit est soumis à la collecte séparée. Il convient de ne pas jeter le
produit avec les déchets ménagers, car il peut constuer un danger
pour l’environnement et la sainte humaine. Le produit usé devrait être
remis au point de recyclage des appareils électriques et électroniques.

ES: El producto cumple los requisitos de las direcvas de la Unión
Europea. De acuerdo con la Direcva 2012/19/UE, este producto
está sujeto a recogida selecva. El producto no debe eliminarse con
los residuos municipales, ya que puede suponer una amenaza para el
medio ambiente y la salud humana. Por favor, entrega el producto que
ya no vayas a ulizar a un centro de reciclaje de disposivos eléctricos
y electrónicos.
NL: Product in overeenstemming met de eisen van de richtlijnen van de
Europese Unie. In overeenstemming met Richtlijn 2012/19/EU moet
dit product gescheiden worden ingezameld. Het product mag niet met
het huisvuil worden weggegooid omdat het een bedreiging kan vormen
voor het milieu en de volksgezondheid. Lever uw oude product in bij
het daarvoor bestemde inzamelpunt voor recycling van elektrische en
elektronische apparatuur.
UK: Продукт відповідає вимогам директив Європейського Союзу.
Відповідно до Директиви 2012/19/ЄС цей продукт підлягає
вибірковому збору. Продукт не слід утилізувати разом із побутовими
відходами, оскільки це може становити загрозу навколишньому
середовищу та здоров’ю людей. Використаний продукт слід здати
до пункту переробки електричних та електронних пристроїв.
LT: Produktas anka Europos Sąjungos direktyvų reikalavimus.
Pagal 2012/19 / ES Direktyvą šis produktas yra rūšiuojamas. Produkto
negalima išmes su komunalinėmis atliekomis, nes tai gali kel grėsmę
aplinkai ir žmonių sveikatai. Panaudotą gaminį reikia nugaben į elektros
ir elektroninės įrangos perdirbimo punktą.
HR: Proizvod je sukladan propisima Direkve Europske Unije.
Sukladno Direkvi 2012/19/UE ovaj proizvod spada u selekvno
skupljanje. Proizvod se ne smije baca skupa s drugim komunalnim
otpadom, jer može predstavlja prijetnju za okoliš i ljudsko zdravlje.
Potrošeni proizvod je potrebno odnije u centar za zbrinjavanje
električnih i elektroničkih uređaja.


BrandLine Group Service – Support
List of Authorized Service Centers:
Liste der Autorisierten Herstellerservicezentren:
Lista autoryzowanych centrów serwisowych:
Elenco dei centri di assistenza autorizza:
Liste des centres de service autorisés:
Lista de centros de servicio autorizados:
Lijst met erkende servicecentra:
Список уповноважених сервісних центрів:
Įgaliotų aptarnavimo centrų sąrašas:
Popis ovlaštenih servisnih centara:
www.zeegma.com/en/service
Szczegółowe warunki gwarancji dostępne są na stronie:
Detailed warranty condions are available on the website:
Detaillierte Garanebedingungen nden Sie auf der Website:
Le condizioni di garanzia deagliate sono disponibili sul sito web:
Les condions de garane détaillées sont disponibles sur le site:
Las condiciones de garana detalladas están disponibles en el sio web:
Gedetailleerde garanevoorwaarden zijn beschikbaar op de website:
Детальні умови гарантії доступні на веб-сайті:
Išsamias garanjos sąlygas galite ras svetainėje:
Detaljni uvje jamstva dostupni su na web mjestu:
www.zeegma.com
Thank you for purchasing our product!
Vielen Dank für den Kauf unseres Produkts!
Dziękujemy za zakup urządzenia naszej marki!
Grazie per aver acquistato il nostro disposivo di marca
Merci d’avoir acheté notre produit!
¡Gracias por adquirir nuestro producto!
Bedankt voor het aanschaen van ons product!
Дякуємо за придбання нашого продукту!
Dėkojame, kad įsigijote mūsų produktą!
Zahvaljujemo na kupnji našeg proizvoda!

zeegma.com
-
 1
1
-
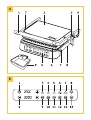 2
2
-
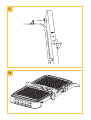 3
3
-
 4
4
-
 5
5
-
 6
6
-
 7
7
-
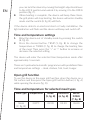 8
8
-
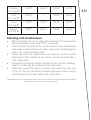 9
9
-
 10
10
-
 11
11
-
 12
12
-
 13
13
-
 14
14
-
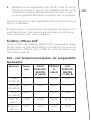 15
15
-
 16
16
-
 17
17
-
 18
18
-
 19
19
-
 20
20
-
 21
21
-
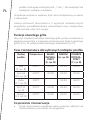 22
22
-
 23
23
-
 24
24
-
 25
25
-
 26
26
-
 27
27
-
 28
28
-
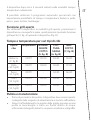 29
29
-
 30
30
-
 31
31
-
 32
32
-
 33
33
-
 34
34
-
 35
35
-
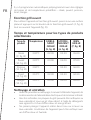 36
36
-
 37
37
-
 38
38
-
 39
39
-
 40
40
-
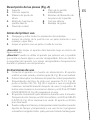 41
41
-
 42
42
-
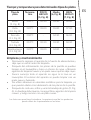 43
43
-
 44
44
-
 45
45
-
 46
46
-
 47
47
-
 48
48
-
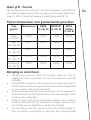 49
49
-
 50
50
-
 51
51
-
 52
52
-
 53
53
-
 54
54
-
 55
55
-
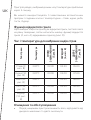 56
56
-
 57
57
-
 58
58
-
 59
59
-
 60
60
-
 61
61
-
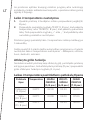 62
62
-
 63
63
-
 64
64
-
 65
65
-
 66
66
-
 67
67
-
 68
68
-
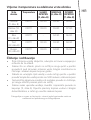 69
69
-
 70
70
-
 71
71
-
 72
72
-
 73
73
-
 74
74


ZEEGMA Grill Chef Electric Grill Handleiding
- Categorie
- Barbecues
- Type
- Handleiding


