Tristar KA-5338 Handleiding
- Categorie
- Ruimteverwarmingstoestellen
- Type
- Handleiding

Contact your dealer or gas supplier for assistance.
• Do not use the Heater if a leakage is found!
• Do not use a naked ame for leakage testing!
• Do not operate any electrical equipment in the presence of a gas leak.
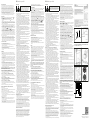
OPERATIONS FIGURE 6
The heater can be regulated to three dierent heat input stages: LOW (1 ),
MEDIUM (2
) and HIGH (3
). The ignition is operated by piezo electric
push button.
• Open the valve on the gas cylinder 1 ½ turns.
• Press down and turn the control knob to LOW (1 ) position and hold for 10
seconds.
• While still pressing down the control knob, press several times on the
ignition button until the pilot ame ignited at the bottom of the burner.
Continue to hold the control knob down for another 10-15 seconds. When
releasing the button and the pilot ame goes out, repeat the operation
• When rst igniting a new heater, it may be necessary to hold the control
knob down for a longer time in order to allow gas to ow to the pilot burner.
• When the heater is burning at the LOW (1 ) stage, please wait for around 4
minutes. The heating element will start glowing and will become red. After
that you can turn the control knob to the MEDIUM (2
) position, again
wait around 4 minutes in this position. Finally you can turn the control knob
to the HIGH (3
) position.
• NEVER PUT THE APPLIANCE DIRECTLY ON THE HIGH (3
) -POSITION. AS
A RESULT OF THIS THE HEATER MIGHT NOT BE ABLE TO DIGEST THE GAS IN
A PROPER WAY AND THERE MIGHT BE EXCESSIVE FLAMING COMBUSTION.
• In order to shut o the heater, you need to turn back the control knob to the
start position and close the cylinder valve fully (in clockwise); the heater can
only be shut o by closing the gas cylinder valve fully. It cannot be turned
o by the control knob.
Note: the heater incorporates several safety devices that will shut down the
heater in unsafe conditions.
1. In case of accidental ame failure, the heater will shut down automatically.
2. The heater will shut down if the ventilation in the room is not sucient or
when the heater is placed in a small room. Turn o the heater, ventilate the
room well, and wait 5-10 minutes before re-lighting the heater.
3. This heater incorporates a “anti-tilt” switch which automatically shuts
o the burner in the event of tipping. Ensure the heater is in the vertical
position.
Changing the gas cylinder
• Gas cylinders must be replaced in a ame free environment.
• Do not smoke while changing the gas cylinder.
• Turn o the gas cylinder valve or regulator fully (clockwise) and take the
empty cylinder out of the heater.
• Do not attempt to remove the regulator while the heater is still running.
• Make sure that the heater is extinguished completely.
• Remove the regulator from the empty cylinder.
• Following the steps described under “Heater Set-up” for connecting a new
cylinder.
CLEANING
• Maintenance and cleaning must be carried out with the gas supply turned
o and the heater must be cold. Do not attempt to clean the heater while it
is in use.
• Your heater should be checked annually by a qualied person for safe
operation and to detect any faults.
• If any faults are detected in use, stop using the heater and contact your
dealer for advice.
• Periodically clean the exterior and rear cylinder, storage area of your heater
to remove dust, which may aect the operation of the heater.
• Light vacuuming with a soft brush will remove any dust build-up on the
surfaces of the ceramic elements. Do not scrape these elements as they may
become very fragile with use.
• Do not use abrasive products to clean the heater.
• Watch the pilot ame while it is in operation. It should burn steadily, if
it ickers or is yellow tipped, the heater should be checked for correct
operation.
• If any parts need replacement, they must be replaced only with genuine
original parts supplied by the manufacturer. The use of incorrect or
substitute the parts may be dangerous and will void any warranty.
When the heater is not in use for a period of time, for instance, over the
summer, we recommend that it is kept covered or replaced in its carton to
minimize the accumulation of dust and dirt that may occur.
Specialist servicing instructions (for KA-5338 & KA-5340)
• The 0.57 marking on the injector indicates that the size of the injector is 0.57 mm.
• ASD should be marked with ODS-1112A. The aeration size is Ø 2.8 mm in
diameter for I3B/P (30) and I3+ (28-30/37).
Specialist servicing instructions (for KA-5338DU & KA-5340DU)
• The 0.47 marking on the injector indicates that the size of the injector is 0.47 mm.
• ASD should be marked with ODS-1112A. The aeration size is Ø 2.7 mm in
diameter for I3B/P (50).
Specialist servicing instructions (for KA-5339)
• The 0.57 marking on the injector indicates that the size of the injector is 0.57 mm.
• ASD should be marked with ODS-1112A. The aeration size is Ø 3.0 mm in
diameter for I3B/P (30) and I3+ (28-30/37).
Specialist servicing instructions (for KA-5339DU)
• The 0.47 marking on the injector indicates that the size of the injector is 0.47 mm.
• ASD should be marked with ODS-1112A. The aeration size is Ø 2.9 mm in
diameter for I3B/P (50).
The correct position of the ODS when tted on the ODS stator plate. (7)
TECHNICAL ASSISTANCE BEFORE CALLING FOR FURTHER HELP
The heater doesn’t light:
• Check the gas cylinder if it is full
• Check the regulator if it is properly attached and the cylinder valve is turned on.
• Check if the instructions have been followed correctly.
The heat doesn’t light after the cylinder has been changed it could be due to:
• There is some air present in the cylinder, hold the control knob down for a
longer period of time until the pilot and main burner light. Switch to the 3
High setting.
• The cylinder may have been excessively cold. Allow the cylinder to reach
room temperature before attempting to start the heater.
The heater turns o by itself:
• If the heater goes out on continuous working, repeat the operation,
following the instruction.
• If it goes out soon after lighting, check for drafts or for the gas cylinder
running out of gas.
• If it goes out after 30 minutes or so, it is signaling that it is operating in a
badly ventilated area. Open a window or door to ventilate the area and
reignite.
• Avoid bumping the heater in operation. Don’t move the heater while in
operation.
WAARSCHUWING
Deze handleiding aandachtig doorlezen
voordat u het apparaat in gebruik neemt.
Houd de handleiding bij de hand om later te
kunnen raadplegen en zolang u het apparaat
in bezit hebt. Bewaar de handleiding met het
garantiebewijs, de kassabon en, indien mogelijk,
de doos met de binnenverpakking.
ALGEMENE VEILIGHEIDSAANWIJZINGEN
• Dit toestel moet gebruikt en onderhouden worden volgens de
geldende voorschriften en normen.
• Voordat u dit apparaat in gebruik gaat nemen, lees a.u.b. eerst de
gebruiksaanwijzing grondig door en bewaar het zodat u het later weer
kunt nalezen.
• Bewaar deze gebruiksaanwijzing, het garantiecerticaat, de verkoopbon
en indien mogelijk de kartonnen doos met de binnenste verpakking.
• Het apparaat is uitsluitend bedoeld voor privé gebruik en niet voor
commercieel gebruik.
• Dit apparaat is niet bedoeld om gebruikt te worden door personen
(waaronder kinderen) met verminderde fysieke, zintuiglijke of mentale
capaciteiten of een gebrek aan ervaring en kennis, tenzij zij onder
toezicht staan of aanwijzingen hebben gekregen m.b.t. het gebruik van
dit apparaat door iemand die verantwoordelijk is voor hun veiligheid.
• Selecteer daarom een plek voor uw apparaat op dusdanige wijze dat
kinderen er niet bij kunnen.
• Test het apparaat regelmatig op schade. Als er schade is dan dient
het apparaat niet gebruikt te worden maar dient het gerepareerd te
worden door een gekwaliceerd technicus om gevaar te vermijden.
Alleen de oorspronkelijke onderdelen mogen gebruikt worden.
• Laat het apparaat nooit alleen wanneer het gebruikt wordt. Schakel het
apparaat uit wanneer u het niet gebruikt zelfs al is het maar voor een ogenblik.
• Dompel in geen geval het apparaat onder in water of een andere
vloeistof en laat het er niet mee in contact komen. Gebruik het apparaat
niet met natte of vochtige handen.
• Het toestel mag in geen geval gewijzigd worden of gebruikt worden
voor toepassingen waarvoor het niet bestemd is.
• Dit toestel vereist een slang en een regelaar, neem hiervoor contact op
met uw gasleverancier.
• Dit toestel mag niet worden geplaatst en gebruikt in woningen waarin zich
al een geiser bevindt die niet aangesloten is op een rookgasafvoerkanaal.
• Schakel het apparaat na gebruik uit op de klep van de gascontainer.
• “NIET AFDEKKEN SYMBOOL” WAARSCHUWING: Dek de verwarming niet
af, om oververhitting te voorkomen.
Belangrijke punten voordat u uw verwarming gebruikt (FIGUUR 1 + 2)
• Uw verwarming en de exibele buizen dienen jaarlijks te worden
gecontroleerd door een gekwaliceerde technicus voor een veilige
werking en om eventuele gebreken te detecteren.
• Dit toestel mag alleen worden geplaatst en gebruikt in ruimten met
voorzieningen voor de afvoer van de rookgassen en voor de toevoer
van voldoende verse lucht voor goede verbranding.
• Zorg er voor dat de kamer goed geventileerd is wanneer de verwarming
in gebruik is. Gebruik het niet in een caravan, motorhome, boot, at,
kelder, slaapkamer, badkamer of elke kamer welke minder dan 84 m
3
is.
• Het ventilatieoppervlak voor de luchtverversing moet tenminste 105 cm
2
bedragen, regelmatig verspreid tussen hoge en lage plaatsen in het vertrek.
• Plaats de verwarming niet in de buurt van gordijnen, meubels,
wandbekleding, vitrages, beddengoed of andere ontvlambare
materialen, wanneer deze in werking is. Richt de verwarming altijd
naar het midden van de kamer wanneer het gebruikt wordt. De
minimale ruimte met brandbare zaken aan de achter- en zijkanten van
de verwarming, achter het vlak van het frontpaneel, is 500 mm. De
minimale ruimte met brandbare zaken aan het frontpaneel is 1.000 mm.
• De verwarming mag niet verplaatst worden wanneer deze in gebruik is.
• Zet geen voorwerpen op of tegen de verwarming.
• Het beveiligingsrooster aan de voorzijde is om het risico van brand
of letsel te voorkomen. Het mag dan ook niet permanent worden
verwijderd. HET GEEFT GEEN VOLLEDIGE BESCHERMING VOOR JONGE
KINDEREN OF PERSONEN MET VERMINDERDE FYSIEKE, ZINTUIGLIJKE OF
MENTALE CAPACITEITEN.
• Dit apparaat dient getest te worden op lekkages vóór het eerste gebruik en
wanneer de cilinder weer opnieuw wordt aangesloten na het hervullen.
• Sluit de gases altijd af wanneer de verwarming niet gebruikt wordt.
• Voor het aansluiten van het toestel heeft u een goedgekeurde gasslang
nodig met een lengte van 40 cm. Deze moet vervangen worden als
hij beschadigd is of scheurtjes vertoont. Hierop dient regelmatig
gecontroleerd te worden. Wij adviseren de gasslang minimaal om de
drie jaar te vervangen.
• De drukregelaar dient te voldoen aan de EN12864 norm en de huidige
regelgevingen van het land waar deze geïnstalleerd is, die gevonden
kunnen worden bij uw dichtstbijzijnde verkoper van gas items.
Raadpleeg de technische gegevens. Het is ten strengste verboden
om verstelbare druk te gebruiken. De levensduur van de drukregelaar
wordt geschat op 10 jaar. Het is aangeraden om de regelaar binnen
10 jaar na de productiedatum of wanneer dit volgens de lokale
voorwaarden vereist is, te vervangen.
• De gasslang moet op een dergelijke manier worden aangesloten, dat
deze niet verwrongen kan worden.
• U bent verplicht de gasslang te vervangen wanneer de nationale
omstandigheden dit vereisen.
• Dit apparaat is uitsluitend geschikt voor gebruik met lage druk butaan,
propaan of een gasmengsel hiervan, uitgerust met de juiste lage
drukregelaar en via een exibele slang.
o Gebruik makend van een 30 mbar uitlaatregelaar voor categorie
I3B/P (30) of categorie I3+ met butaangas.
o Gebruik makend van een 37 mbar uitlaatregelaar voor categorie I3+
met propaangas.
o Gebruik makend van een 50 mbar uitlaatregelaar voor categorie
13B/P (50).
• Dit toestel is ontwikkeld om gebruikt te worden in combinatie met
butagas- of propaangasessen van 5 kg tot 11 kg, voorzien van een
geschikte drukregelaar. Zie tabel voor te gebruiken gas en druk:
HET INSTALLEREN VAN DE VERWARMING (FIGUUR 3 + 4 + 5)
• Haal de verwarming uit zijn verpakking.
• Vouw de plaat aan de achterkant van de verwarming open, zodat het wiel
(verbonden aan deze plaat) de vloer raakt. Fixeer de plaat en de bodem
van de verwarming met elkaar, met behulp van de bevestigde schroeven.
(Uitsluitend voor modelnr. KA-5340)
• De maximale afmeting van de gases is 57 cm hoog en 36 cm breed. (for
KA-5338 & KA-5340) De maximale afmeting van de gases is 40 cm hoog en
32 cm breed. (for KA-5339)
• Schroef de regelaar tegen de klok in op de uitmonding van de gases.
Alleen met de hand aandraaien. Gebruik geen (Engelse) schroefsleutel.
Schroef het totdat de moer helemaal vast zit.
• Om de cilinderklep te sluiten, draai de regelknop helemaal in de richting van de pijl.
• Om de regelaar vast te koppelen, draai het handwiel in de richting van de pijl.
• Fixeer de beugel op de verwarming om de stabiliteit van de gases te waarborgen.
BELANGRIJKE TEST VOOR LEKKAGE
• De test moet uitgevoerd worden in een goed geventileerde ruimte, vrij van
open vuren of andere ontstekingsbronnen. Draai, met de regelaar aangesloten
op de gases, de gasesklep 1 ½ slag tegen de klok in. Besproei alle slang- en
pijpaansluitingen op de gasesklep, regelaaraansluiting op de cilinder en de
gasesklep met een 50:50 oplossing van afwasmiddel en water. Een stroom aan
luchtbellen duidt aan dat er lekkage is. Als er een lekkage gevonden is, schakel
dan de gases uit (met de klok mee), ontkoppel de regelaar van de gases en
haal de gases uit de kachel en zet het in een koele, goed geventileerde ruimte.
Neem contact op met uw dealer of gasleverancier voor assistentie.
• Gebruik de verwarming niet wanneer er een lekkage ontdekt is!
• Gebruik geen vlam om te testen op lekkages!
• Maak in geen geval gebruik van elektrische apparaten indien er een gaslek
aanwezig is.
BEDIENING (FIGUUR 6)
De verwarming kan op drie verschillende warmte standen afgesteld worden:
LAAG (1
), MIDDEN (2
) en HOOG (3
). De ontsteking wordt gestart
door een piëzo-elektrische drukknop.
• Open de kraan op de gases 1 ½ slag.
• Houd de regelknop ingedrukt en draai deze naar de LAAG (1
) stand en
houdt het voor 10 seconden ingedrukt.
• Terwijl u de regelknop nog ingedrukt houdt, druk enkele keren op de piezo-
elektrische drukknop totdat de waakvlam aan de onderkant gaat branden.
Houd de regelknop voor nog 10 á 15 seconden ingedrukt. Wanneer tijdens
het loslaten van de knop de waakvlam uitgaat, herhaal dan de procedure.
• Wanneer een verwarming voor het eerst ontstoken wordt, dan kan het
misschien nodig zijn om de regelknop langer ingedrukt te houden om gas
naar de waakvlambrander te laten stromen.
• Wanneer de verwarming op de LAAG (1
) stand brandt deze eerst
zo’n 4 minuten laten branden op deze stand. Het verwarmingselement
kan zo langzaam warm worden, waarna deze gaat gloeien en rood
wordt. Vervolgens kunt u de regelknop naar de MIDDEN (2
) stand
doorschakelen, wederom 4 minuten op deze stand laten branden. Na deze 4
minuten kunt u doorschakelen naar de HOOG (3
) stand. .
• NOOIT DE KACHEL DIRECT OP STAND “HOOG (3
)” ZETTEN. GEVOLG
IS DAT DE KACHEL NIET GOED KAN VERGASSEN EN ER OVERMATIGE
VLAMVORMING KAN ONTSTAAN!
• Om de verwarming uit te schakelen dient u de regelknop naar de startstand
te draaien en de kraan op de gases helemaal te sluiten (met de klok mee); de
verwarming kan alleen maar uitgeschakeld worden door de kraan op de gases
helemaal te sluiten. Het kan niet uitgeschakeld worden door enkel de regelknop.
Opmerking: de verwarming omvat verschillende veiligheidsvoorzieningen, die de
verwarming zullen uitschakelen indien er sprake is van onveilige omstandigheden.
1. In het geval dat de vlam dooft, zal de verwarming automatisch worden
afgesloten.
2. De verwarming zal worden afgesloten als de ruimte niet voldoende wordt
geventileerd, of als de verwarming in een te kleine ruimte wordt geplaatst.
Schakel de verwarming uit, ventileer de ruimte goed en wacht 5-10
minuten voordat u de verwarming opnieuw inschakelt.
3. Deze verwarming omvat een “anti-kantel” schakelaar, die de verwarming
automatisch afsluit in het geval deze kantelt. Zorg ervoor dat de
verwarming zich in verticale positie bevindt.
Het verwisselen van de gases
• Gasessen moeten vervangen worden in een vlamvrije omgeving.
• Rook niet tijdens het vervangen van de gases.
• Schakel de gasesklep of regelaar helemaal uit (met de klok mee) en haal de
lege es uit de kachel.
• Probeer niet de regelaar te verwijderen wanneer de verwarming nog aanstaat.
• Controleer of de verwarming helemaal uitgedoofd is.
• Verwijder de regelaar van de lege cilinder.
• Volg de stappen beschreven onder “Het installeren van de verwarming” voor
het aansluiten van een nieuwe es.
SCHOONMAKEN
• Onderhoud en schoonmaken dienen uitgevoerd te worden wanneer de
gastoevoer is uitgeschakeld en de verwarming dient koud te zijn. Probeer
niet de verwarming schoon te maken wanneer deze in gebruik is.
• U verwarming dient jaarlijks gecontroleerd te worden door een
gekwaliceerd persoon i.v.m. veilig gebruik en om defecten te detecteren.
• Als er defecten gevonden worden, stop dan met het gebruik van de
verwarming en neem contact op met uw dealer voor advies.
• Maak de buitenkant, achtercilinder en opslagruimte regelmatig schoon om stof,
wat het functioneren van de verwarming kan beïnvloeden, te verwijderen.
• Stofzuig met een zachte borstel het oppervlak en keramische elementen
om opgebouwd stof te verwijderen. Schraap deze elementen niet omdat ze
door gebruik fragiel kunnen worden.
• Gebruik geen bijtende middelen om de verwarming schoon te maken.
• Kijk naar de waakvlam wanneer deze brandt. Het dient stabiel te
branden, als het ikkert of een gele punt heeft, dan dient de verwarming
geïnspecteerd te worden.
• Als onderdelen vervangen moeten worden, dan moeten ze vervangen
worden door oorspronkelijke onderdelen geleverd door de fabrikant. Het
gebruik van onjuiste of vervangingsonderdelen kan gevaarlijk zijn en zal de
garantie ongeldig maken.
Wanneer de verwarming voor een langere periode niet gebruikt wordt, in
de zomer bijvoorbeeld, dan raden wij u aan om het afgedekt te bewaren
of terug te plaatsen in zijn doos om het stof en vuil te minimaliseren.
Specialist onderhoudsinstructies (voor KA-5338 & KA-5340)
• De 0,57 markering op de injector geeft aan dat de grootte van de injector
0,57 mm is.
• De ASD moet gemarkeerd zijn met ODS-1112A. De beluchtinggrootte is
Ø2,8 mm in diameter voor I3B/P (30) en I3 + (28-30/37).
Specialist onderhoudsinstructies (voor KA-5338DU & KA-5340DU)
• De 0,47 markering op de injector geeft aan dat de grootte van de injector
0,47 mm is.
• De ASD moet gemarkeerd zijn met ODS-1112A. De beluchtinggrootte is
Ø2,7 mm diameter voor I3B/P (50).
Specialist onderhoudsinstructies (voor KA-5339)
• De 0,57 markering op de injector geeft aan dat de grootte van de injector
0,57 mm is.
• De ASD moet gemarkeerd zijn met ODS-1112A. De beluchtinggrootte is
Ø3,0 mm in diameter voor I3B/P (30) en I3 + (28-30/37).
Specialist onderhoudsinstructies (voor KA-5339DU)
• De 0,47 markering op de injector geeft aan dat de grootte van de injector
0,47 mm is.
• De ASD moet gemarkeerd zijn met ODS-1112A. De beluchtinggrootte is
Ø2,9 mm diameter voor I3B/P (50).
De juiste positie van de ODS wanneer deze op de ODS statorplaat gemonteerd
is. (7)
TECHNISCHE BIJSTAND DIE U KUNT TOEPASSEN VOORDAT U BELT VOOR
HULP
De verwarming schakelt niet in:
• Controleer of de gases vol is
• Controleer of de regelaar goed is verbonden en of de esafsluiter is ingeschakeld.
• Controleer of de instructies correct zijn opgevolgd.
De verwarming schakelt niet in, nadat de gases is vervangen. Mogelijke oorzaken
hiervan zijn:
• Er is lucht aanwezig in de gases. Houd de regelknop lang ingedrukt, totdat
de waakvlam en de hoofdbrander ontsteken. Schakel naar de hoge stand 3.
• De gases was mogelijk veel te koud. Laat de es op kamertemperatuur
komen, voordat u de verwarming opnieuw probeert in te schakelen.
De verwarming schakelt uit zichzelf uit:
• Als de verwarming na een voortdurende werking uitschakelt, dient u deze
opnieuw in te schakelen door de instructies te volgen.
• Als de verwarming kort na ontsteking uitgaat, dient u te controleren of er
tocht aanwezig is of dat de gases bijna leeg is.
• Als de verwarming na circa 30 minuten uitschakelt, is dit een indicatie dat
de ruimte waarin de verwarming werkzaam is slecht geventileerd is. Open
een raam of een deur om de ruimte te ventileren en probeer de verwarming
vervolgens opnieuw in te schakelen.
• Voorkom het stoten tegen de verwarming als deze in werking is. Verplaats
de verwarming niet als deze in werking is.
WARNING
Please read this instruction manual carefully
before using the product. Keep it for future
reference and for the duration of owning this
product. Store it together with the guarantee
certicate, the sales receipt and, if possible, the
carton with the inner packaging.
GENERAL SAFETY INSTRUCTIONS
• This appliance must be used and serviced in accordance with the
regulations and standards in force.
• Before commissioning and using this device please read the instruction
manual carefully and keep this so that you can check them later.
• Please keep these instructions, the guarantee certicate, the sales
receipt and, if possible, the carton with the inner packaging.
• The device is intended exclusively for private and not for commercial use.
• This appliance is not intended for use by persons with reduced physical,
sensory or mental capacities , or lack of experience and knowledge
(including children) , unless they have been supervised or instructed
concerning use of the appliance by a person responsible for their safety.
• Consequently, when selecting the location for your device, do so in
such a way that children do not have access to the device.
• Test the device regularly for damage. If there is damage of any kind,
the device should not be used but the appliance must be repaired by a
qualied technician in order to avoid a hazard. Only original spare parts
must be used.
• Never use the device unsupervised! Switch o the device whenever you
are not using it, even if this is only for a moment.
• Under no circumstances must the device be placed in water or other
liquid, or come into contact with such. Do not use the device with wet
or moist hands.
• This appliance should never be modied nor used in applications for
which it is not designed.
• This appliance requires a hose and regulator, check with your gas
supplier.
• This appliance may not be 'installed'/used in a space where an
instantaneous water heater (other ueless appliance) is already
installed.
• After use turn o the appliance at the gas container valve.
• “DO NOT COVER SYMBOL” WARNING: In order to avoid overheating, do
not cover the heater.
Important points before using your heater (FIGURE 1 + 2)
• Your heater and exible tubing should be checked annually by a
qualied technician for safe operation and to detect any faults.
• This appliance should only be used and placed in rooms with facilities
for the disposal of waste gas and the supply of sucient fresh air for
proper combustion.
• This is a ueless heater. Ensure the room is ventilated while the heater
is in operation. Do not operate in high rise ats, basements, bedroom,
bathroom, caravan, auto caravan, boat, or any room less than 84 m³ in
volume.
• Air renewal ventilation area should not be less than 105 cm
2
evenly
distributed between room upper and lower levels.
• Do not place the heater near walls, curtains, furniture, hangings, net
curtains, bed linen or other inammable materials while in operation.
Always face the heater towards the centre of the room when in use.
Minimum clearance to combustibles to the rear and sides of the heater
behind the plane of the front panel 500 mm. Minimum clearance to
combustibles to the front panel 1.000 mm.
• The heater must not be moved while operating.
• Do not place objects on or against the heater.
• The guard on this appliance is to prevent risk of re or injury from burns
and no part of it should be permanently removed. IT DOES NOT GIVE
FULL PROTECTION FOR YOUNG CHILDREN OR THE INFIRM.
• This appliance should be leakage tested before initial use and
whenever the cylinder has been reconnected after lling.
• Always close the gas cylinder valve whenever the heater is not in use.
• For the connection of this device you need an approved gas hose
(BS3212 type 2 or BSEN1763 Class B) with a recommended length of 40
cm. It should be replaced if it appears to be damaged or cracked. You
need to check on this frequently. We recommend to replace the gas
hose every 3 years.
• The pressure regulator should comply with the standard EN12864 and
current regulations in the country where it is installed, which may be
found at your nearest retailer of gas items. Refer to the technical date.
It is strictly prohibited to use adjustable pressure. The life expectancy
of the regulator is estimated as 10 years. It is recommended that the
regulator is changed within 10 years of the date of manufacture or the
national conditions require it.
• The gas hose should be connected in such a way that it can’t be twisted.
• You are obliged to replace the gas hose if national circumstances
require.
• This appliance is only suitable for use with low-pressure butane,
propane or their mixture gas and tted with the appropriate low-
pressure regulator via a exible hose.
o Using 30mbar outlet regulator for category I3B/P(30) or category I3+
with butane gas.
o Using 37mbar outlet regulator for category I3+ with propane gas.
o Using 50mbar outlet regulator for category I3B/P(50).
• This appliance is designed to operate with 5 kg till 11 kg butane or
propane gas bottles, with an adequate pressure reducing valve. See
schedule for gas and operating pressure:
HEATER SETUP FIGURE 3 + 4 + 5
• First remove the heater from its package.
• Unfold the shelf at the back of the heater to make the wheel (attached to
this shelf) touch the oor, then x the shelf and the bottom of the heater
together with the attached screws. (Only for model nr. KA-5340)
• The maximum size of the gas cylinder is 57 cm in height and 36 cm in width.
(for KA-5338 & KA-5340) The maximum size of the gas cylinder is 40 cm in
height and 32 cm in width. (for KA-5339)
• Screw the regulator onto the outlet of the gas cylinder valve, anti-clockwise.
Turn by hand only. Do not use a spanner. Screw on until the nut is fully stuck.
• To close the cylinder valve turn the control knob fully in the direction of the arrow.
• To engage and tighten the regulator, turn the hand wheel in the direction
of the arrow.
• Fix the bracket on the heater in order to keep the gas cylinder stable.
IMPORTANT TEST FOR LEAKAGE
The test must be carried out in a well-ventilated area, free from any open
ames or other sources of ignition. With the regulator connected to the
cylinder, turn on the gas cylinder valve 1 ½ turns anti-clockwise. Brush all hose
connections, pipe connections to the gas valve, regulator connection to the
cylinder and gas cylinder valve with a 50:50 solution of detergent and water.
A stream of bubbles is an indication of a leakage. If a leakage is found, turn o
the cylinder valve (clockwise), disconnect the regulator from the gas cylinder
and remove the gas cylinder to a cool, outdoor well-ventilated area.
EN Instruction manual NL Gebruiksaanwijzing FR Mode d'emploi
AVERTISSEMENT
Veuillez lire attentivement les instructions de ce
manuel avant d'utiliser l’appareil. Conservez-le
tant que vous êtes en possession de ce produit
pour pourvoir le consulter par la suite. Rangez-le
avec le bon de garanti, la facture et si possible le
carton et les emballages du produit.
INSTRUCTIONS GÉNÉRALES DE SÉCURITÉ
• L’utilisation et l’entretien de l’appareil doivent être eectués
conformément aux réglementations et normes en vigueur.
• Avant de mettre cet appareil en service, veuillez lire le manuel
d’instructions attentivement et conservez-le an de pouvoir vous y référer
dans le futur.
• Veuillez conserver ces instructions, le certicat de garantie, le ticket de
caisse et, si possible, le carton contenant l’emballage interne.
• L’appareil est conçu uniquement pour un usage privé et non pour un
usage commercial !
• Cet appareil n'est pas prévu pour être utilisé par des personnes (y
compris les enfants) dont les capacités physiques, sensorielles ou
mentales sont réduites, ou des personnes dénuées d'expérience ou
de connaissance, sauf si elles ont pu bénécier, par l'intermédiaire
d'une personne responsable de leur sécurité, d'une surveillance ou
d'instructions préalables concernant l'utilisation de l'appareil.
• Il convient de surveiller les enfants pour s'assurer qu'ils ne jouent pas
avec l'appareil.
• Testez régulièrement l’appareil ou cas il serait endommagé. Seules des
parties de remplacement originales peuvent être utilisées.
• N’utilisez jamais l’appareil sans surveillance; éteignez l’appareil quand
vous ne l’utilisez pas, même pour un court moment.
• L’appareil ne doit être placé dans l’eau ou un autre liquide en aucune
circonstance. N’utilisez pas l’appareil si vos mains sont humides ou mouillées.
• Ne jamais modier cet appareil, ni l’utiliser pour des applications
auxquelles il n’est pas destiné.
• Cet appareil nécessite un tuyau et un régulateur, veuillez contacter
votre fournisseur de gaz.
• Évitez d’installer et d’utiliser dans un espace où est déjà installé un chaue-
eau du type instantané (autre appareil sans conduit d'évacuation).
• Après l'utilisation, éteignez l’appareil avec la valve de la bouteille de gaz.
• AVERTISSEMENT PAR LE SYMBOLE ‘NE PAS COUVRIR’ Ne pas recouvrir le
radiateur an d’éviter la surchaue.
Points importants avant d’utiliser votre radiateur (IMAGE 1 +2)
• Votre radiateur, et le tuyau exible, doivent être vériés une fois par
an par un technicien qualié pour un fonctionnement sécurisé et pour
détecter toutes défectuosités.
• Cet appareil doit être mis en place et utilisé dans des pièces avec des
installations pour l'évacuation des gaz résiduaires et une alimentation
en air frais susante pour une bonne combustion.
• Il s’agit d’un appareil de chauage sans connexion à un conduit Assurez-
vous que la pièce est susamment ventilée lorsque le radiateur est en
marche. N’utilisez pas votre radiateur dans un appartement de grande
hauteur, caves, chambre á coucher, salle de bain, caravane, camping-car,
bateau, ou toute pièce d’un volume inférieur à 84 m³.
• La zone de ventilation pour le renouvellement de l’air doit être d’au
moins 105 cm², répartis de façon égale entre les couches supérieures et
inférieures de la pièce.
• Ne placez pas le radiateur près de murs, rideaux, meubles, tentures, voilages,
literies ou autres matériaux inammables durant le fonctionnement.
Tournez toujours le radiateur vers le centre de la pièce lorsqu’il est en
marche. Distance minimum entre l’arrière et les côtés du radiateur derrière
le panneau frontal et tout objet inammable, 500 mm. Distance minimum
entre tout objet inammable et le panneau frontal, 1.000 mm.
• Le radiateur ne doit pas être déplacé alors qu’il est en marche.
• Ne placez pas d’objets sur ou contre le radiateur.
• Les caches de protection sur cet appareil est de prévenir les risques
d'incendie ou de blessures causées par des brûlures et aucune partie de
celui-ci devrait être dénitivement supprimé. IL NE DONNE PAS LA PLEINE
PROTECTION DES JEUNES ENFANTS OU DES PERSONNES DONT LES
CAPACITÉS PHYSIQUES, SENSORIELLES OU MENTALES SONT RÉDUITES
• Cet appareil devrait être testé contre toute fuite avant la première utilisation
et à chaque fois que la bouteille de gaz est reconnectée après remplissage.
• Fermez toujours le robinet de la bouteille de gaz lorsque le radiateur
n’est pas en marche.
• Un tuyau de gaz approuvé d’une longueur recommandée de 40 cm est
nécessaire pour le branchement de cet appareil. Il doit être remplacé
dès constatation de dommages ou de craquelures. Son état doit être
fréquemment vérié. Il est recommandé de remplacer le tuyau exible
de gaz tous les 3 ans.
• Le régulateur de pression doit être conforme à la norme EN12864 et
aux règlementations en vigueur dans le pays d’installation, qui peuvent
être trouvées auprès du revendeur d’accessoires de gaz le plus proche.
Consultez la date technique. Il est strictement interdit d’utiliser une
pression réglable. Le cycle de vie du régulateur est estimé à 10 ans. Il est
recommandé que le régulateur soit changé dans les 10 ans à partir de la
date de fabrication ou requis par les règlementations nationales.
• Le tuyau de gaz doit être branché de façon à ne pas risquer d’être tordu.
• Il est obligatoire de remplacer le tuyau de gaz si les règlements
nationaux le demandent.
• Cet appareil ne convient qu’à l’utilisation avec du butane à basse
pression, du propane ou leur gaz mélangé et équipé d'un régulateur
adéquat à basse pression avec un tuyau exible.
o Utilisation d’un régulateur d’arrivée de 30mbar de catégorie
I3B/P(30) ou de catégorie I3+ pour du gaz butane.
o Utilisation d’un régulateur d’arrivée de 37mbar de catégorie I3+
avec du gaz propane.
o Utilisation d’un régulateur d’arrivée de 50mbar pour la catégorie I3B/P(50).
• Cet appareil est conçu pour fonctionner avec des bouteilles de butane
ou de propane de 5 kg à 11 kg, avec un réducteur de pression adéquat.
Voir le tableau des gaz et pressions requises:
MISE EN PLACE DU RADIATEUR IMAGE 3 + 4 + 5
• Commencez par retirer le radiateur de son emballage.
• Dépliez l’étagère au dos du radiateur pour que les roulettes (xées à cette
étagère) puissent toucher le sol, vissez ensuite l’étagère et le bas du radiateur
ensemble à l’aide des vis incluses. (Seulement pour le modèle nr. KA-5340)
• Placez la bouteille de gaz pleine dans le compartiment à l’arrière du radiateur avec
la sortie du robinet vers l’extérieur.La taille maximum du cylindre de gaz est de 57
cm de hauteur et 36 cm de largeur. (for KA-5338 & KA-5340) La taille maximum du
cylindre de gaz est de 40 cm de hauteur et 32 cm de largeur. (for KA-5339)
• Vissez le régulateur sur la sortie du robinet de la bouteille de gaz, dans le sens
inverse des aiguilles d’une montre. Vissez à la main seulement. N’utilisez pas
de clé anglaise. Vissez jusqu’à ce que l’écrou soit complètement bloqué.
• Pour fermer le robinet de la bouteille tournez la vis de contrôle
complètement dans le sens de la èche
• Pour enclencher et serrer le Régulateur, tournez la molette dans le sens de la èche.
• Fixez le support sur le radiateur an que la bouteille de gaz reste stable.
FIGURE / FIGUUR / IMAGE / ABBILDUNG / FIGURA / FIGURA / RYSUNEK / FIGURA /
FIGUR / OBRÁZOK / OBRÁZOK / 1 + 2
≥ 1.70 mtr
≥. 52,5cm2
≥. 52,5 cm2
1
2
EN
NL
FR
DE
ES
PT
PL
IT
CS
SV
SK
Instruction manual
Gebruiksaanwijzing
Mode d'emploi
Bedienungsanleitung
Manual de usuario
Manual de utilizador
Instrukcja obsługi
Manuale utente
Návod na použití
Bruksanvisning
Návod na použitie
KA-5338
FIGURE / FIGUUR / IMAGE / ABBILDUNG / FIGURA / FIGURA / RYSUNEK / FIGURA /
FIGUR / OBRÁZOK / OBRÁZOK / 3 + 4 + 5 + 6+7
3 4
5
6
1
2
3
7
Pagina wordt geladen...
Pagina wordt geladen...
Pagina wordt geladen...
Documenttranscriptie
EN Instruction manual Warning eN Instruction manual Nl Gebruiksaanwijzing FR Mode d'emploi DE Bedienungsanleitung ES Manual de usuario PT Manual de utilizador PL Instrukcja obsługi IT Manuale utente SV Bruksanvisning CS Návod na použití SK Návod na použitie KA-5338 Figure / figuur / image / Abbildung / figura / figura / rysunek / figura / figur / obrázok / obrázok / 1 + 2 2 1 ≥. 52,5cm2 ≥ 1.70 mtr ≥. 52,5 cm2 Figure / figuur / image / Abbildung / figura / figura / rysunek / figura / figur / obrázok / obrázok / 3 + 4 + 5 + 6+7 3 4 5 7 1 2 3 6 Please read this instruction manual carefully before using the product. Keep it for future reference and for the duration of owning this product. Store it together with the guarantee certificate, the sales receipt and, if possible, the carton with the inner packaging. General safety instructions • This appliance must be used and serviced in accordance with the regulations and standards in force. • Before commissioning and using this device please read the instruction manual carefully and keep this so that you can check them later. • Please keep these instructions, the guarantee certificate, the sales receipt and, if possible, the carton with the inner packaging. • The device is intended exclusively for private and not for commercial use. • This appliance is not intended for use by persons with reduced physical, sensory or mental capacities , or lack of experience and knowledge (including children) , unless they have been supervised or instructed concerning use of the appliance by a person responsible for their safety. • Consequently, when selecting the location for your device, do so in such a way that children do not have access to the device. • Test the device regularly for damage. If there is damage of any kind, the device should not be used but the appliance must be repaired by a qualified technician in order to avoid a hazard. Only original spare parts must be used. • Never use the device unsupervised! Switch off the device whenever you are not using it, even if this is only for a moment. • Under no circumstances must the device be placed in water or other liquid, or come into contact with such. Do not use the device with wet or moist hands. • This appliance should never be modified nor used in applications for which it is not designed. • This appliance requires a hose and regulator, check with your gas supplier. • This appliance may not be 'installed'/used in a space where an instantaneous water heater (other flueless appliance) is already installed. • After use turn off the appliance at the gas container valve. • “DO NOT COVER SYMBOL” WARNING: In order to avoid overheating, do not cover the heater. Important points before using your heater (FIGURE 1 + 2) • Your heater and flexible tubing should be checked annually by a qualified technician for safe operation and to detect any faults. • This appliance should only be used and placed in rooms with facilities for the disposal of waste gas and the supply of sufficient fresh air for proper combustion. • This is a flueless heater. Ensure the room is ventilated while the heater is in operation. Do not operate in high rise flats, basements, bedroom, bathroom, caravan, auto caravan, boat, or any room less than 84 m³ in volume. • Air renewal ventilation area should not be less than 105 cm2 evenly distributed between room upper and lower levels. • Do not place the heater near walls, curtains, furniture, hangings, net curtains, bed linen or other inflammable materials while in operation. Always face the heater towards the centre of the room when in use. Minimum clearance to combustibles to the rear and sides of the heater behind the plane of the front panel 500 mm. Minimum clearance to combustibles to the front panel 1.000 mm. • The heater must not be moved while operating. • Do not place objects on or against the heater. • The guard on this appliance is to prevent risk of fire or injury from burns and no part of it should be permanently removed. IT DOES NOT GIVE FULL PROTECTION FOR YOUNG CHILDREN OR THE INFIRM. • This appliance should be leakage tested before initial use and whenever the cylinder has been reconnected after filling. • Always close the gas cylinder valve whenever the heater is not in use. • For the connection of this device you need an approved gas hose (BS3212 type 2 or BSEN1763 Class B) with a recommended length of 40 cm. It should be replaced if it appears to be damaged or cracked. You need to check on this frequently. We recommend to replace the gas hose every 3 years. • The pressure regulator should comply with the standard EN12864 and current regulations in the country where it is installed, which may be found at your nearest retailer of gas items. Refer to the technical date. It is strictly prohibited to use adjustable pressure. The life expectancy of the regulator is estimated as 10 years. It is recommended that the regulator is changed within 10 years of the date of manufacture or the national conditions require it. • The gas hose should be connected in such a way that it can’t be twisted. • You are obliged to replace the gas hose if national circumstances require. • This appliance is only suitable for use with low-pressure butane, propane or their mixture gas and fitted with the appropriate lowpressure regulator via a flexible hose. o Using 30mbar outlet regulator for category I3B/P(30) or category I3+ with butane gas. o Using 37mbar outlet regulator for category I3+ with propane gas. o Using 50mbar outlet regulator for category I3B/P(50). • This appliance is designed to operate with 5 kg till 11 kg butane or propane gas bottles, with an adequate pressure reducing valve. See schedule for gas and operating pressure: Heater Set-up (FIgure 3 + 4 + 5) • First remove the heater from its package. • Unfold the shelf at the back of the heater to make the wheel (attached to this shelf ) touch the floor, then fix the shelf and the bottom of the heater together with the attached screws. (Only for model nr. KA-5340) • The maximum size of the gas cylinder is 57 cm in height and 36 cm in width. (for KA-5338 & KA-5340) The maximum size of the gas cylinder is 40 cm in height and 32 cm in width. (for KA-5339) • Screw the regulator onto the outlet of the gas cylinder valve, anti-clockwise. Turn by hand only. Do not use a spanner. Screw on until the nut is fully stuck. • To close the cylinder valve turn the control knob fully in the direction of the arrow. • To engage and tighten the regulator, turn the hand wheel in the direction of the arrow. • Fix the bracket on the heater in order to keep the gas cylinder stable. Important test for leakage The test must be carried out in a well-ventilated area, free from any open flames or other sources of ignition. With the regulator connected to the cylinder, turn on the gas cylinder valve 1 ½ turns anti-clockwise. Brush all hose connections, pipe connections to the gas valve, regulator connection to the cylinder and gas cylinder valve with a 50:50 solution of detergent and water. A stream of bubbles is an indication of a leakage. If a leakage is found, turn off the cylinder valve (clockwise), disconnect the regulator from the gas cylinder and remove the gas cylinder to a cool, outdoor well-ventilated area. NL Gebruiksaanwijzing Contact your dealer or gas supplier for assistance. • Do not use the Heater if a leakage is found! • Do not use a naked flame for leakage testing! • Do not operate any electrical equipment in the presence of a gas leak. Operations (FIgure 6) The heater can be regulated to three different heat input stages: LOW (1 ), MEDIUM (2 ) and HIGH (3 ). The ignition is operated by piezo electric push button. • Open the valve on the gas cylinder 1 ½ turns. • Press down and turn the control knob to LOW (1 ) position and hold for 10 seconds. • While still pressing down the control knob, press several times on the ignition button until the pilot flame ignited at the bottom of the burner. Continue to hold the control knob down for another 10-15 seconds. When releasing the button and the pilot flame goes out, repeat the operation • When first igniting a new heater, it may be necessary to hold the control knob down for a longer time in order to allow gas to flow to the pilot burner. • When the heater is burning at the LOW (1 ) stage, please wait for around 4 minutes. The heating element will start glowing and will become red. After that you can turn the control knob to the MEDIUM (2 ) position, again wait around 4 minutes in this position. Finally you can turn the control knob to the HIGH (3 ) position. • NEVER PUT THE APPLIANCE DIRECTLY ON THE HIGH (3 ) -POSITION. AS A RESULT OF THIS THE HEATER MIGHT NOT BE ABLE TO DIGEST THE GAS IN A PROPER WAY AND THERE MIGHT BE EXCESSIVE FLAMING COMBUSTION. • In order to shut off the heater, you need to turn back the control knob to the start position and close the cylinder valve fully (in clockwise); the heater can only be shut off by closing the gas cylinder valve fully. It cannot be turned off by the control knob. Note: the heater incorporates several safety devices that will shut down the heater in unsafe conditions. 1. In case of accidental flame failure, the heater will shut down automatically. 2. The heater will shut down if the ventilation in the room is not sufficient or when the heater is placed in a small room. Turn off the heater, ventilate the room well, and wait 5-10 minutes before re-lighting the heater. 3. This heater incorporates a “anti-tilt” switch which automatically shuts off the burner in the event of tipping. Ensure the heater is in the vertical position. Changing the gas cylinder • Gas cylinders must be replaced in a flame free environment. • Do not smoke while changing the gas cylinder. • Turn off the gas cylinder valve or regulator fully (clockwise) and take the empty cylinder out of the heater. • Do not attempt to remove the regulator while the heater is still running. • Make sure that the heater is extinguished completely. • Remove the regulator from the empty cylinder. • Following the steps described under “Heater Set-up” for connecting a new cylinder. Cleaning • Maintenance and cleaning must be carried out with the gas supply turned off and the heater must be cold. Do not attempt to clean the heater while it is in use. • Your heater should be checked annually by a qualified person for safe operation and to detect any faults. • If any faults are detected in use, stop using the heater and contact your dealer for advice. • Periodically clean the exterior and rear cylinder, storage area of your heater to remove dust, which may affect the operation of the heater. • Light vacuuming with a soft brush will remove any dust build-up on the surfaces of the ceramic elements. Do not scrape these elements as they may become very fragile with use. • Do not use abrasive products to clean the heater. • Watch the pilot flame while it is in operation. It should burn steadily, if it flickers or is yellow tipped, the heater should be checked for correct operation. • If any parts need replacement, they must be replaced only with genuine original parts supplied by the manufacturer. The use of incorrect or substitute the parts may be dangerous and will void any warranty. When the heater is not in use for a period of time, for instance, over the summer, we recommend that it is kept covered or replaced in its carton to minimize the accumulation of dust and dirt that may occur. Specialist servicing instructions (for KA-5338 & KA-5340) • The 0.57 marking on the injector indicates that the size of the injector is 0.57 mm. • ASD should be marked with ODS-1112A. The aeration size is Ø 2.8 mm in diameter for I3B/P (30) and I3+ (28-30/37). Specialist servicing instructions (for KA-5338DU & KA-5340DU) • The 0.47 marking on the injector indicates that the size of the injector is 0.47 mm. • ASD should be marked with ODS-1112A. The aeration size is Ø 2.7 mm in diameter for I3B/P (50). Specialist servicing instructions (for KA-5339) • The 0.57 marking on the injector indicates that the size of the injector is 0.57 mm. • ASD should be marked with ODS-1112A. The aeration size is Ø 3.0 mm in diameter for I3B/P (30) and I3+ (28-30/37). Specialist servicing instructions (for KA-5339DU) • The 0.47 marking on the injector indicates that the size of the injector is 0.47 mm. • ASD should be marked with ODS-1112A. The aeration size is Ø 2.9 mm in diameter for I3B/P (50). The correct position of the ODS when fitted on the ODS stator plate. (7) Technical assistance before calling for further help The heater doesn’t light: • Check the gas cylinder if it is full • Check the regulator if it is properly attached and the cylinder valve is turned on. • Check if the instructions have been followed correctly. The heat doesn’t light after the cylinder has been changed it could be due to: • There is some air present in the cylinder, hold the control knob down for a longer period of time until the pilot and main burner light. Switch to the 3 High setting. • The cylinder may have been excessively cold. Allow the cylinder to reach room temperature before attempting to start the heater. The heater turns off by itself: • If the heater goes out on continuous working, repeat the operation, following the instruction. • If it goes out soon after lighting, check for drafts or for the gas cylinder running out of gas. • If it goes out after 30 minutes or so, it is signaling that it is operating in a badly ventilated area. Open a window or door to ventilate the area and reignite. • Avoid bumping the heater in operation. Don’t move the heater while in operation. Waarschuwing Deze handleiding aandachtig doorlezen voordat u het apparaat in gebruik neemt. Houd de handleiding bij de hand om later te kunnen raadplegen en zolang u het apparaat in bezit hebt. Bewaar de handleiding met het garantiebewijs, de kassabon en, indien mogelijk, de doos met de binnenverpakking. Algemene Veiligheidsaanwijzingen • Dit toestel moet gebruikt en onderhouden worden volgens de geldende voorschriften en normen. • Voordat u dit apparaat in gebruik gaat nemen, lees a.u.b. eerst de gebruiksaanwijzing grondig door en bewaar het zodat u het later weer kunt nalezen. • Bewaar deze gebruiksaanwijzing, het garantiecertificaat, de verkoopbon en indien mogelijk de kartonnen doos met de binnenste verpakking. • Het apparaat is uitsluitend bedoeld voor privé gebruik en niet voor commercieel gebruik. • Dit apparaat is niet bedoeld om gebruikt te worden door personen (waaronder kinderen) met verminderde fysieke, zintuiglijke of mentale capaciteiten of een gebrek aan ervaring en kennis, tenzij zij onder toezicht staan of aanwijzingen hebben gekregen m.b.t. het gebruik van dit apparaat door iemand die verantwoordelijk is voor hun veiligheid. • Selecteer daarom een plek voor uw apparaat op dusdanige wijze dat kinderen er niet bij kunnen. • Test het apparaat regelmatig op schade. Als er schade is dan dient het apparaat niet gebruikt te worden maar dient het gerepareerd te worden door een gekwalificeerd technicus om gevaar te vermijden. Alleen de oorspronkelijke onderdelen mogen gebruikt worden. • Laat het apparaat nooit alleen wanneer het gebruikt wordt. Schakel het apparaat uit wanneer u het niet gebruikt zelfs al is het maar voor een ogenblik. • Dompel in geen geval het apparaat onder in water of een andere vloeistof en laat het er niet mee in contact komen. Gebruik het apparaat niet met natte of vochtige handen. • Het toestel mag in geen geval gewijzigd worden of gebruikt worden voor toepassingen waarvoor het niet bestemd is. • Dit toestel vereist een slang en een regelaar, neem hiervoor contact op met uw gasleverancier. • Dit toestel mag niet worden geplaatst en gebruikt in woningen waarin zich al een geiser bevindt die niet aangesloten is op een rookgasafvoerkanaal. • Schakel het apparaat na gebruik uit op de klep van de gascontainer. • “NIET AFDEKKEN SYMBOOL” WAARSCHUWING: Dek de verwarming niet af, om oververhitting te voorkomen. Belangrijke punten voordat u uw verwarming gebruikt (FIGUUR 1 + 2) • Uw verwarming en de flexibele buizen dienen jaarlijks te worden gecontroleerd door een gekwalificeerde technicus voor een veilige werking en om eventuele gebreken te detecteren. • Dit toestel mag alleen worden geplaatst en gebruikt in ruimten met voorzieningen voor de afvoer van de rookgassen en voor de toevoer van voldoende verse lucht voor goede verbranding. • Zorg er voor dat de kamer goed geventileerd is wanneer de verwarming in gebruik is. Gebruik het niet in een caravan, motorhome, boot, flat, kelder, slaapkamer, badkamer of elke kamer welke minder dan 84 m3 is. • Het ventilatieoppervlak voor de luchtverversing moet tenminste 105 cm2 bedragen, regelmatig verspreid tussen hoge en lage plaatsen in het vertrek. • Plaats de verwarming niet in de buurt van gordijnen, meubels, wandbekleding, vitrages, beddengoed of andere ontvlambare materialen, wanneer deze in werking is. Richt de verwarming altijd naar het midden van de kamer wanneer het gebruikt wordt. De minimale ruimte met brandbare zaken aan de achter- en zijkanten van de verwarming, achter het vlak van het frontpaneel, is 500 mm. De minimale ruimte met brandbare zaken aan het frontpaneel is 1.000 mm. • De verwarming mag niet verplaatst worden wanneer deze in gebruik is. • Zet geen voorwerpen op of tegen de verwarming. • Het beveiligingsrooster aan de voorzijde is om het risico van brand of letsel te voorkomen. Het mag dan ook niet permanent worden verwijderd. HET GEEFT GEEN VOLLEDIGE BESCHERMING VOOR JONGE KINDEREN OF PERSONEN MET VERMINDERDE FYSIEKE, ZINTUIGLIJKE OF MENTALE CAPACITEITEN. • Dit apparaat dient getest te worden op lekkages vóór het eerste gebruik en wanneer de cilinder weer opnieuw wordt aangesloten na het hervullen. • Sluit de gasfles altijd af wanneer de verwarming niet gebruikt wordt. • Voor het aansluiten van het toestel heeft u een goedgekeurde gasslang nodig met een lengte van 40 cm. Deze moet vervangen worden als hij beschadigd is of scheurtjes vertoont. Hierop dient regelmatig gecontroleerd te worden. Wij adviseren de gasslang minimaal om de drie jaar te vervangen. • De drukregelaar dient te voldoen aan de EN12864 norm en de huidige regelgevingen van het land waar deze geïnstalleerd is, die gevonden kunnen worden bij uw dichtstbijzijnde verkoper van gas items. Raadpleeg de technische gegevens. Het is ten strengste verboden om verstelbare druk te gebruiken. De levensduur van de drukregelaar wordt geschat op 10 jaar. Het is aangeraden om de regelaar binnen 10 jaar na de productiedatum of wanneer dit volgens de lokale voorwaarden vereist is, te vervangen. • De gasslang moet op een dergelijke manier worden aangesloten, dat deze niet verwrongen kan worden. • U bent verplicht de gasslang te vervangen wanneer de nationale omstandigheden dit vereisen. • Dit apparaat is uitsluitend geschikt voor gebruik met lage druk butaan, propaan of een gasmengsel hiervan, uitgerust met de juiste lage drukregelaar en via een flexibele slang. o Gebruik makend van een 30 mbar uitlaatregelaar voor categorie I3B/P (30) of categorie I3+ met butaangas. o Gebruik makend van een 37 mbar uitlaatregelaar voor categorie I3+ met propaangas. o Gebruik makend van een 50 mbar uitlaatregelaar voor categorie 13B/P (50). • Dit toestel is ontwikkeld om gebruikt te worden in combinatie met butagas- of propaangasflessen van 5 kg tot 11 kg, voorzien van een geschikte drukregelaar. Zie tabel voor te gebruiken gas en druk: Het installeren van de verwarming (FIGUUR 3 + 4 + 5) • Haal de verwarming uit zijn verpakking. • Vouw de plaat aan de achterkant van de verwarming open, zodat het wiel (verbonden aan deze plaat) de vloer raakt. Fixeer de plaat en de bodem van de verwarming met elkaar, met behulp van de bevestigde schroeven. (Uitsluitend voor modelnr. KA-5340) • De maximale afmeting van de gasfles is 57 cm hoog en 36 cm breed. (for KA-5338 & KA-5340) De maximale afmeting van de gasfles is 40 cm hoog en 32 cm breed. (for KA-5339) • Schroef de regelaar tegen de klok in op de uitmonding van de gasfles. Alleen met de hand aandraaien. Gebruik geen (Engelse) schroefsleutel. Schroef het totdat de moer helemaal vast zit. • Om de cilinderklep te sluiten, draai de regelknop helemaal in de richting van de pijl. FR Mode d'emploi • Om de regelaar vast te koppelen, draai het handwiel in de richting van de pijl. • Fixeer de beugel op de verwarming om de stabiliteit van de gasfles te waarborgen. Belangrijke test voor lekkage • De test moet uitgevoerd worden in een goed geventileerde ruimte, vrij van open vuren of andere ontstekingsbronnen. Draai, met de regelaar aangesloten op de gasfles, de gasflesklep 1 ½ slag tegen de klok in. Besproei alle slang- en pijpaansluitingen op de gasflesklep, regelaaraansluiting op de cilinder en de gasflesklep met een 50:50 oplossing van afwasmiddel en water. Een stroom aan luchtbellen duidt aan dat er lekkage is. Als er een lekkage gevonden is, schakel dan de gasfles uit (met de klok mee), ontkoppel de regelaar van de gasfles en haal de gasfles uit de kachel en zet het in een koele, goed geventileerde ruimte. Neem contact op met uw dealer of gasleverancier voor assistentie. • Gebruik de verwarming niet wanneer er een lekkage ontdekt is! • Gebruik geen vlam om te testen op lekkages! • Maak in geen geval gebruik van elektrische apparaten indien er een gaslek aanwezig is. Bediening (FIGUUR 6) De verwarming kan op drie verschillende warmte standen afgesteld worden: LAAG (1 ), MIDDEN (2 ) en HOOG (3 ). De ontsteking wordt gestart door een piëzo-elektrische drukknop. • Open de kraan op de gasfles 1 ½ slag. • Houd de regelknop ingedrukt en draai deze naar de LAAG (1 ) stand en houdt het voor 10 seconden ingedrukt. • Terwijl u de regelknop nog ingedrukt houdt, druk enkele keren op de piezoelektrische drukknop totdat de waakvlam aan de onderkant gaat branden. Houd de regelknop voor nog 10 á 15 seconden ingedrukt. Wanneer tijdens het loslaten van de knop de waakvlam uitgaat, herhaal dan de procedure. • Wanneer een verwarming voor het eerst ontstoken wordt, dan kan het misschien nodig zijn om de regelknop langer ingedrukt te houden om gas naar de waakvlambrander te laten stromen. • Wanneer de verwarming op de LAAG (1 ) stand brandt deze eerst zo’n 4 minuten laten branden op deze stand. Het verwarmingselement kan zo langzaam warm worden, waarna deze gaat gloeien en rood wordt. Vervolgens kunt u de regelknop naar de MIDDEN (2 ) stand doorschakelen, wederom 4 minuten op deze stand laten branden. Na deze 4 minuten kunt u doorschakelen naar de HOOG (3 ) stand. . • NOOIT DE KACHEL DIRECT OP STAND “HOOG (3 )” ZETTEN. GEVOLG IS DAT DE KACHEL NIET GOED KAN VERGASSEN EN ER OVERMATIGE VLAMVORMING KAN ONTSTAAN! • Om de verwarming uit te schakelen dient u de regelknop naar de startstand te draaien en de kraan op de gasfles helemaal te sluiten (met de klok mee); de verwarming kan alleen maar uitgeschakeld worden door de kraan op de gasfles helemaal te sluiten. Het kan niet uitgeschakeld worden door enkel de regelknop. Opmerking: de verwarming omvat verschillende veiligheidsvoorzieningen, die de verwarming zullen uitschakelen indien er sprake is van onveilige omstandigheden. 1. In het geval dat de vlam dooft, zal de verwarming automatisch worden afgesloten. 2. De verwarming zal worden afgesloten als de ruimte niet voldoende wordt geventileerd, of als de verwarming in een te kleine ruimte wordt geplaatst. Schakel de verwarming uit, ventileer de ruimte goed en wacht 5-10 minuten voordat u de verwarming opnieuw inschakelt. 3. Deze verwarming omvat een “anti-kantel” schakelaar, die de verwarming automatisch afsluit in het geval deze kantelt. Zorg ervoor dat de verwarming zich in verticale positie bevindt. Het verwisselen van de gasfles • Gasflessen moeten vervangen worden in een vlamvrije omgeving. • Rook niet tijdens het vervangen van de gasfles. • Schakel de gasflesklep of regelaar helemaal uit (met de klok mee) en haal de lege fles uit de kachel. • Probeer niet de regelaar te verwijderen wanneer de verwarming nog aanstaat. • Controleer of de verwarming helemaal uitgedoofd is. • Verwijder de regelaar van de lege cilinder. • Volg de stappen beschreven onder “Het installeren van de verwarming” voor het aansluiten van een nieuwe fles. Schoonmaken • Onderhoud en schoonmaken dienen uitgevoerd te worden wanneer de gastoevoer is uitgeschakeld en de verwarming dient koud te zijn. Probeer niet de verwarming schoon te maken wanneer deze in gebruik is. • U verwarming dient jaarlijks gecontroleerd te worden door een gekwalificeerd persoon i.v.m. veilig gebruik en om defecten te detecteren. • Als er defecten gevonden worden, stop dan met het gebruik van de verwarming en neem contact op met uw dealer voor advies. • Maak de buitenkant, achtercilinder en opslagruimte regelmatig schoon om stof, wat het functioneren van de verwarming kan beïnvloeden, te verwijderen. • Stofzuig met een zachte borstel het oppervlak en keramische elementen om opgebouwd stof te verwijderen. Schraap deze elementen niet omdat ze door gebruik fragiel kunnen worden. • Gebruik geen bijtende middelen om de verwarming schoon te maken. • Kijk naar de waakvlam wanneer deze brandt. Het dient stabiel te branden, als het flikkert of een gele punt heeft, dan dient de verwarming geïnspecteerd te worden. • Als onderdelen vervangen moeten worden, dan moeten ze vervangen worden door oorspronkelijke onderdelen geleverd door de fabrikant. Het gebruik van onjuiste of vervangingsonderdelen kan gevaarlijk zijn en zal de garantie ongeldig maken. Wanneer de verwarming voor een langere periode niet gebruikt wordt, in de zomer bijvoorbeeld, dan raden wij u aan om het afgedekt te bewaren of terug te plaatsen in zijn doos om het stof en vuil te minimaliseren. Specialist onderhoudsinstructies (voor KA-5338 & KA-5340) • De 0,57 markering op de injector geeft aan dat de grootte van de injector 0,57 mm is. • De ASD moet gemarkeerd zijn met ODS-1112A. De beluchtinggrootte is Ø2,8 mm in diameter voor I3B/P (30) en I3 + (28-30/37). Specialist onderhoudsinstructies (voor KA-5338DU & KA-5340DU) • De 0,47 markering op de injector geeft aan dat de grootte van de injector 0,47 mm is. • De ASD moet gemarkeerd zijn met ODS-1112A. De beluchtinggrootte is Ø2,7 mm diameter voor I3B/P (50). Specialist onderhoudsinstructies (voor KA-5339) • De 0,57 markering op de injector geeft aan dat de grootte van de injector 0,57 mm is. • De ASD moet gemarkeerd zijn met ODS-1112A. De beluchtinggrootte is Ø3,0 mm in diameter voor I3B/P (30) en I3 + (28-30/37). Specialist onderhoudsinstructies (voor KA-5339DU) • De 0,47 markering op de injector geeft aan dat de grootte van de injector 0,47 mm is. • De ASD moet gemarkeerd zijn met ODS-1112A. De beluchtinggrootte is Ø2,9 mm diameter voor I3B/P (50). De juiste positie van de ODS wanneer deze op de ODS statorplaat gemonteerd is. (7) Technische bijstand die u kunt toepassen voordat u belt voor hulp De verwarming schakelt niet in: • Controleer of de gasfles vol is • Controleer of de regelaar goed is verbonden en of de flesafsluiter is ingeschakeld. • Controleer of de instructies correct zijn opgevolgd. De verwarming schakelt niet in, nadat de gasfles is vervangen. Mogelijke oorzaken hiervan zijn: • Er is lucht aanwezig in de gasfles. Houd de regelknop lang ingedrukt, totdat de waakvlam en de hoofdbrander ontsteken. Schakel naar de hoge stand 3. • De gasfles was mogelijk veel te koud. Laat de fles op kamertemperatuur komen, voordat u de verwarming opnieuw probeert in te schakelen. De verwarming schakelt uit zichzelf uit: • Als de verwarming na een voortdurende werking uitschakelt, dient u deze opnieuw in te schakelen door de instructies te volgen. • Als de verwarming kort na ontsteking uitgaat, dient u te controleren of er tocht aanwezig is of dat de gasfles bijna leeg is. • Als de verwarming na circa 30 minuten uitschakelt, is dit een indicatie dat de ruimte waarin de verwarming werkzaam is slecht geventileerd is. Open een raam of een deur om de ruimte te ventileren en probeer de verwarming vervolgens opnieuw in te schakelen. • Voorkom het stoten tegen de verwarming als deze in werking is. Verplaats de verwarming niet als deze in werking is. Avertissement Veuillez lire attentivement les instructions de ce manuel avant d'utiliser l’appareil. Conservez-le tant que vous êtes en possession de ce produit pour pourvoir le consulter par la suite. Rangez-le avec le bon de garanti, la facture et si possible le carton et les emballages du produit. Instructions générales de sécurité • L’utilisation et l’entretien de l’appareil doivent être effectués conformément aux réglementations et normes en vigueur. • Avant de mettre cet appareil en service, veuillez lire le manuel d’instructions attentivement et conservez-le afin de pouvoir vous y référer dans le futur. • Veuillez conserver ces instructions, le certificat de garantie, le ticket de caisse et, si possible, le carton contenant l’emballage interne. • L’appareil est conçu uniquement pour un usage privé et non pour un usage commercial ! • Cet appareil n'est pas prévu pour être utilisé par des personnes (y compris les enfants) dont les capacités physiques, sensorielles ou mentales sont réduites, ou des personnes dénuées d'expérience ou de connaissance, sauf si elles ont pu bénéficier, par l'intermédiaire d'une personne responsable de leur sécurité, d'une surveillance ou d'instructions préalables concernant l'utilisation de l'appareil. • Il convient de surveiller les enfants pour s'assurer qu'ils ne jouent pas avec l'appareil. • Testez régulièrement l’appareil ou cas il serait endommagé. Seules des parties de remplacement originales peuvent être utilisées. • N’utilisez jamais l’appareil sans surveillance; éteignez l’appareil quand vous ne l’utilisez pas, même pour un court moment. • L’appareil ne doit être placé dans l’eau ou un autre liquide en aucune circonstance. N’utilisez pas l’appareil si vos mains sont humides ou mouillées. • Ne jamais modifier cet appareil, ni l’utiliser pour des applications auxquelles il n’est pas destiné. • Cet appareil nécessite un tuyau et un régulateur, veuillez contacter votre fournisseur de gaz. • Évitez d’installer et d’utiliser dans un espace où est déjà installé un chauffeeau du type instantané (autre appareil sans conduit d'évacuation). • Après l'utilisation, éteignez l’appareil avec la valve de la bouteille de gaz. • AVERTISSEMENT PAR LE SYMBOLE ‘NE PAS COUVRIR’ Ne pas recouvrir le radiateur afin d’éviter la surchauffe. Points importants avant d’utiliser votre radiateur (IMAGE 1 +2) • Votre radiateur, et le tuyau flexible, doivent être vérifiés une fois par an par un technicien qualifié pour un fonctionnement sécurisé et pour détecter toutes défectuosités. • Cet appareil doit être mis en place et utilisé dans des pièces avec des installations pour l'évacuation des gaz résiduaires et une alimentation en air frais suffisante pour une bonne combustion. • Il s’agit d’un appareil de chauffage sans connexion à un conduit Assurezvous que la pièce est suffisamment ventilée lorsque le radiateur est en marche. N’utilisez pas votre radiateur dans un appartement de grande hauteur, caves, chambre á coucher, salle de bain, caravane, camping-car, bateau, ou toute pièce d’un volume inférieur à 84 m³. • La zone de ventilation pour le renouvellement de l’air doit être d’au moins 105 cm², répartis de façon égale entre les couches supérieures et inférieures de la pièce. • Ne placez pas le radiateur près de murs, rideaux, meubles, tentures, voilages, literies ou autres matériaux inflammables durant le fonctionnement. Tournez toujours le radiateur vers le centre de la pièce lorsqu’il est en marche. Distance minimum entre l’arrière et les côtés du radiateur derrière le panneau frontal et tout objet inflammable, 500 mm. Distance minimum entre tout objet inflammable et le panneau frontal, 1.000 mm. • Le radiateur ne doit pas être déplacé alors qu’il est en marche. • Ne placez pas d’objets sur ou contre le radiateur. • Les caches de protection sur cet appareil est de prévenir les risques d'incendie ou de blessures causées par des brûlures et aucune partie de celui-ci devrait être définitivement supprimé. IL NE DONNE PAS LA PLEINE PROTECTION DES JEUNES ENFANTS OU DES PERSONNES DONT LES CAPACITÉS PHYSIQUES, SENSORIELLES OU MENTALES SONT RÉDUITES • Cet appareil devrait être testé contre toute fuite avant la première utilisation et à chaque fois que la bouteille de gaz est reconnectée après remplissage. • Fermez toujours le robinet de la bouteille de gaz lorsque le radiateur n’est pas en marche. • Un tuyau de gaz approuvé d’une longueur recommandée de 40 cm est nécessaire pour le branchement de cet appareil. Il doit être remplacé dès constatation de dommages ou de craquelures. Son état doit être fréquemment vérifié. Il est recommandé de remplacer le tuyau flexible de gaz tous les 3 ans. • Le régulateur de pression doit être conforme à la norme EN12864 et aux règlementations en vigueur dans le pays d’installation, qui peuvent être trouvées auprès du revendeur d’accessoires de gaz le plus proche. Consultez la date technique. Il est strictement interdit d’utiliser une pression réglable. Le cycle de vie du régulateur est estimé à 10 ans. Il est recommandé que le régulateur soit changé dans les 10 ans à partir de la date de fabrication ou requis par les règlementations nationales. • Le tuyau de gaz doit être branché de façon à ne pas risquer d’être tordu. • Il est obligatoire de remplacer le tuyau de gaz si les règlements nationaux le demandent. • Cet appareil ne convient qu’à l’utilisation avec du butane à basse pression, du propane ou leur gaz mélangé et équipé d'un régulateur adéquat à basse pression avec un tuyau flexible. o Utilisation d’un régulateur d’arrivée de 30mbar de catégorie I3B/P(30) ou de catégorie I3+ pour du gaz butane. o Utilisation d’un régulateur d’arrivée de 37mbar de catégorie I3+ avec du gaz propane. o Utilisation d’un régulateur d’arrivée de 50mbar pour la catégorie I3B/P(50). • Cet appareil est conçu pour fonctionner avec des bouteilles de butane ou de propane de 5 kg à 11 kg, avec un réducteur de pression adéquat. Voir le tableau des gaz et pressions requises: Mise en place du radiateur (IMAGE 3 + 4 + 5) • Commencez par retirer le radiateur de son emballage. • Dépliez l’étagère au dos du radiateur pour que les roulettes (fixées à cette étagère) puissent toucher le sol, vissez ensuite l’étagère et le bas du radiateur ensemble à l’aide des vis incluses. (Seulement pour le modèle nr. KA-5340) • Placez la bouteille de gaz pleine dans le compartiment à l’arrière du radiateur avec la sortie du robinet vers l’extérieur.La taille maximum du cylindre de gaz est de 57 cm de hauteur et 36 cm de largeur. (for KA-5338 & KA-5340) La taille maximum du cylindre de gaz est de 40 cm de hauteur et 32 cm de largeur. (for KA-5339) • Vissez le régulateur sur la sortie du robinet de la bouteille de gaz, dans le sens inverse des aiguilles d’une montre. Vissez à la main seulement. N’utilisez pas de clé anglaise. Vissez jusqu’à ce que l’écrou soit complètement bloqué. • Pour fermer le robinet de la bouteille tournez la vis de contrôle complètement dans le sens de la flèche • Pour enclencher et serrer le Régulateur, tournez la molette dans le sens de la flèche. • Fixez le support sur le radiateur afin que la bouteille de gaz reste stable.-
 1
1
-
 2
2
-
 3
3
-
 4
4


Tristar KA-5338 Handleiding
- Categorie
- Ruimteverwarmingstoestellen
- Type
- Handleiding
in andere talen
- English: Tristar KA-5338 User manual
- italiano: Tristar KA-5338 Manuale utente
- français: Tristar KA-5338 Manuel utilisateur
- español: Tristar KA-5338 Manual de usuario
- Deutsch: Tristar KA-5338 Benutzerhandbuch
- português: Tristar KA-5338 Manual do usuário
- slovenčina: Tristar KA-5338 Používateľská príručka
- čeština: Tristar KA-5338 Uživatelský manuál
- svenska: Tristar KA-5338 Användarmanual
- polski: Tristar KA-5338 Instrukcja obsługi
