
KURZANLEITUNG
QUICK USER GUIDE
GUIDE DE DÉMARRAGE
OVERSIGTSVEJLEDNING
BEKNOPTE HANDLEIDING
GUIDA RAPIDA
BURY CP 1000 CarPhone


3
Introductory information
Chère cliente, cher client,
Vous venez d’acheter un kit mains-libres de la marque BURY et avez ainsi choisi un produit de haute
qualité ainsi que de confort d’utilisation le plus élevé.
Gentile clientela,
Avete acquistato un dispositivo vivavoce di marca BURY, optando così per un prodotto di grande qualità
e di massimo comfort di utilizzo.
Sehr geehrte Kundin, sehr geehrter Kunde,
Sie haben eine Freisprecheinrichtung der Marke BURY erworben und sich so für ein Produkt mit hoher
Qualität sowie höchstem Bedienungskomfort entschieden.
Dear customer,
Congratulations on purchasing a BURY hands-free car kit. You have chosen a high quality product that is
extremely easy to use.
Kære kunde,
Du har erhvervet et håndfrit installationssæt af mærket BURY og dermed bestemt dig for et produkt af
høj kvalitet med maksimal betjeningskomfort.
Geachte klant,
U heeft een handsfreeset van het merk BURY gekocht en dus gekozen voor een product met hoge kwa-
liteit alsmede maximaal bedieningsgemak.

4
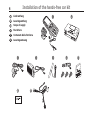
Installation of the hands-free car kit
8
9
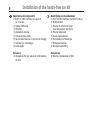
Lieferumfang
Leveringsomfang
Scope of supply
Fourniture
Contenuto della fornitura
Leveringsomvang

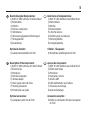
5
Beschreibung der Komponenten:
1) BURY CP 1000 CarPhone mit Vehicle Mount
2) Elektronikbox
3) Mikrofon
4) Externer Lautsprecher
5) GSM-Antenne
6) Stromversorgungskabel mit Sicherungen
7) Montagezubehör
8) Kurzanleitung
Optionales Zubehör:
9) Lautsprecherumschaltbox AC 5120
Description of the components:
1) BURY CP 1000 CarPhone with Vehicle Mount
2) Electronic box
3) Microphone
4) External loudspeaker
5) Antenna adapter
6) Power supply cable with fuses
7) Mounting accessories
8) Printed Quick user guide
Optional accessories:
9) Loudspeaker switch box AC 5120
Beskrivelse af komponenterne:
1) BURY CP 1000 CarPhone med Vehicle Mount
2) Elektronikboks
3) Mikrofon
4) Ekstern højttaler
5) Little-Flat antenne
6) Strømforsyning med sikringer
7) Monteringstilbehør
8) Oversigtsvejledning
Tilbehør - fås separat:
9) ISO højttaler omkoblingsboks AC 5120
Aperçu des composants :
1) BURY CP 1000 CarPhone avec Vehicle Mount
2) Boîtier électronique
3) Microphone
4) Haut-parleur externe
5) Antenne GSM
6) Câble d’alimentation avec fusibles
7) Accessoires de montage
8) Guide de démarrage
Accessoires en option :
9) Boîtier de commutation ISO pour haut-parleur
AC 5120

6
Installation of the hands-free car kit
Beschrijving van de onderdelen:
1) BURY CP 1000 CarPhone met Vehicle Mount
2) Elektronicabox
3) Externe microfoon met kabel
(speciale passieve microfoon)
4) Externe luidspreker
5) Kleine vlakke antenne
6) Stroomkabel met zekeringen
7) Montageaccessoires
8) Beknopte handleiding
Accessoires:
9) Externe omschakelbox AC 5120
Descrizione dei componenti:
1) BURY CP 1000 CarPhone con supporto
per il veicolo
2) Scatola elettronica
3) Microfono
4) Altoparlante esterno
5) Piccola antenna piatta
6) Cavo di alimentazione di corrente con fissaggi
7) Accessori per il montaggio
8) Guida rapida
Accessori:
9) Altoparlante ISO per scatola di commutazione
AC 5120

7
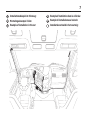
Installationsbeispiel im Fahrzeug:
Monteringseksempel i bilen:
Example of installation in the car:
Exemple d’installation dans le véhicule :
Esempio di installazione sul veicolo:
Installatievoorbeeld in het voertuig:

8
Installation of the hands-free car kit
Die Produktkomponenten in der Übersicht:
Oversigt over produktkomponenterne:
Overview of all components:
Aperçu des composants du produit :
I componenti del prodotto:
Een overzicht van de productcomponenten:
You will receive a separate manual when you purchase the handset shown.
Für den abgebildeten Handhörer erhalten Sie eine separate Anleitung, wenn Sie diesen erwerben.
Voor het afgebeelde handtoestel ontvangt u een afzonderlijke handleiding bij aanschaf van dit toestel.
Vous recevrez une notice d'utilisation séparée pour le combiné, si vous en faites l'acquisition.
Per la cornetta raffigurata vengono fornite istruzioni d’uso separate in caso d’acquisto.
Når du køber det viste telefonrør, medfølger der en separat vejledning.

9
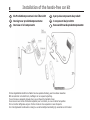
Anschlüsse an der Elektronikbox
Tilslutning af elektronikboks
Connections on the electronics box
Connexions au boîtier électronique
Attacchi della scatola elettronica
Aansluitingen aan de elektronicabox
4
1
2
3

10
Installation of the hands-free car kit
Anschlussmöglichkeiten:
1 Stromversorgung
2 Externer Lautsprecher
3 Mikrofon
4 BURY CP 1000 CarPhone
Connection options:
1 Power supply
2 External loudspeaker
3 Microphone
4 BURY CP 1000 CarPhone
Tilslutningsmuligheder:
1 Strømforsyning
2 Ekstern højttaler
3 Mikrofon
4 BURY CP 1000 CarPhone
Branchements possibles :
1 Alimentation
2 Haut-parleurs externes
3 Microphone
4 BURY CP 1000 CarPhone
Descrizione dei componenti:
1 Alimentazione di corrente
2 Altoparlante esterno
3 Microfono
4 BURY CP 1000 CarPhone
Aansluitmogelijkheden:
1 Stroomvoorziening
2 Externe luidspreker
3 Microfoon
4 BURY CP 1000 CarPhone

11
Stromversorgung
Die Stromversorgung des Autotelefons wird über ein 4adriges Kabel hergestellt. Schließen Sie das schwarze
(Klemme 31 - Minus), das rote (Klemme 30 - Dauerplus) und das blaue Kabel (Klemme 15 - Zündungsplus) an die
Stromversorgung Ihres Radios (ggf. über Zigarettenanzünder oder Sicherungskasten) an. Das gelbe Kabel dient
nach Anschluss am Gegenstück zur Stummschaltung des Radios bei einem Telefongespräch. Den weißen Molex-
stecker verbinden Sie bitte mit Anschluss 1.
Hinweis:
X Schließen Sie Ihr Gerät erst an die Stromversorgung an und
schalten Sie es ein, wenn Sie in der Bedienungsanleitung dazu
aufgefordert werden.
Achtung:
X Schließen Sie das blaue Kabel ebenfalls an Klemme 30 (Dau-
erplus) an, dann wird das Autotelefon permanent mit Strom ver-
sorgt. Dies könnte bei längerem Stillstand des Fahrzeugs zur
Entladung der Autobatterie führen.
X Weichen Sie von der vorgegebenen Anschlussbeschreibung
ab, könnten einige Funktionen des Autotelefons (z. B. die Rufbe-
reitschaft) nicht korrekt funktionieren.

12
Installation of the hands-free car kit
Strømforsyning
Biltelefonen forsynes med strøm via en 4-leder ledning. Tilslut den sorte (klemme 31 – minus), den røde (klem-
me 30 – konstantstrøm) og den blå ledning (klemme 15 – batterispænding) til radioens strømforsyning (evt. via
cigartænderen eller sikringsboksen). Den gule ledning bruges, efter tilslutning til modstykket, til at afbryde ra-
diolyden i forbindelse med en telefonsamtale. Det hvide molex stik forbindes med tilslutning 1.
Bemærk:
X Tilslut først apparatet til strømforsyningen og tænd først for
det, når betjeningsvejledningen beder dig om det.
Bemærk:
X Tilsluttes også den blå ledning til klemme 30 (konstantstrøm)
forsynes FSE’en konstant med strøm. Dette kan resultere i tøm-
ning af batteriet, hvis køretøjet står stille i længere tid.
X Afviges fra den anbefalede tilslutningsbeskrivelse, er der ri-
siko for at nogle af FSE’ens funktioner (f.eks. opkald) ikke virker
korrekt.

13
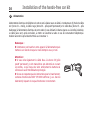
Power supply
The power supply of the BURY CP 1000 CarPhone is established via a 4-core cable. Connect the black (clamp
31 – minus), the red (clamp 30 – steady plus) and the blue cable (clamp 15 – ignition plus) to the power supply
of your radio (where required via the cigarette lighter or the fuse box). After connection to the counterpart, the
yellow cable provides for radio muting during a phone conversation. Please connect the white Molex connector
with connection 1.
Attention:
X Do not connect your device to the power supply or switch it on
until instructed to do so in the installation instructions.
Attention:
X If you also connect the blue cable to clamp 30 (steady posi-
tive), the BURY CP 1000 CarPhone will be permanently supplied
with power. If the vehicle is not running for a longer period, this
could lead to a discharge of the car battery.
X If you deviate from the specified connection descriptions it
may be the case that certain functions on the BURY CP 1000
CarPhone (e.g. the on-call duty) will not function correctly.

14
Installation of the hands-free car kit
Alimentation
L’alimentation électrique du téléphone de voiture est à réaliser avec un câble à 4 conducteurs (6). Reliez le câble
noir (borne 31 – moins), le câble rouge (borne 30 – pôle positif permanent) et le câble bleu (borne 15 – pôle
d’allumage) à l’alimentation électrique de votre radio (le cas échéant à l’allume-cigares ou à la boîte à fusibles).
Le câble jaune sert, après connexion, à mettre en sourdine la radio en cas de conversation téléphonique.
Veuillez raccorder la prise blanche Molex au connecteur 1.
Remarque :
X Commencez par brancher votre appareil à l’alimentation puis
mettez-le en marche lorsque le mode d’emploi vous y invite.
Attention :
X Si vous reliez également le câble bleu à la borne 30 (pôle
positif permanent), le kit mains-libres est alimenté en courant
en continu, ce qui risque de vider entièrement la batterie du
véhicule en cas d’immobilisation prolongée.
X Si vous ne respectez pas les instructions pour le branchement,
certaines fonctions du BURY CP 1000 CarPhone (p. ex. Service
d’astreinte) risquent de ne pas fonctionner correctement.

15
Alimentazione della corrente
L’alimentazione della corrente dell’apparecchio telefonico ha luogo con un cavo a 4 fili (Nr. 6). Collegare quello
nero (morsetto 31 negativo), quello rosso (morsetto 30 positivo continuo) ed il cavo blu (morsetto 15 positivo
dell’accensione) all’alimentazione della corrente della radio (event. con l’accendisigari o la scatola die fusibili).
Dopo il collegamento al pezzo opposto, il cavo giallo serve al silenziamento della radio durante un colloquio tele-
fonico. Collegare la presa bianca Molex all’allacciamento 1 (consultare il disegno nella pagina seguente).
Avvertenza:
X Allacciare l’apparecchio alla corrente elettrica e poi accender-
lo come descritto nel relativo manuale d’uso.
Attenzione:
X Se si collega anche il cavo blu al morsetto 30 (positivo conti-
nuo), il dispositivo vivavoce sarà alimentato permanentemente
da corrente ed in caso di inattività prolungata del veicolo, ciò
potrebbe causare lo scarico della batteria dell’automobile.
X Il mancato rispetto della descrizione di attacco fornita, può
comportare l’errata funzionalità di alcune funzioni dell’apparec-
chio telefonico (es. reperibilità).

16
Installation of the hands-free car kit
Stroomvoorziening
De stroomvoorziening van de autotelefoon wordt tot stand gebracht via een 4-aderige kabel (Nr. 6. Sluit de
zwarte (klem 31 - min), de rode (klem 30 - continuplus) en de blauwe kabel (klem 15 - ontstekingsplus) aan op
de stroomvoorziening van uw radio (evt. via sigarettenaansteker of zekeringkastje). De gele kabel dient na
aansluiting op het tegenstuk voor het uitzetten van het geluid van de radio bij een telefoongesprek. De witte
molexstekker verbindt u met aansluiting 1 (zie tekening op volgende pagina).
Aanwijzing:
X U mag het apparaat pas op de stroomvoorziening aansluiten
en inschakelen als dit in de bedieningshandleiding wordt aan-
gegeven.
Let op:
X Sluit u de blauwe kabel eveneens op klem 30 (continuplus)
aan, dan wordt de HFS permanent van stroom voorzien. Dit zou
bij langere stilstand van het voertuig kunnen leiden tot ontla-
ding van de voertuigaccu.
X Wijkt u van de vorige aansluitbeschrijving af, dan kan het zijn
dat enkele functies van de HFS (bijv. Vertraagd uitschakelen)
niet correct functioneren.

17
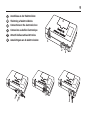
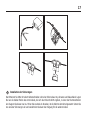
Installation der Sicherungen
Durchtrennen Sie bitte mit einem Seitenschneider oder einer Schere das rote, schwarze und blaue Kabel. Legen
Sie nun die beiden Enden des roten Kabels, die sich durch den Schnitt ergeben, in einen der Klemmverbinder
ein. Klappen Sie diesen nun zu. Hören Sie zweimal ein Knacken, ist die Klemme korrekt eingerastet. Setzen Sie
nun eine der Sicherungen ein und wiederholen Sie dann den Vorgang für die anderen Kabel.

18
Installation of the hands-free car kit
Installatie van de zekeringen
Knip met een zijsnijtang of een schaar de rode, zwarte en blauwe kabel door. Leg nu de beide uiteinden van de
rode kabel, die ontstaan zijn na het doorknippen, in een van de klemconnectors. Klap deze nu dicht. Hoort
u twee keer een klik, dan is de connector correct vastgeklikt. Plaats nu een van de zekeringen en herhaal
daarna de procedure voor de andere kabels.
Installation af sikring
Skær det røde, sorte og blå kabel over med en bidetang eller en saks. Læg begge ender af det røde kabel, som
er opstået ved overskæringen, i en klemmeforbindelse. Klap den sammen. Når man hører to klik er samlingen
samlet korrekt. Indsæt en af sikringerne og gentag proceduren for de andre kabler.
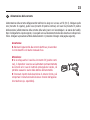
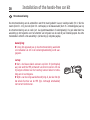
Installation instructions for the fuses
Please cut through the red, the black and the blue cable by means of a wire cutter. Now insert the two endings
of the red cable resulting from the cut into one of the binders, then close it. If you hear two clicking noises,
the clamp snapped in properly. Now insert one of the fuses and then repeat the procedure with the other cables.
Installation des fusibles
Sectionnez avec une pince coupante ou avec des ciseaux le câble rouge, noir et bleu. Placer ensuite les deux
extrémités du câble rouge causées par la coupe dans le connecteur à bornes. Fermez le connecteur. Après deux
déclics le connecteur s’est enclenché correctement. Puis montez une des fusibles et répétez ce processus pour
les autres câbles.
Installazione dei fusibili
Tagliare con un tronchese o un paio di forbici il cavo rosso, nero e blu. Inserire quindi le due estremità del cavo
rosso risultanti dal taglio in un connettore per morsetti e chiuderlo. Se si sente due volte un rumore tipo clic,
il morsetto è stato inserito correttamente. Ora inserire uno dei fusibili e ripetere la stessa procedura per gli altri cavi.

19
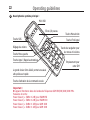
Operating guidelines
Beschreibung des Hauptsystems:
Mini USB
Display 2,8“
Menütaste rechts
Endetaste
4-Wege-Blättern-Taste für
Menüs und Listen
SIM -Karten Steckplatz
SOS-Taste
Lautstärkeregelung
Menütaste links
Anruftaste-/Wiederwahltaste
Beleuchtete und große Tastatur ermöglicht hohe
Präzision und Schnelligkeit bei der Eingabe
Aktivierungstaste für die Sprachsteuerung
Wichtig:
X Das Gerät funktioniert in folgenden Frequenzbändern GSM 850/900/1800/1900 MHz.
Ausgangsleistung:
Power Class 4 (+ 33dBm ± 2dB) für EGSM 850
Power Class 4 (+ 33dBm ± 2dB) für EGSM 900
Power Class 1 (+ 30dBm ± 2dB) für GSM 1800
Power Class 1 (+ 30dBm ± 2dB) für GSM 1900

20
Operating guidelines
Beskrivelse af hovedsystemet:
Mini USB
Display 2,8“
Menutast højre
Afbrydertast
4-vejs-bladringstast til
menuer og lister
Indstik til SIM -kort
SOS-tast
Lydstyrkeregulering
Menutast venstre
Opkaldstast-/Genvalgstast
Stort oplyst tastatur giver stor præcision og
hurtighed ved indtastningen
Aktivieringstast til stemmestyring
Vigtigt:
X Enheden opererer i GSM 850/900/1800/1900 MHz frekvensbånd.
Udgangseffekt:
Power Class 4 (+ 33dBm ± 2dB) til EGSM 850
Power Class 4 (+ 33dBm ± 2dB) til EGSM 900
Power Class 1 (+ 30dBm ± 2dB) til GSM 1800
Power Class 1 (+ 30dBm ± 2dB) til GSM 1900

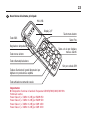
21
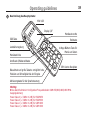
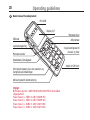
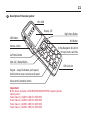
Description of the main system:
Mini USB
Display 2,8“
Right Menu Button
End Button
4 Way Navigation Key Scroll
through menus and lists
SIM Card slot
SOS Button
Volume control
Left Menu Button
Start Call / Redial Button
Keypad – Large illuminated, well-spaced,
tactile buttons ensure accuracy and speed
Voice control activation button
Important:
X The device operates in GSM 850/900/1800/1900 MHz frequency bands.
Output power:
Power Class 4 (+33dBm ±2dB) for EGSM 850
Power Class 4 (+33dBm ±2dB) for EGSM 900
Power Class 1 (+30dBm ±2dB) for GSM 1800
Power Class 1 (+30dBm ±2dB) for GSM 1900

22
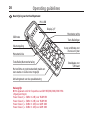
Operating guidelines
Description du système principal :
Mini USB
Écran 2,8 pouces
Touche Menu droite
Touche Fin d’appel
Touche de navigation pour
les menus et les listes
Emplacement pour
carte SIM
Touche SOS
Touche Menu gauche
Touche Appel / Rappel automatique
Le grand clavier rétro-éclairé permet une saisie
ultra-précise et rapide
Touche d’activation de la commande vocale
Réglage du volume
Important :
X L’appareil fonctionne dans des bandes de fréquences GSM 850/900/1800/1900 MHz.
Puissance de sortie :
Power Class 4 (+ 33dBm ± 2dB) pour EGSM 850
Power Class 4 (+ 33dBm ± 2dB) pour EGSM 900
Power Class 1 (+ 30dBm ± 2dB) pour GSM 1800
Power Class 1 (+ 30dBm ± 2dB) pour GSM 1900

23
Descrizione del sistema principale:
Mini USB
Display 2,8“
Tasto menu destro
Tasto Fine
Tasto a 4 vie per sfogliare
menu e elenchi
Slot per scheda SIM
Tasto SOS
Regolazione altoparlanti
Tasto menu sinistro
Tasto chiamata/riselezione
Tastiera illuminato di grandi dimensioni per
digitare con precisione e rapidità
Tasto attivazione comando vocale
Importante:
X Il dispositivo funziona in bande di frequenza GSM 850/900/1800/1900 MHz.
Potenza di uscita:
Power Class 4 (+ 33dBm ± 2dB) per EGSM 850
Power Class 4 (+ 33dBm ± 2dB) per EGSM 900
Power Class 1 (+ 30dBm ± 2dB) per GSM 1800
Power Class 1 (+ 30dBm ± 2dB) per GSM 1900

24
Operating guidelines
Beschrijving van het hoofdsysteem:
Mini USB
Display 2,8“
Menutoets rechts
Toets Beëindigen
4-weg scrolltoets voor
menu’s en lijsten
Steekplaats voor
SIM-kaart
SOS-toets
Volumeregeling
Menutoets links
Toets Bellen/Nummerherhaling
Het verlichte en grote toetsenbord maakt een
zeer exacte en snelle invoer mogelijk
Activeringstoets voor de spraakbesturing
Belangrijk:
X Het apparaat werkt in frequenties van GSM 850/900/1800/1900 MHz.
Uitgangsvermogen:
Power Class 4 (+ 33dBm ± 2dB) voor EGSM 850
Power Class 4 (+ 33dBm ± 2dB) voor EGSM 900
Power Class 1 (+ 30dBm ± 2dB) voor GSM 1800
Power Class 1 (+ 30dBm ± 2dB) voor GSM 1900

25
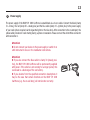
Further Information
A detailed instructions manual for the BURY CP 1000 CarPhone is available on our website
under the following address: www.bury.com.
Have a good trip!
Eine ausführliche Bedienungsanleitung für die BURY CP 1000 CarPhone nden Sie auf unserer
Webseite unter der Adresse: www.bury.com.
Wir wünschen Ihnen eine gute Fahrt.
Une notice d’utilisation détaillée pour BURY CP 1000 CarPhone est disponible sur notre site
Internet à l’adresse : www.bury.com.
Nous vous souhaitons un bon voyage !
Du finder en udførlig brugsanvisning til BURY CP 1000 CarPhone på vores webseite
på adressen: www.bury.com.
BURY ønsker dig god køretur.
Le istruzioni per l’uso complete per il BURY CP 1000 CarPhone sono contenute nel nostro
sito internet, all’indirizzo: www.bury.com.
Vi auguriamo buon viaggio.
Een uitvoerige handleiding voor de BURY CP 1000 CarPhone vindt u op onze website:
www.bury.com.
Wij wensen u een goede reis.

Further Information
26
Service
In case of general or technical queries, suggestions and comments, please do not hesitate to contact our team
at any time. Suggestions and feedback are always welcomed:
Administration: Producer:
BURY GmbH & Co. KG BURY Spółka z o.o.
Robert-Koch-Straße 1-7 ul. Wojska Polskiego 4
D-32584 Löhne 39-300 Mielec
GERMANY POLAND
Hotline: +49(0)180 6 - 842 468*
E-mail: hotline@bury.com
* 0.20 €/call from the Deutsche Telecom AG fixed line network, max. 0.60 € per call from mobile phone
networks. The costs of international telephone calls which are made from abroad can vary.
Warranty / Service desk:
The duration of the warranty for the components of this product totals two years subsequent to the date of sale
to the end customer. Any warranty claims you may have as an end customer are to be asserted towards your
contractual partner. If the corresponding contractual partner is not able to rectify a corresponding fault, please
exercise your rights of purchase. If subsequent to agreement with your contractual partner the product is to be
sent directly to the manufacturer, then please send it, along with a detailed description of the fault in the German
or English language and a copy of the proof of purchase, directly to our service team:
BURY GmbH & Co. KG
Im Hause DPD Depot 103
Robinienweg
D-03222 Lübbenau
GERMANY

27
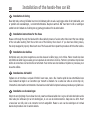
Information on the disposal of electrical goods in the EU
The crossed out wheelie bin symbol means that electrical and electronic products, batteries and accumulators
must be disposed of separately in the European Union. Please do not dispose of any such products in your
normal household waste. As the owner of a product of this sort you are legally obliged to dispose of it at your
local dumping site or recycling centre, where you are able to leave your waste electrical goods free of charge.
Approvals and declaration of conformity
At BURY, purchase, production, as well as distribution and service, follow environmentally friendly processes
according to the ISO 14001 Standard and Quality Management Requirements, according to the ISO/TS 16949
Standard. The device has
Hereby, BURY declares that this device BURY CP 1000 CarPhone is in compliance with the essential
requirements and other relevant provisions of Directive RED 2014/53/EU.
This product meets the requirements of the European directive 2011/65/EU on the restriction of certain
hazardous substances in electrical and electronic equipment.
You can request a conformity declaration from the manufacturer of this product by writing to the following email
address: ce_conformance@bury.com. It is also available on our web site www.bury.com in the downloadable
files section of a given product.
Version 06/2017
60.0815.0-03-220617
Subject to change. Errors and omissions excepted.
All use of these brands by BURY Technologies takes place within the scope of the corresponding licence.
All of the other stated brands are owned by their corresponding owner. All rights reserved.
Documenttranscriptie
BURY CP 1000 CarPhone KURZANLEITUNG OVERSIGTSVEJLEDNING QUICK USER GUIDE GUIDE DE DÉMARRAGE GUIDA RAPIDA BEKNOPTE HANDLEIDING Introductory information 3 Sehr geehrte Kundin, sehr geehrter Kunde, Sie haben eine Freisprecheinrichtung der Marke BURY erworben und sich so für ein Produkt mit hoher Qualität sowie höchstem Bedienungskomfort entschieden. Kære kunde, Du har erhvervet et håndfrit installationssæt af mærket BURY og dermed bestemt dig for et produkt af høj kvalitet med maksimal betjeningskomfort. Dear customer, Congratulations on purchasing a BURY hands-free car kit. You have chosen a high quality product that is extremely easy to use. Chère cliente, cher client, Vous venez d’acheter un kit mains-libres de la marque BURY et avez ainsi choisi un produit de haute qualité ainsi que de confort d’utilisation le plus élevé. Gentile clientela, Avete acquistato un dispositivo vivavoce di marca BURY, optando così per un prodotto di grande qualità e di massimo comfort di utilizzo. Geachte klant, U heeft een handsfreeset van het merk BURY gekocht en dus gekozen voor een product met hoge kwaliteit alsmede maximaal bedieningsgemak. Installation of the hands-free car kit 4 Lieferumfang Leveringsomfang Scope of supply Fourniture Contenuto della fornitura Leveringsomvang 8 9 5 Beschreibung der Komponenten: 1) BURY CP 1000 CarPhone mit Vehicle Mount 2) Elektronikbox 3) Mikrofon 4) Externer Lautsprecher 5) GSM-Antenne 6) Stromversorgungskabel mit Sicherungen 7) Montagezubehör 8) Kurzanleitung Beskrivelse af komponenterne: 1) BURY CP 1000 CarPhone med Vehicle Mount 2) Elektronikboks 3) Mikrofon 4) Ekstern højttaler 5) Little-Flat antenne 6) Strømforsyning med sikringer 7) Monteringstilbehør 8) Oversigtsvejledning Optionales Zubehör: 9) Lautsprecherumschaltbox AC 5120 Tilbehør - fås separat: 9) ISO højttaler omkoblingsboks AC 5120 Description of the components: 1) BURY CP 1000 CarPhone with Vehicle Mount 2) Electronic box 3) Microphone 4) External loudspeaker 5) Antenna adapter 6) Power supply cable with fuses 7) Mounting accessories 8) Printed Quick user guide Aperçu des composants : 1) BURY CP 1000 CarPhone avec Vehicle Mount 2) Boîtier électronique 3) Microphone 4) Haut-parleur externe 5) Antenne GSM 6) Câble d’alimentation avec fusibles 7) Accessoires de montage 8) Guide de démarrage Optional accessories: 9) Loudspeaker switch box AC 5120 Accessoires en option : 9) Boîtier de commutation ISO pour haut-parleur AC 5120 6 Installation of the hands-free car kit Descrizione dei componenti: 1) BURY CP 1000 CarPhone con supporto per il veicolo 2) Scatola elettronica 3) Microfono 4) Altoparlante esterno 5) Piccola antenna piatta 6) Cavo di alimentazione di corrente con fissaggi 7) Accessori per il montaggio 8) Guida rapida Beschrijving van de onderdelen: 1) BURY CP 1000 CarPhone met Vehicle Mount 2) Elektronicabox 3) Externe microfoon met kabel (speciale passieve microfoon) 4) Externe luidspreker 5) Kleine vlakke antenne 6) Stroomkabel met zekeringen 7) Montageaccessoires 8) Beknopte handleiding Accessori: 9) Altoparlante ISO per scatola di commutazione AC 5120 Accessoires: 9) Externe omschakelbox AC 5120 7 Installationsbeispiel im Fahrzeug: Exemple d’installation dans le véhicule : Monteringseksempel i bilen: Esempio di installazione sul veicolo: Example of installation in the car: Installatievoorbeeld in het voertuig: 8 Installation of the hands-free car kit Die Produktkomponenten in der Übersicht: Aperçu des composants du produit : Oversigt over produktkomponenterne: I componenti del prodotto: Overview of all components: Een overzicht van de productcomponenten: Für den abgebildeten Handhörer erhalten Sie eine separate Anleitung, wenn Sie diesen erwerben. Når du køber det viste telefonrør, medfølger der en separat vejledning. You will receive a separate manual when you purchase the handset shown. Vous recevrez une notice d'utilisation séparée pour le combiné, si vous en faites l'acquisition. Per la cornetta raffigurata vengono fornite istruzioni d’uso separate in caso d’acquisto. Voor het afgebeelde handtoestel ontvangt u een afzonderlijke handleiding bij aanschaf van dit toestel. 9 Anschlüsse an der Elektronikbox 4 Tilslutning af elektronikboks Connections on the electronics box Connexions au boîtier électronique Attacchi della scatola elettronica Aansluitingen aan de elektronicabox 1 2 3 10 Installation of the hands-free car kit Anschlussmöglichkeiten: 1 Stromversorgung 2 Externer Lautsprecher 3 Mikrofon 4 BURY CP 1000 CarPhone Tilslutningsmuligheder: 1 Strømforsyning 2 Ekstern højttaler 3 Mikrofon 4 BURY CP 1000 CarPhone Connection options: 1 Power supply 2 External loudspeaker 3 Microphone 4 BURY CP 1000 CarPhone Branchements possibles : 1 Alimentation 2 Haut-parleurs externes 3 Microphone 4 BURY CP 1000 CarPhone Descrizione dei componenti: 1 Alimentazione di corrente 2 Altoparlante esterno 3 Microfono 4 BURY CP 1000 CarPhone Aansluitmogelijkheden: 1 Stroomvoorziening 2 Externe luidspreker 3 Microfoon 4 BURY CP 1000 CarPhone 11 Stromversorgung Die Stromversorgung des Autotelefons wird über ein 4adriges Kabel hergestellt. Schließen Sie das schwarze (Klemme 31 - Minus), das rote (Klemme 30 - Dauerplus) und das blaue Kabel (Klemme 15 - Zündungsplus) an die Stromversorgung Ihres Radios (ggf. über Zigarettenanzünder oder Sicherungskasten) an. Das gelbe Kabel dient nach Anschluss am Gegenstück zur Stummschaltung des Radios bei einem Telefongespräch. Den weißen Molexstecker verbinden Sie bitte mit Anschluss 1. Hinweis: XXSchließen Sie Ihr Gerät erst an die Stromversorgung an und schalten Sie es ein, wenn Sie in der Bedienungsanleitung dazu aufgefordert werden. Achtung: XXSchließen Sie das blaue Kabel ebenfalls an Klemme 30 (Dauerplus) an, dann wird das Autotelefon permanent mit Strom versorgt. Dies könnte bei längerem Stillstand des Fahrzeugs zur Entladung der Autobatterie führen. XXWeichen Sie von der vorgegebenen Anschlussbeschreibung ab, könnten einige Funktionen des Autotelefons (z. B. die Rufbereitschaft) nicht korrekt funktionieren. 12 Installation of the hands-free car kit Strømforsyning Biltelefonen forsynes med strøm via en 4-leder ledning. Tilslut den sorte (klemme 31 – minus), den røde (klemme 30 – konstantstrøm) og den blå ledning (klemme 15 – batterispænding) til radioens strømforsyning (evt. via cigartænderen eller sikringsboksen). Den gule ledning bruges, efter tilslutning til modstykket, til at afbryde radiolyden i forbindelse med en telefonsamtale. Det hvide molex stik forbindes med tilslutning 1. Bemærk: XXTilslut først apparatet til strømforsyningen og tænd først for det, når betjeningsvejledningen beder dig om det. Bemærk: XXTilsluttes også den blå ledning til klemme 30 (konstantstrøm) forsynes FSE’en konstant med strøm. Dette kan resultere i tømning af batteriet, hvis køretøjet står stille i længere tid. XXAfviges fra den anbefalede tilslutningsbeskrivelse, er der risiko for at nogle af FSE’ens funktioner (f.eks. opkald) ikke virker korrekt. 13 Power supply The power supply of the BURY CP 1000 CarPhone is established via a 4-core cable. Connect the black (clamp 31 – minus), the red (clamp 30 – steady plus) and the blue cable (clamp 15 – ignition plus) to the power supply of your radio (where required via the cigarette lighter or the fuse box). After connection to the counterpart, the yellow cable provides for radio muting during a phone conversation. Please connect the white Molex connector with connection 1. Attention: XXDo not connect your device to the power supply or switch it on until instructed to do so in the installation instructions. Attention: XXIf you also connect the blue cable to clamp 30 (steady positive), the BURY CP 1000 CarPhone will be permanently supplied with power. If the vehicle is not running for a longer period, this could lead to a discharge of the car battery. XXIf you deviate from the specified connection descriptions it may be the case that certain functions on the BURY CP 1000 CarPhone (e.g. the on-call duty) will not function correctly. 14 Installation of the hands-free car kit Alimentation L’alimentation électrique du téléphone de voiture est à réaliser avec un câble à 4 conducteurs (6). Reliez le câble noir (borne 31 – moins), le câble rouge (borne 30 – pôle positif permanent) et le câble bleu (borne 15 – pôle d’allumage) à l’alimentation électrique de votre radio (le cas échéant à l’allume-cigares ou à la boîte à fusibles). Le câble jaune sert, après connexion, à mettre en sourdine la radio en cas de conversation téléphonique. Veuillez raccorder la prise blanche Molex au connecteur 1. Remarque : XXCommencez par brancher votre appareil à l’alimentation puis mettez-le en marche lorsque le mode d’emploi vous y invite. Attention : XXSi vous reliez également le câble bleu à la borne 30 (pôle positif permanent), le kit mains-libres est alimenté en courant en continu, ce qui risque de vider entièrement la batterie du véhicule en cas d’immobilisation prolongée. XXSi vous ne respectez pas les instructions pour le branchement, certaines fonctions du BURY CP 1000 CarPhone (p. ex. Service d’astreinte) risquent de ne pas fonctionner correctement. 15 Alimentazione della corrente L’alimentazione della corrente dell’apparecchio telefonico ha luogo con un cavo a 4 fili (Nr. 6). Collegare quello nero (morsetto 31 negativo), quello rosso (morsetto 30 positivo continuo) ed il cavo blu (morsetto 15 positivo dell’accensione) all’alimentazione della corrente della radio (event. con l’accendisigari o la scatola die fusibili). Dopo il collegamento al pezzo opposto, il cavo giallo serve al silenziamento della radio durante un colloquio telefonico. Collegare la presa bianca Molex all’allacciamento 1 (consultare il disegno nella pagina seguente). Avvertenza: XXAllacciare l’apparecchio alla corrente elettrica e poi accenderlo come descritto nel relativo manuale d’uso. Attenzione: XXSe si collega anche il cavo blu al morsetto 30 (positivo continuo), il dispositivo vivavoce sarà alimentato permanentemente da corrente ed in caso di inattività prolungata del veicolo, ciò potrebbe causare lo scarico della batteria dell’automobile. XXIl mancato rispetto della descrizione di attacco fornita, può comportare l’errata funzionalità di alcune funzioni dell’apparecchio telefonico (es. reperibilità). 16 Installation of the hands-free car kit Stroomvoorziening De stroomvoorziening van de autotelefoon wordt tot stand gebracht via een 4-aderige kabel (Nr. 6. Sluit de zwarte (klem 31 - min), de rode (klem 30 - continuplus) en de blauwe kabel (klem 15 - ontstekingsplus) aan op de stroomvoorziening van uw radio (evt. via sigarettenaansteker of zekeringkastje). De gele kabel dient na aansluiting op het tegenstuk voor het uitzetten van het geluid van de radio bij een telefoongesprek. De witte molexstekker verbindt u met aansluiting 1 (zie tekening op volgende pagina). Aanwijzing: XXU mag het apparaat pas op de stroomvoorziening aansluiten en inschakelen als dit in de bedieningshandleiding wordt aangegeven. Let op: XXSluit u de blauwe kabel eveneens op klem 30 (continuplus) aan, dan wordt de HFS permanent van stroom voorzien. Dit zou bij langere stilstand van het voertuig kunnen leiden tot ontlading van de voertuigaccu. XXWijkt u van de vorige aansluitbeschrijving af, dan kan het zijn dat enkele functies van de HFS (bijv. Vertraagd uitschakelen) niet correct functioneren. 17 Installation der Sicherungen Durchtrennen Sie bitte mit einem Seitenschneider oder einer Schere das rote, schwarze und blaue Kabel. Legen Sie nun die beiden Enden des roten Kabels, die sich durch den Schnitt ergeben, in einen der Klemmverbinder ein. Klappen Sie diesen nun zu. Hören Sie zweimal ein Knacken, ist die Klemme korrekt eingerastet. Setzen Sie nun eine der Sicherungen ein und wiederholen Sie dann den Vorgang für die anderen Kabel. 18 Installation of the hands-free car kit Installation af sikring Skær det røde, sorte og blå kabel over med en bidetang eller en saks. Læg begge ender af det røde kabel, som er opstået ved overskæringen, i en klemmeforbindelse. Klap den sammen. Når man hører to klik er samlingen samlet korrekt. Indsæt en af sikringerne og gentag proceduren for de andre kabler. Installation instructions for the fuses Please cut through the red, the black and the blue cable by means of a wire cutter. Now insert the two endings of the red cable resulting from the cut into one of the binders, then close it. If you hear two clicking noises, the clamp snapped in properly. Now insert one of the fuses and then repeat the procedure with the other cables. Installation des fusibles Sectionnez avec une pince coupante ou avec des ciseaux le câble rouge, noir et bleu. Placer ensuite les deux extrémités du câble rouge causées par la coupe dans le connecteur à bornes. Fermez le connecteur. Après deux déclics le connecteur s’est enclenché correctement. Puis montez une des fusibles et répétez ce processus pour les autres câbles. Installazione dei fusibili Tagliare con un tronchese o un paio di forbici il cavo rosso, nero e blu. Inserire quindi le due estremità del cavo rosso risultanti dal taglio in un connettore per morsetti e chiuderlo. Se si sente due volte un rumore tipo clic, il morsetto è stato inserito correttamente. Ora inserire uno dei fusibili e ripetere la stessa procedura per gli altri cavi. Installatie van de zekeringen Knip met een zijsnijtang of een schaar de rode, zwarte en blauwe kabel door. Leg nu de beide uiteinden van de rode kabel, die ontstaan zijn na het doorknippen, in een van de klemconnectors. Klap deze nu dicht. Hoort u twee keer een klik, dan is de connector correct vastgeklikt. Plaats nu een van de zekeringen en herhaal daarna de procedure voor de andere kabels. Operating guidelines 19 Beschreibung des Hauptsystems: Mini USB Display 2,8“ SOS-Taste Menütaste rechts Endetaste Lautstärkeregelung 4-Wege-Blättern-Taste für Menüs und Listen Menütaste links Anruftaste-/Wiederwahltaste Beleuchtete und große Tastatur ermöglicht hohe Präzision und Schnelligkeit bei der Eingabe SIM -Karten Steckplatz Aktivierungstaste für die Sprachsteuerung Wichtig: XXDas Gerät funktioniert Ausgangsleistung: Power Class 4 (+ 33dBm Power Class 4 (+ 33dBm Power Class 1 (+ 30dBm Power Class 1 (+ 30dBm in folgenden Frequenzbändern GSM 850/900/1800/1900 MHz. ± ± ± ± 2dB) 2dB) 2dB) 2dB) für für für für EGSM 850 EGSM 900 GSM 1800 GSM 1900 Operating guidelines 20 Beskrivelse af hovedsystemet: Mini USB Display 2,8“ SOS-tast Menutast højre Afbrydertast Lydstyrkeregulering 4-vejs-bladringstast til menuer og lister Menutast venstre Opkaldstast-/Genvalgstast Stort oplyst tastatur giver stor præcision og hurtighed ved indtastningen Aktivieringstast til stemmestyring Vigtigt: XXEnheden opererer i GSM Udgangseffekt: Power Class 4 (+ 33dBm ± Power Class 4 (+ 33dBm ± Power Class 1 (+ 30dBm ± Power Class 1 (+ 30dBm ± 850/900/1800/1900 MHz frekvensbånd. 2dB) 2dB) 2dB) 2dB) til til til til EGSM 850 EGSM 900 GSM 1800 GSM 1900 Indstik til SIM -kort 21 Description of the main system: Mini USB Display 2,8“ Right Menu Button SOS Button Volume control Left Menu Button End Button 4 Way Navigation Key Scroll through menus and lists Start Call / Redial Button SIM Card slot Keypad – Large illuminated, well-spaced, tactile buttons ensure accuracy and speed Voice control activation button Important: XXThe device operates in GSM 850/900/1800/1900 MHz frequency bands. Output power: Power Class 4 (+33dBm ±2dB) for EGSM 850 Power Class 4 (+33dBm ±2dB) for EGSM 900 Power Class 1 (+30dBm ±2dB) for GSM 1800 Power Class 1 (+30dBm ±2dB) for GSM 1900 Operating guidelines 22 Description du système principal : Mini USB Écran 2,8 pouces Touche SOS Réglage du volume Touche Menu gauche Touche Appel / Rappel automatique Touche Menu droite Touche Fin d’appel Touche de navigation pour les menus et les listes Emplacement pour carte SIM Le grand clavier rétro-éclairé permet une saisie ultra-précise et rapide Touche d’activation de la commande vocale Important : XXL’appareil fonctionne dans des bandes de fréquences GSM 850/900/1800/1900 MHz. Puissance de sortie : Power Class 4 (+ 33dBm ± 2dB) pour EGSM 850 Power Class 4 (+ 33dBm ± 2dB) pour EGSM 900 Power Class 1 (+ 30dBm ± 2dB) pour GSM 1800 Power Class 1 (+ 30dBm ± 2dB) pour GSM 1900 23 Descrizione del sistema principale: Mini USB Display 2,8“ Tasto menu destro Tasto SOS Regolazione altoparlanti Tasto menu sinistro Tasto Fine Tasto a 4 vie per sfogliare menu e elenchi Tasto chiamata/riselezione Tastiera illuminato di grandi dimensioni per digitare con precisione e rapidità Slot per scheda SIM Tasto attivazione comando vocale Importante: XXIl dispositivo funziona in bande di frequenza GSM 850/900/1800/1900 MHz. Potenza di uscita: Power Class 4 (+ 33dBm ± 2dB) per EGSM 850 Power Class 4 (+ 33dBm ± 2dB) per EGSM 900 Power Class 1 (+ 30dBm ± 2dB) per GSM 1800 Power Class 1 (+ 30dBm ± 2dB) per GSM 1900 Operating guidelines 24 Beschrijving van het hoofdsysteem: Mini USB Display 2,8“ Menutoets rechts SOS-toets Volumeregeling Menutoets links Toets Bellen/Nummerherhaling Het verlichte en grote toetsenbord maakt een zeer exacte en snelle invoer mogelijk Activeringstoets voor de spraakbesturing Belangrijk: XXHet apparaat werkt in frequenties van GSM 850/900/1800/1900 MHz. Uitgangsvermogen: Power Class 4 (+ 33dBm ± 2dB) voor EGSM 850 Power Class 4 (+ 33dBm ± 2dB) voor EGSM 900 Power Class 1 (+ 30dBm ± 2dB) voor GSM 1800 Power Class 1 (+ 30dBm ± 2dB) voor GSM 1900 Toets Beëindigen 4-weg scrolltoets voor menu’s en lijsten Steekplaats voor SIM-kaart Further Information 25 Eine ausführliche Bedienungsanleitung für die BURY CP 1000 CarPhone finden Sie auf unserer Webseite unter der Adresse: www.bury.com. Wir wünschen Ihnen eine gute Fahrt. Du finder en udførlig brugsanvisning til BURY CP 1000 CarPhone på vores webseite på adressen: www.bury.com. BURY ønsker dig god køretur. A detailed instructions manual for the BURY CP 1000 CarPhone is available on our website under the following address: www.bury.com. Have a good trip! Une notice d’utilisation détaillée pour BURY CP 1000 CarPhone est disponible sur notre site Internet à l’adresse : www.bury.com. Nous vous souhaitons un bon voyage ! Le istruzioni per l’uso complete per il BURY CP 1000 CarPhone sono contenute nel nostro sito internet, all’indirizzo: www.bury.com. Vi auguriamo buon viaggio. Een uitvoerige handleiding voor de BURY CP 1000 CarPhone vindt u op onze website: www.bury.com. Wij wensen u een goede reis. 26 Further Information Service In case of general or technical queries, suggestions and comments, please do not hesitate to contact our team at any time. Suggestions and feedback are always welcomed: Administration: Producer: BURY GmbH & Co. KG BURY Spółka z o.o. Robert-Koch-Straße 1-7 ul. Wojska Polskiego 4 D-32584 Löhne 39-300 Mielec GERMANY POLAND Hotline: +49(0)180 6 - 842 468* E-mail: [email protected] * 0.20 €/call from the Deutsche Telecom AG fixed line network, max. 0.60 € per call from mobile phone networks. The costs of international telephone calls which are made from abroad can vary. Warranty / Service desk: The duration of the warranty for the components of this product totals two years subsequent to the date of sale to the end customer. Any warranty claims you may have as an end customer are to be asserted towards your contractual partner. If the corresponding contractual partner is not able to rectify a corresponding fault, please exercise your rights of purchase. If subsequent to agreement with your contractual partner the product is to be sent directly to the manufacturer, then please send it, along with a detailed description of the fault in the German or English language and a copy of the proof of purchase, directly to our service team: BURY GmbH & Co. KG Im Hause DPD Depot 103 Robinienweg D-03222 Lübbenau GERMANY 27 Information on the disposal of electrical goods in the EU The crossed out wheelie bin symbol means that electrical and electronic products, batteries and accumulators must be disposed of separately in the European Union. Please do not dispose of any such products in your normal household waste. As the owner of a product of this sort you are legally obliged to dispose of it at your local dumping site or recycling centre, where you are able to leave your waste electrical goods free of charge. Approvals and declaration of conformity At BURY, purchase, production, as well as distribution and service, follow environmentally friendly processes according to the ISO 14001 Standard and Quality Management Requirements, according to the ISO/TS 16949 Standard. The device has Hereby, BURY declares that this device BURY CP 1000 CarPhone is in compliance with the essential requirements and other relevant provisions of Directive RED 2014/53/EU. This product meets the requirements of the European directive 2011/65/EU on the restriction of certain hazardous substances in electrical and electronic equipment. You can request a conformity declaration from the manufacturer of this product by writing to the following email address: [email protected]. It is also available on our web site www.bury.com in the downloadable files section of a given product. Version 06/2017 60.0815.0-03-220617 Subject to change. Errors and omissions excepted. All use of these brands by BURY Technologies takes place within the scope of the corresponding licence. All of the other stated brands are owned by their corresponding owner. All rights reserved.-
 1
1
-
 2
2
-
 3
3
-
 4
4
-
 5
5
-
 6
6
-
 7
7
-
 8
8
-
 9
9
-
 10
10
-
 11
11
-
 12
12
-
 13
13
-
 14
14
-
 15
15
-
 16
16
-
 17
17
-
 18
18
-
 19
19
-
 20
20
-
 21
21
-
 22
22
-
 23
23
-
 24
24
-
 25
25
-
 26
26
-
 27
27


in andere talen
Gerelateerde papieren
-
BURY CP 1000 CarPhone de handleiding
-
BURY S8/S9 POWERMOUNT Adapter de handleiding
-
BURY CC 9068 de handleiding
-
-
-
-
-
-
-
BURY CC 9048 de handleiding