Pagina wordt geladen...
Pagina wordt geladen...

3
DO8141
www.domo-elektro.be
NL
GARANTIE
Geachte klant,
Al onze producten ondergaan steeds een strenge kwaliteitscontrole,
alvorens ze aan je worden aangeboden. Mocht je desondanks toch nog
problemen hebben met jouw toestel, dan betreuren wij dit ten zeerste.
In dat geval verzoeken wij je contact op te nemen met onze klantendienst.
Onze medewerkers zullen je met plezier verder helpen.
+32 14 21 71 91 [email protected]
Maandag – Donderdag : 8.30u – 12.00u en van 13.00u – 17.00u
Vrijdag : 8.30u – 12.00u en van 13.00u – 16.30u
Dit apparaat heeft een garantietermijn van 2 jaar vanaf de datum van aankoop. Gedurende
de garantieperiode zal de distributeur volledige verantwoording op zich nemen voor
gebreken die aanwijsbaar berusten op materiaal- of constructiefouten. Wanneer dergelijke
gebreken voorkomen, zal het apparaat, indien nodig, vervangen of gerepareerd worden. De
garantieperiode van 2 jaar zal op dit moment niet terug beginnen, maar loopt verder tot 2
jaar na de aankoop van het toestel. De garantie wordt verleend op basis van het kassaticket.
Indien je apparaat defect is binnen de garantietermijn van 2 jaar, dan mag je het toestel
samen met het originele kassaticket binnenbrengen in de winkel waar je het toestel hebt
aangekocht.
De garantie op accessoires en onderdelen die onderhevig zijn aan slijtage, bedraagt 6
maanden.
De garantie en verantwoordelijkheid/aansprakelijkheid van de leverancier en fabrikant
vervallen automatisch in de volgende gevallen:
· Bij het niet naleven van de instructies in deze handleiding.
· Bij verkeerde aansluiting, vb. te hoge elektrische spanning.
· Bij verkeerd, hardhandig of abnormaal gebruik.
· Bij onvoldoende of verkeerd onderhoud.
· Bij herstelling of wijziging van het toestel door de consument of niet gemachtigde derden.
· Bij gebruik van onderdelen of accessoires welke niet worden aanbevolen of geleverd door
de leverancier / fabrikant.

4
DO8141
NL
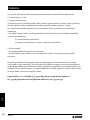
VEILIGHEIDSVOORSCHRIFTEN
Wanneer je elektrische toestellen gebruikt, moeten volgende veiligheidsinstructies in acht
genomen worden:
· Lees deze instructies zorgvuldig door. Bewaar deze handleiding om later te raadplegen.
· Dit toestel mag gebruikt worden door kinderen vanaf 16 jaar en ouder, en door personen
met een fysieke of sensoriële beperking of mensen met een beperkte mentale capaciteit
of gebrek aan ervaring of kennis, op voorwaarde dat deze personen toezicht krijgen of
instructies hebben gekregen over het gebruik van het toestel op een veilige manier en dat
ze ook de gevaren kennen bij het gebruik van het toestel.
· Kinderen mogen niet met het toestel spelen.
· Onderhoud en reiniging van het toestel mogen niet gebeuren door kinderen, tenzij ze
ouder zijn dan 16 jaar en toezicht krijgen. Hou het toestel en het snoer buiten het bereik
van kinderen jonger dan 16 jaar.
Dit toestel is geschikt om te gebruiken in de huishoudelijke omgeving en in gelijkaardige
omgevingen zoals:
· Keukenhoek voor personeel van winkels, kantoren en andere gelijkaardige professionele
omgevingen
· Boerderijen
· Hotel- en motelkamers en andere omgevingen met een residentieel karakter
· Gastenkamers, of gelijkaardige
· Opgelet: het toestel mag niet gebruikt worden met een externe timer of een aparte
afstandsbediening.
· Lees alle instructies voor gebruik.
· Kijk voor gebruik na of het voltage vermeld op het toestel overeenkomt met het voltage
van het elektriciteitsnet bij je thuis.
· Laat het snoer niet op een heet oppervlak of over de rand van een tafel of aanrecht
hangen.
· Gebruik het toestel nooit wanneer het snoer of de stekker beschadigd is, na een slechte
werking van het toestel of wanneer het toestel beschadigd is. Breng het toestel dan naar
het dichtsbijzijnde gekwaliceerde service center voor nazicht en reparatie.
· Streng toezicht is noodzakelijk wanneer het toestel door of in de buurt van kinderen
gebruikt wordt.
· Het gebruik van accessoires die niet aanbevolen of verkocht worden door de fabrikant, kan
brand, elektrische schokken of verwondingen veroorzaken.
· Trek de stekker uit het stopcontact wanneer het toestel niet in gebruik is, vooraleer
onderdelen te monteren of demonteren en vooraleer het toestel te reinigen. Zet eerst alle
knoppen in de ‘uit’-stand en trek de stekker bij de stekker zelf uit het stopcontact. Trek
nooit aan het snoer om de stekker uit het stopcontact te trekken.

5
DO8141
www.domo-elektro.be
NL
· Laat een werkend toestel niet zonder toezicht achter.
· Zet dit toestel nooit op of in de buurt van een gasvuur of elektrisch vuur of op een plaats
waar het in contact zou kunnen komen met een warm toestel.
· Gebruik het toestel niet buiten.
· Gebruik het toestel enkel voor het doel waarvoor het bestemd is.
· Gebruik het toestel altijd op een stevig, droog, een oppervlak.
· Gebruik het toestel alleen voor huishoudelijk gebruik. De fabrikant is niet verantwoordelijk
voor ongelukken die een gevolg zijn van verkeerd gebruik van het toestel, of het niet
naleven van de regels zoals ze vermeld zijn in deze handleiding.
· Alle herstellingen, buiten het gewone onderhoud van het toestel, moeten uitgevoerd
worden door de fabrikant of zijn dienst na verkoop.
· Dompel het toestel, het elektrisch snoer of de stekker nooit onder in water of een andere
vloeistof.
· Zorg ervoor dat kinderen het elektrisch snoer of het toestel niet kunnen aanraken.
· Hou het snoer uit de buurt van scherpe randen en hete onderdelen of andere
warmtebronnen.
· Verwijder voor het eerste gebruik alle verpakkingsmaterialen en eventuele promotionele
stickers.
· Gebruik deze ventilator niet op natte of vochtige plaatsen. Plaats het toestel niet dicht bij
een badkuip of ander waterreservoir.
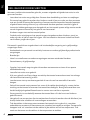
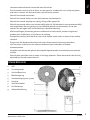
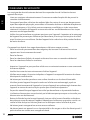
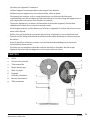
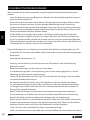
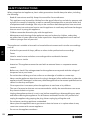
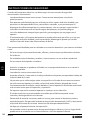
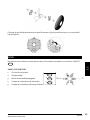
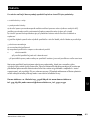
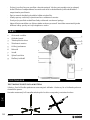
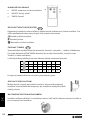
ONDERDELEN
1. Grill
2. Controlepaneel
3. Uitschuiare buis
4. Blokkeringsring
5. Voetbevestiging met 4 poten
6. Handvat
7. Ventilatorbladen
8. Oscillatieknop
9. Afstandsbediening
1
2
3
4
5
6
7
8
9

6
DO8141
NL
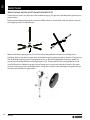
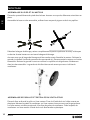
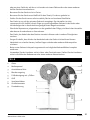
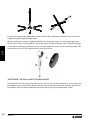
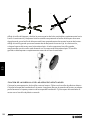
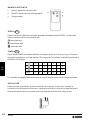
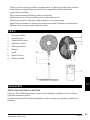
MONTAGE
BEVESTIGING VAN DE VOET EN MOTORGEDEELTE
Plaats de vier poten van de voet in de voetbevestiging. Zorg ervoor dat de poten goed op hun
plaats zitten.
Bevestig de voetbevestiging aan de uitschuiare buis en maak deze vast aan de buis met de
sluitingsring en de vlinderschroef.
4
2
3
2
OWNER’S MANUAL
Stand Fan
Model: FS40-16J
READ AND SAVE THESE INSTRUCTIONS
Version 1.0 2016
Attention: Pictures in the IM are for reference only.
INSTALLATION INSTRUCTIONS
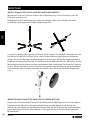
Name of components
Motor
Motor shaft
Install by
aligning
Rear grill
Lock nut of grill
Lock nut of blade
Blade
Screw the lock nut of grill clockwise,
and in the meantime, fix the rear grill.
Lock nut of blade
anticlockwise,
and then install the
front fan cover.
Pull the blade to rotate after installing,
so as to ensure that the blade can be
normally rotated.
Front grill
Instructions for operation of body
INSTRUCTIONS FOR USE
①①
Body key
0
1
2
3
Buckle
Screw
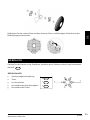
1. Align Screw Holes on the outer ring
of both the Front and Rear Guards,
with the Positioning Clip aligned as
illustrated.
2. Press down all the Buckles to fasten the
Front Guard with the Rear Guard. At the
Screw Holes, tighten the separated screw
and nut.
Front and Rear Guard Installation
Support Installation
Align the Column Pipe with
holes on the support and
tighten screws.
Considerate Hint:
Remove ①②parts from the
component before performing
installation.
Turn counterclockwise and loosen for
performing height adjustment.
Height Adjustment
Height Adjustment Key
Tilt Adjustment
Manual
Swing Pull-knob
Push-down to swing
Pull-up for static
Horizontal Swing
1
Read Rules for Safe Operation and Instructions Carefully.
CAUTION
1. If the supply cord is damaged, it must be replaced by manufacturer
or its service agent or a similarly qualified person in order to avoid
a hazard.
2. Indoor use only.
3. To protect against the risk of electrical shock, do not immerse the
unit, cord or plug in water or other liquid.
4. This appliance can be used by children aged from 8 years and
above and persons with reduced physical, sensory or mental
capabilities or lack of experience and knowledge if they have
been given supervision or instruction concerning use of the
appliance in a safe way and understand the hazards involved.
Children shall not play with the appliance. Cleaning and user
maintenance shall not be made by children without supervision.
Young children should be supervised to ensure that they do not
play with the appliance.
5. When the appliance is not in use and before cleaning, unplug the
appliance from the outlet.
6. When the fan was assembled, the rotor blade guard shall not be
taken off anymore
7. Correct Disposal of this product
This marking indicates that this product should not be
disposed with other household wastes throughout the EU. To
prevent possible harm to the environment or human health from
uncontrolled waste disposal, recycle it responsibly to promote the
sustainable reuse of material resources. To return your used
device, please use the return and collection systems or contact
the retailer where the product was purchased. They can take this
product for environmental safe recycling.
WARNING
1. Never insert fingers, pencils, or any other object through the grille when fan is
running.
2. Disconnect fan when moving from one location to another.
3. Be sure fan is on a stable surface when operating to avoid overturning.
4. DO NOT use fan in window, rain may create electrical hazard.
5. Household use only.
RULES FOR SAFE OPERATION
5
The fan requires little maintenance. Do not try to fix it by yourself. Refer it to
qualified service personnel if service is needed.
1. Before cleaning and assembling, fan must be unplugged.
2. To ensure adequate air circulation to the motor, keep vents at the rear of the
motor free of dust. Do not disassemble the fan to remove dust.
3. Please wipe the exterior parts with a soft cloth soaking a mild detergent.
4. Do not use any abrasive detergent or solvents to avoid scratching the surface.
Do not use any of the following as a cleaner: gasoline, thinner.
5. Do not allow water or any other liquid into the motor housing or interior parts.
MAINTENANCE INSTRUCTION
CLEANING
1. Be sure to unplug from the electrical supply source before cleaning.
2. Plastic parts should be cleaned with a soft cloth moisten with mild soap.
Thoroughly remove soap film with dry cloth.
DISPOSALDo not dispose of electrical appliances as unsorted
municipal waste, use separate collection facilities. Contact you
local government for information regarding the collection systems
available. If electrical appliances are disposed of in landfills or
dumps, hazardous substances can leak into the groundwater and get into the food
chain, damaging your health and well-being.
GD Midea Environment Appliances MFG. Co.Ltd.
No.28,Dong Fu Road,HeSui East Industrial Area,Dong Feng Town,
ZhongShan,GuangDong,China.
4
2
3
2
OWNER’S MANUAL
Stand Fan
Model: FS40-16J
READ AND SAVE THESE INSTRUCTIONS
Version 1.0 2016
Attention: Pictures in the IM are for reference only.
INSTALLATION INSTRUCTIONS
Name of components
Motor
Motor shaft
Install by
aligning
Rear grill
Lock nut of grill
Lock nut of blade
Blade
Screw the lock nut of grill clockwise,
and in the meantime, fix the rear grill.
Lock nut of blade
anticlockwise,
and then install the
front fan cover.
Pull the blade to rotate after installing,
so as to ensure that the blade can be
normally rotated.
Front grill
Instructions for operation of body
INSTRUCTIONS FOR USE
①①
Body key
0
1
2
3
Buckle
Screw
1. Align Screw Holes on the outer ring
of both the Front and Rear Guards,
with the Positioning Clip aligned as
illustrated.
2. Press down all the Buckles to fasten the
Front Guard with the Rear Guard. At the
Screw Holes, tighten the separated screw
and nut.
Front and Rear Guard Installation
Support Installation
Align the Column Pipe with
holes on the support and
tighten screws.
Considerate Hint:
Remove ①②parts from the
component before performing
installation.
Turn counterclockwise and loosen for
performing height adjustment.
Height Adjustment
Height Adjustment Key
Tilt Adjustment
Manual
Swing Pull-knob
Push-down to swing
Pull-up for static
Horizontal Swing
1
Read Rules for Safe Operation and Instructions Carefully.
CAUTION
1. If the supply cord is damaged, it must be replaced by manufacturer
or its service agent or a similarly qualified person in order to avoid
a hazard.
2. Indoor use only.
3. To protect against the risk of electrical shock, do not immerse the
unit, cord or plug in water or other liquid.
4. This appliance can be used by children aged from 8 years and
above and persons with reduced physical, sensory or mental
capabilities or lack of experience and knowledge if they have
been given supervision or instruction concerning use of the
appliance in a safe way and understand the hazards involved.
Children shall not play with the appliance. Cleaning and user
maintenance shall not be made by children without supervision.
Young children should be supervised to ensure that they do not
play with the appliance.
5. When the appliance is not in use and before cleaning, unplug the
appliance from the outlet.
6. When the fan was assembled, the rotor blade guard shall not be
taken off anymore
7. Correct Disposal of this product
This marking indicates that this product should not be
disposed with other household wastes throughout the EU. To
prevent possible harm to the environment or human health from
uncontrolled waste disposal, recycle it responsibly to promote the
sustainable reuse of material resources. To return your used
device, please use the return and collection systems or contact
the retailer where the product was purchased. They can take this
product for environmental safe recycling.
WARNING
1. Never insert fingers, pencils, or any other object through the grille when fan is
running.
2. Disconnect fan when moving from one location to another.
3. Be sure fan is on a stable surface when operating to avoid overturning.
4. DO NOT use fan in window, rain may create electrical hazard.
5. Household use only.
RULES FOR SAFE OPERATION
5
The fan requires little maintenance. Do not try to fix it by yourself. Refer it to
qualified service personnel if service is needed.
1. Before cleaning and assembling, fan must be unplugged.
2. To ensure adequate air circulation to the motor, keep vents at the rear of the
motor free of dust. Do not disassemble the fan to remove dust.
3. Please wipe the exterior parts with a soft cloth soaking a mild detergent.
4. Do not use any abrasive detergent or solvents to avoid scratching the surface.
Do not use any of the following as a cleaner: gasoline, thinner.
5. Do not allow water or any other liquid into the motor housing or interior parts.
MAINTENANCE INSTRUCTION
CLEANING
1. Be sure to unplug from the electrical supply source before cleaning.
2. Plastic parts should be cleaned with a soft cloth moisten with mild soap.
Thoroughly remove soap film with dry cloth.
DISPOSALDo not dispose of electrical appliances as unsorted
municipal waste, use separate collection facilities. Contact you
local government for information regarding the collection systems
available. If electrical appliances are disposed of in landfills or
dumps, hazardous substances can leak into the groundwater and get into the food
chain, damaging your health and well-being.
GD Midea Environment Appliances MFG. Co.Ltd.
No.28,Dong Fu Road,HeSui East Industrial Area,Dong Feng Town,
ZhongShan,GuangDong,China.
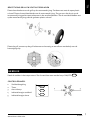
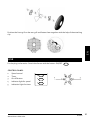
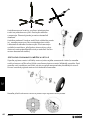
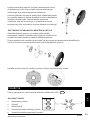
Maak de blokkeringsring los en schuif het bovenste gedeelte van de buis volledig uit en
blokkeer de buis op deze hoogte door de blokkeringsring opnieuw aan te draaien. Zorg ervoor
dat de blokkeringsring goed is aangedraaid voor je het motorgedeelte monteert. Maak de
grote schroef achteraan het controlepaneel los (a). Plaats daarna het motorgedeelte op de
uitschuiare buis. Maak de grote schroef terug vast, zorg ervoor dat de schroef in lijn staat
met de uitsparing in de uitschuiare buis. De grote schroef moet volledige vast gedraaid zijn
alvorens de ventilator te gebruiken.
a

7
DO8141
www.domo-elektro.be
NL
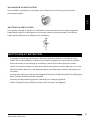
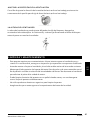
BEVESTIGING GRILL EN VENTILATORBLADEN
Plaats de achterkant van de grill op de motoraandrijving. Zet deze vast met de open plastic
schroef. Plaats de ventilatorbladen om de motoraandrijving. Zorg ervoor dat de pin op de
motoraandrijving perfect past achteraan in de ventilatorbladen. Zet de ventilatorbladen vast
op de motoraandrijving met de gesloten plastic schroef.
Plaats de grill vooraan op de grill achteraan en bevestig ze aan elkaar met behulp van de
bevestigingsclip.
GEBRUIK
Steek de stekker in het stopcontact. Zet de ventilator aan met de knop: ON/OFF
1
54
2
3
2
OWNER’S MANUAL
Stand Fan
Model: FS40-16JR
READ AND SAVE THESE INSTRUCTIONS
6
Version 1.0 2016
Attention: Pictures in the IM are for reference only.
INSTALLATION INSTRUCTIONS
Name of components
Motor
Motor shaft
Rear grill
Lock nut of grill
Lock nut of blade
Blade
Screw the lock nut of grill clockwise,
and in the meantime, fix the rear grill.
Lock nut of blade
anticlockwise,
and then install the
front fan cover.
Pull the blade to rotate after installing,
so as to ensure that the blade can be
normally rotated.
Front grill
Instructions for operation of body
INSTRUCTIONS FOR USE
The fan requires little maintenance. Do not try to fix it by yourself. Refer it to
qualified service personnel if service is needed.
1. Before cleaning and assembling, fan must be unplugged.
2. To ensure adequate air circulation to the motor, keep vents at the rear of the
motor free of dust. Do not disassemble the fan to remove dust.
3. Please wipe the exterior parts with a soft cloth soaking a mild detergent.
4. Do not use any abrasive detergent or solvents to avoid scratching the surface.
Do not use any of the following as a cleaner: gasoline, thinner.
5. Do not allow water or any other liquid into the motor housing or interior parts.
MAINTENANCE INSTRUCTION
CLEANING
①
Tighten
knob
①
Body key
Buckle
Screw
1. Align Screw Holes on the outer ring
of both the Front and Rear Guards,
with the Positioning Clip aligned as
illustrated.
2. Press down all the Buckles to fasten the
Front Guard with the Rear Guard. At the
Screw Holes, tighten the separated screw
and nut.
Front and Rear Guard Installation
Turn counterclockwise and loosen for
performing height adjustment.
Height Adjustment
Height Adjustment Key
Tilt Adjustment
Manual
Swing Pull-knob
Push-down to swing
Pull-up for static
Horizontal Swing
Speed display Timer display
4h
2h
1h
SPEED
TIMER
ON/OFF
Install by
aligning
Instructions for key of remote controller
Instructions for display of body
INSTRUCTIONS FOR USE
Considerate Hint:
Effective Range of Remote Control: within 5 m distance and
30-degree deflection in front of Product.
Battery
“ON/OFF” key
“TIMER”key
“SPEED” key
Pole
Supporting
Considerate Hint:
Remove ①②parts from the
component before performing
installation.
Screw
②
Support Installation
Align the Column Pipe
connection plate with
holes on the support and
tighten screws.
Read Rules for Safe Operation and Instructions Carefully.
CAUTION
1. If the supply cord is damaged, it must be replaced by manufacturer
or its service agent or a similarly qualified person in order to avoid
a hazard.
2. Indoor use only.
3. To protect against the risk of electrical shock, do not immerse the
unit, cord or plug in water or other liquid.
4. This appliance can be used by children aged from 8 years and
above and persons with reduced physical, sensory or mental
capabilities or lack of experience and knowledge if they have been
given supervision or instruction concerning use of the appliance in
a safe way and understand the hazards involved. Children shall not
play with the appliance. Cleaning and user maintenance shall not be
made by children without supervision.
5. When the appliance is not in use and before cleaning, unplug the
appliance from the outlet.
6. When the fan was assembled, the rotor blade guard shall not be
taken off anymore
7. Correct Disposal of this product
This marking indicates that this product should not be
disposed with other household wastes throughout the EU. To
prevent possible harm to the environment or human health from
uncontrolled waste disposal, recycle it responsibly to promote the
sustainable reuse of material resources. To return your used
device, please use the return and collection systems or contact
the retailer where the product was purchased. They can take this
product for environmental safe recycling.
WARNING
1. Never insert fingers, pencils, or any other object through the grille when fan is
running.
2. Disconnect fan when moving from one location to another.
3. Be sure fan is on a stable surface when operating to avoid overturning.
4. DO NOT use fan in window, rain may create electrical hazard.
5. Household use only.
RULES FOR SAFE OPERATION
1. Be sure to unplug from the electrical supply source before cleaning.
2. Plastic parts should be cleaned with a soft cloth moisten with mild soap.
Thoroughly remove soap film with dry cloth.
DISPOSALDo not dispose of electrical appliances as unsorted
municipal waste, use separate collection facilities. Contact your
local government for information regarding the collection systems
available. If electrical appliances are disposed of in landfills or dumps, hazardous
substances can leak into the groundwater and get into the food chain, damaging
your health and well-being.
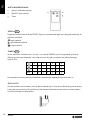
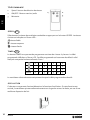
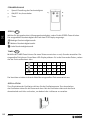
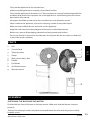
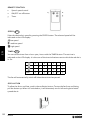
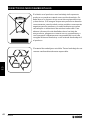
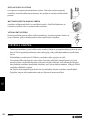
CONTROLEPANEEL
1. Snelheidsregeling
2. Timer
3. Aan-uitknop
4. Indicatielampjes snelheid
5. Indicatielampjes timer
1
54
2
3
2
OWNER’S MANUAL
Stand Fan
Model: FS40-16JR
READ AND SAVE THESE INSTRUCTIONS
6
Version 1.0 2016
Attention: Pictures in the IM are for reference only.
INSTALLATION INSTRUCTIONS
Name of components
Motor
Motor shaft
Rear grill
Lock nut of grill
Lock nut of blade
Blade
Screw the lock nut of grill clockwise,
and in the meantime, fix the rear grill.
Lock nut of blade
anticlockwise,
and then install the
front fan cover.
Pull the blade to rotate after installing,
so as to ensure that the blade can be
normally rotated.
Front grill
Instructions for operation of body
INSTRUCTIONS FOR USE
The fan requires little maintenance. Do not try to fix it by yourself. Refer it to
qualified service personnel if service is needed.
1. Before cleaning and assembling, fan must be unplugged.
2. To ensure adequate air circulation to the motor, keep vents at the rear of the
motor free of dust. Do not disassemble the fan to remove dust.
3. Please wipe the exterior parts with a soft cloth soaking a mild detergent.
4. Do not use any abrasive detergent or solvents to avoid scratching the surface.
Do not use any of the following as a cleaner: gasoline, thinner.
5. Do not allow water or any other liquid into the motor housing or interior parts.
MAINTENANCE INSTRUCTION
CLEANING
①
Tighten
knob
①
Body key
Buckle
Screw
1. Align Screw Holes on the outer ring
of both the Front and Rear Guards,
with the Positioning Clip aligned as
illustrated.
2. Press down all the Buckles to fasten the
Front Guard with the Rear Guard. At the
Screw Holes, tighten the separated screw
and nut.
Front and Rear Guard Installation
Turn counterclockwise and loosen for
performing height adjustment.
Height Adjustment
Height Adjustment Key
Tilt Adjustment
Manual
Swing Pull-knob
Push-down to swing
Pull-up for static
Horizontal Swing
Speed display Timer display
4h
2h
1h
SPEED
TIMER
ON/OFF
Install by
aligning
Instructions for key of remote controller
Instructions for display of body
INSTRUCTIONS FOR USE
Considerate Hint:
Effective Range of Remote Control: within 5 m distance and
30-degree deflection in front of Product.
Battery
“ON/OFF” key
“TIMER”key
“SPEED” key
Pole
Supporting
Considerate Hint:
Remove ①②parts from the
component before performing
installation.
Screw
②
Support Installation
Align the Column Pipe
connection plate with
holes on the support and
tighten screws.
Read Rules for Safe Operation and Instructions Carefully.
CAUTION
1. If the supply cord is damaged, it must be replaced by manufacturer
or its service agent or a similarly qualified person in order to avoid
a hazard.
2. Indoor use only.
3. To protect against the risk of electrical shock, do not immerse the
unit, cord or plug in water or other liquid.
4. This appliance can be used by children aged from 8 years and
above and persons with reduced physical, sensory or mental
capabilities or lack of experience and knowledge if they have been
given supervision or instruction concerning use of the appliance in
a safe way and understand the hazards involved. Children shall not
play with the appliance. Cleaning and user maintenance shall not be
made by children without supervision.
5. When the appliance is not in use and before cleaning, unplug the
appliance from the outlet.
6. When the fan was assembled, the rotor blade guard shall not be
taken off anymore
7. Correct Disposal of this product
This marking indicates that this product should not be
disposed with other household wastes throughout the EU. To
prevent possible harm to the environment or human health from
uncontrolled waste disposal, recycle it responsibly to promote the
sustainable reuse of material resources. To return your used
device, please use the return and collection systems or contact
the retailer where the product was purchased. They can take this
product for environmental safe recycling.
WARNING
1. Never insert fingers, pencils, or any other object through the grille when fan is
running.
2. Disconnect fan when moving from one location to another.
3. Be sure fan is on a stable surface when operating to avoid overturning.
4. DO NOT use fan in window, rain may create electrical hazard.
5. Household use only.
RULES FOR SAFE OPERATION
1. Be sure to unplug from the electrical supply source before cleaning.
2. Plastic parts should be cleaned with a soft cloth moisten with mild soap.
Thoroughly remove soap film with dry cloth.
DISPOSALDo not dispose of electrical appliances as unsorted
municipal waste, use separate collection facilities. Contact your
local government for information regarding the collection systems
available. If electrical appliances are disposed of in landfills or dumps, hazardous
substances can leak into the groundwater and get into the food chain, damaging
your health and well-being.
1
2
3
5
4
Pagina wordt geladen...

9
DO8141
www.domo-elektro.be
NL
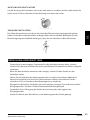
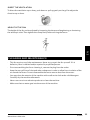
VENTILATIERICHTING
Om de ventilatierichting naar boven of onder aan te passen druk of trek zacht aan de grill om
zo de richting naar boven of onder aan te passen.
HOOGTE INSTELLEN
De hoogte van de ventilator kan je aanpassen door de blokkeringsring los te draaien en zo de
uitschuiare buis langer of korter te maken. Maak daarna de blokkeringsring opnieuw stevig
vast alvorens de ventilator in werking te stellen.
REINIGING EN ONDERHOUD
· Dit toestel heeft weinig onderhoud nodig. Probeer nooit om de ventilator zelf te herstellen,
maar laat hem bij een defect nakijken en/of repareren door een gekwaliceerd persoon.
· Alvorens de ventilator te monteren of te reinigen moet de stekker uit het stopcontact zijn
verwijderd.
· Hou de achterkant van het motorgedeelte vrij van stof en andere materialen om een vrije
circulatie van lucht rond de motor mogelijk te maken. Demonteer de ventilator niet om
stof uit het motorgedeelte te verwijderen.
· Je kan de buitenkant van het toestel schoonmaken met een zachte vochtige doek en een
milde detergent. Droog het toestel daarna zorgvuldig af.
· Gebruik geen schurende of agressieve middelen om het toestel te reinigen.
· Zorg er voor dat er geen water in het motorgedeelte van het toestel terechtkomt.

10
DO8141
NL
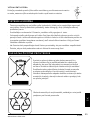
MILIEURICHTLIJNEN
Dit symbool op het product of op de verpakking wijst erop dat
dit product niet als huishoudafval mag worden behandeld.
Het moet naar een plaats worden gebracht waar elektrische
en elektronische apparatuur wordt gerecycleerd. Als je ervoor
zorgt dat dit product op de correcte manier wordt verwijderd,
voorkom je mogelijk voor mens en milieu negatieve gevolgen
die zich zouden kunnen voordoen in geval van verkeerde
afvalbehandeling. Voor meer details in verband met het
recycleren van dit product, neem je best contact op met de
gemeentelijke instanties, het bedrijf of de dienst belast met
de verwijdering van huishoudafval of de winkel waar je het
product hebt gekocht.
Het verpakkingsmateriaal is recycleerbaar. Behandel de
verpakking milieubewust.
Pagina wordt geladen...
Pagina wordt geladen...
Pagina wordt geladen...
Pagina wordt geladen...
Pagina wordt geladen...
Pagina wordt geladen...
Pagina wordt geladen...
Pagina wordt geladen...
Pagina wordt geladen...
Pagina wordt geladen...
Pagina wordt geladen...
Pagina wordt geladen...
Pagina wordt geladen...
Pagina wordt geladen...
Pagina wordt geladen...
Pagina wordt geladen...
Pagina wordt geladen...
Pagina wordt geladen...
Pagina wordt geladen...
Pagina wordt geladen...
Pagina wordt geladen...
Pagina wordt geladen...
Pagina wordt geladen...
Pagina wordt geladen...
Pagina wordt geladen...
Pagina wordt geladen...
Pagina wordt geladen...
Pagina wordt geladen...
Pagina wordt geladen...
Pagina wordt geladen...
Pagina wordt geladen...
Pagina wordt geladen...
Pagina wordt geladen...
Pagina wordt geladen...
Pagina wordt geladen...
Pagina wordt geladen...
Pagina wordt geladen...
Pagina wordt geladen...
Pagina wordt geladen...
Pagina wordt geladen...
Pagina wordt geladen...
Pagina wordt geladen...
Pagina wordt geladen...
Pagina wordt geladen...
Pagina wordt geladen...

LINEA 2000 bvba - Dompel 9 - 2200 Herentals - Belgium - Tel: +32 14 21 71 91 - Fax: +32 14 21 54 63
BESTEL
de originele
Domo-accessoires
en -onderdelen
online via:
of scan hier:
COMMANDEZ
d’authentiques
accessoires et
pièces Domo en
ligne sur:
ou scannez ici:
BESTELLEN SIE
die Domo
Original-Zubehör
und -Ersatzteile
online über:
oder hier scannen:
ORDER
the original
Domo
accessories and
parts online at:
or scan here:
webshop.domo-elektro.be
Webshop
Documenttranscriptie
NL GARANTIE Geachte klant, Al onze producten ondergaan steeds een strenge kwaliteitscontrole, alvorens ze aan je worden aangeboden. Mocht je desondanks toch nog problemen hebben met jouw toestel, dan betreuren wij dit ten zeerste. In dat geval verzoeken wij je contact op te nemen met onze klantendienst. Onze medewerkers zullen je met plezier verder helpen. +32 14 21 71 91 [email protected] Maandag – Donderdag : 8.30u – 12.00u en van 13.00u – 17.00u Vrijdag : 8.30u – 12.00u en van 13.00u – 16.30u Dit apparaat heeft een garantietermijn van 2 jaar vanaf de datum van aankoop. Gedurende de garantieperiode zal de distributeur volledige verantwoording op zich nemen voor gebreken die aanwijsbaar berusten op materiaal- of constructiefouten. Wanneer dergelijke gebreken voorkomen, zal het apparaat, indien nodig, vervangen of gerepareerd worden. De garantieperiode van 2 jaar zal op dit moment niet terug beginnen, maar loopt verder tot 2 jaar na de aankoop van het toestel. De garantie wordt verleend op basis van het kassaticket. Indien je apparaat defect is binnen de garantietermijn van 2 jaar, dan mag je het toestel samen met het originele kassaticket binnenbrengen in de winkel waar je het toestel hebt aangekocht. De garantie op accessoires en onderdelen die onderhevig zijn aan slijtage, bedraagt 6 maanden. De garantie en verantwoordelijkheid/aansprakelijkheid van de leverancier en fabrikant vervallen automatisch in de volgende gevallen: ·· Bij het niet naleven van de instructies in deze handleiding. ·· Bij verkeerde aansluiting, vb. te hoge elektrische spanning. ·· Bij verkeerd, hardhandig of abnormaal gebruik. ·· Bij onvoldoende of verkeerd onderhoud. ·· Bij herstelling of wijziging van het toestel door de consument of niet gemachtigde derden. ·· Bij gebruik van onderdelen of accessoires welke niet worden aanbevolen of geleverd door de leverancier / fabrikant. www.domo-elektro.be DO8141 3 NL VEILIGHEIDSVOORSCHRIFTEN Wanneer je elektrische toestellen gebruikt, moeten volgende veiligheidsinstructies in acht genomen worden: ·· Lees deze instructies zorgvuldig door. Bewaar deze handleiding om later te raadplegen. ·· Dit toestel mag gebruikt worden door kinderen vanaf 16 jaar en ouder, en door personen met een fysieke of sensoriële beperking of mensen met een beperkte mentale capaciteit of gebrek aan ervaring of kennis, op voorwaarde dat deze personen toezicht krijgen of instructies hebben gekregen over het gebruik van het toestel op een veilige manier en dat ze ook de gevaren kennen bij het gebruik van het toestel. ·· Kinderen mogen niet met het toestel spelen. ·· Onderhoud en reiniging van het toestel mogen niet gebeuren door kinderen, tenzij ze ouder zijn dan 16 jaar en toezicht krijgen. Hou het toestel en het snoer buiten het bereik van kinderen jonger dan 16 jaar. Dit toestel is geschikt om te gebruiken in de huishoudelijke omgeving en in gelijkaardige omgevingen zoals: ·· Keukenhoek voor personeel van winkels, kantoren en andere gelijkaardige professionele omgevingen ·· Boerderijen ·· Hotel- en motelkamers en andere omgevingen met een residentieel karakter ·· Gastenkamers, of gelijkaardige ·· Opgelet: het toestel mag niet gebruikt worden met een externe timer of een aparte afstandsbediening. ·· Lees alle instructies voor gebruik. ·· Kijk voor gebruik na of het voltage vermeld op het toestel overeenkomt met het voltage van het elektriciteitsnet bij je thuis. ·· Laat het snoer niet op een heet oppervlak of over de rand van een tafel of aanrecht hangen. ·· Gebruik het toestel nooit wanneer het snoer of de stekker beschadigd is, na een slechte werking van het toestel of wanneer het toestel beschadigd is. Breng het toestel dan naar het dichtsbijzijnde gekwalificeerde service center voor nazicht en reparatie. ·· Streng toezicht is noodzakelijk wanneer het toestel door of in de buurt van kinderen gebruikt wordt. ·· Het gebruik van accessoires die niet aanbevolen of verkocht worden door de fabrikant, kan brand, elektrische schokken of verwondingen veroorzaken. ·· Trek de stekker uit het stopcontact wanneer het toestel niet in gebruik is, vooraleer onderdelen te monteren of demonteren en vooraleer het toestel te reinigen. Zet eerst alle knoppen in de ‘uit’-stand en trek de stekker bij de stekker zelf uit het stopcontact. Trek nooit aan het snoer om de stekker uit het stopcontact te trekken. 4 DO8141 NL ·· Laat een werkend toestel niet zonder toezicht achter. ·· Zet dit toestel nooit op of in de buurt van een gasvuur of elektrisch vuur of op een plaats waar het in contact zou kunnen komen met een warm toestel. ·· Gebruik het toestel niet buiten. ·· Gebruik het toestel enkel voor het doel waarvoor het bestemd is. ·· Gebruik het toestel altijd op een stevig, droog, effen oppervlak. ·· Gebruik het toestel alleen voor huishoudelijk gebruik. De fabrikant is niet verantwoordelijk voor ongelukken die een gevolg zijn van verkeerd gebruik van het toestel, of het niet naleven van de regels zoals ze vermeld zijn in deze handleiding. ·· Alle herstellingen, buiten het gewone onderhoud van het toestel, moeten uitgevoerd worden door de fabrikant of zijn dienst na verkoop. ·· Dompel het toestel, het elektrisch snoer of de stekker nooit onder in water of een andere vloeistof. ·· Zorg ervoor dat kinderen het elektrisch snoer of het toestel niet kunnen aanraken. ·· Hou het snoer uit de buurt van scherpe randen en hete onderdelen of andere warmtebronnen. ·· Verwijder voor het eerste gebruik alle verpakkingsmaterialen en eventuele promotionele stickers. ·· Gebruik deze ventilator niet op natte of vochtige plaatsen. Plaats het toestel niet dicht bij een badkuip of ander waterreservoir. ONDERDELEN 1. Grill 2. Controlepaneel 3. Uitschuifbare buis 4. Blokkeringsring 5. Voetbevestiging met 4 poten 6. Handvat 7. Ventilatorbladen 8. Oscillatieknop 9. Afstandsbediening 6 1 7 8 2 3 4 9 5 www.domo-elektro.be DO8141 5 Name of components turer void 1. Align Screw Holes on the outer ring of both the Front and Rear Guards, with the Positioning Clip aligned as illustrated. 2. Press down all the Buckles to f Front Guard with the Rear Guard Screw Holes, tighten the separa and nut. NL ectrical shock, do not immerse the her liquid. Motor shaft the MONTAGE children aged from 8 years and BEVESTIGING VAN VOET EN MOTORGEDEELTE d physical, sensory orDEmental Motor Motor Plaats de vier poten van dehave voet in de voetbevestiging. Zorg ervoor dat de poten goed op hun e and knowledge if they plaats zitten. Support Installation uction concerning use of the n. Bevestig de voetbevestiging aan de uitschuifbare buis en maak deze vast aan de buis met de derstand the hazards involved. ot sluitingsring en de vlinderschroef. Support Installation appliance. Cleaning and user the by children without supervision. Rear grill Align the Column Pipe with be holes on the support and rvised to ensure that they do not tighten screws. Install by aligning Align the Column Pipe with holes on the support and tighten screws. ① e and before cleaning, unplug the m the Considerate Hint: Remove ①②parts from the component before performing installation. he rotor blade guard shall not be t his ① Lock nut of blade Blade Lock nut of blade anticlockwise, and then install the front fan cover. Pull the blade to rotate after installing, so as to ensure that the blade can be normally rotated. roduct at this product should not be Lock nut of grill wastes throughout the EU. To Maak de los en schuif van de buis volledig uit en3 nvironment orblokkeringsring human health fromhet bovenste gedeelte 2 Considerate Hint: blokkeer de buis op deze hoogte door de blokkeringsring opnieuw aan te draaien. Zorg ervoor Remove ①②parts from the cycle it dat responsibly to promote the component before performing de blokkeringsring goed is aangedraaid voor je het motorgedeelte monteert. Maak de installation. sources. To return yourhetused grote schroef achteraan controlepaneel los (a). Plaats daarna het motorgedeelte op de nd collection systems ordecontact uitschuifbare buis. Maak grote schroef terug vast, zorg ervoor dat de schroef in lijn staat met de uitsparing in de uitschuifbare buis. De grote schroef moet volledige vast gedraaid zijn was purchased. They can take this alvorens de ventilator te gebruiken. recycling. Screw the lock nut of grill clockwise, and in the meantime, fix the rear grill. er object through the grille when fan is ocation to another. operating to avoid overturning. eate electrical hazard. 1 a 2 6 DO8141 NL BEVESTIGING GRILL EN VENTILATORBLADEN Plaats de achterkant van de grill op de motoraandrijving. Zet deze vast met de open plastic schroef. Plaats de ventilatorbladen om de motoraandrijving. Zorg ervoor dat de pin op de motoraandrijving perfect past achteraan in de ventilatorbladen. Zet de ventilatorbladen vast op de motoraandrijving met de gesloten plastic schroef. INSTRUCTIONS FOR USE INSTRUCTIONS FOR USE uard Installation Plaats de grill vooraan Instructions op de grillfor achteraan encontroller bevestig ze aan elkaar met behulp van de for operation of body key of remote Instructions bevestigingsclip. Press down all the Buckles to fasten the ront Guard with the Rear Guard. At the crew Holes, tighten the separated screw nd nut. Screw “SPEED” key “ON/OFF” key “TIMER”key Buckle ONS FOR USE ns for key of remote controller nut of blade ockwise, hen install the fan cover. Body key Battery Instructions for operation of body SPEED Front grill GEBRUIK ” key nut of blade MAINTENANCE INSTRUCTIONS FOR USE Horizontal Swing Pull-up for static “ON/OFF” key TIMER Push-down to swing Considerate Hint: Steek de stekker in het stopcontact. Zet de ventilator met deand knop: ON/OFF Effective Range of Remote Control: withinaan 5 m distance “TIMER”key The fan requires little qualified service pers 1. Before cleaning an 2. To ensure adequa motor free of dust 3. Please wipe the e 4. Do not use any ab Do not use any of 5. Do not allow wate ON/OFF Swing Pull-knob 30-degree deflection in front of Product. CLEANING CONTROLEPANEEL Instructions for display of body 1. 2. e after installing, Timer he blade can be Aan-uitknop 3. Body key Battery Snelheidsregeling Speed display 4. Indicatielampjes snelheid 5. Indicatielampjes timer ate Hint: Range of Remote Control: within 5 m distance and ee deflection in front of Product. 3 Tilt Adjustment DISPOSAL:Do not municipal waste, use local government for available. If electrical substances can leak your health and well- Manual 1 SPEED 2 TIMER 4h 2h 1. Be sure to unplug 2. Plastic parts shoul Thoroughly remov 5 4Timer display 1h 3 ON/OFF 4 5 Height Adjustment Turn counterclockwise and loosen for performing height adjustment. ns for display of body Height Adjustment Key 4h 2h lay Timer display 1h www.domo-elektro.be 4 5 DO8141 7 NL VENTILATIERICHTING Om de ventilatierichting naar boven of onder aan te passen druk of trek zacht aan de grill om zo de richting naar boven of onder aan te passen. HOOGTE INSTELLEN De hoogte van de ventilator kan je aanpassen door de blokkeringsring los te draaien en zo de uitschuifbare buis langer of korter te maken. Maak daarna de blokkeringsring opnieuw stevig vast alvorens de ventilator in werking te stellen. REINIGING EN ONDERHOUD ·· Dit toestel heeft weinig onderhoud nodig. Probeer nooit om de ventilator zelf te herstellen, maar laat hem bij een defect nakijken en/of repareren door een gekwalificeerd persoon. ·· Alvorens de ventilator te monteren of te reinigen moet de stekker uit het stopcontact zijn verwijderd. ·· Hou de achterkant van het motorgedeelte vrij van stof en andere materialen om een vrije circulatie van lucht rond de motor mogelijk te maken. Demonteer de ventilator niet om stof uit het motorgedeelte te verwijderen. ·· Je kan de buitenkant van het toestel schoonmaken met een zachte vochtige doek en een milde detergent. Droog het toestel daarna zorgvuldig af. ·· Gebruik geen schurende of agressieve middelen om het toestel te reinigen. ·· Zorg er voor dat er geen water in het motorgedeelte van het toestel terechtkomt. www.domo-elektro.be DO8141 9 NL MILIEURICHTLIJNEN Dit symbool op het product of op de verpakking wijst erop dat dit product niet als huishoudafval mag worden behandeld. Het moet naar een plaats worden gebracht waar elektrische en elektronische apparatuur wordt gerecycleerd. Als je ervoor zorgt dat dit product op de correcte manier wordt verwijderd, voorkom je mogelijk voor mens en milieu negatieve gevolgen die zich zouden kunnen voordoen in geval van verkeerde afvalbehandeling. Voor meer details in verband met het recycleren van dit product, neem je best contact op met de gemeentelijke instanties, het bedrijf of de dienst belast met de verwijdering van huishoudafval of de winkel waar je het product hebt gekocht. Het verpakkingsmateriaal is recycleerbaar. Behandel de verpakking milieubewust. 10 DO8141 Webshop BESTEL de originele Domo-accessoires en -onderdelen online via: COMMANDEZ d’authentiques accessoires et pièces Domo en ligne sur: BESTELLEN SIE die Domo Original-Zubehör und -Ersatzteile online über: ORDER the original Domo accessories and parts online at: webshop.domo-elektro.be of scan hier: ou scannez ici: oder hier scannen: or scan here: LINEA 2000 bvba - Dompel 9 - 2200 Herentals - Belgium - Tel: +32 14 21 71 91 - Fax: +32 14 21 54 63-
 1
1
-
 2
2
-
 3
3
-
 4
4
-
 5
5
-
 6
6
-
 7
7
-
 8
8
-
 9
9
-
 10
10
-
 11
11
-
 12
12
-
 13
13
-
 14
14
-
 15
15
-
 16
16
-
 17
17
-
 18
18
-
 19
19
-
 20
20
-
 21
21
-
 22
22
-
 23
23
-
 24
24
-
 25
25
-
 26
26
-
 27
27
-
 28
28
-
 29
29
-
 30
30
-
 31
31
-
 32
32
-
 33
33
-
 34
34
-
 35
35
-
 36
36
-
 37
37
-
 38
38
-
 39
39
-
 40
40
-
 41
41
-
 42
42
-
 43
43
-
 44
44
-
 45
45
-
 46
46
-
 47
47
-
 48
48
-
 49
49
-
 50
50
-
 51
51
-
 52
52
-
 53
53
-
 54
54
-
 55
55
-
 56
56


in andere talen
- English: Domo DO8141 Owner's manual
- français: Domo DO8141 Le manuel du propriétaire
- slovenčina: Domo DO8141 Návod na obsluhu
- čeština: Domo DO8141 Návod k obsluze
Gerelateerde papieren
-
Domo DO8141 Handleiding
-
-
Domo DO8126 de handleiding
-
-
-
-
Domo DO8140 de handleiding
-
Domo Zirkulationsventilator 360° Umlauf de handleiding
-
Domo DO157A de handleiding
-

