
Testboy® TV 280
Version 1.1


Sicherheitshinweise
Testboy® TV 280 3
DEUTSCH
Inhaltsverzeichnis
Sicherheitshinweise 4
Allgemeine Sicherheitshinweise 4
Einleitung 7
Bedienung 8
Eigenschaften 8
Aufbau der Kamera 8
Laden des Akkus 8
Grundlegende Funktionen 9
Aufnahme 9
Anzeige und Verwaltung der gespeicherten Bilder 9
Einstellungen 10
Auflösung 10
Sprache 10
Helligkeit 10
Drehen 10
Zeiteinstellung 11
Format 11
System zurücksetzen 11
Space 11
Technische Daten 12

Sicherheitshinweise
Testboy® TV 280 4
Sicherheitshinweise
WARNUNG
Gefahrenquellen sind z.B. mechanische Teile, durch die es zu schweren
Verletzungen von Personen kommen kann.
Auch die Gefährdung von Gegenständen (z.B. die Beschädigung des Gerätes)
besteht.
WARNUNG
Stromschlag kann zum Tod oder zu schweren Verletzungen von Personen führen
sowie eine Gefährdung für die Funktion von Gegenständen (z.B. die Beschädigung
des Gerätes) sein.
WARNUNG
Richten Sie den Laserstrahl nie direkt oder indirekt durch reflektierende Oberflächen
auf das Auge. Laserstrahlung kann irreparable Schäden am Auge hervorrufen. Bei
Messungen in der Nähe von Menschen, muss der Laserstrahl deaktiviert werden.
Allgemeine Sicherheitshinweise
WARNUNG
Aus Sicherheits- und Zulassungsgründen (CE) ist das eigenmächtige Umbauen
und/oder Verändern des Gerätes nicht gestattet. Um einen sicheren Betrieb mit dem
Gerät zu gewährleisten, müssen Sie die Sicherheitshinweise, Warnvermerke und
das Kapitel "Bestimmungsgemäße Verwendung" unbedingt beachten.
WARNUNG
Beachten Sie vor dem Gebrauch des Gerätes bitte folgende Hinweise:
| Vermeiden Sie einen Betrieb des Gerätes in der Nähe von elektrischen
Schweißgeräten, Induktionsheizern und anderen elektromagnetischen Feldern.
| Nach abrupten Temperaturwechseln muss das Gerät vor dem Gebrauch zur
Stabilisierung ca. 30 Minuten an die neue Umgebungstemperatur angepasst
werden um den IR-Sensor zu stabilisieren.
| Setzen Sie das Gerät nicht längere Zeit hohen Temperaturen aus.
| Vermeiden Sie staubige und feuchte Umgebungsbedingungen.
| Messgeräte und Zubehör sind kein Spielzeug und gehören nicht in Kinderhände!
| In gewerblichen Einrichtungen sind die Unfallverhütungsvorschriften des
Verbandes der gewerblichen Berufsgenossenschaften für elektrische Anlagen
und Betriebsmittel zu beachten.

Sicherheitshinweise
Testboy® TV 280 5
DEUTSCH
Bitte beachten Sie die fünf Sicherheitsregeln:
Freischalten
Gegen Wiedereinschalten sichern
Spannungsfreiheit feststellen (Spannungsfreiheit ist 2-polig festzustellen)
Erden und kurzschließen
Benachbarte unter Spannung stehende Teile abdecken
Bestimmungsgemäße Verwendung
Das Gerät ist nur für die in der Bedienungsanleitung beschriebenen Anwendungen bestimmt.
Eine andere Verwendung ist unzulässig und kann zu Unfällen oder Zerstörung des Gerätes
führen. Diese Anwendungen führen zu einem sofortigen Erlöschen jeglicher Garantie- und
Gewährleistungsansprüche des Bedieners gegenüber dem Hersteller.
Um das Gerät vor Beschädigung zu schützen, entfernen Sie bitte bei längerem
Nichtgebrauch des Gerätes die Batterien.
Bei Sach- oder Personenschäden, die durch unsachgemäße Handhabung oder
Nichtbeachtung der Sicherheitshinweise verursacht werden, übernehmen wir keine
Haftung. In solchen Fällen erlischt jeder Garantieanspruch. Ein in einem Dreieck
befindliches Ausrufezeichen weist auf Sicherheitshinweise in der
Bedienungsanleitung hin. Lesen Sie vor Inbetriebnahme die Anleitung komplett
durch. Dieses Gerät ist CE-geprüft und erfüllt somit die erforderlichen Richtlinien.
Rechte vorbehalten, die Spezifikationen ohne vorherige Ankündigung zu ändern
© 2021 Testboy GmbH, Deutschland.
Haftungsausschluss
Bei Schäden, die durch Nichtbeachten der Anleitung verursacht werden, erlischt der
Garantieanspruch! Für Folgeschäden, die daraus resultieren, übernehmen wir keine
Haftung!
Testboy haftet nicht für Schäden, die aus
dem Nichtbeachten der Anleitung,
von Testboy nicht freigegebenen Änderungen am Produkt oder
von Testboy nicht hergestellten oder nicht freigegebenen Ersatzteilen
Alkohol-, Drogen- oder Medikamenteneinfluss hervorgerufen werden
resultieren.

Sicherheitshinweise
Testboy® TV 280 6
Richtigkeit der Bedienungsanleitung
Diese Bedienungsanleitung wurde mit großer Sorgfalt erstellt. Für die Richtigkeit und
Vollständigkeit der Daten, Abbildungen und Zeichnungen wird keine Gewähr übernommen.
Änderungen, Druckfehler und Irrtümer vorbehalten.
Entsorgung
Sehr geehrter Testboy-Kunde, mit dem Erwerb unseres Produktes haben Sie die Möglichkeit, das
Gerät nach Ende seines Lebenszyklus an geeignete Sammelstellen für Elektroschrott
zurückzugeben.
Die WEEE regelt die Rücknahme und das Recycling von Elektroaltgeräten.
Hersteller von Elektrogeräten sind dazu verpflichtet, Elektrogeräte, die verkauft
werden, kostenfrei zurückzunehmen und zu recyceln. Elektrogeräte dürfen
dann nicht mehr in die „normalen“ Abfallströme eingebracht werden.
Elektrogeräte sind separat zu recyceln und zu entsorgen. Alle Geräte, die unter
diese Richtlinie fallen, sind mit diesem Logo gekennzeichnet.
Entsorgung von gebrauchten Batterien
Sie als Endverbraucher sind gesetzlich (Batteriegesetz) zur Rückgabe aller
gebrauchten Batterien und Akkus verpflichtet; eine Entsorgung über den
Hausmüll ist untersagt!
Schadstoffhaltige Batterien/Akkus sind mit nebenstehenden Symbolen
gekennzeichnet, die auf das Verbot der Entsorgung über den Hausmüll hinweisen.
Die Bezeichnungen für das ausschlaggebende Schwermetall sind:
Cd = Cadmium, Hg = Quecksilber, Pb = Blei.
Ihre verbrauchten Batterien/Akkus können Sie unentgeltlich bei den
Sammelstellen Ihrer Gemeinde oder überall dort abgeben, wo Batterien/Akkus
verkauft werden!
Qualitätszertifikat
Alle innerhalb der Testboy GmbH durchgeführten, qualitätsrelevanten Tätigkeiten und Prozesse
werden permanent durch ein Qualitätsmanagementsystem überwacht. Die Testboy GmbH
bestätigt weiterhin, dass die während der Kalibrierung verwendeten Prüfeinrichtungen und
Instrumente einer permanenten Prüfmittelüberwachung unterliegen.
Konformitätserklärung
Das Produkt erfüllt die aktuellsten Richtlinien. Nähere Informationen erhalten Sie auf
www.testboy.de

Einleitung
Testboy® TV 280 7
DEUTSCH
Einleitung
Bei dem Produkt handelt es sich um eine Endoskop-Kamera, welche die Möglichkeit bietet,
schwer zugängliche Areale klar und deutlich zu sehen.
Die Endoskop-Kamera kann anhand des Kabels souverän in Engstellen manövriert werden,
welche anderenfalls nicht im Detail betrachtet werden können. So können beispielsweise
Kabelschächte, Zylinderwände von Motoren, Trockenbauwände, abgehängte Rigips Decken und
Vieles mehr untersucht werden. Das Gerät kann nicht nur ein Live-Bild übermitteln, sondern auch
Fotos und Videos der zu sehenden Gegebenheiten erstellen. Die Anzeige kann dabei in jede
Richtung gedreht und/oder gespiegelt werden, um das Manövrieren zu erleichtern. Das Gerät
wird mit einer Auswahl an Greifwerkzeugen ausgeliefert, mit welchen man z. B. Kleinteile
erreichen/ zurückerlangen kann. An dem Kamerakopf befindet sich ein Leuchtmittel, mit welchem
das Ausleuchten der Engstelle problemlos gelingt. Außerdem ist die Kamera mit einer integrierten
Taschenlampe ausgestattet, sodass auch die Umgebung des Verwenders ausgeleuchtet werden
kann.
Die gespeicherten Aufnahmen können später über den Computer oder auch auf dem Gerät
selbst betrachtet werden. Ein Herunterladen der Daten ist selbstverständlich auch Teil des
Funktionsspektrums. Da die Daten auf einer Mikro SD-Karte gespeichert werden, stehen mehrere
Wege des Herunterladens und der externen Speicherung bereit. Das Gerät verfügt über einen
integrierten Akku, welcher über die Mikro-USB Schnittstelle mit jedem konventionellen USB-
Ladegerät oder USB-Port geladen werden kann.
Um Schäden am Kamera-Kabel vorzubeugen, ist dieses vom Gerät abschraubbar und kann
separat verstaut werden.

Bedienung
Testboy® TV 280 8
Bedienung
Eigenschaften
- Farb-LCD-Display
- einstellbare Beleuchtung
- Video- und Foto-Aufnahme
- Dreh- und spiegelbare Darstellung
- integrierte Taschenlampe
- Greifwerkzeuge
Aufbau der Kamera
1 Taschenlampe ein/aus
2 Taschenlampe
3 Anschluss für Kamera
4 Auf Taste
5 Ab Taste
6 Menü Taste
7 Zurück Taste
8 OK Taste
9 Aufnahme Taste
10 Licht ein/aus
11 ein/aus Taste
12 USB Anschluss
13 Mikro USB Anschluss
14 Mikro SD-Karten Slot
15 Akkufach
16 Kameraanschluss männlich
(Geräteseite)
17 Kameraanschluss weiblich
(Kameraseite)
Laden des Akkus
Das Gerät beinhaltet einen integrierten Lithium-Ion-Akku. Bei geringem Akkuladestand, wird links
oben am Displayrand ein leeres Batterie Symbol angezeigt. Wenn dieser Zustand erreicht ist,
sollte das Gerät geladen werden. Geladen wird das Gerät über den Mikro-USB Port. Wenn das
Gerät vollständig geladen wurde, sollte das Ladekabel abgezogen werden.
Um die bestmögliche Leistung des Akkus erwirken zu können, sollte das Gerät nicht länger als 24
Stunden an ein Ladegerät angeschlossen sein. Die längste Akku-Lebensdauer kann

Bedienung
Testboy® TV 280 9
DEUTSCH
gewährleistet werden, wenn das Gerät mindestens alle 3 Monate für 2 Stunden geladen wird. Der
Akku sollte nicht in extrem kalten Umgebungen geladen werden.
Grundlegende Funktionen
Drücken Sie zum Ein- bzw. Ausschalten des Gerätes die Ein/Aus Taste (11) und halten Sie sie 3
Sekunden lang gedrückt.
Nachdem das Gerät eingeschaltet wurde, drücken Sie die Menü Taste (6), um die Anzeige zur
Einstellung der grundlegenden Funktionen aufzurufen. Es erscheinen die Auswahlmöglichkeiten
„Foto“, „Video“, „Auflösung“, „Sprache“, „Helligkeit“, „Drehen“, „Zeiteinstellung“, „Format“, „System
zurücksetzen“, „Space“ und „Version“. Mit „Zurück“ (7) kehren Sie wieder in den normalen
Messbetrieb zurück.
Drücken Sie nach Betätigung der Menü-Taste im Grundfunktionsmodus die Taste „OK“ (8), um
Einstellungen an grundlegenden Funktionen vorzunehmen. Mit den Pfeil-Tasten (4 und 5) wählen
Sie den gewünschten Wert der jeweiligen Einstellung aus.
Nachdem Sie die gewünschten Einstellungen vorgenommen haben können diese mit erneutem
Druck der Taste „OK“ (8) übernommen werden. Drücken Sie die Taste „Zurück“, um den
Einstellmodus wieder zu verlassen.
Mit der Taschenlampen Taste (1) kann die Taschenlampe am Gerät ein- und ausgeschaltet
werden. Die Taste „Licht ein/aus“ (10) kann die Beleuchtung rings um die Kameralinse dreistufig
ein- und wieder ausgeschalten.
Aufnahme
Um ein Foto aufzunehmen, drücken Sie die Aufnahme Taste (9) einmalig kurz. Wird die Taste
länger gedrückt gehalten, nimmt das Gerät ein Video auf, bis die Taste erneut betätigt wird. Eine
Aufnahme kann nur erfolgen, wenn eine Mikro SD-Karte in dem Gerät eingesetzt ist.
Anzeige und Verwaltung der gespeicherten Bilder
In dem Menüpunkt „Foto“ finden Sie alle bisher aufgenommenen Fotos wieder und können sie
verwalten. Drücken Sie die „Menü“ Taste (6) um in das Hauptmenü zu gelangen. Wählen Sie nun
den ersten Menüpunkt „Foto“ an und drücken Sie anschließend die OK Taste (8). Nun wird das
zuletzt aufgenommene Bild angezeigt. Mit den Pfeiltasten „auf“ und „ab“ (4 und 5) können Sie
nun durch die Aufnahmen blättern. Mit der Taste „Menü“ (6) erhalten Sie nun weitere Optionen
und Informationen. Sie haben nun die Möglichkeit die zuletzt angezeigte Aufnahme oder alle
Aufnahmen zu löschen.
Ebenfalls erhalten Sie Informationen über den Namen, sowie die Größe der Datei aber auch
deren Auflösung. Um eine oder alle Dateien zu löschen wählen Sie den gewünschten Menüpunkt
mithilfe der Pfeiltasten „auf“ und „ab“ (4 und 5) an und bestätigen Sie Ihre Auswahl mit der Taste
„OK“ (8). Die Frage „Diese Datei löschen?“ erscheint. Hier wählen Sie „OK“ und bestätigen erneut

Bedienung
Testboy® TV 280 10
mit der Taste „OK“ (8), um die Datei(en) zu löschen. Um die Foto-Ansicht zu verlassen, drücken
Sie die Taste „zurück“ (7).
In dem Menüpunkt „Video“ finden Sie alle bisher aufgenommenen Videos wieder und können sie
verwalten. Drücken Sie die „Menü“ Taste (6) um in das Hauptmenü zu gelangen. Wählen Sie nun
den zweiten Menüpunkt „Video“ an und drücken Sie anschließend die OK Taste (8). Nun wird das
zuletzt aufgenommene Video angezeigt. Mit den Pfeiltasten „auf“ und „ab“ (4 und 5) können Sie
nun durch die Aufnahmen blättern. Mit der Taste „OK“ (8) wird das Video wiedergegeben. Mit der
Taste „Menü“ (6) erhalten Sie nun weitere Optionen und Informationen. Sie haben nun die
Möglichkeit die zuletzt angezeigte Aufnahme oder alle Aufnahmen zu löschen.
Ebenfalls erhalten Sie Informationen über den Namen, sowie die Größe der Datei aber auch deren
Auflösung. Um eine oder alle Dateien zu löschen wählen Sie den gewünschten Menüpunkt mithilfe
der Pfeiltasten „auf“ und „ab“ (4 und 5) an und bestätigen Sie Ihre Auswahl mit der Taste „OK“ (8).
Die Frage „Diese Datei löschen?“ erscheint. Hier wählen Sie „OK“ und bestätigen erneut mit der
Taste „OK“ (8), um die Datei(en) zu löschen. Um die Video-Ansicht zu verlassen, drücken Sie die
Taste „zurück“ (7).
Einstellungen
Auflösung
Im Menü kann die Option 3 „Auflösung“ mit der OK Taste (8) angewählt werden und eine der
gewünschten Auflösungen eingestellt werden. Hierzu wählen Sie die gewünschte Option mit den
Tasten „auf“ und „ab“ (4 und 5) an und bestätigen diese mit der Taste „OK“ (8). Es stehen die
Auflösungen 640x480, 1280x720 und 192x1080 zur Verfügung.
Sprache
Im Menü kann die Option 4 „Sprache“ mit der OK Taste (8) angewählt werden und eine der
gewünschten Sprachen eingestellt werden. Hierzu wählen Sie die gewünschte Option mit den
Tasten „auf“ und „ab“ (4 und 5) an und bestätigen diese mit der Taste „OK“ (8).
Helligkeit
Im Menü kann die Option 5 „Helligkeit“ mit der OK Taste (8) angewählt werden und eine der
gewünschten Bildschirmhelligkeiten eingestellt werden. Hierzu wählen Sie die gewünschte Option
mit den Tasten „auf“ und „ab“ (4 und 5) an und bestätigen diese mit der Taste „OK“ (8).
Drehen
Im Menü kann die Option 6 „Drehen“ mit der OK Taste (8) angewählt werden und eine der
gewünschten Darstellungen eingestellt werden. Es erscheint ein rotes „F“ mittig am unteren
Bildschirmrand. Wählen Sie die gewünschte Option mit den Tasten „auf“ und „ab“ (4 und 5).
Das rote „F“ wird nun entsprechend gedreht oder gespiegelt. Ist das Bild nach Ihrem Wunsch
gespiegelt/gedreht, bestätigen Sie die Einstellung mit der Taste „OK“ (8).

Bedienung
Testboy® TV 280 11
DEUTSCH
Zeiteinstellung
Im Menü kann die Option 7 „Zeiteinstellung“ mit der OK Taste (8) angewählt und anschließen
Datum und Uhrzeit eingestellt werden. Sie starten im ersten Feld um das Jahr einzustellen. Dazu
wählen Sie mit den Tasten „auf“ und „ab“ (4 und 5) die Zahl aus. Mit der OK Taste springen Sie
zum nächsten Feld „Monat“, gefolgt von dem Feld „Tag“. In der zweiten Zeile starten Sie nun mit
den Stunden, gefolgt von Minuten und Sekunden.
Wurde das letzte Feld entsprechen ausgefüllt, drücken Sie erneut die Taste „OK“ (8) und das
Gerät springt über in die Auswahlmöglichkeiten „OK“ und „Stornieren“. Um die Einstellungen zu
übernehmen drücken Sie die OK Taste (8) erneut, wenn Sie den Vorgang abbrechen wollen,
wechseln Sie mit den Tasten „auf“ und „ab“ (4 und 5) zur Option „stornieren“ und bestätigen diese
mit der OK Taste (8).
Format
Im Menü kann die Option 9 „Format“ mit der OK Taste (8) angewählt und das Speichermedium
formatiert werden.
ACHTUNG! Hierbei werden alle bisherigen Aufnahmen und alle weiteren Daten auf
dem Speichermedium gelöscht!
Wählen Sie mit den Tasten „auf“ und „ab“ (4 und 5) die Option „OK“ und bestätigen Sie die
Auswahl mit der Taste „OK“ (8) um die Formatierung abzuschließen.
System zurücksetzen
Im Menü kann die Option 10 „System zurücksetzen“ mit der OK Taste (8) angewählt und das
Speichermedium formatiert werden.
ACHTUNG! Hierbei werden alle bisherigen Einstellungen des Gerätes zurückgesetzt!
Wählen Sie mit den Tasten „auf“ und „ab“ (4 und 5) die Option „OK“ und bestätigen Sie die
Auswahl mit der Taste „OK“ (8) um die Formatierung abzuschließen.
Space
Der Menüpunkt 11 „Space“ zeigt an, wie viel Speicher auf dem vorhandenen Medium verfügbar
ist. Beispiel: „14,8 | 16G“ bedeutet es sind 14,8 von 16 möglichen GB frei.

Technische Daten
Testboy® TV 280 12
Technische Daten
Display
4,3"-Farb-LCD-Display
Bildauflösung
1920x1080 Pixel
Horizontales Sichtfeld
70°
Brennweite
4 cm – 500 cm
Fokus
fest eingestellt
Dateiformat
.jpg
Bildspeicherung
Mikro SD-Karte
Anzeige
gespeicherter Inhalte
Bilder/Videos die auf dem Bildschirm angezeigt
werden können
Stromversorgung
Integrierter Akku
IP Klasse
IP67
Linsendurchmesser
8 mm
Größe
175×100×30 mm

Table of contents
Testboy® TV 280 13
ENGLISH
Table of contents
Safety information 14
General safety information 14
Introduction 17
Operation 18
Features 18
Camera design 18
Charging the battery 18
Basic functions 19
Taking a photo/video 19
Display and management of the saved images 19
Settings 20
Resolution 20
Language 20
Brightness 20
Rotate 20
Time Setting 21
Format 21
Reset System 21
Space 21
Technical data 22

Safety information
Testboy® TV 280 14
Safety information
WARNING
Sources of danger include, for example, mechanical parts that can cause serious
injuries.
Objects are also at risk (e.g. damage to the instrument).
WARNING
An electric shock can result in death or serious injury and jeopardise the function of
objects (e.g. damage to the instrument).
WARNING
Never point the laser beam at eyes, either directly or indirectly via a reflective
surface. Laser radiation can cause irreparable damage to eyes. The laser beam
must be deactivated when conducting measurements close to people.
General safety information
WARNING
Unauthorised modification and/or changes to the instrument are not permitted for
reasons of safety and approval (CE). In order to ensure safe and reliable operation
of the instrument, you must always comply with the safety information, warnings and
the information contained in the section "Intended use".
WARNING
Observe the following information before using the instrument:
| Avoid operating the instrument near to electric welding equipment, induction
heaters or other electromagnetic fields.
| The instrument must be allowed to adjust to the new ambient temperature for
approx. 30 minutes before use after abrupt temperature fluctuations, in order to
stabilise the IR sensor.
| Do not expose the instrument to high temperatures for a long period of time.
| Avoid dusty and humid environments.
| Measuring instruments and their accessories are not toys, and must be kept out
of the reach of children!
| When working in industrial facilities, comply at all times with the accident
prevention regulations for electrical systems and equipment as established by
the employers’ liability insurance association.

Safety information
Testboy® TV 280 15
ENGLISH
Please observe the five safety rules:
Disconnect
Secure against reactivation
Ensure isolation from the power supply (check that there is no voltage on both poles)
Earth and short-circuit
Cover adjacent live parts
Intended use
The instrument is only intended for use in the applications described in the operating instructions.
Any other usage is forbidden and can result in accidents or destruction of the instrument. Any
such usage will immediately void all guarantee and warranty claims on the part of the operator
against the manufacturer.
Remove the batteries if the instrument is not in use for a long period of time; this will
protect the instrument against damage.
We shall not accept any liability for damage to property or injury to persons resulting
from improper handling or non-compliance with the safety information. Any warranty
claim will be voided in such cases. An exclamation mark in a triangle indicates safety
information in the operating instructions. Read all instructions through before
commissioning. This instrument is CE-approved and thus fulfils the required
directives.
We reserve the right to change specifications without prior notice
© 2021 Testboy GmbH, Germany.
Disclaimer
The warranty claim is voided in cases of damage caused by failure to observe the
instructions! We shall not accept any liability for the resulting damage!
Testboy is not responsible for damage resulting from
Failure to observe the operating instructions
Changes to the product that have not been approved by Testboy
The use of spare parts that have not been manufactured or approved by Testboy
The consumption of alcohol, narcotics and medicine

Safety information
Testboy® TV 280 16
Correctness of the operating instructions
These operating instructions have been compiled with considerable care and attention.
No guarantee is given that the data, figures and drawings are complete or correct. Subject to
changes, printing mistakes and errors.
Disposal
Dear Testboy customer, in purchasing our product, you have the option of returning the
instrument to suitable collection points for waste electrical equipment at the end of its lifespan.
The WEEE directive regulates the return and recycling of electrical appliances.
Manufacturers of electrical appliances are obliged to take back and recycle all
electrical appliances free of charge. Electrical appliances may then no longer be
disposed of through "conventional" waste disposal channels. Electrical
appliances must be recycled and disposed of separately. All equipment subject
to this directive is marked with this logo.
Disposal of used batteries
As an end user, you are legally obliged (battery law) to return all used
batteries; disposal in the domestic waste is prohibited!
Batteries containing contaminant material are marked with this symbol indicating
that they must not be disposed of in domestic waste.
The abbreviations used for the respective heavy metals are:
Cd = cadmium, Hg = mercury, Pb = lead.
You can return your used batteries free of charge to municipal collection points
or anywhere where batteries are sold!
Certificate of quality
All quality-relevant activities and processes carried out within Testboy GmbH are subject to
ongoing monitoring within the framework of a quality management system. Furthermore, Testboy
GmbH confirms that the testing equipment and instruments used during the calibration process
are subject to an ongoing inspection process.
Declaration of conformity
The product conforms to the most recent directives. For further information, go to www.testboy.de

Introduction
Testboy® TV 280 17
ENGLISH
Introduction
The product is an endoscope camera, which enables areas that are difficult to access to be
viewed clearly.
Via the cable, the endoscope camera can be manoeuvred easily at narrow points that cannot
otherwise be examined in detail. This enables, for example, cable ducts, motor cylinder walls,
drywalls, suspended plasterboard ceilings, etc. to be investigated. The instrument not only
transmits a live image, but also allows photos and videos to be taken of the conditions being
viewed. The display can be rotated in any direction and/or mirrored to make manoeuvring easier.
The instrument is supplied with a selection of gripper tools, which are used, for example, to
reach/retrieve small parts. On the camera head is a light to illuminate narrow points without
difficulty. The camera is also equipped with an integrated torch to also illuminate the user's
surroundings.
Saved images can subsequently be viewed via computer or even on the instrument itself.
Downloading of data is, of course, also part of the functionality. As the data is saved on a micro
SD card, there are various ways to download and store it externally. The instrument has an
integrated battery, which can be charged via the micro USB interface using any conventional
USB charger or USB port.
To avoid damaging it, the camera cable can be unscrewed from the instrument and stored
separately.

Operation
Testboy® TV 280 18
Operation
Features
- Colour LCD
- Adjustable lighting
- Video and photo option
- Image rotation and mirroring
- Integrated torch
- Gripper tools
Camera design
1 Torch on/off
2 Torch
3 Connection for camera
4 Up button
5 Down button
6 Menu button
7 Back button
8 OK button
9 Camera button
10 Light on/off
11 On/off button
12 USB connection
13 Micro USB connection
14 Micro SD card slot
15 Battery compartment
16 Camera connection, male
(instrument side)
17 Camera connection, female
(camera side)
Charging the battery
The instrument contains an integrated lithium-ion battery. When the battery status is low, an
empty battery symbol is displayed at the top left on the edge of the display. When this status is
displayed, the instrument should be recharged. The instrument is charged via the micro USB port.
When the instrument is fully charged, the charging cable should be removed.
To achieve the best possible battery performance, the instrument should not be connected to a
charger for more than 24 hours. The longest battery service life can be guaranteed if the

Operation
Testboy® TV 280 19
ENGLISH
instrument is charged at least every 3 months for 2 hours. The battery should not be charged in
extremely cold environments.
Basic functions
To switch the measuring instrument on or off, press the on/off button (11) and keep it pressed for
3 seconds.
Once the instrument is switched on, press the menu button (6) to call up the display that sets up
the basic functions. The screen shows the options "Photo", "Video", "Resolution", "Language",
"Brightness", "Rotate", "Time Setting", "Format", "Reset System", "Space" and "Version". Press
"back" (7) to return to normal measuring mode.
After pressing the menu button in basic function mode, press "OK" (8) to set the basic functions.
Using the arrow buttons (4 and 5), select the preferred value for the relevant setting.
Once the preferred settings have been made, they can be applied by pressing "OK" (8) again.
Press the "back" button to exit setting mode again.
The torch button (1) can be used to switch the torch on the instrument on and off. The "light
on/off" button (10) can switch the lighting rings around the camera lens on and off again in three
stages.
Taking a photo/video
To take a photo, press the camera button (9) briefly once. If the button is held down, the
instrument takes a video until the button is pressed again. A photo/video can only be taken if the
instrument has a micro SD card inserted.
Display and management of the saved images
In the "Photo" menu option, you will find all previously taken photos and you can manage them
here. Press the "menu" button (6) to access the main menu. Now select the first menu option
"Photo" and then press OK (8). The image last taken is displayed. Use the "up" and "down" arrow
buttons (4 and 5) to scroll through the photos. Use the "menu" button (6) to display further options
and information. You now have the option to delete the most recent image or all images.
You will also receive information about the name, size of the file and resolution. To delete one or
all files, select the relevant menu option using the "up" and "down" arrow buttons (4 and 5) and
confirm your selection with "OK" (8). You will receive the prompt "Delete this file?". Select "OK"
and confirm again with the "OK" button (8) to delete the file(s). To exit the photo view, press the
"back" button (7).
In the "Video" menu option, you will find all previously taken videos and you can manage them
here. Press the "menu" button (6) to access the main menu. Now select the second menu option
"Video" and then press OK (8). The video last taken is displayed. Use the "up" and "down" arrow

Operation
Testboy® TV 280 20
buttons (4 and 5) to scroll through the videos. Pressing the "OK" button (8) plays the video. Use
the "menu" button (6) to display further options and information. You now have the option to delete
the most recent video or all videos.
You will also receive information about the name, size of the file and resolution. To delete one or
all files, select the relevant menu option using the "up" and "down" arrow buttons (4 and 5) and
confirm your selection with "OK" (8). You will receive the prompt "Delete this file?". Select "OK" and
confirm again with the "OK" button (8) to delete the file(s). To exit the video view, press the "back"
button (7).
Settings
Resolution
In this menu, you can select option 3 "Resolution" with the OK button (8) and set the preferred
resolution. To do this, select the relevant option with the "up" and "down" buttons (4 and 5) and
confirm with the "OK" button (8). Resolutions 640x480, 1280x720 and 192x1080 are available.
Language
In this menu, you can select option 4 "Language" with the OK button (8) and set the preferred
language. To do this, select the relevant option with the "up" and "down" buttons (4 and 5) and
confirm with the "OK" button (8).
Brightness
In this menu, you can select option 5 "Brightness" with the OK button (8) and set the preferred screen
brightness. To do this, select the relevant option with the "up" and "down" buttons (4 and 5) and
confirm with the "OK" button (8).
Rotate
In this menu, you can select option 6 "Rotate" with the OK button (8) and set the preferred
display. A red "F" appears in the centre of the bottom edge of the screen. Select the preferred
option with the "up" and "down" buttons (4 and 5).
The red "F" is then rotated or mirrored accordingly. Once the screen has been rotated/mirrored as
required, confirm the setting with the "OK" button (8).

Operation
Testboy® TV 280 21
ENGLISH
Time Setting
In this menu, you can select option 7 "Time Setting" with the OK button (8) and set the date and
time. Start in the first field to set the year. Use the "up" and "down" buttons (4 and 5) to select the
number. The OK button takes you to the next field "Month", followed by the field "Day". In the
second line, start with the hours, followed by minutes and seconds.
Once the last field has been filled accordingly, press the "OK" button (8) again and the instrument
skips to the selection options "OK" and "Cancel". To apply the settings, press the OK button (8)
again, and if you want to cancel the action, use the "up" and "down" buttons (4 and 5) to select
the "Cancel" option and then confirm it with the OK button (8).
Format
In this menu, you can select option 9 "Format" with the OK button (8) and format the storage
medium.
CAUTION! This will delete all previous photos/videos taken and all other data on the
storage medium!
Use the "up" and "down" buttons (4 and 5) to select the "OK" option and confirm the selection
with the "OK" button (8) to complete formatting.
Reset System
In this menu, you can select option 10 "Reset System" with the OK button (8) and reset the
system settings.
CAUTION! This will reset all previous instrument settings!
Use the "up" and "down" buttons (4 and 5) to select the "OK" option and confirm the selection
with the "OK" button (8) to complete formatting.
Space
Menu option 11 "Space" indicates how much storage space is available on the relevant medium.
Example: "14.8 | 16 G" means that 14.8 GB of a possible 16 GB are free.

Technical data
Testboy® TV 280 22
Technical data
Display
4.3" colour LCD
Image resolution
1920x1080 pixels
Horizontal field of
view
70°
Focal length
4 cm – 500 cm
Focus
Non-adjustable
File format
.jpg
Image storage
Micro SD card
Display of saved
content
Photos/videos, which can be displayed on the
screen
Power supply
Integrated battery
IP rating
IP67
Lens diameter
8 mm
Size
175 × 100 × 30 mm

Table des matières
Testboy® TV 280 23
FRANÇAIS
Table des matières
Consignes de sécurité 24
Consignes générales de sécurité 24
Introduction 27
Utilisation 28
Propriétés 28
Structure de la caméra 28
Chargement de la batterie 28
Fonctions de base 29
Enregistrement 29
Affichage et gestion des images enregistrées 29
Réglages 30
Résolution 30
Langue 30
Luminosité 30
Rotation 30
Réglage de l’heure 31
Formatage 31
Réinitialisation du système 31
Espace 31
Caractéristiques techniques 32

Consignes de sécurité
Testboy® TV 280 24
Consignes de sécurité
AVERTISSEMENT
Les sources de danger sont, p. ex., les éléments mécaniques pouvant causer de
graves blessures aux personnes.
Il existe également des dangers pour les biens matériels (p.ex. un endommagement
de l'appareil).
AVERTISSEMENT
L'électrocution peut entraîner la mort ou des blessures graves et nuire au
fonctionnement de biens matériels (p.ex. en endommageant l'appareil).
AVERTISSEMENT
Ne jamais orienter le rayon laser directement ou indirectement vers les yeux en
l'orientant sur une surface réfléchissante. Le rayonnement laser peut causer des
lésions irréversibles aux yeux. Le rayon laser doit être désactivé lors des mesures
effectuées à proximité de personnes.
Consignes générales de sécurité
AVERTISSEMENT
Pour des raisons de sécurité et d'homologation (CE), il est interdit de transformer
et/ou modifier l'appareil sans autorisation. Afin de garantir un fonctionnement sûr de
l'appareil, les consignes de sécurité et avertissements, ainsi que le chapitre
« Utilisation conforme » doivent impérativement être respectés.
AVERTISSEMENT
Respecter les consignes suivantes avant toute utilisation de l'appareil :
| Éviter d'utiliser l'appareil à proximité de postes de soudure électriques, de
chauffages à induction et d'autres champs électromagnétiques.
| Après un changement soudain de température, l'appareil doit être placé env. 30
minutes à la nouvelle température ambiante avant son utilisation afin de
permettre la stabilisation du capteur IR.
| Ne pas soumettre l'appareil à des températures élevées pendant des périodes prolongées.
| Éviter les conditions ambiantes poussiéreuses et humides.
| Les appareils de mesure et leurs accessoires ne sont pas des jouets et doivent
être tenus hors de portée des enfants !
| Dans les établissements industriels, les règlements de prévention des accidents
de l'Association des syndicats professionnels en charge des installations et
équipements électriques doivent être respectés.

Consignes de sécurité
Testboy® TV 280 25
FRANÇAIS
Respecter les cinq règles de sécurité suivantes :
Déconnecter l'appareil
Empêcher son redémarrage
Le mettre hors tension (la mise hors tension doit être constatée sur les 2 pôles)
Mettre à la terre et court-circuiter
Couvrir les éléments sous tension voisins
Utilisation conforme
L'appareil a exclusivement été conçu pour les applications décrites dans le manuel d'utilisation.
Toute autre utilisation est interdite et peut être la cause d'accidents ou de dommages sur
l'appareil. Ces applications entraînent l'extinction immédiate de la garantie dont bénéficie
l'utilisateur vis-à-vis du fabricant.
Afin de protéger l'appareil contre d'éventuels dommages, retirer les piles en cas de
non-utilisation prolongée.
Nous n'endossons aucune responsabilité en cas de dommages matériels ou
corporels résultant d'une manipulation inappropriée ou du non-respect des consignes
de sécurité. La garantie s'éteint dans de tels cas. Un point d'exclamation dans un
triangle renvoie aux consignes de sécurité du présent manuel d'utilisation. Lire les
instructions dans leur intégralité avant la mise en service. Cet appareil a fait l'objet
d'un contrôle CE et satisfait aux normes pertinentes.
Nous nous réservons le droit de modifier les spécifications sans préavis.
© 2021 Testboy GmbH, Allemagne.
Exclusion de responsabilité
La garantie s'éteint en cas de dommages résultant du non-respect du présent manuel
d'utilisation ! Nous n'endossons aucune responsabilité pour les dommages
consécutifs en résultant !
Testboy n'assume aucune responsabilité pour les dommages résultant :
du non-respect du présent manuel d'utilisation,
de modifications apportées au produit sans l'accord de Testboy,
de l'utilisation de pièces de rechange n'ayant pas été fabriquées ou homologuées par Testboy,
de l'influence de l'alcool, de drogues ou de médicaments.

Consignes de sécurité
Testboy® TV 280 26
Exactitude du manuel d'utilisation
Ces instructions de service ont été rédigées avec le plus grand soin. Nous n'endossons aucune
responsabilité pour l'exactitude et l'intégralité des données, illustrations et schémas qu'elles
contiennent. Sous réserve de modifications, d'erreurs d'impression et d'erreurs.
Élimination
Cher client Testboy, en acquérant notre produit, vous avez la possibilité de déposer le produit en
fin de vie dans un centre de collecte pour déchets électriques.
La directive WEEE réglemente la reprise et le recyclage des appareils
électriques usagés. Les fabricants d'appareils électriques sont tenus de
reprendre et de recycler gratuitement les appareils électriques vendus.
Les appareils électriques ne peuvent donc plus être jetés avec les déchets
« normaux ». Les appareils électriques doivent être recyclés et éliminés
séparément. Tous les appareils soumis à cette directive portent ce logo.
Élimination des piles usagées
En tant qu'utilisateur, vous êtes légalement (loi allemande sur les piles) tenu
de déposer toutes vos piles et batteries usagées dans des centres agréés ;
il est interdit de jeter celles-ci dans les ordures ménagères !
Les piles et batteries contenant des substances toxiques portent les symboles
illustrés ci-contre, indiquant qu'il est interdit de les jeter dans les ordures
ménagères.
Les symboles des métaux lourds concernés sont :
Cd = Cadmium, Hg = mercure, Pb = plomb.
Vous pouvez ramener gratuitement vos piles et batteries usagées dans un
centre de collecte de votre commune ou partout où des piles/batteries sont
vendues !
Certificat de qualité
L'ensemble des activités et processus pertinents en matière de qualité effectués au sein de
l'entreprise Testboy GmbH est contrôlé en permanence par un système de gestion de la qualité.
La société Testboy GmbH confirme ainsi que les équipements de contrôle et instruments utilisés
pendant l'étalonnage sont soumis à des contrôles permanents.
Déclaration de conformité
Le produit est conforme avec les dernières directives. Plus d'informations sur www.testboy.de

Introduction
Testboy® TV 280 27
FRANÇAIS
Introduction
Ce produit est une caméra endoscopique offrant la possibilité devoir clairement et distinctement
les zones difficilement accessibles.
Grâce à son câble, la caméra endoscopique peut être manœuvrées aisément dans des passages
étroits qui ne pourraient, sans ça, pas être observés en détails. Il est ainsi possible d’inspecter les
caniveaux de câbles, parois des cylindres des moteurs, cloisons sèches, plafonds suspendus en
placoplâtre et bien plus encore. L’appareil peut ainsi non seulement fournir des images en temps
réel, mais aussi prendre des photos et enregistrer des vidéos de tout ce qu’il y a à voir. L’écran
peut également être tourné et/ou réfléchi dans n’importe quelle direction afin de faciliter les
déplacements. L’appareil est fourni avec une sélection d’outils de préhension permettant,
p. ex. d’atteindre / de récupérer les petites pièces. La tête de la caméra est dotée d'une source
lumineuse permettant d'éclairer les passages étroits sans aucun problème. La caméra est
également équipée d'une lampe de poche intégrée permettant d'également éclairer
l’environnement de l’utilisateur.
Les vidéos et photos enregistrées peuvent ensuite être examinées sur ordinateur ou directement
sur l’appareil lui-même. Le téléchargement des données fait bien entendu également partie des
fonctions proposées. Les données étant enregistrées sur une carte microSD, plusieurs options de
téléchargement et d'enregistrement externe sont proposées. L’appareil est finalement doté d'une
batterie intégrée pouvant être chargées au moyen de n’importe quel chargeur USB ou port USB
conventionnels via le port microUSB.
Afin d'éviter tout endommagement du câble de la caméra, celui-ci peut être dévissé de l’appareil
et rangé séparément.

Utilisation
Testboy® TV 280 28
Utilisation
Propriétés
- Écran LCD couleurs
- Éclairage réglable
- Enregistrement de vidéos et photos
- Écran rotatif et pouvant afficher l’image en miroir
- Lampe de poche intégrée
- Outils de préhension
Structure de la caméra
1 Touche « Marche / Arrêt »
de la lampe de poche
2 Lampe de poche
3 Raccord pour caméra
4 Touche « Haut »
5 Touche « Bas »
6 Touche « Menu »
7 Touche « Retour »
8 Touche « OK »
9 Touche « Enregistrement »
10 Touche « Marche / Arrêt »
de l’éclairage
11 Touche « Marche / Arrêt »
12 Port USB
13 Port microUSB
14 Emplacement pour carte
microSD
15 Compartiment de la batterie
16 Raccord mâle « Caméra »
(côté appareil)
17 Raccord femelle « Caméra »
(côté caméra)
Chargement de la batterie
L'appareil contient une batterie lithium-ion intégrée. Lorsque le niveau de la batterie est faible, un
symbole de batterie vide s'affiche dans le coin supérieur gauche de l'écran. Lorsque cette
condition est atteinte, l'appareil doit être chargé. L'appareil est chargé via le port micro-USB.
Lorsque l'appareil est complètement chargé, le câble de charge doit être débranché.

Utilisation
Testboy® TV 280 29
FRANÇAIS
Pour obtenir les meilleures performances possibles de la batterie, l'appareil ne doit pas être
connecté à un chargeur pendant plus de 24 heures. Une durée de vie maximale de la batterie
peut être garantie si l'appareil est chargé pendant 2 heures au moins tous les 3 mois. La batterie
ne doit pas être chargée dans des environnements extrêmement froids.
Fonctions de base
Pour démarrer / arrêter l’appareil, appuyer sur la touche « Marche / Arrêt » (11) et la maintenir
enfoncée 3 secondes.
Une fois l’appareil en marche, appuyer sur la touche « Menu » (6) pour ouvrir l’affichage du
réglage des fonctions de base. Les choix possibles s’affichent : « Photo », « Vidéo »,
« Résolution », « Langue », « Luminosité », « Rotation », « Réglage de l’heure », « Formatage »,
« Réinitialisation du système », « Espace » et « Version ». « Retour » (7) permet de revenir au
mode de fonctionnement normal de la caméra.
Après avoir appuyé sur la touche « Menu » dans le mode « Fonctions de base », appuyer sur la
touche « OK » (8) pour procéder aux réglages des fonctions de base. Les touches fléchées (4 et
5) permettent de sélectionner la valeur souhaitée pour le réglage correspondant.
Une fois les réglages souhaités effectués, ceux-ci peuvent être appliqués en appuyant à nouveau sur
la touche « OK » (8). Appuyer sur la touche « Retour » pour quitter à nouveau le mode de réglage.
La touche de la lampe de poche (1) permet d’allumer et d'éteindre la lampe de poche de
l’appareil. La touche « Marche / Arrêt » de l'éclairage (10) permet d’allumer la bague d'éclairage
autour de la lentille de la caméra sur trois niveaux, puis de l'éteindre.
Enregistrement
Appuyer sur la touche d’enregistrement (9) brièvement pour prendre une photo. Si la touche est
maintenue enfoncée plus longtemps, l’appareil enregistre une vidéo jusqu’à ce que la touche soit
à nouveau enfoncée. Un enregistrement n’est possible que lorsqu’une carte microSD est insérée
dans l’appareil.
Affichage et gestion des images enregistrées
Le deuxième onglet du menu « Photo » reprend toutes les photos prises jusqu'à présent et
permet de les gérer. Appuyer sur la touche « Menu » (6) pour accéder au menu principal.
Sélectionner alors le premier onglet « Photo », puis appuyer sur la touche « OK » (8). La dernière
photo prise s’affiche. Les touches fléchées « Haut » et « Bas » (4 et 5) vous permettent à présent
de faire défiler les différentes photos. La touche « Menu » (6) permet d’afficher d’autres options et
informations. Il est alors possible de supprimer la dernière photo affichée ou toutes les photos.
Des informations sur le nom, la taille du fichier et sa résolution apparaissent également. Pour
supprimer un ou tous les fichiers, sélectionner l’onglet souhaité au moyen des touche fléchées
« Haut » et « Bas » (4 et 5) et confirmer la sélection avec la touche « OK » (8). La question

Utilisation
Testboy® TV 280 30
« Souhaitez-vous supprimer ce fichier ? » apparaît. Sélectionner « OK » et confirmer à nouveau
avec la touche « OK » (8) pour supprimer le(s) fichier(s). Appuyer sur la touche « Retour » (7)
pour quitter l’aperçu des photos.
Le deuxième onglet du menu « Vidéo » reprend toutes les vidéos enregistrées jusqu'à présent et
permet de les gérer. Appuyer sur la touche « Menu » (6) pour accéder au menu principal. Sélectionner
alors le second onglet « Vidéo », puis appuyer sur la touche « OK » (8). La dernière vidéo enregistrée
s’affiche. Les touches fléchées « Haut » et « Bas » (4 et 5) vous permettent à présent de faire défiler
les différentes vidéos. La touche « OK » (8) lance la lecture de la vidéo. La touche « Menu » (6) permet
d’afficher d’autres options et informations. Il est alors possible de supprimer la dernière vidéo affichée
ou toutes les vidéos.
Des informations sur le nom, la taille du fichier et sa résolution apparaissent également. Pour supprimer
un ou tous les fichiers, sélectionner l’onglet souhaité au moyen des touche fléchées « Haut » et « Bas »
(4 et 5) et confirmer la sélection avec la touche « OK » (8). La question « Souhaitez-vous supprimer ce
fichier ? » apparaît. Sélectionner « OK » et confirmer à nouveau avec la touche « OK » (8) pour
supprimer le(s) fichier(s). Appuyer sur la touche « Retour » (7) pour quitter l’aperçu des vidéos.
Réglages
Résolution
Le menu permet de sélectionner l’option 3 « Résolution » avec la touche « OK » (8) et ainsi de
régler les résolutions souhaitées. Pour cela, sélectionner l’option souhaitée avec les touches
« Haut » et « Bas » (4 et 5) et confirmer avec la touche « OK » (8). Les résolutions 640x480,
1280x720 et 192x1080 sont disponibles.
Langue
Le menu permet de sélectionner l’option 4 « Langue » avec la touche « OK » (8) et ainsi de régler
les langues souhaitées. Pour cela, sélectionner l’option souhaitée avec les touches « Haut » et
« Bas » (4 et 5) et confirmer avec la touche « OK » (8).
Luminosité
Le menu permet de sélectionner l’option 5 « Luminosité » avec la touche « OK » (8) et ainsi de
régler les luminosités souhaitées pour l'écran. Pour cela, sélectionner l’option souhaitée avec les
touches « Haut » et « Bas » (4 et 5) et confirmer avec la touche « OK » (8).
Rotation
Le menu permet de sélectionner l’option 6 « Rotation » avec la touche « OK » (8) et ainsi de
régler les affichages souhaitées. Un « F » rouge apparait au centre du bord inférieur de l'écran.
Sélectionner l'option souhaitée avec les touches « Haut » et « Bas » (4 et 5).
Le « F » rouge est alors tourné ou apparaît en miroir. Une fois l’image tournée / affichée en miroir
comme souhaité, confirmer le réglage avec la touche « OK » (8).

Utilisation
Testboy® TV 280 31
FRANÇAIS
Réglage de l’heure
Le menu permet de sélectionner l’option 7 « Réglage de l’heure » avec la touche « OK » (8), puis
de régler la date et l’heure correctes. Le premier champ permet de régler l’année. Pour cela,
utiliser les touches « Haut » et « Bas » (4 et 5) pour sélectionner le chiffre correct. Passer ensuite
au champ suivant « Mois », suivi du champ « Jour », avec la touche « OK ». La seconde ligne
permet de régler l’heure, puis les minutes et les secondes.
Une fois le dernier champ correctement réglé, appuyer à nouveau sur la touche « OK » (8) ;
l’appareil passe alors aux possibilités de sélection « OK » ou « Annuler ». Pour appliquer les
réglages, appuyer sur la touche « OK » (8). Pour interrompre la procédure, passer à l’option
« Annuler » avec les touches « Haut » et « Bas » (4 et 5) et confirmer avec la touche « OK » (8).
Formatage
Le menu permet de sélectionner l’option 9 « Format » avec la touche « OK » (8), puis de formater
le support de données.
ATTENTION ! Tous les enregistrements et autres données présents sur le support de
données seront alors supprimés !
Sélectionner l’option « OK » avec les touches « Haut » et « Bas » (4 et 5) et confirmer la
sélection avec la touche « OK » (8) pour achever le formatage.
Réinitialisation du système
Le menu permet de sélectionner l’option 10 « Réinitialisation du système » avec la touche « OK »
(8) et de réinitialiser les réglages du système.
ATTENTION ! Tous les réglages actuels de l’appareil seront perdus !
Sélectionner l’option « OK » avec les touches « Haut » et « Bas » (4 et 5) et confirmer la
sélection avec la touche « OK » (8) pour achever le restauration des réglages par défaut.
Espace
L’onglet 11 « Espace » indique la mémoire libre sur le support de données disponibles. Exemple :
« 14,8 | 16 GB » signifie que 14,8 de 16 GB disponibles sont libres.

Caractéristiques techniques
Testboy® TV 280 32
Caractéristiques techniques
Écran
Écran LCD couleurs 4,3"
Résolution d’images
1920x1080 pixels
Champ visuel
horizontal
70°
Distance focale
4 cm – 500 cm
Focus
Fixe
Format de fichier
.jpg
Enregistrement
d'image
Carte microSD
Affichage des
contenus enregistrés
Images / Vidéos pouvant être affichées à l'écran
Alimentation en
courant
Batterie intégrée
Classe IP
IP67
Diamètre de la lentille
8 mm
Dimensions
175×100×30 mm

Índice
Testboy® TV 280 33
ESPAÑOL
Índice
Indicaciones de seguridad 34
Indicaciones generales de seguridad 34
Introducción 37
Manejo 38
Propiedades 38
Montaje de la cámara 38
Cargar la batería 38
Funciones básicas 39
Grabación 39
Mostrar y administrar las imágenes almacenadas 39
Ajustes 40
Resolución 40
Idioma 40
Brillo 40
Girar 40
Ajuste de hora 41
Formatear 41
Restablecer el sistema 41
Memoria 41
Datos técnicos 42

Indicaciones de seguridad
Testboy® TV 280 34
Indicaciones de seguridad
ADVERTENCIA
Las fuentes de riesgo son, por ejemplo, piezas mecánicas que podrían causar
lesiones graves a personas.
Existe también riesgo para objetos (p. ej. daños en el instrumento).
ADVERTENCIA
Una descarga eléctrica podría causar lesiones mortales o graves a personas, así
como ser una amenaza para el funcionamiento de objetos (p. ej. daños en el
instrumento).
ADVERTENCIA
No dirija nunca el rayo láser directa ni indirectamente, a través de superficies
reflectantes, hacia los ojos. El rayo láser puede causar daños irreparables en los
ojos. Al realizar mediciones cerca de personas, deberá desactivarse el rayo láser.
Indicaciones generales de seguridad
ADVERTENCIA
Por motivos de seguridad y homologación (CE), no está permitido transformar ni
realizar modificaciones por cuenta propia en el instrumento. Con el fin de garantizar
un funcionamiento seguro del instrumento, es imprescindible tener en cuenta las
indicaciones de seguridad, las notas de advertencia y el capítulo «Uso previsto».
ADVERTENCIA
Antes de usar el instrumento, tenga en cuenta las siguientes indicaciones:
| Evite el uso del instrumento en las inmediaciones de soldadoras eléctricas,
calentadores por inducción y otros campos electromagnéticos.
| Después de cambios de temperatura bruscos, antes de usar el instrumento debe
aclimatarse durante aprox. 30 minutos a la nueva temperatura ambiente para
estabilizar el sensor de infrarrojos.
| No exponga el instrumento durante mucho tiempo a altas temperaturas.
| Evite un entorno con polvo y humedad.
| ¡Los instrumentos de medición y los accesorios no son un juguete y no deben
dejarse al alcance de niños!
| En instalaciones industriales deberán tenerse en cuenta las normas de
prevención de accidentes de la mutua profesional competente en prevención de
accidentes laborales para instalaciones eléctricas y equipos.

Indicaciones de seguridad
Testboy® TV 280 35
ESPAÑOL
Tenga en cuenta las cinco reglas de oro en electricidad:
Desconexión, corte efectivo.
Prevenir cualquier posible realimentación. Bloqueo y señalización.
Verificar la ausencia de tensión (debe determinarse en dos polos).
Puesta a tierra y cortocircuito.
Señalización de la zona de trabajo.
Uso previsto
El instrumento ha sido previsto únicamente para los usos descritos en el manual de
instrucciones. Está prohibido cualquier otro uso. Este podría causar accidentes o destruir el
instrumento. Estos usos resultarán en la anulación inmediata de cualquier derecho o reclamación
por garantía del operador frente al fabricante.
Para proteger el instrumento frente a daños, extraiga las pilas cuando no se vaya a
utilizar el instrumento durante un periodo de tiempo prolongado.
En caso de producirse daños en la integridad física de las personas o daños
materiales ocasionados por una manipulación inadecuada o por el incumplimiento de
las indicaciones de seguridad, no asumimos ninguna responsabilidad. En estos
casos queda anulado cualquier derecho por garantía. Un símbolo de exclamación
dentro de un triángulo hace referencia a las indicaciones de seguridad en el manual
de instrucciones. Antes de la puesta en servicio, lea el manual al completo. Este
instrumento dispone de homologación CE y cumple, por tanto, las directivas
requeridas.
Reservado el derecho a modificar las especificaciones sin previo aviso
© 2021 Testboy GmbH, Alemania.
Cláusula de exención de responsabilidad
¡Los derechos por garantía quedan anulados cuando los daños han sido producidos
por incumplimiento del manual! ¡No asumimos ninguna responsabilidad por los
daños derivados resultantes!
Testboy no asume responsabilidad alguna por los daños que resulten de:
El incumplimiento del manual.
Las modificaciones en el producto no autorizadas por Testboy
Los repuestos no fabricados o no autorizados por Testboy
El trabajo bajo los efectos del alcohol, drogas o medicamentos.

Indicaciones de seguridad
Testboy® TV 280 36
Exactitud del manual de instrucciones
Este manual de instrucciones ha sido redactado con gran esmero. No asumimos garantía alguna
por la exactitud y la integridad de los datos, las imágenes ni los dibujos. Reservado el derecho a
realizar modificaciones, corregir erratas y errores.
Gestión de residuos
Estimado cliente de Testboy, con la adquisición de nuestro producto tiene la posibilidad de, una
vez finalizada su vida útil, devolver el instrumento a los puntos de recogida selectiva adecuados
para chatarra eléctrica.
La Directiva RAEE regula la recogida y el reciclaje de residuos de aparatos
eléctricos y electrónicos. Los fabricantes de aparatos eléctricos están obligados
a recoger y a reciclar de forma gratuita los aparatos eléctricos vendidos. Los
aparatos eléctricos no podrán ser recogidos por tanto en los flujos de residuos
«normales». Los aparatos eléctricos deberán reciclarse y eliminarse por
separado. Todos los aparatos afectados por esta directiva llevan este logotipo.
Eliminación de las pilas usadas
Usted, como usuario final, está obligado por ley a retornar todas las pilas y
baterías usadas (Legislación sobre pilas y acumuladores). ¡Está prohibido
desecharlas en la basura doméstica!
Las pilas/baterías con sustancias nocivas están marcadas con los símbolos
indicados en el margen. Estos señalan la prohibición de desecharlas en la basura
doméstica.
Los símbolos de los metales pesados determinantes son:
Cd = cadmio, Hg = mercurio, Pb = plomo.
Podrá entregar las pilas/baterías usadas en los puntos de recogida selectiva de
su municipio o en cualquier comercio que venda pilas/baterías. ¡Todo ello sin
ningún coste adicional para usted!
Certificado de calidad
Todas las actividades y procesos relacionados con la calidad realizados dentro de Testboy
GmbH son controlados de forma permanente mediante un sistema de gestión de calidad.
La empresa Testboy GmbH certifica además que los dispositivos de revisión y los instrumentos
empleados durante el calibrado están sometidos a un control permanente para equipos de
inspección, medición y ensayo.
Declaración de conformidad
El producto cumple las directivas más recientes. Encontrará más información en www.testboy.de

Introducción
Testboy® TV 280 37
ESPAÑOL
Introducción
El producto es una cámara endoscópica que permite ver áreas de difícil acceso de una forma
clara y nítida.
En puntos estrechos, la cámara endoscópica se puede maniobrar con precisión mediante el
cable, permitiendo observar al detalle la zona, algo no posible con otras cámaras. De esta forma
se pueden examinar, por ejemplo, cajas de cables, paredes de cilindros en motores, el interior de
placas de yeso laminado, techos con placas de yeso y mucho más. El instrumento no solo puede
transmitir imágenes en directo, sino también fotos y vídeos de otras circunstancias a la vista.
La pantalla se puede girar en cualquier dirección o ponerse en modo espejo para facilitar el
maniobrado. El instrumento se suministra con una selección de herramientas de sujeción con las
que se puede llegar, por ejemplo, a piezas pequeñas. En el cabezal de la cámara hay una
lámpara con la que iluminar fácilmente los puntos estrechos. Además, la cámara está integrada
con una linterna para iluminar también el entorno del usuario.
Las fotos guardadas se pueden observar más tarde en el ordenador o en el mismo instrumento.
Descargar los datos es naturalmente también parte del espectro de funcionamiento. Como los
datos se guardan en una tarjeta microSD, hay varias formas de descargar y de guardar
externamente. El instrumento dispone de una batería integrada que se puede cargar mediante
una interfaz para un Micro USB con cualquier cargador convencional o puerto USB.
Para evitar daños en la cámara del cable, este se puede desenroscar y guardar por separado.

Manejo
Testboy® TV 280 38
Manejo
Propiedades
- Pantalla LCD de color
- Iluminación regulable
- Grabación de fotos y de vídeos
- Representación girada y réflex
- Linterna integrada
- Herramientas de sujeción
Montaje de la cámara
1 Linterna encendida/apagada
2 Linterna
3 Conexión para cámara
4 Tecla arriba
5 Tecla abajo
6 Tecla de menú
7 Tecla para volver
8 Tecla OK
9 Tecla de grabación
10 Luz encendida/apagada
11 Tecla de encendido/apagado
12 Conexión USB
13 Conexión Micro USB
14 Ranura para tarjetas microSD
15 Compartimento para baterías
16 Conexión macho para cámara
(en el instrumento)
17 Conexión hembra para
cámara (en la cámara)
Cargar la batería
El instrumento contiene una batería de ion de litio integrada. Cuando el nivel de la batería está
bajo, arriba a la izquierda en el borde de la pantalla aparece un símbolo de batería vacío.
Cuando se alcanza este estado, se debe cargar el instrumento. El instrumento se carga
mediante el puerto Micro USB. Cuando se ha cargado completamente el instrumento, se debe
quitar el cable de carga.
Para poder obtener el mejor rendimiento de la batería, no se debe tener el instrumento
conectado al cargador durante más de 24 horas. La vida útil más larga de la batería se puede

Manejo
Testboy® TV 280 39
ESPAÑOL
obtener cuando se carga el instrumento al menos cada 3 meses durante 2 horas. No se debe
cargar la batería en entornos extremadamente fríos.
Funciones básicas
Para encender o apagar el instrumento de medición, pulse la tecla de encendido/apagado (11) y
manténgala pulsada durante 3 segundos.
Después de encender el instrumento, pulse la tecla de menú (6) para abrir la pantalla de ajuste
de las funciones básicas. Aparecen las opciones «Foto», «Vídeo», «Resolución», «Idioma»,
«Brillo», «Girar», «Ajuste de hora», «Formato», «Restablecer sistema», «Espacio» y «Versión».
Con la tecla «Atrás» (7) volverá al modo de cámara normal.
Después de pulsar la tecla de menú en el modo de funciones básicas, pulse la tecla «OK» (8)
para realizar ajustes en las funciones básicas. Con las teclas de flecha (4 y 5) seleccione el valor
deseado para el ajuste concreto.
Después de haber realizado los ajustes deseados, los puede confirmar y aceptar pulsando la
tecla «OK» (8). Vuelva a pulsar la tecla «Atrás» para volver a salir del modo de ajuste.
Con la tecla de linternas (1) se puede encender y apagar la linterna en el instrumento. Con la
tecla «Encender/apagar luz» (10) se puede encender y apagar la iluminación alrededor de la
lente de la cámara gradualmente en tres fases.
Grabación
Para tomar una foto, pulse una vez brevemente la tecla de grabación (9). Si se mantiene pulsada
durante más tiempo, el instrumento graba un vídeo hasta que se vuelva a presionar la tecla.
La grabación solo es posible cuando hay una tarjeta MicroSD insertada.
Mostrar y administrar las imágenes almacenadas
En la opción de menú «Foto» encontrará todas las fotos tomadas hasta ahora y podrá
administrarlas. Pulse la tecla de «Menú» (6) para volver al menú principal. Seleccione ahora la
primera opción del menú «Foto» y pulse después la tecla «OK» (8). Ahora aparecerá la última
foto tomada. Con las teclas de flecha «arriba» y «abajo» (4 y 5) puede navegar por las fotos. Con
la tecla «Menú» (6) puede acceder a otras opciones e informaciones. Ahora tiene la opción de
borrar la última foto tomada o todas las fotos.
Podrá ver también la información con el nombre, así como el tamaño del archivo y su resolución.
Para borrar una o todas las fotos, seleccione la opción de menú deseada con las teclas de flecha
«arriba» y «abajo» (4 y 5) y confirme la elección con la tecla «OK» (8). Aparece la pregunta
«¿Borrar este archivo?». Aquí selecciona «OK» y lo confirma con la misma tecla «OK» (8) para
borrar el archivo o archivos. Para salir de la vista de fotos, pulse la tecla «Atrás» (7).

Manejo
Testboy® TV 280 40
En la opción de menú «Vídeo» encontrará todos los vídeos grabados hasta ahora y podrá
administrarlos. Pulse la tecla de «Menú» (6) para volver al menú principal. Seleccione ahora la
segunda opción del menú «Vídeo» y pulse después la tecla «OK» (8). Ahora aparecerá el último
vídeo grabado. Con las teclas de flecha «arriba» y «abajo» (4 y 5) puede navegar por las fotos.
Con la tecla «OK» (8) se reproduce el vídeo. Con la tecla «Menú» (6) puede acceder a otras
opciones e informaciones. Ahora tiene la opción de borrar la última foto tomada o todas las fotos.
Podrá ver también la información con el nombre, así como el tamaño del archivo y su resolución.
Para borrar una o todas las fotos, seleccione la opción de menú deseada con las teclas de flecha
«arriba» y «abajo» (4 y 5) y confirme la elección con la tecla «OK» (8). Aparece la pregunta
«¿Borrar este archivo?». Aquí selecciona «OK» y lo confirma con la misma tecla «OK» (8) para
borrar el archivo o archivos. Para salir de la vista de vídeos, pulse la tecla «Atrás» (7).
Ajustes
Resolución
En el menú se puede seleccionar la opción 3 «Resolución» con la tecla «OK» (8) y ajustarse allí
las resoluciones deseadas. Para ello, seleccione la opción deseada con las teclas «arriba» y
«abajo» (4 y 5) y confirme la elección con la tecla «OK» (8). Están disponibles las resoluciones
640x480, 1280x720 y 192x1080.
Idioma
En el menú se puede seleccionar la opción 4 «Idioma» con la tecla «OK» (8) y ajustarse allí el
idioma deseado. Para ello, seleccione la opción deseada con las teclas «arriba» y «abajo»
(4 y 5) y confirme la elección con la tecla «OK» (8).
Brillo
En el menú se puede seleccionar la opción 5 «Brillo» con la tecla «OK» (8) y ajustarse allí el
brillo deseado. Para ello, seleccione la opción deseada con las teclas «arriba» y «abajo» (4 y 5)
y confirme la elección con la tecla «OK» (8).
Girar
En el menú se puede seleccionar la opción 6 «Girar» con la tecla «OK» (8) y ajustarse allí la
representación deseada. Aparece una «F» roja en el centro del borde inferior de la pantalla.
Seleccione la opción deseada con las teclas «arriba» y «abajo» (4 y 5).
La «F» roja va girando correspondientemente o cambia a vista de espejo. Cuando la imagen ha
rotado hasta la posición deseada, confirme el ajuste con la tecla «OK» (8).

Manejo
Testboy® TV 280 41
ESPAÑOL
Ajuste de hora
En el menú se puede seleccionar la opción 7 «Ajuste de hora» con la tecla «OK» (8) y ajustarse
allí la fecha y la hora. Se empieza con el primer campo para ajustar el año. Para ello, elija el
número con las teclas «arriba» y «abajo» (4 y 5). Con la tecla «OK» puede pasar al siguiente
campo «mes», seguido del campo «día». En la segunda línea puede ajustar ahora la hora,
seguida de los minutos y los segundos.
Cuando haya completado correspondientemente el último campo, vuelva a pulsar la tecla «OK»
(8) y el instrumento pasará por las opciones «OK» y «Cancelar». Para confirmar los ajustes,
vuelva a presionar la tecla «OK» (8); para cancelar el proceso, muévase con las teclas «arriba»
y «abajo» (4 y 5) a la opción «Cancelar» y confirme la cancelación con la tecla «OK» (8).
Formatear
En el menú se puede seleccionar la opción 9 «Formatear» con la tecla «OK» (8) y formatearse el
medio de almacenamiento.
¡ATENCIÓN! ¡Se borrarán todas las grabaciones realizadas hasta la fecha y el resto
de datos en la memoria!
Con las teclas «arriba» y «abajo» (4 y 5) seleccione la opción «OK» y confirme con la tecla «OK»
(8) para finalizar el formateado.
Restablecer el sistema
En el menú se puede seleccionar la opción 10 «Restablecer sistema» con la tecla «OK» (8) para
restablecer los ajustes del sistema.
¡ATENCIÓN! ¡Se restablecerán todos los ajustes realizados en el instrumento!
Con las teclas «arriba» y «abajo» (4 y 5) seleccione la opción «OK» y confirme con la tecla «OK»
(8) para finalizar el formateado.
Memoria
La opción de menú 11 «Memoria» muestra la memoria libre disponible en el medio. Ejemplo:
«14,8 | 16G» significa que hay 14,8 GB libres de 16 GB totales.

Datos técnicos
Testboy® TV 280 42
Datos técnicos
Pantalla
Pantalla LCD de color de 4,3"
Resolución de imagen
1920x1080 píxeles
Campo de visión
horizontal
70°
Distancia focal
4 cm – 500 cm
Enfoque
ajustado fijo
Formato de archivo
.jpg
Almacenamiento de
imágenes
Tarjeta MicroSD
Mostrar contenidos
almacenados
Imágenes/vídeos que se pueden mostrar en la
pantalla
Suministro de
corriente
Batería integrada
Clase IP
IP67
Diámetro de lente
8 mm
Tamaño
175×100×30 mm

Indice
Testboy® TV 280 43
ITALIANO
Indice
Avvertenze di sicurezza 44
Avvertenze di sicurezza generali 44
Introduzione 47
Uso 48
Proprietà 48
Struttura dello strumento 48
Ricarica della batteria 48
Funzioni basilari 49
Pulsante di scatto 49
Visualizzazione e gestione delle immagini archiviate 49
Impostazioni 50
Risoluzione 50
Lingua 50
Luminosità 50
Rotazione 50
Regolazione della data e dell’ora 51
Formattazione 51
Ripristino 51
Memoria 51
Dati tecnici 52

Avvertenze di sicurezza
Testboy® TV 280 44
Avvertenze di sicurezza
AVVERTENZA
Fonti di pericolo sono ad es. componenti meccanici che possono provocare gravi
lesioni personali.
Sussiste anche un pericolo di danni materiali (ad es. danneggiamento dello
strumento).
AVVERTENZA
Le folgorazioni elettriche possono causare la morte o gravi lesioni personali, così
come danni materiali (ad es. danneggiamento dello strumento).
AVVERTENZA
Non puntare il raggio laser, né direttamente né indirettamente attraverso superfici
riflettenti, contro gli occhi. Il raggio laser può causare danni irreparabili alla vista.
In caso di misurazioni eseguite vicino ad altre persone, è necessario disattivare il
raggio laser.
Avvertenze di sicurezza generali
AVVERTENZA
Per motivi di sicurezza e di omologazione (CE), non sono ammesse modifiche e/o
trasformazioni arbitrarie dello strumento. Per garantire un funzionamento sicuro
dello strumento è assolutamente necessario osservare le avvertenze di sicurezza,
i simboli di pericolo e il capitolo "Uso previsto".
AVVERTENZA
Prima di utilizzare lo strumento, si prega di osservare i seguenti avvisi:
| Evitare di usare lo strumento nelle vicinanze di saldatrici elettriche, impianti di
riscaldamento a induzione e altri campi elettromagnetici.
| In caso di bruschi cambi di temperatura, prima di utilizzare lo strumento occorre
stabilizzarlo per circa 30 minuti alla nuova temperatura ambiente, per
condizionare il sensore IR.
| Non esporre lo strumento per lunghi periodi di tempo a temperature elevate.
| Evitare l’uso in ambienti polverosi e umidi.
| Gli strumenti di misura e gli accessori non sono giocattoli e vanno tenuti fuori
dalla portata dei bambini!
| All’interno di ambienti industriali occorre rispettare le norme antinfortunistiche delle
associazioni di categoria vigenti in materia di impianti e componenti elettrici.

Avvertenze di sicurezza
Testboy® TV 280 45
ITALIANO
Si prega di rispettare le cinque regole di sicurezza:
Sezionare completamente l’impianto
Assicurarsi contro le richiusure e apporre i cartelli di avviso
Verificare l’assenza di tensione (l’assenza di tensione deve essere verificata sui 2 poli)
Eseguire la messa a terra e in cortocircuito
Delimitare la zona di lavoro e provvedere alla protezione verso le parti attive
adiacenti
Uso previsto
Lo strumento è destinato esclusivamente a svolgere le operazioni descritte nel manuale
dell’utente. Qualsiasi altro uso è considerato non previsto e può causare infortuni o il
danneggiamento irreparabile dello strumento. Simili usi causano un immediato annullamento
della garanzia concessa dal produttore all’utente.
Se lo strumento non viene utilizzato per un lungo periodo di tempo, rimuovere le
batterie per proteggerlo da eventuali danni.
Il produttore non si assume nessuna responsabilità per eventuali danni materiali o
personali derivanti da un uso improprio o dal mancato rispetto delle avvertenze di
sicurezza. In simili casi decade qualsiasi diritto alla garanzia. Il simbolo del punto
esclamativo all’interno di un triangolo richiama l’attenzione sulle avvertenze di
sicurezza contenute nel manuale dell’utente. Prima della messa in funzione, leggere
il manuale completo. Questo strumento reca il marchio CE e risponde così a tutte le
necessarie direttive.
Ci riserviamo la facoltà di modificare le specifiche senza alcun preavviso
© 2021 Testboy GmbH, Germania.
Esclusione della responsabilità
In caso di danni causati dal mancato rispetto del manuale decade qualsiasi diritto alla
garanzia! Il produttore non si assume nessuna responsabilità per gli eventuali danni
indiretti risultanti!
Testboy non risponde dei danni che risultano
dal mancato rispetto del manuale dell’utente,
da modifiche del prodotto non autorizzate da Testboy
dall’uso di ricambi non prodotti né autorizzati da Testboy
dall’uso di alcol, sostanze stupefacenti o medicinali.

Avvertenze di sicurezza
Testboy® TV 280 46
Esattezza del manuale utente
Il presente manuale utente è stato redatto con la massima cura possibile. Ciononostante, non ci
assumiamo nessuna responsabilità per l’esattezza né per la completezza dei dati, delle immagini
e dei disegni. Con riserva di modifiche, refusi ed errori.
Smaltimento
Gentili clienti Testboy, con l’acquisto del nostro prodotto avete la possibilità di restituire lo
strumento – al termine del suo ciclo di vita – ai centri di raccolta per rifiuti elettronici.
La norma RAEE regola la restituzione e il riciclaggio degli apparecchi elettronici.
I produttori di apparecchi elettronici sono obbligati a ritirare e a riciclare
gratuitamente gli articoli elettronici venduti. Gli apparecchi elettrici non possono
più essere smaltiti insieme ai rifiuti domestici. Essi devono essere riciclati e
smaltiti separatamente. Tutti gli apparecchi che rientrano nel campo di validità
di questa direttiva sono contrassegnati con un marchio speciale.
Smaltimento di batterie usate
Il consumatore finale è tenuto per legge (legge sulle batterie) a restituire tutte
le batterie monouso e ricaricabili usate; è vietato smaltire le batterie insieme
ai rifiuti domestici!
Le batterie monouso/ricaricabili sono contrassegnate con il simbolo qui a fianco,
che richiama l’attenzione su divieto di smaltimento insieme ai rifiuti domestici.
I codici che identificano il metallo pesante contenuto nella batteria sono:
Cd = Cadmio, Hg = Mercurio, Pb = Piombo.
Le batterie monouso/ricaricabili usate possono essere consegnate
gratuitamente ai centri di raccolta del comune di residenza oppure in tutti i punti
vendita di batterie!
Certificato di qualità
Tutte le attività e i processi che si svolgono all’interno della Testboy GmbH e rilevanti ai fini della
qualità vengono permanentemente monitorati da un sistema di assicurazione della qualità.
La Testboy GmbH conferma inoltre che anche i dispositivi e gli strumenti utilizzati per la taratura
sono soggetti a un monitoraggio permanente.
Dichiarazione di conformità
Il prodotto è conforme alle direttive più recenti. Maggiori informazioni sono disponibili all’indirizzo
www.testboy.de

Introduzione
Testboy® TV 280 47
ITALIANO
Introduzione
Il prodotto è una telecamera endoscopica che permette di vedere chiaramente i punti difficilmente
accessibili.
Attraverso il cavo, la telecamera endoscopica può essere manovrata in modo ottimale nei punti
stretti che altrimenti non potrebbero essere ispezionati in modo dettagliato. Diventa così possibile
ispezionare ad es. i condotti dei cavi, le pareti dei cilindri di un motore, le pareti a secco, i
controsoffitti in gesso e molto altro ancora. Lo strumento non è solo in grado di trasmettere le
immagini dal vivo, ma anche di scattare fotografie e riprendere video della scena inquadrata.
Per facilitare la manovrabilità, l’immagine ripresa può essere ruotata in qualsiasi direzione e/o
specchiata. Lo strumento viene fornito con una serie di utensili a pinza con i quali è possibile
raggiungere/afferrare ad es. piccoli oggetti. Nella testa della telecamera endoscopica è integrata
una lampada che permette di illuminare senza problemi l’area da ispezionare. La telecamera è
inoltre dotata di una torcia integrata che consente di illuminare anche l’ambiente in cui si trova
l’utente.
Le riprese archiviate possono essere successivamente analizzate al computer o anche nello
strumento stesso. Il download dei dati fa naturalmente parte della gamma delle funzioni
disponibili. Dal momento che i dati vengono archiviati su una scheda di memoria micro SD, sono
disponibili varie opzioni di download e di archiviazione esterna. Lo strumento dispone di una
batteria integrata che può essere ricaricata attraverso la porta USB micro con qualsiasi
caricabatteria USB tradizionale.
Per evitare danni al cavo della telecamera endoscopica, questo può essere svitato dallo
strumento e conservato separatamente.

Uso
Testboy® TV 280 48
Uso
Proprietà
– Display LCD a colori
– Illuminazione regolabile
– Riprese video e fotografiche
– Rappresentazione capovolta e specchiata
– Torcia integrata
– Utensili a pinza
Struttura dello strumento
1 Torcia ON/OFF
2 Torcia elettrica
3 Porta telecamera
4 Tasto SU
5 Tasto GIÙ
6 Tasto Menu
7 Tasto Indietro
8 Tasto OK
9 Pulsante di scatto
10 Luce ON/OFF
11 Tasto ON/OFF
12 Porta USB
13 Porta USB micro
14 Slot per scheda di memoria SD
15 Vano batteria
16 Connettore maschio
(strumento)
17 Connettore femmina
(telecamera)
Ricarica della batteria
Lo strumento integra al suo interno una batteria ricaricabile agli ioni di litio. Quando la carica della
batteria è bassa, nell’angolo superiore sinistro compare l’icona di una batteria vuota. Quando lo
strumento raggiunge questo stato, dovrebbe essere ricaricato al più presto. La ricarica della
batteria avviene tramite la porta USB micro. Una volta che lo strumento è stato completamente
ricaricato, scollegare il cavo di ricarica.
Per garantire la migliore performance possibile della batteria ricaricabile, lo strumento non
dovrebbe rimanere collegato a un caricabatteria per più di 24 ore. La durata più lunga della

Uso
Testboy® TV 280 49
ITALIANO
batteria si ottiene quando lo strumento viene ricaricato almeno una volta ogni 3 mesi per 2 ore.
La batteria non dovrebbe essere ricaricata in un ambiente freddo.
Funzioni basilari
Per accendere o spegnere lo strumento, premere il tasto ON/OFF (11) e mantenerlo premuto per
almeno 3 secondi.
Una volta acceso lo strumento, premere il tasto Menu (6) per accedere alla schermata delle
impostazioni di base. Compaiono le varie opzioni “Foto”, “Video”, “Risoluzione”, “Lingua”,
“Luminosità”, “Rotazione”, “Regolazione data/ora”, “Formattazione”, “Ripristino”, “Memoria”
e “Versione”. Premere il tasto “Indietro” (7) per tornare alla normale modalità telecamera.
Dopo aver premuto il tasto Menu per accedere alla schermata delle impostazioni di base,
premere il tasto “OK” (8) per selezionare la funzione da modificare. Quindi usare i tasti freccia
(4 e 5) per modificare il valore della relativa funzione.
Una volta impostato il valore desiderato, premere nuovamente il tasto “OK” (8) per
confermarlo/applicarlo. Premere il tasto “Indietro” per abbandonare il menu delle impostazioni.
Premere il tasto Torcia (1) per accendere o spegnere la torcia integrata nello strumento. Premere
il tasto “Luce ON/OFF” (10) per accendere, regolare l’intensità luminosa (3 livelli) o spegnere
l’anello luminoso che si trova intorno alla lente della telecamera.
Pulsante di scatto
Per scattare una fotografia, premere brevemente una volta il pulsante di scatto (9). Quando il
pulsante di scatto viene premuto più a lungo, lo strumento registra un video fino a quando il
pulsante viene di nuovo premuto. Una ripresa è possibile soltanto se nello strumento è presente
una scheda di memoria SD.
Visualizzazione e gestione delle immagini archiviate
Nell’opzione di menu “Foto” vengono visualizzate e possono essere gestite tutte le fotografie
riprese sinora. Premere il tasto “Menu” (6) per accedere al menu principale. Quindi selezionare la
prima opzione “Foto” e premere il tasto OK (8). Viene visualizzata l’ultima immagine ripresa.
A questo punto, premere i tasti freccia “SU” e “GIÙ” (4 e 5) per navigare tra le riprese. Premere il
tasto “Menu” (6) per accedere a ulteriori opzioni e informazioni. A questo punto l’utente ha la
possibilità di eliminare l’ultima ripresa o tutte le riprese.
Inoltre l’utente può accedere anche a informazioni sul nome, sulle dimensioni e sulla risoluzione
del file. Per eliminare un file o tutti i file, selezionare l’opzione desiderata con l’aiuto dei tasti
freccia “SU” e “GIÙ” (4 e 5) e confermare la scelta con il tasto “OK” (8). Compare la domanda di
sicurezza “Eliminare questo file?”. Selezionare l’opzione “OK” e quindi premere nuovamente il
tasto “OK” (8) per eliminare il o i file. Per uscire dal menu delle fotografie, premere il tasto
“Indietro” (7).

Uso
Testboy® TV 280 50
Nell’opzione di menu “Video” vengono visualizzati e possono essere gestiti tutti i video ripresi
sinora. Premere il tasto “Menu” (6) per accedere al menu principale. Quindi selezionare la prima
opzione “Video” e premere il tasto OK (8). Viene visualizzato l’ultimo video ripreso. A questo punto,
premere i tasti freccia “SU” e “GIÙ” (4 e 5) per navigare tra le riprese. Premere il tasto “OK” (8) per
riprodurre il video. Premere il tasto “Menu” (6) per accedere a ulteriori opzioni e informazioni.
A questo punto l’utente ha la possibilità di eliminare l’ultima ripresa o tutte le riprese.
Inoltre l’utente può accedere anche a informazioni sul nome, sulle dimensioni e sulla risoluzione
del file. Per eliminare un file o tutti i file, selezionare l’opzione desiderata con l’aiuto dei tasti freccia
“SU” e “GIÙ” (4 e 5) e confermare la scelta con il tasto “OK” (8). Compare la domanda di sicurezza
“Eliminare questo file?”. Selezionare l’opzione “OK” e quindi premere nuovamente il tasto “OK” (8)
per eliminare il o i file. Per uscire dal menu dei video, premere il tasto “Indietro” (7).
Impostazioni
Risoluzione
Selezionare l’opzione di menu 3 “Risoluzione” con il tasto OK (8) e impostare la risoluzione
desiderata. A tal fine selezionare l’opzione desiderata con i tasti freccia “SU” e “GIÙ” (4 e 5) e
confermare la scelta con il tasto “OK” (8). È possibile impostare le seguenti risoluzioni: 640x480,
1280x720 e 192x1080.
Lingua
Selezionare l’opzione di menu 4 “Lingua” con il tasto OK (8) e impostare la lingua desiderata.
A tal fine selezionare l’opzione desiderata con i tasti freccia “SU” e “GIÙ” (4 e 5) e confermare la
scelta con il tasto “OK” (8).
Luminosità
Selezionare l’opzione di menu 5 “Luminosità” con il tasto OK (8) e impostare la luminosità
desiderata. A tal fine selezionare l’opzione desiderata con i tasti freccia “SU” e “GIÙ” (4 e 5) e
confermare la scelta con il tasto “OK” (8).
Rotazione
Selezionare l’opzione di menu 6 “Rotazione” con il tasto OK (8) e impostare la rappresentazione
desiderata. Compare una “F” al centro del margine inferiore dello schermo. Selezionare l’opzione
desiderata con i tasti freccia “SU” e “GIÙ” (4 e 5).
La “F” rossa viene quindi ruotata o specchiata. Una volta che l’immagine è stata
ruotata/specchiata nel modo desiderato, confermare la scelta con il tasto “OK” (8).

Uso
Testboy® TV 280 51
ITALIANO
Regolazione della data e dell’ora
Selezionare l’opzione di menu 7 “Regolazione data/ora” con il tasto OK (8) e quindi regolare la
data e l’ora. La regolazione inizia con il primo campo dell'anno. A tal fine selezionare la cifra con i
tasti freccia “SU” e “GIÙ” (4 e 5). Premere il tasto OK per passare al campo successivo “Mese”,
seguito dal campo “Giorno”. Nella seconda riga la regolazione inizia con il primo campo dell’ora,
seguito dal campo dei minuti e da quello dei secondi.
Una volta completato anche l’ultimo campo, premere nuovamente il tasto “OK” (8) e sul display
compare una finestra con le opzioni “OK” e “Annulla”. Per confermare le modifiche, premere di
nuovo il tasto OK (8). Per annullare la procedura, con l’aiuto dei tasti freccia “SU” e “GIÙ” (4 e 5)
selezionare l’opzione “Annulla” e confermare con il tasto OK (8).
Formattazione
Selezionare l’opzione di menu 9 “Formattazione’” con il tasto OK (8) per formattare la scheda di
memoria.
ATTENZIONE! Con questa funzione vengono eliminate tutte le riprese effettuare
sinora e tutti gli ulteriori dati presenti nella scheda di memoria!
Con l’aiuto dei tasti freccia “SU” e “GIÙ” (4 e 5) selezionare l’opzione “OK” e confermare con il
tasto “OK” (8) per concludere la formattazione.
Ripristino
Selezionare l’opzione di menu 10 “Ripristino’” con il tasto OK (8) per ripristinare le impostazioni ai
valori di fabbrica.
ATTENZIONE! Con questa funzione tutte le impostazioni dello strumento sinora
configurate verranno ripristinate ai valori di fabbrica!
Con l’aiuto dei tasti freccia “SU” e “GIÙ” (4 e 5) selezionare l’opzione “OK” e confermare con il
tasto “OK” (8) per concludere il la formattazione.
Memoria
L’opzione di menu 11 “Memoria” mostra quanto spazio di memoria è ancora disponibile nel
supporto presente. Esempio: “14,8 | 16G” significa che sono liberi 14,8 GB su 16 GB disponibili.

Dati tecnici
Testboy® TV 280 52
Dati tecnici
Display
Display LCD a colori da 4,3"
Risoluzione immagini
1920x1080 pixel
Campo visivo
orizzontale
70°
Distanza focale
4 cm – 500 cm
Messa a fuoco
Fissa
Formato file
.jpg
Archiviazione delle
immagini
Scheda micro SD
Visualizzazione dei
contenuti archiviati
Foto/Video che possono essere visualizzati sul
display
Alimentazione
elettrica
Batteria ricaricabile integrata
Classe IP
IP67
Diametro della lente
8 mm
Dimensioni
175×100×30 mm

Dati tecnici
Testboy® TV 280 53
NEDERLANDS
Inhoudsopgave
Veiligheidsinstructies 54
Algemene veiligheidsinstructies 54
Inleiding 57
Bediening 58
Eigenschappen 58
Opbouw van de camera 58
De accu’s laden 58
Fundamentele functies 59
Opname 59
Weergave en beheer van opgeslagen beelden 59
Instellingen 60
Resolutie 60
Taal 60
Helderheid 60
Draaien 60
Tijdinstelling 61
Format 61
Systeem resetten 61
Space 61
Technische gegevens 62

Veiligheidsinstructies
Testboy® TV 280 54
Veiligheidsinstructies
WAARSCHUWING
Gevarenbronnen zijn bijv. mechanische delen, die ernstig letsel van personen
kunnen veroorzaken.
Er bestaat ook gevaar voor voorwerpen (bijv. de beschadiging van het instrument).
WAARSCHUWING
Een elektrische schok kan de dood of ernstig letsel van personen tot gevolg hebben
en een gevaar inhouden voor de werking van voorwerpen (bijv. de beschadiging van
het instrument).
WAARSCHUWING
Richt de laserstraal nooit direct of indirect door reflecterende oppervlakken op het
oog. Laserstraling kan onherstelbare schade aan het oog veroorzaken. Bij metingen
in de buurt van mensen moet de laserstraal uitgeschakeld worden.
Algemene veiligheidsinstructies
WAARSCHUWING
Om redenen van veiligheid en toelating (CE) is het eigenmachtige ombouwen en/of
veranderen van het instrument niet toegestaan. Om een veilig gebruik van het
instrument te garanderen moet u in elk geval de veiligheidsinstructies,
waarschuwingen en het hoofdstuk ‘Doelmatig gebruik’ in acht nemen.
WAARSCHUWING
Gelieve vóór het gebruik van het instrument de volgende instructies in acht te
nemen:
| Vermijd de inzet van het instrument in de buurt van elektrische lasapparaten,
inductieverwarmers en andere elektromagnetische velden.
| Na abrupte temperatuurveranderingen moet het instrument vóór het gebruik ter
stabilisatie ca. 30 minuten aan de nieuwe omgevingstemperatuur worden
aangepast om de IR-sensor te stabiliseren.
| Stel het instrument niet langere tijd bloot aan hoge temperaturen.
| Vermijd stoffige en vochtige omgevingsvoorwaarden.
| Meetinstrumenten en toebehoren zijn geen speelgoed en horen niet thuis in de
handen van kinderen!
| In industriële faciliteiten moeten de voorschriften ter preventie van ongevallen
van de bond van de industriële ongevallenverzekeringen voor elektrische
installaties en bedrijfsmiddelen in acht worden genomen.

Veiligheidsinstructies
Testboy® TV 280 55
NEDERLANDS
Gelieve de vijf veiligheidsregels in acht te nemen:
Vrijschakelen
Beveiligen tegen opnieuw inschakelen
Spanningsvrijheid vaststellen (spanningsvrijheid moet 2-polig worden vastgesteld)
Aarden en kortsluiten
Naburige onder spanning staande delen afdekken
Doelmatig gebruik
Het instrument is alleen bedoeld voor de in de bedieningshandleiding beschreven toepassingen.
Een ander gebruik is niet toegelaten en kan ongevallen of onherstelbare beschadiging van het
instrument tot gevolg hebben. Deze toepassingen hebben tot gevolg dat elk recht op garantie en
schadevergoeding van de bediener jegens de fabrikant onmiddellijk komt te vervallen.
Verwijder de batterijen om het instrument bij langer niet-gebruik tegen beschadiging
te beschermen.
Bij materiële schade of persoonlijke verwondingen als gevolg van ondeskundige
hantering of niet-inachtneming van de veiligheidsinstructies aanvaarden wij geen
aansprakelijkheid. In zulke gevallen komt elk recht op garantie te vervallen.
Een uitroepteken in de driehoek verwijst naar veiligheidsinstructies in de
bedieningshandleiding. Lees vóór inbedrijfstelling de handleiding helemaal door.
Dit instrument is CE-gekeurd en voldoet derhalve aan de vereiste richtlijnen.
Rechten voorbehouden om de specificaties zonder voorafgaande aankondiging te wijzigen
© 2021 Testboy GmbH, Deutschland.
Uitsluiting van aansprakelijkheid
Bij schade als gevolg van niet-inachtneming van deze handleiding komt het recht op
garantie te vervallen! Voor indirecte schade als gevolg daarvan aanvaarden wij geen
aansprakelijkheid!
Testboy is niet aansprakelijk voor schade ontstaan als gevolg van
niet in acht nemen van de handleiding,
door Testboy niet geautoriseerde veranderingen aan het product of
door Testboy niet gefabriceerde of niet vrijgegeven onderdelen
invloed van alcohol-, verdovende middelen of medicamenten.

Veiligheidsinstructies
Testboy® TV 280 56
Juistheid van de bedieningshandleiding
Deze bedieningshandleiding werd uiterst zorgvuldig opgesteld. De juistheid en volledigheid van
de gegevens, afbeeldingen en tekeningen wordt niet gegarandeerd. Wijzigingen, drukfouten en
vergissingen voorbehouden.
Verwerking
Geachte Testboy klant, met de aankoop van ons product heeft u de mogelijkheid om het
instrument na afloop van zijn levensduur in te leveren op inzamelpunten voor elektrisch schroot.
De WEEE regelt de terugname en de recyclage van afgedankte elektrische
apparaten. Fabrikanten van elektrische apparaten zijn ertoe verplicht om
elektrische apparaten die worden verkocht, gratis terug te nemen en te
recyclen. Elektrische apparaten mogen dan niet meer in de ‘normale’
afvalstromen worden gebracht. Elektrische apparaten moeten apart gerecycled
en verwerkt worden. Alle apparaten die onder deze richtlijn vallen zijn
gekenmerkt met dit logo.
Afvoer van gebruikte batterijen/accu’s
U als eindverbruiker bent wettelijk (Wet op batterijen) verplicht om alle
gebruikte batterijen en accu´s in te leveren; afvoeren via het huisvuil is
verboden!
Batterijen/accu´s die schadelijke stoffen bevatten zijn gekenmerkt met de
symbolen hiernaast, die wijzen op het verbod van afvoeren via het huisvuil.
De benamingen voor de doorslaggevende zware metalen zijn:
Cd = cadmium, Hg = kwik, Pb = lood.
Uw verbruikte batterijen/accu´s kunt u kosteloos inleveren bij de inzamelpunten
van uw gemeente, of overal waar batterijen/accu´s worden verkocht!
Kwaliteitscertificaat
Alle binnen Testboy GmbH uitgevoerde kwaliteitsrelevante handelingen en processen worden
permanent bewaakt door een kwaliteitsmanagementsysteem. Testboy GmbH bevestigt verder
dat de tijdens de kalibratie gebruikte testinrichtingen en instrumenten worden onderworpen aan
een permanente bewaking van de beproevingsmiddelen.
Conformiteitsverklaring
Het product voldoet aan de meest recente richtlijnen. Meer informatie vindt u op www.testboy.de

Inleiding
Testboy® TV 280 57
NEDERLANDS
Inleiding
Bij dit product gaat het om een endoscoop-camera, die de mogelijkheid biedt om lastig
toegankelijke gebieden helder en duidelijk te zien.
De endoscoop-camera kan met behulp van de kabel perfect naar nauwe plekken worden
bewogen, die anders niet gedetailleerd bekeken kunnen worden. Op die manier kunnen
bijvoorbeeld kabelschachten, cilinderwanden van motoren, holle ruimtes in gipsplaatwanden,
verlaagde plafonds en nog veel meer onderzocht worden. Het instrument levert niet alleen live-
beelden maar kan ook foto’s en video’s van de situatie maken. De weergave kan daarbij in elke
richting worden gedraaid en/of gespiegeld om het manoeuvreren eenvoudiger te maken. Het
instrument wordt geleverd met een selectie aan grijptools waarmee men bijv. kleine onderdelen
kan bereiken / terugkrijgen. Aan de kop van de camera zit een lamp waarmee de krappe ruimte
zonder problemen verlicht kan worden. Bovendien is de camera voorzien van een geïntegreerde
zaklamp zodat men ook de omgeving van de gebruiker kan verlichten.
De opgeslagen opnames kunnen later op de computer of ook op het instrument zelf worden
bekeken. Downloaden van de gegevens behoort uiteraard ook tot de functionaliteiten. Aangezien
de gegevens op een micro SD-kaart worden opgeslagen, zijn er verschillende mogelijkheden
voor downloaden en externe opslag. Het instrument heeft een geïntegreerde accu die via de
micro-USB interface met elke gangbare USB-oplader of USB-poort geladen kan worden.
Om beschadiging van de camera-kabel te voorkomen kan deze van het instrument worden
afgeschroefd en apart worden opgeborgen.

Bediening
Testboy® TV 280 58
Bediening
Eigenschappen
- kleuren LCD display
- instelbare verlichting
- video- en foto-opname
- draai- en spiegelbare weergave
- geïntegreerde zaklamp
- grijptools
Opbouw van de camera
1 Zaklamp aan/uit
2 Zaklamp
3 Aansluiting voor camera
4 Omhoog toets
5 Omlaag toets
6 Menu toets
7 Terug toets
8 OK toets
9 Opname toets
10 Licht aan/uit
11 Aan/Uit toets
12 USB aansluiting
13 Micro USB poort
14 Micro SD-kaartsleuf
15 Accuvak
16 Camera-aansluiting mannetje
(op instrument)
17 Camera-aansluiting vrouwtje
(op camera)
De accu’s laden
Het instrument bevat een geïntegreerde lithium-ion-accu. Als de accu bijna leeg is, verschijnt
linksboven op het display een lege-batterij-symbool. Wanneer deze toestand is bereikt, moet het
instrument worden opgeladen. Het instrument wordt opgeladen via de micro-USB-poort. Wanneer
het instrument volledig is opgeladen, moet de laadkabel worden uitgetrokken.
Om de maximale prestaties van de accu te waarborgen, mag het instrument niet langer dan
24 uur aan een oplader worden aangesloten. De langste levensduur van de accu kan worden

Bediening
Testboy® TV 280 59
NEDERLANDS
gegarandeerd als het instrument ten minste om de 3 maanden gedurende 2 uur wordt opgeladen.
De accu mag niet worden opgeladen in een extreem koude omgeving.
Fundamentele functies
Druk om het instrument in- resp. uit te schakelen op de Aan/Uit toets (11) en houd deze
3 seconden lang ingedrukt.
Nadat het instrument werd ingeschakeld drukt u op de Menu toets (6) om het display voor de
instelling van de fundamentele functies op te roepen. De keuzemogelijkheden 'Foto', 'Video',
'Resolutie', 'Taal', 'Helderheid', 'Draaien', 'Tijdinstelling', 'Format', 'Systeem resetten', 'Space' en
'Versie' verschijnen. Met 'Terug’ (7) keert u weer terug naar de normale cameramodus.
Druk na activering van de Menu-toets in de basisfunctiemodus op de toets ‘OK’ (8) om
instellingen aan fundamentele functies uit te voeren. Met de pijltoetsen (4 en 5) selecteert u de
gewenste waarde van de betreffende instelling.
Na het instellen van de gewenste functies kunnen deze door opnieuw op de toets 'OK' (8) te
drukken worden overgenomen. Druk op de toets ‘Terug’ om de instelmodus weer te verlaten.
Met de zaklamp toets (1) kan de zaklamp op het instrument in- en uitgeschakeld worden.
De toets 'Licht aan/uit' (10) kan de verlichting rondom de lens van de camera in drie niveaus in-
en weer uitschakelen.
Opname
Om een foto op te nemen drukt u één keer kort op de Opname toets (9). Als de toets langer
ingedrukt wordt, neemt het instrument een video op totdat de toets weer wordt ingedrukt.
Opnames kunnen alleen worden gemaakt als er een micro SD-kaart in het instrument zit.
Weergave en beheer van opgeslagen beelden
In het menupunt 'Foto' vindt u alle tot dan toe genomen foto's die u daar ook kunt beheren. Druk
op de toets ‘Menu’ (6) om naar het hoofdmenu te gaan. Kies nu het eerste menupunt 'Foto' en
druk vervolgens op de toets ‘OK’ (8). Nu wordt de laatst opgenomen foto getoond. Met de
pijltoetsen 'omhoog' en 'omlaag' (4 en 5) kunt u nu door de opnames bladeren. Met de toets
'Menu' (6) krijgt u dan meer opties en informatie. U hebt nu de mogelijkheid om de laatst
weergegeven opname of alle opnames te wissen.
Tevens krijgt u informatie over de naam, over de grootte van het bestand en over de resolutie
ervan. Om één of alle bestanden te wissen kiest u het gewenste menupunt met de pijltoetsen
'omhoog' en 'omlaag' (4 en 5) en bevestigt de keuze met de toets 'OK' (8). De vraag 'Dit bestand
wissen?' verschijnt. Hier kiest u 'OK' en bevestigt dan opnieuw met de toets 'OK' (8) om het
bestand/de bestanden te wissen. Om het foto-aanzicht te verlaten drukt u op de toets 'Terug' (7).

Bediening
Testboy® TV 280 60
In het menupunt 'Video' vindt u alle tot dan toe genomen video’s die u daar ook kunt beheren. Druk
op de toets ‘Menu’ (6) om naar het hoofdmenu te gaan. Kies nu het tweede menupunt 'Video' en
druk vervolgens op de toets ‘OK’ (8). Nu wordt de laatst opgenomen video getoond. Met de
pijltoetsen 'omhoog' en 'omlaag' (4 en 5) kunt u nu door de opnames bladeren. Met de toets ‘OK’
(8) wordt de video weergegeven. Met de toets 'Menu' (6) krijgt u dan meer opties en informatie.
U hebt nu de mogelijkheid om de laatst weergegeven opname of alle opnames te wissen.
Tevens krijgt u informatie over de naam, over de grootte van het bestand en over de resolutie
ervan. Om één of alle bestanden te wissen kiest u het gewenste menupunt met de pijltoetsen
'omhoog' en 'omlaag' (4 en 5) en bevestigt de keuze met de toets 'OK' (8). De vraag 'Dit bestand
wissen?' verschijnt. Hier kiest u 'OK' en bevestigt dan opnieuw met de toets 'OK' (8) om het
bestand/de bestanden te wissen. Om het video-aanzicht te verlaten drukt u op de toets 'Terug' (7).
Instellingen
Resolutie
In het menu kan optie 3 'Resolutie' met de toets ‘OK’ (8) worden gekozen en kan een van de
resoluties worden ingesteld. Selecteer hiertoe de gewenste optie met de toetsen 'omhoog' en
'omlaag' (4 en 5) en bevestig dit met de toets 'OK' (8). Als resoluties staan 640x480, 1280x720 en
192x1080 ter beschikking.
Taal
In het menu kan optie 4 'Taal' met de toets ‘OK’ (8) worden gekozen en kan een van de talen
worden ingesteld. Selecteer hiertoe de gewenste optie met de toetsen 'omhoog' en 'omlaag' (4 en
5) en bevestig dit met de toets 'OK' (8).
Helderheid
In het menu kan optie 5 'Helderheid' met de toets ‘OK’ (8) worden gekozen en kan een van de
standen voor de helderheid van het beeldscherm worden ingesteld. Selecteer hiertoe de
gewenste optie met de toetsen 'omhoog' en 'omlaag' (4 en 5) en bevestig dit met de toets
'OK' (8).
Draaien
In het menu kan optie 6 'Draaien' met de toets ‘OK’ (8) worden gekozen en kan een van de
weergaven worden ingesteld. Er verschijnt een rode 'F' in het midden onder op het display.
Kies de gewenste optie met de toetsen 'omhoog' en 'omlaag' (4 en 5).
De rode 'F' wordt nu navenant gedraaid of gespiegeld. Wanneer het beeld zoals gewenst is
gespiegeld/gedraaid, dan bevestigt u de instelling met de toets 'OK' (8).

Bediening
Testboy® TV 280 61
NEDERLANDS
Tijdinstelling
In het menu kan optie 7 'Tijdinstelling' met de toets ‘OK’ (8) worden gekozen en kunnen datum en
tijd worden ingesteld. U start in het eerste veld om het jaar in te stellen. Selecteer hiervoor met de
toetsen 'omhoog' en 'omlaag' (4 en 5) het cijfer. Met de toets ‘OK’ springt u naar het volgende
veld ‘Maand’, gevolgd door het veld ‘Dag’. In de tweede regel start u nu met de uren, gevolgd
door minuten en seconden.
Wanneer het laatste veld werd ingevuld, drukt u weer op de toets 'OK' (8) en het instrument
springt naar de keuzemogelijkheden 'OK' en 'Annuleren'. Om de instellingen over te nemen drukt
u weer op de toets ‘OK’ (8). Wanneer u het proces wilt stoppen, gaat u met de toetsen 'omhoog'
en 'omlaag' (4 en 5) naar de optie 'Annuleren' en bevestigt dit met de toets ‘OK’ (8).
Format
In het menu kan optie 9 'Format' met de toets ‘OK’ (8) worden gekozen en kan het
geheugenmedium geformatteerd worden.
Opgelet! Hierbij worden alle tot dan toe gemaakte opnames en alle andere gegevens
op het geheugenmedium gewist!
Kies met de toetsen 'omhoog' en 'omlaag' (4 en 5) de optie 'OK' en bevestig de keuze met de
toets 'OK' (8) om het formatteren af te ronden.
Systeem resetten
In het menu kan optie 10 'Systeem resetten' met de toets ‘OK’ (8) worden gekozen en kan het
systeem gereset worden.
Opgelet! Hierbij worden alle tot dan toe verrichte instellingen van het instrument
gereset!
Kies met de toetsen 'omhoog' en 'omlaag' (4 en 5) de optie 'OK' en bevestig de keuze met de
toets 'OK' (8) om het systeem te resetten.
Space
Menupunt 11 'Space' geeft aan, hoeveel geheugen op het voorhanden medium aanwezig is.
Voorbeeld: '14,8 | 16G' betekent, er is 14,8 van 16 mogelijke GB vrij.

Technische gegevens
Testboy® TV 280 62
Technische gegevens
Display
4,3” kleuren LCD display
Beeldresolutie
1920x1080 pixels
Horizontaal
gezichtsveld
70°
Brandpuntsafstand
4 cm – 500 cm
Focus
Vast ingesteld
Bestandsformaat
.jpg
Opslag van beelden
Micro SD-kaart
Weergave van
opgeslagen inhoud
Foto’s/video’s die op het beeldscherm
weergegeven kunnen worden
Voeding
Geïntegreerde accu
IP klasse
IP67
Lensdiameter
8 mm
Afmetingen
175×100×30 mm


Testboy GmbH Tel: 0049 (0)4441 / 89112-10
Elektrotechnische Spezialfabrik Fax: 0049 (0)4441 / 84536
Beim Alten Flugplatz 3
D-49377 Vechta www.testboy.de
Germany [email protected]
-
 1
1
-
 2
2
-
 3
3
-
 4
4
-
 5
5
-
 6
6
-
 7
7
-
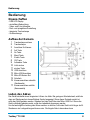 8
8
-
 9
9
-
 10
10
-
 11
11
-
 12
12
-
 13
13
-
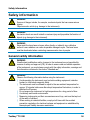 14
14
-
 15
15
-
 16
16
-
 17
17
-
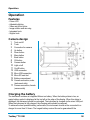 18
18
-
 19
19
-
 20
20
-
 21
21
-
 22
22
-
 23
23
-
 24
24
-
 25
25
-
 26
26
-
 27
27
-
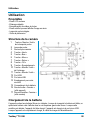 28
28
-
 29
29
-
 30
30
-
 31
31
-
 32
32
-
 33
33
-
 34
34
-
 35
35
-
 36
36
-
 37
37
-
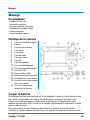 38
38
-
 39
39
-
 40
40
-
 41
41
-
 42
42
-
 43
43
-
 44
44
-
 45
45
-
 46
46
-
 47
47
-
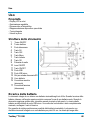 48
48
-
 49
49
-
 50
50
-
 51
51
-
 52
52
-
 53
53
-
 54
54
-
 55
55
-
 56
56
-
 57
57
-
 58
58
-
 59
59
-
 60
60
-
 61
61
-
 62
62
-
 63
63
-
 64
64


in andere talen
- italiano: TESTBOY TV 280 Manuale utente
- français: TESTBOY TV 280 Manuel utilisateur
- español: TESTBOY TV 280 Manual de usuario
- Deutsch: TESTBOY TV 280 Benutzerhandbuch