
LED-DECKENFLUTER MIT FARBTONSTEUERUNG
/ LED
UPLIGHTER/READING LAMP WITH ADJUSTABLE LIGHT
TONE / LAMPADAIRE LED AVEC VARIATEUR DE BLANC
LED-DECKENFLUTER MIT
FARBTONSTEUERUNG
Montage-, Bedienungs- und Sicherheitshinweise
LED UPLIGHTER / READING LAMP WITH
ADJUSTABLE LIGHT TONE
Assembly, operating and safety instructions
LAMPADAIRE LED AVEC
VARIATEUR DE BLANC
Instructions de montage, d‘utilisation et consignes de sécurité
LED-PLAFONDSCHIJNWERPER MET
KLEURREGELING
Montage-, bedienings- en veiligheidsinstructies
STOJACÍ LED LAMPA S NASTAVITELNOU
TEPLOTOU SVĚTLA
Pokyny k montáži, obsluze a bezpečnostní pokyny
LAMPA LED Z UKŁADEM STEROWANIA
MOCY ŚWIA TŁA
Wskazówki montażu, obsługi i bezpieczeństwa
LED STOJACA LAMPA
Pokyny pre montáž, obsluhu a bezpečnostné pokyny
IAN 339716_1910

DE / AT / CH Montage-, Bedienungs- und Sicherheitshinweise Seite 5
GB / IE Assembly, operating and safety instructions Page 15
FR / BE Instructions de montage, d‘utilisation et consignes de sécurité Page 23
NL / BE Montage-, bedienings- en veiligheidsinstructies Pagina 33
PL Wskazówki montażu, obsługi i bezpieczeństwa Strona 41
CZ Pokyny k montáži, obsluze a bezpečnostní pokyny Strana 51
SK Pokyny pre montáž, obsluhu a bezpečnostné pokyny Strana 59
Klappen Sie vor dem Lesen die beiden Seiten mit den Abbildungen aus und machen Sie sich anschließend
mit allen Funktionen des Gerätes vertraut.
Before reading, unfold both pages containing illustrations and familiarise yourself with all functions of
the device.
Avant de lire le mode d‘emploi, ouvrez les deux pages contenant les illustrations et familiarisez-vous
ensuite avec toutes les fonctions de l‘appareil.
Vouw vóór het lezen de beide pagina‘s met de afbeeldingen open en maak u vertrouwd met alle functies
van het apparaat.
Przed przeczytaniem proszę rozłożyć obie strony z ilustracjami, a następnie proszę zapoznać się z
wszystkimi funkcjami urządzenia.
Před čtením si odklopte obě dvě strany s obrázky a potom se seznamte se všemi funkcemi přístroje.
Pred čítaním si odklopte obidve strany s obrázkami a potom sa oboznámte so všetkými funkciami prístroja.

A
B
C
14135502L /
14135602L
14
1
3
2
4
5
6
8
8
11
7
8
9
7
20
16
17
10
1
3
2
4
9
18
11
12
18
13
15
19

8

5 DE/AT/CH
Inhaltsverzeichnis
Legende der verwendeten Piktogramme ........................................................... Seite 6
Einleitung ......................................................................................................................................... Seite 7
Bestimmungsgemäße Verwendung ....................................................................................................Seite 7
Lieferumfang ........................................................................................................................................ Seite 7
Teilebeschreibung ...............................................................................................................................Seite 7
Technische Daten ................................................................................................................................Seite 7
Sicherheit ......................................................................................................................................... Seite 8
Sicherheitshinweise .............................................................................................................................Seite 8
Sicherheitshinweise für Batterien / Akkus ........................................................................................... Seite 9
Vorbereitung ................................................................................................................................Seite 10
Benötigtes Werkzeug und Material ...................................................................................................Seite 10
Inbetriebnahme ......................................................................................................................... Seite 10
Leuchte montieren ...............................................................................................................................Seite 10
Batterien einlegen / wechseln .............................................................................................................Seite 11
Leuchte ein- / ausschalten ...................................................................................................................Seite 11
Leuchte ausrichten ............................................................................................................................... Seite 11
Wartung und Reinigung .....................................................................................................Seite 11
Entsorgung .....................................................................................................................................Seite 12
Garantie und Service ............................................................................................................Seite 12
Garantie ..............................................................................................................................................Seite 12
Serviceadresse ....................................................................................................................................Seite 12
Konformitätserklärung .........................................................................................................................Seite 12
Hersteller ..............................................................................................................................................Seite 13

6 DE/AT/CH
Einleitung Legende der verwendeten Piktogramme
Legende der verwendeten Piktogramme
Anweisungen lesen! Explosionsgefahr!
Volt (Wechselspannung) Schutzhandschuhe tragen!
Hertz (Frequenz) Warnung! Stromschlaggefahr!
Watt (Wirkleistung) So verhalten Sie sich richtig
Schutzklasse II Vorsicht vor heißen Oberflächen!
Kurzschlussfester
Sicherheitstrans formator b
a
Entsorgen Sie Verpackung
und Gerät umweltgerecht!
Diese Leuchte ist ausschließlich für den
Betrieb im Innenbereich, in trockenen
und geschlossenen Räumen geeignet.
Unabhängiges Betriebsgerät
Lebens- und Unfallgefahr für
Kleinkinder und Kinder! Leseleuchte
Warn- und Sicherheitshinweise
beachten! Timer
Deckenfluter ta Umgebungstemperatur
Die Verpackung besteht aus 100 %
recyceltem Papier. tc Gehäusetemperatur am
angegebenen Punkt
Nicht geeignet für externe Dimmer
oder elektronische Schalter Polarität des Anschlusses
d.c. DC Gleichspannung ON OFF Schaltzyklen
LED-Lebensdauer SELV Schutzkleinspannung
Schutzklasse III

7 DE/AT/CH
Einleitung Legende der verwendeten Piktogramme
LED-Deckenfluter mit
Farbtonsteuerung
Einleitung
Wir beglückwünschen Sie zum Kauf Ihres
neuen Gerätes. Sie haben sich damit für
ein hochwertiges Produkt entschieden.
Bitte lesen Sie diese Bedienungsanleitung vollständig
und sorgfältig durch. Klappen Sie die Seite mit den
Abbildungen aus. Diese Anleitung gehört zu diesem
Produkt und enthält wichtige Hinweise zur Inbetrieb-
nahme und Handhabung. Beachten Sie immer alle
Sicherheitshinweise. Prüfen Sie vor der Inbetriebnahme,
ob die korrekte Spannung vorhanden ist und ob alle
Teile richtig montiert sind. Sollten Sie Fragen haben
oder unsicher in Bezug auf die Handhabung des
Gerätes sein, setzen Sie sich bitte mit Ihrem Händler
oder der Servicestelle in Verbindung. Bewahren Sie
diese Anleitung bitte sorgfältig auf und geben Sie
sie ggf. an Dritte weiter.
Bestimmungsgemäße
Verwendung
Diese Leuchte ist ausschließlich für den
Betrieb im Innenbereich, in trockenen
und geschlossenen Räumen geeignet.
Dieses Gerät ist nur für den Einsatz in privaten
Haushalten vorgesehen. Dieses Produkt ist vorgesehen
für den normalen Betrieb.
Lieferumfang
Kontrollieren Sie unmittelbar nach dem Auspacken
immer den Lieferumfang auf Vollständigkeit sowie
den einwandfreien Zustand des Gerätes.
1 LED-Deckenfluter mit Farbtonsteuerung, Modell
14135502L bzw. 14135602L
1 Leuchtenglas
1 Standrohr (2-teilig)
3 Schrauben (Leuchtenglas) (14135502L)
4 Schrauben (Leuchtenglas) (14135602L)
3 Unterlegscheiben / Gummiringe (14135502L)
4 Unterlegscheiben / Gummiringe (14135602L)
1 Fernbedienung
2 Batterien 1,5 V AAA
1 Halterung (2-teilig)
2 Schrauben (Halterung)
1 Standfuß
1 Werkzeug
1 Sicherungsplatte (oval)
1 Steckernetzteil
1 Montage- und Bedienungsanleitung
Teilebeschreibung
1 Schraube (Leuchtenglas)
2 Unterlegscheibe / Gummiringe
3 Leuchtenglas
4 Fluterkopf
5 Leuchtenkopf (Leseleuchte)
6 Flexarm (Leseleuchte)
7 Standrohr
8 Fernbedienung
9 2-teilige Halterung (Fernbedienung)
10 Schraube (Halterung)
11 Standfuß
12 Mutter
13 Werkzeug
14 Steckernetzteil
15 Transportsicherung
16 EIN- / AUS-Schalter (Leseleuchte)
17 EIN- / AUS-Schalter (Deckenfluter)
18 Netzkabel
19 Sicherungsplatte (oval)
20 Unterlegscheibe (groß)
Technische Daten
Modell-Nummer: 14135502L / 14135602L
Spannung: 220‒240 V ~ 50 / 60 Hz
Nennleistung: 36 W
Schutzklasse: II /
Schutzart: IP20
Typ: 14135502L-1 /
14135602L-1
Betriebsspannung: 24 V

8 DE/AT/CH
Sicherheit Einleitung / Sicherheit
Schutzklasse: III /
Schutzart: IP20
Fluterkopf
Leistung: 34 W
LED: fest verbaut, nicht
austauschbar
Leseleuchte
Leistung: 4,5 W
LED: fest verbaut, nicht aus-
tauschbar
Fernbedienung:
Batterien: 2 x 1,5 V AAA
Sicherheit
Sicherheitshinweise
Bei Schäden, die durch Nichtbeachtung dieser
Bedienungsanleitung verursacht werden, erlischt der
Garantieanspruch! Für Folgeschäden wird keine
Haftung übernommen! Bei Sach- oder Personen-
schäden, die durch unsachgemäße Handhabung
oder Nichtbeachtung der Sicherheitshinweise verur-
sacht werden, wird keine Haftung übernommen!
LEBENS- UND
UNFALLGEFAHR FÜR KLEIN-
KINDER UND KINDER!
Lassen Sie Kinder niemals unbeaufsichtigt mit
dem Verpackungsmaterial. Es besteht Erstickungs-
gefahr durch Verpackungsmaterial. Kinder unter-
schätzen häufig die Gefahren. Halten Sie Kinder
stets vom Produkt fern.
Dieses Gerät kann von Kindern ab 8 Jahren und
darüber, sowie von Personen mit verringerten
physischen, sensorischen oder mentalen Fähig-
keiten oder Mangel an Erfahrung und Wissen
benutzt werden, wenn sie beaufsichtigt oder
bezüglich des sicheren Gebrauchs des Gerätes
unterwiesen wurden und die daraus resultieren-
den Gefahren verstehen. Kinder dürfen nicht mit
dem Gerät spielen. Reinigung und
Benutzerwartung dürfen nicht von Kindern
ohne Beaufsichtigung durchgeführt werden.
Vermeiden Sie Lebensgefahr
durch elektrischen Schlag
Überprüfen Sie vor jedem Gebrauch die Leuchte
auf etwaige Beschädigungen. Benutzen Sie Ihre
Leuchte niemals, wenn Sie irgendwelche Be-
schädigungen feststellen.
Eine beschädigte Leuchte bedeutet Lebensgefahr
durch elektrischen Schlag. Wenden Sie sich bei
Beschädigungen, Reparaturen oder anderen
Problemen an der Leuchte an die Servicestelle
oder eine Elektrofachkraft.
Zur Vermeidung von Gefährdungen darf die
beschädigte äußere flexible Leitung dieser
Leuchte ausschließlich vom Hersteller, seinem
Servicevertreter oder einer vergleichbaren
Fachkraft ausgetauscht werden!
Vergewissern Sie sich vor der Benutzung, dass die
vorhandene Netzspannung mit der benötigten
Betriebsspannung der Leuchte übereinstimmt
(siehe „Technische Daten“).
Vermeiden Sie unbedingt die Berührung der
Leuchte mit Wasser oder anderen Flüssigkeiten.
Ziehen Sie immer den Netzstecker vor der
Montage, Demontage, Reinigung oder, wenn
Sie die Leuchte eine Zeit lang nicht verwenden,
aus der Steckdose.
Öffnen Sie niemals eines der elektrischen
Betriebsmittel oder stecken irgendwelche
Gegenstände in dieselben. Derartige Eingriffe
bedeuten Lebensgefahr durch elektrischen Schlag.
Knicken Sie das Netzkabel nicht.
Verlegen Sie das Kabel nicht über scharfe Kanten.
Vermeiden Sie Brand- und
Verletzungsgefahr
VORSICHT! VERLETZUNGSGEFAHR!
Überprüfen Sie unmittelbar nach dem Auspacken
jeden Fluter auf Beschädigungen. Montieren Sie
die Leuchte nicht mit defektem Lampenglas.
Setzen Sie sich in diesem Fall für Ersatz mit der
Servicestelle in Verbindung.

9 DE/AT/CH
Sicherheit Einleitung / Sicherheit
VORSICHT! VERBRENNUNGS-
GEFAHR DURCH HEISSE
OBERFLÄCHEN!
Stellen Sie sicher, dass die Leuchte ausgeschaltet
und abgekühlt ist, bevor Sie diese berühren, um
Verbrennungen zu vermeiden. Leuchtmittel ent-
wickeln im Bereich des Lampenkopfes eine
starke Hitze.
Decken Sie die Leuchte bzw. den Netzstecker
nicht mit Gegenständen ab. Eine übermäßige
Wärmeentwicklung kann zu Brandentwicklung
führen.
Lassen Sie die Leuchte im Betrieb nicht unbe-
aufsichtigt.
ACHTUNG!
Bei Betrieb nicht aus kurzem Abstand in die
LED schauen.
Die LED nicht mit einem optischen Instrument
(z.B. Lupe) betrachten.
Die Lichtquelle dieser Leuchte ist nicht ersetzbar;
wenn die Lichtquelle das Ende ihrer Lebens-
dauer erreicht hat, ist die gesamte Leuchte zu
ersetzen.
So verhalten Sie sich richtig
Montieren Sie die Leuchte so, dass sie vor
Feuchtigkeit und Verschmutzung geschützt ist.
Bereiten Sie die Montage sorgfältig vor und
nehmen Sie sich ausreichend Zeit. Legen Sie alle
Einzelteile und zusätzlich benötigtes Werkzeug
oder Material vorher übersichtlich und griffbereit
zurecht.
Seien Sie stets aufmerksam! Achten Sie immer
darauf was Sie tun und gehen Sie stets mit Ver-
nunft vor. Montieren Sie die Leuchte in keinem
Fall, wenn Sie unkonzentriert sind oder sich
unwohl fühlen.
Um die Leuchte vollständig von der Stromver-
sorgung zu trennen, muss der Netzstecker aus
der Steckdose entfernt werden.
Sicherheitshinweise für
Batterien / Akkus
LEBENSGEFAHR!
Halten Sie Batterien / Akkus außer Reichweite von
Kindern. Suchen Sie im Falle eines Verschluckens
sofort einen Arzt auf!
EXPLOSIONSGEFAHR!
Laden Sie nicht aufladbare Batterien niemals
wieder auf. Schließen Sie Batterien / Akkus nicht
kurz und / oder öffnen Sie diese nicht. Über-
hitzung, Brandgefahr oder Platzen können die
Folge sein.
Werfen Sie Batterien / Akkus niemals in Feuer
oder Wasser.
Setzen Sie Batterien / Akkus keiner mechanischen
Belastung aus.
Risiko des Auslaufens von Batterien /
Akkus
Vermeiden Sie extreme Bedingungen und
Temperaturen, die auf Batterien / Akkus einwirken
können z. B. auf Heizkörpern / direkte Sonnen-
einstrahlung.
Vermeiden Sie den Kontakt mit Haut, Augen
und Schleimhäuten! Spülen Sie bei Kontakt mit
Batteriesäure die betroffenen Stellen sofort mit
klarem Wasser und suchen Sie umgehend einen
Arzt auf!
SCHUTZHANDSCHUHE
TRAGEN!
Ausgelaufene oder beschädigte Batterien /
Akkus können bei Berührung mit der Haut Ver-
ätzungen verursachen. Tragen Sie deshalb in
diesem Fall geeignete Schutzhandschuhe.
Im Falle eines Auslaufens der Batterien / Akkus
entfernen Sie diese sofort aus dem Produkt, um
Beschädigungen zu vermeiden.
Verwenden Sie nur Batterien / Akkus des gleichen
Typs. Mischen Sie nicht alte Batterien / Akkus
mit neuen!
Entfernen Sie die Batterien / Akkus, wenn das
Produkt längere Zeit nicht verwendet wird.

10 DE/AT/CH
Inbetriebnahme / Wartung und Reinigung Sicherheit / Vorbereitung / Inbetriebnahme
Risiko der Beschädigung des Produkts
Verwenden Sie ausschließlich den angegebenen
Batterietyp / Akkutyp!
Setzen Sie Batterien / Akkus gemäß der Polaritäts-
kennzeichnung (+) und (-) an Batterie / Akku
und des Produkts ein.
Reinigen Sie Kontakte an Batterie / Akku und
im Batteriefach vor dem Einlegen!
Entfernen Sie erschöpfte Batterien / Akkus
umgehend aus dem Produkt.
Vorbereitung
Benötigtes Werkzeug
und Material
Die genannten Werkzeuge und Materialien sind
nicht im Lieferumfang enthalten. Es handelt sich hier-
bei um unverbindliche Angaben und Werte zur Ori-
entierung. Die Beschaffenheit des Materials richtet
sich nach den individuellen Gegebenheiten vor Ort.
- Schraubendreher
Inbetriebnahme
Leuchte montieren
Hinweis: Für die Montage benötigen Sie eine
zweite Person.
Hinweis: Legen Sie den Fluter während der
Montage auf eine weiche Unterlage (Decke o. Ä.),
um Beschädigungen zu vermeiden.
Hinweis: Achten Sie während der Montage darauf,
dass Sie das Kabel gleichzeitig langsam durch den
Boden ziehen.
Entfernen Sie die Transportsicherungen 15 aus
dem Standrohr 7.
Stecken Sie die Teile des Standrohrs 7 ineinan-
der und schrauben Sie sie fest.
Hinweis: Achten Sie darauf, dass die Stand-
rohre 7 so weit wie möglich eingedreht werden,
um einen sicheren Stand der Leuchte zu ge-
währleisten.
Achten Sie darauf, dass das Netzkabel 18 , das
durch das Standrohr 7 führt, dabei nicht
eingeklemmt wird.
Hinweis: Die Mutter
12
und die Unterlegscheibe
(groß) 20 sind am Standrohr 7 vormontiert.
Lösen Sie die Mutter 12 und die Unterlegscheibe
(groß) 20 vom Standrohr 7.
Entfernen Sie Mutter 12 und Unterlegscheibe
(groß) 20 vom Netzkabel 18 .
Führen Sie das Netzkabel 18 durch die Öffnung
in der Mitte des Standfußes 11 .
Schieben Sie zuerst die Sicherungsplatte (oval)
19 , dann die Unterlegscheibe (groß) 20 und
zuletzt die Mutter 12 über das Netzkabel 18 .
Führen Sie anschließend das Netzkabel 18 durch
die seitliche Öffnung am Standfuß
11
nach außen.
Stecken Sie das Standrohr 7 durch die Öffnung
des Standfußes 11 .
Achten Sie darauf, dass das Netzkabel 18 ,
das durch das Standrohr 7 führt, dabei nicht
eingeklemmt wird.
Schieben Sie die Sicherungsplatte (oval) 19
und die Unterlegscheibe (groß) 20 von unten
auf das Standrohr 7.
Drehen Sie die Mutter 12 auf der Unterseite des
Standfußes 11 mit Hilfe des Werkzeugs 13 fest.
Achten Sie auf den richtigen Sitz.
Hinweis: Achten Sie darauf, dass Sie das Stand-
rohr 7 beim Festziehen der Mutter 12 festhalten.
Hinweis: Achten Sie darauf, dass das Kabel
in der dafür vorgesehenen Aussparung im Stand-
fuß 11 liegt und nicht gequetscht werden kann.
Stellen Sie den Deckenfluter aufrecht hin.
Legen Sie das Leuchtenglas 3 auf den Fluter-
kopf 4.
Befestigen Sie das Leuchtenglas 3 mit Hilfe
der Schrauben 1 und Unterlegscheiben 2
am Fluterkopf 4 (siehe Abb. A).
Montieren Sie die Halterung 9 mittels der zwei
Schrauben 10 am Standrohr 7 (siehe Abb. C).
Verbinden Sie das Netzkabel 18 mit dem
Steckernetzteil 14 .
Stecken Sie das Steckernetzteil 14 in eine vor-
schriftsmäßig installierte Steckdose.
Ihre Leuchte ist betriebsbereit.

11 DE/AT/CH
Inbetriebnahme / Wartung und Reinigung
Batterien einlegen / wechseln
Schieben Sie die Batterieschublade von der
Fernbedienung 8.
Legen Sie die Batterien aus dem Lieferumfang
in die Fernbedienung 8 ein (siehe Abb.B).
Legen Sie nur Batterien ein, welche den
„Technischen Daten“ entsprechen.
Hinweis: Die richtige Polarität wird im
Batteriefach angezeigt.
Schieben Sie die Batterieschublade wieder auf
die Fernbedienung 8.
Wenn die Reichweite der Fernbedienung 8
nachlässt, müssen Sie die Batterien auswechseln.
Schieben Sie dazu die Batterieschublade von
der Fernbedienung.
Entnehmen Sie die Batterien.
Legen Sie die neuen Batterien ein. Gehen Sie
dazu vor wie zuvor beschrieben.
Leuchte ein- / ausschalten
Schalten Sie den Deckenfluter mittels des EIN- /
AUS-Schalters 17 ein- bzw. aus.
Schalten Sie die Leseleuchte 5 mittels des
EIN- /AUS-Schalters 16 ein- bzw. aus.
Steuerung des Fluterkopfes 4 mittels
Fernbedienung 8:
Schalten Sie den Fluterkopf 4 am EIN- / AUS-
Schalter 17 ein.
Achten Sie darauf, dass sich kein Hindernis
zwischen Leuchte und Fernbedienung 8
befindet.
Die Leuchte speichert die zuletzt gewählte
Lichtfarbe.
Folgende Funktionen stehen Ihnen zur
Verfügung:
Deckenfluter einschalten
Deckenfluter ausschalten
kalt-, neutral- oder warmweißes Licht
einstellen
hochdimmen
herunterdimmen
Nachtlichtfunktion: Mit der Programm-
taste leuchtet der Fluter auf einer sehr
geringen, warmweißen Dimmstufe.
Die Leuchte schaltet sich nach
30 Minuten automatisch ab.
Umschalten zwischen kalt- / neutral-
und warmweiß durch Tastendruck
Leuchte ausrichten
VORSICHT! VERBRENNUNGSGEFAHR
DURCH HEISSE OBERFLÄCHEN!
Lassen Sie die Leuchte zunächst vollständig
abkühlen.
Biegen Sie den Flexarm 6 der Leseleuchte in
die gewünschte Position.
Neigen Sie den Fluterkopf 4 in die gewünschte
Position.
Wartung und Reinigung
STROMSCHLAGGEFAHR!
Ziehen Sie das Steckernetzteil 14 zuerst aus der
Steckdose.
VORSICHT! VERBRENNUNGSGEFAHR
DURCH HEISSE OBERFLÄCHEN!
Lassen Sie die Leuchte zunächst vollständig abkühlen.
STROMSCHLAGGEFAHR!
Aus Gründen der elektrischen Sicherheit darf die
Leuchte niemals mit Wasser oder anderen Flüssig-
keiten gereinigt oder gar in Wasser getaucht werden.
Benutzen Sie keine Lösungsmittel, Benzin o. Ä.
Die Leuchte würde hierbei Schaden nehmen.
Verwenden Sie zur Reinigung nur ein trockenes,
fusselfreies Tuch.
Stecken Sie das Steckernetzteil 14 wieder in
die Steckdose.
Sicherheit / Vorbereitung / Inbetriebnahme

12 DE/AT/CH
Garantie und ServiceEntsorgung / Garantie und Service
Entsorgung
Die Verpackung besteht aus umweltfreundlichen
Materialien, die Sie über die örtlichen Recycling-
stellen entsorgen können.
b
a
Beachten Sie die Kennzeichnung der
Verpackungsmaterialien bei der Abfall-
trennung, diese sind gekennzeichnet mit
Abkürzungen (a) und Nummern (b) mit
folgender Bedeutung: 1–7: Kunststoffe /
20–22: Papier und Pappe / 80–98:
Verbundstoffe.
Das Produkt und die Verpackungs
materialien sind recycelbar, entsorgen Sie
diese getrennt für eine bessere Abfallbe-
handlung. Das Triman-Logo gilt nur für
Frankreich.
Werfen Sie Ihr Produkt, wenn es ausge-
dient hat, im Interesse des Umweltschutzes
nicht in den Hausmüll, sondern führen Sie
es einer fachgerechten Entsorgung zu.
Über Sammelstellen und deren Öffnungs-
zeiten können Sie sich bei Ihrer zuständigen
Verwaltung informieren.
Defekte oder verbrauchte Batterien müssen gemäß
Richtlinie 2006 / 66 / EG und deren Änderungen
recycelt werden. Geben Sie Batterien und / oder
das Produkt über die angebotenen Sammeleinrich-
tungen zurück.
Umweltschäden durch falsche
Entsorgung der Batterien!
Batterien dürfen nicht über den Hausmüll entsorgt
werden. Sie können giftige Schwermetalle enthalten
und unterliegen der Sondermüllbehandlung. Die
chemischen Symbole der Schwermetalle sind wie
folgt: Cd = Cadmium, Hg = Quecksilber, Pb = Blei.
Geben Sie deshalb verbrauchte Batterien bei einer
kommunalen Sammelstelle ab.
Garantie und Service
Garantie
Sie erhalten zum Zeitpunkt des Kaufs auf dieses Gerät
36 Monate Garantie. Das Gerät wurde sorgfältig
produziert und einer genauen Qualitätskontrolle
unterzogen. Innerhalb der Garantiezeit beheben wir
kostenlos alle Material- oder Herstellerfehler. Sollten
sich dennoch während der Garantiezeit Mängel
herausstellen, senden Sie das Gerät bitte an die
aufgeführte Service-Adresse unter Angabe folgender
Modell-Nummer: 14135502L / 14135602L.
Von der Garantie ausgeschlossen sind Schäden
durch nicht sachgemäße Handhabung, Nichtbe-
achtung der Bedienungsanleitung oder Eingriff durch
nicht autorisierte Personen sowie Verschleißteile (wie
z. B. Leuchtmittel). Durch die Garantieleistung wird
die Garantiezeit weder verlängert noch erneuert.
Serviceadresse
Briloner Leuchten GmbH & Co. KG
Im Kissen 2
59929 Brilon
DEUTSCHLAND
Tel.: +49 29 61 / 97 12‒800
Fax: +49 29 61 / 97 12‒199
E-Mail: kundenservice@briloner.com
www.briloner.com
Kostenlose Servicenummer:
Tel.: 00800 / 27456637
IAN 339716_1910
Bitte halten Sie für alle Anfragen den Kassenbon
und die Artikelnummer (z. B. IAN 123456_7890)
als Nachweis für den Kauf bereit.
Konformitätserklärung
Dieses Produkt erfüllt die Anforderungen der geltenden
europäischen und nationalen Richtlinien. Die

13 DE/AT/CH
Garantie und Service
Konformität wurde nachgewiesen. Entsprechende
Erklärungen und Unterlagen sind beim Hersteller
hinterlegt.
Hersteller
Briloner Leuchten GmbH & Co. KG
Im Kissen 2
59929 Brilon
DEUTSCHLAND
Entsorgung / Garantie und Service

14
Table of contents

15 GB/IE
List of pictograms used ........................................................................................................ Page 16
Introduction ................................................................................................................................... Page 17
Proper use ............................................................................................................................................Page 17
Included items .....................................................................................................................................Page 17
Parts description ..................................................................................................................................Page 17
Technical data ..................................................................................................................................... Page 17
Safety .................................................................................................................................................Page 18
Safety advice .......................................................................................................................................Page 18
Safety instructions for batteries / rechargeable batteries .................................................................Page 19
Preparation ...................................................................................................................................Page 19
Required tools and material ...............................................................................................................Page 19
Preparing the product for use .......................................................................................Page 20
Assembling the lamp ...........................................................................................................................Page 20
Inserting / replacing batteries ............................................................................................................. Page 20
Switching the light on / off ..................................................................................................................Page 20
Directing the lamp ............................................................................................................................... Page 21
Care and cleaning .................................................................................................................... Page 21
Disposal ............................................................................................................................................Page 21
Warranty and service ...........................................................................................................Page 22
Warranty .............................................................................................................................................Page 22
Service address ................................................................................................................................... Page 22
Declaration of Conformity ..................................................................................................................Page 22
Manufacturer .......................................................................................................................................Page 22
Table of contents

16 GB/IE
List of pictograms used
List of pictograms used
Read the instructions! Explosion hazard!
Volt (AC) Wear safety gloves!
Hertz (mains frequency) Warning! Risk of electric shock!
Watt (effective power) For your safety
Safety class II Warning - Hot surfaces!
Short-circuit proof safety transformer
b
a
Dispose of the packaging and device
in an environmentally-friendly
manner!
This light is only suitable for indoor
use in dry and enclosed spaces. Independent control unit
Danger to life and risk of accidents
for infants and children! Reading light
Observe the warnings and safety
notices! Timer
Uplighter ta Ambient temperature
The packaging is made from 100%
recycled paper. tc Case temperature at stated point
Not suitable for external dimmers or
electronic switches Polarity of the connection
d.c. DC Direct current ON OFF Switching cycles
LED operating life SELV Safety extra-low voltage
Safety class III
Introduction

17 GB/IE
List of pictograms used Introduction
LED Uplighter / Reading Lamp
with Adjustable Light Tone
Introduction
We congratulate you on the purchase of
your new device. You have chosen a
high
quality product. Please read carefully
and completely through these operating instructions.
Fold out the page with the illustrations. These instruc-
tions form part of the product and contain important
information about bringing the product into use and
its handling. Always observe all the safety advice.
Check that the correct mains voltage is available and
that all the parts have been properly assembled
before bringing into use. Should you have any
questions or be uncertain as to how to operate the
device, please get in touch with your dealer or ser-
vice point. Please keep these instructions in a safe
place and hand them on to a third party if neces
sary.
Proper use
This light is suitable only for interior use,
in dry and enclosed spaces. This lamp is
intended for use only in a domestic envi-
ronment. This product is intended for normal operation.
Included items
Check that all the items and accessories are pre-
sent and that the lamp is in perfect condition
immediately after unpacking.
1 Father & Child LED Lamp With Light Tone Control,
Model 14135502L and 14135602L
1 Lamp glass
1 Tube (2-piece)
3 Screws (lamp glass) (14135502L)
4 Screws (lamp glass) (14135602L)
3 Washers/Rubber rings (14135502L)
4 Washers/Rubber rings (14135602L)
1 Remote control
2 Batteries 1.5 V AAA
1 Bracket (2-piece)
2 Screws (bracket)
1 Base
1 Tool
1 Securing plate (oval)
1 Plug-in power supply unit
1 Set of assembly instructions and instructions for use
Parts description
1 Screw (lamp glass)
2 Washer / Rubber rings
3 Lamp glass
4 Uplight head
5 Lamp head (reading light)
6 Flexible arm (reading light)
7 Tube
8 Remote control
9 2-piece bracket (remote control)
10 Screw (bracket)
11 Base
12 Nut
13 Tool
14 Plug-in mains adapter
15 Transport lock
16 ON / OFF switch (reading light)
17 ON/ OFF switch (uplighter)
18 Mains cable
19 Securing plate (oval)
20 Washer (large)
Technical data
Model number: 14135502L / 14135602L
Voltage: 220‒240 V ~ 50 / 60 Hz
Rated power: 36 W
Protection class: II /
IP rating: IP20
Typ: 14135502L-1 /
14135602L-1
Operating voltage: 24 V
Protection class: III /
IP rating: IP20

18 GB/IE
Introduction / Safety
Floodlight head
Output: 34 W
LED: fixed installation,
non-replaceable
Reading lamp
Output: 4.5 W
LED: fixed installation,
non-replaceable
Remote control:
Batteries: 2 x 1.5 V AAA
Safety
Safety advice
The right to claim under the guarantee shall be
rendered invalid in respect of damage caused by
the non-observance of these operating instructions!
No liability is accepted for consequent damage!
No liability is accepted for damage to property
or persons caused by improper handling or non-
observance of the safety advice!
RISK OF FA-
TAL INJURY AND ACCIDENT
HAZARD FOR TODDLERS AND
SMALL CHILDREN!
Never leave children unsupervised with the
packaging material. The packaging material
poses a suffocation hazard. Children frequently
underestimate dangers. Please always keep the
product out of the reach of children.
This device may be used by children age 8 years
and up, as well as by persons with reduced
physical, sensory or mental capacities, or lack-
ing experience and/or knowledge, so long as
they are supervised or instructed in the safe use
of the device and understand the associated risks.
Do not allow children to play with the product.
Cleaning and user maintenance must not be
performed by children without supervision.
To avoid danger to
life from electric shock
Every time before connecting the lamp the mains,
check it and the mains lead for damage. Never
use your light if you find it is damaged in any way.
A damaged light bulb means your life is at
risk from electric shock. If there is any damage,
repairs to be carried out or other problems re-
lated to the light bulb, please contact the service
centre or a qualified electrician.
In order to prevent hazards, if the outer flexible
cable of this lamp becomes damaged it may
only be replaced by the manufacturer, a service
representative of the manufacturer or a similar
specialist!
Before assembly, ensure that the mains voltage
available corresponds to the operating voltage
necessary of the light (see „Technical Data“).
Never let the lamp come into contact with water
or other liquids.
Always unplug the light from the mains prior to
assembly, disassembly, cleaning or if the light
will not be used for extended periods.
Never open or insert anything into electrical
fittings or equipment. Doing this sort of thing can
lead to a serious danger to life from electric shock.
Do not kink the power cable.
Do not lay the cable on sharp corners.
To avoid danger
of fire and injury
CAUTION! RISK OF INJURY!
Check each uplight for damage immediately
after unpacking. Do not install the light if the
lamp glass is defective. In this case, contact the
service centre for a replacement.
CAUTION! RISK OF BURNS
DUE TO HOT SURFACES!
Ensure the lamp has been switched off and
allowed to cool before you touch it. In this way
you will avoid the danger of burns. Bulbs give
off a lot of heat around the top of the lamp.
Do not cover the light or the mains plug with
objects. Excessive heat can result in a fire.
Safety / Preparation

19 GB/IE
Introduction / Safety Safety / Preparation
Never leave the lamp operating unattended.
ATTENTION!
Do not look into the LED from a close distance
during operation.
Do not look at the LED with an optical instru-
ment (e.g. magnifier).
The illuminant in this light is not replaceable; if
the illuminant reaches the end of its services
life, replace the entire light.
Working safely
Install the light so that it is protected from
moisture and dirt.
Prepare carefully before assembly and allow
yourself enough time. Lay out all the individual
components and additional tools or materials
required so that you can see and reach them.
Remain alert at all times and always watch what
you are doing. Always proceed with caution
and do not assemble the lamp if you cannot
concentrate or feel unwell.
In order to disconnect the light completely from
the power supply, the mains plug must be
removed from the socket.
Safety instructions for
batteries / rechargeable
batteries
DANGER TO LIFE!
Keep batteries / rechargeable batteries out of
reach of children. If accidentally swallowed
seek immediate medical attention.
DANGER OF EXPLOSION!
Never recharge non-rechargeable batteries.
Do not short-circuit batteries / rechargeable
batteries and / or open them. Overheating, fire
or bursting can be the result.
Never throw batteries / rechargeable batteries
into fire or water.
Do not exert mechanical loads to batteries /
rechargeable batteries.
Risk of leakage of batteries / rechargeable
batteries
Avoid extreme environmental conditions and
temperatures, which could affect batteries /
rechargeable batteries, e.g. radiators / direct
sunlight.
Avoid contact with the skin, eyes and mucous
membranes. In the event of contact with battery
acid, thoroughly flush the affected area with
plenty of clean water and seek immediate
medical attention.
WEAR PROTECTIVE GLOVES!
Leaked or damaged batteries / rechargeable
batteries can cause burns on contact with the
skin. Wear suitable protective gloves at all
times if such an event occurs.
In the event of a leakage of batteries / recharge-
able batteries, immediately remove them from
the product to prevent damage.
Only use the same type of batteries / rechargeable
batteries. Do not mix used and new batteries /
rechargeable batteries.
Remove the batteries / rechargeable batteries if
the product will not be used for a longer period.
Risk of damage of the product
Only use the specified type of battery /
rechargeable battery!
Insert batteries / rechargeable batteries accord-
ing to polarity marks (+) and (-) on the battery /
rechargeable battery and the product.
Clean the contacts on the battery / rechargeable
battery and in the battery compartment before
inserting!
Remove exhausted batteries / rechargeable
batteries from the product immediately.
Preparation
Required tools and material
The tools and materials specified are not included.
This information and values specified are non-binding
and are only provided as a reference. The nature

20 GB/IE
Preparation / Preparing the product for use
of the material is determined by the individual local
conditions.
- Screwdriver
Preparing the product for use
Assembling the lamp
Note: You will require a second person to help
with the assembly of the product.
Note: Place the floodlight on a soft surface (i.e. a
blanket) during assembly to prevent it from being
damaged.
Note: Please ensure that you pull the cable slowly
through the base during fitting.
Remove the transport locks 15 from the tube 7.
Connect the sections of tube 7 and screw in
place.
Note: Be sure to screw in the section of tube 7
as far in as possible to ensure the light is stable.
Make sure that the mains cable 18 running
through the tube 7 does not get trapped.
Note: The nut 12 and the washer (large) 20
are pre-assembled on the upright tube 7.
Remove the nut 12 and the washer (large) 20
from the upright tube 7.
Remove the nut 12 and washer (large) 20 from
the power cord 18 .
Insert the power cord 18 through the opening in
the middle of the base 11 .
First slide the securing plate (oval) 19 , then the
washer (large) 20 and finally the nut 12 over
the power cable 18 .
Then pass the power cord 18 outwards through
the opening on the side of the base 11 .
Insert the upright tube 7 through the opening
on the base 11 .
Make sure that the power cable 18 , which runs
through the upright tube
7
, does not get jammed.
Slide the securing plate (oval) 19 and the washer
(large) 20 onto the upright tube 7 from below.
Tighten the nut 12 on the bottom of the base 11
using the tool 13 .
Ensure it is in the correct position.
Note: Be sure to hold the tube 7 tight when
tightening the nut 12 .
Note: Ensure the cable is inside the designated
opening in the base 11 so it cannot be pinched.
Position the uplight upright.
Place the lamp glass 3 on the uplighter
head 4.
Affix the lamp glass 3 using the screws 1
and washers 2 to the uplighter head 4 (see
Fig. A).
Mount the bracket 9 using the two screws 10
to the tube 7 (see Fig. C).
Connect the mains cable 18 to the plug-in mains
adapter 14 .
Plug the plug-in mains adapter 14 into a pro-
perly installed socket.
Your light is now ready for operation.
Inserting / replacing batteries
Slide the battery compartment out of the remote
control 8.
Insert the batteries included in the scope of
delivery into the remote control 8 (see Fig. B).
Only use batteries specified in the chapter
„Technical Data“.
Note: The correct polarity is indicated in the
battery compartment.
Slide the battery compartment back into the
remote control 8.
If the range of the remote control 8 reduces,
the battery needs to be replaced.
Slide the battery compartment out of the remote
control.
Remove the batteries.
Insert new batteries. Proceed as described
above.
Switching the light on / off
Use the ON / OFF switch 17 to switch the
uplighter floor lamp on or off.
Switch the reading light 5 on or off using the
ON / OFF switch 16 .
Preparing the product for use / Care and cleaning / Disposal

21 GB/IE
Preparation / Preparing the product for use Preparing the product for use / Care and cleaning / Disposal
Controlling the uplight head 4 using the
remote control 8:
Switch the uplight head 4 on using the ON /
OFF switch 17 .
Ensure that there are no obstacles between the
lamp and the remote control 8.
The lamp saves the most recently selected light
colour.
Choose from the following functions:
Switch on the uplighter
Switch off the uplighter
Select cold, neutral or warm white
light
brighten
dim
Nightlight function: Using the programme
button, the floodlight illuminates at a
very low warm white dimming level.
The lamp switches off automatically
after 30 minutes.
Switch between cold, neutral and
warm light by pressing the button
Directing the lamp
CAUTION! RISK OF BURNS DUE TO
HOT SURFACES!
First allow the lamp to cool completely.
Bend the flexible arm 6 to bring the reading
lamp into the desired position.
Adjust the uplight head 4 to the desired
position.
Care and cleaning
RISK OF ELECTRIC SHOCK!
First unplug the plug-in mains adapter 14 from the
socket.
CAUTION! RISK OF BURNS DUE TO
HOT SURFACES!
First allow the lamp to cool completely.
RISK OF ELECTRIC SHOCK!
For electrical safety reasons, never clean the lamp
with water or other fluids nor immerse it in water.
Do not use any solvents, petrol or similar. This
would cause damage to the light.
Always use a dry, fluff-free cloth for cleaning.
Plug the plug-in mains adapter 14 back into
the socket.
Disposal
The packaging is made entirely of recyclable mate-
rials, which you may dispose of at local recycling
facilities.
b
a
Observe the marking of the packaging
materials for waste separation, which
are marked with abbreviations (a) and
numbers (b) with following meaning:
1–7: plastics / 20–22: paper and fibre-
board / 80–98: composite materials.
The product and packaging materials
are recyclable, dispose of it separately
for better waste treatment. The Triman
logo is valid in France only.
To help protect the environment, please
dispose of the product properly when it
has reached the end of its useful life and
not in the household waste. Information
on collection points and their opening
hours can be obtained from your local
authority.
Per Directive 2006 / 66 / EC and its amendments,
defective or used batteries must be recycled. Return
the batteries and/or the product to a collection site.

22
Disposal / Warranty and service
Improper disposal of batteries
can harm the environment!
Never dispose of batteries in your household bin.
They may contain toxic heavy metals and are sub-
ject to hazardous waste regulations. The chemical
symbols of the heavy metals are: Cd = cadmium,
Hg = mercury, Pb = lead. Therefore dispose of
used batteries through your local collection facilities.
Warranty and service
Warranty
You receive a 36 month warranty on this product,
valid from the date of purchase. The appliance has
been carefully produced under strict quality control.
Within the warranty period we shall rectify without
charge all material and manufacturing defects. In
the event that a defect arises during the warranty
period, please send the device to the listed service
centre address, quoting the following model number:
14135502L / 14135602L.
Wear parts (such as bulbs) and damage caused
by improper handling, non-observance of the oper-
ating instructions or unauthorised interference are
excluded from the warranty. The performance of
services under the warranty does not extend or
renew the warranty period.
Service address
Briloner Leuchten GmbH & Co. KG
Im Kissen 2
59929 Brilon
GERMANY
Tel.: +49 29 61 / 97 12‒800
Fax: +49 29 61 / 97 12‒199
E-Mail: kundenservice@briloner.com
www.briloner.com
Free service number:
Tel.: 00800 / 27456637
IAN 339716_1910
Please have your receipt and the product number
(e.g. IAN 123456_7890) available for all queries
as proof of purchase.
Declaration of Conformity
This product fulfils the requirements of the applicable
European and national directives. Conformity has
been demonstrated. The relevant declarations and
documents are held by the manufacturer.
Manufacturer
Briloner Leuchten GmbH & Co. KG
Im Kissen 2
59929 Brilon
GERMANY
GB/IE
Table des matières

23 FR/BE
Disposal / Warranty and service Table des matières
Légende des pictogrammes utilisés .......................................................................... Page 24
Introduction ................................................................................................................................... Page 25
Utilisation conforme ............................................................................................................................Page 25
Fourniture ............................................................................................................................................. Page 25
Descriptif des pièces ...........................................................................................................................Page 25
Caractéristiques techniques ................................................................................................................Page 25
Sécurité .............................................................................................................................................Page 26
Consignes de sécurité ......................................................................................................................... Page 26
Consignes de sécurité relatives aux piles / aux piles rechargeables ...............................................Page 27
Préparation ...................................................................................................................................Page 28
Outils et matériel nécessaires ............................................................................................................. Page 28
Mise en service ...........................................................................................................................Page 28
Montage de la lampe .........................................................................................................................Page 28
Insérer / remplacer les piles ................................................................................................................Page 28
Allumer / éteindre la lampe ................................................................................................................Page 29
Orientation de la lampe .....................................................................................................................Page 29
Maintenance et nettoyage ...............................................................................................Page 29
Mise au rebut ............................................................................................................................... Page 29
Garantie et service après-vente ..................................................................................Page 30
Garantie ..............................................................................................................................................Page 30
Adresse du service après-vente .......................................................................................................... Page 31
Déclaration de conformité .................................................................................................................. Page 31
Fabricant ..............................................................................................................................................Page 31

24 FR/BE
Légende des pictogrammes utilisés
Légende des pictogrammes utilisés
Lisez les instructions! Risque d'explosion!
Volt (tension alternative) Porter des gants de protection!
Hertz (fréquence) Avertissement ! Risque
d'électrocution!
Watt (puissance active) Conduite à tenir
Classe de protection II Attention, surfaces très chaudes !
Transformateur de sécurité
anti-court-circuit b
a
Mettez l’emballage et l’appareil au
rebut dans le respect de
l'environnement !
Cette lampe est exclusivement conçue
pour un usage intérieur, dans des
locaux secs et fermés.
Appareil de fonctionnement
indépendant
Danger de mort et risque de blessure
pour les enfants et les enfants en bas
âge! Lampe de lecture
Respecter les avertissements et
consignes de sécurité ! Minuteur
Lampadaire à vasque ta Température ambiante
L‘emballage est exclusivement
composé à 100% de papier recyclé. tc Température du boîtierà l‘endroit
indiqué
Ne convient pas aux variateurs exter-
nes ni aux interrupteurs électroniques Polarité du connecteur
d.c. DC Tension continue ON OFF Cycles de commutation
Durée de vie de la LED SELV Très basse tension de sécurité
Classe de protection III
Introduction

25 FR/BE
Légende des pictogrammes utilisés Introduction
Lampadaire LED avec
variateur de blanc
Introduction
Félicitations pour l’acquisition de votre
nouvel appareil ! Vous avez opté pour
un produit de grande qualité. Veuillez
lire ce mode d‘emploi intégralement et attentivement.
Ouvrez la page contenant les illustrations. Le manuel
accompagne ce produit et contient des instructions
essentielles pour la mise en service et la manipulation.
Toujours respecter les consignes de sécurité. Avant
l‘installation, vérifiez si la tension est correcte et si
toutes les pièces sont correctement montées. Si vous
avez des questions ou des doutes concernant la
manipulation de l‘appareil, veuillez contacter votre
revendeur ou le S.A.V. Veuillez conserver soigneuse-
ment ce manuel et le remettre aux autres utilisateurs.
Utilisation conforme
Cette lampe est exclusivement conçue
pour un usage intérieur, dans des locaux
secs et fermés. Cet appareil est unique-
ment destiné à un usage domestique. Ce produit
est conçu pour une utilisation normale.
Fourniture
Immédiatement après le déballage, veuillez toujours
contrôler que la fourniture est au complet et que
l‘appareil se trouve en parfait état.
1 lampadaire LED avec variateur de blanc, modèle
14135502L voire. 14135602L
1 verre de lampe
1 tube central (en 2 pièces)
3 vis (verre de lampe) (14135502L)
4 vis (verre de lampe) (14135602L)
3 rondelles / bagues en caoutchouc (14135502L)
4 rondelles / bagues en caoutchouc (14135602L)
1 télécommande
2 piles 1,5 V AAA
1 support (2 pièces)
2 vis (support)
1 pied
1 outil
1 plaque de sécurité (ovale)
1 bloc secteur
1 notice de montage et d‘utilisation
Descriptif des pièces
1 Vis (verre de lampe)
2 Rondelle / bagues en caoutchouc
3 Verre de lampe
4 Tête de luminaire
5 Tête de lampe (lampe de lecture)
6 Bras flexible (lampe de lecture)
7 Tube central
8 Télécommande
9 Support à 2 pièces (télécommande)
10 Vis (support)
11 Pied
12 Écrou
13 Outil
14 Bloc d‘alimentation
15 Fixation de transport
16 Interrupteur MARCHE / ARRÊT (lampe de
lecture)
17 Interrupteur MARCHE / ARRÊT (lampadaire à
vasque)
18 Câble d‘alimentation
19 Plaque de sécurité (ovale)
20 Rondelles (large)
Caractéristiques techniques
Numéro de modèle : 14135502L / 14135602L
Tension: 220‒240 V ~ 50 / 60 Hz
Puissance nominale: 36 W
Classe de protection: II /
Indice de protection: IP20
Typ : 14135502L-1 /
14135602L-1
Tension de service : 24 V
Classe de protection : III /
Indice de protection : IP20

26 FR/BE
Introduction / Sécurité
Tête de luminaire
Puissance: 34 W
LED: composant fixe, non
remplaçable
Lampe de lecture
Puissance: 4,5 W
LED: composant fixe, non
remplaçable
Télécommande:
Piles: 2 x 1,5 V AAA
Sécurité
Consignes de sécurité
Les dommages causés par le non respect des
instructions de ce mode d‘emploi sont exclus de la
garantie ! Le fabricant décline toute responsabilité
pour les dommages indirects ! De même, toute
responsabilité est déclinée pour les dommages
matériels ou personnels causés par une manipulation
incorrecte ou le non respect des consignes de sécurité !
DAN-
GER DE MORT ET RISQUE
D‘ACCIDENT POUR LES EN-
FANTS EN BAS ÂGE ET LES ENFANTS !
Ne jamais laisser les enfants sans surveillance
avec le matériel d’emballage. L‘emballage
présente un risque d‘étouffement. Les enfants
sous-estiment souvent le danger. Toujours tenir
le produit à l‘écart des enfants.
Ce produit peut être utilisé par des enfants de
8 ans et plus, ainsi que par des personnes avec
des capacités physiques, psychiques ou senso-
rielles réduites ou manquant d‘expérience ou de
connaissance s‘ils sont surveillés ou s‘ils ont été
instruits de l‘utilisation du produit de manière
sûre et comprennent les risques découlant de
son utilisation. Les enfants ne doivent pas jouer
avec ce produit. Le nettoyage et l‘entretien du
produit ne doivent pas être effectués par des
enfants laissés sans surveillance.
Prévention de risques mortels
par électrocution
Vérifier le bon état de la lampe avant chaque
usage. Ne jamais utiliser la lampe si vous
détectez le moindre endommagement.
Une lampe endommagée représente un danger
mortel d’électrocution. En cas d‘endommagements,
de réparations ou d‘autres problèmes, veuillez
contacter la filiale S.A.V. ou un électricien.
Pour éviter les risques, ne remplacer le cordon
extérieur flexible endommagé de cette lampe
que par l’intermédiaire du fabricant, de son
représentant SAV ou par un spécialiste
comparable.
Avant l’utilisation, vérifiez que la tension secteur
corresponde à la tension de service requise de
la lampe (voir „Caractéristiques techniques“).
Absolument éviter tout contact de la lampe
avec de l‘eau ou d‘autres liquides.
Avant le montage, le démontage, le nettoyage
ou lorsque vous n‘utilisez pas l‘éclairage pen-
dant une certaine période, débranchez tou-
jours la fiche secteur de la prise.
Ne jamais ouvrir les composants électriques,
ni insérer des objets quelconques dans ceux-ci.
Ce type d‘intervention représente un danger
mortel d‘électrocution.
Ne pas plier le câble d‘alimentation.
Ne pas poser le câble sur des bords tranchants.
Prévention de risque
d‘incendies et de blessures
ATTENTION! RISQUE DE BLESSURES !
Vérifiez l‘état de chaque luminaire immédiate-
ment après le déballage. N‘assemblez pas la
lampe si le verre de lampe est défectueux. Si
vous constatez des dommages, veuillez contacter
le service après-vente pour procéder au rem-
placement de la pièce défectueuse.
ATTENTION! RISQUE DE BRÛ-
LURES À CAUSE DES SURFACES
TRÈS CHAUDES !
Afin d‘éviter toutes brûlures, vérifiez que la lampe
est éteinte et suffisamment froide avant de la
Sécurité

27 FR/BE
Introduction / Sécurité Sécurité
manipuler. L‘ampoule dégage une forte chaleur
dans la tête de la lampe.
Ne couvrez pas la lampe ou la fiche secteur
avec des objets. Un dégagement de chaleur
excessif peut provoquer un incendie.
Ne pas laisser la lampe allumée sans surveil-
lance.
ATTENTION !
Lorsque les LED sont allumées, évitez de les
regarder de près.
Ne pas observer les LED à l‘aide d‘un instrument
optique (par exemple une loupe).
La source lumineuse de cette lampe n‘est pas
remplaçable, lorsque la source de lumière ar-
rive en fin de vie, l‘ensemble de la lampe doit
être remplacé.
Pour travailler en toute sécurité
Montez la lampe de telle sorte qu’elle soit
protégée de l’humidité et de la saleté.
Préparez soigneusement le montage et prenez
votre temps. Placez à portée de la main de
manière rangée l’ensemble des pièces et les
outils ou le matériel nécessaires supplémentaires.
Toujours être vigilant ! Toujours travailler concen-
tré et procéder avec prudence. Ne jamais effec-
tuer le montage de la lampe si vous n‘êtes pas
concentré ou vous sentez mal.
Afin de couper complètement la lampe de l‘ali-
mentation électrique, la fiche secteur doit être
débranchée de la prise.
Consignes de sécurité
relatives aux piles / aux
piles rechargeables
DANGER DE MORT!
Rangez les piles / piles rechargeables hors de la
portée des enfants. En cas d’ingestion, consultez
immédiatement un médecin !
RISQUE D‘EXPLOSION !
Ne rechargez jamais des piles non rechargeables.
Ne court-circuitez pas les piles / piles
rechargeables et / ou ne les ouvrez pas ! Autre-
ment, vous risquez de provoquer une surchauffe,
un incendie ou une explosion.
Ne jetez jamais des piles / piles rechargeables
au feu ou dans l’eau.
Ne pas soumettre les piles / piles rechargeables
à une charge mécanique.
Risque de fuite des piles / piles rechar-
geables
Évitez d’exposer les piles / piles rechargeables
à des conditions et températures extrêmes sus-
ceptibles de les endommager, par ex. sur des
radiateurs / exposition directe aux rayons du
soleil.
Évitez tout contact avec la peau, les yeux ou
les muqueuses! En cas de contact avec l’acide
d’une pile, rincez la zone touchée à l’eau claire
et consultez immédiatement un médecin !
PORTER DES GANTS DE PRO-
TECTION!
Les piles / piles rechargeables endommagées
ou sujettes à des fuites peuvent provoquer des
brûlures au contact de la peau. Vous devez donc
porter des gants adéquats pour les manipuler.
En cas de fuite des piles / piles rechargeables,
retirez-les aussitôt du produit pour éviter tout
endommagement.
Utilisez uniquement des piles / piles rechar-
geables du même type. Ne mélangez pas des
piles / piles rechargeables usées et neuves !
Retirez les piles / piles rechargeables, si vous
ne comptez pas utiliser le produit pendant une
période prolongée.
Risque d‘endommagement du produit
Exclusivement utiliser le type de pile / pile re-
chargeable spécifié.
Insérez les piles / piles rechargeables conformé-
ment à l‘indication de polarité (+) et (-) indiquée
sur la pile / pile rechargeable et sur le produit.
Nettoyez les contacts de la pile / pile rechar-
geable et du compartiment à pile avant d‘insé-
rer la pile !
Retirez immédiatement les piles / piles rechar-
geables usées du produit.

28 FR/BE
Préparation / Mise en service
Préparation
Outils et matériel nécessaires
Les outils et matériels indiqués ne sont pas inclus
dans le contenu de la livraison. Il s‘agit là de don-
nées et de valeurs indicatives vous permettant de
vous orienter. Les caractéristiques du matériel dé-
pendent des conditions spécifiques sur place.
- Tournevis
Mise en service
Montage de la lampe
Remarque : Vous devez vous faire aider d’une
autre personne pour le montage.
Remarque : Placez le luminaire pendant le
montage sur une surface souple (couverture p. ex.)
afin d‘éviter les détériorations.
Remarque : Veillez pendant le montage à tirer
lentement le câble dans le sol.
Enlevez les fixations de transport 15 du tube
central 7.
Assemblez les parties du tube central 7 et
les visser fermement.
Remarque : veillez à ce que les tiges du tube
central 7 soit vissées au maximum, afin de
garantir une bonne stabilité de la lampe.
Faites attention à ne pas coincer le câble d‘ali-
mentation 18 passant dans le tube vertical 7.
Remarque: L’écrou 12 et la rondelle (large)
20 sont prémontés sur le tube 7.
Desserrez l’écrou 12 et la rondelle (large) 20
du tube 7.
Retirez l’écrou 12 et la rondelle (large) 20 du
câble secteur 18 .
Introduisez le câble secteur 18 dans l’ouverture
située au centre du pied 11 .
Poussez tout d’abord la plaque de sécurité
(ovale) 19 , puis la rondelle (large) 20 , et enfin
l’écrou 12 sur le câble secteur 18 .
Introduisez ensuite vers l’extérieur le câble
secteur 18 en passant par l’ouverture latérale
située sur le pied 11 .
Emboîtez le tube 7 dans l’ouverture située sur
le pied 11 .
Veillez à ne pas coincer le câble secteur 18
qui passe dans le tube 7.
Poussez par le bas la plaque de sécurité (ovale)
19 et la rondelle (large) 20 sur le tube 7.
À l’aide de l’outil 13 , serrez l’écrou 12 situé
sous le pied 11 .
S’assurer que l’assise de ces éléments est correcte.
Remarque : veillez à bien tenir le tube central
7 lors du serrage de l‘écrou 12 .
Remarque : veillez que le câble se trouve
dans l‘encoche du socle prévue à cet effet 11
et qu‘il ne puisse pas être écrasé.
Positionnez le lampadaire à vasque à la verti-
cale.
Placez le verre de lampe 3 sur la tête de lumi-
naire 4.
Fixez le verre de lampe 3 au moyen des vis
1 et des rondelles 2 sur la tête de luminaire
4 (voir Fig. A).
Montez le support 9 au moyen des deux vis
10 sur le tube central 7 (voir Fig. C).
Reliez le câble d‘alimentation 18 avec le
bloc d‘alimentation 14 .
Branchez le bloc d‘alimentation 14 dans une
prise installée conformément aux spécifications
applicables.
Votre lampe est prête à l‘emploi.
Insérer / remplacer les piles
Faites glissez le compartiment à piles hors de
la télécommande 8.
Insérez les piles fournies dans la télécom-
mande 8 (voir Fig. B).
N‘insérez que des piles correspondant aux
„Caractéristiques techniques“.
Remarque : la bonne polarité est indiquée
dans le compartiment à piles.
Mise en service / Maintenance et nettoyage / Mise au rebut

29 FR/BE
Préparation / Mise en service Mise en service / Maintenance et nettoyage / Mise au rebut
Replacez le compartiment à pile dans la
télécommande 8.
Lorsque la portée de la télécommande 8
diminue, vous devez changer les piles.
Faites glissez pour ceci le compartiment à piles
hors de la télécommande.
Retirez les piles.
Insérez les piles neuves. Procédez pour ceci
comme indiqué précédemment.
Allumer / éteindre la lampe
Allumez ou éteignez le plafonnier avec l‘inter-
rupteur MARCHE / ARRÊT 17 .
Allumez ou éteignez l‘éclairage de lecture 5
avec l‘interrupteur MARCHE / ARRÊT 16 .
Contrôle par télécommande 8 de la tête
de lampadaire 4 :
Allumez la tête de lampadaire 4 à l‘aide de
l‘interrupteur MARCHE / ARRÊT 17 .
Veillez à ce qu‘aucun obstacle ne se trouve
entre la lampe et la télécommande 8.
La lampe sauvegarde la dernière couleur de lumière
sélectionnée.
Les fonctions suivantes sont à disposition:
Allumer le lampadaire
Éteindre le lampadaire
Régler la lumière blanc froid, blanc
neutre ou blanc chaud
augmenter l‘intensité
diminuer l‘intensité
Fonction de veilleuse : La touche de
programme permet de faire fonctionner
le luminaire à niveau de lumière blanc
chaud très bas.
Le luminaire s‘éteint automatiquement
après 30 minutes.
Commuter entre blanc froid / neutre /
blanc chaud par pression de bouton
Orientation de la lampe
ATTENTION! RISQUE DE BRÛLURES À
CAUSE DES SURFACES TRÈS CHAUDES !
Laissez tout d’abord la lampe refroidir complète-
ment.
Pliez dans la position voulue le tube flexible 6
de la lampe de lecture.
Inclinez la tête de luminaire 4 dans la posi-
tion souhaitée.
Maintenance et nettoyage
RISQUE D’ELECTRO-
CUTION!
Retirez tout d‘abord le bloc d‘alimentation 14 de
la prise électrique.
ATTENTION! RISQUE DE BRÛLURES À
CAUSE DES SURFACES TRÈS CHAUDES !
Laissez tout d’abord la lampe refroidir complètement.
RISQUE D’ELECTRO-
CUTION!
Pour des raisons relevant de la sécurité électrique,
ne jamais nettoyer la lampe à l’eau ou avec d’autres
liquides, ni la plonger dans l’eau.
Ne pas utiliser de solvants, essence ou autres.
Ceci endommage la lampe.
Pour le nettoyage, utilisez uniquement un chiffon
sec ne bourrant pas.
Rebranchez le bloc d‘alimentation 14 dans la
prise.
Mise au rebut
L’emballage se compose de matières recyclables
pouvant être mises au rebut dans les déchetteries
locales.
b
a
Veuillez respecter l‘identification des ma-
tériaux d‘emballage pour le tri sélectif, ils
sont identifiés avec des abbréviations (a)

30 FR/BE
Mise au rebut / Garantie et service après-vente
et des chiffres (b) ayant la signification
suivante : 1–7 : plastiques / 20–22 :
papiers et cartons / 80–98 : matériaux
composite.
Le produit et les matériaux d’emballage
sont recyclables, mettez-les au rebut sé-
parément pour un meilleur traitement des
déchets. Le logo Triman n’est valable
qu’en France.
Afin de contribuer à la protection de
l’environnement, veuillez ne pas jeter votre
produit usagé dans les ordures ménagères,
mais éliminez-le de manière appropriée.
Pour obtenir des renseignements concer-
nant les points de collecte et leurs horaires
d’ouverture, vous pouvez contacter votre
municipalité.
Les piles défectueuses ou usagées doivent être
recyclées conformément à la directive 2006 / 66 / CE
et ses modifications. Les piles et / ou le produit
doivent être retournés dans les centres de collecte
proposés.
Pollution de l‘environnement
causée par une mise au rebut
inappropriée des piles !
Les piles ne doivent pas être mises au rebut dans
les ordures ménagères. Elles peuvent contenir des
métaux lourds toxiques et doivent être considérées
comme des déchets spéciaux. Les symboles chimiques
des métaux lourds sont les suivants : Cd = cadmium,
Hg = mercure, Pb = plomb. Pour cette raison, veuil-
lez toujours déposer les piles usagées dans les
conteneurs de recyclage de votre commune.
Garantie et service
après-vente
Garantie
Article L217-16 du Code de la
consommation
Lorsque l‘acheteur demande au vendeur, pendant
le cours de la garantie commerciale qui lui a été
consentie lors de l‘acquisition ou de la réparation
d‘un bien meuble, une remise en état couverte par la
garantie, toute période d‘immobilisation d‘au moins
sept jours vient s‘ajouter à la durée de la garantie
qui restait à courir. Cette période court à compter
de la demande d‘intervention de l‘acheteur ou de
la mise à disposition pour réparation du bien en
cause, si cette mise à disposition est postérieure à
la demande d‘intervention.
Indépendamment de la garantie commerciale sous-
crite, le vendeur reste tenu des défauts de conformité
du bien et des vices rédhibitoires dans les conditions
prévues aux articles L217-4 à L217-13 du Code
de la consommation et aux articles 1641 à 1648
et 2232 du Code Civil.
Article L217-4 du Code de la consommation
Le vendeur livre un bien conforme au contrat et ré-
pond des défauts de conformité existant lors de la
délivrance.
Il répond également des défauts de conformité ré-
sultant de l‘emballage, des instructions de montage
ou de l‘installation lorsque celle-ci a été mise à sa
charge par le contrat ou a été réalisée sous sa
responsabilité.
Article L217-5 du Code de la consommation
Le bien est conforme au contrat :
1° S´il est propre à l‘usage habituellement attendu
d‘un bien semblable et, le cas échéant :
- s‘il correspond à la description donnée par le
vendeur et posséder les qualités que celui-ci a
présentées à l‘acheteur sous forme d‘échantil-
lon ou de modèle ;
- s‘il présente les qualités qu‘un acheteur peut
légitimement attendre eu égard aux
Garantie et service après-vente

31 FR/BE
Mise au rebut / Garantie et service après-vente Garantie et service après-vente
déclarations publiques faites par le vendeur,
par le producteur ou par son représentant,
notamment dans la publicité ou l‘étiquetage ;
2° Ou s‘il présente les caractéristiques définies d‘un
commun accord par les parties ou être propre
à tout usage spécial recherché par l‘acheteur,
porté à la connaissance du vendeur et que ce
dernier a accepté.
Article L217-12 du Code de la
consommation
L‘action résultant du défaut de conformité se prescrit
par deux ans à compter de la délivrance du bien.
Article 1641 du Code civil
Le vendeur est tenu de la garantie à raison des
défauts cachés de la chose vendue qui la rendent
impropre à l‘usage auquel on la destine, ou qui
diminuent tellement cet usage que l‘acheteur ne
l‘aurait pas acquise, ou n‘en aurait donné qu‘un
moindre prix, s‘il les avait connus.
Article 1648 1er alinéa du Code civil
L‘action résultant des vices rédhibitoires doit être in-
tentée par l‘acquéreur dans un délai de deux ans
à compter de la découverte du vice.
Les pièces détachées indispensables à l’utilisation
du produit sont disponibles pendant la durée de la
garantie du produit.
Vous bénéficiez d’une garantie de 36 mois à partir
de la date d’achat de l’appareil. Cet appareil a été
fabriqué avec soin et soumis à un contrôle qualité
minutieux. Pendant la durée de la garantie, nous
réparons gratuitement tous les défauts de matériaux
ou de fabrication. Si cependant des défauts devai-
ent apparaître pendant la période de garantie,
veuillez expédier l‘appareil à l‘adresse SAV indi-
quée en mentionnant la référence de modèle su-
ivante: 14135502L / 14135602L.
La garantie exclut les dommages dus à une mani-
pulation incorrecte, au non-respect des instructions
du mode d’emploi ou à une intervention par une
personne non autorisée, ainsi que les pièces d’usure
(p. ex. les ampoules). La durée de garantie n’est
aucunement prolongée ou renouvelée par une
prestation de garantie.
Adresse du service après-vente
Briloner Leuchten GmbH & Co. KG
Im Kissen 2
59929 Brilon
ALLEMAGNE
Tél.: +49 29 61 / 97 12‒800
Fax: +49 29 61 / 97 12‒199
E-mail: [email protected]
www.briloner.com
Numero de service gratuit
Tél. : 00800 / 27456637
IAN 339716_1910
Veuillez conserver le ticket de caisse et le numéro de
référence de l’article (par ex. IAN 123456_7890)
afin de les produire à titre de preuves d’achat pour
toute demande.
Déclaration de conformité
Ce produit répond aux exigences des directives
européennes et nationales en vigueur. La conformité
a été attestée. Les déclarations et documents cor-
respondants sont disponibles auprès du fabricant.
Fabricant
Briloner Leuchten GmbH & Co. KG
Im Kissen 2
59929 Brilon
ALLEMAGNE

32
Inhoudsopgave

33 NL/BE
Inhoudsopgave
Legenda van de gebruikte pictogrammen ..................................................... Pagina 34
Inleiding ....................................................................................................................................... Pagina 35
Doelmatig gebruik........................................................................................................................... Pagina 35
Leveringsomvang ............................................................................................................................ Pagina 35
Beschrijving van de onderdelen ..................................................................................................... Pagina 35
Technische gegevens ...................................................................................................................... Pagina 35
Veiligheid .................................................................................................................................... Pagina 36
Veiligheidsinstructies ....................................................................................................................... Pagina 36
Veiligheidsinstructies voor batterijen / accu‘s ................................................................................ Pagina 37
Voorbereiding ........................................................................................................................ Pagina 38
Benodigd gereedschap en materiaal ............................................................................................ Pagina 38
Ingebruikname ...................................................................................................................... Pagina 38
Lamp monteren ................................................................................................................................ Pagina 38
Batterijen plaatsen / vervangen ...................................................................................................... Pagina 38
Lamp aan- / uitschakelen ................................................................................................................ Pagina 39
Lamp richten .................................................................................................................................... Pagina 39
Onderhoud en reiniging ................................................................................................. Pagina 39
Afvoer ............................................................................................................................................ Pagina 39
Garantie en service ............................................................................................................ Pagina 40
Garantie .......................................................................................................................................... Pagina 40
Serviceadres .................................................................................................................................... Pagina 40
Conformiteitsverklaring ................................................................................................................... Pagina 40
Fabrikant .......................................................................................................................................... Pagina 40

34 NL/BE
Legenda van de gebruikte pictogrammen
Legenda van de gebruikte pictogrammen
Instructies lezen! Explosiegevaar!
Volt (wisselspanning) Veiligheidshandschoenen dragen!
Hertz (frequentie) Waarschuwing! Kans op een
elektrische schok!
Watt (nuttig vermogen) Zo handelt u correct
Beschermingsklasse II Wees voorzichtig bij hete
oppervlakken!
Tegen kortsluitingen bestendige
veiligheidstransformator b
a
Verwijder de verpakking en het
apparaat op een milieuvriendelijke
manier!
Deze lamp is uitsluitend bedoeld voor
gebruik binnenshuis, in droge en
gesloten ruimtes.
Onafhankelijk voorschakelapparaat
Levensgevaar en kans op ongevallen
bij kleuters en kinderen! Leeslamp
Waarschuwingen en veiligheidsin-
structies in acht nemen! Timer
Staande lamp ta Omgevingstemperatuur
De verpakking bestaat uit 100%
gerecycled papier. tc Temperatuur van de behuizing op het
aangegeven punt
Niet geschikt voor externe dimmers of
elektronische schakelaars Polariteit van de aansluiting
d.c. DC Gelijkspanning ON OFF Schakelcycli
Led-levensduur SELV Beveiligde extra lage spanning
Beschermingsklasse III
Inleiding

35 NL/BE
Legenda van de gebruikte pictogrammen Inleiding
LED-plafondschijnwerper met
kleurregeling
Inleiding
Gefeliciteerd met de koop van uw nieuwe
apparaat. U heeft voor een hoogwaar
dig
product gekozen. Lees deze gebruiksaan-
wijzing en de veiligheidsinstructies volledig en zorg-
vuldig door. Vouw de pagina met de afbeel-dingen
open. Deze gebruiksaanwijzing hoort bij dit product
en bevat belangrijke aanwijzingen voor de ingebruik-
name en de bediening. Neem altijd de veiligheids-
instructies in acht. Controleer vóór de ingebruikname
of de juiste spanning beschikbaar is en of alle on-
derdelen goed gemonteerd zijn. Wanneer u vragen
hebt of onzeker bent in verband met de bediening
van het apparaat, kunt u contact opnemen met uw
leverancier of met het servicepunt. Bewaar deze
handleiding op een veilige plaats en geef ze evt.
aan derden door.
Doelmatig gebruik
Deze lamp is uitsluitend bedoeld voor
gebruik binnenshuis, in droge en geslo-
ten ruimten. Dit product is bestemd voor
het gebruik in privé-huishoudens. Dit product is be-
stemd voor het normale gebruik.
Leveringsomvang
Controleer de levering altijd direct na het uitpakken
op volledigheid en de optimale staat van het product.
1 LED-plafondschijnwerper met kleurregeling,
model 14135502L resp. 14135602L
1 lampglas
1 standbuis (2-delig)
3 schroeven (lampglas) (14135502L)
4 schroeven (lampglas) (14135602L)
3 onderlegplaatjes / rubberen ringen (14135502L)
4 onderlegplaatjes / rubberen ringen (14135602L)
1 afstandsbediening
2 batterijen, 1,5 V AAA
1 houder (tweedelig)
2 schroeven (houder)
1 voet
1 gereedschap
1 borgplaat (ovaal)
1 netadapter
1 montage- en gebruiksaanwijzing
Beschrijving van de
onderdelen
1 Schroef (lampglas)
2 Onderlegplaatje / rubberen ringen
3 Lampglas
4 Kop van de staande lamp
5 Lampkop (leeslamp)
6 Flexibele arm (leeslamp)
7 Standbuis
8 Afstandsbediening
9 Tweedelige houder (afstandsbediening)
10 Schroef (houder)
11 Voet
12 Moeren
13 Gereedschap
14 Netadapter
15 Transportbeveiliging
16 AAN- / UIT-schakelaar (leeslamp)
17 AAN- / UIT-schakelaar (staande lamp)
18 Netsnoer
19 Borgplaat (ovaal)
20 Tussenring (groot)
Technische gegevens
Modelnummer: 14135502L / 14135602L
Spanning: 220‒240 V ~ 50 / 60 Hz
Nominaal vermogen: 36 W
Beschermingsklasse: II /
Beschermingstype: IP20
Typ: 14135502L-1 /
14135602L-1
Bedrijfsspanning: 24 V
Beschermingsklasse: III /
Beschermingstype: IP20

36 NL/BE
Inleiding / Veiligheid
Kop van de staande lamp
Vermogen: 34 W
Led: vast gemonteerd, niet
vervangbaar
Leeslamp
Vermogen: 4,5 W
Led: vast gemonteerd, niet
vervangbaar
Afstandsbediening:
Batterijen: 2 x 1,5 V AAA
Veiligheid
Veiligheidsinstructies
Bij schade die ontstaat door het negeren van deze
gebruiksaanwijzing komt de garantieverlening te
vervallen! Voor volgschade zijn wij niet aansprakelijk!
Wij zijn niet aansprakelijk in geval van materiële
schade of persoonlijk letsel als gevolg van ondes-
kundig gebruik of het negeren van de veiligheidsin-
structies!
LE-
VENSGEVAAR EN KANS OP
ONGEVALLEN BIJ KLEUTERS
EN KINDEREN!
Laat kinderen nooit zonder toezicht bij het ver-
pakkingsmateriaal. Er bestaat kans op verstikking
door verpakkingsmateriaal. Kinderen onder-
schatten vaak de gevaren. Houd het product
altijd buiten bereik van kinderen.
Dit apparaat kan door kinderen vanaf 8 alsmede
personen met verminderde fysieke, sensorische
of mentale vaardigheden of een gebrek aan
ervaring en kennis worden gebruikt, als zij
onder toezicht staan of geïnstrueerd werden
met betrekking tot het veilige gebruik van het
apparaat en de hieruit voortvloeiende gevaren
begrijpen. Kinderen mogen niet met het appa-
raat spelen. Reiniging en onderhoud mag niet
door kinderen zonder toezicht worden uitge-
voerd.
Levensgevaar door
elektrische schok
Controleer vóór ieder gebruik de lamp en de
aansluitkabel op eventuele beschadigingen.
Gebruik de lamp nooit wanneer u ongeacht
welke beschadiging ook hebt geconstateerd.
Bij een beschadigde lamp bestaat levensgevaar
door elektrische schokken. Neem in geval van
beschadigingen, reparaties of andere problemen
aan de lamp contact op met de klantenservice
of een elektricien.
Ter vermijding van gevaren mag de externe,
flexibele leiding van deze lamp bij beschadiging
uitsluitend worden vervangen door de fabrikant,
zijn servicecenter of door dienovereenkomstig
opgeleid vakpersoneel!
Overtuig u er vóór de montage van dat de
bestaande netspanning overeenstemt met de
vereiste bedrijfsspanning van de lamp (zie
„Technische gegevens“).
Vermijd elk contact van de lamp met water of
andere vloeistoffen.
Trek voor de montage, demontage, reiniging of
wanneer u de lamp gedurende een langere
periode niet gebruikt, de stekker uit het stop-
contact.
Open nooit een van de elektrische bedrijfsmid-
delen en steek ook geen voorwerpen in deze
onderdelen. Bij dergelijke ingrepen bestaat
levensgevaar door elektrische schokken.
Knik de stroomkabel niet.
Leg de kabel niet over scherpe kanten.
Vermijd brand- en
verwondingsgevaar
VOORZICHTIG! LETSELGEVAAR!
Controleer elke lamp direct na het uitpakken
op beschadigingen. Monteer de lamp niet met
een defect lampglas. Neem in dit geval contact
op met de klantenservice.
VOORZICHTIG! KANS OP
BRANDWONDEN DOOR HETE
OPPERVLAKKEN!
Voorkom brandwonden en waarborg dat de
lamp uitgeschakeld en afgekoeld is voordat u
Veiligheid

37 NL/BE
Inleiding / Veiligheid Veiligheid
hem aanraakt. Tijdens het bedrijf worden de
lampen rond de kop zeer heet.
Dek de lamp c.q. de stekker niet af met voor-
werpen. Een overmatige warmteontwikkeling
kan tot brand leiden.
Laat de lamp tijdens het gebruik niet zonder
toezicht.
ATTENTIE!
Tijdens het gebruik niet van een korte afstand
in de LED kijken.
De LED niet met een optisch instrument (bijv.
vergrootglas) bekijken.
De lichtbron van deze lamp kan niet worden
vervangen; als de lichtbron het einde van zijn
levensduur heeft bereikt, dient de complete
lamp te worden vervangen.
Zo handelt u correct
Monteer de lamp zodanig dat hij beschermd
wordt tegen vocht en verontreiniging.
Bereid de montage zorgvuldig voor en neem
daarvoor voldoende tijd. Leg alle onderdelen
en het benodigde gereedschap of materiaal
tevoren overzichtelijk en binnen handbereik klaar.
Wees steeds opmerkzaam! Let altijd op wat u
doet en ga steeds met overleg te werk. Monteer
de lamp in geen geval wanneer u ongeconcen-
treerd bent of zich niet goed voelt.
Om de verbinding van de lamp met het stroom-
net volledig te onderbreken, moet de stekker uit
het stopcontact worden getrokken.
Veiligheidsinstructies voor
batterijen / accu‘s
LEVENSGEVAAR!
Houd batterijen / accu‘s buiten het bereik van
kinderen. Raadpleeg bij inslikken onmiddellijk
een arts!
EXPLOSIEGEVAAR!
Laad niet oplaadbare batterijen nooit op. Sluit
de batterijen / accu‘s niet kort en / of open deze
niet. Daardoor kan de batterij oververhit raken,
in brand vliegen of exploderen.
Gooi batterijen / accu‘s nooit in het vuur of
water.
Stel batterijen / accu‘s nooit bloot aan mecha-
nische belastingen.
Risico dat de batterijen / accu’s lekken
Vermijd extreme omstandigheden en tempera-
turen die invloed op de batterijen / accu‘s zou-
den kunnen hebben bijv. radiatoren / direct
zonlicht.
Vermijd contact met huid, ogen en slijmvliezen!
Spoel in geval van contact met batterijzuur de
desbetreffende plekken direct af met voldoende
schoon water en raadpleeg onmiddellijk een
arts!
DRAAG VEILIGHEIDSHAND-
SCHOENEN!
Lekkende of beschadigde batterijen / accu‘s
kunnen in geval van huidcontact chemische
brandwonden veroorzaken. Draag daarom in dit
geval geschikte veiligheidshandschoenen.
Als de batterijen / accu‘s lekken, dient u deze
direct uit het product te halen om beschadigin-
gen te vermijden.
Gebruik alleen batterijen / accu‘s van hetzelfde
type. Gebruik nooit nieuwe en oude batterijen /
accu‘s door elkaar!
Verwijder de batterijen / accu‘s, als u het pro-
duct gedurende een langere periode niet ge-
bruikt.
Risico op beschadiging van het product
Gebruik uitsluitend het aangegeven type
batterij / accu!
Plaats de batterijen / accu‘s volgens de weer-
gegeven polariteit (+) en (-) op batterij / accu
en op product.
Reinig de contacten van de batterij / accu en
die in het batterijvak, voordat u deze plaatst!
Verwijder verbruikte batterijen / accu‘s direct
uit het product.

38 NL/BE
Voorbereiding / Ingebruikname
Voorbereiding
Benodigd gereedschap en
materiaal
Het genoemde gereedschap en materiaal wordt
niet meegeleverd. Het gaat hierbij om vrijblijvende
informatie en waarden ter oriëntatie. De hoedanig-
heid van het materiaal is afhankelijk van de indivi-
duele omstandigheden ter plekke.
- schroevendraaier
Ingebruikname
Lamp monteren
Opmerking: voor de montage is een tweede
persoon vereist.
Opmerking: plaats de staande lamp tijdens de
montage op een zachte ondergrond (kleed o.i.d.)
om beschadigingen te vermijden.
Opmerking: let er tijdens de montage op dat u
de kabel tegelijkertijd langzaam door de bodem
trekt.
Verwijder de transportbeveiligingen 15 uit de
staande buis 7.
Steek de onderdelen van de standbuis 7 in
elkaar en schroef ze vast.
Opmerking: let erop, dat de standbuizen 7
zo ver mogelijk in elkaar worden gedraaid, om
een veilige stand van de lamp te waarborgen.
Let erop dat het netsnoer 18 dat door de
standbuis 7 loopt, hierbij niet klem raakt.
Opmerking: De moer 12 en de tussenring
(groot) 20 zijn reeds op de standbuis 7 ge-
monteerd.
Draai de moer 12 en de tussenring (groot) 20
los van de standbuis 7.
Verwijder de moer 12 en de tussenring (groot)
20 van de stroomkabel 18 .
Steek de stroomkabel 18 door de opening in
het midden van de standvoet 11 .
Schuif eerst de borgplaat (ovaal) 19 , vervol-
gens de tussenring (groot) 20 en als laatste de
moer 12 over de stroomkabel 18 .
Voer vervolgens de stroomkabel 18 door de
opening aan de zijkant van de standvoet 11
naar buiten.
Steek de standbuis 7 door de opening van
de standvoet 11 .
Zorg ervoor dat de stroomkabel 18 , die door
de standbuis 7 loopt, daarbij niet wordt inge-
klemd.
Schuif de borgplaat (ovaal) 19 en de tussenring
(groot) 20 van onderaf op de standbuis 7.
Draai de moer 12 aan de onderkant van de
standvoet 11 met behulp van het gereedschap
13 vast.
Controleer of alles goed vastzit.
Opmerking: let erop, dat u de standbuis 7
tijdens het vastdraaien van de moer 12 vast
houdt.
Opmerking: Let erop, dat de kabel in de
daarvoor bestemde opening in de voet 11 ligt
en niet kan worden platgedrukt.
Zet de staande lamp rechtop neer.
Plaats het lampglas 3 op de kop van de
staande lamp 4.
Bevestig het lampglas 3 met behulp van de
schroeven 1 en onderlegplaatjes 2 aan de
kop van de lamp 4 (zie afb. A).
Monteer de houder 9 met behulp van de
twee schroeven 10 aan de standbuis 7 (zie
afb. C).
Verbind het netsnoer 18 met de netadapter 14 .
Steek de netadapter 14 in een correct geïnstal-
leerde contactdoos.
Uw lamp is gebruiksklaar.
Batterijen plaatsen /
vervangen
Schuif de batterijlade uit de afstandsbediening
8.
Plaats de batterijen van de leveromvang in de
afstandsbediening 8 (zie afb. B).
Plaats alleen batterijen die overeenkomen met
de ‚Technische gegevens‘.
Ingebruikname / Onderhoud en reiniging / Afvoer

39 NL/BE
Voorbereiding / Ingebruikname Ingebruikname / Onderhoud en reiniging / Afvoer
Opmerking: de juiste polariteit wordt in het
batterijvak aangegeven.
Schuif de batterijlade weer in de afstandsbe-
diening 8.
Als de reikwijdte van de afstandsbediening 8
afneemt, moet u de batterijen vervangen.
Schuif daarvoor de batterijlade uit de afstands-
bediening.
Verwijder de batterijen.
Plaats de nieuwe batterijen. Voer daarvoor de
eerder beschreven stappen uit.
Lamp aan- / uitschakelen
Schakel de plafond-vloerlamp met behulp van
de AAN- / UIT-schakelaar 17 in en uit.
Schakel de leeslamp 5 met behulp van de
AAN- / UIT-schakelaar 16 in en uit.
Bediening van de kop van de lamp 4 via
de afstandsbediening 8:
Schakel de kop van de lamp 4 met de
AAN- / UIT-schakelaar 17 in.
Zorg ervoor dat er zich geen hindernis tussen
de lamp en de afstandsbediening 8 bevindt.
De lamp slaat de laatst geselecteerde lichtkleur op.
De volgende functies staan ter beschikking:
Plafond-vloerlamp inschakelen
Plafond-vloerlamp uitschakelen
koud, neutraal of warmwit licht instellen
hoger dimmen
lager dimmen
Nachtlichtfunctie: met de program-
maknop brandt de staande lamp op
een zeer laag, warmwit dimniveau.
De lamp schakelt na 30 minuten
automatisch uit.
Schakelen tussen koud, neutraal en
warmwit door een druk op de knop
Lamp richten
VOORZICHTIG! KANS OP BRAND-
WONDEN DOOR HETE OPPERVLAKKEN!
Laat de lamp eerst volledig afkoelen.
Buig de flexibele arm 6 van de leeslamp in
de gewenste richting.
Beweeg de kop van de staande lamp 4 in de
gewenste positie.
Onderhoud en reiniging
GEVAAR VOOR
ELEKTRISCHE SCHOKKEN!
Trek eerst de netadapter 14 uit de contactdoos.
VOORZICHTIG! KANS OP BRAND-
WONDEN DOOR HETE OPPERVLAKKEN!
Laat de lamp eerst volledig afkoelen.
GEVAAR VOOR
ELEKTRISCHE SCHOKKEN!
Omwille van de elektrische veiligheid mag de lamp
nooit met water of andere vloeistoffen gereinigd en
zeker niet daarin ondergedompeld worden.
Gebruik geen oplosmiddelen, benzine e.d.
Hierdoor wordt de lamp beschadigd.
Gebruik voor de reiniging alleen een droge,
pluisvrije doek.
Steek de netadapter 14 weer in de contact-
doos.
Afvoer
De verpakking bestaat uit milieuvriendelijke grond-
stoffen die u via de plaatselijke recyclingcontainers
kunt afvoeren.
b
a
Neem de aanduiding van de verpakkings-
materialen voor de afvalscheiding in acht.
Deze zijn gemarkeerd met de afkortingen
(a) en een cijfers (b) met de volgende
betekenis: 1–7: kunststoffen / 20–22:

40 NL/BE
Afvoer / Garantie en service
papier en vezelplaten / 80–98: compo-
sietmaterialen.
Het product en de verpakkingsmaterialen
zijn recyclebaar; verwijder deze afzon-
derlijk voor een betere afvalbehandeling.
Het Triman-logo geldt alleen voor Frankrijk.
Gooi het afgedankte product omwille van
het milieu niet weg via het huisvuil, maar
geef het af bij het daarvoor bestemde
depot of het gemeentelijke milieupark.
Over afgifteplaatsen en hun openingstij-
den kunt u zich bij uw aangewezen
instantie informeren.
Defecte of verbruikte batterijen moeten volgens de
richtlijn 2006 / 66 / EG en veranderingen daarop
worden gerecycled. Geef batterijen en / of het pro-
duct af bij de daarvoor bestemde verzamelstations.
Milieuschade door onjuiste
afvoer van batterijen!
Batterijen mogen niet via het huisvuil worden weg-
gegooid. Ze kunnen giftige zware metalen bevatten
en vallen onder het chemisch afval. De chemische
symbolen van de zware metalen zijn: Cd = cadmium,
Hg = kwik, Pb = lood. Geef verbruikte batterijen
daarom af bij een gemeentelijk inzamelpunt.
Garantie en service
Garantie
Op dit product verlenen wij 36 maanden garantie
vanaf koopdatum.
Het apparaat werd zorgvuldig vervaardigd en aan
een nauwkeurige kwaliteitscontrole onderworpen.
Binnen de garantieperiode herstellen wij kosteloos
alle materiaal- of productiefouten. Mocht u desondanks
tijdens de garantieperiode mankementen aantreffen,
stuur het apparaat dan alstublieft naar het aange-
geven serviceadres met vermelding van het volgende
modelnummer: 14135502L / 14135602L.
Beschadigingen door ondeskundig gebruik, negeren
van de handleiding of ingrepen door niet-geautori-
seerde personen zijn van de garantieverlening
uitgesloten. Dit geldt eveneens voor slijtende delen
(zoals bijv. gloeilampen).
Door de garantieservice wordt de garantieperiode
noch verlengd noch vernieuwd.
Serviceadres
Briloner Leuchten GmbH & Co. KG
Im Kissen 2
59929 Brilon
DUITSLAND
Tel.: +49 29 61 / 97 12‒800
Fax: +49 29 61 / 97 12‒199
E-mail: kundenser[email protected]
www.briloner.com
Gratis servicenummer:
Tel.: 00800 / 27456637
IAN 339716_1910
Houd a.u.b. bij alle aanvragen de kassabon en het
artikelnummer (bijv. IAN 123456_7890) als bewijs
voor de aankoop bij de hand.
Conformiteitsverklaring
Dit product voldoet aan de eisen van de van toe-
passing zijnde Europese en nationale richtlijnen.
De conformiteit is aangetoond. Desbetreffende ver-
klaringen en documenten liggen ter inzage bij de
fabrikant.
Fabrikant
Briloner Leuchten GmbH & Co. KG
Im Kissen 2
59929 Brilon
DUITSLAND
Spis zawartości

41 PL
Afvoer / Garantie en service Spis zawartości
Legenda zastosowanych piktogramów ...........................................................Strona 42
Instrukcja ......................................................................................................................................Strona 43
Zastosowanie zgodne z przeznaczeniem .....................................................................................Strona 43
Zawartość .........................................................................................................................................Strona 43
Opis części ....................................................................................................................................... Strona 43
Dane techniczne ..............................................................................................................................Strona 43
Bezpieczeństwo ......................................................................................................................Strona 44
Wskazówki bezpieczeństwa...........................................................................................................Strona 44
Wskazówki bezpieczeństwa dla baterii / akumulatorów .............................................................Strona 45
Przygotowanie .......................................................................................................................Strona 46
Potrzebne narzędzia i materiały .....................................................................................................Strona 46
Uruchomienie............................................................................................................................Strona 46
Montaż lampy ..................................................................................................................................Strona 46
Wkładanie / wymiana baterii ..........................................................................................................Strona 47
Włączanie / wyłączanie lampy ......................................................................................................Strona 47
Ustawienie lampy.............................................................................................................................Strona 47
Konserwacja i czyszczenie............................................................................................Strona 47
Utylizacja .....................................................................................................................................Strona 48
Gwarancja i serwis ..............................................................................................................Strona 48
Gwarancja .......................................................................................................................................Strona 48
Adres serwisu ...................................................................................................................................Strona 48
Deklaracja zgodności ......................................................................................................................Strona 49
Producent ..........................................................................................................................................Strona 49

42 PL
Legenda zastosowanych piktogramów
Legenda zastosowanych piktogramów
Należy przeczytać instrukcje! Niebezpieczeństwo wybuchu!
Wolt (napięcie przemienne) Zakładać rękawice ochronne!
Herc (częstotliwość) Ostrzeżenie! Niebezpieczeństwo
porażenia prądem elektrycznym!
Wat (moc czynna) Prawidłowy sposób postępowania
Klasa ochrony II Uwaga – gorące powierzchnie!
Odporny na zwarcie transformator
bezpieczeństwa b
a
Opakowanie i urządzenie przekazać
do utylizacji zgodnie z przepisami o
ochronie środowiska!
Niniejsza lampa nadaje się wyłącznie
do pracy wewnątrz, w suchych i
zamkniętych pomieszczeniach.
Niezależne urządzenie sterujące
Niebezpieczeństwo utraty życia i
odniesienia obrażeń przez dzieci! Lampa do czytania
Należy przestrzegać ostrzeżeń i
wskazówek bezpieczeństwa! Minutnik
Lampa oświetlająca sufit ta Temperatura otoczenia
Opakowanie składa się z w 100 %
zutylizowanego papieru. tc Temperatura obudowy w danym
punkcie
Nie nadaje się do użycia w
połączeniu z zewnętrznymi
regulatorami jasności światła lub
wyłącznikami elektronicznymi
Biegunowość przyłącza
d.c. DC Napięcie stałe ON OFF Cykle włączania
Żywotność diod LED SELV Bardzo niskie napięcie bezpieczne
Klasa ochrony III
Instrukcja

43 PL
Legenda zastosowanych piktogramów Instrukcja
Lampa LED z układem
sterowania mocy światła
Instrukcja
Gratulujemy Państwu zakupu nowego
urządzenia. Zdecydowali się Państwo
na zakup produktu najwyższej jakości.
Proszę dokładnie przeczytać całą niniejszą instrukcję
obsługi. Proszę rozłożyć stronę z rysunkami. Niniej-
sza instrukcja obsługi należy do produktu. Zawiera
ona ważne wskazówki dotyczące uruchamiania i
posługiwania się nim. Zawsze należy przestrzegać
wszystkich wskazówek dotyczących bezpieczeństwa.
Przed uruchomieniem proszę sprawdzić, czy wystę-
puje prawidłowe napięcie i czy wszystkie części są
prawidłowo zamontowane. W przypadku zapytań
lub niepewności odnośnie obchodzenia się z urzą-
dzeniem prosimy o kontakt ze sprzedawcą lub punk-
tem serwisowym. Proszę starannie przechowywać
niniejszą instrukcję obsługi i ewentualnie przekazać
ją osobom trzecim.
Zastosowanie zgodne z
przeznaczeniem
Niniejsza lampa nadaje się wyłącznie do
pracy wewnątrz, w suchych i zamkniętych
pomieszczeniach.
To urządzenie przewidziano wyłącznie do użytku
w prywatnym gospodarstwie domowym. Produkt
ten jest przeznaczony do normalnej pracy.
Zawartość
Bezpośrednio po wypakowaniu należy sprawdzić,
czy zestaw jest kompletny oraz czy urządzenie
znajduje się w nienagannym stanie.
1 lampa LED z układem sterowania mocy światła,
model 14135502L lub 14135602L
1 klosz
1 rura stojaka (2-częściowa)
3 śruby (klosz) (14135502L)
4 śruby (klosz) (14135602L)
3 podkładki / pierścienie gumowe (14135502L)
4 podkładki / pierścienie gumowe (14135602L)
1 pilot
2 bateriami 1,5 V AAA
1 uchwyt (2-częściowy)
2 śruby (uchwyt)
1 podstawa
1 narzędzie
1 płytka zabezpieczająca (owalna)
1 zasilacz sieciowy z wtyczką
1 instrukcja montażu i obsługi
Opis części
1 Śruba (klosz)
2 Podkładka / pierścienie gumowe
3 Klosz lampy
4 Głowica lampy oświetlającej sufit
5 Głowica lampy (lampa do czytania)
6 Giętkie ramię (lampa do czytania)
7 Rura stojaka
8 Pilot zdalnego sterowania
9 2-częściowy uchwyt (pilot)
10 Śruba (uchwyt)
11 Podstawa
12 Nakrętka
13 Narzędzie
14 Zasilacz z wtyczką
15 Zabezpieczenie na czas transportu
16 Przełącznik WŁĄCZ/WYŁĄCZ (lampa do
czytania)
17 Przełącznik WŁĄCZ / WYŁĄCZ (lampa oświe-
tlająca sufit)
18 Przewód sieciowy
19 Płytka zabezpieczająca (owalna)
20 Podkładka (duża)
Dane techniczne
Numer modelu: 14135502L / 14135602L
Napięcie: 220‒240 V ~ 50 / 60 Hz
Moc znamionowa: 36 W
Klasa ochrony: II /
Rodzaj ochrony: IP20

44 PL
Instrukcja / Bezpieczeństwo
Typ: 14135502L-1 /
14135602L-1
Napięcie robocze: 24 V
Klasa ochrony: III /
Rodzaj ochrony: IP20
Głowica lampy oświetlającej sufit
Moc: 34 W
LED: wbudowana na stałe,
niewymienna
Lampa do czytania
Moc: 4,5 W
LED: wbudowana na stałe,
niewymienna
Pilot zdalnego sterowania:
Baterie: 2 x 1,5 V AAA
Bezpieczeństwo
Wskazówki
bezpieczeństwa
W przypadku szkód spowodowanych nieprzestrze-
ganiem niniejszej instrukcji obsługi wygasa prawo
do gwarancji! Za szkody pośrednie producent nie
ponosi odpowiedzialności! W przypadku szkód
materialnych lub osobowych, które powstały wskutek
niewłaściwego obchodzenia się lub nieprzestrze-
gania wskazówek dotyczących bezpieczeństwa,
nie ponosimy żadnej odpowiedzialności!
NIEBEZPIE-
CZEŃSTWO UTRATY ŻYCIA I
ODNIESIENIA OBRAŻEŃ W
WYPADKU PRZEZ DZIECI!
Nigdy nie należy pozostawiać dzieci bez nad-
zoru z materiałem opakowaniowym. Istnieje
zagrożenie uduszeniem spowodowane przez
materiał opakowaniowy. Dzieci często nie do-
strzegają niebezpieczeństwa. Należy zawsze
trzymać dzieci z dala od produktu.
Niniejsze urządzenie może być używane przez
dzieci od lat 8 oraz przez osoby z obniżonymi
zdolnościami fizycznymi, sensorycznymi lub
mentalnymi lub brakiem doświadczenia i / lub
wiedzy, jeśli pozostają pod nadzorem lub zo-
stały pouczone w kwestii bezpiecznego użycia
urządzenia i rozumieją wynikające z niego za-
grożenia. Dzieci nie mogą bawić się urządze-
niem. Czyszczenie i konserwacja nie mogą
być wykonywane przez dzieci bez nadzoru.
Porażenie prądem elektrycznym
grozi śmiercią
Przed każdym użyciem należy sprawdzić lampę
pod kątem ewentualnych uszkodzeń. Nigdy
nie używać lampy w razie stwierdzenia jakich-
kolwiek uszkodzeń.
Uszkodzona lampa oznacza zagrożenie dla
życia wskutek porażenia prądem. W razie
uszkodzeń, napraw lub innych problemów z
lampą należy zwrócić się do punktu serwiso-
wego lub do elektryka.
Aby uniknąć zagrożeń, uszkodzony kabel
zewnętrzny lampy może być wymieniany wy-
łącznie przez producenta, serwis lub innego
odpowiednio wykwalifikowanego specjalistę!
Przed użyciem należy upewnić się, że istniejące
napięcie sieci jest zgodne z wymaganym na-
pięciem roboczym lampy (patrz „Dane tech-
niczne“).
Bezwzględnie unikać kontaktu lampy z wodą
lub innymi cieczami.
Przed przystąpieniem do montażu, demontażu
bądź czyszczenia lub jeśli lampa nie jest przez
długi czas nieużywana, należy zawsze wycią-
gnąć wtyczkę z gniazdka.
Nigdy nie otwierać elementów elektrycznych i
nie wkładać do nich jakichkolwiek przedmiotów.
Taka ingerencja oznacza zagrożenie życia
poprzez porażenie prądem.
Nie zginać przewodu sieciowego.
Nie rozkładać przewodu nad ostrymi krawę-
dziami.
Unikać zagrożenia pożarowego
i zagrożenia obrażeniami ciała
OSTROŻNIE! NIEBEZPIECZEŃSTWO
OBRAŻEŃ CIAŁA!
Zaraz po rozpakowaniu należy sprawdzić, czy
Bezpieczeństwo

45 PL
Instrukcja / Bezpieczeństwo Bezpieczeństwo
żadna z lamp nie jest uszkodzona. Nie monto-
wać lampy z uszkodzonym szklanym kloszem.
W razie uszkodzenia należy skontaktować się z
punktem serwisowym.
OSTROŻNIE! NIEBEZPIECZEŃ-
STWO POPARZENIA GORĄ-
CYMI POWIERZCHNIAMI!
Aby uniknąć oparzenia, należy upewnić się
przed dotknięciem lampy, że jest ona wyłączona
i schłodzona. Elementy świetlne wytwarzają w
obrębie głowicy lampy wysokie temperatury.
Nie należy zakrywać lampy lub wtyczki żad-
nymi przedmiotami. Nadmierne wydzielanie
się ciepła może spowodować pożar.
Włączonej lampy nie pozostawiać bez nadzoru.
UWAGA!
Podczas uruchomienia nie patrzeć w diody LED
z bliskiej odległości.
Diod LED nie należy oglądać za pomocą
optycznego instrumentu (np. lupy).
Źródło światła tej lampy nie podlega wymianie;
jeśli czas działania źródła światła się zakończy,
należy wymienić całą lampę.
Prawidłowy sposób
postępowania
Lampę zamontować w taki sposób, aby była
zabezpieczona przed wilgocią, wiatrem i za-
nieczyszczeniami.
Starannie przygotować montaż i zarezerwować
sobie wystarczającą ilość czasu. Wszystkie
pojedyncze elementy i dodatkowo potrzebne
narzędzia lub materiał należy wcześniej ułożyć
w sposób przejrzysty i pod ręką.
Zachować ostrożność! Zawsze zwracać uwagę
na wykonywane czynności i kierować się roz-
sądkiem. Nie należy wykonywać montażu
lampy w przypadku braku koncentracji lub
złego samopoczucia.
Aby lampę całkowicie oddzielić od źródła
zasilania, należy wyjąć wtyczkę z gniazda
wtykowego.
Wskazówki
bezpieczeństwa dla
baterii / akumulatorów
ZAGROŻENIE ŻYCIA!
Baterie / akumulatory należy trzymać poza
zasięgiem dzieci. W przypadku połknięcia
należy natychmiast udać się do lekarza!
NIEBEZPIECZEŃSTWO
WYBUCHU!
Baterii jednorazowego użytku nigdy nie wolno
ładować ponownie. Baterii / akumulatorów nie
należy zwierać i / lub otwierać. Może to dopro-
wadzić do przegrzania, pożaru lub wybuchu.
Nigdy nie należy wrzucać baterii / akumulatorów
do ognia lub wody.
Nigdy nie należy narażać baterii / akumulatorów
na obciążenia mechaniczne.
Ryzyko wycieku kwasu z baterii / aku-
mulatorów
Należy unikać ekstremalnych warunków i tem-
peratur, które mogą oddziaływać na baterie /
akumulatorów, np. kaloryferów/ bezpośredniego
działania promieniowania słonecznego.
Unikać kontaktu ze skórą, oczami i błonami
śluzowymi! W razie kontaktu z kwasem
akumu-
latorowym, należy natychmiast wypłukać dotknięte
miejsce czystą wodą i niezwłocznie udać się
do lekarza!
ZAKŁADAĆ RĘKAWICE
OCHRONNE!
Wylane lub uszkodzone baterie / akumulatory
po dotknięciu skóry mogą spowodować popa-
rzenia chemiczne. Dlatego należy w takim
przypadku zakładać odpowiednie rękawice
ochronne.
W przypadku wycieku baterii / akumulatorów
natychmiast usunąć je z produktu, aby uniknąć
uszkodzeń.
Używać wyłącznie baterii / akumulatorów tego
samego typu. Nie mieszać starych baterii /
akumulatorów z nowymi!
Należy wyjąć baterie / akumulatory, jeżeli
produkt nie jest przez dłuższy czas używany.

46 PL
Bezpieczeństwo / Przygotowanie / Uruchomienie
Ryzyko uszkodzenia produktu
Używać wyłącznie zalecanego rodzaju baterii /
akumulatora!
Włożyć baterie / akumulatory zgodnie z ozna-
czeniem biegunów (+) i (-) na baterii/akumula-
torze i produkcie.
Jeśli to konieczne, oczyścić styki baterii / aku-
mulatora i w komorze baterii przed włożeniem
baterii!
Zużyte baterie / akumulatory jak najszybciej
wyjąć z produktu.
Przygotowanie
Potrzebne narzędzia i
materiały
Wymienione narzędzia i materiały nie są częścią
zestawu. Są to jedynie niewiążące informacje i war-
tości orientacyjne. Właściwości materiału zależą
od indywidualnych warunków w pomieszczeniu.
- śrubokręt
Uruchomienie
Montaż lampy
Wskazówka: podczas montażu potrzebna jest
pomoc drugiej osoby.
Wskazówka: podczas montażu położyć lampę
na miękkim podłożu (koc itp.), aby uniknąć uszko-
dzeń.
Wskazówka: podczas montażu należy pamiętać
o tym, aby jednocześnie powoli przeciągnąć kabel
przez dno.
Zdjąć zabezpieczenia na czas transportu 15 z
rury stojaka 7.
Włożyć w siebie części rury stojaka 7 i mocno
je przykręcić.
Wskazówka: Uważać na to, aby rury stojaka
7 były jak najmocniej skręcone, aby zapewnić
bezpieczne ustawienie lampy.
Uważać na to, aby nie przytrzasnąć przy tym
przewodu sieciowego 18 , który przechodzi
przez rurę stojaka 7.
Wskazówka: Nakrętka
12
i podkładka (duża
)
20 są już wstępnie zamontowane na rurze sto-
jaka 7.
Odkręcić nakrętkę 12 i podkładkę (dużą) 20
od rury stojaka 7.
Usunąć nakrętkę 12 i podkładkę (dużą) 20 z
przewodu sieciowego 18 .
Przeprowadzić przewód sieciowy 18 przez
otwór w środku podstawy stojaka 11 .
Najpierw nasunąć płytkę zabezpieczającą
(owalną) 19 , następnie podkładkę (dużą) 20 ,
a na koniec nakrętkę 12 na przewód sieciowy
18 .
Następnie wyprowadzić przewód sieciowy 18
przez otwór boczny w podstawie stojaka 11
na zewnątrz.
Wetknąć rurę stojaka 7 przez otwór w środku
podstawy stojaka 11 .
Zwrócić uwagę na to, aby przewód sieciowy
18 , który prowadzi przez rurę 7, nie został
przy tym zaciśnięty.
Nasunąć płytkę zabezpieczającą (owalną) 19
i podkładkę (dużą) 20 od dołu na rurę stojaka
7.
Przykręcić nakrętkę 12 na spód podstawy
stojaka 11 za pomocą narzędzia 13 .
Zwrócić uwagę na poprawne osadzenie.
Wskazówka: Pamiętać o tym, aby przytrzy-
mać rurę stojaka 7 przy zaciąganiu nakrętki 12 .
Wskazówka: Zwrócić uwagę na to, aby
przewód leżał w przewidzianym do tego wgłę-
bieniu w podstawie 11 i nie mógł zostać
zmiażdżony.
Postawić prosto lampę oświetlającą sufit.
Nałożyć klosz 3 na głowicę lampy oświetla-
jącej sufit 4.
Zamocować klosz 3 przy pomocy śrub 1 i
podkładek 2 na głowicy lampy oświetlającej
sufit 4 (patrz rys. A).
Zamontować uchwyt 9 za pomocą dwóch
śrub 10 na rurze stojaka 7 (patrz rys. C).
Uruchomienie / Konserwacja i czyszczenie

47 PL
Bezpieczeństwo / Przygotowanie / Uruchomienie Uruchomienie / Konserwacja i czyszczenie
Przewód sieciowy 18 połączyć z zasilaczem z
wtyczką 14 .
Włożyć zasilacz z wtyczką 14 do gniazdka
zainstalowanego w sposób zgodny z przepi-
sami.
Lampa jest gotowa do użytku.
Wkładanie / wymiana baterii
Wysunąć szufladkę baterii z pilota 8.
Włożyć baterie z dostarczonego kompletu do
pilota 8 (patrz rys. B).
Wkładać tylko takie baterie, które odpowiadają
„Danym technicznym“.
Wskazówka: poprawne ułożenie biegunów
jest pokazane w komorze na baterie.
Ponownie wsunąć szufladkę baterii do pilota 8.
Jeśli zasięg pilota 8 słabnie, należy wymienić
baterie.
W tym celu wysunąć szufladkę baterii z pilota.
Wyjąć baterie.
Włożyć nowe baterie. W tym celu postępować
tak, jak to zostało opisane wcześniej.
Włączanie / wyłączanie lampy
Lampę oświetlającą sufit włączać i wyłączać za
pomocą przełącznika WŁĄCZ/WYŁĄCZ 17 .
Lampę do czytania 5 włącza się lub wyłącza
za pomocą przełącznika WŁĄCZ / WYŁĄCZ 16 .
Sterowanie głowicą lampy 4 przy użyciu
pilota 8:
Włączyć głowicę lampy 4 przełącznikiem
WŁĄCZ / WYŁĄCZ 17 .
Pamiętać o tym, aby między lampą a pilotem
8 nie znajdowała się żadna przeszkoda.
Lampa zachowuje ostatnio wybraną barwę światła.
Dostępne są następujące funkcje:
włączanie lampy oświetlającej sufit
wyłączanie lampy oświetlającej sufit
ustawianie zimnego, neutralnego lub
ciepłego białego światła
rozjaśnianie
ściemnianie
Funkcja lampki nocnej: przyciskiem
programu powoduje zaświecenie się
lampy oświetlającej sufit na bardzo
niskim, ciepłym białym poziomie
ściemnienia.
Lampa wyłącza się automatycznie po
30 minutach.
Przełączanie między zimnym / neutral-
nym i ciepłym białym światłem poprzez
naciśnięcie przycisku
Ustawienie lampy
OSTROŻNIE! NIEBEZPIECZEŃSTWO
POPARZENIA GORĄCYMI POWIERZCH-
NIAMI!
Następnie zaczekać, aż lampa całkowicie
ostygnie.
Zgiąć ramię giętkie 6 lampy do czytania do
wybranej pozycji.
Przechylić głowicę lampy 4 do wybranej
pozycji.
Konserwacja i czyszczenie
NIEBEZPIECZEŃSTWO
PORAŻENIA PRĄDEM ELEKTRYCZNYM!
Należy najpierw wyjąć zasilacz z wtyczką 14 z
gniazdka.
OSTROŻNIE! NIEBEZPIECZEŃSTWO
POPARZENIA GORĄCYMI POWIERZCH-
NIAMI!
Odczekać, aż lampa całkowicie ostygnie.
NIEBEZPIECZEŃSTWO
PORAŻENIA PRĄDEM ELEKTRYCZNYM!
Ze względu na zachowanie bezpieczeństwa w

48 PL
Gwarancja i serwisKonserwacja i czyszczenie / Utylizacja / Gwarancja i serwis
zakresie elektryczności nie wolno czyścić lampy za
pomocą wody lub innych płynów, ani też zanurzać
w wodzie.
Nie używać rozpuszczalników, benzyny i
podobnych substancji. W przeciwnym razie
lampa może zostać uszkodzona.
Do czyszczenia należy używać wyłącznie
suchej, niestrzępiącej się szmatki.
Ponownie włożyć zasilacz z wtyczką 14 do
gniazdka.
Utylizacja
Opakowanie wykonane jest z materiałów przyjaznych
dla środowiska, które można przekazać do utylizacji
w lokalnym punkcie przetwarzania surowców
wtórnych.
b
a
Przy segregowaniu odpadów prosimy
zwrócić uwagę na oznakowanie mate-
riałów opakowaniowych, oznaczone są
one skrótami (a) i numerami (b) o nastę-
pującym znaczeniu: 1–7: Tworzywa
sztuczne / 20–22: Papier i tektura /
80–98: Materiały kompozytowe.
Produkt i materiał opakowania nadają
się do ponownego przetworzenia, na-
leży je zutylizować osobno w celu lep-
szego przetworzenia odpadów. Logo
Triman jest ważne tylko dla Francji.
Z uwagi na ochronę środowiska nie
wyrzucać urządzenia po zakończeniu
eksploatacji do odpadów domowych,
lecz prawidłowo zutylizować. Informacji
o punktach zbiorczych i ich godzinach
otwarcia udziela odpowiedni urząd.
Uszkodzone lub zużyte baterie / akumulatory muszą
być poddane recyklingowi zgodnie z dyrektywą
2006/66/WE i jej zmianami. Oddać baterie /
akumulatory i / lub produkt w dostępnych punktach
zbiórki.
Niewłaściwa utylizacja baterii /
akumulatorów stwarza zagroże-
nie dla środowiska naturalnego!
Baterii / akumulatorów nie należy wyrzucać razem
z odpadami domowymi. Mogą one zawierać szkod-
liwe metale ciężkie i należy je traktować jak odpady
specjalne. Symbole chemiczne metali ciężkich są
następujące: Cd = kadm, Hg = rtęć, Pb = ołów.
Dlatego też zużyte baterie / akumulatory należy
przekazywać do komunalnych punktów gromadze-
nia odpadów niebezpiecznych.
Gwarancja i serwis
Gwarancja
W momencie zakupu otrzymują Państwo na to urzą-
dzenie 36 miesięcy gwarancji. Urządzenie wypro-
dukowano starannie i poddano dokładnej kontroli
jakości. W okresie gwarancji usuwamy bezpłatnie
wszystkie wady materiałowe lub fabryczne. Jeśli
mimo to w okresie gwarancji pojawią się usterki,
urządzenie należy przesłać na podany adres
serwisowy, podając następujący numer modelu:
14135502L / 14135602L.
Gwarancji nie podlegają uszkodzenia spowodowane
przez nieprawidłowe użytkowanie, nieprzestrzega-
nie instrukcji obsługi lub ingerencję nieautoryzowa-
nych osób, a także części szybko zużywające się
(jak np. elementy świetlne). Usługa gwarancyjna
nie przedłuża ani nie odnawia okresu gwarancji.
Zgodnie z Kodeksem Cywilnym art. 581 §1 wraz
z wymianą urządzenia lub ważnej części czas
gwarancji rozpoczyna się na nowo.
Adres serwisu
Briloner Leuchten GmbH & Co. KG
Im Kissen 2
59929 Brilon
NIEMCY
Tel.: +49 29 61 / 97 12‒800
Faks: +49 29 61 / 97 12‒199
E-mail: kundenser[email protected]
www.briloner.com

49 PL
Gwarancja i serwis
Bezpłatny numer serwisu:
Tel.: 00800 / 27456637
IAN 339716_1910
Przed skontaktowaniem się z działem serwisowym
należy przygotować paragon i numer artykułu (np.
IAN 123456_7890) jako dowód zakupu.
Deklaracja zgodności
Niniejszy produkt spełnia wymagania obowiązują-
cych dyrektyw europejskich i krajowych. Zgodność
została wykazana. Odpowiednie deklaracje i do-
kumenty są przechowywane przez producenta.
Producent
Briloner Leuchten GmbH & Co. KG
Im Kissen 2
59929 Brilon
NIEMCY
Konserwacja i czyszczenie / Utylizacja / Gwarancja i serwis

50
Seznam obsahu

51 CZ
Seznam obsahu
Vysvětlení použitých piktogramů ...........................................................................Strana 52
Úvod .................................................................................................................................................Strana 53
Použití ke stanovenému účelu..........................................................................................................Strana 53
Rozsah dodávky ..............................................................................................................................Strana 53
Popis dílů ..........................................................................................................................................Strana 53
Technické údaje ...............................................................................................................................Strana 53
Bezpečnost ..................................................................................................................................Strana 54
Bezpečnostní pokyny .......................................................................................................................Strana 54
Bezpečnostní pokyny pro baterie a akumulátory .......................................................................... Strana 55
Příprava ........................................................................................................................................Strana 55
Potřebné nářadí a materiál ..............................................................................................................Strana 55
Uvedení do provozu ...........................................................................................................Strana 56
Montáž svítidla .................................................................................................................................Strana 56
Vložení a výměna baterií .................................................................................................................Strana 56
Zapínání a vypínání světla ..............................................................................................................Strana 56
Seřízení lampy ..................................................................................................................................Strana 57
Údržba a čištění ......................................................................................................................Strana 57
Likvidace .......................................................................................................................................Strana 57
Záruka a servis ....................................................................................................................... Strana 58
Záruka ..............................................................................................................................................Strana 58
Adresa servisu .................................................................................................................................. Strana 58
Evropské prohlášení o shodě ..........................................................................................................Strana 58
Výrobce ............................................................................................................................................Strana 58

52 CZ
Vysvětlení použitých piktogramů
Vysvětlení použitých piktogramů
Přečtěte si pokyny! Nebezpečí výbuchu!
Volt (střídavé napětí) Noste ochranné rukavice!
Hertz (kmitočet) Výstraha! Nebezpečí zásahu
elektrickým proudem!
Watt (činný výkon) Tak postupujete správně
Ochranná třída II Pozor na horké povrchy!
Před zkratem chráněný bezpečnostní
transformátor b
a
Obal i výrobek odstraňujte do
odpadu ekologicky!
Toto svítidlo je určené výhradně pro
provoz vinteriéru, vsuchých a
uzavřených místnostech.
Nezávislý provozní přístroj
Nebezpečí ohrožení života a zranění
malých i větších dětí! Svítidlo na čtení
Dbejte na výstrahy a řiďte se
bezpečnostními pokyny! Timer
Svítidlo k osvětlování stropu ta Teplota okolního prostředí
Obal je vyroben ze 100 %
recyklovatelného papíru. tc Teplota tělesa v udaném bodě
Nevhodné pro externí stmívače a pro
elektronické spínače Polarita přípojky
d.c. DC Stejnosměrné napětí ON OFF Spínací cykly
Životnost LED SELV Malé ochranné napětí
Ochranná třída III
Úvod

53 CZ
Vysvětlení použitých piktogramů Úvod
Stojací LED lampa s nastavitelnou
teplotou světla
Úvod
B
lahopřejeme vám ke koupi nového výrobku
.
Rozhodli jste se pro kvalitní produkt. Pře-
čtěte si laskavě kompletně a pečlivě tento
návod k obsluze. Rozevřete stránku s obrázky. Tento
návod patří k tomuto výrobku a obsahuje důležitá
upozornění k uvedení zařízení do provozu a k za-
cházení s ním. Řiďte se vždy bezpečnostními pokyny.
Před uvedením do provozu přezkoušejte, je-li k dis-
pozici správné napětí a jsou-li všechny díly namon-
tované. V případě, že máte dotazy nebo si nejste
jisti se zacházením se zařízením, spojte se laskavě
se svým prodejcem nebo místem servisu. Návod peč-
livě uschovejte a předejte jej případně třetímu.
Použití ke stanovenému účelu
Toto svítidlo se výhradně hodí pro provoz
ve vnitřní oblasti, v suchých a uzavřených
místnostech. Toto zařízení je plánováno
jen pro použití v soukromých domácnostech. Tento
výrobek je určen pro normální provoz.
Rozsah dodávky
Bezprostředně po vybavení vždy zkontrolujte
úplnost rozsahu dodávky a bezvadný stav přístroje.
1 LED stojací lampa s nastavitelným tónem barvy,
model 14135502L resp. 14135602L
1 sklo svítidla
1 stojanová trubka (2dílná)
3 šrouby (sklo svítidla) (14135502L)
4 šrouby (sklo svítidla) (14135602L)
3 podložky / gumové kroužky (14135502L)
4 podložky / gumové kroužky (14135602L)
1 dálkové ovládání
2 baterií 1,5 V AAA
1 držák (2dílný)
2 šrouby (držák)
1 podstavec
1 nářadí
1 jistící deska (oválná)
1 zástrčkový síťový adaptér
1 návod k montáži a obsluze
Popis dílů
1 Šroub (sklo svítidla)
2 Podložka / gumové kroužky
3 Sklo svítidla
4 Hlava svítidla nepřímého osvětlení
5 Hlava lampy (světlo na čtení)
6 Pružné rameno (světlo na čtení)
7 Trubka stojanu
8 Dálkové ovládání
9 2dílný držák (dálkové ovládání)
10 Šroub (držák)
11 Podstavec
12 Matka
13 Nástroj
14 Síťový adaptér se zástrčkou
15 Přepravní pojistka
16 Vypínač ZAP / VYP (svítidlo na čtení)
17 Vypínač ZAP / VYP (svítidlo k osvětlování
stropu)
18 Přívodní kabel
19 Jistící deska (oválná)
20 Podložka (velká)
Technické údaje
Model č.: 14135502L / 14135602L
Napětí: 220 ‒ 240 V ~ 50 / 60 Hz
Jmenovitý výkon: 36 W
Třída ochrany: II /
Druh ochrany: IP20
Typ: 14135502L-1 /
14135602L-1
Provozní napětí: 24 V
Třída ochrany: III /
Druh ochrany: IP20

54 CZ
Úvod / Bezpečnost
Hlava svítidla nepřímého osvětlení
Výkon: 34 W
LED: pevně vestavěné,
nevyměnitelné
Svítidlo na čtení
Příkon: 4,5 W
LED: pevně vestavěné,
nevyměnitelné
Dálkové ovládání:
Baterie: 2 x 1,5 V, AAA
Bezpečnost
Bezpečnostní pokyny
U škod způsobených nedodržováním tohoto návodu
k obsluze zaniká nárok na záruku! Za následovné
škody se nepřevezme záruka! U věcných škod nebo
poškození osob, které byly způsobeny neodborným
zacházením nebo nedbáním bezpečnostních pokynů,
se nepřevezme záruka!
NEBEZPEČÍ
OHROŽENÍ ŽIVOTA A ZRA-
NĚNÍ PRO MALÉ A VELKÉ DĚTI!
Nenechávejte děti nikdy samotné s obalovým
materiálem. Hrozí nebezpečí udušení obalovým
materiálem. Děti nebezpečí často podceňují.
Výrobek chraňte před dětmi.
Tento výrobek mohou používat děti od 8 let,
osoby se sníženými fyzickými, smyslovými nebo
duševními schopnosti nebo s nedostatečnými
zkušenostmi a znalostmi, jestliže budou pod
dohledem nebo byly poučeny o bezpečném
používání výrobku a chápou nebezpečí, která
z jeho používání vyplývají. S výrobkem si děti
nesmí hrát. Děti nesmí bez dohledu provádět
čištění ani uživatelskou údržbu.
Zabraňte ohrožení života
v důsledku úrazu elektrickým
proudem
Před každým připojením k síti přezkoušejte svítidlo
vzhledem k případným poškozením. Svítidlo
nepoužívejte, zjistili-li jste nějaká poškození.
Poškozené svítidlo znamená ohrožení života
úrazem elektrickým proudem. Při poškozeních,
opravách svítidla nebo jiných problémech se ob-
raťte na místo servisu nebo elektrotechnického
odborníka.
K zabránění ohrožení smí poškozené pružné
vedení tohoto svítidla výhradně vyměnit výrobce,
jeho zástupce servisu nebo srovnatelný odborník!
Před použitím se ujistěte, že souhlasí dané síťové
napětí s potřebným provozním napětím výrobku
(viz „ Technické údaje“).
Bezpodmínečně se vyvarujte kontaktu zařízení
s vodou nebo jinými tekutinami.
Před montáží, demontáží, čištěním nebo delším
nepoužívání lampy vytáhněte síťovou zástrčku
ze zásuivky.
Nikdy neotvírejte jeden z elektrických provozních
prostředků nebo nezastrčte do něho nějaké
prostředky. Takové zásahy představují nebezpečí
ohrožení života úrazem elektrickým proudem.
Neohýbejte síťový kabel.
Nezavádějte kabel přes ostré hrany.
Vyvarujte se nebezpečí
požáru a poranění
POZOR! NEBEZPEČÍ ZRANĚNÍ!
Bezprostředně po vybalení zkontrolujte svítidlo,
jestli není poškozené. Nemontujte svítidlo s vad-
ným sklem. Vtakovém případě se obraťte na
servis se žádostí o náhradu.
POZOR! NEBEZPEČÍ POPÁ-
LENÍ HORKÝMI POVRCHY!
Zajistěte, aby bylo svítidlo vypnuté a aspoň po
dobu 30 minut ochladlé, předtím než se ho
znovu dotknete, abyste se vyvarovali popálením.
Svíticí prostředky vyvinou v oblasti hlavy lampy
silné horko.
Bezpečnost / Příprava

55 CZ
Úvod / Bezpečnost Bezpečnost / Příprava
Nepřikrývejte lampu resp. zástrčku žádnými
předměty. Nadměrný vývin tepla může vést ke
vzniku požáru.
Svítidlo nenechejte v provozu bez dohledu.
POZOR!
Nedívejte se za provozu zblízka do LED.
Nedívejte se na LED optickou pomůckou
(např. lupou).
Osvětlovací prostředek tohoto svítidla nelze
vyměnit; jestliže je vadný, musí se celé svítidlo
vyměnit.
Tak se chováte správně
Namontujte svítidlo tak, aby bylo chráněné
před vlhkostí a nečistotou.
Montáž připravte pečlivě a věnujte jí dostatečný
čas. Připravte si předtím přehledně všechny
jednotlivé díly a navíc potřebné nástroje nebo
materiál.
Buďte neustále pozorní! Dbejte neustále na to,
co činíte a postupujte vždy s rozumem. Nikdy
nemontujte svítidlo, nejste-li koncentrovaní nebo
necítíte-li se dobře.
Pro úplné odpojení výrobku od přívodu elek-
trického proudu se musí zástrčka vytáhnout ze
zásuvky.
Bezpečnostní pokyny pro
baterie a akumulátory
NEBEZPEČÍ OHROŽENÍ ŽIVOTA!
Uchovávejte baterie a akumulátory mimo dosah
dětí. V případě spolknutí okamžitě vyhledejte
lékařskou pomoc!
NEBEZPEČÍ VÝBUCHU!
Nenabíjecí baterie nikdy znovu nenabíjejte.
Baterie nebo akumulátory nezkratujte ani je
neotevírejte. Hrozí přehřátí, nebezpečí požáru
nebo jejich prasknutí.
Nikdy neházejte baterie nebo akumulátory do
ohně ani do vody.
Nevystavujte baterie nebo akumulátory mecha-
nickému zatížení.
Nebezpečí vytečení baterií / akumulátorů
Zabraňte extrémním podmínkám a teplotám,
např. na topení anebo na slunci, které mohou
negativně ovlivnit funkci baterií nebo akumulá-
torů.
Vyhýbejte se kontaktu s pokožkou, očima a
sliznicemi! Po kontaktu s kyselinou baterií ihned
omyjte postižená místa dostatečným množstvím
čisté vody a okamžitě vyhledejte lékařskou
pomoc!
NOSTE OCHRANNÉ RUKAVICE!
Vyteklé i poškozené baterie nebo akumulátory
mohou při kontaktu s pokožkou způsobit její
poleptání. Noste proto vhodné rukavice.
V případě vytečení ihned odstraňte baterie nebo
akumulátory z výrobku, abyste zabránili jeho
poškození!
Používejte jen baterie nebo akumulátory stej-
ného typu. Nekombinujte staré baterie nebo
akumulátory s novými!
Odstraňte baterie nebo akumulátory při delším
nepoužívání z výrobku.
Nebezpečí poškození výrobku
Používejte jen udaný typ baterie nebo akumu-
látoru!
Nasazujte baterie nebo akumulátory podle
označení polarity (+) a (-) na bateriích nebo
akumulátorech a na výrobku.
Vyčistěte před vložením kontakty baterie nebo
akumulátoru a kontakty v přihrádce na baterie!
Vybité baterie nebo akumulátory ihned vyjměte
z výrobku.
Příprava
Potřebné nářadí a materiál
Uvedené nářadí a materiály nejsou součástí dodávky.
Jedná se zde o nezávazné údaje a orientační hod-
noty. Vlastnosti materiálu jsou závislé na individuál-
ních podmínkách v místě.
- šroubovák

56
Uvedení do provozu
Montáž svítidla
Upozornění: Pro montáž jsou zapotřebí dvě osoby.
Upozornění: Během montáže položte svítidlo
nepřímého osvětlení na měkký podklad (na deku,
apod.) aby se nepoškodilo.
Upozornění: Během montáže dávejte pozor,
abyste protáhli kabel současně a pomalu dnem
podstavce.
Odstraňte přepravní pojistku 15 ze stojanové
trubky 7.
Sestavte díly stojanové trubky 7 dohromady
a pevně je sešroubujte.
Upozornění: Dávejte pozor, aby byly stoja-
nové trubky 7 dostatečně zašroubované a
zajišťovaly tím bezpečnou polohu svítidla.
Dávejte pozor, aby nedošlo k uskřípnutí přívodního
kabelu 18 , který je protažený stojanovou trub-
kou 7.
Upozornění: Matka 12 a podložka (velká)
20 jsou na stojanové trubce 7 předmontované.
Odšroubujte matku 12 a sejměte podložku
(velkou) 20 ze stojanové trubky 7.
Odšroubujte matku 12 a sejměte podložku
(velkou) 20 ze síťového kabelu 18 .
Protáhněte síťový kabel 18 skrz otvor ve středu
podstavce 11 .
Nasuňte nejdříve jistící desku (oválnou) 19 ,
potom podložku (velkou) 20 a nakonec matku
12 přes síťový kabel 18 .
Potom protáhněte síťový kabel 18 postranním
otvorem v podstavci 11 ven.
Nastrčte stojanovou trubku 7 do otvoru v
podstavci 11 .
Dávejte přitom pozor, abyste neuskřípli síťový
kabel 18 , který vede stojanovou trubkou 7.
Nasuňte jistící desku (oválnou) 19 a podložku
(velkou) 20 zdola na stojanovou trubku 7.
Utáhněte pevně matku 12 na spodní straně
podstavce 11 nástrojem 13 .
Dbejte na správné usazení.
Upozornění: Při utahování matky 12 stoja-
novou trubku 7 přidržujte.
Upozornění: Dbejte na to, aby kabely ležely
příslušné drážce podstavce 11 a nemohly se
uskřípnout.
Postavte svítidlo.
Přiložte sklo svítidla 3 na hlavu nepřímého
osvětlení 4.
Přišroubujte sklo svítidla 3 šrouby 1 s pod-
ložkami 2 na hlavu svítidla nepřímého osvět-
lení 4 (viz obr. A).
Přišroubujte držák 9 dvěma šrouby 10 na
stojanovou trubku 7 (viz obr. C).
Spojte přívodní kabel 18 se síťovým adaptérem
se zástrčkou 14 .
Zapojte síťový adaptér se zástrčkou 14 do
zásuvky instalované vsouladu spředpisy.
Vaše svítidlo je připraveno k provozu.
Vložení a výměna baterií
Vysuňte zásuvku na baterie z dálkového ovlá-
dání 8.
Vložte do dálkového ovládání 8 baterie z
obsahu dodávky (viz obr. B).
Používejte jen baterie odpovídající údajům v
kapitole „ Technické údaje“.
Poznámka: Správná polarita je znázorněná
uvnitř přihrádky na baterie.
Zasuňte zásuvku na baterii zase do dálkového
ovládání 8.
Jestliže se zkrátí dosah dálkového ovládání 8,
je třeba vyměnit jeho baterii.
Vysuňte zásuvku na baterie z dálkového
ovládání.
Vyjměte baterie.
Vložte dovnitř nové baterie. Postupujte přitom
podle předchozího popisu.
Zapínání a vypínání světla
Zapínejte nebo vypínejte nepřímé osvětlení
vypínačem 17 .
Světlo na čtení 5 můžete zapínat nebo vypí-
nat vypínačem 16 .
Uvedení do provozu
CZ
Uvedení do provozu / Údržba a čištění / Likvidace

57 CZ
Uvedení do provozu Uvedení do provozu / Údržba a čištění / Likvidace
Řízení nepřímého osvětlení 4 dálkovým
ovládáním 8:
Zapněte nepřímé osvětlení 4 vypínačem 17 .
Dávejte pozor, aby nebyla žádná překážka
mezi svítidlem a dálkovým ovládáním 8.
Svítidlo ukládá do paměti naposledy zvolenou
barvu světla.
K dispozici máte následující funkce:
Zapnutí nepřímého osvětlení
Vypnutí nepřímého osvětlení
Studené světlo, neutrální nobo teple
bílé světlo nastavit
Vyjasnit
Ztlumit
Funkce nočního světla: s programovým
tlačítkem svítí svítidlo nepřímého osvět-
lení na velmi vysokém stupni ztlumení
s teplým bílým světlem.
Svítidlo se po 30 minutách automaticky
vypne.
Přepínání mezi studeným, neutrálním a
teplým bílým světlem stisknutím tlačítka
Seřízení lampy
POZOR! NEBEZPEČÍ POPÁLENÍ HOR-
KÝMI POVRCHY!
Nechte lampu nejprve úplně vychladnout.
Ohněte pružná ramena 6 svítidla ke čtení
do požadované polohy.
Nastavte hlavu svítidla 4 do požadované
polohy.
Údržba a čištění
NEBEZPEČÍ ÚRAZU ELEK-
TRICKÝM PROUDEM!
Nejdříve odpojte síťový adaptér se zástrčkou 14
ze zásuvky.
POZOR! NEBEZPEČÍ POPÁLENÍ HOR-
KÝMI POVRCHY!
Nechejte svítidlo nejprve úplně ochladnout.
NEBEZPEČÍ ÚRAZU ELEK-
TRICKÝM PROUDEM!
Z důvodů elektrické bezpečnosti se svítidlo nikdy
nesmí čistit vodou nebo jinými kapalinami nebo
dokonce do vody ponořit.
Nepoužívejte rozpouštědla, benzin apod.
Svítidlo by se mohlo přitom poškodit.
K čištění použijte jen suchou tkaninu bez nitek.
Zapojte síťový adaptér se zástrčkou 14 opět
do zásuvky.
Likvidace
Obal se skládá zekologických materiálů, které
můžete zlikvidovat prostřednictvím místních sběren
recyklovatelných materiálů.
b
a
Při třídění odpadu se řiďte podle ozna-
čení obalových materiálů zkratkami (a)
a čísly (b), s následujícím významem:
1–7: umělé hmoty / 20–22: papír a
lepenka / 80–98: složené látky.
Výrobek a obalové materiály jsou recy-
klovatelné, zlikvidujte je odděleně pro
lepší odstranění odpadu. Logo Triman
platí jen pro Francii.
Vzájmu ochrany životního prostředí
vysloužilý výrobek nevyhazujte do do-
movního odpadu, ale předejte k odborné
likvidaci. O sběrnách a jejich otevíracích
hodinách se můžete informovat u přís
lušné
správy města nebo obce.
Vadné nebo vybité baterie se musí, podle směrnice
2006 / 66 / ES a jejích příslušných změn, recyklovat.
Baterie nebo přístroj odevzdejte zpět do nabízených
sběren.

58 CZ
Likvidace / Záruka a servis
Škody na životním prostředí
způsobené nesprávným
odstraněním baterií do odpadu!
Baterie se nesmí vyhazovat do domovního odpadu.
Mohou obsahovat jedovaté těžké kovy a musí se
zpracovávat jako zvláštní odpad. Chemické symboly
těžkých kovů: Cd = kadmium, Hg = rtuť, Pb = olovo.
Proto odevzdejte vybité baterie do komunální sběrny.
Záruka a servis
Záruka
Od okamžiku zakoupení dostáváte na výrobek zá-
ruku po dobu 36 měsíců. Zařízení bylo svědomitě
vyrobeno a podrobeno přesné kontrole jakosti. Bě-
hem záruční doby odstraníme bezplatně všechny
vady materiálu a výrobní vady. Vpřípadě, že se
během záruční doby přesto vyskytnou závady,
zašlete přístroj na uvedenou adresu servisu a uveďte
následující číslo modelu: 14135502L / 14135602L.
Ze záruky vyloučeny škody způsobené neodborným
zacházením, nerespektováním návodu kobsluze
nebo zásahem neautorizovanou osobou, jakož i
poškození rychleopotřebitelných dílů (např. svíticí
prostředky). Záručním výkonem se záruční doba
neprodlouží ani neobnoví.
Adresa servisu
Briloner Leuchten GmbH & Co. KG
Im Kissen 2
59929 Brilon
NĚMECKO
Tel.: +49 29 61 / 97 12‒800
Fax: +49 29 61 / 97 12‒199
E-Mail: kundenservice@briloner.com
www.briloner.com
Servisní číslo zdarma:
Tel.: 00800 / 27456637
IAN 339716_1910
Pro všechny požadavky si připravte pokladní blok a
číslo
výrobku (např. IAN 123456_7890) jako do-
klad o nákupu.
Evropské prohlášení o shodě
Tento výrobek splňuje požadavky platných evropských
a národních směrnic. Konformita byla doložena.
Příslušná prohlášení a dokumentace jsou uloženy
uvýrobce.
Výrobce
Briloner Leuchten GmbH & Co. KG
Im Kissen 2
59929 Brilon
NĚMECKO
Zoznam obsahu

59 SK
Likvidace / Záruka a servis Zoznam obsahu
Legenda použitých piktogramov ............................................................................ Strana 60
Úvod .................................................................................................................................................Strana 61
Použitie k určenému účelu ............................................................................................................... Strana 61
Rozsah dodávky ..............................................................................................................................Strana 61
Popis častí .........................................................................................................................................Strana 61
Technické údaje ...............................................................................................................................Strana 61
Bezpečnosť ................................................................................................................................. Strana 62
Bezpečnostné pokyny ......................................................................................................................Strana 62
Bezpečnostné upozornenia týkajúce sa batérií / akumulátorových batérií ..................................Strana 63
Príprava ........................................................................................................................................Strana 64
Potrebné náradie a materiál ...........................................................................................................Strana 64
Uvedenie do prevádzky ................................................................................................. Strana 64
Montáž svietidla...............................................................................................................................Strana 64
Vkladanie / výmena batérií ..............................................................................................................Strana 64
Zapnutie / vypnutie svietidla ............................................................................................................Strana 65
Vyrovnanie svietidla .........................................................................................................................Strana 65
Údržba a čistenie ...................................................................................................................Strana 65
Likvidácia .....................................................................................................................................Strana 65
Záruka a servis ....................................................................................................................... Strana 66
Záruka ..............................................................................................................................................Strana 66
Servisná adresa ................................................................................................................................Strana 66
Prehlásenie o zhode ........................................................................................................................Strana 66
Výrobca ............................................................................................................................................ Strana 66

60 SK
Legenda použitých piktogramov
Legenda použitých piktogramov
Prečítajte si pokyny! Nebezpečenstvo explózie!
Volt (striedavé napätie) Noste ochranné rukavice!
Hertz (frekvencia) Varovanie! Nebezpečenstvo zásahu
elektrickým prúdom!
Watt (efektívny výkon) Takto postupujete správne
Trieda ochrany II Nebezpečenstvo horúcich povrchov!
Skratuvzdorný bezpečnostný
transformátor b
a
Obal a zariadenie ekologicky
zlikvidujte!
Toto svietidlo je určené výhradne na
prevádzku v interiéri, v suchých a
uzatvorených priestoroch.
Nezávislý prevádzkový prístroj
Nebezpečenstvo ohrozenia života a
nebezpečenstvo nehody pre malé i
staršie deti! Lampa na čítanie
Rešpektujte výstražné a bezpečnostné
upozornenia! Timer
Stojanové svietidlo ta Teplota okolia
Obal je vyrobený zo 100%
recyklovaného papiera. tc Teplota schránky na uvedenom bode
Nevhodné pre externé stmievače
alebo elektronické spínače Polarita pripojenia
d.c. DC Jednosmerné napätie ON OFF Spínacie cykly
Životnosť LED SELV Ochranné nízke napätie
Trieda ochrany III
Úvod

61 SK
Legenda použitých piktogramov Úvod
LED stojaca lampa
Úvod
Blahoželáme vám ku kúpe nového vý-
robku. Rozhodli ste sa pre veľmi kvalitný
výrobok. Prosím prečítajte si dôkladne a
pozorne tento návod na obsluhu. Otvorte si prosím
stranu z obrázkami. Tento návod patrí k tomuto vý-
robku a obsahuje dôležité pokyny pre uvedenie do
prevádzky a manipuláciu. Dodržiavajte vždy všetky
bezpečnostné pokyny. Pred uvedením do prevádzky
prekontrolujte, či je k dispozícii správne napätie a či
sú všetky diely správne namontované. Ak by ste mali
otázky, alebo ste si neboli istý, čo sa týka manipulá-
cie s prístrojom, spojte sa prosím so svojím obchod-
níkom alebo servisným strediskom svojej krajiny.
Tento návod starostlivo uschovajte a prípadne ho
postúpte tretej osobe.
Použitie k určenému účelu
Toto svietidlo je vhodné výlučne na pre-
vádzku v interiéri, v suchých a uzavretých
priestoroch. Tento prístroj je určený len
na použitie v súkromných domácnostiach. Tento
produkt je určený pre normálnu prevádzku.
Rozsah dodávky
Bezprostredne po vybalení skontrolujte, či je dodávka
úplná ako aj, či je kompletný prístroj.
1 LED stojaca lampa, model 14135502L resp.
14135602L
1 sklenené tienidlo
1 rúrkový stojan (2-dielny)
3 skrutky (sklenené tienidlo) (14135502L)
4 skrutky (sklenené tienidlo) (14135602L)
3 podložky pod matice / gumené krúžky
(14135502L)
4 podložky pod matice / gumené krúžky
(14135602L)
1 diaľkové ovládanie
2 batérií 1,5 V AAA
1 držiak (2-dielny)
2 skrutky (držiak)
1 noha stojana
1 náradie
1 varovalna plošča (ovalna)
1 omrežni napajalnik
1 návod na montáž a obsluhu
Popis častí
1 Skrutka (sklenené tienidlo)
2 Podložné koliesko / gumené krúžky
3 Sklenené tienidlo
4 Hlavica svietidla
5 Hlava svietidla (lampa na čítanie)
6 Flexibilné rameno (lampa na čítanie)
7 Rúrkový stojan
8 Diaľkové ovládanie
9 2-dielny držiak (diaľkové ovládanie)
10 Skrutka (držiak)
11 Noha stojana
12 Matica
13 Náradie
14 Zástrčkový sieťový diel
15 Transportná poistka
16 ZA- / VYPÍNAČ (lampa na čítanie)
17 ZA- / VYPÍNAČ (stojanové svietidlo)
18 Sieťový kábel
19 Varovalna plošča (ovalna)
20 Podložka (velika)
Technické údaje
Model číslo: 14135502L / 14135602L
Napätie: 220‒240 V ~ 50 / 60 Hz
Menovitý výkon: 36 W
Trieda ochrany: II /
Druh ochrany: IP20
Typ: 14135502L-1 /
14135602L-1
Prevádzkové napätie: 24 V
Trieda ochrany: III /
Druh ochrany: IP20

62 SK
Úvod / Bezpečnosť
Hlava stojanového svietidla
Výkon: 34 W
LED: pevne zabudovaná, bez
možnosti výmeny
Lampa na čítanie
Výkon: 4,5 W
LED: pevne zabudovaná, bez
možnosti výmeny
Diaľkové ovládanie:
Batérie: 2 x 1,5 V AAA
Bezpečnosť
Bezpečnostné pokyny
Pri škodách, ktoré budú zapríčinené nedodržiavaním
tohto návodu na obsluhu, zaniká nárok na záruku!
Pri následných škodách nepreberáme záruku! Pri
vecných škodách alebo zraneniach osôb, ktoré
boli zapríčinené neodbornou manipuláciou alebo
nedodržiavaním bezpečnostných pokynov, nepre-
beráme žiadnu záruku!
NEBEZPE-
ČENSTVO OHROZENIA ŽIVOTA
A NEBEZPEČENSTVO ÚRAZU
PRE MALÉ I STARŠIE DETI!
Nikdy nenechávajte deti bez dozoru s obalo-
vým materiálom. Hrozí nebezpečenstvo uduse-
nia obalovým materiálom. Deti často podceňujú
nebezpečenstvá. Držte deti vždy v bezpečnej
vzdialenosti od výrobku.
Tento prístroj môžu používať deti od 8 rokov
ako aj osoby so zníženými psychickými, senzo-
rickými alebo duševnými schopnosťami alebo s
nedostatkom skúseností a vedomostí, ak sú pod
dozorom, alebo ak boli poučené ohľadom
bezpečného používania prístroja, a ak porozu-
meli nebezpečenstvám spojeným s jeho použí-
vaním. Deti sa s prístrojom nesmú hrať. Čistenie
a údržbu nesmú vykonávať deti bez dozoru.
Vyhnite sa ohrozeniu života
úderom elektrického prúdu
Pred každým použitím skontrolujte prípadné
poškodenia svietidla. Ak zistíte akékoľvek
poškodenia, svietidlo za žiadnych okolností
nepoužívajte.
Poškodené svietidlo predstavuje riziko ohrozenia
života v dôsledku zásahu elektrickým prúdom.
V prípade poškodení, opráv alebo iných problé-
mov so svietidlom sa obráťte na servisné stredisko
alebo kvalifikovaného elektrikára.
Kvôli zamedzeniu ohrození smie poškodený
vonkajší ohybný kábel tohto svietidla vymieňať
výlučne výrobca, jeho servisný zástupca alebo
porovnateľný odborník!
Pred použitím sa ubezpečte, že existujúce sie-
ťové napätie sa zhoduje s potrebným prevádz-
kovým napätím svietidla (pozri „Technické údaje“).
Bezpodmienečne zabráňte kontaktu svietidla s
vodou alebo inými tekutinami.
Pred montážou, demontážou, čistením, alebo
ak svietidlo dlhší čas nepoužívate, vždy vytiah-
nite zástrčku zo zásuvky.
Nikdy neotvárajte niektorý z elektrických pre-
vádzkových prostriedkov ani do nich nestrkajte
akékoľvek predmety. Takéto zásahy predstavujú
riziko ohrozenia života v dôsledku zásahu
elektrickým prúdom.
Sieťový kábel nezalamujte.
Neveďte kábel ponad ostré hrany.
Zabráňte nebezpečenstvu
požiaru a poranení
OPATRNE! NEBEZPEČENSTVO PORA-
NENIA!
Bezprostredne po vybalení skontrolujte každé
stojanové svietidlo ohľadom prípadných poško-
dení. Nemontujte svietidlo s defektným sklom
lampy. V takom prípade sa spojte so servisným
strediskom kvôli výmene.
POZOR! NEBEZPEČENSTVO
POPÁLENIA SKRZE HORÚCE
POVRCHY!
Zabezpečte, aby svietidlo bolo vypnuté a
vychladnuté, skôr ako sa ho budete dotýkať,
Bezpečnosť

63 SK
Úvod / Bezpečnosť Bezpečnosť
pretože inak hrozí nebezpečenstvo popálenia.
Osvetľovacie prostriedky sa v oblasti hlavy
lampy silno zahrievajú.
Svietidlo resp. sieťovú zástrčku neprikrývajte
predmetmi. Nadmerná tvorba tepla môže viesť
k vzniku požiaru.
Svietidlo nenechávajte počas prevádzky bez
dozoru.
Svietidlo alebo obalový materiál nenechávajte
voľne ležať. Plastové fólie / plastové vrecúška,
umelohmotné diely atď. by sa mohli stať ne-
bezpečnou hračkou pre deti.
POZOR!
Počas prevádzky nepozerajte z krátkej vzdiale-
nosti do LED-svietidiel.
LED-svietidlá si neprehliadajte pomocou optic-
kého nástroja (napr. lupa).
Svetelný zdroj tohto svietidla nie je možné
vymeniť; keď dosiahne koniec svojej životnosti,
je potrebné vymeniť celé svietidlo.
Takto je to správne
Svietidlo namontujte tak, aby bolo chránené
pred vlhkom a znečistením.
Dôkladne si pripravte montáž a vymedzte si
dostatok času. Všetky súčiastky a dodatočné
potrebné náradie alebo materiál si vopred
prehľadne rozložte na dosah ruky.
Buďte vždy opatrný! Vždy dávajte pozor na to,
čo robíte a postupujte vždy uvážene. Svietidlo
v žiadnom prípade nemontujte vtedy, keď ste
nekoncentrovaný, alebo sa necítite dobre.
Ak chcete svietidlo úplne odpojiť od zdroja
prúdu, musíte vytiahnuť sieťovú zástrčku z elek-
trickej zásuvky.
Bezpečnostné upozornenia
týkajúce sa batérií /
akumulátorových batérií
NEBEZPEČENSTVO OHROZENIA
ŽIVOTA!
Batérie / akumulátorové batérie držte mimo
dosahu detí. V prípade prehltnutia okamžite
vyhľadajte lekára!
NEBEZPEČENSTVO EXPLÓZIE!
Nenabíjateľné batérie nikdy znova nenabíjajte.
Batérie / akumulátorové batérie neskratujte a /
alebo neotvárajte. Následkom môže byť pre-
hriatie, požiar alebo explózia.
Batérie / akumulátorové batérie nikdy nehádžte
do ohňa alebo vody.
Nevystavujte batérie / akumulátorové batérie
mechanickej záťaži.
Riziko vytečenia batérií / akumulátorových
batérií
Batérie / akumulátorové batérie nikdy nevysta-
vujte extrémnym podmienkam a teplotám, ktoré
by na ne mohli pôsobiť, napr. na vykurovacích
telesách / priamom slnečnom žiarení.
Vyhýbajte sa styku s pokožkou, očami a slizni-
cami! Pri kontakte s kyselinou batérie ihneď vy-
pláchnite postihnuté miesta väčším množstvom
čistej vody a okamžite vyhľadajte lekára!
NOSTE OCHRANNÉ RUKA-
VICE!
Vytečené alebo poškodené batérie / akumuláto-
rové batérie môžu pri kontakte s pokožkou spô-
sobiť poleptanie. V takom prípade preto noste
vhodné ochranné rukavice.
V prípade vytečenia batérií / akumulátorových
batérií ich ihneď vyberte z výrobku, aby ste
predišli vzniku škôd.
Používajte iba batérie / akumulátorové batérie
rovnakého typu. Nekombinujte staré batérie /
akumulátorové batérie s novými!
Ak produkt dlhší čas nepoužívate, vyberte z
neho batérie / akumulátorové batérie.
Riziko poškodenia produktu
Používajte výhradne uvedený typ batérií /
akumulátorových batérií!
Vložte batérie / akumulátorové batérie podľa
označenia polarity (+) a (-) na batérii / akumu-
látorovej batérii a výrobku.
Pred vložením vyčistite kontakty na batérii /
akumulátorovej batérii a v priečinku pre batérie!
Vybité batérie / akumulátorové batérie ihneď
vyberte z produktu.

64 SK
Príprava / Uvedenie do prevádzky
Príprava
Potrebné náradie a materiál
Uvedené náradie/nástroje a materiál nie sú súčasťou
dodávky. Ide tu o nezáväzné údaje a hodnoty pre
orientáciu. Charakter materiálu sa riadi podľa indi-
viduálnych daností na mieste.
- Šrobovák
Uvedenie do prevádzky
Montáž svietidla
Poznámka: Pri montáži budete potrebovať pomoc
druhej osoby.
Poznámka: Položte stojanové svietidlo počas
montáže na mäkký podklad (deka a. i.), aby ste
predišli poškodeniam.
Poznámka: Počas montáže dbajte na to, aby ste
zároveň pomaly viedli kábel po zemi.
Odstráňte transportné poistky 15 z rúrkového
stojana 7.
Zasuňte časti rúrkového stojana 7 doseba a
pevne ich zošróbujte.
Poznámka: Dbajte na to, aby boli stojanové
tyče 7 čo možno najďalej zatočené, aby bola
zaručená stabilita svietidla.
Dbajte na to, aby sa pritom neprivrel sieťový
kábel 18 , ktorý vedie cez stojanovú tyč 7.
Napotek: Matica 12 in podložka (velika)
20 sta prednameščeni na pokončni cevi 7.
Popustite matico 12 in podložko (veliko) 20 s
pokončne cevi 7.
Odstranite matico 12 in podložko (veliko) 20
z omrežnega kabla 18 .
Uvedite omrežni kabel 18 skozi odprtino v sre-
dini podstavka 11 .
Najprej potisnite varovalno ploščo (ovalno) 19 ,
nato podložko (veliko) 20 in nazadnje matico
12 prek omrežnega kabla 18 .
Nato speljite omrežni kabel 18 skozi stransko
odprtino v podstavku 11 navzven.
Vstavite pokončno cev 7 skozi odprtino v
podstavku 11 .
Poskrbite, da se omrežni kabel 18 , ki vodi
skozi pokončno cev 7, pri tem ne uklešči.
Potisnite varovalno ploščo (ovalno) 19 in pod-
ložko (veliko) 20 od spodaj na pokončno cev 7.
Privijte matico 12 na spodnji strani podstavka
11 s pomočjo orodja 13 .
Pazite na pravilno prileganje.
Poznámka: Dbajte na to, aby ste pevne
držali rúrkový stojan 7 pri zaťahovaní matíc 12 .
Poznámka: Dbajte na to, aby kábel ležal
vo výreze v stojane 11 určenom preň a aby
nemohol byť stlačený.
Vzpriamte stojanové svietidlo.
Položte sklenené tienidlo 3 na hlavicu svie-
tidla 4.
Upevnite sklenené tienidlo 3 pomocou skrutiek
1 a podložiek pod matice 2 na stojanové
svietidlo 4 (pozri obr. A).
Namontujte držiak 9 pomocou dvoch skrutiek
10 na rúrkový stojan 7 (pozri obr. C).
Spojte sieťový kábel 18 so zástrčkovým sieťovým
dielom 14 .
Zastrčte zástrčkový sieťový diel 14 do náležite
nainštalovanej zásuvky.
Vaše svietidlo je teraz pripravené na prevádzku.
Vkladanie / výmena batérií
Vysuňte priečinok pre batérie z diaľkového
ovládania 8.
Vložte batérie obsiahnuté v dodávke do diaľ-
kového ovládania 8 (pozri obr. B).
Vložte len batérie, ktoré zodpovedajú „Technické
údaje“.
Poznámka: Správna polarita je znázornená
v priečinku pre batérie.
Opäť zasuňte priečinok pre batérie na diaľkové
ovládanie 8.
Keď dosah diaľkového ovládania 8 zoslabne,
je potrebné vymeniť batérie.
Uvedenie do prevádzky / Údržba a čistenie / Likvidácia

65 SK
Príprava / Uvedenie do prevádzky Uvedenie do prevádzky / Údržba a čistenie / Likvidácia
Vysuňte preto priečinok pre batérie z diaľkového
ovládania.
Vyberte batérie.
Teraz vložte nové batérie. Postupujte pritom
podľa popisu.
Zapnutie / vypnutie svietidla
Za- resp. vypnite stojanové svietidlo pomocou
ZA- / VYPÍNAČA 17 .
Za- resp. vypnite lampu na čítanie 5 pomocou
ZA- / VYPÍNAČA 16 .
Ovládanie hlavy svietidla 4 prostredníc-
tvom diaľkového ovládania 8:
Hlavu svietidla 4 zapnite ZA-/ VYPÍNAČOM
17 .
Dbajte na to, aby sa medzi svietidlom a
diaľkovým ovládaním nenachádzala žiadna
prekážka 8.
Svietidlo uloží naposledy zvolenú farbu svetla.
K dispozícii máte nasledujúce funkcie:
Zapnutie stojanového svietidla
Vypnutie stojanového svietidla
Nastavenie studeného, neutrálneho
alebo teplého bieleho svetla
zvýšiť jas
znížiť jas
Funkcia nočného svetla: S programovým
tlačidlom svieti stojanové svietidlo na
veľmi nízkom, teplobielom stmievacom
stupni.
Svietidlo sa po 30 minútach automa-
ticky vypne.
Stlačením tlačidla môžete prepínať
medzi studeno- / neutrálne- a teplobie-
lym svetlom.
Vyrovnanie svietidla
POZOR! NEBEZPEČENSTVO POPÁLENIA
SKRZE HORÚCE POVRCHY!
Svietidlo nechajte najskôr úplne vychladnúť.
Flexibilné rameno 6 svietidla na čítanie otočte
do želaného smeru.
Nakloňte hlavicu svietidla 4 do želanej
polohy.
Údržba a čistenie
NEBEZPEČENSTVO
ZÁSAHU ELEKTRICKÝM PRÚDOM!
Najskôr vytiahnite zástrčkový sieťový diel 14 zo
zásuvky.
POZOR! NEBEZPEČENSTVO POPÁLENIA
SKRZE HORÚCE POVRCHY!
Svietidlo nechajte najskôr úplne ochladiť.
NEBEZPEČENSTVO
ZÁSAHU ELEKTRICKÝM PRÚDOM!
Z dôvodov elektrickej bezpečnosti sa svietidlo nikdy
nesmie čistiť vodou alebo inými tekutinami a v žiad-
nom prípade sa nesmie ponárať do vody.
Nepoužívajte žiadne rozpúšťadlá, benzín a
pod. Svietidlo by sa pritom poškodilo.
Na čistenie používajte iba suchú handru, ktorá
nepúšťa vlákna.
Zapojte zástrčkový sieťový diel 14 opäť do
zásuvky.
Likvidácia
Obal pozostáva z ekologických materiálov, ktoré
môžete odovzdať na miestnych recyklačných zber-
ných miestach.
b
a
Všímajte si prosím označenie obalových
materiálov pre triedenie odpadu, sú
označené skratkami (a) a číslami (b) s
nasledujúcim významom: 1–7: Plasty /
20–22: Papier a kartón / 80–98:
Spojené látky.

66 SK
Likvidácia / Záruka a servis
Výrobok a obalové materiály sú recyklo-
vateľné, zlikvidujte ich oddelene pre lep-
šie spracovanie odpadu. Triman-Logo
platí iba pre Francúzsko.
Ak výrobok doslúžil, v záujme ochrany
životného prostredia ho neodhoďte do
domového odpadu, ale odovzdajte na
odbornú likvidáciu. Informácie o zberných
miestach a ich otváracích hodinách
získate na Vašej príslušnej správe.
Defektné alebo použité batérie musia byť odovzdané
na recykláciu podľa smernice 2006 / 66 / ES a jej
zmien. Batérie a/alebo výrobok odovzdajte pro-
stredníctvom dostupných zberných stredísk.
Nesprávna likvidácia batérií
poškodzuje životné prostredie!
Batérie nesmiete likvidovať spolu s domovým odpa-
dom. Môžu obsahovať jedovaté ťažké kovy a je
potrebné zaobchádzať s nimi ako s nebezpečným
odpadom. Chemické značky ťažkých kovov sú na-
sledovné: Cd = kadmium, Hg = ortuť, Pb = olovo.
Opotrebované batérie preto odovzdajte na komunál-
nom zbernom mieste.
Záruka a servis
Záruka
Na tento prístroj poskytujeme záruku 36 mesiacov
od dátumu kúpy. Prístroj bol starostlivo vyrobený a
podrobený dôkladnej kontrole kvality. Vrámci záruč-
nej
doby bezplatne opravíme všetky chyby materiálu
a výrobné chyby. Ak by sa však počas záručnej
doby vyskytli nedostatky, odošlite prístroj na uve-
denú adresu servisu s uvedením nasledovného čísla
modelu: 14135502L / 14135602L.
Zo záruky sú vylúčené škody spôsobené neodbor-
nou manipuláciou, nedodržaním návodu na obsluhu
alebo zásahom neautorizovanej osoby, ako aj diely
podliehajúce opotrebovaniu (napr. osvetľovacie
prostriedky). Poskytnutím záruky sa záručná doba
nepredlžuje ani neobnovuje.
Servisná adresa
Briloner Leuchten GmbH & Co. KG
Im Kissen 2
59929 Brilon
NEMECKO
Tel.: +49 29 61 / 97 12‒800
Fax: +49 29 61 / 97 12‒199
E-mail: [email protected]
www.briloner.com
Bezplatné servisné číslo:
Tel.: 00800 / 27456637
IAN 339716_1910
Pre všetky otázky majte pripravený pokladničný
doklad a číslo výrobku (napr. IAN 123456_7890)
ako dôkaz o kúpe.
Prehlásenie o zhode
Tento výrobok spĺňa požiadavky platných európskych
a národných smerníc. Konformita bola preukázaná.
Príslušné prehlásenia a podklady sú uložené u vý-
robcu.
Výrobca
Briloner Leuchten GmbH & Co. KG
Im Kissen 2
59929 Brilon
NEMECKO

67
Likvidácia / Záruka a servis

68

BRILONER LEUCHTEN GMBH & CO. KG
Im Kissen 2
59929 Brilon
GERMANY
Stand der Informationen · Last Information
Update · Version des informations · Stand
van de informatie · Stan informacji · Stav
informací · Stav informácií: 04 / 2020
Ident.-No.: 14135502L / 14135602L042020-8
IAN 339716_1910
-
 1
1
-
 2
2
-
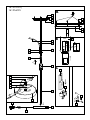 3
3
-
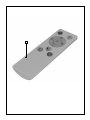 4
4
-
 5
5
-
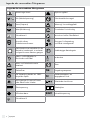 6
6
-
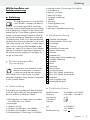 7
7
-
 8
8
-
 9
9
-
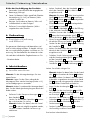 10
10
-
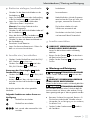 11
11
-
 12
12
-
 13
13
-
 14
14
-
 15
15
-
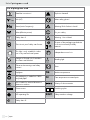 16
16
-
 17
17
-
 18
18
-
 19
19
-
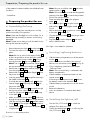 20
20
-
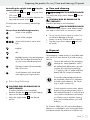 21
21
-
 22
22
-
 23
23
-
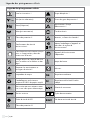 24
24
-
 25
25
-
 26
26
-
 27
27
-
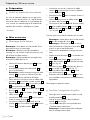 28
28
-
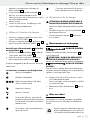 29
29
-
 30
30
-
 31
31
-
 32
32
-
 33
33
-
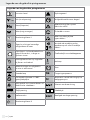 34
34
-
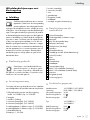 35
35
-
 36
36
-
 37
37
-
 38
38
-
 39
39
-
 40
40
-
 41
41
-
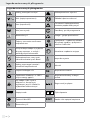 42
42
-
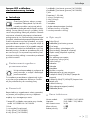 43
43
-
 44
44
-
 45
45
-
 46
46
-
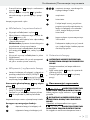 47
47
-
 48
48
-
 49
49
-
 50
50
-
 51
51
-
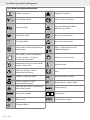 52
52
-
 53
53
-
 54
54
-
 55
55
-
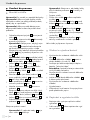 56
56
-
 57
57
-
 58
58
-
 59
59
-
 60
60
-
 61
61
-
 62
62
-
 63
63
-
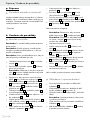 64
64
-
 65
65
-
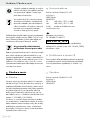 66
66
-
 67
67
-
 68
68
-
 69
69


in andere talen
- français: LIVARNO 339716 Le manuel du propriétaire
- Deutsch: LIVARNO 339716 Bedienungsanleitung
- slovenčina: LIVARNO 339716 Návod na obsluhu
- polski: LIVARNO 339716 Instrukcja obsługi