Samsung SX4411BUU Handleiding
- Categorie
- Stoomreinigers
- Type
- Handleiding

Houd, wanneer u contact opneemt met de serviceafdeling, het complete typenummer bij de hand.
En cas de contact avec le service après-vente, ayez auprès de vous le numéro de type complet.
Halten Sie die vollständige Typennummer bereit,
wenn Sie mit der Kundendienstabteilung Kontakt aufnehmen.
When contacting the service department, have the complete type number to hand.
Sørg for at have hele typenummeret klar, når serviceafdelingen kontaktes.
Ha hele typenummeret for hånden når du kontakter serviceavdelingen.
Ha det kompletta typnumret till hands när du tar kontakt med serviceavdelningen.
Adressen en telefoonnummers van de serviceorganisatie vindt u op de garantiekaart.
Les adresses et les numéros de téléphone du service après-vente se trouvent sur la carte de garantie.
Adressen und Telefonnummern der Kundendienstorganisation fi nden Sie auf der Garantiekarte.
You will fi nd the addresses and phone numbers of the service organisation on the guarantee card.
Adressen og telefonnummeret til servicevirksomheden fi ndes på garantikortet.
Du fi nner adresser og telefonnumre til serviceorganisasjonen på garantikortet.
Adresser och telefonnummer till serviceorganisationen hittar du på garantikortet.
Handleiding
Stoomoven
Manual
Steamer
700005249000
SX4411B
SX4492B
Code No.: DG68-00495A

NL
Handleiding NL 3 - NL 43
EN
Manual EN 3 - EN 42
Gebruikte pictogrammen - Pictogrammes utilisés - Benutzte Piktogramme
Pictograms used - Anvendte piktogrammer - Symboler brukt
Symboler som används
Belangrijk om te weten - Important à savoir - Wissenswertes - Important information
Vigtig information - Viktig informasjon - Viktig information
Tip - Conseil - Tipp - Tips
NL
BE
IE
GB


NL 2
INHOUDSOPGAVE
Bedieningspaneel . . . . . . . . . . . . . . . . . . . . . . . . . . . . . . . . . . . . . . . . . . . . . . . . . . . . . . . . . . 3
Ovenfuncties . . . . . . . . . . . . . . . . . . . . . . . . . . . . . . . . . . . . . . . . . . . . . . . . . . . . . . . . . . . . . . 4
Accessoires . . . . . . . . . . . . . . . . . . . . . . . . . . . . . . . . . . . . . . . . . . . . . . . . . . . . . . . . . . . . . . . 5
Gebruik van deze handleiding . . . . . . . . . . . . . . . . . . . . . . . . . . . . . . . . . . . . . . . . . . . . . . . . . .6
Oven . . . . . . . . . . . . . . . . . . . . . . . . . . . . . . . . . . . . . . . . . . . . . . . . . . . . . . . . . . . . . . . . . . . . 6
Het ovenlampje vervangen . . . . . . . . . . . . . . . . . . . . . . . . . . . . . . . . . . . . . . . . . . . . . . . . . . . 13
Het waterreservoir vullen . . . . . . . . . . . . . . . . . . . . . . . . . . . . . . . . . . . . . . . . . . . . . . . . . . . . . 14
De klok instellen . . . . . . . . . . . . . . . . . . . . . . . . . . . . . . . . . . . . . . . . . . . . . . . . . . . . . . . . . . . 15
De energiebesparingsstand instellen . . . . . . . . . . . . . . . . . . . . . . . . . . . . . . . . . . . . . . . . . . . . 16
Mogelijke STANDEN . . . . . . . . . . . . . . . . . . . . . . . . . . . . . . . . . . . . . . . . . . . . . . . . . . . . . . . .17
Standaardinstellingen . . . . . . . . . . . . . . . . . . . . . . . . . . . . . . . . . . . . . . . . . . . . . . . . . . . . . . . 18
De stoomstand gebruiken . . . . . . . . . . . . . . . . . . . . . . . . . . . . . . . . . . . . . . . . . . . . . . . . . . . 19
De opwarmstand gebruiken . . . . . . . . . . . . . . . . . . . . . . . . . . . . . . . . . . . . . . . . . . . . . . . . . . 23
De kooktijd instellen . . . . . . . . . . . . . . . . . . . . . . . . . . . . . . . . . . . . . . . . . . . . . . . . . . . . . . . . 24
De eindtijd instellen . . . . . . . . . . . . . . . . . . . . . . . . . . . . . . . . . . . . . . . . . . . . . . . . . . . . . . . . . 25
Uitstelfunctie kooktijd . . . . . . . . . . . . . . . . . . . . . . . . . . . . . . . . . . . . . . . . . . . . . . . . . . . . . . . 26
De automatische menustand gebruiken . . . . . . . . . . . . . . . . . . . . . . . . . . . . . . . . . . . . . . . . . 27
De ontdooistand gebruiken . . . . . . . . . . . . . . . . . . . . . . . . . . . . . . . . . . . . . . . . . . . . . . . . . . 31
De waterhardheid instellen . . . . . . . . . . . . . . . . . . . . . . . . . . . . . . . . . . . . . . . . . . . . . . . . . . .33
Ontkalkstand . . . . . . . . . . . . . . . . . . . . . . . . . . . . . . . . . . . . . . . . . . . . . . . . . . . . . . . . . . . . . 34
Reinigen . . . . . . . . . . . . . . . . . . . . . . . . . . . . . . . . . . . . . . . . . . . . . . . . . . . . . . . . . . . . . . . . . 36
De pieptoon uitschakelen . . . . . . . . . . . . . . . . . . . . . . . . . . . . . . . . . . . . . . . . . . . . . . . . . . . .38
Kinderslot . . . . . . . . . . . . . . . . . . . . . . . . . . . . . . . . . . . . . . . . . . . . . . . . . . . . . . . . . . . . . . . . 39
De stoomoven reinigen . . . . . . . . . . . . . . . . . . . . . . . . . . . . . . . . . . . . . . . . . . . . . . . . . . . . . .40
De stoomoven opbergen en repareren . . . . . . . . . . . . . . . . . . . . . . . . . . . . . . . . . . . . . . . . . . 40
Foutcodes . . . . . . . . . . . . . . . . . . . . . . . . . . . . . . . . . . . . . . . . . . . . . . . . . . . . . . . . . . . . . . . 41
Technische specifi caties . . . . . . . . . . . . . . . . . . . . . . . . . . . . . . . . . . . . . . . . . . . . . . . . . . . . . 42
Apparaat en verpakking verwijderen . . . . . . . . . . . . . . . . . . . . . . . . . . . . . . . . . . . . . . . . . . . . 43

NL 3
1. UIT
2. STOOMSTAND
3. ONTDOOISTAND
4. AUTOMATISCHE MENUSTAND
5. OPWARMSTAND
6. STANDKEUZEKNOP
7. DISPLAY
8. VERLICHTING AAN/UIT
9. KLOK
10. STOOMNIVEAU
(NIVEAU 1, 2 of 3)
11. KOOKTIJD
12. EINDTIJD
13. GEWICHT/TEMP.
14. FUNCTIEKEUZEKNOP
BEDIENINGSPANEEL
1
7
53 42
1413121110986

NL 4
Opmerking
• Er is slechts één niveau.
• Met de meegeleverde schalen kunt u op één niveau alles bereiden.
OVENFUNCTIES
Bedieningspaneel Waterreservoir
Ovenlampje
Grillverwarmer
Zijniveau
Handvat
Deur

NL 5
ACCESSOIRES
De volgende accessoires worden bij uw stoomoven geleverd:
1
Stoomovenbakblik zonder gaten,
40mm diep (handig voor het
opvangen van vocht tijdens het
stomen).
2
Stoomovenbakblik met gaten, 40 mm
diep (handig voor de stoomstand).
Voor stomen kunt u het stoomovenbakblik
met gaten in het stoomovenbakblik zonder
gaten plaatsen. Deze kunnen alleen samen
worden gebruikt.
3
Maatbeker voor het vullen van het
waterreservoir.

NL 6
GEBRUIK VAN DEZE HANDLEIDING
Bedankt dat u deze ATAG-stoomoven hebt gekocht.
De gebruikershandleiding bevat belangrijke informatie over het gebruik en onderhoud van
uw nieuwe stoomoven. De installatie-instructies worden afzonderlijk meegeleverd.
Lees vóór het gebruik van de stoomoven de veiligheidsinstructies en alle informatie in deze
handleiding. Bewaar de handleiding om deze later nog eens te kunnen raadplegen.
OVEN
Veilig gebruik
•
WAARSCHUWING: bij gebruik van het
apparaat worden het apparaat zelf en de
onderdelen binnen in het apparaat heet.
Raak de hete onderdelen niet aan. Houd
kinderen jonger dan 8 jaar uit de buurt van
het apparaat, tenzij u voortdurend toezicht
op hen houdt.
•
Dit apparaat kan worden gebruikt door
kinderen van 8 jaar en ouder, mensen met
fysieke, zintuiglijke of leerproblemen of
mensen die weinig ervaring met en kennis
van het apparaat hebben. Het is dan wel
belangrijk dat ze worden begeleid bij en
geïnstrueerd over een veilig gebruik van
het apparaat en de gevaren die dit met
zich meebrengt. Laat kinderen niet met het
apparaat spelen. Laat kinderen niet zonder
toezicht onderhoud plegen of het apparaat
reinigen.
•
Dit apparaat is uitsluitend bedoeld voor
huishoudelijk gebruik. Gebruik het alleen
voor de bereiding van voedsel.
•
Houd het snoer uit de buurt van hete
oppervlakken.
•
Zorg ervoor dat de ventilatieopeningen
onbedekt blijven.

NL 7
OVEN (VERVOLG)
•
Het apparaat is niet bedoeld om te worden
bediend met een externe timer of een
afzonderlijk afstandsbedieningssysteem.
•
In verband met de veiligheid mag het
apparaat niet worden gereinigd met
hogedrukreinigers of stoomreinigers.
•
WAARSCHUWING: verwarm nooit
afgesloten blikken. Er bouwt zich druk op in
het blik, waardoor het kan ontplo en.
•
Bij de bereiding van gerechten met alcohol
kunnen de hoge temperaturen ervoor zorgen
dat de alcohol verdampt. De damp kan vlam
vatten als deze in contact komt met hete
onderdelen.
•
Gebruik het apparaat niet om er
ontvlambare materialen of materialen die
snel kromtrekken in te bewaren.
•
Zorg ervoor dat voedsel altijd door en
door verwarmd wordt. De benodigde tijd
hiervoor is afhankelijk van veel factoren,
waaronder de hoeveelheid en het soort
voedsel. Eventuele bacteriën in het voedsel
worden alleen gedood als het voedsel langer
dan 10minuten op een temperatuur hoger
dan 70 °C wordt verwarmd. Verwarm het
voedsel langer als u er niet zeker van bent of
het door en door verwarmd is.
•
Gebruik geen schurende reinigingsmiddelen
of harde metalen schrapers voor het reinigen
van de glazen deur. Hierdoor ontstaan
krassen, waardoor het glas kan barsten.
•
Gebruik ovenwanten of pannenlappen om
schalen en accessoires uit het apparaat te
halen.

NL 8
OVEN (VERVOLG)
•
Als u rook waarneemt, schakelt u het
apparaat uit of haalt u de stekker van het
apparaat uit het stopcontact. Houd de deur
gesloten om eventuele vlammen te doven.
•
Gebruik alleen de temperatuursensor die
voor deze oven wordt aanbevolen (voor
apparaten waarbij het gebruik van een
temperatuursensor mogelijk is).
•
Verwijder alle etensresten en kookgerei uit
de oven voordat u de oven reinigt met de
zelfreinigende pyrolysefunctie.
•
Wanneer voor het reinigen van de oven
de bedieningstoetsen in een hogere stand
moeten worden gezet (pyrolyse) dan voor
normale kookdoeleinden, kan de buitenkant
warmer worden dan gebruikelijk. Houd
kinderen daarom op veilige afstand.
•
WAARSCHUWING: Voorkom elektrische
schokken door het apparaat uit te schakelen
voordat u het lampje vervangt.
•
WAARSCHUWING: Als het (glazen)
bedieningspaneel is gebarsten, schakelt
u het apparaat uit om de kans op een
elektrische schok te vermijden.
•
WAARSCHUWING: Koken met vet of olie
zonder toezicht kan gevaarlijk zijn en brand
veroorzaken.
•
Probeer NOOIT een brand te blussen met
water. Schakel het apparaat uit en houd de
deur gesloten.
•
WAARSCHUWING: In verband met
brandgevaar niets in de oven bewaren of
opslaan.

NL 9
Kinderen
•
Laat kinderen niet met het apparaat
spelen. Laat kinderen niet zonder toezicht
onderhoud plegen of het apparaat reinigen.
•
Bewaar niets in de kasten boven of achter
het apparaat wat uw kinderen mogelijk
interessant vinden.
Veilig gebruik van oven/stoomoven
•
WAARSCHUWING: Houd kinderen
op een veilige afstand van de oven
tijdens het bakken of braden. De oven
wordt tijdens gebruik warm. Raak de
verwarmingselementen en de binnenzijde
van de oven niet aan tot deze volledig zijn
afgekoeld.
•
WAARSCHUWING: De buitenzijde van de
oven kan heet worden als deze gedurende
langere tijd op een hoge temperatuur
wordt gebruikt. Als de oven lange tijd op
de maximumtemperatuur wordt gebruikt
(bijvoorbeeld tijdens grillen), kan het
glaspaneel in de ovendeur heet worden.
Pasop als er kinderen in de buurt zijn.
•
De oven is volledig geïsoleerd. Toch treedt
er altijd warmteoverdracht op en zal de
temperatuur van de buitenkant van de oven
oplopen. Deze temperaturen vallen ruim
binnen de norm.
•
De oven is voorzien van een ventilator die de
behuizing van de oven koelt. De ventilator
blijft mogelijk nog enige tijd werken nadat u
de oven hebt uitgezet.
•
Voorkom elektrische schokken door het
apparaat uit te schakelen voordat u het
lampje vervangt.
OVEN (VERVOLG)

NL 10
•
Plaats geen accessoires op de geopende
ovendeur.
•
De ovendeur dient tijdens bereidingen
gesloten te zijn.
•
Open de ovendeur voorzichtig, aangezien
erhete stoom kan ontsnappen.
•
Bewaar geen ontvlambare materialen in
deoven.
•
Bevroren producten zoals pizza’s dienen
op het rooster te worden bereid. Als u de
bakplaat gebruikt, kan deze vervormen
vanwege grote temperatuurverschillen.
•
Bedek de bodem van de oven nooit met
aluminiumfolie. De folie blokkeert de warmte,
wat kan leiden tot slechtere kookresultaten.
Daarnaast kan het email van de bodem van
de oven beschadigd raken.
•
Kleinere hoeveelheden vereisen een kortere
bereidingstijd. Als u de bereidingstijden uit
recepten aanhoudt, branden de gerechten
mogelijk aan.
•
Giet nooit koud water op de hete bodem
van de oven. Dit kan het email beschadigen.
•
Vruchtensappen kunnen hardnekkige
vlekken op de bodem van de oven
veroorzaken. Gebruik bij de bereiding van
vochtige taarten/pasteien (zoals appeltaart)
een bakblik/bakplaat/taartvorm als lekbak.
•
Gemorst voedsel dat suiker of
vruchtensappen bevat, zoals pruimensap
of rabarber, kan de kleur van het email
aantasten. We raden u aan de oven te
reinigen direct nadat deze is afgekoeld.
Opmerking: het water in het accessoire dat
u als lekbak hebt gebruikt in de stoomoven
is nog heet!
OVEN (VERVOLG)

NL 11
•
Gebruik hitte- en stoombestendige
bakblikken in de stoomoven. Siliconen
bakblikken zijn niet geschikt voor gebruik
met heteteluchtcirculatie en stoom.
•
Gebruik geen bakblikken met roestplekken.
Zelfs kleine plekjes kunnen leiden tot roest
aan de binnenzijde van de oven.
Installatie
•
Controleer het apparaat op transportschade.
Sluit het apparaat niet aan als het
beschadigd is.
•
Dit apparaat mag uitsluitend worden
geïnstalleerd door een bevoegde monteur!
•
Defecte onderdelen mogen alleen worden
vervangen door originele onderdelen. De
fabrikant garandeert alleen van originele
onderdelen dat deze aan de veiligheidseisen
voldoen.
•
Om gevaarlijke situaties te voorkomen, dient
een beschadigd elektriciteitssnoer alleen
te worden vervangen door de fabrikant, de
serviceorganisatie van de fabrikant of door
een erkend vakman.
•
De elektrische aansluiting moet voldoen aan
de nationale en lokale voorschriften.
•
U dient altijd bij de stekker en het
stopcontact te kunnen komen.
•
Als u een vaste aansluiting wilt maken, moet
in het netsnoer een omnipolaire schakelaar
met een contactafstand van ten minste
3mm worden geplaatst.
OVEN (VERVOLG)

NL 12
•
Het apparaat dient niet via een stekkerdoos
of verlengsnoer op netspanning te worden
aangesloten, aangezien veilig gebruik van
het apparaat dan niet langer kan worden
gegarandeerd.
•
WAARSCHUWING: U dient de behuizing
van het apparaat nooit te openen. De
behuizing mag uitsluitend worden geopend
door een servicemonteur.
•
Koppel het apparaat los van het
elektriciteitsnet voordat er reparaties worden
uitgevoerd.
•
Het apparaat dient zo te worden
geïnstalleerd dat de voeding uitgeschakeld
kan worden. Dat betekent dat de stekker
bereikbaar moet blijven zodat deze uit
de contactdoos kan worden gehaald.
Ook kan in een vaste elektriciteitskabel
een schakelaar worden aangebracht,
in overeenstemming met de daarvoor
geldende richtlijnen, om het apparaat uit te
schakelen.
Als de veiligheidsinstructies en
waarschuwingen niet worden opgevolgd,
kan de fabrikant niet verantwoordelijk
worden gehouden voor eventuele schade
als gevolg hiervan.
Als u besluit het apparaat niet langer te
gebruiken vanwege een fout, raden we u aan
het netsnoer af te knippen nadat u de stekker
uit het stopcontact hebt gehaald. Breng het
apparaat naar de gemeentelijke dienst voor
afvalbeheer.
OVEN (VERVOLG)

NL 13
HET OVENLAMPJE VERVANGEN
Het ovenlampje vervangen en het glazen kapje reinigen
1. Verwijder het kapje door het
linksom te draaien.
2. Ver
wijder de metalen ring en de
twee plaatringen en reinig het
glazen kapje.
3. Vervang de lamp indien nodig
door een hittebestendige (tot
300°C) ovenlamp van 25 watt
en230 V.
4. Bevestig de metalen ring en de
plaatring aan het glazen kapje.
5. Plaats het glazen kapje terug.
Lampje
Metalen
ring
PlaatringGlazen
kapje
Plaatring

NL 14
HET WATERRESERVOIR VULLEN
Het waterreservoir bevindt zich aan de rechterkant. Vul het reservoir uitsluitend met vers
kraanwater of niet-koolzuurhoudend mineraalwater. Bevat het water te veel kalk, dan kunt u
ookgebruikmaken van onthard water (zie ‘Waterhardheid’ op pagina 32).
Let op Giet geen gedestilleerd water of andere vloeisto en in het
waterreservoir.
Vul het waterreservoir altijd
voor gebruik
Til het waterreservoir over de vergrendeling en trek deze
vervolgens uit het apparaat. Open het deksel en vul het
waterreservoir tot de markering ‘Max’ met koud water.
Alsuhetreservoir met behulp van de maatbeker vult, hoeft u
het waterreservoir niet volledig uit het apparaat te verwijderen.
Sluit het deksel totdat u voelt dat deze goed vastzit.
Schuif het waterreservoir terug op zijn plaats.
Leeg het waterreservoir na
elk gebruik
Trek het waterreservoir voorzichtig uit het apparaat. Als u het er
te snel uittrekt, kunt u water knoeien. Houd het waterreservoir
horizontaal, zodat er geen resterend water uit het ventiel kan
druppelen.
Leeg hierna het reservoir.
Maak ook de nis voor het waterreservoir en de afsluiting in het
deksel goed droog.
Indicatie ‘Waterreservoir
vullen’
Wanneer het waterreservoir leeg is, klinkt er een signaal.
Op het display verschijnt een symbool. De werking wordt
onderbroken.
1. Haal het waterreservoir uit de oven, vul tot de ‘Max’
markering en plaats het weer terug.
2. Na 5 seconden start het apparaat automatisch.

NL 15
Wanneer het apparaat voor het eerst wordt aangesloten, licht het DISPLAY op. Na vijf
seconden gaan het kloksymbool en ‘12:00’ knipperen op het DISPLAY.
De klok instellen (bijvoorbeeld: 15:15)
1
Draai de STANDKEUZEKNOP naar
de stand ‘UIT’.
2
Druk op KLOK. ‘12’ begint te
knipperen.
3
Draai de FUNCTIEKEUZEKNOP om
het uur in te stellen.
4
Druk opnieuw op KLOK. ‘00’ begint te
knipperen.
5
Draai de FUNCTIEKEUZEKNOP om
de minuten in te stellen.
6
Druk opnieuw op KLOK.
Opmerking
• Als u op een knop drukt, begint de instelling te knipperen. U kunt de instelling nu wijzigen.
Ukunt de instelling alleen wijzigen als deze knippert. Als het knipperen is gestopt, moet u op
de knop drukken, zodat de instelling weer gaat knipperen.
DE KLOK INSTELLEN

NL 16
DE ENERGIEBESPARINGSSTAND INSTELLEN
De oven beschikt over een energiebesparingsstand. Deze stand bespaart elektriciteit als de oven
niet in gebruik is.
Stand-bystand
Als de oven 10 minuten niet is gebruikt, wordt de stand-bystand ingeschakeld (standaard).
ECO-stand
In de ECO-stand wordt de huidige tijd niet weergegeven. U kunt de oven niet gebruiken.
1
Draai de STANDKEUZEKNOP naar de
stand ‘UIT’.
2
Houd EINDTIJD 3 seconden ingedrukt.
De oven schakelt over naar de ECO-
stand en er wordt niets op het display
weergegeven.
3
Open de deur of druk op een knop
als u naar de stand-bystand wilt gaan.
Op het display wordt de huidige tijd
weergegeven en de oven is klaar voor
gebruik.

NL 17
MOGELIJKE STANDEN
In de volgende tabel staan de instellingen van uw oven.
Gebruik de kooktabellen als richtlijn voor deze standen bij het koken.
Stoomstand
(stel stoomniveau 1, 2 of 3 in met de knop ‘stoomniveau’)
Het gerecht wordt bereid met stoom. De stoom wordt opgewekt door de
stoomgenerator en via twee spuitmonden in de ovenruimte gespoten.
Deze stand is geschikt voor het stomen van bijvoorbeeld groenten, vis,
eieren, fruit en rijst. Zorg er bij deze stand altijd voor dat het reservoir met
vers water is gevuld.
Aanbevolen temperatuur: 100 °C
Opwarmstand
(stel stoomniveau 1, 2 of 3 in met de knop ‘stoomniveau’)
Voedsel wordt opgewarmd door de stoomstand. U kunt voedsel opwarmen
door de ingestelde tijd te regelen. De stoom wordt opgewekt door de
stoomgenerator en met tussenpozen in de ovenruimte gespoten.
Deze stand is geschikt voor het opwarmen van kant-en-klare gerechten.
Degerechten worden geleidelijk verwarmd, zonder dat ze uitdrogen. Zorg er
bij deze stand altijd voor dat het reservoir met vers water is gevuld.
Ontdooistand
U kunt kiezen uit 5 voorgeprogrammeerde instellingen voor ontdooien.
Detijd en temperatuur worden automatisch ingesteld.
U selecteert het programma en het gewicht van uw gerecht en start de
snelle bereiding.
Automatische menustand
U kunt kiezen uit 45 voorgeprogrammeerde automatische menu-instellingen.
De tijd en temperatuur worden automatisch ingesteld. U selecteert het
programma en het gewicht van uw gerecht en start het stomen.

NL 18
STANDAARDINSTELLINGEN
Wanneer de standaardkooktijd of standaardtemperatuur knippert, kunt u de tijd of de
temperatuur wijzigen door de FUNCTIEKEUZEKNOP te draaien.
1
De standaardtijd of
standaardtemperatuur knippert.
2
Wanneer de standaardtijd/-
temperatuur knippert: draai de
FUNCTIEKEUZEKNOP om de
gewenste tijd/temperatuur in te stellen.
Wanneer het knipperen is gestopt, kunt u de tijd/temperatuur wijzigen door op
BEREIDINGSTIJD, GEWICHT/TEMP te drukken.
Tijdens het koken kunt u altijd de KOOKTIJDof de TEMPERATUUR wijzigen.
► Kooktijd: druk op KOOKTIJD en draai vervolgens de FUNCTIEKEUZEKNOP.
► Temperatuur: druk op GEWICHT/TEMP en draai vervolgens de FUNCTIEKEUZEKNOP.

NL 19
DE STOOMSTAND GEBRUIKEN
Stoomstand
1
Vul het waterreservoir tot de markering
‘max’ en plaats het terug. Zet daarna
het gerecht in de oven.
2
Draai de STANDKEUZEKNOP naar de
stoomstand. Druk op STOOMNIVEAU
om stoomniveau 1, 2 of 3 in te stellen.
3
Druk op GEWICHT/TEMP.
Detemperatuur knippert.
4
Draai tijdens het knipperen de
FUNCTIEKEUZEKNOP en stel de
temperatuur in.
5
Druk op KOOKTIJD. De kooktijd
knippert.
6
Draai tijdens het knipperen de
FUNCTIEKEUZEKNOP en stel de
kooktijd in.
7
Na 5 seconden start het apparaat
automatisch.

NL 20
Als tijdens de bereiding het water in het reservoir opraakt,
verschijnt er een symbool op het display en klinkt er een piep.
Vul het waterreservoir bij en wacht 5 seconden voordat u verder
gaat met stomen.
• U kunt gedurende het hele bereidingsproces water bijvullen.
Opmerking
1) Tijdens het koken kunt u de KOOKTIJD en de TEMPERATUUR aanpassen.
► Kooktijd: druk op KOOKTIJD en draai vervolgens de FUNCTIEKEUZEKNOP.
► Temperatuur: druk op GEWICHT/TEMP en draai vervolgens de FUNCTIEKEUZEKNOP.
2) Als de stoomstand wordt gebruikt, wordt de werking van de elementen boven- en onderin
regelmatig onderbroken om de temperatuur te reguleren.
3) Pas op wanneer u de plaat uit de oven haalt. Deze is heet. Zet de deur eerst op een kier om de
hete stoom te laten ontsnappen. Houd ook rekening met de stoomopeningen.
4) Verwijder het waterreservoir na het bereiden van gerechten voorzichtig uit het apparaat en leeg
het reservoir.
5) Droog de ovenruimte met een droge doek als er vocht is achtergebleven.
6) Na het stomen werken de ventilator (10 minuten) en de pomp (10 seconden) nog door. Dit is normaal.
Verwijder het opgevangen water.
1
Leeg na het stomen het waterreservoir
en plaats het terug.
2
Draai de STANDKEUZEKNOP naar de
stand ‘UIT’.
3
Houd KLOK en STOOMNIVEAU
gedurende 2 seconden tegelijk ingedrukt.
Het achtergebleven water in de oven
wordt verwijderd en op het display
worden 20 seconden weergegeven.
4
Verwijder het waterreservoir en leeg het.
5
Na 5 seconden start het apparaat
automatisch.
DE STOOMSTAND GEBRUIKEN (VERVOLG)

NL 21
DE STOOMSTAND GEBRUIKEN (VERVOLG)
Stoomstand
Het gerecht wordt bereid met stoom. De stoom wordt opgewekt door de stoomgeneratoren
en via twee spuitmonden in de ovenruimte gespoten.
Het stoomovenbakblik
met gaten wordt
doorgaans op de plaat
geplaatst.
* Temperatuurstand:
40-100 °C
Bereidingsrichtlijnen
Neem de instellingen en tijden in deze tabel als richtlijnen voor het stomen.
Vul het waterreservoir altijd tot de markering ‘max’ met vers water.
Voedsel
Stoomstand
(°C)
Tijd (min.) Accessoire
Broccoliroosjes
100 °C 12 - 16 Stoomovenbakblik met gaten
Hele wortelen
100 °C 25 - 30 Stoomovenbakblik met gaten
Gesneden groenten
(paprika, courgette,
wortelen, uien)
100 °C 15 - 20 Stoomovenbakblik met gaten
Sperziebonen
100 °C 20 - 25 Stoomovenbakblik met gaten
Asperges
100 °C 10 - 15 Stoomovenbakblik met gaten
Hele groenten
(artisjokken, bloemkool,
maïskolven)
100 °C 25 - 35 Stoomovenbakblik met gaten
Geschilde
aardappelen
(in vier stukken)
100 °C 25 - 35 Stoomovenbakblik met gaten
Visfi let
(2cmdik)
90 °C 15 - 20 Stoomovenbakblik met en zonder gaten
Garnalen
(rauw/ongekookt)
100 °C 10 - 14 Stoomovenbakblik met en zonder gaten
Kipfi let
100 °C 23 - 28 Stoomovenbakblik met en zonder gaten
Gekookte eieren
(hard gekookt)
100 °C 15 - 20 Stoomovenbakblik met gaten

NL 22
DE STOOMSTAND GEBRUIKEN (VERVOLG)
Voedsel
Stoomstand
(°C)
Tijd (min.) Accessoire
Broodje bapao
(bevroren)
100 °C 25 - 30 Stoomovenbakblik met gaten
Witte rijst
(basmatiofpandan)
(voeg twee keer zoveel
water toe)
100 °C 30 - 35 Stoomovenbakblik zonder gaten
Rijstepap
(voeg twee tot vier keer
zoveel melk toe)
100 °C 40 - 50 Stoomovenbakblik zonder gaten
Fruitcompote
(gebruik een platte,
ronde, glazen
ovenschaal, voeg 1 tl
suiker en 2 el water toe)
100 °C 25 - 35 Stoomovenbakblik met gaten
Flan/puddinkjes
(6dessertschaaltjes,
elk 100 ml, bedek de
schaaltjes met folie)
90 °C 20 - 30 Stoomovenbakblik met gaten
Vla (gebruik een
grote, platte, glazen
ovenschaal, afgedekt
met folie)
90 °C 30 - 40 Stoomovenbakblik met gaten

NL 23
DE OPWARMSTAND GEBRUIKEN
Opwarmstand
1
Vul het waterreservoir tot de markering
‘max’ en plaats het terug. Zet daarna
het gerecht in de oven.
2
Draai de STANDKEUZEKNOP
naar de opwarmstand. Druk op
STOOMNIVEAU om stoomniveau 1,
2 of 3 in te stellen.
3
Druk op KOOKTIJD. De tijd knippert.
4
Draai tijdens het knipperen de
FUNCTIEKEUZEKNOP en stel de
gewenste kooktijd in.
5
Na 5 seconden start het apparaat
automatisch.
Opwarmen
Neem de instellingen en tijden in deze tabel als richtlijnen voor het opwarmen.
Vul het waterreservoir altijd tot de markering ‘max’ met vers water.
Voedsel Stand Tijd (min.) Accessoire
Complete maaltijd
(250-500 g)
Opwarmen 13
- 19 Stoomovenbakblik met gaten

NL 24
DE KOOKTIJD INSTELLEN
1
Kies de gewenste stand en functie (en
stel indien gewenst de temperatuur in).
2
Druk op KOOKTIJD.
3
Draai de FUNCTIEKEUZEKNOP om
de gewenste kooktijd in te stellen en
druk op KOOKTIJD om de eindtijd
voor de bereiding in te stellen.
4
Na 5 seconden start het apparaat
automatisch.
Opmerking
1) Wanneer de ingestelde tijd verstreken is, hoort u een geluidssignaal. Op het display knippert
‘0:00’ en de oven schakelt automatisch uit. De huidige tijd wordt op het display weergegeven.
2) U kunt de geprogrammeerde kooktijd op bovenstaande manier opnieuw instellen.
3) Als u de geprogrammeerde kooktijd wilt annuleren, drukt u op KOOKTIJD en stelt u met de
FUNCTIEKEUZEKNOP de tijd in op nul.

NL 25
DE EINDTIJD INSTELLEN
1
Kies de gewenste stand en
functie (enstel indien gewenst de
temperatuur in).
2
Druk op KOOKTIJD en draai de
FUNCTIEKEUZEKNOP om de tijd in
te stellen op ‘0:00’. De KOOKTIJD is
standaard ingesteld op ‘0:20’.
3
Druk op EINDTIJD.
Voorbeeld Het is momenteel 13:00.
De cijfers ‘13:00’ knipperen.
4
Draai de FUNCTIEKEUZEKNOP
om de gewenste eindtijd (14:00) in te
stellen.
5
Druk opnieuw op EINDTIJD.
Voorbeeld De huidige tijd is 13:00.
De gewenste eindtijd is 14:00.
6
Na 5 seconden start het apparaat
automatisch.
De bereidingstijd ‘1:00’ wordt
weergegeven.
Opmerking
1) Op het tijddisplay wordt de resterende tijd weergegeven. Wanneer de ingestelde tijd verstreken is,
hoort u een geluidssignaal. Op het display knippert ‘0:00’ en de oven schakelt automatisch uit.
De huidige tijd wordt op het display weergegeven.
2) Tijdens de bereiding kunt u de vooraf ingestelde kooktijd aanpassen voor betere resultaten.
Druk op KOOKTIJD en pas de tijd aan met de FUNCTIEKEUZEKNOP.
3) Als u de geprogrammeerde eindtijd wilt annuleren, drukt u op KOOKTIJD en stelt u met de
FUNCTIEKEUZEKNOP de tijd in op nul.

NL 26
UITSTELFUNCTIE KOOKTIJD
Voorbeeld met de stoomstand: Huidige tijd: 12:00
Kooktijd: 30 minuten
Eindtijd: u wilt de bereiding stopzetten om 18:00
1
Kies de gewenste stand en
functie (en stel indien gewenst de
temperatuur in).
2
Druk op KOOKTIJD en draai de
FUNCTIEKEUZEKNOP naar de
gewenste kooktijd 30 minuten.
3
Druk op EINDTIJD.
► De kooktijd wordt bij de huidige
tijd opgeteld en ‘12:30’ wordt
weergegeven.
Draai de FUNCTIEKEUZEKNOP
om de gewenste eindtijd (18:00)
intestellen.
4
Druk op EINDTIJD.
► Op het display wordt een symbool
weergegeven dat aangeeft dat de
uitstelfunctie is geactiveerd.
► De oven start automatisch op
de ingestelde tijd (17:30) en de
bereidingstijd wordt weergegeven.
Opmerking
• De kooktijd en de eindtijd kunnen voor de ingestelde tijd worden gewijzigd.
• Als u op de eindtijd drukt zonder de kooktijd in te stellen, wordt de kooktijd ingesteld op
20minuten. Dit is de standaardtijd.
WAARSCHUWING
Laat het voedsel niet te lang in de oven staan; het kan bederven.

NL 27
DE AUTOMATISCHE MENUSTAND GEBRUIKEN
De 45 automatische menu’s bevatten voorgeprogrammeerde kooktijden.
U hoeft de kooktijd en de temperatuur niet in te stellen.
1
Draai de STANDKEUZEKNOP naar de
stand ‘AUTO’.
2
Draai de FUNCTIEKEUZEKNOP om
een automatische menufunctie te
kiezen.
3
Indien het symbool op het display
verschijnt, vul dan het waterreservoir
tot de markering ‘max’ en plaats het
reservoir weer terug. Zet het gerecht in
de oven.
4
Druk op GEWICHT/TEMP. Het
gewicht begint te knipperen.
5
Als u het gewicht wilt wijzigen, draait u
de FUNCTIEKEUZEKNOP.
6
Druk op GEWICHT/TEMP.
► De automatische bereiding begint.
Aan het einde van de kooktijd piept
de oven en knippert ‘Eind’ vier keer.
De oven piept vervolgens eenmaal
per minuut.
7
Na 5 seconden start het apparaat
automatisch.
Opmerking
• Als de deur wordt geopend tijdens de bereiding, stopt de oven. Sluit de deur en wacht
5seconden om de oven opnieuw te starten. De oven begint automatisch.

NL 28
DE AUTOMATISCHE MENUSTAND GEBRUIKEN (VERVOLG)
In de volgende tabel staan 45 automatische programma’s voor stomen. De tabel bevat eveneens
de programmanummers voor automatisch ontdooien. De hoeveelheden en bijbehorende
aanbevelingen worden aangegeven.
Vul voor gebruik van deze programma’s het waterreservoir met vers water tot de markering ‘max’.
Met de meegeleverde schalen kunt u op één niveau alles bereiden. Gebruik ovenwanten wanneer
u gerechten uit de oven haalt!
1. AUTOMATISCHE KOOKSTAND
Nee Voedsel Gewicht Accessoire Aanbeveling
A:01
Bloemkool-
roosjes
0,2 - 0,6
Stoomovenbakblik
met gaten
Leg de bloemkoolroosjes in het stoomovenbakblik.
A:02
Bloemkool,
heel
0,2 - 0,6
Stoomovenbakblik
met gaten
Leg de hele bloemkool in het stoomovenbakblik.
A:03 Broccoliroosjes 0,2 - 0,6
Stoomovenbakblik
met gaten
Leg de broccoliroosjes in het stoomovenbakblik.
A:04 Broccoli, heel 0,2 - 0,6
Stoomovenbakblik
met gaten
Leg de hele broccoli in het stoomovenbakblik.
A:05
Wortel in
plakjes
0,2 - 0,6
Stoomovenbakblik
met gaten
Leg de gesneden wortelen in het stoomovenbakblik.
A:06 Wortel, heel 0,2 - 0,6
Stoomovenbakblik
met gaten
Leg de hele wortelen in het stoomovenbakblik.
A:07
Groene
asperges
0,3 - 0,6
Stoomovenbakblik
met gaten
Leg de groene asperges (± 1,5 cm dik) in het
stoomovenbakblik.
A:08
Witte
asperges
0,4 - 0,8
Stoomovenbakblik
met gaten
Leg de witte asperges in het stoomovenbakblik.
A:09 Sperziebonen 0,2 - 0,6
Stoomovenbakblik
met gaten
Leg de sperziebonen in het stoomovenbakblik.
A:10 Peultjes 0,2 - 0,4
Stoomovenbakblik
met gaten
Leg de peultjes in het stoomovenbakblik.
A:11 Witlof, heel 0,2 - 0,6
Stoomovenbakblik
met gaten
Leg de witlof (elk 80 g) in het stoomovenbakblik.
A:12 Spruitjes 0,2 - 0,6
Stoomovenbakblik
met gaten
Leg de spruitjes in het stoomovenbakblik.
A:13 Witte kool 0,2 - 0,6
Stoomovenbakblik
met gaten
Leg de witte kool in het stoomovenbakblik.
A:14
Gestoomde
groente
0,2 - 0,6
Stoomovenbakblik
met gaten
Leg gesneden groente (zoals courgette, paprika,
aubergine en ui), kerstomaatjes en champignons in
het stoomovenbakblik.
A:15
Gestoomde
aardappel, heel
0,2 - 0,8
Stoomovenbakblik
met gaten
Leg de hele aardappelen (elk 150 - 200 g) in het
stoomovenbakblik.
A:16
Gest
oomde
aardappel-
helften
0,2 - 0,8
Stoomovenbakblik
met gat
en
Snijd de aardappelen (elk 150 - 200 g) doormidden
en leg ze in het stoomovenbakblik.
A:17
Krielaardap-
pelen
0,2 - 0,8
Stoomovenbakblik
met gaten
Leg de krielaardappelen in het stoomovenbakblik.
A:18
Gestoomde,
geschilde
aardappelen
0,2 - 0,8
Stoomovenbakblik
met gaten
Weeg de aardappelen nadat u ze hebt geschild,
gewassen en in gelijke delen hebt gesneden.
Legze in het stoomovenbakblik.
A:19 Witte rij st 0,2 - 0,4
Stoomovenbakblik
zonder gaten
Verdeel de witte rijst (basmati of pandan) gelijkmatig
in een RVS-schaal. Voeg voor elke 100 g rijst
200ml koud water toe. Roer na het stomen door.

NL 29
Nee Voedsel Gewicht Accessoire Aanbeveling
A:20 Zilvervliesrij st 0,2 - 0,4
Stoomovenbakblik
zonder gaten
Verdeel de zilvervliesrijst (voorgestoomd) gelijkmatig
in een RVS-schaal. Voeg voor elke 100 g rijst
175ml koud water toe. Roer na het stomen door.
A:21 Risotto 0,2 - 0,4
Stoomovenbakblik
zonder gaten
Verdeel de risottorijst gelijkmatig in een RVS-schaal.
Voeg voor elke 100 g rijst 220 ml warme bouillon
toe. Roer na het stomen door.
A:22
Gestoomde
kipfi let
0,2 - 1,0
Stoomovenbakblik
met en zonder
gaten
Leg de kipfi let in het stoomovenbakblik.
A:23
Gestoomde
visfi let, 1 cm
0,2 - 1,0
Stoomovenbakblik
met en zonder
gaten
Leg de visfi let (1 cm) in het stoomovenbakblik.
A:24
Gestoomde
vismoot, 2 cm
0,2 - 1,0
Stoomovenbakblik
met en zonder
gaten
Leg de vismoot (2 cm) in het stoomovenbakblik.
A:25
Gestoomde
zalmmoot,
3 cm
0,2 - 1,0
Stoomovenbakblik
met en zonder
gaten
Leg de zalmmoot (3 cm) in het stoomovenbakblik.
A:26
Gestoomde
garnalen
0,2 - 0,5
Stoomovenbakblik
met en zonder
gaten
Leg de garnalen (rauw/ongekookt, gepeld of
ongepeld) in het stoomovenbaklblik.
A:27
Gestoomde
mosselen
1,0 - 1,4
Stoomovenbakblik
met en zonder
gaten
Leg de mosselen met ui en kruiden in de
stoomovenbakblikken.
A:28
Rijzend
gistdeeg
0,3 - 0,6
Stoomovenbakblik
met gaten
Bereid gistdeeg voor pizza, cake of brood. Doe het
deeg in een grote, ronde, hittebestendige schaal en
bedek het met huishoudfolie.
A:29
Flan,
gestoomd
0,4 - 0,6
Stoomovenbakblik
met gaten
Verdeel het fl anbeslag over 6 kleine schaaltjes
(100ml in elk). Dek het geheel af met huishoudfolie.
Zet de schaaltjes in het stoomovenbakblik.
A:30
Fruit, zeer licht
gestoomd
0,2 - 0,5
Stoomovenbakblik
met gaten
Leg plakjes appel, peer of abrikoos in een platte,
glazen ovenschaal. Voeg 1 theelepel suiker en
2eetlepels water toe.
A:31
Fruit, zacht
gestoomd
0,2 - 0,5
Stoomovenbakblik
met gaten
Leg plakjes appel, peer of abrikoos in een platte,
glazen ovenschaal. Voeg 1 theelepel suiker en
2eetlepels water toe.
A:32
Chocolade
smelten
0,1 - 0,3
St
oomovenbakblik
met gaten
Breek chocolade (puur of kookchocolade) in stukk
en.
Doe de stukken in een kleine, glazen ovenschaal en
dek af met plasticfolie of een deksel. Zet de schaal
in het stoomovenbakblik. Houd gedurende het
programma afgedekt. Roer goed door wanneer het
klaar is. (Verminder de kooktijd met 5 minuten voor
witte chocolade en melkchocolade)
A:33
Gedroogd
fruit weken
0,1 - 0,5
Stoomovenbakblik
met gaten
Leg gedroogd fruit (abrikozen, pruimen en appel)
inhet stoomovenbakblik.
A:34 Rijstpudding 0,2 - 0,4
Stoomovenbakblik
met gaten
Verdeel de dessertrijst gelijkmatig in een platte,
glazen ovenschaal. Voeg voor elke 100 g rijst
200 ml koude melk toe. Zet de schaal in het
stoomovenbakblik. Roer na het stomen door.
A:35
Desinfectie,
babyfl essen
2 - 3
Stoomovenbakblik
met gaten
Leg open glazen fl essen horizontaal op het
stoomovenbakblik met de opening naar de
achterkant van de oven. Pas op als u de hete
fl essen uit de oven haalt.
A:36 Babyvoeding
0,1 - 0,2
0,2 - 0,3
Stoomovenbakblik
met gaten
Doe de babyvoeding in een diep keramisch bord.
Dek dit niet af.
DE AUTOMATISCHE MENUSTAND GEBRUIKEN (VERVOLG)

NL 30
DE AUTOMATISCHE MENUSTAND GEBRUIKEN (VERVOLG)
Nee Voedsel Gewicht Accessoire Aanbeveling
A:37
Eieren,
middel- tot
hardgekookt
0,1 - 0,6
Stoomovenbakblik
met gaten
Leg 2-10 eieren (medium) in het stoomovenbakblik.
Laat voor wat stevigere eieren de eieren nog enkele
minuten staan.
A:38
Ei,
hardgekookt
0,1 - 0,6
Stoomovenbakblik
met gaten
Leg 2-10 eieren (medium) in het stoomovenbakblik.
Laat voor wat stevigere eieren de eieren nog enkele
minuten staan.
A:39
Gepocheerde
eieren
0,2 - 0,4
Stoomovenbakblik
met gaten
Smeer ronde, glazen of keramische ovenschaaltjes
in met plantaardige olie. Vul elk schaaltje met een
heel ei zonder schaal.
A:40
Bevroren
broccoli
0,2 - 0,6
Stoomovenbakblik
met gaten
Leg de bevroren broccoliroosjes in het
stoomovenbakblik.
A:41
Bevroren
sperziebonen
0,2 - 0,6
Stoomovenbakblik
met gaten
Leg de bevroren sperziebonen in het
stoomovenbakblik.
A:42
Bevroren
doperwten
0,2 - 0,6
Stoomovenbakblik
met gaten
Leg de bevroren doperwten in het
stoomovenbakblik.
A:43
Bevroren
groentemix
0,2 - 0,6
Stoomovenbakblik
zonder gaten
Leg de bevroren groentemix in het
stoomovenbakblik.
A:44
Bevroren
spinazie-
blokjes
0,3 - 0,5
Stoomovenbakblik
zonder gaten
Leg de bevroren spinazieblokjes in het
stoomovenbakblik.
A:45
Bevroren
broodje bapao
0,3 - 0,6
Stoomovenbakblik
met gaten
Leg de bevroren bapao’s in het stoomovenbakblik.

NL 31
DE ONTDOOISTAND GEBRUIKEN
Ontdooistand
1
Vul het waterreservoir tot de markering
‘max’ en plaats het terug. Zet daarna
het gerecht in de oven.
2
Draai de STANDKEUZEKNOP naar de
ontdooistand.
3
Draai de FUNCTIEKEUZEKNOP om
een ontdooifunctie te kiezen.
4
Druk op GEWICHT/TEMP.
Hetgewicht begint te knipperen.
5
Na 5 seconden start het apparaat
automatisch.

NL 32
Nee Voedsel
Gewicht
(kg)
Accessoire Aanbeveling
d:01
Bevroren
vlees
0,2 - 0,5
0,8 - 1,5
Stoomoven-
bakblik met en
zonder gaten
Dit programma is geschikt voor rundvlees, lamsvlees,
varkensvlees, steaks, karbonades en gehakt. Pak
de randen in met aluminiumfolie. Leg het vlees in
het stoomovenbakblik (bedek gehakt tijdens het
ontdooien met huishoudfolie).
d:02
Bevroren
gevogelte
0,3 - 0,6
0,9 - 1,3
Stoomoven-
bakblik met en
zonder gaten
Dit programma is geschikt voor heel gevogelte
en stukken gevogelte. Pak de randen in
met aluminiumfolie. Leg het gevogelte in het
stoomovebakblik.
d:03 Bevroren vis 0,3 - 0,8
Stoomoven-
bakblik met en
zonder gaten
Dit programma is geschikt voor hele vissen en
visfi lets. Pak dunne randen in met aluminiumfolie.
Leg de vis in het stoomovebakblik.
d:04 Bevroren fruit 0,2 - 0,6
Stoomoven-
bakblik met en
zonder gaten
Verdeel fruit gelijkmatig in het stoomovenbakblik.
Dit programma is geschikt voor alle soorten
gesneden fruit of bessen.
d:05
Bevroren
kant-en-klaar
maaltij d
0,3 - 0,5
Stoomovenbak-
blik met gaten
Zet het gerecht onafgedekt in het stoomovenbakblik.
Opmerking
1) Verwijder na het ontdooien het water in het lekbakje en spoel het waterreservoir af.
2) Droog de ovenruimte met een droge doek als er vocht is achtergebleven.
3) De ventilator werkt na het ontdooien altijd nog 3-10 minuten door.
Dit hoort zo en u hoeft zich er geen zorgen over te maken.
DE ONTDOOISTAND GEBRUIKEN (VERVOLG)

NL 33
DE WATERHARDHEID INSTELLEN
De stoomoven moet regelmatig worden ontkalkt. Dat is de enige manier om schade te
voorkomen.
Er verschijnt automatisch een symbool op het display wanneer u moet ontkalken. Het apparaat
is ingesteld op water met hardheidsgraad 3. Als het water zachter is, kunt u de ingestelde
hardheidsgraad wijzigen.
De waterhardheid controleren
Voor informatie over de hardheid van het water in uw gemeente kunt u terecht bij uw
waterleidingbedrijf.
De waterhardheid wijzigen
1
Draai de STANDKEUZEKNOP naar de
stand ‘UIT’.
2
Druk de knoppen VERLICHTING en
KOOKTIJD tegelijk in.
3
Draai de FUNCTIEKEUZEKNOP om de
gewenste waterhardheid te selecteren.
4
Na 5 seconden start het apparaat
automatisch.
► Het apparaat is nu zo
geprogrammeerd dat de
ontkalkingsmelding op basis van
de daadwerkelijke waterhardheid
verschijnt.
Weergave Type PPM
Franse hardheid
(°df)
Duitse hardheid
(°dH)
H1 Zacht water 0 - 105 0 - 11 0 - 6
H2 Gemiddeld water 125 - 230 12 - 23 7 - 13
H3
(Standaard)
Vrij hard water 250 - 350 24 - 36 14 - 20
H4 Hard water > 375 > 37 > 21

NL 34
ONTKALKSTAND
Als het bericht voor ontkalken op het display wordt weergegeven (zie afbeelding 1), moet
het apparaat worden ontkalkt.
1
Giet 500 ml van het mengsel van
ontkalkingsmiddel en schoon water
in hetwaterreservoir. Raadpleeg de
instructies bij het ontkalkingsmiddel
voorde mengverhouding.
2
Sluit het deksel voordat u het
waterreservoir terugplaatst.
3
Draai de STANDKEUZEKNOP naar de
stand ‘UIT’.
4
Sluit de deur en houd EINDTIJD
en GEWICHT/TEMP. gedurende
3seconden gelijktijdig ingedrukt.
Op het display verschijnt
50minuten en het ontkalken
begint.
► Reinigingsstand: 40 min
► Spoelstand: 10 min

NL 35
ONTKALKSTAND (VERVOLG)
5
Na een proces van ongeveer 40 minuten
verschijnt er ‘10:00’ op het display. Er
klinkt een signaal en het ontkalken stopt.
Verwijder het reservoir en giet eventuele
resten van het mengsel eruit.
Reinig het reservoir met water en vul het
tot het maximum met vers water.
Plaats het terug.
► Als ‘10:00’ wordt weergegeven, moet
de spoelstand binnen 25minuten
worden geactiveerd. Als dit niet
gebeurt, wordt het apparaat na
25minuten opnieuw ingesteld en moet
u de ontkalkstand opnieuw activeren.
6
Na 5 seconden start het apparaat
automatisch.
Het apparaat voert een spoelproces uit
met schoon water. De ontkalkstand is
na 10minuten voltooid.
7
Als het ontkalken klaar is, klinkt er een
signaal. Leeg het waterreservoir en het
lekbakje en spoel het waterreservoir met
water.
8
Open de deur en droog de binnenkant
van de ovenruimte met een droge doek.
Opmerking
• Wij adviseren om voor het ontkalken NOKALK/DLS te gebruiken. NOKALK/DLS is een zeer
e ciënt ontkalkingsmiddel dat uitsluitend uit natuurlijke, volledig afbreekbare ingrediënten
bestaat. Het middel is niet-corrosief, niet-agressief en milieuvriendelijk.
Behalve een doeltre ende ontkalkende werking heeft het tevens een reinigende, antibacteriële
werking, zodat de inwendige onderdelen van het apparaat in optimale hygiënische toestand
verkeren, de goede smaak van het voedsel behouden blijft en de levensduur van het apparaat
toeneemt.
• Voor volgende ontkalkingsbehandelingen met NOKALK/DLS kunt u ontkalkingsproducten
bestellen op www.atag.nl.
• Voor het stoomproces wordt water gebruikt. Water bevat calcium en magnesium. Door
verhitting verdampt het water en blijven alleen mineralen achter (niet schadelijk voor mensen).
• Wanneer de ontkalkingscyclus wordt onderbroken voordat de cyclus is beëindigd, moet het
programma opnieuw vanaf het begin worden gestart.

NL 36
REINIGEN
1
De binnenkant van de oven reinigen.
► Veeg met schoonmaakmiddel en
een schone doek restanten van het
plafond of de wanden.
► Veeg daarna nog eens met een
vochtige doek restanten van het
plafond of de wanden en laat de
oven aan de lucht drogen.
► Nadat u heet water(30~50graden)
in de oven heeft gegoten,kuntu
met de ruwe spons zelfs
hardnekkige vlekken of
opgedroogde etensresten
verwijderen.

NL 37
REINIGEN (VERVOLG)
2
Het oppervlak van de oven,
bedieningspaneel en venster
reinigen.
► Het oppervlak van de oven kunt u
afvegen met een natte theedoek.
Veeg er nadien met een droge
doek overheen om het water te
verwijderen.
► Oefen geen druk uit wanneer u het
bedieningspaneel reinigt; zo kunt u
het beschadigen.
► Reinig het transparante venster met
een mild schoonmaakmiddel en een
theedoek. Veeg er nadien met een
droge doek overheen om het water
te verwijderen.
3
Het waterreservoir en het lekbakje
reinigen.
► Neem ze af met een spons met mild
schoonmaakmiddel en spoel ze na
met water.
4
De accessoires reinigen.
► Neem ze af met een mild
schoonmaakmiddel en droog ze af
voordat u ze in de oven terugplaatst.
► Oefen geen druk uit op de
accessoires als u ze met een borstel
reinigt; zo kunt u het laagje op het
oppervlak beschadigen.
WAARSCHUWING:
• Gebruik NOOIT benzeen, verdunner of een staalschuurspons voor de reiniging. Hierdoor kan
het oppervlak verkleuren of beschadigd raken.
• Spuit tijdens de reiniging geen water op het apparaat. Dit kan elektrische schokken of brand
veroorzaken.
• Laat het waterreservoir of het lekbakje niet in direct zonlicht drogen. Hierdoor kunnen ze
vervormen of beschadigd raken.
• Verwijder voor reiniging de deur van de oven niet.

NL 38
DE PIEPTOON UITSCHAKELEN
1
Draai de STANDKEUZEKNOP naar de
stand ‘UIT’.
2
Als u de pieptoon wilt uitschakelen,
houdt u KOOKTIJD en EINDTIJD
gedurende 3 seconden tegelijk
ingedrukt.
3
Als u de pieptoon weer wilt
inschakelen, houdt u KOOKTIJD
en EINDTIJD opnieuw gedurende
3seconden tegelijk ingedrukt.

NL 39
KINDERSLOT
Met het kinderslot van de oven kunt u het bedieningspaneel vergrendelen, om onbedoeld
gebruik van de oven te voorkomen.
De oven vergrendelen
1
Draai de STANDKEUZEKNOP naar de
stand ‘UIT’.
2
Houd STOOMNIVEAU en KOOKTIJD
gedurende 3 seconden tegelijk
ingedrukt.
3
Er wordt een vergrendelingssymbool
weergegeven op het display,
dat aangeeft dat alle functies
vergrendeldzijn.
De oven ontgrendelen
1
Draai de STANDKEUZEKNOP naar
de stand ‘UIT’. Houd STOOMNIVEAU
en KOOKTIJD gedurende 3 seconden
tegelijk ingedrukt.
2
Het vergrendelingssymbool verdwijnt
van het display, wat aangeeft dat alle
functies ontgrendeld zijn.

NL 40
DE STOOMOVEN REINIGEN
Reinig de oven regelmatig om te voorkomen dat vet en voedselresten zich ophopen,
metname op de oppervlakken aan de binnen- en buitenkant, de deur en de afdichting.
1. Reinig de oppervlakken aan de buitenkant met een zachte doek en warm water met zeep.
Veeg na met een schone, natte doek en droog de oppervlakken af.
2. Verwijder spetters en vlekken op de oppervlakken aan de binnenkant met een doek met zeep.
Veeg na met een schone, natte doek en droog de oppervlakken af.
3. Om hardnekkige voedselresten en geuren te verwijderen, zet u een beker met verdund
citroensap onder in de lege oven. Verwarm het sap gedurende tien minuten op maximaal
vermogen.
4. Neem de binnenkant af met een vochtige doek.
Belangrijk
• Let erop dat er GEEN water in de ventilatieopeningen komt.
• Gebruik NOOIT schurende schoonmaakmiddelen of chemische oplosmiddelen.
• Zorg er ALTIJD voor dat de afdichting van de deur schoon is. Zo voorkomt u de ophoping van
vuil en kunt u de deur goed sluiten.
DE STOOMOVEN OPBERGEN EN REPAREREN
Reparaties dienen uitsluitend te worden uitgevoerd door een gekwalifi ceerde
servicemonteur.
Als er onderhoud moet worden gepleegd, trekt u de stekker uit het stopcontact en neemt u
contact op met de klantenservice van ATAG.
Houd de volgende informatie bij de hand wanneer u belt:
• Het modelnummer en serienummer (deze vindt u aan de binnenzijde van de ovendeur)
• Garantiegegevens
• Een duidelijke beschrijving van het probleem
Kies een schone, droge plek als u de oven tijdelijk moet opbergen, aangezien stof en vocht
het apparaat kunnen beschadigen.

NL 41
FOUTCODES
Foutcode Algemene functies
FOUT TEMPERATUURSENSOR OPEN
Deze fout treedt op bij een defecte sensor, onjuiste aansluitingen, een
defecte printplaat en wanneer de door MICOM gedetecteerde A/D-waarde
hoger is dan 250.
FOUT TEMPERATUURSENSOR KORT
Deze fout treedt op bij een defecte sensor, onjuiste aansluitingen, een
defecte printplaat en wanneer de door MICOM gedetecteerde A/D-waarde
lager is dan 5.
FOUT DOELTEMPERATUUR TEMPERATUURSENSOR
Deze fout treedt op wanneer de temperatuur in de oven gedurende
30minuten niet de ingestelde temperatuur bereikt.
FOUT ABNORMALE TEMPERATUURDETECTIE
Deze fout treedt op wanneer de temperatuur in de oven gedurende
10minuten hoger is dan 250 °C.
FOUT EEPROM OPEN
Deze fout treedt op wanneer er tijdens het instellen van het vermogen iets
misgaat in de EEPROM-communicatie.
FOUT EEPROM LEZEN & SCHRIJVEN
EEPROM wordt niet gebruikt.
FOUT STOOMSENSOR OPEN
Deze fout treedt op bij een defecte stoomsensor, onjuiste aansluitingen, een
defecte printplaat en wanneer de door MICOM gedetecteerde A/D-waarde
langer dan 3 minuten hoger is dan 250.
FOUT STOOMSENSOR KORT
Deze fout treedt op bij een defecte stoomsensor, onjuiste aansluitingen, een
defecte printplaat en wanneer de door MICOM gedetecteerde A/D-waarde
langer dan 3 minuten lager is dan 5.
FOUT NAK-SIGNAAL
Het Nak-signaal wordt gegeven als het inschakelen van het apparaat langer
dan 1 minuut duurt.
COMMUNICATIEFOUT
Deze fout treedt op wanneer er langer dan 10 seconden geen communicatie
plaatsvindt tussen de hoofd- en subprintplaat.
FOUT TOETS KORT
Deze fout treedt op als een knop langer dan 60 seconden ingedrukt blijft.
Deze fout treedt mogelijk op als er water in het bedieningspaneel komt of als
er stofdeeltjes aan het aanraakpaneel blijven hangen.
Als een van deze fouten optreedt, neemt u contact op met de klantenservice van ATAG.

NL 42
TECHNISCHE SPECIFICATIES
Model SX4411BUU
SX4492BUU
Voedingsbron 230 V ~ 50 Hz
Energieverbruik
Stoomstand 2800 W
Koelmethode Motor koelventilator
Afmetingen
Afmetingen apparaat:
Afmetingen bij inbouw:
595 x 454 x 569,4 mm (b x h x d)
555 x 445 x 548,8 mm (b x h x d)
Volume 50 liter
Gewicht
Netto
Verzending
33,0 kg
36,5 kg

NL 43
APPARAAT EN VERPAKKING VERWIJDEREN
De verpakking van dit apparaat kan worden gerecycled en is mogelijk
gemaakt van:
•
karton
•
papier
•
polyethyleenfolie (PE)
•
CFC-vrij polystyreen (hard PS-schuim)
•
polypropyleentape (PP)
Gooi deze materialen op een verantwoorde manier weg
overeenkomstig de wettelijke bepalingen.
Op het pr
oduct is het symbool van een doorgekruiste vuilnisbak
aangebracht om op de verplichting tot gescheiden verwerking te wijzen.
Dit voorkomt negatieve gevolgen voor het milieu en de gezondheid.
Dit houdt in dat het product aan het eind van de levensduur naar een
speciaal centrum voor gescheiden afvalinzameling van de gemeente of
naar de leverancier moet worden gebracht.
Het aparte verwerken zorgt ervoor dat materialen waaruit dit apparaat
bestaat, kunnen worden teruggewonnen, wat een aanzienlijke
besparing van energie en grondstoffen betekent.
Verklaring van overeenstemming
Wij verklaren dat onze producten voldoen aan de toepasselijke
Europese richtlijnen, normen en voorschriften, alsook aan alle vereisten
in de normen waarnaar wordt verwezen.

NL 44


EN 2
CONTENTS
CONTENTS
Control panel . . . . . . . . . . . . . . . . . . . . . . . . . . . . . . . . . . . . . . . . . . . . . . . . . . . . . . . . . . . . . . 3
Oven features . . . . . . . . . . . . . . . . . . . . . . . . . . . . . . . . . . . . . . . . . . . . . . . . . . . . . . . . . . . . . . 4
Accessories . . . . . . . . . . . . . . . . . . . . . . . . . . . . . . . . . . . . . . . . . . . . . . . . . . . . . . . . . . . . . . . 5
Using this manual . . . . . . . . . . . . . . . . . . . . . . . . . . . . . . . . . . . . . . . . . . . . . . . . . . . . . . . . . . . 6
Oven . . . . . . . . . . . . . . . . . . . . . . . . . . . . . . . . . . . . . . . . . . . . . . . . . . . . . . . . . . . . . . . . . . . . 6
Changing the oven lamp . . . . . . . . . . . . . . . . . . . . . . . . . . . . . . . . . . . . . . . . . . . . . . . . . . . . .12
Filling the water tank . . . . . . . . . . . . . . . . . . . . . . . . . . . . . . . . . . . . . . . . . . . . . . . . . . . . . . . . 13
Setting the clock . . . . . . . . . . . . . . . . . . . . . . . . . . . . . . . . . . . . . . . . . . . . . . . . . . . . . . . . . . 14
Setting the energy save mode . . . . . . . . . . . . . . . . . . . . . . . . . . . . . . . . . . . . . . . . . . . . . . . . 15
Types of mode . . . . . . . . . . . . . . . . . . . . . . . . . . . . . . . . . . . . . . . . . . . . . . . . . . . . . . . . . . . . 16
Default settings . . . . . . . . . . . . . . . . . . . . . . . . . . . . . . . . . . . . . . . . . . . . . . . . . . . . . . . . . . . . 17
Using the steam mode . . . . . . . . . . . . . . . . . . . . . . . . . . . . . . . . . . . . . . . . . . . . . . . . . . . . . 18
Using the reheat mode . . . . . . . . . . . . . . . . . . . . . . . . . . . . . . . . . . . . . . . . . . . . . . . . . . . . .22
Setting the cook time . . . . . . . . . . . . . . . . . . . . . . . . . . . . . . . . . . . . . . . . . . . . . . . . . . . . . . . 23
Setting the end time . . . . . . . . . . . . . . . . . . . . . . . . . . . . . . . . . . . . . . . . . . . . . . . . . . . . . . . . 24
Cooking time reservation function . . . . . . . . . . . . . . . . . . . . . . . . . . . . . . . . . . . . . . . . . . . . . . 25
Using the auto menu mode . . . . . . . . . . . . . . . . . . . . . . . . . . . . . . . . . . . . . . . . . . . . . . . . . . 26
Using the defrost mode . . . . . . . . . . . . . . . . . . . . . . . . . . . . . . . . . . . . . . . . . . . . . . . . . . . . .30
Setting the water hardness . . . . . . . . . . . . . . . . . . . . . . . . . . . . . . . . . . . . . . . . . . . . . . . . . . .32
Descale mode . . . . . . . . . . . . . . . . . . . . . . . . . . . . . . . . . . . . . . . . . . . . . . . . . . . . . . . . . . . . 33
Cleaning . . . . . . . . . . . . . . . . . . . . . . . . . . . . . . . . . . . . . . . . . . . . . . . . . . . . . . . . . . . . . . . . . 35
Switching o the beeper . . . . . . . . . . . . . . . . . . . . . . . . . . . . . . . . . . . . . . . . . . . . . . . . . . . . . 37
Child safety lock . . . . . . . . . . . . . . . . . . . . . . . . . . . . . . . . . . . . . . . . . . . . . . . . . . . . . . . . . . . 38
Cleaning your steam oven . . . . . . . . . . . . . . . . . . . . . . . . . . . . . . . . . . . . . . . . . . . . . . . . . . . 39
Storing and repairing your steam oven . . . . . . . . . . . . . . . . . . . . . . . . . . . . . . . . . . . . . . . . . . 39
Error codes. . . . . . . . . . . . . . . . . . . . . . . . . . . . . . . . . . . . . . . . . . . . . . . . . . . . . . . . . . . . . . . 40
Technical specifi cations . . . . . . . . . . . . . . . . . . . . . . . . . . . . . . . . . . . . . . . . . . . . . . . . . . . . . 41
Disposal of appliance and packaging . . . . . . . . . . . . . . . . . . . . . . . . . . . . . . . . . . . . . . . . . . . 42

EN 3
1. OFF
2. STEAM MODE
3. DEFROST MODE
4. AUTO MENU MODE
5. REHEAT MODE
6. MODE SELECTOR
7. DISPLAY
8. LAMP ON/OFF
9. CLOCK
10. STEAM LEVEL
(STEAM 1, 2 or 3)
11. COOK TIME
12. END TIME
13. WEIGHT/TEMP
14. MULTI-FUNCTION SELECTOR
CONTROL PANEL
1
7
53 42
1413121110986

EN 4
Note
• Shelf level is only one.
• You can use just one shelf for every cooking with provided dishes.
OVEN FEATURES
Control Pannel Water Tank
Oven Light
Grill Heater
Side Shelf
Door Handle
Door

EN 5
ACCESSORIES
The following accessories are provided with your Steam Oven:
1
Steam dish, unperforated, 40 mm
deep. (useful during steam mode for
collecting condensation).
2
Steam dish, perforated, 40 mm deep.
(useful for steam mode).
For steaming, you can place the perfo ra-
ted steam dish into the unperforated steam
dish. You can only use these two together
on the shelf.
3
Measuring jug, for fi lling the water tank.

EN 6
USING THIS MANUAL
Thank you for purchasing this ATAG Steam Oven.
Your Owner’s Manual contains essential information on using and caring for your new Steam
Oven. The only installation is seperate installation instructions are included separate.
Before using your steam oven, please read the safety instructions and all the information in
this manual fi rst and keep it for future reference.
OVEN
Safe use
•
WARNING:
this appliance and the accessible
parts become hot during use. Donot touch
the hot components. Keep children younger
than 8 away from the appliance unless you
can watch them continuously.
•
This equipment may be used by children
older than 8, as well as by people with
physical, sensory or learning di culties or
with a lack of experience and knowledge,
provided they are supervised and instructed
in the safe use of the appliance and
understand the associated dangers. Do not
allow children to play with the appliance.
Donot allow children to clean or maintain
the appliance unless supervised.
•
This appliance is only designed for household
use. Use it only for food preparation.
•
Keep the cable away from hot surfaces.
•
Never cover the ventilation openings.
•
The appliance is not intended to be operated
by means of an external timer or separate
remote control system.
•
In connection with electrical safety, the
appliance may not be cleaned with high-
pressure cleaners or steam cleaners.
•
WARNING:
never heat sealed tins.
Pressuredevelops in the tin which can make
it explode.

EN 7
OVEN (CONTINUED)
•
In preparing meals containing alcohol, high
temperatures may cause the alcohol to
evaporate. The vapour can catch fi re if it
comes into contact with hot parts.
•
Do not use the appliance for storing fl ammable
materials or materials that warp easily.
•
Ensure that food is always heated
thoroughly. The time required for this
depends on many factors including the
quantity and type of food. Any bacteria
present in the food are only destroyed if the
food is heated at a temperature higher than
70 °C for more than 10 minutes. Allow the
food to cook for longer if you are not sure if
the food has been heated through.
•
Do not use any abrasive cleaners or metal
scrapers to clean the glass door. This will
scratch the surface which may cause the
glass to break.
•
Use oven gloves or a pot-holder to remove
dishes and accessories from the appliance.
•
If smoke is emitted, switch o or unplug the
appliance and keep the door closed in order
to stifl e any fl ames.
•
Only use the temperature probe
recommended for this oven (for appliances
having a facility to use a temperature-
sensing probe).
•
Remove all excess spillage and utensils
before cleaning with pyrolytic self cleaning
function.
•
If, for cleaning, the controls have to be set
to a position higher than for normal cooking
purposes (pyrolytic), the surfaces may get
hotter than usual and children should be
kept away.

EN 8
OVEN (CONTINUED)
•
WARNING: Ensure that the appliance is
switched o before replacing the lamp to
avoid the possibility of electric shock.
•
WARNING: If the (glass) control panel is
cracked, switch o the appliance to avoid
the possibility of electric shock.
•
WARNING: Unattended cooking with fat or
oil can be dangerous and may result in fi re.
•
NEVER try to extinguish a fi re with water, but
switch o the appliance and keep the door
closed.
•
WARNING: Danger of fi re: do not store
items in the oven.
Children
•
Do not allow children to play with the
appliance. Do not allow children to clean or
maintain the appliance unless supervised.
•
Do not store anything of interest to children
in cabinets above or behind the appliance.
Safe use of oven / Steam oven
•
WARNING: Keep children at a safe distance
from the oven during baking or roasting. The
oven becomes hot during use. Do not touch
the elements and the interior until the oven
has cooled completely.
•
WARNING: The outside of the oven may
become hot if it is used for a long period
of time at high temperatures. If the oven is
used at the maximum temperature for a long
time (when grilling, for example), the glass
panel in the oven door may become hot.
Please be careful if children are around.

EN 9
•
The oven is fully insulated. Despite this, there
is always some transfer of heat, as a result
of which the outside of the oven heats up.
This heating up falls well within the norm.
•
The oven has a fan that cools the oven
casing. The fan may run for some time after
the oven is switched o .
•
Make sure the appliance is turned o before
replacing the bulb to avoid risk of electric
shock.
•
Do not place accessories on the open oven
door.
•
Close the oven door during cooking.
•
Open the oven door carefully; hot steam will
escape.
•
Do not store fl ammable materials in the oven.
•
Frozen products such as pizzas should be
cooked on the grid shelf. If the baking tray is
used, it may become deformed due to the
large di erences in temperature.
•
Never cover the bottom of the oven with
aluminium foil. The foil blocks heat fl ow,
which may result in inferior cooking results.
This can also damage the enamel of the
bottom of the oven.
•
Smaller quantities require a shorter cooking
time. When the cooking times given in
recipes are used, you might burn them.
•
Never pour cold water on the hot oven fl oor.
This can damage the enamel.
•
Fruit juices can result in stains on the oven
fl oor that are di cult to remove. When cooking
moist pastries (such as apple pie), use a
baking tin/griddle/roasting tin as a drip tray.
OVEN (CONTINUED)

EN 10
•
Spilled food containing sugar or fruit juices,
such as prune juice or rhubarb, can damage
the colour of the enamel. It is advisable
to clean the oven immediately after it has
cooled down.
Note: the water in the steam oven insert pan
is still hot!
•
Heat and steam resistant baking tins should
be used in the steam oven. Silicone baking
tins are not suitable when combining hot air
circulation and steam.
•
Do not use baking tins that have areas of
rust. Even tiny patches can lead to rust in
the oven interior.
Installation
•
Check the appliance for transport damage.
Do not connect a damaged appliance.
•
This appliance should only be connected by
a registered installer!
•
Faulty parts may only be replaced by original
parts. The manufacturer can only guarantee
that original parts meet safety requirements.
•
To avoid dangerous situations, a damaged
connecting cable should only be replaced by
the manufacturer, the manufacturer’s service
organisation or suitably qualifi ed persons.
•
The electrical connection must comply with
national and local regulations.
•
The wall plug socket and plug should always
be accessible.
•
If you want to make a fi xed connection,
make sure that a omnipolar switch with a
contact separation of at least 3 mm is fi tted
in the supply cable.
OVEN (CONTINUED)

EN 11
•
The equipment should not be connected
to the network via a multi-plug socket
or extension lead, as the safe use of the
equipment can then not be guaranteed.
•
WARNING: Never open the appliance
casing. The casing may only be opened by a
service technician.
•
Disconnect the appliance from the mains
supply before starting any repair work.
•
Appliance should allow to disconnection
of the appliance from the supply after
installation. The disconnection may be
achieved by having the plug accessible or
by incorporating a switch in the fi xed wiring
in accordance with the wiring rules.
If the safety instructions and warnings are
not followed, the manufacturer cannot be
held responsible for any resulting damage.
If you decide to discontinue using the
appliance because of a fault, we recommend
you cut o the cable after removing the plug
from the plug socket. Take the appliance to
your municipality’s waste disposal site.
OVEN (CONTINUED)

EN 12
CHANGING THE OVEN LAMP
Replacing the oven lamp and cleaning the glass cap
1. Take o the cap by turning
counterclockwise.
2. Remove the metal ring and the
two sheet rings and clean the
glass cap.
3. If necessary, r
eplace the bulb with
a 25 Watt, 230 V, 300 °C heat
resistant oven light bulb.
4. Fit the metal and the sheet ring to
the glass cap.
5. Reinstall the glass cap.
Bulb
Metal
ring
Sheet
ring
Glass
cap
Sheet
ring

EN 13
FILLING THE WATER TANK
You will see the water tank on the right-hand side. Only fi ll the tank with fresh tap water or with
still bottled water. If your water is very hard, we recommend that you use softened water (refer to
the “Water hardness” at page 32.)
Caution Do not fi ll the water tank with distilled water or any other
liquids.
Fill the water tank before
each use
Lift the water tank over the interlock and pull the tank out of the
appliance. Open the lid and fi ll the water tank with cold water
up to the “Max.” mark. If you use the measuring jug to fi ll the
water tank, you don’t have to pull the water tank completely
out of the appliance. Close the lid until you feel it engage.
Slide the water tank back until it engages.
Empty the water tank after
each use
Pull the water tank out of the appliance slowly. Pulling it
out quickly may cause water to spill. Hold the water tank
horizontally, so that no remaining water can drip out of the
valve seat.
Empty out the water.
Thoroughly dry the water tank in the appliance and the seal in
the lid.
“Fill water tank” display If the water tank is empty, a signal sounds.
A symbol appears in the display. The operation is interrupted.
1.
Take out the water tank, fi ll to the “
Max
” mark and reinsert.
2. Automatically start after 5 seconds.

EN 14
When the appliance is fi rst plugged in, the DISPLAY lights up. After fi ve seconds, the Clock
symbol and “12:00” blink on the DISPLAY.
Setting the Clock (example 15:15)
1
Turn the MODE SELECTOR to the
“OFF” position.
2
Press CLOCK. The “12” starts blinking.
3
Turn the MULTI-FUNCTION
SELECTOR to set the hour.
4
Press CLOCK again. The “00” starts
blinking.
5
Turn the MULTI-FUNCTION
SELECTOR to set the minutes.
6
Press CLOCK again.
Note
• If you want to change a setting after you have pressed a button, the setting starts blinking. You
can only change this setting during blinking. If it has stopped blinking, you have to press the
button so it will start blinking again.
SETTING THE CLOCK

EN 15
SETTING THE ENERGY SAVE MODE
The oven has an energy save mode. This facility saves electricity when the oven is not in use.
Standby mode
The oven will automatically go to Standby mode after 10 minutes if not operated (default).
ECO mode
In ECO mode, the current time is not displayed. You cannot use the oven.
1
Turn the MODE SELECTOR to the
“OFF” position.
2
Press END TIME for 3 seconds. The
oven switches to ECO mode and the
display shows nothing.
3
To go to Standby mode, open the door
or press any button. The display will
show the current time and the oven is
ready for use.

EN 16
TYPES OF MODE
The following table represents settings of your oven.
Use the cooking guide tables for those modes as guidelines for cooking.
Steam Mode
(use the button ‘steam level’ to set steam level 1, 2 or 3)
Food is cooked by steam provided by the steam generator and injected
into the cavity by two jet nozzles.
This mode is suitable for steaming food like vegetables, fi sh, eggs, fruits
and rice. When cooking by using this mode, always fi ll the water tank with
fresh water.
Suggested temperature: 100 °C
Reheat Mode
(use the button ‘steam level’ to set steam level 1, 2 or 3)
Food is reheated by steam mode. You can reheat some foods by controlling
the setting time. The steam is provided by the steam generator and injected
into the cavity by interval.
This mode is suitable for plated meals. Dishes can be gently reheated
without drying out. When reheating with this mode always fi ll the water tank
with fresh water.
Defrost Mode
5 pre-programmed defrost settings can be selected for your convenience.
Time and temperature will be set automatically.
You simply select the programme and the weight of your dish and start the
speed cooking process.
Auto Menu Mode
45 pre-programmed auto menu settings can be selected for your
convenience. Time and temperature will be set automatically. You simply
select the programme, the weight of your dish and start the steam cooking
process.

EN 17
DEFAULT SETTINGS
During blinking of the default cook time or default temperature, you can change the time or
temperature by turning the MULTI-FUNCTION SELECTOR.
1
The default time or default temperature
is blinking.
2
While the default time/temperature is
blinking: turn the MULTI-FUNCTION
SELECTOR to set the desired time/
temperature.
If the blinking has stopped, you can change the time/temperature by pressing COOK TIME,
WEIGHT/TEMP fi rst.
During cooking, COOK TIME or TEMPERATURE can always be changed.
►
Cooking time: press COOK TIME and then turn the MULTI-FUNCTION SELECTOR.
► Temperature: press WEIGHT/TEMP and then turn the MULTI-FUNCTION SELECTOR.

EN 18
USING THE STEAM MODE
Steam Mode Setting
1
Fill the water tank up to the maximum
line and place it back. Then place your
food into the cooking cavity.
2
Turn the MODE SELECTOR to Steam
mode position. Press STEAM LEVEL
to set steam level 1, 2 or 3.
3
Press WEIGHT/TEMP. The temperature
is blinking.
4
During Blinking, turn the MULTI-
FUNCTION SELECTOR and set the
temperature.
5
Press COOK TIME. The cook time is
blinking.
6
During Blinking, turn the MULTI-
FUNCTION SELECTOR and set the
cook time.
7
Automatically start after 5 seconds.

EN 19
If there is too little water while cooking, you will see a symbol in
the display along with a beep being played.
Add water into the tank and wait 5 seconds to continue with
the steaming.
• You can add water into the tank at any time while cooking.
Note
1) During cooking, COOK TIME and TEMPERATURE can be changed.
► Cooking time: press COOK TIME and then turn the MULTI-FUNCTION SELECTOR.
► Temperature: press WEIGHT/TEMP and then turn the MULTI-FUNCTION SELECTOR.
2) In Steam mode settings, the top and bottom steam heating elements switch o and on
throughout cooking to regulate the temperature.
3) Be careful when removing the plate as it is hot. First leave the door a little open to allow the hot
steam to escape. Pay attention to the steam outlets as well.
4)
When you have fi nished cooking, pull the water tank out of the appliance slowly and empty the tank.
5) Dry the cooking cavity with a dry cloth if there is any remaining water.
6) The cooling fan (10 minutes) and drain pump (10 sec) always work after a steaming process.
However, this is not a malfunction and you do not need to worry about this.
Remove the remnant water.
1
After fi nish the steam mode, empty the
water tank and place it back.
2
Turn the MODE SELECTOR to the
“OFF” position.
3
Press CLOCK and STEAM LEVEL at
the same time and hold for 2 seconds.
The oven starts removing the remnant
water and displays 20 seconds.
4
Remove the water tank and empty any
remnant water.
5
Automatically start after 5 seconds.
USING THE STEAM MODE (CONTINUED)

EN 20
USING THE STEAM MODE (CONTINUED)
Steam Mode Setting
Food is cooked by steam provided by the steam generators and injected into the cavity by
two jet nozzles.
Perforated steam dish,
is usually placed on the
shelf.
* Temperatures Setting:
40 - 100 °C
Cooking Guide
Use settings and times in this table as guide lines for steaming.
We recommend to always fi ll the water tank with fresh water to the maximum level.
Food Item
Steam mode
(°C )
Time (min.) Accessory
Broccoli Florets
100 °C 12 - 16 Steam dish, perforated
Whole carrots
100 °C 25 - 30 Steam dish, perforated
Sliced Vegetables
(pepper, courgettes,
carrots, onions)
100 °C 15 - 20 Steam dish, perforated
Green Beans
100 °C 20 - 25 Steam dish, perforated
Asparagus
100 °C 10 - 15 Steam dish, perforated
Whole Vegetables
(artichokes, whole
caulifl ower, corn on the
cob)
100 °C 25 - 35 Steam dish, perforated
Peeled Potatoes
(cutinto quarters)
100 °C 25 - 35 Steam dish, perforated
Fish fi llet
(2cmthickness)
90 °C 15 - 20
Steam dishes, perforated and
unperforated
Prawns
(raw/uncooked)
100 °C 10 - 14
Steam dishes, perforated and
unperforated
Chicken Breast
100 °C 23 - 28
Steam dishes, perforated and
unperforated
Boiled Eggs
(hardboiled)
100 °C 15 - 20 Steam dish, perforated

EN 21
USING THE STEAM MODE (CONTINUED)
Food Item
Steam mode
(°C )
Time (min.) Accessory
Frozen Yeast
Dumplings
100 °C 25 - 30 Steam dish, perforated
White Rice (basmati or
pandan)
(add double quantity of
water)
100 °C 30 - 35 Steam dish, unperforated
Milk Rice
(add double or four times
quantity of milk)
100 °C 40 - 50 Steam dish, unperforated
Fruit Compote
(use a fl at round glass
pyrex, add 1 teaspoon
sugar and 2 tbsp. water)
100 °C 25 - 35 Steam dish, perforated
Flan/Creme (6 dessert
dishes, each 100 ml,
cover dishes with foil)
90 °C 20 - 30 Steam dish, perforated
Egg Custard (use a large
fl at glass pyrex dish,
cover dish with foil)
90 °C 30 - 40 Steam dish, perforated

EN 22
USING THE REHEAT MODE
Reheat Mode Setting
1
Fill the water tank up to the maximum
line and place it back. Then place your
food into the cooking cavity.
2
Turn the MODE SELECTOR to
Reheat Mode position. Press STEAM
LEVEL to set steam level 1, 2 or 3.
3
Press COOK TIME. The time is
blinking.
4
During blinking, turn the MULTI-
FUNCTION SELECTOR and set the
desired cooking time.
5
Automatically start after 5 seconds.
Reheat Cooking
Use settings and times in this table as guide lines for reheating.
We recommend to always fi ll the water tank with fresh water to the maximum level.
Food Item Mode Time (min.) Accessory
Plated Meal
(250-500 g)
Reheat 13
- 19 Steam dish, perforated

EN 23
SETTING THE COOK TIME
1
Choose the desired mode and function
(and set the temperature if preferred).
2
Press COOK TIME.
3
Turn the MULTI-FUNCTION
SELECTOR to set the desired Cook
Time and press COOK TIME to end
the setting of the cook time.
4
Automatically start after 5 seconds.
Note
1) When the set time has elapsed, an audible signal sounds, “0:00” will blink in the display and
the oven switches itself of. The current time is shown in the display.
2) You can reset the programmed cook time in the same order as above.
3) To cancel the programmed cook time, press COOK TIME and set the time to zero with the
MULTI-FUNCTION SELECTOR.

EN 24
SETTING THE END TIME
1
Choose the desired mode and
function (and set the temperature if
preferred).
2
Press COOK TIME and turn the
MULTI-FUNCTION SELECTOR to
set time of “0:00”. Because the COOK
TIME is set by default time “0:20”
3
Press END TIME.
Example Current time is 13:00.
The current time’s digit “13:00”
will blink.
4
Turn the MULTI-FUNCTION
SELECTOR to set the desired End
Time (14:00).
5
Press END TIME again.
Example Current time is 13:00.
Desired end time is 14:00.
6
Automatically start after 5 seconds.
Cooking time “1:00” is displayed.
Note
1) The cooking time will count down in the time display. When the set time has elapsed, an
audible signal sounds, “0:00” will blink in the display and the oven switches itself o .
The current time is shown in the display.
2) During cooking, you can adjust the preset cooking time for better cooking performance.
Press COOK TIME and change the time with the MULTI-FUNCTION SELECTOR.
3) To cancel the programmed end time, press COOK TIME and set the time to zero with the
MULTI-FUNCTION SELECTOR.

EN 25
COOKING TIME RESERVATION FUNCTION
Example by using the steam mode: Current time: 12:00
Cook time: 30 minutes
End time: you wish to end cooking at 18:00
1
Choose the desired mode and
function (and set the temperature if
preferred).
2
Press COOK TIME and turn the
MULTI-FUNCTION SELECTOR to set
the desired cooking time 30 minutes.
3
Press END TIME.
► The Cook Time is added to
the current time and “12:30” is
displayed.
Turn the MULTI-FUNCTION
SELECTOR to set the desired End
Time (18:00).
4
Press END TIME.
► You see a fi gure in the display,
indicating that a reservation has
been made.
► The oven automatically starts at
the reserved time of 17:30 and the
Cook Time is displayed.
Note
• Cook Time and End Time can be changed before the reserved time.
• If you press the End Time without setting Cook Time cooking time will be set 20 minutes which
is default time.
WARNING
Do not leave the food for too long time in the oven as food may spoil.

EN 26
USING THE AUTO MENU MODE
The 45 Auto Menu features include/provide pre-programmed cooking times.
You do not need to set either the cooking times or the temperature.
1
Turn the MODE SELECTOR to “AUTO”
position.
2
Turn the MULTI-FUNCTION
SELECTOR to choose an auto menu
feature.
3
If you see the symbol in the display, fi ll
the water tank up to the maximum line
and place it back. Place your food into
the cooking cavity.
4
Press WEIGHT/TEMP. The weight
range starts blinking.
5
If you want to change the weight, turn
the MULTI-FUNCTION SELECTOR.
6
Press WEIGHT/TEMP.
► Auto cooking starts. When the
cooking has fi nished, the oven will
beep and “End” will fl ash four times.
The oven will then beep one time
per minute.
7
Automatically start after 5 seconds.
Note
• If you open the door while oven is cooking, the oven stops. To restart the oven, close the
door and wait 5 seconds. Oven will start automatically.

EN 27
USING THE AUTO MENU MODE (CONTINUED)
The following table presents 45 Auto Programmes for Steam cooking. Also the auto programmes for
Defrosting are presented. The tables contain its quantities and appropriate recommendations.
Before using those programmes always fi ll water tank up to maximum level with fresh water.
You can use just one shelf for every cooking with provided dishes. Use oven gloves while taking
out!
1. AUTO COOK MENU
No Food Item Weight Accessory Recommendation
A:01
Caulifl ower
fl orets
0.2 - 0.6
Steam dish,
perforated
Put caulifl ower fl orets on the steam dish.
A:02
Caulifl ower
whole
0.2 - 0.6
Steam dish,
perforated
Put whole caulifl ower on the steam dish.
A:03
Broccoli
fl orets
0.2 - 0.6
Steam dish,
perforated
Put broccoli fl orets on the steam dish.
A:04
Broccoli
whole
0.2 - 0.6
Steam dish,
perforated
Put whole broccoli on the steam dish.
A:05 Carrot slices 0.2 - 0.6
Steam dish,
perforated
Put sliced carrots on the steam dish.
A:06 Carrot whole 0.2 - 0.6
Steam dish,
perforated
Put whole carrots on the steam dish.
A:07
Asparagus
green
0.3 - 0.6
Steam dish,
perforated
Put green asparagus(±1.5cm thickness) on the steam
dish.
A:08
Asparagus
white
0.4 - 0.8
Steam dish,
perforated
Put white asparagus on the steam dish.
A:09 Green beans 0.2 - 0.6
Steam dish,
perforated
Put green beans on the steam dish.
A:10 Snow peas 0.2 - 0.4
Steam dish,
perforated
Put snow peas on the steam dish.
A:11 Chicory whole 0.2 - 0.6
Steam dish,
perforated
Put chicory (each 80g) on the steam dish.
A:12
Brussels
sprouts
0.2 - 0.6
Steam dish,
perforated
Put sprouts on the steam dish.
A:13
White
Cabbage
0.2 - 0.6
Steam dish,
perforated
Put white cabbage on the steam dish.
A:14
Steamed
vegetable
0.2 - 0.6
Steam dish,
perforated
Put sliced vegetable(such as courgettes, pepper,
egg plants and onions) and add cherry tomatoes and
mushrooms on the steam dish.
A:15
Steamed
potat
o whole
0.2 - 0.8
Steam dish,
perforated
P
ut whole potatoes (each 150-200g) on the steam
dish.
A:16
Steamed
potato half
0.2 - 0.8
Steam dish,
perforated
Cut potatoes (each 150-200g) into halves and put on
the steam dish.
A:17
Steamed baby
potatoes
0.2 - 0.8
Steam dish,
perforated
Put baby potatoes on the steam dish.
A:18
Steamed
peeled
potatoes
0.2 - 0.8
Steam dish,
perforated
Weigh the potatoes after peeling, washing and
cutting into a similar size. Put them on the steam
dish.
A:19 White rice
0.2 - 0.4
Steam dish,
unperforated
Distribute white rice(basmati or pandan) evenly in
stainless dish. Add for each 100g of rice, 200ml cold
water. Stir after steaming.

EN 28
No Food Item Weight Accessory Recommendation
A:20 Brown rice
0.2-0.4
Steam dish,
unperforated
Distribute Brown rice(pre-steamed) evenly in stainless
dish. Add for each 100g of rice, 175ml cold water.
Stir after steaming.
A:21 Risotto 0.2-0.4
Steam dish,
unperforated
Distribute risotto rice evenly in stainless dish. Add
for each 100g of rice, 220ml hot stock. Stir after
steaming.
A:22
Steamed
Chicken
breast
0.2-1.0
Steam dishes,
perforated and
unperforated
Put chicken breast on the steam dishes.
A:23
Steamed Fish
fi llet, 1cm
0.2-1.0
Steam dishes,
perforated and
unperforated
Put fi sh fi llet(1cm) on the steam dishes.
A:24
Steamed Fish
steak, 2cm
0.2-1.0
Steam dishes,
perforated and
unperforated
Put fi sh steak(2cm) on the steam dishes.
A:25
Steamed
Salmon Steak,
3cm
0.2-1.0
Steam dishes,
perforated and
unperforated
Put Salmon steak(3cm) on the steam dishes.
A:26
Steamed
Prawns
0.2-0.5
Steam dishes,
perforated and
unperforated
Put prawn(raw/uncooked-peeled or unpeeled) on the
steam dishes.
A:27
Steamed
Mussels
1.0-1.4
Steam dishes,
perforated and
unperforated
Put mussels with onion and herbs and spices on the
steam dishes.
A:28
Rising yeast
dough
0.3-0.6
Steam dish,
perforated
Prepare yeast dough for pizza, cake or bread. Put
into a large round heat-resistant dish and cover with
cling fi lm.
A:29 Flan steamed 0.4-0.6
Steam dish,
perforated
Put fl an mixture in 6 small fl an dishes(100ml in each).
Cover with cling fi lm. Put dishes on the steam dish.
A:30
Fruit_gentle
steamed
0.2-0.5
Steam dish,
perforated
Put sliced of apples, pears or apricots in a fl at glass
pyrex dish. Add 1 teaspoon sugar and 2 tablespoon
water.
A:31
Fruit_soft
steamed
0.2-0.5
Steam dish,
perforated
Put sliced of apples, pears or apricots in a fl at glass
pyrex dish. Add 1 teaspoon sugar and 2 tablespoon
water.
A:32
Melting
chocolate
0.1-0.3
Steam dish,
perfor
ated
Break chocolate(pur
e or baking chocolate) into
pieces, put in a small glass pyrex dish and cover with
plastic foil or lid. Put dish on the steam dish. Keep
covered during programme. After taking out stir well.
(For white or milk chocolate decrease 5 min)
A:33
Steeping
dried fruit
0.1-0.5
Steam dish,
perforated
Put dried fruits(apricots, plums, apple) on the steam
dish.
A:34
Milk rice
pudding
0.2-0.4
Steam dish,
perforated
Distribute dessert rice evenly in a fl at glass pyrex
dish. Add for each 100g of rice, 200ml cold milk. Put
dish on the steam dish. Stir after steaming.
A:35
Desinfection_
baby bottles
2 - 3
Steam dish,
perforated
Put open glass bottle horizontally on the steam dish,
with the opening to the back of the oven. Be careful
taking out hot bottles.
A:36 Baby food
0.1 - 0.2
0.2 - 0.3
Steam dish,
perforated
Pour the baby food into a deep ceramic dish. Do not
cover.
USING THE AUTO MENU MODE (CONTINUED)

EN 29
USING THE AUTO MENU MODE (CONTINUED)
No Food Item Weight Accessory Recommendation
A:37
Eggs,
medium-hard
0.1 - 0.6
Steam dish,
perforated
Put 2-10 medium sized eggs on the steam dish. If
you like more fi rm eggs, leave the eggs to stand for a
couple of minutes.
A:38
Egg, hard-
boiled
0.1 - 0.6
Steam dish,
perforated
Put 2-10 medium sized eggs on the steam dish. If
you like more fi rm eggs, leave the eggs to stand for a
couple of minutes.
A:39 Poached Eggs
0.2 - 0.4
Steam dish,
perforated
Grease small glass or ceramic round dishes with
vegetable oil. Put each egg without shell into a round
dish.
A:40
Frozen
broccoli
0.2 - 0.6
Steam dish,
perforated
Put frozen broccoli fl orets on the steam dish.
A:41
Frozen green
beans
0.2 - 0.6
Steam dish,
perforated
Put frozen green beans on the steam dish.
A:42 Frozen peas 0.2 - 0.6
Steam dish,
perforated
Put frozen peas on the steam dish.
A:43
Frozen mixed
vegetables
0.2 - 0.6
Steam dish,
unperforated
Put frozen mixed vegetables on the steam dish.
A:44
Frozen
spinach cubes
0.3 - 0.5
Steam dish,
unperforated
Put frozen spinach cubes on the steam dish.
A:45
Frozen yeast
dumplings
0.3 - 0.6
Steam dish,
perforated
Put frozen yeast dumplings on the steam dish.

EN 30
USING THE DEFROST MODE
Defrost Setting
1
Fill the water tank up to the maximum
line and place it back. Then place your
food into the cooking cavity.
2
Turn the MODE SELECTOR to the
Defrost mode position.
3
Turn the MULTI-FUNCTION
SELECTOR to choose a defrost feature.
4
Press WEIGHT/TEMP. The weight
range starts blinking.
5
Automatically start after 5 seconds.

EN 31
No Food Item
Weight
(kg)
Accessory Recommendation
d:01
Frozen meat
0.2 - 0.5
0.8 - 1.5
Steam dishes,
perforated
and
unperforated
This programme is suitable for beef, lamb, pork,
steaks, chops and minced meat. Shield ends with
aluminium foil. Put meat on steam dishes(cover
minced meat with cling fi lm while defrosting).
d:0
2
Frozen
poultry
0.3 - 0.6
0.9 - 1.3
Steam dishes,
perforated
and
unperforated
This programme is suitable for whole poultry as well
as for poultry portions. Shield ends with aluminium
foil. Put poultry on steam dishes.
d:0
3 Frozen fi sh 0.3 - 0.8
Steam dishes,
perforated
and
unperforated
This programme is suitable for whole fi shes as well
as for fi sh fi llets. Shield thin ends with aluminium foil.
Put fi sh on steam dishes.
d:0
4 Frozen fruit 0.2 - 0.6
Steam dishes,
perforated
and
unperforated
Distribute fruits evenly into steam dish.
This programme is suitable for all kinds of sliced fruits
or berries.
d:0
5
Frozen ready
meal
0.3 - 0.5
Put the dish uncovered on the steam dish.
Note
1) When you have fi nished defrosting, pour out the water in the tray and wash out the tank.
2) Dry the cooking room with a dry cloth if there is any remaining water.
3) The cooling fan always works for 3-10 minutes after defrost mode.
However, this is not a malfunction and you do not need to worry about this.
USING THE DEFROST MODE (CONTINUED)
Steam dish,
perforated

EN 32
SETTING THE WATER HARDNESS
It is necessary to descale your appliance at regular intervals. This is the only way to prevent
damage.
Your appliance has a system that automatically displays when it needs descaling. It is preset to a
water hardness 3. Change the value if your water is softer.
Checking the water hardness
Information on the hardness of the water in your area can be obtained from the local water board.
Changing the water hardness
1
Turn the MODE SELECTOR to “OFF”
position.
2
Press LAMP and COOK TIME button
at the same time.
3
Turn the MULTI-FUNCTION
SELECTOR to select the desired water
hardness.
4
Automatically setting after 5 second.
► The appliance is now programmed
to provide the descaling warning
when necessary, based on the
actual hardness of the water.
Display Type PPM
French deg.
(°df)
German deg.
(°dH)
H1 Soft Water 0 - 105 0 - 11 0 - 6
H2 Medium Soft water 125 - 230 12 - 23 7 - 13
H3
(Default)
Medium Hard Water 250 - 350 24 - 36 14 - 20
H4 Hard Water > 375 > 37 > 21

EN 33
DESCALE MODE
When you see the message (see the below picture 1) on the display, the machine needs to
be descaled.
1
Pour 500 ml mixed solution of descaler
and clean water in the water tank.
Regarding to mixing ratio, refer to the
user manual of descaler.
2
Close the lid of water tank before
installing into main unit.
3
Turn the FUNCTION KNOB to “OFF”
position.
4
Close the door and press and
hold down both END TIME and
WEIGHT/TEMP for 3 seconds.
The machine displays 50 minutes
and starts descaling.
► Cleaning Mode: 40 min
► Rinse Mode: 10 min

EN 34
DESCALE MODE (CONTINUED)
5
When it has progressed for about
40minutes, the machine displays
“10:00” and stops operating with a
beep.
Remove the tank and empty any
remaining mixed water.
Wash the tank with water and fi ll up to
the maximum line with clean water.
Put it back into the main unit.
► When ‘10:00’ is displayed, you have
to operate the rinse mode within
25minutes. If you do not, the set
will be reset after 25 minutes and
then you will perform the descale
mode again.
6
Automatically start after 5 seconds.
A rinse mode takes place with clean
water. After 10 minutes later, the
descale mode will be completed.
7
When done, the machine will make a
beep. Empty both the tank and the drip
tray and clean the tank with water.
8
Open the door and wipe inside the
cooking cavity with a dry cloth.
Note
• We advise to use NOKALK/DLS when you descale the machine. NOKALK/DLS is a highly
e ective descaler made exclusively from natural, totally biodegradable substances. It is non-
corrosive, non-aggressive and has no environmental impact.
As well as being an e ective descaler, it also has an antimicrobial sanitising action, thus helping
to ensure the hygiene of the machine’s internal components, preserve the taste of the food
over time and extend the working life of the machine.
• For subsequent descaling operations with NOKALK/DLS, descaling solvent can be purchased
from www.atag.nl
• Water which is used for steam cooking, contains calcium and magnesium. Through heating,
water evaporates and only the fl oating materials (minerals) remain (not harmful to humans).
• If the descaling cycle is interrupted before completion, the programme must be started again
from the beginning.

EN 35
CLEANING
1
Cleaning inside the cavity.
► Wipe any leftovers from the ceiling
or walls using a neutral cloth dipped
in detergent.
► When completed, wipe any
leftovers from ceiling or walls one
more using a wet cloth and let the
cavity in natural drying.
► Even solid, difficult stains or dry
leftovers can be removed by using
the rough sponge after pour 30~50
degree`s hot water in the cavity.

EN 36
CLEANING (CONTINUED)
2
Cleaning the oven surface, control
panel and window.
► The surface of the oven can be
wiped with a wet dish towel,
followed by a dry cloth to remove
the water completely.
► Do not use force when cleaning the
control panel as it can be damaged
while cleaning.
► Clean the transparent window with
a neutral detergent-dipped dish
towel and then with a dry cloth until
no water remains.
3
Cleaning the water tank and the tray.
► Wipe them with a sponge dipped in
a neutral detergent and then rinse
them with water.
4
Cleaning the accessories.
► Wipe them with a neutral detergent
and dry them before inserting them
back into the cooking cavity.
► Do not use force on the accessories
when wiping them with a scrubber,
as this may damage the coated
surface.
WARNING:
• NEVER use benzene, thinner or a metal scrubber to clean. Otherwise, it can cause
discoloration or damage to the surface.
•
Do not spray water onto the machine when cleaning it. This can lead to electric shock or fi re.
•
Do not expose the water tank or tray to direct sunlight to dry it. This can result in mal formation or
damage.
• Do not separate arbitrarily the Gasket door from the cavity for cleaning.

EN 37
SWITCHING OFF THE BEEPER
1
Turn the MODE SELECTOR to “OFF”
position.
2
To switch the beeper o , press COOK
TIME and END TIME at the same time
and hold for 3 seconds.
3
To switch the beeper back on, press
COOK TIME and END TIME again at
the same time and hold for 3 seconds.

EN 38
CHILD SAFETY LOCK
The oven’s Child Safety Lock allows you to lock the control panel to protect the oven
against unintended use.
To Lock the Oven
1
Turn the MULTI-FUNCTION
SELECTOR to “OFF” position.
2
Press STEAM LEVEL and COOK
TIME at the same time and hold for 3
seconds.
3
A lock symbol appears in the display,
indicating that all functions are locked.
To Unlock the Oven
1
Turn the MODE SELECTOR to “OFF”
position. Press STEAM LEVEL and
COOK TIME at the same time and
hold for 3 seconds.
2
The Lock symbol disappears in the
display, indicating that all functions are
unlocked.

EN 39
CLEANING YOUR STEAM OVEN
Clean your oven regularly to prevent grease and food particles from building up, especially
on inside and outside surfaces, door and door seals.
1. Clean outside surfaces with a soft cloth and warm soapy water. Rinse and dry.
2. Remove any splashes or stains on inside surfaces with a soapy cloth. Rinse and dry.
3. To loosen hardened food particles and remove smells, place a cup of diluted lemon juice on
the fl oor of the empty oven and heat for ten minutes at maximum power.
4. Wash the inside.
Important
• Take special care NOT to spill water in the vents.
• NEVER use abrasive products or chemical solvents.
• ALWAYS ensure that door seals are clean to prevent particles from building up so that the door
can close properly.
STORING AND REPAIRING YOUR STEAM OVEN
Repairs should only be made by a qualifi ed service technician.
If oven requires servicing, unplug the oven and contact ATAG Customer Service.
When calling, please have the following information ready:
• The model number and serial number (can be found inside the oven door)
• Warranty details
• Clear description of the problem
If oven must be temporarily stored, choose a clean dry place as dust and dampness can
cause damage.

EN 40
ERROR CODES
Error Code General Functions
TEMP SENSOR OPEN ERROR
It occurs due to a defective sensor, misplaced wires, a defective PCB and
when A/D value that MICOM senses rises over 250.
TEMP SENSOR SHORT ERROR
It occurs due to a defective sensor, misplaced wires, a defective PCB and
when A/D value that MICOM senses falls under 5.
TEMP SENSOR TARGET TEMP ERROR
It occurs when the internal temperature of cavity don’t reach the setting
temperature of user for 30 minutes.
ABNORMAL TEMP SENSING ERROR
It occurs when the temperature of cavity inside is over 250 °C for
10minutes.
EEPROM OPEN ERROR
It occurs when EEPROM communication is error during initial power
setting.
EEPROM READ & WRITE ERROR
EEPROM use does not occur.
STEAM SENSOR OPEN ERROR
It occurs due to a defective steam sensor, misplaced wires, a defective
PCB and when A/D value that MICOM senses rises over 250 for
3minutes.
STEAM SENSOR SHORT ERROR
It occurs due to a defective steam sensor, misplaced wires, a defective
PCB and when A/D value that MICOM senses falls under 5 for 3minutes.
NAK SIGNAL ERROR
Nak signal occurs if initial power-up for more than 1 minute.
COMMUNICATION ERROR
It occurs when not communicating between main and sub PCB for more
than 10 seconds.
KEY SHORT ERROR
This error occurs when a button is pressed and held for over 60 seconds.
It may occur when water soaks through the inside of the control panel or
dust particles are stuck to touch pad.
If any of these errors occur, please contact ATAG Customer Service.

EN 41
TECHNICAL SPECIFICATIONS
Model SX4411BUU
SX4492BUU
Power Source 230 V ~ 50 Hz
Power Consumption
Steam Mode 2800 W
Cooling Method Cooling fan motor
Dimensions
Set size:
Built in size:
W 595 x H 454 x D 569.4 mm
W 555 x H 445 x D 548.8 mm
Volume 50 liter
Weight
Net
Shipping
33.0 kg
36.5 kg

EN 42
DISPOSAL OF APPLIANCE AND PACKAGING
The packaging of this appliance is recyclable and may have been
made of:
•
cardboard
•
paper
•
polythene foil (PE)
•
CFC-free polystyrene (PS hard foam)
•
polypropylene tape (PP).
Dispose of these materials in a responsible manner and in accordance
with government regulations.
The appliance carries the symbol of a crossed-out dustbin to state that
segr
egated processing is compulsory to avoid any negative effects on
the environment and public health. This means that at the end of its
working life, you must hand it in at a special refuse collection centre
run by your local authority or dealer.
Segregated processing enables the recovery of the materials used in
the production of this appliance, thus saving considerably in terms of
raw materials and energy.
Declaration of conformity
We declare that our products meet the applicable European Directives,
Decisions and Regulations and the requirements listed in the
standards referenced.

NOTES

The appliance identification card is located on the inside of the appliance.
When contacting the service department, have the complete type number to hand.
You will find the addresses and phone numbers of the service organisation on the guarantee card.
????????????

NL
Handleiding NL 3 - NL 43
EN
Manual EN 3 - EN 42
Gebruikte pictogrammen - Pictogrammes utilisés - Benutzte Piktogramme
Pictograms used - Anvendte piktogrammer - Symboler brukt
Symboler som används
Belangrijk om te weten - Important à savoir - Wissenswertes - Important information
Vigtig information - Viktig informasjon - Viktig information
Tip - Conseil - Tipp - Tips
NL
BE
IE
GB

Houd, wanneer u contact opneemt met de serviceafdeling, het complete typenummer bij de hand.
En cas de contact avec le service après-vente, ayez auprès de vous le numéro de type complet.
Halten Sie die vollständige Typennummer bereit,
wenn Sie mit der Kundendienstabteilung Kontakt aufnehmen.
When contacting the service department, have the complete type number to hand.
Sørg for at have hele typenummeret klar, når serviceafdelingen kontaktes.
Ha hele typenummeret for hånden når du kontakter serviceavdelingen.
Ha det kompletta typnumret till hands när du tar kontakt med serviceavdelningen.
Adressen en telefoonnummers van de serviceorganisatie vindt u op de garantiekaart.
Les adresses et les numéros de téléphone du service après-vente se trouvent sur la carte de garantie.
Adressen und Telefonnummern der Kundendienstorganisation fi nden Sie auf der Garantiekarte.
You will fi nd the addresses and phone numbers of the service organisation on the guarantee card.
Adressen og telefonnummeret til servicevirksomheden fi ndes på garantikortet.
Du fi nner adresser og telefonnumre til serviceorganisasjonen på garantikortet.
Adresser och telefonnummer till serviceorganisationen hittar du på garantikortet.
Handleiding
Stoomoven
Manual
Steamer
700005249000
SX4411B
SX4492B
Code No.: DG68-00495A
-
 1
1
-
 2
2
-
 3
3
-
 4
4
-
 5
5
-
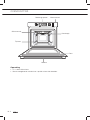 6
6
-
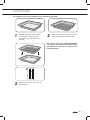 7
7
-
 8
8
-
 9
9
-
 10
10
-
 11
11
-
 12
12
-
 13
13
-
 14
14
-
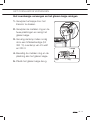 15
15
-
 16
16
-
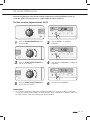 17
17
-
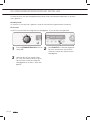 18
18
-
 19
19
-
 20
20
-
 21
21
-
 22
22
-
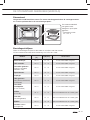 23
23
-
 24
24
-
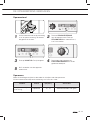 25
25
-
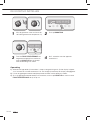 26
26
-
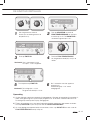 27
27
-
 28
28
-
 29
29
-
 30
30
-
 31
31
-
 32
32
-
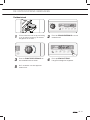 33
33
-
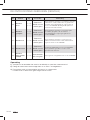 34
34
-
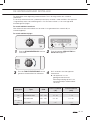 35
35
-
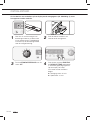 36
36
-
 37
37
-
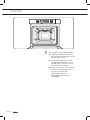 38
38
-
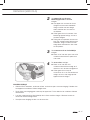 39
39
-
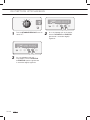 40
40
-
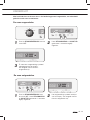 41
41
-
 42
42
-
 43
43
-
 44
44
-
 45
45
-
 46
46
-
 47
47
-
 48
48
-
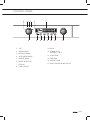 49
49
-
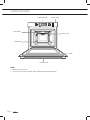 50
50
-
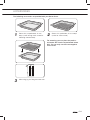 51
51
-
 52
52
-
 53
53
-
 54
54
-
 55
55
-
 56
56
-
 57
57
-
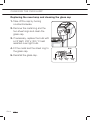 58
58
-
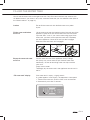 59
59
-
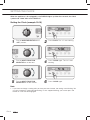 60
60
-
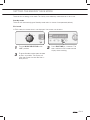 61
61
-
 62
62
-
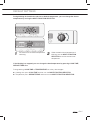 63
63
-
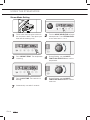 64
64
-
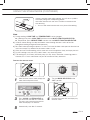 65
65
-
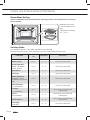 66
66
-
 67
67
-
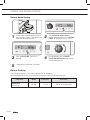 68
68
-
 69
69
-
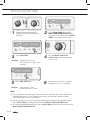 70
70
-
 71
71
-
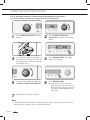 72
72
-
 73
73
-
 74
74
-
 75
75
-
 76
76
-
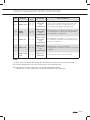 77
77
-
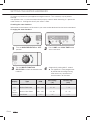 78
78
-
 79
79
-
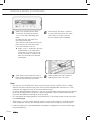 80
80
-
 81
81
-
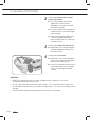 82
82
-
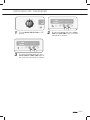 83
83
-
 84
84
-
 85
85
-
 86
86
-
 87
87
-
 88
88
-
 89
89
-
 90
90
-
 91
91
-
 92
92


Samsung SX4411BUU Handleiding
- Categorie
- Stoomreinigers
- Type
- Handleiding
in andere talen
- English: Samsung SX4411BUU User manual
Gerelateerde papieren
Andere documenten
-
Barazza 1FVCFY Handleiding
-
Miele DG 2740 CS de handleiding
-
KitchenAid KOQCX 45600 de handleiding
-
KitchenAid KOCV 4510 Gebruikershandleiding
-
KitchenAid KOCV 4525 Gebruikershandleiding
-
-
-
-
Princess 262008 Classic Egg Cooker - Mini Steamer de handleiding
-
Caterchef 921510 Handleiding