Parkside PHSHE 900 B2 Translation Of The Original Instructions
- Categorie
- Elektrische heggenscharen
- Type
- Translation Of The Original Instructions

2-IN-1-LANGSTIEL-HECKENSCHERE / HOCHENTASTER
2-IN-1 HEDGE TRIMMER / POLE PRUNER
TAILLE-HAIES SUR PERCHE / PERCHE ÉLAGUEUSE 2 EN 1
PHSHE 900 B2
2-IN-1-LANGSTIEL-HECKENSCHERE /
HOCHENTASTER
Originalbetriebsanleitung
2-IN-1 HEDGE TRIMMER /
POLE PRUNER
Translation of the original instructions
TAILLE-HAIES SUR PERCHE /
PERCHE ÉLAGUEUSE 2 EN 1
Traduction des instructions d’origine
IAN 313266_1904
2-IN-1-TELESCOPISCHE
HEGGENSCHAAR/TELESCOPISCHE
TAKKENSCHAAR
Vertaling van de originele gebruiksaanwijzing
2-W-1 NOŻYCE DO ŻYWOPŁOTU
ZDŁUGIM TRZONKIEM /
OKRZESYWARKA
Tłumaczenie oryginalnej instrukcji obsługi
NŮŽKY NA ŽIVÝ PLOT
AODVĚTVOVAČ 2 V 1
Překlad originálního provozního návodu
2 V 1 NOŽNICE NA ŽIVÝ PLOT S
DLHOU NÁSADOU / ODVETVOVAČ
Preklad originálneho návodu na obsluhu

DE / AT / CH Originalbetriebsanleitung Seite 1
GB/IE Translation of the original instructions Page 15
FR / BE Traduction des instructions d’origine Page 29
NL / BE Vertaling van de originele gebruiksaanwijzing Pagina 43
PL Tłumaczenie oryginalnej instrukcji obsługi Strona 57
CZ Překlad originálního provozního návodu Strana 71
SK Preklad originálneho návodu na obsluhu Strana 85
Klappen Sie vor dem Lesen die beiden Seiten mit den Abbildungen aus und machen Sie sich anschließend
mit allen Funktionen des Gerätes vertraut.
Before reading, unfold both pages containing illustrations and familiarise yourself with all functions of the
device.
Avant de lire le mode d’emploi, ouvrez les deux pages contenant les illustrations et familiarisez-vous ensuite
avec toutes les fonctions de l’appareil.
Vouw vóór het lezen de beide pagina‘s met de afbeeldingen open en maak u vertrouwd met alle functies
van het apparaat.
Przed przeczytaniem proszę rozłożyć obie strony z ilustracjami, a następnie proszę zapoznać się z
wszystkimi funkcjami urządzenia.
Před čtením si odklopte obě dvě strany s obrázky a potom se seznamte se všemi funkcemi přístroje.
Pred čítaním si odklopte obidve strany s obrázkami a potom sa oboznámte so všetkými funkciami prístroja.


A

PHSHE 900 B2
DE
│
AT
│
CH
│
1 ■
Inhaltsverzeichnis
Einleitung ......................................................................................2
Bestimmungsgemäßer Gebrauch Langstielheckenschere .................................................................2
Bestimmungsgemäßer Gebrauch Hochentaster ........................................................................2
Bestimmungsgemäßer Gebrauch ...................................................................................2
Ausstattung ....................................................................................................2
Lieferumfang ...................................................................................................3
Technische Daten ...............................................................................................3
Allgemeine Sicherheitshinweise für Elektrowerkzeuge ................................................4
1. Arbeitsplatz-Sicherheit..........................................................................................4
2. Elektrische Sicherheit...........................................................................................4
3. Sicherheit von Personen ........................................................................................4
4. Verwendung und Behandlung des Elektrowerkzeuges.................................................................4
5. Service......................................................................................................5
Gerätespezifische Sicherheitshinweise für Heckenscheren . . . . . . . . . . . . . . . . . . . . . . . . . . . . . . . . . . . . . . . . . . . . . . . . . . . . . . . . . . . . . . . . 5
Ergänzende Sicherheitshinweise für Heckenscheren.....................................................................5
Weiterführende Sicherheitshinweise für Heckenscheren ..................................................................6
RESTRISIKEN! ..................................................................................................6
Gerätespezifische Sicherheitshinweise für Hochentaster..................................................................6
Vorsichtsmaßnahmen gegen Rückschlag .............................................................................7
Weiterführende Sicherheitshinweise .................................................................................7
Vor der Inbetriebnahme..........................................................................8
Motoreinheit ...................................................................................................8
Rundgriff montieren ..............................................................................................8
Schultergurt befestigen / montieren .................................................................................8
Heckenschere montieren ..........................................................................................8
Hochentaster montieren...........................................................................................8
Schwenken der Heckenschere .....................................................................................8
Schwenken des Hochentasters .....................................................................................8
Sägekette und Schwert montieren...................................................................................8
Sägekette spannen und prüfen .....................................................................................8
Kettenschmierung ...............................................................................................9
Sägekette schärfen ..............................................................................................9
Inbetriebnahme.................................................................................9
Ein- / ausschalten ................................................................................................9
Handgriff verstellen ..............................................................................................9
Arbeiten mit der Heckenschere .....................................................................................9
Gebrauch der Maschine: .........................................................................................9
Schnitttechniken.................................................................................................9
Arbeiten mit dem Hochentaster .....................................................................................9
Sägetechniken..................................................................................................9
Sicheres Arbeiten...............................................................................................10
Transport .....................................................................................10
Wartung und Reinigung .........................................................................10
Lagerung .....................................................................................10
Fehlersuche Hochentaster........................................................................11
Fehlersuche Heckenschere .......................................................................11
Wartungsintervalle Hochentaster .................................................................11
Wartungsintervalle Heckenschere.................................................................11
Garantie der Kompernaß Handels GmbH ..........................................................12
Service .......................................................................................12
Importeur
.....................................................................................13
Entsorgung....................................................................................13
Ersatzteile.....................................................................................13
Original-Konformitätserklärung ..................................................................13

PHSHE 900 B2
■ 2
│
DE
│
AT
│
CH
2-IN-1-LANGSTIEL-HECKENSCHERE /
HOCHENTASTER PHSHE 900 B2
Einleitung
Wir beglückwünschen Sie zum Kauf Ihres neuen Gerätes. Sie haben sich
damit für ein hochwertiges Produkt entschieden. Die Bedienungsanleitung ist
Teil dieses Produkts. Sie enthält wichtige Hinweise für Sicherheit, Gebrauch und
Entsorgung. Machen Sie sich vor der Benutzung des Produkts mit allen Bedien-
und Sicherheitshinweisen vertraut. Benutzen Sie das Produkt nur wie beschrie-
ben und für die angegebenen Einsatzbereiche. Händigen Sie alle Unterlagen
bei Weitergabe des Produkts an Dritte mit aus.
Bestimmungsgemäßer Gebrauch
Langstielheckenschere
Dieses Gerät ist bestimmt zum Schneiden und Trimmen von Hecken, Bü-
schen und Ziersträuchern im häuslichen Bereich. Es handelt sich hierbei um
ein handgeführtes Gerät mit integriertem Antrieb, bei dem sich die linear
angeordneten Schneiden hin und her bewegen.
WARNUNG!
► Heckenscheren sind nicht für die Benutzung durch Kinder geeignet.
Bestimmungsgemäßer Gebrauch Hochentaster
Dieses Gerät ist bestimmt für Entastungsarbeiten an Bäumen.
Bestimmungsgemäßer Gebrauch
Benutzen Sie das Gerät nur wie beschrieben und für die angegebenen
Einsatzbereiche. Das Gerät ist nicht für den gewerblichen Einsatz bestimmt.
Das Gerät ist zum Gebrauch durch Erwachsene bestimmt. Dieses Gerät ist
nicht dafür bestimmt, durch Personen (einschließlich Kinder) mit einge-
schränkten physischen, sensorischen oder geistigen Fähigkeiten oder
mangels Erfahrung und / oder mangels Wissen benutzt zu werden. Die
Benutzung des Gerätes bei Regen oder feuchter Umgebung ist verboten.
Jede andere Verwendung oder Veränderung des Gerätes gilt als nicht
bestimmungsgemäß und birgt erhebliche Unfallgefahren. Für aus
bestimmungswidriger Verwendung entstandene Schäden übernimmt der
Hersteller keine Haftung.
Ausstattung
Motoreinheit
Knebelschraube
Mutter
Ausleger
Schraube
Rundgriff
Trageöse
Drehelement
Entriegelungstaste
Einschaltsperre
Ein-/Ausschalter
Netzkabel
Zugentlastung
Heckenscherenvorsatz
Messerbalken
Getriebegehäuse
Ent-/Verriegelung
Grundplatte (Heckenschere)
Stellhebel
Handgriff
Vorderer Ausleger
Arretierstift
Antriebswelle
Schutzkappe
Hochentastervorsatz
Schleifbockhilfe
Sägekette
Schwert
Anschlag
Öltank
Mutter
Gewinde
Kettenradabdeckung
Schwertbohrung
Schwertführung
Führungsschiene
Tropföler
Kettenspannschraube
Kettenrad
Kettenspannstift
Vorderer Ausleger
Antriebswelle
Schutzkappe
Arretierstift
Schutzring
Stellhebel
Grundplatte (Hochentaster)
Ent-/Verriegelung
Öltankdeckel

PHSHE 900 B2
DE
│
AT
│
CH
│
3 ■
Lieferumfang
1 Motoreinheit PHSHE 900 B2
1 Heckenscherenvorsatz PHS 1 (nachfolgend Heckenschere genannt)
1 Hochentastervorsatz PHE 1 (nachfolgend Hochentaster genannt)
Zubehör
1
Schultergurt
1
Kettenschutzhülle
1
Schwertschutzhülle
1
100 ml Bio-Kettenöl
1
Montagewerkzeug
1 Bedienungsanleitung
Technische Daten
Motoreinheit: PHSHE 900 B2
Nennspannung: 230 V ∼ 50 Hz (Wechselstrom)
Nennleistung: 900 W
Schutzklasse: II /
(Doppelisolierung)
Gewicht:
(ohne Handgriff u. Tragegurt): ca. 2,7 kg
Hochentaster: PHE 1
Kettengeschwindigkeit: max. 6 m/s
Arbeitswinkel: 0°; 15°; 30°
Gewicht (betriebsbereit): ca. 1,6 kg
Öltank empfohlene Füllmenge: 100 cm
3
Schnittlänge: ca. 260 mm
Schwert: Oregon Typ 100SDEA041
Sägekette: Oregon 91P040X
Heckenschere: PHS 1
Leerlaufhubzahl: 2000 min
-1
Arbeitswinkel: -90° bis +90°
Schnittlänge: 410 mm
Zahnabstand: 20 mm
Gewicht
(betriebsbereit): ca. 2,1 kg
Geräusch- und Vibrationsinformationen:
Messwert für Geräusch ermittelt entsprechend EN 60745. Der A-bewertete
Geräuschpegel des Elektrowerkzeugs beträgt typischerweise:
Hochentaster: PHE 1
Schalldruckpegel: L
PA
= 83 dB (A)
Unsicherheit K: 3 dB
Schallleistungspegel: L
WA
= 104 dB (A)
Unsicherheit K: 3 dB
Heckenschere: PHS 1
Schalldruckpegel: L
PA
= 81 dB (A)
Unsicherheit K: 3 dB
Schallleistungspegel: L
WA
= 102 dB (A)
Garantierter
Schallleistungspegel: L
WA
= 105 dB (A)
Unsicherheit K: 3 dB
Schwingungswerte (Vektorsumme dreier Richtungen) ermittelt entsprechend
EN 60745:
Hochentaster:
Vibration am vorderen Griff: Schwingungsemissionswert
a
h,D
= 1,0 m/s
2
Unsicherheit K = 1,5 m/s
2
Vibration am hinteren Griff: Schwingungsemissionswert
a
h,D
= 1,2 m/s
2
Unsicherheit K = 1,5 m/s
2
Heckenschere:
Vibration am vorderen Griff: Schwingungsemissionswert
a
h,D
= 1,6 m/s
2
Unsicherheit K = 1,5 m/s
2
Vibration am hinteren Griff: Schwingungsemissionswert
a
h,D
= 1,8 m/s
2
Unsicherheit K = 1,5 m/s
2
Gehörschutz tragen!
HINWEIS
► Der in diesen Anweisungen angegebene Schwingungspegel ist ent-
sprechend einem in EN 60745 genormten Messverfahren gemessen
worden und kann für den Gerätevergleich verwendet werden. Der
angegebene Schwingungsemissionswert kann auch zu einer einlei-
tenden Einschätzung der Aussetzung verwendet werden.
WARNUNG!
► Der Schwingungspegel wird sich entsprechend dem Einsatz des
Elektrowerkzeugs verändern und kann in manchen Fällen über dem
in diesen Anweisungen angegebenen Wert liegen. Die Schwingungs-
belastung könnte unterschätzt werden, wenn das Elektrowerkzeug
regelmäßig in solcher Weise verwendet wird. Versuchen Sie, die
Belastung durch Vibrationen so gering wie möglich zu halten.
Beispielhafte Maßnahmen zur Verringerung der Vibrationsbelastung
sind das Tragen von Handschuhen beim Gebrauch des Werkzeugs
und die Begrenzung der Arbeitszeit. Dabei sind alle Anteile des
Betriebszyklus zu berücksichtigen (beispielweise Zeiten, in denen
das Elektrowerkzeug abgeschaltet ist, und solche, in denen es zwar
eingeschaltet ist, aber ohne Belastung läuft).
Erläuterungen der Hinweisschilder auf dem Gerät:
Vor Inbetriebnahme
Betriebsanleitung und Anweisungen lesen!
Schutzhandschuhe tragen!
Sicherheitsschuhe tragen!
Gehörschutz tragen!
Schutzhelm tragen!

PHSHE 900 B2
■ 4
│
DE
│
AT
│
CH
Schutzbrille tragen!
Umstehende Personen von dem Gerät fernhalten!
Gerät vor Regen oder Nässe schützen!
Lebensgefahr durch Stromschlag! Halten Sie sich
mindestens 10m von Überlandleitungen fern.
Achtung! Herabfallende Gegenstände.
Insbesondere beim Schnitt über Kopfhöhe.
Achtung! Verletzungsgefahr durch laufende
Messer.
Stecker sofort vom Netz trennen, wenn die Lei-
tung beschädigt oder durchtrennt wurde.
Angabe des Schallleistungspegels LWA in dB.
Allgemeine Sicherheitshin-
weise für Elektrowerkzeuge
WARNUNG!
► Lesen Sie alle Sicherheitshinweise und Anweisungen. Versäumnisse bei
der Einhaltung der Sicherheitshinweise und Anweisungen können elekt-
rischen Schlag, Brand und / oder schwere Verletzungen verursachen.
Bewahren Sie alle Sicherheitshinweise und Anweisungen für
die Zukunft auf.
Der in den Sicherheitshinweisen verwendete Begriff „Elektrowerkzeug“
bezieht sich auf netzbetriebene Elektrowerkzeuge (mit Netzkabel) und auf
akkubetriebene Elektrowerkzeuge (ohne Netzkabel).
1. Arbeitsplatz-Sicherheit
a) Halten Sie Ihren Arbeitsbereich sauber und gut beleuchtet. Unord-
nung und unbeleuchtete Arbeitsbereiche können zu Unfällen führen.
b) Arbeiten Sie mit dem Elektrowerkzeug nicht in explosionsgefährdeter
Umgebung, in der sich brennbare Flüssigkeiten, Gase oder Stäube
befinden. Elektrowerkzeuge erzeugen Funken, die den Staub oder die
Dämpfe entzünden können.
c) Halten Sie Kinder und andere Personen während der Benutzung des
Elektrowerkzeugs fern. Bei Ablenkung können Sie die Kontrolle über
das Gerät verlieren.
2. Elektrische Sicherheit
a) Der Anschlussstecker des Elektrowerkzeuges muss in die Steckdose
passen. Der Stecker darf in keiner Weise verändert werden.
Verwenden Sie keine Adapterstecker gemeinsam mit schutzgeerde-
ten Elektrowerkzeugen. Unveränderte Stecker und passende Steckdo-
sen verringern das Risiko eines elektrischen Schlages.
b) Vermeiden Sie Körperkontakt mit geerdeten Oberflächen, wie von
Rohren, Heizungen, Herden und Kühlschränken. Es besteht ein erhöh-
tes Risiko durch elektrischen Schlag, wenn Ihr Körper geerdet ist.
c) Halten Sie Elektrowerkzeuge von Regen oder Nässe fern. Das
Eindringen von Wasser in ein Elektrogerät erhöht das Risiko eines
elektrischen Schlages.
d) Zweckentfremden Sie das Kabel nicht, um das Elektrowerkzeug zu
tragen, aufzuhängen oder um den Stecker aus der Steckdose zu
ziehen. Halten Sie das Kabel fern von Hitze, Öl, scharfen Kanten
oder sich bewegenden Geräteteilen. Beschädigte oder verwickelte
Kabel erhöhen das Risiko eines elektrischen Schlages.
e) Wenn Sie mit einem Elektrowerkzeug im Freien arbeiten, verwenden
Sie nur Verlängerungskabel, die auch für den Außenbereich zuge-
lassen sind. Die Anwendung eines für den Außenbereich geeigneten
Verlängerungskabels verringert das Risiko eines elektrischen Schlages.
f) Wenn der Betrieb des Elektrowerkzeuges in feuchter Umgebung
nicht vermeidbar ist, verwenden Sie einen Fehlerstromschutzschal-
ter. Der Einsatz eines Fehlerstromschutzschalters vermindert das Risiko
eines elektrischen Schlages.
3. Sicherheit von Personen
a) Seien Sie stets aufmerksam, achten Sie darauf, was Sie tun und
gehen Sie mit Vernunft an die Arbeit mit einem Elektrowerkzeug.
Benutzen Sie kein Elektrowerkzeug, wenn Sie müde sind oder unter
dem Einfluss von Drogen, Alkohol oder Medikamenten stehen. Ein
Moment der Unachtsamkeit beim Gebrauch des Elektrowerk zeuges
kann zu ernsthaften Verletzungen führen.
b) Tragen Sie persönliche Schutzausrüstung und immer eine Schutzbril-
le. Das Tragen persönlicher Schutzausrüstung wie Staubmaske, rutsch-
feste Sicherheitsschuhe, Schutzhelm oder Gehörschutz, je nach Art und
Einsatz des Elektrowerkzeuges, verringert das Risiko von Verletzungen.
c) Vermeiden Sie eine unbeabsichtigte Inbetriebnahme. Vergewissern
Sie sich, dass das Elektrowerkzeug ausgeschaltet ist, bevor Sie es an
die Stromversorgung und / oder den Akku anschließen, es aufnehmen
oder tragen. Wenn Sie beim Tragen des Elektrowerkzeuges den Finger am
Schalter haben oder das Gerät bereits eingeschaltet an die Stromversorgung
anschließen, kann dies zu Unfällen führen.
d) Entfernen Sie Einstellwerkzeuge oder Schraubenschlüssel, bevor Sie
das Elektrowerkzeug einschalten. Ein Werkzeug oder Schlüssel, der sich
in einem drehenden Geräteteil befindet, kann zu Verletzungen führen.
e) Vermeiden Sie eine abnormale Körperhaltung. Sorgen Sie für einen
sicheren Stand und halten Sie jederzeit das Gleichgewicht. Dadurch kön-
nen Sie das Elektrowerkzeug in unerwarteten Situationen besser kontrollieren.
f) Tragen Sie geeignete Kleidung. Tragen Sie keine weite Kleidung
oder Schmuck. Halten Sie Haare, Kleidung und Handschuhe fern
von sich bewegenden Teilen. Lockere Kleidung, Schmuck oder lange
Haare können von sich bewegenden Teilen erfasst werden.
g) Wenn Staubabsaug- und -auffangeinrichtungen montiert werden
können, vergewissern Sie sich, dass diese angeschlossen sind und
richtig verwendet werden. Die Verwendung einer Staubabsaugung
kann Gefährdungen durch Staub verringern.
4. Verwendung und Behandlung des Elektro-
werkzeuges
a) Überlasten Sie das Gerät nicht. Verwenden Sie für Ihre Arbeit das
dafür bestimmte Elektrowerkzeug. Mit dem passenden Elektrowerkzeug
arbeiten Sie besser und sicherer im angegebenen Leistungsbereich.
b) Benutzen Sie kein Elektrowerkzeug, dessen Schalter defekt ist. Ein
Elektrowerkzeug, das sich nicht mehr ein- oder ausschalten lässt, ist
gefährlich und muss repariert werden.
c) Ziehen Sie den Stecker aus der Steckdose und / oder entfernen Sie
einen abnehmbaren Akku, bevor Sie Geräteeinstellungen vorneh-
men, Einsatzwerkzeugteile wechseln oder das Elektrowerkzeug
weglegen. Diese Vorsichtsmaßnahme verhindert den unbeabsichtigten
Start des Elektrowerkzeuges.
d) Bewahren Sie die unbenutzten Elektrowerkzeuge außerhalb
der Reichweite von Kindern auf. Lassen Sie Personen das Gerät
nicht benutzen, die mit diesem nicht vertraut sind oder diese
Anweisungen nicht gelesen haben. Elektrowerkzeuge sind gefährlich,
wenn sie von unerfahrenen Personen benutzt werden.
e) Pflegen Sie Elektrowerkzeuge mit Sorgfalt. Kontrollieren Sie, ob
bewegliche Teile einwandfrei funktionieren und nicht klemmen, ob
Teile gebrochen oder so beschädigt sind, dass die Funktion des

PHSHE 900 B2
DE
│
AT
│
CH
│
5 ■
Elektrowerkzeuges beeinträchtigt ist. Lassen Sie beschädigte Teile
vor dem Einsatz des Gerätes reparieren. Viele Unfälle haben ihre
Ursache in schlecht gewarteten Elektrowerkzeugen.
f) Halten Sie Schneidwerkzeuge scharf und sauber. Sorgfältig
gepflegte Schneidwerkzeuge mit scharfen Schneidkanten verklemmen
sich weniger und sind leichter zu führen.
g) Verwenden Sie Elektrowerkzeug, Zubehör, Einsatzwerkzeuge usw.
entsprechend diesen Anweisungen. Berücksichtigen Sie dabei die
Arbeitsbedingungen und die auszuführende Tätigkeit. Der Gebrauch
von Elektrowerkzeugen für andere als die vorgesehenen Anwendungen
kann zu gefährlichen Situationen führen.
5. Service
a) Lassen Sie Ihr Elektrowerkzeug nur von qualifiziertem Fachpersonal
und nur mit Original-Ersatzteilen reparieren. Damit wird sicherge-
stellt, dass die Sicherheit des Elektrowerkzeugs erhalten bleibt.
Gerätespezifische Sicherheitshinweise
für Heckenscheren
■ Halten Sie alle Körperteile vom Schneidmesser fern. Versuchen
Sie nicht, bei laufendem Messer Schnittgut zu entfernen oder zu
schneidendes Material festzuhalten. Entfernen Sie eingeklemmtes
Schnittgut nur bei ausgeschaltetem Gerät. Ziehen Sie zusätzlich den
Stecker aus der Steckdose. Ein Moment der Unachtsamkeit bei Benut-
zung der Heckenschere kann zu schweren Verletzungen führen.
■ Tragen Sie die Heckenschere am vorderen Griff im ausgeschalteten
Zustand, den Messerbalken von Ihrem Körper abgewandt. Bei Trans-
port oder Aufbewahrung der Heckenschere stets die Schutzabdeckung
aufziehen. Sorgfältiger Umgang mit dem Gerät verringert die Wahrschein-
lichkeit einer versehentlichen Berührung mit den laufenden Messern.
■ Halten Sie das Elektrowerkzeug nur an den isolierten Griffflächen,
da das Schneidmesser in Berührung mit verborgenen Stromleitungen
oder dem eigenen Netzkabel kommen kann. Der Kontakt des Schneid-
messers mit einer spannungsführenden Leitung kann metallene Gerätetei-
le unter Spannung setzen und zu einem elektrischen Schlag führen.
■ Halten Sie das Kabel vom Schneidbereich fern. Während des Ar-
beitsvorgangs kann das Kabel im Gebüsch verdeckt sein und versehent-
lich durchtrennt werden.
■ Inspizieren Sie die zu schneidende Fläche sorgfältig und beseitigen Sie
alle Drähte oder sonstigen Fremdkörper.
■ Es ist empfohlen, einen Fehlerstromschutzschalter mit einem Auslöse-
strom von 30 mA oder weniger zu verwenden.
HINWEIS
►
Die Heckenschere wird vollständig zusammengebaut geliefert.
► Bildliche Darstellungen über den Gebrauch der Heckenschere bzw.
deren Stellteile finden Sie auf der Ausklappseite.
► Hinweise und bildliche Darstellungen zur Einstellung, Wartung,
Schmierung durch den Benutzer finden Sie in dieser Anleitung.
► Hinweise zur Arbeitsposition (siehe Ausklappseite).
► Hinweise zu Stellteilen (siehe Ausklappseite).
► Hinweise zu Austausch und Reparatur (siehe Kapitel Wartung und
Reinigung / Service).
► Erklärung aller an der Heckenschere verwendeten grafischen
Symbole und technische Daten finden Sie in dieser Anleitung.
► Die Merkmale der Heckenschere finden Sie in den technischen Daten.
► Blockiertes Werkzeug: Entfernen Sie das klemmende Material aus dem
Messerbalken
.
ACHTUNG!
► Bei drohender Gefahr bzw. im Notfall sofort den Motor ausschalten
und Netzstecker ziehen.
Ergänzende Sicherheitshinweise für Heckenscheren
Vorbereitung:
a) DIESE HECKENSCHERE KANN ERNSTHAFTE VERLETZUNGEN
VERURSACHEN! Lesen Sie sorgfältig die Anweisungen zum korrekten
Umgang, zur Vorbereitung, zur Instandhaltung, zum Starten und
Abstellen der Heckenschere. Machen Sie sich mit allen Stellteilen und
der sachgerechten Benutzung der Heckenschere vertraut.
b) Kinder dürfen die Heckenschere niemals benutzen.
c) Vorsicht vor oberirdischen Stromleitungen.
d) Der Gebrauch der Heckenschere ist zu vermeiden, wenn sich Personen,
vor allem Kinder, in der Nähe befinden.
e) Tragen Sie geeignete Kleidung! Tragen Sie keine weite Kleidung oder
Schmuck, welcher von sich bewegenden Teilen erfasst werden kann. Es
wird empfohlen, feste Handschuhe, rutschfeste Schuhe und Schutzbrille
zu tragen.
f) Berührt die Schneideinrichtung einen Fremdkörper oder sollten sich die
Betriebsgeräusche verstärken oder die Heckenschere ungewöhnlich
stark vibrieren, stellen Sie den Motor ab und lassen Sie die
Heckenschere zum Stillstand kommen.
Ergreifen Sie folgende Maßnahmen:
– auf Schäden überprüfen;
– auf lose Teile überprüfen und alle losen Teile befestigen;
– beschädigte Teile gegen gleichwertige Teile austauschen oder
reparieren lassen.
g)
Tragen Sie Gehörschutz!
h)
Tragen Sie Augenschutz!
i) Um im Notfall die Heckenschere stillzusetzen, ziehen Sie den
Netzstecker aus der Netzsteckdose.
Betrieb:
a) Netzstecker aus der Steckdose ziehen, vor:
– Reinigung oder Beseitigung einer Blockierung;
– Überprüfung, Instandhaltung oder Arbeiten an der Heckenschere;
– Einstellung der Arbeitsposition der Schneideinrichtung;
– wenn die Heckenschere unbeaufsichtigt bleibt.
b) Stellen Sie immer sicher, dass sich die Heckenschere ordnungsgemäß
in einer der vorgegebenen Arbeitspositionen befindet, bevor der Motor
gestartet wird.
c) Während des Betriebes der Heckenschere ist immer sicherzustellen,
dass ein sicherer Stand eingenommen wird, besonders wenn Tritte oder
eine Leiter benutzt werden.
d) Benutzen Sie die Heckenschere nicht mit einer defekten oder stark
abgenutzten Schneideinrichtung.
e) Stellen Sie immer sicher, dass alle Griffe und Sicherheitseinrichtungen
beim Gebrauch der Heckenschere angebaut sind. Versuchen Sie
niemals, eine unvollständige Heckenschere oder eine mit nicht
zulässigem Umbau zu benutzen.
f) Halten Sie die Heckenschere fest mit beiden Händen an den dafür
vorgesehenen Handgriffen.
g) Machen Sie sich stets vertraut mit Ihrer Umgebung und achten Sie auf
mögliche Gefahren, die Sie wegen der Geräusche der Heckenschere
vielleicht nicht hören können.

PHSHE 900 B2
■ 6
│
DE
│
AT
│
CH
Wartung und Aufbewahrung:
a) Wenn die Heckenschere zwecks Wartung, Inspektion oder Lagerung
stillgesetzt wird, schalten Sie den Motor aus, dass alle rotierenden Teile
zum Stillstand gekommen sind. Lassen Sie die Maschine abkühlen,
bevor Sie diese überprüfen, einstellen usw.
b) Lagern Sie die Heckenschere dort, wo Benzindämpfe nicht mit
offenem Feuer oder Funken in Kontakt kommen können. Lassen Sie die
Heckenschere immer abkühlen, bevor Sie diese lagern.
c) Beim Transportieren oder bei der Lagerung der Heckenschere ist die
Schneideinrichtung immer mit dem Schutz für die Schneideinrichtung
abzudecken.
Weiterführende Sicherheitshinweise für
Heckenscheren
■ Halten Sie alle Körperteile vom Schneidmesser fern. Versuchen Sie
nicht, bei laufendem Messer Schnittgut zu entfernen oder zu schnei-
dendes Material festzuhalten. Entfernen Sie eingeklemmtes Schnittgut
nur bei ausgeschaltetem Gerät. Ein Moment der Unachtsamkeit bei
Benutzung der Heckenschere kann zu schweren Verletzungen führen.
■ Tragen Sie die Heckenschere am Griff im ausgeschalteten Zustand, den
Messerbalken von Ihrem Körper abgewandt. Bei Transport oder Auf-
bewahrung der Heckenschere stets die Schutzabdeckung aufziehen.
Sorgfältiger Umgang mit dem Gerät verringert die Verletzungsgefahr
durch das Messer.
■ Halten Sie das Elektrowerkzeug nur an den isolierten Griffflächen, da
das Schneidmesser in Berührung mit verborgenen Stromleitungen oder
dem eigenen Netzkabel kommen kann. Der Kontakt des Schneidmes-
sers mit einer spannungsführenden Leitung kann metallene Geräteteile
unter Spannung setzen und zu einem elektrischen Schlag führen.
♦ Die Hecke nach verborgenen Objekten (z. B. Drahtzäunen) absuchen.
RESTRISIKEN!
Auch wenn Sie dieses Elektrowerkzeug vorschriftsmäßig bedienen, bleiben
immer Restrisiken bestehen. Folgende Gefahren können im Zusammenhang
mit der Bauweise und Ausführung dieses Elektrowerkzeugs auftreten:
a) Schnittverletzungen
b) Gehörschäden, falls kein geeigneter Gehörschutz getragen wird.
c) Gesundheitsschäden, die aus Hand-Arm-Schwingungen resultieren, falls
das Gerät über einen längeren Zeitraum verwendet wird oder nicht
ordnungsgemäß geführt und gewartet wird.
HINWEIS
► Die Heckenschere wird vollständig zusammengebaut geliefert.
► Hinweise und bildliche Darstellungen zur Einstellung, Wartung,
Schmierung durch den Benutzer finden Sie in dieser Anleitung.
► Hinweise zu Austausch und Reparatur (siehe Kapitel Wartung und
Reinigung / Service).
► Erklärung aller an der Heckenschere verwendeten grafischen
Symbole und technische Daten finden Sie in dieser Anleitung.
► Die Merkmale der Heckenschere finden Sie in den technischen Daten.
► Blockiertes Werkzeug: Entfernen Sie das klemmende Material aus dem
Messerbalken .
■ Benutzen Sie nur Zubehör und Zusatzgeräte, die in der
Gebrauchsanweisung angegeben sind. Der Gebrauch anderer als in
der Bedienungsanleitung empfohlener Einsatzwerkzeuge oder anderen
Zubehörs kann eine Verletzungsgefahr für Sie bedeuten.
Gerätespezifische Sicherheitshinweise für
Hochentaster
■ Tragen Sie stets einen Schutzhelm, Gehörschutz und Sicherheitshandschu-
he. Tragen Sie auch Augenschutz, um keine Ölspritzer oder Sägestaub in
die Augen zu bekommen. Tragen Sie eine Staubmaske gegen Staub.
■ Verwenden Sie das Gerät niemals auf einer Leiter stehend.
■ Lehnen Sie sich bei der Verwendung des Gerätes nicht zu weit nach
vorne. Achten Sie immer auf einen sicheren Stand und halten Sie
jederzeit das Gleichgewicht. Verwenden Sie den im Lieferumfang
enthaltenen Tragegurt, um das Gewicht gleichmäßig auf den Körper zu
verteilen.
■ Tragen Sie robuste, rutschfeste Stiefel.
■ Verwenden Sie das Gerät nicht bei Regen oder Feuchtigkeit.
■ Verwenden Sie das Gerät nicht in der Nähe von Stromleitungen. Halten
Sie einen Mindestabstand von 10 m zu oberirdischen Stromleitungen.
■ Stellen Sie sich nicht unter die Äste, die sie abschneiden möchten, um
Verletzungen durch heruntergefallene Äste zu vermeiden. Achten Sie
auch auf zurückspringende Äste, um Verletzungen zu vermeiden. Arbei-
ten Sie unter einem Winkel von 60° ±10°.
■ Achten Sie darauf, dass es zu einem Geräterückschlag kommen kann.
■ Beobachten Sie nicht nur zu bearbeitende Äste, sondern auch herunter-
gefallenes Material, um Stolpern zu vermeiden.
■ Legen Sie nach 30 Arbeitsminuten eine Pause von mindestens einer
Stunde ein.
■ Tragen Sie stets Schutzhandschuhe.
■ Decken Sie die Führungsschiene und die Kette bei Transport und Lage-
rung mit der Abdeckung ab.
■ Benutzen Sie das Gerät nicht in explosionsgefährdeter Umgebung, wie
in der Nähe von entzündlichen Flüssigkeiten, Gasen oder Dämpfen.
Die von der Maschine produzierten Funken können diese Dämpfe oder
Gase entzünden.
■ Die verwendete Steckdose muss für den Stecker geeignet sein. Nehmen
Sie niemals Änderungen am Stecker vor, um einen elektrischen Schlag
zu vermeiden.
■ Netzstecker nicht durch Ziehen an der Leitung aus der Steckdose zie-
hen, sondern am Netzstecker anfassen. Verwenden Sie das Netzkabel
nicht, um das Gerät zu ziehen oder zu transportieren. Halten Sie das
Netzkabel von Hitze, Öl, scharfen Kanten und beweglichen Teilen fern.
■ Entfernen Sie den Netzstecker nach Beendigung der Arbeit oder bei
Reinigungs- und Wartungsarbeiten vom Gerät.
■ Vermeiden Sie unbeabsichtigtes Starten des Gerätes.
■ Geräte mit defektem Schalter müssen unmittelbar repariert werden, um
Schäden und Verletzungen zu vermeiden.
■ Lagern Sie das Gerät außerhalb der Reichweite von Kindern.
■ Nur mit der Bedienungsanleitung und dem Gerät vertraute Personen
dürfen dieses bedienen.
■ Warten Sie Elektrowerkzeuge sorgfältig. Kontrollieren Sie, ob be-
wegliche Teile einwandfrei funktionieren und nicht klemmen, ob Teile
gebrochen oder so beschädigt sind, dass die Funktion des Elektrowerk-
zeuges beeinträchtigt ist. Lassen Sie beschädigte Teile vor dem Einsatz
des Gerätes reparieren. Viele Unfälle haben ihre Ursache in schlecht
gewarteten Elektrowerkzeugen.
■ Halten Sie Schneidwerkzeuge scharf und sauber. Sorgfältig gepflegte
Schneidwerkzeuge mit scharfen Schneidkanten verklemmen sich weni-
ger und sind leichter zu führen.
■ Lassen Sie das Gerät von dafür qualifiziertem Personal warten. Verwen-
den Sie nur vom Hersteller empfohlene Original-Ersatzteile.

PHSHE 900 B2
DE
│
AT
│
CH
│
7 ■
Vorsichtsmaßnahmen gegen Rückschlag
ACHTUNG RÜCKSCHLAG!
► Achten Sie beim Arbeiten auf Rückschlag des Gerätes. Es besteht
Verletzungsgefahr. Sie vermeiden Rückschläge durch Vorsicht und
richtige Sägetechnik.
■ Eine Berührung mit der Schienenspitze kann in manchen Fällen zu einer
unerwarteten nach hinten gerichteten Reaktion führen, bei der die
Führungsschiene nach oben und in Richtung der Bedienperson
geschlagen wird (siehe Abbildung).
■ Rückschlag kann auftreten, wenn die Spitze der Führungsschiene einen
Gegenstand berührt oder wenn das Holz sich biegt und die Sägekette
im Schnitt festklemmt (siehe Abbildung).
■ Das Verklemmen der Sägekette an der Oberkante der Führungsschiene
kann die Schiene heftig in Bedienerrichtung zurückstoßen.
■ Jede dieser Reaktionen kann dazu führen, dass Sie die Kontrolle über
die Säge verlieren und sich möglicherweise schwer verletzen. Verlassen
Sie sich nicht ausschließlich auf die in der Kettensäge eingebauten
Sicherheitseinrichtungen. Ergreifen Sie als Benutzer einer Kettensäge
verschiedene Maßnahmen, um unfall- und verletzungsfrei zu arbeiten. Ein
Rückschlag ist die Folge eines falschen oder fehlerhaften Gebrauchs des
Elektrowerkzeugs. Er kann durch geeignete Vorsichtsmaßnahmen, wie
nachfolgend beschrieben, verhindert werden:
■ Halten Sie die Säge mit beiden Händen fest, wobei Daumen und
Finger die Griffe der Kettensäge umschließen. Bringen Sie Ihren Kör-
per und die Arme in eine Stellung, in der Sie den Rückschlagkräften
standhalten können. Wenn geeignete Maßnahmen getroffen werden,
kann die Bedienperson die Rückschlagkräfte beherrschen. Niemals die
Kettensäge loslassen.
■ Vermeiden Sie eine abnormale Körperhaltung und sägen Sie nicht
über Schulterhöhe. Dadurch wird ein unbeabsichtigtes Berühren mit
der Schienenspitze vermieden und eine bessere Kontrolle der Kettensä-
ge in unerwarteten Situationen ermöglicht.
■ Verwenden Sie stets vom Hersteller vorgeschriebene Ersatzschienen
und Sägeketten. Falsche Ersatzschienen und Sägeketten können zum
Reißen der Sägekette und / oder zu Rückschlag führen.
■ Halten Sie sich an die Anweisungen des Herstellers für das Schärfen
und die Wartung der Sägekette. Zu niedrige Tiefenbegrenzer erhö-
hen die Neigung zu Rückschlag.
■ Sägen Sie nicht mit der Schwertspitze. Es besteht Rückschlagsgefahr.
■ Sorgen Sie dafür, dass keine Gegenstände am Boden liegen, über die
Sie stolpern können.
Weiterführende Sicherheitshinweise
VORSICHT! VERLETZUNGSGEFAHR!
► Fassen Sie niemals das Gerät im laufenden Betrieb oberhalb des
Schutzringes
an, um Verletzungen zu vermeiden!
■ Während des Betriebes dürfen sich im Umkreis von 15 Metern keine
anderen Personen oder Tiere aufhalten. Der Bedienende ist im Arbeits-
bereich gegenüber Dritten verantwortlich.
■ Halten Sie das Gerät, die Schneidgarnitur und die Schwertschutzhülle
in einem guten Gebrauchszustand, um Verletzungen vorzubeugen.
■ Kinder müssen beaufsichtigt werden, um sicherzustellen, dass sie nicht
mit dem Gerät spielen.
■ Benutzen Sie das Gerät erst, wenn Sie sich mit diesem vertraut fühlen.
■ Arbeiten Sie nicht mit einem beschädigten, unvollständigen oder ohne
Zustimmung des Herstellers geänderten Gerät. Benutzen Sie das Gerät
nie mit defekter Schutzausrüstung. Benutzen Sie das Gerät nicht bei de-
fektem Ein-/Ausschalter. Prüfen Sie vor dem Gebrauch den Sicherheits-
zustand des Gerätes, insbesondere das Schwert und die Sägekette.
Prüfen Sie nach Fallenlassen das Gerät auf signifikante Schäden oder
Defekte.
■ Starten Sie das Gerät nie, bevor Schwert, Sägekette und Kettenradab-
deckung korrekt montiert sind.
■ Vergewissern Sie sich, dass das Gerät beim Starten und während der
Arbeit nicht mit dem Erdboden, Steinen, Draht oder anderen Fremd-
körpern in Berührung kommt. Schalten Sie das Gerät aus, bevor Sie es
absetzen.
■ Das Gerät ist für einen zweihändigen Betrieb ausgelegt. Arbeiten Sie
niemals einhändig.
■ Halten Sie das Gerät nur an den isolierten Griffflächen, da die Sä-
gekette in Berührung mit verborgenen Stromleitungen kommen kann.
Der Kontakt der Sägekette mit einer spannungsführenden Leitung kann
metallene Geräteteile unter Spannung setzen und zu einem elektrischen
Schlag führen.
■ Achten Sie beim Standortwechsel darauf, dass das Gerät ausgeschaltet
ist und der Finger nicht den Ein-/Ausschalter berührt. Tragen Sie das
Gerät mit nach hinten gerichteter Sägekette und Schwert. Bringen Sie
für den Transport die Schwertschutzhülle an.
■ Setzen Sie bei jedem Schnitt den Krallenanschlag fest an und beginnen
Sie erst dann mit dem Sägen.
■ Seien Sie beim Sägen kleiner Büsche und Äste äußerst vorsichtig. Das
dünne Astwerk kann sich in der Säge verfangen und in Ihre Richtung
schlagen oder Sie aus dem Gleichgewicht bringen.
■ Schneiden Sie kein am Boden liegendes Holz bzw. versuchen Sie nicht
aus dem Boden ragende Wurzeln zu Sägen. Vermeiden Sie auf jeden
Fall, dass die Sägekette in das Erdreich eintaucht, da die Sägekette
andernfalls sofort abstumpft.
■ Achten Sie beim Sägen eines unter Spannung stehenden Astes auf
einen möglichen Rückschlag, wenn die Spannung des Holzes plötzlich
nachlässt. Es besteht Verletzungsgefahr.
■ Versuchen Sie nicht im Falle eines Verkantens oder Einklemmens der
Schneidgarnitur im Astwerk das Gerät durch Gewaltanwendung zu
befreien. Schalten Sie das Gerät sofort aus und erst nach Entfernen der
Blockade wieder ein. Es besteht Verletzungsgefahr!
Bild 1

PHSHE 900 B2
■ 8
│
DE
│
AT
│
CH
Vor der Inbetriebnahme
VORSICHT! VERLETZUNGSGEFAHR!
► Ziehen Sie vor allen Arbeiten am Gerät den Neztstecker.
Gefahr durch elektrischen Schlag!
Motoreinheit
Rundgriff montieren
♦ Stecken Sie den Rundgriff in der gewünschten Position auf den
Ausleger
.
♦ Ziehen Sie die Schraube
fest.
Schultergurt befestigen / montieren
♦ Haken Sie den Schultergurt in die Trageöse ein.
♦ Passen Sie den Schultergurt
an Ihre Größe an, so dass sich die Trageö-
se
im eingehängten Zustand auf Höhe der Hüfte befindet.
Heckenschere montieren
♦ Schieben Sie den vorderen Ausleger der Heckenschere auf den
Ausleger
der Motoreinheit.
♦ Der Arretierstift
muss einrasten.
♦ Verschrauben Sie die beiden Ausleger
mit der Knebelschraube
,
setzen Sie dazu die Mutter
auf der gegenüberliegenden Seite ein.
Hochentaster montieren
♦ Schieben Sie den vorderen Ausleger
des Hochentasters auf den
Ausleger der Motoreinheit.
♦ Der Arretierstift
muss einrasten.
♦ Verschrauben Sie die beiden Ausleger
mit der Knebelschraube ,
setzen Sie dazu die Mutter
auf der gegenüberliegenden Seite ein.
Schwenken der Heckenschere
♦ Lösen Sie die Ent-/Verriegelung .
♦ Betätigen Sie den Stellhebel
, schwenken Sie die Heckenschere in
die gewünschte Position.
♦ Lassen Sie den Stellhebel
und die Ent-/Verriegelung in die Aus-
sparung in der Grundplatte (Heckenschere)
einrasten.
Schwenken des Hochentasters
♦ Lösen Sie die Ent-/Verriegelung .
♦ Betätigen Sie den Stellhebel
, schwenken Sie den Hochentaster in
eine der beiden Positionen.
♦ Lassen Sie den Stellhebel
und die Ent-/Verriegelung in die Aus-
sparung in der Grundplatte (Hochentaster)
einrasten.
Sägekette und Schwert montieren
WARNUNG!
► Schutzhandschuhe anziehen! Verletzungsgefahr durch die scharfen
Schneidezähne!
HINWEIS
►
Beachten Sie die Laufrichtung der Sägekette
am Schwert und
an der Kettenradabdeckung .
► Im Auslieferungszustand ist das Schwert
und die Sägekette
bereits montiert.
► Je nach Verschleiß, kann das Schwert
gewendet werden.
♦ Lösen Sie die Mutter
mit dem Montagewerkzeug .
♦ Nehmen Sie die Kettenradabdeckung
ab.
♦ Die Sägekette
muss gegebenenfalls vorher entspannt werden, um
das Schwert
und die Sägekette abzunehmen. (siehe Kapitel
Sägekette spannen und prüfen). Folgen Sie diesen Anweisungen in
umgekehrter Reihenfolge.
♦ Nehmen Sie das Schwert
mit der Sägekette von der Grund-
platte
ab.
♦ Setzen Sie die Sägekette
wieder an der Spitze des Schwerts
beginnend auf.
♦ Führungsschiene
über die Schwertführung legen, dabei auch
den Kettenspannstift
in die Schwertbohrung einsetzen. Gleich-
zeitig die Sägekette
über das Kettenrad legen.
♦ Kettenradabdeckung
wieder aufsetzen und Mutter leicht
anziehen.
♦ Spannen Sie jetzt die Sägekette
(siehe Kapitel Sägekette spannen
und prüfen).
Sägekette spannen und prüfen
HINWEIS
► Die Spannung der Sägekette
ist wichtig für Ihre Sicherheit und die
Funktion des Gerätes. Eine richtig gespannte Sägekette
erhöht die
Lebensdauer Ihres Gerätes.
WARNUNG!
► Schutzhandschuhe anziehen! Verletzungsgefahr durch die scharfen
Schneidezähne!
♦ Lösen Sie etwas die Mutter
mit dem Montagewerkzeug .
♦ Drehen Sie die Kettenspannschraube
mit dem Montagewerkzeug
im Uhrzeigersinn um die Spannung zu erhöhen.
♦ Drehen Sie die Kettenspannschraube
mit dem Montagewerkzeug
gegen den Uhrzeigersinn um die Spannung zu verringern.
♦ Die Sägekette
muss an der Schwertunterseite anliegen. Prüfen Sie,
ob sich die Sägekette von Hand über das Schwert ziehen lässt.
♦ Ziehen Sie die Mutter
wieder mit dem Montagewerkzeug fest.
HINWEIS
►
Beim Ziehen an der Sägekette
mit 9 N (ca. 1 kg) Zugkraft sollten
Sägekette
und Schwert nicht mehr als 2 mm Abstand haben.
► Eine neue Sägekette
längt sich und muss öfter nachgespannt
werden.
► Prüfen Sie vor jeder Nutzung des Gerätes die Kettenspannung.

PHSHE 900 B2
DE
│
AT
│
CH
│
9 ■
Kettenschmierung
♦ Entfernen Sie den Öltankdeckel .
♦ Befüllen Sie den Öltank
mit ca. 100ml Bio-Kettenöl .
WARNUNG!
► Niemals ohne Kettenschmierung arbeiten!
Bei trocken laufender Sägekette wird die Schneidgarnitur in kurzer
Zeit irreparabel zerstört. Vor der Arbeit immer Kettenschmierung und
Ölstand im Tank überprüfen.
HINWEIS
►
Verwenden Sie nur Sägekettenöl. Vorzugsweise biologisch abbau-
bar. Verwenden Sie kein Altöl, Motoröl, usw. .
► Kontrollieren Sie während der Arbeit, ob die automatische Ketten-
schmierung funktioniert. Überprüfen Sie vor und während der Arbeit
die Funktion der Kettenschmierung.
Sägekette schärfen
HINWEIS
► Ein Schleifbock kann an der Schleifbockhilfe
für den sicheren Halt
während des Schleifens befestigt werden.
► In einem Schärfset z. B. von Oregon finden sie detaillierte Informatio-
nen zum Schärfvorgang.
► Alternativ benutzen Sie ein elektrisches Kettenschärfgerät und folgen
Sie den Anweisungen des Herstellers.
► Im Zweifel über die Durchführung der Arbeit ist ein Austausch der
Sägekette vorzunehmen.
Inbetriebnahme
HINWEIS
►
Beachten Sie den Lärmschutz und örtliche Vorschriften. Die Benut-
zung des Gerätes kann an bestimmten Tagen (z. B. Sonn- und
Feiertagen), während bestimmter Tageszeiten (Mittagszeiten,
Nachtruhe) oder in besonderen Gebieten (z. B. Kurorten, Kliniken
etc.) eingeschränkt oder verboten sein.
Ein- / ausschalten
Einschalten:
♦ Verbinden Sie das Netzkabel mit dem Verlängerungskabel.
♦ Formen Sie am Ende des Verlängerungskabels eine Schlaufe und
hängen Sie diese in die Zugentlastung
ein.
♦ Drücken Sie die Einschaltsperre , halten sie diese gedrückt und
drücken Sie den Ein-/Ausschalter
.
Ausschalten:
♦ Lassen Sie den Ein-/Ausschalter
los.
♦ Entfernen Sie das Verlängerungskabel aus der Zugentlastung
.
♦ Trennen Sie das Netzkabel
von dem Verlängerungskabel.
Handgriff verstellen
♦ Betätigen Sie die Entriegelungstaste . Verdrehen Sie das Drehele-
ment
in die gewünschte Position. Lassen Sie die Entriegelungstaste
los, diese muss einrasten.
Arbeiten mit der Heckenschere
Gebrauch der Maschine:
HINWEIS
► Bitte beachten Sie, dass die nationalen Vorschriften Ihres Landes den
Gebrauch der Heckenschere beschränken können.
► Die tägliche Inspektion der Heckenschere vor jeder Benutzung ist
unabdingbar. Überprüfen Sie Ihr Gerät auch nach Stößen und
Fallenlassen, um signifikante Schäden oder Defekte festzustellen.
► Tragen Sie bitte festes Schuhwerk und eng anliegende Kleidung um
das Unfallrisiko zu minimieren. Stehen Sie fest auf dem Boden,
achten Sie auf Ihr Gleichgewicht und tragen Sie immer den
mitgelieferten Tragegurt!
► Bitte legen Sie, um Ihrer Gesundheit willen, Ruhepausen während
des Arbeitens ein. Durch körperliche Erschöpfung erhöht sich das
Verletzungsrisiko!
WARNUNG!
► Betätigen Sie das Gerät keinesfalls unter Einfluss von Müdigkeit,
Krankheit, Alkohol oder anderen Drogen.
Schnitttechniken
■ Siehe Ausklappseite (Abbildung A).
HINWEIS
► Entfernen Sie starke Äste mit einer Astschere.
Arbeiten mit dem Hochentaster
Sägetechniken
WARNUNG!
► Achten Sie grundsätzlich auf das herabfallende Schnittgut.
► Beachten Sie grundsätzlich die Gefahr von zurückschlagenden Ästen.
HINWEIS
► Legen Sie den Anschlag
am Ast an. Dadurch arbeiten Sie sicherer
und ruhiger.
► Beginnen Sie erst dann mit dem Sägen.
Absägen eines kleinen Astes
♦ Sägen Sie bei kleinen Ästen (Ø 0-8 cm) von oben nach unten (siehe
Abbildung).

PHSHE 900 B2
■ 10
│
DE
│
AT
│
CH
♦ Absägen größerer Äste
♦ Setzen Sie bei größeren Ästen (Ø 8-25 cm) zuerst einen Entlastungs-
schnitt
A
(siehe Abbildung).
■ Der Entlastungsschnitt verhindert auch ein Abschälen der Rinde am
Hauptstamm.
♦ Sägen Sie nun von oben
B
nach unten
A
durch.
2
1
Absägen in Teilstücken
Lange bzw. dicke Äste sollten Sie kürzen bevor Sie den finalen Trennschnitt
vornehmen (siehe Abbildung).
cb a
Sicheres Arbeiten
■ Halten Sie das Gerät, die Schneidgarnitur und die Schwertschutzhülle
in einem guten Gebrauchszustand, um Verletzungen vorzubeugen.
■ Prüfen Sie nach Fallenlassen das Gerät auf signifikante Schäden oder
Defekte.
■ Beachten Sie den vorgeschriebenen Arbeitswinkel von 60°±10°, um
ein sicheres Arbeiten zu gewährleisten (siehe Abbildung).
■ Benutzen Sie das Gerät nicht auf einer Leiter stehend oder auf einem
unsicheren Standplatz.
■ Lassen Sie sich nicht zu einem unüberlegten Schnitt verleiten. Das könn-
te Sie selbst und andere gefährden.
■ Kinder müssen beaufsichtigt werden, um sicherzustellen, dass sie nicht
mit dem Gerät spielen.
■ Wechseln Sie regelmäßig Ihre Arbeitsposition. Eine längere Benutzung
des Gerätes kann zu vibrationsbedingten Durchblutungsstörungen der
Hände führen. Sie können die Benutzungsdauer jedoch durch geeig-
nete Handschuhe oder regelmäßige Pausen verlängern. Achten Sie
darauf, dass die persönliche Veranlagung zu schlechter Durchblutung,
niedrige Außentemperaturen oder große Greifkräfte beim Arbeiten die
Benutzungsdauer verringern.
■ Vermindern Sie auch die Schwingungsrisiken z. B. das Risiko einer
Weißfingererkrankung durch häufige Arbeitspausen in denen Sie z. B.
ihre Handflächen aneinander reiben.
Transport
■ Benutzen Sie beim Transport die Schutzhüllen
.
■ Achten Sie darauf, das Gerät beim Tragen nicht einzuschalten (siehe
Abbildung).
Wartung und Reinigung
WARNUNG! Wenn ein Ersatz der Anschlussleitung
erforderlich ist, dann ist dies vom Hersteller oder
seinem Vertreter auszuführen, um Sicherheitsgefähr-
dungen zu vermeiden.
■ Die Motoreinheit muss stets sauber, trocken und frei von Öl oder
Schmierfetten sein.
■ Der Hochentaster muss in regelmäßigen Abständen von Sägespänen
gesäubert werden.
♦ Verwenden Sie zum Reinigen des Gehäuses ein trockenes Tuch.
♦ Entfernen Sie die Abdeckung
.
♦ Nehmen Sie die Sägekette
vom Schwert
ab und reinigen Sie die
Führungsschiene .
♦ Halten Sie die Sägekette
scharf und kontrollieren Sie die Span-
nung, achten Sie auf den Ölstand und die Ölzufuhr.
♦ Kontrollieren Sie die Heckenschere auf gelockerte Schrauben am
Messerbalken
und ziehen Sie diese bei Bedarf nach.
♦ Entfernen Sie festsitzenden Grünschnitt.
♦ Pflegen Sie den Messerbalken
mit einem Ölspray oder einem
Ölkännchen.
Lagerung
■ Reinigen Sie das Gerät vor der Aufbewahrung.
■ Bewahren Sie das Gerät in den mitgelieferten Schutzhüllen
an
einem frostfreien, trockenen Ort außerhalb der Reichweite von Kindern
auf.
■ Lagern Sie das Gerät liegend oder gegen Umfallen gesichert.
■ Entleeren Sie den Öltank
. Bio-Kettenöl kann verharzen oder über
die Entlüftungsöffnung im Öltankdeckel
auslaufen.
A
B
C A B
60°±10°

PHSHE 900 B2
DE
│
AT
│
CH
│
11 ■
Fehlersuche Hochentaster
Problem Mögliche Ursache Fehlerbehebung
Motor läuft,
Sägekette
bewegt sich nicht
Heckenscherenvorsatz
bzw. Hochentastervorsatz
an Motoreinheit nicht
richtig angeschlossen
Montage prüfen
Kein Arbeitsfort-
schritt
Sägekette
trocken bzw.
überhitzt oder hängt durch
Öl nachfüllen bzw.
Sägekette
nach-
schleifen, austauschen
oder spannen
Fehlersuche Heckenschere
Problem Mögliche Ursache Fehlerbehebung
Motor läuft,
Messer bleiben
stehen
Heckenscherenvorsatz
bzw. Hochentastervorsatz
an Motoreinheit nicht
richtig angeschlossen
Montage prüfen
Wartungsintervalle Hochentaster
Die hier aufgeführten Angaben beziehen sich auf normale Einsatzbedin-
gungen. Bei erschwerten Bedingungen, wie z. B. starke Staubentwicklung
und längeren täglichen Arbeitszeiten sind die angegebenen Intervalle
entsprechend zu verkürzen.
Geräteteil Aktion Vor Arbeitsbeginn wöchentlich bei Störung bei Beschädigung bei Bedarf
Kettenschmierung prüfen
X
Sägekette
prüfen und auf
Schärfzustand
achten
X
Kettenspannung
kontrollieren
X
schärfen X
Führungsschiene
prüfen (Abnut-
zung, Beschädi-
gung)
X
reinigen und
wenden
XX
entgraten X
ersetzen X X
Kettenrad
prüfen X
ersetzen X
Wartungsintervalle Heckenschere
Die hier aufgeführten Angaben beziehen sich auf normale Einsatzbedin-
gungen. Bei erschwerten Bedingungen, wie z. B. starke Staubentwicklung
und längeren täglichen Arbeitszeiten sind die angegebenen Intervalle
entsprechend zu verkürzen.
Geräteteil Aktion Vor
Arbeits-
beginn
nach
Arbeits-
ende
bei
Bedarf
Schneid-
messer
Sichtprüfung X
reinigen X X

PHSHE 900 B2
■ 12
│
DE
│
AT
│
CH
Garantie der
Kompernaß Handels GmbH
Sehr geehrte Kundin, sehr geehrter Kunde,
Sie erhalten auf dieses Gerät 3 Jahre Garantie ab Kaufdatum. Im Falle von
Mängeln dieses Produkts stehen Ihnen gegen den Verkäufer des Produkts
gesetzliche Rechte zu. Diese gesetzlichen Rechte werden durch unsere im
Folgenden dargestellte Garantie nicht eingeschränkt.
Garantiebedingungen
Die Garantiefrist beginnt mit dem Kaufdatum. Bitte bewahren Sie den
Kassenbon gut auf. Dieser wird als Nachweis für den Kauf benötigt.
Tritt innerhalb von drei Jahren ab dem Kaufdatum dieses Produkts ein Ma-
terial- oder Fabrikationsfehler auf, wird das Produkt von uns – nach unserer
Wahl – für Sie kostenlos repariert, ersetzt oder der Kaufpreis erstattet.
Diese Garantieleistung setzt voraus, dass innerhalb der Dreijahresfrist das
defekte Gerät und der Kaufbeleg (Kassenbon) vorgelegt und schriftlich
kurz beschrieben wird, worin der Mangel besteht und wann er aufgetreten
ist.
Wenn der Defekt von unserer Garantie gedeckt ist, erhalten Sie das repa-
rierte oder ein neues Produkt zurück. Mit Reparatur oder Austausch des
Produkts beginnt kein neuer Garantiezeitraum.
Garantiezeit und gesetzliche Mängelansprüche
Die Garantiezeit wird durch die Gewährleistung nicht verlängert. Dies gilt
auch für ersetzte und reparierte Teile. Eventuell schon beim Kauf vorhan-
dene Schäden und Mängel müssen sofort nach dem Auspacken gemeldet
werden. Nach Ablauf der Garantiezeit anfallende Reparaturen sind
kostenpflichtig.
Garantieumfang
Das Gerät wurde nach strengen Qualitätsrichtlinien sorgfältig produziert
und vor Auslieferung gewissenhaft geprüft.
Die Garantieleistung gilt für Material- oder Fabrikationsfehler. Diese Garan-
tie erstreckt sich nicht auf Produktteile, die normaler Abnutzung ausgesetzt
sind und daher als Verschleißteile angesehen werden können oder für
Beschädigungen an zerbrechlichen Teilen, z. B. Schalter, Akkus oder Teile,
die aus Glas gefertigt sind.
Diese Garantie verfällt, wenn das Produkt beschädigt, nicht sachgemäß
benutzt oder gewartet wurde. Für eine sachgemäße Benutzung des
Produkts sind alle in der Bedienungsanleitung aufgeführten Anweisungen
genau einzuhalten. Verwendungszwecke und Handlungen, von denen in
der Bedienungsanleitung abgeraten oder vor denen gewarnt wird, sind
unbedingt zu vermeiden.
Das Produkt ist nur für den privaten und nicht für den gewerblichen Ge-
brauch bestimmt. Bei missbräuchlicher und unsachgemäßer Behandlung,
Gewaltanwendung und bei Eingriffen, die nicht von unserer autorisierten
Serviceniederlassung vorgenommen wurden, erlischt die Garantie.
Abwicklung im Garantiefall
Um eine schnelle Bearbeitung Ihres Anliegens zu gewährleisten, folgen Sie
bitte den folgenden Hinweisen:
■ Bitte halten Sie für alle Anfragen den Kassenbon und die Artikelnummer
(z.B.IAN123456) als Nachweis für den Kauf bereit.
■ Die Artikelnummer entnehmen Sie bitte dem Typenschild am Produkt,
einer Gravur am Produkt, dem Titelblatt der Bedienungsanleitung (unten
links) oder dem Aufkleber auf der Rück- oder Unterseite des Produktes.
■ Sollten Funktionsfehler oder sonstige Mängel auftreten, kontaktieren
Sie zunächst die nachfolgend benannte Serviceabteilung telefonisch
oder per E-Mail.
■ Ein als defekt erfasstes Produkt können Sie dann unter Beifügung des
Kaufbelegs (Kassenbon) und der Angabe, worin der Mangel besteht
und wann er aufgetreten ist, für Sie portofrei an die Ihnen mitgeteilte
Serviceanschrift übersenden.
Auf www.lidl-service.com können Sie diese und viele weitere
Handbücher, Produktvideos und Installationssoftware
herunterladen.
Mit diesem QR-Code gelangen Sie
direkt auf die Lidl-Service-
Seite (www.lidl-service.com)
und können mittels der Eingabe
der Artikelnummer (IAN) 123456 Ihre Bedienungsanleitung
öffnen.
HINWEIS
► Bei Parkside und Florabest Werkzeugen senden Sie bitte ausschließ-
lich den defekten Artikel ohne Zubehör (z. B. Akku, Aufbewahrungs-
koffer, Montagewerkzeuge, etc.) ein.
Service
WARNUNG!
► Lassen Sie Ihre Geräte von der Servicestelle oder einer Elektro-
fachkraft und nur mit Original-Ersatzteilen reparieren. Damit wird
sichergestellt, dass die Sicherheit des Gerätes erhalten bleibt.
► Lassen Sie den Austausch des Steckers oder der Netzleitung
immer vom Hersteller des Gerätes oder seinem Kundendienst
ausführen. Damit wird sichergestellt, dass die Sicherheit des Gerätes
erhalten bleibt.
Service Deutschland
Tel.: 0800 5435 111 (kostenfrei aus dem dt. Festnetz/
Mobilfunknetz)
E-Mail: [email protected]
Service Österreich
Tel.: 0820 201 222 (0,15 EUR/Min.)
E-Mail: [email protected]
Service Schweiz
Tel.: 0842 665566 (0,08 CHF/Min.,
Mobilfunk max. 0,40 CHF/Min.)
E-Mail: [email protected]
IAN 313266_1904

PHSHE 900 B2
DE
│
AT
│
CH
│
13 ■
Importeur
Bitte beachten Sie, dass die folgende Anschrift keine Serviceanschrift ist.
Kontaktieren Sie zunächst die benannte Servicestelle.
KOMPERNASS HANDELS GMBH
BURGSTRASSE 21
44867 BOCHUM
DEUTSCHLAND
www.kompernass.com
Entsorgung
Die Verpackung besteht aus umweltfreundlichen Materialien, die Sie
über die örtlichen Recyclingstellen entsorgen können. Das Gerät
und dessen Zubehör bestehen aus verschiedenen Materialien,
wie z. B. Metall und Kunststoffe.
Möglichkeiten zur Entsorgung des ausgedienten Gerätes erfahren Sie bei
Ihrer Gemeinde- oder Stadtverwaltung.
Umweltschutz
■ Entleeren Sie den Öltank
sorgfältig und geben Sie ihr Gerät an
einer Verwertungsstelle ab. Die verwendeten Kunststoff- und Metallteile
können sortenrein getrennt werden und so einer Wiederverwendung
zugeführt werden. Fragen Sie hierzu unser Service-Center.
■ Geben Sie Altöl an einer Entsorgungsstelle ab und schütten dieses nicht
in die Kanalisation oder in den Abfluss.
■ Geben Sie verschmutztes Wartungsmaterial und Betriebsstoffe in einer
dafür vorgesehenen Sammelstelle ab.
Werfen Sie Elektrowerkzeuge nicht in den Hausmüll!
Gemäß Europäischer Richtlinie 2012/19/EU müssen verbrauchte Elektro-
werkzeuge getrennt gesammelt und einer umweltgerechten Wiederverwer-
tung zugeführt werden.
Das Produkt ist recycelbar, unterliegt einer erweiterten Hersteller-
verantwortung und wird getrennt gesammelt.
Ersatzteile
Ersatzteile können Sie direkt über das Service-Center bestellen. Geben Sie
bei der Bestellung unbedingt den Maschinentyp und die Teilenummer an.
Original-Konformitätserklärung
Wir, KOMPERNASS HANDELS GMBH, Dokumentenverantwortlicher:
Herr Semi Uguzlu, BURGSTR. 21, 44867 BOCHUM, DEUTSCHLAND,
erklären hiermit, dass dieses Gerät mit den folgenden Normen, normativen
Dokumenten und EG-Richtlinien übereinstimmt:
Maschinenrichtlinie
(2006 / 42 / EG)
Elektromagnetische Verträglichkeit
(2014 / 30 / EU)
Richtlinie für Geräuschemission
2000 / 14 / EC
2005 / 88 / EC
Benannte Stelle: Nr. 0036
TÜV SÜD Industrie Service GmbH, Westendstraße 199,
80686 München, Deutschland
Bewertungsverfahren der Konformität gemäß Anhang V.
Schallleistungspegel LWA:
Gemessen: 102,2 dB (A)
Garantiert: 105 dB (A)
RoHS–Richtlinie
(2011 / 65 / EU)*
*Die alleinige Verantwortung für die Ausstellung dieser Konformitätserklä-
rung trägt der Hersteller. Der oben beschriebene Gegenstand der Erklä-
rung erfüllt die Vorschriften der Richtlinie 2011/65/EU des Europäischen
Parlaments und des Rates vom 8. Juni 2011 zur Beschränkung der Verwen-
dung bestimmter gefährlicher Stoffe in Elektro- und Elektronikgeräten.
Angewandte harmonisierte Normen:
EN 60745-1: 2009/A11: 2010
EN ISO 10517: 2019
EN ISO 11680-1: 2011
EN 55014-1: 2017
EN 55014-2: 2015
EN 61000-3-2: 2014
EN 61000-3-3: 2013
EN 50581:2012
Typ / Gerätebezeichnung:
2-in-1-Langstiel-Heckenschere / Hochentaster PHSHE 900 B2
Herstellungsjahr: 09-2019
Seriennummer: IAN 313266_1904
Bochum, 11.09.2019
Semi Uguzlu
- Qualitätsmanager -
Technische Änderungen im Sinne der Weiterentwicklung sind vorbehalten.

PHSHE 900 B2
■ 14
│
DE
│
AT
│
CH

GB
│
IE
│
15 ■
PHSHE 900 B2
Contents
Introduction ...................................................................................16
Intended use of the long-handled hedge trimmer ......................................................................16
Intended use of the pole pruner ...................................................................................16
Intended use ..................................................................................................16
Features ......................................................................................................16
Package contents...............................................................................................17
Technical data .................................................................................................17
General Power Tool Safety Warnings..............................................................18
1. Work area safety ............................................................................................18
2. Electrical safety ..............................................................................................18
3. Personal safety ..............................................................................................18
4. Power tool use and care . . . . . . . . . . . . . . . . . . . . . . . . . . . . . . . . . . . . . . . . . . . . . . . . . . . . . . . . . . . . . . . . . . . . . . . . . . . . . . . . . . . . . . .18
5. Service ....................................................................................................19
Appliance-specific safety instructions for hedge trimmers ................................................................19
Supplementary safety instructions for hedge trimmers...................................................................19
Additional safety instructions for hedge trimmers ......................................................................20
RESIDUAL RISKS! ..............................................................................................20
Appliance-specific safety instructions for pole pruners ..................................................................20
Precautions against kickback......................................................................................21
Additional safety instructions......................................................................................21
Before use ....................................................................................22
Motor unit ....................................................................................................22
Attaching the round handle.......................................................................................22
Fastening/attaching the shoulder strap ..............................................................................22
Assembling the hedge trimmer ....................................................................................22
Mounting the pole pruner . . . . . . . . . . . . . . . . . . . . . . . . . . . . . . . . . . . . . . . . . . . . . . . . . . . . . . . . . . . . . . . . . . . . . . . . . . . . . . . . . . . . . . . .22
Swivelling of the hedge trimmer ...................................................................................22
Swivelling of the pole pruner......................................................................................22
Mounting the saw chain and blade ................................................................................22
Tightening and checking the saw chain .............................................................................22
Lubricating the chain ............................................................................................23
Sharpening the saw chain........................................................................................23
Operation.....................................................................................23
Switching on and off ............................................................................................23
Adjusting the handle ............................................................................................23
Working with the hedge trimmer ...................................................................................23
Use of the machine:.............................................................................................23
Cutting techniques..............................................................................................23
Working with the pole pruner .....................................................................................23
Sawing techniques .............................................................................................23
Working safely ................................................................................................24
Transport .....................................................................................24
Maintenance and cleaning .......................................................................24
Storage ......................................................................................24
Troubleshooting: pole pruner.....................................................................25
Troubleshooting: hedge trimmer ..................................................................25
Maintenance intervals: pole pruner ...............................................................25
Maintenance intervals: hedge trimmer.............................................................25
Kompernass Handels GmbH warranty.............................................................26
Service .......................................................................................26
Importer......................................................................................26
Disposal ......................................................................................27
Replacement parts .............................................................................27
Translation of the original Conformity Declaration ...................................................27

■ 16
│
GB
│
IE
PHSHE 900 B2
2-IN-1 HEDGE TRIMMER /
POLE PRUNER PHSHE 900 B2
Introduction
Congratulations on the purchase of your new appliance. You have chosen
a high-quality product. The operating instructions are part of this product.
They contain important information about safety, usage and disposal.
Before using the product, please familiarise yourself with all operating and
safety instructions. Use the product only as described and for the range of
applications specified. Please also pass these operating instructions on to
any future owner.
Intended use of the long-handled hedge trimmer
This appliance is intended for the cutting and trimming of hedges, bushes
and flowering shrubs in the home environment. This is a hand-held appliance
with an integrated motor unit with linear reciprocating cutting blades.
WARNING!
► Hedge trimmers are not suitable for use by children.
Intended use of the pole pruner
This appliance is intended for trimming branches in trees.
Intended use
Use this product only as described and for the areas of applications spe-
cified. The appliance is not intended for commercial use. The appliance is
designed for use by adults. This appliance is not intended for use by anyone
(including children) with reduced physical, sensory or mental capabilities or
lack of experience and/or knowledge. The use of the appliance in rain or in
humid environments is prohibited.
Any other usage or modification of the appliance is deemed to be im-
proper and carries a significant risk of accidents. The manufacturer accepts
no responsibility for damage(s) attributable to misuse.
Features
Motor unit
Tommy screw
Nut
Boom
Screw
Round handle
Carrying lug
Turning element
Release button
Safety lock-out
On/Off switch
Power cable
Strain relief
Hedge trimmer attachment
Cutter bar
Gear housing
Lock/release
Base plate (hedge trimmer)
Control lever
Handle
Front boom
Locking pin
Drive shaft
Protective cap
Pole pruner attachment
Bench grinder support
Saw chain
Blade
Stop
Oil tank
Nut
Thread
Sprocket cover
Blade hole
Blade guide
Guide rail
Oil dispenser
Chain adjuster screw
Chain sprocket
Chain roll pin
Front boom
Drive shaft
Protective cap
Locking pin
Safety ring
Control lever
Base plate (pole pruner)
Lock/release
Oil filler cap

GB
│
IE
│
17 ■
PHSHE 900 B2
Package contents
1 motor unit PHSHE 900 B2
1 hedge trimmer attachment PHS 1 (hereinafter hedge trimmer)
1 pole pruner attachment PHE 1 (hereinafter pole pruner)
Accessories
1
shoulder strap
1
chain guard
1
blade guard
1
100 ml organic chain oil
1
assembly tool
1 set of operating instructions
Technical data
Motor unit: PHSHE 900 B2
Rated voltage: 230 V ∼ 50 Hz (AC)
Rated output: 900W
Protection class: II /
(double insulation)
Weight:
(without handle &
carrying strap): approx. 2.7 kg
Pole pruner: PHE 1
Chain speed: max. 6 m/s
Working angle:
0°; 15°; 30°
Weight (ready for use): approx. 1.6 kg
Oil tank, recommended fill level: 100 ml
Cut length: approx. 260 mm
Blade: Oregon type 100SDEA041
Saw chain: Oregon 91P040X
Hedge trimmer: PHS 1
Idle stroke speed: 2000 rpm
Working angle:
-90° to +90°
Cut length: 410 mm
Tooth spacing: 20 mm
Weight
(ready for use): approx. 2.1 kg
Noise and vibration information:
Measured sound value determined according to EN 60745. The A-rated
noise levels of the electrical power tool are tyoically at:
Pole pruner: PHE 1
Sound pressure level: L
PA
= 83 dB (A)
Uncertainty K: 3 dB
Sound power level: L
WA
= 104 dB (A)
Uncertainty K: 3 dB
Hedge trimmer: PHS 1
Sound pressure level: L
PA
= 81 dB (A)
Uncertainty K: 3 dB
Sound power level: L
WA
= 102 dB (A)
Guaranteed sound power level: L
WA
= 105 dB (A)
Uncertainty K: 3 dB
Vibration values (vector total of three directions) determined in accordance
with EN 60745:
Pole pruner:
Vibration on the front handle: Vibration emission value
a
h,D
= 1.0 m/s
2
Uncertainty K = 1.5 m/s
2
Vibration on the rear handle: vibration emission value
a
h,D
= 1.2 m/s
2
Uncertainty K = 1.5 m/s
2
Hedge trimmer:
Vibration on the front handle: Vibration emission value
a
h,D
= 1.6 m/s
2
Uncertainty K = 1.5 m/s
2
Vibration on the rear handle: Vibration emission value
a
h,D
= 1.8 m/s
2
Uncertainty K = 1.5 m/s
2
Wear ear protection!
NOTE
► The vibration level specified in these instructions has been measured
in accordance with the standardised measuring procedure specified
in EN 60745 and can be used to make equipment comparisons. The
specified vibration emission value can also be used to make an initial
exposure estimate.
WARNING!
► The vibration level will vary according to the use of the power tool
and may sometimes be higher than the value specified in these
instructions. Regular use of the power tool in such a way may cause
the user to underestimate the vibration. Try to keep the vibration
exposure as low as possible. Measures to reduce the vibration
exposure are, for example, wearing gloves and limiting the working
time. All states of operation must be considered (e.g. times when the
power tool is switched off and times where the power tool is switched
on but running without load).
Explanation of the symbols on the appliance:
Read the operating instructions and safety
advice before initial operation!
Wear protective gloves!
Wear safety shoes!
Wear ear protection!
Wear a hard hat!
Wear protective goggles!

■ 18
│
GB
│
IE
PHSHE 900 B2
Keep bystanders away from the appliance!
Protect the appliance from rain and moisture!
Risk of fatal electric shock! Keep at least 10m
away from above-ground power lines.
Attention! Falling objects.
Especially when cutting above head height.
Caution! Risk of injury due to running blades!
Unplug the appliance immediately if the cable is
damaged or has been cut.
Sound power level LWA data in dB.
General Power Tool
Safety Warnings
WARNING!
► Read all safety warnings and all instructions. Failure to follow the
warnings and instructions may result in electric shock, fire and/or
serious injury.
Save all warnings and instructions for future reference.
The term "power tool" in the warnings refers to your mains-operated (cor-
ded) power tool or battery-operated (cordless) power tool.
1. Work area safety
a) Keep work area clean and well lit. Cluttered or dark areas invite to
accidents.
b) Do not operate power tools in explosive atmospheres, such as in
the presence of flammable liquids, gases or dust. Power tools create
sparks which may ignite the dust or fumes.
c) Keep children and bystanders away while operating a power tool.
Distractions can cause you to lose control.
2. Electrical safety
a) Power tool plugs must match the outlet. Never modify the plug in
any way. Do not use any adapter plugs with earthed (grounded)
power tools. Unmodified plugs and matching outlets will reduce risk of
electric shock.
b) Avoid body contact with earthed or grounded surfaces, such as
pipes, radiators, ranges and refrigerators. There is an increased risk
of electric shock if your body is earthed or grounded.
c) Do not expose power tools to rain or wet conditions. Water entering
a power tool will increase the risk of electric shock.
d) Do not abuse the cord. Never use the cord for carrying, pulling or
unplugging the power tool. Keep cord away from heat, oil, sharp
edges or moving parts. Damaged or entangled cords increase the
risk of electric shock.
e) When operating a power tool outdoors, use an extension cord suit-
able for outdoor use. Use of a cord suitable for outdoor use reduces
the risk of electric shock.
f) If operating a power tool in a damp location is unavoidable, use
a residual current device (RCD) protected supply. Use of an RCD
reduces the risk of electric shock.
3. Personal safety
a) Stay alert, watch what you are doing and use common sense when
operating a power tool. Do not use a power tool while you are tired
or under the influence of drugs, alcohol or medication. A moment of
inattention while operating power tools may result in serious personal
injury.
b) Use personal protective equipment. Always wear eye protection.
Protective equipment such as dust mask, non-skid safety shoes, hard hat,
or hearing protection used for appropriate conditions will reduce personal
injuries.
c) Prevent unintentional starting. Ensure the switch is in the off position
before connecting to power source and/or battery pack, picking
up or carrying the tool. Carrying power tools with your finger on
the switch or energizing power tools that have the switch on invites
accidents.
d) Remove any adjusting key or wrench before turning the power tool
on. A wrench or a key left attached to a rotating part of the power tool
may result in personal injury.
e) Do not overreach. Keep proper footing and balance at all times.
This enables better control of the power tool in unexpected situations.
f) Dress properly. Do not wear loose clothing or jewellery.
Keep your hair, clothing and gloves away from moving parts.
Loose clothes, jewellery or long hair can be caught in moving parts.
g) If devices are provided for the connection of dust extraction and
collection facilities, ensure these are connected and properly used.
Use of dust collection can reduce dust-related hazards.
4. Power tool use and care
a) Do not force the power tool. Use the correct power tool for your
application. The correct power tool will do the job better and safer
at the rate for which it was designed.
b) Do not use the power tool if the switch does not turn it on and off.
Any power tool that cannot be controlled with the switch is dangerous
and must be repaired.
c) Disconnect the plug from the power source and/or the battery pack
from the power tool before making any adjustments, changing
accessories, or storing power tools.. Such preventive safety measures
reduce the risk of starting the power tool accidentally.
d) Store idle power tools out of the reach of children and do not allow
persons unfamiliar with the power tool or these instructions to
operate the power tool. Power tools are dangerous in the hands of
untrained users.
e) Maintain power tools. Check for misalignment or binding of moving
parts, breakage of parts and any other condition that may affect the
power tool's operation. If damaged, have the power tool repaired
before use. Many accidents are caused by poorly maintained power
tools.
f) Keep cutting tools sharp and clean. Properly maintained cutting tools
with sharp cutting edges are less likely to bind and are easier to control.
g) Use the power tool, accessories and tool bits etc. in accordance
with these instructions, taking into account the working conditions
and the work to be performed. Use of the power tool for operations
different from those intended could result in a hazardous situation.

GB
│
IE
│
19 ■
PHSHE 900 B2
5. Service
a) Have your power tool serviced by a qualified repair person using
only identical replacement parts. This will ensure that the safety of the
power tool is maintained.
Appliance-specific safety instructions for hedge
trimmers
■ Keep your hands away from the cutting blades. Do not attempt to
clear clippings or hold onto the material to be cut while the blades
are still in motion. Remove any jammed clippings only when the
appliance has been switched off. Also remove the plug from the
power socket. A moment of inattention while operating the hedge
trimmer may result in serious personal injury.
■ Carry the hedge trimmer by the front handle when switched off, and
with the cutter bar facing away from your body. When transporting
or storing the trimmer, always put on the protective cover. Careful
handling of the appliance reduces the likelihood of accidental contact
with the moving blades.
■ Hold the power tool only by the insulated grips as the cutting blades
could come into contact with hidden power lines or the appliance’s
own power cable. Contact between the blades and a live wire may
make exposed metal parts of the power tool live and could give the
operator an electric shock.
■ Keep the cable out of the cutting area. While working, the cable can
be hidden in the bushes and be accidentally cut.
■ Inspect the surface to be cut carefully and remove any wires or other
obstructions.
■ It is recommended to use a residual current circuit breaker with a trip-
ping current of 30 mA or less.
NOTE
► The hedge trimmer is supplied completely assembled.
► Graphical representations illustrating the usage of the hedge trimmer
and its operating controls can be found on the fold-out page.
► Notes and diagrams of the settings, maintenance and lubrication by
the user can be found in these instructions.
► Notes on the working position (see fold-out page).
► Notes on the operating controls (see fold-out page).
► Notes on exchange and repair (see section Maintenance and
cleaning/service).
► Explanation of all graphical symbols used on the hedge trimmer and
technical data can be found in these instructions.
► The features of the hedge trimmer can be found in the technical data.
► Blocked tool: Remove any blockages from the cutter bar
.
CAUTION!
► In the event of imminent danger or an emergency switch off the
motor immediately and unplug the appliance.
Supplementary safety instructions for hedge
trimmers
Preparation:
a) THE HEDGE TRIMMER CAN CAUSE SERIOUS INJURIES! Read the
instructions on correct handling, preparation, maintenance, starting and
stopping the hedge trimmer very carefully. Familiarise yourself with all
manual controls and the proper use of the hedge trimmer.
b) Children may never use the hedge trimmer.
c) Beware of above-ground power lines.
d) Do not use the hedge trimmer while anyone, especially children, is in
the vicinity.
e) Wear suitable clothing! Do not wear loose clothing or jewellery which
could get caught in moving parts. We recommend wearing heavy-duty
gloves, non-slip footwear and goggles.
f) If the cutting unit comes in contact with a foreign object or if the oper-
ating noise increases or the hedge trimmer starts to vibrate abnormally,
stop the motor and allow the hedge trimmer to come to a standstill.
Take the following measures:
– check for damage;
– check for loose parts and secure all the loose parts;
– replace damaged parts with equivalent parts or have them re-
paired.
g)
Wear ear protection!
h)
Wear safety goggles!
i) To stop the hedge trimmer in an emergency situation, remove the plug
from the power socket.
Office:
a) Remove the plug from the powert socket:
– cleaning or removal of a blockage;
– inspection, maintenance or work on the hedge trimmer;
– setting the working position of the cutting unit;
– if the hedge trimmer is to be left unattended.
b) Always make sure that the hedge trimmer is in the proper working
position before the motor is started.
c) During operation of the hedge trimmer, always ensure that you have
firm footing, especially when using steps or a ladder.
d) Do not use the hedge trimmer if it has a defective or badly worn cutting
unit.
e) Ensure that all supplied handles and safety guards are mounted when
operating the hedge trimmer. Never attempt to operate an incomplete-
ly assembled hedge trimmer or a hedge trimmer with non-approved
modifications.
f) Hold the hedge trimmer firmly with both hands using the handles pro-
vided.
g) Always familiarise yourself with your environment and be aware of
potential dangers that you may not be able to hear because of the
noise of the hedge trimmer.
Maintenance and storage:
a) If the hedge trimmer is shut down for maintenance, inspection or stor-
age, switch off the motor and ensure that all rotating parts have come
to a standstill. Allow the machine to cool down before carrying out an
inspection, settings, etc.
b) Store the hedge trimmer where benzine fumes can not come into contact
with open fire or sparks. Always allow the hedge trimmer to cool before
storing.
c) When transporting or storing the hedge trimmer, cover the cutting unit
with the protective cover for the cutting unit.

■ 20
│
GB
│
IE
PHSHE 900 B2
Additional safety instructions for hedge trimmers
■ Keep your hands away from the cutting blades. Do not attempt to clear
clippings or hold onto the material to be cut while the blades are still
in motion. Remove any jammed clippings only when the appliance has
been switched off. A moment of inattention while operating the hedge
trimmer may result in serious personal injury.
■ Carry the hedge trimmer by the handle when switched off, and with the
cutter bar facing away from your body. When transporting or storing
the trimmer, always put on the protective cover. Careful handling of the
appliance will reduce the risk of injury from the cutter.
■ Hold the power tool only by the insulated grips as the cutting blades
could come into contact with hidden power lines or the appliance’s
own power cable. Contact between the blades and a live wire may
make exposed metal parts of the power tool live and could give the
operator an electric shock.
♦ Check the hedge for hidden objects (e.g. wire fences).
RESIDUAL RISKS!
Even if you operate this power tool properly, there will still be residual risks.
The following risks can occur in relation to the power tool’s design and
structure:
a) Cuts
b) Hearing damage, if no suitable ear protection is worn.
c) Damage to health caused by hand-arm vibrations if the appliance is
used for extended periods or is not properly used and maintained.
NOTE
► The hedge trimmer is supplied completely assembled.
► Notes and diagrams of the settings, maintenance and lubrication by
the user can be found in these instructions.
► Notes on exchange and repair (see section Maintenance and cleaning/
service).
► Explanation of all graphical symbols used on the hedge trimmer and
technical data can be found in these instructions.
► The features of the hedge trimmer can be found in the technical data.
► Blocked tool: Remove any blockages from the cutter bar.
■ Use only the additional equipment and accessories specified in the
operating instructions. Using attachments or accessory tools other than
those recommended in the operating instructions can lead to injury.
Appliance-specific safety instructions for pole
pruners
■ Always wear a hard hat, ear protection and safety gloves. Also wear
safety goggles to prevent splashes of oil or sawdust from getting into
your eyes. Wear a dust mask to protect yourself from dust.
■ Never use the appliance while standing on a ladder.
■ Do not lean too far forward while using the appliance. Ensure you are
standing firmly and keep your balance at all times. Use the supplied
carrying harness to spread the weight evenly on the body.
■ Wear sturdy, non-slip boots.
■ Do not use the appliance in the rain.
■ Do not use the appliance near power lines. Maintain a minimum
distance of 10 m to above-ground power lines.
■ To avoid injuries due to falling branches, do not stand under the
branches that you want to cut off. Be aware of branches that may
spring back and cause injuries. Work at an angle of approximately
60°.
■ Be aware that an appliance kickback can occur.
■ Keep an eye not only on the branches being cut, but also on falling
material, to avoid tripping.
■ After 30 minutes of work, take a break of at least one hour.
■ Always wear protective gloves.
■ Cover the guide rail and the chain with the cover during transport and
storage.
■ Do not use the appliance in a potentially explosive environment con-
taining flammable liquids, gases or dusts. The sparks generated by the
machine could ignite the vapours or gases.
■ The power outlet used must be suitable for the plug. To avoid electric
shock, never try to modify the plug.
■ Never remove the plug from the power supply by pulling on the power
cable. Always pull the power plug itself. Do not drag or carry the ap-
pliance using the power cable. Keep the power cable away from heat,
oil, sharp edges or moving parts.
■ Remove the pluf from the power supply after completion of work or
during cleaning and maintenance.
■ Avoid unintentional starting of the appliance.
■ Appliances with defective switches must be repaired immediately to
avoid damage or injuries.
■ Store the appliance outside the reach of children. Only those who are
fully acquainted with these operating instructions and the appliance
itself may operate the appliance.
■ Maintain power tools carefully. Check for misalignment or binding of
moving parts, breakage of parts and any other condition that may
affect the power tool's operation. If damaged, have the power tool
repaired before use. Many accidents are caused by poorly maintained
power tools.
■ Keep cutting tools sharp and clean. Properly maintained cutting tools
with sharp cutting edges are less likely to jam and are easier to control.
■ Have the appliance checked by qualified specialists. Use only the
replacement parts recommended by the manufacturer.

GB
│
IE
│
21 ■
PHSHE 900 B2
Precautions against kickback
CAUTION KICKBACK!
► Be aware of the danger of kickback when working with the appli-
ance. There is a risk of personal injury. You can avoid kickbacks by
being careful and using the correct sawing technique.
■ Contact with the tip of the rail may in some cases lead to an unexpected
rearwards reaction resulting in the guide rail flying upwards towards
the operator (see figure).
■ Kickbacks can occur if the tip of the guide rail touches an object or if
the wood bends and the saw chain gets caught in the cut (see figure).
■ If the saw chain jams in the upper edge of the guide rail, the rail can
kick back violently towards the operator.
■ Any such reaction can lead to you losing control over the saw and
possibly injuring yourself. Do not rely solely on the chainsaw's built-in
safety devices. As the user of a chainsaw, you can take a number
of measures to avoid accidents and injury. A kickback is caused by
incorrect use or misuse of the power tool. It can be avoided by taking
proper precautions, as described below:
■ Hold the saw firmly with both hands, with your thumb and fingers
around the handles of the chainsaw. Position your body and arms
so you can withstand kickback forces. If suitable measures are taken,
the operator can control the recoil forces. Never let go of the chainsaw.
■ Avoid any abnormal posture and do not saw over shoulder height.
This will prevent inadvertent contact with the tip of the rail and allows
a better control of the chainsaw in unexpected situations.
■ Always use the replacement rails and saw chains specified by the
manufacturer. Incorrect replacement rails and saw chains can lead to
a tearing of the saw chain and/or kickback.
■ Follow the manufacturer's instructions for sharpening and mainten-
ance of the saw chain. Setting the depth limiter too low can increase
the risk of kickback.
■ Do not saw with the tip of the blade. This can lead to a kickback.
■ Ensure that there aren’t any objects on the ground that you can trip
over.
Additional safety instructions
CAUTION! RISK OF INJURY!
► To prevent injuries, never touch the appliance above the safety ring
while it is running!
■ During operation, no other person or animal may be within a radius
of 15 metres. The operator is responsible for third parties within the
working area.
■ Keep the appliance, the cutting mechanism and the blade guard in
good condition to prevent injury.
■ Children should be supervised to ensure that they do not play with the
appliance.
■ Do not use the appliance until you have familiarised yourself with its
use.
■ Do not work with a damaged or incomplete appliance or an appli-
ance that has been modified without the consent of the manufacturer.
Never use the unit with defective protective equipment. Do not use the
appliance if it has a defective On/Off switch. Before use, check the
appliance's safety condition, especially the blade and the saw chain.
If the appliance has been dropped, check for significant damage or
defects.
■ Never start the appliance before the blade, saw chain and sprocket
covers have been fitted correctly.
■ When starting and operating the appliance, ensure that it does not
come into contact with the ground, stones, wire or other foreign mater-
ial. Switch off the appliance before you put it down.
■ The appliance is designed for two-handed operation. Never work with
one hand.
■ Hold the appliance only by the insulated handles as the saw chain
could come into contact with hidden power lines. Contact between the
saw chain and a live wire may make exposed metal parts of the power
tool live and could give the operator an electric shock.
■ Make sure that the appliance is switched off when relocating the appli-
ance and that you cannot accidentally touch the On/Off switch. Carry
the appliance with the saw chain and blade facing backwards. Attach
the blade guard during transportation.
■ Attach the bumper spike firmly before every cut and do not start until
this has been done.
■ Be extremely careful when sawing small bushes and branches. The thin
branches and twigs can catch in the saw and fly in your direction or
knock you off balance.
■ Do not cut any wood that is lying on the ground and do not attempt to
saw roots that are protruding from the soil. Avoid immersing the saw
chain in the soil at all costs, as this could blunt the saw chain.
When sawing a branch under tension, be aware of the possibility of
the branch flying back once the tension is suddenly removed. There is
a risk of personal injury.
■ Do not use force to free the appliance if the cutting tools get caught
or jammed in branches. Switch the appliance off immediately and do
not switch it on until the blockage has been removed. There is a risk of
injury!
Bild 1

■ 22
│
GB
│
IE
PHSHE 900 B2
Before use
CAUTION! RISK OF INJURY!
► Before any work on the appliance, disconnect the plug.
Risk of electric shock!
Motor unit
Attaching the round handle
♦ Place the round handle in the desired position on the boom .
♦ Tighten the screw
.
Fastening/attaching the shoulder strap
♦ Hook the shoulder strap into the carrying lug .
♦ Adjust the length of the shoulder strap
to your size so that the carrying
lug
is at hip height when the strap is hooked in place.
Assembling the hedge trimmer
♦ Push the front boom of the hedge trimmer onto the boom of the
motor unit.
♦ The locking pin
must engage.
♦ Secure the two booms
with the tommy screw ; to do this, fit
the nut
on the opposite side.
Mounting the pole pruner
♦ Push the front boom of the pole pruner to the boom of the motor
unit.
♦ The locking pin
must click into place.
♦ Secure the two booms
with the tommy screw ; to do this, fit
the nut
on the opposite side.
Swivelling of the hedge trimmer
♦ Trigger the lock/release .
♦ Press the control lever
and swivel the hedge trimmer into the
desired position.
♦ Allow the control lever
and the lock/release to click into the
recess in the base plate (hedge trimmer)
.
Swivelling of the pole pruner
♦ Release the lock/release .
♦ Press the control lever
and swivel the pole pruner into the desired
position.
♦ Allow the control lever
and the lock/release to click into the
recess in the base plate (pole pruner)
.
Mounting the saw chain and blade
WARNING!
► Wear protective gloves! There is a danger of injury from the sharp
cutting teeth!
NOTE
►
Pay close attention to the running direction of the saw chain
on
the blade and at the sprocket cover
.
► The blade
and the saw chain are already assembled upon
delivery.
► Depending on wear, the blade can be turned.
♦ Undo the nut
using the assembly tool .
♦ Remove the sprocket cover
.
♦ You may have to loosen the saw chain
to remove the blade
and the saw chain
(see section "Tightening and checking the saw
chain"). Follow these instructions in reverse order.
♦ Remove the blade
with the saw chain from the base plate
(pole pruner)
.
♦ Reset the saw chain
starting at the top of the blade .
♦ Lay the guide rail
over the blade guide , while inserting the chain
roll pin
in the blade hole . At the same time, lay the saw chain
over the chain sprocket
.
♦ Replace the sprocket cover
and tighten the nut gently.
♦ Now you can tighten the saw chain
(see section “Tightening and
checking the saw chain”).
Tightening and checking the saw chain
NOTE
►
The tension of the saw chain
is important for your safety and the
function of the appliance. A correctly pre-stressed saw chain
increases the service life of your appliance.
WARNING!
► Wear protective gloves! There is a danger of injury from the sharp
cutting teeth!
♦ Loosen the nut
a little using the assembly tool .
♦ Using the assembly tool
, turn the chain adjuster screw in a
clockwise direction to increase the tension.
♦ Using the assembly tool
, turn the chain adjuster screw
in an
anticlockwise direction to decrease the tension.
♦ The saw chain
must lie against the underside of the blade. Check
whether the saw chain
can be drawn over the blade
by hand.
♦ Tighten the nut
using the assembly tool .
NOTE
► When pulling on the saw chain
with a force of 9 N (approx. 1 kg),
the gap between the saw chain
and blade should not be more
than 2 mm.
► A new saw chain stretches and must be tightened more frequently.
► Check the chain tension before each use of the appliance.

GB
│
IE
│
23 ■
PHSHE 900 B2
Lubricating the chain
♦ Remove the oil filler cap .
♦ Fill the oil tank
with approx. 100ml of organic chain oil .
WARNING!
► Never work without lubricating the chain first!
If the saw chain runs dry, the cutting equipment may become irrepar-
ably damaged within a short time. Always check chain lubrication
and oil level in the tank before starting work.
NOTE
►
Use only saw chain oil. Preferably biodegradable. Do not use waste
oil, motor oil, etc.
► Check whether the automatic chain lubrication is working correctly
while working. Check the chain lubrication before and during work.
Sharpening the saw chain
NOTE
►
A bench grinder can be attached to the bench grinder support
for
a secure grip during grinding.
► You will find detailed information on sharpening in a sharpening set,
e.g. from Oregon.
► Alternatively, you can use an electrical saw chain sharpening device
and follow the manufacturer's instructions.
► If you have any doubts about carrying out the work, the saw chain
should be replaced.
Operation
NOTE
► Comply with regulations regarding noise protection and local rules.
Using the appliance on certain days (e.g. on Sundays and public
holidays), during certain times (midday, night time) or in certain
locations (e.g. health resorts, clinics, etc.) may be restricted or
prohibited.
Switching on and off
Switching on:
♦ Connect the power cable to the extension cable.
♦ Form a loop at the end of the extension cable and attach this to the
strain relief
.
♦ Press the safety lock-out and keep it pressed and then press the
On/Off switch
.
Switching off:
♦ Release the On/Off switch .
♦ Remove the extension cable from the strain relief
.
♦ Disconnect the power cable
from the extension cable.
Adjusting the handle
♦ Press the release button . Turn the turning element to the desired
position. Let go of the release button
; this must click into place.
Working with the hedge trimmer
Use of the machine:
NOTE
► Please note that legal restrictions in your country may limit your use
of the hedge trimmer.
► The daily inspection of the hedge trimmer before each use is
indispensable. Also check the appliance after knocks and drops to
rule out any significant damage or defects.
► Wear sturdy shoes and snug-fitting clothing to reduce the risk of
accidents. Stand firmly on the ground, pay attention to your balance
and always wear the supplied carrying strap!
► For the sake of your health, take regular breaks while working.
Physical fatigue increases the risk of injury!
WARNING!
► Never use the appliance when you are tired or ill or under the in-
fluence of alcohol or other drugs or medications.
Cutting techniques
■ See fold-out page (Figure A).
NOTE
► Remove thicker branches with a branch cutter.
Working with the pole pruner
Sawing techniques
WARNING!
► Always pay attention to the falling clippings.
► Be aware of the danger of branches swinging back.
NOTE
► Place the stop
on the branch. This will help you work more safely
and quietly.
► Now you can begin sawing.
Sawing off small branches
♦ Saw small branches (Ø 0–8 cm) from the top down (see figure).

■ 24
│
GB
│
IE
PHSHE 900 B2
♦ Sawing off larger branches
♦ When sawing larger branches (Ø 8–25 cm), first make a relief cut
A
(see figure).
■ A relief cut also prevents peeling of the bark on the main trunk.
♦ Saw from the top
B
to the bottom
A
.
2
1
Saw in sections
Long or thick branches should be shortened before making the final cut
(see figure).
cb a
Working safely
■ Keep the appliance, the cutting mechanism and the blade guard in
good condition to prevent injury.
■ If the appliance has been dropped, check for significant damage or
defects.
■ Maintain the specified angle 60°±10° to ensure safe operation (see
figure).
■ Do not use the appliance while standing on a ladder or with unsteady
footing.
■ Do not be tempted into making a poorly considered cut. You could
endanger yourself and others.
■ Children should be supervised to ensure that they do not play with the
appliance.
■ Change your working position regularly. Using the appliance for a long
time can lead to vibration-related circulation disorders of the hands.
You can extend the usage duration by using appropriate gloves or by
taking regular breaks. Note that any personal predisposition to poor
blood circulation, low external temperatures or large gripping forces
can reduce the usage period.
■ You can reduce the vibration risk, for example, the risk of Raynaud’s
phenomenon, by taking regular breaks during which you rub your
hands together.
Transport
■ Use the protective cases
for transporting the appliance.
■ Ensure that the appliance cannot switch on during transport (see
figure).
Maintenance and cleaning
WARNING! If the mains cable needs to be replaced,
this must be carried out by the manufacturer or an
authorised representative in order to avoid safety
hazards.
■ The motor unit must always be kept clean, dry and free from oil or
grease.
■ The pole pruner must be cleaned of sawdust at regular intervals.
♦ Use a soft, dry cloth to clean the housing.
♦ Remove the sprocket cover
.
♦ Remove the saw chain
from the blade and clean the guide
rail
.
♦ Keep the saw chain
sharp and check the tension; check the oil level
and the oil supply.
♦ Check the hedge trimmer for loose screws on the cutter bar
and
tighten these if necessary.
♦ Remove stuck cuttings.
♦ Maintain the cutter bar
using an oil spray or an oil can.
Storage
■ Always clean the appliance thoroughly before storing.
■ Store the appliance in the supplied protective cases in a dry
place and out of the reach of children.
■ Store the appliance horizontally or secured against falling.
■ Empty the oil tank
. Organic chain oil can resinify or leak through
the vent hole in the oil filler cap .
A
B
C A B
max. 60°±10°

GB
│
IE
│
25 ■
PHSHE 900 B2
Troubleshooting: pole pruner
Problem Possible cause Troubleshooting
Motor is running,
saw chain
does not move
Hedge trimmer attachment
or pole pruner attachment
is not connected properly
to the motor unit
Check assembly
No progress
Saw chain
dry/over-
heating or is hanging
down
Refill oil or grind,
replace or tighten
the saw chain
Troubleshooting: hedge trimmer
Problem Possible cause Troubleshooting
Motor is running,
blades do not
move
Hedge trimmer attachment
or pole pruner attachment
is not connected properly
to the motor unit
Check assembly
Maintenance intervals: pole pruner
The figures given here are based on normal operating conditions. In the
event of more difficult conditions, such as strong dust generation and longer
daily operating hours, the given intervals are to be reduced correspondingly.
Appliance part Action Before starting
work
Weekly In the event of
faults
In the event of
damage
As required
Lubricating
the chain
Check
X
Saw chain
check and pay
attention to the
sharpness
X
check chain
tension
X
sharpen
X
Guide rail
check (wear,
damage)
X
clean and turn
XX
deburr
X
replace
XX
Chain sprocket
check
X
replace
X
Maintenance intervals: hedge trimmer
The figures given here are based on normal operating conditions. In the
event of more difficult conditions, such as strong dust generation and
longer daily operating hours, the given intervals are to be reduced
correspondingly.
Appli-
ance part
Action Before
starting
work
After
com-
pletion
of work
As re-
quired
Cutting
blade
visual inspection
X
cleaning
XX

■ 26
│
GB
│
IE
PHSHE 900 B2
Kompernass Handels GmbH warranty
Dear Customer,
This appliance has a 3-year warranty valid from the date of purchase. If this
product has any faults, you, the buyer, have certain statutory rights. Your
statutory rights are not restricted in any way by the warranty described
below.
Warranty conditions
The warranty period starts on the date of purchase. Please keep your
receipt in a safe place. This will be required as proof of purchase.
If any material or manufacturing fault occurs within three years of the date
of purchase of the product, we will either repair or replace the product
for you or refund the purchase price (at our discretion). This warranty
service requires that you present the defective appliance and the proof of
purchase (receipt) within the three-year warranty period, along with a brief
written description of the fault and of when it occurred.
If the defect is covered by the warranty, your product will either be re-
paired or replaced by us. The repair or replacement of a product does not
signify the beginning of a new warranty period.
Warranty period and statutory claims for defects
The warranty period is not prolonged by repairs effected under the
warranty. This also applies to replaced and repaired components. Any
damage and defects present at the time of purchase must be reported im-
mediately after unpacking. Repairs carried out after expiry of the warranty
period shall be subject to a fee.
Scope of the warranty
This appliance has been manufactured in accordance with strict quality
guidelines and inspected meticulously prior to delivery.
The warranty covers material faults or production faults. The warranty does
not extend to product parts subject to normal wear and tear or to fragile
parts which could be considered as consumable parts such as switches,
batteries or parts made of glass.
The warranty does not apply if the product has been damaged, improperly
used or improperly maintained. The directions in the operating instructions
for the product regarding proper use of the product are to be strictly fol-
lowed. Uses and actions that are discouraged in the operating instructions
or which are warned against must be avoided.
This product is intended solely for private use and not for commercial pur-
poses. The warranty shall be deemed void in cases of misuse or improper
handling, use of force and modifications / repairs which have not been
carried out by one of our authorised Service centres.
Warranty claim procedure
To ensure quick processing of your case, please observe the following
instructions:
■ Please have the till receipt and the item number (e.g.IAN12345) availa-
ble as proof of purchase.
■ You will find the item number on the type plate on the product, an en-
graving on the product, on the front page of the operating instructions
(below left) or on the sticker on the rear or bottom of the product.
■ If functional or other defects occur, please contact the service depart-
ment listed either by telephone or by e-mail.
■ You can return a defective product to us free of charge to the service
address that will be provided to you. Ensure that you enclose the proof
of purchase (till receipt) and information about what the defect is and
when it occurred.
You can download these instructions along with many other
manuals, product videos and installation software at
www.lidl-service.com.
This QR code will take you directly to the Lidl service page
(www.lidl-service.com) where you can open your operating
instructions by entering the item number (IAN) 123456.
NOTE
► For Parkside and Florabest tools, please send us only the defective
item without the accessories (e.g. battery, storage case, assembly
tools, etc.).
Service
WARNING!
► Have the power tool repaired by the service centre or a qualified
electrician and only using genuine replacement parts. This will
ensure that the safety of the appliance is maintained.
► Always ensure that the power plug or the mains cable is replaced
only by the manufacturer of the appliance or by an approved
customer service provider. This will ensure that the safety of the
appliance is maintained.
Service Great Britain
Tel.: 0800 404 7657
E-Mail: [email protected]
Service Ireland
Tel.: 1890 930 034
(0,08 EUR/Min., (peak))
(0,06 EUR/Min., (off peak))
E-Mail: [email protected]
IAN 313266_1904
Importer
Please note that the following address is not the service address. Please
use the service address provided in the operating instructions.
KOMPERNASS HANDELS GMBH
BURGSTRASSE 21
44867 BOCHUM
GERMANY
www.kompernass.com

GB
│
IE
│
27 ■
PHSHE 900 B2
Disposal
The packaging is made from environmentally friendly material
and can be disposed of at your local recycling plant. The
appliance and its accessories are made from various materials,
such as metal and plastic.
Your local community or municipal authorities can provide information on
how to dispose of the appliance.
Environmental protection
■ Carefully empty the oil tank
and dispose of your appliance at a
recycling plant. The plastic and metal parts used can be separated and
recycled. Ask our Service Centre for more information.
■ Dispose of waste oil at a waste collection centre, do not dump it into
the sewerage or drainage system.
■ Dispose of contaminated maintenance material and working materials
at a collection point provided for this purpose.
Do not dispose of power tools in your normal
household waste!
European Directive 2012/19/EU requires that worn-out power tools
be collected separately and recycled in an environmentally compatible
manner.
The product is recyclable, subject to extended producer
responsibility and is collected separately.
Replacement parts
Replacement parts can be ordered directly from the service centre. Please
provide the following details when making an order: appliance type and
part number.
Translation of the original Conformity
Declaration
We, KOMPERNASS HANDELS GMBH, document officer:
Mr. Semi Uguzlu, BURGSTR. 21, 44867 BOCHUM, GERMANY,
hereby declare that this appliance complies with the following standards,
normative documents and EC directives:
Machinery directive
(2006/42/EC)
EMC (Electromagnetic Compatibility)
(2014/30/EU)
Directives on noise emission
2000/14/EC
2005/88/EC
Notified body: No. 0036
TÜV SÜD Industrie Service GmbH, Westendstraße 199, 80686 Munich,
Germany Evaluation procedure for conformity as per appendix V.
Sound power level LWA:
Measured: 102.2dB(A)
Guaranteed: 105dB(A)
RoHS Directive
(2011/65/EU)*
*The manufacturer bears the full responsibility for compliance with this
conformity declaration. The object of the declaration described above
complies with the requirements of the Directive 2011/65/EU of the Euro-
pean Parliament and Council of 8 June 2011 on the limitations of use of
certain dangerous substances in electrical and electronic appliances.
Applied harmonised standards:
EN 60745-1: 2009/A11: 2010
EN ISO 10517: 2019
EN ISO 11680-1: 2011
EN 55014-1: 2017
EN 55014-2: 2015
EN 61000-3-2: 2014
EN 61000-3-3: 2013
EN 50581:2012
Type/appliance designation:
2-in-1 Hedge Trimmer / Pole Pruner PHSHE 900 B2
Year of manufacture: 09-2019
Serial number: IAN 313266_1904
Bochum, 11/09/2019
Semi Uguzlu
- Quality Manager -
We reserve the right to technical changes in the context of further product
development.

■ 28
│
GB
│
IE
PHSHE 900 B2

FR│BE │ 29 ■
PHSHE 900 B2
Table des matières
Introduction ...................................................................................30
Utilisation conforme à l'usage prévu de l'élagueuse sur perche ...........................................................30
Usage conforme de l'élagueuse ...................................................................................30
Utilisation conforme à l'usage prévu . . . . . . . . . . . . . . . . . . . . . . . . . . . . . . . . . . . . . . . . . . . . . . . . . . . . . . . . . . . . . . . . . . . . . . . . . . . . . . . .30
Équipement ...................................................................................................30
Matériel livré ..................................................................................................31
Caractéristiques techniques.......................................................................................31
Avertissements de sécurité généraux pour les outils électriques ........................................32
1. Sécurité de la zone de travail ...................................................................................32
2. Sécurité électrique............................................................................................32
3. Sécurité des personnes ........................................................................................32
4. Utilisation et entretien de l'outil ..................................................................................32
5. Service après-vente...........................................................................................33
Consignes de sécurité spécifiques à l'appareil pour le taille-haies .........................................................33
Consignes de sécurité complémentaires pour les taille-haies .............................................................33
Consignes de sécurité approfondies pour les taille-haies ................................................................34
RISQUES RÉSIDUELS! ..........................................................................................34
Consignes de sécurité spécifiques à l'élagueuse.......................................................................34
Mesures de prudence contre le rebond .............................................................................35
Consignes de sécurité approfondies ................................................................................35
Avant la mise en service .........................................................................36
Unité moteur ..................................................................................................36
Montage de la poignée ronde ....................................................................................36
Fixation/montage de la bandoulière................................................................................36
Montage du taille-haies..........................................................................................36
Montage de l'élagueuse .........................................................................................36
Faire pivoter le taille-haies........................................................................................36
Inclinaison de l'élagueuse ........................................................................................36
Monter la chaîne de scie et la lame ................................................................................36
Tendre et vérifier la chaîne de scie .................................................................................36
Graissage de la chaîne..........................................................................................37
Affûter la chaîne de scie .........................................................................................37
Mise en service ................................................................................37
Mise en marche / mise hors service ................................................................................37
Réglage de la poignée ..........................................................................................37
Travailler avec le taille-haies ......................................................................................37
Utilisation de la machine : ........................................................................................37
Techniques de coupe............................................................................................37
Travailler avec l'élagueuse........................................................................................37
Techniques de scie..............................................................................................37
Travail sûr ....................................................................................................38
Transport .....................................................................................38
Entretien et nettoyage ..........................................................................38
Entreposage...................................................................................38
Résolution de problèmes sur l'élagueuse ...........................................................39
Résolution de problèmes sur le taille-haies..........................................................39
Intervalles de maintenance pour l'élagueuse........................................................39
Intervalles de maintenance pour le taille-haies ......................................................39
Garantie de Kompernass Handels GmbH...........................................................40
Service après-vente.............................................................................40
Importateur...................................................................................40
Mise au rebut..................................................................................41
Pièces de rechange .............................................................................41
Traduction de la déclaration de conformité originale .................................................41

■ 30 │ FR│BE
PHSHE 900 B2
TAILLE-HAIES SUR PERCHE /
PERCHE ÉLAGUEUSE 2 EN 1
PHSHE 900 B2
Introduction
Nous vous félicitons pour l'achat de votre nouvel appareil. Vous venez
ainsi d'opter pour un produit de grande qualité. Le mode d'emploi fait
partie de ce produit. Il contient des remarques importantes concernant la
sécurité, l'usage et la mise au rebut. Avant d'utiliser le produit, veuillez vous
familiariser avec toutes les consignes d'utilisation et de sécurité. N'utilisez
le produit que conformément aux consignes et pour les domaines d'utilisa-
tion prévus. Si vous cédez le produit à un tiers, remettez-lui également tous
les documents.
Utilisation conforme à l'usage prévu de l'éla-
gueuse sur perche
Cet appareil est idéal pour l'élagage et la coupe de haies, buissons et
arbustes d'ornement dans le secteur domestique. Il s'agit ici d'un appareil
manuel à transmission intégrée, dont les lames linéaires se déplacent en
avant et en arrière.
AVERTISSEMENT!
► Les taille-haies ne sont pas faits pour être utilisés par les enfants.
Usage conforme de l'élagueuse
Cet appareil est destiné aux travaux d'élagage d'arbres.
Utilisation conforme à l'usage prévu
N'utilisez l'appareil que conformément aux consignes et pour les domaines
d'utilisation prévus. L'appareil n'est pas conçu pour un usage professionnel.
L'appareil est conçu pour être utilisé par des adultes. Cet appareil n'est pas
destiné à l'usage par des personnes (enfants compris) présentant des apti-
tudes physiques, sensorielles ou intellectuelles restreintes, ou qui manquent
de l'expérience et/ou des connaissances requises. Il est interdit d'utiliser
l'appareil en cas de pluie ou dans un environnement humide.
Toute utilisation autre ou modification de l'appareil est considérée comme
non conforme et s'accompagne de risques d'accident non négligeables.
Le fabricant n'assume aucune responsabilité pour les dommages résultant
d'une utilisation non conforme à l'usage prévu.
Équipement
Unité moteur
Molette de serrage
Écrou
Manche
Vis
Poignée ronde
Anneau de transport
Élément rotatif
Touche de déverrouillage
Verrouillage de sécurité
Bouton marche/arrêt
Cordon d'alimentation
Système anti-traction
Empiècement taille-haies
Barre de coupe
Boîte d'engrenages
Verrouillage/déverrouillage
Plaque (taille-haies)
Levier de réglage
Poignée
Bras avant
Tige d'arrêt
Arbre d'entraînement
Capuchon de protection
Empiècement élagueuse
Touret
Chaîne de scie
Lame
Butée
Réservoir à huile
Écrou
Filetage
Cache de pignon
Alésage de lame
Guide-lame
Rail de guidage
Huileur par gouttes
Vis de tension de chaîne
Pignon
Goupille de tension de chaîne
Bras avant
Arbre d'entraînement
Capuchon de protection
Tige d'arrêt
Bague de protection
Levier de réglage
Plaque (élagueuse)
Verrouillage/déverrouillage
Couvercle du réservoir à huile

FR│BE │ 31 ■
PHSHE 900 B2
Matériel livré
1 Bloc moteur PHSHE 900 B2
1 Empiècement taille-haies PHS 1 (ci-après appelé taille-haies)
1 Empiècement élagueuse PHE 1 (ci-après appelé élagueuse)
Accessoires
1
Bandoulière
1
Housse protectrice pour la chaîne
1
Gaine protectrice pour la lame
1
100 ml d'huile bio pour chaîne
1
Outil de montage
1 Mode d'emploi
Caractéristiques techniques
Unité moteur : PHSHE 900 B2
Tension nominale: 230 V ∼ 50 Hz (courant alternatif)
Puissance nominale: 900 W
Classe de protection: II/
(double isolation)
Poids :
(sans poignée ni sangle): ca. 2,7 kg
Élagueuse: PHE 1
Vitesse de la chaîne : 6 m/s max.
Angle de travail :
0°; 15°; 30°
Poids (opérationnel): env. 1,6 kg
Quantité d'huile recommandée
pour le réservoir à huile: 100 cm
3
Longueur de coupe: env. 260 mm
Lame: Oregon type 100SDEA041
Chaîne de scie: Oregon 91P040X
Taille-haies: PHS 1
Nombre de cycles à vide: 2000 min
-1
Angle de travail :
-90°à +90°
Longueur de coupe : 410 mm
Écart entre les dents: 20 mm
Poids
(opérationnel): env. 2,1 kg
Informations relatives aux bruits et aux vibrations
Valeur de mesure du bruit déterminée conformément à la norme EN60745.
Le niveau de bruit A pondéré typique de l'outil électrique est de:
Élagueuse: PHE 1
Niveau de pression acoustique: L
PA
= 83 dB (A)
Imprécision K: 3 dB
Niveau de puissance acoustique : L
WA
= 104 dB (A)
Imprécision K: 3 dB
Taille-haies: PHS 1
Niveau de pression acoustique: L
PA
= 81 dB (A)
Imprécision K: 3 dB
Niveau de puissance acoustique : L
WA
= 102 dB (A)
Niveau de puissance acoustique garanti : L
WA
= 105 dB (A)
Imprécision K: 3 dB
Valeurs de vibrations (somme vectorielle triaxiale) déterminées conformé-
ment à EN 60745:
Élagueuse:
Vibrations sur la poignée avant: Valeur d'émission des vibrations
a
h,D
= 1,0 m/s
2
Imprécision K = 1,5 m/s
2
Vibrations sur la poignée arrière: Valeur d'émission des vibrations
a
h,D
= 1,2 m/s
2
Imprécision K = 1,5 m/s
2
Taille-haies :
Vibrations sur la poignée avant: Valeur d'émission des vibrations
a
h,D
= 1,6 m/s
2
Imprécision K = 1,5 m/s
2
Vibrations sur la poignée arrière: Valeur d'émission des vibrations
a
h,D
= 1,8 m/s
2
Imprécision K = 1,5 m/s
2
Porter une protection auditive!
REMARQUE
► Le niveau de vibrations indiqué dans ces instructions a été mesuré
conformément aux méthodes de mesure décrites dans la norme EN
60745 et peut être utilisé pour la comparaison d'appareils. La valeur
d'émission des vibrations déclarée peut également être utilisée pour
une évaluation préliminaire de l'exposition.
AVERTISSEMENT!
► Le niveau des vibrations varie en fonction de l'usage de l'outil
électrique et peut, dans certains cas, excéder la valeur indiquée dans
ces instructions. La sollicitation vibratoire pourrait être sous-estimée
si l'outil électrique est utilisé régulièrement de cette manière. Essayez
de garder la sollicitation par vibrations aussi faible que possible. Des
mesures d'exemple de réduction de la sollicitation des vibrations sont
le port de gants lors de l‘utilisation de l'outil et la limitation du temps
de travail. Pour cela, toutes les parts du cycle de travail doivent être
prises en compte (par exemple les durées pendant lesquelles l'outil
est éteint et celles pendant lesquelles il est allumé mais fonctionne
sans charge).
Explication des plaques signalétiques sur l'appareil:
Lisez le mode d'emploi et les instructions avant
la mise en service!
Porter des gants de protection!
Porter des gants de sécurité!
Porter une protection auditive!
Porter un casque de protection!
Porter des lunettes de protection!

■ 32 │ FR│BE
PHSHE 900 B2
Éloignez les personnes qui se trouvent à proxi-
mité de l'appareil!
Protéger l'appareil de la pluie ou de l'humidité!
Danger de mort par électrocution! Tenez-vous
au moins à 10 m de distance de lignes aériennes
à haute tension.
Attention! Chute d'objets.
En particulier lors de la coupe au-dessus de la
tête.
Attention! Risque de blessures du à la lame en
service.
Débranchez la prise de courant immédiatement
si le câble a été endommagé ou sectionné.
Indication du niveau de puissance acoustique
LWA en dB.
Avertissements de sécurité
généraux pour les outils
électriques
AVERTISSEMENT!
► Lire tous les avertissements de sécurité et toutes les instructions. Ne
pas suivre les avertissements et instructions peut donner lieu à un
choc électrique, un incendie et/ou une blessure sérieuse.
Conserver tous les avertissements et toutes les instructions
pour pouvoir s'y reporter ultérieurement.
Le terme "outil" dans les consignes de sécurité fait référence à votre outil
électrique alimenté par le secteur (avec cordon d'alimentation) ou à votre
outil fonctionnant sur batterie (sans cordon d'alimentation).
1. Sécurité de la zone de travail
a) Conserver la zone de travail propre et bien éclairée. Les zones en
désordre ou sombres sont propices aux accidents.
b) Ne pas faire fonctionner les outils électriques en atmosphère explo-
sive, par exemple en présence de liquides inflammables, de gaz
ou de poussières. Les outils électriques produisent des étincelles qui
peuvent enflammer les poussières ou les fumées.
c) Maintenir les enfants et les personnes présentes à l'écart pendant
l'utilisation de l'outil. Les distractions peuvent vous faire perdre le
contrôle de l'outil.
2. Sécurité électrique
a) La fiche de l'outil doit être adaptée à la prise secteur. Ne jamais
modifier la fiche de quelque façon que ce soit.
Ne pas utiliser d'adaptateurs avec des outils à branchement de
terre. Des fiches non modifiées et des socles adaptés réduiront le
risque de choc électrique.
b) Eviter tout contact du corps avec des surfaces reliées à la terre telles
que les tuyaux, les radiateurs, les cuisinières et les réfrigérateurs.
Il existe un risque accru de choc électrique si votre corps est relié à la
terre.
c) Ne pas exposer les outils à la pluie ou à des conditions humides. La
pénétration d'eau à l'intérieur d'un outil augmentera le risque de choc
électrique.
d) Ne pas maltraiter le cordon. Ne jamais utiliser le cordon pour
porter, tirer ou débrancher l'outil. Maintenir le cordon à l'écart de
la chaleur, du lubrifiant, des arêtes ou des parties en mouvement.
Des cordons endommagés ou emmêlés augmentent le risque de choc
électrique.
e) En cas d'utilisation d'un outil électrique à l'extérieur, utiliser une
rallonge adaptée à l'utilisation extérieure. L'utilisation d'un cordon
adapté à l'utilisation extérieure réduit le risque de choc électrique.
f) Si l'usage d'un outil dans un emplacement humide est inévitable,
utiliser une alimentation protégée par un dispositif à courant
différentiel résiduel (RCD). L'usage d'un RCD réduit le risque de choc
électrique.
3. Sécurité des personnes
a) Rester vigilant, regarder ce que vous êtes en train de faire et faire
preuve de bon sens dans votre utilisation de l'outil. Ne pas utiliser
un outil lorsque vous êtes fatigué ou sous l'emprise de drogues,
d'alcool ou de médicaments. Un moment d'inattention en cours d'utili-
sation d'un outil peut entraîner des blessures graves des personnes.
b) Utiliser un équipement de sécurité. Toujours porter une protection
pour les yeux. Les équipements de sécurité tels que les masques contre
les poussières, les chaussures de sécurité antidérapantes, les casques
ou les protections acoustiques utilisés pour les conditions appropriées
réduiront les blessures de personnes.
c) Eviter tout démarrage intempestif. S'assurer que l'interrupteur est en
position arrêt avant de brancher l'outil au secteur et/ou au bloc de
batteries, de le ramasser ou de le porter. Porter les outils en ayant le
doigt sur l'interrupteur ou brancher des outils dont l'interrupteur est en
position marche est source d'accidents.
d) Retirer toute clé de réglage avant de mettre l'outil en marche. Une
clé laissée fixée sur une partie tournante de l'outil peut donner lieu à
des blessures de personnes.
e) Ne pas se précipiter. Garder une position et un équilibre adaptés
à tout moment. Cela permet un meilleur contrôle de l'outil dans des
situations inattendues.
f) S'habiller de manière adaptée. Ne pas porter de vêtements amples
ou de bijoux. Garder les cheveux, les vêtements et les gants à dis-
tance des parties en mouvement. Des vêtements amples, des bijoux
ou les cheveux longs peuvent être pris dans des parties en mouvement.
g) Si des dispositifs sont fournis pour le raccordement d'équipements
pour l'extraction et la récupération des poussières, s'assurer qu'ils
sont connectés et correctement utilisés. Utiliser des collecteurs de
poussière peut réduire les risques dus aux poussières.
4. Utilisation et entretien de l'outil
a) Ne pas forcer l'outil. Utiliser l'outil adapté à votre application. L'outil
adapté réalisera mieux le travail et de manière plus sûre au régime
pour lequel il a été construit.
b) Ne pas utiliser l'outil si l'interrupteur ne permet pas de passer de
l'état de marche à arrêt et vice versa. Tout outil qui ne peut pas être
commandé par l'interrupteur est dangereux et il faut le réparer.
c) Débrancher la fiche de la prise de courant et/ou l'accu amovible
avant de procéder à tout réglage sur l'appareil, changement
d'accessoires ou avant de ranger l'outil. De telles mesures de sécurité
préventives réduisent le risque de démarrage accidentel de l'outil.
d) Conserver les outils à l'arrêt hors de la portée des enfants. Ne pas
permettre à des personnes ne connaissant pas l'outil ou les pré-
sentes instructions de le faire fonctionner. Les outils sont dangereux
entre les mains d'utilisateurs novices.
e) Observer la maintenance de l'outil. Vérifier qu'il n'y a pas de
mauvais alignement ou de blocage des parties mobiles, des pièces
cassées ou toute autre condition pouvant affecter le fonctionnement
de l'outil. En cas de dommages, faire réparer l'outil avant de l'utili-
ser. De nombreux accidents sont dus à des outils mal entretenus.

FR│BE │ 33 ■
PHSHE 900 B2
f) Garder affûtés et propres les outils permettant de couper. Des
outils destinés à couper correctement entretenus avec des pièces
coupantes tranchantes sont moins susceptibles de bloquer et sont
plus faciles à contrôler.
g) Utiliser l'outil, les accessoires et les lames etc., conformément à ces
instructions. en tenant compte des conditions de travail et du travail
à réaliser. L'utilisation de l'outil pour des opérations différentes de
celles prévues pourrait donner lieu à des situations dangereuses.
5. Service après-vente
a) Faire entretenir l'outil par un réparateur qualifié utilisant uniquement
des pièces de rechange identiques. Cela assurera que la sécurité de
l'outil est maintenue.
Consignes de sécurité spécifiques à l'appareil
pour le taille-haies
■ Tenir toutes les parties du corps éloignées de la lame. Ne pas
essayer de retirer les déchets de coupe lorsque la lame tourne ou
de tenir un matériau à couper. Ne retirer les déchets de coupe
que lorsque l'appareil est mis hors tension. De plus, débranchez la
prise. Un moment d'inattention durant l'utilisation du taille-haies peut
provoquer des blessures graves.
■ Porter le taille-haies par la poignée avant en état hors tension, la
barre de coupe éloignée de votre corps. Lors du transport ou du
stockage du taille-haies, toujours le recouvrir de la protection.Une
manipulation prudente de l'appareil réduit l'éventualité d'un contact
involontaire avec les lames tournantes.
■ Ne tenez l'outil que par la poignée isolante, car la lame peut
entrer en contact avec des câbles électriques cachés ou avec le
cordon d'alimentation. Le contact de la lame avec une ligne électrique
conductrice de tension peut mettre les pièces métalliques de l'appareil
sous tension et provoquer une décharge électrique.
■ Maintenez le câble éloigné de la zone de coupe.Pendant les tra-
vaux, le câble peut se dissimuler dans les végétaux et être coupé par
mégarde.
■ Inspectez soigneusement la surface à couper et retirez tous les fils de
fer ou autres corps étrangers.
■ Il est recommandé d'utiliser un RCD avec un courant de mise au repos
de 30 mA ou moins.
REMARQUE
► Le taille-haies est livré entièrement monté.
► Les schémas concernant l'utilisation du taille-haies ou de ses
composants se trouvent sur le volet dépliant.
► Les instructions et les schémas concernant le réglage, la maintenance
et la lubrification par l'utilisateur se trouvent dans ce mode d'emploi.
► Remarques relatives à la position de travail (voir volet dépliant).
► Remarques relatives aux pièces de réglage (voir volet dépliant).
► Consignes sur le remplacement et la réparation (voir chapitre
entretien et nettoyage/service).
► La signification de tous les symboles graphiques utilisés sur le
taille-haies et les données techniques se trouvent dans ce mode
d'emploi.
► Vous trouverez les caractéristiques du taille-haies dans les données
techniques.
► Outil bloqué: Retirez les matières coincées de la barre de coupe
.
ATTENTION!
► En cas de danger ou d'urgence, éteignez immédiatement le moteur
et débranchez la prise de courant.
Consignes de sécurité complémentaires pour les
taille-haies
Préparation :
a) CE TAILLE-HAIES PEUT PROVOQUER DES BLESSURES GRAVES!
Lisez avec soin les instructions relatives à la bonne utilisation, à la
préparation, à la maintenance, pour démarrer et arrêter le taille-haies.
Familiarisez-vous avec toutes les pièces de réglage et avec l'utilisation
conforme du taille-haies.
b) Les enfants ne doivent pas utiliser le taille-haies.
c) Prudence avec les lignes électriques aériennes.
d) L'utilisation du taille-haies doit être évitée lorsque des personnes, surtout
des enfants, se trouvent à proximité.
e) Portez des vêtements adaptés! Ne portez pas de vêtements amples ni
de bijoux qui risqueraient d'être happés par les pièces mobiles. Il est
recommandé de porter des gants de protection rigides, des chaussures
anti-dérapantes et des lunettes de protection.
g) Si le dispositif de coupe touche un corps étranger, ou si les bruits de
fonctionnement venaient à s'amplifier ou le taille-haies à vibrer forte-
ment de manière inhabituelle, couper le moteur et laisser le taille-haies
s'immobiliser.
Retirer la cosse de la bougie d'allumage et prendre les mesures
suivantes:
– vérifier d'éventuels dommages ;
– vérifier d'éventuelles pièces mobiles et fixer toutes les pièces déta-
chées ;
– remplacer les pièces défectueuses contre des pièces semblables ou
les faire réparer.
g)
porter une protection auditive !
h)
porter une protection oculaire !
i) pour immobiliser le taille-haies en cas d'urgence, débrancher la fiche
secteur de la prise secteur.
Fonctionnement :
a) retirer la fiche secteur de la prise avant :
– le nettoyage ou l'élimination d'un blocage ;
– le contrôle, la maintenance ou des travaux sur le taille-haies;
– le réglage de la position de travail du dispositif de coupe ;
– lorsque le taille-haies reste sans surveillance.
b) Toujours s'assurer que le taille-haies se trouve de manière conforme
dans l'une des positions de travail prescrites, avant de démarrer le
moteur.
c) Pendant l'utilisation du taille-haies, il faut toujours s'assurer de pouvoir
occuper une position stable, en particulier en cas d'utilisation d'une
échelle.
d) Ne jamais utiliser le taille-haies avec un dispositif de coupe défectueux
ou fortement usé.
e) Toujours s'assurer que toutes les poignées et les dispositifs de sécurité
sont montés lors de l'utilisation du taille-haies. Ne jamais essayer d'utili-
ser un taille-haies incomplet ou un taille-haies ayant subi une transfor-
mation non autorisée.
f) Tenir le taille-haie fermement à deux mains à l'aide des poignées pré-
vues à cet effet.
g) Toujours vous familiariser avec votre environnement et prêter attention
aux dangers possibles que vous pourriez ne pas entendre à cause du
bruit du taille-haies.

■ 34 │ FR│BE
PHSHE 900 B2
Maintenance et stockage :
a) Une fois le taille-haies immobilisé pour une maintenance, inspection ou
un stockage, couper le moteur pour que toutes les pièces en rotation se
soient immobilisées. Laisser refroidir la machine avant de la contrôler,
de la régler, etc.
b) Stocker le taille-haies là où les vapeurs d'essence ne peuvent pas entrer
en contact avec une flamme nue ou des étincelles. Laisser toujours
refroidir le taille-haies avant de le stocker.
c) Lors du transport ou du stockage du taille-haies, le dispositif de coupe
doit toujours être couvert de la protection adaptée.
Consignes de sécurité approfondies pour les
taille-haies
■ Tenir toutes les parties du corps éloignées de la lame. Ne pas essayer
de retirer les déchets de coupe lorsque la lame tourne ou de tenir un
matériau à couper. Ne retirer les déchets de coupe que lorsque l'appa-
reil est mis hors tension. Un moment d'inattention durant l'utilisation du
taille-haies peut provoquer des blessures graves.
■ Porter le taille-haies par la poignée en état hors tension, la barre de
coupe éloignée de votre corps. Lors du transport ou du stockage du
taille-haies, toujours le recouvrir de la protection. Une manipulation
prudente de l'appareil réduit le risque de blessures dû à la lame.
■ Ne tenez l'outil que par la poignée isolante, car la lame peut entrer en
contact avec des câbles électriques cachés ou avec le cordon d'alimen-
tation. Le contact de la lame avec une ligne électrique conductrice de
tension peut mettre les pièces métalliques de l'appareil sous tension et
provoquer une décharge électrique.
♦ Contrôler la haie en vue de détecter des objets cachés (par ex. clôture
en fer barbelé).
RISQUES RÉSIDUELS!
Des risques résiduels demeurent même si vous utilisez cet outil électrique
conformément à la règlementation. Les risques suivants peuvent survenir en
liaison avec la construction et l'exécution de cet outil électrique:
a) Blessures (entailles)
b) Lésions auditives si vous ne portez pas de protection auditive appro-
priée.
c) Risques sanitaires engendrés par les vibrations au niveau des mains
et des bras si vous utilisez l'appareil pendant une période prolongé, si
vous ne le guidez et ne l'entretenez pas correctement.
REMARQUE
► Le taille-haies est livré entièrement monté.
► Les instructions et les schémas concernant le réglage, la maintenance
et la lubrification par l'utilisateur se trouvent dans ce mode d'emploi.
► Consignes sur le remplacement et la réparation (voir chapitre entre-
tien et nettoyage/service).
► La signification de tous les symboles graphiques utilisés sur le taille-
haies et les données techniques se trouvent dans ce mode d'emploi.
► Vous trouverez les caractéristiques du taille-haies dans les données
techniques.
► Outil bloqué: retirez les matières coincées de la barre de coupe .
■ Utilisez uniquement les accessoires et les équipements supplémentaires
indiqués dans le mode d'emploi. L'utilisation d'outils d'usinage diffé-
rents de ceux recommandés dans ces instructions d'utilisation, ou bien
d'autres accessoires, peut vous faire courir un risque de blessures.
Consignes de sécurité spécifiques à l'élagueuse
■ Toujours porter un casque de protection, une protection auditive et
des gants de sécurité. Porter aussi une protection oculaire pour ne pas
recevoir de projections d'huile ou de poussière de sciure dans les yeux.
Porter un masque anti-poussière.
■ Ne jamais utiliser l'appareil debout sur une échelle.
■ Ne pas trop se pencher en avant lors de l'utilisation de l'appareil. Tou-
jours veiller à une posture stable et toujours garder l'équilibre. Utiliser
la ceinture de port comprise dans le matériel livré pour répartir le poids
de manière uniforme sur le corps.
■ Porter des bottes robustes et anti-dérapantes.
■ Ne pas utiliser l'appareil par pluie ou humidité.
■ Ne pas utiliser l'appareil à proximité de lignes électriques. Respecter
une distance minimum de 10 m avec les lignes électriques aériennes.
■ Ne pas se tenir en-dessous des branches à couper afin d'éviter des
blessures causées par la chute de branches. Veiller au retour de
branches afin d'éviter toute blessure. Travailler en respectant un angle
de 60° ±10°
■ Veiller à éviter tout rebond de l'appareil.
■ Ne pas uniquement surveiller les branches à couper, mais également le
matériel qui tombe pour ne pas trébucher.
■ Faire une pause d'une heure au moins toutes les 30 minutes de travail.
■ Portez toujours des gants de protection.
■ Recouvrir le rail de guidage et la chaîne avec le cache lors du transport
et du stockage.
■ N'utilisez pas l'appareil dans un environnement explosif ni à proximité
de liquides, de gaz ou de vapeurs inflammables. Les étincelles pro-
duites par la machine risquent d'enflammer ces vapeurs ou ces gaz.
■ La prise de courant utilisée doit être compatible avec la fiche secteur.
Ne modifiez jamais la fiche secteur, vous risqueriez de vous électrocu-
ter.
■ Pour débrancher l'appareil, ne tirez pas sur le câble, mais au niveau de
la fiche secteur. N'utilisez pas le câble électrique pour tirer ou transpor-
ter l'appareil. Maintenez le cordon à l'écart de la chaleur, de l'huile,
des arêtes ou des parties en mouvement.
■ Débranchez la fiche secteur avant la fin du travail ou avant de nettoyer
ou entretenir l'appareil.
■ Éviter tout démarrage involontaire de l'appareil.
■ Les appareils dont l'interrupteur est défectueux doivent être immédiate-
ment réparés afin d'éviter tout dommage et blessure.
■ Entreposer l'appareil hors de portée des enfants.
■ Seules des personnes familiarisées avec ce mode d'emploi et avec
l'appareil peuvent l'utiliser.
■ Entretenez soigneusement vos outils électriques. Vérifier qu'il n'y a pas
de mauvais alignement ou de blocage des parties mobiles, des pièces
cassées ou toute autre condition pouvant affecter le fonctionnement de
l'outil. En cas de dommages, faire réparer l'outil avant de l'utiliser. De
nombreux accidents sont dus à des outils mal entretenus.
■ Conserver l'outil de coupe bien affûté et propre. Des outils destinés à
couper correctement entretenus avec des pièces coupantes tranchantes
sont moins susceptibles de bloquer et sont plus faciles à contrôler.
■ Faire entretenir l'appareil par du personnel qualifié. Utiliser uniquement
les pièces détachées d'origine recommandées par le fabricant.

FR│BE │ 35 ■
PHSHE 900 B2
Mesures de prudence contre le rebond
ATTENTION AU REBOND!
► Pendant le travail, l'appareil risque de rebondir. Il y a risque de
blessure. La prudence ainsi que la technique de coupe adaptée
permettent d'éviter les rebonds.
■ Un contact avec la pointe du rail peut dans certains cas entraîner une
réaction inattendue vers l'arrière, durant laquelle le rail de guidage est
renvoyé brutalement vers le haut et en direction de l'utilisateur (voir
illustration).
■ Un rebond peut survenir lorsque la pointe du rail de guidage touche un
objet ou lorsque le bois se plie et que la chaîne de scie se bloque (voir
illustration).
■ Le grippage de la chaîne de scie sur le bord supérieur du rail de
guidage peut entraîner un brusque rebond du rail en direction de
l'utilisateur.
■ Chacune de ces réactions peut entraîner une perte de contrôle de la
scie et d'éventuelles blessures graves. Ne pas se fier uniquement aux
dispositifs de sécurité intégrés dans la scie à chaîne. En tant qu'utilisa-
teur d'une scie à chaîne, prenez différentes mesures afin de travailler
sans accident et sans vous blesser. Un recul résulte d'une utilisation in-
correcte ou inappropriée de l'outil électrique. Des mesures de prudence
adaptées, comme celles décrites ci-dessous, permettent de l'éviter:
■ Bien tenir la scie des deux mains, les pouces et les doigts entourant
les poignées de la scie à chaîne. Placez votre corps et vos bras
dans une position dans laquelle vous pouvez résister aux forces de
rebond.Lorsque des mesures adaptées ont été prises, l'utilisateur peut
alors maîtriser les forces de rebond. Ne jamais lâcher la scie à chaîne.
■ Éviter un maintien corporel anormal et ne pas scier au-dessus de la
hauteur d'épaules.Ceci permet d'éviter un contact involontaire avec la
pointe du rail et de mieux contrôler la scie à chaîne lors de situations
inattendues.
■ Toujours utiliser les rails de remplacement et les chaînes de scie
préconisés par le fabricant.De mauvais rails et chaînes à scie de
rechange peuvent entraîner la déchirure de la chaîne de scie et/ou un
rebond.
■ Respecter les instructions du fabricant concernant l'affûtage et la
maintenance de la chaîne de scie.Des limiteurs de profondeur trop
bas augmentent la tendance au rebond.
■ Ne pas scier avec la pointe de la lame. Il y a risque de rebond.
■ Veiller à ce qu'aucun objet sur lequel vous pourriez trébucher ne se
trouve par terre.
Consignes de sécurité approfondies
ATTENTION! RISQUE DE BLESSURES!
► Ne touchez jamais l'appareil en marche au-delà de la bague de
protection
, vous risqueriez de vous blesser!
■ Durant l'utilisation, aucune autre personne ou aucun animal ne doit se
trouver dans un périmètre de 15 mètres. L'utilisateur est responsable
envers les tierces personnes dans la zone de travail.
■ Maintenez l'appareil, les parties coupantes et la gaine protectrice pour
la lame en bon état afin d'éviter des blessures.
■ Il faut surveiller les enfants pour être sûr qu'ils ne jouent pas avec
l'appareil.
■ Utiliser uniquement l'appareil lorsque vous vous êtes familiarisé avec ce
dernier.
■ Ne pas travailler avec un appareil endommagé, incomplet ou modifié
sans l'autorisation du fabricant. Ne jamais utiliser l'appareil avec un
équipement de protection défectueux. N'utilisez pas l'appareil si l'inter-
rupteur Marche/Arrêt est défectueux. Avant l'utilisation, vérifier l'état de
sûreté de l'appareil, en particulier de la lame et de la chaîne de scie. Si
vous avez laissé tomber l'appareil, vérifier que celui-ci ne présente pas
de dommages ou défauts importants.
■ Ne jamais démarrer l'appareil avant que lame, chaîne de scie et cache
de pignon ne soient correctement montés.
■ S'assurer que l'appareil n'entre pas en contact lors du démarrage et
pendant le travail avec le sol, les pierres, du fil ou d'autres corps étran-
gers. Éteindre l'appareil avant de le reposer.
■ L'appareil n'est conçu que pour être utilisé à deux mains. Ne l'utilisez
jamais d'une main.
■ Ne tenez l'appareil que par ses poignées isolées vu que la chaîne de
scie risque d'entrer en contact avec des lignes électriques cachées. Si la
chaîne de scie entre en contact avec une ligne sous tension, cela peut
mettre des pièces métalliques de l'appareil sous tension et provoquer
une électrocution.
■ Lorsque vous changez de site, vérifiez bien que l'appareil est éteint et
que le doigt ne touche pas l'interrupteur Marche/Arrêt. Portez l'appa-
reil avec la chaîne de scie et la lame regardant en arrière. Avant le
transport, enfilez la gaine protectrice pour la lame.
■ Lors de chaque coupe, appliquez fermement la butée dentée et ne
commencez à scier qu'ensuite.
■ Soyez particulièrement prudent pendant le sciage des petites touffes
et des branches. Les matériaux minces peuvent rester coincés dans la
chaîne de scie et vous percuter ou vous faire perdre l'équilibre.
■ Ne pas couper de bois posé sur le sol et ne pas essayer de scier des
racines dépassant du sol. Éviter dans tous les cas que la chaîne de scie
ne plonge dans la terre, cette dernière s'émoussant sinon immédiate-
ment.
■ Lorsque vous sciez une branche sous tension mécanique, attention à un
mouvement de rappel brusque lorsque le bois se détend. Il y a risque
de blessure.
■ Si les parties coupantes restent bloquées ou coincées dans la ramure,
ne tentez jamais de dégager l'appareil de force. Éteignez immédiate-
ment l'appareil et ne le rallumez qu'après avoir supprimé la cause du
blocage. Il y a risque de blessures!
Bild 1

■ 36 │ FR│BE
PHSHE 900 B2
Avant la mise en service
ATTENTION! RISQUE DE BLESSURES!
► Avant tous travaux sur l'appareil, veuillez débrancher l'appareil de la
prise secteur.
Risque de choc électrique!
Unité moteur
Montage de la poignée ronde
♦ Insérez la poignée ronde dans le bras à l'endroit souhaité.
♦ Serrez bien la vis
.
Fixation/montage de la bandoulière
♦ Accrochez la bandoulière dans l'œillet .
♦ Réglez la sangle
à votre taille afin que l'œillet se trouve à hau-
teur de vos hanches quand vous laissez pendre l'appareil.
Montage du taille-haies
♦ Glissez le manche avant du taille-haies dans le manche de
l'unité moteur.
♦ La tige d'arrêt
doit s'enclencher.
♦ Vissez les deux bras
avec la molette de serrage . Pour cela,
placez l'écrou
sur la face opposée.
Montage de l'élagueuse
♦ Insérez le bras avant de l'élagueuse dans le bras du bloc
moteur.
♦ La tige d'arrêt
doit s'enclencher.
♦ Vissez les deux bras
avec la molette de serrage . Pour cela,
placez l'écrou
sur la face opposée.
Faire pivoter le taille-haies
♦ Utilisez le verrouillage/déverrouillage .
♦ Actionnez le levier de réglage
et inclinez le taille-haies dans la
position souhaitée.
♦ Insérez le levier
et le verrouillage/déverrouillage dans l'orifice
de la plaque (taille-haie)
.
Inclinaison de l'élagueuse
♦ Utilisez le verrouillage/déverrouillage .
♦ Actionnez le levier
et inclinez l'élagueuse dans l'une des deux
positions possibles.
♦ Insérez le levier
et le verrouillage/déverrrouillage dans l'orifice
de la plaque (élagueuse)
.
Monter la chaîne de scie et la lame
AVERTISSEMENT !
► Mettre des gants de protection! Risque de blessure causé par les
dents de coupe tranchantes!
REMARQUE
►
Respectez le sens de rotation de la chaîne de scie
par rapport à
la lame et au cache de pignon
.
► Lors de la livraison, le guide-chaîne
et la chaîne sont déjà
installés.
► Lorsqu'elle est trop usée, la lame peut être retournée.
♦ Dévissez l'écrou
avec l'outil de montage .
♦ Retirez le cache de pignon
.
♦ La chaîne de scie
doit le cas échéant être au préalable détendue,
pour retirer la lame
et la chaîne de scie (cf. le chapitre Tendre et
vérifier la chaîne de scie). Suivez les instructions dans l'ordre inverse.
♦ Retirez le guide-chaîne
et la chaîne de la plaque .
♦ Pour commencer, replacez la chaîne
au bout du guide-chaîne .
♦ Placez le rail de guidage
au-dessus du guide-lame tout en insé-
rant la goupille de tension de chaîne
dans l'alésage de la lame .
En même temps, placez la chaîne de scie
au-dessus du pignon .
♦ Replacez le cache de pignon
et revissez légèrement l’écrou .
♦ Tendez maintenant la chaîne
(voir chapitre Tendre et contrôler la
chaîne).
Tendre et vérifier la chaîne de scie
REMARQUE
► La tension de la chaine de scie
est importante pour votre sécurité
et le fonctionnement de l'appareil. Une chaîne de scie correctement
tendue
augmente la longévité de votre appareil.
AVERTISSEMENT !
► Mettre des gants de protection! Risque de blessure causé par les
dents de coupe tranchantes!
♦ Dévissez légèrement l'écrou
avec l'outil de montage .
♦ Tournez la vis de tension de la chaîne
avec l'outil de montage
dans le sens des aiguilles d'une montre afin d'augmenter la tension.
♦ Tournez la vis de tension de la chaîne
avec l'outil de montage
dans le sens contraire aux aiguilles d'une montre afin de réduire la
tension.
♦ La chaîne de scie
doit reposer sur la partie inférieure de la lame.
Vérifiez si la chaîne de scie
peut être tirée à la main au-dessus de
la lame
.
♦ Vissez à nouveau l'écrou
avec l'outil de montage .
REMARQUE
► Lors du serrage de la chaîne de scie
avec 9 N (env. 1 kg) de
force de traction, la chaîne de scie et la lame ne doivent pas
présenter un écart supérieur à 2 mm.
► Une nouvelle chaîne de scie se détend et doit souvent être
retendue.
► Contrôlez la tension de la chaîne avant chaque utilisation de
l'appareil.

FR│BE │ 37 ■
PHSHE 900 B2
Graissage de la chaîne
♦ Retirez le couvercle du réservoir à huile .
♦ Remplissez le réservoir
avec env. 100ml d'huile bio pour chaîne
.
AVERTISSEMENT !
► Ne jamais travailler sans graissage de chaîne!
Lorsque la chaîne de scie tourne à sec, la garniture de coupe est
rapidement détruite de manière irréparable. Avant le travail, toujours
contrôler le graissage de chaîne et le niveau d'huile dans le réservoir.
REMARQUE
► N'utilisez que de l'huile pour chaîne de scie. De préférence
biodégradable. N'utilisez pas d'huile usagée, d'huile moteur etc.
► Pendant le travail, vérifiez que la lubrification automatique de la
chaîne fonctionne. Avant et pendant le travail, vérifiez que la
lubrification de la chaîne fonctionne.
Affûter la chaîne de scie
REMARQUE
►
Un touret peut être fixé sur l'aide pour touret
pour un maintien sûr
lors de l'affûtage.
► Vous trouverez des informations détaillées concernant l'opération
d'affûtage dans un kit d'affûtage d'Oregon par ex.
► Vous pouvez également utiliser un appareil à affûter les chaînes
électriques et suivre les instructions du fabricant.
► En cas de doute concernant la réalisation du travail, il convient de
procéder au remplacement de la chaîne de scie.
Mise en service
REMARQUE
► Veuillez respecter les directives locales et les règlementations sur le
bruit. L'utilisation de l'appareil peut être limitée ou interdite certains
jours (par exemple dimanche et jours fériés), pendant certaines
plages horaires (repas de midi, nuit)) ou dans des zones spécifiques
(sites de cure, cliniques, etc.).
Mise en marche / mise hors service
Mise en marche:
♦ Branchez le cordon d'alimentation
à la rallonge.
♦
Formez une boucle à l'extrémité de la rallonge et suspendez-la dans le
dispositif de décharge de traction
.
♦ Enfoncez le verrouillage de sécurité
, maintenez-le enfoncé et
appuyez sur l'interrupteur Marche/Arrêt
.
Mise hors service:
♦ Relâchez l'interrupteur Marche/Arrêt .
♦ Retirez la
rallonge du dispositif de décharge de traction
.
♦ Débranchez le cordon d'alimentation
de la rallonge.
Réglage de la poignée
♦ Actionnez la touche de déverrouillage . Tournez l'élément rotatif
dans la position souhaitée. Relâchez la touche de déverrouillage
,
elle doit s'enclencher
Travailler avec le taille-haies
Utilisation de la machine :
REMARQUE
► Veuillez tenir compte du fait que les prescriptions nationales de votre
pays peuvent limiter l'utilisation du taille-haies.
► L'inspection quotidienne du taille-haies avant chaque utilisation est
indispensable. Contrôlez votre appareil également suite à des chocs
et chutes pour constater des détériorations ou défauts importants.
► Veuillez porter des chaussures solides et des vêtements près du corps
pour réduire le risque d'accident. Tenez-vous bien au sol, veillez à
votre équilibre et portez toujours la ceinture de port livrée !
► Veuillez faire des pauses durant le travail pour veiller à votre santé.
L'épuisement corporel décuple le risque de blessure !
AVERTISSEMENT !
► N'utilisez en aucun cas l'appareil sous l'emprise de la fatigue, de la
maladie, de l'alcool ou d'autres droges.
Techniques de coupe
■ Voir le volet dépliant (figure A).
REMARQUE
► Coupez les grosses branches auparavant avec des cisailles à
élaguer.
Travailler avec l'élagueuse
Techniques de scie
AVERTISSEMENT !
► Faites systématiquement attention à la chute des déchets de taille.
► Tenez systématiquement compte du danger de retour brutal de
branches.
REMARQUE
► Posez la butée
sur la branche. Vous travaillez ainsi de manière
plus sûre et plus tranquille.
► Commencez d'abord à scier.
Scier une petite branche
♦ Pour les petites branches (Ø 0-8 cm), sciez de haut en bas (voir la
figure).

■ 38 │ FR│BE
PHSHE 900 B2
♦ Scier de grosses branches
♦ Pour les plus grosses branches (Ø 8-25 cm) , effectuez d'abord une
première coupe sous la branche
A
(voir schéma).
■ La coupe de délestage évite également un épluchage de l'écorce du
tronc principal.
♦ Sciez ensuite du haut
B
vers le bas
A
.
2
1
Scier en morceaux
Avant d'effectuer la coupe définitive d'une branche longue ou épaisse,
vous devez d'abord la raccourcir (voir schéma).
cb a
Travail sûr
■ Maintenez l'appareil, les parties coupantes et la gaine protectrice pour
la lame en bon état afin d'éviter les blessures.
■ Si vous avez laissé tomber l'appareil, vérifier que celui-ci ne présente
pas de dommages ou défauts importants.
■ Respectez l'angle de travail conseillé de 60°±10°afin de travailler en
toute sécurité (voir schéma).
■ N'utilisez pas l'appareil debout sur une échelle ou sur un emplacement
qui n'est pas sûr.
■ Ne vous laissez pas convaincre d'effectuer une coupe irréfléchie. Ceci
pourrait vous mettre en danger ainsi que d'autres personnes.
■ Il faut surveiller les enfants pour être sûr qu'ils ne jouent pas avec
l'appareil.
■ Changez régulièrement de position de travail. Une utilisation prolon-
gée de l'appareil peut entraîner des problèmes de circulation dans les
mains dus aux vibrations. Vous pouvez cependant prolonger la durée
d'utilisation en portant des gants adaptés ou en faisant régulièrement
des pauses. Tenez compte du fait que la disposition personnelle à une
mauvaise circulation, des températures extérieures basses ou des forces
de préhension importantes lors du travail diminuent la durée d'utilisa-
tion.
■ Réduisez également les risques de vibrations tels que le risque d'une
maladie des doigts morts grâce à des pauses de travail fréquentes
dans lesquelles vous frottez par ex. les paumes des mains l'une contre
l'autre!
Transport
■ Pour le transport, utilisez les housses de protection
.
■ Veillez à ne pas mettre l'appareil en marche lorsque vous le portez
(voir figure).
Entretien et nettoyage
AVERTISSEMENT! Lorsqu'un remplacement du
cordon d'alimentation est nécessaire, il doit être
réalisé par le fabricant ou par son représentant pour
éviter toute situation dangereuse.
■ Le bloc moteur doit toujours être propre, sec et exempt d'huile ou de
graisse.
■ L'élagueuse doit être nettoyée des copeaux de sciure à intervalles
réguliers.
♦ Pour le nettoyage du boîtier, utilisez un chiffon sec.Retirez le capot
.
♦ Retirez la chaîne de scie
de la lame et nettoyez le rail de
guidage
.
♦ Gardez la chaîne de scie
affûtée et contrôlez sa tension. Surveillez
le niveau et l'arrivée d'huile.
♦ Vérifiez que toutes les vis de la barre de coupe
du taille-haies sont
bien serrées, et si nécessaire, resserrez-les.
♦ Retirez les débris verts collés.
♦ Entretenez la barre de coupe
avec de l'huile en spray ou une
burette d'huile.
Entreposage
■ Nettoyez l'appareil avant de le ranger.
■ Rangez l'appareil dans les housses de protection fournies dans
un endroit sec et à l'abri du gel hors de portée des enfants.
■ Rangez l'appareil en position couchée ou sécurisée contre les acci-
dents.
■ Videz le réservoir d'huile
. L'huile bio pour chaîne peut durcir ou
fuir dans le couvercle du réservoir
via l'orifice d'aération.
A
B
C A B
60°±10°

FR│BE │ 39 ■
PHSHE 900 B2
Résolution de problèmes sur
l'élagueuse
Problème Cause possible Dépannage
Le moteur tourne,
mais la chaîne
de scie
ne
bouge pas
L'empiècement taille-haie
ou élagueuse n'est pas
correctement fixé à l'unité
moteur
Vérifier le montage
Le travail
n'avance pas
La chaîne de scie
est
sèche, surchauffée ou
détendue
Remettre de l'huile ou
affûter la chaîne de
scie
, la remplacer
ou la retendre
Résolution de problèmes sur le
taille-haies
Problème Cause possible Dépannage
Le moteur
tourne, mais
les lames ne
bougent pas
L'empiècement taille-haie
ou élagueuse n'est pas
correctement fixé à l'unité
moteur
Vérifier le montage
Intervalles de maintenance pour
l'élagueuse
Les indications listées ici réfèrent à des conditions d'utilisation normales. En
cas de conditions difficiles, comme par ex. une forte formation de pous-
sière et des temps de travail quotidiens plus longs, les intervalles indiqués
doivent être raccourcis en conséquence.
Partie de l'appareil Action Avant le début du
travail
hebdomadaire en cas de panne en cas de détério-
ration
en cas de besoin
Graissage de la chaîne vérifier
X
Chaîne de scie
vérifier et veiller à
un état affûté
X
Contrôler la ten-
sion de chaîne
X
affûter
X
Rail de guidage
vérifier (usure,
détérioration)
X
nettoyer et retour-
ner
XX
ébavurer
X
remplacer
XX
Pignon
vérifier
X
remplacer
X
Intervalles de maintenance pour le
taille-haies
Les indications listées ici réfèrent à des conditions d'utilisation normales. En
cas de conditions difficiles, comme par ex. une forte formation de pous-
sière et des temps de travail quotidiens plus longs, les intervalles indiqués
doivent être raccourcis en conséquence.
Partie de
l'appareil
Action Avant
le
début
du
travail
Suite
à la
fin du
travail
en cas
de
besoin
Lame Contrôle visuel
X
nettoyer
XX

■ 40 │ FR│BE
PHSHE 900 B2
Garantie de
Kompernass Handels GmbH
Chère cliente, cher client,
Cet appareil est garanti 3 ans à partir de la date d’achat. Si ce produit
venait à présenter des vices, vous disposez de droits légaux face au
vendeur de ce produit. Vos droits légaux ne sont pas restreints par notre
garantie présentée ci-dessous.
Conditions de garantie
La période de garantie débute à la date d’achat. Veuillez bien conserver
le ticket de caisse. Celui-ci servira de preuve d’achat.
Si dans un délai de trois ans suivant la date d’achat de ce produit, un vice
de matériel ou de fabrication venait à apparaître, le produit sera réparé,
remplacé gratuitement par nos soins ou le prix d’achat remboursé, selon
notre choix. Cette prestation sous garantie nécessite, dans le délai de trois
ans, la présentation de l’appareil défectueux et du justificatif d’achat (ticket
de caisse) ainsi que la description brève du vice et du moment de son
apparition.
Si le vice est couvert par notre garantie, vous recevrez le produit réparé
ou un nouveau produit en retour. Aucune nouvelle période de garantie ne
débute avec la réparation ou l’échange du produit.
Période de garantie et réclamation légale pour vices cachés
L’exercice de la garantie ne prolonge pas la période de garantie. Cette
disposition s’applique également aux pièces remplacées ou réparées. Les
dommages et vices éventuellement déjà présents à l’achat doivent être
signalés immédiatement après le déballage. Toute réparation survenant
après la période sous garantie fera l’objet d’une facturation.
Étendue de la garantie
L’appareil a été fabriqué avec soin conformément à des directives de
qualité strictes et consciencieusement contrôlé avant sa livraison.
La prestation de la garantie s’applique aux vices de matériel et de
fabrication. Cette garantie ne s’étend pas aux pièces du produit qui sont
exposées à une usure normale et peuvent de ce fait être considérées
comme pièces d’usure, ni aux détériorations de pièces fragiles, par ex.
interrupteurs, batteries ou pièces en verre.
Cette garantie devient caduque si le produit est détérioré, utilisé ou
entretenu de manière non conforme. Toutes les instructions listées dans le
manuel d’utilisation doivent être exactement respectées pour une utilisation
conforme du produit. Des buts d’utilisation et actions qui sont déconseillés
dans le manuel d’utilisation, ou dont vous êtes avertis doivent également
être évités.
Le produit est uniquement destiné à un usage privé et ne convient pas à un
usage professionnel. La garantie est annulée en cas d’entretien incorrect et
inapproprié, d’usage de la force et en cas d’intervention non réalisée par
notre centre de service après-vente agréé.
Procédure en cas de garantie
Afin de garantir un traitement rapide de votre demande, veuillez suivre les
indications suivantes :
■ Veuillez avoir à portée de main pour toutes questions le ticket de caisse
et la référence article (par ex.IAN12345) en tant que justificatif de
votre achat.
■ Vous trouverez la référence sur la plaque signalétique sur le produit,
une gravure sur le produit, sur la page de garde du mode d’emploi (en
bas à gauche) ou sur l’autocollant au dos ou sur le dessous du produit.
■ Si des erreurs de fonctionnement ou d’autres vices venaient à appa-
raître, veuillez d’abord contacter le département service clientèle cité
ci-dessous par téléphone ou par e-mail.
■ Vous pouvez ensuite retourner un produit enregistré comme étant défec-
tueux en joignant le ticket de caisse et en indiquant en quoi consiste
le vice et quand il est survenu, sans devoir l’affranchir à l’adresse de
service après-vente communiquée.
Sur www.lidl-service.com, vous pourrez télécharger ce mode
d’emploi et de nombreux autres manuels, vidéos produit et
logiciels d’installation.
Grâce à ce code QR, vous arriverez directement sur le
site Lidl service après-vente (www.lidl-service.com) et
vous pourrez ouvrir votre mode d’emploi en saisissant votre référence
(IAN)123456.
REMARQUE
► Pour les outils Parkside et Florabest, veuillez ne renvoyer que l’article
défectueux, sans accessoire (par ex. sans batterie, mallette de range-
ment, outil de montage, etc.).
Service après-vente
AVERTISSEMENT!
► Faites réparer vos appareils par le service après-vente ou un
électricien et uniquement avec des pièces de rechange d'origine.
Cela assure le maintien de la sécurité de l'appareil.
► Confiez toujours le remplacement de la fiche ou du cordon d'ali-
mentation au fabricant de l'appareil ou à son service après-vente.
Cela assure le maintien de la sécurité de l'appareil.
Service France
Tel.: 0800 919270
E-Mail: [email protected]
Service Belgique
Tel.: 070 270 171 (0,15 EUR/Min.)
E-Mail: [email protected]
IAN 313266_1904
Importateur
Veuillez tenir compte du fait que l’adresse suivante n’est pas une adresse
de service après-vente. Veuillez d’abord contacter le service mentionné.
KOMPERNASS HANDELS GMBH
BURGSTRASSE 21
44867 BOCHUM
ALLEMAGNE
www.kompernass.com

FR│BE │ 41 ■
PHSHE 900 B2
Mise au rebut
L'emballage est constitué de matériaux écologiques que vous
pouvez recycler par le biais des postes de recyclage locaux.
L'appareil et ses accessoires sont composés de différents
matériaux, comme par ex. le métal et le plastique.
Renseignez-vous auprès de votre mairie ou des services de votre commune
pour connaître les possibilités de mise au rebut de votre appareil usagé.
Protection de l'environnement
■ Videz le réservoir d'huile
avec soin et déposez votre appareil à un
point d'élimination. Les pièces en plastique et en métal utilisées peuvent
être triées et être ainsi réutilisées. Pour cela, adressez-vous à notre
service après-vente.
■ Déposez les huiles usagées à un site de stockage et ne les déversez
pas dans les canalisations ou dans les égouts.
■ Déposez le matériel d'entretien pollué et les carburants dans un point
de collecte agréé.
Ne jetez pas les outils électriques dans les ordures
ménagères!
Conformément à la directive européenne 2012/19/EU, les outils élec-
triques usagés doivent faire l'objet d'un tri et d'un recyclage respectueux
de l'environnement.
Le produit récyclable doit être trié ou rapporté dans un point
de collecte pour être recycle.
Pièces de rechange
Les pièces de rechange peuvent être commandées directement en passant
par le service après-vente. Lors de la commande, indiquez impérativement
le type de machine et le numéro de la pièce.
Traduction de la déclaration de
conformité originale
Nous soussignés, KOMPERNASS HANDELS GMBH, responsable
du document: M. Semi Uguzlu, BURGSTR. 21, 44867 BOCHUM,
ALLEMAGNE, déclarons par la présente que cet appareil est en confor-
mité avec les normes, documents normatifs et directives CE suivants:
Directive relative aux machines
(2006 / 42 / CE)
Compatibilité électromagnétique
(2014 / 30 / EU)
Directive relative aux émissions sonores
2000 / 14 / EC
2005 / 88 / EC
Organisme cité : Nr. 0036
TÜV SÜD Industrie Service GmbH, Westendstraße 199, 80686 Munich,
Allemagne Procédure d'évaluation de la conformité conformément à
l'annexe V.
Niveau de puissance acoustique LWA :
Mesuré : 102,2dB (A)
Garanti : 105 dB (A)
Directive –RoHS
(2011 / 65 / EU)*
* La seule responsabilité pour l'établissement de cette déclaration de
conformité incombe au fabricant. L'objet de la déclaration décrit ci-dessus
répond aux prescriptions de la directive 2011/65/EU du Parlement
européen et du Conseil en date du 8juin 2011 visant la restriction de
l'utilisation de certaines substances dangereuses dans les appareils
électriques et électroniques.
Normes harmonisées appliquées:
EN 60745-1: 2009/A11: 2010
EN ISO 10517: 2019
EN ISO 11680-1: 2011
EN 55014-1: 2017
EN 55014-2: 2015
EN 61000-3-2: 2014
EN 61000-3-3: 2013
EN 50581:2012
Type / désignation de l'appareil: Taille-haies sur perche /
perche élagueuse 2 en 1 PHSHE 900 B2
Année de fabrication: 09-2019
Numéro de série: IAN 313266_1904
Bochum, le 11.09.2019
Semi Uguzlu
-Responsable qualité-
Sous réserve de modifications techniques à des fins de perfectionnement.

■ 42 │ FR│BE
PHSHE 900 B2

NL│BE │ 43 ■
PHSHE 900 B2
Inhoud
Inleiding ......................................................................................44
Gebruik van de heggenschaar met lange steel in overeenstemming met de bestemming .......................................44
Gebruik van de hoogsnoeier in overeenstemming met de bestemming .....................................................44
Gebruik in overeenstemming met bestemming ........................................................................44
Uitrusting .....................................................................................................44
Inhoud van het pakket ...........................................................................................45
Technische gegevens............................................................................................45
Algemene veiligheidsvoorschriften voor elektrische gereedschappen ...................................46
1. Veiligheid op de werkplek......................................................................................46
2. Elektrische veiligheid ..........................................................................................46
3. Veiligheid van personen .......................................................................................46
4. Gebruik en behandeling van het elektrische gereedschap.............................................................46
5. Service ....................................................................................................47
Apparaatspecifieke veiligheidsvoorschriften voor heggenscharen .........................................................47
Aanvullende veiligheidsvoorschriften voor heggenscharen...............................................................47
Gedetailleerdere veiligheidsvoorschriften voor heggenscharen ...........................................................48
OVERIGE RISICO'S! ............................................................................................48
Apparaatspecifieke veiligheidsvoorschriften voor hoogsnoeiers...........................................................48
Voorzorgsmaatregelen tegen terugslag .............................................................................49
Aanvullende veiligheidsvoorschriften................................................................................49
Vóór de ingebruikname .........................................................................50
Motorunit.....................................................................................................50
Ronde handgreep monteren ......................................................................................50
Schouderriem bevestigen/monteren . . . . . . . . . . . . . . . . . . . . . . . . . . . . . . . . . . . . . . . . . . . . . . . . . . . . . . . . . . . . . . . . . . . . . . . . . . . . . . . .50
Heggenschaar monteren.........................................................................................50
Hoogsnoeier monteren ..........................................................................................50
De heggenschaar kantelen .......................................................................................50
De hoogsnoeier kantelen.........................................................................................50
Zaagketting en zwaard monteren ..................................................................................50
Zaagketting spannen en controleren................................................................................50
Ketting smeren.................................................................................................51
Zaagketting slijpen .............................................................................................51
Ingebruikname ................................................................................51
In-/uitschakelen ................................................................................................51
Handgreep verstellen ...........................................................................................51
Werken met de heggenschaar ....................................................................................51
Gebruik van het apparaat: .......................................................................................51
Snoeitechnieken................................................................................................51
Werken met de hoogsnoeier......................................................................................51
Zaagtechnieken................................................................................................51
Veilig werken ..................................................................................................52
Transport .....................................................................................52
Onderhoud en reiniging .........................................................................52
Opbergen.....................................................................................52
Problemen met de hoogsnoeier oplossen...........................................................53
Problemen met de heggenschaar oplossen .........................................................53
Onderhoudsintervallen hoogsnoeier ..............................................................53
Onderhoudsintervallen heggenschaar .............................................................53
Garantie van Kompernaß Handels GmbH ..........................................................54
Service .......................................................................................54
Importeur.....................................................................................54
Afvoeren .....................................................................................55
Vervangende onderdelen .......................................................................55
Vertaling van de oorspronkelijke conformiteitsverklaring.............................................55

■ 44 │ NL│BE
PHSHE 900 B2
2-IN-1-TELESCOPISCHE
HEGGENSCHAAR/TELESCOPISCHE
TAKKENSCHAAR PHSHE 900 B2
Inleiding
Hartelijk gefeliciteerd met de aankoop van uw nieuwe apparaat. U hebt
hiermee gekozen voor een hoogwaardig product. De gebruiksaanwijzing
maakt deel uit van dit product. Deze bevat belangrijke aanwijzingen voor
veiligheid, gebruik en afvoer. Lees alle bedienings- en veiligheidsvoorschrif-
ten voordat u het product in gebruik neemt. Gebruik het product uitsluitend
op de voorgeschreven wijze en voor de aangegeven doeleinden. Geef
alle documenten mee als u het product overdraagt aan een derde.
Gebruik van de heggenschaar met lange steel
in overeenstemming met de bestemming
Dit apparaat is bestemd voor het snoeien en trimmen van heggen, heesters
en sierstruiken in het privéhuishouden. Het gaat daarbij om een met de
hand bediend apparaat met een geïntegreerde aandrijving waarbij de
lineair gemonteerde messen heen en weer bewegen.
WAARSCHUWING!
► Heggenscharen zijn niet geschikt voor gebruik door kinderen.
Gebruik van de hoogsnoeier in overeenstemming
met de bestemming
Dit apparaat is bestemd voor snoeiwerkzaamheden aan bomen.
Gebruik in overeenstemming met bestemming
Gebruik het apparaat uitsluitend op de voorgeschreven wijze en voor de
aangegeven doeleinden. Het apparaat is niet bestemd voor bedrijfsmatig
of commercieel gebruik. Het apparaat is alleen bestemd voor gebruik door
volwassenen. Dit apparaat is niet bedoeld voor gebruik door personen
(met inbegrip van kinderen) met beperkte fysieke, zintuiglijke of geestelijke
vermogens of met gebrek aan ervaring en/of gebrek aan kennis. Het is
niet toegestaan het apparaat te gebruiken als het regent en in vochtige
omgevingen.
Elk ander gebruik of elke wijziging van het apparaat geldt als niet in over-
eenstemming met de bestemming en brengt ernstig gevaar voor ongelukken
met zich mee. De fabrikant aanvaardt geen enkele aansprakelijkheid voor
schade die voortvloeit uit gebruik in strijd met de bestemming.
Uitrusting
Motorunit
Klemschroef
Moer
Schacht
Schroef
Ronde handgreep
Draagoog
Draaielement
Ontgrendelingsknop
Inschakelblokkering
Aan-/uitknop
Netsnoer
Trekontlasting
Heggenschaar
Messenbalk
Aandrijfhuis
Ont-/vergrendeling
Bodemplaat (heggenschaar)
Stelhendel
Handgreep
Voorste schacht
Borgpen
Aandrijfas
Beschermkap
Hoogsnoeier
Slijpsteenhulp
Zaagketting
Zwaard
Aanslag
Olietank
Moer
Schroefdraad
Kamwielhuis
Zwaardboring
Zwaardgeleider
Geleider
Olieautomaat
Kettingspanschroef
Kamwiel
Kettingspanstift
Voorste schacht
Aandrijfas
Beschermkap
Borgpen
Beschermring
Stelhendel
Bodemplaat (hoogsnoeier)
Ont-/vergrendeling
Olietankdop

NL│BE │ 45 ■
PHSHE 900 B2
Inhoud van het pakket
1 motorunit PHSHE 900 B2
1 heggenschaar PHS 1 (hierna heggenschaar genoemd)
1 hoogsnoeier PHE 1 (hierna hoogsnoeier genoemd)
Accessoires
1
schouderriem
1
kettingbeschermkoker
1
zwaardkoker
1
100 ml bio-kettingolie
1
montagegereedschap
1 gebruiksaanwijzing
Technische gegevens
Motorunit: PHSHE 900 B2
Nominale spanning: 230 V ∼ 50 Hz (wisselstroom)
Nominaal vermogen: 900 W
Beschermingsklasse: II /
(dubbel geïsoleerd)
Gewicht:
(zonder handgreep en draagriem): ca. 2,7 kg
Hoogsnoeier: PHE 1
Kettingsnelheid: max. 6 m/s
Werkhoek:
0°; 15°; 30°
Gewicht (bedrijfsklaar): ca. 1,6 kg
Aanbevolen vulhoeveelheid olietank: 100 cm
3
Snoeilengte: ca. 260 mm
Zwaard: Oregon type 100SDEA041
Zaagketting: Oregon 91P040X
Heggenschaar: PHS 1
Slagfrequentie (onbelast): 2000 min
-1
Werkhoek:
-90°; +90°
Snoeilengte: ca. 410 mm
Tandafstand: 20 mm
Gewicht
(bedrijfsklaar): ca. 2,1 kg
Geluids- en trillingsgegevens:
Gemeten waarde voor geluid vastgesteld conform EN 60745.
Het A-gewogen geluidsniveau van het elektrische gereedschap bedraagt
gemiddeld:
Hoogsnoeier: PHE 1
Geluidsdrukniveau: L
PA
= 83 dB (A)
Onzekerheid K: 3 dB
Geluidsvermogensniveau: L
WA
= 104 dB (A)
Onzekerheid K: 3 dB
Heggenschaar: PHS 1
Geluidsdrukniveau: L
PA
= 81 dB (A)
Onzekerheid K: 3 dB
Geluidsvermogensniveau: L
WA
= 102 dB (A)
Gegarandeerd geluidsvermogens-
niveau: L
WA
= 105 dB (A)
Onzekerheid K: 3 dB
Trillingswaarden (vectorsom van drie richtingen) bepaald conform
EN 60745:
Hoogsnoeier:
Trilling bij voorste handgreep: Trillingsemissiewaarde
a
h,D
= 1,0 m/s
2
Onzekerheid K = 1,5 m/s
2
Trilling bij achterste handgreep: Trillingsemissiewaarde
a
h,D
= 1,2 m/s
2
Onzekerheid K = 1,5 m/s
2
Heggenschaar:
Trilling bij voorste handgreep: Trillingsemissiewaarde
a
h,D
= 1,6 m/s
2
Onzekerheid K = 1,5 m/s
2
Trilling bij achterste handgreep: Trillingsemissiewaarde
a
h,D
= 1,8 m/s
2
Onzekerheid K = 1,5 m/s
2
Draag gehoorbescherming!
OPMERKING
► Het in deze gebruiksaanwijzing vermelde trillingsniveau is gemeten
conform een in EN60745 genormeerde meetprocedure en kan
worden gebruikt voor apparaatvergelijking. De vermelde trillings-
emissiewaarde kan ook worden gebruikt voor een voorlopige
beoordeling van de blootstelling.
WAARSCHUWING!
► Het trillingsniveau verandert afhankelijk van het gebruik van het
elektrische gereedschap en kan in bepaalde gevallen hoger zijn
dan de in deze gebruiksaanwijzing aangegeven waarde. De
trillingsbelasting kan worden onderschat wanneer het elektrische
gereedschap regelmatig op een dergelijke manier wordt gebruikt.
Probeer de belasting door trillingen zo klein mogelijk te houden. U
kunt bijvoorbeeld handschoenen dragen tijdens het gebruik van het
gereedschap en slechts beperkte tijd met het gereedschap werken
om de trillingsbelasting te reduceren. Daarbij dient u rekening te hou-
den met alle aspecten van de bedrijfscyclus (bijvoorbeeld perioden
waarin het gereedschap is uitgeschakeld en perioden waarin het
gereedschap weliswaar is ingeschakeld, maar niet wordt belast).
Betekenis van de aanwijzingsplaatjes op het apparaat:
Lees voor ingebruikname de handleiding en
veiligheidsinstructies!
Draag veiligheidshandschoenen!
Draag veiligheidsschoenen!
Draag gehoorbescherming!
Draag een veiligheidshelm!

■ 46 │ NL│BE
PHSHE 900 B2
Draag een veiligheidsbril!
Houd omstanders uit de buurt van het apparaat!
Bescherm het apparaat tegen regen en vocht!
Levensgevaar door een elektrische schok!
Bewaar een minimale afstand van 10 m tot
bovengrondse leidingen.
Let op! Neervallende voorwerpen.
In het bijzonder bij werk boven hoofdhoogte.
Let op! Letselgevaar door bewegende messen.
Trek de stekker meteen uit het stopcontact
als het snoer beschadigd raakt of wordt
doorgesneden.
Indicatie van het geluidsvermogensniveau
LWA in dB.
Algemene veiligheidsvoor-
schriften voor elektrische
gereedschappen
WAARSCHUWING!
► Lees alle veiligheidsvoorschriften en aanwijzingen. Het niet-naleven
van de veiligheidsvoorschriften en aanwijzingen kan elektrische
schokken, brand en/of ernstig letsel veroorzaken.
Bewaar alle veiligheidsinstructies en aanwijzingen voor
toekomstig gebruik.
De in de veiligheidsinstructies gebruikte term “elektrisch gereedschap”
heeft betrekking op elektrische gereedschappen die op netvoeding werken
(met snoer) en op elektrische gereedschappen die op accu's werken
(zonder snoer).
1. Veiligheid op de werkplek
a) Houd uw werkomgeving schoon en goed verlicht. Wanorde en een
niet verlichte werkomgeving kunnen leiden tot ongelukken.
b) Werk met het elektrische gereedschap niet in explosiegevaarlijke
omgevingen waarin zich brandbare vloeistoffen, gassen of stof
bevinden. Elektrisch gereedschap geeft vonken af die stof of dampen
kunnen doen ontvlammen.
c) Houd kinderen en andere personen uit de buurt tijdens het gebruik
van het elektrische gereedschap. Als u afgeleid raakt, zou u de
controle over het apparaat kunnen verliezen.
2. Elektrische veiligheid
a) De stekker van het elektrische gereedschap moet in het stopcontact
passen. De stekker mag op geen enkele wijze worden veranderd.
Gebruik geen verloopstekker in combinatie met geaarde elektrische
gereedschappen. Onveranderde stekkers en passende stopcontacten
verminderen het risico op elektrische schokken.
b) Voorkom lichamelijk contact met geaarde oppervlakken, zoals
buizen, verwarmingen, fornuizen en koelkasten. Er bestaat een
verhoogd risico op elektrische schokken als uw lichaam geaard is.
c) Houd elektrisch gereedschap uit de buurt van regen of vocht.
Als er water in een elektrisch apparaat binnendringt, bestaat er een
verhoogde kans op een elektrische schok.
d) Gebruik het snoer niet voor een ander doel, bijvoorbeeld om het
elektrische gereedschap te dragen, op te hangen of om de stekker
uit het stopcontact te trekken. Houd het snoer uit de buurt van hitte,
olie, scherpe randen of bewegende onderdelen. Beschadigde of
verwarde snoeren verhogen de kans op een elektrische schok.
e) Gebruik bij het werken met elektrisch gereedschap buitenshuis alleen
verlengsnoeren die zijn goedgekeurd voor gebruik buitenshuis. Het
gebruik van een verlengsnoer dat geschikt is voor gebruik buitenshuis,
vermindert het risico op een elektrische schok.
f) Gebruik een aardlekschakelaar als het gebruik van het elektrische
gereedschap in een vochtige omgeving onvermijdelijk is.
Het gebruik van een aardlekschakelaar vermindert het risico op een
elektrische schok.
3. Veiligheid van personen
a) Wees altijd alert, let op wat u doet en gebruik uw gezond verstand
bij het gebruik van elektrisch gereedschap. Gebruik geen elektrisch
gereedschap als u moe bent of onder invloed bent van drugs, alcohol
of medicijnen. Een moment van onoplettendheid kan bij het gebruik
van het elektrische gereedschap al tot ernstig letsel leiden.
b) Draag persoonlijke beschermingsmiddelen en altijd een veiligheids-
bril. Het dragen van persoonlijke beschermingsmiddelen zoals een
stofmasker, antislip-veiligheidsschoenen, veiligheidshelm of gehoorbe-
scherming, al naargelang het type en het gebruik van het elektrische
gereedschap, vermindert het risico op letsel.
c) Voorkom onbedoelde inschakeling. Zorg ervoor dat het elektrische
gereedschap is uitgeschakeld voordat u het aansluit op de netvoe-
ding en/of de accu, het optilt of draagt. Als u bij het dragen van
het elektrische gereedschap uw vinger op de aan-/uitknop houdt of
het apparaat al ingeschakeld op de netvoeding aansluit, kan dit tot
ongelukken leiden.
d) Verwijder het afstelgereedschap of de sleutel voordat u het elektrische
gereedschap aanzet. Gereedschap of een sleutel die zich in een draai-
end onderdeel van het apparaat bevindt, kan letsel tot gevolg hebben.
e) Voorkom een abnormale lichaamshouding. Zorg dat u stevig staat
en bewaar altijd uw evenwicht. Daardoor kunt u het elektrische
gereedschap in onverwachte situaties beter controleren.
f) Draag geschikte kleding. Draag geen wijde kleding of sieraden.
Houd haar, kleding en handschoenen ver van bewegende onder-
delen. Loszittende kleding, sieraden of haren kunnen door bewegende
onderdelen gegrepen worden.
g) Als stofafzuigings- en opvangvoorzieningen kunnen worden bevestigd,
zorg er dan voor dat deze zijn aangesloten en correct worden ge-
bruikt. Het gebruik van een stofafzuiging kan risico's door stof beperken.
4. Gebruik en behandeling van het elektrische
gereedschap
a) Voorkom overbelasting van het apparaat. Gebruik voor uw
werkzaamheden het daarvoor bedoelde elektrische gereedschap.
Met een passend elektrisch apparaat werkt u beter en veiliger in het
aangegeven vermogensbereik.
b) Gebruik geen elektrisch gereedschap waarvan de aan-/uitknop
defect is. Elektrisch gereedschap dat niet meer aan- of uitgezet kan
worden, is gevaarlijk en moet worden gerepareerd.
c) Haal de stekker uit het stopcontact of verwijder een afneembare
accu, voordat u instellingen aan het apparaat verricht, hulpstukken
verwisselt of het elektrische gereedschap weglegt. Deze voorzorgs-
maatregel voorkomt dat het elektrische gereedschap onbedoeld kan
worden gestart.
d) Berg elektrisch gereedschap buiten het bereik van kinderen op
als het niet in gebruik is. Zorg ervoor dat het apparaat niet wordt
gebruikt door personen die hiermee niet vertrouwd zijn of die deze
instructies niet hebben gelezen. Elektrisch gereedschap is gevaarlijk
als het door onervaren personen wordt gebruikt.

NL│BE │ 47 ■
PHSHE 900 B2
e) Onderhoud elektrisch gereedschap zorgvuldig. Controleer of
bewegende onderdelen naar behoren werken en niet klemmen,
en of er geen onderdelen gebroken of zodanig beschadigd zijn
dat daardoor de werking van het elektrische gereedschap nadelig
wordt beïnvloed. Laat beschadigde onderdelen vóór de ingebruik-
name van het apparaat repareren. Veel ongelukken zijn het gevolg
van slecht onderhoud van elektrisch gereedschap.
f) Houd snijgereedschappen scherp en schoon. Met zorg onderhouden
zagen met scherpe zaagvlakken lopen minder vaak vast en zijn ge-
makkelijker te sturen.
g) Gebruik elektrisch gereedschap, accessoires, hulpstukken en derge-
lijke in overeenstemming met deze instructies. Houd daarbij rekening
met de werkomstandigheden en de te verrichten werkzaamheden.
Het gebruik van elektrisch gereedschap voor andere doeleinden dan
de beoogde toepassingen kan tot gevaarlijke situaties leiden.
5. Service
a) Laat uw elektrisch gereedschap alleen door gekwalificeerde vak-
mensen en uitsluitend met originele vervangingsonderdelen repare-
ren. Op die manier blijft de veiligheid van het elektrische gereedschap
gewaarborgd.
Apparaatspecifieke veiligheidsvoorschriften voor
heggenscharen
■ Houd uw handen uit de buurt van de messen. Probeer geen
snoeiresten te verwijderen of snoeimateriaal vast te houden als de
messen in werking zijn. Verwijder vastzittend snoeimateriaal alleen
als het apparaat is uitgeschakeld. Haal bovendien de stekker uit het
stopcontact.Een moment van onoplettendheid kan bij het gebruik van
de heggenschaar al tot ernstig letsel leiden.
■ Draag de heggenschaar aan de voorste handgreep in uitgeschakelde
toestand met de messen van uw lichaam afgekeerd. Breng altijd de
beschermkoker aan bij transport of als u de heggenschaar opbergt.
Zorgvuldig omgaan met het apparaat reduceert de kans dat u onop-
zettelijk in aanraking komt met de lopende messen.
■ Houd het elektrische gereedschap uitsluitend vast aan de geïsoleerde
handgrepen, omdat de messen verborgen elektricitreitsleidingen
of het eigen snoer kunnen raken. Bij contact tussen messen en een
leiding waar spanning op staat, kunnen ook metalen onderdelen van
het apparaat onder spanning komen te staan, met een elektrische
schok tot gevolg.
■ Houd het snoer uit de buurt van waar u snoeit.Tijdens het werk kan
het snoer zich niet zichtbaar in het struikgewas bevinden en per onge-
luk worden doorgesneden.
■ Inspecteer alle te snijden vlakken zorgvuldig en verwijder draden en
andere vreemde voorwerpen.
■ We raden aan een aardlekschakelaar met een uitschakelstroom van
30 mA of minder te gebruiken.
OPMERKING
►
De heggenschaar wordt volledig gemonteerd geleverd.
► Op de uitvouwpagina staan afbeeldingen voor het gebruik van de
heggenschaar en de bedieningselementen.
► In deze handleiding zelf staan afbeeldingen voor het instellen, onder-
houden en smeren van de heggenschaar door de gebruiker.
► Aanwijzingen voor werkhouding (zie uitvouwpagina).
► Aanwijzingen voor bedieningselementen (zie uitvouwpagina).
► Aanwijzingen voor vervanging en reparatie (zie het hoofdstuk
Onderhoud en reiniging/service).
► In deze handleiding staat uitleg over alle op de heggenschaar
gebruikte grafische symbolen en technische specificaties.
► Bij de technische specificaties staan de kenmerken van de heggen-
schaar.
► Geblokkeerd gereedschap: verwijder het vastzittende materiaal uit
de messenbalk
.
LET OP!
► Schakel bij dreigend gevaar en in noodgevallen onmiddellijk de
motor uit en trek de stekker uit het stopcontact.
Aanvullende veiligheidsvoorschriften voor
heggenscharen
Voorbereiding:
a) DEZE HEGGENSCHAAR KAN ERNSTIG LETSEL VEROORZAKEN!
Lees aandachtig de aanwijzingen voor correcte omgang, voorbereiding,
onderhoud en reparatie, starten en wegzetten van de heggenschaar.
Maak u vertrouwd met alle bedieningselementen en het gebruik van
de heggenschaar volgens de voorschriften.
b) Kinderen mogen de heggenschaar nooit gebruiken.
c) Pas op voor bovengrondse stroomleidingen.
d) Het gebruik van de heggenschaar moet worden vermeden wanneer
zich personen, vooral dan kinderen, in de buurt bevinden.
e) Draag geschikte kleding! Draag geen wijde kleding of sieraden, die
door bewegende delen kunnen worden gegrepen. Het verdient aanbe-
veling vaste handschoenen, antislipschoenen en een veiligheidsbril te
dragen.
f) Zet de motor af en laat de heggenschaar tot stilstand komen, als de
messenbalk een vreemd voorwerp raakt, of als de werkingsgeluiden
sterker worden of als de heggenschaar ongewoon heftig trilt.
Neem de volgende maatregelen:
– controleer op schade;
– controleer op losse onderdelen en zet alle losse onderdelen vast;
– vervang beschadigde onderdelen door gelijkwaardige onderdelen
of laat het apparaat repareren.
g)
Draag gehoorbescherming!
h) Draag oogbescherming!
i) Om in geval van nood de heggenschaar stop te zetten, trekt u de stekker
uit het stopcontact.
Tijdens het gebruik:
a) Trek de stekker uit het stopcontact voorafgaand aan:
– reiniging of verhelpen van een blokkering;
– controle, onderhoud, reparatie of werkzaamheden aan de heggen-
schaar;
– instelling van de werkpositie van de messenbalk;
– het zonder toezicht achterlaten van de heggenschaar.
b) Vergewis u er altijd van of de heggenschaar zich volgens de voorschrif-
ten in een van de beschreven werkposities bevindt, voordat de motor
wordt gestart.
c) Tijdens het werken met de heggenschaar moet er altijd op worden
gelet dat een veilige houding wordt aangenomen, vooral bij gebruik
van een trap of ladder.
d) Gebruik de heggenschaar niet met defecte of sterk versleten messen.
e) Zorg er altijd voor dat alle handgrepen en veiligheidsvoorzieningen
bij gebruik van de heggenschaar zijn gemonteerd. Probeer nooit een
onvolledige heggenschaar of een heggenschaar met niet-toegestane
modificaties te gebruiken.
f) Houd de heggenschaar met beide handen vast aan de daarvoor
bestemde handgrepen.
g) Maak u altijd vertrouwd met uw omgeving en let op mogelijke gevaren,
die u door het lawaai van de heggenschaar misschien niet kunt horen.

■ 48 │ NL│BE
PHSHE 900 B2
Onderhouden en opbergen:
a) Wanneer de heggenschaar vanwege onderhoud, inspectie of opslag
wordt stilgezet, schakelt u de motor uit en wacht u tot alle roterende
delen tot stilstand zijn gekomen. Laat de machine afkoelen voordat u
deze controleert, instelt, enz.
b) Berg de heggenschaar op een plek op waar benzinedamp niet met
open vuur of vonken in contact kan komen. Laat de heggenschaar
altijd afkoelen voordat u deze opbergt.
c) Bij transport of opslag van de heggenschaar moet de messenbalk altijd
met de bijbehorende koker worden afgedekt.
Gedetailleerdere veiligheidsvoorschriften voor
heggenscharen
■ Houd uw handen uit de buurt van de messen. Probeer geen snoeiresten
te verwijderen of snoeimateriaal vast te houden als de messen in werking
zijn. Verwijder vastzittend snoeimateriaal alleen als het apparaat is
uitgeschakeld. Een moment van onoplettendheid kan bij het gebruik
van het apparaat al tot ernstig letsel leiden.
■ Draag de heggenschaar aan de handgreep in uitgeschakelde toestand
met de messen van uw lichaam afgekeerd. Breng altijd de bescherm-
koker aan bij transport of als u de heggenschaar opbergt. Zorgvuldig
omgaan met het apparaat verkleint letselgevaar door het mes.
■ Houd het elektrische gereedschap uitsluitend vast aan de geïsoleerde
handgrepen, omdat de messen verborgen elektricitreitsleidingen of het
eigen snoer kunnen raken. Bij contact tussen messen en een leiding
waar spanning op staat, kunnen ook metalen onderdelen van het ap-
paraat onder spanning komen te staan, met een elektrische schok tot
gevolg.
♦ Doorzoek de heg op verborgen objecten (bijv. draadhekken).
OVERIGE RISICO'S!
Ook wanneer u dit elektrische apparaat volgens de voorschriften bedient,
blijven er altijd risico's bestaan. De volgende gevaren kunnen door de
constructie en uitvoering van dit elektrische gereedschap optreden:
a) snijwonden;
b) gehoorschade, als er geen passende gehoorbescherming wordt
gedragen;
c) gezondheidsschade als gevolg van hand-arm-trillingen, als het appa-
raat gedurende langere tijd wordt gebruikt of wanneer het niet volgens
de voorschriften wordt bediend en onderhouden.
OPMERKING
► De heggenschaar wordt volledig gemonteerd geleverd.
► In deze handleiding zelf staan afbeeldingen voor het instellen,
onderhouden en smeren van de heggenschaar door de gebruiker.
► Aanwijzingen voor vervanging en reparatie (zie het hoofdstuk
Onderhoud en reiniging/service).
► In deze handleiding staat uitleg over alle op de heggenschaar
gebruikte grafische symbolen en technische specificaties.
► Bij de technische specificaties staan de kenmerken van de heggen-
schaar.
► Geblokkeerd gereedschap: verwijder het vastzittende materiaal uit
de messenbalk.
■ Gebruik uitsluitend accessoires en hulpapparatuur die in de gebruiks-
aanwijzing zijn aangegeven. Het gebruik van andere hulpstukken of
accessoires dan aanbevolen in de gebruiksaanwijzing, kan letselge-
vaar inhouden.
Apparaatspecifieke veiligheidsvoorschriften voor
hoogsnoeiers
■ Draag altijd een veiligheidshelm, gehoorbescherming en veiligheids-
handschoenen. Draag ook een veiligheidsbril om te voorkomen dat u
oliespetters of zaagstof in uw ogen krijgt. Draag een stofmasker tegen
stof.
■ Gebruik het apparaat nooit als u op een ladder staat.
■ Buig bij het gebruik van het apparaat niet te ver voorover. Zorg dat u
altijd stevig staat en bewaar altijd uw evenwicht. Gebruik het meegele-
verde harnas om het gewicht gelijkmatig over uw lichaam te verdelen.
■ Draag stevige schoenen met stroeve zolen.
■ Gebruik het apparaat niet als het regent en onder vochtige omstandig-
heden.
■ Gebruik het apparaat niet in de buurt van elektriciteitsleidingen. Bewaar
een minimale afstand van 10 m tot bovengrondse stroomleidingen.
■ Ga niet onder de tak staan die u wilt afzagen, om letsel door vallende
takken te voorkomen. Houd ook rekening met terugspringende takken,
om letsel te voorkomen. Werk onder een hoek van 60° ±10°.
■ Houd er rekening mee dat het apparaat kan terugslaan.
■ Let niet alleen op de af te zagen takken, maar ook op reeds afgevallen
materiaal, om te voorkomen dat u struikelt.
■ Las na 30 minuten werken een pauze in van minstens een uur.
■ Draag altijd veiligheidshandschoenen.
■ Dek het zwaard en de ketting bij transport en opslag af met de koker.
■ Gebruik het apparaat niet in explosiegevaarlijke omgevingen, bijvoor-
beeld in de nabijheid van ontvlambare vloeistoffen of gassen. De door
het apparaat veroorzaakte vonken kunnen dergelijke dampen doen
ontbranden.
■ Het gebruikte stopcontact moet geschikt zijn voor de stekker van het
apparaat. Wijzig nooit iets aan de stekker, om elektrische schokken te
voorkomen.
■ Trek aan de stekker, niet aan het snoer, om de stekker uit het stopcon-
tact te nemen. Gebruik het snoer niet om het apparaat voort te trekken
of te verplaatsen. Houd het snoer uit de buurt van hitte, olie, scherpe
kanten en bewegende onderdelen.
■ Haal de stekker uit het apparaat als u klaar bent met werken of bij het
onderhouden of reinigen van het apparaat.
■ Voorkom dat het apparaat onbedoeld wordt gestart.
■ Een apparaat met een defecte schakelaar moet onmiddellijk worden
gerepareerd, om schade en letsel te voorkomen.
■ Berg het apparaat op buiten het bereik van kinderen.
■ Alleen personen die vertrouwd zijn met de gebruiksaanwijzing en het
apparaat mogen het apparaat bedienen.
■ Onderhoud elektrische gereedschappen zorgvuldig. Controleer of be-
wegende onderdelen naar behoren werken en niet klemmen, en of er
geen onderdelen gebroken of zodanig beschadigd zijn dat daardoor
de werking van het elektrische gereedschap nadelig wordt beïnvloed.
Laat beschadigde onderdelen vóór de ingebruikname van het appa-
raat repareren. Veel ongelukken zijn het gevolg van slecht onderhoud
van elektrisch gereedschap.
■ Houd zagen scherp en schoon. Met zorg onderhouden zagen met
scherpe zaagvlakken lopen minder vaak vast en zijn gemakkelijker te
sturen.
■ Laat het apparaat onderhouden door daartoe gekwalificeerd personeel.
Gebruik uitsluitend de door de fabrikant aanbevolen originele onder-
delen.

NL│BE │ 49 ■
PHSHE 900 B2
Voorzorgsmaatregelen tegen terugslag
LET OP TERUGSLAG!
► Wees bij gebruik van het apparaat beducht op terugslag. Er bestaat
letselgevaar. U voorkomt terugslag door voorzichtig te werk te gaan
en op de juiste manier te zagen.
■ Als u iets met de punt van het zwaard raakt, kan dat in veel gevallen
een onverwachte reactie in achterwaartse richting veroorzaken,
waarbij het zwaard omhoog en in de richting van degene die het
apparaat bedient, wordt geslagen (zie afbeelding).
■ Een terugslag kan optreden als de punt van het zwaard een voorwerp
raakt, of als het hout meebuigt en de zaagketting in de zaagsnede
vastklemt (zie afbeelding).
■ Als de zaagketting aan de bovenkant van het zwaard beklemd raakt,
kan het zwaard heftig terugslaan in de richting van degene die het
apparaat bedient.
■ Beide reacties kunnen tot gevolg hebben dat u de controle over de
zaag verliest en uzelf zwaar verwondt. Vertrouw niet uitsluitend op
de in de kettingzaag ingebouwde veiligheidsvoorzieningen. Neem
als gebruiker van een kettingzaag de nodige maatregelen om zonder
ongelukken te werken. Een terugslag is het gevolg van verkeerd of
onrechtmatig gebruik van het elektrische gereedschap. Dit is te voorko-
men door passende voorzorgsmaatregelen te nemen, zoals hieronder
beschreven:
■ Houd de zaag met beide handen vast, waarbij de duimen en de
vingers de handgrepen van de kettingzaag omsluiten. Breng uw
lichaam en uw armen in een dusdanige stand dat u terugslagkrach-
ten kunt opvangen.Als u de juiste voorzorgsmaatregelen neemt, zijn
terugslagkrachten beheersbaar. Laat de kettingzaag nooit los.
■ Vermijd een abnormale lichaamshouding en zaag niet boven schou-
derhoogte. Op die manier voorkomt u dat de punt van het zwaard iets
raakt en bent u beter in staat in onverwachte situaties de controle te
behouden over de kettingzaag.
■ Gebruik altijd de door de fabrikant voorgeschreven vervangings-
zwaarden en zaagkettingen. Onjuiste vervangingszwaarden en
zaagkettingen kunnen de ketting doen breken en/of terugslagkrachten
veroorzaken.
■ Houd u aan de aanwijzingen van de fabrikant voor het slijpen en
onderhouden van de zaagketting. Een te geringe diepte-instelling
verhoogt de kans op terugslag.
■ Zaag niet met de punt van het zwaard. Er is gevaar voor terugslag.
■ Zorg ervoor dat de grond waarop u staat vrij is van voorwerpen
waarover u kunt struikelen.
Aanvullende veiligheidsvoorschriften
VOORZICHTIG! LETSELGEVAAR!
► Pak het apparaat als het in werking is, nooit boven de beschermring
beet, om letsel te voorkomen!
■ Tijdens gebruik mogen zich binnen een straal van 15 meter geen andere
personen of dieren bevinden. Degene die het apparaat bedient, is op
de plaats van gebruik verantwoordelijk voor derden.
■ Houd het apparaat, de zaag en de zwaardkoker in goede conditie,
om letsel te voorkomen.
■ Bij kinderen is supervisie noodzakelijk om ervoor te zorgen dat ze niet
met het apparaat spelen.
■ Gebruik het apparaat pas wanneer u zich ermee vertrouwd voelt.
■ Werk niet met een beschadigd, onvolledig of zonder toestemming van
de fabrikant gemodificeerd apparaat. Gebruik het apparaat nooit als
de veiligheidsvoorzieningen defect zijn. Gebruik het apparaat niet als
de aan-/uitknop defect is. Controleer het apparaat voor gebruik op
veiligheid, in het bijzonder het zwaard en de ketting. Controleer het
apparaat op duidelijke schade of defecten als u het hebt laten vallen.
■ Schakel het apparaat nooit in voordat u zwaard, ketting en kamwielhuis
deugdelijk hebt gemonteerd.
■ Zorg ervoor dat het apparaat bij het inschakelen en tijdens het werk
niet met de grond, stenen, draad of andere vreemde voorwerpen in
aanraking komt. Schakel het apparaat uit voordat u het weglegt.
■ Het apparaat is ontworpen voor bediening met twee handen. Werk
nooit met één hand.
■ Houd het apparaat uitsluitend vast aan de geïsoleerde handgrepen,
omdat de zaagketting verborgen elektriciteitsleidingen kan raken. Bij
contact tussen de zaagketting en een leiding waar spanning op staat,
kunnen ook metalen onderdelen van het apparaat onder spanning
komen te staan, met een elektrische schok tot gevolg.
■ Als u van plaats verandert, let er dan op dat het apparaat is uitge-
schakeld en dat uw vinger de aan-/uitknop niet aanraakt. Draag het
apparaat met achterwaarts gerichte zaagketting en zwaard. Breng
voor het transport de beschermkoker van het zwaard aan.
■ Zet bij elke zaagsnede eerst de klauwaanslag vast en begin pas dan
met zagen.
■ Wees uiterst voorzichtig bij het zagen van kleine heesters en takken.
Dunne takjes kunnen in de zaag vast komen te zitten en in uw richting
slaan of u uw evenwicht laten verliezen.
■ Zaag geen hout dat op de grond ligt en probeer niet om uit de grond
stekende wortels te zagen. Voorkom in ieder geval dat de zaagketting
zich in de grond ingraaft, omdat hij daardoor meteen stomp wordt.
■ Let bij het zagen van een onder spanning staande tak op een moge-
lijke terugslag wanneer de spanning van het hout plotseling wegvalt.
Er bestaat letselgevaar.
■ Probeer het apparaat niet met geweld los te maken in geval van kan-
telen of vastklemmen van de zaag. Schakel het apparaat onmiddellijk
uit en schakel het pas weer in als de blokkade is opgeheven. Er bestaat
letselgevaar!
Bild 1

■ 50 │ NL│BE
PHSHE 900 B2
Vóór de ingebruikname
VOORZICHTIG! LETSELGEVAAR!
► Haal voorafgaand aan alle werkzaamheden aan het apparaat de
stekker uit het stopcontact.
Gevaar voor een elektrische schok!
Motorunit
Ronde handgreep monteren
♦ Steek de ronde handgreep op de juiste positie op de schacht .
♦ Draai de schroef
vast.
Schouderriem bevestigen/monteren
♦ Haak de schouderriem in het draagoog .
♦ Pas de schouderriem
zo aan uw lengte aan, dat het draagoog
zich op heuphoogte bevindt.
Heggenschaar monteren
♦ Schuif de voorste schacht van de heggenschaar op de schacht
van de motorunit.
♦ De borgpen
moet vastklikken.
♦ Zet de beide schachten
vast met de klemschroef ; draai
daartoe de moer
aan de andere zijde op de schroef.
Hoogsnoeier monteren
♦ Schuif de voorste schacht van de hoogsnoeier op de schacht
van de motorunit.
♦ De borgpen
moet vastklikken.
♦ Zet de beide schachten
vast met de klemschroef ; draai
daartoe de moer
aan de andere zijde op de schroef.
De heggenschaar kantelen
♦ Draai de ont-/vergrendeling los.
♦ Druk op de stelhendel
en kantel de heggenschaar in de gewenste
stand.
♦ Laat de stelhendel
en de ont-/vergrendeling terugklikken in de
uitsparing van de bodemplaat (heggenschaar)
.
De hoogsnoeier kantelen
♦ Draai de ont-/vergrendeling los.
♦ Druk op de stelhendel
en kantel de hoogsnoeier in een van beide
standen.
♦ Laat de stelhendel
en de ont-/vergrendeling terugklikken in de
uitsparing van de bodemplaat (hoogsnoeier)
.
Zaagketting en zwaard monteren
WAARSCHUWING!
► Trek veiligheidshandschoenen aan! Letselgevaar door de scherpe
zaagtanden!
OPMERKING
►
Let op de looprichting van de zaagketting
over het zwaard en
bij het kamwielhuis .
► Bij levering zijn het zwaard
en de zaagketting reeds gemonteerd.
► Bij slijtage kan het zwaard worden omgekeerd.
♦ Draai de moer
los met het montagegereedschap .
♦ Verwijder het kamwielhuis
van het apparaat.
♦ De zaagketting
moet zo nodig tevoren worden ontspannen om het
zwaard
en de zaagketting te verwijderen (zie hoofdstuk “Zaag-
ketting spannen en controleren”). Voer de instructies in omgekeerde
volgorde uit.
♦ Verwijder het zwaard
met de zaagketting van de bodemplaat .
♦ Monteer de zaagketting
weer, te beginnen bij de punt van het
zwaard
.
♦ Leg het zwaard
op de zwaardgeleider en plaats de kettingspan-
nerstift
in de zwaardboring . Leg tegelijkertijd de zaagketting
om het kamwiel
.
♦ Bevestig het kamwielhuis
weer en zet de moer licht vast.
♦ Span de zaagketting
(zie het hoofdstuk Zaagketting spannen en
controleren).
Zaagketting spannen en controleren
OPMERKING
► De spanning van de zaagketting
is belangrijk voor uw veiligheid
en de werking van het apparaat. Een correct gespannen zaagketting
verhoogt de levensduur van het apparaat.
WAARSCHUWING!
► Trek veiligheidshandschoenen aan! Letselgevaar door de scherpe
zaagtanden!
♦ Draai de moer
iets los met het montagereedschap .
♦ Draai de kettingspannerbout
met het montagegereedschap met
de wijzers van de klok mee om de spanning te verhogen.
♦ Draai de kettingspannerschroef
met het montagegereedschap
tegen de wijzers van de klok in om de spanning te verlagen.
♦ De zaagketting
moet tegen de onderzijde van het zwaard aan
liggen. Controleer of u de zaagketting
met de hand over het
zwaard
kunt trekken.
♦ Draai de moer
weer vast met het montagegereedschap .
OPMERKING
►
Bij het trekken aan de zaagketting
met 9 N (ca. 1 kg) trekkracht
dienen de zaagketting
en het zwaard niet meer dan 2 mm
afstand tot elkaar te hebben.
► Een nieuwe zaagketting rekt uit en moet vaker opnieuw worden
gespannen.
► Controleer voor elk gebruik van het apparaat de kettingspanning.

NL│BE │ 51 ■
PHSHE 900 B2
Ketting smeren
♦ Verwijder de dop van de olietank .
♦ Vul de olietank
met ongeveer 100 ml bio-kettingolie .
WAARSCHUWING!
► Werk nooit zonder kettingsmering!
Bij een droog lopende zaagketting raakt de zaag in korte tijd onher-
stelbaar beschadigd. Controleer voordat u aan het werk gaat, altijd
de kettingsmering en het oliepeil.
OPMERKING
►
Gebruik alleen kettingzaagolie. Bij voorkeur biologisch afbreekbare
kettingolie. Gebruik geen oude olie, motorolie enz.
► Controleer tijdens het werk of de automatische kettingsmering werkt.
Controleer voor en tijdens het werk of de kettingsmering werkt.
Zaagketting slijpen
OPMERKING
►
Aan de slijpsteenhulp
kan een slijpsteen worden bevestigd voor
een stevige greep tijdens het slijpen.
► In een slijpset van bijvoorbeeld Oregon staat gedetailleerde
informatie over het slijpen.
► U kunt ook een elektrische kettingslijper gebruiken en de instructies
van de fabrikant daarvan volgen.
► Als u twijfelt over het slijpen van de ketting, kunt u de ketting ook
vervangen.
Ingebruikname
OPMERKING
► Houd rekening met regelgeving voor geluidshinder en andere
plaatselijke voorschriften. Mogelijk is gebruik van het apparaat
beperkt toegestaan of verboden op bepaalde dagen (bijvoorbeeld
zon- en feestdagen), op bepaalde tijdstippen van de dag ('smid-
dags, 's nachts), of in bepaalde gebieden (bijvoorbeeld bij
kuuroorden, ziekenhuizen e.d.).
In-/uitschakelen
Inschakelen:
♦ Sluit het snoer aan op de verlengkabel.
♦ Maak aan het einde van de verlengkabel een lus en haak die in de
trekontlasting
.
♦ Houd de inschakelblokkering ingedrukt en druk op de aan-/uitknop
.
Uitschakelen:
♦ Laat de aan-/uitknop los.
♦ Maak de verlengkabel los uit de trekontlasting
.
♦ Maak het snoer
los van de verlengkabel.
Handgreep verstellen
♦ Druk op de ontgrendelingsknop . Draai het draai-element naar
de gewenste stand. Laat de ontgrendelingsknop
los, de knop moet
weer vastklikken.
Werken met de heggenschaar
Gebruik van het apparaat:
OPMERKING
► Houd er rekening mee dat de nationale voorschriften van uw land
het gebruik van de heggenschaar kunnen beperken.
► Dagelijkse inspectie van de heggenschaar voor elk gebruik is
verplicht. Controleer het apparaat ook wanneer u er ergens mee
tegen gestoten hebt of het hebt laten vallen, om aanzienlijke schade
of defecten vast te stellen.
► Draag stevig schoeisel en nauwsluitende kleding om het risico van
ongevallen tot een minimum te beperken. Ga stevig op de grond
staan, let op uw evenwicht en draag altijd de meegeleverde
draagriem!
► Las omwille van uw gezondheid rustpauzes in tijdens het werken.
Door lichamelijke uitputting neemt de kans op letsel toe!
WAARSCHUWING!
► Gebruik het apparaat in geen geval als u moe of ziek bent of wan-
neer u onder invloed bent van alcohol of andere drugs.
Snoeitechnieken
■ Zie uitvouwpagina (afbeelding A).
OPMERKING
► Verwijder dikke takken met een takkenschaar.
Werken met de hoogsnoeier
Zaagtechnieken
WAARSCHUWING!
► Houd rekening met neervallend afgezaagd hout.
► Houd rekening met het gevaar van terugslaande takken.
OPMERKING
► Zet de aanslag
tegen de tak. Op die manier werkt u veiliger en
rustiger.
► Begin pas daarna met zagen.
Afzagen van kleine takken
♦ Zaag bij kleine takken (Ø 0-8 cm) van boven naar beneden
(zie afbeelding).

■ 52 │ NL│BE
PHSHE 900 B2
♦ Afzagen van grotere takken
♦ Maak bij grotere takken (Ø 8-25 cm) eerst een kleine zaagsnede
A
om de spanning van de tak te halen (zie afbeelding).
■ Die zaagsnede voorkomt ook dat de schors van de stam scheurt.
♦ Zaag vervolgens van boven
B
naar beneden
A
de tak door.
2
1
Afzagen in gedeelten
Kort lange of dikke takken in voordat u de laatste zaagsnede maakt om de
tak van de stam te scheiden (zie afbeelding).
cb a
Veilig werken
■ Houd het apparaat, de zaag en de zwaardkoker in goede conditie,
om letsel te voorkomen.
■ Controleer het apparaat op duidelijke schade of defecten als u het
hebt laten vallen.
■ Neem de voorgeschreven werkhoek van 60° ±10° in acht, om veilig
te kunnen werken (zie afbeelding).
■ Gebruik het apparaat niet als u op een ladder staat of op een instabiele
ondergrond.
■ Laat u niet verleiden om zonder nadenken te gaan zagen. Dat kan
uzelf en anderen in gevaar brengen.
■ Bij kinderen is supervisie noodzakelijk om ervoor te zorgen dat ze niet
met het apparaat spelen.
■ Neem regelmatig een andere werkhouding aan. Bij langer gebruik van
het apparaat kan de doorbloeding van de handen verstoord raken.
U kunt echter langer met het apparaat werken als u geschikte hand-
schoenen draagt of regelmatig een pauze inlast. Houd er rekening
mee dat de persoonlijke aanleg voor een slechte doorbloeding, lage
buitentemperaturen of het gebruik van veel kracht bij het werken de
gebruiksduur kunnen reduceren.
■ Verminder ook de trillingsrisico's, bijv. het risico van “dode vingers”,
door vaak werkpauzes te nemen waarin u bijv. uw handen tegen
elkaar aan wrijft.
Transport
■ Gebruik bij transport de beschermkokers .
■ Let erop dat u het apparaat niet inschakelt als u het draagt
(zie afbeelding).
Onderhoud en reiniging
WAARSCHUWING! Wanneer het snoer moet worden
vervangen, moet dit worden gedaan door de
fabrikant of diens vertegenwoordiger, om veilig-
heidsrisico's te voorkomen.
■ De motorunit moet altijd schoon, droog en vrij van olie of smeervet zijn.
■ De hoogsnoeier moet regelmatig worden vrijgemaakt van zaagspanen.
♦ Gebruik voor het schoonmaken van de behuizing een droge doek.
Verwijder het kamwielhuis
.
♦ Neem de zaagketting
van het zwaard en maak de geleider
schoon.
♦ Houd de zaagketting
scherp en controleer de spanning, het oliepeil
en de olietoevoer.
♦ Controleer de messenbalk
van de heggenschaar op losgeraakte
schroeven en draai die zo nodig vast.
♦ Verwijder vastgeraakt snoeisel.
♦ Verzorg de messenbalk
met olie uit een spuitbus of een kannetje.
Opbergen
■ Reinig het apparaat voordat u het opbergt.
■ Bewaar het apparaat in de meegeleverde beschermkokers op
een vorstvrije, droge plaats, buiten het bereik van kinderen.
■ Berg het apparaat liggend op of zodanig dat het niet kan omvallen.
■ Maak de olietank
leeg. Bio-kettingolie kan verharsen of weglopen
door het luchtgaatje in de olietankdop
.
A
B
C A B
60° ±10°

NL│BE │ 53 ■
PHSHE 900 B2
Problemen met de hoogsnoeier
oplossen
Probleem Mogelijke oorzaak Problemen oplossen
Motor loopt,
zaagketting
beweegt niet
De heggenschaar of de
hoogsnoeier is niet correct
op de motorunit bevestigd
Controleer de beves-
tiging
Het zagen
vordert niet
Zaagketting
droog of
oververhit, of hangt door
Vul olie bij of slijp,
vervang of span de
zaagketting
Problemen met de heggenschaar
oplossen
Probleem Mogelijke oorzaak Problemen oplossen
Motor loopt,
messen staan stil
De heggenschaar of de
hoogsnoeier is niet correct
op de motorunit bevestigd
Controleer de beves-
tiging
Onderhoudsintervallen hoogsnoeier
De onderstaande gegevens gelden bij gebruik onder normale omstandig-
heden. Bij gebruik onder bijzondere omstandigheden, bijvoorbeeld bij veel
stofontwikkeling of lange dagelijkse werktijden, dienen de aangegeven
intervallen overeenkomstig te worden verkort.
Onderdeel Actie Voor aanvang
van het werk
Wekelijks Bij storing Bij beschadiging Indien nodig
Ketting smeren Controleren
X
Zaagketting
Controleren, ook
op scherpte
X
Kettingspanning
controleren
X
Slijpen
X
Geleider
Controleren
(slijtage, bescha-
diging)
X
Reinigen en
omkeren
XX
Ontbramen
X
Vervangen
XX
Kamwiel
Controleren
X
Vervangen
X
Onderhoudsintervallen heggenschaar
De onderstaande gegevens gelden bij gebruik onder normale omstandig-
heden. Bij gebruik onder bijzondere omstandigheden, bijvoorbeeld bij veel
stofontwikkeling of lange dagelijkse werktijden, dienen de aangegeven
intervallen overeenkomstig te worden verkort.
Onder-
deel
Actie Voor
aan-
vang
van het
werk
Na het
werk
Indien
nodig
Messen Visuele controle
X
Reinigen
XX

■ 54 │ NL│BE
PHSHE 900 B2
Garantie van
Kompernaß Handels GmbH
Geachte klant,
U hebt op dit apparaat 3 jaar garantie vanaf de aankoopdatum. In geval
van ge breken in dit product hebt u wettelijke rechten tegenover de ver-
koper van het product. Deze wettelijke rechten worden door onze hierna
beschreven garantie niet beperkt.
Garantievoorwaarden
De garantieperiode geldt vanaf de datum van aankoop. Bewaar de kas-
sabon zorgvuldig. U hebt hem nodig als bewijs van aankoop.
Als er binnen drie jaar vanaf de aankoopdatum van dit product een
materiaal- of fabricagefout optreedt, wordt - naar onze keuze - het product
door ons kosteloos gerepareerd of vervangen of wordt de koopprijs
terugbetaald. Voorwaarde voor deze garantie is dat het defecte apparaat
en het aankoopbewijs (kassabon) binnen de termijn van drie jaar worden
overlegd en dat kort wordt omschreven waaruit het gebrek bestaat en
wanneer het is opgetreden.
Wanneer het defect door onze garantie wordt gedekt, krijgt u het gerepa-
reerde product of een nieuw product retour. Met de reparatie of vervan-
ging van het product begint er geen nieuwe garantieperiode.
Garantieperiode en wettelijke aanspraken bij gebreken
De garantieperiode wordt door deze waarborg niet verlengd. Dat
geldt ook voor vervangen en gerepareerde onderdelen. Eventueel al bij
aankoop aanwezige schade en gebreken moeten meteen na het uitpak-
ken worden gemeld. Voor reparaties na afloop van de garantieperiode
worden kosten in rekening gebracht.
Garantieomvang
Het apparaat is op basis van strenge kwaliteitsnormen met de grootst
mogelijke zorg vervaardigd en voorafgaand aan de levering nauwkeurig
gecontroleerd.
De garantie geldt voor materiaal- of fabricagefouten. Deze garantie geldt
niet voor productonderdelen die onderhevig zijn aan normale slijtage en
die daarom als slijtonderdelen worden beschouwd, of voor schade aan
breekbare onderdelen zoals schakelaars, accu‘s of onderdelen die van
glas zijn gemaakt.
Deze garantie vervalt wanneer het product is beschadigd, ondeskundig
is gebruikt of is gerepareerd. Voor deskundig gebruik van het product
moeten alle in de gebruiksaanwijzing beschreven aanwijzingen precies
worden opgevolgd. Gebruiksdoeleinden en handelingen die in de ge-
bruiksaanwijzing worden afgeraden of waarvoor wordt gewaarschuwd,
moeten beslist worden vermeden.
Het product is uitsluitend bestemd voor privégebruik en niet voor bedrijfs-
matige doeleinden. Bij verkeerd gebruik en ondeskundige behandeling, bij
gebruik van geweld en bij reparaties die niet door ons erkend servicefiliaal
zijn uitgevoerd, vervalt de garantie.
Afhandeling bij een garantiekwestie
Voor een snelle afhandeling van uw aanvraag neemt u de volgende aanwij-
zingen in acht:
■ Houd voor alle aanvragen de kassabon en het artikelnummer
(bijv.IAN12345) als aankoopbewijs bij de hand.
■ Het artikelnummer vindt u op het typeplaatje van het product, op het
product gegraveerd, op de titelpagina van de gebruiksaanwijzing
(linksonder) of op de sticker op de achter- of onderkant van het pro-
duct.
■ Als er fouten in de werking of andere gebreken optreden, neemt u eerst
contract op met de hierna genoemde serviceafdeling, telefonisch of
viae-mail.
■ Een als defect geregistreerd product kunt u dan zonder portokosten
naar het aan u doorgegeven serviceadres sturen. Voeg het aankoopbe-
wijs (kassabon) bij en vermeld waaruit het gebrek bestaat en wanneer
het is opgetreden.
Op www.lidl-service.com kunt u deze en vele andere
handleidingen, productvideo‘s en installatiesoftware
downloaden.
Met deze QR-code gaat u direct naar de website van Lidl
Service (www.lidl-service.com) en kunt u met het invoeren
van het artikelnummer (IAN) 123456 de gebruiksaanwijzing openen.
OPMERKING
► Bij gereedschap van Parkside en Florabest: retourneer a.u.b. uitslui-
tend het defecte artikel zonder accessoires (bijv. accu, opbergkoffer,
montagegereedschap, enz.).
Service
WAARSCHUWING!
► Laat uw apparaten door het servicepunt of een elektricien repare-
ren, en uitsluitend met originele vervangingsonderdelen. Op die
manier blijft de veiligheid van het apparaat gewaarborgd.
► Laat de stekker of het snoer altijd vervangen door de fabrikant
van het apparaat of diens klantenservice. Op die manier blijft de
veiligheid van het apparaat gewaarborgd.
Service Nederland
Tel.: 0900 0400223 (0,10 EUR/Min.)
E-Mail: [email protected]
Service België
Tel.: 070 270 171 (0,15 EUR/Min.)
E-Mail: [email protected]
IAN 313266_1904
Importeur
Let op: het volgende adres is geen serviceadres. Neem eerst contact op
met het opgegeven serviceadres.
KOMPERNASS HANDELS GMBH
BURGSTRASSE 21
44867 BOCHUM
DUITSLAND
www.kompernass.com

NL│BE │ 55 ■
PHSHE 900 B2
Afvoeren
De verpakking bestaat uit milieuvriendelijke materialen, die u via
de plaatselijke recyclepunten kunt afvoeren. Het apparaat en de
accessoires bestaan uit verschillende materialen, zoals metaal en
kunststoffen.
Informatie over mogelijkheden voor het afvoeren van het afgedankte ap-
paraat krijgt u bij uw gemeentereinigingsdienst.
Milieubescherming
■ Leeg de olietank
zorgvuldig en lever uw apparaat in bij een recycle-
punt. De gebruikte onderdelen van kunststof en metaal kunnen worden
gescheiden voor hergebruik. Wend u voor informatie hierover tot onze
klantenservice.
■ Lever oude olie in bij een afvalverwerkingspunt en giet deze niet in de
riolering of in de afvoer.
■ Lever verontreinigd onderhoudsmateriaal en grondstoffen in bij een
daarvoor bestemd inzamelpunt.
Deponeer elektrisch gereedschap niet bij het
huisvuil!
Conform de Europese richtlijn 2012/19/EU moet afgedankt elektrisch
gereedschap gescheiden worden ingezameld en op een milieuvriendelijke
wijze worden gerecycled.
Het product is recycleerbaar; er is een uitgebreide producen-
tenverantwoordelijkheid op van toepassing en het afval wordt
gescheiden ingezameld.
Vervangende onderdelen
U kunt vervangende onderdelen direct bij de klantenservice bestellen.
Geef bij bestelling in ieder geval het type apparaat en het onderdeelnum-
mer op.
Vertaling van de oorspronkelijke
conformiteitsverklaring
Wij, KOMPERNASS HANDELS GMBH, documentverantwoordelijke
persoon: de heer Semi Uguzlu, BURGSTR. 21, 44867 BOCHUM,
DUITSLAND, verklaren hierbij dat dit product voldoet aan de volgende
normen, normatieve documenten en EU-richtlijnen:
Machinerichtlijn
(2006 / 42 / EC)
Elektromagnetische compatibiliteit
(2014 / 30 / EU)
Richtlijn voor geluidsemissie
2000 / 14 / EC
2005 / 88 / EC
Aangemelde instantie: Nr. 0036
TÜV SÜD Industrie Service GmbH, Westendstraße 199,
80686 München, Duitsland
Evaluatiemethode van de conformiteit conform Bijlage V.
Geluidsvermogensniveau LWA:
Gemeten: 102,2 dB (A)
Gegarandeerd: 105 dB (A)
RoHS–richtlijn
(2011 / 65 / EU)*
* De volledige verantwoordelijkheid voor het afgeven van deze conformi-
teitsverklaring ligt bij de fabrikant. Het hierboven beschreven object van
de verklaring voldoet aan de voorschriften van de Richtlijn 2011/65/EU
van het Europees Parlement en de Raad van 8juni 2011 aangaande de
beperking van het gebruik van bepaalde gevaarlijke stoffen in elektrische
en elektronische apparaten.
Toegepaste geharmoniseerde normen:
EN 60745-1: 2009/A11: 2010
EN ISO 10517: 2019
EN ISO 11680-1: 2011
EN 55014-1: 2017
EN 55014-2: 2015
EN 61000-3-2: 2014
EN 61000-3-3: 2013
EN 50581:2012
Type / apparaatbeschrijving:
2-in-1-telescopische heggenschaar/telescopische takkenschaar
PHSHE 900 B2
Productiejaar: 09 - 2019
Serienummer: IAN 313266_1904
Bochum, 11-09-2019
Semi Uguzlu
- Kwaliteitsmanager -
Technische wijzigingen vanwege verdere ontwikkeling voorbehouden.

■ 56 │ NL│BE
PHSHE 900 B2

PL │ 57 ■
PHSHE 900 B2
Spis treści
Wstęp........................................................................................58
Użytkowanie zgodne z przeznaczeniem nożyc do żywopłotów z długim trzonkiem...........................................58
Użytkowanie zgodne z przeznaczeniem piły do gałęzi .................................................................58
Użytkowanie zgodne zprzeznaczeniem ............................................................................58
Wyposażenie .................................................................................................58
Zakres dostawy ................................................................................................59
Dane techniczne ...............................................................................................59
Ogólne wskazówki bezpieczeństwa dla elektronarzędzi .............................................60
1. Bezpieczeństwo na stanowisku pracy.............................................................................60
2. Bezpieczeństwo elektryczne ....................................................................................60
3. Bezpieczeństwo osób .........................................................................................60
4. Zastosowanie i obsługa elektronarzędzia .........................................................................60
5. Serwis......................................................................................................61
Specyficzne dla urządzenia wskazówki bezpieczeństwa do nożyc do żywopłotów...........................................61
Uzupełniające wskazówki bezpieczeństwa do nożyc do żywopłotów .....................................................61
Dalsze wskazówki bezpieczeństwa do nożyc do żywopłotów............................................................62
RYZYKO RESZTKOWE!..........................................................................................62
Specyficzne dla urządzenia wskazówki bezpieczeństwa do piły do gałęzi .................................................62
Środki ostrożności przeciwko odbiciu narzędzia ......................................................................63
Dalsze wskazówki bezpieczeństwa ................................................................................63
Przed uruchomieniem...........................................................................64
Zespół napędowy ..............................................................................................64
Montaż uchwytu okrągłego ......................................................................................64
Zamocowanie/montaż pasa do przenoszenia........................................................................64
Montaż nożyc do żywopłotów ....................................................................................64
Montaż piły do gałęzi...........................................................................................64
Ustawianie nożyc do żywopłotów pod kątem ........................................................................64
Ustawianie piły do gałęzi pod kątem ...............................................................................64
Montaż łańcucha tnącego i prowadnicy.............................................................................64
Naprężanie i kontrola łańcucha tnącego ............................................................................64
Smarowanie łańcucha...........................................................................................65
Ostrzenie łańcucha tnącego ......................................................................................65
Uruchomienie .................................................................................65
Włączanie/wyłączanie..........................................................................................65
Przestawianie uchwytu ..........................................................................................65
Praca z nożycami do żywopłotów .................................................................................65
Użytkowanie maszyny: ..........................................................................................65
Techniki cięcia .................................................................................................65
Praca z piłą do gałęzi...........................................................................................65
Techniki piłowania..............................................................................................65
Bezpieczna praca ..............................................................................................66
Transport .....................................................................................66
Konserwacja iczyszczenie .......................................................................66
Przechowywanie ..............................................................................66
Wyszukiwanie usterek, piła do gałęzi .............................................................67
Wyszukiwanie usterek w nożycach do żywopłotów .................................................67
Terminy konserwacji piły do gałęzi ...............................................................67
Terminy konserwacji nożyc do żywopłotów ........................................................67
Gwarancja Kompernaß Handels GmbH ............................................................68
Serwis .......................................................................................68
Importer......................................................................................68
Utylizacja .....................................................................................69
Części zamienne ...............................................................................69
Tłumaczenie oryginalnej deklaracji zgodności ......................................................69

■ 58 │ PL
PHSHE 900 B2
2-W-1 NOŻYCE DO ŻYWOPŁOTU
Z DŁUGIM TRZONKIEM /
OKRZESYWARKA PHSHE 900 B2
Wstęp
Gratulujemy zakupu nowego urządzenia. Wybrany produkt charakte-
ryzuje się wysoką jakością. Instrukcja obsługi stanowi część niniejszego
produktu. Zawiera ona ważne informacje na temat bezpieczeństwa, użyt-
kowania iutylizacji. Przed rozpoczęciem użytkowania produktu należy
zapoznać się ze wszystkimi informacjami dotyczącymi obsługi ibezpie-
czeństwa. Produkt należy użytkować wyłącznie zgodnie zzamieszczonym
tu opisem oraz wpodanym zakresie zastosowań. W przypadku przeka-
zania urządzenia osobie trzeciej należy dołączyć do niego również całą
dokumentację.
Użytkowanie zgodne z przeznaczeniem nożyc
do żywopłotów z długim trzonkiem
To urządzenie jest przeznaczone do przycinania i formowania żywopło-
tów, krzaków i ozdobnych krzewów w przydomowych ogrodach. Jest to
prowadzone ręcznie urządzenie z wbudowanym napędem, w którym
umieszczone liniowo ostrza poruszają się w tę i z powrotem.
OSTRZEŻENIE!
► Dzieci nie mogą posługiwać się nożycami do żywopłotów.
Użytkowanie zgodne z przeznaczeniem piły do
gałęzi
To urządzenie jest przeznaczone do obcinania gałęzi drzew.
Użytkowanie zgodne zprzeznaczeniem
Urządzenia należy używać zgodnie zopisem iwpodanych zakresach
zastosowania. Urządzenie nie nadaje się do zastosowań komercyjnych.
Urządzenie jest przeznaczone do użytku przez osoby dorosłe. To urzą-
dzenie nie jest przeznaczone do użytku przez osoby (łącznie z dziećmi) o
ograniczonych zdolnościach fizycznych, sensorycznych lub psychicznych
lub nieposiadające doświadczenia i/lub potrzebnej wiedzy. Użytkowanie
urządzenia podczas deszczu lub w wilgotnym otoczeniu jest zabronione.
Jakiekolwiek inne użycie lub modyfikacje urządzenia uważane są za nie-
zgodne zprzeznaczeniem iniosą za sobą poważne niebezpieczeństwo
wypadku. Producent nie ponosi żadnej odpowiedzialności za szkody
powstałe wwyniku użycia urządzenia wsposób niezgodny zjego prze-
znaczeniem.
Wyposażenie
Zespół napędowy
Śruba dociskowa z przetyczką
Nakrętka
Wysięgnik
Śruba
Uchwyt okrągły
Ucho do przenoszenia
Element obrotowy
Przycisk odblokowujący
Blokada włączania
Włącznik/wyłącznik
Kabel zasilający
Zabezpieczenie przed wyrwaniem
Nasadka do przycinania krzewów
Belka noża
Obudowa przekładni
Blokada/odblokowanie
Płyta podstawy (nożyce do żywopłotów)
Dźwignia nastawcza
Uchwyt
Przedni wysięgnik
Kołek do aretowania
Wałek napędowy
Pokrywka ochronna
Piła do gałęzi
Pomoc do ostrzenia
Łańcuch tnący
Prowadnica
Ogranicznik
Zbiornik oleju
Nakrętka
Gwint
Osłona koła łańcuchowego
Otwór prowadnicy
Szyna prowadnicy
Szyna prowadząca
Olejarka kroplowa
Śruba naprężenia łańcucha tnącego
Koło łańcuchowe
Kołek naprężający łańcuch tnący
Przedni wysięgnik
Wałek napędowy
Pokrywka ochronna
Kołek do aretowania
Pierścień ochronny
Dźwignia nastawcza
Płyta podstawy (piła do gałęzi)
Blokada/odblokowanie
Pokrywka zbiornika oleju

PL │ 59 ■
PHSHE 900 B2
Zakres dostawy
1 Zespół napędowy PHSHE 900 B2
1 Nasadka do przycinania żywopłotów PHS 1 (zwana dalej nożycami
do żywopłotów)
1 Nasadka do cięcia gałęzi PHE 1 (dalej nazywana piłą do gałęzi)
Akcesoria
1
pas na ramię
1
osłona łańcucha
1
osłona prowadnicy
1
100 ml ekologicznego oleju do łańcucha
1
narzędzie montażowe
1 instrukcja obsługi
Dane techniczne
Zespół napędowy: PHSHE 900 B2
Napięcie znamionowe: 230 V ∼ 50 Hz (prąd przemienny)
Moc znamionowa: 900 W
Klasa ochrony: II /
(podwójna izolacja)
Masa:
(bez uchwytu i pasa do przenoszenia): ok. 2,7 kg
Piła do gałęzi: PHE 1
Prędkość przesuwu łańcucha tnącego: maks. 6 m/s
Kąt roboczy:
0°; 15°; 30°
Masa (w stanie gotowości do pracy): ok. 1,6 kg
Zalecane napełnienie zbiornika na olej: 100 cm
3
Długość cięcia: ok. 260 mm
Prowadnica: Oregon typ 100SDEA041
Łańcuch tnący: Oregon 91P040X
Nożyce do żywopłotów: PHS 1
Liczba skoków na biegu jałowym: 2000 obr/min
Kąt roboczy:
90°; +90°
Długość cięcia: ok. 410 mm
Odstęp zębów: 20 mm
Masa
(w stanie gotowości do pracy): ok. 2,1 kg
Informacje dotyczące poziomu hałasu idrgań:
Wartość pomiarowa hałasu określona zgodnie znormą EN 60745.
Korygowany współczynnikiem A poziom hałasu elektronarzędzia
wynosi zreguły:
Piła do gałęzi: PHE 1
Poziom ciśnienia akustycznego: L
PA
= 83 dB (A)
Niepewność pomiarów K: 3 dB
Poziom mocy akustycznej: L
WA
= 104 dB (A)
Niepewność pomiarów K: 3 dB
Nożyce do żywopłotów: PHS 1
Poziom ciśnienia akustycznego: L
PA
= 81 dB (A)
Niepewność pomiarów K: 3 dB
Poziom mocy akustycznej: L
WA
= 102 dB (A)
Gwarantowany poziom mocy akustycznej: L
WA
= 105 dB (A)
Niepewność pomiarów K: 3 dB
Wartości drgań (suma wektorów trzech kierunków) ustalone zgodnie
znormą EN 60745:
Piła do gałęzi:
Drgania na przednim uchwycie: wartość emisji drgań
a
h,D
= 1,0 m/s
2
Niepewność pomiarów K = 1,5 m/s
2
Drgania na tylnym uchwycie: wartość emisji drgań
a
h, D
= 1,2 m/s
2
Niepewność pomiarów K = 1,5 m/s
2
Nożyce do żywopłotów:
Drgania na przednim uchwycie: wartość emisji drgań
a
h, D
= 1,6 m/s
2
Niepewność pomiarów K = 1,5 m/s
2
Drgania na tylnym uchwycie: wartość emisji drgań
a
h, D
= 1,8 m/s
2
Niepewność pomiarów K = 1,5 m/s
2
Nosić ochronniki słuchu!
WSKAZÓWKA
► Poziom drgań podany wtych instrukcjach został zmierzony zgodnie
zmetodą pomiarową, określoną wnormie EN 60745 imoże być
użyty do porównywania urządzeń. Podana wartość emisji drgań
może posłużyć także do wstępnej oceny stopnia narażenia.
OSTRZEŻENIE!
► Poziom drgań będzie zmieniał się wzależności od rodzaju zastosowa-
nia elektronarzędzia iwniektórych przypadkach może przekraczać
wartość podaną wniniejszych instrukcjach. Narażenie na drgania
mogłoby zostać nieprawidłowo ocenione, gdyby elektronarzędzie
było regularnie wykorzystywane wtaki sposób. Należy starać się, aby
obciążenie drganiami było jak najmniejsze. Przykładowe środki ma-
jące na celu zmniejszenie narażenia na drgania to noszenie rękawic
wtrakcie korzystania znarzędzia iograniczenie czasu pracy. Należy
przy tym uwzględnić wszystkie części cyklu pracy (na przykład czas,
przez jaki elektronarzędzie pozostaje wyłączone, oraz czas, wktórym
jest ono wprawdzie włączone, ale pracuje bez obciążenia).
Objaśnienia do naklejek informacyjnych, znajdujących się
na urządzeniu:
Przed uruchomieniem przeczytać instrukcję
obsługi i wskazówki bezpieczeństwa!
Nosić rękawice ochronne!
Nosić obuwie ochronne!
Nosić ochronniki słuchu!
Nosić kask ochronny!
Nosić okulary ochronne!

■ 60 │ PL
PHSHE 900 B2
Znajdujące się w pobliżu osoby trzymać z dala
od urządzenia!
Chronić urządzenie przed deszczem i wilgocią!
Zagrożenie dla życia na skutek porażenia prą-
dem! Trzymać się co najmniej 10 m od
napowietrznych linii energetycznych.
Uwaga! Spadające przedmioty.
Szczególnie podczas cięcia ponad głową.
Uwaga! Niebezpieczeństwo zranienia przez
obracające się noże.
Natychmiast wyjąć wtyk z gniazda zasilają-
cego, jeśli przewód zostanie uszkodzony lub
przecięty.
Informacja o poziomie mocy akustycznej
LWA w dB.
Ogólne wskazówki
bezpieczeństwa dla
elektronarzędzi
OSTRZEŻENIE!
► Przeczytaj wszystkie wskazówki bezpieczeństwa oraz instrukcje.
Nieprzestrzeganie poniższych wskazówek bezpieczeństwa oraz
instrukcji może być przyczyną porażenia prądem elektrycznym,
pożaru i/lub ciężkich obrażeń ciała.
Wszystkie wskazówki bezpieczeństwa oraz instrukcje
należy zachować do późniejszego wykorzystania.
Użyte we wskazówkach bezpieczeństwa pojęcie „elektronarzędzie“ doty-
czy narzędzi elektrycznych zasilanych zsieci (przez kabel sieciowy) oraz
narzędzi elektrycznych zasilanych akumulatorami (bez kabla sieciowego).
1. Bezpieczeństwo na stanowisku pracy
a) Stanowisko pracy należy utrzymywać wczystości idbać ojego
dobre oświetlenie. Nieporządek iniedostateczne oświetlenie mogą
być przyczyną wypadków.
b) Nigdy nie używaj elektronarzędzia wotoczeniu zagrożonym wy-
buchem, wktórym znajdują się łatwopalne ciecze, gazy lub pyły.
Elektronarzędzia wytwarzają iskry, które mogą spowodować zapłon
pyłu lub oparów.
c) W czasie użytkowania elektronarzędzia zwróć uwagę na to, aby
wpobliżu nie przebywały dzieci ani żadne inne osoby. W przypadku
odwrócenia uwagi od pracy możesz stracić kontrolę nad urządzeniem.
2. Bezpieczeństwo elektryczne
a) Wtyk przyłączeniowy elektronarzędzia musi pasować do gniazda
zasilania. Dokonywanie zmian we wtyku jest zabronione.
Nigdy nie używaj adapterów wtyków wpołączeniu zelektronarzę-
dziami mającymi uziemienie. Oryginalne wtyki oraz pasujące gniaz-
da wtykowe zmniejszają ryzyko porażenia prądem elektrycznym.
b) Unikaj kontaktu zuziemionymi powierzchniami, takimi jak rury,
grzejniki, kuchenki lub lodówki. Zetknięcie się zuziemionym przed-
miotem zwiększa ryzyko porażenia prądem elektrycznym.
c) Nigdy nie narażaj elektronarzędzia na działanie deszczu lub
wilgoci. Przedostanie się wody do wnętrza elektronarzędzia zwiększa
ryzyko porażenia prądem elektrycznym.
d) Nigdy nie chwytaj za kabel, np. wcelu przeniesienia bądź zawie-
szenia elektronarzędzia lub wyciągnięcia wtyku zgniazda zasila-
nia. Chroń kabel przed źródłami gorąca, olejem, ostrymi krawę-
dziami lub poruszającymi się częściami urządzenia. Uszkodzone lub
poskręcane kable zwiększają ryzyko porażenia prądem elektrycznym.
e) Podczas pracy zelektronarzędziem na zewnątrz stosuj wyłącznie
przedłużacze, które są dopuszczone również do użytku na zewnątrz
pomieszczeń. Stosowanie przedłużacza przystosowanego do pracy
na zewnątrz pomieszczeń zmniejsza ryzyko porażenia prądem elek-
trycznym.
f) Jeśli nie da się uniknąć pracy zelektronarzędziem wwilgotnym
otoczeniu, zastosuj wyłącznik różnicowo-prądowy. Zastosowanie
wyłącznika różnicowo-prądowego zmniejsza ryzyko porażenia prą-
dem elektrycznym.
3. Bezpieczeństwo osób
a) Zawsze zachowuj ostrożność iuważaj na to, co robisz. Praca
zelektronarzędziem wymaga także zachowania zasad zdrowego
rozsądku. Nie korzystaj zelektronarzędzia wprzypadku przemę-
czenia, bycia pod wpływem narkotyków, alkoholu lub lekarstw.
Nawet chwila nieuwagi podczas korzystania zelektronarzędzia może
spowodować poważne obrażenia ciała.
b) W czasie pracy noś środki ochrony indywidualnej iobowiązkowo
okulary ochronne. Noszenie środków ochrony indywidualnej, np.
maski przeciwpyłowej, antypoślizgowego obuwia roboczego, kasku
lub ochronników słuchu - wzależności od rodzaju zastosowania elek-
tronarzędzia - zmniejsza ryzyko odniesienia obrażeń.
c) Unikaj sytuacji prowadzących do przypadkowego uruchomienia
urządzenia. Przed podłączeniem do zasilania sieciowego i/lub aku-
mulatora, chwyceniem lub przeniesieniem urządzenia upewnij się,
że elektronarzędzie jest wyłączone. Trzymanie palca na wyłączniku
wtrakcie przenoszenia elektronarzędzia lub podłączenie elektronarzę-
dzia do zasilania zwciśniętym już wyłącznikiem może doprowadzić
do wypadku.
d) Przed włączeniem elektronarzędzia usuń wszystkie przyrządy regu-
lacyjne lub klucze. Narzędzie lub klucz pozostawiony wobracającej
się części urządzenia może spowodować obrażenia ciała.
e) Unikaj nienaturalnej postawy ciała. Zadbaj outrzymanie stabilnej
postawy iprzez cały czas utrzymuj równowagę. Pozwoli to na lepszą
kontrolę elektronarzędzia wprzypadku nieoczekiwanych sytuacji.
f) Noś odpowiednią odzież. Nie nosić luźnych ubrań ani biżuterii.
Włosy, odzież irękawice trzymaj zdala od ruchomych części urzą-
dzenia. Ruchome części urządzenia mogą pochwycić luźną, odstającą
odzież, biżuterię lub długie włosy.
g) Jeżeli możliwe jest podłączenie odciągu izbiornika pyłu, upewnij
się, że są one podłączone iużywane wsposób prawidłowy. Zasto-
sowanie odciągu pyłowego może zmniejszyć zagrożenia związane
zzapyleniem.
4. Zastosowanie i obsługa elektronarzędzia
a) Nie przeciążaj urządzenia. Elektronarzędzia używaj tylko do ściśle
określonego zakresu zastosowania. Elektronarzędzie pracuje lepiej
i bezpieczniej, gdy podczas eksploatacji przestrzegasz jego parame-
trów mocy.
b) Nie używaj elektronarzędzia zuszkodzonym wyłącznikiem.
Elektronarzędzie, którego nie można włączyć ani wyłączyć, stanowi
zagrożenie i musi zostać niezwłocznie naprawione.
c) Przed dokonaniem ustawień urządzenia, wymianą narzędzi ro-
boczych lub odłożeniem elektronarzędzia na bok wyciągnij wtyk
zgniazda zasilania i/lub wyjmij akumulator.. Uniemożliwi to przy-
padkowe uruchomienie elektronarzędzia.
d) Nieużywane elektronarzędzia przechowuj poza zasięgiem dzieci.
Nie pozwalaj na używanie urządzenia przez osoby, które nie
wiedzą, jak się znim obchodzić lub nie przeczytały niniejszych
instrukcji. Elektronarzędzia wrękach osób niedoświadczonych mogą
być niebezpieczne.

PL │ 61 ■
PHSHE 900 B2
e) Elektronarzędzia wymagają starannej pielęgnacji. Należy spraw-
dzić, czy ruchome elementy działają prawidłowo i nie blokują się,
czy żaden z elementów nie pękł ani nie jest uszkodzony w stopniu
uniemożliwiającym prawidłowe działanie elektronarzędzia. Przed
użyciem urządzenia zleć naprawę uszkodzonych części. Przyczyną
wielu wypadków zelektronarzędziami jest ich niewłaściwa konserwacja.
f) Dbaj oto, aby narzędzia skrawające były ostre iczyste. Zadbane
narzędzia skrawające zostrymi ostrzami rzadziej się blokują ipozwa-
lają się lepiej prowadzić.
g) Korzystaj zelektronarzędzia, akcesoriów, narzędzi roboczych itd.
zgodnie ztymi instrukcjami. Uwzględnij przy tym warunki pracy
oraz specyfikę wykonywanej czynności. Używanie elektronarzędzi
do celów innych, niż przewiduje to ich przeznaczenie, może doprowa-
dzić do niebezpiecznych sytuacji.
5. Serwis
a) Naprawę urządzenia należy zlecać tylko wykwalifikowanemu spe-
cjaliście i stosować do tego oryginalne części zamienne. Dzięki temu
zapewnione jest bezpieczeństwo użytkowania elektronarzędzia.
Specyficzne dla urządzenia wskazówki bezpie-
czeństwa do nożyc do żywopłotów
■ Wszystkie części ciała trzymać z dala od noża tnącego. Nie próbo-
wać przy pracującym nożu usuwać ściętego materiału ani go przy-
trzymywać. Zakleszczony materiał usuwać tylko przy wyłączonym
urządzeniu. Dodatkowo wyciągnij wtyk z gniazda zasilania. Nawet
chwila nieuwagi podczas korzystania z nożyc może spowodować
poważne obrażenia ciała.
■ Nosić nożyce za przedni uchwyt, w stanie wyłączonym, z belką
noża skierowaną od ciała. Podczas transportu lub w czasie prze-
chowywania zawsze zakładać osłonę ochronną. Staranne obcho-
dzenie się z urządzeniem zmniejsza prawdopodobieństwo przypadko-
wego dotknięcia pracujących noży.
■ Trzymać narzędzie tylko za izolowane uchwyty, ponieważ nóż
tnący może trafić na ukryte przewody pod napięciem lub na własny
przewód zasilający. Kontakt z przewodem przewodzącym prąd może
spowodować pojawienie się napięcia również w metalowych elemen-
tach urządzenia i spowodować porażenie prądem.
■ Przewód sieciowy trzymaj z dala od obszaru cięcia. W trakcie pracy
przewód może zostać zakryty przez roślinność i może dojść do jego
przypadkowego przecięcia.
■ Należy starannie skontrolować żywopłot do przycięcia i usunąć wszelkie
druty oraz ciała obce.
■ Zaleca się stosowanie wyłącznika różnicowo-prądowego o prądzie
wyzwalającym 30 mA lub mniej.
WSKAZÓWKA
►
Nożyce do żywopłotów są dostarczane w stanie kompletnie
zmontowanym.
► Ilustracje przedstawiające sposób pracy z nożycami do krzewów
wzgl. ich elementy nastawcze można znaleźć na rozkładanej
okładce.
► Informacje i ilustracje na temat ustawień, konserwacji i smarowania
przez użytkownika znajdują się w niniejszej instrukcji.
► Wskazówki na temat pozycji podczas pracy (patrz rozkładana
strona okładki).
► Wskazówki na temat elementów ustawczych (patrz rozkładana
strona okładki).
► Wskazówki na temat wymiany i naprawy (patrz rozdz. Konserwacja
i czyszczenie / serwis).
► Wyjaśnienie wszystkich symboli graficznych, zastosowanych w
nożycach do żywopłotów oraz dane techniczne znajdują się w
niniejszej instrukcji.
► Cechy nożyc do żywopłotów są podane w danych technicznych.
► Zablokowane narzędzie: usunąć blokujący materiał z belki noża
.
UWAGA!
► W razie zagrożenia lub w sytuacji awaryjnej natychmiast wyłączyć
silnik i wyjąć wtyk przewodu zasilającego.
Uzupełniające wskazówki bezpieczeństwa do
nożyc do żywopłotów
Przygotowanie:
a) TE NOŻYCE DO ŻYWOPŁOTÓW MOGĄ SPOWODOWAĆ POWAŻ-
NE OBRAŻENIA! Należy starannie przeczytać instrukcje w sprawie
poprawnego obchodzenia się z nożycami do żywopłotów, ich przygo-
towania, naprawy, uruchamiania i odstawiania. Należy zapoznać się
ze wszystkimi elementami nastawczymi oraz z prawidłowym obcho-
dzeniem się z nożycami do żywopłotów.
b) Dzieci nigdy nie mogą używać nożyc do żywopłotów.
c) Uwaga na napowietrzne przewody energetyczne.
d) Należy zrezygnować z posługiwania się nożycami do żywopłotów,
gdy w pobliżu znajdują się inne osoby, w szczególności dzieci.
e) Nosić odpowiednią odzież! Nie nosić luźnej odzieży ani biżuterii;
mogłyby one zostać wciągnięte przez ruchome części. Zaleca się no-
szenie wytrzymałych rękawic, obuwia z przeciwpoślizgową podeszwą
i okularów ochronnych.
f) Jeżeli element tnący dotyka ciała obcego, odgłosy pracy stają się gło-
śniejsze lub nożyce do żywopłotów wpadają w nienormalne drgania,
wyłączyć silnik i odczekać na zatrzymanie się urządzenia.
Wykonać następujące czynności:
– sprawdzić, czy narzędzie nie jest uszkodzone;
– sprawdzić, czy są obluzowane części i ew. zamocować je;
– uszkodzone części wymienić na równoważne lub zlecić naprawę.
g)
Nosić ochronniki słuchu!
h)
Nosić ochronę oczu!
i) Aby w sytuacji awaryjnej zatrzymać nożyce do żywopłotów, wyciągnij
wtyk sieciowy z gniazda zasilania.

■ 62 │ PL
PHSHE 900 B2
Praca:
a) wyjmij wtyk z gniazda zasilania przed następującymi czynnościami:
– czyszczenie lub usuwanie elementów blokujących;
– kontrola, naprawa lub prace przy nożycach do żywopłotów;
– ustawianie pozycji roboczej urządzenia tnącego;
– oraz gdy nożyce do żywopłotów pozostają bez nadzoru.
b) Przed uruchomieniem silnika zawsze dopilnować, by nożyce do żywo-
płotów znajdowały się w jednej z przepisanych pozycji roboczych.
c) Podczas pracy z nożycami do żywopłotów należy zawsze przestrze-
gać bezpiecznej pozycji roboczej, szczególnie podczas pracy na
schodkach lub na drabinie.
d) Nie eksploatować nożyc do żywopłotów z uszkodzonym lub silnie
zużytym urządzeniem tnącym.
e) Dopilnować, by podczas pracy wszystkie uchwyty i urządzenia za-
bezpieczające nożyc do żywopłotów były zamontowane. Nigdy nie
próbować pracować z niekompletnymi nożycami do żywopłotów lub
z niedozwolonymi przeróbkami.
f) Nożyce do żywopłotów mocno trzymać oburącz za przewidziane do
tego uchwyty.
g) Zawsze należy zapoznać się z otoczeniem i zwracać uwagę na możliwe
zagrożenia, które mogą być niesłyszalne z powodu hałasu wytwarza-
nego przez nożyce.
Konserwacja i przechowywanie:
a) Jeżeli nożyce do żywopłotów mają być unieruchomione w celu konser-
wacji, kontroli lub przechowania, należy wyłączyć silnik, aby wszystkie
części obrotowe zatrzymały się. Przed sprawdzaniem, ustawianiem itp.
należy odczekać na schłodzenie się urządzenia.
b) Nożyce do żywopłotów przechowywać w takim miejscu, w którym
opary benzyny nie wejdą w kontakt z otwartym płomieniem ani iskra-
mi. Przed odłożeniem nożyc do przechowywania należy zawsze od-
czekać, aż się schłodzą.
c) Podczas transportu lub na czas przechowywania nożyc do żywopłotów
należy zawsze zakładać osłonę urządzenia tnącego.
Dalsze wskazówki bezpieczeństwa do nożyc do
żywopłotów
■ Wszystkie części ciała trzymać z dala od noża tnącego. Nie próbo-
wać przy pracującym nożu usuwać ściętego materiału ani go przytrzy-
mywać. Zakleszczony materiał usuwać tylko przy wyłączonym urzą-
dzeniu. Nawet chwila nieuwagi podczas korzystania z nożyc może
spowodować poważne obrażenia ciała.
■ Nosić nożyce za uchwyt, w stanie wyłączonym, z belką noża skie-
rowaną od ciała. Podczas transportu lub w czasie przechowywania
zawsze zakładać osłonę ochronną. Staranne obchodzenie się z urzą-
dzeniem zmniejsza niebezpieczeństwo obrażeń ciała spowodowanych
przez noże.
■ Trzymać urządzenie tylko za izolowane uchwyty, ponieważ nóż tnący
może trafić na ukryte przewody pod napięciem lub na własny przewód
zasilający. Kontakt z przewodem przewodzącym prąd może spowo-
dować pojawienie się napięcia również w metalowych elementach
urządzenia i spowodować porażenie prądem.
♦ Przeszukać żywopłot, czy nie ma w nim ukrytych przedmiotów
(np. ogrodzeń drucianych).
RYZYKO RESZTKOWE!
Nawet jeśli używa się tego elektronarzędzia prawidłowo, zawsze pozostają
ryzyka resztkowe. Poniższe zagrożenia mogą powstać w związku z kon-
strukcją i wykonaniem tego elektronarzędzia:
a) skaleczenia
b) uszkodzenia słuchu, jeśli nie nosi się odpowiedniej ochrony słuchu.
c) szkody zdrowotne wynikające z drgań dłoń/ramię, jeśli urządzenie jest
używane przez dłuższy czas, albo też nie jest odpowiednio prowadzo-
ne lub konserwowane.
WSKAZÓWKA
► Nożyce do żywopłotów są dostarczane w stanie kompletnie zmon-
towanym.
► Informacje i ilustracje na temat ustawień, konserwacji i smarowania
przez użytkownika znajdują się w niniejszej instrukcji.
► Wskazówki na temat wymiany i naprawy (patrz rozdz. Konserwacja
i czyszczenie / serwis).
► Wyjaśnienie wszystkich symboli graficznych, zastosowanych w noży-
cach do żywopłotów oraz dane techniczne znajdują się w niniejszej
instrukcji.
► Cechy nożyc do żywopłotów są podane w danych technicznych.
► Zablokowane narzędzie: usunąć blokujący materiał z belki noża .
■ Korzystać wyłącznie z osprzętu i przyrządów dodatkowych, które
zostały wymienione w instrukcji obsługi. Korzystanie z narzędzi lub
akcesoriów innych, niż podano w instrukcji obsługi, może doprowadzić
do obrażeń.
Specyficzne dla urządzenia wskazówki
bezpieczeństwa do piły do gałęzi
■ Zawsze nosić kask ochronny, ochronniki słuchu i rękawice bezpieczeń-
stwa. Nosić okulary ochronne, by do oczu nie dostały się krople oleju
czy trociny. Nosić maskę przeciwpyłową.
■ Nigdy nie używać urządzenia stojąc na drabinie.
■ Podczas używania urządzenia nie wychylać się nadmiernie do przodu.
Zawsze dbać o utrzymanie stabilnej postawy i przez cały czas utrzy-
mywać równowagę. Podczas pracy używać dołączonego pasa do
przenoszenia, by równomiernie rozłożyć ciężar na ciele.
■ Nosić wytrzymałe, przeciwpoślizgowe buty z cholewą.
■ Nie używać urządzenia podczas deszczu ani przy dużej wilgotności.
■ Nie używać urządzenia wpobliżu przewodów pod napięciem. Utrzy-
mywać odstęp co najmniej 10 metrów od napowietrznych linii energe-
tycznych.
■ Nie stawać pod gałęziami, które mają zostać obcięte, by uniknąć
obrażeń na skutek ich upadku. Uważać na odskakujące gałęzie, by
uniknąć obrażeń. Pracować pod kątem 60° ±10°.
■ Należy pamiętać, że może dojść do odbicia urządzenia.
■ Należy obserwować nie tylko obcinane gałęzie, ale także spadający
materiał, by uniknąć potknięcia.
■ Po 30 minutach pracy konieczna jest przerwa na co najmniej jedną
godzinę.
■ Zawsze nosić odpowiednie rękawice ochronne.
■ Na czas przechowywania i transportu założyć osłonę na szynę prowa-
dzącą i łańcuch tnący.
■ Nie używać urządzenia w otoczeniu grożącym wybuchem, jak np. w
pobliżu łatwopalnych cieczy, gazów lub oparów. Wytwarzane przez
urządzenie iskry mogłyby spowodować zapłon tych oparów lub ga-
zów.
■ Gniazdo zasilające musi być odpowiednie do wtyku. Nigdy nie prze-
rabiać wtyku, by nie spowodować porażenia prądem elektrycznym.
■ Nie wyjmować wtyku z gniazda ciągnąc za przewód, ale zawsze
chwytać za wtyk. Nie używać przewodu sieciowego do przeciągania
lub transportowania urządzenia. Nie dopuścić do kontaktu przewodu
sieciowego z wysoką temperaturą, olejami, ostrymi krawędziami i ru-
chomymi częściami.
■ Po zakończeniu pracy lub podczas czyszczenia i konserwacji wyjąć
wtyk z urządzenia.
■ Należy unikać niezamierzonego uruchomienia urządzenia.

PL │ 63 ■
PHSHE 900 B2
■ Urządzenia z uszkodzonym wyłącznikiem należy natychmiast naprawiać,
by nie dopuścić do szkód i obrażeń.
■ Urządzenie należy przechowywać poza zasięgiem dzieci.
■ Tym urządzeniem mogą się posługiwać tylko osoby zaznajomione z
instrukcją obsługi i z samym urządzeniem.
■ Starannie konserwować elektronarzędzia. Należy sprawdzić, czy
ruchome elementy działają prawidłowo i nie blokują się, czy żaden z
elementów nie pękł ani nie jest uszkodzony w stopniu uniemożliwiają-
cym prawidłowe działanie elektronarzędzia. Przed użyciem urządze-
nia zleć naprawę uszkodzonych części. Przyczyną wielu wypadków
zelektronarzędziami jest ich niewłaściwa konserwacja.
■ Dbać o to, aby narzędzia skrawające były ostre i czyste. Zadbane
narzędzia skrawające zostrymi ostrzami rzadziej się blokują ipozwa-
lają się lepiej prowadzić.
■ Konserwację urządzenia zlecać specjalistom. Stosować wyłącznie
oryginalne części zamienne, zalecane przez producenta.
Środki ostrożności przeciwko odbiciu narzędzia
UWAGA ODBICIE!
► Podczas pracy należy wystrzegać się odbicia urządzenia. Istnieje
niebezpieczeństwo zranienia. Należy unikać odbić, zachowując
ostrożność i stosując właściwą technikę piłowania.
■ Dotknięcie czubkiem szyny może w niektórych przypadkach spowodo-
wać nieoczekiwany, gwałtowny ruch do tyłu, w trakcie którego szyna
jest odbijana do góry i w kierunku operatora (patrz rys.).
■ Do odbicia może dojść wtedy, gdy czubek szyny prowadzącej dotknie
przedmiotu lub gdy drewno się wygnie i łańcuch zostanie zakleszczo-
ny w drewnie (patrz rys.).
■ Zakleszczenie piły łańcuchowej na górnej krawędzi szyny prowadzą-
cej może spowodować silne odbicie szyny w kierunku operatora.
■ Każda z tych reakcji może spowodować utratę kontroli nad piłą i ewen-
tualne obrażenia. Nie należy zdawać się wyłącznie na wbudowane
w piłę łańcuchową urządzenia zabezpieczające. Użytkownik piły
łańcuchowej powinien stosować różne środki ostrożności, by uniknąć
obrażeń i wypadków. Odbicie jest skutkiem nieodpowiedniego lub
wadliwego użytkowania elektronarzędzia. Można mu zapobiec za
pomocą odpowiednich środków bezpieczeństwa, jak opisano poniżej:
■ Piłę należy mocno trzymać oburącz, przy czym kciuki i palce po-
winny obejmować uchwyty piły łańcuchowej. Ciało i ręce należy
utrzymywać w takiej pozycji, by móc odeprzeć siłę odbicia. Gdy
zastosowano odpowiednie środki, operator jest w stanie opanować
siłę odbicia. Nigdy nie wypuszczać piły łańcuchowej z rąk.
■ Unikać nienaturalnej postawy ciała i nie piłować powyżej wysokości
ramion. Unika się w ten sposób niezamierzonego dotknięcia wierz-
chołka szyny, a jednocześnie zapewnia to lepszą kontrolę nad piłą w
nieoczekiwanych sytuacjach.
■ Zawsze stosować zalecane przez producenta szyny zamienne i
łańcuchy tnące.Niewłaściwe szyny zamienne i łańcuchy tnące mogą
spowodować zerwanie łańcucha i/lub odbicie.
■ Należy stosować się do zaleceń producenta na temat ostrzenia i
konserwacji łańcucha tnącego. Zbyt niskie ograniczniki głębokości
zwiększają skłonność do powstawania odbić.
■ Nie należy piłować wierzchołkiem prowadnicy. Istnieje niebezpie-
czeństwo odbicia.
■ Należy dopilnować, by na podłożu nie było żadnych przedmiotów,
o które można by się potknąć.
Dalsze wskazówki bezpieczeństwa
PRZESTROGA! NIEBEZPIECZEŃSTWO OBRAŻEŃ!
► Podczas pracy nigdy nie chwytać urządzenia powyżej pierścienia
ochronnego
, by uniknąć obrażeń!
■ Podczas pracy w promieniu 15 metrów nie mogą przebywać inne
osoby ani zwierzęta. Użytkownik jest odpowiedzialny za osoby trzecie
w strefie pracy.
■ Utrzymywać urządzenie, narzędzia tnące i osłonę prowadnicy łańcucha
w dobrym stanie, by uniknąć obrażeń.
■ Należy zapewnić nadzór nad dziećmi, aby nie bawiły się urządzeniem.
■ Urządzeniem należy się posługiwać dopiero po zaznajomieniu się z
nim.
■ Nigdy nie pracować z uszkodzonym, niekompletnym lub zmodyfikowa-
nym bez zgody producenta urządzeniem. Nigdy nie pracować, gdy
urządzenia zabezpieczające są uszkodzone. Nie używać urządzenia,
gdy włącznik/wyłącznik jest uszkodzony. Przed użyciem sprawdzić
stan bezpieczeństwa urządzenia, w szczególności prowadnicę i łań-
cuch tnący. Jeżeli urządzenie upadło, sprawdzić, czy nie ma poważ-
nych uszkodzeń.
■ Nigdy nie uruchamiać urządzenia, jeśli prowadnica, piła łańcuchowa
i osłona koła łańcuchowego nie są poprawnie zamontowane.
■ Podczas uruchamiania i pracy dopilnować, by urządzenie nie stykało
się z podłożem, kamieniami, drutem i innymi ciałami obcymi. Przed
odstawieniem urządzenia należy je wyłączyć.
■ Urządzenie jest przeznaczone do pracy oburącz. Nigdy nie pracować
z użyciem jednej ręki.
■ Trzymać narzędzie tylko za izolowane uchwyty, ponieważ łańcuch tnący
może trafić na ukryte przewody pod napięciem. Kontakt łańcucha tnące-
go z przewodem przewodzącym prąd może spowodować pojawienie
się napięcia również w metalowych elementach urządzenia i spowodo-
wać porażenie prądem.
■ Podczas zmiany miejsca pracy należy uważać na to, aby urządzenie
było wyłączone, a palec nie dotykał włącznika/wyłącznika. Urządzenie
przenosić z łańcuchem tnącym i prowadnicą skierowaną do tyłu. Na
czas transportu zakładać osłonę prowadnicy.
■ Przy każdym cięciu zakładać zderzak oporowy zębaty i dopiero wte-
dy rozpoczynać piłowanie.
■ Zachować szczególną ostrożność podczas cięcia małych krzewów i
gałęzi. Cienkie gałęzie mogą zaplątać się w pile oraz odbić w kierunku
operatora, powodując ewentualną utratę równowagi.
■ Nie ciąć drewna leżącego na ziemi ani nie próbować wycinać korzeni
wystających z ziemi. Należy bezwzględnie unikać zagłębiania łańcu-
cha tnącego w glebie, gdyż w przeciwnym razie piła natychmiast się
stępi.
■ Podczas piłowania naprężonej gałęzi należy uważać na możliwe odbi-
cie po uwolnieniu naprężenia. Istnieje niebezpieczeństwo zranienia.
■ W przypadku przekoszenia lub zablokowania narzędzia tnącego
w gałęziach nie wolno próbować siłą uwolnić tego urządzenia. Na-
tychmiast wyłączyć urządzenie i ponownie włączyć dopiero po uwol-
nieniu urządzenia. Niebezpieczeństwo odniesienia obrażeń!
Bild 1

■ 64 │ PL
PHSHE 900 B2
Przed uruchomieniem
PRZESTROGA! NIEBEZPIECZEŃSTWO OBRAŻEŃ!
► Przed wykonywaniem wszelkich czynności przy urządzeniu należy
wyjąć wtyk przewodu zasilającego z gniazda.
Niebezpieczeństwo porażenia prądem elektrycznym!
Zespół napędowy
Montaż uchwytu okrągłego
♦ Załóż uchwyt okrągły w żądanym położeniu na wysięgnik .
♦ Dokręć śrubę
do oporu.
Zamocowanie/montaż pasa do przenoszenia
♦ Zaczep pas do przenoszenia za oczko .
♦ Dopasuj pas do przenoszenia
do swojego wzrostu w taki sposób, by
oczko
przy zawieszonym urządzeniu znajdowało się na wysokości
bioder.
Montaż nożyc do żywopłotów
♦ Wsunąć przedni wysięgnik nożyc do żywopłotów na wysięgnik
zespołu napędowego.
♦ Kołek aretujący
musi się zatrzasnąć.
♦ Połączyć oba wysięgniki
śrubą dociskową z przetyczką ,
nakręcić nakrętkę
po przeciwnej stronie.
Montaż piły do gałęzi
♦ Wsunąć przedni wysięgnik piły do gałęzi na wysięgnik zespołu
napędowego.
♦ Kołek aretujący
musi się zatrzasnąć.
♦ Połączyć oba wysięgniki
śrubą dociskową z przetyczką ,
nakręcić nakrętkę
po przeciwnej stronie.
Ustawianie nożyc do żywopłotów pod kątem
♦ Zwolnić blokadę .
♦ Nacisnąć dźwignię nastawczą
, obrócić nożyce do żywopłotów do
żądanego położenia.
♦ Pozwolić, by dźwignia nastawcza
i blokada zatrzasnęła się
w płycie podstawy
nożyc.
Ustawianie piły do gałęzi pod kątem
♦ Zwolnić blokadę .
♦ Nacisnąć dźwignię nastawczą
, obrócić piłę do gałęzi do jednej
z dwóch pozycji.
♦ Pozwolić, by dźwignia nastawcza
i blokada zatrzasnęły się
w wycięciu płyty podstawy (piła do gałęzi)
.
Montaż łańcucha tnącego i prowadnicy
OSTRZEŻENIE!
► Nosić rękawice ochronne! Niebezpieczeństwo zranienia przez ostre
zęby tnące!
WSKAZÓWKA
►
Przestrzegać kierunku biegu łańcucha tnącego
na prowadnicy
i na osłonie koła łańcuchowego .
► W chwili dostawy prowadnica
i łańcuch tnący są już
zmontowane.
► Zależnie od zużycia, prowadnicę można obrócić.
♦ Odkręcić nakrętkę
narzędziem montażowym .
♦ Zdjąć osłonę koła łańcuchowego
.
♦ Łańcuch tnący
należy ew. wcześniej poluzować, by móc wymonto-
wać prowadnicę
i łańcuch (patrz rozdz. „Naprężanie i kontrola
łańcucha tnącego”). Wykonać te polecenia w odwrotnej kolejności.
♦ Wymontować prowadnicę
z łańcuchem tnącym z płyty podsta-
wy
.
♦ Łańcuch tnący
zakładać ponownie od początku prowadnicy .
♦ Szynę prowadzącą
założyć nad prowadnicą , włożyć przy tym
kołek naprężenia łańcucha
do otworu prowadnicy . Jednocze-
śnie przełożyć łańcuch tnący
przez koło łańcuchowe .
♦ Zamontować ponownie osłonę koła łańcuchowego
i lekko dokręć
nakrętką
.
♦ Teraz należy naprężyć łańcuch tnący
(patrz rozdz. Naprężanie i
kontrola łańcucha tnącego).
Naprężanie i kontrola łańcucha tnącego
WSKAZÓWKA
►
Naprężenie łańcucha tnącego
jest ważne dla bezpieczeństwa
użytkownika oraz działania urządzenia. Prawidłowo naciągnięty
łańcuch tnący wydłuża okres użytkowania urządzenia.
OSTRZEŻENIE!
► Nosić rękawice ochronne! Niebezpieczeństwo zranienia przez ostre
zęby tnące!
♦ Odkręć nieznacznie nakrętkę
narzędziem montażowym .
♦ Obróć śrubę naprężenia łańcucha
narzędziem montażowym
w prawo, by zwiększyć naprężenie.
♦ Obróć śrubę naprężenia łańcucha
narzędziem montażowym
w lewo, by zmniejszyć naprężenie.
♦ Łańcuch tnący
musi przylegać do dolnej strony prowadnicy.
Sprawdź, czy łańcuch tnący
da się przeciągnąć ręcznie przez
prowadnicę
.
♦ Ponownie dokręcić nakrętkę
do oporu narzędziem montażowym .
WSKAZÓWKA
► Pociągając za łańcuch piły
z siłą 9 N (ok. 1 kg), między
łańcuchem a prowadnicą odległość nie powinna być większa
niż 2 mm.
► Nowy łańcuch tnący wydłuża się i trzeba go dość często
naprężać.
► Przed każdym użyciem urządzenia sprawdzić naprężenie łańcucha.

PL │ 65 ■
PHSHE 900 B2
Smarowanie łańcucha
♦ Zdjąć pokrywę zbiornika oleju .
♦ Wlać do zbiornika oleju
ok. 100 ml ekologicznego oleju do łańcu-
chów
.
OSTRZEŻENIE!
► Nigdy nie pracować bez smarowania łańcucha tnącego!
Gdyby piła pracowała na sucho, cały układ piłowania zostanie
w krótkim czasie nieodwracalnie zniszczony. Przed rozpoczęciem
pracy zawsze sprawdzać smarowanie łańcucha i poziom oleju w
zbiorniku.
WSKAZÓWKA
►
Używać wyłącznie oleju do pił łańcuchowych. Preferowane są oleje
biodegradowalne. Nie stosować zużytych olejów, olejów silnikowych
itp.
► W trakcie pracy należy kontrolować, czy automatyczne smarowanie
łańcucha tnącego działa poprawnie. Przed pracą i w trakcie pracy
kontrolować działanie smarowania łańcucha tnącego.
Ostrzenie łańcucha tnącego
WSKAZÓWKA
►
Ostrzałkę można zamocować w pomocniczym urządzeniu do
ostrzenia
dla pewnego chwytu podczas szlifowania.
► W zestawie do ostrzenia, np. firmy Oregon, można znaleźć
szczegółowe informacje na temat przebiegu ostrzenia.
► Alternatywnie, można wykorzystać elektryczny przyrząd do
ostrzenia łańcuchów tnących. Postępować zgodnie z zaleceniami
producenta.
► W razie wątpliwości co do wykonania ostrzenia, wymienić łańcuch
tnący na nowy.
Uruchomienie
WSKAZÓWKA
► Przestrzegać przepisów w sprawie ochrony przed hałasem oraz
przepisów lokalnych. Używanie urządzenia może ograniczone lub
zabronione w określone dni (np. niedziele i święta), w określonych
godzinach (południe, cisza nocna) lub na określonym terenie (np.
w kurortach, klinikach itp.).
Włączanie/wyłączanie
Włączanie:
♦ połącz przewód sieciowy
z przedłużaczem.
♦ Na końcówce przedłużacza uformuj pętlę i zawieś ją w odciążeniu
kabla
.
♦ Naciśnij blokadę włączenia
i trzymając ją wciśniętą, naciśnij
włącznik/wyłącznik
.
Wyłączanie:
♦ zwolnij włącznik / wyłącznik .
♦ Odłącz przedłużacz od odciążenia
.
♦ Odłącz przewód sieciowy
od przedłużacza.
Przestawianie uchwytu
♦ Naciśnij przycisk odblokowania . Przestaw element obrotowy do
żądanego położenia. Zwolnij przycisk odryglowania
musi się on
zatrzasnąć.
Praca z nożycami do żywopłotów
Użytkowanie maszyny:
WSKAZÓWKA
► Należy pamiętać, że przepisy w danym kraju mogą powodować
ograniczenia w użytkowaniu nożyc do żywopłotów.
► Codzienna kontrola nożyc do żywopłotów przed każdym użyciem
jest nieodzowna. Urządzenie należy sprawdzić również po
uderzeniu i upadku, aby znaleźć znaczące uszkodzenia i usterki.
► Należy zawsze nosić solidne obuwie i ciasno przylegającą odzież,
aby zminimalizować ryzyko wypadku. Stać stabilnie na ziemi, uważać
na zachowanie równowagi i zawsze nosić dostarczony pas nośny!
► Ze względu na zdrowie należy stosować przerwy na odpoczynek
podczas pracy. Zmęczenie fizyczne zwiększa ryzyko obrażeń ciała!
OSTRZEŻENIE!
► Nigdy nie uruchamiać urządzenia przy zmęczeniu, w chorobie, pod
wpływem alkoholu lub innych używek.
Techniki cięcia
■ Patrz rozkładana okładka (rys. A).
WSKAZÓWKA
► Grube gałęzie obcinać sekatorem.
Praca z piłą do gałęzi
Techniki piłowania
OSTRZEŻENIE!
► Zawsze uważać na spadające gałęzie.
► Zwracać uwagę na zagrożenie ze strony odbijających gałęzi.
WSKAZÓWKA
► Przyłóż zderzak
do gałęzi. W ten sposób praca jest bardziej
bezpieczna i spokojna.
► Dopiero wtedy rozpocząć piłowanie.
Obcinanie małych gałęzi
♦ Małe gałęzie (Ø do 0- 8 cm) obcinać od góry do dołu (patrz rysunek).

■ 66 │ PL
PHSHE 900 B2
♦ Obcinanie grubszych gałęzi
♦ W przypadku większych gałęzi (Ø 8-25 cm) wykonać najpierw cięcie
odciążające
A
(patrz rysunek).
■ Cięcie odciążające zapobiega też oddzieraniu kory z pnia.
♦ Teraz piłować od góry
B
w dół
A
do odcięcia.
2
1
Piłowanie po kawałku
Długie lub grube gałęzie należy skrócić przed ich odcięciem (patrz rysunek).
cb a
Bezpieczna praca
■ Utrzymywać urządzenie, narzędzia tnące i osłonę łańcucha w
dobrym stanie, by uniknąć obrażeń.
■ Jeżeli urządzenie upadło, sprawdzić, czy nie ma poważnych uszkodzeń.
■ Przestrzegać przepisanego kąta roboczego 60° ±10°, by zapewnić
bezpieczną pracę (patrz rysunek).
■ Nie używać urządzenia, stojąc na drabinie lub w innym niepewnym
miejscu.
■ Nie pozwalać sobie na nieprzemyślane cięcia. Może to zagrażać
Tobie i innym.
■ Należy zapewnić nadzór nad dziećmi, aby nie bawiły się urządzeniem.
■ Regularnie zmieniać pozycję roboczą. Dłuższe używanie urządzenia
może spowodować zakłócenia ukrwienia dłoni na skutek drgań. Czas
bezpiecznego użytkowania urządzenia można jednak przedłużyć
za pomocą odpowiednich rękawic lub regularnych przerw. Należy
pamiętać, że osobiste skłonności do problemów z krążeniem, niskie
temperatury zewnętrzne lub duże siły podczas chwytania skracają
czas użytkowania.
■ Należy unikać ryzyka związanego z drganiami, np. ryzyka wystąpienia
choroby znanej jako zespół wibracyjny lub choroba wibracyjna.
W tym celu należy stosować częste przerwy podczas pracy, w trakcie
których należy rozcierać dłonie!
Transport
■ Podczas transportu korzystać z osłon ochronnych .
■ Nie włączać urządzenia w trakcie przenoszenia (patrz rysunek).
Konserwacja iczyszczenie
OSTRZEŻENIE! Jeśli konieczna jest wymiana przewo-
du sieciowego, powinna ona zostać wykonana
przez producenta lub jego przedstawiciela, aby
uniknąć zagrożeń bezpieczeństwa.
■ Pamiętaj, aby zespół napędowy był zawsze czysty, suchy oraz aby nie
był zabrudzony olejem ani smarem.
■ Piłę do gałęzi należy regularnie czyścić z wiórów.
♦ Do czyszczenia obudowy przyrządu używaj suchej szmatki.
Zdejmij pokrywę
.
♦ Zdejmij łańcuch tnący
z prowadnicy i oczyść prowadnicę .
♦ Pilnuj, aby łańcuch tnący
był ostry i kontroluj naprężenie łańcucha,
sprawdzaj poziom oleju i doprowadzanie oleju.
♦ Sprawdź, czy w nożycach nie ma obluzowanych śrub belki nożna
i w razie potrzeby dokręć je.
♦ Usuń pozostałości roślin.
♦ Konserwuj belkę noża
olejem w aerozolu lub z oliwiarki.
Przechowywanie
■ Urządzenie oczyścić przed odłożeniem na przechowanie.
■ Urządzenie należy przechowywać w dołączonych osłonach
w suchym, ciepłym miejscu i poza zasięgiem dzieci.
■ Urządzenie należy przechowywać na leżąco lub zabezpieczyć je
przed przewróceniem.
■ Opróżnić zbiornik oleju
. Ekologiczny olej do łańcuchów może
ulec zżywiczeniu lub wyciec ze zbiornika przez otwór odpowietrzający
.
A
B
C A B
60°±10°

PL │ 67 ■
PHSHE 900 B2
Wyszukiwanie usterek, piła do gałęzi
Problem Możliwa przyczyna Usuwanie usterek
Silnik działa,
łańcuch tnący
nie porusza się.
Nasadka do cięcia żywo-
płotów lub piła do gałęzi
niewłaściwie podłączona
do zespołu napędowego.
Sprawdzić montaż
Brak postępu
pracy
Łańcuch tnący
pracuje
na sucho, jest przegrzany
lub zwisa.
Uzupełnić olej lub
łańcuch tnący
naostrzyć, wymienić
lub naprężyć.
Wyszukiwanie usterek w nożycach do
żywopłotów
Problem Możliwa przyczyna Usuwanie usterek
Silnik pracuje,
noże nie poru-
szają się
Nasadka do cięcia żywo-
płotów lub piła do gałęzi
niewłaściwie podłączona
do zespołu napędowego.
Sprawdzić montaż
Terminy konserwacji piły do gałęzi
Podane tutaj informacje odnoszą się do normalnych warunków użytkowa-
nia. W trudnych warunkach, jak np. silne pylenie i przy pracy długotrwałej
należy odpowiednio skrócić podane terminy.
Część urządzenia Czynność Przed rozpoczę-
ciem pracy
Co tydzień W razie awarii W razie uszko-
dzenia
W razie potrzeby
Smarowanie łańcucha Sprawdzić
X
Łańcuch tnący
Sprawdzić i
dopilnować, aby
był ostry
X
Sprawdzić naprę-
żenie łańcucha
X
Naostrzyć
X
Szyna prowadząca
sprawdzić (zuży-
cie, uszkodzenie)
X
Oczyścić i od-
wrócić
XX
Usunąć zadziory
X
Wymienić
XX
Koło łańcuchowe
Sprawdzić
X
Wymienić
X
Terminy konserwacji nożyc do
żywopłotów
Podane tutaj informacje odnoszą się do normalnych warunków użytkowa-
nia. W trudnych warunkach, jak np. silne pylenie i przy pracy długotrwałej
należy odpowiednio skrócić podane terminy.
Część
urządze-
nia
Czynność Przed
rozpo-
czę-
ciem
pracy
Po
zakoń-
czeniu
pracy
W
razie
potrze-
by
Nóż
tnący
Kontrola wzrokowa
X
czyszczenie
XX

■ 68 │ PL
PHSHE 900 B2
Gwarancja
Kompernaß Handels GmbH
Szanowny Kliencie,
To urządzenie objęte jest 3-letnią gwarancją, licząc od daty zakupu. W przy-
padku wad tego produktu, masz gwarantowane ustawowo prawa w stosunku
sprzedawcy. Te ustawowe prawa nie są ograniczone przez nasze opisane
poniżej warunki gwarancji.
Warunki gwarancji
Okres gwarancji rozpoczyna się od daty zakupu. Należy zachować
paragon. Jest on wymagany jako dowód zakupu.
Jeżeli w ciągu trzech lat od daty zakupu produktu ujawni się w nim wada
materiałowa lub produkcyjna, produkt zostanie wedle naszego uznania
nieodpłatnie naprawiony, wymieniony na nowy lub zostanie zwrócona
jego cena. Warunkiem spełnienia tego świadczenia gwarancyjnego jest
dostarczenie w trakcie tego trzyletniego okresu uszkodzonego urządzenia
wraz z dowodem zakupu (paragonem) oraz krótkim opisem wady i daty
jej wystąpienia.
Jeżeli wada jest objęta naszą gwarancją, otrzymasz z powrotem naprawio-
ny lub nowy produkt.
Okres gwarancji i ustawowe roszczenia gwarancyjne
Wykonanie usługi gwarancyjnej nie przedłuża okresu gwarancji. Dotyczy
to również wymienionych i naprawionych części. Wszelkie szkody i wady
wykryte w chwili zakupu należy zgłosić bezpośrednio po rozpakowaniu
urządzenia. Po upływie okresu gwarancji wszelkie naprawy są wykonywa-
ne odpłatnie.
Zakres gwarancji
Urządzenie zostało starannie wyprodukowane i poddane przed wysyłką
skrupulatnej kontroli jakości.
Gwarancja obejmuje wady materiałowe lub produkcyjne. Niniejsza gwa-
rancja nie obejmuje części produktu, podlegających normalnemu zużyciu,
ani uszkodzeń części łatwo łamliwych, np. przełączników, akumulatorów,
lub części wykonanych ze szkła.
Niniejsza gwarancja traci swoją ważność, jeśli produkt został uszkodzo-
ny, nie używano go prawidłowo lub nie serwisowano należycie. W celu
zapewnienia prawidłowego stosowania produktu należy ściśle przestrzegać
wszystkich instrukcji wymienionych w instrukcjach obsługi. Należy bez-
względnie unikać zastosowania oraz postępowania, których odradza się
w instrukcji obsługi lub przed którymi się w niej ostrzega.
Produkt przeznaczony jest wyłącznie do użytku domowego, a nie do zasto-
sowań komercyjnych. Niewłaściwe użytkowanie urządzenia, używanie go w
sposób niezgodny z jego przeznaczeniem, użycie siły lub ingerencja w
urządzenie, dokonywana poza naszymi autoryzowanymi punktami serwiso-
wymi, powodują utratę gwarancji.
Realizacja zobowiązań gwarancyjnych
W celu zapewnienia szybkiego załatwienia sprawy, postępuj zgodnie z
poniższymi wskazówkami:
■ W przypadku wszelkich pytań przygotuj paragon fiskalny oraz numer
artykułu (np.IAN12345) jako dowód zakupu.
■ Numer artykułu można znaleźć na tabliczce znamionowej na pro-
dukcie, wygrawerowany na urządzeniu, zapisany na stronie tytułowej
instrukcji obsługi (w dolnym lewym rogu) lub na naklejce ztyłu bądź
na spodzie urządzenia.
■ W przypadku wystąpienia błędów działania lub innych wad, prosimy
o kontakt z odpowiednim działem serwisu telefonicznie lub przez
e-mail.
■ Zarejestrowany jako wadliwy produkt możesz wtedy wraz z dołączo-
nym dowodem zakupu (paragonem) oraz opisem i datą wystąpienia
usterki wysłać nieodpłatnie na przekazany wcześniej adres serwisu.
Na stronie www.lidl-service.com możesz pobrać te i wiele
innych instrukcji, filmów o produktach oraz oprogramowanie
instalacyjne.
Za pomocą tego kodu QR możesz przejść bezpośrednio
na stronę serwisu Lidl (www.lidl-service.com), gdzie możesz
otworzyć instrukcję obsługi, wpisując numer artykułu (IAN) 123456.
WSKAZÓWKA
► W przypadku narzędzi Parkside i Florabest prosimy przesłać wyłącz-
nie uszkodzony produkt bez akcesoriów (np. akumulatorów, walizek
do przechowywania, narzędzi montażowych itp.).
Serwis
OSTRZEŻENIE!
► Naprawy urządzenia zlecaj wyłącznie serwisowi lub elektrykowi,
stosując tylko oryginalne części zamienne. Zapewni to odpowied-
ni poziom bezpieczeństwa użytkowania urządzenia po naprawie.
► Wymianę wtyku lub kabla przewodu zasilającego powierzaj
zawsze producentowi elektronarzędzia lub autoryzowanemu
serwisowi. Zapewni to odpowiedni poziom bezpieczeństwa użytko-
wania urządzenia po naprawie.
Serwis Polska
Tel.: 22 397 4996
E-Mail: [email protected]
IAN 313266_1904
Importer
Pamiętaj, że poniższy adres nie jest adresem serwisu. Skontaktuj się
najpierw z odpowiednim punktem serwisowym.
KOMPERNASS HANDELS GMBH
BURGSTRASSE 21
44867 BOCHUM
NIEMCY
www.kompernass.com

PL │ 69 ■
PHSHE 900 B2
Utylizacja
Opakowanie urządzenia wykonane jest z materiałów przyjaznych
dla środowiska naturalnego, które można oddać w lokalnych
punktach zbiórki. Urządzenie oraz jego akcesoria są wykonane
z różnych materiałów, jak np. metal i tworzywa sztuczne.
O informacje na temat utylizacji zużytego urządzenia należy zapytać
wnajbliższym urzędzie gminy lub miasta.
Ochrona środowiska
■ Starannie opróżnij zbiornik oleju
i oddaj urządzenie do punktu
zbiórki surowców do recyklingu. Wykorzystane w urządzeniu części
metalowe oraz elementy z tworzyw sztucznych po ich segregacji nada-
ją się do ponownego wykorzystania. Informacje na ten temat uzyskasz
w naszym centrum serwisowym.
■ Zużyty olej oddać do punktu utylizacji odpadów. Nie wylewać ich do
kanalizacji ani do ścieków.
■ Zużyte materiały serwisowe oraz materiały eksploatacyjne oddać do
właściwego punktu zbiórki odpadów.
Urządzeń elektrycznych nie wolno wyrzucać razem
zodpadami domowymi!
Zgodnie zdyrektywą europejską 2012/19/EU zużyte elektronarzędzia
należy zbierać oddzielnie ipoddawać procesowi odzysku zposzanowa-
niem zasad ochrony środowiska naturalnego.
Produkt można poddać recyklingowi, podlega rozszerzonej
odpowiedzialności producenta i jest zbierany w ramach
systemu segregacji odpadów.
Części zamienne
Części zamienne można zamawiać bezpośrednio w centrum serwisowym.
Podczas zamawiania należy koniecznie podać typ maszyny i numer części.
Tłumaczenie oryginalnej deklaracji
zgodności
My, KOMPERNASS HANDELS GMBH, osoba odpowiedzialna za spo-
rządzenie dokumentacji: Semi Uguzlu, BURGSTR. 21, 44867 BOCHUM,
NIEMCY, oświadczamy niniejszym, że to urządzenie jest zgodne z nastę-
pującymi normami, dokumentami normatywnymi oraz dyrektywami WE:
Dyrektywa maszynowa
(2006 / 42 / EC)
Dyrektywa w sprawie zgodności elektromagnetycznej
(2014 / 30 / EU)
Dyrektywa w sprawie emisji hałasu
2000/14/EC
2005/88/EC
Instytucja notyfikowana: nr 0036
TÜV SÜD Industrie Service GmbH, Westendstraße 199,
80686 Monachium, Niemcy
Metoda oceny zgodności na podstawie załącznika V.
Poziom mocy akustycznej LWA:
zmierzono: 102,2 dB (A)
gwarantowane: 105 dB (A)
Dyrektywa w sprawie stosowania substancji
szkodliwych dla zdrowia
(2011/65/EU)*
* Wyłączną odpowiedzialność za wystawienie niniejszej deklaracji
zgodności ponosi producent. Opisany powyżej przedmiot oświadczenia
spełnia wymagania przepisów dyrektywy 2011/65/EU Parlamentu Euro-
pejskiego iRady z8 czerwca 2011 wsprawie ograniczenia stosowania
określonych substancji niebezpiecznych wurządzeniach elektrycznych
ielektronicznych.
Zastosowane normy zharmonizowane:
EN 60745-1: 2009/A11: 2010
EN ISO 10517: 2019
EN ISO 11680-1: 2011
EN 55014-1: 2017
EN 55014-2: 2015
EN 61000-3-2: 2014
EN 61000-3-3: 2013
EN 50581:2012
Typ / nazwa urządzenia: 2-w-1 nożyce do żywopłotu z długim
trzonkiem / okrzesywarka PHSHE 900 B2
Rok produkcji: 09 - 2019
Numer seryjny: IAN 313266_1904
Bochum, 11.09.2019
Semi Uguzlu
- dyrektor ds. jakości -
Zastrzegamy sobie prawo do wprowadzania zmian technicznych w ramach
procesu udoskonalania urządzenia.

■ 70 │ PL
PHSHE 900 B2

CZ │ 71 ■
PHSHE 900 B2
Obsah
Úvod.........................................................................................72
Použití nůžek na živý plot sdlouhou násadou vsouladu surčením ........................................................72
Použití nástavce pro řezání větví ve výšce vsouladu surčením............................................................72
Použití vsouladu surčením .......................................................................................72
Vybavení .....................................................................................................72
Rozsah dodávky ...............................................................................................73
Technické údaje................................................................................................73
Obecné bezpečnostní pokyny pro elektrická nářadí..................................................74
1. Bezpečnost na pracovišti.......................................................................................74
2. Elektrická bezpečnost .........................................................................................74
3. Bezpečnost osob.............................................................................................74
4. Použití a údržba elektrického nářadí..............................................................................74
5. Servis......................................................................................................75
Bezpečnostní pokyny specifické pro nůžky na živý plot .................................................................75
Doplňující bezpečnostní pokyny knůžkám na živý plot .................................................................75
Další bezpečnostní pokyny knůžkám na živý plot .....................................................................76
ZBYTKOVÁ RIZIKA!.............................................................................................76
Bezpečnostní pokyny specifické pro nástavec pro řezání větví............................................................76
Preventivní opatření proti zpětnému rázu.............................................................................77
Další bezpečnostní upozornění ....................................................................................77
Před uvedením do provozu ......................................................................78
Motorová jednotka .............................................................................................78
Montáž kulaté rukojeti...........................................................................................78
Připevnění / montáž ramenního popruhu ............................................................................78
Montáž nůžek na živý plot .......................................................................................78
Montáž nástavce pro řezání větví ..................................................................................78
Nastavení polohy unůžek na živý plot ..............................................................................78
Nastavení polohy unástavce pro řezání větví.........................................................................78
Montáž pilového řetězu a mečovitého nože ..........................................................................78
Napnutí a kontrola pilového řetězu.................................................................................78
Mazání řetězu.................................................................................................79
Ostření pilového řetězu ..........................................................................................79
Uvedení do provozu ............................................................................79
Zapnutí / vypnutí...............................................................................................79
Přestavení rukojeti ..............................................................................................79
Práce snůžkami na živý plot ......................................................................................79
Použití stroje: ..................................................................................................79
Techniky stříhání ...............................................................................................79
Práce snástavcem pro řezání větví .................................................................................79
Techniky řezání ................................................................................................79
Bezpečná práce ...............................................................................................80
Přeprava .....................................................................................80
Údržba a čištění................................................................................80
Skladování....................................................................................80
Vyhledávání závad u nástavce pro řezání větví .....................................................81
Vyhledávání závad unůžek na živý plot ...........................................................81
Intervaly údržby nástavce pro řezání větví . . . . . . . . . . . . . . . . . . . . . . . . . . . . . . . . . . . . . . . . . . . . . . . . . . . . . . . . .81
Intervaly údržby nůžek na živý plot ...............................................................81
Záruka společnosti Kompernass Handels GmbH.....................................................82
Servis ........................................................................................82
Dovozce ......................................................................................82
Likvidace .....................................................................................83
Náhradní díly .................................................................................83
Překlad originálu prohlášení o shodě..............................................................83

■ 72 │ CZ
PHSHE 900 B2
NŮŽKY NA ŽIVÝ PLOT A ODVĚTVOVAČ
2 V 1 PHSHE 900 B2
Úvod
Blahopřejeme Vám kzakoupení Vašeho nového přístroje. Rozhodli jste se
pro vysoce kvalitní výrobek. Návod kobsluze je součástí tohoto výrobku.
Obsahuje důležité informace obezpečnosti, použití a likvidaci. Před pou-
žitím výrobku se seznamte se všemi obslužnými a bezpečnostními pokyny.
Výrobek používejte pouze předepsaným způsobem a pro uvedené oblasti
použití. Při předávání výrobku třetím osobám předejte spolu sním ityto
podklady.
Použití nůžek na živý plot sdlouhou násadou
vsouladu surčením
Tento přístroj je určen kstříhání a řezání živých plotů, křovin a ozdobných
keřů pro soukromé použití. Jedná se přitom oručně vedený přístroj sinte-
grovaným pohonem, ukterého se lineárně uspořádané břity pohybují sem
a tam.
VÝSTRAHA!
► Nůžky na živý plot nejsou vhodné pro používání dětmi.
Použití nástavce pro řezání větví ve výšce
vsouladu surčením
Tento přístroj je určen křezání větví na stromech.
Použití vsouladu surčením
Přístroj používejte pouze předepsaným způsobem a vuvedených oblas-
tech použití. Přístroj není určen pro podnikatelské účely. Přístroj je určen
kpoužití dospělými osobami. Tento přístroj není určen k použití osobami
(včetně dětí) se sníženými fyzickými, smyslovými nebo duševními schop-
nostmi, nebo nedostatkem zkušeností a/nebo znalostí. Použití přístroje při
dešti nebo ve vlhkém prostředí je zakázáno.
Jakékoli jiné použití nebo úprava přístroje jsou považovány za použití
vrozporu surčením a představují značné riziko úrazu. Za škody, které
vzniknou při použití vrozporu surčením, nenese výrobce odpovědnost.
Vybavení
Motorová jednotka
šroub shvězdicí
matice
násada
šroub
kulatá rukojeť
závěsné oko
otočný prvek
odjišťovací tlačítko
blokovací tlačítko
zapínač/vypínač
síťový kabel
odlehčení od tahu
Nástavec pro nůžky na živý plot
nožová lišta
převodová skříň
odblokování/zablokování
základní deska (nůžek na živý plot)
stavěcí páčka
rukojeť
přední násada
aretační kolík
hnací hřídel
ochranná krytka
Nástavec pro řezání větví ve výšce
úchyt pro brusku
pilový řetěz
mečovitý nůž
doraz
nádržka na olej
matice
závit
kryt řetězového kola
otvor vmečovitém noži
vedení mečovitého nože
vodicí lišta
kapací maznice
šroub pro upnutí řetězu
řetězové kolo
kolík pro upnutí řetězu
přední násada
hnací hřídel
ochranná krytka
aretační kolík
ochranný kroužek
stavěcí páčka
základní deska (nástavce pro řezání větví ve výšce)
odblokování/zablokování
víčko nádržky na olej

CZ │ 73 ■
PHSHE 900 B2
Rozsah dodávky
1 motorová jednotka PHSHE 900 B2
1 nástavec pro nůžky na živý plot PHS1 (dále jen nůžky na živý plot)
1 nástavec pro řezání větví ve výšce PHE1 (dále jen nástavec pro řezání
větví)
Příslušenství
1
ramenní popruh
1
ochranné pouzdro na řetěz
1
ochranné pouzdro na mečovitý nůž
1
100ml biooleje na řetězové pily
1
montážní nástroj
1 návod kobsluze
Technické údaje
Motorová jednotka: PHSHE 900 B2
Jmenovité napětí: 230V ∼ 50Hz (střídavý proud)
Jmenovitý výkon: 900W
Třída ochrany: II /
(dvojitá izolace)
Hmotnost:
(bez rukojeti a popruhu): cca 2,7kg
Nástavec pro řezání větví: PHE1
Rychlost řetězu: max. 6m/s
Pracovní úhel:
0°; 15°; 30°
Hmotnost (ve stavu připraveném
kprovozu): cca 1,6kg
Doporučená náplň nádržky na olej: 100cm
3
Řezná délka: cca 260mm
Mečovitý nůž: Oregon typ100SDEA041
Pilový řetěz: Oregon 91P040X
Nůžky na živý plot: PHS1
Počet zdvihů naprázdno: 2000min
-1
Pracovní úhel:
-90°; +90°
Řezná délka: 410mm
Rozteč zubů: 20mm
Hmotnost
(ve stavu připraveném kprovozu): cca 2,1kg
Informace ohluku a vibracích:
Měřená hodnota zjištěna podle EN 60745. Typická hladina hluku
elektrického nářadí shodnocenímA je:
Nástavec pro řezání větví: PHE1
Hladina akustického tlaku: L
PA
= 83 dB (A)
Nejistota K: 3 dB
Hladina akustického výkonu: L
WA
= 104 dB (A)
Nejistota K: 3 dB
Nůžky na živý plot: PHS1
Hladina akustického tlaku: L
PA
= 81 dB (A)
Nejistota K: 3 dB
Hladina akustického výkonu: L
WA
= 102 dB (A)
Garantovaná hladina akustického výkonu: L
WA
= 105 dB (A)
NejistotaK: 3 dB
Hodnoty vibrací (součet vektorů tří směrů) stanoveny vsouladu
sEN 60745:
Nástavec pro řezání větví:
Vibrace na přední rukojeti: Hodnota emise vibrací
a
h,D
= 1,0m/s
2
Nejistota K=1,5m/s
2
Vibrace na zadní rukojeti: Hodnota emise vibrací
a
h,D
= 1,2m/s
2
Nejistota K=1,5m/s
2
Nůžky na živý plot:
Vibrace na přední rukojeti: Hodnota emise vibrací
a
h,D
= 1,6m/s
2
Nejistota K=1,5m/s
2
Vibrace na zadní rukojeti: Hodnota emise vibrací
a
h,D
= 1,8m/s
2
Nejistota K=1,5m/s
2
Používejte ochranu sluchu!
UPOZORNĚNÍ
► Hladina vibrací, uvedená vtomto návodu, byla měřena vsouladu se
standardizovanou metodou měření dle EN60745 a lze ji použít ke
srovnání přístrojů. Uvedenou hodnotu emise vibrací lze rovněž použít
kpředběžnému posouzení expozice.
VÝSTRAHA!
► Hladina vibrací se mění vzávislosti na použití elektrického nářadí
a může být vněkterých případech vyšší než hodnota uvedená
vtomto návodu. Pokud se elektrické nářadí užívá takovým způsobem
pravidelně, mohlo by být zatížení vibracemi podceněno. Snažte se
udržovat zatížení vibracemi co nejnižší. Příklady opatření na snížení
zatížení vibracemi je použití rukavic při práci snářadím a omezení
doby práce snářadím. Přitom se musí zohlednit všechny části provoz-
ního cyklu (například časy, kdy je elektrické nářadí vypnuté a časy,
kdy je sice zapnuté, ale běží bez zatížení).
Vysvětlení informačních štítků na přístroji:
Před uvedením do provozu si přečtěte návod
kprovozu a pokyny!
Noste ochranné rukavice!
Noste bezpečnostní obuv!
Používejte ochranu sluchu!
Noste ochrannou přilbu!
Noste ochranné brýle!
Udržujte okolo stojící osoby vdostatečné
vzdálenosti od přístroje!

■ 74 │ CZ
PHSHE 900 B2
Chraňte přístroj před deštěm a mokrem!
Nebezpečí ohrožení života při úrazu elektric-
kým proudem! Dodržujte minimální vzdálenost
10m od dálkových vedení.
Pozor! Padající předměty.
Obzvláště při řezání nad hlavou.
Pozor! Nebezpečí zranění běžícími noži.
Pokud dojde kpoškození nebo proříznutí kabelu,
odpojte ihned zástrčku od sítě.
Uvedení hladiny akustického tlaku LWA vdB.
Obecné bezpečnostní pokyny
pro elektrická nářadí
VÝSTRAHA!
► Přečtěte si veškerá bezpečnostní upozornění a pokyny. Nedbalost při
dodržování bezpečnostních upozornění a pokynů může vést kúrazu
elektrickým proudem, kpožáru a/nebo těžkým zraněním.
Veškerá bezpečnostní upozornění a pokyny uschovejte pro
budoucí použití.
Pojem „elektrické nářadí“ užívaný vbezpečnostních pokynech se vztahuje
na elektrické nářadí napájené ze sítě (síťovým kabelem) a elektrické nářadí
napájené akumulátorem (bez síťového kabelu).
1. Bezpečnost na pracovišti
a) Svůj pracovní prostor udržujte včistotě a dobře osvětlený.
Nepořádek a neosvětlený pracovní prostor mohou vést kúrazům.
b) Selektrickým nářadím nepracujte vprostředí ohroženém výbuchem,
ve kterém se nachází hořlavé kapaliny, plyny nebo prachy. Elektrické
nářadí vytváří jiskry, od nichž se může vznítit prach nebo výpary.
c) Nedovolte dětem ani jiným osobám, aby se přibližovaly kelektrické-
mu nářadí vdobě, kdy jej používáte. Vpřípadě odvedení pozornosti
můžete ztratit kontrolu nad přístrojem.
2. Elektrická bezpečnost
a) Přípojná zástrčka elektrického nářadí musí odpovídat zásuvce. Zá-
strčka se nesmí žádným způsobem pozměňovat.
Nepoužívejte adaptérové zástrčky vkombinaci suzemněným elek-
trickým nářadím. Nepozměněné zástrčky a jim odpovídající zásuvky
snižují riziko úrazu elektrickým proudem.
b) Zabraňte kontaktu těla suzemněnými povrchy jako např. od trubek,
topení, sporáků a chladniček. Je-li Vaše tělo uzemněné, hrozí zvýšené
riziko úrazu elektrickým proudem.
c) Elektrické nářadí chraňte před deštěm a vlhkostí. Vniknutím vody do
elektrického přístroje se zvyšuje riziko úrazu elektrickým proudem.
d) Nepoužívejte kabel vrozporu sjeho určením pro přenášení či zavě-
šování elektrického nářadí nebo kvytahování zástrčky ze zásuvky.
Udržujte kabel vdostatečné vzdálenosti od zdrojů vysoké teploty,
oleje, ostrých hran nebo pohyblivých částí přístroje. Poškozené nebo
zapletené kabely zvyšují riziko úrazu elektrickým proudem.
e) Pokud pracujete selektrickým nářadím venku, používejte pouze
takové prodlužovací kabely, jež jsou schváleny i pro venkovní použi-
tí. Používáním prodlužovacího kabelu vhodného pro venkovní použití se
snižuje riziko úrazu elektrickým proudem.
f) Pokud nelze zabránit provozu elektrického nářadí ve vlhkém prostředí,
používejte proudový chránič. Použitím ochranného spínače chybného
proudu se snižuje riziko úrazu elektrickým proudem.
3. Bezpečnost osob
a) Buďte stále pozorní, sledujte, co děláte a kpráci selektrickým ná-
řadím přistupujte srozumem. Elektrické nářadí nepoužívejte, jste-li
unavení nebo pod vlivem drog, alkoholu či léků. Jediný okamžik
nepozornosti při používání elektrického nářadí může způsobit vážná
zranění.
b) Noste osobní ochranné prostředky a vždy iochranné brýle. Nošením
osobních ochranných prostředků, jako je ochranná maska proti prachu,
protiskluzová bezpečnostní obuv, ochranná přilba nebo ochrana sluchu,
a to vzávislosti na druhu a použití elektrického nářadí, se snižuje riziko
zranění.
c) Zabraňte neúmyslnému uvedení přístroje do provozu. Než elektrické
nářadí zapojíte do elektrické sítě a/nebo připojíte akumulátor nebo
než nářadí zvednete či přenesete, ujistěte se, že je vypnuté. Pokud
máte při přenášení elektrického nářadí prst na vypínači nebo pokud do
sítě zapojíte již zapnutý přístroj, může dojít kúrazu.
d) Předtím, než elektrické nářadí zapnete, odstraňte nastavovací ná-
stroje nebo šroubováky. Pokud se nástroj nebo šroubovák nachází
votáčející se části přístroje, může to vést kezraněním.
e) Vyhýbejte se nepřirozenému držení těla. Zajistěte si bezpečnou
stabilitu a neustále udržujte rovnováhu. Tak dokážete elektrické
nářadí vneočekávaných situacích lépe kontrolovat.
f) Noste vhodný oděv. Nenoste volné oblečení ani šperky. Vlasy, oděv
a rukavice udržujte vbezpečné vzdálenosti od pohyblivých částí.
Volný a nepřiléhavý oděv, šperky nebo dlouhé vlasy mohou být pohybli-
vými částmi zachyceny.
g) Pokud lze namontovat zařízení pro odsávání a zachytávání prachu,
ujistěte se, zda jsou připojena a správně použita. Použitím odsávání
prachu se může snížit ohrožení prachem.
4. Použití a údržba elektrického nářadí
a) Přístroj nepřetěžujte. Pro svou práci používejte elektrické nářadí
vhodné kdanému účelu. Svhodným elektrickým nářadím se Vám
bude vuvedeném výkonovém rozsahu pracovat lépe a bezpečněji.
b) Nepoužívejte elektrické nářadí, jehož vypínač je vadný. Elektrické
nářadí, které se již nedá zapnout nebo vypnout, představuje nebezpečí
a musí se opravit.
c) Před nastavováním přístroje, výměnou dílů vsazeného nástroje nebo
odložením elektrického nářadí vytáhněte zástrčku ze zásuvky a/
nebo vyjměte vyjímatelný akumulátor.. Toto bezpečnostní opatření
zabraňuje neúmyslnému spuštění elektrického nářadí.
d) Nepoužívaná elektrická nářadí udržujte mimo dosah dětí. Nedovolte
používat přístroj osobám, které sním nejsou obeznámeny nebo které
nečetly tento návod. Elektrické nářadí je nebezpečné, manipulují-li
sním nezkušené osoby.
e) Údržbu elektrických nářadí vykonávejte pečlivě. Zkontrolujte, zda
jsou vpořádku pohyblivé části přístroje a zda jim není bráněno
vpohybu, zda nejsou některé součásti rozbité nebo natolik poško-
zené, že je funkčnost elektrického nářadí omezena. Poškozené části
přístroje nechte před jeho použitím opravit. Řada úrazů má svou
příčinu ve špatné údržbě elektrických nářadí.
f) Řezné nástroje udržujte vostrém a čistém stavu. Pečlivě udržované
řezné nástroje sostrými řeznými hranami se méně zasekávají a snáze
se vedou.
g) Elektrické nářadí, příslušenství, vsazené nástroje atd. používejte dle
těchto pokynů. Zohledňujte přitom pracovní podmínky a vykonáva-
nou činnost. Použití elektrického nářadí kjiným než určeným účelům
může vést ke vzniku nebezpečných situací.

CZ │ 75 ■
PHSHE 900 B2
5. Servis
a) Nechte své elektrické nářadí opravovat pouze kvalifikovanými od-
borníky a používejte jen originální náhradní díly. Tím zajistíte, že
zůstane zachována bezpečnost elektrického nářadí.
Bezpečnostní pokyny specifické pro nůžky na
živý plot
■ Mějte všechny části těla mimo dosah nože. Při běžícím noži se nepo-
koušejte odstranit odřezky nebo držet řezaný materiál. Odstraňujte
uvízlé odřezky pouze při vypnutém přístroji. Navíc vytáhněte zástrč-
ku ze zásuvky. Jediný okamžik nepozornosti při používání nůžek na
živý plot může způsobit vážná zranění.
■ Přenášejte nůžky na živý plot za přední rukojeť ve vypnutém stavu,
snožovou lištou odvrácenou od těla. Při přepravě nebo skladování
nůžek na živý plot natáhněte vždy ochranný kryt. Opatrná mani-
pulace spřístrojem snižuje pravděpodobnost neúmyslného kontaktu
sběžícími noži.
■ Držte elektrické nářadí jen za izolované plochy rukojetí, protože
nůž se může dostat do kontaktu se skrytými elektrickými vedeními
nebo vlastním síťovým kabelem. Kontakt nože svedením pod napětím
může přenést napětí na kovové díly přístroje a vést kzásahu elektric-
kým proudem.
■ Udržujte kabel mimo oblast stříhání. Během práce se Vám kabel
může ztratit vkeřích a můžete ho omylem přeříznout.
■ Pečlivě si prohlédněte plochu, kterou chcete stříhat či řezat, a odstraňte
všechny dráty nebo jiná cizí tělesa.
■ Doporučujeme použít proudový chránič se spouštěcím proudem 30mA
nebo méně.
UPOZORNĚNÍ
► Nůžky na živý plot se dodávají vkompletně smontovaném stavu.
► Názorné obrázky kpoužití nůžek na živý plot, resp. jejich stavěcích
dílů najdete na výklopné stránce.
► Pokyny a názorné obrázky knastavení, údržbě, mazání uživatelem
najdete vtomto návodu.
► Pokyny kpracovní poloze (viz výklopná stránka).
► Pokyny kstavěcím dílům (viz výklopná stránka).
► Pokyny kvýměně a opravě (viz kapitola Údržba a čištění / Servis).
► Vysvětlení všech grafických symbolů použitých na nůžkách na živý
plot a technické údaje najdete vtomto návodu.
► Charakteristické vlastnosti nůžek na živý plot najdete vtechnických
údajích.
► Zablokované nářadí: Odstraňte blokující materiál znožové lišty
.
POZOR!
► Při hrozícím nebezpečí, resp. vnouzové situaci ihned vypněte motor
a vytáhněte síťovou zástrčku.
Doplňující bezpečnostní pokyny knůžkám na
živý plot
Příprava:
a) PŘI POUŽÍVÁNÍ TĚCHTO NŮŽEK NA ŽIVÝ PLOT MŮŽE DOJÍT KVÁŽ-
NÝM ZRANĚNÍM! Přečtěte si pečlivě pokyny ke správné manipulaci,
kpřípravě, kúdržbě, ke spouštění a vypínání nůžek na živý plot.
Seznamte se se všemi stavěcími díly a se správným používáním nůžek
na živý plot.
b) Nůžky na živý plot nesmí nikdy používat děti.
c) Pozor na nadzemní elektrická vedení.
d) Zamezte použití nůžek na živý plot, pokud se vblízkosti nacházejí
osoby, zejména děti.
e) Noste vhodný oděv! Nenoste volný oděv nebo šperky, který/které
může/mohou být zachycen(y) pohybujícími se díly. Doporučujeme
nosit pevné rukavice, obuv sprotiskluzovou úpravou a ochranné brýle.
f) Jestliže se řezací zařízení dostane do kontaktu scizím tělesem nebo
zesílí provozní hluk nebo nůžky na živý plot neobvykle silně vibrují,
vypněte motor a vyčkejte, než se nůžky na živý plot zastaví.
Proveďte tato opatření:
– zkontrolujte, zda přístroj není poškozený;
– zkontrolujte, zda se některé díly neuvolnily, a všechny uvolněné díly
připevněte;
– poškozené díly vyměňte za rovnocenné díly nebo je nechte opravit.
g)
Noste ochranu sluchu!
h)
Noste ochranu očí!
i) Pro zastavení nůžek na živý plot vpřípadě nouze vytáhněte síťovou
zástrčku ze zásuvky.
Provoz:
a) Vytáhněte síťovou zástrčku ze zásuvky:
– před čištěním nebo odstraňováním blokování;
– před kontrolou, údržbou nebo pracemi na nůžkách na živý plot;
– před nastavováním pracovní polohy řezacího zařízení;
– když nůžky na živý plot zůstanou bez dozoru.
b) Před spuštěním motoru se vždy ujistěte, že se nůžky na živý plot nachází
řádně vjedné zdaných pracovních poloh.
c) Během provozu nůžek na živý plot je vždy třeba zajistit, aby uživatel
zaujímal bezpečný postoj, obzvláště při použití schůdků nebo žebříku.
d) Nepoužívejte nůžky na živý plot svadným nebo silně opotřebovaným
řezacím zařízením.
e) Ujistěte se vždy, že všechny rukojeti a bezpečnostní zařízení jsou při
použití nůžek na živý plot namontované. Nikdy se nepokoušejte použí-
vat nekompletní nůžky na živý plot nebo nůžky snepřípustnými modifi-
kacemi.
f) Držte nůžky na živý plot pevně oběma rukama za rukojeti ktomu určené.
g) Seznamte se vždy sprostředím a dávejte pozor na možná nebezpečí,
která vzhledem ke hluku nůžek na živý plot nemusíte možná zaslechnout.

■ 76 │ CZ
PHSHE 900 B2
Údržba a skladování:
a) Pokud se nůžky na živý plot zastaví za účelem údržby, inspekce nebo
skladování, vypněte motor, aby se všechny rotující díly zastavily. Před
kontrolou stroje, jeho nastavováním atd. ho nechte vychladnout.
b) Skladujte nůžky na živý plot tam, kde se benzinové výpary nemohou
dostat do kontaktu sotevřeným ohněm nebo jiskrami. Nůžky na živý
plot nechte vždy nejdříve vychladnout a teprve poté je uložte ke sklado-
vání.
c) Při přepravě nebo skladování nůžek na živý plot je třeba řezací zařízení
vždy zakrýt ochranným krytem řezacího zařízení.
Další bezpečnostní pokyny knůžkám na živý
plot
■ Mějte všechny části těla mimo dosah nože. Při běžícím noži se nepo-
koušejte odstranit odřezky nebo držet řezaný materiál. Odstraňujte
uvízlé odřezky pouze při vypnutém přístroji. Jediný okamžik nepozor-
nosti při používání nůžek na živý plot může způsobit vážná zranění.
■ Přenášejte nůžky na živý plot za rukojeť ve vypnutém stavu, snožovou
lištou odvrácenou od těla. Při přepravě nebo skladování nůžek na živý
plot natáhněte vždy ochranný kryt. Pečlivá manipulace spřístrojem
snižuje nebezpečí zranění onůž.
■ Držte elektrické nářadí jen za izolované plochy rukojetí, protože nůž
se může dostat do kontaktu se skrytými elektrickými vedeními nebo
vlastním síťovým kabelem. Kontakt nože svedením pod napětím může
přenést napětí na kovové díly přístroje a vést kzásahu elektrickým
proudem.
♦ Prohledejte živý plot, zda se vněm neukrývají nějaké objekty (např.
ploty zdrátěného pletiva).
ZBYTKOVÁ RIZIKA!
I když tento elektrický nástroj správně obsluhujete, vždy zůstanou zbytková
rizika. Následující nebezpečí mohou vzniknout v souvislosti s konstrukcí
a provedením tohoto elektrického nářadí:
a) pořezání
b) poruchy sluchu, pokud se nenosí vhodná ochrana sluchu.
c) újmy na zdraví v důsledku vibrací ruky a paže, pokud se přístroj používá
delší dobu nebo není řádně provozován a udržován.
UPOZORNĚNÍ
► Nůžky na živý plot se dodávají vkompletně smontovaném stavu.
► Pokyny a názorné obrázky knastavení, údržbě, mazání uživatelem
najdete vtomto návodu.
► Pokyny kvýměně a opravě (viz kapitola Údržba a čištění / Servis).
► Vysvětlení všech grafických symbolů použitých na nůžkách na živý
plot a technické údaje najdete vtomto návodu.
► Charakteristické vlastnosti nůžek na živý plot najdete vtechnických
údajích.
► Zablokované nářadí: Odstraňte blokující materiál znožové lišty .
■ Používejte výhradně příslušenství a přídavná zařízení, která jsou uve-
dena vnávodu kpoužití. Používání jiných přídavných zařízení nebo
jiného příslušenství, než je uvedeno vnávodu kobsluze, pro vás může
znamenat nebezpečí úrazu.
Bezpečnostní pokyny specifické pro nástavec pro
řezání větví
■ Noste vždy ochrannou přilbu, ochranu sluchu a bezpečnostní rukavice.
Noste také ochranu zraku, aby se odstřikující olej nebo prach zpily
nedostal do očí. Noste ochrannou masku proti prachu.
■ Nepoužívejte přístroj nikdy, když stojíte na žebříku.
■ Při použití přístroje se nevyklánějte příliš daleko dopředu. Dbejte vždy
na bezpečný postoj a neustále udržujte rovnováhu. Pro rovnoměrné
rozložení hmotnosti působící na tělo používejte popruh, který je součás-
tí dodávky.
■ Noste robustní vysoké boty sprotiskluzovou úpravou.
■ Přístroj nepoužívejte při dešti nebo ve vlhkém prostředí.
■ Nepoužívejte přístroj vblízkosti elektrických vedení. Udržujte minimální
vzdálenost 10m od nadzemních elektrických vedení.
■ Nestavte se pod větve, které chcete řezat, předejdete tak zranění spad-
lými větvemi. Dávejte pozor rovněž na uskakující větve, abyste předešli
zranění. Pracujte pod úhlem cca 60° ±10°.
■ Dávejte pozor na to, aby nedošlo ke zpětnému rázu přístroje.
■ Nesledujte jen právě řezané větve, ale také spadlý materiál, abyste
oněj nezakopli.
■ Po 30minutách práce si udělejte minimálně hodinovou přestávku.
■ Noste vždy ochranné rukavice.
■ Zakryjte vodicí lištu a řetěz při přepravě a skladování krytem.
■ Nepoužívejte přístroj vprostředí snebezpečím výbuchu, kde se nachá-
zejí zápalné kapaliny, plyny nebo výpary. Jiskry produkované strojem
mohou vést ke vznícení těchto výparů nebo plynů.
■ Použitá zásuvka musí být vhodná pro zástrčku. Neprovádějte na zástrč-
ce nikdy žádné změny, předejdete tak úrazu elektrickým proudem.
■ Síťovou zástrčku nikdy nevyndávejte ze zásuvky tahem za kabel, ný-
brž uchopte přímo zástrčku. Nepoužívejte síťový kabel ktahání nebo
přepravě přístroje. Udržujte síťový kabel vdostatečné vzdálenosti od
zdrojů vysoké teploty, oleje, ostrých hran a pohyblivých dílů.
■ Po ukončení práce nebo při čištění a údržbě vytáhněte síťovou zástrčku
zpřístroje.
■ Zabraňte neúmyslnému spuštění přístroje.
■ Přístroje svadným vypínačem se musí ihned opravit, aby se předešlo
škodám a zraněním.
■ Uchovávejte přístroj mimo dosah dětí.
■ Přístroj smí obsluhovat pouze osoby důkladně seznámené snávodem
kobsluze a spřístrojem.
■ Údržbu elektrického nářadí provádějte pečlivě. Zkontrolujte, zda jsou
vpořádku pohyblivé části přístroje a zda jim není bráněno vpohybu,
zda nejsou některé součásti rozbité nebo natolik poškozené, že je
funkčnost elektrického nářadí omezena. Poškozené části přístroje nechte
před jeho použitím opravit. Řada úrazů má svou příčinu ve špatné
údržbě elektrických nářadí.
■ Řezné nástroje udržujte vostrém a čistém stavu. Pečlivě udržované
řezné nástroje sostrými řeznými hranami se méně zasekávají a snáze
se vedou.
■ Nechte údržbu přístroje provádět personálem kvalifikovaným pro tuto
činnost. Používejte pouze originální náhradní díly doporučované výrob-
cem.

CZ │ 77 ■
PHSHE 900 B2
Preventivní opatření proti zpětnému rázu
POZOR, ZPĚTNÝ RÁZ!
► Při práci dávejte pozor na zpětný ráz přístroje. Hrozí nebezpečí
zranění. Zpětným rázům zabráníte opatrností a správnou technikou
řezání.
■ Kontakt špičkou lišty může vněkterých případech vést kneočekávané
reakci směrem dozadu, při které je vodicí lišta vyhozena nahoru
a směrem kobsluhující osobě (viz obr.).
■ Zpětný ráz může nastat, když se špička vodicí lišty dotkne nějakého
předmětu nebo když se dřevo ohne a pilový řetěz uvízne vmístě řezu
(viz obr.).
■ Zaklínění pilového řetězu na horní hraně vodicí lišty může vést kprud-
kému nárazu lišty zpět směrem kobsluhující osobě.
■ Každá ztěchto reakcí může způsobit, že ztratíte kontrolu nad pilou
a možná se těžce zraníte. Nespoléhejte se nikdy výlučně na bezpeč-
nostní zařízení zabudovaná vřetězové pile. Jako uživatel řetězové pily
učiňte různá opatření, aby při práci nedošlo kúrazu a zranění. Zpětný
ráz je důsledkem nesprávného nebo chybného použití elektrického
nářadí. Vhodnými bezpečnostními opatřeními mu lze zabránit tak, jak
je popsáno níže:
■ Držte pilu pevně oběma rukama, přičemž jsou rukojeti pily palcem
a prsty obemknuty. Mějte tělo a ruce vtakové poloze, ve které jste
schopni odolat silám zpětného rázu.Učiníte-li vhodná opatření, může
obsluhující osoba síly zpětného rázu zvládnout. Nikdy řetězovou pilu
nepouštějte zruky.
■ Vyhněte se nepřirozenému postoji a při řezání nezvedejte ruce nad
výšku ramen. Tím předejdete neúmyslnému kontaktu špičkou lišty
a získáte lepší kontrolu nad řetězovou pilou vneočekávaných situacích.
■ Používejte vždy náhradní lišty a pilové řetězy předepsané výrob-
cem. Nesprávné náhradní lišty a pilové řetězy mohou vést kroztržení
pilového řetězu a/nebo ke zpětnému rázu.
■ Dodržujte pokyny výrobce kostření a údržbě pilového řetězu.
Příliš nízké omezovače hloubky zvyšují sklon ke zpětnému rázu.
■ Neřežte nikdy špičkou mečovitého nože. Hrozí nebezpečí zpětného
rázu.
■ Dávejte pozor na to, aby na zemi neležely žádné předměty, okteré
byste mohli zakopnout.
Další bezpečnostní upozornění
VÝSTRAHA! NEBEZPEČÍ ZRANĚNÍ!
► Nikdy nechytejte spuštěný přístroj za provozu nad ochranným krouž-
kem
, předejdete tak zranění!
■ Během provozu se vokruhu 15metrů nesmí zdržovat žádné jiné osoby
ani zvířata. Obsluhující osoba je vpracovní oblasti odpovědná vůči
třetím osobám.
■ Udržujte přístroj, řezací mechanizmus a ochranné pouzdro na mečovi-
tém noži vdobrém provozním stavu, předejdete tak zranění.
■ Děti musí být pod dohledem, a to pro jistotu, aby si spřístrojem nehrály.
■ Přístroj používejte teprve poté, co jste se sním důkladně seznámili.
■ Nepracujte spoškozeným, neúplným nebo bez souhlasu výrobce
změněným přístrojem. Nepoužívejte přístroj nikdy svadným ochranným
vybavením. Nepoužívejte přístroj nikdy svadným spínačem zap./vyp.
Před použitím zkontrolujte bezpečnostní stav přístroje, obzvláště mečo-
vitý nůž a pilový řetěz. Po pádu přístroje zkontrolujte, zda není význam-
ně poškozený nebo vadný.
■ Přístroj nikdy nespouštějte, dokud nejsou správně namontovány mečovi-
tý nůž, pilový řetěz a kryt řetězového kola.
■ Zajistěte, aby se přístroj při spouštění a během práce nedostal do kon-
taktu se zemí, kameny, drátem nebo jinými cizími tělesy. Před odložením
přístroj vypněte.
■ Přístroj je dimenzován pro obouruční provoz. Nikdy nepracujte s jed-
nou rukou.
■ Držte přístroj jen za izolované plochy rukojetí, protože pilový řetěz se
může dostat do kontaktu se skrytými elektrickými vedeními. Kontakt
pilového řetězu svedením pod napětím může přenést napětí na kovové
díly přístroje a vést kzásahu elektrickým proudem.
■ Při změně místa dbejte na to, aby byl přístroj vypnutý a aby se prst ne-
dotýkal vypínače. Noste přístroj pilovým řetězem a mečovitým nožem
směrem dolů. Během přepravy nasaďte ochranné pouzdro na mečovitý
nůž.
■ Při každém řezu pevně nasaďte drapákový doraz a až potom začněte
s řezáním.
■ Při řezání malých keřů a větví s krajní buďte maximálně opatrní. Tenké
větve se mohou zachytit v pile a šlehat do vašeho směru nebo vás
vyvést z rovnováhy.
■ Neřežte dřevo položené na zemi, resp. nepokoušejte se řezat kořeny
vyčnívající ze země. Vkaždém případě zamezte zanoření pilového
řetězu do země, protože jinak dojde ihned kjeho ztupení.
■ Při řezání napnuté větve dávejte pozor na možný zpětný ráz, když
napětí dřeva náhle poklesne. Hrozí nebezpečí zranění.
■ V případě vzpříčení nebo sevření řezacího mechanizmu ve větvi se
nepokoušejte uvolnit přístroj za použití násilí. Přístroj okamžitě vypněte
a zapněte jej až po odstranění blokády. Hrozí nebezpečí zranění!
Bild 1

■ 78 │ CZ
PHSHE 900 B2
Před uvedením do provozu
VÝSTRAHA! NEBEZPEČÍ ZRANĚNÍ!
► Před všemi pracemi na přístroji vytáhněte síťovou zástrčku ze zásuvky.
Nebezpečí úrazu elektrickým proudem!
Motorová jednotka
Montáž kulaté rukojeti
♦ Nasuňte kulatou rukojeť vpožadované poloze na násadu .
♦ Utáhněte šroub
.
Připevnění / montáž ramenního popruhu
♦ Zahákněte ramenní popruh do závěsného oka .
♦ Upravte ramenní popruh
podle své velikosti tak, aby se závěsné
oko
nacházelo vzavěšeném stavu ve výšce boků.
Montáž nůžek na živý plot
♦ Nasuňte přední násadu nůžek na živý plot na násadu motorové
jednotky.
♦ Aretační kolík
musí zapadnout.
♦ Sešroubujte obě násady
pomocí šroubu shvězdicí
, za tím
účelem použijte na protilehlé straně matici
.
Montáž nástavce pro řezání větví
♦ Nasuňte přední násadu nástavce pro řezání větví na násadu
motorové jednotky.
♦ Aretační kolík
musí zapadnout.
♦ Sešroubujte obě násady
pomocí šroubu shvězdicí , za tím
účelem použijte na protilehlé straně matici
.
Nastavení polohy unůžek na živý plot
♦ Uvolněte odblokování/zablokování .
♦ Stiskněte stavěcí páčku
, nastavte nůžky na živý plot do požadované
polohy.
♦ Pusťte stavěcí páčku
a nechte odblokování/zablokování zapad-
nout do vybrání vzákladní desce (nůžek na živý plot)
.
Nastavení polohy unástavce pro řezání větví
♦ Uvolněte odblokování/zablokování .
♦ Stiskněte stavěcí páčku
, nastavte nástavec pro řezání větví do jedné
ze dvou poloh.
♦ Pusťte stavěcí páčku
a nechte odblokování/zablokování zapad-
nout do vybrání vzákladní desce (nástavce pro řezání větví)
.
Montáž pilového řetězu a mečovitého nože
VÝSTRAHA!
► Natáhněte si ochranné rukavice! Nebezpečí zranění ostrými řeznými
zuby!
UPOZORNĚNÍ
►
Dávejte pozor na směr chodu pilového řetězu
na mečovitém
noži a ukrytu řetězového kola .
► Ve stavu při dodání jsou mečovitý nůž
a pilový řetěz již
namontované.
► Vzávislosti na opotřebení je možné mečovitý nůž obrátit.
♦ Povolte matici
montážním nástrojem .
♦ Sejměte kryt řetězového kola
.
♦ Napnutí pilového řetězu
se musí případně předem snížit, aby bylo
možné sejmout mečovitý nůž
a pilový řetěz (viz kapitola „Napnutí
a kontrola pilového řetězu“). Řiďte se těmito pokyny vopačném pořadí.
♦ Sejměte mečovitý nůž
spilovým řetězem ze základní desky .
♦ Nasaďte opět pilový řetěz
, přičemž postupujte od špičky mečovitého
nože
.
♦ Položte vodicí lištu
přes vedení mečovitého nože , přitom také
vsaďte kolík pro upnutí řetězu
do otvoru vmečovitém noži .
Současně položte pilový řetěz
přes řetězové kolo .
♦ Nasaďte opět kryt řetězového kola
a utáhněte lehce matici .
♦ Nyní napněte pilový řetěz
(viz kapitola Napnutí a kontrola pilové-
ho řetězu).
Napnutí a kontrola pilového řetězu
UPOZORNĚNÍ
►
Napnutí pilového řetězu
je důležité pro Vaši bezpečnost a funkci
přístroje. Správně napnutý pilový řetěz
prodlužuje životnost
Vašeho přístroje.
VÝSTRAHA!
► Natáhněte si ochranné rukavice! Nebezpečí zranění ostrými řeznými
zuby!
♦ Povolte mírně matici
montážním nástrojem .
♦ Napnutí zvýšíte otáčením šroubu pro upnutí řetězu
pomocí montáž-
ního nástroje
ve směru chodu hodinových ručiček.
♦ Napnutí zvýšíte otáčením šroubu pro upnutí řetězu
pomocí montáž-
ního nástroje
proti směru chodu hodinových ručiček.
♦ Pilový řetěz
musí přiléhat kspodní straně mečovitého nože. Zkontro-
lujte, zda lze přetáhnout pilový řetěz
rukou přes mečovitý nůž .
♦ Utáhněte opětovně matici
montážním nástrojem .
UPOZORNĚNÍ
► Při zatáhnutí za pilový řetěz
tažnou silou 9N (cca 1kg) by pilový
řetěz
a mečovitý nůž neměly být od sebe vzdáleny více než
2mm.
► Nový pilový řetěz se vytahuje a musí se napínat častěji.
► Před každým použitím přístroje zkontrolujte napnutí řetězu.

CZ │ 79 ■
PHSHE 900 B2
Mazání řetězu
♦ Sejměte víčko nádržky na olej .
♦ Naplňte nádržku na olej
cca 100ml biooleje na řetězové pily .
VÝSTRAHA!
► Nikdy nepracujte bez mazání řetězu!
Uřetězu běžícího nasucho se řezací mechanizmus vkrátké době ne-
návratně zničí. Před prací vždy zkontrolujte mazání řetězu a hladinu
oleje vnádržce.
UPOZORNĚNÍ
►
Používejte pouze olej na řetězové pily. Přednostně takový, který je
biologicky odbouratelný. Nepoužívejte již použitý olej, motorový
olej atd.
► Během práce kontrolujte, zda funguje automatické mazání řetězu.
Kontrolujte před prací a během ní funkci mazání řetězu.
Ostření pilového řetězu
UPOZORNĚNÍ
► Pro bezpečné držení během broušení je možné brusku připevnit za
úchyt pro brusku
.
► Vsoupravě pro ostření např. se značkou Oregon najdete podrobné
informace kprocesu broušení.
► Alternativně použijte elektrický přístroj na ostření řetězů a řiďte se
pokyny výrobce.
► Vpřípadě pochyb oprovedení práce je třeba provést výměnu
pilového řetězu.
Uvedení do provozu
UPOZORNĚNÍ
►
Dodržujte předpisy kochraně proti hluku a místní předpisy. Použití
přístroje může být vurčitých dnech (např. vneděli a osvátcích),
vurčitou denní dobu (poledne, noční klid) nebo ve zvláštních
oblastech (např. vlázních, na klinikách atd.) omezené nebo
zakázané.
Zapnutí / vypnutí
Zapnutí:
♦ Spojte síťový kabel sprodlužovacím kabelem.
♦ Vytvořte na konci prodlužovacího kabelu smyčku a zavěste ji do odleh-
čení od tahu
.
♦ Stiskněte blokovací tlačítko , podržte ho stisknuté a stiskněte spínač
zap./vyp.
.
Vypnutí:
♦ Pusťte spínač zap./vyp. .
♦ Vyjměte prodlužovací kabel zodlehčení od tahu
.
♦ Odpojte síťový kabel
od prodlužovacího kabelu.
Přestavení rukojeti
♦ Stiskněte odjišťovací tlačítko . Otočte otočný prvek do požadované
polohy. Pusťte odjišťovací tlačítko
, to musí zaskočit.
Práce snůžkami na živý plot
Použití stroje:
UPOZORNĚNÍ
► Nezapomeňte, prosím, že národní předpisy Vaší země mohou
omezovat použití nůžek na živý plot.
► Před každým použitím nůžek na živý plot je nezbytná každodenní
inspekce. Zkontrolujte svůj přístroj také po nárazu a po pádu, abyste
zjistili závažná poškození nebo závady.
► Noste, prosím, pevnou obuv a těsně přiléhavý oděv, abyste
minimalizovali riziko úrazu. Stůjte pevně na zemi, dbejte na
rovnováhu a noste vždy přibalený nosný popruh!
► Pro zachování Vašeho zdraví dělejte, prosím, během práce přestávky
za účelem odpočinku. Tělesné vyčerpání zvyšuje riziko zranění!
VÝSTRAHA!
► Vžádné případě nepracujte spřístrojem, jste-li unavení, nemocní,
pod vlivem alkoholu nebo jiných drog či léků.
Techniky stříhání
■ Viz výklopná stránka (obrázekA).
UPOZORNĚNÍ
► Silné větve odstraňujte pomocí nůžek na větve.
Práce snástavcem pro řezání větví
Techniky řezání
VÝSTRAHA!
► Dávejte zásadně pozor na padající odříznuté větve.
► Buďte si zásadně vědomi nebezpečí zpětného šlehnutí větví.
UPOZORNĚNÍ
► Přiložte doraz
květvi. Tak budete pracovat bezpečněji a klidněji.
► Teprve potom začněte řezat.
Odříznutí malé větve
♦ Umalých větví (Ø 0-8cm) řežte ze shora dolů (viz obrázek).

■ 80 │ CZ
PHSHE 900 B2
♦ Odříznutí větších větví
♦ Uvětších větví (Ø 8-25cm) proveďte nejprve odlehčovací řez
A
(viz obrázek).
■ Odlehčovací řez také zabraňuje odloupnutí kůry zhlavního kmene.
♦ Postupujte nyní při řezání ze shora
B
dolů
A
.
2
1
Odřezávání po kouskách
Dlouhé, resp. silné větve byste měli před provedením finálního oddělovacího
řezu zkrátit (viz obrázek).
cb a
Bezpečná práce
■ Udržujte přístroj, řezací mechanizmus a ochranné pouzdro na mečovitém
noži
vdobrém provozním stavu, předejdete tak zranění.
■ Po pádu přístroje zkontrolujte, zda není významně poškozený nebo
vadný.
■ Pro zaručení bezpečné práce dodržujte předepsaný pracovní úhel
60°±10° (viz obrázek).
■ Nepoužívejte přístroj, když stojíte na žebříku nebo na nejistém stanovišti.
■ Nenechte se svést knepromyšlenému řezu. Mohlo by to ohrozit vás i
ostatní.
■ Děti musí být pod dohledem, a to pro jistotu, aby si spřístrojem nehrály.
■ Měňte pravidelně svou pracovní polohu. Delší používání přístroje může
vést kporuchám prokrvení rukou způsobených vibracemi. Dobu použí-
vání však můžete prodloužit vhodnými rukavicemi nebo pravidelnými
přestávkami. Uvědomte si prosím, že osobní dispozice kšpatnému
prokrvení, nízké venkovní teploty nebo velké síly vynakládané na udrže-
ní přístroje při práci mohou dobu používání snížit.
■ Snižte rovněž rizika daná vibracemi, např. riziko bělání prstů, častými
pracovními přestávkami, ve kterých si např. budete třít dlaně jednu
odruhou.
Přeprava
■ Při přepravě používejte ochranná pouzdra .
■ Dbejte na to, abyste přístroj při přenášení nezapnuli (viz obrázek).
Údržba a čištění
VÝSTRAHA! Pokud je nutná výměna připojovacího
kabelu, musí ji provést výrobce nebo jeho zástupce,
aby se zabránilo ohrožení bezpečnosti.
■ Motorová jednotka musí být vždy čistá, suchá a zbavená oleje a maziv.
■ Nástavec pro řezání větví se musí vpravidelných intervalech vyčistit od
pilin.
♦ Kčištění povrchu používejte suchý hadřík.Sejměte kryt
.
♦ Sejměte pilový řetěz
zmečovitého nože a vyčistěte vodicí lištu .
♦ Udržujte pilový řetěz
ostrý a kontrolujte napnutí řetězu a hladinu
oleje, dbejte na přívod oleje.
♦ Zkontrolujte nůžky na živý plot, zda na nožové liště
nejsou uvolněné
šrouby, a vpřípadě potřeby šrouby dotáhněte.
♦ Odstraňte uvízlé listí.
♦ Ošetřete nožovou lištu
pomocí olejového spreje nebo olejničky.
Skladování
■ Před uložením přístroj vyčistěte.
■ Uchovávejte přístroj vdodaných ochranných pouzdrech mimo
dosah dětí na suchém místě, které není vystaveno mrazu.
■ Skladujte přístroj naležato nebo zajištěný proti překlopení.
■ Vyprázdněte nádržku na olej
. Bioolej na řetězové pily může
zhoustnout nebo vytéct odvzdušňovacím otvorem ve víčku nádržky
na olej
.
A
B
C A B
60°±10°

CZ │ 81 ■
PHSHE 900 B2
Vyhledávání závad u nástavce pro
řezání větví
Problém Možná příčina Odstranění závad
Motor běží,
pilový řetěz
se nepohybuje
Nástavec pro nůžky na
živý plot, resp. nástavec
pro řezání větví ve výšce
není správně připojen
kmotorové jednotce
Zkontrolujte montáž
Žádný pokrok
při práci
Pilový řetěz
je suchý
resp. přehřátý nebo
prověšený
Doplňte olej, resp.
naostřete, vyměňte
nebo napněte pilový
řetěz
Vyhledávání závad unůžek na živý
plot
Problém Možná příčina Odstranění závad
Motor běží,
nože stojí
Nástavec pro nůžky na
živý plot, resp. nástavec
pro řezání větví ve výšce
není správně připojen
kmotorové jednotce
Zkontrolujte montáž
Intervaly údržby nástavce pro řezání
větví
Zde uvedené údaje se týkají normálních podmínek použití. Při ztížených
podmínkách, jako je např. intenzivní prášení a delší denní pracovní doba,
je třeba uvedené intervaly přiměřeně zkrátit.
Díl přístroje Akce Před začátkem
práce
Týdně Při poruše Při poškození Podle potřeby
Mazání řetězu Kontrola
X
Pilový řetěz
Kontrola a kontro-
la stavu ostrosti
X
Kontrola napnutí
řetězu
X
Ostření
X
Vodicí lišta
Kontrola (opotře-
bení, poškození)
X
Čištění a obrácení
XX
Odhrotování
X
Výměna
XX
Řetězové kolo
Kontrola
X
Výměna
X
Intervaly údržby nůžek na živý plot
Zde uvedené údaje se týkají normálních podmínek použití. Při ztížených
podmínkách, jako je např. intenzivní prášení a delší denní pracovní doba,
je třeba uvedené intervaly přiměřeně zkrátit.
Díl přístro-
je
Akce Před
začát-
kem
práce
Po
ukon-
čení
práce
Podle
potře-
by
Nože Vizuální kontrola
X
vyčistit
XX

■ 82 │ CZ
PHSHE 900 B2
Záruka společnosti
Kompernass Handels GmbH
Vážená zákaznice, vážený zákazníku,
na tento přístroj získáváte záruku v trvání 3let od data zakoupení. V přípa-
dě závad tohoto výrobku máte zákonná práva vůči prodejci výrobku. Tato
zákonná práva nejsou omezena naší níže uvedenou zárukou.
Záruční podmínky
Záruční doba začíná plynout dnem nákupu. Dobře uschovejte pokladní
doklad. Tento doklad je potřebný jako důkaz okoupi.
Pokud se do tří let od data zakoupení tohoto výrobku vyskytne vada
materiálu nebo výrobní závada, pak Vám podle našeho uvážení výrobek
zdarma opravíme, vyměníme nebo uhradíme kupní cenu. Předpokladem
této záruky je, že bude během tříleté lhůty předložen vadný přístroj a do-
klad okoupi (pokladní doklad) a stručně se popíše, včem závada spočívá
a kdy se vyskytla.
Vztahuje-li se na závadu naše záruka, obdržíte zpět buď opravený nebo
nový produkt. Opravou nebo výměnou výrobku nezačne plynout nová
záruční doba.
Záruční doba a zákonné nároky vyplývající ze závad
Záručním plněním se záruční doba neprodlužuje. To platí ipro vyměněné
a opravené součásti. Poškození nebo vady vyskytující se případně již
při nákupu se musí oznámit ihned po vybalení. Po uplynutí záruční doby
podléhají veškeré opravy zpoplatnění.
Rozsah záruky
Přístroj byl vyroben pečlivě podle přísných směrnic kvality a před expedicí
byl svědomitě vyzkoušen.
Záruka se vztahuje na materiálové nebo výrobní vady. Tato záruka se
nevztahuje
na součásti výrobku, které jsou vystaveny běžnému opotřebení, a proto
je lze považovat za spotřební díly, nebo na poškození křehkých součástí,
jako jsou např. spínače, akumulátory nebo díly, které jsou vyrobeny ze
skla.
Tato záruka zaniká, pokud je výrobek poškozen, nebyl řádně používán
nebo udržován. Pro zajištění správného používání výrobku se musí přesně
dodržovat všechny pokyny uvedené v návodu kobsluze. Účelům použití
a úkonům, které se v návodu kobsluze nedoporučují nebo se před nimi
varuje, je třeba se bezpodmínečně vyhnout.
Výrobek je určen pouze pro soukromé účely a ne pro komerční použití.
Při nesprávném a neodborném používání, při použití násilí a při zásazích,
které nebyly provedeny našimi autorizovanými servisními provozovnami,
záruční nároky zanikají.
Vyřízení v případě záruky
Pro zajištění rychlého Vaší žádosti postupujte podle následujících pokynů:
■ Pro všechny dotazy mějte připraven pokladní lístek a číslo výrobku
(např.IAN12345) jako doklad o koupi.
■ Číslo výrobku naleznete na typovém štítku na výrobku, rytině na výrob-
ku, na titulní straně návodu k obsluze (vlevo dole) nebo na nálepce na
zadní nebo spodní straně výrobku.
■ Pokud by se měly vyskytovat funkční vady nebo jiné závady, kon-
taktujte nejprve níže uvedené servisní oddělení telefonicky nebo
e-mailem.
■ Výrobek, zaevidovaný jako vadný výrobek pak můžete při přiložení
dokladu o nákupu (pokladní lístek) a při uvedení, v čem spočívá vada
a kdy k ní došlo, poslat výrobek pro Vás bez poštovného na adresu,
kterou Vám oznámí servis.
Na webových stránkách www.lidl-service.com si můžete
stáhnout tyto a mnoho dalších příruček, videí o výrobku a
instalační software.
Pomocí kódu QR se dostanete přímo na stránku servisu Lidl
(www.lidl-service.com) a můžete pomocí zadání čísla výrob-
ku (IAN)123456 otevřít svůj návod k obsluze.
UPOZORNĚNÍ
► U nástrojů Parkside a Florabest zašlete, prosím, výlučně vadnou část bez
příslušenství (např. akumulátor, úložný kufřík, montážní nářadí, atd.).
Servis
VÝSTRAHA!
► Nechte své přístroje opravit vservisní dílně nebo odborným elek-
trikářem a pouze za použití originálních náhradních dílů.
Tím se zajistí, že zůstane zachována bezpečnost přístroje.
► Výměnu zástrčky nebo síťového kabelu svěřte vždy výrobci
přístroje nebo jeho zákaznickému servisu. Tím se zajistí, že zůstane
zachována bezpečnost přístroje.
Servis Česko
Tel.: 800143873
E-Mail: [email protected]
IAN 313266_1904
Dovozce
Dbejte prosím na to, že následující adresa není adresou servisu.
Kontaktujte nejprve uvedený servis.
KOMPERNASS HANDELS GMBH
BURGSTRASSE 21
44867 BOCHUM
NĚMECKO
www.kompernass.com

CZ │ 83 ■
PHSHE 900 B2
Likvidace
Obal se skládá zekologických materiálů, které lze zlikvidovat
vkomunálních sběrných recyklačních dvorech. Přístroj a jeho
příslušenství se skládají zrůzných materiálů jako např. kovů
a plastů.
Informace omožnostech likvidace vysloužilého přístroje Vám poskytne
obecní nebo městský úřad.
Ochrana životního prostředí
■ Vyprázdněte pečlivě nádržku na olej
a odevzdejte přístroj na sběr-
ném místě krecyklaci. Použité plastové a kovové díly lze roztřídit podle
druhu a recyklovat. Sdotazy se obracejte na naše servisní středisko.
■ Použitý olej odevzdejte na sběrném místě a nevylévejte ho do kanalizace
ani do odtoku.
■ Znečištěný materiál zúdržby a provozní materiály odevzdejte na urče-
ném sběrném místě.
Nevyhazujte elektrická nářadí do domovního
odpadu!
Vsouladu sevropskou směrnicí č. 2012/19/EU musí být opotřebovaná
elektrická nářadí shromažďována odděleně a odevzdána kekologické
recyklaci.
Výrobek je recyklovatelný, podléhá rozšířené odpovědnosti
výrobce a je shromažďován odděleně.
Náhradní díly
Náhradní díly si můžete objednat přímo přes servisní středisko.
Při objednávání bezpodmínečně uveďte typ stroje a číslo dílu.
Překlad originálu prohlášení o shodě
My, KOMPERNASS HANDELS GMBH, osoba odpovědná za dokumentaci:
pan Semi Uguzlu, BURGSTR. 21, 44867 BOCHUM, DEUTSCHLAND/
NĚMECKO, prohlašujeme, že tento přístroj je ve shodě snásledujícími
normami, normativními dokumenty a směrnicemi ES:
Směrnice ostrojních zařízeních
(2006 / 42 / EC)
Směrnice oelektromagnetické kompatibilitě
(2014 / 30 / EU)
Směrnice ohlukových emisích
2000 / 14 / EC
2005 / 88 / EC
Jmenovaný orgán: Č. 0036
TÜV SÜD Industrie Service GmbH, Westendstraße 199,
80686 Mnichov, Německo
Metoda hodnocení shody podle přílohy V.
Hladina akustického výkonu LWA:
Naměřeno: 102,2dB (A)
Garantováno: 105dB (A)
Směrnice oomezení používání nebezpečných látek – RoHS
(2011 / 65 / EU)*
* Výhradní odpovědnost za vystavení tohoto prohlášení o shodě nese vý-
robce. Výše popsán předmět prohlášení je v souladu spředpisy směrnice
č. 2011/65/EU Evropského parlamentu a Rady ze dne 8. června 2011
oomezení používání určitých nebezpečných látek velektrických
a elektronických zařízeních.
Použité harmonizované normy:
EN 60745-1: 2009/A11: 2010
EN ISO 10517: 2019
EN ISO 11680-1: 2011
EN 55014-1: 2017
EN 55014-2: 2015
EN 61000-3-2: 2014
EN 61000-3-3: 2013
EN 50581:2012
Typ/označení přístroje:
Nůžky na živý plot a odvětvovač 2 v 1 PHSHE 900 B2
Rok výroby: 09 - 2019
Sériové číslo: IAN 313266_1904
Bochum, 11.09.2019
Semi Uguzlu
- manažer kvality -
Technické změny ve smyslu dalšího vývoje jsou vyhrazeny.

■ 84 │ CZ
PHSHE 900 B2

SK │ 85 ■
PHSHE 900 B2
Obsah
Úvod.........................................................................................86
Používanie nožníc na živý plot vsúlade surčením .....................................................................86
Používanie odvetvovača vsúlade surčením ..........................................................................86
Používanie vsúlade surčením.....................................................................................86
Vybavenie ....................................................................................................86
Rozsah dodávky ...............................................................................................87
Technické údaje................................................................................................87
Všeobecné bezpečnostné pokyny pre elektrické náradie .............................................88
1. Bezpečnosť na pracovisku .....................................................................................88
2. Elektrická bezpečnosť .........................................................................................88
3. Bezpečnosť osôb ............................................................................................88
4. Používanie a zaobchádzanie s elektrickým náradím .................................................................88
5. Servis......................................................................................................89
Bezpečnostné pokynyšpecifické pre nožnice na živý plot ...............................................................89
Doplňujúce bezpečnostné pokyny pre nožnice na živý plot ..............................................................89
Ďalšie bezpečnostné pokyny pre nožnice na živý plot ..................................................................90
ZVYŠKOVÉ RIZIKÁ!.............................................................................................90
Bezpečnostné pokynyšpecifické pre predĺžený odvetvovač..............................................................90
Preventívne opatrenia proti spätnému rázu ...........................................................................91
Ďalšie bezpečnostné pokyny......................................................................................91
Pred uvedením do prevádzky ....................................................................92
Blok motora ...................................................................................................92
Montáž okrúhlej rukoväte ........................................................................................92
Pripevnenie / montáž ramenného popruhu...........................................................................92
Montáž nožníc na živý plot.......................................................................................92
Montáž predĺženého odvetvovača .................................................................................92
Otáčanie nožníc na živý plot .....................................................................................92
Otáčanie predĺženého odvetvovača................................................................................92
Montáž pílovej reťaze a kýlovnice .................................................................................92
Napnutie a kontrola pílovej reťaze .................................................................................92
Mazanie reťaze................................................................................................93
Ostrenie pílovej reťaze ..........................................................................................93
Uvedenie do prevádzky.........................................................................93
Zapnutie/vypnutie..............................................................................................93
Prestavenie rukoväte ............................................................................................93
Práca s nožnicami na živý plot ....................................................................................93
Použitie stroja: . . . . . . . . . . . . . . . . . . . . . . . . . . . . . . . . . . . . . . . . . . . . . . . . . . . . . . . . . . . . . . . . . . . . . . . . . . . . . . . . . . . . . . . . . . . . . . . . .93
Techniky strihania ..............................................................................................93
Práca s predĺženým odvetvovačom.................................................................................93
Techniky rezania ...............................................................................................93
Bezpečná práca ...............................................................................................94
Preprava .....................................................................................94
Údržba ačistenie...............................................................................94
Skladovanie...................................................................................94
Hľadanie porúch na predĺženom odvetvovači.......................................................95
Vyhľadávanie chýb nožníc na živý plot ............................................................95
Intervaly údržby predĺženého odvetvovača ........................................................95
Intervaly údržby nožníc na živý plot...............................................................95
Záruka spoločnosti Kompernass Handels GmbH.....................................................96
Servis ........................................................................................96
Dovozca . . . . . . . . . . . . . . . . . . . . . . . . . . . . . . . . . . . . . . . . . . . . . . . . . . . . . . . . . . . . . . . . . . . . . . . . . . . . . . . . . . . . . .96
Likvidácia.....................................................................................97
Náhradné diely ................................................................................97
Preklad originálneho vyhlásenia o zhode ..........................................................97

■ 86 │ SK
PHSHE 900 B2
2 V 1 NOŽNICE NA ŽIVÝ PLOT S
DLHOU NÁSADOU / ODVETVOVAČ
PHSHE 900 B2
Úvod
Srdečne vám gratulujeme kukúpe vášho nového prístroja. Touto kúpou
ste sa rozhodli pre výrobok vysokej kvality. Návod na obsluhu je súčasťou
tohto výrobku. Obsahuje dôležité upozornenia týkajúce sa bezpečnosti,
používania alikvidácie. Pred používaním výrobku sa oboznámte sovšet-
kými pokynmi na obsluhu abezpečnostnými pokynmi. Výrobok používajte
iba podľa popisu a vuvedených oblastiach použitia. Pri postúpení výrobku
tretej osobe odovzdajte spolu sním aj všetky dokumenty.
Používanie nožníc na živý plot
vsúlade surčením
Tento prístroj je určený na rezanie a úpravu živých plotov, kríkov a krovín
v domácom prostredí. Ide pritom o ručne vedený prístroj s integrovaným
pohonom, pri ktorom sa tam a späť pohybujú lineárne usporiadané rezné
hrany.
VÝSTRAHA!
► Nožnice na živý plot nie sú určené na používanie deťmi.
Používanie odvetvovača vsúlade surčením
Tento prístroj je určený na odvetvovanie stromov.
Používanie vsúlade surčením
Prístroj používajte len tak, ako je popísané a len pre uvedené oblasti po-
užitia. Prístroj nie je určený na komerčné použitie. Tento prístroj je určený
na používanie dospelými osobami. Tento prístroj nie je určený na to, aby
ho používali osoby (vrátane detí) s obmedzenými fyzickými, senzorickými
alebo duševnými schopnosťami alebo nedostatkom skúseností a/alebo
nedostatkom vedomostí. Použitie prístroja v daždi alebo vlhkom prostredí
je zakázané.
Akýkoľvek iný spôsob používania alebo zmeny prístroja sa považujú za
používanie v rozpore surčením a má za následok vážne nebezpečenstvá
úrazu. Za škody vzniknuté v dôsledku používania v rozpore s určením
výrobca nepreberá žiadnu zodpovednosť.
Vybavenie
Blok motora
skrutka s kolíkovou rukoväťou
matica
výložník
skrutka
okrúhla rukoväť
nosné oko
otočný prvok
tlačidlo odblokovania
blokovanie zapnutia
spínač ZAP/VYP
sieťový kábel
odľahčenie ťahu
Násada nožníc na živý plot
nožová lišta
prevodovka
odblokovanie/zablokovanie
základná doska (nožnice na živý plot)
nastavovacia páka
rukoväť
predný výložník
aretačný kolík
hnací hriadeľ
ochranný kryt
Násada predĺženého odvetvovača
pomocná stojanová brúska
pílová reťaz
kýlovnica
doraz
olejová nádrž
matica
závit
kryt reťazového kolesa
otvor kýlovnice
vedenie kýlovnice
vodiaca lišta
kvapkacia olejnička
napínacia skrutka reťaze
reťazové koleso
napínací kolík reťaze
predný výložník
hnací hriadeľ
ochranný kryt
aretačný kolík
ochranný krúžok
nastavovacia páka
základná doska (predĺžený odvetvovač)
odblokovanie/zablokovanie
veko olejovej nádrže

SK │ 87 ■
PHSHE 900 B2
Rozsah dodávky
1 motorová jednotka PHSHE 900 B2
1 násada nožníc na živý plot PHS 1 (ďalej uvedené ako nožnice na živý plot)
1 násada predĺženého odvetvovača PHE 1 (ďalej uvedené ako predĺžený
odvetvovač)
Príslušenstvo
1
ramenný popruh
1
ochranné puzdro reťaze
1
ochranné puzdro na kýlovnicu
1
100 ml bio reťazového oleja
1
montážne náradie
1 návod na obsluhu
Technické údaje
Motorová jednotka: PHSHE 900 B2
Menovité napätie: 230 V ∼ 50 Hz (striedavý prúd)
Menovitý výkon: 900 W
Trieda ochrany: II /
(dvojitá izolácia)
Hmotnosť:
(bez rukoväte a nosného popruhu): cca 2,7 kg
Predĺžený odvetvovač: PHE 1
Rýchlosť reťaze: max. 6 m/s
Pracovný uhol:
0°; 15°; 30°
Hmotnosť (prevádzková pohotovosť): cca 1,6kg
Odporúčané množstvo naplnenia
olejovej nádrže: 100 cm
3
Dĺžka rezu: cca 260 mm
Kýlovnica: Oregon typ 100SDEA041
Pílová reťaz: Oregon 91P040X
Nožnice na živý plot: PHS 1
Počet zdvihov pri chode naprázdno: 2000 min
-1
Pracovný uhol:
-90°; +90°
Dĺžka rezu: cca 410 mm
Rozstup zubov: 20 mm
Hmotnosť
(prevádzková pohotovosť): cca 2,1kg
Informácie o hluku avibráciách:
Nameraná hodnota hluku zistená podľa EN 60745. Hodnota hladiny
hluku elektrického náradia, vyhodnotená ako A je typicky:
Predĺžený odvetvovač: PHE 1
Hladina akustického tlaku: L
PA
= 83 dB (A)
Neurčitosť K: 3 dB
Hladina akustického výkonu: L
WA
= 104 dB (A)
Neurčitosť K: 3 dB
Nožnice na živý plot: PHS 1
Hladina akustického tlaku: L
PA
= 81 dB (A)
Neurčitosť K: 3 dB
Hladina akustického výkonu: L
WA
= 102 dB (A)
Zaručená hladina akustického výkonu: L
WA
= 105 dB (A)
Neurčitosť K: 3 dB
Hodnoty vibrácií (súčet vektorov troch smerov) zisťované podľa
EN 60745:
Predĺžený odvetvovač:
Vibrácie na prednej rukoväti: Hodnota emisie vibrácií
a
h,D
= 1,0 m/s
2
Neurčitosť K = 1,5 m/s
2
Vibrácie na zadnej rukoväti: Hodnota emisie vibrácií
a
h,D
= 1,2 m/s
2
Neurčitosť K = 1,5 m/s
2
Nožnice na živý plot:
Vibrácie na prednej rukoväti: Hodnota emisie vibrácií
a
h,D
= 1,6 m/s
2
Neurčitosť K = 1,5 m/s
2
Vibrácie na zadnej rukoväti: Hodnota emisie vibrácií
a
h,D
= 1,8 m/s
2
Neurčitosť K = 1,5 m/s
2
Nosiť ochranu sluchu!
UPOZORNENIE
► Hladina vibrácií uvedená v týchtoinštrukciách bola meraná vsúlade
spostupom merania uvedeným vnorme EN60745 amôže sa
použiť na porovnanie prístrojov. Uvedená hodnota emisií vibrácií sa
môže tiež použiť na počiatočné posúdenie prerušenia.
VÝSTRAHA!
► Hladina vibrácií sa zmení podľa používania elektrického náradia
a vniektorých prípadoch môže byť väčšia ako hodnota uvedená
vtýchto pokynoch. Zaťaženie vibráciami by sa mohlo podceniť, keď
sa elektrické náradie používa pravidelne takýmto spôsobom. Pokúste
sa zaťaženie vibráciami udržať na čo najnižšej hodnote. Príkladom
opatrení na zníženie zaťaženia vibráciami je nosenie rukavíc pri
používaní náradia a obmedzenie pracovného času. Pritom sa musia
zohľadniť všetky časti prevádzkového cyklu (napríklad časy, v priebe-
hu ktorých je elektrické náradie vypnuté a tie, počas ktorých je síce
zapnuté, ale beží bez zaťaženia).
Vysvetlenia ku štítkom supozorneniami na prístroji:
Pred uvedením do prevádzky si prečítajte
návod na obsluhu a pokyny!
Nosiť ochranné rukavice!
Nosiť bezpečnostnú obuv!
Nosiť ochranu sluchu!
Nosiť ochrannú prilbu!
Nosiť ochranné okuliare!

■ 88 │ SK
PHSHE 900 B2
Nedovoľte prístup okolostojacich osôb
k prístroju!
Prístroj chráňte pred dažďom a vlhkosťou!
Nebezpečenstvo ohrozenia života elektrickým
prúdom! Udržiavajte vzdialenosť minimálne
10 m od nadzemných elektrických vedení.
Pozor! Padajúce predmety.
Najmä pri rezaní nad výškou hlavy.
Pozor! Nebezpečenstvo poranenia bežiacimi
nožmi.
Ak sa poškodil alebo pretrhol kábel, ihneď
vytiahnite zástrčku zo sieťovej zásuvky.
Údaj o hladine akustického výkonu LWA vdB.
Všeobecné bezpečnostné
pokyny pre elektrické
náradie
VÝSTRAHA!
► Prečítajte si všetky bezpečnostné pokyny a upozornenia. Zanedba-
nia pri dodržiavaní bezpečnostných pokynov a upozornení môžu
mať za následok zásah elektrickým prúdom, požiar a/alebo ťažké
poranenia.
Pre prípad budúceho použitia uschovajte všetky bezpeč-
nostné pokyny a upozornenia.
V bezpečnostných pokynoch používaný pojem „elektrické náradie“ sa
vzťahuje na elektrické náradie napájané zo siete (so sieťovým káblom)
aelektrické náradie prevádzkované s akumulátorom (bez sieťového
kábla).
1. Bezpečnosť na pracovisku
a) Udržiavajte svoje pracovisko v čistote adobre osvetlené.
Neporiadok aneosvetlené pracovné oblasti môžu viesť k úrazom.
b) Nepracujte s elektrickým náradím na miestach s nebezpečenstvom
výbuchu, na ktorých sa nachádzajú horľavé kvapaliny, plyny alebo
prach. Z elektrického náradia vychádzajú iskry, ktoré môžu tento prach
alebo výpary zapáliť.
c) Počas používaniaelektrického náradia zabráňte prístupu detí
a iných osôb. Pri odvedení pozornosti môžete stratiť kontrolu nad
prístrojom.
2. Elektrická bezpečnosť
a) Prípojná zástrčka elektrického náradia musí byť vhodná pre danú
zásuvku. Zástrčka sa nesmie žiadnym spôsobom modifikovať.
Spolu s elektrickým náradím, ktoré má ochranné uzemnenie, ne-
používajte žiadne sieťové adaptéry. Nezmenené zástrčky avhodné
zásuvky znižujú riziko zásahu elektrickým prúdom.
b) Vyvarujte sa telesnému kontaktu suzemnenými povrchmi, ako sú
potrubia, vykurovacie telesá, sporáky achladničky. Ak je vaše telo
uzemnené, hrozí zvýšené riziko zásahu elektrickým prúdom.
c) Chráňte elektrické náradie pred dažďom alebo vlhkosťou. Vniknutie
vody do elektrického náradia zvyšuje riziko zásahu elektrickým prúdom.
d) Nepoužívajte kábel na iné účely, ako napr. na nosenie, zavesenie
elektrického náradia alebo na vyťahovanie zástrčky z elektrickej
zásuvky. Udržiavajte kábel mimo zdrojov tepla, oleja, ostrých hrán
alebo pohybujúcich sa častí prístroja. Poškodené alebo zamotané
káble zvyšujú riziko zásahu elektrickým prúdom.
e) Ak pracujete s elektrickým náradím vonku, používajte len taký
predlžovací kábel, ktorý je schválený na vonkajšie použitie. Použitie
predlžovacieho kábla vhodného do vonkajšieho prostredia zníži riziko
zásahu elektrickým prúdom.
f) Ak nie je možné zabrániť prevádzke elektrického náradia vo vlh-
kom prostredí, použite prúdový chránič. Použitie prúdového chrániča
znižuje riziko zásahu elektrickým prúdom.
3. Bezpečnosť osôb
a) Buďte vždy pozorní a dbajte na to, čo robíte a pri práci s elektric-
kým náradím postupujte s rozvahou. Nepoužívajte elektrické nára-
die, ak ste unavení alebo ak ste pod vplyvom drog, alkoholu alebo
liekov. Aj okamih nepozornosti pri používaní elektrického náradia
môže spôsobiť vážne zranenia.
b) Vždy noste osobné ochranné prostriedky a ochranné okuliare.
Nosenie osobných ochranných prostriedkov, ako je maska proti prachu,
protišmyková bezpečnostná obuv, ochranná prilba alebo ochrana sluchu,
podľa druhu apoužitia elektrického náradia, znižuje riziko poranení.
c) Zabráňte neúmyselnému uvedeniu do prevádzky. Pred zapojením
elektrického náradia do napájania prúdom a/alebo do napája-
nia akumulátorom, ako aj pred jeho zdvíhaním a prenášaním sa
presvedčte, či je vypnuté. Ak máte pri prenášaní elektrického náradia
prst na spínači, alebo ak prístroj zapojíte do zdroja elektrického prúdu
zapnuté, môže to viesť kúrazom.
d) Skôr než zapnete elektrické náradie, odstráňte nastavovacie ná-
radie alebo kľúč na skrutky. Náradie alebo kľúč, ktorý sa nachádza
na otáčajúcej sa časti prístroja, môže spôsobiť zranenia.
e) Vyhýbajte sa neprirodzenému držaniu tela. Majte pevný postoj
a nepretržite udržiavajte rovnováhu. Takto môžete elektrické nára-
die lepšie kontrolovať v neočakávaných situáciách.
f) Noste vhodný odev. Nenoste voľný odev ani šperky. Vlasy, odev
arukavice sa musia udržiavať v bezpečnej vzdialenosti od pohybli-
vých dielov. Voľný odev, šperky alebo dlhé vlasy môžu byť zachytené
pohybujúcimi sa časťami prístroja.
g) Ak je možná montáž zariadení na odsávanie a zachytávanie pra-
chu, presvedčte sa, či sú tieto zapojené a či sú používané správne.
Používanie odsávania prachu môže zredukovať ohrozenie prachom.
4. Používanie a zaobchádzanie s elektrickým
náradím
a) Prístroj nepreťažujte. Pri svojej práci používajte len na to určené
elektrické náradie. S vhodným elektrickým náradím pracujete lepšie
abezpečnejšie v uvedenom rozsahu jeho výkonu.
b) Nepoužívajte elektrické náradie spoškodeným spínačom. Elektrické
náradie, ktoré sa nedá zapnúť alebo vypnúť, je nebezpečné amusí sa
opraviť.
c) Pred vykonávaním nastavení na prístroji, výmenou vložených
nástrojov alebo pred odložením prístroja vytiahnite zástrčku z elek-
trickej zásuvky a/alebo odstráňte odoberateľný akumulátor. Toto
preventívne opatrenie zabraňuje neúmyselnému spusteniu elektrického
náradia.
d) Nepoužívané elektrické náradie uschovávajte mimo dosahu detí.
Nedovoľte používať prístroj osobám, ktoré sním nie sú oboznámené
alebo si neprečítali tieto pokyny. Elektrické náradie je nebezpečné, ak
ho používajú neskúsené osoby.
e) Elektrické náradie starostlivo udržiavajte. Skontrolujte, či pohyblivé
diely fungujú správne a nie sú zaseknuté, či niektoré diely nie sú
zlomené alebo poškodené tak, aby bola obmedzená funkcia elek-
trického náradia. Pred použitím prístroja nechajte opraviť poškodené
časti. Veľa úrazov je spôsobených nedostatočnou údržbou elektrického
náradia.

SK │ 89 ■
PHSHE 900 B2
f) Rezné nástroje udržiavajte ostré ačisté. Starostlivo udržiavané rezné
nástroje sostrými reznými hranami sa menej zasekávajú aľahšie sa
dajú viesť.
g) Elektrické náradie, príslušenstvo, vložené nástroje a pod. používajte
v súlade s týmito inštrukciami. Zohľadnite pritom pracovné podmien-
ky ačinnosť, ktorú budete vykonávať. Použitie elektrického náradia
na iný, ako určený účel použitia, môže mať za následok nebezpečné
situácie.
5. Servis
a) Elektrické náradie smie opravovať len kvalifikovaný odborný personál
alen za použitia originálnych náhradných dielov. Takto sa zabezpečí,
že zostane zachovaná bezpečnosť elektrického náradia.
Bezpečnostné pokynyšpecifické pre nožnice na
živý plot
■ Všetky časti tela držte mimo dosahu rezných nožov. Pri bežiacom
noži sa nepokúšajte odstrániť odrezky alebo držať rezaný materiál.
Uviaznuté odrezky odstraňujte iba pri vypnutom prístroji. Vytiahni-
te navyše zástrčku zo zásuvky.Aj chvíľa nepozornosti pri používaní
nožníc na živý plot môže spôsobiť vážne zranenia.
■ Nožnice na živý plot prenášajte za prednú rukoväť vo vypnutom
stave, s nožovou lištou odvrátenou od tela. Pri preprave alebo
skladovaní nožníc na živý plot natiahnite vždy ochranný kryt.
Opatrná manipulácia s prístrojom znižuje pravdepodobnosť náhodného
kontaktu s bežiacimi nožmi.
■ Elektrické náradie držte len za izolované plochy rukovätí, pretože
nôž sa môže dostať do kontaktu so skrytými elektrickými vedeniami
alebo vlastným sieťovým káblom. Kontakt rezného noža svedením ve-
dúcim napätie môže uviesť pod napätie aj kovové časti prístrojaaspô-
sobiť zásah elektrickým prúdom.
■ Udržiavajte kábel ďaleko od oblasti rezania.Počas práce sa vám
kábel môže stratiť v kríkoch a môžete ho omylom prerezať.
■ Skontrolujte starostlivo oblasť, ktorá sa má zostrihať a odstráňte všetky
drôty alebo iné cudzie telesá.
■ Odporúča sa používať prúdový chránič s vypínacím prúdom 30 mA
alebo menej.
UPOZORNENIE
►
Nožnice na živý plot sa dodávajú v kompletne zmontovanom stave.
► Znázornené obrázky na použitie nožníc na živý plot, príp. ich
nastavovacích dielov nájdete na výklopnej stránke.
► Pokyny a znázornené obrázky na nastavenie, údržbu, mastenie
používateľom nájdete v tomto návode.
► Pokyny pre pracovnú polohu (pozri výklopnú stránku).
► Pokyny pre nastavovacie diely (pozri výklopnú stránku).
► Pokyny na výmenu a opravu (pozri kapitolu Údržba a čistenie/
Servis).
► Vysvetlenie všetkých grafických symbolov, použitých na nožniciach
na živý plot a technické údaje nájdete v tomto návode.
► Charakteristické vlastnosti nožníc na živý plot nájdete v technických
údajoch.
► Blokovaný nástroj: Odstráňte zaseknutý materiál z nožovej lišty
.
POZOR!
► V prípade hroziaceho nebezpečenstva, príp. v núdzovej situácii
ihneď vypnite motor a vytiahnite sieťovú zástrčku.
Doplňujúce bezpečnostné pokyny pre nožnice
na živý plot
Príprava:
a) TIETO NOŽNICE NA ŽIVÝ PLOT MÔŽU SPÔSOBIŤ ZÁVAŽNÉ
PORANENIA! Starostlivo si prečítajte inštrukcie ohľadom správneho
použitia, prípravy, údržby, naštartovania a vypnutia nožníc na živý
plot. Oboznámte sa so všetkými ovládateľnými dielmi, ako aj s vecným
používaním nožníc na živý plot.
b) Deti nesmú nožnice na živý plot používať.
c) Pozor na nadzemné elektrické vedenia.
d) Použitiu nožníc na živý plot treba radšej zabrániť, ak sa v blízkosti
nachádzajú osoby, predovšetkým deti.
e) Noste vhodný odev! Nenoste žiadne voľné oblečenie alebo šperky,
ktoré by sa mohli zachytiť o pohyblivé časti. Odporúča sa nosiť pevné
rukavice, protišmykovú obuv a ochranné okuliare.
f) Ak sa rezacie zariadenie dotkne cudzieho telesa alebo ak sa zosilní
prevádzkový hluk, prípadne ak nožnice na živý plot vibrujú neobvykle
silno, vypnite motor a nechajte nožnice na živý plot zastaviť.
Vykonajte nasledovné opatrenia:
– skontrolujte poškodenia;
– skontrolujte uvoľnené časti a všetky upevnite;
– vymeňte poškodené súčiastky za rovnocenné súčiastky alebo ich
nechajte opraviť.
g)
Noste ochranu sluchu!
h)
Noste ochranu očí!
i) V prípade núdze vypnite nožnice na živý plot a vytiahnite sieťovú
zástrčku zo sieťovej zásuvky.
Prevádzka:
a) Vytiahnite sieťovú zástrčku z elektrickej zásuvky pred:
– čistením alebo odstránením zablokovania;
– kontrolou, údržbou alebo prácami na nožniciach na živý plot;
– nastavením pozície v závislosti od smeru strihania;
– ak nožnice na živý plot zostanú bez dozoru.
b) Vždy sa uistite, že sú nožnice na živý plot v poriadku a v stanovenej
pracovnej polohe, predtým než naštartujete motor.
c) Počas prevádzky nožníc na živý plot vždy zabezpečte, aby sa nachá-
dzali v bezpečnom stave, predovšetkým ak sa zároveň s ním používajú
stúpadlá alebo rebrík.
d) Nepoužívajte nožnice na živý plot s poškodeným alebo silne opotrebova-
ným rezným zariadením.
e) Vždy sa uistite, že sú pri použití nožníc na živý plot namontované
všetky držadlá a tiež bezpečnostné zariadenia. Nikdy sa nepokúšajte
používať nekompletné nožnice na živý plot alebo nožnice na živý plot,
ktoré majú nepovolenú úpravu.
f) držte nožnice na živý plot pevne oboma rukami za rukoväte, ktoré sú
na to určené.
g) Vždy sa oboznámte so svojím okolím a dávajte pozor na možné nebez-
pečenstvá, ktoré možno z dôvodu hluku z nožníc na živý plot nemôžete
počuť.

■ 90 │ SK
PHSHE 900 B2
Údržba a uskladnenie:
a) Pokiaľ sú nožnice na živý plot z dôvodu údržby, inšpekcie alebo
uskladnenia odstavené, vypnite motor a uistite sa, že všetky rotujúce
časti sa zastavili. Nechajte prístroj vychladnúť, predtým, než ho začnete
kontrolovať, nastavovať atď.
b) Skladujte nožnice na živý plot tam, kde benzínové výpary sa nemôžu
dostať do kontaktu s otvoreným ohňom alebo iskrami. Nechajte nožnice
na živý plot vždy vychladnúť predtým, než ich uskladníte.
c) Pri preprave alebo skladovaní nožníc na živý plot je potrebné rezné
zariadenie vždy prikryť ochranu na rezné zariadenia.
Ďalšie bezpečnostné pokyny pre nožnice na živý
plot
■ Všetky časti tela držte mimo dosahu rezných nožov. Pri bežiacom noži sa
nepokúšajte odstrániť odrezky alebo držať rezaný materiál. Uviaznuté
odrezky odstraňujte iba pri vypnutom prístroji. Aj chvíľa nepozornosti
pri používaní nožníc na živý plot môže spôsobiť vážne zranenia.
■ Nožnice na živý plot prenášajte za rukoväť vo vypnutom stave, s nožo-
vou lištou odvrátenou od tela. Pri preprave alebo skladovaní nožníc
na živý plot natiahnite vždy ochranný kryt. Starostlivá manipulácia
s prístrojom znižuje riziko zranenia nožom.
■ Elektrické náradie držte len za izolované plochy rukovätí, pretože nôž
sa môže dostať do kontaktu so skrytými elektrickými vedeniami alebo
vlastným sieťovým káblom. Kontakt rezného noža snapäťovým vede-
ním môže uviesť pod napätie aj kovové časti prístrojaaspôsobiť zásah
elektrickým prúdom.
♦ Prehľadajte, či v kríku nie sú skryté predmety (napr. drôtené ploty).
ZVYŠKOVÉ RIZIKÁ!
Aj keď toto elektrické náradie používate podľa predpisov, vždy ostávajú
zvyškové riziká. V súvislosti s konštrukciou a vyhotovením tohto elektrického
náradia môžu vzniknúť nasledovné riziká:
a) Rezné poranenia
b) Poškodenia sluchu, ak sa nenosí žiadna vhodná ochrana sluchu.
c) Poškodenia zdravia, ktoré vyplývajú z vibrácií ruka – rameno, ak sa
prístroj používa dlhší čas alebo sa riadne nevedie ani neudržiava.
UPOZORNENIE
► Nožnice na živý plot sa dodávajú v kompletne zmontovanom stave.
► Pokyny a znázornené obrázky na nastavenie, údržbu, mastenie
používateľom nájdete v tomto návode.
► Pokyny na výmenu a opravu (pozri kapitolu Údržba a čistenie/
Servis).
► Vysvetlenie všetkých grafických symbolov, použitých na nožniciach
na živý plot a technické údaje nájdete v tomto návode.
► Charakteristické vlastnosti nožníc na živý plot nájdete v technických
údajoch.
► Blokovaný nástroj: Odstráňte zaseknutý materiál z nožovej lišty.
■ Používajte len príslušenstvo a prídavné zariadenia, ktoré sú uvedené
v návode na obsluhu. Použitie iných, ako v návode na obsluhu uve-
dených, vložených nástrojov alebo iného príslušenstva, môže pre vás
znamenať nebezpečenstvo poranenia.
Bezpečnostné pokynyšpecifické pre predĺžený
odvetvovač
■ Noste vždy ochrannú prilbu, ochranu sluchu a bezpečnostné rukavice.
Noste tiež ochranu zraku, aby sa striekajúci olej alebo prach z píly
nedostal do očí. Noste ochrannú protiprachovú masku.
■ Nikdy nepoužívajte prístroj, keď stojíte na rebríku.
■ Pri použití prístroja sa nenakláňajte príliš ďaleko dopredu. Dbajte vždy
na bezpečný postoj a neustále udržiavajte rovnováhu. Pre rovnomerné
rozloženie hmotnosti, pôsobiacej na telo, používajte nosný popruh,
ktorý je súčasťou dodávky.
■ Noste robustné vysoké čižmy s protišmykovou úpravou.
■ Nepoužívajte prístroj pri daždi alebo vo vlhkom prostredí.
■ Nepoužívajte prístroj v blízkosti elektrického vedenia. Udržiavajte mini-
málnu vzdialenosť 10 m od nadzemných elektrických vedení.
■ Nestavajte sa pod konáre, ktoré chcete rezať, predídete tak zraneniu
spadnutými vetvami. Taktiež dávajte pozor na odskakujúce konáre, aby
ste predišli zraneniu. Pracujte pod uhlom 60° ±10°.
■ Dávajte pozor na to, aby nedošlo k spätnému rázu prístroja.
■ Nesledujte len práve rezané vetvy, ale tiež spadnutý materiál, aby ste
o neho nezakopli.
■ Po 30 minútach práce si urobte minimálne hodinovú prestávku.
■ Noste vždy ochranné rukavice.
■ Pri preprave a skladovaní zakryte vodiacu lištu a reťaz krytom.
■ Nepoužívajte prístroj vprostredí snebezpečenstvom výbuchu, kde sa
v blízkosti nachádzajú horľavé kvapaliny, plyny alebo výpary. Iskry pro-
dukované strojom môžu viesť k vznieteniu týchto výparov alebo plynov.
■ Použitá zásuvka musí byť vhodná pre zástrčku. Nevykonávajte na zá-
strčke nikdy žiadne zmeny, predídete tak zásahu elektrickým prúdom.
■ Sieťovú zástrčku nikdy nevyťahujte zo zásuvky ťahom za kábel, ale
uchopte priamo za sieťovú zástrčku. Nepoužívajte sieťový kábel na ťa-
hanie alebo prepravu prístroja. Udržiavajte kábel mimo dosahu tepla,
oleja, ostrých hrán alebo pohybujúcich sa častí prístroja.
■ Po ukončení práce alebo pri čistiacich a údržbárskych prácach vytiahnite
sieťovú zástrčku z prístroja.
■ Zabráňte náhodnému spusteniu prístroja.
■ Prístroje s chybným spínačom sa musia ihneď opraviť, aby sa zabránilo
škodám a poraneniam.
■ Prístroj uchovávajte mimo dosahu detí.
■ Prístroj smú obsluhovať iba osoby dôkladne oboznámené s návodom
na obsluhu a s prístrojom.
■ Na elektrickom náradí starostlivo vykonávajte údržbu. Skontrolujte, či
pohyblivé diely fungujú správne a nie sú zaseknuté, či niektoré diely nie
sú zlomené alebo poškodené tak, aby bola obmedzená funkcia elek-
trického náradia. Pred použitím prístroja nechajte opraviť poškodené
časti. Veľa úrazov je spôsobených nedostatočnou údržbou elektrického
náradia.
■ Rezné nástroje udržiavajte ostré ačisté. Starostlivo udržiavané rezné
nástroje sostrými reznými hranami sa menej zasekávajú aľahšie sa
dajú viesť.
■ Údržbu prístroja nechajte vykonávať personálom, kvalifikovaným pre
túto činnosť. Používajte iba originálne náhradné diely odporúčané
výrobcom.

SK │ 91 ■
PHSHE 900 B2
Preventívne opatrenia proti spätnému rázu
POZOR, SPÄTNÝ RÁZ!
► Pri práci dávajte pozor na spätný ráz prístroja. Hrozí nebezpečen-
stvo poranenia. Spätným rázom zabránite opatrnosťou a správnou
technikou rezania.
■ Dotknutie sa špičkou lišty môže v niektorých prípadoch viesť k neočaká-
vanej reakcii smerom dozadu, pri ktorej sa vodiaca lišta vyhodí nahor
a smerom k obsluhujúcej osobe (pozri obr.).
■ Spätný ráz môže vzniknúť vtedy, keď sa špička vodiacej lišty dotkne
nejakého predmetu alebo keď sa drevo ohne a pílová reťaz uviazne
v mieste rezu (pozri obr.).
■ Uviaznutie pílovej reťaze na hornej hrane vodiacej lišty môže viesť
k prudkému rázu lišty späť smerom k obsluhujúcej osobe.
■ Každá z týchto reakcií môže spôsobiť, že stratíte kontrolu nad pílou
a môžete sa ťažko zraniť. Nespoliehajte sa nikdy výlučne na bezpeč-
nostné zariadenia zabudované v reťazovej píle. Ako používateľ reťazovej
píly urobte rôzne opatrenia, aby pri práci nedošlo k úrazu
a poraneniam. Spätný ráz je dôsledkom nesprávneho alebo chybného
používania elektrického náradia. Môžete mu zabrániť vhodnými pre-
ventívnymi bezpečnostnými opatreniami, ktoré sú popísané v nasledu-
júcom texte:
■ Držte pílu pevne oboma rukami, pričom sú rukoväte píly zovreté
palcom a prstami. Dajte svoje telo a ruky do takej polohy, v kto-
rej ste schopní odolať silám spätného rázu. Ak sa prijmú vhodné
opatrenia, môže obsluhujúca osoba sily spätného rázu zvládnuť. Nikdy
reťazovú pílu nepúšťajte z ruky.
■ Vyhýbajte sa neprirodzenému postoju a pri rezaní nedvíhajte ruky
nad výšku ramien. Tak predídete neúmyselnému dotknutiu sa špičkou
lišty a získate lepšiu kontrolu nad reťazovou pílou v neočakávaných
situáciách.
■ Používajte vždy náhradné lišty a pílové reťaze predpísané výrob-
com. Nesprávne náhradné lišty a pílové reťaze môžu viesť k roztrhnutiu
reťaze a/alebo k spätnému rázu.
■ Dodržiavajte pokyny výrobcu ohľadom ostrenia a údržby pílovej
reťaze. Príliš nízke obmedzovače hĺbky zvyšujú sklon k spätnému rázu.
■ Nepíľte špičkou kýlovnice. Hrozí nebezpečenstvo spätného rázu.
■ Postarajte sa o to, aby na zemi neležali žiadne predmety, o ktoré
by ste mohli potknúť.
Ďalšie bezpečnostné pokyny
POZOR! NEBEZPEČENSTVO PORANENIA!
► Nikdy nechytajte spustený prístroj nad ochranným krúžkom
,
vyhnete sa tak zraneniu!
■ Počas prevádzky sa v okruhu 15 metrov nesmú zdržiavať žiadne iné
osoby ani zvieratá. Obsluhujúca osoba je v pracovnej oblasti zodpo-
vedná voči tretím osobám.
■ Udržiavajte prístroj, rezací mechanizmus a ochranné puzdro kýlovnice
v dobrom stave na používanie, aby sa tak zabránilo poraneniam.
■ Na deti sa musí dohliadať, aby sa zabezpečilo, že sa s prístrojom
nebudú hrať.
■ Prístroj použite až po dôkladnom oboznámení s ním.
■ Nepracujte s poškodeným, neúplným alebo bez súhlasu výrobcu zme-
neným prístrojom. Nikdy nepoužívajte prístroj s chybným ochranným
vybavením. Nikdy nepoužívajte prístroj s chybným spínačom zap./vyp.
Pred použitím skontrolujte bezpečný stav prístroja, obzvlášť kýlovnicu a
pílovú reťaz. Po spadnutí prístroja skontrolujte, či nie je značne poško-
dený alebo chybný.
■ Prístroj nikdy nespúšťajte, dokiaľ nie sú správne namontované kýlovni-
ca, pílová reťaz a kryt reťazového kolesa.
■ Uistite sa, či sa prístroj pri spúšťaní a počas práce nedostal do kontaktu
so zemou, kameňmi, drôtom alebo inými cudzími telesami. Skôr ako
prístroj vypnite, odstavte ho.
■ Prístroj je konštruovaný na obojručnú prevádzku. Nikdy nepracujte
jednou rukou.
■ Prístroj držte len na izolovaných plochách rukoväte, pretože pílová
reťaz sa môže dostať do kontaktu so skrytým elektrickým vedením. Kon-
takt pílovej reťaze svedením pod napätím môže tiež vytvoriť napätie aj
v kovových častiach prístrojaaspôsobiť zásah elektrickým prúdom.
■ Pri prenášaní na iné miesto dávajte pozor na to, aby prístroj bol
vypnutý a prst sa nedotýkal spínača ZAP/VYP. Prístroj noste s pílovou
reťazou a kýlovnicou nasmerovanou dozadu. Pri prenášaní založte na
kýlovnicu ochranné puzdro.
■ Pri každom reze pevne nastavte doraz a až potom začnite píliť.
■ Pri rezaní malých kríkov a vetví buďte mimoriadne opatrní. Tenké
vetvičky sa môžu v píle zamotať a udrieť smerom k vám alebo môžete
stratiť rovnováhu.
■ Nerežte drevo položené na zemi, resp. nepokúšajte sa rezať korene
vyčnievajúce zo zeme. V každom prípade zabráňte ponoreniu pílovej
reťaze do zeminy, pretože inak dôjde ihneď k jej otupeniu.
■ Pri pílení dávajte pozor na vetvy, ktoré sú napnuté, pretože môžu spô-
sobiť spätý úder, keď sa napnutie náhle uvoľní. Hrozí nebezpečenstvo
poranenia.
■ V prípade vzpriečenia alebo zaseknutia rezacieho mechanizmu do
vetví sa nepokúšajte uvoľniť prístroj použitím násilia. Okamžite prístroj
vypnite a zapnite ho až po odstránení zablokovania. Hrozí nebezpe-
čenstvo poranenia!
Bild 1

■ 92 │ SK
PHSHE 900 B2
Pred uvedením do prevádzky
POZOR! NEBEZPEČENSTVO PORANENIA!
► Pred všetkými prácami na prístroji vytiahnite sieťovú zástrčku zo siete.
Nebezpečenstvo zásahu elektrickým prúdom!
Blok motora
Montáž okrúhlej rukoväte
♦ Nastrčte okrúhlu rukoväť v požadovanej polohe na výložník .
♦ Utiahnite skrutku
.
Pripevnenie / montáž ramenného popruhu
♦ Zaveste ramenný popruh do nosného oka .
♦ Prispôsobte ramenný popruh
Vašej veľkosti tak, aby sa nosné oko
nachádzalo v zavesenom stave vo výške bokov.
Montáž nožníc na živý plot
♦ Nasuňte predný výložník nožníc na živý plot na výložník bloku
motora.
♦ Aretovací kolík
musí zaskočiť.
♦ Zoskrutkujte oba výložníky
skrutkou s kolíkovou rukoväťou ,
na tento účel použite maticu
na protiľahlej strane.
Montáž predĺženého odvetvovača
♦ Nasuňte predný výložník predĺženého odvetvovača na výložník
bloku motora.
♦ Aretovací kolík
musí zaskočiť.
♦ Zoskrutkujte oba výložníky
skrutkou s kolíkovou rukoväťou ,
na tento účel použite maticu
na protiľahlej strane.
Otáčanie nožníc na živý plot
♦ Povoľte odblokovanie/zablokovanie .
♦ Stlačte nastavovaciu páčku
, otočte nožnice na živý plot do požado-
vanej polohy.
♦ Nastavovaciu páčku
pustite a odblokovanie/zablokovanie
nechajte zaskočiť do vyhĺbeniny v základnej doske (nožnice na živý
plot)
.
Otáčanie predĺženého odvetvovača
♦ Povoľte odblokovanie/zablokovanie .
♦ Stlačte nastavovaciu páčku
, vytočte predĺžený odvetvovač do
jednej z oboch polôh.
♦ Nastavovaciu páčku
pustite a odblokovanie/zablokovanie
nechajte zaskočiť do vyhĺbeniny v základnej doske (predĺžený odvet-
vovač)
.
Montáž pílovej reťaze a kýlovnice
VÝSTRAHA!
► Používajte ochranné rukavice! Nebezpečenstvo zranenia ostrými
reznými zubami!
UPOZORNENIE
►
Dbajte na smer chodu pílovej reťaze
na kýlovnici a na kryte
reťazového kolesa .
► V stave dodávky sú kýlovnica
a pílová reťaz už namontované.
► Podľa opotrebenia možno kýlovnicu obrátiť.
♦ Povoľte maticu
montážnym náradím .
♦ Odoberte kryt reťazového kolesa
.
♦ Pílová reťaz
sa v danom prípade musí predtým uvoľniť, aby bolo
možné sňať kýlovnicu
a pílovú reťaz (pozri kapitolu „Napnutie
a kontrola pílovej reťaze“). Riaďte sa týmito pokynmi v opačnom
poradí.
♦ Odoberte kýlovnicu
s pílovou reťazou zo základnej dosky .
♦ Nasaďte opäť pílovú reťaz
, pričom začnete od špičky kýlovnice .
♦ Položte vodiacu lištu
cez vedenie kýlovnice , pri tom tiež nasaďte
napínací kolík reťaze
do otvoru kýlovnice . Súčasne položte
pílovú reťaz
cez reťazové koleso .
♦ Opäť nasaďte kryt pílovej reťaze
a mierne utiahnite maticu .
♦ Teraz napnite pílovú reťaz
(pozri kapitolu Napnutie a kontrola
pílovej reťaze).
Napnutie a kontrola pílovej reťaze
UPOZORNENIE
►
Napnutie pílovej reťaze
je dôležité pre bezpečnosť a funkciu
prístroja. Správne upnutá pílová reťaz
zvyšuje životnosť vášho
prístroja.
VÝSTRAHA!
► Používajte ochranné rukavice! Nebezpečenstvo zranenia ostrými
reznými zubami!
♦ Povoľte mierne maticu
montážnym náradím .
♦ Napnutie zvýšite otáčaním napínacej skrutky reťaze
montážnym
náradím
v smere hodinových ručičiek.
♦ Napnutie znížite otáčaním napínacej skrutky reťaze
montážnym
náradím
v smere hodinových ručičiek.
♦ Pílová reťaz
musí dosadať na spodnú stranu kýlovnice. Skontrolujte,
či pílovú reťaz
možno rukou pretiahnuť cez kýlovnicu .
♦ Utiahnite maticu
znovu pomocou montážneho náradia .
UPOZORNENIE
► Pri utiahnutí pílovej reťaze uťahovacou silou
9 N (cca 1 kg) by
pílová reťaz a kýlovnica nemali byť vzdialené viac ako 2 mm.
► Nová pílová reťaz prevísa a musí sa napínať častejšie.
► Pred každým používaním prístroja skontrolujte upnutie reťaze.

SK │ 93 ■
PHSHE 900 B2
Mazanie reťaze
♦ Odstráňte veko olejovej nádrže .
♦ Nalejte do olejovej nádrže
cca 100 ml bio reťazového oleja .
VÝSTRAHA!
► Nikdy nepracujte bez namastenej reťaze!!
Pri reťazi bežiacej nasucho sa rezací mechanizmus v krátkej dobe
nenávratne zničí. Pred prácou vždy skontrolujte mastenie reťaze a
hladinu oleja v nádrži.
UPOZORNENIE
►
Používajte iba olej na pílové reťaze. Prednostne biologicky odbúra-
teľný. Nepoužívajte starý olej, motorový olej atď.
► Počas práce kontrolujte, či funguje automatické mastenie reťaze. Pred
prácou a počas nej kontrolujte funkciu mastenia reťaze.
Ostrenie pílovej reťaze
UPOZORNENIE
► Na bezpečné držanie počas brúsenia možno stojan brúsky pripevniť
na pomôcku stojanovej brúsky
.
► V súprave na ostrenie, napr. so značkou Oregon, nájdete podrobné
informácie o procese brúsenia.
► Alternatívne použite elektrický prístroj na ostrenie reťazí a riaďte sa
pokynmi výrobcu.
► V prípade pochybností o vykonaní práce sa musí vykonať výmena
pílovej reťaze.
Uvedenie do prevádzky
UPOZORNENIE
► Dodržiavajte predpisy na ochranu proti hluku a miestne predpisy.
Používanie prístroja môže byť v určitých dňoch (napr. v nedeľu a
počas sviatkov), v určitú dennú dobu (poludnie, nočný kľud) alebo v
osobitných oblastiach (napr. v kúpeľoch, na klinikách atď.) obmedze-
né alebo zakázané.
Zapnutie/vypnutie
Zapnutie:
♦ Zapojte sieťový kábel do predlžovacieho kábla.
♦ Vytvorte na konci predlžovacieho kábla slučku a zaveste ju do odľah-
čenia ťahu
.
♦ Stlačte blokovacie tlačidlo , podržte toto stlačené a stlačte spínač
zap./vyp.
.
Vypnutie:
♦ Pustite spínač zap./vyp. .
♦ Vytiahnite predlžovací kábel z odľahčenia ťahu
.
♦ Sieťový kábel
odpojte od predlžovacieho kábla.
Prestavenie rukoväte
♦ Stlačte odisťovacie tlačidlo . Otočte otočný prvok do požadova-
nej polohy. Pustite odisťovacie tlačidlo
, toto musí zaskočiť.
Práca s nožnicami na živý plot
Použitie stroja:
UPOZORNENIE
► Majte na pamäti, prosím, že národné predpisy vašej krajiny môžu
obmedzovať používanie nožníc na živý plot.
► Každodenná inšpekcia nožníc pred každým použitím je bezpodmie-
nečná. Svoj prístroj skontrolujte takisto po nárazoch a pádoch, aby
ste zistili vážne škody a poruchy.
► Noste, prosím, pevné topánky a tesne priliehajúci odev, aby ste
minimalizovali nebezpečenstvo poranenia. Zaujmite pevný postoj na
zemi, dbajte na rovnováhu a noste vždy dodaný ramenný popruh!
► Zo zdravotných dôvodov si počas práce vždy dávajte prestávky
v práci. Telesné vyčerpanie zvyšuje riziko zranenia!
VÝSTRAHA!
► Prístroj v žiadnom prípade neobsluhujte, ak ste unavení, chorí, po
požití alkoholu alebo iných drog.
Techniky strihania
■ Pozri výklopnú stránku (obrázok A).
UPOZORNENIE
► Hrubé konáre odstraňujte nožnicami na konáre.
Práca s predĺženým odvetvovačom
Techniky rezania
VÝSTRAHA!
► Dávajte zásadne pozor na padajúce odrezané konáre.
► Buďte si zásadne vedomí nebezpečenstva spätného šľahnutia
konárov.
UPOZORNENIE
► Priložte doraz
na konár. Tak budete pracovať bezpečnejšie
a pokojnejšie.
► Až potom začnite s rezaním.
Odrezanie malého konára
♦ Pri malých konároch (Ø 0 – 8 cm) režte zhora nadol (pozri obrázok).

■ 94 │ SK
PHSHE 900 B2
♦ Odrezanie väčších konárov
♦ Pri väčších konároch (Ø 8 – 25 cm) urobte najskôr odľahčovací rez
A
(pozri obrázok).
■ Odľahčovací rez tiež zabraňuje odlúpnutiu kôry z hlavného kmeňa.
♦ Režte teraz postupne zhora
B
nadol
A
.
2
1
Odrezávanie po kúskoch
Dlhé, príp. hrubé konáre by ste mali pred vykonaním finálneho oddeľova-
cieho rezu skrátiť (pozri obrázok).
cb a
Bezpečná práca
■ Prístroj, rezací mechanizmus a ochranné puzdro kýlovnice udržiavajte
v dobrom stave na používanie, aby sa tak zabránilo zraneniam.
■ Po spadnutí prístroja skontrolujte, či nie je značne poškodený alebo
chybný.
■ Na zaručenie bezpečnej práce dodržiavajte predpísaný pracovný uhol
60°±10° (pozri obrázok).
■ Nepoužívajte prístroj, keď stojíte na rebríku alebo na neistom stanovišti.
■ Nenechajte sa zviesť k nepremyslenému rezu. Mohlo by to ohroziť vás
aj ostatných.
■ Na deti sa musí dohliadať, aby sa zabezpečilo, že sa s prístrojom
nebudú hrať.
■ Meňte pravidelne svoju pracovnú polohu. Dlhšie používanie prístroja
môže viesť k poruchám prekrvenia rúk, podmieneným vibráciami. Dobu
používania však môžete predĺžiť vhodnými rukavicami alebo pravi-
delnými prestávkami. Majte na vedomí, že osobné dispozície k zlému
prekrveniu, nízke vonkajšie teploty alebo veľké sily vynakladané na
udržanie prístroja pri práci môžu dobu používania znížiť.
■ Vyhýbajte sa aj riziku vibrácií, napr. riziku porúch prekrvenia, preto
si robte často prestávky pri práci, počas ktorých si napr. budete trieť
dlane.
Preprava
■ Pri preprave používajte ochranné puzdrá .
■ Dávajte pozor na to, aby ste prístroj pri prenášaní nezapli (pozri
obrázok).
Údržba ačistenie
VÝSTRAHA! Ak je nevyhnutná výmena prípojného
kábla, potom túto musí vykonať výrobca alebo ním
poverený zástupca, aby nedošlo k ohrozeniu
bezpečnosti.
■ Motorová jednotka musí byť vždy čistá, suchá azbavená oleja alebo
mastiaceho tuku.
■ Predĺžený odvetvovač sa musí v pravidelných intervaloch čistiť od pilín.
♦ Načistenie krytupoužívajte suchú handru.Odstráňte kryt
.
♦ Odoberte pílovú reťaz
z kýlovnice a vyčistite vodiacu lištu .
♦ Udržiavajte pílovú reťaz
ostrú a skontrolujte napnutie, dbajte na
stav hladiny oleja a prívod oleja.
♦ Skontrolujte nožnice na živý plot, či nie sú povolené skrutky na nožovej
lište
a podľa potreby ich dotiahnite.
♦ Odstráňte uviaznutý odrezaný materiál.
♦ Nožovú lištu namastite
olejovým sprejom alebo olejovou mazničkou.
Skladovanie
■ Pred uložením prístroj vyčistite.
■ Prístroj uschovávajte v dodaných ochranných puzdrách na
suchom a mieste bez mrazu, mimo dosahu detí.
■ Skladujte prístroj naležato alebo zaistený proti preklopeniu.
■ Vyprázdnite olejovú nádrž
. Bio reťazový olej môže zhustnúť
alebo vytiecť odvzdušňovacím otvorom vo veku nádrže na olej
.
A
B
C A B
60°±10°

SK │ 95 ■
PHSHE 900 B2
Hľadanie porúch na predĺženom
odvetvovači
Problém Možná príčina Odstraňovanie porúch
Motor beží,
pílová reťaz
sa nepohybuje
Nadstavec na nožnice na
živý plot, príp. nadstavec
predĺženého odvetvovača
nie je správne zapojený do
bloku motora
Skontrolujte montáž
Žiadny pokrok
pri práci
Pílová reťaz
je suchá,
príp. prehriata alebo
prevísa
Doplňte olej, príp. pílo-
vú reťaz
naostrite,
vymeňte alebo napnite
Vyhľadávanie chýb nožníc na živý plot
Problém Možná príčina Odstraňovanie porúch
Motor beží,
nože zostanú
stáť
Nadstavec na nožnice na
živý plot, príp. nadstavec
predĺženého odvetvovača
nie je správne zapojený do
bloku motora
Skontrolujte montáž
Intervaly údržby predĺženého odvet-
vovača
Tu uvedené údaje sa týkajú normálnych podmienok použitia. V prípade
sťažených podmienok, ako je napr. intenzívne zaprášenie a dlhšia denná
pracovná doba, je potrebné uvedené intervaly primerane skrátiť.
Diel prístroja Činnosť Pred začatím
práce
týždenne v prípade
poruchy
v prípade poško-
denia
podľa potreby
Mazanie reťaze skontrolovať
X
Pílová reťaz
skontrolovať a
dbať na stav
naostrenia
X
skontrolovať
napnutie reťaze
X
naostriť
X
Vodiaca lišta
skontrolovať
(opotrebenie,
poškodenie)
X
vyčistiť a otočiť
XX
odhrotovať
X
vymeniť
XX
Reťazové koleso
skontrolovať
X
vymeniť
X
Intervaly údržby nožníc na živý plot
Tu uvedené údaje sa týkajú normálnych podmienok použitia. V prípade
sťažených podmienok, ako je napr. intenzívne zaprášenie a dlhšia denná
pracovná doba, je potrebné uvedené intervaly primerane skrátiť.
Diel
prístroja
Činnosť Pred zača-
tím práce
Na konci
práce
podľa
potreby
Rezací
nôž
vizuálna kontrola
X
vyčistiť
XX

■ 96 │ SK
PHSHE 900 B2
Záruka spoločnosti
Kompernass Handels GmbH
Vážená zákazníčka, vážený zákazník,
natento prístroj máte záruku 3roky od dátumu zakúpenia. V prípade
nedostatkov tohto výrobku máte práva vyplývajúce zo zákona voči
predajcovi tohto výrobku. Tieto Vaše práva vyplývajúce zo zákona nie sú
obmedzené našou zárukou, uvedenou nižšie.
Záručné podmienky
Záručná doba začína plynúť dátumom zakúpenia. Prosím, uschovajte si
pokladničný blok. Tento bude potrebný ako dôkaz ozakúpení.
Ak v priebehu troch rokov od dátumu zakúpenia tohto výrobku dôjde
k chybe materiálu alebo výrobnej chybe, výrobok vám – podľa nášho
uváženia – bezplatne opravíme, vymeníme alebo uhradíme kúpnu cenu.
Podmienkou tohto záručného plnenia je, že počas trojročnej lehoty sa
poškodený prístroj a doklad o zakúpení (pokladničný blok) predloží so
stručným opisom, v čom spočíva nedostatok prístroja a kedy sa vyskytol.
Ak je chyba pokrytá našou zárukou, zašleme Vám späť opravený alebo
nový výrobok. Opravou alebo výmenou výrobku nezačína plynúť žiadna
nová záručná doba.
Záručná doba a zákonné nároky na odstránenie chýb
Záručná doba sa záručným plnením nepredĺži. To platí aj pre vymenené
aopravené diely. Poškodenia a chyby zistené prípadne už pri kúpe, sa
musia hlásiť okamžite po vybalení. Po uplynutí záručnej doby podliehajú
prípadné opravy poplatku.
Rozsah záruky
Prístroj bol starostlivo vyrobený v súlade s prísnymi smernicami kvality a
pred dodaním bol svedomito preskúšaný.
Záručné plnenie sa vzťahuje na chyby materiálu alebo výrobné chyby. Táto
záruka sa nevzťahuje na časti výrobku, ktoré sú vystavené bežnému opotre
-
bovaniu a preto ich možno pokladať za rýchlo opotrebiteľné diely, ani na
poškodenia krehkých dielov, ako sú napríklad spínače, akumulátory alebo
diely vyrobené zo skla.
Táto záruka zaniká v prípade poškodenia výrobku neodborným používa-
ním alebo neodbornou údržbou. Na správne používanie výrobku sa musia
presne dodržiavať všetky pokyny, uvedené v návode na obsluhu. Bezpod-
mienečne sa musí zabrániť použitiu alebo úkonom, ktoré sa v návode na
obsluhu neodporúčajú alebo pred ktorými sa varuje.
Výrobok je určený len na súkromné použitie a nie na priemyselné použí-
vanie. Zárukazaniká pri nesprávnom aneodbornom zaobchádzaní, pri
použití násilia apri zásahoch, ktoré neboli vykonané naším autorizovaným
servisom.
Vybavenie v prípade záruky
Na zaručenie rýchleho vybavenia Vašej žiadosti postupujte podľa nasle-
dujúcich pokynov:
■ Na všetky otázky majte pripravený pokladničný doklad a číslo výrobku
(napr.IAN12345) ako doklad o nákupe.
■ Číslo výrobku nájdete na typovom štítku na výrobku, na gravúre na
výrobku, na titulnej stránke návodu na obsluhu (dole vľavo) alebo ako
nálepku na zadnej alebo spodnej strane výrobku.
■ Ak dôjde k funkčným poruchám alebo iným nedostatkom, kontaktujte naj-
prv nižšie uvedené servisné oddelenie telefonicky alebo e-mailom.
■ Výrobok, zaevidovaný ako poruchový, môžete potom spolu s dokladom
o nákupe (pokladničný blok) a uvedením popisu chyby a dátumu, kedy
k nej došlo, bezplatne odoslať na adresu servisného strediska, ktorá Vám
bude oznámená.
Na webovej stránke www.lidl-service.com si môžete stiahnuť
tieto a mnoho ďalších príručiek, videá o výrobkoch a
inštalačný softvér.
Pomocou tohto QR-kódu sa dostanete priamo na stránku
servisu Lidl (www.lidl-service.com) a pomocou zadania čísla
výrobku (IAN) 123456 otvoríte váš návod na obsluhu.
UPOZORNENIE
►
Pri nástrojoch Parkside a Florabest zašlite, prosím, výlučne chybný
diel bez príslušenstva (napr. akumulátor, úložný kufrík, montážne
náradie, atď.).
Servis
VÝSTRAHA!
► Opravy vašich prístrojov zverte servisnému stredisku alebo
odbornému elektrikárovi a pri opravách použite iba originálne
náhradné diely. Tým sa zaistí, že sa zachová bezpečnosť prístroja.
► Výmenu zástrčky alebo sieťového kábla nechajte vykonať len vý-
robcom prístroja alebo jeho zákazníckym servisom. Tým sa zaistí,
že sa zachová bezpečnosť prístroja.
Servis Slovensko
Tel. 0850 232001
E-Mail: [email protected]
IAN 313266_1904
Dovozca
Majte na pamäti, že nižšie uvedená adresa nie je adresou servisného
strediska. Najprv kontaktujte uvedené servisné stredisko.
KOMPERNASS HANDELS GMBH
BURGSTRASSE 21
44867 BOCHUM
NEMECKO
www.kompernass.com

SK │ 97 ■
PHSHE 900 B2
Likvidácia
Obal sa skladá zekologických materiálov, ktoré môžete zlikvido-
vať vmiestnych zberných surovinách. Prístroj a jeho príslušenstvo
sa skladajú zrôznych materiálov, ako sú napr. kov a plasty.
Informácie o možnostiach likvidácie opotrebovaného prístroja dostanete
na miestnej alebo mestskej správe.
Ochrana životného prostredia
■ Dôkladne vyprázdnite olejovú nádrž
a odovzdajte prístroj do zberne
odpadu. Použité plastové a kovové časti sa dajú rozdeliť podľa druhu
a odovzdať na opätovné spracovanie. V prípade otázok kontaktujte naše
servisné stredisko.
■ Použitý olej odovzdajte do zberne a nevylievajte ho do kanalizácie
alebo do odtoku.
■ Znečistený údržbársky materiál a prevádzkové materiály odovzdajte
vpríslušnej zberni odpadu.
Elektrické prístroje neodhadzujte do komunálneho
odpadu!
V súlade s európskou smernicou č. 2012/19/EU sa opotrebované elek-
trické prístroje musia zberať oddelene a odovzdať za účelom ekologickej
recyklácie.
Produkt je recyklovateľný, podlieha rozšírenej zodpovednosti
výrobcu a zbiera sa oddelene.
Náhradné diely
Náhradné diely si môžete objednať priamo cez servisné stredisko.
Pri objednávaní bezpodmienečne uveďte typ prístroja a číslo dielu.
Preklad originálneho vyhlásenia o
zhode
My, spoločnosť KOMPERNASS HANDELS GMBH, zodpovedná osoba
za dokumentáciu: pán Semi Uguzlu, BURGSTR. 21, 44867 BOCHUM,
DEUTSCHLAND/NEMECKO vyhlasujeme, že tento prístroj je vsúlade
snasledovnými normami, normatívnymi dokumentmi a smernicami ES:
Smernicao strojových zariadeniach
(2006 / 42 / EC)
Elektromagnetická kompatibilita
(2014 / 30 / EU)
Smernica pre emisie hluku
(2000 / 14 / EC)
(2005 / 88 / EC)
Uvedené miesto: Č. 0036
TÜV SÜD Industrie Service GmbH, Westendstraße 199,
80686 Mníchov, Nemecko
Postup hodnotenia konformity podľa prílohy V.
Hladina akustického výkonu LWA:
Nameraná: 102,2 dB (A)
Zaručená: 105 dB (A)
Smernica RoHS
(2011 / 65 / EU)*
* Výhradnú zodpovednosť za vydanie tohto vyhlásenia o zhode nesie vý-
robca. Vyššie opísaný predmet vyhlásenia je v súlade spredpismi smernice
č. 2011/65/EU Európskeho parlamentu a Rady z 8.júna 2011 o obme-
dzení používania určitých nebezpečných látok velektrických
a elektronických zariadeniach.
Použité harmonizované normy:
EN 60745-1: 2009/A11: 2010
EN ISO 10517: 2019
EN ISO 11680-1: 2011
EN 55014-1: 2017
EN 55014-2: 2015
EN 61000-3-2: 2014
EN 61000-3-3: 2013
EN 50581:2012
Typ/označenie prístroja:
2 v 1 nožnice na živý plot s dlhou násadou / odvetvovač PHSHE 900 B2
Rok výroby: 09 - 2019
Sériové číslo: IAN 313266_1904
Bochum, 11.09.2019
Semi Uguzlu
– Manažér kvality –
Technické zmeny vzmysle ďalšieho vývoja sú vyhradené.

■ 98 │ SK
PHSHE 900 B2

2-IN-1-LANGSTIEL-HECKENSCHERE / HOCHENTASTER
2-IN-1 HEDGE TRIMMER / POLE PRUNER
TAILLE-HAIES SUR PERCHE / PERCHE ÉLAGUEUSE 2 EN 1
PHSHE 900 B2
2-IN-1-LANGSTIEL-HECKENSCHERE /
HOCHENTASTER
Originalbetriebsanleitung
2-IN-1 HEDGE TRIMMER /
POLE PRUNER
Translation of the original instructions
TAILLE-HAIES SUR PERCHE /
PERCHE ÉLAGUEUSE 2 EN 1
Traduction des instructions d’origine
IAN 313266_1904
2-IN-1-TELESCOPISCHE
HEGGENSCHAAR/TELESCOPISCHE
TAKKENSCHAAR
Vertaling van de originele gebruiksaanwijzing
2-W-1 NOŻYCE DO ŻYWOPŁOTU
ZDŁUGIM TRZONKIEM /
OKRZESYWARKA
Tłumaczenie oryginalnej instrukcji obsługi
NŮŽKY NA ŽIVÝ PLOT
AODVĚTVOVAČ 2 V 1
Překlad originálního provozního návodu
2 V 1 NOŽNICE NA ŽIVÝ PLOT S
DLHOU NÁSADOU / ODVETVOVAČ
Preklad originálneho návodu na obsluhu

DE / AT / CH Originalbetriebsanleitung Seite 1
GB/IE Translation of the original instructions Page 15
FR / BE Traduction des instructions d’origine Page 29
NL / BE Vertaling van de originele gebruiksaanwijzing Pagina 43
PL Tłumaczenie oryginalnej instrukcji obsługi Strona 57
CZ Překlad originálního provozního návodu Strana 71
SK Preklad originálneho návodu na obsluhu Strana 85
Klappen Sie vor dem Lesen die beiden Seiten mit den Abbildungen aus und machen Sie sich anschließend
mit allen Funktionen des Gerätes vertraut.
Before reading, unfold both pages containing illustrations and familiarise yourself with all functions of the
device.
Avant de lire le mode d’emploi, ouvrez les deux pages contenant les illustrations et familiarisez-vous ensuite
avec toutes les fonctions de l’appareil.
Vouw vóór het lezen de beide pagina‘s met de afbeeldingen open en maak u vertrouwd met alle functies
van het apparaat.
Przed przeczytaniem proszę rozłożyć obie strony z ilustracjami, a następnie proszę zapoznać się z
wszystkimi funkcjami urządzenia.
Před čtením si odklopte obě dvě strany s obrázky a potom se seznamte se všemi funkcemi přístroje.
Pred čítaním si odklopte obidve strany s obrázkami a potom sa oboznámte so všetkými funkciami prístroja.


KOMPERNASS HANDELS GMBH
BURGSTRASSE 21
44867 BOCHUM
GERMANY
www.kompernass.com
Stand der Informationen · Last Information Update · Version des informations
Stand van de informatie · Stan informacji · Stav informací · Stav informácií:
10 / 2019 · Ident.-No.: PHSHE900B2-092019-1
8
IAN 313266_1904
Documenttranscriptie
2-IN-1-LANGSTIEL-HECKENSCHERE / HOCHENTASTER 2-IN-1 HEDGE TRIMMER / POLE PRUNER TAILLE-HAIES SUR PERCHE / PERCHE ÉLAGUEUSE 2 EN 1 PHSHE 900 B2 2-IN-1-LANGSTIEL-HECKENSCHERE / HOCHENTASTER 2-IN-1 HEDGE TRIMMER / POLE PRUNER Originalbetriebsanleitung Translation of the original instructions TAILLE-HAIES SUR PERCHE / PERCHE ÉLAGUEUSE 2 EN 1 2-IN-1-TELESCOPISCHE HEGGENSCHAAR/TELESCOPISCHE TAKKENSCHAAR Traduction des instructions d’origine Vertaling van de originele gebruiksaanwijzing 2-W-1 NOŻYCE DO ŻYWOPŁOTU Z DŁUGIM TRZONKIEM / OKRZESYWARKA NŮŽKY NA ŽIVÝ PLOT A ODVĚTVOVAČ 2 V 1 Překlad originálního provozního návodu Tłumaczenie oryginalnej instrukcji obsługi 2 V 1 NOŽNICE NA ŽIVÝ PLOT S DLHOU NÁSADOU / ODVETVOVAČ Preklad originálneho návodu na obsluhu IAN 313266_1904 Klappen Sie vor dem Lesen die beiden Seiten mit den Abbildungen aus und machen Sie sich anschließend mit allen Funktionen des Gerätes vertraut. Before reading, unfold both pages containing illustrations and familiarise yourself with all functions of the device. Avant de lire le mode d’emploi, ouvrez les deux pages contenant les illustrations et familiarisez-vous ensuite avec toutes les fonctions de l’appareil. Vouw vóór het lezen de beide pagina‘s met de afbeeldingen open en maak u vertrouwd met alle functies van het apparaat. Przed przeczytaniem proszę rozłożyć obie strony z ilustracjami, a następnie proszę zapoznać się z wszystkimi funkcjami urządzenia. Před čtením si odklopte obě dvě strany s obrázky a potom se seznamte se všemi funkcemi přístroje. Pred čítaním si odklopte obidve strany s obrázkami a potom sa oboznámte so všetkými funkciami prístroja. DE / AT / CH GB/IE FR / BE NL / BE PL CZ SK Originalbetriebsanleitung Translation of the original instructions Traduction des instructions d’origine Vertaling van de originele gebruiksaanwijzing Tłumaczenie oryginalnej instrukcji obsługi Překlad originálního provozního návodu Preklad originálneho návodu na obsluhu Seite Page Page Pagina Strona Strana Strana 1 15 29 43 57 71 85 A Inhaltsverzeichnis Einleitung . . . . . . . . . . . . . . . . . . . . . . . . . . . . . . . . . . . . . . . . . . . . . . . . . . . . . . . . . . . . . . . . . . . . . . . . . . . . . . . . . . . . . . 2 Bestimmungsgemäßer Gebrauch Langstielheckenschere . . . . . . . . . . . . . . . . . . . . . . . . . . . . . . . . . . . . . . . . . . . . . . . . . . . . . . . . . . . . . . . . . 2 Bestimmungsgemäßer Gebrauch Hochentaster . . . . . . . . . . . . . . . . . . . . . . . . . . . . . . . . . . . . . . . . . . . . . . . . . . . . . . . . . . . . . . . . . . . . . . . . 2 Bestimmungsgemäßer Gebrauch . . . . . . . . . . . . . . . . . . . . . . . . . . . . . . . . . . . . . . . . . . . . . . . . . . . . . . . . . . . . . . . . . . . . . . . . . . . . . . . . . . . 2 Ausstattung . . . . . . . . . . . . . . . . . . . . . . . . . . . . . . . . . . . . . . . . . . . . . . . . . . . . . . . . . . . . . . . . . . . . . . . . . . . . . . . . . . . . . . . . . . . . . . . . . . . . 2 Lieferumfang . . . . . . . . . . . . . . . . . . . . . . . . . . . . . . . . . . . . . . . . . . . . . . . . . . . . . . . . . . . . . . . . . . . . . . . . . . . . . . . . . . . . . . . . . . . . . . . . . . . 3 Technische Daten . . . . . . . . . . . . . . . . . . . . . . . . . . . . . . . . . . . . . . . . . . . . . . . . . . . . . . . . . . . . . . . . . . . . . . . . . . . . . . . . . . . . . . . . . . . . . . . 3 Allgemeine Sicherheitshinweise für Elektrowerkzeuge . . . . . . . . . . . . . . . . . . . . . . . . . . . . . . . . . . . . . . . . . . . . . . . . 4 1. Arbeitsplatz-Sicherheit. . . . . . . . . . . . . . . . . . . . . . . . . . . . . . . . . . . . . . . . . . . . . . . . . . . . . . . . . . . . . . . . . . . . . . . . . . . . . . . . . . . . . . . . . . 4 2. Elektrische Sicherheit . . . . . . . . . . . . . . . . . . . . . . . . . . . . . . . . . . . . . . . . . . . . . . . . . . . . . . . . . . . . . . . . . . . . . . . . . . . . . . . . . . . . . . . . . . . 4 3. Sicherheit von Personen . . . . . . . . . . . . . . . . . . . . . . . . . . . . . . . . . . . . . . . . . . . . . . . . . . . . . . . . . . . . . . . . . . . . . . . . . . . . . . . . . . . . . . . . 4 4. Verwendung und Behandlung des Elektrowerkzeuges . . . . . . . . . . . . . . . . . . . . . . . . . . . . . . . . . . . . . . . . . . . . . . . . . . . . . . . . . . . . . . . . . 4 5. Service. . . . . . . . . . . . . . . . . . . . . . . . . . . . . . . . . . . . . . . . . . . . . . . . . . . . . . . . . . . . . . . . . . . . . . . . . . . . . . . . . . . . . . . . . . . . . . . . . . . . . . 5 Gerätespezifische Sicherheitshinweise für Heckenscheren . . . . . . . . . . . . . . . . . . . . . . . . . . . . . . . . . . . . . . . . . . . . . . . . . . . . . . . . . . . . . . . . 5 Ergänzende Sicherheitshinweise für Heckenscheren. . . . . . . . . . . . . . . . . . . . . . . . . . . . . . . . . . . . . . . . . . . . . . . . . . . . . . . . . . . . . . . . . . . . . 5 Weiterführende Sicherheitshinweise für Heckenscheren . . . . . . . . . . . . . . . . . . . . . . . . . . . . . . . . . . . . . . . . . . . . . . . . . . . . . . . . . . . . . . . . . . 6 RESTRISIKEN! . . . . . . . . . . . . . . . . . . . . . . . . . . . . . . . . . . . . . . . . . . . . . . . . . . . . . . . . . . . . . . . . . . . . . . . . . . . . . . . . . . . . . . . . . . . . . . . . . . 6 Gerätespezifische Sicherheitshinweise für Hochentaster. . . . . . . . . . . . . . . . . . . . . . . . . . . . . . . . . . . . . . . . . . . . . . . . . . . . . . . . . . . . . . . . . . 6 Vorsichtsmaßnahmen gegen Rückschlag . . . . . . . . . . . . . . . . . . . . . . . . . . . . . . . . . . . . . . . . . . . . . . . . . . . . . . . . . . . . . . . . . . . . . . . . . . . . . 7 Weiterführende Sicherheitshinweise . . . . . . . . . . . . . . . . . . . . . . . . . . . . . . . . . . . . . . . . . . . . . . . . . . . . . . . . . . . . . . . . . . . . . . . . . . . . . . . . . 7 Vor der Inbetriebnahme . . . . . . . . . . . . . . . . . . . . . . . . . . . . . . . . . . . . . . . . . . . . . . . . . . . . . . . . . . . . . . . . . . . . . . . . . . 8 Motoreinheit . . . . . . . . . . . . . . . . . . . . . . . . . . . . . . . . . . . . . . . . . . . . . . . . . . . . . . . . . . . . . . . . . . . . . . . . . . . . . . . . . . . . . . . . . . . . . . . . . . . 8 Rundgriff montieren . . . . . . . . . . . . . . . . . . . . . . . . . . . . . . . . . . . . . . . . . . . . . . . . . . . . . . . . . . . . . . . . . . . . . . . . . . . . . . . . . . . . . . . . . . . . . . 8 Schultergurt befestigen / montieren . . . . . . . . . . . . . . . . . . . . . . . . . . . . . . . . . . . . . . . . . . . . . . . . . . . . . . . . . . . . . . . . . . . . . . . . . . . . . . . . . 8 Heckenschere montieren . . . . . . . . . . . . . . . . . . . . . . . . . . . . . . . . . . . . . . . . . . . . . . . . . . . . . . . . . . . . . . . . . . . . . . . . . . . . . . . . . . . . . . . . . . 8 Hochentaster montieren. . . . . . . . . . . . . . . . . . . . . . . . . . . . . . . . . . . . . . . . . . . . . . . . . . . . . . . . . . . . . . . . . . . . . . . . . . . . . . . . . . . . . . . . . . . 8 Schwenken der Heckenschere . . . . . . . . . . . . . . . . . . . . . . . . . . . . . . . . . . . . . . . . . . . . . . . . . . . . . . . . . . . . . . . . . . . . . . . . . . . . . . . . . . . . . 8 Schwenken des Hochentasters . . . . . . . . . . . . . . . . . . . . . . . . . . . . . . . . . . . . . . . . . . . . . . . . . . . . . . . . . . . . . . . . . . . . . . . . . . . . . . . . . . . . . 8 Sägekette und Schwert montieren . . . . . . . . . . . . . . . . . . . . . . . . . . . . . . . . . . . . . . . . . . . . . . . . . . . . . . . . . . . . . . . . . . . . . . . . . . . . . . . . . . . 8 Sägekette spannen und prüfen . . . . . . . . . . . . . . . . . . . . . . . . . . . . . . . . . . . . . . . . . . . . . . . . . . . . . . . . . . . . . . . . . . . . . . . . . . . . . . . . . . . . . 8 Kettenschmierung . . . . . . . . . . . . . . . . . . . . . . . . . . . . . . . . . . . . . . . . . . . . . . . . . . . . . . . . . . . . . . . . . . . . . . . . . . . . . . . . . . . . . . . . . . . . . . . 9 Sägekette schärfen . . . . . . . . . . . . . . . . . . . . . . . . . . . . . . . . . . . . . . . . . . . . . . . . . . . . . . . . . . . . . . . . . . . . . . . . . . . . . . . . . . . . . . . . . . . . . . 9 Inbetriebnahme. . . . . . . . . . . . . . . . . . . . . . . . . . . . . . . . . . . . . . . . . . . . . . . . . . . . . . . . . . . . . . . . . . . . . . . . . . . . . . . . . 9 Ein- / ausschalten . . . . . . . . . . . . . . . . . . . . . . . . . . . . . . . . . . . . . . . . . . . . . . . . . . . . . . . . . . . . . . . . . . . . . . . . . . . . . . . . . . . . . . . . . . . . . . . . 9 Handgriff verstellen . . . . . . . . . . . . . . . . . . . . . . . . . . . . . . . . . . . . . . . . . . . . . . . . . . . . . . . . . . . . . . . . . . . . . . . . . . . . . . . . . . . . . . . . . . . . . . 9 Arbeiten mit der Heckenschere . . . . . . . . . . . . . . . . . . . . . . . . . . . . . . . . . . . . . . . . . . . . . . . . . . . . . . . . . . . . . . . . . . . . . . . . . . . . . . . . . . . . . 9 Gebrauch der Maschine: . . . . . . . . . . . . . . . . . . . . . . . . . . . . . . . . . . . . . . . . . . . . . . . . . . . . . . . . . . . . . . . . . . . . . . . . . . . . . . . . . . . . . . . . . 9 Schnitttechniken . . . . . . . . . . . . . . . . . . . . . . . . . . . . . . . . . . . . . . . . . . . . . . . . . . . . . . . . . . . . . . . . . . . . . . . . . . . . . . . . . . . . . . . . . . . . . . . . . 9 Arbeiten mit dem Hochentaster . . . . . . . . . . . . . . . . . . . . . . . . . . . . . . . . . . . . . . . . . . . . . . . . . . . . . . . . . . . . . . . . . . . . . . . . . . . . . . . . . . . . . 9 Sägetechniken . . . . . . . . . . . . . . . . . . . . . . . . . . . . . . . . . . . . . . . . . . . . . . . . . . . . . . . . . . . . . . . . . . . . . . . . . . . . . . . . . . . . . . . . . . . . . . . . . . 9 Sicheres Arbeiten. . . . . . . . . . . . . . . . . . . . . . . . . . . . . . . . . . . . . . . . . . . . . . . . . . . . . . . . . . . . . . . . . . . . . . . . . . . . . . . . . . . . . . . . . . . . . . . 10 Transport . . . . . . . . . . . . . . . . . . . . . . . . . . . . . . . . . . . . . . . . . . . . . . . . . . . . . . . . . . . . . . . . . . . . . . . . . . . . . . . . . . . . . 10 Wartung und Reinigung . . . . . . . . . . . . . . . . . . . . . . . . . . . . . . . . . . . . . . . . . . . . . . . . . . . . . . . . . . . . . . . . . . . . . . . . . 10 Lagerung . . . . . . . . . . . . . . . . . . . . . . . . . . . . . . . . . . . . . . . . . . . . . . . . . . . . . . . . . . . . . . . . . . . . . . . . . . . . . . . . . . . . . 10 Fehlersuche Hochentaster. . . . . . . . . . . . . . . . . . . . . . . . . . . . . . . . . . . . . . . . . . . . . . . . . . . . . . . . . . . . . . . . . . . . . . . . 11 Fehlersuche Heckenschere . . . . . . . . . . . . . . . . . . . . . . . . . . . . . . . . . . . . . . . . . . . . . . . . . . . . . . . . . . . . . . . . . . . . . . . 11 Wartungsintervalle Hochentaster . . . . . . . . . . . . . . . . . . . . . . . . . . . . . . . . . . . . . . . . . . . . . . . . . . . . . . . . . . . . . . . . . 11 Wartungsintervalle Heckenschere. . . . . . . . . . . . . . . . . . . . . . . . . . . . . . . . . . . . . . . . . . . . . . . . . . . . . . . . . . . . . . . . . 11 Garantie der Kompernaß Handels GmbH . . . . . . . . . . . . . . . . . . . . . . . . . . . . . . . . . . . . . . . . . . . . . . . . . . . . . . . . . . 12 Service . . . . . . . . . . . . . . . . . . . . . . . . . . . . . . . . . . . . . . . . . . . . . . . . . . . . . . . . . . . . . . . . . . . . . . . . . . . . . . . . . . . . . . . 12 Importeur. . . . . . . . . . . . . . . . . . . . . . . . . . . . . . . . . . . . . . . . . . . . . . . . . . . . . . . . . . . . . . . . . . . . . . . . . . . . . . . . . . . . . 13 Entsorgung. . . . . . . . . . . . . . . . . . . . . . . . . . . . . . . . . . . . . . . . . . . . . . . . . . . . . . . . . . . . . . . . . . . . . . . . . . . . . . . . . . . . 13 Ersatzteile. . . . . . . . . . . . . . . . . . . . . . . . . . . . . . . . . . . . . . . . . . . . . . . . . . . . . . . . . . . . . . . . . . . . . . . . . . . . . . . . . . . . . 13 Original-Konformitätserklärung . . . . . . . . . . . . . . . . . . . . . . . . . . . . . . . . . . . . . . . . . . . . . . . . . . . . . . . . . . . . . . . . . . 13 PHSHE 900 B2 DE│AT│CH │ 1 ■ 2-IN-1-LANGSTIEL-HECKENSCHERE / HOCHENTASTER PHSHE 900 B2 Einleitung Wir beglückwünschen Sie zum Kauf Ihres neuen Gerätes. Sie haben sich damit für ein hochwertiges Produkt entschieden. Die Bedienungsanleitung ist Teil dieses Produkts. Sie enthält wichtige Hinweise für Sicherheit, Gebrauch und Entsorgung. Machen Sie sich vor der Benutzung des Produkts mit allen Bedienund Sicherheitshinweisen vertraut. Benutzen Sie das Produkt nur wie beschrieben und für die angegebenen Einsatzbereiche. Händigen Sie alle Unterlagen bei Weitergabe des Produkts an Dritte mit aus. Bestimmungsgemäßer Gebrauch Langstielheckenschere Dieses Gerät ist bestimmt zum Schneiden und Trimmen von Hecken, Büschen und Ziersträuchern im häuslichen Bereich. Es handelt sich hierbei um ein handgeführtes Gerät mit integriertem Antrieb, bei dem sich die linear angeordneten Schneiden hin und her bewegen. WARNUNG! ► Heckenscheren sind nicht für die Benutzung durch Kinder geeignet. Bestimmungsgemäßer Gebrauch Hochentaster Dieses Gerät ist bestimmt für Entastungsarbeiten an Bäumen. Ausstattung Motoreinheit Knebelschraube Mutter Ausleger Schraube Rundgriff Trageöse Drehelement Entriegelungstaste Einschaltsperre Ein-/Ausschalter Netzkabel Zugentlastung Heckenscherenvorsatz Messerbalken Getriebegehäuse Ent-/Verriegelung Grundplatte (Heckenschere) Stellhebel Handgriff Bestimmungsgemäßer Gebrauch Vorderer Ausleger Benutzen Sie das Gerät nur wie beschrieben und für die angegebenen Einsatzbereiche. Das Gerät ist nicht für den gewerblichen Einsatz bestimmt. Das Gerät ist zum Gebrauch durch Erwachsene bestimmt. Dieses Gerät ist nicht dafür bestimmt, durch Personen (einschließlich Kinder) mit eingeschränkten physischen, sensorischen oder geistigen Fähigkeiten oder mangels Erfahrung und / oder mangels Wissen benutzt zu werden. Die Benutzung des Gerätes bei Regen oder feuchter Umgebung ist verboten. Jede andere Verwendung oder Veränderung des Gerätes gilt als nicht bestimmungsgemäß und birgt erhebliche Unfallgefahren. Für aus bestimmungswidriger Verwendung entstandene Schäden übernimmt der Hersteller keine Haftung. Arretierstift Antriebswelle Schutzkappe Hochentastervorsatz Schleifbockhilfe Sägekette Schwert Anschlag Öltank Mutter Gewinde Kettenradabdeckung Schwertbohrung Schwertführung Führungsschiene Tropföler Kettenspannschraube Kettenrad Kettenspannstift Vorderer Ausleger Antriebswelle Schutzkappe Arretierstift Schutzring Stellhebel Grundplatte (Hochentaster) Ent-/Verriegelung Öltankdeckel ■ 2 │ DE│AT│CH PHSHE 900 B2 Schwingungswerte (Vektorsumme dreier Richtungen) ermittelt entsprechend EN 60745: Lieferumfang 1 Motoreinheit PHSHE 900 B2 1 Heckenscherenvorsatz PHS 1 (nachfolgend Heckenschere genannt) Hochentaster: 1 Hochentastervorsatz PHE 1 (nachfolgend Hochentaster genannt) Vibration am vorderen Griff: Schwingungsemissionswert ah,D = 1,0 m/s2 Unsicherheit K = 1,5 m/s2 Vibration am hinteren Griff: Schwingungsemissionswert ah,D = 1,2 m/s2 Unsicherheit K = 1,5 m/s2 Zubehör 1 Schultergurt 1 Kettenschutzhülle 1 Schwertschutzhülle 1 100 ml Bio-Kettenöl 1 Montagewerkzeug Heckenschere: 1 Bedienungsanleitung Vibration am vorderen Griff: Schwingungsemissionswert ah,D = 1,6 m/s2 Unsicherheit K = 1,5 m/s2 Vibration am hinteren Griff: Schwingungsemissionswert ah,D = 1,8 m/s2 Unsicherheit K = 1,5 m/s2 Technische Daten Motoreinheit: PHSHE 900 B2 Nennspannung: 230 V ∼ 50 Hz (Wechselstrom) Nennleistung: 900 W Schutzklasse: II / (Doppelisolierung) Gewicht: (ohne Handgriff u. Tragegurt): ca. 2,7 kg Gehörschutz tragen! HINWEIS Hochentaster: PHE 1 Kettengeschwindigkeit: max. 6 m/s Arbeitswinkel: 0°; 15°; 30° Gewicht (betriebsbereit): ca. 1,6 kg ► Der in diesen Anweisungen angegebene Schwingungspegel ist entsprechend einem in EN 60745 genormten Messverfahren gemessen worden und kann für den Gerätevergleich verwendet werden. Der angegebene Schwingungsemissionswert kann auch zu einer einleitenden Einschätzung der Aussetzung verwendet werden. WARNUNG! Öltank empfohlene Füllmenge: 100 cm3 Schnittlänge: ca. 260 mm Schwert: Oregon Typ 100SDEA041 Sägekette: Oregon 91P040X Heckenschere: PHS 1 Leerlaufhubzahl: 2000 min-1 Arbeitswinkel: -90° bis +90° Schnittlänge: 410 mm Zahnabstand: 20 mm Gewicht (betriebsbereit): ca. 2,1 kg ► Der Schwingungspegel wird sich entsprechend dem Einsatz des Elektrowerkzeugs verändern und kann in manchen Fällen über dem in diesen Anweisungen angegebenen Wert liegen. Die Schwingungsbelastung könnte unterschätzt werden, wenn das Elektrowerkzeug regelmäßig in solcher Weise verwendet wird. Versuchen Sie, die Belastung durch Vibrationen so gering wie möglich zu halten. Beispielhafte Maßnahmen zur Verringerung der Vibrationsbelastung sind das Tragen von Handschuhen beim Gebrauch des Werkzeugs und die Begrenzung der Arbeitszeit. Dabei sind alle Anteile des Betriebszyklus zu berücksichtigen (beispielweise Zeiten, in denen das Elektrowerkzeug abgeschaltet ist, und solche, in denen es zwar eingeschaltet ist, aber ohne Belastung läuft). Erläuterungen der Hinweisschilder auf dem Gerät: Geräusch- und Vibrationsinformationen: Messwert für Geräusch ermittelt entsprechend EN 60745. Der A-bewertete Geräuschpegel des Elektrowerkzeugs beträgt typischerweise: Hochentaster: Vor Inbetriebnahme Betriebsanleitung und Anweisungen lesen! PHE 1 Schalldruckpegel: Unsicherheit K: Schallleistungspegel: Unsicherheit K: Heckenschere: LPA = 83 3 LWA = 104 3 PHS 1 dB (A) dB dB (A) dB Schalldruckpegel: Unsicherheit K: Schallleistungspegel: Garantierter Schallleistungspegel: Unsicherheit K: LPA = 81 3 LWA = 102 dB (A) dB dB (A) LWA = 105 3 dB (A) dB Schutzhandschuhe tragen! Sicherheitsschuhe tragen! Gehörschutz tragen! Schutzhelm tragen! PHSHE 900 B2 DE│AT│CH │ 3 ■ Schutzbrille tragen! Umstehende Personen von dem Gerät fernhalten! Gerät vor Regen oder Nässe schützen! Lebensgefahr durch Stromschlag! Halten Sie sich mindestens 10m von Überlandleitungen fern. d) Zweckentfremden Sie das Kabel nicht, um das Elektrowerkzeug zu tragen, aufzuhängen oder um den Stecker aus der Steckdose zu ziehen. Halten Sie das Kabel fern von Hitze, Öl, scharfen Kanten oder sich bewegenden Geräteteilen. Beschädigte oder verwickelte Kabel erhöhen das Risiko eines elektrischen Schlages. e) Wenn Sie mit einem Elektrowerkzeug im Freien arbeiten, verwenden Sie nur Verlängerungskabel, die auch für den Außenbereich zugelassen sind. Die Anwendung eines für den Außenbereich geeigneten Verlängerungskabels verringert das Risiko eines elektrischen Schlages. f) Wenn der Betrieb des Elektrowerkzeuges in feuchter Umgebung nicht vermeidbar ist, verwenden Sie einen Fehlerstromschutzschalter. Der Einsatz eines Fehlerstromschutzschalters vermindert das Risiko eines elektrischen Schlages. 3. Sicherheit von Personen Achtung! Herabfallende Gegenstände. Insbesondere beim Schnitt über Kopfhöhe. Achtung! Verletzungsgefahr durch laufende Messer. Stecker sofort vom Netz trennen, wenn die Leitung beschädigt oder durchtrennt wurde. Angabe des Schallleistungspegels LWA in dB. Allgemeine Sicherheitshinweise für Elektrowerkzeuge WARNUNG! ► Lesen Sie alle Sicherheitshinweise und Anweisungen. Versäumnisse bei der Einhaltung der Sicherheitshinweise und Anweisungen können elektrischen Schlag, Brand und / oder schwere Verletzungen verursachen. Bewahren Sie alle Sicherheitshinweise und Anweisungen für die Zukunft auf. Der in den Sicherheitshinweisen verwendete Begriff „Elektrowerkzeug“ bezieht sich auf netzbetriebene Elektrowerkzeuge (mit Netzkabel) und auf akkubetriebene Elektrowerkzeuge (ohne Netzkabel). 1. Arbeitsplatz-Sicherheit a) Halten Sie Ihren Arbeitsbereich sauber und gut beleuchtet. Unordnung und unbeleuchtete Arbeitsbereiche können zu Unfällen führen. b) Arbeiten Sie mit dem Elektrowerkzeug nicht in explosionsgefährdeter Umgebung, in der sich brennbare Flüssigkeiten, Gase oder Stäube befinden. Elektrowerkzeuge erzeugen Funken, die den Staub oder die Dämpfe entzünden können. c) Halten Sie Kinder und andere Personen während der Benutzung des Elektrowerkzeugs fern. Bei Ablenkung können Sie die Kontrolle über das Gerät verlieren. 2. Elektrische Sicherheit a) Der Anschlussstecker des Elektrowerkzeuges muss in die Steckdose passen. Der Stecker darf in keiner Weise verändert werden. Verwenden Sie keine Adapterstecker gemeinsam mit schutzgeerdeten Elektrowerkzeugen. Unveränderte Stecker und passende Steckdosen verringern das Risiko eines elektrischen Schlages. b) Vermeiden Sie Körperkontakt mit geerdeten Oberflächen, wie von Rohren, Heizungen, Herden und Kühlschränken. Es besteht ein erhöhtes Risiko durch elektrischen Schlag, wenn Ihr Körper geerdet ist. c) Halten Sie Elektrowerkzeuge von Regen oder Nässe fern. Das Eindringen von Wasser in ein Elektrogerät erhöht das Risiko eines elektrischen Schlages. ■ 4 │ DE│AT│CH a) Seien Sie stets aufmerksam, achten Sie darauf, was Sie tun und gehen Sie mit Vernunft an die Arbeit mit einem Elektrowerkzeug. Benutzen Sie kein Elektrowerkzeug, wenn Sie müde sind oder unter dem Einfluss von Drogen, Alkohol oder Medikamenten stehen. Ein Moment der Unachtsamkeit beim Gebrauch des Elektrowerkzeuges kann zu ernsthaften Verletzungen führen. b) Tragen Sie persönliche Schutzausrüstung und immer eine Schutzbrille. Das Tragen persönlicher Schutzausrüstung wie Staubmaske, rutschfeste Sicherheitsschuhe, Schutzhelm oder Gehörschutz, je nach Art und Einsatz des Elektrowerkzeuges, verringert das Risiko von Verletzungen. c) Vermeiden Sie eine unbeabsichtigte Inbetriebnahme. Vergewissern Sie sich, dass das Elektrowerkzeug ausgeschaltet ist, bevor Sie es an die Stromversorgung und / oder den Akku anschließen, es aufnehmen oder tragen. Wenn Sie beim Tragen des Elektrowerkzeuges den Finger am Schalter haben oder das Gerät bereits eingeschaltet an die Stromversorgung anschließen, kann dies zu Unfällen führen. d) Entfernen Sie Einstellwerkzeuge oder Schraubenschlüssel, bevor Sie das Elektrowerkzeug einschalten. Ein Werkzeug oder Schlüssel, der sich in einem drehenden Geräteteil befindet, kann zu Verletzungen führen. e) Vermeiden Sie eine abnormale Körperhaltung. Sorgen Sie für einen sicheren Stand und halten Sie jederzeit das Gleichgewicht. Dadurch können Sie das Elektrowerkzeug in unerwarteten Situationen besser kontrollieren. f) Tragen Sie geeignete Kleidung. Tragen Sie keine weite Kleidung oder Schmuck. Halten Sie Haare, Kleidung und Handschuhe fern von sich bewegenden Teilen. Lockere Kleidung, Schmuck oder lange Haare können von sich bewegenden Teilen erfasst werden. g) Wenn Staubabsaug- und -auffangeinrichtungen montiert werden können, vergewissern Sie sich, dass diese angeschlossen sind und richtig verwendet werden. Die Verwendung einer Staubabsaugung kann Gefährdungen durch Staub verringern. 4. Verwendung und Behandlung des Elektrowerkzeuges a) Überlasten Sie das Gerät nicht. Verwenden Sie für Ihre Arbeit das dafür bestimmte Elektrowerkzeug. Mit dem passenden Elektrowerkzeug arbeiten Sie besser und sicherer im angegebenen Leistungsbereich. b) Benutzen Sie kein Elektrowerkzeug, dessen Schalter defekt ist. Ein Elektrowerkzeug, das sich nicht mehr ein- oder ausschalten lässt, ist gefährlich und muss repariert werden. c) Ziehen Sie den Stecker aus der Steckdose und / oder entfernen Sie einen abnehmbaren Akku, bevor Sie Geräteeinstellungen vornehmen, Einsatzwerkzeugteile wechseln oder das Elektrowerkzeug weglegen. Diese Vorsichtsmaßnahme verhindert den unbeabsichtigten Start des Elektrowerkzeuges. d) Bewahren Sie die unbenutzten Elektrowerkzeuge außerhalb der Reichweite von Kindern auf. Lassen Sie Personen das Gerät nicht benutzen, die mit diesem nicht vertraut sind oder diese Anweisungen nicht gelesen haben. Elektrowerkzeuge sind gefährlich, wenn sie von unerfahrenen Personen benutzt werden. e) Pflegen Sie Elektrowerkzeuge mit Sorgfalt. Kontrollieren Sie, ob bewegliche Teile einwandfrei funktionieren und nicht klemmen, ob Teile gebrochen oder so beschädigt sind, dass die Funktion des PHSHE 900 B2 Elektrowerkzeuges beeinträchtigt ist. Lassen Sie beschädigte Teile vor dem Einsatz des Gerätes reparieren. Viele Unfälle haben ihre Ursache in schlecht gewarteten Elektrowerkzeugen. f) Halten Sie Schneidwerkzeuge scharf und sauber. Sorgfältig gepflegte Schneidwerkzeuge mit scharfen Schneidkanten verklemmen sich weniger und sind leichter zu führen. g) Verwenden Sie Elektrowerkzeug, Zubehör, Einsatzwerkzeuge usw. entsprechend diesen Anweisungen. Berücksichtigen Sie dabei die Arbeitsbedingungen und die auszuführende Tätigkeit. Der Gebrauch von Elektrowerkzeugen für andere als die vorgesehenen Anwendungen kann zu gefährlichen Situationen führen. 5. Service a) Lassen Sie Ihr Elektrowerkzeug nur von qualifiziertem Fachpersonal und nur mit Original-Ersatzteilen reparieren. Damit wird sichergestellt, dass die Sicherheit des Elektrowerkzeugs erhalten bleibt. Gerätespezifische Sicherheitshinweise für Heckenscheren ■ Halten Sie alle Körperteile vom Schneidmesser fern. Versuchen Sie nicht, bei laufendem Messer Schnittgut zu entfernen oder zu schneidendes Material festzuhalten. Entfernen Sie eingeklemmtes Schnittgut nur bei ausgeschaltetem Gerät. Ziehen Sie zusätzlich den Stecker aus der Steckdose. Ein Moment der Unachtsamkeit bei Benutzung der Heckenschere kann zu schweren Verletzungen führen. ■ Tragen Sie die Heckenschere am vorderen Griff im ausgeschalteten Zustand, den Messerbalken von Ihrem Körper abgewandt. Bei Transport oder Aufbewahrung der Heckenschere stets die Schutzabdeckung aufziehen. Sorgfältiger Umgang mit dem Gerät verringert die Wahrscheinlichkeit einer versehentlichen Berührung mit den laufenden Messern. ■ Halten Sie das Elektrowerkzeug nur an den isolierten Griffflächen, da das Schneidmesser in Berührung mit verborgenen Stromleitungen oder dem eigenen Netzkabel kommen kann. Der Kontakt des Schneidmessers mit einer spannungsführenden Leitung kann metallene Geräteteile unter Spannung setzen und zu einem elektrischen Schlag führen. ■ Halten Sie das Kabel vom Schneidbereich fern. Während des Arbeitsvorgangs kann das Kabel im Gebüsch verdeckt sein und versehentlich durchtrennt werden. ■ Inspizieren Sie die zu schneidende Fläche sorgfältig und beseitigen Sie alle Drähte oder sonstigen Fremdkörper. ■ Es ist empfohlen, einen Fehlerstromschutzschalter mit einem Auslösestrom von 30 mA oder weniger zu verwenden. HINWEIS ► Die Heckenschere wird vollständig zusammengebaut geliefert. ► Bildliche Darstellungen über den Gebrauch der Heckenschere bzw. deren Stellteile finden Sie auf der Ausklappseite. ► Hinweise und bildliche Darstellungen zur Einstellung, Wartung, Schmierung durch den Benutzer finden Sie in dieser Anleitung. ► Hinweise zur Arbeitsposition (siehe Ausklappseite). ► Hinweise zu Stellteilen (siehe Ausklappseite). ► Hinweise zu Austausch und Reparatur (siehe Kapitel Wartung und Reinigung / Service). ► Erklärung aller an der Heckenschere verwendeten grafischen Symbole und technische Daten finden Sie in dieser Anleitung. ► Die Merkmale der Heckenschere finden Sie in den technischen Daten. ► Blockiertes Werkzeug: Entfernen Sie das klemmende Material aus dem Messerbalken . ACHTUNG! Ergänzende Sicherheitshinweise für Heckenscheren Vorbereitung: a) DIESE HECKENSCHERE KANN ERNSTHAFTE VERLETZUNGEN VERURSACHEN! Lesen Sie sorgfältig die Anweisungen zum korrekten Umgang, zur Vorbereitung, zur Instandhaltung, zum Starten und Abstellen der Heckenschere. Machen Sie sich mit allen Stellteilen und der sachgerechten Benutzung der Heckenschere vertraut. b) Kinder dürfen die Heckenschere niemals benutzen. c) Vorsicht vor oberirdischen Stromleitungen. d) Der Gebrauch der Heckenschere ist zu vermeiden, wenn sich Personen, vor allem Kinder, in der Nähe befinden. e) Tragen Sie geeignete Kleidung! Tragen Sie keine weite Kleidung oder Schmuck, welcher von sich bewegenden Teilen erfasst werden kann. Es wird empfohlen, feste Handschuhe, rutschfeste Schuhe und Schutzbrille zu tragen. f) Berührt die Schneideinrichtung einen Fremdkörper oder sollten sich die Betriebsgeräusche verstärken oder die Heckenschere ungewöhnlich stark vibrieren, stellen Sie den Motor ab und lassen Sie die Heckenschere zum Stillstand kommen. Ergreifen Sie folgende Maßnahmen: – auf Schäden überprüfen; – auf lose Teile überprüfen und alle losen Teile befestigen; – beschädigte Teile gegen gleichwertige Teile austauschen oder reparieren lassen. g) Tragen Sie Gehörschutz! h) Tragen Sie Augenschutz! i) Um im Notfall die Heckenschere stillzusetzen, ziehen Sie den Netzstecker aus der Netzsteckdose. Betrieb: a) Netzstecker aus der Steckdose ziehen, vor: – Reinigung oder Beseitigung einer Blockierung; – Überprüfung, Instandhaltung oder Arbeiten an der Heckenschere; – Einstellung der Arbeitsposition der Schneideinrichtung; – wenn die Heckenschere unbeaufsichtigt bleibt. b) Stellen Sie immer sicher, dass sich die Heckenschere ordnungsgemäß in einer der vorgegebenen Arbeitspositionen befindet, bevor der Motor gestartet wird. c) Während des Betriebes der Heckenschere ist immer sicherzustellen, dass ein sicherer Stand eingenommen wird, besonders wenn Tritte oder eine Leiter benutzt werden. d) Benutzen Sie die Heckenschere nicht mit einer defekten oder stark abgenutzten Schneideinrichtung. e) Stellen Sie immer sicher, dass alle Griffe und Sicherheitseinrichtungen beim Gebrauch der Heckenschere angebaut sind. Versuchen Sie niemals, eine unvollständige Heckenschere oder eine mit nicht zulässigem Umbau zu benutzen. f) Halten Sie die Heckenschere fest mit beiden Händen an den dafür vorgesehenen Handgriffen. g) Machen Sie sich stets vertraut mit Ihrer Umgebung und achten Sie auf mögliche Gefahren, die Sie wegen der Geräusche der Heckenschere vielleicht nicht hören können. ► Bei drohender Gefahr bzw. im Notfall sofort den Motor ausschalten und Netzstecker ziehen. PHSHE 900 B2 DE│AT│CH │ 5 ■ Wartung und Aufbewahrung: a) Wenn die Heckenschere zwecks Wartung, Inspektion oder Lagerung stillgesetzt wird, schalten Sie den Motor aus, dass alle rotierenden Teile zum Stillstand gekommen sind. Lassen Sie die Maschine abkühlen, bevor Sie diese überprüfen, einstellen usw. b) Lagern Sie die Heckenschere dort, wo Benzindämpfe nicht mit offenem Feuer oder Funken in Kontakt kommen können. Lassen Sie die Heckenschere immer abkühlen, bevor Sie diese lagern. c) Beim Transportieren oder bei der Lagerung der Heckenschere ist die Schneideinrichtung immer mit dem Schutz für die Schneideinrichtung abzudecken. Weiterführende Sicherheitshinweise für Heckenscheren ■ Halten Sie alle Körperteile vom Schneidmesser fern. Versuchen Sie nicht, bei laufendem Messer Schnittgut zu entfernen oder zu schneidendes Material festzuhalten. Entfernen Sie eingeklemmtes Schnittgut nur bei ausgeschaltetem Gerät. Ein Moment der Unachtsamkeit bei Benutzung der Heckenschere kann zu schweren Verletzungen führen. ■ Tragen Sie die Heckenschere am Griff im ausgeschalteten Zustand, den Messerbalken von Ihrem Körper abgewandt. Bei Transport oder Aufbewahrung der Heckenschere stets die Schutzabdeckung aufziehen. Sorgfältiger Umgang mit dem Gerät verringert die Verletzungsgefahr durch das Messer. ■ Halten Sie das Elektrowerkzeug nur an den isolierten Griffflächen, da das Schneidmesser in Berührung mit verborgenen Stromleitungen oder dem eigenen Netzkabel kommen kann. Der Kontakt des Schneidmessers mit einer spannungsführenden Leitung kann metallene Geräteteile unter Spannung setzen und zu einem elektrischen Schlag führen. Gerätespezifische Sicherheitshinweise für Hochentaster ■ Tragen Sie stets einen Schutzhelm, Gehörschutz und Sicherheitshandschuhe. Tragen Sie auch Augenschutz, um keine Ölspritzer oder Sägestaub in die Augen zu bekommen. Tragen Sie eine Staubmaske gegen Staub. ■ Verwenden Sie das Gerät niemals auf einer Leiter stehend. ■ Lehnen Sie sich bei der Verwendung des Gerätes nicht zu weit nach vorne. Achten Sie immer auf einen sicheren Stand und halten Sie jederzeit das Gleichgewicht. Verwenden Sie den im Lieferumfang enthaltenen Tragegurt, um das Gewicht gleichmäßig auf den Körper zu verteilen. ■ Tragen Sie robuste, rutschfeste Stiefel. ■ Verwenden Sie das Gerät nicht bei Regen oder Feuchtigkeit. ■ Verwenden Sie das Gerät nicht in der Nähe von Stromleitungen. Halten Sie einen Mindestabstand von 10 m zu oberirdischen Stromleitungen. ■ Stellen Sie sich nicht unter die Äste, die sie abschneiden möchten, um Verletzungen durch heruntergefallene Äste zu vermeiden. Achten Sie auch auf zurückspringende Äste, um Verletzungen zu vermeiden. Arbeiten Sie unter einem Winkel von 60° ±10°. ■ Achten Sie darauf, dass es zu einem Geräterückschlag kommen kann. ■ Beobachten Sie nicht nur zu bearbeitende Äste, sondern auch heruntergefallenes Material, um Stolpern zu vermeiden. ■ Legen Sie nach 30 Arbeitsminuten eine Pause von mindestens einer Stunde ein. ■ Tragen Sie stets Schutzhandschuhe. ■ Decken Sie die Führungsschiene und die Kette bei Transport und Lagerung mit der Abdeckung ab. RESTRISIKEN! ■ Benutzen Sie das Gerät nicht in explosionsgefährdeter Umgebung, wie in der Nähe von entzündlichen Flüssigkeiten, Gasen oder Dämpfen. Die von der Maschine produzierten Funken können diese Dämpfe oder Gase entzünden. Auch wenn Sie dieses Elektrowerkzeug vorschriftsmäßig bedienen, bleiben immer Restrisiken bestehen. Folgende Gefahren können im Zusammenhang mit der Bauweise und Ausführung dieses Elektrowerkzeugs auftreten: ■ Die verwendete Steckdose muss für den Stecker geeignet sein. Nehmen Sie niemals Änderungen am Stecker vor, um einen elektrischen Schlag zu vermeiden. a) Schnittverletzungen ■ Netzstecker nicht durch Ziehen an der Leitung aus der Steckdose ziehen, sondern am Netzstecker anfassen. Verwenden Sie das Netzkabel nicht, um das Gerät zu ziehen oder zu transportieren. Halten Sie das Netzkabel von Hitze, Öl, scharfen Kanten und beweglichen Teilen fern. ♦ Die Hecke nach verborgenen Objekten (z. B. Drahtzäunen) absuchen. b) Gehörschäden, falls kein geeigneter Gehörschutz getragen wird. c) Gesundheitsschäden, die aus Hand-Arm-Schwingungen resultieren, falls das Gerät über einen längeren Zeitraum verwendet wird oder nicht ordnungsgemäß geführt und gewartet wird. ■ Entfernen Sie den Netzstecker nach Beendigung der Arbeit oder bei Reinigungs- und Wartungsarbeiten vom Gerät. HINWEIS ■ Vermeiden Sie unbeabsichtigtes Starten des Gerätes. ► Die Heckenschere wird vollständig zusammengebaut geliefert. ■ Geräte mit defektem Schalter müssen unmittelbar repariert werden, um Schäden und Verletzungen zu vermeiden. ► Hinweise und bildliche Darstellungen zur Einstellung, Wartung, Schmierung durch den Benutzer finden Sie in dieser Anleitung. ■ Lagern Sie das Gerät außerhalb der Reichweite von Kindern. ► Hinweise zu Austausch und Reparatur (siehe Kapitel Wartung und Reinigung / Service). ■ Nur mit der Bedienungsanleitung und dem Gerät vertraute Personen dürfen dieses bedienen. ► Erklärung aller an der Heckenschere verwendeten grafischen Symbole und technische Daten finden Sie in dieser Anleitung. ■ Warten Sie Elektrowerkzeuge sorgfältig. Kontrollieren Sie, ob bewegliche Teile einwandfrei funktionieren und nicht klemmen, ob Teile gebrochen oder so beschädigt sind, dass die Funktion des Elektrowerkzeuges beeinträchtigt ist. Lassen Sie beschädigte Teile vor dem Einsatz des Gerätes reparieren. Viele Unfälle haben ihre Ursache in schlecht gewarteten Elektrowerkzeugen. ► Die Merkmale der Heckenschere finden Sie in den technischen Daten. ► Blockiertes Werkzeug: Entfernen Sie das klemmende Material aus dem Messerbalken . ■ Benutzen Sie nur Zubehör und Zusatzgeräte, die in der Gebrauchsanweisung angegeben sind. Der Gebrauch anderer als in der Bedienungsanleitung empfohlener Einsatzwerkzeuge oder anderen Zubehörs kann eine Verletzungsgefahr für Sie bedeuten. ■ 6 │ DE│AT│CH ■ Halten Sie Schneidwerkzeuge scharf und sauber. Sorgfältig gepflegte Schneidwerkzeuge mit scharfen Schneidkanten verklemmen sich weniger und sind leichter zu führen. ■ Lassen Sie das Gerät von dafür qualifiziertem Personal warten. Verwenden Sie nur vom Hersteller empfohlene Original-Ersatzteile. PHSHE 900 B2 Vorsichtsmaßnahmen gegen Rückschlag ACHTUNG RÜCKSCHLAG! ► Achten Sie beim Arbeiten auf Rückschlag des Gerätes. Es besteht Verletzungsgefahr. Sie vermeiden Rückschläge durch Vorsicht und richtige Sägetechnik. ■ Eine Berührung mit der Schienenspitze kann in manchen Fällen zu einer unerwarteten nach hinten gerichteten Reaktion führen, bei der die Führungsschiene nach oben und in Richtung der Bedienperson geschlagen wird (siehe Abbildung). Bild 1 ■ Rückschlag kann auftreten, wenn die Spitze der Führungsschiene einen Gegenstand berührt oder wenn das Holz sich biegt und die Sägekette im Schnitt festklemmt (siehe Abbildung). ■ Das Verklemmen der Sägekette an der Oberkante der Führungsschiene kann die Schiene heftig in Bedienerrichtung zurückstoßen. ■ Jede dieser Reaktionen kann dazu führen, dass Sie die Kontrolle über die Säge verlieren und sich möglicherweise schwer verletzen. Verlassen Sie sich nicht ausschließlich auf die in der Kettensäge eingebauten Sicherheitseinrichtungen. Ergreifen Sie als Benutzer einer Kettensäge verschiedene Maßnahmen, um unfall- und verletzungsfrei zu arbeiten. Ein Rückschlag ist die Folge eines falschen oder fehlerhaften Gebrauchs des Elektrowerkzeugs. Er kann durch geeignete Vorsichtsmaßnahmen, wie nachfolgend beschrieben, verhindert werden: ■ Halten Sie die Säge mit beiden Händen fest, wobei Daumen und Finger die Griffe der Kettensäge umschließen. Bringen Sie Ihren Körper und die Arme in eine Stellung, in der Sie den Rückschlagkräften standhalten können. Wenn geeignete Maßnahmen getroffen werden, kann die Bedienperson die Rückschlagkräfte beherrschen. Niemals die Kettensäge loslassen. ■ Vermeiden Sie eine abnormale Körperhaltung und sägen Sie nicht über Schulterhöhe. Dadurch wird ein unbeabsichtigtes Berühren mit der Schienenspitze vermieden und eine bessere Kontrolle der Kettensäge in unerwarteten Situationen ermöglicht. Weiterführende Sicherheitshinweise VORSICHT! VERLETZUNGSGEFAHR! ► Fassen Sie niemals das Gerät im laufenden Betrieb oberhalb des Schutzringes an, um Verletzungen zu vermeiden! ■ Während des Betriebes dürfen sich im Umkreis von 15 Metern keine anderen Personen oder Tiere aufhalten. Der Bedienende ist im Arbeitsbereich gegenüber Dritten verantwortlich. ■ Halten Sie das Gerät, die Schneidgarnitur und die Schwertschutzhülle in einem guten Gebrauchszustand, um Verletzungen vorzubeugen. ■ Kinder müssen beaufsichtigt werden, um sicherzustellen, dass sie nicht mit dem Gerät spielen. ■ Benutzen Sie das Gerät erst, wenn Sie sich mit diesem vertraut fühlen. ■ Arbeiten Sie nicht mit einem beschädigten, unvollständigen oder ohne Zustimmung des Herstellers geänderten Gerät. Benutzen Sie das Gerät nie mit defekter Schutzausrüstung. Benutzen Sie das Gerät nicht bei defektem Ein-/Ausschalter. Prüfen Sie vor dem Gebrauch den Sicherheitszustand des Gerätes, insbesondere das Schwert und die Sägekette. Prüfen Sie nach Fallenlassen das Gerät auf signifikante Schäden oder Defekte. ■ Starten Sie das Gerät nie, bevor Schwert, Sägekette und Kettenradabdeckung korrekt montiert sind. ■ Vergewissern Sie sich, dass das Gerät beim Starten und während der Arbeit nicht mit dem Erdboden, Steinen, Draht oder anderen Fremdkörpern in Berührung kommt. Schalten Sie das Gerät aus, bevor Sie es absetzen. ■ Das Gerät ist für einen zweihändigen Betrieb ausgelegt. Arbeiten Sie niemals einhändig. ■ Halten Sie das Gerät nur an den isolierten Griffflächen, da die Sägekette in Berührung mit verborgenen Stromleitungen kommen kann. Der Kontakt der Sägekette mit einer spannungsführenden Leitung kann metallene Geräteteile unter Spannung setzen und zu einem elektrischen Schlag führen. ■ Achten Sie beim Standortwechsel darauf, dass das Gerät ausgeschaltet ist und der Finger nicht den Ein-/Ausschalter berührt. Tragen Sie das Gerät mit nach hinten gerichteter Sägekette und Schwert. Bringen Sie für den Transport die Schwertschutzhülle an. ■ Setzen Sie bei jedem Schnitt den Krallenanschlag fest an und beginnen Sie erst dann mit dem Sägen. ■ Seien Sie beim Sägen kleiner Büsche und Äste äußerst vorsichtig. Das dünne Astwerk kann sich in der Säge verfangen und in Ihre Richtung schlagen oder Sie aus dem Gleichgewicht bringen. ■ Schneiden Sie kein am Boden liegendes Holz bzw. versuchen Sie nicht aus dem Boden ragende Wurzeln zu Sägen. Vermeiden Sie auf jeden Fall, dass die Sägekette in das Erdreich eintaucht, da die Sägekette andernfalls sofort abstumpft. ■ Achten Sie beim Sägen eines unter Spannung stehenden Astes auf einen möglichen Rückschlag, wenn die Spannung des Holzes plötzlich nachlässt. Es besteht Verletzungsgefahr. ■ Versuchen Sie nicht im Falle eines Verkantens oder Einklemmens der Schneidgarnitur im Astwerk das Gerät durch Gewaltanwendung zu befreien. Schalten Sie das Gerät sofort aus und erst nach Entfernen der Blockade wieder ein. Es besteht Verletzungsgefahr! ■ Verwenden Sie stets vom Hersteller vorgeschriebene Ersatzschienen und Sägeketten. Falsche Ersatzschienen und Sägeketten können zum Reißen der Sägekette und / oder zu Rückschlag führen. ■ Halten Sie sich an die Anweisungen des Herstellers für das Schärfen und die Wartung der Sägekette. Zu niedrige Tiefenbegrenzer erhöhen die Neigung zu Rückschlag. ■ Sägen Sie nicht mit der Schwertspitze. Es besteht Rückschlagsgefahr. ■ Sorgen Sie dafür, dass keine Gegenstände am Boden liegen, über die Sie stolpern können. PHSHE 900 B2 DE│AT│CH │ 7 ■ Sägekette und Schwert montieren Vor der Inbetriebnahme WARNUNG! VORSICHT! VERLETZUNGSGEFAHR! ► Schutzhandschuhe anziehen! Verletzungsgefahr durch die scharfen Schneidezähne! ► Ziehen Sie vor allen Arbeiten am Gerät den Neztstecker. Gefahr durch elektrischen Schlag! HINWEIS Motoreinheit Rundgriff montieren ♦ Stecken Sie den Rundgriff Ausleger . ♦ Ziehen Sie die Schraube ► Beachten Sie die Laufrichtung der Sägekette an der Kettenradabdeckung . in der gewünschten Position auf den ► Je nach Verschleiß, kann das Schwert Schultergurt befestigen / montieren ♦ Haken Sie den Schultergurt in die Trageöse ein. ♦ Passen Sie den Schultergurt an Ihre Größe an, so dass sich die Trageöse im eingehängten Zustand auf Höhe der Hüfte befindet. Heckenschere montieren ♦ Schieben Sie den vorderen Ausleger Ausleger der Motoreinheit. ♦ Der Arretierstift der Heckenschere auf den mit der Knebelschraube ♦ Verschrauben Sie die beiden Ausleger setzen Sie dazu die Mutter auf der gegenüberliegenden Seite ein. , Hochentaster montieren ♦ Der Arretierstift des Hochentasters auf den muss einrasten. ♦ Verschrauben Sie die beiden Ausleger mit der Knebelschraube , setzen Sie dazu die Mutter auf der gegenüberliegenden Seite ein. Schwenken der Heckenschere ♦ Lösen Sie die Ent-/Verriegelung ♦ Betätigen Sie den Stellhebel die gewünschte Position. . , schwenken Sie die Heckenschere in ♦ Lassen Sie den Stellhebel und die Ent-/Verriegelung in die Aussparung in der Grundplatte (Heckenschere) einrasten. Schwenken des Hochentasters ♦ Lösen Sie die Ent-/Verriegelung ♦ Betätigen Sie den Stellhebel eine der beiden Positionen. . , schwenken Sie den Hochentaster in ♦ Lassen Sie den Stellhebel und die Ent-/Verriegelung in die Aussparung in der Grundplatte (Hochentaster) einrasten. gewendet werden. mit dem Montagewerkzeug . ab. ♦ Die Sägekette muss gegebenenfalls vorher entspannt werden, um das Schwert und die Sägekette abzunehmen. (siehe Kapitel Sägekette spannen und prüfen). Folgen Sie diesen Anweisungen in umgekehrter Reihenfolge. ♦ Nehmen Sie das Schwert ab. platte muss einrasten. ♦ Schieben Sie den vorderen Ausleger Ausleger der Motoreinheit. ♦ Lösen Sie die Mutter ♦ Nehmen Sie die Kettenradabdeckung und und die Sägekette ► Im Auslieferungszustand ist das Schwert bereits montiert. fest. am Schwert ♦ Setzen Sie die Sägekette beginnend auf. mit der Sägekette von der Grund- wieder an der Spitze des Schwerts ♦ Führungsschiene über die Schwertführung legen, dabei auch den Kettenspannstift in die Schwertbohrung einsetzen. Gleichzeitig die Sägekette über das Kettenrad legen. ♦ Kettenradabdeckung anziehen. wieder aufsetzen und Mutter ♦ Spannen Sie jetzt die Sägekette und prüfen). leicht (siehe Kapitel Sägekette spannen Sägekette spannen und prüfen HINWEIS ► Die Spannung der Sägekette ist wichtig für Ihre Sicherheit und die Funktion des Gerätes. Eine richtig gespannte Sägekette erhöht die Lebensdauer Ihres Gerätes. WARNUNG! ► Schutzhandschuhe anziehen! Verletzungsgefahr durch die scharfen Schneidezähne! ♦ Lösen Sie etwas die Mutter mit dem Montagewerkzeug . ♦ Drehen Sie die Kettenspannschraube mit dem Montagewerkzeug im Uhrzeigersinn um die Spannung zu erhöhen. ♦ Drehen Sie die Kettenspannschraube mit dem Montagewerkzeug gegen den Uhrzeigersinn um die Spannung zu verringern. ♦ Die Sägekette muss an der Schwertunterseite anliegen. Prüfen Sie, ob sich die Sägekette von Hand über das Schwert ziehen lässt. ♦ Ziehen Sie die Mutter wieder mit dem Montagewerkzeug fest. HINWEIS ► Beim Ziehen an der Sägekette mit 9 N (ca. 1 kg) Zugkraft sollten Sägekette und Schwert nicht mehr als 2 mm Abstand haben. ► Eine neue Sägekette werden. längt sich und muss öfter nachgespannt ► Prüfen Sie vor jeder Nutzung des Gerätes die Kettenspannung. ■ 8 │ DE│AT│CH PHSHE 900 B2 Kettenschmierung Arbeiten mit der Heckenschere ♦ Entfernen Sie den Öltankdeckel ♦ Befüllen Sie den Öltank . Gebrauch der Maschine: mit ca. 100ml Bio-Kettenöl . HINWEIS WARNUNG! ► Niemals ohne Kettenschmierung arbeiten! Bei trocken laufender Sägekette wird die Schneidgarnitur in kurzer Zeit irreparabel zerstört. Vor der Arbeit immer Kettenschmierung und Ölstand im Tank überprüfen. ► Bitte beachten Sie, dass die nationalen Vorschriften Ihres Landes den Gebrauch der Heckenschere beschränken können. ► Die tägliche Inspektion der Heckenschere vor jeder Benutzung ist unabdingbar. Überprüfen Sie Ihr Gerät auch nach Stößen und Fallenlassen, um signifikante Schäden oder Defekte festzustellen. ► Verwenden Sie nur Sägekettenöl. Vorzugsweise biologisch abbaubar. Verwenden Sie kein Altöl, Motoröl, usw. . ► Tragen Sie bitte festes Schuhwerk und eng anliegende Kleidung um das Unfallrisiko zu minimieren. Stehen Sie fest auf dem Boden, achten Sie auf Ihr Gleichgewicht und tragen Sie immer den mitgelieferten Tragegurt! ► Kontrollieren Sie während der Arbeit, ob die automatische Kettenschmierung funktioniert. Überprüfen Sie vor und während der Arbeit die Funktion der Kettenschmierung. ► Bitte legen Sie, um Ihrer Gesundheit willen, Ruhepausen während des Arbeitens ein. Durch körperliche Erschöpfung erhöht sich das Verletzungsrisiko! HINWEIS WARNUNG! Sägekette schärfen ► Betätigen Sie das Gerät keinesfalls unter Einfluss von Müdigkeit, Krankheit, Alkohol oder anderen Drogen. HINWEIS ► Ein Schleifbock kann an der Schleifbockhilfe während des Schleifens befestigt werden. für den sicheren Halt ► In einem Schärfset z. B. von Oregon finden sie detaillierte Informationen zum Schärfvorgang. ► Alternativ benutzen Sie ein elektrisches Kettenschärfgerät und folgen Sie den Anweisungen des Herstellers. ► Im Zweifel über die Durchführung der Arbeit ist ein Austausch der Sägekette vorzunehmen. Schnitttechniken ■ Siehe Ausklappseite (Abbildung A). HINWEIS ► Entfernen Sie starke Äste mit einer Astschere. Arbeiten mit dem Hochentaster Sägetechniken Inbetriebnahme WARNUNG! HINWEIS ► Achten Sie grundsätzlich auf das herabfallende Schnittgut. ► Beachten Sie den Lärmschutz und örtliche Vorschriften. Die Benutzung des Gerätes kann an bestimmten Tagen (z. B. Sonn- und Feiertagen), während bestimmter Tageszeiten (Mittagszeiten, Nachtruhe) oder in besonderen Gebieten (z. B. Kurorten, Kliniken etc.) eingeschränkt oder verboten sein. ► Beachten Sie grundsätzlich die Gefahr von zurückschlagenden Ästen. HINWEIS ► Legen Sie den Anschlag und ruhiger. am Ast an. Dadurch arbeiten Sie sicherer ► Beginnen Sie erst dann mit dem Sägen. Ein- / ausschalten Absägen eines kleinen Astes Einschalten: ♦ Verbinden Sie das Netzkabel ♦ Sägen Sie bei kleinen Ästen (Ø 0-8 cm) von oben nach unten (siehe Abbildung). mit dem Verlängerungskabel. ♦ Formen Sie am Ende des Verlängerungskabels eine Schlaufe und hängen Sie diese in die Zugentlastung ein. ♦ Drücken Sie die Einschaltsperre , halten sie diese gedrückt und drücken Sie den Ein-/Ausschalter . Ausschalten: ♦ Lassen Sie den Ein-/Ausschalter los. ♦ Entfernen Sie das Verlängerungskabel aus der Zugentlastung ♦ Trennen Sie das Netzkabel . von dem Verlängerungskabel. Handgriff verstellen ♦ Betätigen Sie die Entriegelungstaste . Verdrehen Sie das Drehelement in die gewünschte Position. Lassen Sie die Entriegelungstaste los, diese muss einrasten. PHSHE 900 B2 DE│AT│CH │ 9 ■ ♦ Absägen größerer Äste Transport ♦ Setzen Sie bei größeren Ästen (Ø 8-25 cm) zuerst einen Entlastungsschnitt A (siehe Abbildung). ■ Benutzen Sie beim Transport die Schutzhüllen ■ Der Entlastungsschnitt verhindert auch ein Abschälen der Rinde am Hauptstamm. . ■ Achten Sie darauf, das Gerät beim Tragen nicht einzuschalten (siehe Abbildung). ♦ Sägen Sie nun von oben B nach unten A durch. B 2 1 A Wartung und Reinigung Absägen in Teilstücken Lange bzw. dicke Äste sollten Sie kürzen bevor Sie den finalen Trennschnitt vornehmen (siehe Abbildung). Cc B b A a WARNUNG! Wenn ein Ersatz der Anschlussleitung erforderlich ist, dann ist dies vom Hersteller oder seinem Vertreter auszuführen, um Sicherheitsgefährdungen zu vermeiden. ■ Die Motoreinheit muss stets sauber, trocken und frei von Öl oder Schmierfetten sein. ■ Der Hochentaster muss in regelmäßigen Abständen von Sägespänen gesäubert werden. ♦ Verwenden Sie zum Reinigen des Gehäuses ein trockenes Tuch. Sicheres Arbeiten ♦ Entfernen Sie die Abdeckung . ab und reinigen Sie die ■ Halten Sie das Gerät, die Schneidgarnitur und die Schwertschutzhülle in einem guten Gebrauchszustand, um Verletzungen vorzubeugen. ♦ Nehmen Sie die Sägekette Führungsschiene . ■ Prüfen Sie nach Fallenlassen das Gerät auf signifikante Schäden oder Defekte. ♦ Halten Sie die Sägekette scharf und kontrollieren Sie die Spannung, achten Sie auf den Ölstand und die Ölzufuhr. ■ Beachten Sie den vorgeschriebenen Arbeitswinkel von 60°±10°, um ein sicheres Arbeiten zu gewährleisten (siehe Abbildung). vom Schwert ♦ Kontrollieren Sie die Heckenschere auf gelockerte Schrauben am Messerbalken und ziehen Sie diese bei Bedarf nach. ♦ Entfernen Sie festsitzenden Grünschnitt. ♦ Pflegen Sie den Messerbalken Ölkännchen. 60°±10° mit einem Ölspray oder einem Lagerung ■ Reinigen Sie das Gerät vor der Aufbewahrung. ■ Benutzen Sie das Gerät nicht auf einer Leiter stehend oder auf einem unsicheren Standplatz. ■ Lassen Sie sich nicht zu einem unüberlegten Schnitt verleiten. Das könnte Sie selbst und andere gefährden. ■ Kinder müssen beaufsichtigt werden, um sicherzustellen, dass sie nicht mit dem Gerät spielen. an ■ Bewahren Sie das Gerät in den mitgelieferten Schutzhüllen einem frostfreien, trockenen Ort außerhalb der Reichweite von Kindern auf. ■ Lagern Sie das Gerät liegend oder gegen Umfallen gesichert. ■ Entleeren Sie den Öltank . Bio-Kettenöl kann verharzen oder über die Entlüftungsöffnung im Öltankdeckel auslaufen. ■ Wechseln Sie regelmäßig Ihre Arbeitsposition. Eine längere Benutzung des Gerätes kann zu vibrationsbedingten Durchblutungsstörungen der Hände führen. Sie können die Benutzungsdauer jedoch durch geeignete Handschuhe oder regelmäßige Pausen verlängern. Achten Sie darauf, dass die persönliche Veranlagung zu schlechter Durchblutung, niedrige Außentemperaturen oder große Greifkräfte beim Arbeiten die Benutzungsdauer verringern. ■ Vermindern Sie auch die Schwingungsrisiken z. B. das Risiko einer Weißfingererkrankung durch häufige Arbeitspausen in denen Sie z. B. ihre Handflächen aneinander reiben. ■ 10 │ DE│AT│CH PHSHE 900 B2 Fehlersuche Hochentaster Problem Wartungsintervalle Heckenschere Mögliche Ursache Die hier aufgeführten Angaben beziehen sich auf normale Einsatzbedingungen. Bei erschwerten Bedingungen, wie z. B. starke Staubentwicklung und längeren täglichen Arbeitszeiten sind die angegebenen Intervalle entsprechend zu verkürzen. Fehlerbehebung Heckenscherenvorsatz Motor läuft, bzw. Hochentastervorsatz Sägekette bewegt sich nicht an Motoreinheit nicht richtig angeschlossen Montage prüfen Kein Arbeitsfortschritt Öl nachfüllen bzw. nachSägekette schleifen, austauschen oder spannen Sägekette trocken bzw. überhitzt oder hängt durch Fehlersuche Heckenschere Problem Mögliche Ursache Fehlerbehebung Motor läuft, Messer bleiben stehen Heckenscherenvorsatz bzw. Hochentastervorsatz an Motoreinheit nicht richtig angeschlossen Montage prüfen Geräteteil Aktion Schneidmesser Vor nach bei Arbeits- Arbeits- Bedarf beginn ende Sichtprüfung X reinigen X X Wartungsintervalle Hochentaster Die hier aufgeführten Angaben beziehen sich auf normale Einsatzbedingungen. Bei erschwerten Bedingungen, wie z. B. starke Staubentwicklung und längeren täglichen Arbeitszeiten sind die angegebenen Intervalle entsprechend zu verkürzen. Geräteteil Aktion Kettenschmierung prüfen Vor Arbeitsbeginn wöchentlich bei Störung bei Beschädigung bei Bedarf X Sägekette prüfen und auf Schärfzustand achten X Kettenspannung kontrollieren X schärfen Führungsschiene prüfen (Abnutzung, Beschädigung) X X reinigen und wenden X entgraten X ersetzen Kettenrad prüfen ersetzen PHSHE 900 B2 X X X X X DE│AT│CH │ 11 ■ Garantie der Kompernaß Handels GmbH Sehr geehrte Kundin, sehr geehrter Kunde, Sie erhalten auf dieses Gerät 3 Jahre Garantie ab Kaufdatum. Im Falle von Mängeln dieses Produkts stehen Ihnen gegen den Verkäufer des Produkts gesetzliche Rechte zu. Diese gesetzlichen Rechte werden durch unsere im Folgenden dargestellte Garantie nicht eingeschränkt. Garantiebedingungen Die Garantiefrist beginnt mit dem Kaufdatum. Bitte bewahren Sie den Kassenbon gut auf. Dieser wird als Nachweis für den Kauf benötigt. Tritt innerhalb von drei Jahren ab dem Kaufdatum dieses Produkts ein Material- oder Fabrikationsfehler auf, wird das Produkt von uns – nach unserer Wahl – für Sie kostenlos repariert, ersetzt oder der Kaufpreis erstattet. Diese Garantieleistung setzt voraus, dass innerhalb der Dreijahresfrist das defekte Gerät und der Kaufbeleg (Kassenbon) vorgelegt und schriftlich kurz beschrieben wird, worin der Mangel besteht und wann er aufgetreten ist. Abwicklung im Garantiefall Um eine schnelle Bearbeitung Ihres Anliegens zu gewährleisten, folgen Sie bitte den folgenden Hinweisen: ■ Bitte halten Sie für alle Anfragen den Kassenbon und die Artikelnummer (z. B. IAN 123456) als Nachweis für den Kauf bereit. ■ Die Artikelnummer entnehmen Sie bitte dem Typenschild am Produkt, einer Gravur am Produkt, dem Titelblatt der Bedienungsanleitung (unten links) oder dem Aufkleber auf der Rück- oder Unterseite des Produktes. ■ Sollten Funktionsfehler oder sonstige Mängel auftreten, kontaktieren Sie zunächst die nachfolgend benannte Serviceabteilung telefonisch oder per E-Mail. ■ Ein als defekt erfasstes Produkt können Sie dann unter Beifügung des Kaufbelegs (Kassenbon) und der Angabe, worin der Mangel besteht und wann er aufgetreten ist, für Sie portofrei an die Ihnen mitgeteilte Serviceanschrift übersenden. Auf www.lidl-service.com können Sie diese und viele weitere Handbücher, Produktvideos und Installationssoftware herunterladen. Mit diesem QR-Code gelangen Sie direkt auf die Lidl-ServiceSeite (www.lidl-service.com) und können mittels der Eingabe der Artikelnummer (IAN) 123456 Ihre Bedienungsanleitung öffnen. Wenn der Defekt von unserer Garantie gedeckt ist, erhalten Sie das reparierte oder ein neues Produkt zurück. Mit Reparatur oder Austausch des Produkts beginnt kein neuer Garantiezeitraum. Garantiezeit und gesetzliche Mängelansprüche Die Garantiezeit wird durch die Gewährleistung nicht verlängert. Dies gilt auch für ersetzte und reparierte Teile. Eventuell schon beim Kauf vorhandene Schäden und Mängel müssen sofort nach dem Auspacken gemeldet werden. Nach Ablauf der Garantiezeit anfallende Reparaturen sind kostenpflichtig. HINWEIS ► Bei Parkside und Florabest Werkzeugen senden Sie bitte ausschließlich den defekten Artikel ohne Zubehör (z. B. Akku, Aufbewahrungskoffer, Montagewerkzeuge, etc.) ein. Service WARNUNG! Garantieumfang Das Gerät wurde nach strengen Qualitätsrichtlinien sorgfältig produziert und vor Auslieferung gewissenhaft geprüft. Die Garantieleistung gilt für Material- oder Fabrikationsfehler. Diese Garantie erstreckt sich nicht auf Produktteile, die normaler Abnutzung ausgesetzt sind und daher als Verschleißteile angesehen werden können oder für Beschädigungen an zerbrechlichen Teilen, z. B. Schalter, Akkus oder Teile, die aus Glas gefertigt sind. Diese Garantie verfällt, wenn das Produkt beschädigt, nicht sachgemäß benutzt oder gewartet wurde. Für eine sachgemäße Benutzung des Produkts sind alle in der Bedienungsanleitung aufgeführten Anweisungen genau einzuhalten. Verwendungszwecke und Handlungen, von denen in der Bedienungsanleitung abgeraten oder vor denen gewarnt wird, sind unbedingt zu vermeiden. Das Produkt ist nur für den privaten und nicht für den gewerblichen Gebrauch bestimmt. Bei missbräuchlicher und unsachgemäßer Behandlung, Gewaltanwendung und bei Eingriffen, die nicht von unserer autorisierten Serviceniederlassung vorgenommen wurden, erlischt die Garantie. ■ 12 │ DE│AT│CH ► Lassen Sie Ihre Geräte von der Servicestelle oder einer Elektrofachkraft und nur mit Original-Ersatzteilen reparieren. Damit wird sichergestellt, dass die Sicherheit des Gerätes erhalten bleibt. ► Lassen Sie den Austausch des Steckers oder der Netzleitung immer vom Hersteller des Gerätes oder seinem Kundendienst ausführen. Damit wird sichergestellt, dass die Sicherheit des Gerätes erhalten bleibt. Service Deutschland Tel.: 0800 5435 111 (kostenfrei aus dem dt. Festnetz/ Mobilfunknetz) E-Mail: [email protected] Service Österreich Tel.: 0820 201 222 (0,15 EUR/Min.) E-Mail: [email protected] Service Schweiz Tel.: 0842 665566 (0,08 CHF/Min., Mobilfunk max. 0,40 CHF/Min.) E-Mail: [email protected] IAN 313266_1904 PHSHE 900 B2 Importeur Original-Konformitätserklärung Bitte beachten Sie, dass die folgende Anschrift keine Serviceanschrift ist. Kontaktieren Sie zunächst die benannte Servicestelle. Wir, KOMPERNASS HANDELS GMBH, Dokumentenverantwortlicher: Herr Semi Uguzlu, BURGSTR. 21, 44867 BOCHUM, DEUTSCHLAND, erklären hiermit, dass dieses Gerät mit den folgenden Normen, normativen Dokumenten und EG-Richtlinien übereinstimmt: KOMPERNASS HANDELS GMBH BURGSTRASSE 21 44867 BOCHUM DEUTSCHLAND www.kompernass.com Entsorgung Die Verpackung besteht aus umweltfreundlichen Materialien, die Sie über die örtlichen Recyclingstellen entsorgen können. Das Gerät und dessen Zubehör bestehen aus verschiedenen Materialien, wie z. B. Metall und Kunststoffe. Möglichkeiten zur Entsorgung des ausgedienten Gerätes erfahren Sie bei Ihrer Gemeinde- oder Stadtverwaltung. Umweltschutz ■ Entleeren Sie den Öltank sorgfältig und geben Sie ihr Gerät an einer Verwertungsstelle ab. Die verwendeten Kunststoff- und Metallteile können sortenrein getrennt werden und so einer Wiederverwendung zugeführt werden. Fragen Sie hierzu unser Service-Center. ■ Geben Sie Altöl an einer Entsorgungsstelle ab und schütten dieses nicht in die Kanalisation oder in den Abfluss. ■ Geben Sie verschmutztes Wartungsmaterial und Betriebsstoffe in einer dafür vorgesehenen Sammelstelle ab. Maschinenrichtlinie (2006 / 42 / EG) Elektromagnetische Verträglichkeit (2014 / 30 / EU) Richtlinie für Geräuschemission 2000 / 14 / EC 2005 / 88 / EC Benannte Stelle: Nr. 0036 TÜV SÜD Industrie Service GmbH, Westendstraße 199, 80686 München, Deutschland Bewertungsverfahren der Konformität gemäß Anhang V. Schallleistungspegel LWA: Gemessen: 102,2 dB (A) Garantiert: 105 dB (A) RoHS–Richtlinie (2011 / 65 / EU)* *Die alleinige Verantwortung für die Ausstellung dieser Konformitätserklärung trägt der Hersteller. Der oben beschriebene Gegenstand der Erklärung erfüllt die Vorschriften der Richtlinie 2011/65/EU des Europäischen Parlaments und des Rates vom 8. Juni 2011 zur Beschränkung der Verwendung bestimmter gefährlicher Stoffe in Elektro- und Elektronikgeräten. Angewandte harmonisierte Normen: Werfen Sie Elektrowerkzeuge nicht in den Hausmüll! EN 60745-1: 2009/A11: 2010 EN ISO 10517: 2019 EN ISO 11680-1: 2011 Gemäß Europäischer Richtlinie 2012/19/EU müssen verbrauchte Elektrowerkzeuge getrennt gesammelt und einer umweltgerechten Wiederverwertung zugeführt werden. EN 55014-1: 2017 EN 55014-2: 2015 EN 61000-3-2: 2014 EN 61000-3-3: 2013 Das Produkt ist recycelbar, unterliegt einer erweiterten Herstellerverantwortung und wird getrennt gesammelt. Ersatzteile Ersatzteile können Sie direkt über das Service-Center bestellen. Geben Sie bei der Bestellung unbedingt den Maschinentyp und die Teilenummer an. EN 50581:2012 Typ / Gerätebezeichnung: 2-in-1-Langstiel-Heckenschere / Hochentaster PHSHE 900 B2 Herstellungsjahr: 09-2019 Seriennummer: IAN 313266_1904 Bochum, 11.09.2019 Semi Uguzlu - Qualitätsmanager Technische Änderungen im Sinne der Weiterentwicklung sind vorbehalten. PHSHE 900 B2 DE│AT│CH │ 13 ■ ■ 14 │ DE│AT│CH PHSHE 900 B2 Contents Introduction . . . . . . . . . . . . . . . . . . . . . . . . . . . . . . . . . . . . . . . . . . . . . . . . . . . . . . . . . . . . . . . . . . . . . . . . . . . . . . . . . . . 16 Intended use of the long-handled hedge trimmer . . . . . . . . . . . . . . . . . . . . . . . . . . . . . . . . . . . . . . . . . . . . . . . . . . . . . . . . . . . . . . . . . . . . . . 16 Intended use of the pole pruner . . . . . . . . . . . . . . . . . . . . . . . . . . . . . . . . . . . . . . . . . . . . . . . . . . . . . . . . . . . . . . . . . . . . . . . . . . . . . . . . . . . 16 Intended use . . . . . . . . . . . . . . . . . . . . . . . . . . . . . . . . . . . . . . . . . . . . . . . . . . . . . . . . . . . . . . . . . . . . . . . . . . . . . . . . . . . . . . . . . . . . . . . . . . 16 Features . . . . . . . . . . . . . . . . . . . . . . . . . . . . . . . . . . . . . . . . . . . . . . . . . . . . . . . . . . . . . . . . . . . . . . . . . . . . . . . . . . . . . . . . . . . . . . . . . . . . . . 16 Package contents. . . . . . . . . . . . . . . . . . . . . . . . . . . . . . . . . . . . . . . . . . . . . . . . . . . . . . . . . . . . . . . . . . . . . . . . . . . . . . . . . . . . . . . . . . . . . . . 17 Technical data . . . . . . . . . . . . . . . . . . . . . . . . . . . . . . . . . . . . . . . . . . . . . . . . . . . . . . . . . . . . . . . . . . . . . . . . . . . . . . . . . . . . . . . . . . . . . . . . . 17 General Power Tool Safety Warnings . . . . . . . . . . . . . . . . . . . . . . . . . . . . . . . . . . . . . . . . . . . . . . . . . . . . . . . . . . . . . . 18 1. Work area safety . . . . . . . . . . . . . . . . . . . . . . . . . . . . . . . . . . . . . . . . . . . . . . . . . . . . . . . . . . . . . . . . . . . . . . . . . . . . . . . . . . . . . . . . . . . . 18 2. Electrical safety . . . . . . . . . . . . . . . . . . . . . . . . . . . . . . . . . . . . . . . . . . . . . . . . . . . . . . . . . . . . . . . . . . . . . . . . . . . . . . . . . . . . . . . . . . . . . . 18 3. Personal safety . . . . . . . . . . . . . . . . . . . . . . . . . . . . . . . . . . . . . . . . . . . . . . . . . . . . . . . . . . . . . . . . . . . . . . . . . . . . . . . . . . . . . . . . . . . . . . 18 4. Power tool use and care . . . . . . . . . . . . . . . . . . . . . . . . . . . . . . . . . . . . . . . . . . . . . . . . . . . . . . . . . . . . . . . . . . . . . . . . . . . . . . . . . . . . . . . 18 5. Service . . . . . . . . . . . . . . . . . . . . . . . . . . . . . . . . . . . . . . . . . . . . . . . . . . . . . . . . . . . . . . . . . . . . . . . . . . . . . . . . . . . . . . . . . . . . . . . . . . . . 19 Appliance-specific safety instructions for hedge trimmers . . . . . . . . . . . . . . . . . . . . . . . . . . . . . . . . . . . . . . . . . . . . . . . . . . . . . . . . . . . . . . . . 19 Supplementary safety instructions for hedge trimmers. . . . . . . . . . . . . . . . . . . . . . . . . . . . . . . . . . . . . . . . . . . . . . . . . . . . . . . . . . . . . . . . . . . 19 Additional safety instructions for hedge trimmers . . . . . . . . . . . . . . . . . . . . . . . . . . . . . . . . . . . . . . . . . . . . . . . . . . . . . . . . . . . . . . . . . . . . . . 20 RESIDUAL RISKS! . . . . . . . . . . . . . . . . . . . . . . . . . . . . . . . . . . . . . . . . . . . . . . . . . . . . . . . . . . . . . . . . . . . . . . . . . . . . . . . . . . . . . . . . . . . . . . 20 Appliance-specific safety instructions for pole pruners . . . . . . . . . . . . . . . . . . . . . . . . . . . . . . . . . . . . . . . . . . . . . . . . . . . . . . . . . . . . . . . . . . 20 Precautions against kickback. . . . . . . . . . . . . . . . . . . . . . . . . . . . . . . . . . . . . . . . . . . . . . . . . . . . . . . . . . . . . . . . . . . . . . . . . . . . . . . . . . . . . . 21 Additional safety instructions . . . . . . . . . . . . . . . . . . . . . . . . . . . . . . . . . . . . . . . . . . . . . . . . . . . . . . . . . . . . . . . . . . . . . . . . . . . . . . . . . . . . . . 21 Before use . . . . . . . . . . . . . . . . . . . . . . . . . . . . . . . . . . . . . . . . . . . . . . . . . . . . . . . . . . . . . . . . . . . . . . . . . . . . . . . . . . . . 22 Motor unit . . . . . . . . . . . . . . . . . . . . . . . . . . . . . . . . . . . . . . . . . . . . . . . . . . . . . . . . . . . . . . . . . . . . . . . . . . . . . . . . . . . . . . . . . . . . . . . . . . . . 22 Attaching the round handle . . . . . . . . . . . . . . . . . . . . . . . . . . . . . . . . . . . . . . . . . . . . . . . . . . . . . . . . . . . . . . . . . . . . . . . . . . . . . . . . . . . . . . . 22 Fastening/attaching the shoulder strap . . . . . . . . . . . . . . . . . . . . . . . . . . . . . . . . . . . . . . . . . . . . . . . . . . . . . . . . . . . . . . . . . . . . . . . . . . . . . . 22 Assembling the hedge trimmer . . . . . . . . . . . . . . . . . . . . . . . . . . . . . . . . . . . . . . . . . . . . . . . . . . . . . . . . . . . . . . . . . . . . . . . . . . . . . . . . . . . . 22 Mounting the pole pruner . . . . . . . . . . . . . . . . . . . . . . . . . . . . . . . . . . . . . . . . . . . . . . . . . . . . . . . . . . . . . . . . . . . . . . . . . . . . . . . . . . . . . . . . 22 Swivelling of the hedge trimmer . . . . . . . . . . . . . . . . . . . . . . . . . . . . . . . . . . . . . . . . . . . . . . . . . . . . . . . . . . . . . . . . . . . . . . . . . . . . . . . . . . . 22 Swivelling of the pole pruner. . . . . . . . . . . . . . . . . . . . . . . . . . . . . . . . . . . . . . . . . . . . . . . . . . . . . . . . . . . . . . . . . . . . . . . . . . . . . . . . . . . . . . 22 Mounting the saw chain and blade . . . . . . . . . . . . . . . . . . . . . . . . . . . . . . . . . . . . . . . . . . . . . . . . . . . . . . . . . . . . . . . . . . . . . . . . . . . . . . . . 22 Tightening and checking the saw chain . . . . . . . . . . . . . . . . . . . . . . . . . . . . . . . . . . . . . . . . . . . . . . . . . . . . . . . . . . . . . . . . . . . . . . . . . . . . . 22 Lubricating the chain . . . . . . . . . . . . . . . . . . . . . . . . . . . . . . . . . . . . . . . . . . . . . . . . . . . . . . . . . . . . . . . . . . . . . . . . . . . . . . . . . . . . . . . . . . . . 23 Sharpening the saw chain . . . . . . . . . . . . . . . . . . . . . . . . . . . . . . . . . . . . . . . . . . . . . . . . . . . . . . . . . . . . . . . . . . . . . . . . . . . . . . . . . . . . . . . . 23 Operation. . . . . . . . . . . . . . . . . . . . . . . . . . . . . . . . . . . . . . . . . . . . . . . . . . . . . . . . . . . . . . . . . . . . . . . . . . . . . . . . . . . . . 23 Switching on and off . . . . . . . . . . . . . . . . . . . . . . . . . . . . . . . . . . . . . . . . . . . . . . . . . . . . . . . . . . . . . . . . . . . . . . . . . . . . . . . . . . . . . . . . . . . . 23 Adjusting the handle . . . . . . . . . . . . . . . . . . . . . . . . . . . . . . . . . . . . . . . . . . . . . . . . . . . . . . . . . . . . . . . . . . . . . . . . . . . . . . . . . . . . . . . . . . . . 23 Working with the hedge trimmer . . . . . . . . . . . . . . . . . . . . . . . . . . . . . . . . . . . . . . . . . . . . . . . . . . . . . . . . . . . . . . . . . . . . . . . . . . . . . . . . . . . 23 Use of the machine:. . . . . . . . . . . . . . . . . . . . . . . . . . . . . . . . . . . . . . . . . . . . . . . . . . . . . . . . . . . . . . . . . . . . . . . . . . . . . . . . . . . . . . . . . . . . . 23 Cutting techniques . . . . . . . . . . . . . . . . . . . . . . . . . . . . . . . . . . . . . . . . . . . . . . . . . . . . . . . . . . . . . . . . . . . . . . . . . . . . . . . . . . . . . . . . . . . . . . 23 Working with the pole pruner . . . . . . . . . . . . . . . . . . . . . . . . . . . . . . . . . . . . . . . . . . . . . . . . . . . . . . . . . . . . . . . . . . . . . . . . . . . . . . . . . . . . . 23 Sawing techniques . . . . . . . . . . . . . . . . . . . . . . . . . . . . . . . . . . . . . . . . . . . . . . . . . . . . . . . . . . . . . . . . . . . . . . . . . . . . . . . . . . . . . . . . . . . . . 23 Working safely . . . . . . . . . . . . . . . . . . . . . . . . . . . . . . . . . . . . . . . . . . . . . . . . . . . . . . . . . . . . . . . . . . . . . . . . . . . . . . . . . . . . . . . . . . . . . . . . 24 Transport . . . . . . . . . . . . . . . . . . . . . . . . . . . . . . . . . . . . . . . . . . . . . . . . . . . . . . . . . . . . . . . . . . . . . . . . . . . . . . . . . . . . . 24 Maintenance and cleaning . . . . . . . . . . . . . . . . . . . . . . . . . . . . . . . . . . . . . . . . . . . . . . . . . . . . . . . . . . . . . . . . . . . . . . . 24 Storage . . . . . . . . . . . . . . . . . . . . . . . . . . . . . . . . . . . . . . . . . . . . . . . . . . . . . . . . . . . . . . . . . . . . . . . . . . . . . . . . . . . . . . 24 Troubleshooting: pole pruner. . . . . . . . . . . . . . . . . . . . . . . . . . . . . . . . . . . . . . . . . . . . . . . . . . . . . . . . . . . . . . . . . . . . . 25 Troubleshooting: hedge trimmer . . . . . . . . . . . . . . . . . . . . . . . . . . . . . . . . . . . . . . . . . . . . . . . . . . . . . . . . . . . . . . . . . . 25 Maintenance intervals: pole pruner . . . . . . . . . . . . . . . . . . . . . . . . . . . . . . . . . . . . . . . . . . . . . . . . . . . . . . . . . . . . . . . 25 Maintenance intervals: hedge trimmer . . . . . . . . . . . . . . . . . . . . . . . . . . . . . . . . . . . . . . . . . . . . . . . . . . . . . . . . . . . . . 25 Kompernass Handels GmbH warranty . . . . . . . . . . . . . . . . . . . . . . . . . . . . . . . . . . . . . . . . . . . . . . . . . . . . . . . . . . . . . 26 Service . . . . . . . . . . . . . . . . . . . . . . . . . . . . . . . . . . . . . . . . . . . . . . . . . . . . . . . . . . . . . . . . . . . . . . . . . . . . . . . . . . . . . . . 26 Importer . . . . . . . . . . . . . . . . . . . . . . . . . . . . . . . . . . . . . . . . . . . . . . . . . . . . . . . . . . . . . . . . . . . . . . . . . . . . . . . . . . . . . . 26 Disposal . . . . . . . . . . . . . . . . . . . . . . . . . . . . . . . . . . . . . . . . . . . . . . . . . . . . . . . . . . . . . . . . . . . . . . . . . . . . . . . . . . . . . . 27 Replacement parts . . . . . . . . . . . . . . . . . . . . . . . . . . . . . . . . . . . . . . . . . . . . . . . . . . . . . . . . . . . . . . . . . . . . . . . . . . . . . 27 Translation of the original Conformity Declaration . . . . . . . . . . . . . . . . . . . . . . . . . . . . . . . . . . . . . . . . . . . . . . . . . . . 27 PHSHE 900 B2 GB│IE │ 15 ■ 2-IN-1 HEDGE TRIMMER / POLE PRUNER PHSHE 900 B2 Introduction Congratulations on the purchase of your new appliance. You have chosen a high-quality product. The operating instructions are part of this product. They contain important information about safety, usage and disposal. Before using the product, please familiarise yourself with all operating and safety instructions. Use the product only as described and for the range of applications specified. Please also pass these operating instructions on to any future owner. Intended use of the long-handled hedge trimmer This appliance is intended for the cutting and trimming of hedges, bushes and flowering shrubs in the home environment. This is a hand-held appliance with an integrated motor unit with linear reciprocating cutting blades. WARNING! ► Hedge trimmers are not suitable for use by children. Features Motor unit Tommy screw Nut Boom Screw Round handle Carrying lug Turning element Release button Safety lock-out On/Off switch Power cable Strain relief Hedge trimmer attachment Cutter bar Gear housing Intended use of the pole pruner Lock/release This appliance is intended for trimming branches in trees. Base plate (hedge trimmer) Intended use Control lever Use this product only as described and for the areas of applications specified. The appliance is not intended for commercial use. The appliance is designed for use by adults. This appliance is not intended for use by anyone (including children) with reduced physical, sensory or mental capabilities or lack of experience and/or knowledge. The use of the appliance in rain or in humid environments is prohibited. Any other usage or modification of the appliance is deemed to be improper and carries a significant risk of accidents. The manufacturer accepts no responsibility for damage(s) attributable to misuse. Handle Front boom Locking pin Drive shaft Protective cap Pole pruner attachment Bench grinder support Saw chain Blade Stop Oil tank Nut Thread Sprocket cover Blade hole Blade guide Guide rail Oil dispenser Chain adjuster screw Chain sprocket Chain roll pin Front boom Drive shaft Protective cap Locking pin Safety ring Control lever Base plate (pole pruner) Lock/release Oil filler cap ■ 16 │ GB│IE PHSHE 900 B2 Vibration values (vector total of three directions) determined in accordance with EN 60745: Package contents 1 motor unit PHSHE 900 B2 1 hedge trimmer attachment PHS 1 (hereinafter hedge trimmer) Pole pruner: 1 pole pruner attachment PHE 1 (hereinafter pole pruner) Vibration on the front handle: Vibration emission value ah,D = 1.0 m/s2 Uncertainty K = 1.5 m/s2 Accessories 1 shoulder strap 1 chain guard 1 blade guard 1 100 ml organic chain oil 1 assembly tool Vibration on the rear handle: Hedge trimmer: Vibration on the front handle: Vibration emission value ah,D = 1.6 m/s2 Uncertainty K = 1.5 m/s2 1 set of operating instructions Technical data Motor unit: PHSHE 900 B2 Rated voltage: 230 V ∼ 50 Hz (AC) Rated output: 900 W Protection class: II / Weight: (without handle & carrying strap): approx. 2.7 kg Pole pruner: PHE 1 Chain speed: max. 6 m/s Working angle: 0°; 15°; 30° Weight (ready for use): approx. 1.6 kg Vibration on the rear handle: (double insulation) Wear ear protection! ► The vibration level specified in these instructions has been measured in accordance with the standardised measuring procedure specified in EN 60745 and can be used to make equipment comparisons. The specified vibration emission value can also be used to make an initial exposure estimate. WARNING! Cut length: approx. 260 mm Blade: Oregon type 100SDEA041 Saw chain: Oregon 91P040X Hedge trimmer: PHS 1 Idle stroke speed: 2000 rpm Working angle: -90° to +90° Cut length: 410 mm Tooth spacing: 20 mm Read the operating instructions and safety advice before initial operation! approx. 2.1 kg Pole pruner: Sound pressure level: Uncertainty K: Sound power level: Uncertainty K: Hedge trimmer: Sound pressure level: Uncertainty K: Sound power level: Guaranteed sound power level: Uncertainty K: ► The vibration level will vary according to the use of the power tool and may sometimes be higher than the value specified in these instructions. Regular use of the power tool in such a way may cause the user to underestimate the vibration. Try to keep the vibration exposure as low as possible. Measures to reduce the vibration exposure are, for example, wearing gloves and limiting the working time. All states of operation must be considered (e.g. times when the power tool is switched off and times where the power tool is switched on but running without load). Explanation of the symbols on the appliance: Noise and vibration information: Measured sound value determined according to EN 60745. The A-rated noise levels of the electrical power tool are tyoically at: PHSHE 900 B2 Vibration emission value ah,D = 1.8 m/s2 Uncertainty K = 1.5 m/s2 NOTE Oil tank, recommended fill level: 100 ml Weight (ready for use): vibration emission value ah,D = 1.2 m/s2 Uncertainty K = 1.5 m/s2 Wear protective gloves! PHE 1 dB (A) dB dB (A) dB Wear safety shoes! LWA 83 3 = 104 3 PHS 1 LPA = Wear a hard hat! LWA LWA = = dB (A) dB dB (A) dB (A) dB LPA = 81 3 102 105 3 Wear ear protection! Wear protective goggles! GB│IE │ 17 ■ Keep bystanders away from the appliance! f) If operating a power tool in a damp location is unavoidable, use a residual current device (RCD) protected supply. Use of an RCD reduces the risk of electric shock. 3. Personal safety Protect the appliance from rain and moisture! Risk of fatal electric shock! Keep at least 10 m away from above-ground power lines. Attention! Falling objects. Especially when cutting above head height. Caution! Risk of injury due to running blades! Unplug the appliance immediately if the cable is damaged or has been cut. Sound power level LWA data in dB. General Power Tool Safety Warnings WARNING! ► Read all safety warnings and all instructions. Failure to follow the warnings and instructions may result in electric shock, fire and/or serious injury. Save all warnings and instructions for future reference. The term "power tool" in the warnings refers to your mains-operated (corded) power tool or battery-operated (cordless) power tool. 1. Work area safety a) Keep work area clean and well lit. Cluttered or dark areas invite to accidents. b) Do not operate power tools in explosive atmospheres, such as in the presence of flammable liquids, gases or dust. Power tools create sparks which may ignite the dust or fumes. c) Keep children and bystanders away while operating a power tool. Distractions can cause you to lose control. 2. Electrical safety a) Power tool plugs must match the outlet. Never modify the plug in any way. Do not use any adapter plugs with earthed (grounded) power tools. Unmodified plugs and matching outlets will reduce risk of electric shock. b) Avoid body contact with earthed or grounded surfaces, such as pipes, radiators, ranges and refrigerators. There is an increased risk of electric shock if your body is earthed or grounded. c) Do not expose power tools to rain or wet conditions. Water entering a power tool will increase the risk of electric shock. d) Do not abuse the cord. Never use the cord for carrying, pulling or unplugging the power tool. Keep cord away from heat, oil, sharp edges or moving parts. Damaged or entangled cords increase the risk of electric shock. e) When operating a power tool outdoors, use an extension cord suitable for outdoor use. Use of a cord suitable for outdoor use reduces the risk of electric shock. ■ 18 │ GB│IE a) Stay alert, watch what you are doing and use common sense when operating a power tool. Do not use a power tool while you are tired or under the influence of drugs, alcohol or medication. A moment of inattention while operating power tools may result in serious personal injury. b) Use personal protective equipment. Always wear eye protection. Protective equipment such as dust mask, non-skid safety shoes, hard hat, or hearing protection used for appropriate conditions will reduce personal injuries. c) Prevent unintentional starting. Ensure the switch is in the off position before connecting to power source and/or battery pack, picking up or carrying the tool. Carrying power tools with your finger on the switch or energizing power tools that have the switch on invites accidents. d) Remove any adjusting key or wrench before turning the power tool on. A wrench or a key left attached to a rotating part of the power tool may result in personal injury. e) Do not overreach. Keep proper footing and balance at all times. This enables better control of the power tool in unexpected situations. f) Dress properly. Do not wear loose clothing or jewellery. Keep your hair, clothing and gloves away from moving parts. Loose clothes, jewellery or long hair can be caught in moving parts. g) If devices are provided for the connection of dust extraction and collection facilities, ensure these are connected and properly used. Use of dust collection can reduce dust-related hazards. 4. Power tool use and care a) Do not force the power tool. Use the correct power tool for your application. The correct power tool will do the job better and safer at the rate for which it was designed. b) Do not use the power tool if the switch does not turn it on and off. Any power tool that cannot be controlled with the switch is dangerous and must be repaired. c) Disconnect the plug from the power source and/or the battery pack from the power tool before making any adjustments, changing accessories, or storing power tools.. Such preventive safety measures reduce the risk of starting the power tool accidentally. d) Store idle power tools out of the reach of children and do not allow persons unfamiliar with the power tool or these instructions to operate the power tool. Power tools are dangerous in the hands of untrained users. e) Maintain power tools. Check for misalignment or binding of moving parts, breakage of parts and any other condition that may affect the power tool's operation. If damaged, have the power tool repaired before use. Many accidents are caused by poorly maintained power tools. f) Keep cutting tools sharp and clean. Properly maintained cutting tools with sharp cutting edges are less likely to bind and are easier to control. g) Use the power tool, accessories and tool bits etc. in accordance with these instructions, taking into account the working conditions and the work to be performed. Use of the power tool for operations different from those intended could result in a hazardous situation. PHSHE 900 B2 5. Service a) Have your power tool serviced by a qualified repair person using only identical replacement parts. This will ensure that the safety of the power tool is maintained. Appliance-specific safety instructions for hedge trimmers ■ Keep your hands away from the cutting blades. Do not attempt to clear clippings or hold onto the material to be cut while the blades are still in motion. Remove any jammed clippings only when the appliance has been switched off. Also remove the plug from the power socket. A moment of inattention while operating the hedge trimmer may result in serious personal injury. ■ Carry the hedge trimmer by the front handle when switched off, and with the cutter bar facing away from your body. When transporting or storing the trimmer, always put on the protective cover. Careful handling of the appliance reduces the likelihood of accidental contact with the moving blades. Supplementary safety instructions for hedge trimmers Preparation: a) THE HEDGE TRIMMER CAN CAUSE SERIOUS INJURIES! Read the instructions on correct handling, preparation, maintenance, starting and stopping the hedge trimmer very carefully. Familiarise yourself with all manual controls and the proper use of the hedge trimmer. b) Children may never use the hedge trimmer. c) Beware of above-ground power lines. d) Do not use the hedge trimmer while anyone, especially children, is in the vicinity. e) Wear suitable clothing! Do not wear loose clothing or jewellery which could get caught in moving parts. We recommend wearing heavy-duty gloves, non-slip footwear and goggles. f) If the cutting unit comes in contact with a foreign object or if the operating noise increases or the hedge trimmer starts to vibrate abnormally, stop the motor and allow the hedge trimmer to come to a standstill. Take the following measures: – check for damage; ■ Hold the power tool only by the insulated grips as the cutting blades could come into contact with hidden power lines or the appliance’s own power cable. Contact between the blades and a live wire may make exposed metal parts of the power tool live and could give the operator an electric shock. – check for loose parts and secure all the loose parts; – replace damaged parts with equivalent parts or have them repaired. ■ Keep the cable out of the cutting area. While working, the cable can be hidden in the bushes and be accidentally cut. g) Wear ear protection! ■ Inspect the surface to be cut carefully and remove any wires or other obstructions. h) Wear safety goggles! ■ It is recommended to use a residual current circuit breaker with a tripping current of 30 mA or less. NOTE ► The hedge trimmer is supplied completely assembled. ► Graphical representations illustrating the usage of the hedge trimmer and its operating controls can be found on the fold-out page. ► Notes and diagrams of the settings, maintenance and lubrication by the user can be found in these instructions. ► Notes on the working position (see fold-out page). ► Notes on the operating controls (see fold-out page). ► Notes on exchange and repair (see section Maintenance and cleaning/service). ► Explanation of all graphical symbols used on the hedge trimmer and technical data can be found in these instructions. ► The features of the hedge trimmer can be found in the technical data. ► Blocked tool: Remove any blockages from the cutter bar . CAUTION! ► In the event of imminent danger or an emergency switch off the motor immediately and unplug the appliance. i) To stop the hedge trimmer in an emergency situation, remove the plug from the power socket. Office: a) Remove the plug from the powert socket: – cleaning or removal of a blockage; – inspection, maintenance or work on the hedge trimmer; – setting the working position of the cutting unit; – if the hedge trimmer is to be left unattended. b) Always make sure that the hedge trimmer is in the proper working position before the motor is started. c) During operation of the hedge trimmer, always ensure that you have firm footing, especially when using steps or a ladder. d) Do not use the hedge trimmer if it has a defective or badly worn cutting unit. e) Ensure that all supplied handles and safety guards are mounted when operating the hedge trimmer. Never attempt to operate an incompletely assembled hedge trimmer or a hedge trimmer with non-approved modifications. f) Hold the hedge trimmer firmly with both hands using the handles provided. g) Always familiarise yourself with your environment and be aware of potential dangers that you may not be able to hear because of the noise of the hedge trimmer. Maintenance and storage: a) If the hedge trimmer is shut down for maintenance, inspection or storage, switch off the motor and ensure that all rotating parts have come to a standstill. Allow the machine to cool down before carrying out an inspection, settings, etc. b) Store the hedge trimmer where benzine fumes can not come into contact with open fire or sparks. Always allow the hedge trimmer to cool before storing. c) When transporting or storing the hedge trimmer, cover the cutting unit with the protective cover for the cutting unit. PHSHE 900 B2 GB│IE │ 19 ■ Additional safety instructions for hedge trimmers ■ Keep your hands away from the cutting blades. Do not attempt to clear clippings or hold onto the material to be cut while the blades are still in motion. Remove any jammed clippings only when the appliance has been switched off. A moment of inattention while operating the hedge trimmer may result in serious personal injury. ■ Carry the hedge trimmer by the handle when switched off, and with the cutter bar facing away from your body. When transporting or storing the trimmer, always put on the protective cover. Careful handling of the appliance will reduce the risk of injury from the cutter. ■ Hold the power tool only by the insulated grips as the cutting blades could come into contact with hidden power lines or the appliance’s own power cable. Contact between the blades and a live wire may make exposed metal parts of the power tool live and could give the operator an electric shock. ♦ Check the hedge for hidden objects (e.g. wire fences). RESIDUAL RISKS! Even if you operate this power tool properly, there will still be residual risks. The following risks can occur in relation to the power tool’s design and structure: a) Cuts b) Hearing damage, if no suitable ear protection is worn. c) Damage to health caused by hand-arm vibrations if the appliance is used for extended periods or is not properly used and maintained. NOTE ► The hedge trimmer is supplied completely assembled. ► Notes and diagrams of the settings, maintenance and lubrication by the user can be found in these instructions. ► Notes on exchange and repair (see section Maintenance and cleaning/ service). ► Explanation of all graphical symbols used on the hedge trimmer and technical data can be found in these instructions. Appliance-specific safety instructions for pole pruners ■ Always wear a hard hat, ear protection and safety gloves. Also wear safety goggles to prevent splashes of oil or sawdust from getting into your eyes. Wear a dust mask to protect yourself from dust. ■ Never use the appliance while standing on a ladder. ■ Do not lean too far forward while using the appliance. Ensure you are standing firmly and keep your balance at all times. Use the supplied carrying harness to spread the weight evenly on the body. ■ Wear sturdy, non-slip boots. ■ Do not use the appliance in the rain. ■ Do not use the appliance near power lines. Maintain a minimum distance of 10 m to above-ground power lines. ■ To avoid injuries due to falling branches, do not stand under the branches that you want to cut off. Be aware of branches that may spring back and cause injuries. Work at an angle of approximately 60°. ■ Be aware that an appliance kickback can occur. ■ Keep an eye not only on the branches being cut, but also on falling material, to avoid tripping. ■ After 30 minutes of work, take a break of at least one hour. ■ Always wear protective gloves. ■ Cover the guide rail and the chain with the cover during transport and storage. ■ Do not use the appliance in a potentially explosive environment containing flammable liquids, gases or dusts. The sparks generated by the machine could ignite the vapours or gases. ■ The power outlet used must be suitable for the plug. To avoid electric shock, never try to modify the plug. ■ Never remove the plug from the power supply by pulling on the power cable. Always pull the power plug itself. Do not drag or carry the appliance using the power cable. Keep the power cable away from heat, oil, sharp edges or moving parts. ► The features of the hedge trimmer can be found in the technical data. ■ Remove the pluf from the power supply after completion of work or during cleaning and maintenance. ► Blocked tool: Remove any blockages from the cutter bar. ■ Avoid unintentional starting of the appliance. ■ Use only the additional equipment and accessories specified in the operating instructions. Using attachments or accessory tools other than those recommended in the operating instructions can lead to injury. ■ Appliances with defective switches must be repaired immediately to avoid damage or injuries. ■ Store the appliance outside the reach of children. Only those who are fully acquainted with these operating instructions and the appliance itself may operate the appliance. ■ Maintain power tools carefully. Check for misalignment or binding of moving parts, breakage of parts and any other condition that may affect the power tool's operation. If damaged, have the power tool repaired before use. Many accidents are caused by poorly maintained power tools. ■ Keep cutting tools sharp and clean. Properly maintained cutting tools with sharp cutting edges are less likely to jam and are easier to control. ■ Have the appliance checked by qualified specialists. Use only the replacement parts recommended by the manufacturer. ■ 20 │ GB│IE PHSHE 900 B2 Precautions against kickback CAUTION KICKBACK! ► Be aware of the danger of kickback when working with the appliance. There is a risk of personal injury. You can avoid kickbacks by being careful and using the correct sawing technique. ■ Contact with the tip of the rail may in some cases lead to an unexpected rearwards reaction resulting in the guide rail flying upwards towards the operator (see figure). Bild 1 ■ Kickbacks can occur if the tip of the guide rail touches an object or if the wood bends and the saw chain gets caught in the cut (see figure). ■ If the saw chain jams in the upper edge of the guide rail, the rail can kick back violently towards the operator. ■ Any such reaction can lead to you losing control over the saw and possibly injuring yourself. Do not rely solely on the chainsaw's built-in safety devices. As the user of a chainsaw, you can take a number of measures to avoid accidents and injury. A kickback is caused by incorrect use or misuse of the power tool. It can be avoided by taking proper precautions, as described below: ■ Hold the saw firmly with both hands, with your thumb and fingers around the handles of the chainsaw. Position your body and arms so you can withstand kickback forces. If suitable measures are taken, the operator can control the recoil forces. Never let go of the chainsaw. ■ Avoid any abnormal posture and do not saw over shoulder height. This will prevent inadvertent contact with the tip of the rail and allows a better control of the chainsaw in unexpected situations. ■ Always use the replacement rails and saw chains specified by the manufacturer. Incorrect replacement rails and saw chains can lead to a tearing of the saw chain and/or kickback. ■ Follow the manufacturer's instructions for sharpening and maintenance of the saw chain. Setting the depth limiter too low can increase the risk of kickback. Additional safety instructions CAUTION! RISK OF INJURY! ► To prevent injuries, never touch the appliance above the safety ring while it is running! ■ During operation, no other person or animal may be within a radius of 15 metres. The operator is responsible for third parties within the working area. ■ Keep the appliance, the cutting mechanism and the blade guard in good condition to prevent injury. ■ Children should be supervised to ensure that they do not play with the appliance. ■ Do not use the appliance until you have familiarised yourself with its use. ■ Do not work with a damaged or incomplete appliance or an appliance that has been modified without the consent of the manufacturer. Never use the unit with defective protective equipment. Do not use the appliance if it has a defective On/Off switch. Before use, check the appliance's safety condition, especially the blade and the saw chain. If the appliance has been dropped, check for significant damage or defects. ■ Never start the appliance before the blade, saw chain and sprocket covers have been fitted correctly. ■ When starting and operating the appliance, ensure that it does not come into contact with the ground, stones, wire or other foreign material. Switch off the appliance before you put it down. ■ The appliance is designed for two-handed operation. Never work with one hand. ■ Hold the appliance only by the insulated handles as the saw chain could come into contact with hidden power lines. Contact between the saw chain and a live wire may make exposed metal parts of the power tool live and could give the operator an electric shock. ■ Make sure that the appliance is switched off when relocating the appliance and that you cannot accidentally touch the On/Off switch. Carry the appliance with the saw chain and blade facing backwards. Attach the blade guard during transportation. ■ Attach the bumper spike firmly before every cut and do not start until this has been done. ■ Be extremely careful when sawing small bushes and branches. The thin branches and twigs can catch in the saw and fly in your direction or knock you off balance. ■ Do not cut any wood that is lying on the ground and do not attempt to saw roots that are protruding from the soil. Avoid immersing the saw chain in the soil at all costs, as this could blunt the saw chain. When sawing a branch under tension, be aware of the possibility of the branch flying back once the tension is suddenly removed. There is a risk of personal injury. ■ Do not use force to free the appliance if the cutting tools get caught or jammed in branches. Switch the appliance off immediately and do not switch it on until the blockage has been removed. There is a risk of injury! ■ Do not saw with the tip of the blade. This can lead to a kickback. ■ Ensure that there aren’t any objects on the ground that you can trip over. PHSHE 900 B2 GB│IE │ 21 ■ Mounting the saw chain and blade Before use WARNING! CAUTION! RISK OF INJURY! ► Wear protective gloves! There is a danger of injury from the sharp cutting teeth! ► Before any work on the appliance, disconnect the plug. Risk of electric shock! NOTE Motor unit Attaching the round handle ♦ Place the round handle ♦ Tighten the screw . in the desired position on the boom . ♦ Hook the shoulder strap into the carrying lug . ♦ Adjust the length of the shoulder strap to your size so that the carrying lug is at hip height when the strap is hooked in place. Assembling the hedge trimmer ♦ The locking pin of the hedge trimmer onto the boom of the ; to do this, fit ♦ The locking pin of the pole pruner to the boom of the motor ; to do this, fit ♦ Press the control lever desired position. . and swivel the hedge trimmer into the ♦ Allow the control lever and the lock/release recess in the base plate (hedge trimmer) . to click into the ♦ Press the control lever position. . . ♦ You may have to loosen the saw chain to remove the blade and the saw chain (see section "Tightening and checking the saw chain"). Follow these instructions in reverse order. with the saw chain ♦ Reset the saw chain from the base plate starting at the top of the blade ♦ Replace the sprocket cover . and tighten the nut gently. (see section “Tightening and Tightening and checking the saw chain ► The tension of the saw chain is important for your safety and the function of the appliance. A correctly pre-stressed saw chain increases the service life of your appliance. WARNING! ♦ Loosen the nut . and swivel the pole pruner into the desired ♦ Allow the control lever and the lock/release recess in the base plate (pole pruner) . using the assembly tool ► Wear protective gloves! There is a danger of injury from the sharp cutting teeth! Swivelling of the pole pruner ♦ Release the lock/release can be turned. NOTE Swivelling of the hedge trimmer ♦ Trigger the lock/release are already assembled upon ♦ Now you can tighten the saw chain checking the saw chain”). must click into place. ♦ Secure the two booms with the tommy screw the nut on the opposite side. ♦ Undo the nut ♦ Remove the sprocket cover on ♦ Lay the guide rail over the blade guide , while inserting the chain roll pin in the blade hole . At the same time, lay the saw chain over the chain sprocket . Mounting the pole pruner ♦ Push the front boom unit. and the saw chain ♦ Remove the blade (pole pruner) . must engage. ♦ Secure the two booms with the tommy screw the nut on the opposite side. ► The blade delivery. ► Depending on wear, the blade Fastening/attaching the shoulder strap ♦ Push the front boom motor unit. ► Pay close attention to the running direction of the saw chain the blade and at the sprocket cover . to click into the a little using the assembly tool . ♦ Using the assembly tool , turn the chain adjuster screw clockwise direction to increase the tension. in a ♦ Using the assembly tool , turn the chain adjuster screw anticlockwise direction to decrease the tension. in an ♦ The saw chain must lie against the underside of the blade. Check whether the saw chain can be drawn over the blade by hand. ♦ Tighten the nut using the assembly tool . NOTE ► When pulling on the saw chain the gap between the saw chain than 2 mm. ► A new saw chain with a force of 9 N (approx. 1 kg), and blade should not be more stretches and must be tightened more frequently. ► Check the chain tension before each use of the appliance. ■ 22 │ GB│IE PHSHE 900 B2 Lubricating the chain Working with the hedge trimmer ♦ Remove the oil filler cap Use of the machine: ♦ Fill the oil tank . with approx. 100 ml of organic chain oil . NOTE WARNING! ► Never work without lubricating the chain first! If the saw chain runs dry, the cutting equipment may become irreparably damaged within a short time. Always check chain lubrication and oil level in the tank before starting work. NOTE ► Use only saw chain oil. Preferably biodegradable. Do not use waste oil, motor oil, etc. ► Check whether the automatic chain lubrication is working correctly while working. Check the chain lubrication before and during work. ► Please note that legal restrictions in your country may limit your use of the hedge trimmer. ► The daily inspection of the hedge trimmer before each use is indispensable. Also check the appliance after knocks and drops to rule out any significant damage or defects. ► Wear sturdy shoes and snug-fitting clothing to reduce the risk of accidents. Stand firmly on the ground, pay attention to your balance and always wear the supplied carrying strap! ► For the sake of your health, take regular breaks while working. Physical fatigue increases the risk of injury! WARNING! Sharpening the saw chain ► Never use the appliance when you are tired or ill or under the influence of alcohol or other drugs or medications. NOTE ► A bench grinder can be attached to the bench grinder support a secure grip during grinding. for ► You will find detailed information on sharpening in a sharpening set, e.g. from Oregon. ► Alternatively, you can use an electrical saw chain sharpening device and follow the manufacturer's instructions. ► If you have any doubts about carrying out the work, the saw chain should be replaced. Cutting techniques ■ See fold-out page (Figure A). NOTE ► Remove thicker branches with a branch cutter. Working with the pole pruner Sawing techniques WARNING! Operation ► Always pay attention to the falling clippings. NOTE ► Be aware of the danger of branches swinging back. ► Comply with regulations regarding noise protection and local rules. Using the appliance on certain days (e.g. on Sundays and public holidays), during certain times (midday, night time) or in certain locations (e.g. health resorts, clinics, etc.) may be restricted or prohibited. NOTE ► Place the stop and quietly. on the branch. This will help you work more safely ► Now you can begin sawing. Sawing off small branches Switching on and off ♦ Saw small branches (Ø 0–8 cm) from the top down (see figure). Switching on: ♦ Connect the power cable to the extension cable. ♦ Form a loop at the end of the extension cable and attach this to the strain relief . ♦ Press the safety lock-out On/Off switch . and keep it pressed and then press the Switching off: ♦ Release the On/Off switch . ♦ Remove the extension cable from the strain relief ♦ Disconnect the power cable . from the extension cable. Adjusting the handle ♦ Press the release button . Turn the turning element to the desired position. Let go of the release button ; this must click into place. PHSHE 900 B2 GB│IE │ 23 ■ ♦ Sawing off larger branches Transport ♦ When sawing larger branches (Ø 8–25 cm), first make a relief cut A (see figure). ■ Use the protective cases ■ A relief cut also prevents peeling of the bark on the main trunk. for transporting the appliance. ■ Ensure that the appliance cannot switch on during transport (see figure). ♦ Saw from the top B to the bottom A . B 2 1 A Maintenance and cleaning Saw in sections WARNING! If the mains cable needs to be replaced, this must be carried out by the manufacturer or an authorised representative in order to avoid safety hazards. Long or thick branches should be shortened before making the final cut (see figure). Cc B b A a ■ The motor unit must always be kept clean, dry and free from oil or grease. ■ The pole pruner must be cleaned of sawdust at regular intervals. ♦ Use a soft, dry cloth to clean the housing. ♦ Remove the sprocket cover Working safely ■ Keep the appliance, the cutting mechanism and the blade guard good condition to prevent injury. in ■ If the appliance has been dropped, check for significant damage or defects. ■ Maintain the specified angle 60°±10° to ensure safe operation (see figure). ♦ Remove the saw chain rail . ♦ Keep the saw chain and the oil supply. . from the blade and clean the guide sharp and check the tension; check the oil level ♦ Check the hedge trimmer for loose screws on the cutter bar tighten these if necessary. and ♦ Remove stuck cuttings. ♦ Maintain the cutter bar max. 60°±10° using an oil spray or an oil can. Storage ■ Always clean the appliance thoroughly before storing. ■ Do not use the appliance while standing on a ladder or with unsteady footing. ■ Do not be tempted into making a poorly considered cut. You could endanger yourself and others. ■ Store the appliance in the supplied protective cases place and out of the reach of children. in a dry ■ Store the appliance horizontally or secured against falling. ■ Empty the oil tank . Organic chain oil the vent hole in the oil filler cap . can resinify or leak through ■ Children should be supervised to ensure that they do not play with the appliance. ■ Change your working position regularly. Using the appliance for a long time can lead to vibration-related circulation disorders of the hands. You can extend the usage duration by using appropriate gloves or by taking regular breaks. Note that any personal predisposition to poor blood circulation, low external temperatures or large gripping forces can reduce the usage period. ■ You can reduce the vibration risk, for example, the risk of Raynaud’s phenomenon, by taking regular breaks during which you rub your hands together. ■ 24 │ GB│IE PHSHE 900 B2 Troubleshooting: pole pruner Problem Possible cause Maintenance intervals: hedge trimmer Motor is running, Hedge trimmer attachment or pole pruner attachment saw chain is not connected properly does not move to the motor unit Check assembly No progress Refill oil or grind, replace or tighten the saw chain Saw chain dry/overheating or is hanging down The figures given here are based on normal operating conditions. In the event of more difficult conditions, such as strong dust generation and longer daily operating hours, the given intervals are to be reduced correspondingly. Troubleshooting Troubleshooting: hedge trimmer Problem Possible cause Motor is running, Hedge trimmer attachment blades do not or pole pruner attachment move is not connected properly to the motor unit Troubleshooting Appliance part Action Before After As restarting comquired work pletion of work Cutting blade visual inspection X cleaning X X Check assembly Maintenance intervals: pole pruner The figures given here are based on normal operating conditions. In the event of more difficult conditions, such as strong dust generation and longer daily operating hours, the given intervals are to be reduced correspondingly. Appliance part Action Before starting work Lubricating the chain Check Saw chain check and pay attention to the sharpness X check chain tension X Weekly In the event of faults In the event of damage X sharpen Guide rail check (wear, damage) X X clean and turn X deburr X replace Chain sprocket check replace PHSHE 900 B2 As required X X X X X GB│IE │ 25 ■ Kompernass Handels GmbH warranty Dear Customer, This appliance has a 3-year warranty valid from the date of purchase. If this product has any faults, you, the buyer, have certain statutory rights. Your statutory rights are not restricted in any way by the warranty described below. Warranty conditions The warranty period starts on the date of purchase. Please keep your receipt in a safe place. This will be required as proof of purchase. If any material or manufacturing fault occurs within three years of the date of purchase of the product, we will either repair or replace the product for you or refund the purchase price (at our discretion). This warranty service requires that you present the defective appliance and the proof of purchase (receipt) within the three-year warranty period, along with a brief written description of the fault and of when it occurred. ■ You can return a defective product to us free of charge to the service address that will be provided to you. Ensure that you enclose the proof of purchase (till receipt) and information about what the defect is and when it occurred. You can download these instructions along with many other manuals, product videos and installation software at www.lidl-service.com. This QR code will take you directly to the Lidl service page (www.lidl-service.com) where you can open your operating instructions by entering the item number (IAN) 123456. NOTE ► For Parkside and Florabest tools, please send us only the defective item without the accessories (e.g. battery, storage case, assembly tools, etc.). Service If the defect is covered by the warranty, your product will either be repaired or replaced by us. The repair or replacement of a product does not signify the beginning of a new warranty period. WARNING! ► Have the power tool repaired by the service centre or a qualified electrician and only using genuine replacement parts. This will ensure that the safety of the appliance is maintained. Warranty period and statutory claims for defects ► Always ensure that the power plug or the mains cable is replaced only by the manufacturer of the appliance or by an approved customer service provider. This will ensure that the safety of the appliance is maintained. The warranty period is not prolonged by repairs effected under the warranty. This also applies to replaced and repaired components. Any damage and defects present at the time of purchase must be reported immediately after unpacking. Repairs carried out after expiry of the warranty period shall be subject to a fee. Scope of the warranty This appliance has been manufactured in accordance with strict quality guidelines and inspected meticulously prior to delivery. The warranty covers material faults or production faults. The warranty does not extend to product parts subject to normal wear and tear or to fragile parts which could be considered as consumable parts such as switches, batteries or parts made of glass. Service Great Britain Tel.: 0800 404 7657 E-Mail: [email protected] Service Ireland Tel.: 1890 930 034 (0,08 EUR/Min., (peak)) (0,06 EUR/Min., (off peak)) E-Mail: [email protected] IAN 313266_1904 The warranty does not apply if the product has been damaged, improperly used or improperly maintained. The directions in the operating instructions for the product regarding proper use of the product are to be strictly followed. Uses and actions that are discouraged in the operating instructions or which are warned against must be avoided. Importer This product is intended solely for private use and not for commercial purposes. The warranty shall be deemed void in cases of misuse or improper handling, use of force and modifications / repairs which have not been carried out by one of our authorised Service centres. BURGSTRASSE 21 Warranty claim procedure Please note that the following address is not the service address. Please use the service address provided in the operating instructions. KOMPERNASS HANDELS GMBH 44867 BOCHUM GERMANY www.kompernass.com To ensure quick processing of your case, please observe the following instructions: ■ Please have the till receipt and the item number (e.g. IAN 12345) available as proof of purchase. ■ You will find the item number on the type plate on the product, an engraving on the product, on the front page of the operating instructions (below left) or on the sticker on the rear or bottom of the product. ■ If functional or other defects occur, please contact the service department listed either by telephone or by e-mail. ■ 26 │ GB│IE PHSHE 900 B2 Disposal The packaging is made from environmentally friendly material and can be disposed of at your local recycling plant. The appliance and its accessories are made from various materials, such as metal and plastic. Your local community or municipal authorities can provide information on how to dispose of the appliance. Environmental protection ■ Carefully empty the oil tank and dispose of your appliance at a recycling plant. The plastic and metal parts used can be separated and recycled. Ask our Service Centre for more information. ■ Dispose of waste oil at a waste collection centre, do not dump it into the sewerage or drainage system. ■ Dispose of contaminated maintenance material and working materials at a collection point provided for this purpose. Do not dispose of power tools in your normal household waste! European Directive 2012/19/EU requires that worn-out power tools be collected separately and recycled in an environmentally compatible manner. The product is recyclable, subject to extended producer responsibility and is collected separately. Translation of the original Conformity Declaration We, KOMPERNASS HANDELS GMBH, document officer: Mr. Semi Uguzlu, BURGSTR. 21, 44867 BOCHUM, GERMANY, hereby declare that this appliance complies with the following standards, normative documents and EC directives: Machinery directive (2006/42/EC) EMC (Electromagnetic Compatibility) (2014/30/EU) Directives on noise emission 2000/14/EC 2005/88/EC Notified body: No. 0036 TÜV SÜD Industrie Service GmbH, Westendstraße 199, 80686 Munich, Germany Evaluation procedure for conformity as per appendix V. Sound power level LWA: Measured: 102.2 dB(A) Guaranteed: 105 dB(A) RoHS Directive (2011/65/EU)* *The manufacturer bears the full responsibility for compliance with this conformity declaration. The object of the declaration described above complies with the requirements of the Directive 2011/65/EU of the European Parliament and Council of 8 June 2011 on the limitations of use of certain dangerous substances in electrical and electronic appliances. Applied harmonised standards: Replacement parts EN 60745-1: 2009/A11: 2010 Replacement parts can be ordered directly from the service centre. Please provide the following details when making an order: appliance type and part number. EN ISO 10517: 2019 EN ISO 11680-1: 2011 EN 55014-1: 2017 EN 55014-2: 2015 EN 61000-3-2: 2014 EN 61000-3-3: 2013 EN 50581:2012 Type/appliance designation: 2-in-1 Hedge Trimmer / Pole Pruner PHSHE 900 B2 Year of manufacture: 09-2019 Serial number: IAN 313266_1904 Bochum, 11/09/2019 Semi Uguzlu - Quality Manager We reserve the right to technical changes in the context of further product development. PHSHE 900 B2 GB│IE │ 27 ■ ■ 28 │ GB│IE PHSHE 900 B2 Table des matières Introduction . . . . . . . . . . . . . . . . . . . . . . . . . . . . . . . . . . . . . . . . . . . . . . . . . . . . . . . . . . . . . . . . . . . . . . . . . . . . . . . . . . . 30 Utilisation conforme à l'usage prévu de l'élagueuse sur perche . . . . . . . . . . . . . . . . . . . . . . . . . . . . . . . . . . . . . . . . . . . . . . . . . . . . . . . . . . . 30 Usage conforme de l'élagueuse . . . . . . . . . . . . . . . . . . . . . . . . . . . . . . . . . . . . . . . . . . . . . . . . . . . . . . . . . . . . . . . . . . . . . . . . . . . . . . . . . . . 30 Utilisation conforme à l'usage prévu . . . . . . . . . . . . . . . . . . . . . . . . . . . . . . . . . . . . . . . . . . . . . . . . . . . . . . . . . . . . . . . . . . . . . . . . . . . . . . . . 30 Équipement . . . . . . . . . . . . . . . . . . . . . . . . . . . . . . . . . . . . . . . . . . . . . . . . . . . . . . . . . . . . . . . . . . . . . . . . . . . . . . . . . . . . . . . . . . . . . . . . . . . 30 Matériel livré . . . . . . . . . . . . . . . . . . . . . . . . . . . . . . . . . . . . . . . . . . . . . . . . . . . . . . . . . . . . . . . . . . . . . . . . . . . . . . . . . . . . . . . . . . . . . . . . . . 31 Caractéristiques techniques . . . . . . . . . . . . . . . . . . . . . . . . . . . . . . . . . . . . . . . . . . . . . . . . . . . . . . . . . . . . . . . . . . . . . . . . . . . . . . . . . . . . . . . 31 Avertissements de sécurité généraux pour les outils électriques . . . . . . . . . . . . . . . . . . . . . . . . . . . . . . . . . . . . . . . . 32 1. Sécurité de la zone de travail . . . . . . . . . . . . . . . . . . . . . . . . . . . . . . . . . . . . . . . . . . . . . . . . . . . . . . . . . . . . . . . . . . . . . . . . . . . . . . . . . . . 32 2. Sécurité électrique. . . . . . . . . . . . . . . . . . . . . . . . . . . . . . . . . . . . . . . . . . . . . . . . . . . . . . . . . . . . . . . . . . . . . . . . . . . . . . . . . . . . . . . . . . . . 32 3. Sécurité des personnes . . . . . . . . . . . . . . . . . . . . . . . . . . . . . . . . . . . . . . . . . . . . . . . . . . . . . . . . . . . . . . . . . . . . . . . . . . . . . . . . . . . . . . . . 32 4. Utilisation et entretien de l'outil . . . . . . . . . . . . . . . . . . . . . . . . . . . . . . . . . . . . . . . . . . . . . . . . . . . . . . . . . . . . . . . . . . . . . . . . . . . . . . . . . . 32 5. Service après-vente . . . . . . . . . . . . . . . . . . . . . . . . . . . . . . . . . . . . . . . . . . . . . . . . . . . . . . . . . . . . . . . . . . . . . . . . . . . . . . . . . . . . . . . . . . . 33 Consignes de sécurité spécifiques à l'appareil pour le taille-haies . . . . . . . . . . . . . . . . . . . . . . . . . . . . . . . . . . . . . . . . . . . . . . . . . . . . . . . . . 33 Consignes de sécurité complémentaires pour les taille-haies . . . . . . . . . . . . . . . . . . . . . . . . . . . . . . . . . . . . . . . . . . . . . . . . . . . . . . . . . . . . . 33 Consignes de sécurité approfondies pour les taille-haies . . . . . . . . . . . . . . . . . . . . . . . . . . . . . . . . . . . . . . . . . . . . . . . . . . . . . . . . . . . . . . . . 34 RISQUES RÉSIDUELS ! . . . . . . . . . . . . . . . . . . . . . . . . . . . . . . . . . . . . . . . . . . . . . . . . . . . . . . . . . . . . . . . . . . . . . . . . . . . . . . . . . . . . . . . . . . 34 Consignes de sécurité spécifiques à l'élagueuse. . . . . . . . . . . . . . . . . . . . . . . . . . . . . . . . . . . . . . . . . . . . . . . . . . . . . . . . . . . . . . . . . . . . . . . 34 Mesures de prudence contre le rebond . . . . . . . . . . . . . . . . . . . . . . . . . . . . . . . . . . . . . . . . . . . . . . . . . . . . . . . . . . . . . . . . . . . . . . . . . . . . . 35 Consignes de sécurité approfondies . . . . . . . . . . . . . . . . . . . . . . . . . . . . . . . . . . . . . . . . . . . . . . . . . . . . . . . . . . . . . . . . . . . . . . . . . . . . . . . . 35 Avant la mise en service . . . . . . . . . . . . . . . . . . . . . . . . . . . . . . . . . . . . . . . . . . . . . . . . . . . . . . . . . . . . . . . . . . . . . . . . . 36 Unité moteur . . . . . . . . . . . . . . . . . . . . . . . . . . . . . . . . . . . . . . . . . . . . . . . . . . . . . . . . . . . . . . . . . . . . . . . . . . . . . . . . . . . . . . . . . . . . . . . . . . 36 Montage de la poignée ronde . . . . . . . . . . . . . . . . . . . . . . . . . . . . . . . . . . . . . . . . . . . . . . . . . . . . . . . . . . . . . . . . . . . . . . . . . . . . . . . . . . . . 36 Fixation/montage de la bandoulière. . . . . . . . . . . . . . . . . . . . . . . . . . . . . . . . . . . . . . . . . . . . . . . . . . . . . . . . . . . . . . . . . . . . . . . . . . . . . . . . 36 Montage du taille-haies. . . . . . . . . . . . . . . . . . . . . . . . . . . . . . . . . . . . . . . . . . . . . . . . . . . . . . . . . . . . . . . . . . . . . . . . . . . . . . . . . . . . . . . . . . 36 Montage de l'élagueuse . . . . . . . . . . . . . . . . . . . . . . . . . . . . . . . . . . . . . . . . . . . . . . . . . . . . . . . . . . . . . . . . . . . . . . . . . . . . . . . . . . . . . . . . . 36 Faire pivoter le taille-haies . . . . . . . . . . . . . . . . . . . . . . . . . . . . . . . . . . . . . . . . . . . . . . . . . . . . . . . . . . . . . . . . . . . . . . . . . . . . . . . . . . . . . . . . 36 Inclinaison de l'élagueuse . . . . . . . . . . . . . . . . . . . . . . . . . . . . . . . . . . . . . . . . . . . . . . . . . . . . . . . . . . . . . . . . . . . . . . . . . . . . . . . . . . . . . . . . 36 Monter la chaîne de scie et la lame . . . . . . . . . . . . . . . . . . . . . . . . . . . . . . . . . . . . . . . . . . . . . . . . . . . . . . . . . . . . . . . . . . . . . . . . . . . . . . . . 36 Tendre et vérifier la chaîne de scie . . . . . . . . . . . . . . . . . . . . . . . . . . . . . . . . . . . . . . . . . . . . . . . . . . . . . . . . . . . . . . . . . . . . . . . . . . . . . . . . . 36 Graissage de la chaîne . . . . . . . . . . . . . . . . . . . . . . . . . . . . . . . . . . . . . . . . . . . . . . . . . . . . . . . . . . . . . . . . . . . . . . . . . . . . . . . . . . . . . . . . . . 37 Affûter la chaîne de scie . . . . . . . . . . . . . . . . . . . . . . . . . . . . . . . . . . . . . . . . . . . . . . . . . . . . . . . . . . . . . . . . . . . . . . . . . . . . . . . . . . . . . . . . . 37 Mise en service . . . . . . . . . . . . . . . . . . . . . . . . . . . . . . . . . . . . . . . . . . . . . . . . . . . . . . . . . . . . . . . . . . . . . . . . . . . . . . . . 37 Mise en marche / mise hors service . . . . . . . . . . . . . . . . . . . . . . . . . . . . . . . . . . . . . . . . . . . . . . . . . . . . . . . . . . . . . . . . . . . . . . . . . . . . . . . . 37 Réglage de la poignée . . . . . . . . . . . . . . . . . . . . . . . . . . . . . . . . . . . . . . . . . . . . . . . . . . . . . . . . . . . . . . . . . . . . . . . . . . . . . . . . . . . . . . . . . . 37 Travailler avec le taille-haies . . . . . . . . . . . . . . . . . . . . . . . . . . . . . . . . . . . . . . . . . . . . . . . . . . . . . . . . . . . . . . . . . . . . . . . . . . . . . . . . . . . . . . 37 Utilisation de la machine : . . . . . . . . . . . . . . . . . . . . . . . . . . . . . . . . . . . . . . . . . . . . . . . . . . . . . . . . . . . . . . . . . . . . . . . . . . . . . . . . . . . . . . . . 37 Techniques de coupe. . . . . . . . . . . . . . . . . . . . . . . . . . . . . . . . . . . . . . . . . . . . . . . . . . . . . . . . . . . . . . . . . . . . . . . . . . . . . . . . . . . . . . . . . . . . 37 Travailler avec l'élagueuse. . . . . . . . . . . . . . . . . . . . . . . . . . . . . . . . . . . . . . . . . . . . . . . . . . . . . . . . . . . . . . . . . . . . . . . . . . . . . . . . . . . . . . . . 37 Techniques de scie. . . . . . . . . . . . . . . . . . . . . . . . . . . . . . . . . . . . . . . . . . . . . . . . . . . . . . . . . . . . . . . . . . . . . . . . . . . . . . . . . . . . . . . . . . . . . . 37 Travail sûr . . . . . . . . . . . . . . . . . . . . . . . . . . . . . . . . . . . . . . . . . . . . . . . . . . . . . . . . . . . . . . . . . . . . . . . . . . . . . . . . . . . . . . . . . . . . . . . . . . . . 38 Transport . . . . . . . . . . . . . . . . . . . . . . . . . . . . . . . . . . . . . . . . . . . . . . . . . . . . . . . . . . . . . . . . . . . . . . . . . . . . . . . . . . . . . 38 Entretien et nettoyage . . . . . . . . . . . . . . . . . . . . . . . . . . . . . . . . . . . . . . . . . . . . . . . . . . . . . . . . . . . . . . . . . . . . . . . . . . 38 Entreposage. . . . . . . . . . . . . . . . . . . . . . . . . . . . . . . . . . . . . . . . . . . . . . . . . . . . . . . . . . . . . . . . . . . . . . . . . . . . . . . . . . . 38 Résolution de problèmes sur l'élagueuse . . . . . . . . . . . . . . . . . . . . . . . . . . . . . . . . . . . . . . . . . . . . . . . . . . . . . . . . . . . 39 Résolution de problèmes sur le taille-haies. . . . . . . . . . . . . . . . . . . . . . . . . . . . . . . . . . . . . . . . . . . . . . . . . . . . . . . . . . 39 Intervalles de maintenance pour l'élagueuse. . . . . . . . . . . . . . . . . . . . . . . . . . . . . . . . . . . . . . . . . . . . . . . . . . . . . . . . 39 Intervalles de maintenance pour le taille-haies . . . . . . . . . . . . . . . . . . . . . . . . . . . . . . . . . . . . . . . . . . . . . . . . . . . . . . 39 Garantie de Kompernass Handels GmbH. . . . . . . . . . . . . . . . . . . . . . . . . . . . . . . . . . . . . . . . . . . . . . . . . . . . . . . . . . . 40 Service après-vente. . . . . . . . . . . . . . . . . . . . . . . . . . . . . . . . . . . . . . . . . . . . . . . . . . . . . . . . . . . . . . . . . . . . . . . . . . . . . 40 Importateur . . . . . . . . . . . . . . . . . . . . . . . . . . . . . . . . . . . . . . . . . . . . . . . . . . . . . . . . . . . . . . . . . . . . . . . . . . . . . . . . . . . 40 Mise au rebut. . . . . . . . . . . . . . . . . . . . . . . . . . . . . . . . . . . . . . . . . . . . . . . . . . . . . . . . . . . . . . . . . . . . . . . . . . . . . . . . . . 41 Pièces de rechange . . . . . . . . . . . . . . . . . . . . . . . . . . . . . . . . . . . . . . . . . . . . . . . . . . . . . . . . . . . . . . . . . . . . . . . . . . . . . 41 Traduction de la déclaration de conformité originale . . . . . . . . . . . . . . . . . . . . . . . . . . . . . . . . . . . . . . . . . . . . . . . . . 41 PHSHE 900 B2 FR│BE │ 29 ■ TAILLE-HAIES SUR PERCHE / PERCHE ÉLAGUEUSE 2 EN 1 PHSHE 900 B2 Introduction Nous vous félicitons pour l'achat de votre nouvel appareil. Vous venez ainsi d'opter pour un produit de grande qualité. Le mode d'emploi fait partie de ce produit. Il contient des remarques importantes concernant la sécurité, l'usage et la mise au rebut. Avant d'utiliser le produit, veuillez vous familiariser avec toutes les consignes d'utilisation et de sécurité. N'utilisez le produit que conformément aux consignes et pour les domaines d'utilisation prévus. Si vous cédez le produit à un tiers, remettez-lui également tous les documents. Utilisation conforme à l'usage prévu de l'élagueuse sur perche Cet appareil est idéal pour l'élagage et la coupe de haies, buissons et arbustes d'ornement dans le secteur domestique. Il s'agit ici d'un appareil manuel à transmission intégrée, dont les lames linéaires se déplacent en avant et en arrière. AVERTISSEMENT ! ► Les taille-haies ne sont pas faits pour être utilisés par les enfants. Usage conforme de l'élagueuse Cet appareil est destiné aux travaux d'élagage d'arbres. Équipement Unité moteur Molette de serrage Écrou Manche Vis Poignée ronde Anneau de transport Élément rotatif Touche de déverrouillage Verrouillage de sécurité Bouton marche/arrêt Cordon d'alimentation Système anti-traction Empiècement taille-haies Barre de coupe Boîte d'engrenages Verrouillage/déverrouillage Plaque (taille-haies) Levier de réglage Poignée Bras avant Tige d'arrêt Utilisation conforme à l'usage prévu N'utilisez l'appareil que conformément aux consignes et pour les domaines d'utilisation prévus. L'appareil n'est pas conçu pour un usage professionnel. L'appareil est conçu pour être utilisé par des adultes. Cet appareil n'est pas destiné à l'usage par des personnes (enfants compris) présentant des aptitudes physiques, sensorielles ou intellectuelles restreintes, ou qui manquent de l'expérience et/ou des connaissances requises. Il est interdit d'utiliser l'appareil en cas de pluie ou dans un environnement humide. Toute utilisation autre ou modification de l'appareil est considérée comme non conforme et s'accompagne de risques d'accident non négligeables. Le fabricant n'assume aucune responsabilité pour les dommages résultant d'une utilisation non conforme à l'usage prévu. Arbre d'entraînement Capuchon de protection Empiècement élagueuse Touret Chaîne de scie Lame Butée Réservoir à huile Écrou Filetage Cache de pignon Alésage de lame Guide-lame Rail de guidage Huileur par gouttes Vis de tension de chaîne Pignon Goupille de tension de chaîne Bras avant Arbre d'entraînement Capuchon de protection Tige d'arrêt Bague de protection Levier de réglage Plaque (élagueuse) Verrouillage/déverrouillage Couvercle du réservoir à huile ■ 30 │ FR│BE PHSHE 900 B2 Matériel livré 1 Bloc moteur PHSHE 900 B2 1 Empiècement taille-haies PHS 1 (ci-après appelé taille-haies) 1 Empiècement élagueuse PHE 1 (ci-après appelé élagueuse) Valeurs de vibrations (somme vectorielle triaxiale) déterminées conformément à EN 60745 : Élagueuse : Vibrations sur la poignée avant : Valeur d'émission des vibrations ah,D = 1,0 m/s2 Imprécision K = 1,5 m/s2 Vibrations sur la poignée arrière : Valeur d'émission des vibrations ah,D = 1,2 m/s2 Imprécision K = 1,5 m/s2 Accessoires Bandoulière 1 Housse protectrice pour la chaîne 1 Gaine protectrice pour la lame 1 100 ml d'huile bio pour chaîne 1 Outil de montage 1 1 Mode d'emploi Taille-haies : Caractéristiques techniques Vibrations sur la poignée avant : Valeur d'émission des vibrations ah,D = 1,6 m/s2 Imprécision K = 1,5 m/s2 Vibrations sur la poignée arrière : Valeur d'émission des vibrations ah,D = 1,8 m/s2 Imprécision K = 1,5 m/s2 Unité moteur : PHSHE 900 B2 Tension nominale : 230 V ∼ 50 Hz (courant alternatif) Puissance nominale : 900 W Classe de protection : II / Poids : (sans poignée ni sangle) : Élagueuse : ca. 2,7 kg PHE 1 Vitesse de la chaîne : 6 m/s max. REMARQUE Angle de travail : 0°; 15°; 30° Poids (opérationnel) : env. 1,6 kg ► Le niveau de vibrations indiqué dans ces instructions a été mesuré conformément aux méthodes de mesure décrites dans la norme EN 60745 et peut être utilisé pour la comparaison d'appareils. La valeur d'émission des vibrations déclarée peut également être utilisée pour une évaluation préliminaire de l'exposition. (double isolation) Porter une protection auditive ! Quantité d'huile recommandée pour le réservoir à huile : 100 cm3 Longueur de coupe: env. 260 mm Lame : Oregon type 100SDEA041 Chaîne de scie : Taille-haies : Oregon 91P040X PHS 1 Nombre de cycles à vide : 2000 min-1 Angle de travail : -90°à +90° Longueur de coupe : 410 mm Écart entre les dents : 20 mm Poids (opérationnel) : env. 2,1 kg Informations relatives aux bruits et aux vibrations Valeur de mesure du bruit déterminée conformément à la norme EN 60745. Le niveau de bruit A pondéré typique de l'outil électrique est de : Élagueuse : PHE 1 Niveau de pression acoustique : Imprécision K : Niveau de puissance acoustique : Imprécision K : Taille-haies : PHS 1 LPA = 83 dB (A) 3 dB LWA = 104 dB (A) 3 dB Niveau de pression acoustique : LPA = 81 dB (A) Imprécision K : 3 dB Niveau de puissance acoustique : LWA = 102 dB (A) Niveau de puissance acoustique garanti : LWA = 105 dB (A) Imprécision K : 3 dB AVERTISSEMENT ! ► Le niveau des vibrations varie en fonction de l'usage de l'outil électrique et peut, dans certains cas, excéder la valeur indiquée dans ces instructions. La sollicitation vibratoire pourrait être sous-estimée si l'outil électrique est utilisé régulièrement de cette manière. Essayez de garder la sollicitation par vibrations aussi faible que possible. Des mesures d'exemple de réduction de la sollicitation des vibrations sont le port de gants lors de l‘utilisation de l'outil et la limitation du temps de travail. Pour cela, toutes les parts du cycle de travail doivent être prises en compte (par exemple les durées pendant lesquelles l'outil est éteint et celles pendant lesquelles il est allumé mais fonctionne sans charge). Explication des plaques signalétiques sur l'appareil : Lisez le mode d'emploi et les instructions avant la mise en service ! Porter des gants de protection ! Porter des gants de sécurité ! Porter une protection auditive ! Porter un casque de protection ! Porter des lunettes de protection ! PHSHE 900 B2 FR│BE │ 31 ■ Éloignez les personnes qui se trouvent à proximité de l'appareil ! Protéger l'appareil de la pluie ou de l'humidité ! Danger de mort par électrocution ! Tenez-vous au moins à 10 m de distance de lignes aériennes à haute tension. Attention ! Chute d'objets. En particulier lors de la coupe au-dessus de la tête. Attention ! Risque de blessures du à la lame en service. Débranchez la prise de courant immédiatement si le câble a été endommagé ou sectionné. Indication du niveau de puissance acoustique LWA en dB. Avertissements de sécurité généraux pour les outils électriques AVERTISSEMENT ! ► Lire tous les avertissements de sécurité et toutes les instructions. Ne pas suivre les avertissements et instructions peut donner lieu à un choc électrique, un incendie et/ou une blessure sérieuse. Conserver tous les avertissements et toutes les instructions pour pouvoir s'y reporter ultérieurement. Le terme "outil" dans les consignes de sécurité fait référence à votre outil électrique alimenté par le secteur (avec cordon d'alimentation) ou à votre outil fonctionnant sur batterie (sans cordon d'alimentation). 1. Sécurité de la zone de travail a) Conserver la zone de travail propre et bien éclairée. Les zones en désordre ou sombres sont propices aux accidents. b) Ne pas faire fonctionner les outils électriques en atmosphère explosive, par exemple en présence de liquides inflammables, de gaz ou de poussières. Les outils électriques produisent des étincelles qui peuvent enflammer les poussières ou les fumées. c) Maintenir les enfants et les personnes présentes à l'écart pendant l'utilisation de l'outil. Les distractions peuvent vous faire perdre le contrôle de l'outil. 2. Sécurité électrique a) La fiche de l'outil doit être adaptée à la prise secteur. Ne jamais modifier la fiche de quelque façon que ce soit. Ne pas utiliser d'adaptateurs avec des outils à branchement de terre. Des fiches non modifiées et des socles adaptés réduiront le risque de choc électrique. b) Eviter tout contact du corps avec des surfaces reliées à la terre telles que les tuyaux, les radiateurs, les cuisinières et les réfrigérateurs. Il existe un risque accru de choc électrique si votre corps est relié à la terre. ■ 32 │ FR│BE c) Ne pas exposer les outils à la pluie ou à des conditions humides. La pénétration d'eau à l'intérieur d'un outil augmentera le risque de choc électrique. d) Ne pas maltraiter le cordon. Ne jamais utiliser le cordon pour porter, tirer ou débrancher l'outil. Maintenir le cordon à l'écart de la chaleur, du lubrifiant, des arêtes ou des parties en mouvement. Des cordons endommagés ou emmêlés augmentent le risque de choc électrique. e) En cas d'utilisation d'un outil électrique à l'extérieur, utiliser une rallonge adaptée à l'utilisation extérieure. L'utilisation d'un cordon adapté à l'utilisation extérieure réduit le risque de choc électrique. f) Si l'usage d'un outil dans un emplacement humide est inévitable, utiliser une alimentation protégée par un dispositif à courant différentiel résiduel (RCD). L'usage d'un RCD réduit le risque de choc électrique. 3. Sécurité des personnes a) Rester vigilant, regarder ce que vous êtes en train de faire et faire preuve de bon sens dans votre utilisation de l'outil. Ne pas utiliser un outil lorsque vous êtes fatigué ou sous l'emprise de drogues, d'alcool ou de médicaments. Un moment d'inattention en cours d'utilisation d'un outil peut entraîner des blessures graves des personnes. b) Utiliser un équipement de sécurité. Toujours porter une protection pour les yeux. Les équipements de sécurité tels que les masques contre les poussières, les chaussures de sécurité antidérapantes, les casques ou les protections acoustiques utilisés pour les conditions appropriées réduiront les blessures de personnes. c) Eviter tout démarrage intempestif. S'assurer que l'interrupteur est en position arrêt avant de brancher l'outil au secteur et/ou au bloc de batteries, de le ramasser ou de le porter. Porter les outils en ayant le doigt sur l'interrupteur ou brancher des outils dont l'interrupteur est en position marche est source d'accidents. d) Retirer toute clé de réglage avant de mettre l'outil en marche. Une clé laissée fixée sur une partie tournante de l'outil peut donner lieu à des blessures de personnes. e) Ne pas se précipiter. Garder une position et un équilibre adaptés à tout moment. Cela permet un meilleur contrôle de l'outil dans des situations inattendues. f) S'habiller de manière adaptée. Ne pas porter de vêtements amples ou de bijoux. Garder les cheveux, les vêtements et les gants à distance des parties en mouvement. Des vêtements amples, des bijoux ou les cheveux longs peuvent être pris dans des parties en mouvement. g) Si des dispositifs sont fournis pour le raccordement d'équipements pour l'extraction et la récupération des poussières, s'assurer qu'ils sont connectés et correctement utilisés. Utiliser des collecteurs de poussière peut réduire les risques dus aux poussières. 4. Utilisation et entretien de l'outil a) Ne pas forcer l'outil. Utiliser l'outil adapté à votre application. L'outil adapté réalisera mieux le travail et de manière plus sûre au régime pour lequel il a été construit. b) Ne pas utiliser l'outil si l'interrupteur ne permet pas de passer de l'état de marche à arrêt et vice versa. Tout outil qui ne peut pas être commandé par l'interrupteur est dangereux et il faut le réparer. c) Débrancher la fiche de la prise de courant et/ou l'accu amovible avant de procéder à tout réglage sur l'appareil, changement d'accessoires ou avant de ranger l'outil. De telles mesures de sécurité préventives réduisent le risque de démarrage accidentel de l'outil. d) Conserver les outils à l'arrêt hors de la portée des enfants. Ne pas permettre à des personnes ne connaissant pas l'outil ou les présentes instructions de le faire fonctionner. Les outils sont dangereux entre les mains d'utilisateurs novices. e) Observer la maintenance de l'outil. Vérifier qu'il n'y a pas de mauvais alignement ou de blocage des parties mobiles, des pièces cassées ou toute autre condition pouvant affecter le fonctionnement de l'outil. En cas de dommages, faire réparer l'outil avant de l'utiliser. De nombreux accidents sont dus à des outils mal entretenus. PHSHE 900 B2 f) Garder affûtés et propres les outils permettant de couper. Des outils destinés à couper correctement entretenus avec des pièces coupantes tranchantes sont moins susceptibles de bloquer et sont plus faciles à contrôler. Consignes de sécurité complémentaires pour les taille-haies g) Utiliser l'outil, les accessoires et les lames etc., conformément à ces instructions. en tenant compte des conditions de travail et du travail à réaliser. L'utilisation de l'outil pour des opérations différentes de celles prévues pourrait donner lieu à des situations dangereuses. a) CE TAILLE-HAIES PEUT PROVOQUER DES BLESSURES GRAVES ! Lisez avec soin les instructions relatives à la bonne utilisation, à la préparation, à la maintenance, pour démarrer et arrêter le taille-haies. Familiarisez-vous avec toutes les pièces de réglage et avec l'utilisation conforme du taille-haies. b) Les enfants ne doivent pas utiliser le taille-haies. c) Prudence avec les lignes électriques aériennes. d) L'utilisation du taille-haies doit être évitée lorsque des personnes, surtout des enfants, se trouvent à proximité. e) Portez des vêtements adaptés ! Ne portez pas de vêtements amples ni de bijoux qui risqueraient d'être happés par les pièces mobiles. Il est recommandé de porter des gants de protection rigides, des chaussures anti-dérapantes et des lunettes de protection. g) Si le dispositif de coupe touche un corps étranger, ou si les bruits de fonctionnement venaient à s'amplifier ou le taille-haies à vibrer fortement de manière inhabituelle, couper le moteur et laisser le taille-haies s'immobiliser. Retirer la cosse de la bougie d'allumage et prendre les mesures suivantes : Préparation : 5. Service après-vente a) Faire entretenir l'outil par un réparateur qualifié utilisant uniquement des pièces de rechange identiques. Cela assurera que la sécurité de l'outil est maintenue. Consignes de sécurité spécifiques à l'appareil pour le taille-haies ■ Tenir toutes les parties du corps éloignées de la lame. Ne pas essayer de retirer les déchets de coupe lorsque la lame tourne ou de tenir un matériau à couper. Ne retirer les déchets de coupe que lorsque l'appareil est mis hors tension. De plus, débranchez la prise. Un moment d'inattention durant l'utilisation du taille-haies peut provoquer des blessures graves. ■ Porter le taille-haies par la poignée avant en état hors tension, la barre de coupe éloignée de votre corps. Lors du transport ou du stockage du taille-haies, toujours le recouvrir de la protection.Une manipulation prudente de l'appareil réduit l'éventualité d'un contact involontaire avec les lames tournantes. – vérifier d'éventuels dommages ; – vérifier d'éventuelles pièces mobiles et fixer toutes les pièces détachées ; ■ Ne tenez l'outil que par la poignée isolante, car la lame peut entrer en contact avec des câbles électriques cachés ou avec le cordon d'alimentation. Le contact de la lame avec une ligne électrique conductrice de tension peut mettre les pièces métalliques de l'appareil sous tension et provoquer une décharge électrique. ■ Maintenez le câble éloigné de la zone de coupe.Pendant les travaux, le câble peut se dissimuler dans les végétaux et être coupé par mégarde. – remplacer les pièces défectueuses contre des pièces semblables ou les faire réparer. g) porter une protection auditive ! h) porter une protection oculaire ! i) pour immobiliser le taille-haies en cas d'urgence, débrancher la fiche secteur de la prise secteur. ■ Inspectez soigneusement la surface à couper et retirez tous les fils de fer ou autres corps étrangers. ■ Il est recommandé d'utiliser un RCD avec un courant de mise au repos de 30 mA ou moins. Fonctionnement : a) retirer la fiche secteur de la prise avant : REMARQUE – le nettoyage ou l'élimination d'un blocage ; ► Le taille-haies est livré entièrement monté. – le contrôle, la maintenance ou des travaux sur le taille-haies ; ► Les schémas concernant l'utilisation du taille-haies ou de ses composants se trouvent sur le volet dépliant. – le réglage de la position de travail du dispositif de coupe ; ► Les instructions et les schémas concernant le réglage, la maintenance et la lubrification par l'utilisateur se trouvent dans ce mode d'emploi. ► Remarques relatives à la position de travail (voir volet dépliant). ► Remarques relatives aux pièces de réglage (voir volet dépliant). – lorsque le taille-haies reste sans surveillance. b) Toujours s'assurer que le taille-haies se trouve de manière conforme dans l'une des positions de travail prescrites, avant de démarrer le moteur. ► Consignes sur le remplacement et la réparation (voir chapitre entretien et nettoyage/service). c) Pendant l'utilisation du taille-haies, il faut toujours s'assurer de pouvoir occuper une position stable, en particulier en cas d'utilisation d'une échelle. ► La signification de tous les symboles graphiques utilisés sur le taille-haies et les données techniques se trouvent dans ce mode d'emploi. d) Ne jamais utiliser le taille-haies avec un dispositif de coupe défectueux ou fortement usé. ► Vous trouverez les caractéristiques du taille-haies dans les données techniques. ► Outil bloqué : Retirez les matières coincées de la barre de coupe ATTENTION ! ► En cas de danger ou d'urgence, éteignez immédiatement le moteur et débranchez la prise de courant. PHSHE 900 B2 . e) Toujours s'assurer que toutes les poignées et les dispositifs de sécurité sont montés lors de l'utilisation du taille-haies. Ne jamais essayer d'utiliser un taille-haies incomplet ou un taille-haies ayant subi une transformation non autorisée. f) Tenir le taille-haie fermement à deux mains à l'aide des poignées prévues à cet effet. g) Toujours vous familiariser avec votre environnement et prêter attention aux dangers possibles que vous pourriez ne pas entendre à cause du bruit du taille-haies. FR│BE │ 33 ■ Maintenance et stockage : Consignes de sécurité spécifiques à l'élagueuse a) Une fois le taille-haies immobilisé pour une maintenance, inspection ou un stockage, couper le moteur pour que toutes les pièces en rotation se soient immobilisées. Laisser refroidir la machine avant de la contrôler, de la régler, etc. ■ Toujours porter un casque de protection, une protection auditive et des gants de sécurité. Porter aussi une protection oculaire pour ne pas recevoir de projections d'huile ou de poussière de sciure dans les yeux. Porter un masque anti-poussière. b) Stocker le taille-haies là où les vapeurs d'essence ne peuvent pas entrer en contact avec une flamme nue ou des étincelles. Laisser toujours refroidir le taille-haies avant de le stocker. ■ Ne jamais utiliser l'appareil debout sur une échelle. c) Lors du transport ou du stockage du taille-haies, le dispositif de coupe doit toujours être couvert de la protection adaptée. Consignes de sécurité approfondies pour les taille-haies ■ Tenir toutes les parties du corps éloignées de la lame. Ne pas essayer de retirer les déchets de coupe lorsque la lame tourne ou de tenir un matériau à couper. Ne retirer les déchets de coupe que lorsque l'appareil est mis hors tension. Un moment d'inattention durant l'utilisation du taille-haies peut provoquer des blessures graves. ■ Porter le taille-haies par la poignée en état hors tension, la barre de coupe éloignée de votre corps. Lors du transport ou du stockage du taille-haies, toujours le recouvrir de la protection. Une manipulation prudente de l'appareil réduit le risque de blessures dû à la lame. ■ Ne tenez l'outil que par la poignée isolante, car la lame peut entrer en contact avec des câbles électriques cachés ou avec le cordon d'alimentation. Le contact de la lame avec une ligne électrique conductrice de tension peut mettre les pièces métalliques de l'appareil sous tension et provoquer une décharge électrique. ♦ Contrôler la haie en vue de détecter des objets cachés (par ex. clôture en fer barbelé). RISQUES RÉSIDUELS ! Des risques résiduels demeurent même si vous utilisez cet outil électrique conformément à la règlementation. Les risques suivants peuvent survenir en liaison avec la construction et l'exécution de cet outil électrique : ■ Ne pas trop se pencher en avant lors de l'utilisation de l'appareil. Toujours veiller à une posture stable et toujours garder l'équilibre. Utiliser la ceinture de port comprise dans le matériel livré pour répartir le poids de manière uniforme sur le corps. ■ Porter des bottes robustes et anti-dérapantes. ■ Ne pas utiliser l'appareil par pluie ou humidité. ■ Ne pas utiliser l'appareil à proximité de lignes électriques. Respecter une distance minimum de 10 m avec les lignes électriques aériennes. ■ Ne pas se tenir en-dessous des branches à couper afin d'éviter des blessures causées par la chute de branches. Veiller au retour de branches afin d'éviter toute blessure. Travailler en respectant un angle de 60° ±10° ■ Veiller à éviter tout rebond de l'appareil. ■ Ne pas uniquement surveiller les branches à couper, mais également le matériel qui tombe pour ne pas trébucher. ■ Faire une pause d'une heure au moins toutes les 30 minutes de travail. ■ Portez toujours des gants de protection. ■ Recouvrir le rail de guidage et la chaîne avec le cache lors du transport et du stockage. ■ N'utilisez pas l'appareil dans un environnement explosif ni à proximité de liquides, de gaz ou de vapeurs inflammables. Les étincelles produites par la machine risquent d'enflammer ces vapeurs ou ces gaz. ■ La prise de courant utilisée doit être compatible avec la fiche secteur. Ne modifiez jamais la fiche secteur, vous risqueriez de vous électrocuter. a) Blessures (entailles) ■ Pour débrancher l'appareil, ne tirez pas sur le câble, mais au niveau de la fiche secteur. N'utilisez pas le câble électrique pour tirer ou transporter l'appareil. Maintenez le cordon à l'écart de la chaleur, de l'huile, des arêtes ou des parties en mouvement. b) Lésions auditives si vous ne portez pas de protection auditive appropriée. ■ Débranchez la fiche secteur avant la fin du travail ou avant de nettoyer ou entretenir l'appareil. c) Risques sanitaires engendrés par les vibrations au niveau des mains et des bras si vous utilisez l'appareil pendant une période prolongé, si vous ne le guidez et ne l'entretenez pas correctement. ■ Éviter tout démarrage involontaire de l'appareil. ■ Les appareils dont l'interrupteur est défectueux doivent être immédiatement réparés afin d'éviter tout dommage et blessure. REMARQUE ■ Entreposer l'appareil hors de portée des enfants. ► Le taille-haies est livré entièrement monté. ■ Seules des personnes familiarisées avec ce mode d'emploi et avec l'appareil peuvent l'utiliser. ► Les instructions et les schémas concernant le réglage, la maintenance et la lubrification par l'utilisateur se trouvent dans ce mode d'emploi. ► Consignes sur le remplacement et la réparation (voir chapitre entretien et nettoyage/service). ► La signification de tous les symboles graphiques utilisés sur le taillehaies et les données techniques se trouvent dans ce mode d'emploi. ► Vous trouverez les caractéristiques du taille-haies dans les données techniques. ► Outil bloqué : retirez les matières coincées de la barre de coupe . ■ Utilisez uniquement les accessoires et les équipements supplémentaires indiqués dans le mode d'emploi. L'utilisation d'outils d'usinage différents de ceux recommandés dans ces instructions d'utilisation, ou bien d'autres accessoires, peut vous faire courir un risque de blessures. ■ 34 │ FR│BE ■ Entretenez soigneusement vos outils électriques. Vérifier qu'il n'y a pas de mauvais alignement ou de blocage des parties mobiles, des pièces cassées ou toute autre condition pouvant affecter le fonctionnement de l'outil. En cas de dommages, faire réparer l'outil avant de l'utiliser. De nombreux accidents sont dus à des outils mal entretenus. ■ Conserver l'outil de coupe bien affûté et propre. Des outils destinés à couper correctement entretenus avec des pièces coupantes tranchantes sont moins susceptibles de bloquer et sont plus faciles à contrôler. ■ Faire entretenir l'appareil par du personnel qualifié. Utiliser uniquement les pièces détachées d'origine recommandées par le fabricant. PHSHE 900 B2 Mesures de prudence contre le rebond ATTENTION AU REBOND ! ► Pendant le travail, l'appareil risque de rebondir. Il y a risque de blessure. La prudence ainsi que la technique de coupe adaptée permettent d'éviter les rebonds. ■ Un contact avec la pointe du rail peut dans certains cas entraîner une réaction inattendue vers l'arrière, durant laquelle le rail de guidage est renvoyé brutalement vers le haut et en direction de l'utilisateur (voir illustration). Bild 1 ■ Un rebond peut survenir lorsque la pointe du rail de guidage touche un objet ou lorsque le bois se plie et que la chaîne de scie se bloque (voir illustration). ■ Le grippage de la chaîne de scie sur le bord supérieur du rail de guidage peut entraîner un brusque rebond du rail en direction de l'utilisateur. ■ Chacune de ces réactions peut entraîner une perte de contrôle de la scie et d'éventuelles blessures graves. Ne pas se fier uniquement aux dispositifs de sécurité intégrés dans la scie à chaîne. En tant qu'utilisateur d'une scie à chaîne, prenez différentes mesures afin de travailler sans accident et sans vous blesser. Un recul résulte d'une utilisation incorrecte ou inappropriée de l'outil électrique. Des mesures de prudence adaptées, comme celles décrites ci-dessous, permettent de l'éviter : ■ Bien tenir la scie des deux mains, les pouces et les doigts entourant les poignées de la scie à chaîne. Placez votre corps et vos bras dans une position dans laquelle vous pouvez résister aux forces de rebond.Lorsque des mesures adaptées ont été prises, l'utilisateur peut alors maîtriser les forces de rebond. Ne jamais lâcher la scie à chaîne. ■ Éviter un maintien corporel anormal et ne pas scier au-dessus de la hauteur d'épaules.Ceci permet d'éviter un contact involontaire avec la pointe du rail et de mieux contrôler la scie à chaîne lors de situations inattendues. Consignes de sécurité approfondies ATTENTION ! RISQUE DE BLESSURES ! ► Ne touchez jamais l'appareil en marche au-delà de la bague de protection , vous risqueriez de vous blesser ! ■ Durant l'utilisation, aucune autre personne ou aucun animal ne doit se trouver dans un périmètre de 15 mètres. L'utilisateur est responsable envers les tierces personnes dans la zone de travail. ■ Maintenez l'appareil, les parties coupantes et la gaine protectrice pour la lame en bon état afin d'éviter des blessures. ■ Il faut surveiller les enfants pour être sûr qu'ils ne jouent pas avec l'appareil. ■ Utiliser uniquement l'appareil lorsque vous vous êtes familiarisé avec ce dernier. ■ Ne pas travailler avec un appareil endommagé, incomplet ou modifié sans l'autorisation du fabricant. Ne jamais utiliser l'appareil avec un équipement de protection défectueux. N'utilisez pas l'appareil si l'interrupteur Marche/Arrêt est défectueux. Avant l'utilisation, vérifier l'état de sûreté de l'appareil, en particulier de la lame et de la chaîne de scie. Si vous avez laissé tomber l'appareil, vérifier que celui-ci ne présente pas de dommages ou défauts importants. ■ Ne jamais démarrer l'appareil avant que lame, chaîne de scie et cache de pignon ne soient correctement montés. ■ S'assurer que l'appareil n'entre pas en contact lors du démarrage et pendant le travail avec le sol, les pierres, du fil ou d'autres corps étrangers. Éteindre l'appareil avant de le reposer. ■ L'appareil n'est conçu que pour être utilisé à deux mains. Ne l'utilisez jamais d'une main. ■ Ne tenez l'appareil que par ses poignées isolées vu que la chaîne de scie risque d'entrer en contact avec des lignes électriques cachées. Si la chaîne de scie entre en contact avec une ligne sous tension, cela peut mettre des pièces métalliques de l'appareil sous tension et provoquer une électrocution. ■ Lorsque vous changez de site, vérifiez bien que l'appareil est éteint et que le doigt ne touche pas l'interrupteur Marche/Arrêt. Portez l'appareil avec la chaîne de scie et la lame regardant en arrière. Avant le transport, enfilez la gaine protectrice pour la lame. ■ Lors de chaque coupe, appliquez fermement la butée dentée et ne commencez à scier qu'ensuite. ■ Soyez particulièrement prudent pendant le sciage des petites touffes et des branches. Les matériaux minces peuvent rester coincés dans la chaîne de scie et vous percuter ou vous faire perdre l'équilibre. ■ Ne pas couper de bois posé sur le sol et ne pas essayer de scier des racines dépassant du sol. Éviter dans tous les cas que la chaîne de scie ne plonge dans la terre, cette dernière s'émoussant sinon immédiatement. ■ Lorsque vous sciez une branche sous tension mécanique, attention à un mouvement de rappel brusque lorsque le bois se détend. Il y a risque de blessure. ■ Si les parties coupantes restent bloquées ou coincées dans la ramure, ne tentez jamais de dégager l'appareil de force. Éteignez immédiatement l'appareil et ne le rallumez qu'après avoir supprimé la cause du blocage. Il y a risque de blessures ! ■ Toujours utiliser les rails de remplacement et les chaînes de scie préconisés par le fabricant.De mauvais rails et chaînes à scie de rechange peuvent entraîner la déchirure de la chaîne de scie et/ou un rebond. ■ Respecter les instructions du fabricant concernant l'affûtage et la maintenance de la chaîne de scie.Des limiteurs de profondeur trop bas augmentent la tendance au rebond. ■ Ne pas scier avec la pointe de la lame. Il y a risque de rebond. ■ Veiller à ce qu'aucun objet sur lequel vous pourriez trébucher ne se trouve par terre. PHSHE 900 B2 FR│BE │ 35 ■ Monter la chaîne de scie et la lame Avant la mise en service AVERTISSEMENT ! ATTENTION ! RISQUE DE BLESSURES ! ► Avant tous travaux sur l'appareil, veuillez débrancher l'appareil de la prise secteur. Risque de choc électrique ! Unité moteur Montage de la poignée ronde ♦ Insérez la poignée ronde ♦ Serrez bien la vis . dans le bras à l'endroit souhaité. ♦ Dévissez l'écrou Montage du taille-haies du taille-haies dans le manche de ♦ Vissez les deux bras avec la molette de serrage placez l'écrou sur la face opposée. . Pour cela, Montage de l'élagueuse ♦ La tige d'arrêt de l'élagueuse dans le bras du bloc ♦ Vissez les deux bras avec la molette de serrage placez l'écrou sur la face opposée. . Pour cela, ♦ Actionnez le levier de réglage position souhaitée. . et inclinez le taille-haies dans la ♦ Insérez le levier et le verrouillage/déverrouillage de la plaque (taille-haie) . dans l'orifice ♦ La chaîne de scie doit le cas échéant être au préalable détendue, pour retirer la lame et la chaîne de scie (cf. le chapitre Tendre et vérifier la chaîne de scie). Suivez les instructions dans l'ordre inverse. ♦ Retirez le guide-chaîne et la chaîne de la plaque . au bout du guide-chaîne . ♦ Placez le rail de guidage au-dessus du guide-lame tout en insérant la goupille de tension de chaîne dans l'alésage de la lame . En même temps, placez la chaîne de scie au-dessus du pignon . ♦ Replacez le cache de pignon et revissez légèrement l’écrou ♦ Tendez maintenant la chaîne chaîne). (voir chapitre Tendre et contrôler la . AVERTISSEMENT ! ► Mettre des gants de protection ! Risque de blessure causé par les dents de coupe tranchantes ! avec l'outil de montage . ♦ Tournez la vis de tension de la chaîne avec l'outil de montage dans le sens des aiguilles d'une montre afin d'augmenter la tension. . et inclinez l'élagueuse dans l'une des deux ♦ Insérez le levier et le verrouillage/déverrrouillage de la plaque (élagueuse) . REMARQUE ♦ Dévissez légèrement l'écrou Inclinaison de l'élagueuse ♦ Utilisez le verrouillage/déverrouillage . . ► La tension de la chaine de scie est importante pour votre sécurité et le fonctionnement de l'appareil. Une chaîne de scie correctement tendue augmente la longévité de votre appareil. Faire pivoter le taille-haies ♦ Utilisez le verrouillage/déverrouillage sont déjà peut être retournée. avec l'outil de montage ♦ Retirez le cache de pignon par rapport à Tendre et vérifier la chaîne de scie doit s'enclencher. ♦ Actionnez le levier positions possibles. et la chaîne ♦ Pour commencer, replacez la chaîne doit s'enclencher. ♦ Insérez le bras avant moteur. ► Lors de la livraison, le guide-chaîne installés. ► Lorsqu'elle est trop usée, la lame ♦ Accrochez la bandoulière dans l'œillet . ♦ Réglez la sangle à votre taille afin que l'œillet se trouve à hauteur de vos hanches quand vous laissez pendre l'appareil. ♦ La tige d'arrêt REMARQUE ► Respectez le sens de rotation de la chaîne de scie la lame et au cache de pignon . Fixation/montage de la bandoulière ♦ Glissez le manche avant l'unité moteur. ► Mettre des gants de protection ! Risque de blessure causé par les dents de coupe tranchantes ! dans l'orifice ♦ Tournez la vis de tension de la chaîne avec l'outil de montage dans le sens contraire aux aiguilles d'une montre afin de réduire la tension. ♦ La chaîne de scie doit reposer sur la partie inférieure de la lame. Vérifiez si la chaîne de scie peut être tirée à la main au-dessus de la lame . ♦ Vissez à nouveau l'écrou avec l'outil de montage . REMARQUE ► Lors du serrage de la chaîne de scie avec 9 N (env. 1 kg) de force de traction, la chaîne de scie et la lame ne doivent pas présenter un écart supérieur à 2 mm. ► Une nouvelle chaîne de scie se détend retendue. et doit souvent être ► Contrôlez la tension de la chaîne avant chaque utilisation de l'appareil. ■ 36 │ FR│BE PHSHE 900 B2 Graissage de la chaîne Travailler avec le taille-haies ♦ Retirez le couvercle du réservoir à huile ♦ Remplissez le réservoir . . Utilisation de la machine : avec env. 100 ml d'huile bio pour chaîne REMARQUE ► Veuillez tenir compte du fait que les prescriptions nationales de votre pays peuvent limiter l'utilisation du taille-haies. AVERTISSEMENT ! ► Ne jamais travailler sans graissage de chaîne ! Lorsque la chaîne de scie tourne à sec, la garniture de coupe est rapidement détruite de manière irréparable. Avant le travail, toujours contrôler le graissage de chaîne et le niveau d'huile dans le réservoir. ► L'inspection quotidienne du taille-haies avant chaque utilisation est indispensable. Contrôlez votre appareil également suite à des chocs et chutes pour constater des détériorations ou défauts importants. REMARQUE ► Veuillez porter des chaussures solides et des vêtements près du corps pour réduire le risque d'accident. Tenez-vous bien au sol, veillez à votre équilibre et portez toujours la ceinture de port livrée ! ► N'utilisez que de l'huile pour chaîne de scie. De préférence biodégradable. N'utilisez pas d'huile usagée, d'huile moteur etc. ► Veuillez faire des pauses durant le travail pour veiller à votre santé. L'épuisement corporel décuple le risque de blessure ! ► Pendant le travail, vérifiez que la lubrification automatique de la chaîne fonctionne. Avant et pendant le travail, vérifiez que la lubrification de la chaîne fonctionne. Affûter la chaîne de scie AVERTISSEMENT ! ► N'utilisez en aucun cas l'appareil sous l'emprise de la fatigue, de la maladie, de l'alcool ou d'autres droges. Techniques de coupe REMARQUE ■ Voir le volet dépliant (figure A). ► Un touret peut être fixé sur l'aide pour touret lors de l'affûtage. pour un maintien sûr ► Vous trouverez des informations détaillées concernant l'opération d'affûtage dans un kit d'affûtage d'Oregon par ex. REMARQUE ► Coupez les grosses branches auparavant avec des cisailles à élaguer. ► Vous pouvez également utiliser un appareil à affûter les chaînes électriques et suivre les instructions du fabricant. Travailler avec l'élagueuse ► En cas de doute concernant la réalisation du travail, il convient de procéder au remplacement de la chaîne de scie. Techniques de scie AVERTISSEMENT ! ► Faites systématiquement attention à la chute des déchets de taille. Mise en service ► Tenez systématiquement compte du danger de retour brutal de branches. REMARQUE ► Veuillez respecter les directives locales et les règlementations sur le bruit. L'utilisation de l'appareil peut être limitée ou interdite certains jours (par exemple dimanche et jours fériés), pendant certaines plages horaires (repas de midi, nuit)) ou dans des zones spécifiques (sites de cure, cliniques, etc.). ► Posez la butée sur la branche. Vous travaillez ainsi de manière plus sûre et plus tranquille. ► Commencez d'abord à scier. Scier une petite branche Mise en marche / mise hors service ♦ Pour les petites branches (Ø 0-8 cm), sciez de haut en bas (voir la figure). Mise en marche : ♦ Branchez le cordon d'alimentation REMARQUE à la rallonge. ♦ Formez une boucle à l'extrémité de la rallonge et suspendez-la dans le dispositif de décharge de traction . ♦ Enfoncez le verrouillage de sécurité , maintenez-le enfoncé et appuyez sur l'interrupteur Marche/Arrêt . Mise hors service : ♦ Relâchez l'interrupteur Marche/Arrêt . ♦ Retirez la rallonge du dispositif de décharge de traction ♦ Débranchez le cordon d'alimentation . de la rallonge. Réglage de la poignée ♦ Actionnez la touche de déverrouillage . Tournez l'élément rotatif dans la position souhaitée. Relâchez la touche de déverrouillage , elle doit s'enclencher PHSHE 900 B2 FR│BE │ 37 ■ ♦ Scier de grosses branches Transport ♦ Pour les plus grosses branches (Ø 8-25 cm) , effectuez d'abord une première coupe sous la branche A (voir schéma). ■ Pour le transport, utilisez les housses de protection ■ La coupe de délestage évite également un épluchage de l'écorce du tronc principal. . ■ Veillez à ne pas mettre l'appareil en marche lorsque vous le portez (voir figure). ♦ Sciez ensuite du haut B vers le bas A . B 2 1 A Entretien et nettoyage Scier en morceaux Avant d'effectuer la coupe définitive d'une branche longue ou épaisse, vous devez d'abord la raccourcir (voir schéma). Cc B b A a AVERTISSEMENT ! Lorsqu'un remplacement du cordon d'alimentation est nécessaire, il doit être réalisé par le fabricant ou par son représentant pour éviter toute situation dangereuse. ■ Le bloc moteur doit toujours être propre, sec et exempt d'huile ou de graisse. ■ L'élagueuse doit être nettoyée des copeaux de sciure à intervalles réguliers. ♦ Pour le nettoyage du boîtier, utilisez un chiffon sec.Retirez le capot Travail sûr ■ Maintenez l'appareil, les parties coupantes et la gaine protectrice pour la lame en bon état afin d'éviter les blessures. ■ Si vous avez laissé tomber l'appareil, vérifier que celui-ci ne présente pas de dommages ou défauts importants. ■ Respectez l'angle de travail conseillé de 60°±10°afin de travailler en toute sécurité (voir schéma). ♦ Retirez la chaîne de scie guidage . de la lame et nettoyez le rail de ♦ Gardez la chaîne de scie affûtée et contrôlez sa tension. Surveillez le niveau et l'arrivée d'huile. ♦ Vérifiez que toutes les vis de la barre de coupe bien serrées, et si nécessaire, resserrez-les. du taille-haies sont ♦ Retirez les débris verts collés. ♦ Entretenez la barre de coupe burette d'huile. 60°±10° . avec de l'huile en spray ou une Entreposage ■ Nettoyez l'appareil avant de le ranger. ■ Rangez l'appareil dans les housses de protection fournies un endroit sec et à l'abri du gel hors de portée des enfants. dans ■ N'utilisez pas l'appareil debout sur une échelle ou sur un emplacement qui n'est pas sûr. ■ Rangez l'appareil en position couchée ou sécurisée contre les accidents. ■ Ne vous laissez pas convaincre d'effectuer une coupe irréfléchie. Ceci pourrait vous mettre en danger ainsi que d'autres personnes. ■ Videz le réservoir d'huile . L'huile bio pour chaîne peut durcir ou fuir dans le couvercle du réservoir via l'orifice d'aération. ■ Il faut surveiller les enfants pour être sûr qu'ils ne jouent pas avec l'appareil. ■ Changez régulièrement de position de travail. Une utilisation prolongée de l'appareil peut entraîner des problèmes de circulation dans les mains dus aux vibrations. Vous pouvez cependant prolonger la durée d'utilisation en portant des gants adaptés ou en faisant régulièrement des pauses. Tenez compte du fait que la disposition personnelle à une mauvaise circulation, des températures extérieures basses ou des forces de préhension importantes lors du travail diminuent la durée d'utilisation. ■ Réduisez également les risques de vibrations tels que le risque d'une maladie des doigts morts grâce à des pauses de travail fréquentes dans lesquelles vous frottez par ex. les paumes des mains l'une contre l'autre ! ■ 38 │ FR│BE PHSHE 900 B2 Résolution de problèmes sur l'élagueuse Intervalles de maintenance pour le taille-haies Problème Cause possible Dépannage Le moteur tourne, mais la chaîne ne de scie bouge pas L'empiècement taille-haie ou élagueuse n'est pas correctement fixé à l'unité moteur Vérifier le montage Le travail n'avance pas La chaîne de scie est sèche, surchauffée ou détendue Remettre de l'huile ou affûter la chaîne de scie , la remplacer ou la retendre Les indications listées ici réfèrent à des conditions d'utilisation normales. En cas de conditions difficiles, comme par ex. une forte formation de poussière et des temps de travail quotidiens plus longs, les intervalles indiqués doivent être raccourcis en conséquence. Résolution de problèmes sur le taille-haies Partie de l'appareil Action Avant le début du travail Lame Contrôle visuel Cause possible Dépannage Le moteur tourne, mais les lames ne bougent pas L'empiècement taille-haie ou élagueuse n'est pas correctement fixé à l'unité moteur Vérifier le montage en cas de besoin X X X nettoyer Problème Suite à la fin du travail Intervalles de maintenance pour l'élagueuse Les indications listées ici réfèrent à des conditions d'utilisation normales. En cas de conditions difficiles, comme par ex. une forte formation de poussière et des temps de travail quotidiens plus longs, les intervalles indiqués doivent être raccourcis en conséquence. Partie de l'appareil Action Graissage de la chaîne vérifier Avant le début du travail hebdomadaire en cas de panne en cas de détérioration en cas de besoin X Chaîne de scie vérifier et veiller à un état affûté X Contrôler la tension de chaîne X affûter Rail de guidage vérifier (usure, détérioration) X X nettoyer et retourner X ébavurer X remplacer Pignon vérifier remplacer PHSHE 900 B2 X X X X X FR│BE │ 39 ■ Garantie de Kompernass Handels GmbH Chère cliente, cher client, Cet appareil est garanti 3 ans à partir de la date d’achat. Si ce produit venait à présenter des vices, vous disposez de droits légaux face au vendeur de ce produit. Vos droits légaux ne sont pas restreints par notre garantie présentée ci-dessous. Conditions de garantie La période de garantie débute à la date d’achat. Veuillez bien conserver le ticket de caisse. Celui-ci servira de preuve d’achat. Si dans un délai de trois ans suivant la date d’achat de ce produit, un vice de matériel ou de fabrication venait à apparaître, le produit sera réparé, remplacé gratuitement par nos soins ou le prix d’achat remboursé, selon notre choix. Cette prestation sous garantie nécessite, dans le délai de trois ans, la présentation de l’appareil défectueux et du justificatif d’achat (ticket de caisse) ainsi que la description brève du vice et du moment de son apparition. Si le vice est couvert par notre garantie, vous recevrez le produit réparé ou un nouveau produit en retour. Aucune nouvelle période de garantie ne débute avec la réparation ou l’échange du produit. Procédure en cas de garantie Afin de garantir un traitement rapide de votre demande, veuillez suivre les indications suivantes : ■ Veuillez avoir à portée de main pour toutes questions le ticket de caisse et la référence article (par ex. IAN 12345) en tant que justificatif de votre achat. ■ Vous trouverez la référence sur la plaque signalétique sur le produit, une gravure sur le produit, sur la page de garde du mode d’emploi (en bas à gauche) ou sur l’autocollant au dos ou sur le dessous du produit. ■ Si des erreurs de fonctionnement ou d’autres vices venaient à apparaître, veuillez d’abord contacter le département service clientèle cité ci-dessous par téléphone ou par e-mail. ■ Vous pouvez ensuite retourner un produit enregistré comme étant défectueux en joignant le ticket de caisse et en indiquant en quoi consiste le vice et quand il est survenu, sans devoir l’affranchir à l’adresse de service après-vente communiquée. Sur www.lidl-service.com, vous pourrez télécharger ce mode d’emploi et de nombreux autres manuels, vidéos produit et logiciels d’installation. Grâce à ce code QR, vous arriverez directement sur le site Lidl service après-vente (www.lidl-service.com) et vous pourrez ouvrir votre mode d’emploi en saisissant votre référence (IAN) 123456. Période de garantie et réclamation légale pour vices cachés L’exercice de la garantie ne prolonge pas la période de garantie. Cette disposition s’applique également aux pièces remplacées ou réparées. Les dommages et vices éventuellement déjà présents à l’achat doivent être signalés immédiatement après le déballage. Toute réparation survenant après la période sous garantie fera l’objet d’une facturation. Étendue de la garantie L’appareil a été fabriqué avec soin conformément à des directives de qualité strictes et consciencieusement contrôlé avant sa livraison. La prestation de la garantie s’applique aux vices de matériel et de fabrication. Cette garantie ne s’étend pas aux pièces du produit qui sont exposées à une usure normale et peuvent de ce fait être considérées comme pièces d’usure, ni aux détériorations de pièces fragiles, par ex. interrupteurs, batteries ou pièces en verre. Cette garantie devient caduque si le produit est détérioré, utilisé ou entretenu de manière non conforme. Toutes les instructions listées dans le manuel d’utilisation doivent être exactement respectées pour une utilisation conforme du produit. Des buts d’utilisation et actions qui sont déconseillés dans le manuel d’utilisation, ou dont vous êtes avertis doivent également être évités. Le produit est uniquement destiné à un usage privé et ne convient pas à un usage professionnel. La garantie est annulée en cas d’entretien incorrect et inapproprié, d’usage de la force et en cas d’intervention non réalisée par notre centre de service après-vente agréé. REMARQUE ► Pour les outils Parkside et Florabest, veuillez ne renvoyer que l’article défectueux, sans accessoire (par ex. sans batterie, mallette de rangement, outil de montage, etc.). Service après-vente AVERTISSEMENT ! ► Faites réparer vos appareils par le service après-vente ou un électricien et uniquement avec des pièces de rechange d'origine. Cela assure le maintien de la sécurité de l'appareil. ► Confiez toujours le remplacement de la fiche ou du cordon d'alimentation au fabricant de l'appareil ou à son service après-vente. Cela assure le maintien de la sécurité de l'appareil. Service France Tel.: 0800 919270 E-Mail: [email protected] Service Belgique Tel.: 070 270 171 (0,15 EUR/Min.) E-Mail: [email protected] IAN 313266_1904 Importateur Veuillez tenir compte du fait que l’adresse suivante n’est pas une adresse de service après-vente. Veuillez d’abord contacter le service mentionné. KOMPERNASS HANDELS GMBH BURGSTRASSE 21 44867 BOCHUM ALLEMAGNE www.kompernass.com ■ 40 │ FR│BE PHSHE 900 B2 Mise au rebut L'emballage est constitué de matériaux écologiques que vous pouvez recycler par le biais des postes de recyclage locaux. L'appareil et ses accessoires sont composés de différents matériaux, comme par ex. le métal et le plastique. Renseignez-vous auprès de votre mairie ou des services de votre commune pour connaître les possibilités de mise au rebut de votre appareil usagé. Traduction de la déclaration de conformité originale Nous soussignés, KOMPERNASS HANDELS GMBH, responsable du document : M. Semi Uguzlu, BURGSTR. 21, 44867 BOCHUM, ALLEMAGNE, déclarons par la présente que cet appareil est en conformité avec les normes, documents normatifs et directives CE suivants : Directive relative aux machines (2006 / 42 / CE) Protection de l'environnement Compatibilité électromagnétique (2014 / 30 / EU) ■ Videz le réservoir d'huile avec soin et déposez votre appareil à un point d'élimination. Les pièces en plastique et en métal utilisées peuvent être triées et être ainsi réutilisées. Pour cela, adressez-vous à notre service après-vente. Directive relative aux émissions sonores 2000 / 14 / EC 2005 / 88 / EC ■ Déposez les huiles usagées à un site de stockage et ne les déversez pas dans les canalisations ou dans les égouts. Organisme cité : Nr. 0036 ■ Déposez le matériel d'entretien pollué et les carburants dans un point de collecte agréé. Ne jetez pas les outils électriques dans les ordures ménagères ! TÜV SÜD Industrie Service GmbH, Westendstraße 199, 80686 Munich, Allemagne Procédure d'évaluation de la conformité conformément à l'annexe V. Niveau de puissance acoustique LWA : Mesuré : 102,2dB (A) Garanti : 105 dB (A) Directive –RoHS (2011 / 65 / EU)* Conformément à la directive européenne 2012/19/EU, les outils électriques usagés doivent faire l'objet d'un tri et d'un recyclage respectueux de l'environnement. Le produit récyclable doit être trié ou rapporté dans un point de collecte pour être recycle. *La seule responsabilité pour l'établissement de cette déclaration de conformité incombe au fabricant. L'objet de la déclaration décrit ci-dessus répond aux prescriptions de la directive 2011/65/EU du Parlement européen et du Conseil en date du 8 juin 2011 visant la restriction de l'utilisation de certaines substances dangereuses dans les appareils électriques et électroniques. Normes harmonisées appliquées : Pièces de rechange Les pièces de rechange peuvent être commandées directement en passant par le service après-vente. Lors de la commande, indiquez impérativement le type de machine et le numéro de la pièce. EN 60745-1: 2009/A11: 2010 EN ISO 10517: 2019 EN ISO 11680-1: 2011 EN 55014-1: 2017 EN 55014-2: 2015 EN 61000-3-2: 2014 EN 61000-3-3: 2013 EN 50581:2012 Type / désignation de l'appareil : Taille-haies sur perche / perche élagueuse 2 en 1 PHSHE 900 B2 Année de fabrication : 09-2019 Numéro de série : IAN 313266_1904 Bochum, le 11.09.2019 Semi Uguzlu - Responsable qualité Sous réserve de modifications techniques à des fins de perfectionnement. PHSHE 900 B2 FR│BE │ 41 ■ ■ 42 │ FR│BE PHSHE 900 B2 Inhoud Inleiding . . . . . . . . . . . . . . . . . . . . . . . . . . . . . . . . . . . . . . . . . . . . . . . . . . . . . . . . . . . . . . . . . . . . . . . . . . . . . . . . . . . . . . 44 Gebruik van de heggenschaar met lange steel in overeenstemming met de bestemming . . . . . . . . . . . . . . . . . . . . . . . . . . . . . . . . . . . . . . . 44 Gebruik van de hoogsnoeier in overeenstemming met de bestemming . . . . . . . . . . . . . . . . . . . . . . . . . . . . . . . . . . . . . . . . . . . . . . . . . . . . . 44 Gebruik in overeenstemming met bestemming . . . . . . . . . . . . . . . . . . . . . . . . . . . . . . . . . . . . . . . . . . . . . . . . . . . . . . . . . . . . . . . . . . . . . . . . 44 Uitrusting . . . . . . . . . . . . . . . . . . . . . . . . . . . . . . . . . . . . . . . . . . . . . . . . . . . . . . . . . . . . . . . . . . . . . . . . . . . . . . . . . . . . . . . . . . . . . . . . . . . . . 44 Inhoud van het pakket . . . . . . . . . . . . . . . . . . . . . . . . . . . . . . . . . . . . . . . . . . . . . . . . . . . . . . . . . . . . . . . . . . . . . . . . . . . . . . . . . . . . . . . . . . . 45 Technische gegevens . . . . . . . . . . . . . . . . . . . . . . . . . . . . . . . . . . . . . . . . . . . . . . . . . . . . . . . . . . . . . . . . . . . . . . . . . . . . . . . . . . . . . . . . . . . . 45 Algemene veiligheidsvoorschriften voor elektrische gereedschappen . . . . . . . . . . . . . . . . . . . . . . . . . . . . . . . . . . . 46 1. Veiligheid op de werkplek. . . . . . . . . . . . . . . . . . . . . . . . . . . . . . . . . . . . . . . . . . . . . . . . . . . . . . . . . . . . . . . . . . . . . . . . . . . . . . . . . . . . . . 46 2. Elektrische veiligheid . . . . . . . . . . . . . . . . . . . . . . . . . . . . . . . . . . . . . . . . . . . . . . . . . . . . . . . . . . . . . . . . . . . . . . . . . . . . . . . . . . . . . . . . . . 46 3. Veiligheid van personen . . . . . . . . . . . . . . . . . . . . . . . . . . . . . . . . . . . . . . . . . . . . . . . . . . . . . . . . . . . . . . . . . . . . . . . . . . . . . . . . . . . . . . . 46 4. Gebruik en behandeling van het elektrische gereedschap . . . . . . . . . . . . . . . . . . . . . . . . . . . . . . . . . . . . . . . . . . . . . . . . . . . . . . . . . . . . . 46 5. Service . . . . . . . . . . . . . . . . . . . . . . . . . . . . . . . . . . . . . . . . . . . . . . . . . . . . . . . . . . . . . . . . . . . . . . . . . . . . . . . . . . . . . . . . . . . . . . . . . . . . 47 Apparaatspecifieke veiligheidsvoorschriften voor heggenscharen . . . . . . . . . . . . . . . . . . . . . . . . . . . . . . . . . . . . . . . . . . . . . . . . . . . . . . . . . 47 Aanvullende veiligheidsvoorschriften voor heggenscharen. . . . . . . . . . . . . . . . . . . . . . . . . . . . . . . . . . . . . . . . . . . . . . . . . . . . . . . . . . . . . . . 47 Gedetailleerdere veiligheidsvoorschriften voor heggenscharen . . . . . . . . . . . . . . . . . . . . . . . . . . . . . . . . . . . . . . . . . . . . . . . . . . . . . . . . . . . 48 OVERIGE RISICO'S! . . . . . . . . . . . . . . . . . . . . . . . . . . . . . . . . . . . . . . . . . . . . . . . . . . . . . . . . . . . . . . . . . . . . . . . . . . . . . . . . . . . . . . . . . . . . 48 Apparaatspecifieke veiligheidsvoorschriften voor hoogsnoeiers . . . . . . . . . . . . . . . . . . . . . . . . . . . . . . . . . . . . . . . . . . . . . . . . . . . . . . . . . . . 48 Voorzorgsmaatregelen tegen terugslag . . . . . . . . . . . . . . . . . . . . . . . . . . . . . . . . . . . . . . . . . . . . . . . . . . . . . . . . . . . . . . . . . . . . . . . . . . . . . 49 Aanvullende veiligheidsvoorschriften. . . . . . . . . . . . . . . . . . . . . . . . . . . . . . . . . . . . . . . . . . . . . . . . . . . . . . . . . . . . . . . . . . . . . . . . . . . . . . . . 49 Vóór de ingebruikname . . . . . . . . . . . . . . . . . . . . . . . . . . . . . . . . . . . . . . . . . . . . . . . . . . . . . . . . . . . . . . . . . . . . . . . . . 50 Motorunit. . . . . . . . . . . . . . . . . . . . . . . . . . . . . . . . . . . . . . . . . . . . . . . . . . . . . . . . . . . . . . . . . . . . . . . . . . . . . . . . . . . . . . . . . . . . . . . . . . . . . 50 Ronde handgreep monteren . . . . . . . . . . . . . . . . . . . . . . . . . . . . . . . . . . . . . . . . . . . . . . . . . . . . . . . . . . . . . . . . . . . . . . . . . . . . . . . . . . . . . . 50 Schouderriem bevestigen/monteren . . . . . . . . . . . . . . . . . . . . . . . . . . . . . . . . . . . . . . . . . . . . . . . . . . . . . . . . . . . . . . . . . . . . . . . . . . . . . . . . 50 Heggenschaar monteren . . . . . . . . . . . . . . . . . . . . . . . . . . . . . . . . . . . . . . . . . . . . . . . . . . . . . . . . . . . . . . . . . . . . . . . . . . . . . . . . . . . . . . . . . 50 Hoogsnoeier monteren . . . . . . . . . . . . . . . . . . . . . . . . . . . . . . . . . . . . . . . . . . . . . . . . . . . . . . . . . . . . . . . . . . . . . . . . . . . . . . . . . . . . . . . . . . 50 De heggenschaar kantelen . . . . . . . . . . . . . . . . . . . . . . . . . . . . . . . . . . . . . . . . . . . . . . . . . . . . . . . . . . . . . . . . . . . . . . . . . . . . . . . . . . . . . . . 50 De hoogsnoeier kantelen. . . . . . . . . . . . . . . . . . . . . . . . . . . . . . . . . . . . . . . . . . . . . . . . . . . . . . . . . . . . . . . . . . . . . . . . . . . . . . . . . . . . . . . . . 50 Zaagketting en zwaard monteren . . . . . . . . . . . . . . . . . . . . . . . . . . . . . . . . . . . . . . . . . . . . . . . . . . . . . . . . . . . . . . . . . . . . . . . . . . . . . . . . . . 50 Zaagketting spannen en controleren . . . . . . . . . . . . . . . . . . . . . . . . . . . . . . . . . . . . . . . . . . . . . . . . . . . . . . . . . . . . . . . . . . . . . . . . . . . . . . . . 50 Ketting smeren . . . . . . . . . . . . . . . . . . . . . . . . . . . . . . . . . . . . . . . . . . . . . . . . . . . . . . . . . . . . . . . . . . . . . . . . . . . . . . . . . . . . . . . . . . . . . . . . . 51 Zaagketting slijpen . . . . . . . . . . . . . . . . . . . . . . . . . . . . . . . . . . . . . . . . . . . . . . . . . . . . . . . . . . . . . . . . . . . . . . . . . . . . . . . . . . . . . . . . . . . . . 51 Ingebruikname . . . . . . . . . . . . . . . . . . . . . . . . . . . . . . . . . . . . . . . . . . . . . . . . . . . . . . . . . . . . . . . . . . . . . . . . . . . . . . . . 51 In-/uitschakelen . . . . . . . . . . . . . . . . . . . . . . . . . . . . . . . . . . . . . . . . . . . . . . . . . . . . . . . . . . . . . . . . . . . . . . . . . . . . . . . . . . . . . . . . . . . . . . . . 51 Handgreep verstellen . . . . . . . . . . . . . . . . . . . . . . . . . . . . . . . . . . . . . . . . . . . . . . . . . . . . . . . . . . . . . . . . . . . . . . . . . . . . . . . . . . . . . . . . . . . 51 Werken met de heggenschaar . . . . . . . . . . . . . . . . . . . . . . . . . . . . . . . . . . . . . . . . . . . . . . . . . . . . . . . . . . . . . . . . . . . . . . . . . . . . . . . . . . . . 51 Gebruik van het apparaat: . . . . . . . . . . . . . . . . . . . . . . . . . . . . . . . . . . . . . . . . . . . . . . . . . . . . . . . . . . . . . . . . . . . . . . . . . . . . . . . . . . . . . . . 51 Snoeitechnieken. . . . . . . . . . . . . . . . . . . . . . . . . . . . . . . . . . . . . . . . . . . . . . . . . . . . . . . . . . . . . . . . . . . . . . . . . . . . . . . . . . . . . . . . . . . . . . . . 51 Werken met de hoogsnoeier . . . . . . . . . . . . . . . . . . . . . . . . . . . . . . . . . . . . . . . . . . . . . . . . . . . . . . . . . . . . . . . . . . . . . . . . . . . . . . . . . . . . . . 51 Zaagtechnieken. . . . . . . . . . . . . . . . . . . . . . . . . . . . . . . . . . . . . . . . . . . . . . . . . . . . . . . . . . . . . . . . . . . . . . . . . . . . . . . . . . . . . . . . . . . . . . . . 51 Veilig werken . . . . . . . . . . . . . . . . . . . . . . . . . . . . . . . . . . . . . . . . . . . . . . . . . . . . . . . . . . . . . . . . . . . . . . . . . . . . . . . . . . . . . . . . . . . . . . . . . . 52 Transport . . . . . . . . . . . . . . . . . . . . . . . . . . . . . . . . . . . . . . . . . . . . . . . . . . . . . . . . . . . . . . . . . . . . . . . . . . . . . . . . . . . . . 52 Onderhoud en reiniging . . . . . . . . . . . . . . . . . . . . . . . . . . . . . . . . . . . . . . . . . . . . . . . . . . . . . . . . . . . . . . . . . . . . . . . . . 52 Opbergen. . . . . . . . . . . . . . . . . . . . . . . . . . . . . . . . . . . . . . . . . . . . . . . . . . . . . . . . . . . . . . . . . . . . . . . . . . . . . . . . . . . . . 52 Problemen met de hoogsnoeier oplossen. . . . . . . . . . . . . . . . . . . . . . . . . . . . . . . . . . . . . . . . . . . . . . . . . . . . . . . . . . . 53 Problemen met de heggenschaar oplossen . . . . . . . . . . . . . . . . . . . . . . . . . . . . . . . . . . . . . . . . . . . . . . . . . . . . . . . . . 53 Onderhoudsintervallen hoogsnoeier . . . . . . . . . . . . . . . . . . . . . . . . . . . . . . . . . . . . . . . . . . . . . . . . . . . . . . . . . . . . . . 53 Onderhoudsintervallen heggenschaar . . . . . . . . . . . . . . . . . . . . . . . . . . . . . . . . . . . . . . . . . . . . . . . . . . . . . . . . . . . . . 53 Garantie van Kompernaß Handels GmbH . . . . . . . . . . . . . . . . . . . . . . . . . . . . . . . . . . . . . . . . . . . . . . . . . . . . . . . . . . 54 Service . . . . . . . . . . . . . . . . . . . . . . . . . . . . . . . . . . . . . . . . . . . . . . . . . . . . . . . . . . . . . . . . . . . . . . . . . . . . . . . . . . . . . . . 54 Importeur. . . . . . . . . . . . . . . . . . . . . . . . . . . . . . . . . . . . . . . . . . . . . . . . . . . . . . . . . . . . . . . . . . . . . . . . . . . . . . . . . . . . . 54 Afvoeren . . . . . . . . . . . . . . . . . . . . . . . . . . . . . . . . . . . . . . . . . . . . . . . . . . . . . . . . . . . . . . . . . . . . . . . . . . . . . . . . . . . . . 55 Vervangende onderdelen . . . . . . . . . . . . . . . . . . . . . . . . . . . . . . . . . . . . . . . . . . . . . . . . . . . . . . . . . . . . . . . . . . . . . . . 55 Vertaling van de oorspronkelijke conformiteitsverklaring. . . . . . . . . . . . . . . . . . . . . . . . . . . . . . . . . . . . . . . . . . . . . 55 PHSHE 900 B2 NL│BE │ 43 ■ 2-IN-1-TELESCOPISCHE HEGGENSCHAAR/TELESCOPISCHE TAKKENSCHAAR PHSHE 900 B2 Inleiding Hartelijk gefeliciteerd met de aankoop van uw nieuwe apparaat. U hebt hiermee gekozen voor een hoogwaardig product. De gebruiksaanwijzing maakt deel uit van dit product. Deze bevat belangrijke aanwijzingen voor veiligheid, gebruik en afvoer. Lees alle bedienings- en veiligheidsvoorschriften voordat u het product in gebruik neemt. Gebruik het product uitsluitend op de voorgeschreven wijze en voor de aangegeven doeleinden. Geef alle documenten mee als u het product overdraagt aan een derde. Uitrusting Motorunit Klemschroef Moer Schacht Schroef Ronde handgreep Draagoog Draaielement Ontgrendelingsknop Inschakelblokkering Aan-/uitknop Gebruik van de heggenschaar met lange steel in overeenstemming met de bestemming Dit apparaat is bestemd voor het snoeien en trimmen van heggen, heesters en sierstruiken in het privéhuishouden. Het gaat daarbij om een met de hand bediend apparaat met een geïntegreerde aandrijving waarbij de lineair gemonteerde messen heen en weer bewegen. WAARSCHUWING! ► Heggenscharen zijn niet geschikt voor gebruik door kinderen. Gebruik van de hoogsnoeier in overeenstemming met de bestemming Dit apparaat is bestemd voor snoeiwerkzaamheden aan bomen. Gebruik in overeenstemming met bestemming Gebruik het apparaat uitsluitend op de voorgeschreven wijze en voor de aangegeven doeleinden. Het apparaat is niet bestemd voor bedrijfsmatig of commercieel gebruik. Het apparaat is alleen bestemd voor gebruik door volwassenen. Dit apparaat is niet bedoeld voor gebruik door personen (met inbegrip van kinderen) met beperkte fysieke, zintuiglijke of geestelijke vermogens of met gebrek aan ervaring en/of gebrek aan kennis. Het is niet toegestaan het apparaat te gebruiken als het regent en in vochtige omgevingen. Elk ander gebruik of elke wijziging van het apparaat geldt als niet in overeenstemming met de bestemming en brengt ernstig gevaar voor ongelukken met zich mee. De fabrikant aanvaardt geen enkele aansprakelijkheid voor schade die voortvloeit uit gebruik in strijd met de bestemming. Netsnoer Trekontlasting Heggenschaar Messenbalk Aandrijfhuis Ont-/vergrendeling Bodemplaat (heggenschaar) Stelhendel Handgreep Voorste schacht Borgpen Aandrijfas Beschermkap Hoogsnoeier Slijpsteenhulp Zaagketting Zwaard Aanslag Olietank Moer Schroefdraad Kamwielhuis Zwaardboring Zwaardgeleider Geleider Olieautomaat Kettingspanschroef Kamwiel Kettingspanstift Voorste schacht Aandrijfas Beschermkap Borgpen Beschermring Stelhendel Bodemplaat (hoogsnoeier) Ont-/vergrendeling Olietankdop ■ 44 │ NL│BE PHSHE 900 B2 Trillingswaarden (vectorsom van drie richtingen) bepaald conform EN 60745: Inhoud van het pakket 1 motorunit PHSHE 900 B2 1 heggenschaar PHS 1 (hierna heggenschaar genoemd) Hoogsnoeier: 1 hoogsnoeier PHE 1 (hierna hoogsnoeier genoemd) Trilling bij voorste handgreep: Trillingsemissiewaarde ah,D = 1,0 m/s2 Onzekerheid K = 1,5 m/s2 Trilling bij achterste handgreep: Trillingsemissiewaarde ah,D = 1,2 m/s2 Onzekerheid K = 1,5 m/s2 Accessoires 1 schouderriem 1 kettingbeschermkoker 1 zwaardkoker 1 100 ml bio-kettingolie 1 montagegereedschap Heggenschaar: 1 gebruiksaanwijzing Trilling bij voorste handgreep: Trillingsemissiewaarde ah,D = 1,6 m/s2 Onzekerheid K = 1,5 m/s2 Trilling bij achterste handgreep: Trillingsemissiewaarde ah,D = 1,8 m/s2 Onzekerheid K = 1,5 m/s2 Technische gegevens Motorunit: PHSHE 900 B2 Nominale spanning: 230 V ∼ 50 Hz (wisselstroom) Nominaal vermogen: 900 W Beschermingsklasse: II / Gewicht: (zonder handgreep en draagriem): ca. 2,7 kg OPMERKING Hoogsnoeier: PHE 1 Kettingsnelheid: max. 6 m/s Werkhoek: 0°; 15°; 30° Gewicht (bedrijfsklaar): ca. 1,6 kg ► Het in deze gebruiksaanwijzing vermelde trillingsniveau is gemeten conform een in EN 60745 genormeerde meetprocedure en kan worden gebruikt voor apparaatvergelijking. De vermelde trillingsemissiewaarde kan ook worden gebruikt voor een voorlopige beoordeling van de blootstelling. (dubbel geïsoleerd) Aanbevolen vulhoeveelheid olietank: 100 cm3 Snoeilengte: ca. 260 mm Zwaard: Oregon type 100SDEA041 Zaagketting: Oregon 91P040X Heggenschaar: PHS 1 Slagfrequentie (onbelast): 2000 min-1 Werkhoek: -90°; +90° Snoeilengte: ca. 410 mm Tandafstand: 20 mm Gewicht (bedrijfsklaar): ca. 2,1 kg Geluidsdrukniveau: Onzekerheid Geluidsvermogensniveau: Onzekerheid Heggenschaar: ► Het trillingsniveau verandert afhankelijk van het gebruik van het elektrische gereedschap en kan in bepaalde gevallen hoger zijn dan de in deze gebruiksaanwijzing aangegeven waarde. De trillingsbelasting kan worden onderschat wanneer het elektrische gereedschap regelmatig op een dergelijke manier wordt gebruikt. Probeer de belasting door trillingen zo klein mogelijk te houden. U kunt bijvoorbeeld handschoenen dragen tijdens het gebruik van het gereedschap en slechts beperkte tijd met het gereedschap werken om de trillingsbelasting te reduceren. Daarbij dient u rekening te houden met alle aspecten van de bedrijfscyclus (bijvoorbeeld perioden waarin het gereedschap is uitgeschakeld en perioden waarin het gereedschap weliswaar is ingeschakeld, maar niet wordt belast). Lees voor ingebruikname de handleiding en veiligheidsinstructies! PHE 1 LPA K: LWA K: = = 83 dB (A) 3 dB 104 dB (A) 3 dB Draag veiligheidshandschoenen! Draag veiligheidsschoenen! PHS 1 Geluidsdrukniveau: LPA = Onzekerheid K: Geluidsvermogensniveau: LWA = Gegarandeerd geluidsvermogensniveau: LWA = Onzekerheid K: PHSHE 900 B2 WAARSCHUWING! Betekenis van de aanwijzingsplaatjes op het apparaat: Geluids- en trillingsgegevens: Gemeten waarde voor geluid vastgesteld conform EN 60745. Het A-gewogen geluidsniveau van het elektrische gereedschap bedraagt gemiddeld: Hoogsnoeier: Draag gehoorbescherming! 81 dB (A) 3 dB 102 dB (A) Draag gehoorbescherming! Draag een veiligheidshelm! 105 dB (A) 3 dB NL│BE │ 45 ■ Draag een veiligheidsbril! Houd omstanders uit de buurt van het apparaat! Bescherm het apparaat tegen regen en vocht! Levensgevaar door een elektrische schok! Bewaar een minimale afstand van 10 m tot bovengrondse leidingen. Let op! Neervallende voorwerpen. In het bijzonder bij werk boven hoofdhoogte. Let op! Letselgevaar door bewegende messen. Trek de stekker meteen uit het stopcontact als het snoer beschadigd raakt of wordt doorgesneden. Indicatie van het geluidsvermogensniveau LWA in dB. Algemene veiligheidsvoorschriften voor elektrische gereedschappen WAARSCHUWING! ► Lees alle veiligheidsvoorschriften en aanwijzingen. Het niet-naleven van de veiligheidsvoorschriften en aanwijzingen kan elektrische schokken, brand en/of ernstig letsel veroorzaken. Bewaar alle veiligheidsinstructies en aanwijzingen voor toekomstig gebruik. De in de veiligheidsinstructies gebruikte term “elektrisch gereedschap” heeft betrekking op elektrische gereedschappen die op netvoeding werken (met snoer) en op elektrische gereedschappen die op accu's werken (zonder snoer). 1. Veiligheid op de werkplek a) Houd uw werkomgeving schoon en goed verlicht. Wanorde en een niet verlichte werkomgeving kunnen leiden tot ongelukken. b) Werk met het elektrische gereedschap niet in explosiegevaarlijke omgevingen waarin zich brandbare vloeistoffen, gassen of stof bevinden. Elektrisch gereedschap geeft vonken af die stof of dampen kunnen doen ontvlammen. c) Houd kinderen en andere personen uit de buurt tijdens het gebruik van het elektrische gereedschap. Als u afgeleid raakt, zou u de controle over het apparaat kunnen verliezen. 2. Elektrische veiligheid a) De stekker van het elektrische gereedschap moet in het stopcontact passen. De stekker mag op geen enkele wijze worden veranderd. Gebruik geen verloopstekker in combinatie met geaarde elektrische gereedschappen. Onveranderde stekkers en passende stopcontacten verminderen het risico op elektrische schokken. b) Voorkom lichamelijk contact met geaarde oppervlakken, zoals buizen, verwarmingen, fornuizen en koelkasten. Er bestaat een verhoogd risico op elektrische schokken als uw lichaam geaard is. ■ 46 │ NL│BE c) Houd elektrisch gereedschap uit de buurt van regen of vocht. Als er water in een elektrisch apparaat binnendringt, bestaat er een verhoogde kans op een elektrische schok. d) Gebruik het snoer niet voor een ander doel, bijvoorbeeld om het elektrische gereedschap te dragen, op te hangen of om de stekker uit het stopcontact te trekken. Houd het snoer uit de buurt van hitte, olie, scherpe randen of bewegende onderdelen. Beschadigde of verwarde snoeren verhogen de kans op een elektrische schok. e) Gebruik bij het werken met elektrisch gereedschap buitenshuis alleen verlengsnoeren die zijn goedgekeurd voor gebruik buitenshuis. Het gebruik van een verlengsnoer dat geschikt is voor gebruik buitenshuis, vermindert het risico op een elektrische schok. f) Gebruik een aardlekschakelaar als het gebruik van het elektrische gereedschap in een vochtige omgeving onvermijdelijk is. Het gebruik van een aardlekschakelaar vermindert het risico op een elektrische schok. 3. Veiligheid van personen a) Wees altijd alert, let op wat u doet en gebruik uw gezond verstand bij het gebruik van elektrisch gereedschap. Gebruik geen elektrisch gereedschap als u moe bent of onder invloed bent van drugs, alcohol of medicijnen. Een moment van onoplettendheid kan bij het gebruik van het elektrische gereedschap al tot ernstig letsel leiden. b) Draag persoonlijke beschermingsmiddelen en altijd een veiligheidsbril. Het dragen van persoonlijke beschermingsmiddelen zoals een stofmasker, antislip-veiligheidsschoenen, veiligheidshelm of gehoorbescherming, al naargelang het type en het gebruik van het elektrische gereedschap, vermindert het risico op letsel. c) Voorkom onbedoelde inschakeling. Zorg ervoor dat het elektrische gereedschap is uitgeschakeld voordat u het aansluit op de netvoeding en/of de accu, het optilt of draagt. Als u bij het dragen van het elektrische gereedschap uw vinger op de aan-/uitknop houdt of het apparaat al ingeschakeld op de netvoeding aansluit, kan dit tot ongelukken leiden. d) Verwijder het afstelgereedschap of de sleutel voordat u het elektrische gereedschap aanzet. Gereedschap of een sleutel die zich in een draaiend onderdeel van het apparaat bevindt, kan letsel tot gevolg hebben. e) Voorkom een abnormale lichaamshouding. Zorg dat u stevig staat en bewaar altijd uw evenwicht. Daardoor kunt u het elektrische gereedschap in onverwachte situaties beter controleren. f) Draag geschikte kleding. Draag geen wijde kleding of sieraden. Houd haar, kleding en handschoenen ver van bewegende onderdelen. Loszittende kleding, sieraden of haren kunnen door bewegende onderdelen gegrepen worden. g) Als stofafzuigings- en opvangvoorzieningen kunnen worden bevestigd, zorg er dan voor dat deze zijn aangesloten en correct worden gebruikt. Het gebruik van een stofafzuiging kan risico's door stof beperken. 4. Gebruik en behandeling van het elektrische gereedschap a) Voorkom overbelasting van het apparaat. Gebruik voor uw werkzaamheden het daarvoor bedoelde elektrische gereedschap. Met een passend elektrisch apparaat werkt u beter en veiliger in het aangegeven vermogensbereik. b) Gebruik geen elektrisch gereedschap waarvan de aan-/uitknop defect is. Elektrisch gereedschap dat niet meer aan- of uitgezet kan worden, is gevaarlijk en moet worden gerepareerd. c) Haal de stekker uit het stopcontact of verwijder een afneembare accu, voordat u instellingen aan het apparaat verricht, hulpstukken verwisselt of het elektrische gereedschap weglegt. Deze voorzorgsmaatregel voorkomt dat het elektrische gereedschap onbedoeld kan worden gestart. d) Berg elektrisch gereedschap buiten het bereik van kinderen op als het niet in gebruik is. Zorg ervoor dat het apparaat niet wordt gebruikt door personen die hiermee niet vertrouwd zijn of die deze instructies niet hebben gelezen. Elektrisch gereedschap is gevaarlijk als het door onervaren personen wordt gebruikt. PHSHE 900 B2 e) Onderhoud elektrisch gereedschap zorgvuldig. Controleer of bewegende onderdelen naar behoren werken en niet klemmen, en of er geen onderdelen gebroken of zodanig beschadigd zijn dat daardoor de werking van het elektrische gereedschap nadelig wordt beïnvloed. Laat beschadigde onderdelen vóór de ingebruikname van het apparaat repareren. Veel ongelukken zijn het gevolg van slecht onderhoud van elektrisch gereedschap. f) Houd snijgereedschappen scherp en schoon. Met zorg onderhouden zagen met scherpe zaagvlakken lopen minder vaak vast en zijn gemakkelijker te sturen. g) Gebruik elektrisch gereedschap, accessoires, hulpstukken en dergelijke in overeenstemming met deze instructies. Houd daarbij rekening met de werkomstandigheden en de te verrichten werkzaamheden. Het gebruik van elektrisch gereedschap voor andere doeleinden dan de beoogde toepassingen kan tot gevaarlijke situaties leiden. 5. Service a) Laat uw elektrisch gereedschap alleen door gekwalificeerde vakmensen en uitsluitend met originele vervangingsonderdelen repareren. Op die manier blijft de veiligheid van het elektrische gereedschap gewaarborgd. Apparaatspecifieke veiligheidsvoorschriften voor heggenscharen ■ Houd uw handen uit de buurt van de messen. Probeer geen snoeiresten te verwijderen of snoeimateriaal vast te houden als de messen in werking zijn. Verwijder vastzittend snoeimateriaal alleen als het apparaat is uitgeschakeld. Haal bovendien de stekker uit het stopcontact.Een moment van onoplettendheid kan bij het gebruik van de heggenschaar al tot ernstig letsel leiden. ■ Draag de heggenschaar aan de voorste handgreep in uitgeschakelde toestand met de messen van uw lichaam afgekeerd. Breng altijd de beschermkoker aan bij transport of als u de heggenschaar opbergt. Zorgvuldig omgaan met het apparaat reduceert de kans dat u onopzettelijk in aanraking komt met de lopende messen. LET OP! ► Schakel bij dreigend gevaar en in noodgevallen onmiddellijk de motor uit en trek de stekker uit het stopcontact. Aanvullende veiligheidsvoorschriften voor heggenscharen Voorbereiding: a) DEZE HEGGENSCHAAR KAN ERNSTIG LETSEL VEROORZAKEN! Lees aandachtig de aanwijzingen voor correcte omgang, voorbereiding, onderhoud en reparatie, starten en wegzetten van de heggenschaar. Maak u vertrouwd met alle bedieningselementen en het gebruik van de heggenschaar volgens de voorschriften. b) Kinderen mogen de heggenschaar nooit gebruiken. c) Pas op voor bovengrondse stroomleidingen. d) Het gebruik van de heggenschaar moet worden vermeden wanneer zich personen, vooral dan kinderen, in de buurt bevinden. e) Draag geschikte kleding! Draag geen wijde kleding of sieraden, die door bewegende delen kunnen worden gegrepen. Het verdient aanbeveling vaste handschoenen, antislipschoenen en een veiligheidsbril te dragen. f) Zet de motor af en laat de heggenschaar tot stilstand komen, als de messenbalk een vreemd voorwerp raakt, of als de werkingsgeluiden sterker worden of als de heggenschaar ongewoon heftig trilt. Neem de volgende maatregelen: – controleer op schade; – controleer op losse onderdelen en zet alle losse onderdelen vast; – vervang beschadigde onderdelen door gelijkwaardige onderdelen of laat het apparaat repareren. g) Draag gehoorbescherming! ■ Houd het elektrische gereedschap uitsluitend vast aan de geïsoleerde handgrepen, omdat de messen verborgen elektricitreitsleidingen of het eigen snoer kunnen raken. Bij contact tussen messen en een leiding waar spanning op staat, kunnen ook metalen onderdelen van het apparaat onder spanning komen te staan, met een elektrische schok tot gevolg. h) Draag oogbescherming! ■ Houd het snoer uit de buurt van waar u snoeit.Tijdens het werk kan het snoer zich niet zichtbaar in het struikgewas bevinden en per ongeluk worden doorgesneden. a) Trek de stekker uit het stopcontact voorafgaand aan: ■ Inspecteer alle te snijden vlakken zorgvuldig en verwijder draden en andere vreemde voorwerpen. ■ We raden aan een aardlekschakelaar met een uitschakelstroom van 30 mA of minder te gebruiken. OPMERKING ► De heggenschaar wordt volledig gemonteerd geleverd. ► Op de uitvouwpagina staan afbeeldingen voor het gebruik van de heggenschaar en de bedieningselementen. ► In deze handleiding zelf staan afbeeldingen voor het instellen, onderhouden en smeren van de heggenschaar door de gebruiker. ► Aanwijzingen voor werkhouding (zie uitvouwpagina). ► Aanwijzingen voor bedieningselementen (zie uitvouwpagina). ► Aanwijzingen voor vervanging en reparatie (zie het hoofdstuk Onderhoud en reiniging/service). ► In deze handleiding staat uitleg over alle op de heggenschaar gebruikte grafische symbolen en technische specificaties. ► Bij de technische specificaties staan de kenmerken van de heggenschaar. ► Geblokkeerd gereedschap: verwijder het vastzittende materiaal uit de messenbalk . PHSHE 900 B2 i) Om in geval van nood de heggenschaar stop te zetten, trekt u de stekker uit het stopcontact. Tijdens het gebruik: – reiniging of verhelpen van een blokkering; – controle, onderhoud, reparatie of werkzaamheden aan de heggenschaar; – instelling van de werkpositie van de messenbalk; – het zonder toezicht achterlaten van de heggenschaar. b) Vergewis u er altijd van of de heggenschaar zich volgens de voorschriften in een van de beschreven werkposities bevindt, voordat de motor wordt gestart. c) Tijdens het werken met de heggenschaar moet er altijd op worden gelet dat een veilige houding wordt aangenomen, vooral bij gebruik van een trap of ladder. d) Gebruik de heggenschaar niet met defecte of sterk versleten messen. e) Zorg er altijd voor dat alle handgrepen en veiligheidsvoorzieningen bij gebruik van de heggenschaar zijn gemonteerd. Probeer nooit een onvolledige heggenschaar of een heggenschaar met niet-toegestane modificaties te gebruiken. f) Houd de heggenschaar met beide handen vast aan de daarvoor bestemde handgrepen. g) Maak u altijd vertrouwd met uw omgeving en let op mogelijke gevaren, die u door het lawaai van de heggenschaar misschien niet kunt horen. NL│BE │ 47 ■ Onderhouden en opbergen: a) Wanneer de heggenschaar vanwege onderhoud, inspectie of opslag wordt stilgezet, schakelt u de motor uit en wacht u tot alle roterende delen tot stilstand zijn gekomen. Laat de machine afkoelen voordat u deze controleert, instelt, enz. b) Berg de heggenschaar op een plek op waar benzinedamp niet met open vuur of vonken in contact kan komen. Laat de heggenschaar altijd afkoelen voordat u deze opbergt. c) Bij transport of opslag van de heggenschaar moet de messenbalk altijd met de bijbehorende koker worden afgedekt. Gedetailleerdere veiligheidsvoorschriften voor heggenscharen ■ Houd uw handen uit de buurt van de messen. Probeer geen snoeiresten te verwijderen of snoeimateriaal vast te houden als de messen in werking zijn. Verwijder vastzittend snoeimateriaal alleen als het apparaat is uitgeschakeld. Een moment van onoplettendheid kan bij het gebruik van het apparaat al tot ernstig letsel leiden. ■ Draag de heggenschaar aan de handgreep in uitgeschakelde toestand met de messen van uw lichaam afgekeerd. Breng altijd de beschermkoker aan bij transport of als u de heggenschaar opbergt. Zorgvuldig omgaan met het apparaat verkleint letselgevaar door het mes. ■ Houd het elektrische gereedschap uitsluitend vast aan de geïsoleerde handgrepen, omdat de messen verborgen elektricitreitsleidingen of het eigen snoer kunnen raken. Bij contact tussen messen en een leiding waar spanning op staat, kunnen ook metalen onderdelen van het apparaat onder spanning komen te staan, met een elektrische schok tot gevolg. ♦ Doorzoek de heg op verborgen objecten (bijv. draadhekken). OVERIGE RISICO'S! Ook wanneer u dit elektrische apparaat volgens de voorschriften bedient, blijven er altijd risico's bestaan. De volgende gevaren kunnen door de constructie en uitvoering van dit elektrische gereedschap optreden: a) snijwonden; b) gehoorschade, als er geen passende gehoorbescherming wordt gedragen; c) gezondheidsschade als gevolg van hand-arm-trillingen, als het apparaat gedurende langere tijd wordt gebruikt of wanneer het niet volgens de voorschriften wordt bediend en onderhouden. OPMERKING ► De heggenschaar wordt volledig gemonteerd geleverd. ► In deze handleiding zelf staan afbeeldingen voor het instellen, onderhouden en smeren van de heggenschaar door de gebruiker. ► Aanwijzingen voor vervanging en reparatie (zie het hoofdstuk Onderhoud en reiniging/service). ► In deze handleiding staat uitleg over alle op de heggenschaar gebruikte grafische symbolen en technische specificaties. ► Bij de technische specificaties staan de kenmerken van de heggenschaar. ► Geblokkeerd gereedschap: verwijder het vastzittende materiaal uit de messenbalk. ■ Gebruik uitsluitend accessoires en hulpapparatuur die in de gebruiksaanwijzing zijn aangegeven. Het gebruik van andere hulpstukken of accessoires dan aanbevolen in de gebruiksaanwijzing, kan letselgevaar inhouden. ■ 48 │ NL│BE Apparaatspecifieke veiligheidsvoorschriften voor hoogsnoeiers ■ Draag altijd een veiligheidshelm, gehoorbescherming en veiligheidshandschoenen. Draag ook een veiligheidsbril om te voorkomen dat u oliespetters of zaagstof in uw ogen krijgt. Draag een stofmasker tegen stof. ■ Gebruik het apparaat nooit als u op een ladder staat. ■ Buig bij het gebruik van het apparaat niet te ver voorover. Zorg dat u altijd stevig staat en bewaar altijd uw evenwicht. Gebruik het meegeleverde harnas om het gewicht gelijkmatig over uw lichaam te verdelen. ■ Draag stevige schoenen met stroeve zolen. ■ Gebruik het apparaat niet als het regent en onder vochtige omstandigheden. ■ Gebruik het apparaat niet in de buurt van elektriciteitsleidingen. Bewaar een minimale afstand van 10 m tot bovengrondse stroomleidingen. ■ Ga niet onder de tak staan die u wilt afzagen, om letsel door vallende takken te voorkomen. Houd ook rekening met terugspringende takken, om letsel te voorkomen. Werk onder een hoek van 60° ±10°. ■ Houd er rekening mee dat het apparaat kan terugslaan. ■ Let niet alleen op de af te zagen takken, maar ook op reeds afgevallen materiaal, om te voorkomen dat u struikelt. ■ Las na 30 minuten werken een pauze in van minstens een uur. ■ Draag altijd veiligheidshandschoenen. ■ Dek het zwaard en de ketting bij transport en opslag af met de koker. ■ Gebruik het apparaat niet in explosiegevaarlijke omgevingen, bijvoorbeeld in de nabijheid van ontvlambare vloeistoffen of gassen. De door het apparaat veroorzaakte vonken kunnen dergelijke dampen doen ontbranden. ■ Het gebruikte stopcontact moet geschikt zijn voor de stekker van het apparaat. Wijzig nooit iets aan de stekker, om elektrische schokken te voorkomen. ■ Trek aan de stekker, niet aan het snoer, om de stekker uit het stopcontact te nemen. Gebruik het snoer niet om het apparaat voort te trekken of te verplaatsen. Houd het snoer uit de buurt van hitte, olie, scherpe kanten en bewegende onderdelen. ■ Haal de stekker uit het apparaat als u klaar bent met werken of bij het onderhouden of reinigen van het apparaat. ■ Voorkom dat het apparaat onbedoeld wordt gestart. ■ Een apparaat met een defecte schakelaar moet onmiddellijk worden gerepareerd, om schade en letsel te voorkomen. ■ Berg het apparaat op buiten het bereik van kinderen. ■ Alleen personen die vertrouwd zijn met de gebruiksaanwijzing en het apparaat mogen het apparaat bedienen. ■ Onderhoud elektrische gereedschappen zorgvuldig. Controleer of bewegende onderdelen naar behoren werken en niet klemmen, en of er geen onderdelen gebroken of zodanig beschadigd zijn dat daardoor de werking van het elektrische gereedschap nadelig wordt beïnvloed. Laat beschadigde onderdelen vóór de ingebruikname van het apparaat repareren. Veel ongelukken zijn het gevolg van slecht onderhoud van elektrisch gereedschap. ■ Houd zagen scherp en schoon. Met zorg onderhouden zagen met scherpe zaagvlakken lopen minder vaak vast en zijn gemakkelijker te sturen. ■ Laat het apparaat onderhouden door daartoe gekwalificeerd personeel. Gebruik uitsluitend de door de fabrikant aanbevolen originele onderdelen. PHSHE 900 B2 Voorzorgsmaatregelen tegen terugslag LET OP TERUGSLAG! ► Wees bij gebruik van het apparaat beducht op terugslag. Er bestaat letselgevaar. U voorkomt terugslag door voorzichtig te werk te gaan en op de juiste manier te zagen. ■ Als u iets met de punt van het zwaard raakt, kan dat in veel gevallen een onverwachte reactie in achterwaartse richting veroorzaken, waarbij het zwaard omhoog en in de richting van degene die het apparaat bedient, wordt geslagen (zie afbeelding). Bild 1 ■ Een terugslag kan optreden als de punt van het zwaard een voorwerp raakt, of als het hout meebuigt en de zaagketting in de zaagsnede vastklemt (zie afbeelding). ■ Als de zaagketting aan de bovenkant van het zwaard beklemd raakt, kan het zwaard heftig terugslaan in de richting van degene die het apparaat bedient. ■ Beide reacties kunnen tot gevolg hebben dat u de controle over de zaag verliest en uzelf zwaar verwondt. Vertrouw niet uitsluitend op de in de kettingzaag ingebouwde veiligheidsvoorzieningen. Neem als gebruiker van een kettingzaag de nodige maatregelen om zonder ongelukken te werken. Een terugslag is het gevolg van verkeerd of onrechtmatig gebruik van het elektrische gereedschap. Dit is te voorkomen door passende voorzorgsmaatregelen te nemen, zoals hieronder beschreven: ■ Houd de zaag met beide handen vast, waarbij de duimen en de vingers de handgrepen van de kettingzaag omsluiten. Breng uw lichaam en uw armen in een dusdanige stand dat u terugslagkrachten kunt opvangen.Als u de juiste voorzorgsmaatregelen neemt, zijn terugslagkrachten beheersbaar. Laat de kettingzaag nooit los. Aanvullende veiligheidsvoorschriften VOORZICHTIG! LETSELGEVAAR! ► Pak het apparaat als het in werking is, nooit boven de beschermring beet, om letsel te voorkomen! ■ Tijdens gebruik mogen zich binnen een straal van 15 meter geen andere personen of dieren bevinden. Degene die het apparaat bedient, is op de plaats van gebruik verantwoordelijk voor derden. ■ Houd het apparaat, de zaag en de zwaardkoker in goede conditie, om letsel te voorkomen. ■ Bij kinderen is supervisie noodzakelijk om ervoor te zorgen dat ze niet met het apparaat spelen. ■ Gebruik het apparaat pas wanneer u zich ermee vertrouwd voelt. ■ Werk niet met een beschadigd, onvolledig of zonder toestemming van de fabrikant gemodificeerd apparaat. Gebruik het apparaat nooit als de veiligheidsvoorzieningen defect zijn. Gebruik het apparaat niet als de aan-/uitknop defect is. Controleer het apparaat voor gebruik op veiligheid, in het bijzonder het zwaard en de ketting. Controleer het apparaat op duidelijke schade of defecten als u het hebt laten vallen. ■ Schakel het apparaat nooit in voordat u zwaard, ketting en kamwielhuis deugdelijk hebt gemonteerd. ■ Zorg ervoor dat het apparaat bij het inschakelen en tijdens het werk niet met de grond, stenen, draad of andere vreemde voorwerpen in aanraking komt. Schakel het apparaat uit voordat u het weglegt. ■ Het apparaat is ontworpen voor bediening met twee handen. Werk nooit met één hand. ■ Houd het apparaat uitsluitend vast aan de geïsoleerde handgrepen, omdat de zaagketting verborgen elektriciteitsleidingen kan raken. Bij contact tussen de zaagketting en een leiding waar spanning op staat, kunnen ook metalen onderdelen van het apparaat onder spanning komen te staan, met een elektrische schok tot gevolg. ■ Als u van plaats verandert, let er dan op dat het apparaat is uitgeschakeld en dat uw vinger de aan-/uitknop niet aanraakt. Draag het apparaat met achterwaarts gerichte zaagketting en zwaard. Breng voor het transport de beschermkoker van het zwaard aan. ■ Zet bij elke zaagsnede eerst de klauwaanslag vast en begin pas dan met zagen. ■ Wees uiterst voorzichtig bij het zagen van kleine heesters en takken. Dunne takjes kunnen in de zaag vast komen te zitten en in uw richting slaan of u uw evenwicht laten verliezen. ■ Zaag geen hout dat op de grond ligt en probeer niet om uit de grond stekende wortels te zagen. Voorkom in ieder geval dat de zaagketting zich in de grond ingraaft, omdat hij daardoor meteen stomp wordt. ■ Let bij het zagen van een onder spanning staande tak op een mogelijke terugslag wanneer de spanning van het hout plotseling wegvalt. Er bestaat letselgevaar. ■ Probeer het apparaat niet met geweld los te maken in geval van kantelen of vastklemmen van de zaag. Schakel het apparaat onmiddellijk uit en schakel het pas weer in als de blokkade is opgeheven. Er bestaat letselgevaar! ■ Vermijd een abnormale lichaamshouding en zaag niet boven schouderhoogte. Op die manier voorkomt u dat de punt van het zwaard iets raakt en bent u beter in staat in onverwachte situaties de controle te behouden over de kettingzaag. ■ Gebruik altijd de door de fabrikant voorgeschreven vervangingszwaarden en zaagkettingen. Onjuiste vervangingszwaarden en zaagkettingen kunnen de ketting doen breken en/of terugslagkrachten veroorzaken. ■ Houd u aan de aanwijzingen van de fabrikant voor het slijpen en onderhouden van de zaagketting. Een te geringe diepte-instelling verhoogt de kans op terugslag. ■ Zaag niet met de punt van het zwaard. Er is gevaar voor terugslag. ■ Zorg ervoor dat de grond waarop u staat vrij is van voorwerpen waarover u kunt struikelen. PHSHE 900 B2 NL│BE │ 49 ■ Zaagketting en zwaard monteren Vóór de ingebruikname WAARSCHUWING! VOORZICHTIG! LETSELGEVAAR! ► Trek veiligheidshandschoenen aan! Letselgevaar door de scherpe zaagtanden! ► Haal voorafgaand aan alle werkzaamheden aan het apparaat de stekker uit het stopcontact. Gevaar voor een elektrische schok! OPMERKING Motorunit Ronde handgreep monteren ♦ Steek de ronde handgreep ♦ Draai de schroef vast. ► Let op de looprichting van de zaagketting bij het kamwielhuis . op de juiste positie op de schacht . ♦ Haak de schouderriem in het draagoog . ♦ Pas de schouderriem zo aan uw lengte aan, dat het draagoog zich op heuphoogte bevindt. Heggenschaar monteren ♦ Schuif de voorste schacht van de motorunit. ♦ De borgpen van de heggenschaar op de schacht ♦ Zet de beide schachten vast met de klemschroef ; draai daartoe de moer aan de andere zijde op de schroef. Hoogsnoeier monteren ♦ De borgpen van de hoogsnoeier op de schacht moet vastklikken. De heggenschaar kantelen ♦ Druk op de stelhendel stand. ► Bij slijtage kan het zwaard worden omgekeerd. ♦ Verwijder het kamwielhuis los. en kantel de heggenschaar in de gewenste . van het apparaat. ♦ De zaagketting moet zo nodig tevoren worden ontspannen om het zwaard en de zaagketting te verwijderen (zie hoofdstuk “Zaagketting spannen en controleren”). Voer de instructies in omgekeerde volgorde uit. ♦ Verwijder het zwaard met de zaagketting van de bodemplaat . weer, te beginnen bij de punt van het ♦ Leg het zwaard op de zwaardgeleider en plaats de kettingspannerstift in de zwaardboring . Leg tegelijkertijd de zaagketting om het kamwiel . ♦ Bevestig het kamwielhuis weer en zet de moer licht vast. (zie het hoofdstuk Zaagketting spannen en Zaagketting spannen en controleren OPMERKING ► De spanning van de zaagketting is belangrijk voor uw veiligheid en de werking van het apparaat. Een correct gespannen zaagketting verhoogt de levensduur van het apparaat. WAARSCHUWING! ♦ Laat de stelhendel en de ont-/vergrendeling uitsparing van de bodemplaat (heggenschaar) terugklikken in de . ► Trek veiligheidshandschoenen aan! Letselgevaar door de scherpe zaagtanden! De hoogsnoeier kantelen ♦ Draai de moer ♦ Draai de ont-/vergrendeling ♦ Draai de kettingspannerbout met het montagegereedschap de wijzers van de klok mee om de spanning te verhogen. ♦ Druk op de stelhendel standen. en reeds gemonteerd. los met het montagegereedschap ♦ Span de zaagketting controleren). ♦ Zet de beide schachten vast met de klemschroef ; draai daartoe de moer aan de andere zijde op de schroef. ♦ Draai de ont-/vergrendeling en de zaagketting ♦ Monteer de zaagketting zwaard . moet vastklikken. ♦ Schuif de voorste schacht van de motorunit. ► Bij levering zijn het zwaard ♦ Draai de moer Schouderriem bevestigen/monteren over het zwaard los. en kantel de hoogsnoeier in een van beide ♦ Laat de stelhendel en de ont-/vergrendeling terugklikken in de uitsparing van de bodemplaat (hoogsnoeier) . iets los met het montagereedschap . met ♦ Draai de kettingspannerschroef met het montagegereedschap tegen de wijzers van de klok in om de spanning te verlagen. moet tegen de onderzijde van het zwaard aan ♦ De zaagketting liggen. Controleer of u de zaagketting met de hand over het zwaard kunt trekken. ♦ Draai de moer weer vast met het montagegereedschap . OPMERKING ► Bij het trekken aan de zaagketting met 9 N (ca. 1 kg) trekkracht dienen de zaagketting en het zwaard niet meer dan 2 mm afstand tot elkaar te hebben. ► Een nieuwe zaagketting gespannen. rekt uit en moet vaker opnieuw worden ► Controleer voor elk gebruik van het apparaat de kettingspanning. ■ 50 │ NL│BE PHSHE 900 B2 Ketting smeren Werken met de heggenschaar ♦ Verwijder de dop van de olietank ♦ Vul de olietank . Gebruik van het apparaat: met ongeveer 100 ml bio-kettingolie . WAARSCHUWING! ► Werk nooit zonder kettingsmering! Bij een droog lopende zaagketting raakt de zaag in korte tijd onherstelbaar beschadigd. Controleer voordat u aan het werk gaat, altijd de kettingsmering en het oliepeil. OPMERKING ► Gebruik alleen kettingzaagolie. Bij voorkeur biologisch afbreekbare kettingolie. Gebruik geen oude olie, motorolie enz. ► Controleer tijdens het werk of de automatische kettingsmering werkt. Controleer voor en tijdens het werk of de kettingsmering werkt. OPMERKING ► Houd er rekening mee dat de nationale voorschriften van uw land het gebruik van de heggenschaar kunnen beperken. ► Dagelijkse inspectie van de heggenschaar voor elk gebruik is verplicht. Controleer het apparaat ook wanneer u er ergens mee tegen gestoten hebt of het hebt laten vallen, om aanzienlijke schade of defecten vast te stellen. ► Draag stevig schoeisel en nauwsluitende kleding om het risico van ongevallen tot een minimum te beperken. Ga stevig op de grond staan, let op uw evenwicht en draag altijd de meegeleverde draagriem! ► Las omwille van uw gezondheid rustpauzes in tijdens het werken. Door lichamelijke uitputting neemt de kans op letsel toe! Zaagketting slijpen WAARSCHUWING! OPMERKING ► Aan de slijpsteenhulp kan een slijpsteen worden bevestigd voor een stevige greep tijdens het slijpen. ► In een slijpset van bijvoorbeeld Oregon staat gedetailleerde informatie over het slijpen. ► U kunt ook een elektrische kettingslijper gebruiken en de instructies van de fabrikant daarvan volgen. ► Als u twijfelt over het slijpen van de ketting, kunt u de ketting ook vervangen. Ingebruikname Snoeitechnieken ■ Zie uitvouwpagina (afbeelding A). OPMERKING ► Verwijder dikke takken met een takkenschaar. Werken met de hoogsnoeier Zaagtechnieken WAARSCHUWING! OPMERKING ► Houd rekening met regelgeving voor geluidshinder en andere plaatselijke voorschriften. Mogelijk is gebruik van het apparaat beperkt toegestaan of verboden op bepaalde dagen (bijvoorbeeld zon- en feestdagen), op bepaalde tijdstippen van de dag ('s middags, 's nachts), of in bepaalde gebieden (bijvoorbeeld bij kuuroorden, ziekenhuizen e.d.). ► Houd rekening met neervallend afgezaagd hout. ► Houd rekening met het gevaar van terugslaande takken. OPMERKING ► Zet de aanslag rustiger. tegen de tak. Op die manier werkt u veiliger en ► Begin pas daarna met zagen. In-/uitschakelen Afzagen van kleine takken Inschakelen: ♦ Sluit het snoer ► Gebruik het apparaat in geen geval als u moe of ziek bent of wanneer u onder invloed bent van alcohol of andere drugs. ♦ Zaag bij kleine takken (Ø 0-8 cm) van boven naar beneden (zie afbeelding). aan op de verlengkabel. ♦ Maak aan het einde van de verlengkabel een lus en haak die in de trekontlasting . ♦ Houd de inschakelblokkering . ingedrukt en druk op de aan-/uitknop Uitschakelen: ♦ Laat de aan-/uitknop los. ♦ Maak de verlengkabel los uit de trekontlasting ♦ Maak het snoer . los van de verlengkabel. Handgreep verstellen ♦ Druk op de ontgrendelingsknop . Draai het draai-element naar de gewenste stand. Laat de ontgrendelingsknop los, de knop moet weer vastklikken. PHSHE 900 B2 NL│BE │ 51 ■ ♦ Afzagen van grotere takken Transport ♦ Maak bij grotere takken (Ø 8-25 cm) eerst een kleine zaagsnede A om de spanning van de tak te halen (zie afbeelding). ■ Gebruik bij transport de beschermkokers ■ Die zaagsnede voorkomt ook dat de schors van de stam scheurt. . ■ Let erop dat u het apparaat niet inschakelt als u het draagt (zie afbeelding). ♦ Zaag vervolgens van boven B naar beneden A de tak door. B 2 1 A Onderhoud en reiniging Afzagen in gedeelten Kort lange of dikke takken in voordat u de laatste zaagsnede maakt om de tak van de stam te scheiden (zie afbeelding). Cc B b A a WAARSCHUWING! Wanneer het snoer moet worden vervangen, moet dit worden gedaan door de fabrikant of diens vertegenwoordiger, om veiligheidsrisico's te voorkomen. ■ De motorunit moet altijd schoon, droog en vrij van olie of smeervet zijn. ■ De hoogsnoeier moet regelmatig worden vrijgemaakt van zaagspanen. ♦ Gebruik voor het schoonmaken van de behuizing een droge doek. Verwijder het kamwielhuis . Veilig werken ■ Houd het apparaat, de zaag en de zwaardkoker om letsel te voorkomen. in goede conditie, ■ Controleer het apparaat op duidelijke schade of defecten als u het hebt laten vallen. ■ Neem de voorgeschreven werkhoek van 60° ±10° in acht, om veilig te kunnen werken (zie afbeelding). ♦ Neem de zaagketting schoon. ♦ Houd de zaagketting en de olietoevoer. van het zwaard en maak de geleider scherp en controleer de spanning, het oliepeil ♦ Controleer de messenbalk van de heggenschaar op losgeraakte schroeven en draai die zo nodig vast. ♦ Verwijder vastgeraakt snoeisel. ♦ Verzorg de messenbalk met olie uit een spuitbus of een kannetje. Opbergen 60° ±10° ■ Reinig het apparaat voordat u het opbergt. ■ Bewaar het apparaat in de meegeleverde beschermkokers een vorstvrije, droge plaats, buiten het bereik van kinderen. ■ Gebruik het apparaat niet als u op een ladder staat of op een instabiele ondergrond. ■ Laat u niet verleiden om zonder nadenken te gaan zagen. Dat kan uzelf en anderen in gevaar brengen. op ■ Berg het apparaat liggend op of zodanig dat het niet kan omvallen. ■ Maak de olietank leeg. Bio-kettingolie door het luchtgaatje in de olietankdop . kan verharsen of weglopen ■ Bij kinderen is supervisie noodzakelijk om ervoor te zorgen dat ze niet met het apparaat spelen. ■ Neem regelmatig een andere werkhouding aan. Bij langer gebruik van het apparaat kan de doorbloeding van de handen verstoord raken. U kunt echter langer met het apparaat werken als u geschikte handschoenen draagt of regelmatig een pauze inlast. Houd er rekening mee dat de persoonlijke aanleg voor een slechte doorbloeding, lage buitentemperaturen of het gebruik van veel kracht bij het werken de gebruiksduur kunnen reduceren. ■ Verminder ook de trillingsrisico's, bijv. het risico van “dode vingers”, door vaak werkpauzes te nemen waarin u bijv. uw handen tegen elkaar aan wrijft. ■ 52 │ NL│BE PHSHE 900 B2 Problemen met de hoogsnoeier oplossen Probleem Mogelijke oorzaak Problemen oplossen Motor loopt, zaagketting beweegt niet De heggenschaar of de hoogsnoeier is niet correct op de motorunit bevestigd Controleer de bevestiging Het zagen vordert niet Zaagketting droog of oververhit, of hangt door Vul olie bij of slijp, vervang of span de zaagketting Onderhoudsintervallen heggenschaar De onderstaande gegevens gelden bij gebruik onder normale omstandigheden. Bij gebruik onder bijzondere omstandigheden, bijvoorbeeld bij veel stofontwikkeling of lange dagelijkse werktijden, dienen de aangegeven intervallen overeenkomstig te worden verkort. Problemen met de heggenschaar oplossen Probleem Mogelijke oorzaak Problemen oplossen Motor loopt, messen staan stil De heggenschaar of de hoogsnoeier is niet correct op de motorunit bevestigd Controleer de bevestiging Onderdeel Actie Voor aanvang van het werk Messen Visuele controle Na het werk Indien nodig X X X Reinigen Onderhoudsintervallen hoogsnoeier De onderstaande gegevens gelden bij gebruik onder normale omstandigheden. Bij gebruik onder bijzondere omstandigheden, bijvoorbeeld bij veel stofontwikkeling of lange dagelijkse werktijden, dienen de aangegeven intervallen overeenkomstig te worden verkort. Onderdeel Actie Ketting smeren Controleren Voor aanvang van het werk Wekelijks Bij storing Bij beschadiging Indien nodig X Zaagketting Controleren, ook op scherpte X Kettingspanning controleren X Slijpen Geleider Controleren (slijtage, beschadiging) X X Reinigen en omkeren X Ontbramen X Vervangen Kamwiel Controleren Vervangen PHSHE 900 B2 X X X X X NL│BE │ 53 ■ Garantie van Kompernaß Handels GmbH Geachte klant, U hebt op dit apparaat 3 jaar garantie vanaf de aankoopdatum. In geval van gebreken in dit product hebt u wettelijke rechten tegenover de verkoper van het product. Deze wettelijke rechten worden door onze hierna beschreven garantie niet beperkt. Garantievoorwaarden De garantieperiode geldt vanaf de datum van aankoop. Bewaar de kassabon zorgvuldig. U hebt hem nodig als bewijs van aankoop. Als er binnen drie jaar vanaf de aankoopdatum van dit product een materiaal- of fabricagefout optreedt, wordt - naar onze keuze - het product door ons kosteloos gerepareerd of vervangen of wordt de koopprijs terugbetaald. Voorwaarde voor deze garantie is dat het defecte apparaat en het aankoopbewijs (kassabon) binnen de termijn van drie jaar worden overlegd en dat kort wordt omschreven waaruit het gebrek bestaat en wanneer het is opgetreden. Wanneer het defect door onze garantie wordt gedekt, krijgt u het gerepareerde product of een nieuw product retour. Met de reparatie of vervanging van het product begint er geen nieuwe garantieperiode. Garantieperiode en wettelijke aanspraken bij gebreken De garantieperiode wordt door deze waarborg niet verlengd. Dat geldt ook voor vervangen en gerepareerde onderdelen. Eventueel al bij aankoop aanwezige schade en gebreken moeten meteen na het uitpakken worden gemeld. Voor reparaties na afloop van de garantieperiode worden kosten in rekening gebracht. Garantieomvang Het apparaat is op basis van strenge kwaliteitsnormen met de grootst mogelijke zorg vervaardigd en voorafgaand aan de levering nauwkeurig gecontroleerd. De garantie geldt voor materiaal- of fabricagefouten. Deze garantie geldt niet voor productonderdelen die onderhevig zijn aan normale slijtage en die daarom als slijtonderdelen worden beschouwd, of voor schade aan breekbare onderdelen zoals schakelaars, accu‘s of onderdelen die van glas zijn gemaakt. Deze garantie vervalt wanneer het product is beschadigd, ondeskundig is gebruikt of is gerepareerd. Voor deskundig gebruik van het product moeten alle in de gebruiksaanwijzing beschreven aanwijzingen precies worden opgevolgd. Gebruiksdoeleinden en handelingen die in de gebruiksaanwijzing worden afgeraden of waarvoor wordt gewaarschuwd, moeten beslist worden vermeden. Het product is uitsluitend bestemd voor privégebruik en niet voor bedrijfsmatige doeleinden. Bij verkeerd gebruik en ondeskundige behandeling, bij gebruik van geweld en bij reparaties die niet door ons erkend servicefiliaal zijn uitgevoerd, vervalt de garantie. Afhandeling bij een garantiekwestie Voor een snelle afhandeling van uw aanvraag neemt u de volgende aanwijzingen in acht: ■ Houd voor alle aanvragen de kassabon en het artikelnummer (bijv. IAN 12345) als aankoopbewijs bij de hand. ■ Het artikelnummer vindt u op het typeplaatje van het product, op het product gegraveerd, op de titelpagina van de gebruiksaanwijzing (linksonder) of op de sticker op de achter- of onderkant van het product. ■ Als er fouten in de werking of andere gebreken optreden, neemt u eerst contract op met de hierna genoemde serviceafdeling, telefonisch of via e-mail. ■ Een als defect geregistreerd product kunt u dan zonder portokosten naar het aan u doorgegeven serviceadres sturen. Voeg het aankoopbewijs (kassabon) bij en vermeld waaruit het gebrek bestaat en wanneer het is opgetreden. Op www.lidl-service.com kunt u deze en vele andere handleidingen, productvideo‘s en installatiesoftware downloaden. Met deze QR-code gaat u direct naar de website van Lidl Service (www.lidl-service.com) en kunt u met het invoeren van het artikelnummer (IAN) 123456 de gebruiksaanwijzing openen. OPMERKING ► Bij gereedschap van Parkside en Florabest: retourneer a.u.b. uitsluitend het defecte artikel zonder accessoires (bijv. accu, opbergkoffer, montagegereedschap, enz.). Service WAARSCHUWING! ► Laat uw apparaten door het servicepunt of een elektricien repareren, en uitsluitend met originele vervangingsonderdelen. Op die manier blijft de veiligheid van het apparaat gewaarborgd. ► Laat de stekker of het snoer altijd vervangen door de fabrikant van het apparaat of diens klantenservice. Op die manier blijft de veiligheid van het apparaat gewaarborgd. Service Nederland Tel.: 0900 0400223 (0,10 EUR/Min.) E-Mail: [email protected] Service België Tel.: 070 270 171 (0,15 EUR/Min.) E-Mail: [email protected] IAN 313266_1904 Importeur Let op: het volgende adres is geen serviceadres. Neem eerst contact op met het opgegeven serviceadres. KOMPERNASS HANDELS GMBH BURGSTRASSE 21 44867 BOCHUM DUITSLAND www.kompernass.com ■ 54 │ NL│BE PHSHE 900 B2 Afvoeren De verpakking bestaat uit milieuvriendelijke materialen, die u via de plaatselijke recyclepunten kunt afvoeren. Het apparaat en de accessoires bestaan uit verschillende materialen, zoals metaal en kunststoffen. Informatie over mogelijkheden voor het afvoeren van het afgedankte apparaat krijgt u bij uw gemeentereinigingsdienst. Milieubescherming ■ Leeg de olietank zorgvuldig en lever uw apparaat in bij een recyclepunt. De gebruikte onderdelen van kunststof en metaal kunnen worden gescheiden voor hergebruik. Wend u voor informatie hierover tot onze klantenservice. ■ Lever oude olie in bij een afvalverwerkingspunt en giet deze niet in de riolering of in de afvoer. ■ Lever verontreinigd onderhoudsmateriaal en grondstoffen in bij een daarvoor bestemd inzamelpunt. Deponeer elektrisch gereedschap niet bij het huisvuil! Conform de Europese richtlijn 2012/19/EU moet afgedankt elektrisch gereedschap gescheiden worden ingezameld en op een milieuvriendelijke wijze worden gerecycled. Het product is recycleerbaar; er is een uitgebreide producentenverantwoordelijkheid op van toepassing en het afval wordt gescheiden ingezameld. Vervangende onderdelen U kunt vervangende onderdelen direct bij de klantenservice bestellen. Geef bij bestelling in ieder geval het type apparaat en het onderdeelnummer op. Vertaling van de oorspronkelijke conformiteitsverklaring Wij, KOMPERNASS HANDELS GMBH, documentverantwoordelijke persoon: de heer Semi Uguzlu, BURGSTR. 21, 44867 BOCHUM, DUITSLAND, verklaren hierbij dat dit product voldoet aan de volgende normen, normatieve documenten en EU-richtlijnen: Machinerichtlijn (2006 / 42 / EC) Elektromagnetische compatibiliteit (2014 / 30 / EU) Richtlijn voor geluidsemissie 2000 / 14 / EC 2005 / 88 / EC Aangemelde instantie: Nr. 0036 TÜV SÜD Industrie Service GmbH, Westendstraße 199, 80686 München, Duitsland Evaluatiemethode van de conformiteit conform Bijlage V. Geluidsvermogensniveau LWA: Gemeten: 102,2 dB (A) Gegarandeerd: 105 dB (A) RoHS–richtlijn (2011 / 65 / EU)* * De volledige verantwoordelijkheid voor het afgeven van deze conformiteitsverklaring ligt bij de fabrikant. Het hierboven beschreven object van de verklaring voldoet aan de voorschriften van de Richtlijn 2011/65/EU van het Europees Parlement en de Raad van 8 juni 2011 aangaande de beperking van het gebruik van bepaalde gevaarlijke stoffen in elektrische en elektronische apparaten. Toegepaste geharmoniseerde normen: EN 60745-1: 2009/A11: 2010 EN ISO 10517: 2019 EN ISO 11680-1: 2011 EN 55014-1: 2017 EN 55014-2: 2015 EN 61000-3-2: 2014 EN 61000-3-3: 2013 EN 50581:2012 Type / apparaatbeschrijving: 2-in-1-telescopische heggenschaar/telescopische takkenschaar PHSHE 900 B2 Productiejaar: 09 - 2019 Serienummer: IAN 313266_1904 Bochum, 11-09-2019 Semi Uguzlu - Kwaliteitsmanager Technische wijzigingen vanwege verdere ontwikkeling voorbehouden. PHSHE 900 B2 NL│BE │ 55 ■ ■ 56 │ NL│BE PHSHE 900 B2 Spis treści Wstęp . . . . . . . . . . . . . . . . . . . . . . . . . . . . . . . . . . . . . . . . . . . . . . . . . . . . . . . . . . . . . . . . . . . . . . . . . . . . . . . . . . . . . . . . 58 Użytkowanie zgodne z przeznaczeniem nożyc do żywopłotów z długim trzonkiem. . . . . . . . . . . . . . . . . . . . . . . . . . . . . . . . . . . . . . . . . . . 58 Użytkowanie zgodne z przeznaczeniem piły do gałęzi . . . . . . . . . . . . . . . . . . . . . . . . . . . . . . . . . . . . . . . . . . . . . . . . . . . . . . . . . . . . . . . . . 58 Użytkowanie zgodne z przeznaczeniem . . . . . . . . . . . . . . . . . . . . . . . . . . . . . . . . . . . . . . . . . . . . . . . . . . . . . . . . . . . . . . . . . . . . . . . . . . . . 58 Wyposażenie . . . . . . . . . . . . . . . . . . . . . . . . . . . . . . . . . . . . . . . . . . . . . . . . . . . . . . . . . . . . . . . . . . . . . . . . . . . . . . . . . . . . . . . . . . . . . . . . . 58 Zakres dostawy . . . . . . . . . . . . . . . . . . . . . . . . . . . . . . . . . . . . . . . . . . . . . . . . . . . . . . . . . . . . . . . . . . . . . . . . . . . . . . . . . . . . . . . . . . . . . . . . 59 Dane techniczne . . . . . . . . . . . . . . . . . . . . . . . . . . . . . . . . . . . . . . . . . . . . . . . . . . . . . . . . . . . . . . . . . . . . . . . . . . . . . . . . . . . . . . . . . . . . . . . 59 Ogólne wskazówki bezpieczeństwa dla elektronarzędzi . . . . . . . . . . . . . . . . . . . . . . . . . . . . . . . . . . . . . . . . . . . . . 60 1. Bezpieczeństwo na stanowisku pracy. . . . . . . . . . . . . . . . . . . . . . . . . . . . . . . . . . . . . . . . . . . . . . . . . . . . . . . . . . . . . . . . . . . . . . . . . . . . . 60 2. Bezpieczeństwo elektryczne . . . . . . . . . . . . . . . . . . . . . . . . . . . . . . . . . . . . . . . . . . . . . . . . . . . . . . . . . . . . . . . . . . . . . . . . . . . . . . . . . . . . 60 3. Bezpieczeństwo osób . . . . . . . . . . . . . . . . . . . . . . . . . . . . . . . . . . . . . . . . . . . . . . . . . . . . . . . . . . . . . . . . . . . . . . . . . . . . . . . . . . . . . . . . . 60 4. Zastosowanie i obsługa elektronarzędzia . . . . . . . . . . . . . . . . . . . . . . . . . . . . . . . . . . . . . . . . . . . . . . . . . . . . . . . . . . . . . . . . . . . . . . . . . 60 5.Serwis. . . . . . . . . . . . . . . . . . . . . . . . . . . . . . . . . . . . . . . . . . . . . . . . . . . . . . . . . . . . . . . . . . . . . . . . . . . . . . . . . . . . . . . . . . . . . . . . . . . . . . 61 Specyficzne dla urządzenia wskazówki bezpieczeństwa do nożyc do żywopłotów . . . . . . . . . . . . . . . . . . . . . . . . . . . . . . . . . . . . . . . . . . . 61 Uzupełniające wskazówki bezpieczeństwa do nożyc do żywopłotów . . . . . . . . . . . . . . . . . . . . . . . . . . . . . . . . . . . . . . . . . . . . . . . . . . . . . 61 Dalsze wskazówki bezpieczeństwa do nożyc do żywopłotów. . . . . . . . . . . . . . . . . . . . . . . . . . . . . . . . . . . . . . . . . . . . . . . . . . . . . . . . . . . . 62 RYZYKO RESZTKOWE! . . . . . . . . . . . . . . . . . . . . . . . . . . . . . . . . . . . . . . . . . . . . . . . . . . . . . . . . . . . . . . . . . . . . . . . . . . . . . . . . . . . . . . . . . . 62 Specyficzne dla urządzenia wskazówki bezpieczeństwa do piły do gałęzi . . . . . . . . . . . . . . . . . . . . . . . . . . . . . . . . . . . . . . . . . . . . . . . . . 62 Środki ostrożności przeciwko odbiciu narzędzia . . . . . . . . . . . . . . . . . . . . . . . . . . . . . . . . . . . . . . . . . . . . . . . . . . . . . . . . . . . . . . . . . . . . . . 63 Dalsze wskazówki bezpieczeństwa . . . . . . . . . . . . . . . . . . . . . . . . . . . . . . . . . . . . . . . . . . . . . . . . . . . . . . . . . . . . . . . . . . . . . . . . . . . . . . . . 63 Przed uruchomieniem . . . . . . . . . . . . . . . . . . . . . . . . . . . . . . . . . . . . . . . . . . . . . . . . . . . . . . . . . . . . . . . . . . . . . . . . . . . 64 Zespół napędowy . . . . . . . . . . . . . . . . . . . . . . . . . . . . . . . . . . . . . . . . . . . . . . . . . . . . . . . . . . . . . . . . . . . . . . . . . . . . . . . . . . . . . . . . . . . . . . 64 Montaż uchwytu okrągłego . . . . . . . . . . . . . . . . . . . . . . . . . . . . . . . . . . . . . . . . . . . . . . . . . . . . . . . . . . . . . . . . . . . . . . . . . . . . . . . . . . . . . . 64 Zamocowanie/montaż pasa do przenoszenia . . . . . . . . . . . . . . . . . . . . . . . . . . . . . . . . . . . . . . . . . . . . . . . . . . . . . . . . . . . . . . . . . . . . . . . . 64 Montaż nożyc do żywopłotów . . . . . . . . . . . . . . . . . . . . . . . . . . . . . . . . . . . . . . . . . . . . . . . . . . . . . . . . . . . . . . . . . . . . . . . . . . . . . . . . . . . . 64 Montaż piły do gałęzi. . . . . . . . . . . . . . . . . . . . . . . . . . . . . . . . . . . . . . . . . . . . . . . . . . . . . . . . . . . . . . . . . . . . . . . . . . . . . . . . . . . . . . . . . . . 64 Ustawianie nożyc do żywopłotów pod kątem . . . . . . . . . . . . . . . . . . . . . . . . . . . . . . . . . . . . . . . . . . . . . . . . . . . . . . . . . . . . . . . . . . . . . . . . 64 Ustawianie piły do gałęzi pod kątem . . . . . . . . . . . . . . . . . . . . . . . . . . . . . . . . . . . . . . . . . . . . . . . . . . . . . . . . . . . . . . . . . . . . . . . . . . . . . . . 64 Montaż łańcucha tnącego i prowadnicy. . . . . . . . . . . . . . . . . . . . . . . . . . . . . . . . . . . . . . . . . . . . . . . . . . . . . . . . . . . . . . . . . . . . . . . . . . . . . 64 Naprężanie i kontrola łańcucha tnącego . . . . . . . . . . . . . . . . . . . . . . . . . . . . . . . . . . . . . . . . . . . . . . . . . . . . . . . . . . . . . . . . . . . . . . . . . . . . 64 Smarowanie łańcucha . . . . . . . . . . . . . . . . . . . . . . . . . . . . . . . . . . . . . . . . . . . . . . . . . . . . . . . . . . . . . . . . . . . . . . . . . . . . . . . . . . . . . . . . . . . 65 Ostrzenie łańcucha tnącego . . . . . . . . . . . . . . . . . . . . . . . . . . . . . . . . . . . . . . . . . . . . . . . . . . . . . . . . . . . . . . . . . . . . . . . . . . . . . . . . . . . . . . 65 Uruchomienie . . . . . . . . . . . . . . . . . . . . . . . . . . . . . . . . . . . . . . . . . . . . . . . . . . . . . . . . . . . . . . . . . . . . . . . . . . . . . . . . . 65 Włączanie/wyłączanie. . . . . . . . . . . . . . . . . . . . . . . . . . . . . . . . . . . . . . . . . . . . . . . . . . . . . . . . . . . . . . . . . . . . . . . . . . . . . . . . . . . . . . . . . . 65 Przestawianie uchwytu . . . . . . . . . . . . . . . . . . . . . . . . . . . . . . . . . . . . . . . . . . . . . . . . . . . . . . . . . . . . . . . . . . . . . . . . . . . . . . . . . . . . . . . . . . 65 Praca z nożycami do żywopłotów . . . . . . . . . . . . . . . . . . . . . . . . . . . . . . . . . . . . . . . . . . . . . . . . . . . . . . . . . . . . . . . . . . . . . . . . . . . . . . . . . 65 Użytkowanie maszyny: . . . . . . . . . . . . . . . . . . . . . . . . . . . . . . . . . . . . . . . . . . . . . . . . . . . . . . . . . . . . . . . . . . . . . . . . . . . . . . . . . . . . . . . . . . 65 Techniki cięcia . . . . . . . . . . . . . . . . . . . . . . . . . . . . . . . . . . . . . . . . . . . . . . . . . . . . . . . . . . . . . . . . . . . . . . . . . . . . . . . . . . . . . . . . . . . . . . . . . 65 Praca z piłą do gałęzi . . . . . . . . . . . . . . . . . . . . . . . . . . . . . . . . . . . . . . . . . . . . . . . . . . . . . . . . . . . . . . . . . . . . . . . . . . . . . . . . . . . . . . . . . . . 65 Techniki piłowania . . . . . . . . . . . . . . . . . . . . . . . . . . . . . . . . . . . . . . . . . . . . . . . . . . . . . . . . . . . . . . . . . . . . . . . . . . . . . . . . . . . . . . . . . . . . . . 65 Bezpieczna praca . . . . . . . . . . . . . . . . . . . . . . . . . . . . . . . . . . . . . . . . . . . . . . . . . . . . . . . . . . . . . . . . . . . . . . . . . . . . . . . . . . . . . . . . . . . . . . 66 Transport . . . . . . . . . . . . . . . . . . . . . . . . . . . . . . . . . . . . . . . . . . . . . . . . . . . . . . . . . . . . . . . . . . . . . . . . . . . . . . . . . . . . . 66 Konserwacja i czyszczenie . . . . . . . . . . . . . . . . . . . . . . . . . . . . . . . . . . . . . . . . . . . . . . . . . . . . . . . . . . . . . . . . . . . . . . . 66 Przechowywanie . . . . . . . . . . . . . . . . . . . . . . . . . . . . . . . . . . . . . . . . . . . . . . . . . . . . . . . . . . . . . . . . . . . . . . . . . . . . . . 66 Wyszukiwanie usterek, piła do gałęzi . . . . . . . . . . . . . . . . . . . . . . . . . . . . . . . . . . . . . . . . . . . . . . . . . . . . . . . . . . . . . 67 Wyszukiwanie usterek w nożycach do żywopłotów . . . . . . . . . . . . . . . . . . . . . . . . . . . . . . . . . . . . . . . . . . . . . . . . . 67 Terminy konserwacji piły do gałęzi . . . . . . . . . . . . . . . . . . . . . . . . . . . . . . . . . . . . . . . . . . . . . . . . . . . . . . . . . . . . . . . 67 Terminy konserwacji nożyc do żywopłotów . . . . . . . . . . . . . . . . . . . . . . . . . . . . . . . . . . . . . . . . . . . . . . . . . . . . . . . . 67 Gwarancja Kompernaß Handels GmbH . . . . . . . . . . . . . . . . . . . . . . . . . . . . . . . . . . . . . . . . . . . . . . . . . . . . . . . . . . . . 68 Serwis . . . . . . . . . . . . . . . . . . . . . . . . . . . . . . . . . . . . . . . . . . . . . . . . . . . . . . . . . . . . . . . . . . . . . . . . . . . . . . . . . . . . . . . 68 Importer . . . . . . . . . . . . . . . . . . . . . . . . . . . . . . . . . . . . . . . . . . . . . . . . . . . . . . . . . . . . . . . . . . . . . . . . . . . . . . . . . . . . . . 68 Utylizacja . . . . . . . . . . . . . . . . . . . . . . . . . . . . . . . . . . . . . . . . . . . . . . . . . . . . . . . . . . . . . . . . . . . . . . . . . . . . . . . . . . . . . 69 Części zamienne . . . . . . . . . . . . . . . . . . . . . . . . . . . . . . . . . . . . . . . . . . . . . . . . . . . . . . . . . . . . . . . . . . . . . . . . . . . . . . . 69 Tłumaczenie oryginalnej deklaracji zgodności . . . . . . . . . . . . . . . . . . . . . . . . . . . . . . . . . . . . . . . . . . . . . . . . . . . . . . 69 PHSHE 900 B2 PL │ 57 ■ 2-W-1 NOŻYCE DO ŻYWOPŁOTU Z DŁUGIM TRZONKIEM / OKRZESYWARKA PHSHE 900 B2 Wstęp Gratulujemy zakupu nowego urządzenia. Wybrany produkt charakteryzuje się wysoką jakością. Instrukcja obsługi stanowi część niniejszego produktu. Zawiera ona ważne informacje na temat bezpieczeństwa, użytkowania i utylizacji. Przed rozpoczęciem użytkowania produktu należy zapoznać się ze wszystkimi informacjami dotyczącymi obsługi i bezpieczeństwa. Produkt należy użytkować wyłącznie zgodnie z zamieszczonym tu opisem oraz w podanym zakresie zastosowań. W przypadku przekazania urządzenia osobie trzeciej należy dołączyć do niego również całą dokumentację. Użytkowanie zgodne z przeznaczeniem nożyc do żywopłotów z długim trzonkiem To urządzenie jest przeznaczone do przycinania i formowania żywopłotów, krzaków i ozdobnych krzewów w przydomowych ogrodach. Jest to prowadzone ręcznie urządzenie z wbudowanym napędem, w którym umieszczone liniowo ostrza poruszają się w tę i z powrotem. OSTRZEŻENIE! ► Dzieci nie mogą posługiwać się nożycami do żywopłotów. Wyposażenie Zespół napędowy Śruba dociskowa z przetyczką Nakrętka Wysięgnik Śruba Uchwyt okrągły Ucho do przenoszenia Element obrotowy Przycisk odblokowujący Blokada włączania Włącznik/wyłącznik Kabel zasilający Zabezpieczenie przed wyrwaniem Nasadka do przycinania krzewów Belka noża Obudowa przekładni Blokada/odblokowanie Płyta podstawy (nożyce do żywopłotów) Dźwignia nastawcza Uchwyt Przedni wysięgnik Użytkowanie zgodne z przeznaczeniem piły do gałęzi Kołek do aretowania To urządzenie jest przeznaczone do obcinania gałęzi drzew. Wałek napędowy Użytkowanie zgodne z przeznaczeniem Urządzenia należy używać zgodnie z opisem i w podanych zakresach zastosowania. Urządzenie nie nadaje się do zastosowań komercyjnych. Urządzenie jest przeznaczone do użytku przez osoby dorosłe. To urządzenie nie jest przeznaczone do użytku przez osoby (łącznie z dziećmi) o ograniczonych zdolnościach fizycznych, sensorycznych lub psychicznych lub nieposiadające doświadczenia i/lub potrzebnej wiedzy. Użytkowanie urządzenia podczas deszczu lub w wilgotnym otoczeniu jest zabronione. Jakiekolwiek inne użycie lub modyfikacje urządzenia uważane są za niezgodne z przeznaczeniem i niosą za sobą poważne niebezpieczeństwo wypadku. Producent nie ponosi żadnej odpowiedzialności za szkody powstałe w wyniku użycia urządzenia w sposób niezgodny z jego przeznaczeniem. Pokrywka ochronna Piła do gałęzi Pomoc do ostrzenia Łańcuch tnący Prowadnica Ogranicznik Zbiornik oleju Nakrętka Gwint Osłona koła łańcuchowego Otwór prowadnicy Szyna prowadnicy Szyna prowadząca Olejarka kroplowa Śruba naprężenia łańcucha tnącego Koło łańcuchowe Kołek naprężający łańcuch tnący Przedni wysięgnik Wałek napędowy Pokrywka ochronna Kołek do aretowania Pierścień ochronny Dźwignia nastawcza Płyta podstawy (piła do gałęzi) Blokada/odblokowanie Pokrywka zbiornika oleju ■ 58 │ PL PHSHE 900 B2 Wartości drgań (suma wektorów trzech kierunków) ustalone zgodnie z normą EN 60745: Zakres dostawy 1 Zespół napędowy PHSHE 900 B2 1 Nasadka do przycinania żywopłotów PHS 1 (zwana dalej nożycami do żywopłotów) 1 Nasadka do cięcia gałęzi PHE 1 (dalej nazywana piłą do gałęzi) Akcesoria pas na ramię 1 osłona łańcucha 1 osłona prowadnicy 1 100 ml ekologicznego oleju do łańcucha 1 narzędzie montażowe wartość emisji drgań ah, D = 1,2 m/s2 Niepewność pomiarów K = 1,5 m/s2 Nożyce do żywopłotów: Drgania na przednim uchwycie: wartość emisji drgań ah, D = 1,6 m/s2 Niepewność pomiarów K = 1,5 m/s2 1 instrukcja obsługi Dane techniczne Drgania na tylnym uchwycie: Zespół napędowy: PHSHE 900 B2 Napięcie znamionowe: 230 V ∼ 50 Hz (prąd przemienny) Moc znamionowa: 900 W Klasa ochrony: II / wartość emisji drgań ah, D = 1,8 m/s2 Niepewność pomiarów K = 1,5 m/s2 Nosić ochronniki słuchu! (podwójna izolacja) WSKAZÓWKA Masa: (bez uchwytu i pasa do przenoszenia): ok. 2,7 kg ► Poziom drgań podany w tych instrukcjach został zmierzony zgodnie z metodą pomiarową, określoną w normie EN 60745 i może być użyty do porównywania urządzeń. Podana wartość emisji drgań może posłużyć także do wstępnej oceny stopnia narażenia. PHE 1 Prędkość przesuwu łańcucha tnącego: maks. 6 m/s Kąt roboczy: Drgania na przednim uchwycie: wartość emisji drgań ah,D = 1,0 m/s2 Niepewność pomiarów K = 1,5 m/s2 Drgania na tylnym uchwycie: 1 Piła do gałęzi: Piła do gałęzi: 0°; 15°; 30° OSTRZEŻENIE! Masa (w stanie gotowości do pracy): ok. 1,6 kg Zalecane napełnienie zbiornika na olej: 100 cm3 Długość cięcia: ok. 260 mm Prowadnica: Oregon typ 100SDEA041 Łańcuch tnący: Oregon 91P040X Nożyce do żywopłotów: PHS 1 Liczba skoków na biegu jałowym: 2000 obr/min Kąt roboczy: 90°; +90° Długość cięcia: ok. 410 mm Odstęp zębów: 20 mm ► Poziom drgań będzie zmieniał się w zależności od rodzaju zastosowania elektronarzędzia i w niektórych przypadkach może przekraczać wartość podaną w niniejszych instrukcjach. Narażenie na drgania mogłoby zostać nieprawidłowo ocenione, gdyby elektronarzędzie było regularnie wykorzystywane w taki sposób. Należy starać się, aby obciążenie drganiami było jak najmniejsze. Przykładowe środki mające na celu zmniejszenie narażenia na drgania to noszenie rękawic w trakcie korzystania z narzędzia i ograniczenie czasu pracy. Należy przy tym uwzględnić wszystkie części cyklu pracy (na przykład czas, przez jaki elektronarzędzie pozostaje wyłączone, oraz czas, w którym jest ono wprawdzie włączone, ale pracuje bez obciążenia). Objaśnienia do naklejek informacyjnych, znajdujących się na urządzeniu: Masa (w stanie gotowości do pracy): ok. 2,1 kg Informacje dotyczące poziomu hałasu i drgań: Wartość pomiarowa hałasu określona zgodnie z normą EN 60745. Korygowany współczynnikiem A poziom hałasu elektronarzędzia wynosi z reguły: Piła do gałęzi: Przed uruchomieniem przeczytać instrukcję obsługi i wskazówki bezpieczeństwa! Nosić rękawice ochronne! PHE 1 83 3 = 104 3 PHS 1 dB (A) dB dB (A) dB Nosić obuwie ochronne! Poziom ciśnienia akustycznego: LPA = 81 Niepewność pomiarów K: 3 Poziom mocy akustycznej: LWA = 102 Gwarantowany poziom mocy akustycznej: LWA = 105 Niepewność pomiarów K: 3 dB (A) dB dB (A) dB (A) dB Nosić kask ochronny! Poziom ciśnienia akustycznego: Niepewność pomiarów K: Poziom mocy akustycznej: Niepewność pomiarów K: Nożyce do żywopłotów: PHSHE 900 B2 LPA = LWA Nosić ochronniki słuchu! Nosić okulary ochronne! PL │ 59 ■ Znajdujące się w pobliżu osoby trzymać z dala od urządzenia! Chronić urządzenie przed deszczem i wilgocią! Zagrożenie dla życia na skutek porażenia prądem! Trzymać się co najmniej 10 m od napowietrznych linii energetycznych. Uwaga! Spadające przedmioty. Szczególnie podczas cięcia ponad głową. d) Nigdy nie chwytaj za kabel, np. w celu przeniesienia bądź zawieszenia elektronarzędzia lub wyciągnięcia wtyku z gniazda zasilania. Chroń kabel przed źródłami gorąca, olejem, ostrymi krawędziami lub poruszającymi się częściami urządzenia. Uszkodzone lub poskręcane kable zwiększają ryzyko porażenia prądem elektrycznym. e) Podczas pracy z elektronarzędziem na zewnątrz stosuj wyłącznie przedłużacze, które są dopuszczone również do użytku na zewnątrz pomieszczeń. Stosowanie przedłużacza przystosowanego do pracy na zewnątrz pomieszczeń zmniejsza ryzyko porażenia prądem elektrycznym. f) Jeśli nie da się uniknąć pracy z elektronarzędziem w wilgotnym otoczeniu, zastosuj wyłącznik różnicowo-prądowy. Zastosowanie wyłącznika różnicowo-prądowego zmniejsza ryzyko porażenia prądem elektrycznym. 3. Bezpieczeństwo osób Uwaga! Niebezpieczeństwo zranienia przez obracające się noże. Natychmiast wyjąć wtyk z gniazda zasilającego, jeśli przewód zostanie uszkodzony lub przecięty. Informacja o poziomie mocy akustycznej LWA w dB. Ogólne wskazówki bezpieczeństwa dla elektronarzędzi OSTRZEŻENIE! ► Przeczytaj wszystkie wskazówki bezpieczeństwa oraz instrukcje. Nieprzestrzeganie poniższych wskazówek bezpieczeństwa oraz instrukcji może być przyczyną porażenia prądem elektrycznym, pożaru i/lub ciężkich obrażeń ciała. Wszystkie wskazówki bezpieczeństwa oraz instrukcje należy zachować do późniejszego wykorzystania. Użyte we wskazówkach bezpieczeństwa pojęcie „elektronarzędzie“ dotyczy narzędzi elektrycznych zasilanych z sieci (przez kabel sieciowy) oraz narzędzi elektrycznych zasilanych akumulatorami (bez kabla sieciowego). 1. Bezpieczeństwo na stanowisku pracy a) Stanowisko pracy należy utrzymywać w czystości i dbać o jego dobre oświetlenie. Nieporządek i niedostateczne oświetlenie mogą być przyczyną wypadków. b) Nigdy nie używaj elektronarzędzia w otoczeniu zagrożonym wybuchem, w którym znajdują się łatwopalne ciecze, gazy lub pyły. Elektronarzędzia wytwarzają iskry, które mogą spowodować zapłon pyłu lub oparów. c) W czasie użytkowania elektronarzędzia zwróć uwagę na to, aby w pobliżu nie przebywały dzieci ani żadne inne osoby. W przypadku odwrócenia uwagi od pracy możesz stracić kontrolę nad urządzeniem. 2. Bezpieczeństwo elektryczne a) Wtyk przyłączeniowy elektronarzędzia musi pasować do gniazda zasilania. Dokonywanie zmian we wtyku jest zabronione. Nigdy nie używaj adapterów wtyków w połączeniu z elektronarzędziami mającymi uziemienie. Oryginalne wtyki oraz pasujące gniazda wtykowe zmniejszają ryzyko porażenia prądem elektrycznym. b) Unikaj kontaktu z uziemionymi powierzchniami, takimi jak rury, grzejniki, kuchenki lub lodówki. Zetknięcie się z uziemionym przedmiotem zwiększa ryzyko porażenia prądem elektrycznym. c) Nigdy nie narażaj elektronarzędzia na działanie deszczu lub wilgoci. Przedostanie się wody do wnętrza elektronarzędzia zwiększa ryzyko porażenia prądem elektrycznym. ■ 60 │ PL a) Zawsze zachowuj ostrożność i uważaj na to, co robisz. Praca z elektronarzędziem wymaga także zachowania zasad zdrowego rozsądku. Nie korzystaj z elektronarzędzia w przypadku przemęczenia, bycia pod wpływem narkotyków, alkoholu lub lekarstw. Nawet chwila nieuwagi podczas korzystania z elektronarzędzia może spowodować poważne obrażenia ciała. b) W czasie pracy noś środki ochrony indywidualnej i obowiązkowo okulary ochronne. Noszenie środków ochrony indywidualnej, np. maski przeciwpyłowej, antypoślizgowego obuwia roboczego, kasku lub ochronników słuchu - w zależności od rodzaju zastosowania elektronarzędzia - zmniejsza ryzyko odniesienia obrażeń. c) Unikaj sytuacji prowadzących do przypadkowego uruchomienia urządzenia. Przed podłączeniem do zasilania sieciowego i/lub akumulatora, chwyceniem lub przeniesieniem urządzenia upewnij się, że elektronarzędzie jest wyłączone. Trzymanie palca na wyłączniku w trakcie przenoszenia elektronarzędzia lub podłączenie elektronarzędzia do zasilania z wciśniętym już wyłącznikiem może doprowadzić do wypadku. d) Przed włączeniem elektronarzędzia usuń wszystkie przyrządy regulacyjne lub klucze. Narzędzie lub klucz pozostawiony w obracającej się części urządzenia może spowodować obrażenia ciała. e) Unikaj nienaturalnej postawy ciała. Zadbaj o utrzymanie stabilnej postawy i przez cały czas utrzymuj równowagę. Pozwoli to na lepszą kontrolę elektronarzędzia w przypadku nieoczekiwanych sytuacji. f) Noś odpowiednią odzież. Nie nosić luźnych ubrań ani biżuterii. Włosy, odzież i rękawice trzymaj z dala od ruchomych części urządzenia. Ruchome części urządzenia mogą pochwycić luźną, odstającą odzież, biżuterię lub długie włosy. g) Jeżeli możliwe jest podłączenie odciągu i zbiornika pyłu, upewnij się, że są one podłączone i używane w sposób prawidłowy. Zastosowanie odciągu pyłowego może zmniejszyć zagrożenia związane z zapyleniem. 4. Zastosowanie i obsługa elektronarzędzia a) Nie przeciążaj urządzenia. Elektronarzędzia używaj tylko do ściśle określonego zakresu zastosowania. Elektronarzędzie pracuje lepiej i bezpieczniej, gdy podczas eksploatacji przestrzegasz jego parametrów mocy. b) Nie używaj elektronarzędzia z uszkodzonym wyłącznikiem. Elektronarzędzie, którego nie można włączyć ani wyłączyć, stanowi zagrożenie i musi zostać niezwłocznie naprawione. c) Przed dokonaniem ustawień urządzenia, wymianą narzędzi roboczych lub odłożeniem elektronarzędzia na bok wyciągnij wtyk z gniazda zasilania i/lub wyjmij akumulator.. Uniemożliwi to przypadkowe uruchomienie elektronarzędzia. d) Nieużywane elektronarzędzia przechowuj poza zasięgiem dzieci. Nie pozwalaj na używanie urządzenia przez osoby, które nie wiedzą, jak się z nim obchodzić lub nie przeczytały niniejszych instrukcji. Elektronarzędzia w rękach osób niedoświadczonych mogą być niebezpieczne. PHSHE 900 B2 e) Elektronarzędzia wymagają starannej pielęgnacji. Należy sprawdzić, czy ruchome elementy działają prawidłowo i nie blokują się, czy żaden z elementów nie pękł ani nie jest uszkodzony w stopniu uniemożliwiającym prawidłowe działanie elektronarzędzia. Przed użyciem urządzenia zleć naprawę uszkodzonych części. Przyczyną wielu wypadków z elektronarzędziami jest ich niewłaściwa konserwacja. f) Dbaj o to, aby narzędzia skrawające były ostre i czyste. Zadbane narzędzia skrawające z ostrymi ostrzami rzadziej się blokują i pozwalają się lepiej prowadzić. g) Korzystaj z elektronarzędzia, akcesoriów, narzędzi roboczych itd. zgodnie z tymi instrukcjami. Uwzględnij przy tym warunki pracy oraz specyfikę wykonywanej czynności. Używanie elektronarzędzi do celów innych, niż przewiduje to ich przeznaczenie, może doprowadzić do niebezpiecznych sytuacji. 5.Serwis a) Naprawę urządzenia należy zlecać tylko wykwalifikowanemu specjaliście i stosować do tego oryginalne części zamienne. Dzięki temu zapewnione jest bezpieczeństwo użytkowania elektronarzędzia. Specyficzne dla urządzenia wskazówki bezpieczeństwa do nożyc do żywopłotów ■ Wszystkie części ciała trzymać z dala od noża tnącego. Nie próbować przy pracującym nożu usuwać ściętego materiału ani go przytrzymywać. Zakleszczony materiał usuwać tylko przy wyłączonym urządzeniu. Dodatkowo wyciągnij wtyk z gniazda zasilania. Nawet chwila nieuwagi podczas korzystania z nożyc może spowodować poważne obrażenia ciała. ■ Nosić nożyce za przedni uchwyt, w stanie wyłączonym, z belką noża skierowaną od ciała. Podczas transportu lub w czasie przechowywania zawsze zakładać osłonę ochronną. Staranne obchodzenie się z urządzeniem zmniejsza prawdopodobieństwo przypadkowego dotknięcia pracujących noży. ■ Trzymać narzędzie tylko za izolowane uchwyty, ponieważ nóż tnący może trafić na ukryte przewody pod napięciem lub na własny przewód zasilający. Kontakt z przewodem przewodzącym prąd może spowodować pojawienie się napięcia również w metalowych elementach urządzenia i spowodować porażenie prądem. ■ Przewód sieciowy trzymaj z dala od obszaru cięcia. W trakcie pracy przewód może zostać zakryty przez roślinność i może dojść do jego przypadkowego przecięcia. ■ Należy starannie skontrolować żywopłot do przycięcia i usunąć wszelkie druty oraz ciała obce. ■ Zaleca się stosowanie wyłącznika różnicowo-prądowego o prądzie wyzwalającym 30 mA lub mniej. WSKAZÓWKA ► Nożyce do żywopłotów są dostarczane w stanie kompletnie zmontowanym. ► Ilustracje przedstawiające sposób pracy z nożycami do krzewów wzgl. ich elementy nastawcze można znaleźć na rozkładanej okładce. ► Informacje i ilustracje na temat ustawień, konserwacji i smarowania przez użytkownika znajdują się w niniejszej instrukcji. ► Wskazówki na temat pozycji podczas pracy (patrz rozkładana strona okładki). ► Wskazówki na temat elementów ustawczych (patrz rozkładana strona okładki). ► Wskazówki na temat wymiany i naprawy (patrz rozdz. Konserwacja i czyszczenie / serwis). ► Wyjaśnienie wszystkich symboli graficznych, zastosowanych w nożycach do żywopłotów oraz dane techniczne znajdują się w niniejszej instrukcji. ► Cechy nożyc do żywopłotów są podane w danych technicznych. ► Zablokowane narzędzie: usunąć blokujący materiał z belki noża . UWAGA! ► W razie zagrożenia lub w sytuacji awaryjnej natychmiast wyłączyć silnik i wyjąć wtyk przewodu zasilającego. Uzupełniające wskazówki bezpieczeństwa do nożyc do żywopłotów Przygotowanie: a) TE NOŻYCE DO ŻYWOPŁOTÓW MOGĄ SPOWODOWAĆ POWAŻNE OBRAŻENIA! Należy starannie przeczytać instrukcje w sprawie poprawnego obchodzenia się z nożycami do żywopłotów, ich przygotowania, naprawy, uruchamiania i odstawiania. Należy zapoznać się ze wszystkimi elementami nastawczymi oraz z prawidłowym obchodzeniem się z nożycami do żywopłotów. b) Dzieci nigdy nie mogą używać nożyc do żywopłotów. c) Uwaga na napowietrzne przewody energetyczne. d) Należy zrezygnować z posługiwania się nożycami do żywopłotów, gdy w pobliżu znajdują się inne osoby, w szczególności dzieci. e) Nosić odpowiednią odzież! Nie nosić luźnej odzieży ani biżuterii; mogłyby one zostać wciągnięte przez ruchome części. Zaleca się noszenie wytrzymałych rękawic, obuwia z przeciwpoślizgową podeszwą i okularów ochronnych. f) Jeżeli element tnący dotyka ciała obcego, odgłosy pracy stają się głośniejsze lub nożyce do żywopłotów wpadają w nienormalne drgania, wyłączyć silnik i odczekać na zatrzymanie się urządzenia. Wykonać następujące czynności: – sprawdzić, czy narzędzie nie jest uszkodzone; – sprawdzić, czy są obluzowane części i ew. zamocować je; – uszkodzone części wymienić na równoważne lub zlecić naprawę. g) Nosić ochronniki słuchu! h) Nosić ochronę oczu! i) Aby w sytuacji awaryjnej zatrzymać nożyce do żywopłotów, wyciągnij wtyk sieciowy z gniazda zasilania. PHSHE 900 B2 PL │ 61 ■ Praca: a) wyjmij wtyk z gniazda zasilania przed następującymi czynnościami: – czyszczenie lub usuwanie elementów blokujących; – kontrola, naprawa lub prace przy nożycach do żywopłotów; – ustawianie pozycji roboczej urządzenia tnącego; – oraz gdy nożyce do żywopłotów pozostają bez nadzoru. b) Przed uruchomieniem silnika zawsze dopilnować, by nożyce do żywopłotów znajdowały się w jednej z przepisanych pozycji roboczych. c) Podczas pracy z nożycami do żywopłotów należy zawsze przestrzegać bezpiecznej pozycji roboczej, szczególnie podczas pracy na schodkach lub na drabinie. d) Nie eksploatować nożyc do żywopłotów z uszkodzonym lub silnie zużytym urządzeniem tnącym. e) Dopilnować, by podczas pracy wszystkie uchwyty i urządzenia zabezpieczające nożyc do żywopłotów były zamontowane. Nigdy nie próbować pracować z niekompletnymi nożycami do żywopłotów lub z niedozwolonymi przeróbkami. f) Nożyce do żywopłotów mocno trzymać oburącz za przewidziane do tego uchwyty. g) Zawsze należy zapoznać się z otoczeniem i zwracać uwagę na możliwe zagrożenia, które mogą być niesłyszalne z powodu hałasu wytwarzanego przez nożyce. Konserwacja i przechowywanie: a) Jeżeli nożyce do żywopłotów mają być unieruchomione w celu konserwacji, kontroli lub przechowania, należy wyłączyć silnik, aby wszystkie części obrotowe zatrzymały się. Przed sprawdzaniem, ustawianiem itp. należy odczekać na schłodzenie się urządzenia. b) Nożyce do żywopłotów przechowywać w takim miejscu, w którym opary benzyny nie wejdą w kontakt z otwartym płomieniem ani iskrami. Przed odłożeniem nożyc do przechowywania należy zawsze odczekać, aż się schłodzą. c) Podczas transportu lub na czas przechowywania nożyc do żywopłotów należy zawsze zakładać osłonę urządzenia tnącego. Dalsze wskazówki bezpieczeństwa do nożyc do żywopłotów ■ Wszystkie części ciała trzymać z dala od noża tnącego. Nie próbować przy pracującym nożu usuwać ściętego materiału ani go przytrzymywać. Zakleszczony materiał usuwać tylko przy wyłączonym urządzeniu. Nawet chwila nieuwagi podczas korzystania z nożyc może spowodować poważne obrażenia ciała. ■ Nosić nożyce za uchwyt, w stanie wyłączonym, z belką noża skierowaną od ciała. Podczas transportu lub w czasie przechowywania zawsze zakładać osłonę ochronną. Staranne obchodzenie się z urządzeniem zmniejsza niebezpieczeństwo obrażeń ciała spowodowanych przez noże. ■ Trzymać urządzenie tylko za izolowane uchwyty, ponieważ nóż tnący może trafić na ukryte przewody pod napięciem lub na własny przewód zasilający. Kontakt z przewodem przewodzącym prąd może spowodować pojawienie się napięcia również w metalowych elementach urządzenia i spowodować porażenie prądem. ♦ Przeszukać żywopłot, czy nie ma w nim ukrytych przedmiotów (np. ogrodzeń drucianych). RYZYKO RESZTKOWE! Nawet jeśli używa się tego elektronarzędzia prawidłowo, zawsze pozostają ryzyka resztkowe. Poniższe zagrożenia mogą powstać w związku z konstrukcją i wykonaniem tego elektronarzędzia: a) skaleczenia c) szkody zdrowotne wynikające z drgań dłoń/ramię, jeśli urządzenie jest używane przez dłuższy czas, albo też nie jest odpowiednio prowadzone lub konserwowane. WSKAZÓWKA ► Nożyce do żywopłotów są dostarczane w stanie kompletnie zmontowanym. ► Informacje i ilustracje na temat ustawień, konserwacji i smarowania przez użytkownika znajdują się w niniejszej instrukcji. ► Wskazówki na temat wymiany i naprawy (patrz rozdz. Konserwacja i czyszczenie / serwis). ► Wyjaśnienie wszystkich symboli graficznych, zastosowanych w nożycach do żywopłotów oraz dane techniczne znajdują się w niniejszej instrukcji. ► Cechy nożyc do żywopłotów są podane w danych technicznych. ► Zablokowane narzędzie: usunąć blokujący materiał z belki noża . ■ Korzystać wyłącznie z osprzętu i przyrządów dodatkowych, które zostały wymienione w instrukcji obsługi. Korzystanie z narzędzi lub akcesoriów innych, niż podano w instrukcji obsługi, może doprowadzić do obrażeń. Specyficzne dla urządzenia wskazówki bezpieczeństwa do piły do gałęzi ■ Zawsze nosić kask ochronny, ochronniki słuchu i rękawice bezpieczeństwa. Nosić okulary ochronne, by do oczu nie dostały się krople oleju czy trociny. Nosić maskę przeciwpyłową. ■ Nigdy nie używać urządzenia stojąc na drabinie. ■ Podczas używania urządzenia nie wychylać się nadmiernie do przodu. Zawsze dbać o utrzymanie stabilnej postawy i przez cały czas utrzymywać równowagę. Podczas pracy używać dołączonego pasa do przenoszenia, by równomiernie rozłożyć ciężar na ciele. ■ Nosić wytrzymałe, przeciwpoślizgowe buty z cholewą. ■ Nie używać urządzenia podczas deszczu ani przy dużej wilgotności. ■ Nie używać urządzenia w pobliżu przewodów pod napięciem. Utrzymywać odstęp co najmniej 10 metrów od napowietrznych linii energetycznych. ■ Nie stawać pod gałęziami, które mają zostać obcięte, by uniknąć obrażeń na skutek ich upadku. Uważać na odskakujące gałęzie, by uniknąć obrażeń. Pracować pod kątem 60° ±10°. ■ Należy pamiętać, że może dojść do odbicia urządzenia. ■ Należy obserwować nie tylko obcinane gałęzie, ale także spadający materiał, by uniknąć potknięcia. ■ Po 30 minutach pracy konieczna jest przerwa na co najmniej jedną godzinę. ■ Zawsze nosić odpowiednie rękawice ochronne. ■ Na czas przechowywania i transportu założyć osłonę na szynę prowadzącą i łańcuch tnący. ■ Nie używać urządzenia w otoczeniu grożącym wybuchem, jak np. w pobliżu łatwopalnych cieczy, gazów lub oparów. Wytwarzane przez urządzenie iskry mogłyby spowodować zapłon tych oparów lub gazów. ■ Gniazdo zasilające musi być odpowiednie do wtyku. Nigdy nie przerabiać wtyku, by nie spowodować porażenia prądem elektrycznym. ■ Nie wyjmować wtyku z gniazda ciągnąc za przewód, ale zawsze chwytać za wtyk. Nie używać przewodu sieciowego do przeciągania lub transportowania urządzenia. Nie dopuścić do kontaktu przewodu sieciowego z wysoką temperaturą, olejami, ostrymi krawędziami i ruchomymi częściami. ■ Po zakończeniu pracy lub podczas czyszczenia i konserwacji wyjąć wtyk z urządzenia. ■ Należy unikać niezamierzonego uruchomienia urządzenia. b) uszkodzenia słuchu, jeśli nie nosi się odpowiedniej ochrony słuchu. ■ 62 │ PL PHSHE 900 B2 ■ Urządzenia z uszkodzonym wyłącznikiem należy natychmiast naprawiać, by nie dopuścić do szkód i obrażeń. ■ Urządzenie należy przechowywać poza zasięgiem dzieci. ■ Tym urządzeniem mogą się posługiwać tylko osoby zaznajomione z instrukcją obsługi i z samym urządzeniem. ■ Starannie konserwować elektronarzędzia. Należy sprawdzić, czy ruchome elementy działają prawidłowo i nie blokują się, czy żaden z elementów nie pękł ani nie jest uszkodzony w stopniu uniemożliwiającym prawidłowe działanie elektronarzędzia. Przed użyciem urządzenia zleć naprawę uszkodzonych części. Przyczyną wielu wypadków z elektronarzędziami jest ich niewłaściwa konserwacja. ■ Dbać o to, aby narzędzia skrawające były ostre i czyste. Zadbane narzędzia skrawające z ostrymi ostrzami rzadziej się blokują i pozwalają się lepiej prowadzić. ■ Konserwację urządzenia zlecać specjalistom. Stosować wyłącznie oryginalne części zamienne, zalecane przez producenta. Środki ostrożności przeciwko odbiciu narzędzia UWAGA ODBICIE! ► Podczas pracy należy wystrzegać się odbicia urządzenia. Istnieje niebezpieczeństwo zranienia. Należy unikać odbić, zachowując ostrożność i stosując właściwą technikę piłowania. ■ Dotknięcie czubkiem szyny może w niektórych przypadkach spowodować nieoczekiwany, gwałtowny ruch do tyłu, w trakcie którego szyna jest odbijana do góry i w kierunku operatora (patrz rys.). Bild 1 ■ Do odbicia może dojść wtedy, gdy czubek szyny prowadzącej dotknie przedmiotu lub gdy drewno się wygnie i łańcuch zostanie zakleszczony w drewnie (patrz rys.). ■ Zakleszczenie piły łańcuchowej na górnej krawędzi szyny prowadzącej może spowodować silne odbicie szyny w kierunku operatora. ■ Każda z tych reakcji może spowodować utratę kontroli nad piłą i ewentualne obrażenia. Nie należy zdawać się wyłącznie na wbudowane w piłę łańcuchową urządzenia zabezpieczające. Użytkownik piły łańcuchowej powinien stosować różne środki ostrożności, by uniknąć obrażeń i wypadków. Odbicie jest skutkiem nieodpowiedniego lub wadliwego użytkowania elektronarzędzia. Można mu zapobiec za pomocą odpowiednich środków bezpieczeństwa, jak opisano poniżej: ■ Piłę należy mocno trzymać oburącz, przy czym kciuki i palce powinny obejmować uchwyty piły łańcuchowej. Ciało i ręce należy utrzymywać w takiej pozycji, by móc odeprzeć siłę odbicia. Gdy zastosowano odpowiednie środki, operator jest w stanie opanować siłę odbicia. Nigdy nie wypuszczać piły łańcuchowej z rąk. PHSHE 900 B2 ■ Unikać nienaturalnej postawy ciała i nie piłować powyżej wysokości ramion. Unika się w ten sposób niezamierzonego dotknięcia wierzchołka szyny, a jednocześnie zapewnia to lepszą kontrolę nad piłą w nieoczekiwanych sytuacjach. ■ Zawsze stosować zalecane przez producenta szyny zamienne i łańcuchy tnące.Niewłaściwe szyny zamienne i łańcuchy tnące mogą spowodować zerwanie łańcucha i/lub odbicie. ■ Należy stosować się do zaleceń producenta na temat ostrzenia i konserwacji łańcucha tnącego. Zbyt niskie ograniczniki głębokości zwiększają skłonność do powstawania odbić. ■ Nie należy piłować wierzchołkiem prowadnicy. Istnieje niebezpieczeństwo odbicia. ■ Należy dopilnować, by na podłożu nie było żadnych przedmiotów, o które można by się potknąć. Dalsze wskazówki bezpieczeństwa PRZESTROGA! NIEBEZPIECZEŃSTWO OBRAŻEŃ! ► Podczas pracy nigdy nie chwytać urządzenia powyżej pierścienia ochronnego , by uniknąć obrażeń! ■ Podczas pracy w promieniu 15 metrów nie mogą przebywać inne osoby ani zwierzęta. Użytkownik jest odpowiedzialny za osoby trzecie w strefie pracy. ■ Utrzymywać urządzenie, narzędzia tnące i osłonę prowadnicy łańcucha w dobrym stanie, by uniknąć obrażeń. ■ Należy zapewnić nadzór nad dziećmi, aby nie bawiły się urządzeniem. ■ Urządzeniem należy się posługiwać dopiero po zaznajomieniu się z nim. ■ Nigdy nie pracować z uszkodzonym, niekompletnym lub zmodyfikowanym bez zgody producenta urządzeniem. Nigdy nie pracować, gdy urządzenia zabezpieczające są uszkodzone. Nie używać urządzenia, gdy włącznik/wyłącznik jest uszkodzony. Przed użyciem sprawdzić stan bezpieczeństwa urządzenia, w szczególności prowadnicę i łańcuch tnący. Jeżeli urządzenie upadło, sprawdzić, czy nie ma poważnych uszkodzeń. ■ Nigdy nie uruchamiać urządzenia, jeśli prowadnica, piła łańcuchowa i osłona koła łańcuchowego nie są poprawnie zamontowane. ■ Podczas uruchamiania i pracy dopilnować, by urządzenie nie stykało się z podłożem, kamieniami, drutem i innymi ciałami obcymi. Przed odstawieniem urządzenia należy je wyłączyć. ■ Urządzenie jest przeznaczone do pracy oburącz. Nigdy nie pracować z użyciem jednej ręki. ■ Trzymać narzędzie tylko za izolowane uchwyty, ponieważ łańcuch tnący może trafić na ukryte przewody pod napięciem. Kontakt łańcucha tnącego z przewodem przewodzącym prąd może spowodować pojawienie się napięcia również w metalowych elementach urządzenia i spowodować porażenie prądem. ■ Podczas zmiany miejsca pracy należy uważać na to, aby urządzenie było wyłączone, a palec nie dotykał włącznika/wyłącznika. Urządzenie przenosić z łańcuchem tnącym i prowadnicą skierowaną do tyłu. Na czas transportu zakładać osłonę prowadnicy. ■ Przy każdym cięciu zakładać zderzak oporowy zębaty i dopiero wtedy rozpoczynać piłowanie. ■ Zachować szczególną ostrożność podczas cięcia małych krzewów i gałęzi. Cienkie gałęzie mogą zaplątać się w pile oraz odbić w kierunku operatora, powodując ewentualną utratę równowagi. ■ Nie ciąć drewna leżącego na ziemi ani nie próbować wycinać korzeni wystających z ziemi. Należy bezwzględnie unikać zagłębiania łańcucha tnącego w glebie, gdyż w przeciwnym razie piła natychmiast się stępi. ■ Podczas piłowania naprężonej gałęzi należy uważać na możliwe odbicie po uwolnieniu naprężenia. Istnieje niebezpieczeństwo zranienia. ■ W przypadku przekoszenia lub zablokowania narzędzia tnącego w gałęziach nie wolno próbować siłą uwolnić tego urządzenia. Natychmiast wyłączyć urządzenie i ponownie włączyć dopiero po uwolnieniu urządzenia. Niebezpieczeństwo odniesienia obrażeń! PL │ 63 ■ Montaż łańcucha tnącego i prowadnicy Przed uruchomieniem OSTRZEŻENIE! PRZESTROGA! NIEBEZPIECZEŃSTWO OBRAŻEŃ! ► Przed wykonywaniem wszelkich czynności przy urządzeniu należy wyjąć wtyk przewodu zasilającego z gniazda. Niebezpieczeństwo porażenia prądem elektrycznym! Zespół napędowy Montaż uchwytu okrągłego ► Nosić rękawice ochronne! Niebezpieczeństwo zranienia przez ostre zęby tnące! WSKAZÓWKA ► Przestrzegać kierunku biegu łańcucha tnącego i na osłonie koła łańcuchowego . ♦ Załóż uchwyt okrągły w żądanym położeniu na wysięgnik ♦ Dokręć śrubę do oporu. . i łańcuch tnący ► W chwili dostawy prowadnica zmontowane. ► Zależnie od zużycia, prowadnicę Zamocowanie/montaż pasa do przenoszenia ♦ Odkręcić nakrętkę ♦ Zdjąć osłonę koła łańcuchowego Montaż nożyc do żywopłotów ♦ Wymontować prowadnicę wy . ♦ Kołek aretujący do żywopłotów na wysięgnik musi się zatrzasnąć. , Montaż piły do gałęzi ♦ Wsunąć przedni wysięgnik napędowego. ♦ Kołek aretujący piły do gałęzi na wysięgnik zespołu musi się zatrzasnąć. ♦ Połączyć oba wysięgniki śrubą dociskową z przetyczką nakręcić nakrętkę po przeciwnej stronie. , Ustawianie nożyc do żywopłotów pod kątem ♦ Zwolnić blokadę . ♦ Nacisnąć dźwignię nastawczą żądanego położenia. ♦ Pozwolić, by dźwignia nastawcza w płycie podstawy nożyc. , obrócić nożyce do żywopłotów do . . ♦ Łańcuch tnący należy ew. wcześniej poluzować, by móc wymontować prowadnicę i łańcuch (patrz rozdz. „Naprężanie i kontrola łańcucha tnącego”). Wykonać te polecenia w odwrotnej kolejności. ♦ Łańcuch tnący ♦ Połączyć oba wysięgniki śrubą dociskową z przetyczką nakręcić nakrętkę po przeciwnej stronie. są już można obrócić. narzędziem montażowym ♦ Zaczep pas do przenoszenia za oczko . ♦ Dopasuj pas do przenoszenia do swojego wzrostu w taki sposób, by oczko przy zawieszonym urządzeniu znajdowało się na wysokości bioder. ♦ Wsunąć przedni wysięgnik nożyc zespołu napędowego. na prowadnicy z łańcuchem tnącym z płyty podsta- zakładać ponownie od początku prowadnicy ♦ Szynę prowadzącą założyć nad prowadnicą , włożyć przy tym kołek naprężenia łańcucha do otworu prowadnicy . Jednocześnie przełożyć łańcuch tnący przez koło łańcuchowe . ♦ Zamontować ponownie osłonę koła łańcuchowego nakrętką . ♦ Teraz należy naprężyć łańcuch tnący kontrola łańcucha tnącego). i lekko dokręć (patrz rozdz. Naprężanie i Naprężanie i kontrola łańcucha tnącego WSKAZÓWKA ► Naprężenie łańcucha tnącego jest ważne dla bezpieczeństwa użytkownika oraz działania urządzenia. Prawidłowo naciągnięty łańcuch tnący wydłuża okres użytkowania urządzenia. OSTRZEŻENIE! i blokada zatrzasnęła się ► Nosić rękawice ochronne! Niebezpieczeństwo zranienia przez ostre zęby tnące! Ustawianie piły do gałęzi pod kątem ♦ Odkręć nieznacznie nakrętkę ♦ Zwolnić blokadę ♦ Obróć śrubę naprężenia łańcucha w prawo, by zwiększyć naprężenie. narzędziem montażowym ♦ Obróć śrubę naprężenia łańcucha w lewo, by zmniejszyć naprężenie. narzędziem montażowym . ♦ Nacisnąć dźwignię nastawczą z dwóch pozycji. . , obrócić piłę do gałęzi do jednej ♦ Pozwolić, by dźwignia nastawcza i blokada w wycięciu płyty podstawy (piła do gałęzi) . zatrzasnęły się narzędziem montażowym . ♦ Łańcuch tnący musi przylegać do dolnej strony prowadnicy. Sprawdź, czy łańcuch tnący da się przeciągnąć ręcznie przez prowadnicę . ♦ Ponownie dokręcić nakrętkę do oporu narzędziem montażowym . WSKAZÓWKA ► Pociągając za łańcuch piły z siłą 9 N (ok. 1 kg), między łańcuchem a prowadnicą odległość nie powinna być większa niż 2 mm. ► Nowy łańcuch tnący naprężać. wydłuża się i trzeba go dość często ► Przed każdym użyciem urządzenia sprawdzić naprężenie łańcucha. ■ 64 │ PL PHSHE 900 B2 Smarowanie łańcucha Praca z nożycami do żywopłotów ♦ Zdjąć pokrywę zbiornika oleju ♦ Wlać do zbiornika oleju chów . . Użytkowanie maszyny: ok. 100 ml ekologicznego oleju do łańcu- WSKAZÓWKA ► Należy pamiętać, że przepisy w danym kraju mogą powodować ograniczenia w użytkowaniu nożyc do żywopłotów. OSTRZEŻENIE! ► Nigdy nie pracować bez smarowania łańcucha tnącego! Gdyby piła pracowała na sucho, cały układ piłowania zostanie w krótkim czasie nieodwracalnie zniszczony. Przed rozpoczęciem pracy zawsze sprawdzać smarowanie łańcucha i poziom oleju w zbiorniku. WSKAZÓWKA ► Używać wyłącznie oleju do pił łańcuchowych. Preferowane są oleje biodegradowalne. Nie stosować zużytych olejów, olejów silnikowych itp. ► W trakcie pracy należy kontrolować, czy automatyczne smarowanie łańcucha tnącego działa poprawnie. Przed pracą i w trakcie pracy kontrolować działanie smarowania łańcucha tnącego. Ostrzenie łańcucha tnącego ► Codzienna kontrola nożyc do żywopłotów przed każdym użyciem jest nieodzowna. Urządzenie należy sprawdzić również po uderzeniu i upadku, aby znaleźć znaczące uszkodzenia i usterki. ► Należy zawsze nosić solidne obuwie i ciasno przylegającą odzież, aby zminimalizować ryzyko wypadku. Stać stabilnie na ziemi, uważać na zachowanie równowagi i zawsze nosić dostarczony pas nośny! ► Ze względu na zdrowie należy stosować przerwy na odpoczynek podczas pracy. Zmęczenie fizyczne zwiększa ryzyko obrażeń ciała! OSTRZEŻENIE! ► Nigdy nie uruchamiać urządzenia przy zmęczeniu, w chorobie, pod wpływem alkoholu lub innych używek. Techniki cięcia ■ Patrz rozkładana okładka (rys. A). WSKAZÓWKA WSKAZÓWKA ► Ostrzałkę można zamocować w pomocniczym urządzeniu do ostrzenia dla pewnego chwytu podczas szlifowania. ► Grube gałęzie obcinać sekatorem. ► W zestawie do ostrzenia, np. firmy Oregon, można znaleźć szczegółowe informacje na temat przebiegu ostrzenia. ► Alternatywnie, można wykorzystać elektryczny przyrząd do ostrzenia łańcuchów tnących. Postępować zgodnie z zaleceniami producenta. ► W razie wątpliwości co do wykonania ostrzenia, wymienić łańcuch tnący na nowy. Praca z piłą do gałęzi Techniki piłowania OSTRZEŻENIE! ► Zawsze uważać na spadające gałęzie. ► Zwracać uwagę na zagrożenie ze strony odbijających gałęzi. WSKAZÓWKA Uruchomienie ► Przyłóż zderzak do gałęzi. W ten sposób praca jest bardziej bezpieczna i spokojna. WSKAZÓWKA ► Przestrzegać przepisów w sprawie ochrony przed hałasem oraz przepisów lokalnych. Używanie urządzenia może ograniczone lub zabronione w określone dni (np. niedziele i święta), w określonych godzinach (południe, cisza nocna) lub na określonym terenie (np. w kurortach, klinikach itp.). ► Dopiero wtedy rozpocząć piłowanie. Obcinanie małych gałęzi ♦ Małe gałęzie (Ø do 0- 8 cm) obcinać od góry do dołu (patrz rysunek). Włączanie/wyłączanie Włączanie: ♦ połącz przewód sieciowy z przedłużaczem. ♦ Na końcówce przedłużacza uformuj pętlę i zawieś ją w odciążeniu kabla . ♦ Naciśnij blokadę włączenia włącznik/wyłącznik . i trzymając ją wciśniętą, naciśnij Wyłączanie: ♦ zwolnij włącznik / wyłącznik . ♦ Odłącz przedłużacz od odciążenia ♦ Odłącz przewód sieciowy . od przedłużacza. Przestawianie uchwytu ♦ Naciśnij przycisk odblokowania . Przestaw element obrotowy do żądanego położenia. Zwolnij przycisk odryglowania musi się on zatrzasnąć. PHSHE 900 B2 PL │ 65 ■ ♦ Obcinanie grubszych gałęzi Transport ♦ W przypadku większych gałęzi (Ø 8-25 cm) wykonać najpierw cięcie odciążające A (patrz rysunek). ■ Podczas transportu korzystać z osłon ochronnych ■ Cięcie odciążające zapobiega też oddzieraniu kory z pnia. . ■ Nie włączać urządzenia w trakcie przenoszenia (patrz rysunek). ♦ Teraz piłować od góry B w dół A do odcięcia. B 2 1 A Konserwacja i czyszczenie Piłowanie po kawałku Długie lub grube gałęzie należy skrócić przed ich odcięciem (patrz rysunek). Cc B b A a OSTRZEŻENIE! Jeśli konieczna jest wymiana przewodu sieciowego, powinna ona zostać wykonana przez producenta lub jego przedstawiciela, aby uniknąć zagrożeń bezpieczeństwa. ■ Pamiętaj, aby zespół napędowy był zawsze czysty, suchy oraz aby nie był zabrudzony olejem ani smarem. ■ Piłę do gałęzi należy regularnie czyścić z wiórów. ♦ Do czyszczenia obudowy przyrządu używaj suchej szmatki. Zdejmij pokrywę . Bezpieczna praca ■ Utrzymywać urządzenie, narzędzia tnące i osłonę łańcucha dobrym stanie, by uniknąć obrażeń. w ♦ Zdejmij łańcuch tnący z prowadnicy i oczyść prowadnicę . ■ Jeżeli urządzenie upadło, sprawdzić, czy nie ma poważnych uszkodzeń. ♦ Pilnuj, aby łańcuch tnący był ostry i kontroluj naprężenie łańcucha, sprawdzaj poziom oleju i doprowadzanie oleju. ■ Przestrzegać przepisanego kąta roboczego 60° ±10°, by zapewnić bezpieczną pracę (patrz rysunek). ♦ Sprawdź, czy w nożycach nie ma obluzowanych śrub belki nożna i w razie potrzeby dokręć je. ♦ Usuń pozostałości roślin. ♦ Konserwuj belkę noża 60°±10° olejem w aerozolu lub z oliwiarki. Przechowywanie ■ Urządzenie oczyścić przed odłożeniem na przechowanie. ■ Urządzenie należy przechowywać w dołączonych osłonach w suchym, ciepłym miejscu i poza zasięgiem dzieci. ■ Nie używać urządzenia, stojąc na drabinie lub w innym niepewnym miejscu. ■ Urządzenie należy przechowywać na leżąco lub zabezpieczyć je przed przewróceniem. ■ Nie pozwalać sobie na nieprzemyślane cięcia. Może to zagrażać Tobie i innym. ■ Opróżnić zbiornik oleju . Ekologiczny olej do łańcuchów może ulec zżywiczeniu lub wyciec ze zbiornika przez otwór odpowietrzający . ■ Należy zapewnić nadzór nad dziećmi, aby nie bawiły się urządzeniem. ■ Regularnie zmieniać pozycję roboczą. Dłuższe używanie urządzenia może spowodować zakłócenia ukrwienia dłoni na skutek drgań. Czas bezpiecznego użytkowania urządzenia można jednak przedłużyć za pomocą odpowiednich rękawic lub regularnych przerw. Należy pamiętać, że osobiste skłonności do problemów z krążeniem, niskie temperatury zewnętrzne lub duże siły podczas chwytania skracają czas użytkowania. ■ Należy unikać ryzyka związanego z drganiami, np. ryzyka wystąpienia choroby znanej jako zespół wibracyjny lub choroba wibracyjna. W tym celu należy stosować częste przerwy podczas pracy, w trakcie których należy rozcierać dłonie! ■ 66 │ PL PHSHE 900 B2 Wyszukiwanie usterek, piła do gałęzi Problem Możliwa przyczyna Usuwanie usterek Silnik działa, łańcuch tnący nie porusza się. Nasadka do cięcia żywopłotów lub piła do gałęzi niewłaściwie podłączona do zespołu napędowego. Sprawdzić montaż Brak postępu pracy Łańcuch tnący pracuje na sucho, jest przegrzany lub zwisa. Uzupełnić olej lub łańcuch tnący naostrzyć, wymienić lub naprężyć. Podane tutaj informacje odnoszą się do normalnych warunków użytkowania. W trudnych warunkach, jak np. silne pylenie i przy pracy długotrwałej należy odpowiednio skrócić podane terminy. Wyszukiwanie usterek w nożycach do żywopłotów Problem Możliwa przyczyna Usuwanie usterek Silnik pracuje, noże nie poruszają się Nasadka do cięcia żywopłotów lub piła do gałęzi niewłaściwie podłączona do zespołu napędowego. Sprawdzić montaż Terminy konserwacji nożyc do żywopłotów Część urządzenia Czynność Nóż tnący Kontrola wzrokowa Przed rozpoczęciem pracy Po zakończeniu pracy W razie potrzeby X X X czyszczenie Terminy konserwacji piły do gałęzi Podane tutaj informacje odnoszą się do normalnych warunków użytkowania. W trudnych warunkach, jak np. silne pylenie i przy pracy długotrwałej należy odpowiednio skrócić podane terminy. Część urządzenia Czynność Smarowanie łańcucha Sprawdzić Przed rozpoczęciem pracy Co tydzień W razie awarii W razie uszkodzenia W razie potrzeby X Łańcuch tnący Sprawdzić i dopilnować, aby był ostry X Sprawdzić naprężenie łańcucha X Naostrzyć Szyna prowadząca sprawdzić (zużycie, uszkodzenie) X X Oczyścić i odwrócić X Usunąć zadziory X Wymienić Koło łańcuchowe Sprawdzić Wymienić PHSHE 900 B2 X X X X X PL │ 67 ■ Gwarancja Kompernaß Handels GmbH Szanowny Kliencie, To urządzenie objęte jest 3-letnią gwarancją, licząc od daty zakupu. W przypadku wad tego produktu, masz gwarantowane ustawowo prawa w stosunku sprzedawcy. Te ustawowe prawa nie są ograniczone przez nasze opisane poniżej warunki gwarancji. Warunki gwarancji Okres gwarancji rozpoczyna się od daty zakupu. Należy zachować paragon. Jest on wymagany jako dowód zakupu. Jeżeli w ciągu trzech lat od daty zakupu produktu ujawni się w nim wada materiałowa lub produkcyjna, produkt zostanie wedle naszego uznania nieodpłatnie naprawiony, wymieniony na nowy lub zostanie zwrócona jego cena. Warunkiem spełnienia tego świadczenia gwarancyjnego jest dostarczenie w trakcie tego trzyletniego okresu uszkodzonego urządzenia wraz z dowodem zakupu (paragonem) oraz krótkim opisem wady i daty jej wystąpienia. Jeżeli wada jest objęta naszą gwarancją, otrzymasz z powrotem naprawiony lub nowy produkt. Okres gwarancji i ustawowe roszczenia gwarancyjne Wykonanie usługi gwarancyjnej nie przedłuża okresu gwarancji. Dotyczy to również wymienionych i naprawionych części. Wszelkie szkody i wady wykryte w chwili zakupu należy zgłosić bezpośrednio po rozpakowaniu urządzenia. Po upływie okresu gwarancji wszelkie naprawy są wykonywane odpłatnie. Zakres gwarancji Urządzenie zostało starannie wyprodukowane i poddane przed wysyłką skrupulatnej kontroli jakości. Gwarancja obejmuje wady materiałowe lub produkcyjne. Niniejsza gwarancja nie obejmuje części produktu, podlegających normalnemu zużyciu, ani uszkodzeń części łatwo łamliwych, np. przełączników, akumulatorów, lub części wykonanych ze szkła. Niniejsza gwarancja traci swoją ważność, jeśli produkt został uszkodzony, nie używano go prawidłowo lub nie serwisowano należycie. W celu zapewnienia prawidłowego stosowania produktu należy ściśle przestrzegać wszystkich instrukcji wymienionych w instrukcjach obsługi. Należy bezwzględnie unikać zastosowania oraz postępowania, których odradza się w instrukcji obsługi lub przed którymi się w niej ostrzega. Produkt przeznaczony jest wyłącznie do użytku domowego, a nie do zastosowań komercyjnych. Niewłaściwe użytkowanie urządzenia, używanie go w sposób niezgodny z jego przeznaczeniem, użycie siły lub ingerencja w urządzenie, dokonywana poza naszymi autoryzowanymi punktami serwisowymi, powodują utratę gwarancji. Realizacja zobowiązań gwarancyjnych W celu zapewnienia szybkiego załatwienia sprawy, postępuj zgodnie z poniższymi wskazówkami: ■ W przypadku wszelkich pytań przygotuj paragon fiskalny oraz numer artykułu (np. IAN 12345) jako dowód zakupu. ■ Numer artykułu można znaleźć na tabliczce znamionowej na produkcie, wygrawerowany na urządzeniu, zapisany na stronie tytułowej instrukcji obsługi (w dolnym lewym rogu) lub na naklejce z tyłu bądź na spodzie urządzenia. ■ W przypadku wystąpienia błędów działania lub innych wad, prosimy o kontakt z odpowiednim działem serwisu telefonicznie lub przez e-mail. ■ Zarejestrowany jako wadliwy produkt możesz wtedy wraz z dołączonym dowodem zakupu (paragonem) oraz opisem i datą wystąpienia usterki wysłać nieodpłatnie na przekazany wcześniej adres serwisu. Na stronie www.lidl-service.com możesz pobrać te i wiele innych instrukcji, filmów o produktach oraz oprogramowanie instalacyjne. Za pomocą tego kodu QR możesz przejść bezpośrednio na stronę serwisu Lidl (www.lidl-service.com), gdzie możesz otworzyć instrukcję obsługi, wpisując numer artykułu (IAN) 123456. WSKAZÓWKA ► W przypadku narzędzi Parkside i Florabest prosimy przesłać wyłącznie uszkodzony produkt bez akcesoriów (np. akumulatorów, walizek do przechowywania, narzędzi montażowych itp.). Serwis OSTRZEŻENIE! ► Naprawy urządzenia zlecaj wyłącznie serwisowi lub elektrykowi, stosując tylko oryginalne części zamienne. Zapewni to odpowiedni poziom bezpieczeństwa użytkowania urządzenia po naprawie. ► Wymianę wtyku lub kabla przewodu zasilającego powierzaj zawsze producentowi elektronarzędzia lub autoryzowanemu serwisowi. Zapewni to odpowiedni poziom bezpieczeństwa użytkowania urządzenia po naprawie. Serwis Polska Tel.: 22 397 4996 E-Mail: [email protected] IAN 313266_1904 Importer Pamiętaj, że poniższy adres nie jest adresem serwisu. Skontaktuj się najpierw z odpowiednim punktem serwisowym. KOMPERNASS HANDELS GMBH BURGSTRASSE 21 44867 BOCHUM NIEMCY www.kompernass.com ■ 68 │ PL PHSHE 900 B2 Utylizacja Opakowanie urządzenia wykonane jest z materiałów przyjaznych dla środowiska naturalnego, które można oddać w lokalnych punktach zbiórki. Urządzenie oraz jego akcesoria są wykonane z różnych materiałów, jak np. metal i tworzywa sztuczne. O informacje na temat utylizacji zużytego urządzenia należy zapytać w najbliższym urzędzie gminy lub miasta. Ochrona środowiska ■ Starannie opróżnij zbiornik oleju i oddaj urządzenie do punktu zbiórki surowców do recyklingu. Wykorzystane w urządzeniu części metalowe oraz elementy z tworzyw sztucznych po ich segregacji nadają się do ponownego wykorzystania. Informacje na ten temat uzyskasz w naszym centrum serwisowym. ■ Zużyty olej oddać do punktu utylizacji odpadów. Nie wylewać ich do kanalizacji ani do ścieków. ■ Zużyte materiały serwisowe oraz materiały eksploatacyjne oddać do właściwego punktu zbiórki odpadów. Urządzeń elektrycznych nie wolno wyrzucać razem z odpadami domowymi! Zgodnie z dyrektywą europejską 2012/19/EU zużyte elektronarzędzia należy zbierać oddzielnie i poddawać procesowi odzysku z poszanowaniem zasad ochrony środowiska naturalnego. Produkt można poddać recyklingowi, podlega rozszerzonej odpowiedzialności producenta i jest zbierany w ramach systemu segregacji odpadów. Części zamienne Części zamienne można zamawiać bezpośrednio w centrum serwisowym. Podczas zamawiania należy koniecznie podać typ maszyny i numer części. Tłumaczenie oryginalnej deklaracji zgodności My, KOMPERNASS HANDELS GMBH, osoba odpowiedzialna za sporządzenie dokumentacji: Semi Uguzlu, BURGSTR. 21, 44867 BOCHUM, NIEMCY, oświadczamy niniejszym, że to urządzenie jest zgodne z następującymi normami, dokumentami normatywnymi oraz dyrektywami WE: Dyrektywa maszynowa (2006 / 42 / EC) Dyrektywa w sprawie zgodności elektromagnetycznej (2014 / 30 / EU) Dyrektywa w sprawie emisji hałasu 2000/14/EC 2005/88/EC Instytucja notyfikowana: nr 0036 TÜV SÜD Industrie Service GmbH, Westendstraße 199, 80686 Monachium, Niemcy Metoda oceny zgodności na podstawie załącznika V. Poziom mocy akustycznej LWA: zmierzono: 102,2 dB (A) gwarantowane: 105 dB (A) Dyrektywa w sprawie stosowania substancji szkodliwych dla zdrowia (2011/65/EU)* * Wyłączną odpowiedzialność za wystawienie niniejszej deklaracji zgodności ponosi producent. Opisany powyżej przedmiot oświadczenia spełnia wymagania przepisów dyrektywy 2011/65/EU Parlamentu Europejskiego i Rady z 8 czerwca 2011 w sprawie ograniczenia stosowania określonych substancji niebezpiecznych w urządzeniach elektrycznych i elektronicznych. Zastosowane normy zharmonizowane: EN 60745-1: 2009/A11: 2010 EN ISO 10517: 2019 EN ISO 11680-1: 2011 EN 55014-1: 2017 EN 55014-2: 2015 EN 61000-3-2: 2014 EN 61000-3-3: 2013 EN 50581:2012 Typ / nazwa urządzenia: 2-w-1 nożyce do żywopłotu z długim trzonkiem / okrzesywarka PHSHE 900 B2 Rok produkcji: 09 - 2019 Numer seryjny: IAN 313266_1904 Bochum, 11.09.2019 Semi Uguzlu - dyrektor ds. jakości Zastrzegamy sobie prawo do wprowadzania zmian technicznych w ramach procesu udoskonalania urządzenia. PHSHE 900 B2 PL │ 69 ■ ■ 70 │ PL PHSHE 900 B2 Obsah Úvod . . . . . . . . . . . . . . . . . . . . . . . . . . . . . . . . . . . . . . . . . . . . . . . . . . . . . . . . . . . . . . . . . . . . . . . . . . . . . . . . . . . . . . . . . 72 Použití nůžek na živý plot s dlouhou násadou v souladu s určením . . . . . . . . . . . . . . . . . . . . . . . . . . . . . . . . . . . . . . . . . . . . . . . . . . . . . . . . 72 Použití nástavce pro řezání větví ve výšce v souladu s určením. . . . . . . . . . . . . . . . . . . . . . . . . . . . . . . . . . . . . . . . . . . . . . . . . . . . . . . . . . . . 72 Použití v souladu s určením . . . . . . . . . . . . . . . . . . . . . . . . . . . . . . . . . . . . . . . . . . . . . . . . . . . . . . . . . . . . . . . . . . . . . . . . . . . . . . . . . . . . . . . 72 Vybavení . . . . . . . . . . . . . . . . . . . . . . . . . . . . . . . . . . . . . . . . . . . . . . . . . . . . . . . . . . . . . . . . . . . . . . . . . . . . . . . . . . . . . . . . . . . . . . . . . . . . . 72 Rozsah dodávky . . . . . . . . . . . . . . . . . . . . . . . . . . . . . . . . . . . . . . . . . . . . . . . . . . . . . . . . . . . . . . . . . . . . . . . . . . . . . . . . . . . . . . . . . . . . . . . 73 Technické údaje. . . . . . . . . . . . . . . . . . . . . . . . . . . . . . . . . . . . . . . . . . . . . . . . . . . . . . . . . . . . . . . . . . . . . . . . . . . . . . . . . . . . . . . . . . . . . . . . 73 Obecné bezpečnostní pokyny pro elektrická nářadí. . . . . . . . . . . . . . . . . . . . . . . . . . . . . . . . . . . . . . . . . . . . . . . . . . 74 1. Bezpečnost na pracovišti. . . . . . . . . . . . . . . . . . . . . . . . . . . . . . . . . . . . . . . . . . . . . . . . . . . . . . . . . . . . . . . . . . . . . . . . . . . . . . . . . . . . . . . 74 2. Elektrická bezpečnost . . . . . . . . . . . . . . . . . . . . . . . . . . . . . . . . . . . . . . . . . . . . . . . . . . . . . . . . . . . . . . . . . . . . . . . . . . . . . . . . . . . . . . . . . 74 3. Bezpečnost osob. . . . . . . . . . . . . . . . . . . . . . . . . . . . . . . . . . . . . . . . . . . . . . . . . . . . . . . . . . . . . . . . . . . . . . . . . . . . . . . . . . . . . . . . . . . . . 74 4. Použití a údržba elektrického nářadí. . . . . . . . . . . . . . . . . . . . . . . . . . . . . . . . . . . . . . . . . . . . . . . . . . . . . . . . . . . . . . . . . . . . . . . . . . . . . . 74 5. Servis. . . . . . . . . . . . . . . . . . . . . . . . . . . . . . . . . . . . . . . . . . . . . . . . . . . . . . . . . . . . . . . . . . . . . . . . . . . . . . . . . . . . . . . . . . . . . . . . . . . . . . 75 Bezpečnostní pokyny specifické pro nůžky na živý plot . . . . . . . . . . . . . . . . . . . . . . . . . . . . . . . . . . . . . . . . . . . . . . . . . . . . . . . . . . . . . . . . . 75 Doplňující bezpečnostní pokyny k nůžkám na živý plot . . . . . . . . . . . . . . . . . . . . . . . . . . . . . . . . . . . . . . . . . . . . . . . . . . . . . . . . . . . . . . . . . 75 Další bezpečnostní pokyny k nůžkám na živý plot . . . . . . . . . . . . . . . . . . . . . . . . . . . . . . . . . . . . . . . . . . . . . . . . . . . . . . . . . . . . . . . . . . . . . 76 ZBYTKOVÁ RIZIKA!. . . . . . . . . . . . . . . . . . . . . . . . . . . . . . . . . . . . . . . . . . . . . . . . . . . . . . . . . . . . . . . . . . . . . . . . . . . . . . . . . . . . . . . . . . . . . 76 Bezpečnostní pokyny specifické pro nástavec pro řezání větví . . . . . . . . . . . . . . . . . . . . . . . . . . . . . . . . . . . . . . . . . . . . . . . . . . . . . . . . . . . . 76 Preventivní opatření proti zpětnému rázu. . . . . . . . . . . . . . . . . . . . . . . . . . . . . . . . . . . . . . . . . . . . . . . . . . . . . . . . . . . . . . . . . . . . . . . . . . . . . 77 Další bezpečnostní upozornění . . . . . . . . . . . . . . . . . . . . . . . . . . . . . . . . . . . . . . . . . . . . . . . . . . . . . . . . . . . . . . . . . . . . . . . . . . . . . . . . . . . . 77 Před uvedením do provozu . . . . . . . . . . . . . . . . . . . . . . . . . . . . . . . . . . . . . . . . . . . . . . . . . . . . . . . . . . . . . . . . . . . . . . 78 Motorová jednotka . . . . . . . . . . . . . . . . . . . . . . . . . . . . . . . . . . . . . . . . . . . . . . . . . . . . . . . . . . . . . . . . . . . . . . . . . . . . . . . . . . . . . . . . . . . . . 78 Montáž kulaté rukojeti. . . . . . . . . . . . . . . . . . . . . . . . . . . . . . . . . . . . . . . . . . . . . . . . . . . . . . . . . . . . . . . . . . . . . . . . . . . . . . . . . . . . . . . . . . . 78 Připevnění / montáž ramenního popruhu . . . . . . . . . . . . . . . . . . . . . . . . . . . . . . . . . . . . . . . . . . . . . . . . . . . . . . . . . . . . . . . . . . . . . . . . . . . . 78 Montáž nůžek na živý plot . . . . . . . . . . . . . . . . . . . . . . . . . . . . . . . . . . . . . . . . . . . . . . . . . . . . . . . . . . . . . . . . . . . . . . . . . . . . . . . . . . . . . . . 78 Montáž nástavce pro řezání větví . . . . . . . . . . . . . . . . . . . . . . . . . . . . . . . . . . . . . . . . . . . . . . . . . . . . . . . . . . . . . . . . . . . . . . . . . . . . . . . . . . 78 Nastavení polohy u nůžek na živý plot . . . . . . . . . . . . . . . . . . . . . . . . . . . . . . . . . . . . . . . . . . . . . . . . . . . . . . . . . . . . . . . . . . . . . . . . . . . . . . 78 Nastavení polohy u nástavce pro řezání větví. . . . . . . . . . . . . . . . . . . . . . . . . . . . . . . . . . . . . . . . . . . . . . . . . . . . . . . . . . . . . . . . . . . . . . . . . 78 Montáž pilového řetězu a mečovitého nože . . . . . . . . . . . . . . . . . . . . . . . . . . . . . . . . . . . . . . . . . . . . . . . . . . . . . . . . . . . . . . . . . . . . . . . . . . 78 Napnutí a kontrola pilového řetězu. . . . . . . . . . . . . . . . . . . . . . . . . . . . . . . . . . . . . . . . . . . . . . . . . . . . . . . . . . . . . . . . . . . . . . . . . . . . . . . . . 78 Mazání řetězu . . . . . . . . . . . . . . . . . . . . . . . . . . . . . . . . . . . . . . . . . . . . . . . . . . . . . . . . . . . . . . . . . . . . . . . . . . . . . . . . . . . . . . . . . . . . . . . . . 79 Ostření pilového řetězu . . . . . . . . . . . . . . . . . . . . . . . . . . . . . . . . . . . . . . . . . . . . . . . . . . . . . . . . . . . . . . . . . . . . . . . . . . . . . . . . . . . . . . . . . . 79 Uvedení do provozu . . . . . . . . . . . . . . . . . . . . . . . . . . . . . . . . . . . . . . . . . . . . . . . . . . . . . . . . . . . . . . . . . . . . . . . . . . . . 79 Zapnutí / vypnutí. . . . . . . . . . . . . . . . . . . . . . . . . . . . . . . . . . . . . . . . . . . . . . . . . . . . . . . . . . . . . . . . . . . . . . . . . . . . . . . . . . . . . . . . . . . . . . . 79 Přestavení rukojeti . . . . . . . . . . . . . . . . . . . . . . . . . . . . . . . . . . . . . . . . . . . . . . . . . . . . . . . . . . . . . . . . . . . . . . . . . . . . . . . . . . . . . . . . . . . . . . 79 Práce s nůžkami na živý plot . . . . . . . . . . . . . . . . . . . . . . . . . . . . . . . . . . . . . . . . . . . . . . . . . . . . . . . . . . . . . . . . . . . . . . . . . . . . . . . . . . . . . . 79 Použití stroje: . . . . . . . . . . . . . . . . . . . . . . . . . . . . . . . . . . . . . . . . . . . . . . . . . . . . . . . . . . . . . . . . . . . . . . . . . . . . . . . . . . . . . . . . . . . . . . . . . . 79 Techniky stříhání . . . . . . . . . . . . . . . . . . . . . . . . . . . . . . . . . . . . . . . . . . . . . . . . . . . . . . . . . . . . . . . . . . . . . . . . . . . . . . . . . . . . . . . . . . . . . . . 79 Práce s nástavcem pro řezání větví . . . . . . . . . . . . . . . . . . . . . . . . . . . . . . . . . . . . . . . . . . . . . . . . . . . . . . . . . . . . . . . . . . . . . . . . . . . . . . . . . 79 Techniky řezání . . . . . . . . . . . . . . . . . . . . . . . . . . . . . . . . . . . . . . . . . . . . . . . . . . . . . . . . . . . . . . . . . . . . . . . . . . . . . . . . . . . . . . . . . . . . . . . . 79 Bezpečná práce . . . . . . . . . . . . . . . . . . . . . . . . . . . . . . . . . . . . . . . . . . . . . . . . . . . . . . . . . . . . . . . . . . . . . . . . . . . . . . . . . . . . . . . . . . . . . . . 80 Přeprava . . . . . . . . . . . . . . . . . . . . . . . . . . . . . . . . . . . . . . . . . . . . . . . . . . . . . . . . . . . . . . . . . . . . . . . . . . . . . . . . . . . . . 80 Údržba a čištění. . . . . . . . . . . . . . . . . . . . . . . . . . . . . . . . . . . . . . . . . . . . . . . . . . . . . . . . . . . . . . . . . . . . . . . . . . . . . . . . 80 Skladování. . . . . . . . . . . . . . . . . . . . . . . . . . . . . . . . . . . . . . . . . . . . . . . . . . . . . . . . . . . . . . . . . . . . . . . . . . . . . . . . . . . . 80 Vyhledávání závad u nástavce pro řezání větví . . . . . . . . . . . . . . . . . . . . . . . . . . . . . . . . . . . . . . . . . . . . . . . . . . . . . 81 Vyhledávání závad u nůžek na živý plot . . . . . . . . . . . . . . . . . . . . . . . . . . . . . . . . . . . . . . . . . . . . . . . . . . . . . . . . . . . 81 Intervaly údržby nástavce pro řezání větví . . . . . . . . . . . . . . . . . . . . . . . . . . . . . . . . . . . . . . . . . . . . . . . . . . . . . . . . . 81 Intervaly údržby nůžek na živý plot . . . . . . . . . . . . . . . . . . . . . . . . . . . . . . . . . . . . . . . . . . . . . . . . . . . . . . . . . . . . . . . 81 Záruka společnosti Kompernass Handels GmbH. . . . . . . . . . . . . . . . . . . . . . . . . . . . . . . . . . . . . . . . . . . . . . . . . . . . . 82 Servis . . . . . . . . . . . . . . . . . . . . . . . . . . . . . . . . . . . . . . . . . . . . . . . . . . . . . . . . . . . . . . . . . . . . . . . . . . . . . . . . . . . . . . . . 82 Dovozce . . . . . . . . . . . . . . . . . . . . . . . . . . . . . . . . . . . . . . . . . . . . . . . . . . . . . . . . . . . . . . . . . . . . . . . . . . . . . . . . . . . . . . 82 Likvidace . . . . . . . . . . . . . . . . . . . . . . . . . . . . . . . . . . . . . . . . . . . . . . . . . . . . . . . . . . . . . . . . . . . . . . . . . . . . . . . . . . . . . 83 Náhradní díly . . . . . . . . . . . . . . . . . . . . . . . . . . . . . . . . . . . . . . . . . . . . . . . . . . . . . . . . . . . . . . . . . . . . . . . . . . . . . . . . . 83 Překlad originálu prohlášení o shodě . . . . . . . . . . . . . . . . . . . . . . . . . . . . . . . . . . . . . . . . . . . . . . . . . . . . . . . . . . . . . . 83 PHSHE 900 B2 CZ │ 71 ■ NŮŽKY NA ŽIVÝ PLOT A ODVĚTVOVAČ 2 V 1 PHSHE 900 B2 Úvod Blahopřejeme Vám k zakoupení Vašeho nového přístroje. Rozhodli jste se pro vysoce kvalitní výrobek. Návod k obsluze je součástí tohoto výrobku. Obsahuje důležité informace o bezpečnosti, použití a likvidaci. Před použitím výrobku se seznamte se všemi obslužnými a bezpečnostními pokyny. Výrobek používejte pouze předepsaným způsobem a pro uvedené oblasti použití. Při předávání výrobku třetím osobám předejte spolu s ním i tyto podklady. Použití nůžek na živý plot s dlouhou násadou v souladu s určením Tento přístroj je určen k stříhání a řezání živých plotů, křovin a ozdobných keřů pro soukromé použití. Jedná se přitom o ručně vedený přístroj s integrovaným pohonem, u kterého se lineárně uspořádané břity pohybují sem a tam. VÝSTRAHA! ► Nůžky na živý plot nejsou vhodné pro používání dětmi. Použití nástavce pro řezání větví ve výšce v souladu s určením Tento přístroj je určen k řezání větví na stromech. Vybavení Motorová jednotka šroub s hvězdicí matice násada šroub kulatá rukojeť závěsné oko otočný prvek odjišťovací tlačítko blokovací tlačítko zapínač/vypínač síťový kabel odlehčení od tahu Nástavec pro nůžky na živý plot nožová lišta převodová skříň odblokování/zablokování základní deska (nůžek na živý plot) stavěcí páčka rukojeť přední násada Použití v souladu s určením Přístroj používejte pouze předepsaným způsobem a v uvedených oblastech použití. Přístroj není určen pro podnikatelské účely. Přístroj je určen k použití dospělými osobami. Tento přístroj není určen k použití osobami (včetně dětí) se sníženými fyzickými, smyslovými nebo duševními schopnostmi, nebo nedostatkem zkušeností a/nebo znalostí. Použití přístroje při dešti nebo ve vlhkém prostředí je zakázáno. Jakékoli jiné použití nebo úprava přístroje jsou považovány za použití v rozporu s určením a představují značné riziko úrazu. Za škody, které vzniknou při použití v rozporu s určením, nenese výrobce odpovědnost. aretační kolík hnací hřídel ochranná krytka Nástavec pro řezání větví ve výšce úchyt pro brusku pilový řetěz mečovitý nůž doraz nádržka na olej matice závit kryt řetězového kola otvor v mečovitém noži vedení mečovitého nože vodicí lišta kapací maznice šroub pro upnutí řetězu řetězové kolo kolík pro upnutí řetězu přední násada hnací hřídel ochranná krytka aretační kolík ochranný kroužek stavěcí páčka základní deska (nástavce pro řezání větví ve výšce) odblokování/zablokování víčko nádržky na olej ■ 72 │ CZ PHSHE 900 B2 Hodnoty vibrací (součet vektorů tří směrů) stanoveny v souladu s EN 60745: Rozsah dodávky 1 motorová jednotka PHSHE 900 B2 1 nástavec pro nůžky na živý plot PHS 1 (dále jen nůžky na živý plot) Nástavec pro řezání větví: 1 nástavec pro řezání větví ve výšce PHE 1 (dále jen nástavec pro řezání větví) Vibrace na přední rukojeti: Hodnota emise vibrací ah,D = 1,0 m/s2 Nejistota K = 1,5 m/s2 Vibrace na zadní rukojeti: Hodnota emise vibrací ah,D = 1,2 m/s2 Nejistota K = 1,5 m/s2 Příslušenství 1 ramenní popruh 1 ochranné pouzdro na řetěz 1 ochranné pouzdro na mečovitý nůž 1 100 ml biooleje na řetězové pily 1 montážní nástroj Nůžky na živý plot: Vibrace na přední rukojeti: Hodnota emise vibrací ah,D = 1,6 m/s2 Nejistota K = 1,5 m/s2 Vibrace na zadní rukojeti: Hodnota emise vibrací ah,D = 1,8 m/s2 Nejistota K = 1,5 m/s2 1 návod k obsluze Technické údaje Motorová jednotka: PHSHE 900 B2 Jmenovité napětí: 230 V ∼ 50 Hz (střídavý proud) Jmenovitý výkon: 900 W Třída ochrany: II / Hmotnost: (bez rukojeti a popruhu): cca 2,7 kg Nástavec pro řezání větví: PHE 1 Rychlost řetězu: max. 6 m/s Pracovní úhel: 0°; 15°; 30° Používejte ochranu sluchu! (dvojitá izolace) UPOZORNĚNÍ ► Hladina vibrací, uvedená v tomto návodu, byla měřena v souladu se standardizovanou metodou měření dle EN 60745 a lze ji použít ke srovnání přístrojů. Uvedenou hodnotu emise vibrací lze rovněž použít k předběžnému posouzení expozice. VÝSTRAHA! Hmotnost (ve stavu připraveném k provozu): cca 1,6 kg Doporučená náplň nádržky na olej: 100 cm3 Řezná délka: cca 260 mm Mečovitý nůž: Oregon typ 100SDEA041 Pilový řetěz: Oregon 91P040X Nůžky na živý plot: PHS 1 Počet zdvihů naprázdno: 2 000 min-1 Pracovní úhel: -90°; +90° Řezná délka: 410 mm Rozteč zubů: 20 mm Hmotnost (ve stavu připraveném k provozu): cca 2,1 kg Vysvětlení informačních štítků na přístroji: Před uvedením do provozu si přečtěte návod k provozu a pokyny! Informace o hluku a vibracích: Měřená hodnota zjištěna podle EN 60745. Typická hladina hluku elektrického nářadí s hodnocením A je: Nástavec pro řezání větví: PHE 1 Hladina akustického tlaku: Nejistota K: Hladina akustického výkonu: Nejistota K: Nůžky na živý plot: LPA = LWA = 83 3 104 3 dB (A) dB dB (A) dB 81 3 102 105 3 dB (A) dB dB (A) dB (A) dB Noste ochranné rukavice! Noste bezpečnostní obuv! Používejte ochranu sluchu! Noste ochrannou přilbu! PHS 1 Hladina akustického tlaku: LPA = Nejistota K: Hladina akustického výkonu: LWA = Garantovaná hladina akustického výkonu: LWA = Nejistota K: PHSHE 900 B2 ► Hladina vibrací se mění v závislosti na použití elektrického nářadí a může být v některých případech vyšší než hodnota uvedená v tomto návodu. Pokud se elektrické nářadí užívá takovým způsobem pravidelně, mohlo by být zatížení vibracemi podceněno. Snažte se udržovat zatížení vibracemi co nejnižší. Příklady opatření na snížení zatížení vibracemi je použití rukavic při práci s nářadím a omezení doby práce s nářadím. Přitom se musí zohlednit všechny části provozního cyklu (například časy, kdy je elektrické nářadí vypnuté a časy, kdy je sice zapnuté, ale běží bez zatížení). Noste ochranné brýle! Udržujte okolo stojící osoby v dostatečné vzdálenosti od přístroje! CZ │ 73 ■ Chraňte přístroj před deštěm a mokrem! Nebezpečí ohrožení života při úrazu elektrickým proudem! Dodržujte minimální vzdálenost 10 m od dálkových vedení. e) Pokud pracujete s elektrickým nářadím venku, používejte pouze takové prodlužovací kabely, jež jsou schváleny i pro venkovní použití. Používáním prodlužovacího kabelu vhodného pro venkovní použití se snižuje riziko úrazu elektrickým proudem. f) Pokud nelze zabránit provozu elektrického nářadí ve vlhkém prostředí, používejte proudový chránič. Použitím ochranného spínače chybného proudu se snižuje riziko úrazu elektrickým proudem. 3. Bezpečnost osob Pozor! Padající předměty. Obzvláště při řezání nad hlavou. Pozor! Nebezpečí zranění běžícími noži. Pokud dojde k poškození nebo proříznutí kabelu, odpojte ihned zástrčku od sítě. Uvedení hladiny akustického tlaku LWA v dB. Obecné bezpečnostní pokyny pro elektrická nářadí VÝSTRAHA! ► Přečtěte si veškerá bezpečnostní upozornění a pokyny. Nedbalost při dodržování bezpečnostních upozornění a pokynů může vést k úrazu elektrickým proudem, k požáru a/nebo těžkým zraněním. Veškerá bezpečnostní upozornění a pokyny uschovejte pro budoucí použití. Pojem „elektrické nářadí“ užívaný v bezpečnostních pokynech se vztahuje na elektrické nářadí napájené ze sítě (síťovým kabelem) a elektrické nářadí napájené akumulátorem (bez síťového kabelu). 1. Bezpečnost na pracovišti a) Svůj pracovní prostor udržujte v čistotě a dobře osvětlený. Nepořádek a neosvětlený pracovní prostor mohou vést k úrazům. b) S elektrickým nářadím nepracujte v prostředí ohroženém výbuchem, ve kterém se nachází hořlavé kapaliny, plyny nebo prachy. Elektrické nářadí vytváří jiskry, od nichž se může vznítit prach nebo výpary. c) Nedovolte dětem ani jiným osobám, aby se přibližovaly k elektrickému nářadí v době, kdy jej používáte. V případě odvedení pozornosti můžete ztratit kontrolu nad přístrojem. 2. Elektrická bezpečnost a) Přípojná zástrčka elektrického nářadí musí odpovídat zásuvce. Zástrčka se nesmí žádným způsobem pozměňovat. Nepoužívejte adaptérové zástrčky v kombinaci s uzemněným elektrickým nářadím. Nepozměněné zástrčky a jim odpovídající zásuvky snižují riziko úrazu elektrickým proudem. b) Zabraňte kontaktu těla s uzemněnými povrchy jako např. od trubek, topení, sporáků a chladniček. Je-li Vaše tělo uzemněné, hrozí zvýšené riziko úrazu elektrickým proudem. c) Elektrické nářadí chraňte před deštěm a vlhkostí. Vniknutím vody do elektrického přístroje se zvyšuje riziko úrazu elektrickým proudem. d) Nepoužívejte kabel v rozporu s jeho určením pro přenášení či zavěšování elektrického nářadí nebo k vytahování zástrčky ze zásuvky. Udržujte kabel v dostatečné vzdálenosti od zdrojů vysoké teploty, oleje, ostrých hran nebo pohyblivých částí přístroje. Poškozené nebo zapletené kabely zvyšují riziko úrazu elektrickým proudem. ■ 74 │ CZ a) Buďte stále pozorní, sledujte, co děláte a k práci s elektrickým nářadím přistupujte s rozumem. Elektrické nářadí nepoužívejte, jste-li unavení nebo pod vlivem drog, alkoholu či léků. Jediný okamžik nepozornosti při používání elektrického nářadí může způsobit vážná zranění. b) Noste osobní ochranné prostředky a vždy i ochranné brýle. Nošením osobních ochranných prostředků, jako je ochranná maska proti prachu, protiskluzová bezpečnostní obuv, ochranná přilba nebo ochrana sluchu, a to v závislosti na druhu a použití elektrického nářadí, se snižuje riziko zranění. c) Zabraňte neúmyslnému uvedení přístroje do provozu. Než elektrické nářadí zapojíte do elektrické sítě a/nebo připojíte akumulátor nebo než nářadí zvednete či přenesete, ujistěte se, že je vypnuté. Pokud máte při přenášení elektrického nářadí prst na vypínači nebo pokud do sítě zapojíte již zapnutý přístroj, může dojít k úrazu. d) Předtím, než elektrické nářadí zapnete, odstraňte nastavovací nástroje nebo šroubováky. Pokud se nástroj nebo šroubovák nachází v otáčející se části přístroje, může to vést ke zraněním. e) Vyhýbejte se nepřirozenému držení těla. Zajistěte si bezpečnou stabilitu a neustále udržujte rovnováhu. Tak dokážete elektrické nářadí v neočekávaných situacích lépe kontrolovat. f) Noste vhodný oděv. Nenoste volné oblečení ani šperky. Vlasy, oděv a rukavice udržujte v bezpečné vzdálenosti od pohyblivých částí. Volný a nepřiléhavý oděv, šperky nebo dlouhé vlasy mohou být pohyblivými částmi zachyceny. g) Pokud lze namontovat zařízení pro odsávání a zachytávání prachu, ujistěte se, zda jsou připojena a správně použita. Použitím odsávání prachu se může snížit ohrožení prachem. 4. Použití a údržba elektrického nářadí a) Přístroj nepřetěžujte. Pro svou práci používejte elektrické nářadí vhodné k danému účelu. S vhodným elektrickým nářadím se Vám bude v uvedeném výkonovém rozsahu pracovat lépe a bezpečněji. b) Nepoužívejte elektrické nářadí, jehož vypínač je vadný. Elektrické nářadí, které se již nedá zapnout nebo vypnout, představuje nebezpečí a musí se opravit. c) Před nastavováním přístroje, výměnou dílů vsazeného nástroje nebo odložením elektrického nářadí vytáhněte zástrčku ze zásuvky a/ nebo vyjměte vyjímatelný akumulátor.. Toto bezpečnostní opatření zabraňuje neúmyslnému spuštění elektrického nářadí. d) Nepoužívaná elektrická nářadí udržujte mimo dosah dětí. Nedovolte používat přístroj osobám, které s ním nejsou obeznámeny nebo které nečetly tento návod. Elektrické nářadí je nebezpečné, manipulují-li s ním nezkušené osoby. e) Údržbu elektrických nářadí vykonávejte pečlivě. Zkontrolujte, zda jsou v pořádku pohyblivé části přístroje a zda jim není bráněno v pohybu, zda nejsou některé součásti rozbité nebo natolik poškozené, že je funkčnost elektrického nářadí omezena. Poškozené části přístroje nechte před jeho použitím opravit. Řada úrazů má svou příčinu ve špatné údržbě elektrických nářadí. f) Řezné nástroje udržujte v ostrém a čistém stavu. Pečlivě udržované řezné nástroje s ostrými řeznými hranami se méně zasekávají a snáze se vedou. g) Elektrické nářadí, příslušenství, vsazené nástroje atd. používejte dle těchto pokynů. Zohledňujte přitom pracovní podmínky a vykonávanou činnost. Použití elektrického nářadí k jiným než určeným účelům může vést ke vzniku nebezpečných situací. PHSHE 900 B2 5. Servis a) Nechte své elektrické nářadí opravovat pouze kvalifikovanými odborníky a používejte jen originální náhradní díly. Tím zajistíte, že zůstane zachována bezpečnost elektrického nářadí. Bezpečnostní pokyny specifické pro nůžky na živý plot ■ Mějte všechny části těla mimo dosah nože. Při běžícím noži se nepokoušejte odstranit odřezky nebo držet řezaný materiál. Odstraňujte uvízlé odřezky pouze při vypnutém přístroji. Navíc vytáhněte zástrčku ze zásuvky. Jediný okamžik nepozornosti při používání nůžek na živý plot může způsobit vážná zranění. ■ Přenášejte nůžky na živý plot za přední rukojeť ve vypnutém stavu, s nožovou lištou odvrácenou od těla. Při přepravě nebo skladování nůžek na živý plot natáhněte vždy ochranný kryt. Opatrná manipulace s přístrojem snižuje pravděpodobnost neúmyslného kontaktu s běžícími noži. ■ Držte elektrické nářadí jen za izolované plochy rukojetí, protože nůž se může dostat do kontaktu se skrytými elektrickými vedeními nebo vlastním síťovým kabelem. Kontakt nože s vedením pod napětím může přenést napětí na kovové díly přístroje a vést k zásahu elektrickým proudem. Doplňující bezpečnostní pokyny k nůžkám na živý plot Příprava: a) PŘI POUŽÍVÁNÍ TĚCHTO NŮŽEK NA ŽIVÝ PLOT MŮŽE DOJÍT K VÁŽNÝM ZRANĚNÍM! Přečtěte si pečlivě pokyny ke správné manipulaci, k přípravě, k údržbě, ke spouštění a vypínání nůžek na živý plot. Seznamte se se všemi stavěcími díly a se správným používáním nůžek na živý plot. b) Nůžky na živý plot nesmí nikdy používat děti. c) Pozor na nadzemní elektrická vedení. d) Zamezte použití nůžek na živý plot, pokud se v blízkosti nacházejí osoby, zejména děti. e) Noste vhodný oděv! Nenoste volný oděv nebo šperky, který/které může/mohou být zachycen(y) pohybujícími se díly. Doporučujeme nosit pevné rukavice, obuv s protiskluzovou úpravou a ochranné brýle. f) Jestliže se řezací zařízení dostane do kontaktu s cizím tělesem nebo zesílí provozní hluk nebo nůžky na živý plot neobvykle silně vibrují, vypněte motor a vyčkejte, než se nůžky na živý plot zastaví. Proveďte tato opatření: – zkontrolujte, zda přístroj není poškozený; – zkontrolujte, zda se některé díly neuvolnily, a všechny uvolněné díly připevněte; ■ Udržujte kabel mimo oblast stříhání. Během práce se Vám kabel může ztratit v keřích a můžete ho omylem přeříznout. – poškozené díly vyměňte za rovnocenné díly nebo je nechte opravit. ■ Pečlivě si prohlédněte plochu, kterou chcete stříhat či řezat, a odstraňte všechny dráty nebo jiná cizí tělesa. ■ Doporučujeme použít proudový chránič se spouštěcím proudem 30 mA nebo méně. g) Noste ochranu sluchu! h) Noste ochranu očí! UPOZORNĚNÍ ► Nůžky na živý plot se dodávají v kompletně smontovaném stavu. ► Názorné obrázky k použití nůžek na živý plot, resp. jejich stavěcích dílů najdete na výklopné stránce. ► Pokyny a názorné obrázky k nastavení, údržbě, mazání uživatelem najdete v tomto návodu. i) Pro zastavení nůžek na živý plot v případě nouze vytáhněte síťovou zástrčku ze zásuvky. ► Pokyny k pracovní poloze (viz výklopná stránka). Provoz: ► Pokyny k stavěcím dílům (viz výklopná stránka). a) Vytáhněte síťovou zástrčku ze zásuvky: ► Pokyny k výměně a opravě (viz kapitola Údržba a čištění / Servis). – před čištěním nebo odstraňováním blokování; ► Vysvětlení všech grafických symbolů použitých na nůžkách na živý plot a technické údaje najdete v tomto návodu. – před kontrolou, údržbou nebo pracemi na nůžkách na živý plot; ► Charakteristické vlastnosti nůžek na živý plot najdete v technických údajích. ► Zablokované nářadí: Odstraňte blokující materiál z nožové lišty . POZOR! ► Při hrozícím nebezpečí, resp. v nouzové situaci ihned vypněte motor a vytáhněte síťovou zástrčku. – před nastavováním pracovní polohy řezacího zařízení; – když nůžky na živý plot zůstanou bez dozoru. b) Před spuštěním motoru se vždy ujistěte, že se nůžky na živý plot nachází řádně v jedné z daných pracovních poloh. c) Během provozu nůžek na živý plot je vždy třeba zajistit, aby uživatel zaujímal bezpečný postoj, obzvláště při použití schůdků nebo žebříku. d) Nepoužívejte nůžky na živý plot s vadným nebo silně opotřebovaným řezacím zařízením. e) Ujistěte se vždy, že všechny rukojeti a bezpečnostní zařízení jsou při použití nůžek na živý plot namontované. Nikdy se nepokoušejte používat nekompletní nůžky na živý plot nebo nůžky s nepřípustnými modifikacemi. f) Držte nůžky na živý plot pevně oběma rukama za rukojeti k tomu určené. g) Seznamte se vždy s prostředím a dávejte pozor na možná nebezpečí, která vzhledem ke hluku nůžek na živý plot nemusíte možná zaslechnout. PHSHE 900 B2 CZ │ 75 ■ Údržba a skladování: a) Pokud se nůžky na živý plot zastaví za účelem údržby, inspekce nebo skladování, vypněte motor, aby se všechny rotující díly zastavily. Před kontrolou stroje, jeho nastavováním atd. ho nechte vychladnout. b) Skladujte nůžky na živý plot tam, kde se benzinové výpary nemohou dostat do kontaktu s otevřeným ohněm nebo jiskrami. Nůžky na živý plot nechte vždy nejdříve vychladnout a teprve poté je uložte ke skladování. c) Při přepravě nebo skladování nůžek na živý plot je třeba řezací zařízení vždy zakrýt ochranným krytem řezacího zařízení. Další bezpečnostní pokyny k nůžkám na živý plot ■ Mějte všechny části těla mimo dosah nože. Při běžícím noži se nepokoušejte odstranit odřezky nebo držet řezaný materiál. Odstraňujte uvízlé odřezky pouze při vypnutém přístroji. Jediný okamžik nepozornosti při používání nůžek na živý plot může způsobit vážná zranění. ■ Přenášejte nůžky na živý plot za rukojeť ve vypnutém stavu, s nožovou lištou odvrácenou od těla. Při přepravě nebo skladování nůžek na živý plot natáhněte vždy ochranný kryt. Pečlivá manipulace s přístrojem snižuje nebezpečí zranění o nůž. ■ Držte elektrické nářadí jen za izolované plochy rukojetí, protože nůž se může dostat do kontaktu se skrytými elektrickými vedeními nebo vlastním síťovým kabelem. Kontakt nože s vedením pod napětím může přenést napětí na kovové díly přístroje a vést k zásahu elektrickým proudem. ♦ Prohledejte živý plot, zda se v něm neukrývají nějaké objekty (např. ploty z drátěného pletiva). ZBYTKOVÁ RIZIKA! I když tento elektrický nástroj správně obsluhujete, vždy zůstanou zbytková rizika. Následující nebezpečí mohou vzniknout v souvislosti s konstrukcí a provedením tohoto elektrického nářadí: a) pořezání b) poruchy sluchu, pokud se nenosí vhodná ochrana sluchu. c) újmy na zdraví v důsledku vibrací ruky a paže, pokud se přístroj používá delší dobu nebo není řádně provozován a udržován. UPOZORNĚNÍ ► Nůžky na živý plot se dodávají v kompletně smontovaném stavu. ► Pokyny a názorné obrázky k nastavení, údržbě, mazání uživatelem najdete v tomto návodu. ► Pokyny k výměně a opravě (viz kapitola Údržba a čištění / Servis). ► Vysvětlení všech grafických symbolů použitých na nůžkách na živý plot a technické údaje najdete v tomto návodu. ► Charakteristické vlastnosti nůžek na živý plot najdete v technických údajích. ► Zablokované nářadí: Odstraňte blokující materiál z nožové lišty . ■ Používejte výhradně příslušenství a přídavná zařízení, která jsou uvedena v návodu k použití. Používání jiných přídavných zařízení nebo jiného příslušenství, než je uvedeno v návodu k obsluze, pro vás může znamenat nebezpečí úrazu. ■ 76 │ CZ Bezpečnostní pokyny specifické pro nástavec pro řezání větví ■ Noste vždy ochrannou přilbu, ochranu sluchu a bezpečnostní rukavice. Noste také ochranu zraku, aby se odstřikující olej nebo prach z pily nedostal do očí. Noste ochrannou masku proti prachu. ■ Nepoužívejte přístroj nikdy, když stojíte na žebříku. ■ Při použití přístroje se nevyklánějte příliš daleko dopředu. Dbejte vždy na bezpečný postoj a neustále udržujte rovnováhu. Pro rovnoměrné rozložení hmotnosti působící na tělo používejte popruh, který je součástí dodávky. ■ Noste robustní vysoké boty s protiskluzovou úpravou. ■ Přístroj nepoužívejte při dešti nebo ve vlhkém prostředí. ■ Nepoužívejte přístroj v blízkosti elektrických vedení. Udržujte minimální vzdálenost 10 m od nadzemních elektrických vedení. ■ Nestavte se pod větve, které chcete řezat, předejdete tak zranění spadlými větvemi. Dávejte pozor rovněž na uskakující větve, abyste předešli zranění. Pracujte pod úhlem cca 60° ±10°. ■ Dávejte pozor na to, aby nedošlo ke zpětnému rázu přístroje. ■ Nesledujte jen právě řezané větve, ale také spadlý materiál, abyste o něj nezakopli. ■ Po 30 minutách práce si udělejte minimálně hodinovou přestávku. ■ Noste vždy ochranné rukavice. ■ Zakryjte vodicí lištu a řetěz při přepravě a skladování krytem. ■ Nepoužívejte přístroj v prostředí s nebezpečím výbuchu, kde se nacházejí zápalné kapaliny, plyny nebo výpary. Jiskry produkované strojem mohou vést ke vznícení těchto výparů nebo plynů. ■ Použitá zásuvka musí být vhodná pro zástrčku. Neprovádějte na zástrčce nikdy žádné změny, předejdete tak úrazu elektrickým proudem. ■ Síťovou zástrčku nikdy nevyndávejte ze zásuvky tahem za kabel, nýbrž uchopte přímo zástrčku. Nepoužívejte síťový kabel k tahání nebo přepravě přístroje. Udržujte síťový kabel v dostatečné vzdálenosti od zdrojů vysoké teploty, oleje, ostrých hran a pohyblivých dílů. ■ Po ukončení práce nebo při čištění a údržbě vytáhněte síťovou zástrčku z přístroje. ■ Zabraňte neúmyslnému spuštění přístroje. ■ Přístroje s vadným vypínačem se musí ihned opravit, aby se předešlo škodám a zraněním. ■ Uchovávejte přístroj mimo dosah dětí. ■ Přístroj smí obsluhovat pouze osoby důkladně seznámené s návodem k obsluze a s přístrojem. ■ Údržbu elektrického nářadí provádějte pečlivě. Zkontrolujte, zda jsou v pořádku pohyblivé části přístroje a zda jim není bráněno v pohybu, zda nejsou některé součásti rozbité nebo natolik poškozené, že je funkčnost elektrického nářadí omezena. Poškozené části přístroje nechte před jeho použitím opravit. Řada úrazů má svou příčinu ve špatné údržbě elektrických nářadí. ■ Řezné nástroje udržujte v ostrém a čistém stavu. Pečlivě udržované řezné nástroje s ostrými řeznými hranami se méně zasekávají a snáze se vedou. ■ Nechte údržbu přístroje provádět personálem kvalifikovaným pro tuto činnost. Používejte pouze originální náhradní díly doporučované výrobcem. PHSHE 900 B2 Preventivní opatření proti zpětnému rázu POZOR, ZPĚTNÝ RÁZ! ► Při práci dávejte pozor na zpětný ráz přístroje. Hrozí nebezpečí zranění. Zpětným rázům zabráníte opatrností a správnou technikou řezání. ■ Kontakt špičkou lišty může v některých případech vést k neočekávané reakci směrem dozadu, při které je vodicí lišta vyhozena nahoru a směrem k obsluhující osobě (viz obr.). Bild 1 ■ Zpětný ráz může nastat, když se špička vodicí lišty dotkne nějakého předmětu nebo když se dřevo ohne a pilový řetěz uvízne v místě řezu (viz obr.). ■ Zaklínění pilového řetězu na horní hraně vodicí lišty může vést k prudkému nárazu lišty zpět směrem k obsluhující osobě. ■ Každá z těchto reakcí může způsobit, že ztratíte kontrolu nad pilou a možná se těžce zraníte. Nespoléhejte se nikdy výlučně na bezpečnostní zařízení zabudovaná v řetězové pile. Jako uživatel řetězové pily učiňte různá opatření, aby při práci nedošlo k úrazu a zranění. Zpětný ráz je důsledkem nesprávného nebo chybného použití elektrického nářadí. Vhodnými bezpečnostními opatřeními mu lze zabránit tak, jak je popsáno níže: ■ Držte pilu pevně oběma rukama, přičemž jsou rukojeti pily palcem a prsty obemknuty. Mějte tělo a ruce v takové poloze, ve které jste schopni odolat silám zpětného rázu.Učiníte-li vhodná opatření, může obsluhující osoba síly zpětného rázu zvládnout. Nikdy řetězovou pilu nepouštějte z ruky. Další bezpečnostní upozornění VÝSTRAHA! NEBEZPEČÍ ZRANĚNÍ! ► Nikdy nechytejte spuštěný přístroj za provozu nad ochranným kroužkem , předejdete tak zranění! ■ Během provozu se v okruhu 15 metrů nesmí zdržovat žádné jiné osoby ani zvířata. Obsluhující osoba je v pracovní oblasti odpovědná vůči třetím osobám. ■ Udržujte přístroj, řezací mechanizmus a ochranné pouzdro na mečovitém noži v dobrém provozním stavu, předejdete tak zranění. ■ Děti musí být pod dohledem, a to pro jistotu, aby si s přístrojem nehrály. ■ Přístroj používejte teprve poté, co jste se s ním důkladně seznámili. ■ Nepracujte s poškozeným, neúplným nebo bez souhlasu výrobce změněným přístrojem. Nepoužívejte přístroj nikdy s vadným ochranným vybavením. Nepoužívejte přístroj nikdy s vadným spínačem zap./vyp. Před použitím zkontrolujte bezpečnostní stav přístroje, obzvláště mečovitý nůž a pilový řetěz. Po pádu přístroje zkontrolujte, zda není významně poškozený nebo vadný. ■ Přístroj nikdy nespouštějte, dokud nejsou správně namontovány mečovitý nůž, pilový řetěz a kryt řetězového kola. ■ Zajistěte, aby se přístroj při spouštění a během práce nedostal do kontaktu se zemí, kameny, drátem nebo jinými cizími tělesy. Před odložením přístroj vypněte. ■ Přístroj je dimenzován pro obouruční provoz. Nikdy nepracujte s jednou rukou. ■ Držte přístroj jen za izolované plochy rukojetí, protože pilový řetěz se může dostat do kontaktu se skrytými elektrickými vedeními. Kontakt pilového řetězu s vedením pod napětím může přenést napětí na kovové díly přístroje a vést k zásahu elektrickým proudem. ■ Při změně místa dbejte na to, aby byl přístroj vypnutý a aby se prst nedotýkal vypínače. Noste přístroj pilovým řetězem a mečovitým nožem směrem dolů. Během přepravy nasaďte ochranné pouzdro na mečovitý nůž. ■ Při každém řezu pevně nasaďte drapákový doraz a až potom začněte s řezáním. ■ Při řezání malých keřů a větví s krajní buďte maximálně opatrní. Tenké větve se mohou zachytit v pile a šlehat do vašeho směru nebo vás vyvést z rovnováhy. ■ Neřežte dřevo položené na zemi, resp. nepokoušejte se řezat kořeny vyčnívající ze země. V každém případě zamezte zanoření pilového řetězu do země, protože jinak dojde ihned k jeho ztupení. ■ Při řezání napnuté větve dávejte pozor na možný zpětný ráz, když napětí dřeva náhle poklesne. Hrozí nebezpečí zranění. ■ V případě vzpříčení nebo sevření řezacího mechanizmu ve větvi se nepokoušejte uvolnit přístroj za použití násilí. Přístroj okamžitě vypněte a zapněte jej až po odstranění blokády. Hrozí nebezpečí zranění! ■ Vyhněte se nepřirozenému postoji a při řezání nezvedejte ruce nad výšku ramen. Tím předejdete neúmyslnému kontaktu špičkou lišty a získáte lepší kontrolu nad řetězovou pilou v neočekávaných situacích. ■ Používejte vždy náhradní lišty a pilové řetězy předepsané výrobcem. Nesprávné náhradní lišty a pilové řetězy mohou vést k roztržení pilového řetězu a/nebo ke zpětnému rázu. ■ Dodržujte pokyny výrobce k ostření a údržbě pilového řetězu. Příliš nízké omezovače hloubky zvyšují sklon ke zpětnému rázu. ■ Neřežte nikdy špičkou mečovitého nože. Hrozí nebezpečí zpětného rázu. ■ Dávejte pozor na to, aby na zemi neležely žádné předměty, o které byste mohli zakopnout. PHSHE 900 B2 CZ │ 77 ■ Montáž pilového řetězu a mečovitého nože Před uvedením do provozu VÝSTRAHA! VÝSTRAHA! NEBEZPEČÍ ZRANĚNÍ! ► Před všemi pracemi na přístroji vytáhněte síťovou zástrčku ze zásuvky. Nebezpečí úrazu elektrickým proudem! UPOZORNĚNÍ Motorová jednotka Montáž kulaté rukojeti ♦ Nasuňte kulatou rukojeť ♦ Utáhněte šroub . v požadované poloze na násadu . ♦ Zahákněte ramenní popruh do závěsného oka . ♦ Upravte ramenní popruh podle své velikosti tak, aby se závěsné oko nacházelo v zavěšeném stavu ve výšce boků. Montáž nůžek na živý plot ♦ Aretační kolík nůžek na živý plot na násadu motorové pomocí šroubu s hvězdicí ♦ Sešroubujte obě násady účelem použijte na protilehlé straně matici . , za tím nástavce pro řezání větví na násadu , za tím ♦ Uvolněte odblokování/zablokování . , nastavte nůžky na živý plot do požadované ♦ Pusťte stavěcí páčku a nechte odblokování/zablokování nout do vybrání v základní desce (nůžek na živý plot) . zapad- Nastavení polohy u nástavce pro řezání větví ♦ Uvolněte odblokování/zablokování ♦ Stiskněte stavěcí páčku ze dvou poloh. a pilový řetěz montážním nástrojem již obrátit. . . ♦ Napnutí pilového řetězu se musí případně předem snížit, aby bylo možné sejmout mečovitý nůž a pilový řetěz (viz kapitola „Napnutí a kontrola pilového řetězu“). Řiďte se těmito pokyny v opačném pořadí. s pilovým řetězem ♦ Nasaďte opět pilový řetěz nože . ze základní desky . , přičemž postupujte od špičky mečovitého ♦ Nasaďte opět kryt řetězového kola a utáhněte lehce matici . (viz kapitola Napnutí a kontrola pilové- Napnutí a kontrola pilového řetězu UPOZORNĚNÍ Nastavení polohy u nůžek na živý plot ♦ Stiskněte stavěcí páčku polohy. ♦ Povolte matici ♦ Sejměte kryt řetězového kola ♦ Nyní napněte pilový řetěz ho řetězu). musí zapadnout. ♦ Sešroubujte obě násady pomocí šroubu s hvězdicí účelem použijte na protilehlé straně matici . na mečovitém ♦ Položte vodicí lištu přes vedení mečovitého nože , přitom také vsaďte kolík pro upnutí řetězu do otvoru v mečovitém noži . Současně položte pilový řetěz přes řetězové kolo . Montáž nástavce pro řezání větví ♦ Aretační kolík ► Ve stavu při dodání jsou mečovitý nůž namontované. ♦ Sejměte mečovitý nůž musí zapadnout. ♦ Nasuňte přední násadu motorové jednotky. ► Dávejte pozor na směr chodu pilového řetězu noži a u krytu řetězového kola . ► V závislosti na opotřebení je možné mečovitý nůž Připevnění / montáž ramenního popruhu ♦ Nasuňte přední násadu jednotky. ► Natáhněte si ochranné rukavice! Nebezpečí zranění ostrými řeznými zuby! . , nastavte nástavec pro řezání větví do jedné ♦ Pusťte stavěcí páčku a nechte odblokování/zablokování zapadnout do vybrání v základní desce (nástavce pro řezání větví) . ► Napnutí pilového řetězu je důležité pro Vaši bezpečnost a funkci přístroje. Správně napnutý pilový řetěz prodlužuje životnost Vašeho přístroje. VÝSTRAHA! ► Natáhněte si ochranné rukavice! Nebezpečí zranění ostrými řeznými zuby! ♦ Povolte mírně matici montážním nástrojem . ♦ Napnutí zvýšíte otáčením šroubu pro upnutí řetězu pomocí montážního nástroje ve směru chodu hodinových ručiček. ♦ Napnutí zvýšíte otáčením šroubu pro upnutí řetězu pomocí montážního nástroje proti směru chodu hodinových ručiček. ♦ Pilový řetěz musí přiléhat k spodní straně mečovitého nože. Zkontrolujte, zda lze přetáhnout pilový řetěz rukou přes mečovitý nůž . ♦ Utáhněte opětovně matici montážním nástrojem . UPOZORNĚNÍ ► Při zatáhnutí za pilový řetěz tažnou silou 9 N (cca 1 kg) by pilový řetěz a mečovitý nůž neměly být od sebe vzdáleny více než 2 mm. ► Nový pilový řetěz se vytahuje a musí se napínat častěji. ► Před každým použitím přístroje zkontrolujte napnutí řetězu. ■ 78 │ CZ PHSHE 900 B2 Mazání řetězu Práce s nůžkami na živý plot ♦ Sejměte víčko nádržky na olej ♦ Naplňte nádržku na olej . Použití stroje: cca 100 ml biooleje na řetězové pily . VÝSTRAHA! ► Nikdy nepracujte bez mazání řetězu! U řetězu běžícího nasucho se řezací mechanizmus v krátké době nenávratně zničí. Před prací vždy zkontrolujte mazání řetězu a hladinu oleje v nádržce. UPOZORNĚNÍ ► Používejte pouze olej na řetězové pily. Přednostně takový, který je biologicky odbouratelný. Nepoužívejte již použitý olej, motorový olej atd. ► Během práce kontrolujte, zda funguje automatické mazání řetězu. Kontrolujte před prací a během ní funkci mazání řetězu. UPOZORNĚNÍ ► Nezapomeňte, prosím, že národní předpisy Vaší země mohou omezovat použití nůžek na živý plot. ► Před každým použitím nůžek na živý plot je nezbytná každodenní inspekce. Zkontrolujte svůj přístroj také po nárazu a po pádu, abyste zjistili závažná poškození nebo závady. ► Noste, prosím, pevnou obuv a těsně přiléhavý oděv, abyste minimalizovali riziko úrazu. Stůjte pevně na zemi, dbejte na rovnováhu a noste vždy přibalený nosný popruh! ► Pro zachování Vašeho zdraví dělejte, prosím, během práce přestávky za účelem odpočinku. Tělesné vyčerpání zvyšuje riziko zranění! VÝSTRAHA! ► V žádné případě nepracujte s přístrojem, jste-li unavení, nemocní, pod vlivem alkoholu nebo jiných drog či léků. Ostření pilového řetězu UPOZORNĚNÍ Techniky stříhání ► Pro bezpečné držení během broušení je možné brusku připevnit za úchyt pro brusku . ► V soupravě pro ostření např. se značkou Oregon najdete podrobné informace k procesu broušení. ■ Viz výklopná stránka (obrázek A). UPOZORNĚNÍ ► Silné větve odstraňujte pomocí nůžek na větve. ► Alternativně použijte elektrický přístroj na ostření řetězů a řiďte se pokyny výrobce. Práce s nástavcem pro řezání větví ► V případě pochyb o provedení práce je třeba provést výměnu pilového řetězu. Techniky řezání VÝSTRAHA! Uvedení do provozu ► Dávejte zásadně pozor na padající odříznuté větve. ► Buďte si zásadně vědomi nebezpečí zpětného šlehnutí větví. UPOZORNĚNÍ ► Dodržujte předpisy k ochraně proti hluku a místní předpisy. Použití přístroje může být v určitých dnech (např. v neděli a o svátcích), v určitou denní dobu (poledne, noční klid) nebo ve zvláštních oblastech (např. v lázních, na klinikách atd.) omezené nebo zakázané. UPOZORNĚNÍ ► Přiložte doraz k větvi. Tak budete pracovat bezpečněji a klidněji. ► Teprve potom začněte řezat. Odříznutí malé větve ♦ U malých větví (Ø 0-8 cm) řežte ze shora dolů (viz obrázek). Zapnutí / vypnutí Zapnutí: ♦ Spojte síťový kabel s prodlužovacím kabelem. ♦ Vytvořte na konci prodlužovacího kabelu smyčku a zavěste ji do odlehčení od tahu . ♦ Stiskněte blokovací tlačítko zap./vyp. . , podržte ho stisknuté a stiskněte spínač Vypnutí: ♦ Pusťte spínač zap./vyp. . ♦ Vyjměte prodlužovací kabel z odlehčení od tahu ♦ Odpojte síťový kabel . od prodlužovacího kabelu. Přestavení rukojeti ♦ Stiskněte odjišťovací tlačítko . Otočte otočný prvek polohy. Pusťte odjišťovací tlačítko , to musí zaskočit. PHSHE 900 B2 do požadované CZ │ 79 ■ ♦ Odříznutí větších větví Přeprava ♦ U větších větví (Ø 8-25 cm) proveďte nejprve odlehčovací řez A (viz obrázek). ■ Při přepravě používejte ochranná pouzdra ■ Odlehčovací řez také zabraňuje odloupnutí kůry z hlavního kmene. . ■ Dbejte na to, abyste přístroj při přenášení nezapnuli (viz obrázek). ♦ Postupujte nyní při řezání ze shora B dolů A . B 2 1 A Údržba a čištění Odřezávání po kouskách Dlouhé, resp. silné větve byste měli před provedením finálního oddělovacího řezu zkrátit (viz obrázek). Cc B b A a VÝSTRAHA! Pokud je nutná výměna připojovacího kabelu, musí ji provést výrobce nebo jeho zástupce, aby se zabránilo ohrožení bezpečnosti. ■ Motorová jednotka musí být vždy čistá, suchá a zbavená oleje a maziv. ■ Nástavec pro řezání větví se musí v pravidelných intervalech vyčistit od pilin. ♦ K čištění povrchu používejte suchý hadřík.Sejměte kryt ♦ Sejměte pilový řetěz Bezpečná práce ■ Udržujte přístroj, řezací mechanizmus a ochranné pouzdro na mečovitém noži v dobrém provozním stavu, předejdete tak zranění. z mečovitého nože . a vyčistěte vodicí lištu . ♦ Udržujte pilový řetěz ostrý a kontrolujte napnutí řetězu a hladinu oleje, dbejte na přívod oleje. ♦ Zkontrolujte nůžky na živý plot, zda na nožové liště šrouby, a v případě potřeby šrouby dotáhněte. ■ Po pádu přístroje zkontrolujte, zda není významně poškozený nebo vadný. ♦ Odstraňte uvízlé listí. ■ Pro zaručení bezpečné práce dodržujte předepsaný pracovní úhel 60°±10° (viz obrázek). ♦ Ošetřete nožovou lištu nejsou uvolněné pomocí olejového spreje nebo olejničky. Skladování ■ Před uložením přístroj vyčistěte. ■ Uchovávejte přístroj v dodaných ochranných pouzdrech dosah dětí na suchém místě, které není vystaveno mrazu. 60°±10° mimo ■ Skladujte přístroj naležato nebo zajištěný proti překlopení. ■ Vyprázdněte nádržku na olej . Bioolej na řetězové pily může zhoustnout nebo vytéct odvzdušňovacím otvorem ve víčku nádržky na olej . ■ Nepoužívejte přístroj, když stojíte na žebříku nebo na nejistém stanovišti. ■ Nenechte se svést k nepromyšlenému řezu. Mohlo by to ohrozit vás i ostatní. ■ Děti musí být pod dohledem, a to pro jistotu, aby si s přístrojem nehrály. ■ Měňte pravidelně svou pracovní polohu. Delší používání přístroje může vést k poruchám prokrvení rukou způsobených vibracemi. Dobu používání však můžete prodloužit vhodnými rukavicemi nebo pravidelnými přestávkami. Uvědomte si prosím, že osobní dispozice k špatnému prokrvení, nízké venkovní teploty nebo velké síly vynakládané na udržení přístroje při práci mohou dobu používání snížit. ■ Snižte rovněž rizika daná vibracemi, např. riziko bělání prstů, častými pracovními přestávkami, ve kterých si např. budete třít dlaně jednu o druhou. ■ 80 │ CZ PHSHE 900 B2 Vyhledávání závad u nástavce pro řezání větví Problém Možná příčina Odstranění závad Motor běží, pilový řetěz se nepohybuje Nástavec pro nůžky na živý plot, resp. nástavec pro řezání větví ve výšce není správně připojen k motorové jednotce Zkontrolujte montáž Žádný pokrok při práci Pilový řetěz je suchý resp. přehřátý nebo prověšený Doplňte olej, resp. naostřete, vyměňte nebo napněte pilový řetěz Intervaly údržby nůžek na živý plot Zde uvedené údaje se týkají normálních podmínek použití. Při ztížených podmínkách, jako je např. intenzivní prášení a delší denní pracovní doba, je třeba uvedené intervaly přiměřeně zkrátit. Díl přístro- Akce je Nože Před začátkem práce Vizuální kontrola Po ukončení práce Podle potřeby X vyčistit X X Vyhledávání závad u nůžek na živý plot Problém Možná příčina Odstranění závad Motor běží, nože stojí Nástavec pro nůžky na živý plot, resp. nástavec pro řezání větví ve výšce není správně připojen k motorové jednotce Zkontrolujte montáž Intervaly údržby nástavce pro řezání větví Zde uvedené údaje se týkají normálních podmínek použití. Při ztížených podmínkách, jako je např. intenzivní prášení a delší denní pracovní doba, je třeba uvedené intervaly přiměřeně zkrátit. Díl přístroje Akce Mazání řetězu Kontrola Před začátkem práce Týdně Při poruše Při poškození Podle potřeby X Pilový řetěz Kontrola a kontrola stavu ostrosti X Kontrola napnutí řetězu X Ostření Vodicí lišta Kontrola (opotřebení, poškození) X X Čištění a obrácení X Odhrotování X Výměna Řetězové kolo Kontrola Výměna PHSHE 900 B2 X X X X X CZ │ 81 ■ Záruka společnosti Kompernass Handels GmbH Vyřízení v případě záruky Pro zajištění rychlého Vaší žádosti postupujte podle následujících pokynů: Vážená zákaznice, vážený zákazníku, ■ Pro všechny dotazy mějte připraven pokladní lístek a číslo výrobku (např. IAN 12345) jako doklad o koupi. na tento přístroj získáváte záruku v trvání 3 let od data zakoupení. V případě závad tohoto výrobku máte zákonná práva vůči prodejci výrobku. Tato zákonná práva nejsou omezena naší níže uvedenou zárukou. ■ Číslo výrobku naleznete na typovém štítku na výrobku, rytině na výrobku, na titulní straně návodu k obsluze (vlevo dole) nebo na nálepce na zadní nebo spodní straně výrobku. Záruční podmínky ■ Pokud by se měly vyskytovat funkční vady nebo jiné závady, kontaktujte nejprve níže uvedené servisní oddělení telefonicky nebo e-mailem. Záruční doba začíná plynout dnem nákupu. Dobře uschovejte pokladní doklad. Tento doklad je potřebný jako důkaz o koupi. Pokud se do tří let od data zakoupení tohoto výrobku vyskytne vada materiálu nebo výrobní závada, pak Vám podle našeho uvážení výrobek zdarma opravíme, vyměníme nebo uhradíme kupní cenu. Předpokladem této záruky je, že bude během tříleté lhůty předložen vadný přístroj a doklad o koupi (pokladní doklad) a stručně se popíše, v čem závada spočívá a kdy se vyskytla. Vztahuje-li se na závadu naše záruka, obdržíte zpět buď opravený nebo nový produkt. Opravou nebo výměnou výrobku nezačne plynout nová záruční doba. Záruční doba a zákonné nároky vyplývající ze závad Záručním plněním se záruční doba neprodlužuje. To platí i pro vyměněné a opravené součásti. Poškození nebo vady vyskytující se případně již při nákupu se musí oznámit ihned po vybalení. Po uplynutí záruční doby podléhají veškeré opravy zpoplatnění. Rozsah záruky Přístroj byl vyroben pečlivě podle přísných směrnic kvality a před expedicí byl svědomitě vyzkoušen. Záruka se vztahuje na materiálové nebo výrobní vady. Tato záruka se nevztahuje na součásti výrobku, které jsou vystaveny běžnému opotřebení, a proto je lze považovat za spotřební díly, nebo na poškození křehkých součástí, jako jsou např. spínače, akumulátory nebo díly, které jsou vyrobeny ze skla. Tato záruka zaniká, pokud je výrobek poškozen, nebyl řádně používán nebo udržován. Pro zajištění správného používání výrobku se musí přesně dodržovat všechny pokyny uvedené v návodu k obsluze. Účelům použití a úkonům, které se v návodu k obsluze nedoporučují nebo se před nimi varuje, je třeba se bezpodmínečně vyhnout. Výrobek je určen pouze pro soukromé účely a ne pro komerční použití. Při nesprávném a neodborném používání, při použití násilí a při zásazích, které nebyly provedeny našimi autorizovanými servisními provozovnami, záruční nároky zanikají. ■ Výrobek, zaevidovaný jako vadný výrobek pak můžete při přiložení dokladu o nákupu (pokladní lístek) a při uvedení, v čem spočívá vada a kdy k ní došlo, poslat výrobek pro Vás bez poštovného na adresu, kterou Vám oznámí servis. Na webových stránkách www.lidl-service.com si můžete stáhnout tyto a mnoho dalších příruček, videí o výrobku a instalační software. Pomocí kódu QR se dostanete přímo na stránku servisu Lidl (www.lidl-service.com) a můžete pomocí zadání čísla výrobku (IAN) 123456 otevřít svůj návod k obsluze. UPOZORNĚNÍ ► U nástrojů Parkside a Florabest zašlete, prosím, výlučně vadnou část bez příslušenství (např. akumulátor, úložný kufřík, montážní nářadí, atd.). Servis VÝSTRAHA! ► Nechte své přístroje opravit v servisní dílně nebo odborným elektrikářem a pouze za použití originálních náhradních dílů. Tím se zajistí, že zůstane zachována bezpečnost přístroje. ► Výměnu zástrčky nebo síťového kabelu svěřte vždy výrobci přístroje nebo jeho zákaznickému servisu. Tím se zajistí, že zůstane zachována bezpečnost přístroje. Servis Česko Tel.: 800143873 E-Mail: [email protected] IAN 313266_1904 Dovozce Dbejte prosím na to, že následující adresa není adresou servisu. Kontaktujte nejprve uvedený servis. KOMPERNASS HANDELS GMBH BURGSTRASSE 21 44867 BOCHUM NĚMECKO www.kompernass.com ■ 82 │ CZ PHSHE 900 B2 Likvidace Obal se skládá z ekologických materiálů, které lze zlikvidovat v komunálních sběrných recyklačních dvorech. Přístroj a jeho příslušenství se skládají z různých materiálů jako např. kovů a plastů. Překlad originálu prohlášení o shodě My, KOMPERNASS HANDELS GMBH, osoba odpovědná za dokumentaci: pan Semi Uguzlu, BURGSTR. 21, 44867 BOCHUM, DEUTSCHLAND/ NĚMECKO, prohlašujeme, že tento přístroj je ve shodě s následujícími normami, normativními dokumenty a směrnicemi ES: Informace o možnostech likvidace vysloužilého přístroje Vám poskytne obecní nebo městský úřad. Směrnice o strojních zařízeních (2006 / 42 / EC) Ochrana životního prostředí Směrnice o elektromagnetické kompatibilitě (2014 / 30 / EU) ■ Vyprázdněte pečlivě nádržku na olej a odevzdejte přístroj na sběrném místě k recyklaci. Použité plastové a kovové díly lze roztřídit podle druhu a recyklovat. S dotazy se obracejte na naše servisní středisko. ■ Použitý olej odevzdejte na sběrném místě a nevylévejte ho do kanalizace ani do odtoku. ■ Znečištěný materiál z údržby a provozní materiály odevzdejte na určeném sběrném místě. Nevyhazujte elektrická nářadí do domovního odpadu! V souladu s evropskou směrnicí č. 2012/19/EU musí být opotřebovaná elektrická nářadí shromažďována odděleně a odevzdána k ekologické recyklaci. Výrobek je recyklovatelný, podléhá rozšířené odpovědnosti výrobce a je shromažďován odděleně. Náhradní díly Náhradní díly si můžete objednat přímo přes servisní středisko. Při objednávání bezpodmínečně uveďte typ stroje a číslo dílu. Směrnice o hlukových emisích 2000 / 14 / EC 2005 / 88 / EC Jmenovaný orgán: Č. 0036 TÜV SÜD Industrie Service GmbH, Westendstraße 199, 80686 Mnichov, Německo Metoda hodnocení shody podle přílohy V. Hladina akustického výkonu LWA: Naměřeno: 102,2 dB (A) Garantováno: 105 dB (A) Směrnice o omezení používání nebezpečných látek – RoHS (2011 / 65 / EU)* * Výhradní odpovědnost za vystavení tohoto prohlášení o shodě nese výrobce. Výše popsán předmět prohlášení je v souladu s předpisy směrnice č. 2011/65/EU Evropského parlamentu a Rady ze dne 8. června 2011 o omezení používání určitých nebezpečných látek v elektrických a elektronických zařízeních. Použité harmonizované normy: EN 60745-1: 2009/A11: 2010 EN ISO 10517: 2019 EN ISO 11680-1: 2011 EN 55014-1: 2017 EN 55014-2: 2015 EN 61000-3-2: 2014 EN 61000-3-3: 2013 EN 50581:2012 Typ/označení přístroje: Nůžky na živý plot a odvětvovač 2 v 1 PHSHE 900 B2 Rok výroby: 09 - 2019 Sériové číslo: IAN 313266_1904 Bochum, 11.09.2019 Semi Uguzlu - manažer kvality Technické změny ve smyslu dalšího vývoje jsou vyhrazeny. PHSHE 900 B2 CZ │ 83 ■ ■ 84 │ CZ PHSHE 900 B2 Obsah Úvod . . . . . . . . . . . . . . . . . . . . . . . . . . . . . . . . . . . . . . . . . . . . . . . . . . . . . . . . . . . . . . . . . . . . . . . . . . . . . . . . . . . . . . . . . 86 Používanie nožníc na živý plot v súlade s určením . . . . . . . . . . . . . . . . . . . . . . . . . . . . . . . . . . . . . . . . . . . . . . . . . . . . . . . . . . . . . . . . . . . . . 86 Používanie odvetvovača v súlade s určením . . . . . . . . . . . . . . . . . . . . . . . . . . . . . . . . . . . . . . . . . . . . . . . . . . . . . . . . . . . . . . . . . . . . . . . . . . 86 Používanie v súlade s určením . . . . . . . . . . . . . . . . . . . . . . . . . . . . . . . . . . . . . . . . . . . . . . . . . . . . . . . . . . . . . . . . . . . . . . . . . . . . . . . . . . . . . 86 Vybavenie . . . . . . . . . . . . . . . . . . . . . . . . . . . . . . . . . . . . . . . . . . . . . . . . . . . . . . . . . . . . . . . . . . . . . . . . . . . . . . . . . . . . . . . . . . . . . . . . . . . . 86 Rozsah dodávky . . . . . . . . . . . . . . . . . . . . . . . . . . . . . . . . . . . . . . . . . . . . . . . . . . . . . . . . . . . . . . . . . . . . . . . . . . . . . . . . . . . . . . . . . . . . . . . 87 Technické údaje. . . . . . . . . . . . . . . . . . . . . . . . . . . . . . . . . . . . . . . . . . . . . . . . . . . . . . . . . . . . . . . . . . . . . . . . . . . . . . . . . . . . . . . . . . . . . . . . 87 Všeobecné bezpečnostné pokyny pre elektrické náradie . . . . . . . . . . . . . . . . . . . . . . . . . . . . . . . . . . . . . . . . . . . . . 88 1. Bezpečnosť na pracovisku . . . . . . . . . . . . . . . . . . . . . . . . . . . . . . . . . . . . . . . . . . . . . . . . . . . . . . . . . . . . . . . . . . . . . . . . . . . . . . . . . . . . . 88 2. Elektrická bezpečnosť . . . . . . . . . . . . . . . . . . . . . . . . . . . . . . . . . . . . . . . . . . . . . . . . . . . . . . . . . . . . . . . . . . . . . . . . . . . . . . . . . . . . . . . . . 88 3. Bezpečnosť osôb . . . . . . . . . . . . . . . . . . . . . . . . . . . . . . . . . . . . . . . . . . . . . . . . . . . . . . . . . . . . . . . . . . . . . . . . . . . . . . . . . . . . . . . . . . . . 88 4. Používanie a zaobchádzanie s elektrickým náradím . . . . . . . . . . . . . . . . . . . . . . . . . . . . . . . . . . . . . . . . . . . . . . . . . . . . . . . . . . . . . . . . . 88 5. Servis. . . . . . . . . . . . . . . . . . . . . . . . . . . . . . . . . . . . . . . . . . . . . . . . . . . . . . . . . . . . . . . . . . . . . . . . . . . . . . . . . . . . . . . . . . . . . . . . . . . . . . 89 Bezpečnostné pokyny špecifické pre nožnice na živý plot . . . . . . . . . . . . . . . . . . . . . . . . . . . . . . . . . . . . . . . . . . . . . . . . . . . . . . . . . . . . . . . 89 Doplňujúce bezpečnostné pokyny pre nožnice na živý plot . . . . . . . . . . . . . . . . . . . . . . . . . . . . . . . . . . . . . . . . . . . . . . . . . . . . . . . . . . . . . . 89 Ďalšie bezpečnostné pokyny pre nožnice na živý plot . . . . . . . . . . . . . . . . . . . . . . . . . . . . . . . . . . . . . . . . . . . . . . . . . . . . . . . . . . . . . . . . . . 90 ZVYŠKOVÉ RIZIKÁ!. . . . . . . . . . . . . . . . . . . . . . . . . . . . . . . . . . . . . . . . . . . . . . . . . . . . . . . . . . . . . . . . . . . . . . . . . . . . . . . . . . . . . . . . . . . . . 90 Bezpečnostné pokyny špecifické pre predĺžený odvetvovač. . . . . . . . . . . . . . . . . . . . . . . . . . . . . . . . . . . . . . . . . . . . . . . . . . . . . . . . . . . . . . 90 Preventívne opatrenia proti spätnému rázu . . . . . . . . . . . . . . . . . . . . . . . . . . . . . . . . . . . . . . . . . . . . . . . . . . . . . . . . . . . . . . . . . . . . . . . . . . . 91 Ďalšie bezpečnostné pokyny. . . . . . . . . . . . . . . . . . . . . . . . . . . . . . . . . . . . . . . . . . . . . . . . . . . . . . . . . . . . . . . . . . . . . . . . . . . . . . . . . . . . . . 91 Pred uvedením do prevádzky . . . . . . . . . . . . . . . . . . . . . . . . . . . . . . . . . . . . . . . . . . . . . . . . . . . . . . . . . . . . . . . . . . . . 92 Blok motora . . . . . . . . . . . . . . . . . . . . . . . . . . . . . . . . . . . . . . . . . . . . . . . . . . . . . . . . . . . . . . . . . . . . . . . . . . . . . . . . . . . . . . . . . . . . . . . . . . . 92 Montáž okrúhlej rukoväte . . . . . . . . . . . . . . . . . . . . . . . . . . . . . . . . . . . . . . . . . . . . . . . . . . . . . . . . . . . . . . . . . . . . . . . . . . . . . . . . . . . . . . . . 92 Pripevnenie / montáž ramenného popruhu. . . . . . . . . . . . . . . . . . . . . . . . . . . . . . . . . . . . . . . . . . . . . . . . . . . . . . . . . . . . . . . . . . . . . . . . . . . 92 Montáž nožníc na živý plot. . . . . . . . . . . . . . . . . . . . . . . . . . . . . . . . . . . . . . . . . . . . . . . . . . . . . . . . . . . . . . . . . . . . . . . . . . . . . . . . . . . . . . . 92 Montáž predĺženého odvetvovača . . . . . . . . . . . . . . . . . . . . . . . . . . . . . . . . . . . . . . . . . . . . . . . . . . . . . . . . . . . . . . . . . . . . . . . . . . . . . . . . . 92 Otáčanie nožníc na živý plot . . . . . . . . . . . . . . . . . . . . . . . . . . . . . . . . . . . . . . . . . . . . . . . . . . . . . . . . . . . . . . . . . . . . . . . . . . . . . . . . . . . . . 92 Otáčanie predĺženého odvetvovača . . . . . . . . . . . . . . . . . . . . . . . . . . . . . . . . . . . . . . . . . . . . . . . . . . . . . . . . . . . . . . . . . . . . . . . . . . . . . . . . 92 Montáž pílovej reťaze a kýlovnice . . . . . . . . . . . . . . . . . . . . . . . . . . . . . . . . . . . . . . . . . . . . . . . . . . . . . . . . . . . . . . . . . . . . . . . . . . . . . . . . . 92 Napnutie a kontrola pílovej reťaze . . . . . . . . . . . . . . . . . . . . . . . . . . . . . . . . . . . . . . . . . . . . . . . . . . . . . . . . . . . . . . . . . . . . . . . . . . . . . . . . . 92 Mazanie reťaze. . . . . . . . . . . . . . . . . . . . . . . . . . . . . . . . . . . . . . . . . . . . . . . . . . . . . . . . . . . . . . . . . . . . . . . . . . . . . . . . . . . . . . . . . . . . . . . . 93 Ostrenie pílovej reťaze . . . . . . . . . . . . . . . . . . . . . . . . . . . . . . . . . . . . . . . . . . . . . . . . . . . . . . . . . . . . . . . . . . . . . . . . . . . . . . . . . . . . . . . . . . 93 Uvedenie do prevádzky . . . . . . . . . . . . . . . . . . . . . . . . . . . . . . . . . . . . . . . . . . . . . . . . . . . . . . . . . . . . . . . . . . . . . . . . . 93 Zapnutie/vypnutie . . . . . . . . . . . . . . . . . . . . . . . . . . . . . . . . . . . . . . . . . . . . . . . . . . . . . . . . . . . . . . . . . . . . . . . . . . . . . . . . . . . . . . . . . . . . . . 93 Prestavenie rukoväte . . . . . . . . . . . . . . . . . . . . . . . . . . . . . . . . . . . . . . . . . . . . . . . . . . . . . . . . . . . . . . . . . . . . . . . . . . . . . . . . . . . . . . . . . . . . 93 Práca s nožnicami na živý plot . . . . . . . . . . . . . . . . . . . . . . . . . . . . . . . . . . . . . . . . . . . . . . . . . . . . . . . . . . . . . . . . . . . . . . . . . . . . . . . . . . . . 93 Použitie stroja: . . . . . . . . . . . . . . . . . . . . . . . . . . . . . . . . . . . . . . . . . . . . . . . . . . . . . . . . . . . . . . . . . . . . . . . . . . . . . . . . . . . . . . . . . . . . . . . . . 93 Techniky strihania . . . . . . . . . . . . . . . . . . . . . . . . . . . . . . . . . . . . . . . . . . . . . . . . . . . . . . . . . . . . . . . . . . . . . . . . . . . . . . . . . . . . . . . . . . . . . . 93 Práca s predĺženým odvetvovačom . . . . . . . . . . . . . . . . . . . . . . . . . . . . . . . . . . . . . . . . . . . . . . . . . . . . . . . . . . . . . . . . . . . . . . . . . . . . . . . . . 93 Techniky rezania . . . . . . . . . . . . . . . . . . . . . . . . . . . . . . . . . . . . . . . . . . . . . . . . . . . . . . . . . . . . . . . . . . . . . . . . . . . . . . . . . . . . . . . . . . . . . . . 93 Bezpečná práca . . . . . . . . . . . . . . . . . . . . . . . . . . . . . . . . . . . . . . . . . . . . . . . . . . . . . . . . . . . . . . . . . . . . . . . . . . . . . . . . . . . . . . . . . . . . . . . 94 Preprava . . . . . . . . . . . . . . . . . . . . . . . . . . . . . . . . . . . . . . . . . . . . . . . . . . . . . . . . . . . . . . . . . . . . . . . . . . . . . . . . . . . . . 94 Údržba a čistenie. . . . . . . . . . . . . . . . . . . . . . . . . . . . . . . . . . . . . . . . . . . . . . . . . . . . . . . . . . . . . . . . . . . . . . . . . . . . . . . 94 Skladovanie. . . . . . . . . . . . . . . . . . . . . . . . . . . . . . . . . . . . . . . . . . . . . . . . . . . . . . . . . . . . . . . . . . . . . . . . . . . . . . . . . . . 94 Hľadanie porúch na predĺženom odvetvovači . . . . . . . . . . . . . . . . . . . . . . . . . . . . . . . . . . . . . . . . . . . . . . . . . . . . . . . 95 Vyhľadávanie chýb nožníc na živý plot . . . . . . . . . . . . . . . . . . . . . . . . . . . . . . . . . . . . . . . . . . . . . . . . . . . . . . . . . . . . 95 Intervaly údržby predĺženého odvetvovača . . . . . . . . . . . . . . . . . . . . . . . . . . . . . . . . . . . . . . . . . . . . . . . . . . . . . . . . 95 Intervaly údržby nožníc na živý plot. . . . . . . . . . . . . . . . . . . . . . . . . . . . . . . . . . . . . . . . . . . . . . . . . . . . . . . . . . . . . . . 95 Záruka spoločnosti Kompernass Handels GmbH. . . . . . . . . . . . . . . . . . . . . . . . . . . . . . . . . . . . . . . . . . . . . . . . . . . . . 96 Servis . . . . . . . . . . . . . . . . . . . . . . . . . . . . . . . . . . . . . . . . . . . . . . . . . . . . . . . . . . . . . . . . . . . . . . . . . . . . . . . . . . . . . . . . 96 Dovozca . . . . . . . . . . . . . . . . . . . . . . . . . . . . . . . . . . . . . . . . . . . . . . . . . . . . . . . . . . . . . . . . . . . . . . . . . . . . . . . . . . . . . . 96 Likvidácia. . . . . . . . . . . . . . . . . . . . . . . . . . . . . . . . . . . . . . . . . . . . . . . . . . . . . . . . . . . . . . . . . . . . . . . . . . . . . . . . . . . . . 97 Náhradné diely . . . . . . . . . . . . . . . . . . . . . . . . . . . . . . . . . . . . . . . . . . . . . . . . . . . . . . . . . . . . . . . . . . . . . . . . . . . . . . . . 97 Preklad originálneho vyhlásenia o zhode . . . . . . . . . . . . . . . . . . . . . . . . . . . . . . . . . . . . . . . . . . . . . . . . . . . . . . . . . . 97 PHSHE 900 B2 SK │ 85 ■ 2 V 1 NOŽNICE NA ŽIVÝ PLOT S DLHOU NÁSADOU / ODVETVOVAČ PHSHE 900 B2 Úvod Srdečne vám gratulujeme ku kúpe vášho nového prístroja. Touto kúpou ste sa rozhodli pre výrobok vysokej kvality. Návod na obsluhu je súčasťou tohto výrobku. Obsahuje dôležité upozornenia týkajúce sa bezpečnosti, používania a likvidácie. Pred používaním výrobku sa oboznámte so všetkými pokynmi na obsluhu a bezpečnostnými pokynmi. Výrobok používajte iba podľa popisu a v uvedených oblastiach použitia. Pri postúpení výrobku tretej osobe odovzdajte spolu s ním aj všetky dokumenty. Vybavenie Blok motora skrutka s kolíkovou rukoväťou matica výložník skrutka okrúhla rukoväť nosné oko otočný prvok tlačidlo odblokovania blokovanie zapnutia spínač ZAP/VYP Používanie nožníc na živý plot v súlade s určením Tento prístroj je určený na rezanie a úpravu živých plotov, kríkov a krovín v domácom prostredí. Ide pritom o ručne vedený prístroj s integrovaným pohonom, pri ktorom sa tam a späť pohybujú lineárne usporiadané rezné hrany. VÝSTRAHA! ► Nožnice na živý plot nie sú určené na používanie deťmi. Používanie odvetvovača v súlade s určením Tento prístroj je určený na odvetvovanie stromov. sieťový kábel odľahčenie ťahu Násada nožníc na živý plot nožová lišta prevodovka odblokovanie/zablokovanie základná doska (nožnice na živý plot) nastavovacia páka rukoväť predný výložník Používanie v súlade s určením aretačný kolík Prístroj používajte len tak, ako je popísané a len pre uvedené oblasti použitia. Prístroj nie je určený na komerčné použitie. Tento prístroj je určený na používanie dospelými osobami. Tento prístroj nie je určený na to, aby ho používali osoby (vrátane detí) s obmedzenými fyzickými, senzorickými alebo duševnými schopnosťami alebo nedostatkom skúseností a/alebo nedostatkom vedomostí. Použitie prístroja v daždi alebo vlhkom prostredí je zakázané. Akýkoľvek iný spôsob používania alebo zmeny prístroja sa považujú za používanie v rozpore s určením a má za následok vážne nebezpečenstvá úrazu. Za škody vzniknuté v dôsledku používania v rozpore s určením výrobca nepreberá žiadnu zodpovednosť. hnací hriadeľ ochranný kryt Násada predĺženého odvetvovača pomocná stojanová brúska pílová reťaz kýlovnica doraz olejová nádrž matica závit kryt reťazového kolesa otvor kýlovnice vedenie kýlovnice vodiaca lišta kvapkacia olejnička napínacia skrutka reťaze reťazové koleso napínací kolík reťaze predný výložník hnací hriadeľ ochranný kryt aretačný kolík ochranný krúžok nastavovacia páka základná doska (predĺžený odvetvovač) odblokovanie/zablokovanie veko olejovej nádrže ■ 86 │ SK PHSHE 900 B2 Hodnoty vibrácií (súčet vektorov troch smerov) zisťované podľa EN 60745: Rozsah dodávky 1 motorová jednotka PHSHE 900 B2 1 násada nožníc na živý plot PHS 1 (ďalej uvedené ako nožnice na živý plot) Predĺžený odvetvovač: 1 násada predĺženého odvetvovača PHE 1 (ďalej uvedené ako predĺžený odvetvovač) Vibrácie na prednej rukoväti: Hodnota emisie vibrácií ah,D = 1,0 m/s2 Neurčitosť K = 1,5 m/s2 Vibrácie na zadnej rukoväti: Hodnota emisie vibrácií ah,D = 1,2 m/s2 Neurčitosť K = 1,5 m/s2 Príslušenstvo 1 ramenný popruh 1 ochranné puzdro reťaze 1 ochranné puzdro na kýlovnicu 1 100 ml bio reťazového oleja 1 montážne náradie Nožnice na živý plot: Vibrácie na prednej rukoväti: Hodnota emisie vibrácií ah,D = 1,6 m/s2 Neurčitosť K = 1,5 m/s2 Vibrácie na zadnej rukoväti: Hodnota emisie vibrácií ah,D = 1,8 m/s2 Neurčitosť K = 1,5 m/s2 1 návod na obsluhu Technické údaje Motorová jednotka: PHSHE 900 B2 Menovité napätie: 230 V ∼ 50 Hz (striedavý prúd) Menovitý výkon: 900 W Trieda ochrany: II / Hmotnosť: (bez rukoväte a nosného popruhu): cca 2,7 kg Predĺžený odvetvovač: PHE 1 Rýchlosť reťaze: max. 6 m/s Pracovný uhol: 0°; 15°; 30° Hmotnosť (prevádzková pohotovosť): cca 1,6 kg Odporúčané množstvo naplnenia olejovej nádrže: 100 cm3 Dĺžka rezu: cca 260 mm Kýlovnica: Oregon typ 100SDEA041 Pílová reťaz: Oregon 91P040X Nožnice na živý plot: PHS 1 Počet zdvihov pri chode naprázdno: (dvojitá izolácia) UPOZORNENIE ► Hladina vibrácií uvedená v týchto inštrukciách bola meraná v súlade s postupom merania uvedeným v norme EN 60745 a môže sa použiť na porovnanie prístrojov. Uvedená hodnota emisií vibrácií sa môže tiež použiť na počiatočné posúdenie prerušenia. VÝSTRAHA! 2000 min-1 Pracovný uhol: -90°; +90° Dĺžka rezu: cca 410 mm Rozstup zubov: 20 mm Hmotnosť (prevádzková pohotovosť): Nosiť ochranu sluchu! Vysvetlenia ku štítkom s upozorneniami na prístroji: Pred uvedením do prevádzky si prečítajte návod na obsluhu a pokyny! cca 2,1 kg Informácie o hluku a vibráciách: Nameraná hodnota hluku zistená podľa EN 60745. Hodnota hladiny hluku elektrického náradia, vyhodnotená ako A je typicky: Nosiť ochranné rukavice! Nosiť bezpečnostnú obuv! Predĺžený odvetvovač: PHE 1 Hladina akustického tlaku: Neurčitosť Hladina akustického výkonu: Neurčitosť Nožnice na živý plot: LPA = 83 K: 3 LWA = 104 K: 3 PHS 1 dB (A) dB dB (A) dB Hladina akustického tlaku: Neurčitosť Hladina akustického výkonu: Zaručená hladina akustického výkonu: Neurčitosť LPA = 81 K: 3 LWA = 102 LWA = 105 K: 3 dB (A) dB dB (A) dB (A) dB PHSHE 900 B2 ► Hladina vibrácií sa zmení podľa používania elektrického náradia a v niektorých prípadoch môže byť väčšia ako hodnota uvedená v týchto pokynoch. Zaťaženie vibráciami by sa mohlo podceniť, keď sa elektrické náradie používa pravidelne takýmto spôsobom. Pokúste sa zaťaženie vibráciami udržať na čo najnižšej hodnote. Príkladom opatrení na zníženie zaťaženia vibráciami je nosenie rukavíc pri používaní náradia a obmedzenie pracovného času. Pritom sa musia zohľadniť všetky časti prevádzkového cyklu (napríklad časy, v priebehu ktorých je elektrické náradie vypnuté a tie, počas ktorých je síce zapnuté, ale beží bez zaťaženia). Nosiť ochranu sluchu! Nosiť ochrannú prilbu! Nosiť ochranné okuliare! SK │ 87 ■ Nedovoľte prístup okolostojacich osôb k prístroju! Prístroj chráňte pred dažďom a vlhkosťou! Nebezpečenstvo ohrozenia života elektrickým prúdom! Udržiavajte vzdialenosť minimálne 10 m od nadzemných elektrických vedení. Pozor! Padajúce predmety. Najmä pri rezaní nad výškou hlavy. Pozor! Nebezpečenstvo poranenia bežiacimi nožmi. Ak sa poškodil alebo pretrhol kábel, ihneď vytiahnite zástrčku zo sieťovej zásuvky. Údaj o hladine akustického výkonu LWA v dB. Všeobecné bezpečnostné pokyny pre elektrické náradie VÝSTRAHA! ► Prečítajte si všetky bezpečnostné pokyny a upozornenia. Zanedbania pri dodržiavaní bezpečnostných pokynov a upozornení môžu mať za následok zásah elektrickým prúdom, požiar a/alebo ťažké poranenia. Pre prípad budúceho použitia uschovajte všetky bezpečnostné pokyny a upozornenia. V bezpečnostných pokynoch používaný pojem „elektrické náradie“ sa vzťahuje na elektrické náradie napájané zo siete (so sieťovým káblom) a elektrické náradie prevádzkované s akumulátorom (bez sieťového kábla). 1. Bezpečnosť na pracovisku a) Udržiavajte svoje pracovisko v čistote a dobre osvetlené. Neporiadok a neosvetlené pracovné oblasti môžu viesť k úrazom. b) Nepracujte s elektrickým náradím na miestach s nebezpečenstvom výbuchu, na ktorých sa nachádzajú horľavé kvapaliny, plyny alebo prach. Z elektrického náradia vychádzajú iskry, ktoré môžu tento prach alebo výpary zapáliť. c) Počas používania elektrického náradia zabráňte prístupu detí a iných osôb. Pri odvedení pozornosti môžete stratiť kontrolu nad prístrojom. 2. Elektrická bezpečnosť a) Prípojná zástrčka elektrického náradia musí byť vhodná pre danú zásuvku. Zástrčka sa nesmie žiadnym spôsobom modifikovať. Spolu s elektrickým náradím, ktoré má ochranné uzemnenie, nepoužívajte žiadne sieťové adaptéry. Nezmenené zástrčky a vhodné zásuvky znižujú riziko zásahu elektrickým prúdom. b) Vyvarujte sa telesnému kontaktu s uzemnenými povrchmi, ako sú potrubia, vykurovacie telesá, sporáky a chladničky. Ak je vaše telo uzemnené, hrozí zvýšené riziko zásahu elektrickým prúdom. c) Chráňte elektrické náradie pred dažďom alebo vlhkosťou. Vniknutie vody do elektrického náradia zvyšuje riziko zásahu elektrickým prúdom. ■ 88 │ SK d) Nepoužívajte kábel na iné účely, ako napr. na nosenie, zavesenie elektrického náradia alebo na vyťahovanie zástrčky z elektrickej zásuvky. Udržiavajte kábel mimo zdrojov tepla, oleja, ostrých hrán alebo pohybujúcich sa častí prístroja. Poškodené alebo zamotané káble zvyšujú riziko zásahu elektrickým prúdom. e) Ak pracujete s elektrickým náradím vonku, používajte len taký predlžovací kábel, ktorý je schválený na vonkajšie použitie. Použitie predlžovacieho kábla vhodného do vonkajšieho prostredia zníži riziko zásahu elektrickým prúdom. f) Ak nie je možné zabrániť prevádzke elektrického náradia vo vlhkom prostredí, použite prúdový chránič. Použitie prúdového chrániča znižuje riziko zásahu elektrickým prúdom. 3. Bezpečnosť osôb a) Buďte vždy pozorní a dbajte na to, čo robíte a pri práci s elektrickým náradím postupujte s rozvahou. Nepoužívajte elektrické náradie, ak ste unavení alebo ak ste pod vplyvom drog, alkoholu alebo liekov. Aj okamih nepozornosti pri používaní elektrického náradia môže spôsobiť vážne zranenia. b) Vždy noste osobné ochranné prostriedky a ochranné okuliare. Nosenie osobných ochranných prostriedkov, ako je maska proti prachu, protišmyková bezpečnostná obuv, ochranná prilba alebo ochrana sluchu, podľa druhu a použitia elektrického náradia, znižuje riziko poranení. c) Zabráňte neúmyselnému uvedeniu do prevádzky. Pred zapojením elektrického náradia do napájania prúdom a/alebo do napájania akumulátorom, ako aj pred jeho zdvíhaním a prenášaním sa presvedčte, či je vypnuté. Ak máte pri prenášaní elektrického náradia prst na spínači, alebo ak prístroj zapojíte do zdroja elektrického prúdu zapnuté, môže to viesť k úrazom. d) Skôr než zapnete elektrické náradie, odstráňte nastavovacie náradie alebo kľúč na skrutky. Náradie alebo kľúč, ktorý sa nachádza na otáčajúcej sa časti prístroja, môže spôsobiť zranenia. e) Vyhýbajte sa neprirodzenému držaniu tela. Majte pevný postoj a nepretržite udržiavajte rovnováhu. Takto môžete elektrické náradie lepšie kontrolovať v neočakávaných situáciách. f) Noste vhodný odev. Nenoste voľný odev ani šperky. Vlasy, odev a rukavice sa musia udržiavať v bezpečnej vzdialenosti od pohyblivých dielov. Voľný odev, šperky alebo dlhé vlasy môžu byť zachytené pohybujúcimi sa časťami prístroja. g) Ak je možná montáž zariadení na odsávanie a zachytávanie prachu, presvedčte sa, či sú tieto zapojené a či sú používané správne. Používanie odsávania prachu môže zredukovať ohrozenie prachom. 4. Používanie a zaobchádzanie s elektrickým náradím a) Prístroj nepreťažujte. Pri svojej práci používajte len na to určené elektrické náradie. S vhodným elektrickým náradím pracujete lepšie a bezpečnejšie v uvedenom rozsahu jeho výkonu. b) Nepoužívajte elektrické náradie s poškodeným spínačom. Elektrické náradie, ktoré sa nedá zapnúť alebo vypnúť, je nebezpečné a musí sa opraviť. c) Pred vykonávaním nastavení na prístroji, výmenou vložených nástrojov alebo pred odložením prístroja vytiahnite zástrčku z elektrickej zásuvky a/alebo odstráňte odoberateľný akumulátor. Toto preventívne opatrenie zabraňuje neúmyselnému spusteniu elektrického náradia. d) Nepoužívané elektrické náradie uschovávajte mimo dosahu detí. Nedovoľte používať prístroj osobám, ktoré s ním nie sú oboznámené alebo si neprečítali tieto pokyny. Elektrické náradie je nebezpečné, ak ho používajú neskúsené osoby. e) Elektrické náradie starostlivo udržiavajte. Skontrolujte, či pohyblivé diely fungujú správne a nie sú zaseknuté, či niektoré diely nie sú zlomené alebo poškodené tak, aby bola obmedzená funkcia elektrického náradia. Pred použitím prístroja nechajte opraviť poškodené časti. Veľa úrazov je spôsobených nedostatočnou údržbou elektrického náradia. PHSHE 900 B2 f) Rezné nástroje udržiavajte ostré a čisté. Starostlivo udržiavané rezné nástroje s ostrými reznými hranami sa menej zasekávajú a ľahšie sa dajú viesť. g) Elektrické náradie, príslušenstvo, vložené nástroje a pod. používajte v súlade s týmito inštrukciami. Zohľadnite pritom pracovné podmienky a činnosť, ktorú budete vykonávať. Použitie elektrického náradia na iný, ako určený účel použitia, môže mať za následok nebezpečné situácie. 5. Servis a) Elektrické náradie smie opravovať len kvalifikovaný odborný personál a len za použitia originálnych náhradných dielov. Takto sa zabezpečí, že zostane zachovaná bezpečnosť elektrického náradia. Bezpečnostné pokyny špecifické pre nožnice na živý plot ■ Všetky časti tela držte mimo dosahu rezných nožov. Pri bežiacom noži sa nepokúšajte odstrániť odrezky alebo držať rezaný materiál. Uviaznuté odrezky odstraňujte iba pri vypnutom prístroji. Vytiahnite navyše zástrčku zo zásuvky.Aj chvíľa nepozornosti pri používaní nožníc na živý plot môže spôsobiť vážne zranenia. Doplňujúce bezpečnostné pokyny pre nožnice na živý plot Príprava: a) TIETO NOŽNICE NA ŽIVÝ PLOT MÔŽU SPÔSOBIŤ ZÁVAŽNÉ PORANENIA! Starostlivo si prečítajte inštrukcie ohľadom správneho použitia, prípravy, údržby, naštartovania a vypnutia nožníc na živý plot. Oboznámte sa so všetkými ovládateľnými dielmi, ako aj s vecným používaním nožníc na živý plot. b) Deti nesmú nožnice na živý plot používať. c) Pozor na nadzemné elektrické vedenia. d) Použitiu nožníc na živý plot treba radšej zabrániť, ak sa v blízkosti nachádzajú osoby, predovšetkým deti. e) Noste vhodný odev! Nenoste žiadne voľné oblečenie alebo šperky, ktoré by sa mohli zachytiť o pohyblivé časti. Odporúča sa nosiť pevné rukavice, protišmykovú obuv a ochranné okuliare. f) Ak sa rezacie zariadenie dotkne cudzieho telesa alebo ak sa zosilní prevádzkový hluk, prípadne ak nožnice na živý plot vibrujú neobvykle silno, vypnite motor a nechajte nožnice na živý plot zastaviť. Vykonajte nasledovné opatrenia: – skontrolujte poškodenia; ■ Nožnice na živý plot prenášajte za prednú rukoväť vo vypnutom stave, s nožovou lištou odvrátenou od tela. Pri preprave alebo skladovaní nožníc na živý plot natiahnite vždy ochranný kryt. Opatrná manipulácia s prístrojom znižuje pravdepodobnosť náhodného kontaktu s bežiacimi nožmi. ■ Elektrické náradie držte len za izolované plochy rukovätí, pretože nôž sa môže dostať do kontaktu so skrytými elektrickými vedeniami alebo vlastným sieťovým káblom. Kontakt rezného noža s vedením vedúcim napätie môže uviesť pod napätie aj kovové časti prístroja a spôsobiť zásah elektrickým prúdom. – skontrolujte uvoľnené časti a všetky upevnite; – vymeňte poškodené súčiastky za rovnocenné súčiastky alebo ich nechajte opraviť. g) Noste ochranu sluchu! h) Noste ochranu očí! ■ Udržiavajte kábel ďaleko od oblasti rezania.Počas práce sa vám kábel môže stratiť v kríkoch a môžete ho omylom prerezať. i) V prípade núdze vypnite nožnice na živý plot a vytiahnite sieťovú zástrčku zo sieťovej zásuvky. ■ Skontrolujte starostlivo oblasť, ktorá sa má zostrihať a odstráňte všetky drôty alebo iné cudzie telesá. Prevádzka: ■ Odporúča sa používať prúdový chránič s vypínacím prúdom 30 mA alebo menej. a) Vytiahnite sieťovú zástrčku z elektrickej zásuvky pred: – čistením alebo odstránením zablokovania; UPOZORNENIE – kontrolou, údržbou alebo prácami na nožniciach na živý plot; ► Nožnice na živý plot sa dodávajú v kompletne zmontovanom stave. – nastavením pozície v závislosti od smeru strihania; ► Znázornené obrázky na použitie nožníc na živý plot, príp. ich nastavovacích dielov nájdete na výklopnej stránke. – ak nožnice na živý plot zostanú bez dozoru. b) Vždy sa uistite, že sú nožnice na živý plot v poriadku a v stanovenej pracovnej polohe, predtým než naštartujete motor. ► Pokyny a znázornené obrázky na nastavenie, údržbu, mastenie používateľom nájdete v tomto návode. ► Pokyny pre nastavovacie diely (pozri výklopnú stránku). c) Počas prevádzky nožníc na živý plot vždy zabezpečte, aby sa nachádzali v bezpečnom stave, predovšetkým ak sa zároveň s ním používajú stúpadlá alebo rebrík. ► Pokyny na výmenu a opravu (pozri kapitolu Údržba a čistenie/ Servis). d) Nepoužívajte nožnice na živý plot s poškodeným alebo silne opotrebovaným rezným zariadením. ► Vysvetlenie všetkých grafických symbolov, použitých na nožniciach na živý plot a technické údaje nájdete v tomto návode. e) Vždy sa uistite, že sú pri použití nožníc na živý plot namontované všetky držadlá a tiež bezpečnostné zariadenia. Nikdy sa nepokúšajte používať nekompletné nožnice na živý plot alebo nožnice na živý plot, ktoré majú nepovolenú úpravu. ► Pokyny pre pracovnú polohu (pozri výklopnú stránku). ► Charakteristické vlastnosti nožníc na živý plot nájdete v technických údajoch. ► Blokovaný nástroj: Odstráňte zaseknutý materiál z nožovej lišty POZOR! ► V prípade hroziaceho nebezpečenstva, príp. v núdzovej situácii ihneď vypnite motor a vytiahnite sieťovú zástrčku. PHSHE 900 B2 . f) držte nožnice na živý plot pevne oboma rukami za rukoväte, ktoré sú na to určené. g) Vždy sa oboznámte so svojím okolím a dávajte pozor na možné nebezpečenstvá, ktoré možno z dôvodu hluku z nožníc na živý plot nemôžete počuť. SK │ 89 ■ Údržba a uskladnenie: a) Pokiaľ sú nožnice na živý plot z dôvodu údržby, inšpekcie alebo uskladnenia odstavené, vypnite motor a uistite sa, že všetky rotujúce časti sa zastavili. Nechajte prístroj vychladnúť, predtým, než ho začnete kontrolovať, nastavovať atď. b) Skladujte nožnice na živý plot tam, kde benzínové výpary sa nemôžu dostať do kontaktu s otvoreným ohňom alebo iskrami. Nechajte nožnice na živý plot vždy vychladnúť predtým, než ich uskladníte. c) Pri preprave alebo skladovaní nožníc na živý plot je potrebné rezné zariadenie vždy prikryť ochranu na rezné zariadenia. Ďalšie bezpečnostné pokyny pre nožnice na živý plot ■ Všetky časti tela držte mimo dosahu rezných nožov. Pri bežiacom noži sa nepokúšajte odstrániť odrezky alebo držať rezaný materiál. Uviaznuté odrezky odstraňujte iba pri vypnutom prístroji. Aj chvíľa nepozornosti pri používaní nožníc na živý plot môže spôsobiť vážne zranenia. ■ Nožnice na živý plot prenášajte za rukoväť vo vypnutom stave, s nožovou lištou odvrátenou od tela. Pri preprave alebo skladovaní nožníc na živý plot natiahnite vždy ochranný kryt. Starostlivá manipulácia s prístrojom znižuje riziko zranenia nožom. ■ Elektrické náradie držte len za izolované plochy rukovätí, pretože nôž sa môže dostať do kontaktu so skrytými elektrickými vedeniami alebo vlastným sieťovým káblom. Kontakt rezného noža s napäťovým vedením môže uviesť pod napätie aj kovové časti prístroja a spôsobiť zásah elektrickým prúdom. ♦ Prehľadajte, či v kríku nie sú skryté predmety (napr. drôtené ploty). Bezpečnostné pokyny špecifické pre predĺžený odvetvovač ■ Noste vždy ochrannú prilbu, ochranu sluchu a bezpečnostné rukavice. Noste tiež ochranu zraku, aby sa striekajúci olej alebo prach z píly nedostal do očí. Noste ochrannú protiprachovú masku. ■ Nikdy nepoužívajte prístroj, keď stojíte na rebríku. ■ Pri použití prístroja sa nenakláňajte príliš ďaleko dopredu. Dbajte vždy na bezpečný postoj a neustále udržiavajte rovnováhu. Pre rovnomerné rozloženie hmotnosti, pôsobiacej na telo, používajte nosný popruh, ktorý je súčasťou dodávky. ■ Noste robustné vysoké čižmy s protišmykovou úpravou. ■ Nepoužívajte prístroj pri daždi alebo vo vlhkom prostredí. ■ Nepoužívajte prístroj v blízkosti elektrického vedenia. Udržiavajte minimálnu vzdialenosť 10 m od nadzemných elektrických vedení. ■ Nestavajte sa pod konáre, ktoré chcete rezať, predídete tak zraneniu spadnutými vetvami. Taktiež dávajte pozor na odskakujúce konáre, aby ste predišli zraneniu. Pracujte pod uhlom 60° ±10°. ■ Dávajte pozor na to, aby nedošlo k spätnému rázu prístroja. ■ Nesledujte len práve rezané vetvy, ale tiež spadnutý materiál, aby ste o neho nezakopli. ■ Po 30 minútach práce si urobte minimálne hodinovú prestávku. ■ Noste vždy ochranné rukavice. ■ Pri preprave a skladovaní zakryte vodiacu lištu a reťaz krytom. ■ Nepoužívajte prístroj v prostredí s nebezpečenstvom výbuchu, kde sa v blízkosti nachádzajú horľavé kvapaliny, plyny alebo výpary. Iskry produkované strojom môžu viesť k vznieteniu týchto výparov alebo plynov. ZVYŠKOVÉ RIZIKÁ! ■ Použitá zásuvka musí byť vhodná pre zástrčku. Nevykonávajte na zástrčke nikdy žiadne zmeny, predídete tak zásahu elektrickým prúdom. Aj keď toto elektrické náradie používate podľa predpisov, vždy ostávajú zvyškové riziká. V súvislosti s konštrukciou a vyhotovením tohto elektrického náradia môžu vzniknúť nasledovné riziká: ■ Sieťovú zástrčku nikdy nevyťahujte zo zásuvky ťahom za kábel, ale uchopte priamo za sieťovú zástrčku. Nepoužívajte sieťový kábel na ťahanie alebo prepravu prístroja. Udržiavajte kábel mimo dosahu tepla, oleja, ostrých hrán alebo pohybujúcich sa častí prístroja. a) Rezné poranenia b) Poškodenia sluchu, ak sa nenosí žiadna vhodná ochrana sluchu. c) Poškodenia zdravia, ktoré vyplývajú z vibrácií ruka – rameno, ak sa prístroj používa dlhší čas alebo sa riadne nevedie ani neudržiava. ■ Po ukončení práce alebo pri čistiacich a údržbárskych prácach vytiahnite sieťovú zástrčku z prístroja. ■ Zabráňte náhodnému spusteniu prístroja. UPOZORNENIE ■ Prístroje s chybným spínačom sa musia ihneď opraviť, aby sa zabránilo škodám a poraneniam. ► Nožnice na živý plot sa dodávajú v kompletne zmontovanom stave. ■ Prístroj uchovávajte mimo dosahu detí. ► Pokyny a znázornené obrázky na nastavenie, údržbu, mastenie používateľom nájdete v tomto návode. ■ Prístroj smú obsluhovať iba osoby dôkladne oboznámené s návodom na obsluhu a s prístrojom. ► Pokyny na výmenu a opravu (pozri kapitolu Údržba a čistenie/ Servis). ■ Na elektrickom náradí starostlivo vykonávajte údržbu. Skontrolujte, či pohyblivé diely fungujú správne a nie sú zaseknuté, či niektoré diely nie sú zlomené alebo poškodené tak, aby bola obmedzená funkcia elektrického náradia. Pred použitím prístroja nechajte opraviť poškodené časti. Veľa úrazov je spôsobených nedostatočnou údržbou elektrického náradia. ► Vysvetlenie všetkých grafických symbolov, použitých na nožniciach na živý plot a technické údaje nájdete v tomto návode. ► Charakteristické vlastnosti nožníc na živý plot nájdete v technických údajoch. ► Blokovaný nástroj: Odstráňte zaseknutý materiál z nožovej lišty. ■ Používajte len príslušenstvo a prídavné zariadenia, ktoré sú uvedené v návode na obsluhu. Použitie iných, ako v návode na obsluhu uvedených, vložených nástrojov alebo iného príslušenstva, môže pre vás znamenať nebezpečenstvo poranenia. ■ 90 │ SK ■ Rezné nástroje udržiavajte ostré a čisté. Starostlivo udržiavané rezné nástroje s ostrými reznými hranami sa menej zasekávajú a ľahšie sa dajú viesť. ■ Údržbu prístroja nechajte vykonávať personálom, kvalifikovaným pre túto činnosť. Používajte iba originálne náhradné diely odporúčané výrobcom. PHSHE 900 B2 Preventívne opatrenia proti spätnému rázu POZOR, SPÄTNÝ RÁZ! ► Pri práci dávajte pozor na spätný ráz prístroja. Hrozí nebezpečenstvo poranenia. Spätným rázom zabránite opatrnosťou a správnou technikou rezania. ■ Dotknutie sa špičkou lišty môže v niektorých prípadoch viesť k neočakávanej reakcii smerom dozadu, pri ktorej sa vodiaca lišta vyhodí nahor a smerom k obsluhujúcej osobe (pozri obr.). Bild 1 ■ Spätný ráz môže vzniknúť vtedy, keď sa špička vodiacej lišty dotkne nejakého predmetu alebo keď sa drevo ohne a pílová reťaz uviazne v mieste rezu (pozri obr.). ■ Uviaznutie pílovej reťaze na hornej hrane vodiacej lišty môže viesť k prudkému rázu lišty späť smerom k obsluhujúcej osobe. ■ Každá z týchto reakcií môže spôsobiť, že stratíte kontrolu nad pílou a môžete sa ťažko zraniť. Nespoliehajte sa nikdy výlučne na bezpečnostné zariadenia zabudované v reťazovej píle. Ako používateľ reťazovej píly urobte rôzne opatrenia, aby pri práci nedošlo k úrazu a poraneniam. Spätný ráz je dôsledkom nesprávneho alebo chybného používania elektrického náradia. Môžete mu zabrániť vhodnými preventívnymi bezpečnostnými opatreniami, ktoré sú popísané v nasledujúcom texte: ■ Držte pílu pevne oboma rukami, pričom sú rukoväte píly zovreté palcom a prstami. Dajte svoje telo a ruky do takej polohy, v ktorej ste schopní odolať silám spätného rázu. Ak sa prijmú vhodné opatrenia, môže obsluhujúca osoba sily spätného rázu zvládnuť. Nikdy reťazovú pílu nepúšťajte z ruky. ■ Vyhýbajte sa neprirodzenému postoju a pri rezaní nedvíhajte ruky nad výšku ramien. Tak predídete neúmyselnému dotknutiu sa špičkou lišty a získate lepšiu kontrolu nad reťazovou pílou v neočakávaných situáciách. Ďalšie bezpečnostné pokyny POZOR! NEBEZPEČENSTVO PORANENIA! ► Nikdy nechytajte spustený prístroj nad ochranným krúžkom vyhnete sa tak zraneniu! , ■ Počas prevádzky sa v okruhu 15 metrov nesmú zdržiavať žiadne iné osoby ani zvieratá. Obsluhujúca osoba je v pracovnej oblasti zodpovedná voči tretím osobám. ■ Udržiavajte prístroj, rezací mechanizmus a ochranné puzdro kýlovnice v dobrom stave na používanie, aby sa tak zabránilo poraneniam. ■ Na deti sa musí dohliadať, aby sa zabezpečilo, že sa s prístrojom nebudú hrať. ■ Prístroj použite až po dôkladnom oboznámení s ním. ■ Nepracujte s poškodeným, neúplným alebo bez súhlasu výrobcu zmeneným prístrojom. Nikdy nepoužívajte prístroj s chybným ochranným vybavením. Nikdy nepoužívajte prístroj s chybným spínačom zap./vyp. Pred použitím skontrolujte bezpečný stav prístroja, obzvlášť kýlovnicu a pílovú reťaz. Po spadnutí prístroja skontrolujte, či nie je značne poškodený alebo chybný. ■ Prístroj nikdy nespúšťajte, dokiaľ nie sú správne namontované kýlovnica, pílová reťaz a kryt reťazového kolesa. ■ Uistite sa, či sa prístroj pri spúšťaní a počas práce nedostal do kontaktu so zemou, kameňmi, drôtom alebo inými cudzími telesami. Skôr ako prístroj vypnite, odstavte ho. ■ Prístroj je konštruovaný na obojručnú prevádzku. Nikdy nepracujte jednou rukou. ■ Prístroj držte len na izolovaných plochách rukoväte, pretože pílová reťaz sa môže dostať do kontaktu so skrytým elektrickým vedením. Kontakt pílovej reťaze s vedením pod napätím môže tiež vytvoriť napätie aj v kovových častiach prístroja a spôsobiť zásah elektrickým prúdom. ■ Pri prenášaní na iné miesto dávajte pozor na to, aby prístroj bol vypnutý a prst sa nedotýkal spínača ZAP/VYP. Prístroj noste s pílovou reťazou a kýlovnicou nasmerovanou dozadu. Pri prenášaní založte na kýlovnicu ochranné puzdro. ■ Pri každom reze pevne nastavte doraz a až potom začnite píliť. ■ Pri rezaní malých kríkov a vetví buďte mimoriadne opatrní. Tenké vetvičky sa môžu v píle zamotať a udrieť smerom k vám alebo môžete stratiť rovnováhu. ■ Nerežte drevo položené na zemi, resp. nepokúšajte sa rezať korene vyčnievajúce zo zeme. V každom prípade zabráňte ponoreniu pílovej reťaze do zeminy, pretože inak dôjde ihneď k jej otupeniu. ■ Pri pílení dávajte pozor na vetvy, ktoré sú napnuté, pretože môžu spôsobiť spätý úder, keď sa napnutie náhle uvoľní. Hrozí nebezpečenstvo poranenia. ■ V prípade vzpriečenia alebo zaseknutia rezacieho mechanizmu do vetví sa nepokúšajte uvoľniť prístroj použitím násilia. Okamžite prístroj vypnite a zapnite ho až po odstránení zablokovania. Hrozí nebezpečenstvo poranenia! ■ Používajte vždy náhradné lišty a pílové reťaze predpísané výrobcom. Nesprávne náhradné lišty a pílové reťaze môžu viesť k roztrhnutiu reťaze a/alebo k spätnému rázu. ■ Dodržiavajte pokyny výrobcu ohľadom ostrenia a údržby pílovej reťaze. Príliš nízke obmedzovače hĺbky zvyšujú sklon k spätnému rázu. ■ Nepíľte špičkou kýlovnice. Hrozí nebezpečenstvo spätného rázu. ■ Postarajte sa o to, aby na zemi neležali žiadne predmety, o ktoré by ste mohli potknúť. PHSHE 900 B2 SK │ 91 ■ Montáž pílovej reťaze a kýlovnice Pred uvedením do prevádzky VÝSTRAHA! POZOR! NEBEZPEČENSTVO PORANENIA! ► Pred všetkými prácami na prístroji vytiahnite sieťovú zástrčku zo siete. Nebezpečenstvo zásahu elektrickým prúdom! UPOZORNENIE Blok motora Montáž okrúhlej rukoväte ♦ Nastrčte okrúhlu rukoväť ♦ Utiahnite skrutku . v požadovanej polohe na výložník ► Dbajte na smer chodu pílovej reťaze reťazového kolesa . . ► Podľa opotrebenia možno kýlovnicu ♦ Povoľte maticu ♦ Zaveste ramenný popruh do nosného oka . ♦ Prispôsobte ramenný popruh Vašej veľkosti tak, aby sa nosné oko nachádzalo v zavesenom stave vo výške bokov. nožníc na živý plot na výložník bloku ♦ Zoskrutkujte oba výložníky na tento účel použite maticu , Montáž predĺženého odvetvovača ♦ Nasuňte predný výložník bloku motora. ♦ Aretovací kolík ♦ Zoskrutkujte oba výložníky na tento účel použite maticu skrutkou s kolíkovou rukoväťou na protiľahlej strane. , Otáčanie nožníc na živý plot ♦ Povoľte odblokovanie/zablokovanie ♦ Stlačte nastavovaciu páčku vanej polohy. . , otočte nožnice na živý plot do požado- . a mierne utiahnite maticu . (pozri kapitolu Napnutie a kontrola Napnutie a kontrola pílovej reťaze UPOZORNENIE ► Napnutie pílovej reťaze je dôležité pre bezpečnosť a funkciu prístroja. Správne upnutá pílová reťaz zvyšuje životnosť vášho prístroja. VÝSTRAHA! ♦ Nastavovaciu páčku pustite a odblokovanie/zablokovanie nechajte zaskočiť do vyhĺbeniny v základnej doske (nožnice na živý plot) . Otáčanie predĺženého odvetvovača ♦ Povoľte odblokovanie/zablokovanie ♦ Stlačte nastavovaciu páčku jednej z oboch polôh. . ♦ Položte vodiacu lištu cez vedenie kýlovnice , pri tom tiež nasaďte napínací kolík reťaze do otvoru kýlovnice . Súčasne položte pílovú reťaz cez reťazové koleso . ♦ Teraz napnite pílovú reťaz pílovej reťaze). musí zaskočiť. zo základnej dosky , pričom začnete od špičky kýlovnice ♦ Opäť nasaďte kryt pílovej reťaze predĺženého odvetvovača na výložník . . s pílovou reťazou ♦ Nasaďte opäť pílovú reťaz skrutkou s kolíkovou rukoväťou na protiľahlej strane. už namontované. ♦ Pílová reťaz sa v danom prípade musí predtým uvoľniť, aby bolo možné sňať kýlovnicu a pílovú reťaz (pozri kapitolu „Napnutie a kontrola pílovej reťaze“). Riaďte sa týmito pokynmi v opačnom poradí. ♦ Odoberte kýlovnicu musí zaskočiť. a na kryte obrátiť. montážnym náradím ♦ Odoberte kryt reťazového kolesa Montáž nožníc na živý plot ♦ Aretovací kolík na kýlovnici a pílová reťaz ► V stave dodávky sú kýlovnica Pripevnenie / montáž ramenného popruhu ♦ Nasuňte predný výložník motora. ► Používajte ochranné rukavice! Nebezpečenstvo zranenia ostrými reznými zubami! . , vytočte predĺžený odvetvovač do ♦ Nastavovaciu páčku pustite a odblokovanie/zablokovanie nechajte zaskočiť do vyhĺbeniny v základnej doske (predĺžený odvetvovač) . ► Používajte ochranné rukavice! Nebezpečenstvo zranenia ostrými reznými zubami! ♦ Povoľte mierne maticu montážnym náradím . ♦ Napnutie zvýšite otáčaním napínacej skrutky reťaze náradím v smere hodinových ručičiek. montážnym ♦ Napnutie znížite otáčaním napínacej skrutky reťaze náradím v smere hodinových ručičiek. montážnym ♦ Pílová reťaz musí dosadať na spodnú stranu kýlovnice. Skontrolujte, či pílovú reťaz možno rukou pretiahnuť cez kýlovnicu . ♦ Utiahnite maticu znovu pomocou montážneho náradia . UPOZORNENIE ► Pri utiahnutí pílovej reťaze uťahovacou silou 9 N (cca 1 kg) by pílová reťaz a kýlovnica nemali byť vzdialené viac ako 2 mm. ► Nová pílová reťaz prevísa a musí sa napínať častejšie. ► Pred každým používaním prístroja skontrolujte upnutie reťaze. ■ 92 │ SK PHSHE 900 B2 Mazanie reťaze Práca s nožnicami na živý plot ♦ Odstráňte veko olejovej nádrže ♦ Nalejte do olejovej nádrže . Použitie stroja: cca 100 ml bio reťazového oleja . VÝSTRAHA! ► Nikdy nepracujte bez namastenej reťaze!! Pri reťazi bežiacej nasucho sa rezací mechanizmus v krátkej dobe nenávratne zničí. Pred prácou vždy skontrolujte mastenie reťaze a hladinu oleja v nádrži. UPOZORNENIE ► Používajte iba olej na pílové reťaze. Prednostne biologicky odbúrateľný. Nepoužívajte starý olej, motorový olej atď. ► Počas práce kontrolujte, či funguje automatické mastenie reťaze. Pred prácou a počas nej kontrolujte funkciu mastenia reťaze. UPOZORNENIE ► Majte na pamäti, prosím, že národné predpisy vašej krajiny môžu obmedzovať používanie nožníc na živý plot. ► Každodenná inšpekcia nožníc pred každým použitím je bezpodmienečná. Svoj prístroj skontrolujte takisto po nárazoch a pádoch, aby ste zistili vážne škody a poruchy. ► Noste, prosím, pevné topánky a tesne priliehajúci odev, aby ste minimalizovali nebezpečenstvo poranenia. Zaujmite pevný postoj na zemi, dbajte na rovnováhu a noste vždy dodaný ramenný popruh! ► Zo zdravotných dôvodov si počas práce vždy dávajte prestávky v práci. Telesné vyčerpanie zvyšuje riziko zranenia! VÝSTRAHA! Ostrenie pílovej reťaze ► Prístroj v žiadnom prípade neobsluhujte, ak ste unavení, chorí, po požití alkoholu alebo iných drog. UPOZORNENIE ► Na bezpečné držanie počas brúsenia možno stojan brúsky pripevniť na pomôcku stojanovej brúsky . ► V súprave na ostrenie, napr. so značkou Oregon, nájdete podrobné informácie o procese brúsenia. ► Alternatívne použite elektrický prístroj na ostrenie reťazí a riaďte sa pokynmi výrobcu. ► V prípade pochybností o vykonaní práce sa musí vykonať výmena pílovej reťaze. Techniky strihania ■ Pozri výklopnú stránku (obrázok A). UPOZORNENIE ► Hrubé konáre odstraňujte nožnicami na konáre. Práca s predĺženým odvetvovačom Techniky rezania VÝSTRAHA! Uvedenie do prevádzky ► Dávajte zásadne pozor na padajúce odrezané konáre. UPOZORNENIE ► Dodržiavajte predpisy na ochranu proti hluku a miestne predpisy. Používanie prístroja môže byť v určitých dňoch (napr. v nedeľu a počas sviatkov), v určitú dennú dobu (poludnie, nočný kľud) alebo v osobitných oblastiach (napr. v kúpeľoch, na klinikách atď.) obmedzené alebo zakázané. ► Buďte si zásadne vedomí nebezpečenstva spätného šľahnutia konárov. UPOZORNENIE ► Priložte doraz a pokojnejšie. na konár. Tak budete pracovať bezpečnejšie ► Až potom začnite s rezaním. Zapnutie/vypnutie Odrezanie malého konára Zapnutie: ♦ Pri malých konároch (Ø 0 – 8 cm) režte zhora nadol (pozri obrázok). ♦ Zapojte sieťový kábel do predlžovacieho kábla. ♦ Vytvorte na konci predlžovacieho kábla slučku a zaveste ju do odľahčenia ťahu . ♦ Stlačte blokovacie tlačidlo zap./vyp. . , podržte toto stlačené a stlačte spínač Vypnutie: ♦ Pustite spínač zap./vyp. . ♦ Vytiahnite predlžovací kábel z odľahčenia ťahu ♦ Sieťový kábel . odpojte od predlžovacieho kábla. Prestavenie rukoväte ♦ Stlačte odisťovacie tlačidlo . Otočte otočný prvok do požadovanej polohy. Pustite odisťovacie tlačidlo , toto musí zaskočiť. PHSHE 900 B2 SK │ 93 ■ ♦ Odrezanie väčších konárov Preprava ♦ Pri väčších konároch (Ø 8 – 25 cm) urobte najskôr odľahčovací rez A (pozri obrázok). ■ Pri preprave používajte ochranné puzdrá ■ Odľahčovací rez tiež zabraňuje odlúpnutiu kôry z hlavného kmeňa. . ■ Dávajte pozor na to, aby ste prístroj pri prenášaní nezapli (pozri obrázok). ♦ Režte teraz postupne zhora B nadol A . B 2 1 A Údržba a čistenie Odrezávanie po kúskoch Dlhé, príp. hrubé konáre by ste mali pred vykonaním finálneho oddeľovacieho rezu skrátiť (pozri obrázok). Cc B b A a VÝSTRAHA! Ak je nevyhnutná výmena prípojného kábla, potom túto musí vykonať výrobca alebo ním poverený zástupca, aby nedošlo k ohrozeniu bezpečnosti. ■ Motorová jednotka musí byť vždy čistá, suchá a zbavená oleja alebo mastiaceho tuku. ■ Predĺžený odvetvovač sa musí v pravidelných intervaloch čistiť od pilín. ♦ Na čistenie krytu používajte suchú handru.Odstráňte kryt Bezpečná práca ♦ Odoberte pílovú reťaz z kýlovnice . a vyčistite vodiacu lištu . ■ Prístroj, rezací mechanizmus a ochranné puzdro kýlovnice udržiavajte v dobrom stave na používanie, aby sa tak zabránilo zraneniam. ♦ Udržiavajte pílovú reťaz ostrú a skontrolujte napnutie, dbajte na stav hladiny oleja a prívod oleja. ■ Po spadnutí prístroja skontrolujte, či nie je značne poškodený alebo chybný. ♦ Skontrolujte nožnice na živý plot, či nie sú povolené skrutky na nožovej lište a podľa potreby ich dotiahnite. ■ Na zaručenie bezpečnej práce dodržiavajte predpísaný pracovný uhol 60°±10° (pozri obrázok). ♦ Odstráňte uviaznutý odrezaný materiál. ♦ Nožovú lištu namastite olejovým sprejom alebo olejovou mazničkou. Skladovanie ■ Pred uložením prístroj vyčistite. 60°±10° ■ Prístroj uschovávajte v dodaných ochranných puzdrách suchom a mieste bez mrazu, mimo dosahu detí. na ■ Skladujte prístroj naležato alebo zaistený proti preklopeniu. ■ Nepoužívajte prístroj, keď stojíte na rebríku alebo na neistom stanovišti. ■ Vyprázdnite olejovú nádrž . Bio reťazový olej môže zhustnúť alebo vytiecť odvzdušňovacím otvorom vo veku nádrže na olej . ■ Nenechajte sa zviesť k nepremyslenému rezu. Mohlo by to ohroziť vás aj ostatných. ■ Na deti sa musí dohliadať, aby sa zabezpečilo, že sa s prístrojom nebudú hrať. ■ Meňte pravidelne svoju pracovnú polohu. Dlhšie používanie prístroja môže viesť k poruchám prekrvenia rúk, podmieneným vibráciami. Dobu používania však môžete predĺžiť vhodnými rukavicami alebo pravidelnými prestávkami. Majte na vedomí, že osobné dispozície k zlému prekrveniu, nízke vonkajšie teploty alebo veľké sily vynakladané na udržanie prístroja pri práci môžu dobu používania znížiť. ■ Vyhýbajte sa aj riziku vibrácií, napr. riziku porúch prekrvenia, preto si robte často prestávky pri práci, počas ktorých si napr. budete trieť dlane. ■ 94 │ SK PHSHE 900 B2 Hľadanie porúch na predĺženom odvetvovači Problém Možná príčina Motor beží, pílová reťaz sa nepohybuje Nadstavec na nožnice na Skontrolujte montáž živý plot, príp. nadstavec predĺženého odvetvovača nie je správne zapojený do bloku motora Žiadny pokrok pri práci Pílová reťaz je suchá, príp. prehriata alebo prevísa Intervaly údržby nožníc na živý plot Odstraňovanie porúch Doplňte olej, príp. pílonaostrite, vú reťaz vymeňte alebo napnite Tu uvedené údaje sa týkajú normálnych podmienok použitia. V prípade sťažených podmienok, ako je napr. intenzívne zaprášenie a dlhšia denná pracovná doba, je potrebné uvedené intervaly primerane skrátiť. Diel prístroja Činnosť Pred začatím práce Rezací nôž vizuálna kontrola Na konci práce podľa potreby X vyčistiť X X Vyhľadávanie chýb nožníc na živý plot Problém Možná príčina Odstraňovanie porúch Motor beží, nože zostanú stáť Nadstavec na nožnice na Skontrolujte montáž živý plot, príp. nadstavec predĺženého odvetvovača nie je správne zapojený do bloku motora Intervaly údržby predĺženého odvetvovača Tu uvedené údaje sa týkajú normálnych podmienok použitia. V prípade sťažených podmienok, ako je napr. intenzívne zaprášenie a dlhšia denná pracovná doba, je potrebné uvedené intervaly primerane skrátiť. Diel prístroja Činnosť Mazanie reťaze skontrolovať Pred začatím práce týždenne v prípade poruchy v prípade poškodenia podľa potreby X Pílová reťaz skontrolovať a dbať na stav naostrenia X skontrolovať napnutie reťaze X naostriť Vodiaca lišta skontrolovať (opotrebenie, poškodenie) X X vyčistiť a otočiť X odhrotovať X vymeniť Reťazové koleso skontrolovať vymeniť PHSHE 900 B2 X X X X X SK │ 95 ■ Záruka spoločnosti Kompernass Handels GmbH Vážená zákazníčka, vážený zákazník, Vybavenie v prípade záruky Na zaručenie rýchleho vybavenia Vašej žiadosti postupujte podľa nasledujúcich pokynov: ■ Na všetky otázky majte pripravený pokladničný doklad a číslo výrobku (napr. IAN 12345) ako doklad o nákupe. na tento prístroj máte záruku 3 roky od dátumu zakúpenia. V prípade nedostatkov tohto výrobku máte práva vyplývajúce zo zákona voči predajcovi tohto výrobku. Tieto Vaše práva vyplývajúce zo zákona nie sú obmedzené našou zárukou, uvedenou nižšie. ■ Číslo výrobku nájdete na typovom štítku na výrobku, na gravúre na výrobku, na titulnej stránke návodu na obsluhu (dole vľavo) alebo ako nálepku na zadnej alebo spodnej strane výrobku. Záručné podmienky ■ Ak dôjde k funkčným poruchám alebo iným nedostatkom, kontaktujte najprv nižšie uvedené servisné oddelenie telefonicky alebo e-mailom. Záručná doba začína plynúť dátumom zakúpenia. Prosím, uschovajte si pokladničný blok. Tento bude potrebný ako dôkaz o zakúpení. Ak v priebehu troch rokov od dátumu zakúpenia tohto výrobku dôjde k chybe materiálu alebo výrobnej chybe, výrobok vám – podľa nášho uváženia – bezplatne opravíme, vymeníme alebo uhradíme kúpnu cenu. Podmienkou tohto záručného plnenia je, že počas trojročnej lehoty sa poškodený prístroj a doklad o zakúpení (pokladničný blok) predloží so stručným opisom, v čom spočíva nedostatok prístroja a kedy sa vyskytol. Ak je chyba pokrytá našou zárukou, zašleme Vám späť opravený alebo nový výrobok. Opravou alebo výmenou výrobku nezačína plynúť žiadna nová záručná doba. Záručná doba a zákonné nároky na odstránenie chýb Záručná doba sa záručným plnením nepredĺži. To platí aj pre vymenené a opravené diely. Poškodenia a chyby zistené prípadne už pri kúpe, sa musia hlásiť okamžite po vybalení. Po uplynutí záručnej doby podliehajú prípadné opravy poplatku. Rozsah záruky Prístroj bol starostlivo vyrobený v súlade s prísnymi smernicami kvality a pred dodaním bol svedomito preskúšaný. Záručné plnenie sa vzťahuje na chyby materiálu alebo výrobné chyby. Táto záruka sa nevzťahuje na časti výrobku, ktoré sú vystavené bežnému opotrebovaniu a preto ich možno pokladať za rýchlo opotrebiteľné diely, ani na poškodenia krehkých dielov, ako sú napríklad spínače, akumulátory alebo diely vyrobené zo skla. Táto záruka zaniká v prípade poškodenia výrobku neodborným používaním alebo neodbornou údržbou. Na správne používanie výrobku sa musia presne dodržiavať všetky pokyny, uvedené v návode na obsluhu. Bezpodmienečne sa musí zabrániť použitiu alebo úkonom, ktoré sa v návode na obsluhu neodporúčajú alebo pred ktorými sa varuje. Výrobok je určený len na súkromné použitie a nie na priemyselné používanie. Záruka zaniká pri nesprávnom a neodbornom zaobchádzaní, pri použití násilia a pri zásahoch, ktoré neboli vykonané naším autorizovaným servisom. ■ Výrobok, zaevidovaný ako poruchový, môžete potom spolu s dokladom o nákupe (pokladničný blok) a uvedením popisu chyby a dátumu, kedy k nej došlo, bezplatne odoslať na adresu servisného strediska, ktorá Vám bude oznámená. Na webovej stránke www.lidl-service.com si môžete stiahnuť tieto a mnoho ďalších príručiek, videá o výrobkoch a inštalačný softvér. Pomocou tohto QR-kódu sa dostanete priamo na stránku servisu Lidl (www.lidl-service.com) a pomocou zadania čísla výrobku (IAN) 123456 otvoríte váš návod na obsluhu. UPOZORNENIE ► Pri nástrojoch Parkside a Florabest zašlite, prosím, výlučne chybný diel bez príslušenstva (napr. akumulátor, úložný kufrík, montážne náradie, atď.). Servis VÝSTRAHA! ► Opravy vašich prístrojov zverte servisnému stredisku alebo odbornému elektrikárovi a pri opravách použite iba originálne náhradné diely. Tým sa zaistí, že sa zachová bezpečnosť prístroja. ► Výmenu zástrčky alebo sieťového kábla nechajte vykonať len výrobcom prístroja alebo jeho zákazníckym servisom. Tým sa zaistí, že sa zachová bezpečnosť prístroja. Servis Slovensko Tel. 0850 232001 E-Mail: [email protected] IAN 313266_1904 Dovozca Majte na pamäti, že nižšie uvedená adresa nie je adresou servisného strediska. Najprv kontaktujte uvedené servisné stredisko. KOMPERNASS HANDELS GMBH BURGSTRASSE 21 44867 BOCHUM NEMECKO www.kompernass.com ■ 96 │ SK PHSHE 900 B2 Likvidácia Obal sa skladá z ekologických materiálov, ktoré môžete zlikvidovať v miestnych zberných surovinách. Prístroj a jeho príslušenstvo sa skladajú z rôznych materiálov, ako sú napr. kov a plasty. Informácie o možnostiach likvidácie opotrebovaného prístroja dostanete na miestnej alebo mestskej správe. Ochrana životného prostredia ■ Dôkladne vyprázdnite olejovú nádrž a odovzdajte prístroj do zberne odpadu. Použité plastové a kovové časti sa dajú rozdeliť podľa druhu a odovzdať na opätovné spracovanie. V prípade otázok kontaktujte naše servisné stredisko. ■ Použitý olej odovzdajte do zberne a nevylievajte ho do kanalizácie alebo do odtoku. ■ Znečistený údržbársky materiál a prevádzkové materiály odovzdajte v príslušnej zberni odpadu. Elektrické prístroje neodhadzujte do komunálneho odpadu! V súlade s európskou smernicou č. 2012/19/EU sa opotrebované elektrické prístroje musia zberať oddelene a odovzdať za účelom ekologickej recyklácie. Produkt je recyklovateľný, podlieha rozšírenej zodpovednosti výrobcu a zbiera sa oddelene. Náhradné diely Náhradné diely si môžete objednať priamo cez servisné stredisko. Pri objednávaní bezpodmienečne uveďte typ prístroja a číslo dielu. Preklad originálneho vyhlásenia o zhode My, spoločnosť KOMPERNASS HANDELS GMBH, zodpovedná osoba za dokumentáciu: pán Semi Uguzlu, BURGSTR. 21, 44867 BOCHUM, DEUTSCHLAND/NEMECKO vyhlasujeme, že tento prístroj je v súlade s nasledovnými normami, normatívnymi dokumentmi a smernicami ES: Smernica o strojových zariadeniach (2006 / 42 / EC) Elektromagnetická kompatibilita (2014 / 30 / EU) Smernica pre emisie hluku (2000 / 14 / EC) (2005 / 88 / EC) Uvedené miesto: Č. 0036 TÜV SÜD Industrie Service GmbH, Westendstraße 199, 80686 Mníchov, Nemecko Postup hodnotenia konformity podľa prílohy V. Hladina akustického výkonu LWA: Nameraná: 102,2 dB (A) Zaručená: 105 dB (A) Smernica RoHS (2011 / 65 / EU)* * Výhradnú zodpovednosť za vydanie tohto vyhlásenia o zhode nesie výrobca. Vyššie opísaný predmet vyhlásenia je v súlade s predpismi smernice č. 2011/65/EU Európskeho parlamentu a Rady z 8. júna 2011 o obmedzení používania určitých nebezpečných látok v elektrických a elektronických zariadeniach. Použité harmonizované normy: EN 60745-1: 2009/A11: 2010 EN ISO 10517: 2019 EN ISO 11680-1: 2011 EN 55014-1: 2017 EN 55014-2: 2015 EN 61000-3-2: 2014 EN 61000-3-3: 2013 EN 50581:2012 Typ/označenie prístroja: 2 v 1 nožnice na živý plot s dlhou násadou / odvetvovač PHSHE 900 B2 Rok výroby: 09 - 2019 Sériové číslo: IAN 313266_1904 Bochum, 11.09.2019 Semi Uguzlu – Manažér kvality – Technické zmeny v zmysle ďalšieho vývoja sú vyhradené. PHSHE 900 B2 SK │ 97 ■ ■ 98 │ SK PHSHE 900 B2 2-IN-1-LANGSTIEL-HECKENSCHERE / HOCHENTASTER 2-IN-1 HEDGE TRIMMER / POLE PRUNER TAILLE-HAIES SUR PERCHE / PERCHE ÉLAGUEUSE 2 EN 1 PHSHE 900 B2 2-IN-1-LANGSTIEL-HECKENSCHERE / HOCHENTASTER 2-IN-1 HEDGE TRIMMER / POLE PRUNER Originalbetriebsanleitung Translation of the original instructions TAILLE-HAIES SUR PERCHE / PERCHE ÉLAGUEUSE 2 EN 1 2-IN-1-TELESCOPISCHE HEGGENSCHAAR/TELESCOPISCHE TAKKENSCHAAR Traduction des instructions d’origine Vertaling van de originele gebruiksaanwijzing 2-W-1 NOŻYCE DO ŻYWOPŁOTU Z DŁUGIM TRZONKIEM / OKRZESYWARKA NŮŽKY NA ŽIVÝ PLOT A ODVĚTVOVAČ 2 V 1 Překlad originálního provozního návodu Tłumaczenie oryginalnej instrukcji obsługi 2 V 1 NOŽNICE NA ŽIVÝ PLOT S DLHOU NÁSADOU / ODVETVOVAČ Preklad originálneho návodu na obsluhu IAN 313266_1904 Klappen Sie vor dem Lesen die beiden Seiten mit den Abbildungen aus und machen Sie sich anschließend mit allen Funktionen des Gerätes vertraut. Before reading, unfold both pages containing illustrations and familiarise yourself with all functions of the device. Avant de lire le mode d’emploi, ouvrez les deux pages contenant les illustrations et familiarisez-vous ensuite avec toutes les fonctions de l’appareil. Vouw vóór het lezen de beide pagina‘s met de afbeeldingen open en maak u vertrouwd met alle functies van het apparaat. Przed przeczytaniem proszę rozłożyć obie strony z ilustracjami, a następnie proszę zapoznać się z wszystkimi funkcjami urządzenia. Před čtením si odklopte obě dvě strany s obrázky a potom se seznamte se všemi funkcemi přístroje. Pred čítaním si odklopte obidve strany s obrázkami a potom sa oboznámte so všetkými funkciami prístroja. DE / AT / CH GB/IE FR / BE NL / BE PL CZ SK Originalbetriebsanleitung Translation of the original instructions Traduction des instructions d’origine Vertaling van de originele gebruiksaanwijzing Tłumaczenie oryginalnej instrukcji obsługi Překlad originálního provozního návodu Preklad originálneho návodu na obsluhu Seite Page Page Pagina Strona Strana Strana 1 15 29 43 57 71 85 KOMPERNASS HANDELS GMBH BURGSTRASSE 21 44867 BOCHUM GERMANY www.kompernass.com Stand der Informationen · Last Information Update · Version des informations Stand van de informatie · Stan informacji · Stav informací · Stav informácií: 10 / 2019 · Ident.-No.: PHSHE900B2-092019-1 IAN 313266_1904 8-
 1
1
-
 2
2
-
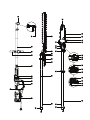 3
3
-
 4
4
-
 5
5
-
 6
6
-
 7
7
-
 8
8
-
 9
9
-
 10
10
-
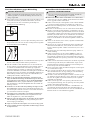 11
11
-
 12
12
-
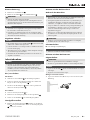 13
13
-
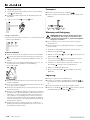 14
14
-
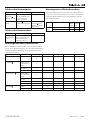 15
15
-
 16
16
-
 17
17
-
 18
18
-
 19
19
-
 20
20
-
 21
21
-
 22
22
-
 23
23
-
 24
24
-
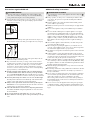 25
25
-
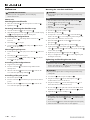 26
26
-
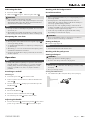 27
27
-
 28
28
-
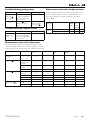 29
29
-
 30
30
-
 31
31
-
 32
32
-
 33
33
-
 34
34
-
 35
35
-
 36
36
-
 37
37
-
 38
38
-
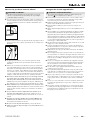 39
39
-
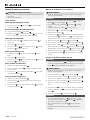 40
40
-
 41
41
-
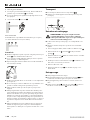 42
42
-
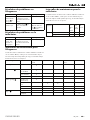 43
43
-
 44
44
-
 45
45
-
 46
46
-
 47
47
-
 48
48
-
 49
49
-
 50
50
-
 51
51
-
 52
52
-
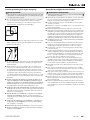 53
53
-
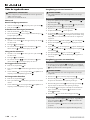 54
54
-
 55
55
-
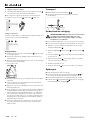 56
56
-
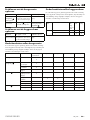 57
57
-
 58
58
-
 59
59
-
 60
60
-
 61
61
-
 62
62
-
 63
63
-
 64
64
-
 65
65
-
 66
66
-
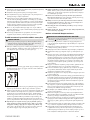 67
67
-
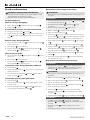 68
68
-
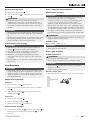 69
69
-
 70
70
-
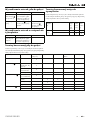 71
71
-
 72
72
-
 73
73
-
 74
74
-
 75
75
-
 76
76
-
 77
77
-
 78
78
-
 79
79
-
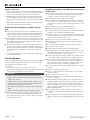 80
80
-
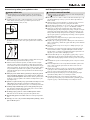 81
81
-
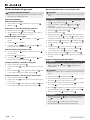 82
82
-
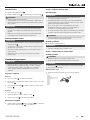 83
83
-
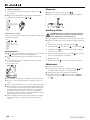 84
84
-
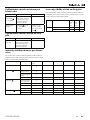 85
85
-
 86
86
-
 87
87
-
 88
88
-
 89
89
-
 90
90
-
 91
91
-
 92
92
-
 93
93
-
 94
94
-
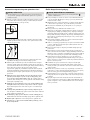 95
95
-
 96
96
-
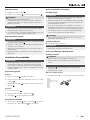 97
97
-
 98
98
-
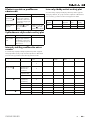 99
99
-
 100
100
-
 101
101
-
 102
102
-
 103
103
-
 104
104
-
 105
105
-
 106
106


Parkside PHSHE 900 B2 Translation Of The Original Instructions
- Categorie
- Elektrische heggenscharen
- Type
- Translation Of The Original Instructions
in andere talen
- English: Parkside PHSHE 900 B2
- français: Parkside PHSHE 900 B2
- Deutsch: Parkside PHSHE 900 B2
- slovenčina: Parkside PHSHE 900 B2
- čeština: Parkside PHSHE 900 B2
- polski: Parkside PHSHE 900 B2
Gerelateerde papieren
Andere documenten
-
FLORABEST FHEHS 900 A1 de handleiding
-
Ikra HESI 750-1 Hurricane de handleiding
-
BLACK+DECKER BCASK8967D2 Handleiding
-
ALDI IEAS 750 Electric Telescopic Pruning Saw Handleiding
-
Worx WG209E Data papier
-
-
Ikra IHS 550 de handleiding
-
Echo HCR 610 Operating Instructions Manual
-
ATIKA KSH 600 - Handleiding
-
Makita UC100D Cordless Pruning Saw Handleiding