
BEDIENUNG UND INSTALLATION
OPERATION AND INSTALLATION
UTILISATION ET INSTALLATION
BEDIENING EN INSTALLATIE
OBSLUHA A INSTALACE
HASZNÁLATI ÉS TELEPÍTÉSI ÚTMUTATÓ
Schnellheizer | Rapid heater | Radiateur à chauffage rapide | Snelverwarmers |
Rychloohřívač | Gyorsfűtő
» CK 20 S
» CKZ 20 S
» CKR 20 S
» CKT 20 S

2 | CK 20 S | CKZ 20 S | CKR 20 S | CKT 20 S www.stiebel-eltron.com
INHALT | BESONDERE HINWEISE
BESONDERE HINWEISE
- Halten Sie Kinder unter 3Jahren von dem Gerät
fern, wenn keine ständige Beaufsichtigung ge-
währleistet ist.
- Das Gerät kann von 3- bis 7-jährigen Kindern ein-
und ausgeschaltet werden, wenn sie beaufsichtigt
werden oder bezüglich des sicheren Gebrauchs
des Gerätes unterwiesen wurden und die daraus
resultierenden Gefahren verstanden haben. Vo-
raussetzung hierfür ist, dass das Gerät wie be-
schrieben montiert wurde.
3- bis 7-jährige Kinder dürfen nicht den Stecker
in die Steckdose stecken und das Gerät nicht
regulieren.
- Das Gerät kann von Kindern ab 8Jahren sowie
von Personen mit verringerten physischen, sen-
sorischen oder mentalen Fähigkeiten oder Man-
gel an Erfahrung und Wissen benutzt werden,
wenn sie beaufsichtigt werden oder bezüglich
des sicheren Gebrauchs des Gerätes unterwiesen
wurden und die daraus resultierenden Gefahren
verstanden haben.
- Kinder dürfen nicht mit dem Gerät spielen. Rei-
nigung und Benutzer-Wartung dürfen nicht von
Kindern ohne Beaufsichtigung durchgeführt
werden.
- Wird das Gerät mit der Zeitschaltuhr betrieben,
kann es ungeregelt den Raum immer weiter
aufheizen. Wenn der Raum klein ist und die dort
befindlichen Personen nicht selbstständig den
Raum verlassen können, stellen Sie eine ständige
Überwachung sicher.
- Teile des Gerätes können sehr heiß werden und
Verbrennungen verursachen.
Wenn Kinder und schutzbedürftige Personen an-
wesend sind, ist besondere Vorsicht geboten.
- Decken Sie das Gerät nicht ab.
BESONDERE HINWEISE
BEDIENUNG
1. Allgemeine Hinweise ����������������������������������������3
1.1 Sicherheitshinweise ��������������������������������������������� 3
1.2 Andere Markierungen in dieser Dokumentation ���������� 3
1.3 Hinweise am Gerät ���������������������������������������������� 3
1.4 Maßeinheiten ����������������������������������������������������� 3
2. Sicherheit �����������������������������������������������������3
2.1 Bestimmungsgemäße Verwendung ������������������������� 3
2.2 Allgemeine Sicherheitshinweise ������������������������������ 4
2.3 Prüfzeichen ������������������������������������������������������� 4
3. Gerätebeschreibung �����������������������������������������4
4. Bedienung CK 20 S �������������������������������������������4
4.1 Heizung einschalten ��������������������������������������������� 5
4.2 Bedienung mit externem Raumtemperaturregler �������� 5
4.3 Heizung ausschalten / Frostschutz ��������������������������� 5
4.4 Außerbetriebnahme��������������������������������������������� 5
5. Bedienung CKZ 20 S ������������������������������������������5
5.1 Heizung einschalten ��������������������������������������������� 5
5.2 Heizung ausschalten / Frostschutz ��������������������������� 5
5.3 Außerbetriebnahme��������������������������������������������� 5
6. Bedienung CKR 20 S �����������������������������������������5
6.1 Heizung einschalten ��������������������������������������������� 5
6.2 Bedienung mit externem Raumtemperaturregler �������� 6
6.3 Heizung ausschalten / Frostschutz ��������������������������� 6
6.4 Außerbetriebnahme��������������������������������������������� 6
7. Bedienung CKT 20 S ������������������������������������������ 6
7.1 Heizung einschalten ��������������������������������������������� 6
7.2 Zeitschalter einstellen ������������������������������������������ 6
7.3 Heizung ausschalten / Frostschutz ��������������������������� 6
7.4 Außerbetriebnahme��������������������������������������������� 6
8. Reinigung, Pflege und Wartung ����������������������������6
9. Lagerung ������������������������������������������������������6
10. Problembehebung �������������������������������������������7
INSTALLATION
11. Sicherheit �����������������������������������������������������7
11.1 Allgemeine Sicherheitshinweise ������������������������������ 7
11.2 Vorschriften, Normen und Bestimmungen ����������������� 7
12. Gerätebeschreibung �����������������������������������������7
12.1 Lieferumfang ����������������������������������������������������� 7
13. Vorbereitungen ����������������������������������������������� 7
13.1 Mindestabstände ������������������������������������������������ 7
14. Montage �������������������������������������������������������7
15. Elektrischer Anschluss ���������������������������������������8
16. Übergabe des Gerätes ���������������������������������������8
17. Störungsbehebung ������������������������������������������� 8
18. Technische Daten ��������������������������������������������� 8
18.1 Maße und Anschlüsse ������������������������������������������ 8
18.2 Schaltplan CK 20 S ����������������������������������������������� 9
18.3 Schaltplan CKZ 20 S ��������������������������������������������� 9
18.4 Schaltplan CKR 20 S �������������������������������������������� 10
18.5 Schaltplan CKT 20 S �������������������������������������������� 10
18.6 Datentabelle ����������������������������������������������������� 11
KUNDENDIENST UND GARANTIE
UMWELT UND RECYCLING

BEDIENUNG
Allgemeine Hinweise
DEUTSCH
www.stiebel-eltron.com CK 20 S | CKZ 20 S | CKR 20 S | CKT 20 S | 3
- Bringen Sie das Gerät nicht unmittelbar unter
einer Wandsteckdose an.
- Bringen Sie das Gerät so an, dass die Schalt- und
Reglereinrichtungen nicht von einer in der Bade-
wanne oder unter der Dusche befindlichen Per-
son berührt werden können.
- Bei Festanschluss muss das Gerät über eine
Trennstrecke von mindestens 3 mm allpolig vom
Netz getrennt werden können.
- Die elektrische Anschlussleitung darf bei Be-
schädigung oder Austausch nur durch einen vom
Hersteller berechtigten Fachhandwerker mit dem
originalen Ersatzteil ersetzt werden.
- Befestigen Sie das Gerät wie in Kapitel „Installati-
on/ Montage“ beschrieben.
BEDIENUNG
1. Allgemeine Hinweise
Die Kapitel „Besondere Hinweise“ und „Bedienung“ richten sich
an den Gerätebenutzer und den Fachhandwerker.
Das Kapitel „Installation“ richtet sich an den Fachhandwerker.
Hinweis
Lesen Sie diese Anleitung vor dem Gebrauch sorgfältig
durch und bewahren Sie sie auf.
Geben Sie die Anleitung ggf. an einen nachfolgenden
Benutzer weiter.
1.1 Sicherheitshinweise
1.1.1 Aufbau von Sicherheitshinweisen
!
SIGNALWORT Art der Gefahr
Hier stehen mögliche Folgen bei Nichtbeachtung des Si-
cherheitshinweises.
Hier stehen Maßnahmen zur Abwehr der Gefahr.
1.1.2 Symbole, Art der Gefahr
Symbol Art der Gefahr
Verletzung
Stromschlag
Verbrennung
(Verbrennung, Verbrühung)
1.1.3 Signalworte
SIGNALWORT Bedeutung
GEFAHR Hinweise, deren Nichtbeachtung schwere Verletzungen
oder Tod zur Folge haben.
WARNUNG Hinweise, deren Nichtbeachtung schwere Verletzungen
oder Tod zur Folge haben kann.
VORSICHT Hinweise, deren Nichtbeachtung zu mittelschweren oder
leichten Verletzungen führen kann.
1.2 Andere Markierungen in dieser Dokumentation
Hinweis
Allgemeine Hinweise werden mit dem nebenstehenden
Symbol gekennzeichnet.
Lesen Sie die Hinweistexte sorgfältig durch.
Symbol Bedeutung
Sachschaden
(Geräte-, Folge-, Umweltschaden)
Geräteentsorgung
Dieses Symbol zeigt Ihnen, dass Sie etwas tun müssen.
Die erforderlichen Handlungen werden Schritt für Schritt
beschrieben.
1.3 Hinweise am Gerät
Symbol Bedeutung
Gerät nicht abdecken
1.4 Maßeinheiten
Hinweis
Wenn nicht anders angegeben, sind alle Maße in Milli-
meter.
2. Sicherheit
Betreiben Sie das Gerät nur komplett installiert und mit allen
Sicherheitseinrichtungen.
2.1 Bestimmungsgemäße Verwendung
Das Gerät ist für den Einsatz im häuslichen Umfeld vorgesehen.
Es kann von nicht eingewiesenen Personen sicher bedient wer-
den. In nicht häuslicher Umgebung, z.B. im Kleingewerbe, kann
das Gerät ebenfalls verwendet werden, sofern die Benutzung in
gleicher Weise erfolgt.
Eine andere oder darüber hinausgehende Benutzung gilt als nicht
bestimmungsgemäß. Zum bestimmungsgemäßen Gebrauch ge-
hört auch das Beachten dieser Anleitung sowie der Anleitungen
für eingesetztes Zubehör.
!
!

BEDIENUNG
Gerätebeschreibung
4 | CK 20 S | CKZ 20 S | CKR 20 S | CKT 20 S www.stiebel-eltron.com
2.2 Allgemeine Sicherheitshinweise
!
WARNUNG Verletzung
- Halten Sie Kinder unter 3Jahren von dem Gerät
fern, wenn keine ständige Beaufsichtigung gewähr-
leistet ist.
- Das Gerät kann von 3- bis 7-jährigen Kindern ein-
und ausgeschaltet werden, wenn sie beaufsichtigt
werden oder bezüglich des sicheren Gebrauchs
des Gerätes unterwiesen wurden und die daraus
resultierenden Gefahren verstanden haben. Voraus-
setzung hierfür ist, dass das Gerät wie beschrieben
montiert wurde.
3- bis 7-jährige Kinder dürfen nicht den Stecker in
die Steckdose stecken und das Gerät nicht regulie-
ren.
- Das Gerät kann von Kindern ab 8Jahren sowie von
Personen mit verringerten physischen, sensorischen
oder mentalen Fähigkeiten oder Mangel an Erfah-
rung und Wissen benutzt werden, wenn sie beauf-
sichtigt werden oder bezüglich des sicheren Ge-
brauchs des Gerätes unterwiesen wurden und die
daraus resultierenden Gefahren verstanden haben.
- Kinder dürfen nicht mit dem Gerät spielen. Reini-
gung und Benutzer-Wartung dürfen nicht von Kin-
dern ohne Beaufsichtigung durchgeführt werden.
WARNUNG Verbrennung
Betreiben Sie das Gerät nicht ...
- wenn die Mindestabstände zu angrenzenden Ob-
jektflächen wie zum Beispiel Möbel, Gardinen,
Vorhänge und Textilien oder sonstige brennbaren
Materialien unterschritten werden (Mindestabstän-
de siehe Kapitel „Installation / Vorbereitungen“).
- wenn die Räume durch Chemikalien, Staub, Gase
oder Dämpfe feuer- oder explosionsgefährdet sind.
- in unmittelbarer Nähe von Leitungen oder Behält-
nissen, die brennbare oder explosionsgefährdete
Stoffe führen oder enthalten.
- wenn im Aufstellungsraum Arbeiten wie Verlegen,
Schleifen, Versiegeln, durchgeführt werden.
- wenn mit Benzin Sprays, Bohnerwachs oder Ähnli-
chem umgegangen wird. Lüften Sie den Raum vor
dem Heizen ausreichend.
- wenn ein Gerätebauteil beschädigt ist, das Gerät
heruntergefallen ist oder bereits eine Fehlfunktion
vorlag.
- im Freien
WARNUNG Verbrennung
Auf dem Gerät oder in dessen unmittelbarer Nähe dür-
fen keine brennbaren, entzündbaren oder wärmedäm-
menden Gegenstände oder Stoffe, wie Wäsche, Decken,
Zeitschriften, Behälter mit Bohnerwachs oder Benzin,
Spraydosen und dergleichen gelegt werden.
WARNUNG Verbrennung
Achten Sie darauf, dass keine Fremdkörper in die Belüf-
tungs- oder Abluftöffnungen geraten, da dies zu einem
Stromschlag oder Brand führen kann oder das Gerät
beschädigen kann.
WARNUNG Verbrennung
Achten Sie zur Vermeidung von Bränden darauf, dass die
Luftein- und -auslässe nicht blockiert werden. Verwen-
den Sie das Gerät niemals auf weichen Flächen, wie zum
Beispiel auf einem Bett, da dies zu einem Blockieren der
Öffnungen führen kann.
!
VORSICHT Verletzung
Wird das Gerät mit der Zeitschaltuhr betrieben, kann
es ungeregelt den Raum immer weiter aufheizen. Wenn
der Raum klein ist und die dort befindlichen Personen
nicht selbstständig den Raum verlassen können, stellen
Sie eine ständige Überwachung sicher.
VORSICHT Verbrennung
Teile des Gerätes können sehr heiß werden und Ver-
brennungen verursachen. Wenn Kinder und schutzbe-
dürftige Personen anwesend sind, ist besondere Vorsicht
geboten.
!
Sachschaden
- Decken Sie das Gerät nicht ab.
- Treten Sie nicht auf das Gerät.
2.3 Prüfzeichen
Siehe Typenschild am Gerät.
3. Gerätebeschreibung
Das Gerät wird an der Wand befestigt und ist besonders für Ar-
beitsräume, Küche, Bad, Waschraum und dergleichen geeignet.
Das Außengehäuse des Gerätes besteht aus einbrennlackiertem
Stahlblech. Seitlich begrenzt wird es durch zwei Kunststoff-Sei-
tenteile. Am rechten Seitenteil sitzen die Bedienelemente.
Das geräuscharme Gebläse saugt die Raumluft an, die dann vom
Blankdraht-Heizkörper erwärmt wird und durch den Warmluftka-
nal und das unten sitzende Warmluft-Austrittsgitter gleichmäßig
ausströmt.
Das Gerät heizt die Raumtemperatur auf und hält die Temperatur
konstant auf den eingestellten Wert.
Nach der Wandbefestigung und elektrischem Anschluss mittels
Netzstecker ist das Gerät betriebsbereit.
4. Bedienung CK 20 S
1
26�07�31�0211
1 Temperatur-Wählknopf

BEDIENUNG
Bedienung CKZ 20 S
DEUTSCH
www.stiebel-eltron.com CK 20 S | CKZ 20 S | CKR 20 S | CKT 20 S | 5
4.1 Heizung einschalten
Sie können die Temperatur stufenlos einstellen. Das Gerät schaltet
ab, sobald die eingestellte Raumtemperatur erreicht ist.
Drehen Sie den Temperatur-Wählknopf nach rechts bis zur
gewünschten Stufe.
4.2 Bedienung mit externem
Raumtemperaturregler
Bei Räumen über 20m
2
können Sie das Gerät mit einem handels-
üblichen, externen Raumtemperaturregler betreiben.
Drehen Sie dazu den Temperatur-Wählknopf am Gerät auf
Rechts-Endanschlag.
4.3 Heizung ausschalten / Frostschutz
Drehen Sie den Temperatur-Wählknopf bis zum Anschlag
nach links.
In dieser Stellung ist der Frostschutz gegeben. Die Heizung schal-
tet automatisch ein, falls die Raumtemperatur unter die Frost-
schutztemperatur absinkt.
4.4 Außerbetriebnahme
Ziehen Sie den Netzstecker.
5. Bedienung CKZ 20 S
1
2
3
5
4
26�07�31�0212
1 Temperatur-Wählknopf
2 Wippschalter-Stellung (Betrieb mit Zeitschaltuhr)
3 Wippschalter-Stellung (Normaler Betrieb)
4 Zeitschaltuhr
5 Markierungspfeil
5.1 Heizung einschalten
Wählen Sie am Wippschalter zwischen folgenden zwei
Betriebsarten:
- Normaler Betrieb
- Betrieb mit Zeitschaltuhr
Normaler Betrieb
Sie können die Temperatur stufenlos einstellen. Das Gerät schaltet
ab, sobald die eingestellte Raumtemperatur erreicht ist.
Drehen Sie den Temperatur-Wählknopf nach rechts bis zur
gewünschten Stufe.
Betrieb mit Zeitschaltuhr
Die 24 Stunden Zeitschaltuhr ist mit 96 Zeitsegementen ausgerüs-
tet. Jede Stunde ist in 4 Zeitsegmente mit je 15 Minuten unterteilt.
Bei Inbetriebnahme und nach jeder Stromunterbrechung müssen
Sie die Zeitschaltuhr auf die aktuelle Uhrzeit einstellen, indem Sie
die Zeitschaltuhr solange nach rechts drehen, bis die augenblick-
liche Uhrzeit auf dem Markierungspfeil steht.
So stellen Sie die gewünschte Heizzeit ein:
Drücken Sie die am Umfang sitzenden Zeitsegmente nach unten.
Die sichtbar werdende rote Markierung zeigt Ihnen die vorgewähl-
te Heizzeit an, in der das Gerät automatisch heizt. Wird während
der Heizzeit die gewünschte Raumtemperatur erreicht, so schaltet
das Gerät ab und bei weiterem Wärmebedarf auch wieder ein,
bis die eingestellte Heizzeit abgelaufen ist. Dieser Vorgang wie-
derholt sich täglich. Die Heizzeit können Sie jederzeit dem Bedarf
anpassen, indem Sie die Zeitsegmente herunterdrücken oder nach
oben drücken.
5.2 Heizung ausschalten / Frostschutz
Drehen Sie den Temperatur-Wählknopf bis zum Anschlag
nach links.
In dieser Stellung ist der Frostschutz nur dann gegeben, wenn der
Wippschalter auf „Normalen Betrieb“ steht. Die Heizung schal-
tet automatisch ein, falls die Raumtemperatur unter die Frost-
schutztemperatur absinkt.
5.3 Außerbetriebnahme
Ziehen Sie den Netzstecker.
6. Bedienung CKR 20 S
2
3
1
26�07�31�0213
1 Temperatur-Wählknopf
2 Wippschalter-Schaltstufe (Grundheizstufe)
3 Wippschalter-Schaltstufe (Schnellheizstufe)
6.1 Heizung einschalten
Drehen Sie den Temperatur-Wählknopf nach rechts bis zur
gewünschten Stufe.
Sie können die Temperatur stufenlos einstellen. Das Gerät schaltet
ab, sobald die eingestellte Raumtemperatur erreicht ist.
Sie können zwischen folgenden zwei Heizleistungen mit ange-
passter Drehzahl des Gebläsemotors, am Wippschalter wählen:

BEDIENUNG
Bedienung CKT 20 S
6 | CK 20 S | CKZ 20 S | CKR 20 S | CKT 20 S www.stiebel-eltron.com
Grundheizstufe
Stellen Sie den Wippschalter auf „I“. Sofern das Gerät über den
Temperatur-Wählknopf eingeschaltet ist, heizt es mit 1000W Heiz-
leistung in der langsamen Gebläsestufe.
Hinweis
Betreiben Sie das Gerät nicht in der GrundheizstufeI,
wenn der Raum, in dem das Gerät installiert ist, stark
ausgekühlt ist.
Schalten Sie am Gerät bei stark ausgekühlten Räu-
men in die SchnellheizstufeII, um einen normalen
Gerätebetrieb zu gewährleisten.
Schnellheizstufe
Stellen Sie den Wippschalter auf „II“. Sofern das Gerät über den
Temperatur-Wählknopf eingeschaltet ist, heizt es mit 2000W Heiz-
leistung in der schnellen Gebläsestufe.
Wählen Sie die leistungsstarke Schnellheizstufe, um einen kalten
Raum besonders schnell auf die eingestellte Temperatur zu erwär-
men. Schalten Sie danach wieder auf Stufe „I“ zurück.
Ist die vorgewählte Raumtemperatur erreicht, schaltet das Gerät
ab und hält die Raumtemperatur anschließend durch wiederholtes
Ein- und Ausschalten konstant.
6.2 Bedienung mit externem
Raumtemperaturregler
Bei Räumen über 20m
2
können Sie das Gerät mit einem handels-
üblichen, externen Raumtemperaturregler betreiben.
Drehen Sie dazu den Temperatur-Wählknopf am Gerät auf
Rechts-Endanschlag.
6.3 Heizung ausschalten / Frostschutz
Drehen Sie den Temperatur-Wählknopf bis zum Anschlag
nach links und wählen Sie am Wippschalter die Schnellheiz-
stufe „II“.
In dieser Stellung ist der Frostschutz gegeben. Die Heizung schal-
tet automatisch ein, falls die Raumtemperatur unter die Frost-
schutztemperatur absinkt.
6.4 Außerbetriebnahme
Ziehen Sie den Netzstecker.
7. Bedienung CKT 20 S
1
2
26�07�31�0214
1 Temperatur-Wählknopf
2 Zeitschalter
7.1 Heizung einschalten
Sie können die Temperatur stufenlos einstellen. Das Gerät schaltet
ab, sobald die eingestellte Raumtemperatur erreicht ist.
Drehen Sie den Temperatur-Wählknopf nach rechts bis zur
gewünschten Stufe.
7.2 Zeitschalter einstellen
Mit Zeitschalter heizt das Gerät ohne Temperaturregelung mit
voller Leistung.
Drehen Sie den Zeitschalt-Knopf nach rechts, um eine belie-
bige Ablaufzeit von 0 - 60 Minuten einzustellen.
7.3 Heizung ausschalten / Frostschutz
Drehen Sie den Temperatur-Wählknopf bis zum Anschlag
nach links und stellen Sie sicher, dass der Zeitschalter auf
„0“ steht.
In dieser Stellung ist der Frostschutz gegeben. Die Heizung schal-
tet automatisch ein, falls die Raumtemperatur unter die Frost-
schutztemperatur absinkt.
7.4 Außerbetriebnahme
Ziehen Sie den Netzstecker.
8. Reinigung, Pflege und Wartung
Das Gerät enthält keine vom Benutzer zu wartenden Teile.
Reinigen Sie das Gerät in kaltem Zustand mit gebräuchlichen Pfle-
gemitteln. Vermeiden Sie scheuernde und ätzende Pflegemittel.
Sollten am Gerätegehäuse leichte bräunliche Verfärbungen auftre-
ten, reiben Sie diese möglichst sofort mit einem feuchten Tuch ab.
!
Sachschaden
Sprühen Sie kein Reinigungsspray in die Luftschlitze.
9. Lagerung
Bewahren Sie das Gerät bei Nichtbenutzung an einem tro-
ckenen Ort auf.

INSTALLATION
Problembehebung
DEUTSCH
www.stiebel-eltron.com CK 20 S | CKZ 20 S | CKR 20 S | CKT 20 S | 7
10. Problembehebung
Wenn das Gerät nicht heizt, überprüfen Sie die eingestellte Tem-
peratur am Gerät und die Sicherung in der Hausinstallation.
Das Gerät besitzt einen Schutztemperaturregler, der bei Überhit-
zung das Gerät abschaltet. Nach Beseitigung der Ursache (zum
Beispiel verdeckte Luftaus- oder -eintrittsöffnung) geht das Gerät
nach einer Abkühlzeit von wenigen Minuten wieder in Betrieb.
Wenn Sie die Ursache nicht beheben können, rufen Sie den Fach-
handwerker. Zur besseren und schnelleren Hilfe teilen Sie ihm die
Nummer vom Typenschild mit (000000-0000-000000).
INSTALLATION
11. Sicherheit
Die Installation, Inbetriebnahme sowie Wartung und Reparatur
des Gerätes darf nur von einem Fachhandwerker durchgeführt
werden.
11.1 Allgemeine Sicherheitshinweise
Wir gewährleisten eine einwandfreie Funktion und Betriebssicher-
heit nur, wenn das für das Gerät bestimmte Original-Zubehör und
die originalen Ersatzteile verwendet werden.
11.2 Vorschriften, Normen und Bestimmungen
Hinweis
Beachten Sie alle nationalen und regionalen Vorschriften
und Bestimmungen.
12. Gerätebeschreibung
Das Gerät ist ein Elektro-Direktheizgerät, das an der Wand befes-
tigt wird. Das Gerät eignet sich besonders für die Beheizung von
Räumen, zum Beispiel Arbeitsraum, Küche, Bad, Waschraum usw.
12.1 Lieferumfang
Mit dem Gerät werden geliefert:
- Wandhalterung
- Befestigungswinkel
13. Vorbereitungen
13.1 Mindestabstände
≥10
≥100≥100
≥500
≥100 ≥100
D0000018481
14. Montage
WARNUNG Stromschlag
- Bei der Installation des Gerätes in Räumen mit Ba-
dewanne und/oder Dusche berücksichtigen Sie den
Schutzbereich in Abstimmung mit den Angaben auf
dem Geräte-Typenschild.
- Bringen Sie das Gerät so an, dass Schalt- und Re-
gelvorrichtungen nicht von einer in der Badewanne
oder unter der Dusche befindlichen Person berührt
werden können.
WARNUNG Verbrennung
- Sie dürfen das Gerät nur an einer senkrechten, bis
mindestens 90 °C temperaturbeständigen Wand
anbringen.
- Halten Sie Mindestabstände zu angrenzenden Ob-
jektflächen ein.
- Sie dürfen das Gerät nicht unmittelbar unterhalb
einer Wandsteckdose anbringen.
Sehen Sie in der Maßzeichnung nach, in welchem Lochab-
stand die Wandhalterung montiert wird.
Befestigen Sie die Wandhalterung mit geeignetem Befesti-
gungsmaterial. Mit dem horizontalen und vertikalen Lang-
loch in der Wandhalterung ist ein Ausgleich beim Verlaufen
der Bohrung möglich.
Hängen Sie das Gerät so ein, dass die beiden oben in der
Rückwand herausgestellten Gauben in die Schlitze der Wand-
halterung eingreifen.
Sichern Sie das Gerät mit dem Befestigungswinkel und einer
Schraube gegen unbeabsichtigtes Abhängen. Hängen Sie
dazu den Befestigungswinkel von hinten unten in die Rück-
wand ein.

INSTALLATION
Elektrischer Anschluss
8 | CK 20 S | CKZ 20 S | CKR 20 S | CKT 20 S www.stiebel-eltron.com
15. Elektrischer Anschluss
WARNUNG Stromschlag
Führen Sie alle elektrischen Anschluss- und Installati-
onsarbeiten nach Vorschrift aus.
!
Sachschaden
Beachten Sie das Typenschild. Die angegebene Spannung
muss mit der Netzspannung übereinstimmen.
- Die Leitung darf nicht am Gerät anliegen.
- Achten Sie beim Anschluss an eine Steckdose darauf, dass
diese nach der Installation des Gerätes frei zugänglich ist.
- Bringen Sie das Gerät nicht unmittelbar unter einer Wand-
steckdose an.
- Kürzen Sie bei gefordertem Festanschluss die Leitung so
(Stecker abschneiden), dass sie direkt zur Geräteanschluss-
dose führt.
- Bei Festanschluss muss das Gerät über eine Trennstrecke
von mindestens 3 mm allpolig vom Netz getrennt werden
können.
- Das Gerät ist nicht geeignet für festverlegte Leitungen.
16. Übergabe des Gerätes
Erklären Sie dem Benutzer die Funktionen des Gerätes. Machen
Sie ihn besonders auf die Sicherheitshinweise aufmerksam. Über-
reichen Sie dem Benutzer die Bedienungs- und Installationsan-
leitung.
17. Störungsbehebung
Die Netzanschlussleitung darf bei einem Austausch nur von einem
Fachhandwerker mit Original Ersatzteilen von uns ersetzt werden.
18. Technische Daten
18.1 Maße und Anschlüsse
i13
i32
b01
335
123
10
200
460
365
D0000018442
b01 Durchführung elektr. Leitungen
i13 Wandaufhängung
i32 Fi xierung

INSTALLATION
Technische Daten
DEUTSCH
www.stiebel-eltron.com CK 20 S | CKZ 20 S | CKR 20 S | CKT 20 S | 9
18.2 Schaltplan CK 20 S
N1
R1
F1
>80 °C ±5 K
>80 °C ±5 K
F1
X1
X2
1
PE L N
2
M1
M
1 ~
R2
A1
26�07�31�0216
A1 Baugruppe Elektrischer Heizkörper
F1 Übertemperaturschutz
M1 Gebläse
N1 Temperaturregler
R1 Heizwiderstand
R2 Heizwiderstand
X1 Buchsenklemme
X2 Steckanschluss
18.3 Schaltplan CKZ 20 S
26�07�31�0217
A1 Baugruppe Elektrischer Heizkörper
F1 Übertemperaturschutz
M1 Gebläse
N1 Temperaturregler
R1 Heizwiderstand
R2 Heizwiderstand
T1 Schaltuhr
W1 Wippenschalter
X1 Buchsenklemme
X2 Steckanschluss

INSTALLATION
Technische Daten
10 | CK 20 S | CKZ 20 S | CKR 20 S | CKT 20 S www.stiebel-eltron.com
18.4 Schaltplan CKR 20 S
6(1a)
5(1)
3(2a)
1(2b)
2(2)
26�07�31�0046
A1 Baugruppe Elektrischer Heizkörper
F1 Übertemperaturschutz
M1 Gebläse
N1 Temperaturregler
R1 Heizwiderstand
R2 Heizwiderstand
W1 Wippenschalter
X1 Buchsenklemme
X2 Steckanschluss
18.5 Schaltplan CKT 20 S
> 174°F ± 41°F
> 80°C ± 5K
ϑ
ϑ
> 174°F ± 41°F
> 80°C ± 5K
ϑ
1
3
2
4
6 5
1
2
N1
R1 R2
F1
F1
X1
X2
T1
M1
PE
L
N
A1
M
1
~
26�07�31�0215
A1 Baugruppe Elektrischer Heizkörper
F1 Übertemperaturschutz
M1 Gebläse
N1 Temperaturregler
R1 Heizwiderstand
R2 Heizwiderstand
T1 Kurzzeitschaltuhr 60min
X1 Buchsenklemmleiste

INSTALLATION
Technische Daten
DEUTSCH
www.stiebel-eltron.com CK 20 S | CKZ 20 S | CKR 20 S | CKT 20 S | 11
18.6 Datentabelle
CK 20 S CKZ 20 S CKR 20 S CKT 20 S
Bestellnummer 071793 071795 072633 230344
Elektrische Daten
Anschlussleistung W 2000 2000 2000 2000
Phasen 1/N/PE 1/N/PE 1/N/PE 1/N/PE
Nennspannung V 230 230 230 230
Frequenz Hz 50 50 50 50
Dimensionen
Höhe mm 460 460 460 460
Breite mm 335 335 335 335
Tiefe mm 123 123 123 123
Gewichte
Gewicht kg 4,4 4,4 4,4 4,4
Ausführungen
Ausführung 24h-Zeitschaltuhr 60-Minuten-Kurzzeittimer
Frostschutzstellung °C 7 7 7 7
Schutzart (IP) IP13B IP13B IP13B IP13B
Schutzklasse I I I I
Farbe alpineweiß alpineweiß alpineweiß alpineweiß
Werte
Leistungsstufen 1,0 / 2,0 kW
Einstellbereich °C 5-30 5-30 5-30 5-30
Betriebsgeräusch dB(A) 53 53 42/51 53

12 | CK 20 S | CKZ 20 S | CKR 20 S | CKT 20 S www.stiebel-eltron.com
KUNDENDIENST UND GARANTIE
Erreichbarkeit
Sollte einmal eine Störung an einem unserer Produkte auftre-
ten, stehen wir Ihnen natürlich mit Rat und Tat zur Seite.
Rufen Sie uns an:
05531 702-111
oder schreiben Sie uns:
Stiebel Eltron GmbH & Co. KG
- Kundendienst -
Fürstenberger Straße 77, 37603 Holzminden
E-Mail: kundendienst@stiebel-eltron.de
Fax: 05531 702-95890
Weitere Anschriften sind auf der letzten Seite aufgeführt.
Unseren Kundendienst erreichen Sie telefonisch rund um die
Uhr, auch an Samstagen und Sonntagen sowie an Feiertagen.
Kundendiensteinsätze erfolgen während unserer Geschäftszei-
ten (von 7.15 bis 18.00 Uhr, freitags bis 17.00 Uhr). Als Sonder-
service bieten wir Kundendiensteinsätze bis 21.30 Uhr. Für die-
sen Sonderservice sowie Kundendiensteinsätze an Wochenen-
den und Feiertagen werden höhere Preise berechnet.
Garantiebedingungen
Diese Garantiebedingungen regeln zusätzliche Garantieleistun-
gen von uns gegenüber dem Endkunden. Sie treten neben die
gesetzlichen Gewährleistungsansprüche des Kunden. Die ge-
setzlichen Gewährleistungsansprüche gegenüber den sonsti-
gen Vertragspartnern sind nicht berührt.
Diese Garantiebedingungen gelten nur für solche Geräte, die
vom Endkunden in der Bundesrepublik Deutschland als Neuge-
räte erworben werden. Ein Garantievertrag kommt nicht zu-
stande, soweit der Endkunde ein gebrauchtes Gerät oder ein
neues Gerät seinerseits von einem anderen Endkunden erwirbt.
Inhalt und Umfang der Garantie
Die Garantieleistung wird erbracht, wenn an unseren Geräten
ein Herstellungs- und/oder Materialfehler innerhalb der Garan-
tiedauer auftritt. Die Garantie umfasst jedoch keine Leistungen
für solche Geräte, an denen Fehler, Schäden oder Mängel auf-
grund von Verkalkung, chemischer oder elektrochemischer
Einwirkung, fehlerhafter Aufstellung bzw. Installation sowie
unsachgemäßer Einregulierung, Bedienung oder unsachgemä-
ßer Inanspruchnahme bzw. Verwendung auftreten. Ebenso
ausgeschlossen sind Leistungen aufgrund mangelhafter oder
unterlassener Wartung, Witterungseinflüssen oder sonstigen
Naturerscheinungen.
Die Garantie erlischt, wenn am Gerät Reparaturen, Eingriffe oder
Abänderungen durch nicht von uns autorisierte Personen vor-
genommen wurden.
Die Garantieleistung umfasst die sorgfältige Prüfung des Gerä-
tes, wobei zunächst ermittelt wird, ob ein Garantieanspruch
besteht. Im Garantiefall entscheiden allein wir, auf welche Art
der Fehler behoben wird. Es steht uns frei, eine Reparatur des
Gerätes ausführen zu lassen oder selbst auszuführen. Etwaige
ausgewechselte Teile werden unser Eigentum.
Für die Dauer und Reichweite der Garantie übernehmen wir
sämtliche Material- und Montagekosten.
Soweit der Kunde wegen des Garantiefalles aufgrund gesetzli-
cher Gewährleistungsansprüche gegen andere Vertragspartner
Leistungen erhalten hat, entfällt eine Leistungspflicht von uns.
Soweit eine Garantieleistung erbracht wird, übernehmen wir
keine Haftung für die Beschädigung eines Gerätes durch Dieb-
stahl, Feuer, Aufruhr oder ähnliche Ursachen.
Über die vorstehend zugesagten Garantieleistungen hinausge-
hend kann der Endkunde nach dieser Garantie keine Ansprüche
wegen mittelbarer Schäden oder Folgeschäden, die durch das
Gerät verursacht werden, insbesondere auf Ersatz außerhalb des
Gerätes entstandener Schäden, geltend machen. Gesetzliche
Ansprüche des Kunden uns gegenüber oder gegenüber Dritten
bleiben unberührt.
Garantiedauer
Für im privaten Haushalt eingesetzte Geräte beträgt die Garan-
tiedauer 24 Monate; im Übrigen (zum Beispiel bei einem Einsatz
der Geräte in Gewerbe-, Handwerks- oder Industriebetrieben)
beträgt die Garantiedauer 12 Monate.
Die Garantiedauer beginnt für jedes Gerät mit der Übergabe des
Gerätes an den Kunden, der das Gerät zum ersten Mal einsetzt.
Garantieleistungen führen nicht zu einer Verlängerung der
Garantiedauer. Durch die erbrachte Garantieleistung wird keine
neue Garantiedauer in Gang gesetzt. Dies gilt für alle erbrachten
Garantieleistungen, insbesondere für etwaig eingebaute Ersatz-
teile oder für die Ersatzlieferung eines neuen Gerätes.
Inanspruchnahme der Garantie
Garantieansprüche sind vor Ablauf der Garantiedauer, innerhalb
von zwei Wochen, nachdem der Mangel erkannt wurde, bei uns
anzumelden. Dabei müssen Angaben zum Fehler, zum Gerät
und zum Zeitpunkt der Feststellung gemacht werden. Als Ga-
rantienachweis ist die Rechnung oder ein sonstiger datierter
Kaufnachweis beizufügen. Fehlen die vorgenannten Angaben
oder Unterlagen, besteht kein Garantieanspruch.
Garantie für in Deutschland erworbene, jedoch außer-
halb Deutschlands eingesetzte Geräte
Wir sind nicht verpflichtet, Garantieleistungen außerhalb der
Bundesrepublik Deutschland zu erbringen. Bei Störungen eines
im Ausland eingesetzten Gerätes ist dieses gegebenenfalls auf
Gefahr und Kosten des Kunden an den Kundendienst in
Deutschland zu senden. Die Rücksendung erfolgt ebenfalls auf
Gefahr und Kosten des Kunden. Etwaige gesetzliche Ansprüche
des Kunden uns gegenüber oder gegenüber Dritten bleiben
auch in diesem Fall unberührt.
Außerhalb Deutschlands erworbene Geräte
Für außerhalb Deutschlands erworbene Geräte gilt diese Garan-
tie nicht. Es gelten die jeweiligen gesetzlichen Vorschriften und
gegebenenfalls die Lieferbedingungen der Ländergesellschaft
bzw. des Importeurs.
KUNDENDIENST UND GARANTIE

DEUTSCH
www.stiebel-eltron.com CK 20 S | CKZ 20 S | CKR 20 S | CKT 20 S | 13
UMWELT UND RECYCLING
Entsorgung von Transport- und
Verkaufsverpackungsmaterial
Damit Ihr Gerät unbeschädigt bei Ihnen ankommt, haben wir
es sorgfältig verpackt. Bitte helfen Sie, die Umwelt zu schützen,
und entsorgen Sie das Verpackungsmaterial des Gerätes sach-
gerecht. Wir beteiligen uns gemeinsam mit dem Großhandel
und dem Fachhandwerk/ Fachhandel in Deutschland an einem
wirksamen Rücknahme- und Entsorgungskonzept für die um-
weltschonende Aufarbeitung der Verpackungen.
Überlassen Sie die Transportverpackung dem Fachhandwerker
beziehungsweise dem Fachhandel.
Entsorgen Sie Verkaufsverpackungen über eines der Dualen
Systeme in Deutschland.
Entsorgung von Altgeräten in Deutschland
Geräteentsorgung
Die mit diesem Symbol gekennzeichneten Geräte dür-
fen nicht mit dem Hausmüll entsorgt werden.
Als Hersteller sorgen wir im Rahmen der Produktverantwor-
tung für eine umweltgerechte Behandlung und Verwertung
der Altgeräte. Weitere Informationen zur Sammlung und Ent-
sorgung erhalten Sie über Ihre Kommune oder Ihren Fach-
handwerker/ Fachhändler.
Bereits bei der Entwicklung neuer Geräte achten wir auf eine
hohe Recyclingfähigkeit der Materialien.
Über das Rücknahmesystem werden hohe Recyclingquoten
der Materialien erreicht, um Deponien und die Umwelt zu ent-
lasten. Damit leisten wir gemeinsam einen wichtigen Beitrag
zum Umweltschutz.
Entsorgung außerhalb Deutschlands
Entsorgen Sie dieses Gerät fach- und sachgerecht nach den
örtlich geltenden Vorschriften und Gesetzen.
UMWELT UND RECYCLING

14 | CK 20 S | CKZ 20 S | CKR 20 S | CKT 20 S www.stiebel-eltron.com
CONTENTS | SPECIAL INFORMATION
SPECIAL INFORMATION
- Keep children under the age of3 away from
the appliance if constant supervision cannot be
guaranteed.
- Children from the age of 3 to 7 may switch the
appliance on and off, provided they are super-
vised or have been instructed in the safe oper-
ation of the appliance and understand any risks
that may result. This is subject to the appliance
having been installed as described.
Children from the age of 3 to 7 must not plug
the power cable into its socket nor regulate the
appliance.
- The appliance may be used by children aged8
and older and persons with reduced physical,
sensory or mental capabilities or a lack of expe-
rience and know-how, provided that they are su-
pervised or they have been instructed on how to
use the appliance safely and have understood the
resulting risks.
- Children must never play with the appliance. Chil-
dren must never clean the appliance or perform
user maintenance unless they are supervised.
- The appliance could continue to heat the room
unchecked if it is operated on a time switch. En-
sure constant supervision if the appliance is used
in a small room and the persons within that room
cannot leave the room on their own.
- Parts of the appliance can get very hot and may
cause burns.
Particular caution is advised when children or
vulnerable persons are present.
- Never cover the appliance.
- Never install the appliance directly below a wall
socket.
SPECIAL INFORMATION
OPERATION
1. General information ��������������������������������������� 15
1.1 Safety instructions ����������������������������������������������15
1.2 Other symbols in this documentation ���������������������� 15
1.3 Information on the appliance �������������������������������� 15
1.4 Units of measurement ����������������������������������������� 15
2. Safety �������������������������������������������������������� 15
2.1 Intended use �����������������������������������������������������15
2.2 General safety instructions ����������������������������������� 16
2.3 Test symbols �����������������������������������������������������16
3. Appliance description ������������������������������������� 16
4. Operation CK 20 S ������������������������������������������ 16
4.1 Start heating ����������������������������������������������������� 16
4.2 Control with external room temperature controller ���� 17
4.3 Stopping heating / frost protection ������������������������� 17
4.4 Decommissioning ����������������������������������������������� 17
5. Operation CKZ 20 S����������������������������������������� 17
5.1 Start heating ����������������������������������������������������� 17
5.2 Stopping heating / frost protection ������������������������� 17
5.3 Decommissioning ����������������������������������������������� 17
6. Operation CKR 20 S ���������������������������������������� 17
6.1 Start heating ����������������������������������������������������� 17
6.2 Control with external room temperature controller ���� 18
6.3 Stopping heating / frost protection �������������������������18
6.4 Decommissioning ����������������������������������������������� 18
7. Operation CKT 20 S ����������������������������������������� 18
7.1 Start heating ����������������������������������������������������� 18
7.2 Adjusting the time switch ������������������������������������� 18
7.3 Stopping heating / frost protection ������������������������� 18
7.4 Decommissioning ����������������������������������������������� 18
8. Cleaning, care and maintenance ������������������������� 18
9. Storage ������������������������������������������������������ 18
10. Troubleshooting �������������������������������������������� 18
INSTALLATION
11. Safety �������������������������������������������������������� 19
11.1 General safety instructions ����������������������������������� 19
11.2 Instructions, standards and regulations �������������������19
12. Appliance description ������������������������������������� 19
12.1 Standard delivery ����������������������������������������������� 19
13. Preparations ������������������������������������������������ 19
13.1 Minimum clearances ������������������������������������������� 19
14. Installation �������������������������������������������������� 19
15. Power supply ����������������������������������������������� 19
16. Appliance handover ���������������������������������������� 20
17. Troubleshooting �������������������������������������������� 20
18. Specification ������������������������������������������������ 20
18.1 Dimensions and connections ��������������������������������� 20
18.2 Wiring diagram CK 20 S ���������������������������������������21
18.3 Wiring diagram CKZ 20 S ������������������������������������� 21
18.4 Wiring diagram CKR 20 S ������������������������������������� 22
18.5 Wiring diagram CKT 20 S �������������������������������������� 22
18.6 Data table ��������������������������������������������������������23
GUARANTEE
ENVIRONMENT AND RECYCLING

OPERATION
General information
www.stiebel-eltron.com CK 20 S | CKZ 20 S | CKR 20 S | CKT 20 S | 15
ENGLISH
- Install the appliance in such a way that the con-
trol equipment cannot be touched by a person in
the bath or shower.
- In the case of a permanent connection, the ap-
pliance must be able to be separated from the
power supply by an isolator that disconnects all
poles with at least 3 mm contact separation.
- In the event of damage to the power cable this
must always be replaced by a qualified contractor
authorised by the manufacturer, using original
spare parts.
- Secure the appliance as described in chapter "In-
stallation/ Installation".
OPERATION
1. General information
The chapters "Special Information" and "Operation" are intended
for both the user and qualified contractors.
The chapter "Installation" is intended for qualified contractors.
Note
Read these instructions carefully before using the appli-
ance and retain them for future reference.
Pass on the instructions to a new user if required.
1.1 Safety instructions
1.1.1 Structure of safety instructions
!
KEYWORD Type of risk
Here, possible consequences are listed that may result
from failure to observe the safety instructions.
Steps to prevent the risk are listed.
1.1.2 Symbols, type of risk
Symbol Type of risk
Injury
Electrocution
Burns
(burns, scalding)
1.1.3 Keywords
KEYWORD Meaning
DANGER Failure to observe this information will result in serious
injury or death.
WARNING Failure to observe this information may result in serious
injury or death.
CAUTION Failure to observe this information may result in non-seri-
ous or minor injury.
1.2 Other symbols in this documentation
Note
General information is identified by the adjacent symbol.
Read these texts carefully.
Symbol Meaning
Material losses
(appliance damage, consequential losses and environmen-
tal pollution)
Appliance disposal
This symbol indicates that you have to do something. The ac-
tion you need to take is described step by step.
1.3 Information on the appliance
Symbol Meaning
Never cover the appliance
1.4 Units of measurement
Note
All measurements are given in mm unless stated oth-
erwise.
2. Safety
Operate the appliance only when fully installed and with all safety
equipment fitted.
2.1 Intended use
This appliance is intended for domestic use. It can be used safely
by untrained persons. The appliance can also be used in a non-do-
mestic environment, e.g. in a small business, as long as it is used
in the same way.
Any other use beyond that described shall be deemed inappropri-
ate. Observation of these instructions and of instructions for any
accessories used is also part of the correct use of this appliance.
!
!

OPERATION
Appliance description
16 | CK 20 S | CKZ 20 S | CKR 20 S | CKT 20 S www.stiebel-eltron.com
2.2 General safety instructions
!
WARNING Injury
- Keep children under the age of3 away from the
appliance if constant supervision cannot be guar-
anteed.
- Children from the age of 3 to 7 may switch the ap-
pliance on and off, provided they are supervised
or have been instructed in the safe operation of
the appliance and understand any risks that may
result. This is subject to the appliance having been
installed as described.
Children from the age of 3 to 7 must not plug the
power cable into its socket nor regulate the appli-
ance.
- The appliance may be used by children aged8 and
older and persons with reduced physical, sensory
or mental capabilities or a lack of experience and
know-how, provided that they are supervised or
they have been instructed on how to use the appli-
ance safely and have understood the resulting risks.
- Children must never play with the appliance. Chil-
dren must never clean the appliance or perform
user maintenance unless they are supervised.
WARNING Burns
Never operate this appliance...
- if the minimum clearances to adjacent object sur-
faces are not maintained, for example to furniture,
net curtains, curtains, textiles or other flammable
materials (for minimum clearances, see “Installation
/ Preparations”).
- in rooms where the appliance is at risk of fire or
explosion as a result of chemicals, dust, gases or
vapours.
- in the direct proximity of pipes or receptacles that
carry or contain flammable or explosive materials.
- if work such as laying cables, grinding or sealing is
carried out in the installation room.
- if sprays, floor polish or similar products containing
naphtha are used. Ventilate the room sufficiently
before heating.
- if an appliance component is damaged, the appli-
ance has fallen over or already has a fault.
WARNING Burns
Never place any flammable, combustible or insulating
objects or materials, such as laundry, blankets, maga-
zines, containers with floor polish or naphtha, spray cans
or similar on the appliance or in direct proximity to it.
WARNING Burns
Ensure that no foreign bodies enter the ventilation and
extract air apertures. This could result in electric shock
or fire or in damage to the appliance.
WARNING Burns
To prevent fires ensure that the air inlets and outlets are
never blocked. Never position the appliance on soft sur-
faces, such as a bed, as this could result in the apertures
becoming blocked.
!
CAUTION Injury
The appliance could continue to heat the room unchecked
if it is operated on a time switch. Ensure constant su-
pervision if the appliance is used in a small room and
the persons within that room cannot leave the room on
their own.
CAUTION Burns
Parts of the appliance can get very hot and may cause
burns. Particular caution is advised when children or
vulnerable persons are present.
!
Material losses
- Never cover the appliance.
- Never step on the appliance.
- Never operate the appliance in the open air.
2.3 Test symbols
See type plate on the appliance.
3. Appliance description
This appliance is wall mounted and is particularly suitable for work
rooms, kitchens, bathrooms, wash rooms and similar.
The external casing of the appliance is made from stove enamelled
sheet steel. The sides are made from plastic. The controls are
located on the r.h. side panel.
The quiet fan draws in the ambient air that is heated by a bare wire
heater element. The air then exits evenly through the hot air chan-
nel and the air outlet grille set into the bottom of the appliance.
The appliance heats up the ambient air inside the room and main-
tains it at the selected temperature.
After mounting the appliance on the wall and making the elec-
trical connection using a mains plug, the appliance is ready for
operation.
4. Operation CK 20 S
1
26�07�31�0211
1 Temperature selector
4.1 Start heating
The temperature is variably adjustable. The appliance switches
off as soon as the selected room temperature has been reached.
Turn the temperature selector clockwise to the required
setting.

OPERATION
Operation CKZ 20 S
www.stiebel-eltron.com CK 20 S | CKZ 20 S | CKR 20 S | CKT 20 S | 17
ENGLISH
4.2 Control with external room temperature
controller
In rooms larger than 20m2 you can operate the appliance with a
conventional external room temperature controller.
To do so, turn the temperature selector fully clockwise.
4.3 Stopping heating / frost protection
Turn the temperature selector fully anti-clockwise.
This position ensures frost protection. The heating system starts
automatically if the room temperature drops below the frost pro-
tection temperature.
4.4 Decommissioning
Pull the plug from the power socket.
5. Operation CKZ 20 S
1
2
3
5
4
26�07�31�0212
1 Temperature selector
2 Rocker switch position (operation with the time switch)
3 Rocker switch position (standard operation)
4 Time switch
5 Marker arrow
5.1 Start heating
Use the rocker switch to select one of the following operating
modes:
- Standard operation
- Operation with the time switch
Standard operation
The temperature is variably adjustable. The appliance switches
off as soon as the selected room temperature has been reached.
Turn the temperature selector clockwise to the required
setting.
Operation with the time switch
The 24-hour time switch has 96 time segments. Every hour is di-
vided into 4 time segments of 15 minutes. The time switch has to
be reset when commissioning the appliance and after any power
interruption. To do this, turn the time switch clockwise until the
marker arrow points to the current time.
To select the required heating time, proceed as follows:
Press down the time segments around the circumference. Red
markings will become visible, indicating the preselected heating
time at which the appliance automatically starts to heat. If the
required room temperature has been reached during the heat-up
time, the appliance switches off. It starts again if there is a further
heat demand and will continue doing so until the selected heating
time has elapsed. This process is repeated daily. The heating time
can be adjusted at any time if required by pressing time segments
up or down.
5.2 Stopping heating / frost protection
Turn the temperature selector fully anti-clockwise.
In this setting, frost protection is only ensured if the rocker switch
is positioned for "Standard operation". The heating system starts
automatically if the room temperature drops below the frost pro-
tection temperature.
5.3 Decommissioning
Pull the plug from the power socket.
6. Operation CKR 20 S
2
3
1
26�07�31�0213
1 Temperature selector
2 Rocker switch stage (base heating stage)
3 Rocker switch stage (quick heating stage)
6.1 Start heating
Turn the temperature selector clockwise to the required
setting.
The temperature is variably adjustable. The appliance switches
off as soon as the selected room temperature has been reached.
You can use the rocker switch to choose between the following
two outputs with matched fan motor speed:

OPERATION
Operation CKT 20 S
18 | CK 20 S | CKZ 20 S | CKR 20 S | CKT 20 S www.stiebel-eltron.com
Base heating stage
Set the rocker switch to "I". Provided that the appliance has been
switched on via the temperature selector, it will heat with an
output of 1000W at the slow fan stage.
Note
Never operate the appliance at standard heating stageI,
if the room where the appliance has been installed has
cooled down severely.
If the room has cooled down severely, switch the
appliance to rapid heating stageII in order to ensure
normal appliance operation.
Quick heating stage
Set the rocker switch to "II". Provided that the appliance has been
switched on via the temperature selector, it will heat with an
output of 2000W at the quick fan stage.
Select the powerful quick heating stage if you need to heat up a
cold room rapidly to the selected temperature. Afterwards, set the
rocker switch back to stage "I".
Once the preselected room temperature has been reached, the
appliance switches off. The appliance then starts and stops heating
as necessary to keep the room temperature constant.
6.2 Control with external room temperature
controller
In rooms larger than 20m2 you can operate the appliance with a
conventional external room temperature controller.
To do so, turn the temperature selector fully clockwise.
6.3 Stopping heating / frost protection
Turn the temperature selector fully anti-clockwise and select
quick heating stage "II" on the rocker switch.
This position ensures frost protection. The heating system starts
automatically if the room temperature drops below the frost pro-
tection temperature.
6.4 Decommissioning
Pull the plug from the power socket.
7. Operation CKT 20 S
1
2
26�07�31�0214
1 Temperature selector
2 Time switch
7.1 Start heating
The temperature is variably adjustable. The appliance switches
off as soon as the selected room temperature has been reached.
Turn the temperature selector clockwise to the required
setting.
7.2 Adjusting the time switch
With the time switch, the appliance heats with full output and
without temperature control.
Turn the time switch selector clockwise to set any number of
minutes to count down, from 0 - 60 minutes.
7.3 Stopping heating / frost protection
Turn the temperature selector fully anti-clockwise and ensure
that the time switch is set to "0".
This position ensures frost protection. The heating system starts
automatically if the room temperature drops below the frost pro-
tection temperature.
7.4 Decommissioning
Pull the plug from the power socket.
8. Cleaning, care and maintenance
The appliance contains no user serviceable parts.
Clean the appliance when cold with ordinary cleaning products.
Avoid abrasive or corrosive cleaning products.
If a pale brownish discolouration appears on the appliance casing,
wipe this off as soon as possible with a damp cloth.
!
Material losses
Never spray cleaning spray into the air slot.
9. Storage
When not in use, keep the appliance in a dry place.
10. Troubleshooting
If the appliance does not heat, check the temperature set at the
appliance and the MCB/fuse in your fuse box.
The appliance has a safety temperature controller that shuts the
appliance down if it overheats. After the cause has been removed
(for example air outlet or inlet apertures covered) and the appli-
ance has cooled down for a few minutes, operation starts again.
If you cannot remedy the fault, notify your heating contractor. To
facilitate and speed up your enquiry, please provide the serial
number from the type plate (000000-0000-000000).

INSTALLATION
Safety
www.stiebel-eltron.com CK 20 S | CKZ 20 S | CKR 20 S | CKT 20 S | 19
ENGLISH
INSTALLATION
11. Safety
Only a qualified contractor should carry out installation, commis-
sioning, maintenance and repair of the appliance.
11.1 General safety instructions
We guarantee trouble-free function and operational reliability only
if original accessories and spare parts intended for the appliance
are used.
11.2 Instructions, standards and regulations
Note
Observe all applicable national and regional regulations
and instructions.
12. Appliance description
This appliance is a wall mounted electric direct heater. This ap-
pliance is particularly suitable for heating rooms, such as work
rooms, kitchens, bathrooms, wash rooms etc.
12.1 Standard delivery
The following are delivered with the appliance:
- Wall mounting bracket
- Fixing bracket
13. Preparations
13.1 Minimum clearances
≥10
≥100≥100
≥500
≥100 ≥100
D0000018481
14. Installation
WARNING Electrocution
- If installing the appliance in rooms with a bath
and/or shower, take the relevant safety zone into
account in accordance with the information on the
appliance type plate.
- Install the appliance in such a way that control
equipment cannot be touched by a person in the
bath or shower.
WARNING Burns
- Only fit the appliance to a vertical wall that is tem-
perature-resistant to at least 90 °C.
- Maintain minimum clearances to adjacent surfaces.
- Never install the appliance directly below a wall
socket.
Check the hole distances for the wall mounting bracket in the
dimensioned drawing.
Secure the wall mounting bracket with suitable fixing mate-
rials. The horizontal and vertical slots in the wall mounting
bracket enable alignment if drilled holes are not completely
accurate.
Position the appliance against the wall so that the two pro-
trusions in the top of the back panel grip into the slots in the
wall mounting bracket.
Secure the appliance with the mounting bracket and one
screw to prevent unintentional unhooking. Hook the mount-
ing bracket into the back panel from the lower rear.
15. Power supply
WARNING Electrocution
Carry out all electrical connection and installation work
in accordance with relevant regulations.
!
Material losses
Observe the type plate. The specified voltage must match
the mains voltage.
- The cable must not touch the appliance.
- When connecting the appliance via a standard socket, ensure
that this is easily accessible once the appliance has been
installed.
- Never install the appliance directly below a wall socket.
- If a permanent connection is required, trim the cable (cut
off the plug) so that it runs directly to the appliance junction
box.
- In the case of a permanent connection, the appliance must
be able to be separated from the power supply by an iso-
lator that disconnects all poles with at least 3 mm contact
separation.
- This appliance is unsuitable for fixed cables.

INSTALLATION
Appliance handover
20 | CK 20 S | CKZ 20 S | CKR 20 S | CKT 20 S www.stiebel-eltron.com
16. Appliance handover
Explain the functions of the appliance to the user. Draw special
attention to the safety instructions. Hand over the operating and
installation instructions to the user.
17. Troubleshooting
The power cable must only be replaced by a qualified contractor
using original spare parts supplied by us.
18. Specification
18.1 Dimensions and connections
i13
i32
b01
335
123
10
200
460
365
D0000018442
b01 Cable entries
i1 3 Wall mounting bracket
i32 fixing

INSTALLATION
www.stiebel-eltron.com CK 20 S | CKZ 20 S | CKR 20 S | CKT 20 S | 21
ENGLISH
18.2 Wiring diagram CK 20 S
N1
R1
F1
>80 °C ±5 K
>80 °C ±5 K
F1
X1
X2
1
PE L N
2
M1
M
1 ~
R2
A1
26�07�31�0216
A1 Electric heater element assembly
F1 Overheating protection
M1 Fan
N1 Temperature controller
R1 Heating resistor
R2 Heating resistor
X1 Socket terminal
X2 Plug-in connection
18.3 Wiring diagram CKZ 20 S
26�07�31�0217
A1 Electric heater element assembly
F1 Overheating protection
M1 Fan
N1 Temperature controller
R1 Heating resistor
R2 Heating resistor
T1 Time switch
W1 Rocker switch
X1 Socket terminal
X2 Plug-in connection

INSTALLATION
22 | CK 20 S | CKZ 20 S | CKR 20 S | CKT 20 S www.stiebel-eltron.com
18.4 Wiring diagram CKR 20 S
6(1a)
5(1)
3(2a)
1(2b)
2(2)
26�07�31�0046
A1 Electric heater element assembly
F1 Overheating protection
M1 Fan
N1 Temperature controller
R1 Heating resistor
R2 Heating resistor
W1 Rocker switch
X1 Socket terminal
X2 Plug-in connection
18.5 Wiring diagram CKT 20 S
> 174°F ± 41°F
> 80°C ± 5K
ϑ
ϑ
> 174°F ± 41°F
> 80°C ± 5K
ϑ
1
3
2
4
6 5
1
2
N1
R1 R2
F1
F1
X1
X2
T1
M1
PE
L
N
A1
M
1
~
26�07�31�0215
A1 Electric heater element assembly
F1 Overheating protection
M1 Fan
N1 Temperature controller
R1 Heating resistor
R2 Heating resistor
T1 60 minute time switch
X1 Socket terminal strip

www.stiebel-eltron.com CK 20 S | CKZ 20 S | CKR 20 S | CKT 20 S | 23
ENGLISH
INSTALLATION | GUARANTEE | ENVIRONMENT AND RECYCLING
18.6 Data table
CK 20 S CKZ 20 S CKR 20 S CKT 20 S
Part number 071793 071795 072633 230344
Electrical data
Connected load W 2000 2000 2000 2000
Phases 1/N/PE 1/N/PE 1/N/PE 1/N/PE
Rated voltage V 230 230 230 230
Frequency Hz 50 50 50 50
Dimensions
Height mm 460 460 460 460
Width mm 335 335 335 335
Depth mm 123 123 123 123
Weights
Weight kg 4.4 4.4 4.4 4.4
Versions
Version 24 h time switch 60-minute short-time
timer
Frost protection setting °C 7 7 7 7
IP rating IP13B IP13B IP13B IP13B
Protection class I I I I
Colour Alpine white Alpine white Alpine white Alpine white
Values
Output stages 1.0 / 2.0 kW
Setting range °C 5-30 5-30 5-30 5-30
Operating noise dB(A) 53 53 42/51 53
GUARANTEE
ENVIRONMENT AND RECYCLING
Guarantee
The guarantee conditions of our German companies do not
apply to appliances acquired outside of Germany. In countries
where our subsidiaries sell our products a guarantee can only
be issued by those subsidiaries. Such guarantee is only grant-
ed if the subsidiary has issued its own terms of guarantee. No
other guarantee will be granted.
We shall not provide any guarantee for appliances acquired in
countries where we have no subsidiary to sell our products.
This will not aect warranties issued by any importers.
Environment and recycling
We would ask you to help protect the environment. After use,
dispose of the various materials in accordance with national
regulations.

24 | CK 20 S | CKZ 20 S | CKR 20 S | CKT 20 S www.stiebel-eltron.com
TABLE DES MATIÈRES | REMARQUES PARTICULIÈRES
REMARQUES
PARTICULIÈRES
- Veuillez tenir les enfants de moins de 3ans éloi-
gnés de l’appareil s’ils ne sont pas sous constante
surveillance.
- L’appareil peut être allumé et éteint par des en-
fants âgés de 3 à 7 ans s’ils sont sous surveillance
ou s’ils ont été formés à son utilisation en toute
sécurité et qu’ils ont compris les dangers en-
courus. La pose de l’appareil en conformité aux
instructions est une condition préalable incon-
tournable.
Il est interdit aux enfants de 3 à 7 ans de bran-
cher la prise électrique ou d’intervenir sur la ré-
gulation de l’appareil.
- L’appareil peut être utilisé par des enfants de
8ans et plus ainsi que par des personnes aux
facultés physiques, sensorielles ou mentales
réduites ou par des personnes sans expérience
sous surveillance ou après formation à l’utilisa-
tion en toute sécurité de l’appareil si les dangers
potentiels ont été compris.
- Ne laissez pas des enfants jouer avec l’appareil.
Ni le nettoyage ni la maintenance relevant de
l’utilisateur ne doivent être effectués par des en-
fants sans surveillance.
- Si l’appareil est utilisé avec une horloge de pro-
grammation, il peut, sans régulation, chauffer
le local sans s’arrêter. Si le local est petit et que
les personnes qui s’y trouvent ne peuvent pas le
quitter d’elles-mêmes, il convient d’assurer une
surveillance permanente.
- Certaines parties de l’appareil peuvent être à très
haute température et causer des brûlures.
La présence d’enfants ou de personnes vulné-
rables requiert une attention particulière.
- Ne couvrez pas l’appareil.
REMARQUES PARTICULIÈRES
UTILISATION
1. Remarques générales ������������������������������������� 25
1.1 Consignes de sécurité ������������������������������������������ 25
1.2 Autres symboles utilisés dans cette documentation ����� 25
1.3 Remarques apposées sur l’appareil ������������������������ 25
1.4 Unités de mesure ����������������������������������������������� 25
2. Sécurité ����������������������������������������������������� 25
2.1 Utilisation conforme ������������������������������������������� 26
2.2 Consignes de sécurité générales ���������������������������� 26
2.3 Label de conformité �������������������������������������������� 26
3. Description de l’appareil ���������������������������������� 26
4. Commande CK 20 S ����������������������������������������� 27
4.1 Mise en marche du chauffage ��������������������������������27
4.2 Utilisation avec un régulateur externe de
température ambiante �����������������������������������������27
4.3 Arrêt du chauffage/protection hors gel�������������������27
4.4 Mise hors service �����������������������������������������������27
5. Commande CKZ 20 S ��������������������������������������� 27
5.1 Mise en marche du chauffage �������������������������������� 27
5.2 Arrêt du chauffage/protection hors gel�������������������27
5.3 Mise hors service ����������������������������������������������� 27
6. Commande CKR 20 S ��������������������������������������� 28
6.1 Mise en marche du chauffage ��������������������������������28
6.2 Utilisation avec un régulateur externe de
température ambiante �����������������������������������������28
6.3 Arrêt du chauffage/protection hors gel�������������������28
6.4 Mise hors service �����������������������������������������������28
7. Commande CKT 20 S ��������������������������������������� 28
7.1 Mise en marche du chauffage �������������������������������� 28
7.2 Réglage de l’horloge de programmation ������������������ 28
7.3 Arrêt du chauffage/protection hors gel�������������������28
7.4 Mise hors service �����������������������������������������������29
8. Nettoyage, entretien et maintenance �������������������� 29
9. Stockage����������������������������������������������������� 29
10. Aide au dépannage ���������������������������������������� 29
11. Sécurité ����������������������������������������������������� 29
11.1 Consignes de sécurité générales ����������������������������29
11.2 Prescriptions, normes et réglementations����������������� 29
12. Description de l’appareil ���������������������������������� 29
13. Travaux préparatoires ������������������������������������� 29
13.1 Distances minimales ������������������������������������������� 29
14. Montage ����������������������������������������������������� 29
15. Raccordement électrique ���������������������������������� 30
16. Remise de l’appareil au client ���������������������������� 30
17. Aide au dépannage ���������������������������������������� 30
18. Données techniques ��������������������������������������� 30
18.1 Cotes et raccordements ���������������������������������������� 30
18.2 Schéma de câblage CK 20 S ����������������������������������� 31
18.3 Schéma de câblage CKZ 20 S ��������������������������������� 31
18.4 Schéma de câblage CKR 20 S ���������������������������������32
18.5 Schéma de câblage CKT 20 S ���������������������������������32
18.6 Tableau de données �������������������������������������������� 33
GARANTIE
ENVIRONNEMENT ET RECYCLAGE

UTILISATION
Remarques générales
www.stiebel-eltron.com CK 20 S | CKZ 20 S | CKR 20 S | CKT 20 S | 25
FRANÇAIS
- N’installez pas l’appareil directement sous une
prise électrique murale.
- Placez l’appareil de sorte que les dispositifs de
commutation et de régulation ne puissent être
touchés par les personnes se trouvant dans la
baignoire ou la douche.
- En cas de branchement électrique fixe, l’appareil
doit pouvoir être déconnecté du réseau par un
dispositif de coupure omnipolaire ayant une ou-
verture minimale des contacts de 3mm.
- En cas d’endommagement ou de remplacement,
le cordon d’alimentation électrique ne doit être
remplacé que par un installateur habilité par le
fabricant et avec une pièce de rechange d’origine.
- Fixez l’appareil comme indiqué dans le chapitre
«Installation / montage».
UTILISATION
1. Remarques générales
Les chapitres «Remarquesparticulières» et «Utilisation»
s’adressent aux utilisateurs de l’appareil et aux installateurs.
Le chapitre «Installation» s’adresse aux installateurs.
Remarque
Lisez attentivement cette notice avant utilisation et
conservez-la.
Le cas échéant, veuillez remettre cette notice au nouvel
utilisateur.
1.1 Consignes de sécurité
1.1.1 Structure des consignes de sécurité
!
MENTION D’AVERTISSEMENT Nature du danger
Sont indiqués ici les risques éventuellement encourus en
cas de non-respect de la consigne de sécurité.
Sont indiquées ici les mesures permettant de pallier
le danger.
1.1.2 Symboles, nature du danger
Symbole Nature du danger
Blessure
Électrocution
Brûlure
(brûlure, ébouillantement)
1.1.3 Mentions d’avertissement
MENTION
D’AVERTISSE-
MENT
Signification
DANGER Caractérise des remarques dont le non-respect entraîne de
graves lésions, voire la mort.
AVERTISSEMENT Caractérise des remarques dont le non-respect peut entraî-
ner de graves lésions, voire la mort.
ATTENTION Caractérise des remarques dont le non-respect peut entraî-
ner des lésions légères ou moyennement graves.
1.2 Autres symboles utilisés dans cette
documentation
Remarque
Le symbole ci-contre caractérise des remarques géné-
rales.
Lisez attentivement les remarques.
Symbole Signification
Dommages matériels
(dommages induits, dommages causés à l’appareil, à l’en-
vironnement)
Recyclage de l’appareil
Ce symbole indique que vous devez intervenir. Les actions
nécessaires sont décrites étape par étape.
1.3 Remarques apposées sur l’appareil
Symbole Signification
Ne pas couvrir l’appareil
1.4 Unités de mesure
Remarque
Sauf indication contraire, toutes les cotes sont indiquées
en millimètres.
2. Sécurité
N’utilisez cet appareil que s’il est installé dans son intégralité et
doté de tous les dispositifs de sécurité.
!
!

UTILISATION
Description de l’appareil
26 | CK 20 S | CKZ 20 S | CKR 20 S | CKT 20 S www.stiebel-eltron.com
2.1 Utilisation conforme
L’appareil est destiné à une utilisation domestique. Il peut être
utilisé sans risque par des personnes qui ne disposent pas de
connaissances techniques particulières. L’appareil peut également
être utilisé dans un environnement non domestique, par exemple
dans de petites entreprises, à condition que son utilisation soit
du même ordre.
Tout autre emploi est considéré comme non conforme. Une uti-
lisation conforme de l’appareil implique également le respect de
cette notice et de celles des accessoires utilisés.
2.2 Consignes de sécurité générales
!
AVERTISSEMENT Blessure
- Veuillez tenir les enfants de moins de 3ans éloignés
de l’appareil s’ils ne sont pas sous constante sur-
veillance.
- L’appareil peut être allumé et éteint par des enfants
âgés de 3 à 7 ans s’ils sont sous surveillance ou s’ils
ont été formés à son utilisation en toute sécurité et
qu’ils ont compris les dangers encourus. La pose
de l’appareil en conformité aux instructions est une
condition préalable incontournable.
Il est interdit aux enfants de 3 à 7 ans de brancher
la prise électrique ou d’intervenir sur la régulation
de l’appareil.
- L’appareil peut être utilisé par des enfants de 8ans
et plus ainsi que par des personnes aux facultés
physiques, sensorielles ou mentales réduites ou par
des personnes sans expérience sous surveillance ou
après formation à l’utilisation en toute sécurité de
l’appareil si les dangers potentiels ont été compris.
- Ne laissez pas des enfants jouer avec l’appareil. Ni
le nettoyage ni la maintenance relevant de l’utilisa-
teur ne doivent être effectués par des enfants sans
surveillance.
AVERTISSEMENT Brûlure
N’utilisez pas l’appareil ...
- lorsque les distances minimales avec les surfaces
des objets voisins (mobilier, rideaux et voilages,
autres textiles ou tout autre matériau inflammable)
ne sont pas respectées (voir le chapitre « Installa-
tion / Travaux préparatoires » pour les indications
sur les distances minimales)
- dans les locaux où existe un risque d’incendie ou
d’explosion en raison de la présence de produits
chimiques, poussières, gaz ou vapeurs.
- à proximité immédiate de câbles ou récipients sus-
ceptibles de contenir ou de transporter des maté-
riaux inflammables ou explosibles.
- si des travaux de pose, de ponçage, de vitrification
sont exécutés dans le local où l’appareil est instal-
lé là où sont manipulés de l’essence, des bombes
aérosols, de l’encaustique ou d’autres produits
similaires. Aérez suffisamment le local avant de
chauffer.
- après une chute de l’appareil, ni après un fonction-
nement défaillant, ni si un composant de l’appareil
est endommagé.
- à l’extérieur
AVERTISSEMENT Brûlure
Ne posez pas sur l’appareil ou à proximité immédiate
de celui-ci des objets ou des matériaux combustibles,
inflammables ou isolants thermiques tels que linge, cou-
vertures, journaux, récipients contenant de l’encaustique
ou de l’essence, bombes aérosols et autres produits si-
milaires.
AVERTISSEMENT Brûlure
Veillez à ce qu’aucun corps étranger ne pénètre dans les
ouvertures d’entrée ou de sortie d’air. Toute pénétration
d’un corps étranger dans ces ouvertures risque de pro-
voquer une électrocution ou un incendie, ou d’endom-
mager l’appareil.
AVERTISSEMENT Brûlure
Pour éviter tout incendie, veillez à ne jamais bloquer les
ouvertures d’entrée et de sortie d’air. N’utilisez jamais
l’appareil sur une surface de pose molle (lit par ex.) pour
éviter que les ouvertures ne soient bloquées.
!
ATTENTION Blessure
Si l’appareil est utilisé avec une horloge de program-
mation, il peut, sans régulation, chauffer le local sans
s’arrêter. Si le local est petit et que les personnes qui
s’y trouvent ne peuvent pas le quitter d’elles-mêmes, il
convient d’assurer une surveillance permanente.
ATTENTION Brûlure
Certaines parties de l’appareil peuvent être à très haute
température et causer des brûlures. La présence d’en-
fants ou de personnes vulnérables requiert une attention
particulière.
!
Dommages matériels
- Ne couvrez pas l’appareil.
- Ne montez pas sur l’appareil.
- N’utilisez pas l’appareil à l’extérieur.
2.3 Label de conformité
Voir la plaque signalétique sur l’appareil.
3. Description de l’appareil
L’appareil se fixe au mur et convient en particulier pour les bu-
reaux ou ateliers, cuisines, salles de bains, laveries et locaux si-
milaires.
L’habillage externe de l’appareil est en tôle métallique thermola-
quée. Les deux parois latérales sont en matière synthétique Les
organes de commande sont placés sur le côté droit.
Le ventilateur silencieux capte l’air ambiant qui est ensuite chauf-
fé par le système de chauffe à fil nu puis soufflé uniformément
par le conduit d’air chaud et la grille de sortie d’air chaud située
en-dessous.
L’appareil chauffe l’air ambiant à la température réglée et main-
tient cette température constante.
L’appareil est prêt à fonctionner, une fois le montage mural réalisé
et le raccordement électrique effectué au moyen du connecteur
secteur.

UTILISATION
Commande CK 20 S
www.stiebel-eltron.com CK 20 S | CKZ 20 S | CKR 20 S | CKT 20 S | 27
FRANÇAIS
4. Commande CK 20 S
1
26�07�31�0211
1 Sélecteur de température
4.1 Mise en marche du chauffage
La température se règle en continu. L’appareil se coupe dès que
la température ambiante réglée est atteinte.
Tournez le sélecteur de température de l’appareil vers la
droite jusqu’au niveau souhaité.
4.2 Utilisation avec un régulateur externe de
température ambiante
Il est possible d’utiliser cet appareil dans des locaux de plus de
20m2 avec un régulateur externe de température ambiante acheté
dans le commerce.
Tournez le sélecteur de température de l’appareil vers la
droite jusqu’en butée.
4.3 Arrêt du chauffage/protection hors gel
Tournez le sélecteur de température de l’appareil vers la
gauche jusqu’en butée.
La protection hors gel est activée en cette position. Le chauffage
se met automatiquement en marche si la température ambiante
est inférieure à la température de protection hors gel.
4.4 Mise hors service
Débrancher la fiche d’alimentation.
5. Commande CKZ 20 S
1
2
3
5
4
26�07�31�0212
1 Sélecteur de température
2 Position de l’interrupteur à bascule (fonctionnement avec
horloge de programmation)
3 Position de l’interrupteur à bascule (mode normal)
4 Horloge de programmation
5 Flèche de repérage
5.1 Mise en marche du chauffage
Choisissez l’un des deux modes suivants de fonctionnement
sur l’interrupteur à bascule.
- Fonctionnement normal
- Fonctionnement avec horloge de programmation
Fonctionnement normal
La température se règle en continu. L’appareil se coupe dès que
la température ambiante réglée est atteinte.
Tournez le sélecteur de température de l’appareil vers la
droite jusqu’au niveau souhaité.
Fonctionnement avec horloge de programmation
L’horloge de programmation 24 heures est dotée de 96 segments
horaires. Chaque heure est subdivisée en 4 segments horaires
de 15 minutes chacun. Pour la mise en service et après chaque
interruption de courant, il faut procéder au réglage de l’horloge
de programmation en la tournant vers la droite jusqu’à ce que
l’heure réelle soit indiquée face à la flèche de repérage.
Pour programmer les plages horaires de chauffage, procédez
comme suit :
Enfoncer vers le bas les segments horaires placés sur le pourtour
de l’horloge. La plage rouge apparente indique la plage horaire
de chauffage présélectionnée pendant laquelle l’appareil chauffe
automatiquement. Dès que la température ambiante souhaitée est
atteinte pendant la plage horaire programmée, l’appareil se coupe
et se remet en marche dès qu’il y a à nouveau une demande de
chaleur jusqu’à écoulement de la plage horaire programmée. Ce
processus se répète tous les jours. Vous pouvez adapter le temps
de chauffage selon vos besoins en agissant sur les segments ho-
raires (les enfoncer ou les relever).
5.2 Arrêt du chauffage/protection hors gel
Tournez le sélecteur de température de l’appareil vers la
gauche jusqu’en butée.
Dans cette position, la protection hors gel n’est activée que si l’in-
terrupteur à bascule est positionné sur Fonctionnement normal. Le
chauffage se met automatiquement en marche si la température
ambiante est inférieure à la température de protection hors gel.
5.3 Mise hors service
Débrancher la fiche d’alimentation.

UTILISATION
Commande CKR 20 S
28 | CK 20 S | CKZ 20 S | CKR 20 S | CKT 20 S www.stiebel-eltron.com
6. Commande CKR 20 S
2
3
1
26�07�31�0213
1 Sélecteur de température
2 Niveau de commutation de l’interrupteur à bascule (allure de
chauffe de base)
3 Niveau de commutation de l’interrupteur à bascule (allure de
chauffe rapide)
6.1 Mise en marche du chauffage
Tournez le sélecteur de température de l’appareil vers la
droite jusqu’au niveau souhaité.
La température se règle en continu. L’appareil se coupe dès que
la température ambiante réglée est atteinte.
Vous pouvez choisir sur l’interrupteur à bascule l’une des deux
puissances de chauffage suivantes correspondant à une vitesse
respective du moteur du ventilateur.
Allure de chauffe de base
Placez l’interrupteur à bascule sur «I». Si l’appareil est mis en
marche par le sélecteur de température, il chauffe avec une puis-
sance chauffage de 1000W et le ventilateur est sur petite vitesse.
Remarque
Ne faites pas fonctionner l’appareil à l’allure de chauffe
de base I lorsque le local dans lequel il est installé est
très froid.
Pour assurer un fonctionnement normal de l’appa-
reil dans un local fortement refroidi, mettez-le sur
l’allure de chauffe rapide II.
Allure de chauffe rapide
Placez l’interrupteur à bascule sur «II». Si l’appareil est mis en
marche par le sélecteur de température, il chauffe avec une puis-
sance chauffage de 2000W et le ventilateur est sur grande vitesse.
Optez pour l’allure de chauffe rapide à forte puissance pour chauf-
fer rapidement un local froid à la température réglée. Commutez
ensuite à nouveau sur l’allure «I».
Lorsque la température présélectionnée est atteinte, l’appareil se
coupe et maintient la température ambiante à un niveau constant
par remise en marche et extinction.
6.2 Utilisation avec un régulateur externe de
température ambiante
Il est possible d’utiliser cet appareil dans des locaux de plus de
20m2 avec un régulateur externe de température ambiante acheté
dans le commerce.
Tournez le sélecteur de température de l’appareil vers la
droite jusqu’en butée.
6.3 Arrêt du chauffage/protection hors gel
Tournez le sélecteur de température vers la gauche jusqu’en
butée, puis sélectionnez l’allure de chauffe rapide «II» sur
l’interrupteur à bascule.
La protection hors gel est activée en cette position. Le chauffage
se met automatiquement en marche si la température ambiante
est inférieure à la température de protection hors gel.
6.4 Mise hors service
Débrancher la fiche d’alimentation.
7. Commande CKT 20 S
1
2
26�07�31�0214
1 Sélecteur de température
2 Horloge de programmation
7.1 Mise en marche du chauffage
La température se règle en continu. L’appareil se coupe dès que
la température ambiante réglée est atteinte.
Tournez le sélecteur de température de l’appareil vers la
droite jusqu’au niveau souhaité.
7.2 Réglage de l’horloge de programmation
Sans régulation et avec l’horloge de programmation, l’appareil
chauffe à pleine puissance.
Tournez le bouton de l’horloge de programmation vers la
droite pour régler une durée de fonctionnement comprise
entre 0 et 60 minutes.
7.3 Arrêt du chauffage/protection hors gel
Tournez le sélecteur de température de l’appareil vers la
gauche jusqu’en butée et vérifiez que l’horloge de program-
mation est sur 0.
La protection hors gel est activée en cette position. Le chauffage
se met automatiquement en marche si la température ambiante
est inférieure à la température de protection hors gel.

UTILISATION
Nettoyage, entretien et maintenance
www.stiebel-eltron.com CK 20 S | CKZ 20 S | CKR 20 S | CKT 20 S | 29
FRANÇAIS
7.4 Mise hors service
Débrancher la fiche d’alimentation.
8. Nettoyage, entretien et
maintenance
Cet appareil ne contient aucune pièce devant être entretenue par
l’utilisateur.
Nettoyez l’appareil, lorsqu’il est froid, avec des produits d’entre-
tien usuels. Évitez les produits d’entretien abrasifs et corrosifs.
Si des taches de couleur brune apparaissent sur l’enveloppe de
l’appareil, nettoyez celles-ci avec un chiffon humide le plus tôt
possible.
!
Dommages matériels
Ne vaporisez pas de nettoyant en spray dans la fente de
passage d’air.
9. Stockage
Lorsque l’appareil n’est pas utilisé, rangez-le dans un endroit
sec.
10. Aide au dépannage
Si l’appareil ne chauffe pas, vérifiez la température réglée sur
l’appareil et protection de l’installation domestique.
L’appareil est équipé d’un thermostat de sécurité qui le coupe en
cas de surchauffe. Une fois la cause éliminée (entrée ou sortie de
l’air recouverte), l’appareil se remet en marche après un temps
de refroidissement de quelques minutes.
Appelez votre installateur si vous ne réussissez pas à résoudre le
problème.Donnez-lui le numéro indiqué sur la plaque signalétique
pour qu’il puisse vous aider plus rapidement et plus efficacement
(000000-0000-000000).
INSTALLATION
11. Sécurité
L’installation, la mise en service, la maintenance et les réparations
de cet appareil ne doivent être effectuées que par un installateur
qualifié.
11.1 Consignes de sécurité générales
Nous ne garantissons le bon fonctionnement et la sécurité de
l’appareil que si des accessoires et pièces de rechange d’origine
sont utilisés.
11.2 Prescriptions, normes et réglementations
Remarque
Respectez toutes les prescriptions et réglementations
nationales et locales en vigueur.
12. Description de l’appareil
Cet appareil est un appareil de chauffage électrique direct à mon-
ter au mur. Cet appareil convient particulièrement au chauffage
des locaux tels que bureaux ou ateliers, cuisines, salles de bains,
laveries, etc.
Fourniture
Sont fournis avec l’appareil:
- Fixation murale
- Équerre de fixation
13. Travaux préparatoires
13.1 Distances minimales
≥10
≥100≥100
≥500
≥100 ≥100
D0000018481
14. Montage
AVERTISSEMENT Électrocution
- Lors de l’installation de cet appareil dans des lo-
caux avec baignoire et/ou douche, tenez compte de
la zone de protection conformément aux indications
reportées sur la plaquette signalétique de l’appa-
reil.
- Placez l’appareil de sorte que les dispositifs de
commutation et de régulation ne puissent être
touchés par les personnes se trouvant dans la bai-
gnoire ou la douche.
AVERTISSEMENT Brûlure
- L’appareil ne peut être fixé que sur une paroi ver-
ticale capable de résister au moins à une tempéra-
ture de 90°C.
- Respectez les distances minimales avec les surfaces
des objets voisins.
- N’installez pas l’appareil directement sous une prise
électrique murale.
Référez-vous au plan de cotes pour l’écartement des trous
pour la fixation murale.
Fixez la fixation murale à l’aide du matériel de fixation adé-
quat. Il est possible de compenser un décalage du trou dans
le sens horizontal et vertical à l’aide du trou oblong de la
fixation murale.

UTILISATION
Raccordement électrique
30 | CK 20 S | CKZ 20 S | CKR 20 S | CKT 20 S www.stiebel-eltron.com
Accrochez l’appareil de manière à ce que les deux ergots qui
ressortent en haut de la paroi arrière s’agrippent dans la
fente de la fixation murale.
Fixez l’appareil avec l’équerre de fixation et une vis afin
d’éviter qu’il ne se décroche inopinément. Accrochez
l’équerre de fixation derrière à la paroi arrière.
15. Raccordement électrique
AVERTISSEMENT Électrocution
Exécutez tous les travaux de branchement et d’installa-
tion électriques conformément aux prescriptions.
!
Dommages matériels
Respectez les indications de la plaque signalétique. La
tension indiquée doit correspondre à la tension du sec-
teur.
- Le câble ne doit pas être en contact avec l’appareil.
- En cas de branchement sur une prise 2P+T, veillez à ce que
celle-ci soit facilement accessible une fois l’appareil installé.
- N’installez pas l’appareil directement sous une prise élec-
trique murale.
- Si un branchement électrique fixe est exigé, raccourcissez
le câble, en coupant le connecteur, de manière à ce que le
câble arrive directement à la prise de raccordement fixe.
- En cas de branchement électrique fixe, l’appareil doit pou-
voir être déconnecté du réseau par un dispositif de coupure
omnipolaire ayant une ouverture minimale des contacts de
3mm.
- L’appareil n’est pas conçu pour des câbles posés fixement.
16. Remise de l’appareil au client
Expliquez les différentes fonctions de l’appareil à l’utilisateur. At-
tirez particulièrement son attention sur les consignes de sécurité.
Remettez les notices d’utilisation et d’installation à l’utilisateur.
17. Aide au dépannage
Seul un installateur est autorisé à changer le câble de raccor-
dement au secteur en utilisant des pièces de rechange d’origine
provenant de chez nous.
18. Données techniques
18.1 Cotes et raccordements
i13
i32
b01
335
123
10
200
460
365
D0000018442
b01 Passage des câbles électriques
i1 3 Support mural
i32 Fixation

UTILISATION
Données techniques
www.stiebel-eltron.com CK 20 S | CKZ 20 S | CKR 20 S | CKT 20 S | 31
FRANÇAIS
18.2 Schéma de câblage CK 20 S
N1
R1
F1
>80 °C ±5 K
>80 °C ±5 K
F1
X1
X2
1
PE L N
2
M1
M
1 ~
R2
A1
26�07�31�0216
A1 Module corps de chauffe électrique
F1 Protection contre la surchauffe
M1 Ventilateur
N1 Thermostat
R1 Résistance électrique
R2 Résistance électrique
X1 Borne
X2 Raccord enfichable
18.3 Schéma de câblage CKZ 20 S
26�07�31�0217
A1 Module corps de chauffe électrique
F1 Protection contre la surchauffe
M1 Ventilateur
N1 Thermostat
R1 Résistance électrique
R2 Résistance électrique
T1 Horloge de commutation
W1 Interrupteur à bascule
X1 Borne
X2 Raccord enfichable

UTILISATION
Données techniques
32 | CK 20 S | CKZ 20 S | CKR 20 S | CKT 20 S www.stiebel-eltron.com
18.4 Schéma de câblage CKR 20 S
6(1a)
5(1)
3(2a)
1(2b)
2(2)
26�07�31�0046
A1 Module corps de chauffe électrique
F1 Protection contre la surchauffe
M1 Ventilateur
N1 Thermostat
R1 Résistance électrique
R2 Résistance électrique
W1 Interrupteur à bascule
X1 Borne
X2 Raccord enfichable
18.5 Schéma de câblage CKT 20 S
> 174°F ± 41°F
> 80°C ± 5K
ϑ
ϑ
> 174°F ± 41°F
> 80°C ± 5K
ϑ
1
3
2
4
6 5
1
2
N1
R1 R2
F1
F1
X1
X2
T1
M1
PE
L
N
A1
M
1
~
26�07�31�0215
A1 Module corps de chauffe électrique
F1 Protection contre la surchauffe
M1 Ventilateur
N1 Thermostat
R1 Résistance électrique
R2 Résistance électrique
T1 Minuterie 60min
X1 Bloc de jonction

www.stiebel-eltron.com CK 20 S | CKZ 20 S | CKR 20 S | CKT 20 S | 33
FRANÇAIS
UTILISATION | GARANTIE | ENVIRONNEMENT ET RECYCLAGE
Données techniques
18.6 Tableau de données
CK 20 S CKZ 20 S CKR 20 S CKT 20 S
Code article 071793 071795 072633 230344
Données électriques
Puissance de raccordement W 2000 2000 2000 2000
Phases 1/N/PE 1/N/PE 1/N/PE 1/N/PE
Tension nominale V 230 230 230 230
Fréquence Hz 50 50 50 50
Dimensions
Hauteur mm 460 460 460 460
Largeur mm 335 335 335 335
Profondeur mm 123 123 123 123
Poids
Poids kg 4,4 4,4 4,4 4,4
Versions
Exécution Horloge de programma-
tion de 24h
Minuterie de 60 minutes
Protection hors gel °C 7 7 7 7
Indice de protection (IP) IP13B IP13B IP13B IP13B
Classe de protection I I I I
Couleur blanc alpin blanc alpin blanc alpin blanc alpin
Valeurs
Niveaux de puissance 1,0 / 2,0 kW
Plage de réglage °C 5-30 5-30 5-30 5-30
Bruit en fonctionnement dB(A) 53 53 42/51 53
GARANTIE
ENVIRONNEMENT ET RECYCLAGE
Garantie
Les conditions de garantie de nos sociétés allemandes ne
s’appliquent pas aux appareils achetés hors d’Allemagne. Au
contraire, c’est la liale chargée de la distribution de nos pro-
duits dans le pays qui est seule habilitée à accorder une garan-
tie. Une telle garantie ne pourra cependant être accordée que
si la liale a publié ses propres conditions de garantie. Il ne sera
accordé aucune garantie par ailleurs.
Nous n’accordons aucune garantie pour les appareils achetés
dans des pays où aucune liale de notre société ne distribue
nos produits. D’éventuelles garanties accordées par l’importa-
teur restent inchangées.
Environnement et recyclage
Merci de contribuer à la préservation de notre environnement.
Après usage, procédez à l’élimination des matériaux conformé-
ment à la réglementation nationale.

34 | CK 20 S | CKZ 20 S | CKR 20 S | CKT 20 S www.stiebel-eltron.com
INHOUD
- Houd kinderen jonger dan 3 jaar uit de buurt van
het toestel, wanneer er niet voortdurend toezicht
is.
- Het toestel kan door kinderen van 3 tot 7 jaar
worden in- en uitgeschakeld, wanneer er toe-
zicht op hen gehouden wordt, of wanneer ze met
betrekking tot het veilige gebruik van het toestel
geïnstrueerd zijn en de gevaren die daaruit ont-
staan, begrepen hebben. Voorwaarde hiervoor is
dat het toestel gemonteerd is zoals beschreven.
3- tot 7-jarige kinderen mogen niet de stekker in
het stopcontact steken en mogen het toestel niet
regelen.
- Het toestel kan door kinderen vanaf 8 jaar, als-
mede door personen met fysieke, sensorische of
geestelijke beperkingen of met een gebrek aan
ervaring en kennis gebruikt worden wanneer er
toezicht op hen gehouden wordt, of wanneer ze
met betrekking tot het veilige gebruik van het
toestel geïnstrueerd zijn en de gevaren die daar-
uit ontstaan, begrepen hebben.
- Kinderen mogen niet met het toestel spelen. Kin-
deren mogen zonder toezicht geen reiniging of
gebruikersonderhoud uitvoeren.
- Indien het toestel via de timer werkt, kan deze
de ruimte ongeregeld steeds verder verwarmen.
Wanneer de ruimte klein is en de daar aanwezi-
ge personen niet zelfstandig de ruimte kunnen
verlaten, moet worden gezorgd voor voortdurend
toezicht.
- Delen van het toestel kunnen zeer heet worden
en brandwonden veroorzaken.
Als er kinderen en hulpbehoevenden aanwezig
zijn, is extra voorzichtigheid geboden.
- Dek het toestel niet af.
BIJZONDERE AANWIJZINGEN
BEDIENING
1. Algemene aanwijzingen ����������������������������������� 35
1.1 Veiligheidsaanwijzingen �������������������������������������� 35
1.2 Andere aandachtspunten in deze documentatie ��������� 35
1.3 Instructies op het toestel �������������������������������������� 35
1.4 Maateenheden �������������������������������������������������� 35
2. Veiligheid ��������������������������������������������������� 35
2.1 Reglementair gebruik ������������������������������������������ 35
2.2 Algemene veiligheidsaanwijzingen �������������������������36
2.3 Keurmerk ���������������������������������������������������������36
3. Toestelbeschrijving ���������������������������������������� 36
4. CK 20 S bedienen ������������������������������������������� 36
4.1 Verwarming inschakelen �������������������������������������� 37
4.2 Bediening met externe kamerthermostaat ��������������� 37
4.3 Verwarming uitschakelen/vorstbescherming �������������37
4.4 Buitendienststelling �������������������������������������������� 37
5. CKZ 20 S bedienen ����������������������������������������� 37
5.1 Verwarming inschakelen ��������������������������������������37
5.2 Verwarming uitschakelen/vorstbescherming ������������� 37
5.3 Buitendienststelling �������������������������������������������� 37
6. CKR 20 S bedienen ����������������������������������������� 37
6.1 Verwarming inschakelen ��������������������������������������37
6.2 Bediening met externe kamerthermostaat ��������������� 38
6.3 Verwarming uitschakelen/vorstbescherming ������������� 38
6.4 Buitendienststelling �������������������������������������������� 38
7. CKT 20 S bedienen ����������������������������������������� 38
7.1 Verwarming inschakelen ��������������������������������������38
7.2 Timer instellen ��������������������������������������������������38
7.3 Verwarming uitschakelen/vorstbescherming �������������38
7.4 Buitendienststelling �������������������������������������������� 38
8. Reiniging en onderhoud ����������������������������������� 38
9. Opslag ������������������������������������������������������� 39
10. Problemen verhelpen �������������������������������������� 39
11. Veiligheid ��������������������������������������������������� 39
11.1 Algemene veiligheidsaanwijzingen ������������������������� 39
11.2 Voorschriften, normen en bepalingen���������������������� 39
12. Toestelbeschrijving ���������������������������������������� 39
13. Voorbereidingen ������������������������������������������� 39
13.1 Minimumafstanden �������������������������������������������� 39
14. Montage ����������������������������������������������������� 39
15. Elektrische aansluiting ������������������������������������ 40
16. Overdracht van het toestel �������������������������������� 40
17. Storingen verhelpen ��������������������������������������� 40
18. Technische gegevens��������������������������������������� 40
18.1 Afmetingen en aansluitingen���������������������������������40
18.2 Schakelschema CK 20 S ���������������������������������������� 41
18.3 Schakelschema CKZ 20 S �������������������������������������� 41
18.4 Schakelschema CKR 20 S �������������������������������������� 42
18.5 Schakelschema CKT 20 S �������������������������������������� 42
18.6 Gegevenstabel ��������������������������������������������������� 43
GARANTIE
MILIEU EN RECYCLING

BEDIENING
www.stiebel-eltron.com CK 20 S | CKZ 20 S | CKR 20 S | CKT 20 S | 35
NEDERLANDS
- Plaats het toestel niet direct onder een
stopcontact.
- Plaats het toestel zo, dat de schakel- en regel-
voorzieningen niet kunnen worden aangeraakt
door een persoon die in bad zit of onder de dou-
che staat.
- Bij een vaste aansluiting moet het toestel met een
afstand van ten minste 3 mm op alle polen van
het stroomnetwerk kunnen worden losgekoppeld.
- De elektriciteitskabel mag bij beschadiging of
vervanging alleen worden vervangen door het
originele onderdeel en door een installateur die
daartoe door de fabrikant gemachtigd is.
- Monteer het toestel zoals beschreven in het
hoofdstuk "Installatie/montage".
BEDIENING
1. Algemene aanwijzingen
De hoofdstukken "Bijzondere Aanwijzingen" en "Bediening" zijn
bedoeld voor de gebruiker van het toestel en voor de installateur.
Het hoofdstuk "Installatie" is bedoeld voor de installateur.
Instructie
Lees voor gebruik deze handleiding zorgvuldig door en
bewaar de handleiding op een veilige plaats.
Overhandig de handleiding in voorkomende gevallen aan
een volgende gebruiker.
1.1 Veiligheidsaanwijzingen
1.1.1 Structuur veiligheidsaanwijzingen
!
TREFWOORD Soort gevaar
Hier staan mogelijke gevolgen wanneer het veiligheids-
voorschrift wordt genegeerd.
Hier staan maatregelen om het gevaar af te wen-
den.
1.1.2 Symbolen, soort gevaar
Symbool Soort gevaar
Letsel
Elektrische schok
Verbranding
(Verbranding, brandwonden)
1.1.3 Trefwoorden
TREFWOORD Betekenis
GEVAAR Aanwijzingen die leiden tot zwaar letsel of overlijden, wan-
neer deze niet in acht worden genomen.
WAARSCHUWING Aanwijzingen die kunnen leiden tot zwaar letsel of overlij-
den, wanneer deze niet in acht worden genomen.
VOORZICHTIG Aanwijzingen die kunnen leiden tot middelmatig zwaar of
licht letsel, wanneer deze niet in acht worden genomen.
1.2 Andere aandachtspunten in deze documentatie
Instructie
Algemene aanwijzingen worden aangeduid met het sym-
bool dat hiernaast staat.
Lees de aanwijzingen grondig door.
Symbool Betekenis
Materiële schade
(toestel-, gevolg-, milieuschade)
Het toestel afvoeren
Dit symbool geeft aan dat u iets moet doen. De vereiste han-
delingen worden stap voor stap beschreven.
1.3 Instructies op het toestel
Symbool Betekenis
Toestel niet afdekken
1.4 Maateenheden
Instructie
Tenzij anders vermeld, worden alle maten in millimeters
aangegeven.
2. Veiligheid
Gebruik het toestel enkel als het volledig geïnstalleerd is en als
alle veiligheidsvoorzieningen aangebracht zijn.
2.1 Reglementair gebruik
Het toestel is bestemd voor gebruik in een huishoudelijke omge-
ving. Het kan veilig bediend worden door personen die daarover
niet geïnstrueerd zijn. Het toestel kan ook buiten het huishouden
gebruikt worden, bijv. in een klein bedrijf, voor zover het op de-
zelfde wijze gebruikt wordt.
Elk ander gebruik geldt als niet-reglementair gebruik. Onder re-
glementair gebruik valt ook het in acht nemen van deze hand-
leiding evenals de handleidingen voor de gebruikte toebehoren.
!
!

BEDIENING
36 | CK 20 S | CKZ 20 S | CKR 20 S | CKT 20 S www.stiebel-eltron.com
2.2 Algemene veiligheidsaanwijzingen
!
WAARSCHUWING letsel
- Houd kinderen jonger dan 3 jaar uit de buurt van
het toestel, wanneer er niet voortdurend toezicht is.
- Het toestel kan door kinderen van 3 tot 7 jaar wor-
den in- en uitgeschakeld, wanneer er toezicht op
hen gehouden wordt, of wanneer ze met betrekking
tot het veilige gebruik van het toestel geïnstrueerd
zijn en de gevaren die daaruit ontstaan, begrepen
hebben. Voorwaarde hiervoor is dat het toestel ge-
monteerd is zoals beschreven.
3- tot 7-jarige kinderen mogen niet de stekker in
het stopcontact steken en mogen het toestel niet
regelen.
- Het toestel kan door kinderen vanaf 8 jaar, alsmede
door personen met fysieke, sensorische of geeste-
lijke beperkingen of met een gebrek aan ervaring
en kennis gebruikt worden wanneer er toezicht op
hen gehouden wordt, of wanneer ze met betrekking
tot het veilige gebruik van het toestel geïnstrueerd
zijn en de gevaren die daaruit ontstaan, begrepen
hebben.
- Kinderen mogen niet met het toestel spelen. Kinde-
ren mogen zonder toezicht geen reiniging of gebrui-
kersonderhoud uitvoeren.
WAARSCHUWING verbranding
Gebruik het toestel niet...
- wanneer de minimumafstanden tot aangrenzen-
de objectoppervlakken te klein worden, zoals bij
meubels, gordijnen, vitrage en textiel, of overig
brandbaar materiaal (voor minimumafstanden, zie
hoofdstuk “Installatie / Voorbereidingen”).
- wanneer er door chemicaliën, stof, gassen of dam-
pen gevaar voor brand of explosies bestaat in de
ruimte.
- in de onmiddellijke omgeving van leidingen of con-
tainers met brandbare of explosieve stoffen;
- wanneer in de opstelruimte bouw- of verbouwings-
werkzaamheden worden uitgevoerd.
- wanneer er wordt gewerkt met benzine, sprays,
boenwas en dergelijke; Ventileer de ruimte vol-
doende voordat deze wordt verwarmd.
- wanneer een toestelmodule is beschadigd, het toe-
stel is gevallen of er reeds een storing was;
WAARSCHUWING verbranding
Er mogen op het toestel of in de onmiddellijke omgeving
ervan geen brandbare, ontvlambare of warmte-isoleren-
de voorwerpen of stoffen geplaatst worden, zoals was-
goed, dekens, tijdschriften, blikken boenwas of benzine,
spuitbussen en dergelijke.
WAARSCHUWING verbranding
Let erop dat er geen vreemde voorwerpen in de ventila-
tie- of luchtuitlaatopeningen komen, omdat deze tot een
elektrische schok of brand kunnen leiden, of het toestel
kan worden beschadigd.
WAARSCHUWING verbranding
Let erop dat de luchtin- en -uitgangen niet geblokkeerd
worden om brand te voorkomen. Gebruik het toestel
nooit op een zachte ondergrond, zoals een bed. Daardoor
kunnen de openingen namelijk worden geblokkeerd.
!
VOORZICHTIG letsel
Indien het toestel via de timer werkt, kan deze de ruimte
ongeregeld steeds verder verwarmen. Wanneer de ruim-
te klein is en de daar aanwezige personen niet zelfstan-
dig de ruimte kunnen verlaten, moet worden gezorgd
voor voortdurend toezicht.
VOORZICHTIG verbranding
Delen van het toestel kunnen zeer heet worden en brand-
wonden veroorzaken. Als er kinderen en hulpbehoeven-
den aanwezig zijn, is extra voorzichtigheid geboden.
!
Materiële schade
- Dek het toestel niet af.
- Ga niet op het toestel staan.
- Gebruik het toestel niet in de openlucht.
2.3 Keurmerk
Zie het typeplaatje op het toestel.
3. Toestelbeschrijving
Het toestel wordt bevestigd aan de wand en is vooral geschikt
voor werkruimtes, keuken, badkamer, bijkeuken en dergelijke.
De buitenbehuizing van het toestel is gemaakt van geëmailleer-
de staalplaat. Aan de zijkant wordt deze afgebakend door twee
kunststof zijdelen. Aan het rechter zijdeel bevinden zich de be-
dieningselementen.
De geluidsarme ventilator zuigt de omgevingslucht aan die dan
door het verwarmingselement met blanke draad wordt verwarmd
en door het warmeluchtkanaal en het aan de onderzijde bevestig-
de warmeluchtafvoerrooster gelijkmatig eruit stroomt.
Het toestel verwarmt de kamertemperatuur en houdt de tempe-
ratuur constant op de ingestelde temperatuur.
Na de wandmontage en de elektriciteitsaansluiting via een stekker
is het toestel gereed voor gebruik.
4. CK 20 S bedienen
1
26�07�31�0211
1 Temperatuurkeuzeschakelaar

BEDIENING
CKZ 20 S bedienen
www.stiebel-eltron.com CK 20 S | CKZ 20 S | CKR 20 S | CKT 20 S | 37
NEDERLANDS
4.1 Verwarming inschakelen
Het is mogelijk de temperatuur traploos in te stellen. Het toestel
wordt uitgeschakeld, zodra de ingestelde kamertemperatuur is
bereikt.
Draai de temperatuurselectieknop naar rechts tot aan de ge-
wenste trap.
4.2 Bediening met externe kamerthermostaat
Bij ruimtes die groter zijn dan 20m
2
is het mogelijk het toestel met
een gangbare, externe kamerthermostaat te gebruiken.
Draai de temperatuurkeuzeschakelaar op het toestel daar-
voor tot aan de rechtereindaanslag.
4.3 Verwarming uitschakelen/vorstbescherming
Draai de temperatuurselectieknop naar rechts tot aan de ge-
wenste trap.
In deze stand is de vorstbescherming gewaarborgd. De verwar-
ming schakelt automatisch in, indien de kamertemperatuur daalt
tot onder de vorstbeschermingstemperatuur.
4.4 Buitendienststelling
Trek de stekker uit het stopcontact.
5. CKZ 20 S bedienen
1
2
3
5
4
26�07�31�0212
1 Temperatuurkeuzeschakelaar
2 Stand tuimelschakelaar (bedrijf met timer)
3 Stand tuimelschakelaar (normaal bedrijf)
4 Timer
5 Markeringspijl
5.1 Verwarming inschakelen
Kies via de tuimelschakelaar tussen de volgende twee
bedrijfsmodi:
- Normaal bedrijf
- Bedrijf met timer
Normaal bedrijf
Het is mogelijk de temperatuur traploos in te stellen. Het toestel
wordt uitgeschakeld, zodra de ingestelde kamertemperatuur is
bereikt.
Draai de temperatuurselectieknop naar rechts tot aan de ge-
wenste trap.
Bedrijf met timer
De 24-uurs timer beschikt over 96 tijdsegmenten. Elk uur is on-
derverdeeld in 4 tijdsegmenten van elk 15 minuten. Voor de in-
bedrijfstelling en na iedere stroomonderbreking moet de timer
opnieuw worden ingesteld door de timer zo lang naar rechts te
draaien totdat de tijd van dat moment op de markeringspijl staat.
De gewenste verwarmingstijd wordt op de volgende manier in-
gesteld:
Druk de tijdsegmenten omlaag die op de omtrek zitten. De rode
markering die zichtbaar wordt, toont de vooraf ingestelde ver-
warmingstijd waarop het toestel automatisch verwarmt. Indien
tijdens de verwarmingstijd de gewenste kamertemperatuur wordt
bereikt, dan schakelt het toestel uit en bij een verdere warmte-
behoefte ook weer in, totdat de ingestelde verwarmingstijd is
verlopen. Dit proces wordt dagelijks herhaald. De verwarmings-
tijd kan te allen tijde naar behoefte worden aangepast door de
tijdsegmenten omlaag of omhoog te drukken.
5.2 Verwarming uitschakelen/vorstbescherming
Draai de temperatuurselectieknop naar rechts tot aan de ge-
wenste trap.
In deze stand is de vorstbescherming alleen gewaarborgd, wan-
neer de tuimelschakelaar op "Normaal bedrijf" staat. De verwar-
ming schakelt automatisch in, indien de kamertemperatuur daalt
tot onder de vorstbeschermingstemperatuur.
5.3 Buitendienststelling
Trek de stekker uit het stopcontact.
6. CKR 20 S bedienen
2
3
1
26�07�31�0213
1 Temperatuurkeuzeschakelaar
2 Schakeltrap tuimelschakelaar (basisverwarmingstrap)
3 Schakeltrap tuimelschakelaar (snelverwarmingstrap)
6.1 Verwarming inschakelen
Draai de temperatuurselectieknop naar rechts tot aan de ge-
wenste trap.
Het is mogelijk de temperatuur traploos in te stellen. Het toestel
wordt uitgeschakeld, zodra de ingestelde kamertemperatuur is
bereikt.
Via de tuimelschakelaar kunnen de volgende twee verwarmings-
vermogens met aangepast toerental van de ventilatormotor wor-
den gekozen:

BEDIENING
CKT 20 S bedienen
38 | CK 20 S | CKZ 20 S | CKR 20 S | CKT 20 S www.stiebel-eltron.com
Basisverwarmingstrap
Stel de tuimelschakelaar in op "I". Indien het toestel via de tem-
peratuurselectieknop is ingeschakeld, verwarmt het met een ver-
warmingsvermogen van 1000 W op de langzame ventilatortrap.
Instructie
Gebruik het toestel niet in basisverwarmingstrap I, wan-
neer de ruimte waar het toestel is geïnstalleerd, te veel
is afgekoeld.
Schakel op het toestel bij te veel afgekoelde ruimtes
naar snelverwarmingstrap II om een normale wer-
king van het toestel te waarborgen.
Snelverwarmingstrap
Stel de tuimelschakelaar in op "II". Indien het toestel via de tem-
peratuurselectieknop is ingeschakeld, verwarmt het met een ver-
warmingsvermogen van 2000 W op de langzame ventilatortrap.
Selecteer de snelverwarmingstrap met hoog vermogen om een
koude ruimte zeer snel tot op de ingestelde temperatuur te ver-
warmen. Schakel daarna weer terug naar trap "I".
Indien de vooraf ingestelde kamertemperatuur is bereikt, dan
schakelt het toestel uit en houdt de kamertemperatuur vervolgens
constant door telkens in- en uit te schakelen.
6.2 Bediening met externe kamerthermostaat
Bij ruimtes die groter zijn dan 20m
2
is het mogelijk het toestel met
een gangbare, externe kamerthermostaat te gebruiken.
Draai de temperatuurkeuzeschakelaar op het toestel daar-
voor tot aan de rechtereindaanslag.
6.3 Verwarming uitschakelen/vorstbescherming
Draai de temperatuurselectieknop naar rechts tot aan de ge-
wenste trap.
In deze stand is de vorstbescherming gewaarborgd. De verwar-
ming schakelt automatisch in, indien de kamertemperatuur daalt
tot onder de vorstbeschermingstemperatuur.
6.4 Buitendienststelling
Trek de stekker uit het stopcontact.
7. CKT 20 S bedienen
1
2
26�07�31�0214
1 Temperatuurkeuzeschakelaar
2 Timer
7.1 Verwarming inschakelen
Het is mogelijk de temperatuur traploos in te stellen. Het toestel
wordt uitgeschakeld, zodra de ingestelde kamertemperatuur is
bereikt.
Draai de temperatuurselectieknop naar rechts tot aan de ge-
wenste trap.
7.2 Timer instellen
Met een timer verwarmt het toestel op vol vermogen zonder ther-
mostaat.
Draai de temperatuurselectieknop naar rechts om een ge-
wenste werktijd van 0 - 60 minuten in te stellen.
7.3 Verwarming uitschakelen/vorstbescherming
Draai de temperatuurselectieknop tot aan de aanslag naar
links en zorg ervoor dat de timer op "0" staat.
In deze stand is de vorstbescherming gewaarborgd. De verwar-
ming schakelt automatisch in, indien de kamertemperatuur daalt
tot onder de vorstbeschermingstemperatuur.
7.4 Buitendienststelling
Trek de stekker uit het stopcontact.
8. Reiniging en onderhoud
Het toestel bevat geen onderdelen die door de gebruiker onder-
houden moeten worden.
Reinig het toestel in koude toestand met gebruikelijke onderhoud-
smiddelen. Vermijd schurende en bijtende onderhoudsmiddelen.
Als er een lichte, bruinachtige verkleuring optreedt op de behui-
zing van het toestel, moet deze zo vlug mogelijk met een vochtige
doek worden afgeveegd.
!
Materiële schade
Spuit geen reinigingsspray in de luchtspleten.

BEDIENING
Opslag
www.stiebel-eltron.com CK 20 S | CKZ 20 S | CKR 20 S | CKT 20 S | 39
NEDERLANDS
9. Opslag
Sla het toestel op een droge plaats op, wanneer het niet
wordt gebruikt.
10. Problemen verhelpen
Controleer de ingestelde temperatuur op het toestel en de zekering
van de huisinstallatie, wanneer het toestel niet verwarmt.
Het toestel heeft een veiligheidsthermostaat die het toestel bij
oververhitting uitschakelt. Na het verhelpen van de oorzaak (bij-
voorbeeld afgedekte luchtuitlaat- of -inlaatopening) wordt het
toestel na een afkoeltijd van enkele minuten weer ingeschakeld.
Waarschuw de installateur als u de oorzaak zelf niet kunt verhel-
pen. Als u de oorzaak zelf niet kunt verhelpen, waarschuwt u de
installateur. Om u nog sneller en beter te kunnen helpen, deelt u
hem het nummer op het typeplaatje mee (000000-0000-000000).
INSTALLATIE
11. Veiligheid
Installatie, ingebruikname, onderhoud en reparatie van het toestel
mogen alleen door een gekwalificeerde installateur uitgevoerd
worden.
11.1 Algemene veiligheidsaanwijzingen
Wij waarborgen de goede werking en de bedrijfszekerheid uit-
sluitend bij gebruik van originele onderdelen en vervangingson-
derdelen voor het toestel.
11.2 Voorschriften, normen en bepalingen
Instructie
Neem alle nationale en regionale voorschriften en be-
palingen in acht.
12. Toestelbeschrijving
Het toestel is een elektrisch convectieverwarmingstoestel voor
wandmontage. Het toestel is in het bijzonder geschikt voor het
verwarmen van ruimtes, zoals werkruimtes, keuken, badkamer,
bijkeuken, enz.
Inhoud van het pakket
Bij het toestel wordt het volgende geleverd:
- Wandconsole
- bevestigingshoek
13. Voorbereidingen
13.1 Minimumafstanden
≥10
≥100≥100
≥500
≥100 ≥100
D0000018481
14. Montage
WAARSCHUWING elektrische schok
- Wanneer het toestel wordt geïnstalleerd in ruimten
met een ligbad en/of douche, houd dan rekening
met de veiligheidszone in overeenstemming met de
informatie op het typeplaatje van het toestel.
- Plaats het toestel op een wijze dat schakel- en re-
gelvoorzieningen niet kunnen worden aangeraakt
door een persoon die in bad zit of onder de douche
staat.
WAARSCHUWING verbranding
- Het is slechts toegestaan het toestel te bevestigen
aan een verticale wand die is bestand tegen een
temperatuur van minstens 90 °C.
- Houd de minimale afstanden tot naastliggende ob-
jecten aan.
- U mag het toestel niet onmiddellijk onder een stop-
contact aanbrengen.
Zoek op de maatschets op welke afstand van de gaten de
wandhouder gemonteerd wordt.
Bevestig de wandhouder met geschikt bevestigingsmateriaal.
Dankzij het horizontale en verticale slobgat in de wand-
houder kan het verloop van de bevestigingsboring worden
gecompenseerd.
Hang het toestel op een wijze op dat de beide boven in de
achterwand aangebrachte uitstekende punten in de sleuven
van de wandhouder klikken.
Borg het toestel met de bevestigingshoek en een schroef
tegen onopzettelijk afnemen. Hang daarvoor de bevesti-
gingshoek vanaf de achterkant in de achterwand.

BEDIENING
Elektrische aansluiting
40 | CK 20 S | CKZ 20 S | CKR 20 S | CKT 20 S www.stiebel-eltron.com
15. Elektrische aansluiting
WAARSCHUWING elektrische schok
Voer alle werkzaamheden voor elektriciteitsaansluitin-
gen en montage uit conform de voorschriften.
!
Materiële schade
Houd rekening met de specificaties op het typeplaatje.
De aangegeven spanning moet overeenkomen met de
netspanning.
- De kabel mag niet in contact komen met het toestel.
Let er bij het aansluiten op een geaard stopcontact op dat
het geaard stopcontact na de installatie van het toestel vrij
toegankelijk is.
- Plaats het toestel niet direct onder een stopcontact.
- Kort bij een vereiste, vaste aansluiting de kabel op een wijze
in (stekker afsnijden) dat deze direct naar de toestelaansluit-
doos leidt.
- Bij een vaste aansluiting moet het toestel met een afstand
van ten minste 3 mm op alle polen van het stroomnetwerk
kunnen worden losgekoppeld.
- Het toestel is niet geschikt voor vast geplaatste kabels.
16. Overdracht van het toestel
Leg aan de gebruiker uit hoe het toestel werkt. Schenk daarbij
vooral aandacht aan de veiligheidsaanwijzingen. Geef de bedie-
nings- en installatiehandleiding aan de nieuwe gebruiker.
17. Storingen verhelpen
De netaansluitkabel mag bij vervanging alleen worden vervangen
door onze originele vervangingsonderdelen door een vakman.
18. Technische gegevens
18.1 Afmetingen en aansluitingen
i13
i32
b01
335
123
10
200
460
365
D0000018442
b01 Doorvoer elektr. kabels
i1 3 Wandbevestiging
i32 Bevestiging

BEDIENING
Technische gegevens
www.stiebel-eltron.com CK 20 S | CKZ 20 S | CKR 20 S | CKT 20 S | 41
NEDERLANDS
18.2 Schakelschema CK 20 S
N1
R1
F1
>80 °C ±5 K
>80 °C ±5 K
F1
X1
X2
1
PE L N
2
M1
M
1 ~
R2
A1
26�07�31�0216
A1 Module elektrisch verwarmingselement
F1 Beveiliging tegen te hoge temperatuur
M1 Ventilator
N1 Thermostaat
R1 Verwarmingsweerstand
R2 Verwarmingsweerstand
X1 klem
X2 Steekaansluiting
18.3 Schakelschema CKZ 20 S
26�07�31�0217
A1 Module elektrisch verwarmingselement
F1 Beveiliging tegen te hoge temperatuur
M1 Ventilator
N1 Thermostaat
R1 Verwarmingsweerstand
R2 Verwarmingsweerstand
T1 schakelklok
W1 Tuimelschakelaar
X1 klem
X2 Steekaansluiting

BEDIENING
Technische gegevens
42 | CK 20 S | CKZ 20 S | CKR 20 S | CKT 20 S www.stiebel-eltron.com
18.4 Schakelschema CKR 20 S
6(1a)
5(1)
3(2a)
1(2b)
2(2)
26�07�31�0046
A1 Module elektrisch verwarmingselement
F1 Beveiliging tegen te hoge temperatuur
M1 Ventilator
N1 Thermostaat
R1 Verwarmingsweerstand
R2 Verwarmingsweerstand
W1 Tuimelschakelaar
X1 klem
X2 Steekaansluiting
18.5 Schakelschema CKT 20 S
> 174°F ± 41°F
> 80°C ± 5K
ϑ
ϑ
> 174°F ± 41°F
> 80°C ± 5K
ϑ
1
3
2
4
6 5
1
2
N1
R1 R2
F1
F1
X1
X2
T1
M1
PE
L
N
A1
M
1
~
26�07�31�0215
A1 Module elektrisch verwarmingselement
F1 Beveiliging tegen te hoge temperatuur
M1 Ventilator
N1 Thermostaat
R1 Verwarmingsweerstand
R2 Verwarmingsweerstand
T1 Timer voor korte tijd 60 min
X1 Busklemmenstrook

www.stiebel-eltron.com CK 20 S | CKZ 20 S | CKR 20 S | CKT 20 S | 43
NEDERLANDS
BEDIENING | GARANTIE | MILIEU EN RECYCLING
Technische gegevens
18.6 Gegevenstabel
CK 20 S CKZ 20 S CKR 20 S CKT 20 S
Artikelnummer 071793 071795 072633 230344
Elektrische gegevens
aansluitvermogen W 2000 2000 2000 2000
Fasen 1/N/PE 1/N/PE 1/N/PE 1/N/PE
Nominale spanning V 230 230 230 230
Frequentie Hz 50 50 50 50
Afmetingen
Hoogte mm 460 460 460 460
Breedte mm 335 335 335 335
Diepte mm 123 123 123 123
Gewichten
Gewicht kg 4,4 4,4 4,4 4,4
Uitvoeringen
Uitvoering 24h-timer 60-minuten-kortlopende
timer
Vorstbeschermingsstand °C 7 7 7 7
Beschermingsgraad (IP) IP13B IP13B IP13B IP13B
Beveiligingsklasse I I I I
Kleur alpinewit alpinewit alpinewit alpinewit
Waarden
Vermogenstrappen 1,0 / 2,0 kW
Instelbereik °C 5-30 5-30 5-30 5-30
Werkingsgeluid dB(A) 53 53 42/51 53
GARANTIE
MILIEU EN RECYCLING
Garantie
Voor toestellen die buiten Duitsland zijn gekocht, gelden de
garantievoorwaarden van onze Duitse ondernemingen niet.
Bovendien kan in landen waar één van onze dochtermaat-
schappijen verantwoordelijk is voor de verkoop van onze
producten, alleen garantie worden verleend door deze doch-
termaatschappij. Een dergelijk garantie wordt alleen verstrekt,
wanneer de dochtermaatschappij eigen garantievoorwaarden
heeft gepubliceerd. In andere situaties wordt er geen garantie
verleend.
Voor toestellen die in landen worden gekocht waar wij geen
dochtermaatschappijen hebben die onze producten verkopen,
verlenen wij geen garantie. Een eventueel door de importeur
verzekerde garantie blijft onverminderd van kracht.
Milieu en recycling
Wij verzoeken u ons te helpen ons milieu te beschermen. Doe
de materialen na het gebruik weg overeenkomstig de natio-
nale voorschriften.

44 | CK 20 S | CKZ 20 S | CKR 20 S | CKT 20 S www.stiebel-eltron.com
OBSAH | ZVLÁŠTNÍ POKYNY
ZVLÁŠTNÍ POKYNY
- Děti do3let udržujte vdostatečné vzdálenosti
odpřístroje, pokud není zajištěn stálý dohled.
- Děti vevěku 3až 7let smějí přístroj zapínat a
vypínat, jsou-li pod dohledem nebo byly poučeny
obezpečném použití přístroje a pochopily zněho
vyplývající rizika. Předpokladem ktomu je, aby
montáž přístroje byla provedena podle popisu.
Děti vevěku 3až 7let nesmějí zasouvat zástrčku
dozásuvky a přístroj regulovat.
- Přístroj smí používat děti od 8let a osoby se sní-
ženými fyzickými, senzorickými nebo mentálními
schopnostmi nebo snedostatkem zkušeností a
znalostí pouze pod dozorem nebo po poučení
obezpečném používání přístroje, a poté, co poro-
zuměly nebezpečí, které zjeho používání plyne.
- Nenechávejte děti, aby si spřístrojem hrály. Čiš-
tění a údržbu, kterou má provádět uživatel, nesmí
provádět samotné děti bez dozoru.
- Při provozování přístroje se spínacími hodinami
může docházet k neregulovanému vytápění míst-
nosti. Pokud je místnost malá a osoby, které se v
ní nachází ji nemohou samostatně opustit, zajis-
těte neustálý dohled.
- Části přístroje mohou být velmi horké a způsobit
popáleniny.
Jsou -li přítomny děti a osoby vyžadující ochranu,
je nutná zvláštní opatrnost.
- Přístroj nezakrývejte.
- Neinstalujte přístroj přímo pod zásuvku.
- Instalujte přístroj tak, aby se osoba ve sprše nebo
ve vaně nemohla dostat do kontaktu se spínači a
regulátory.
- Přístroj musí být vpřípadě pevného připojení
možné odpojit odsítě navšech pólech navzdále-
nost nejméně 3mm.
ZVLÁŠTNÍ POKYNY
OBSLUHA
1. Obecné pokyny ��������������������������������������������� 45
1.1 Bezpečnostní pokyny ������������������������������������������ 45
1.2 Jiné symboly použité vtéto dokumentaci ������������������ 45
1.3 Upozornění na přístroji ���������������������������������������� 45
1.4 Měrné jednotky ������������������������������������������������� 45
2. Bezpečnost �������������������������������������������������� 45
2.1 Správné používání ���������������������������������������������� 45
2.2 Všeobecné bezpečnostní pokyny ����������������������������46
2.3 Kontrolní symbol ������������������������������������������������46
3. Popis přístroje ���������������������������������������������� 46
4. Ovládání CK 20 S ������������������������������������������� 46
4.1 Zapnutí topení ��������������������������������������������������� 46
4.2 Ovládání externím regulátorem teploty v místnosti ����� 47
4.3 Vypnutí topení/ochrana před mrazem���������������������� 47
4.4 Uvedení mimo provoz ������������������������������������������ 47
5. Ovládání CKZ 20 S ������������������������������������������ 47
5.1 Zapnutí topení ��������������������������������������������������� 47
5.2 Vypnutí topení/ochrana před mrazem���������������������� 47
5.3 Uvedení mimo provoz ������������������������������������������ 47
6. Ovládání CKR 20 S ������������������������������������������ 47
6.1 Zapnutí topení ��������������������������������������������������� 47
6.2 Ovládání externím regulátorem teploty v místnosti �����48
6.3 Vypnutí topení/ochrana před mrazem����������������������48
6.4 Uvedení mimo provoz ������������������������������������������48
7. Ovládání CKT 20 S ������������������������������������������ 48
7.1 Zapnutí topení ���������������������������������������������������48
7.2 Nastavení časového spínače ����������������������������������48
7.3 Vypnutí topení/ochrana před mrazem����������������������48
7.4 Uvedení mimo provoz ������������������������������������������48
8. Čištění, péče a údržba ������������������������������������� 48
9. Uskladnění �������������������������������������������������� 49
10. Odstranění problémů �������������������������������������� 49
INSTALACE
11. Bezpečnost �������������������������������������������������� 49
11.1 Všeobecné bezpečnostní pokyny ���������������������������� 49
11.2 Předpisy, normy a ustanovení ������������������������������� 49
12. Popis přístroje ���������������������������������������������� 49
12.1 Rozsah dodávky ������������������������������������������������� 49
13. Příprava ����������������������������������������������������� 49
13.1 Minimální vzdálenosti �����������������������������������������49
14. Montហ������������������������������������������������������ 49
15. Připojení elektrického napětí ����������������������������� 50
16. Předání přístroje ������������������������������������������� 50
17. Odstraňování poruch �������������������������������������� 50
18. Technické údaje �������������������������������������������� 50
18.1 Rozměry a přípojky���������������������������������������������50
18.2 Schéma zapojení CK 20 S �������������������������������������� 51
18.3 Schéma zapojení CKZ 20 S ������������������������������������ 51
18.4 Schéma zapojení CKR 20 S ������������������������������������ 52
18.5 Schéma zapojení CKT 20 S ������������������������������������ 52
18.6 Tabulka údajů ��������������������������������������������������� 53
ZÁRUKA
ŽIVOTNÍ PROSTŘEDÍ A RECYKLACE

OBSLUHA
Obecné pokyny
www.stiebel-eltron.com CK 20 S | CKZ 20 S | CKR 20 S | CKT 20 S | 45
ČESKY
- Elektrické přívodní vedení smí při poškození
nebo při výměně nahradit originálním náhrad-
ním dílem pouze specializovaný elektrotechnik
soprávněním výrobce.
- Upevněte přístroj způsobem popsaným vkapitole
„Instalace/ Montáž“.
OBSLUHA
1. Obecné pokyny
Kapitoly „Zvláštní pokyny“ a „Obsluha“ jsou určeny uživatelům
přístroje a instalačním technikům.
Kapitola „Instalace“ je určena instalačním technikům.
Upozornění
Dříve, než zahájíte provoz, si pozorně přečtěte tento
návod a pečlivě jej uschovejte.
Případně předejte návod dalšímu uživateli.
1.1 Bezpečnostní pokyny
1.1.1 Struktura bezpečnostních pokynů
!
UVOZUJÍCÍ SLOVO - Druh nebezpečí
Zde jsou uvedeny možné následky nedodržení bezpeč-
nostních pokynů.
Zde jsou uvedena opatření kodvrácení nebezpečí.
1.1.2 Symboly, druh nebezpečí
Symbol
Úraz
Úraz elektrickým proudem
Popálení
(popálení, opaření)
1.1.3 Uvozující slova
UVOZUJÍCÍ
SLOVO
NEBEZPEČÍ Pokyny, jejichž nedodržení má za následek vážné nebo
smrtelné úrazy.
VÝSTRAHA Pokyny, jejichž nedodržení může mít za následek vážné
nebo smrtelné úrazy.
POZOR Pokyny, jejichž nedodržení může mít za následek středně
vážné nebo lehké úrazy.
1.2 Jiné symboly použité vtéto dokumentaci
Upozornění
Obecné pokyny jsou označeny symbolem zobrazeným
vedle.
Texty upozornění čtěte pečlivě.
Symbol
Věcné škody
(poškození přístroje, následné škody, poškození životního
prostředí)
Likvidace přístroje
Tento symbol vás vyzývá kurčitému jednání. Potřebné úkony
jsou popsány po jednotlivých krocích.
1.3 Upozornění na přístroji
Symbol
Nezakrývejte přístroj
1.4 Měrné jednotky
Upozornění
Pokud není uvedeno jinak, jsou všechny rozměry uvedeny
vmilimetrech.
2. Bezpečnost
Používejte přístroj pouze v plně instalovaném stavu a se všemi
bezpečnostními zařízeními.
2.1 Správné používání
Přístroj je určen kpoužití vdomácnostech. Mohou jej tedy bezpeč-
ně obsluhovat neškolené osoby. Lze jej používat i mimo domác-
nosti, např. v drobném průmyslu, pokud je provozován stejným
způsobem jako v domácnostech.
Jiné použití nebo použití nad rámec daného rozsahu je považová-
no za použití vrozporu surčením. Kpoužití vsouladu surčením
patří také dodržování tohoto návodu a návodů kpoužívanému
příslušenství.
!
!

OBSLUHA
46 | CK 20 S | CKZ 20 S | CKR 20 S | CKT 20 S www.stiebel-eltron.com
2.2 Všeobecné bezpečnostní pokyny
!
VÝSTRAHA úraz
- Děti do3let udržujte vdostatečné vzdálenosti
odpřístroje, pokud není zajištěn stálý dohled.
- Děti vevěku 3až 7let smějí přístroj zapínat a vypí-
nat, jsou-li pod dohledem nebo byly poučeny obez-
pečném použití přístroje a pochopily zněho vyplý-
vající rizika. Předpokladem ktomu je, aby montáž
přístroje byla provedena podle popisu.
Děti vevěku 3až 7let nesmějí zasouvat zástrčku
dozásuvky a přístroj regulovat.
- Přístroj smí používat děti od 8let a osoby se sní-
ženými fyzickými, senzorickými nebo mentálními
schopnostmi nebo snedostatkem zkušeností a
znalostí pouze pod dozorem nebo po poučení obez-
pečném používání přístroje, a poté, co porozuměly
nebezpečí, které zjeho používání plyne.
- Nenechávejte děti, aby si spřístrojem hrály. Čištění
a údržbu, kterou má provádět uživatel, nesmí pro-
vádět samotné děti bez dozoru.
VÝSTRAHA popálení
Nepoužívejte přístroj...
- pokud nejsou dodrženy minimální odstupy odpři-
lehlých předmětů, jako je například nábytek, záclo-
ny, závěsy a textilie nebo jiné hořlavé materiály (mi-
nimální odstupy viz kapitolu „Instalace/Příprava“).
- v místnostech s chemikáliemi, prachem, plyny nebo
výpary s hrozícím nebezpečím požáru nebo exploze.
- v bezprostřední blízkosti rozvodů nebo nádob, které
obsahují nebo rozvádějí hořlavé nebo výbušné
látky.
- pokud se v místě instalace provádí práce, jako na-
příklad pokládka, broušení, nátěry.
- pokud se zde používá benzín, spreje, vosk na par-
kety a podobně. Před zahájením topení místnost
dostatečně vyvětrejte.
- pokud je některá část přístroje poškozena, přístroj
upadl nebo pokud je přístroj vadný.
- ve venkovním prostředí
VÝSTRAHA popálení
Na přístroj a do bezprostřední blízkosti přístroje nesmí-
te ukládat žádné hořlavé, zápalné nebo tepelně izolač-
ní materiály, jako jsou prádlo, oděvy, deky, časopisy,
nádoby s lešticím voskem nebo benzínem, spreje apod.
VÝSTRAHA popálení
Dejte pozor, aby se do vstupních a výstupních otvorů
vzduchu nedostala žádná cizí tělesa, neboť by to mohlo
vést k zasažení elektrickým proudem nebo k požáru a
poškodit přístroj.
VÝSTRAHA popálení
Vsouvislosti sprotipožární ochranou dbejte nato, aby
otvory pro vstup a výstup vzduchu nebyly blokované.
Nikdy přístroj nepoužívejte naměkkých plochách, jako
je například postel, neboť by mohlo tak dojít k ucpání
otvorů.
!
POZOR úraz
Při provozování přístroje se spínacími hodinami může
docházet k neregulovanému vytápění místnosti. Pokud je
místnost malá a osoby, které se v ní nachází ji nemohou
samostatně opustit, zajistěte neustálý dohled.
POZOR popálení
Části přístroje mohou být velmi horké a způsobit popá-
leniny. Jsou -li přítomny děti a osoby vyžadující ochranu,
je nutná zvláštní opatrnost.
!
Věcné škody
- Přístroj nezakrývejte.
- Nestoupejte na přístroj.
2.3 Kontrolní symbol
Viz typový štítek na přístroji.
3. Popis přístroje
Přístroj se připevňuje na stěnu a je vhodný zejména pro pracovny,
kuchyně, koupelny, prádelny apod.
Kryt zařízení je z ocelového plechu opatřeného vypalovacím lakem.
Po stranách jsou dvě plastové bočnice. Na pravé bočnici jsou umís-
těny ovládací prvky.
Tichý ventilátor nasává vzduch v místnosti, který je následně ohří-
ván topný tělesem s holou spirálou a proudí rovnoměrně kanálem
teplého vzduchu a výstupní mřížkou teplého vzduchu ve spodní
části.
Přístroj vytápí místnost a udržuje konstantní teplotu podle na-
stavené hodnoty.
Po upevnění na stěnu a připojení k elektrické síti pomocí zástrčky
je přístroj připraven k použití.
4. Ovládání CK 20 S
1
26�07�31�0211
1 Volič teploty
4.1 Zapnutí topení
Teplotu je možné nastavovat plynule. Přístroj se vypne, jakmile je
dosaženo nastavené prostorové teploty.
Otočte regulátor teploty doprava až k požadovanému stupni.

OBSLUHA
www.stiebel-eltron.com CK 20 S | CKZ 20 S | CKR 20 S | CKT 20 S | 47
ČESKY
4.2 Ovládání externím regulátorem teploty v
místnosti
V místnostech nad 20m
2
můžete přístroj provozovat s běžným
externím prostorovým termostatem.
K tomu otočte regulátor teploty na přístroji doprava až na
doraz.
4.3 Vypnutí topení/ochrana před mrazem
Otočte regulátor teploty doleva až nadoraz.
Vtéto poloze je přístroj chráněn před mrazem. Ohřev se automa-
ticky zapíná vpřípadě, že prostorová teplota klesne pod spínací
teplotu protizámrazové ochrany.
4.4 Uvedení mimo provoz
Vytáhněte síťovou zástrčku.
5. Ovládání CKZ 20 S
1
2
3
5
4
26�07�31�0212
1 Volič teploty
2 Poloha kolébkového spínače (provoz se spínacími hodinami)
3 Poloha kolébkového spínače (normální provoz)
4 Spínací hodiny
5 Značka šipky
5.1 Zapnutí topení
Vyberte si mezi dvěma následujícími provozními režimy:
- Normální provoz
- Provoz se spínacími hodinami
Normální provoz
Teplotu je možné nastavovat plynule. Přístroj se vypne, jakmile je
dosaženo nastavené prostorové teploty.
Otočte regulátor teploty doprava až k požadovanému stupni.
Provoz se spínacími hodinami
Spínací hodiny na 24 hodin jsou rozdělené na 96 časových segmen-
tů. Každá hodina je dělená po 15 minutách na 4 časové segmenty.
Při uvádění do provozu a po každém přerušení proudu musíte na-
stavit spínací hodiny na aktuální čas tím způsobem, že jimi budete
otáčet doprava, dokud nebude okamžitý čas proti značce šipky.
Požadovanou dobu vytápění nastavíte takto:
Stiskněte dolů časové segmenty po obvodu. Červená značka, která
se objeví, ukazuje přednastavený čas vytápění, kdy přístroj auto-
maticky topí. Jestliže je v době vytápění dosaženo požadované tep-
loty v místnosti, přístroj se vypne, a při dalším potřebě tepla opět
zapne, dokud neuplyne nastavená doba vytápění. Tento proces
se každý den opakuje. Dobu vytápění můžete kdykoli přizpůsobit
potřebě tak, že stisknete dolů nebo nahoru časové segmenty.
5.2 Vypnutí topení/ochrana před mrazem
Otočte regulátor teploty doleva až nadoraz.
V této poloze je zajištěna ochrana před mrazem jen tehdy, pokud
je kolébkový spínač v poloze „Normální provoz“. Ohřev se auto-
maticky zapíná vpřípadě, že prostorová teplota klesne pod spínací
teplotu protizámrazové ochrany.
5.3 Uvedení mimo provoz
Vytáhněte síťovou zástrčku.
6. Ovládání CKR 20 S
2
3
1
26�07�31�0213
1 Volič teploty
2 Kolébkový spínač - spínací stupeň (základní stupeň vytápění)
3 Kolébkový spínač - spínací stupeň (stupeň rychlého vytápění)
6.1 Zapnutí topení
Otočte regulátor teploty doprava až k požadovanému stupni.
Teplotu je možné nastavovat plynule. Přístroj se vypne, jakmile je
dosaženo nastavené prostorové teploty.
Kolébkovým spínačem můžete přepínat mezi dvěma topnými vý-
kony úpravou otáček motoru ventilátoru:

OBSLUHA
48 | CK 20 S | CKZ 20 S | CKR 20 S | CKT 20 S www.stiebel-eltron.com
Základní stupeň vytápění
Nastavte kolébkový spínač do polohy „I“. Při zapnutí přístroje pro-
střednictvím regulátoru teploty je zapnut topný výkon 1000W s
pomalejšími otáčkami ventilátoru.
Upozornění
Neprovozujte přístroj v základním stupniI, pokud je míst-
nost, kde je přístroj instalován, silně vychladlá.
U velmi vychladlých místností zapněte na přístroji
stupeň rychlého vytápěníII, aby byl zajištěn normál-
ní provoz přístroje.
Stupeň rychlého vytápění
Nastavte kolébkový spínač do polohy „II“. Při zapnutí přístroje
prostřednictvím regulátoru teploty je zapnut topný výkon 2000W
s rychlejšími otáčkami ventilátoru.
Zvolte výkonný stupeň rychlého vytápění, chcete-li zvláště rychle
vyhřát studenou místnost na nastavenou teplotu. Poté opět pře-
pněte zpět na stupeň „I“.
Po dosažení přednastavené teploty místnosti se přístroj vypne a
dále udržuje nastavenou teplotu místnosti střídavým zapínáním
a vypínáním.
6.2 Ovládání externím regulátorem teploty v
místnosti
V místnostech nad 20m
2
můžete přístroj provozovat s běžným
externím prostorovým termostatem.
K tomu otočte regulátor teploty na přístroji doprava až na
doraz.
6.3 Vypnutí topení/ochrana před mrazem
Otočte regulátor teploty doleva až nadoraz a zvolte kolébko-
vým spínačem stupeň rychlého vytápění „II“.
Vtéto poloze je přístroj chráněn před mrazem. Ohřev se automa-
ticky zapíná vpřípadě, že prostorová teplota klesne pod spínací
teplotu protizámrazové ochrany.
6.4 Uvedení mimo provoz
Vytáhněte síťovou zástrčku.
7. Ovládání CKT 20 S
1
2
26�07�31�0214
1 Volič teploty
2 Časový spínač
7.1 Zapnutí topení
Teplotu je možné nastavovat plynule. Přístroj se vypne, jakmile je
dosaženo nastavené prostorové teploty.
Otočte regulátor teploty doprava až k požadovanému stupni.
7.2 Nastavení časového spínače
S časovým spínačem topí přístroj bez regulace teploty na plný
výkon.
Otáčejte časovým spínačem doprava pro nastavení libovolné-
ho času průběhu 0 - 60 minut.
7.3 Vypnutí topení/ochrana před mrazem
Otočte regulátor teploty doleva až na doraz; přitom musí být
časový spínač v poloze „0“.
Vtéto poloze je přístroj chráněn před mrazem. Ohřev se automa-
ticky zapíná vpřípadě, že prostorová teplota klesne pod spínací
teplotu protizámrazové ochrany.
7.4 Uvedení mimo provoz
Vytáhněte síťovou zástrčku.
8. Čištění, péče a údržba
Přístroj neobsahuje žádné součásti vyžadující údržbu uživatele.
Čistěte přístroj až po vychladnutí běžnými čisticími prostředky.
Nepoužívejte čisticí písky a leptavé prostředky.
Pokud se na přístroji objeví mírně zahnědlé zbarvení, musíte je
pokud možno okamžitě setřít vlhkou utěrkou.
!
Věcné škody
Nestříkejte do větracích otvorů čisticí spreje.

INSTALACE
www.stiebel-eltron.com CK 20 S | CKZ 20 S | CKR 20 S | CKT 20 S | 49
ČESKY
9. Uskladnění
Když přístroj nepoužíváte, skladujte jej nasuchém místě.
10. Odstranění problémů
Když přístroj netopí, zkontrolujte nastavení teploty napřístroji a
pojistku vdomovní instalaci.
Přístroj je vybaven bezpečnostním regulátorem teploty, který v
případě přehřátí vypne přístroj. Po odstranění příčin (například
zakryté vzduchové vstupní a výstupní otvory) se přístroj po něko-
likaminutovém krátkém vychladnutí opět zapne.
Pokud nedokážete příčinu odstranit, kontaktujte specializovaného
odborníka. Kzískání lepší a rychlejší pomoci sdělte číslo ztypo-
vého štítku (000000-0000-000000).
INSTALACE
11. Bezpečnost
Instalaci, uvedení do provozu, údržbu a opravy přístroje smí pro-
vádět pouze odborník.
11.1 Všeobecné bezpečnostní pokyny
Řádnou funkci a spolehlivý provoz lze zaručit pouze vpřípadě
použití původního příslušenství a originálních náhradních dílů
určených pro tento přístroj.
11.2 Předpisy, normy a ustanovení
Upozornění
Dodržujte všechny národní a místní předpisy a ustano-
vení.
12. Popis přístroje
Přístroj je elektrické přímotopné zařízení, které se upevňuje na
stěnu. Přístroj je vhodný zejména k vytápění místností, například
pracoven, kuchyní, koupelen, prádelen apod.
12.1 Rozsah dodávky
Spolu spřístrojem je dodáváno:
- nástěnný držák
- upevňovací úhelník
13. Příprava
13.1 Minimální vzdálenosti
≥10
≥100≥100
≥500
≥100 ≥100
D0000018481
14. Montáž
VÝSTRAHA elektrický proud
- Při instalaci přístroje v prostoru s koupelnovou
vanou a/nebo sprchou dbejte ochranné zóny podle
údajů na typovém štítku přístroje.
- Instalujte přístroj tak, aby se osoba ve sprše nebo
ve vaně nemohla dostat do kontaktu se spínači a
regulátory.
VÝSTRAHA popálení
- Přístroj smíte instalovat pouze na kolmou stěnu,
odolnou proti působení teploty minimálně 90 °C.
- Dodržujte minimální vzdálenosti od sousedních ob-
jektů.
- Přístroj nesmíte instalovat bezprostředně pod elek-
trickou zásuvku ve stěně.
Podívejte se dorozměrového výkresu, vjakém rozestupu ot-
vorů se má namontovat nástěnný držák.
Upevněte nástěnný držák vhodnými šrouby. Pomocí horizon-
tálního a vertikálního podélného otvoru v nástěnném držáku
lze po vyvrtání otvorů provést vhodné vyrovnání.
Přístroj zavěste tak, aby oba výčnělky na zadní stěně zapadly
doštěrbin nástěnného držáku.
Zajistěte přístroj pomocí upevňovacího úhelníku a šroubem
proti náhodnému vyháknutí. Za tímto účelem zavěste upev-
ňovací úhelník zezadu dole do zadní stěny.

INSTALACE
50 | CK 20 S | CKZ 20 S | CKR 20 S | CKT 20 S www.stiebel-eltron.com
15. Připojení elektrického napětí
VÝSTRAHA elektrický proud
Veškerá elektrická zapojení a instalace provádějte podle
předpisů.
!
Věcné škody
Dodržujte údaje uvedené na typovém štítku. Uvedené
napětí se musí shodovat se síťovým napětím.
- Kabel nesmí přiléhat kpřístroji.
- Při připojování do zásuvky sochranným kontaktem dbejte na
to, aby zásuvka byla po instalaci přístroje volně přístupná.
- Neinstalujte přístroj přímo pod zásuvku.
- Zkraťte upožadovaného pevného připojení kabel tak (od-
řízněte zástrčku), aby vedl přímo kpřípojné krabici přístroje.
- Přístroj musí být vpřípadě pevného připojení možné odpojit
odsítě navšech pólech navzdálenost nejméně 3mm.
- Přístroj není vhodný pro pevné uložení kabelů.
16. Předání přístroje
Vysvětlete uživateli funkce přístroje. Upozorněte jej především
na bezpečnostní pokyny. Předejte uživateli návod kobsluze a in-
stalaci.
17. Odstraňování poruch
Přívodní síťový rozvod smí vpřípadě výměny instalovat pouze
elektrikář svyužitím našich originálních náhradních dílů.
18. Technické údaje
18.1 Rozměry a přípojky
i13
i32
b01
335
123
10
200
460
365
D0000018442
b01 Průchodka el. rozvodů
i1 3 Zavěšení na zeď
i32 Fixace

INSTALACE
www.stiebel-eltron.com CK 20 S | CKZ 20 S | CKR 20 S | CKT 20 S | 51
ČESKY
18.2 Schéma zapojení CK 20 S
N1
R1
F1
>80 °C ±5 K
>80 °C ±5 K
F1
X1
X2
1
PE L N
2
M1
M
1 ~
R2
A1
26�07�31�0216
A1 Skupina elektrického topného tělesa
F1 Tepelná ochrana
M1 Ventilátor
N1 Regulátor teploty
R1 Topný odpor
R2 Topný odpor
X1 Svorka se zdířkami
X2 Zásuvný konektor
18.3 Schéma zapojení CKZ 20 S
26�07�31�0217
A1 Skupina elektrického topného tělesa
F1 Tepelná ochrana
M1 Ventilátor
N1 Regulátor teploty
R1 Topný odpor
R2 Topný odpor
T1 Spínací hodiny
W1 Kolébkový spínač
X1 Svorka se zdířkami
X2 Zásuvný konektor

INSTALACE
52 | CK 20 S | CKZ 20 S | CKR 20 S | CKT 20 S www.stiebel-eltron.com
18.4 Schéma zapojení CKR 20 S
6(1a)
5(1)
3(2a)
1(2b)
2(2)
26�07�31�0046
A1 Skupina elektrického topného tělesa
F1 Tepelná ochrana
M1 Ventilátor
N1 Regulátor teploty
R1 Topný odpor
R2 Topný odpor
W1 Kolébkový spínač
X1 Svorka se zdířkami
X2 Zásuvný konektor
18.5 Schéma zapojení CKT 20 S
> 174°F ± 41°F
> 80°C ± 5K
ϑ
ϑ
> 174°F ± 41°F
> 80°C ± 5K
ϑ
1
3
2
4
6 5
1
2
N1
R1 R2
F1
F1
X1
X2
T1
M1
PE
L
N
A1
M
1
~
26�07�31�0215
A1 Skupina elektrického topného tělesa
F1 Tepelná ochrana
M1 Ventilátor
N1 Regulátor teploty
R1 Topný odpor
R2 Topný odpor
T1 Krátkodobé spínací hodiny 60min
X1 Svorkovnice se zdířkami

www.stiebel-eltron.com CK 20 S | CKZ 20 S | CKR 20 S | CKT 20 S | 53
ČESKY
INSTALACE |
18.6 Tabulka údajů
CK 20 S CKZ 20 S CKR 20 S CKT 20 S
Objednací číslo 071793 071795 072633 230344
Připojovací výkon W 2000 2000 2000 2000
Fáze 1/N/PE 1/N/PE 1/N/PE 1/N/PE
Jmenovité napětí V 230 230 230 230
Frekvence Hz 50 50 50 50
Výška mm 460 460 460 460
Šířka mm 335 335 335 335
Hloubka mm 123 123 123 123
Hmotnosti
Hmotnost kg 4,4 4,4 4,4 4,4
Provedení
Spínací hodiny 24h Krátkodobé spínací hodiny
60min
Nastavení ochrany proti zamrznutí °C 7 7 7 7
Krytí (IP) IP13B IP13B IP13B IP13B
Třída krytí I I I I
Barva Alpská bílá Alpská bílá Alpská bílá Alpská bílá
Hodnoty
Výkonové stupně 1,0 / 2,0 kW
Rozsah nastavení °C 5-30 5-30 5-30 5-30
Provozní hluk dB(A) 53 53 42/51 53
ZÁRUKA
Záruka
Pro přístroje nabyté mimo území Německa neplatí záruční
podmínky poskytované našimi rmami vNěmecku. Vzemích,
ve kterých některá znašich dceřiných společností distribuuje
naše výrobky, poskytuje záruku jenom tato dceřiná společnost.
Takovou záruku lze poskytnout pouze tehdy, pokud dceřiná
společnost vydala vlastní záruční podmínky. Jinak nelze záruku
poskytnout.
Na přístroje zakoupené vzemích, ve kterých nejsou naše vý-
robky distribuovány žádnou zdceřiných společností, nepo-
skytujeme žádnou záruku. Případné záruky závazně přislíbené
dovozcem zůstávají proto nedotčené.
Životní prostředí a recyklace
Pomozte nám chránit naše životní prostředí. Materiály po pou-
žití zlikvidujte v souladu s platnými národními předpisy.

54 | CK 20 S | CKZ 20 S | CKR 20 S | CKT 20 S www.stiebel-eltron.com
POZNÁMKY

www.stiebel-eltron.com CK 20 S | CKZ 20 S | CKR 20 S | CKT 20 S | 55
ČESKY
POZNÁMKY

Deutschland
STIEBEL ELTRON GmbH & Co. KG
Dr.-Stiebel-Straße 33 | 37603 Holzminden
Tel. 05531 702-0 | Fax 05531 702-480
www.stiebel-eltron.de
Verkauf Tel. 05531 702-110 | Fax 05531 702-95108 | [email protected]
Kundendienst Tel. 05531 702-111 | Fax 05531 702-95890 | [email protected]
Ersatzteilverkauf Tel. 05531 702-120 | Fax 05531 702-95335 | [email protected]
Irrtum und technische Änderungen vorbehalten! | Subject to errors and technical changes! | Sous réserve
d‘erreurs et de modifications techniques! | Onder voorbehoud van ver
g
issin
g
en en technische wi
j
zi
g
in
g
en! |
Salvo error o modificación técnica! | Excepto erro ou alteração técnica | Zastrzeżone zmian
y
techniczne i
ewentualne błędy | Omyly a technické změny jsou vyhrazeny! | A muszaki változtatások és tévedések
j
o
g
át
fenntartjuk! |
Отсутствие ошибок не гарантируется. Возможны технические изменения.
| Ch
y
b
y
a
technické zmeny sú vyhradené! Stand 9147
Australia
STIEBEL ELTRON Australia Pty. Ltd.
6 Prohasky Street | Port Melbourne VIC 3207
Tel. 03 9645-1833 | Fax 03 9645-4366
www.stiebel.com.au
Austria
STIEBEL ELTRON Ges.m.b.H.
Gewerbegebiet Neubau-Nord
Margaritenstraße 4 A | 4063 Hörsching
Tel. 07221 74600-0 | Fax 07221 74600-42
www.stiebel-eltron.at
Belgium
STIEBEL ELTRON bvba/sprl
't Hofveld 6 - D1 | 1702 Groot-Bijgaarden
Tel. 02 42322-22 | Fax 02 42322-12
www.stiebel-eltron.be
China
STIEBEL ELTRON (Guangzhou) Electric
Appliance Co., Ltd.
Rm 102, F1, Yingbin-Yihao Mansion, No. 1
Yingbin Road
Panyu District | 511431 Guangzhou
Tel. 020 39162209 | Fax 020 39162203
info@stiebeleltron.cn
www.stiebeleltron.cn
Czech Republic
STIEBEL ELTRON spol. s r.o.
K Hájům 946 | 155 00 Praha 5 - Stodůlky
Tel. 251116-111 | Fax 235512-122
www.stiebel-eltron.cz
Finland
STIEBEL ELTRON OY
Kapinakuja 1 | 04600 Mäntsälä
Tel. 020 720-9988
www.stiebel-eltron.fi
France
STIEBEL ELTRON SAS
7-9, rue des Selliers
B.P 85107 | 57073 Metz-Cédex 3
Tel. 0387 7438-88 | Fax 0387 7468-26
www.stiebel-eltron.fr
Hungary
STIEBEL ELTRON Kft.
Gyár u. 2 | 2040 Budaörs
Tel. 01 250-6055 | Fax 01 368-8097
www.stiebel-eltron.hu
Japan
NIHON STIEBEL Co. Ltd.
Kowa Kawasaki Nishiguchi Building 8F
66-2 Horikawa-Cho
Saiwai-Ku | 212-0013 Kawasaki
Tel. 044 540-3200 | Fax 044 540-3210
www.nihonstiebel.co.jp
Netherlands
STIEBEL ELTRON Nederland B.V.
Daviottenweg 36 | 5222 BH 's-Hertogenbosch
Tel. 073 623-0000 | Fax 073 623-1141
www.stiebel-eltron.nl
Poland
STIEBEL ELTRON Polska Sp. z O.O.
ul. Działkowa 2 | 02-234 Warszawa
Tel. 022 60920-30 | Fax 022 60920-29
www.stiebel-eltron.pl
Russia
STIEBEL ELTRON LLC RUSSIA
Urzhumskaya street 4,
building 2 | 129343 Moscow
Tel. 0495 7753889 | Fax 0495 7753887
www.stiebel-eltron.ru
Slovakia
TATRAMAT - ohrievače vody s.r.o.
Hlavná 1 | 058 01 Poprad
Tel. 052 7127-125 | Fax 052 7127-148
www.stiebel-eltron.sk
Switzerland
STIEBEL ELTRON AG
Industrie West
Gass 8 | 5242 Lupfig
Tel. 056 4640-500 | Fax 056 4640-501
www.stiebel-eltron.ch
Thailand
STIEBEL ELTRON Asia Ltd.
469 Moo 2 Tambol Klong-Jik
Amphur Bangpa-In | 13160 Ayutthaya
Tel. 035 220088 | Fax 035 221188
info@stiebeleltronasia.com
www.stiebeleltronasia.com
United Kingdom and Ireland
STIEBEL ELTRON UK Ltd.
Unit 12 Stadium Court
Stadium Road | CH62 3RP Bromborough
Tel. 0151 346-2300 | Fax 0151 334-2913
www.stiebel-eltron.co.uk
United States of America
STIEBEL ELTRON, Inc.
17 West Street | 01088 West Hatfield MA
Tel. 0413 247-3380 | Fax 0413 247-3369
www.stiebel-eltron-usa.com
A 128685-39874-9233
4<AMHCMM=cigifd>
-
 1
1
-
 2
2
-
 3
3
-
 4
4
-
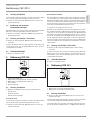 5
5
-
 6
6
-
 7
7
-
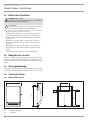 8
8
-
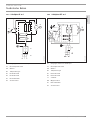 9
9
-
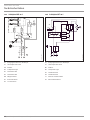 10
10
-
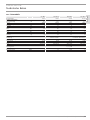 11
11
-
 12
12
-
 13
13
-
 14
14
-
 15
15
-
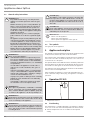 16
16
-
 17
17
-
 18
18
-
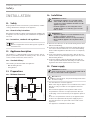 19
19
-
 20
20
-
 21
21
-
 22
22
-
 23
23
-
 24
24
-
 25
25
-
 26
26
-
 27
27
-
 28
28
-
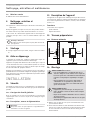 29
29
-
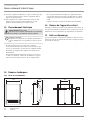 30
30
-
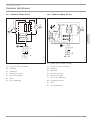 31
31
-
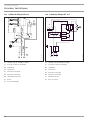 32
32
-
 33
33
-
 34
34
-
 35
35
-
 36
36
-
 37
37
-
 38
38
-
 39
39
-
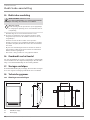 40
40
-
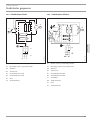 41
41
-
 42
42
-
 43
43
-
 44
44
-
 45
45
-
 46
46
-
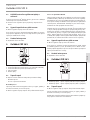 47
47
-
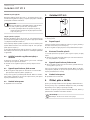 48
48
-
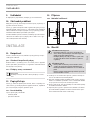 49
49
-
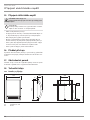 50
50
-
 51
51
-
 52
52
-
 53
53
-
 54
54
-
 55
55
-
 56
56


STIEBEL ELTRON ckt 20 s Operation and Installation
- Type
- Operation and Installation
- Deze handleiding is ook geschikt voor
in andere talen
- English: STIEBEL ELTRON ckt 20 s
- français: STIEBEL ELTRON ckt 20 s
- Deutsch: STIEBEL ELTRON ckt 20 s
- slovenčina: STIEBEL ELTRON ckt 20 s
Gerelateerde papieren
-
STIEBEL ELTRON CFK 50 Operation Instruction
-
-
-
-
-
-
-
-
-