
EMS114
V. 01 – 15/05/2019 1 ©Velleman nv
EMS114
01
02
03
04
05
06
07
USER MANUAL
1. Introduction
To all residents of the European Union
Important environmental information about this
product
This symbol on the device or the package indicates that
disposal of the device after its lifecycle could
harm the environment. Do not dispose of the
unit (or batteries) as unsorted municipal
waste; it should be taken to a specialized
company for recycling. This device should be
returned to your distributor or to a local
recycling service. Respect the local environmental rules. If
in doubt, contact your local waste disposal
authorities.
Thank you for choosing Perel! Please read the manual
thoroughly before bringing this device into service. If the
device was damaged in transit, do not install or use it and
contact your dealer.
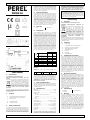
2. Symbols
01
CE marking.
02
Read and understand this manual and all
safety signs before using this appliance.
03
Indoor use only.
04
Switch of micro-gap construction.
05
Incandescent lamp.
06
Energy-saving lamp.
07
Safety class 2.
3. Safety Instructions
● This device can be used by children aged from 8 years
and above, and persons with reduced physical, sensory or
mental capabilities or lack of experience and knowledge if
they have been given supervision or instruction concerning
the use of the device in a safe way and understand the
hazards involved. Children shall not play with the device.
Cleaning and user maintenance shall not be made by
children without supervision. ● Do not disassemble or open
the housing. ● There are no user-serviceable parts inside
the device. Refer to an authorized dealer for service and/or
spare parts. ● Do not immerge the device in any liquid.
Keep away from high heat and fire.
4. General Guidelines
● Refer to the Velleman
®
Service and Quality Warranty on
www.velleman.eu. ● Protect this device from shocks and
abuse. Avoid brute force when operating the device.
● Familiarise yourself with the functions of the device
before actually using it. ● All modifications of the device
are forbidden for safety reasons. Damage caused by user
modifications to the device is not covered by the warranty.
● Only use the device for its intended purpose. Using the
device in an unauthorised way will void the warranty.
● Damage caused by disregard of certain guidelines in this
manual is not covered by the warranty and the dealer will
not accept responsibility for any ensuing defects or
problems. ● Keep this manual for future reference.
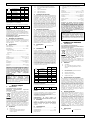
5. Overview
1. wiring
3. DIP switches
2. controller
6. Installation
● The installation must be carried out by a qualified
person. ● Choose a proper location for the sensor. Avoid
places where temperature changes frequently, e.g. near
air conditioners or heating devices. Also, avoid moving
obstructions or objects in the detection field of the sensor
to prevent unnecessary activation. ● The sensor must be
installed inside a hole, which is max. 12 mm in diameter.
The controller can be installed on the other side of the wall,
inside a dropped ceiling or, behind a false wall. Leave
sufficient space (at least 2 cm) around the controller for
ventilation. ● The lead wires of the sensor are ± 18 cm
long. When mounting the controller on the other side of a
wall, drill a hole of at least 14 mm for the connector and
wires to go through. ● Make sure the controller is
accessible at all times when installing inside a dropped
ceiling or behind a false wall. However, it should be
sufficiently protected to avoid accidental touching! ● A
12 VDC, 2.6 A power supply (not incl.) must be provided.
● Connect the sensor to the controller. The connector fits
only one way, do not force. ● Set the DIP switches:
ON
OFF
light sens.
< 10 lx
always
movement sens.
low
high
5”
on-time
5 s
-
30”
on-time
30 s
-
1’
on-time
1 min
-
3’
on-time
3 min
-
5’
on-time
5 min
-
8’
on-time
8 min
-
NOTE: Only the highest selected on-time will be
applicable.
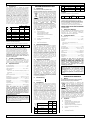
● Connect the wiring to the terminals according to the
diagram.
x
red (+)
y
black (-)
z
brown
WARNING! Do not short-circuit any terminals.
● Connect the power supply. ● To test the PIR sensor, set
the light sensitivity to OFF and the movement sensitivity
and 5” to ON. The load should switch on immediately and
– when no movement is detected – switch off after 5 s.
WARNING! Do not change the DIP switch settings
when power is connected.
7. Care and Maintenance
The appliance does not need any particular maintenance.
However, occasionally wipe it with a damp cloth to keep it
looking new. Do not use harsh chemicals, cleaning solvents
or strong detergents.
8. Specifications
switch type .......................................................... relay
detection angle .................................................... 100°
detection range ...................................... 8 m (< 22 °C)
rated load
max. 25 W - max. inrush current 2.1 A
fluorescent............................................................ -
LED ..................................................................... -
IP rating .............................................................. IP20
power supply ................................. 12 VDC ± 1 V, 2.6 A
working temperature .......................... -10 °C to +40 °C
working humidity ......................................... < 93 % RH
time-delay switch ............................5/30 s, 1/3/5/8 min
light control ........................................ < 3 lx to 2000 lx
cable length .................................................... ± 18 cm
dimensions ............................................ Ø 22 x 10 mm
weight .............................................................. ± 41 g
Use this device with original accessories only.
Velleman nv cannot be held responsible in the event
of damage or injury resulting from (incorrect) use of
this device. For more info concerning this product
and the latest version of this manual, please visit our
website www.perel.eu. The information in this
manual is subject to change without prior notice.
© COPYRIGHT NOTICE
The copyright to this manual is owned by Velleman
nv. All worldwide rights reserved. No part of this
manual may be copied, reproduced, translated or reduced
to any electronic medium or otherwise without the prior
written consent of the copyright holder.
Handleiding
1. Inleiding
Aan alle ingezetenen van de Europese Unie
Belangrijke milieu-informatie betreffende dit
product
Dit symbool op het toestel of de verpakking geeft aan dat,
als het na zijn levenscyclus wordt
weggeworpen, dit toestel schade kan
toebrengen aan het milieu. Gooi dit toestel
(en eventuele batterijen) niet bij het gewone
huishoudelijke afval; het moet bij een
gespecialiseerd bedrijf terechtkomen voor
recyclage. U moet dit toestel naar uw verdeler of naar een
lokaal recyclagepunt brengen. Respecteer de plaatselijke
milieuwetgeving. Hebt u vragen, contacteer dan de
plaatselijke autoriteiten betreffende de
verwijdering.
Bedankt voor uw aankoop! Lees deze handleiding grondig
door voor u het toestel in gebruik neemt. Werd het toestel
beschadigd tijdens het transport, installeer het dan niet en
raadpleeg uw dealer.
2. Symbolen
01
CE-markering.
02
Lees en begrijp deze handleiding en de
veiligheidsinstructies vóór ingebruikname.
03
Uitsluitend voor gebruik binnenshuis.
04
Schakelapparaten met relais met
microcontactopening.
05
Gloeilamp.
06
Spaarlamp.
07
Veiligheidsklasse 2.
3. Veiligheidsvoorschriften
● Dit toestel is geschikt voor gebruik door kinderen vanaf
8 jaar, door personen met fysieke, zintuiglijke of
verstandelijke beperkingen, of door personen met gebrek
aan ervaring en kennis, op voorwaarde dat dit onder
toezicht gebeurt van een persoon die verantwoordelijk is
voor hun veiligheid of hun aanwijzingen heeft gegeven,
hoe zij het toestel moeten gebruiken en zich bewust zijn
van de risico's die het gebruik van het toestel met zich
meebrengt. Kinderen mogen niet met het toestel spelen.
De reiniging en het onderhoud van het toestel mogen niet
worden uitgevoerd door kinderen, tenzij ze onder toezicht
staan. ● Open de behuizing niet zelf. ● Er zijn geen
onderdelen in het toestel die door de gebruiker
gerepareerd kunnen worden. Contacteer uw verdeler voor
eventuele reserveonderdelen. ● Dompel het toestel nooit
onder in een vloeistof. Stel het toestel niet bloot aan
extreme temperaturen of vuur.
4. Algemene richtlijnen
Raadpleeg de Velleman
®
service- en kwaliteitsgarantie op
www.velleman.eu. ● Bescherm tegen schokken. Vermijd
brute kracht tijdens de bediening van het toestel. ● Leer
eerst de functies van het toestel kennen voor u het gaat
gebruiken. ● Om veiligheidsredenen mag u geen
wijzigingen aanbrengen. Schade door wijzigingen die de
gebruiker heeft aangebracht aan het toestel valt niet onder
de garantie. ● Gebruik het toestel enkel waarvoor het
gemaakt is. De garantie vervalt automatisch bij
ongeoorloofd gebruik. ● De garantie geldt niet voor schade
door het negeren van bepaalde richtlijnen in deze
handleiding en uw dealer zal de verantwoordelijkheid
afwijzen voor defecten of problemen die hier rechtstreeks
verband mee houden. ● Bewaar deze handleiding voor
verdere raadpleging.
5. Omschrijving
1. bedrading
3. DIP-schakelaars
2. controller
6. Montage
● Laat het toestel installeren door een vakman. ● Kies een
geschikte montageplaats. Vermijd ruimtes met grote
temperatuurschommelingen (bv. naast een koel- of
warmtebron) of waar zich bewegende voorwerpen
bevinden. ● Voorzie een uitsparing met een diameter van
12 mm. U kunt de controller installeren achteraan een
wand of vals plafond. Voorzie een ruimte van minstens
2 cm rond de controller voor voldoende ventilatie. ● De
sensorkabels zijn ± 18 cm lang. Bij montage van de
controller achter een wand, boor een gat van minstens
14 mm voor de stekker en de kabels. ● Zorg dat de
controller bij montage achter een wand of vals plafond
altijd bereikbaar is. maar voldoende beschermd is zodat
niemand hem kan aanraken! ● Voorzie een 12 VDC/2.6 A
voeding (niet meegelev.). ● Sluit de sensor aan op de
controller. Niets forceren. ● Stel de DIP-schakelaars in:
Pagina wordt geladen...
Pagina wordt geladen...
Pagina wordt geladen...
Documenttranscriptie
EMS114 Cleaning and user maintenance shall not be made by children without supervision. ● Do not disassemble or open the housing. ● There are no user-serviceable parts inside the device. Refer to an authorized dealer for service and/or spare parts. ● Do not immerge the device in any liquid. Keep away from high heat and fire. EMS114 01 02 04 05 4. 03 06 General Guidelines ● Refer to the Velleman® Service and Quality Warranty on www.velleman.eu. ● Protect this device from shocks and abuse. Avoid brute force when operating the device. ● Familiarise yourself with the functions of the device before actually using it. ● All modifications of the device are forbidden for safety reasons. Damage caused by user modifications to the device is not covered by the warranty. ● Only use the device for its intended purpose. Using the device in an unauthorised way will void the warranty. ● Damage caused by disregard of certain guidelines in this manual is not covered by the warranty and the dealer will not accept responsibility for any ensuing defects or problems. ● Keep this manual for future reference. 5. Overview 1. wiring 07 3. DIP switches 2. controller 6. Installation ● The installation must be carried out by a qualified person. ● Choose a proper location for the sensor. Avoid places where temperature changes frequently, e.g. near air conditioners or heating devices. Also, avoid moving obstructions or objects in the detection field of the sensor to prevent unnecessary activation. ● The sensor must be installed inside a hole, which is max. 12 mm in diameter. The controller can be installed on the other side of the wall, inside a dropped ceiling or, behind a false wall. Leave sufficient space (at least 2 cm) around the controller for ventilation. ● The lead wires of the sensor are ± 18 cm long. When mounting the controller on the other side of a wall, drill a hole of at least 14 mm for the connector and wires to go through. ● Make sure the controller is accessible at all times when installing inside a dropped ceiling or behind a false wall. However, it should be sufficiently protected to avoid accidental touching! ● A 12 VDC, 2.6 A power supply (not incl.) must be provided. ● Connect the sensor to the controller. The connector fits only one way, do not force. ● Set the DIP switches: 1. Introduction To all residents of the European Union Important environmental information about this product This symbol on the device or the package indicates that disposal of the device after its lifecycle could harm the environment. Do not dispose of the unit (or batteries) as unsorted municipal waste; it should be taken to a specialized company for recycling. This device should be returned to your distributor or to a local recycling service. Respect the local environmental rules. If in doubt, contact your local waste disposal authorities. Thank you for choosing Perel! Please read the manual thoroughly before bringing this device into service. If the device was damaged in transit, do not install or use it and contact your dealer. 2. Symbols Symbolen 01 CE-markering. 02 Lees en begrijp deze handleiding en de veiligheidsinstructies vóór ingebruikname. 03 Uitsluitend voor gebruik binnenshuis. 04 Schakelapparaten met relais met microcontactopening. Veiligheidsklasse 2. low high 5s - 30” on-time 30 s - 1’ on-time 1 min - 3’ on-time 3 min - 5’ on-time 5 min - 8’ on-time 8 min - y black (-) z brown WARNING! Do not change the DIP switch settings when power is connected. Care and Maintenance The appliance does not need any particular maintenance. However, occasionally wipe it with a damp cloth to keep it looking new. Do not use harsh chemicals, cleaning solvents or strong detergents. Specifications switch type ..........................................................relay detection angle .................................................... 100° detection range ...................................... 8 m (< 22 °C) 3. Read and understand this manual and all safety signs before using this appliance. fluorescent............................................................ - 03 Indoor use only. 04 Switch of micro-gap construction. 05 Incandescent lamp. 06 Energy-saving lamp. 07 Safety class 2. LED ..................................................................... IP rating .............................................................. IP20 power supply ................................. 12 VDC ± 1 V, 2.6 A working temperature .......................... -10 °C to +40 °C working humidity ......................................... < 93 % RH time-delay switch ............................5/30 s, 1/3/5/8 min light control ........................................ < 3 lx to 2000 lx cable length ....................................................± 18 cm dimensions ............................................ Ø 22 x 10 mm Veiligheidsvoorschriften ● Dit toestel is geschikt voor gebruik door kinderen vanaf 8 jaar, door personen met fysieke, zintuiglijke of verstandelijke beperkingen, of door personen met gebrek aan ervaring en kennis, op voorwaarde dat dit onder toezicht gebeurt van een persoon die verantwoordelijk is voor hun veiligheid of hun aanwijzingen heeft gegeven, hoe zij het toestel moeten gebruiken en zich bewust zijn van de risico's die het gebruik van het toestel met zich meebrengt. Kinderen mogen niet met het toestel spelen. De reiniging en het onderhoud van het toestel mogen niet worden uitgevoerd door kinderen, tenzij ze onder toezicht staan. ● Open de behuizing niet zelf. ● Er zijn geen onderdelen in het toestel die door de gebruiker gerepareerd kunnen worden. Contacteer uw verdeler voor eventuele reserveonderdelen. ● Dompel het toestel nooit onder in een vloeistof. Stel het toestel niet bloot aan extreme temperaturen of vuur. 4. Algemene richtlijnen Raadpleeg de Velleman® service- en kwaliteitsgarantie op www.velleman.eu. ● Bescherm tegen schokken. Vermijd brute kracht tijdens de bediening van het toestel. ● Leer eerst de functies van het toestel kennen voor u het gaat gebruiken. ● Om veiligheidsredenen mag u geen wijzigingen aanbrengen. Schade door wijzigingen die de gebruiker heeft aangebracht aan het toestel valt niet onder de garantie. ● Gebruik het toestel enkel waarvoor het gemaakt is. De garantie vervalt automatisch bij ongeoorloofd gebruik. ● De garantie geldt niet voor schade door het negeren van bepaalde richtlijnen in deze handleiding en uw dealer zal de verantwoordelijkheid afwijzen voor defecten of problemen die hier rechtstreeks verband mee houden. ● Bewaar deze handleiding voor verdere raadpleging. 5. Omschrijving 1. bedrading 3. DIP-schakelaars 2. controller 6. rated load 02 V. 01 – 15/05/2019 2. Spaarlamp. on-time dit Bedankt voor uw aankoop! Lees deze handleiding grondig door voor u het toestel in gebruik neemt. Werd het toestel beschadigd tijdens het transport, installeer het dan niet en raadpleeg uw dealer. 07 movement sens. betreffende Dit symbool op het toestel of de verpakking geeft aan dat, als het na zijn levenscyclus wordt weggeworpen, dit toestel schade kan toebrengen aan het milieu. Gooi dit toestel (en eventuele batterijen) niet bij het gewone huishoudelijke afval; het moet bij een gespecialiseerd bedrijf terechtkomen voor recyclage. U moet dit toestel naar uw verdeler of naar een lokaal recyclagepunt brengen. Respecteer de plaatselijke milieuwetgeving. Hebt u vragen, contacteer dan de plaatselijke autoriteiten betreffende de verwijdering. always max. 25 W - max. inrush current 2.1 A ● This device can be used by children aged from 8 years and above, and persons with reduced physical, sensory or mental capabilities or lack of experience and knowledge if they have been given supervision or instruction concerning the use of the device in a safe way and understand the hazards involved. Children shall not play with the device. milieu-informatie < 10 lx CE marking. Safety Instructions Belangrijke product light sens. 01 3. Aan alle ingezetenen van de Europese Unie Gloeilamp. ● Connect the power supply. ● To test the PIR sensor, set the light sensitivity to OFF and the movement sensitivity and 5” to ON. The load should switch on immediately and – when no movement is detected – switch off after 5 s. 8. Inleiding 06 WARNING! Do not short-circuit any terminals. 7. Handleiding 1. 05 5” red (+) The copyright to this manual is owned by Velleman nv. All worldwide rights reserved. No part of this manual may be copied, reproduced, translated or reduced to any electronic medium or otherwise without the prior written consent of the copyright holder. OFF ● Connect the wiring to the terminals according to the diagram. x © COPYRIGHT NOTICE ON NOTE: Only the highest selected on-time will be applicable. USER MANUAL of damage or injury resulting from (incorrect) use of this device. For more info concerning this product and the latest version of this manual, please visit our website www.perel.eu. The information in this manual is subject to change without prior notice. Montage ● Laat het toestel installeren door een vakman. ● Kies een geschikte montageplaats. Vermijd ruimtes met grote temperatuurschommelingen (bv. naast een koel- of warmtebron) of waar zich bewegende voorwerpen bevinden. ● Voorzie een uitsparing met een diameter van 12 mm. U kunt de controller installeren achteraan een wand of vals plafond. Voorzie een ruimte van minstens 2 cm rond de controller voor voldoende ventilatie. ● De sensorkabels zijn ± 18 cm lang. Bij montage van de controller achter een wand, boor een gat van minstens 14 mm voor de stekker en de kabels. ● Zorg dat de controller bij montage achter een wand of vals plafond altijd bereikbaar is. maar voldoende beschermd is zodat niemand hem kan aanraken! ● Voorzie een 12 VDC/2.6 A voeding (niet meegelev.). ● Sluit de sensor aan op de controller. Niets forceren. ● Stel de DIP-schakelaars in: weight.............................................................. ± 41 g Use this device with original accessories only. Velleman nv cannot be held responsible in the event 1 ©Velleman nv-
 1
1
-
 2
2
-
 3
3
-
 4
4


Perel PEREL EMS114 Handleiding
- Type
- Handleiding
- Deze handleiding is ook geschikt voor
in andere talen
- English: Perel PEREL EMS114 User manual
- français: Perel PEREL EMS114 Manuel utilisateur
- español: Perel PEREL EMS114 Manual de usuario
- Deutsch: Perel PEREL EMS114 Benutzerhandbuch
- português: Perel PEREL EMS114 Manual do usuário
- polski: Perel PEREL EMS114 Instrukcja obsługi