Soundmaster SCD7800 Handleiding
- Categorie
- CD spelers
- Type
- Handleiding

DEUTSCH
ITALIANO
ENGLISH
ČEŠTINA
FRANÇAIS
SLOVENSKÝ
NEDERLANDS
SCD7800
Hersteller
Wörlein GmbH Tel.: +49 9103/71670
Gewerbestrasse 12 Fax.: +49 9103/716712
D 90556 Cadolzburg Email. info@soundmaster.de
GERMANY Web: www.soundmaster.de

Sicherheits- / Umwelt- / Aufstellhinweise
DE
HINWEIS ZUM UMWELTSCHUTZ
Dieses Produkt darf am Ende seiner Lebensdauer nicht über den
normalen Haushaltsabfall entsorgt werden, sondern muss an
einem Sammelpunkt für das Recycling von elektrischen und
elektronischen Geräten abgegeben werden. Das Symbol auf
dem Produkt in der Gebrauchsanleitung oder auf der
Verpackung weist darauf hin
Die Werkstoffe sind gemäß Ihrer Kennzeichnung wiederverwertbar. Mit
der Wiederverwendung der stofflichen Verwertung oder anderen Formen
der Verwertung von Altgeräten, leisten Sie einen wichtigen Beitrag zum
Schutze unserer Umwelt
Bitte fragen Sie Ihre Gemeindeverwaltung nach der zuständigen
Entsorgungsstelle.
WARNUNG
Gefahr elektrischer Schläge
Gerät nicht öffnen!
Zur Vermeidung von Stromschlägen darf dieses Gerät nicht geöffnet
werden. Es enthält keine Bauteile, die vom Benutzer gewartet oder
repariert werden können, Wartungs- und Reparaturarbeiten dürfen nur
von Fachpersonal ausgeführt werden.
Dieses Symbol zeigt an, dass im Inneren des
Gerätes gefährliche Spannungen vorhanden sind,
und einen Stromschlag verursachen können.
Dieses Symbol weist auf wichtige Bedienungs- und
Wartungsanweisungen bezüglich des Geräts hin.
Verbrauchte Batterien sind Sonderabfall und gehören
NICHT in den Hausmüll! Als Verbraucher sind Sie
gesetzlich verpflichtet alle Batterien und Akkus egal
ob Schadstoffe *) enthalten oder nicht zur
umweltschonenden Entsorgung zurückzugeben.
Sie können alle Batterien und Akkus bei den öffentlichen
Sammelstellen in Ihrer Gemeinde oder dort unentgeltlich ab-
geben wo Batterien und Akkus der betreffenden Art verkauf
werden.
Batterien und Akkus bitte nur in entladenem Zustand abgeben.
*) gekennzeichnet mit Cd = Cadmium, Hg =Quecksilber, Pb = Blei
Verwenden Sie nur Batterien, die frei von Quecksilber &
Cadmium sind.
Batterien dürfen nicht in die Hände von Kindern gelangen.
Kinder können Batterien verschlucken. Wurde eine Batterie
verschluckt, muss sofort medizinische Hilfe in Anspruch
genommen werden.
Überprüfen Sie regelmäßig die Batterien um ein Auslaufen
der Batterie zu vermeiden.
Batterien dürfen keiner Hitze (z. B. Sonnenbestrahlung),
Feuer ausgesetzt werden.
ACHTUNG: Explosionsgefahr bei falscher
Batteriehandhabung. Nur durch denselben oder baugleichen
Batterietyp ersetzen.
VORSICHT – UNSICHTBARE LASERSTRAHLUNG
TRITT AUS, WENN DER DECKEL GEÖFFNET, UND
DIE SICHERHEITSVERRIEGELUNG
NIEDERGEDRÜCKT WIRD. SETZEN SIE SICH
NICHT DEM STRAHL AUS.
Ständige Benutzung des Kopfhörers bei hoher
Lautstärke kann zu Gehörschädigungen führen.
Das Gerät ausnahmslos nur in trockenen
Innenräumen betreiben.
Niemals mit Feuchtigkeit in Verbindung bringen.
Schützen Sie das Gerät vor tropfenden oder
spritzenden Flüssigkeiten, und stellen Sie keine mit
Flüssigkeit gefüllten Gefäße (z. B. Vasen) auf das
Gerät.
Betreiben Sie das Gerät nur in einem gemäßigten
Klima.
Schließen Sie das Gerät nur an eine
vorschriftsmäßig installierte und geerdete
Netzsteckdose an. Die Netzspannung muss mit
den Angaben auf dem Typenschild des Gerätes
übereinstimmen.
Achten Sie darauf, dass im Betrieb das Netzkabel
niemals nass oder feucht wird. Das Netzkabel darf
nicht eingeklemmt oder anderweitig beschädigt
werden.
Der Netzstecker dient als Trennvorrichtung und
muss ohne Schwierigkeiten benutzbar sein.
Achten Sie beim Verlegen des Netzkabels darauf,
dass es beim Betrieb des Gerätes nicht zu einer
Stolperfalle werden kann.
Lassen Sie beschädigte Netzstecker oder
Netzkabel sofort von dem Kundenservice
austauschen.
Prüfen Sie das Gerät, das Netzkabel sowie den
Netzstecker regelmäßig auf sichtbare
Beschädigungen. Verwenden Sie das Gerät auf
keinen Fall, wenn Sie Beschädigungen festgestellt
haben.
Benutzen Sie das Gerät nicht, wenn es
Beschädigungen aufweist, wenn es
heruntergefallen ist oder nicht einwandfrei
funktioniert.
Sie dürfen das Gehäuse nicht öffnen oder
reparieren. In diesem Falle ist die Sicherheit nicht
gegeben und die Garantie erlischt. Reparaturen
sind ausschließlich durch einen Service-
Center/Kundencenter auszuführen.
Ziehen Sie bei Gewitter oder einer längerer
Abwesenheit (z.B. Urlaub) den Netzstecker und
entnehmen Sie ggf. die Batterien.
Kinder sollten das Gerät nur unter Aufsicht
Erwachsener betreiben.
Lassen Sie das Gerät während des Gebrauchs
nicht unbeaufsichtigt.
Das Gerät ausnahmslos nur mit einem trockenen
Abstaubtuch reinigen.
KEINE REINIGUNGSMITTEL oder TÜCHER mit
GROBEN Material verwenden!!!
Das Gerät keiner Sonnenbestrahlung oder
anderen Hitzequellen aussetzen.
Stellen Sie das Gerät so auf, dass kein Hitzestau
entstehen kann, also frei und gut belüftet.
Achten Sie darauf, dass an den Seiten ein
Mindestabstand von 10 cm besteht, um eine
ausreichende Luftzirkulation zu gewährleisten.
Decken Sie niemals die Belüftungsöffnungen zu!!!
Offene Brandquellen, wie z.B. brennende Kerzen,
dürfen nicht auf das Gerät gestellt werden.
Das Gerät an einem sicheren,
erschütterungsfreien Platz aufstellen.
Benutzen Sie das Gerät nicht, wenn es
Beschädigungen aufweist, wenn es
heruntergefallen ist oder nicht einwandfrei
funktioniert.
Gerät möglichst weit entfernt von Computern und
Mikrowellengeräten platzieren, da es sonst evtl. zu
Empfangsstörungen im Radiobetrieb kommen
kann.
Treten wegen einer elektrostatischen Entladung
oder kurzeitigen Netzüberspannung
Fehlfunktionen auf, setzen Sie das Gerät zurück.
Ziehen Sie hierfür den Netzstecker bzw.
Netzadapter und schließen ihn nach einigen
Sekunden wieder an.

SCD7800 / Deutsche Bedienungsanleitung
1
BEDIENELEMENTE
FRONTANSICHT
1
SKIP + / TUNING + Taste
2
SCAN / MODE. Taste
3
STANDBY / FUNKTION - Taste
4
PRESET+ / ORDNER+ Taste
5
SKIP - / TUNING - Taste
6
KASSETTEN FACH
7
DISPLAY
8
VOL+ / ALARM 2 Taste
9
PLAY/PAUSE/CLOCK/ENTER Taste
10
INFO / SNOOZE
11
STOP / MENU Taste
12
VOL - / ALARM 1 Taste
13
LAUTSPRECHER
DRAUFSICHT
14
KASSETTEN BEDIENUNG
15
CD - Fach
16
TRAGEGRIFF
17
DAB+ / UKW ANTENNE
RÜCKANSICHT
18
Kopfhöreranschluß
19
AUX-IN BUCHSE
20
USB-Buchse
21
AC-Netzbuchse
22
BATTERIEFACH
INSTALLATION
LIEFERUMFANG
➢ Hauptgerät
➢ Bedienungsanleitung
➢ Netzkabel
SPANNUNGSVERSORGUNG
➢ Vergewissern Sie sich, dass Ihre Netzspannung mit den Angaben auf dem Typenschild des
Gerätes übereinstimmt.
➢ Stecken Sie den Netzstecker des Netzkabels in eine handelsübliche Netzsteckdose und den
Netzgerätestecker in die AC Netzbuchse auf der Rückseite des Gerätes.

SCD7800 / Deutsche Bedienungsanleitung
2
BATTERIEBETRIEB
1. Öffnen Sie das Batteriefach auf der Rückseite des Gerätes.
2. Legen Sie 6 Batterien des Typs LR14 (“C”-Größe) 1.5 V ein. Achten Sie dabei auf die
richtige Polarität (siehe im Batteriefach).
3. Schliessen Sie das Batteriefach.
Hinweis:
➢ Wenn das Gerät mit Batterien betrieben wird und sich im Standby-Modus befindet, werden
dabei auch die Batterien entladen. Um dies zu vermeiden, empfehlen wir Ihnen, die
Batterien zu entfernen oder das Gerät an das Stromnetz anzuschließen. Das Display und
die blaue LED-Beleuchtung sind dabei auch ausgeschaltet.
➢ Wenn das Gerät mit Batterien betrieben wird, empfehlen wir Ihnen für längeren Erhalt der
Batterien, das Gerät nicht mit voller Lautstärke zu betreiben.
Automatische Standby-Schaltung (ERP)
Das Gerät schaltet sich nach ca. 10 Minuten automatisch in Standby wenn kein Audio-
Signal vorhanden ist. Um das Gerät wieder einzuschalten, drücken Sie erneut die
“STANDBY / FUNCTION” Taste.
GRUNDBEDIENUNG
GERÄT EIN-/AUSSCHALTEN
Drücken Sie die “STANDBY / FUNCTION” Taste um das Gerät einzuschalten.
Drücken und halten Sie die “STANDBY / FUNCTION” Taste um das Gerät in Standby zu
schalten.
QUELLENAUSWAHL
Drücken Sie im eingeschaltetem Zustand wiederholt die “STANDBY / FUNCTION” Taste um die
gewünschte Quelle auszuwählen.
LAUTSTÄRKEEINSTELLUNG
Drücken Sie die Taste “VOLUME –“ oder “VOLUME +“ um die Lautstärke zu verringern oder zu
erhöhen.
DAB
Ziehen Sie die Antenne komplett aus und ändern Sie Ihre Richtung für bestmöglichen Empfang.
Drücken Sie wiederholt die “STANDBY / FUNCTION” Taste bis „DAB“ angezeigt wird.
Wird der DAB-Modus zum ersten Mal ausgewählt, startet das Gerät von selbst einen
automatischen Sendersuchlauf. Die gefundenen Sender werden in alphabetischer Reihenfolge
gespeichert. Anschließend ist der erste verfügbare Sender zu hören.

SCD7800 / Deutsche Bedienungsanleitung
3
Hinweis:
Sollte kein Sender gefunden werden, ändern Sie die Position des Gerätes und der Antenne.
Drücken und halten Sie für ca. 3 Sekunden die Taste “SCAN / MODE” um einen neuen
Suchlauf zu starten.
DAB Senderauswahl
Um den gewünschten Radiosender auszuwählen, drücken Sie die Taste “SKIP - / TUNING -”
oder “SKIP + / TUNING +”. Zur Bestätigung drücken Sie die “PLAY / PAUSE / CLOCK /
ENTER” Taste.
Festsender speichern
1. Wählen Sie den gewünschten Radiosender aus.
2. Drücken Sie die Taste “SCAN / MODE” und wählen Sie mit “SKIP - / TUNING -” oder
“SKIP + / TUNING +” die gewünschte Stationsnummer aus.
3. Bestätigen Sie die Auswahl mit der Taste “PLAY / PAUSE / CLOCK / ENTER”.
Festsender abrufen
Wählen Sie mit der Taste “PRE + / FOLDER +” durch Wiederholtes drücken die gewünschte
Stationsnummer aus.
DAB Information
Drücken Sie wiederholt die “INFO / SNOOZE” Taste um die folgenden DAB Informationen
auszuwählen: DLS, Signalstärke, Genre, Frequenz, Signalfehlerrate, Audiobitrate, Uhrzeit,
Datum.
DAB Menü
Um in das DAB Menü zu gelangen, drücken Sie die “STOP / MENU” Taste. Wählen Sie mit
“SKIP + / TUNING +” eine der nachfolgenden Funktionen und bestätigen Sie mit “PLAY /
PAUSE / CLOCK / ENTER”:
• Vollständiger Suchlauf:
Startet einen kompletten Sendersuchlauf.
• Manueller Suchlauf:
Für den manuellen Suchlauf benötigen Sie den gewünschten Kanal. Wählen Sie den
gewünschten Kanal aus und drücken Sie die “PLAY / PAUSE / CLOCK / ENTER” Taste.

SCD7800 / Deutsche Bedienungsanleitung
4
• DRC:
Abkürzung für Digital Range Control (Dynamikbereich). Der Begriff DRC beschreibt das
Verhältnis zwischen dem leisesten und dem lautesten Ton. Wenn der Dynamikbereich sehr
hoch ist, gibt es sowohl sehr leise als auch sehr laute Geräusche.
Unter bestimmten Umständen kann dies zu Problemen bei der Wiedergabe führen. Nehmen
wir an, Sie hören einen Radiosender in einer relativ lauten Umgebung. Durch Erhöhen der
Lautstärke können Sie die leisen Abschnitte lauter spielen.
Dies hat jedoch den Nachteil, dass die lauten Abschnitte unangenehm laut werden. Hier ist
es sinnvoll, den Dynamikbereich zu reduzieren. Wählen Sie zwischen den Optionen:
- DRC off: Der Dynamikbereich ist nicht reduziert.
- DRC high: Der Dynamikbereich ist stark reduziert.
- DRC low: Der Dynamikbereich ist leicht reduziert.
• Senderbereinigung (“Leeren”):
Es kann sein, dass Sie nach einem Sendersuchlauf oder einem Ortswechsel einige Sender
nicht mehr empfangen können. Mit dieser Funktion können Sie diese Sender aus der
Senderliste löschen. Wählen Sie “JA” und bestätigen Sie mit “PLAY / PAUSE / CLOCK /
ENTER”.
• System
Siehe unter “SYSTEMEINSTELLUNGEN”.
FM
1. Drücken Sie wiederholt die “STANDBY / FUNCTION” Taste bis “FM” angezeigt wird.
2. Ziehen Sie die Antenne komplett aus und ändern Sie Ihre Richtung für bestmöglichen
Empfang.
3. Es gibt zwei Möglichkeiten, nach Radiosendern zu suchen und diese einzustellen.
• Automatischer Suchlauf:
Wichtig! Alle gespeicherten Radiosender werden gelöscht!
Drücken und halten Sie die Taste "SCAN / MODE" für ca. 3 Sekunden. Das Gerät
durchsucht den kompletten Frequenzbereich nach Radiosendern. Das Grät speichert alle
gefundenen Sender von der niedriegsten bis zur höchsten Frequenz.
• Manuelle Senderabstimmung:
Drücken Sie die Taste “SKIP - / TUNING -” oder “SKIP + / TUNING +” zur manuellen
Abstimmung. Halten Sie eine der beiden Tasten gedrückt, startet das Gerät den Suchlauf
und stoppt beim nächsten verfügbaren Sender.
Festsender speichern
Ist identisch wie im DAB-Modus.
Festsender abrufen
Ist identisch wie im DAB-Modus.

SCD7800 / Deutsche Bedienungsanleitung
5
UKW Information
Drücken Sie wiederholt die “INFO / SNOOZE” Taste um die folgenden UKW Informationen
auszuwählen: Radiotext, PTY, Name, Mono- oder Stereo-Ausstrahlung, Uhrzeit, Datum.
UKW Menü
Um in das UKW Menü zu gelangen, drücken Sie die “STOP / MENU” Taste. Wählen Sie mit
“SKIP - / TUNING -” oder “SKIP + / TUNING +” eine der nachfolgenden Funktionen und
bestätigen Sie mit “PLAY / PAUSE / CLOCK / ENTER”:
• Suchlauf-Einstellung: Wählen Sie die gewünschte Option für den automatischen
Sendersuchlauf.
- Alle Sender: Sucht nach allen verfügbaren Sendern. In diesem Fall stoppt das Gerät
auch bei empfangsschwachen Sendern.
- Nur starke Sender: Sucht nur empfangsstarke Sender.
• Audio-Einstellung: Wählen Sie MONO oder STEREO für UKW-Empfang.
• System
Siehe unter “SYSTEMEINSTELLUNGEN”.
CD
1. Drücken Sie wiederholt die “STANDBY / FUNCTION” Taste bis “CD” angezeigt wird.
2. Öffnen Sie das CD-Fach durch Anheben des CD-Deckels.
3. Legen Sie eine CD mit der beschrifteten Seite nach oben auf die Zentrierung ein bis die CD
arritiert ist und schließen Sie wieder den CD-Deckel.
4. Die Wiedergabe startet mit dem ersten Titel der CD.
5. Wenn Sie die CD wechseln möchten, drücken Sie die “STOP / MENU” Taste, öffnen Sie
den CD-Deckel und heben Sie die CD vorsichtig aus der Arritierung.
Halten Sie das CD-Fach immer geschlossen.
HINWEIS:
Sollte die CD mit der falschen Seite nach oben eingelegt sein oder keine CD eingelegt sein,
erscheint im Display “NO DISC”.
Steuerfunktionen:
➢ Um die Wiedergabe zu starten oder zu unterbrechen, drücken Sie die “PLAY / PAUSE /
CLOCK / ENTER” Taste.
➢ Zum Stoppen der Wiedergabe drücken Sie die Taste „STOP / MENU”.
➢ Mit Taste “SKIP + / TUNING +” wählen Sie den nächsten Titel. Halten Sie die Taste
gedrückt, starten Sie den Suchlauf vorwärts innerhalb der Titel.
Die Taste “SKIP - / TUNING -” hat folgende Funktionen:
Einmal gedrückt = Startet den gegenwärtig gespielten Titel erneut.
Zweimal gedrückt = Wählt den vorherigen Titel.
Halten Sie die Taste gedrückt, starten Sie den Suchlauf rückwärts innerhalb der Titel.
➢ Um einen Ordner auszuwählen, drücken Sie die Taste “PRE - / FOLDER –“ oder
“PRE + / FOLDER” (nur bei MP3-CD oder USB).

SCD7800 / Deutsche Bedienungsanleitung
6
Hörbuchfunktion (Resume)
Wenn Sie die Funktion wechseln oder das Gerät ausschalten und wieder zurück in den CD-
Modus wechseln, startet die Wiedergabe vom letzten gehörten Punkt.
Sollten Sie zweimal die „STOP / MENU“ Taste drücken und anschließend die Wiedergabe erneut
starten, beginnt das Gerät die Wiedergabe erneut mit dem ersten Titel (Titel 1).
Wiederholfunktion
Drücken Sie während der Wiedergabe wiederholt die “SCAN / MODE” Taste um eine der
folgenden Wiederholfunktionen zu wählen:
Audio-CD:
Einmal gedrückt = Normaler Wiedergabemodus. Das Display zeigt „Normal“.
Zweimal gedrückt = Der gegenwärtige Titel wird endlos wiedergegeben. Das Display zeigt
“Repeat One”.
Dreimal gedrückt = Die komplette CD wird endlos wiedergegeben. Das Display zeigt “Repeat
All”.
Viermal gedrückt = Alle Titel werden in zufälliger Reihenfolge wiedergegeben. Das Display zeigt
“Random”.
Fünfmal gedrückt = Zurück zum normalen Wiedergabemodus.
MP3-CD:
Einmal gedrückt = Normaler Wiedergabemodus. Das Display zeigt „Normal“.
Zweimal gedrückt = Der gegenwärtige Titel wird endlos wiedergegeben. Das Display zeigt
“Repeat One”.
Dreimal gedrückt = Der gegenwärtig gespielte Ordner wird endlos wiedergegeben. Das Display
zeigt „Folder“.
Viermal gedrückt = Die komplette CD wird endlos wiedergegeben. Das Display zeigt “Repeat
All”.
Fünfmal gedrückt = Alle Titel werden in zufälliger Reihenfolge wiedergegeben. Das Display zeigt
“Random”.
Sechsmal gedrückt = Zurück zum normalen Wiedergabemodus.
Programmierte Wiedergabe
Diese Funktion kann verwendet werden, um eine beliebige Reihenfolge von Titeln zu
programmieren.
1. Drücken Sie die “STOP / MENU” Taste.
2. Drücken Sie die "SCAN / MODE" Taste. “P_01” blinkt nun im Display (P_01 bedeutet
Programmnummer).
3. Wählen Sie mit “SKIP + / TUNING +” oder “SKIP - / TUNING -” den gewünschten Titel und
drücken Sie "SCAN / MODE" Taste erneut. Die Anzeige “P_01” wechselt zu “P_02”.

SCD7800 / Deutsche Bedienungsanleitung
7
4. Wählen Sie den nächsten Titel mit “SKIP + / TUNING +” oder “SKIP - / TUNING -” und
drücken Sie "SCAN / MODE" erneut. Wiederholen Sie den Schritt um weitere Titel zu
speichern.
Hinweis:
Sollte die Anzahl der speicherbaren Titel erreicht sein, wird “PROGFULL” im Display
angezeigt.
5. Um die programmierte Wiedergabe zu starten, drücken Sie die “PLAY / PAUSE / CLOCK /
ENTER” Taste. „MEM“ wird dabei oben links im Display angezeigt.
6. Um die Wiedergabe zu stoppen, drücken Sie die “STOP / MENU” Taste. Die gespeicherte
Reihenfolge bleibt erhalten.
7. Um die Wiedergabe erneut zu starten drücken Sie die “PLAY / PAUSE / CLOCK / ENTER”
Taste.
8. Um die Programmierung zu löschen, drücken Sie zweimal die “STOP / MENU” Taste. Der
Hinweis “MEM” ist anschliessend nicht mehr zu sehen.
Kassetten Betrieb
Kassetten Abspielen
1. Drücken Sie Wiederholt die „SCAN / MODE“ Taste bis „TAPE“ ausgewählt ist.
2. Drücken Sie die STOP/EJECT-Taste ʺ ʺ, um das Kassettenfach zu öffnen.
3. Legen Sie eine bespielte Audio-Kassette in das Kassettenfach mit der Bandöffnung nach
oben.
4. Drücken Sie die PLAY-Taste ʺ ʺ, um die Wiedergabe zu starten.
5. Drücken Sie die STOP/EJECT-Taste ʺ ʺ, um die Wiedergabe zu Stoppen.
6. Spulen Sie wenn nötig, das Kassettenband in Richtung der Pfeiltaste auf
(Vorspulen Rückspulen )
7. Drücken Sie immer die STOP/EJECT-Taste ʺ ʺ, wenn Sie das Band aufwickeln, oder
das Band Stoppen möchten. Dies verhindert Schäden am Gerät und an ihrem Tonband.
8. Drücken Sie die STOP/EJECT-Taste ʺ ʺ, um das Kassettenfach zu öffnen.
9. Um die Wiedergabe anzuhalten, drücken Sie die PAUSE-Taste ʺ ʺ. Drücken Sie die
PAUSE-Taste ʺ ʺ erneut, um die Wiedergabe fortzusetzen.
USB
Dieses Gerät wurde gemäß den neuesten technischen Fortschritten im USB-Bereich entwickelt.
Aufgrund der großen Auswahl an verschiedenen USB-Speichergeräten aller Art, die derzeit auf
dem Markt sind, können wir leider nicht die vollständige Kompatibilität mit allen USB-
Speichergeräten garantieren. Aus diesem Grund kann es in seltenen Fällen zu Problemen bei
der Wiedergabe von Dateien von USB-Speichergeräten kommen. Dies ist keine Fehlfunktion
des Geräts.
1. Drücken Sie wiederholt die “STANDBY / FUNCTION” Taste bis “USB” angezeigt wird.
2. Stecken Sie das USB-Speichergerät in die USB-Buchse. Die Wiedergabe startet nach
einigen Sekunden automatisch.
Die Steuerfunktionen, Wiederholfunktion und programmierte Wiedergabe ist identisch wie im
CD-Modus.

SCD7800 / Deutsche Bedienungsanleitung
8
Hinweis:
• Schließen Sie immer ein USB-Speichermedium direkt an den USB-Anschluss an, um
Fehlfunktionen zu vermeiden.
• Der USB-Anschluss ist nicht geeignet zum Aufladen externer Geräte.
ACHTUNG:
Schalten Sie das Gerät in einen anderen Betriebsmodus, bevor Sie das USB-Speichergerät
entfernen.
AUX IN
Über diese Buchse können Sie auch den Ton anderer Wiedergabegeräte wie MP3-Player, CD-
Player usw. über die Lautsprecher hören.
1. Schließen Sie das externe Gerät mit einem 3.5mm Klinkenkabel an die AUX-IN-Buchse auf
der Rückseite des Geräts an.
2. Drücken Sie wiederholt die “STANDBY / FUNCTION” Taste bis “Aux” angezeigt wird.
3. Sie hören die Tonwiedergabe vom externen Gerät über die Lautsprecher des Gerätes. Sie
können die Lautstärke mit den Lautstärketasten einstellen. Die CD-Tasten sind nicht
funktionsfähig.
4. Informationen zur Bedienung finden Sie in der Bedienungsanleitung des externen Gerätes.
Hinweis:
Stellen Sie die Lautstärke des externen Geräts auf einen angenehmen Wert ein.
ALARM
Einstellen der Alarmzeit
Das Gerät muss sich im ausgeschaltetem Zustand befinden, um den Alarm einzustellen.
Sie haben die Möglichkeit zwei Alarmzeiten einzustellen:
1. Drücken Sie die Taste “VOLUME+ / ALARM 1” für etwa 3 Sekunden. Die Stunde des
gegenwärtig eingestellten Alarms blinkt in der Anzeige.
2. Stellen Sie mit “SKIP + / TUNING +” oder “SKIP - / TUNING -” die gewünschten Stunde ein.
3. Drücken Sie die Taste “VOLUME+ / ALARM 1” zum bestätigen. Die Minuten beginnen zu
blinken.
4. Stellen Sie mit “SKIP + / TUNING +” oder “SKIP - / TUNING -” die gewünschten Minuten
ein.
5. Drücken Sie die Taste “VOLUME+ / ALARM 1” zum bestätigen. Stellen Sie mit den Tasten
“SKIP + / TUNING +” oder “SKIP - / TUNING -” die gewünschte Weckart ein und drücken
Sie “VOLUME+ / ALARM 1” zum Bestätigen.
• FM:
Sobald die Weckzeit erreicht ist, schaltet das Gerät mit dem UKW-Modus ein.
• DAB:
Sobald die Weckzeit erreicht ist, schaltet das Gerät mit dem DAB-Modus ein.
• CD:
Sobald die Weckzeit erreicht ist, schaltet das Gerät mit dem CD-Modus ein. Die
eingelegte CD wird mit dem ersten Titel abgespielt.

SCD7800 / Deutsche Bedienungsanleitung
9
• USB:
Sobald die Weckzeit erreicht ist, schaltet das Gerät mit dem USB-Modus ein.Bei
eingesteckten USB-Speichermedium startet die Wiedergabe mit dem ersten Titel.
• BUZZ:
Sobald die Weckzeit erreicht ist, ist ein Signatton zu hören.
6. Wenn DAB oder FM als Weckart gewählt ist, wählen Sie den gewünschten Festsenderplatz
1-30.
7. Stellen Sie mit “SKIP + / TUNING +” oder “SKIP - / TUNING -” die gewünschte
Wecklautstärke ein und drücken Sie abschließend die „VOLUME+ / ALARM 1” zum
bestätigen.
Um den Alarm 2 einzustellen, wiederholen Sie die oben genannten Schritte. Verwenden Sie
dafür die Taste “VOLUME- / ALARM 2”.
Snooze
Der Alarmton kann für 9 Minuten ausgeschaltet werden, indem Sie die Taste “INFO / SNOOZE”
drücken.
Alarmton ausschalten
Drücken Sie “VOLUME+ / ALARM 1” oder “VOLUME- / ALARM 2” um den Weckton
auszuschalten.
Aktivieren / Deaktivieren des Alarms
Drücken Sie wiederholt im ausgeschaltetem Zustand die “VOLUME+ / ALARM 1” oder
“VOLUME- / ALARM 2” Taste und wählen Sie “Alarm off.
Drücken Sie wiederholt im ausgeschaltetem Zustand die “VOLUME+ / ALARM 1” oder
“VOLUME- / ALARM 2” Taste und wählen Sie die gewünschte Weckart aus.
EINSTELLEN VON UHRZEIZ UND DATUM
Um die Uhrzeit manuell einzustellen, muss sich das Gerät im ausgeschaltetem Zustand
befinden.
1. Drücken und halten Sie für ca. 2 Sekunden die “PLAY / PAUSE / CLOCK / ENTER” Taste.
2. Wählen Sie mit “SKIP + / TUNING +” oder “SKIP - / TUNING -” das gewünschte
Uhrzeitformat “12 / 24hr” aus und drücken Sie “PLAY / PAUSE / CLOCK / ENTER”.
Anschließend blinkt die Stundenanzeige im Display.
3. Stellen Sie mit “SKIP + / TUNING +” oder “SKIP - / TUNING -” die Stunden ein und drücken
Sie “PLAY / PAUSE / CLOCK / ENTER” zum Bestätigen. Nun beginnt die Minutenanzeige
zu blinken.
4. Stellen Sie mit “SKIP + / TUNING +” oder “SKIP - / TUNING -” die Minuten ein und drücken
Sie “PLAY / PAUSE / CLOCK / ENTER” zum Bestätigen. Das Display zeigt nun das Datum
an.
5. Stellen Sie nun auf die gleiche Weise das Datum ein.

SCD7800 / Deutsche Bedienungsanleitung
10
Hinweis:
Drücken und halten Sie die Taste “PLAY / PAUSE / CLOCK / ENTER” um während des
Betriebs um die gegenwärtige Uhrzeit anzuzeigen.
KOPFHÖRERANSCHLUSS
Verwenden Sie zum ungestörten Musikhören Kopfhörer mit einem 3.5mm Klinkenstecker und
schließen Sie diesen an die Kopfhörerbuchse auf der Rückseite des Gerätes an. Die
Lautsprecher werden dann stummgeschaltet.
SYSTEMEINSTELLUNGEN
Hinweis: Die Systemeinstellungen sind nur im DAB- oder UKW-Modus verfügbar!
1. Um in das Systemmenü zu gelangen, drücken Sie die Taste “STOP / MENU” und wählen
Sie mit “SKIP + / TUNING +” oder “SKIP - / TUNING -” den Punkt “SYSTEM”. Drücken Sie
“PLAY / PAUSE / CLOCK / ENTER” zur Bestätigung der Auswahl.
2. Wählen Sie mit “SKIP + / TUNING +” oder “SKIP - / TUNING -” eine der folgenden
Einstellungen aus und drücken Sie die Taste “PLAY / PAUSE / CLOCK / ENTER”:
➢ Sprache
Wählen Sie die gewünschte Menüsprache aus: deutsch, englisch, französisch,
italienisch, niederländisch, norwegisch, dänisch.
➢ Zeit Update
Stellen Sie die Quelle für die Zeitaktualisierung ein: Update von allen, DAB, FM, kein
Update.
➢ Werkseinstellung (Factory Reset)
Alle Sender und Einstellungen werden gelöscht!
➢ SW Version
Zeigt die gegenwärtige installierte Software-Version an.
Aktuelle Bedienungsanleitungen können unter www.soundmaster.de
heruntergeladen werden.
Technische Änderungen und Druckfehler vorbehalten.
Copyright by Woerlein GmbH, 90556 Cadolzburg, www.soundmaster.de
Vervielfältigung nur mit ausdrücklicher Genehmigung der Woerlein GmbH.

Safety, Environmental and Setup Instructions
EN
ENVIRONMENTAL PROTECTION
Do not dispose of this product with the normal household
waste at the end of its life cycle. Return it to a collection
point for the recycling of electrical and electronic devices.
This is indicated by the symbol on the product, user
manual or packaging
The materials are reusable according to their markings. By
reusing, recycling or other forms of utilization of old devices you
make an important contribution to the protection of our
environment.
Please contact your local authorities for details about collection
points.
WARNING
Risk of electric shock
Do not open!
Caution: To reduce the risk of electric shock, do not remove the
cover (or back). There are no user serviceable parts inside.
Refer servicing to qualified service personnel.
This symbol indicates the presence of dangerous
voltage inside the enclosure, sufficient enough to
cause electric shock.
This symbol indicates the presence of important
operating and maintenance instructions for the device
Used batteries are hazardous waste and NOT to be
disposed of with the household waste! As a
consumer you are legally obligated to return all
batteries for environmentally responsible recycling –
no matter whether or not the batteries contain harmful
substances*)
Return batteries free of charge to public collection points in your
community or shops selling batteries of the respective kind.
Only return fully discharged batteries
*) marked Cd = cadmium, Hg = mercury, Pb = lead
Only use mercury and cadmium-free batteries.
Used batteries are hazardous waste and NOT to be
disposed of with the household waste!!!
Keep batteries away from children. Children might swallow
batteries.
Contact a physician immediately if a battery was swallowed.
Check your batteries regularly to avoid battery leakage.
Batteries shall not be exposed to excessive heat such as
sunshine, fire or the like.
CAUTION: Danger of explosion if battery is incorrectly
replaced
Replace only with the same or equivalent type
CAUTION - INVISIBLE LASER
RADIATION WHEN OPENING THE
COVER OR PRESSING THE SAFETY
INTERLOCK. AVOID EXPOSURE TO
THE LASER BEAM.
To prevent possible hearing damage, do not
listen at high volume levels for long periods
Use the device in dry indoor environments only.
Protect the device from humidity.
This apparatus is for moderate climates areas use,
not suitable for use in tropical climates countries.
No objects filled with liquids, such as vases,
shall be placed on the apparatus.
The mains plug or an appliance coupler is used
as the disconnect device, the disconnect devices
shall remain readily operable.
Connect this device to a properly installed and
earthed wall outlet only. Make sure the mains
voltage corresponds with the specifications on
the rating plate.
Make sure the mains cable stays dry during
operation. Do not pinch or damage the mains
cable in any way.
A damaged mains cable or plug must
immediately be replaced by an authorized service
center.
In case of lightning, immediately disconnect the
device from the mains supply.
Children should be supervised by parents when
using the device.
Clean the device with a dry cloth only.
Do NOT use CLEANING AGENTS or ABRASIVE
CLOTHS!
Do not expose the device to direct sunlight or
other heat sources.
Install the device at a location with sufficient
ventilation in order to prevent heat accumulation.
Do not cover the ventilation openings!
Install the device at a safe and vibration-free
location.
Install the device as far away as possible from
computers and microwave units; otherwise radio
reception may be disturbed.
Do not open or repair the enclosure. It is not safe
to do so and will void your warranty. Repairs only
by authorized service/ customer center.
No naked flame sources, such as lighted
candles, should be placed on the unit.
When you are necessary to ship the unit store it
in its original package. Save the package for this
purpose.
In case of malfunction due to electrostatic
discharge or fast transient (burst), remove and
reconnect the power supply.
If the unit is not using for a long period of time,
disconnect it from the power supply by
unplugging the power plug. This is to avoid the
risk of fire.

SCD7800 / English Instruction Manual
1
LOCATION OF CONTROLS
FRONT VIEW
1
SKIP+ / TUNE+
2
SCAN / MODE
3
STANDBY / FUNCTION
4
PRESET+ / FOLDER+
5
SKIP- / TUNE-
6
CASSETTE DOOR
7
DISPLAY
8
VOLUME+ / ALARM 2
9
PLAY/PAUSE/CLOCK/ENTER
10
INFO / SNOOZE
11
STOP / MENU
12
VOLUME - / ALARM 1
13
SPEAKER
TOP VIEW
14
TAPE buttons
15
CD door
16
HANDLE
17
DAB-/FM antenna
BACK VIEW
18
Headphone jack
19
AUX IN jack
20
USB jack
21
AC socket
22
BATTERY compartment
INSTALLATION
CONTENT OF DELIVERY
➢ Main unit
➢ Instruction Manual
➢ AC power cable
POWER SUPPLY
➢ Ensure that the voltage is the same as that indicated on the main unit identification plate.
➢ Connect the supplied AC power cable to a properly installed safety power socket and the
plug of the cable into the AC socket at the back side of the unit.

SCD7800 / English Instruction Manual
2
BATTERY OPERATION
1. Open the lid of the battery compartment at the bottom of the unit.
2. Insert 6 batteries of type UM-2/R14 (“C” size) 1.5 V. Please ensure that the polarity is correct
(see indicated in the battery compartment).
3. Then close the battery lid.
Note:
➢ If the device is operated with batteries and is in standby mode, the batteries will still be
discharged. To avoid this, we recommend removing the batteries or connecting the device
to the mains. The display and the blue lights are turned off.
➢ When the unit is powered by batteries, in order to play longer time, it is better not to
adjust the volume to max.
ERP power management
The unit will turn off automatically after 10 minutes in standby mode if there is no audio
signal. To turn on the unit again press the “STANDBY / FUNCTION” button.
BASIC OPERATIONS
POWER ON / OFF
Press “STANDBY / FUNCTION” button to turn the unit on.
Press and hold “STANDBY / FUNCTION” button to turn off the unit in standby mode.
SELECTING MODES
During on mode, press the “STANDBY / FUNCTION” button repeatedly to switch between the
different modes.
ADJUSTING VOLUME
Press the “VOLUME – / ALARM 1“ or “VOLUME + / ALARM 2“ button to decrease or increase
the volume.
DAB
Extend completely the telescopic antenna. Change its position to improve the reception.
Press repeatedly the “STANDBY / FUNCTION” button, until “DAB” is shown in the display.
The radio will automatically start a full scan of DAB+ stations if the unit is powered on the first
time. When the scan is complete, the stations are stored in alphabetical order. The first available
station will be played.
Note:
If there is no DAB+ reception at any time, change the position of the unit or adjust the antenna.
Press and hold the “SCAN / MODE” button for approx. 3 seconds to start a new search.

SCD7800 / English Instruction Manual
3
Select DAB radio station
Press the “SKIP - / TUNING -” or “SKIP + / TUNING +” and select the desired radio station.
To confirm the selection, press the “PLAY / PAUSE / CLOCK / ENTER” button.
Preset store
1. Select the desired radio station.
2. Press the “SCAN / MODE” button and choose with “SKIP - / TUNING -” or “SKIP + /
TUNING +” the desired program station number.
3. Press to confirm the “PLAY / PAUSE / CLOCK / ENTER”.
Preset recall
Press the “PRE + / FOLDER +“ button repeatedly to select the desired stored radio station.
DAB information
Press repeatedly the “INFO / SNOOZE” button to show the following DAB information:
DLS, signal strength, genre, frequency, signal error, audio bit rate, time, date.
DAB menu
To enter the DAB menu, press the “STOP / MENU” button. Select with the “SKIP - / TUNING -”
or “SKIP + / TUNING +” one of the following settings and press “PLAY / PAUSE / CLOCK /
ENTER”:
• Full scan:
Starts the station scan. The DAB frequency band is scanned for stations.
• Manual tune:
To do so you need to know the station frequency. This can be found on the internet site of
the broadcasting service. Select individual frequencies using the “PLAY / PAUSE / CLOCK
/ ENTER” button.
• DRC:
Short for Digital Range Control (dynamic range). The term DRC describes the ratio between
the quietest and the loudest sound. If the dynamic range is very high there are very soft
sounds as well as very loud sounds.
Under some circumstances this may present a problem with playback. Let us assume that
you are listening to a radio station in a relatively loud environment. By increasing the volume
you can play the quiet sections louder.
This however has the disadvantage that the loud sections become uncomfortably loud. It
makes sense here to reduce the dynamic range. Select between the options:
- DRC off: The dynamic range is not reduced.
- DRC high: The dynamic range is sharply reduced.
- DRC low: The dynamic range is slightly reduced

SCD7800 / English Instruction Manual
4
• Prune:
It may be that you can no longer receive some stations after a station scan or change of
location. With this function you can delete these stations from the reception list. Select
“YES” and confirm with the “PLAY / PAUSE / CLOCK / ENTER” button.
• System
See under “SYSTEM SETTINGS”.
FM
1. Press repeatedly the “STANDBY / FUNCTION” button, until “FM” is shown in the display.
2. Extend completely the telescopic antenna. Change its position to improve the reception.
3. There are two options to search for and preset radio stations.
• Automatic scan:
Important! Any preset radio stations will be overridden.
Press and hold the "SCAN / MODE" button for approx. 3 seconds. The system scans the
complete frequency band for radio stations. Any stations found will be preset from lowest to
highest frequency.
• Manual scan for audio stations:
Briefly press the “SKIP - / TUNING -” or “SKIP + / TUNING +” buttons, until you have found
the radio station which you are looking for. If you keep one of the buttons pressed down, the
device will search to the previous, respectively next radio station.
Preset store
Is the same as in DAB mode.
Preset recall
Is the same as in DAB mode.
Info display
Press repeatedly the “INFO / SNOOZE” button to show the following FM information:
Radio text, PTY, name, mono or stereo broadcast, time, date.
FM Menu
To enter the FM menu, press the “STOP / MENU” button. Select with the “SKIP - / TUNING -” or
“SKIP + / TUNING +” one of the following settings and press “PLAY / PAUSE / CLOCK /
ENTER”:
• Scan setting: Select the desired option for automatic station search.
- All stations: Search for all stations that can be received. In this case, station search also
stops for weak stations.
- Strong stations only: Only clear stations are searched.
• Audio setting: Select the MONO or STEREO for FM reception.

SCD7800 / English Instruction Manual
5
• System
See under “SYSTEM SETTINGS”.
CD
1. Press repeatedly the “STANDBY / FUNCTION” button, until “CD” is shown in the display.
2. Open the CD compartment by pulling the CD door upwards by the tab.
3. Insert an audio CD with the printed side facing upwards on to the central cone so that the
CD clicks into place and then close the lid of the CD compartment.
4. The CD will start the playback from the first title.
5. In order to remove a CD, please press the “STOP / MENU” button, open the CD door and lift
the CD out carefully.
Keep always the CD deck closed.
NOTE:
If a disc is inserted with a wrong side face up, respectively if no disc is inserted, then the
message “NO DISC“ appears in the display.
Control buttons:
➢ To start or interrupt the playback, press the “PLAY / PAUSE / CLOCK / ENTER” button.
➢ To stop the playback, press the “STOP / MENU” button.
➢ With “SKIP + / TUNING +” button you can jump to the next track.
If the button is kept pressed down, the machine starts to search forwards through the tracks.
The “SKIP - / TUNING -” button can be used as follows:
Press once = This starts the current track again from the beginning.
Press twice = This jumps back to the previous track.
If the button is kept pressed down, the machine starts to search backwards through the
tracks.
➢ To select a folder, press the “PRE + / FOLDER +“ button (only for MP3-CD or USB).
Resume function
If you change the mode or turn off the unit and come back to the CD mode, the unit starts the
playback from the last point.
If you press the “STOP / MENU” button and start the playback again, the unit starts with the first
track (track 1).
Repeat function
During playback, press repeatedly the “SCAN / MODE” button to select the following repeat
functions:

SCD7800 / English Instruction Manual
6
Audio CD:
Press once = the normal play mode. The display will show “Normal”.
Press twice = the current track is repeated continuously. The display will show “Repeat One”.
Press three times = the whole CD is played continuously. The display will show “Repeat All”.
Press four times = all tracks will be played in random order. The display will show “Random”.
Press five times = back to the normal play mode.
MP3-CD:
Press once = the normal play mode. The display will show “Normal”.
Press twice = the current track is repeated continuously. The display will show “Repeat One”.
Press three times = the selected folder is repeated continuously. The display will show “Repeat
Folder”.
Press four times = the whole CD is played continuously. The display will show “Repeat All”.
Press five times = all tracks will be played in random order. The display will show “Random”.
Press six times = back to the normal play mode.
Programmed Play
This can be used to program any desired sequence of tracks.
1. Press the “STOP / MENU” button.
2. Press the "SCAN / MODE" button. “P_01” flash in the display (P_01 means the program
number).
3. Use the “SKIP + / TUNING +” or “SKIP - / TUNING -” buttons to select the desired track and
press the "SCAN / MODE" button again. The display “P_01” change to “P_02”.
4. Select the next track with the “SKIP + / TUNING +” or “SKIP - / TUNING -” buttons and
press the "SCAN / MODE" button again. Repeat the procedure until all the desired tracks
are selected.
NOTE:
Once the storage capacity of the tracks to be programmed has been reached “PROGFULL”
will show in the display.
5. Press the “PLAY / PAUSE / CLOCK / ENTER” button to start the programmed playback.
The upper-left of the display will show “MEM”.
6. Press once the “STOP / MENU” button to stop the playback while retaining the program.
7. To play the programmed back again, press the “PLAY / PAUSE / CLOCK / ENTER” button.
8. To delete the program, press the “STOP / MENU” button twice. The notification “MEM” will
disappear.

SCD7800 / English Instruction Manual
7
CASSETTE
Playing Cassettes
1. Select the Tape mode with the “STANDBY / FUNCTION” button, until “TAPE” is shown.
2. Press the “STOP/EJECT” button to open the cassette compartment.
3. Insert a recorded audiocassette into the compartment with the tape opening facing upwards
and the side you wish to listen to facing the front (full spool to the right). Then close the
cassette compartment again.
4. Press the “PLAY” button to listen to the tape.
5. With the “STOP/EJECT” button you can stop play-back.
6. Wind the tape forwards or backwards if necessary ( . forward backward)
7. Always press the “STOP/EJECT” key when changing the direction or stopping the tape.
This prevents damage to the machine and the tape.
8. If the “STOP/EJECT” button is pressed again the flap of the cassette compartment opens.
9. In order to interrupt playback briefly, press the “PAUSE” button. Pressing again continues
playback.
USB
This device has been developed in line with the latest technical advances in the USB field. The
wide range of different USB storage devices of all types which are currently on the market,
unfortunately do not allow us to guarantee full compatibility with all USB storage devices. For
this reason, in rare cases there may be problems in playing back files from USB storage
devices. This is not a malfunction of the device.
1. Press repeatedly the “STANDBY / FUNCTION” button, until “USB” is shown in the display.
2. Connect a USB storage device directly into the port. Playback will automatically start after a
few seconds.
The control functions, repeat functions and programmed play are the same as in CD mode.
Note:
• Always directly connect a USB storage medium to the USB port to prevent any
malfunctions.
• The USB port is not designed for charging external devices.
CAUTION:
Switch the device to a different operating mode before you remove the USB storage device.

SCD7800 / English Instruction Manual
8
AUX IN
Via this socket you can also hear the sound of other playback devices such as MP3 players, CD
players etc. through the loudspeakers.
1. Please connect the external device with a 3.5mm stereo jack plug to the AUX-IN socket at
the back side of the unit.
2. Press repeatedly the “STANDBY / FUNCTION” button, until “Aux” is shown in the display.
3. You will hear the sound playback from the external device through the loudspeakers. You
may adjust the volume with volume buttons buttons. The CD buttons are not functional.
4. For the remaining procedure please see the operating instructions of the external sound
source.
Note:
Adjust the volume of the external device to a comfortable level.
ALARM
Setting the alarm time
The system must be in standby mode in order to set the alarm.
You have the option of setting two alarm times. Proceed as follows:
1. Press the “VOLUME+ / ALARM 1” button for about 3 seconds. The hours of the currently
set alarm time will start to flash.
2. Perform the settings with the “SKIP + / TUNING +” or “SKIP - / TUNING -” buttons.
3. Press the “VOLUME+ / ALARM 1” button to confirm. The minutes will start to flash.
4. Perform the settings with “SKIP + / TUNING +” or “SKIP - / TUNING -” button.
5. Press the “VOLUME+ / ALARM 1” button to confirm. Then choose how you would like to be
woken up. Perform the settings with the “SKIP + / TUNING +” or “SKIP - / TUNING -”
buttons. Press the “VOLUME+ / ALARM 1” to confirm.
• FM:
As soon as the set alarm time has been reached, the radio will turn on in FM mode.
• DAB:
As soon as the set alarm time has been reached, the radio will turn on in CD mode.
• CD:
As soon as the set alarm time has been reached, the device will turn on in CD mode.
The inserted CD will be played from the first track.
• USB:
As soon as the set alarm time has been reached, the device will turn on in USB mode.
The tracks of the connected storage device will be played from the first track.
• BUZZ:
A signal tone will sound when reaching the alarm time.
6. If DAB or FM is selected as wake up function, you must select a stored preset station 1-30.
7. Finally, press the “SKIP + / TUNING +” or “SKIP - / TUNING -” buttons to set the alarm
volume. Press the “VOLUME+ / ALARM 1” to confirm.
To set the second alarm time, repeat each of the above steps with the “VOLUME- / ALARM 2”
button.

SCD7800 / English Instruction Manual
9
Snooze
The automatically set alarm function can be switched off for 9 minutes with the “INFO /
SNOOZE” button.
Deactivate the sounding wake up tone
Press the “VOLUME+ / ALARM 1” or “VOLUME- / ALARM 2” button to deactivate the sounding
alarm tone.
Activate / Deactivate the alarm
Press in standby mode repeatedly the “VOLUME+ / ALARM 1” or “VOLUME- / ALARM 2” and
choose “Alarm off.
Press in standby mode repeatedly the “VOLUME+ / ALARM 1” or “VOLUME- / ALARM 2” and
choose the desired wake up source.
SETTING CLOCK AND DATE
The system must be in standby mode in order to set the clock.
1. Press and hold the “PLAY / PAUSE / CLOCK / ENTER” button for approx. 2 seconds.
2. Use the “SKIP + / TUNING +” or “SKIP - / TUNING -” buttons to set the time format “12 /
24hr” and press the “PLAY / PAUSE / CLOCK / ENTER” button to confirm time format. Now
the hour digits start flashing.
3. Use the “SKIP + / TUNING +” or “SKIP - / TUNING -” buttons to set the hours and press the
“PLAY / PAUSE / CLOCK / ENTER” button to confirm. Now the minutes digits flashing.
4. Use the “SKIP + / TUNING +” or “SKIP - / TUNING -” buttons to set the minutes and press
the “PLAY / PAUSE / CLOCK / ENTER” button to confirm. Now the display shows the date.
5. Set in the same way the date.
Note:
Press and hold the “PLAY / PAUSE / CLOCK / ENTER” button during operation order to briefly
display the current time.
HEADPHONE
To listen to music privately, use headphones with a 3.5mm stereo jack plug and connect them to
the headphones socket on the back of the system. The speakers will then be muted.

SCD7800 / English Instruction Manual
10
SYSTEM SETTINGS
Note: The system settings are only in DAB or FM mode available!
1. To enter the system settings, press the “STOP / MENU” button and select with the “SKIP + /
TUNING +” or “SKIP - / TUNING -” button the point “SYSTEM”. Press the “PLAY / PAUSE /
CLOCK / ENTER” button to confirm the selection.
2. Select with “SKIP + / TUNING +” or “SKIP - / TUNING -” one of the following settings and
press “PLAY / PAUSE / CLOCK / ENTER” to enter the setting:
➢ Language
Select the desired menu language: German, English, French, Italian, Dutch, Norwegian,
Danish.
➢ Time Update
Adjust the source for the time update: All sources, DAB, FM, no update.
➢ Factory reset
All stations and adjustments will be deleted!
➢ SW Version
Shows the currently installed software.
The current instruction manual can be downloaded from www.soundmaster.de.
Technical changes and misprints reserved.
Copyright by Woerlein GmbH, 90556 Cadolzburg, www.soundmaster.de
Duplication only with the permission of Woerlein GmbH

Consignes de sécurité, d’environnement et d’installation
FR
PROTECTION DE L’ENVIRONNEMENT
Ne jetez pas ce produit avec les ordures ménagères
lorsqu’il est usagé. Retournez-le à un point de collecte
pour le recyclage des appareils électriques et
électroniques. Cette recommandation est indiquée par le
symbole sur le produit, le mode d’emploi ou l’emballage.
Les composants sont réutilisables en fonction de leur marquage.
En réutilisant, recyclant ou employant autrement les vieux
appareils, vous contribuerez de façon signifiante à la protection
de notre environnement.
Veuillez contacter vos collectivités locales pour vous
renseigner sur les points de collecte
ATTENTION
Risque d’électrocution
Ne pas ouvrir!
Attention!: Pour réduire le risque d’électrocution, ne retirez
pas le couvercle (ou l’arrière). L’usager ne peut entretenir
aucune pièce à l’intérieur. Confiez l’entretien à un
personnel qualifié.ntretenir aucune pièce à l’intérieur.
Confiez l’entretien à un personnel qualifié.
Ce symbole indique la présence d’une tension
dangereuse à l’intérieur de l'appareil, qui est
suffisante pour provoquer un choc électrique.
Ce symbole indique la présence de consignes
importantes de fonctionnement et d’entretien de pour
l’appareil
Les piles usages sont des déchets dangereux et
ne doivent PAS être jetées avec les ordures
ménagères ! La loi impose aux consommateurs de
disposer de toutes les piles pour un recyclage
écologique – et ce que les piles soient de contenance
dangereuse ou pas*).
Disposer gratuitement des piles dans les points de collecte
de votre communauté ou auprès des magasins détaillant
les piles de même catégories.
Ne disposez que de piles entièrement vides.
*) marquée Cd = cadmium, Hg = mercure, Pb = plomb
CLASS 1 LASER PRODUCT
KLASSE 1 LASER PRODUKT
LUOKAN 1 LASER LAITE
KLASS 1 LASER APPARAT
PRODUCTO LASER CLASE 1
ATTENTION – RADIATION
LASER INVISIBLE LORSQUE
VOUS OUVREZ LE COUVERCLE
OU APPUYEZ SUR
L’ENCLENCHEMENT DE
SECURITE. EVITEZ TOUTE
EXPOSITION AU RAYON LASER
Pour éviter des lésions auditives, n’écoutez pas à
des niveaux sonores élevés pendant de longues
périodes.
N'utilisez l'appareil qu’à l’intérieur dans un lieu sec
Protégez l’appareil contre l’humidité
N’ouvrez pas l’appareil RISQUE
D’ELECTROCUTION ! Faites effectuer l’ouverture
et l’entretien par un personnel qualifié
Ne connectez cet appareil qu'à une prise murale
correctement installée et reliée à la terre Assurez-
vous que la tension principale corresponde aux
recommandations de la plaque d’indice.
Assurez-vous que le câble d’alimentation reste
au sec pendant le fonctionnement. Ne pincez
pas le câble et ne l’endommagez d’aucune
façon.
Un câble de réseau ou une prise abimés doivent
être immédiatement remplacés par un centre
agréé.
En cas de tonnerre, débranchez immédiatement
l’appareil de l’alimentation.
Les enfants doivent être surveillés par leurs
parents lorsqu’ils utilisent l’appareil.
Ne nettoyez l’appareil qu’avec un tissu sec.
N’utilisez PAS de PRODUITS DETERGENTS
ou de CHIFFONS ABRASIFS !
N’exposez pas l’appareil à la lumière directe du
soleil ou toute autre source de chaleur
Installez l’appareil dans un emplacement
suffisamment ventilé pour éviter une
accumulation de chaleur.
Ne recouvrez pas les grilles d’aération !
Installez l’appareil dans un emplacement
sécurisé et sans vibrations.
Ne pas installer l’appareil à proximité
d’ordinateurs et fours à micro-ondes; sinon la
réception de radio pourrait être perturbée.
Ne pas ouvrir ou réparer l’appareil. Cela est
dangereux et annulerait la garantie. La
réparation doit être uniquement effectuée que
par un centre de réparations / service agréé.
L’appareil est équipé d’un « Laser Classe 1 ».
Evitez toute exposition au rayon laser car cela
pourrait blesser les yeux.
N’utilisez que des piles au mercure et sans
cadmium.
Les piles usagées sont des déchets dangereux
et ne doivent PAS être jetées avec les ordures
ménagères !!! Ramenez les piles à votre point
de vente ou aux points de collecte de votre ville.
Eloignez les piles des enfants. Les enfants
pourraient avaler les piles. En cas d’ingestion
d’une pile, contactez immédiatement un
médecin.
Vérifiez régulièrement vos piles pour éviter les
fuites.
La prise de courant ou un coupleur d’appareil
est utilisé comme dispositif de déconnexion, les
dispositifs de déconnexion doivent rester
facilement utilisables.
Aucune source de flamme nue, telle que des
bougies allumées, ne doit être placée sur
l’appareil.
Aucun objet rempli de liquide, tel que des vases,
ne doit être placé sur l’appareil.
Cet appareil, conçu pour les climats modérés,
ne convient pas pour une utilisation dans les
pays au climat tropical.

SCD7800 / Français Manuel d’instructions
1
EMPLACEMENT DES BOUTONS
VUE DE FACE
1
Bouton SAUT+/SYNTONISATION+
2
Bouton SCAN / MODE
3
Bouton VEILLE / FONCTION
4
Bouton PRÉRÉGLAGE + / DOSSIER +
5
Bouton SAUT - / SYNTONISATION -
6
COMPARTIMENT CASSETTE
7
AFFICHAGE
8
Bouton VOLUME+/ALARME 2
9
Bouton LECTURE / PAUSE / HORLOGE /
ENTRÉE
10
Bouton INFO / SNOOZE
11
Bouton ARRÊT/MENU
12
Bouton VOLUME- /ALARME 1
13
HAUT-PARLEUR
VUE DE HAUT
14
FONCTIONNEMENT DE LA CASSETTE
15
COMPARTIMENT CD
16
Poignée
17
ANTENNE
VUE ARRIÈRE
18
Prise casque
19
PRISE AUX-IN
20
PRISE USB
21
PRISE secteur
22
COMPARTIMENT BATTERIE
INSTALLATION
CONTENU DE L’ENVOI
➢ Unité principale
➢ Manuel d’instructions
➢ Câble d’alimentation secteur
ALIMENTATION
➢ Assurez-vous que la tension est la même que celle indiquée sur la plaque d'identification de
l'unité principale.
➢ Connectez le câble d’alimentation secteur fourni à une prise de courant de sécurité
correctement installée et la fiche du câble à la prise d’entrée secteur située à l’arrière de
l’appareil.

SCD7800 / Français Manuel d’instructions
2
FONCTIONNEMENT SUR PILES
1. Ouvrez le couvercle du compartiment à piles au bas de l’appareil.
2. Insérez 6 piles de type LR14 (type « C ») de 1,5 V. Assurez-vous que la polarité est correcte
(consultez le fond du compartiment à piles)
3. Refermez ensuite le couvercle du compartiment à piles.
Remarque :
➢ Si l’appareil fonctionne avec des piles et est en mode veille, les piles se déchargeront
quand même. Pour éviter cela, nous vous recommandons de retirer les piles ou de
brancher l’appareil au secteur. L’affichage et les voyants bleus sont éteints.
➢ Lorsque l’appareil est alimenté par piles, il est préférable de ne pas régler le volume au
maximum
Afin de prolonger les temps d’écoute.
Gestion de l’alimentation ERP
L’appareil s’éteint automatiquement après 10 minutes en mode veille en l’absence de
signal audio. Pour l’allumer de nouveau, appuyez sur le bouton « STANDBY /
FUNCTION ».
FONCTIONNEMENT DE BASE
MISE EN MARCHE / ARRÊT
Appuyez sur le bouton « STANDBY / FUNCTION » pour allumer l’appareil.
Maintenez enfoncé le bouton « STANDBY / FUNCTION » pour éteindre l’appareil en mode
veille.
SÉLECTION DES MODES
Lorsque l’appareil est en marche, appuyez à plusieurs reprises sur le bouton « STANDBY /
FUNCTION » pour alterner entre les différents modes.
RÉGLAGE DU VOLUME
Appuyez sur le bouton « VOLUME - » ou « VOLUME + » pour diminuer ou augmenter le volume.
DAB
Déployez complètement l’antenne télescopique. Changez sa position pour améliorer la
réception.
Appuyez à plusieurs reprises sur le bouton « STANDBY / FUNCTION » jusqu’à ce que « DAB »
s’affiche à l’écran.
La radio démarre automatiquement une recherche complète des stations DAB+ à la première
mise sous tension de l’appareil. Lorsque la recherche est terminée, les stations sont stockées
par ordre alphabétique. La première station disponible sera jouée.
Remarque :
S’il n’y a aucune réception DAB+, changez l’appareil de place ou ajustez l’antenne. Maintenez
le bouton « SCAN / MODE » enfoncé pendant environ 3 secondes pour lancer une nouvelle
recherche.

SCD7800 / Français Manuel d’instructions
3
Sélectionner une station de radio DAB
Appuyez sur le bouton « SKIP - / TUNING - » ou « SKIP + / TUNING + » et sélectionnez la
station radio souhaitée.
Pour confirmer la sélection, appuyez à nouveau sur le bouton « PLAY / PAUSE / CLOCK /
ENTER ».
Stockage de préréglage
1. Sélectionnez la station radio désirée.
2. Appuyez sur le bouton « SCAN / MODE » et choisissez avec le bouton « SKIP -/TUNING
- » ou « SKIP + / TUNING + » le numéro de station de programme souhaité.
3. Appuyez sur le bouton « PLAY / PAUSE / CLOCK / ENTER » pour confirmer.
Rappel de préréglage
Appuyez sur le bouton « PRE + / FOLDER + » pour sélectionner la station radio stockée
souhaitée.
Informations DAB
Appuyez à plusieurs reprises sur le bouton « INFO / SNOOZE » pour afficher les informations
suivantes :
DLS, intensité du signal, genre, fréquence, erreur de signal, débit binaire audio, heure, date.
MENU DAB
Pour accéder au menu DAB, appuyez sur le bouton « STOP / MENU ». Sélectionnez l’un des
paramètres suivants avec le bouton « SKIP - / TUNING - » ou « SKIP + / TUNING + » et
appuyez sur le bouton « PLAY / PAUSE / CLOCK / ENTER » :
• Recherche complète :
la recherche de stations commence. Les stations sont recherchées dans la bande de
fréquence DAB.
• Recherche manuelle :
Pour ce faire, vous devez connaître la fréquence de la station. Elle se trouve sur le site
Internet du service de radiodiffusion. Sélectionnez les fréquences individuelles à l’aide du
bouton « PLAY / PAUSE / CLOCK / ENTER ».
• DRC :
Abréviation de contrôle de la plage numérique (plage dynamique). Le terme DRC décrit le
rapport entre le son le plus silencieux et le son le plus bruyant. Si la plage dynamique est
très élevée, il y a des sons très doux ainsi que des sons très forts.
Dans certaines circonstances, cela peut poser un problème de lecture. Supposons que
vous écoutez une station de radio dans un environnement relativement bruyant. En
augmentant le volume, vous pouvez jouer les parties silencieuses plus fort.
Ceci présente cependant l’inconvénient que les parties bruyantes deviennent
inconfortablement bruyantes. Il est logique ici de réduire la dynamique. Choisissez parmi les
options suivantes :

SCD7800 / Français Manuel d’instructions
4
- DRC désactivé : la plage dynamique n’est pas réduite.
- DRC élevé : la plage dynamique est considérablement réduite.
- DRC faible : la plage dynamique est légèrement réduite.
• Tri :
Il se peut que vous ne puissiez plus recevoir certaines stations après une recherche de
stations ou un changement d’emplacement. Avec cette fonction, vous pouvez supprimer ces
stations de la liste de réception. Sélectionnez « YES » et confirmez avec le bouton « PLAY /
PAUSE / CLOCK / ENTER ».
• Système
Reportez-vous à la section « PARAMÈTRES SYSTÈME ».
FM
1. Appuyez à plusieurs reprises sur le bouton « STANDBY / FUNCTION » jusqu’à ce que
« FM » s’affiche à l’écran.
2. Déployez complètement l’antenne télescopique. Changez sa position pour améliorer la
réception.
3. Il existe deux modes de recherche et de mémorisation des stations radio.
• Recherche automatique :
Important ! Toutes les stations radio existantes seront écrasées.
Maintenez le bouton « SCAN / MODE » enfoncé pendant environ 3 secondes. Le système
recherche les stations radio dans toute la bande de fréquences. Toutes les stations
trouvées seront préréglées de la fréquence la plus basse à la fréquence la plus élevée.
• Recherche manuelle de stations radio :
Appuyez brièvement sur les boutons « SKIP -/TUNING - » ou « SKIP + / TUNING + »,
jusqu’ à ce que vous ayez trouvé la station de radio que vous recherchez. Si vous
maintenez l’un des boutons enfoncé, l’appareil effectuera une recherche jusqu’à la station
radio précédente ou respectivement la station radio suivante.
Stockage de préréglage
La procédure est la même qu’en mode DAB.
Rappel de préréglage
La procédure est la même qu’en mode DAB.
Affichage des informations
Appuyez à plusieurs reprises sur le bouton « INFO / SNOOZE » pour afficher les informations
FM suivantes :
Texte radio, code PTY, nom, diffusion mono ou stéréo, heure, date.

SCD7800 / Français Manuel d’instructions
5
MENU FM
Pour accéder au menu FM, appuyez sur le bouton « STOP / MENU ». Sélectionnez l’un des
paramètres suivants avec le bouton « SKIP - / TUNING - » ou « SKIP + / TUNING + » et
appuyez sur le bouton « PLAY / PAUSE / CLOCK / ENTER » :
• Réglages de la recherche : sélectionner l’option de recherche automatique de stations radio
désirée.
- Toutes les stations : Toutes les stations qui peuvent être reçues sont recherchées.
Dans ce cas, la recherche de stations s’arrête également sur les stations à faible signal.
- Stations ayant un signal fort uniquement : le système recherche uniquement les stations
ayant un signal fort.
• Réglages audio : sélectionner MONO ou STEREO pour la réception FM.
• Système
Reportez-vous à la section « PARAMÈTRES SYSTÈME ».
CD
1. Appuyez à plusieurs reprises sur le bouton « STANDBY / FUNCTION » jusqu’à ce que
« CD » s’affiche à l’écran.
2. Ouvrez le compartiment à CD en tirant la porte du compartiment vers le haut à l’aide de
l’onglet.
3. Insérez un CD audio sur le cône central, la face imprimée vers le haut, et appuyez jusqu’à
ce que le CD provoque un clic, puis fermez le couvercle du compartiment CD.
4. Le CD démarre la lecture à partir du premier titre.
5. Pour retirer un CD, veuillez appuyer sur le bouton « STOP / MENU », ouvrez la porte du
compartiment à CD et retirez celui-ci avec soin.
Gardez toujours le plateau de CD fermé.
REMARQUE :
Si un disque est inséré avec un mauvais côté vers le haut, ou respectivement si aucun disque
n'est inséré, alors le message « NO DISC » s'affiche à l'écran.

SCD7800 / Français Manuel d’instructions
6
Boutons de commande :
➢ Pour démarrer ou interrompre la lecture, appuyez sur le bouton « PLAY / PAUSE / CLOCK /
ENTER ».
➢ Pour arrêter la lecture, appuyez sur le bouton « STOP/MENU ».
➢ Utilisez le bouton «SKIP + / TUNING +» pour sélectionner la piste suivante. Maintenez le
bouton enfoncé et commencez à rechercher dans les pistes.
Le bouton « SKIP - / TUNING - » peut être utilisé de la manière suivante :
Une pression = redémarrer la lecture de la piste en cours à partir du début.
Deux pressions = revenir à la piste précédente.
Maintenez le bouton enfoncé et commencez à rechercher en arrière dans les pistes.
➢ Pour sélectionner un dossier, appuyez sur le bouton « PRE -/FOLDER - » ou « PRE + /
FOLDER » (uniquement pour les CD MP3 ou USB).
Fonction de reprise
Si vous modifiez le mode ou éteignez l’appareil et revenez au mode CD, l’appareil démarre la
lecture à partir du dernier point.
Si vous appuyez sur le bouton « STOP / MENU » et relancez la lecture, l’appareil démarre avec
la première piste (piste 1).
Fonction RÉPÉTER
Appuyez à plusieurs reprises sur le bouton « SCAN / MODE » pendant la lecture pour effectuer
une sélection parmi les fonctions de répétition suivantes :
CD audio :
Une pression = le mode de lecture normal. L’écran affichera « Normal ».
Deux pressions = le morceau en cours est répété en continu. L'écran affichera « Repeat One ».
Trois pressions = tout le CD est lu en continu. L’écran affichera « Repeat All ».
Quatre pressions = tous les morceaux seront lus dans un ordre aléatoire. L’écran affichera
« Random ».
Cinq pressions = retour au mode de lecture normal.
CD MP3 :
Une pression = le mode de lecture normal. L’écran affichera « Normal ».
Deux pressions = le morceau en cours est répété en continu. L'écran affichera « Repeat One ».
Trois pressions = le dossier sélectionné est répété en continu. L’écran affichera « Repeat
Folder ».
Quatre pressions = tout le CD est lu en continu. L’écran affichera « Repeat All ».
Cinq pressions = tous les morceaux seront lus dans un ordre aléatoire. L’écran affichera
« Random ».
Six pressions = retour au mode de lecture normal.

SCD7800 / Français Manuel d’instructions
7
Programmation de la lecture
Cette fonction peut être utilisée pour programmer une liste de pistes à lire.
1. Appuyez sur le bouton « STOP / MENU ».
2. Appuyez sur le bouton « SCAN / MODE ». « P_01 » clignote à l’écran (P_01 désigne le
numéro de programme).
3. Utilisez les boutons « SKIP + / TUNING + » ou « SKIP -/TUNING - » pour sélectionner le
morceau souhaité et appuyez à nouveau sur le bouton « SCAN / MODE ». L’affichage de
« P_01 » passe à « P_02 ».
4. Sélectionnez le morceau suivant avec le bouton « SKIP + / TUNING + » ou « SKIP -
/TUNING - » et appuyez à nouveau sur le bouton « SCAN / MODE ». Répétez la procédure
jusqu’à ce que tous les morceaux souhaités soient sélectionnés.
REMARQUE :
Lorsque la capacité de stockage maximale des pistes est atteinte, « PROGFULL » s’affiche
à l’écran.
5. Appuyez sur le bouton « PLAY / PAUSE / CLOCK / ENTER » pour démarrer la lecture
programmée. La partie supérieure gauche de l’écran affiche « MEM ».
6. Appuyez une fois sur le bouton « STOP / MENU » pour arrêter la lecture tout en conservant
le programme.
7. Pour réécouter la programmation, appuyez sur le bouton « PLAY / PAUSE / CLOCK /
ENTER ».
8. Pour supprimer le programme, appuyez à deux reprises sur la bouton « STOP/ MENU ». La
notification « MEM » disparaîtra.
9. Mode d’emploi du lecteur de cassettes
Lecture de cassettes
1. Appuyez plusieurs fois sur le bouton "SCAN / MODE" jusqu'à ce que "TAPE" soit
sélectionné.
2. Appuyez sur la touche ARRÊT/ÉJECTION pour ouvrir le compartiment à cassette.
3. Insérez une cassette audio enregistrée dans le compartiment avec son ouverture vers le
haut et la face que vous souhaitez écouter vers l’avant (bobine pleine vers la droite). Puis
refermez le compartiment à cassette.
4. Appuyez sur la touche LECTURE pour écouter la cassette.
5. Vous pouvez en arrêter la lecture avec la touche ARRÊT/ÉJECTION.
6. Enrouler la bande vers l'avant ou vers l'arrière selon ( avant . en arrière )
7. Appuyez toujours sur la touche ARRÊT/ÉJECTION avant de changer de direction ou
pour arrêter la cassette. Cela évite d’endommager la machine et la cassette.
8. Si la touche ARRÊT/ÉJECTION est enfoncée à nouveau le volet du compartiment à
cassette d’ouvre.
9. Pour interrompre brièvement la lecture, appuyez sur la touche PAUSE. Enfoncez-la de
nouveau pour continuer la lecture.

SCD7800 / Français Manuel d’instructions
8
USB
Cet appareil a été développé en fonction des dernières avancées techniques dans le domaine
de l’USB. La large gamme de différents périphériques de stockage USB de tous types qui sont
actuellement sur le marché, ne nous permet malheureusement pas de garantir une compatibilité
totale avec tous les périphériques de stockage USB. Pour cette raison, dans de rares cas, il
peut y avoir des problèmes de lecture de fichiers à partir de périphériques de stockage USB. Il
ne s’agit pas d’un dysfonctionnement de l’appareil.
1. Appuyez à plusieurs reprises sur le bouton « STANDBY / FUNCTION » jusqu’à ce que
« USB » s’affiche à l’écran.
2. Branchez un périphérique de stockage USB directement dans le port. La lecture démarre
automatiquement au bout de quelques secondes.
Les fonctions de commande et de répétitions ainsi que la lecture programmée ont les mêmes
qu’en mode CD.
Remarque :
• Branchez toujours directement le périphérique de stockage USB sur le port USB pour éviter
tout dysfonctionnement.
• Le port USB n’est pas destiné à la charge de périphériques externes.
ATTENTION :
Commutez le système vers un autre mode de fonctionnement avant de retirer le périphérique
de stockage USB.
AUX IN
Cette prise permet également de diffuser dans les enceintes le son issu d’autres périphériques
de lecture, par exemple les lecteurs MP3 et CD.
1. Connectez l’appareil externe à l’aide d’une prise jack stéréo de 3,5 mm à la prise AUX-IN à
l’arrière de l’appareil.
2. Appuyez à plusieurs reprises sur le bouton « STANDBY / FUNCTION » jusqu’à ce que
« Aux » s’affiche à l’écran.
3. Vous entendrez le son lu à partir de l’appareil externe à travers les haut-parleurs. Vous
pouvez régler le volume à l’aide des boutons de volume. Les boutons du CD ne sont pas
fonctionnels.
4. Pour le reste de la procédure, veuillez consulter les instructions de fonctionnement du
périphérique externe.
Remarque :
Ajustez le volume de l’appareil externe pour une écoute confortable.

SCD7800 / Français Manuel d’instructions
9
ALARME
Réglage de l’heure de l’alarme
Assurez-vous que l’appareil est en veille avant de régler l’alarme.
Vous avez la possibilité de régler deux heures d’alarme. Procédez de la manière suivante :
1. Appuyez sur le bouton « VOLUME+ / ALARM 1 » pendant environ 3 secondes. Les heures
de l’alarme actuellement définie commenceront à clignoter.
2. Effectuez les réglages avec le bouton « SKIP + / TUNING + » ou « SKIP -/TUNING - ».
3. Appuyez sur le bouton « VOLUME+/ALARM 1 » pour confirmer. Les minutes commencent
à clignoter.
4. Effectuez les réglages avec le bouton « SKIP + / TUNING + » ou « SKIP -/TUNING - ».
5. Appuyez sur le bouton « VOLUME+/ALARM 1 » pour confirmer. Choisissez ensuite
comment vous aimeriez vous réveiller. Effectuez les réglages avec le bouton « SKIP + /
TUNING + » ou « SKIP -/TUNING - ». Appuyez sur le bouton « VOLUME+/ALARM 1 »
pour confirmer.
• FM :
Dès que l’heure d’alarme réglée est atteinte, la radio s’allume en mode FM.
• DAB :
Dès que l’heure d’alarme réglée est atteinte, la radio s’allume en mode CD.
• CD :
Dès que l’heure d’alarme réglée est atteinte, l’appareil s’allume en mode CD. Le CD
inséré sera lu à partir du premier morceau.
• USB :
Dès que l’heure d’alarme définie est atteinte, l’appareil s’allume en mode USB. Les
morceaux du périphérique de stockage connecté sont lus à partir du premier d’entre
eux.
• AVERTISSEUR :
Un signal sonore retentit lorsque l’heure de l’alarme est atteinte.
6. Si DAB ou FM est sélectionné comme fonction de réveil, vous devez sélectionner une
station préréglée stockée parmi les numéros 1 à 30.
7. Enfin, appuyez sur le bouton « SKIP + / TUNING + » ou « SKIP + / TUNING + » pour régler
le volume de l’alarme. Appuyez sur le bouton « VOLUME+ / ALARM 1 » pour confirmer.
Pour définir la seconde heure d’alarme, répétez toutes les étapes ci-dessus à l’aide du bouton
« VOLUME- / ALARM 2 ».
Report d’alarme
Le bouton « INFO / SNOOZE » permet de désactiver l’alarme définie automatiquement pendant
9 minutes.
Désactiver le son du réveil
Appuyez sur le bouton « VOLUME+ / ALARM 1 » ou « VOLUME - / ALARM 2 » pour
désactiver l’alarme.

SCD7800 / Français Manuel d’instructions
10
Activer/Désactiver l’alarme
En mode veille, appuyez à plusieurs reprises sur « VOLUME+ / ALARM 1 » ou « VOLUME - /
ALARM 2 » et choisissez « Alarm off ».
En mode veille, appuyez à plusieurs reprises sur « VOLUME+ / ALARM 1 » ou « VOLUME - /
ALARM 2 » et choisissez la source de réveil souhaitée.
RÉGLAGE DE L’HEURE ET DE LA DATE
Assurez-vous que l’appareil est en veille avant de régler l’heure.
1. Maintenez enfoncé le bouton « PLAY / PAUSE / CLOCK / ENTER » pendant environ
2 secondes.
2. Utilisez le bouton « SKIP + / TUNING + » ou « SKIP -/TUNING - » pour définir le format
d’heure « 12 / 24h » et appuyez sur le bouton « PLAY / PAUSE / CLOCK / ENTER » pour
confirmer le format d’heure. Les chiffres de l’heure commencent alors à clignoter.
3. Utilisez le bouton « SKIP + / TUNING + » ou « SKIP - / TUNING - » pour régler les heures
et appuyez sur le bouton « PLAY / PAUSE / CLOCK / ENTER » pour confirmer. Les
chiffres des minutes clignotent.
4. Utilisez le bouton « SKIP + / TUNING + » ou « SKIP -/TUNING - » pour régler les minutes
et appuyez sur le bouton « PLAY / PAUSE / CLOCK / ENTER » pour confirmer. L’écran
affiche désormais la date.
5. Réglez la date de la même manière.
Remarque :
Maintenez enfoncé le bouton « PLAY / PAUSE / CLOCK / ENTER » pendant le fonctionnement
afin d’afficher brièvement l’heure actuelle.
ÉCOUTEURS
Pour écouter de la musique en privé, utilisez un casque pourvu d’un connecteur stéréo de
3,5 mm que vous branchez à la prise casque à l’arrière de l’appareil. Les haut-parleurs seront
alors mis en sourdine.

SCD7800 / Français Manuel d’instructions
11
RÉGLAGES SYSTÈME
Remarque : Les paramètres système ne sont disponibles qu’en mode DAB ou FM !
1. Pour accéder aux paramètres du système, appuyez sur le bouton « STOP / MENU » et
sélectionnez avec le bouton « SKIP + / TUNING + » ou « SKIP -/TUNING - » la rubrique
« SYSTÈME ». Appuyez sur le bouton « PLAY / PAUSE / CLOCK / ENTER » pour
confirmer la sélection.
2. Sélectionnez l’un des paramètres suivants avec le » bouton « SKIP + / TUNING + » ou
« SKIP -/TUNING - » et appuyez sur le bouton « PLAY / PAUSE / CLOCK / ENTER » pour
accéder au paramètre :
➢ Langue
Sélectionnez la langue de menu souhaitée : allemand, anglais, français, italien,
néerlandais, norvégien, danois.
➢ Mise à jour de l’heure
Ajustez la source pour la mise à jour de l’heure : Toutes sources, DAB, FM, aucune mise
à jour.
➢ Réinitialisation aux réglages d’usine
Toutes les stations et tous les réglages seront supprimés !
➢ Version du logiciel
Permet d’afficher la version du logiciel installé.
Ce manuel d’instructions peut être téléchargé sur www.soundmaster.de
Modifications techniques et fautes d’impression réservées
Copyright de Wörlein GmbH, 90556 Cadolzburg, www.soundmaster.de
Duplication uniquement avec l’autorisation de Woerlein GmbH

Veiligheids-, milieu- en instellingsaanwijzingen
NL
MILIEUBESCHERMING
Gooi dit product niet weg bij het huishoudafval aan
het einde van de levensduur ervan. Breng het product
terug naar een inzamelingspunt voor hergebruik van
electrische en electronische apparatuur. Dit wordt
aangegeven door dit symbool op het product, in de
gebruiksaanwijzing of op de verpakking.
De materialen zijn herbruikbaar volgens de markeringen.
Door materiaal te recyclen of oude apparaten op een andere
manier te hergebruiken draagt u bij aan het bescherming van
ons milieu. Neem a.u.b. contact op met uw gemeente voor
informatie over inzamelingspunten.
WAARSCHUWING
Risico voor een elektrische schok
Niet openen!
Waarschuwing: Verwijder de behuizing (of achterzijde) niet,
om het risico op elektrische schokken te verkleinen. Geen
voor de gebruiker te onderhouden onderdelen binnenin het
apparaat. Laat reparatie over aan gekwalificeerd
onderhoudspersoneel.
Dit symbool wijst op de aanwezigheid van een
gevaarlijke spanning binnenin de behuizing, die groot
genoeg is om electrische schokken te veroorz aken.
Dit symbool wijst de gebruiker op de aanwezigheid
van belangrijke gebruiks- en onderhoudsinstructies
voor het apparaat.
Gebruikte batterijen zijn gevaarlijk afval en mogen
NIET weggegooid worden bij het huishoudelijk afval!!!
Als consument bent u wettelijk verplicht alle batterijen
terug te brengen voor milieuvriendelijk hergebruik - of
de batterijen gevaarlijke stoffen*) bevatten of niet.
U kunt batterijen gratis terugbrengen naar openbare
inzamelingspunten in uw gemeente of bij winkels die de
betreffende soort batterijen verkopen.
Alleen volledig lege batterijen.
*) met de markering Cd = cadmium, Hg = kwik, Pb = lood
CLASS 1 LASER PRODUCT
KLASSE 1 LASER PRODUKT
LUOKAN 1 LASER LAITE
KLASS 1 LASER APPARAT
PRODUCTO LASER CLASE 1
WAARSCHUWING - ONZICHTBARE
LASERSTRALING WANNEER DE
BEHUIZING GEOPEND WORDT OF
DE INTERNE BEVEILIGING
UITGESCHAKELD. VERMIJD
BLOOTSTELLING AAN DE
LASERSTRAAL.
Luister nooit langdurig op hoge volumeniveaus,
om mogelijke gehoorbeschadiging te voorkomen.
Gebruik het apparaat alleen binnenshuis in een
droge omgeving.
Bescherm het apparaat tegen vocht.
Open het apparaat niet. ELECTRISCHE
SCHOKGEVAAR! Laat opening en reparatie over
aan gekwalificeerd onderhoudspersoneel.
Sluit dit apparaat alleen aan op een goed
geïnstalleerd en geaard stopcontact. Zorg ervoor dat
de netspanning overeenkomt met het de
specificaties op het etiket.
Zorg ervoor dat het electriciteitssnoer droog blijft
tijdens gebruik. Zorg ervoor dat het
electriciteitssnoer niet afgeknepen of op een
andere manier beschadigd wordt.
Beschadigde snoeren of stekkers moeten
meteen vervangen worden door geautoriseerd
onderhoudspersoneel.
In geval van bliksem moet de stekker
onmiddellijk uit het stopcontact getrokken
worden.
Wanneer kinderen het apparaat gebruiken,
moeten de ouders toezicht houden.
Reinig het apparaat alleen met een droge doek.
Gebruik GEEN SCHOONMAAKMIDDELEN of
SCHUURSPONSJES!
Stel het apparaat niet bloot aan direct zonlicht of
andere hittebronnen.
Installeer het apparaat op een plaats met
voldoende ventilatie, om oververhitting te
voorkomen.
Dek de ventilatieopeningen niet af!
Installeer het apparaat op een veilige en
vibratie-vrije plaats.
Installeer het apparaat zo ver mogelijk uit de
buurt van computers en magnetrons; anders kan
de radio-ontvangst gestoord worden.
Open de behuizing niet en probeer het apparaat
niet te repareren. Dit is gevaarlijk en doet uw
garantie vervallen. Reparaties mogen alleen
uitgevoerd worden door geautoriseerd
onderhoudspersoneel.
Dit apparaat is uitgerust met een “Klasse 1
Laser”. Vermijd blootstelling aan de laserstraal;
dit kan verwondingen aan de ogen veroorzaken.
Gebruik alleen kwik- en cadmium-vrije batterijen.
Gebruikte batterijen zijn gevaarlijk afval en
mogen NIET weggegooid worden bij het
huishoudelijk afval!!! Breng de batterijen terug
naar uw handelaar of naar inzamelingspunten in
uw gemeente.
Houd batterijen buiten bereik van kinderen.
Kinderen kunnen batterijen per ongeluk
inslikken. Raadpleeg onmiddellijk een dokter
wanneer een kind een batterij ingeslikt heeft.
Controleer uw batterijen regelmatig om
batterijlekkage te voorkomen.
De stekker of een koppelkabel wordt gebruikt als
onderbrekingsapparaat. De
onderbrekingsapparaten zullen gereed zijn voor
gebruik.
Zet geen open vuurbronnen, zoals brandende
kaarsen, op het apparaat.
Zet geen met vloeistof gevulde objecten, zoals
vazen, op het apparaat.
Dit apparaat is voor gebuik in omgevingen met
een gematigd klimaat; niet geschikt in landen
met een tropisch klimaat.

SCD7800 / Nederlands Gebruiksaanwijzing
1
LOCATIE VAN BEDIENINGEN
VOORAANZICHT
1
Toets VOLGENDE+/AFSTEMMEN+
2
Toets SCAN/PROG
3
Toets STAND-BY / FUNCTIE -
4
Toets PRE+/MAP+-
5
Toets OVERLAAN - / AFSTEMMEN -
6
CASSETTE compartiment
7
SCHERM
8
Toets VOLUME+/ALARM 2
9
Toets
AFSPELEN/PAUZEREN/ENTER/KLOK
10
Toets INFO/ SLUIMER
11
Toets STOP/MENU
12
Toets VOLUME-/ALARM 1
13
SPREKER
BOVENAANZICHT
14
CASSETTE bediening
15
CD-lade
16
Handgreep
17
Antenne
ACHTERAANZICHT
18
Hoofdtelefoonaansluiting
19
AUX-INGANG
20
USB-INGANG
21
Stromingang
22
Batterijklep
INSTALLATIE
LEVERINGSOMVANG
➢ Hoofdeenheid
➢ Gebruiksaanwijzing
➢ Voedingskabel
STROOMVOORZIENING
➢ Zorg ervoor dat de spanning hetzelfde is als aangegeven op het identificatieplaatje van de
hoofdeenheid.
➢ Sluit de meegeleverde voedingskabel aan op een veilig geïnstalleerd stopcontact en steek
de stekker van de kabel in de stroomaansluiting aan de achterkant van het apparaat.

SCD7800 / Nederlands Gebruiksaanwijzing
2
WERKING OP BATTERIJEN
1. Open het deksel van het batterijvak op de onderzijde van het apparaat.
2. Installeer 6 type LR14 (formaat “C”) 1,5 V batterijen en let daarbij op de juiste polariteit (zie
markeringen in het batterijvak).
3. Sluit daarna het deksel van het batterijvak.
Opmerking:
➢ Als het apparaat op batterijen werkt en in stand-by staat, raken de batterijen nog steeds
leeg. Om dit te voorkomen, raden we aan de batterijen te verwijderen of het apparaat op het
lichtnet aan te sluiten. Het display en de blauwe lampjes zullen uit gaan.
➢ Om langer te kunnen afspelen als het apparaat op batterijen werkt, is het beter om
het volume niet op maximaal te zetten.
ERP-voedingsbeheer
Het apparaat zal in stand-by-modus na 10 minuten automatisch uitschakelen als er geen
audiosignaal aanwezig is. Druk op de toets “STANDBY / FUNCTION” om het apparaat
weer in te schakelen.
ALGEMENE BEDIENINGEN
IN-/UITSCHAKELEN
Druk op de toets “STANDBY / FUNCTION” om het apparaat in te schakelen.
Houd de toets “STANDBY / FUNCTION” ingedrukt om het apparaat uit te schakelen in stand-by-
modus.
MODI SELECTEREN
Druk in aan-modus herhaaldelijk op de toets “STANDBY / FUNCTION” om de modus te wijzigen.
VOLUMEREGELING
Druk op de toets “VOLUME –” of “VOLUME +” om het volume te verlagen of te verhogen.
DAB
Trek de telescoopantenne volledig uit. Verander de positie ervan om de ontvangst te
verbeteren.
Druk herhaaldelijk op de toets “STANDBY / FUNCTION” totdat er “DAB” op het display wordt
weergegeven.
De radio zal automatisch een volledige scan van DAB+-zenders starten als het apparaat de
eerste keer wordt ingeschakeld. Wanneer de scan voltooid is, dan worden de stations in
alfabetische volgorde opgeslagen. De eerst beschikbare zender wordt gespeeld.
Opmerking:
Als er op een bepaald moment geen DAB+ ontvangst is, verplaats dan het apparaat of pas de
antenne aan. Houd de toets “SCAN / MODE” ongeveer 3 seconden ingedrukt om een nieuwe
zoekopdracht te starten.

SCD7800 / Nederlands Gebruiksaanwijzing
3
DAB-radiozender selecteren
Druk op “SKIP - / TUNING -” of “SKIP + / TUNING +” en selecteer de gewenste radiozender.
Om de selectie te bevestigen, drukt u op de toets “PLAY / PAUSE / CLOCK / ENTER”.
Voorinstelling opslaan
1. Selecteer het gewenste radiostation.
2. Druk op de toets “SCAN / MODE” en kies het gewenste geprogrammeerde zendernummer
met “SKIP - / TUNING -” of “SKIP + / TUNING +”.
3. Druk op “PLAY / PAUSE / CLOCK / ENTER” om te bevestigen.
Voorinstelling oproepen
Druk op “PRE - / FOLDER -” of “PRE + / FOLDER +” om de gewenste opgeslagen radiozender
te selecteren.
DAB-informatie
Druk herhaaldelijk op de toets “INFO / SNOOZE” om de volgende DAB-informatie te tonen:
DLS, signaalsterkte, genre, frequentie, signaalfout, bitsnelheid audio, tijd, datum.
DAB-MENU
Druk op de toets “STOP / MENU” om het DAB-menu te openen. Gebruik “SKIP - / TUNING -” of
“SKIP + / TUNING +” om een van de volgende instellingen te selecteren en druk vervolgens op
“PLAY / PAUSE / CLOCK / ENTER”:
• Volledige scan:
De stationscan starten. De DAB-frequentieband wordt gescand voor stations.
• Handmatig afstemmen:
U dient hiervoor de frequentie van het gewenste station te weten. Deze is te vinden op de
website van de zenderservice. Selecteer individuele frequenties met de toets “PLAY /
PAUSE / CLOCK / ENTER”.
• DRC:
Afkorting voor Digital Range Control oftewel digitale bereikcontrole (dynamisch bereik). De
term DRC beschrijft de verhouding tussen het zachtste en het luidste geluid. Als het
dynamische bereik erg hoog is, dan zult u zowel zeer zachte en zeer luide geluiden horen.
Dit kan in bepaalde omstandigheden tot problemen leiden met het afspelen. Laten we
aannemen dat u naar een radiostation luistert in een relatief lawaaierige omgeving. U kunt
de zachtere secties luider afspelen door het volume te verhogen.
Dit heeft echter het nadeel dat de luidere secties oncomfortabel luid worden. Het is in dit
geval aangeraden het dynamische bereik te verlagen. Kies uit de volgende opties:
- DRC uit: Het dynamische bereik wordt niet verlaagd.
- DRC hoog: Het dynamische bereik wordt sterk verlaagd.
- DRC laag: Het dynamische bereik wordt ietwat verlaagd.

SCD7800 / Nederlands Gebruiksaanwijzing
4
• Opschonen:
Het kan gebeuren dat u bepaalde stations niet langer kunt ontvangen na een stationscan of
na een verandering in locatie. U kunt met deze functie de betreffende stations uit de
ontvangstlijst wissen. Selecteer “YES” en bevestig met de toets “PLAY / PAUSE / CLOCK /
ENTER”.
• Systeem
Kijk onder “SYSTEEMINSTELLINGEN”.
FM
1. Druk herhaaldelijk op de toets “STANDBY / FUNCTION” totdat er “FM” op het display wordt
weergegeven.
2. Trek de telescoopantenne volledig uit. Verander de positie ervan om de ontvangst te
verbeteren.
3. Er zijn twee opties voor het zoeken naar en opslaan van radiostations als voorkeuze.
• Automatische scan:
Belangrijk Enigerlei voorgeprogrammeerde radiostations zullen worden overschreven.
Houd de toets "SCAN / MODE" ongeveer 3 seconden ingedrukt. Het systeem scant de
volledige frequentieband op radiozenders. Alle gevonden stations zullen als voorkeuze
worden opgeslagen van laagste tot hoogste frequentie.
• Handmatige scan voor audiostations:
Druk kort op de toets “SKIP - / TUNING -” of “SKIP + / TUNING +” totdat u de radiozender
waarnaar u zocht hebt gevonden. Als u een van de toetsen ingedrukt houdt, dan zal het
apparaat naar respectievelijk het vorige of volgende radiostation zoeken.
Voorinstelling opslaan
Dit gaat hetzelfde als in de DAB-modus.
Voorinstelling oproepen
Dit gaat hetzelfde als in de DAB-modus.
Informatieweergave
Druk herhaaldelijk op de toets “INFO / SNOOZE” om de volgende FM-informatie te tonen:
Radiotekst, PTY, naam, mono- of stereo-uitzending, tijd, datum.

SCD7800 / Nederlands Gebruiksaanwijzing
5
FM-MENU
Druk op de toets “STOP / MENU” om het FM-menu te openen. Gebruik “SKIP - / TUNING -” of
“SKIP + / TUNING +” om een van de volgende instellingen te selecteren en druk vervolgens op
“PLAY / PAUSE / CLOCK / ENTER”:
• Scaninstelling: Selecteer de gewenste optie voor de automatische stationscan.
- Alle stations: Naar alle stations zoeken die kunnen worden ontvangen. De stationscan
stopt in dit geval ook op zwakke stations.
- Alleen krachtige stations: Er wordt alleen naar duidelijke stations gezocht.
• Audio-instelling: Selecteer MONO of STEREO voor de FM-ontvangst.
• Systeem
Kijk onder “SYSTEEMINSTELLINGEN”.
CD
1. Druk herhaaldelijk op de toets “STANDBY / FUNCTION” totdat er “CD” op het display wordt
weergegeven.
2. Open het cd-vak door de klep bij het lipje omhoog te trekken.
3. Plaats een audio-cd met de bedrukte zijde omhoog op de centrale conus zodat de cd op zijn
plek klikt en sluit vervolgens de klep van de cd-houder.
4. De cd start het afspelen vanaf het eerste nummer.
5. Om de cd te verwijderen, drukt u op de toets “STOP / MENU”, opent u de cd-klep en tilt u de
cd er voorzichtig uit.
Houd het cd-deck altijd gesloten.
OPMERKING:
Als een schijf ondersteboven is geplaatst of er geen schijf is geplaatst, zal er “NO DISC“ op het
display verschijnen.
Bedieningstoetsen:
➢ Om het afspelen te starten of te pauzeren, drukt u op de toets “PLAY / PAUSE / CLOCK /
ENTER”.
➢ Druk op de toets “STOP / MENU” om het afspelen te stoppen.
➢ Gebruik de "SKIP + / TUNING +" knop om de volgende track te selecteren. Houd de knop
ingedrukt en begin vooruit te zoeken binnen de tracks.
De toets “SKIP - / TUNING -” kan als volgt worden gebruikt:
Eenmaal indrukken = Dit start de huidige track weer vanaf het begin.
Tweemaal indrukken = Hierdoor wordt de vorige track geselecteerd.
Houd de knop ingedrukt en begin achteruit te zoeken binnen de tracks.
➢ Druk op de toet “PRE + / FOLDER” om een map te selecteren (alleen voor MP3-cd of USB).

SCD7800 / Nederlands Gebruiksaanwijzing
6
Hervatfunctie
Als u van modus wisselt of het apparaat uitschakelt en terugkeert naar de cd-modus, dan zal
het apparaat het afspelen starten vanaf het laatste punt.
Als u op de toets “STOP / MENU” drukt of het afspelen opnieuw start, dan zal het apparaat
starten vanaf de eerste track (track 1).
HERHAAL-functie
Druk tijdens het afspelen herhaaldelijk op de toets “SCAN / MODE” om de volgende
herhaalfuncties te selecteren:
Audio-cd:
Eenmaal indrukken = de normale afspeelmodus. De display zal “Normal” weergeven.
Tweemaal indrukken = de huidige track wordt continu herhaald. De display zal “Repeat One”
weergeven.
Driemaal indrukken = de gehele cd wordt continu herhaald. De display zal “Repeat All”
weergeven.
Viermaal indrukken = alle tracks zullen op willekeurige volgorde worden afgespeeld. De display
zal “Random” weergeven.
Vijfmaal indrukken = de normale afspeelmodus hervatten.
MP3-cd:
Eenmaal indrukken = de normale afspeelmodus. De display zal “Normal” weergeven.
Tweemaal indrukken = de huidige track wordt continu herhaald. De display zal “Repeat One”
weergeven.
Driemaal indrukken = de geselecteerde folder wordt continu herhaald. De display zal “Repeat
Folder” weergeven.
Viermaal indrukken = de gehele USB wordt continu herhaald. De display zal “Repeat All”
weergeven.
Vijfmaal indrukken = alle tracks zullen op willekeurige volgorde worden afgespeeld. De display
zal “Random” weergeven.
Zesmaal indrukken = de normale afspeelmodus hervatten.
Geprogrammeerd afspelen
Dit kan worden gebruikt om iedere gewenste volgorde van de nummers te programmeren.
1. Druk op de toets “STOP / MENU”.
2. Druk op de toets “SCAN / MODE”. “P_01” zal knipperen op het display (P_01 staat voor het
programmanummer).
3. Gebruik de toetsen “SKIP + / TUNING +” of “SKIP - / TUNING -” om het gewenste nummer
te selecteren en druk opnieuw op de toets "SCAN / MODE". Op het display zal “P_01”
veranderen in “P_02”.
4. Selecteer het volgende nummer met de toetsen “SKIP + / TUNING +” of “SKIP - / TUNING -
” en druk opnieuw op de toets "SCAN / MODE". Herhaal de procedure totdat alle gewenste
tracks zijn geselecteerd.

SCD7800 / Nederlands Gebruiksaanwijzing
7
OPMERKING:
Als de opslagcapaciteit voor de te programmeren tracks is bereikt, dan zal de display
“PROGFULL” weergeven.
5. Druk op de toets “PLAY / PAUSE / CLOCK / ENTER” om het geprogrammeerde afspelen
te starten. Linksboven op de display zal “MEM” verschijnen.
6. Druk eenmaal op de toets “STOP / MENU” om het afspelen te stoppen en het programma te
behouden.
7. Om het programma opnieuw af te spelen, drukt u op de toets “PLAY / PAUSE / CLOCK /
ENTER”.
8. Druk tweemaal op de toets “STOP / MENU” om het programma te verwijderen. De
notificatie “MEM” zal verdwijnen.
CASSETTE
Cassettes afspelen
1. Selecteer de tapemodus met de knop "STANDBY / FUNCTION", totdat "TAPE" wordt
weergegeven in het display.
2. Druk op de knop “STOP/UITWERPEN” om de cassettehouder te openen.
3. Plaats een opgenomen audiocassette in de houder met de opening van de tape omhoog
gericht en met de zijde waar u naar wilt luisteren naar voren gericht (volle spoel aan de
rechterzijde). Sluit vervolgens de cassettehouder.
4. Druk op de knop “START” om naar de tape te luisteren.
5. Druk op de knop “STOP/UITWERPEN” om het afspelen te stoppen.
6. Gebruik de pijltjestoetsen om de tape naar wens vooruit of terug te spoelen
( vooruit achteruit )
7. Druk altijd op de knop “STOP/UITWERPEN”wanneer u de tape van richting verandert of
stopt. Hierdoor voorkomt u beschadiging van het apparaat en de tape.
8. Als u nogmaals op de knop “STOP/UITWERPEN” drukt, zal het klepje van de
cassettehouder openen.
9. Druk op de knop “PAUZE” om het afspelen even te onderbreken. Druk nogmaals op deze
knop om het afspelen te hervatten.

SCD7800 / Nederlands Gebruiksaanwijzing
8
USB
Dit apparaat is ontwikkeld volgens de meest recente technische ontwikkelingen in de USB-
industrie. Wegens de grote verscheidenheid aan USB-geheugenapparatuur momenteel
verkrijgbaar op de markt, kunnen wij helaas niet de volledige compatibiliteit garanderen met alle
USB-geheugenapparaten. Er kunnen daarom in zeldzame gevallen problemen optreden tijdens
het afspelen van bestanden van USB-geheugenapparatuur. Dit is geen storing van het
apparaat.
1. Druk herhaaldelijk op de toets “STANDBY / FUNCTION” totdat er “USB” op het display
wordt weergegeven.
2. Sluit een USB-geheugenapparaat direct aan op de poort. Het afspelen zal na enkele
seconden automatisch worden gestart.
De bedieningsfuncties, de herhaalfuncties en het geprogrammeerd afspelen zijn hetzelfde als in
cd-modus.
Opmerking:
• Sluit een USB-opslagmedium altijd direct aan op de USB-poort om storingen te voorkomen.
• De USB-poort is niet ontworpen voor het opladen van externe apparatuur.
LET OP:
Stel het apparaat in op een andere gebruiksmodus voordat u het USB-geheugenapparaat
loskoppelt.
AUX-IN
U kunt met deze ingang via de luidsprekers audio afspelen van andere afspeelapparatuur, zoals
MP3-spelers, cd-spelers, enz.
1. Sluit het externe apparaat met een 3,5 mm stereo-jack aan op de AUX-IN-aansluiting aan
de achterkant van het apparaat.
2. Druk herhaaldelijk op de toets “STANDBY / FUNCTION” totdat er “Aux” op het display
wordt weergegeven.
3. U zult vervolgens de afspelende muziek van het externe apparaat via de luidsprekers horen.
U kunt het volume aanpassen met behulp van de volumetoetsen. De cd-toetsen zijn niet
functioneel.
4. Voor de resterende procedure, raadpleeg a.u.b. de gebruiksaanwijzingen van de externe
audiobron.
Opmerking:
Stel het volume van het externe apparaat in op een comfortabel niveau.

SCD7800 / Nederlands Gebruiksaanwijzing
9
ALARM
De alarmtijd instellen
Het systeem moet op stand-bymodus staan om het alarm in te kunnen stellen.
U hebt de optie twee alarmtijden in te stellen. Ga als volgt te werk:
1. Houd de toets “VOLUME+ / ALARM 1” ca. 3 seconden ingedrukt. De uren van de
momenteel ingestelde alarmtijd zullen beginnen te knipperen.
2. Gebruik de toetsen “SKIP + / TUNING +” of “SKIP - / TUNING -” om in te stellen.
3. Druk ter bevestiging op de toets “VOLUME+ / ALARM 1”. De minuten zullen beginnen te
knipperen.
4. Gebruik de toetsen “SKIP + / TUNING +” of “SKIP - / TUNING -” om in te stellen.
5. Druk ter bevestiging op de toets “VOLUME+ / ALARM 1”. Kies vervolgens hoe u wilt worden
gewekt. Gebruik de toetsen “SKIP + / TUNING +” of “SKIP - / TUNING -” om in te stellen.
Druk ter bevestiging op “VOLUME+ / ALARM 1”.
• FM:
De radio zal op de FM-modus schakelen zodra de ingestelde alarmtijd is bereikt.
• DAB:
De radio zal op de DAB-modus schakelen zodra de ingestelde alarmtijd is bereikt.
• CD:
Het apparaat zal op de cd-modus schakelen zodra de ingestelde alarmtijd is bereikt. De
geladen cd zal vanaf de eerste track worden worden afgespeeld.
• USB:
Het apparaat zal op de USB-modus schakelen zodra de ingestelde alarmtijd is bereikt.
De tracks van het aangesloten geheugenapparaat zullen vanaf de eerste track worden
afgespeeld.
• BUZZ:
Er klinkt een zoemer wanneer de alarmtijd is bereikt.
6. Als DAB of FM is geselecteerd als wekfunctie, dient u een opgeslagen voorkeurzender (1-
30) te selecteren.
7. Druk ten slotte op de toetsen “SKIP + / TUNING +” of “SKIP - / TUNING -” om het
alarmvolume in te stellen. Druk ter bevestiging op “VOLUME+ / ALARM 1”.
U kunt de tweede alarmtijd instellen door elk van de bovengenoemde stappen te herhalen met
de toets “VOLUME- / ALARM 2”.
Sluimer
De automatisch ingestelde alarmfunctie kan 9 minuten lang worden uitgeschakeld met de toets
“INFO / SNOOZE”.
Het wekgeluid deactiveren
Druk op de toetsen “VOLUME+ / ALARM 1” of “VOLUME- / ALARM 2” om het wekgeluid te
deactiveren.

SCD7800 / Nederlands Gebruiksaanwijzing
10
Het alarm (de)activeren
Druk in stand-by-modus herhaaldelijk op de toetsen “VOLUME+ / ALARM 1” of “VOLUME- /
ALARM 2” en kies “Alarm off”.
Druk in stand-by-modus herhaaldelijk op de toetsen “VOLUME+ / ALARM 1” of “VOLUME- /
ALARM 2” en kies de gewenste wekker.
DE KLOK EN DATUM INSTELLEN
Het systeem moet op stand-bymodus staan om de klok in te kunnen stellen.
1. Houd de toets “PLAY / PAUSE / CLOCK / ENTER” ongeveer 2 seconden ingedrukt.
2. Gebruik de toetsen “SKIP + / TUNING +” of “SKIP - / TUNING -” om de tijdsnotatie (12- of
24-uurs) in te stellen en druk op de toets “PLAY / PAUSE / CLOCK / ENTER” om de
tijdsnotatie te bevestigen. De uurcijfers zullen nu knipperen.
3. Gebruik de toetsen “SKIP + / TUNING +” of “SKIP - / TUNING -” om de uren in te stellen en
druk op de toets “PLAY / PAUSE / CLOCK / ENTER” om te bevestigen. De minuutcijfers
zullen nu knipperen.
4. Gebruik de toetsen “SKIP + / TUNING +” of “SKIP - / TUNING -” om de minuten in te stellen
en druk op de toets “PLAY / PAUSE / CLOCK / ENTER” om te bevestigen. De datum
verschijnt nu op het display.
5. Stel de datum op dezelfde manier in.
Opmerking:
Houd de toets “PLAY / PAUSE / CLOCK / ENTER” tijdens het afspelen in om de huidige tijd
kort weer te geven.
HOOFDTELEFOON
Gebruik om privé naar muziek te luisteren een hoofdtelefoon met een 3,5 mm stereokabel en
sluit deze aan op de hoofdtelefoonaansluiting aan de achterkant van het systeem. De
luidsprekers zullen vervolgens worden gedempt.

SCD7800 / Nederlands Gebruiksaanwijzing
11
SYSTEEMINSTELLINGEN
Opmerking: De systeeminstellingen zijn alleen beschikbaar in de DAB- of FM-modus!
1. Druk op de toets “STOP / MENU” en selecteer “SYSTEM” met behulp van de toetsen “SKIP
+ / TUNING +” of “SKIP - / TUNING -” om de systeeminstellingen te openen. Druk op de
toets “PLAY / PAUSE / CLOCK / ENTER” om de selectie te bevestigen.
2. Gebruik “SKIP - / TUNING -” of “SKIP + / TUNING +” om een van de volgende instellingen
te selecteren en druk vervolgens op “PLAY / PAUSE / CLOCK / ENTER” om de instelling te
openen:
➢ Taal
Selecteer de gewenste menutaal: Duits, Engels, Frans, Italiaans, Nederlands, Noors,
Deens.
➢ Tijdupdate
Selecteer de bron voor de tijdupdate: Alle bronnen, DAB, FM, geen update.
➢ Fabrieksinstellingen herstellen
Alle stations en instellingen zullen worden gewist!
➢ SW-versie
Toont de momenteel geïnstalleerde software.
De nieuwste versie van de gebruiksaanwijzing kunt u downloaden vanaf
www.soundmaster.de
Technische veranderingen en drukfouten voorbehouden.
Auteursrecht van Woerlein GmbH, 90556 Cadolzburg,
www.soundmaster.de
Duplicatie alleen met de toestemming van Woerlein GmbH

Istruzioni di sicurezza, configurazione e ambienti di utilizzo
IT
PROTEZIONE AMBIENTALE
Non smaltire il presente prodotto tra I normali rifiuti
domestici al termine del suo ciclo di vita. Portarlo invece
ad un centro specializzato nel riciclo di materiale elettrico
e dispositivi elettronici. Quest’obbligo è indicato dal
simbolo di riciclo presente sul prodotto, sul manuale di
istruzioni o sulla confezione.
I materiali sono riutilizzabili in base alle indicazioni su di essi
riportate. Riutilizzando, riciclando o comunque trovando altri usi ai
dispositivi usati, si dà un grande contributo alla protezione
ambientale. Contattare i propri enti locali responsabili della
questione per ulteriori informazioni sui punti di raccolta.
ATTENZIONE
Rischio di scosse elettriche
Non aprire il dispositivo!
Cautela: Per ridurre il rischio di scosse elettriche, non rimuovere
la copertura (o il retro). Il prodotto non contiene componenti
riparabili. Affidare le riparazioni esclusivamente a personale
qualificato.
Tale simbolo indica la presenza all’interno
dell’apparecchio di componenti che generano
tensione elettrica a livelli pericolosi, capaci di
produrre scosse elettriche.
Tale simbolo indica la presenza di importanti
istruzioni di utilizzo e manutenzione del prodotto.
Le batterie usate sono rifiuti pericolosi e NON
devono essere smaltite assieme agli altri rifiuti
domestici! Infatti, ogni consumatore è obbligato a
norma di legge a restituire tutte le batterie ai centri
di riciclaggio ecosostenibile – indipendentemente
dalla presenza nelle batterie di sostanze più o meno
dannose*).Le batterie usate possono essere consegnate in
maniera completamente gratuita ai centri di raccolta
pubblica o al proprio rivenditore.
Riportare le batterie solo quando esse sono completamente
scariche.
*) indicate dai simboli Cd = cadmio, Hg = mercurio, Pb = piombo
ATTENZIONE – IL DISPOSITIVO PUÒ
EMETTERE RADIAZIONI LASER INVISIBILI,
IN CASO DI APERTURA DEL COPERCHIO O
RIMOZIONE DEL BLOCCO DI PROTEZIONE.
EVITARE L’ESPOSIZIONE ALLE EMISSIONI
LASER.
Per evitare possibili danni all'udito, non ascoltare
musica ad alto volume per un periodo di tempo
prolungato.
Usare il dispositivo esclusivamente al chiuso, in
ambienti asciutti. Proteggere il dispositivo dall’umidità.
Non aprire l’unità. RISCHIO DI SCOSSE
ELETTRICHE! Affidare l’apertura dell’apparecchio e le
riparazioni esclusivamente a personale qualificato.
Collegare il presente dispositivo esclusivamente ad
una presa a muro ben installata e dotata di messa a
terra. Accertarsi che la tensione di alimentazione
corrisponda a quella nominale riportata sulla targa del
prodotto.
Tenere il cavo di alimentazione lontano da fonti di
umidità durante il funzionamento. Non ostruire o
danneggiare il cavo di alimentazione in alcun modo.
Avvisi per la disconnessione del dispositivo: La spina di
alimentazione serve per la connessione del dispositivo
alla rete elettrica, quindi tenerla sempre in posizione
facilmente accessibile.
Se il cavo o la spina di alimentazione sono
danneggiati in qualunque modo, farli sostituire
immediatamente presso un centro di assistenza
autorizzato.
In caso di temporali, disconnettere
immediatamente il dispositivo dalla rete elettrica.
Il dispositivo può essere utilizzato dai bambini, solo
sotto il controllo dei genitori.
Per la pulizia dell’apparecchio, servirsi
esclusivamente di un panno asciutto.
NON USARE DETERGENTI o PANNI ABRASIVI!
Installare il dispositivo in un ambiente dotato di
sufficiente ventilazione, per evitare problemi di
surriscaldamento.
Non ostruire le aperture di ventilazione!
La libera circolazione dell’aria potrebbe essere
ostacolata, ostruendo le feritoie di ventilazione con
oggetti, quali giornali, tovaglie o tende ecc.
Tenere l’apparecchio lontano da schizzi o zampilli,
evitando di appoggiare sopra di esso oggetti
contenenti liquidi, ad esempio tazze.
L’unità non deve essere esposta direttamente alla
luce solare o altre fonti di calore, né conservata in
ambienti eccessivamente freddi, umidi, polverosi o
soggetti ad urti e vibrazioni.
Non tentare di applicare cavi, spine o altri oggetti
all’unità, né tentare di aprirla.
Installare il dispositivo in una posizione sicura e
non soggetta a vibrazioni.
Non appoggiare sul dispositivo fonti di fiamme
libere, ad esempio candele accese.
Installare l’apparecchio lontano da computer o
unità a microonde, che potrebbero causare
interferenze alla ricezione radio.
Non tentare di aprire o riparare l’unità. Tale
operazione espone l’utente a rischio di lesioni e
rende nulla la garanzia del prodotto. Per le
riparazione affidarsi esclusivamente a personale /
centri di assistenza autorizzati.
Il dispositivo è dotato di una fonte di emissioni
laser di Classe 1. Evitare di esporsi direttamente
all’emissione dei fasci laser, che potrebbero
causare danni agli occhi.
Usare esclusivamente batterie prive di mercurio e
cadmio.
Le batterie non devono essere esposte
direttamente a fonti di calore, quali luce solare,
fiamme libere o simili.
Le batterie usate sono rifiuti pericolosi e NON
devono essere smaltite assieme agli altri rifiuti
domestici!!! Portare invece le batterie vecchie al
proprio rivenditore o in appositi centri di raccolta
locali.
Tenere le batterie fuori della portata dei bambini. I
bambini potrebbero infatti correre il rischio di
ingerirle. Consultare immediatamente un medico in
caso di ingestione di batterie.
Controllare regolarmente che le batterie del proprio
apparecchio non abbiano perdite.
L’apparato è concepito per l’uso in zone con climi
temperati; non è adatto all’uso in paesi con climi
tropicali.

SCD7800 / Italiano Manuale di istruzioni
1
POSIZIONE DEI COMANDI
VISTA ANTERIORE
1
Tasto SALTA+/SINTONIA+
2
TASTO SCANSIONE / MODALITÀ
3
TASTO STANDBY / FUNZIONE
4
PULSANTE PRESET + / FOLDER +
5
PULSANTE SKIP- / TUNING-
6
Scomparto cassetta
7
SCHERMO
8
Tasto VOLUME+/SVEGLIA 2
9
Tasto RIPRODUCI / PAUSA /
OROLOGIO / INVIO
10
Pulsante INFO / SNOOZE
11
Tasto STOP / MENU
12
Tasto VOLUME - / SVEGLIA 1
13
ALTOPARLANTE
VISTA DALL’ALTO
14
FUNZIONAMENTO A CASSETTA
15
Sportello CD
16
Maniglia
17
Antenna
VISTA POSTERIORE
18
Jack cuffie
19
PRESA AUX-IN
20
Porta USB
21
Porta CA
22
COMPARTIMENTO DELLA
BATTERIA
INSTALLAZIONE
CONTENUTO DELLA CONFEZIONE
➢ Unità principale
➢ Manuale di istruzioni
➢ Cavo di alimentazione CA
ALIMENTAZIONE
➢ Assicurarsi che la tensione sia la stessa indicata sulla targhetta di identificazione dell'unità
principale.
➢ Collegare la spina del cavo di alimentazione CA a una presa installata correttamente;
collegare, poi, l’altra estremità del cavo alla presa CA sul retro dell’unità.

SCD7800 / Italiano Manuale di istruzioni
2
FUNZIONAMENTO A BATTERIA
1. Aprire il coperchio del vano porta batteria situato in basso.
2. Inserire 6 batterie di tipo LR14 (formato “C”) da 1,5 V. Assicurarsi di aver rispettato la polarità
(vedere le indicazioni all’interno del vano porta batteria).
3. Infine, chiudere il coperchio del vano porta batteria.
Nota:
➢ Se il dispositivo è alimentato a batteria, il consumo di questo tipo di alimentazione
continuerà anche in modalità Standby. Per evitare tale consumo, suggeriamo la rimozione
delle batterie o il collegamento del dispositivo alla rete elettrica. Risultano spenti sia il
display sia le luci blu.
➢ Quando l’unità è alimentata a batteria, al fine di allungarne l’operatività, è meglio evitare
di alzare al massimo il volume.
Direttiva ERP per l’efficienza energetica
L’unità si spegnerà automaticamente dopo 10 minuti in modalità Standby in assenza di
segnale audio. Per riaccendere l’unità premere il pulsante “STANDBY / FUNCTION”.
FUNZIONAMENTO DI BASE
ACCENSIONE/SPEGNIMENTO
Premere il pulsante “STANDBY / FUNCTION” per accendere l’unità.
Premere e lasciare premuto il pulsante “STANDBY / FUNCTION” per passare alla modalità
Standby (spegnimento).
MODALITÀ DI SELEZIONE
Quando l’unità è accesa, premere ripetutamente il pulsante “STANDBY / FUNCTION” per
passare da una modalità all’altra.
REGOLAZIONE DEL VOLUME
Premere il pulsante “VOLUME –” o il pulsante “VOLUME +” per abbassare o alzare il volume.
DAB
Allungare tutta l’antenna telescopica. Cambiarne la posizione per migliorare la ricezione.
Premere ripetutamente il pulsante “STANDBY / FUNCTION” fino a quando sul display non
comparirà “DAB”.
La radio avvierà in automatico una ricerca di tutte le stazioni DAB+ qualora l’unità sia accesa
per la prima volta. Al termine della scansione, le stazioni sono memorizzate in ordine alfabetico.
Verrà riprodotta la prima stazione disponibile.
Nota:
Se il sistema non riceve alcuna trasmissione DAB+, modificare la posizione dell'unità o regolare
l'antenna. Premere e lasciare premuto il pulsante “SCAN / MODE” per circa 3 secondi per
avviare una nuova ricerca.

SCD7800 / Italiano Manuale di istruzioni
3
Selezionare una stazione radio DAB
Premere il pulsante “SKIP - / TUNING -” o il pulsante “SKIP + / TUNING +” e selezionare la
stazione radio desiderata.
Per confermare la selezione premere il pulsante “PLAY / PAUSE / CLOCK / ENTER”.
Salvare le stazioni in preselezione
1. Selezionare la stazione radio desiderata.
2. Premere il pulsante “SCAN / MODE” e scegliere tramite il pulsante “SKIP - / TUNING -” o il
pulsante “SKIP + / TUNING +” il numero corrispondente alla stazione radio desiderata.
3. Per confermare premere il pulsante “PLAY / PAUSE / CLOCK / ENTER”.
Richiamare le stazioni in preselezione
Premere il pulsante o il pulsante “PRE + / FOLDER +” per selezionare la stazione radio
desiderata in memoria.
Informazioni DAB
Premere ripetutamente il pulsante “INFO / SNOOZE.” per visualizzare le seguenti informazioni
DAB:
DLS, potenza del segnale, genere, frequenza, errore del segnale, bitrate dell’audio, ora, data.
MENU DAB
Per entrare nel menu DAB premere il pulsante “STOP / MENU”. Utilizzando il pulsante “SKIP - /
TUNING -” o il pulsante “SKIP + / TUNING +” selezionare una delle seguenti impostazioni e
premere “PLAY / PAUSE / CLOCK / ENTER”:
• Scansione completa:
Avvia la scansione completa. La banda di frequenza DAB è scandita alla ricerca delle
stazioni disponibili.
• Sintonizzazione manuale:
Per procedere con questa opzione occorre conoscere la frequenza della stazione. Tale
informazione si trova sul sito web del responsabile delle trasmissioni. Selezionare le singole
frequenze usando il pulsante “PLAY / PAUSE / CLOCK / ENTER”.
• DRC:
Abbreviazione di Controllo di intervallo digitale (intervallo dinamico). Il termine DRC indica il
rapporto tra il suono più alto e quello più basso. Se l'intervallo dinamico è molto ampio c'è
una mescolanza di suoni molto alti e molto bassi.
In alcuni casi, questo può creare problemi alla riproduzione. Supponiamo di ascoltare una
stazione radio in un ambiente relativamente rumoroso. Alzando il volume, è possibile
intensificare la riproduzione dei suoni più bassi.
Questo però ha l'effetto collaterale di intensificare in modo sgradevole anche i suoni già alti.
In tal caso può essere utile ridurre l'intervallo dinamico. Scegliere una delle opzioni:

SCD7800 / Italiano Manuale di istruzioni
4
- DRC disattivato: L'intervallo dinamico non è ridotto.
- DRC elevato: L'intervallo dinamico è ridotto drasticamente.
- DRC basso: L'intervallo dinamico è ridotto leggermente.
• Eliminazione delle stazioni non ricevute:
Dopo una nuova scansione o dopo uno spostamento dell'unità, è possibile che alcune
stazioni non siano più ricevute. Questa funzione permette di eliminare tali stazioni
dall'elenco dei canali ricevuti. Selezionare “YES” e confermare con il pulsante “PLAY /
PAUSE / CLOCK / ENTER”.
• Sistema
Vedere il paragrafo “Impostazioni del sistema”.
FM
1. Premere ripetutamente il pulsante “STANDBY / FUNCTION” fino a quando sul display non
verrà visualizzato “FM”.
2. Allungare tutta l’antenna telescopica. Cambiarne la posizione per migliorare la ricezione.
3. Ci sono due modalità di ricerca e preimpostazione delle stazioni radio.
• Scansione automatica:
Importante! Tutte le stazioni radio preimpostate saranno sostituite.
Premere e lasciare premuto il pulsante "SCAN / MODE" per circa 3 secondi. Il sistema
scansione l’intera banda di frequenza per trovare delle stazioni radio. Tutte le stazioni
trovate saranno preimpostate, da quella di frequenza più bassa a quella più alta.
• Scansione manuale delle stazioni audio:
Premere rapidamente il pulsante “SKIP - / TUNING -” o il pulsante “SKIP + / TUNING +” fino
a quando non verrà trovata la stazione radio desiderata. Tenendo premuto uno dei due
tasti, il dispositivo effettuerà la ricerca della stazione precedente o successiva,
rispettivamente.
Salvare le stazioni in preselezione
Come descritto per la modalità DAB.
Richiamare le stazioni in preselezione
Come descritto per la modalità DAB.
Visualizzazione informazioni
Premere ripetutamente il pulsante “INFO / SNOOZE.” per visualizzare le seguenti informazioni
FM:
Radio text (testo radio), PTY (tipo di programma), nome, trasmissione mono o stereo, ora, data.

SCD7800 / Italiano Manuale di istruzioni
5
Menu FM
Per entrare nel menu FM, premere il pulsante “STOP / MENU”. Utilizzando il pulsante “SKIP - /
TUNING -” o il pulsante “SKIP + / TUNING +” selezionare una delle seguenti impostazioni e
premere “PLAY / PAUSE / CLOCK / ENTER”:
• Impostazioni di scansione: Selezionare l'opzione richiesta per la ricerca automatica delle
stazioni.
- Tutte le stazioni: Ricerca tutte le stazioni ricevibili. In questo caso, la ricerca si ferma
anche sulle stazioni con ricezione debole.
- Solo stazioni con ricezione forte: La ricerca considera solo le stazioni con ricezione
chiara.
• Impostazioni audio: Selezionare MONO o STEREO per la ricezione FM.
• Sistema
Vedere il paragrafo “Impostazioni del sistema”.
CD
1. Premere ripetutamente il pulsante “STANDBY / FUNCTION” fino a quando sul display non
verrà visualizzato “CD”.
2. Aprire il vano porta CD premendo il corrispettivo pulsante. Lo sportellino si aprirà
muovendosi verso l’alto.
3. Inserire un CD audio con la parte stampata rivolta verso l'alto nel cono centrale, in modo
che il CD si incastri nella sua posizione con uno scatto, quindi chiudere il coperchio del vano
CD.
4. Verrà avviata la riproduzione dei brani contenuti nel CD a partire dal primo titolo.
5. Per rimuovere il CD premere il pulsante “STOP / MENU”, aprire lo sportellino del vano porta
CD ed estrarre il CD con attenzione.
Il lettore CD deve rimanere sempre chiuso.
NOTA:
Se viene posizionato un disco con il lato sbagliato rivolto verso l’alto ovvero se non viene
inserito alcun CD, sul display comparirà il messaggio “NO DISC“.
Pulsanti di controllo:
➢ Per avviare o interrompere la riproduzione premere il pulsante “PLAY / PAUSE / CLOCK /
ENTER”.
➢ Per interrompere la riproduzione premere il pulsante “STOP / MENU”.
➢ Utilizzare il pulsante "SKIP + / TUNING +" per selezionare la traccia successiva. Tieni
premuto il pulsante e inizia a cercare in avanti all'interno delle tracce.
È possibile usare il pulsante “SKIP - / TUNING -” come segue:
Premere una volta = La riproduzione della traccia corrente ricomincia daccapo.
Premere due volte = Si avvia la riproduzione della traccia precedente.
Tenere premuto il pulsante e iniziare la ricerca all'indietro all'interno delle tracce.
➢ Per selezionare una cartella premere il pulsante o il pulsante “PRE + / FOLDER” (solo per
CD con file MP3 o USB).

SCD7800 / Italiano Manuale di istruzioni
6
Funzione Resume
Se si modifica l'impostazione o si spegne l'unità e si ritorna in modalità CD, l'unità avvia la
riproduzione dall'ultimo punto.
Se si premere il pulsante “STOP / MENU” e si avvia la riproduzione, l'unità inizia con il primo
brano (brano 1).
Funzione Ripeti
Durante la riproduzione, premere ripetutamente il pulsante “SCAN / MODE” per selezionare le
funzioni:
CD audio:
Premere una volta = modalità di riproduzione normale. Lo schermo mostra l'indicazione
“Normal”.
Premere due volte = la traccia corrente è ripetuta in continuazione. Lo schermo mostra
l'indicazione “Repeat One”.
Premere tre volte = l'intero CD è riprodotto in continuazione. Lo schermo mostra l'indicazione
“Repeat All”.
Premere quattro volte = tutte le tracce sono riprodotte in ordine casuale. Lo schermo mostra
l'indicazione “Random”.
Premere cinque volte = il sistema torna alla modalità di riproduzione normale.
CD con file MP3:
Premere una volta = modalità di riproduzione normale. Lo schermo mostra l'indicazione
“Normal”.
Premere due volte = la traccia corrente è ripetuta in continuazione. Lo schermo mostra
l'indicazione “Repeat One”.
Premere tre volte = la cartella selezionata è ripetuta in continuazione. Lo schermo mostra
l'indicazione “Repeat Folder”.
Premere quattro volte = l'intero CD è riprodotto in continuazione. Lo schermo mostra
l'indicazione “Repeat All”.
Premere cinque volte = tutte le tracce sono riprodotte in ordine casuale. Lo schermo mostra
l'indicazione “Random”.
Premere sei volte = il sistema torna alla modalità di riproduzione normale.
Riproduzione programmata
Questa funzione consente di programmare una sequenza di tracce.
1. Premere il pulsante “STOP / MENU”.
2. Premere il pulsante "SCAN / MODE". “P_01” lampeggia sul display (P_01 indica il numero
della programmazione).
3. Usare il pulsante “SKIP + / TUNING +” o il pulsante “SKIP - / TUNING -” per selezionare la
traccia desiderata e premere nuovamente il pulsante "SCAN / MODE". Sul display “P_01”
diventerà “P_02”.

SCD7800 / Italiano Manuale di istruzioni
7
4. Selezionare la traccia successiva con il pulsante “SKIP + / TUNING +” o il pulsante “SKIP - /
TUNING -”. Premere nuovamente il pulsante "SCAN / MODE". Ripetere la procedura per
selezionare tutte le tracce richieste.
NOTA:
Quando lo spazio di memoria per la programmazione delle tracce è esaurito, l'indicazione
“PROGFULL” appare sullo schermo.
5. Premere il pulsante “PLAY / PAUSE / CLOCK / ENTER” per avviare la riproduzione
programmata. Nell'angolo in alto sinistra dello schermo, appare l'indicazione “MEM”.
6. Premere una volta il pulsante “STOP / MENU” per interrompere la riproduzione mantenendo
la programmazione.
7. Per riprendere la riproduzione delle tracce programmate, premere il pulsante “PLAY /
PAUSE / CLOCK / ENTER”.
8. Per cancellare premere due volte il pulsante “STOP / MENU”. La notifica “MEM” scompare
dallo schermo.
CASSETTA
Riproduzione delle cassette
1. Selezionare la modalità Tape con il pulsante "STANDBY / FUNCTION", finché sul display
non viene visualizzato "TAPE".
2. Premere il pulsante “STOP/ESPELLI” per aprire il vano della cassetta.
3. Inserire un'audiocassetta registrata nel vano rivolgendo la faccia con l'apertura per il nastro
verso l'alto e la facciata del lato da ascoltare sul davanti (riavvolgimento completo a destra),
quindi richiudere il vano della cassetta.
4. Premere il tasto “RIPRODUCI” per ascoltare la cassetta.
5. Utilizzare il tasto “STOP/ESPELLI” per interrompere la riproduzione.
6. Se necessario, i tasti freccia consentono di avanzare o riavvolgere rapidamente il nastro.
(inoltrare indietro )
7. Premere sempre il tasto “STOP/ESPELLI” prima di cambiare direzione o fermare il nastro.
In tal modo si eviteranno danni al dispositivo e al nastro.
8. Se si preme nuovamente il tasto “STOP/ESPELLI”, lo sportello del vano della cassetta di
apre.
9. Per una breve interruzione della riproduzione è preferibile utilizzare il tasto “PAUSA”. Per
continuare la riproduzione da dove era stata interrotta è sufficiente premere nuovamente il
tasto.
USB
Questo dispositivo è stato sviluppato per supportare tutte le più avanzate tecnologie in campo
USB. Tuttavia, la vasta gamma di dispositivi di memorizzazione USB oggi disponibili sul
mercato non ci permette di garantire la piena compatibilità del sistema con tutte le unità USB.
Per questo motivo, in alcuni rari casi ci potrebbero essere problemi di riproduzione dei file da
dispositivi USB. Non si tratta di un malfunzionamento del dispositivo.
1. Premere ripetutamente il pulsante “STANDBY / FUNCTION” fino a quando sul display non
verrà visualizzato “USB”.

SCD7800 / Italiano Manuale di istruzioni
8
2. Collegare un'unità USB direttamente alla porta del sistema. La riproduzione si avvierà
automaticamente dopo alcuni istanti.
Le funzioni di controllo, di ripetizione e di riproduzione delle tracce programmate corrispondono
a quelle descritte per la modalità CD.
Nota:
• Collegare sempre le unità USB direttamente alla porta USB del sistema per evitare
malfunzionamenti.
• La porta USB non è progettata per la ricarica di dispositivi esterni.
ATTENZIONE:
Impostare il dispositivo su un'altra modalità di funzionamento prima di rimuovere l'unità USB.
AUX IN
Tramite questa presa è possibile ascoltare l'audio di altri dispositivi di riproduzione, quali lettori
MP3, lettori di CD, attraverso gli altoparlanti del sistema.
1. Collegare il dispositivo esterno con un connettore jack stereo da 3,5 mm all’ingresso AUX
sul retro dell’unità.
2. Premere ripetutamente il pulsante “STANDBY / FUNCTION” fino a quando sul display non
verrà visualizzato “Aux”.
3. Sarà possibile ascoltare l'audio proveniente dal dispositivo esterno, riprodotto tramite gli
altoparlanti. È possibile regolare il volume attraverso i corrispettivi pulsanti. I tasti del CD
non permettono di attivare funzioni.
4. Per il resto della procedura, consultare le istruzioni di funzionamento del dispositivo esterno.
Nota:
Regolare il volume del dispositivo esterno ad un livello appropriato.
SVEGLIA
Impostare l’ora della sveglia
Per regolare la sveglia, il sistema deve essere in modalità sospesa.
L'unità offre la possibilità di impostare due orari di sveglia. Procedere come segue:
1. Premere il tasto “VOLUME+ / ALARM 1” per circa 3 secondi. Le cifre dell'ora della sveglia
attualmente impostata iniziano a lampeggiare.
2. Effettuare le impostazioni con il pulsante “SKIP + / TUNING +” o il pulsante “SKIP - /
TUNING -”.
3. Premere il tasto “VOLUME+ / ALARM 1” per confermare. Le cifre dei minuti iniziano a
lampeggiare.
4. Effettuare le impostazioni con il pulsante “SKIP + / TUNING +” o il pulsante “SKIP - /
TUNING -”.
5. Premere il tasto “VOLUME+ / ALARM 1” per confermare. Poi scegliere la modalità di
sveglia. Effettuare le impostazioni con il pulsante “SKIP + / TUNING +” o il pulsante “SKIP -
/ TUNING -”. Premere il tasto “VOLUME+ / ALARM 1” per confermare.
• FM:
Una volta scattata la sveglia, la radio passerà alla modalità FM.

SCD7800 / Italiano Manuale di istruzioni
9
• DAB:
Una volta scattata la sveglia, la radio passerà alla modalità CD.
• CD:
Non appena scatta l'orario impostato per la sveglia, il dispositivo si accende in modalità
CD. Il CD inserito sarà riprodotto a partire dalla prima traccia.
• USB:
Non appena scatta l'orario impostato per la sveglia, il dispositivo si accende in modalità
USB. Il sistema inizierà la riproduzione delle tracce memorizzate nell'unità connessa
alla porta USB a partire dalla prima.
• SUONERIA:
Una volta scattato l’orario impostato per la sveglia, verrà emesso un segnale acustico.
6. Se si seleziona DAB o FM come sorgente per la sveglia, sarà necessario selezionare una
stazione salvata in preselezione ai numeri compresi tra 1 e 30.
7. Dunque, premere il pulsante “SKIP + / TUNING +” o il pulsante “SKIP - / TUNING -” per
impostare il volume della sveglia. Premere il tasto “VOLUME+ / ALARM 1” per confermare.
Per impostare l'orario della seconda sveglia, ripetere i passi precedenti usando il tasto
“VOLUME- / ALARM 2”.
Funzione Snooze
L'attivazione della funzione di sveglia impostata può essere rinviata di 9 minuti premendo il tasto
“INFO / SNOOZE”.
Disattivare il segnale acustico attivato
Premere il pulsante “VOLUME+ / ALARM 1” o il pulsante “VOLUME- / ALARM 2” per
disattivare il segnale acustico attivato.
Attivare/Disattivare la sveglia
In modalità Standby premere ripetutamente il pulsante “VOLUME+ / ALARM 1” o il pulsante
“VOLUME- / ALARM 2” e scegliere “Alarm off” (Spegni sveglia).
In modalità Standby premere ripetutamente il pulsante “VOLUME+ / ALARM 1” o il pulsante
“VOLUME- / ALARM 2” e scegliere la sorgente della sveglia desiderata.
IMPOSTAZIONE ORA E DATA
Per regolare l'orologio, il sistema deve essere in modalità sospesa.
1. Premere e lasciare premuto il pulsante “PLAY / PAUSE / CLOCK / ENTER” per circa 2
secondi.
2. Usare il pulsante “SKIP + / TUNING +” o il pulsante “SKIP - / TUNING -” per impostare il
formato dell’ora scegliendo tra 12 ore e 24 ore. Premere il pulsante “PLAY / PAUSE /
CLOCK / ENTER” per confermare il formato scelto. Le cifre dell’ora cominceranno a
lampeggiare .

SCD7800 / Italiano Manuale di istruzioni
10
3. Usare il pulsante “SKIP + / TUNING +” o il pulsante “SKIP - / TUNING -” per impostare l’ora.
Premere il pulsante “PLAY / PAUSE / CLOCK / ENTER” per confermare. In seguito,
lampeggeranno le cifre dei minuti.
4. Usare il pulsante “SKIP + / TUNING +” o il pulsante “SKIP - / TUNING -” per impostare i
minuti. Premere il pulsante “PLAY / PAUSE / CLOCK / ENTER” per confermare. Sul
display comparirà la data.
5. Impostare la data seguendo la medesima procedura.
Nota:
Quando il dispositivo è acceso, premere e lasciare premuto il pulsante “PLAY / PAUSE /
CLOCK / ENTER” al fine di visualizzare velocemente l’ora.
CUFFIE
Per ascoltare musica in privato, utilizzare cuffie dotate di un connettore da 3 stereo e collegare
quest'ultimo alla presa per le cuffie situata sul retro del sistema. Gli altoparlanti verranno
disattivati.
IMPOSTAZIONI DI SISTEMA
Nota: Le impostazioni del sistema sono disponibili solo in modalità DAB o FM.
1. Per entrare nelle impostazioni del sistema premere il pulsante “STOP / MENU” e
selezionare “SYSTEM” (Sistema) con il pulsante “SKIP + / TUNING +” o il pulsante “SKIP -
/ TUNING -”. Per confermare la selezione premere il pulsante “PLAY / PAUSE / CLOCK /
ENTER” .
2. Selezionare con il pulsante “SKIP + / TUNING +” o il pulsante “SKIP - / TUNING -” una delle
seguenti impostazioni e premere “PLAY / PAUSE / CLOCK / ENTER” per entrare
nell’impostazione:
➢ Lingua
Selezionare la lingua desiderata per il menu scegliendo tra: tedesco, inglese, francese,
italiano, olandese, norvegese, danese.
➢ Aggiornamento orario
Regolare la sorgente per aggiornare l’ora: Tutte le sorgenti, DAB, FM, nessun
aggiornamento.
➢ Ripristino impostazioni di fabbrica
Saranno cancellate tutte le stazioni e le impostazioni personalizzate.
➢ Versione SW
Mostra il software attualmente installato.
Il presente manuale d’uso può essere scaricato dal sito
www.soundmaster.de
Ci riserviamo eventuali errori di stampa e modifiche tecniche.
Copyright di Woerlein GmbH, 90556 Cadolzburg, www.soundmaster.de
Riproduzione possibile solo con il permesso di Woerlein GmbH

Pokyny týkající se bezpečnosti, životního prostředí a nastavení
CZ
OCHRANA ŽIVOTNÍHO PROSTŘEDÍ
Nelikvidujte tento výrobek na konci jeho životního cyklu
spolu s běžným domovním odpadem. Odevzdejte jej ve
sběrném dvoře pro recyklaci elektrických a
elektronických zařízení. Tento význam má symbol na
výrobku, návodu k použití nebo na balení.
Materiály lze dle jejich označení opětovně použít. Opětovným
použitím, recyklací nebo jinými způsoby využití starých zařízení
významně přispíváte k ochraně našeho životního prostředí.
Více informací o sběrných dvorech vám poskytne příslušný
místní úřad.
VAROVÁNÍ
Nebezpečí úrazu elektrickým
Proudem Neotevírejte!
Upozornění: Nesnímejte kryt (ani zadní část), abyste snížili
nebezpečí úrazu elektrickým proudem. Uvnitř nejsou žádné díly,
které by mohl uživatel opravit sám. Opravy svěřte
kvalifikovaným servisním pracovníkům.
Tento symbol značí přítomnost nebezpečného napětí
uvnitř krytu, které je dostatečně vysoké, aby
představovalo nebezpečí úrazu elektrickým proudem.
Tento symbol značí, že k zařízení jsou k dispozici
pokyny k obsluze a údržbě.
Použité baterie představují nebezpečný odpad a
NESMÍ být likvidovány spolu s domovním
odpadem! Jako spotřebitelé jste z právního
hlediska povinni odevzdat všechny baterie
k zajištění ekologicky šetrné recyklace – bez ohledu
na to, zda baterie obsahují škodlivé látky či nikoli*.
Odevzdejte baterie zdarma v místním veřejném sběrném dvoře
nebo v obchodech, které příslušný druh baterií prodávají.
Odevzdávejte pouze zcela vybité baterie.
* Označení Cd = kadmium, Hg = rtuť, Pb = olovo
UPOZORNĚNÍ – PŘI OTEVŘENÍ KRYTU
NEBO STISKNUTÍ BEZPEČNOSTNÍHO
ODPOJOVAČE DOCHÁZÍ K NEVIDITELNÉMU
LASEROVÉMU ZÁŘENÍ. NEVYSTAVUJTE SE
LASEROVÉMU PAPRSKU.
Neposlouchejte po delší dobu s vysokou
hlasitostí, abyste zabránili možnému poškození
sluchu.
Používejte zařízení pouze v suchém vnitřním
prostředí.
Chraňte zařízení před vlhkostí.
Zařízení neotevírejte. NEBEZPEČÍ ÚRAZU
ELEKTRICKÝM PROUDEM! Otevření a opravy
svěřte kvalifikovaným servisním pracovníkům.
Zařízení připojujte pouze ke správně namontované a
uzemněné nástěnné zásuvce. Zkontrolujte, zda
napětí odpovídá technickým údajům uvedeným na
typovém štítku.
Zajistěte, aby síťový kabel zůstal během provozu
suchý. Síťový kabel nepřiskřípněte ani jiným
způsobem nepoškozujte.
Varování pro odpojování zařízení: Síťová
zástrčka se používá jako připojení, měla by
proto zůstat vždy přístupná.Poškozený síťový
kabel nebo zástrčku je nutné nechat ihned
vyměnit v autorizovaném servisním středisku.
Dochází-li k bleskům, zařízení ihned odpojte od
síťového napájení.
Děti by měly zařízení používat pod dohledem
rodičů.
Zařízení čistěte pouze suchým hadříkem.
NEPOUŽÍVEJTE ČISTICÍ PROSTŘEDKY ani
ABRAZIVNÍ TKANINY!
Zařízení umístěte na místo s dostatečnou
ventilací, aby nedocházelo k přehřívání.
Nezakrývejte ventilační otvory!
Ventilační otvory by neměly být zablokovány
předměty, jako jsou noviny, ubrusy, záclony
apod.
Zařízení by nemělo být vystaveno kapající ani
stříkající vodě a neměly by se na něj pokládat
předměty s tekutinami, jako jsou vázy.
Zařízení by nemělo být vystaveno přímému
slunečnímu záření, příliš vysokým ani příliš
nízkým teplotám, vlhkosti, vibracím ani by
nemělo být umístěno v prašném prostředí.
Do ventilačních otvorů ani jiných otvorů zařízení
se nikdy nepokoušejte vložit dráty, špendlíky ani
jiné předměty.
Umístěte zařízení na bezpečné místo bez
vibrací.
Na zařízení by se neměly pokládat zdroje
otevřeného ohně jako například hořící svíčky.
Umístěte zařízení co nejdále od počítačů a
mikrovlnných trub. V opačném případě by mohlo
docházet k rušení příjmu rádiového signálu.
Neotevírejte ani neopravujte kryt. Není to
bezpečné a došlo by k porušení platnosti
záruky. Opravy smí provádět pouze
autorizované servisní/zákaznické středisko.
Zařízení je vybaveno „laserovým zařízením třídy
1“. Nevystavujte se laserovému paprsku,
protože by mohlo dojít ke zranění očí.
Používejte pouze baterie neobsahující rtuť ani
kadmium.
Baterii by neměly být vystaveny působení
nadměrného tepla, jako je sluneční záření, oheň
apod.
Použité baterie představují nebezpečný odpad a
NESMÍ být likvidovány spolu s domovním
odpadem!!! Vraťte baterie svému prodejci nebo
je odevzdejte v místním sběrném dvoře.
Udržujte baterie mimo dosah dětí. Děti by mohly
baterie spolknout. Pokud došlo ke spolknutí
baterie, okamžitě vyhledejte lékařskou pomoc.
Baterie pravidelně kontrolujte, zda nedochází k
úniku kapalin.
Toto zařízení je určeno k používání v mírném
klimatu. Není vhodné pro používání v zemích s
tropickým klimatem.

SCD7800 / návod k obsluze – česky
1
UMÍSTĚNÍ OVLÁDACÍCH PRVKŮ
POHLED ZEPŘEDU
1
PŘESKOČIT+ / LADIT+
2
VYHLEDAT / REŽIM
3
POHOTOVOSTNÍ REŽIM / FUNKCE
4
PŘEDVOLBA + / SLOŽKA +
5
PŘESKOČIT- / LADIT-
6
DVÍŘKA KAZETOVÉ MECHANIKY
7
DISPLEJ
8
HLASITOST + / ALARM 2
9
PŘEHRÁT/POZASTAVIT/HODINY/
ENTER
10
INFO / OPAKOVANÉ BUZENÍ
11
ZASTAVIT/NABÍDKA
12
HLASITOST − / ALARM 1
13
REPRODUKTOR
POHLED SHORA
14
Tlačítka KAZETOVÉ MECHANIKY
15
Dvířka mechaniky CD
16
MADLO
17
DAB − / anténa FM
POHLED ZEZADU
18
Konektor sluchátek
19
Vstup AUX IN
20
Konektor USB
21
Napájecí zdířka
22
Prostor pro BATERIE
MONTÁŽ
OBSAH DODÁVKY
➢ Zařízení
➢ Návod k obsluze
➢ Napájecí kabel pro střídavý proud
NAPÁJENÍ
➢ Ujistěte se, že napětí je stejné jako napětí uvedené na identifikačním štítku zařízení.
➢ Dodaný napájecí kabel pro střídavý proud připojte k řádně nainstalované bezpečnostní
elektrické zásuvce a připojte konektor kabelu do konektoru vstupu napájení střídavým
proudem na zadní straně zařízení.

SCD7800 / návod k obsluze – česky
2
PROVOZ NA BATERIE
1. Otevřete víko prostoru pro baterie na spodní straně zařízení.
2. Vložte 6 baterií typu UM-2/R14 (velikost „C“) 1,5 V. Zajistěte správnost polarity (viz symboly
v prostoru pro baterie).
3. Poté kryt bateriového prostoru zavřete.
Poznámka:
➢ Pokud je zařízení napájeno pomocí baterií a je v pohotovostním režimu, baterie se přesto
stále vybíjejí. Chcete-li tomu zabránit, doporučujeme baterie vyjmout nebo zařízení připojit
k síťovému napájení. Displej a modré kontrolky se vypnou.
➢ Je-li zařízení napájeno pomocí baterií, je lepší nenastavovat maximální hlasitost, abyste
zajistili delší dobu přehrávání.
Správa napájení ERP
Pokud není zvukový signál, zařízení se po 10 minutách v pohotovostním režimu
automaticky vypne. Chcete-li přístroj opět zapnout, stiskněte tlačítko
„STANDBY/FUNCTION“.
ZÁKLADNÍ OVLÁDÁNÍ
ZAPNUTÍ/VYPNUTÍ
Zařízení se zapíná stisknutím tlačítka „STANDBY / FUNCTION“.
Stisknutím tlačítka „STANDBY / FUNCTION“ a jeho podržením zařízení vypnete do
pohotovostního režimu.
VÝBĚR REŽIMU
Je-li zařízení zapnuto, opakovaným stisknutím tlačítka „STANDBY / FUNCTION“ přepnete mezi
různými režimy.
NASTAVENÍ HLASITOSTI
Pomocí tlačítek „VOLUME − / ALARM 1“ nebo „VOLUME + / ALARM 2“ snížíte nebo zvýšíte
hlasitost.
DAB
Zcela vytáhněte teleskopickou anténu. Příjem lze zlepšit změnou polohy antény.
Stiskněte opakovaně tlačítko „STANDBY / FUNCTION“, dokud se na displeji nezobrazí text
„DAB“.
Při prvním spuštění rádio automaticky zahájí kompletní vyhledávání stanic DAB+. Po dokončení
vyhledávání se stanice uloží v abecedním pořadí. Začne se přehrávat první dostupná stanice.
Poznámka:
Pokud nikdy nedojde k žádnému příjmu signálu DAB+, změňte polohu zařízení nebo upravte
anténu. Stisknutím tlačítka „SCAN / MODE“ a jeho podržením po dobu přibližně 3 sekund
spustíte nové vyhledávání.

SCD7800 / návod k obsluze – česky
3
Výběr rozhlasové stanice DAB
Požadovanou rozhlasovou stanici vyberete stisknutím tlačítka „SKIP − / TUNING −“ nebo
„SKIP + / TUNING +“.
Výběr potvrdíte stisknutím tlačítka „PLAY / PAUSE / CLOCK / ENTER“.
Uložení předvolby
1. Vyberte požadovanou rádiovou stanici.
2. Stiskněte tlačítko „SCAN / MODE“ a pomocí tlačítka „SKIP − / TUNING −“ nebo „SKIP + /
TUNING +“ vyberte požadované číslo stanice programu.
3. Stisknutím tlačítka „PLAY / PAUSE / CLOCK / ENTER“ volbu potvrďte.
Vyvolání předvolby
Opakovaným stisknutím tlačítka „PRE + / FOLDER +“ vyberte požadovanou uloženou
rozhlasovou stanici.
Informace režimu DAB
Opakovaným stisknutím tlačítka „INFO / SNOOZE“ zobrazíte následující informace DAB:
DLS, síla signálu, žánr, frekvence, chyba signálu, přenosová rychlost zvuku, čas a datum.
NABÍDKA DAB
K nabídce DAB přejdete stisknutím tlačítka „STOP / MENU“. Pomocí tlačítka „SKIP − /
TUNING −“ nebo „SKIP + / TUNING +“ vyberte jedno z následujících nastavení a stiskněte
tlačítko „PLAY / PAUSE / CLOCK / ENTER“:
• Kompletní vyhledávání:
Spustí vyhledávání stanic. Vyhledají se stanice ve frekvenčním pásmu DAB.
• Manuální ladění:
Chcete-li provést ruční ladění, musíte znát frekvenci stanice. Lze ji nalézt na webových
stránkách poskytovatele služeb vysílání. Stisknutím tlačítka „PLAY / PAUSE / CLOCK /
ENTER“ vyberte konkrétní frekvenci.
• DRC:
Jde o zkratku z „Digital Range Control“ (ovládání dynamického rozsahu). Termín DRC
popisuje poměr mezi nejtišším a nejhlasitějším zvukem. Je-li dynamický rozsah velmi
vysoký, může být zvuk velmi tlumený stejně jako velmi hlasitý.
Za určitých podmínek to může způsobovat problém s přehráváním. Předpokládejme
například, že posloucháte rozhlasovou stanici v relativně hlučném prostředí. Zvýšením
hlasitosti tak uslyšíte tiché zvuky jako hlasitější.
Má to však nevýhodu, že hlasité části budou nepříjemně hlasité. V takových případech má
smysl omezit dynamický rozsah. Vyberte mezi dvěma možnostmi:
- DRC off: Dynamický rozsah není omezen.
- DRC high: Dynamický rozsah je výrazně omezen.
- DRC low: Dynamický rozsah je mírně omezen

SCD7800 / návod k obsluze – česky
4
• Vyřazení:
Může nastat situace, že po vyhledání stanic nebo změně místa nebudete chtít některé
stanice již dále přijímat. Tato funkce slouží k odstranění těchto stanic ze seznamu příjmu.
Vyberte možnost „YES“ a pomocí tlačítka „PLAY / PAUSE / CLOCK / ENTER“ ji potvrďte.
• Systém
Viz část „SYSTEM SETTINGS“.
FM
1. Stiskněte opakovaně tlačítko „STANDBY / FUNCTION“, dokud se na displeji nezobrazí text
„FM“.
2. Zcela vytáhněte teleskopickou anténu. Příjem lze zlepšit změnou polohy antény.
3. Existují dvě možnosti, jak rozhlasové stanice vyhledávat a ukládat do předvoleb.
• Automatické vyhledávání:
Důležité! Jakékoli předvolby rozhlasových stanic se přepíší.
Stiskněte tlačítko „SCAN / MODE“ a podržte ho po dobu přibližně 3 sekund. Zařízení
vyhledá rozhlasové stanice v celém frekvenčním pásmu. Nalezené stanice budou uloženy
do předvoleb od nejnižší po nejvyšší frekvenci.
• Ruční vyhledávání rádiových stanic:
Pomocí krátkých stisknutí tlačítek „SKIP-/TUNING-“ a „SKIP+/TUNING+“ vyhledejte
požadovanou rozhlasovou stanici. Pokud některé z tlačítek podržíte stisknuté, bude zařízení
hledat předchozí, případně následující rozhlasovou stanici.
Uložení předvolby
Je stejné jako v režimu DAB.
Vyvolání předvolby
Je stejné jako v režimu DAB.
Zobrazení informací
Opakovaným stisknutím tlačítka „INFO / SNOOZE“ zobrazíte následující informace FM:
text rádia, PTY, název, mono- nebo stereovysílání, čas, datum.
NABÍDKA FM
K nabídce FM přejdete stisknutím tlačítka „STOP / MENU“. Pomocí tlačítka „SKIP − /
TUNING −“ nebo „SKIP + / TUNING +“ vyberte jedno z následujících nastavení a stiskněte
tlačítko „PLAY / PAUSE / CLOCK / ENTER“:
• Nastavení vyhledávání: Vyberte požadovanou možnost k automatickému vyhledání stanic.
- Všechny stanice: Vyhledají se všechny stanice, které lze přijmout. V tomto případě se
vyhledávání zastavuje i u stanic se slabým signálem.
- Pouze silné stanice: Vyhledají se pouze zřetelné stanice.

SCD7800 / návod k obsluze – česky
5
• Nastavení zvuku: Vyberte pro příjem signálu FM možnost MONO nebo STEREO.
• Systém
Viz část „SYSTEM SETTINGS“.
MECHANIKA CD
1. Stiskněte opakovaně tlačítko „STANDBY / FUNCTION“, dokud se na displeji nezobrazí text
„CD“.
2. Zvedněte u značky dvířka mechaniky CD, a mechaniku tak otevřete.
3. Disk CD se zvukovou nahrávkou umístěte potištěnou stranou nahoru na středový trn tak,
aby disk CD zapadl na místo. Poté kryt prostoru pro disk CD zavřete.
4. Disk CD se začne přehrávat od první stopy.
5. Chcete-li disk CD vyjmout, stiskněte tlačítko „STOP / MENU“, otevřete dvířka mechaniky CD
a opatrně vyjměte disk CD.
Dvířka mechaniky CD ponechávejte vždy zavřená.
POZNÁMKA:
Pokud disk vložíte obráceně, případně pokud jej nevložíte vůbec, zobrazí se na displeji text „NO
DISC“.
Ovládací tlačítka:
➢ Chcete-li spustit nebo přerušit přehrávání, stiskněte tlačítko „PLAY / PAUSE / CLOCK /
ENTER“.
➢ Chcete-li přehrávání zastavit, stiskněte tlačítko „STOP / MENU“.
➢ Pomocí tlačítka „SKIP+ / TUNING+“ můžete přeskočit na následující stopu.
Pokud podržíte tlačítko stisknuté, začne zařízení vyhledávat stopy směrem dopředu.
Tlačítko „SKIP-/TUNING-“ lze použít následovně:
Jedno stisknutí = spustí znovu od začátku aktuální stopu.
Dvě stisknutí = přechod zpět na předchozí stopu.
Pokud podržíte tlačítko stisknuté, začne zařízení vyhledávat stopy směrem dozadu.
➢ Chcete-li vybrat složku, stiskněte tlačítko „PRE + / FOLDER +“ (pouze při přehrávání disku
MP3, CD nebo úložiště USB).
Funkce pokračování přehrávání
Pokud změníte režim nebo zařízení vypnete a pak se vrátíte k režimu CD, začne zařízení
přehrávat od posledního místa.
Stisknete-li tlačítko „STOP / MENU“ a začnete znovu přehrávat, začne zařízení přehrávat od
první stopy (stopa 1).
Funkce Opakovat
Opakovaným stisknutím tlačítka „SCAN / MODE“ během přehrávání vyberte následující funkce
opakování:

SCD7800 / návod k obsluze – česky
6
Zvukový disk CD:
Jedno stisknutí = normální režim přehrávání. Na displeji se zobrazí text „Normal“.
Dvě stisknutí = bude se nepřetržitě opakovat aktuální stopa. Na displeji se zobrazí hlášení
„Repeat One“.
Tři stisknutí = celý disk CD je nepřetržitě přehráván. Na displeji se zobrazí hlášení „Repeat All“.
Čtyři stisknutí = všechny stopy budou přehrávány v náhodném pořadí. Na displeji se zobrazí
hlášení „Random“.
Pět stisknutí = návrat do běžného režimu přehrávání.
Disk MP3 nebo CD:
Jedno stisknutí = normální režim přehrávání. Na displeji se zobrazí text „Normal“.
Dvě stisknutí = bude se nepřetržitě opakovat aktuální stopa. Na displeji se zobrazí hlášení
„Repeat One“.
Tři stisknutí = bude se nepřetržitě opakovat vybraná složka. Na displeji se zobrazí hlášení
„Repeat Folder“.
Čtyři stisknutí = bude se nepřetržitě přehrávat celý disk CD. Na displeji se zobrazí hlášení
„Repeat All“.
Pět stisknutí = všechny stopy se budou přehrávat v náhodném pořadí. Na displeji se zobrazí
hlášení „Random“.
Šest stisknutí = přehrávání se vrátí zpět do normálního režimu přehrávání.
Naprogramované přehrávání
Tuto funkci lze použít k naprogramování požadovaného pořadí stop.
1. Stiskněte tlačítko „STOP / MENU“.
2. Stiskněte tlačítko „SCAN / MODE“. Na displeji bude blikat text „P_01“ („P_01“ představuje
číslo programu).
3. Pomocí tlačítka „SKIP + / TUNING +“ nebo „SKIP − / TUNING −“ vyberte požadovanou
stopu a znovu stiskněte tlačítko „SCAN / MODE“. Na displeji se text „P_01“ změní na
„P_02“.
4. Pomocí tlačítka „SKIP + / TUNING +“ nebo „SKIP − / TUNING −“ vyberte další stopu
a stiskněte znovu tlačítko „SCAN / MODE“. Postup opakujte, dokud nebudou vybrány
všechny požadované stopy.
POZNÁMKA:
Po dosažení kapacity paměti pro naprogramované stopy se na displeji zobrazí hlášení
„PROGFULL“.
5. Stisknutím tlačítka „PLAY / PAUSE / CLOCK / ENTER“ spusťte naprogramované
přehrávání. V horní levé části displeje se zobrazí text „MEM“.
6. Jedním stisknutím tlačítka „STOP / MENU“ zastavíte přehrávání, ale program zůstane
zachován.
7. Chcete-li v naprogramovaném přehrávání opět pokračovat, stiskněte znovu tlačítko „PLAY /
PAUSE / CLOCK / ENTER“.
8. Program odstraníte dvojitým stisknutím tlačítka „STOP / MENU“. Text „MEM“ zmizí.

SCD7800 / návod k obsluze – česky
7
KAZETA
Přehrávání kazet
1. Pomocí tlačítka „STANDBY / FUNCTION“ vyberte režim kazetové mechaniky, dokud se
nezobrazí text „TAPE“.
2. Stisknutím tlačítka „STOP/EJECT“ otevřete prostor kazetové mechaniky.
3. Vložte do prostoru nahranou audiokazetu odkrytým páskem směrem nahoru a stranou,
kterou chcete poslouchat, směrem dopředu (plná cívka musí být vpravo). Poté dvířka
kazetové mechaniky opět zavřete.
4. Chcete-li poslouchat magnetofon, stiskněte tlačítko „PLAY“.
5. Přehrávání zastavíte pomocí tlačítka „STOP/EJECT“.
6. V případě potřeby převiňte pásku směrem dopředu nebo dozadu ve směru tlačítek se
šipkami.
7. Chcete-li změnit směr kazety nebo kazetu zastavit, vždy stiskněte tlačítko „STOP/EJECT“.
Předejdete tak poškození zařízení a kazety.
8. Stisknete-li tlačítko „STOP/EJECT“ znovu, otevřou se dvířka kazetové mechaniky.
9. Chcete-li přehrávání zastavit pouze dočasně, stiskněte tlačítko „PAUSE“. Jeho opětovným
stisknutím přehrávání opět spustíte.
USB
Zařízení bylo vyvinuto v souladu s nejnovějšími technickými pokroky v oblasti USB. Široká škála
nejrůznějších typů paměťových zařízení USB, která jsou v současné době na trhu, bohužel
neumožňuje zaručit plnou kompatibilitu se všemi paměťovými zařízeními USB. Z tohoto důvodu
mohou být ve výjimečných případech problémy při přehrávání souborů z paměťových zařízení
USB. Nejedná se o závadu zařízení.
1. Stiskněte opakovaně tlačítko „STANDBY / FUNCTION“, dokud se na displeji nezobrazí text
„USB“.
2. Paměťové zařízení USB připojte přímo do portu. Přehrávání se po několika sekundách
automaticky spustí.
Funkce ovládání, opakování a naprogramovaného přehrávání jsou stejné jako v režimu CD.
Poznámka:
• Abyste předešli poruchám, paměťové médium USB připojujte přímo do portu USB.
• Port USB není navržen pro nabíjení externích zařízení.
UPOZORNĚNÍ:
Než paměťové zařízení USB odpojíte, přepněte zařízení do jiného režimu provozu.

SCD7800 / návod k obsluze – česky
8
VSTUP AUX
K této zdířce lze připojit jiné přehrávací zařízení a poslouchat zvuk prostřednictvím reproduktoru
ze zařízení, jako je přehrávač MP3, přehrávač CD atd.
1. Připojte externí zařízení pomocí stereofonního jacku 3,5 mm ke vstupu AUX na zadní straně
zařízení.
2. Stiskněte opakovaně tlačítko „STANDBY / FUNCTION“, dokud se na displeji nezobrazí text
„Aux“.
3. Přehrávaný zvuk z externích zařízení uslyšíte prostřednictvím reproduktorů. Hlasitost
můžete nastavit pomocí tlačítek hlasitosti. Tlačítka CD nejsou nyní funkční.
4. Ostatní ovládání viz návod k obsluze externího zvukového zařízení.
Poznámka:
Nastavte hlasitost externího zařízení na příjemnou úroveň.
BUDÍK
Nastavení času budíku
Zařízení musí být v pohotovostním režimu, aby bylo možné nastavit budík.
Nastavit lze dva časy budíku. Postupujte následujícím způsobem:
1. Stiskněte tlačítko „VOLUME + / ALARM 1“ a podržte jej stisknuté po dobu asi 3 sekund.
Začnou blikat hodiny v aktuálně nastaveném času budíku.
2. Pomocí tlačítka „SKIP + / TUNING +“ nebo „SKIP − / TUNING −“ proveďte nastavení.
3. Stisknutím tlačítka „VOLUME + / ALARM 1“ volbu potvrďte. Začnou blikat číslice minut.
4. Pomocí tlačítka „SKIP + / TUNING +“ nebo „SKIP − / TUNING −“ proveďte nastavení.
5. Stisknutím tlačítka „VOLUME + / ALARM 1“ volbu potvrďte. Poté zvolte, jakým způsobem
chcete být buzeni. Pomocí tlačítka „SKIP + / TUNING +“ nebo „SKIP − / TUNING −“
proveďte nastavení. Stisknutím tlačítka „VOLUME + / ALARM 1“ volbu potvrďte.
• Pásmo FM:
Jakmile nastane nastavený čas budíku, rádio se zapne v režimu FM.
• DAB:
Jakmile nastane nastavený čas budíku, rádio se zapne v režimu CD.
• CD:
Jakmile nastane nastavený čas budíku, zařízení se zapne v režimu CD. Vložený
disk CD se začne přehrávat od první stopy.
• ZAŘÍZENÍ USB:
Jakmile nastane nastavený čas budíku, zařízení se zapne v režimu USB. Začnou se
přehrávat stopy připojeného úložného zařízení od první stopy.
• BZUČÁK:
Jakmile nastane čas budíku, ozve se signální tón.
6. Je-li jako funkce buzení zvolena možnost DAB nebo FM, je nutné vybrat uloženou
předvolenou stanici 1–30.

SCD7800 / návod k obsluze – česky
9
7. Na závěr nastavte stisknutím tlačítka „SKIP + / TUNING +“ nebo „SKIP − / TUNING −“
hlasitost budíku. Stisknutím tlačítka „VOLUME + / ALARM 1“ volbu potvrďte.
Chcete-li nastavit druhý čas budíku, opakujte výše uvedené kroky se stisknutím tlačítka
„VOLUME − / ALARM 2“.
Opakované buzení
Pomocí tlačítka „INFO/ SNOOZE“ lze funkci automaticky nastaveného budíku na dobu 9 minut
vypnout.
Deaktivace zvonícího budíku
Zvonící budík deaktivujete stisknutím tlačítka „VOLUME + / ALARM 1“ nebo „VOLUME − /
ALARM 2“.
Aktivace a deaktivace budíku
Stiskněte v pohotovostním režimu opakovaně tlačítko „VOLUME + / ALARM 1“ nebo
„VOLUME − / ALARM 2“ a zvolte možnost „Alarm off“.
Stiskněte v pohotovostním režimu opakovaně tlačítko „VOLUME + / ALARM 1“ nebo
„VOLUME − / ALARM 2“ a zvolte požadovaný zdroj pro buzení.
NASTAVENÍ HODIN A DATA
Aby bylo možné nastavit hodiny, musí být systém v pohotovostním režimu.
1. Stiskněte tlačítko „PLAY / PAUSE / CLOCK / ENTER“ a podržte ho po dobu přibližně
2 sekund.
2. Pomocí tlačítka „SKIP + / TUNING +“ nebo „SKIP − / TUNING −“ nastavte 12- nebo
24hodinový formát času a stisknutím tlačítka „PLAY / PAUSE / CLOCK / ENTER“ formát
času potvrďte. Nyní začnou blikat číslice hodin.
3. Pomocí tlačítka „SKIP + / TUNING +“ nebo „SKIP − / TUNING −“ nastavte hodiny
a stisknutím tlačítka „PLAY / PAUSE / CLOCK / ENTER“ volbu potvrďte. Nyní začnou blikat
číslice minut.
4. Pomocí tlačítka „SKIP + / TUNING +“ nebo „SKIP − / TUNING −“ nastavte minuty
a stisknutím tlačítka „PLAY / PAUSE / CLOCK / ENTER“ volbu potvrďte. Nyní se na displeji
zobrazí datum.
5. Stejným způsobem nastavte datum.
Poznámka:
Stisknutím tlačítka „PLAY / PAUSE / CLOCK / ENTER“ a jeho podržením během provozu
zařízení zobrazíte krátce aktuální čas.
SLUCHÁTKA
Chcete-li poslouchat hudbu sami, připojte sluchátka s 3,5 mm stereokonektorem ke konektoru
pro sluchátka na zadní straně zařízení. Reproduktory se poté ztlumí.

SCD7800 / návod k obsluze – česky
10
NASTAVENÍ SYSTÉMU
Poznámka: Nastavení systému jsou k dispozici pouze v režimu DAB nebo FM.
1. Chcete-li přejít k nastavením systému, stiskněte tlačítko „STOP / MENU“ a pomocí tlačítka
„SKIP + / TUNING +“ nebo „SKIP − / TUNING −“ vyberte položku „SYSTEM“. Stisknutím
tlačítka „PLAY / PAUSE / CLOCK / ENTER“ potvrďte výběr.
2. Pomocí tlačítka „SKIP + / TUNING +“ nebo „SKIP − / TUNING −“ vyberte jedno
z následujících nastavení a stisknutím tlačítka „PLAY / PAUSE / CLOCK / ENTER“ přejděte
k nastavení:
➢ Jazyk
Vyberte požadovaný jazyk nabídky: němčina, angličtina, francouzština, italština,
nizozemština, norština, dánština.
➢ Aktualizace času
Nastavte zdroj pro aktualizace času: všechny zdroje, DAB, FM, žádné aktualizace.
➢ Obnovení továrního nastavení
Všechny stanice a nastavení se odstraní!
➢ Verze SW
Zobrazuje aktuálně nainstalovanou verzi softwaru.
Aktuální návod k obsluze lze stáhnout z webu www.soundmaster.de.
Technické změny a chyby tisku jsou vyhrazeny.
Autorská práva jsou ve vlastnictví společnosti Woerlein GmbH,
90556 Cadolzburg, www.soundmaster.de
Kopírování pouze se souhlasem společnosti Woerlein GmbH

Bezpečnostné, environmentálne a inštalačné pokyny
SK
OCHRANA ŽIVOTNÉHO PROSTREDIA
Na konci životnosti výrobok nelikvidujte s bežným
komunálnym odpadom. Odovzdajte ho na zberné miesto
na recyklovanie elektrických a elektronických zariadení.
Je to označené symbolom na výrobku, v používateľskej
príručke a na obale.
Materiály sú opakovane použiteľné podľa príslušných značiek.
Opakovaným používaním, recyklovaním alebo inou formou
využívania starých zariadení významne prispievate k ochrane
životného prostredia.
Podrobnosti o zberných miestach získate od miestnych orgánov.
UPOZORNENIE
Nebezpečenstvo zásahu elektrickým
prúdom Neotvárať!
Výstraha: Aby sa znížilo nebezpečenstvo zásahu elektrickým
prúdom, neodstraňujte kryt (ani zadnú časť). Vo vnútri sa
nenachádzajú žiadne diely, ktorých údržbu by mohol vykonávať
používateľ. Vykonávanie údržby prenechajte kvalifikovaným
servisným pracovníkom.
Tento symbol označuje prítomnosť nebezpečného
napätia pod krytom, ktoré je dostatočne vysoké na
spôsobenie zásahu elektrickým prúdom.
Tento symbol označuje prítomnosť dôležitých pokynov k
prevádzke a údržbe zariadenia.
Použité batérie predstavujú nebezpečný odpad a
NESMÚ sa likvidovať s komunálnym odpadom!
Ako zákazník máte zákonnú povinnosť odovzdať
všetky batérie na ekologické recyklovanie – bez
ohľadu na to, či obsahujú alebo neobsahujú škodlivé látky*).
Batérie bezplatne odovzdajte na verejné zberné miesta vo
vašom okolí alebo v obchodoch, v ktorých sa predávajú
batérie príslušného druhu.
Odovzdávajte len úplne vybité batérie.
*) označenie Cd = kadmium, Hg = ortuť, Pb = olovo
LASEROVÝ VÝROBOK TRIEDY 1
LUOKEN 1 LAISERLAITE
KLASSE 1 LASER PRODUKT
VÝSTRAHA – NEVIDITEĽNÉ LASEROVÉ
ŽIARENIE PRI OTVORENÍ KRYTU ALEBO
STLAČENÍ BEZPEČNOSTNEJ POISTKY.
NEVYSTAVUJTE SA PÔSOBENIU
LASEROVÉHO LÚČA.
Aby ste predišli poškodeniu sluchu, nepočúvajte dlho
pri vysokej hlasitosti.
Zariadenie používajte len v suchých vnútorných
priestoroch.
Chráňte zariadenie pred vlhkosťou.
Neotvárajte zariadenie. NEBEZPEČENSTVO
ZÁSAHU ELEKTRICKÝM PRÚDOM! Otváranie a
servis zariadenia prenechajte kvalifikovaným
pracovníkom.
Zariadenie zapájajte len do správne nainštalovanej a
uzemnenej zásuvky. Ubezpečte sa, že sieťové
napätie zodpovedá špecifikáciám uvedeným na
typovom štítku.
Zabezpečte, aby napájací kábel bol počas prevádzky
suchý. Zabráňte privretiu alebo akémukoľvek
poškodeniu napájacieho kábla.
Upozornenie pri odpájaní zariadenia: Napájacia
zástrčka slúži ako pripojenie, preto musí vždy
umožňovať manipuláciu.
Napájacia zástrčka slúži ako odpájacie
zariadenie, s ktorým sa musí vždy dať
manipulovať.
Poškodený napájací kábel alebo zástrčku musí
autorizované servisné centrum okamžite
vymeniť.
V prípade výskytu bleskov zariadenie okamžite
odpojte od zdroja sieťového napätia.
Deti musia byť pri používaní zariadenia pod
dohľadom rodičov.
Na čistenie zariadenia používajte len suchú
tkaninu.
Nepoužívajte ČISTIACE PROSTRIEDKY ani
DRSNÉ TKANINY!
Zariadenie inštalujte na miesto s dostatočným
vetraním, aby ste predchádzali nahromadeniu
tepla.
Nezakrývajte vetracie otvory!
Nebráňte vetraniu zakrytím vetracích otvorov
predmetmi, napríklad novinami, obrusom,
záclonou atď.
Nevystavujte zariadenie kvapkajúcim ani
striekajúcim kvapalinám a neklaďte na zariadenie
žiadne predmety naplnené kvapalinami,
napríklad vázy.
Nevystavujte jednotku priamemu slnečnému
žiareniu, veľmi vysokým alebo veľmi nízkym
teplotám, vlhkosti, vibráciám ani prašnému
prostrediu.
Nikdy sa nepokúšajte vkladať do ventilačných
otvorov alebo do otváracej časti jednotky drôty,
špendlíky ani iné podobné predmety.
Zariadenie nainštalujte na bezpečné miesto,
ktoré nie je vystavené vibráciám.
Na zariadenie neumiestňujte žiadne zdroje
otvoreného ohňa, napríklad horiace sviečky.
Zariadenie nainštalujte čo najďalej od počítačov a
mikrovlnných rúr, v opačnom prípade môže dôjsť
k rušeniu rozhlasového príjmu.
Kryt neotvárajte ani neopravujte. Nie je to
bezpečné a vaša záruka tým stratí platnosť.
Opravy smie vykonávať len autorizované
servisné/zákaznícke stredisko.
Zariadenie je vybavené „laserom triedy 1“.
Nevystavujte sa laserovým lúčom, pretože môžu
spôsobiť poranenie očí.
Používajte len batérie bez obsahu ortuti a
kadmia.
Batérie nevystavujte nadmernému teplu,
napríklad slnečnému žiareniu, ohňu a podobne.
Použité batérie predstavujú nebezpečný odpad a
NESMÚ sa likvidovať s komunálnym odpadom!
Batérie odovzdajte u predajcu alebo na zberných
miestach vo vašom okolí.
Udržujte batérie mimo dosahu detí. Deti by mohli
batérie prehltnúť. V prípade prehltnutia batérie sa
okamžite obráťte na lekára.
Pravidelne kontrolujte vaše batérie, aby nedošlo
k ich vytečeniu.
Toto zariadenie je určené na použitie v miernom
podnebí, nie je vhodné na použitie v tropických
krajinách.

SCD7800/Návod na použitie v slovenčine
1
UMIESTNENIE OVLÁDAČOV
POHĽAD SPREDU
1
PRESKOČIŤ+ / NALADIŤ+
2
VYHĽADÁVANIE / REŽIM
3
POHOTOVOSTNÝ REŽIM / FUNKCIA
4
PREDVOĽBA+ / PRIEČINOK+
5
PRESKOČIŤ- / NALADIŤ-
6
DVIERKA KAZETOVEJ ČASTI
7
ZOBRAZIŤ
8
HLASITOSŤ+ / ALARM 2
9
PREHRAŤ/POZASTAVIŤ/HODINY/
ENTER
10
INFORMÁCIE / DRIEMAŤ
11
ZASTAVIŤ / PONUKA
12
HLASITOSŤ- / ALARM 1
13
REPRODUKTOR
POHĽAD ZHORA
14
Tlačidlá KAZETY
15
Dvierka mechaniky CD
16
RUKOVÄŤ
17
DAB-/anténa FM
POHĽAD ZOZADU
18
Konektor na slúchadlá
19
Konektor vstupu AUX IN
20
Konektor USB
21
Prípojka sieťového napájania
22
ODDELENIE pre batérie
INŠTALÁCIA
OBSAH DODÁVKY
➢ Hlavná jednotka
➢ Návod na používanie
➢ Sieťový napájací kábel
ZDROJ NAPÁJANIA
➢ Uistite sa, že napätie je rovnaké ako napätie uvedené na identifikačnom štítku hlavnej
jednotky.
➢ Pripojte dodaný sieťový napájací kábel do správne nainštalovanej bezpečnostnej zásuvky a
zástrčku kábla do konektora striedavého prúdu na zadnej strane jednotky.

SCD7800/Návod na použitie v slovenčine
2
PREVÁDZKA NA BATÉRIE
1. Otvorte veko priestoru na batérie v spodnej časti jednotky.
2. Vložte 6 batérií typu UM-2/R14 (veľkosť „C“) 1,5 V. Uistite sa, že polarita je správna (pozri
označenie v priestore na batérie).
3. Potom zatvorte kryt batérií.
Poznámka:
➢ Ak je zariadenie napájané z batérií a je v pohotovostnom režime, batérie budú stále vybité.
Aby ste sa tomu vyhli, odporúčame vybrať batérie alebo pripojiť zariadenie k elektrickej
sieti. Displej a modré svetlá sú vypnuté.
➢ Keď je jednotka napájaná z batérií, je lepšie, aby sa hlasitosť nenastavovala na maximum.
Správa napájania ERP
Ak neexistuje žiaden zvukový signál, jednotka sa automaticky vypne po 10 minútach
v pohotovostnom režime. Ak chcete jednotku znova zapnúť, stlačte tlačidlo „STANDBY /
FUNCTION“.
ZÁKLADNÁ OBSLUHA
ZAPNUTIE/VYPNUTIE
Jednotku zapnete stlačením tlačidla „STANDBY/FUNCTION“.
Stlačením a podržaním tlačidla „STANDBY/FUNCTION“ vypnete jednotku v pohotovostnom
režime.
VÝBER REŽIMOV
Počas režimu zapnutia prepínajte medzi režimami opakovaným stlačením tlačidla
„STANDBY/FUNCTION“.
NASTAVENIE HLASITOSTI
Stlačením tlačidla „VOLUME –/ALARM 1“ alebo „VOLUME +/ALARM 2“ znížite alebo zvýšite
hlasitosť.
DAB
Teleskopickú anténu úplne vysuňte. Na vylepšenie príjmu zmeňte jej polohu.
Opakovane stláčajte tlačidlo „STANDBY / FUNCTION“, až kým sa na displeji nezobrazí „DAB“.
Ak je jednotku prvýkrát zapnete, rádio automaticky spustí úplné vyhľadanie staníc DAB+. Po
dokončení vyhľadávania sa stanice uložia v abecednom poradí. Prehrá sa prvá dostupná
stanica.
Poznámka:
Ak nie je k dispozícii príjem DAB+, zmeňte polohu jednotky alebo nastavte anténu. Ak chcete
spustiť nové vyhľadávanie, stlačte a podržte tlačidlo „SCAN/MODE“ približne na 3 sekundy.

SCD7800/Návod na použitie v slovenčine
3
Výber rozhlasovej stanice DAB
Stlačte tlačidlo „SKIP -/TUNING -“ alebo „SKIP +/TUNING +“ a vyberte požadovanú rozhlasovú
stanicu.
Ak chcete potvrdiť výber, stlačte tlačidlo „PLAY/PAUSE/CLOCK/ENTER“.
Uloženie predvoľby
1. Vyberte požadovanú rozhlasovú stanicu.
2. Stlačte tlačidlo „SCAN/MODE“ a pomocou tlačidla „SKIP -/TUNING -“ alebo „SKIP
+/TUNING +“ vyberte číslo požadovanej programovej stanice.
3. Na potvrdenie stlačte tlačidlo „PLAY/PAUSE/CLOCK/ENTER“.
Vyvolanie predvoľby
Opakovaným stláčaním tlačidla „PRE +/FOLDER +“ vyberte požadovanú uloženú rozhlasovú
stanicu.
INFORMÁCIE DAB
Opakovaným stlačením tlačidla „INFO/SNOOZE“ zobrazíte nasledujúce informácie DAB:
DLS, intenzita signálu, žáner, frekvencia, chyba signálu, bitová rýchlosť zvuku, čas, dátum.
PONUKA DAB
Do ponuky FM vstúpite stlačením tlačidla „STOP/MENU“. Pomocou tlačidla „SKIP -/TUNING -“
alebo „SKIP +/TUNING +“ vyberte jedno z nasledujúcich nastavení a stlačte tlačidlo
„PLAY/PAUSE/CLOCK/ENTER“:
• Úplné vyhľadávanie:
Spustí vyhľadávanie staníc. Na frekvenčnom pásme DAB sa vyhľadajú stanice.
• Manuálne ladenie:
Aby ste ho mohli vykonať, musíte poznať frekvenciu stanice. Je možné ju nájsť na
internetovej lokalite vysielania. Jednotlivé frekvencie vyberiete pomocou tlačidla
„PLAY/PAUSE/CLOCK/ENTER“.
• DRC:
Skratka pre Digital Range Control (ovládanie dynamického rozsahu). Výraz DRC opisuje
pomer medzi najtichším a najhlasnejším zvukom. Keď je dynamický rozsah veľmi veľký,
vyskytujú sa veľmi tiché zvuky, rovnako ako veľmi hlasné zvuky.
Za určitých okolností to môže byť problém pri prehrávaní. Predpokladajme, že počúvate
rozhlasovú stanicu v relatívne hlučnom prostredí. Zvýšením hlasitosti môžete tichšie časti
prehrávať hlasnejšie.
Má to však nevýhodu, že hlasné časti budú nepríjemne hlasné. Tu má zmysel zmenšiť
dynamický rozsah. Vyberte si z týchto možností:
- DRC vypnuté: Dynamický rozsah nie je znížený.
- Vysoké DRC: Dynamický rozsah je výrazne znížený.
- Nízke DRC: Dynamický rozsah je mierne znížený

SCD7800/Návod na použitie v slovenčine
4
• Odstránenie:
Môže sa stať, že po vyhľadávaní staníc alebo zmene umiestnenia už nie je možné prijímať
niektoré stanice. Pomocou tejto funkcie môžete odstrániť tieto stanice zo zoznamu príjmu.
Vyberte možnosť „YES“ a potvrďte tlačidlom „PLAY/PAUSE/CLOCK/ENTER“.
• Systém
Pozrite si časť „SYSTEM SETTINGS“.
FM
1. Opakovane stláčajte tlačidlo „STANDBY / FUNCTION“, až kým sa na displeji nezobrazí
„FM“.
2. Teleskopickú anténu úplne vysuňte. Na vylepšenie príjmu zmeňte jej polohu.
3. Na vyhľadávanie a predvolené nastavenie rozhlasových staníc existujú dve možnosti.
• Automatické vyhľadávanie:
Dôležité! Všetky predvolené rozhlasové stanice budú prepísané.
Stlačte a podržte tlačidlo „SCAN/MODE“ približne na 3 sekundy. Systém prehľadá celé
frekvenčné pásmo pre rozhlasové stanice. Všetky nájdené stanice budú predvolene
nastavené od najnižšej po najvyššiu frekvenciu.
• Manuálne vyhľadávanie zvukových staníc:
Krátko stlačte tlačidlá „SKIP- / TUNING -“ a „SKIP+ / TUNING +“, až kým nenájdete
rozhlasovú stanicu, ktorú hľadáte. Ak jedno z tlačidiel podržíte stlačené, zariadenie vyhľadá
predchádzajúcu alebo ďalšiu rozhlasovú stanicu.
Uloženie predvoľby
Je to rovnaké ako v režime DAB.
Vyvolanie predvoľby
Je to rovnaké ako v režime DAB.
Informačný displej
Opakovaným stlačením tlačidla „INFO/SNOOZE“ zobrazíte nasledujúce informácie FM:
text rádia, PTY, názov, mono alebo stereo vysielanie, čas, dátum.
PONUKA FM
Do ponuky FM vstúpite stlačením tlačidla „STOP/MENU“. Pomocou tlačidla „SKIP -/TUNING -“
alebo „SKIP +/TUNING +“ vyberte jedno z nasledujúcich nastavení a stlačte tlačidlo
„PLAY/PAUSE/CLOCK/ENTER“:

SCD7800/Návod na použitie v slovenčine
5
• Nastavenie vyhľadávania: Vyberte požadovanú voľbu pre automatické vyhľadávanie
staníc.
- Všetky stanice: Vyhľadávanie všetkých staníc, ktoré je možné prijímať. Vyhľadávanie sa
v tomto prípade zastaví aj na slabých staniciach.
- Iba silné stanice: Vyhľadávajú sa iba stanice s čistým príjmom.
• Nastavenie zvuku: Vyberte možnosť MONO alebo STEREO pre príjem FM.
• Systém
Pozrite si časť „SYSTEM SETTINGS“.
CD
1. Opakovane stláčajte tlačidlo „STANDBY / FUNCTION“, až kým sa na displeji nezobrazí
„CD“.
2. Otvorte priestor na CD potiahnutím za dvierok CD mechaniky nahor.
3. Vložte zvukové CD potlačenou stranou smerujúcou nahor k stredovému kužeľu tak, aby
disk CD zapadol na miesto a potom zatvorte kryt priestoru na CD.
4. Disk CD sa bude prehrávať od prvého titulu.
5. Ak chcete CD vybrať, stlačte tlačidlo „STOP / MENU“ , otvorte dvierka na CD mechaniky a
opatrne vyberte disk CD.
Oblasť prehrávača CD nechajte vždy zatvorenú.
POZNÁMKA:
Ak je disk vložený nesprávnou stranou nahor, respektíve ak nie je vložený žiadny disk, na
displeji sa zobrazí hlásenie „NO DISC“.
Ovládacie tlačidlá:
➢ Na spustenie alebo prerušenie prehrávania stlačte tlačidlo „PLAY/PAUSE/CLOCK/ENTER“.
➢ Na zastavenie prehrávania stlačte tlačidlo „STOP/MENU“.
➢ Pomocou tlačidla „SKIP+ / TUNING +“ môžete preskočiť na ďalšiu skladbu.
Ak tlačidlo podržíte stlačené, prístroj začne prehľadávať skladby smerom dopredu.
Tlačidlo „SKIP -/ TUNING -“ je možné použiť nasledovne:
Jedno stlačenie = spustí sa aktuálna skladba od začiatku.
Dve stlačenia = preskočenie späť na predchádzajúcu skladbu.
Ak tlačidlo podržíte stlačené, prístroj začne prehľadávať skladby smerom dozadu.
➢ Ak chcete vybrať priečinok, stlačte tlačidlo „PRE +/FOLDER +“ (iba pre MP3-CD alebo
USB).
Funkcia obnovenia prehrávania
Ak zmeníte režim alebo vypnete prístroj a vrátite sa do režimu CD, prístroj spustí prehrávanie
od posledného bodu.
Ak stlačíte tlačidlo „STOP / MENU“ a spustíte prehrávanie znova, jednotka sa spustí od prvej
skladby (skladba 1).

SCD7800/Návod na použitie v slovenčine
6
Funkcia opakovania
Počas prehrávania opakovane stláčajte tlačidlo „SCAN/MODE“ a vyberte nasledujúce funkcie
opakovania:
Zvukové CD:
Jedno stlačenie = normálny režim prehrávania. Na displeji sa zobrazí „Normal“.
Dve stlačenia = aktuálna skladba sa bude nepretržite opakovať. Na displeji sa zobrazí „Repeat
One“.
Tri stlačenia = celé CD sa bude nepretržite prehrávať. Na displeji sa zobrazí „Repeat All“.
Štyri stlačenia = všetky skladby sa budú prehrávať v náhodnom poradí. Na displeji sa zobrazí
„Random“.
Päť stlačení = návrat do normálneho režimu prehrávania.
MP3-CD:
Jedno stlačenie = normálny režim prehrávania. Na displeji sa zobrazí „Normal“.
Dve stlačenia = aktuálna skladba sa bude nepretržite opakovať. Na displeji sa zobrazí „Repeat
One“.
Tri stlačenia = vybraný priečinok sa bude nepretržite opakovať. Na displeji sa zobrazí „Repeat
Folder“.
Štyri stlačenia = celé CD sa bude nepretržite prehrávať. Na displeji sa zobrazí „Repeat All“.
Päť stlačení = všetky skladby sa budú prehrávať v náhodnom poradí. Na displeji sa zobrazí
„Random“.
Šesť stlačení = návrat do normálneho režimu prehrávania.
Programované prehrávanie
Túto funkciu môžete využiť na naprogramovanie akejkoľvek požadovanej postupnosti skladieb.
1. Stlačte tlačidlo „STOP/MENU“.
2. Stlačte tlačidlo „SCAN/MODE“. Na displeji bude blikať „P_01“ (P_01 znamená číslo
programu).
3. Pomocou tlačidiel „SKIP +/TUNING +“ alebo „SKIP -/TUNING -“ vyberte požadovanú
skladbu a potom stlačte tlačidlo „SCAN/MODE“ znova. Text „P_01“ na displeji sa zmení na
„P_02“.
4. Pomocou tlačidiel „SKIP+/TUNING+“ alebo „SKIP-/TUNING-“ vyberte ďalšiu skladbu a
stlačte tlačidlo „SCAN/MODE“ znova. Postup opakujte dovtedy, kým nie sú vybraté všetky
požadované skladby.
POZNÁMKA:
Po dosiahnutí úložnej kapacity skladieb, ktoré sa majú naprogramovať, sa na displeji
zobrazí „PROGFULL“.
5. Stlačením tlačidla „PLAY/PAUSE/CLOCK/ENTER“ spustíte programované prehrávanie. V
ľavom hornom rohu displeja sa zobrazí „MEM“.

SCD7800/Návod na použitie v slovenčine
7
6. Jedným stlačením tlačidla „STOP / MENU“ zastavíte prehrávanie a zachováte program.
7. Na opätovné programované prehrávanie stlačte tlačidlo „PLAY/PAUSE/CLOCK/ENTER“.
8. Ak chcete program odstrániť, dvakrát stlačte tlačidlo „STOP/MENU“. Oznámenie „MEM“
zmizne.
KAZETA
Prehrávanie kaziet
1. Režim kazety vyberiete pomocou tlačidla „STANDBY/FUNCTION“ vtedy, keď sa zobrazí
text „TAPE“.
2. Stlačením tlačidla „STOP/EJECT“ otvorte priehradku na kazety.
3. Vložte nahratú audiokazetu do priehradky tak, že páska je hore a strana, ktorú chcete
počúvať, je otočená k vám (navinutá časť pásky je napravo). Potom znova zatvorte
priehradku na kazety.
4. Na počúvanie kazety stlačte tlačidlo „PLAY“.
5. Prehrávanie je možné zastaviť pomocou tlačidla „STOP/EJECT“.
6. V prípade potreby previňte kazetu dopredu alebo dozadu v smere tlačidiel so šípkou.
7. Pri zmene smeru alebo zastavení pásky vždy stlačte tlačidlo „STOP/EJECT“. Tým zabránite
poškodeniu prístroja a kazety.
8. Ak znova stlačíte tlačidlo „STOP/EJECT“, priehradka na kazety sa otvorí.
9. Ak chcete na chvíľu prerušiť prehrávanie, stlačte tlačidlo „PAUSE“. Opätovným stlačením
bude prehrávanie pokračovať.
USB
Toto zariadenie bolo vyvinuté v súlade s najnovším technickým pokrokom v oblasti týkajúcej sa
USB. Široká spektrum rôznych typov úložných zariadení USB, ktoré sú v súčasnosti na trhu,
nám bohužiaľ neumožňuje zaručiť úplnú kompatibilitu so všetkými úložnými zariadeniami USB.
Z tohto dôvodu môže v zriedkavých prípadoch dôjsť k problémom s prehrávaním súborov z
úložných zariadení USB. Nie je to porucha zariadenia.
1. Opakovane stláčajte tlačidlo „STANDBY / FUNCTION“, až kým sa na displeji nezobrazí
„USB“.
2. Pripojte úložné zariadenie USB priamo do portu. Prehrávanie sa automaticky spustí po
niekoľkých sekundách.
Funkcie ovládania, funkcie opakovania a programované prehrávanie sú rovnaké ako v režime
CD.
Poznámka:
• Úložné médium USB pripojte vždy k portu USB, aby ste predišli akýmkoľvek poruchám.
• Port USB nie je určený na nabíjanie externých zariadení.
UPOZORNENIE:
Pred vybratím úložného zariadenia USB prepnite zariadenie do iného režimu prevádzky.

SCD7800/Návod na použitie v slovenčine
8
POMOCNÝ VSTUP
Prostredníctvom tohto konektora môžete tiež cez reproduktory počuť zvuk ďalších prehrávacích
zariadení, ako sú prehrávače MP3, prehrávače CD atď.
1. Externé zariadenie pripojte pomocou 3,5 mm stereofónneho konektora do konektora
pomocného vstupu na zadnej strane jednotky.
2. Opakovane stláčajte tlačidlo „STANDBY/FUNCTION“, až kým sa na displeji nezobrazí
„Aux“.
3. Prehrávanie zvuku z externého zariadenia budete počuť z reproduktorov. Hlasitosť môžete
upraviť pomocou tlačidiel hlasitosti. Tlačidlá CD nie sú funkčné.
4. Zvyšnú časť postupu nájdete v návode na použitie externého zdroja zvuku.
Poznámka:
Nastavte hlasitosť externého zariadenia na prijateľnú úroveň.
BUDÍK
Nastavenie času budíka
Ak chcete nastaviť budík, systém musí byť v pohotovostnom režime.
Máte možnosť nastaviť dva časy budíka. Postupujte nasledovne:
1. Stlačte tlačidlo „VOLUME+/ALARM 1“ asi na 3 sekundy. Začnú blikať hodiny aktuálne
nastaveného času budíka.
2. Vykonajte nastavenia pomocou tlačidiel „SKIP +/TUNING +“ alebo „SKIP -/TUNING -“.
3. Na potvrdenie stlačte tlačidlo „VOLUME+/ALARM 1“. Začnú blikať minúty.
4. Vykonajte nastavenia pomocou tlačidiel „SKIP +/TUNING +“ alebo „SKIP -/TUNING -“.
5. Na potvrdenie stlačte tlačidlo „VOLUME+/ALARM 1“. Potom vyberte režim budenia.
Vykonajte nastavenia pomocou tlačidiel „SKIP +/TUNING +“ alebo „SKIP -/TUNING -“. Na
potvrdenie stlačte tlačidlo „VOLUME+/ALARM 1“.
• FM:
Ihneď po dosiahnutí nastaveného času budíka sa rádio zapne v režime FM.
• DAB:
Ihneď po dosiahnutí nastaveného času budíka sa rádio zapne v režime CD.
• CD:
Ihneď po dosiahnutí nastaveného času budíka sa zariadenie zapne v režime CD.
Vložené CD sa prehrá od prvej skladby.
• USB:
Ihneď po dosiahnutí nastaveného času budíka sa zariadenie zapne v režime USB.
Skladby pripojeného úložného zariadenia sa prehrajú od prvej skladby.
• BZUČIAK:
Po dosiahnutí času budíka zaznie signálny tón.
6. Ak je ako funkcia budenia vybraná možnosť DAB alebo FM, musíte vybrať uloženú
predvoľbu 1 – 30.

SCD7800/Návod na použitie v slovenčine
9
7. Nakoniec stlačte tlačidlo „SKIP +/TUNING +“ alebo „SKIP -/TUNING -“ a nastavte hlasitosť
budíka. Na potvrdenie stlačte tlačidlo „VOLUME+/ALARM 1“.
Ak chcete nastaviť čas druhého budíka, opakujte všetky vyššie uvedené kroky pomocou tlačidla
„VOLUME-/ALARM 2“.
Driemanie
Automaticky nastavenú funkciu budíka je možné vypnúť na 9 minút pomocou tlačidla
„INFO/SNOOZE“.
Deaktivácia zvukového tónu budenia
Zvukový tón budíka deaktivujete stlačením tlačidla „VOLUME+/ALARM 1“ alebo „VOLUME-
/ALARM 2“.
Aktivácia/deaktivácia budíka
V pohotovostnom režime opakovane stláčajte tlačilo „VOLUME+/ALARM 1“ alebo „VOLUME-
/ALARM 2“ a zvoľte možnosť „Alarm off“.
V pohotovostnom režime opakovane stláčajte tlačilo „VOLUME+/ALARM 1“ alebo „VOLUME-
/ALARM 2“ a zvoľte požadovaný zdroj budenia.
NASTAVENIE HODÍN A DÁTUMU
Ak chcete nastaviť hodiny, systém musí byť v pohotovostnom režime.
1. Stlačte a podržte tlačidlo „PLAY/PAUSE/CLOCK/ENTER“ približne na 2 sekundy.
2. Pomocou tlačidiel „SKIP +/TUNING +“ alebo „SKIP -/TUNING -“ nastavte formát času
„12/24hod“ a stlačte tlačidlo „PLAY/PAUSE/CLOCK/ENTER“ na potvrdenie formátu času.
Teraz začnú číslice hodín blikať.
3. Pomocou tlačidiel „SKIP +/TUNING +“ alebo „SKIP -/TUNING -“ nastavte hodiny a stlačte
tlačidlo „PLAY/PAUSE/CLOCK/ ENTER“ na potvrdenie. Teraz budú blikať číslice minút.
4. Pomocou tlačidiel „SKIP +/TUNING +“ alebo „SKIP -/TUNING -“ nastavte minúty a stlačte
tlačidlo „PLAY/PAUSE/CLOCK/ ENTER“ na potvrdenie. Teraz sa na displeji zobrazí dátum.
5. Rovnakým spôsobom nastavte dátum.
Poznámka:
Stlačením a podržaním tlačidla „PLAY/PAUSE/CLOCK/ENTER” počas prevádzky sa nakrátko
zobrazí aktuálny čas.
SLÚCHADLÁ
Ak chcete počúvať hudbu v súkromí, použite slúchadlá so stereofónnym konektorom 3,5 mm a
zapojte ich do konektora na slúchadlá na pravej strane systému. Reproduktory budú stlmené.

SCD7800/Návod na použitie v slovenčine
10
SYSTÉMOVÉ NASTAVENIA
Poznámka: Nastavenia systému sú k dispozícii iba v režime DAB alebo FM!
1. Na vstup do nastavení systému stlačte „STOP/MENU“ a pomocou tlačidla „SKIP +/TUNING
+“ alebo „SKIP -/TUNING -“ vyberte položku „SYSTEM“. Stlačením tlačidla
„PLAY/PAUSE/CLOCK/ENTER“ potvrďte výber.
2. Pomocou tlačidla „SKIP +/TUNING +“ alebo „SKIP -/TUNING -“ vyberte jedno z
nasledujúcich nastavení a stlačte tlačidlo „PLAY/PAUSE/CLOCK/ENTER“ na zadanie
nastavenia:
➢ Jazyk
Vyberte požadovaný jazyk ponuky: Nemecky, anglicky, francúzsky, taliansky, holandsky,
nórsky, dánsky.
➢ Aktualizácia času
Upravte zdroj aktualizácie času: všetky zdroje, DAB, FM, žiadna aktualizácia.
➢ Obnovenie výrobných nastavení
Všetky stanice a úpravy budú odstránené!
➢ Verzia softvéru
Zobrazí aktuálne nainštalovaný softvér.
Aktuálny návod na používanie je možné stiahnuť zo stránky www.soundmaster.de.
Technické rezervy a chyby vyhradené.
Copyright Woerlein GmbH, 90556 Cadolzburg, www.soundmaster.de
Kopírovanie je možné iba so súhlasom spoločnosti Woerlein GmbH

SCD7800 / Technical Specifications
TECHNICAL SPECIFICATIONS
Spannungseingang
Power input
Entrée d’alimentation
Voedingsingang
Ingresso di alimentazione
Vstup napájení
Zdroj napájania
100-240V~ 50/60Hz 0.3A max.
DAB Bereich
DAB range
Plage DAB
DAB-bereik
Portata DAB
Rozsah DAB+
Rozsah DAB+
174-239MHz
UKW Bereich
FM range
Plage FM
FM-bereik
Portata FM
Rozsah pásma FM
Rozsah frekvencií FM
87.5MHz – 108.0MHz
Festsenderspeicher
Preset Stations
Stations présélectionnées
Zendergeheugens
Stazioni in preselezione
Přednastavení stanic
Predvolené stanice
30 DAB+, 30 UKW (FM)
Audioausgangsleistung
Audio power output
Sortie de puissance audio
Audio-uitgangsvermogen
Uscita di potenza audio
Napájecí výstup zvuku
Výstupný zvukový výkon
2 x 11.5W RMS
Batteriebetrieb
Battery operation
Fonctionnement sur piles
Werking op batterijen
Funzionamento a batteria
Napájení z baterií
Napájanie batériou
6x 1.5V LR14 („C“- Size)
Audioanschluß
Audio socket
Prise audio
Audio-aansluiting
Presa audio
Zvuková zásuvka
Audio zásuvka
AUX-IN (3,5mm)

HERSTELLER / IMPORTEUR
Wörlein GmbH
Gewerbestraße 12
D 90556 Cadolzburg, Germany
Tel: +49 9103 71 67 0
Fax: +49 9103 71 67 12
E-Mail: info@soundmaster.de
Internet: www.soundmaster.de
Hiermit bestätigt Wörlein GmbH, dass sich dieses Gerät in
Übereinstimmung mit den grundlegenden Anforderungen
und den übrigen einschlägigen Bestimmungen der Richtlinie
2014/53/EU befindet.
Eine Kopie der Konformitätserklärung kann unter
obenstehender Adresse bezogen werden.
Hereby, Wörlein GmbH declares that this device is in
compliance with the essential requirements and other
relevant provisions of Directive 2014/53/EU.
A copy of the declaration of conformity can be obtained from
the above address.
Par la présente, Wörlein GmbH déclare que cet appareil est
conforme aux exigences principales et autres clauses
applicables de la Directive 2014/53/EU.
Une copie de la déclaration de conformité peut être obtenue
à l'adresse ci-dessus.
Wörlein GmbH verklaart hierbij dat dit apparaat in
overeenkomst is met de essentiële vereisten en andere
relevante bepalingen van de Richtlijn 2014/53/EU.
Een kopie van de conformiteitsverklaring kunt u verkrijgen
op het hierboven vermelde adres.
Con la presente, Wörlein GmbH dichiara che questo
dispositivo è conforme ai requisiti essenziali e altre
disposizioni contenute nella Direttiva 2014/53/EU.
Una copia della dichiarazione di conformità può essere
richiesta all'indirizzo sopra indicato.
Härmed Wörlein GmbH deklarerar att denna enhet är i
överensstämmelse med de grundläggande kraven och andra
relevanta bestämmelser i direktiv 2014/53/EU.
En kopia av försäkran om överensstämmelse kan erhållas
från ovanstående adress.
Herved Wörlein GmbH erklærer, at denne enhed er i
overensstemmelse med de væsentlige krav og øvrige
relevante krav i direktiv 2014/53/EU.
En kopi af overensstemmelseserklæringen kan hentes fra
ovennævnte adresse.
Tímto Wörlein GmbH prohlašuje, že toto zařízení je ve shodě
se základními požadavky a dalšími příslušnými ustanoveními
směrnice 2014/53/EU.
Kopii prohlášení o shodě lze získat na výše uvedené adrese.
Por este meio, Wörlein GmbH declara que este dispositivo
está em conformidade com os requisitos essenciais e outras
disposições da Directiva 2014/53/EU.
Uma cópia da declaração de conformidade pode ser obtida
no endereço acima.
Wörlein GmbH confirma que este dispositivo cumple con los
requisitos esenciales y otras disposiciones relevantes de la
Directiva 2014/53/EU.
Se puede obtener una copia de la declaración de
conformidad en la dirección anterior.
Wörlein GmbH týmto potvrdzuje, že toto zariadenie je v
súlade so základnými požiadavkami a ďalšími príslušnými
ustanoveniami smernice 2014/53/EU.
Kópiu vyhlásenia o zhode je možné získať na uvedenej
adrese.
Wörlein GmbH potrjuje, da je ta naprava v skladu z
bistvenimi zahtevami in drugimi ustreznimi določbami
Direktive 2014/53/EU.
Kopijo izjave o skladnosti je mogoče dobiti na zgornjem
naslovu.
Wörlein GmbH confirmă prin prezenta că acest dispozitiv
respectă cerințele esențiale și alte prevederi relevante ale
Directivei 2014/53/EU.
O copie a declarației de conformitate poate fi obținută de la
adresa de mai sus.
Wörlein GmbH patvirtina, kad šis prietaisas atitinka esminius
reikalavimus ir kitas atitinkamas Direktyvos 2014/53/EU
nuostatas.
Atitikties deklaracijos kopiją galima gauti iš pirmiau nurodyto
adreso.
A Wörlein GmbH megerősíti, hogy ez az eszköz megfelel a
2014/53/EU irányelv alapvető követelményeinek és egyéb
vonatkozó rendelkezéseinek.
A megfelelőségi nyilatkozat egy példányát a fenti címről
szerezheti be.
Wörlein GmbH potvŭrzhdava, che tova ustrostvo e v
sŭotvet·stvie sŭs sŭshtestvenite iziskvaniya i drugi prilozhimi
razporedbi na Direktiva 2014/53 EUS. Kopie ot deklaratsiyata
za sŭotvet·stvie mozhe da bŭde polucheno ot
goreposocheniya adres.
Wörlein GmbH kinnitab käesolevaga, et see seade vastab
direktiivi 2014/53/EU olulistele nõuetele ja muudele
asjakohastele sätetele.
Vastavusdeklaratsiooni koopiat saab eespool nimetatud
aadressilt.
Wörlein GmbH vahvistaa, että tämä laite on direktiivin
2014/53/EU olennaisten vaatimusten ja muiden asiaa
koskevien säännösten mukainen.
Kopio vaatimustenmukaisuusvakuutuksesta on saatavissa
edellä mainitusta osoitteesta.
Ar šo Wörlein GmbH apstiprina, ka šī ierīce atbilst Direktīvas
2014/53/EU būtiskajām prasībām un citiem attiecīgajiem
noteikumiem.
Atbilstības deklarācijas kopiju var iegūt, izmantojot iepriekš
minēto adresi.
Wörlein GmbH bekrefter herved at denne enheten er i
samsvar med de vesentlige kravene og andre relevante
bestemmelser i direktiv 2014/53/EU.
En kopi av samsvarserklæringen kan fås fra adressen ovenfor.
Wörlein GmbH niniejszym potwierdza, że to urządzenie jest
zgodne z zasadniczymi wymaganiami i innymi stosownymi
postanowieniami dyrektywy 2014/53/EU.
Kopię deklaracji zgodności można uzyskać pod powyższym
adresem.
-
 1
1
-
 2
2
-
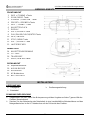 3
3
-
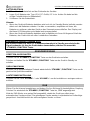 4
4
-
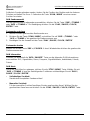 5
5
-
 6
6
-
 7
7
-
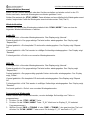 8
8
-
 9
9
-
 10
10
-
 11
11
-
 12
12
-
 13
13
-
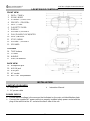 14
14
-
 15
15
-
 16
16
-
 17
17
-
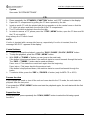 18
18
-
 19
19
-
 20
20
-
 21
21
-
 22
22
-
 23
23
-
 24
24
-
 25
25
-
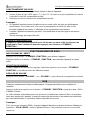 26
26
-
 27
27
-
 28
28
-
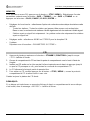 29
29
-
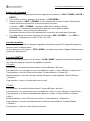 30
30
-
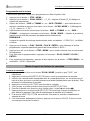 31
31
-
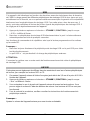 32
32
-
 33
33
-
 34
34
-
 35
35
-
 36
36
-
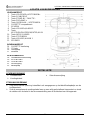 37
37
-
 38
38
-
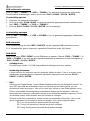 39
39
-
 40
40
-
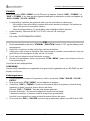 41
41
-
 42
42
-
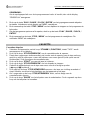 43
43
-
 44
44
-
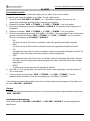 45
45
-
 46
46
-
 47
47
-
 48
48
-
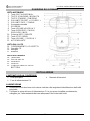 49
49
-
 50
50
-
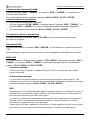 51
51
-
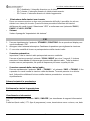 52
52
-
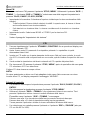 53
53
-
 54
54
-
 55
55
-
 56
56
-
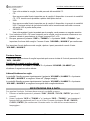 57
57
-
 58
58
-
 59
59
-
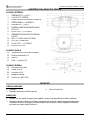 60
60
-
 61
61
-
 62
62
-
 63
63
-
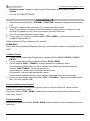 64
64
-
 65
65
-
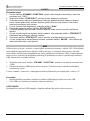 66
66
-
 67
67
-
 68
68
-
 69
69
-
 70
70
-
 71
71
-
 72
72
-
 73
73
-
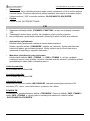 74
74
-
 75
75
-
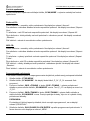 76
76
-
 77
77
-
 78
78
-
 79
79
-
 80
80
-
 81
81
-
 82
82


Soundmaster SCD7800 Handleiding
- Categorie
- CD spelers
- Type
- Handleiding
in andere talen
- italiano: Soundmaster SCD7800 Manuale utente
- français: Soundmaster SCD7800 Manuel utilisateur
- Deutsch: Soundmaster SCD7800 Benutzerhandbuch
- slovenčina: Soundmaster SCD7800 Používateľská príručka