
Network
Camera
Quick Guide
Powered by

2
Safety Precautions
1. Read Instructions
All the safety and operating instructions should be read before the
appliance is operated.
2. Retain Instructions
The safety and operating instructions should be retained for future
reference.
3. Cleaning
Unplug this equipment from the wall outlet before cleaning it. Do
not use liquid aerosol cleaners. Use a damp soft cloth for cleaning.
4. Attachments
Never add any attachments and/or equipment without the
approval of the manufacturer as such additions may result in the
risk of re, electric shock or other personal injury.
5. Water and/or Moisture
Do not use this equipment near water or in contact with water.
6. Placing and Accessories
Do not place this equipment on an wall or ceiling
that is not strong enough to sustain the camera. The
equipment may fall, causing serious injury to a child
or adult, and serious damage to the equipment. Wall
or shelf mounting should follow the manufacturer’s
instructions, and should use a mounting kit approved by
the manufacturer.
This equipment and cart combination should be moved with care.
Quick stops, excessive force, and uneven surfaces may cause the
equipment and cart combination to overturn.
Do not place this equipment in an enclosed space. Sucient
ventilation is required to prevent an increase in ambient
temperature which can cause malfunction or the risk of re.
7. Power Sources
This equipment should be operated only from the type of power
source indicated on the marking label. If you are not sure of the
type of power, please consult your equipment dealer or local
power company.
You may want to install a UPS (Uninterruptible Power Supply)
system for safe operation in order to prevent damage caused by
an unexpected power stoppage. Any questions concerning UPS,
consult your UPS retailer.
This equipment should be remain readily operable.
8. Power Cord
Operator or installer must remove power and TNT connections
before handling the equipment.
9. Lightning
For added protection for this equipment during a lightning storm,
or when it is left unattended and unused for long periods of time,
unplug it from the wall outlet and disconnect the antenna or
cable system. This will prevent damage to the equipment due to
lightning and power-line surges. If thunder or lightning is common
where the equipment is installed, use a surge protection device.
10. Overloading
Do not overload wall outlets and extension cords as this can result
in the risk of re or electric shock.
11. Objects and Liquids
Never push objects of any kind through openings of this
equipment as they may touch dangerous voltage points or short
out parts that could result in a re or electric shock. Never spill
liquid of any kind on the equipment.
12. Servicing
Do not attempt to service this equipment yourself. Refer all
servicing to qualied service personnel.
13. Damage requiring Service
Unplug this equipment from the wall outlet and refer servicing to
qualied service personnel under the following conditions:
A. When the power-supply cord or the plug has been damaged.
B. If liquid is spilled, or objects have hit the equipment.
C. If the equipment has been exposed to rain or water.
D. If the equipment does not operate normally by following
the operating instructions, adjust only those controls that
are covered by the operating instructions as an improper
adjustment of other controls may result in damage and will
often require extensive work by a qualied technician to restore
the equipment to its normal operation.
E. If the equipment has been dropped, or the cabinet damaged.
F. When the equipment exhibits a distinct change in performance
— this indicates a need for service.
14. Replacement Parts
When replacement parts are required, be sure the service
technician has used replacement parts specied by the
manufacturer or that have the same characteristics as the original
part. Unauthorized substitutions may result in re, electric shock
or other hazards.
15. Safety Check
Upon completion of any service or repairs to this equipment, ask
the service technician to perform safety checks to determine that
the equipment is in proper operating condition.
16. Field Installation
This installation should be made by a qualied service person and
should conform to all local codes.
17. Correct Batteries
Warning: Risk of explosion if battery is replaced by an incorrect
type. Replace only with the same or equivalent type. Dispose of
used batteries according to the instructions. The battery shall not
be exposed to excessive heat such as sunshine, re or the like.
18. Tmra
A manufacturer’s maximum recommended ambient temperature
(Tmra) for the equipment must be specied so that the customer
and installer may determine a suitable maximum operating
environment for the equipment.
WARNING
RISK OF ELECTRIC SHOCK
DO NOT OPEN
WARNING: TO REDUCE THE RISK OF ELECTRIC SHOCK,
DO NOT REMOVE COVER (OR BACK). NO USER-SERVICEABLE PARTS INSIDE.
REFER SERVICING TO QUALIFIED SERVICE PERSONNEL.
Important Safeguards
English

3
FCC Compliance Statement
THIS EQUIPMENT HAS BEEN TESTED AND FOUND TO COMPLY WITH THE LIMITS FOR A CLASS A DIGITAL DEVICE, PURSUANT TO PART 15
OF THE FCC RULES. THESE LIMITS ARE DESIGNED TO PROVIDE REASONABLE PROTECTION AGAINST HARMFUL INTERFERENCE WHEN THE
EQUIPMENT IS OPERATED IN A COMMERCIAL ENVIRONMENT. THIS EQUIPMENT GENERATES, USES, AND CAN RADIATE RADIO FREQUENCY
ENERGY AND IF NOT INSTALLED AND USED IN ACCORDANCE WITH THE INSTRUCTION MANUAL, MAY CAUSE HARMFUL INTERFERENCE
TO RADIO COMMUNICATIONS. OPERATION OF THIS EQUIPMENT IN A RESIDENTIAL AREA IS LIKELY TO CAUSE HARMFUL INTERFERENCE, IN
WHICH CASE USERS WILL BE REQUIRED TO CORRECT THE INTERFERENCE AT THEIR OWN EXPENSE.
WARNING: CHANGES OR MODIFICATIONS NOT EXPRESSLY APPROVED BY THE PARTY RESPONSIBLE FOR COMPLIANCE COULD VOID THE
USER’S AUTHORITY TO OPERATE THE EQUIPMENT. THIS CLASS OF DIGITAL APPARATUS MEETS ALL REQUIREMENTS OF THE CANADIAN
INTERFERENCE CAUSING EQUIPMENT REGULATIONS.
WEEE (Waste Electrical & Electronic Equipment)
Correct Disposal of This Product
(Applicable in the European Union and other European countries with separate collection systems)
This marking shown on the product or its literature, indicates that it should not be disposed with other household
wastes at the end of its working life. To prevent possible harm to the environment or human health from uncontrolled
waste disposal, please separate this from other types of wastes and recycle it responsibly to promote the sustainable
reuse of material resources.
Household users should contact either the retailer where they purchased this product, or their local government oce,
for details of where and how they can take this item for environmentally safe recycling.
Business users should contact their supplier and check the terms and conditions of the purchase contract. This product
should not be mixed with other commercial wastes for disposal.
Copyright
© 2017 IDIS Co., Ltd.
IDIS Co., Ltd. reserves all rights concerning this document.
Use or duplication of this document in part or whole without the prior consent of IDIS Co., Ltd. is strictly prohibited.
Contents of this document are subject to change without prior notice for reasons such as functionality enhancements.
Registered Trademarks
IDIS is a registered trademark of IDIS Co., Ltd.
Other company and product names are registered trademarks of their respective owners.
The information in this manual is believed to be accurate as of the date of publication even though explanation about some functions
may not be incorporated. We are not responsible for any problems resulting from the use thereof. The information contained herein is
subject to change without notice. Revisions or new editions to this publication may be issued to incorporate such changes.
This product contains software built partially on open-source content. Codes for the corresponding open-source content are available
for download. For more information, refer to the software CD (OpenSourceGuide\OpenSourceGuide.pdf) or the open source guide
accompanying this document.
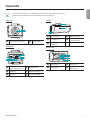
Accessories
Upon purchasing the product, check inside the box to make sure all the following accessories are included. Some parts may dier
depending on the situation.
Item
Network Camera
Ferrite Core
Open Source Guide
Quick Guide
C-Mount Ring
Installation Parts
Protective Cover (attaches to camera)
English

4
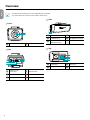
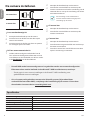
Overview
• Product color and design may vary depending on the model.
• For more details on each part name, refer to the manual.
Front
1
2
1
2
3
4
5
6
VIDEO
OUT
DC 12V
FGND
NETWORK+
-
Alarm
GND 3
2
1
OUT
IN
RS485
-
8
9
+
Audio
GND
GND
3
2
2
1
OUT
IN
1
2
3
4
1
2
3
4
5
1
Built-in Microphone
2
Image Sensor
Rear
1
2
1
2
3
4
5
6
VIDEO
OUT
DC 12V
FGND
NETWORK+
-
Alarm
GND 3
2
1
OUT
IN
RS485
-
8
9
+
Audio
GND
GND
3
2
2
1
OUT
IN
1
2
3
4
1
2
3
4
5
1
Auto Iris Lens
Connector
4
Network Port
2
Video Out
5
Network LED
3
Power
6
Power LED
Side
1
2
1
2
3
4
5
6
VIDEO
OUT
DC 12V
FGND
NETWORK+
-
Alarm
GND 3
2
1
OUT
IN
RS485
-
8
9
+
Audio
GND
GND
3
2
2
1
OUT
IN
1
2
3
4
1
2
3
4
5
1
Protective Cover
4
Mount Bracket
2
C-Mount Ring
5
SD Memory Card Slot
3
Back Focus
Adjustment Ring
Top
1
2
1
2
3
4
5
6
VIDEO
OUT
DC 12V
FGND
NETWORK+
-
Alarm
GND 3
2
1
OUT
IN
RS485
-
8
9
+
Audio
GND
GND
3
2
2
1
OUT
IN
1
2
3
4
1
2
3
4
5
1
RS485 Port
3
Alarm I/O
2
Audio I/O
4
Factory Reset Switch
English

5
Camera Installation
CS-Mount Lens
C-Mount Lens
Manual Iris Lens
1
Remove the protective cover from the camera.
2
Turn the lens in clockwise direction and mount it
on the camera.
3
Rotate the lens' iris ring to open up the iris and
then adjust accordingly.
DC Type/P Type Auto Iris Lens
1
Solder on the lens connection line to the
connector socket, if necessary. For more
information about soldering on the lens control
wire, refer to the lens manufacturer's manual.
2
Remove the protective cover from the camera.
3
Turn the lens in clockwise direction, mount it on
to the camera, and connect the auto iris jack to
the auto iris lens connector.
The auto iris jack must be at least 20cm
long in order to connect it to the camera.
CS-Mount Lens
1
Remove the protective cover from the camera.
2
Turn the lens in clockwise direction and mount it
on the camera.
C-Mount Lens
1
Remove the protective cover from the camera.
2
Turn the mount ring in clockwise direction and
mount the ring on to the camera.
3
Turn the C-mount lens in clockwise direction and
mount it on to the C-mount ring.
English

6
Specications
Exterior Dimensions (W x H x D)
75.6mm x 61mm x 129.3mm (2.98” x 2.4” x 5.09”)
Weight (Main Unit) 425 g (0.94 lbs.)
Working Temperature -10˚C ~ 50˚C (14˚F ~ 122˚F) [Starting Temperature: 0˚C ~ 50˚C (32˚F ~ 122˚F)]
Operating Humidity 0% ~ 90%
Power 12 VDC, PoE (IEEE 802.3af, Class 3)
Power Consumption Max. 8.4W
External Storage* (Optional)
(MicroSD (SDXC) Memory Card (Class 6 or above, up to 128 GB))
Certications FCC, CE
* An SLC (Single Level Cell) or MLC (Multi Level Cell) card by SanDisk or Transcend is recommended to ensu re stable recording
performance.
* An SD memory card is a consumable product with a nite service life. Prolonged use will damage the card’s memory sectors
and result in data loss or memory card failure. Test the SD memory card regularly and replace it whenever necessary.
* microSD Logo is a trademark of SD-3C, LLC.
• DirectIP NVR makes it easy to use cameras without extra network congurations.
Each camera can be controlled via the DirectIP™ NVR setup menu, without any PC.
– For detailed camera settings, please see the camera setting pages of DirectIP™ NVR manual.
• To use your camera with non-DirectIP system (e.g. other NVR or VMS), refer to the camera
manual and it can be downloaded from our website: www.idisglobal.com.
V1.5
English

1
Netwerk-camera
Veiligheidsvoorzorgsmaatregelen
1. Instructies lezen
Lees alle veiligheids- en bedieningsinstructies voordat u het
apparaat gebruikt.
2. Instructies bewaren
Bewaar de veiligheids- en bedieningsinstructies voor toekomstig
gebruik.
3. Schoonmaken
Haal de stekker uit het stopcontact voordat u het apparaat
schoonmaakt. Gebruik geen vloeibare reinigingsmiddelen in een
spuitbus. Maak het apparaat schoon met een vochtige, zachte doek.
4. Accessoires
Voeg nooit accessoires en/of apparatuur toe zonder goedkeuring
van de fabrikant, omdat dergelijke toevoegingen brand, elektrische
schokken of ander persoonlijk letsel kunnen veroorzaken.
5. Water en/of vocht
Gebruik dit apparaat niet in de buurt van water of in aanraking
met water.
6. Plaatsing en hulpmiddelen
Monteer dit apparaat niet aan muren of plafonds die niet
sterk genoeg zijn voor de camera. Het apparaat kan vallen
en ernstig letsel toebrengen aan een kind of volwassene
en ernstige schade toebrengen aan het apparaat. Volg
bij montage aan de muur of op een plank de instructies
van de fabrikant en gebruik een montageset die is
goedgekeurd door de fabrikant.
Wees voorzichtig als u het apparaat op een karretje verplaatst. Door
abrupt stoppen, hard duwen of een oneen ondergrond kan het
karretje met het apparaat omvallen.
Plaats dit apparaat niet in een afgesloten ruimte. Zorg voor voldoende
ventilatie om te voorkomen dat de omgevingstemperatuur stijgt. Dit
kan leiden tot storingen of brandgevaar.
7. Voedingsbronnen
Sluit dit apparaat alleen aan op het type voedingsbron dat is
aangegeven op het etiket. Als u niet zeker weet wat het type
voeding is, kunt u contact opnemen met de leverancier van uw
apparaat of uw plaatselijke energiebedrijf.
Installeer voor een veilige werking desgewenst een UPS-systeem
(Uninterruptible Power Supply) om schade door onverwachte
stroomonderbrekingen te voorkomen. Neem voor vragen over UPS
contact op met uw UPS-leverancier.
Deze apparatuur moet gemakkelijk operationeel blijven.
8. Netsnoer
De gebruiker of installateur moet alle netsnoeren en TNT-
aansluitingen ontkoppelen alvorens het apparaat te hanteren.
9. Bliksem
Haal de stekker uit het stopcontact en ontkoppel de antenne of het
kabelsysteem voor extra beveiliging van dit apparaat bij onweer,
of wanneer het lange perioden onbeheerd blijft of niet wordt
gebruikt. Dit voorkomt schade aan het apparaat door blikseminslag
en spanningspieken. Gebruik overspanningsbeveiliging als het vaak
onweert op de plaats waar het apparaat is geïnstalleerd.
10. Overbelasting
Zorg dat u de stopcontacten en verlengsnoeren niet overbelast,
omdat dit brand of elektrische schokken kan veroorzaken.
11. Objecten en vloeistoen
Steek nooit objecten in de openingen van dit apparaat omdat
deze in contact kunnen komen met gevaarlijke spanningspunten
of onderdelen die kortsluiting kunnen veroorzaken. Dit kan leiden
tot brand of elektrische schokken. Mors geen vloeistoen op dit
apparaat.
12. Onderhoud
Pleeg nooit zelf onderhoud aan dit apparaat. Laat al het onderhoud
over aan gekwaliceerd personeel.
13. Schade waarvoor onderhoud vereist is
Haal de stekker uit het stopcontact en laat in de volgende situaties
alle reparaties over aan gekwaliceerd onderhoudspersoneel:
A. Wanneer het netsnoer of de stekker beschadigd is.
B. Als er vloeistof is gemorst of het apparaat is geraakt door
objecten.
C. Als het apparaat is blootgesteld aan regen of water.
D. Als het apparaat bij het volgen van de bedieningsinstructies niet
normaal functioneert, verander dan alleen de instellingen die in
de bedieningsinstructies worden genoemd. Onjuiste aanpassing
van andere instellingen kan leiden tot schade, en er is vaak veel
werk van gekwaliceerd onderhoudspersoneel nodig om de
normale werking van het apparaat te herstellen.
E. Als het apparaat is gevallen of de behuizing beschadigd is.
F. Als het apparaat een opmerkelijke verandering in prestaties
vertoont. Dit geeft aan dat er onderhoud moet worden gepleegd.
14. Vervangende onderdelen
Als er vervangende onderdelen nodig zijn, zorg dan dat de
onderhoudsmonteur vervangende onderdelen gebruikt die door de
fabrikant zijn gespeciceerd of die dezelfde eigenschappen hebben
als de oorspronkelijke onderdelen. Ongeoorloofde vervangingen
kunnen leiden tot brand, elektrische schokken of andere gevaren.
15. Veiligheidscontrole
Vraag na onderhoud of reparatie of de monteur veiligheidscontroles
wil uitvoeren om na te gaan of het apparaat weer naar behoren
werkt.
16. Installatie ter plaatse
Deze installatie moet worden uitgevoerd door gekwaliceerd
personeel en moet voldoen aan de plaatselijke voorschriften.
17. De juiste batterijen
Waarschuwing: er bestaat ontplongsgevaar als een batterij
wordt vervangen door een onjuist type. Alleen vervangen
met hetzelfde of een vergelijkbaar type. Verwijder gebruikte
batterijen volgens de instructies. De batterij mag niet blootgesteld
worden aan overmatige hitte zoals zonlicht, brand of soortgelijke
warmtebronnen.
18. Aanbevolen maximale omgevingstemperatuur
Er moet een door de fabrikant aanbevolen maximale
omgevingstemperatuur voor het apparaat zijn gespeciceerd,
zodat de klant en installateur een geschikte maximale
omgevingstemperatuur voor het apparaat kunnen bepalen.
WAARSCHUWING
KANS OP ELEKTRISCHE SCHOKKEN
NIET OPENMAKEN
WAARSCHUWING: OM DE KANS OP ELEKTRISCHE SCHOKKEN TE BEPERKEN,
MAG U DE BEHUIZING (OF ACHTERKANT) NIET VERWIJDEREN. BINNENIN BEVINDEN ZICH GEEN BRUIKBARE ONDERDELEN VOOR DE GEBRUIKER.
LAAT REPARATIES UITVOEREN DOOR GEKWALIFICEERD ONDERHOUDSPERSONEEL.
Belangrijke veiligheidsvoorschriften
Nederlands

2
Snelstartgids
FCC-verklaring
DIT APPARAAT IS GETEST EN IN OVEREENSTEMMING BEVONDEN MET DE LIMIETEN VOOR DIGITALE APPARATEN VAN KLASSE A,
CONFORM DEEL 15 VAN DE FCC-VOORSCHRIFTEN. DEZE LIMIETEN ZIJN BEDOELD OM EEN REDELIJKE BESCHERMING TE BIEDEN TEGEN
SCHADELIJKE INTERFERENTIE BIJ GEBRUIK VAN HET APPARAAT IN EEN COMMERCIËLE OMGEVING. DIT APPARAAT GENEREERT EN GEBRUIKT
RADIOFREQUENTIE-ENERGIE EN KAN DEZE UITSTRALEN, EN KAN SCHADELIJKE INTERFERENTIE MET RADIOCOMMUNICATIE VEROORZAKEN
INDIEN HET APPARAAT NIET WORDT GEÏNSTALLEERD EN GEBRUIKT IN OVEREENSTEMMING MET DE GEBRUIKSAANWIJZING. BIJ GEBRUIK
VAN DIT APPARAAT IN EEN WOONWIJK IS DE KANS OP SCHADELIJKE INTERFERENTIE GROOT. IN DAT GEVAL MOETEN GEBRUIKERS DE
INTERFERENTIE OP EIGEN KOSTEN CORRIGEREN.
WAARSCHUWING: DOOR HET AANBRENGEN VAN WIJZIGINGEN OF AANPASSINGEN DIE NIET UITDRUKKELIJK ZIJN GOEDGEKEURD
DOOR DE PARTIJ DIE VERANTWOORDELIJK IS VOOR NALEVING, KAN HET RECHT VAN DE GEBRUIKER OM HET APPARAAT TE GEBRUIKEN
VERVALLEN. DIGITALE APPARATEN VAN DEZE KLASSE VOLDOEN AAN ALLE VEREISTEN VAN DE CANADESE VOORSCHRIFTEN VOOR
APPARATEN DIE INTERFERENTIE VEROORZAKEN.
WEEE (Waste Electrical & Electronic Equipment)
Correcte verwijdering van dit product
(van toepassing op de Europese Unie en andere Europese landen met gescheiden inzameling)
Deze markering op het product of de documentatie geeft aan dat het product aan het eind van de levensduur niet met
ander huishoudelijk afval mag worden verwijderd. Om mogelijke schade aan het milieu of de volksgezondheid door
ongecontroleerde verwijdering van afval te voorkomen, moet dit product worden gescheiden van andere soorten afval
en verantwoord worden gerecycled om duurzaam hergebruik van materialen te bevorderen.
Huishoudelijke gebruikers kunnen contact opnemen met de winkel waar ze het product hebben gekocht of met de
lokale overheid voor informatie over waar en hoe ze dit artikel milieuvriendelijk kunnen laten recyclen.
Zakelijke gebruikers kunnen contact opnemen met hun leverancier en de voorwaarden van het koopcontract
controleren. Dit product mag niet worden gemengd met ander te verwijderen bedrijfsafval.
Veiligheidssymbolen
Symbool Publicatie Beschrijving
IEC60417, No.5031 Wisselspanning
IEC60417, No.5032 Directe stroom
Copyright
© 2015 IDIS Co., Ltd.
IDIS Co., Ltd. behoudt zich alle rechten voor inzake dit document.
Gebruik of duplicatie van dit document, zowel gedeeltelijk als geheel, zonder de voorafgaande toestemming van IDIS Co., Ltd. is strikt verboden.
De inhoud van dit document is zonder voorafgaande kennisgeving onderhevig aan wijzigingen voor redenen zoals functionaliteitsverbeteringen.
Gedeponeerde handelsmerken
IDIS is een gedeponeerd handelsmerk van IDIS Co., LTD.
Overige bedrijfs- en productnamen zijn gedeponeerde handelsmerken van hun respectievelijke eigenaren.
Dit product bevat software die gedeeltelijk op opensource-inhoud is gebouwd. Codes voor de corresponderende opensource-inhoud
zijn als download beschikbaar. Raadpleeg voor meer informatie de software-cd (OpenSourceGuide\OpenSourceGuide.pdf) of de bij
dit document geleverde opensourcehandleiding.
Accessoires
Controleer de inhoud van de doos bij aankoop van het product om te controleren of de volgende accessoires aanwezig zijn. Afhankelijk
van de situatie kunnen bepaalde onderdelen verschillen.
Item
Netwerkcamera
Ferrietkern
Opensourcehandleiding
Snelstartgids
C-mount-ring
Installatieonderdelen
Beschermkap (voor op de camera)
Nederlands

3
Netwerk-camera
Overzicht
• De kleur en het ontwerp van het product kunnen variëren afhankelijk van het model.
• Raadpleeg de handleiding voor meer informatie over elk onderdeel.
Voorkant
1
2
1
2
3
4
5
6
VIDEO
OUT
DC 12V
FGND
NETWORK+
-
Alarm
GND 3
2
1
OUT
IN
RS485
-
8
9
+
Audio
GND
GND
3
2
2
1
OUT
IN
1
2
3
4
1
2
3
4
5
1
Ingebouwde microfoon
2
Beeldsensor
Achterkant
1
2
1
2
3
4
5
6
VIDEO
OUT
DC 12V
FGND
NETWORK+
-
Alarm
GND 3
2
1
OUT
IN
RS485
-
8
9
+
Audio
GND
GND
3
2
2
1
OUT
IN
1
2
3
4
1
2
3
4
5
1
Aansluiting voor lens
met automatische iris
4
Netwerkpoort
2
Video uit
5
Netwerkledlampje
3
Stroom
6
Aan/uit-ledlampje
Zijkant
1
2
1
2
3
4
5
6
VIDEO
OUT
DC 12V
FGND
NETWORK+
-
Alarm
GND 3
2
1
OUT
IN
RS485
-
8
9
+
Audio
GND
GND
3
2
2
1
OUT
IN
1
2
3
4
1
2
3
4
5
1
Beschermkap
4
Montagebeugel
2
C-mount-ring
5
Sleuf voor SD-
geheugenkaart
3
Instelring voor
backfocus
Bovenkant
1
2
1
2
3
4
5
6
VIDEO
OUT
DC 12V
FGND
NETWORK+
-
Alarm
GND 3
2
1
OUT
IN
RS485
-
8
9
+
Audio
GND
GND
3
2
2
1
OUT
IN
1
2
3
4
1
2
3
4
5
1
RS485-poort
3
Alarm in/uit
2
Audio in/uit
4
Schakelaar voor
fabrieksreset
Nederlands

4
Nederlands
De camera installeren
CS-mount-lens
C-mount-lens
Lens met handmatige iris
1
Verwijder de beschermkap van de camera.
2
Draai de lens met de klok mee om deze op de
camera te monteren.
3
Draai de irisring van de lens om de iris te openen
en vervolgens juist af te stellen.
DC-lens met automatische iris
1
Soldeer, indien nodig, de aansluitkabel van de
lens aan de aansluiting. Meer informatie over het
vastsolderen van de stuurkabel van de lens vindt u
in de handleiding van de lensfabrikant.
2
Verwijder de beschermkap van de camera.
3
Draai de lens met de klok mee om deze op de
camera te monteren en sluit het aansluiting van de
automatische iris aan op de aansluiting van de lens
met automatische iris.
De aansluiting van de automatische
iris moet minimaal 20 cm lang zijn voor
aansluiting op de camera.
CS-mount-lens
1
Verwijder de beschermkap van de camera.
2
Draai de lens met de klok mee om deze op de
camera te monteren.
C-mount-lens
1
Verwijder de beschermkap van de camera.
2
Draai de mount-ring met de klok mee om deze op
de camera te monteren.
3
Draai de C-mount-lens met de klok mee om deze
op de C-mount-ring te monteren.
• DirectIP NVR maakt het eenvoudig camera's te gebruiken zonder extra netwerkconguraties.
Elke camera kan worden bediend via het DirectIP™ NVR-installatiemenu, zonder pc.
– Zie de pagina's over camera-instellingen in de DirectIP™ NVR-handleiding voor
gedetailleerde camera-instellingen.
• Als u de camera wilt gebruiken met een niet-DirectIP-systeem (bijvoorbeeld een
andere NVR of een ander VMS), raadpleegt u de handleiding bij de camera. U kunt deze
downloaden via onze website: www.idisglobal.com.
Specicaties
Buitenafmetingen (B x H x D) 75,6mm x 61mm x 129,3mm
Gewicht (hoofdeenheid) 425 g
Temperatuur in bedrijf -10 ˚C ~ 50 ˚C (Opstarttemperatuur: 0 ˚C ~ 50 ˚C)
Luchtvochtigheid in bedrijf 0% ~ 90%
Stroom 12 VDC, PoE (IEEE 802,3af, klasse 3)
Energieverbruik Max. 8,4 W
Certicaten FCC, CE
V1.1

Memo

IDIS Co., Ltd.
For more information, please visit
ww w.idisglobal.com
-
 1
1
-
 2
2
-
 3
3
-
 4
4
-
 5
5
-
 6
6
-
 7
7
-
 8
8
-
 9
9
-
 10
10
-
 11
11
-
 12
12


in andere talen
- English: IDIS DC-B1803 Quick start guide
Andere documenten
-
Honeywell HCD485LX Handleiding
-
Siemens CCBS1337 Handleiding
-
-
Transcend 3 miniCPAP Gebruikershandleiding
-
Comelit IPPTZ120IRB Handleiding
-
Abus TVVR35011 Handleiding
-
Abus TVIP52501 Handleiding
-
Dedicated Micros 2060 PTZ Dome de handleiding
-
Abus TVCC91500 Handleiding
-
Abus TVIP72500 Handleiding