
Operating Instructions
Bedienungsanleitung
Mode d’emploi
Istruzioni per l’uso
Gebruiksaanwijzing
Network Audio Player
Netzwerkaudio-Player
Lecteur réseau
Network Audio Player
Netwerk Audio Speler
ST-C700D
ST-C700DE-TQBM0007.book 1 ページ 2016年10月26日 水曜日 午後1時17分

ST-C700DE-TQBM0007.book 2 ページ 2016年10月26日 水曜日 午後1時17分

Music is borderless and timeless,
touching people’s hearts across cultures and generations.
Each day the discovery of a truly emotive experience
from an unencountered sound awaits.
Let us take you on your journey to rediscover music.
ST-C700DE-TQBM0007.book 3 ページ 2016年10月26日 水曜日 午後1時17分

4
Thank you for purchasing this product.
Please read these instructions carefully before using this product, and save this manual for future use.
∫ Features of this unit
This unit offers the following features:
Digital Noise Isolation Architecture
Since most digital content storage media are intended for use with PCs, they are not designed with consideration for low noise,
which is critical to pure audio reproduction. To overcome this challenge, this unit employs a thorough measure against jitter and
outstanding noise blocking technology for each of its interfaces, delivering clear sound.
Virtual Battery Operation
Virtual Battery Operation prevents power supply noise, a factor that causes “turbidity” in sound, from mixing into the audio signal.
The result is an improvement in sound localisation performance and spatial expression.
Ultra Low Distortion Oversampling Digital Filter
High-precision oversampling eliminates distortion and enhances the sound quality of music sources, thus reproducing sound rich
with spatial expression.
∫ Recommended devices
We recommend using Technics devices (optional) for superior audio quality.
Sales and Support Information
Customer Communications Centre
≥For customers within the UK: 0333 222 8777
≥For customers within Ireland: 01 447 5229
≥Monday–Friday 9:00 am – 5:00 pm, (Excluding public holidays).
≥For further support on your product, please visit our website: www.technics.com/uk/
Product name Model number
Speaker System SB-C700
Compact Disc Player SL-C700
Stereo Integrated Amplifier SU-C700
(4)
ST-C700DE-TQBM0007.book 4 ページ 2016年10月26日 水曜日 午後1時17分

5
English
Safety precautions
Unit
≥ To reduce the risk of fire, electric shock or product damage,
– Do not expose this unit to rain, moisture, dripping or splashing.
– Do not place objects filled with liquids, such as vases, on this unit.
– Use only the recommended accessories.
– Do not remove covers.
– Do not repair this unit by yourself. Refer servicing to qualified service
personnel.
– Do not let metal objects fall inside this unit.
– Do not place heavy items on this unit.
AC mains lead
≥ To reduce the risk of fire, electric shock or product damage,
– Ensure that the power supply voltage corresponds to the voltage printed
on this unit.
– Insert the mains plug fully into the socket outlet.
– Do not pull, bend, or place heavy items on the lead.
– Do not handle the plug with wet hands.
– Hold onto the mains plug body when disconnecting the plug.
– Do not use a damaged mains plug or socket outlet.
≥ The mains plug is the disconnecting device.
Install this unit so that the mains plug can be unplugged from the socket
outlet immediately.
Unit
≥ Do not place sources of naked flames, such as lighted candles, on this unit.
≥ This unit may receive radio interference caused by mobile telephones
during use. If such interference occurs, please increase separation between
this unit and the mobile telephone.
≥ This unit is intended for use in moderate and tropical climates.
Placement
≥ Place this unit on an even surface.
≥ To reduce the risk of fire, electric shock or product damage,
– Do not install or place this unit in a bookcase, built-in cabinet or in another
confined space. Ensure this unit is well ventilated.
– Do not obstruct this unit’s ventilation openings with newspapers,
tablecloths, curtains, and similar items.
– Do not expose this unit to direct sunlight, high temperatures, high
humidity, and excessive vibration.
≥ Do not lift or carry this unit by holding any of its levers. Doing so may cause
this unit to fall, resulting in personal injury or malfunction of this unit.
Battery
≥ Danger of explosion if battery is incorrectly replaced. Replace only with the
type recommended by the manufacturer.
≥ Mishandling of batteries can cause electrolyte leakage and may cause a
fire.
– Remove the battery if you do not intend to use the remote control for a
long period of time. Store in a cool, dark place.
– Do not heat or expose to flame.
– Do not leave the battery(ies) in a car exposed to direct sunlight for a long
period of time with doors and windows closed.
– Do not take apart or short circuit.
– Do not recharge alkaline or manganese batteries.
– Do not use batteries if the covering has been peeled off.
– Do not mix old and new batteries or different types at the same time.
≥ When disposing of the batteries, please contact your local authorities or
dealer and ask for the correct method of disposal.
(For the AC mains plug of three pins)
For your safety, please read the following text carefully.
This appliance is supplied with a moulded three pin mains plug for your safety
and convenience.
A 10-ampere fuse is fitted in this plug.
Should the fuse need to be replaced please ensure that the replacement fuse
has a rating of 10-ampere and that it is approved by ASTA or BSI to BS1362.
Check for the ASTA mark Ï or the BSI mark Ì on the body of the fuse.
If the plug contains a removable fuse cover you must ensure that it is refitted
when the fuse is replaced.
If you lose the fuse cover the plug must not be used until a replacement cover
is obtained.
A replacement fuse cover can be purchased from your local dealer.
Before use
Remove the connector cover.
How to replace the fuse
The location of the fuse differ according to the type of AC mains plug (figures A
and B). Confirm the AC mains plug fitted and follow the instructions below.
Illustrations may differ from actual AC mains plug.
1. Open the fuse cover with a screwdriver.
2. Replace the fuse and close or attach the fuse cover.
WARNING
CAUTION
Caution for AC Mains Lead
Declaration of Conformity (DoC)
Hereby, “Panasonic Corporation” declares that this product is in compliance with the
essential requirements and other relevant provisions of Directive 1999/5/EC.
Customers can download a copy of the original DoC to our R&TTE products from our
DoC server:
http://www.doc.panasonic.de
Contact to Authorised Representative:
Panasonic Marketing Europe GmbH, Panasonic Testing Centre,
Winsbergring 15, 22525 Hamburg, Germany
Disposal of Old Equipment and Batteries
Only for European Union and countries with recycling systems
These symbols on the products, packaging, and/or
accompanying documents mean that used electrical and
electronic products and batteries must not be mixed with
general household waste.
For proper treatment, recovery and recycling of old
products and used batteries, please take them to
applicable collection points in accordance with your
national legislation.
By disposing of them correctly, you will help to save
valuable resources and prevent any potential negative
effects on human health and the environment.
For more information about collection and recycling,
please contact your local municipality.
Penalties may be applicable for incorrect disposal of this
waste, in accordance with national legislation.
Note for the battery symbol (bottom symbol):
This symbol might be used in combination with a
chemical symbol. In this case it complies with the
requirement set by the Directive for the chemical involved.
Figure A Figure B
Fuse cover
Figure A Figure B
Fuse
(10 ampere)
Fuse
(10 ampere)
(5)
ST-C700DE-TQBM0007.book 5 ページ 2016年10月26日 水曜日 午後1時17分

6
Table of contents
∫ To dispose or transfer this unit
This unit may contain private information. Before disposing of or transferring this unit, perform the following to delete the data,
including personal or secret information.
≥“To return all settings to the factory defaults” (> 29)
Accessories
≥ Product numbers provided in these operating instructions are correct as of September 2016. These may be subject to change.
≥ Do not use AC mains lead with other equipment.
Safety precautions ............................................................5
Accessories .......................................................................6
Control reference guide....................................................7
Getting started...................................................................9
HOME menu and basic operations................................ 11
Network settings .............................................................12
Playing back music files on the DLNA server ..............13
Playing back Internet Radio (vTuner) ............................14
Using Spotify ...................................................................16
Using iPhone/iPad/iPod..................................................17
Using AirPlay ...................................................................18
Using USB device............................................................18
Using PC, etc. ..................................................................20
Using Bluetooth
®
.............................................................21
Listening to FM radio ......................................................23
Listening to DAB/DAB+...................................................24
Sound adjustment ...........................................................25
Others ...............................................................................26
Troubleshooting ..............................................................29
Unit care ...........................................................................32
Specifications ..................................................................33
About descriptions in these operating instructions
≥Pages to be referred to are indicated as “@ ±±”.
≥The illustrations shown may differ from your unit.
≥Unless otherwise indicated, operations are described using the remote control.
∏ 1 AC mains lead
(REQ0456)
∏ 1 System connection cable
(K2KYYYY00233)
∏ 1 Coaxial digital cable
(K2KYYYY00251)
∏ 1 DAB indoor antenna
(RFA3654)
∏ 1 Remote control
(N2QAYA000096)
∏ 2 Batteries for remote
control
(K2CQ2YY00127)
∫ Using the remote control
Insert the battery so the terminals (i and j)
match those in the remote control.
Point it at the remote control signal sensor on this
unit. (> 7)
≥Keep the batteries out of reach of children to
prevent swallowing.
2
1
R03/LR03, AAA
(Alkaline or manganese batteries)
(6)
ST-C700DE-TQBM0007.book 6 ページ 2016年10月26日 水曜日 午後1時17分

7
English
Control reference guide
∫ Front
1 Power switch lever [Í/I (Standby/on)]/[OFF]
Turn on/off this unit.
≥ The remote control do not operate when the power switch
lever is in the lowered position.
≥ You can switch the unit from on to standby mode or vice versa
when the power switch lever is in the raised position. (> 8)
2 Port for iPhone/iPad/iPod and USB devices
( DC 5 V 2.1 A) (> 17, 18)
3 Remote control signal sensor
Distance: Within approx. 7 m directly in front
Angle: Approx. 30o left and right
4 Display
≥The input source, playback status and other information
are displayed. For more details, check the support site
below as well as these operating instructions.
www.technics.com/support/
5 Basic control switches
These switches work just by touching the marks. Each
time you touch the switch, there will be a beep sound.
(> 11)
≥ When playback information is not shown on the display
(except in NFC registration standby mode (> 21)), you can
perform the following operations on the touch panel:
6 NFC touch area (> 21)
The NFC touch area sheet is attached to this area at the
time of purchase.
∫ Rear
7 Product identification marking
The model number is indicated.
8 DAB/FM terminal (> 10)
9 Analogue audio output terminal [LINE OUT] (> 9)
: Digital audio output terminal [COAX OUT] (> 9)
; Digital audio output terminal [OPT OUT] (> 9)
< Digital audio input terminal [PC] (> 20)
For connecting to a PC, etc.
= System terminal [CONTROL] (> 9)
> LAN port [LAN] (> 12)
? AC IN terminal [AC IN T]( ) (> 10)
This unit
:3 (Up)
94 (Down)
1/; OK (OK)
∫ RETURN (Return)
HOME (Touch and hold) MENU (Enter menu)
Class II equipment
(The construction of the product is double-insulated.)
(7)
ST-C700DE-TQBM0007.book 7 ページ 2016年10月26日 水曜日 午後1時17分

8
∫ Buttons that work for this unit
1 [NWP Í]: Standby/on switch
Press to switch the unit from on to standby mode or vice
versa. In standby mode, the unit is still consuming a small
amount of power.
≥ The remote control do not operate when the power switch
lever is in the lowered position.
2 [AMP]/[NWP]/[CD]: Select the device to be operated
3 [N INPUT O]: Select the input source
4 [DIMMER]: Adjust the brightness of the display, etc.
(> 11)
5 [HOME]: Display HOME menu (> 11)
6 [INFO]: View content information
Press this button to display the track, artist, and album names,
file type, sampling frequency, and other information.
7 [3, 4, 2, 1]/[OK]: Selection/OK
8 [RETURN]: Return to the previous display
9 [MENU]: Enter menu (> 21, 22, 23, 24, 26)
: [DIRECT]: Turn on/off Direct mode (> 25)
; [RE-MASTER]: Turn on/off Re-master (> 25)
< Basic playback control buttons
= Numeric buttons, etc.
≥ To select a 2-digit number
Example:
16: [S10] > [1] > [6]
≥ To select a 4-digit number
Example:
1234: [S10] > [S10] > [S10] > [1] > [2] > [3] > [4]
≥ [CLEAR]: Clear the entered value.
∫ Buttons that work for the SU-C700/
SL-C700
The remote control of this unit also works for the
SU-C700/SL-C700.
For information on the operations of the SU-C700/SL-C700,
please also refer to their operating instructions.
1 Standby/on switch for the SU-C700
2 Standby/on switch for the
SL-C700
3 Select the device to be operated
4 Select the input source of the
SU-C700
5 Adjust the brightness of the display, etc.
6 Measure the characteristics of the amplifier and correct
its output
7 Adjust the volume
8 Mute the sound
Remote control
(8)
ST-C700DE-TQBM0007.book 8 ページ 2016年10月26日 水曜日 午後1時17分

9
English
Getting started
≥Turn off all equipment before connection and read the appropriate operating instructions.
≥Do not connect the AC mains lead until all other connections are complete.
≥Insert the plugs of the cables to be connected all the way in.
≥Do not bend cables at sharp angles.
≥You can output digital audio signals from this unit and play back music.
≥You can automatically link this unit with the SU-C700 and operate them easily with the remote control. (> 28)
≥ Do not use any other system connection cables or coaxial digital cables except the supplied one.
≥ Connect the system connection cable to the system terminal [CONTROL1] of the SU-C700.
≥ Connect the coaxial digital cable to the digital audio input terminal [COAX1 IN] of the SU-C700.
You can output analogue or digital audio signals from this unit and play back music files.
System control connection to an SU-C700
This unit
(rear)
SU-C700
Coaxial digital cable
(supplied)
System connection cable
(supplied)
Connecting to an amplifier and a D/A converter
e.g.,
This unit
(rear)
Amplifier
Optical digital audio cable
(not supplied)
D/A converter
Audio cable
(not supplied)
(9)
ST-C700DE-TQBM0007.book 9 ページ 2016年10月26日 水曜日 午後1時17分

10
≥ If radio reception is poor, use a DAB outdoor antenna (not supplied).
≥ Do not use any other indoor antennas except the supplied DAB indoor antenna.
Connect only after all other connections are completed.
≥ This unit consumes a small amount of AC power (> 33) even the power switch lever is in the [OFF] position. Remove the plug from the main
electrical outlet if you will not be using the unit for an extended period of time. Place the unit so the plug can be easily removed.
Antenna connection
AC mains lead connection
This unit
(rear)
Adhesive tape
(not supplied)
DAB indoor antenna
(supplied)
Be sure to tighten the nut fully.
Place the antenna where reception is best.
AC mains lead
(supplied)
To a household mains socket
This unit
(rear)
Insert the AC mains lead up
to A, a point just before the
round hole.
(10)
ST-C700DE-TQBM0007.book 10 ページ 2016年10月26日 水曜日 午後1時17分

11
English
HOME menu and basic operations
Major functions of this unit can be operated from the HOME
menu.
Preparation
≥Prepare the music that you want to play back.
≥Turn on the connected device (amplifier, etc.) and lower its
volume.
1 Raise the power switch lever of this unit to
the [Í/I] position.
2 Press [NWP].
3 Press [HOME].
4 Press [3, 4] to select an item and then
press [OK].
≥If there are any other items, repeat this step.
≥ New items may be added and existing items may be updated. For
information on additions and updates, refer to the support site
below.
www.technics.com/support/
5 Start play.
∫ To display HOME menu
Press [HOME].
Adjust the volume of the connected device (amplifier, etc.).
The brightness of this unit’s display and the basic control
switches can be changed.
Press [DIMMER] repeatedly.
≥ When the display is turned off, it will light up only when you
operate this unit.
Before the display turns off again, “Display Off” will be displayed
for a few seconds.
You can turn the beep sound on/off.
≥ The factory default is “On”.
1 Press [NWP].
2 Press [HOME].
3 Press [3, 4] repeatedly to select “SETUP”
and then press [OK].
4 Press [3, 4] repeatedly to select “Beep”
and then press [OK].
5 Press [3, 4] to select “On”/“Off” and then
press [OK].
If you install the dedicated app “Technics Music App” (free of
charge) on your tablet/smartphone, you can control this unit
and the SU-C700 using a wide variety of functions.
For details, visit:
www.technics.com/support/
DMP
Connects this unit to a network and
plays back music over it. (> 13)
Internet Radio
Plays back Internet Radio (vTuner).
(> 14)
USB
Plays back music stored on a USB
device or an iPhone/iPad/iPod.
(> 17, 18, 19)
PC
Plays back music stored on a PC,
etc. (> 20)
Bluetooth
Connects this unit to a Bluetooth
®
device and plays back music stored
on it. (> 21, 22)
FM FM (> 23)
DAB/DAB+ DAB/DAB+ (> 24)
SETUP (> 11, 12, 25, 26, 27, 28)
ラヰヮユ
リㄏㄕㄆㄓㄏㄆㄕチンㄅㄊㄐ
ヒバベ
ュヮ
ヱ
Adjusting the volume
Display brightness
Operation sound setting
Operations using the
dedicated app “Technics
Music App”
(11)
ST-C700DE-TQBM0007.book 11 ページ 2016年10月26日 水曜日 午後1時17分

12
Network settings
You can stream music from an iOS device
(iPhone/iPad/iPod), an Android™ device or a PC
(Mac/Windows) to this unit by using the AirPlay or DLNA
feature. (> 13, 18)
To use these features, this unit must join the same network
as the AirPlay compatible device or the DLNA compatible
device.
Normally, just connecting a LAN cable will complete the setup.
A: LAN cable (not supplied)
1 Disconnect the AC mains lead.
2 Connect this unit to a broadband router, etc.
using a LAN cable.
3 Connect the AC mains lead to this unit, and
raise the power switch lever to the [Í/I]
position. (> 10)
≥When the connection is established, “ ” is displayed.
≥ If “Firmware update is available” is displayed after the network
connection is set up, the firmware for this unit is available.
– Refer to “Firmware update is available” (> 31) for details on
update.
– For the update information, refer to the following website.
www.technics.com/support/firmware/
You can change this unit’s name on the network (Friendly
Name), and use specific IP address, subnet mask, default
gateway, primary DNS, etc.
≥ Do not play back music while changing these settings.
1 Press [NWP].
2 Press [HOME].
3 Press [3, 4] repeatedly to select “SETUP” and then
press [OK].
4 Press [3, 4] repeatedly to select “Network” and then
press [OK].
5 Select and input the details.
6 Press [OK] to apply the settings.
7 Press [RETURN] repeatedly to exit the settings.
8 Press [NWP Í] to turn the unit to standby mode.
≥ Wait until “Please Wait” disappears.
9 Perform “Wired LAN connection”. (> left)
≥ Use category 7 or above straight LAN cables (STP) when
connecting to peripheral devices.
≥ Inserting any cable other than a LAN cable in the LAN port can
damage the unit.
≥ If you try to change the network settings immediately after turning
on this unit, it may take some time until the network setup screen
is displayed.
∫ This unit’s name on the network
“Friendly Name”
1 Press [NWP].
2 Press [HOME].
3 Press [3, 4] repeatedly to select “SETUP” and then
press [OK].
4 Press [3, 4] repeatedly to select “Network” and then
press [OK].
5 Press [3, 4] repeatedly to select “Friendly Name” and
then press [OK]..
≥ The current name of this unit is displayed. Press [OK] to edit.
6 Press [3, 4, 2, 1] to input the friendly name.
≥ Only ASCII characters can be used.
≥ “A” can be added when you press the [1] at the time of the
last letter of the Friendly Name is selected.
≥ Press [CLEAR] to delete a letter.
≥ Press [S10] to insert a letter “A”.
≥ Default name is “Technics ST-C700D _ _ _ _ _ _”.
“ _ ” stands for a digit that is unique to each set.
7 Press [OK] to apply the settings.
8 Press [RETURN] repeatedly to exit the settings.
∫ To check the MAC address of this unit
1 Press [NWP].
2 Press [HOME].
3 Press [3, 4] repeatedly to select “SETUP” and then
press [OK].
4 Press [3, 4] repeatedly to select “Network” and then
press [OK].
5 Press [3, 4] repeatedly to select “MAC Address”.
≥ The MAC address of this unit is displayed.
Wired LAN connection
Broadband router, etc.
This unit
(rear)
PC, etc.
To make network-related settings
(12)
ST-C700DE-TQBM0007.book 12 ページ 2016年10月26日 水曜日 午後1時17分

13
English
Playing back music files on the DLNA server
You can share music files stored in the DLNA Certified media
server (PC, smartphone, etc.) connected to your home
network, and enjoy the contents with this unit.
≥ About supported format, refer to “File format” (> 35)
Preparation
≥Complete the network settings. (> 12)
≥
Connect the device to be used to the same network as this unit.
≥Add the contents and folder to the libraries of the Windows
Media
®
player 11 or 12, or a smartphone, etc.
– Playlist of Windows Media
®
player can play back only the
contents that are stored in the libraries.
– To use Windows Media
®
Player for streaming, you need to
configure it in advance.
You can play back music stored on the DLNA server on this
unit (DMP—Digital Media Player) by controlling the DLNA
server with this unit.
1 Press [NWP].
2 Press [N INPUT O] below [NWP] repeatedly
to select “DMP”.
≥The server selection screen will be displayed.
3 Press [3, 4] to select a DLNA server on the
network, and then press [OK].
≥The folder/content selection screen will be displayed.
≥
Folders/content may be displayed in different order from
the order on the server, depending on its specifications.
4 Press [3, 4] to select an item and then
press [OK].
≥If there are any other items, repeat this step.
Operations on the remote control
≥ The connected server and its contents may not be displayed
properly depending on its condition. (e.g. soon after adding the
contents to the server, etc.)
Please try again later. For details, refer to the operating
instructions of the device.
∫ Random repeat playback
Press [RND].
Each time you press the button:
∫ Repeat playback
Press [`].
Each time you press the button:
By controlling a DMC (Digital Media Controller) compatible
device, you can play back music stored on the DLNA server
on this unit (DMR—Digital Media Renderer).
1 Raise the power switch lever of this unit to
the [Í/I] position.
2 Operate the DMC compatible device and
connect to this unit.
≥The device name of this unit will be displayed as
“Technics ST-C700D _ _ _ _ _ _”*
1, 2
.
≥For details on how to use DMC compatible devices,
refer to the operating instructions of the devices or the
software.
≥ When you operate DMC, playback of other audio sources will stop
and DLNA output will have priority.
≥ Depending on the contents and the connected equipment,
operations or playback may not be possible.
≥ This unit does not guarantee connection with all DMC
applications. Use the dedicated app “Technics Music App”.
*1 “ _ ” stands for a digit that is unique to each set.
*2 The device name can be changed from “This unit’s name on the
network “Friendly Name””. (> 12)
Playing back content stored
on the DLNA server by
controlling it from this unit
Stop Press [∫].
Pause
Press [1/;].
≥ Press again to restart play.
Skip Press [:] or [9] to skip track.
Search
During play or pause, press and hold
[6] or [5].
≥
On the unit: press and hold [
:
] or [
9
].
≥ This operation may not be available for
some formats.
On
All tracks in a folder are repeated
randomly.
≥ “RND `” is displayed.
≥ During random playback, you cannot skip to
the previous track.
Off Turns off random repeat mode.
1-Track
Only plays the selected track.
≥ “1 `” is displayed.
All
All tracks in a folder are repeated.
≥ “`” is displayed.
Off Turns off repeat mode.
Playing back content stored
on the DLNA server by
controlling it from a DMC
(13)
ST-C700DE-TQBM0007.book 13 ページ 2016年10月26日 水曜日 午後1時17分

14
Playing back Internet Radio (vTuner)
Internet radio is an audio broadcasting service available over
the Internet. With vTuner, an online directory service, you
can listen to many different Internet radio stations from all
over the world.
Preparation
≥Complete the network settings. (> 12)
– Make sure that the network is connected to the Internet.
1 Press [NWP].
2 Press [N INPUT O] below [NWP] repeatedly
to select “Internet Radio”.
≥When “Internet Radio” is selected as the source, this
unit will automatically try and connect to the last
selected Internet Radio station.
3 Press [3, 4] to select a station and then
press [OK].
≥The buffering status is displayed as %. ( “” stands
for a number.)
≥Repeat this step to make further selections according
to the genre, region, etc.
≥Press [RETURN] to return to the previous screen.
≥The Internet Radio stations, genre, region, etc. on this
unit are edited and managed by vTuner.
≥The podcasts on the list of vTuner can also be played
back.
≥The station that does not broadcast cannot be played
back. (It will be skipped or return to the list.)
≥ The Internet Radio service may be suspended or be otherwise
unavailable without notice.
≥ Internet Radio may not be played back properly depending on the
network condition.
Operations on the remote control
Stop Press [∫].
Pause
Press [1/;].
≥ Press again to restart play. (While playing
back the podcasts)
Skip Press [:] or [9] to skip station.
Viewing
available
information
Press [INFO].
(14)
ST-C700DE-TQBM0007.book 14 ページ 2016年10月26日 水曜日 午後1時17分

15
English
1 Press [NWP].
2 Press [3, 4] to select a station to add and
then press [OK].
3 Press [MENU].
4 Press [3, 4] repeatedly to select “Add
Favourites” and then press [OK].
≥“Added” is displayed after registering.
≥You can register up to 50 stations with this unit. If a 51st
station is added, “Favourites Full” is displayed. Delete the
stations from the favourite list. (> below)
≥You cannot add the already registered station. (“Already
Exists” is displayed.)
1 Press [NWP].
2 Press [MENU].
3 Press [3, 4] repeatedly to select “Call
Favourites” and then press [OK].
4 Press [3, 4] to select the station you want
to call up, and then press [OK].
≥“ ” is displayed.
≥If no station is registered to the favourite list, “Empty” is
displayed. Add a station to the list. (> above)
1 Press [NWP].
2 Press [MENU].
3 Press [3, 4] repeatedly to select “Delete
Favourites” and then press [OK].
4 Press [3, 4] to select a station to delete
from the favourite list.
5 Press [3, 4] to select “Yes” and then press
[OK].
≥“Deleted” is displayed after deleting.
≥“Empty” is displayed if no station is registered to the
favourite list.
You can control this unit and edit your favourite list with the
vTuner function by installing the dedicated app “Technics
Music App” (free of charge) on your tablet/smartphone.
Download and install the app from the website below.
www.technics.com/support/
Preparation
≥Check the MAC address of this unit. (> 12)
1 Press [NWP].
2 Press [N INPUT O] below [NWP] repeatedly
to select “Internet Radio”.
3 Use your PC to access the vTuner website.
www.technics.com/radio/
≥You can select the language on the website.
4 Follow the on-screen instructions and enter
the necessary information for registration.
5 Search by category (genre, region,
language, etc.) or edit the list.
∫ Playback of the stations listed by your PC
You can play back the stations listed by your PC separately
from the favourite list of this unit.
1 Press [NWP].
2 Press [N INPUT O] below [NWP] repeatedly
to select “Internet Radio”.
3 Press [3, 4] repeatedly to select
“technics.com/radio/” and then press [OK].
≥Before disposing of or transferring this unit, delete the
personal information on the website.
Adding a station to favourite list
“Add Favourites”
Calling up the favourite list
“Call Favourites”
Deleting the favourite station
“Delete Favourites”
Operations using the
dedicated app
“Technics Music App”
Creating the Internet Radio
station list with PC
(15)
ST-C700DE-TQBM0007.book 15 ページ 2016年10月26日 水曜日 午後1時17分

16
Using Spotify
This unit is compatible with the online music service
(Spotify).
Preparation
≥You will need Spotify Premium. For details, visit the
following website.
www.spotify.com/connect/
≥Complete the network settings. (> 12)
≥Make sure that the network is connected to the Internet.
≥Connect the device to be used to the same network as this
unit.
1 Start the Spotify app on your device, and
select a song to play back.
2 Select the square cover art for the song on
the playback screen.
3 Select the icon “ ”
4 Select this unit as the output speakers.
≥ The device name of this unit will be displayed as “Technics ST-
C700D _ _ _ _ _ _”*
1, 2
.
≥ Registration/subscription is required.
≥ Fees may apply.
≥ Services, icons, and specifications are subject to change.
*1 “ _ ” stands for a digit that is unique to each set.
*2 The device name can be changed from “This unit’s name on the
network “Friendly Name””. (> 12)
(16)
ST-C700DE-TQBM0007.book 16 ページ 2016年10月26日 水曜日 午後1時17分

17
English
Using iPhone/iPad/iPod
Connect your iPhone/iPad/iPod, and you can play back
music stored on iPhone/iPad/iPod or charge
iPhone/iPad/iPod.
∫ Compatible iPhone/iPad/iPod
(as of August 2016)
≥ Compatibility depends on the software version. Update your
iPhone/iPad/iPod to the latest software before using it with this
unit.
≥ Please be aware that Panasonic accepts no responsibility for the
loss of data and/or information.
≥ Do not connect the following models to the port:
– iPod classic, iPod [4th (colour display), and 5th (video)
generation], iPod nano (1st generation)
Unexpected behaviour may occur.
≥ Operation results may vary depending on the iPhone/iPad/iPod
models or the iOS version.
When connecting an iPhone/iPad/iPod, use the dedicated
USB cable (not supplied).
1 Connect iPhone/iPad/iPod to the unit.
2 Press [NWP].
3 Press [N INPUT O] below [NWP] repeatedly
to select “USB”.
4 Start play.
Operations on the remote control
≥ It may be necessary to select the album, artist, etc. on the
iPhone/iPad/iPod.
≥ Depending on the iPhone/iPad/iPod models, operations on the
remote control may not be possible.
During unit on, charging starts when an iPhone/iPad/iPod is
connected to this unit.
≥ Charging is not possible when this unit is turned off.
≥ Make sure the unit is turned on when you start charging.
– When charging an iPhone/iPad/iPod whose battery is depleted,
do not turn this unit to standby mode until the iPhone/iPad/iPod
becomes operational.
≥ Check the iPhone/iPad/iPod to see if the battery is fully charged.
Once fully charged, remove the iPhone/iPad/iPod.
≥ Charging stops when the battery is fully charged. The battery will
deplete naturally.
iPhone SE / iPhone 6s Plus / iPhone 6s /
iPhone 6 Plus / iPhone 6 / iPhone 5s / iPhone 5c /
iPhone 5 / iPhone 4s
iPad Pro
(9.7 inch)
/ iPad Pro
(12.9 inch)
/
iPad Air 2 / iPad Air / iPad
(3rd and 4th generation)
/ iPad 2 /
iPad mini 4 / iPad mini 3 / iPad mini 2 / iPad mini
iPod touch (5th and 6th generation)
iPod nano (7th generation)
Connecting an
iPhone/iPad/iPod
USB cable
(not supplied)
e.g.,
This unit
(front)
iPhone, etc.
Listening to music stored on
an iPhone/iPad/iPod
Stop Press [∫].
Pause
Press [1/;].
≥ Press again to restart play.
Skip Press [:] or [9] to skip track.
Search
During play or pause, press and hold
[6] or [5].
≥
On the unit: press and hold [
:
] or [
9
].
Charging an iPhone/iPad/iPod
(17)
ST-C700DE-TQBM0007.book 17 ページ 2016年10月26日 水曜日 午後1時17分

18
Using AirPlay
AirPlay works with iPhone, iPad, and iPod touch with iOS
4.3.3 or later, Mac with OS X Mountain Lion or later, and PC
with iTunes 10.2.2 or later.
Preparation
≥Complete the network settings. (> 12)
≥Connect the iOS device or PC to the same network as this
unit.
1 [iOS_d e vi c e] : Start the “Music” (or iPod) app.
[PC] : Start “iTunes”.
2 Select “Technics ST-C700D _ _ _ _ _ _”*
1, 2
from the AirPlay icon.
≥Check the volume settings before starting the playback.
(When AirPlay is used for the first time, the volume may
be output at the maximum setting.)
3 Start play.
≥The playback will start with a slight delay.
Operations on the remote control
≥ Playback of other audio sources will stop and AirPlay output will
have priority.
≥ With some iOS and iTunes versions, it may not be possible to
restart the AirPlay playback if the selector is changed or the unit is
turned off, during the AirPlay playback.
In this case, select a different device from the AirPlay icon of the
Music app or iTunes and then re-select this unit as the output
speakers.
≥ AirPlay will not work when playing back videos on iTunes.
*1 “ _ ” stands for a digit that is unique to each set.
*2 The device name can be changed from “This unit’s name on the
network “Friendly Name””. (> 12)
Using USB device
You can play back music stored on a USB device.
≥ This unit does not guarantee connection with all USB devices.
≥ FAT16 and FAT32 file systems are supported.
≥ This unit supports USB 2.0 high speed.
≥ USB devices may not be recognised by this unit when connected
using the following:
– a USB hub
– a USB extension cable
≥ It is not possible to use USB card reader/writers.
≥ This unit cannot record music to a USB device.
≥ About supported format, refer to “File format” (> 35)
∫ Folder and file structure
The unit plays back only the music files in the selected folder.
Select the folder containing the tracks that you want to play
back.
≥Nothing is played back if you select a folder without music
files, such as the folder D in the diagram below. (“Empty”
is displayed.)
1 Connect a USB device to the unit.
Listening to music with AirPlay
Stop Press [∫].
Pause
Press [1/;].
≥ Press again to restart play.
Skip Press [:] or [9] to skip track.
Listening to music stored on a
USB device
Music 1
Music 2
Music 4
Music 5
Music 3
e.g.,
Folder
Music file
e.g.,
This unit
(front)
USB device
(18)
ST-C700DE-TQBM0007.book 18 ページ 2016年10月26日 水曜日 午後1時17分

19
English
2 Press [NWP].
3 Press [N INPUT O] below [NWP] repeatedly
to select “USB”.
4 Press [3, 4] to select an item and then
press [OK].
≥If there are any other items, repeat this step.
Operations on the remote control
∫ Random repeat playback
Press [RND].
Each time you press the button:
∫ Repeat playback
Press [`].
Each time you press the button:
≥ You can use repeat playback in combination with programme
playback.
This function allows you to programme up to 24 tracks.
Preparation
≥It is not possible to programme tracks by moving folders.
Move all the tracks you want to programme to a single
folder in advance.
1 Select the folder containing the music file to
which you want to set programme playback.
2 Press [PGM] in the stop mode.
≥“Program Mode” screen will be displayed.
3 Press [OK] to display the programming
screen.
4 Press [3, 4] to select the desired track.
5 Press [OK].
≥Do steps 3 through 4 again to programme other tracks.
6 Press [1/;] to start playback.
≥To return to the “Program Mode” screen, press [∫].
Operations on the remote control
≥ Programmed content is maintained as long as the input source is
set to “USB”.
≥ The programme memory will be cleared:
– When the USB device is disconnected.
– When the unit is turned to standby or off mode.
≥ You can use programme playback in combination with repeat
playback.
Stop Press [∫].
Pause
Press [1/;].
≥ Press again to restart play.
Skip Press [:] or [9] to skip track.
Search
During play or pause, press and hold
[6] or [5].
≥
On the unit: press and hold [
:
] or [
9
].
≥ This operation may not be available for
some formats.
On
All tracks in a folder are repeated
randomly.
≥ “RND `” is displayed.
≥ During random playback, you cannot skip to
the previous track.
Off Turns off random repeat mode.
1-Track
Only plays the selected track.
≥ “1 `” is displayed.
All
All tracks in a folder are repeated.
≥ “`” is displayed.
Off Turns off repeat mode.
Programme playback
Stop
Press [∫].
≥ Programmed content is maintained.
Check the
programmed
order
Press [2, 1] in the stop mode.
≥ To return to the “Program Mode” screen,
press [OK].
Add tracks Do steps 3 through 4 in the stop mode.
Clear the last
track
Press [CLEAR] in the stop mode.
≥ It is not possible to select and clear the
desired programmed track.
Cancel
programme
mode
1 Press [PGM] in the stop mode.
≥ “Clear Program List?” is shown.
2 Press [3, 4] to select “Yes” and
then press [OK].
≥ The programme memory will be
cleared.
(19)
ST-C700DE-TQBM0007.book 19 ページ 2016年10月26日 水曜日 午後1時17分

20
Using PC, etc.
You can connect the digital audio input terminal [PC] and a
PC, etc. with a USB cable and play back music on the PC,
etc. with this unit.
≥ About supported format, refer to “File format” (> 35)
(as of December 2015)
1 Disconnect the AC mains lead.
2 Connect this unit and a PC, etc.
3 Connect the AC mains lead to this unit, and
raise the power switch lever to the [Í/I]
position. (> 10)
4 Press [N INPUT O] below [NWP] repeatedly
to select “PC”.
5 Operate the PC, etc. for playback.
Connecting to a PC
Before connecting to a PC, follow the steps below.
≥ Refer to the following for the recommend OS versions for your
PC:
– Windows 7, Windows 8, Windows 8.1, Windows 10
– OS X 10.7, 10.8, 10.9, 10.10, 10.11
1 Download and install the dedicated driver to the PC.
(Only for Windows OS)
Download and install the driver from the website below.
www.technics.com/support/
2 Download and install the dedicated app “Technics
Audio Player” (free of charge) on your PC. (Common
to both Windows OS and OS X)
Download and install the app from the website below.
www.technics.com/support/
Listening to audio from a PC,
etc.
USB
USB 2.0 cable
(not supplied)
This unit
(rear)
e.g.,
PC, etc.
Type A
Type B
(20)
ST-C700DE-TQBM0007.book 20 ページ 2016年10月26日 水曜日 午後1時17分

21
English
Using Bluetooth
®
You can listen to the sound from the Bluetooth
®
audio device from this unit wirelessly.
≥ Refer to the operating instructions of the Bluetooth
®
device for details.
≥ If you intend to use an NFC (Near Field Communication)-compatible Bluetooth
®
device, proceed to “Connecting by NFC”.
Preparation
≥Turn on the Bluetooth
®
feature of the device and place the
device near this unit.
1 Press [NWP].
2 Press [N INPUT O] below [NWP] repeatedly
to select “Bluetooth”.
3 Press [MENU].
4 Press [3, 4] repeatedly to select “Pairing”
and then press [OK].
5 Press [3, 4] to select “Yes” and then press
[OK].
≥“Pairing” is indicated on the display.
6 Select “ST-C700D” from the Bluetooth
®
device’s menu.
≥The name of the connected device is indicated on the
display.
≥ If prompted for the passkey, input “0000”.
≥ You can register up to 8 devices with this unit. If a 9th device is
paired, the device that has not been used the longest will be
replaced.
For NFC-compatible Bluetooth
®
devices (Android™
devices with version 4.1 or later) only
With the touch of an NFC (Near Field Communication)-
compatible Bluetooth
®
device to this unit, you can complete a
series of steps from registering a Bluetooth
®
device to
connecting it to this unit.
Preparation
≥Turn on the NFC feature of the device.
1 Press [NWP].
2 Press [N INPUT O] below [NWP] repeatedly
to select “Bluetooth”.
3 Press [MENU].
4 Press [3, 4] repeatedly to select “NFC” and
then press [OK].
5 Press [3, 4] to select “Yes” and then press
[OK].
6 Touch and hold your device on the NFC
touch area of this unit within 20 seconds.
(> 7)
≥Do not move the Bluetooth
®
device until it displays a
message or reacts in some way.
Once the Bluetooth
®
device has reacted, move the
device away from this unit.
– When the connection of the Bluetooth
®
device is complete,
the name of the connected device is indicated on the
display.
– The location of the NFC touch area differs depending on the
device. When a connection cannot be established even if
your Bluetooth
®
device has touched the NFC touch area of
this unit, change the position of the device.
≥ If you connect another NFC-compatible Bluetooth
®
device, the
previously connected device will be disconnected automatically.
≥ When the connection is established, playback may start
automatically depending on the type of device being used.
≥ Connecting by NFC may not work properly depending on the type
of device being used.
≥ Do not make an NFC connection in any other way than instructed
in the Operating Instructions. Doing so may cause malfunction.
Connecting via Bluetooth
®
menu
Connecting by NFC
(21)
ST-C700DE-TQBM0007.book 21 ページ 2016年10月26日 水曜日 午後1時17分

22
1 Press [NWP].
2 Press [N INPUT O] below [NWP] repeatedly
to select “Bluetooth”.
≥“Ready” is indicated on the display.
≥If you press [1/;], this unit will try and connect to the
last connected Bluetooth
®
device.
–“Linking” is indicated on the display.
3 Select “ST-C700D” from the Bluetooth
®
device’s menu.
≥The name of the connected device is indicated on the
display.
4 Start playback on the Bluetooth
®
device.
Operations on the remote control
≥ This unit can only be connected to one device at a time.
≥ To use this unit’s remote control with a Bluetooth
®
device, the
Bluetooth
®
device must support AVRCP (Audio Video Remote
Control Profile).
Depending on the status of the device, some controls may not
work.
≥ When enjoying video contents with this function, the video and
audio output may not be synchronised.
You can change the transmission mode to prioritise
transmission quality or sound quality.
1 Press [NWP].
2 Press [N INPUT O] below [NWP] repeatedly
to select “Bluetooth”.
≥If a Bluetooth
®
device is already connected, disconnect
it.
3 Press [MENU].
4 Press [3, 4] repeatedly to select
“Link Mode” and then press [OK].
5 Press [3, 4] to select the mode and then
press [OK].
≥ Select “Mode 1” if the sound is interrupted.
1 Press [NWP].
2 Press [MENU].
3 Press [3, 4] repeatedly to select
“Disconnect?” and then press [OK].
4 Press [3, 4] to select “Yes” and then press
[OK].
≥ The Bluetooth
®
device will be disconnected if a different audio
source is selected.
Listening to music stored on a
Bluetooth
®
device
Stop Press [∫].
Pause
Press [1/;].
≥ Press again to restart play.
Skip Press [:] or [9] to skip track.
Search
During play or pause, press and hold
[6] or [5].
≥
On the unit: press and hold [
:
] or [
9
].
Bluetooth
®
transmission mode
Mode 1 Emphasis on connectivity
Mode 2 Emphasis on sound quality (default)
Disconnecting a Bluetooth
®
device
(22)
ST-C700DE-TQBM0007.book 22 ページ 2016年10月26日 水曜日 午後1時17分

23
English
Listening to FM radio
You can preset up to 30 channels.
Preparation
≥Press [NWP] and then [N INPUT O] below [NWP]
repeatedly to select “FM”.
1 Press [NWP].
2 Press [MENU].
3 Press [3, 4] repeatedly to select “Auto
Preset” and then press [OK].
4 Press [3, 4] to select “Lowest” or “Current”
and then press [OK].
Lowest:
To begin auto preset with the lowest frequency (FM
87.50).
Current:
To begin auto preset with the current frequency.
1 Press [NWP].
2 Press [6] or [5] to tune in to the station.
≥To tune automatically, press and hold the button until
the frequency starts changing quickly.
3 Press [PGM].
4 Press the numeric buttons to select a preset
number.
≥Do steps 1 through 3 again to preset more stations.
≥ A station previously stored is overwritten when another station is
stored in the same preset number.
1 Press [NWP].
2 Press the numeric buttons, [:] or [9] to
select the preset station.
1 Press [NWP].
2 Press [MENU].
3 Press [3, 4] repeatedly to select “FM
Mode” and then press [OK].
4 Press [3, 4] to select “Mono” and then
press [OK].
≥“MONO” is displayed.
To memorise the setting
Continue with steps 2 and 3 of “Manual tuning and
presetting”.
≥ Select “Stereo” in step 4 to return to stereo broadcasts.
≥ “Mono” is cancelled if the frequency is changed.
The unit can display the text data transmitted by the radio
data system (RDS) available in some areas.
≥ RDS is available only when stereo works in reception.
≥ RDS displays may not be available if reception is poor.
≥ RDS function does not work if “Mono” is selected in “FM Mode”.
(> above)
Automatic presetting
Manual tuning and presetting
Selecting a preset station
Improving the sound quality
RDS broadcasting
(23)
ST-C700DE-TQBM0007.book 23 ページ 2016年10月26日 水曜日 午後1時17分

24
Listening to DAB/DAB+
You can preset up to 20 channels.
Preparation
≥Make sure that the DAB antenna is connected. (> 10)
≥Press [NWP] and then [N INPUT O] below [NWP]
repeatedly to select “DAB/DAB+”.
– If you select “DAB/DAB+” for the first time, the system will start
the “DAB auto scan” procedure.
1 Press [NWP].
2 Press [MENU].
3 Press [3, 4] repeatedly to select “Auto
Scan” and then press [OK].
4 Press [3, 4] to select “Yes” and then press
[OK].
≥“Auto Scan” is displayed.
To find the best antenna position, use manual tuning to
search selected DAB frequency block.
1 Press [NWP].
2 Press [MENU].
3 Press [3, 4] repeatedly to select “Manual
Scan” and then press [OK].
4 Press [3, 4] to select a frequency block to
scan and then press [OK].
1 Press [NWP].
2 Press [6] or [5] to tune in to the station.
3 Press [PGM].
4 Press the numeric buttons to select a preset
number.
≥Do steps 1 through 3 again to preset more stations.
≥ A station previously stored is overwritten when another station is
stored in the same preset number.
≥ You cannot preset a station when the station is not broadcasting or
when you have selected a secondary service.
≥ Previous station memory is cleared during auto scan.
1 Press [NWP].
2 Press the numeric buttons, [:] or [9] to
select the preset station.
You can view information about the DAB broadcast,
programme type, ensemble label and frequency.
1 Press [NWP].
2 Press [INFO] to view available information.
Some DAB/DAB+ stations provide a secondary service as
well as the primary service. If the station you are listening to
is providing secondary service, “ ” will be displayed.
1 Press [NWP].
2 Press [MENU].
3 Press [3, 4] repeatedly to select
“Secondary” and then press [OK].
4 Press [3, 4] to select the secondary
service and press [OK].
≥ The setting will go back to primary service when changes are
made (e.g. the station is changed).
When adjusting the antenna, you can check the reception quality.
1 Press [NWP].
2 Press [MENU].
3 Press [3, 4] repeatedly to select “Signal
Quality” and then press [OK].
4 Press [3, 4] to select frequency.
DAB auto scan
DAB manual tuning
Memory presetting
Selecting a preset station
Viewing available information
DAB Secondary
DAB signal quality
Frequency block
Frequency
Reception quality
0 (poor) to 8 (excellent)
e.g.,
(24)
ST-C700DE-TQBM0007.book 24 ページ 2016年10月26日 水曜日 午後1時17分

25
English
Sound adjustment
The following sound effects can be added to the audio output.
Re-mastering expands the playback band and achieves a
higher bit depth to reproduce natural and expansive sound
close to original music.
≥ The factory default is “Off”.
1 Press [NWP].
2 Press [RE-MASTER] to select “On”/“Off”.
This unit can transmit input signals without performing digital
signal processing (DSP). This enables faithful and high
quality reproduction of original sound.
≥ The factory default is “Off”.
1 Press [NWP].
2 Press [DIRECT] to select “On”/“Off”.
You can set an upper limit on the output sampling frequency
range. Please note that the range that can be processed
differs depending on the amplifier or D/A converter. For
details, refer to the operating instructions of the connected
device.
≥ The factory default is “32kHz-192kHz”.
Preparation
≥Set “Digital Output” to “On”.
1 Press [NWP].
2 Press [HOME].
3 Press [3, 4] repeatedly to select “SETUP”
and then press [OK].
4 Press [3, 4] repeatedly to select “D.Output
fs” and then press [OK].
5 Press [3, 4] to select an item and then
press [OK].
≥
You can select a sampling frequency of 96 kHz or 192 kHz.
Disabling the audio output of unused terminals minimises
noise and allows playback in higher audio quality.
≥ The factory default is “On”.
1 Press [NWP].
2 Press [HOME].
3 Press [3, 4] repeatedly to select “SETUP”
and then press [OK].
To disable the digital audio output:
Press [3, 4] repeatedly to select “Digital Output” and
then press [OK].
To disable the analogue audio output:
Press [3, 4] repeatedly to select “Analog Output” and
then press [OK].
4 Press [3, 4] to select “Off” and then press
[OK].
≥To enable the output again, select “On”.
≥ Depending on the music source that you play back, the applied
setting may be less effective.
≥ Depending on the music source that you play back, it may not be
possible to achieve the desired audio quality and sound field
effect. In such cases, turn off this function.
≥ Both Re-master and Direct mode cannot be set to “On”.
≥ When “Digital Output” and “Analog Output” are set to “Off”, no
sound will be output.
≥ It may take some time to output audio when you have adjusted the
audio quality.
Listening to more natural-
sounding audio (Re-master)
Direct mode
Setting the sampling
frequency
Disabling audio output
(25)
ST-C700DE-TQBM0007.book 25 ページ 2016年10月26日 水曜日 午後1時17分

26
Others
The sleep timer can switch the unit to standby mode after a
set time.
1 Press [NWP].
2 Press [MENU].
3 Press [3, 4] repeatedly to select “SLEEP”
and then press [OK].
4 Press [3, 4] to set the time (in minutes) and
then press [OK].
“30 minutes” ,-. “60 minutes” ,-. “90 minutes” ,-. “120 minutes”
^""""""""""""". “Off” !"""""""""""""J
This unit is designed to conserve its power consumption and
save energy. The unit will turn to standby mode automatically
if there is no sound and it is not being used for approximately
20 minutes.
≥ The factory default is “On”.
To cancel this function
1 Press [NWP].
2 Press [HOME].
3 Press [3, 4] repeatedly to select “SETUP”
and then press [OK].
4 Press [3, 4] repeatedly to select
“AUTO OFF” and then press [OK].
5 Press [3, 4] to select “Off” and then press
[OK].
≥ The auto off function works unless you turn it off, even if you turn
off and on this unit.
≥
When “DAB/DAB+” or “FM” is the source, the function does not work.
This unit automatically turns on from standby mode when
selected as a speaker for Spotify/AirPlay/DLNA (DMR).
Keep in mind that after selecting this unit, you may also need
to start playback to turn it on in some cases.
≥ The factory default is “Auto”.
To change this setting
1 Press [NWP].
2 Press [HOME].
3 Press [3, 4] repeatedly to select “SETUP”
and then press [OK].
4 Press [3, 4] repeatedly to select
“Network Standby” and then press [OK].
5 Press [3, 4] to select an item and then
press [OK].
≥ If this function is set to “On” or “Auto”, the standby power
consumption will increase.
Sleep timer
Auto off function
Network standby
Auto
Enables the network standby function
when the network connection is available.
On
Always enables the network standby
function.
Off Turns off the network standby function.
(26)
ST-C700DE-TQBM0007.book 26 ページ 2016年10月26日 水曜日 午後1時17分

27
English
Occasionally, Panasonic may release updated firmware for
this unit that may add new features or improve the ways
existing features operate. These updates are available free
of charge.
≥For the update information (new or improve features), refer
to the following website.
www.technics.com/support/firmware/
≥ During the update process, no other operations can be performed.
≥ If there are no updates, “Firmware is Up To Date” is displayed. (No
need to update it.)
≥ Updating the firmware may reset the settings.
∫ Update via internet
Preparation
≥Connect this unit to the network. (> 12)
– Make sure that the network is connected to the Internet.
1 Press [NWP].
2 Press [HOME].
3 Press [3, 4] repeatedly to select “SETUP”
and then press [OK].
4 Press [3, 4] repeatedly to select “F/W
Update” and then press [OK].
5 Press [3, 4] to select “Internet” and then
press [OK].
6 Press [3, 4] to select “Yes” and then press
[OK].
≥The progress is displayed as “Updating %” while
updating. ( stands for a number.)
≥When the update has finished successfully, “Success”
is displayed.
7 After “Success” is displayed, disconnect the
AC mains lead and then reconnect it after 3
minutes.
≥ Downloading may take longer or may not work properly depending
on the connection environment.
∫ Update via USB flash memory
Preparation
≥Download the latest firmware on the USB flash memory.
For details, refer to the following website.
www.technics.com/support/firmware/
≥FAT16 and FAT32 file systems are supported.
1 Connect the USB flash memory with new
firmware.
2 Press [NWP].
3 Press [HOME].
4 Press [3, 4] repeatedly to select “SETUP”
and then press [OK].
5 Press [3, 4] repeatedly to select “F/W
Update” and then press [OK].
6 Press [3, 4] to select “USB” and then press
[OK].
7 Press [3, 4] to select “Yes” and then press
[OK].
≥The progress is displayed as “Updating %” while
updating. ( stands for a number.)
≥When the update has finished successfully, “Success”
is displayed.
8 After “Success” is displayed, disconnect the
AC mains lead and then reconnect it after 3
minutes.
≥ Downloading may take longer depending on the USB flash
memory.
∫ Checking the firmware version and the
model number
1 Press [NWP].
2 Press [HOME].
3 Press [3, 4] repeatedly to select “SETUP” and then
press [OK].
4 Press [3, 4] repeatedly to select “F/W Version” and
then press [OK].
≥ The firmware version and the model number are displayed.
≥ Press [OK] to exit.
Firmware updates
Downloading takes approx. 10 minutes.
Do not disconnect the AC mains lead or lower the
power switch lever to the [OFF] position while one of
the following messages is displayed.
“Linking” or “Updating %”
(27)
ST-C700DE-TQBM0007.book 27 ページ 2016年10月26日 水曜日 午後1時17分

28
When other equipment responds to the supplied remote
control, change the remote control code.
≥ The factory default is “Mode 1”.
Point the remote control at this unit, and press
and hold [OK] and the numeric button for at least
4 seconds.
≥When the remote control code is changed, the new code
will appear on the display for a few seconds.
≥ When the SU-C700/SL-C700 is connected via the system control
function, change its remote control code as well as the remote
control code for this unit.
You can change the character encoding of track names,
artist names and other information when they are not
displayed as they should be.
≥ The factory default is “Type 1( 日本 )”.
1 Press [NWP].
2 Press [HOME].
3 Press [3, 4] repeatedly to select “SETUP”
and then press [OK].
4 Press [3, 4] repeatedly to select “E Asian
Character” and then press [OK].
5 Press [3, 4] to select
“Type 1( 日本 )”/“Type 2( 简体字 )” and then
press [OK].
You can automatically link this unit with the SU-C700 and
operate them easily with the remote control.
Preparation
1 Connect this unit and the SU-C700 with a system
connection cable and a coaxial digital cable. (> 9)
2 Set the power switch lever of this unit and the SU-C700
to the [Í/I] position.
∫ Switching this unit and the SU-C700 to
on/standby simultaneously
≥If you point the remote control at this unit and press
[NWP Í] when this unit and the SU-C700 are in standby
mode, this unit and the SU-C700 will be turned on
simultaneously.
≥When both this unit and the SU-C700 are turned on and
the input source of the SU-C700 is set to “COAX1”, you
can set them to automatically enter standby mode using
the sleep-timer. (> 26)
∫ Switching the SU-C700’s input source
automatically
When you perform an operation such as playback on this
unit, the input source of the SU-C700 will be automatically
switched to “COAX1”.
∫ Adjusting Bass/Middle/Treble
You can adjust the tone of the SU-C700 with this unit. Each
tonal range (Bass/Middle/Treble) can be adjusted.
1 Press [NWP].
2 Press [HOME].
3 Press [3, 4] repeatedly to select “SETUP” and then
press [OK].
4 Press [3, 4] repeatedly to select “Tone Control” and
then press [OK].
5 Press [3, 4] to select “On (adjustment)” and then press
[OK].
6 Press [3, 4] to select “BASS” (Bass), “MID” (Middle) or
“TREBLE” (Treble).
7 Press [2, 1] to adjust the level and then press [OK].
≥ Each level can be adjusted between “s10” and “r10”.
≥ For information on the operations of the SU-C700, please also
refer to its operating instructions.
Remote control code
[OK] + [1] Set the code to “Mode 1”
[OK] + [2] Set the code to “Mode 2”
Changing the character
encoding
Type 1( 日本 )
Priority is given to Japanese.
Type 2( 简体字 )
Priority is given to Chinese
(Simplified).
Using the system control
function
(28)
ST-C700DE-TQBM0007.book 28 ページ 2016年10月26日 水曜日 午後1時17分

29
English
Troubleshooting
Before requesting service, make the following checks. If you
are uncertain about some of the check points, or if the
solutions indicated in the following guide does not resolve
the issue, then consult your dealer for instructions.
Heat buildup of this unit.
≥This unit becomes warm when used for a long time. This is
not a malfunction.
Do you have the latest firmware installed?
≥Panasonic is constantly improving the unit’s firmware to
ensure that our customers are enjoying the latest
technology. (> 27)
The unit does not work.
Operations are not done properly.
≥One of the unit’s safety devices may have been activated.
1 Lower the power switch lever of this unit to the [OFF] position.
≥ Alternatively, disconnect the AC mains lead, wait for at least 3
minutes, then reconnect it.
2 Raise the power switch lever of this unit to the [Í/I] position.
If the unit still cannot be operated, consult the dealer.
A “humming” sound can be heard during
playback.
≥An AC mains lead or fluorescent light is near the cables.
Keep other appliances and cords away from the cables of
this unit.
No sound.
≥Check the volume of the connected device (amplifier, etc.).
≥Check to see if the cable connections to the input and
output terminals are incorrect. If this is the case, turn off
this unit and reconnect the cables correctly.
≥Check to see if the correct input source is selected.
≥Insert the plugs of the cables to be connected all the way
in.
≥When “Digital Output” and “Analog Output” are set to “Off”,
no sound will be output. Change the setting of the output
terminal to be used to “On”. (> 25)
≥Playback of multi-channel content is not supported.
The sound is interrupted.
≥Depending on your environment, the audio may be
interrupted during playback. Check the operating
instructions of the connected device and the connection to
the device.
Playback does not start.
≥Depending on your environment or connected devices, it
may take some time.
The system control function is not working.
≥Connect the system connection cable to the system
terminal [CONTROL1] of the SU-C700.
≥Connect the coaxial digital cable to the digital audio input
terminal [COAX1 IN] of the SU-C700.
The unit turns off automatically.
≥Is the auto off function turned on? (> 26)
≥If the SU-C700 is connected to this unit via the system
control function, this unit may automatically enter standby
mode when the SU-C700 enters standby mode. (> 9, 28)
The settings are reset to the factory defaults.
≥Updating the firmware may reset the settings.
To return all settings to the factory defaults
When the following situations occur, reset the memory:
≥ There is no response when buttons are pressed.
≥ You want to clear and reset the memory contents.
1 Press [NWP].
2 Press [HOME].
3 Press [3, 4] repeatedly to select “SETUP” and then
press [OK].
4 Press [3, 4] repeatedly to select “Initialization” and
then press [OK].
5 Press [3, 4] to select “Yes” and then press [OK].
6 Press [3, 4] to select “Yes” and then press [OK]
again.
General
(29)
ST-C700DE-TQBM0007.book 29 ページ 2016年10月26日 水曜日 午後1時17分

30
Cannot connect to the network.
≥Confirm the network connection and settings. (> 12)
Cannot connect to the unit.
≥Make sure that the multicast function on the wireless router
is enabled.
≥Make sure that the device and the unit are connected to
the same network. (> 12)
≥Reconnect the compatible device to the network and then
connect to this unit again.
≥Turn this unit off and on, and then connect to this unit
again.
Playback does not start.
The sound is interrupted.
≥Simultaneous use with other 2.4 GHz devices, such as
microwaves, cordless telephones, etc., may result in
connection interruptions.
Increase the distance between the wireless router and
these devices.
≥If several wireless devices are simultaneously using the
same wireless network as this unit, try turning off the other
devices or reducing their wireless network usage.
≥If the playback stops, check the playback status on the
device.
Cannot find music files stored on the PC.
≥When you play back music files over a network, those that
are not registered to its network server are not displayed.
For details, refer to the operating instructions for your
server.
Playback does not start.
The sound is interrupted.
≥The station that does not broadcast cannot be played back.
(It will be skipped or return to the list.)
≥Internet Radio may not be played back properly depending
on the network condition.
≥Depending on the internet connection environment, the
sound may be interrupted or it may take some time to play
back.
≥Internet Radio is an audio broadcasting service transmitted
via the Internet. Depending on the broadcaster or condition
of the transmitting, the sound quality may vary.
Cannot display the information properly.
≥Track names, station names, etc. which are managed by
vTuner/Spotify may not be displayed properly.
Cannot operate.
≥Select “USB” as the input source.
≥Check that the iPhone/iPad/iPod is connected properly.
≥Connect the iPhone/iPad/iPod again or try to restart the
iPhone/iPad/iPod.
≥The battery of the iPhone/iPad/iPod is depleted. Charge
the iPhone/iPad/iPod, and then operate again.
iPhone/iPad/iPod does not charge.
≥Make sure the unit is turned on when you start charging.
– When charging an iPhone/iPad/iPod whose battery is depleted,
do not turn this unit to standby mode until the iPhone/iPad/iPod
becomes operational.
The USB drive or its contents cannot be read.
≥The USB drive format or its contents is/are not compatible
with the unit. (> 35)
No response when [1/;] is pressed.
≥Disconnect the USB device and then reconnect it.
Alternatively, turn the unit off and on again.
Slow operation of the USB flash drive.
≥Large file size or high memory USB flash drive takes longer
time to read.
The PC does not recognise this unit.
≥Check your operating environment. (> 20)
≥Restart the PC, turn off and on this unit, and then
reconnect the USB cable.
≥Use another USB port of the connected PC.
≥Install the dedicated USB driver if using a PC with
Windows.
Cannot find music files stored on the PC.
≥When you play back music files over a network, those that
are not registered to its network server are not displayed.
For details, refer to the operating instructions for your
server. (> 35)
AirPlay/DLNA
vTuner/Spotify
iPhone/iPad/iPod
USB
PC
(30)
ST-C700DE-TQBM0007.book 30 ページ 2016年10月26日 水曜日 午後1時17分

31
English
Pairing cannot be completed.
≥Check the Bluetooth
®
device condition.
The device cannot be connected.
≥The pairing of the device was unsuccessful or the
registration has been replaced. Try re-pairing the device.
≥This unit might be connected to a different device.
Disconnect the other device and try re-pairing the device.
The device is connected, but audio cannot be
heard through this unit.
≥For some built-in Bluetooth
®
devices, you have to set the
audio output to “ST-C700D” manually. Read the operating
instructions for the device for details.
NFC is not working.
≥Make sure the NFC feature of the device are turned on.
≥When you try again, change the angle at which the
Bluetooth
®
device touches the NFC touch area.
≥Turn on the NFC feature of this unit when you connect a
device using NFC. (> 21)
Playback does not start.
The sound is interrupted.
≥Simultaneous use with other 2.4 GHz devices, such as
microwaves, cordless telephones, etc., may result in
connection interruptions.
Bring the Bluetooth
®
device closer to this unit and distance
it from the other devices.
Reception is poor or a beat sound is heard.
≥Keep the antenna away from computers, TVs, other cables
and cords.
≥Use an outdoor antenna.
The remote control does not work properly.
≥To avoid interference, please do not put any objects in front
of signal sensor. (> 7)
≥Change the remote control code if other products react to
this remote control. (> 28)
≥If the SU-C700/SL-C700 is selected for the device to be
operated, press [NWP] and retry the operation. (> 8)
Pressing [DIMMER] changes the display, the light
and the indicator brightness of the SU-C700/
SL-C700.
≥[DIMMER] works for the SU-C700/SL-C700 as well as this
unit. Turn off the device that you want to maintain the
brightness level of, and press [DIMMER].
The following messages or service numbers may appear
on the unit’s display.
“AUTO OFF”
≥The unit has been left unused for about 20 minutes and will
enter standby mode within a minute. Press any button to
cancel it.
“Checking Device”
≥The unit is checking the connected iPhone/iPad/iPod or a
USB device.
“Connect to Network”
≥Connect this unit to the network and then wait for the start
of the Firmware Update via Internet. (> 27)
“Connect USB Device”
≥Download the latest firmware on the USB flash memory
and connect it. (> 27)
“Download Fail”
≥The firmware download has failed. Press any button to exit.
Please try again later.
≥The server cannot be found. Press any button to exit. Make
sure that the network is connected to the Internet.
“Empty”
≥The selected folder is empty. Move tracks into the folder
and retry the operation.
≥The server is not found on the network. Check to see if the
server is connected to the same network as this unit, and
retry the connection to this unit. (> 13)
≥No Internet Radio station is registered to the favourite list.
Add a station to the list. (> 15)
“Error”
≥Incorrect operation is performed. Read the instructions and
try again.
“Firmware update is available”
≥The firmware (free of charge) for this unit is available.
1 Press [NWP].
2 Press [OK].
3 Press [3, 4] to select “Yes” and then press [OK].
≥ The progress is displayed as “Updating %” while updating.
( stands for a number.)
≥ When the update has finished successfully, “Success” is
displayed.
4 After “Success” is displayed, disconnect the AC mains lead
and then reconnect it after 3 minutes.
≥For the update information, refer to the following website.
www.technics.com/support/firmware/
Bluetooth
®
Radio
Remote control
Messages
(31)
ST-C700DE-TQBM0007.book 31 ページ 2016年10月26日 水曜日 午後1時17分

32
“F” (“ ” stands for a number.)
≥There is a problem with this unit.
– Is this unit placed in an extremely hot place?
If so, move this unit to a cooler place and wait a few moments
and then try to turn it on again.
If the problem persists, write down the displayed number,
disconnect the AC mains lead and consult your dealer.
“Load Fail”
≥The firmware on the USB flash memory cannot be found.
≥Download the latest firmware on the USB flash memory
and try again. (> 27)
“No Network Available”
≥This unit is not connected to the network.
Check the network connection. (> 12)
“No Memory”
≥There are no preset DAB/DAB+ stations to select. Preset
some channels. (> 24)
“No Signal”
≥This station cannot be received. Check your antenna.
“Not Valid”
≥The function you have tried to use is not available with the
current settings. Check the steps and settings.
“PGM Full”
≥The number of programmed tracks is more than 24.
“Please Wait”
≥This is displayed, for example, when this unit is turned
on/off. (For up to 1 minute and 30 seconds)
“Remote ” (“ ” stands for a number.)
≥The remote control and this unit are using different codes.
Change the code on the remote control.
– When “Remote 1” is displayed, press and hold [OK] and [1] for
at least 4 seconds.
– When “Remote 2” is displayed, press and hold [OK] and [2] for
at least 4 seconds.
“Remote Mode”
≥Basic operations using any of the basic control switches on
the main unit or the buttons on the remote control cannot
be performed. (This happens when music stored on a
DLNA server is played back on this unit (DMR), for
example.)
≥Use the connected device for basic playback control.
“Scan Failed”
≥Stations are not receivable. Check your antenna and try
Auto scanning. (> 24)
If “Scan Failed” is still displayed, find the best signal
reception with the “Manual Scan” tuning function. (> 24)
“Searching”
≥The unit is checking the DLNA server on the network.
“Unlocked”
≥“PC” is selected, but a PC is not connected. Check the
connection with the PC. (> 20)
≥The sampling frequency components, etc. of the audio
signals are not input correctly.
– About supported format, refer to “File format” (> 35)
“USB Over Current Error”
≥The iPhone/iPad/iPod or USB device is drawing too much
power. Disconnect the iPhone/iPad/iPod or USB device
and turn the unit off and on again.
“Hub Device Not Supported”
“Device Not Recognized”
“Not Supported”
“USB Device Not Supported”
≥You have connected an iPhone/iPad/iPod or USB device
that is not supported.
– If the iPhone/iPad/iPod is compatible, turn it on and connect it
correctly.
≥The format of the file on the iPhone/iPad/iPod or USB
device is not supported.
– About supported format, refer to “File format” (> 35)
∫ About Network service
The services through network service are operated by their
respective service providers, and service may be
discontinued either temporarily or permanently without
notice. Therefore, Panasonic will make no warranty for the
content or the continuity of the services.
Unit care
Pull out the AC mains lead from the outlet before
maintenance. Clean this unit with a soft cloth.
≥ When dirt is heavy, wring a wet cloth tightly to wipe the dirt, and
then wipe it with a soft cloth.
≥ Do not use solvents including benzine, thinner, alcohol, kitchen
detergent, a chemical wiper, etc. This might cause the exterior
case to be deformed or the coating to come off.
(32)
ST-C700DE-TQBM0007.book 32 ページ 2016年10月26日 水曜日 午後1時17分

33
English
Specifications
∫ GENERAL
Power supply AC 220 V to 240 V, 50/60 Hz
Power consumption 26 W
Power consumption in standby mode*
1
(When “Network Standby” is off) Approx. 0.2 W
(When “Network Standby” is on) Approx. 2.0 W
Power consumption in off mode Approx. 0.2 W
Dimensions (WkHkD) 340 mmk78 mmk305 mm
Mass Approx. 4.0 kg
Operating temperature range 0 oC to r40 oC
Operating humidity range 35 % to 80 % RH (no condensation)
∫ TERMINALS SECTION
Analogue output
LINE OUT Pin jack
Digital output
Optical digital output Optical terminal
Coaxial digital output Pin jack
System port
System control ‰3.5 mm jack
USB
Front USB Type A connector
Support memory capacity 2TB (max)
Maximum number of folders (albums) 800
Maximum number of files (songs) 8000
File system FAT16, FAT32
USB port power DC OUT 5 V 2.1 A (max)
PC
Rear USB Type B connector
Ethernet interface
LAN 10 Base-T/100 Base-TX
∫ FORMAT SECTION
USB-A
USB Standard USB 2.0 high-speed
USB Mass Storage class
USB-B
USB Standard USB 2.0 high-speed
USB Audio Class 2.0, Asynchronous mode
DSD control mode ASIO Native mode, DoP mode
(33)
ST-C700DE-TQBM0007.book 33 ページ 2016年10月26日 水曜日 午後1時17分

34
≥ Specifications are subject to change without notice.
≥ Mass and dimensions are approximate.
*1 When the iPhone/iPad/iPod is not charging
*2 Prospective communication distance
Measurement environment: Temperature 25
o
C/ Height 1.0 m
Measure in “Mode 1”
∫ ANALOGUE OUTPUT SECTION
Channel 2ch
Output level
LINE OUT 2.0 Vrms
Frequency response 2Hz to 90kHz (s3dB)
THD+N 0.0012 % (1 kHz, 0 dB)
S/N 112 dB (IHF-A)
Dynamic range 112 dB (IHF-A)
∫ Bluetooth
®
/NFC SECTION
Bluetooth
®
Bluetooth
®
system specification Bluetooth
®
Ver.3.0
Wireless equipment classification Class 2 (2.5 mW)
Supported profiles A2DP/AVRCP
Supported codec Qualcomm
®
aptX™ Low Latency, AAC, SBC
Frequency band 2.4 GHz band FH-SS
Operating distance Approx. 10 m Line of sight*
2
∫ TUNER SECTION
Frequency modulation (FM)
Preset memory 30 stations
Frequency range 87.50 MHz to 108.00 MHz (50 kHz step)
Antenna terminals 75 ≠ (unbalanced)
DAB
DAB memories 20 channels
Frequency band (wavelength)
Band III (All Band III) 5A to 13F (174.928 MHz to 239.200 MHz)
Sensitivity
Min requirement s98 dBm
DAB external antenna terminal F-Connector (75 ≠)
(34)
ST-C700DE-TQBM0007.book 34 ページ 2016年10月26日 水曜日 午後1時17分

35
English
∫ File format
This unit supports the following file formats.
≥This unit does not support the playback of copy-protected music files.
≥Playback of all files in formats supported by this unit is not guaranteed.
≥Playback of a file in a format not supported by this unit may cause choppy audio or noise. In such cases, check to see if this unit
supports the file format.
≥This unit does not support VBR (Variable Bit Rate) playback.
≥Some of the connected devices (servers) may be capable of converting files in formats not supported by this unit and output
them. For details, refer to the operating instructions for your server.
≥File information (sampling frequency, etc.) shown by this unit and playback software may differ from each other.
USB-A
PC (USB-B)*
1
LAN (DLNA)*
2
*1 If you download and install the dedicated app, you can play back files in wide-ranging formats. (> 20)
For details, refer to the operating instructions of the app.
*2 Whether or not each music file can be played back over your network is determined by the network server even if the format of the file is listed
above. For example, if you are using Windows Media
®
Player 11, not all music files on the PC are playable. You can play back only those
added to the library of Windows Media
®
Player 11.
≥ All the information above is current as of October 2016 and subject to update without notice. For update information, refer to the website below.
www.technics.com/support/firmware/
File format Extension Sampling frequency
Bit rate
Number of quantisation bits
MP3 .mp3 32/44.1/48 kHz 16 kbps to 320 kbps
AAC .m4a/.aac 32/44.1/48/88.2/96 kHz 16 kbps to 320 kbps
WMA .wma 32/44.1/48 kHz 16 kbps to 320 kbps
WAV .wav 32/44.1/48/88.2/96/176.4/192 kHz 16/24 bit
FLAC .flac 32/44.1/48/88.2/96/176.4/192 kHz 16/24 bit
AIFF .aiff 32/44.1/48/88.2/96/176.4/192 kHz 16/24 bit
ALAC .m4a 32/44.1/48/88.2/96/176.4/192 kHz 16/24 bit
DSD .dff/.dsf 2.8/5.6 MHz
File format Extension Sampling frequency
Bit rate
Number of quantisation bits
LPCM 32/44.1/48/88.2/96/176.4/192 kHz 16/24/32 bit
DSD .dff/.dsf 2.8/5.6 MHz
File format Extension Sampling frequency
Bit rate
Number of quantisation bits
MP3 .mp3 32/44.1/48 kHz 16 kbps to 320 kbps
AAC .m4a/.aac 32/44.1/48/88.2/96 kHz 16 kbps to 320 kbps
WMA .wma 32/44.1/48 kHz 16 kbps to 320 kbps
WAV .wav 32/44.1/48/88.2/96/176.4/192 kHz 16/24 bit
FLAC .flac 32/44.1/48/88.2/96/176.4/192 kHz 16/24 bit
AIFF .aiff 32/44.1/48/88.2/96/176.4/192 kHz 16/24 bit
ALAC .m4a 32/44.1/48/88.2/96/176.4/192 kHz 16/24 bit
DSD .dff/.dsf 2.8/5.6 MHz
(35)
ST-C700DE-TQBM0007.book 35 ページ 2016年10月26日 水曜日 午後1時17分

36
∫ About Bluetooth
®
Frequency band used
≥This system uses the 2.4 GHz frequency band.
Certification of this device
≥This system conforms to frequency restrictions and has
received certification based on frequency laws. Thus, a
wireless permit is not necessary.
≥The actions below are punishable by law in some
countries:
– Taking apart or modifying the system.
– Removing specification indications.
Restrictions of use
≥Wireless transmission and/or usage with all Bluetooth
®
equipped devices is not guaranteed.
≥All devices must conform to standards set by Bluetooth
SIG, Inc.
≥Depending on the specifications and settings of a device, it
can fail to connect or some operations can be different.
≥This system supports Bluetooth
®
security features. But
depending on the operating environment and/or settings,
this security is possibly not sufficient. Transmit data
wirelessly to this system with caution.
≥This system cannot transmit data to a Bluetooth
®
device.
Range of use
≥Use this device at a maximum range of 10 m. The range
can decrease depending on the environment, obstacles or
interference.
Interference from other devices
≥
This system may not function properly and troubles such as
noise and sound jumps may arise due to radio wave
interference if this system is located too close to other
Bluetooth
®
devices or the devices that use the 2.4 GHz band.
≥This system may not function properly if radio waves from
a nearby broadcasting station, etc. is too strong.
Intended usage
≥This system is for normal, general use only.
≥Do not use this system near an equipment or in an
environment that is sensitive to radio frequency
interference (example: airports, hospitals, laboratories,
etc).
Panasonic bears no responsibility for data and/or
information that is compromised during a wireless
transmission.
“Made for iPod”, “Made for iPhone”, and “Made for iPad” mean that an
electronic accessory has been designed to connect specifically to iPod,
iPhone, or iPad, respectively, and has been certified by the developer to
meet Apple performance standards.
Apple is not responsible for the operation of this device or its compliance
with safety and regulatory standards.
Please note that the use of this accessory with iPod, iPhone, or iPad may
affect wireless performance.
AirPlay, iPad, iPhone, iPod, iPod nano, iPod touch and iPad Air are
trademarks of Apple Inc., registered in the U.S. and other countries.
iPad mini and iPad Pro are trademarks of Apple Inc.
Mac and OS X are trademarks of Apple Inc., registered in the U.S. and
other countries.
Android is a trademark of Google Inc.
Qualcomm aptX is a product of Qualcomm Technologies International, Ltd.
Qualcomm is a trademark of Qualcomm Incorporated, registered in the
United States and other countries, used with permission. aptX is a
trademark of Qualcomm Technologies International, Ltd., registered in the
United States and other countries, used with permission.
The Bluetooth
®
word mark and logos are registered trademarks owned by
the Bluetooth SIG, Inc. and any use of such marks by Panasonic
Corporation is under license.
Other trademarks and trade names are those of their respective owners.
DLNA, the DLNA Logo and DLNA CERTIFIED are trademarks, service
marks, or certification marks of the Digital Living Network Alliance.
MPEG Layer-3 audio coding technology licensed from Fraunhofer IIS and
Thomson.
Windows and Windows Vista are either registered trademarks or
trademarks of Microsoft Corporation in the United States and/or other
countries.
Windows Media and the Windows logo are trademarks or registered
trademarks of Microsoft Corporation in the United States and/or other
countries.
This product is protected by certain intellectual property rights of Microsoft
Corporation and third parties. Use or distribution of such technology outside
of this product is prohibited without a license from Microsoft or an
authorized Microsoft subsidiary and third parties.
FLAC Decoder
Copyright (C) 2000, 2001, 2002, 2003, 2004, 2005, 2006, 2007, 2008,
2009 Josh Coalson
Redistribution and use in source and binary forms, with or without
modification, are permitted provided that the following conditions are met:
– Redistributions of source code must retain the above copyright notice,
this list of conditions and the following disclaimer.
– Redistributions in binary form must reproduce the above copyright
notice, this list of conditions and the following disclaimer in the
documentation and/or other materials provided with the distribution.
– Neither the name of the Xiph.org Foundation nor the names of its
contributors may be used to endorse or promote products derived from
this software without specific prior written permission.
THIS SOFTWARE IS PROVIDED BY THE COPYRIGHT HOLDERS AND
CONTRIBUTORS “AS IS” AND ANY EXPRESS OR IMPLIED
WARRANTIES, INCLUDING, BUT NOT LIMITED TO, THE IMPLIED
WARRANTIES OF MERCHANTABILITY AND FITNESS FOR A
PARTICULAR PURPOSE ARE DISCLAIMED. IN NO EVENT SHALL THE
FOUNDATION OR CONTRIBUTORS BE LIABLE FOR ANY DIRECT,
INDIRECT, INCIDENTAL, SPECIAL, EXEMPLARY, OR CONSEQUENTIAL
DAMAGES (INCLUDING, BUT NOT LIMITED TO, PROCUREMENT OF
SUBSTITUTE GOODS OR SERVICES; LOSS OF USE, DATA, OR
PROFITS; OR BUSINESS INTERRUPTION) HOWEVER CAUSED AND
ON ANY THEORY OF LIABILITY, WHETHER IN CONTRACT, STRICT
LIABILITY, OR TORT (INCLUDING NEGLIGENCE OR OTHERWISE)
ARISING IN ANY WAY OUT OF THE USE OF THIS SOFTWARE, EVEN IF
ADVISED OF THE POSSIBILITY OF SUCH DAMAGE.
The Spotify software is subject to third party licenses found here:
www.spotify.com/connect/third-party-licenses
(36)
ST-C700DE-TQBM0007.book 36 ページ 2016年10月26日 水曜日 午後1時17分

37
(37)
ST-C700DE-TQBM0007.book 37 ページ 2016年10月26日 水曜日 午後1時17分

4
Wir möchten Ihnen dafür danken, dass Sie sich für dieses Gerät entschieden haben.
Bitte lesen Sie diese Anleitung vor der Inbetriebnahme dieses Produkts aufmerksam durch, und bewahren Sie dieses Handbuch
für spätere Bezugnahme griffbereit auf.
∫ Funktionen dieses Geräts
Dieses Gerät bietet folgende Funktionen:
Digital Noise Isolation-Architektur
Da die meisten Speichermedien für digitale Inhalte zur Nutzung mit PCs ausgelegt sind, werden diese nicht unter
Berücksichtigung eines niedrigen Rauschens konzipiert, was für eine reine Tonwiedergabe entscheidend ist. Um diese
Herausforderung zu überwinden, nutzt dieses Gerät eine eingehende Maßnahme gegen Jitter sowie eine hervorragende
Technologie zur Rauschunterdrückung für jede einzelne Schnittstelle, um einen klaren Klang zu gewährleisten.
Virtueller Akkubetrieb
Der virtuelle Akkubetrieb verhindert das Mischen von Stromversorgungsrauschen, einem Faktor, der zur “Trübung” von Sound
führt, ins Audiosignal. Das Ergebnis ist eine Verbesserung der Leistung der Klanglokalisierung sowie des räumlichen Ausdrucks.
Ultra Low Distortion Oversampling Digital Filter
Hochpräzises Oversampling eliminiert die Verzerrung und verbessert die Tonqualität der Musikquellen und gibt somit den Sound
reich und mit räumlichem Ausdruck wieder.
∫ Empfohlene Geräte
Wir empfehlen die Verwendung von Technics-Geräten (Sonderzubehör) für eine überragende Audioqualität.
Produktname Modellnummer
Lautsprecheranlage SB-C700
CD-Spieler SL-C700
Stereo-Vollstärker SU-C700
(38)
ST-C700DE-TQBM0007.book 4 ページ 2016年10月26日 水曜日 午後1時17分

5
Deutsch
Vorsichtsmaßnahmen
Gerät
≥ Zur Reduzierung der Gefahr von Brand, elektrischem Schlag und
Beschädigung:
– Setzen Sie dieses Gerät weder Regen, noch Feuchtigkeit, Tropfen oder
Spritzern aus.
– Stellen Sie keine mit Flüssigkeiten gefüllten Gefäße, wie Vasen, auf
dieses Gerät.
– Ausschliesslich das empfohlene Zubehör verwenden.
– Entfernen Sie die Abdeckungen nicht.
– Reparieren Sie dieses Gerät nicht selbst. Wenden Sie sich zur Wartung
an qualifiziertes Kundendienstpersonal.
– Lassen Sie keine Gegenstände aus Metall in dieses Gerät fallen.
– Stellen Sie keine schweren Gegenstände auf dieses Gerät.
Netzkabel
≥ Zur Reduzierung der Gefahr von Brand, elektrischem Schlag und
Beschädigung:
– Gewährleisten Sie, dass die Spannung der Stromversorgung dem auf
diesem Gerät angegebenen Wert entspricht.
– Fügen Sie den Netzstecker vollständig in die Steckdose ein.
– Ziehen Sie nicht an der Leitung, knicken Sie sie nicht und stellen Sie
keine schweren Gegenstände darauf.
– Fassen Sie den Stecker nicht mit nassen Händen an.
– Fassen Sie den Stecker beim Herausziehen an seinem Korpus an.
– Verwenden Sie keinen Netzstecker und keine Steckdose, die beschädigt
sind.
≥ Der Netzstecker ist das trennende Gerät.
Installieren Sie dieses Gerät so, dass der Netzstecker sofort aus der
Wandsteckdose gezogen werden kann.
Gerät
≥ Stellen Sie keine Quellen offener Flammen, z.B. brennende Kerzen, auf das
Gerät.
≥ Dieses Gerät kann beim Betrieb Hochfrequenzstörungen auffangen, die
durch die Benutzung von Mobiltelefonen verursacht werden. Sollte eine
solche Störung festgestellt werden, sollte das Handy in größerer Entfernung
zu diesem Gerät betrieben werden.
≥ Dieses Gerät ist zum Betrieb in Regionen mit gemäßigtem oder tropischem
Klima bestimmt.
Aufstellung
≥ Stellen Sie dieses Gerät auf eine ebene Oberfläche.
≥ Zur Reduzierung der Gefahr von Brand, elektrischem Schlag und
Beschädigung:
– Installieren oder positionieren Sie dieses Gerät nicht in einem
Bücherregal, Einbauschrank oder einem sonstigen engen Raum. Stellen
Sie eine gute Belüftung des Gerätes sicher.
– Achten Sie darauf, die Entlüftungsschlitze des Gerätes nicht durch
Gegenstände aus Papier oder Stoff zu blockieren, z.B. Zeitungen,
Tischdecken und Vorhänge.
– Setzen Sie dieses Gerät keinem direkten Sonnenlicht, hohen
Temperaturen, starker Feuchtigkeit und übermäßigen Erschütterungen
aus.
≥ Heben oder tragen Sie dieses Gerät nicht, indem Sie es an einem seiner
Hebel festhalten. Dadurch kann dieses Gerät herunterfallen, was zu
Verletzungen oder Fehlfunktionen dieses Geräts führen kann.
Batterie
≥ Explosionsgefahr bei falschem Anbringen der Batterie. Ersetzen Sie die
Batterie nur durch den vom Hersteller empfohlenen Typ.
≥ Der Missbrauch der Batterien kann zu einem Auslaufen von Elektrolyt und
einem Brand führen.
– Entfernen Sie die Batterien, wenn Sie die Fernbedienung über längere
Zeit nicht benutzen. Bewahren Sie sie an einem kühlen, dunklen Ort auf.
– Niemals starker Hitze oder offenem Feuer aussetzen.
– Lassen Sie die Batterie(n) nie längere Zeit in einem Auto mit
geschlossenen Türen und Fenstern zurück, das direkter
Sonneneinstrahlung ausgesetzt ist.
– Nehmen Sie die Batterien nicht auseinander, und schließen Sie sie nicht
kurz.
– Laden Sie Alkali- oder Manganbatterien nicht wieder auf.
– Verwenden Sie keine Batterien mit teilweise abgelöstem Mantel.
– Verwenden Sie keine alten und neuen Batterien oder verschiedene Typen
gleichzeitig.
≥ Wenden Sie sich zur Entsorgung der Batterien an die lokalen Behörden
oder erfragen Sie die richtige Vorgehensweise zur Entsorgung.
WARNUNG
ACHTUNG
Konformitätserklärung (DoC)
Hiermit erklärt "Panasonic Corporation", dass dieses Produkt den grundlegenden
Anforderungen sowie den anderen relevanten Vorschriften der Richtlinie 1999/5/EG
entspricht.
Kunden können eine Kopie der Original-DoC unserer R&TTE-konformen Geräte von
unserem DoC-Server herunterladen:
http://www.doc.panasonic.de
Wenden Sie sich an einen zugelassenen Vertragshändler:
Panasonic Marketing Europe GmbH, Panasonic Testing Centre,
Winsbergring 15, 22525 Hamburg, Deutschland
Entsorgung von Altgeräten und Batterien
Nur für die Europäische Union und Länder mit
Recyclingsystemen
Dieses Symbol, auf den Produkten, der Verpackung
und/oder den Begleitdokumenten, bedeutet, dass
gebrauchte elektrische und elektronische Produkte sowie
Batterien nicht in den allgemeinen Hausmüll gegeben
werden dürfen.
Bitte führen Sie alte Produkte und verbrauchte Batterien
zur Behandlung, Aufarbeitung bzw. zum Recycling
gemäß den gesetzlichen Bestimmungen den
zuständigen Sammelpunkten zu.
Indem Sie diese Produkte und Batterien ordnungsgemäß
entsorgen, helfen Sie dabei, wertvolle Ressourcen zu
schützen und eventuelle negative Auswirkungen auf die
menschliche Gesundheit und die Umwelt zu vermeiden.
Für mehr Informationen zu Sammlung und Recycling,
wenden Sie sich bitte an Ihren örtlichen
Abfallentsorgungsdienstleister.
Gemäß Landesvorschriften können wegen nicht
ordnungsgemäßer Entsorgung dieses Abfalls Strafgelder
verhängt werden.
Hinweis für das Batteriesymbol (Symbol
unten):
Dieses Symbol kann in Kombination mit einem
chemischen Symbol abgebildet sein. In diesem Fall erfolgt dieses auf
Grund der Anforderungen derjenigen Richtlinien, die für die betreffende
Chemikalie erlassen wurden.
(39)
ST-C700DE-TQBM0007.book 5 ページ 2016年10月26日 水曜日 午後1時17分

6
Inhaltsverzeichnis
∫ Entsorgung oder Weitergabe dieses Gerätes
Diese Gerät kann private Angaben enthalten. Führen Sie vor der Entsorgung oder Weitergabe des Gerätes folgendes durch, um
die Daten, einschließlich persönlicher und geheimer Angaben, zu löschen.
≥“So setzen Sie alle Einstellungen auf die werksseitigen Standardeinstellungen zurück.” (> 29)
Zubehör
≥ Stand der in dieser Bedienungsanleitung aufgeführten Produktnummern ist September 2016. Änderungen vorbehalten.
≥ Verwenden Sie das Netzkabel nicht mit anderen Geräten.
Vorsichtsmaßnahmen .......................................................5
Zubehör..............................................................................6
Benutzung der Bedienelemente.......................................7
Inbetriebnahme..................................................................9
HOME-Menü und Grundbedienung ............................... 11
Netzwerkeinstellungen ...................................................12
Abspielen von Musikdateien auf dem DLNA-Server....13
Wiedergabe von Internet Radio (vTuner) ......................14
Verwendung von Spotify ................................................16
Verwenden der iPhone/iPad/iPod ..................................17
Verwenden der AirPlay ...................................................18
Verwendung des USB-Geräts .........................................18
Verwendung des PC etc..................................................20
Verwenden der Bluetooth
®
..............................................21
FM-Radio hören ...............................................................23
Sie hören DAB/DAB+.......................................................24
Sound-Anpassung...........................................................25
Sonstige ...........................................................................26
Fehlerbehebung...............................................................29
Gerätepflege.....................................................................32
Technische Daten ............................................................33
Hinweise zu Beschreibungen in dieser Bedienungsanleitung
≥Seitenverweise werden dargestellt als “@ ±±”.
≥Die gezeigten Abbildungen können sich von Ihrem Gerät unterscheiden.
≥Wenn nicht anders angegeben, werden die Bedienvorgänge unter Verwendung der Fernbedienung beschrieben.
∏ 1 Netzkabel
(REQ0456)
∏ 1 System-Anschlusskabel
(K2KYYYY00233)
∏ 1 Koaxial-Digitalkabel
(K2KYYYY00251)
∏ 1 DAB-Zimmerantenne
(RFA3654)
∏ 1 Fernbedienung
(N2QAYA000096)
∏ 2 Batterien für
Fernbedienung
(K2CQ2YY00127)
∫ Verwendung der Fernbedienung
Legen Sie die Batterie so ein, dass die Pole
(i und j) mit denen in der Fernsteuerung
übereinstimmen.
Auf den Fernbedienungs-Signalsensor an diesem
Gerät richten. (> 7)
≥Bewahren Sie die Batterien außerhalb der
Reichweite von Kindern auf, um ein
Verschlucken zu verhindern.
2
1
R03/LR03, AAA
(Alkali- oder Manganbatterien)
(40)
ST-C700DE-TQBM0007.book 6 ページ 2016年10月26日 水曜日 午後1時17分

7
Deutsch
Benutzung der Bedienelemente
∫ Vorderansicht
1 Netzschalterhebel [Í/I (Standby/Ein)]/[OFF]
Schalten Sie dieses Gerät ein/aus.
≥ Die Fernbedienung funktioniert nicht, wenn sich der
Netzschalterhebel in der abgesenkten Position befindet.
≥ Wenn der Netzschalterhebel dieses Geräts sich in der oberen
Position befindet, können Sie zwischen eingeschaltetem
Zustand und Standby-Modus wechseln. (> 8)
2 Port für iPhone/iPad/iPod und USB-Geräte
( DC 5 V 2,1 A) (> 17, 18)
3 Fernbedienungs-Signalsensor
Abstand: Max. 7 m direkt von der Vorderseite
Winkel: Ca. 30o links und rechts
4 Display
≥Die Eingabequelle, der Wiedergabestatus und weitere
Informationen werden angezeigt. Weitere Details
finden Sie auf der unten genannten Supportseite sowie
in dieser Bedienungsanleitung.
www.technics.com/support/
5 Grundsteuerschalter
Diese Schalter funktionieren nur durch Berühren der
Zeichen. Bei jedem Berühren des Schalters ertönt ein
Signalton. (> 11)
≥ Wenn keine Wiedergabeinformationen am Display angezeigt
werden (mit Ausnahme des NFC-Registrierungs- Standby-
Modus (> 21)), können Sie folgende Vorgänge auf dem Touch
Panel ausführen:
6 NFC-Touch-Bereich (> 21)
Zum Kaufzeitpunkt ist die Schutzfolie am NFC-
Touchbereich angebracht.
∫ Rückansicht
7 Produktkennzeichnung
Die Modellnummer ist angegeben.
8 DAB/FM-Anschluss (> 10)
9 Analoger Audioausgangsanschluss [LINE OUT] (> 9)
: Digitaler Audioausgangsanschluss [COAX OUT]
(> 9)
; Digitaler Audioausgangsanschluss [OPT OUT] (> 9)
< Digitaler Audioeingangsanschluss [PC] (> 20)
Zum Anschluss an einen PC etc.
= Systemanschluss [CONTROL] (> 9)
> LAN-Anschluss [LAN] (> 12)
? Netzkabel-Anschluss [AC IN T]( ) (> 10)
Dieses Gerät
:3 (Hoch)
94 (Runter)
1/; OK (OK)
∫ RETURN (Zurück)
HOME (Berühren und
halten Sie gedrückt)
MENU (Menü öffnen)
Gerät der Klasse II
(doppelt isoliert konstruiert.)
(41)
ST-C700DE-TQBM0007.book 7 ページ 2016年10月26日 水曜日 午後1時17分

8
∫ Für dieses Gerät funktionierende Tasten
1 [NWP Í]: Stand-by-/Ein-Schalter
Drücken Sie diese Taste, um das Gerät ein- oder in den
Stand-by-Modus zu schalten. Auch im Stand-by-Modus
verbraucht das Gerät eine geringe Menge Strom.
≥ Die Fernbedienung funktioniert nicht, wenn sich der
Netzschalterhebel in der abgesenkten Position befindet.
2 [AMP]/[NWP]/[CD]: Wählen Sie das zu bedienende
Gerät
3 [N INPUT O]: Wählen Sie die Eingangsquelle
4 [DIMMER]: Passen Sie die Helligkeit des Displays
etc. an (> 11)
5 [HOME]: Anzeige HOME (> 11)
6 [INFO]: Informationen anzeigen
Drücken Sie diese Taste, um den Titel, den Künstler- und
Albumnamen, den Dateitypen, die Abtastfrequenz, und andere
Informationen anzuzeigen.
7 [3, 4, 2, 1]/[OK]: Auswahl/OK
8 [RETURN]: Kehren Sie zur vorherigen Anzeige
zurück
9 [MENU]: Gehen Sie ins Menü (> 21, 22, 23, 24, 26)
: [DIRECT]: Schalten Sie den Direktmodus ein/aus
(> 25)
; [RE-MASTER]: Schalten Sie Re-Master ein/aus (> 25)
< Steuertasten für grundlegende
Wiedergabefunktionen
= Zifferntasten usw.
≥ Zur Auswahl einer 2-stelligen Nummer
Beispiel:
16: [S10] > [1] > [6]
≥ Zur Auswahl einer 4-stelligen Nummer
Beispiel:
1234: [S10] > [S10] > [S10] > [1] > [2] > [3] > [4]
≥ [CLEAR]: Löschen Sie den eingegebenen Wert.
∫ Für SU-C700/SL-C700 funktionierende
Tasten
Die Fernbedienung dieses Geräts funktioniert auch für das
SU-C700/SL-C700.
Informationen zu den Bedienvorgängen für SU-C700/
SL-C700 finden Sie auch in deren Bedienungsanleitungen.
1 Standby-/Ein-Schalter für SU-C700
2 Standby-/Ein-Schalter für
SL-C700
3 Wählen Sie das zu bedienende Gerät
4 Wählen Sie die Eingabequelle für SU-C700
5 Passen Sie die Helligkeit des Displays etc. an
6 Messen Sie die Charakteristiken des Verstärkers und
korrigieren Sie dessen Ausgabe
7 Anpassen der Lautstärke
8 Stummschalten des Tons
Fernbedienung
(42)
ST-C700DE-TQBM0007.book 8 ページ 2016年10月26日 水曜日 午後1時17分

9
Deutsch
Inbetriebnahme
≥Schalten Sie das gesamte Gerät vor dem Anschließen aus und lesen Sie die entsprechende Betriebsanleitung.
≥Verbinden Sie das Netzkabel erst, wenn alle anderen Verbindungen hergestellt wurden.
≥Setzen Sie die Stecker der zu verbindenden Kabel vollständig ein.
≥Knicken Sie Kabel nicht in spitzen Winkeln.
≥Sie können digitale Audiosignale über dieses Gerät ausgeben und Musik wiedergeben.
≥Sie können dieses Gerät automatisch mit dem SU-C700 verknüpfen und die Geräte gemeinsam mit der Fernbedienung
betreiben. (> 28)
≥ Verwenden Sie ausschließlich die mitgelieferten System-Anschlusskabel oder die mitgelieferten Koaxial-Digitalkabel.
≥ Verbinden Sie das System-Anschlusskabel mit dem Systemanschluss [CONTROL1] des SU-C700.
≥ Verbinden Sie das Koaxial-Digitalkabel mit dem digitalen Audioeingangsanschluss [COAX1 IN] des SU-C700.
Sie können analoge oder digitale Audiosignale über dieses Gerät ausgeben und Musikdateien wiedergeben.
Systemsteuerverbindung mit einem SU-C700
Dieses Gerät
(Rückseite)
SU-C700
Koaxial-Digitalkabel
(mitgeliefert)
System-Anschlusskabel
(mitgeliefert)
Anschluss an einen Verstärker und einen D/A-Wandler
z.B.
Dieses Gerät
(Rückseite)
Verstärker
Optisches Digital-Audiokabel
(nicht mitgeliefert)
D/A-Wandler
Audio-Kabel
(nicht mitgeliefert)
(43)
ST-C700DE-TQBM0007.book 9 ページ 2016年10月26日 水曜日 午後1時17分

10
≥ Wenn der Radioempfang schlecht ist, verwenden Sie eine DAB-Außenantenne (nicht mitgeliefert).
≥ Verwenden Sie ausschließlich die mitgelieferte DAB-Zimmerantenne.
Erst anschließen, wenn alle anderen Kabel bereits angeschlossen sind.
≥Dieses Gerät verbraucht eine geringe Menge Netzstrom (> 33), auch wenn sich der Netzschalterhebel in der [OFF]-Position
befindet. Ziehen Sie den Stecker aus der Netzsteckdose, wenn Sie das Gerät für einen längeren Zeitraum nicht verwenden.
Stellen Sie das Gerät so auf, dass der Stecker leicht gezogen werden kann.
Antennenanschluss
Netzkabelanschluss
Dieses Gerät
(Rückseite)
Klebstreifen
(nicht mitgeliefert)
DAB-Zimmerantenne
(mitgeliefert)
Darauf achten, die Mutter fest
anzuziehen.
Befestigen Sie den Antennendraht in der Position, in der die optimale
Empfangsqualität erzielt wird.
Netzkabel
(mitgeliefert)
An eine Netzsteckdose
Dieses Gerät
(Rückseite)
Stecken Sie das Netzkabel
bis zu A ein. Dies ist ein
Punkt direkt vor dem runden
Loch.
(44)
ST-C700DE-TQBM0007.book 10 ページ 2016年10月26日 水曜日 午後1時17分

11
Deutsch
HOME-Menü und Grundbedienung
Die Hauptfunktionen dieses Geräts können im HOME Menü
bedient werden.
Vorbereitung
≥Bereiten Sie die Musik vor, die Sie wiedergeben möchten.
≥Schalten Sie das verbundene Gerät (Verstärker etc.) ein
und reduzieren Sie dessen Lautstärke.
1 Erhöhen Sie den Netzschalterhebel dieses
Geräts auf die [Í/I]-Position.
2 Drücken Sie [NWP].
3 Drücken Sie [HOME].
4 Wählen Sie mit [3, 4] eine Option aus und
drücken Sie [OK].
≥Wiederholen Sie diesen Schritt, wenn weitere Optionen
vorhanden sind.
≥ Es werden möglicherweise neue Elemente hinzugefügt und
vorhandene Elemente aktualisiert. Informationen zu
Hinzufügungen und Aktualisierungen finden Sie auf der unten
genannten Supportseite.
www.technics.com/support/
5 Starten Sie die Wiedergabe.
∫ Anzeige des HOME-Menüs
Drücken Sie [HOME].
Passen Sie die Lautstärke des angeschlossenen Geräts
(Verstärker etc.) an.
Die Helligkeit des Gerätedisplays und die Stromanzeige
können geändert werden.
Wiederholt [DIMMER] betätigen.
≥ Wenn das Display ausgeschaltet wird, leuchtet es nur auf, wenn
Sie dieses Gerät bedienen.
Bevor sich das Display wieder ausschaltet, wird “Display Off” ein
paar Sekunden lang angezeigt.
Sie können den Signalton ein-/ausschalten.
≥ Die werkseitige Standardeinstellung ist “On”.
1 Drücken Sie [NWP].
2 Drücken Sie [HOME].
3 Drücken Sie wiederholt [3, 4] zur Auswahl
von “SETUP” und drücken Sie dann [OK].
4 Drücken Sie wiederholt [3, 4] zur Auswahl
von “Beep” und drücken Sie dann [OK].
5 Drücken Sie [3, 4] zur Auswahl von
“On”/“Off” und drücken Sie dann [OK].
Wenn Sie die spezielle App “Technics Music App”
(kostenlos) auf Ihrem Tablet/Smartphone installieren, können
Sie dieses Gerät und den SU-C700 mit einer Vielzahl von
Funktionen steuern.
Besuchen Sie für Details:
www.technics.com/support/
DMP
Verbindet dieses Gerät mit einem
Netzwerk und gibt über dieses Musik
wieder. (> 13)
Internet Radio
Zum Wiedergeben von Internetradio
(vTuner). (> 14)
USB
Gibt auf einem USB-Gerät oder einem
iPhone/iPad/iPod gespeicherte Musik
wieder. (
>
17, 18, 19)
PC
Gibt auf einem PC etc. gespeicherte
Musik wieder (> 20)
Bluetooth
Verbindet dieses Gerät mit einem
Bluetooth
®
-Gerät und gibt darauf
gespeicherte Musik wieder. (
>
21, 22)
FM FM (> 23)
DAB/DAB+ DAB/DAB+ (> 24)
SETUP (> 11, 12, 25, 26, 27, 28)
ラヰヮユ
リㄏㄕㄆㄓㄏㄆㄕチンㄅㄊㄐ
ヒバベ
ュヮ
ヱ
Einstellen der Lautstärke
Display-Helligkeit
Betriebsgeräusch-Einstellung
Bedienung über die spezielle
App “Technics Music App”
(45)
ST-C700DE-TQBM0007.book 11 ページ 2016年10月26日 水曜日 午後1時17分

12
Netzwerkeinstellungen
Sie können Musik von einem iOS-Gerät (iPhone/iPad/iPod),
einem Android™-Gerät oder einem PC (Mac/Windows) an
dieses Gerät streamen, indem Sie die AirPlay- oder DLNA-
Funktion verwenden. (> 13, 18)
Zur Verwendung dieser Funktionen muss sich dieses Gerät
im selben Netzwerk wie das AirPlay-kompatible Gerät oder
das DLNA-kompatible Gerät befinden.
Normalerweise wird das Setup durch die einfache
Verbindung über ein LAN-Kabel abgeschlossen.
A: LAN-Kabel (nicht mitgeliefert)
1 Ziehen Sie das Netzkabel.
2 Verbinden Sie dieses Gerät über ein LAN-
Kabel etc. mit einem Breitband-Router.
3 Verbinden Sie das Netzkabel mit diesem
Gerät und stellen Sie den Netzschalterhebel
auf die [Í/I]-Position hoch. (> 10)
≥
Wenn die Verbindung hergestellt ist, wird “ ” angezeigt.
≥ Falls nach dem Aufbau einer Netzwerkverbindung “Firmware
update is available” angezeigt wird, ist die Firmware für dieses
Gerät verfügbar.
– Details über die Aktualisierung finden Sie unter “Firmware
update is available” (> 31).
– Informationen über die Aktualisierung finden Sie auf der
folgenden Website.
www.technics.com/support/firmware/
Sie können den Namen dieses Geräts am Netzwerk (Friendly
Name) ändern und eine bestimmte IP-Adresse, Subnetzmaske,
einen Standard-Gateway, primären DNS etc. verwenden.
≥
Geben Sie keine Musik wieder, während Sie diese Einstellungen ändern.
1 Drücken Sie [NWP].
2 Drücken Sie [HOME].
3 Drücken Sie wiederholt [3, 4] zur Auswahl von
“SETUP” und drücken Sie dann [OK].
4 Drücken Sie wiederholt [3, 4] zur Auswahl von
“Network” und drücken Sie dann [OK].
5
Nehmen Sie die Auswahl vor und geben Sie die Details ein.
6 Drücken Sie [OK], um die Einstellungen anzuwenden.
7 Drücken Sie wiederholt [RETURN], um die Einstellungen
zu verlassen.
8 Drücken Sie [NWP Í], um das Gerät in den Standby-
Modus zu schalten.
≥ Warten Sie, bis “Please Wait” erlischt.
9
Führen Sie “Kabelgebundene LAN-Verbindung” aus. (
>
links)
≥ Bei Anschluss von Peripheriegeräten verwenden Sie gerade LAN
Kabel (STP) der Kategorie 7 oder darüber.
≥ Wird ein anderes Kabel als ein LAN-Kabel in den LAN-Anschluss
eingesteckt, kann das Gerät beschädigt werden.
≥ Wenn Sie direkt nach dem Ausschalten dieses Geräts versuchen,
die Netzwerkeinstellungen zu ändern, kann es einige Zeit dauern,
bis der Netzwerksetup-Bildschirm angezeigt wird.
∫ Der Name dieses Geräts im Netzwerk
“Friendly Name”
1 Drücken Sie [NWP].
2 Drücken Sie [HOME].
3 Drücken Sie wiederholt [3, 4] zur Auswahl von
“SETUP” und drücken Sie dann [OK].
4 Drücken Sie wiederholt [3, 4] zur Auswahl von
“Network” und drücken Sie dann [OK].
5 Drücken Sie [3, 4] wiederholt, um “Friendly Name”
auszuw
ä
hlen, und drücken Sie danach [OK].
≥ Der aktuelle Name dieses Geräts wird angezeigt. Drücken Sie
zum Bearbeiten [OK].
6 Drücken Sie zur Eingabe eines benutzerfreundlichen
Namens [3, 4, 2, 1].
≥ Es können nur ASCII-Zeichen verwendet werden.
≥
“A” kann hinzugefügt werden, indem [
1
] gedrückt wird, sobald der letzte
Buchstabe des benutzerfreundlichen Namens ausgewählt wurde.
≥ Drücken Sie zum Löschen eines Buchstabens [CLEAR].
≥ Drücken Sie zum Einfügen eines Buchstabens “A” [S10].
≥ Der Standardname ist “Technics ST-C700D _ _ _ _ _ _”.
“ _ ” steht für eine Ziffer, die einzigartig für jedes Set ist.
7 Drücken Sie [OK], um die Einstellungen anzuwenden.
8 Drücken Sie wiederholt [RETURN], um die Einstellungen
zu verlassen.
∫
Zum Überprüfen der MAC-Adresse dieses Geräts.
1 Drücken Sie [NWP].
2 Drücken Sie [HOME].
3 Drücken Sie wiederholt [3, 4] zur Auswahl von
“SETUP” und drücken Sie dann [OK].
4 Drücken Sie wiederholt [3, 4] zur Auswahl von
“Network” und drücken Sie dann [OK].
5
Drücken Sie mehrfach [
3
,
4
], um "MAC Address" auszuwählen.
≥ Die MAC-Adresse dieses Geräts wird angezeigt.
Kabelgebundene LAN-Verbindung
Breitband-Router, usw.
Dieses Gerät
(Rückseite)
PC usw.
Vornehmen der
netzwerkbezogenen Einstellungen
(46)
ST-C700DE-TQBM0007.book 12 ページ 2016年10月26日 水曜日 午後1時17分

13
Deutsch
Abspielen von Musikdateien auf dem DLNA-Server
Sie können auf einem mit Ihrem Heimnetzwerk verbundenen DLNA-
zertifizierten Medienserver (PC, Smartphone etc.) gespeicherte
Musikdateien teilen und die Inhalte über dieses Gerät genießen.
≥
Hinweise zum unterstützten Format finden Sie unter “Dateiformat” (
>
35).
Vorbereitung
≥Beenden Sie die Netzwerkeinstellungen. (> 12)
≥Verbinden Sie das zu verwendende Gerät mit demselben
Netzwerk wie dieses Gerät.
≥Fügen Sie die Inhalte und den Ordner zu den Bibliotheken
des Windows Media
®
Player 11 oder 12 oder eines
Smartphones etc. hinzu.
– Die Wiedergabeliste von Windows Media
®
Player kann nur
Inhalte wiedergeben, die in den Bibliotheken gespeichert sind.
– Um den Windows Media
®
-Player zum streamen zu verwenden,
müssen Sie diesen im Voraus konfigurieren.
Sie können die am DLNA-Server gespeicherte Musik auf
diesem Gerät (DMP—Digital Media Player) durch Steuerung
des DLNA-Servers über dieses Gerät wiedergeben.
1 Drücken Sie [NWP].
2 Drücken Sie wiederholt [N INPUT O] unter
[NWP], um “DMP” auszuwählen.
≥Der Bildschirm zur Serverauswahl wird angezeigt.
3 Drücken Sie [3, 4] zur Auswahl eines
DLNA-Servers im Netzwerk und drücken Sie
anschließend [OK].
≥
Der Bildschirm zur Ordner-/Inhaltsauswahl wird angezeigt.
≥Je nach den Spezifikationen werden Ordner/Inhalte
möglicherweise in einer anderen Reihenfolge als auf
dem Server angezeigt.
4 Wählen Sie mit [3, 4] eine Option aus und
drücken Sie [OK].
≥Wiederholen Sie diesen Schritt, wenn weitere Optionen
vorhanden sind.
Steuerung der Fernbedienung
≥ Je nach seinem Status werden der angeschlossene Server und
sein Inhalt möglicherweise nicht richtig angezeigt. (z.B. kurz
nachdem Inhalte zu dem Server hinzugefügt wurden usw.)
Bitte versuchen Sie es später erneut. Weitere Details finden Sie in
der Bedienungsanleitung des Geräts.
∫ Zufällige wiederholte Wiedergabe
Drücken Sie [RND].
Jedes Mal, wenn Sie die Taste drücken:
∫ Wiederholte Wiedergabe
Drücken Sie [`].
Jedes Mal, wenn Sie die Taste drücken:
Durch Steuerung eines DMC (Digital Media Controller)
kompatiblen Geräts können Sie die am DLNA-Server
gespeicherte Musik auf diesem Gerät (DMR—Digital Media
Renderer) wiedergeben.
1 Erhöhen Sie den Netzschalterhebel dieses
Geräts auf die [Í/I]-Position.
2 Bedienen Sie das DMC-kompatible Gerät
und schließen Sie es an dieses Gerät an.
≥Der Gerätename dieses Geräts wird als
“Technics ST-C700D _ _ _ _ _ _”*
1, 2
angezeigt.
≥Wegen Details hinsichtlich der Benutzung von
DMC-kompatiblen Geräten siehe Bedienungsanleitung
der Geräte oder der Software.
≥ Die Wiedergabe anderer Audioquellen stoppt und die DLNA-
Ausgabe hat Vorrang, wenn Sie DMC bedienen.
≥ Je nach den Inhalten und dem angeschlossenen Gerät ist die
Bedienung oder Wiedergabe unter Umständen nicht möglich.
≥ Dies garantiert nicht die Verbindung mit allen DMC-Anwendungen.
Verwenden Sie die dafür vorgesehene App “Technics Music App”.
*1 “ _ ” steht für eine Ziffer, die einzigartig für jedes Set ist.
*2 Der Gerätename kann von “Der Name dieses Geräts im
Netzwerk “Friendly Name”” geändert werden. (> 12)
Wiedergabe von auf dem DLNA-
Server gespeicherten Inhalten durch
die Steuerung über dieses Gerät
Stopp Drücken Sie [∫].
Pause
Drücken Sie [1/;].
≥ Drücken Sie erneut, um die Wiedergabe
fortzusetzen.
Überspringen
Drücken Sie [:] oder [9], um
einen Titel zu überspringen.
Suchlauf
Während Wiedergabe oder Pause [
6
]
oder [
5
] drücken und gedrückt halten.
≥
Am Gerät: halten Sie [
:
] oder [
9
] gedrückt.
≥ Dieser Betrieb kann für einige Formate
nicht möglich sein.
On
Alle Tracks in einem Ordner werden
wiederholt wiedergegeben.
≥ “RND `” wird angezeigt.
≥ Während der Zufallswiedergabe können Sie
den zuvor abgespielten Titel überspringen.
Off
Schaltet den Zufallswiederholungsmodus
aus.
1-Track
Nur der gewählte Titel wird abgespielt.
≥ “1 `” wird angezeigt.
All
Alle Tracks in einem Ordner werden
wiederholt.
≥ “`” wird angezeigt.
Off Schaltet den Wiederholungsmodus aus.
Wiedergabe von auf dem
DLNA-Server gespeicherten
Inhalten durch die Steuerung
über einen DMC
(47)
ST-C700DE-TQBM0007.book 13 ページ 2016年10月26日 水曜日 午後1時17分

14
Wiedergabe von Internet Radio (vTuner)
Internet-Radio ist ein über das Internet verfügbarer
Rundfunkdienst. Mit dem Onlineverzeichnis vTuner können
Sie zahlreiche internationale Internet-Radiosender
empfangen.
Vorbereitung
≥Beenden Sie die Netzwerkeinstellungen. (> 12)
– Stellen Sie sicher, dass das Netzwerk mit dem Internet
verbunden ist.
1 Drücken Sie [NWP].
2 Drücken Sie wiederholt [N INPUT O] unter
[NWP], um “Internet Radio” auszuwählen.
≥Wenn “Internet Radio” als Quelle gewählt wird,
versucht das Gerät automatisch eine Verbindung zum
zuletzt ausgewählten Internet-Radiosender
aufzubauen.
3 Drücken Sie [3, 4] um einen Sender
auszuwählen und drücken Sie danach [OK].
≥Der Status der Pufferung wird als % angezeigt.
( “” steht für eine Zahl.)
≥Wiederholen Sie diesen Schritt, um eine weitere
Auswahl je nach Genre, Region, usw. zu treffen.
≥Drücken Sie [RETURN], um zum vorherigen Bildschirm
zurückzukehren.
≥Die Internet Radio Sender, Genre, Region, usw. auf
diesem Gerät werden von vTuner verwaltet.
≥Die Podcasts auf der Liste von vTuner können
ebenfalls wiedergegeben werden.
≥Ein Sender, der nicht sendet, kann nicht
wiedergegeben werden. (Er wird ausgelassen oder
kehren Sie auf die Liste zurück.)
≥ Der Internet-Radio-Service kann ohne Vorankündigung gesperrt
oder auf andere Weise nicht verfügbar sein.
≥ Das Internet Radio kann, abhängig vom Zustand des Netzwerks,
möglicherweise nicht ordnungsgemäß wiedergegeben werden.
Steuerung der Fernbedienung
Stopp Drücken Sie [∫].
Pause
Drücken Sie [1/;].
≥ Drücken Sie erneut, um die Wiedergabe
fortzusetzen. (Während Sie die Podcasts
abspielen)
Überspringen
Drücken Sie [:] oder [9], um den
Sender zu überspringen.
Ansehen
Verfügbarer
Information
Drücken Sie [INFO].
(48)
ST-C700DE-TQBM0007.book 14 ページ 2016年10月26日 水曜日 午後1時17分

15
Deutsch
1
Drücken Sie [NWP].
2
Drücken Sie [
3
,
4
] um einen Sender zum Hinzufügen
auszuwählen und drücken Sie danach [OK].
3
Drücken Sie [MENU].
4
Drücken Sie [
3
,
4
] wiederholt, um “Add Favourites”
auszuwählen, und drücken Sie danach [OK].
≥“Added” wird nach der Registrierung angezeigt.
≥
Mit diesem Gerät können bis zu 50 Sender registrieren. Fügt
man den 51. Sender hinzu, wird “Favourites Full” angezeigt.
Löschen Sie die Sender aus der Favoritenliste. (
>
unten)
≥Sie können einen schon registrierten Sender nicht
hinzufügen. (“Already Exists” wird angezeigt.)
1
Drücken Sie [NWP].
2
Drücken Sie [MENU].
3
Drücken Sie [
3
,
4
] wiederholt, um “Call Favourites”
auszuwählen, und drücken Sie danach [OK].
4
Drücken Sie [
3
,
4
] zum Auswählen des Senders, der
wiedergeben oder aufgenommen werden soll, und
drücken Sie anschließend [OK].
≥“ ” wird angezeigt.
≥
Falls kein Sender für die Favoritenliste registriert ist, wird “Empty”
angezeigt. Fügen Sie der Liste einen Sender hinzu. (
>
oben)
1
Drücken Sie [NWP].
2
Drücken Sie [MENU].
3
Drücken Sie [
3
,
4
] wiederholt, um “Delete Favourites”
auszuwählen, und drücken Sie danach [OK].
4
Drücken Sie [
3
,
4
] um einen Sender zum Löschen aus
der Favoritenliste auszuwählen.
5
Drücken Sie [
3
,
4
] zur Auswahl von “Yes” und drücken
Sie dann [OK].
≥“Deleted” wird nach dem Löschen angezeigt.
≥“Empty” wird angezeigt, falls kein Sender für die
Favoritenliste registriert ist.
Über die vTuner-Funktion können Sie dieses Gerät bedienen
und Ihre Favoritenliste bearbeiten. Installieren Sie dazu die
spezielle App “Technics Music App” (kostenlos) auf Ihrem
Tablet/Smartphone.
Laden Sie die App von der folgenden Website herunter und
installieren Sie diese.
www.technics.com/support/
Vorbereitung
≥Prüfen Sie die MAC-Adresse dieses Geräts. (> 12)
1 Drücken Sie [NWP].
2 Drücken Sie wiederholt [N INPUT O] unter
[NWP], um “Internet Radio” auszuwählen.
3 Benutzen Sie Ihren PC, um auf die vTuner
Website zuzugreifen.
www.technics.com/radio/
≥Sie können die Sprache auf der Website auswählen.
4 Folgen Sie den Anweisungen auf dem
Bildschirm und geben Sie die für die
Registrierung notwendigen Angaben ein.
5
Suchen Sie nach Kategorie (Genre, Region,
Sprache, usw.) oder bearbeiten Sie die Liste.
∫ Wiedergabe der von Ihrem PC
aufgelisteten Sender
Sie können die von Ihrem PC aufgelisteten Sender getrennt
von der Favoritenliste dieses Geräts abspielen.
1 Drücken Sie [NWP].
2 Drücken Sie wiederholt [N INPUT O] unter
[NWP], um “Internet Radio” auszuwählen.
3 Drücken Sie [3, 4] wiederholt, um
“technics.com/radio/” auszuwählen, und
drücken Sie danach [OK].
≥Löschen Sie vor der Entsorgung oder Weitergabe dieses
Gerätes die persönlichen Angaben auf der Website.
Sender zu einer Favoritenliste hinzufügen
“Add Favourites”
Abrufen der Favoritenliste
“Call Favourites”
Löschen eines Lieblingssenders
“Delete Favourites”
Vorgänge mithilfe der
speziellen App
“Technics Music App”
Liste von Internet-
Radiosendern mit PC erstellen
(49)
ST-C700DE-TQBM0007.book 15 ページ 2016年10月26日 水曜日 午後1時17分

16
Verwendung von Spotify
Dieses Gerät ist mit dem Online-Musikdienst (Spotify)
kompatibel.
Vorbereitung
≥Sie brauchen Spotify Premium. Besuchen Sie für weitere
Details die folgende Website.
www.spotify.com/connect/
≥Beenden Sie die Netzwerkeinstellungen. (> 12)
≥Stellen Sie sicher, dass das Netzwerk mit dem Internet
verbunden ist.
≥Verbinden Sie das zu verwendende Gerät mit demselben
Netzwerk wie dieses Gerät.
1 Starten Sie die Spotify App auf Ihrem gerät
und wählen Sie ein Lied zum Abspielen aus.
2 Wählen Sie im Wiedergabebildschirm das
Coverbild des Songs aus.
3 Wählen Sie das Symbol “ ” aus.
4 Wählen Sie dieses System als Ausgangs-
Lautsprecher aus.
≥ Der Gerätename dieses Geräts wird als “Technics ST-C700D _ _ _
_ _ _”*
1, 2
angezeigt.
≥ Eine Registrierung/Abonnement ist erforderlich.
≥ Möglicherweise fallen Gebühren an.
≥ Änderungen von Dienstleistungen, Symbolen und Vorgaben
vorbehalten.
*1 “ _ ” steht für eine Ziffer, die einzigartig für jedes Set ist.
*2 Der Gerätename kann von “Der Name dieses Geräts im
Netzwerk “Friendly Name”” geändert werden. (> 12)
(50)
ST-C700DE-TQBM0007.book 16 ページ 2016年10月26日 水曜日 午後1時17分

17
Deutsch
Verwenden der iPhone/iPad/iPod
Schließen Sie Ihren/Ihr iPhone/iPad/iPod an, um Musik
wiederzugeben, die auf dem iPhone/iPad/iPod gespeichert
ist, oder um den/das iPhone/iPad/iPod zu laden.
∫ Kompatibler/s iPhone/iPad/iPod
(Stand: August 2016)
≥ Die Kompatibilität hängt von der Software-Version ab.
Aktualisieren Sie Ihren/Ihr iPhone/iPad/iPod auf die aktuelle
Software-Version, bevor Sie es mit diesem Gerät verwenden.
≥ Bitte beachten Sie, dass Panasonic keine Verantwortung für den
Verlust von Daten und/oder Informationen übernimmt.
≥ Die folgenden Modelle nicht an den Port anschließen:
– iPod classic, iPod [4. (Farb-Display) und 5. (Video) Generation],
iPod nano (1. Generation)
Es kann unerwartetes Verhalten auftreten.
≥ Die Ergebnisse der Bedienvorgänge können je nach
iPhone/iPad/iPod-Modell bzw. iOS-Version variieren.
Verwenden Sie zum Anschluss an ein iPhone/iPad/iPod das
entsprechende USB-Kabel (nicht mitgeliefert).
1 Verbinden Sie den/das iPhone/iPad/iPod mit
dem Gerät.
2 Drücken Sie [NWP].
3 Drücken Sie wiederholt [N INPUT O] unter
[NWP], um “USB” auszuwählen.
4 Starten Sie die Wiedergabe.
Steuerung der Fernbedienung
≥ Es kann erforderlich sein, das Album, den Künstler etc. auf dem
iPhone/iPad/iPod auszuwählen.
≥ Je nach iPhone/iPad/iPod-Modell sind Bedienvorgänge mit der
Fernbedienung unter Umständen nicht möglich.
Wenn dieses Gerät eingeschaltet ist, beginnt der
Ladevorgang, sobald ein iPhone/iPad/iPod an dieses Gerät
angeschlossen wird.
≥ Das Aufladen ist nicht möglich, wenn dieses Gerät ausgeschaltet
ist.
≥ Stellen Sie sicher, dass das Gerät eingeschaltet ist, wenn Sie den
Ladevorgang beginnen.
– Beim Aufladen eines iPhone/iPad/iPod, dessen Akku entladen
ist, schalten Sie dieses Gerät nicht in den Standby-Modus, bis
das iPhone/iPad/iPod wieder betriebsbereit ist.
≥ Überprüfen Sie am iPhone/iPad/iPod, ob der Akku vollständig
geladen ist. Entfernen Sie nach vollständiger Aufladung das/den
iPhone/iPad/iPod.
≥ Der Aufladevorgang endet, sobald der Akku vollständig
aufgeladen ist. Der Akku entleert sich mit der Zeit.
iPhone SE/iPhone 6s Plus/iPhone 6s/
iPhone 6 Plus/iPhone 6/iPhone 5s/iPhone 5c/
iPhone 5/iPhone 4s
iPad Pro
(9,7 Zoll)
/iPad Pro
(12,9 Zoll)
/
iPad Air 2/iPad Air/iPad
(3./4. Generation)
/iPad 2/
iPad mini 4/iPad mini 3/iPad mini 2/iPad mini
iPod touch (5. und 6. Generation)
iPod nano (7. Generation)
Anschluss eines
iPhone/iPad/iPod
USB-Kabel
(nicht mitgeliefert)
z.B.
Dieses Gerät
(Vorderseite)
iPhone usw.
Anhören von auf einem
iPhone/iPad/iPod
gespeicherten Musik
Stopp Drücken Sie [∫].
Pause
Drücken Sie [1/;].
≥ Drücken Sie erneut, um die Wiedergabe
fortzusetzen.
Überspringen
Drücken Sie [:] oder [9], um
einen Titel zu überspringen.
Suchlauf
Während Wiedergabe oder Pause
[6] oder [5] drücken und gedrückt
halten.
≥ Am Gerät: halten Sie [:] oder [9]
gedrückt.
Aufladen eines
iPhone/iPad/iPod
(51)
ST-C700DE-TQBM0007.book 17 ページ 2016年10月26日 水曜日 午後1時17分

18
Verwenden der
AirPlay
AirPlay funktioniert mit iPhone, iPad und iPod touch mit
iOS 4.3.3 oder später, Mac mit OS X Mountain Lion oder
später und PC mit iTunes 10.2.2 oder später.
Vorbereitung
≥Beenden Sie die Netzwerkeinstellungen. (> 12)
≥Verbinden Sie das iOS-Gerät oder den PC mit demselben
Netzwerk wie dieses Gerät.
1 [iOS_d e vi c e] : Starten Sie die “Music”- (oder
iPod-) App.
[PC] : Starten Sie “iTunes”.
2
Wählen Sie “Technics ST-C700D _ _ _ _ _
_”
*
1, 2
aus dem AirPlay Symbol.
≥Überprüfen Sie die Lautstärke-Einstellungen, bevor Sie
mit der Wiedergabe beginnen. (Wird AirPlay das erste
Mal verwendet, wird die Lautstärke unter Umständen
mit maximaler Einstellung ausgegeben.)
3 Starten Sie die Wiedergabe.
≥Die Wiedergabe startet mit einer leichten Verzögerung.
Steuerung der Fernbedienung
≥ Die Wiedergabe anderer Audioquellen stoppt und die AirPlay-
Ausgabe hat Vorrang.
≥ Mit einigen iOS- und iTunes-Versionen ist es unter Umständen
nicht möglich, die AirPlay-Wiedergabe erneut zu starten, wenn die
Auswahl geändert wird oder das Gerät während der AirPlay-
Wiedergabe ausgeschaltet wird.
Wählen Sie in diesem Fall ein anderes Gerät über das AirPlay-
Symbol der Musik-App oder iTunes und wählen Sie dieses Gerät
dann erneut als Ausgabelautsprecher aus.
≥ AirPlay funktioniert nicht, wenn Videos in iTunes wiedergegeben
werden.
*1 “ _ ” steht für eine Ziffer, die einzigartig für jedes Set ist.
*2 Der Gerätename kann von “Der Name dieses Geräts im
Netzwerk “Friendly Name”” geändert werden. (> 12)
Verwendung des USB-
Geräts
Sie können auf einem USB-Gerät gespeicherte Musik
wiedergeben.
≥
Dieses Gerät gewährleistet nicht den Anschluss an alle USB-Geräte.
≥ FAT16 und FAT32 Dateisysteme werden unterstützt.
≥ Dieses Gerät unterstützt USB 2.0 Highspeed.
≥ USB-Geräte können von diesem Gerät nicht erkannt werden,
wenn angeschlossen an:
– einen USB-Hub
– ein USB-Verlängerungskabel
≥ Es können keine USB-Kartenlesegeräte verwendet werden.
≥ Von diesem Gerät kann keine Musik auf ein USB-Gerät
aufgenommen werden.
≥ Hinweise zum unterstützten Format finden Sie unter “Dateiformat”
(> 35).
∫ Ordner- und Dateistruktur
Vom Gerät werden nur die Musikdateien im ausgewählten
Ordner wiedergegeben. Wählen Sie den Ordner aus, der die
wiederzugebenden Tracks enthält.
≥Es erfolgt keine Wiedergabe, wenn ein Ordner ohne
Musikdateien ausgewählt wird, beispielsweise D in der
Abbildung unten. ("Empty" wird angezeigt.)
1
Verbinden Sie ein USB-Gerät mit diesem Gerät.
Musik hören mit AirPlay
Stopp Drücken Sie [∫].
Pause
Drücken Sie [1/;].
≥ Drücken Sie erneut, um die Wiedergabe
fortzusetzen.
Überspringen
Drücken Sie [:] oder [9], um
einen Titel zu überspringen.
Auf einem USB-Gerät
gespeicherte Musik anhören
Musik 1
Musik 2
Musik 4
Musik 5
Musik 3
z.B.
Ordner
Musikdatei
z.B.
Dieses Gerät
(Vorderseite)
USB-Gerät
(52)
ST-C700DE-TQBM0007.book 18 ページ 2016年10月26日 水曜日 午後1時17分

19
Deutsch
2 Drücken Sie [NWP].
3 Drücken Sie wiederholt [N INPUT O] unter
[NWP], um “USB” auszuwählen.
4 Wählen Sie mit [3, 4] eine Option aus und
drücken Sie [OK].
≥Wiederholen Sie diesen Schritt, wenn weitere Optionen
vorhanden sind.
Steuerung der Fernbedienung
∫ Zufällige wiederholte Wiedergabe
Drücken Sie [RND].
Jedes Mal, wenn Sie die Taste drücken:
∫ Wiederholte Wiedergabe
Drücken Sie [`].
Jedes Mal, wenn Sie die Taste drücken:
≥ Sie können die wiederholte Wiedergabe in Kombination mit der
Programmwiedergabe nutzen.
Mit dieser Funktion können Sie bis zu 24 Titel programmieren.
Vorbereitung
≥Tracks können nicht durch Verschieben von Ordnern
programmiert werden. Verschieben Sie im Voraus alle zu
programmierenden Tracks in einen einzelnen Ordner.
1 Wählen Sie den Ordner mit der Musikdatei
aus, für die die Programmwiedergabe
eingestellt werden soll.
2 Drücken Sie [PGM] im Stop-Modus.
≥“Program Mode”-Bildschirm wird angezeigt.
3 Drücken Sie [OK], um den
Programmierbildschirm anzuzeigen.
4 Drücken Sie [3, 4], um den gewünschten
Track auszuwählen.
5 Drücken Sie [OK].
≥Wiederholen Sie die Schritte 3 bis 4, um weitere Titel
zu programmieren.
6 Drücken Sie [1/;], um mit der Wiedergabe
zu beginnen.
≥Um zum “Program Mode”-Bildschirm zurückzukehren,
drücken Sie [∫].
Steuerung der Fernbedienung
≥ Der programmierte Inhalt wird beibehalten, so lange die
Eingabequelle auf “USB” gestellt ist.
≥ Der Programmspeicher wird geleert:
– Wenn das USB-Gerät ausgesteckt wird.
– Wenn das Gerät in den Standby- oder Aus-Modus geschaltet wird.
≥ Sie können die Programmwiedergabe in Kombination mit der
wiederholten Wiedergabe nutzen.
Stopp Drücken Sie [∫].
Pause
Drücken Sie [1/;].
≥ Drücken Sie erneut, um die Wiedergabe
fortzusetzen.
Überspringen
Drücken Sie [:] oder [9], um
einen Titel zu überspringen.
Suchlauf
Während Wiedergabe oder Pause [
6
]
oder [
5
] drücken und gedrückt halten.
≥ Am Gerät: halten Sie [:] oder [9]
gedrückt.
≥ Dieser Betrieb kann für einige Formate
nicht möglich sein.
On
Alle Tracks in einem Ordner werden
wiederholt wiedergegeben.
≥ “RND `” wird angezeigt.
≥ Während der Zufallswiedergabe können Sie
den zuvor abgespielten Titel überspringen.
Off
Schaltet den Zufallswiederholungsmodus
aus.
1-Track
Nur der gewählte Titel wird abgespielt.
≥ “1 `” wird angezeigt.
All
Alle Tracks in einem Ordner werden
wiederholt.
≥ “`” wird angezeigt.
Off Schaltet den Wiederholungsmodus aus.
Programmwiedergabe
Stopp
Drücken Sie [∫].
≥ Der programmierte Inhalt wird beibehalten.
Überprüfen des
programmierten
Ordners
Drücken Sie [2, 1] im Stopp-Modus.
≥ Um zum “Program Mode”-Bildschirm
zurückzukehren, drücken Sie [OK].
Hinzufügen
von Tracks
Führen Sie die Schritte 3 bis 4 im Stop-
Modus durch.
Letzten Titel
löschen
Drücken Sie [CLEAR] im Stopp-Modus.
≥ Es ist nicht möglich, den gewünschten
programmierten Track auszuwählen und
zu löschen.
Abbrechen
des
Programm-
Modus
1
Drücken Sie [PGM] im Stopp-Modus.
≥ “Clear Program List?” wird angezeigt.
2
Drücken Sie [
3
,
4
] zur Auswahl von
“Yes” und drücken Sie dann [OK].
≥ Der Programmspeicher wird geleert.
(53)
ST-C700DE-TQBM0007.book 19 ページ 2016年10月26日 水曜日 午後1時17分

20
Verwendung des PC etc.
Sie können den digitalen Audioeingangsanschluss [PC] und
einen PC etc. über ein USB-Kabel miteinander verbinden
und Musik auf dem PC etc. mit diesem Gerät wiedergeben.
≥ Hinweise zum unterstützten Format finden Sie unter “Dateiformat”
(> 35).
(Stand: Dezember 2015)
1 Ziehen Sie das Netzkabel.
2 Verbinden Sie dieses Gerät und einen PC
etc.
3 Verbinden Sie das Netzkabel mit diesem
Gerät und stellen Sie den Netzschalterhebel
auf die [Í/I]-Position hoch. (> 10)
4 Drücken Sie wiederholt [N INPUT O] unter
[NWP], um “PC” auszuwählen.
5 Bedienen Sie das zur Wiedergabe zu
verwendende Gerät (z. B. den PC).
Verbindung mit einem PC
Bevor Sie eine Verbindung zu einem PC herstellen, folgen
Sie den Schritten unten.
≥ Beziehen Sie sich für die empfohlenen
Betriebssystemversionen für Ihren PC auf Folgendes:
– Windows 7, Windows 8, Windows 8.1, Windows 10
– OS X 10.7, 10.8, 10.9, 10.10, 10.11
1 Laden Sie den speziellen Treiber auf den PC herunter
und installieren Sie ihn. (Nur bei einem Windows-
Betriebssystem)
Laden Sie den Treiber von der folgenden Website herunter
und installieren Sie ihn.
www.technics.com/support/
2 Laden Sie die spezielle App “Technics Audio Player”
(kostenlos) auf den PC herunter und installieren Sie
sie. (Gilt für das Windows-Betriebssystem und OS X)
Laden Sie die App von der folgenden Website herunter und
installieren Sie diese.
www.technics.com/support/
Anhören von Audio über einen
PC etc.
USB
USB 2.0-Kabel
(nicht mitgeliefert)
Dieses
Gerät
(Rückseite)
z.B.
PC usw.
Typ A
Typ B
(54)
ST-C700DE-TQBM0007.book 20 ページ 2016年10月26日 水曜日 午後1時17分

21
Deutsch
Verwenden der Bluetooth
®
Sie können den Sound vom Bluetooth
®
-Audiogerät drahtlos von diesem Gerät anhören.
≥ Wegen Details siehe Bedienungsanleitung des Bluetooth
®
-Geräts.
≥
Wenn Sie ein mit NFC (Near Field Communication) kompatibles Bluetooth
®
-Gerät verwenden möchten, fahren Sie mit “Verbindung über NFC” fort.
Vorbereitung
≥Schalten Sie die Bluetooth
®
-Funktion des Geräts ein und
stellen Sie das Gerät in der Nähe des Geräts auf.
1 Drücken Sie [NWP].
2 Drücken Sie wiederholt [N INPUT O] unter
[NWP], um “Bluetooth” auszuwählen.
3 Drücken Sie [MENU].
4 Drücken Sie wiederholt [3, 4] zur Auswahl
von “Pairing” und drücken Sie dann [OK].
5 Drücken Sie [3, 4] zur Auswahl von “Yes”
und drücken Sie dann [OK].
≥“Pairing” wird auf dem Display eingeblendet.
6 Wählen Sie "ST-C700D" im Menü des
Bluetooth
®
-Geräts aus.
≥Der Name des angeschlossenen Geräts wird am
Display angezeigt.
≥ Bei Aufforderung zur Eingabe des Zugangsschlüssels “0000”
eingeben.
≥ Mit diesem Gerät können Sie bis zu 8 Geräte registrieren.
Wird ein 9. Gerät angekoppelt, wird das Gerät, das am längsten
nicht verwendet wurde, ersetzt.
Nur für NFC-kompatible Bluetooth
®
-Geräte (Android™-
Geräte mit Version 4.1 oder höher)
Durch Annähern eines NFC (Near Field Communication)-
kompatiblen Bluetooth
®
Gerätes an dieses Gerät, können
Sie eine Reihe von Schritten ausführen, und zwar von der
Registrierung eines Bluetooth
®
-Geräts bis zu seinem
Anschluss an dieses Gerät, ausführen.
Vorbereitung
≥Schalten Sie die NFC-Funktion des Geräts ein.
1 Drücken Sie [NWP].
2 Drücken Sie wiederholt [N INPUT O] unter
[NWP], um “Bluetooth” auszuwählen.
3 Drücken Sie [MENU].
4 Drücken Sie wiederholt [3, 4] zur Auswahl
von “NFC” und drücken Sie dann [OK].
5 Drücken Sie [3, 4] zur Auswahl von “Yes”
und drücken Sie dann [OK].
6 Berühren und halten Sie Ihr Gerät innerhalb
von 20 Sekunden am NFC-Touch-Bereich
dieses Geräts. (> 7)
≥Bewegen Sie das Bluetooth
®
-Gerät nicht, bis es eine
Meldung anzeigt oder auf irgend eine Weise reagiert
wird.
Wenn das Bluetooth
®
-Gerät reagiert hat, entfernen Sie
es von diesem Gerät.
– Wenn die Verbindung des Bluetooth
®
-Geräts hergestellt
wurde, wird der Name des angeschlossenen Geräts auf
dem Display angezeigt.
– Die Position des NFC-Touch-Bereichs unterscheidet sich je
nach Gerät. Wenn keine Verbindung hergestellt werden
kann obwohl Ihr Bluetooth
®
-Gerät den NFC-Touch-Bereich
dieses Geräts berührt hat, ändern Sie die Position des
Geräts.
≥ Wenn Sie ein anderes NFC-kompatibles Bluetooth
®
-Gerät
verbinden, wird das zuvor verbundene Gerät automatisch
getrennt.
≥ Wenn die Verbindung hergestellt wurde, startet die Wiedergabe, je
nach verwendetem Gerätetyp, möglicherweise automatisch.
≥ Die Verbindung per NFC funktioniert möglicherweise je nach dem
verwendeten Gerätetypen nicht ordnungsgemäß.
≥ Stellen Sie eine NFC-Verbindung ausschließlich auf die in der
Bedienungsanleitung beschriebene Weise her. Dies kann zu
Fehlfunktionen führen.
Verbindung über das
Bluetooth
®
-Menü
Verbindung über NFC
(55)
ST-C700DE-TQBM0007.book 21 ページ 2016年10月26日 水曜日 午後1時17分

22
1 Drücken Sie [NWP].
2 Drücken Sie wiederholt [N INPUT O] unter
[NWP], um “Bluetooth” auszuwählen.
≥“Ready” wird auf dem Display eingeblendet.
≥Wenn Sie [1/;] drücken, versucht dieses Gerät, eine
Verbindung zum zuletzt verbundenen Bluetooth
®
-Gerät
aufzubauen.
– “Linking” wird auf dem Display eingeblendet.
3 Wählen Sie "ST-C700D" im Menü des
Bluetooth
®
-Geräts aus.
≥Der Name des angeschlossenen Geräts wird am
Display angezeigt.
4 Starten Sie die Wiedergabe auf dem
Bluetooth
®
-Gerät.
Steuerung der Fernbedienung
≥ Dieses Gerät kann nur mit einem Gerät auf einmal verbunden
werden.
≥ Zur Verwendung der Fernbedienung dieses Geräts mit einem
Bluetooth
®
-Gerät muss das Bluetooth
®
-Gerät AVRCP (Audio
Video Remote Control Profile) unterstützen.
Je nach dem Status des Geräts könnten einige Steuerungen nicht
möglich sein.
≥ Wenn mit dieser Funktion Videoinhalte geladen werden, sind die
Video- und Audioausgabe evtl. nicht synchronisiert.
Sie können den Übertragungsmodus ändern, um der
Übertragungs- oder Tonqualität Vorrang zu geben.
1 Drücken Sie [NWP].
2 Drücken Sie wiederholt [N INPUT O] unter
[NWP], um “Bluetooth” auszuwählen.
≥Ist bereits ein Bluetooth
®
-Gerät angeschlossen, dieses
abtrennen.
3 Drücken Sie [MENU].
4 Drücken Sie wiederholt [3, 4] zur Auswahl
von “Link Mode” und drücken Sie dann [OK].
5 Betätigen Sie [3, 4], um den Modus
auszuwählen und dann [OK].
≥ Wählen Sie “Mode 1” wenn der Sound unterbrochen wird.
1 Drücken Sie [NWP].
2 Drücken Sie [MENU].
3 Drücken Sie wiederholt [3, 4] zur Auswahl
von “Disconnect?” und drücken Sie dann
[OK].
4 Drücken Sie [3, 4] zur Auswahl von “Yes”
und drücken Sie dann [OK].
≥ Das Bluetooth
®
-Gerät wird abgeschaltet, wenn eine andere
Audioquelle ausgewählt wird.
Anhören von auf einem
Bluetooth
®
-Gerät
gespeicherten Musik
Stopp Drücken Sie [∫].
Pause
Drücken Sie [1/;].
≥ Drücken Sie erneut, um die Wiedergabe
fortzusetzen.
Überspringen
Drücken Sie [:] oder [9], um
einen Titel zu überspringen.
Suchlauf
Während Wiedergabe oder Pause
[6] oder [5] drücken und gedrückt
halten.
≥ Am Gerät: halten Sie [:] oder [9]
gedrückt.
Bluetooth
®
Übertragungsmodus
Mode 1 Betonung der Konnektivität
Mode 2 Betonung der Klangqualität (Standard)
Abtrennen eines Bluetooth
®
-
Geräts
(56)
ST-C700DE-TQBM0007.book 22 ページ 2016年10月26日 水曜日 午後1時17分

23
Deutsch
FM-Radio hören
Sie können bis zu 30 Kanäle einstellen.
Vorbereitung
≥Drücken Sie [NWP] und anschließend wiederholt
[N INPUT O] unter [NWP], um “FM” auszuwählen.
1 Drücken Sie [NWP].
2 Drücken Sie [MENU].
3
Drücken Sie wiederholt [
3
,
4
] zur Auswahl
von “Auto Preset” und drücken Sie dann [OK].
4 Drücken Sie [3, 4] zur Auswahl von
“Lowest” oder “Current” und drücken Sie
dann [OK].
Lowest:
Mit dem automatischen Einspeichern bei der niedrigsten
Frequenz (FM 87,50) beginnen.
Current:
Mit dem automatischen Einspeichern bei der aktuellen
Frequenz beginnen.
1 Drücken Sie [NWP].
2 Drücken Sie [6] oder [5], um den
Sender einzustellen.
≥
Zur automatischen Abstimmung halten Sie die Taste
gedrückt, bis die Frequenz sich schnell zu ändern beginnt.
3 Drücken Sie [PGM].
4 Drücken Sie die Zifferntasten, um einen
Speicherplatz zu wählen.
≥Wiederholen die Schritte 1 bis 3, um weitere Sender
einzustellen.
≥ Ein zuvor gespeicherter Sender wird überschrieben, wenn ein
anderer auf dem gleichen Kanal gespeichert wird.
1 Drücken Sie [NWP].
2 Drücken Sie die Zifferntasten [:] oder
[9], um den vorprogrammierten Sender
auszuwählen.
1 Drücken Sie [NWP].
2 Drücken Sie [MENU].
3 Drücken Sie wiederholt [3, 4] zur Auswahl
von “FM Mode” und drücken Sie dann [OK].
4 Drücken Sie [3, 4], um “Mono”
auszuwählen, und danach [OK].
≥“MONO” wird angezeigt.
Um die Einstellung beizubehalten
Fahren Sie mit den Schritten 2 und 3 von “Manuelle
Abstimmung und Voreinstellung” fort.
≥ Wählen Sie “Stereo” in Schritt 4 aus, um zur Stereo-Übertragung
zurückzukehren.
≥ “Mono” wird abgebrochen, wenn die Frequenz geändert wird.
Das Gerät kann in einigen verfügbaren Bereichen die vom
Radiodatensystem (RDS) übermittelten Textdaten anzeigen.
≥ RDS ist nur verfügbar, wenn Stereo-Empfang vorhanden ist.
≥ Bei ungünstigen Empfangsbedingungen erscheinen u. U. keine
RDS-Anzeigen.
≥ Die RDS-Funktion funktioniert nicht, wenn “Mono” in “FM Mode”
ausgewählt ist. (> oben)
Automatische Voreinstellung
Manuelle Abstimmung und
Voreinstellung
Einen vorprogrammierten
Sender auswählen
Verbessern der Klangqualität
Empfang von RDS-Programmen
(57)
ST-C700DE-TQBM0007.book 23 ページ 2016年10月26日 水曜日 午後1時17分

24
Sie hören DAB/DAB+
Sie können bis zu 20 Kanäle einstellen.
Vorbereitung
≥
Überprüfen Sie, ob die DAB-Antenne angeschlossen ist. (
>
10)
≥Drücken Sie [NWP] und anschließend wiederholt
[N INPUT O] unter [NWP], um “DAB/DAB+” auszuwählen.
– Bei erstmaliger Auswahl von “DAB/DAB+” leitet das System den
Vorgang “Automatische DAB-Abstimmung” ein.
1 Drücken Sie [NWP].
2 Drücken Sie [MENU].
3 Drücken Sie wiederholt [3, 4] zur Auswahl
von “Auto Scan” und drücken Sie dann [OK].
4 Drücken Sie [3, 4] zur Auswahl von “Yes”
und drücken Sie dann [OK].
≥“Auto Scan” wird angezeigt.
Verwenden Sie die manuelle Abstimmung, um die günstigste
Antennenposition zu finden und den gewählten DAB-
Frequenz-Block zu suchen.
1 Drücken Sie [NWP].
2 Drücken Sie [MENU].
3
Drücken Sie wiederholt [
3
,
4
] zur Auswahl
von “Manual Scan” und drücken Sie dann [OK].
4 Betätigen Sie [3, 4], zur Auswahl eines
abzutastenden Frequenzblocks und drücken
Sie dann [OK].
1 Drücken Sie [NWP].
2 Drücken Sie [6] oder [5], um den
Sender einzustellen.
3 Drücken Sie [PGM].
4 Betätigen Sie die Zifferntasten, um eine
vorab eingerichtetem Kanal zu wählen.
≥Führen Sie die Arbeitsgänge 1 bis 3 erneut aus, um
weitere Sender einzurichten.
≥ Ein zuvor gespeicherter Sender wird überschrieben, wenn ein
anderer auf dem gleichen Kanal gespeichert wird.
≥ Sie können keine Sender voreinstellen, wenn der Sender nicht
überträgt oder ein Secondary Service ausgewählt ist.
≥ Während der automatischen Abstimmung wird der
Senderspeicher gelöscht.
1 Drücken Sie [NWP].
2
Betätigen Sie die Zifferntasten, [
:
] von [
9
],
um den voreingestellten Sender zu wählen.
Sie können Informationen zur DAB-Übertragung, zur Programmart,
zur Gruppenkennzeichnung und zur Frequenz ansehen.
1 Drücken Sie [NWP].
2 Drucken Sie [INFO], um die verfügbaren
Informationen abzurufen.
Einige DAB/DAB+-Sender bieten sowohl einen Secondary
als auch einen Primary Service an. Bietet der Sender, den
Sie hören, einen Secondary Service, wird “ ” angezeigt.
1 Drücken Sie [NWP].
2 Drücken Sie [MENU].
3 Drücken Sie wiederholt [3, 4] zur Auswahl
von “Secondary” und drücken Sie dann [OK].
4 Drücken Sie [3, 4], um den Secondary
Service auszuwählen und dann [OK].
≥ Die Einstellung begibt sich zurück in den Primary Service, wenn
Änderungen vorgenommen werden (z. B. wenn der Sender
gewechselt wird).
Beim Einstellen der Antenne können Sie die Empfangsqualität prüfen.
1 Drücken Sie [NWP].
2 Drücken Sie [MENU].
3
Drücken Sie wiederholt [
3
,
4
] zur Auswahl von
“Signal Quality” und drücken Sie dann [OK].
4
Drücken Sie [
3
,
4
]
zur Auswahl der Frequenz.
Automatische DAB-Abstimmung
Manuelle DAB-Abstimmung
Voreinstellung des Speichers
Auswahl eines
voreingestellten Senders
Anzeige verfügbarer Informationen
DAB Sekundär
Qualität des DAB-Signals
Frequenzblock
Frequenz
Empfangsqualität
0 (schlecht) – 8 (hervorragend)
z. B.
(58)
ST-C700DE-TQBM0007.book 24 ページ 2016年10月26日 水曜日 午後1時17分

25
Deutsch
Sound-Anpassung
Die folgenden Soundeffekte können zum Audio-Ausgang hinzugefügt werden.
Durch das Re-Mastering erweitert sich das Wiedergabeband und
es wird eine höhere Bit-Tiefe erzielt, um einen originalgetreuen
natürlichen und raumfüllenden Klang zu erzeugen.
≥ Die werkseitige Standardeinstellung ist “Off”.
1 Drücken Sie [NWP].
2 Drücken Sie [RE-MASTER] zur Auswahl von
“On”/“Off”.
Dieses Gerät kann Eingangssignale übertragen, ohne eine
digitale Signalverarbeitung (DSP - Digital Signal Processing)
auszuführen. Dies ermöglicht eine originalgetreue und
hochqualitative Sound-Wiedergabe.
≥ Die werkseitige Standardeinstellung ist “Off”.
1 Drücken Sie [NWP].
2 Drücken Sie [DIRECT] zur Auswahl von
“On”/“Off”.
Sie können eine Obergrenze für den Abtastfrequenzbereich
einstellen. Bitte beachten Sie, dass der Bereich, der
verarbeitet werden kann, vom Verstärker oder D/A-Wandler
abhängt. Detaillierte Informationen finden Sie in der
Bedienungsanleitung des angeschlossenen Geräts.
≥ Die werkseitige Standardeinstellung ist “32kHz-192kHz”.
Vorbereitung
≥Stellen Sie “Digital Output” auf “On”.
1 Drücken Sie [NWP].
2 Drücken Sie [HOME].
3 Drücken Sie wiederholt [3, 4] zur Auswahl
von “SETUP” und drücken Sie dann [OK].
4
Drücken Sie wiederholt [
3
,
4
] zur Auswahl
von “D.Output fs” und drücken Sie dann [OK].
5 Wählen Sie mit [3, 4] eine Option aus und
drücken Sie [OK].
≥Sie können eine Abtastfrequenz von 96 kHz oder
192 kHz auswählen.
Durch die Deaktivierung des Audioausgangs von
ungenutzten Anschlüssen wird das Rauschen minimiert und
die Wiedergabe in höherer Audioqualität ermöglicht.
≥ Die werkseitige Standardeinstellung ist “On”.
1 Drücken Sie [NWP].
2 Drücken Sie [HOME].
3 Drücken Sie wiederholt [3, 4] zur Auswahl
von “SETUP” und drücken Sie dann [OK].
Um den digitalen Audioausgang zu deaktivieren:
Drücken Sie wiederholt [3, 4] zur Auswahl von “Digital
Output” und drücken Sie dann [OK].
Um den analogen Audioausgang zu deaktivieren:
Drücken Sie wiederholt [3, 4] zur Auswahl von “Analog
Output” und drücken Sie dann [OK].
4 Drücken Sie [3, 4] zur Auswahl von “Off”
und drücken Sie dann [OK].
≥Um den Ausgang wieder zu aktivieren, wählen Sie
“On”.
≥ Je nach der wiedergegebenen Musikquelle, kann die angewandte
Einstellung weniger wirksam sein.
≥ Je nach der wiedergegebenen Musikquelle können die
gewünschte Audioqualität und der gewünschte Klangfeldeffekt
möglicherweise nicht erzielt werden. Schalten Sie diese Funktion
in solchen Fällen aus.
≥ Weder der Re-Master- als auch der Direktmodus können auf “On”
gestellt werden.
≥ Wenn “Digital Output” und “Analog Output” auf “Off” gestellt sind,
wird kein Sound ausgegeben.
≥ Es kann einige Zeit dauern, bis Audio ausgegeben wird, wenn Sie
die Audioqualität eingestellt haben.
Anhören von natürlicher
klingendem Sound (Re-Master)
Direktmodus
Einstellen der Abtastfrequenz
Deaktivierung des
Audioausgangs
(59)
ST-C700DE-TQBM0007.book 25 ページ 2016年10月26日 水曜日 午後1時17分

26
Sonstige
Mit dem Sleep-Timer kann dieses Gerät nach einer
voreingestellten Zeit in den Standby-Modus geschaltet
werden.
1 Drücken Sie [NWP].
2 Drücken Sie [MENU].
3 Drücken Sie wiederholt [3, 4] zur Auswahl
von “SLEEP” und drücken Sie dann [OK].
4 Drücken Sie [3, 4] zur Einstellung der Zeit
(in Minuten) und drücken Sie dann [OK].
“30 minutes” ,-. “60 minutes” ,-. “90 minutes” ,-. “120 minutes”
^""""""""""""". “Off” !"""""""""""""J
Dieses Gerät ist darauf ausgelegt, den Stromverbrauch zu
reduzieren und Energie einzusparen. Das Gerät wird
automatisch in den Standby-Modus geschaltet, wenn kein
Sound vorhanden ist und wenn es ca. 20 Minuten lang nicht
verwendet wird.
≥ Die werkseitige Standardeinstellung ist “On”.
Abbruch dieser Funktion
1 Drücken Sie [NWP].
2 Drücken Sie [HOME].
3 Drücken Sie wiederholt [3, 4] zur Auswahl
von “SETUP” und drücken Sie dann [OK].
4
Drücken Sie wiederholt [
3
,
4
] zur Auswahl
von “AUTO OFF” und drücken Sie dann [OK].
5 Drücken Sie [3, 4] zur Auswahl von “Off”
und drücken Sie dann [OK].
≥ Die Auto-Aus-Funktion ist aktiv, bis sie ausgeschaltet wird, auch
dann, wenn dieses Gerät ein- und ausgeschaltet wird.
≥ Wenn “DAB/DAB+” oder “FM” die Quelle ist, funktioniert die
Funktion nicht.
Das Gerät wird automatisch aus dem Standby-Modus
eingeschaltet, wenn es als Ausgabelautsprecher für
Spotify/AirPlay/DLNA (DMR) ausgewählt wird.
Denken Sie daran, dass Sie nach dem Auswählen dieses
Geräts möglicherweise auch die Wiedergabe starten
müssen, um das Gerät einzuschalten.
≥ Die werkseitige Standardeinstellung ist “Auto”.
So ändern Sie diese Einstellung
1 Drücken Sie [NWP].
2 Drücken Sie [HOME].
3 Drücken Sie wiederholt [3, 4] zur Auswahl
von “SETUP” und drücken Sie dann [OK].
4
Drücken Sie wiederholt [
3
,
4
] zur Auswahl von
“Network Standby” und anschließend [OK].
5 Wählen Sie mit [3, 4] eine Option aus und
drücken Sie [OK].
≥ Wenn diese Funktion auf “On” oder “Auto” eingestellt wird, steigt
der Standby-Stromverbrauch.
Einschlaf-Zeitschaltuhr
Auto-OFF-Funktion
Netzwerk-Standby
Auto
Aktiviert die Netzwerk-Standby-Funktion,
wenn die Netzwerkverbindung verfügbar
ist.
On
Aktiviert immer die Netzwerk-Standby-
Funktion.
Off
Hiermit wird die Netzwerk-
Standbyfunktion ausgeschaltet.
(60)
ST-C700DE-TQBM0007.book 26 ページ 2016年10月26日 水曜日 午後1時17分

27
Deutsch
Gelegentlich kann Panasonic aktualisierte Firmware-
Versionen für dieses Gerät herausbringen, mit denen
Funktionen hinzufügt oder optimiert werden. Solche Updates
stehen kostenlos zur Verfügung.
≥Informationen zu Updates (neue oder optimierte
Funktionen) finden Sie auf der folgenden Website:
www.technics.com/support/firmware/
≥ Während des Update-Prozesses können keine anderen Vorgänge
ausgeführt werden.
≥ Wenn keine Updates zur Verfügung stehen, wird “Firmware is Up
To Date” angezeigt. (Muss nicht aktualisiert werden.)
≥ Die Einstellungen können durch eine Aktualisierung der Firmware
zurückgesetzt werden.
∫ Update über Internet
Vorbereitung
≥Verbinden Sie dieses Gerät mit dem Netzwerk. (> 12)
– Stellen Sie sicher, dass das Netzwerk mit dem Internet
verbunden ist.
1 Drücken Sie [NWP].
2 Drücken Sie [HOME].
3 Drücken Sie wiederholt [3, 4] zur Auswahl
von “SETUP” und drücken Sie dann [OK].
4
Drücken Sie wiederholt [
3
,
4
] zur Auswahl
von “F/W Update” und drücken Sie dann [OK].
5 Drücken Sie [3, 4] zur Auswahl von
“Internet” und drücken Sie dann [OK].
6 Drücken Sie [3, 4] zur Auswahl von “Yes”
und drücken Sie dann [OK].
≥Der Updatevorgang wird als “Updating %” angezeigt.
( steht für eine Zahl.)
≥Nachdem das Update erfolgreich beendet wurde, wird
“Success” angezeigt.
7 Wenn “Success” angezeigt wird, entfernen
Sie das Netzkabel, warten 3 Minuten und
schließen es dann wieder an.
≥ Der Downloadvorgang dauert je nach Verbindung möglicherweise
länger oder kann nicht ausgeführt werden.
∫ Update über USB-Flash-Speicher
Vorbereitung
≥Laden Sie die aktuelle Firmware auf den USB-Flash-
Speicher herunter. Details finden Sie auf der folgenden
Website:
www.technics.com/support/firmware/
≥FAT16 und FAT32 Dateisysteme werden unterstützt.
1 Schließen Sie das USB-Flash-Speichergerät
mit der neuen Firmware an.
2 Drücken Sie [NWP].
3 Drücken Sie [HOME].
4 Drücken Sie wiederholt [3, 4] zur Auswahl
von “SETUP” und drücken Sie dann [OK].
5
Drücken Sie wiederholt [
3
,
4
] zur Auswahl
von “F/W Update” und drücken Sie dann [OK].
6 Drücken Sie [3, 4] zur Auswahl von “USB”
und drücken Sie dann [OK].
7 Drücken Sie [3, 4] zur Auswahl von “Yes”
und drücken Sie dann [OK].
≥Der Updatevorgang wird als "Updating %" angezeigt.
( steht für eine Zahl.)
≥Nachdem das Update erfolgreich beendet wurde, wird
“Success” angezeigt.
8 Wenn “Success” angezeigt wird, entfernen
Sie das Netzkabel, warten 3 Minuten und
schließen es dann wieder an.
≥ Es kann je nach USB-Flash-Speichergerät länger dauern, bis der
Downloadvorgang abgeschlossen ist.
∫ Überprüfen von Firmwareversion und
Modellnummer
1 Drücken Sie [NWP].
2 Drücken Sie [HOME].
3 Drücken Sie wiederholt [3, 4] zur Auswahl von
“SETUP” und drücken Sie dann [OK].
4 Drücken Sie wiederholt [3, 4] zur Auswahl von “F/W
Version” und drücken Sie dann [OK].
≥ Firmwareversion und Modellnummer werden angezeigt.
≥ Drücken Sie [OK] zum Beenden.
Firmware-Update
Das Herunterladen dauert ca. 10 Minuten.
Stecken Sie das Netzkabel nicht aus oder senken Sie
nicht den Netzschalterhebel auf die [OFF]-Position,
während eine der folgenden Meldungen angezeigt wird.
“Linking” oder “Updating %”
(61)
ST-C700DE-TQBM0007.book 27 ページ 2016年10月26日 水曜日 午後1時17分

28
Wenn ein anderes Gerät auf die mitgelieferte Fernbedienung
reagiert, ändern Sie den Fernbedienungscode.
≥ Die werkseitige Standardeinstellung ist “Mode 1”.
Richten Sie die Fernbedienung auf dieses Gerät
und halten Sie [OK] sowie die Zifferntaste
mindestens 4 Sekunden lang gedrückt.
≥Wenn der Code der Fernbedienung geändert wird, wird der
neue Code einige Sekunden lang auf dem Display
angezeigt.
≥ Wenn SU-C700/SL-C700 über die Systemsteuerfunktion
verbunden ist, ändern Sie dessen Fernbedienungscode sowie den
Fernbedienungscode für dieses Gerät.
Sie können die Zeichenkodierung von Titelnamen,
Künstlernamen und anderen Informationen ändern, wenn
diese nicht wie erwartet angezeigt werden.
≥ Die werkseitige Standardeinstellung ist “Type 1( 日本 )”.
1 Drücken Sie [NWP].
2 Drücken Sie [HOME].
3 Drücken Sie wiederholt [3, 4] zur Auswahl
von “SETUP” und drücken Sie dann [OK].
4
Drücken Sie wiederholt [
3
,
4
] zur Auswahl
von “
E Asian Character
” und drücken Sie
dann [OK].
5 Drücken Sie [3, 4] zur Auswahl von
“Type 1(日本)”/“Type 2(简体字)” und drücken
Sie dann [OK].
Sie können dieses Gerät automatisch mit dem SU-C700
verknüpfen und die Geräte gemeinsam mit der
Fernbedienung betreiben.
Vorbereitung
1 Verbinden Sie dieses Gerät und SU-C700 mit den
System-Anschlusskabeln und Koaxial-Digitalkabeln.
(> 9)
2 Stellen Sie den Netzschalterhebel dieses Geräts und
SU-C700 auf die [Í/I]-Position.
∫ Gleichzeitiges Schalten dieses Geräts und
SU-C700 auf ein/Standby
≥Wenn Sie die Fernbedienung auf dieses Gerät richten und
[NWP Í] drücken, während sich dieses Gerät und
SU-C700 im Standby-Modus befinden, werden dieses
Gerät und SU-C700 gleichzeitig eingeschaltet.
≥
Wenn dieses Gerät und das SU-C700 eingeschaltet sind und
die Eingabequelle des SU-C700 auf “COAX1” gestellt ist,
können Sie mit dem Sleep-Timer einstellen, dass diese
automatisch in den Standby-Modus geschaltet werden. (
>
26)
∫ Automatisches Umschalten der
Eingabequelle des Geräts SU-C700
Wenn Sie einen Bedienvorgang wie die Wiedergabe bei
diesem Gerät ausführen, wird die Eingabequelle des
SU-C700 automatisch auf “COAX1” umgeschaltet.
∫ Einstellen von Bass/Mitte/Höhe
Sie können den Klang des SU-C700 mit diesem Gerät
anpassen. Jeder Tonbereich (Bass/Mitte/Höhe) kann
eingestellt werden.
1 Drücken Sie [NWP].
2 Drücken Sie [HOME].
3 Drücken Sie wiederholt [3, 4] zur Auswahl von
“SETUP” und drücken Sie dann [OK].
4 Drücken Sie wiederholt [3, 4] zur Auswahl von “Tone
Control” und drücken Sie dann [OK].
5 Drücken Sie [3, 4] zur Auswahl von “On (adjustment)”
und drücken Sie dann [OK].
6 Drücken Sie [3, 4] zur Auswahl von “BASS” (Bass),
“MID” (Mitte) oder “TREBLE” (Höhe).
7 Drücken Sie [2, 1], um die Stufe auszuwählen, und
dann [OK].
≥ Jeder Pegel kann zwischen “s10” und “r10” eingestellt
werden.
≥ Informationen zu den Bedienvorgängen für SU-C700 finden Sie
auch in deren Bedienungsanleitungen.
Fernbedienungscode
[OK] + [1] Stellen Sie den Code auf “Mode 1”
[OK] + [2] Stellen Sie den Code auf “Mode 2”
Ändern der Zeichenkodierung
Type 1( 日本 )
Japanisch hat Priorität.
Type 2( 简体字 )
Chinesisch (vereinfacht) hat
Priorität.
Verwendung der
Systemsteuerfunktion
(62)
ST-C700DE-TQBM0007.book 28 ページ 2016年10月26日 水曜日 午後1時17分

29
Deutsch
Fehlerbehebung
Vor dem Kundendienstruf kontrollieren Sie Folgendes. Wenn
Sie bei einigen Kontrollpunkten Zweifel haben oder die in
Ihrer Betriebsanleitung aufgeführten Angaben Ihr Problem
nicht lösen können, wenden Sie sich an Ihren Händler.
Wärmeentwicklung dieses Geräts.
≥Dieses Gerät wird warm, wenn es für eine längere Zeit
verwendet wird. Dies ist kein Grund zur Beunruhigung.
Haben Sie die neueste Firmware installiert?
≥Panasonic verbessert ständig die Firmware des Gerätes,
um zu gewährleisten, dass unsere Kunden in den Genuss
der modernsten Technologie kommen. (> 27)
Das Gerät funktioniert nicht.
Das Gerät wurde nicht ordnungsgemäß bedient.
≥Evtl. wurde eine der Sicherheitsvorrichtungen des Geräts
aktiviert.
1 Bewegen Sie den Netzschalterhebel dieses Geräts nach
unten zur [OFF]-Position.
≥ Alternativ können Sie auch das Netzkabel ziehen, mind.
3 Minuten warten und es dann erneut anschließen.
2 Erhöhen Sie den Netzschalterhebel dieses Geräts auf die
[Í/I]-Position. Wenn das Gerät immer noch nicht betrieben
werden kann, wenden Sie sich an einen Fachhändler.
Während der Wiedergabe ist ein Brummton zu hören.
≥Ein Netzkabel oder eine Leuchtstoffröhre befindet sich in
der Nähe der Kabel. Halten Sie andere Elektrogeräte und
Kabel von den Kabeln dieses Geräts fern.
Kein Ton.
≥Überprüfen Sie die Lautstärke des angeschlossenen
Geräts (Verstärker etc.).
≥Prüfen Sie, ob die Kabelverbindungen mit den Eingangs-
und Ausgangsanschlüssen fehlerhaft sind. Wenn dies der
Fall ist, schalten Sie dieses Gerät aus und verbinden Sie
die Kabel richtig.
≥
Überprüfen Sie, ob die korrekte Eingabequelle ausgewählt ist.
≥Setzen Sie die Stecker der zu verbindenden Kabel
vollständig ein.
≥Wenn “Digital Output” und “Analog Output” auf “Off” gestellt
sind, wird kein Sound ausgegeben. Ändern Sie die
Einstellung des zu verwendenden Ausgangsanschlusses
auf “On”. (> 25)
≥Die Wiedergabe von Mehrkanal-Inhalten wird nicht
unterstützt.
Der Sound wird unterbrochen.
≥Je nach Ihrer Umgebung kann Audio während der
Wiedergabe unterbrochen werden. Überprüfen Sie die
Bedienungsanleitung des angeschlossenen Geräts sowie
die Verbindung zum Gerät.
Die Wiedergabe startet nicht.
≥Je nach Ihrer Umgebung oder Ihren angeschlossenen
Geräten kann dies einige Zeit dauern.
Die Systemsteuerfunktion funktioniert nicht.
≥Verbinden Sie das System-Anschlusskabel mit dem
Systemanschluss [CONTROL1] des SU-C700.
≥Verbinden Sie das Koaxial-Digitalkabel mit dem digitalen
Audioeingangsanschluss [COAX1 IN] des SU-C700.
Das Gerät wird automatisch ausgeschaltet.
≥Ist die Auto-Aus-Funktion aktiviert? (> 26)
≥Wenn der SU-C700 über die Systemsteuerfunktion mit
diesem Gerät verbunden wird, wechselt dieses Gerät
möglicherweise in den Standby-Modus, wenn der SU-C700
in den Standby-Modus wechselt. (> 9, 28)
Die Einstellungen werden auf die werksseitigen
Standardeinstellungen zurückgesetzt.
≥Die Einstellungen können durch eine Aktualisierung der
Firmware zurückgesetzt werden.
So setzen Sie alle Einstellungen auf die werksseitigen
Standardeinstellungen zurück.
Setzen Sie den Speicher in den folgenden Fällen zurück:
≥ Bei Drücken der Tasten erfolgt keine Reaktion.
≥ Sie möchten den Speicherinhalt löschen und zurücksetzen.
1 Drücken Sie [NWP].
2 Drücken Sie [HOME].
3 Drücken Sie wiederholt [3, 4] zur Auswahl von
“SETUP” und drücken Sie dann [OK].
4 Drücken Sie wiederholt [3, 4] zur Auswahl von
“Initialization” und drücken Sie dann [OK].
5 Drücken Sie [3, 4] zur Auswahl von “Yes” und
drücken Sie dann [OK].
6 Drücken Sie [3, 4] zur Auswahl von “Yes” und
drücken Sie anschließend erneut [OK].
Allgemeines
(63)
ST-C700DE-TQBM0007.book 29 ページ 2016年10月26日 水曜日 午後1時17分

30
Verbindung zum Netzwerk kann nicht hergestellt werden.
≥Überprüfen Sie die Netzwerkverbindung und die
Einstellungen. (> 12)
Verbindung zum Gerät kann nicht hergestellt werden.
≥Stellen Sie sicher, dass die Multicast-Funktion im Wireless-
Router aktiviert ist.
≥Stellen Sie sicher, dass das Gerät und dieses Gerät mit
demselben Netzwerk verbunden sind. (> 12)
≥Verbinden Sie das kompatible Gerät erneut mit dem
Netzwerk und verbinden Sie sich wieder mit diesem Gerät.
≥
Schalten Sie dieses Gerät aus und wieder ein und stellen Sie
anschließend wieder eine Verbindung zu diesem Gerät her.
Die Wiedergabe startet nicht.
Der Sound wird unterbrochen.
≥Das gleichzeitige Verwenden von anderen 2,4 GHz-
Geräten, wie Mikrowellen, schnurlosen Telefonen, etc.,
kann zu Verbindungsunterbrechungen führen.
Erhöhen Sie die Entfernung zwischen dem drahtlosen
Router und diesen Geräten.
≥Wenn mehrere Wireless-Geräte gleichzeitig das gleiche
Wireless-Netz nutzen, wie auch dieses Gerät, versuchen
Sie, die anderen Geräte auszuschalten oder deren Zugriff
auf das Wireless-Netz einzuschränken.
≥Wenn die Wiedergabe anhält, überprüfen Sie den
Wiedergabestatus am Gerät.
Es können keine am PC gespeicherten
Musikdateien gefunden werden.
≥Bei der Wiedergabe von Musikdateien über ein Netzwerk,
werden die Dateien, die nicht auf dem Server-Netzwerk
registriert sind, nicht angezeigt. Detaillierte Informationen
finden Sie in der Bedienungsanleitung Ihres Servers.
Die Wiedergabe startet nicht.
Der Sound wird unterbrochen.
≥
Ein Sender, der nicht sendet, kann nicht wiedergegeben werden.
(Er wird ausgelassen oder kehren Sie auf die Liste zurück.)
≥Das Internet Radio kann, abhängig vom Zustand des
Netzwerks, möglicherweise nicht ordnungsgemäß
wiedergegeben werden.
≥Abhängig von der Internetverbindungsumgebung kann es
zu Unterbrechungen oder zu Verzögerungen bei der
akustischen Wiedergabe kommen.
≥Das Internet Radio ist ein Audiorundfunkservice, der über
das Internet gesendet wird. Die Tonqualität kann abhängig
vom Sender oder den Übertragungsbedingungen variieren.
Kann die Informationen nicht korrekt anzeigen.
≥Titelnamen, Sendernamen, usw. die von vTuner/Spotify
verwaltet werden, können möglicherweise nicht korrekt
angezeigt werden.
Bedienung nicht möglich.
≥Wählen Sie “USB” als Eingabequelle.
≥Vergewissern Sie sich, dass der/das iPhone/iPad/iPod
korrekt angeschlossen ist.
≥Schließen Sie den/das iPhone/iPad/iPod wieder an oder
versuchen Sie das/den iPhone/iPad/iPod.erneut zu starten
≥Der Akku des iPhone/iPad/iPod ist leer. Laden Sie den/das
iPhone/iPad/iPod auf und nehmen Sie ihn/es wieder in
Betrieb.
Der/Das iPhone/iPad/iPod wird nicht aufgeladen.
≥Stellen Sie sicher, dass das Gerät eingeschaltet ist, wenn
Sie den Ladevorgang beginnen.
– Beim Aufladen eines iPhone/iPad/iPod, dessen Akku entladen
ist, schalten Sie dieses Gerät nicht in den Standby-Modus, bis
das iPhone/iPad/iPod wieder betriebsbereit ist.
Das USB-Laufwerk oder dessen Inhalt kann nicht
gelesen werden.
≥Das USB-Laufwerkformat oder dessen Inhalt ist nicht mit
dem Gerät kompatibel. (> 35)
Keine Reaktion, wenn [1/;] gedrückt wird.
≥Trennen Sie das USB-Gerät und schließen Sie es wieder
an. Oder schalten Sie das Gerät aus und wieder ein.
Langsamer Betrieb des USB-Sticks.
≥Große Dateien oder USB-Sticks beanspruchen eine
längere Lesezeit.
Der PC erkennt dieses Gerät nicht.
≥Überprüfen Sie Ihre Betriebsumgebung. (> 20)
≥Starten Sie den PC neu, schalten Sie dieses Gerät aus und
wieder ein und stecken Sie das USB-Kabel anschließend
wieder ein.
≥Verwenden Sie einen anderen USB-Anschluss am
verbundenen PC.
≥Installieren Sie den speziellen USB-Treiber, wenn Sie
einen PC mit Windows verwenden.
Es können keine am PC gespeicherten
Musikdateien gefunden werden.
≥Bei der Wiedergabe von Musikdateien über ein Netzwerk,
werden die Dateien, die nicht auf dem Server-Netzwerk
registriert sind nicht angezeigt. Detaillierte Informationen
finden Sie in der Bedienungsanleitung Ihres Servers.
(> 35)
AirPlay/DLNA
vTuner/Spotify
iPhone/iPad/iPod
USB
PC
(64)
ST-C700DE-TQBM0007.book 30 ページ 2016年10月26日 水曜日 午後1時17分

31
Deutsch
Die Kopplung kann nicht beendet werden.
≥Überprüfen Sie den Zustand des Bluetooth
®
-Geräts.
Das Gerät kann nicht verbunden werden.
≥Die Kopplung der Vorrichtung war nicht erfolgreich oder die
Aufzeichnung wurde ersetzt. Versuchen Sie das Gerät neu
anzukoppeln.
≥Dieses Gerät könnte mit einem anderen Gerät verbunden
sein. Trennen Sie die Verbindung des anderen Geräts und
versuchen Sie, das Gerät erneut zu koppeln.
Das Gerät ist angeschlossen, aber es ist kein Ton
über dieses Gerät zu hören.
≥Für einige integrierte Bluetooth
®
-Geräte müssen Sie den
Audioausgang manuell auf “ST-C700D” stellen. Lesen Sie
für Details die Bedienungsanleitung des Geräts.
NFC funktioniert nicht.
≥Stellen Sie sicher, dass die NFC-Funktion des Geräts
eingeschaltet ist.
≥Wenn Sie es erneut versuchen, ändern Sie den Winkel, mit
dem das Bluetooth
®
-Gerät den NFC-Touchbereich berührt.
≥Schalten Sie die NFC-Funktion dieses Geräts ein, wenn
Sie ein Gerät über NFC verbinden. (> 21)
Die Wiedergabe startet nicht.
Der Sound wird unterbrochen.
≥Das gleichzeitige Verwenden von anderen 2,4 GHz-
Geräten, wie Mikrowellen, schnurlosen Telefonen, etc.,
kann zu Verbindungsunterbrechungen führen.
Bringen Sie das Bluetooth
®
-Gerät näher an dieses Gerät
und entfernen Sie es von den anderen Geräten.
Der Empfang ist schlecht oder es ist ein
schlagender Sound zu hören.
≥Halten Sie die Antenne von Computern, Fernsehern,
anderen Kabeln und Leitungen entfernt.
≥Verwenden Sie eine Außenantenne.
Die Fernbedienung funktioniert nicht richtig.
≥Um Interferenzen zu vermeiden, stellen Sie keine Objekte
vor den Signalsensor. (> 7)
≥Ändern Sie den Fernbedienungscode, wenn andere
Geräte auf diese Fernbedienung reagieren. (> 28)
≥Wenn das SU-C700/SL-C700 als zu betreibendes Gerät
ausgewählt ist, drücken Sie [NWP] und versuchen Sie, den
Vorgang erneut auszuführen. (> 8)
Durch Drücken von [DIMMER] wird die Helligkeit
des Displays und der Anzeigen vom SU-C700/
SL-C700 geändert.
≥
[DIMMER] funktioniert für SU-C700/SL-C700 sowie für dieses
Gerät. Schalten Sie das Gerät, dessen Helligkeitsstufe Sie
beibehalten möchten, aus und drücken Sie [DIMMER].
Die folgenden Meldungen oder Servicenummern
erscheinen unter Umständen auf dem Display des Gerätes.
“AUTO OFF”
≥Das Gerät wurde ca. 20 Minuten lang nicht betrieben und
wechselt in einer Minute in den Standby-Modus. Drücken
Sie eine beliebige Taste, um dies zu verhindern.
“Checking Device”
≥Das Gerät überprüft den angeschlossenen/das
angeschlossene iPhone/iPad/iPod oder USB-Gerät.
“Connect to Network”
≥Schließen Sie dieses Gerät an das Netzwerk an und
warten Sie anschließend auf den Start der Firmware-
Aktualisierung über das Internet. (> 27)
“Connect USB Device”
≥
Laden Sie die neueste Version der Firmware auf den USB-
Flash-Speicher herunter und schließen Sie diesen an. (
>
27)
“Download Fail”
≥Der Firmware-Download ist fehlgeschlagen. Drücken Sie
zum Beenden eine beliebige Taste. Bitte versuchen Sie es
später erneut.
≥Der Server kann nicht gefunden werden. Drücken Sie zum
Beenden eine beliebige Taste. Stellen Sie sicher, dass das
Drahtlosnetzwerk mit dem Internet verbunden ist.
“Empty”
≥
Der gewählte Ordner ist leer. Verschieben Sie Titel in den
Ordner und versuchen Sie, den Vorgang erneut auszuführen.
≥Der Server wird im Netzwerk nicht gefunden. Überprüfen
Sie, ob der Server mit demselben Netzwerk wie dieses
Gerät verbunden ist und versuchen Sie erneut, eine
Verbindung zu diesem Gerät herzustellen. (> 13)
≥Kein Internet-Radiosender ist für die Favoritenliste
registriert. Fügen Sie der Liste einen Sender hinzu.(> 15)
“Error”
≥Die Bedienung ist inkorrekt. Lesen Sie die Anleitung durch
und versuchen Sie es erneut.
“Firmware update is available”
≥Die Firmware ist für dieses Gerät verfügbar (kostenlos).
1 Drücken Sie [NWP].
2 Drücken Sie [OK].
3 Drücken Sie [3, 4] zur Auswahl von “Yes” und drücken Sie
dann [OK].
≥ Der Updatevorgang wird als "Updating %" angezeigt.
( steht für eine Zahl.)
≥ Nachdem das Update erfolgreich beendet wurde, wird
“Success” angezeigt.
4 Wenn “Success” angezeigt wird, entfernen Sie das Netzkabel,
warten 3 Minuten und schließen es dann wieder an.
≥Informationen über die Aktualisierung finden Sie auf der
folgenden Website.
www.technics.com/support/firmware/
Bluetooth
®
Radio
Platte
Meldungen
(65)
ST-C700DE-TQBM0007.book 31 ページ 2016年10月26日 水曜日 午後1時17分

32
“F” (“ ” steht für eine Zahl.)
≥Es liegt ein Problem mit diesem Gerät vor.
– Befindet sich dieses Gerät an einem besonders warmen Ort?
In diesem Fall bringen Sie das Gerät an einen kühleren Ort, warten
eine Weile und versuchen dann, es wieder einzuschalten.
Wenn das Problem weiterhin besteht, notieren Sie die
angezeigte Nummer, trennen das Netzkabel ab und
wenden sich an Ihren Händler.
“Load Fail”
≥Die Firmware auf dem USB-Flash-Speicher kann nicht
gefunden werden.
≥Laden Sie die neueste Version der Firmware herunter,
speichern Sie sie auf dem USB-Flash-Speicher und
versuchen Sie es erneut. (> 27)
“No Network Available”
≥Dieses Gerät hat keine Verbindung mit dem Netzwerk.
Überprüfen Sie die Netzwerkverbindung. (> 12)
“No Memory”
≥
Es liegen keine auswählbaren voreingestellten DAB/DAB+-Sender
vor. Nehmen Sie die Voreinstellung einiger Kanäle vor. (
>
24)
“No Signal”
≥Dieser Sender kann nicht empfangen werden.
Kontrollieren Sie Ihre Antenne.
“Not Valid”
≥Die Funktion, die Sie verwenden möchten, ist mit den
derzeitigen Einstellungen nicht verfügbar. Überprüfen Sie
die Schritte und Einstellungen.
“PGM Full”
≥Die Anzahl der programmierten Titel ist mehr als 24.
“Please Wait”
≥
Dies wird beispielsweise angezeigt, wenn dieses Gerät
ein-/ausgeschaltet ist. (Für bis zu 1 Minute und 30 Sekunden)
“Remote ” (“ ” steht für eine Zahl.)
≥
Die Fernbedienung und das Gerät verwenden unterschiedliche
Codes. Ändern Sie den Code an der Fernbedienung.
– Wenn “Remote 1” angezeigt wird, drücken und halten Sie [OK]
und [1] für mindestens 4 Sekunden.
– Wenn “Remote 2” angezeigt wird, drücken und halten Sie [OK]
und [2] für mindestens 4 Sekunden.
“Remote Mode”
≥
Grundlegende Bedienvorgänge mithilfe der Basis-Bedienschalter am
Hauptgerät oder der Tasten auf der Fernbedienung können nicht
ausgeführt werden. (Dies ist beispielsweise der Fall, wenn Musik von
einem DLNA-Server auf diesem Gerät wiedergegeben wird (DMR).)
≥
Regeln Sie die Wiedergabe über das angeschlossene Gerät.
“Scan Failed”
≥Die Sender können nicht empfangen werden. Kontrollieren
Sie Ihre Antenne und versuchen Sie einen automatischen
Scanvorgang. (> 24)
Wird immer noch “Scan Failed” eingeblendet, finden Sie
den besten Signalempfang mit der “Manual Scan”
Senderwahlfunktion. (> 24)
“Searching”
≥Das Gerät überprüft den DLNA-Server im Netzwerk.
“Unlocked”
≥“PC” ist ausgewählt, aber es ist kein PC angeschlossen.
Überprüfen Sie die Verbindung mit dem PC. (> 20)
≥Die Abtastratenkomponenten, usw. der Audiosignale
werden nicht korrekt eingegeben.
– Hinweise zum unterstützten Format finden Sie unter
“Dateiformat” (> 35).
“USB Over Current Error”
≥
Der/Das iPhone/iPad/iPod oder das USB-Gerät nimmt zu viel
Strom auf. Trennen Sie den/das iPhone/iPad/iPod bzw. das
USB-Gerät ab und schalten Sie das Gerät ein und wieder aus.
“Hub Device Not Supported”
“Device Not Recognized”
“Not Supported”
“USB Device Not Supported”
≥Sie haben einen/ein iPhone/iPad/iPod oder ein USB-Gerät
angeschlossen, das nicht unterstützt wird.
– Ist der/das iPhone/iPad/iPod kompatibel, dieses einschalten und
korrekt anschließen.
≥Das Dateiformat auf dem iPhone/iPad/iPod oder USB-
Gerät wird nicht unterstützt.
– Hinweise zum unterstützten Format finden Sie unter
“Dateiformat” (> 35).
∫ Informationen zum Netzwerkdienst
Die einzelnen Dienste des Netzwerkdiensts werden von den
entsprechenden Anbietern betrieben und werden
möglicherweise ohne Ankündigung dauerhaft oder
vorübergehend eingestellt. Deshalb übernimmt Panasonic
keine Gewähr für Inhalte oder Verfügbarkeit solcher Dienste.
Gerätepflege
Stecken Sie vor der Wartung das Netzkabel aus der Netzsteckdose
aus. Reinigen Sie dieses Gerät mit einem weichen Tuch.
≥ Wenn der Schmutz hartnäckig ist, wringen Sie ein nasses Tuch
gründlich aus, um den Schmutz abzuwischen und trocknen Sie es
mit einem weichen Tuch ab.
≥ Verwenden Sie keine Lösungsmittel wie Benzin, Verdünner,
Alkohol, Haushaltsreiniger, einen chemischen Wischer etc. Diese
könnten dazu führen, dass sich das äußere Gehäuse verformt
oder die Beschichtung abblättert.
(66)
ST-C700DE-TQBM0007.book 32 ページ 2016年10月26日 水曜日 午後1時17分

33
Deutsch
Technische Daten
∫ ALLGEMEIN
Spannungsversorgung AC 220 V bis 240 V, 50/60 Hz
Leistungsaufnahme 26 W
Stromverbrauch im Standby-Modus*
1
(Wenn “Network Standby” ausgeschaltet ist) Ca. 0,2 W
(Wenn “Network Standby” eingeschaltet ist) Ca. 2,0 W
Stromverbrauch in ausgeschaltetem Zustand Ca. 0,2 W
Abmessungen (BkHkT) 340 mmk78 mmk305 mm
Gewicht Ca. 4,0 kg
Betriebstemperaturbereich 0 oC bis r40 oC
Betriebsfeuchtigkeitsbereich 35 % bis 80 % Rel. Feuchte (keine Kondensbildung)
∫ ANSCHLUSS-TEIL
Analogausgang
LINE OUT Klinkenbuchse
Digitalausgang
Optischer Digitalausgang Optischer Anschluss
Koaxialer Digitalausgang Klinkenbuchse
Systemanschluss
Systemsteuerung ‰3,5 mm Buchse
USB
Vorderer USB-Port Typ A Anschluss
Supportspeicher-Kapazität 2TB (max.)
Maximale Anzahl an Ordnern (Alben) 800
Maximale Anzahl an Dateien (Lieder) 8000
Dateiensystem FAT16, FAT32
USB-Anschlussleistung DC OUT 5 V 2,1 A (max.)
PC
Hinterer USB-Port Typ B Anschluss
Ethernet Interface
LAN 10 Base-T/100 Base-TX
∫ FORMAT-ABSCHNITT
USB-A
USB Standard USB 2.0 High-Speed
USB-Massenspeicher-Klasse
USB-B
USB Standard USB 2.0 High-Speed
USB-Audio-Klasse 2.0, Asynchronmodus
DSD-Steuermodus Nativer ASIO-Modus, DoP-Modus
(67)
ST-C700DE-TQBM0007.book 33 ページ 2016年10月26日 水曜日 午後1時17分

34
≥ Änderungen der technischen Daten bleiben ohne vorherige Ankündigung vorbehalten.
≥ Die Gewichtsangaben und Abmessungen sind ungefähre Werte.
*1 Wenn das iPhone/iPad/iPod nicht aufgeladen wird
*2 Voraussichtliche Entfernung für den Datenaustausch
Messumgebung: Temperatur 25 oC / Höhe 1,0 m
Messung in “Mode 1”
∫ ANALOGAUSGANG-ABSCHNITT
Kanal 2ch
Ausgangspegel
LINE OUT 2,0 Vrms
Frequenzantwort 2 Hz bis 90 kHz (s3dB)
THD+N 0,0012 % (1 kHz, 0 dB)
S/R 112 dB (IHF-A)
Dynamikumfang 112 dB (IHF-A)
∫ Bluetooth
®
/NFC-ABSCHNITT
Bluetooth
®
Bluetooth
®
-Systemspezifikation Bluetooth
®
Ver.3.0
Klassifizierung von Drahtlosgeräten Klasse 2 (2,5 mW)
Unterstützte Profile A2DP/AVRCP
Unterstützter Codec Qualcomm
®
aptX™ Low Latency, AAC, SBC
Frequenzband 2,4 GHz Band FH-SS
Reichweite Ca. 10 m Sichtlinie*
2
∫ TUNERTEIL
Frequenzmodulation (FM)
Stationsspeicher 30 Sender
Frequenzbereich 87,50 MHz bis 108,00 MHz (50 kHz-Schritt)
Antennenklemmen 75 ≠ (ungleichmäßig)
DAB
DAB-Speicher 20 Kanäle
Frequenzband (Wellenlänge)
Band III (All Band III) 5A bis 13F (174,928 MHz bis 239,200 MHz)
Empfindlichkeit
Mindestanforderung s98 dBm
DAB-Außenantennenanschluss F-Anschluss (75 ≠)
(68)
ST-C700DE-TQBM0007.book 34 ページ 2016年10月26日 水曜日 午後1時17分

35
Deutsch
∫ Dateiformat
Dieses Gerät unterstützt die folgenden Dateiformate.
≥Dieses Gerät unterstützt nicht die Wiedergabe von kopiergeschützten Musikdateien.
≥Die Wiedergabe aller Dateien in Formaten, die von diesem Gerät unterstützt werden, kann nicht garantiert werden.
≥Die Wiedergabe einer Datei in einem Format, das von diesem Gerät nicht unterstützt wird, kann zu abgehacktem Audio oder zu
Rauschen führen. Überprüfen Sie in solchen Fällen, ob dieses Gerät das Dateiformat unterstützt.
≥Dieses Gerät unterstützt nicht die Wiedergabe von VBR (Variable Bitrate).
≥Einige der angeschlossenen Geräte (Server) sind möglicherweise in der Lage, Dateien in Formate zu konvertieren, die von
diesem Gerät nicht unterstützt werden, und diese auszugeben. Detaillierte Informationen finden Sie in der Bedienungsanleitung
Ihres Servers.
≥Die von diesem Gerät und von der Wiedergabe-Software angezeigten Dateiinformationen (Abtastfrequenz, etc.) können sich
voneinander unterscheiden.
USB-A
PC (USB-B)*
1
LAN (DLNA)*
2
*1 Wenn Sie die spezielle App herunterladen und installieren, können Sie Dateien in vielen verschiedenen Formaten wiedergeben. (> 20)
Detaillierte Informationen finden Sie in der Bedienungsanleitung des App.
*2 Ob jede Musikdatei über Ihr Netzwerk wiedergegeben werden kann, wird durch den Netzwerk-Server bestimmt, auch wenn das Dateiformat
oben aufgelistet ist. Wenn Sie beispielsweise Windows Media
®
Player 11 verwenden, sind nicht alle Musikdateien auf dem PC abspielbar. Sie
können nur diejenigen wiedergeben, die zur Bibliothek von Windows Media
®
Player 11 hinzugefügt wurden.
≥ Stand der genannten Informationen: Oktober 2016. Sie können ohne Ankündigung aktualisiert werden. Informationen zu Updates finden Sie
auf der unten genannten Website.
www.technics.com/support/firmware/
Dateiformat Erweiterung Abtastrate
Bitrate
Anzahl der Quantisierungsbits
MP3 .mp3 32/44,1/48 kHz 16 kbps bis 320 kbps
AAC .m4a/.aac 32/44,1/48/88,2/96 kHz 16 kbps bis 320 kbps
WMA .wma 32/44,1/48 kHz 16 kbps bis 320 kbps
WAV .wav 32/44,1/48/88,2/96/176,4/192 kHz 16/24 bit
FLAC .flac 32/44,1/48/88,2/96/176,4/192 kHz 16/24 bit
AIFF .aiff 32/44,1/48/88,2/96/176,4/192 kHz 16/24 bit
ALAC .m4a 32/44,1/48/88,2/96/176,4/192 kHz 16/24 bit
DSD .dff/.dsf 2,8/5,6 MHz
Dateiformat Erweiterung Abtastrate
Bitrate
Anzahl der Quantisierungsbits
LPCM 32/44,1/48/88,2/96/176,4/192 kHz 16/24/32 bit
DSD .dff/.dsf 2,8/5,6 MHz
Dateiformat Erweiterung Abtastrate
Bitrate
Anzahl der Quantisierungsbits
MP3 .mp3 32/44,1/48 kHz 16 kbps bis 320 kbps
AAC .m4a/.aac 32/44,1/48/88,2/96 kHz 16 kbps bis 320 kbps
WMA .wma 32/44,1/48 kHz 16 kbps bis 320 kbps
WAV .wav 32/44,1/48/88,2/96/176,4/192 kHz 16/24 bit
FLAC .flac 32/44,1/48/88,2/96/176,4/192 kHz 16/24 bit
AIFF .aiff 32/44,1/48/88,2/96/176,4/192 kHz 16/24 bit
ALAC .m4a 32/44,1/48/88,2/96/176,4/192 kHz 16/24 bit
DSD .dff/.dsf 2,8/5,6 MHz
(69)
ST-C700DE-TQBM0007.book 35 ページ 2016年10月26日 水曜日 午後1時17分

36
∫ Über Bluetooth
®
Verwendetes Frequenzband
≥Dieses System verwendet das 2,4 GHz Frequenzband.
Zertifizierung dieses Geräts
≥Dieses System entspricht den Frequenzbeschränkungen
und wurde gemäß dem Frequenzrecht zertifiziert. Daher ist
keine Drahtlosgenehmigung erforderlich.
≥Die unten genannten Handlungen sind in einigen Ländern
strafbar:
– Ein Auseinanderbauen oder Modifizieren des Systems.
– Ein Entfernen der Spezifikationskennzeichnungen.
Nutzungsbeschränkungen
≥Die drahtlose Übertragung und/oder Nutzung mit allen mit
Bluetooth
®
ausgerüsteten Geräten kann nicht garantiert
werden.
≥Alle Geräte müssen den durch Bluetooth SIG, Inc.
festgelegten Standards entsprechen.
≥Je nach Spezifikationen und Einstellungen eines Gerätes,
kann die Verbindung unter Umständen nicht hergestellt
werden, oder einige Funktionen können sich
unterscheiden.
≥Dieses System unterstützt Bluetooth
®
-
Sicherheitsfunktionen. Aber je nach Betriebsumgebung
und/oder Einstellungen, ist diese Sicherheit
möglicherweise nicht ausreichend. Übertragen Sie mit
Vorsicht drahtlos Daten an dieses System.
≥Dieses System kann keine Daten an ein Bluetooth
®
-Gerät
übertragen.
Einsatzbereich
≥Verwenden Sie dieses Gerät bei einer maximalen
Reichweite von 10 m. Die Reichweite kann je nach
Umgebung, Hindernissen oder Interferenzen, abnehmen.
Interferenz von anderen Geräten
≥Dieses System kann aufgrund von
Funkwelleninterferenzen nicht korrekt funktionieren und es
können Störungen wie Rauschen und Tonsprünge
auftreten, wenn dieses System zu nahe an anderen
Bluetooth
®
-Geräten oder Geräten aufgestellt ist, die das
2,4 GHz-Band verwenden.
≥Dieses System könnte nicht korrekt funktionieren, wenn
die Funkwellen einer nahe gelegenen Sendestation, etc.
zu stark sind.
Verwendungszweck
≥Dieses System ist nur für den normalen, allgemeinen
Gebrauch gedacht.
≥Verwenden Sie dieses System nicht in der Nähe von
Geräten oder in einer Umgebung, die gegenüber
hochfrequenten Störungen empfindlich ist (Beispiel:
Flughäfen, Krankenhäuser, Labors, etc).
Panasonic übernimmt keine Verantwortung für Daten
und/oder Informationen, die während einer
drahtlosen Übertragung gefährdet sind.
“Made for iPod”, “Made for iPhone” und “Made for iPad” bedeutet, dass ein
elektronisches Zubehörteil speziell für den Anschluss an einen iPod,
iPhone bzw. ein iPad, entworfen wurde, und vom Entwickler zertifiziert
wurde, dass es den Leistungsstandards von Apple entspricht.
Apple ist nicht für die Funktionsfähigkeit dieses Geräts, oder für die
Einhaltung von Sicherheits- und Regulierungsstandards, verantwortlich.
Bitte beachten Sie, dass die Verwendung dieses Zubehörs mit einem iPod,
iPhone oder iPad die drahtlose Leistung beeinträchtigen kann.
AirPlay, iPad, iPhone, iPod, iPod nano, iPod touch und iPad Air sind
Warenzeichen von Apple Inc., die in den USA und in anderen Ländern
eingetragen sind.
iPad mini und iPad Pro sind Markenzeichen von Apple Inc.
Mac und OS X sind Warenzeichen von Apple Inc., die in den USA und in
anderen Ländern eingetragen sind.
Android ist eine Marke von Google Inc.
Qualcomm aptX ist ein Produkt von Qualcomm Technologies International, Ltd.
Qualcomm ist ein Markenzeichen von Qualcomm Incorporated,
eingetragen in den Vereinigten Staaten von Amerika und anderen Ländern,
und es wird mit entsprechender Genehmigung verwendet. aptX ist ein
Markenzeichen von Qualcomm Technologies International, Ltd.,
eingetragen in den Vereinigten Staaten von Amerika und anderen Ländern,
und es wird mit entsprechender Genehmigung verwendet.
Die Bluetooth
®
-Wortmarke und -Logos sind eingetragene Markenzeichen
von Bluetooth SIG, Inc. und jede Verwendung dieser Marken durch
Panasonic Corporation erfolgt unter Lizenz.
Andere Warenzeichen und Handelsnamen sind Eigentum der jeweiligen Inhaber.
DLNA, the DLNA Logo and DLNA CERTIFIED are trademarks, service
marks, or certification marks of the Digital Living Network Alliance.
Die MPEG Layer-3 Audio-Codiertechnologie wurde von Fraunhofer IIS und
Thomson lizensiert.
Windows und
Windows Vista
sind eingetragene Warenzeichen oder
Warenzeichen von Microsoft Corporation in den USA und/oder anderen Ländern.
Windows Media und das Windows-Logo sind Markenzeichen oder
eingetragene Markenzeichen der Microsoft Corporation in den Vereinigten
Staaten und/oder anderen Ländern.
Dieses Produkt unterliegt dem Schutz durch bestimmte Rechte an
geistigem Eigentum von Microsoft Corporation und Dritten. Nutzung oder
Verteilung einer derartigen Technologie außerhalb dieses Produkts ohne
Erteilung einer entsprechenden Lizenz durch Microsoft, ein autorisiertes
Microsoft-Tochterunternehmen oder autorisierte Dritte ist verboten.
FLAC Decoder
Copyright (C) 2000, 2001, 2002, 2003, 2004, 2005, 2006, 2007, 2008,
2009 Josh Coalson
Redistribution and use in source and binary forms, with or without
modification, are permitted provided that the following conditions are met:
– Redistributions of source code must retain the above copyright notice,
this list of conditions and the following disclaimer.
– Redistributions in binary form must reproduce the above copyright
notice, this list of conditions and the following disclaimer in the
documentation and/or other materials provided with the distribution.
– Neither the name of the Xiph.org Foundation nor the names of its
contributors may be used to endorse or promote products derived from
this software without specific prior written permission.
THIS SOFTWARE IS PROVIDED BY THE COPYRIGHT HOLDERS AND
CONTRIBUTORS “AS IS” AND ANY EXPRESS OR IMPLIED WARRANTIES,
INCLUDING, BUT NOT LIMITED TO, THE IMPLIED WARRANTIES OF
MERCHANTABILITY AND FITNESS FOR A PARTICULAR PURPOSE ARE
DISCLAIMED. IN NO EVENT SHALL THE FOUNDATION OR CONTRIBUTORS
BE LIABLE FOR ANY DIRECT, INDIRECT, INCIDENTAL, SPECIAL,
EXEMPLARY, OR CONSEQUENTIAL DAMAGES (INCLUDING, BUT NOT
LIMITED TO, PROCUREMENT OF SUBSTITUTE GOODS OR SERVICES;
LOSS OF USE, DATA, OR PROFITS; OR BUSINESS INTERRUPTION)
HOWEVER CAUSED AND ON ANY THEORY OF LIABILITY, WHETHER IN
CONTRACT, STRICT LIABILITY, OR TORT (INCLUDING NEGLIGENCE OR
OTHERWISE) ARISING IN ANY WAY OUT OF THE USE OF THIS SOFTWARE,
EVEN IF ADVISED OF THE POSSIBILITY OF SUCH DAMAGE.
Die Spotify-Software unterliegt Lizenzen von Dritten, die Sie hier finden:
www.spotify.com/connect/third-party-licenses
(70)
ST-C700DE-TQBM0007.book 36 ページ 2016年10月26日 水曜日 午後1時17分

37
Deutsch
(71)
ST-C700DE-TQBM0007.book 37 ページ 2016年10月26日 水曜日 午後1時17分

4
Merci d’avoir porté votre choix sur cet appareil.
Veuillez lire attentivement les présentes instructions avant d’utiliser ce produit, et conserver ce manuel pour utilisation ultérieure.
∫ Caractéristiques de cet appareil
Cet appareil offre les caractéristiques suivantes :
Digital Noise Isolation Architecture (Architecture d'isolation des bruits numériques)
Puisque la plupart des supports de stockage de contenu numérique sont destinés à être utilisés avec des ordinateurs, ils n'ont
pas été conçus en tenant compte des faibles bruits, ce qui est essentiel à la reproduction d'un son pur. Pour surmonter ce défi,
cet appareil utilise une mesure efficace contre les instabilités et une technologie de blocage de bruit exceptionnelle pour chacune
de ses interfaces, afin de reproduire un son clair.
Virtual Battery Operation (Exploitation virtuelle de la batterie)
Virtual Battery Operation (Exploitation virtuelle de la batterie) empêche le bruit de l'alimentation, un facteur qui cause une
“turbidité” du son, provenant du mixage dans le signal audio. Il en résulte une amélioration de la performance de la localisation du
son et de l'expression spatiale.
Ultra Low Distortion Oversampling Digital Filter (Filtre numérique du suréchantillonnage de distorsion ultra basse)
Le suréchantillonnage de haute précision élimine la distorsion et améliore la qualité du son des sources musicales, en
reproduisant un son et une expression spatiale riches.
∫ Dispositifs recommandés
Nous vous recommandons l'utilisation de dispositifs Technics (en option) pour une qualité sonore supérieure.
Nom du produit Numéro du modèle
Enceintes acoustiques SB-C700
Lecteur de Compact Disc SL-C700
Amplificateur intégré SU-C700
(72)
ST-C700DE-TQBM0007.book 4 ページ 2016年10月26日 水曜日 午後1時17分

5
Français
Consignes de sécurité
Appareil
≥ Pour réduire les risques d’incendie, d’électrocution ou de dommages au
produit,
– N’exposez pas cet appareil à la pluie, l’humidité, l’égouttement ou
l’éclaboussement.
– Ne placez pas d’objets remplis d’eau, tels que des vases, sur l’appareil.
– Utiliser exclusivement les accessoires préconises.
– Ne retirez pas les caches.
– Ne réparez pas l’appareil vous-même. Confiez l’entretien a un personnel
qualifié.
– Ne laissez pas d’objets métalliques tomber dans cet appareil.
– Ne pas placer d’objets lourds sur cet appareil.
Cordon d’alimentation secteur
≥ Pour réduire les risques d’incendie, d’électrocution ou de dommages au
produit,
– Assurez-vous que la puissance du voltage fourni correspond au voltage
inscrit sur l’appareil.
– Branchez la prise secteur dans la prise électrique.
– Ne pas tirer, plier ou placer des objets lourds sur le cordon.
– Ne manipulez pas la prise avec les mains mouillées.
– Tenez le corps de la prise secteur en la débranchant.
– N’utilisez pas de prise secteur ni de prise de courant endommagée.
≥ La fiche secteur est le dispositif de déconnexion.
Installez cet appareil de sorte que la fiche secteur puisse être débranchée
immédiatement de la prise de courant.
Appareil
≥ Ne placez pas de sources de flammes vives telles que bougies allumées sur
cet appareil.
≥ Cet appareil peut être perturbé par des interférences causées par des
téléphones mobiles pendant l’utilisation. En présence de telles
interférences, éloignez le téléphone mobile de cet appareil.
≥ Cet appareil est destiné à être utilisé sous des climats tempérés et
tropicaux.
Emplacement
≥ Placez cet appareil sur une surface plane.
≥ Pour réduire les risques d’incendie, d’électrocution ou de dommages au
produit,
– N’installez pas et ne placez pas cet appareil dans une bibliothèque, un
placard ni dans aucun autre espace réduit. Assurez-vous que l’appareil
est bien ventilé.
– Ne bouchez pas les ouvertures d’aération de cet appareil avec des
journaux, nappes, rideaux ou objets similaires.
– N’exposez pas cet appareil directement aux rayons du soleil, à des
températures élevées, à une humidité élevée ni à des vibrations
excessives.
≥ Ne soulevez pas et ne transportez pas cet appareil en le tenant pas ses
leviers. Cela pourrait faire tomber l'appareil, causant des blessures ou un
dysfonctionnement de celui-ci.
Pile
≥ Il y a un danger d’explosion si la pile n’est pas correctement remplacée.
Remplacez uniquement par le type recommandé par le fabricant.
≥ Manipuler de façon incorrecte les piles peut causer une fuite d’électrolyte
ainsi qu’un incendie.
– Retirez la batterie si vous n’avez pas l’intention d’utiliser la télécommande
pendant un long moment. Rangez-la dans un endroit frais et sombre.
– Ne chauffez pas et n’exposez pas les piles à une flamme.
– Ne laissez pas la (les) pile(s) dans un véhicule exposé directement aux
rayons du soleil pendant un long moment avec fenêtres et portières
fermées.
– Ne pas démonter ou court-circuiter les piles.
– Ne rechargez pas des piles alcalines ou au manganèse.
– Ne pas utiliser des piles dont le revêtement a été enlevé.
– Ne mélangez pas les anciennes piles avec les piles neuves ou différents
types de piles.
≥ Pour jeter les piles, veuillez contacter les autorités locales ou votre
revendeur afin de connaître la procédure d’élimination à suivre.
AVERTISSEMENT
ATTENTION
Déclaration de Conformité (DoC)
Par la présente, “Panasonic Corporation” déclare que ce produit est en conformité
avec les exigences essentielles et les autres clauses justificatives de la Directive
1999/5/CE.
Les clients peuvent télécharger un exemplaire de la DoC originale concernant nos
produits relevant de la Directive R&TTE sur notre serveur DoC:
http://www.doc.panasonic.de
Pour contacter un Représentant Autorisé:
Panasonic Marketing Europe GmbH, Panasonic Testing Centre,
Winsbergring 15, 22525 Hamburg, Allemagne
L’élimination des équipements et des batteries usages
Applicable uniquement dans les pays membres de l’Union
européenne et les pays disposant de systèmes de recyclage.
Apposé sur le produit lui-même, sur son emballage, ou
figurant dans la documentation qui l’accompagne, ce
pictogramme indique que les piles, appareils électriques
et électroniques usagés, doivent être séparées des
ordures ménagères.
Afin de permettre le traitement, la valorisation et le
recyclage adéquats des piles et des appareils usagés,
veuillez les porter à l’un des points de collecte prévus,
conformément à la législation nationale en vigueur.
En les éliminant conformément à la réglementation en
vigueur, vous contribuez à éviter le gaspillage de
ressources précieuses ainsi qu’à protéger la santé
humaine et l’environnement.
Pour de plus amples renseignements sur la collecte et le
recyclage, veuillez vous renseigner auprès des
collectivités locales.
Le non-respect de la réglementation relative à
l’élimination des déchets est passible d’une peine
d’amende.
Note relative au pictogramme à apposer sur
les piles (pictogramme du bas) :
Si ce pictogramme est combiné avec un symbole
chimique, il répond également aux exigences posées par
la Directive relative au produit chimique concerné.
(73)
ST-C700DE-TQBM0007.book 5 ページ 2016年10月26日 水曜日 午後1時17分

6
Table des matières
∫ Pour éliminer ou transférer cette unité
Cette unité peut contenir des informations privées. Avant d’éliminer ou de transférer cette unité, effectuez les actions suivantes
pour supprimer les données, notamment les informations personnelles ou secrètes.
≥“Pour remettre tous les paramètres sur leurs réglages d’usine par défaut” (> 29)
Accessoires
≥ Les références des produits fournies dans ce mode d'emploi sont correctes à compter de septembre 2016. Sous réserve de modifications.
≥ N’utilisez pas de cordon d’alimentation avec d’autres appareils.
Consignes de sécurité ......................................................5
Accessoires .......................................................................6
Guide de référence de la commande...............................7
Préparatifs..........................................................................9
Menu HOME et commandes de base............................. 11
Configuration réseau ......................................................12
Lecture des fichiers musicaux sur le serveur DLNA ...13
Écouter une station de Internet Radio (vTuner) ...........14
Utilisation de Spotify.......................................................16
Utilisation iPhone/iPad/iPod...........................................17
Utilisation AirPlay............................................................18
Utilisation du périphérique USB ....................................18
Utilisation d'un ordinateur, etc.......................................20
Utilisation Bluetooth
®
......................................................21
Écoute d'une Radio FM ...................................................23
Écoute avec le système DAB/DAB+...............................24
Réglage du son................................................................25
Autres ...............................................................................26
Guide de dépannage .......................................................29
Entretien de l’appareil .....................................................32
Caractéristiques ..............................................................33
A propos des descriptions dans ce mode d’emploi
≥Les pages à consulter sont désignées par le signe “@ ±±”.
≥Les illustrations montrées peuvent être différentes de votre appareil.
≥Sauf indication contraire, les opérations sont décrites en utilisant la télécommande.
∏ 1 Cordon d’alimentation secteur
(REQ0456)
∏ 1 Câble de connexion du système
(K2KYYYY00233)
∏ 1 Câble numérique coaxial
(K2KYYYY00251)
∏ 1 Antenne intérieure DAB
(RFA3654)
∏ 1 Télécommande
(N2QAYA000096)
∏ 2 Piles pour la
télécommande
(K2CQ2YY00127)
∫ Utiliser la télécommande
Insérez la pile de façon à ce que ses pôles (
i
et
j
)
correspondent à ceux de la télécommande.
Pointez-le vers la cellule de réception du signal de
commande à distance sur cet appareil. (> 7)
≥Gardez les piles hors de portée des enfants pour
éviter qu’ils les avalent.
2
1
R03/LR03, AAA
(Piles alcalines ou au manganèse)
(74)
ST-C700DE-TQBM0007.book 6 ページ 2016年10月26日 水曜日 午後1時17分

7
Français
Guide de référence de la commande
∫ Avant
1
Interrupteur d'alimentation [
Í
/
I
(veille/marche)]/[OFF]
Pour mettre en marche/éteindre cet appareil.
≥ La télécommande ne fonctionne pas lorsque l'interrupteur
d'alimentation est baissé.
≥ Vous pouvez passer l'appareil en marche sur le mode veille et
vice versa lorsque le commutateur d'alimentation est sur la
position du haut. (> 8)
2 Port pour iPhone/iPad/iPod et périphériques USB
( DC 5 V 2,1 A) (> 17, 18)
3 Capteur du signal de la télécommande
Distance: Environ dans un rayon de 7 m directement vers
l’avant
Angle: Environ 30o à gauche et à droite
4 Affichage
≥La source d'entrée, l'état de la lecture et d'autres
informations s'affichent. Pour plus de détails, consultez
le site d'assistance suivant ainsi que ce mode d'emploi.
www.technics.com/support/
5 Commutateurs de commande de base
Ces commutateurs fonctionnent simplement en touchant
les symboles. Chaque fois que vous toucherez le
commutateur, un bip sonore se fera entendre. (> 11)
≥
Lorsque les informations de lecture n'apparaissent pas sur
l'afficheur (excepté en mode veille d'enregistrement NFC (
>
21)),
vous pouvez effectuer les actions suivantes sur l'écran tactile:
6 Zone tactile NFC (> 21)
Un film protecteur adhère à la zone tactile NFC au
moment de l'achat.
∫ Arrière
7 Marquage d'identification du produit
Le numéro du modèle est indiqué.
8 Prise DAB/FM (> 10)
9 Sortie audio analogique [LINE OUT] (> 9)
: Sortie audio numérique [COAX OUT] (> 9)
; Sortie audio numérique [OPT OUT] (> 9)
< Entrée audio numérique [PC] (> 20)
Pour raccorder un ordinateur, etc.
= Prise système [CONTROL] (> 9)
> Port LAN [LAN] (> 12)
? Prise AC IN [AC IN T]( ) (> 10)
Cet appareil
:3 (Haut)
94 (Bas)
1/; OK (OK)
∫ RETURN (Retour)
HOME (Touchez
quelques instants)
MENU (Menu entrée)
Équipement de Classe II
(Le produit a été construit avec une double isolation.)
(75)
ST-C700DE-TQBM0007.book 7 ページ 2016年10月26日 水曜日 午後1時17分

8
∫ Touches qui fonctionnent avec cet appareil
1 [NWP Í]: Commutateur veille/marche
Appuyez sur le commutateur de l’appareil à partir de
mode marche vers le mode veille et vice et versa.
En mode veille, l’appareil consomme une petite quantité
d’énergie.
≥ La télécommande ne fonctionne pas lorsque l'interrupteur
d'alimentation est baissé.
2 [AMP]/[NWP]/[CD]: Sélectionnez le périphérique à
utiliser
3 [N INPUT O]: Sélectionne la source d’entrée
4 [DIMMER]: Réglez la luminosité de l'écran
d'affichage, etc. (> 11)
5 [HOME]: Affichez le menu de HOME (> 11)
6 [INFO]: Afficher les informations le contenu
Appuyez sur ce bouton pour afficher les noms de la piste, de
l'artiste et de l'album ainsi que le type de fichier, la fréquence
d'échantillonnage, et d'autres informations.
7 [3, 4, 2, 1]/[OK]: Sélection/OK
8 [RETURN]: Retourne sur l'affichage précédent
9 [MENU]: Entre dans le menu (> 21, 22, 23, 24, 26)
: [DIRECT]: Active/désactive le mode Direct (> 25)
; [RE-MASTER]: Active/désactive Re-master (> 25)
< Touches de contrôle de base de la lecture
= Touches numériques, etc.
≥ Pour sélectionner un numéro à 2 chiffres
Exemple:
16: [S10] > [1] > [6]
≥ Pour sélectionner un nombre à 4 chiffres
Exemple:
1234 : [S10] > [S10] > [S10] > [1] > [2] > [3] > [4]
≥ [CLEAR]: Efface la valeur entrée.
∫ Touches qui fonctionnent avec les
modèles SU-C700/SL-C700
La télécommande de cet appareil fonctionne également avec
les modèles SU-C700/SL-C700.
Pour avoir des informations sur les modèles SU-C700/
SL-C700, veuillez consulter leur mode d'emploi.
1 Commutateur veille/marche du SU-C700
2 Commutateur veille/marche du
SL-C700
3 Sélectionne le périphérique à utiliser
4 Sélectionne la source d'entrée du modèle SU-C700
5 Réglez la luminosité de l'écran d'affichage, etc.
6 Mesure des caractéristiques de l'amplificateur et corrige
sa sortie
7 Règle le volume
8 Option muet
Télécommande
(76)
ST-C700DE-TQBM0007.book 8 ページ 2016年10月26日 水曜日 午後1時17分

9
Français
Préparatifs
≥Eteignez tous les appareils avant le branchement et lisez le mode d'emploi approprié.
≥Ne branchez pas le cordon d'alimentation secteur avant que les autres raccordements soient effectués.
≥Insérez les connecteurs des câbles à raccorder complètement.
≥Ne pliez pas les câbles trop abruptement.
≥Vous pouvez reproduire les signaux audio numériques de cet appareil et écouter de la musique.
≥Vous pouvez lier automatiquement cet appareil au SU-C700 et les commander facilement à l'aide de la télécommande. (> 28)
≥ N'utilisez aucun autre câble de connexion du système ou câble numérique coaxial à l'exception de celui fourni.
≥ Branchez le câble de connexion du système à la prise du système [CONTROL1] du SU-C700.
≥ Branchez le câble numérique coaxial à l'entrée audio numérique [COAX1 IN] du SU-C700.
Vous pouvez reproduire les signaux audio analogiques ou numériques de cet appareil et écouter des fichiers musicaux.
Branchement du contrôle de système au SU-C700
Cet appareil
(Derrière)
SU-C700
Câble numérique coaxial
(fourni)
Câble de connexion du
système
(fourni)
Raccordement à un amplificateur et à un convertisseur D/A
ex:
Cet appareil
(Derrière)
Amplificateur
Câble audio numérique optique
(non fourni)
Convertisseur D/A
Câble audio
(non fourni)
(77)
ST-C700DE-TQBM0007.book 9 ページ 2016年10月26日 水曜日 午後1時17分

10
≥ Si la réception radio est mauvaise, utilisez une antenne extérieure DAB (non fournie).
≥ N'utilisez aucune autre antenne intérieure que l'antenne intérieure DAB fournie.
À raccorder une fois tous les autres branchements effectués.
≥ Cet appareil consomme une petite quantité de courant (> 33) même lorsque l'interrupteur d'alimentation est sur [OFF]. Débranchez la fiche de
la prise électrique murale si vous ne devez plus utiliser l'appareil durant une période prolongée. Placez l'appareil de manière à ce que la fiche
puisse être facilement débranchée.
Branchez l’antenne
Connexion du câble d’alimentation secteur
Cet appareil
(Derrière)
Ruban adhésif
(non fourni)
Antenne intérieure DAB
(fourni)
Assurez-vous de serrer à fond
l'écrou.
Placer l’antenne là où la réception est maximale.
Cordon
d’alimentation
secteur (fourni)
Vers une prise secteur
Cet appareil
(Derrière)
Insérez le cordon
d'alimentation secteur
jusqu'à A, un point juste
avant le trou rond.
(78)
ST-C700DE-TQBM0007.book 10 ページ 2016年10月26日 水曜日 午後1時17分

11
Français
Menu HOME et commandes de base
Les fonctions principales de cet appareil peuvent être gérées
du menu HOME.
Préparation
≥Préparez la musique que vous désirez écouter.
≥Mettez en marche le périphérique raccordé (amplificateur,
etc.) et baissez son volume.
1 Relevez l'interrupteur d'alimentation de cet
appareil sur la position [Í/I].
2 Appuyez sur [NWP].
3 Appuyez sur [HOME].
4 Appuyez sur [3, 4] pour sélectionner un
élément puis appuyez sur [OK].
≥S’il y a d’autres éléments, répétez cette étape.
≥
De nouveaux éléments peuvent être ajoutés et les éléments
existants peuvent être mis à jour. Pour avoir des informations sur
les ajouts et les mises à jour, visitez le site d'assistance ci-dessous.
www.technics.com/support/
5 Démarrez la lecture.
∫ Pour afficher le menu HOME
Appuyez sur [HOME].
Réglez le volume du périphérique raccordé (amplificateur, etc.).
La luminosité de l'afficheur de cet appareil et de l'indicateur
d'alimentation peut être changée.
Appuyez plusieurs fois sur [DIMMER].
≥ Si l'afficheur est éteint, il ne s'allumera que lorsque vous
actionnerez cet appareil.
Avant que l'afficheur s'éteigne à nouveau, “Display Off” s'affichera
pendant quelques secondes.
Vous pouvez activer/désactiver le bip sonore.
≥ Le réglage d'usine par défaut est “On”.
1 Appuyez sur [NWP].
2 Appuyez sur [HOME].
3 Appuyez plusieurs fois sur [3, 4] pour
sélectionner “SETUP” puis appuyez sur
[OK].
4 Appuyez plusieurs fois sur [3, 4] pour
sélectionner “Beep” puis appuyez sur [OK].
5 Appuyez sur [3, 4] pour sélectionner
“On”/“Off” puis appuyez sur [OK].
Si vous installez l'appli dédiée “Technics Music App”
(gratuite) sur votre smartphone/tablette, vous pouvez
actionner cet appareil et le SU-C700 en utilisant une grande
variété de fonctions.
Pour avoir des détails, visitez :
www.technics.com/support/
DMP
Connecte cet appareil à un réseau et
lit la musique qui y est diffusée.
(> 13)
Internet Radio
Permet de lire la Radio Internet
(vTuner). (> 14)
USB
Lit la musique stockée sur un
périphérique USB ou un
iPhone/iPad/iPod. (> 17, 18, 19)
PC
Lit la musique stockée sur un
ordinateur, etc. (> 20)
Bluetooth
Connecte cet appareil à un
périphérique Bluetooth
®
et lit la
musique qui y est stockée.
(> 21, 22)
FM FM (> 23)
DAB/DAB+ DAB/DAB+ (> 24)
SETUP (> 11, 12, 25, 26, 27, 28)
ラヰヮユ
リㄏㄕㄆㄓㄏㄆㄕチンㄅㄊㄐ
ヒバベ
ュヮ
ヱ
Réglage du volume
Luminosité de l’afficheur
Configuration du son de
fonctionnement
Commandes utilisant l'appli
dédiée “Technics Music App”
(79)
ST-C700DE-TQBM0007.book 11 ページ 2016年10月26日 水曜日 午後1時17分

12
Configuration réseau
Vous pouvez diffuser en streaming la musique d'un périphérique
iOS (iPhone/iPad/iPod), d'un périphérique Android™ ou d'un
ordinateur (Mac/Windows) vers cet appareil en utilisant la
fonctionnalité AirPlay ou DLNA. (
>
13, 18)
Pour utiliser ces fonctionnalités, cet appareil doit être
connecté au même réseau que le périphérique compatible
AirPlay ou le périphérique compatible DLNA.
Normalement, le simple raccordement d'un câble réseau
terminera la configuration.
A: Câble réseau (LAN) (non fourni)
1 Débrancher le cordon d’alimentation
secteur.
2 Raccordez cet appareil à un routeur à haut
débit, etc. via un câble réseau.
3 Branchez le cordon d’alimentation secteur à
cet appareil et relevez l'interrupteur
d'alimentation sur la position [Í/I]. (> 10)
≥
Une fois la connexion établie, “ ” est affiché à l’écran.
≥ Si “Firmware update is available” s’affiche une fois que la
connexion est établie, le micrologiciel de cette unité est disponible.
– Reportez-vous à “Firmware update is available” (> 31) pour
plus de détails sur la mise à jour.
– Pour des informations sur la mise à jour, référez-vous au site
Internet suivant.
www.technics.com/support/firmware/
Vous pouvez changer le nom de cet appareil sur le réseau (Friendly
Name) et utiliser une adresse IP, un masque de sous-réseau, une
passerelle par défaut, un DNS primaire, etc. spécifiques.
≥
N'écoutez pas de musique pendant le changement de ces paramètres.
1 Appuyez sur [NWP].
2 Appuyez sur [HOME].
3 Appuyez plusieurs fois sur [3, 4] pour sélectionner
“SETUP” puis appuyez sur [OK].
4 Appuyez plusieurs fois sur [3, 4] pour sélectionner
“Network” puis appuyez sur [OK].
5 Sélectionnez et saisissez les détails.
6 Appuyez sur [OK] pour appliquer les paramètres.
7 Appuyez plusieurs fois sur [RETURN] pour quitter les
paramètres.
8 Appuyez sur [NWP Í] pour passer l'appareil en mode de
veille.
≥ Attendez jusqu’à ce que “Please Wait” disparaisse.
9
Effectuez “Raccordement du réseau local filaire”. (
>
gauche)
≥ Utilisez des câbles LAN droits de catégorie 7 ou supérieure (STP)
pour connecter les appareils périphériques.
≥ L’introduction d’un tout autre câble que le câble réseau dans le
port LAN peut endommager l’appareil.
≥
Si vous essayez de changer les paramètres réseau immédiatement
après avoir mis en marche cet appareil, cela peut prendre du temps
avant que l'écran de configuration du réseau s'affiche.
∫ Nom de cette unité sur le réseau
“Friendly Name”
1 Appuyez sur [NWP].
2 Appuyez sur [HOME].
3 Appuyez plusieurs fois sur [3, 4] pour sélectionner
“SETUP” puis appuyez sur [OK].
4 Appuyez plusieurs fois sur [3, 4] pour sélectionner
“Network” puis appuyez sur [OK].
5 Appuyez sur [3, 4] de façon répétée pour choisir
“Friendly Name” puis appuyez sur [OK].
≥ Le nom actuel de cette unité est affiché. Appuyez sur [OK]
pour modifier.
6
Appuyez sur [
3
,
4
,
2
,
1
] pour saisir le nom personnalisé.
≥ Seuls des caractères ASCII peuvent être utilisés.
≥ “A” peut être ajouté lorsque vous appuyez sur [1] lorsque la
dernière lettre du nom personnalisé est sélectionnée.
≥ Appuyez sur [CLEAR] pour supprimer une lettre.
≥ Appuyez sur [S10] pour insérer une lettre “A”.
≥ Le nom par défaut est “Technics ST-C700D _ _ _ _ _ _”.
“ _ ” représente un chiffre unique pour chaque système.
7 Appuyez sur [OK] pour appliquer les paramètres.
8 Appuyez plusieurs fois sur [RETURN] pour quitter les
paramètres.
∫ Pour vérifier l'adresse MAC de cet appareil
1 Appuyez sur [NWP].
2 Appuyez sur [HOME].
3 Appuyez plusieurs fois sur [3, 4] pour sélectionner
“SETUP” puis appuyez sur [OK].
4 Appuyez plusieurs fois sur [3, 4] pour sélectionner
“Network” puis appuyez sur [OK].
5 Appuyez plusieurs fois sur [3, 4] pour sélectionner
“MAC Address”.
≥ L'adresse MAC de cet appareil s'affiche.
Raccordement du réseau local filaire
Routeur de bande large passante, etc.
Cet appareil
(Derrière)
PC , etc.
Pour définir les paramètres
liés au réseau
(80)
ST-C700DE-TQBM0007.book 12 ページ 2016年10月26日 水曜日 午後1時17分

13
Français
Lecture des fichiers musicaux sur le serveur
DLNA
Vous pouvez partager les fichiers musicaux stockés sur le
serveur de média certifié DLNA (Ordinateur, smartphone,
etc.) connecté à votre réseau domestique, et bénéficier du
contenu à l'aide de cet appareil.
≥
A propos du format supporté, consultez “Formats des fichiers” (
>
35)
Préparation
≥Terminez la configuration réseau. (> 12)
≥Connectez le périphérique à utiliser au même réseau que
cet appareil.
≥Ajoutez le contenu et le dossier aux bibliothèques du
lecteur Windows Media
®
11 ou 12 ou d'un smartphone, etc.
– La liste de lecture de lecteur Windows Media
®
peut lire
uniquement les contenus enregistrés dans ces bibliothèques.
– Pour utiliser le lecteur Windows Media
®
pour la diffusion en flux
(streaming), vous devez le configurer à l'avance.
Vous pouvez écouter la musique stockée sur le serveur
DLNA avec cet appareil (DMP—Digital Media Player pour
Lecteur de support numérique) en contrôlant le serveur
DLNA à l'aide de cet appareil.
1 Appuyez sur [NWP].
2 Appuyez plusieurs fois sur [N INPUT O]
sous [NWP] pour sélectionner “DMP”.
≥L'écran de sélection du serveur s'affichera.
3
Appuyez sur [
3
,
4
] pour sélectionner un serveur
DLNA sur le réseau puis appuyez sur [OK].
≥L'écran de sélection du contenu/dossier s'affichera.
≥Les dossiers/contenus peuvent être affichés dans un
ordre différent de celui du serveur, en fonction de ses
caractéristiques.
4 Appuyez sur [3, 4] pour sélectionner un
élément puis appuyez sur [OK].
≥S’il y a d’autres éléments, répétez cette étape.
Actions sur la télécommande
≥ Selon l’état, le serveur connecté et son contenu risquent de ne pas
s’afficher correctement. (par exemple, peu de temps après avoir
ajouté le contenu sur le serveur, etc.)
Veuillez réessayer plus tard. Pour plus de détails, référez-vous au
mode d’emploi du périphérique.
∫ Répétition aléatoire de la lecture
Appuyez sur [RND].
Chaque fois que vous appuyez sur la touche:
∫ Répétition de la lecture
Appuyez sur [`].
Chaque fois que vous appuyez sur la touche:
En contrôlant un périphérique compatible DMC (Digital
Media Controller pour Contrôleur de support numérique),
vous pouvez écouter la musique stockée sur le serveur
DLNA avec cet appareil (DMR—Digital Media Renderer pour
Restituteur de support numérique).
1 Relevez l'interrupteur d'alimentation de cet
appareil sur la position [Í/I].
2 Actionnez le dispositif compatible DMC et
connectez-vous à cet appareil.
≥Le nom de dispositif de cet appareil s'affichera ainsi
“Technics ST-C700D _ _ _ _ _ _”*
1, 2
.
≥Pour plus de détails sur la manière d'utiliser les
dispositifs compatibles DMC, consultez le mode
d'emploi des dispositifs ou du logiciel.
≥ Lorsque vous utilisez un DMC, la lecture des autres sources audio
s'arrêtera et la diffusion DLNA aura la priorité.
≥ Selon les contenus et l’équipement connecté, les commandes ou
la lecture peuvent être impossibles.
≥
Cette unité ne garantit pas la connexion avec toutes les applications
DMC. Utilisez l’application dédiée “Technics Music App”.
*1 “ _ ” symbolise une entrée unique pour chaque paramètre.
*2 Le nom du périphérique peut être changé à partir de “Nom de
cette unité sur le réseau “Friendly Name””. (> 12)
Lecture du contenu stocké sur
le serveur DLNA en le
contrôlant de cet appareil.
Arrêt Appuyez sur [∫].
Pause
Appuyez sur [1/;].
≥
Appuyez de nouveau pour redémarrer la lecture.
Saut
Appuyez sur [:] ou [9] pour
sauter une piste.
Rechercher
Durant la lecture ou la pause, appuyez
et maintenez [6] ou [5].
≥ Sur cet appareil : appuyez quelques
instants sur [:] ou sur [9].
≥ Cette action peut ne pas être disponible
pour certains formats.
On
Toutes les pistes du dossier sont répétées
aléatoirement.
≥ “RND `” s’affiche.
≥ Durant la lecture aléatoire, vous ne pouvez
pas retourner à la piste précédente.
Off Désactive le mode de répétition aléatoire.
1-Track
Ne joue que la piste sélectionnée.
≥ “1 `” s’affiche.
All
Toutes les pistes du dossier sont répétées.
≥ “`” s’affiche.
Off Désactive le mode répétition.
Lecture du contenu stocké sur
le serveur DLNA en le
contrôlant à partir d'un DMC
(81)
ST-C700DE-TQBM0007.book 13 ページ 2016年10月26日 水曜日 午後1時17分

14
Écouter une station de Internet Radio (vTuner)
La radio Internet est un service de diffusion audio par
Internet. Avec vTuner, un service d'annuaire en ligne, vous
pouvez écouter une quantité de stations de radio Internet
différentes provenant du monde entier.
Préparation
≥Terminez la configuration réseau. (> 12)
– Assurez-vous que le réseau est connecté à internet.
1 Appuyez sur [NWP].
2 Appuyez plusieurs fois sur [N INPUT O]
sous [NWP] pour sélectionner “Internet
Radio”.
≥Lorsque “Internet Radio” est sélectionnée en tant que
source d’entrée, l’appareil tente automatiquement de
se connecter à la dernière station de Internet Radio
sélectionnée.
3 Appuyez sur [3, 4] pour sélectionner une
station, puis appuyez sur [OK].
≥Le statut de la mise en mémoire tampon s’affiche
comme %. ( “” représente un nombre.)
≥Recommencez cette étape pour effectuer d’autres
sélections selon le genre, la région, etc.
≥Appuyez sur [RETURN] pour revenir à l’écran
precedent.
≥Les stations Internet Radio, genre, région, etc. sur cette
unité sont édités et gérés par vTuner.
≥Les podcasts sur la liste de vTuner peuvent également
être lus.
≥Une station qui ne diffuse pas ne peut pas être lue.
(Cela sera sauté ou l’écran revient à la liste.)
≥ Le service de Internet Radio peut être suspend ou autrement
indisponible sans préavis.
≥ La Internet Radio ne sera peut pas lue correctement selon l’état du
réseau.
Actions sur la télécommande
Arrêt Appuyez sur [∫].
Pause
Appuyez sur [1/;].
≥ Appuyez de nouveau pour redémarrer la
lecture. (Pendant la lecture de podcasts)
Saut
Appuyez sur [:] ou [9] pour
sauter une station.
Afficher les
Informations
disponibles
Appuyez sur [INFO].
(82)
ST-C700DE-TQBM0007.book 14 ページ 2016年10月26日 水曜日 午後1時17分

15
Français
1
Appuyez sur [NWP].
2
Appuyez sur [
3
,
4
] pour sélectionner une
station à ajouter, puis appuyez sur [OK].
3
Appuyez sur [MENU].
4
Appuyez sur [
3
,
4
] de façon répétée pour
choisir “Add Favourites” puis appuyez sur [OK].
≥“Added” s’affiche après l’enregistrement.
≥
Vous pouvez mémoriser jusqu’à 50 stations sur cet appareil. Si
une 51e station est ajoutée, “Favourites Full” s’affiche.
Supprimer les stations de la liste des favoris. (
>
ci-dessous)
≥Vous ne pouvez pas ajouter une station qui est déjà
enregistrée. (“Already Exists” s’affiche.)
1
Appuyez sur [NWP].
2
Appuyez sur [MENU].
3
Appuyez sur [
3
,
4
] s’affiche de façon répétée
pour choisir “Call Favourites” puis appuyez sur
[OK].
4
Appuyez sur [
3
,
4
] pour sélectionner la station
que vous désirez appeler puis appuyez sur [OK].
≥“” s’affiche.
≥
Si aucune station n’est enregistrée dans la liste des favoris,
“Empty” s’affiche. Ajouter une station à la liste. (
>
ci-dessus)
1
Appuyez sur [NWP].
2
Appuyez sur [MENU].
3
Appuyez sur [
3
,
4
] de façon répétée pour choisir
“Delete Favourites” puis appuyez sur [OK].
4
Appuyez sur [
3
,
4
] pour sélectionner la station à
supprimer de la liste des favoris.
5
Appuyez sur [
3
,
4
] pour sélectionner “Yes” puis
appuyez sur [OK].
≥“Deleted” s’affiche après la suppression.
≥“Empty” s’affiche si aucune station n’est enregistrée dans
la liste des favoris.
Vous pouvez contrôler cet appareil et éditer votre liste
favorite avec la fonction vTuner en installant l'application
dédiée “Technics Music App” (gratuite) sur votre
tablette/smartphone.
Téléchargez et installez l’appli dédiée à partir du site ci-dessous.
www.technics.com/support/
Préparation
≥Vérifiez l’adresse MAC de cet appareil. (> 12)
1 Appuyez sur [NWP].
2 Appuyez plusieurs fois sur [N INPUT O]
sous [NWP] pour sélectionner “Internet
Radio”.
3 Utilisez votre PC pour accéder au site web
vTuner.
www.technics.com/radio/
≥Vous pouvez sélectionner la langue sur le site web.
4 Suivez les instructions à l’écran et saisissez
les informations nécessaires à
l’enregistrement.
5 Recherchez par catégorie (genre, région,
langue, etc.) ou modifiez la liste.
∫ Lire les stations de la liste grâce au PC
Vous pouvez lire les stations de la liste grâce à votre PC
séparément de la liste des favoris de cet appareil.
1 Appuyez sur [NWP].
2 Appuyez plusieurs fois sur [N INPUT O]
sous [NWP] pour sélectionner “Internet
Radio”.
3 Appuyez sur [3, 4] de façon répétée pour
choisir “technics.com/radio/” puis appuyez
sur [OK].
≥Avant d’éliminer ou de transférer cette unité, supprimez les
informations personnelles sur le site web.
Ajouter une station à la liste
des favoris
“Add Favourites”
Chargement de la liste des favoris
“Call Favourites”
Supprimer une station favorite
“Delete Favourites”
Opérations utilisant
l’application dédiée
“Technics Music App”
Créer une liste de stations de
Internet Radio avec un PC
(83)
ST-C700DE-TQBM0007.book 15 ページ 2016年10月26日 水曜日 午後1時17分

16
Utilisation de Spotify
Cet appareil est compatible avec le service de musique ne
ligne (Spotify).
Préparation
≥Vous aurez besoin de Spotify Premium. Pour les détails,
visitez le site web suivant.
www.spotify.com/connect/
≥Terminez la configuration réseau. (> 12)
≥Assurez-vous que le réseau est connecté à Internet.
≥Connectez le périphérique à utiliser au même réseau que
cet appareil.
1 Démarrez l’application Spotify sur votre
appareil, puis sélectionnez une chanson à
lire.
2 Sélectionnez la jaquette carrée de la
chanson sur l'écran de lecture.
3 Sélectionnez l’icône “ ”
4 Sélectionnez cet appareil comme
hautparleurs de sortie.
≥ Le nom de dispositif de cet appareil s’affichera ainsi “Technics ST-
C700D _ _ _ _ _ _”*
1, 2
.
≥ Un enregistrement/une inscription est necessaire.
≥ Des frais peuvent s’appliquer.
≥ Les services, icônes et caractéristiques sont sujets à modification.
*1 “ _ ” symbolise une entrée unique pour chaque paramètre.
*2 Le nom du périphérique peut être changé à partir de “Nom de
cette unité sur le réseau “Friendly Name””. (> 12)
(84)
ST-C700DE-TQBM0007.book 16 ページ 2016年10月26日 水曜日 午後1時17分

17
Français
Utilisation iPhone/iPad/iPod
Branchez votre iPhone/iPad/iPod, vous pourrez écouter la
musique stockée sur l' iPhone/iPad/iPod ou charger l'
iPhone/iPad/iPod.
∫ Compatible iPhone/iPad/iPod
(à compter d’août 2016)
≥ La compatibilité dépend de la version du logiciel. Mettez à jour
votre iPhone/iPad/iPod avec le dernier logiciel avant de l’utiliser
avec cet appareil.
≥ Veuillez prendre note que Panasonic n’accepte aucune
responsabilité pour la perte de données et/ou d’information.
≥ Ne connectez pas les modèles suivants au port:
– iPod classic, iPod [4e (afficheur en couleur), et 5e (vidéo)
génération] iPod nano (1re génération)
Un comportement inattendu peut se produire.
≥ Les résultats de l'opération peuvent être différents en fonction du
modèle de l'iPhone/iPad/iPod ou de la version iOS.
Pour connecter un iPhone/iPad/iPod, utilisez le câble USB
dédié (non fourni).
1 Branchez l'iPhone/iPad/iPod à l'appareil.
2 Appuyez sur [NWP].
3 Appuyez plusieurs fois sur [N INPUT O]
sous [NWP] pour sélectionner “USB”.
4 Démarrez la lecture.
Actions sur la télécommande
≥ Il pourrait être nécessaire de sélectionner l’album, l’artiste, etc. sur
l’iPhone/iPad/iPod.
≥ En fonction des modèles d'iPhone/iPad/iPod, certaines
commandes sur la télécommande pourraient être impossibles.
Avec l'appareil en marche, le chargement démarre lorsqu'un
iPhone/iPad/iPod est raccordé à cet appareil.
≥ Le chargement n'est pas possible si cet appareil est éteint.
≥ Assurez-vous que l'appareil est en marche lorsque vous démarrez
le chargement.
– Lorsque vous chargez un iPhone/iPad/iPod dont la batterie est
complètement épuisée, ne mettez pas cet appareil en mode
veille avant que l'iPhone/iPad/iPod soit opérationnel.
≥ Vérifiez l'iPhone/iPad/iPod pour voir si la batterie est
complètement chargée. Une fois complètement chargée, retirez
l'iPhone/iPad/iPod.
≥ Le chargement s’arrête lorsque la pile est complètement chargée.
La pile se videra naturellement.
iPhone SE / iPhone 6s Plus / iPhone 6s /
iPhone 6 Plus / iPhone 6 / iPhone 5s / iPhone 5c /
iPhone 5 / iPhone 4s
iPad Pro
(9,7 pouce)
/ iPad Pro
(12,9 pouce)
/
iPad Air 2 / iPad Air / iPad
(3e et 4e génération)
/ iPad 2 /
iPad mini 4 / iPad mini 3 / iPad mini 2 / iPad mini
iPod touch (5e et 6e génération)
iPod nano (7e génération)
Raccordement d'un
iPhone/iPad/iPod
Câble USB
(non fourni)
ex:
Cet appareil
(avant)
iPhone, etc.
Écoute de la musique stockée
sur un iPhone/iPad/iPod
Arrêt Appuyez sur [∫].
Pause
Appuyez sur [1/;].
≥ Appuyez de nouveau pour redémarrer la
lecture.
Saut
Appuyez sur [:] ou [9] pour
sauter une piste.
Rechercher
Durant la lecture ou la pause, appuyez
et maintenez [6] ou [5].
≥ Sur cet appareil : appuyez quelques
instants sur [:] ou sur [9].
Chargement d'un
iPhone/iPad/iPod
(85)
ST-C700DE-TQBM0007.book 17 ページ 2016年10月26日 水曜日 午後1時17分

18
Utilisation AirPlay
AirPlay fonctionne sur iPhone, iPad, et iPod touch avec iOS
4.3.3 ou ultérieur, sur Mac avec OS X Mountain Lion ou
ultérieur, et sur PC avec iTunes 10.2.2 ou ultérieur.
Préparation
≥Terminez la configuration réseau. (> 12)
≥Connectez le périphérique iOS ou le PC sur le même
réseau que cet appareil.
1 [iOS_d e vi c e] : Démarrez l’application “
Music
” (ou
iPod).
[PC] : Démarrez “iTunes”.
2
Sélectionnez “Technics ST-C700D _ _ _ _ _
_”*
1, 2
à partir de l'icône AirPlay .
≥
Contrôlez la configuration du volume avant de démarrer
la lecture. (Lorsque AirPlay est utilisé pour la première
fois, le volume peut être réglé sur le maximum.)
3 Démarrez la lecture.
≥La lecture démarrera avec un léger retard.
Actions sur la télécommande
≥ La lecture des autres sources audio s’arrêtera et la diffusion
AirPlay aura la priorité.
≥ Avec certaines versions iOS et iTunes, il pourrait être impossible
de redémarrer la lecture AirPlay si le sélecteur est changé ou si
l'appareil est éteint, durant la lecture AirPlay.
Dans ce cas, sélectionnez un dispositif différent à partir de l'icône
AirPlay de Music App ou iTunes puis resélectionnez cet appareil
comme sortie des enceintes.
≥ AirPlay ne fonctionnera pas en regardant des vidéos sur iTunes.
*1 “ _ ” symbolise une entrée unique pour chaque paramètre.
*2 Le nom du périphérique peut être changé à partir de “Nom de
cette unité sur le réseau “Friendly Name””. (> 12)
Utilisation du
périphérique USB
Vous pouvez écouter la musique stockée sur un périphérique USB.
≥
Cet appareil ne garantit pas la connexion avec tous les dispositifs USB.
≥ Les systèmes de fichiers FAT16 et FAT32 sont pris en charge.
≥ Cet appareil prend en charge l’USB 2.0 Full Speed.
≥ Les dispositifs USB peuvent ne pas être reconnus par cet appareil
s'ils sont connectés en utilisant les choses suivantes:
– un concentrateur (hub) USB
– un câble d'extension USB
≥
Il est également possible d'utiliser des lecteurs/graveurs de carte USB.
≥ Cet appareil ne peut pas enregistrer de musique sur un
périphérique USB.
≥
A propos du format supporté, consultez “Formats des fichiers” (
>
35)
∫ Structure des dossiers et fichiers
L'appareil lit uniquement les fichiers musicaux présents dans
le dossier sélectionné. Sélectionnez le dossier contenant les
pistes que vous désirez lire.
≥Rien n'est lu si vous sélectionnez un dossier ne contenant
pas de fichiers musicaux, comme le dossier D dans le
schéma ci-dessous. ("Empty" s'affiche.)
1
Branchez un périphérique USB à cet appareil.
Écoute de la musique avec
AirPlay
Arrêt Appuyez sur [∫].
Pause
Appuyez sur [1/;].
≥ Appuyez de nouveau pour redémarrer la
lecture.
Saut
Appuyez sur [:] ou [9] pour
sauter une piste.
Écoute de la musique stockée
sur un périphérique USB
Musique 1
Musique 2
Musique 4
Musique 5
Musique 3
ex:
Dossier
Fichier musical
ex:
Cet appareil
(avant)
Périphérique USB
(86)
ST-C700DE-TQBM0007.book 18 ページ 2016年10月26日 水曜日 午後1時17分

19
Français
2 Appuyez sur [NWP].
3 Appuyez plusieurs fois sur [N INPUT O]
sous [NWP] pour sélectionner “USB”.
4 Appuyez sur [3, 4] pour sélectionner un
élément puis appuyez sur [OK].
≥S’il y a d’autres éléments, répétez cette étape.
Actions sur la télécommande
∫ Répétition aléatoire de la lecture
Appuyez sur [RND].
Chaque fois que vous appuyez sur la touche:
∫ Répétition de la lecture
Appuyez sur [`].
Chaque fois que vous appuyez sur la touche:
≥ Vous pouvez utiliser la répétition de lecture avec la programmation
de lecture.
Cette fonction permet de programmer un maximum de
24 plages.
Préparation
≥Il n'est pas possible de programmer des pistes par
déplacement des dossiers. Déplacez toutes les pistes que
vous désirez programmer dans un seul dossier à l'avance.
1 Sélectionnez le dossier contenant le fichier
musical pour lequel vous avez programmé la
lecture.
2 Appuyez sur [PGM] en mode arrêt.
≥L'écran “Program Mode” s’affichera.
3 Appuyez sur [OK] pour afficher l'écran de
programmation.
4 Appuyez sur [3, 4] pour sélectionner la
piste désirée.
5 Appuyer sur [OK].
≥Effectuer les étapes 3 à 4 pour programmer d’autres
plages.
6 Appuyer sur [1/;] pour lancer la lecture.
≥
Pour revenir sur l'écran “Program Mode”, appuyez sur [
∫
].
Actions sur la télécommande
≥ Le contenu programmé sera conservé aussi longtemps que la
source d'entrée est paramétrée sur “USB”.
≥ La mémoire du programme sera effacée :
– Lorsque le périphérique USB est débranché.
– Lorsque l'appareil est mis en mode veille ou en mode arrêt.
≥ Vous pouvez utiliser la programmation de lecture avec la répétition
de lecture.
Arrêt Appuyez sur [∫].
Pause
Appuyez sur [1/;].
≥ Appuyez de nouveau pour redémarrer la
lecture.
Saut
Appuyez sur [:] ou [9] pour
sauter une piste.
Rechercher
Durant la lecture ou la pause, appuyez
et maintenez [6] ou [5].
≥ Sur cet appareil : appuyez quelques
instants sur [:] ou sur [9].
≥ Cette action peut ne pas être disponible
pour certains formats.
On
Toutes les pistes du dossier sont répétées
aléatoirement.
≥ “RND `” s’affiche.
≥ Durant la lecture aléatoire, vous ne pouvez
pas retourner à la piste précédente.
Off Désactive le mode de répétition aléatoire.
1-Track
Ne joue que la piste sélectionnée.
≥ “1 `” s’affiche.
All
Toutes les pistes du dossier sont répétées.
≥ “`” s’affiche.
Off Désactive le mode répétition.
Lecture du programme
Arrêt
Appuyez sur [∫].
≥ Le contenu programmé est conservé.
Vérifie l'ordre
programmé
Appuyer sur [2, 1] en mode d’arrêt.
≥ Pour revenir sur l'écran “Program Mode”,
appuyez sur [OK].
Ajout de
pistes
Effectuez les étapes 3 et 4 en mode
arrêt.
Effacer la
dernière plage
Appuyer sur [CLEAR] en mode d’arrêt.
≥ Il n'est pas possible de sélectionner et
d'effacer la piste programmée désirée.
Annuler le
mode de
lecture
programmée
1 Appuyer sur [PGM] en mode d’arrêt.
≥ “Clear Program List?” s’affiche.
2
Appuyez sur [
3
,
4
] pour sélectionner
“Yes” puis appuyez sur [OK].
≥ La mémoire du programme sera
effacée.
(87)
ST-C700DE-TQBM0007.book 19 ページ 2016年10月26日 水曜日 午後1時17分

20
Utilisation d'un ordinateur, etc.
Vous pouvez raccorder l'entrée audio numérique [PC] et un
ordinateur, etc. à l'aide d'un câble USB et écouter la musique
présente sur l'ordinateur, etc. avec cet appareil.
≥
A propos du format supporté, consultez “Formats des fichiers” (
>
35)
(à compter de décembre 2015)
1 Débrancher le cordon d’alimentation
secteur.
2 Raccordez cet appareil et un ordinateur, etc.
3 Branchez le cordon d’alimentation secteur à
cet appareil et relevez l'interrupteur
d'alimentation sur la position [Í/I]. (> 10)
4 Appuyez plusieurs fois sur [N INPUT O]
sous [NWP] pour sélectionner “PC”.
5 Utilisez l'ordinateur, etc. pour la lecture.
Pour raccorder un ordinateur
Avant de raccorder un ordinateur, suivez les étapes
suivantes.
≥ Consultez ce qui suit pour connaitre les versions
recommandées du système d'exploitation de votre ordinateur:
– Windows 7, Windows 8, Windows 8.1, Windows 10
– OS X 10.7, 10.8, 10.9, 10.10, 10.11
1 Téléchargez et installez le pilote dédié sur l'ordinateur.
(Uniquement pour Windows OS)
Téléchargez et installez le pilote dédié à partir du site ci-dessous.
www.technics.com/support/
2 Téléchargez et installez l'appli dédiée “Technics Audio
Player” (gratuite) sur votre ordinateur. (Commune à
Windows et à OS X)
Téléchargez et installez l'appli dédiée à partir du site ci-dessous.
www.technics.com/support/
Pour écouter le son d'un
ordinateur, etc.
USB
Câble USB 2.0
(non fourni)
Cet appareil
(Derrière)
ex:
PC , etc.
Type A
Type B
(88)
ST-C700DE-TQBM0007.book 20 ページ 2016年10月26日 水曜日 午後1時17分

21
Français
Utilisation Bluetooth
®
Vous pouvez écouter du son provenant du dispositif audio Bluetooth
®
à partir de cet appareil à distance.
≥ Consultez le mode d'emploi du dispositif Bluetooth
®
pour avoir des détails.
≥
Si vous avez l'intention d'utiliser un périphérique Bluetooth
®
compatible NFC (Near Field Communication), poursuivez vers “Connexion par NFC”.
Préparation
≥Activez la fonctionnalité Bluetooth
®
du dispositif et placez-
le près de cet appareil.
1 Appuyez sur [NWP].
2 Appuyez plusieurs fois sur [N INPUT O]
sous [NWP] pour sélectionner “Bluetooth”.
3 Appuyez sur [MENU].
4 Appuyez plusieurs fois sur [3, 4] pour
sélectionner “Pairing” puis appuyez sur [OK].
5 Appuyez sur [3, 4] pour sélectionner “Yes”
puis appuyez sur [OK].
≥“Pairing” apparait sur l’afficheur.
6 Sélectionnez “ST-C700D” à partir du menu
du dispositif Bluetooth
®
.
≥Le nom du périphérique connecté apparait sur
l'afficheur.
≥ Si vous êtes invité à saisir le mot de passe, saisissez “0000”.
≥ Vous pouvez mémoriser jusqu'à 8 dispositifs sur cet appareil. Si
un 9e dispositif est couplé, le dispositif inutilisé depuis le plus
longtemps sera remplacé.
Pour les périphériques Bluetooth
®
compatibles NFC
(périphériques Android™ version 4.1 ou ultérieure)
uniquement
En mettant en contact un périphérique Bluetooth
®
compatible
NFC (Near Field Communication) avec cet appareil, vous
pouvez effectuer tout une série d'étapes de l'enregistrement
du périphérique Bluetooth
®
à la connexion de celui-ci à cet
appareil.
Préparation
≥Activez la fonctionnalité NFC du dispositif.
1 Appuyez sur [NWP].
2 Appuyez plusieurs fois sur [N INPUT O]
sous [NWP] pour sélectionner “Bluetooth”.
3 Appuyez sur [MENU].
4 Appuyez plusieurs fois sur [3, 4] pour
sélectionner “NFC” puis appuyez sur [OK].
5 Appuyez sur [3, 4] pour sélectionner “Yes”
puis appuyez sur [OK].
6 Mettez en contact votre périphérique et la
zone tactile NFC de cet appareil pendant
environ 20 secondes. (> 7)
≥Ne bougez pas le périphérique Bluetooth
®
avant de voir
un message s'afficher ou de le voir réagir de quelque
manière.
Une fois que le dispositif Bluetooth
®
a réagi, éloignez-le
de cet appareil.
– Lorsque la connexion du périphérique Bluetooth
®
est
effectuée, le nom du périphérique connecté est indiqué sur
l'afficheur.
– La position de la zone tactile NFC est différente en fonction
du périphérique. Si aucune connexion ne peut être établie
même lorsque votre périphérique Bluetooth
®
a touché la
zone tactile NFC de cet appareil, changez la position du
périphérique.
≥ Si vous connectez un autre périphérique Bluetooth
®
compatible
NFC, le périphérique déjà connecté se déconnectera
automatiquement.
≥ Lorsque la connexion est établie, la lecture peut démarrer
automatiquement en fonction du type de périphérique qui est
utilisé.
≥ La Connexion NFC peut ne pas fonctionner correctement en
fonction du type de périphérique qui est utilisé.
≥ N'effectuez pas de connexion NFC d'une autre manière que celle
décrite dans le Mode d'emploi. Cela pourrait causer un
dysfonctionnement.
Bluetooth
®
veille Connexion par NFC
(89)
ST-C700DE-TQBM0007.book 21 ページ 2016年10月26日 水曜日 午後1時17分

22
1 Appuyez sur [NWP].
2 Appuyez plusieurs fois sur [N INPUT O]
sous [NWP] pour sélectionner “Bluetooth”.
≥“Ready” apparait sur l’afficheur.
≥Si vous appuyez sur [1/;], cet appareil essaiera de se
connecter au dernier dispositif Bluetooth
®
qui a été
connecté.
– “Linking” apparait sur l’afficheur.
3 Sélectionnez “ST-C700D” à partir du menu
du périphérique Bluetooth
®
.
≥Le nom du périphérique connecté apparait sur
l'afficheur.
4 Démarrez la lecture sur le dispositif
Bluetooth
®
.
Actions sur la télécommande
≥ Cet appareil ne peut être connecté qu'à un seul dispositif à la fois.
≥ Pour utiliser la télécommande de cet appareil avec un dispositif
Bluetooth
®
, le dispositif Bluetooth
®
doit prendre en charge les
profils AVRCP (Audio Video Remote Control Profile).
En fonction de l'état du dispositif, certaines commandes peuvent
ne pas fonctionner.
≥ Lorsque vous regardez un contenu vidéo avec cette fonction, il se
peut que la sortie vidéo et audio ne soit pas synchronisée.
Vous pouvez changer le mode de transmission afin de
donner la priorité à la qualité de la transmission ou à la
qualité du son.
1 Appuyez sur [NWP].
2 Appuyez plusieurs fois sur [N INPUT O]
sous [NWP] pour sélectionner “Bluetooth”.
≥Si un dispositif Bluetooth
®
est déjà connecté,
déconnectez-le.
3 Appuyez sur [MENU].
4 Appuyez plusieurs fois sur [3, 4] pour
sélectionner “Link Mode” puis appuyez sur
[OK].
5 Appuyez sur [3, 4] pour sélectionner le
mode puis appuyez sur [OK].
≥ Sélectionnez “Mode 1” si le son est coupé.
1 Appuyez sur [NWP].
2 Appuyez sur [MENU].
3 Appuyez plusieurs fois sur [3, 4] pour
sélectionner “Disconnect?” puis appuyez sur
[OK].
4 Appuyez sur [3, 4] pour sélectionner “Yes”
puis appuyez sur [OK].
≥ Le dispositif Bluetooth
®
sera déconnecté si une source audio
différente est sélectionnée.
Écoute de la musique stockée
sur un périphérique Bluetooth
®
Arrêt Appuyez sur [∫].
Pause
Appuyez sur [1/;].
≥ Appuyez de nouveau pour redémarrer la
lecture.
Saut
Appuyez sur [:] ou [9] pour
sauter une piste.
Recherche
Durant la lecture ou la pause, appuyez
et maintenez [6] ou [5].
≥ Sur cet appareil : appuyez quelques
instants sur [:] ou sur [9].
Mode de transmission
Bluetooth
®
Mode 1 Met l'accent sur la connectivité
Mode 2
Met l'accent sur la qualité du son
(par défaut)
Déconnexion d’un
périphérique Bluetooth
®
(90)
ST-C700DE-TQBM0007.book 22 ページ 2016年10月26日 水曜日 午後1時17分

23
Français
Écoute d'une Radio FM
Vous pouvez prérégler jusqu’à 30 canaux.
Préparation
≥Appuyez sur [NWP] puis plusieurs fois sur [N INPUT O]
sous [NWP] pour sélectionner “FM”.
1 Appuyez sur [NWP].
2 Appuyez sur [MENU].
3 Appuyez plusieurs fois sur [3, 4] pour
sélectionner “Auto Preset” puis appuyez sur
[OK].
4 Appuyez sur [3, 4] pour sélectionner
“Lowest” ou “Current” puis appuyez sur [OK].
Lowest:
Pour commencer le préréglage automatique avec le
fréquence la plus basse (FM 87,50).
Current:
Pour commencer le préréglage automatique avec le
fréquence en cours.
1 Appuyez sur [NWP].
2 Appuyer sur [6] ou [5] pour syntoniser
la station souhaitée.
≥Pour effectuer automatiquement la syntonisation,
appuyer sur la touche et la maintenir enfoncée jusqu’à
ce que la fréquence commence à changer rapidement.
3 Appuyer sur [PGM].
4 Appuyer sur les touches numériques pour
sélectionner un canal.
≥Effectuer les étapes 1 à 3 à nouveau afin de prérégler
plus de stations.
≥ Une station précédemment sauvegardée sera écrasée si une
autre station est sauvegardée sur le même canal préréglé.
1 Appuyez sur [NWP].
2 Appuyer sur les touches numériques, [:]
ou [9] pour sélectionner la station
préréglée.
1 Appuyez sur [NWP].
2 Appuyez sur [MENU].
3 Appuyez plusieurs fois sur [3, 4] pour
sélectionner “FM Mode” puis appuyez sur
[OK].
4 Appuyer sur [3, 4] pour sélectionner
“Mono”, puis appuyer sur [OK].
≥“MONO” s’affiche.
Pour mémoriser le réglage
Passer aux étapes 2 et 3 de “Réglage et préréglage
manuels”.
≥ Sélectionnez “Stereo” à l’étape 4 pour revenir aux émissions
stéréo.
≥ “
Mono
” est annulé si la fréquence est changée.
L’appareil peut afficher les données texte transmises par le
système de transmission de données radio (RDS) disponible
dans certaines zones.
≥ Le RDS est disponible uniquement si la stéréo fonctionne à la
réception.
≥ Il est possible que le système RDS ne soit pas disponible si la
réception n’est pas bonne.
≥ La fonction RDS ne marche pas si “Mono” est sélectionné dans
“FM Mode”. (> ci-dessus)
Préréglage automatique
Réglage et préréglage
manuels
Sélection d’une station préréglée
Amélioration de la qualité
sonore
Diffusion RDS
(91)
ST-C700DE-TQBM0007.book 23 ページ 2016年10月26日 水曜日 午後1時17分

24
Écoute avec le système DAB/DAB+
Vous pouvez prérégler jusqu’à 20 canaux.
Préparation
≥Assurez-vous que l'antenne DAB est connectée. (> 10)
≥Appuyez sur [NWP] puis plusieurs fois sur [N INPUT O]
sous [NWP] pour sélectionner “DAB/DAB+”.
– Si vous sélectionnez “DAB/DAB+” pour la première fois, le
système démarrera la procédure “Balayage automatique DAB”.
1 Appuyez sur [NWP].
2 Appuyez sur [MENU].
3
Appuyez plusieurs fois sur [
3
,
4
] pour
sélectionner “Auto Scan” puis appuyez sur [OK].
4 Appuyez sur [3, 4] pour sélectionner “Yes”
puis appuyez sur [OK].
≥“Auto Scan” s’affiche.
Pour trouver la meilleure position de l'antenne, utilisez la
syntonisation manuelle pour rechercher les blocs de
fréquence DAB sélectionnés.
1 Appuyez sur [NWP].
2 Appuyez sur [MENU].
3 Appuyez plusieurs fois sur [3, 4] pour
sélectionner “Manual Scan” puis appuyez
sur [OK].
4
Appuyez sur [
3
,
4
] pour sélectionner un bloc
de fréquence à balayer puis appuyez sur [OK].
1 Appuyez sur [NWP].
2 Appuyer sur [6] ou [5] pour syntoniser
la station souhaitée.
3 Appuyez sur [PGM].
4 Appuyez sur les touches numériques pour
sélectionner un nombre préréglé.
≥Effectuez de nouveau les étapes 1 à 3 pour prérégler
plus de stations.
≥Une station déjà sauvegardée est écrasée si une autre
station est sauvegardée avec le même numéro préréglé.
≥
Vous ne pouvez pas prérégler une station si celle-ci n'est pas
diffusée ou si vous avez sélectionné un service secondaire.
≥Les stations précédemment mémorisées sont effacées
durant le balayage automatique.
1 Appuyez sur [NWP].
2
Appuyez sur les touches numériques, [
:
] ou
[
9
] pour sélectionner la station préréglée.
Vous pouvez voir les informations sur la diffusion DAB, le
type de programme, l'étiquette de l'ensemble et la fréquence.
1 Appuyez sur [NWP].
2 Appuyez sur [INFO] pour voir les
informations disponibles.
Certaines stations DAB/DAB+ fournissent aussi bien un
service secondaire qu'un service principal. Si la station que
vous écoutez fournit un service secondaire, “ ” s'affichera.
1 Appuyez sur [NWP].
2 Appuyez sur [MENU].
3
Appuyez plusieurs fois sur [
3
,
4
] pour
sélectionner “Secondary” puis appuyez sur [OK].
4 Appuyez sur [3, 4] pour sélectionner le
service secondaire et appuyez sur [OK].
≥ Le service principal sera de retour si des changements sont
effectués (ex. si la station est changée).
En réglant l'antenne, vous pouvez contrôler la qualité de la
réception.
1 Appuyez sur [NWP].
2 Appuyez sur [MENU].
3 Appuyez plusieurs fois sur [3, 4] pour
sélectionner “Signal Quality” puis appuyez
sur [OK].
4 Appuyez sur [3, 4] pour sélectionner la
fréquence.
Balayage automatique DAB
Syntonisation manuelle DAB
Préréglage de la mémoire
Sélection d’une station préréglée
Visualisation des informations
disponibles
DAB secondaire
Qualité du signal DAB
Bloc de fréquence
Fréquence
Qualité de la réception
0 (faible) à 8 (excellent)
ex.
(92)
ST-C700DE-TQBM0007.book 24 ページ 2016年10月26日 水曜日 午後1時17分

25
Français
Réglage du son
L’effet sonore suivant peut être ajouté à la sortie audio.
Le remastérisation élargit la bande de lecture et permet
d'obtenir une profondeur de bits supérieure pour reproduire
un son naturel et expansif proche de la musique originale.
≥ Le réglage d'usine par défaut est “Off”.
1 Appuyez sur [NWP].
2 Appuyez sur [RE-MASTER] pour
sélectionner “On”/“Off”.
Cet appareil peut transmettre les signaux d'entrée sans
effectuer de traitement du signal numérique (DSP). Cela permet
une reproduction fidèle et de haute qualité du son d'origine.
≥ Le réglage d'usine par défaut est “Off”.
1 Appuyez sur [NWP].
2 Appuyez sur [DIRECT] pour sélectionner
“On”/“Off”.
Vous pouvez définir la limite supérieure de la plage de la
fréquence d'échantillonnage de sortie. Notez que la plage qui
peut être traitée est différente en fonction de l'amplificateur
ou du convertisseur D/A. Pour avoir plus de détails, consultez
le mode d'emploi du périphérique raccordé.
≥ Le réglage d'usine par défaut est “32kHz-192kHz”.
Préparation
≥ Paramétrez “Digital Output” sur “On”.
1 Appuyez sur [NWP].
2 Appuyez sur [HOME].
3
Appuyez plusieurs fois sur [
3
,
4
] pour
sélectionner “SETUP” puis appuyez sur [OK].
4 Appuyez plusieurs fois sur [3, 4] pour
sélectionner “D.Output fs” puis appuyez sur
[OK].
5 Appuyez sur [3, 4] pour sélectionner un
élément puis appuyez sur [OK].
≥Vous pouvez sélectionner une fréquence
d'échantillonnage de 96 kHz ou de 192 kHz.
Désactiver la sortie audio des prises non utilisées minimise
les parasites et permet une qualité audio plus élevée.
≥ Le réglage d'usine par défaut est “On”.
1 Appuyez sur [NWP].
2 Appuyez sur [HOME].
3 Appuyez plusieurs fois sur [3, 4] pour
sélectionner “SETUP” puis appuyez sur
[OK].
Pour désactiver la sortie audio numérique :
Appuyez plusieurs fois sur [3, 4] pour sélectionner
“Digital Output” puis appuyez sur [OK].
Pour désactiver la sortie audio analogique :
Appuyez plusieurs fois sur [3, 4] pour sélectionner
“Analog Output” puis appuyez sur [OK].
4 Appuyez sur [3, 4] pour sélectionner “Off”
puis appuyez sur [OK].
≥Pour activer de nouveau la sortie, sélectionnez “On”.
≥ Selon la source musicale que vous écoutez, le paramètre appliqué
peut être moins efficace.
≥ Selon la source musicale que vous écoutez, il peut être impossible
d'atteindre la qualité audio et l'effet de champ sonore désirés.
Dans ce cas, désactivez la fonction.
≥ Ni Remastérisation ni le mode Direct mode ne peuvent être
paramétrés sur “On”.
≥ Lorsque “Digital Output” et “Analog Output” sont paramétrés sur
“Off”, aucun son n'est reproduit.
≥ Si cela prend du temps pour reproduire le son lorsque vous avez
réglé la qualité du son.
Écoute d'un son plus naturel
(Remastérisation)
Mode direct
Réglage de la fréquence
d'échantillonnage
Sortie désactivée
(93)
ST-C700DE-TQBM0007.book 25 ページ 2016年10月26日 水曜日 午後1時17分

26
Autres
La minuterie d’arrêt différé peut passer l’appareil en mode
veille après une durée définie.
1 Appuyez sur [NWP].
2 Appuyez sur [MENU].
3 Appuyez plusieurs fois sur [3, 4] pour
sélectionner “SLEEP” puis appuyez sur
[OK].
4 Appuyez sur [3, 4] pour définir la durée (en
minutes) puis appuyez sur [OK].
“30 minutes” ,-. “60 minutes” ,-. “90 minutes” ,-. “120 minutes”
^""""""""""""". “Off” !"""""""""""""J
Cet appareil est conçu pour conserver et économiser sa
consommation d’énergie. L’appareil passera automatiquement
en mode veille s’il n’émet aucun son et s’il n’est pas utilisé
pendant environ 20 minutes.
≥ Le réglage d'usine par défaut est “On”.
Pour annuler cette fonction
1 Appuyez sur [NWP].
2 Appuyez sur [HOME].
3
Appuyez plusieurs fois sur [
3
,
4
] pour
sélectionner “SETUP” puis appuyez sur [OK].
4 Appuyez plusieurs fois sur [3, 4] pour
sélectionner “AUTO OFF” puis appuyez sur
[OK].
5 Appuyez sur [3, 4] pour sélectionner “Off”
puis appuyez sur [OK].
≥ La fonction d'arrêt automatique marche sauf si vous la désactivez,
même si vous éteignez et remettez en marche cet appareil.
≥
Lorsque “DAB/DAB+” ou “FM” est la source, la fonction ne marche pas.
Cet appareil se met automatiquement en marche depuis le
mode veille s'il est sélectionné comme enceinte pour
Spotify/AirPlay/DLNA (DMR).
Gardez en tête qu'après la sélection de cet appareil, vous
pourrez aussi avoir besoin de démarrer la lecture pour le
mettre en marche dans certains cas.
≥ Le réglage d'usine par défaut est “Auto”.
Pour changer ce paramètre
1 Appuyez sur [NWP].
2 Appuyez sur [HOME].
3
Appuyez plusieurs fois sur [
3
,
4
] pour
sélectionner “SETUP” puis appuyez sur [OK].
4 Appuyez plusieurs fois sur [3, 4] pour
sélectionner “Network Standby” puis
appuyez sur [OK].
5 Appuyez sur [3, 4] pour sélectionner un
élément puis appuyez sur [OK].
≥ Si cette fonction est paramétrée sur “On” ou “Auto”, la
consommation électrique en veille augmente.
Minuterie d’arrêt différé
Fonction d'arrêt automatique
Veille réseau
Auto
Active la fonction Veille réseau lorsque la
connexion au réseau est disponible.
On
Active la fonction Veille réseau en
permanence.
Off Désactive la fonction de veille réseau.
(94)
ST-C700DE-TQBM0007.book 26 ページ 2016年10月26日 水曜日 午後1時17分

27
Français
Occasionnellement, Panasonic peut mettre à disposition des mises à
jour du firmware de cet appareil pour qu'elles ajoutent de nouvelles
fonctionnalités ou qu'elles améliorent la manière d'utiliser celles déjà
existantes. Ces mises à jour sont disponibles gratuitement.
≥
Pour avoir des informations sur les mises à jour (fonctionnalités
nouvelles ou améliorations), visitez le site Web suivant.
www.technics.com/support/firmware/
≥ Pendant le traitement de la mise à jour, aucune autre opération ne
peut être effectuée.
≥ S’il n’y a aucune mise à jour, “Firmware is Up To Date” s’affiche.
(Mise à jour non nécessaire.)
≥ La mise à niveau du micrologiciel peut réinitialiser les paramètres.
∫ Mise à jour via Internet
Préparation
≥Connectez cet appareil au réseau. (> 12)
– Assurez-vous que le réseau est connecté à internet.
1 Appuyez sur [NWP].
2 Appuyez sur [HOME].
3
Appuyez plusieurs fois sur [
3
,
4
] pour
sélectionner “SETUP” puis appuyez sur [OK].
4 Appuyez plusieurs fois sur [3, 4] pour
sélectionner “F/W Update” puis appuyez sur
[OK].
5 Appuyez sur [3, 4] pour sélectionner
“Internet” puis appuyez sur [OK].
6 Appuyez sur [3, 4] pour sélectionner “Yes”
puis appuyez sur [OK].
≥La progression s’affiche ainsi “Updating %” pendant
la mise à jour. ( représente un numéro.)
≥Si la mise à jour s'est effectuée avec succès, “Success”
s'affiche.
7 Une fois que “Success” s'est affiché,
débranchez le cordon d’alimentation secteur
puis rebranchez-le après 3 minutes.
≥ Le téléchargement pourrait prendre plus de temps ou ne pas
s'effectuer correctement selon l'état de la connexion.
∫ Mise à jour via la clé USB
Préparation
≥Téléchargez le dernier firmware sur la clé USB. Pour avoir
plus de détails, visitez le site suivant.
www.technics.com/support/firmware/
≥Les systèmes de fichiers FAT16 et FAT32 sont pris en
charge.
1 Branchez la clé USB contenant le nouveau
firmware.
2 Appuyez sur [NWP].
3 Appuyez sur [HOME].
4 Appuyez plusieurs fois sur [3, 4] pour
sélectionner “SETUP” puis appuyez sur
[OK].
5 Appuyez plusieurs fois sur [3, 4] pour
sélectionner “F/W Update” puis appuyez sur
[OK].
6 Appuyez sur [3, 4] pour sélectionner
“USB” puis appuyez sur [OK].
7 Appuyez sur [3, 4] pour sélectionner “Yes”
puis appuyez sur [OK].
≥La progression s’affiche ainsi “Updating %” pendant
la mise à jour. ( représente un numéro.)
≥Si la mise à jour s'est effectuée avec succès, “Success”
s'affiche.
8 Une fois que “Success” s'est affiché,
débranchez le cordon d’alimentation secteur
puis rebranchez-le après 3 minutes.
≥ Le téléchargement peut prendre plus de temps que prévu selon la
clé USB.
∫ Vérification de la version du firmware et du
numéro de modèle
1 Appuyez sur [NWP].
2 Appuyez sur [HOME].
3 Appuyez plusieurs fois sur [3, 4] pour sélectionner
“SETUP” puis appuyez sur [OK].
4 Appuyez plusieurs fois sur [3, 4] pour sélectionner
“F/W Version” puis appuyez sur [OK].
≥ La version du firmware et le numéro du modèle s'affichent.
≥ Appuyez sur [OK] pour quitter.
Mise à jour du logiciel
Le téléchargement prend environ 10 minutes.
Ne débranchez pas le cordon d'alimentation secteur ou
ne baissez pas l'interrupteur d'alimentation sur la
position [OFF] si un des messages suivants est affiché.
“Linking” ou “Updating %”
(95)
ST-C700DE-TQBM0007.book 27 ページ 2016年10月26日 水曜日 午後1時17分

28
Si un autre équipement répond à la télécommande fournie,
changez le code de la télécommande.
≥ Le réglage d'usine par défaut est “Mode 1”.
Pointez la télécommande vers cet appareil, puis
appuyez sur [OK] et la touche numérique pendant
au moins 4 secondes.
≥Lorsque le code de la télécommande est changé, le
nouveau code est indiqué sur l'afficheur pendant quelques
secondes.
≥ Lorsque le SU-C700/SL-C700 est branché via la fonction de
contrôle du système, changez le code de sa télécommandeainsi
que le code de la télécommande de cet appareil.
Vous pouvez modifier l'encodage des caractères du nom de
la piste, du nom de l'artiste et des autres informations s'ils ne
sont pas affichés comme ils devraient l'être.
≥ Le réglage d'usine par défaut est “Type 1( 日本 )”.
1 Appuyez sur [NWP].
2 Appuyez sur [HOME].
3 Appuyez plusieurs fois sur [3, 4] pour
sélectionner “SETUP” puis appuyez sur
[OK].
4 Appuyez plusieurs fois sur [3, 4] pour
sélectionner “E Asian Character” puis
appuyez sur [OK].
5 Appuyez sur [3, 4] pour sélectionner “Type
1(日本)”/“Type 2(简体字 )” puis appuyez sur
[OK].
Vous pouvez lier automatiquement cet appareil au SU-C700
et les commander facilement à l'aide de la télécommande.
Préparation
1 Raccordez cet appareil et le SU-C700 à l'aide des câbles
de connexion du système et les câbles numériques
coaxiaux. (> 9)
2 Mettez l'interrupteur d'alimentation de cet appareil et du
modèle SU-C700 sur la position [Í/I].
∫ Passez simultanément cet appareil et le
modèle SU-C700 sur marche/veille
≥Si vous pointez la télécommande vers cet appareil et que
vous appuyez sur [NWP Í] lorsque cet appareil et le
modèle SU-C700 sont en mode veille, cet appareil et le
modèle SU-C700 seront mis en marche simultanément.
≥Lorsque cet appareil et le SU-C700 sont tous les deux en
marche et que la source d'entrée du SU-C700 est
paramétrée sur “COAX1”, vous pouvez les configurer pour
qu'ils passent automatiquement en mode veille à l'aide du
programmateur d'arrêt. (> 26)
∫ Changement automatique de la source
d'entrée du SU-C700
Lorsque vous effectuez une action comme la lecture sur cet
appareil, la source d'entrée du SU-C700 passe
automatiquement sur “COAX1”.
∫ Réglage Graves/Médiums/Aigus
Vous pouvez régler la tonalité du SU-C700 avec cet appareil.
Chaque plage tonale (Grave/Médium/Aigu) peut être réglée.
1 Appuyez sur [NWP].
2 Appuyez sur [HOME].
3 Appuyez plusieurs fois sur [3, 4] pour sélectionner
“SETUP” puis appuyez sur [OK].
4 Appuyez plusieurs fois sur [3, 4] pour sélectionner
“Tone Control” puis appuyez sur [OK].
5 Appuyez sur [3, 4] pour sélectionner “On (adjustment)”
puis appuyez sur [OK].
6 Appuyez sur [3, 4] pour sélectionner “BASS” (Graves),
“MID” (Médiums) ou “TREBLE” (Aigus).
7 Appuyez sur [2, 1] pour régler le niveau puis appuyez
sur [OK].
≥ Chaque niveau peut être réglé entre “s10” et “r10”.
≥ Pour avoir des informations sur les modèles SU-C700, veuillez
consulter leur mode d'emploi.
Code de la télécommande
[OK] + [1] Réglez le code sur “Mode 1”
[OK] + [2] Réglez le code sur “Mode 2”
Modification de l'encodage
d'un jeu de caractères
Type 1( 日本 )
La priorité est donnée au
japonais.
Type 2( 简体字 )
La priorité est donnée au chinois
(simplifié).
Utilisation de la fonction de
contrôle du système
(96)
ST-C700DE-TQBM0007.book 28 ページ 2016年10月26日 水曜日 午後1時17分

29
Français
Guide de dépannage
Avant de contacter l'assistance, effectuez les contrôles
suivants. Si vous avez des doutes sur certains points, ou si
les solutions fournies dans le guide suivant ne permettent
pas de trouver une solution, contactez votre revendeur pour
connaitre la marche à suivre.
Accumulation de chaleur de cet appareil.
≥Cet appareil chauffe lorsqu'il est utilisé pendant longtemps.
Ceci ne doit causer aucune inquiétude.
Le dernier micrologiciel est-il installé?
≥Panasonic améliore de façon constante le firmware de
l’appareil afin de s’assurer que ses clients bénéficient
d’une technologie de pointe. (> 27)
L’unité ne fonctionne pas.
Les opérations ne sont pas effectuées de manière
correcte.
≥L’un des appareils de sécurité de l’unité est peut-être
activé.
1 Baissez l'interrupteur d'alimentation de cet appareil sur la
position [OFF].
≥ Sinon, déconnectez le cordon d’alimentation secteur, attendez
au moins 3 minutes, puis rebranchez-le.
2 Relevez l'interrupteur d'alimentation de cet appareil sur la
position [Í/I]. Si l’unité ne fonctionne toujours pas, consultez
le concessionnaire.
Un son de “bourdonnement” peut être émis au
cours de la lecture.
≥Un cordon d'alimentation secteur ou une lumière
fluorescente se trouve près des câbles. Conservez les
autres appareils et cordons loin des câbles de cet appareil.
Pas de son.
≥
Vérifiez le volume du périphérique raccordé (amplificateur, etc.).
≥Vérifiez pour voir si le branchement des câbles aux prises
d'entrée et de sortie est incorrect. Si c'est le cas, éteignez
cet appareil et rebranchez correctement les câbles.
≥Vérifiez pour voir si la source d'entrée correcte est
sélectionnée.
≥Insérez les connecteurs des câbles à raccorder
complètement.
≥Lorsque “Digital Output” et “Analog Output” sont sur “Off”,
aucun son ne sera reproduit. Changez le paramètre de la
sortie qui doit être utilisée pour “On”. (> 25)
≥La lecture d'un contenu multicanal n'est pas prise en
charge.
Le son est coupé.
≥En fonction de votre environnement, le son peut être coupé
durant la lecture. Vérifiez le mode d'emploi du périphérique
raccordé et la connexion au périphérique.
La lecture ne démarre pas.
≥En fonction de votre environnement ou des périphériques
raccordés, cela peut prendre un certain temps.
La fonction de contrôle de système ne marche pas.
≥Branchez le câble de connexion du système à la prise du
système [CONTROL1] du SU-C700.
≥Branchez le câble numérique coaxial à l'entrée audio
numérique [COAX1 IN] du SU-C700.
L’appareil s'éteint automatiquement.
≥Est-ce que la fonction d'arrêt automatique est active?
(> 26)
≥Si le SU-C700 est raccordé à cet appareil via la fonction de
contrôle du système, cet appareil peut passer
automatiquement en mode veille si le SU-C700 passe en
mode veille. (> 9, 28)
Les paramètres sont réinitialisés sur les
paramètres usine par défaut.
≥La mise à niveau du micrologiciel peut réinitialiser les
paramètres.
Pour remettre tous les paramètres sur leurs réglages
d’usine par défaut
Si une des situations suivantes se produit, réinitialisez la
mémoire:
≥ Aucune réponse lorsque les touches sont actionnées.
≥
Si vous désirez effacer et réinitialiser le contenu de la mémoire.
1 Appuyez sur [NWP].
2 Appuyez sur [HOME].
3 Appuyez plusieurs fois sur [3, 4] pour sélectionner
“SETUP” puis appuyez sur [OK].
4 Appuyez plusieurs fois sur [3, 4] pour sélectionner
“Initialization” puis appuyez sur [OK].
5 Appuyez sur [3, 4] pour sélectionner “Yes” puis
appuyez sur [OK].
6 Appuyez sur [3, 4] pour sélectionner “Yes” puis
appuyez de nouveau sur [OK].
Général
(97)
ST-C700DE-TQBM0007.book 29 ページ 2016年10月26日 水曜日 午後1時17分

30
Impossible de se connecter au réseau.
≥Vérifiez les paramètres et la connexion réseau. (> 12)
Impossible de se connecter à l’appareil.
≥Assurez-vous que la fonction multicast du routeur sans fil
est active.
≥Assurez-vous que le périphérique et l'appareil sont
connectés au même réseau. (> 12)
≥Rebranchez le périphérique compatible au réseau puis
raccordez-le de nouveau à cet appareil.
≥Éteignez cet appareil et remettez-le en marche, puis
raccordez-le de nouveau à cet appareil.
La lecture ne démarre pas.
Le son est coupé.
≥L'utilisation simultanée d'autres dispositifs à 2,4 GHz, tels
que les fours à micro-onde, les téléphones sans fil, etc.
peut causer des coupures de connexion.
Augmente la distance entre cet appareil et ces dispositifs.
≥Si plusieurs dispositifs sans fil sont utilisés simultanément
sur le même réseau sans fil que cet appareil, essayez
d’éteindre les autres dispositifs ou de réduire leur utilisation
du réseau sans fil.
≥Si la lecture s'arrête, vérifiez l'état de la lecture sur le
périphérique.
Impossible de trouver des fichiers musicaux
stockés sur l'ordinateur.
≥Lorsque vous écoutez des fichiers musicaux sur un
réseau, ceux qui ne sont pas enregistrés sur leur serveur
réseau ne sont pas affichés. Pour plus de détails,
consultez le mode d’emploi de votre serveur.
La lecture ne démarre pas.
Le son est coupé.
≥Une station qui ne diffuse pas ne peut pas être lue. (Cela
sera sauté ou l’écran revient à la liste.)
≥La Internet Radio ne sera peut pas lue correctement selon
l’état du réseau.
≥En fonction de l’environnement de connexion d’internet, le
son peut être interrompu ou cela peut prendre du temps
pour la lecture.
≥La Internet Radio est un service de diffusion audio
transmis via Internet. En fonction du diffuseur ou de la
condition de transmission, la qualité du son peut varier.
Impossible de lire les informations correctement.
≥Les noms de pistes, les noms des stations, etc. qui sont
gérées par vTuner/Spotify peuvent ne pas s’afficher
convenablement.
Utilisation impossible.
≥Choisissez “USB” comme source d'entrée.
≥Contrôlez que l'iPhone/iPad/iPod est connecté
correctement.
≥Reconnectez l'iPhone/iPad/iPod ou essayez de redémarrer
l'iPhone/iPad/iPod.
≥La batterie de l’iPhone/iPad/iPod est épuisée. Chargez
l’iPhone/iPad/iPod et faites-le de nouveau fonctionner.
L’iPhone/iPad/iPod ne se charge pas.
≥Assurez-vous que l'appareil est en marche lorsque vous
démarrez le chargement.
– Lorsque vous chargez un iPhone/iPad/iPod dont la batterie est
complètement épuisée, ne mettez pas cet appareil en mode
veille avant que l'iPhone/iPad/iPod soit opérationnel.
Impossible de lire la clé USB ou son contenu.
≥Le format de la clé USB ou son contenu n’est pas
compatible avec cet appareil. (> 35)
Il n’y a aucune réponse lorsque [
1
/
;
] est actionné.
≥Déconnectez le périphérique USB puis reconnectez-le.
Sinon, éteignez et rallumez l’appareil.
La clé USB à mémoire flash est lente.
≥La lecture d’un fichier volumineux ou d’une clé USB à
mémoire flash de grande capacité peut prendre du temps.
L'ordinateur ne reconnait pas cet appareil.
≥Vérifiez l'environnement d'exploitation. (> 20)
≥Redémarrez l'ordinateur, éteignez et mettez en marche cet
appareil, puis rebranchez le câble USB.
≥Utilisez un autre port USB de l'ordinateur.
≥Installez le pilote USB dédié si vous utilisez un ordinateur
avec Windows.
Impossible de trouver des fichiers musicaux
stockés sur l'ordinateur.
≥Lorsque vous écoutez des fichiers musicaux sur un
réseau, ceux qui ne sont pas enregistrés sur leur serveur
réseau ne sont pas affichés. Pour plus de détails,
consultez le mode d'emploi de votre serveur. (> 35)
AirPlay/DLNA
vTuner/Spotify
iPhone/iPad/iPod
USB
PC
(98)
ST-C700DE-TQBM0007.book 30 ページ 2016年10月26日 水曜日 午後1時17分

31
Français
L'appairage ne peut pas se poursuivre.
≥Vérifiez l'état du dispositif Bluetooth
®
.
Le dispositif ne peut pas être connecté.
≥
L'appairage du dispositif a échoué ou l'enregistrement a été
remplacé. Essayez de nouveau l'appairage du dispositif.
≥Cet appareil pourrait être connecté à un dispositif différent.
Déconnectez l'autre dispositif et essayez de nouveau
l'appairage du dispositif.
Le dispositif est connecté mais le son n'est pas perçu à
travers cet appareil.
≥
Pour certains dispositif avec Bluetooth
®
incorporé, vous devez
définir manuellement la sortie du son sur “ST-C700D”. Lisez le
mode d'emploi du dispositif pour avoir des détails.
La fonctionnalité NFC ne marche pas.
≥
Assurez-vous que la fonctionnalité NFC du périphérique est activée.
≥En réessayant, changez l'angle dans lequel le périphérique
Bluetooth
®
touche la zone tactile NFC.
≥Activez la fonctionnalité NFC de cet appareil lorsque vous
connectez un périphérique en utilisant le NFC. (> 21)
La lecture ne démarre pas.
Le son est coupé.
≥L'utilisation simultanée d'autres dispositifs à 2,4 GHz, tels
que les fours à micro-onde, les téléphones sans fil, etc.
peut causer des coupures de connexion.
Rapprochez le dispositif Bluetooth
®
de cet appareil et
éloignez-le des autres dispositifs.
La réception est mauvaise ou un battement est entendu.
≥Gardez l’antenne éloignée des ordinateurs, des
téléviseurs, des autres câbles et cordons.
≥Utilisez une antenne extérieure.
La télécommande ne fonctionne pas correctement.
≥Pour éviter les interférences, veillez à ne placer aucun
objet devant le capteur de signal. (> 7)
≥Changez le code de la télécommande si aucun appareil ne
réagit à cette télécommande. (> 28)
≥
Si le SU-C700/SL-C700 est sélectionné pour être le
périphérique à utiliser, appuyez sur [NWP] et réessayez. (
>
8)
Appuyer sur [DIMMER] change la luminosité de
l'afficheur, de l'éclairage et de l'indicateur du
SU-C700/SL-C700.
≥
[DIMMER] fonctionne pour le modèle SU-C700/SL-C700 aussi bien
que pour cet appareil. Éteignez le périphérique sur lequel vous désirez
conserver le niveau de luminosité, puis appuyez sur [DIMMER].
Les messages ou codes de service suivants peuvent
apparaître sur l’afficheur de l’appareil.
“AUTO OFF”
≥L’appareil n’a pas été utilisé pendant environ 20 minutes et
passera en mode veille au bout d'une minute. Appuyez sur
n'importe quelle touche pour l'annuler.
“Checking Device”
≥L’appareil contrôle l’iPhone/iPad/iPod/USB connecté.
“Connect to Network”
≥Connectez cette unité au réseau et attendez le démarrage
de la mise à jour du micrologiciel va Internet. (> 27)
“Connect USB Device”
≥Téléchargez le micrologiciel le plus récent sur la mémoire
USB et connectez-le. (> 27)
“Download Fail”
≥Le téléchargement du firmware a échoué. Appuyez sur
n'importe quelle touche pour quitter. Veuillez réessayer
plus tard.
≥Le serveur est introuvable. Appuyez sur n’importe quelle
touche pour quitter. Assurez-vous que le réseau sans fil est
connecté à internet.
“Empty”
≥Le dossier sélectionné est vide. Déplacez les pistes dans
le dossier et réessayez.
≥Le serveur n'est pas détecté sur le réseau. Voyez si le
serveur est connecté au même réseau que cet appareil, et
réessayez de le connecter à cet appareil. (> 13)
≥Aucune station de Internet Radio n’est enregistrée dans la
liste des favoris. Ajouter une station à la liste. (> 15)
“Error”
≥Une opération incorrecte a été effectuée. Lisez les
instructions et essayez encore.
“Firmware update is available”
≥Le micrologiciel (gratuit) pour cette unité est disponible.
1 Appuyez sur [NWP].
2 Appuyez sur [OK].
3 Appuyez sur [3, 4] pour choisir “Yes” puis appuyez sur [OK].
≥ La progression s’affiche ainsi “Updating %” pendant la
mise à jour. ( représente un numéro.)
≥ Si la mise à jour s'est effectuée avec succès, “Success”
s'affiche.
4 Une fois que “Success” s'est affiché, débranchez le cordon
d’alimentation secteur puis rebranchez-le après 3 minutes.
≥Pour des informations sur la mise à jour, référezvous au
site Internet suivant.
www.technics.com/support/firmware/
Bluetooth
®
Radio
Télécommande
Messages
(99)
ST-C700DE-TQBM0007.book 31 ページ 2016年10月26日 水曜日 午後1時17分

32
“F” (“ ” représente un chiffre.)
≥Il y a un problème avec cet appareil.
– Est-ce que cet appareil se trouve dans un endroit extrêmement chaud?
Si oui, mettez cet appareil dans un endroit plus frais et attendez
quelques instants puis essayez de le remettre en marche.
Si le problème persiste, notez le numéro affiché,
débranchez le cordon d'alimentation secteur et consultez
votre revendeur.
“Load Fail”
≥Le micrologiciel présent sur la mémoire USB ne peut pas
être trouvé.
≥Téléchargez le micrologiciel le plus récent sur la mémoire
USB et essayez à nouveau. (> 27)
“No Network Available”
≥Cet appareil n'est pas connecté au réseau.
Contrôlez la connexion réseau. (> 12)
“No Memory”
≥Il n'y a aucune station DAB/DAB+ préréglée à sélectionner.
Préréglez quelques canaux. (> 24)
“No Signal”
≥Cette station ne peut pas être réceptionnée. Contrôlez
votre antenne.
“Not Valid”
≥
La fonction que vous avez essayé d'utiliser n'est pas disponible avec
la configuration actuelle. Vérifiez les étapes et les paramètres.
“PGM Full”
≥Il y a plus de 24 pistes programmées.
“Please Wait”
≥Ceci s'affiche, par exemple, lorsque cet appareil est
allumé/éteint. (Pendant 1 minute et 30 secondes max.)
“Remote ” (“ ” représente un chiffre.)
≥La télécommande et cet appareil utilisent des codes
différents. Changez le code de la télécommande.
– Lorsque “Remote 1” s'affiche, appuyez sur [OK] et [1] pendant
au moins 4 secondes.
– Lorsque “Remote 2” s'affiche, appuyez sur [OK] et [2] pendant
au moins 4 secondes.
“Remote Mode”
≥Les actions de base utilisant l'un des commutateurs de
commande basique présents sur l'appareil principal ou
bien les touches de la télécommande ne peuvent pas être
utilisées. (Ceci arrive lorsque la musique stockée sur un
serveur DLNA est lue sur cet appareil (DMR) par exemple.)
≥Utilisez le périphérique connecté pour les commandes de
lecture de base.
“Scan Failed”
≥Les stations ne peuvent pas être réceptionnées. Contrôlez
votre antenne et essayez le balayage automatique (> 24).
Si “Scan Failed” s'affiche encore, cherchez une meilleure réception
du signal avec la fonction de syntonisation “Manual Scan”. (
>
24)
“Searching”
≥L'appareil contrôle le serveur DLNA sur le réseau.
“Unlocked”
≥“PC” est sélectionné, mais aucun ordinateur n'est branché.
Vérifiez le branchement avec l'ordinateur. (> 20)
≥Les composants d’échantillonnage de la fréquence, etc.
des signaux audio n’entrent pas correctement.
– A propos du format supporté, consultez “Formats des fichiers” (
>
35)
“USB Over Current Error”
≥L'iPhone/iPad/iPod ou le périphérique USB consomme
trop de courant. Débranchez l'iPhone/iPad/iPod ou le
périphérique USB puis éteignez l'appareil et rallumez-le.
“Hub Device Not Supported”
“Device Not Recognized”
“Not Supported”
“USB Device Not Supported”
≥Vous avez branché un iPhone/iPad/iPod ou un
périphérique USB qui n'est pas pris en charge.
– Si l'iPhone/iPad/iPod est compatible, allumez-le avant de le
connecter à cet appareil.
≥Le format du fichier sur l'iPhone/iPad/iPod ou le
périphérique USB n'est pas pris en charge.
– A propos du format supporté, consultez “Formats des fichiers” (
>
35)
∫ À propos du service Réseau
Les services passant par le service réseau sont utilisés par
leurs fournisseurs de service respectifs, et le service peut être
interrompu temporairement ou de façon permanente sans
avis préalable. C'est pourquoi, Panasonic ne peut en aucun
cas garantir le contenu et la continuité de ces services.
Entretien de l’appareil
Débranchez le cordon d'alimentation secteur de la prise avant
l'entretien. Nettoyez cet appareil à l'aide d'un chiffon doux.
≥ Si la saleté est importante, utilisez un chiffon mouillé bien essoré
pour nettoyer la saleté, puis essuyez-le à l’aide un chiffon doux.
≥ N'utilisez pas de solvants, y compris essence, diluant, alcool,
liquide vaisselle, lingette chimique, etc. Cela peut déformer le
boitier externe ou décoller le revêtement.
(100)
ST-C700DE-TQBM0007.book 32 ページ 2016年10月26日 水曜日 午後1時17分

33
Français
Caractéristiques
∫ GÉNÉRALITÉS
Alimentation électrique AC 220 V à 240 V, 50/60 Hz
Consommation d’énergie 26 W
Consommation d’énergie en mode veille*
1
(Lorsque “Network Standby” est désactivé) Environ 0,2 W
(Lorsque “Network Standby” est activé) Environ 2,0 W
Consommation d’énergie en mode désactivé Environ 0,2 W
Dimensions (LkHkP) 340 mmk78 mmk305 mm
Masse Environ 4,0 kg
Plage de température en fonctionnement 0 oC à r40 oC
Plage d’humidité de fonctionnement 35 % à 80 % RH (sans condensation)
∫ SECTION CONNECTEUR
Sortie analogique
LINE OUT Prise jack
Sortie numérique
Sortie optonumérique Prise optique
Sortie numérique coaxiale Prise jack
Port système
Contrôle de système ‰3,5 mm jack
USB
USB avant Connecteur type A
Capacité de mémoire du support 2TB (max)
Nombres maximum de dossiers (albums) 800
Nombres maximum de fichiers (chansons) 8000
Système de fichier FAT16, FAT32
Alimentation du port USB DC OUT 5 V 2,1 A (max)
PC
USB arrière Connecteur type B
Interface Ethernet
LAN 10 Base-T/100 Base-TX
∫ SECTION FORMAT
USB-A
Le standard USB USB 2.0 haut débit
USB Classe stockage de masse
USB-B
Le standard USB USB 2.0 haut débit
USB Audio Class 2.0, Mode asynchrone
Mode contrôle DSD Mode ASIO Native, Mode DoP
(101)
ST-C700DE-TQBM0007.book 33 ページ 2016年10月26日 水曜日 午後1時17分

34
≥ Ces caractéristiques peuvent être soumises à des changements sans avis préalable.
≥ La masse et les dimensions sont approximatives.
*1 Lorsque l'iPhone/iPad/iPod ne se charge pas
*2 Distance de communication prospective
Mesures de l'environnement : Température 25 oC / Hauteur 1,0 m
Mesure en “Mode 1”
∫ SECTION SORTIE ANALOGIQUE
Canal 2canaux
Niveau de sortie
LINE OUT 2,0 Vrms
Réponse de fréquence 2 Hz à 90 kHz (s3dB)
THD+N 0,0012 % (1 kHz, 0 dB)
S/N 112 dB (IHF-A)
Plage dynamique 112 dB (IHF-A)
∫ SECTION Bluetooth
®
/NFC
Bluetooth
®
Caractéristiques du système Bluetooth
®
Bluetooth
®
Ver.3.0
Classification de l’équipement sans fil Classe 2 (2,5 mW)
Profils pris en charge A2DP/AVRCP
Codec pris en charge Qualcomm
®
aptX™ Low Latency, AAC, SBC
Bande de fréquence Bande FH-SS 2,4 GHz
Distance d'action Environ 10 m en Ligne de Mire*
2
∫ SECTION TUNER
Modulation de fréquence (FM)
Préréglage de la mémoire (mémorisation) 30 stations
Gamme de fréquence 87,50 MHz à 108,00 MHz (étape 50 kHz)
Bornes d’antenne 75 ≠ (asymétrique)
DAB
Mémoire DAB 20 canaux
Bande de fréquence (longueur d'ondes)
Bande III (Toutes les bandes III) 5A à 13F (174,928 MHz à 239,200 MHz)
Sensibilité
Condition minimale requise s98 dBm
Prise de l'antenne extérieure DAB F-Connector (75 ≠)
(102)
ST-C700DE-TQBM0007.book 34 ページ 2016年10月26日 水曜日 午後1時17分

35
Français
∫ Formats des fichiers
Cet appareil prend en charge les formats de fichier suivants :
≥Cet appareil ne prend pas en charge la lecture des fichiers musicaux protégés contre la copie.
≥La lecture de tous les formats de fichier pris en charge par cet appareil n'est pas garantie.
≥La lecture d'un fichier ayant un format qui n'est pas pris en charge par cet appareil peut causer un son saccadé ou des
parasites. Dans ce cas, vérifiez pour voir si cet appareil prend en charge le format du fichier.
≥Cet appareil ne prend pas en charge la lecture VBR (Variable Bit Rate pour Taux d'échantillonnage variable).
≥Certains périphériques connectés (serveurs) peuvent être en mesure de convertir les fichiers dont le format n'est pas pris en
charge par cet appareil et de les reproduire. Pour avoir plus de détails, consultez le mode d'emploi de votre serveur.
≥Les informations du fichier (fréquence d'échantillonnage, etc.) affichées par cet appareil et par le logiciel de lecture peuvent être
différentes.
USB-A
PC (USB-B)*
1
LAN (DLNA)*
2
*1 Si vous téléchargez et installez l'appli dédiée, vous pouvez lire des fichiers de grands formats. (> 20)
Pour avoir plus de détails, consultez le mode d’emploi de l'appli.
*2 La possibilité qu'a chaque fichier musical d'être lu sur votre réseau est déterminée par le serveur du réseau même si le format du fichier est
présent dans la liste ci-dessus. Par exemple, si vous utilisez Windows Media
®
Player 11, tous les fichiers musicaux de l'ordinateur ne sont
pas lisibles. Vous ne pouvez lire que ceux qui ont été ajoutés à la bibliothèque de Windows Media
®
Player 11.
≥ Toutes les informations ci-dessus sont celles en cours à octobre 2016 et elles peuvent faire l'objet de mises à jour sans avis préalable. Pour
avoir des informations sur les mises à jour, visitez le site Web ci-dessous.
www.technics.com/support/firmware/
Formats
des fichiers
Extension Fréquence d’échantillonnage
Débit
Nombre de bits de quantification
MP3 .mp3 32/44,1/48 kHz 16 kbps à 320 kbps
AAC .m4a/.aac 32/44,1/48/88,2/96 kHz 16 kbps à 320 kbps
WMA .wma 32/44,1/48 kHz 16 kbps à 320 kbps
WAV .wav 32/44,1/48/88,2/96/176,4/192 kHz 16/24 bits
FLAC .flac 32/44,1/48/88,2/96/176,4/192 kHz 16/24 bits
AIFF .aiff 32/44,1/48/88,2/96/176,4/192 kHz 16/24 bits
ALAC .m4a 32/44,1/48/88,2/96/176,4/192 kHz 16/24 bits
DSD .dff/.dsf 2,8/5,6 MHz
Formats
des fichiers
Extension Fréquence d’échantillonnage
Débit
Nombre de bits de quantification
LPCM 32/44,1/48/88,2/96/176,4/192 kHz 16/24/32 bits
DSD .dff/.dsf 2,8/5,6 MHz
Formats
des fichiers
Extension Fréquence d’échantillonnage
Débit
Nombre de bits de quantification
MP3 .mp3 32/44,1/48 kHz 16 kbps à 320 kbps
AAC .m4a/.aac 32/44,1/48/88,2/96 kHz 16 kbps à 320 kbps
WMA .wma 32/44,1/48 kHz 16 kbps à 320 kbps
WAV .wav 32/44,1/48/88,2/96/176,4/192 kHz 16/24 bits
FLAC .flac 32/44,1/48/88,2/96/176,4/192 kHz 16/24 bits
AIFF .aiff 32/44,1/48/88,2/96/176,4/192 kHz 16/24 bits
ALAC .m4a 32/44,1/48/88,2/96/176,4/192 kHz 16/24 bits
DSD .dff/.dsf 2,8/5,6 MHz
(103)
ST-C700DE-TQBM0007.book 35 ページ 2016年10月26日 水曜日 午後1時17分

36
∫ À propos des Bluetooth
®
Fréquence de la bande utilisée
≥Ce système utilise une bande de fréquence de 2,4 GHz.
Certification de cet appareil
≥Ce système est conforme aux limitations de fréquence et a
obtenu une certification relative au règlement en vigueur
sur les fréquences, par conséquence, une autorisation de
détention d’appareil sans fil n'est pas nécessaire.
≥Dans certains pays, les actions suivantes sont punies par
la loi:
– Démontage ou modification du système.
– Suppression des indications de spécification.
Limites d’utilisation
≥La transmission sans fil et/ou l’utilisation avec tous les
appareils équipés de la technologie Bluetooth
®
n’est pas
garantie.
≥Tous les dispositifs doivent se conformer aux normes
définies par Bluetooth SIG, Inc.
≥En fonction des caractéristiques et des paramètres d'un
dispositif, la connexion peut échouer ou bien certaines
opérations peuvent être différentes.
≥Ce système prend en charge les fonctionnalités de sécurité
Bluetooth
®
. Mais en fonction de l'environnement et/ou des
paramètres, cette sécurité peut être insuffisante. Utilisez
avec précaution la transmission sans fil des données vers
cet appareil.
≥Ce système ne peut pas transmettre de données vers un
dispositif Bluetooth
®
.
Portée d’utilisation
≥Utilisez ce dispositif à une portée maximale de 10 m. La
portée peut diminuer en fonction de l'environnement, des
obstacles ou des interférences.
Interférences provenant d’autres dispositifs
≥Ce système peut ne pas fonctionner correctement et des
problèmes comme des parasites ou des coupures du son
peuvent être causés par les interférences des ondes radio
lorsque ce système se trouve trop près des dispositifs
Bluetooth
®
ou des dispositifs qui utilisent la bande de
fréquence de 2,4
GHz
.
≥Ce système peut ne pas fonctionner correctement si les
ondes radio d'une station de diffusion proche, etc. sont trop
fortes.
Usages prévus
≥Ce système est prévu uniquement pour une utilisation
normale et générale.
≥N'utilisez pas ce système près d'un équipement ou dans un
environnement sensible aux interférences des ondes radio
(exemple: aéroports, hôpitaux, laboratoires, etc).
Panasonic n’assume aucune responsabilité quant
aux données et/ou aux informations qui pourraient
être compromises pendant une transmission sans fil.
“Conçu pour iPod”, “Conçu pour iPhone” et “Conçu pour iPad” signifient
qu’un accessoire électronique a été conçu pour se connecter
spécifiquement à un iPod, un iPhone, ou un iPad, respectivement, et a été
certifié conforme par le concepteur aux normes de performance Apple.
Apple décline toute responsabilité concernant le fonctionnement de cet
appareil ou sa conformité aux normes de sécurité et de réglementation.
Veuillez noter que l’utilisation de cet accessoire avec un iPod, un iPhone ou
un iPad peut affecter la performance de la connexion sans fil.
AirPlay, iPad, iPhone, iPod, iPod nano, iPod touch et iPad Air sont des
marques commerciales d’Apple Inc., enregistrées aux États-Unis et dans
les autres pays.
iPad mini et iPad Pro sont des marques commerciales de Apple Inc.
Mac et OS X sont des marques de commerce de Apple Inc., enregistrées
aux Etats-Unis et dans d’autres pays.
Android est une marque commerciale de Google Inc.
Qualcomm aptX est un produit de Qualcomm Technologies International, Ltd.
Qualcomm est une marque de Qualcomm Incorporated, enregistrée aux
États-Unis, et dans les autres pays, elle est utilisée avec autorisation. aptX
est une marque de Qualcomm Technologies International, Ltd., enregistrée
aux États-Unis, et dans les autres pays, elle est utilisée avec autorisation.
Le nom et les logos de la marque Bluetooth
®
sont des marques déposées
appartenant à Bluetooth SIG, Inc. et toute utilisation de ces marques par
Panasonic Corporation est effectuée sous licence.
Les autres marques et noms commerciaux appartiennent à leurs
propriétaires respectifs.
DLNA, the DLNA Logo and DLNA CERTIFIED are trademarks, service
marks, or certification marks of the Digital Living Network Alliance.
Technologie d’encodage du son MPEG Layer-3 brevetée par Fraunhofer
IIS et Thomson.
Windows et Windows Vista
sont des marques déposées ou des marques
commerciales de Microsoft Corporation aux États-Unis et/ou dans d’autres pays.
Windows Media et le logo Windows sont soit des marques de Microsoft
Corporation, soit des marques déposées de Microsoft Corporation aux
États-Unis et/ou dans d’autres pays.
Cet appareil est protégé par certains droits de propriété intellectuelle de
Microsoft Corporation et de tiers. L’utilisation ou la distribution de cette
technologie à l’extérieur de cet appareil est interdite sans une licence de
Microsoft ou d’une filiale Microsoft autorisée et des tiers.
FLAC Decoder
Copyright (C) 2000, 2001, 2002, 2003, 2004, 2005, 2006, 2007, 2008,
2009 Josh Coalson
Redistribution and use in source and binary forms, with or without
modification, are permitted provided that the following conditions are met:
– Redistributions of source code must retain the above copyright notice,
this list of conditions and the following disclaimer.
– Redistributions in binary form must reproduce the above copyright
notice, this list of conditions and the following disclaimer in the
documentation and/or other materials provided with the distribution.
– Neither the name of the Xiph.org Foundation nor the names of its
contributors may be used to endorse or promote products derived from
this software without specific prior written permission.
THIS SOFTWARE IS PROVIDED BY THE COPYRIGHT HOLDERS AND
CONTRIBUTORS “AS IS” AND ANY EXPRESS OR IMPLIED
WARRANTIES, INCLUDING, BUT NOT LIMITED TO, THE IMPLIED
WARRANTIES OF MERCHANTABILITY AND FITNESS FOR A
PARTICULAR PURPOSE ARE DISCLAIMED. IN NO EVENT SHALL THE
FOUNDATION OR CONTRIBUTORS BE LIABLE FOR ANY DIRECT,
INDIRECT, INCIDENTAL, SPECIAL, EXEMPLARY, OR CONSEQUENTIAL
DAMAGES (INCLUDING, BUT NOT LIMITED TO, PROCUREMENT OF
SUBSTITUTE GOODS OR SERVICES; LOSS OF USE, DATA, OR
PROFITS; OR BUSINESS INTERRUPTION) HOWEVER CAUSED AND
ON ANY THEORY OF LIABILITY, WHETHER IN CONTRACT, STRICT
LIABILITY, OR TORT (INCLUDING NEGLIGENCE OR OTHERWISE)
ARISING IN ANY WAY OUT OF THE USE OF THIS SOFTWARE, EVEN IF
ADVISED OF THE POSSIBILITY OF SUCH DAMAGE.
Le logiciel Spotify est soumis à une licence de tierce partie se trouvant ici :
www.spotify.com/connect/third-party-licenses
(104)
ST-C700DE-TQBM0007.book 36 ページ 2016年10月26日 水曜日 午後1時17分

37
Français
(105)
ST-C700DE-TQBM0007.book 37 ページ 2016年10月26日 水曜日 午後1時17分

4
La ringraziamo dell’acquisto di questo prodotto.
Leggere attentamente queste istruzioni prima di utilizzare il presente prodotto, e conservare questo manuale per usi futuri.
∫ Funzioni di questa unità
Questa unità offre le seguenti funzioni:
Architettura isolamento rumore digitale
Poiché la maggior parte dei supporti per la memorizzazione di contenuti digitali è pensata per l'utilizzo su PC, non è progettata in
modo da minimizzare i disturbi, un requisito essenziale per la purezza della riproduzione. Per risolvere tale problema, questa
unità utilizza un'efficace funzione anti-jitter e una straordinaria tecnologia di isolamento dei disturbi per ciascuna delle sue
interfacce, offrendo un suono chiaro.
Operazione batteria virtuale
L'operazione batteria virtuale evita che il rumore da alimentazione, un fattore che causa “turbolenza” al suono, si mescoli al
segnale audio. Il risultato è un miglioramento nella localizzazione del suono e nell'espressione spaziale.
Filtro digitale di sovracampionamento ultra bassa distorsione
Il sovracampionamento ad alta precisione elimina la distorsione e migliora la qualità del suono delle sorgenti musicali,
riproducendo così un suono ricco di espressione spaziale.
∫ Dispositivi consigliati
Per una migliore qualità dell'audio si consiglia di utilizzare i seguenti dispositivi Technics (opzionali).
Nome del prodotto Numero modello
Cassa acustica SB-C700
Lettore di Compact Disc SL-C700
Amplificatore stereo integrato SU-C700
(106)
ST-C700DE-TQBM0007.book 4 ページ 2016年10月26日 水曜日 午後1時17分

5
Italiano
Precauzioni per la sicurezza
Unità
≥ Per ridurre il rischio d’incendio, folgorazioni o danni all’unità,
– Non esporre questa unità alla pioggia, umidità, gocciolamenti o spruzzi.
– Non posare oggetti contenenti liquidi, come un vaso di fiori, su questa
unità.
– Utilizzare solo gli accessori consigliati.
– Non rimuovere le coperture.
– Non riparare quest’unità da soli. Per qualsiasi riparazione rivolgersi a un
tecnico qualificato.
– Non introdurre oggetti metallici all’interno di questa unità.
– Non appoggiare oggetti pesanti su questa unità.
Cavo di alimentazione CA
≥ Per ridurre il rischio d’incendio, folgorazioni o danni all’unità,
– Accertarsi che la tensione di alimentazione corrisponda a quella indicata
su questa unità.
– Inserire fino in fondo la spina del cavo di alimentazione nella presa.
– Non tirare, piegare, o appoggiare oggetti pesanti sul cavo di
alimentazione.
– Non maneggiare la spina con le mani bagnate.
– Tenere la spina del cavo di alimentazione tra le dita quando la si scollega.
– Non utilizzare una spina o una presa di rete danneggiate.
≥ La presa di rete è il dispositivo per scollegare.
Installare l’unità in modo che la presa di rete possa essere scollegata
immediatamente dalla presa di corrente.
Unità
≥ Non mettere sull’unità sorgenti di fiamme nude, come candele accese.
≥ Durante l’uso, questa unità potrebbe essere soggetta all’interferenza radio
causata dal cellulare. Se si dovesse verificare tale interferenza, aumentare
la distanza tra questa unità e il cellulare.
≥ Questa unità è progettata per l’uso in paesi con clima mite e tropicale.
Collocazione
≥ Collocare questa unità su una superficie piana.
≥ Per ridurre il rischio d’incendio, folgorazioni o danni all’unità,
– Per mantenere una buona ventilazione, non installare o sistemare questa
unità in uno scaffale dei libri, armadietto incorporato od altro spazio
ristretto.
– Non ostruire le aperture di ventilazione di questa unità con giornali,
tovaglie, tende ed altri oggetti simili.
– Non esporre questa unità alla luce diretta del sole, a temperature elevate,
a eccessiva umidità e a forti vibrazioni.
≥ Non sollevare o trasportare questa unità tenendola per una levetta. Questo
potrebbe causare la caduta dell'unità e conseguenti lesioni personali o
malfunzionamento dell'unità.
Batteria
≥ Se la batteria viene sostituita in modo non corretto esiste il rischio che
esploda. Sostituirla esclusivamente con una del tipo consigliato dal
produttore.
≥ L’uso scorretto delle batterie può causare perdite di elettrolito e causare
incendi.
– Rimuovere la batteria se si prevede di non utilizzare il telecomando per
lungo tempo. Conservarla in un luogo fresco e al riparo dalla luce.
– Non riscaldare o esporre a fiamme le batterie.
– Non lasciare la batteria/le batterie per lungo tempo all’interno dell’auto,
esposte alla luce solare diretta e con le porte e i finestrini chiusi.
– Non aprire o mettere in corto le batteria.
– Non ricaricare batterie alcaline o al manganese.
– Non usare batterie la cui guaina non è intatta.
– Non utilizzare batterie nuove e vecchie o batterie di tipi diversi insieme.
≥ Quando si smaltiscono le batterie, contattare le autorità locali o il rivenditore
e chiedere informazioni sul metodo corretto di smaltimento.
ATTENZIONE
AVVERTENZA
Dichiarazione di conformità (DoC)
Con il presente documento “Panasonic Corporation” dichiara che questo prodotto è
conforme ai requisiti base e altre disposizioni applicabili della direttiva 1999/5/EC.
I clienti possono scaricare una copia della DoC originale per i nostri prodotti R&TTE dal
nostro server DoC:
http://www.doc.panasonic.de
Contatto del Rappresentante Autorizzato:
Panasonic Marketing Europe GmbH, Panasonic Testing Centre,
Winsbergring 15, 22525 Hamburg, Germania
Smaltimento di vecchie apparecchiature e batterie usate
Solo per Unione Europea e Nazioni con sistemi di raccolta e
smaltimento
Questi simboli sui prodotti, sull’imballaggio e/o sulle
documentazioni o manuali accompagnanti i prodotti
indicano che i prodotti elettrici, elettronici e le batterie usate
non devono essere buttati nei rifiuti domestici generici.
Per un trattamento adeguato, recupero e riciclaggio di
vecchi prodotti e batterie usate vi invitiamo a portarli negli
appositi punti di raccolta secondo la legislazione vigente
nel vostro paese.
Con uno smaltimento corretto, contribuirete a salvare
importanti risorse e ad evitare i potenziali effetti negativi
sulla salute umana e sull’ambiente.
Per ulteriori informazioni su raccolta e riciclaggio, vi
invitiamo a contattare il vostro comune.
Lo smaltimento non corretto di questi rifiuti potrebbe
comportare sanzioni in accordo con la legislazione
nazionale.
Note per il simbolo batterie (simbolo sotto):
Questo simbolo può essere usato in combinazione con un
simbolo chimico. In questo caso è conforme ai requisiti indicati
dalla Direttiva per il prodotto chimico in questione.
(107)
ST-C700DE-TQBM0007.book 5 ページ 2016年10月26日 水曜日 午後1時17分

6
Indice
∫ Per smaltire o trasferire questa unità
Questa unità può contenere informazioni private. Prima di procedere allo smaltimento o al trasferimento di questa unità, eseguire
i seguenti passaggi per procedere all’eliminazione dei dati, comprese le informazioni personali e quelle segrete.
≥“Per ripristinare tutte le impostazioni predefinite in fabbrica” (> 29)
Accessori
≥ I codici prodotto forniti in queste istruzioni per l'uso sono aggiornati a settembre 2016. Possono essere soggetti a modifiche.
≥ Non utilizzare il cavo di alimentazione CA con altri apparecchi.
Precauzioni per la sicurezza ............................................5
Accessori ...........................................................................6
Guida di riferimento e controllo.......................................7
Preparativi..........................................................................9
Menu HOME e operazioni di base..................................11
Impostazioni di rete.........................................................12
Riproduzione di file musicali sul server DLNA.............13
Riproduzione di Internet Radio (vTuner).......................14
Utilizzo di Spotify ............................................................16
Uso di iPhone/iPad/iPod .................................................17
Uso di AirPlay..................................................................18
Utilizzo dispositivo USB .................................................18
Utilizzo PC, ecc. ...............................................................20
Uso di Bluetooth
®
............................................................21
Ascolto della radio FM ....................................................23
Ascolto DAB/DAB+..........................................................24
Regolazione dell’audio....................................................25
Altre operazioni ...............................................................26
Risoluzione dei problemi ................................................29
Cura dell’unità..................................................................32
Specifiche.........................................................................33
Descrizioni contenute in queste istruzioni per l’uso
≥I riferimenti alle pagine sono indicati con “@ ±±”.
≥L’aspetto dell’unità mostrata nelle illustrazioni potrebbe apparire diverso da quello dell’unità in dotazione.
≥A meno di indicazioni diverse, le operazioni descritte prevedono l’utilizzo del telecomando.
∏ 1 Cavo di alimentazione c.a.
(REQ0456)
∏ 1 Cavo di collegamento di sistema
(K2KYYYY00233)
∏ 1 Cavo digitale coassiale
(K2KYYYY00251)
∏ 1 Antenna DAB interna
(RFA3654)
∏ 1 Telecomando
(N2QAYA000096)
∏ 2 Batterie per il
telecomando
(K2CQ2YY00127)
∫ Uso del comando a distanza
Inserire la batteria in modo che i poli (i e j)
coincidano con quelli indicati sul telecomando.
Puntarlo verso il sensore del segnale del
telecomando di quest’unità. (> 7)
≥Tenere le batterie fuori della portata dei bambini,
per evitare che le possano ingerire.
2
1
R03/LR03, AAA
(Batterie alcaline o al manganese)
(108)
ST-C700DE-TQBM0007.book 6 ページ 2016年10月26日 水曜日 午後1時17分

7
Italiano
Guida di riferimento e controllo
∫ Parte anteriore
1 Leva dell'interruttore d'alimentazione
[Í/I (standby/accensione)]/[OFF]
Accendere/spegnere questa unità.
≥ Il telecomando non funziona quando la leva dell'interruttore di
alimentazione si trova in posizione abbassata.
≥ È possibile passare l'unità dallo stato ON allo stato standby o
vice versa quando la leva di accensione è in posizione
sollevata. (> 8)
2 Porta per iPhone/iPad/iPod e dispositivi USB
( CC 5 V 2,1 A) (> 17, 18)
3 Sensore del segnale del telecomando
Distanza: Fino a 7 m circa, direttamente di fronte
Angolo: Circa 30o a sinistra e a destra
4 Display
≥Vengono visualizzati la sorgente di ingresso, lo stato
della riproduzione ed altre informazioni. Per maggiori
informazioni, fare riferimento al sito dell'assistenza
indicato sotto, oltre a queste istruzioni per l’uso.
www.technics.com/support/
5 Interruttori per il controllo di base
Per impostare questi selettori è sufficiente sfiorare i
simboli. Ogni volta che si sfiora il selettore, verrà emesso
un segnale sonoro. (> 11)
≥ Quando le informazioni relative alla riproduzione non vengono
visualizzate sul display (tranne nella modalità standby di
registrazione in NFC (> 21)), è possibile svolgere le seguenti
operazioni sul pannello touch:
6 Area di sfioramento NFC (> 21)
La pellicola per l'area di sfioramento NFC è applicata su
quest'area al momento dell'acquisto.
∫ Parte posteriore
7 Marcatura di identificazione del prodotto
Indica il numero del modello.
8 Terminale DAB/FM (> 10)
9 Terminale uscita audio analogica [LINE OUT] (> 9)
: Terminale uscita audio digitale [COAX OUT] (> 9)
; Terminale uscita audio digitale [OPT OUT] (> 9)
< Terminale ingresso audio digitale [PC] (> 20)
Per il collegamento di un PC ecc.
= Terminale di sistema [CONTROL] (> 9)
> Porta LAN [LAN] (> 12)
? Terminale AC IN [AC IN T]( ) (> 10)
Questa unità
:3 (Su)
94 (Giù)
1/; OK (OK)
∫ RETURN (Ritorno)
HOME (Tenere premuto) MENU (Consente di
accedere al menu)
Apparecchiatura Classe II
(il prodotto è munito di doppio isolamento).
(109)
ST-C700DE-TQBM0007.book 7 ページ 2016年10月26日 水曜日 午後1時17分

8
∫ Pulsanti utilizzabili su questa unità
1 [NWP Í]: Interruttore di standby/accensione
Premerlo per passare dallo stato di accensione alla
modalità standby o viceversa. In modalità standby l’unità
consuma comunque una piccola quantità di corrente.
≥ Il telecomando non funziona quando la leva dell'interruttore di
alimentazione si trova in posizione abbassata.
2 [AMP]/[NWP]/[CD]: Seleziona il dispositivo da
utilizzare
3 [N INPUT O]: Selezionare la sorgente
4
[DIMMER]: Regolare la luminosità del display, ecc. (
>
11)
5 [HOME]: Mostra il menu HOME (> 11)
6 [INFO]: Visualizzazione le informazioni di contenuto
Premere questo pulsante per visualizzare traccia, artista, nome
album, tipo di file, frequenza di campionamento, ed altre
informazioni.
7 [3, 4, 2, 1]/[OK]: Selezione/OK
8 [RETURN]: Torna all'impostazione precedente del
display
9 [MENU]: Consente di accedere al menu
(> 21, 22, 23, 24, 26)
: [DIRECT]: Attiva/disattiva la modalità Diretta (> 25)
; [RE-MASTER]: Attiva/disattiva la funzione di
Rimasterizzazione (> 25)
< Tasti per il controllo di base della riproduzione
= Pulsanti numerici, ecc.
≥ Per selezionare un numero a 2 cifre
Esempio:
16: [S10] > [1] > [6]
≥ Per selezionare un numero a 4 cifre
Esempio:
1234: [S10] > [S10] > [S10] > [1] > [2] > [3] > [4]
≥ [CLEAR]: Cancellare il valore inserito.
∫ Pulsanti utilizzabili per i dispositivi
SU-C700/SL-C700
Il telecomando di questa unità può essere utilizzato anche
per SU-C700/SL-C700.
Per informazioni sul funzionamento dei dispositivi
SU-C700/SL-C700, consultare le relative istruzioni per l'uso.
1 Interruttore standby/accensione per SU-C700
2 Interruttore standby/accensione per
SL-C700
3 Seleziona il dispositivo da utilizzare
4 Seleziona la sorgente in ingresso per il dispositivo
SU-C700
5 Regolare la luminosità del display, ecc.
6 Misura le caratteristiche dell'amplificatore e corregge il
segnale in uscita
7 Regola il volume
8 Silenzia il volume
Telecomando
(110)
ST-C700DE-TQBM0007.book 8 ページ 2016年10月26日 水曜日 午後1時17分

9
Italiano
Preparativi
≥Prima di effettuare il collegamento spegnere tutti gli apparecchi e leggere il relativo manuale di istruzioni.
≥Non collegare il cavo di alimentazione CA sino a che tutti gli altri collegamenti siano stati completati.
≥Inserire fino in fondo gli spinotti dei cavi da collegare.
≥Non piegare eccessivamente i cavi.
≥È possibile utilizzare questa unità per trasmettere dei segnali audio digitali e riprodurre della musica.
≥
È possibile collegare automaticamente questa unità con SU-C700 e controllarli facilmente con il telecomando. (
>
28)
≥ Non usare cavi di collegamento di sistema o cavi digitali coassiali diversi da quelli in dotazione.
≥ Collegare il cavo di collegamento di sistema al terminale di sistema [CONTROL1] dell'SU-C700.
≥ Collegare il cavo digitale coassiale al terminale di ingresso audio digitale [COAX1 IN] dell'SU-C700.
È possibile utilizzare questa unità per trasmettere dei segnali audio analogici o digitali e riprodurre file musicali.
Collegamento del controllo di sistema a SU-C700
Questa unità
(Parte posteriore)
SU-C700
Cavo digitale coassiale
(in dotazione)
Cavo di collegamento di
sistema
(in dotazione)
Collegamento a un amplificatore e a un convertitore D/A
es.
Questa unità
(Parte posteriore)
Amplificatore
Cavo audio digitale a fibre ottiche
(non in dotazione)
Convertitore D/A
Cavo audio
(non in dotazione)
(111)
ST-C700DE-TQBM0007.book 9 ページ 2016年10月26日 水曜日 午後1時17分

10
≥ Se la qualità di ricezione della radio è scarsa, usare un'antenna DAB esterna (non in dotazione).
≥ Non usare antenne per interni diverse dall'antenna DAB per interni in dotazione.
Collegare solo dopo che tutti gli altri collegamenti sono completati.
≥ Questa unità consuma una piccola quantità di corrente CA (> 33) anche quando la leva dell'interruttore di alimentazione si trova in posizione
[OFF]. Se si prevede di non utilizzare l'unità per un periodo prolungato, togliere la spina dalla presa di rete. Collocare l'unità in una posizione
che consenta di togliere facilmente la spina.
Collegare l’antenna
Collegamento cavo di alimentazione CA
Questa unità
(Parte
posteriore)
Nastro adesivo
(non in dotazione)
Antenna DAB interna
(in dotazione)
Assicurarsi di aver stretto il
dado.
Sistemare l’antenna dove la ricezione è migliore.
Cavo di
alimentazione CA
(in dotazione)
Ad una presa di corrente
Questa unità
(Parte posteriore)
Inserire il cavo di
alimentazione CA sino a A,
un punto appena prima al
foro circolare.
(112)
ST-C700DE-TQBM0007.book 10 ページ 2016年10月26日 水曜日 午後1時17分

11
Italiano
Menu HOME e operazioni di base
Le principali funzioni di questa unità possono essere
controllate dal menu HOME.
Preparazione
≥Preparare la musica che si desidera riprodurre.
≥Attivare il dispositivo collegato (amplificatore ecc.) e
ridurne il volume.
1 Portare la leva dell'interruttore di
alimentazione di questa unità in posizione
[Í/I].
2 Premere [NWP].
3 Premere [HOME].
4 Premere [3, 4] per selezionare una voce e
premere [OK].
≥Se vi sono altre voci, ripetere questo passaggio.
≥ Nuove voci possono essere aggiunte e le voci esistenti possono
essere aggiornate. Per informazioni su aggiunte e aggiornamenti,
consultare il seguente sito di supporto.
www.technics.com/support/
5 Avviare la riproduzione.
∫ Per visualizzare il menu HOME
Premere [HOME].
Regolare il volume del dispositivo collegato (amplificatore, ecc.).
È possibile modificare la luminosità del display di questa
unità e dell'indicatore di accensione.
Premere ripetutamente [DIMMER].
≥ Quando il display è spento, questo si illumina solo quando si
aziona questa unità.
Prima che il display si spenga di nuovo, per qualche secondo
verrà visualizzato "Display Off".
È possibile attivare/disattivare il bip.
≥ L'impostazione predefinita è “
On
”.
1 Premere [NWP].
2 Premere [HOME].
3 Premere [3, 4] ripetutamente per
selezionare “SETUP”, quindi premere [OK].
4 Premere [3, 4] ripetutamente per
selezionare “Beep”, quindi premere [OK].
5 Premere [3, 4] per selezionare “On”/“Off” e
quindi premere [OK].
Se si installa l'apposita app gratuita “Technics Music App” sul
proprio tablet/smartphone, è possibile controllare questa
unità e SU-C700 utilizzando un'ampia varietà di funzioni.
Per ulteriori informazioni, visitare il sito:
www.technics.com/support/
DMP
Collega questa unità ad una rete e
riproduce la musica disponibile in
rete. (> 13)
Internet Radio
Consente di riprodurre le radio via
Internet (vTuner). (> 14)
USB
Riproduce la musica memorizzata su
un dispositivo USB o un
iPhone/iPad/iPod. (> 17, 18, 19)
PC
Riproduce la musica memorizzata su
un PC, ecc. (> 20)
Bluetooth
Collega questa unità ad un dispositivo
Bluetooth
®
e riproduce la musica
memorizzata su di esso. (
>
21, 22)
FM FM (> 23)
DAB/DAB+ DAB/DAB+ (> 24)
SETUP (> 11, 12, 25, 26, 27, 28)
ラヰヮユ
リㄏㄕㄆㄓㄏㄆㄕチンㄅㄊㄐ
ヒバベ
ュヮ
ヱ
Regolazione del volume
Luminosità del display
Impostazioni suono di
funzionamento
Operazioni con utilizzo di app
dedicata “Technics Music App”
(113)
ST-C700DE-TQBM0007.book 11 ページ 2016年10月26日 水曜日 午後1時17分

12
Impostazioni di rete
È possibile effettuare lo streaming di musica da un
dispositivo iOS (iPhone/iPad/iPod), un dispositivo Android™
o un PC (Mac/Windows) a questa unità utilizzando la
funzione AirPlay o DLNA. (> 13, 18)
Per utilizzare queste funzioni, questa unità deve essere
collegata alla stessa rete del dispositivo compatibile con
AirPlay o con DLNA.
Normalmente è sufficiente collegare un cavo LAN per
completare l'impostazione.
A: Cavo LAN (non in dotazione)
1 Staccare il cavo di alimentazione CA.
2 Collegare questa unità ad un router a banda
larga utilizzando un cavo LAN.
3 Collegare il cavo di alimentazione CA a
questa unità e portare la leva dell'interruttore
dell'alimentazione in posizione [Í/I]. (> 10)
≥Quando viene stabilita la connessione, viene
visualizzato “ ”.
≥ Se “Firmware update is available” viene visualizzato dopo
l’impostazione della connessione di rete, il firmware per questa
unità è disponibile.
– Si rimanda a “Firmware update is available” (> 31) per maggiori
dettagli relativi all’aggiornamento.
– Per informazioni relative all’aggiornamento, si rimanda al
seguente sito web.
www.technics.com/support/firmware/
È possibile modificare il nome di questa unità sulla rete
(Friendly Name), ed usare indirizzo IP, subnet mask,
gateway predefinito, DNS primario specifici.
≥
Non riprodurre musica mentre si stanno modificando queste impostazioni.
1 Premere [NWP].
2 Premere [HOME].
3 Premere [3, 4] ripetutamente per selezionare “SETUP”,
quindi premere [OK].
4 Premere [3, 4] ripetutamente per selezionare
“Network”, quindi premere [OK].
5 Selezionare e immettere le voci.
6 Premere [OK] per applicare le impostazioni.
7 Premere ripetutamente [RETURN] per uscire dalle
impostazioni.
8
Premere [NWP
Í
] per passare l'unità in modalità standby.
≥ Attendere fino alla scomparsa di “Please Wait”.
9 Eseguire
“
Connessione LAN via cavo”. (> a sinistra)
≥ Utilizzare soltanto cavi LAN diretti di categoria 7 o superiore (STP)
per collegarsi alle periferiche.
≥ L’inserimento di un cavo che non sia il cavo LAN nella porta LAN
può danneggiare l’unità.
≥ Se si tenta di modificare le impostazioni della rete
immediatamente dopo aver attivato questa unità, potrebbe essere
necessario un po’ di tempo affinché venga visualizzata la
schermata di impostazione della rete.
∫
Nome di questa unità sulla rete “Friendly Name”
1 Premere [NWP].
2 Premere [HOME].
3 Premere [3, 4] ripetutamente per selezionare “SETUP”,
quindi premere [OK].
4 Premere [3, 4] ripetutamente per selezionare
“Network”, quindi premere [OK].
5 Premere [3, 4] ripetutamente per selezionare “Friendly
Name”, quindi premere [OK].
≥ Viene visualizzato l’attuale nome corrente di questa unità.
Premere [OK] per modificarlo.
6 Premere [3, 4, 2, 1] per inserire il nome descrittivo.
≥ Possono essere utilizzati solo i caratteri ASCII.
≥ È possibile aggiungere “A” premendo [1] quando seleziona
l’ultima lettere del nome descrittivo.
≥ Premere [CLEAR] per eliminare una lettera.
≥ Premere [S10] per inserire una lettera “A”.
≥ Il nome predefinito è “Technics ST-C700D _ _ _ _ _ _”.
“ _ ” indica una cifra unica per ciascun apparecchio.
7 Premere [OK] per applicare le impostazioni.
8 Premere ripetutamente [RETURN] per uscire dalle
impostazioni.
∫
Per controllare l'indirizzo MAC di questa unità
1 Premere [NWP].
2 Premere [HOME].
3 Premere [3, 4] ripetutamente per selezionare “SETUP”,
quindi premere [OK].
4 Premere [3, 4] ripetutamente per selezionare
“Network”, quindi premere [OK].
5
Premere ripetutamente [
3
,
4
] per selezionare “MAC Address”.
≥ Verrà visualizzato l'indirizzo MAC di questa unità.
Connessione LAN via cavo
Router a banda larga, ecc.
Questa unità
(Parte posteriore)
PC, ecc.
Effettuare impostazioni
relative alla rete
(114)
ST-C700DE-TQBM0007.book 12 ページ 2016年10月26日 水曜日 午後1時17分

13
Italiano
Riproduzione di file musicali sul server DLNA
È possibile condividere file musicali memorizzati su un media
server certificato DLNA (PC, smartphone, ecc.) collegato alla
rete domestica, e visualizzare i contenuti con questa unità.
≥
Riguardo al formato supportato, fare riferimento a “Formato file” (
>
35)
Preparazione
≥Completare le impostazioni di rete. (> 12)
≥Collegare i dispositivi da utilizzare alla stessa rete come
questa unità.
≥Aggiungere i contenuti e la cartella alle librerie di Windows
Media
®
player 11 o 12 o allo smartphone, ecc.
– La playlist di Windows Media
®
Player è in grado di riprodurre
solo i contenuti presenti nelle librerie.
– Per utilizzare Windows Media
®
Player per lo streaming, è
necessario per prima cosa configurarlo.
È possibile riprodurre la musica memorizzata sul server
DLNA su questa unità (DMP—Digital Media Player)
controllando il server DLNA con questa unità.
1 Premere [NWP].
2 Premere ripetutamente [N INPUT O] sotto
[NWP] per selezionare “DMP”.
≥Verrà visualizzata la schermata di selezione del server.
3 Premere [3, 4] per selezionare un server
DLNA sulla rete, quindi premere [OK].
≥Verrà visualizzata la schermata di selezione della
cartella/del contenuto.
≥
Le cartelle/i contenuti possono essere visualizzati in ordine
diverso da quello del server, a seconda delle sue specifiche.
4 Premere [3, 4] per selezionare una voce e
premere [OK].
≥Se vi sono altre voci, ripetere questo passaggio.
Funzioni presenti sul telecomando
≥ Il server connesso ed i relativi contenuti potrebbero non essere
visualizzati correttamente a seconda delle relative condizioni.
(Ad esempio, subito dopo l’aggiunta di contenuti al server, ecc.)
Riprovare in un secondo momento. Per maggiori informazioni, si
rimanda al manuale per l’uso del dispositivo.
∫ Riproduzione ripetuta casuale
Premere [RND].
Ogni volta che si preme il pulsante:
∫ Riproduzione ripetuta
Premere [`].
Ogni volta che si preme il pulsante:
Controllando un dispositivo compatibile DMC (Digital Media
Controller), è possibile riprodurre la musica memorizzata sul
server DLNA su questa unità (DMR—Digital Media Renderer).
1 Portare la leva dell'interruttore di
alimentazione di questa unità in posizione
[Í/I].
2 Azionare il dispositivo compatibile con DMC
e collegarsi a questa unità.
≥Il nome di questa unità verrà visualizzato come
“Technics ST-C700D _ _ _ _ _ _”*
1, 2
.
≥Per maggiori dettagli sull'utilizzo dei dispositivi
compatibili con DMC, consultare le istruzioni per l'uso
dei dispositivi o del software.
≥ Quando si attiva DMC, la riproduzione delle altre sorgenti audio si
interromperà e il DLNA in uscita avrà la priorità.
≥ A seconda dei contenuti e dell'apparecchio collegato, le operazioni
o la riproduzione potrebbero non essere possibili.
≥ Questa unità non garantisce il collegamento con tutte le
applicazioni DMC. Utilizzare l’app dedicata “Technics Music App”.
*1 “ _ ” indica una cifra unica per ciascun apparecchio.
*2 Il nome del dispositivo può essere cambiato consultando “Nome
di questa unità sulla rete “Friendly Name””. (> 12)
Riproduzione del contenuto
memorizzato sul server DLNA
controllandolo da questa unità
Stop Premere [∫].
Pausa
Premere [1/;].
≥ Premere nuovamente per riavviare la
riproduzione.
Salto
Premere [
:
] o [
9
] per saltare un brano.
Ricerca
Durante la riproduzione o la pausa,
tenere premuto [6] o [5].
≥ Sull'unità: tenere premuto [:] o [9].
≥ Questa impostazione potrebbe non essere
disponibile per alcuni formati.
On
Tutti i brani in una cartella vengono
ripetuti casualmente.
≥ Viene visualizzato “RND `”.
≥ Durante la riproduzione casuale non è
possibile saltare al brano precedente.
Off Disattiva la modalità ripetizione casuale.
1-Track
Riproduce solo il brano selezionato.
≥ Viene visualizzato “1 `”.
All
Tutti i brani in una cartella vengono ripetuti.
≥ Viene visualizzato “`”.
Off Disattiva la modalità ripetizione.
Riproduzione del contenuto
memorizzato sul server DLNA
controllandolo da un DMC
(115)
ST-C700DE-TQBM0007.book 13 ページ 2016年10月26日 水曜日 午後1時17分

14
Riproduzione di Internet Radio (vTuner)
Internet radio è un servizio di trasmissione audio disponibile
su Internet. Con vTuner, un servizio di ricerca online, è
possibile ascoltare molte stazioni radio Internet diverse da
tutto il mondo.
Preparazione
≥Completare le impostazioni di rete. (> 12)
– Accertarsi che la rete sia collegata a Internet.
1 Premere [NWP].
2 Premere ripetutamente [N INPUT O] sotto
[NWP] per selezionare “Internet Radio”.
≥Quando “Internet Radio” è selezionata come sorgente
di ingresso, l’unità tenta di connettersi
automaticamente all’ultima stazione Internet Radio.
3 Premere [3, 4] per selezionare una
stazione, quindi premere [OK].
≥Lo stato del buffering viene visualizzato come %.
( “” indica un numero.)
≥Ripetere questo passaggio per effettuare ulteriori
selezioni in base a genere, regione, eccetera.
≥Premere [RETURN] per tornare alla schermata
precedente.
≥Le stazioni Internet Radio, il genere, la regione, ecc. su
questa unità vengono modificate e gestite da vTuner.
≥I podcast sull’elenco di vTuner possono anche essere
riprodotti.
≥Una stazione che non trasmette non può essere
riprodotta. (Verrà saltata o riporterà all’elenco.)
≥ Il servizio Internet Radio può essere sospeso o essere altrimenti
non disponibile senza preavviso.
≥ Internet Radio potrebbe non essere riprodotto correttamente a
causa delle condizioni della rete.
Funzioni presenti sul telecomando
Stop Premere [∫].
Pausa
Premere [1/;].
≥ Premere nuovamente per riavviare la
riproduzione. (Durante la riproduzione dei
podcast)
Salto
Premere [:] o [9] per saltare una
stazione.
Visualizzazione
delle
informazioni
disponibili
Premere [INFO].
(116)
ST-C700DE-TQBM0007.book 14 ページ 2016年10月26日 水曜日 午後1時17分

15
Italiano
1
Premere [NWP].
2
Premere [
3
,
4
] per selezionare una stazione
da aggiungere, quindi premere [OK].
3
Premere [MENU].
4
Premere [
3
,
4
] ripetutamente per selezionare
“Add Favourites” e quindi premere [OK].
≥
Successivamente alla registrazione, viene visualizzato “Added”.
≥
Con questa unità è possibile registrare fino a 50 stazioni. Se si
aggiunge la 51a stazione, viene visualizzato “Favourites Full”.
Eliminazione delle stazioni dall’elenco dei preferiti. (
>
sotto)
≥Non è possibile aggiungere una stazione già registrata.
(Viene visualizzato “Already Exists”.)
1
Premere [NWP].
2
Premere [MENU].
3
Premere [
3
,
4
] ripetutamente per selezionare
“Call Favourites” e quindi premere [OK].
4
Premere [
3
,
4
] per selezionare la stazione che
si desidera richiamare, quindi premere [OK].
≥Viene visualizzato “ ”.
≥
Se nell’elenco dei preferiti non è registrata alcuna stazione,
viene visualizzato “Empty”. Inserire una stazione nell’elenco.
(
>
sopra)
1
Premere [NWP].
2
Premere [MENU].
3
Premere [
3
,
4
] ripetutamente per selezionare
“Delete Favourites” e quindi premere [OK].
4
Premere [
3
,
4
] per selezionare una stazione
da eliminare dall’elenco dei preferiti.
5
Premere [
3
,
4
] per selezionare “Yes” e quindi
premere [OK].
≥
Successivamente all’eliminazione, viene visualizzato “Deleted”.
≥Se nell’elenco dei preferiti non è registrata alcuna stazione,
viene visualizzato “Empty”.
È possibile controllare questa unità e modificare il proprio
elenco dei preferiti con la funzione vTuner installando l'app
dedicata “Technics Music App” (gratuita) sul proprio
tablet/smartphone.
Scaricare e installare la app dal sito sottostante.
www.technics.com/support/
Preparazione
≥Controllare l’indirizzo MAC di questa unità. (> 12)
1 Premere [NWP].
2 Premere ripetutamente [N INPUT O] sotto
[NWP] per selezionare “Internet Radio”.
3 Utilizzare il PC per accedere al sito web
vTuner.
www.technics.com/radio/
≥Sul sito è possibile selezionare la lingua.
4 Seguire le istruzioni a video ed inserire le
informazioni necessarie per la registrazione.
5 Ricercare per categoria (genere, regione,
lingua, eccetera) oppure modificare l’elenco.
∫ Riproduzione delle stazioni elencate dal
PC
È possibile riprodurre le stazioni elencate dal PC
separatamente dall’elenco dei preferiti di questa unità.
1 Premere [NWP].
2 Premere ripetutamente [N INPUT O] sotto
[NWP] per selezionare “Internet Radio”.
3 Premere [3, 4] ripetutamente per
selezionare “technics.com/radio/” e quindi
premere [OK].
≥Prima di procedere allo smaltimento o al trasferimento di
questa unità, eliminare i dati personali dal sito web.
Inserimento di una stazione
nell’elenco dei preferiti
“Add Favourites”
Richiamo dell’elenco dei preferiti
“Call Favourites”
Eliminazione della stazione
dai preferiti
“Delete Favourites”
Funzioni mediante app
dedicata
“Technics Music App”
Creazione dell’elenco delle
stazioni Internet Radio con il
PC
(117)
ST-C700DE-TQBM0007.book 15 ページ 2016年10月26日 水曜日 午後1時17分

16
Utilizzo di Spotify
Questa unità è compatibile con il servizio di musica online
(Spotify).
Preparazione
≥Sarà necessario Spotify Premium. Per maggiori dettagli,
visitare il sito web.
www.spotify.com/connect/
≥Completare le impostazioni di rete. (> 12)
≥Accertarsi che la rete sia collegata a Internet.
≥Collegare i dispositivi da utilizzare alla stessa rete come
questa unità.
1 Avviare l’app Spotify e sul proprio dispositivo
e selezionare un brano da riprodurre.
2 Selezionare la copertina del brano sulla
schermata di riproduzione.
3 Selezionare l’icona “ ”
4 Selezionare questa unità come riproduttore
di uscita.
≥ Il nome di questa unità verrà visualizzato come
“Technics ST-C700D _ _ _ _ _ _”*
1, 2
.
≥ È richiesta la registrazione/abbonamento.
≥ Potrebbe essere un servizio a pagamento.
≥ Servizi, icone e specifiche sono soggetti a modifiche.
*1 “ _ ” indica una cifra unica per ciascun apparecchio.
*2 Il nome del dispositivo può essere cambiato consultando “Nome
di questa unità sulla rete “Friendly Name””. (> 12)
(118)
ST-C700DE-TQBM0007.book 16 ページ 2016年10月26日 水曜日 午後1時17分

17
Italiano
Uso di iPhone/iPad/iPod
Collegando il proprio iPhone/iPad/iPod, è possibile
riprodurre la musica memorizzata sull'iPhone/iPad/iPod o
ricaricare l'iPhone/iPad/iPod.
∫ iPhone/iPad/iPod compatibile
(informazioni aggiornate ad agosto 2016)
≥ La compatibilità dipende dalla versione del software. Aggiornare il
software dell’iPhone/iPad/iPod alla versione più recente prima di
utilizzarlo con questa unità.
≥ Panasonic non accetta alcuna responsabilità per la perdita di dati
e/o informazioni.
≥ Non collegare i seguenti modelli alla porta:
– iPod classic, iPod [4a (display a colori) e 5a (video)
generazione], iPod nano (1a generazione)
Il funzionamento potrebbe non essere quello atteso.
≥ È possibile che le operazioni siano diverse a seconda dei modelli
di iPhone/iPad/iPod o della versione di iOS.
Quando si collega un iPhone/iPad/iPod, utilizzare l'apposito
cavo USB (non in dotazione).
1 Collegare l'iPhone/iPad/iPod all'unità.
2 Premere [NWP].
3 Premere ripetutamente [N INPUT O] sotto
[NWP] per selezionare “USB”.
4 Avviare la riproduzione.
Funzioni presenti sul telecomando
≥ Può essere necessario selezionare l'album, l'artista, ecc.
sull'iPhone/iPad/iPod.
≥ A seconda dei modelli di iPhone/iPad/iPod, le operazioni sul
telecomando potrebbero non essere possibili.
Quando l'unità è accesa, la carica inizia quando si connette
un iPhone/iPad/iPod a questa unità.
≥ Non è possibile caricare il dispositivo quando questa unità è
spenta.
≥ Accertarsi che l'unità sia accesa quando si inizia la ricarica.
– Quando si ricarica un iPhone/iPad/iPod la cui batteria si è
esaurita, non mettere questa unità in standby fino a quando non
è stata ripristinata l'operatività dell'iPhone/iPad/iPod.
≥ Controllare l'iPhone/iPad/iPod per verificare se la batteria è
completamente carica. Una volta completamente carica,
rimuovere l'iPhone/iPad/iPod.
≥ Il caricamento si arresta quando la batteria è completamente
carica. La batteria si esaurisce naturalmente.
iPhone SE / iPhone 6s Plus / iPhone 6s /
iPhone 6 Plus / iPhone 6 / iPhone 5s / iPhone 5c /
iPhone 5 / iPhone 4s
iPad Pro
(9,7 pollici)
/ iPad Pro
(12,9 pollici)
/
iPad Air 2 / iPad Air / iPad
(3a e 4a generazione)
/ iPad 2 /
iPad mini 4 / iPad mini 3 / iPad mini 2 / iPad mini
iPod touch (5a e 6a generazione)
iPod nano (7a generazione)
Collegamento di un
iPhone/iPad/iPod
Cavo USB
(non in dotazione)
es.
Questa unità
(fronte)
iPhone, ecc.
Ascolto di musica
memorizzata su un
iPhone/iPad/iPod
Stop Premere [∫].
Pausa
Premere [1/;].
≥ Premere nuovamente per riavviare la
riproduzione.
Salto
Premere [:] o [9] per saltare un
brano.
Ricerca
Durante la riproduzione o la pausa,
tenere premuto [6] o [5].
≥ Sull'unità: tenere premuto [:] o [9].
Carica di un iPhone/iPad/iPod
(119)
ST-C700DE-TQBM0007.book 17 ページ 2016年10月26日 水曜日 午後1時17分

18
Uso di AirPlay
AirPlay funziona con iPhone, iPad e iPod touch con
iOS 4.3.3 o superiore, Mac con OS X Mountain Lion o
successivo e PC con iTunes 10.2.2 o superiore.
Preparazione
≥Completare le impostazioni di rete. (> 12)
≥Collegare il proprio dispositivo iOS o il PC alla stessa rete
di questa unità.
1 [iOS_d e vi c e] : Avviare l'applicazione “Music”
(o l'iPod)
[PC] : Avviare “iTunes”.
2
Selezionare “Technics ST-C700D _ _ _ _ _
_”*
1, 2
dall'icona AirPlay .
≥
Controllare le impostazioni del volume prima di avviare
la riproduzione. (Quando si utilizza AirPlay per la prima
volta, è possibile che il volume di uscita sia al massimo.)
3 Avviare la riproduzione.
≥
La riproduzione inizierà con un leggero ritardo.
Funzioni presenti sul telecomando
≥ La riproduzione delle altre sorgenti audio si interromperà e il
segnale AirPlay in uscita avrà la priorità.
≥ Con alcune versioni di iOS e iTunes, è possibile che non si riesca
a riavviare la AirPlay riproduzione se si cambia la posizione del
selettore o se l’unità viene spenta durante la AirPlay riproduzione.
In tal caso selezionare un dispositivo diverso dall’icona AirPlay
dell’applicazione musicale o di iTunes, quindi selezionare
nuovamente questa unità come diffusore di uscita.
≥ AirPlay non funzionerà quando si riproducono dei video su iTunes.
*1 “ _ ” indica una cifra unica per ciascun apparecchio.
*2 Il nome del dispositivo può essere cambiato consultando “Nome
di questa unità sulla rete “Friendly Name””. (> 12)
Utilizzo dispositivo
USB
È possibile riprodurre la musica memorizzata su un
dispositivo USB.
≥ Non è garantito che questa unità possa essere collegata a tutti i
dispositivi USB.
≥ Sono supportati i file system FAT16 e FAT32.
≥ Questa unità supporta USB 2.0 ad alta velocità.
≥ È possibile che i dispositivi USB non vengano riconosciuti
dall'unità quando per il collegamento si utilizza :
– un hub USB
– una prolunga USB
≥ Non è possibile usare il lettore/scrittore di schede USB.
≥ L’unità non è in grado di registrare musica su un dispositivo USB.
≥
Riguardo al formato supportato, fare riferimento a “Formato file” (
>
35)
∫ Struttura delle cartelle e dei file
L'unità riproduce solo i file musicali presenti nella cartella
selezionata. Selezionare la cartella contenente i brani che si
desidera riprodurre.
≥
Se si seleziona una cartella in cui non sono presenti file
musicali, come la cartella
D
nel diagramma sotto, non verrà
riprodotto nulla. (verrà visualizzata l'indicazione “Empty”.)
1 Collegare un dispositivo USB all'unità.
Ascolto di musica con AirPlay
Stop Premere [∫].
Pausa
Premere [1/;].
≥ Premere nuovamente per riavviare la
riproduzione.
Salto
Premere [:] o [9] per saltare un
brano.
Ascolto di musica memorizzata
su un dispositivo USB
Musica 1
Musica 2
Musica 4
Musica 5
Musica 3
es.
Cartella
File musicale
es.
Questa unità
(fronte)
Dispositivo USB
(120)
ST-C700DE-TQBM0007.book 18 ページ 2016年10月26日 水曜日 午後1時17分

19
Italiano
2 Premere [NWP].
3 Premere ripetutamente [N INPUT O] sotto
[NWP] per selezionare “USB”.
4 Premere [3, 4] per selezionare una voce e
premere [OK].
≥Se vi sono altre voci, ripetere questo passaggio.
Funzioni presenti sul telecomando
∫ Riproduzione ripetuta casuale
Premere [RND].
Ogni volta che si preme il pulsante:
∫ Riproduzione ripetuta
Premere [`].
Ogni volta che si preme il pulsante:
≥ È possibile usare riproduzione ripetuta in combinazione con
riproduzione programma.
Questa funzione permette di programmare fino a 24 brani.
Preparazione
≥Non è possibile programmare i brani spostando le cartelle.
Spostare tutti i brani che si desidera programmare in una
singola cartella anticipatamente.
1 Selezionare la cartella contenente il file
musicale di cui si desidera programmare la
riproduzione.
2 Premere [PGM] nella modalità di arresto.
≥Verrà visualizzata la schermata “Program Mode”.
3 Premere [OK] per visualizzare la schermata
di programmazione.
4 Premere [3, 4] per selezionare il brano
desiderato.
5 Premere [OK].
≥Ripetere i punti dal 3 a 4 per programmare altri brani.
6 Premere [1/;] per avviare la riproduzione.
≥
Per tornare alla schermata “Program Mode”, premere [
∫
].
Funzioni presenti sul telecomando
≥ Il contenuto programmato verrà mantenuto fintanto che la
sorgente di ingresso è impostata su “USB”.
≥ La memoria di programma verrà annullata:
– Quando il dispositivo USB viene scollegato.
– Quando l’unità viene messa in modalità standby o viene spenta.
≥ È possibile usare riproduzione programma in combinazione con
riproduzione ripetuta.
Stop Premere [∫].
Pause
Premere [1/;].
≥ Premere nuovamente per riavviare la
riproduzione.
Salto
Premere [:] o [9] per saltare un
brano.
Ricerca
Durante la riproduzione o la pausa,
tenere premuto [6] o [5].
≥ Sull'unità: tenere premuto [:] o [9].
≥ Questa impostazione potrebbe non essere
disponibile per alcuni formati.
On
Tutti i brani in una cartella vengono
ripetuti casualmente.
≥ Viene visualizzato “RND `”.
≥ Durante la riproduzione casuale non è
possibile saltare al brano precedente.
Off Disattiva la modalità ripetizione casuale.
1-Track
Riproduce solo il brano selezionato.
≥ Viene visualizzato “1 `”.
All
Tutti i brani in una cartella vengono ripetuti.
≥ Viene visualizzato “`”.
Off Disattiva la modalità ripetizione.
Riproduzione programmata
Stop
Premere [∫].
≥
Il contenuto programmato viene mantenuto.
Controllare
l'ordine
programmato
Premere [2, 1] nella modalità di
arresto.
≥ Per tornare alla schermata “Program
Mode”, premere [OK].
Aggiunta brani
Effettuare i passaggi da 3 a 4 quando la
modalità di arresto è attivata.
Cancellare
l’ultimo brano
Premere [CLEAR] nella modalità di
arresto.
≥ Non è possibile selezionare ed annullare la
traccia programmata desiderata.
Cancellare la
modalità di
programmazione
1 Premere [PGM] nella modalità di
arresto.
≥
Viene visualizzato “Clear Program List?”.
2 Premere [3, 4] per selezionare
“Yes” e quindi premere [OK].
≥ La memoria di programma verrà
annullata.
(121)
ST-C700DE-TQBM0007.book 19 ページ 2016年10月26日 水曜日 午後1時17分

20
Utilizzo PC, ecc.
È possibile collegare il terminale di ingresso audio [PC] ad
un PC, ecc. con un cavo USB e riprodurre della musica
presente sul PC, ecc. con questa unità.
≥
Riguardo al formato supportato, fare riferimento a “Formato file” (
>
35)
(informazioni aggiornate a dicembre 2015)
1 Staccare il cavo di alimentazione CA.
2 Collegare questa unità a un PC, ecc.
3 Collegare il cavo di alimentazione CA a
questa unità e portare la leva dell'interruttore
dell'alimentazione in posizione [Í/I]. (> 10)
4 Premere ripetutamente [N INPUT O] sotto
[NWP] per selezionare “PC”.
5 Utilizzare il PC, ecc. per la riproduzione.
Connessione a un PC
Prima di effettuare il collegamento al PC, seguire i
seguenti passaggi:
≥ Ulteriori informazioni riguardanti le versioni del sistema
operativo per il vostro PC:
– Windows 7, Windows 8, Windows 8.1, Windows 10
– OS X 10.7, 10.8, 10.9, 10.10, 10.11
1 Scaricare e installare il relativo driver sul PC. (Solo per
il sistema operativo Windows)
Scaricare e installare il driver dal sito sottostante.
www.technics.com/support/
2 Scaricare ed installare la app dedicata “Technics Audio
Player” (gratuita) sul proprio PC. (Identica sia per
Windows OS che per OS X)
Scaricare e installare la app dal sito sottostante.
www.technics.com/support/
Ascolto di audio da un PC, ecc.
USB
Cavo USB 2.0
(non in dotazione)
Questa unità
(Parte
posteriore)
es.
PC, ecc.
Tipo A
Tipo B
(122)
ST-C700DE-TQBM0007.book 20 ページ 2016年10月26日 水曜日 午後1時17分

21
Italiano
Uso di Bluetooth
®
Su questa unità è possibile ascoltare l'audio dal dispositivo audio Bluetooth
®
in modalità wireless.
≥ Per informazioni consultare le istruzioni per l’uso del dispositivo Bluetooth
®
.
≥ Se si intende utilizzare un dispositivo Bluetooth
®
compatibile con NFC (Near Field Communication), passare a “Collegamento tramite NFC”.
Preparazione
≥Attivare la funzionalità Bluetooth
®
del dispositivo e
posizionare il dispositivo vicino a questa unità.
1 Premere [NWP].
2 Premere ripetutamente [N INPUT O] sotto
[NWP] per selezionare “Bluetooth”.
3 Premere [MENU].
4 Premere [3, 4] ripetutamente per
selezionare “Pairing”, quindi premere [OK].
5 Premere [3, 4] per selezionare “Yes” e
quindi premere [OK].
≥“Pairing” è indicato sul display.
6 Selezionare “ST-C700D” dal menu del
dispositivo Bluetooth
®
.
≥Il nome del dispositivo connesso viene indicato sul
display.
≥ Se viene richiesta la passkey, immettere “0000”.
≥ È possibile registrare sino a 8 dispositivi a questa unità.
Se viene registrato un 9° dispositivo, il dispositivo non utilizzato da
più tempo viene sostituito.
Solo per dispositivi Bluetooth
®
compatibili con NFC
(dispositivi Android™ con versione 4.1 o successiva)
Appoggiando un dispositivo Bluetooth
®
compatibile con la
tecnologia NFC (Near Field Communication) su questa unità,
è possibile compiere una serie di passaggi dalla
registrazione di un dispositivo Bluetooth
®
al collegamento
dello stesso a questa unità.
Preparazione
≥Attivare la funzione NFC del dispositivo.
1 Premere [NWP].
2 Premere ripetutamente [N INPUT O] sotto
[NWP] per selezionare “Bluetooth”.
3 Premere [MENU].
4 Premere [3, 4] ripetutamente per
selezionare “NFC”, quindi premere [OK].
5 Premere [3, 4] per selezionare “Yes” e
quindi premere [OK].
6 Tenere premuto il dispositivo sull'area di
sfioramento NFC di questa unità per
20 secondi. (> 7)
≥Non spostare il dispositivo Bluetooth
®
finché non
visualizza un messaggio o reagisce in qualche modo.
Una volta che il dispositivo Bluetooth
®
ha reagito,
allontanarlo da questa unità.
– Una volta completate la connessione del dispositivo
Bluetooth
®
, il nome del dispositivo collegato viene
visualizzato sul display.
– La posizione dell'area di sfioramento NFC varia a seconda
del dispositivo. Quando non è possibile stabilire una
connessione anche se il proprio dispositivo Bluetooth
®
ha
sfiorato l'area di sfioramento NFC di questa unità, spostare il
dispositivo.
≥ Se si collega un altro dispositivo Bluetooth
®
compatibile con NFC,
il dispositivo precedentemente collegato verrà disconnesso
automaticamente.
≥ Una volta stabilita la connessione, con alcuni tipi di dispositivi è
possibile che la riproduzione si avvii automaticamente.
≥ È possibile che la connessione NFC non funzioni correttamente a
seconda del tipo di dispositivo che si sta utilizzando.
≥ Non effettuare una connessione NFC in modi diversi da quelli
indicati nelle Istruzioni per l’uso. Farlo può causare
malfunzionamenti.
Connessione tramite il menu
Bluetooth
®
Collegamento tramite NFC
(123)
ST-C700DE-TQBM0007.book 21 ページ 2016年10月26日 水曜日 午後1時17分

22
1 Premere [NWP].
2 Premere ripetutamente [N INPUT O] sotto
[NWP] per selezionare “Bluetooth”.
≥“Ready” è indicato sul display.
≥Se si preme [1/;], questa unità tenterà
automaticamente di connettersi all'ultimo dispositivo
Bluetooth
®
connesso.
– “Linking” è indicato sul display.
3 Selezionare “ST-C700D” dal menu
Bluetooth
®
del dispositivo.
≥Il nome del dispositivo connesso viene indicato sul
display.
4 Avviare la riproduzione sul dispositivo
Bluetooth
®
.
Funzioni presenti sul telecomando
≥ Questa unità può essere collegata con un solo dispositivo alla
volta.
≥ Per usare il telecomando di questa unità con un dispositivo
Bluetooth
®
, il dispositivo Bluetooth
®
deve supportare AVRCP
(Audio Video Remote Control Profile).
A seconda del dispositivo o dello stato del dispositivo, alcuni
comandi potrebbero non essere disponibili.
≥ Quando si visualizzano contenuti video con questa funzione, le
uscite video e audio potrebbero non essere sincronizzate.
È possibile modificare la modalità di trasmissione in modo da
dare priorità alla qualità della trasmissione o alla qualità
dell'audio.
1 Premere [NWP].
2 Premere ripetutamente [N INPUT O] sotto
[NWP] per selezionare “Bluetooth”.
≥Se è già connesso un dispositivo Bluetooth
®
,
disconnetterlo.
3 Premere [MENU].
4 Premere [3, 4] ripetutamente per
selezionare “Link Mode”, quindi premere
[OK].
5 Premere [3, 4] per selezionare la modalità
e quindi premere [OK].
≥ Selezionare “Mode 1” se il suono si interrompe.
1 Premere [NWP].
2 Premere [MENU].
3 Premere [3, 4] ripetutamente per
selezionare “Disconnect?”, quindi premere
[OK].
4 Premere [3, 4] per selezionare “Yes” e
quindi premere [OK].
≥ Il dispositivo Bluetooth
®
verrà disconnesso se viene selezionata
una sorgente audio diversa.
Ascolto di musica
memorizzata su un dispositivo
Bluetooth
®
Stop Premere [∫].
Pausa
Premere [1/;].
≥ Premere nuovamente per riavviare la
riproduzione.
Salto
Premere [:] o [9] per saltare un
brano.
Ricerca
Durante la riproduzione o la pausa,
tenere premuto [6] o [5].
≥ Sull'unità: tenere premuto [:] o [9].
Modalità di trasmissione
Bluetooth
®
Mode 1 Priorità alla qualità della connessione
Mode 2
Priorità alla qualità audio (valore
predefinito)
Disconnessione di un
dispositivo Bluetooth
®
(124)
ST-C700DE-TQBM0007.book 22 ページ 2016年10月26日 水曜日 午後1時17分

23
Italiano
Ascolto della radio FM
È possibile preimpostare fino a 30 canali.
Preparazione
≥Premere [NWP], quindi premere ripetutamente
[N INPUT O] sotto [NWP] per selezionare “FM”.
1 Premere [NWP].
2 Premere [MENU].
3
Premere [
3
,
4
] ripetutamente per selezionare
“Auto Preset”, quindi premere [OK].
4 Premere [3, 4] per selezionare “Lowest” o
“Current”, quindi premere [OK].
Lowest:
Per iniziare la preselezione automatica con le frequenza
più bassa (FM 87,50).
Current:
Per iniziare la preselezione automatica con le frequenza
corrente.
1 Premere [NWP].
2 Premere [6] o [5] per sintonizzarsi sulla
stazione.
≥Per la sintonizzazione automatica, tenere premuto il
pulsante finché la frequenza non inizia a cambiare
rapidamente.
3 Premere [PGM].
4 Premere i pulsanti numerici per selezionare
un numero preselezionato.
≥Ripetere i punti da 1 a 3 per preselezionare altre
stazioni.
≥ Se si memorizza una stazione su un numero di memorizzazione
che ne conteneva già una, questa verrà sovrascritta.
1 Premere [NWP].
2 Premere i pulsanti numerici, [:] o [9]
per selezionare la stazione preselezionata.
1 Premere [NWP].
2 Premere [MENU].
3 Premere [3, 4] ripetutamente per
selezionare “FM Mode”, quindi premere
[OK].
4 Premere [3, 4] per selezionare “Mono”,
quindi premere [OK].
≥Viene visualizzato “MONO”.
Per memorizzare l'impostazione
Continuare con i punti dal 2 e 3 di “Sintonizzazione e
preselezione manuale”.
≥ Selezionare “Stereo” al passaggio 4 per tornare alle trasmissioni
stereo.
≥ “
Mono
” viene disattivato se si cambia la frequenza.
L’unità è in grado di visualizzare i dati testuali trasmessi dal
Radio Data System (RDS), disponibile in alcune aree.
≥ RDS è disponibile solo quando si riceve un segnale stereo.
≥ RDS potrebbe non essere disponibile se la ricezione è debole.
≥ La funzione RDS non si attiva se “Mono” è selezionato in “FM
Mode”. (> sopra)
Preselezione automatica
Sintonizzazione e
preselezione manuale
Selezione di una stazione di
preselezione
Migliorare la qualità dell’audio
Trasmissioni RDS
(125)
ST-C700DE-TQBM0007.book 23 ページ 2016年10月26日 水曜日 午後1時17分

24
Ascolto DAB/DAB+
È possibile preimpostare fino a 20 canali.
Preparazione
≥Accertarsi che l'antenna DAB sia collegata. (> 10)
≥Premere [NWP], quindi premere ripetutamente
[N INPUT O] sotto [NWP] per selezionare “DAB/DAB+”.
– Se si seleziona “DAB/DAB+” per la prima volta, il sistema
inizierà la procedura “Scansione automatica DAB”.
1 Premere [NWP].
2 Premere [MENU].
3
Premere [
3
,
4
] ripetutamente per
selezionare “Auto Scan”, quindi premere [OK].
4 Premere [3, 4] per selezionare “Yes” e
quindi premere [OK].
≥Viene visualizzato “Auto Scan”.
Per trovare la posizione migliore dell'antenna, usare la
sintonizzazione manuale per effettuare la ricerca nel blocco
di frequenze DAB selezionato.
1 Premere [NWP].
2 Premere [MENU].
3
Premere [
3
,
4
] ripetutamente per selezionare
“Manual Scan”, quindi premere [OK].
4 Premere [3, 4] per selezionare un blocco
di frequenze e quindi premere [OK].
1 Premere [NWP].
2 Premere [6] o [5] per sintonizzarsi sulla
stazione.
3 Premere [PGM].
4 Premere i tasti numerici per selezionare un
numero per la memorizzazione.
≥Effettuare nuovamente i passaggi da 1 a 3 per
memorizzare ulteriori stazioni.
≥ Se si memorizza una stazione su un numero di memorizzazione
che ne conteneva già una, questa verrà sovrascritta.
≥ Non è possibile memorizzare una stazione che non sta
trasmettendo o quando è stato selezionato un servizio secondario.
≥ La memorizzazione precedente delle stazioni viene annullata
durante la scansione automatica.
1 Premere [NWP].
2 Premere i pulsanti numerici, [:] o [9]
per selezionare la stazione memorizzata.
È possibile visualizzare informazioni sulla trasmissione DAB,
tipo di programma, etichetta gruppo e frequenza.
1 Premere [NWP].
2 Premere [INFO] per visualizzare le
informazioni disponibili.
Alcune stazioni DAB/DAB+ forniscono un servizio secondario oltre
ad un servizio principale. Se la stazione che state ascoltando
fornisce un servizio secondario, verrà visualizzato “ ”.
1 Premere [NWP].
2 Premere [MENU].
3
Premere [
3
,
4
] ripetutamente per selezionare
“Secondary”, quindi premere [OK].
4 Premere [3, 4] per selezionare il servizio
secondario e premere [OK].
≥ L'impostazione ritornerà al servizio principale quando vengono
effettuate modifiche (ad esempio viene modificata la stazione).
Quando si regola l'antenna è possibile verificare la qualità
della ricezione.
1 Premere [NWP].
2 Premere [MENU].
3
Premere [
3
,
4
] ripetutamente per selezionare
“Signal Quality”, quindi premere [OK].
4
Premere
[
3
,
4
]
per selezionare la frequenza.
Scansione automatica DAB
Sintonizzazione manuale DAB
Memorizzazione stazioni
Selezione di una stazione
preselezionata
Visualizzazione delle
informazioni disponibili
DAB Secondario
Qualità segnale DAB
Blocco di frequenze
Frequenza
Qualità di ricezione da
0 (scarsa) a 8 (eccellente)
es.,
(126)
ST-C700DE-TQBM0007.book 24 ページ 2016年10月26日 水曜日 午後1時17分

25
Italiano
Regolazione dell’audio
È possibile aggiungere all’audio in uscita i seguenti effetti sonori.
La rimasterizzazione amplia la banda di riproduzione
raggiungendo una maggiore profondità di bit al fine di
riprodurre un suono naturale ed espansivo simile alla musica
originale.
≥ L'impostazione predefinita è “Off”.
1 Premere [NWP].
2 Premere [RE-MASTER] per selezionare
“On”/“Off”.
Questa unità è in grado di trasmettere i segnali in ingresso
senza passare attraverso l'elaboratore di segnale digitale
(DSP). Questo consente una riproduzione fedele e di alta
qualità del suono originale.
≥ L'impostazione predefinita è “Off”.
1 Premere [NWP].
2
Premere [DIRECT] per selezionare “On”/“Off”.
È possibile impostare il limite superiore dell'intervallo di
frequenza di campionamento in uscita. Si prega di notare
che l'intervallo che può essere elaborato differisce a seconda
dell'amplificatore o del convertitore D/A. Si rimanda alle
Istruzioni per l'uso per quanto riguarda i dettagli sul
dispositivo collegato.
≥ L'impostazione predefinita è “32kHz-192kHz”.
Preparazione
≥Impostare “Digital Output” su “On”.
1 Premere [NWP].
2 Premere [HOME].
3 Premere [3, 4] ripetutamente per
selezionare “SETUP”, quindi premere [OK].
4 Premere [3, 4] ripetutamente per
selezionare “D.Output fs”, quindi premere
[OK].
5 Premere [3, 4] per selezionare una voce e
premere [OK].
≥È possibile selezionare una frequenza di
campionamento di 96 kHz o 192 kHz.
La disabilitazione dell'uscita audio di terminali inutilizzati
minimizza i disturbi e consente la riproduzione di un audio di
più alta qualità.
≥ L'impostazione predefinita è “
On
”.
1 Premere [NWP].
2 Premere [HOME].
3 Premere [3, 4] ripetutamente per
selezionare “SETUP”, quindi premere [OK].
Per disabilitare l'uscita audio digitale:
Premere [3, 4] ripetutamente per selezionare “Digital
Output”, quindi premere [OK].
Per disabilitare l'uscita audio analogica:
Premere [3, 4] ripetutamente per selezionare “Analog
Output”, quindi premere [OK].
4 Premere [3, 4] per selezionare “Off”, quindi
premere [OK].
≥Per riabilitare l'uscita, selezionare “On”.
≥ A seconda della fonte audio che si riproduce, l'impostazione
applicata potrebbe avere prestazioni inferiori.
≥ A seconda della fonte audio che si riproduce, potrebbe non essere
possibile ottenere la qualità audio e l'effetto del campo sonoro
desiderati. In tali casi disattivare questa funzione.
≥ Le modalità Re-master e Direct non possono essere impostate
entrambe su “On”.
≥ Quando “Digital Output” e “Analog Output” sono impostati su “Off”,
non verrà emesso nessun suono.
≥ È possibile che occorra del tempo per emettere l'audio quando si è
regolata la qualità dello stesso.
Ascolto di un suono più
naturale (Rimasterizzazione)
Modalità diretta
Impostazione della frequenza
di campionamento
Disabilitazione uscita audio
(127)
ST-C700DE-TQBM0007.book 25 ページ 2016年10月26日 水曜日 午後1時17分

26
Altre operazioni
Il timer di spegnimento automatico consente di mettere
l’unità in standby dopo un tempo impostato.
1 Premere [NWP].
2 Premere [MENU].
3 Premere [3, 4] ripetutamente per
selezionare “SLEEP”, quindi premere [OK].
4 Premere [3, 4] per impostare l'ora
(in minuti), quindi premere [OK].
“30 minutes” ,-. “60 minutes” ,-. “90 minutes” ,-. “120 minutes”
^""""""""""""". “Off” !"""""""""""""J
Questa unità è stata progettata per ridurre i consumi
energetici. Questa unità passerà automaticamente alla
modalità standby se non vengono emessi segnali audio e se
non vengono eseguite operazioni per circa 20 minuti.
≥ L'impostazione predefinita è “On”.
Per annullare questa funzione
1 Premere [NWP].
2 Premere [HOME].
3 Premere [3, 4] ripetutamente per
selezionare “SETUP”, quindi premere [OK].
4 Premere [3, 4] ripetutamente per
selezionare “AUTO OFF”, quindi premere
[OK].
5 Premere [3, 4] per selezionare “Off”, quindi
premere [OK].
≥ La funzione di spegnimento automatico è attiva a meno che non
venga disattivata, anche se questa unità viene spenta e riaccesa.
≥ Quando la sorgente è “DAB/DAB+” o “FM”, l'impostazione non
funziona.
Questa unità passa automaticamente da standby ad ON
quando viene selezionata come diffusore per
Spotify/AirPlay/DLNA (DMR).
Considerare che, dopo aver selezionato questa unità, in
alcuni casi potrebbe essere necessario anche avviare la
riproduzione per accenderla.
≥ L'impostazione predefinita è “Auto”.
Per modificare questa impostazione
1 Premere [NWP].
2 Premere [HOME].
3 Premere [3, 4] ripetutamente per
selezionare “SETUP”, quindi premere [OK].
4 Premere [3, 4] ripetutamente per
selezionare “Network Standby”, quindi
premere [OK].
5 Premere [3, 4] per selezionare una voce e
premere [OK].
≥ Se questa funzione è impostata su “On” o “Auto”, il consumo
elettrico in standby aumenterà.
Timer di spegnimento
automatico
Funzione di spegnimento
automatico
Standby di rete
Auto
Consente la funzione di standby di rete
quando la connessione di rete è
disponibile.
On
Consente sempre la funzione di standby
di rete.
Off Disattiva la funzione standby rete.
(128)
ST-C700DE-TQBM0007.book 26 ページ 2016年10月26日 水曜日 午後1時17分

27
Italiano
È possibile che occasionalmente Panasonic rilasci degli
aggiornamenti del firmware per questa unità, che possono offrire
funzioni aggiuntive o migliorare il modo in cui operano le funzioni
esistenti. Tali aggiornamenti sono disponibili gratuitamente.
≥Per informazioni sull'aggiornamento (funzionalità nuove o
migliorate), vedere il sito web seguente.
www.technics.com/support/firmware/
≥ Mentre è in corso il processo di aggiornamento non è possibile
effettuare nessun’altra operazione.
≥ Se non vi sono aggiornamenti, verrà visualizzata l’indicazione
“Firmware is Up To Date”. (Aggiornamento non necessario.)
≥ L’aggiornamento del firmware potrebbe resettare le impostazioni.
∫ Aggiornamento via Internet
Preparazione
≥Collegare questa unità alla rete. (> 12)
– Accertarsi che la rete sia collegata a Internet.
1 Premere [NWP].
2 Premere [HOME].
3 Premere [3, 4] ripetutamente per
selezionare “SETUP”, quindi premere [OK].
4
Premere [
3
,
4
] ripetutamente per selezionare
“F/W Update”, quindi premere [OK].
5 Premere [3, 4] per selezionare “Internet” e
quindi premere [OK].
6 Premere [3, 4] per selezionare “Yes” e
quindi premere [OK].
≥Il progredire dell'operazione viene visualizzato come
“Updating %” durante l'aggiornamento. ( sta per un
numero.)
≥Al termine dell'aggiornamento verrà visualizzata
l'indicazione “Success”.
7 Dopo che viene visualizzato “Success”,
scollegare il cavo di alimentazione CA,
quindi ricollegarlo dopo 3 minuti.
≥ Con alcuni tipi di connessione è possibile che la durata del
download sia maggiore, o che il download non venga eseguito
correttamente.
∫ Aggiornamento tramite memoria flash USB
Preparazione
≥Scaricare il firmware più recente sulla memoria flash USB.
Per ulteriori informazioni, consultare il seguente sito Web.
www.technics.com/support/firmware/
≥Sono supportati i file system FAT16 e FAT32.
1 Connettere la memoria flash USB
contenente il nuovo firmware.
2 Premere [NWP].
3 Premere [HOME].
4 Premere [3, 4] ripetutamente per
selezionare “SETUP”, quindi premere [OK].
5 Premere [3, 4] ripetutamente per
selezionare “F/W Update”, quindi premere
[OK].
6 Premere [3, 4] per selezionare “USB” e
quindi premere [OK].
7 Premere [3, 4] per selezionare “Yes” e
quindi premere [OK].
≥Il progredire dell'operazione viene visualizzato come
“Updating %” durante l'aggiornamento. ( sta per un
numero.)
≥Al termine dell'aggiornamento verrà visualizzata
l'indicazione “Success”.
8 Dopo che viene visualizzato “Success”,
scollegare il cavo di alimentazione CA,
quindi ricollegarlo dopo 3 minuti.
≥ Con alcuni tipi di memoria flash USB, il download può richiedere
un tempo maggiore.
∫ Verifica della versione del firmware e del
numero del modello.
1 Premere [NWP].
2 Premere [HOME].
3 Premere [3, 4] ripetutamente per selezionare “SETUP”,
quindi premere [OK].
4 Premere [3, 4] ripetutamente per selezionare “F/W
Version”, quindi premere [OK].
≥ Verranno visualizzati la versione del firmware e il numero del
modello.
≥ Premere [OK] per uscire.
Aggiornamento del firmware
Il download richiede circa 10 minuti.
Non scollegare il cavo di alimentazione CA e non portare
il pulsante di accensione/spegnimento in posizione [OFF]
mentre è visualizzato uno dei seguenti messaggi.
“Linking” o “Updating %”
(129)
ST-C700DE-TQBM0007.book 27 ページ 2016年10月26日 水曜日 午後1時17分

28
Quando altri apparecchi rispondono al telecomando in
dotazione, cambiare il codice del telecomando.
≥ L'impostazione predefinita è “Mode 1”.
Puntare il telecomando verso questa unità, quindi
tenere premuto [OK] e il pulsante numerico per
almeno 4 secondi.
≥Quando viene modificato il codice del telecomando, il
nuovo codice apparirà sul display per alcuni secondi.
≥ Quando SU-C700/SL-C700 è collegato tramite la funzione di
collegamento di sistema, cambiare anche i suoi codici del
telecomando oltre al codice del telecomando per questa unità.
È possibile modificare la codifica dei caratteri dei nomi delle
tracce, dei nomi degli artisti e di altre informazioni quando
non vengono visualizzati correttamente.
≥ L'impostazione predefinita è “Type 1( 日本 )”.
1 Premere [NWP].
2 Premere [HOME].
3 Premere [3, 4] ripetutamente per
selezionare “SETUP”, quindi premere [OK].
4 Premere [3, 4] ripetutamente per
selezionare “E Asian Character”, quindi
premere [OK].
5 Premere [3, 4] per selezionare
“Type 1( 日本 )”/“Type 2( 简体字 )” e quindi
premere [OK].
È possibile collegare automaticamente questa unità con
SU-C700 e controllarli facilmente con il telecomando.
Preparazione
1 Collegare questa unità e SU-C700 ai cavi di
collegamento di sistema e ai cavi digitali coassiali. (> 9)
2 Portare la leva dell'interruttore di alimentazione di questa
unità e del dispositivo SU-C700 in posizione [Í/I].
∫ Accensione/messa in standby
contemporanea di questa unità e dei
dispositivi SU-C700
≥Se si punta il telecomando verso questa unità e si preme
[NWP Í] quando questa unità e SU-C700 si trovano in
modalità standby, questa unità e SU-C700 si
accenderanno contemporaneamente.
≥Quando sia questa unità sia SU-C700 sono accesi e la
sorgente in ingresso di SU-C700 è impostata su “COAX1”,
è possibile impostarli in modo che entrino
automaticamente in standby usando il timer di
spegnimento. (> 26)
∫ Commutazione automatica della sorgente
in ingresso SU-C700
Quando si esegue un'operazione come la riproduzione su
questa unità, la sorgente in ingresso di SU-C700 verrà
automaticamente commutata su “COAX1”.
∫ Regolazione Bassi/Medi/Alti
È possibile regolare i toni di SU-C700 con questa unità.
È possibile regolare ciascuna gamma tonale (Bassi/Medi/Alti).
1 Premere [NWP].
2 Premere [HOME].
3 Premere [3, 4] ripetutamente per selezionare “SETUP”,
quindi premere [OK].
4 Premere [3, 4] ripetutamente per selezionare “Tone
Control”, quindi premere [OK].
5 Premere [3, 4] per selezionare “On (adjustment)”,
quindi premere [OK].
6 Premere [3, 4] per selezionare “BASS” (Basso),
“MID” (Medio) o “TREBLE” (Alto).
7 Premere [2, 1] per regolare il livello e quindi premere
[OK].
≥ Ogni livello può essere regolato tra “s10” e “r10”.
≥ Per informazioni sul funzionamento dei dispositivi SU-C700,
consultare le relative istruzioni per l'uso.
Codice del telecomando
[OK] + [1] Imposta il codice su “Mode 1”
[OK] + [2] Imposta il codice su “Mode 2”
Modifica della codifica dei
caratteri
Type 1( 日本 )
Viene data priorità al giapponese.
Type 2( 简体字 )
Viene data priorità al cinese
(semplificato).
Utilizzo della funzione di
controllo di sistema
(130)
ST-C700DE-TQBM0007.book 28 ページ 2016年10月26日 水曜日 午後1時17分

29
Italiano
Risoluzione dei problemi
Prima di rivolgersi all'assistenza, eseguire i seguenti
controlli. In caso di dubbi su alcuni controlli o nel caso in cui
le soluzioni indicate nella guida non risolvano il problema,
rivolgersi al proprio rivenditore per le istruzioni.
Surriscaldamento di questa unità.
≥Questa unità si surriscalda se utilizzata a lungo. Ciò non è
motivo di allarme.
È stata installata la versione più recente del
firmware?
≥Panasonic migliora costantemente il firmware dell’unità per
garantire ai propri clienti le tecnologie più recenti. (> 27)
L’unità non funziona.
Le operazioni non sono state eseguite
correttamente.
≥Uno dei dispositivi di sicurezza dell’unità potrebbe essere
stato attivato.
1 Abbassare la leva dell'interruttore di alimentazione di questa
unità in posizione [OFF].
≥ In alternativa, scollegare il cavo di alimentazione CA,
attendere almeno 3 minuti, quindi ricollegarlo.
2 Portare la leva dell'interruttore di alimentazione di questa unità
in posizione [Í/I]. Se l’unità continua a non funzionare,
rivolgersi al rivenditore.
Si sente un ronzio durante la riproduzione.
≥Vicino ai cavi vi sono un cavo di alimentazione CA o una
lampada a fluorescenza. Tenere le altre apparecchiature e
i relativi cavi lontani dai cavi di questa unità.
Nessun suono.
≥Controllare il volume del dispositivo collegato
(amplificatore, ecc.).
≥Verificare che le connessioni con cavo ai terminali di
ingresso e di uscita non siano scorrette. In tal caso,
spegnere questa unità e ricollegare i cavi correttamente.
≥
Verificare che sia selezionata la sorgente in ingresso corretta.
≥Inserire fino in fondo gli spinotti dei cavi da collegare.
≥Quando “Digital Output” e “Analog Output” sono impostati
su “Off”, non verrà emesso alcun suono. Modificare in “On”
l'impostazione del terminale di uscita che si desidera
utilizzare. (> 25)
≥La riproduzione di contenuto multi-canale non è
supportata.
Il suono si interrompe.
≥A seconda del proprio ambiente, l'audio potrebbe essere
interrotto durante la riproduzione. Controllare le istruzioni
per l'uso del dispositivo connesso e la connessione al
dispositivo.
La riproduzione non si avvia.
≥A seconda del proprio ambiente o dei dispositivi connessi,
potrebbe essere necessario un po' di tempo.
La funzione di controllo di sistema non funziona.
≥Collegare il cavo di collegamento di sistema al terminale di
sistema [CONTROL1] dell'SU-C700.
≥Collegare il cavo digitale coassiale al terminale di ingresso
audio digitale [COAX1 IN] dell'SU-C700.
L'unità si spegne automaticamente.
≥La funzione di spegnimento automatico è attiva? (> 26)
≥Se SU-C700 è collegato a questa unità tramite la funzione
di controllo del sistema, questa unità potrebbe entrare
automaticamente in standby quando SU-C700 entra in
standby. (> 9, 28)
Vengono ripristinate le impostazioni predefinite.
≥L’aggiornamento del firmware potrebbe resettare le
impostazioni.
Per ripristinare tutte le impostazioni predefinite in
fabbrica
Quando si verificano le seguenti circostanze, reimpostare
la memoria:
≥ Premendo i pulsanti non si ottiene alcuna risposta.
≥
Si desidera cancellare e reimpostare il contenuto della memoria.
1 Premere [NWP].
2 Premere [HOME].
3 Premere [3, 4] ripetutamente per selezionare
“SETUP”, quindi premere [OK].
4 Premere [3, 4] ripetutamente per selezionare
“Initialization”, quindi premere [OK].
5 Premere [3, 4] per selezionare “Yes” e quindi
premere [OK].
6 Premere [3, 4] per selezionare “Yes” e quindi
premere nuovamente [OK].
Generale
(131)
ST-C700DE-TQBM0007.book 29 ページ 2016年10月26日 水曜日 午後1時17分

30
Non è possibile collegarsi alla rete.
≥Effettuare il collegamento alla rete e le impostazioni.
(> 12)
Non è possibile collegarsi all’unità.
≥Accertarsi che la funzione multicast sul router wireless sia
abilitata.
≥Accertarsi che il dispositivo e l'unità siano collegati alla
stessa rete. (> 12)
≥Ricollegare il dispositivo compatibile alla rete e collegare
nuovamente a questa unità.
≥Spegnere e riaccendere questa unità, quindi collegare di
nuovo a questa unità.
La riproduzione non si avvia.
Il suono si interrompe.
≥Se si utilizza l'unità contemporaneamente ad altri
dispositivi che operano a 2,4 GHz, come microonde,
telefoni, ecc., è possibile che la connessione si interrompa.
Aumentare la distanza tra questa unità e questi dispositivi.
≥
Se diversi dispositivi wireless usano la stessa rete wireless
contemporaneamente a questa unità, provare a spegnere gli
altri dispositivi o a ridurre il loro utilizzo della rete wireless.
≥Se la riproduzione si arresta, verificare lo stato della
riproduzione sul dispositivo.
Impossibile trovare i file musicali memorizzati su
PC.
≥Quando si riproducono file musicali su una rete, quelli non
registrati sul relativo server di rete non vengono
visualizzati. Per maggiori dettagli, consultare le istruzioni
per l’uso del proprio server.
La riproduzione non si avvia.
Il suono si interrompe.
≥Una stazione che non trasmette non può essere riprodotta.
(Verrà saltata o riporterà all’elenco.)
≥Internet Radio potrebbe non essere riprodotto
correttamente a causa delle condizioni della rete.
≥A seconda del tipo di connessione internet, l’audio
potrebbe essere interrotto o potrebbe essere necessario
del tempo per la riproduzione dello stesso.
≥Internet Radio è un servizio di trasmissione audio via
Internet. A seconda dell’emittente o delle condizioni di
trasmissione, la qualità dell’audio potrebbe subire delle
variazioni.
Impossibile visualizzare le informazioni
correttamente.
≥I nomi delle tracce, i nomi delle stazioni, ecc. gestiti da
vTuner/Spotify possono non essere visualizzati
correttamente.
Non è possibile eseguire operazioni.
≥Selezionare “USB” come sorgente in ingresso.
≥Controllare che l'iPhone/iPad/iPod sia collegato
correttamente.
≥Collegare nuovamente l'iPhone/iPad/iPod o tentare di
riavviare l'iPhone/iPad/iPod.
≥La batteria dell’iPhone/iPad/iPod è esaurita. Ricaricare
l’iPhone/iPad/iPod, quindi azionarlo nuovamente.
L’iPhone/iPad/iPod non si carica
≥Accertarsi che l'unità sia accesa quando si inizia la ricarica.
– Quando si ricarica un iPhone/iPad/iPod la cui batteria si è
esaurita, non mettere questa unità in standby fino a quando non
è stata ripristinata l'operatività dell'iPhone/iPad/iPod.
Impossibile leggere l’unità USB o il suo contenuto.
≥Il formato o il contenuto dell’unità USB non sono
compatibili con l’unità (> 35).
Nessuna risposta quando si preme [1/;].
≥Scollegare e ricollegare il dispositivo USB. In alternativa,
spegnere e riaccendere l’unità.
Rallentamento nel funzionamento dell’unità flash USB.
≥File di grandi dimensioni o unità flash USB di grandi
capacità richiedono un tempo di lettura maggiore.
Il PC non riconosce questa unità.
≥Controllare il proprio ambiente operativo. (> 20)
≥Riavviare il PC, spegnere e riaccendere questa unità,
infine ricollegare il cavo USB.
≥Utilizzare un'altra porta USB del PC collegato.
≥Installare l'apposito driver USB in caso di utilizzo di un PC
con Windows.
Impossibile trovare i file musicali memorizzati su
PC.
≥Quando si riproducono file musicali su una rete, quelli non
registrati sul relativo server di rete non vengono
visualizzati. Per maggiori dettagli, consultare le istruzioni
per l'uso del proprio server. (> 35)
AirPlay/DLNA
vTuner/Spotify
iPhone/iPad/iPod
USB
PC
(132)
ST-C700DE-TQBM0007.book 30 ページ 2016年10月26日 水曜日 午後1時17分

31
Italiano
Non è possibile effettuare l'accoppiamento del dispositivo.
≥Verificare la stato del dispositivo Bluetooth
®
.
Non si riesce ad ottenere il collegamento con il
dispositivo.
≥
L'accoppiamento del dispositivo non è riuscito o la registrazione è
stata sostituita. Ritentare l'accoppiamento del dispositivo.
≥Questa unità potrebbe essere connessa ad un dispositivo
diverso. Scollegare l'altro dispositivo e provare
nuovamente ad accoppiare il dispositivo.
Il dispositivo è collegato ma non è possibile
ascoltare l'audio attraverso l'unità.
≥
Per alcuni dispositivi con Bluetooth
®
incorporato, è necessario
impostare l'output audio manualmente su “ST-C700D”. Per
maggiori informazioni leggere le istruzioni per l'uso del dispositivo.
NFC non funziona.
≥Accertarsi che la funzione NFC del dispositivo sia attiva.
≥Quando si ritenta, modificare l'angolo con cui il dispositivo
Bluetooth
®
sfiora l'area di sfioramento NFC.
≥Attivare la funzione NFC di questa unità quando si collega
un dispositivo utilizzando NFC. (> 21)
La riproduzione non si avvia.
Il suono si interrompe.
≥Se si utilizza l'unità contemporaneamente ad altri
dispositivi che operano a 2,4 GHz, come microonde,
telefoni, ecc., è possibile che la connessione si interrompa.
Portare il dispositivo Bluetooth
®
più vicino a questa unità e
allontanarlo dagli altri dispositivi.
La ricezione è debole o si sente il rumore di un battito.
≥Allontanare l’antenna da computer, televisori ed altri cavi.
≥Usare un'antenna esterna.
Il telecomando non funziona correttamente.
≥Per evitare interferenze, no collocare oggetti di fronte al
sensore del segnale. (> 7)
≥Cambiare il codice del telecomando se anche altri prodotti
rispondono ai comandi inviati. (> 28)
≥Se SU-C700/SL-C700 è selezionato come dispositivo da
controllare, premere [NWP] e ritentare l'operazione. (> 8)
Premendo [DIMMER] viene modificata la luminosità del
display, della spia e dell'indicatore
di SU-C700/SL-C700.
≥
[DIMMER] agisce sui dispositivi SU-C700/SL-C700 oltre che
su questa unità. Spegnere il dispositivo di cui non si
desidera cambiare la luminosità, quindi premere [DIMMER].
I seguenti messaggi o numeri di servizio possono venire
visualizzati sul display dell’unità.
“AUTO OFF”
≥L’unità è rimasta inutilizzata per circa 20 minuti ed entrerà
in modalità standby entro un minuto. Per evitare questo
premere un tasto qualsiasi.
“Checking Device”
≥L’unità sta controllando l’iPhone/iPad/iPod/USB collegato.
“Connect to Network”
≥Collegare questa unità alla rete e attendere l’avvio
dell’aggiornamento del firmware via Internet. (> 27)
“Connect USB Device”
≥Scaricare il firmware più recente sulla memoria flash USB
e collegarlo. (> 27)
“Download Fail”
≥Il download del firmware non è riuscito. Premere un tasto
qualsiasi per uscire. Riprovare in un secondo momento.
≥Non è possibile trovare il server. Premere un tasto
qualsiasi per uscire. Accertarsi che la rete sia collegata a
Internet.
“Empty”
≥La cartella selezionata è vuota. Spostare le tracce nella
cartella e ritentare l'operazione.
≥Non è possibile trovare il server in rete. Verificare se il
server è collegato alla stessa rete di questa unità, e
ritentare la connessione a questa unità. (> 13)
≥Nessuna stazione Internet Radio registrata nell’elenco dei
preferiti. Inserire una stazione nell’elenco. (> 15)
“Error”
≥È stata eseguita un’operazione scorretta. Leggere le
istruzioni e riprovare.
“Firmware update is available”
≥È disponibile il firmware (gratuito) di questa unità.
1 Premere [NWP].
2 Premere [OK].
3 Premere [3, 4] per selezionare “Yes” e quindi premere [OK].
≥ Il progredire dell'operazione viene visualizzato come
“Updating %” durante l'aggiornamento. ( sta per un
numero.)
≥ Al termine dell'aggiornamento verrà visualizzata
l'indicazione “Success”.
4 Dopo che viene visualizzato “Success”, scollegare il cavo di
alimentazione CA, quindi ricollegarlo dopo 3 minuti.
≥Per informazioni relative all’aggiornamento, si rimanda al
seguente sito web.
www.technics.com/support/firmware/
Bluetooth
®
Radio
Telecomando
Messaggi
(133)
ST-C700DE-TQBM0007.book 31 ページ 2016年10月26日 水曜日 午後1時17分

32
“F” (“ ” indica un numero.)
≥Questa unità ha un problema.
– Questa unità è posizionata in un luogo estremamente caldo?
In tal caso, spostare questa unità in un luogo più freddo,
attendere alcuni istanti e quindi provare a riaccenderla.
Se il problema persiste, annotare il numero visualizzato,
scollegare il cavo di alimentazione CA e contattare il
proprio rivenditore.
“Load Fail”
≥Impossibile trovare il firmware sulla memoria flash USB.
≥Scaricare il firmware più recente sulla memoria flash USB
e riprovare. (> 27)
“No Network Available”
≥Questa unità non è collegata alla rete.
Controllare la connessione di rete. (> 12)
“No Memory”
≥Non ci sono stazioni DAB/DAB+ memorizzate da
selezionare. Memorizzare alcuni canali. (> 24)
“No Signal”
≥Non è possibile ricevere la stazione. Controllare la propria
antenna.
“Not Valid”
≥
La funzione che si è tentato di usare non è disponibile con le
impostazioni attuali. Verificare i passaggi e le impostazioni.
“PGM Full”
≥Il numero dei brani programmati è superiore a 24.
“Please Wait”
≥
Viene visualizzato, ad esempio, quando si accende/spegne
questa unità. (Fino a 1 minuto e 30 secondi)
“Remote ” (“ ” sta a indicare un numero.)
≥Il telecomando e questa unità usano codici differenti.
Cambiare il codice del telecomando.
– Quando è visualizzata l'indicazione “Remote 1”, tenere premuto
[OK] e [1] per almeno 4 secondi.
– Quando è visualizzata l'indicazione “Remote 2”, tenere premuto
[OK] e [2] per almeno 4 secondi.
“Remote Mode”
≥Non è possibile effettuare le operazioni essenziali usando i
selettori di controllo essenziali sull'unità principale o i
pulsanti sul telecomando (questo accade ad esempio
quando la musica memorizzata su un server DLNA viene
riprodotta su questa unità (DMR)).
≥Utilizzare il dispositivo connesso per il controllo di base
della riproduzione.
“Scan Failed”
≥Non è possibile ricevere le stazioni. Verificare la propria
antenna e provare l'Auto scanning. (> 24)
Se viene ancora visualizzato “Scan Failed”, trovare la
ricezione del segnale migliore con la funzione di
sintonizzazione “Manual Scan”. (> 24)
“Searching”
≥Questa unità sta verificando il server DLNA in rete.
“Unlocked”
≥È stato selezionato PC, ma non è collegato nessun PC.
Verificare il collegamento con il PC. (> 20)
≥I componenti della frequenza di campionamento, ecc. dei
segnali audio non sono inseriti correttamente.
– Riguardo al formato supportato, fare riferimento a “Formato file”
(> 35)
“USB Over Current Error”
≥L'iPhone/iPad/iPod o il dispositivo USB assorbe troppa
corrente. Scollegare l'iPhone/iPad/iPod o il dispositivo
USB, quindi spegnere e riaccendere l'unità.
“Hub Device Not Supported”
“Device Not Recognized”
“Not Supported”
“USB Device Not Supported”
≥È stato collegato un iPhone/iPad/iPod o un dispositivo USB
non supportato.
– Se l'iPhone/iPad/iPod è compatibile, accenderlo e collegarlo
correttamente.
≥Il formato del file sull'iPhone/iPad/iPod o sul dispositivo
USB non è supportato.
– Riguardo al formato supportato, fare riferimento a “Formato file”
(> 35)
∫ Informazioni sui servizi in rete
I servizi forniti attraverso i servizi in rete sono controllati dai rispettivi
fornitori, e possono essere interrotti sia temporaneamente che in
maniera definitiva senza alcun preavviso. Perciò, Panasonic non
garantisce il contenuto o la continuità dei servizi.
Cura dell’unità
Prima di eseguire qualsiasi operazione di manutenzione
rimuovere il cavo di alimentazione CA dalla presa. Pulire
questa unità con un panno morbido.
≥ Se l'unità è molto sporca, passare un panno inumidito e ben
strizzato per rimuovere lo sporco, quindi un panno morbido.
≥ Non utilizzare solventi come benzina, diluenti, alcol, detergenti da
cucina, panni chimici, ecc. In caso contrario l'involucro esterno
potrebbe deformarsi o il rivestimento potrebbe staccarsi.
(134)
ST-C700DE-TQBM0007.book 32 ページ 2016年10月26日 水曜日 午後1時17分

33
Italiano
Specifiche
∫ GENERALI
Alimentazione CA da 220 V a 240 V, 50/60 Hz
Consumo di corrente 26 W
Consumo di corrente in standby*
1
(Quando “Network Standby” non è attivo) Circa 0,2 W
(Quando è attivo “Network Standby”) Circa 2,0 W
Consumo di corrente da spento Circa 0,2 W
Dimensioni (LkAkP) 340 mmk78 mmk305 mm
Massa Circa 4,0 kg
Intervallo temperature di funzionamento 0 oC a r40 oC
Gamma di umidità tollerata 35 % a 80 % RH (nessuna condensa)
∫ SEZIONE TERMINALI
Uscita analogica
LINE OUT Spinotto
Uscita digitale
Uscita digitale ottica Terminale ottico
Uscita digitale coassiale Spinotto
Porta di sistema
Controllo di sistema Spinotto ‰3,5 mm
USB
USB anteriore Connettore tipo A
Capacità di memoria del supporto 2TB (max)
Numero massimo di cartelle (album) 800
Numero massimo di file (brani) 8000
File system FAT16, FAT32
Alimentazione porta USB DC OUT 5 V 2,1 A (max)
PC
USB posteriore Connettore tipo B
Interfaccia Ethernet
LAN 10 Base-T/100 Base-TX
∫ SEZIONE FORMATO
USB-A
Standard USB USB 2.0 alta velocità
Dispositivi di archiviazione di massa USB
USB-B
Standard USB USB 2.0 alta velocità
Classe Audio USB 2.0, modalità Asincrona
Modalità controllo DSD Modalità ASIO Nativa, modalità DoP
(135)
ST-C700DE-TQBM0007.book 33 ページ 2016年10月26日 水曜日 午後1時17分

34
≥ Le specifiche possono essere modificate senza preavviso.
≥ La massa e le dimensioni sono approssimate.
*1 Quando l'iPhone/iPad/iPod non è in carica
*2 Distanza di comunicazione potenziale
Ambiente di misurazione: Temperatura 25 oC / Altezza 1,0 m
Misurazione in “Mode 1”
∫ SEZIONE USCITA ANALOGICA
Canale 2 canali
Livello di uscita
LINE OUT 2,0 Vrms
Risposta in frequenza 2 Hz a 90 kHz (s3dB)
THD+N 0,0012 % (1 kHz, 0 dB)
Segnale/Rumore 112 dB (IHF-A)
Gamma dinamica 112 dB (IHF-A)
∫ SEZIONE Bluetooth
®
/NFC
Bluetooth
®
Specifiche del sistema Bluetooth
®
Bluetooth
®
Ver.3.0
Classificazione delle apparecchiature wireless Classe 2 (2,5 mW)
Profili supportati A2DP/AVRCP
Codec supportati Qualcomm
®
aptX™ Low Latency, AAC, SBC
Banda di frequenza Banda da 2,4 GHz FH-SS
Distanza operativa Circa 10 m Linea di vista*
2
∫ SEZIONE SINTONIZZATORE
Modulazione di frequenza (FM)
Preselezione di memoria 30 stazioni
Gamma di frequenza 87,50 MHz a 108,00 MHz (Intervallo di 50 kHz)
Terminali antenna 75 ≠ (non bilanciato)
DAB
Memorie DAB 20 canali
Banda di frequenza (lunghezza d'onda)
Banda III (Tutta Banda III) da 5A a 13F (da 174,928 MHz a 239,200 MHz)
Sensibilità
Requisito minimo s98 dBm
Terminale antenna esterna DAB Connettore F (75 ≠)
(136)
ST-C700DE-TQBM0007.book 34 ページ 2016年10月26日 水曜日 午後1時17分

35
Italiano
∫ Formato file
Questa unità supporta i seguenti formati di file.
≥Questa unità non supporta la riproduzione di file musicali protetti da copia.
≥Non è garantita la riproduzione di tutti i file nei formati supportati da questa unità.
≥La riproduzione di un file non supportato da questa unità può portare ad un audio discontinuo o a rumore. In questi casi,
verificare se questa unità supporta il formato del file.
≥Questa unità non supporta la riproduzione a VBR (bitrate variabile).
≥Alcuni dei dispositivi connessi (server) possono essere in grado di convertire i file in formati non supportati da questa unità e di
trasmetterli. Per maggiori dettagli, fare riferimento alle istruzioni per l'uso per il vostro server.
≥Le informazioni relative ai file (frequenza di campionamento, ecc.) visualizzate da questa unità e da un software di riproduzione
di file audio possono differire.
USB-A
PC (USB-B)*
1
LAN (DLNA)*
2
*1 Scaricando e installando la app dedicata, è possibile riprodurre file nei formati estesi. (> 20)
Per ulteriori informazioni, vedere le istruzioni per l’uso dell'applicazione.
*2 La riproducibilità di un file musicale attraverso la propria rete dipende dal server di rete anche se il formato del file compare qui sopra. Per
esempio, se si utilizza Windows Media
®
Player 11, non tutti i file musicali presenti sul PC possono essere riprodotti. È possibile riprodurre
solo quelli aggiunti alla libreria di Windows Media
®
Player 11.
≥ Tutte le informazioni precedenti sono aggiornate ad ottobre 2016 e sono soggette ad aggiornamento senza preavviso. Per informazioni
sull'aggiornamento, vedere il sito web seguente.
www.technics.com/support/firmware/
Formato file Estensione Frequenza di campionamento
Bit rate
Numero di bit di quantizzazione
MP3 .mp3 32/44,1/48 kHz 16 kbps a 320 kbps
AAC .m4a/.aac 32/44,1/48/88,2/96 kHz 16 kbps a 320 kbps
WMA .wma 32/44,1/48 kHz 16 kbps a 320 kbps
WAV .wav 32/44,1/48/88,2/96/176,4/192 kHz 16/24 bit
FLAC .flac 32/44,1/48/88,2/96/176,4/192 kHz 16/24 bit
AIFF .aiff 32/44,1/48/88,2/96/176,4/192 kHz 16/24 bit
ALAC .m4a 32/44,1/48/88,2/96/176,4/192 kHz 16/24 bit
DSD .dff/.dsf 2,8/5,6 MHz
Formato file Estensione Frequenza di campionamento
Bit rate
Numero di bit di quantizzazione
LPCM 32/44,1/48/88,2/96/176,4/192 kHz 16/24/32 bit
DSD .dff/.dsf 2,8/5,6 MHz
Formato file Estensione Frequenza di campionamento
Bit rate
Numero di bit di quantizzazione
MP3 .mp3 32/44,1/48 kHz 16 kbps a 320 kbps
AAC .m4a/.aac 32/44,1/48/88,2/96 kHz 16 kbps a 320 kbps
WMA .wma 32/44,1/48 kHz 16 kbps a 320 kbps
WAV .wav 32/44,1/48/88,2/96/176,4/192 kHz 16/24 bit
FLAC .flac 32/44,1/48/88,2/96/176,4/192 kHz 16/24 bit
AIFF .aiff 32/44,1/48/88,2/96/176,4/192 kHz 16/24 bit
ALAC .m4a 32/44,1/48/88,2/96/176,4/192 kHz 16/24 bit
DSD .dff/.dsf 2,8/5,6 MHz
(137)
ST-C700DE-TQBM0007.book 35 ページ 2016年10月26日 水曜日 午後1時17分

36
∫ Informazioni su Bluetooth
®
Banda di frequenza utilizzata
≥Questo sistema usa la banda di frequenza 2,4 GHz.
Certificazione del dispositivo
≥Questo sistema rispetta le limitazioni di frequenza e ha
ottenuto la certificazione in base alla normativa sulle
radiofrequenze; non è quindi necessaria una concessione
per l’uso di reti wireless.
≥In alcuni paesi la legge punisce le seguenti azioni:
– Disassemblaggio o modifica del sistema.
– Rimozione delle indicazioni delle specifiche.
Restrizioni d'uso
≥Non si garantisce la trasmissione wireless e/o l’utilizzo con
tutti i dispositivi provvisti di tecnologia Bluetooth
®
.
≥Tutti i dispositivi devono rispettare gli standard di Bluetooth
SIG, Inc.
≥A seconda delle specifiche e delle impostazioni di un
dispositivo, questo potrebbe non essere in grado di
collegarsi o alcune operazioni potrebbero essere diverse.
≥Questo sistema supporta le caratteristiche di sicurezza di
Bluetooth
®
, ma a seconda dell'ambiente operativo e/o delle
impostazioni, questa sicurezza potrebbe non essere
sufficiente. Trasmettere dati a questo sistema in modalità
wireless con cautela.
≥L’unità non è in grado di trasmettere dati ad un dispositivo
Bluetooth
®
.
Range di utilizzo
≥Usare questo dispositivo in un range massimo di 10 m. Il
range può diminuire a seconda dell'ambiente, di ostacoli o
di interferenze.
Interferenza da altri dispositivi
≥Questo sistema potrebbe non funzionare correttamente e
potrebbero verificarsi problemi come rumore e interruzioni
dell'audio a causa dell'interferenza delle onde radio, se
questo sistema è posizionato troppo vicino ad altri
dispositivi
Bluetooth
®
o a dispositivi che usano la banda
2,4
GHz
.
≥Questo sistema potrebbe non funzionare correttamente se
onde radio trasmesse da una stazione vicina sono troppo
forti.
Uso previsto
≥Questo sistema è predisposto per un normale impiego di
tipo generale.
≥Non usare questo sistema vicino ad un impianto o in un
ambiente soggetto a interferenza in radiofrequenza
(ad esempio: aeroporti, ospedali, laboratori, ecc).
Panasonic non è responsabile per la compromissione
di dati e/o informazioni durante una trasmissione
wireless.
“Made for iPod”, “Made for iPhone”, e “Made for iPad” indicano che un
accessorio elettronico è stato progettato per essere collegato
specificamente all'iPod, iPhone, o iPad, rispettivamente, e che lo
sviluppatore ne certifica la conformità con gli standard prestazionali di
Apple.
Apple non è responsabile per il funzionamento di tale dispositivo o della
sua conformità con gli standard normativi e di sicurezza.
Si noti che l'utilizzo di tale accessorio con iPod o iPhone o iPad può
influenzare negativamente le prestazioni wireless.
AirPlay, iPad, iPhone, iPod, iPod nano, iPod touch e iPad Air sono marchi
di Apple Inc., registrati negli Stati Uniti e in altri paesi.
iPad mini e iPad Pro sono marchi di Apple Inc.
Mac e OS X sono marchi di Apple Inc., registrati negli Stati Uniti e in altri
paesi.
Android è un marchio di Google Inc.
Qualcomm aptX è un prodotto di Qualcomm Technologies International,
Ltd.
Qualcomm è un marchio di Qualcomm Incorporated, registrato negli Stati
Uniti ed in altri paesi, usato con autorizzazione. aptX è un marchio di
Qualcomm Technologies International, Ltd., registrato negli Stati Uniti ed in
altri paesi, usato con autorizzazione.
Il marchio denominativo Bluetooth
®
e i loghi sono marchi registrati di
proprietà di Bluetooth SIG, Inc. e qualsiasi utilizzo di tali marchi da parte di
Panasonic Corporation è concesso in licenza.
Altri marchi e nomi di marchi sono di proprietà dei rispettivi proprietari.
DLNA, the DLNA Logo and DLNA CERTIFIED are trademarks, service
marks, or certification marks of the Digital Living Network Alliance.
MPEG Layer-3, tecnologia di codifica audio con licenza della Fraunhofer
IIS e Thomson.
Windows e
Windows Vista
sono marchi registrati o marchi di Microsoft
Corporation negli Stati Uniti e/o in altri paesi.
Windows Media e il logo Windows sono marchi di fabbrica o marchi di
fabbrica registrati della Microsoft Corporation negli Stati Uniti e/o in altri
Paesi.
Questo prodotto è protetto da certi diritti di proprietà intellettuali della
Microsoft Corporation e di terze parti. L’uso o la distribuzione di tale
tecnologia fuori di questo prodotto sono proibiti senza una licenza dalla
Microsoft o da una consociata Microsoft autorizzata e terze parti.
FLAC Decoder
Copyright (C) 2000, 2001, 2002, 2003, 2004, 2005, 2006, 2007, 2008,
2009 Josh Coalson
Redistribution and use in source and binary forms, with or without
modification, are permitted provided that the following conditions are met:
– Redistributions of source code must retain the above copyright notice,
this list of conditions and the following disclaimer.
– Redistributions in binary form must reproduce the above copyright
notice, this list of conditions and the following disclaimer in the
documentation and/or other materials provided with the distribution.
– Neither the name of the Xiph.org Foundation nor the names of its
contributors may be used to endorse or promote products derived from
this software without specific prior written permission.
THIS SOFTWARE IS PROVIDED BY THE COPYRIGHT HOLDERS AND
CONTRIBUTORS “AS IS” AND ANY EXPRESS OR IMPLIED
WARRANTIES, INCLUDING, BUT NOT LIMITED TO, THE IMPLIED
WARRANTIES OF MERCHANTABILITY AND FITNESS FOR A
PARTICULAR PURPOSE ARE DISCLAIMED. IN NO EVENT SHALL THE
FOUNDATION OR CONTRIBUTORS BE LIABLE FOR ANY DIRECT,
INDIRECT, INCIDENTAL, SPECIAL, EXEMPLARY, OR CONSEQUENTIAL
DAMAGES (INCLUDING, BUT NOT LIMITED TO, PROCUREMENT OF
SUBSTITUTE GOODS OR SERVICES; LOSS OF USE, DATA, OR
PROFITS; OR BUSINESS INTERRUPTION) HOWEVER CAUSED AND
ON ANY THEORY OF LIABILITY, WHETHER IN CONTRACT, STRICT
LIABILITY, OR TORT (INCLUDING NEGLIGENCE OR OTHERWISE)
ARISING IN ANY WAY OUT OF THE USE OF THIS SOFTWARE, EVEN IF
ADVISED OF THE POSSIBILITY OF SUCH DAMAGE.
Il software Spotify è soggetto a licenze di terzi che è possibile trovare qui:
www.spotify.com/connect/third-party-licenses
(138)
ST-C700DE-TQBM0007.book 36 ページ 2016年10月26日 水曜日 午後1時17分

37
Italiano
(139)
ST-C700DE-TQBM0007.book 37 ページ 2016年10月26日 水曜日 午後1時17分

4
Dank u voor de aankoop van dit product.
Lees deze instructies zorgvuldig door voordat u dit product gebruikt en bewaar deze handleiding, zodat u deze later kunt
raadplegen.
∫ Kenmerken van dit toestel
Dit toestel biedt de volgende kenmerken:
Architectuur met digitale ruisisolatie
Aangezien de meeste digitale opslagmedia bedoeld zijn om met PC's gebruikt te worden, is bij het ontwerp geen rekening
gehouden met lage ruis die kritiek is voor een zuivere audioweergave. Om deze uitdaging het hoofd te bieden, is voor iedere
interface van dit toestel gebruik gemaakt van een verregaande maatregel tegen jitter en van uitmuntende technologie ter
blokkering van ruis zodat helder geluid verstrekt wordt.
Werking op virtuele batterij
De werking met een virtuele batterij voorkomt dat de ruis van de stroomtoevoer, een factor die “troebelheid” in het geluid
veroorzaakt, zich met het audiosignaal mengt. Het resultaat is een verbetering van de werking van de geluidslokalisatie en
ruimtelijke expressie.
Digitaal filter ultralage vervorming oversampling
Oversampling met hoge precisie elimineert vervorming en verhoogt de geluidskwaliteit van muziekbronnen, zodat geluid
weergegeven wordt dat rijk aan ruimtelijke expressie is.
∫ Aanbevolen apparatuur
Wij raden aan (optionele) apparatuur van Technics te gebruiken voor een superieure geluidskwaliteit.
Productnaam Modelnummer
Luidsprekersysteem SB-C700
Compact Disc Speler SL-C700
Geïntegreerde Stereo Versterker SU-C700
(140)
ST-C700DE-TQBM0007.book 4 ページ 2016年10月26日 水曜日 午後1時17分

5
Nederlands
Veiligheidsmaatregelen
Toestel
≥ Om het risico op brand, elektrische schokken of productschade te
verkleinen,
– Stel dit toestel niet bloot aan regen, vocht, druppels of spetters.
– Plaats geen met vloeistof gevulde objecten, zoals vazen, op dit toestel.
– Gebruik alleen de aanbevolen accessoires.
– Verwijder de afdekking niet.
– Repareer dit toestel niet zelf. Laat onderhoud over aan gekwalificeerd
onderhoudspersoneel.
– Laat geen metalen voorwerpen in dit toestel vallen.
– Plaats geen zware voorwerpen op dit toestel.
Netsnoer
≥ Om het risico op brand, elektrische schokken of productschade te
verkleinen,
– Controleer of de voedingsspanning overeenkomt met de spanning die op
dit toestel afgedrukt is.
– Steek de stekker volledig in het stopcontact.
– Trek niet aan de voedingskabel, buig hem niet en plaats er geen zware
voorwerpen op.
– Hanteer de stekker niet met natte handen.
– Houd het hoofddeel van de stekker vast als u deze uit het stopcontact
neemt.
– Gebruik geen beschadigde stekker of stopcontact.
≥ De hoofdstekker schakelt het apparaat uit.
Installeer het apparaat op een dergelijke wijze dat de hoofdstekker
onmiddellijk uit het stopcontact kan worden getrokken.
Toestel
≥ Plaats geen bronnen van open vuur, zoals brandende kaarsen, op dit
toestel.
≥ Dit toestel kan tijdens het gebruik de interferentie van radio’s ontvangen die
veroorzaakt wordt door mobiele telefoons. In dat geval dient u de afstand
tussen dit toestel en de mobiele telefoon te vergroten.
≥ Dit toestel is bestemd voor gebruik in gematigde en tropische klimaten.
Opstelling
≥ Plaats dit toestel op een vlakke ondergrond.
≥ Om het risico op brand, elektrische schokken of productschade te
verkleinen,
– Installeer of plaats dit toestel niet in een boekenkast, een muurkast of in
een andere omsloten ruimte. Controleer of het toestel goed geventileerd
wordt.
– Blokkeer de ventilatieopening van dit toestel niet met kranten, tafelkleden,
gordijnen, enzovoorts.
– Stel dit toestel niet bloot aan rechtstreeks zonlicht, hoge temperaturen,
hoge vochtigheid en overmatige trillingen.
≥ Til of draag dit toestel niet aan een van diens hendels. Dit kan tot gevolg
hebben dat het toestel valt waardoor persoonlijk letsel of een slechte
werking veroorzaakt kan worden.
Batterij
≥ Er bestaat explosiegevaar als de batterij niet correct geplaatst wordt.
Vervang de batterij alleen door één van het type dat door de fabrikant
aanbevolen wordt.
≥ Het verkeerd hanteren van batterijen kan het lekken van elektrolyt tot gevolg
hebben waardoor brand kan ontstaan.
– Neem de batterij uit als u denkt dat u de afstandsbediening lange tijd niet
zult gebruiken. Bewaar hem in een koele, donkere plaats.
– Verwarm de batterijen niet en stel deze niet bloot aan vuur.
– Laat de batterij(en) niet lange tijd in een auto in direct zonlicht liggen
terwijl de portieren en de raampjes gesloten zijn.
– Probeer de batterijen nooit open te maken of kort te sluiten.
– Laad geen alkaline of mangaanbatterijen op.
– Gebruik geen batterijen waarvan de buitenlaag is afgehaald.
– Gebruik nieuwe en oude batterijen, of verschillende soorten batterijen,
niet door elkaar.
≥ Neem voor het weggooien van de batterijen contact op met de plaatselijke
autoriteiten of uw verkoper en vraag wat de juiste weggooimethode is.
WAARSCHUWING
VOORZICHTIG
Conformiteitsverklaring (DoC)
“Panasonic Corporation” verklaart hierbij dat dit product in overeenstemming is met de
essentiële eisen en andere relevante bepalingen van Richtlijn 1999/5/EC.
Klanten kunnen een kopie van de originele DoC voor onze R&TTE-producten
downloaden vanaf onze DoC-server:
http://www.doc.panasonic.de
Neem contact op met de bevoegde vertegenwoordiger:
Panasonic Marketing Europe GmbH, Panasonic Testing Centre,
Winsbergring 15, 22525 Hamburg, Duitsland
Het ontdoen van oude apparatuur en batterijen
Enkel voor de Europese Unie en landen met recycle
systemen
Deze symbolen op de producten, verpakkingen en/of
begeleidende documenten betekenen dat gebruikte elektrische
en elektronische producten en batterijen niet samen mogen
worden weggegooid met de rest van het huishoudelijk afval.
Voor een juiste verwerking, hergebruik en recycling van
oude producten en batterijen, gelieve deze in te leveren
bij de desbetreffende inleverpunten in overeenstemming
met uw nationale wetgeving.
Door ze op de juiste wijze weg te gooien, helpt u mee
met het besparen van kostbare hulpbronnen en
voorkomt u potentiële negatieve effecten op de
volksgezondheid en het milieu.
Voor meer informatie over inzameling en recycling kunt u
contact opnemen met uw plaatselijke gemeente.
Afhankelijk van uw nationale wetgeving kunnen er
boetes worden opgelegd bij het onjuist weggooien van dit
soort afval.
Let op: het batterij symbool
(Onderstaand symbool):
Dit symbool kan in combinatie met een chemisch
symbool gebruikt worden. In dit geval volstaan de eisen,
die zijn vastgesteld in de richtlijnen van de
desbetreffende chemische stof.
(141)
ST-C700DE-TQBM0007.book 5 ページ 2016年10月26日 水曜日 午後1時17分

6
Inhoudsopgave
∫ Voor de afvalverwerking of overdracht van dit toestel
Dit toestel kan persoonlijke informatie bevatten. Voer de volgende stappen uit, vooraleer dit toestel wordt afgevoerd of
overgedragen, om de gegevens te verwijderen, met inbegrip van persoonlijke of geheime informatie.
≥“Alle instellingen opnieuw op de fabrieksinstellingen zetten” (> 29)
Accessoires
≥
De productnummers die in deze gebruiksaanwijzing verstrekt worden, zijn correct met ingang van september 2016. Ze kunnen aan wijzigingen onderhevig zijn.
≥ Het netsnoer niet met andere apparatuur gebruiken.
Veiligheidsmaatregelen ....................................................5
Accessoires .......................................................................6
Snelzoekgids voor de bediening .....................................7
Voorbereidingen ................................................................9
HOME-menu and basisbedieningsorganen..................11
Netwerkinstellingen ........................................................12
Afspelen van muziekbestanden op de DLNA-server ...13
Internet Radio afspelen (vTuner)....................................14
Met behulp van Spotify ...................................................16
Gebruik van iPhone/iPad/iPod .......................................17
Gebruik van AirPlay ........................................................18
Gebruik van USB-apparatuur .........................................18
Gebruik van een PC, enz.................................................20
Gebruik van Bluetooth
®
..................................................21
Naar de FM-radio luisteren .............................................23
Naar DAB/DAB+ luisteren...............................................24
Geluidsinstelling..............................................................25
Overige .............................................................................26
Verhelpen van ongemakken ...........................................29
Verzorging van het toestel..............................................32
Specificaties.....................................................................33
Over de beschrijvingen die in deze handleiding staan
≥Doorverwijspagina’s worden aangeduid als “@ ±±”.
≥De getoonde illustraties kunnen afwijken van uw apparaat.
≥Tenzij anders aangegeven moeten de beschreven handelingen met de afstandsbediening uitgevoerd worden.
∏ 1Netsnoer
(REQ0456)
∏ 1 Systeemverbindingskabel
(K2KYYYY00233)
∏ 1 Coaxiale digitale kabel
(K2KYYYY00251)
∏ 1 DAB-binnenantenne
(RFA3654)
∏ 1 Afstandsbediening
(N2QAYA000096)
∏ 2 Batterijenafstands
bediening
(K2CQ2YY00127)
∫ De afstandsbediening gebruiken
Plaats de batterij op een wijze dat de polen
(i en j) samenvallen met die in de
afstandsbediening.
Richt deze op de signaalsensor van de
afstandsbediening op dit apparaat. (> 7)
≥Bewaar de batterijen buiten het bereik van
kinderen om inslikken ervan te voorkomen.
2
1
R03/LR03, AAA
(Alkali- of mangaanbatterijen)
(142)
ST-C700DE-TQBM0007.book 6 ページ 2016年10月26日 水曜日 午後1時17分

7
Nederlands
Snelzoekgids voor de bediening
∫ Voorkant
1 Power-schakelhendel [Í/I (Stand-by/on)]/[OFF]
Schakelt dit toestel in/uit.
≥ De afstandsbediening werkt niet als de power-schakelhendel
in de lage stand staat.
≥ U kunt het toestel van ingeschakeld naar de stand-by-modus
schakelen, of omgekeerd, als de power-schakelhendel in de
opgetilde stand staat. (> 8)
2 Poort voor iPhone/iPad/iPod en USB-apparaten
( DC 5 V 2,1 A) (> 17, 18)
3 Afstandsbedieningssignaalsensor
Afstand: Binnen ongeveer 7 m direct ervoor
Hoek: Ong. 30o links en rechts
4 Display
≥De ingangsbron, de afspeelstatus en andere informatie
worden weergegeven. Controleer voor meer details
onderstaande website, evenals deze
gebruiksaanwijzing.
www.technics.com/support/
5 Schakelaars voor basisbediening
Deze schakelaars werken zodra het teken aangeraakt
wordt. Telkens wanneer de schakelaar wordt aangeraakt,
klinkt een pieptoon. (> 11)
≥ Als geen afspeelinformatie op het display getoond wordt (met
uitzondering van de stand-by-modus van de NFC-registratie
(> 21)), kunt u de volgende handelingen op het
aanraakpaneel uitvoeren:
6 NFC-aanraakzone (> 21)
Het vel van het NFC-aanraakgebied is op het moment
van aankoop op dit gebied aangebracht.
∫ Achterkant
7 Markering productidentificatie
Het modelnummer wordt aangegeven.
8 DAB/FM-aansluiting (> 10)
9 Aansluiting analoge audio-uitgang [LINE OUT] (> 9)
: Aansluiting digitale audio-uitgang [COAX OUT] (> 9)
; Aansluiting digitale audio-uitgang [OPT OUT] (> 9)
< Aansluiting digitale audio-ingang [PC] (> 20)
Om een PC, enz., aan te sluiten.
= Systeemaansluiting [CONTROL] (> 9)
> LAN-poort [LAN] (> 12)
? AC IN-aansluiting [AC IN T]( ) (> 10)
Dit toestel
:3 (Omhoog)
94 (Omlaag)
1/; OK (OK)
∫ RETURN (Terug)
HOME (Raak aan blijf
aangeraakt houden)
MENU (Gaat menu
binnen)
Uitrusting klasse II
(De constructie van het product is dubbel geïsoleerd.)
(143)
ST-C700DE-TQBM0007.book 7 ページ 2016年10月26日 水曜日 午後1時17分

8
∫ Knoppen die voor dit toestel werkzaam zijn
1 [NWP Í]: Stand-by/On schakelaar
Indrukken om het apparaat van Aan op Stand-by te
zetten of omgekeerd. Op stand-by verbruikt het apparaat
nog steeds een kleine hoeveelheid stroom.
≥ De afstandsbediening werkt niet als de power-schakelhendel
in de lage stand staat.
2 [AMP]/[NWP]/[CD]: Selecteert het apparaat dat
bediend moet worden
3 [N INPUT O]: Selecteer de ingangsbron
4 [DIMMER]: Regelt de helderheid van het display, enz.
(> 11)
5 [HOME]: HOME menu weergeven (> 11)
6 [INFO]: Informatie over het af te spelen materiaal
bekijken
Druk op deze knop om nummer, artiest, albumnaam,
bestandstype, samplingfrequentie en andere informatie weer te
geven.
7 [3, 4, 2, 1]/[OK]: Selectie/OK
8 [RETURN]: Keert terug naar de vorige weergave
9 [MENU]: Gaat menu binnen (> 21, 22, 23, 24, 26)
: [DIRECT]: Schakelt Directe mode in/uit (> 25)
; [RE-MASTER]: Schakelt Re-master in/uit (> 25)
< Basistoetsen voor de bediening van het afspelen
= Cijfertoetsen, enz.
≥ Om een nummer van 2 cijfers te selecteren
Voorbeeld:
16: [S10] > [1] > [6]
≥ Om een nummer van 4 cijfers te selecteren
Voorbeeld:
1234: [S10] > [S10] > [S10] > [1] > [2] > [3] > [4]
≥ [CLEAR]: Wist de ingevoerde waarde.
∫ Knoppen die werkzaam zijn voor
SU-C700/SL-C700
De afstandsbediening van dit toestel werkt ook voor de
SU-C700/SL-C700.
Raadpleeg voor informatie over de bediening van
SU-C700/SL-C700 ook de gebruiksaanwijzingen daarvan.
1 Schakelaar stand-by/on voor SU-C700
2 Schakelaar stand-by/on voor
SL-C700
3 Selecteert het apparaat dat bediend moet worden
4 Selecteert de ingangsbron van
SU-C700
5 Regelt de helderheid van het display, enz.
6 Meet de karakteristieken van de versterker en corrigeert
de uitgave daarvan
7 Regelt het volume
8 Zet het geluid uit (Mute)
Afstandsbediening
(144)
ST-C700DE-TQBM0007.book 8 ページ 2016年10月26日 水曜日 午後1時17分

9
Nederlands
Voorbereidingen
≥Zet alle apparatuur uit voordat u de aansluiting tot stand brengt en lees de betreffende gebruiksaanwijzing.
≥Sluit het netsnoer niet aan zolang alle andere verbindingen niet voltooid zijn.
≥Steek de stekker van de aan te sluiten kabels volledig naar binnen.
≥Buig de kabels niet om bij scherpe hoeken.
≥U kunt digitale audiosignalen uit dit toestel uitzenden en muziek afspelen.
≥U kunt dit toestel automatisch aan de SU-C700 koppelen en ze probleemloos bedienen met de afstandsbediening. (> 28)
≥ Gebruik geen andere systeemverbindingskabels of coaxiale digitale kabels dan de bijgeleverde.
≥ Verbind de systeemverbindingskabel met de systeemaansluiting [CONTROL1] van de SU-C700.
≥ Verbind de coaxiale digitale kabel met de digitale audio-ingang [COAX1 IN] van de SU-C700.
U kunt analoge of digitale audiosignalen uit dit toestel uitzenden en muziekbestanden afspelen.
Verbinding systeembediening met een SU-C700
Aansluiten op een versterker en een D/A-omzetter
Dit toestel
(achterkant)
SU-C700
Coaxiale digitale kabel
(bijgeleverd)
Systeemverbindingskabel
(bijgeleverd)
bijv.
Dit toestel
(achterkant)
Versterker
Optische digitale audiokabel
(niet bijgeleverd)
D/A-omzetter
Audiokabel
(niet bijgeleverd)
(145)
ST-C700DE-TQBM0007.book 9 ページ 2016年10月26日 水曜日 午後1時17分

10
≥ Als de radio-ontvangst slecht is, gebruik dan een DAB-buitenantenne (niet bijgeleverd).
≥ Gebruik geen andere binnenantennes behalve de bijgeleverde DAB-binnenantenne.
Sluit aan nadat alle andere aansluitingen zijn gemaakt.
≥ Dit toestel verbruikt een kleine hoeveelheid netstroom (> 33), zelfs als de power-schakelhendel op [OFF] staat. Trek de stekker uit het
stopcontact als u het toestel lange tijd niet zult gebruiken. Plaats het toestel op een wijze dat de stekker gemakkelijk verwijderd kan worden.
Antenne-verbinding
Netsnoeraansluiting
Dit toestel
(achterkant)
Plakband
(niet bijgeleverd)
DAB-binnenantenne
(bijgeleverd)
Controleer of de moer volledig
vastgedraaid is.
Plaats de antenne waar de ontvangst optimaal is.
Netsnoer
(bijgeleverd)
Op een stopcontact
Dit toestel
(achterkant)
Steek het netsnoer naar
binnen tot A, een punt vlak
voor het ronde gat.
(146)
ST-C700DE-TQBM0007.book 10 ページ 2016年10月26日 水曜日 午後1時17分

11
Nederlands
HOME-menu and basisbedieningsorganen
De hoofdfuncties van dit apparaat kunnen vanaf het HOME
menu gehanteerd worden.
Voorbereiding
≥Maak de muziek gereed die u wilt afspelen.
≥Schakel het aangesloten apparaat (versterker, enz.) in en
verlaag het volume daarvan.
1 Beweeg de power-schakelhendel van dit
toestel omhoog naar de stand [Í/I].
2 Druk op [NWP].
3 Druk op [HOME].
4 Druk op [3, 4], selecteer een item en druk
op [OK].
≥Als er geen andere items zijn, herhaal dan deze stap.
≥ Er kunnen nieuwe items toegevoegd zijn en bestaande items
kunnen geüpdatet zijn. Raadpleeg onderstaande site voor
informatie over toevoegingen en updates.
www.technics.com/support/
5 Afspelen starten.
∫ Tonen van het HOME menu
Druk op [HOME].
Regelt het volume van het aangesloten apparaat (versterker,
enz.).
De helderheid van het display en van het schakelaars voor
basisbediening van dit toestel kan veranderd worden.
Druk herhaaldelijk op [DIMMER].
≥ Als het display uitgeschakeld wordt, zal het alleen oplichten als dit
toestel bediend wordt.
Voordat het display opnieuw uitgeschakeld wordt, zal “Display Off”
enkele seconden weergegeven worden.
U kunt de pieptoon in-/uitschakelen.
≥ De fabrieksinstelling is “
On
”.
1 Druk op [NWP].
2 Druk op [HOME].
3 Druk herhaaldelijk op [3, 4] om “SETUP” te
kiezen en druk vervolgens op [OK].
4 Druk herhaaldelijk op [3, 4] om “Beep” te
kiezen en druk vervolgens op [OK].
5 Druk op [3, 4] om “On”/“Off” te kiezen en
druk vervolgens op [OK].
Als u de speciale app “Technics Music App” (gratis) op uw
tablet/smartphone installeert, kunt u dit toestel en de
SU-C700 bedienen met gebruik van een grote
verscheidenheid aan functies.
Bezoek voor details:
www.technics.com/support/
DMP
Verbind dit toestel met een netwerk
en speel de muziek via het netwerk
af. (> 13)
Internet Radio
Speelt Internetradio af (vTuner).
(> 14)
USB
Speelt muziek af die opgeslagen is
op een USB-apparaat of een
iPhone/iPad/iPod. (> 17, 18, 19)
PC
Speelt muziek af die opgeslagen is
op een PC, enz. (> 20)
Bluetooth
Verbind dit toestel met een
Bluetooth
®
-apparaat en speel de
daarop opgeslagen muziek af.
(> 21, 22)
FM FM (> 23)
DAB/DAB+ DAB/DAB+ (> 24)
SETUP (> 11, 12, 25, 26, 27, 28)
ラヰヮユ
リㄏㄕㄆㄓㄏㄆㄕチンㄅㄊㄐ
ヒバベ
ュヮ
ヱ
Het volume regelen
Helderheid van het display
Instelling werkgeluid
Handelingen met gebruik van
de speciale app “Technics
Music App”
(147)
ST-C700DE-TQBM0007.book 11 ページ 2016年10月26日 水曜日 午後1時17分

12
Netwerkinstellingen
U kunt muziek van een iOS-apparaat (iPhone/iPad/iPod),
een Android™-apparaat of een PC (Mac/Windows) naar dit
toestel streamen met gebruik van het kenmerk AirPlay of
DLNA. (> 13, 18)
Om deze kenmerken te gebruiken, moet dit toestel gebruik
maken van hetzelfde netwerk als het apparaat dat
compatibel is met AirPlay of met DLNA.
Doorgaans zal de aansluiting van een LAN-kabel de
instelling al voltooien.
A: LAN-kabel (niet bijgeleverd)
1 Haal de stekker van het netsnoer uit het
stopcontact.
2 Verbind dit toestel met een breedband
router, enz., met gebruik van een LAN-kabel.
3 Sluit het netsnoer op dit toestel aan en
beweeg de power-schakelhendel omhoog
naar de stand [Í/I]. (> 10)
≥Wanneer de verbinding tot stand is gebracht, wordt
“ ” weergegeven.
≥ Als “Firmware update is available” verschijnt nadat de
netwerkverbinding ingesteld werd, dan is de firmware voor dit
toestel beschikbaar.
– Zie “Firmware update is available” (> 31) voor details over
updates.
– Meer informatie over updates, vindt u op de volgende website.
www.technics.com/support/firmware/
U kunt de naam van dit toestel in het netwerkveranderen
(Friendly Name), en een specifiek IP-adres, subnet mask,
default gateway, primaire DNS, enz., gebruiken.
≥ Speel geen muziek af terwijl u deze instellingen verandert.
1 Druk op [NWP].
2 Druk op [HOME].
3 Druk herhaaldelijk op [3, 4] om “SETUP” te kiezen en
druk vervolgens op [OK].
4 Druk herhaaldelijk op [3, 4] om “Network” te kiezen en
druk vervolgens op [OK].
5 Selecteer de details en voer ze in.
6 Druk op [OK] om de instellingen toe te passen.
7
Druk herhaaldelijk op [RETURN] om de instellingen te verlaten.
8
Druk op [NWP
Í
] om het toestel op de stand-by-modus te zetten.
≥ Wacht tot “Please Wait” verdwijnt.
9
Voer de “Permanent bedrade LAN-verbinding” uit. (
>
links)
≥ Gebruik rechte LAN-kabels van categorie 7 of hoger (STP) als u
een aansluiting op randapparatuur tot stand brengt.
≥ Als een kabel anders dan een LAN-kabel in de LAN-poort
gestoken wordt, kan het toestel beschadigd raken.
≥ Als u de netwerkinstellingen verandert onmiddellijk nadat u dit
toestel ingeschakeld heeft, kan het even duren voordat het
instellingenscherm van het netwerk weergegeven wordt.
∫ De naam van dit toestel op het netwerk
“Friendly Name”
1 Druk op [NWP].
2 Druk op [HOME].
3 Druk herhaaldelijk op [3, 4] om “SETUP” te kiezen en
druk vervolgens op [OK].
4 Druk herhaaldelijk op [3, 4] om “Network” te kiezen en
druk vervolgens op [OK].
5 Druk herhaaldelijk op [3, 4] om “Friendly Name” te
kiezen en druk vervolgens op [OK].
≥ The current name of this unit is displayed. Press [OK] to edit.
6
Druk op [
3
,
4
,
2
,
1
] om de Friendly Name in te voeren.
≥ Alleen ASCII-tekens kunnen worden gebruikt.
≥
“A” kan worden toegevoegd wanneer u op de [
1
] drukt op het
moment dat de laatste letter van de Friendly Name is geselecteerd.
≥ Druk op [CLEAR] om een letter te wissen.
≥ Druk op [S10] om een letter “A” in te voegen.
≥ Standaardnaam is “Technics ST-C700D _ _ _ _ _ _”.
“ _ ” duidt op een cijfer dat voor elke set uniek is.
7 Druk op [OK] om de instellingen toe te passen.
8
Druk herhaaldelijk op [RETURN] om de instellingen te verlaten.
∫
Om het MAC-adres van dit toestel te controleren
1 Druk op [NWP].
2 Druk op [HOME].
3 Druk herhaaldelijk op [3, 4] om “SETUP” te kiezen en
druk vervolgens op [OK].
4 Druk herhaaldelijk op [3, 4] om “Network” te kiezen en
druk vervolgens op [OK].
5
Druk herhaaldelijk op [
3
,
4
] om “MAC Address” te selecteren.
≥ Het MAC-adres van dit toestel wordt weergegeven.
Permanent bedrade LAN-verbinding
Breedband router, enz.
Dit toestel
(achterkant)
PC, enz.
Uitvoeren van netwerk
gerelateerde instellingen
(148)
ST-C700DE-TQBM0007.book 12 ページ 2016年10月26日 水曜日 午後1時17分

13
Nederlands
Afspelen van muziekbestanden op de DLNA-
server
U kunt muziekbestanden delen, die bewaard worden in de mediaserver
met DLNA-certificatie (PC, smartphone, enz.), die op uw thuisnetwerk
aangesloten is, en met dit toestel naar de inhoud ervan luisteren.
≥
Raadpleeg “Bestands-formaat” (
>
35) voor het ondersteunde formaat
Voorbereidingen
≥Voltooi de netwerkinstellingen. (> 12)
≥Verbind het apparaat dat gebruikt moet worden met
hetzelfde netwerk als dit toestel.
≥Voeg de inhoud en de map toe aan de bibliotheken van de
Windows Media
®
-speler 11 of 12, of een smartphone, enz.
– Afspeellijst van Windows Media
®
-speler kan alleen de inhouden
afspelen die in de bibliotheken bewaard zijn.
– Om Windows Media
®
-speler voor streaming te gebruiken, moet
u dit van tevoren configureren.
U kunt op dit toestel muziek afspelen die op de DLNA-server
opgeslagen is (DMP—Digital Media Player) door de DLNA-
server met dit toestel te bedienen.
1 Druk op [NWP].
2 Druk herhaaldelijk op [N INPUT O] onder
[NWP] om “DMP” te selecteren.
≥
Het selectiescherm van de server zal weergegeven worden.
3
Druk op [
3
,
4
] om een DLNA-server in het
netwerk te selecteren en druk vervolgens op [OK].
≥Het selectiescherm van de map/inhoud zal
weergegeven worden.
≥Mappen/inhoud kunnen in een volgorde afgespeeld
worden die anders is dan de volgorde op de server,
afhankelijk van de specificaties daarvan.
4 Druk op [3, 4], selecteer een item en druk
op [OK].
≥Als er geen andere items zijn, herhaal dan deze stap.
Handelingen met de afstandsbediening
≥ De verbonden server en zijn inhoud worden mogelijk niet correct
weergegeven naargelang de conditie ervan. (bv. niet lang na het
toevoegen van inhoud op de server, enz.)
Probeer het later opnieuw. Meer informatie vindt u in de
gebruiksaanwijzing van het apparaat.
∫ Afspelen willekeurig herhalen
Druk op [RND].
Iedere keer dat u op de knop drukt:
∫ Afspelen herhalen
Druk op [`].
Iedere keer dat u op de knop drukt:
Door een apparaat te bedienen dat compatibel is met DMC
(Digital Media Controller) kunt u op dit toestel muziek
afspelen die opgeslagen is op de DLNA-server (DMR—
Digital Media Renderer).
1 Beweeg de power-schakelhendel van dit
toestel omhoog naar de stand [Í/I].
2 Bedien het DMC-compatibele apparaat en
stel het in verbinding met dit toestel.
≥De naam van dit toestel zal weergegeven worden als
“Technics ST-C700D _ _ _ _ _ _”*
1, 2
.
≥Raadpleeg voor details over het gebruik van
DMC-compatibele apparatuur de gebruiksaanwijzing
van de apparatuur of van de software.
≥
Wanneer u de DMC bedient, zal het afspelen van andere
audiobronnen stoppen en zal de DLNA-uitgang de prioriteit hebben.
≥ Al naargelang de inhoud en de aangesloten apparatuur kan het
zijn dat bedienen of afspelen niet mogelijk is.
≥
Dit toestel garandeert niet dat alle DMC applicaties kunnen worden
aangesloten. Gebruik de speciale app “Technics Music App”.
*1 “ _ ” duidt op een cijfer dat voor iedere reeks uniek is.
*2 De apparaatnaam kan veranderd worden bij “De naam van dit
toestel op het netwerk “Friendly Name””. (> 12)
Afspelen van een inhoud die op
de DLNA-server opgeslagen is,
met bediening vanaf dit toestel
Stoppen Druk op [∫].
Pauzeren
Druk op [1/;].
≥
Druk nog een keer om het afspelen te hervatten.
Springen
Druk op [:] of [9] om naar een
track te springen.
Zoeken
Tijdens afspelen of pauzeren, druk op
[6] of [5] en houdt deze ingedrukt.
≥
Op het toestel: houd [
:
] of [
9
] ingedrukt.
≥ Het kan zijn dat deze bediening voor
sommige formaten niet beschikbaar is.
On
Alle nummers in een map worden
willekeurig herhaald.
≥ “RND `” wordt weergegeven.
≥ Tijdens willekeurige weergave kunt u niet
teruggaan naar het vorige nummer.
Off
Schakelt de willekeurige herhaalmodus
uit.
1-Track
Speelt alleen de geselecteerde track af.
≥ “1 `” wordt weergegeven.
All
Alle nummers in een map worden herhaald.
≥ “`” wordt weergegeven.
Off Schakelt de herhaalmodus uit.
Afspelen van een inhoud die op
de DLNA-server opgeslagen is,
met bediening vanaf een DMC
(149)
ST-C700DE-TQBM0007.book 13 ページ 2016年10月26日 水曜日 午後1時17分

14
Internet Radio afspelen (vTuner)
Internet radio is een audio omroepdienst die beschikbaar is
via internet. Met vTuner, een online directory-dienst, kunt u
naar vele verschillende internetradiozenders van over de
hele wereld luisteren.
Voorbereiding
≥Voltooi de netwerkinstellingen. (> 12)
– Zorg ervoor dat het netwerk verbinding met het internet maakt.
1 Druk op [NWP].
2 Druk herhaaldelijk op [N INPUT O] onder
[NWP] om “Internet Radio” te selecteren.
≥Wanneer “Internet Radio” is geselecteerd als de bron,
probeert dit toestel automatisch verbinding te maken
met de laatst geselecteerde internetradiozender.
3 Druk op [3, 4] om een zender te selecteren
en druk vervolgens op [OK].
≥De bufferstatus wordt aangegeven als %. ( “” staat
voor een nummer.)
≥Herhaal deze stap om meer selecties te maken op
basis van het genre, de regio enz.
≥Druk op [RETURN] om terug te keren naar het vorige
scherm.
≥De Internet Radio zenders, genre, regio, enz. op dit
toestel worden bewerkt en beheerd door vTuner.
≥De podcasts op de lijst van de vTuner kunnen
eveneens worden afgespeeld.
≥De zender die niet uitzendt, kan niet worden
afgespeeld. (Deze wordt overgeslagen of er wordt
teruggekeerd naar de lijst.)
≥ De Internet Radio-service kan worden onderbroken of kan op een
andere manier onbeschikbaar zijn zonder kennisgeving.
≥ Internet Radio wordt mogelijk niet goed afgespeeld, afhankelijk
van de toestand van het netwerk.
Handelingen met de afstandsbediening
Stoppen Druk op [∫].
Pauzeren
Druk op [1/;].
≥ Druk nog een keer om het afspelen te
hervatten. (Tijdens het afspelen van de
podcasts)
Springen
Druk op [:] of [9] om naar een
zender te springen.
Beschikbare
informatie
bekijken
Druk op [INFO].
(150)
ST-C700DE-TQBM0007.book 14 ページ 2016年10月26日 水曜日 午後1時17分

15
Nederlands
1 Druk op [NWP].
2
Druk op [
3
,
4
] om een zender te selecteren om
deze toe te voegen en druk vervolgens op [OK].
3 Druk op [MENU].
4
Druk herhaaldelijk op [
3
,
4
] om “Add Favourites”
te selecteren en druk vervolgens op [OK].
≥“Added” wordt weergegeven na het registreren.
≥U kunt tot 50 zenders registreren met dit toestel. Als een
51e zender wordt toegevoegd, verschijnt “Favourites Full”.
Verwijder de zenders uit de favorietenlijst. (> beneden)
≥U kunt de reeds geregistreerde zender niet toevoegen.
(“Already Exists” wordt weergegeven.)
1 Druk op [NWP].
2 Druk op [MENU].
3
Druk herhaaldelijk op [
3
,
4
] om “Call Favourites”
te selecteren en druk vervolgens op [OK].
4
Druk op [
3
,
4
] om de zender te selecteren die u
wilt oproepen en druk vervolgens op [OK].
≥“ ” wordt weergegeven.
≥Als er geen zender is geregistreerd in de favorietenlijst,
wordt “Empty” weergegeven. Voeg een zender toe aan de
lijst. (> hierboven)
1 Druk op [NWP].
2 Druk op [MENU].
3
Druk herhaaldelijk op [
3
,
4
] om “Delete Favourites”
te selecteren en druk vervolgens op [OK].
4 Druk op [3, 4] om een zender die u uit de
favorietenlijst wilt verwijderen, te selecteren.
5 Druk op [3, 4] om “Yes” te kiezen en druk
vervolgens op [OK].
≥“Deleted” wordt weergegeven na het verwijderen.
≥Als er geen zender is geregistreerd in de favorietenlijst,
wordt “Empty” weergegeven.
U kunt dit toestel bedienen en uw favoriete lijst bewerken
met de vTuner-functie door de speciale app “Technics Music
App” (kosteloos) op uw tablet/smartphone te installeren.
Download de app van onderstaande website en installeer
deze.
www.technics.com/support/
Voorbereidingen
≥Controleer het MAC-adres van dit toestel. (> 12)
1 Druk op [NWP].
2 Druk herhaaldelijk op [N INPUT O] onder
[NWP] om “Internet Radio” te selecteren.
3 Gebruik uw pc om naar de vTunerwebsite te
gaan.
www.technics.com/radio/
≥Op de website kan u de taal selecteren.
4 Volg de instructies op het scherm en geef de
noodzakelijke informatie voor registratie in.
5 Zoek op categorie (genre, regio, taal enz.) of
bewerk de lijst.
∫ Afspelen van de zenders die door uw pc
zijn weergegeven
U kunt de zenders die door uw pc zijn weergegeven,
afzonderlijk afspelen vanaf de favorietenlijst van dit toestel.
1 Druk op [NWP].
2 Druk herhaaldelijk op [N INPUT O] onder
[NWP] om “Internet Radio” te selecteren.
3 Druk herhaaldelijk op [3, 4] om
“technics.com/radio/” te selecteren en druk
vervolgens op [OK].
≥Verwijder persoonlijke informatie van de website, vooraleer
dit toestel wordt afgevoerd of doorgegeven.
Een zender toevoegen aan de
favorietenlijst
“Add Favourites”
De favorietenlijst oproepen
“Call Favourites”
De favoriete zender verwijderen
“Delete Favourites”
Bediening met behulp van de
speciale app
“Technics Music App”
De lijst met Internet Radio-
zenders maken met de pc
(151)
ST-C700DE-TQBM0007.book 15 ページ 2016年10月26日 水曜日 午後1時17分

16
Met behulp van Spotify
Dit toestel is compatibel met de online muziekservice
(Spotify).
Voorbereiding
≥U hebt Spotify Premium nodig. Meer informatie vindt u op
de volgende website.
www.spotify.com/connect/
≥Voltooi de netwerkinstellingen. (> 12)
≥Zorg ervoor dat het netwerk verbinding met het internet
maakt.
≥Verbind het apparaat dat gebruikt moet worden met
hetzelfde netwerk als dit toestel.
1 Start de Spotify app op uw toestel, en
selecteer een af te spelen nummer.
2 Selecteer de cover art afbeelding voor het
liedje op het afspeelscherm.
3 Selecteer het pictogram “ ”.
4 Selecteer dit toestel als uitvoerluidsprekers.
≥ De naam van dit toestel zal weergegeven worden als “Technics
ST-C700D _ _ _ _ _ _”*
1, 2
.
≥ Registratie/abonnement vereist.
≥ Er kunnen kosten worden aangerekend.
≥ Services, pictogrammen en specificaties zijn onderhevig aan
wijzigingen.
*1 “ _ ” duidt op een cijfer dat voor iedere reeks uniek is.
*2 De apparaatnaam kan veranderd worden bij “De naam van dit
toestel op het netwerk “Friendly Name””. (> 12)
(152)
ST-C700DE-TQBM0007.book 16 ページ 2016年10月26日 水曜日 午後1時17分

17
Nederlands
Gebruik van iPhone/iPad/iPod
Verbind uw iPhone/iPad/iPod en u kunt muziek afspelen die
op een iPhone/iPad/iPod opgeslagen is, of de
iPhone/iPad/iPod opladen.
∫ Compatibele iPhone/iPad/iPod
(met ingang van augustus 2016)
≥ De compatibiliteit is afhankelijk van de softwareversie. Maak een
update van uw iPhone/iPad/iPod naar de laatste software voordat
u deze met dit toestel gebruikt.
≥ Houd u er rekening mee dat Panasonic zich niet aansprakelijk stelt
voor het verlies van gegevens en/of informatie.
≥ Sluit de volgende modellen niet op de poort aan:
– iPod classic, iPod [4e (kleurendisplay) en 5e (video) generatie],
iPod nano (1e generatie)
Er kan onverwacht gedrag optreden.
≥ De resultaten van de bediening kunnen variëren, afhankelijk van
de modellen iPhone/iPad/iPod of de iOS-versie.
Als u een iPhone/iPad/iPod aansluit, gebruik dan de
daarvoor bestemde USB-kabel (niet bijgeleverd).
1 Verbind de iPhone/iPad/iPod met het
toestel.
2 Druk op [NWP].
3 Druk herhaaldelijk op [N INPUT O] onder
[NWP] om “USB” te selecteren.
4 Afspelen starten.
Handelingen met de afstandsbediening
≥ Het zou nodig kunnen zijn het album, de artiest, enz. op de
iPhone/iPad/iPod te moeten selecteren.
≥ Afhankelijk van de modellen iPhone/iPad/iPod kan het zijn dat
bediening met de afstandsbediening niet mogelijk is.
Als het toestel ingeschakeld is, gaat het opladen van start als
een iPhone/iPad/iPod met dit toestel verbonden wordt.
≥ Opladen is niet mogelijk als dit toestel uitgeschakeld is.
≥ Controleer of het toestel ingeschakeld is wanneer u het opladen
start.
– Als een iPhone/iPad/iPod met een lege batterij opgeladen wordt,
schakel dit toestel dan niet op de stand-by-modus zolang de
iPhone/iPad/iPod niet werkzaam is.
≥ Controleer de iPhone/iPad/iPod om te kijken of de batterij volledig
geladen is. Is hij eenmaal volledig geladen, verwijder dan de
iPhone/iPad/iPod.
≥ Het laden stopt wanneer de batterij volledig geladen is. De batterij
zal vanzelf leegraken.
iPhone SE / iPhone 6s Plus / iPhone 6s /
iPhone 6 Plus / iPhone 6 / iPhone 5s / iPhone 5c /
iPhone 5 / iPhone 4s
iPad Pro
(9,7 inch)
/ iPad Pro
(12,9 inch)
/
iPad Air 2 / iPad Air / iPad
(3e en 4e generatie)
/ iPad 2 /
iPad mini 4 / iPad mini 3 / iPad mini 2 / iPad mini
iPod touch (5e en 6e generatie)
iPod nano (7e generatie)
Een iPhone/iPad/iPod
verbinden
USB-kabel
(niet bijgeleverd)
bijv.
Dit toestel
(voorkant)
iPhone, enz.
Luisteren naar muziek die op
een iPhone/iPad/iPod
opgeslagen is
Stoppen Druk op [∫].
Pauzeren
Druk op [1/;].
≥ Druk nog een keer om het afspelen te
hervatten.
Springen
Druk op [:] of [9] om naar een
track te springen.
Zoeken
Tijdens afspelen of pauzeren, druk op
[6] of [5] en houdt deze ingedrukt.
≥ Op het toestel: houd [:] of [9]
ingedrukt.
Opladen van een
iPhone/iPad/iPod
(153)
ST-C700DE-TQBM0007.book 17 ページ 2016年10月26日 水曜日 午後1時17分

18
Gebruik van AirPlay
AirPlay werkt met iPhone, iPad en iPod touch met iOS 4.3.3
of nieuwer, Mac met OS X Mountain Lion of nieuwer en PC
met iTunes 10.2.2 of nieuwer.
Voorbereidingen
≥Voltooi de netwerkinstellingen. (> 12)
≥Verbind het iOS-apparaat of de PC met hetzelfde netwerk
als dit toestel.
1 [iOS_d e vi c e]
:
Start de “Music” (of iPod) app.
[PC]
:
Start “iTunes”.
2
Selecteer “Technics ST-C700D _ _ _ _ _ _”*
1, 2
vanuit de AirPlay -icoon.
≥Controleer het volume voordat u het afspelen start.
(als AirPlay voor het eerst gebruikt wordt, kan het
volume op de maximuminstelling staan.)
3 Afspelen starten.
≥
Het afspelen zal met een korte vertraging van start gaan.
Handelingen met de afstandsbediening
≥ Het afspelen van andere audiobronnen zal stoppen en het AirPlay
afspelen zal voorrang krijgen.
≥ Met sommige iOS en iTunes-uitvoeringen is het misschien niet
mogelijk om het AirPlay afspelen te herstarten als de
keuzeschakelaar veranderd wordt of als het toestel wordt
uitgeschakeld, tijdens het afspelen van AirPlay.
Selecteer in dit geval een ander apparaat in de AirPlay-icoon van
de Muziek-app of iTunes en selecteer dit toestel vervolgens
opnieuw als de uitgangsluidsprekers.
≥ AirPlay zal niet werken als video's op iTunes afgespeeld worden.
*1 “ _ ” duidt op een cijfer dat voor iedere reeks uniek is.
*2 De apparaatnaam kan veranderd worden bij “De naam van dit
toestel op het netwerk “Friendly Name””. (> 12)
Gebruik van USB-
apparatuur
U kunt muziek afspelen die op een USB-apparaat opgeslagen is.
≥ Dit apparaat garandeert niet dat alle USB-apparaten aangesloten
kunnen worden.
≥ FAT16 en FAT32 bestandssystemen worden ondersteund.
≥ Dit toestel ondersteunt USB 2.0 hoge snelheid.
≥ Het kan zijn dat USB-apparatuur niet door dit toestel herkend
wordt als deze apparatuur aangesloten is met gebruik van:
– een USB-hub
– een USB-verlengsnoer
≥ Het is niet mogelijk USB-kaartlezers/schrijvers te gebruiken.
≥ Dit toestel kan geen muziek op een USB-apparaat opnemen.
≥
Raadpleeg “Bestands-formaat” (
>
35) voor het ondersteunde formaat
∫ Map- en bestandsstructuur
Het toestel speelt alleen de muziekbestanden in de
geselecteerde map af. Selecteer de map die de nummers
bevat die u wilt afspelen.
≥Er wordt niets afgespeeld als u een map zonder
muziekbestanden selecteert, zoals map D in onderstaand
schema. (“Empty” wordt weergegeven.)
1 Verbind het USB-apparaat met het toestel.
Naar muziek luisteren met
AirPlay
Stoppen Druk op [∫].
Pauzeren
Druk op [1/;].
≥ Druk nog een keer om het afspelen te
hervatten.
Springen
Druk op [:] of [9] om naar een
track te springen.
Luisteren naar muziek die op
een USB-apparaat
opgeslagen is
Muziek 1
Muziek 2
Muziek 4
Muziek 5
Muziek 3
bijv.
Map
Muziekbestand
bijv.
Dit toestel
(voorkant)
USB-apparaat
(154)
ST-C700DE-TQBM0007.book 18 ページ 2016年10月26日 水曜日 午後1時17分

19
Nederlands
2 Druk op [NWP].
3 Druk herhaaldelijk op [N INPUT O] onder
[NWP] om “USB” te selecteren.
4 Druk op [3, 4], selecteer een item en druk
op [OK].
≥Als er geen andere items zijn, herhaal dan deze stap.
Handelingen met de afstandsbediening
∫ Afspelen willekeurig herhalen
Druk op [RND].
Iedere keer dat u op de knop drukt:
∫ Afspelen herhalen
Druk op [`].
Iedere keer dat u op de knop drukt:
≥ U kunt herhaaldelijk afspelen gebruiken in combinatie met
programma afspelen.
Met deze functie kunt u maximaal 24 muzieknummers
programmeren.
Voorbereidingen
≥Het is niet mogelijk nummers te programmeren door
mappen te verplaatsen. Verplaats alle nummers die u wilt
programmeren van tevoren naar een aparte map.
1
Selecteer de map met het muziekbestand waarop
u programma afspelen wenst in te stellen.
2 Druk in de stand Stop op [PGM].
≥“Program Mode” zal weergegeven worden.
3 Druk op [OK] om het programmeerscherm
weer te geven.
4 Druk op [3, 4] om het gewenste nummer te
selecteren.
5 Druk op [OK].
≥Herhaal stappen 3 tot 4 als u andere tracks wilt
programmeren.
6
Druk op [
1
/
;
] als u het afspelen wilt starten.
≥Druk, om naar het scherm van de “Program Mode”
terug te keren, op [∫].
Handelingen met de afstandsbediening
≥ De geprogrammeerde inhoud zal gehandhaafd blijven zolang de
ingangsbron op “USB” staat.
≥ Het programmageheugen zal gewist worden:
– Als het USB-apparaat wordt afgesloten.
– Als het toestel op de stand-by of off-modus gezet wordt.
≥ U kunt programma afspelen gebruiken in combinatie met
herhaaldelijk afspelen.
Stoppen Druk op [∫].
Pauzeren
Druk op [1/;].
≥
Druk nog een keer om het afspelen te hervatten.
Springen
Druk op [:] of [9] om naar een
track te springen.
Zoeken
Tijdens afspelen of pauzeren, druk op
[6] of [5] en houdt deze ingedrukt.
≥ Op het toestel: houd [:] of [9]
ingedrukt.
≥ Het kan zijn dat deze bediening voor
sommige formaten niet beschikbaar is.
On
Alle nummers in een map worden
willekeurig herhaald.
≥ “RND `” wordt weergegeven.
≥ Tijdens willekeurige weergave kunt u niet
teruggaan naar het vorige nummer.
Off
Schakelt de willekeurige herhaalmodus uit.
1-Track
Speelt alleen de geselecteerde track af.
≥ “1 `” wordt weergegeven.
All
Alle nummers in een map worden herhaald.
≥ “`” wordt weergegeven.
Off Schakelt de herhaalmodus uit.
Programma afspelen
Stoppen
Druk op [∫].
≥
De geprogrammeerd inhoud wordt gehandhaafd.
Controleer de
geprogramme
erde volgorde
Druk op [2, 1] in de stand Stop.
≥ Druk, om naar het scherm van de
“Program Mode” terug te keren, op [OK].
Voeg tracks toe
Voer stappen 3 tot 4 in de stand Stop uit.
De laatste
track wissen
Druk op [CLEAR] in de stand Stop.
≥ Het is niet mogelijk het gewenste
geprogrammeerde nummer te selecteren
en te wissen.
Programmafunctie
annuleren
1 Druk op [PGM] in de stand Stop.
≥ “Clear Program List?” wordt getoond.
2 Druk op [3, 4] om “Yes” te kiezen
en druk vervolgens op [OK].
≥
Het programmageheugen zal gewist worden.
(155)
ST-C700DE-TQBM0007.book 19 ページ 2016年10月26日 水曜日 午後1時17分

20
Gebruik van een PC, enz.
U kunt met een USB-kabel de digitale audio-ingang [PC] met
een PC, enz., verbinden en met dit toestel muziek op de PC,
enz., afspelen.
≥ Raadpleeg “Bestands-formaat” (> 35) voor het ondersteunde
formaat
(per december 2015)
1 Haal de stekker van het netsnoer uit het
stopcontact.
2 Verbind dit toestel met een PC, enz.
3 Sluit het netsnoer op dit toestel aan en
beweeg de power-schakelhendel omhoog
naar de stand [Í/I]. (> 10)
4 Druk herhaaldelijk op [N INPUT O] onder
[NWP] om “PC” te selecteren.
5 Bedien de PC, enz., voor het afspelen.
Verbinding maken met een PC
Volg onderstaande stappen alvorens verbinding met een
PC te maken.
≥ Raadpleeg het volgende voor de aanbevolen versies
besturingssystemen voor uw PC.
– Windows 7, Windows 8, Windows 8.1, Windows 10
– OS X 10.7, 10.8, 10.9, 10.10, 10.11
1 Download de speciale driver en installeer deze op de
PC. (Alleen voor Windows besturingssystemen)
Download de driver van onderstaande website en installeer
deze.
www.technics.com/support/
2 Download en installeer de speciale app “Technics
Audio Player” (gratis) op uw PC. (Gemeenschappelijk
voor zowel Windows besturingssysteem als OS X)
Download de app van onderstaande website en installeer
deze.
www.technics.com/support/
Luisteren naar audio uit een
PC, enz.
USB
USB 2.0-kabel
(niet bijgeleverd)
Dit toestel
(achterkant)
bijv.
PC, enz.
Type A
Type B
(156)
ST-C700DE-TQBM0007.book 20 ページ 2016年10月26日 水曜日 午後1時17分

21
Nederlands
Gebruik van Bluetooth
®
U kunt via dit toestel draadloos naar het geluid luisteren dat uit het Bluetooth
®
-audioapparaat komt.
≥ Raadpleeg de handleiding van het Bluetooth
®
apparaat voor.
≥ Als u van plan bent om een NFC (Near Field Communication)-compatibel Bluetooth
®
-apparaat te gebruiken, ga dan verder met “Verbinden via
NFC”.
Voorbereidingen
≥Schakel Bluetooth
®
van het apparaat in en zet het apparaat
vlak bij dit toestel.
1 Druk op [NWP].
2 Druk herhaaldelijk op [N INPUT O] onder
[NWP] om “Bluetooth” te selecteren.
3 Druk op [MENU].
4 Druk herhaaldelijk op [3, 4] om “Pairing” te
kiezen en druk vervolgens op [OK].
5 Druk op [3, 4] om “Yes” te kiezen en druk
vervolgens op [OK].
≥“Pairing” wordt op het display aangeduid.
6 Selecteer “ST-C700D” in het Bluetooth
®
-
menu van het apparaat.
≥De naam van het verbonden apparaat wordt op het
display weergegeven.
≥ Als om het password gevraagd wordt, voer dan “0000” in.
≥ U kunt tot 8 apparaten voor dit toestel registreren. Als een 9e
apparaat gepaird wordt, zal het apparaat dat het langst ongebruikt
gebleven is vervangen worden.
Alleen voor Bluetooth
®
-apparaten die compatibel zijn
met NFC (Android™-apparaten met versie 4.1 of
nieuwer)
Door een NFC (Near Field Communication)-compatibel
Bluetooth
®
-apparaat dit toestel te laten aanraken, kunt u een
volledige reeks stappen uitvoeren, van het registreren van
een Bluetooth
®
-apparaat tot het verbinden daarvan met dit
toestel.
Voorbereidingen
≥Schakel het NFC-kenmerk van het apparaat in.
1 Druk op [NWP].
2 Druk herhaaldelijk op [N INPUT O] onder
[NWP] om “Bluetooth” te selecteren.
3 Druk op [MENU].
4 Druk herhaaldelijk op [3, 4] om “NFC” te
kiezen en druk vervolgens op [OK].
5 Druk op [3, 4] om “Yes” te kiezen en druk
vervolgens op [OK].
6 Laat uw apparaat binnen 20 seconden de
NFC-aanraakzone van dit toestel aanraken
en aangeraakt houden. (> 7)
≥Beweeg het Bluetooth
®
-apparaat niet tot het een
bericht weergeeft of op een of andere manier reageert.
Heeft het Bluetooth
®
-apparaat eenmaal gereageerd,
plaats het dan op afstand van het dit toestel.
– Als de verbinding van het Bluetooth
®
-apparaat eenmaal
voltooid is, wordt de naam van het verbonden apparaat op
het display weergegeven.
– De locatie van de NFC-aanraakzone varieert, afhankelijk
van het apparaat. Als zelfs geen verbinding tot stand
gebracht kan worden nadat uw Bluetooth
®
-apparaat de
NFC-aanraakzone van dit toestel aangeraakt heeft,
verander dan de positie van het apparaat.
≥ Als u een andere NFC-compatibel Bluetooth
®
-apparaat verbindt,
zal het eerder verbonden apparaat automatisch afgesloten
worden.
≥ Als de verbinding tot stand gebracht is, kan het afspelen
automatisch van start gaan, afhankelijk van het type apparaat dat
gebruikt wordt.
≥ Het kan zijn dat verbinden via NFC niet naar behoren werkt,
afhankelijk van het type apparaat dat gebruikt wordt.
≥ Maak geen NFC-verbinding op een andere wijze dan in deze
gebruiksaanwijzing beschreven wordt. Doet u dat wel dan kan een
slechte werking het gevolg zijn.
Verbinden via het Bluetooth
®
-
menu
Verbinden via NFC
(157)
ST-C700DE-TQBM0007.book 21 ページ 2016年10月26日 水曜日 午後1時17分

22
1 Druk op [NWP].
2 Druk herhaaldelijk op [N INPUT O] onder
[NWP] om “Bluetooth” te selecteren.
≥“Ready” wordt op het display aangeduid.
≥Als u op [1/;] drukt, zal dit toestel proberen met het
laatst verbonden Bluetooth
®
-apparaat verbinding te
maken.
– “Linking” wordt op het display aangeduid.
3 Selecteer “ST-C700D” in het Bluetooth
®
-
menu van het apparaat.
≥De naam van het verbonden apparaat wordt op het
display weergegeven.
4 Start het afspelen op het Bluetooth
®
-
apparaat.
Handelingen met de afstandsbediening
≥ Dit toestel kan met één apparaat per keer verbonden worden.
≥ Om een Bluetooth
®
-apparaat met de afstandsbediening van dit
toestel te bedienen, moet het Bluetooth
®
-apparaat AVRCP (Audio
Video Remote Control Profile) ondersteunen.
Afhankelijk van de status van het apparaat kan het zijn dat
sommige bedieningen niet werken.
≥ Wanneer u video’s bekijkt met deze functie, zijn de video- en
audio-uitvoer mogelijk niet gesynchroniseerd.
U kunt de verzendmodus veranderen om de prioriteit te
geven aan de kwaliteit van de verzending dan wel aan de
kwaliteit van het geluid.
1 Druk op [NWP].
2 Druk herhaaldelijk op [N INPUT O] onder
[NWP] om “Bluetooth” te selecteren.
≥Als een Bluetooth
®
-apparaat reeds aangesloten is,
maak de verbinding dan ongedaan.
3 Druk op [MENU].
4 Druk herhaaldelijk op [3, 4] om
“Link Mode” te kiezen en druk vervolgens op
[OK].
5 Druk op [3, 4] om de modus te selecteren
en druk vervolgens op [OK].
≥ Selecteer “Mode 1” als het geluid wordt onderbroken.
1 Druk op [NWP].
2 Druk op [MENU].
3 Druk herhaaldelijk op [3, 4] om
“Disconnect?” te kiezen en druk vervolgens
op [OK].
4 Druk op [3, 4] om “Yes” te kiezen en druk
vervolgens op [OK].
≥ De verbinding met het Bluetooth
®
-apparaat zal ongedaan gemaakt
worden als een andere audiobron geselecteerd wordt.
Luisteren naar muziek die
opgeslagen is op een
Bluetooth
®
-apparaat
Stoppen Druk op [∫].
Pauzeren
Druk op [1/;].
≥ Druk nog een keer om het afspelen te
hervatten.
Springen
Druk op [:] of [9] om naar een
track te springen.
Zoeken
Tijdens afspelen of pauzeren, druk op
[6] of [5] en houdt deze ingedrukt.
≥ Op het toestel: houd [:] of [9]
ingedrukt.
Bluetooth
®
-zendmodus
Mode 1 Nadruk op de connectiviteit
Mode 2
Nadruk op de geluidskwaliteit
(fabrieksinstelling)
Afsluiten van een Bluetooth
®
-
apparaat
(158)
ST-C700DE-TQBM0007.book 22 ページ 2016年10月26日 水曜日 午後1時17分

23
Nederlands
Naar de FM-radio luisteren
U kunt tot 30 kanalen van te voren instellen.
Voorbereiding
≥Druk herhaaldelijk op [NWP] en vervolgens op
[N INPUT O] onder [NWP] om “FM” te selecteren.
1 Druk op [NWP].
2 Druk op [MENU].
3
Druk herhaaldelijk op [
3
,
4
] om “Auto
Preset” te kiezen en druk vervolgens op [OK].
4 Druk op [3, 4] om “Lowest” of “Current” te
kiezen en druk vervolgens op [OK].
Lowest:
Starten van automatisch presetten bij de laagste
frequentie (FM 87,50).
Current:
Starten van automatisch presetten bij de huidige
frequentie.
1 Druk op [NWP].
2 Stel het radiostation van uw keuze in door op
[6] of [5] te drukken.
≥Houd, als u automatisch wilt afstemmen, de knop
ingedrukt, totdat de frequentie snel verandert.
3 Druk op [PGM].
4 Kies een vooraf ingesteld nummer door op
de cijfertoetsen te drukken.
≥Voer de stappen 1 tot 3 opnieuw uit als u meer stations
vooraf wilt instellen.
≥
Er wordt over een eerder opgeslagen zender heen geschreven wanneer
een andere zender op hetzelfde preset-nummer opgeslagen wordt.
1 Druk op [NWP].
2 Kies het vooraf ingestelde station door op de
cijfertoetsen, [:] of [9] te drukken.
1 Druk op [NWP].
2 Druk op [MENU].
3 Druk herhaaldelijk op [3, 4] om “FM Mode”
te selecteren en druk vervolgens op [OK].
4 Kies “Mono” door op [3, 4] te drukken en
druk vervolgens op [OK].
≥“MONO” wordt weergegeven.
De instelling in het geheugen opslaan
Ga verder met stappen 2 en 3 van “Handmatige
afstemming en instelling van voorkeuzestations”.
≥ Selecteer “Stereo” in stap 4 om terug te keren naar stereo-
uitzendingen.
≥ “Mono” wordt gewist als de frequentie veranderd wordt.
Het apparaat kan de tekstgegevens weergeven die
verzonden worden door het radiogegevenssysteem (RDS)
dat beschikbaar is in bepaalde gebieden.
≥ RDS is alleen beschikbaar als stereo bij ontvangst werkzaam is.
≥ RDS-gegevens zullen soms niet verschijnen als de ontvangst
slecht is.
≥ De RDS-functie werkt niet als “Mono” geselecteerd is in “FM
Mode”. (> hierboven)
Automatische voorinstelling
Handmatige afstemming en
instelling van voorkeuzestations
Een voorkeuzestation kiezen
Verbeteren van de
geluidskwaliteit
RDS-uitzendingen
(159)
ST-C700DE-TQBM0007.book 23 ページ 2016年10月26日 水曜日 午後1時17分

24
Naar DAB/DAB+ luisteren
U kunt tot 20 kanalen van te voren instellen.
Voorbereiding
≥Zorg ervoor dat de DAB-antenne aangesloten is. (> 10)
≥Druk herhaaldelijk op [NWP] en vervolgens op
[N INPUT O] onder [NWP] om “DAB/DAB+” te selecteren.
– Als u voor het eerst “DAB/DAB+” selecteert, zal het systeem de
“DAB auto scan”-procedure starten.
1 Druk op [NWP].
2 Druk op [MENU].
3 Druk herhaaldelijk op [3, 4] om “Auto
Scan” te kiezen en druk vervolgens op [OK].
4 Druk op [3, 4] om “Yes” te kiezen en druk
vervolgens op [OK].
≥“Auto Scan” wordt getoond.
Om de beste positie van de antenne te vinden, moet
handmatig tunen gebruikt worden om het geselecteerde
DAB-frequentieblok te vinden.
1 Druk op [NWP].
2 Druk op [MENU].
3 Druk herhaaldelijk op [3, 4] om “Manual
Scan” te kiezen en druk vervolgens op [OK].
4 Druk op [3, 4] om een te scannen
frequentieblok te selecteren en druk
vervolgens op [OK].
1 Druk op [NWP].
2 Stel het radiostation van uw keuze in door op
[6] of [5] te drukken.
3 Druk op [PGM].
4 Druk op de numerieke knoppen om een
preset-nummer te selecteren.
≥Voer stappen 1 tot 3 opnieuw uit om meer zenders te
presetten.
≥
Er wordt over een eerder opgeslagen zender heen geschreven wanneer
een andere zender op hetzelfde preset-nummer opgeslagen wordt.
≥ U kunt geen zender met preset instellen als de zender niet
uitzendt of wanneer u een secundaire dienst geselecteerd heeft.
≥ Tijdens auto scan wordt een eerder geheugen met zenders leeg
gemaakt.
1 Druk op [NWP].
2
Druk op de numerieke knoppen [
:
] of [
9
] om
de met preset ingestelde zender te selecteren.
U kunt de informatie over de DAB-uitzending, het programmatype,
het ensemble-label, de frequentie en de tijd bekijken
1 Druk op [NWP].
2 Druk op [INFO] om de beschikbare
informatie te bekijken.
Sommige DAB/DAB+-zenders verstrekken naast de primaire
dienst een secundaire dienst. Als de zender waar u naar luistert
een secundaire dienst verstrekt, wordt “ ” weergegeven.
1 Druk op [NWP].
2 Druk op [MENU].
3
Druk herhaaldelijk op [
3
,
4
] om “Secondary”
te kiezen en druk vervolgens op [OK].
4 Druk op [3, 4] om de secundaire dienst te
selecteren en druk op [OK].
≥
De instelling zal opnieuw op de primaire dienst gezet worden als veranderingen
gemaakt worden (als de zender bijvoorbeeld veranderd wordt).
Tijdens het afstellen van de antenne kunt u de
ontvangstkwaliteit controleren.
1 Druk op [NWP].
2 Druk op [MENU].
3
Druk herhaaldelijk op [
3
,
4
] om “Signal
Quality” te kiezen en druk vervolgens op [OK].
4
Druk op
[
3
,
4
]
om de frequentie te selecteren.
DAB auto scan
Handmatige DAB-tuning
Presetten van het geheugen
Selecteren van een met
preset ingestelde zender
Bekijken van beschikbare informatie
Secundaire DAB
Kwaliteit DAB-signaal
Frequentieblok
Frequentie
Ontvangstkwaliteit
0 (slecht) tot 8 (uitstekend)
bijv.
(160)
ST-C700DE-TQBM0007.book 24 ページ 2016年10月26日 水曜日 午後1時17分

25
Nederlands
Geluidsinstelling
De volgende geluidseffecten kunnen toegevoegd worden aan de audio output.
Het re-masteren vergroot de weergaveband en verwerft een
hogere bitdiepte voor de weergave van een natuurlijk en
expansief geluid dat dicht bij de originele muziek staat.
≥ De fabrieksinstelling is “Off”.
1 Druk op [NWP].
2 Druk op [RE-MASTER] om “On”/“Off” te
selecteren.
Dit toestel kan ingangssignalen uitzenden zonder een
digitale signaalverwerking (DSP) uit te voeren. Hierdoor
wordt een betrouwbare hogekwaliteitsweergave van het
originele geluid mogelijk.
≥ De fabrieksinstelling is “Off”.
1 Druk op [NWP].
2
Druk op [DIRECT] om “On”/“Off” te selecteren.
U kunt een bovenlimiet op het bereik van de
uitgangssamplingfrequentie instellen. Houd er echter
rekening mee dat het bereik dat verwerkt kan worden
verschilt, afhankelijk van de versterker of de D/A-omzetter.
Raadpleeg voor details de gebruiksaanwijzing van het
verbonden apparaat.
≥ De fabrieksinstelling is “32kHz-192kHz”.
Voorbereidingen
≥Zet “Digital Output” op “On”.
1 Druk op [NWP].
2 Druk op [HOME].
3 Druk herhaaldelijk op [3, 4] om “SETUP” te
kiezen en druk vervolgens op [OK].
4 Druk herhaaldelijk op [3, 4] om
“D.Output fs” te kiezen en druk vervolgens
op [OK].
5 Druk op [3, 4], selecteer een item en druk
op [OK].
≥U kunt een sampling-frequentie van 96 kHz of 192 kHz
selecteren.
Door de audio-uitgang van ongebruikte aansluitingen uit te
schakelen, wordt ruis geminimaliseerd en is het mogelijk om
met een hogere audiokwaliteit af te spelen.
≥ De fabrieksinstelling is “
On
”.
1 Druk op [NWP].
2 Druk op [HOME].
3 Druk herhaaldelijk op [3, 4] om “SETUP” te
kiezen en druk vervolgens op [OK].
Om de digitale audio-uitgang uit te schakelen:
Druk herhaaldelijk op [3, 4] om “Digital Output” te
kiezen en druk vervolgens op [OK].
Om de analoge audio-uitgang uit te schakelen:
Druk herhaaldelijk op [3, 4] om “Analog Output” te
kiezen en druk vervolgens op [OK].
4 Druk op [3, 4] om “Off” te kiezen en druk
vervolgens op [OK].
≥Selecteer “On” om de uitgang weer in te schakelen.
≥ Afhankelijk van de muziekbron die u afspeelt, kan het zijn dat de
toegepaste instelling minder doeltreffend is.
≥ Afhankelijk van de muziekbron die u afspeelt, is het misschien niet
mogelijk de gewenste audiokwaliteit en geluidsveldeffect te
verkrijgen. Schakel deze functie in dergelijke gevallen uit.
≥ Noch de Re-master modus noch de Direct modus kunnen op “On”
gezet worden.
≥ Als “Digital Output” en “Analog Output” op “Off” gezet zijn, zal
geen geluid uitgegeven worden.
≥ Het kan even duren om audio uit te geven als u de audiokwaliteit
afgesteld heeft.
Naar een meer natuurlijk
klinkend geluid luisteren
(Re-master)
Direct modus
Instellen van de sampling-
frequentie
Audio-uitgang uitschakelen
(161)
ST-C700DE-TQBM0007.book 25 ページ 2016年10月26日 水曜日 午後1時17分

26
Overige
De sleep-timer kan het toestel na een ingestelde tijd op de
stand-by-modus schakelen.
1 Druk op [NWP].
2 Druk op [MENU].
3 Druk herhaaldelijk op [3, 4] om “SLEEP” te
kiezen en druk vervolgens op [OK].
4 Druk op [3, 4] om de tijd in te stellen (in
minuten) en druk vervolgens op [OK].
“30 minutes” ,-. “60 minutes” ,-. “90 minutes” ,-. “120 minutes”
^""""""""""""". “Off” !"""""""""""""J
Dit toestel is ontworpen om het eigen stroomverbruik te
reduceren en energie te besparen. Het toestel zal
automatisch op de stand-by-modus gezet worden als er
gedurende ongeveer 20 minuten geen geluid is en het niet
gebruikt wordt.
≥ De fabrieksinstelling is “On”.
Om deze functie te annuleren
1 Druk op [NWP].
2 Druk op [HOME].
3 Druk herhaaldelijk op [3, 4] om “SETUP” te
kiezen en druk vervolgens op [OK].
4 Druk herhaaldelijk op [3, 4] om
“AUTO OFF” te kiezen en druk vervolgens
op [OK].
5 Druk op [3, 4] om “Off” te kiezen en druk
vervolgens op [OK].
≥ De audio off-functie werkt zelfs als u dit toestel uit- en weer
inschakelt, tenzij u de functie uitschakelt.
≥ Als “DAB/DAB+” of “FM” de bron is, werkt deze functie niet.
Dit toestel wordt vanuit de stand-by-modus automatisch
ingeschakeld als het als luidspreker voor
Spotify/AirPlay/DLNA (DMR) geselecteerd wordt.
Houd er rekening mee dat nadat dit toestel geselecteerd is,
het in sommige gevallen ook nodig kan zijn het afspelen te
moeten starten om het in te schakelen.
≥ De fabrieksinstelling is “Auto”.
Om deze instelling te veranderen
1 Druk op [NWP].
2 Druk op [HOME].
3 Druk herhaaldelijk op [3, 4] om “SETUP” te
kiezen en druk vervolgens op [OK].
4 Druk herhaaldelijk op [3, 4] om
“Network Standby” te selecteren en druk
vervolgens op [OK].
5 Druk op [3, 4], selecteer een item en druk
op [OK].
≥ Als deze functie op “On” of “Auto” is ingesteld, stijgt het
stroomverbruik in stand-by-modus.
Slaaptimer
Auto off-functie
Standby van het netwerk
Auto
Schakelt de stand-by-functie van het
netwerk in wanneer de netwerkverbinding
beschikbaar is.
On
Schakelt altijd de stand-by-functie van het
netwerk in.
Off Schakelt de netwerk stand-by-functie uit.
(162)
ST-C700DE-TQBM0007.book 26 ページ 2016年10月26日 水曜日 午後1時17分

27
Nederlands
Af en toe zal Panasonic bijgewerkte firmware voor dit toestel
uitgeven, die kenmerken toevoegt of een verbetering vormt
van de manieren waarop een bestaand kenmerk werkt.
≥Raadpleeg de volgende website voor informatie over de
update (nieuwe of verbeterde kenmerken).
www.technics.com/support/firmware/
≥ Tijdens het update-proces kunnen geen andere handelingen
uitgevoerd worden.
≥ Als er geen updates beschikbaar zijn, wordt “Firmware is Up To
Date” weergegeven. (U hoeft geen updates uit te voeren.)
≥ Als u de firmware bijwerkt, kan dit de instellingen resetten.
∫ Updaten via internet
Voorbereidingen
≥Verbind dit toestel met het netwerk. (> 12)
– Zorg ervoor dat het netwerk verbinding met het internet maakt.
1 Druk op [NWP].
2 Druk op [HOME].
3 Druk herhaaldelijk op [3, 4] om “SETUP” te
kiezen en druk vervolgens op [OK].
4
Druk herhaaldelijk op [
3
,
4
] om “F/W Update” te
kiezen en druk vervolgens op [OK].
5 Druk op [3, 4] om “Internet” te kiezen en
druk vervolgens op [OK].
6 Druk op [3, 4] om “Yes” te kiezen en druk
vervolgens op [OK].
≥De voortgang wordt tijdens het updaten weergegeven
als “Updating %”. ( staat voor een nummer.)
≥Als het updaten met succes voltooid is, wordt
“Success” weergegeven.
7 Nadat “Success” weergegeven is, sluit u het
netsnoer af en sluit u het na 3 minuten weer
aan.
≥ Het downloaden kan mogelijk langer kunnen duren of niet
helemaal correct werken, afhankelijk van de
verbindingsomgeving.
∫ Updaten via USB-flashgeheugen
Voorbereidingen
≥Download de meest recente firmware naar het USB-
flashgeheugen. Raadpleeg de volgende website voor
details.
www.technics.com/support/firmware/
≥FAT16 en FAT32 bestandssystemen worden ondersteund.
1 Verbind het USB-flashgeheugen met de
nieuwe firmware.
2 Druk op [NWP].
3 Druk op [HOME].
4 Druk herhaaldelijk op [3, 4] om “SETUP” te
kiezen en druk vervolgens op [OK].
5 Druk herhaaldelijk op [3, 4] om “F/W
Update” te kiezen en druk vervolgens op
[OK].
6 Druk op [3, 4] om “USB” te kiezen en druk
vervolgens op [OK].
7 Druk op [3, 4] om “Yes” te kiezen en druk
vervolgens op [OK].
≥De voortgang wordt tijdens het updaten weergegeven
als “Updating %”. ( staat voor een nummer.)
≥Als het updaten met succes voltooid is, wordt
“Success” weergegeven.
8 Nadat “Success” weergegeven is, sluit u het
netsnoer af en sluit u het na 3 minuten weer
aan.
≥ Het downloaden kan langer duren, afhankelijk van het USB-
flashgeheugen.
∫ De firmware-versie en het modelnummer
controleren
1 Druk op [NWP].
2 Druk op [HOME].
3 Druk herhaaldelijk op [3, 4] om “SETUP” te kiezen en
druk vervolgens op [OK].
4 Druk herhaaldelijk op [3, 4] om “F/W Version” te kiezen
en druk vervolgens op [OK].
≥ De firmware-versie en het modelnummer worden
weergegeven.
≥ Druk op [OK] om te verlaten.
Updaten van Firmware
Het downloaden duurt ong. 10 minuten.
Sluit het netsnoer niet af en zet de power-
schakelhendel niet omlaag op [OFF] terwijl een van
de volgende berichten weergegeven wordt.
“Linking” of
“Updating %”
(163)
ST-C700DE-TQBM0007.book 27 ページ 2016年10月26日 水曜日 午後1時17分

28
Als andere apparatuur op de bijgeleverde afstandsbediening
reageert, verander dan de code van de afstandsbediening.
≥ De fabrieksinstelling is “Mode 1”.
Richt de afstandsbediening op dit toestel en druk
op [OK] en de numerieke knop, gedurende
minstens 4 seconden.
≥Als de code van de afstandsbediening veranderd is, zal de
nieuwe code enkele seconden op het display weergegeven
worden.
≥ Als de SU-C700/SL-C700 via de systeembedieningsfunctie
verbonden is, verander dan de afstandsbedieningscodes ervan,
evenals de afstandsbedieningscode voor dit toestel.
U kunt de karaktercodering van de namen van nummers,
artiesten en andere informatie veranderen als deze niet
weergegeven worden zoals dat zou moeten.
≥ De fabrieksinstelling is “Type 1( 日本 )”.
1 Druk op [NWP].
2 Druk op [HOME].
3 Druk herhaaldelijk op [3, 4] om “SETUP” te
kiezen en druk vervolgens op [OK].
4 Druk herhaaldelijk op [3, 4] om “E Asian
Character” te kiezen en druk vervolgens op
[OK].
5 Druk op [3, 4] om “Type 1( 日本 )”/
“Type 2( 简体字 )” te kiezen en druk
vervolgens op [OK].
U kunt dit toestel automatisch aan de SU-C700 koppelen en
ze probleemloos bedienen met de afstandsbediening.
Voorbereidingen
1 Verbind dit toestel en de SU-C700 met
systeemverbindingskabels en coaxiale digitale kabels.
(> 9)
2 Zet de power-schakelhendel van dit toestel en
SU-C700 op de stand [Í/I].
∫ Dit toestel en SU-C700 gelijktijdig op
on/stand-by schakelen
≥Als u de afstandsbediening op dit toestel richt en op
[NWP Í] drukt wanneer dit toestel en de SU-C700 op de
stand-by-modus staan, zullen dit toestel en de SU-C700
gelijktijdig ingeschakeld worden.
≥Als zowel dit toestel als de SU-C700 ingeschakeld zijn en
de ingangsbron van de SU-C700 is op “COAX1” gezet, dan
kunt u ze met gebruik van de sleep-timer instellen om
automatisch de stand-by-modus binnen te gaan. (> 26)
∫ Automatisch omschakelen van de
ingangsbron van SU-C700
Als u een handeling zoals afspelen op dit toestel uitvoert, zal
de ingangsbron van de SU-C700 automatisch naar “COAX1”
geschakeld worden.
∫ Afstellen van Bass/Middle/Treble
U kunt de toon van de SU-C700 op dit toestel afstellen. Ieder
toonbereik (Bass/Middle/Treble) kan afgesteld worden.
1 Druk op [NWP].
2 Druk op [HOME].
3 Druk herhaaldelijk op [3, 4] om “SETUP” te kiezen en
druk vervolgens op [OK].
4 Druk herhaaldelijk op [3, 4] om “Tone Control” te kiezen
en druk vervolgens op [OK].
5 Druk op [3, 4] om “On (adjustment)” te kiezen en druk
vervolgens op [OK].
6 Druk op [3, 4] om “BASS” (lage tonen), “MID”
(middentonen) of “TREBLE” (hoge tonen) te selecteren.
7 Druk op [2, 1] om het niveau te regelen en druk
vervolgens op [OK].
≥ Ieder niveau kan afgesteld worden tussen “s10” en “r10”.
≥ Raadpleeg voor informatie over de bediening van SU-C700 ook
de gebruiksaanwijzingen daarvan.
Code afstandsbediening
[OK] + [1] Zet de code op “Mode 1”
[OK] + [2] Zet de code op “Mode 2”
Veranderen van de
karaktercodering
Type 1( 日本 )
Er wordt prioriteit gegeven aan
Japans.
Type 2( 简体字 )
Er wordt prioriteit gegeven aan
(vereenvoudigd) Chinees.
Gebruik van de
systeembedieningsfunctie
(164)
ST-C700DE-TQBM0007.book 28 ページ 2016年10月26日 水曜日 午後1時17分

29
Nederlands
Verhelpen van ongemakken
Voer eerst de onderstaande controles uit voordat u het
apparaat laat repareren. Als u twijfelt aan het resultaat van
enkele controles, of als de oplossingen die door de volgende
gids worden voorgesteld het probleem niet verhelpen, neem
dan contact op met uw verkoper voor advies.
Warmteopbouw van dit toestel.
≥Dit toestel wordt warm als het lang gebruikt wordt. Dit is
geen reden tot ongerustheid.
Heeft u de meest recente firmware geïnstalleerd?
≥
Panasonic is constant bezig met het verbeteren van de
firmware van het toestel om ervoor te zorgen dat onze
klanten kunnen genieten van de laatste technologie. (
>
27)
Het toestel werkt niet.
De bedieningen zijn niet goed uitgevoerd.
≥Een van de beveiligingsapparaten van het toestel zijn
mogelijk geactiveerd.
1 Beweeg de power-schakelhendel van dit toestel omlaag naar
de stand [OFF].
≥ Anders koppelt u het netsnoer los, wacht u minstens
3 minuten en sluit u het terug aan.
2 Beweeg de power-schakelhendel van dit toestel omhoog naar
de stand [Í/I]. Als het toestel nog steeds niet werkt, neem dan
contact op met de dealer.
Het is mogelijk, dat tijdens de weergave een
“zoemgeluid” te horen is.
≥Er bevindt zich een netsnoer of fluorescent licht vlakbij de
kabels. Houd andere apparatuur en snoeren verwijderd
van de kabels van dit toestel.
Geen geluid.
≥Controleer het volume van het aangesloten apparaat
(versterker, enz.).
≥Controleer of de kabelverbindingen naar de aansluitingen
van in- en uitgang onjuist zijn. Als dat zo is, schakel dit
toestel dan uit en sluit de kabels opnieuw correct aan.
≥Controleer of de correcte ingangsbron geselecteerd is.
≥
Steek de stekker van de aan te sluiten kabels volledig naar binnen.
≥Als zowel de “Digital Output” als de “Analog Output” op
“Off” gezet zijn, zal geen geluid uitgegeven worden.
Verander de instelling van de te gebruiken uitgang in “On”.
(> 25)
≥Het afspelen van multi-kanaal inhoud wordt niet
ondersteund.
Het geluid wordt onderbroken.
≥Afhankelijk van uw omgeving kan de audio tijdens het
afspelen worden onderbroken. Controleer de
gebruiksaanwijzing van het verbonden apparaat en de
verbinding van het apparaat.
Het afspelen start niet.
≥Afhankelijk van uw omgeving of de verbonden apparaten
kan dit enige tijd duren.
De systeembedieningsfunctie werkt niet.
≥Verbind de systeemverbindingskabel met de
systeemaansluiting [CONTROL1] van de SU-C700.
≥Verbind de coaxiale digitale kabel met de digitale audio-
ingang [COAX1 IN] van de SU-C700.
Het toestel wordt automatisch uitgeschakeld.
≥Is de auto off-functie ingeschakeld? (> 26)
≥Als de SU-C700 via de systeembedieningsfunctie met dit
toestel verbonden is, kan het zijn dat dit toestel
automatisch de stand-by-modus binnengaat als de
SU-C700 de stand-by-modus binnengaat. (> 9, 28)
De instellingen worden gereset naar de
fabrieksinstellingen.
≥Als u de firmware bijwerkt, kan dit de instellingen resetten.
Alle instellingen opnieuw op de fabrieksinstellingen
zetten
Verricht een reset van het geheugen als de volgende
situaties optreden:
≥ Er is geen reactie als op de knoppen gedrukt wordt.
≥ U wilt de geheugeninhouden wissen en resetten.
1 Druk op [NWP].
2 Druk op [HOME].
3 Druk herhaaldelijk op [3, 4] om “SETUP” te kiezen
en druk vervolgens op [OK].
4 Druk herhaaldelijk op [3, 4] om “Initialization” te
kiezen en druk vervolgens op [OK].
5 Druk op [3, 4] om “Yes” te kiezen en druk vervolgens
op [OK].
6 Druk op [3, 4] om “Yes” te kiezen en druk vervolgens
opnieuw op [OK].
Algemeen
(165)
ST-C700DE-TQBM0007.book 29 ページ 2016年10月26日 水曜日 午後1時17分

30
Het lukt niet een verbinding met het netwerk te maken.
≥Bevestig de netwerkverbinding en instellingen. (> 12)
Het lukt niet om een verbinding met het toestel te maken.
≥Zorg ervoor dat de multicast-functie op de draadloze router
vrijgegeven is.
≥Zorg ervoor dat het apparaat en het toestel op hetzelfde
netwerk aangesloten zijn. (> 12)
≥Verbind het compatibele apparaat opnieuw met het
netwerk en verbind het vervolgens weer met dit toestel.
≥Schakel dit toestel uit en in en maak vervolgens weer
verbinding met dit toestel.
Het afspelen start niet.
Het geluid wordt onderbroken.
≥Het gelijktijdige gebruik met andere 2,4 GHz-apparatuur,
zoals magnetrons, draadloze telefoons, enz., kan
onderbrekingen van de verbinding veroorzaken.
Vergroot de afstand tussen dit toestel en deze apparaten.
≥Als diverse draadloze apparaten gelijktijdig gebruik maken
van hetzelfde draadloze netwerk als dit toestel, probeer de
andere apparaten dan uit te schakelen of reduceer het
gebruik wat ze van het draadloze netwerk maken.
≥Als het afspelen stopt, controleer dan de afspeelstatus op
het apparaat.
Kan geen muziekbestanden vinden die op de PC
opgeslagen zijn.
≥Als u muziekbestanden via een netwerk afspeelt, worden
de bestanden die niet op de server van dat netwerk
geregistreerd zijn niet weergegeven. Raadpleeg voor
details de gebruiksaanwijzing van uw server.
Het afspelen start niet.
Het geluid wordt onderbroken.
≥
De zender die niet uitzendt, kan niet worden afgespeeld. (Deze
wordt overgeslagen of er wordt teruggekeerd naar de lijst.)
≥Internet Radio wordt mogelijk niet goed afgespeeld,
afhankelijk van de toestand van het netwerk.
≥Afhankelijk van de omgeving van de internetaansluiting,
kan het geluid onderbroken worden of kan het even duren
voor er afgespeeld wordt.
≥Internet Radio is een audio-uitzendingsservice die wordt
uitgezonden via internet. Afhankelijk van de uitzender of de
toestand van de overdracht, kan de kwaliteit van het geluid
verschillen.
De informatie kan niet correct worden
weergegeven.
≥Namen van nummers, namen van zenders, enz. die
beheerd worden door vTuner/Spotify worden misschien
niet correct weergegeven.
Kan niet werken.
≥Selecteer “USB” als de ingangsbron.
≥Controleer of de iPhone/iPad/iPod correct aangesloten is.
≥Sluit de iPhone/iPad/iPod opnieuw aan of probeer de
iPhone/iPad/iPod te herstarten.
≥De batterij van de iPhone/iPad/iPod is leeg. Laad de
iPhone/iPad/iPod en probeer het opnieuw.
De iPhone/iPad/iPod wordt niet geladen.
≥Controleer of het toestel ingeschakeld is wanneer u het
opladen start.
– Als een iPhone/iPad/iPod met een lege batterij opgeladen wordt,
schakel dit toestel dan niet op de stand-by-modus zolang de
iPhone/iPad/iPod niet werkzaam is.
De USB-drive of diens inhouden kunnen niet
gelezen worden.
≥Het formaat van de USB-drive, of van diens inhouden
is/zijn niet compatibel met het apparaat. (> 35)
Geen reactie als op [1/;] gedrukt wordt.
≥Sluit het USB-toestel af en weer aan. Schakel als
alternatief het apparaat uit en weer in.
Langzame werking van de USB-flash drive.
≥Een groot bestandformaat of een USB-flash drive met een
groot geheugen vereisen een langere leestijd.
De PC herkent dit toestel niet.
≥Controleer uw besturingsomgeving. (> 20)
≥Herstart de PC; schakel dit toestel uit en weer in en sluit
vervolgens de USB-kabel weer aan.
≥Gebruik een andere USB-poort van de verbonden PC.
≥Installeer de speciale USB-driver als een PC met Windows
gebruikt wordt.
Kan geen muziekbestanden vinden die op de PC
opgeslagen zijn.
≥Als u muziekbestanden via een netwerk afspeelt, worden
de bestanden die niet op de server van dat netwerk
geregistreerd zijn niet weergegeven. Raadpleeg voor
details de gebruiksaanwijzing van uw server. (> 35)
AirPlay/DLNA
vTuner/Spotify
iPhone/iPad/iPod
USB
PC
(166)
ST-C700DE-TQBM0007.book 30 ページ 2016年10月26日 水曜日 午後1時17分

31
Nederlands
Het pairen kan niet voltooid worden.
≥Controleer de toestand van het Bluetooth
®
-apparaat.
Het apparaat kan niet aangesloten worden.
≥
Het pairen van het apparaat verliep zonder succes of de registratie
werd vervangen. Probeer het apparaat opnieuw te pairen.
≥Het kan zijn dat dit toestel op een ander apparaat
aangesloten is. Sluit het andere apparaat af en probeer het
apparaat opnieuw te pairen.
Het apparaat is aangesloten maar er komt geen
audio uit dit toestel.
≥Voor sommige ingebouwde Bluetooth
®
-apparaten dient u
de audio-uitgang met de hand op “ST-C700D” te zetten.
Lees voor details de handleiding van het apparaat.
NFC werkt niet.
≥
Controleer of het NFC-kenmerk van het apparaat ingeschakeld is.
≥Als u het opnieuw probeert, verander dan de hoek waarbij
het Bluetooth
®
-apparaat het NFC-aanraakgebied aanraakt.
≥Schakel het NFC-kenmerk van dit toestel in als u een
apparaat verbindt met gebruik van NFC. (> 21)
Het afspelen start niet.
Het geluid wordt onderbroken.
≥Het gelijktijdige gebruik met andere 2,4 GHz-apparatuur,
zoals magnetrons, draadloze telefoons, enz., kan
onderbrekingen van de verbinding veroorzaken.
Breng het Bluetooth
®
-apparaat dichterbij dit systeem en op
grotere afstand van andere apparaten.
De ontvangst is slecht of er klinkt een kloppend geluid.
≥Houd de antenne verwijderd van computers, TV's, andere
kabels en snoeren.
≥Gebruik een buitenantenne.
De afstandsbediening werkt niet correct.
≥Om interferentie te voorkomen dient u geen objecten voor
de signaalsensor te plaatsen. (> 7)
≥Verander de afstandsbedieningscode als andere
producten op deze afstandsbediening reageren. (> 28)
≥Als de SU-C700/SL-C700 voor het te bedienen apparaat
geselecteerd is, druk dan op [NWP] en probeer de
handeling opnieuw uit te voeren. (> 8)
Door op [DIMMER] te drukken, worden het display,
het licht en de helderheid van de controlelampjes
van de SU-C700/SL-C700 veranderd.
≥[DIMMER] werkt voor SU-C700/SL-C700, alsmede voor dit
toestel. Schakel het apparaat uit waarvan u het
helderheidsniveau wilt handhaven en druk op [DIMMER].
De volgende berichten of dienstnummers kunnen op het
display van het toestel verschijnen.
“AUTO OFF”
≥Het toestel werd ongeveer 20 minuten lang niet gebruikt en
wordt binnen een minuut op de stand-by-modus gezet.
Druk op ongeacht welke knop om dit te annuleren.
“Checking Device”
≥
Het toestel controleert de verbonden iPhone/iPad/iPod of
een USB-apparaat.
“Connect to Network”
≥Sluit dit toestel op het netwerk aan en wacht dan tot de
Firmware Update opstart via Internet. (> 27)
“Connect USB Device”
≥Download de nieuwste firmware op het USB-
flashgeheugen en sluit het aan. (> 27)
“Download Fail”
≥
Het downloaden van de firmware is mislukt. Druk op ongeacht
welke knop om te verlaten. Probeer het later opnieuw.
≥De server wordt niet gevonden. Druk op ongeacht welke
toets om te verlaten. Zorg ervoor dat het draadloze
netwerk verbinding met het internet maakt.
“Empty”
≥De geselecteerde map is leeg. Verplaats nummers naar de
map en probeer de handeling opnieuw uit te voeren.
≥
De server wordt niet op het netwerk gevonden. Controleer om te
kijken of de server met hetzelfde netwerk als dit toestel verbonden
is en probeer opnieuw verbinding met dit toestel te maken. (
>
13)
≥Er is geen Internet Radio-zender geregistreerd in de
favorietenlijst. Voeg een zender toe aan de lijst. (> 15)
“Error”
≥Er is een onjuiste handeling verricht. Lees de instructies en
probeer het opnieuw.
“Firmware update is available”
≥De firmware (gratis) voor dit toestel is beschikbaar.
1 Druk op [NWP].
2 Druk op [OK].
3 Druk op [3, 4] om “Yes” te selecteren en druk vervolgens op
[OK].
≥ De voortgang wordt tijdens het updaten weergegeven als
“Updating %”. ( staat voor een nummer.)
≥ Als het updaten met succes voltooid is, wordt “Success”
weergegeven.
4 Nadat “Success” weergegeven is, sluit u het netsnoer af en
sluit u het na 3 minuten weer aan.
≥
Meer informatie over updates, vindt u op de volgende website.
www.technics.com/support/firmware/
Bluetooth
®
Radio
Afstandsbediening
Berichten
(167)
ST-C700DE-TQBM0007.book 31 ページ 2016年10月26日 水曜日 午後1時17分

32
“F” (“” geeft een nummer aan.)
≥Er is een probleem met dit toestel.
– Staat dit toestel op een zeer warme plek?
Zo ja, verplaats dit toestel dan naar een koelere plek, wacht een
tijdje en probeer het dan opnieuw in te schakelen.
Als het probleem aanhoudt, schrijf dan het weergegeven
nummer op, sluit het netsnoer af en raadpleeg uw verkoper.
“Load Fail”
≥
De firmware op het USB-flashgeheugen kan niet worden gevonden.
≥Download de nieuwste firmware op het USB-
flashgeheugen en probeer het opnieuw. (> 27)
“No Network Available”
≥Dit toestel heeft geen verbinding met het netwerk.
Controleer de netwerkverbinding. (> 12)
“No Memory”
≥Er zijn geen met preset ingestelde DAB/DAB+-zenders die
geselecteerd kunnen worden. Stel enkele kanalen in met
preset. (> 24)
“No Signal”
≥
Deze zender kan niet ontvangen worden. Controleer uw antenne.
“Not Valid”
≥
De functie die u geprobeerd heeft te gebruiken, is niet beschikbaar
met de huidige instellingen. Kijk de stappen en de instellingen na.
“PGM Full”
≥Het aantal geprogrammeerde tracks is meer dan 24.
“Please Wait”
≥
Dit wordt bijvoorbeeld weergegeven als dit toestel
in-/uitgeschakeld is (niet langer dan 1 minuut en 30 seconden).
“Remote ” (“ ” geeft een nummer aan.)
≥
De afstandsbediening en dit toestel gebruiken verschillende
codes. Verander de code op de afstandsbediening.
– Als “Remote 1” weergegeven wordt, houd [OK] en [1] dan
minstens 4 seconden ingedrukt.
– Als “Remote 2” weergegeven wordt, houd [OK] en [2] dan
minstens 4 seconden ingedrukt.
“Remote Mode”
≥De basishandelingen met gebruik van ongeacht welke
basisbedieningsschakelaar op het hoofdtoestel, of met
gebruik van de knoppen op de afstandsbediening, kunnen
niet worden uitgevoerd (dit gebeurt bijvoorbeeld als muziek
die op een DLNA-server opgeslagen is op dit toestel
(DMR) afgespeeld wordt).
≥Gebruik het aangesloten apparaat voor de basisbediening
van de weergave.
“Scan Failed”
≥De zenders kunnen niet ontvangen worden. Controleer uw
antenne en probeer Auto scanning. (> 24)
Als “Scan Failed” nog steeds weergegeven wordt, zoek
dan de beste signaalontvangst op met de “Manual Scan”
tune-functie. (> 24)
“Searching”
≥Het toestel controleert de DLNA-server op het netwerk.
“Unlocked”
≥“PC” is geselecteerd maar er is geen verbonden PC. Kijk
de verbinding met de PC na. (> 20)
≥De onderdelen voor de bemonsteringsfrequentie, enz. van
de geluidssignalen werden niet correct ingevoerd.
– Raadpleeg “Bestands-formaat” (
>
35) voor het ondersteunde formaat
“USB Over Current Error”
≥De iPhone/iPad/iPod of het USB-apparaat verbruikt teveel
stroom. Verwijder de iPhone/iPad/iPod of het USB-
apparaat en schakel het toestel uit en weer in.
“Hub Device Not Supported”
“Device Not Recognized”
“Not Supported”
“USB Device Not Supported”
≥U heeft een iPhone/iPad/iPod of een USB-apparaat
verbonden die niet ondersteund worden.
– Als de iPhone/iPad/iPod compatibel is, schakel deze dan in en
breng de verbinding op correcte wijze tot stand.
≥Het formaat van het bestand op de iPhone/iPad/iPod of het
USB-apparaat wordt niet ondersteund.
– Raadpleeg “Bestands-formaat” (
>
35) voor het ondersteunde formaat
∫ Netwerkdienst
De diensten die via een netwerkdienst lopen, worden bediend
door de respectievelijke service providers en de dienst kan
zonder voorgaande kennisgeving tijdelijk of permanent
onderbroken worden. Panasonic zal daarom geen garantie
verstrekken voor de inhoud of de continuïteit van de diensten.
Verzorging van het
toestel
Trek het netsnoer uit het stopcontact alvorens onderhoud uit
te voeren. Reinig dit toestel met een zachte doek.
≥
Als het toestel erg vuil is, wring dan een nat gemaakte doek goed uit en
veeg het vuil weg. Neem het toestel vervolgens met een zachte doek af.
≥
Gebruik geen oplosmiddelen, zoals benzine, verdunners, alcohol,
reinigingsmidddelen voor de keuken, chemische doekjes, enz. Deze
kunnen de ombouw vervormen of de coating doen afbladderen.
(168)
ST-C700DE-TQBM0007.book 32 ページ 2016年10月26日 水曜日 午後1時17分

33
Nederlands
Specificaties
∫ ALGEMEEN
Stroomtoevoer AC 220 V tot 240 V, 50/60 Hz
Stroomverbruik 26 W
Stroomverbruik tijdens de stand-by-modus*
1
(Als “Network Standby” uitgeschakeld is) Ongev. 0,2 W
(Als “Network Standby” ingeschakeld is) Ongev. 2,0 W
Stroomverbruik tijdens uitschakeling Ongev. 0,2 W
Afmetingen (BkHkD) 340 mmk78 mmk305 mm
Massa Ongev. 4,0 kg
Bedrijfstemperatuurbereik 0 oC tot r40 oC
Bedrijfsvochtigheidsbereik 35 % tot 80 % RH (geen condensatie)
∫ AANSLUITINGEN
Analoge uitgang
LINE OUT Penstekker
Digitale uitgang
Optische digitale uitgang Optische aansluiting
Coaxiale digitale uitgang Penstekker
Systeempoort
Systeembediening ‰3,5 mm stekker
USB
USB voorkant Connector type A
Ondersteunde geheugencapaciteit 2TB (max)
Maximum aantal mappen (albums) 800
Maximum aantal bestanden (liedjes) 8000
Bestandssysteem FAT16, FAT32
Stroom USB-poort DC OUT 5 V 2,1 A (max)
PC
USB achterkant Connector type B
Ethernet-interface
LAN 10 Base-T/100 Base-TX
∫ FORMAAT
USB-A
USB-standaard USB 2.0 hoge snelheid
USB-massaopslag klasse
USB-B
USB-standaard USB 2.0 hoge snelheid
USB Audioklasse 2.0, Asynchrone modus
DSD-besturingsmodus ASIO Native-modus, DoP-modus
(169)
ST-C700DE-TQBM0007.book 33 ページ 2016年10月26日 水曜日 午後1時17分

34
≥ De specificaties zijn zonder voorgaande kennisgeving aan wijzigingen onderhevig.
≥ Gewicht en afmetingen zijn bij benadering.
*1 Als de iPhone/iPad/iPod niet opgeladen wordt
*2 Perspectief communicatie-afstand
Omgevingsmetingen: Temperatuur 25 oC/Hoogte 1,0 m
Meting in “Mode 1”
∫ ANALOGE UITGANG
Kanaal 2ch
Uitgangsniveau
LINE OUT 2,0 Vrms
Frequentierespons 2 Hz tot 90 kHz (s3dB)
THD+N 0,0012 % (1 kHz, 0 dB)
S/N 112 dB (IHF-A)
Dynamisch bereik 112 dB (IHF-A)
∫ Bluetooth
®
/NFC
Bluetooth
®
Bluetooth
®
systeemspecificatie Bluetooth
®
Ver.3.0
Draadloze apparatuurclassificatie Klasse 2 (2,5 mW)
Ondersteunde profielen A2DP/AVRCP
Ondersteunde codec Qualcomm
®
aptX™ Low Latency, AAC, SBC
Frequentieband 2,4 GHz-band FH-SS
Bedieningsafstand Ongev. 10 m gezichtslijn*
2
∫ TUNER
Frequentiemodulatie (FM)
Preset geheugen 30 zenders
Frequentiebereik 87,50 MHz tot 108,00 MHz (50 kHz stap)
Antenneterminals 75 ≠ (niet gebalanceerd)
DAB
DAB-geheugens 20 kanalen
Frequentieband (golflengte)
Band III (Alle Band III) 5A tot 13F (174,928 MHz tot 239,200 MHz)
Gevoeligheid
Min. vereiste s98 dBm
Aansluiting DAB-buitenantenne F-Connector (75 ≠)
(170)
ST-C700DE-TQBM0007.book 34 ページ 2016年10月26日 水曜日 午後1時17分

35
Nederlands
∫ Bestands-formaat
Dit toestel ondersteunt de volgende bestandsformaten.
≥Dit toestel ondersteunt niet het afspelen van muziekbestanden met kopieerbeveiliging.
≥Het afspelen van alle bestanden in formaten die door dit toestel ondersteund worden, wordt niet gegarandeerd.
≥Het afspelen van een bestand in een formaat dat niet door dit toestel ondersteund wordt, kan een hakkelend geluid of ruis
veroorzaken. Controleer in die gevallen of dit toestel het bestandsformaat ondersteunt.
≥Dit toestel ondersteunt niet het afspelen van VBR (Variable Bit Rate).
≥Sommige verbonden apparaten (servers) kunnen in staat zijn bestanden in formaten te converteren die niet dor dit toestel
ondersteund worden en deze uitvoeren. Raadpleeg voor details de gebruiksaanwijzing van uw server.
≥De bestandsinformatie (samplingfrequentie, enz.), die door dit toestel getoond wordt, en de afspeel-software, kunnen van
elkaar verschillen.
USB-A
PC (USB-B)*
1
LAN (DLNA)*
2
*1 Als u de speciale app downloadt en installeert, kunt u bestanden met een grote verscheidenheid aan formaten afspelen. (> 20)
Raadpleeg voor details de gebruiksaanwijzing van de app.
*2 Het al dan niet kunnen afspelen van ieder muziekbestand via uw netwerk wordt bepaald door de netwerkserver, zelfs als het formaat van het
bestand hierboven vermeld wordt. Als u bijvoorbeeld Windows Media
®
Player 11 gebruikt, kunnen niet alle muziekbestanden op de PC
afgespeeld worden. U kunt alleen die afspelen die aan de bibliotheek van Windows Media
®
Player 11 toegevoegd zijn.
≥ Alle bovenstaande informatie is van kracht met ingang van oktober 2016 en kan zonder voorgaande kennisgeving worden geüpdatet.
Raadpleeg onderstaande website voor meer informatie.
www.technics.com/support/firmware/
Bestands-
formaat
Extensie
Bemon-sterings-
frequentie
Bitsnelheid
Aantal quantisatiebits
MP3 .mp3 32/44,1/48 kHz 16 kbps tot 320 kbps
AAC .m4a/.aac 32/44,1/48/88,2/96 kHz 16 kbps tot 320 kbps
WMA .wma 32/44,1/48 kHz 16 kbps tot 320 kbps
WAV .wav 32/44,1/48/88,2/96/176,4/192 kHz 16/24 bit
FLAC .flac 32/44,1/48/88,2/96/176,4/192 kHz 16/24 bit
AIFF .aiff 32/44,1/48/88,2/96/176,4/192 kHz 16/24 bit
ALAC .m4a 32/44,1/48/88,2/96/176,4/192 kHz 16/24 bit
DSD .dff/.dsf 2,8/5,6 MHz
Bestands-
formaat
Extensie
Bemon-sterings-
frequentie
Bitsnelheid
Aantal quantisatiebits
LPCM 32/44,1/48/88,2/96/176,4/192 kHz 16/24/32 bit
DSD .dff/.dsf 2,8/5,6 MHz
Bestands-
formaat
Extensie
Bemon-sterings-
frequentie
Bitsnelheid
Aantal quantisatiebits
MP3 .mp3 32/44,1/48 kHz 16 kbps tot 320 kbps
AAC .m4a/.aac 32/44,1/48/88,2/96 kHz 16 kbps tot 320 kbps
WMA .wma 32/44,1/48 kHz 16 kbps tot 320 kbps
WAV .wav 32/44,1/48/88,2/96/176,4/192 kHz 16/24 bit
FLAC .flac 32/44,1/48/88,2/96/176,4/192 kHz 16/24 bit
AIFF .aiff 32/44,1/48/88,2/96/176,4/192 kHz 16/24 bit
ALAC .m4a 32/44,1/48/88,2/96/176,4/192 kHz 16/24 bit
DSD .dff/.dsf 2,8/5,6 MHz
(171)
ST-C700DE-TQBM0007.book 35 ページ 2016年10月26日 水曜日 午後1時17分

36
∫ Over Bluetooth
®
Gebruikte frequentieband
≥Dit systeem gebruikt de 2,4 GHz-frequentieband.
Certificatie van dit apparaat
≥Dit systeem is in overeenstemming met de
frequentiebeperkingen en heeft een certificaat ontvangen
dat op de frequentiewetten gebaseerd is, dus toestemming
voor een draadloze werking is niet noodzakelijk.
≥De volgende handelingen zijn in sommige landen wettelijk
strafbaar:
– Demonteren of wijzigen van het systeem.
– Verwijderen van de specificatie-aanduidingen.
Gebruiksbeperkingen
≥De draadloze uitzending en/of het gebruik met alle
toestellen die met Bluetooth
®
uitgerust zijn, wordt niet
gegarandeerd.
≥Alle apparaten moeten in overeenstemming zijn met de
normen die bepaald zijn door Bluetooth SIG, Inc.
≥Afhankelijk van de specificaties en de instellingen van een
apparaat, kan het gebeuren dat het apparaat er niet in
slaagt de verbinding tot stand te brengen of kunnen
bepaalde bedieningen anders zijn.
≥Dit systeem ondersteunt de veiligheidskenmerken van
Bluetooth
®
maar het kan zijn dat deze beveiliging niet
voldoende is, afhankelijk van de werkomgeving en/of de
instellingen. Wees voorzichtig bij het draadloos versturen
van gegevens naar dit systeem.
≥Dit systeem kan geen gegevens naar een Bluetooth
®
-
apparaat sturen.
Gebruiksbereik
≥Gebruik dit toestel op een maximumbereik van 10 m. Het
bereik kan afnemen, afhankelijk van de omgeving,
obstakels of interferentie.
Interferentie afkomstig van andere apparatuur
≥Het kan zijn dat dit systeem niet naar behoren werkt en dat
problemen ontstaan, zoals ruis en verspringen van het
geluid, wegens interferentie van de radiogolven, als dit
systeem te dicht bij andere
Bluetooth
®
-apparaten staat of
bij apparaten die ook gebruik maken van de 2,4
GHz
-band.
≥Het kan zijn dat dit systeem niet naar behoren werkt als er
te sterke radiogolven van een zendstation, enz., in de
nabijheid zijn.
Bedoeld gebruik
≥Dit systeem is alleen bedoeld voor normaal, algemeen
gebruik.
≥Gebruik dit systeem niet in de nabijheid van apparatuur of
in een omgeving die gevoelig is voor de interferentie van
radiofrequentie (bijvoorbeeld op vliegvelden, in
ziekenhuizen, laboratoria, enz.).
Panasonic stelt zich niet aansprakelijk voor gegevens
en/of informatie die gecompromitteerd worden tijdens
een draadloze uitzending.
“Made for iPod” en “Made for iPhone” en “Made for iPad” betekenen dat
een elektronisch accessoire ontworpen is om speciaal op een iPod, iPhone
of iPad aangesloten te worden en door de ontwikkelaar gecertificeerd is om
te voldoen aan de prestatienormen van Apple.
Apple is niet verantwoordelijk voor de werking van dit apparaat of voor de
overeenstemming ervan met de veiligheid – en registratienormen.
Wij wijzen u erop dat het gebruik van dit accessoire met iPod, iPhone, of
iPad de draadloze prestatie kan beïnvloeden.
AirPlay, iPad, iPhone, iPod, iPod nano, iPod touch en iPad Air zijn
handelsmerken van Apple Inc. die in de V.S. en andere landen
gedeponeerd zijn.
iPad mini en iPad Pro zijn handelsmerken van Apple Inc.
Mac en OS X zij handelsmerken van Apple Inc., die in de V.S: en andere
landen gedeponeerd zijn.
Android is een handelsmerk van Google Inc.
Qualcomm aptX is een product van Qualcomm Technologies International, Ltd.
Qualcomm is een handelsmerk van Qualcomm Incorporated, dat
gedeponeerd is in de Verenigde Staten en andere landen, met
toestemming gebruikt wordt. aptX is een handelsmerk van Qualcomm
Technologies International, Ltd., dat gedeponeerd is in de Verenigde Staten
en andere landen, met toestemming gebruikt wordt.
Het Bluetooth
®
woordmerk en logo's zijn gedeponeerde handelsmerken die
het bezit zijn van Bluetooth SIG, Inc. en ieder gebruik van dergelijke
merken door Panasonic Corporation vindt plaats onder licentie.
Andere handelsmerken en handelsnamen zijn die van de respectievelijke
eigenaren.
DLNA, the DLNA Logo and DLNA CERTIFIED are trademarks, service
marks, or certification marks of the Digital Living Network Alliance.
MPEG Layer-3 audio coding technologie onder licentie van Fraunhofer IIS
en Thomson.
Windows en
Windows Vista
zijn of gedeponeerde handelsmerken of handelsmerken
van Microsoft Corporation in de Verenigde Staten en/of andere landen.
Windows Media en het Windows-logo zijn handelsmerken of
gedeponeerde handelsmerken van Microsoft Corporation in de Verenigde
Staten en/of andere landen.
Dit product wordt beschermd door bepaalde intellectueel-eigendomsrechten van
Microsoft Corporation en van derden. Het gebruik of de verspreiding van
dergelijke technologie buiten dit product is verboden zonder een licentie van
Microsoft of erkende dochteronderneming van Microsoft, en van derden.
FLAC Decoder
Copyright (C) 2000, 2001, 2002, 2003, 2004, 2005, 2006, 2007, 2008,
2009 Josh Coalson
Redistribution and use in source and binary forms, with or without
modification, are permitted provided that the following conditions are met:
– Redistributions of source code must retain the above copyright notice,
this list of conditions and the following disclaimer.
– Redistributions in binary form must reproduce the above copyright
notice, this list of conditions and the following disclaimer in the
documentation and/or other materials provided with the distribution.
– Neither the name of the Xiph.org Foundation nor the names of its
contributors may be used to endorse or promote products derived from
this software without specific prior written permission.
THIS SOFTWARE IS PROVIDED BY THE COPYRIGHT HOLDERS AND
CONTRIBUTORS “AS IS” AND ANY EXPRESS OR IMPLIED WARRANTIES,
INCLUDING, BUT NOT LIMITED TO, THE IMPLIED WARRANTIES OF
MERCHANTABILITY AND FITNESS FOR A PARTICULAR PURPOSE ARE
DISCLAIMED. IN NO EVENT SHALL THE FOUNDATION OR CONTRIBUTORS
BE LIABLE FOR ANY DIRECT, INDIRECT, INCIDENTAL, SPECIAL,
EXEMPLARY, OR CONSEQUENTIAL DAMAGES (INCLUDING, BUT NOT
LIMITED TO, PROCUREMENT OF SUBSTITUTE GOODS OR SERVICES;
LOSS OF USE, DATA, OR PROFITS; OR BUSINESS INTERRUPTION)
HOWEVER CAUSED AND ON ANY THEORY OF LIABILITY, WHETHER IN
CONTRACT, STRICT LIABILITY, OR TORT (INCLUDING NEGLIGENCE OR
OTHERWISE) ARISING IN ANY WAY OUT OF THE USE OF THIS SOFTWARE,
EVEN IF ADVISED OF THE POSSIBILITY OF SUCH DAMAGE.
De Spotify-software vormt het voorwerp van licenties van derde partijen die
hier gevonden worden:
www.spotify.com/connect/third-party-licenses
(172)
ST-C700DE-TQBM0007.book 36 ページ 2016年10月26日 水曜日 午後1時17分

37
Nederlands
(173)
ST-C700DE-TQBM0007.book 37 ページ 2016年10月26日 水曜日 午後1時17分

English
Declaration of Conformity (DoC)
Hereby, “Panasonic Corporation” declares that this product is in compliance with the
essential requirements and other relevant provisions of Directive 1999/5/EC.
Customers can download a copy of the original DoC to our R&TTE products from our DoC
server:
http://www.doc.panasonic.de
Contact to Authorised Representative:
Panasonic Marketing Europe GmbH, Panasonic Testing Centre,
Winsbergring 15, 22525 Hamburg, Germany
Ελληνικά
Δήλωση συμμόρφωσης (DoC)
Με την παρούσα, η “Panasonic Corporation” δηλώνει ότι το προϊόν αυτό είναι σύμφωνο με
τις βασικές απαιτήσεις και άλλες σχετικές διατάξεις της οδηγίας 1999/5/EC.
Οι πελάτες μπορούν να κατεβάσουν ένα αντίγραφο του πρωτοτύπου DoC για τα R&TTE
προϊόντα μας από τον DoC server μας:
http://www.doc.panasonic.de
Στοιχεία επικοινωνίας Eξουσιοδοτημένου Aντιπροσώπου:
Panasonic Marketing Europe GmbH, Panasonic Testing Centre,
Winsbergring 15, 22525 Hamburg, Γερμανία
Português
Declaração de Conformidade (DoC)
Com o presente documento, a “Panasonic Corporation” declara que este produto é
conforme os requisitos específicos e demais especificações referentes à Directriz
1999/5/EC.
Os clientes podem baixar uma cópia da declaração de conformidade (DoC) para nossos
produtos R&TTE do Server DoC:
http://www.doc.panasonic.de
Contacte o representante autorizado:
Panasonic Marketing Europe GmbH, Panasonic Testing Centre,
Winsbergring 15, 22525 Hamburg, Alemanha
Polski
Deklaracja zgodności
Niniejszym “Panasonic Corporation” deklaruje, że ten produkt jest zgodny z istotnymi
wymaganiami i innymi odnośnymi postanowieniami dyrektywy 1999/5/WE.
Klienci mogą pobrać oryginalną deklarację zgodności naszych produktów z serwera
deklaracji zgodności:
http://www.doc.panasonic.de
Kontakt się z autoryzowanym przedstawicielem:
Panasonic Marketing Europe GmbH, Panasonic Testing Centre,
Winsbergring 15, 22525 Hamburg, Niemcy
Magyar
Megfelelőségi Nyilatkozat (DoC)
Ezennel a , “Panasonic Corporation” kijelenti, hogy a jelen termék kielégíti az 1999/5/EK
Irányelv létfontosságú követelményeit és más vonatkozó rendelkezéseit.
A vásárlók letölthetik az R&TTE termékek eredeti DoC másolatát a DoC szerverünkről:
http://www.doc.panasonic.de
Forduljon a hivatalos márkaképviselethez:
Panasonic Marketing Europe GmbH, Panasonic Testing Centre,
Winsbergring 15, 22525 Hamburg, Németország
Česky
Prohlášení o shodě
Společnost “Panasonic Corporation” tímto prohlašuje, že tento výrobek je ve shodě se
základními požadavky a dalšími příslušnými ustanoveními směrnice 1999/5/EC.
Zákazníci si mohou stáhnout kopii originálu prohlášení o shodě pro naše produkty R&TTE z
našeho serveru:
http://www.doc.panasonic.de
Oprávněný zástupce:
Panasonic Marketing Europe GmbH, Panasonic Testing Centre,
Winsbergring 15, 22525 Hamburg, Německo
Slovensky
Vyhlαsenie o zhode (DoC)
“Panasonic Corporation” týmto prehlasuje, že tento výrobok je v zhode so základnými
požiadavkami a ďalšími príslušnými ustanoveniami smernice 1999/5/ES.
Zákazníci si môžu stiahnuť kópiu pôvodného DoC na naše R&TTE výrobky z nášho
servera DoC:
http://www.doc.panasonic.de
Kontakt na splnomocneného zástupcu:
Panasonic Marketing Europe GmbH, Panasonic Testing Centre,
Winsbergring 15, 22525 Hamburg, Nemecko
Eesti keel
Vastavusdeklaratsioon (DoC)
“Panasonic Corporation” kinnitab käesolevaga, et see toode on vastavuses põhiliste nõuete
ja muude direktiivi 1999/5/EÜ asjakohaste sätetega.
Kliendid saavad koopia meie R&TTE toodetele kehtiva originaalvastavusdeklaratsiooni
koopia alla laadida meie DoC-serverist:
http://www.doc.panasonic.de
Võtke ühendust volitatud esindajaga:
Panasonic Marketing Europe GmbH, Panasonic Testing Centre,
Winsbergring 15, 22525 Hamburg, Saksamaa
Lietuviškai
Atitikties deklaracija (AD)
Bendrovė “Panasonic Corporation” patvirtina, kad šis gaminys tenkina direktyvos
1999/5/EB esminius reikalavimus ir kitas taikytinas nuostatas.
Mūsų R&TTE gaminių originalios atitikties deklaracijos kopiją klientai gali atsisiųsti iš mūsų
AD serverio:
http://www.doc.panasonic.de
Įgaliotojo atstovo adresas:
Panasonic Marketing Europe GmbH, Panasonic Testing Centre,
Winsbergring 15, 22525 Hamburg, Vokietija.
Slovensko
Izjava o skladnosti (DoC)
S pričujočo izjavo podjetje “Panasonic Corporation” izjavlja, da so svoji izdelki skladni s
poglavitnimi zahtevami in drugimi odgovarjajočimi predpisi direktive 1999/5/ES.
Stranka lahko naloži izvod izvirnega DoC o naših izdelkih R&TTE s strežnika DoC:
http://www.doc.panasonic.de
Pooblaščeni zastopnik:
Panasonic Marketing Europe GmbH, Panasonic Testing Centre,
Winsbergring 15, 22525 Hamburg, Nemčija
Norsk
Samsvarserklæring (DoC)
“Panasonic Corporation” erklærer at utstyret er i samsvar med de grunnleggende krav og
øvrige relevante krav i direktiv 1999/5/EF.
Kundene kan laste ned en kopi av den originale samsvarserklæringen (DoC) for vårt
R&TTE utstyr fra vår DoC server:
http://www.doc.panasonic.de
Kontakt vår autoriserte representant:
Panasonic Marketing Europe GmbH, Panasonic Testing Centre,
Winsbergring 15, 22525 Hamburg, Tyskland
Български
Декларация за съответствие (DoC)
“Panasonic Corporation” декларира, че този продукт съответства на съществените
изисквания и другите приложими разпоредби на Директива 1999/5/EC.
Потребителите могат да свалят копие от оригиналните DoC към нашите продуктите от
типа R&TTE от сървъра, на който се съхраняват DoC:
http://www.doc.panasonic.de
За контакт с оторизиран представител:
Panasonic Marketing Europe GmbH, Panasonic Testing Centre,
Winsbergring 15, 22525 Hamburg, Германия
Român
Declaraţie de Conformitate (DoC)
Prin prezenta, societatea “Panasonic Corporation” declară că produsul este conform cu
cerinţele esenţiale şi cu alte norme corespunzătoare Directivei 1999/5/EC.
Clienţii pot descărca o copie a DoC-ului original al produselor noastre R&TTE de la adressa
noastră DoC din Internet:
http://www.doc.panasonic.de
Contact la Reprezentanţa autorizată:
Panasonic Marketing Europe GmbH, Panasonic Testing Centre,
Winsbergring 15, 22525 Hamburg, Germania
Hrvatski
Deklaracija o podobnosti (DoC)
Ovime, “Panasonic Corporation” izjavljuje da je ovaj proizvod udovoljava osnovnim
zahtjevima i ostalim relevantnim uvjetima Smjernice 1999/5/EC.
Kupci mogu preuzeti kopiju originalne DoC za naše R&TTE proizvode s našeg DoC
poslužitelja:
http://www.doc.panasonic.de
Kontakti u Europskoj uniji:
Panasonic Marketing Europe GmbH, Panasonic Testing Centre,
Winsbergring 15, 22525 Hamburg, Njemačka
Latviski
Atbilstības deklarācija (DoC)
Kompānija “Panasonic Corporation” ar šo paziņo, ka šis izstrādājums atbilst
būtiskām prasībām un citām saistošām Direktīvas 1999/5/EK prasībām.
Pircēji var lejupielādēt oriģinālo DoC kopiju mūsu R&TTE izstrādājumos no mūsu
DoC servera:
http://www.doc.panasonic.de
Lūdzam sazināties ar pilnvaroto parstāvi
Panasonic Marketing Europe GmbH, Panasonic Testing Centre,
Winsbergring 15, 22525 Hamburg, Vācijā
(174)
ST-C700DE-TQBM0007.book 35 ページ 2016年10月26日 水曜日 午後1時17分

(175)
ST-C700DE-TQBM0007.book 36 ページ 2016年10月26日 水曜日 午後1時17分

Headquarter Address:
Panasonic Corporation
Kadoma, Osaka, Japan
Importer for Europe:
Panasonic Marketing Europe GmbH
Panasonic Testing Centre
Winsbergring 15, 22525 Hamburg, Germany
Panasonic Corporation
Web Site: http://www.panasonic.com
C Panasonic Corporation 2016
ptvuw
TQBM0007
F1016MH0
EU
ST-C700DE-TQBM0007.book 34 ページ 2016年10月26日 水曜日 午後1時17分
-
 1
1
-
 2
2
-
 3
3
-
 4
4
-
 5
5
-
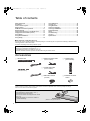 6
6
-
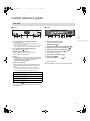 7
7
-
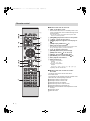 8
8
-
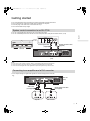 9
9
-
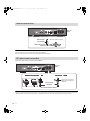 10
10
-
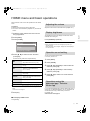 11
11
-
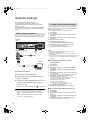 12
12
-
 13
13
-
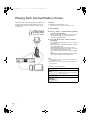 14
14
-
 15
15
-
 16
16
-
 17
17
-
 18
18
-
 19
19
-
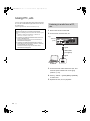 20
20
-
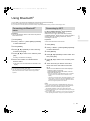 21
21
-
 22
22
-
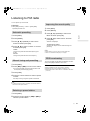 23
23
-
 24
24
-
 25
25
-
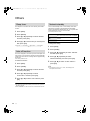 26
26
-
 27
27
-
 28
28
-
 29
29
-
 30
30
-
 31
31
-
 32
32
-
 33
33
-
 34
34
-
 35
35
-
 36
36
-
 37
37
-
 38
38
-
 39
39
-
 40
40
-
 41
41
-
 42
42
-
 43
43
-
 44
44
-
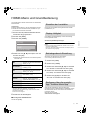 45
45
-
 46
46
-
 47
47
-
 48
48
-
 49
49
-
 50
50
-
 51
51
-
 52
52
-
 53
53
-
 54
54
-
 55
55
-
 56
56
-
 57
57
-
 58
58
-
 59
59
-
 60
60
-
 61
61
-
 62
62
-
 63
63
-
 64
64
-
 65
65
-
 66
66
-
 67
67
-
 68
68
-
 69
69
-
 70
70
-
 71
71
-
 72
72
-
 73
73
-
 74
74
-
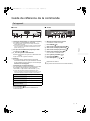 75
75
-
 76
76
-
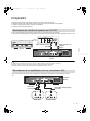 77
77
-
 78
78
-
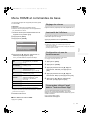 79
79
-
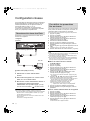 80
80
-
 81
81
-
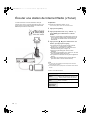 82
82
-
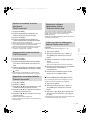 83
83
-
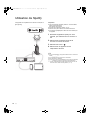 84
84
-
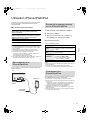 85
85
-
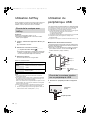 86
86
-
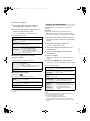 87
87
-
 88
88
-
 89
89
-
 90
90
-
 91
91
-
 92
92
-
 93
93
-
 94
94
-
 95
95
-
 96
96
-
 97
97
-
 98
98
-
 99
99
-
 100
100
-
 101
101
-
 102
102
-
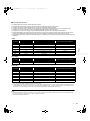 103
103
-
 104
104
-
 105
105
-
 106
106
-
 107
107
-
 108
108
-
 109
109
-
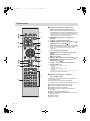 110
110
-
 111
111
-
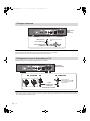 112
112
-
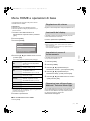 113
113
-
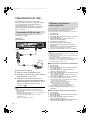 114
114
-
 115
115
-
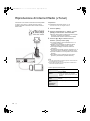 116
116
-
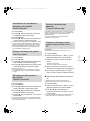 117
117
-
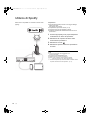 118
118
-
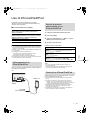 119
119
-
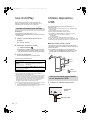 120
120
-
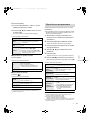 121
121
-
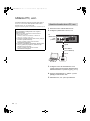 122
122
-
 123
123
-
 124
124
-
 125
125
-
 126
126
-
 127
127
-
 128
128
-
 129
129
-
 130
130
-
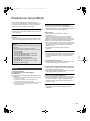 131
131
-
 132
132
-
 133
133
-
 134
134
-
 135
135
-
 136
136
-
 137
137
-
 138
138
-
 139
139
-
 140
140
-
 141
141
-
 142
142
-
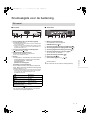 143
143
-
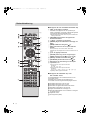 144
144
-
 145
145
-
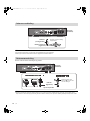 146
146
-
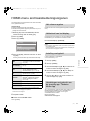 147
147
-
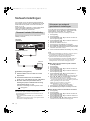 148
148
-
 149
149
-
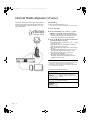 150
150
-
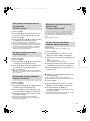 151
151
-
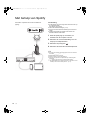 152
152
-
 153
153
-
 154
154
-
 155
155
-
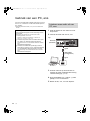 156
156
-
 157
157
-
 158
158
-
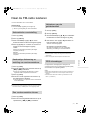 159
159
-
 160
160
-
 161
161
-
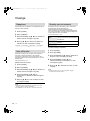 162
162
-
 163
163
-
 164
164
-
 165
165
-
 166
166
-
 167
167
-
 168
168
-
 169
169
-
 170
170
-
 171
171
-
 172
172
-
 173
173
-
 174
174
-
 175
175
-
 176
176


Panasonic ST-C700D de handleiding
- Categorie
- Auto media-ontvangers
- Type
- de handleiding
in andere talen
- English: Panasonic ST-C700D Owner's manual
- italiano: Panasonic ST-C700D Manuale del proprietario
- français: Panasonic ST-C700D Le manuel du propriétaire
- Deutsch: Panasonic ST-C700D Bedienungsanleitung
Gerelateerde papieren
-
Panasonic SCC70MK2EG Handleiding
-
Technics STC700EG de handleiding
-
-
Panasonic STG30E Handleiding
-
Panasonic SCALL05EG Handleiding
-
Technics SC-C50 Handleiding
-
-
Panasonic SC-RB5E de handleiding
-
-
Andere documenten
-
Pioneer X-EM16 Handleiding
-
-
Sony RSX-GS9 de handleiding
-
-
-
-
-
-
-