
00
136697
30
Dashcam
E
F
D
GB
CZ
SK
P
RO
NL
Operating Instructions
Bedienungsanleitung
Mode d‘emploi
Instrucciones de uso
Gebruiksaanwijzing
Návod kpoužití
Návod na použitie
Manual de instruções
Manual de utilizare

3
1
2
45678910
A
B

11
12
13
15
14
C
D

Controls and displays
A
1. Attachment point for suction cup holder
2. microSD cardslot
3. Microphone/speaker
B
4. Reset
5.
Navigation button
►
6. Mode
7. OK
8. Menu
9.
Navigation button
◄
10.Power
C
11.Mini-USB charging socket
12.StatusLED
13.Save button
D
14.Dashcam holder
15.Locking lever
Video mode -Overview of symbols
Videomode
Time loop
Day mode
Night mode
Movement mode
Video quality
Memorycardrecognised
G Operating instruction
2

Memory cardnot recognised
Batteryindicator
Videorecordinginprogress
Videosaved
00.00.00
Videodurat ion
Photo mode -Overview of symbols
Photo mode
Day mode
Night mode
12M-VGA Image resolution
Memory card recognised
Memory cardnot recognised
Batteryindicator
Playback mode -Overview of symbols
Video running
Video paused
Video saved
3

Memorycardrecognised
Memory cardnot recognised
Batteryindicator
Thank you for choosing aHama product.
Take your time and read the following instructions and information completely.Please keep these
instructions in asafe place for futurereference. If you sellthe device, please pass these operating
instructions on to the new owner.
1. Explanation of Warning Symbols and Notes
Risk of electric shock
This symbol indicates product parts energized with adangerous voltage of sucient magnitude to
constitute arisk of electric shock.
Warning
This symbol is used to indicate safety instructions or to draw your attention to specichazards and
risks.
Note
This symbol is used to indicate additional information or important notes.
2. Package Contents
•Dashcam 30
•Mini-USB vehicle charger
•Suction cup holder
•microSD cardreader
•These operating instructions
4

3. Safety Notes
• This product is intended for private, non-commercial use only.
• Use the product for its intended purpose only.
• Protect the product from dirt, moistureand overheating, and only use it in adry environment.
• Do not drop the product and do not expose it to any major shocks.
• Do not operate the product outside the power limits given in the specications.
• Do not bend or crush the cable.
• Since the battery is integrated and cannot be removed, you will need to dispose of the product as a
whole. Do this in compliance with the legal requirements.
• Do not open the device or continue to operate it if it becomes damaged.
• Keep this product, as all electrical products, out of the reach of children!
• When using this product, observe the applicable local traclaws and regulations.
• Take carethat components such as airbags, safety areas, controls, instruments, etc. and visibility are
not blocked or restricted.
• Do not allow yourself to be distracted by the product when driving avehicle. Always pay attention to
the surrounding tracand your environment.
• Check that the product is safely mounted beforebeginning your journey.
• Dispose of packaging material immediately according to locally applicable regulations.
• Do not modify the product in any way.Doing so voids the warranty.
• Do not throw the battery or the product into re.
• Do not tamper with or damage/heat/disassemble the batteries/rechargeable batteries.
Risk of electric shock
• Do not open the device or continue to operate it if it becomes damaged.
• Do not use the product if the charging cable, adapter cable or power cable is damaged.
• Do not attempt to service or repair the device yourself.Leave any service work to qualied experts.
4. Legal regulations/limitations when operating Dashcams
Note
• The information on legal regulations set out in these instructions covers only the German
regulations and laws at the time of printing. Beforeusing the product in other countries, nd out
about the applicable regulations!
• When using the product on the road, different regulations can apply depending on the laws of
the respective country.
• In some jurisdictions, the use of Dashcams is regulated separately or prohibited. Get to know the
laws and guidelines beforeusing the Dashcam.
5

• Payattention to the applicable data protection regulations beforeinstalling and using the product.
• Observe the applicable regulations for recording and storing video and image les.
5. Proper use
•This product is intended for use only in vehicles.
•Respect the personal and property rights of others. Do not make recordings of other people with
the Dashcam.
•Observe the right to one’sown image and spoken wordwhen recording.
•Ifthe product will not be used for along period of time, remove it from the windscreen to avoid sun
and temperature-related damage.
6. Getting Started
Warning -Risk of injury!
• When using this product, observe the applicable local traclaws and regulations.
• Take carethat components such as airbags, safety areas, controls, instruments, etc. and visibility
arenot blocked or restricted.
• Do not allow yourself to be distracted by the product when driving avehicle. Always pay
attention to the surrounding tracand your environment.
Note
• Beforemounting the holder,check the installation options in your vehicle. If in doubt, consult the
manual for your vehicle or contact the manufacturer.
• Never apply force when using the product or during installation.
• Check that the product is safely mounted beforebeginning your journey
6.1 Mounting the suction cup holder
• Remove the protective lm from the suction cup.
• Open the locking lever (15) of the suction cup.
• Position the holder with the suction cup on aclean, even mounting surface (e.g. glass pane).
• Lightly press the holder onto the desired mounting surface and close the locking lever (15) to fasten
the holder.
• After mounting, always check to ensurethe suction cup is securely attached.
• To remove the suction cup from the surface, open the locking lever.Then gently pull the ap to
completely release the suction cup.
6

6.2 Setting angle and tilt
The viewing angle and tilt of the holder can be continuously adjusted using aball head.
• Always set the angle and tilt without the terminal device inserted.
• Loosen the clamping screw of the ball head.
• Set the angle and tilt as desired and tighten the clamping screw.
6.3 Inserting/removing the Dashcam
Note
Continually check that the suction cup holder is securely seated and the Dashcam is securely held.
• Slide the Dashcam into the holder (14) of the suction cup holder.
• Pull the Dashcam out of the holder by carefully moving the Dashcam to and fro.
7. Operation
7.1. Connection to the vehicle’s electrical system
Warning –rechargeablebattery
• Only use suitable charging devices with USB connections for charging.
• As arule, do not use charging devices or USB connections that aredefective and do not try to
repair them yourself.
• Do not overcharge the product or allow the battery to completely discharge.
• Avoid storing, charging or using the device in extreme temperatures and extremely low
atmospheric pressure(for example, at high altitudes).
• When stored over along period of time, batteries should be charged regularly (at least every
three months).
• Connect the included Mini-USB charging cable to the Mini-USB charging socket (11) on the
Dashcam and to the vehicle socket of the electrical system.
• The Dashcam automatically switches on when the engine is started.
• The status LED (12) is constantly lit blue.
Note -Battery capacity
The battery has alimited life of about 2–3 minutes. This buffer function is used for continuation of
the time, for example. Longer operation is possible only with aconnected vehicle adapter.
Note -Constant battery operation
The device is not intended for constant battery operation. This can lead to irreparable damage.
7

7.2. Switching on/off
Note -Automatic switching on/off
If the Dashcam is connected to apower source by means of the vehicle charger,itautomatically
switches on/off when the vehicle is started/switched off.
Note -Car battery
With some vehicles, it can happen that power continues to be supplied even though the ignition
has been switched off.Inthis case, switch off the cameramanually to protect your car battery from
discharge.
Press and hold Power [
](10) for about 3seconds to manually switch on/off the Dashcam.
7.3. Inserting amicroSD card
• Insert amicroSD cardinto the microSD cardslot (2) on the Dashcam.
• is shown on the display.
Note -Memory cardfull
Once the memory of the microSD cardisfull, the oldest video recording will be overwritten.
8. Modes
8.1 Video mode
• After switching on, the cameraisinVideo operating mode.
appears at the upper-left edge of
the screen.
• Video recording starts automatically when you switch on the device.
• Press [OK](7) to stop/start video recording.
• The recording duration is displayed at the upper-left edge of the screen. The status LED (12)
alternates between redand blue.
Note -Night mode
Brieypress Power [ ](10), during video recording to activate/deactivate Night mode.
8.2 Photo mode
• Repeatedly press [MODE](6) to activate Photo mode. appears at the upper-left edge of the
screen.
• Press [OK](7) to take apicture.
8

8.3 Playback mode
• Activate Playback operating mode by repeatedly pressing [MODE](6).
appears at the lower-left edge of the screen.
• Use the navigation buttons [◄](9) /[►](5) to select the le you would like to play.
• Press [MENU](8) for moreoptions.
• Use the navigation buttons [◄](9) /[►](5) to navigate through the menu.
• Select the Delete menu item and conrm your selection by pressing [OK](7).
• Youcan choose between Delete selection and Delete all.
• Conrm the subsequent conrmation prompt with OK,orselect Cancel to cancel the operation.
• Press [MENU](8) for moreoptions, to alternatively go to the Lock menu item.
• Select the Lock menu item and conrm your selection by pressing [OK](7).
• Youcan choose between Lock le, Lock all, Unlock le and Unlock all.
• Conrm the subsequent conrmation prompt with OK,orselect Cancel to cancel the operation.
9. Settings
9.1 Video mode settings
• Switch to Video mode as described in section 8.1 Video mode.
• Press [MENU](8) to go to the video settings.
•
is shown at the upper-left edge of the screen.
• Use the navigation buttons [◄](9) /[►](5) to navigate through the menu.
• Conrm your selection by pressing [OK](7).
9.1.1 Resolution
Select the desired resolution (1280X720/1920X1080)ofthe recorded video material.
• Navigate to the Resolution menu item and conrm your selection by pressing [OK](7). Anew
overview window opens.
• Use the navigation buttons [◄](9) /[►](5) to select the desired setting.
• Conrm your selection by pressing [OK](7).
9.1.2 Watermark
With the mode activated, atime and date stamp is added to every video le.
• Navigate to the Watermark menu item and conrm your selection by pressing [OK](7). Anew
overview window opens.
• Use the navigation buttons [◄](9) /[►](5) to select the desired setting.
• Conrm your selection by pressing [OK](7).
9.1.3 Motion detection
With motion detection activated, video recording is automatically started when the camerasenses
vibrations (for example, in the case of an accident).
9

• Navigate to the Motion detectionmenu item and conrm your selection by pressing [OK](7). Anew
overview window opens.
• Use the navigation buttons [◄](9) /[►](5) to select the desired setting.
• Conrm your selection by pressing [OK](7).
• is shown on the video display.
9.1.4 Loop function
Select the time interval (1/2/3/5 minutes)after which anew video recording should begin.
Select Off to deactivate this function. Now only one le will be created.
• Navigate to the Loop functionmenu item and conrm your selection by pressing [OK](7). Anew
overview window opens.
• Use the navigation buttons [◄](9) /[►](5) to select the desired setting.
• Conrm your selection by pressing [OK](7).
• is shown on the video display.
9.1.5 Audio recording
With the mode activated, sound is recorded in addition to the video material.
• Navigate to the Audio recordingmenu item and conrm your selection by pressing [OK](7). Anew
overview window opens.
• Use the navigation buttons [◄](9) /[►](5) to select the desired setting.
• Conrm your selection by pressing [OK](7).
9.1.6 Contrast
Improve the quality of the video recording through contrast adjustment (-2 to +2).
• Navigate to the Contrast menu item and conrm your selection by pressing [OK](7). Anew
overview window opens.
• Use the navigation buttons [◄](9) /[►](5) to select the desired setting.
• Conrm your selection by pressing [OK](7).
9.2 Photo mode settings
• Switch to Photo mode as described in section 8.2 Photo mode.
• Press [MENU](8) to go to the photo settings.
•
is shown at the upper-left edge of the screen.
• Use the navigation buttons [◄](9) /[►](5) to navigate through the menu.
• Conrm your selection by pressing [OK](7).
10

9.2.1 Resolution
Select the desired resolution (VGA -12megapixels)ofthe recorded photo material.
• Navigate to the Resolution menu item and conrm your selection by pressing [OK](7). Anew
overview window opens.
• Use the navigation buttons [◄](9) /[►](5) to select the desired setting.
• Conrm your selection by pressing [OK](7).
9.2.2 Image display
When the picturedisplay is activated, the picturetaken is shown on the display for ashort time (2/5
seconds). Anew picturecan only be taken after this time has elapsed.
Select Off to deactivate this function.
• Navigate to the Image display menu item and conrm your selection by pressing [OK](7). Anew
overview window opens.
• Use the navigation buttons [◄](9) /[►](5) to select the desired setting.
• Conrm your selection by pressing [OK](7).
9.2.3 Watermark
With the mode activated, atime and date stamp is added to every photo le.
• Navigate to the Watermark menu item and conrm your selection by pressing [OK](7). Anew
overview window opens.
• Use the navigation buttons [◄](9) /[►](5) to select the desired setting.
• Conrm your selection by pressing [OK](7).
9.2.4 Contrast
Improve the quality of the photo through contrast adjustment (-2 to +2).
• Navigate to the Contrast menu item and conrm your selection by pressing [OK](7). Anew
overview window opens.
• Use the navigation buttons [◄](9) /[►](5) to select the desired setting.
• Conrm your selection by pressing [OK](7).
9.3 General settings
• Press [MENU](8) twice to go to the camera’ssettings menu.
• Alternatively,press [MENU](8) once if you arealready in the Video/Photo menu.
• is shown at the upper-left edge of the screen.
• Use the navigation buttons [◄](9) /[►](5) to navigate through the menu.
• Conrm your selection by pressing [OK](7).
11

9.3.1 Format memory card
Delete all les located on the inserted memory card.
• Navigate to the Format memory card menu item and conrm your selection by pressing [OK](7).
Anew overview window opens.
• Conrm the formatting with OK,orselect Cancel to cancel the operation.
9.3.2 Language
Select the language for the menu navigation.
• Navigate to the Language menu item and conrm your selection by pressing [OK](7). Anew
overview window opens.
• Use the navigation buttons [◄](9) /[►](5) to select the desired setting.
• Conrm your selection by pressing [OK](7).
9.3.3 Off following inactivity
Select the time interval (1minute /3 minutes)after which the camera automatically switches off if
not in use.
Select Off to deactivate this function.
• Navigate to the Off following inactivity menu item and conrm your selection by pressing
[OK](7). Anew overview window opens.
• Use the navigation buttons [◄](9) /[►](5) to select the desired setting.
• Conrm your selection by pressing [OK](7).
9.3.4 Screen saver
Select the time interval (1minute /3minutes /5 minutes)after which the screen saver is activated.
If you do not press abutton during this time interval, the display switches off.Video recording
continues, however.
Select Off to deactivate this function.
• Navigate to the Screen saver menu item and conrm your selection by pressing [OK](7). Anew
overview window opens.
• Use the navigation buttons [◄](9) /[►](5) to select the desired setting.
• Conrm your selection by pressing [OK](7).
9.3.5 Factory settings
• Navigate to the Factory settings menu item and conrm your selection by pressing [OK](7). A
new overview window opens.
• Conrm the reset with OK,orselect Cancel to cancel the operation.
12

9.3.6 Date/time
• Navigate to the Date/time menu item and conrm your selection by pressing [OK](7). Anew
overview window opens.
• Use the navigation buttons [◄](9) /[►](5) to set the year and conrm your entry by pressing [OK](7).
• Afterwards, adjust the following information in succession following the same procedure: month,
day,time.
• Conrm your selection by pressing [MENU](8).
9.3.7 Version
• Navigate to the Version menu item and conrm your selection by pressing [OK](7). Anew
overview window opens.
• The current cameraversion is displayed.
10. Retrieving the recorded material
Note
Do not remove the microSD cardwith the Dashcam switched on. This can result in data loss or cause
damage to the device.
• Switch off the Dashcam as described in 7.2 Switching on/off.
• Remove the camera’smicroSD card.
• Connect the microSD cardtoyour PC using the SD cardreader(included in delivery).
• Transfer the stored data to your PC to free up space on the memory card.
11. Save button
Note
In the event of an accident, the administering of rst aid and the safety of all involved have priority.
To be sureyour data is permanently stored, proceed as follows:
• Press the Save button (13). Auf dem Display erscheint appears on the display.
• Press and hold Power [ ](10) for about 3seconds to switch off the camera.
• Now remove the camera’smicroSD card.
Note
• Videos stored after pressing the Save button arestored under the designation ‘LOKXXXXX’.
• Normal video les arestored under the designation ‘REC’ and aconsecutive number.
13

12. Factory settings
To reset the Dashcam to the factory default settings, proceed as follows:
• Switch off the Dashcam as described in 7.2 Switching on/off.
• Press and hold [Reset] (4) for about 3seconds using apointed object.
• Alternatively,you can restorethe factory settings as described in Section 9.3.5 Factory settings.
• All settings you made aredeleted.
Note
• Resetting to the factory default settings can solve some problems and malfunctions.
• However,all settings made previously arepermanently deleted.
13. Care and Maintenance
• Only clean this product with aslightly damp, lint-free cloth and do not use aggressive cleaning agents.
• Make surethat water does not get into the product.
14. Warranty Disclaimer
Hama GmbH &CoKG assumes no liability and provides no warranty for damage resulting from
improper installation/mounting, improper use of the product or from failuretoobserve the operating
instructions and/or safety notes.
15. Technical Data
Max. resolution 89 x48x35mm
Screen size:2.4"
Max. Resolution Photo: 12 megapixels | Video: 1080i
Data format Photo: JPEG | Video: AVI
Memory card Supports microSD memory cards up to 32 GB
Powersupply Input: 12 V-24V 0,5A; Output: 5V ;1A; cable length: 2m
Battery
Input:5V 290mA; Type:3,7 V/LiPo;
Min. capacity: 130 mAh /0.48Wh
14

Bedienungselemente und Anzeigen
A
1. Vorrichtung Saugnapfhalterung
2. MicroSD-Kartenslot
3. Mikrofon/Lautsprecher
B
4. Reset
5.
Navigationstaste
►
6. Mode
7. OK
8. Menu
9.
Navigationstaste
◄
10.Power
C
11.MiniUSB-Ladebuchse
12.StatusLED
13.Sicherungstaste
D
14.Halterung Dashcam
15.Verriegelungshebel
Videomodus -Symbolübersicht
Videomodus
Zeitdauer Loop
Tagmodus
Nachtmodus
Bewegungsmodus
Videoqualität
Speicherkarteerkannt
D Bedienungsanleitung
15

Speicherkartenichterkannt
Batter ieanzeige
Videoaufnahme läuft
Videogesichert
00.00.00
Videodauer
Fotomodus -Symbolübersicht
Fotomodus
Tagmodus
Nachtmodus
12M-VGA Bildauösung
Speicherkarteerkannt
Speicherkartenichterkannt
Batterieanzeige
Wiedergabemodus -Symbolübersicht
Video läuft
Video pausiert
Video gesichert
16

Speicherkarteerkannt
Speicherkartenichterkannt
Batterieanzeige
Vielen Dank, dass Sie sich für ein Hama Produkt entschieden haben!
Nehmen Sie sich Zeit und lesen Sie die folgenden Anweisungen und Hinweise zunächst ganz durch.
Bewahren Sie diese Bedienungsanleitung anschließend an einem sicheren Ort auf,umbei Bedarf darin
nachschlagen zu können. Sollten Sie das Gerät veräußern, geben Sie diese Bedienungsanleitung an
den neuen Eigentümer weiter.
1. Erklärung von Warnsymbolen und Hinweisen
Gefahr eines elektrischen Schlages
Dieses Symbol weist auf eine Berührungsgefahr mit nicht isolierten Teilen des Produktes hin,
die möglicherweise eine gefährliche Spannung von solcher Höhe führen, dass die Gefahr eines
elektrischen Schlags besteht.
Warnung
Wirdverwendet, um Sicherheitshinweise zu kennzeichnen oder um Aufmerksamkeit auf besondere
Gefahren und Risiken zu lenken.
Hinweis
Wirdverwendet, um zusätzlich Informationen oder wichtige Hinweise zu kennzeichnen.
2. Packungsinhalt
•Dashcam 30
•MiniUSB-KFZ-Ladegerät
•Saugnapfhalterung
•MicroSDKartenleser
•Bedienungsanleitung
17

3. Sicherheitshinweise
• Das Produkt ist für den privaten, nicht-gewerblichen Gebrauch vorgesehen.
• Verwenden Sie das Produkt ausschließlich für den dazu vorgesehenen Zweck.
• Schützen Sie das Produkt vor Schmutz, Feuchtigkeit und Überhitzung und verwenden Sie es nur in
trockenen Räumen.
• Lassen Sie das Produkt nicht fallen und setzen Sie es keinen heftigen Erschütterungen aus.
• Betreiben Sie das Produkt nicht außerhalb seiner in den technischen Daten angegebenen
Leistungsgrenzen.
• Knicken und quetschen Sie das Kabel nicht.
• Der Akku ist fest eingebaut und kann nicht entfernt werden, entsorgen Sie das Produkt als Ganzes
gemäß den gesetzlichen Bestimmungen.
• Öffnen Sie das Produkt nicht und betreiben Sie es bei Beschädigungen nicht weiter.
• Dieses Produkt gehört, wie alle elektrischen Produkte, nicht in Kinderhände!
• Beim Einsatz des Produktes im Straßenverkehr gelten die Vorschriften der StVZO.
• Beachten Sie, dass keine Komponenten, wie der Airbag, Sicherheitsbereiche, Bedienelemente,
Instrumente, etc. oder die Sicht, verdeckt oder einschränkt sind.
• Lassen Sie sich auf der Fahrt mit einem Kraftfahrzeug nicht durch Ihr Produkt ablenken und achten
Sie auf die Verkehrslage und IhreUmgebung.
• Kontrollieren Sie vor jeder Fahrt die sichereMontage des Produkts.
• Entsorgen Sie das Verpackungsmaterial sofort gemäß den örtlich gültigen Entsorgungsvorschriften.
• Nehmen Sie keine Veränderungen am Produkt vor.Dadurch verlieren Sie jegliche
Gewährleistungsansprüche.
• Werfen Sie den Akku bzw.das Produkt nicht ins Feuer.
• Verändern und/oder deformieren/erhitzen/zerlegen Sie Akkus/Batterien nicht.
Gefahr eines elektrischen Schlages
• Öffnen Sie das Produkt nicht und betreiben Sie es bei Beschädigungen nicht weiter.
• Verwenden Sie das Produkt nicht, wenn das Ladekabel, das Adapterkabel oder die Netzleitung
beschädigt sind.
• Versuchen Sie nicht, das Produkt selbst zu warten oder zu reparieren. Überlassen Sie jegliche
Wartungsarbeit dem zuständigen Fachpersonal.
4. Gesetzliche Regelungen/Einschränkungen beim Betrieb von Dashcams
Hinweis
• Beachten Sie, dass Hinweise zu gesetzlichen Regelungen in diesen Hinweisen nur die deutschen
Vorschriften und Gesetze zum Zeitpunkt der Drucklegung abbilden. Informieren Sie sich in
anderen Staaten vor der Verwendung des Produktes über die dort geltenden Regelungen!
18

Hinweis
• Beachten Sie, dass bei Einsatz des Produktes im Straßenverkehr abhängig von der Gesetzgebung
eines Landes unterschiedliche Regelungen gelten können.
• In einigen Rechtssprechungen ist die Verwendung von Dashcams gesondert geregelt bzw.
untersagt. Befassen Sie sich vor Einsatz der Dashcam mit den Gesetzen und Richtlinien.
• Beachten Sie vor Installation und Einsatz des Produktes die geltenden Vorschriften des
Datenschutzes.
• Beachten Sie die geltenden Vorschriften für die Aufnahme und Speicherung von Video- und
Bilddateien.
5. Bestimmungsgemäße Verwendung
•Dieses Produkt ist nur für die Verwendung in Fahrzeugen vorgesehen.
•Respektieren Sie die Persönlichkeits- und Eigentumsrechte Anderer.Machen Sie mit der Dashcam
keine Aufnahmen anderer Personen.
•Beachten Sie bei Aufnahmen das Recht am eigenen Bild und gesprochenem Wort.
•Entfernen Sie das Produkt bei längerem Nichtgebrauch von der Windschutzscheibe, um sonnen- und
temperaturbedingte Schäden zu vermeiden.
6. Inbetriebnahme
Warnung -Verletzungsgefahr
• Beim Einsatz des Produktes im Straßenverkehr gelten die Vorschriften der StVZO.
• Beachten Sie, dass keine Komponenten, wie der Airbag, Sicherheitsbereiche, Bedienelemente,
Instrumente, etc. oder die Sicht, verdeckt oder einschränkt sind.
• Lassen Sie sich auf der Fahrt mit einem Kraftfahrzeug nicht durch Ihr Produkt ablenken und
achten Sie auf die Verkehrslage und ihreUmgebung.
Hinweis
• Prüfen Sie vor der Montage der Halterung die Einbaumöglichkeiten in Ihrem Fahrzeug. Im
Zweifelsfall ziehen Sie dazu die Betriebsanleitung des Fahrzeugs zu Rate oder wenden Sie sich an
den Fahrzeughersteller.
• Wenden Sie im Umgang mit dem Produkt und bei der Montage niemals Gewalt oder hohe
Kräfte an.
• Kontrollieren Sie vor jeder Fahrt die sichereMontage des Produkts.
19

6.1 Montage Saugnapfhalterung
• Entfernen Sie die Schutzfolie am Saugnapf.
• Öffnen Sie den Verriegelungshebel (15) des Saugnapfes.
• Positionieren Sie den Halter mit dem Saugnapf auf einer gesäuberten, ebenen Montageäche (z.B.
Glasscheibe)
• Drücken Sie den Halter auf der gewünschten Montageäche leicht an und schließen Sie den
Verriegelungshebel, um den Halter zu befestigen.
• Prüfen Sie nach der Montage stets den sicheren Halt des Saugnapfes.
• Um den Saugnapf wieder von der Montageäche zu lösen, öffnen Sie den Verriegelungshebel.
Ziehen Sie anschließend ggf.leicht an der Lasche, um den Saugnapf vollständig zu lösen.
6.2 Winkel und Neigung einstellen
Die Halterung kann mittels eines Kugelkopfes stufenlos in Winkel und Neigung zum Betrachter verstellt
werden.
• Verstellen Sie Winkel und Neigung stets ohne eingesetztes Endgerät.
• Lockern Sie zum Verstellen die Klemmschraube des Kugelkopfes.
• Stellen Sie Winkel und Neigung wie gewünscht ein und drehen Sie die Klemmschraube fest.
6.3 Dashcam einsetzen/entnehmen
Hinweis
Prüfen Sie stets den sicheren Sitz der Saugnapfhalterung und den sicheren Halt der Dashcam.
• Schieben Sie die Dashcam in die Halterung (14) des Saugnapfhalters.
• Ziehen Sie die Dashcam durch vorsichtiges Hin- und Herbewegen aus der Halterung heraus.
7. Betrieb
7.1. Verbindung mit KFZ-Bordnetz
Warnung –Akku
• Verwenden Sie nur geeignete Ladegeräte mit USB Anschlüssen zum Auaden.
• Verwenden Sie defekte Ladegeräte oder USB Anschlüsse generell nicht mehr und versuchen Sie
nicht, diese zu reparieren.
• Überladen oder tiefentladen Sie das Produkt nicht.
• Vermeiden Sie Lagerung, Laden und Benutzung bei extremen Temperaturen und extrem
niedrigem Luftdruck (wie z.B. in großen Höhen).
• Laden Sie bei längerer Lagerung regelmäßig (mind. vierteljährig) nach.
20

• Verbinden Sie das beiliegende MiniUSB-Ladekabel mit der MiniUSB-Ladebuchse (11) der Dashcam
und der Kfz-Steckdose des Bordnetzes.
• Die Dashcam schaltet sich nach Start des Motors automatisch ein.
• Die Status-LED (12) leuchtet dauerhaft blau.
Hinweis -Akkukapazität
Der Akku verfügt über eine begrenzte Laufzeit von ca. 2-3 Minuten. Diese Pufferfunktion dient
z.B. der kontinuierlichen Weiterführung der Uhrzeit. Längerer Betrieb ist nur mit angeschlossenem
KFZ-Adapter möglich.
Hinweis -dauerhafter Akkubetrieb
Das Gerät ist nicht für den dauerhaften Akkubetrieb vorgesehen. Dauerhafter Akkubetrieb kann zu
irreparablen Schäden führen.
7.2. Ein-/Ausschalten
Hinweis -automatisches Ein-/Ausschalten
Ist die Dashcam mittels des KFZ-Ladegeräts mit einer Stromquelle verbunden, schaltet sie sich beim
Starten/Ausschalten des Fahrzeugs automatisch ein/aus.
Hinweis -Autobatterie
Bei einigen Fahrzeugen kann es vorkommen, dass die Stromzufuhr trotz abgestellter Zündung
erhalten bleibt. Schalten Sie in diesem Fall die Kameramanuell aus, um IhreAutobatterie vor
Entladung zu schützen.
Drücken und halten Sie Power [ ](10) für ca. 3Sekunden, um die Dashcam manuell ein-/
auszuschalten.
7.3. Einsetzen MicroSD-Karte
• Stecken Sie eine MicroSD-Karte in den MicroSD-Kartenslot (2) der Dashcam.
• Auf dem Display wird angezeigt.
Hinweis -Speicherkarte voll
Sobald der Speicher der MicroSD-Karte voll ist, wirddie älteste Videoaufnahme überschrieben.
21

8. Modi
8.1 Videomodus
• Nach Einschalten der Kamerabendet sich diese im Betriebsmodus Video. erscheint am linken,
oberen Bildschirmrand.
• Die Videoaufnahme startet automatisch beim Einschalten des Gerätes.
• Drücken Sie [OK](7), um die Videoaufnahme zu stoppen/starten.
• Während der Videoaufnahme wirddie Aufnahmedauer am linken, oberen Bildschirmrand angezeigt.
Die Status-LED (12) leuchtet abwechselnd rotund blau.
Hinweis -Nachtmodus
Drücken Sie während der Videoaufnahme kurz Power [ ](10), um den Nachtmodus zu aktivieren/
deaktivieren.
8.2 Fotomodus
• Aktivieren Sie durch wiederholtes Drücken von [MODE](6) den Betriebsmodus Foto. erscheint
am linken, oberen Bildschirmrand.
• Drücken Sie [OK](7), um ein Bild aufzunehmen.
8.3 Wiedergabemodus
• Aktivieren Sie durch wiederholtes Drücken von [MODE](6) den Betriebsmodus Wiedergabe.
erscheint am linken, unteren Bildschirmrand.
• Wählen Sie mit Hilfe der Navigationstasten [◄](9) /[►](5) die Datei aus, die Sie wiedergeben
möchten.
• Drücken Sie [MENU](8) für weitereOptionen.
• Navigieren Sie mithilfe der Navigationstasten [◄](9) /[►](5) durch das Menü.
• Wählen Sie den Menüpunkt Löschen und bestätigen Sie IhreAuswahl durch Drücken von [OK](7).
• Sie haben die Wahl zwischen Auswahl löschen und Alle löschen.
• Bestätigen Sie die nachfolgende Sicherheitsabfrage mit OK oder wählen Sie Abbrechen,umden
Vorgang abzubrechen.
• Drücken Sie [MENU](8) für weitereOptionen, um alternativ zum Menüpunkt Schutz zu gelangen.
• Wählen Sie den Menüpunkt Schutz und bestätigen Sie IhreAuswahl durch Drücken von [OK](7).
• Sie haben die Wahl zwischen Datei sperren, Alle sperren, Datei entsperren und Alle
entsperren.
• Bestätigen Sie die nachfolgende Sicherheitsabfrage mit OK oder wählen Sie Abbrechen,umden
Vorgang abzubrechen.
22

9. Einstellungen
9.1 Einstellungen Videomodus
• Wechseln Sie –wie in Kapitel 8.1 Videomodus beschrieben –inden Videomodus.
• Drücken Sie [MENU](8), um zu den Videoeinstellungen zu gelangen.
• Am linken, oberen Bildschirmrand wird
angezeigt.
• Navigieren Sie mithilfe der Navigationstasten [◄](9) /[►](5) durch das Menü.
• Bestätigen Sie ihreAuswahl durch Drücken von [OK](7).
9.1.1 Auflösung
Wählen Sie die gewünschte Auösung (1280X720 /1920X1080)des aufgenommenen Videomaterials.
• Navigieren Sie zum Menüpunkt Auösung und bestätigen Sie ihreAuswahl durch Drücken von
[OK](7). Ein neues Übersichtsfenster wirdgeöffnet.
• Wählen Sie mithilfe der Navigationstasten [◄](9) /[►](5) die gewünschte Einstellung aus.
• Bestätigen Sie IhreAuswahl durch Drücken von [OK](7).
9.1.2 Wasserzeichen
Bei aktiviertem Modus erhält jede Videodatei einen Zeit- und Datumsstempel.
• Navigieren Sie zum Menüpunkt Wasserzeichen und bestätigen Sie ihreAuswahl durch Drücken
von [OK](7). Ein neues Übersichtsfenster wirdgeöffnet.
• Wählen Sie mithilfe der Navigationstasten [◄](9) /[►](5) die gewünschte Einstellung aus.
• Bestätigen Sie IhreAuswahl durch Drücken von [OK](7).
9.1.3 Bewegungserkennung
Bei aktivierter Bewegungserkennung wirddie Videoaufnahme bei Erschütterungen der Kamera(z.B.
Unfall) automatisch gestartet.
• Navigieren Sie zum Menüpunkt Bewegungserkennung und bestätigen Sie ihreAuswahl durch
Drücken von [OK](7). Ein neues Übersichtsfenster wirdgeöffnet.
• Wählen Sie mithilfe der Navigationstasten [◄](9) /[►](5) die gewünschte Einstellung aus.
• Bestätigen Sie IhreAuswahl durch Drücken von [OK](7).
• Auf dem Videodisplay wird angezeigt.
9.1.4 Loop-Funktion
Wählen Sie hier das Zeitintervall (1/2/3/5 Minuten), nach dem eine neue Videoaufnahme begonnen
werden soll.
Wählen Sie Aus,umdiese Funktion zu deaktivieren. Es wirdnun nur eine Datei erstellt.
• Navigieren Sie zum Menüpunkt Loop-Funktion und bestätigen Sie ihreAuswahl durch Drücken
von [OK](7). Ein neues Übersichtsfenster wirdgeöffnet.
• Wählen Sie mithilfe der Navigationstasten [◄](9) /[►](5) die gewünschte Einstellung aus.
23

• Bestätigen Sie IhreAuswahl durch Drücken von [OK](7).
• Auf dem Videodisplay wird angezeigt.
9.1.5 Audioaufnahme
Bei aktiviertem Modus wirdneben dem Videomaterial zusätzlich der Tonaufgezeichnet.
• Navigieren Sie zum Menüpunkt Audioaufnahme und bestätigen Sie ihreAuswahl durch Drücken
von [OK](7). Ein neues Übersichtsfenster wirdgeöffnet.
• Wählen Sie mithilfe der Navigationstasten [◄](9) /[►](5) die gewünschte Einstellung aus.
• Bestätigen Sie IhreAuswahl durch Drücken von [OK](7).
9.1.6 Kontrast
Erhöhen Sie die Qualität der Videoaufnahme durch Anpassung des Kontrasts (-2 bis +2).
• Navigieren Sie zum Menüpunkt Kontrast und bestätigen Sie ihreAuswahl durch Drücken von
[OK](7). Ein neues Übersichtsfenster wirdgeöffnet.
• Wählen Sie mithilfe der Navigationstasten [◄](9) /[►](5) die gewünschte Einstellung aus.
• Bestätigen Sie IhreAuswahl durch Drücken von [OK](7).
9.2 Einstellungen Fotomodus
• Wechseln Sie –wie in Kapitel 8.2 Fotomodus beschrieben –inden Fotomodus.
• Drücken Sie [MENU](8), um zu den Einstellungen Foto zu gelangen.
• Am linken, oberen Bildschirmrand wird angezeigt.
• Navigieren Sie mithilfe der Navigationstasten [◄](9) /[►](5) durch das Menü.
• Bestätigen Sie IhreAuswahl durch Drücken von [OK](7).
9.2.1 Auflösung
Wählen Sie die gewünschte Auösung (VGA -12Megapixel)des aufgenommenen Bildmaterials.
• Navigieren Sie zum Menüpunkt Auösung und bestätigen Sie ihreAuswahl durch Drücken von
[OK](7). Ein neues Übersichtsfenster wirdgeöffnet.
• Wählen Sie mithilfe der Navigationstasten [◄](9) /[►](5) die gewünschte Einstellung aus.
• Bestätigen Sie IhreAuswahl durch Drücken von [OK](7).
9.2.2 Bildanzeige
Bei aktivierter Bildanzeige wirddie getätigte Aufnahme für eine kurze Zeit (2/5 Sekunden)auf dem
Display angezeigt. Erst nach Ablauf dieser Zeit kann ein neues Bild aufgenommen werden.
Wählen Sie Aus,umdiese Funktion zu deaktivieren.
• Navigieren Sie zum Menüpunkt Bildanzeige und bestätigen Sie ihreAuswahl durch Drücken von
[OK](7). Ein neues Übersichtsfenster wirdgeöffnet.
• Wählen Sie mithilfe der Navigationstasten [◄](9) /[►](5) die gewünschte Einstellung aus.
• Bestätigen Sie IhreAuswahl durch Drücken von [OK](7).
24

9.2.3 Wasserzeichen
Bei aktiviertem Modus erhält jede Fotodatei einen Zeit- und Datumsstempel.
• Navigieren Sie zum Menüpunkt Wasserzeichen und bestätigen Sie ihreAuswahl durch Drücken
von [OK](7). Ein neues Übersichtsfenster wirdgeöffnet.
• Wählen Sie mithilfe der Navigationstasten [◄](9) /[►](5) die gewünschte Einstellung aus.
• Bestätigen Sie IhreAuswahl durch Drücken von [OK](7).
9.2.4 Kontrast
Erhöhen Sie die Qualität der Fotoaufnahme durch Anpassung des Kontrasts (-2 bis +2).
• Navigieren Sie zum Menüpunkt Kontrast und bestätigen Sie ihreAuswahl durch Drücken von
[OK](7). Ein neues Übersichtsfenster wirdgeöffnet.
• Wählen Sie mithilfe der Navigationstasten [◄](9) /[►](5) die gewünschte Einstellung aus.
• Bestätigen Sie IhreAuswahl durch Drücken von [OK](7).
9.3 Allgemeine Einstellungen
• Drücken Sie zwei Mal [MENU](8), um zum Einstellungsmenü der Kamerazugelangen.
• Alternativ drücken Sie ein Mal [MENU](8), wenn Sie sich bereits im Menü Video/Foto benden.
• Am linken, oberen Bildschirmrand wird angezeigt.
• Navigieren Sie mithilfe der Navigationstasten [◄](9) /[►](5) durch das Menü.
• Bestätigen Sie IhreAuswahl durch Drücken von [OK](7).
9.3.1 Speicherkarte formatieren
Löschen Sie alle Dateien, die sich auf der eingelegten Speicherkarte benden.
• Navigieren Sie zum Menüpunkt Speicherkarte formatieren und bestätigen Sie ihreAuswahl
durch Drücken von [OK](7). Ein neues Übersichtsfenster wirdgeöffnet.
• Bestätigen Sie die Formatierung mit OK oder wählen Sie Abbrechen,umden Vorgang
abzubrechen.
9.3.2 Sprache
Wählen Sie die Sprache der Menüführung aus.
• Navigieren Sie zum Menüpunkt Sprache und bestätigen Sie ihreAuswahl durch Drücken von
[OK](7). Ein neues Übersichtsfenster wirdgeöffnet.
• Wählen Sie mithilfe der Navigationstasten [◄](9) /[►](5) die gewünschte Einstellung aus.
• Bestätigen Sie IhreAuswahl durch Drücken von [OK](7).
9.3.3 Aus bei Inaktivität
Wählen Sie das Zeitintervall (1Minute /3 Minuten), nach dem sich die Kamerabei Nichtbenutzung
automatisch ausschaltet.
25

Wählen Sie Aus,umdiese Funktion zu deaktivieren.
• Navigieren Sie zum Menüpunkt Aus bei Inaktivität und bestätigen Sie ihreAuswahl durch
Drücken von [OK](7). Ein neues Übersichtsfenster wirdgeöffnet.
• Wählen Sie mithilfe der Navigationstasten [◄](9) /[►](5) die gewünschte Einstellung aus.
• Bestätigen Sie IhreAuswahl durch Drücken von [OK](7).
9.3.4 Bildschirmschoner
Wählen Sie das Zeitintervall (1Minute /3Minuten /5 Minuten), nach dem der Bildschirmschoner
aktiviert wird. Betätigen Sie in dieser Zeit keine Taste, wirdder Display ausgeschaltet. Die
Videoaufnahme läuft jedoch weiter.
Wählen Sie Aus,umdiese Funktion zu deaktivieren.
• Navigieren Sie zum Menüpunkt Bildschirmschoner und bestätigen Sie ihreAuswahl durch
Drücken von [OK](7). Ein neues Übersichtsfenster wirdgeöffnet.
• Wählen Sie mithilfe der Navigationstasten [◄](9) /[►](5) die gewünschte Einstellung aus.
• Bestätigen Sie IhreAuswahl durch Drücken von [OK](7).
9.3.5 Werkseinstellungen
• Navigieren Sie zum Menüpunkt Werkseinstellungen und bestätigen Sie ihreAuswahl durch
Drücken von [OK](7). Ein neues Übersichtsfenster wirdgeöffnet.
• Bestätigen Sie die Zurücksetzung mit OK oder wählen Sie Abbrechen,umden Vorgang
abzubrechen.
9.3.6 Datum/Uhrzeit
• Navigieren Sie zum Menüpunkt Datum/Uhrzeit und bestätigen Sie ihreAuswahl durch Drücken
von [OK](7). Ein neues Übersichtsfenster wirdgeöffnet.
• Stellen Sie mithilfe der Navigationstasten [◄](9) /[►](5) das Jahr ein und bestätigen Sie Ihre
Eingabe durch Drücken von [OK](7).
• Stellen Sie danach die folgenden Informationen mit der gleichen Vorgehensweise nacheinander ein:
Monat, Tag, Uhrzeit.
• Bestätigen Sie IhreAuswahl durch Drücken von [MENU](8).
9.3.7 Version
• Navigieren Sie zum Menüpunkt Version und bestätigen Sie ihreAuswahl durch Drücken von
[OK](7). Ein neues Übersichtsfenster wirdgeöffnet.
• Die aktuelle Version der Kamerawirdangezeigt.
26

10. Abrufen des aufgenommenen Materials
Hinweis
Entfernen Sie die MicroSD-Karte nicht bei eingeschalteter Dashcam. Dies kann zu Datenverlust
führen bzw.Schäden am Gerät verursachen.
• Schalten Sie die Dashcam –wie in 7.2 Ein-/Ausschalten beschrieben –aus.
• Entnehmen Sie die MicroSD-Karte der Kamera.
• Schließen Sie die MicroSD-Karte mithilfe des SD-Kartenlesegeräts (Lieferumfang) an Ihren PC an.
• Übertragen Sie die gespeicherten Daten auf Ihren PC, um den Speicher zu entlasten.
11. Sicherungstaste
Hinweis
Beachten Sie, dass im Falle eines Unfalls das Leisten von Erster Hilfe und die Sicherheit aller
Beteiligten Priorität besitzt.
Um sicher zu gehen, dass IhreDaten dauerhaft gespeichert werden, gehen Sie wie folgt vor:
• Drücken Sie die Sicherungstaste (13). Auf dem Display erscheint .
• Drücken und halten Sie Sie Power [ ](10) für ca. 3Sekunden, um die Kameraauszuschalten.
• Entnehmen Sie nun die MicroSD-Karte der Kamera.
Hinweis
• Videos, die nach Drücken der Sicherungstaste gespeichert wurden, werden unter der
Bezeichnung „LOKXXXXX“ abgespeichert.
• ReguläreVideodateien werden unter der Bezeichnung „REC“ sowie einer fortlaufenden Nummer
gespeichert.
12. Werkseinstellungen
Um die Dashcam auf die Werkseinstellung (Auslieferungszustand) zurückzusetzen, gehen Sie bitte wie
folgt vor:
• Schalten Sie die Dashcam –wie in 7.2 Ein-/Ausschalten beschrieben –aus.
• Drücken und halten Sie [Reset](4) mit Hilfe eines spitzen Gegenstandes für ca. 3Sekunden.
• Alternativ können Sie die Werkseinstellungen –wie in Kapitel 9.3.5 Werkseinstellungen
beschrieben -wiederherstellen.
• Alle vorgenommenen Einstellungen werden gelöscht.
27

Hinweis
• Probleme und Fehlfunktionen können möglicherweise durch Rücksetzung auf die
Werkseinstellungen behoben werden.
• Es werden jedoch alle Voreinstellungen unwiderruich gelöscht.
13. Wartung und Pflege
• Reinigen Sie dieses Produkt nur mit einem fusselfreien, leicht feuchten Tuch und verwenden Sie
keine aggressiven Reiniger.
• Achten Sie darauf,dass kein Wasser in das Produkt eindringt.
14. Haftungsausschluss
Die Hama GmbH &CoKG übernimmt keinerlei Haftung oder Gewährleistung für Schäden, die aus
unsachgemäßer Installation, Montage und unsachgemäßem Gebrauch des Produktes oder einer
Nichtbeachtung der Bedienungsanleitung und/oder der Sicherheitshinweise resultieren.
15. Technische Daten
Abmessungen 89 x48x35mm
Bildschirmdiagonale2.4"
Max. Auösung Photo:12megapixel | Video: 1080i
Datenformat Photo: JPEG | Video: AVI
SpeicherkarteUnterstützt MicroSD-Speicherkarten bis 32 GB
Stromversorgung Input: 12 V-24V 0,5A; Output: 5V ;1A ;Kabellänge: 2m
Batter ie
Input:5V 290mA; Typ:3,7 V/LiPo;
min.Kapazität: 130 mAh /0,48Wh
28

Éléments de commande et d’affichage
A
1. Système de support àventouse
2. Fente pour carte microSD
3. Microphone /haut-parleur
B
4. Réinitialisation
5.
Touche de navigation
►
6. Mode
7. OK
8. Menu
9.
Touche de navigation
◄
10.Power (mise sous tension)
C
11.Prise de charge mini USB
12.LED d’état
13.Touche de protection
D
14.Support Dashcam
15.Levier de verrouillage
Mode vidéo -Aperçu des symboles
Mode vidéo
Durée de la boucle
Mode diurne
Mode nocturne
Mode mouvement
Qualité vidéo
Cartemémoire reco nnu e
F Mode d‘emploi
29

Carte mémoirenon reconnue
Témoindebat terie
Enregistrementvidéoencours
Sécurisépar vidéo
00.00.00
Duréedelavidé o
Fotomodus -Symbolübersicht
Mode photo
Mode diurne
Mode nocturne
12M-VGA Résolution image
Cartemémoire reco nnu e
Carte mémoirenon reconnue
Témoindebat terie
Wiedergabemodus -Symbolübersicht
Enregistrement vidéo en cours
Pause de l’enregistrement vidéo
Sécurisé par vidéo
30

Cartemémoire reco nnu e
Carte mémoirenon reconnue
Témoindebat terie
Nous vous remercions d’avoir choisi un produit Hama.
Veuillez prendreletemps de lirel‘ensemble des remarques et consignes suivantes. Veuillez conserver
ce mode d‘emploi àportée de main andepouvoir le consulter en cas de besoin. Transmettez-le au
nouveau propriétaireavec l’appareil le cas échéant.
1. Explication des symboles d‘avertissement et des remarques
Risque d’électrocution
Ce symbole indique un risque de contact avec des parties non isolées du produit susceptibles de
conduireuncourant électrique capable de provoquer un risque d‘électrocution.
Avertissement
Ce symbole est utilisé pour indiquer des consignes de sécurité ou pour attirer votreattention sur des
dangers et risques particuliers.
Remarque
Ce symbole est utilisé pour indiquer des informations supplémentaires ou des remarques
importantes.
2. Contenu de l‘emballage
•Dashcam 30
•Chargeur voituremini USB
•Support àventouse
•Lecteur de cartes microSD
•Cemode d’emploi
31

3. Consignes de sécurité
• Ce produit est destiné àunusage domestique non commercial.
• Utilisez le produit exclusivement conformément àsadestination.
• Protégez le produit de toute saleté, humidité, surchauffe et utilisez-le uniquement dans des locaux secs.
• Protégez le produit des secousses violentes et évitez tout choc ou toute chute.
• N‘utilisez pas le produit en dehors des limites de puissance indiquées dans les caractéristiques techniques.
• Faites attention ànepas plier ni coincer le câble.
• La batterie est installée de façon permanente et ne peut pas êtreretirée ;recyclez le produit en bloc
conformément aux directives légales.
• Ne tentez pas d‘ouvrir le produit en cas de détérioration et cessez de l’utiliser.
• Cet appareil, comme tout appareil électrique, doit êtregardé hors de portée des enfants !
• Veuillez respecter les lois et réglementations locales en vigueur relatives au code de la route lors de
l‘utilisation du produit.
• Veuillez contrôler que le produit n‘affecte le fonctionnement d‘aucun élément de sécurité tel qu‘un
airbag, zone de sécurité, élément de commande, instrument, etc. et qu‘il n‘entrave pas la visibilité.
• Ne laissez pas le produit capter votreattention lorsque vous pilotez un véhicule et veuillez
concentrer toute votreattention sur la circulation et votreenvironnement.
• Vériez que le produit est xé en toute sécurité avant chaque trajet.
• Recyclez les matériaux d’emballage conformément aux prescriptions locales en vigueur.
• N’apportez aucune modication àl’appareil. Des modications vous feraient perdrevos droits de
garantie.
• Ne jetez pas le produit ni aucune batterie dans un feu.
• Ne modiez pas et/ou ne déformez/chauffez/désassemblez pas les batteries/piles.
Risque d’électrocution
• Ne tentez pas d'ouvrir l'appareil et cessez de l'utiliser en cas de détérioration.
• Cessez d'utiliser l'appareil en cas de détérioration du câble de charge, du câble adaptateur ou du
cordon d'alimentation.
• Ne tentez pas de réparer l’appareil vous-même ni d’effectuer des travaux d’entretien. Faites appel
àdes techniciens qualiés pour effectuer tous les travaux d’entretien.
4. Dispositions légales /restrictions lors du fonctionnement de la Dashcam
Remarque
• Les remarques concernant les dispositions légales mentionnées dans ce manuel correspondent
uniquement aux règlements et lois en vigueur en Allemagne au moment de leur impression. Dans
un autrepays, informez-vous des réglementations locales avant l’utilisation du produit.
32

Remarque
• Veuillez noter qu’en cas d’utilisation du produit sur la voie publique, différentes réglementations
sont susceptibles de devoir êtrerespectées en fonction de la législation du pays concerné.
• Certaines jurisprudences nationales imposent des règles spéciques àl’utilisation de Dashcams
ou l’interdisent totalement. Veuillez vous renseigner avant de mettrelaDashcam en service et
obtenir des informations concernant les lois et réglementations du pays concerné.
• Veuillez également respecter les directives concernant la protection des données d’utiliser le produit.
• Veuillez respecter les directives en vigueur concernant l’enregistrement et la sauvegarde de chiers
vidéo et audio.
5. Utilisation conforme
•Ceproduit est destiné uniquement àune utilisation àl’intérieur de véhicules.
•Veuillez respecter les droits de la personnalité et les droits de propriété de tiers. N’utilisez pas la
Dashcam andelmer d’autres personnes.
•Veuillez respecter le droit exclusif dont dispose chaque individu sur son image et ses paroles.
•Encas d’interruption d’utilisation prolongée, retirez le produit de votrepare-brise and’éviter toute
détérioration provoquée par le soleil ou une températureexcessive.
6. Mise en service
Avertissement -Risque de blessure
• Veuillez respecter les lois et réglementations locales en vigueur relatives au code de la route lors
de l‘utilisation du produit.
• Veuillez contrôler que le produit n‘affecte le fonctionnement d‘aucun élément de sécurité tel
qu‘un airbag, zone de sécurité, élément de commande, instrument, etc. et qu‘il n‘entrave pas
la visibilité.
• Ne laissez pas le produit capter votreattention lorsque vous pilotez un véhicule et veuillez
concentrer toute votreattention sur la circulation et votreenvironnement.
Remarque
• Avant d'installer le système de xation, veuillez contrôler les possibilités d’installation de votre
véhicule. En cas de doute, veuillez consulter le mode d’emploi de votrevéhicule ou contacter le
fabricant de ce dernier.
• N‘appliquez en aucun cas une force excessive lors de l‘utilisation ou de l‘installation du produit.
• Vériez que le produit est xé en toute sécurité avant chaque trajet.
33

6.1 Installation du support àventouse
• Retirez le lm protecteur placé sur la ventouse.
• Ouvrez le levier de verrouillage (15) de la ventouse.
• Placez le support avec la ventouse sur une surface d’installation plane et propre(vitre, etc.).
• Appuyez légèrement le support sur la surface d’installation souhaitée, puis fermez le levier de
verrouillage (15) pour xer le support.
• Vériez la bonne xation de la ventouse une fois l’installation terminée.
• Pour retirer la ventouse, ouvrez le levier de verrouillage. Tirezensuite légèrement sur la languette
andedégager totalement la ventouse.
6.2 Réglage de l’angle et de l’inclinaison
La tête articulée du support vous permet d’orienter en continu le produit en direction de l’utilisateur.
• Réglez l’angle et l’inclinaison du support avant de mettrevotreDashcam en place.
• Pour effectuer le réglage, desserrez la vis de blocage de la tête articulée.
• Réglez l’angle et l’inclinaison souhaités et resserrez la vis de blocage.
6.3 Mise en place/retrait de la Dashcam
Remarque
Vériez la bonne xation du support àventouse et le parfait maintien de votreDashcam.
• Faites glisser votreDashcam dans le dispositif de xation (14) du support àventouse.
• Vous pourrez retirer votreDashcam en exerçant avec précaution un mouvement de va-et-vient.
7. Fonctionnement
7.1. Connexion avec votre tableau de bord
Avertissement concernant la batterie
• Utilisez exclusivement un chargeur approprié disposant de connexions USB pour la charge.
• Cessez d'utiliser tout chargeur ou tout port USB défectueux et ne tentez pas de réparer ces
derniers.
• Ne surchargez ou ne déchargez pas totalement le produit.
• Évitez de stocker,charger et utiliser le produit àdes températures extrêmes et àune pression
atmosphérique extrêmement basse (à haute altitude, par exemple).
• Rechargez régulièrement le produit (au moins une fois par trimestre) en cas de longue période
de stockage.
34

• Branchez le câble de charge mini USB fourni au port de charge mini USB (11) de la Dashcam et àla
prise électrique de votretableau de bord.
• La Dashcam se met automatiquement sous tension dès que vous démarrez le moteur.
• La LED d'état (12) s'allume en permanence en bleu.
Remarque -Capacité de la batterie
La batterie dispose d’une capacité limitée d’env.2-3 minutes. Cette fonction de tampon est utilisée,
par exemple, pour l’alimentation de l’horloge. Une fonctionnement plus long de la Dashcam n’est
possible qu’après avoir branché un adaptateur voiture.
Remarque -Fonctionnement permanent sur batterie
L’appareil n’a pas été conçu pour un fonctionnement permanent sur batterie. Un fonctionnement
permanent sur batterie est susceptible de provoquer une détérioration irréparable du produit.
7.2. Mise sous/hors tension
Remarque -Mise sous/hors tension automatique
La Dashcam se met automatiquement sous/hors tension dès que vous démarrez/arrêtez votre
véhicule lorsqu’elle est branchée àune source d’alimentation au moyen du chargeur voiture.
Remarque -Batterie du véhicule
L’alimentation électrique de certains véhicules reste disponible lorsqu’on en arrête le moteur.
Dans ce cas, mettez la camérahors tension manuellement andenepas épuiser la batterie votre
véhicule.
Maintenez la touche Power [ ](10) enfoncée pendant env.3secondes pour mettremanuellement la
Dashcam sous ou hors tension.
7.3. Utilisation d’une carte micro SD
• Insérez une carte microSD dans l’emplacement de cartes microSD (2) de la Dashcam.
• apparaît àl'écran.
Remarque -Carte mémoirepleine
La caméraécrase la plus ancienne vidéo dès que la mémoiredelacarte microSD est saturée.
35

8. Modes
8.1 Mode vidéo
• apparaît dans le coin supérieur gauche de l’écran après avoir mis la camérasous tension.
• L’enregistrement vidéo démarreautomatiquement lors de la mise sous tension de l’appareil.
• Appuyez sur la touche [OK](7) andeinterrompre/démarrer l’enregistrement vidéo.
• La duré de l’enregistrement vidéo est indiquée dans le coin supérieur gauche de l'écran pendant
l’enregistrement. La LED d’état (12) s’allume alternativement en rouge et bleu.
Remarque -Mode nocturne
Pendant un enregistrement, appuyez brièvement sur la touche Power [ ](10) and’activer/
désactiver le mode nocturne.
8.2 Mode photo
• Activez le mode photo en appuyant plusieurs fois sur la touche [MODE](6) ; apparaît dans le
coin supérieur gauche de l’écran.
• Appuyez sur la touche [OK](7) andeprendreune photo.
8.3 Wiedergabemodus
• Vous pouvez activer le mode lectureenappuyant plusieurs fois sur [MODE](6).
apparaît dans le bordinférieur gauche de l’écran.
• Utilisez les touches de navigation [◄](9) /[►](5) andesélectionner le chier que vous désirez
lire.
• Appuyez sur [MENU](8) pour sélectionner d’autres options.
• Utilisez les touches de navigation [◄](9) /[►](5) andesélectionner une option du menu.
• Sélectionnez l’option de menu Supprimer,puis conrmez votresélection en appuyant sur [OK](7).
• Vous pouvez sélectionner Supprimer la sélection ou Tout supprimer.
• Conrmez le message de sécurité àl’aide de OK ou sélectionnez Annuler and’interrompre
l’opération.
• Appuyez sur [MENU](8) pour sélectionner d’autres options ou, par exemple, pour ouvrir l’option
Bloquer.
• Sélectionnez l’option de menu Bloquer,puis conrmez votresélection en appuyant sur [OK](7).
• Vous pouvez sélectionner Verrouiller le chier, Verrouiller tout, Déverrouiller le chier ou
Tout déverrouiller.
• Conrmez le message de sécurité àl’aide de OK ou sélectionnez Annuler and’interrompre
l’opération.
9. Paramètres
9.1 Paramètres du mode vidéo
• Sélectionnez le mode vidéo –comme décrit au chapitre 8.1 Mode vidéo.
36

• Appuyez sur la touche [MENU](8) and’ouvrir les paramètres vidéo.
•
apparaît dans le bordsupérieur gauche de l’écran.
• Utilisez les touches de navigation [◄](9) /[►](5) andesélectionner une option du menu.
• Conrmez votresélection en appuyant sur [OK](7).
9.1.1 Résolution
Sélectionnez une résolution (1280X720 /1920X1080)pour le matériel vidéo que vous souhaitez
enregistrer.
• Ouvrez l’option de menu Résolution,puis conrmez votresélection en appuyant sur [OK](7). Un
nouvel aperçu apparait àl’écran.
• Utilisez les touches de navigation [◄](9) /[►](5) andesélectionner le paramètresouhaité.
• Conrmez votresélection en appuyant sur [OK](7).
9.1.2 Filigrane
La date et l’heuredetous les enregistrements seront adjoints aux chiers vidéo lorsque vous activez
ce mode.
• Ouvrez l’option de menu Filigrane,puis conrmez votresélection en appuyant sur [OK](7). Un
nouvel aperçu apparait àl’écran.
• Utilisez les touches de navigation [◄](9) /[►](5) andesélectionner le paramètresouhaité.
• Conrmez votresélection en appuyant sur [OK](7).
9.1.3 Détection de mouvements
L’enregistrement vidéo démarreautomatiquement en cas de secousses détectées par la caméra(en cas
d’accident, par exemple) lorsque l’option dedétection de mouvements est activée.
• Ouvrez l’option de menu Détection de mouvements,puis conrmez votresélection en appuyant
sur [OK](7). Un nouvel aperçu apparait àl’écran.
• Utilisez les touches de navigation [◄](9) /[►](5) andesélectionner le paramètresouhaité.
• Conrmez votresélection en appuyant sur [OK](7).
• apparaît àl’écran vidéo.
9.1.4 Fonction boucle
Sélectionnez un laps de temps (1/2/3/5 minutes)aubout duquel vous souhaitez que le nouvel
enregistrement vidéo démarre.
Sélectionnez Off,andedésactiver cette fonction. La caméracrée un nouveau chier.
• Ouvrez l’option de menu Fonction boucle,puis conrmez votresélection en appuyant sur [OK](7).
Un nouvel aperçu apparait àl’écran.
• Utilisez les touches de navigation [◄](9) /[►](5) andesélectionner le paramètresouhaité.
• Conrmez votresélection en appuyant sur [OK](7).
• apparaît àl’écran vidéo.
37

9.1.5 Enregistrement audio
La caméraenregistreraleson, parallèlement àl’enregistrement vidéo, lorsque vous activez ce mode.
• Ouvrez l’option de menu Enregistrement audio,puis conrmez votresélection en appuyant sur
[OK](7). Un nouvel aperçu apparait àl’écran.
• Utilisez les touches de navigation [◄](9) /[►](5) andesélectionner le paramètresouhaité.
• Conrmez votresélection en appuyant sur [OK](7).
9.1.6 Contraste
Vous pouvez améliorer la qualité des enregistrements vidéo en paramétrant une adaptation en fonction
du contraste (-2 à+2).
• Ouvrez l’option de menu Contraste,puis conrmez votresélection en appuyant sur [OK](7). Un
nouvel aperçu apparait àl’écran.
• Utilisez les touches de navigation [◄](9) /[►](5) andesélectionner le paramètresouhaité.
• Conrmez votresélection en appuyant sur [OK](7).
9.2 Paramètres du mode photo
• Sélectionnez le mode photo –comme décrit au chapitre 8.2 Mode photo.
• Appuyez sur la touche [MENU](8) and’ouvrir les paramètres photo.
• apparaît dans le coin supérieur gauche de l’écran.
• Utilisez les touches de navigation [◄](9) /[►](5) andesélectionner une option du menu.
• Conrmez votresélection en appuyant sur [OK](7).
9.2.1 Résolution
Sélectionnez une résolution (VGA -12mégapixels)pour le matériel vidéo que vous souhaitez enregistrer.
• Ouvrez l’option de menu Résolution,puis conrmez votresélection en appuyant sur [OK](7). Un
nouvel aperçu apparait àl’écran.
• Utilisez les touches de navigation [◄](9) /[►](5) andesélectionner le paramètresouhaité.
• Conrmez votresélection en appuyant sur [OK](7).
9.2.2 Affichage des photos
La photo que vous venez de prendreapparaît brièvement (2/5 secondes)àl’écran après avoir activé.
Achage des photos Vous devrez attendrelandel’achage avant de pouvoir prendreune nouvelle
photo.
Sélectionnez Off andedésactiver cette fonction.
• Ouvrez l’option de menu Achage des photos,puis conrmez votresélection en appuyant sur
[OK](7). Un nouvel aperçu apparait àl’écran.
38

• Utilisez les touches de navigation [◄](9) /[►](5) andesélectionner le paramètresouhaité.
• Conrmez votresélection en appuyant sur [OK](7).
9.2.3 Filigrane
La date et l’heuredetoutes vos photos seront adjointes aux chiers vidéo lorsque vous activez ce mode.
• Ouvrez l’option de menu Filigrane,puis conrmez votresélection en appuyant sur [OK](7). Un
nouvel aperçu apparait àl’écran.
• Utilisez les touches de navigation [◄](9) /[►](5) andesélectionner le paramètresouhaité.
• Conrmez votresélection en appuyant sur [OK](7).
9.2.4 Contraste
Vous pouvez améliorer la qualité de vos photos en paramétrant une adaptation en fonction du
contraste (-2 à+2).
• Ouvrez l’option de menu Contraste,puis conrmez votresélection en appuyant sur [OK](7). Un
nouvel aperçu apparait àl’écran.
• Utilisez les touches de navigation [◄](9) /[►](5) andesélectionner le paramètresouhaité.
• Conrmez votresélection en appuyant sur [OK](7).
9.3 Paramètres généraux
• Appuyez deux fois sur [MENU](8) and’ouvrir le menu de réglages de la caméra.
• Vous pouvez également appuyer une fois sur [MENU](8) lorsque le menu vidéo/phto est déjà
ouvert.
• apparaît dans le coin supérieur gauche de l’écran.
• Utilisez les touches de navigation [◄](9) /[►](5) andesélectionner une option du menu.
• Conrmez votresélection en appuyant sur [OK](7).
9.3.1 Formater la carte mémoire
Suppression de tous les chiers enregistrés sur la carte mémoireinsérée.
• Ouvrez l’option de menu Formater la carte mémoire,puis conrmez votresélection en appuyant
sur [OK](7). Un nouvel aperçu apparait àl’écran.
• Conrmez le formatage àl’aide de OK ou sélectionnez Annuler and’interromprel’opération.
9.3.2 Langue
Sélection de la langue du menu.
• Ouvrez l’option de menu Langue,puis conrmez votresélection en appuyant sur [OK](7). Un
nouvel aperçu apparait àl’écran.
• Utilisez les touches de navigation [◄](9) /[►](5) andesélectionner le paramètresouhaité.
• Conrmez votresélection en appuyant sur [OK](7).
39

9.3.3 Off en cas d’inactivité
Sélectionnez un laps de temps (1minute /3 minutes), au bout duquel vous souhaitez que la caméra
se mette automatiquement hors tension en cas de non-utilisation.
Sélectionnez Off andedésactiver cette fonction.
• Ouvrez l’option de menu Off en cas d’inactivité,puis conrmez votresélection en appuyant sur
[OK](7). Un nouvel aperçu apparait àl’écran.
• Utilisez les touches de navigation [◄](9) /[►](5) andesélectionner le paramètresouhaité.
• Conrmez votresélection en appuyant sur [OK](7).
9.3.4 Écran de veille
Sélectionnez un laps de temps (1minute /3minutes /5minutes ), au bout duquel vous souhaitez
activer l’écran de veille. L’écran s’éteindrasivous n’appuyez sur aucune touche pendant ce laps de
temps. La caméracontinue toutefois l’enregistrement vidéo.
Sélectionnez Off andedésactiver cette fonction.
• Ouvrez l’option de menu Écran de veille,puis conrmez votresélection en appuyant sur [OK](7).
Un nouvel aperçu apparait àl’écran.
• Utilisez les touches de navigation [◄](9) /[►](5) andesélectionner le paramètresouhaité.
• Conrmez votresélection en appuyant sur [OK](7).
9.3.5 Réglages d’usine
• Ouvrez l’option de menu Réglages d’usine,puis conrmez votresélection en appuyant sur
[OK](7). Un nouvel aperçu apparait àl’écran.
• Conrmez la réinitialisation àl’aide de OK ou sélectionnez Annuler and’interromprel’opération.
9.3.6 Date/heure
• Ouvrez l’option de menu Date/heure,puis conrmez votresélection en appuyant sur [OK](7). Un
nouvel aperçu apparait àl’écran.
• Utilisez les touches de navigation [◄](9) /[►](5) anderégler l’année, puis conrmez votre
sélection en appuyant sur [OK](7).
• Réglez les informations successives en utilisant la même méthode :mois, jour,heure.
• Conrmez votresélection en appuyant sur [MENU](8).
9.3.7 Version
• Ouvrez l’option de menu Version,puis conrmez votresélection en appuyant sur [OK](7). Un
nouvel aperçu apparait àl’écran.
• La version actuelle du logiciel s’ache àl’écran.
40

10. Consultation du matériel enregistré
Remarque
Ne retirez pas la carte microSD de la Dashcam lorsque cette dernièreest sous tension, risque de
perte de données ou de détérioration de l’appareil.
• Mettez la Dashcam hors tension -comme décrit au chapitre 7.2 Mise sous/hors tension.
• Retirez la carte microSD de la caméra.
• Connectez la carte microSD àvotreordinateur àl’aide du lecteur de cartes SD (fourni).
• Transférez les données sauvegardées sur votreordinateur andelibérer de l’espace mémoiresur
votrecarte.
11. Touche de protection
Remarque
Veuillez noter qu’en cas d’accident, l’apport des premiers secours ainsi que la sécurisation de toutes
les personnes concernées est prioritaire.
Procédez comme suit pour êtrecertain(e) que vos données seront durablement sauvegardées :
• Appuyez sur la touche de protection (13).
apparaît àl'écran.
• Maintenez la touche Power [ ](10) enfoncée pendant env.3secondes andemettrelacaméra
hors tension.
• Retirez la carte microSD de la caméra.
Remarque
• Les vidéos sauvegardées après avoir appuyé sur la touche de protection seront enregistrées sous
la désignation „LOKXXXXX“.
• Les chiers vidéo normaux seront enregistrés avec l’extension „REC“, puis un numéroconsécutif.
12. Paramètres par défaut
Procédez comme suit pour rétablir les paramètres par défaut de votreDashcam (état d’origine) :
• Mettez la Dashcam hors tension -comme décrit au chapitre7.2 Mise sous/hors tension.
• Appuyez àl’aide d’un objet pointu sur la touche [Reset](4) et maintenez-la enfoncée pendant env.
3secondes.
• Vous pouvez également réinitialiser les réglages d’usine –comme décrit au chapitre
9.3.5 Réglages d’usine.
• Tous vos réglages seront supprimés.
41

Remarque
• Certains problèmes ou dysfonctionnements peuvent éventuellement êtreréparés àl’aide du
rétablissement des paramètres par défaut.
• Tous vos préréglages seront alors irrémédiablement supprimés.
13. Soins et entretien
• Nettoyez la balance uniquement àl’aide d’unchiffon non breux légèrement humide ;évitez tout
détergent agressif.
• Veillez àcequ’aucun liquide ne pénètredans le produit.
14. Exclusion de garantie
La société Hama GmbH &CoKG décline toute responsabilité en cas de dommages provoqués par une
installation, un montage ou une utilisation non conformes du produit ou encoreprovoqués par un non
respect des consignes du mode d‘emploi et/ou des consignes de sécurité.
15. Caractéristiques techniques
Dimensions 89 x48x35mm
Diagonale d‘écran 2.4"
Sensibilité maxi photo :12mégapixels |vidéo :1080i
Format de données photo :JPEG|vidéo:AVI
Cartemémoire prend en charge les cartes mémoiremicroSD jusqu’à 32 Go
Alimentation en électricité
Input:12V-24 V 0,5A;Output: 5V ; 1A;longueurducâble:2 m
Pile
Input:5V
290mA ;Type:3,7V/LiPo;
Min capacité :130 mAh /0,48Wh
42

Bedienungselemente und Anzeigen
A
1. Dispositivo de soporte de ventosa
2. Ranuraparatarjetas MicroSD
3. Micrófono/altavoz
B
4. Reset
5.
Tecla de navegación
►
6. Modo
7. OK
8. Menú
9.
Tecla de navegación
◄
10.Power
C
11.Hembrilla de carga MiniUSB
12.LED de estado
13.Tecla de guardar
D
14.Soporte de Dashcam
15.Palanca de bloqueo
Modo de vídeo -Resumen de símbolos
Modo de vídeo
Duración del loop
Modo diurno
Modo nocturno
Modo de movimiento
Calidad de vídeo
Tarjetadememoria dete ctada
E Instrucciones de uso
43

Tarjeta de memoria no detectada
Indicador delestadodelabatería
Grabacióndevídeo en curso
Vídeoguarda do
00.00.00
Duracióndel vide o
Modo de fotografía -Resumen de símbolos
Modo de fotografía
Modo diurno
Modo nocturno
12M-VGA Resolución de imagen
Tarjetadememoria dete ctada
Tarjeta de memoria no detectada
Indicador delestadodelabatería
Modo de reproducción -Resumen de símbolos
Vídeo en marcha
Vídeo pausado
Vídeo guardado
44

Tarjetadememoria dete ctada
Tarjeta de memoria no detectada
Indicador delestadodelabatería
Le agradecemos que se haya decidido por un producto de Hama.
Tómese tiempo yléase primerolas siguientes instrucciones eindicaciones. Después, guarde estas
instrucciones de manejo en un lugar seguroparapoder consultarlas cuando sea necesario. Si vende el
aparato, entregue estas instrucciones de manejo al nuevo propietario.
1. Explicación de los símbolos de aviso ydelas indicaciones
Peligrodesufrir una descarga eléctrica
Este símbolo hace referencia al peligrodecontacto con partes no aisladas del producto que pueden
conducir una tensión peligrosa de una intensidad tal que puede provocar una descarga eléctrica.
Aviso
Se utiliza paracaracterizar las indicaciones de seguridad oparallamar la atención sobrepeligros y
riesgos especiales.
Nota
Se utiliza paracaracterizar informaciones adicionales oindicaciones importantes.
2. Contenido del paquete
•Dashcam 30
•Cargador paravehículo MiniUSB
•Soporte de ventosa
•Lector de tarjetas MicroSD
•Estas instrucciones de manejo
45

3. Instrucciones de seguridad
• El producto está destinado al uso privado, no comercial.
• Emplee el producto exclusivamente paralafunción paralaque fue diseñado.
• Proteja el producto de la suciedad, la humedad yelsobrecalentamiento yutilícelo sólo en recintos secos.
• No deje caer el producto ni lo someta asacudidas fuertes.
• No opereelproducto fueradelos límites de potencia indicados en los datos técnicos.
• No doble ni aplaste el cable.
• La pila recargable está montada de forma ja ynosepuede retirar,deseche el producto como una
unidad yenconformidad con los reglamentos locales.
• No abraelproducto ynolosiga operando de presentar deterioros.
• Este aparato, como todos los aparatos eléctricos, no debe estar en manos de los niños.
• Tenga en cuenta al utilizar el producto las disposiciones yleyes locales vigentes paraeltráco rodado.
• Asegúrese de que ni la vista ni ningún componente, como airbag, áreas de seguridad, elementos de
manejo, instrumentos, etc.,se verán tapados olimitados.
• Durante los desplazamientos con un vehículo, no se distraiga con el producto ypreste atención al
tráco yasu entorno.
• Verique que el montaje del producto es seguroantes de cada desplazamiento.
• Deseche el material de embalaje en conformidad con las disposiciones locales sobreeldesecho
vigentes.
• No realice cambios en el aparato. Esto conllevaría la pérdida de todos los derechos de la garantía.
• No arroje la batería oelproducto al fuego.
• No modique ni deforme/caliente/desensamble las pilas recargables/baterías.
Peligrodesufrir una descarga eléctrica
• No abraelproducto ynolosiga operando de presentar deterioros.
• No utilice el producto si el cable de carga, el adaptador del cable oelcable eléctrico están dañados.
• No intente mantener oreparar el producto por cuenta propia. Encomiende cualquier trabajo de
mantenimiento al personal especializado competente.
4. Regulaciones/limitaciones legales durante el funcionamiento de Dashcams
Nota
• Tenga en cuenta que las indicaciones referentes alaregulaciones legales contenidas en estas
indicaciones solo representan las disposiciones yleyes alemanas en el momento de la impresión.
En otros países, infórmese acerca de las regulaciones vigentes en ese lugar antes de emplear
el producto.
46

Nota
• Tenga en cuenta que al utilizar el producto en el tráco por carreterapueden aplicarse diferentes
normativas dependiendo de la legislación de un país.
• En algunas jurisdicciones, el uso de Dashcams está especícamente regulado oprohibido. Antes
de usar la Dashcam, familiarícese con las leyes ydisposiciones.
• Antes de instalar yutilizar el producto, observe las normas de protección de datos aplicables.
• Observe las normas vigentes paralagrabación yelalmacenamiento de archivos de vídeo eimagen.
5. Uso adecuado
•Este producto está previsto exclusivamente parasuempleo en vehículos.
•Respete los derechos de la personalidad ylapropiedad de otras personas. No haga grabaciones de
otras personas con la Dashcam.
•Algrabar,respete elderecho alapropia imagen yala palabrahablada.
•Retireelproducto del parabrisas cuando no lo utilice durante periodos prolongados paraevitar
daños causados por la luz solar ylatemperatura.
6. Puesta en funcionamiento
Aviso -Peligrodesufrir lesiones
• Tenga en cuenta al utilizar el producto las disposiciones yleyes locales vigentes paraeltráco
rodado.
• Asegúrese de que ni la vista ni ningún componente, como airbag, áreas de seguridad, elementos
de manejo, instrumentos, etc.,se verán tapados olimitados.
• Durante los desplazamientos con un vehículo, no se distraiga con el producto ypreste atención
al tráco yasuentorno.
Nota
• Antes del montaje del soporte, compruebe las diferentes posibilidades de montaje dentrodesu
vehículo. En caso de duda, consulte paraello el manual de instrucciones del automóvil odiríjase
al fabricante del automóvil.
• No fuerce nunca el producto durante su manejo omontaje.
• Verique que el montaje del producto es seguroantes de cada desplazamiento.
47

6.1 Montaje del soporte de ventosa
• Retirelalámina protectoradelaventosa.
• Abralapalanca de bloqueo (15) de la ventosa.
• Posicione el soporte con la ventosa sobreuna supercie de montaje previamente limpiada que no
presente desniveles (p. ej. un cristal)
• Presione el soporte suavemente sobrelasupercie de montaje deseada ycierrelapalanca de
bloqueo (15) para jar el soporte.
• Tras el montaje, compruebe siemprelasujeción seguradelaventosa.
• Para volver asoltar la ventosa de la supercie de montaje, abralapalanca de bloqueo.
Seguidamente ydeser necesario, tirelevemente de la lengüeta parasoltar por completo la ventosa.
6.2 Ajuste del ángulo ylainclinación
El soporte ofrece un ajuste continuo del ángulo ylainclinación respecto al usuario mediante un
cabezal esférico.
• Ajuste el ángulo ylainclinación siempresin tener colocado el terminal.
• Para el ajuste, aoje el tornillo de apriete del cabezal esférico.
• Proceda aajustar el ángulo ylainclinación según desee yvuelva aapretar el tornillo de apriete.
6.3 Colocar/retirar la Dashcam
Nota
Verique siempreque la colocación del soporte de ventosa ylasujeción de la Dashcam sean
seguras.
• Introduzca la Dashcam en el soporte (14) del soporte de ventosa.
• Saque la Dashcam del soporte moviéndola con cuidado de un lado al otro.
7. Funcionamiento
7.1. Conexión con la red de abordo del vehículo
Aviso –Batería
• Utilice sólo cargadores adecuados con puertos USB paralacarga.
• No siga utilizando cargadores opuertos USB defectuosos ynointente repararlos.
• No sobrecargue ni descargue totalmente el producto.
• Evite almacenar,cargar yutilizar el despertador atemperaturas extremas ycon presiones de aire
exageradamente bajas (p. ej. bajas temperaturas).
• En caso de almacenamiento prolongado, cargue regularmente (mín. trimestralmente).
48

• Conecte el cable de carga MiniUSB suministrado alahembrilla de carga MiniUSB (11) de la
Dashcam yala toma de corriente de la reddeabordo del vehículo.
• La Dashcam se enciende automáticamente tras arrancar el motor.
• El LED de estado (12) luce permanentemente azul.
Nota -Capacidad de la pila recargable
La pila recargable tiene una autonomía limitada aaprox. 2-3 minutos. Esta función de memoria
intermedia se utiliza, por ejemplo, paraque no se interrumpa la hora. Un funcionamiento más largo
es posible sólo con el adaptador paravehículos.
Nota -Funcionamiento permanente con pila recargable
El dispositivo no se ha previsto paraelfuncionamiento permanente con pila recargable. El
funcionamiento permanente con pila recargable puede provocar daños irreparables.
7.2. Encender/Apagar
Nota -Encendido/apagado automático
Si la Dashcam está conectada auna fuente de alimentación mediante el cargador paravehículo, se
encenderá yapagará automáticamente cuando se arranque oapague el vehículo.
Nota -Batería del vehículo
En algunos vehículos puede ocurrir que la alimentación de corriente siga activa apesar de que el
encendido esté desconectado. En este caso, apague la cámaramanualmente paraevitar que la
batería del coche se descargue.
Pulse ymantenga pulsada la tecla Power [ ](10) durante aprox. 3segundos paraencender/apagar
manualmente la Dashcam.
7.3. Utilizar la tarjeta MicroSD
• Inserte una tarjeta MicroSD en la ranuraparatarjetas MicroSD (2) de la Dashcam.
• En la pantalla se visualiza .
Nota -Tarjeta de memoria llena
En cuanto la memoria de la tarjeta MicroSD esté llena, se sobrescribirá la grabación de vídeo más antigua.
49

8. Modos
8.1 Modo de vídeo
• Después de encender la cámara, ésta se encuentraenelmodo de vídeo.
se visualiza en el
borde superior izquierdo de la pantalla.
• La grabación de vídeo se inicia automáticamente al encender el aparato.
• Pulse [OK](7) paradetener/ iniciar la grabación de vídeo.
• Durante la grabación de vídeo, el tiempo de grabación se muestraenlaparte superior izquierda de
la pantalla. El LED de estado (12) luce alternando rojo yazul.
Nota -Inicio automático de la grabación de vídeo
Active, tal ycomo se describe en el capítulo 9.7 Vídeo automático,elmodo Vídeo automático
paraque la grabación se inicie automáticamente después de encender la cámara.
8.2 Modo de fotografía
• Active el modo de fotografía pulsando [MODE](6) repetidas veces. se visualiza en el borde
superior izquierdo de la pantalla.
• Pulse [OK](7) paratomar una fotografía.
8.3 Modo de reproducción
• Active el modo de funcionamiento Reproducción pulsando repetidamente [MODE](6).
se visualiza en el borde inferior izquierdo de la pantalla.
• Seleccione el archivo que desea reproducir con ayuda de las teclas de navegación [◄](9) /[►](5).
• Pulse [MENU] (8) paramás opciones.
• Navegue por el menú con ayuda de las teclas de navegación [◄](9) /[►](5).
• Seleccione la opción de menú Borrar yconrme su selección pulsando [OK](7).
• Puede elegir entre Borrar selección y Borrar todos.
• Conrme la consulta de seguridad que sigue con OK oseleccione Cancelar paracancelar el
proceso.
• Pulse [MENU](8) paratener acceso amás opciones para, alternativamente, llegar alaopción de
menú Bloquear.
• Seleccione la opción de menú Bloquear yconrme su selección pulsando [OK](7).
• Puede elegir entre Bloquear archivo, Bloquear todos, Desbloquear archivo y Desbloquear
todos.
• Conrme la consulta de seguridad que sigue con OK oseleccione Cancelar paracancelar el
proceso.
50

9. Ajustes
9.1 Ajustes del modo de vídeo
• Cambie al modo de vídeo siguiendo las indicaciones descritas en el capítulo 8.1 Modo de vídeo.
• Pulse [MENU](8) paraacceder alos ajustes de vídeo.
• En el borde superior izquierdo de la pantalla se visualiza
.
• Navegue por el menú con ayuda de las teclas de navegación [◄](9) /[►](5).
•
Conrme su selección pulsando [OK](7).
9.1.1 Resolución
Seleccione la resolución que desee (1280X720 /1920X1080)del material de vídeo grabado.
• Navegue alaopción de menú Resolución yconrme su selección pulsando [OK](7). Se abreuna
nueva ventana de resumen.
• Seleccione el ajuste que desee con ayuda de las teclas de navegación [◄](9) /[►](5).
• Conrme su selección pulsando [OK](7).
9.1.2 Marca de agua
Con el modo activado, cada archivo de vídeo obtiene un sello de horayfecha.
• Navegue alaopción de menú Marca de agua yconrme su selección pulsando [OK](7). Se abre
una nueva ventana de resumen.
• Seleccione el ajuste que desee con ayuda de las teclas de navegación [◄](9) /[►](5).
• Conrme su selección pulsando [OK](7).
9.1.3 Detección de movimiento
Cuando la detección de movimientos está activada, la grabación de vídeo se inicia automáticamente
cuando la cámarasufresacudidas (p. ej., por un accidente).
• Navegue alaopción de menú Detección de movimiento yconrme su selección pulsando
[OK](7). Se abreuna nueva ventana de resumen.
• Seleccione el ajuste que desee con ayuda de las teclas de navegación [◄](9) /[►](5).
• Conrme su selección pulsando [OK](7).
• En la pantalla de vídeo se visualiza .
9.1.4 Función Loop
Seleccione aquí el intervalo de tiempo (1/2/3/5 minutos)traselcual se debe iniciar una nueva
grabación de vídeo.
Seleccione Off paradesactivar esta función. Se crea un nuevo archivo.
• Navegue alaopción de menú Función Loop yconrme su selección pulsando [OK](7). Se abre
una nueva ventana de resumen.
• Seleccione el ajuste que desee con ayuda de las teclas de navegación [◄](9) /[►](5).
51

• Conrme su selección pulsando [OK](7).
• En la pantalla de vídeo se visualiza .
9.1.5 Grabación de audio
Con el modo activado, además de grabar el material de vídeo se graba también el sonido.
• Navegue alaopción de menú Grabación de audio yconrme su selección pulsando [OK](7). Se
abreuna nueva ventana de resumen.
• Seleccione el ajuste que desee con ayuda de las teclas de navegación [◄](9) /[►](5).
• Conrme su selección pulsando [OK](7).
9.1.6 Contraste
Aumente la calidad de la grabación de vídeo ajustando el contraste (de -2 a+2).
• Navegue alaopción de menú Contraste yconrme su selección pulsando [OK](7). Se abreuna
nueva ventana de resumen.
• Seleccione el ajuste que desee con ayuda de las teclas de navegación [◄](9) /[►](5).
• Conrme su selección pulsando [OK](7).
9.2 Ajustes del modo de fotografía
• Cambie al modo de fotografía siguiendo las indicaciones descritas en el capítulo 8.2 Modo de
fotografía.
• •Pulse [MENU](8) paraacceder alos ajustes de fotografía.
• En el borde superior izquierdo de la pantalla se visualiza .
• Navegue por el menú con ayuda de las teclas de navegación [◄](9) /[►](5).
• Conrme su selección pulsando [OK](7).
9.2.1 Resolución
Seleccione la resolución que desee (VGA -12megapíxeles)del material de vídeo grabado.
• Navegue alaopción de menú Resolución yconrme su selección pulsando [OK](7). Se abreuna
nueva ventana de resumen.
• Seleccione el ajuste que desee con ayuda de las teclas de navegación [◄](9) /[►](5).
• Conrme su selección pulsando [OK](7).
9.2.2 Visor de imágenes
Si el visor de imágenes está activado, en la pantalla se mostrarán brevemente (de 2a5segundos)las
capturas realizadas. Solo podrá hacer una nueva fotografía en cuanto haya transcurrido ese tiempo.
Seleccione Off paradesactivar esta función.
• Navegue alaopción de menú Visor de imágenes yconrme su selección pulsando [OK](7). Se
abreuna nueva ventana de resumen.
• Seleccione el ajuste que desee con ayuda de las teclas de navegación [◄](9) /[►](5).
52

• Conrme su selección pulsando [OK](7).
9.2.3 Marca de agua
Con el modo activado, cada archivo de fotografía cuenta con un registrodehorayfecha.
• Navegue alaopción de menú Marca de agua yconrme su selección pulsando [OK](7). Se abre
una nueva ventana de resumen.
• Seleccione el ajuste que desee con ayuda de las teclas de navegación [◄](9) /[►](5).
• Conrme su selección pulsando [OK](7).
9.2.4 Contraste
Aumente la calidad de las fotografías ajustando el contraste (de -2 a+2).
• Navegue alaopción de menú Contraste yconrme su selección pulsando [OK](7). Se abreuna
nueva ventana de resumen.
• Seleccione el ajuste que desee con ayuda de las teclas de navegación [◄](9) /[►](5).
• Conrme su selección pulsando [OK](7).
9.3 Ajustes generales
• Pulse dos veces [MENU](8) paraacceder la menú de ajustes de la cámara.
• De forma alternativa, pulse una vez [MENU](8) si ya se encuentraenelmenú Vídeo/Foto.
• En el borde superior izquierdo de la pantalla se visualiza .
• Navegue por el menú con ayuda de las teclas de navegación [◄](9) /[►](5).
• Conrme su selección pulsando [OK](7).
9.3.1 Formatear tarjeta de memoria
Borretodos los archivos que se encuentran en la tarjeta de memoria insertada.
• Navegue alaopción de menú Formatear tarjeta de memoria yconrme su selección pulsando
[OK](7). Se abreuna nueva ventana de resumen.
• Conrme el formateado con OK oseleccione Cancelar paracancelar el proceso.
9.3.2 Idioma
Seleccione el idioma de la guía de menú.
• Navegue alaopción de menú Idioma yconrme su selección pulsando [OK](7). Se abreuna
nueva ventana de resumen.
• Seleccione el ajuste que desee con ayuda de las teclas de navegación [◄](9) /[►](5).
• Conrme su selección pulsando [OK](7).
9.3.3 Apagado en caso de inactividad
Seleccione el intervalo de tiempo (1minuto /3 minutos)traselcual la cámaraseapaga
automáticamente si no se utiliza.
Seleccione Off paradesactivar esta función.
53

• Navegue alaopción de menú Apagado en caso de inactividad yconrme su selección pulsando
[OK](7). Se abreuna nueva ventana de resumen.
• Seleccione el ajuste que desee con ayuda de las teclas de navegación [◄](9) /[►](5).
• Conrme su selección pulsando [OK](7).
9.3.4 Salvapantallas
Seleccione el intervalo de tiempo (1minuto /3minutos /5minutos )traselcual se activa el
salvapantallas. Si durante este tiempo no pulsa ninguna tecla, la pantalla se apaga. La grabación de
vídeo, sin embargo, continúa.
Seleccione Off paradesactivar esta función.
• Navegue alaopción de menú Salvapantallas yconrme su selección pulsando [OK](7). Se abre
una nueva ventana de resumen.
• Seleccione el ajuste que desee con ayuda de las teclas de navegación [◄](9) /[►](5).
• Conrme su selección pulsando [OK](7).
9.3.5 Formatear tarjeta de memoria
Borretodos los archivos que se encuentran en la tarjeta de memoria insertada.
• Navegue alaopción de menú Formatear tarjeta de memoria yconrme su selección pulsando
[OK](7). Se abreuna nueva ventana de resumen.
• Conrme el restablecimiento con OK oseleccione Cancelar paracancelar el proceso.
9.3.6 Fecha/Hora
• Navegue alaopción de menú Fecha/Hora yconrme su selección pulsando [OK](7). Se abreuna
nueva ventana de resumen.
• Ajuste el año con ayuda de las teclas de navegación [◄](9) /[►](5) yconrme su entrada
pulsando [OK](7).
• Ajuste seguidamente las siguientes informaciones procediendo de forma análoga: mes, día, hora.
• Conrme su selección pulsando [MENU](8).
9.3.7 Versión
• Navegue alaopción de menú Versión yconrme su selección pulsando [OK](7). Se abreuna
nueva ventana de resumen.
• Se muestralaversión actual de la cámara.
54

10. Consulta del material grabado
Nota
No retirelatarjeta MicroSD con la Dashcam encendida. Esto puede provocar una pérdida de datos
odaños en el dispositivo.
• Apague la Dashcam tal ycomo se describe en 7.2 Encender/Apagar.
• Retirelatarjeta MicroSD de la cámara.
• Conecte la tarjeta MicroSD asuPCmediante el lector de tarjetas SD (volumen de suministro).
Transmita los datos guardados asuPCparaliberar espacio de memoria en la tarjeta.
11. Tecla de guardar
Nota
Recuerde que en caso de accidente, la prestación de primeros auxilios ylaseguridad de todos los
implicados tienen prioridad.
Para asegurarse de que sus datos se guardan de forma permanente, proceda del siguiente modo:
• Pulse la tecla de guardar (13). En la pantalla aparece .
• Pulse ymantenga pulsada la tecla Power [ ](10) durante aprox. 3segundos paraapagar la
cámara.
• Retireahoralatarjeta MicroSD de la cámara.
Nota
• Losvídeos guardados después de pulsar la tecla de guardar se guardan con el nombre
«LOKXXXXX».
• Losarchivos de vídeo regulares se guardan bajo el nombre«REC» yunnúmerocorrelativo.
12. Ajustes de fábrica
Para restablecer la Dashcam alos justes de fábrica (en el momento del suministro), proceda según se
indica acontinuación:
• Apague la Dashcam tal ycomo se describe en 7.2 Encender/Apagar.
• Pulse ymantenga pulsada [Reset](4) con ayuda de un objeto agudo durante aprox. 3segundos.
• Alternativamente, puede restablecer los ajustes de fábrica tal ycomo se describe en el capítulo
9.3.5 Formatear tarjeta de memoria.
• Todos los ajustes realizados se borran.
55

Nota
• Algunos problemas yfallos en el funcionamiento pueden solucionarse restableciendo los ajustes
de fábrica.
• Sin embargo, todos los ajustes previos (hora, horas de alarma, etc.) se borran de forma denitiva.
13. Mantenimiento ycuidado
• Limpie este producto sólo con un paño ligeramente humedecido que no deje pelusas ynoutilice
detergentes agresivos.
• Asegúrese de que no entreagua en el producto.
14. Exclusión de responsabilidad
Hama GmbH &CoKG no se responsabiliza ni concede garantía por los daños que surjan por una
instalación, montaje omanejo incorrectos del producto opor la no observación de las instrucciones de
manejo y/o de las instrucciones de seguridad.
15. Datos técnicos
Dimensiones 89 x48x35mm
Diagonal de pantalla 2.4"
Resoluciónmáx. Foto: 12 megapíxeles |Vídeo: 1080i
Formato de datosFoto:JPEG |Vídeo:AVI
Tarjetadememoria Soporta tarjetas de memoria MicroSD hasta 32 GB
Alimentación de corriente
Input:12V-24 V 0,5A; Output: 5V ; 1A; longitud del cable: 2m
Batería
Input:5V
290mA; Tipo: 3,7 V/LiPo;
Min. capacidad: 130 mAh /0,48Wh
56

Bedieningselementen en weergaven
A
1. Zuigkophoudersysteem
2. Micro-SD-kaartsleuf
3. Microfoon/luidspreker
B
4. Reset
5. Navigatietoets
►
6. Modus
7. OK
8. Menu
9. Navigatietoets
◄
10.Power
C
11.Mini-USB-laadcontact
12. Statusledje
13. Veiligstellingstoets
D
14.Houder dashcam
15. Vergrendelingshendel
Videomodus -Pictogramoverzicht
Videomodus
Tijdsduur lus
Dagmodus
Nachtmodus
Bewegingsmodus
Videokwaliteit
Geheugenkaartherkend
N Gebruiksaanwijzing
57

Geheugenkaartnietherkend
Batter ijwe ergave
Video-opnameloopt
Videoveiliggeste ld
00.00.00
Videoduur
Fotomodus -Pictogramoverzicht
Fotomodus
Dagmodus
Nachtmodus
12M-VGA Resolutie
Geheugenkaartherkend
Geheugenkaartnietherkend
Batterijweergave
Afspeelmodus -Pictogramoverzicht
Video loopt
Video gepauzeerd
Video veiliggesteld
58

Geheugenkaartherkend
Geheugenkaartnietherkend
Batterijweergave
Hartelijk dank dat uvoor een product van Hama heeft gekozen.
Neem de tijd om de volgende aanwijzingen en instructies volledig door te lezen. Bergdeze
gebruiksaanwijzing vervolgens op een goede plek op zodat uhem als naslagwerk kunt gebruiken.
Mocht uhet toestel verkopen, geeft udan ook deze gebruiksaanwijzing aan de nieuwe eigenaar.
1. Verklaring van waarschuwingssymbolen en instructies
Gevaar voor een elektrische schok
Dit symbool duidt op gevaar bij aanraking van niet-geïsoleerde onderdelen van het product, welke
mogelijk onder een zodanig gevaarlijke spanning staan, dat het gevaar voor een elektrische schok
aanwezig is.
Waarschuwing
Wordtgebruikt voor veiligheidsinstructies of om de aandacht te trekken op bijzonderegevaren en
risico‘s.
Aanwijzing
Wordtgebruikt voor extrainformatie of belangrijke informatie.
2. Inhoud van de verpakking
•Dashcam 30
•Mini-USB-autolader
•Zuignaphouder
•Micro-SD-kaartlezer
• Deze gebruiksaanwijzing
59

3. Veiligheidsinstructies
• Het product is bedoeld voor niet-commercieel privegebruik in huiselijke kring.
• Gebruik het product uitsluitend voor het doel waarvoor het gemaakt is.
• Bescherm het product tegen vuil, vocht en oververhitting en gebruik het alleen in droge omgevingen.
• Laat het product niet vallen en stel het niet bloot aan zwareschokken of stoten.
• Gebruik het product niet buiten de in de technische gegevens vermelde vermogensgrenzen.
• De kabel niet knikken of inklemmen.
• De accu is vast ingebouwd en kan niet worden verwijderd, voer het product derhalve als één geheel
af overeenkomstig de wettelijke voorschriften.
• Open het product niet en gebruik het niet meer als het beschadigd is.
• Elektrische apparaten dienen buiten het bereik van kinderen gehouden te worden!
• Let erop dat bij gebruikmaking van het product de in het wegverkeer geldende lokale voorschriften
van het wegenverkeersreglement m.b.t. technische eisen en rijvaardigheidseisen gelden.
• Let erop dat geen componenten, zoals de airbag, andereveiligheidsvoorzieningen,
bedieningselementen, instrumenten, enz., of het vrije zicht, bedekt of beperkt zijn.
• Laat uineen motorvoertuig niet door uw product aeiden en let op de verkeerssituatie en uw omgeving.
• Controleer voorafgaande aan elke rit de veilige installatie van het product.
• Het verpakkingsmateriaal direct en overeenkomstig de lokaal geldende afvoervoorschriften afvoeren.
• Verander niets aan het toestel. Daardoor vervalt elke aanspraak op garantie.
• Gooi de accu resp. het product niet in het vuur.
• De accu‘s/batterijen niet wijzigen en/of vervormen/verhitten/demonteren.
Gevaar voor een elektrische schok
• Open het product niet en gebruik het niet meer als het beschadigd is.
• Gebruik het product niet indien de oplaadkabel of de voedingskabel is beschadigd.
• Probeer niet het product zelf te onderhouden of te repareren. Laat onderhouds- en
reparatiewerkzaamheden door vakpersoneel uitvoeren.
4. Wettelijke voorschriften/beperkingen bij de werking van dashcams
Aanwijzing
• Houdt uerrekening mee dat aanwijzingen inzake de wettelijke regelingen in deze informatie
uitsluitend de Duitse voorschriften en wetten op het tijdstip van het ter perse gaan
vertegenwoordigen. Informeer uinanderelanden vóór het gebruik van het product over de
aldaar geldende regelingen!
60

Aanwijzing
• Houd er rekening mee dat bij gebruik van het product in het wegverkeer,afhankelijk van de
wetgeving in een land, verschillende voorschriften kunnen gelden.
• In sommige rechterlijke uitspraken is het gebruik van dashcams afzonderlijk geregeld, resp.
verboden. Informeer uzelf voordat udedashcam gaat gebruiken over de wet- en regelgeving.
• Neem voor het installeren en het gebruik van het product de geldende voorschriften inzake de
gegevensbescherming in acht.
• Neem de geldende voorschriften voor het opnemen en opslaan van video- en beeldbestanden in acht.
5. Beoogd gebruik
• Dit product is uitsluitend bestemd voor het gebruik in voertuigen.
• Respecteer de privacy en eigendomsrechten van anderen. Maak met de dashcam geen opnames
van anderepersonen.
• Neem bij opnames het recht op het eigen beeld en gesproken woordinacht.
• Verwijder het product als het gedurende langeretijd niet wordt gebruikt van de voorruit om schade
door zonlicht en temperatuur te voorkomen.
6. Inbedrijfstellen
Waarschuwing -Risico op letsel
• Let erop dat bij gebruikmaking van het product de in het wegverkeer geldende lokale
voorschriften van het wegenverkeersreglement m.b.t. technische eisen en rijvaardigheidseisen
gelden.
• Let erop dat geen componenten, zoals de airbag, andereveiligheidsvoorzieningen,
bedieningselementen, instrumenten, enz., of het vrije zicht, bedekt of beperkt zijn.
• Laat uineen motorvoertuig niet door uw product aeiden en let op de verkeerssituatie en uw
omgeving.
Aanwijzing
• Controleer vóór de montage van de houder de inbouwmogelijkheden in uw voertuig. In
twijfelgevallen kunt uhet instructieboekje van het voertuig nalezen of contact opnemen met de
fabrikant van het voertuig.
• Tijdens de omgang met en bij de montage van het product nimmer geweld of grote krachten
aanwenden.
• Controleer voorafgaande aan elke rit de veilige installatie van het product.
61

6.1 Montage zuignaphouder
• Verwijder de beschermfolie van de zuignap.
• Open de vergrendelingshendel (15) van de zuignap.
• Positioneer de houder met de zuignap op een schoongemaakt, vlak montageoppervlak (bijv.ruit).
• Druk de houder op het gewenste montageoppervlak lichtjes aan en sluit de vergrendelingshendel (15)
teneinde de houder te bevestigen.
• Controleer na de montage altijd of de zuignap goed vastzit.
• Teneinde de zuignap weer van het montageoppervlak los te maken, opent ude
vergrendelingshendel. Trek vervolgens zacht aan de lip, teneinde de zuignap geheel los te maken.
6.2 Hoek en hellingshoek instellen
De houder kan traploos in hoek en helling t.o.v.degebruiker worden versteld door middel van een
kogelkop.
• Verstel de hoek en hellingshoek altijd zonder een geplaatst eindtoestel.
• Draai voor het verstellen de klembout van het kogelscharnier een beetje los.
• Stel de hoek en hellingshoek zoals gewenst in en draai de klembout weer vast.
6.3 Dashcam plaatsen/verwijderen
Aanwijzing
Controleer altijd of de zuignaphouder goed is bevestigd en of de dashcam goed vastzit.
• Schieben Sie die Dashcam in die Halterung (14) des Saugnapfhalters.
• Ziehen Sie die Dashcam durch vorsichtiges Hin- und Herbewegen aus der Halterung heraus.
7. Gebruik
7.1. Aansluiting op het elektrische systeem van de auto
Waarschuwing –Batterij
• Gebruik alleen geschikte laadapparatuur of USB-aansluitingen voor het opladen.
• Gebruik defecte laadapparatuur of USB-aansluitingen principieel niet meer en probeer ze niet
te repareren.
• Het op te laden product niet overladen of diepontladen.
• Vermijd opslag, opladen en gebruik bij extreme temperaturen en extreem lage luchtdruk (bijv.
op grote hoogte).
• Indien de accu’sgedurende langeretijd worden opgeborgen, dan dienen ze ten minste
regelmatig (min. om die 3maanden) te worden opgeladen.
62

• Sluit de meegeleverde Mini-USB-oplaadkabel aan op het Mini-USB-laadcontact (11) van de
dashcam en de elektrische aansluiting van de auto.
• De dashcam schakelt zichzelf automatisch in na het starten van de motor.
• Het statusledje (12) brandt continu blauw.
Aanwijzing -Batterijcapaciteit
De batterij beschikt over een beperkte looptijd van ca. 2-3 minuten. Deze bufferfunctie wordt
bijvoorbeeld gebruikt voor de continue voortzetting van de kloktijd. Langer gebruik is alleen
mogelijk met aangesloten auto-adapter.
Aanwijzing -Continue werking op batterij
Het apparaat is niet bestemd voor continu gebruik met een accu. Continu gebruik met een accu kan
tot onherstelbareschade leiden.
7.2. In-/uitschakelen
Aanwijzing -automatisch in-/uitschakelen
Is de dashcam via de autolader op een stroombron aangesloten, dan wordt deze automatisch in- of
uitgeschakeld wanneer de auto wordt gestart of uitgeschakeld.
Aanwijzing -Auto-accu
Bij sommige voertuigen kan het voorkomen dat de stroomvoorziening in stand blijft ondanks dat
het contact is uitgeschakeld. Schakel in dit geval de camerahandmatig uit om de accu van uw auto
tegen leeglopen te beschermen.
Houd Power [ ](10) gedurende ongeveer 3seconden ingedrukt om de dashcam handmatig in/uit
te schakelen.
7.3. Micro-SD-kaart plaatsen
• Steek een micro-SD-kaart in de micro-SD-kaartsleuf (2) van de dashcam.
• Het display geeft weer.
Aanwijzing -Geheugenkaart vol
Zodrahet geheugen van de micro-SD-kaart vol is, wordt de oudste video-opname overschreven.
63

8. Modi
8.1 Videomodus
• Nadat de cameraisingeschakeld, staat deze in de videomodus.
verschijnt linksboven in de
schermrand
.
• De video-opname start automatisch wanneer het apparaat wordt ingeschakeld.
• Druk op [OK](7) om de video-opname te stoppen/starten.
• Tijdens de video-opname wordt de opnameduur linksboven in het scherm weergegeven. Het
statusledje (12) brandt afwisselend rood en blauw.
Aanwijzing -Nachtmodus
Druk tijdens de video-opname kortstondig op Power [ ](10) om de nachtmodus te activeren/
deactiveren.
8.2 Fotomodus
• Activeer de fotobedieningsmodus door herhaaldelijk op [MODE](6) te drukken. verschijnt
linksboven in de schermrand.
• Druk op [OK](7) om een foto te maken.
8.3 Afspeelmodus
• Activeer de afspeelmodus door herhaaldelijk op [MODE] (6) te drukken. verschijnt linksonder
in de schermrand.
• Gebruik de navigatietoetsen [◄](9) /[►](5) om het bestand te selecteren dat uwilt afspelen.
• Druk op [MENU](8) voor meer opties.
• Gebruik de navigatietoetsen [◄](9) /[►](5) om door het menu te navigeren.
• Selecteer de menukeuze [Delete]enbevestig uw keuze door op [OK](7) te drukken.
• Ukunt kiezen tussen [Delete selection]en[Delete all].
• Bevestig de volgende beveiligingsmelding met [OK]ofselecteer [Cancel]omdebewerking te
annuleren.
• Druk op [MENU](8) voor meer opties om op een alternatieve manier in de menukeuze [Lock]te
komen.
• Selecteer de menukeuze [Lock]enbevestig uw keuze door op [OK](7) te drukken.
• Ukunt kiezen tussen [Lock le], [Lock all], [Unlock le]en[Unlock all].
• Bevestig de volgende beveiligingsmelding met [OK]ofselecteer [Cancel]omdebewerking te
annuleren.
64

9. Instellingen
9.1 Instellingen videomodus
• Schakel zoals beschreven in paragraaf 8.1 Videomodus over naar de videomodus.
• Druk op [MENU](8) om naar de video-instellingen te gaan.
• Linksboven in de schermrand wordt weergegeven.
• Gebruik de navigatietoetsen [◄](9) /[►](5) om door het menu te navigeren.
• Bevestig uw keuze door op [OK](7) te drukken.
9.1.1 Resolutie
Selecteer de gewenste resolutie (1280X720 /1920X1080)van het opgenomen videomateriaal.
• Navigeer naar de menukeuze [Resolution]enbevestig uw keuze door op [OK](7) te drukken. Er
wordt een nieuw overzichtsvenster geopend.
• Selecteer met behulp van de navigatietoetsen [◄](9) /[►](5) de gewenste instelling.
• Bevestig uw keuze door op [OK](7) te drukken.
9.1.2 Watermerk
Wanneer deze modus is geactiveerd, krijgt elk videobestand een tijd- en datumstempel.
• Navigeer naar de menukeuze [Watermark]enbevestig uw keuze door op [OK](7) te drukken. Er
wordt een nieuw overzichtsvenster geopend.
• Selecteer met behulp van de navigatietoetsen [◄](9) /[►](5) de gewenste instelling.
• Bevestig uw keuze door op [OK](7) te drukken.
9.1.3 Bewegingsdetectie
Als de bewegingsdetectie is geactiveerd, wordt de video-opname automatisch gestart wanneer de
cameraeen schok krijgt (bijv.bij een ongeval).
• Navigeer naar de menukeuze [Motion]enbevestig uw keuze door op [OK](7) te drukken. Er wordt
een nieuw overzichtsvenster geopend.
• Selecteer met behulp van de navigatietoetsen [◄](9) /[►](5) de gewenste instelling.
• Bevestig uw keuze door op [OK](7) te drukken.
• Op de videodisplay wordt weergegeven.
9.1.4 Lus-functie
• Selecteer het tijdsinterval (1/2/3/5 minutes),waarna een nieuwe video-opname moet worden
gestart.
• Selecteer [Off]omdeze functie uit te schakelen. Er wordt nu slechts één bestand aangemaakt.
• Navigeer naar de menukeuze [Loop]enbevestig uw keuze door op [OK](7) te drukken. Er wordt
een nieuw overzichtsvenster geopend.
• Selecteer met behulp van de navigatietoetsen [◄](9) /[►](5) de gewenste instelling.
65

• Bevestig uw keuze door op [OK](7) te drukken.
• Op de videodisplay wordt weergegeven.
9.1.5 Audio-opname
Als deze modus geactiveerd is, wordt naast het videomateriaal ook geluid opgenomen.
• Navigeer naar de menukeuze [Audio]enbevestig uw keuze door op [OK](7) te drukken. Er wordt
een nieuw overzichtsvenster geopend.
• Selecteer met behulp van de navigatietoetsen [◄](9) /[►](5) de gewenste instelling.
• Bevestig uw keuze door op [OK](7) te drukken.
9.1.6 Contrast
Verhoog de kwaliteit van de video-opname door het contrast aan te passen (-2 t/m +2).
• Navigeer naar de menukeuze [Contrast]enbevestig uw keuze door op [OK](7) te drukken. Er
wordt een nieuw overzichtsvenster geopend.
• Selecteer met behulp van de navigatietoetsen [◄](9) /[►](5) de gewenste instelling.
• Bevestig uw keuze door op [OK](7) te drukken.
9.2 Instellingen fotomodus
• Schakel over naar de fotomodus zoals beschreven in paragraaf 8.2 Fotomodus.
• Druk op [MENU](8) om naar de instellingen Foto te gaan.
• Linksboven in de schermrand wordt weergegeven.
• Gebruik de navigatietoetsen [◄](9) /[►](5) om door het menu te navigeren.
• Bevestig uw keuze door op [OK](7) te drukken.
9.2.1 Resolutie
Selecteer de gewenste resolutie (VGA -12megapixels)van het opgenomen beeldmateriaal.
• Navigeer naar de menukeuze [Resolution]enbevestig uw keuze door op [OK](7) te drukken. Er
wordt een nieuw overzichtsvenster geopend.
• Selecteer met behulp van de navigatietoetsen [◄](9) /[►](5) de gewenste instelling.
• Bevestig uw keuze door op [OK](7) te drukken.
9.2.2 Fotoweergave
Bij geactiveerde fotoweergave wordt de geselecteerde opname gedurende korte tijd (2/5 seconds)op
het scherm weergegeven. Pasnaaoop van deze tijd kan een nieuwe foto worden genomen.
Selecteer [Off]omdeze functie uit te schakelen.
• Navigeer naar de menukeuze [Image display]enbevestig uw keuze door op [OK](7) te drukken.
Er wordt een nieuw overzichtsvenster geopend.
• Selecteer met behulp van de navigatietoetsen [◄](9) /[►](5) de gewenste instelling.
• Bevestig uw keuze door op [OK](7) te drukken.
66

9.2.3 Watermerk
Wanneer deze modus is ingeschakeld, krijgt elk fotobestand een tijd- en datumstempel.
• Navigeer naar de menukeuze [Watermark]enbevestig uw keuze door op [OK](7) te drukken. Er
wordt een nieuw overzichtsvenster geopend.
• Selecteer met behulp van de navigatietoetsen [◄](9) /[►](5) de gewenste instelling.
• Bevestig uw keuze door op [OK](7) te drukken.
9.2.4 Contrast
Verhoog de kwaliteit van de genomen foto door aanpassing van het contrast (-2 t/m +2).
• Navigeer naar de menukeuze [Contrast]enbevestig uw keuze door op [OK](7) te drukken. Er
wordt een nieuw overzichtsvenster geopend.
• Selecteer met behulp van de navigatietoetsen [◄](9) /[►](5) de gewenste instelling.
• Bevestig uw keuze door op [OK](7) te drukken.
9.3 Algemene instellingen
• Druk tweemaal op [MENU](8) om het instelmenu van de camerateopenen.
• Als alternatief kunt uook één keer op [MENU](8) drukken als uzich al in het menu Video/foto
bevindt.
• Linksboven in de schermrand wordt weergegeven.
• Gebruik de navigatietoetsen [◄](9) /[►](5) om door het menu te navigeren.
• Bevestig uw keuze door op [OK](7) te drukken.
9.3.1 Geheugenkaart formatteren
Verwijder alle bestanden die zich op de geplaatste geheugenkaart bevinden.
• Navigeer naar de menukeuze [Format memory card]enbevestig uw keuze door op [OK](7) te
drukken. Er wordt een nieuw overzichtsvenster geopend.
• Bevestig de formattering met [OK]ofselecteer [Cancel]omde bewerking te annuleren.
9.3.2 Taal
Selecteer de taal van de menunavigatie.
• Navigeer naar de menukeuze [Language]enbevestig uw keuze door op [OK] (7) te drukken. Er
wordt een nieuw overzichtsvenster geopend.
• Selecteer met behulp van de navigatietoetsen [◄](9) /[►](5) de gewenste instelling.
• Bevestig uw keuze door op [OK](7) te drukken.
9.3.3 Uit bij inactiviteit
Selecteer het tijdsinterval (1minute /3 minutes), waarna de cameraautomatisch wordt uitgeschakeld
wanneer deze niet wordt gebruikt.
67

Selecteer [Off]omdeze functie uit te schakelen.
• Navigeer naar de menukeuze [Off following inactivity]enbevestig uw keuze door op [OK](7) te
drukken. Er wordt een nieuw overzichtsvenster geopend.
• Selecteer met behulp van de navigatietoetsen [◄](9) /[►](5) de gewenste instelling.
• Bevestig uw keuze door op [OK](7) te drukken.
9.3.4 Schermbeveiliging
Selecteer het tijdsinterval (1minute /3minutes /5 minutes), waarna de schermbeveiliging wordt
geactiveerd. Als er gedurende deze tijd geen toets wordt ingedrukt, wordt het display uitgeschakeld.
De video-opname loopt echter door.
Selecteer [Off]omdeze functie te deactiveren.
• Navigeer naar de menukeuze [Screen saver]enbevestig uw keuze door op [OK] (7) te drukken. Er
wordt een nieuw overzichtsvenster geopend.
• Selecteer met behulp van de navigatietoetsen [◄](9) /[►](5) de gewenste instelling.
• Bevestig uw keuze door op [OK](7) te drukken.
9.3.5 Fabrieksinstellingen
• Navigeer naar de menukeuze [Factory settings]enbevestig uw keuze door op [OK](7) te drukken.
Er wordt een nieuw overzichtsvenster geopend.
• Bevestig de reset met [OK]ofselecteer [Cancel]omhet proces te annuleren.
9.3.6 Datum/tijd
• Navigeer naar de menukeuze [Date/time]enbevestig uw keuze door op [OK](7) te drukken. Er
wordt een nieuw overzichtsvenster geopend.
• Gebruik de navigatietoetsen [◄](9) /[►](5) om het jaar in te stellen en bevestig uw invoer door
op [OK](7) te drukken.
• Stel vervolgens de volgende informatie achter elkaar in met gebruikmaking van dezelfde procedure:
Maand, dag, tijd.
• Bevestig uw keuze door op [MENU](8) te drukken.
9.3.7 Versie
• Navigeer naar de menukeuze [Version]enbevestig uw keuze door op [OK](7) te drukken. Er wordt
een nieuw overzichtsvenster geopend.
• De actuele versie van de camerawordt weergegeven.
68

10. Opgenomen beeldmateriaal bekijken
Aanwijzing
Verwijder de micro-SD-kaart niet als de dashcam is ingeschakeld. Dit kan leiden tot verlies van
gegevens of schade aan het apparaat.
• Schakel de dashcam uit zoals beschreven in 7.2 In-/uitschakelen.
• Haal de MicroSD-kaart uit de camera.
• Sluit de micro-SD-kaart aan op uw pc met behulp van de SD-kaartlezer (meegeleverd).
• Draag de opgeslagen gegevens over op uw pc om het geheugen te ontlasten.
11. Veiligstellingstoets
Aanwijzing
Denk eraan dat in het geval van een ongeval het verlenen van eerste hulp en de veiligheid van alle
betrokkenen prioriteit heeft.
Om ervoor te zorgen dat uw gegevens permanent worden opgeslagen, gaat uals volgt te werk:
• Druk op de veiligstellingstoets (13). Het display geeft weer.
• Houd Power [ ](10) gedurende ongeveer 3seconden ingedrukt om de camerauit te schakelen.
• Verwijder nu de micro-SD-kaart uit de camera.
Aanwijzing
• Video's die na het indrukken van de veiligstellingstoets worden opgeslagen, worden opgeslagen
met de aanduiding "LOKXXXXXXX".
• Gewone videobestanden worden opgeslagen met de aanduiding "REC" en een volgnummer.
12. Fabrieksinstellingen
Om de dashcam terug te zetten (resetten) naar de fabrieksinstellingen (leveringstoestand), gaat uals
volgt te werk:
• Schakel de dashcam uit zoals beschreven in 7.2 In-/uitschakelen.
• Houd [Reset](4) met een puntig voorwerp gedurende ongeveer 3seconden ingedrukt.
• Als alternatief kunt udefabrieksinstellingen zoals beschreven in subparagraaf 9.3.5
Fabrieksinstellingen herstellen.
• Al uw persoonlijke instellingen worden gewist.
69

Aanwijzing
• Problemen en storingen kunnen mogelijk worden opgelost door naar de fabrieksinstellingen te
resetten.
• Hierbij worden echter alle eerder uitgevoerde instellingen onherroepelijk gewist.
13. Onderhoud en verzorging
• Reinig dit product uitsluitend met een pluisvrije, licht vochtige doek en maak geen gebruik van
agressieve reinigingsmiddelen.
• Let erop dat er geen water in het product binnendringt.
14. Uitsluiting van garantie en aansprakelijkheid
Hama GmbH &CoKG aanvaardt geen enkele aansprakelijkheid of garantieclaims voor schade of
gevolgschade, welke door ondeskundige installatie, montage en ondeskundig gebruik van het
product ontstaan of het resultaat zijn van het niet in acht nemen van de bedieningsinstructies en/of
veiligheidsinstructies.
15. Technische specificaties
Afmetingen 89 x48x35mm
Beeldscherm-diagonaal:2.4"
Max. ResolutieFoto: 12 megapixel |video: 1080i
Gegevensformaat Foto:JPEG |Video: AVI
GeheugenkaartOndersteunt micro-SD-geheugenkaarten tot 32 GB
Stroomvoor zieningIngang: 12 V-24V 0,5A; Uitgang: 5V ;1A;kabellengte: 2m
Batter ij
Ingang:5V 290mA; type: 3,7 V/LiPo;
min.capaciteit:130mAh/0,48 Wh
70

Ovládací prvky aindikace
A
1. Zařízení držák spřísavkou
2. Slot na karty microSD
3. Mikrofon /reproduktor
B
4. Reset
5.
Navigační tlačítko
►
6. Mode
7. OK
8. Menu
9.
Navigační tlačítko
◄
10.Power
C
11.Nabíjecí zdířka mini USB
12.Stavová LED dioda
13.Zálohovací tlačítko
D
14.Držák Dashcam
15.Blokovací páčka
Režim videa -Přehled symbolů
Režimvidea
Doba trvání Loop
Denní režim
Noční režim
Režimpohybu
Kvalita videa
Paměťovákarta rozpoznána
C Návod kpoužití
71

Paměťová karta nebyla rozpoznána
Indikátorbaterie
Nahrávání videa bě ží
Zabezpečenévideo
00.00.00
Trvání videa
Režim fotografie -Přehled symbolů
Režimfotograe
Denní režim
Noční režim
12M-VGA Rozlišení obrazu
Paměťovákarta rozpoznána
Paměťová karta nebyla rozpoznána
Indikátorbaterie
Wiedergabemodus -Symbolübersicht
Video se přehrává
Video je pozastaveno
Zabezpečené video
72

Paměťovákarta rozpoznána
Paměťová karta nebyla rozpoznána
Indikátorbaterie
Děkujeme, že jste si vybrali výrobek Hama.
Přečtěte si, prosím, všechny následující pokyny ainformace. Uchovejte tento text propřípadné budoucí
použití. Pokud výrobek prodáte, předejte tento text novému majiteli.
1. Vysvětlení výstražných symbolů apokynů
Nebezpečíporanění elektrickým proudem
Tento symbol upozorňuje na nebezpečípřidotyku neizolovaných částí produktu, které by mohly vést
nebezpečné napětí otakové síle, že hrozí nebezpečíporanění elektrickým proudem.
Upozornění
Tento symbol označuje bezpečnostní upozornění, které poukazuje na určitá rizika anebezpečí.
Poznámka
Tento symbol označuje dodatečné informace nebo důležité poznámky.
2. Obsah balení
•Dashcam 30
•Nabíječka do motorových vozidel mini USB
•Držák spřísavkou
• Čtečka karet microSD
•Informace kpoužívání
73

3. Bezpečnostní pokyny
• Výrobek je určen prosoukromé, nevýdělečné použití.
• Výrobek používejte výhradně ke stanovenému účelu.
• Výrobek chraňte před znečištěním. Nepoužívejte ve vlhkém prostředí azabraňte styku svodou.
Používejte pouze vsuchých prostorách.
• Výrobek chraňte před pádem avelkými otřesy.
• Přístroj nepoužívejte mimo rozsah předepsaných hodnot vtechnických údajích.
• Kabel nelámejte anedeformujte.
• Akumulátor je pevně instalován anelze jej vyjmout. Výrobek likvidujte jako celek vsouladu splatnými
předpisy.
• Výrobek neotvírejte avpřípadě poškození již dále nepoužívejte.
• Výrobek nepatřídorukou dětem, stejně jako ivšechny elektrické přístroje.
• Připoužití výrobku dodržujte platné předpisy apravidla silničního provozu.
• Dbejte na to, aby nebyly zakryty nebo omezeny žádné komponenty jako je airbag, bezpečnostní a
ovládací prvky,zobrazovací přístroje apod., nebo výhled.
• Přijízdě autem se nerozptylujte produktem aneodvracejte svou pozornost od dopravní situace a
dění ve svém okolí.
• Před každou jízdou zkontrolujte bezpečnou montáž produktu.
• Vybité baterie bez odkladu vyměňte azlikvidujte dle platných předpisů.
• Výrobek žádným způsobem neupravujte, ztratíte tím nárok na záruku.
• Baterii ani výrobek nevhazujte do ohně.
• Nu modicați, deformați, încălzițisau dezmembrabateriile/acumulatoarele.
Nebezpečíporanění elektrickým proudem
• Výrobek neotvírejte avpřípadě poškození již dále nepoužívejte.
• Výrobek nepoužívejte, pokud je nabíjecí kabel, kabel adaptéru nebo síťové vedení poškozeno.
• Do výrobku samovolně nezasahujte aneopravujte ho. Veškeré úkony údržby přenechejte
příslušnému odbornému personálu.
4. Zákonná ustanovení /omezení připrovozu Dashcam
Poznámka
• Beachten Sie, dass Hinweise zu gesetzlichen Regelungen in diesen Hinweisen nur die deutschen
Vorschriften und Gesetze zum Zeitpunkt der Drucklegung abbilden. Informieren Sie sich in
anderen Staaten vor der Verwendung des Produktes über die dort geltenden Regelungen!
• Respektujte, že použití produktu vsilniční dopravě závisí na legislativě příslušné země,vkteré
mohou platit různá nařízení.
74

Poznámka
• Vněkterých právních výrocích je použití Dashcam zvlášť upraveno, příp. zakázáno. Před použitím
Dashcam se informujte ozákonech asměrnicích.
• Před instalací apoužitím produktu dbejte platných předpisů aochrany dat.
• Dodržujte platné předpisy,které se týkají pořizování aukládání videosouborů aobrazových dat.
5. Použití kstanovenému účelu
•Tento výrobek je určený pouze propoužití vozidlech.
•Respektujte osobní amajetková práva jiných osob. Nepořizujte pomocí Dashcam nahrávky jiných
osob.
•Přinahrávání respektujte právo na vlastní podobiznu amluvené slovo.
•Pokud produkt delší dobu nepoužíváte, sejměte jej z čelního skla, aby nedošlo kjeho poškození
slunečním zářením ateplotou.
6. Uvedení do provozu
Upozornění -Nebezpečíporanění
• Připoužití výrobku dodržujte platné předpisy apravidla silničního provozu.
• Dbejte na to, aby nebyly zakryty nebo omezeny žádné komponenty jako je airbag, bezpečnostní a
ovládací prvky,zobrazovací přístroje apod., nebo výhled.
• Přijízdě autem neodvracejte svou pozornost od dopravní situace adění ve svém okolí.
Poznámka
• Před montáží držáku zkontrolujte možnosti instalace ve svém vozidle. Pokud budete mít pochyby,
podívejte se do návodu kpoužití vozidla nebo se obraťte na výrobce vozidla.
• Přimanipulaci svýrobkem nebo přimontáži nikdy nepoužívejte násilí nebo velkou sílu.
• Před každou jízdou zkontrolujte bezpečnou montáž produktu.
6.1 Montáž držáku spřísavkou
• Odstraňte zpřísavky ochrannou fólii.
• Otevřete (15) blokovací páku přísavky.
• Umístěte držák spřísavkou na vyčištěnou, rovnou plochu montáže (např.okno).
• Lehce přitlačte držák na požadovanou plochu montáže azavřete blokovací páku (15), tím držák upevníte.
• Po instalaci vždy zkontrolujte bezpečné upevnění přísavky.
• Prouvolnění přísavky zplochy montáže otevřete blokovací páku. Popřípadě lehce zatáhněte za
sponu, abyste přísavku zcela uvolnili.
75

6.2 Nastavení úhlu asklonu
Úhel asklon držáku lze pomocí kulové hlavy plynule seřídit směremkpozorovateli.
• Úhel asklon seřizujte vždy bez nasazeného koncového zařízení.
• Proseřízení uvolněte upínací šroub kulové hlavy.
• Nastavte požadovaný úhel asklon aupínací šroub pevně utáhněte.
6.3 Nasazení/vyjmutí Dashcam
Poznámka
Vždy zkontrolujte bezpečné usazení držáku spřísavkou izařízení Dashcam.
• Vložte Dashcam do držáku (14) spřísavkou.
• Dashcam vytáhnete opatrným pohybem sem atam zdržáku.
7. Provoz
7.1. Spojení spalubní sítí vozidla
Upozornění –baterie
• Pronabíjení používejte pouze vhodné nabíječky spřípojkami USB.
• Vadné nabíječky nebo USB přípojky dále nepoužívejte aani je nezkoušejte opravovat.
• Výrobek nepřebíjejte ani ho zcela nevybíjejte.
• Vyhněte se skladování, nabíjení apoužívání přiextrémních teplotách aextrémně nízkém tlaku
vzduchu (např.vevelkých výškách).
• Vpřípadě delšího skladování výrobek pravidelně dobíjejte (nejméně každého čtvrt roku).
• Zapojte přiložený nabíjecí kabel mini USB do nabíjecí zdířky mini USB (11) Dashcam adozásuvky
palubní sítě vozidla.
• Dashcam se automaticky zapne po nastartování motoru.
• Stavová LED dioda (12) se rozsvítí natrvalo modře.
Poznámka -Kapacitabaterie
Baterie má omezenou dobu chodu cca 2–3 minuty.Tatozálohovací funkce slouží např.ke
kontinuálnímu pokračování času. Delší provoz je možný pouze spřipojeným adaptérem vozidla.
Poznámka -trvalý provoz zbaterie
Přístroj není určen protrvalý provoz zbaterie. Trvalý provoz zbaterie může způsobit neopravitelná
poškození.
76

7.2. Zapnutí /vypnutí
Poznámka -automatické zapnutí avypnutí
Pokud je kameraDashcam prostřednictvím nabíječky vozidla připojena kzdroji proudu, při
nastartovaní avypnutí motoru se automaticky zapne avypne.
Poznámka -autobaterie
Uněkterých vozidel může dojít ktomu, že bude proud přiváděnipřivypnutém zapalování. Vtomto
případě vypněte kameru manuálně,aby nedošlo kvybití baterie.
Stisknutím apodržením tlačítka Power [ ](10) na cca 3sekundy manuálně zapnete/vypnete
Dashcam.
7.3. Vložení karty micro SD
• Vložte kartu microSDdo slotu prokarty microSD(2) kamery Dashcam.
• Na displeji se zobrazí .
Poznámka -plná paměťová karta
Jakmile je paměť karty microSDplná, nejstarší video záznamy se přepíší.
8. Režimy
8.1 Režim videa
• Po zapnutí se kameranachází vprovozním režimu video. Na levém horním okraji obrazovky se
zobrazí .
• Nahrávání videa se spustí automaticky přizapnutí zařízení.
• Stiskněte [OK](7) prozastavení /zahájení nahrávání videa.
• Během nahrávání se na levém horním okraji obrazovky zobrazuje doba nahrávání. Stavová LED
dioda (12) svítí střídavěčerveně amodře.
Poznámka -noční režim
Během nahrávání krátce stiskněte Power [ ](10) proaktivaci/deaktivaci nočního režimu.
8.2 Režim fotografi
• Opakovaným stisknutím tlačítka [MODE](6) aktivujte provozní režim foto. Na levém horním okraji
obrazovky se zobrazí
.
• Stiskněte [OK](7) propořízení snímku.
77

8.3 Režim reprodukce
• Opakovaným stisknutím tlačítka alternativně aktivujete [MODE](6) provozní režim přehrávání.
se zobrazí na levém spodním okraji obrazovky.
• Pomocí navigačních tlačítek [◄](9) /[►]vyberte soubor,který chcete zobrazit.
• Stiskněte [MENU](8) prodalší možnosti.
• Pomocí navigačních tlačítek
[◄](9) /[►](5)
se pohybujte vmenu.
• Vyberte bod menu Vymazání apotvrďte svůjvýběrstisknutím [OK](7).
• Můžete zvolit Vymazání výběr nebo Vymazání vše.
• Následující bezpečnostní otázku potvrďte stisknutím OK nebo zvolte Přerušit propřerušení procesu.
• Stiskněte [MENU](8) prodalší možnosti, abyste se alternativně dostali kbodu menu Blokování.
• Vyberte bod menu Blokování apotvrďte svůjvýběrstisknutím [OK](7).
• Můžete si vybrat Zamknout soubor, Zamknout vše, Odemknout soubor nebo Odemknout vše.
• Následující bezpečnostní otázku potvrďte stisknutím OK nebo zvolte Zrušit propřerušení procesu.
9. Nastavení
9.1 Nastavení režimu videa
• Přejděte do režimu videa tak, jak je popsáno vkapitole 8.1 Režim videa.
• Stiskněte [MENU](8) propřístup knastavení videa.
• Na levém horním okraji obrazovky se zobrazí
.
• Pomocí navigačních tlačítek [◄](9) /[►](5) se pohybujte vmenu.
• Volbu potvrďte stisknutím [OK](7).
9.1.1 Rozlišení
Zvolte požadované rozlišení (1280X720 /1920X1080)pořízeného video materiálu.
• Navigujte do bodu menu Rozlišení apotvrďte výběrstisknutím [OK](7). Otevřesenové přehledové
okno.
• Pomocí navigačních tlačítek [◄](9) /[►](5) zvolte požadované nastavení.
• Volbu potvrďte stisknutím [OK](7).
9.1.2 Vodoznak
Přitomto aktivovaném režimu obdrží každý videosoubor časové adatumové razítko.
• Navigujte do bodu menu Vodoznak apotvrďte výběrstisknutím [OK](7). Otevřesenové
přehledové okno.
• Pomocí navigačních tlačítek [◄](9) /[►](5) zvolte požadované nastavení.
• Volbu potvrďte stisknutím [OK](7).
9.1.3 Rozpoznání pohybu
Přiaktivovaném rozpoznávání pohybu se přiotřesech kamery (např.nehoda) automaticky spustí
nahrávání.
78

• Navigujte do bodu menu Rozpoznání pohybu apotvrďte výběrstisknutím [OK](7). Otevřesenové
přehledové okno.
• Pomocí navigačních tlačítek [◄](9) /[►](5) zvolte požadované nastavení.
• Volbu potvrďte stisknutím [OK](7).
• Na displeji videa se zobrazí .
9.1.4 Funkce Loop
Zvolte požadovaný časový interval (1/2/3/5 minut), po jehož uplynutí se má zahájit nové nahrávání
videa.
Zvolte Vypnuto prodeaktivaci této funkce. Nyní bude pořízen pouze jeden soubor.
• Navigujte do bodu menu Funkce Loop apotvrďte výběrstisknutím [OK](7). Otevřesenové
přehledové okno.
• Pomocí navigačních tlačítek [◄](9) /[►](5) zvolte požadované nastavení.
• Volbu potvrďte stisknutím [OK](7).
• Na displeji videa se zobrazí .
9.1.5 Pořízení audia
Přitomto aktivovaném režimu je kromě videa zaznamenáván izvuk.
• Navigujte do bodu menu Pořízení audia apotvrďte výběrstisknutím [OK](7). Otevřesenové
přehledové okno.
• Pomocí navigačních tlačítek [◄](9) /[►](5) zvolte požadované nastavení.
• Volbu potvrďte stisknutím [OK](7).
9.1.6 Kontrast
Přizpůsobením kontrastu zvýšíte kvalitu videonahrávky (-2 až +2).
• Navigujte do bodu menu Kontrast apotvrďte výběrstisknutím [OK](7). Otevřesenové přehledové
okno.
• Pomocí navigačních tlačítek [◄](9) /[►](5) zvolte požadované nastavení.
• Volbu potvrďte stisknutím [OK](7).
9.2 Nastavení režimu fotografie
• Přejděte do režimu fotograetak, jak je popsáno vkapitole 8.2 Režim fotograe.
• Stiskněte [MENU](8) propřístup knastavení fotografování.
• Na levém horním okraji obrazovky se zobrazí .
• Pomocí navigačních tlačítek [◄](9) /[►](5) se pohybujte vmenu.
• Volbu potvrďte stisknutím [OK](7).
79

9.2.1 Rozlišení
Zvolte požadované rozlišení (VGA -12megapixelů)pořízeného obrazového materiálu.
• Navigujte do bodu menu Rozlišení apotvrďte výběrstisknutím [OK](7). Otevřesenové přehledové
okno.
• Pomocí navigačních tlačítek [◄](9) /[►](5) zvolte požadované nastavení.
• Volbu potvrďte stisknutím [OK](7).
9.2.2 Zobrazení snímku
Vpřípadě aktivního zobrazení snímku se na displeji na krátkou dobu (2/5 sekund)zobrazí pořízený
snímek. Teprve po uplynutí této doby lze pořídit další snímek.
Prodeaktivaci této funkce zvolte Vypnuto.
• Navigujte do bodu menu Zobrazení snímku apotvrďte výběrstisknutím [OK](7). Otevřesenové
přehledové okno.
• Pomocí navigačních tlačítek [◄](9) /[►](5) zvolte požadované nastavení.
• Volbu potvrďte stisknutím [OK](7).
9.2.3 Vodoznak
Přitomto aktivovaném režimu obdrží každá fotograe časové adatumové razítko.
• Navigujte do bodu menu Vodoznak apotvrďte výběrstisknutím [OK](7). Otevřesenové
přehledové okno.
• Pomocí navigačních tlačítek [◄](9) /[►](5) zvolte požadované nastavení.
• Volbu potvrďte stisknutím [OK](7).
9.2.4 Kontrast
Přizpůsobením kontrastu zvýšíte kvalitu fotografie (-2 až +2).
• Navigujte do bodu menu Kontrast apotvrďte výběrstisknutím [OK](7). Otevřesenové přehledové
okno.
• Pomocí navigačních tlačítek [◄](9) /[►](5) zvolte požadované nastavení.
• Volbu potvrďte stisknutím [OK](7).
9.3 Všeobecná nastavení
• Dvakrát stiskněte [MENU](8) propřístup kmenu nastavení kamery.
• Pokud jste již vmenu video/foto, alternativně jednou stiskněte [MENU](8).
• Na levém horním okraji obrazovky se zobrazí .
• Pomocí navigačních tlačítek [◄](9) /[►](5) se pohybujte vmenu.
• Volbu potvrďte stisknutím [OK](7).
80

9.3.1 Formátování paměťové karty
Smažte veškeré soubory,které se nacházejí na vložené paměťové kartě.
• Navigujte do bodu menu Formátování paměťové karty apotvrďte výběrstisknutím [OK](7).
Otevřesenové přehledové okno.
• Formátování potvrďte stisknutím OK nebo zvolte Přerušit propřerušení procesu.
9.3.2 Jazyk
Zvolte jazyk provádění menu.
• Navigujte do bodu menu Jazyk apotvrďte výběrstisknutím [OK](7). Otevřesenové přehledové
okno.
• Pomocí navigačních tlačítek [◄](9) /[►](5) zvolte požadované nastavení.
• Volbu potvrďte stisknutím [OK](7).
9.3.3 Vypnout přineaktivitě
Zvolte časový interval (1minuta /3 minuty), po jehož uplynutí se kameravpřípadě nepoužívání
automaticky vypne.
Zvolte Vypnuto prodeaktivaci této funkce.
• Navigujte do bodu menu Vypnout přineaktivitě apotvrďte výběrstisknutím [OK](7). Otevřese
nové přehledové okno.
• Pomocí navigačních tlačítek [◄](9) /[►](5) zvolte požadované nastavení.
• Volbu potvrďte stisknutím [OK](7).
9.3.4 Spořič obrazovky
Zvolte požadovaný časový interval (1minuta /3minuty /5minut), po jehož uplynutí se má
aktivovat spořič obrazovky.Jestliže po tuto dobu nestisknete žádné tlačítko, displej se vypne. Nahrávání
videa však běží dále.
Zvolte Vypnuto prodeaktivaci této funkce.
• Navigujte do bodu menu Spořič obrazovky apotvrďte výběrstisknutím [OK](7). Otevřesenové
přehledové okno.
• Pomocí navigačních tlačítek [◄](9) /[►](5) zvolte požadované nastavení.
• Volbu potvrďte stisknutím [OK](7).
9.3.5 Výrobní nastavení
• Navigujte do bodu menu Výrobní nastavení apotvrďte výběrstisknutím [OK](7). Otevřesenové
přehledové okno.
• Resetování potvrďte stisknutím OK nebo zvolte Přerušit propřerušení procesu.
81

9.3.6 Datum/čas
• Navigujte do bodu menu Datum/čas apotvrďte výběrstisknutím [OK](7). Otevřesenové
přehledové okno.
• Pomocí navigačních tlačítek [◄](9) /[►](5) nastavte rokapotvrďte zadání stisknutím [OK](7).
• Poté nastavte následující informace jednu po druhé stejným postupem: měsíc, den, čas.
• Volbu potvrďte stisknutím [MENU](8).
9.3.7 Verze
• Navigujte do bodu menu Verze apotvrďte výběrstisknutím [OK](7). Otevřesenové přehledové okno.
• Zobrazí se aktuální verze kamery.
10. Zobrazení nahraného materiálu
Poznámka
Vpřípadě zapnuté kamery Dashcam nevytahujte kartu microSD. Mohlo by dojít ke ztrátě dat nebo
poškození zařízení.
• Zapněte Dashcam tak, jak je popsáno vkapitole 7.2 Zapnutí/vypnutí.
• Vyjměte kartu microSDzkamery.
• Vložte kartu microSDdo čtečky SD karet (součást balení) apřipojte ji kVašemupočítači.
• Přeneste uložená data na Váš PC, uvolníte tím paměť.
11. Zálohovací tlačítko
Poznámka
Upozorňujeme, že vpřípadě nehody má prioritu poskytnutí první pomoci azajištění bezpečnosti
všech zúčastněných.
Abyste měli jistotu, že jsou Vaše data trvale uložena, postupujte následovně:
• Stiskněte zálohovací tlačítko (13). Na displeji se objeví
.
• Stisknutím apodržením tlačítka Power [ ](10) na cca 3sekundy kameru vypnete.
• Nyní vyjměte kartu microSDzkamery.
Poznámka
• Videa, která se uloží stisknutím zálohovacího tlačítka, budou uložena do paměti pod označením
„LOKXXXXX“.
• Pravidelné videosoubory budou ukládány pod označením „REC“ apořadovým číslem.
82

12. Nastavení zvýroby
Proresetkamery Dashcam na nastavení zvýroby (stav přidodání) postupujte následujícím způsobem:
• Zapněte Dashcam tak, jak je popsáno vkapitole 7.2 Zapnutí/vypnutí.
• Stiskněte apodržte stisknuté tlačítko [Reset](4) pomocí špičatého nástroje na cca 3sekundy.
• Alternativně můžete původní nastavení obnovit tak, jak je popsáno vkapitole 9.3.5 Výrobní
nastavení.
• Všechna provedená nastavení budou vymazána.
Poznámka
• Některé problémy achybné funkce je možné odstranit vrácením nastavení na tovární hodnoty.
• Nicméně všechny přednastavené hodnoty (čas, budík, apod.) budou trvale odstraněny.
13. Údržba a čištění
• Tento výrobek čistěte pouze mírně navlhčeným hadříkem nepouštějícím vlákna anepoužívejte
agresivní čisticí prostředky.
• Dbejte na to, aby se do výrobku nedostala voda.
14. Vyloučení záruky
Hama GmbH &CoKG nepřebírá žádnou odpovědnost nebo záruku za škody vzniklé neodbornou
instalací, montáží nebo neodborným použitím výrobku nebo nedodržováním návodu kpoužití a/nebo
bezpečnostních pokynů.
15. Technické údaje
Rozměry 89 x48x35mm
Uhlopříčka obrazovky 2.4"
Max. rozlišeníFoto: 12 megapixelů |video: 1080i
datový formát Foto:JPEG |Video: AVI
Paměťovákarta Podporujepaměťovékarty microSDdo 32 GB
NapájeníInput: 12 V-24V 0,5A; Output: 5V ;1A; délka kabelu: 2m
Baterie
Input:5V 290mA; typ: 3,7 V/LiPo;
Min. kapacita: 130 mAh /0,48Wh
83

Ovládacie prvky aindikácie
A
1. Zariadenie prísavkového držiaka
2. Slot na microSD karty
3. Mikrofón/reproduktor
B
4. Resetovanie
5.
Navigačné tlačidlo
►
6. Mode
7. OK
8. Menu
9.
Navigačné tlačidlo
◄
10.Power
C
11.Nabíjacia zdierka miniUSB
12.Stavová LED dióda
13.Poistné tlačidlo
D
14.Držiak na kameru Dashcam
15.Blokovacia páka
Režim Video -Prehľad symbolov
RežimVideo
Časový interval slučky (Loop)
Denný režim
Nočný režim
Režimpohybu
Kvalita videa
Pamäťovákar ta rozpoznaná
Q Návod na použitie
84

Pamäťová karta nerozpoznaná
Indikáciabatérie
Záznam videa beží
Videobolo uložené
00.00.00
Dĺžkavidea
Režim Foto -Prehľad symbolov
RežimFoto
Denný režim
Nočný režim
12M-VGA Rozlíšenie
Pamäťovákar ta rozpoznaná
Pamäťová karta nerozpoznaná
Indikáciabatérie
Režim Prehrávanie -Prehľad symbolov
Video je spustené
Video bolo pozastavené
Video bolo uložené
85

Pamäťovákar ta rozpoznaná
Pamäťová karta nerozpoznaná
Indikáciabatérie
Ďakujeme, že ste sa rozhodli prevýrobok Hama.
Prečítajte si všetky nasledujúce pokyny ainformácie. Uchovajte tento návod na použitie preprípadné
budúce použitie. Pokiaľ výrobok predáte, dajte tento návod novému majiteľovi.
1. Vysvetlenie výstražných symbolov aupozornení
Nebezpečenstvo elektrického úderu
Tento symbol upozorňuje na nebezpečenstvo dotyku neizolovaných častí výrobku, ktoré sú
eventuálne pod tak vysokým nebezpečným napätím, že hrozí nebezpečenstvo elektrického úderu.
Upozornenie
Tento symbol označuje bezpečnostné upozornenie, ktoré poukazuje na určité riziká
anebezpečenstva.
Poznámka
Tento symbol označuje dodatočné informácie, alebo dôležité poznámky.
2. Obsah balenia
•Dashcam 30
•Autonabíjačka miniUSB
•Prísavkový držiak
• Čítačka microSD kariet
•Informácie na používanie
86

3. Bezpečnostné upozornenia
• Tento výrobok je určený na súkromné použitie vdomácnosti, nie je určený na komerčné použitie.
• Výrobok používajte výhradne na stanovený účel.
• Výrobok chráňte pred znečistením. Nepoužívajte vo vlhkom prostredí azabráňte styku svodou.
Používajte iba vsuchých priestoroch.
• Výrobok chráňte pred pádmi aveľkými otrasmi.
• Prístroj nepoužívajte mimo rozsahu predpísaných hodnôt vtechnických údajoch.
• Kábel nelámte anedeformujte.
• Akumulátor je pevne nainštalovaný anedá sa vybrať.Výrobok likvidujte ako celok vsúlade s
platnými predpismi.
• Výrobok neotvárajte avprípade poškodenia ho ďalej nepoužívajte.
• Výrobok nepatrí do rúk deťom, rovnako ako všetky elektrické prístroje.
• Pri použití výrobku dodržiavajte platné predpisy apravidlá cestnej premávky.
• Dbajte na to, aby neboli zakryté alebo obmedzené žiadne komponenty,ako je je airbag,
bezpečnostné aovládacie prvky,zobrazovacie prístroje apod., alebo výhľad.
• Počas jazdy motorovým vozidlom sa nenechajte rozptyľovať vaším výrobkom adbajte na dopravnú
situáciu aokolité prostredie.
• Pred každou jazdou skontrolujte bezpečnú montáž výrobku.
• Obalový materiál zlikvidujte podľaplatných predpisov olikvidácii.
• Výrobok žiadnym spôsobom neupravujte, stratíte tým nárok na záruku.
• Akumulátor,resp.výrobok nevhadzujte do ohňa.
• Na akumulátoroch/batériách nerobte žiadne zmeny a/ani ich nedeformujte/nezahrievajte/nerozoberajte.
Nebezpečenstvo elektrického úderu
• Výrobok neotvárajte anepoužívajte ho ďalej, ak je poškodený.
• Výrobok nepoužívajte, ak sú poškodené nabíjací kábel, adaptérový kábel alebo sieťové vedenie.
• Nepokúšajte sa sami oúdržbu ani opravu výrobku. Prenechajte akúkoľvek údržbu
kompetentnému odbornému personálu.
4. Zákonné ustanovenia/obmedzenia pri prevádzke kamier Dashcam
Poznámka
• Upozorňujeme na to, že upozornenia vyplývajúce zo zákonných ustanovení uvedené vtýchto
pokynoch zohľadňujú iba nemecké predpisy azákony platné v čase tlače. Pred použitím výrobku v
iných štátoch sa informujte omiestnych ustanoveniach!
• Upozorňujeme na to, že pri používaní výrobku vcestnej premávke môžu platiť vzávislosti od
právnych predpisov príslušnej krajiny rôzne ustanovenia.
87

Poznámka
• Vniektorých judikatúrach podlieha používanie kamier Dashcam osobitným ustanoveniam, resp. je
zakázané. Pred použitím kamery Dashcam sa oboznámte so zákonmi asmernicami.
• Pred inštaláciou apoužitím výrobku dodržiavajte platné predpisy oochrane osobných údajov.
• Dodržiavajte platné predpisy týkajúce sa zaznamenávania aukladania video súborov aobrazových
súborov.
5. Používanie na určený účel
•Tento výrobok je určený len na používanie vo vozidlách.
•Rešpektujte osobné avlastnícke práva iných osôb. Nerobte kamerou Dashcam záznamy iných osôb.
•Pri zázname rešpektujte právo na vlastnú podobu ahovorené slovo.
•Vprípade dlhšieho nepoužívania odstráňte výrobok z čelného skla, aby ste predišli poškodeniam
podmieneným slnečným žiarením ateplotou.
6. Uvedenie do prevádzky
Upozornenie -nebezpečenstvo poranenia
• Pri použití výrobku dodržiavajte platné predpisy apravidlá cestnej premávky.
• Dbajte na to, aby neboli zakryté alebo obmedzené žiadne komponenty,ako je je airbag,
bezpečnostné aovládacie prvky,zobrazovacie prístroje apod., alebo výhľad.
• Počas jazdy motorovým vozidlom sa nenechajte rozptyľovať výrobkom adbajte na dopravnú
situáciu aokolité prostredie.
Poznámka
• Pred montážou držiaka skontrolujte možnosti montáže vo svojom vozidle. Vprípade pochybností
si preštudujte návod na používanie vozidla alebo sa obráťte na výrobcu vozidla.
• Pri manipulácii svýrobkom amontáži nikdy nepoužívajte násilie alebo veľkú silu.
• Pred každou jazdou skontrolujte bezpečnú montáž výrobku.
6.1 Montáž prísavkového držiaka
• Odstráňte zprísavky ochrannú fóliu.
• Otvorte blokovaciu (15) páku prísavky.
• Umiestnite držiak sprísavkou na vyčistenú, rovnú montážnu plochu (napr.sklo vaute).
• Držiakupevnitejehomiernympritlačenímnapožadovanúmontážnuplochuazatvorenímblokovacejpáky(15).
• Po montáži vždy skontrolujte bezpečné upevnenie prísavky.
• Ak chcete prísavku znova uvoľniť zmontážnej plochy,otvorte blokovaciu páku. Vprípade potreby
následne zľahka potiahnite za páku aby sa prísavka úplne uvoľnila.
88

6.2 Nastavenie uhla asklonu
Pomocou guľovej hlavy môžete plynulo prestavovať uhol náklonu držiaka kpoužívateľovi.
• Uhol sklonu prestavujte vždy bez vloženého koncového zariadenia.
• Prenastavenie uvoľnite upínaciu skrutku guľovej hlavy.
• Nastavte požadovaný uhol sklonu autiahnite upínaciu skrutku.
6.3 Vloženie/vybratie kamery Dashcam
Poznámka
Vždy skontrolujte bezpečné osadenie prísavkového držiaka abezpečné uchytenie kamery Dashcam.
• Zasuňte kameru Dashcam do uchytenia (14) prísavkového držiaka.
• Kameru Dashcam vytiahnete zuchytenia opatrným pohybom sem atam.
7. Prevádzka
7.1. Spojenie spalubnou sieťou
Upozornenie –akumulátor
• Nanabíjanie používajte iba vhodné nabíjačky sUSB prípojkami.
• Poškodené nabíjačky alebo USB prípojky ďalej nepoužívajte, ani sa ich nepokúšajte opraviť.
• Zabráňte prebitiu alebo úplnému vybitiu výrobku.
• Vyhýbajte sa skladovaniu, nabíjaniu apoužívaniu pri extrémnych teplotách aextrémne nízkom
tlaku vzduchu (ako napr.voveľkých výškach).
• Pri dlhšom uskladnení zariadenie pravidelne dobíjajte (min. štvrťročne).
• Spojte priložený nabíjací kábel miniUSB snabíjacou zdierkou miniUSB (11) kamery Dashcam a
autozásuvkou palubnej siete.
• Po spustení motorasakameraDashcam automaticky zapne.
• Indikátor stavu LED (12) svieti nepretržite namodro.
Poznámka -kapacita akumulátora
Akumulátor disponuje obmedzenou prevádzkovou dobou cca 2–3minúty.Táto vyrovnávacia
funkcia slúži napr.nakontinuálne pokračovanie času. Dlhšia prevádzka je možná len spripojeným
adaptérom na napájanie vaute.
Poznámka -trvalé napájanie akumulátorom
Prístroj nie je určený na trvalé napájanie akumulátorom. Trvalé napájanie akumulátorom môže
spôsobiť nenapraviteľné škody.
89

7.2. Zapnutie/vypnutie
Poznámka -automatické zapnutie/vypnutie
Ak je kameraDashcam prostredníctvom autonabíjačky spojená so zdrojom napájania, pri
naštartovaní/vypnutí vozidla sa automaticky zapne/vypne.
Poznámka -autobatéria
Uniektorých vozidiel môže dôjsť ktomu, že prívod prúdu zostane zachovaný napriek vypnutému
zapaľovaniu. Vtakom prípade vypnite kameru manuálne, aby ste svoju autobatériu ochránili pred vybitím.
Na manuálne zapnutie/vypnutie kamery Dashcam podržte stlačené tlačidlo Power [
](10) na
cca 3sekundy.
7.3. Vloženie karty microSD
• Zasuňte microSD kartu do slotu na microSD karty (2) kamery Dashcam.
• Na displeji sa zobrazí .
Poznámka -pamäťová karta plná
Hneď ako je pamäť microSD karty plná, prepíše sa najstarší videozáznam.
8. Režimy
8.1 Režim Video
• Kamerasapozapnutí nachádza vprevádzkovom režime Video. Na hornom ľavom okraji obrazovky
sa zobrazí .
• Nahrávanie videa sa po zapnutí zariadenia spustí automaticky.
• Na zastavenie/spustenie videozáznamu stlačte tlačidlo [OK](7).
• Počas videozáznamu sa na hornom ľavom okraji obrazovky zobrazí doba trvania záznamu. Indikátor
stavu LED (12) svieti striedavo načerveno anamodro.
Poznámka -nočný režim
Na aktivovanie/deaktivovanie nočného režimu stlačte počas videozáznamu krátko tlačidlo
Power [
](10).
8.2 Režim Foto
• Prevádzkový režim Foto aktivujete opakovaným stláčaním tlačidla [MODE](6). Na hornom ľavom
okraji obrazovky sa zobrazí
.
• Na nasnímanie obrazu stlačte tlačidlo [OK](7).
90

8.3 Režim Prehrávanie
• Aktivujte prevádzkový režim Prehrávanie opakovaným stláčaním tlačidla [MODE](6).
sa zobrazí na ľavom dolnom okraji obrazovky.
• Pomocou navigačných tlačidiel [◄](9) /[►](5) zvoľte súbor,ktorý chcete prehrať.
• Pre ďalšie možnosti stlačte tlačidlo [MENU](8).
• Pomocou navigačných tlačidiel [◄](9) /[►](5) zvoľte súbor,ktorý chcete prehrať.
• Zvoľte položku menu Vymazať avýber potvrďte stlačením tlačidla [OK](7).
• Môžete si vybrať medzi Vymazať výber a Vymazať všetky.
• Následnú bezpečnostnú otázku potvrďte stlačením tlačidla OK alebo zvoľte Zrušiť na zrušenie
operácie.
• Stlačením tlačidla [MENU](8) získate ďalšie možnosti aprípadne prejdite na položku ponuky
Zablokovať.
• Zvoľte položku menu Zablokovať avýber potvrďte stlačením tlačidla [OK](7).
• Môžete si vybrať medzi Zamknúť súbor, Zamknúť všetky, Odomknúť súbor a Odomknúť všetky.
• Následnú bezpečnostnú otázku potvrďte stlačením tlačidla OK alebo zvoľte Zrušiť na zrušenie
operácie.
9. Nastavenia
9.1 Nastavenia režimu Video
• Prejdite do režimu Video, ako je opísané vkapitole 8.1 Režim Video.
• Na prechod na nastavenia videa stlačte tlačidlo [MENU](8).
• Na hornom ľavom okraji obrazovky sa zobrazí
.
• Pomocou navigačných tlačidiel [◄](9) /[►](5) prechádzajte cez položky menu.
• Výber potvrďte stlačením tlačidla [OK](7).
9.1.1 Rozlíšenie
Zvoľte požadované rozlíšenie (1280X720 /1920X1080)zaznamenávaného video materiálu.
• Prejdite na položku menu Rozlíšenie avýber potvrďte stlačením tlačidla [OK](7). Otvorí sa nové
okno sprehľadom.
• Pomocou navigačných tlačidiel [◄](9) /[►](5) zvoľte súbor,ktorý chcete prehrať.
• Výber potvrďte stlačením tlačidla [OK](7).
9.1.2 Vodoznak
Ak je režim aktivovaný, označísakaždý video súbor časovou adátumovou pečiatkou.
• Prejdite na položku menu Vodoznak avýber potvrďte stlačením tlačidla [OK](7). Otvorí sa nové
okno sprehľadom.
• Pomocou navigačných tlačidiel [◄](9) /[►](5) zvoľte súbor,ktorý chcete prehrať.
• Výber potvrďte stlačením tlačidla [OK](7).
91

9.1.3 Rozpoznanie pohybov
Ak je aktivované rozpoznanie pohybu, videozáznam sa automaticky spustí pri otrasoch kamery (napr.
nehoda).
• Prejdite na položku menu Rozpoznanie pohybov avýber potvrďte stlačením tlačidla [OK](7).
Otvorí sa nové okno sprehľadom.
• Pomocou navigačných tlačidiel [◄](9) /[►](5) zvoľte súbor,ktorý chcete prehrať.
• Výber potvrďte stlačením tlačidla [OK](7).
• Na displeji režimu Video sa zobrazí .
9.1.4 Funkcia Loop
Tu zvoľte časový interval (1/2/3/5 minút), po uplynutí ktorého má začať nový videozáznam.
Ak chcete túto funkciu deaktivovať,zvoľte možnosť Vypnutý.Teraz sa vytvorí len jeden súbor.
• Prejdite na položku menu Funkcia Loop avýber potvrďte stlačením tlačidla [OK](7). Otvorí sa nové
okno sprehľadom.
• Pomocou navigačných tlačidiel [◄](9) /[►](5) zvoľte súbor,ktorý chcete prehrať.
• Výber potvrďte stlačením tlačidla [OK](7).
• Na displeji režimu Video sa zobrazí .
9.1.5 Záznam zvuku
Ak je režim aktivovaný, sníma sa okrem video materiálu aj zvuk.
• Prejdite na položku menu Záznam zvuku avýber potvrďte stlačením tlačidla [OK](7). Otvorí sa
nové okno sprehľadom.
• Pomocou navigačných tlačidiel [◄](9) /[►](5) zvoľte súbor,ktorý chcete prehrať.
• Výber potvrďte stlačením tlačidla [OK](7).
9.1.6 Kontrast
Zvýšte kvalitu videozáznamu úpravou kontrastu (-2 až +2).
• Prejdite na položku menu Kontrast avýber potvrďte stlačením tlačidla [OK](7). Otvorí sa nové
okno sprehľadom.
• Pomocou navigačných tlačidiel [◄](9) /[►](5) zvoľte súbor,ktorý chcete prehrať.
• Výber potvrďte stlačením tlačidla [OK](7).
9.2 Nastavenia režimu Foto
• Prejdite do režimu Foto, ako je opísané vkapitole 8.2 Režim Foto.
• Na prechod na nastavenia fotograestlačte tlačidlo [MENU](8).
• Na ľavom hornom okraji obrazovky sa zobrazí .
• Pomocou navigačných tlačidiel [◄](9) /[►](5) prechádzajte cez položky menu.
• Výber potvrďte stlačením tlačidla [OK](7).
92

9.2.1 Rozlíšenie
Zvoľte požadované rozlíšenie (VGA -12megapixelov)zaznamenávaného obrazového materiálu.
• Prejdite na položku menu Rozlíšenie avýber potvrďte stlačením tlačidla [OK](7). Otvorí sa nové
okno sprehľadom.
• Pomocou navigačných tlačidiel [◄](9) /[►](5) zvoľte súbor,ktorý chcete prehrať.
• Výber potvrďte stlačením tlačidla [OK](7).
9.2.2 Zobrazenie obrázkov
Pri aktivovanom zobrazovaní snímok sa snímka zobrazí na displeji na krátky čas (2/5 sekúnd). Až po
uplynutí tohto času môžete nasnímať novú fotograu.
Ak chcete túto funkciu deaktivovať,zvoľte možnosť Vypnutý.
• Prejdite na položku menu Zobrazenie obrázkov avýber potvrďte stlačením tlačidla [OK](7). Otvorí
sa nové okno sprehľadom.
• Pomocou navigačných tlačidiel [◄](9) /[►](5) zvoľte súbor,ktorý chcete prehrať.
• Výber potvrďte stlačením tlačidla [OK](7).
9.2.3 Vodoznak
Ak je režim aktivovaný, označísakaždý foto súbor časovou adátumovou pečiatkou.
• Prejdite na položku menu Vodoznak avýber potvrďte stlačením tlačidla [OK](7). Otvorí sa nové
okno sprehľadom.
• Pomocou navigačných tlačidiel [◄](9) /[►](5) zvoľte súbor,ktorý chcete prehrať.
• Výber potvrďte stlačením tlačidla [OK](7).
9.2.4 Kontrast
Zvýšte kvalitu fotografickej snímky úpravou kontrastu (-2 až +2).
• Prejdite na položku menu Kontrast avýber potvrďte stlačením tlačidla [OK](7). Otvorí sa nové
okno sprehľadom.
• Pomocou navigačných tlačidiel [◄](9) /[►](5) zvoľte súbor,ktorý chcete prehrať.
• Výber potvrďte stlačením tlačidla [OK](7).
9.3 Všeobecné nastavenia
• Dvojitým stlačením tlačidla [MENU](8) prejdite do ponuky nastavení kamery.
• Prípadne razstlačte tlačidlo [MENU](8), keď sa nachádzate vponuke Video/Foto.
• Na ľavom hornom okraji obrazovky sa zobrazí .
• Pomocou navigačných tlačidiel [◄](9) /[►](5) prechádzajte cez položky menu.
• Výber potvrďte stlačením tlačidla [OK](7).
93

9.3.1 Formátovať pamäťovú kartu
Zmažte všetky súbory,ktoré sa nachádzajú na vloženej pamäťovej karte.
• Prejdite na položku menu Formátovať pamäťovú kartu avýber potvrďte stlačením tlačidla
[OK](7). Otvorí sa nové okno sprehľadom.
• Formátovanie potvrďte stlačením tlačidla OK alebo zvoľte Zrušiť na zrušenie operácie.
9.3.2 Jazyk
Vyberte jazyk navigácie vmenu.
• Prejdite na položku menu Jazyk avýber potvrďte stlačením tlačidla [OK](7). Otvorí sa nové okno
sprehľadom.
• Pomocou navigačných tlačidiel [◄](9) /[►](5) zvoľte súbor,ktorý chcete prehrať.
• Výber potvrďte stlačením tlačidla [OK](7).
9.3.3 Vypnúť pri nečinnosti
Tu zvoľte časový interval (1minúta /3 minúty), po uplynutí ktorého sa kamerapri nepoužívaní
automaticky vypne.
Ak chcete túto funkciu deaktivovať,zvoľte možnosť Vypnutý.
• Prejdite na položku menu Vypnúť pri nečinnosti avýber potvrďte stlačením tlačidla [OK](7).
Otvorí sa nové okno sprehľadom.
• Pomocou navigačných tlačidiel [◄](9) /[►](5) zvoľte súbor,ktorý chcete prehrať.
• Výber potvrďte stlačením tlačidla [OK](7).
9.3.4 Šetrič obrazovky
Zvoľte časový interval (1minúta /3minúty /5minút), po uplynutí ktorého sa aktivuje šetrič
obrazovky.Akpočas tejto doby nestlačíte žiadne tlačidlo, displej sa vypne. Videozáznam bude však
pokračovať.
Ak chcete túto funkciu deaktivovať,zvoľte možnosť Vypnutý.
• Prejdite na položku menu Šetrič obrazovky avýber potvrďte stlačením tlačidla [OK](7). Otvorí sa
nové okno sprehľadom.
• Pomocou navigačných tlačidiel [◄](9) /[►](5) zvoľte súbor,ktorý chcete prehrať.
• Výber potvrďte stlačením tlačidla [OK](7).
9.3.5 Továrenské nastavenia
• Prejdite na položku menu Továrenské nastavenia avýber potvrďte stlačením tlačidla [OK](7).
Otvorí sa nové okno sprehľadom.
• Resetovanie potvrďte stlačením tlačidla OK alebo zvoľte Zrušiť na zrušenie operácie.
94

9.3.6 Dátum/čas
• Prejdite na položku menu Dátum/čas avýber potvrďte stlačením tlačidla [OK](7). Otvorí sa nové
okno sprehľadom.
• Pomocou navigačných tlačidiel [◄](9) /[►](5) nastavte rokazadanie potvrďte stlačením tlačidla
[OK](7).
• Rovnakým spôsobom nastavte postupne nasledovné informácie: mesiac, deň, čas.
• Výber potvrďte stlačením tlačidla [MENU](8).
9.3.7 Verzia
• Prejdite na položku menu Verzia avýber potvrďte stlačením tlačidla [OK](7). Otvorí sa nové okno
sprehľadom.
• Zobrazí sa aktuálna verzia kamery.
10. Vyvolanie nasnímaného materiálu
Poznámka
Kartu microSD nevyberajte, ak je kameraDashcam zapnutá. Môže to viesť kstrate údajov,príp. k
poškodeniu zariadenia.
• Vypnite kameru Dashcam –ako je opísané v časti 7.2 Zapnutie/vypnutie.
• Vyberte zkamery kartu microSD.
• Pripojte kartu microSD do počítačapomocou čítačky kariet SD (súčasť dodávky).
• Uložené dáta preneste do počítača, čím uvoľníte pamäť.
11. Poistné tlačidlo
Poznámka
Dbajte na to, aby vprípade nehody bolo prioritou poskytnutie prvej pomoci abezpečnosť všetkých
účastníkov.
Aby ste zabezpečili, že údaje budú trvalo uložené, postupujte nasledovne:
• Stlačte poistné tlačidlo (13). Na displeji sa zobrazí .
• Ak chcete kameru vypnúť,podržte asi 3sekundy stlačené tlačidlo Power [ ](10).
• Terazvyberte zkamery kartu microSD.
Poznámka
• Videá, ktorá sa uložili po stlačení poistného tlačidla, sú označené „LOKXXXXX“.
• Bežné video súbory sa ukladajú pod označením „REC“ aporadovým číslom.
95

12. Výrobné nastavenie
Ak chcete na kamereDashcam obnoviť výrobné nastavenie (stav pri dodávke), postupujte nasledovne:
• Vypnite kameru Dashcam –ako je opísané v časti 7.2 Zapnutie/vypnutie.
• Pomocou špicatého predmetu podržte na cca 3sekundy stlačené tlačidlo [Reset](4).
• Alternatívne môžete obnoviť továrenské nastavenia, ako je opísané vkapitole 9.3.5 Továrenské
nastavenia.
• Všetky uskutočnené nastavenia sa vymažú.
Poznámka
• Niektoré problémy achybné funkcie je možné odstrániť obnovením výrobných nastavení.
• Všetky prednastavenia (čas, časy budenia atď.) sa tým však nenávratne vymažú.
13. Údržba astarostlivosť
• Na čistenie tohto výrobku používajte len navlhčenú utierku, ktorá nepúšťavlákna anepoužívajte
žiadne agresívne čistiace prostriedky.
• Dbajte na to, aby do výrobku nevnikla voda.
14. Vylúčenie záruky
Firma Hama GmbH &CoKGneručí/nezodpovedá za škody vyplývajúce zneodbornej inštalácie,
montáže alebo neodborného používania výrobku alebo znerešpektovania návodu na používanie a/
alebo bezpečnostných pokynov.
15. Technické údaje
Rozmery 89 x48x35mm
Uhlopříčka obrazovky 2.4"
Max. rozlíšenie Foto: 12 megapixelov |Video: 1080i
Dátový formát Foto:JPEG |Video: AVI
Pamäťovákarta Podporujepamäťovú kartumicroSD do 32 GB
NapájanieInput: 12 V-24V 0,5A; Output: 5V ;1A; dĺžka kábla: 2m
Batérie
Input:5V 290mA; Typ:3,7 V/LiPo;
min. kapacita: 130 mAh /0,48Wh
96

Elementos de comando eindicadores
A
1. Aplicação de suporte com ventosa
2. Ranhuraparacartões microSD
3. Microfone/coluna
B
4. Reset
5.
Botão de navegação
►
6. Mode
7. OK
8. Menu
9.
Botão de navegação
◄
10.Power
C
11.Tomada de carregamento MiniUSB
12.LED de estado
13.Botão de cópia de segurança
D
14.Suporte de Dashcam
15.Alavanca de bloqueio
Modo de vídeo -Visão geral dos símbolos
Modo de vídeo
Duração do loop
Modo Diurno
Modo Noturno
Modo Movimento
Qualidade do vídeo
Cartão de memória detetado
O Manual de instruções
97

Cartão de memória não detetado
Indicação do estado da bateria
Gravação de vídeoemcurso
Vídeoprote gi do
00.00.00
Duraçãodovídeo
Modo de fotografia -Visão geral dos símbolos
Modo de fotograa
Modo Diurno
Modo Noturno
12M-VGA Resolução da imagem
Cartão de memória detetado
Cartão de memória não detetado
Indicação do estado da bateria
Modo de reprodução -Visão geral dos símbolos
Vídeo em curso
Vídeo em pausa
Vídeo protegido
98

Cartão de memória detetado
Cartão de memória não detetado
Indicação do estado da bateria
Agradecemos que se tenha decidido por este produto Hama!
Antes de utilizar oproduto, leia completamente estas indicações einformações. Guarde, depois,
estas informações num local seguroparaconsultas futuras. Se transmitir oproduto paraumnovo
proprietário, entregue também as instruções de utilização.
1. Descrição dos símbolos de aviso edas notas
Perigo de choque eléctrico
Este símbolo remete paraumperigo de toque de partes não isoladas do produto eventualmente
condutoras de tensão perigosa que poderão representar um perigo de choque eléctrico.
Aviso
Éutilizado paraidenticar informações de segurança ou chamar aatenção paraperigos eriscos
especiais.
Nota
Éutilizado paraidenticar informações adicionais ou notas importantes.
2. Conteúdo da embalagem
•Dashcam 30
•Carregador paraautomóvel MiniUSB
•Suporte com ventosa
•Leitor de cartões microSD
•Estas instruções de utilização
99

3. Indicações de segurança
• Oproduto está previsto apenas paraautilização privada enão comercial.
• Utilize oproduto apenas paraanalidade prevista.
• Proteja oproduto contrasujidade, humidadeesobreaquecimentoeutilize-o somente em ambientes secos.
• Não deixe cair oproduto nem osubmeta achoques fortes.
• Não utilize oproduto forados limites de desempenho indicados nas especicações técnicas.
• Não dobrenem esmague ocabo.
• Abateria está instalada de forma xa enão pode ser removida. Elimine oproduto completo de
acordo com alegislação em vigor.
• Não abraoproduto nem outilize caso este esteja danicado.
• Este aparelho não pode ser manuseado por crianças, tal como qualquer aparelho eléctrico!
• Ao utilizar oproduto, observe os regulamentos ealegislação nacionais em vigor paraacirculação
rodoviária.
• Assegure-se de que airbags, áreas de segurança, elementos de comando, instrumentos, etc. não
sejam tapados ou aáreadevisão seja afectada.
• Não se distraia com oproduto durante acondução do veículo etenha sempreatenção ao trânsito
eaomeio circundante.
• Antes de iniciar aviagem, controle amontagem seguradoproduto.
• Elimine imediatamente omaterial da embalagem em conformidade com as normas locais aplicáveis.
• Não efectue modicações no aparelho. Perdados direitos de garantia.
• Não queime abateria nem oproduto.
• Não alterenem deforme/aqueça/desmonte pilhas/baterias.
Perigo de choque eléctrico
• Não abraoproduto, nem ocontinue autilizar em caso de danos.
• Não utilize oproduto se ocabo de carregamento, ocabo adaptador ou ocabo de alimentação
estiver danicado.
• Não tente fazer qualquer manutenção ou reparação do produto. Qualquer trabalho de
manutenção deve ser executado por técnicos especializados.
4. Regulamentos/restrições legais durante ofuncionamento de Dashcams
Nota
• Tenha em consideração que as indicações sobreosregulamentos legais neste manual só
representam as prescrições eleis alemãs na alturadaimpressão do manual. No caso de
utilização noutros países, informese sobreosregulamentos válidos no respetivo país antes da
utilização do produto!
100

Nota
• Ao utilizar oproduto no trânsito, tenha em atenção que podem ser aplicados regulamentos
diferentes consoante alegislação de um país.
• Em algumas jurisdições, autilização de Dashcams éregulada por disposições especícas ou
proibida. Antes de utilizar aDashcam, informe-se sobrealegislação ediretivas aplicáveis.
• Antes de instalar eutilizar oproduto, observe as disposições da proteção de dados em vigor.
• Observe as disposições aplicáveis relativas àgravação earmazenamento de cheiros de vídeo e
imagem.
5. Utilização correta
•Este produto só está previsto paraser utilizado em veículos.
•Respeite os direitos de propriedade edeprivacidade de terceiros. Não realize gravações de outras
pessoas com aDashcam.
•Arealizar gravações, respeite odireito àimagem eàpalavrafalada.
•Senão utilizar oproduto durante um período de tempo prolongado, retire-o do para-brisas para
evitar danos provocados pelo sol epela temperatura.
6. Colocação em funcionamento
Aviso -perigo de ferimentos
• Ao utilizar oproduto, observe os regulamentos ealegislação nacionais em vigor paraa
circulação rodoviária.
• Assegure-se de que airbags, áreas de segurança, elementos de comando, instrumentos, etc. não
sejam tapados ou aáreadevisão seja afectada.
• Não se distraia com oproduto durante acondução do veículo etenha sempreatenção ao
trânsito eaomeio circundante.
Nota
• Antes da montagem do suporte, verique as possibilidades de montagem no seu veículo. Em
caso de dúvida, consulte omanual de instruções do veículo ou contacte ofabricante do veículo.
• Ao utilizar oproduto ou montá-lo, nunca aplique força exagerada.
• Antes de iniciar aviagem, controle amontagem seguradoproduto.
101

6.1 Montagem do suporte com ventosa
• Remova apelícula de proteção na ventosa.
• Abraaalavanca de bloqueio da ventosa (15).
• Posicione osuporte com ventosa sobreuma superfície de montagem plana elimpa (por ex., vidro)
• Pressione osuporte sobreasuperfície de montagem pretendida efeche aalavanca de bloqueio (15)
para xar osuporte.
• Após amontagem, verique a xação seguradaventosa.
• Para voltar asoltar aventosa da superfície de montagem, abraaalavanca de bloqueio. Em seguida,
se aplicável, puxe ligeiramente apresilha parasoltar totalmente aventosa.
6.2 Ajustar oângulo eainclinação
Oângulo eainclinação do suporte podem ser ajustados continuamente através da cabeça esférica.
• Ajuste oângulo eainclinação sempresem odispositivo colocado.
• Para realizar oajuste, solte oparafuso de aperto da cabeça esférica.
• Ajuste oângulo eainclinação pretendida eaperte oparafuso de aperto.
6.3 Colocar/retirar aDashcam
Nota
Verique sempreaxação seguradosuporte com ventosa eoposicionamento segurodaDashcam.
• Introduza aDashcam no retentor (14) do suporte com ventosa.
• RetireaDashcam do suporte deslocando-a com cuidado paraafrente eparatrás.
7. Funcionamento
7.1. Ligação àrede de bordo do automóvel
Aviso –Bateria
• Utilize apenas carregadores adequados com ligações USB paraefetuar ocarregamento.
• De modo geral, não utilize carregadores ou ligações USB que apresentem danos, nem tente
reparar os mesmos.
• Não submeta oproduto aumcarregamento excessivo ou aumdescarregamento completo.
• Evite oarmazenamento, carregamento eutilização com temperaturas extremas epressão
atmosférica extremamente baixa (como, por exemplo, agrande altitude).
• Em caso de um período de armazenamento prolongado, carregue abateria regularmente (pelo
menos, trimestralmente).
• Ligue ocabo de carregamento MiniUSB fornecido àtomada de carregamento MiniUSB (11) da
Dashcam eàtomada da rede de bordo do veículo.
102

• ADashcam liga-se automaticamente ao ligar omotor.
• OLED de estado (12) acende-se permanentemente aazul.
Nota -Capacidade da bateria
Abateria dispõe de um tempo de autonomia limitado de aproximadamente 2a3minutos. Esta
função de reserva serve, por exemplo, paraque ahoranão seja interrompida. Um funcionamento
mais prolongado apenas épossível com um adaptador paraautomóvel ligado.
Nota -Funcionamento permanente abateria
Odispositivo não se destina afuncionar de forma permanente abateria. Ofuncionamento
permanente abateria pode causar danos irreparáveis.
7.2. Ligar/desligar
Nota -Ligar/desligar automático
Se aDashcam estiver ligada auma fonte de corrente através do carregador de isqueiro, liga-se e
desliga-se automaticamente quando oveículo éligado/desligado.
Nota -Bateria do automóvel
Em alguns veículos, pode acontecer que aalimentação de tensão se mantenha mesmo com a
ignição desligada. Nesse caso, desligue acâmaramanualmente paraevitar que abateria do
automóvel descarregue.
Prima emantenha obotão Power [ ](10) premido durante aprox. 3segundos paraligar/desligar
manualmente aDashcam.
7.3. Colocar ocartão micro SD
• Introduza um cartão microSDna ranhuraparacartões microSD(2) da Dashcam.
• No visor surge aindicação .
Nota -Cartão de memória cheio
Quando amemória do cartão microSDestiver cheia, agravação de vídeo mais antiga será substituída.
103

8. Modos
8.1 Modo de vídeo
• Ao ligar acâmara, esta encontra-se no modo de funcionamento de vídeo.No canto superior
esquerdo do ecrã surge aindicação .
• Registo vídeo inicia automaticamente ao ligar aparelho.
• Prima [OK](7), paraparar/começar agravação de vídeo.
• Durante agravação de vídeo, aduração da gravação éapresentada no canto superior esquerdo do
ecrã. OLED de estado (12) acende-se alternadamente avermelho eazul.
Nota -Modo noturno
Durante agravação de vídeo, prima brevemente obotão Power [ ](10) paraativar/desativar o
modo noturno.
8.2 Modo de fotografia
• Para ativar omodo de funcionamento de fotograa, prima repetidamente [MODE](6). No canto
superior esquerdo do ecrã surge aindicação .
• Prima [OK](7) paracapturar uma imagem.
8.3 Modo de reprodução
• Ative modo de reprodução premindo de novo botão [MODE](6).
éexibido no rebordo inferior esq. ecrã.
• Através dos botões de navegação [◄](9) /[►](5), selecione o cheiroque deseja reproduzir.
• Prima [MENU](8) paraopções.
• Percorraomenu com os botões de navegação [◄](9) /[►](5).
• Selecione item de menu Apagar econrme seleção premindo [OK](7).
• Opção entre Apagar seleção e Apagar tudo.
• Conrme perguntas de segurança seguintes com OK ou selecione Cancelar parainterromper
processo.
• Prima [MENU](8) paramais opções parachegar ao item de menu Bloquear.
• Selecione item de menu Bloquear econrme seleção [OK](7).
• Opção entre Bloquear cheiro, Bloquear tudo, Desbloquear cheiro e Desbloquear tudo.
• Conrme perguntas de segurança seguintes com OK ou selecione Cancelar parainterromper
processo.
9. Definições
9.1 Definições do modo de vídeo
• Mude paraomodo de vídeo tal como descrito no capítulo 8.1 Modo de vídeo.
• Prima [MENU](8) paraabrir denições de vídeo.
104

• No canto superior esquerdo do ecrã aparece aindicação
.
• Percorraomenu com os botões de navegação [◄](9) /[►](5).
• Conrme aseleção premindo [OK](7).
9.1.1 Resolução
Selecione aresolução pretendida (1280X720 /1920X1080)paraovídeo gravado.
• Aceda ao item de menu Resolução econrme aseleção premindo [OK](7). Éaberta uma nova
janela que apresenta uma visão geral.
• Através dos botões de navegação [◄](9) /[►](5), selecione adenição pretendida.
• Conrme aseleção premindo [OK](7).
9.1.2 Marca de água
Com omodo ativado, éregistada adata eahoraemtodos os cheiros de vídeo.
• Aceda ao item de menu Marca de água econrme aseleção premindo [OK](7). Éaberta uma
nova janela que apresenta uma visão geral.
• Através dos botões de navegação [◄](9) /[►](5), selecione adenição pretendida.
• Conrme aseleção premindo [OK](7).
9.1.3 Deteção de movimento
Com adeteção de movimento ativada, agravação de vídeo éiniciada automaticamente quando a
câmarasofreumchoque (por ex., em caso de acidente).
• Aceda ao item de menu Deteção de movimento econrme aseleção premindo [OK](7). Éaberta
uma nova janela que apresenta uma visão geral.
• Através dos botões de navegação [◄](9) /[►](5), selecione adenição pretendida.
• Conrme aseleção premindo [OK](7).
• No ecrã do vídeo éapresentada aindicação .
9.1.4 Função Loop
Selecione ointervalo de tempo (1/2/3/5 minutos), após oqual deve ser iniciada uma nova gravação
de vídeo.
Selecione desativado paradesativar esta função. Apenas será criado um cheiro.
• Aceda ao item de menu Função Loop econrme aseleção premindo [OK](7). Éaberta uma nova
janela que apresenta uma visão geral.
• Através dos botões de navegação [◄](9) /[►](5), selecione adenição pretendida.
• Conrme aseleção premindo [OK](7).
• No ecrã do vídeo éapresentada aindicação .
105

9.1.5 Gravação áudio
Com omodo ativado, paraalém do vídeo étambém gravado osom.
• Aceda ao item de menu Gravação áudio econrme aseleção premindo [OK](7). Éaberta uma
nova janela que apresenta uma visão geral.
• Através dos botões de navegação [◄](9) /[►](5), selecione adenição pretendida.
• Conrme aseleção premindo [OK](7).
9.1.6 Contraste
Aumente aqualidade da gravação de vídeo através do ajuste do contraste (-2 a+2).
• Aceda ao item de menu Contraste econrme aseleção premindo [OK](7). Éaberta uma nova
janela que apresenta uma visão geral.
• Através dos botões de navegação [◄](9) /[►](5), selecione adenição pretendida.
• Conrme aseleção premindo [OK](7).
9.2 Definições do modo de fotografia
• Mude paraomodo de fotograatal como descrito no capítulo 8.2 Modo de fotograa.
• Prima [MENU](8) paraabrir denições de fotograa.
• No canto superior esquerdo do ecrã éapresentada aindicação .
• Percorraomenu com os botões de navegação [◄](9) /[►](5).
• Conrme aseleção premindo [OK](7).
9.2.1 Resolução
Selecione aresolução pretendida (VGA -12megapíxeis)paraaimagem capturada.
• Aceda ao item de menu Resolução econrme aseleção premindo [OK](7). Éaberta uma nova
janela que apresenta uma visão geral.
• Através dos botões de navegação [◄](9) /[►](5), selecione adenição pretendida.
• Conrme aseleção premindo [OK](7).
9.2.2 Apresentação da imagem
Com avisualização da imagem ativa, acaptação efetuada éapresentada no ecrã durante um breve
período (2/5 segundos). Só depois de decorrido este tempo éque épossível captar uma nova
imagem.
Selecione desativado paradesativar esta função.
• Aceda ao item de menu Apresentação da imagem econrme aseleção premindo [OK](7). É
aberta uma nova janela que apresenta uma visão geral.
• Através dos botões de navegação [◄](9) /[►](5), selecione adenição pretendida.
• Conrme aseleção premindo [OK](7).
106

9.2.3 Marca de água
Com omodo ativado, éregistada adata eahoraemcada um dos cheiros de fotograa.
• Aceda ao item de menu Marca de água econrme aseleção premindo [OK](7). Éaberta uma
nova janela que apresenta uma visão geral.
• Através dos botões de navegação [◄](9) /[►](5), selecione adenição pretendida.
• Conrme aseleção premindo [OK](7).
9.2.4 Contraste
Aumente aqualidade da captação de fotograaajustando ocontraste (-2 a+2).
• Aceda ao item de menu Contraste econrme aseleção premindo [OK](7). Éaberta uma nova
janela que apresenta uma visão geral.
• Através dos botões de navegação [◄](9) /[►](5), selecione adenição pretendida.
• Conrme aseleção premindo [OK](7).
9.3 Definições gerais
• Em alternativa prima duas vezes [MENU](8) paraabrir menu de denições da câmara.
• Em alternativa, prima brevemente botão [MENU](8) se já se encontrar no menu Vídeo/Foto.
• No canto superior esquerdo do ecrã éapresentada aindicação .
• Percorraomenu com os botões de navegação [◄](9) /[►](5).
• Conrme aseleção premindo [OK](7).
9.3.1 Formatar cartão de memória
Apague todos os cheiros gravados no cartão de memória introduzido.
• Aceda ao item de menu Formatar cartão de memória econrme aseleção premindo [OK](7). É
aberta uma nova janela que apresenta uma visão geral.
• Conrme perguntas de segurança seguintes com OK ou selecione Cancelar parainterromper o
processo.
9.3.2 Idioma
Selecione oidioma da navegação do menu.
• Aceda ao item de menu Idioma econrme aseleção premindo [OK](7). Éaberta uma nova janela
que apresenta uma visão geral.
• Através dos botões de navegação [◄](9) /[►](5), selecione adenição pretendida.
• Conrme aseleção premindo [OK](7).
9.3.3 Desligado em caso de inatividade
Selecione ointervalo de tempo (1minuto /3 minutos), após oqual acâmaradeve desligar-se
automaticamente se não estiver aser utilizada.
107

Selecione desativado paradesativar esta função.
• Aceda ao item de menu Desligado em caso de inatividade econrme aseleção premindo
[OK](7). Éaberta uma nova janela que apresenta uma visão geral.
• Através dos botões de navegação [◄](9) /[►](5), selecione adenição pretendida.
• Conrme aseleção premindo [OK](7).
9.3.4 Protetor de ecrã
Selecione ointervalo de tempo (1minuto / 3minutos /5minutos), após oqual aproteção de ecrã
deve ser ativada. Se durante este tempo não premir nenhum botão, ovisor desliga-se. No entanto, a
gravação de vídeo continua.
Selecione desativado paradesativar esta função.
• Aceda ao item de menu Protetor de ecrã econrme aseleção premindo [OK](7). Éaberta uma
nova janela que apresenta uma visão geral.
• Através dos botões de navegação [◄](9) /[►](5), selecione adenição pretendida.
• Conrme aseleção premindo [OK](7).
9.3.5 Definições de fábrica
• Aceda ao item de menu Denições de fábrica econrme aseleção premindo [OK](7). Éaberta
uma nova janela que apresenta uma visão geral.
• Conrme reposição com OK ou selecione Cancelar parainterromper processo.
9.3.6 Data/hora
• Aceda ao item de menu Data/hora econrme aseleção premindo [OK](7). Éaberta uma nova
janela que apresenta uma visão geral.
• Através dos botões de navegação [◄](9) /[►](5) dena oano econrme aintrodução premindon
[OK](7).
• Aseguir,dena as seguintes informações em sequência utilizando omesmo procedimento: mês,
dia, hora.
• Conrme aseleção premindo [MENU](8).
9.3.7 Versão
• Aceda ao item de menu Versão econrme aseleção premindo [OK](7). Éaberta uma nova janela
que apresenta uma visão geral.
• Éapresentada aversão atual da câmara.
108

10. Consultar omaterial gravado
Nota
Não retireocartão microSDcom aDashcam ligada. Talpode causar aperda de dados ou danos
no dispositivo.
• Desligue aDashcam como descrito no ponto 7.2 Ligar/desligar.
• Remova ocartão microSDda câmara.
• Com aajuda do leitor de cartões SD (incluído no material fornecido), conecte ocartão microSDao
seu computador.
• Transra os dados armazenados paraoseu computador paralibertar amemória.
11. Botão de cópia de segurança
Nota
Tenha em atenção que, em caso de acidente, aprioridade éprestar os primeiros socorros egarantir
asegurança de todos os envolvidos.
Para garantir que os seus dados são protegidos de forma permanente, proceda do seguinte modo:
• Prima obotão de cópia de segurança (13). No visor éapresentado .
• Prima emantenha premido obotão Power [ ](10) durante aprox. 3segundos paradesligar a
câmara.
• Remova agoraocartão microSDda câmara.
Nota
• Os vídeos gravados ao premir obotão de cópia de segurança são gravados com adesignação
“LOKXXXXX”.
• Os cheiros de vídeo normais são gravados com adesignação “REC” eumnúmerosequencial.
12. Definições de fábrica
Para repor aDashcam paraasdenições de fábrica (estado de fornecimento), proceda conforme se segue:
• Desligue aDashcam como descrito no ponto 7.2 Ligar/desligar.
• Prima emantenha premido obotão [Reset](4) com um objeto pontiagudo durante aprox. 3segundos.
• Em alternativa, pode repor as denições de fábrica como descrito no capítulo 9.3.5 Definições
de fábrica.
• Todas as denições efetuadas são eliminadas.
109

Nota
• Eventuais problemas eanomalias podem ser resolvidos através da reposição paraasdenições
de fábrica.
• No entanto, todas as predenições são eliminadas de forma denitiva.
13. Manutenção econservação
• limpe oproduto apenas com um pano sem apos ligeiramente humedecido enão utilize produtos
de limpeza agressivos.
• Certique-se de que não entraágua paradentrodoproduto.
14. Exclusão de garantia
AHama GmbH &CoKGnão assume qualquer responsabilidade ou garantia por danos provocados pela
instalação, montagem ou manuseamento incorrectos do produto enão observação do das instruções
de utilização e/ou das informações de segurança.
15. Especificações técnicas
Dimensões 89 x48x35 mm
Diagonal do ecrã 2.4"
Máx. ResoluçãoFotograas: 12 megapíxeis |Vídeo: 1080i
Formato de dados Fotograas: JPEG |Vídeo:AVI
Cartão de memória Suporta cartões de memória microSDaté 32 GB
Alimentaçãoelétrica
Input:12V-24 V 0,5A;Output: 5V ;1A; Comprimento do cabo: 2m
Bateria
Input:5V
290mA; Tipo: 3,7 V/LiPo;
Capacidade mínima: 130 mAh /0,48Wh
110

Elemente de comandășiafișaje
A
1. Dispozitiv suport de xareventuză
2. Slot cardmicroSD
3. Microfon/Difuzor
B
4. Reset
5.
Tastă navigație
►
6. Mode
7. OK
8. Meniu
9.
Tastă navigație
◄
10.Power
C
11.Fișă de încărcaremini USB
12.LED de statut
13.Tastă de siguranță
D
14.Dispozitiv xareDashcam
15.Pârghie de blocare
Regim video -Vedere de ansamblu simboluri
Regim video
Durată de timp Loop
Regim de zi
Regim de noapte
Regimdemișcare
Calitate video
Cardul de memorie afos trecunoscut
M Manual de utilizare
111

Cardul de memorie nu afost recunoscut
Așaj baterie
Înregistrare videofunc ț ioneaz ă
Videoasi gurat
00.00.00
Durată video
Regim foto -Vedere de ansamblu simboluri
Regimfoto
Regim de zi
Regim de noapte
12M-VGA Rezoluție aimaginii
Cardul de memorie afos trecunoscut
Cardul de memorie nu afost recunoscut
Așaj baterie
Regim redare -Vedere de ansamblu simboluri
Video funcționează
Video este întrerupt
Video asigurat
112

Cardul de memorie afos trecunoscut
Cardul de memorie nu afost recunoscut
Așaj baterie
Vă mulţumim că aţioptat pentru un produs Hama.
Pentru început vă rugămsăvălăsațipuțin timp șisăcitițicomplet următoarele instrucțiuni șiindicații.
Vă rugămsăpăstraţimanualul de utilizarelaloc sigur pentru oconsultareulterioară în caz de nevoie.
În caz de înstrăinareaaparatului vă rugămsăpredați șiacest manual noului proprietar.
1. Explicarea simbolurilor de avertizare șiindicații
Pericol de electrocutare
Acest simbol semnalizează pericol la atingerea cu componentele neizolate ale produsului, care
datorită tensiunii înalte indicate, poate duce la electrocutare.
Avertizare
Se folosește la marcarea instrucțiunilor de siguranță sau la concentrarea atenției în caz de pericol
șiriscuri mari.
Instrucțiune
Se folosește pentru marcarea informațiilor șiinstrucțiunilor importante.
2. Conținutul pachetului
•Dashcam 30
•Încărcător auto mini USB
•Suport de xareventuză
•Cititor de carduri microSD
•Acest manual de utilizare
113

3. Instrucțiuni de siguranță
• Produsul este conceput pentru utilizareprivatășinu profesională.
• Folosițiprodusul numai în scopul pentru careafost conceput.
• Protejaţiprodusul de impurităţi, umiditate, supraîncălzire şiutilizaţi-l numai în mediu uscat.
• Nu lăsațiprodusul să cadășinuîlsupunețitrepidațiilor puternice.
• Nu exploataţiprodusul în afaralimitelor de putereindicate în datele tehnice.
• Nu îndoiți şinustriviţicablul.
• Acumulatorul este montat x șinupoate demontat, salubrizațiprodusul ca un întreg conform
prevederilor legale.
• Nu deschidețiprodusul șinu-l utilizațiîncontinuareîncaz de deterioare.
• Acest aparat, ca de altfel toată aparaturaelectronică,nuare ce căuta în mâinile copiilor!
• La folosirea produsului trebuiesc respectatele regulamentele șilegile locale valabile tracului rutier.
• Vă rugămsăținețiseama ca nici un component precum aribag-ul, componentele de siguranță,
elementele de comandă,instrumentele sau vizibilitatea săeacoperite sau reduse.
• În timpul călătoriei cu un autovehicul nu vă lăsațidistras de produs și țiatent la situația tracului
șiaîmprejurimilor.
• Înaintea ecăreiporniri vericațimontarea sigură aprodusului.
• Reciclarea materialului pachetului se execută comform normelor locale de salubrizareînvigoare.
• Nu executaţimodicări la aparat. În acest fel pierdeţiorice drept la garanţie.
• Produsul sau acumulatorul nu se aruncă în foc.
• Nu modicați, deformați, încălzițisau dezmembrabateriile/acumulatoarele.
Pericol de electrocutare
• Nu deschidețiprodusul șinu-l utilizațiîncontinuareîncaz de deteriorare.
• Nu utilizațiprodusul dacă cablul de încărcare, cablul adaptor sau conductorul rețelei sunt
deteriorate.
• Nu încercațisăreparațisau să depanațiprodusul. Lucrările de reparații se execută numai de
personal de specialitate.
4. Reglementări legale/restricții în funcționarea Dashcam
Instrucțiune
• Indicațiile cu privirelareglementările legale cuprinse aici reproduc numai reglementările șilegile
germane din momentul tipăririi. Înaintea folosirii produsului în alte țări informați-vă cu privirela
reglementările în vigoaredeacolo!
• La utilizarea produsului în tracul rutier,înfuncție de legislația țării pot valabile reglementări diferite.
114

Instrucțiune
• În anumite legislații utilizarea Dashcam este reglementată separat respectiv interzisă.Înaintea
utilizării informați-vă referitor la legislație șidirective.
• Înaintea instalării șiutilizării informați-vă referitor la reglementările protecției datelor în vigoare.
• Trebuiesc respectate reglementările în vigoarereferitoarelaînregistrarea șimemorarea șierelor
video șifoto.
5. Utilizare conform destinației
•Produsul este prevăzut numai pentru folosireînautovehicule.
•Respectațidrepturile la propria personalitate șideproprietate ale altora. Nu facețiînregistrări cu
alte persoane.
•Respectațidreptul la imaginea proprie șicuvintele pronunțate.
•Pentru evitarea deteriorărilor provocate de soare șitemperatură,îndepărtațiprodusul din parbriz
dacă nu îl folosițioperioadă mai lungă.
6. Punere în funcțiune
Avertizare-Pericol de accidentare
• La folosirea produsului trebuiesc respectatele regulamentele șilegile locale valabile tracului
rutier.
• Vă rugămsăținețiseama ca nici un component precum aribag-ul, componentele de siguranță,
elementele de comandă,instrumentele sau vizibilitatea săeacoperite sau reduse.
• În timpul călătoriei cu un autovehicul nu vă lăsațidistras de produs și țiatent la situația
tracului șiaîmprejurimilor.
Instrucțiune
• Înainte montajului dispozitivului de xarevericațisoluțiile de instalareînautovehicul. Dacă nu
suntețisigur citițimanualul de folosirealautovehiculului sau adresați-vă producătorului.
• Nu folosițiforțalamontaj sau întrebuințarea produsului.
• Înaintea ecăreiporniri vericațimontarea sigură aprodusului.
6.1 Montaj suport de fixare ventuză
• Îndepărtațifolia de protecție aventuzei.
• Deschidețipârghia de blocareaventuzei (15).
• Poziționațisuportul cu ventuză pe osuprafață de montarecurată,netedă (de ex. foaie de sticlă).
115

• Pentru xareapăsațiușor suportul pe suprafațademontaredoritășiînchidețipârghia de
blocare(15).
• După montarevericațiperiodic xarea fermă aventuzei.
• Pentru desfacerea ventuzei deschidețipârghia de blocarePentru desfacerea denitivă aventuzei
tragețiușor de limbă.
6.2 Reglare unghi șiînclinare
Unghiul șiînclinarea suportului se pot regla, în raport cu observatorul, fără trepte cu ajutorul unui cap sferic.
• Reglarea unghiului șiînclinării se face fără ca aparatul nal săemontat.
• Pentru reglareslăbiți șurubul de blocarealcapului sferic.
• Reglațiunghiul șiînclinarea doritășixațisolid șurubul de blocare.
6.3 Instalare/scoatere Dashcam
Instrucțiune
Vericațiperiodic xarea fermă asuportului ventuzei șistabilitatea sigură aDashcam.
• ÎmpingețiDashcam în suportul de xare(14) al ventuzei.
• ScoatețiDashcam din suport prin mișcări ușoareînainte șiînapoi.
7. Exploatare
7.1. Conectare la rețeaua de bord auto
Avertizare–Acumulator
• Pentru încărcarefolosiținumai încărcătoareUSB adecvate.
• Nu folosițiîncărcătoaresau porturi USB defecte șinuîncercațisăle reparați.
• Nu supraîncărcațisau descărcațicomplet produsul.
• Evitațidepozitarea, încărcarea șifolosirea la temperaturi extreme șipresiune foarte scăzută a
aerului (de ex. la înălțimi mari).
• La depozitaremai îndelungată efectuațireîncărcarea la intervale regulate (cel puțin trimestrial).
• Conectațicablul de încărcaremini USB livrat cu șadeîncărcaremini USB (11) de la Dashcam și
priza auto arețelei de bord.
• După pornirea motorului Dashcam se activează automat.
• LED-ul de statut (12) luminează continuu albastru.
Instrucțiune -Capacitate acumulator
Acumulatorul dispune de timp limitat de funcționaredecca 2-3 minute. Această funcție tampon
servește de ex. așării continue fără întreruperi aoreiexacte. Funcționaremai îndelungată este
posibilă numai conectat la un adaptor auto.
116

Instrucțiune -Funcționarecontinuă pe acumulator
Aparatul nu este prevăzut pentru ofuncționarecontinuă pe acumulator.Funcționarea continuă pe
acumulator poate duce la defecte ireparabile.
7.2. Pornire/Oprire
Instrucțiune -Pornire/oprireautomată
Dacă aparatul este conectat prin încărcătorul auto la osursă de curent, la pornirea/oprirea
autovehiculului Dashcam se activează/dezactivează automat.
Instrucțiune -Baterie auto
La unele autovehicule se continuă alimentarea cu curent deșiaprinderea este întreruptă.Pentru a
evita descărcarea bateriei auto oprițicameramanual.
Pentru pornirea/oprirea manuală acamerei apăsațicca 3secunde [
](10).
7.3. Utilizare card micro SD
• IntroducețiuncardmicroSDîn slotul de carduri microSD(2) al Dashcam.
• Pe display se așează .
Instrucțiune -Cartela de memorarecompletă
De îndată ce memoria cardului microSDeste completă,setranscrie cea mai veche înregistrare
video.
8. Regimuri
8.1 Regim video
• După pornirecameraseaă în regim de funcționarevideo. În partea stângă,sus aecranului apare
.
• Înregistrarea video pornește automat când se dă drumul aparatului.
• Pentru oprirea/pornirea înregistrării video apăsați[OK](7).
• În timpul înregistrării se așează în stânga, sus durata acesteia. LED-ul de statut (12) luminează
alternativ roșu șialbastru.
Instrucțiune -Regim noapte
Pentru activarea/dezactivarea regimului de noapte, apăsațiscurt în timpul înregistrării,
Power [
](10).
117

8.2 Regim foto
• Regimul de funcționarefoto se activează prin apăsarea repetată pe [ MODE](6). Sus, stânga
apare .
• Pentru înregistrarea unei imagini apăsați[OK](7).
8.3 Wiedergabemodus
• Regimul de funcționareredareseactivează prin apăsarea repetată pe [MODE](6).
În stânga marginii inferioareaecranului apare .
• Cu ajutorul tastelor de navigație [◄](9) /[►](5) selectați șierul caredorițisăeredat.
• Pentru alte opțiuni apăsați[MENU](8).
• Cu ajutorul tastelor [◄](9) /[►](5) puteținaviga în meniu.
• Alegețiînmeniu punctul Ștergeți șiconrmațiprin apăsarepe[OK](7).
• Putețialege între Ștergețiselecția și Ștergețitot.
• Pentru întreruperea procesului conrmațicuOK întrebarea de siguranță sau alegeți Întrerupeți.
• Pentru aajunge în meniu la punctul Blocare,apăsați[MENU](8) pentru alte opțiuni.
• Alegețiînmeniu punctul Blocare șiconrmațiprin apăsarepe[OK](7).
• Putețialege între Blocați șier, Blocațitot, Deblocați șier și Deblocațitot.
• Pentru întreruperea procesului conrmațicuOK întrebarea de siguranță sau alegeți Întrerupeți.
9. Setări
9.1 Setări regim video
• Trecețiînregimvideo conform descrierii din 8.1 Regim video.
• Pentru aajunge la setările video apăsați[MENU](8).
• În stânga marginii superioareaecranului apare
.
• Cu ajutorul tastelor [◄](9) /[►](5) puteținaviga în meniu.
• Conrmațiselecția prin apăsarepe[OK](7).
9.1.1 Rezoluție
Alegețirezoluția dorită (1280X720 /1920X1080)pentru materialul video înregistrat.
• Navigațilapunctul din meniu Rezoluție șiconrmațialegerea prin apăsarea pe [OK](7). Se
deschide onouă fereastră cu vederedeansamblu.
• Cu ajutorul tastelor de navigație [◄](9) /[►](5) selectațisetarea dorită.
• Conrmațiselecția prin apăsarepe[OK](7).
9.1.2 Filigran
Dacă regimul este activat ecare șier video primește o ștampilă cu timpul șidata.
• Navigațilapunctul din meniu Filigran șiconrmațialegerea prin apăsarea pe [OK](7). Se deschide
onouă fereastră cu vederedeansamblu.
118

• Cu ajutorul tastelor de navigație [◄](9) /[►](5) selectațisetarea dorită.
• Conrmațiselecția prin apăsarepe[OK](7).
9.1.3 Recunoaștere mișcare
Dacă recunoașterea mișcării este activată,înregistrarea video pornește automat la șocuri ale camerei
(de ex. accident).
• Navigațilapunctul din meniu Recunoașteremișcare șiconrmațialegerea prin apăsarea pe
[OK](7). Se deschide onouă fereastră cu vederedeansamblu.
• Cu ajutorul tastelor de navigație [◄](9) /[►](5) selectațisetarea dorită.
• Conrmațiselecția prin apăsarepe[OK](7).
• Pe display se așează .
9.1.4 Funcție Loop
Alegețiintervalul de timp (1/2/3/5 minute)după carepoate să înceapă onouă înregistrarevideo.
Pentru dezactivarea acestei funcțiuni alegeți Oprit.Secreează numai un șier.
• Navigațilapunctul din meniu Funcție Loop șiconrmațialegerea prin apăsarea pe [OK](7). Se
deschide onouă fereastră cu vederedeansamblu.
• Cu ajutorul tastelor de navigație [◄](9) /[►](5) selectațisetarea dorită.
• Conrmațiselecția prin apăsarepe[OK](7).
• Pe display se așează .
9.1.5 Înregistrare audio
Dacă regimul este activat, pe lângă video se înregistreazășisunetul.
• Navigațilapunctul din meniu Înregistrareaudio șiconrmațialegerea prin apăsarea pe [OK](7).
Se deschide onouă fereastră cu vederedeansamblu.
• Cu ajutorul tastelor de navigație [◄](9) /[►](5) selectațisetarea dorită.
• Conrmațiselecția prin apăsarepe[OK](7).
9.1.6 Contrast
Mărițicalitatea înregistrării video prin adaptarea contrastului (-2 până la +2).
• Navigațilapunctul din meniu Contrast șiconrmațialegerea prin apăsarea pe [OK](7). Se
deschide onouă fereastră cu vederedeansamblu.
• Cu ajutorul tastelor de navigație [◄](9) /[►](5selectațisetarea dorită.
• Conrmațiselecția prin apăsarepe[OK](7).
9.2 Setări regim foto
• Trecețiînregimfoto conform descrierii din 8.2 Regim foto.
• Pentru aajunge la setările foto apăsați[MENU](8).
• Stânga, sus se așează .
119

• Cu ajutorul tastelor [◄](9) /[►](5) puteținaviga în meniu.
• Conrmațiselecția prin apăsarepe[OK](7).
9.2.1 Rezoluție
Alegețirezoluția dorită (VGA -12megapixeli)pentru materialul video înregistrat.
• Navigațilapunctul din meniu Rezoluție șiconrmațialegerea prin apăsarea pe [OK](7). Se
deschide onouă fereastră cu vederedeansamblu.
• Cu ajutorul tastelor de navigație [◄](9) /[►](5) selectațisetarea dorită.
• Conrmațiselecția prin apăsarepe[OK](7).
9.2.2 Afișaj imagine
aactivarea așajului imaginii, înregistrarea în curs de efectuareseașează pe display pentru scurt timp
(2/5 secunde). Numai după scurgerea acestui interval de timp se poate înregistraoimagine nouă.
Pentru dezactivarea acestei funcțiuni alegeți Oprit.
• Navigațilapunctul din meniu Așaj imagine șiconrmațialegerea prin apăsarea pe [OK](7). Se
deschide onouă fereastră cu vederedeansamblu.
• Cu ajutorul tastelor de navigație [◄](9) /[►](5) selectațisetarea dorită.
• Conrmațiselecția prin apăsarepe[OK](7).
9.2.3 Filigran
Dacă regimul este activat ecare șier foto primește o ștampilă cu timpul șidata.
• Navigațilapunctul din meniu Filigran șiconrmațialegerea prin apăsarea pe [OK](7). Se deschide
onouă fereastră cu vederedeansamblu.
• Cu ajutorul tastelor de navigație [◄](9) /[►](5) selectațisetarea dorită.
• Conrmațiselecția prin apăsarepe[OK](7).
9.2.4 Contrast
Mărițicalitatea înregistrării foto prin adaptarea contrastului (-2 până la +2).
• Navigațilapunctul din meniu Contrast șiconrmațialegerea prin apăsarea pe [OK](7). Se
deschide onouă fereastră cu vederedeansamblu.
• Cu ajutorul tastelor de navigație [◄](9) /[►](5) selectațisetarea dorită.
• Conrmațiselecția prin apăsarepe[OK](7).
9.3 Setări generale
• Pentru aajunge la meniul setărilor aparatului fotogracapăsațidedouă ori [MENU](8).
• Dacă vă aațiînmeniul video/foto apăsațiodată [MENU](8).
• Stânga, sus se așează .
• Cu ajutorul tastelor [◄](9) /[►](5) puteținaviga în meniu.
• Conrmațiselecția prin apăsarepe[OK](7).
120

9.3.1 Formatațicardul de memorie
Ștergețitoate șierele din cardul de memorie introdus.
• Navigațilapunctul din meniu Formatațicardul de memorie șiconrmațialegerea prin apăsarea
pe [OK](7). Se deschide onouă fereastră cu vederedeansamblu.
• Pentru întreruperea procesului conrmațicuOK formatarea sau alegeți Întrerupeți.
9.3.2 Limbă
Selectațilimba administrării meniului.
• Navigațilapunctul din meniu Limbă șiconrmațialegerea prin apăsarea pe [OK](7). Se deschide o
nouă fereastră cu vederedeansamblu.
• Cu ajutorul tastelor de navigație [◄](9) /[►](5) selectațisetarea dorită.
• Conrmațiselecția prin apăsarepe[OK](7).
9.3.3 Oprit în caz de inactivitate
Alegețiintervalul de timp (1minut /3 minute)după carecameraseoprește automat în caz de
nefolosire.
Pentru dezactivarea acestei funcțiuni alegeți Oprit.
• Navigațilapunctul din meniu Oprit în caz de inactivitate șiconrmațialegerea prin apăsarea pe
[OK](7). Se deschide onouă fereastră cu vederedeansamblu.
• Cu ajutorul tastelor de navigație [◄](9) /[►](5) selectațisetarea dorită.
• Conrmațiselecția prin apăsarepe[OK](7).
9.3.4 Protecție ecran
Alegețiintervalul de timp (1minut /3minute /5minute)după careseactivează protecția pentru
ecran. Dacă în acest interval de timp nu este activată nici otastă displayul de oprește. Înregistrarea
video funcționează în continuare.
Pentru dezactivarea acestei funcțiuni alegeți Oprit.
• Navigațilapunctul din meniu Protecție ecran șiconrmațialegerea prin apăsarea pe [OK](7). Se
deschide onouă fereastră cu vederedeansamblu.
• Cu ajutorul tastelor de navigație [◄](9) /[►](5) selectațisetarea dorită.
• Conrmațiselecția prin apăsarepe[OK](7).
9.3.5 Setări din fabrică
• Navigațilapunctul din meniu Setări din fabrică șiconrmațialegerea prin apăsarea pe [OK](7).
Se deschide onouă fereastră cu vederedeansamblu.
• Pentru întreruperea procesului conrmațicuOK repunerea la zerosau alegeți Întrerupeți.
121

9.3.6 Dată/Oră exactă
• Navigațilapunctul din meniu Dată/Oră exactă șiconrmațialegerea prin apăsarea pe [OK](7).
Se deschide onouă fereastră cu vederedeansamblu.
• Cu ajutorul tastelor de navigație [◄](9) /[►](5) setațianul șiconrmațiprin apăsarepe[OK](7).
• În acelașifel setațisuccesiv următoarele informații: Lună,zi, Oră exactă.
• Conrmațiselecția prin apăsarepe[MENU](8).
9.3.7 Versiune
• Navigațilapunctul din meniu Versiune șiconrmațialegerea prin apăsarea pe [OK](7). Se
deschide onouă fereastră cu vederedeansamblu.
• Se așează actuala versiune acamerei.
10. Apelarea materialului înregistrat
Instrucțiune
Nu îndepărtațimicrocardul SD dacă Dash Cam funcționează.Sepot pierde date sau provoca daune
aparatului.
• OprițiDash Cam conform descrierii din 7.2 Pornire/Oprire.
• Scoatețicardul microSDdin cameră.
• Cu ajutorul cititorului de carduri SD livrat, conectațicardul microSDla calculator.
• Pentru descărcarea memoriei transferațidatele memorate pe calculator.
11. Tastă de siguranță
Instrucțiune
În caz de accident areprioritate acordarea primului ajutor șisiguranțapasagerilor.
Pentru a sigur că datele se memorează permanent, procedațiînfelul următor:
• Apăsațitasta de siguranță (13). Pe display se așează .
• Pentru oprirea camerei apăsațiPower [ ](10) cca 3secunde.
• Scoatețicardul microSDdin cameră.
Instrucțiune
• Video careaufost memorate după apăsarea tastei de siguranță,sememorează sub denumirea
„LOKXXXXX“.
• Fișierele video regulate se memorează sub denumirea „REC“ precum șiunnumărcurent.
122

12. Setare de fabrică
Pentru readucerea Dashcam la setarea din fabrică (setarelalivrare) procedațiînfelul următor:
• OprițiDashcam conform descrierii din 7.2 Pornire/Oprire.
• Cu ajutorul unui obiect ascuțit apăsațicca 3secunde [Reset](4).
• Alternativ putețireface setarea din fabrică conform descrierii din capitolul 9.3.5 Setări din fabrică.
• Toate setările executate anterior se șterg.
Instrucțiune
• Probleme șierori în funcționarepot îndepărtate uneori prin resetarea la setarea de fabrică.
• Toate setările executate anterior (oră exactă,timp de deșteptare, etc.) se ștergdenitiv.
13. Întreţinere şirevizie
• Curățațiacest produs numai cu ocârpă fără scame, puțin umedășinufolosițidetergențiagresivi.
• Avețigrijă să nu intreapăîn produs.
14. Excludere de garanție
Hama GmbH &CoKG nu îşiasumă nici orăspunderesau garanție pentru pagube cauzate de
montarea, instalarea sau folosirea necorespunzătoareaprodusului sau nerespectarea instrucțiunilor de
folosiresau/șiainstrucțiunilor de siguranță.
15. Date tehnice
Dimensiuni 89 x48x35mm
Diagonala ecranului2.4"
Rezoluț ie ma x. Imagine: 12 megapixeli |Video: 1080i
Format date Imagine:JPEG |Vide o: AVI
Card de memorieSunt susținute carduri de memorie microSDpână la 32 GB
Alimentarecucurent Input: 12 V-24V 0,5A; Output: 5V ;1A; lungime cablu: 2m
Baterie
Input:5V 290mA; Tip: 3,7 V/LiPo;
Min. capacitate: 130 mAh /0,48Wh
123

Service &Support
www.hama.com
+49 9091 502-0
DG
www.hama.com /nep
Alllistedbrands aretrademarksofthe corresponding companies.
Errors andomissions excepted,and subjecttotechnical changes.
Ourgeneralterms of deli ver yand paymentare applied.
00136697/10.19
Hama GmbH &CoKG
86652 Monheim/Germany
Documenttranscriptie
00 136697 Dashcam 30 Operating Instructions Bedienungsanleitung Mode d‘emploi Instrucciones de uso Gebruiksaanwijzing Návod k použití Návod na použitie Manual de instruções Manual de utilizare GB D F E NL CZ SK P RO A 1 2 3 B 4 5 6 7 8 9 10 C 11 12 13 D 14 15 G Operating instruction Controls and displays A 1. Attachment point for suction cup holder 2. microSD card slot 3. Microphone/speaker B 4. 5. 6. 7. 8. 9. 10. C 11. Mini-USB charging socket 12. Status LED 13. Save button D 14. Dashcam holder 15. Locking lever Reset Navigation button ► Mode OK Menu Navigation button ◄ Power Video mode - Overview of symbols Video mode Time loop Day mode Night mode Movement mode Video quality Memory card recognised 2 Memory card not recognised Battery indicator Video recording in progress Video saved 00.00.00 Video duration Photo mode - Overview of symbols Photo mode Day mode Night mode 12M-VGA Image resolution Memory card recognised Memory card not recognised Battery indicator Playback mode - Overview of symbols Video running Video paused Video saved 3 Memory card recognised Memory card not recognised Battery indicator Thank you for choosing a Hama product. Take your time and read the following instructions and information completely. Please keep these instructions in a safe place for future reference. If you sell the device, please pass these operating instructions on to the new owner. 1. Explanation of Warning Symbols and Notes Risk of electric shock This symbol indicates product parts energized with a dangerous voltage of sufficient magnitude to constitute a risk of electric shock. Warning This symbol is used to indicate safety instructions or to draw your attention to specific hazards and risks. Note This symbol is used to indicate additional information or important notes. 2. Package Contents • Dashcam 30 • Mini-USB vehicle charger • Suction cup holder • microSD card reader • These operating instructions 4 3. Safety Notes • This product is intended for private, non-commercial use only. • Use the product for its intended purpose only. • Protect the product from dirt, moisture and overheating, and only use it in a dry environment. • Do not drop the product and do not expose it to any major shocks. • Do not operate the product outside the power limits given in the specifications. • Do not bend or crush the cable. • Since the battery is integrated and cannot be removed, you will need to dispose of the product as a whole. Do this in compliance with the legal requirements. • Do not open the device or continue to operate it if it becomes damaged. • Keep this product, as all electrical products, out of the reach of children! • When using this product, observe the applicable local traffic laws and regulations. • Take care that components such as airbags, safety areas, controls, instruments, etc. and visibility are not blocked or restricted. • Do not allow yourself to be distracted by the product when driving a vehicle. Always pay attention to the surrounding traffic and your environment. • Check that the product is safely mounted before beginning your journey. • Dispose of packaging material immediately according to locally applicable regulations. • Do not modify the product in any way. Doing so voids the warranty. • Do not throw the battery or the product into fire. • Do not tamper with or damage/heat/disassemble the batteries/rechargeable batteries. Risk of electric shock • Do not open the device or continue to operate it if it becomes damaged. • Do not use the product if the charging cable, adapter cable or power cable is damaged. • Do not attempt to service or repair the device yourself. Leave any service work to qualified experts. 4. Legal regulations/limitations when operating Dashcams Note • The information on legal regulations set out in these instructions covers only the German regulations and laws at the time of printing. Before using the product in other countries, find out about the applicable regulations! • When using the product on the road, different regulations can apply depending on the laws of the respective country. • In some jurisdictions, the use of Dashcams is regulated separately or prohibited. Get to know the laws and guidelines before using the Dashcam. 5 • Pay attention to the applicable data protection regulations before installing and using the product. • Observe the applicable regulations for recording and storing video and image files. 5. Proper use • This product is intended for use only in vehicles. • Respect the personal and property rights of others. Do not make recordings of other people with the Dashcam. • Observe the right to one’s own image and spoken word when recording. • If the product will not be used for a long period of time, remove it from the windscreen to avoid sun and temperature-related damage. 6. Getting Started Warning - Risk of injury! • When using this product, observe the applicable local traffic laws and regulations. • Take care that components such as airbags, safety areas, controls, instruments, etc. and visibility are not blocked or restricted. • Do not allow yourself to be distracted by the product when driving a vehicle. Always pay attention to the surrounding traffic and your environment. Note • Before mounting the holder, check the installation options in your vehicle. If in doubt, consult the manual for your vehicle or contact the manufacturer. • Never apply force when using the product or during installation. • Check that the product is safely mounted before beginning your journey 6.1 Mounting the suction cup holder • Remove the protective film from the suction cup. • Open the locking lever (15) of the suction cup. • Position the holder with the suction cup on a clean, even mounting surface (e.g. glass pane). • Lightly press the holder onto the desired mounting surface and close the locking lever (15) to fasten the holder. • After mounting, always check to ensure the suction cup is securely attached. • To remove the suction cup from the surface, open the locking lever. Then gently pull the flap to completely release the suction cup. 6 6.2 Setting angle and tilt The viewing angle and tilt of the holder can be continuously adjusted using a ball head. • Always set the angle and tilt without the terminal device inserted. • Loosen the clamping screw of the ball head. • Set the angle and tilt as desired and tighten the clamping screw. 6.3 Inserting/removing the Dashcam Note Continually check that the suction cup holder is securely seated and the Dashcam is securely held. • Slide the Dashcam into the holder (14) of the suction cup holder. • Pull the Dashcam out of the holder by carefully moving the Dashcam to and fro. 7. Operation 7.1. Connection to the vehicle’s electrical system Warning – rechargeable battery • Only use suitable charging devices with USB connections for charging. • As a rule, do not use charging devices or USB connections that are defective and do not try to repair them yourself. • Do not overcharge the product or allow the battery to completely discharge. • Avoid storing, charging or using the device in extreme temperatures and extremely low atmospheric pressure (for example, at high altitudes). • When stored over a long period of time, batteries should be charged regularly (at least every three months). • Connect the included Mini-USB charging cable to the Mini-USB charging socket (11) on the Dashcam and to the vehicle socket of the electrical system. • The Dashcam automatically switches on when the engine is started. • The status LED (12) is constantly lit blue. Note - Battery capacity The battery has a limited life of about 2–3 minutes. This buffer function is used for continuation of the time, for example. Longer operation is possible only with a connected vehicle adapter. Note - Constant battery operation The device is not intended for constant battery operation. This can lead to irreparable damage. 7 7.2. Switching on/off Note - Automatic switching on/off If the Dashcam is connected to a power source by means of the vehicle charger, it automatically switches on/off when the vehicle is started/switched off. Note - Car battery With some vehicles, it can happen that power continues to be supplied even though the ignition has been switched off. In this case, switch off the camera manually to protect your car battery from discharge. Press and hold Power [ ] (10) for about 3 seconds to manually switch on/off the Dashcam. 7.3. Inserting a microSD card • Insert a microSD card into the microSD card slot (2) on the Dashcam. • is shown on the display. Note - Memory card full Once the memory of the microSD card is full, the oldest video recording will be overwritten. 8. Modes 8.1 Video mode appears at the upper-left edge of • After switching on, the camera is in Video operating mode. the screen. • Video recording starts automatically when you switch on the device. • Press [OK] (7) to stop/start video recording. • The recording duration is displayed at the upper-left edge of the screen. The status LED (12) alternates between red and blue. Note - Night mode Briefly press Power [ ] (10), during video recording to activate/deactivate Night mode. 8.2 Photo mode • Repeatedly press [MODE] (6) to activate Photo mode. screen. • Press [OK] (7) to take a picture. 8 appears at the upper-left edge of the 8.3 Playback mode • Activate Playback operating mode by repeatedly pressing [MODE] (6). appears at the lower-left edge of the screen. • Use the navigation buttons [◄] (9) / [►] (5) to select the file you would like to play. • Press [MENU] (8) for more options. • Use the navigation buttons [◄] (9) / [►] (5) to navigate through the menu. • Select the Delete menu item and confirm your selection by pressing [OK] (7). • You can choose between Delete selection and Delete all. • Confirm the subsequent confirmation prompt with OK, or select Cancel to cancel the operation. • Press [MENU] (8) for more options, to alternatively go to the Lock menu item. • Select the Lock menu item and confirm your selection by pressing [OK] (7). • You can choose between Lock file, Lock all, Unlock file and Unlock all. • Confirm the subsequent confirmation prompt with OK, or select Cancel to cancel the operation. 9. Settings 9.1 Video mode settings • Switch to Video mode as described in section 8.1 Video mode. • Press [MENU] (8) to go to the video settings. is shown at the upper-left edge of the screen. • • Use the navigation buttons [◄] (9) / [►] (5) to navigate through the menu. • Confirm your selection by pressing [OK] (7). 9.1.1 Resolution Select the desired resolution (1280X720 / 1920X1080) of the recorded video material. • Navigate to the Resolution menu item and confirm your selection by pressing [OK] (7). A new overview window opens. • Use the navigation buttons [◄] (9) / [►] (5) to select the desired setting. • Confirm your selection by pressing [OK] (7). 9.1.2 Watermark With the mode activated, a time and date stamp is added to every video file. • Navigate to the Watermark menu item and confirm your selection by pressing [OK] (7). A new overview window opens. • Use the navigation buttons [◄] (9) / [►] (5) to select the desired setting. • Confirm your selection by pressing [OK] (7). 9.1.3 Motion detection With motion detection activated, video recording is automatically started when the camera senses vibrations (for example, in the case of an accident). 9 • Navigate to the Motion detectionmenu item and confirm your selection by pressing [OK] (7). A new overview window opens. • Use the navigation buttons [◄] (9) / [►] (5) to select the desired setting. • Confirm your selection by pressing [OK] (7). is shown on the video display. • 9.1.4 Loop function Select the time interval (1/2/3/5 minutes) after which a new video recording should begin. Select Off to deactivate this function. Now only one file will be created. • Navigate to the Loop functionmenu item and confirm your selection by pressing [OK] (7). A new overview window opens. • Use the navigation buttons [◄] (9) / [►] (5) to select the desired setting. • Confirm your selection by pressing [OK] (7). • is shown on the video display. 9.1.5 Audio recording With the mode activated, sound is recorded in addition to the video material. • Navigate to the Audio recordingmenu item and confirm your selection by pressing [OK] (7). A new overview window opens. • Use the navigation buttons [◄] (9) / [►] (5) to select the desired setting. • Confirm your selection by pressing [OK] (7). 9.1.6 Contrast Improve the quality of the video recording through contrast adjustment (-2 to +2). • Navigate to the Contrast menu item and confirm your selection by pressing [OK] (7). A new overview window opens. • Use the navigation buttons [◄] (9) / [►] (5) to select the desired setting. • Confirm your selection by pressing [OK] (7). 9.2 Photo mode settings • Switch to Photo mode as described in section 8.2 Photo mode. • Press [MENU] (8) to go to the photo settings. is shown at the upper-left edge of the screen. • • Use the navigation buttons [◄] (9) / [►] (5) to navigate through the menu. • Confirm your selection by pressing [OK] (7). 10 9.2.1 Resolution Select the desired resolution (VGA - 12 megapixels) of the recorded photo material. • Navigate to the Resolution menu item and confirm your selection by pressing [OK] (7). A new overview window opens. • Use the navigation buttons [◄] (9) / [►] (5) to select the desired setting. • Confirm your selection by pressing [OK] (7). 9.2.2 Image display When the picture display is activated, the picture taken is shown on the display for a short time (2/5 seconds). A new picture can only be taken after this time has elapsed. Select Off to deactivate this function. • Navigate to the Image display menu item and confirm your selection by pressing [OK] (7). A new overview window opens. • Use the navigation buttons [◄] (9) / [►] (5) to select the desired setting. • Confirm your selection by pressing [OK] (7). 9.2.3 Watermark With the mode activated, a time and date stamp is added to every photo file. • Navigate to the Watermark menu item and confirm your selection by pressing [OK] (7). A new overview window opens. • Use the navigation buttons [◄] (9) / [►] (5) to select the desired setting. • Confirm your selection by pressing [OK] (7). 9.2.4 Contrast Improve the quality of the photo through contrast adjustment (-2 to +2). • Navigate to the Contrast menu item and confirm your selection by pressing [OK] (7). A new overview window opens. • Use the navigation buttons [◄] (9) / [►] (5) to select the desired setting. • Confirm your selection by pressing [OK] (7). 9.3 General settings • Press [MENU] (8) twice to go to the camera’s settings menu. • Alternatively, press [MENU] (8) once if you are already in the Video/Photo menu. is shown at the upper-left edge of the screen. • • Use the navigation buttons [◄] (9) / [►] (5) to navigate through the menu. • Confirm your selection by pressing [OK] (7). 11 9.3.1 Format memory card Delete all files located on the inserted memory card. • Navigate to the Format memory card menu item and confirm your selection by pressing [OK] (7). A new overview window opens. • Confirm the formatting with OK, or select Cancel to cancel the operation. 9.3.2 Language Select the language for the menu navigation. • Navigate to the Language menu item and confirm your selection by pressing [OK] (7). A new overview window opens. • Use the navigation buttons [◄] (9) / [►] (5) to select the desired setting. • Confirm your selection by pressing [OK] (7). 9.3.3 Off following inactivity Select the time interval (1 minute /3 minutes) after which the camera automatically switches off if not in use. Select Off to deactivate this function. • Navigate to the Off following inactivity menu item and confirm your selection by pressing [OK] (7). A new overview window opens. • Use the navigation buttons [◄] (9) / [►] (5) to select the desired setting. • Confirm your selection by pressing [OK] (7). 9.3.4 Screen saver Select the time interval (1 minute / 3 minutes / 5 minutes) after which the screen saver is activated. If you do not press a button during this time interval, the display switches off. Video recording continues, however. Select Off to deactivate this function. • Navigate to the Screen saver menu item and confirm your selection by pressing [OK] (7). A new overview window opens. • Use the navigation buttons [◄] (9) / [►] (5) to select the desired setting. • Confirm your selection by pressing [OK] (7). 9.3.5 Factory settings • Navigate to the Factory settings menu item and confirm your selection by pressing [OK] (7). A new overview window opens. • Confirm the reset with OK, or select Cancel to cancel the operation. 12 9.3.6 Date/time • Navigate to the Date/time menu item and confirm your selection by pressing [OK] (7). A new overview window opens. • Use the navigation buttons [◄] (9) / [►] (5) to set the year and confirm your entry by pressing [OK] (7). • Afterwards, adjust the following information in succession following the same procedure: month, day, time. • Confirm your selection by pressing [MENU] (8). 9.3.7 Version • Navigate to the Version menu item and confirm your selection by pressing [OK] (7). A new overview window opens. • The current camera version is displayed. 10. Retrieving the recorded material Note Do not remove the microSD card with the Dashcam switched on. This can result in data loss or cause damage to the device. • • • • Switch off the Dashcam as described in 7.2 Switching on/off. Remove the camera’s microSD card. Connect the microSD card to your PC using the SD card reader (included in delivery). Transfer the stored data to your PC to free up space on the memory card. 11. Save button Note In the event of an accident, the administering of first aid and the safety of all involved have priority. To be sure your data is permanently stored, proceed as follows: • Press the Save button (13). Auf dem Display erscheint appears on the display. • Press and hold Power [ ] (10) for about 3 seconds to switch off the camera. • Now remove the camera’s microSD card. Note • Videos stored after pressing the Save button are stored under the designation ‘LOKXXXXX’. • Normal video files are stored under the designation ‘REC’ and a consecutive number. 13 12. Factory settings To reset the Dashcam to the factory default settings, proceed as follows: • Switch off the Dashcam as described in 7.2 Switching on/off. • Press and hold [Reset] (4) for about 3 seconds using a pointed object. • Alternatively, you can restore the factory settings as described in Section 9.3.5 Factory settings. • All settings you made are deleted. Note • Resetting to the factory default settings can solve some problems and malfunctions. • However, all settings made previously are permanently deleted. 13. Care and Maintenance • Only clean this product with a slightly damp, lint-free cloth and do not use aggressive cleaning agents. • Make sure that water does not get into the product. 14. Warranty Disclaimer Hama GmbH & Co KG assumes no liability and provides no warranty for damage resulting from improper installation/mounting, improper use of the product or from failure to observe the operating instructions and/or safety notes. 15. Technical Data Max. resolution 89 x 48 x 35 mm Screen size: 2.4" Max. Resolution Photo: 12 megapixels | Video: 1080i Data format Photo: JPEG | Video: AVI Memory card Supports microSD memory cards up to 32 GB Power supply Input: 12 V-24 V Battery Input: 5 V 290 mA; Type: 3,7 V / LiPo; Min. capacity: 130 mAh / 0.48 Wh 14 0,5A; Output: 5 V ; 1A; cable length: 2 m D Bedienungsanleitung Bedienungselemente und Anzeigen A 1. Vorrichtung Saugnapfhalterung 2. Micro SD-Kartenslot 3. Mikrofon/Lautsprecher B 4. 5. 6. 7. 8. 9. 10. C 11. MiniUSB-Ladebuchse 12. Status LED 13. Sicherungstaste D 14. Halterung Dashcam 15. Verriegelungshebel Reset Navigationstaste ► Mode OK Menu Navigationstaste ◄ Power Videomodus - Symbolübersicht Videomodus Zeitdauer Loop Tagmodus Nachtmodus Bewegungsmodus Videoqualität Speicherkarte erkannt 15 Speicherkarte nicht erkannt Batterieanzeige Videoaufnahme läuft Video gesichert 00.00.00 Videodauer Fotomodus - Symbolübersicht Fotomodus Tagmodus Nachtmodus 12M-VGA Bildauflösung Speicherkarte erkannt Speicherkarte nicht erkannt Batterieanzeige Wiedergabemodus - Symbolübersicht Video läuft Video pausiert Video gesichert 16 Speicherkarte erkannt Speicherkarte nicht erkannt Batterieanzeige Vielen Dank, dass Sie sich für ein Hama Produkt entschieden haben! Nehmen Sie sich Zeit und lesen Sie die folgenden Anweisungen und Hinweise zunächst ganz durch. Bewahren Sie diese Bedienungsanleitung anschließend an einem sicheren Ort auf, um bei Bedarf darin nachschlagen zu können. Sollten Sie das Gerät veräußern, geben Sie diese Bedienungsanleitung an den neuen Eigentümer weiter. 1. Erklärung von Warnsymbolen und Hinweisen Gefahr eines elektrischen Schlages Dieses Symbol weist auf eine Berührungsgefahr mit nicht isolierten Teilen des Produktes hin, die möglicherweise eine gefährliche Spannung von solcher Höhe führen, dass die Gefahr eines elektrischen Schlags besteht. Warnung Wird verwendet, um Sicherheitshinweise zu kennzeichnen oder um Aufmerksamkeit auf besondere Gefahren und Risiken zu lenken. Hinweis Wird verwendet, um zusätzlich Informationen oder wichtige Hinweise zu kennzeichnen. 2. Packungsinhalt • Dashcam 30 • MiniUSB-KFZ-Ladegerät • Saugnapfhalterung • Micro SD Kartenleser • Bedienungsanleitung 17 3. Sicherheitshinweise • Das Produkt ist für den privaten, nicht-gewerblichen Gebrauch vorgesehen. • Verwenden Sie das Produkt ausschließlich für den dazu vorgesehenen Zweck. • Schützen Sie das Produkt vor Schmutz, Feuchtigkeit und Überhitzung und verwenden Sie es nur in trockenen Räumen. • Lassen Sie das Produkt nicht fallen und setzen Sie es keinen heftigen Erschütterungen aus. • Betreiben Sie das Produkt nicht außerhalb seiner in den technischen Daten angegebenen Leistungsgrenzen. • Knicken und quetschen Sie das Kabel nicht. • Der Akku ist fest eingebaut und kann nicht entfernt werden, entsorgen Sie das Produkt als Ganzes gemäß den gesetzlichen Bestimmungen. • Öffnen Sie das Produkt nicht und betreiben Sie es bei Beschädigungen nicht weiter. • Dieses Produkt gehört, wie alle elektrischen Produkte, nicht in Kinderhände! • Beim Einsatz des Produktes im Straßenverkehr gelten die Vorschriften der StVZO. • Beachten Sie, dass keine Komponenten, wie der Airbag, Sicherheitsbereiche, Bedienelemente, Instrumente, etc. oder die Sicht, verdeckt oder einschränkt sind. • Lassen Sie sich auf der Fahrt mit einem Kraftfahrzeug nicht durch Ihr Produkt ablenken und achten Sie auf die Verkehrslage und Ihre Umgebung. • Kontrollieren Sie vor jeder Fahrt die sichere Montage des Produkts. • Entsorgen Sie das Verpackungsmaterial sofort gemäß den örtlich gültigen Entsorgungsvorschriften. • Nehmen Sie keine Veränderungen am Produkt vor. Dadurch verlieren Sie jegliche Gewährleistungsansprüche. • Werfen Sie den Akku bzw. das Produkt nicht ins Feuer. • Verändern und/oder deformieren/erhitzen/zerlegen Sie Akkus/Batterien nicht. Gefahr eines elektrischen Schlages • Öffnen Sie das Produkt nicht und betreiben Sie es bei Beschädigungen nicht weiter. • Verwenden Sie das Produkt nicht, wenn das Ladekabel, das Adapterkabel oder die Netzleitung beschädigt sind. • Versuchen Sie nicht, das Produkt selbst zu warten oder zu reparieren. Überlassen Sie jegliche Wartungsarbeit dem zuständigen Fachpersonal. 4. Gesetzliche Regelungen/Einschränkungen beim Betrieb von Dashcams Hinweis • Beachten Sie, dass Hinweise zu gesetzlichen Regelungen in diesen Hinweisen nur die deutschen Vorschriften und Gesetze zum Zeitpunkt der Drucklegung abbilden. Informieren Sie sich in anderen Staaten vor der Verwendung des Produktes über die dort geltenden Regelungen! 18 Hinweis • Beachten Sie, dass bei Einsatz des Produktes im Straßenverkehr abhängig von der Gesetzgebung eines Landes unterschiedliche Regelungen gelten können. • In einigen Rechtssprechungen ist die Verwendung von Dashcams gesondert geregelt bzw. untersagt. Befassen Sie sich vor Einsatz der Dashcam mit den Gesetzen und Richtlinien. • Beachten Sie vor Installation und Einsatz des Produktes die geltenden Vorschriften des Datenschutzes. • Beachten Sie die geltenden Vorschriften für die Aufnahme und Speicherung von Video- und Bilddateien. 5. Bestimmungsgemäße Verwendung • Dieses Produkt ist nur für die Verwendung in Fahrzeugen vorgesehen. • Respektieren Sie die Persönlichkeits- und Eigentumsrechte Anderer. Machen Sie mit der Dashcam keine Aufnahmen anderer Personen. • Beachten Sie bei Aufnahmen das Recht am eigenen Bild und gesprochenem Wort. • Entfernen Sie das Produkt bei längerem Nichtgebrauch von der Windschutzscheibe, um sonnen- und temperaturbedingte Schäden zu vermeiden. 6. Inbetriebnahme Warnung - Verletzungsgefahr • Beim Einsatz des Produktes im Straßenverkehr gelten die Vorschriften der StVZO. • Beachten Sie, dass keine Komponenten, wie der Airbag, Sicherheitsbereiche, Bedienelemente, Instrumente, etc. oder die Sicht, verdeckt oder einschränkt sind. • Lassen Sie sich auf der Fahrt mit einem Kraftfahrzeug nicht durch Ihr Produkt ablenken und achten Sie auf die Verkehrslage und ihre Umgebung. Hinweis • Prüfen Sie vor der Montage der Halterung die Einbaumöglichkeiten in Ihrem Fahrzeug. Im Zweifelsfall ziehen Sie dazu die Betriebsanleitung des Fahrzeugs zu Rate oder wenden Sie sich an den Fahrzeughersteller. • Wenden Sie im Umgang mit dem Produkt und bei der Montage niemals Gewalt oder hohe Kräfte an. • Kontrollieren Sie vor jeder Fahrt die sichere Montage des Produkts. 19 6.1 Montage Saugnapfhalterung • Entfernen Sie die Schutzfolie am Saugnapf. • Öffnen Sie den Verriegelungshebel (15) des Saugnapfes. • Positionieren Sie den Halter mit dem Saugnapf auf einer gesäuberten, ebenen Montagefläche (z.B. Glasscheibe) • Drücken Sie den Halter auf der gewünschten Montagefläche leicht an und schließen Sie den Verriegelungshebel, um den Halter zu befestigen. • Prüfen Sie nach der Montage stets den sicheren Halt des Saugnapfes. • Um den Saugnapf wieder von der Montagefläche zu lösen, öffnen Sie den Verriegelungshebel. Ziehen Sie anschließend ggf. leicht an der Lasche, um den Saugnapf vollständig zu lösen. 6.2 Winkel und Neigung einstellen Die Halterung kann mittels eines Kugelkopfes stufenlos in Winkel und Neigung zum Betrachter verstellt werden. • Verstellen Sie Winkel und Neigung stets ohne eingesetztes Endgerät. • Lockern Sie zum Verstellen die Klemmschraube des Kugelkopfes. • Stellen Sie Winkel und Neigung wie gewünscht ein und drehen Sie die Klemmschraube fest. 6.3 Dashcam einsetzen/entnehmen Hinweis Prüfen Sie stets den sicheren Sitz der Saugnapfhalterung und den sicheren Halt der Dashcam. • Schieben Sie die Dashcam in die Halterung (14) des Saugnapfhalters. • Ziehen Sie die Dashcam durch vorsichtiges Hin- und Herbewegen aus der Halterung heraus. 7. Betrieb 7.1. Verbindung mit KFZ-Bordnetz Warnung – Akku • Verwenden Sie nur geeignete Ladegeräte mit USB Anschlüssen zum Aufladen. • Verwenden Sie defekte Ladegeräte oder USB Anschlüsse generell nicht mehr und versuchen Sie nicht, diese zu reparieren. • Überladen oder tiefentladen Sie das Produkt nicht. • Vermeiden Sie Lagerung, Laden und Benutzung bei extremen Temperaturen und extrem niedrigem Luftdruck (wie z.B. in großen Höhen). • Laden Sie bei längerer Lagerung regelmäßig (mind. vierteljährig) nach. 20 • Verbinden Sie das beiliegende MiniUSB-Ladekabel mit der MiniUSB-Ladebuchse (11) der Dashcam und der Kfz-Steckdose des Bordnetzes. • Die Dashcam schaltet sich nach Start des Motors automatisch ein. • Die Status-LED (12) leuchtet dauerhaft blau. Hinweis - Akkukapazität Der Akku verfügt über eine begrenzte Laufzeit von ca. 2-3 Minuten. Diese Pufferfunktion dient z.B. der kontinuierlichen Weiterführung der Uhrzeit. Längerer Betrieb ist nur mit angeschlossenem KFZ-Adapter möglich. Hinweis - dauerhafter Akkubetrieb Das Gerät ist nicht für den dauerhaften Akkubetrieb vorgesehen. Dauerhafter Akkubetrieb kann zu irreparablen Schäden führen. 7.2. Ein-/Ausschalten Hinweis - automatisches Ein-/Ausschalten Ist die Dashcam mittels des KFZ-Ladegeräts mit einer Stromquelle verbunden, schaltet sie sich beim Starten/Ausschalten des Fahrzeugs automatisch ein/aus. Hinweis - Autobatterie Bei einigen Fahrzeugen kann es vorkommen, dass die Stromzufuhr trotz abgestellter Zündung erhalten bleibt. Schalten Sie in diesem Fall die Kamera manuell aus, um Ihre Autobatterie vor Entladung zu schützen. Drücken und halten Sie Power [ auszuschalten. ] (10) für ca. 3 Sekunden, um die Dashcam manuell ein-/ 7.3. Einsetzen MicroSD-Karte • Stecken Sie eine MicroSD-Karte in den MicroSD-Kartenslot (2) der Dashcam. • Auf dem Display wird angezeigt. Hinweis - Speicherkarte voll Sobald der Speicher der MicroSD-Karte voll ist, wird die älteste Videoaufnahme überschrieben. 21 8. Modi 8.1 Videomodus • Nach Einschalten der Kamera befindet sich diese im Betriebsmodus Video. erscheint am linken, oberen Bildschirmrand. • Die Videoaufnahme startet automatisch beim Einschalten des Gerätes. • Drücken Sie [OK] (7), um die Videoaufnahme zu stoppen/starten. • Während der Videoaufnahme wird die Aufnahmedauer am linken, oberen Bildschirmrand angezeigt. Die Status-LED (12) leuchtet abwechselnd rot und blau. Hinweis - Nachtmodus Drücken Sie während der Videoaufnahme kurz Power [ deaktivieren. ] (10), um den Nachtmodus zu aktivieren/ 8.2 Fotomodus • Aktivieren Sie durch wiederholtes Drücken von [MODE] (6) den Betriebsmodus Foto. am linken, oberen Bildschirmrand. • Drücken Sie [OK] (7), um ein Bild aufzunehmen. erscheint 8.3 Wiedergabemodus • Aktivieren Sie durch wiederholtes Drücken von [MODE] (6) den Betriebsmodus Wiedergabe. erscheint am linken, unteren Bildschirmrand. • Wählen Sie mit Hilfe der Navigationstasten [◄] (9) / [►] (5) die Datei aus, die Sie wiedergeben möchten. • Drücken Sie [MENU] (8) für weitere Optionen. • Navigieren Sie mithilfe der Navigationstasten [◄] (9) / [►] (5) durch das Menü. • Wählen Sie den Menüpunkt Löschen und bestätigen Sie Ihre Auswahl durch Drücken von [OK] (7). • Sie haben die Wahl zwischen Auswahl löschen und Alle löschen. • Bestätigen Sie die nachfolgende Sicherheitsabfrage mit OK oder wählen Sie Abbrechen, um den Vorgang abzubrechen. • Drücken Sie [MENU] (8) für weitere Optionen, um alternativ zum Menüpunkt Schutz zu gelangen. • Wählen Sie den Menüpunkt Schutz und bestätigen Sie Ihre Auswahl durch Drücken von [OK] (7). • Sie haben die Wahl zwischen Datei sperren, Alle sperren, Datei entsperren und Alle entsperren. • Bestätigen Sie die nachfolgende Sicherheitsabfrage mit OK oder wählen Sie Abbrechen, um den Vorgang abzubrechen. 22 9. Einstellungen 9.1 Einstellungen Videomodus • • • • • Wechseln Sie – wie in Kapitel 8.1 Videomodus beschrieben – in den Videomodus. Drücken Sie [MENU] (8), um zu den Videoeinstellungen zu gelangen. angezeigt. Am linken, oberen Bildschirmrand wird Navigieren Sie mithilfe der Navigationstasten [◄] (9) / [►] (5) durch das Menü. Bestätigen Sie ihre Auswahl durch Drücken von [OK] (7). 9.1.1 Auflösung Wählen Sie die gewünschte Auflösung (1280X720 / 1920X1080) des aufgenommenen Videomaterials. • Navigieren Sie zum Menüpunkt Auflösung und bestätigen Sie ihre Auswahl durch Drücken von [OK] (7). Ein neues Übersichtsfenster wird geöffnet. • Wählen Sie mithilfe der Navigationstasten [◄] (9) / [►] (5) die gewünschte Einstellung aus. • Bestätigen Sie Ihre Auswahl durch Drücken von [OK] (7). 9.1.2 Wasserzeichen Bei aktiviertem Modus erhält jede Videodatei einen Zeit- und Datumsstempel. • Navigieren Sie zum Menüpunkt Wasserzeichen und bestätigen Sie ihre Auswahl durch Drücken von [OK] (7). Ein neues Übersichtsfenster wird geöffnet. • Wählen Sie mithilfe der Navigationstasten [◄] (9) / [►] (5) die gewünschte Einstellung aus. • Bestätigen Sie Ihre Auswahl durch Drücken von [OK] (7). 9.1.3 Bewegungserkennung Bei aktivierter Bewegungserkennung wird die Videoaufnahme bei Erschütterungen der Kamera (z.B. Unfall) automatisch gestartet. • Navigieren Sie zum Menüpunkt Bewegungserkennung und bestätigen Sie ihre Auswahl durch Drücken von [OK] (7). Ein neues Übersichtsfenster wird geöffnet. • Wählen Sie mithilfe der Navigationstasten [◄] (9) / [►] (5) die gewünschte Einstellung aus. • Bestätigen Sie Ihre Auswahl durch Drücken von [OK] (7). • Auf dem Videodisplay wird angezeigt. 9.1.4 Loop-Funktion Wählen Sie hier das Zeitintervall (1/2/3/5 Minuten), nach dem eine neue Videoaufnahme begonnen werden soll. Wählen Sie Aus, um diese Funktion zu deaktivieren. Es wird nun nur eine Datei erstellt. • Navigieren Sie zum Menüpunkt Loop-Funktion und bestätigen Sie ihre Auswahl durch Drücken von [OK] (7). Ein neues Übersichtsfenster wird geöffnet. • Wählen Sie mithilfe der Navigationstasten [◄] (9) / [►] (5) die gewünschte Einstellung aus. 23 • Bestätigen Sie Ihre Auswahl durch Drücken von [OK] (7). • Auf dem Videodisplay wird angezeigt. 9.1.5 Audioaufnahme Bei aktiviertem Modus wird neben dem Videomaterial zusätzlich der Ton aufgezeichnet. • Navigieren Sie zum Menüpunkt Audioaufnahme und bestätigen Sie ihre Auswahl durch Drücken von [OK] (7). Ein neues Übersichtsfenster wird geöffnet. • Wählen Sie mithilfe der Navigationstasten [◄] (9) / [►] (5) die gewünschte Einstellung aus. • Bestätigen Sie Ihre Auswahl durch Drücken von [OK] (7). 9.1.6 Kontrast Erhöhen Sie die Qualität der Videoaufnahme durch Anpassung des Kontrasts (-2 bis +2). • Navigieren Sie zum Menüpunkt Kontrast und bestätigen Sie ihre Auswahl durch Drücken von [OK] (7). Ein neues Übersichtsfenster wird geöffnet. • Wählen Sie mithilfe der Navigationstasten [◄] (9) / [►] (5) die gewünschte Einstellung aus. • Bestätigen Sie Ihre Auswahl durch Drücken von [OK] (7). 9.2 Einstellungen Fotomodus • Wechseln Sie – wie in Kapitel 8.2 Fotomodus beschrieben – in den Fotomodus. • Drücken Sie [MENU] (8), um zu den Einstellungen Foto zu gelangen. • Am linken, oberen Bildschirmrand wird angezeigt. • Navigieren Sie mithilfe der Navigationstasten [◄] (9) / [►] (5) durch das Menü. • Bestätigen Sie Ihre Auswahl durch Drücken von [OK] (7). 9.2.1 Auflösung Wählen Sie die gewünschte Auflösung (VGA - 12 Megapixel) des aufgenommenen Bildmaterials. • Navigieren Sie zum Menüpunkt Auflösung und bestätigen Sie ihre Auswahl durch Drücken von [OK] (7). Ein neues Übersichtsfenster wird geöffnet. • Wählen Sie mithilfe der Navigationstasten [◄] (9) / [►] (5) die gewünschte Einstellung aus. • Bestätigen Sie Ihre Auswahl durch Drücken von [OK] (7). 9.2.2 Bildanzeige Bei aktivierter Bildanzeige wird die getätigte Aufnahme für eine kurze Zeit (2/5 Sekunden) auf dem Display angezeigt. Erst nach Ablauf dieser Zeit kann ein neues Bild aufgenommen werden. Wählen Sie Aus, um diese Funktion zu deaktivieren. • Navigieren Sie zum Menüpunkt Bildanzeige und bestätigen Sie ihre Auswahl durch Drücken von [OK] (7). Ein neues Übersichtsfenster wird geöffnet. • Wählen Sie mithilfe der Navigationstasten [◄] (9) / [►] (5) die gewünschte Einstellung aus. • Bestätigen Sie Ihre Auswahl durch Drücken von [OK] (7). 24 9.2.3 Wasserzeichen Bei aktiviertem Modus erhält jede Fotodatei einen Zeit- und Datumsstempel. • Navigieren Sie zum Menüpunkt Wasserzeichen und bestätigen Sie ihre Auswahl durch Drücken von [OK] (7). Ein neues Übersichtsfenster wird geöffnet. • Wählen Sie mithilfe der Navigationstasten [◄] (9) / [►] (5) die gewünschte Einstellung aus. • Bestätigen Sie Ihre Auswahl durch Drücken von [OK] (7). 9.2.4 Kontrast Erhöhen Sie die Qualität der Fotoaufnahme durch Anpassung des Kontrasts (-2 bis +2). • Navigieren Sie zum Menüpunkt Kontrast und bestätigen Sie ihre Auswahl durch Drücken von [OK] (7). Ein neues Übersichtsfenster wird geöffnet. • Wählen Sie mithilfe der Navigationstasten [◄] (9) / [►] (5) die gewünschte Einstellung aus. • Bestätigen Sie Ihre Auswahl durch Drücken von [OK] (7). 9.3 Allgemeine Einstellungen • Drücken Sie zwei Mal [MENU] (8), um zum Einstellungsmenü der Kamera zu gelangen. • Alternativ drücken Sie ein Mal [MENU] (8), wenn Sie sich bereits im Menü Video/Foto befinden. • Am linken, oberen Bildschirmrand wird angezeigt. • Navigieren Sie mithilfe der Navigationstasten [◄] (9) / [►] (5) durch das Menü. • Bestätigen Sie Ihre Auswahl durch Drücken von [OK] (7). 9.3.1 Speicherkarte formatieren Löschen Sie alle Dateien, die sich auf der eingelegten Speicherkarte befinden. • Navigieren Sie zum Menüpunkt Speicherkarte formatieren und bestätigen Sie ihre Auswahl durch Drücken von [OK] (7). Ein neues Übersichtsfenster wird geöffnet. • Bestätigen Sie die Formatierung mit OK oder wählen Sie Abbrechen, um den Vorgang abzubrechen. 9.3.2 Sprache Wählen Sie die Sprache der Menüführung aus. • Navigieren Sie zum Menüpunkt Sprache und bestätigen Sie ihre Auswahl durch Drücken von [OK] (7). Ein neues Übersichtsfenster wird geöffnet. • Wählen Sie mithilfe der Navigationstasten [◄] (9) / [►] (5) die gewünschte Einstellung aus. • Bestätigen Sie Ihre Auswahl durch Drücken von [OK] (7). 9.3.3 Aus bei Inaktivität Wählen Sie das Zeitintervall (1 Minute / 3 Minuten), nach dem sich die Kamera bei Nichtbenutzung automatisch ausschaltet. 25 Wählen Sie Aus, um diese Funktion zu deaktivieren. • Navigieren Sie zum Menüpunkt Aus bei Inaktivität und bestätigen Sie ihre Auswahl durch Drücken von [OK] (7). Ein neues Übersichtsfenster wird geöffnet. • Wählen Sie mithilfe der Navigationstasten [◄] (9) / [►] (5) die gewünschte Einstellung aus. • Bestätigen Sie Ihre Auswahl durch Drücken von [OK] (7). 9.3.4 Bildschirmschoner Wählen Sie das Zeitintervall (1 Minute / 3 Minuten / 5 Minuten), nach dem der Bildschirmschoner aktiviert wird. Betätigen Sie in dieser Zeit keine Taste, wird der Display ausgeschaltet. Die Videoaufnahme läuft jedoch weiter. Wählen Sie Aus, um diese Funktion zu deaktivieren. • Navigieren Sie zum Menüpunkt Bildschirmschoner und bestätigen Sie ihre Auswahl durch Drücken von [OK] (7). Ein neues Übersichtsfenster wird geöffnet. • Wählen Sie mithilfe der Navigationstasten [◄] (9) / [►] (5) die gewünschte Einstellung aus. • Bestätigen Sie Ihre Auswahl durch Drücken von [OK] (7). 9.3.5 Werkseinstellungen • Navigieren Sie zum Menüpunkt Werkseinstellungen und bestätigen Sie ihre Auswahl durch Drücken von [OK] (7). Ein neues Übersichtsfenster wird geöffnet. • Bestätigen Sie die Zurücksetzung mit OK oder wählen Sie Abbrechen, um den Vorgang abzubrechen. 9.3.6 Datum/Uhrzeit • Navigieren Sie zum Menüpunkt Datum/Uhrzeit und bestätigen Sie ihre Auswahl durch Drücken von [OK] (7). Ein neues Übersichtsfenster wird geöffnet. • Stellen Sie mithilfe der Navigationstasten [◄] (9) / [►] (5) das Jahr ein und bestätigen Sie Ihre Eingabe durch Drücken von [OK] (7). • Stellen Sie danach die folgenden Informationen mit der gleichen Vorgehensweise nacheinander ein: Monat, Tag, Uhrzeit. • Bestätigen Sie Ihre Auswahl durch Drücken von [MENU] (8). 9.3.7 Version • Navigieren Sie zum Menüpunkt Version und bestätigen Sie ihre Auswahl durch Drücken von [OK] (7). Ein neues Übersichtsfenster wird geöffnet. • Die aktuelle Version der Kamera wird angezeigt. 26 10. Abrufen des aufgenommenen Materials Hinweis Entfernen Sie die MicroSD-Karte nicht bei eingeschalteter Dashcam. Dies kann zu Datenverlust führen bzw. Schäden am Gerät verursachen. • • • • Schalten Sie die Dashcam – wie in 7.2 Ein-/Ausschalten beschrieben – aus. Entnehmen Sie die MicroSD-Karte der Kamera. Schließen Sie die MicroSD-Karte mithilfe des SD-Kartenlesegeräts (Lieferumfang) an Ihren PC an. Übertragen Sie die gespeicherten Daten auf Ihren PC, um den Speicher zu entlasten. 11. Sicherungstaste Hinweis Beachten Sie, dass im Falle eines Unfalls das Leisten von Erster Hilfe und die Sicherheit aller Beteiligten Priorität besitzt. Um sicher zu gehen, dass Ihre Daten dauerhaft gespeichert werden, gehen Sie wie folgt vor: • Drücken Sie die Sicherungstaste (13). Auf dem Display erscheint . • Drücken und halten Sie Sie Power [ ] (10) für ca. 3 Sekunden, um die Kamera auszuschalten. • Entnehmen Sie nun die MicroSD-Karte der Kamera. Hinweis • Videos, die nach Drücken der Sicherungstaste gespeichert wurden, werden unter der Bezeichnung „LOKXXXXX“ abgespeichert. • Reguläre Videodateien werden unter der Bezeichnung „REC“ sowie einer fortlaufenden Nummer gespeichert. 12. Werkseinstellungen Um die Dashcam auf die Werkseinstellung (Auslieferungszustand) zurückzusetzen, gehen Sie bitte wie folgt vor: • Schalten Sie die Dashcam – wie in 7.2 Ein-/Ausschalten beschrieben – aus. • Drücken und halten Sie [Reset] (4) mit Hilfe eines spitzen Gegenstandes für ca. 3 Sekunden. • Alternativ können Sie die Werkseinstellungen – wie in Kapitel 9.3.5 Werkseinstellungen beschrieben - wiederherstellen. • Alle vorgenommenen Einstellungen werden gelöscht. 27 Hinweis • Probleme und Fehlfunktionen können möglicherweise durch Rücksetzung auf die Werkseinstellungen behoben werden. • Es werden jedoch alle Voreinstellungen unwiderruflich gelöscht. 13. Wartung und Pflege • Reinigen Sie dieses Produkt nur mit einem fusselfreien, leicht feuchten Tuch und verwenden Sie keine aggressiven Reiniger. • Achten Sie darauf, dass kein Wasser in das Produkt eindringt. 14. Haftungsausschluss Die Hama GmbH & Co KG übernimmt keinerlei Haftung oder Gewährleistung für Schäden, die aus unsachgemäßer Installation, Montage und unsachgemäßem Gebrauch des Produktes oder einer Nichtbeachtung der Bedienungsanleitung und/oder der Sicherheitshinweise resultieren. 15. Technische Daten Abmessungen 89 x 48 x 35 mm Bildschirmdiagonale 2.4" Max. Auflösung Photo: 12 megapixel | Video: 1080i Datenformat Photo: JPEG | Video: AVI Speicherkarte Unterstützt MicroSD-Speicherkarten bis 32 GB Stromversorgung Input: 12 V-24 V Batterie Input: 5 V 290 mA; Typ: 3,7 V / LiPo; min. Kapazität: 130 mAh / 0,48 Wh 28 0,5A; Output: 5 V ; 1A ; Kabellänge: 2m F Mode d‘emploi Éléments de commande et d’affichage A 1. Système de support à ventouse 2. Fente pour carte microSD 3. Microphone / haut-parleur B 4. 5. 6. 7. 8. 9. 10. C 11. Prise de charge mini USB 12. LED d’état 13. Touche de protection D 14. Support Dashcam 15. Levier de verrouillage Réinitialisation Touche de navigation ► Mode OK Menu Touche de navigation ◄ Power (mise sous tension) Mode vidéo - Aperçu des symboles Mode vidéo Durée de la boucle Mode diurne Mode nocturne Mode mouvement Qualité vidéo Carte mémoire reconnue 29 Carte mémoire non reconnue Témoin de batterie Enregistrement vidéo en cours Sécurisé par vidéo 00.00.00 Durée de la vidéo Fotomodus - Symbolübersicht Mode photo Mode diurne Mode nocturne 12M-VGA Résolution image Carte mémoire reconnue Carte mémoire non reconnue Témoin de batterie Wiedergabemodus - Symbolübersicht Enregistrement vidéo en cours Pause de l’enregistrement vidéo Sécurisé par vidéo 30 Carte mémoire reconnue Carte mémoire non reconnue Témoin de batterie Nous vous remercions d’avoir choisi un produit Hama. Veuillez prendre le temps de lire l‘ensemble des remarques et consignes suivantes. Veuillez conserver ce mode d‘emploi à portée de main afin de pouvoir le consulter en cas de besoin. Transmettez-le au nouveau propriétaire avec l’appareil le cas échéant. 1. Explication des symboles d‘avertissement et des remarques Risque d’électrocution Ce symbole indique un risque de contact avec des parties non isolées du produit susceptibles de conduire un courant électrique capable de provoquer un risque d‘électrocution. Avertissement Ce symbole est utilisé pour indiquer des consignes de sécurité ou pour attirer votre attention sur des dangers et risques particuliers. Remarque Ce symbole est utilisé pour indiquer des informations supplémentaires ou des remarques importantes. 2. Contenu de l‘emballage • Dashcam 30 • Chargeur voiture mini USB • Support à ventouse • Lecteur de cartes microSD • Ce mode d’emploi 31 3. Consignes de sécurité • Ce produit est destiné à un usage domestique non commercial. • Utilisez le produit exclusivement conformément à sa destination. • Protégez le produit de toute saleté, humidité, surchauffe et utilisez-le uniquement dans des locaux secs. • Protégez le produit des secousses violentes et évitez tout choc ou toute chute. • N‘utilisez pas le produit en dehors des limites de puissance indiquées dans les caractéristiques techniques. • Faites attention à ne pas plier ni coincer le câble. • La batterie est installée de façon permanente et ne peut pas être retirée ; recyclez le produit en bloc conformément aux directives légales. • Ne tentez pas d‘ouvrir le produit en cas de détérioration et cessez de l’utiliser. • Cet appareil, comme tout appareil électrique, doit être gardé hors de portée des enfants ! • Veuillez respecter les lois et réglementations locales en vigueur relatives au code de la route lors de l‘utilisation du produit. • Veuillez contrôler que le produit n‘affecte le fonctionnement d‘aucun élément de sécurité tel qu‘un airbag, zone de sécurité, élément de commande, instrument, etc. et qu‘il n‘entrave pas la visibilité. • Ne laissez pas le produit capter votre attention lorsque vous pilotez un véhicule et veuillez concentrer toute votre attention sur la circulation et votre environnement. • Vérifiez que le produit est fixé en toute sécurité avant chaque trajet. • Recyclez les matériaux d’emballage conformément aux prescriptions locales en vigueur. • N’apportez aucune modification à l’appareil. Des modifications vous feraient perdre vos droits de garantie. • Ne jetez pas le produit ni aucune batterie dans un feu. • Ne modifiez pas et/ou ne déformez/chauffez/désassemblez pas les batteries/piles. Risque d’électrocution • Ne tentez pas d'ouvrir l'appareil et cessez de l'utiliser en cas de détérioration. • Cessez d'utiliser l'appareil en cas de détérioration du câble de charge, du câble adaptateur ou du cordon d'alimentation. • Ne tentez pas de réparer l’appareil vous-même ni d’effectuer des travaux d’entretien. Faites appel à des techniciens qualifiés pour effectuer tous les travaux d’entretien. 4. Dispositions légales / restrictions lors du fonctionnement de la Dashcam Remarque • Les remarques concernant les dispositions légales mentionnées dans ce manuel correspondent uniquement aux règlements et lois en vigueur en Allemagne au moment de leur impression. Dans un autre pays, informez-vous des réglementations locales avant l’utilisation du produit. 32 Remarque • Veuillez noter qu’en cas d’utilisation du produit sur la voie publique, différentes réglementations sont susceptibles de devoir être respectées en fonction de la législation du pays concerné. • Certaines jurisprudences nationales imposent des règles spécifiques à l’utilisation de Dashcams ou l’interdisent totalement. Veuillez vous renseigner avant de mettre la Dashcam en service et obtenir des informations concernant les lois et réglementations du pays concerné. • Veuillez également respecter les directives concernant la protection des données d’utiliser le produit. • Veuillez respecter les directives en vigueur concernant l’enregistrement et la sauvegarde de fichiers vidéo et audio. 5. Utilisation conforme • Ce produit est destiné uniquement à une utilisation à l’intérieur de véhicules. • Veuillez respecter les droits de la personnalité et les droits de propriété de tiers. N’utilisez pas la Dashcam afin de filmer d’autres personnes. • Veuillez respecter le droit exclusif dont dispose chaque individu sur son image et ses paroles. • En cas d’interruption d’utilisation prolongée, retirez le produit de votre pare-brise afin d’éviter toute détérioration provoquée par le soleil ou une température excessive. 6. Mise en service Avertissement - Risque de blessure • Veuillez respecter les lois et réglementations locales en vigueur relatives au code de la route lors de l‘utilisation du produit. • Veuillez contrôler que le produit n‘affecte le fonctionnement d‘aucun élément de sécurité tel qu‘un airbag, zone de sécurité, élément de commande, instrument, etc. et qu‘il n‘entrave pas la visibilité. • Ne laissez pas le produit capter votre attention lorsque vous pilotez un véhicule et veuillez concentrer toute votre attention sur la circulation et votre environnement. Remarque • Avant d'installer le système de fixation, veuillez contrôler les possibilités d’installation de votre véhicule. En cas de doute, veuillez consulter le mode d’emploi de votre véhicule ou contacter le fabricant de ce dernier. • N‘appliquez en aucun cas une force excessive lors de l‘utilisation ou de l‘installation du produit. • Vérifiez que le produit est fixé en toute sécurité avant chaque trajet. 33 6.1 Installation du support à ventouse • Retirez le film protecteur placé sur la ventouse. • Ouvrez le levier de verrouillage (15) de la ventouse. • Placez le support avec la ventouse sur une surface d’installation plane et propre (vitre, etc.). • Appuyez légèrement le support sur la surface d’installation souhaitée, puis fermez le levier de verrouillage (15) pour fixer le support. • Vérifiez la bonne fixation de la ventouse une fois l’installation terminée. • Pour retirer la ventouse, ouvrez le levier de verrouillage. Tirez ensuite légèrement sur la languette afin de dégager totalement la ventouse. 6.2 Réglage de l’angle et de l’inclinaison La tête articulée du support vous permet d’orienter en continu le produit en direction de l’utilisateur. • Réglez l’angle et l’inclinaison du support avant de mettre votre Dashcam en place. • Pour effectuer le réglage, desserrez la vis de blocage de la tête articulée. • Réglez l’angle et l’inclinaison souhaités et resserrez la vis de blocage. 6.3 Mise en place/retrait de la Dashcam Remarque Vérifiez la bonne fixation du support à ventouse et le parfait maintien de votre Dashcam. • Faites glisser votre Dashcam dans le dispositif de fixation (14) du support à ventouse. • Vous pourrez retirer votre Dashcam en exerçant avec précaution un mouvement de va-et-vient. 7. Fonctionnement 7.1. Connexion avec votre tableau de bord Avertissement concernant la batterie • Utilisez exclusivement un chargeur approprié disposant de connexions USB pour la charge. • Cessez d'utiliser tout chargeur ou tout port USB défectueux et ne tentez pas de réparer ces derniers. • Ne surchargez ou ne déchargez pas totalement le produit. • Évitez de stocker, charger et utiliser le produit à des températures extrêmes et à une pression atmosphérique extrêmement basse (à haute altitude, par exemple). • Rechargez régulièrement le produit (au moins une fois par trimestre) en cas de longue période de stockage. 34 • Branchez le câble de charge mini USB fourni au port de charge mini USB (11) de la Dashcam et à la prise électrique de votre tableau de bord. • La Dashcam se met automatiquement sous tension dès que vous démarrez le moteur. • La LED d'état (12) s'allume en permanence en bleu. Remarque - Capacité de la batterie La batterie dispose d’une capacité limitée d’env. 2-3 minutes. Cette fonction de tampon est utilisée, par exemple, pour l’alimentation de l’horloge. Une fonctionnement plus long de la Dashcam n’est possible qu’après avoir branché un adaptateur voiture. Remarque - Fonctionnement permanent sur batterie L’appareil n’a pas été conçu pour un fonctionnement permanent sur batterie. Un fonctionnement permanent sur batterie est susceptible de provoquer une détérioration irréparable du produit. 7.2. Mise sous/hors tension Remarque - Mise sous/hors tension automatique La Dashcam se met automatiquement sous/hors tension dès que vous démarrez/arrêtez votre véhicule lorsqu’elle est branchée à une source d’alimentation au moyen du chargeur voiture. Remarque - Batterie du véhicule L’alimentation électrique de certains véhicules reste disponible lorsqu’on en arrête le moteur. Dans ce cas, mettez la caméra hors tension manuellement afin de ne pas épuiser la batterie votre véhicule. Maintenez la touche Power [ ] (10) enfoncée pendant env. 3 secondes pour mettre manuellement la Dashcam sous ou hors tension. 7.3. Utilisation d’une carte micro SD • Insérez une carte microSD dans l’emplacement de cartes microSD (2) de la Dashcam. • apparaît à l'écran. Remarque - Carte mémoire pleine La caméra écrase la plus ancienne vidéo dès que la mémoire de la carte microSD est saturée. 35 8. Modes 8.1 Mode vidéo • apparaît dans le coin supérieur gauche de l’écran après avoir mis la caméra sous tension. • L’enregistrement vidéo démarre automatiquement lors de la mise sous tension de l’appareil. • Appuyez sur la touche [OK] (7) afin de interrompre/démarrer l’enregistrement vidéo. • La duré de l’enregistrement vidéo est indiquée dans le coin supérieur gauche de l'écran pendant l’enregistrement. La LED d’état (12) s’allume alternativement en rouge et bleu. Remarque - Mode nocturne Pendant un enregistrement, appuyez brièvement sur la touche Power [ désactiver le mode nocturne. ] (10) afin d’activer/ 8.2 Mode photo • Activez le mode photo en appuyant plusieurs fois sur la touche [MODE] (6) ; coin supérieur gauche de l’écran. • Appuyez sur la touche [OK] (7) afin de prendre une photo. apparaît dans le 8.3 Wiedergabemodus • Vous pouvez activer le mode lecture en appuyant plusieurs fois sur [MODE] (6). apparaît dans le bord inférieur gauche de l’écran. • Utilisez les touches de navigation [◄] (9) / [►] (5) afin de sélectionner le fichier que vous désirez lire. • Appuyez sur [MENU] (8) pour sélectionner d’autres options. • Utilisez les touches de navigation [◄] (9) / [►] (5) afin de sélectionner une option du menu. • Sélectionnez l’option de menu Supprimer, puis confirmez votre sélection en appuyant sur [OK] (7). • Vous pouvez sélectionner Supprimer la sélection ou Tout supprimer. • Confirmez le message de sécurité à l’aide de OK ou sélectionnez Annuler afin d’interrompre l’opération. • Appuyez sur [MENU] (8) pour sélectionner d’autres options ou, par exemple, pour ouvrir l’option Bloquer. • Sélectionnez l’option de menu Bloquer, puis confirmez votre sélection en appuyant sur [OK] (7). • Vous pouvez sélectionner Verrouiller le fichier, Verrouiller tout, Déverrouiller le fichier ou Tout déverrouiller. • Confirmez le message de sécurité à l’aide de OK ou sélectionnez Annuler afin d’interrompre l’opération. 9. Paramètres 9.1 Paramètres du mode vidéo • Sélectionnez le mode vidéo – comme décrit au chapitre 8.1 Mode vidéo. 36 • Appuyez sur la touche [MENU] (8) afin d’ouvrir les paramètres vidéo. • apparaît dans le bord supérieur gauche de l’écran. • Utilisez les touches de navigation [◄] (9) / [►] (5) afin de sélectionner une option du menu. • Confirmez votre sélection en appuyant sur [OK] (7). 9.1.1 Résolution Sélectionnez une résolution (1280X720 / 1920X1080) pour le matériel vidéo que vous souhaitez enregistrer. • Ouvrez l’option de menu Résolution, puis confirmez votre sélection en appuyant sur [OK] (7). Un nouvel aperçu apparait à l’écran. • Utilisez les touches de navigation [◄] (9) / [►] (5) afin de sélectionner le paramètre souhaité. • Confirmez votre sélection en appuyant sur [OK] (7). 9.1.2 Filigrane La date et l’heure de tous les enregistrements seront adjoints aux fichiers vidéo lorsque vous activez ce mode. • Ouvrez l’option de menu Filigrane, puis confirmez votre sélection en appuyant sur [OK] (7). Un nouvel aperçu apparait à l’écran. • Utilisez les touches de navigation [◄] (9) / [►] (5) afin de sélectionner le paramètre souhaité. • Confirmez votre sélection en appuyant sur [OK] (7). 9.1.3 Détection de mouvements L’enregistrement vidéo démarre automatiquement en cas de secousses détectées par la caméra (en cas d’accident, par exemple) lorsque l’option de détection de mouvements est activée. • Ouvrez l’option de menu Détection de mouvements, puis confirmez votre sélection en appuyant sur [OK] (7). Un nouvel aperçu apparait à l’écran. • Utilisez les touches de navigation [◄] (9) / [►] (5) afin de sélectionner le paramètre souhaité. • Confirmez votre sélection en appuyant sur [OK] (7). • apparaît à l’écran vidéo. 9.1.4 Fonction boucle Sélectionnez un laps de temps (1/2/3/5 minutes) au bout duquel vous souhaitez que le nouvel enregistrement vidéo démarre. Sélectionnez Off, afin de désactiver cette fonction. La caméra crée un nouveau fichier. • Ouvrez l’option de menu Fonction boucle, puis confirmez votre sélection en appuyant sur [OK] (7). Un nouvel aperçu apparait à l’écran. • Utilisez les touches de navigation [◄] (9) / [►] (5) afin de sélectionner le paramètre souhaité. • Confirmez votre sélection en appuyant sur [OK] (7). • apparaît à l’écran vidéo. 37 9.1.5 Enregistrement audio La caméra enregistrera le son, parallèlement à l’enregistrement vidéo, lorsque vous activez ce mode. • Ouvrez l’option de menu Enregistrement audio, puis confirmez votre sélection en appuyant sur [OK] (7). Un nouvel aperçu apparait à l’écran. • Utilisez les touches de navigation [◄] (9) / [►] (5) afin de sélectionner le paramètre souhaité. • Confirmez votre sélection en appuyant sur [OK] (7). 9.1.6 Contraste Vous pouvez améliorer la qualité des enregistrements vidéo en paramétrant une adaptation en fonction du contraste (-2 à +2). • Ouvrez l’option de menu Contraste, puis confirmez votre sélection en appuyant sur [OK] (7). Un nouvel aperçu apparait à l’écran. • Utilisez les touches de navigation [◄] (9) / [►] (5) afin de sélectionner le paramètre souhaité. • Confirmez votre sélection en appuyant sur [OK] (7). 9.2 Paramètres du mode photo • Sélectionnez le mode photo – comme décrit au chapitre 8.2 Mode photo. • Appuyez sur la touche [MENU] (8) afin d’ouvrir les paramètres photo. • apparaît dans le coin supérieur gauche de l’écran. • Utilisez les touches de navigation [◄] (9) / [►] (5) afin de sélectionner une option du menu. • Confirmez votre sélection en appuyant sur [OK] (7). 9.2.1 Résolution Sélectionnez une résolution (VGA - 12 mégapixels) pour le matériel vidéo que vous souhaitez enregistrer. • Ouvrez l’option de menu Résolution, puis confirmez votre sélection en appuyant sur [OK] (7). Un nouvel aperçu apparait à l’écran. • Utilisez les touches de navigation [◄] (9) / [►] (5) afin de sélectionner le paramètre souhaité. • Confirmez votre sélection en appuyant sur [OK] (7). 9.2.2 Affichage des photos La photo que vous venez de prendre apparaît brièvement (2/5 secondes) à l’écran après avoir activé. Affichage des photos Vous devrez attendre la fin de l’affichage avant de pouvoir prendre une nouvelle photo. Sélectionnez Off afin de désactiver cette fonction. • Ouvrez l’option de menu Affichage des photos, puis confirmez votre sélection en appuyant sur [OK] (7). Un nouvel aperçu apparait à l’écran. 38 • Utilisez les touches de navigation [◄] (9) / [►] (5) afin de sélectionner le paramètre souhaité. • Confirmez votre sélection en appuyant sur [OK] (7). 9.2.3 Filigrane La date et l’heure de toutes vos photos seront adjointes aux fichiers vidéo lorsque vous activez ce mode. • Ouvrez l’option de menu Filigrane, puis confirmez votre sélection en appuyant sur [OK] (7). Un nouvel aperçu apparait à l’écran. • Utilisez les touches de navigation [◄] (9) / [►] (5) afin de sélectionner le paramètre souhaité. • Confirmez votre sélection en appuyant sur [OK] (7). 9.2.4 Contraste Vous pouvez améliorer la qualité de vos photos en paramétrant une adaptation en fonction du contraste (-2 à +2). • Ouvrez l’option de menu Contraste, puis confirmez votre sélection en appuyant sur [OK] (7). Un nouvel aperçu apparait à l’écran. • Utilisez les touches de navigation [◄] (9) / [►] (5) afin de sélectionner le paramètre souhaité. • Confirmez votre sélection en appuyant sur [OK] (7). 9.3 Paramètres généraux • Appuyez deux fois sur [MENU] (8) afin d’ouvrir le menu de réglages de la caméra. • Vous pouvez également appuyer une fois sur [MENU] (8) lorsque le menu vidéo/phto est déjà ouvert. • apparaît dans le coin supérieur gauche de l’écran. • Utilisez les touches de navigation [◄] (9) / [►] (5) afin de sélectionner une option du menu. • Confirmez votre sélection en appuyant sur [OK] (7). 9.3.1 Formater la carte mémoire Suppression de tous les fichiers enregistrés sur la carte mémoire insérée. • Ouvrez l’option de menu Formater la carte mémoire, puis confirmez votre sélection en appuyant sur [OK] (7). Un nouvel aperçu apparait à l’écran. • Confirmez le formatage à l’aide de OK ou sélectionnez Annuler afin d’interrompre l’opération. 9.3.2 Langue Sélection de la langue du menu. • Ouvrez l’option de menu Langue, puis confirmez votre sélection en appuyant sur [OK] (7). Un nouvel aperçu apparait à l’écran. • Utilisez les touches de navigation [◄] (9) / [►] (5) afin de sélectionner le paramètre souhaité. • Confirmez votre sélection en appuyant sur [OK] (7). 39 9.3.3 Off en cas d’inactivité Sélectionnez un laps de temps (1 minute / 3 minutes), au bout duquel vous souhaitez que la caméra se mette automatiquement hors tension en cas de non-utilisation. Sélectionnez Off afin de désactiver cette fonction. • Ouvrez l’option de menu Off en cas d’inactivité, puis confirmez votre sélection en appuyant sur [OK] (7). Un nouvel aperçu apparait à l’écran. • Utilisez les touches de navigation [◄] (9) / [►] (5) afin de sélectionner le paramètre souhaité. • Confirmez votre sélection en appuyant sur [OK] (7). 9.3.4 Écran de veille Sélectionnez un laps de temps (1 minute / 3 minutes / 5 minutes ), au bout duquel vous souhaitez activer l’écran de veille. L’écran s’éteindra si vous n’appuyez sur aucune touche pendant ce laps de temps. La caméra continue toutefois l’enregistrement vidéo. Sélectionnez Off afin de désactiver cette fonction. • Ouvrez l’option de menu Écran de veille, puis confirmez votre sélection en appuyant sur [OK] (7). Un nouvel aperçu apparait à l’écran. • Utilisez les touches de navigation [◄] (9) / [►] (5) afin de sélectionner le paramètre souhaité. • Confirmez votre sélection en appuyant sur [OK] (7). 9.3.5 Réglages d’usine • Ouvrez l’option de menu Réglages d’usine, puis confirmez votre sélection en appuyant sur [OK] (7). Un nouvel aperçu apparait à l’écran. • Confirmez la réinitialisation à l’aide de OK ou sélectionnez Annuler afin d’interrompre l’opération. 9.3.6 Date/heure • Ouvrez l’option de menu Date/heure, puis confirmez votre sélection en appuyant sur [OK] (7). Un nouvel aperçu apparait à l’écran. • Utilisez les touches de navigation [◄] (9) / [►] (5) afin de régler l’année, puis confirmez votre sélection en appuyant sur [OK] (7). • Réglez les informations successives en utilisant la même méthode : mois, jour, heure. • Confirmez votre sélection en appuyant sur [MENU] (8). 9.3.7 Version • Ouvrez l’option de menu Version, puis confirmez votre sélection en appuyant sur [OK] (7). Un nouvel aperçu apparait à l’écran. • La version actuelle du logiciel s’affiche à l’écran. 40 10. Consultation du matériel enregistré Remarque Ne retirez pas la carte microSD de la Dashcam lorsque cette dernière est sous tension, risque de perte de données ou de détérioration de l’appareil. • • • • Mettez la Dashcam hors tension - comme décrit au chapitre 7.2 Mise sous/hors tension. Retirez la carte microSD de la caméra. Connectez la carte microSD à votre ordinateur à l’aide du lecteur de cartes SD (fourni). Transférez les données sauvegardées sur votre ordinateur afin de libérer de l’espace mémoire sur votre carte. 11. Touche de protection Remarque Veuillez noter qu’en cas d’accident, l’apport des premiers secours ainsi que la sécurisation de toutes les personnes concernées est prioritaire. Procédez comme suit pour être certain(e) que vos données seront durablement sauvegardées : • Appuyez sur la touche de protection (13). apparaît à l'écran. • Maintenez la touche Power [ ] (10) enfoncée pendant env. 3 secondes afin de mettre la caméra hors tension. • Retirez la carte microSD de la caméra. Remarque • Les vidéos sauvegardées après avoir appuyé sur la touche de protection seront enregistrées sous la désignation „LOKXXXXX“. • Les fichiers vidéo normaux seront enregistrés avec l’extension „REC“, puis un numéro consécutif. 12. Paramètres par défaut Procédez comme suit pour rétablir les paramètres par défaut de votre Dashcam (état d’origine) : • Mettez la Dashcam hors tension - comme décrit au chapitre 7.2 Mise sous/hors tension. • Appuyez à l’aide d’un objet pointu sur la touche [Reset] (4) et maintenez-la enfoncée pendant env. 3 secondes. • Vous pouvez également réinitialiser les réglages d’usine – comme décrit au chapitre 9.3.5 Réglages d’usine. • Tous vos réglages seront supprimés. 41 Remarque • Certains problèmes ou dysfonctionnements peuvent éventuellement être réparés à l’aide du rétablissement des paramètres par défaut. • Tous vos préréglages seront alors irrémédiablement supprimés. 13. Soins et entretien • Nettoyez la balance uniquement à l’aide d’un chiffon non fibreux légèrement humide ; évitez tout détergent agressif. • Veillez à ce qu’aucun liquide ne pénètre dans le produit. 14. Exclusion de garantie La société Hama GmbH & Co KG décline toute responsabilité en cas de dommages provoqués par une installation, un montage ou une utilisation non conformes du produit ou encore provoqués par un non respect des consignes du mode d‘emploi et/ou des consignes de sécurité. 15. Caractéristiques techniques Dimensions 89 x 48 x 35 mm Diagonale d‘écran 2.4" Sensibilité maxi photo : 12 mégapixels | vidéo : 1080i Format de données photo : JPEG | vidéo : AVI Carte mémoire prend en charge les cartes mémoire microSD jusqu’à 32 Go Alimentation en électricité Input: 12 V-24 V Pile Input: 5 V 290 mA ; Type: 3,7 V / LiPo ; Min capacité : 130 mAh / 0,48 Wh 42 0,5A ; Output: 5 V ; 1A ; longueur du câble : 2 m E Instrucciones de uso Bedienungselemente und Anzeigen A 1. Dispositivo de soporte de ventosa 2. Ranura para tarjetas Micro SD 3. Micrófono/altavoz B 4. 5. 6. 7. 8. 9. 10. C 11. Hembrilla de carga MiniUSB 12. LED de estado 13. Tecla de guardar D 14. Soporte de Dashcam 15. Palanca de bloqueo Reset Tecla de navegación ► Modo OK Menú Tecla de navegación ◄ Power Modo de vídeo - Resumen de símbolos Modo de vídeo Duración del loop Modo diurno Modo nocturno Modo de movimiento Calidad de vídeo Tarjeta de memoria detectada 43 Tarjeta de memoria no detectada Indicador del estado de la batería Grabación de vídeo en curso Vídeo guardado 00.00.00 Duración del video Modo de fotografía - Resumen de símbolos Modo de fotografía Modo diurno Modo nocturno 12M-VGA Resolución de imagen Tarjeta de memoria detectada Tarjeta de memoria no detectada Indicador del estado de la batería Modo de reproducción - Resumen de símbolos Vídeo en marcha Vídeo pausado Vídeo guardado 44 Tarjeta de memoria detectada Tarjeta de memoria no detectada Indicador del estado de la batería Le agradecemos que se haya decidido por un producto de Hama. Tómese tiempo y léase primero las siguientes instrucciones e indicaciones. Después, guarde estas instrucciones de manejo en un lugar seguro para poder consultarlas cuando sea necesario. Si vende el aparato, entregue estas instrucciones de manejo al nuevo propietario. 1. Explicación de los símbolos de aviso y de las indicaciones Peligro de sufrir una descarga eléctrica Este símbolo hace referencia al peligro de contacto con partes no aisladas del producto que pueden conducir una tensión peligrosa de una intensidad tal que puede provocar una descarga eléctrica. Aviso Se utiliza para caracterizar las indicaciones de seguridad o para llamar la atención sobre peligros y riesgos especiales. Nota Se utiliza para caracterizar informaciones adicionales o indicaciones importantes. 2. Contenido del paquete • Dashcam 30 • Cargador para vehículo MiniUSB • Soporte de ventosa • Lector de tarjetas Micro SD • Estas instrucciones de manejo 45 3. Instrucciones de seguridad • El producto está destinado al uso privado, no comercial. • Emplee el producto exclusivamente para la función para la que fue diseñado. • Proteja el producto de la suciedad, la humedad y el sobrecalentamiento y utilícelo sólo en recintos secos. • No deje caer el producto ni lo someta a sacudidas fuertes. • No opere el producto fuera de los límites de potencia indicados en los datos técnicos. • No doble ni aplaste el cable. • La pila recargable está montada de forma fija y no se puede retirar, deseche el producto como una unidad y en conformidad con los reglamentos locales. • No abra el producto y no lo siga operando de presentar deterioros. • Este aparato, como todos los aparatos eléctricos, no debe estar en manos de los niños. • Tenga en cuenta al utilizar el producto las disposiciones y leyes locales vigentes para el tráfico rodado. • Asegúrese de que ni la vista ni ningún componente, como airbag, áreas de seguridad, elementos de manejo, instrumentos, etc.,se verán tapados o limitados. • Durante los desplazamientos con un vehículo, no se distraiga con el producto y preste atención al tráfico y a su entorno. • Verifique que el montaje del producto es seguro antes de cada desplazamiento. • Deseche el material de embalaje en conformidad con las disposiciones locales sobre el desecho vigentes. • No realice cambios en el aparato. Esto conllevaría la pérdida de todos los derechos de la garantía. • No arroje la batería o el producto al fuego. • No modifique ni deforme/caliente/desensamble las pilas recargables/baterías. Peligro de sufrir una descarga eléctrica • No abra el producto y no lo siga operando de presentar deterioros. • No utilice el producto si el cable de carga, el adaptador del cable o el cable eléctrico están dañados. • No intente mantener o reparar el producto por cuenta propia. Encomiende cualquier trabajo de mantenimiento al personal especializado competente. 4. Regulaciones/limitaciones legales durante el funcionamiento de Dashcams Nota • Tenga en cuenta que las indicaciones referentes a la regulaciones legales contenidas en estas indicaciones solo representan las disposiciones y leyes alemanas en el momento de la impresión. En otros países, infórmese acerca de las regulaciones vigentes en ese lugar antes de emplear el producto. 46 Nota • Tenga en cuenta que al utilizar el producto en el tráfico por carretera pueden aplicarse diferentes normativas dependiendo de la legislación de un país. • En algunas jurisdicciones, el uso de Dashcams está específicamente regulado o prohibido. Antes de usar la Dashcam, familiarícese con las leyes y disposiciones. • Antes de instalar y utilizar el producto, observe las normas de protección de datos aplicables. • Observe las normas vigentes para la grabación y el almacenamiento de archivos de vídeo e imagen. 5. Uso adecuado • Este producto está previsto exclusivamente para su empleo en vehículos. • Respete los derechos de la personalidad y la propiedad de otras personas. No haga grabaciones de otras personas con la Dashcam. • Al grabar, respete el derecho a la propia imagen y a la palabra hablada. • Retire el producto del parabrisas cuando no lo utilice durante periodos prolongados para evitar daños causados por la luz solar y la temperatura. 6. Puesta en funcionamiento Aviso - Peligro de sufrir lesiones • Tenga en cuenta al utilizar el producto las disposiciones y leyes locales vigentes para el tráfico rodado. • Asegúrese de que ni la vista ni ningún componente, como airbag, áreas de seguridad, elementos de manejo, instrumentos, etc.,se verán tapados o limitados. • Durante los desplazamientos con un vehículo, no se distraiga con el producto y preste atención al tráfico y a su entorno. Nota • Antes del montaje del soporte, compruebe las diferentes posibilidades de montaje dentro de su vehículo. En caso de duda, consulte para ello el manual de instrucciones del automóvil o diríjase al fabricante del automóvil. • No fuerce nunca el producto durante su manejo o montaje. • Verifique que el montaje del producto es seguro antes de cada desplazamiento. 47 6.1 Montaje del soporte de ventosa • Retire la lámina protectora de la ventosa. • Abra la palanca de bloqueo (15) de la ventosa. • Posicione el soporte con la ventosa sobre una superficie de montaje previamente limpiada que no presente desniveles (p. ej. un cristal) • Presione el soporte suavemente sobre la superficie de montaje deseada y cierre la palanca de bloqueo (15) para fijar el soporte. • Tras el montaje, compruebe siempre la sujeción segura de la ventosa. • Para volver a soltar la ventosa de la superficie de montaje, abra la palanca de bloqueo. Seguidamente y de ser necesario, tire levemente de la lengüeta para soltar por completo la ventosa. 6.2 Ajuste del ángulo y la inclinación El soporte ofrece un ajuste continuo del ángulo y la inclinación respecto al usuario mediante un cabezal esférico. • Ajuste el ángulo y la inclinación siempre sin tener colocado el terminal. • Para el ajuste, afloje el tornillo de apriete del cabezal esférico. • Proceda a ajustar el ángulo y la inclinación según desee y vuelva a apretar el tornillo de apriete. 6.3 Colocar/retirar la Dashcam Nota Verifique siempre que la colocación del soporte de ventosa y la sujeción de la Dashcam sean seguras. • Introduzca la Dashcam en el soporte (14) del soporte de ventosa. • Saque la Dashcam del soporte moviéndola con cuidado de un lado al otro. 7. Funcionamiento 7.1. Conexión con la red de a bordo del vehículo Aviso – Batería • Utilice sólo cargadores adecuados con puertos USB para la carga. • No siga utilizando cargadores o puertos USB defectuosos y no intente repararlos. • No sobrecargue ni descargue totalmente el producto. • Evite almacenar, cargar y utilizar el despertador a temperaturas extremas y con presiones de aire exageradamente bajas (p. ej. bajas temperaturas). • En caso de almacenamiento prolongado, cargue regularmente (mín. trimestralmente). 48 • Conecte el cable de carga MiniUSB suministrado a la hembrilla de carga MiniUSB (11) de la Dashcam y a la toma de corriente de la red de a bordo del vehículo. • La Dashcam se enciende automáticamente tras arrancar el motor. • El LED de estado (12) luce permanentemente azul. Nota - Capacidad de la pila recargable La pila recargable tiene una autonomía limitada a aprox. 2-3 minutos. Esta función de memoria intermedia se utiliza, por ejemplo, para que no se interrumpa la hora. Un funcionamiento más largo es posible sólo con el adaptador para vehículos. Nota - Funcionamiento permanente con pila recargable El dispositivo no se ha previsto para el funcionamiento permanente con pila recargable. El funcionamiento permanente con pila recargable puede provocar daños irreparables. 7.2. Encender/Apagar Nota - Encendido/apagado automático Si la Dashcam está conectada a una fuente de alimentación mediante el cargador para vehículo, se encenderá y apagará automáticamente cuando se arranque o apague el vehículo. Nota - Batería del vehículo En algunos vehículos puede ocurrir que la alimentación de corriente siga activa a pesar de que el encendido esté desconectado. En este caso, apague la cámara manualmente para evitar que la batería del coche se descargue. Pulse y mantenga pulsada la tecla Power [ manualmente la Dashcam. ] (10) durante aprox. 3 segundos para encender/apagar 7.3. Utilizar la tarjeta MicroSD • Inserte una tarjeta MicroSD en la ranura para tarjetas MicroSD (2) de la Dashcam. • En la pantalla se visualiza . Nota - Tarjeta de memoria llena En cuanto la memoria de la tarjeta MicroSD esté llena, se sobrescribirá la grabación de vídeo más antigua. 49 8. Modos 8.1 Modo de vídeo se visualiza en el • Después de encender la cámara, ésta se encuentra en el modo de vídeo. borde superior izquierdo de la pantalla. • La grabación de vídeo se inicia automáticamente al encender el aparato. • Pulse [OK] (7) para detener/ iniciar la grabación de vídeo. • Durante la grabación de vídeo, el tiempo de grabación se muestra en la parte superior izquierda de la pantalla. El LED de estado (12) luce alternando rojo y azul. Nota - Inicio automático de la grabación de vídeo Active, tal y como se describe en el capítulo 9.7 Vídeo automático, el modo Vídeo automático para que la grabación se inicie automáticamente después de encender la cámara. 8.2 Modo de fotografía • Active el modo de fotografía pulsando [MODE] (6) repetidas veces. superior izquierdo de la pantalla. • Pulse [OK] (7) para tomar una fotografía. se visualiza en el borde 8.3 Modo de reproducción • Active el modo de funcionamiento Reproducción pulsando repetidamente [MODE] (6). se visualiza en el borde inferior izquierdo de la pantalla. • Seleccione el archivo que desea reproducir con ayuda de las teclas de navegación [◄] (9) / [►] (5). • Pulse [MENU] (8) para más opciones. • Navegue por el menú con ayuda de las teclas de navegación [◄] (9) / [►] (5). • Seleccione la opción de menú Borrar y confirme su selección pulsando [OK] (7). • Puede elegir entre Borrar selección y Borrar todos. • Confirme la consulta de seguridad que sigue con OK o seleccione Cancelar para cancelar el proceso. • Pulse [MENU] (8) para tener acceso a más opciones para, alternativamente, llegar a la opción de menú Bloquear. • Seleccione la opción de menú Bloquear y confirme su selección pulsando [OK] (7). • Puede elegir entre Bloquear archivo, Bloquear todos, Desbloquear archivo y Desbloquear todos. • Confirme la consulta de seguridad que sigue con OK o seleccione Cancelar para cancelar el proceso. 50 9. Ajustes 9.1 Ajustes del modo de vídeo • • • • • Cambie al modo de vídeo siguiendo las indicaciones descritas en el capítulo 8.1 Modo de vídeo. Pulse [MENU] (8) para acceder a los ajustes de vídeo. En el borde superior izquierdo de la pantalla se visualiza . Navegue por el menú con ayuda de las teclas de navegación [◄] (9) / [►] (5). Confirme su selección pulsando [OK] (7). 9.1.1 Resolución Seleccione la resolución que desee (1280X720 / 1920X1080) del material de vídeo grabado. • Navegue a la opción de menú Resolución y confirme su selección pulsando [OK] (7). Se abre una nueva ventana de resumen. • Seleccione el ajuste que desee con ayuda de las teclas de navegación [◄] (9) / [►] (5). • Confirme su selección pulsando [OK] (7). 9.1.2 Marca de agua Con el modo activado, cada archivo de vídeo obtiene un sello de hora y fecha. • Navegue a la opción de menú Marca de agua y confirme su selección pulsando [OK] (7). Se abre una nueva ventana de resumen. • Seleccione el ajuste que desee con ayuda de las teclas de navegación [◄] (9) / [►] (5). • Confirme su selección pulsando [OK] (7). 9.1.3 Detección de movimiento Cuando la detección de movimientos está activada, la grabación de vídeo se inicia automáticamente cuando la cámara sufre sacudidas (p. ej., por un accidente). • Navegue a la opción de menú Detección de movimiento y confirme su selección pulsando [OK] (7). Se abre una nueva ventana de resumen. • Seleccione el ajuste que desee con ayuda de las teclas de navegación [◄] (9) / [►] (5). • Confirme su selección pulsando [OK] (7). • En la pantalla de vídeo se visualiza . 9.1.4 Función Loop Seleccione aquí el intervalo de tiempo (1/2/3/5 minutos) tras el cual se debe iniciar una nueva grabación de vídeo. Seleccione Off para desactivar esta función. Se crea un nuevo archivo. • Navegue a la opción de menú Función Loop y confirme su selección pulsando [OK] (7). Se abre una nueva ventana de resumen. • Seleccione el ajuste que desee con ayuda de las teclas de navegación [◄] (9) / [►] (5). 51 • Confirme su selección pulsando [OK] (7). • En la pantalla de vídeo se visualiza . 9.1.5 Grabación de audio Con el modo activado, además de grabar el material de vídeo se graba también el sonido. • Navegue a la opción de menú Grabación de audio y confirme su selección pulsando [OK] (7). Se abre una nueva ventana de resumen. • Seleccione el ajuste que desee con ayuda de las teclas de navegación [◄] (9) / [►] (5). • Confirme su selección pulsando [OK] (7). 9.1.6 Contraste Aumente la calidad de la grabación de vídeo ajustando el contraste (de -2 a +2). • Navegue a la opción de menú Contraste y confirme su selección pulsando [OK] (7). Se abre una nueva ventana de resumen. • Seleccione el ajuste que desee con ayuda de las teclas de navegación [◄] (9) / [►] (5). • Confirme su selección pulsando [OK] (7). 9.2 Ajustes del modo de fotografía • Cambie al modo de fotografía siguiendo las indicaciones descritas en el capítulo 8.2 Modo de fotografía. • • Pulse [MENU] (8) para acceder a los ajustes de fotografía. • En el borde superior izquierdo de la pantalla se visualiza . • Navegue por el menú con ayuda de las teclas de navegación [◄] (9) / [►] (5). • Confirme su selección pulsando [OK] (7). 9.2.1 Resolución Seleccione la resolución que desee (VGA - 12 megapíxeles) del material de vídeo grabado. • Navegue a la opción de menú Resolución y confirme su selección pulsando [OK] (7). Se abre una nueva ventana de resumen. • Seleccione el ajuste que desee con ayuda de las teclas de navegación [◄] (9) / [►] (5). • Confirme su selección pulsando [OK] (7). 9.2.2 Visor de imágenes Si el visor de imágenes está activado, en la pantalla se mostrarán brevemente (de 2 a 5 segundos) las capturas realizadas. Solo podrá hacer una nueva fotografía en cuanto haya transcurrido ese tiempo. Seleccione Off para desactivar esta función. • Navegue a la opción de menú Visor de imágenes y confirme su selección pulsando [OK] (7). Se abre una nueva ventana de resumen. • Seleccione el ajuste que desee con ayuda de las teclas de navegación [◄] (9) / [►] (5). 52 • Confirme su selección pulsando [OK] (7). 9.2.3 Marca de agua Con el modo activado, cada archivo de fotografía cuenta con un registro de hora y fecha. • Navegue a la opción de menú Marca de agua y confirme su selección pulsando [OK] (7). Se abre una nueva ventana de resumen. • Seleccione el ajuste que desee con ayuda de las teclas de navegación [◄] (9) / [►] (5). • Confirme su selección pulsando [OK] (7). 9.2.4 Contraste Aumente la calidad de las fotografías ajustando el contraste (de -2 a +2). • Navegue a la opción de menú Contraste y confirme su selección pulsando [OK] (7). Se abre una nueva ventana de resumen. • Seleccione el ajuste que desee con ayuda de las teclas de navegación [◄] (9) / [►] (5). • Confirme su selección pulsando [OK] (7). 9.3 Ajustes generales • Pulse dos veces [MENU] (8) para acceder la menú de ajustes de la cámara. • De forma alternativa, pulse una vez [MENU] (8) si ya se encuentra en el menú Vídeo/Foto. • En el borde superior izquierdo de la pantalla se visualiza . • Navegue por el menú con ayuda de las teclas de navegación [◄] (9) / [►] (5). • Confirme su selección pulsando [OK] (7). 9.3.1 Formatear tarjeta de memoria Borre todos los archivos que se encuentran en la tarjeta de memoria insertada. • Navegue a la opción de menú Formatear tarjeta de memoria y confirme su selección pulsando [OK] (7). Se abre una nueva ventana de resumen. • Confirme el formateado con OK o seleccione Cancelar para cancelar el proceso. 9.3.2 Idioma Seleccione el idioma de la guía de menú. • Navegue a la opción de menú Idioma y confirme su selección pulsando [OK] (7). Se abre una nueva ventana de resumen. • Seleccione el ajuste que desee con ayuda de las teclas de navegación [◄] (9) / [►] (5). • Confirme su selección pulsando [OK] (7). 9.3.3 Apagado en caso de inactividad Seleccione el intervalo de tiempo (1 minuto / 3 minutos) tras el cual la cámara se apaga automáticamente si no se utiliza. Seleccione Off para desactivar esta función. 53 • Navegue a la opción de menú Apagado en caso de inactividad y confirme su selección pulsando [OK] (7). Se abre una nueva ventana de resumen. • Seleccione el ajuste que desee con ayuda de las teclas de navegación [◄] (9) / [►] (5). • Confirme su selección pulsando [OK] (7). 9.3.4 Salvapantallas Seleccione el intervalo de tiempo (1 minuto / 3 minutos / 5 minutos ) tras el cual se activa el salvapantallas. Si durante este tiempo no pulsa ninguna tecla, la pantalla se apaga. La grabación de vídeo, sin embargo, continúa. Seleccione Off para desactivar esta función. • Navegue a la opción de menú Salvapantallas y confirme su selección pulsando [OK] (7). Se abre una nueva ventana de resumen. • Seleccione el ajuste que desee con ayuda de las teclas de navegación [◄] (9) / [►] (5). • Confirme su selección pulsando [OK] (7). 9.3.5 Formatear tarjeta de memoria Borre todos los archivos que se encuentran en la tarjeta de memoria insertada. • Navegue a la opción de menú Formatear tarjeta de memoria y confirme su selección pulsando [OK] (7). Se abre una nueva ventana de resumen. • Confirme el restablecimiento con OK o seleccione Cancelar para cancelar el proceso. 9.3.6 Fecha/Hora • Navegue a la opción de menú Fecha/Hora y confirme su selección pulsando [OK] (7). Se abre una nueva ventana de resumen. • Ajuste el año con ayuda de las teclas de navegación [◄] (9) / [►] (5) y confirme su entrada pulsando [OK] (7). • Ajuste seguidamente las siguientes informaciones procediendo de forma análoga: mes, día, hora. • Confirme su selección pulsando [MENU] (8). 9.3.7 Versión • Navegue a la opción de menú Versión y confirme su selección pulsando [OK] (7). Se abre una nueva ventana de resumen. • Se muestra la versión actual de la cámara. 54 10. Consulta del material grabado Nota No retire la tarjeta MicroSD con la Dashcam encendida. Esto puede provocar una pérdida de datos o daños en el dispositivo. • Apague la Dashcam tal y como se describe en 7.2 Encender/Apagar. • Retire la tarjeta MicroSD de la cámara. • Conecte la tarjeta MicroSD a su PC mediante el lector de tarjetas SD (volumen de suministro). Transmita los datos guardados a su PC para liberar espacio de memoria en la tarjeta. 11. Tecla de guardar Nota Recuerde que en caso de accidente, la prestación de primeros auxilios y la seguridad de todos los implicados tienen prioridad. Para asegurarse de que sus datos se guardan de forma permanente, proceda del siguiente modo: • Pulse la tecla de guardar (13). En la pantalla aparece . • Pulse y mantenga pulsada la tecla Power [ ] (10) durante aprox. 3 segundos para apagar la cámara. • Retire ahora la tarjeta MicroSD de la cámara. Nota • Los vídeos guardados después de pulsar la tecla de guardar se guardan con el nombre «LOKXXXXX». • Los archivos de vídeo regulares se guardan bajo el nombre «REC» y un número correlativo. 12. Ajustes de fábrica Para restablecer la Dashcam a los justes de fábrica (en el momento del suministro), proceda según se indica a continuación: • Apague la Dashcam tal y como se describe en 7.2 Encender/Apagar. • Pulse y mantenga pulsada [Reset] (4) con ayuda de un objeto agudo durante aprox. 3 segundos. • Alternativamente, puede restablecer los ajustes de fábrica tal y como se describe en el capítulo 9.3.5 Formatear tarjeta de memoria. • Todos los ajustes realizados se borran. 55 Nota • Algunos problemas y fallos en el funcionamiento pueden solucionarse restableciendo los ajustes de fábrica. • Sin embargo, todos los ajustes previos (hora, horas de alarma, etc.) se borran de forma definitiva. 13. Mantenimiento y cuidado • Limpie este producto sólo con un paño ligeramente humedecido que no deje pelusas y no utilice detergentes agresivos. • Asegúrese de que no entre agua en el producto. 14. Exclusión de responsabilidad Hama GmbH & Co KG no se responsabiliza ni concede garantía por los daños que surjan por una instalación, montaje o manejo incorrectos del producto o por la no observación de las instrucciones de manejo y/o de las instrucciones de seguridad. 15. Datos técnicos Dimensiones 89 x 48 x 35 mm Diagonal de pantalla 2.4" Resolución máx. Foto: 12 megapíxeles | Vídeo: 1080i Formato de datos Foto: JPEG | Vídeo: AVI Tarjeta de memoria Soporta tarjetas de memoria MicroSD hasta 32 GB Alimentación de corriente Input: 12 V-24 V Batería Input: 5 V 290 mA; Tipo: 3,7 V / LiPo; Min. capacidad: 130 mAh / 0,48 Wh 56 0,5A; Output: 5 V ; 1A; longitud del cable: 2 m N Gebruiksaanwijzing Bedieningselementen en weergaven A 1. Zuigkophoudersysteem 2. Micro-SD-kaartsleuf 3. Microfoon/luidspreker B 4. 5. 6. 7. 8. 9. 10. C 11. Mini-USB-laadcontact 12. Statusledje 13. Veiligstellingstoets D 14. Houder dashcam 15. Vergrendelingshendel Reset Navigatietoets ► Modus OK Menu Navigatietoets ◄ Power Videomodus - Pictogramoverzicht Videomodus Tijdsduur lus Dagmodus Nachtmodus Bewegingsmodus Videokwaliteit Geheugenkaart herkend 57 Geheugenkaart niet herkend Batterijweergave Video-opname loopt Video veiliggesteld 00.00.00 Videoduur Fotomodus - Pictogramoverzicht Fotomodus Dagmodus Nachtmodus 12M-VGA Resolutie Geheugenkaart herkend Geheugenkaart niet herkend Batterijweergave Afspeelmodus - Pictogramoverzicht Video loopt Video gepauzeerd Video veiliggesteld 58 Geheugenkaart herkend Geheugenkaart niet herkend Batterijweergave Hartelijk dank dat u voor een product van Hama heeft gekozen. Neem de tijd om de volgende aanwijzingen en instructies volledig door te lezen. Berg deze gebruiksaanwijzing vervolgens op een goede plek op zodat u hem als naslagwerk kunt gebruiken. Mocht u het toestel verkopen, geeft u dan ook deze gebruiksaanwijzing aan de nieuwe eigenaar. 1. Verklaring van waarschuwingssymbolen en instructies Gevaar voor een elektrische schok Dit symbool duidt op gevaar bij aanraking van niet-geïsoleerde onderdelen van het product, welke mogelijk onder een zodanig gevaarlijke spanning staan, dat het gevaar voor een elektrische schok aanwezig is. Waarschuwing Wordt gebruikt voor veiligheidsinstructies of om de aandacht te trekken op bijzondere gevaren en risico‘s. Aanwijzing Wordt gebruikt voor extra informatie of belangrijke informatie. 2. • • • • • Inhoud van de verpakking Dashcam 30 Mini-USB-autolader Zuignaphouder Micro-SD-kaartlezer Deze gebruiksaanwijzing 59 3. Veiligheidsinstructies • Het product is bedoeld voor niet-commercieel privegebruik in huiselijke kring. • Gebruik het product uitsluitend voor het doel waarvoor het gemaakt is. • Bescherm het product tegen vuil, vocht en oververhitting en gebruik het alleen in droge omgevingen. • Laat het product niet vallen en stel het niet bloot aan zware schokken of stoten. • Gebruik het product niet buiten de in de technische gegevens vermelde vermogensgrenzen. • De kabel niet knikken of inklemmen. • De accu is vast ingebouwd en kan niet worden verwijderd, voer het product derhalve als één geheel af overeenkomstig de wettelijke voorschriften. • Open het product niet en gebruik het niet meer als het beschadigd is. • Elektrische apparaten dienen buiten het bereik van kinderen gehouden te worden! • Let erop dat bij gebruikmaking van het product de in het wegverkeer geldende lokale voorschriften van het wegenverkeersreglement m.b.t. technische eisen en rijvaardigheidseisen gelden. • Let erop dat geen componenten, zoals de airbag, andere veiligheidsvoorzieningen, bedieningselementen, instrumenten, enz., of het vrije zicht, bedekt of beperkt zijn. • Laat u in een motorvoertuig niet door uw product afleiden en let op de verkeerssituatie en uw omgeving. • Controleer voorafgaande aan elke rit de veilige installatie van het product. • Het verpakkingsmateriaal direct en overeenkomstig de lokaal geldende afvoervoorschriften afvoeren. • Verander niets aan het toestel. Daardoor vervalt elke aanspraak op garantie. • Gooi de accu resp. het product niet in het vuur. • De accu‘s/batterijen niet wijzigen en/of vervormen/verhitten/demonteren. Gevaar voor een elektrische schok • Open het product niet en gebruik het niet meer als het beschadigd is. • Gebruik het product niet indien de oplaadkabel of de voedingskabel is beschadigd. • Probeer niet het product zelf te onderhouden of te repareren. Laat onderhouds- en reparatiewerkzaamheden door vakpersoneel uitvoeren. 4. Wettelijke voorschriften/beperkingen bij de werking van dashcams Aanwijzing • Houdt u er rekening mee dat aanwijzingen inzake de wettelijke regelingen in deze informatie uitsluitend de Duitse voorschriften en wetten op het tijdstip van het ter perse gaan vertegenwoordigen. Informeer u in andere landen vóór het gebruik van het product over de aldaar geldende regelingen! 60 Aanwijzing • Houd er rekening mee dat bij gebruik van het product in het wegverkeer, afhankelijk van de wetgeving in een land, verschillende voorschriften kunnen gelden. • In sommige rechterlijke uitspraken is het gebruik van dashcams afzonderlijk geregeld, resp. verboden. Informeer uzelf voordat u de dashcam gaat gebruiken over de wet- en regelgeving. • Neem voor het installeren en het gebruik van het product de geldende voorschriften inzake de gegevensbescherming in acht. • Neem de geldende voorschriften voor het opnemen en opslaan van video- en beeldbestanden in acht. 5. Beoogd gebruik • Dit product is uitsluitend bestemd voor het gebruik in voertuigen. • Respecteer de privacy en eigendomsrechten van anderen. Maak met de dashcam geen opnames van andere personen. • Neem bij opnames het recht op het eigen beeld en gesproken woord in acht. • Verwijder het product als het gedurende langere tijd niet wordt gebruikt van de voorruit om schade door zonlicht en temperatuur te voorkomen. 6. Inbedrijfstellen Waarschuwing - Risico op letsel • Let erop dat bij gebruikmaking van het product de in het wegverkeer geldende lokale voorschriften van het wegenverkeersreglement m.b.t. technische eisen en rijvaardigheidseisen gelden. • Let erop dat geen componenten, zoals de airbag, andere veiligheidsvoorzieningen, bedieningselementen, instrumenten, enz., of het vrije zicht, bedekt of beperkt zijn. • Laat u in een motorvoertuig niet door uw product afleiden en let op de verkeerssituatie en uw omgeving. Aanwijzing • Controleer vóór de montage van de houder de inbouwmogelijkheden in uw voertuig. In twijfelgevallen kunt u het instructieboekje van het voertuig nalezen of contact opnemen met de fabrikant van het voertuig. • Tijdens de omgang met en bij de montage van het product nimmer geweld of grote krachten aanwenden. • Controleer voorafgaande aan elke rit de veilige installatie van het product. 61 6.1 Montage zuignaphouder • Verwijder de beschermfolie van de zuignap. • Open de vergrendelingshendel (15) van de zuignap. • Positioneer de houder met de zuignap op een schoongemaakt, vlak montageoppervlak (bijv. ruit). • Druk de houder op het gewenste montageoppervlak lichtjes aan en sluit de vergrendelingshendel (15) teneinde de houder te bevestigen. • Controleer na de montage altijd of de zuignap goed vastzit. • Teneinde de zuignap weer van het montageoppervlak los te maken, opent u de vergrendelingshendel. Trek vervolgens zacht aan de lip, teneinde de zuignap geheel los te maken. 6.2 Hoek en hellingshoek instellen De houder kan traploos in hoek en helling t.o.v. de gebruiker worden versteld door middel van een kogelkop. • Verstel de hoek en hellingshoek altijd zonder een geplaatst eindtoestel. • Draai voor het verstellen de klembout van het kogelscharnier een beetje los. • Stel de hoek en hellingshoek zoals gewenst in en draai de klembout weer vast. 6.3 Dashcam plaatsen/verwijderen Aanwijzing Controleer altijd of de zuignaphouder goed is bevestigd en of de dashcam goed vastzit. • Schieben Sie die Dashcam in die Halterung (14) des Saugnapfhalters. • Ziehen Sie die Dashcam durch vorsichtiges Hin- und Herbewegen aus der Halterung heraus. 7. Gebruik 7.1. Aansluiting op het elektrische systeem van de auto Waarschuwing – Batterij • Gebruik alleen geschikte laadapparatuur of USB-aansluitingen voor het opladen. • Gebruik defecte laadapparatuur of USB-aansluitingen principieel niet meer en probeer ze niet te repareren. • Het op te laden product niet overladen of diepontladen. • Vermijd opslag, opladen en gebruik bij extreme temperaturen en extreem lage luchtdruk (bijv. op grote hoogte). • Indien de accu’s gedurende langere tijd worden opgeborgen, dan dienen ze ten minste regelmatig (min. om die 3 maanden) te worden opgeladen. 62 • Sluit de meegeleverde Mini-USB-oplaadkabel aan op het Mini-USB-laadcontact (11) van de dashcam en de elektrische aansluiting van de auto. • De dashcam schakelt zichzelf automatisch in na het starten van de motor. • Het statusledje (12) brandt continu blauw. Aanwijzing - Batterijcapaciteit De batterij beschikt over een beperkte looptijd van ca. 2-3 minuten. Deze bufferfunctie wordt bijvoorbeeld gebruikt voor de continue voortzetting van de kloktijd. Langer gebruik is alleen mogelijk met aangesloten auto-adapter. Aanwijzing - Continue werking op batterij Het apparaat is niet bestemd voor continu gebruik met een accu. Continu gebruik met een accu kan tot onherstelbare schade leiden. 7.2. In-/uitschakelen Aanwijzing - automatisch in-/uitschakelen Is de dashcam via de autolader op een stroombron aangesloten, dan wordt deze automatisch in- of uitgeschakeld wanneer de auto wordt gestart of uitgeschakeld. Aanwijzing - Auto-accu Bij sommige voertuigen kan het voorkomen dat de stroomvoorziening in stand blijft ondanks dat het contact is uitgeschakeld. Schakel in dit geval de camera handmatig uit om de accu van uw auto tegen leeglopen te beschermen. Houd Power [ te schakelen. ] (10) gedurende ongeveer 3 seconden ingedrukt om de dashcam handmatig in/uit 7.3. Micro-SD-kaart plaatsen • Steek een micro-SD-kaart in de micro-SD-kaartsleuf (2) van de dashcam. • Het display geeft weer. Aanwijzing - Geheugenkaart vol Zodra het geheugen van de micro-SD-kaart vol is, wordt de oudste video-opname overschreven. 63 8. Modi 8.1 Videomodus verschijnt linksboven in de • Nadat de camera is ingeschakeld, staat deze in de videomodus. schermrand. • De video-opname start automatisch wanneer het apparaat wordt ingeschakeld. • Druk op [OK] (7) om de video-opname te stoppen/starten. • Tijdens de video-opname wordt de opnameduur linksboven in het scherm weergegeven. Het statusledje (12) brandt afwisselend rood en blauw. Aanwijzing - Nachtmodus Druk tijdens de video-opname kortstondig op Power [ deactiveren. ] (10) om de nachtmodus te activeren/ 8.2 Fotomodus • Activeer de fotobedieningsmodus door herhaaldelijk op [MODE] (6) te drukken. linksboven in de schermrand. • Druk op [OK] (7) om een foto te maken. verschijnt 8.3 Afspeelmodus • Activeer de afspeelmodus door herhaaldelijk op [MODE] (6) te drukken. verschijnt linksonder in de schermrand. • Gebruik de navigatietoetsen [◄] (9) / [►] (5) om het bestand te selecteren dat u wilt afspelen. • Druk op [MENU] (8) voor meer opties. • Gebruik de navigatietoetsen [◄] (9) / [►] (5) om door het menu te navigeren. • Selecteer de menukeuze [Delete] en bevestig uw keuze door op [OK] (7) te drukken. • U kunt kiezen tussen [Delete selection] en [Delete all]. • Bevestig de volgende beveiligingsmelding met [OK] of selecteer [Cancel] om de bewerking te annuleren. • Druk op [MENU] (8) voor meer opties om op een alternatieve manier in de menukeuze [Lock] te komen. • Selecteer de menukeuze [Lock] en bevestig uw keuze door op [OK] (7) te drukken. • U kunt kiezen tussen [Lock file], [Lock all], [Unlock file] en [Unlock all]. • Bevestig de volgende beveiligingsmelding met [OK] of selecteer [Cancel] om de bewerking te annuleren. 64 9. Instellingen 9.1 Instellingen videomodus • Schakel zoals beschreven in paragraaf 8.1 Videomodus over naar de videomodus. • Druk op [MENU] (8) om naar de video-instellingen te gaan. weergegeven. • Linksboven in de schermrand wordt • Gebruik de navigatietoetsen [◄] (9) / [►] (5) om door het menu te navigeren. • Bevestig uw keuze door op [OK] (7) te drukken. 9.1.1 Resolutie Selecteer de gewenste resolutie (1280X720 / 1920X1080) van het opgenomen videomateriaal. • Navigeer naar de menukeuze [Resolution] en bevestig uw keuze door op [OK] (7) te drukken. Er wordt een nieuw overzichtsvenster geopend. • Selecteer met behulp van de navigatietoetsen [◄] (9) / [►] (5) de gewenste instelling. • Bevestig uw keuze door op [OK] (7) te drukken. 9.1.2 Watermerk Wanneer deze modus is geactiveerd, krijgt elk videobestand een tijd- en datumstempel. • Navigeer naar de menukeuze [Watermark] en bevestig uw keuze door op [OK] (7) te drukken. Er wordt een nieuw overzichtsvenster geopend. • Selecteer met behulp van de navigatietoetsen [◄] (9) / [►] (5) de gewenste instelling. • Bevestig uw keuze door op [OK] (7) te drukken. 9.1.3 Bewegingsdetectie Als de bewegingsdetectie is geactiveerd, wordt de video-opname automatisch gestart wanneer de camera een schok krijgt (bijv. bij een ongeval). • Navigeer naar de menukeuze [Motion] en bevestig uw keuze door op [OK] (7) te drukken. Er wordt een nieuw overzichtsvenster geopend. • Selecteer met behulp van de navigatietoetsen [◄] (9) / [►] (5) de gewenste instelling. • Bevestig uw keuze door op [OK] (7) te drukken. • Op de videodisplay wordt weergegeven. 9.1.4 Lus-functie • Selecteer het tijdsinterval (1/2/3/5 minutes), waarna een nieuwe video-opname moet worden gestart. • Selecteer [Off] om deze functie uit te schakelen. Er wordt nu slechts één bestand aangemaakt. • Navigeer naar de menukeuze [Loop] en bevestig uw keuze door op [OK] (7) te drukken. Er wordt een nieuw overzichtsvenster geopend. • Selecteer met behulp van de navigatietoetsen [◄] (9) / [►] (5) de gewenste instelling. 65 • Bevestig uw keuze door op [OK] (7) te drukken. • Op de videodisplay wordt weergegeven. 9.1.5 Audio-opname Als deze modus geactiveerd is, wordt naast het videomateriaal ook geluid opgenomen. • Navigeer naar de menukeuze [Audio] en bevestig uw keuze door op [OK] (7) te drukken. Er wordt een nieuw overzichtsvenster geopend. • Selecteer met behulp van de navigatietoetsen [◄] (9) / [►] (5) de gewenste instelling. • Bevestig uw keuze door op [OK] (7) te drukken. 9.1.6 Contrast Verhoog de kwaliteit van de video-opname door het contrast aan te passen (-2 t/m +2). • Navigeer naar de menukeuze [Contrast] en bevestig uw keuze door op [OK] (7) te drukken. Er wordt een nieuw overzichtsvenster geopend. • Selecteer met behulp van de navigatietoetsen [◄] (9) / [►] (5) de gewenste instelling. • Bevestig uw keuze door op [OK] (7) te drukken. 9.2 Instellingen fotomodus • Schakel over naar de fotomodus zoals beschreven in paragraaf 8.2 Fotomodus. • Druk op [MENU] (8) om naar de instellingen Foto te gaan. • Linksboven in de schermrand wordt weergegeven. • Gebruik de navigatietoetsen [◄] (9) / [►] (5) om door het menu te navigeren. • Bevestig uw keuze door op [OK] (7) te drukken. 9.2.1 Resolutie Selecteer de gewenste resolutie (VGA - 12 megapixels) van het opgenomen beeldmateriaal. • Navigeer naar de menukeuze [Resolution] en bevestig uw keuze door op [OK] (7) te drukken. Er wordt een nieuw overzichtsvenster geopend. • Selecteer met behulp van de navigatietoetsen [◄] (9) / [►] (5) de gewenste instelling. • Bevestig uw keuze door op [OK] (7) te drukken. 9.2.2 Fotoweergave Bij geactiveerde fotoweergave wordt de geselecteerde opname gedurende korte tijd (2/5 seconds) op het scherm weergegeven. Pas na afloop van deze tijd kan een nieuwe foto worden genomen. Selecteer [Off] om deze functie uit te schakelen. • Navigeer naar de menukeuze [Image display] en bevestig uw keuze door op [OK] (7) te drukken. Er wordt een nieuw overzichtsvenster geopend. • Selecteer met behulp van de navigatietoetsen [◄] (9) / [►] (5) de gewenste instelling. • Bevestig uw keuze door op [OK] (7) te drukken. 66 9.2.3 Watermerk Wanneer deze modus is ingeschakeld, krijgt elk fotobestand een tijd- en datumstempel. • Navigeer naar de menukeuze [Watermark] en bevestig uw keuze door op [OK] (7) te drukken. Er wordt een nieuw overzichtsvenster geopend. • Selecteer met behulp van de navigatietoetsen [◄] (9) / [►] (5) de gewenste instelling. • Bevestig uw keuze door op [OK] (7) te drukken. 9.2.4 Contrast Verhoog de kwaliteit van de genomen foto door aanpassing van het contrast (-2 t/m +2). • Navigeer naar de menukeuze [Contrast] en bevestig uw keuze door op [OK] (7) te drukken. Er wordt een nieuw overzichtsvenster geopend. • Selecteer met behulp van de navigatietoetsen [◄] (9) / [►] (5) de gewenste instelling. • Bevestig uw keuze door op [OK] (7) te drukken. 9.3 Algemene instellingen • Druk tweemaal op [MENU] (8) om het instelmenu van de camera te openen. • Als alternatief kunt u ook één keer op [MENU] (8) drukken als u zich al in het menu Video/foto bevindt. • Linksboven in de schermrand wordt weergegeven. • Gebruik de navigatietoetsen [◄] (9) / [►] (5) om door het menu te navigeren. • Bevestig uw keuze door op [OK] (7) te drukken. 9.3.1 Geheugenkaart formatteren Verwijder alle bestanden die zich op de geplaatste geheugenkaart bevinden. • Navigeer naar de menukeuze [Format memory card] en bevestig uw keuze door op [OK] (7) te drukken. Er wordt een nieuw overzichtsvenster geopend. • Bevestig de formattering met [OK] of selecteer [Cancel] om de bewerking te annuleren. 9.3.2 Taal Selecteer de taal van de menunavigatie. • Navigeer naar de menukeuze [Language] en bevestig uw keuze door op [OK] (7) te drukken. Er wordt een nieuw overzichtsvenster geopend. • Selecteer met behulp van de navigatietoetsen [◄] (9) / [►] (5) de gewenste instelling. • Bevestig uw keuze door op [OK] (7) te drukken. 9.3.3 Uit bij inactiviteit Selecteer het tijdsinterval (1 minute /3 minutes), waarna de camera automatisch wordt uitgeschakeld wanneer deze niet wordt gebruikt. 67 Selecteer [Off] om deze functie uit te schakelen. • Navigeer naar de menukeuze [Off following inactivity] en bevestig uw keuze door op [OK] (7) te drukken. Er wordt een nieuw overzichtsvenster geopend. • Selecteer met behulp van de navigatietoetsen [◄] (9) / [►] (5) de gewenste instelling. • Bevestig uw keuze door op [OK] (7) te drukken. 9.3.4 Schermbeveiliging Selecteer het tijdsinterval (1 minute / 3 minutes / 5 minutes), waarna de schermbeveiliging wordt geactiveerd. Als er gedurende deze tijd geen toets wordt ingedrukt, wordt het display uitgeschakeld. De video-opname loopt echter door. Selecteer [Off] om deze functie te deactiveren. • Navigeer naar de menukeuze [Screen saver] en bevestig uw keuze door op [OK] (7) te drukken. Er wordt een nieuw overzichtsvenster geopend. • Selecteer met behulp van de navigatietoetsen [◄] (9) / [►] (5) de gewenste instelling. • Bevestig uw keuze door op [OK] (7) te drukken. 9.3.5 Fabrieksinstellingen • Navigeer naar de menukeuze [Factory settings] en bevestig uw keuze door op [OK] (7) te drukken. Er wordt een nieuw overzichtsvenster geopend. • Bevestig de reset met [OK] of selecteer [Cancel] om het proces te annuleren. 9.3.6 Datum/tijd • Navigeer naar de menukeuze [Date/time] en bevestig uw keuze door op [OK] (7) te drukken. Er wordt een nieuw overzichtsvenster geopend. • Gebruik de navigatietoetsen [◄] (9) / [►] (5) om het jaar in te stellen en bevestig uw invoer door op [OK] (7) te drukken. • Stel vervolgens de volgende informatie achter elkaar in met gebruikmaking van dezelfde procedure: Maand, dag, tijd. • Bevestig uw keuze door op [MENU] (8) te drukken. 9.3.7 Versie • Navigeer naar de menukeuze [Version] en bevestig uw keuze door op [OK] (7) te drukken. Er wordt een nieuw overzichtsvenster geopend. • De actuele versie van de camera wordt weergegeven. 68 10. Opgenomen beeldmateriaal bekijken Aanwijzing Verwijder de micro-SD-kaart niet als de dashcam is ingeschakeld. Dit kan leiden tot verlies van gegevens of schade aan het apparaat. • • • • Schakel de dashcam uit zoals beschreven in 7.2 In-/uitschakelen. Haal de MicroSD-kaart uit de camera. Sluit de micro-SD-kaart aan op uw pc met behulp van de SD-kaartlezer (meegeleverd). Draag de opgeslagen gegevens over op uw pc om het geheugen te ontlasten. 11. Veiligstellingstoets Aanwijzing Denk eraan dat in het geval van een ongeval het verlenen van eerste hulp en de veiligheid van alle betrokkenen prioriteit heeft. Om ervoor te zorgen dat uw gegevens permanent worden opgeslagen, gaat u als volgt te werk: • Druk op de veiligstellingstoets (13). Het display geeft weer. • Houd Power [ ] (10) gedurende ongeveer 3 seconden ingedrukt om de camera uit te schakelen. • Verwijder nu de micro-SD-kaart uit de camera. Aanwijzing • Video's die na het indrukken van de veiligstellingstoets worden opgeslagen, worden opgeslagen met de aanduiding "LOKXXXXXXX". • Gewone videobestanden worden opgeslagen met de aanduiding "REC" en een volgnummer. 12. Fabrieksinstellingen Om de dashcam terug te zetten (resetten) naar de fabrieksinstellingen (leveringstoestand), gaat u als volgt te werk: • Schakel de dashcam uit zoals beschreven in 7.2 In-/uitschakelen. • Houd [Reset] (4) met een puntig voorwerp gedurende ongeveer 3 seconden ingedrukt. • Als alternatief kunt u de fabrieksinstellingen zoals beschreven in subparagraaf 9.3.5 Fabrieksinstellingen herstellen. • Al uw persoonlijke instellingen worden gewist. 69 Aanwijzing • Problemen en storingen kunnen mogelijk worden opgelost door naar de fabrieksinstellingen te resetten. • Hierbij worden echter alle eerder uitgevoerde instellingen onherroepelijk gewist. 13. Onderhoud en verzorging • Reinig dit product uitsluitend met een pluisvrije, licht vochtige doek en maak geen gebruik van agressieve reinigingsmiddelen. • Let erop dat er geen water in het product binnendringt. 14. Uitsluiting van garantie en aansprakelijkheid Hama GmbH & Co KG aanvaardt geen enkele aansprakelijkheid of garantieclaims voor schade of gevolgschade, welke door ondeskundige installatie, montage en ondeskundig gebruik van het product ontstaan of het resultaat zijn van het niet in acht nemen van de bedieningsinstructies en/of veiligheidsinstructies. 15. Technische specificaties Afmetingen 89 x 48 x 35 mm Beeldscherm-diagonaal: 2.4" Max. Resolutie Foto: 12 megapixel | video: 1080i Gegevensformaat Foto: JPEG | Video: AVI Geheugenkaart Ondersteunt micro-SD-geheugenkaarten tot 32 GB Stroomvoorziening Ingang: 12 V-24 V Batterij Ingang: 5 V 290 mA; type: 3,7 V / LiPo; min. capaciteit: 130 mAh / 0,48 Wh 70 0,5A; Uitgang: 5 V ; 1A ; kabellengte: 2m C Návod k použití Ovládací prvky a indikace A 1. Zařízení držák s přísavkou 2. Slot na karty micro SD 3. Mikrofon / reproduktor B 4. 5. 6. 7. 8. 9. 10. C 11. Nabíjecí zdířka mini USB 12. Stavová LED dioda 13. Zálohovací tlačítko D 14. Držák Dashcam 15. Blokovací páčka Reset Navigační tlačítko ► Mode OK Menu Navigační tlačítko ◄ Power Režim videa - Přehled symbolů Režim videa Doba trvání Loop Denní režim Noční režim Režim pohybu Kvalita videa Paměťová karta rozpoznána 71 Paměťová karta nebyla rozpoznána Indikátor baterie Nahrávání videa běží Zabezpečené video 00.00.00 Trvání videa Režim fotografie - Přehled symbolů Režim fotografie Denní režim Noční režim 12M-VGA Rozlišení obrazu Paměťová karta rozpoznána Paměťová karta nebyla rozpoznána Indikátor baterie Wiedergabemodus - Symbolübersicht Video se přehrává Video je pozastaveno Zabezpečené video 72 Paměťová karta rozpoznána Paměťová karta nebyla rozpoznána Indikátor baterie Děkujeme, že jste si vybrali výrobek Hama. Přečtěte si, prosím, všechny následující pokyny a informace. Uchovejte tento text pro případné budoucí použití. Pokud výrobek prodáte, předejte tento text novému majiteli. 1. Vysvětlení výstražných symbolů a pokynů Nebezpečí poranění elektrickým proudem Tento symbol upozorňuje na nebezpečí při dotyku neizolovaných částí produktu, které by mohly vést nebezpečné napětí o takové síle, že hrozí nebezpečí poranění elektrickým proudem. Upozornění Tento symbol označuje bezpečnostní upozornění, které poukazuje na určitá rizika a nebezpečí. Poznámka Tento symbol označuje dodatečné informace nebo důležité poznámky. 2. Obsah balení • Dashcam 30 • Nabíječka do motorových vozidel mini USB • Držák s přísavkou • Čtečka karet micro SD • Informace k používání 73 3. Bezpečnostní pokyny • Výrobek je určen pro soukromé, nevýdělečné použití. • Výrobek používejte výhradně ke stanovenému účelu. • Výrobek chraňte před znečištěním. Nepoužívejte ve vlhkém prostředí a zabraňte styku s vodou. Používejte pouze v suchých prostorách. • Výrobek chraňte před pádem a velkými otřesy. • Přístroj nepoužívejte mimo rozsah předepsaných hodnot v technických údajích. • Kabel nelámejte a nedeformujte. • Akumulátor je pevně instalován a nelze jej vyjmout. Výrobek likvidujte jako celek v souladu s platnými předpisy. • Výrobek neotvírejte a v případě poškození již dále nepoužívejte. • Výrobek nepatří do rukou dětem, stejně jako i všechny elektrické přístroje. • Při použití výrobku dodržujte platné předpisy a pravidla silničního provozu. • Dbejte na to, aby nebyly zakryty nebo omezeny žádné komponenty jako je airbag, bezpečnostní a ovládací prvky, zobrazovací přístroje apod., nebo výhled. • Při jízdě autem se nerozptylujte produktem a neodvracejte svou pozornost od dopravní situace a dění ve svém okolí. • Před každou jízdou zkontrolujte bezpečnou montáž produktu. • Vybité baterie bez odkladu vyměňte a zlikvidujte dle platných předpisů. • Výrobek žádným způsobem neupravujte, ztratíte tím nárok na záruku. • Baterii ani výrobek nevhazujte do ohně. • Nu modificați, deformați, încălziți sau dezmembra bateriile/acumulatoarele. Nebezpečí poranění elektrickým proudem • Výrobek neotvírejte a v případě poškození již dále nepoužívejte. • Výrobek nepoužívejte, pokud je nabíjecí kabel, kabel adaptéru nebo síťové vedení poškozeno. • Do výrobku samovolně nezasahujte a neopravujte ho. Veškeré úkony údržby přenechejte příslušnému odbornému personálu. 4. Zákonná ustanovení / omezení při provozu Dashcam Poznámka • Beachten Sie, dass Hinweise zu gesetzlichen Regelungen in diesen Hinweisen nur die deutschen Vorschriften und Gesetze zum Zeitpunkt der Drucklegung abbilden. Informieren Sie sich in anderen Staaten vor der Verwendung des Produktes über die dort geltenden Regelungen! • Respektujte, že použití produktu v silniční dopravě závisí na legislativě příslušné země, v které mohou platit různá nařízení. 74 Poznámka • V některých právních výrocích je použití Dashcam zvlášť upraveno, příp. zakázáno. Před použitím Dashcam se informujte o zákonech a směrnicích. • Před instalací a použitím produktu dbejte platných předpisů a ochrany dat. • Dodržujte platné předpisy, které se týkají pořizování a ukládání videosouborů a obrazových dat. 5. Použití k stanovenému účelu • Tento výrobek je určený pouze pro použití vozidlech. • Respektujte osobní a majetková práva jiných osob. Nepořizujte pomocí Dashcam nahrávky jiných osob. • Při nahrávání respektujte právo na vlastní podobiznu a mluvené slovo. • Pokud produkt delší dobu nepoužíváte, sejměte jej z čelního skla, aby nedošlo k jeho poškození slunečním zářením a teplotou. 6. Uvedení do provozu Upozornění - Nebezpečí poranění • Při použití výrobku dodržujte platné předpisy a pravidla silničního provozu. • Dbejte na to, aby nebyly zakryty nebo omezeny žádné komponenty jako je airbag, bezpečnostní a ovládací prvky, zobrazovací přístroje apod., nebo výhled. • Při jízdě autem neodvracejte svou pozornost od dopravní situace a dění ve svém okolí. Poznámka • Před montáží držáku zkontrolujte možnosti instalace ve svém vozidle. Pokud budete mít pochyby, podívejte se do návodu k použití vozidla nebo se obraťte na výrobce vozidla. • Při manipulaci s výrobkem nebo při montáži nikdy nepoužívejte násilí nebo velkou sílu. • Před každou jízdou zkontrolujte bezpečnou montáž produktu. 6.1 Montáž držáku s přísavkou • Odstraňte z přísavky ochrannou fólii. • Otevřete (15) blokovací páku přísavky. • Umístěte držák s přísavkou na vyčištěnou, rovnou plochu montáže (např. okno). • Lehce přitlačte držák na požadovanou plochu montáže a zavřete blokovací páku (15), tím držák upevníte. • Po instalaci vždy zkontrolujte bezpečné upevnění přísavky. • Pro uvolnění přísavky z plochy montáže otevřete blokovací páku. Popřípadě lehce zatáhněte za sponu, abyste přísavku zcela uvolnili. 75 6.2 Nastavení úhlu a sklonu Úhel a sklon držáku lze pomocí kulové hlavy plynule seřídit směrem k pozorovateli. • Úhel a sklon seřizujte vždy bez nasazeného koncového zařízení. • Pro seřízení uvolněte upínací šroub kulové hlavy. • Nastavte požadovaný úhel a sklon a upínací šroub pevně utáhněte. 6.3 Nasazení/vyjmutí Dashcam Poznámka Vždy zkontrolujte bezpečné usazení držáku s přísavkou i zařízení Dashcam. • Vložte Dashcam do držáku (14) s přísavkou. • Dashcam vytáhnete opatrným pohybem sem a tam z držáku. 7. Provoz 7.1. Spojení s palubní sítí vozidla Upozornění – baterie • Pro nabíjení používejte pouze vhodné nabíječky s přípojkami USB. • Vadné nabíječky nebo USB přípojky dále nepoužívejte a ani je nezkoušejte opravovat. • Výrobek nepřebíjejte ani ho zcela nevybíjejte. • Vyhněte se skladování, nabíjení a používání při extrémních teplotách a extrémně nízkém tlaku vzduchu (např. ve velkých výškách). • V případě delšího skladování výrobek pravidelně dobíjejte (nejméně každého čtvrt roku). • Zapojte přiložený nabíjecí kabel mini USB do nabíjecí zdířky mini USB (11) Dashcam a do zásuvky palubní sítě vozidla. • Dashcam se automaticky zapne po nastartování motoru. • Stavová LED dioda (12) se rozsvítí natrvalo modře. Poznámka - Kapacita baterie Baterie má omezenou dobu chodu cca 2–3 minuty. Tato zálohovací funkce slouží např. ke kontinuálnímu pokračování času. Delší provoz je možný pouze s připojeným adaptérem vozidla. Poznámka - trvalý provoz z baterie Přístroj není určen pro trvalý provoz z baterie. Trvalý provoz z baterie může způsobit neopravitelná poškození. 76 7.2. Zapnutí / vypnutí Poznámka - automatické zapnutí a vypnutí Pokud je kamera Dashcam prostřednictvím nabíječky vozidla připojena k zdroji proudu, při nastartovaní a vypnutí motoru se automaticky zapne a vypne. Poznámka - autobaterie U některých vozidel může dojít k tomu, že bude proud přiváděn i při vypnutém zapalování. V tomto případě vypněte kameru manuálně, aby nedošlo k vybití baterie. Stisknutím a podržením tlačítka Power [ Dashcam. ] (10) na cca 3 sekundy manuálně zapnete/vypnete 7.3. Vložení karty micro SD • Vložte kartu micro SD do slotu pro karty micro SD (2) kamery Dashcam. • Na displeji se zobrazí . Poznámka - plná paměťová karta Jakmile je paměť karty micro SD plná, nejstarší video záznamy se přepíší. 8. Režimy 8.1 Režim videa • Po zapnutí se kamera nachází v provozním režimu video. Na levém horním okraji obrazovky se zobrazí . • Nahrávání videa se spustí automaticky při zapnutí zařízení. • Stiskněte [OK] (7) pro zastavení / zahájení nahrávání videa. • Během nahrávání se na levém horním okraji obrazovky zobrazuje doba nahrávání. Stavová LED dioda (12) svítí střídavě červeně a modře. Poznámka - noční režim Během nahrávání krátce stiskněte Power [ ] (10) pro aktivaci/deaktivaci nočního režimu. 8.2 Režim fotografi • Opakovaným stisknutím tlačítka [MODE] (6) aktivujte provozní režim foto. Na levém horním okraji obrazovky se zobrazí . • Stiskněte [OK] (7) pro pořízení snímku. 77 8.3 Režim reprodukce • Opakovaným stisknutím tlačítka alternativně aktivujete [MODE] (6) provozní režim přehrávání. se zobrazí na levém spodním okraji obrazovky. • Pomocí navigačních tlačítek [◄] (9) / [►] vyberte soubor, který chcete zobrazit. • Stiskněte [MENU] (8) pro další možnosti. • Pomocí navigačních tlačítek [◄] (9) / [►] (5) se pohybujte v menu. • Vyberte bod menu Vymazání a potvrďte svůj výběr stisknutím [OK] (7). • Můžete zvolit Vymazání výběr nebo Vymazání vše. • Následující bezpečnostní otázku potvrďte stisknutím OK nebo zvolte Přerušit pro přerušení procesu. • Stiskněte [MENU] (8) pro další možnosti, abyste se alternativně dostali k bodu menu Blokování. • Vyberte bod menu Blokování a potvrďte svůj výběr stisknutím [OK] (7). • Můžete si vybrat Zamknout soubor, Zamknout vše, Odemknout soubor nebo Odemknout vše. • Následující bezpečnostní otázku potvrďte stisknutím OK nebo zvolte Zrušit pro přerušení procesu. 9. Nastavení 9.1 Nastavení režimu videa • Přejděte do režimu videa tak, jak je popsáno v kapitole 8.1 Režim videa. • Stiskněte [MENU] (8) pro přístup k nastavení videa. . • Na levém horním okraji obrazovky se zobrazí • Pomocí navigačních tlačítek [◄] (9) / [►] (5) se pohybujte v menu. • Volbu potvrďte stisknutím [OK] (7). 9.1.1 Rozlišení Zvolte požadované rozlišení (1280X720 / 1920X1080) pořízeného video materiálu. • Navigujte do bodu menu Rozlišení a potvrďte výběr stisknutím [OK] (7). Otevře se nové přehledové okno. • Pomocí navigačních tlačítek [◄] (9) / [►] (5) zvolte požadované nastavení. • Volbu potvrďte stisknutím [OK] (7). 9.1.2 Vodoznak Při tomto aktivovaném režimu obdrží každý videosoubor časové a datumové razítko. • Navigujte do bodu menu Vodoznak a potvrďte výběr stisknutím [OK] (7). Otevře se nové přehledové okno. • Pomocí navigačních tlačítek [◄] (9) / [►] (5) zvolte požadované nastavení. • Volbu potvrďte stisknutím [OK] (7). 9.1.3 Rozpoznání pohybu Při aktivovaném rozpoznávání pohybu se při otřesech kamery (např. nehoda) automaticky spustí nahrávání. 78 • Navigujte do bodu menu Rozpoznání pohybu a potvrďte výběr stisknutím [OK] (7). Otevře se nové přehledové okno. • Pomocí navigačních tlačítek [◄] (9) / [►] (5) zvolte požadované nastavení. • Volbu potvrďte stisknutím [OK] (7). . • Na displeji videa se zobrazí 9.1.4 Funkce Loop Zvolte požadovaný časový interval (1/2/3/5 minut), po jehož uplynutí se má zahájit nové nahrávání videa. Zvolte Vypnuto pro deaktivaci této funkce. Nyní bude pořízen pouze jeden soubor. • Navigujte do bodu menu Funkce Loop a potvrďte výběr stisknutím [OK] (7). Otevře se nové přehledové okno. • Pomocí navigačních tlačítek [◄] (9) / [►] (5) zvolte požadované nastavení. • Volbu potvrďte stisknutím [OK] (7). • Na displeji videa se zobrazí . 9.1.5 Pořízení audia Při tomto aktivovaném režimu je kromě videa zaznamenáván i zvuk. • Navigujte do bodu menu Pořízení audia a potvrďte výběr stisknutím [OK] (7). Otevře se nové přehledové okno. • Pomocí navigačních tlačítek [◄] (9) / [►] (5) zvolte požadované nastavení. • Volbu potvrďte stisknutím [OK] (7). 9.1.6 Kontrast Přizpůsobením kontrastu zvýšíte kvalitu videonahrávky (-2 až +2). • Navigujte do bodu menu Kontrast a potvrďte výběr stisknutím [OK] (7). Otevře se nové přehledové okno. • Pomocí navigačních tlačítek [◄] (9) / [►] (5) zvolte požadované nastavení. • Volbu potvrďte stisknutím [OK] (7). 9.2 Nastavení režimu fotografie • Přejděte do režimu fotografie tak, jak je popsáno v kapitole 8.2 Režim fotografie. • Stiskněte [MENU] (8) pro přístup k nastavení fotografování. • Na levém horním okraji obrazovky se zobrazí . • Pomocí navigačních tlačítek [◄] (9) / [►] (5) se pohybujte v menu. • Volbu potvrďte stisknutím [OK] (7). 79 9.2.1 Rozlišení Zvolte požadované rozlišení (VGA - 12 megapixelů) pořízeného obrazového materiálu. • Navigujte do bodu menu Rozlišení a potvrďte výběr stisknutím [OK] (7). Otevře se nové přehledové okno. • Pomocí navigačních tlačítek [◄] (9) / [►] (5) zvolte požadované nastavení. • Volbu potvrďte stisknutím [OK] (7). 9.2.2 Zobrazení snímku V případě aktivního zobrazení snímku se na displeji na krátkou dobu (2/5 sekund) zobrazí pořízený snímek. Teprve po uplynutí této doby lze pořídit další snímek. Pro deaktivaci této funkce zvolte Vypnuto. • Navigujte do bodu menu Zobrazení snímku a potvrďte výběr stisknutím [OK] (7). Otevře se nové přehledové okno. • Pomocí navigačních tlačítek [◄] (9) / [►] (5) zvolte požadované nastavení. • Volbu potvrďte stisknutím [OK] (7). 9.2.3 Vodoznak Při tomto aktivovaném režimu obdrží každá fotografie časové a datumové razítko. • Navigujte do bodu menu Vodoznak a potvrďte výběr stisknutím [OK] (7). Otevře se nové přehledové okno. • Pomocí navigačních tlačítek [◄] (9) / [►] (5) zvolte požadované nastavení. • Volbu potvrďte stisknutím [OK] (7). 9.2.4 Kontrast Přizpůsobením kontrastu zvýšíte kvalitu fotografie (-2 až +2). • Navigujte do bodu menu Kontrast a potvrďte výběr stisknutím [OK] (7). Otevře se nové přehledové okno. • Pomocí navigačních tlačítek [◄] (9) / [►] (5) zvolte požadované nastavení. • Volbu potvrďte stisknutím [OK] (7). 9.3 Všeobecná nastavení • Dvakrát stiskněte [MENU] (8) pro přístup k menu nastavení kamery. • Pokud jste již v menu video/foto, alternativně jednou stiskněte [MENU] (8). . • Na levém horním okraji obrazovky se zobrazí • Pomocí navigačních tlačítek [◄] (9) / [►] (5) se pohybujte v menu. • Volbu potvrďte stisknutím [OK] (7). 80 9.3.1 Formátování paměťové karty Smažte veškeré soubory, které se nacházejí na vložené paměťové kartě. • Navigujte do bodu menu Formátování paměťové karty a potvrďte výběr stisknutím [OK] (7). Otevře se nové přehledové okno. • Formátování potvrďte stisknutím OK nebo zvolte Přerušit pro přerušení procesu. 9.3.2 Jazyk Zvolte jazyk provádění menu. • Navigujte do bodu menu Jazyk a potvrďte výběr stisknutím [OK] (7). Otevře se nové přehledové okno. • Pomocí navigačních tlačítek [◄] (9) / [►] (5) zvolte požadované nastavení. • Volbu potvrďte stisknutím [OK] (7). 9.3.3 Vypnout při neaktivitě Zvolte časový interval (1 minuta / 3 minuty), po jehož uplynutí se kamera v případě nepoužívání automaticky vypne. Zvolte Vypnuto pro deaktivaci této funkce. • Navigujte do bodu menu Vypnout při neaktivitě a potvrďte výběr stisknutím [OK] (7). Otevře se nové přehledové okno. • Pomocí navigačních tlačítek [◄] (9) / [►] (5) zvolte požadované nastavení. • Volbu potvrďte stisknutím [OK] (7). 9.3.4 Spořič obrazovky Zvolte požadovaný časový interval (1 minuta / 3 minuty / 5 minut), po jehož uplynutí se má aktivovat spořič obrazovky. Jestliže po tuto dobu nestisknete žádné tlačítko, displej se vypne. Nahrávání videa však běží dále. Zvolte Vypnuto pro deaktivaci této funkce. • Navigujte do bodu menu Spořič obrazovky a potvrďte výběr stisknutím [OK] (7). Otevře se nové přehledové okno. • Pomocí navigačních tlačítek [◄] (9) / [►] (5) zvolte požadované nastavení. • Volbu potvrďte stisknutím [OK] (7). 9.3.5 Výrobní nastavení • Navigujte do bodu menu Výrobní nastavení a potvrďte výběr stisknutím [OK] (7). Otevře se nové přehledové okno. • Resetování potvrďte stisknutím OK nebo zvolte Přerušit pro přerušení procesu. 81 9.3.6 Datum/čas • Navigujte do bodu menu Datum/čas a potvrďte výběr stisknutím [OK] (7). Otevře se nové přehledové okno. • Pomocí navigačních tlačítek [◄] (9) / [►] (5) nastavte rok a potvrďte zadání stisknutím [OK] (7). • Poté nastavte následující informace jednu po druhé stejným postupem: měsíc, den, čas. • Volbu potvrďte stisknutím [MENU] (8). 9.3.7 Verze • Navigujte do bodu menu Verze a potvrďte výběr stisknutím [OK] (7). Otevře se nové přehledové okno. • Zobrazí se aktuální verze kamery. 10. Zobrazení nahraného materiálu Poznámka V případě zapnuté kamery Dashcam nevytahujte kartu micro SD. Mohlo by dojít ke ztrátě dat nebo poškození zařízení. • • • • Zapněte Dashcam tak, jak je popsáno v kapitole 7.2 Zapnutí/vypnutí. Vyjměte kartu micro SD z kamery. Vložte kartu micro SD do čtečky SD karet (součást balení) a připojte ji k Vašemu počítači. Přeneste uložená data na Váš PC, uvolníte tím paměť. 11. Zálohovací tlačítko Poznámka Upozorňujeme, že v případě nehody má prioritu poskytnutí první pomoci a zajištění bezpečnosti všech zúčastněných. Abyste měli jistotu, že jsou Vaše data trvale uložena, postupujte následovně: • Stiskněte zálohovací tlačítko (13). Na displeji se objeví . • Stisknutím a podržením tlačítka Power [ ] (10) na cca 3 sekundy kameru vypnete. • Nyní vyjměte kartu micro SD z kamery. Poznámka • Videa, která se uloží stisknutím zálohovacího tlačítka, budou uložena do paměti pod označením „LOKXXXXX“. • Pravidelné videosoubory budou ukládány pod označením „REC“ a pořadovým číslem. 82 12. Nastavení z výroby Pro reset kamery Dashcam na nastavení z výroby (stav při dodání) postupujte následujícím způsobem: • Zapněte Dashcam tak, jak je popsáno v kapitole 7.2 Zapnutí/vypnutí. • Stiskněte a podržte stisknuté tlačítko [Reset] (4) pomocí špičatého nástroje na cca 3 sekundy. • Alternativně můžete původní nastavení obnovit tak, jak je popsáno v kapitole 9.3.5 Výrobní nastavení. • Všechna provedená nastavení budou vymazána. Poznámka • Některé problémy a chybné funkce je možné odstranit vrácením nastavení na tovární hodnoty. • Nicméně všechny přednastavené hodnoty (čas, budík, apod.) budou trvale odstraněny. 13. Údržba a čištění • Tento výrobek čistěte pouze mírně navlhčeným hadříkem nepouštějícím vlákna a nepoužívejte agresivní čisticí prostředky. • Dbejte na to, aby se do výrobku nedostala voda. 14. Vyloučení záruky Hama GmbH & Co KG nepřebírá žádnou odpovědnost nebo záruku za škody vzniklé neodbornou instalací, montáží nebo neodborným použitím výrobku nebo nedodržováním návodu k použití a/nebo bezpečnostních pokynů. 15. Technické údaje Rozměry 89 x 48 x 35 mm Uhlopříčka obrazovky 2.4" Max. rozlišení Foto: 12 megapixelů | video: 1080i datový formát Foto: JPEG | Video: AVI Paměťová karta Podporuje paměťové karty micro SD do 32 GB Napájení Input: 12 V-24 V Baterie Input: 5 V 290 mA; typ: 3,7 V / LiPo; Min. kapacita: 130 mAh / 0,48 Wh 0,5A; Output: 5 V ; 1A; délka kabelu: 2 m 83 Q Návod na použitie Ovládacie prvky a indikácie A 1. Zariadenie prísavkového držiaka 2. Slot na microSD karty 3. Mikrofón/reproduktor B 4. 5. 6. 7. 8. 9. 10. C 11. Nabíjacia zdierka miniUSB 12. Stavová LED dióda 13. Poistné tlačidlo D 14. Držiak na kameru Dashcam 15. Blokovacia páka Resetovanie Navigačné tlačidlo ► Mode OK Menu Navigačné tlačidlo◄ Power Režim Video - Prehľad symbolov Režim Video Časový interval slučky (Loop) Denný režim Nočný režim Režim pohybu Kvalita videa Pamäťová karta rozpoznaná 84 Pamäťová karta nerozpoznaná Indikácia batérie Záznam videa beží Video bolo uložené 00.00.00 Dĺžka videa Režim Foto - Prehľad symbolov Režim Foto Denný režim Nočný režim 12M-VGA Rozlíšenie Pamäťová karta rozpoznaná Pamäťová karta nerozpoznaná Indikácia batérie Režim Prehrávanie - Prehľad symbolov Video je spustené Video bolo pozastavené Video bolo uložené 85 Pamäťová karta rozpoznaná Pamäťová karta nerozpoznaná Indikácia batérie Ďakujeme, že ste sa rozhodli pre výrobok Hama. Prečítajte si všetky nasledujúce pokyny a informácie. Uchovajte tento návod na použitie pre prípadné budúce použitie. Pokiaľ výrobok predáte, dajte tento návod novému majiteľovi. 1. Vysvetlenie výstražných symbolov a upozornení Nebezpečenstvo elektrického úderu Tento symbol upozorňuje na nebezpečenstvo dotyku neizolovaných častí výrobku, ktoré sú eventuálne pod tak vysokým nebezpečným napätím, že hrozí nebezpečenstvo elektrického úderu. Upozornenie Tento symbol označuje bezpečnostné upozornenie, ktoré poukazuje na určité riziká a nebezpečenstva. Poznámka Tento symbol označuje dodatočné informácie, alebo dôležité poznámky. 2. Obsah balenia • Dashcam 30 • Autonabíjačka miniUSB • Prísavkový držiak • Čítačka microSD kariet • Informácie na používanie 86 3. • • • • • • • • • • • • • • • • • Bezpečnostné upozornenia Tento výrobok je určený na súkromné použitie v domácnosti, nie je určený na komerčné použitie. Výrobok používajte výhradne na stanovený účel. Výrobok chráňte pred znečistením. Nepoužívajte vo vlhkom prostredí a zabráňte styku s vodou. Používajte iba v suchých priestoroch. Výrobok chráňte pred pádmi a veľkými otrasmi. Prístroj nepoužívajte mimo rozsahu predpísaných hodnôt v technických údajoch. Kábel nelámte a nedeformujte. Akumulátor je pevne nainštalovaný a nedá sa vybrať. Výrobok likvidujte ako celok v súlade s platnými predpismi. Výrobok neotvárajte a v prípade poškodenia ho ďalej nepoužívajte. Výrobok nepatrí do rúk deťom, rovnako ako všetky elektrické prístroje. Pri použití výrobku dodržiavajte platné predpisy a pravidlá cestnej premávky. Dbajte na to, aby neboli zakryté alebo obmedzené žiadne komponenty, ako je je airbag, bezpečnostné a ovládacie prvky, zobrazovacie prístroje a pod., alebo výhľad. Počas jazdy motorovým vozidlom sa nenechajte rozptyľovať vaším výrobkom a dbajte na dopravnú situáciu a okolité prostredie. Pred každou jazdou skontrolujte bezpečnú montáž výrobku. Obalový materiál zlikvidujte podľa platných predpisov o likvidácii. Výrobok žiadnym spôsobom neupravujte, stratíte tým nárok na záruku. Akumulátor, resp. výrobok nevhadzujte do ohňa. Na akumulátoroch/batériách nerobte žiadne zmeny a/ani ich nedeformujte/nezahrievajte/nerozoberajte. Nebezpečenstvo elektrického úderu • Výrobok neotvárajte a nepoužívajte ho ďalej, ak je poškodený. • Výrobok nepoužívajte, ak sú poškodené nabíjací kábel, adaptérový kábel alebo sieťové vedenie. • Nepokúšajte sa sami o údržbu ani opravu výrobku. Prenechajte akúkoľvek údržbu kompetentnému odbornému personálu. 4. Zákonné ustanovenia/obmedzenia pri prevádzke kamier Dashcam Poznámka • Upozorňujeme na to, že upozornenia vyplývajúce zo zákonných ustanovení uvedené v týchto pokynoch zohľadňujú iba nemecké predpisy a zákony platné v čase tlače. Pred použitím výrobku v iných štátoch sa informujte o miestnych ustanoveniach! • Upozorňujeme na to, že pri používaní výrobku v cestnej premávke môžu platiť v závislosti od právnych predpisov príslušnej krajiny rôzne ustanovenia. 87 Poznámka • V niektorých judikatúrach podlieha používanie kamier Dashcam osobitným ustanoveniam, resp. je zakázané. Pred použitím kamery Dashcam sa oboznámte so zákonmi a smernicami. • Pred inštaláciou a použitím výrobku dodržiavajte platné predpisy o ochrane osobných údajov. • Dodržiavajte platné predpisy týkajúce sa zaznamenávania a ukladania video súborov a obrazových súborov. 5. Používanie na určený účel • Tento výrobok je určený len na používanie vo vozidlách. • Rešpektujte osobné a vlastnícke práva iných osôb. Nerobte kamerou Dashcam záznamy iných osôb. • Pri zázname rešpektujte právo na vlastnú podobu a hovorené slovo. • V prípade dlhšieho nepoužívania odstráňte výrobok z čelného skla, aby ste predišli poškodeniam podmieneným slnečným žiarením a teplotou. 6. Uvedenie do prevádzky Upozornenie - nebezpečenstvo poranenia • Pri použití výrobku dodržiavajte platné predpisy a pravidlá cestnej premávky. • Dbajte na to, aby neboli zakryté alebo obmedzené žiadne komponenty, ako je je airbag, bezpečnostné a ovládacie prvky, zobrazovacie prístroje a pod., alebo výhľad. • Počas jazdy motorovým vozidlom sa nenechajte rozptyľovať výrobkom a dbajte na dopravnú situáciu a okolité prostredie. Poznámka • Pred montážou držiaka skontrolujte možnosti montáže vo svojom vozidle. V prípade pochybností si preštudujte návod na používanie vozidla alebo sa obráťte na výrobcu vozidla. • Pri manipulácii s výrobkom a montáži nikdy nepoužívajte násilie alebo veľkú silu. • Pred každou jazdou skontrolujte bezpečnú montáž výrobku. 6.1 Montáž prísavkového držiaka • Odstráňte z prísavky ochrannú fóliu. • Otvorte blokovaciu (15) páku prísavky. • Umiestnite držiak s prísavkou na vyčistenú, rovnú montážnu plochu (napr. sklo v aute). • Držiakupevnitejehomiernympritlačenímnapožadovanúmontážnuplochuazatvorenímblokovacejpáky (15). • Po montáži vždy skontrolujte bezpečné upevnenie prísavky. • Ak chcete prísavku znova uvoľniť z montážnej plochy, otvorte blokovaciu páku. V prípade potreby následne zľahka potiahnite za páku aby sa prísavka úplne uvoľnila. 88 6.2 Nastavenie uhla a sklonu Pomocou guľovej hlavy môžete plynulo prestavovať uhol náklonu držiaka k používateľovi. • Uhol sklonu prestavujte vždy bez vloženého koncového zariadenia. • Pre nastavenie uvoľnite upínaciu skrutku guľovej hlavy. • Nastavte požadovaný uhol sklonu a utiahnite upínaciu skrutku. 6.3 Vloženie/vybratie kamery Dashcam Poznámka Vždy skontrolujte bezpečné osadenie prísavkového držiaka a bezpečné uchytenie kamery Dashcam. • Zasuňte kameru Dashcam do uchytenia (14) prísavkového držiaka. • Kameru Dashcam vytiahnete z uchytenia opatrným pohybom sem a tam. 7. Prevádzka 7.1. Spojenie s palubnou sieťou Upozornenie – akumulátor • Na nabíjanie používajte iba vhodné nabíjačky s USB prípojkami. • Poškodené nabíjačky alebo USB prípojky ďalej nepoužívajte, ani sa ich nepokúšajte opraviť. • Zabráňte prebitiu alebo úplnému vybitiu výrobku. • Vyhýbajte sa skladovaniu, nabíjaniu a používaniu pri extrémnych teplotách a extrémne nízkom tlaku vzduchu (ako napr. vo veľkých výškach). • Pri dlhšom uskladnení zariadenie pravidelne dobíjajte (min. štvrťročne). • Spojte priložený nabíjací kábel miniUSB s nabíjacou zdierkou miniUSB (11) kamery Dashcam a autozásuvkou palubnej siete. • Po spustení motora sa kamera Dashcam automaticky zapne. • Indikátor stavu LED (12) svieti nepretržite namodro. Poznámka - kapacita akumulátora Akumulátor disponuje obmedzenou prevádzkovou dobou cca 2 – 3 minúty. Táto vyrovnávacia funkcia slúži napr. na kontinuálne pokračovanie času. Dlhšia prevádzka je možná len s pripojeným adaptérom na napájanie v aute. Poznámka - trvalé napájanie akumulátorom Prístroj nie je určený na trvalé napájanie akumulátorom. Trvalé napájanie akumulátorom môže spôsobiť nenapraviteľné škody. 89 7.2. Zapnutie/vypnutie Poznámka - automatické zapnutie/vypnutie Ak je kamera Dashcam prostredníctvom autonabíjačky spojená so zdrojom napájania, pri naštartovaní/vypnutí vozidla sa automaticky zapne/vypne. Poznámka - autobatéria U niektorých vozidiel môže dôjsť k tomu, že prívod prúdu zostane zachovaný napriek vypnutému zapaľovaniu. V takom prípade vypnite kameru manuálne, aby ste svoju autobatériu ochránili pred vybitím. Na manuálne zapnutie/vypnutie kamery Dashcam podržte stlačené tlačidlo Power [ cca 3 sekundy. ] (10) na 7.3. Vloženie karty microSD • Zasuňte microSD kartu do slotu na microSD karty (2) kamery Dashcam. • Na displeji sa zobrazí . Poznámka - pamäťová karta plná Hneď ako je pamäť microSD karty plná, prepíše sa najstarší videozáznam. 8. Režimy 8.1 Režim Video • Kamera sa po zapnutí nachádza v prevádzkovom režime Video. Na hornom ľavom okraji obrazovky sa zobrazí . • Nahrávanie videa sa po zapnutí zariadenia spustí automaticky. • Na zastavenie/spustenie videozáznamu stlačte tlačidlo [OK] (7). • Počas videozáznamu sa na hornom ľavom okraji obrazovky zobrazí doba trvania záznamu. Indikátor stavu LED (12) svieti striedavo načerveno a namodro. Poznámka - nočný režim Na aktivovanie/deaktivovanie nočného režimu stlačte počas videozáznamu krátko tlačidlo Power [ ] (10). 8.2 Režim Foto • Prevádzkový režim Foto aktivujete opakovaným stláčaním tlačidla [MODE] (6). Na hornom ľavom okraji obrazovky sa zobrazí . • Na nasnímanie obrazu stlačte tlačidlo [OK] (7). 90 8.3 Režim Prehrávanie • Aktivujte prevádzkový režim Prehrávanie opakovaným stláčaním tlačidla [MODE] (6). sa zobrazí na ľavom dolnom okraji obrazovky. • Pomocou navigačných tlačidiel [◄] (9) / [►] (5) zvoľte súbor, ktorý chcete prehrať. • Pre ďalšie možnosti stlačte tlačidlo [MENU] (8). • Pomocou navigačných tlačidiel [◄] (9) / [►] (5) zvoľte súbor, ktorý chcete prehrať. • Zvoľte položku menu Vymazať a výber potvrďte stlačením tlačidla [OK] (7). • Môžete si vybrať medzi Vymazať výber a Vymazať všetky. • Následnú bezpečnostnú otázku potvrďte stlačením tlačidla OK alebo zvoľte Zrušiť na zrušenie operácie. • Stlačením tlačidla [MENU] (8) získate ďalšie možnosti a prípadne prejdite na položku ponuky Zablokovať. • Zvoľte položku menu Zablokovať a výber potvrďte stlačením tlačidla [OK] (7). • Môžete si vybrať medzi Zamknúť súbor, Zamknúť všetky, Odomknúť súbor a Odomknúť všetky. • Následnú bezpečnostnú otázku potvrďte stlačením tlačidla OK alebo zvoľte Zrušiť na zrušenie operácie. 9. Nastavenia 9.1 Nastavenia režimu Video • Prejdite do režimu Video, ako je opísané v kapitole 8.1 Režim Video. • Na prechod na nastavenia videa stlačte tlačidlo [MENU] (8). • Na hornom ľavom okraji obrazovky sa zobrazí . • Pomocou navigačných tlačidiel [◄] (9) / [►] (5) prechádzajte cez položky menu. • Výber potvrďte stlačením tlačidla [OK] (7). 9.1.1 Rozlíšenie Zvoľte požadované rozlíšenie (1280X720 / 1920X1080) zaznamenávaného video materiálu. • Prejdite na položku menu Rozlíšenie a výber potvrďte stlačením tlačidla [OK] (7). Otvorí sa nové okno s prehľadom. • Pomocou navigačných tlačidiel [◄] (9) / [►] (5) zvoľte súbor, ktorý chcete prehrať. • Výber potvrďte stlačením tlačidla [OK] (7). 9.1.2 Vodoznak Ak je režim aktivovaný, označí sa každý video súbor časovou a dátumovou pečiatkou. • Prejdite na položku menu Vodoznak a výber potvrďte stlačením tlačidla [OK] (7). Otvorí sa nové okno s prehľadom. • Pomocou navigačných tlačidiel [◄] (9) / [►] (5) zvoľte súbor, ktorý chcete prehrať. • Výber potvrďte stlačením tlačidla [OK] (7). 91 9.1.3 Rozpoznanie pohybov Ak je aktivované rozpoznanie pohybu, videozáznam sa automaticky spustí pri otrasoch kamery (napr. nehoda). • Prejdite na položku menu Rozpoznanie pohybov a výber potvrďte stlačením tlačidla [OK] (7). Otvorí sa nové okno s prehľadom. • Pomocou navigačných tlačidiel [◄] (9) / [►] (5) zvoľte súbor, ktorý chcete prehrať. • Výber potvrďte stlačením tlačidla [OK] (7). • Na displeji režimu Video sa zobrazí . 9.1.4 Funkcia Loop Tu zvoľte časový interval (1/2/3/5 minút), po uplynutí ktorého má začať nový videozáznam. Ak chcete túto funkciu deaktivovať, zvoľte možnosť Vypnutý. Teraz sa vytvorí len jeden súbor. • Prejdite na položku menu Funkcia Loop a výber potvrďte stlačením tlačidla [OK] (7). Otvorí sa nové okno s prehľadom. • Pomocou navigačných tlačidiel [◄] (9) / [►] (5) zvoľte súbor, ktorý chcete prehrať. • Výber potvrďte stlačením tlačidla [OK] (7). • Na displeji režimu Video sa zobrazí . 9.1.5 Záznam zvuku Ak je režim aktivovaný, sníma sa okrem video materiálu aj zvuk. • Prejdite na položku menu Záznam zvuku a výber potvrďte stlačením tlačidla [OK] (7). Otvorí sa nové okno s prehľadom. • Pomocou navigačných tlačidiel [◄] (9) / [►] (5) zvoľte súbor, ktorý chcete prehrať. • Výber potvrďte stlačením tlačidla [OK] (7). 9.1.6 Kontrast Zvýšte kvalitu videozáznamu úpravou kontrastu (-2 až +2). • Prejdite na položku menu Kontrast a výber potvrďte stlačením tlačidla [OK] (7). Otvorí sa nové okno s prehľadom. • Pomocou navigačných tlačidiel [◄] (9) / [►] (5) zvoľte súbor, ktorý chcete prehrať. • Výber potvrďte stlačením tlačidla [OK] (7). 9.2 Nastavenia režimu Foto • Prejdite do režimu Foto, ako je opísané v kapitole 8.2 Režim Foto. • Na prechod na nastavenia fotografie stlačte tlačidlo [MENU] (8). • Na ľavom hornom okraji obrazovky sa zobrazí . • Pomocou navigačných tlačidiel [◄] (9) / [►] (5) prechádzajte cez položky menu. • Výber potvrďte stlačením tlačidla [OK] (7). 92 9.2.1 Rozlíšenie Zvoľte požadované rozlíšenie (VGA - 12 megapixelov) zaznamenávaného obrazového materiálu. • Prejdite na položku menu Rozlíšenie a výber potvrďte stlačením tlačidla [OK] (7). Otvorí sa nové okno s prehľadom. • Pomocou navigačných tlačidiel [◄] (9) / [►] (5) zvoľte súbor, ktorý chcete prehrať. • Výber potvrďte stlačením tlačidla [OK] (7). 9.2.2 Zobrazenie obrázkov Pri aktivovanom zobrazovaní snímok sa snímka zobrazí na displeji na krátky čas (2/5 sekúnd). Až po uplynutí tohto času môžete nasnímať novú fotografiu. Ak chcete túto funkciu deaktivovať, zvoľte možnosť Vypnutý. • Prejdite na položku menu Zobrazenie obrázkov a výber potvrďte stlačením tlačidla [OK] (7). Otvorí sa nové okno s prehľadom. • Pomocou navigačných tlačidiel [◄] (9) / [►] (5) zvoľte súbor, ktorý chcete prehrať. • Výber potvrďte stlačením tlačidla [OK] (7). 9.2.3 Vodoznak Ak je režim aktivovaný, označí sa každý foto súbor časovou a dátumovou pečiatkou. • Prejdite na položku menu Vodoznak a výber potvrďte stlačením tlačidla [OK] (7). Otvorí sa nové okno s prehľadom. • Pomocou navigačných tlačidiel [◄] (9) / [►] (5) zvoľte súbor, ktorý chcete prehrať. • Výber potvrďte stlačením tlačidla [OK] (7). 9.2.4 Kontrast Zvýšte kvalitu fotografickej snímky úpravou kontrastu (-2 až +2). • Prejdite na položku menu Kontrast a výber potvrďte stlačením tlačidla [OK] (7). Otvorí sa nové okno s prehľadom. • Pomocou navigačných tlačidiel [◄] (9) / [►] (5) zvoľte súbor, ktorý chcete prehrať. • Výber potvrďte stlačením tlačidla [OK] (7). 9.3 Všeobecné nastavenia • Dvojitým stlačením tlačidla [MENU] (8) prejdite do ponuky nastavení kamery. • Prípadne raz stlačte tlačidlo [MENU] (8), keď sa nachádzate v ponuke Video/Foto. • Na ľavom hornom okraji obrazovky sa zobrazí . • Pomocou navigačných tlačidiel [◄] (9) / [►] (5) prechádzajte cez položky menu. • Výber potvrďte stlačením tlačidla [OK] (7). 93 9.3.1 Formátovať pamäťovú kartu Zmažte všetky súbory, ktoré sa nachádzajú na vloženej pamäťovej karte. • Prejdite na položku menu Formátovať pamäťovú kartu a výber potvrďte stlačením tlačidla [OK] (7). Otvorí sa nové okno s prehľadom. • Formátovanie potvrďte stlačením tlačidla OK alebo zvoľte Zrušiť na zrušenie operácie. 9.3.2 Jazyk Vyberte jazyk navigácie v menu. • Prejdite na položku menu Jazyk a výber potvrďte stlačením tlačidla [OK] (7). Otvorí sa nové okno s prehľadom. • Pomocou navigačných tlačidiel [◄] (9) / [►] (5) zvoľte súbor, ktorý chcete prehrať. • Výber potvrďte stlačením tlačidla [OK] (7). 9.3.3 Vypnúť pri nečinnosti Tu zvoľte časový interval (1 minúta /3 minúty), po uplynutí ktorého sa kamera pri nepoužívaní automaticky vypne. Ak chcete túto funkciu deaktivovať, zvoľte možnosť Vypnutý. • Prejdite na položku menu Vypnúť pri nečinnosti a výber potvrďte stlačením tlačidla [OK] (7). Otvorí sa nové okno s prehľadom. • Pomocou navigačných tlačidiel [◄] (9) / [►] (5) zvoľte súbor, ktorý chcete prehrať. • Výber potvrďte stlačením tlačidla [OK] (7). 9.3.4 Šetrič obrazovky Zvoľte časový interval (1 minúta / 3 minúty / 5 minút), po uplynutí ktorého sa aktivuje šetrič obrazovky. Ak počas tejto doby nestlačíte žiadne tlačidlo, displej sa vypne. Videozáznam bude však pokračovať. Ak chcete túto funkciu deaktivovať, zvoľte možnosť Vypnutý. • Prejdite na položku menu Šetrič obrazovky a výber potvrďte stlačením tlačidla [OK] (7). Otvorí sa nové okno s prehľadom. • Pomocou navigačných tlačidiel [◄] (9) / [►] (5) zvoľte súbor, ktorý chcete prehrať. • Výber potvrďte stlačením tlačidla [OK] (7). 9.3.5 Továrenské nastavenia • Prejdite na položku menu Továrenské nastavenia a výber potvrďte stlačením tlačidla [OK] (7). Otvorí sa nové okno s prehľadom. • Resetovanie potvrďte stlačením tlačidla OK alebo zvoľte Zrušiť na zrušenie operácie. 94 9.3.6 Dátum/čas • Prejdite na položku menu Dátum/čas a výber potvrďte stlačením tlačidla [OK] (7). Otvorí sa nové okno s prehľadom. • Pomocou navigačných tlačidiel [◄] (9) / [►] (5) nastavte rok a zadanie potvrďte stlačením tlačidla [OK] (7). • Rovnakým spôsobom nastavte postupne nasledovné informácie: mesiac, deň, čas. • Výber potvrďte stlačením tlačidla [MENU] (8). 9.3.7 Verzia • Prejdite na položku menu Verzia a výber potvrďte stlačením tlačidla [OK] (7). Otvorí sa nové okno s prehľadom. • Zobrazí sa aktuálna verzia kamery. 10. Vyvolanie nasnímaného materiálu Poznámka Kartu microSD nevyberajte, ak je kamera Dashcam zapnutá. Môže to viesť k strate údajov, príp. k poškodeniu zariadenia. • • • • Vypnite kameru Dashcam – ako je opísané v časti 7.2 Zapnutie/vypnutie. Vyberte z kamery kartu microSD. Pripojte kartu microSD do počítača pomocou čítačky kariet SD (súčasť dodávky). Uložené dáta preneste do počítača, čím uvoľníte pamäť. 11. Poistné tlačidlo Poznámka Dbajte na to, aby v prípade nehody bolo prioritou poskytnutie prvej pomoci a bezpečnosť všetkých účastníkov. Aby ste zabezpečili, že údaje budú trvalo uložené, postupujte nasledovne: • Stlačte poistné tlačidlo (13). Na displeji sa zobrazí . • Ak chcete kameru vypnúť, podržte asi 3 sekundy stlačené tlačidlo Power [ • Teraz vyberte z kamery kartu microSD. ] (10). Poznámka • Videá, ktorá sa uložili po stlačení poistného tlačidla, sú označené „LOKXXXXX“. • Bežné video súbory sa ukladajú pod označením „REC“ a poradovým číslom. 95 12. Výrobné nastavenie Ak chcete na kamere Dashcam obnoviť výrobné nastavenie (stav pri dodávke), postupujte nasledovne: • Vypnite kameru Dashcam – ako je opísané v časti 7.2 Zapnutie/vypnutie. • Pomocou špicatého predmetu podržte na cca 3 sekundy stlačené tlačidlo [Reset] (4). • Alternatívne môžete obnoviť továrenské nastavenia, ako je opísané v kapitole 9.3.5 Továrenské nastavenia. • Všetky uskutočnené nastavenia sa vymažú. Poznámka • Niektoré problémy a chybné funkcie je možné odstrániť obnovením výrobných nastavení. • Všetky prednastavenia (čas, časy budenia atď.) sa tým však nenávratne vymažú. 13. Údržba a starostlivosť • Na čistenie tohto výrobku používajte len navlhčenú utierku, ktorá nepúšťa vlákna a nepoužívajte žiadne agresívne čistiace prostriedky. • Dbajte na to, aby do výrobku nevnikla voda. 14. Vylúčenie záruky Firma Hama GmbH & Co KG neručí/nezodpovedá za škody vyplývajúce z neodbornej inštalácie, montáže alebo neodborného používania výrobku alebo z nerešpektovania návodu na používanie a/ alebo bezpečnostných pokynov. 15. Technické údaje Rozmery 89 x 48 x 35 mm Uhlopříčka obrazovky 2.4" Max. rozlíšenie Foto: 12 megapixelov | Video: 1080i Dátový formát Foto: JPEG | Video: AVI Pamäťová karta Podporuje pamäťovú kartu microSD do 32 GB Napájanie Input: 12 V-24 V Batérie Input: 5 V 290 mA; Typ: 3,7 V / LiPo; min. kapacita: 130 mAh / 0,48 Wh 96 0,5A; Output: 5 V ; 1A; dĺžka kábla: 2 m O Manual de instruções Elementos de comando e indicadores A 1. Aplicação de suporte com ventosa 2. Ranhura para cartões micro SD 3. Microfone/coluna B 4. 5. 6. 7. 8. 9. 10. C 11. Tomada de carregamento MiniUSB 12. LED de estado 13. Botão de cópia de segurança D 14. Suporte de Dashcam 15. Alavanca de bloqueio Reset Botão de navegação ► Mode OK Menu Botão de navegação ◄ Power Modo de vídeo - Visão geral dos símbolos Modo de vídeo Duração do loop Modo Diurno Modo Noturno Modo Movimento Qualidade do vídeo Cartão de memória detetado 97 Cartão de memória não detetado Indicação do estado da bateria Gravação de vídeo em curso Vídeo protegido 00.00.00 Duração do vídeo Modo de fotografia - Visão geral dos símbolos Modo de fotografia Modo Diurno Modo Noturno 12M-VGA Resolução da imagem Cartão de memória detetado Cartão de memória não detetado Indicação do estado da bateria Modo de reprodução - Visão geral dos símbolos Vídeo em curso Vídeo em pausa Vídeo protegido 98 Cartão de memória detetado Cartão de memória não detetado Indicação do estado da bateria Agradecemos que se tenha decidido por este produto Hama! Antes de utilizar o produto, leia completamente estas indicações e informações. Guarde, depois, estas informações num local seguro para consultas futuras. Se transmitir o produto para um novo proprietário, entregue também as instruções de utilização. 1. Descrição dos símbolos de aviso e das notas Perigo de choque eléctrico Este símbolo remete para um perigo de toque de partes não isoladas do produto eventualmente condutoras de tensão perigosa que poderão representar um perigo de choque eléctrico. Aviso É utilizado para identificar informações de segurança ou chamar a atenção para perigos e riscos especiais. Nota É utilizado para identificar informações adicionais ou notas importantes. 2. Conteúdo da embalagem • Dashcam 30 • Carregador para automóvel MiniUSB • Suporte com ventosa • Leitor de cartões micro SD • Estas instruções de utilização 99 3. Indicações de segurança • O produto está previsto apenas para a utilização privada e não comercial. • Utilize o produto apenas para a finalidade prevista. • Proteja o produto contra sujidade, humidade e sobreaquecimento e utilize-o somente em ambientes secos. • Não deixe cair o produto nem o submeta a choques fortes. • Não utilize o produto fora dos limites de desempenho indicados nas especificações técnicas. • Não dobre nem esmague o cabo. • A bateria está instalada de forma fixa e não pode ser removida. Elimine o produto completo de acordo com a legislação em vigor. • Não abra o produto nem o utilize caso este esteja danificado. • Este aparelho não pode ser manuseado por crianças, tal como qualquer aparelho eléctrico! • Ao utilizar o produto, observe os regulamentos e a legislação nacionais em vigor para a circulação rodoviária. • Assegure-se de que airbags, áreas de segurança, elementos de comando, instrumentos, etc. não sejam tapados ou a área de visão seja afectada. • Não se distraia com o produto durante a condução do veículo e tenha sempre atenção ao trânsito e ao meio circundante. • Antes de iniciar a viagem, controle a montagem segura do produto. • Elimine imediatamente o material da embalagem em conformidade com as normas locais aplicáveis. • Não efectue modificações no aparelho. Perda dos direitos de garantia. • Não queime a bateria nem o produto. • Não altere nem deforme/aqueça/desmonte pilhas/baterias. Perigo de choque eléctrico • Não abra o produto, nem o continue a utilizar em caso de danos. • Não utilize o produto se o cabo de carregamento, o cabo adaptador ou o cabo de alimentação estiver danificado. • Não tente fazer qualquer manutenção ou reparação do produto. Qualquer trabalho de manutenção deve ser executado por técnicos especializados. 4. Regulamentos/restrições legais durante o funcionamento de Dashcams Nota • Tenha em consideração que as indicações sobre os regulamentos legais neste manual só representam as prescrições e leis alemãs na altura da impressão do manual. No caso de utilização noutros países, informese sobre os regulamentos válidos no respetivo país antes da utilização do produto! 100 Nota • Ao utilizar o produto no trânsito, tenha em atenção que podem ser aplicados regulamentos diferentes consoante a legislação de um país. • Em algumas jurisdições, a utilização de Dashcams é regulada por disposições específicas ou proibida. Antes de utilizar a Dashcam, informe-se sobre a legislação e diretivas aplicáveis. • Antes de instalar e utilizar o produto, observe as disposições da proteção de dados em vigor. • Observe as disposições aplicáveis relativas à gravação e armazenamento de ficheiros de vídeo e imagem. 5. Utilização correta • Este produto só está previsto para ser utilizado em veículos. • Respeite os direitos de propriedade e de privacidade de terceiros. Não realize gravações de outras pessoas com a Dashcam. • A realizar gravações, respeite o direito à imagem e à palavra falada. • Se não utilizar o produto durante um período de tempo prolongado, retire-o do para-brisas para evitar danos provocados pelo sol e pela temperatura. 6. Colocação em funcionamento Aviso - perigo de ferimentos • Ao utilizar o produto, observe os regulamentos e a legislação nacionais em vigor para a circulação rodoviária. • Assegure-se de que airbags, áreas de segurança, elementos de comando, instrumentos, etc. não sejam tapados ou a área de visão seja afectada. • Não se distraia com o produto durante a condução do veículo e tenha sempre atenção ao trânsito e ao meio circundante. Nota • Antes da montagem do suporte, verifique as possibilidades de montagem no seu veículo. Em caso de dúvida, consulte o manual de instruções do veículo ou contacte o fabricante do veículo. • Ao utilizar o produto ou montá-lo, nunca aplique força exagerada. • Antes de iniciar a viagem, controle a montagem segura do produto. 101 6.1 Montagem do suporte com ventosa • Remova a película de proteção na ventosa. • Abra a alavanca de bloqueio da ventosa (15). • Posicione o suporte com ventosa sobre uma superfície de montagem plana e limpa (por ex., vidro) • Pressione o suporte sobre a superfície de montagem pretendida e feche a alavanca de bloqueio (15) para fixar o suporte. • Após a montagem, verifique a fixação segura da ventosa. • Para voltar a soltar a ventosa da superfície de montagem, abra a alavanca de bloqueio. Em seguida, se aplicável, puxe ligeiramente a presilha para soltar totalmente a ventosa. 6.2 Ajustar o ângulo e a inclinação O ângulo e a inclinação do suporte podem ser ajustados continuamente através da cabeça esférica. • Ajuste o ângulo e a inclinação sempre sem o dispositivo colocado. • Para realizar o ajuste, solte o parafuso de aperto da cabeça esférica. • Ajuste o ângulo e a inclinação pretendida e aperte o parafuso de aperto. 6.3 Colocar/retirar a Dashcam Nota Verifique sempre a fixação segura do suporte com ventosa e o posicionamento seguro da Dashcam. • Introduza a Dashcam no retentor (14) do suporte com ventosa. • Retire a Dashcam do suporte deslocando-a com cuidado para a frente e para trás. 7. Funcionamento 7.1. Ligação à rede de bordo do automóvel Aviso – Bateria • Utilize apenas carregadores adequados com ligações USB para efetuar o carregamento. • De modo geral, não utilize carregadores ou ligações USB que apresentem danos, nem tente reparar os mesmos. • Não submeta o produto a um carregamento excessivo ou a um descarregamento completo. • Evite o armazenamento, carregamento e utilização com temperaturas extremas e pressão atmosférica extremamente baixa (como, por exemplo, a grande altitude). • Em caso de um período de armazenamento prolongado, carregue a bateria regularmente (pelo menos, trimestralmente). • Ligue o cabo de carregamento MiniUSB fornecido à tomada de carregamento MiniUSB (11) da Dashcam e à tomada da rede de bordo do veículo. 102 • A Dashcam liga-se automaticamente ao ligar o motor. • O LED de estado (12) acende-se permanentemente a azul. Nota - Capacidade da bateria A bateria dispõe de um tempo de autonomia limitado de aproximadamente 2 a 3 minutos. Esta função de reserva serve, por exemplo, para que a hora não seja interrompida. Um funcionamento mais prolongado apenas é possível com um adaptador para automóvel ligado. Nota - Funcionamento permanente a bateria O dispositivo não se destina a funcionar de forma permanente a bateria. O funcionamento permanente a bateria pode causar danos irreparáveis. 7.2. Ligar/desligar Nota - Ligar/desligar automático Se a Dashcam estiver ligada a uma fonte de corrente através do carregador de isqueiro, liga-se e desliga-se automaticamente quando o veículo é ligado/desligado. Nota - Bateria do automóvel Em alguns veículos, pode acontecer que a alimentação de tensão se mantenha mesmo com a ignição desligada. Nesse caso, desligue a câmara manualmente para evitar que a bateria do automóvel descarregue. Prima e mantenha o botão Power [ manualmente a Dashcam. ] (10) premido durante aprox. 3 segundos para ligar/desligar 7.3. Colocar o cartão micro SD • Introduza um cartão micro SD na ranhura para cartões micro SD (2) da Dashcam. • No visor surge a indicação . Nota - Cartão de memória cheio Quando a memória do cartão micro SD estiver cheia, a gravação de vídeo mais antiga será substituída. 103 8. Modos 8.1 Modo de vídeo • Ao ligar a câmara, esta encontra-se no modo de funcionamento de vídeo. No canto superior . esquerdo do ecrã surge a indicação • Registo vídeo inicia automaticamente ao ligar aparelho. • Prima [OK] (7), para parar/começar a gravação de vídeo. • Durante a gravação de vídeo, a duração da gravação é apresentada no canto superior esquerdo do ecrã. O LED de estado (12) acende-se alternadamente a vermelho e azul. Nota - Modo noturno Durante a gravação de vídeo, prima brevemente o botão Power [ modo noturno. ] (10) para ativar/desativar o 8.2 Modo de fotografia • Para ativar o modo de funcionamento de fotografia, prima repetidamente [MODE] (6). No canto superior esquerdo do ecrã surge a indicação . • Prima [OK] (7) para capturar uma imagem. 8.3 Modo de reprodução • Ative modo de reprodução premindo de novo botão [MODE] (6). é exibido no rebordo inferior esq. ecrã. • Através dos botões de navegação [◄] (9) / [►] (5), selecione o ficheiro que deseja reproduzir. • Prima [MENU] (8) para opções. • Percorra o menu com os botões de navegação [◄] (9) / [►] (5). • Selecione item de menu Apagar e confirme seleção premindo [OK] (7). • Opção entre Apagar seleção e Apagar tudo. • Confirme perguntas de segurança seguintes com OK ou selecione Cancelar para interromper processo. • Prima [MENU] (8) para mais opções para chegar ao item de menu Bloquear. • Selecione item de menu Bloquear e confirme seleção [OK] (7). • Opção entre Bloquear ficheiro, Bloquear tudo, Desbloquear ficheiro e Desbloquear tudo. • Confirme perguntas de segurança seguintes com OK ou selecione Cancelar para interromper processo. 9. Definições 9.1 Definições do modo de vídeo • Mude para o modo de vídeo tal como descrito no capítulo 8.1 Modo de vídeo. • Prima [MENU] (8) para abrir definições de vídeo. 104 • No canto superior esquerdo do ecrã aparece a indicação . • Percorra o menu com os botões de navegação [◄] (9) / [►] (5). • Confirme a seleção premindo [OK] (7). 9.1.1 Resolução Selecione a resolução pretendida (1280X720 / 1920X1080) para o vídeo gravado. • Aceda ao item de menu Resolução e confirme a seleção premindo [OK] (7). É aberta uma nova janela que apresenta uma visão geral. • Através dos botões de navegação [◄] (9) / [►] (5), selecione a definição pretendida. • Confirme a seleção premindo [OK] (7). 9.1.2 Marca de água Com o modo ativado, é registada a data e a hora em todos os ficheiros de vídeo. • Aceda ao item de menu Marca de água e confirme a seleção premindo [OK] (7). É aberta uma nova janela que apresenta uma visão geral. • Através dos botões de navegação [◄] (9) / [►] (5), selecione a definição pretendida. • Confirme a seleção premindo [OK] (7). 9.1.3 Deteção de movimento Com a deteção de movimento ativada, a gravação de vídeo é iniciada automaticamente quando a câmara sofre um choque (por ex., em caso de acidente). • Aceda ao item de menu Deteção de movimento e confirme a seleção premindo [OK] (7). É aberta uma nova janela que apresenta uma visão geral. • Através dos botões de navegação [◄] (9) / [►] (5), selecione a definição pretendida. • Confirme a seleção premindo [OK] (7). • No ecrã do vídeo é apresentada a indicação . 9.1.4 Função Loop Selecione o intervalo de tempo (1/2/3/5 minutos), após o qual deve ser iniciada uma nova gravação de vídeo. Selecione desativado para desativar esta função. Apenas será criado um ficheiro. • Aceda ao item de menu Função Loop e confirme a seleção premindo [OK] (7). É aberta uma nova janela que apresenta uma visão geral. • Através dos botões de navegação [◄] (9) / [►] (5), selecione a definição pretendida. • Confirme a seleção premindo [OK] (7). • No ecrã do vídeo é apresentada a indicação . 105 9.1.5 Gravação áudio Com o modo ativado, para além do vídeo é também gravado o som. • Aceda ao item de menu Gravação áudio e confirme a seleção premindo [OK] (7). É aberta uma nova janela que apresenta uma visão geral. • Através dos botões de navegação [◄] (9) / [►] (5), selecione a definição pretendida. • Confirme a seleção premindo [OK] (7). 9.1.6 Contraste Aumente a qualidade da gravação de vídeo através do ajuste do contraste (-2 a +2). • Aceda ao item de menu Contraste e confirme a seleção premindo [OK] (7). É aberta uma nova janela que apresenta uma visão geral. • Através dos botões de navegação [◄] (9) / [►] (5), selecione a definição pretendida. • Confirme a seleção premindo [OK] (7). 9.2 Definições do modo de fotografia • Mude para o modo de fotografia tal como descrito no capítulo 8.2 Modo de fotografia. • Prima [MENU] (8) para abrir definições de fotografia. • No canto superior esquerdo do ecrã é apresentada a indicação . • Percorra o menu com os botões de navegação [◄] (9) / [►] (5). • Confirme a seleção premindo [OK] (7). 9.2.1 Resolução Selecione a resolução pretendida (VGA - 12 megapíxeis) para a imagem capturada. • Aceda ao item de menu Resolução e confirme a seleção premindo [OK] (7). É aberta uma nova janela que apresenta uma visão geral. • Através dos botões de navegação [◄] (9) / [►] (5), selecione a definição pretendida. • Confirme a seleção premindo [OK] (7). 9.2.2 Apresentação da imagem Com a visualização da imagem ativa, a captação efetuada é apresentada no ecrã durante um breve período (2/5 segundos). Só depois de decorrido este tempo é que é possível captar uma nova imagem. Selecione desativado para desativar esta função. • Aceda ao item de menu Apresentação da imagem e confirme a seleção premindo [OK] (7). É aberta uma nova janela que apresenta uma visão geral. • Através dos botões de navegação [◄] (9) / [►] (5), selecione a definição pretendida. • Confirme a seleção premindo [OK] (7). 106 9.2.3 Marca de água Com o modo ativado, é registada a data e a hora em cada um dos ficheiros de fotografia. • Aceda ao item de menu Marca de água e confirme a seleção premindo [OK] (7). É aberta uma nova janela que apresenta uma visão geral. • Através dos botões de navegação [◄] (9) / [►] (5), selecione a definição pretendida. • Confirme a seleção premindo [OK] (7). 9.2.4 Contraste Aumente a qualidade da captação de fotografia ajustando o contraste (-2 a +2). • Aceda ao item de menu Contraste e confirme a seleção premindo [OK] (7). É aberta uma nova janela que apresenta uma visão geral. • Através dos botões de navegação [◄] (9) / [►] (5), selecione a definição pretendida. • Confirme a seleção premindo [OK] (7). 9.3 Definições gerais • Em alternativa prima duas vezes [MENU] (8) para abrir menu de definições da câmara. • Em alternativa, prima brevemente botão [MENU] (8) se já se encontrar no menu Vídeo/Foto. • No canto superior esquerdo do ecrã é apresentada a indicação . • Percorra o menu com os botões de navegação [◄] (9) / [►] (5). • Confirme a seleção premindo [OK] (7). 9.3.1 Formatar cartão de memória Apague todos os ficheiros gravados no cartão de memória introduzido. • Aceda ao item de menu Formatar cartão de memória e confirme a seleção premindo [OK] (7). É aberta uma nova janela que apresenta uma visão geral. • Confirme perguntas de segurança seguintes com OK ou selecione Cancelar para interromper o processo. 9.3.2 Idioma Selecione o idioma da navegação do menu. • Aceda ao item de menu Idioma e confirme a seleção premindo [OK] (7). É aberta uma nova janela que apresenta uma visão geral. • Através dos botões de navegação [◄] (9) / [►] (5), selecione a definição pretendida. • Confirme a seleção premindo [OK] (7). 9.3.3 Desligado em caso de inatividade Selecione o intervalo de tempo (1 minuto /3 minutos), após o qual a câmara deve desligar-se automaticamente se não estiver a ser utilizada. 107 Selecione desativado para desativar esta função. • Aceda ao item de menu Desligado em caso de inatividade e confirme a seleção premindo [OK] (7). É aberta uma nova janela que apresenta uma visão geral. • Através dos botões de navegação [◄] (9) / [►] (5), selecione a definição pretendida. • Confirme a seleção premindo [OK] (7). 9.3.4 Protetor de ecrã Selecione o intervalo de tempo (1 minuto / 3 minutos / 5 minutos), após o qual a proteção de ecrã deve ser ativada. Se durante este tempo não premir nenhum botão, o visor desliga-se. No entanto, a gravação de vídeo continua. Selecione desativado para desativar esta função. • Aceda ao item de menu Protetor de ecrã e confirme a seleção premindo [OK] (7). É aberta uma nova janela que apresenta uma visão geral. • Através dos botões de navegação [◄] (9) / [►] (5), selecione a definição pretendida. • Confirme a seleção premindo [OK] (7). 9.3.5 Definições de fábrica • Aceda ao item de menu Definições de fábrica e confirme a seleção premindo [OK] (7). É aberta uma nova janela que apresenta uma visão geral. • Confirme reposição com OK ou selecione Cancelar para interromper processo. 9.3.6 Data/hora • Aceda ao item de menu Data/hora e confirme a seleção premindo [OK] (7). É aberta uma nova janela que apresenta uma visão geral. • Através dos botões de navegação [◄] (9) / [►] (5) defina o ano e confirme a introdução premindon [OK] (7). • A seguir, defina as seguintes informações em sequência utilizando o mesmo procedimento: mês, dia, hora. • Confirme a seleção premindo [MENU] (8). 9.3.7 Versão • Aceda ao item de menu Versão e confirme a seleção premindo [OK] (7). É aberta uma nova janela que apresenta uma visão geral. • É apresentada a versão atual da câmara. 108 10. Consultar o material gravado Nota Não retire o cartão micro SD com a Dashcam ligada. Tal pode causar a perda de dados ou danos no dispositivo. • Desligue a Dashcam como descrito no ponto 7.2 Ligar/desligar. • Remova o cartão micro SD da câmara. • Com a ajuda do leitor de cartões SD (incluído no material fornecido), conecte o cartão micro SD ao seu computador. • Transfira os dados armazenados para o seu computador para libertar a memória. 11. Botão de cópia de segurança Nota Tenha em atenção que, em caso de acidente, a prioridade é prestar os primeiros socorros e garantir a segurança de todos os envolvidos. Para garantir que os seus dados são protegidos de forma permanente, proceda do seguinte modo: • Prima o botão de cópia de segurança (13). No visor é apresentado . • Prima e mantenha premido o botão Power [ ] (10) durante aprox. 3 segundos para desligar a câmara. • Remova agora o cartão micro SD da câmara. Nota • Os vídeos gravados ao premir o botão de cópia de segurança são gravados com a designação “LOKXXXXX”. • Os ficheiros de vídeo normais são gravados com a designação “REC” e um número sequencial. 12. Definições de fábrica Para repor a Dashcam para as definições de fábrica (estado de fornecimento), proceda conforme se segue: • Desligue a Dashcam como descrito no ponto 7.2 Ligar/desligar. • Prima e mantenha premido o botão [Reset] (4) com um objeto pontiagudo durante aprox. 3 segundos. • Em alternativa, pode repor as definições de fábrica como descrito no capítulo 9.3.5 Definições de fábrica. • Todas as definições efetuadas são eliminadas. 109 Nota • Eventuais problemas e anomalias podem ser resolvidos através da reposição para as definições de fábrica. • No entanto, todas as predefinições são eliminadas de forma definitiva. 13. Manutenção e conservação • limpe o produto apenas com um pano sem fiapos ligeiramente humedecido e não utilize produtos de limpeza agressivos. • Certifique-se de que não entra água para dentro do produto. 14. Exclusão de garantia A Hama GmbH & Co KG não assume qualquer responsabilidade ou garantia por danos provocados pela instalação, montagem ou manuseamento incorrectos do produto e não observação do das instruções de utilização e/ou das informações de segurança. 15. Especificações técnicas Dimensões 89 x 48 x 35 mm Diagonal do ecrã 2.4" Máx. Resolução Fotografias: 12 megapíxeis | Vídeo: 1080i Formato de dados Fotografias: JPEG | Vídeo: AVI Cartão de memória Suporta cartões de memória micro SD até 32 GB Alimentação elétrica Input: 12 V-24 V Bateria Input: 5 V 290 mA; Tipo: 3,7 V / LiPo; Capacidade mínima: 130 mAh / 0,48 Wh 110 0,5A; Output: 5 V ; 1A; Comprimento do cabo: 2 m M Manual de utilizare Elemente de comandă și afișaje A 1. Dispozitiv suport de fixare ventuză 2. Slot card micro SD 3. Microfon/Difuzor B 4. 5. 6. 7. 8. 9. 10. C 11. Fișă de încărcare mini USB 12. LED de statut 13. Tastă de siguranță D 14. Dispozitiv fixare Dashcam 15. Pârghie de blocare Reset Tastă navigație ► Mode OK Meniu Tastă navigație ◄ Power Regim video - Vedere de ansamblu simboluri Regim video Durată de timp Loop Regim de zi Regim de noapte Regim de mișcare Calitate video Cardul de memorie a fost recunoscut 111 Cardul de memorie nu a fost recunoscut Afișaj baterie Înregistrare video funcționează Video asigurat 00.00.00 Durată video Regim foto - Vedere de ansamblu simboluri Regim foto Regim de zi Regim de noapte 12M-VGA Rezoluție a imaginii Cardul de memorie a fost recunoscut Cardul de memorie nu a fost recunoscut Afișaj baterie Regim redare - Vedere de ansamblu simboluri Video funcționează Video este întrerupt Video asigurat 112 Cardul de memorie a fost recunoscut Cardul de memorie nu a fost recunoscut Afișaj baterie Vă mulţumim că aţi optat pentru un produs Hama. Pentru început vă rugăm să vă lăsați puțin timp și să citiți complet următoarele instrucțiuni și indicații. Vă rugăm să păstraţi manualul de utilizare la loc sigur pentru o consultare ulterioară în caz de nevoie. În caz de înstrăinare a aparatului vă rugăm să predați și acest manual noului proprietar. 1. Explicarea simbolurilor de avertizare și indicații Pericol de electrocutare Acest simbol semnalizează pericol la atingerea cu componentele neizolate ale produsului, care datorită tensiunii înalte indicate, poate duce la electrocutare. Avertizare Se folosește la marcarea instrucțiunilor de siguranță sau la concentrarea atenției în caz de pericol și riscuri mari. Instrucțiune Se folosește pentru marcarea informațiilor și instrucțiunilor importante. 2. Conținutul pachetului • Dashcam 30 • Încărcător auto mini USB • Suport de fixare ventuză • Cititor de carduri micro SD • Acest manual de utilizare 113 3. Instrucțiuni de siguranță • Produsul este conceput pentru utilizare privată și nu profesională. • Folosiți produsul numai în scopul pentru care a fost conceput. • Protejaţi produsul de impurităţi, umiditate, supraîncălzire şi utilizaţi-l numai în mediu uscat. • Nu lăsați produsul să cadă și nu îl supuneți trepidațiilor puternice. • Nu exploataţi produsul în afara limitelor de putere indicate în datele tehnice. • Nu îndoiți şi nu striviţi cablul. • Acumulatorul este montat fix și nu poate fi demontat, salubrizați produsul ca un întreg conform prevederilor legale. • Nu deschideți produsul și nu-l utilizați în continuare în caz de deterioare. • Acest aparat, ca de altfel toată aparatura electronică, nu are ce căuta în mâinile copiilor! • La folosirea produsului trebuiesc respectatele regulamentele și legile locale valabile traficului rutier. • Vă rugăm să țineți seama ca nici un component precum aribag-ul, componentele de siguranță, elementele de comandă, instrumentele sau vizibilitatea să fie acoperite sau reduse. • În timpul călătoriei cu un autovehicul nu vă lăsați distras de produs și fiți atent la situația traficului și a împrejurimilor. • Înaintea fiecărei porniri verificați montarea sigură a produsului. • Reciclarea materialului pachetului se execută comform normelor locale de salubrizare în vigoare. • Nu executaţi modificări la aparat. În acest fel pierdeţi orice drept la garanţie. • Produsul sau acumulatorul nu se aruncă în foc. • Nu modificați, deformați, încălziți sau dezmembra bateriile/acumulatoarele. Pericol de electrocutare • Nu deschideți produsul și nu-l utilizați în continuare în caz de deteriorare. • Nu utilizați produsul dacă cablul de încărcare, cablul adaptor sau conductorul rețelei sunt deteriorate. • Nu încercați să reparați sau să depanați produsul. Lucrările de reparații se execută numai de personal de specialitate. 4. Reglementări legale/restricții în funcționarea Dashcam Instrucțiune • Indicațiile cu privire la reglementările legale cuprinse aici reproduc numai reglementările și legile germane din momentul tipăririi. Înaintea folosirii produsului în alte țări informați-vă cu privire la reglementările în vigoare de acolo! • La utilizarea produsului în traficul rutier, în funcție de legislația țării pot fi valabile reglementări diferite. 114 Instrucțiune • În anumite legislații utilizarea Dashcam este reglementată separat respectiv interzisă. Înaintea utilizării informați-vă referitor la legislație și directive. • Înaintea instalării și utilizării informați-vă referitor la reglementările protecției datelor în vigoare. • Trebuiesc respectate reglementările în vigoare referitoare la înregistrarea și memorarea fișierelor video și foto. 5. Utilizare conform destinației • Produsul este prevăzut numai pentru folosire în autovehicule. • Respectați drepturile la propria personalitate și de proprietate ale altora. Nu faceți înregistrări cu alte persoane. • Respectați dreptul la imaginea proprie și cuvintele pronunțate. • Pentru evitarea deteriorărilor provocate de soare și temperatură, îndepărtați produsul din parbriz dacă nu îl folosiți o perioadă mai lungă. 6. Punere în funcțiune Avertizare - Pericol de accidentare • La folosirea produsului trebuiesc respectatele regulamentele și legile locale valabile traficului rutier. • Vă rugăm să țineți seama ca nici un component precum aribag-ul, componentele de siguranță, elementele de comandă, instrumentele sau vizibilitatea să fie acoperite sau reduse. • În timpul călătoriei cu un autovehicul nu vă lăsați distras de produs și fiți atent la situația traficului și a împrejurimilor. Instrucțiune • Înainte montajului dispozitivului de fixare verificați soluțiile de instalare în autovehicul. Dacă nu sunteți sigur citiți manualul de folosire al autovehiculului sau adresați-vă producătorului. • Nu folosiți forța la montaj sau întrebuințarea produsului. • Înaintea fiecărei porniri verificați montarea sigură a produsului. 6.1 Montaj suport de fixare ventuză • Îndepărtați folia de protecție a ventuzei. • Deschideți pârghia de blocare a ventuzei (15). • Poziționați suportul cu ventuză pe o suprafață de montare curată, netedă (de ex. foaie de sticlă). 115 • Pentru fixare apăsați ușor suportul pe suprafața de montare dorită și închideți pârghia de blocare (15). • După montare verificați periodic fixarea fermă a ventuzei. • Pentru desfacerea ventuzei deschideți pârghia de blocare Pentru desfacerea definitivă a ventuzei trageți ușor de limbă. 6.2 Reglare unghi și înclinare Unghiul și înclinarea suportului se pot regla, în raport cu observatorul, fără trepte cu ajutorul unui cap sferic. • Reglarea unghiului și înclinării se face fără ca aparatul final să fie montat. • Pentru reglare slăbiți șurubul de blocare al capului sferic. • Reglați unghiul și înclinarea dorită și fixați solid șurubul de blocare. 6.3 Instalare/scoatere Dashcam Instrucțiune Verificați periodic fixarea fermă a suportului ventuzei și stabilitatea sigură a Dashcam. • • Împingeți Dashcam în suportul de fixare (14) al ventuzei. Scoateți Dashcam din suport prin mișcări ușoare înainte și înapoi. 7. Exploatare 7.1. Conectare la rețeaua de bord auto Avertizare – Acumulator • Pentru încărcare folosiți numai încărcătoare USB adecvate. • Nu folosiți încărcătoare sau porturi USB defecte și nu încercați să le reparați. • Nu supraîncărcați sau descărcați complet produsul. • Evitați depozitarea, încărcarea și folosirea la temperaturi extreme și presiune foarte scăzută a aerului (de ex. la înălțimi mari). • La depozitare mai îndelungată efectuați reîncărcarea la intervale regulate (cel puțin trimestrial). • Conectați cablul de încărcare mini USB livrat cu fișa de încărcare mini USB (11) de la Dashcam și priza auto a rețelei de bord. • După pornirea motorului Dashcam se activează automat. • LED-ul de statut (12) luminează continuu albastru. Instrucțiune - Capacitate acumulator Acumulatorul dispune de timp limitat de funcționare de cca 2-3 minute. Această funcție tampon servește de ex. afișării continue fără întreruperi a orei exacte. Funcționare mai îndelungată este posibilă numai conectat la un adaptor auto. 116 Instrucțiune - Funcționare continuă pe acumulator Aparatul nu este prevăzut pentru o funcționare continuă pe acumulator. Funcționarea continuă pe acumulator poate duce la defecte ireparabile. 7.2. Pornire/Oprire Instrucțiune - Pornire/oprire automată Dacă aparatul este conectat prin încărcătorul auto la o sursă de curent, la pornirea/oprirea autovehiculului Dashcam se activează/dezactivează automat. Instrucțiune - Baterie auto La unele autovehicule se continuă alimentarea cu curent deși aprinderea este întreruptă. Pentru a evita descărcarea bateriei auto opriți camera manual. Pentru pornirea/oprirea manuală a camerei apăsați cca 3 secunde [ ] (10). 7.3. Utilizare card micro SD • Introduceți un card micro SD în slotul de carduri micro SD (2) al Dashcam. • Pe display se afișează . Instrucțiune - Cartela de memorare completă De îndată ce memoria cardului micro SD este completă, se transcrie cea mai veche înregistrare video. 8. Regimuri 8.1 Regim video • După pornire camera se află în regim de funcționare video. În partea stângă, sus a ecranului apare • Înregistrarea video pornește automat când se dă drumul aparatului. • Pentru oprirea/pornirea înregistrării video apăsați [OK] (7). • În timpul înregistrării se afișează în stânga, sus durata acesteia. LED-ul de statut (12) luminează alternativ roșu și albastru. . Instrucțiune - Regim noapte Pentru activarea/dezactivarea regimului de noapte, apăsați scurt în timpul înregistrării, Power [ ] (10). 117 8.2 Regim foto • Regimul de funcționare foto se activează prin apăsarea repetată pe [ MODE] (6). Sus, stânga apare . • Pentru înregistrarea unei imagini apăsați [OK] (7). 8.3 Wiedergabemodus • Regimul de funcționare redare se activează prin apăsarea repetată pe [MODE] (6). În stânga marginii inferioare a ecranului apare . • Cu ajutorul tastelor de navigație [◄] (9) / [►] (5) selectați fișierul care doriți să fie redat. • Pentru alte opțiuni apăsați [MENU] (8). • Cu ajutorul tastelor [◄] (9) / [►] (5) puteți naviga în meniu. • Alegeți în meniu punctul Ștergeți și confirmați prin apăsare pe [OK] (7). • Puteți alege între Ștergeți selecția și Ștergeți tot. • Pentru întreruperea procesului confirmați cu OK întrebarea de siguranță sau alegeți Întrerupeți. • Pentru a ajunge în meniu la punctul Blocare, apăsați [MENU] (8) pentru alte opțiuni. • Alegeți în meniu punctul Blocare și confirmați prin apăsare pe [OK] (7). • Puteți alege între Blocați fișier, Blocați tot, Deblocați fișier și Deblocați tot. • Pentru întreruperea procesului confirmați cu OK întrebarea de siguranță sau alegeți Întrerupeți. 9. Setări 9.1 Setări regim video • Treceți în regim video conform descrierii din 8.1 Regim video. • Pentru a ajunge la setările video apăsați [MENU] (8). • În stânga marginii superioare a ecranului apare . • Cu ajutorul tastelor [◄] (9) / [►] (5) puteți naviga în meniu. • Confirmați selecția prin apăsare pe [OK] (7). 9.1.1 Rezoluție Alegeți rezoluția dorită (1280X720 / 1920X1080) pentru materialul video înregistrat. • Navigați la punctul din meniu Rezoluție și confirmați alegerea prin apăsarea pe [OK] (7). Se deschide o nouă fereastră cu vedere de ansamblu. • Cu ajutorul tastelor de navigație [◄] (9) / [►] (5) selectați setarea dorită. • Confirmați selecția prin apăsare pe [OK] (7). 9.1.2 Filigran Dacă regimul este activat fiecare fișier video primește o ștampilă cu timpul și data. • Navigați la punctul din meniu Filigran și confirmați alegerea prin apăsarea pe [OK] (7). Se deschide o nouă fereastră cu vedere de ansamblu. 118 • Cu ajutorul tastelor de navigație [◄] (9) / [►] (5) selectați setarea dorită. • Confirmați selecția prin apăsare pe [OK] (7). 9.1.3 Recunoaștere mișcare Dacă recunoașterea mișcării este activată, înregistrarea video pornește automat la șocuri ale camerei (de ex. accident). • Navigați la punctul din meniu Recunoaștere mișcare și confirmați alegerea prin apăsarea pe [OK] (7). Se deschide o nouă fereastră cu vedere de ansamblu. • Cu ajutorul tastelor de navigație [◄] (9) / [►] (5) selectați setarea dorită. • Confirmați selecția prin apăsare pe [OK] (7). • Pe display se afișează . 9.1.4 Funcție Loop Alegeți intervalul de timp (1/2/3/5 minute) după care poate să înceapă o nouă înregistrare video. Pentru dezactivarea acestei funcțiuni alegeți Oprit. Se creează numai un fișier. • Navigați la punctul din meniu Funcție Loop și confirmați alegerea prin apăsarea pe [OK] (7). Se deschide o nouă fereastră cu vedere de ansamblu. • Cu ajutorul tastelor de navigație [◄] (9) / [►] (5) selectați setarea dorită. • Confirmați selecția prin apăsare pe [OK] (7). • Pe display se afișează . 9.1.5 Înregistrare audio Dacă regimul este activat, pe lângă video se înregistrează și sunetul. • Navigați la punctul din meniu Înregistrare audio și confirmați alegerea prin apăsarea pe [OK] (7). Se deschide o nouă fereastră cu vedere de ansamblu. • Cu ajutorul tastelor de navigație [◄] (9) / [►] (5) selectați setarea dorită. • Confirmați selecția prin apăsare pe [OK] (7). 9.1.6 Contrast Măriți calitatea înregistrării video prin adaptarea contrastului (-2 până la +2). • Navigați la punctul din meniu Contrast și confirmați alegerea prin apăsarea pe [OK] (7). Se deschide o nouă fereastră cu vedere de ansamblu. • Cu ajutorul tastelor de navigație [◄] (9) / [►] (5 selectați setarea dorită. • Confirmați selecția prin apăsare pe [OK] (7). 9.2 Setări regim foto • Treceți în regim foto conform descrierii din 8.2 Regim foto. • Pentru a ajunge la setările foto apăsați [MENU] (8). • Stânga, sus se afișează . 119 • Cu ajutorul tastelor [◄] (9) / [►] (5) puteți naviga în meniu. • Confirmați selecția prin apăsare pe [OK] (7). 9.2.1 Rezoluție Alegeți rezoluția dorită (VGA - 12 megapixeli) pentru materialul video înregistrat. • Navigați la punctul din meniu Rezoluție și confirmați alegerea prin apăsarea pe [OK] (7). Se deschide o nouă fereastră cu vedere de ansamblu. • Cu ajutorul tastelor de navigație [◄] (9) / [►] (5) selectați setarea dorită. • Confirmați selecția prin apăsare pe [OK] (7). 9.2.2 Afișaj imagine a activarea afișajului imaginii, înregistrarea în curs de efectuare se afișează pe display pentru scurt timp (2/5 secunde). Numai după scurgerea acestui interval de timp se poate înregistra o imagine nouă. Pentru dezactivarea acestei funcțiuni alegeți Oprit. • Navigați la punctul din meniu Afișaj imagine și confirmați alegerea prin apăsarea pe [OK] (7). Se deschide o nouă fereastră cu vedere de ansamblu. • Cu ajutorul tastelor de navigație [◄] (9) / [►] (5) selectați setarea dorită. • Confirmați selecția prin apăsare pe [OK] (7). 9.2.3 Filigran Dacă regimul este activat fiecare fișier foto primește o ștampilă cu timpul și data. • Navigați la punctul din meniu Filigran și confirmați alegerea prin apăsarea pe [OK] (7). Se deschide o nouă fereastră cu vedere de ansamblu. • Cu ajutorul tastelor de navigație [◄] (9) / [►] (5) selectați setarea dorită. • Confirmați selecția prin apăsare pe [OK] (7). 9.2.4 Contrast Măriți calitatea înregistrării foto prin adaptarea contrastului (-2 până la +2). • Navigați la punctul din meniu Contrast și confirmați alegerea prin apăsarea pe [OK] (7). Se deschide o nouă fereastră cu vedere de ansamblu. • Cu ajutorul tastelor de navigație [◄] (9) / [►] (5) selectați setarea dorită. • Confirmați selecția prin apăsare pe [OK] (7). 9.3 Setări generale • Pentru a ajunge la meniul setărilor aparatului fotografic apăsați de două ori [MENU] (8). • Dacă vă aflați în meniul video/foto apăsați o dată [MENU] (8). • Stânga, sus se afișează . • Cu ajutorul tastelor [◄] (9) / [►] (5) puteți naviga în meniu. • Confirmați selecția prin apăsare pe [OK] (7). 120 9.3.1 Formatați cardul de memorie Ștergeți toate fișierele din cardul de memorie introdus. • Navigați la punctul din meniu Formatați cardul de memorie și confirmați alegerea prin apăsarea pe [OK] (7). Se deschide o nouă fereastră cu vedere de ansamblu. • Pentru întreruperea procesului confirmați cu OK formatarea sau alegeți Întrerupeți. 9.3.2 Limbă Selectați limba administrării meniului. • Navigați la punctul din meniu Limbă și confirmați alegerea prin apăsarea pe [OK] (7). Se deschide o nouă fereastră cu vedere de ansamblu. • Cu ajutorul tastelor de navigație [◄] (9) / [►] (5) selectați setarea dorită. • Confirmați selecția prin apăsare pe [OK] (7). 9.3.3 Oprit în caz de inactivitate Alegeți intervalul de timp (1 minut / 3 minute) după care camera se oprește automat în caz de nefolosire. Pentru dezactivarea acestei funcțiuni alegeți Oprit. • Navigați la punctul din meniu Oprit în caz de inactivitate și confirmați alegerea prin apăsarea pe [OK] (7). Se deschide o nouă fereastră cu vedere de ansamblu. • Cu ajutorul tastelor de navigație [◄] (9) / [►] (5) selectați setarea dorită. • Confirmați selecția prin apăsare pe [OK] (7). 9.3.4 Protecție ecran Alegeți intervalul de timp (1 minut / 3 minute / 5 minute) după care se activează protecția pentru ecran. Dacă în acest interval de timp nu este activată nici o tastă displayul de oprește. Înregistrarea video funcționează în continuare. Pentru dezactivarea acestei funcțiuni alegeți Oprit. • Navigați la punctul din meniu Protecție ecran și confirmați alegerea prin apăsarea pe [OK] (7). Se deschide o nouă fereastră cu vedere de ansamblu. • Cu ajutorul tastelor de navigație [◄] (9) / [►] (5) selectați setarea dorită. • Confirmați selecția prin apăsare pe [OK] (7). 9.3.5 Setări din fabrică • Navigați la punctul din meniu Setări din fabrică și confirmați alegerea prin apăsarea pe [OK] (7). Se deschide o nouă fereastră cu vedere de ansamblu. • Pentru întreruperea procesului confirmați cu OK repunerea la zero sau alegeți Întrerupeți. 121 9.3.6 Dată/Oră exactă • Navigați la punctul din meniu Dată/Oră exactă și confirmați alegerea prin apăsarea pe [OK] (7). Se deschide o nouă fereastră cu vedere de ansamblu. • Cu ajutorul tastelor de navigație [◄] (9) / [►] (5) setați anul și confirmați prin apăsare pe [OK] (7). • În același fel setați succesiv următoarele informații: Lună, zi, Oră exactă. • Confirmați selecția prin apăsare pe [MENU] (8). 9.3.7 Versiune • Navigați la punctul din meniu Versiune și confirmați alegerea prin apăsarea pe [OK] (7). Se deschide o nouă fereastră cu vedere de ansamblu. • Se afișează actuala versiune a camerei. 10. Apelarea materialului înregistrat Instrucțiune Nu îndepărtați micro cardul SD dacă Dash Cam funcționează. Se pot pierde date sau provoca daune aparatului. • • • • Opriți Dash Cam conform descrierii din 7.2 Pornire/Oprire. Scoateți cardul micro SD din cameră. Cu ajutorul cititorului de carduri SD livrat, conectați cardul micro SD la calculator. Pentru descărcarea memoriei transferați datele memorate pe calculator. 11. Tastă de siguranță Instrucțiune În caz de accident are prioritate acordarea primului ajutor și siguranța pasagerilor. Pentru a fi sigur că datele se memorează permanent, procedați în felul următor: • Apăsați tasta de siguranță (13). Pe display se afișează . • Pentru oprirea camerei apăsați Power [ ] (10) cca 3 secunde. • Scoateți cardul micro SD din cameră. Instrucțiune • Video care au fost memorate după apăsarea tastei de siguranță, se memorează sub denumirea „LOKXXXXX“. • Fișierele video regulate se memorează sub denumirea „REC“ precum și un număr curent. 122 12. Setare de fabrică Pentru readucerea Dashcam la setarea din fabrică (setare la livrare) procedați în felul următor: • Opriți Dashcam conform descrierii din 7.2 Pornire/Oprire. • Cu ajutorul unui obiect ascuțit apăsați cca 3 secunde [Reset] (4). • Alternativ puteți reface setarea din fabrică conform descrierii din capitolul 9.3.5 Setări din fabrică. • Toate setările executate anterior se șterg. Instrucțiune • Probleme și erori în funcționare pot fi îndepărtate uneori prin resetarea la setarea de fabrică. • Toate setările executate anterior (oră exactă, timp de deșteptare, etc.) se șterg definitiv. 13. Întreţinere şi revizie • Curățați acest produs numai cu o cârpă fără scame, puțin umedă și nu folosiți detergenți agresivi. • Aveți grijă să nu intre apă în produs. 14. Excludere de garanție Hama GmbH & Co KG nu îşi asumă nici o răspundere sau garanție pentru pagube cauzate de montarea, instalarea sau folosirea necorespunzătoare a produsului sau nerespectarea instrucțiunilor de folosire sau/și a instrucțiunilor de siguranță. 15. Date tehnice Dimensiuni 89 x 48 x 35 mm Diagonala ecranului 2.4" Rezoluție max. Imagine: 12 megapixeli | Video: 1080i Format date Imagine: JPEG | Video: AVI Card de memorie Sunt susținute carduri de memorie micro SD până la 32 GB Alimentare cu curent Input: 12 V-24 V Baterie Input: 5 V 290 mA; Tip: 3,7 V / LiPo; Min. capacitate: 130 mAh / 0,48 Wh 0,5A; Output: 5 V ; 1A; lungime cablu: 2 m 123 Hama GmbH & Co KG 86652 Monheim / Germany Service & Support www.hama.com www.hama.com/nep All listed brands are trademarks of the corresponding companies. Errors and omissions excepted, and subject to technical changes. Our general terms of delivery and payment are applied. 00136697/10.19 +49 9091 502-0 DG-
 1
1
-
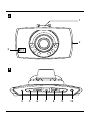 2
2
-
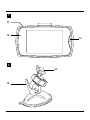 3
3
-
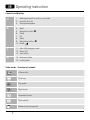 4
4
-
 5
5
-
 6
6
-
 7
7
-
 8
8
-
 9
9
-
 10
10
-
 11
11
-
 12
12
-
 13
13
-
 14
14
-
 15
15
-
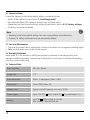 16
16
-
 17
17
-
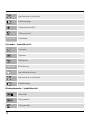 18
18
-
 19
19
-
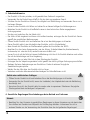 20
20
-
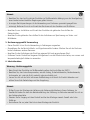 21
21
-
 22
22
-
 23
23
-
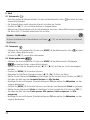 24
24
-
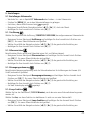 25
25
-
 26
26
-
 27
27
-
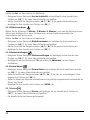 28
28
-
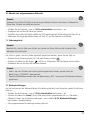 29
29
-
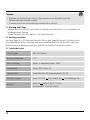 30
30
-
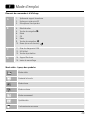 31
31
-
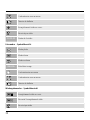 32
32
-
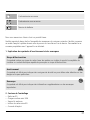 33
33
-
 34
34
-
 35
35
-
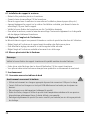 36
36
-
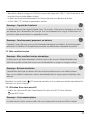 37
37
-
 38
38
-
 39
39
-
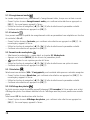 40
40
-
 41
41
-
 42
42
-
 43
43
-
 44
44
-
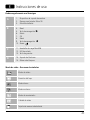 45
45
-
 46
46
-
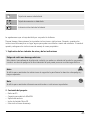 47
47
-
 48
48
-
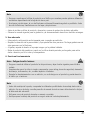 49
49
-
 50
50
-
 51
51
-
 52
52
-
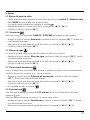 53
53
-
 54
54
-
 55
55
-
 56
56
-
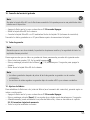 57
57
-
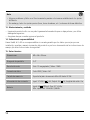 58
58
-
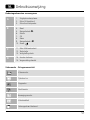 59
59
-
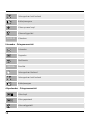 60
60
-
 61
61
-
 62
62
-
 63
63
-
 64
64
-
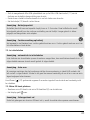 65
65
-
 66
66
-
 67
67
-
 68
68
-
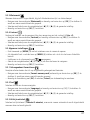 69
69
-
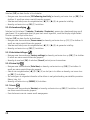 70
70
-
 71
71
-
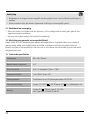 72
72
-
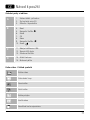 73
73
-
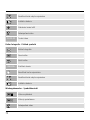 74
74
-
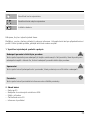 75
75
-
 76
76
-
 77
77
-
 78
78
-
 79
79
-
 80
80
-
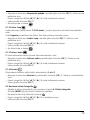 81
81
-
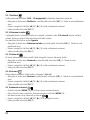 82
82
-
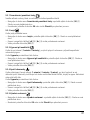 83
83
-
 84
84
-
 85
85
-
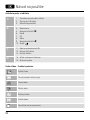 86
86
-
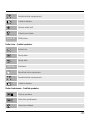 87
87
-
 88
88
-
 89
89
-
 90
90
-
 91
91
-
 92
92
-
 93
93
-
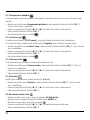 94
94
-
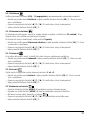 95
95
-
 96
96
-
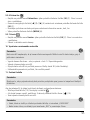 97
97
-
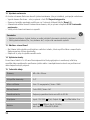 98
98
-
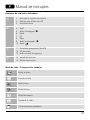 99
99
-
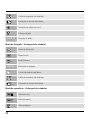 100
100
-
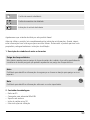 101
101
-
 102
102
-
 103
103
-
 104
104
-
 105
105
-
 106
106
-
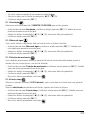 107
107
-
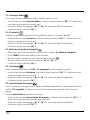 108
108
-
 109
109
-
 110
110
-
 111
111
-
 112
112
-
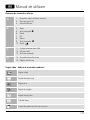 113
113
-
 114
114
-
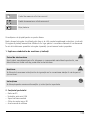 115
115
-
 116
116
-
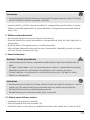 117
117
-
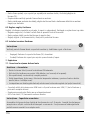 118
118
-
 119
119
-
 120
120
-
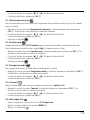 121
121
-
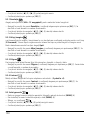 122
122
-
 123
123
-
 124
124
-
 125
125
-
 126
126


Hama 00136697 de handleiding
- Type
- de handleiding
- Deze handleiding is ook geschikt voor
in andere talen
- English: Hama 00136697 Owner's manual
- français: Hama 00136697 Le manuel du propriétaire
- español: Hama 00136697 El manual del propietario
- Deutsch: Hama 00136697 Bedienungsanleitung
- português: Hama 00136697 Manual do proprietário
- slovenčina: Hama 00136697 Návod na obsluhu
- čeština: Hama 00136697 Návod k obsluze
- română: Hama 00136697 Manualul proprietarului
Gerelateerde papieren
Andere documenten
-
Ring RDC1000 Gebruikershandleiding
-
Quintezz HD 720P Handleiding
-
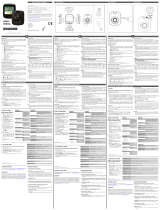 Mr Handsfree Dashcam 1080P HD DC-100 de handleiding
-
Kenwood DRV Series User DRV-A201 Snelstartgids
-
Kenwood DRV Series User DRV-A301W Snelstartgids
-
Kenwood DRV Series User DRV-A501W Handleiding
-
Kenwood DRV-A100 Snelstartgids
-
Motorola MDC500GW Snelstartgids
-
Silvercrest SCAA 5.00 A1 de handleiding
-
VOLTCRAFT BS-2000HD Handleiding
