
HANDLEIDING - MANUAL - MODE D’EMPLOI - GEBRAUCHSHANTLEITUNG
BABYWALKER
TOTTI
BNBW011

NL Nederlands
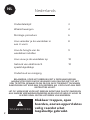
Onderdelenlijst 3
Waarschuwingen 4
Montage procedure 6
Hoe verander je de wandelaar in 8
een U-vorm
Hoe de hoogte van de 9
wandelaar instellen
Hoe vouw je de wandelaar op 10
Gebruik van elektronisch 10
speelstukjesbakje
Onderhoud en reiniging 11
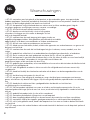
BELANGRIJK: VOOR HET GEBRUIK LEEST U DEZE HANDLEIDING
AANDACHTIG DOOR OM DE VEILIGHEID VAN UW KIND NIET OP HET
SPEL TE ZETTEN. BEWAAR ZE OM ZE OOK IN DE TOEKOMST TE KUNNEN
RAADPLEGEN. HET KIND KAN ZICH BEZEREN ALS U ZICH NIET AAN DEZE
INSTRUCTIES HOUDT.
LET OP: VERWIJDER VOOR HET GEBRUIK EVENTUELE PLASTIC ZAKKEN EN
ALLE ANDERE VERPAKKINGSONDERDELEN EN GOOI ZE WEG OF HOUD ZE
IN IEDER GEVAL BUITEN HET BEREIK VAN KINDEREN.
Blokkeer trappen, open
haarden, oneven oppervlaktes
veilig voordat u het
loopstoeltje gebruikt.
WAARSCHUWING
2

NL
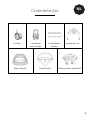
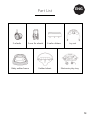
Onderdelenlijst
2 wielen 2 achterste
vaste wielen
6 veiligheids
rubbers
Elektronische speeltafelGevuld blad Baby looprek
3
speelgoed set

NL Waarschuwingen
4

NL
Waarschuwingen
Elektronisch speelblad:
٠
Het speelblad reinigen en onderhouden:
Batterijen:
5

NL Montage procedure
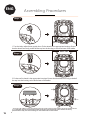
3. Fix the safe rubbers in the appropriate housings. Ensure that the safe rubbers are firmly pushed all the
way into the housing on the down base of the walker.
Assembling Procedures
1. Turn the baby walker frame upside down. Fix the wheels in the appropriate housings. Ensure that the
wheels are firmly pushed all the way into the housing on the down base of the walker.
2. Fix the rear fix wheels in the appropriate housings. Ensure that the wheels are firmly pushed all the way
into the housing on the down base of the walker.
Front Side
Back Side
Step 2
Step 3
Step 1
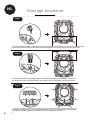
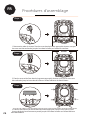
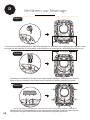
1. Draai het baby looprekje ondersteboven. Bevestig de wielen in de daarvoor bestemde behuizingen. Zorg
ervoor dat de wielen stevig in de behuizing aan de onderkant van de loopwagen worden geschoven.
2. Bevestig de achterste bevestigingswielen in de daarvoor bestemde behuizingen. Zorg ervoor
dat de wielen stevig in de behuizing aan de onderkant van de loopwagen worden geschoven.
3. Bevestig de veilige rubbers in de juiste behuizingen. Zorg ervoor dat de veilige rubbers stevig
helemaal in de behuizing aan de onderkant van de loopwagen zijn geduwd.
Achterzijde
Voorzijde
Stap 1
Stap 2
Stap 3
6

NL
3
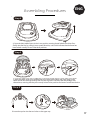
4. Open the baby walker frame in the in-use posion, ensuring that all wheels touch the floor. Slowly raise the
tray by pulling it in an upward direcon, unl a click indicates that the frame has been locked correctly in one
of the three posions.
Step 4
Step 5
Step 6
5. Insert the plasc rings of the padded seat in the slots located along the upper edge of the walker
frame. Pass the rings through the slots and tug them unl they clear the passage, then release them,
ensuring that they are correctly locked in the posion and cannot recede into the slot.
6. Insert the toys bar into the two holes on the upper tray.
Montage procedure
4. Open the baby walker frame in the in-use posion, ensuring that all wheels touch the floor. Slowly raise the
tray by polling it in an upward direcon, unl a click indicates that the frame has been locked correctly in one
of the three posions.
Step 4
Step 5
Step 6
5. Insert the plasc rings of the padded seat in the slots located along the upper edge of the walker
frame. Pass the rings through the slots and tug them unl they clear the passage, then release them,
ensuring that they are correctly locked in the posion and cannot recede into the slot.
6. Fit the large spoiler on the rear walker frame; simply place it on the housings, located at the rear of the
backrest, and push it firmly in a downward direcon, ensuring that it has been fied in the correct
posion. Please do not li up baby walker with large spoiler. It is dangerous do in this way.
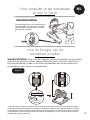
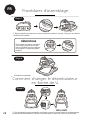
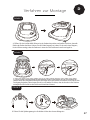
4. Open het babyloopframe in de gebruikspositie en zorg ervoor dat alle wielen de vloer raken.
Til het plateau langzaam op door het in opwaartse richting te tillen, totdat een klik aangeeft dat
het frame correct is vergrendeld in een van de drie posities.
5. Steek de plastieke ringen van de beklede zitting in de gleuven die zich langs de bovenrand van
de zitting bevinden. Haal de ringen door de gleuven en trek er aan tot ze de doorgang vrijmaken,
en laat ze dan los en zorg ervoor dat ze correct zijn vergrendeld in deze positie en niet kunnen
terugvallen in de gleuf.
Stap 6
Stap 5
Stap 4
7
6. Steek de speelgoedstang in de twee gaten van de bovenste lade.

NL
8
Montage procedure
4
8. Completely assembled.
Step 8
7. Put the music toy board onto the groove on the upper tray, listen for 3 clicks to make sure it's installed
firmly.
Step 7
DISASSEMBLY
Pull the ring of the music toy tray
onward the seat,then pull up with
certain strength to disassemble the
music toy tray from the upper tray.
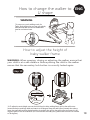
How to Change Walker to U Shape
9. Pull the device at both ends back as the picture showed and make the cross bar away from the
walker, it becomes U shape walker for baby pushing.
Step 9
4
8. Completely assembled.
Step 8
7. Put the music toy board onto the groove on the upper tray, listen for 3 clicks to make sure it's installed
firmly.
Step 7
DISASSEMBLY
Pull the ring of the music toy tray
onward the seat,then pull up with
certain strength to disassemble the
music toy tray from the upper tray.
How to Change Walker to U Shape
9. Pull the device at both ends back as the picture showed and make the cross bar away from the
walker, it becomes U shape walker for baby pushing.
Step 9
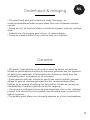
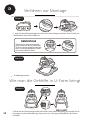
7. Zet het muziekbord op de groef op het bovenste dienblad, luister voor 3 klikken om er zeker van
te zijn dat het stevig is geïnstalleerd.
9. Trek het apparaat aan beide uiteinden terug zoals op de foto te zien is en maak de dwarsstang
los van de rollator, het wordt een U-vormige rollator die de baby kan verder duwen.
8. Volledig gemonteerd.
Trek de ring van het muziekbakje
verder naar de zitting en trek dan met
een zekere kracht omhoog om het
muziekbakje van het bovenste bakje
te demonteren.
Hoe verander je de wandelaar in een U-vorm
DEMONTAGE
Stap 9
Stap 8
Stap 7

NL
9
Hoe verander je de wandelaar
in een U-vorm
5
When opening, closing or adjusng the walker, ensure that your child is at a safe
distance. Before placing the child in the walker, ensure that the secondary lock
buon is correctly locked again.
Step 10
How to Adjust the Height of Baby Walker Frame
10. To adjust the seat’s height, remove the child from the baby walking frame, pull up the safe buon
located under the small tray table and rotate it to 90 degrees. keep the safe buon pressed, then
raise or lower the small table unl the desired posion is reached, then pull up the safe buon and
rotate it to 90 degrees again to lock the small table.(If it is a automac secondary lock, please make
sure the lock is rotated to 90 degrees.)
The front
press
90 degree
rotation
90 degrees
rotation
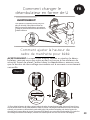
Voor de veiligheid zet u eerst de twee achter-
ste greepwielen vast, dan neemt u de stoel
af en verwijdert u de afneembare achterste
stang aan de onderkant.
WAARSCHUWING
Hoe de hoogte van de
wandelaar instellen
WAARSCHUWING: Zorg er bij het openen, sluiten of afstellen van de rollator
voor dat uw kind zich op een veilige afstand bevindt. Voordat u het kind in
het looprek plaatst, moet u zich ervan vergewissen dat de secundaire ver-
grendelknop weer correct is vergrendeld.
10. Om het zitje in hoogte te verstellen, haalt u het kind uit het looprek, trekt u de knop onder het tafeltje
omhoog en draai het tot 90 graden. Houd de knop ingedrukt, til dan de kleine tafel op of laat hem zakken
tot de gewenste positie is bereikt, trek dan de knop omhoog en draai hem weer tot 90 graden om de tafel
te vergrendelen. (Als het een automatische secundaire vergrendeling is, zorg er dan voor dat de vergren-
deling tot 90 graden is gedraaid).
Stap 10

NL Hoe vouw je de wandelaar op
Gebruik van elektronisch
speelstukjesbakje
6
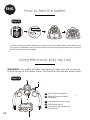
Using Electronic Play Toy Tray
Step 12
A
B
C
D
E
Rotate the lion 360 degrees.
Rotate the tortoise and hippo 360
degrees.
Silde the beads from le to right.
Switch, adjust volumn.
Press buons,lights twinkle with
splendid music.
The walker includes one electronic play tray and one toy set that aached to the
walker frame. The funcon and use are shown here.
How to Fold the Walker
11. Firstly, pull down the buon under top tray, make sure the buon finally parallel to the
adjusted-device(see 1st picture). Meanwhile, press up the front poson(see 2nd picture),
and press down the top base ll the end. The frame folds up completely.
Step 11
The front
press
90 degree
rotation
90 degrees
rotation
6
Using Electronic Play Toy Tray
Step 12
A
B
C
D
E
Rotate the lion 360 degrees.
Rotate the tortoise and hippo 360
degrees.
Silde the beads from le to right.
Switch, adjust volumn.
Press buons,lights twinkle with
splendid music.
The walker includes one electronic play tray and one toy set that aached to the
walker frame. The funcon and use are shown here.
How to Fold the Walker
11. Firstly, pull down the buon under top tray, make sure the buon finally parallel to the
adjusted-device(see 1st picture). Meanwhile, press up the front poson(see 2nd picture),
and press down the top base ll the end. The frame folds up completely.
Step 11
The front
press
90 degree
rotation
90 degrees
rotation
WAARSCHUWING: De rollator is voorzien van een elektronisch
speelplateau en een speelgoedset die aan het rollatorframe is beves-
tigd. De functie en het gebruik worden hier getoond.
10. Trek eerst de knop onder de bovenste lade naar beneden en zorg ervoor dat de knop uiteindelijk even-
wijdig aan het afgestelde apparaat staat (zie 1e foto). Druk ondertussen de voorste positie naar boven (zie
2de foto), en druk de bovenste basis naar beneden tot het einde. Het frame klapt volledig op.
Schakelaar, regel het volume.
Schuif de kralen van links naar rechts.
Draai de schildpad en het nijlpaard 360
graden.
Drukknoppen, lichten fonkelen met
Prachtige muziek.
Draai de leeuw 360 graden.
20
Stap 11
Stap 12

NL
Onderhoud & reiniging
Garantie
• Dit artikel heeft geregeld onderhoud nodig. Reinigings- en
onderhoudswerkzaamheden mogen alleen door een volwassene worden
verricht.
• Reinig de stof, de kunststof delen, inclusief de stoppers, met een vochtige
doek.
• Gebruik voor de reiniging geen schuur- of oplosmiddelen.
• Droog de metalen delen af, om roestvorming te voorkomen.
• Wij geven 2 jaar garantie op dit product vanaf de datum van aankoop.
Binnen de garantieperiode zullen wij eventuele gebreken aan het apparaat
als gevolg van materiaal- of fabricagefouten elimineren, hetzij door het
complete product te repareren of te vervangen.
• Deze garantie dekt niet: schade als gevolg van onjuist gebruik, normale
slijtage of gebruik, alsmede gebreken die een verwaarloosbaar eect
hebben op de waarde of werking van het product. Schade als gevolg van
overbelasting of verkeerd gebruik wordt niet vergoed.
• Om service te verkrijgen binnen de garantieperiode, dient u het volledige
product in te leveren met uw kassabon naar de winkel waar het product is
gekocht geweest.
• De garantie geldt alleen voor de eerste eigenaar en is niet overdraagbaar.
11

ENG ENGLISH
IMPORTANT: READ THE INSTRUCTIONS CAREFULLY BEFORE USE AND
KEEP THEM FOR FUTURE REFERENCE .
THE CHILD MAY BE HURT IF YOU DO NOT FOLLOW THESE
INSTRUCTIONS
WARNING: BEFORE FIRST USE, REMOVE AND DISPOSE
OF ALL PLASTIC BAGS AND PACKAGING MATERIALS
AND KEEP THEM OUT OF REACH OF CHILDREN.
Block stairs, fireplaces,
uneven surfaces safely before
using the baby walker.
Part list 13
Warning 14
Assembling procedures 16
How to change the walker to U shape 18
How to adjust the height 19
of baby walker frame
How to fold the walker 20
Using electronic play toy tray 20
Care and maintenance 21
WARNING
12

ENG
Part List
2 wheels 2 rear x wheels 6 safe rubbers toy set
Electronic play trayFadded sheet Baby walker frame
13

ENG Warning
14

ENG
ELECTRONIC TOY
WARNING: Check the product regularly for signs of wear and damage and to ensure that it is
assembled correctly. If you notice any damage or malfunctions, keep the product
out of reach of children, do not use it, do not attempt to repair it and contact qualified service
centres only.
CARE AND MAINTENANCE OF THE TOY:
B AT T ER I ES
Warning
15

ENG Assembling Procedures
3. Fix the safe rubbers in the appropriate housings. Ensure that the safe rubbers are firmly pushed all the
way into the housing on the down base of the walker.
Assembling Procedures
1. Turn the baby walker frame upside down. Fix the wheels in the appropriate housings. Ensure that the
wheels are firmly pushed all the way into the housing on the down base of the walker.
2. Fix the rear fix wheels in the appropriate housings. Ensure that the wheels are firmly pushed all the way
into the housing on the down base of the walker.
Front Side
Back Side
Step 2
Step 3
Step 1
1. Turn the baby walker frame upside down. Fix the wheels in the appropriate housings. Ensure
that the wheels are rmly pushed all the way into the housing on the down base of the walker
2. Fix the rear x wheels in the appropriate housings. Ensure that the wheels are rmly pushed all
the way into the housing on the down base of the walker.
3. Fix the safe rubbers in the appropriate housings. Ensure that the safe rubbers are rmly
pushed all the way into the housing on the down base of the walker.
Back Side
16

ENG
Assembling Procedures
4. Open the baby walker frame in the in-use posion, ensuring that all wheels touch the floor. Slowly raise the
tray by polling it in an upward direcon, unl a click indicates that the frame has been locked correctly in one
of the three posions.
Step 4
Step 5
Step 6
5. Insert the plasc rings of the padded seat in the slots located along the upper edge of the walker
frame. Pass the rings through the slots and tug them unl they clear the passage, then release them,
ensuring that they are correctly locked in the posion and cannot recede into the slot.
6. Fit the large spoiler on the rear walker frame; simply place it on the housings, located at the rear of the
backrest, and push it firmly in a downward direcon, ensuring that it has been fied in the correct
posion. Please do not li up baby walker with large spoiler. It is dangerous do in this way.
4. Open the baby walker frame in the in-use position, ensuring that all wheels touch the oor.
Slowly raise the tray by pulling it in an upward direction, until a click indicates that the frame has
been locked correctly in one of the three positions.
5. Insert the plastic rings of the padded seat in the slots located along the upper edge of the
walker frame. Pass the rings through the slots and tug them until they clear the passage, then
release them, ensuring that they are correctly locked in the position and cannot recede into the slot.
17
3
4. Open the baby walker frame in the in-use posion, ensuring that all wheels touch the floor. Slowly raise the
tray by pulling it in an upward direcon, unl a click indicates that the frame has been locked correctly in one
of the three posions.
Step 4
Step 5
Step 6
5. Insert the plasc rings of the padded seat in the slots located along the upper edge of the walker
frame. Pass the rings through the slots and tug them unl they clear the passage, then release them,
ensuring that they are correctly locked in the posion and cannot recede into the slot.
6. Insert the toys bar into the two holes on the upper tray.
6. Insert the toys bar into the two holes on the upper tray.

ENG Assembling Procedures
4
8. Completely assembled.
Step 8
7. Put the music toy board onto the groove on the upper tray, listen for 3 clicks to make sure it's installed
firmly.
Step 7
DISASSEMBLY
Pull the ring of the music toy tray
onward the seat,then pull up with
certain strength to disassemble the
music toy tray from the upper tray.
How to Change Walker to U Shape
9. Pull the device at both ends back as the picture showed and make the cross bar away from the
walker, it becomes U shape walker for baby pushing.
Step 9
7. Put the music toy board onto the groove on the upper tray, listen for 3 clicks to make sure it’s
installed rmly
9. Pull the device at both ends back as the picture showed and make the cross bar away from the
walker, it becomes U shape walker for baby pushing.
8. Completely assembled.
Pull the ring of the music toy tray on-
ward the seat, then pull up with certain
strength to disassemble the music toy
tray from the upper tray.
18
How to change the walker to U shape
DISASSEMBLY

ENG
How to change the walker to
U shape
5
When opening, closing or adjusng the walker, ensure that your child is at a safe
distance. Before placing the child in the walker, ensure that the secondary lock
buon is correctly locked again.
Step 10
How to Adjust the Height of Baby Walker Frame
10. To adjust the seat’s height, remove the child from the baby walking frame, pull up the safe buon
located under the small tray table and rotate it to 90 degrees. keep the safe buon pressed, then
raise or lower the small table unl the desired posion is reached, then pull up the safe buon and
rotate it to 90 degrees again to lock the small table.(If it is a automac secondary lock, please make
sure the lock is rotated to 90 degrees.)
The front
press
90 degree
rotation
90 degrees
rotation
To convert to a push-walking mode, for
safety, rstly tighten the two rear grip wheels,
then take o seat and remove detachable
rear bar on bottom base.
WARNING
How to adjust the height of
baby walker frame
WARNING: When opening, closing or adjusting the walker, ensure that
your child is at a safe distance. Before placing the child in the walker
ensure that the secondary lock button is correctly locked again.
10. To adjust the seat’s height, remove the child from the baby walking frame, pull up the safe button
located under the small tray table and rotate it to 90 degrees. Keep the safe button pressed, then raise or
lower the small table until the desired position is reached, then pull up the safe button and rotate it to 90
degrees again to lock the small table. (If it is a automatic secondary lock, please make sure the lock rotated
to 90 degrees.) 19

ENG How to fold the walker
Using electronic play toy tray
6
Using Electronic Play Toy Tray
Step 12
A
B
C
D
E
Rotate the lion 360 degrees.
Rotate the tortoise and hippo 360
degrees.
Silde the beads from le to right.
Switch, adjust volumn.
Press buons,lights twinkle with
splendid music.
The walker includes one electronic play tray and one toy set that aached to the
walker frame. The funcon and use are shown here.
How to Fold the Walker
11. Firstly, pull down the buon under top tray, make sure the buon finally parallel to the
adjusted-device(see 1st picture). Meanwhile, press up the front poson(see 2nd picture),
and press down the top base ll the end. The frame folds up completely.
Step 11
The front
press
90 degree
rotation
90 degrees
rotation
WARNING: The walker includes one electronic play tray and on toy set
that attached to the walker frame. The function and use are shown here.
10. Firstly, pull down the button under top tray, make sure the button nally parallel to the adjusted-device
(see 1st picture). Meanwhile, press up the front position (see 2nd picture), and press down the top base till
the end. The frame folds up completely.
Switch, adjust volumn.
Slide the beads from left to right.
Rotate the tortoise and hippo
360 degrees.
Press buttons, lights twinkle with
splendid music.
Rotate the lion 360 degrees.
20

ENG
Cleaning and maintenance
Guarantee
• This product requires periodic maintenance. The cleaning and
maintenance operations must only be carried out by an adult.
• Use a soft damp cloth to clean the fabric, plastic parts and the
stoppers.
• Do not clean the product with abrasive products or solvents.
• Always dry the metal parts to prevent the formation of rust.
• We grant 2 year guarantee on this product commencing on the date
of purchase. Within the guarantee period we will eliminate any defects
in the appliance resulting from faults in materials or workmanship, ei-
ther by repairing or replacing the complete product.
• This guarantee does not cover: damage due to improper use, normal
wear or use as well as defects that have a negligible effect on the value
or operation of the product. Damages caused by overloading or wrong
use are not grantes.
• To obtain service within the guarantee period, hand in the complete
product with your sales receipt to the store where the product had
been bought.
• The warranty applies only the first owner and is not transferable.
21

FR FRANCAIS
Liste des parties 23
Avertissement 24
Procédures d’assemblage 26
Comment changer le déambulateur 28
en forme de U
Comment ajuster la hateur de 29
cadre de marchette pour bébé
Comment plier le déambulateur 30
Utilisation d’un plateau de jeu électronique 30
Nettoyage et entretien 31
IMPORTANT: LIRE ATTENTIVEMENT CETTE NOTICE D’UTILISATION
POUR NE PAS COMPROMETTRE LA SECURITE DE
VOTRE ENFANT. LA CONSERVER POUR TOUTE CONSULTATION
FUTURE. L’ENFANT POURRAIT SE FAIRE MAL SI CES
INSTRUCTIONS NE SONT PAS SUIVIES.
AVERTISSEMENT : AVANT LA PREMIERE UTILISATION, OTER
ET ELIMINER TOUS LES SACHETS EN PLASTIQUE EVENTUELS
ET TOUS LES ELEMENTS FAISANT PARTIE DE L’EMBALLAGE
DU PRODUIT ET LES TENIR HORS DE PORTEE DES ENFANTS.
Empêcher tout accès à des
escaliers, marches et surfaces
irrégulières.
AVERTISSEMENT
22

FR
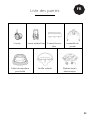
Liste des parties
2 roues 2 roues arrière xes 6 caoutchoucs
sûrs
Plateau de jeu
électronique
Feuille volante Cadre de marcheur
pour bébé
23
ensemble de
jouets

FR AVERTISSEMENT
24

FR
AVERTISSEMENT
JEU ÉLECTRONIQUE
٠
NETTOYAGE ET ENTRETIEN DU JEU
PILES:
25

FR Procédures d’assemblage
3. Fix the safe rubbers in the appropriate housings. Ensure that the safe rubbers are firmly pushed all the
way into the housing on the down base of the walker.
Assembling Procedures
1. Turn the baby walker frame upside down. Fix the wheels in the appropriate housings. Ensure that the
wheels are firmly pushed all the way into the housing on the down base of the walker.
2. Fix the rear fix wheels in the appropriate housings. Ensure that the wheels are firmly pushed all the way
into the housing on the down base of the walker.
Front Side
Back Side
Step 2
Step 3
Step 1
1. Retournez le cadre du trotteur. Fixez les roues dans les boîtiers appropriés. Assurez-vous que
les roues sont bien enfoncées jusqu’au bout dans le boîtier, sur la base du marcheur
2. Fixez les roues arrière xes dans les logements appropriés. Assurez-vous que les roues sont
bien enfoncées jusqu’au bout dans le boîtier sur la base inférieure du déambulateur.
3. Fixez les caoutchoucs de sécurité dans les boîtiers appropriés. Assurez-vous que les caout-
choucs de sécurité sont fermement poussé jusqu’au bout dans le boîtier sur la base inférieure
du déambulateur.
Retour
Avant
Étape 1
Étape 2
Étape 3
26

FR
Procédures d’assemblage
4. Open the baby walker frame in the in-use posion, ensuring that all wheels touch the floor. Slowly raise the
tray by polling it in an upward direcon, unl a click indicates that the frame has been locked correctly in one
of the three posions.
Step 4
Step 5
Step 6
5. Insert the plasc rings of the padded seat in the slots located along the upper edge of the walker
frame. Pass the rings through the slots and tug them unl they clear the passage, then release them,
ensuring that they are correctly locked in the posion and cannot recede into the slot.
6. Fit the large spoiler on the rear walker frame; simply place it on the housings, located at the rear of the
backrest, and push it firmly in a downward direcon, ensuring that it has been fied in the correct
posion. Please do not li up baby walker with large spoiler. It is dangerous do in this way.
4. Ouvrez le cadre du trotteur en position d’utilisation, en vous assurant que toutes les roues
touchent le sol. Soulevez lentement le plateau en l’interrogeant vers le haut, jusqu’à ce qu’un clic
indique que le cadre a été correctement verrouillé dans l’une des trois positions.
5. Insérez les anneaux en plastique du siège rembourré dans les fentes situées le long du bord
supérieur de la cadre de marcheur. Faites passer les anneaux dans les fentes et tirez-les jusqu’à ce
qu’ils dégagent le passage, puis les libérer, en s’assurant qu’ils sont correctement verrouillés dans la
position et qu’ils ne peuvent pas se rétracter dans la fente.
Étape 5
Étape 4
27
3
4. Open the baby walker frame in the in-use posion, ensuring that all wheels touch the floor. Slowly raise the
tray by pulling it in an upward direcon, unl a click indicates that the frame has been locked correctly in one
of the three posions.
Step 4
Step 5
Step 6
5. Insert the plasc rings of the padded seat in the slots located along the upper edge of the walker
frame. Pass the rings through the slots and tug them unl they clear the passage, then release them,
ensuring that they are correctly locked in the posion and cannot recede into the slot.
6. Insert the toys bar into the two holes on the upper tray.
6. Insérez la barre de jouets dans les deux trous du plateau supérieur.
Étape 6

FR
28
Procédures d’assemblage
4
8. Completely assembled.
Step 8
7. Put the music toy board onto the groove on the upper tray, listen for 3 clicks to make sure it's installed
firmly.
Step 7
DISASSEMBLY
Pull the ring of the music toy tray
onward the seat,then pull up with
certain strength to disassemble the
music toy tray from the upper tray.
How to Change Walker to U Shape
9. Pull the device at both ends back as the picture showed and make the cross bar away from the
walker, it becomes U shape walker for baby pushing.
Step 9
7. Placez la planche à musique sur la rainure du plateau supérieur, écoutez 3 clics pour vous assurer
qu’elle est bien installée
9. Tirez le dispositif aux deux extrémités vers l’arrière comme le montre la photo et éloignez la barre
transversale du déambulateur, il devient un déambulateur en forme de U pour pousser le bébé.
8. Entièrement assemblé.
Tirez l’anneau du plateau à musique
vers le siège, puis tirez vers le haut
avec une certaine force pour démon-
ter le plateau à musique du plateau
supérieur.
Comment changer le déambulateur
en forme de U
DÉMONTAGE
Étape 9
Étape 8
Étape 7

FR
29
Comment changer le
déambulateur en forme de U
5
When opening, closing or adjusng the walker, ensure that your child is at a safe
distance. Before placing the child in the walker, ensure that the secondary lock
buon is correctly locked again.
Step 10
How to Adjust the Height of Baby Walker Frame
10. To adjust the seat’s height, remove the child from the baby walking frame, pull up the safe buon
located under the small tray table and rotate it to 90 degrees. keep the safe buon pressed, then
raise or lower the small table unl the desired posion is reached, then pull up the safe buon and
rotate it to 90 degrees again to lock the small table.(If it is a automac secondary lock, please make
sure the lock is rotated to 90 degrees.)
The front
press
90 degree
rotation
90 degrees
rotation
Pour passer en mode de marche par pous-
sée, par sécurité, il faut d’abord serrer les
deux roues arrière à adhérence, puis enlever
le siège et retirer la barre arrière amovible sur
la base inférieure.
AVERTISSEMENT
Comment ajuster la hauteur de
cadre de marchette pour bébé
AVERTISSEMENT: Lorsque vous ouvrez, fermez ou ajustez le déam-
bulateur, assurez-vous que votre enfant se trouve à une distance de
sécurité. Avant de placer l’enfant dans le déambulateur, assurez-vous
que le bouton de verrouillage secondaire est à nouveau correctement
verrouillé.
10. Pour régler la hauteur du siège, retirez l’enfant du cadre de marche pour bébé, tirez vers le haut le bou-
ton de sécurité situé sous la petite tablette et faites-le pivoter à 90 degrés. Maintenez le bouton de sécurité
enfoncé, puis montez ou descendez la petite table jusqu’à la position souhaitée, puis tirez le bouton de
sécurité vers le haut et faites-le pivoter à nouveau à 90 degrés pour verrouiller la petite table. (S’il s’agit d’un
verrouillage secondaire automatique, veuillez vous assurer que le verrou a bien tourné à 90 degrés).
Étape 10

FR
30
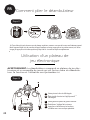
Comment plier le déambulateur
Utilisation d’un plateau de
jeu électronique
6
Using Electronic Play Toy Tray
Step 12
A
B
C
D
E
Rotate the lion 360 degrees.
Rotate the tortoise and hippo 360
degrees.
Silde the beads from le to right.
Switch, adjust volumn.
Press buons,lights twinkle with
splendid music.
The walker includes one electronic play tray and one toy set that aached to the
walker frame. The funcon and use are shown here.
How to Fold the Walker
11. Firstly, pull down the buon under top tray, make sure the buon finally parallel to the
adjusted-device(see 1st picture). Meanwhile, press up the front poson(see 2nd picture),
and press down the top base ll the end. The frame folds up completely.
Step 11
The front
press
90 degree
rotation
90 degrees
rotation
AVERTISSEMENT: Le déambulateur comprend un plateau de jeu élec-
tronique et un ensemble de jouets qui est fixé au cadre du déambula-
teur. La fonction et l’utilisation sont présentées ici.
10. Tout d’abord, tirez le bouton sous le plateau supérieur, assurez-vous que le bouton est nalement paral-
lèle à l’appareil réglé (voir la première image). Pendant ce temps, appuyez sur la position avant (voir 2ème
image), et appuyez sur la base supérieure jusqu’à la n. Le cadre se replie complètement.
Interrupteur, réglage de la colonne.
Faites glisser les perles de gauche à droite.
Faire tourner la tortue et l’hippopotame
360 degrés.
Appuyez sur les boutons, les lumières
scintillent avec une musique splendide.
Faites pivoter le lion de 360 degrés.
Étape 11
Étape 12

FR
Nettoyage et entretien
Garantie
• Ce produit doit être entretenu régulièrement. Les opérations de nettoyage
et d’entretien doivent être eectuées par un adulte.
• Nettoyer les tissus, les parties en plastique, y compris les taquets avec un
chion humide.
• Ne pas utiliser de produits abrasifs ou de solvants pour le nettoyage.
• Essuyer les parties en métal an d’éviter la formation de rouille.
• Nous accordons une garantie de 2 ans sur ce produit à partir de la date
d’achat. Pendant la période de garantie, nous éliminerons tout défaut de
l’appareil dû à un vice de matériau ou de fabrication, soit en réparant soit
en remplaçant le produit complet.
• Cette garantie ne couvre pas: les dommages résultant d’une mauvaise
utilisation, de l’usure normale ou de l’utilisation, ainsi que les défauts qui
ont un eect négligeable sur la valeur ou le fonctionnement du produit. Les
dommages résultant d’une surcharge ou d’un pliage incorrect ne seront pas
indemnisés.
• Pour obtenir un service pendant la période de garantie, vous devez
retourner le produit complet avec votre reçu au magasin où le produit a été
achteté.
• La garantie ne s’applique que’au premier propriétaire et n’est pas
transférable.
31

DDEUTSCH
WICHTIG: LESEN SIE BITTE VOR DEM GEBRAUCH DIESE
ANLEITUNGEN AUFMERKSAM DURCH, UM DIE SICHERHEIT
IHRES KINDES NICHT ZU GEFÄHRDEN. FÜR ZUKÜNFTIGES
NACHSCHLAGEN AUFBEWAHREN. DAS KIND
KÖNNTE SICH VERLETZEN, WENN DIESE ANLEITUNGEN
NICHT EINGEHALTEN WERDEN.
WARNUNG: VOR DEM GEBRAUCH, EVENTUELLE PLASTIKTÜTEN
UND ALLE VERPACKUNGSTEILE DES PRODUKTS
ABNEHMEN UND ENTSORGEN ODER JEDENFALLS FÜR
KINDER UNZUGÄNGLICH AUFBEWAHREN.
Blockieren Sie sicher Treppen,
Kamine, unebene Oberflächen,
bevor Sie die Lauflernhilfe
benutzen.
Teilie-Liste 33
Warnung 34
Verfahren zur Montage 36
Wie man die Gehhilfe in U-Form bringt 38
So stellen Sie die Höhe 39
von Lauernhilfe-Rahmen
Wie faltet man die Gehhilfe zusammen? 40
Elektronische Spielzeugablage verwenden 40
Tipps für die pege 41
WARNUNG
32

D
Teile-Liste
2 Räder 2 hintere festste-
hende Räder
6 sichere Beläge
Elektronisches AblagefachGefaltetes Blatt Lauernhilfe-Rahmen
33
Spielzeug-Set

DWarnung
34

D
LEKTRONISCHES SPIEL
WARNUNG: Regelmäßig den Abnutzungsgrad des Produktes überprüfen und es auf evtl. Schäden
untersuchen. Im Falle von Beschädigung oder Fehlfunktion, bewahren Sie das Produkt außerhalb der
Reichweite von Kindern auf und benutzen Sie es nicht mehr. Versuchen Sie nicht, es zu reparieren, sondern
wenden Sie sich ausschließlich an Fachpersonal.
REINIGUNG UND WARTUNG DES SPIELS
BATTERIEN
Warnung
35

DVerfahren zur Montage
3. Fix the safe rubbers in the appropriate housings. Ensure that the safe rubbers are firmly pushed all the
way into the housing on the down base of the walker.
Assembling Procedures
1. Turn the baby walker frame upside down. Fix the wheels in the appropriate housings. Ensure that the
wheels are firmly pushed all the way into the housing on the down base of the walker.
2. Fix the rear fix wheels in the appropriate housings. Ensure that the wheels are firmly pushed all the way
into the housing on the down base of the walker.
Front Side
Back Side
Step 2
Step 3
Step 1
1. Drehen Sie den Lauernhilfe-Rahmen auf den Kopf. Befestigen Sie die Räder in den entsprechenden Gehäusen. Achten
Sie darauf, dass die Räder fest bis zum Anschlag in das Gehäuse an der Unterseite der Lauernhilfe eingeschoben sind.
2. Befestigen Sie die hinteren Fixierräder in den entsprechenden Gehäusen. Achten Sie darauf, dass die
Räder fest bis zum Anschlag in das Gehäuse an der Unterseite der Gehhilfe eingeschoben werden.
3. Befestigen Sie die Sicherheitsgummis in den entsprechenden Gehäusen. Achten Sie darauf, dass die
Tresorgummis fest ganz in das Gehäuse an der Unterseite des Gehgestells geschoben.
Rückseite
Vorderseite
Schritt 3
Schritt 2
Schritt 1
36

D
3
4. Open the baby walker frame in the in-use posion, ensuring that all wheels touch the floor. Slowly raise the
tray by pulling it in an upward direcon, unl a click indicates that the frame has been locked correctly in one
of the three posions.
Step 4
Step 5
Step 6
5. Insert the plasc rings of the padded seat in the slots located along the upper edge of the walker
frame. Pass the rings through the slots and tug them unl they clear the passage, then release them,
ensuring that they are correctly locked in the posion and cannot recede into the slot.
6. Insert the toys bar into the two holes on the upper tray.
6. Führen Sie die Spielzeugstange in die beiden Löcher der oberen Ablage ein.
Verfahren zur Montage
4. Open the baby walker frame in the in-use posion, ensuring that all wheels touch the floor. Slowly raise the
tray by polling it in an upward direcon, unl a click indicates that the frame has been locked correctly in one
of the three posions.
Step 4
Step 5
Step 6
5. Insert the plasc rings of the padded seat in the slots located along the upper edge of the walker
frame. Pass the rings through the slots and tug them unl they clear the passage, then release them,
ensuring that they are correctly locked in the posion and cannot recede into the slot.
6. Fit the large spoiler on the rear walker frame; simply place it on the housings, located at the rear of the
backrest, and push it firmly in a downward direcon, ensuring that it has been fied in the correct
posion. Please do not li up baby walker with large spoiler. It is dangerous do in this way.
4. Önen Sie den Lauernhilfe-Rahmen in der Gebrauchsposition und stellen Sie sicher, dass alle
Räder den Boden berühren. Heben Sie die Schale langsam an, indem Sie sie nach oben klappen,
bis ein Klicken anzeigt, dass der Rahmen in einer der drei Positionen korrekt verriegelt ist.
5. Führen Sie die Kunststoringe des gepolsterten Sitzes in die Schlitze ein, die sich entlang der
oberen Kante des Gehgestell. Führen Sie die Ringe durch die Schlitze und ziehen Sie sie, bis sie den
Durchgang freigeben, dann Lassen Sie sie los und stellen Sie sicher, dass sie korrekt in der Position
verriegelt sind und nicht in den Schlitz zurückweichen können.
Schritt 6
Schritt 5
Schritt 4
37

D
38
Verfahren zur Montage
4
8. Completely assembled.
Step 8
7. Put the music toy board onto the groove on the upper tray, listen for 3 clicks to make sure it's installed
firmly.
Step 7
DISASSEMBLY
Pull the ring of the music toy tray
onward the seat,then pull up with
certain strength to disassemble the
music toy tray from the upper tray.
How to Change Walker to U Shape
9. Pull the device at both ends back as the picture showed and make the cross bar away from the
walker, it becomes U shape walker for baby pushing.
Step 9
7. Legen Sie das Musikspielzeugbrett in die Nut der oberen Ablage und achten Sie auf 3 Klicks, um
sicherzustellen, dass es fest installiert ist.
8. Vollständig montiert.
Ziehen Sie den Ring des Musikspiel-
zeug-Tabletts auf den Sitz und ziehen
Sie dann mit einer gewissen Kraft nach
oben, um das Musikspielzeug-Tablett
vom oberen Tablett zu lösen.
Wie man die Gehhilfe in U-Form bringt
DEMONTAGE
Schritt 9
Schritt 8
Schritt 7
9. Ziehen Sie das Gerät an beiden Enden nach hinten, wie auf dem Bild gezeigt, und machen Sie die
Querstange von der Lauernhilfe weg, dann wird es zur U-förmigen Lauernhilfe für das Pressen
von Babys.

D
39
Wie man die Gehhilfe in
U-Form bringt
5
When opening, closing or adjusng the walker, ensure that your child is at a safe
distance. Before placing the child in the walker, ensure that the secondary lock
buon is correctly locked again.
Step 10
How to Adjust the Height of Baby Walker Frame
10. To adjust the seat’s height, remove the child from the baby walking frame, pull up the safe buon
located under the small tray table and rotate it to 90 degrees. keep the safe buon pressed, then
raise or lower the small table unl the desired posion is reached, then pull up the safe buon and
rotate it to 90 degrees again to lock the small table.(If it is a automac secondary lock, please make
sure the lock is rotated to 90 degrees.)
The front
press
90 degree
rotation
90 degrees
rotation
Um in einen Schiebe-Walking-Modus um-
zuschalten, ziehen Sie zur Sicherheit zuerst
die beiden hinteren Griräder fest, nehmen
Sie dann den Sitz ab und entfernen Sie die
abnehmbare hintere Stange am unteren
Fußende.
WARNUNG
So stellen Sie die Höhe von
Lauflernhilfe-Rahmen
WARNUNG: Achten Sie beim Önen, Schließen oder Einstellen der Gehhilfe
darauf, dass sich Ihr Kind in einem sicheren Abstand bendet. Stellen Sie
vor dem Einsetzen des Kindes in die Lauernhilfe sicher, dass der sekundäre
Verriegelungsknopf wieder korrekt verriegelt ist.
10. Um die Höhe des Sitzes einzustellen, nehmen Sie das Kind aus dem Kinderlaufgestell, ziehen Sie den
Sicherheitsknopf unter dem kleinen Tabletttisch hoch und drehen Sie ihn um 90 Grad. Halten Sie den Si-
cherheitsknopf gedrückt, heben oder senken Sie den kleinen Tisch, bis die gewünschte Position erreicht ist,
ziehen Sie dann den Sicherheitsknopf hoch und drehen Sie ihn wieder um 90 Grad, um den kleinen Tisch
zu arretieren. (Wenn es sich um eine automatische Sekundärverriegelung handelt, stellen Sie bitte sicher,
dass die Verriegelung auf 90 Grad gedreht ist).
Schritt 10

D
6
Using Electronic Play Toy Tray
Step 12
A
B
C
D
E
Rotate the lion 360 degrees.
Rotate the tortoise and hippo 360
degrees.
Silde the beads from le to right.
Switch, adjust volumn.
Press buons,lights twinkle with
splendid music.
The walker includes one electronic play tray and one toy set that aached to the
walker frame. The funcon and use are shown here.
How to Fold the Walker
11. Firstly, pull down the buon under top tray, make sure the buon finally parallel to the
adjusted-device(see 1st picture). Meanwhile, press up the front poson(see 2nd picture),
and press down the top base ll the end. The frame folds up completely.
Step 11
The front
press
90 degree
rotation
90 degrees
rotation
Schritt 11
40
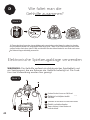
Wie faltet man die
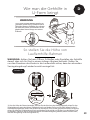
Gehhilfe zusammen?
Elektronische Spielzeugablage verwenden
6
Using Electronic Play Toy Tray
Step 12
A
B
C
D
E
Rotate the lion 360 degrees.
Rotate the tortoise and hippo 360
degrees.
Silde the beads from le to right.
Switch, adjust volumn.
Press buons,lights twinkle with
splendid music.
The walker includes one electronic play tray and one toy set that aached to the
walker frame. The funcon and use are shown here.
How to Fold the Walker
11. Firstly, pull down the buon under top tray, make sure the buon finally parallel to the
adjusted-device(see 1st picture). Meanwhile, press up the front poson(see 2nd picture),
and press down the top base ll the end. The frame folds up completely.
Step 11
The front
press
90 degree
rotation
90 degrees
rotation
WARNUNG: Die Gehhilfe umfasst ein elektronisches Spieltablett und
ein Spielzeugset, das am Rahmen der Gehhilfe befestigt ist. Die Funk-
tion und Verwendung werden hier gezeigt.
10. Zuerst den Knopf unter der oberen Ablage nach unten ziehen, wobei darauf zu achten ist, dass der
Knopf schließlich parallel zum eingestellten Gerät liegt (siehe 1. Bild). In der Zwischenzeit drücken Sie die
vordere Position nach oben (siehe 2. Bild), und drücken Sie den oberen Boden bis zum Ende nach unten.
Der Rahmen klappt vollständig zusammen.
Schalter, Lautstärke einstellen.
Schieben Sie die Perlen von links nach rechts.
Schildkröte und Nilpferd drehen
360 Grad.
Tasten drücken, Lichter blinken mit
herrliche Musik.
Drehen Sie den Löwen um 360 Grad.
Schritt 13

D
Tipps für die pege
Garantie
• Dieses Produkt benötigt regelmäßige Wartung. Die Reinigungs und
Wartungsarbeiten dürfen nur von einem Erwachsenen durchgeführt
werden.
• Die Stoffe und Kunststoffteile einschließlich der Stopper mit einem
feuchten Tuch reinigen.
• Verwenden Sie zur Reinigung keine Scheuer- oder Lösungsmittel.
• Die Metallteile abtrocknen, damit sich kein Rost bildet.
• Wir gewähren 2 Jahre Garantie auf dieses Produkt ab dem Kaufdatum.
Innerhalb de Garantiezeit beheben wir alle Mängel am Gerät, die auf
Material- oder Verarbeitungsfehler zurückzuführen sind, entweder durch
Reparatur oder Austausch des kompletten Produkts.
• Diese Garantie erstreckt sich nicht auf: Schäden, die durch unsachgemäßen
Gebrauch, normale Abnutzung oder normalen Verschleiß oder Gebrauch
entstehen, sowie auf Mängel, die den Wert oder den Betrieb des Produkts
nur unwesentlich beeinflussen. Schäden, die durch Überlastung oder falsches
Falten entstehen, werden nicht kompensiert.
• Um innerhalb der Garantiezeit Service zu enhalten, müssen Sie das gesamte
Produkt mit dem Kaufbeleg an das Geschäft zurückgeben, in dem das
Produkt gekauft wurde.
• Die Garantie gilt nur für den Erstbesitzer und ist nicht übertragbar.
41

IMPORTED BY BANINNI BELGIUM
-
 1
1
-
 2
2
-
 3
3
-
 4
4
-
 5
5
-
 6
6
-
 7
7
-
 8
8
-
 9
9
-
 10
10
-
 11
11
-
 12
12
-
 13
13
-
 14
14
-
 15
15
-
 16
16
-
 17
17
-
 18
18
-
 19
19
-
 20
20
-
 21
21
-
 22
22
-
 23
23
-
 24
24
-
 25
25
-
 26
26
-
 27
27
-
 28
28
-
 29
29
-
 30
30
-
 31
31
-
 32
32
-
 33
33
-
 34
34
-
 35
35
-
 36
36
-
 37
37
-
 38
38
-
 39
39
-
 40
40
-
 41
41
-
 42
42


in andere talen
- English: Baninni Totti Owner's manual
- français: Baninni Totti Le manuel du propriétaire
- Deutsch: Baninni Totti Bedienungsanleitung
Gerelateerde papieren
Andere documenten
-
BABYMOOV A040008 Handleiding
-
mothercare Chicco_walker WALKY TALKY Gebruikershandleiding
-
Hauck ROLL A ROUND II de handleiding
-
-
-
Brevi 551 de handleiding
-
-
-
Graco DISCOVERY WALKER de handleiding
-
BEBE CONFORT BALANCELLE de handleiding