Pagina wordt geladen...

998 309-A agria 6194 211/221, 6196 011/021 agria-Werke GmbH • D-74219 Möckmühl • Tel. +(0)6298/39-0 • Telefax +49(0)6298/38111 • e-mail: info@agria.de • Internet: www.agria.de 2
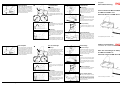
Meeneemnok
Monteer voor de bevestiging van de
verzamelbak en het sneeuwruimschild
aan beide kanten de meeneemnokken
(12) met ringen en zeskantmoeren aan
de basisbeschermplaat (bij arbeids-
breedte 70 cm wordt de meeneemnok
ook door de aanbouw-beschermplaten
gemonteerd).
Sneeuwruimer
Erste montage
l
Aanslagbeugel (32) aan de voorzij-
de beneden met de bevestigings-
schroeven aan de basisbeschermplaat
monteren. De aanslagbeugel kan tij-
dens het vegen aan de machine beve-
stigd blijven.
Annbouw
l
Sneeuwruimschild aan de voorzijde
met de meeneembuizen op de nee-
neemnokken (12) steken,
l
sneeuwruimschild kan met de zwenk-
stang als bij het vegen worden ge-
zwenkt.
Transportpositie
l
Sneeuwruimschild heffen en op het
uitstekende gedeelte van de aanslag-
beugel (32) plaatsen.
Kunststofschraaplijst
Men kan een kunststofschraaplijst
(K) onder de staalschraaplijst (S) aan-
bouwen. De kunststofschraaplijst (agria-
nr. 0496911) dient te worden geboord in
overeenstemming met de staal-schraap-
lijst (bovenaan evenredig) en eventueel
overeenkomstig te worden ingekort.
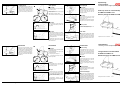
Verzamelbak
Montage
Greepbeugel volgens afbeelding op de
verzamelbak leggen
1. Stanguiteinde door het oog aan de
verzamelbak leiden
2. stang enigszins buigen en
3. stanguiteinde daarbij door het
tweede oog leiden.
Aanbouw
l
Verzamelbak aan de voorzijde met
de meeneembuizen op de mee-
neemnokken plaatsen.
Legen
l
Veegmachine naar het afvaldepot
rijden en verzamelbak door aan de
greep te trekken naar achteren of naar
voren aan het frame omhoogzwenken
– het vuil valt naar beneden.
Of:
l
Verzamelbak omhoog uit de
meeneemnok tillen, naar het afvaldepot
brengen en legen.
1.
2.
3.
Montage-instructie nr. 998 309-A 03.12
Coupling pivot
For coupling the dust bin and the snow
plough,
mount on both sides the coupling
pivots (12) with washers and hexagonal nut
on the basic protection casing (if the work-
ing width is70 cm also mount the coupling
pivot across the secondary protection cas-
ings).
Snow plough
Assembly
l
Mount the stop bow (32) below from
the front on the basic protection casing
using the locking bolts. The stop bow
may stay on the machine even for
sweeping operation.
Mounting
l
From the front, place the snow
plough with the tube fittings on the
coupling pivots (12).
l
Swivel the snow plough the same way
using the rod as on the road sweeper.
Drive position
l
Lift the snow ploughand place it on
the nose of the stop bow (32).
Plastic blade
It is possible to add a plastic blade
(K) below the steel blade (S). Pierce
the plastic blade (agria ref. 0496911)
at the top, alongside and flush with the
steel blade and suitably shorten if nec-
essary.
Pick-up tank
Assembly
Put the hand lever (as represented) on
the collecting tank.
1. Enter the end of the rod in the eye of
the pick-up tank.
2. Bend the rod slightly and fit
3. the end of the rod in the second eye.
Mounting
l
From the front, connect the pick-up
tank with the tube fittings to the cou-
pling pivots.
Dumping
l
Take the road sweeper to the dump-
ing place and pivote the pick-up tank
along the frame by pulling the handle to
the back or to the front - the waste will
be discharged below
or :
l
unhook the pick-up tank out of the
coupling pivots, take it to the dumping
place and unload.
1.
2.
3.
Operation manual nr. 998 309-A 03.12
Operating
Instructions
Translation of the original operating instructions
Handleiding
Vertaling van het oorspronkeijke handleiding
Pick-up tank of road sweeper
6194 211/221 and
Snow plough 6196 011/021
Veegmachine-verzamelbak
6194 211/221 en
Sneeuwruimer 6196 011/021
8,5 - 9 mm
8,5 - 9 mm
.
Documenttranscriptie
. Coupling pivot For coupling the dust bin and the snow plough, mount on both sides the coupling pivots (12) with washers and hexagonal nut on the basic protection casing (if the working width is70 cm also mount the coupling pivot across the secondary protection casings). Pick-up tank 2. Assembly Assembly Put the hand lever (as represented) on the collecting tank. l Mount the stop bow (32) below from the front on the basic protection casing using the locking bolts. The stop bow may stay on the machine even for sweeping operation. 1. Enter the end of the rod in the eye of the pick-up tank. 2. Bend the rod slightly and fit 3. the end of the rod in the second eye. 3. 1. Pick-up tank of road sweeper 6194 211/221 and Snow plough 6196 011/021 l From the front, connect the pick-up tank with the tube fittings to the coupling pivots. Dumping Mounting Translation of the original operating instructions l From the front, place the snow plough with the tube fittings on the coupling pivots (12). l Swivel the snow plough the same way using the rod as on the road sweeper. Mounting Snow plough Operating Instructions l Take the road sweeper to the dumping place and pivote the pick-up tank along the frame by pulling the handle to the back or to the front - the waste will be discharged below or : Drive position l Lift the snow ploughand place it on the nose of the stop bow (32). 8,5 - 9 mm l unhook the pick-up tank out of the coupling pivots, take it to the dumping place and unload. Plastic blade It is possible to add a plastic blade (K) below the steel blade (S). Pierce the plastic blade (agria ref. 0496911) at the top, alongside and flush with the steel blade and suitably shorten if necessary. Operation manual nr. 998 309-A 03.12 Handleiding Meeneemnok Monteer voor de bevestiging van de verzamelbak en het sneeuwruimschild aan beide kanten de meeneemnokken (12) met ringen en zeskantmoeren aan de basisbeschermplaat (bij arbeidsbreedte 70 cm wordt de meeneemnok ook door de aanbouw-beschermplaten gemonteerd). Verzamelbak 2. Montage Erste montage Greepbeugel volgens afbeelding op de verzamelbak leggen l Aanslagbeugel (32) aan de voorzijde beneden met de bevestigingsschroeven aan de basisbeschermplaat monteren. De aanslagbeugel kan tijdens het vegen aan de machine bevestigd blijven. 1. Stanguiteinde door het oog aan de verzamelbak leiden 2. stang enigszins buigen en 3. 1. 3. stanguiteinde daarbij door het tweede oog leiden. Aanbouw l Verzamelbak aan de voorzijde met de meeneembuizen op de meeneemnokken plaatsen. agria 6194 211/221, 6196 011/021 Veegmachine-verzamelbak 6194 211/221 en Sneeuwruimer 6196 011/021 l Sneeuwruimschild aan de voorzijde met de meeneembuizen op de neeneemnokken (12) steken, l sneeuwruimschild kan met de zwenkstang als bij het vegen worden gezwenkt. Transportpositie l Sneeuwruimschild heffen en op het uitstekende gedeelte van de aanslagbeugel (32) plaatsen. l Veegmachine naar het afvaldepot rijden en verzamelbak door aan de greep te trekken naar achteren of naar voren aan het frame omhoogzwenken – het vuil valt naar beneden. Of: l Verzamelbak omhoog uit de meeneemnok tillen, naar het afvaldepot brengen en legen. 998 309-A Vertaling van het oorspronkeijke handleiding Annbouw Legen Sneeuwruimer Kunststofschraaplijst 8,5 - 9 mm Men kan een kunststofschraaplijst (K) onder de staalschraaplijst (S) aanbouwen. De kunststofschraaplijst (agrianr. 0496911) dient te worden geboord in overeenstemming met de staal-schraaplijst (bovenaan evenredig) en eventueel overeenkomstig te worden ingekort. Montage-instructie nr. 998 309-A 03.12 agria-Werke GmbH • D-74219 Möckmühl • Tel. +(0)6298/39-0 • Telefax +49(0)6298/38111 • e-mail: [email protected] • Internet: www.agria.de 2-
 1
1
-
 2
2


Agria 6196 de handleiding
- Type
- de handleiding
- Deze handleiding is ook geschikt voor
in andere talen
- English: Agria 6196 Owner's manual
- français: Agria 6196 Le manuel du propriétaire
- Deutsch: Agria 6196 Bedienungsanleitung