Viscount Unico 700 Handleiding
- Categorie
- Aanvullende muziekapparatuur
- Type
- Handleiding

viscount
User Guide - EN
Gebruikersgids - NL
Guida Utente - IT
Ver. EU - 1.4
UNICO 700

WARNING: READ THIS FIRST!
WARNING
AVIS
RISK OF ELECTRIC SHOCK
DO NOT OPEN
RISQUE DE CHOC ÉLECTRIQUE
NE PAS OUVRIR
This symbol is intended to alert the user to the
presence of uninsulated “dangerous voltage”
within the product’s enclosure that may be of
sufficient magnitude to constitute a risk of
electric shock to persons.
This symbol is intended to alert the user to
the presence of important operating and
maintenance (servicing) instructions in the
literature accompanying the appliance.
WARNING:
TO REDUCE THE RISK OF FIRE OR ELECTRIC SHOCK:
DO NOT EXPOSE THIS APPARATUS TO RAIN OR MOISTURE
AND OBJECTS FILLED WITH LIQUIDS, SUCH AS VASES,
SHOULD NOT BE PLACED ON THIS APPARATUS.
DO NOT REMOVE COVER (OR BACK)
NO USER-SERVICEABLE PARTS INSIDE
REFER SERVICING TO QUALIFIED SERVICE PERSONNEL
"INSTRUCTIONS PERTAINING TO A RISK OF FIRE,
ELECTRIC SHOCK OR INJURY TO PERSONS"
IMPORTANT SAFETY INSTRUCTIONS
SAVE THESE INSTRUCTIONS
WARNING:
1) Read these instructions.
2) Keep these instructions.
3) Heed all warnings.
4) Follow all instructions.
5) Do not use this apparatus near water.
6) Clean only with dry cloth.
7) Do not block any ventilation openings. Install in accordance with the manufacturer’s instructions.
8) Do not install near any heat sources such as radiators, heat registers, stoves
or other apparatus (including amplifiers) that produces heat.
9) Do not defeat the safety purpose of the polarized or grounding-type plug. A polarized plug has two blades with one
wider than the other. A grounding type plug has two blades and a third grounding prong. The wider blade or the third
prong are provided for your safety. If the provided plug does not fit in to your outlet, consult an electrician for
replacement of the obsolete outlet.
10)Protect the power cord from being walked on or pinched, particularly at plugs, convenience receptacles,
and the point where they exit from the apparatus.
11)Only use attachments/accessories specified by the manufacturer.
12)Use only with the cart, stand, tripod, bracket, or table specified by
the manufacturer, or sold, with the apparatus. When a cart is used,
use caution when moving the cart/apparatus combination to avoid
injury from tip-over.
13)Unplug this apparatus during lightning storms or when unused for long periods of time.
14)Refer all servicing to qualified service personnel. Servicing is required when the apparatus has been damaged
in any way, such as power-supply cord or plug is damaged, liquid has been spilled or objects have fallen into
the apparatus, the apparatus has been exposed to rain or moisture, does not operate normally, or has been
dropped.
NOTE: The socket-outlet shall be installed near the equipment and shall be easily accessible.

1
Viscount UNICO 700User Guide
INDEX
1. Important notes .............................................................................................................................. 2
1.1 Looking after the product .............................................................................................................................. 2
1.2 Notes about the manual .................................................................................................................................. 2
2. Introduction.................................................................................................................................... 4
3. General description ........................................................................................................................ 5
4. Switching on and main video page ............................................................................................... 10
5. Setting the volumes (Volumes function) .......................................................................................11
6. Tuning the instrument (Tuning menu) ........................................................................................ 12
7. The organ styles (Styles menu) ..................................................................................................... 13
8. Selecting and regulating the voices (Voices menu) ...................................................................... 14
8.1 Regulating the volume (Volume Level function)....................................................................................... 14
8.2 Regulating the audio parameters (Edit Parameters function) ..................................................................15
8.3 Selecting the alternative voices (Alternative Voice function)................................................................... 16
9. Instrument general settings (Set-Up menu) ................................................................................. 18
9.1 Setting the routing of the voices on the rear audio outputs (Ext. Out Router function) ................... 18
9.2 Configuring the audio outputs on the rear (Ext. Out Config function) ................................................ 21
10. Utility and MIDI functions (Util. & MIDI menu) ......................................................................22
11. File management functions (File Manag. menu)........................................................................ 23
12. Playing and recording of musical sequences (Sequencer).........................................................24
12.1 Playing back a piece (Play mode) ............................................................................................................... 24
12.2 Recording a piece (Record mode) ............................................................................................................. 26
12.3 Sequencer playback options (Play Options menu).................................................................................. 28
12.4 Songlists (Songlist function)....................................................................................................................... 28
13. Appendix ......................................................................................................................................30
13.1 Stop Local Off ............................................................................................................................................. 30
13.2 Factory Settings............................................................................................................................................ 30
13.3 Upgrading the operating system ................................................................................................................ 31

2
Viscount UNICO 700 User Guide
1. IMPORTANT NOTES
1.1 LOOKING AFTER THE PRODUCT
• Do not apply excessive force to the organ’s structures or the controls (knobs, stops, push-buttons, etc.).
• When possible, do not place the instrument close to units which generate strong interference, such as
radios, TVs, computer videos, etc.
• Do not place the organ close to heat sources, in damp or dusty places or in the vicinity of strong magnetic
fields.
• Do not expose the instrument to direct sunlight.
• Never insert foreign bodies inside the instrument or pour liquids of any kind into it.
• For cleaning, use only a soft brush or compressed air; never use detergents, solvents or alcohol.
• Always use good quality screened cables for connection to amplification or diffusion systems. When
disconnecting cables from sockets, always take hold of the connector and not the cable itself; when
winding cables, do not knot or twist them.
• Before making the connections ensure that the other units (especially amplification and diffusion systems)
you are about to connect are switched off. This will prevent noisy or even dangerous signal peaks.
• Connect the net cable to an earthed socket.
• Check that the voltage corresponds to the voltage shown on the serial number plate of the organ.
• If the organ is to be out of use for lengthy periods, disconnect the plug from the power socket.
1.2 NOTES ABOUT THE MANUAL
• Take good care of this manual.
• This manual is an integral part of the instrument. The descriptions and illustrations in this publication
are not binding.
• While the instrument’s essential characteristics remain the same, the manufacturer reserves the right to
make any modifications to parts, details or accessories considered appropriate to improve the product or
for requirements of a constructional or commercial nature, at any time and without undertaking to
update this publication immediately.
• All rights reserved; the reproduction of any part of this manual, in any form, without the manufacturer’s
specific written permission is forbidden.
• All the trademarks referred to in this manual are the property of the respective manufacturers.

3
Viscount UNICO 700User Guide
• Read all the information carefully in order to obtain the best performances from your product and waste
no time.
• The codes or numbers in square brackets ([ ]) indicate the names of the buttons, sliders, trimmers and
connectors on the instrument. For example, [ENTER] refers to the ENTER button.
• The illustrations and display pages are purely guideline and may differ from those actually shown on the
display.
• The instructions provided in this manual only concern the instrument's operating system version that
was up to date when the document was released. Therefore, such instructions might not describe faithfully
your current operating system release. Please, visit the website http://www.physisorgans.com/
download.asp to check for the newest operating system release and manual.
• Check the Reference Manual for detailed descriptions on the organ's functions. The manual can be
downloaded from the Download page of the website http://www.physisorgans.com.

4
Viscount UNICO 700 User Guide
2. INTRODUCTION
Dear Customer,
Thank you for choosing the organ Viscount
Unico. The Company, a world leader in the
construction of fine classical organs, has installed
in this instrument the latest and most sophisticated
technology dedicated to the high fidelity
reproduction of pipe organ sounds, with
impressive flexibility and remakable quality of
timbre.
After years of research exploring musical synthesis
techniques, our Research and Development unit,
is the FIRST in the world to create the sounds of
a pipe organ by using the “physical modeling
technology” upon which the Physis is based.
Instead of using “sound samples” from pipe
organs (previously the standard method) this
revolutionary sound generation system involves the
real-time calculation of the waveform generated
by a precise mathematical model based on the
sound emission physics of a pipe organ,
incorporating the principal physical parameters ie. construction geometry, materials used, and pertaining air
pressure, etc.
The fact that the simple reproduction of memorized “sound” has been disregarded, permits the achievement
of unimaginable realism, with the level of detail previously only created by a traditional pipe organ.
For example, the mathematical model allows the production of a different sound for each key since it provides
the virtual reproduction of the original instrument by assigning a different pipe to each note, similar to a pipe
organ. Furthermore, it will generate a different sound for each consecutive pressure of the same note, thus
simulating the precise condition of the air volume inside the pipe as it is pressed.
The Unico also permits the “physical” editing of the sounds produced, by adjusting the parameters - just as
the organ builder constructs the pipes. If however, “editing” is not your forte, you may choose your sound
from a big library of pre-programmed pipe organ voices already in the instrument’s memory.
To conclude we suggest that you visit our web-sites www.viscount-organs.com and www.physisorgans.com
where you will find information, updates, documents and news about our unique range of instruments.

5
Viscount UNICO 700User Guide
3. GENERAL DESCRIPTION

6
Viscount UNICO 700 User Guide
1. PEDAL Section.
Contains the pedal’s stops and couplers for linking the manuals to the pedal board.
2. MAN. II Section.
Contains the stops, manual couplers and tremulants of Manual II.
3. MAN. IV Section.
Contains the stops and tremulants of Manual IV.
4. MAN.III Section.
Contains the stops, manual couplers and tremulants of Manual III.
5. MAN.I Section.
Stops, manual couplers and tremulants for Manual I.
6. [POWER] Switch.
Instrument on/off switch.
7. AMPLIFICATION Section.
Organ amplification controls.
- [CONSOLE ON] switches on the instrument’s internal amplification system.
- [EXT. SPEAKER ON] enables the PROG. OUT external outputs in the rear panel (point 27).
8. CANCEL Section.
Cancel buttons which allow disabling of all the Reed voices ([REED] tab) and the Plenum voices
([MIXTUR] tab).
9. MIDI Section
These controls, provided for each manual and the pedal board, allow transmission of the note MIDI
codes on the MIDI [OUT] port to be enabled and disabled. All the instrument’s other MIDI messages
will continue to be transmitted, even with the MIDI control off.
10. Control and programming section.
Contains the buttons and display for viewing and programming all the instrument’s setup and sequencer
functions.
11. ORCHESTRA Section.
This section contains the organ’s Orchestra stops.
12. Additional displays.
- [CRESCENDO] shows the step currently reached by the [CRESCENDO] pedal (point 25)
- [M. BANK] displays the memory bank of the combinations (general and customised) selected using
the [MEM. BANK +] and [MEM. BANK -] pistons (point 20).
13. General pistons.
These pistons and foot pistons recall the general combinations of the memory bank selected using
[MEM. BANK +] and [MEM. BANK -] (point 20). These combinations can be modified; the procedure
for saving them is described in point 19.
[HR] restores the voice setup prepared in manual mode before a memory was recalled.
General combination sequencer controls are also provided, [PREV] in descending order, [NEXT.] in
ascending order.

7
Viscount UNICO 700User Guide
14. Pedal Board pistons.
This section contains the six pedal board combinations and the [HR] control for restoring the pedal
board voice setup prepared in manual mode before one of these combinations is recalled. These
combinations can be modified; the procedure for saving them is described in point 19.
15. Manual IV pistons.
Pistons of the dedicated combinations of Man.IV. [HR] for restoring the Man.IV voices setup prepared
in manual mode before one of these combinations is recalled. The combinations can be modified; the
procedure for saving them is described in point 19.
[P] of the IV/P coupling.
[M.SOLO] (MIDI Solo) piston, which allows mono transmission of the notes played on this manual on
the MIDI [OUT] output, with priority to the highest note.
16. Manual III pistons.
Pistons of the dedicated combinations of Man.III. [HR] for restoring the Man.III voices setup prepared
in manual mode before one of these combinations is recalled. The combinations can be modified; the
procedure for saving them is described in point 19.
[P] of the III/P coupling. [IV] of the keyboards coupling.
[M.SOLO] (MIDI Solo) piston, which allows mono transmission of the notes played on this manual on
the MIDI [OUT] output, with priority to the highest note.
17. Manual II pistons.
Pistons of the dedicated combinations of Man.II. [HR] for restoring the Man.II voices setup prepared in
manual mode before one of these combinations is recalled. The combinations can be modified; the
procedure for saving them is described in point 19.
[P] of the II/P coupling. [III], [I] and [IV] of the keyboards couplings.
[O.SOLO] (Organ Solo) pistons, which allow the Man.III voices to be played in mono mode with priority
to the highest note when the [III/II] coupling is active, and [M.SOLO] (Midi Solo) piston, which allows
mono transmission of the notes played on this manual on the MIDI [OUT] output, with priority to the
highest note.
18. Manual I pistons.
Pistons of the dedicated combinations of Man.I. [HR] for restoring the Man.I voices setup prepared in
manual mode before one of these combinations is recalled. These combinations can be modified; the
procedure for saving them is described in point 19.
[P] of the I/P coupling. [III] and [IV] of the keyboards coupling.
[M.SOLO] (MIDI Solo) piston, which allows mono transmission of the notes played on this manual on
the MIDI [OUT] output, with priority to the highest note.
19. [S] Piston.
Fixing piston for saving the general and dedicated combinations, the Tutti and the Crescendo steps.
To set a combination or the Tutti, after setting the voices as required, press [S], hold it down and then
press the piston or foot piston of the combinations you wish to save.
To save a Crescendo step, select it using the pedal of the same name, press [S], hold it down and press the
[HR] of the general memories. To copy the contents of one step into another, select the step you wish to
copy, hold down the [S] piston, select the step into which you wish to copy the contents, then press the
[HR] of the general memories.
NOTE
If the LED of the [S] piston is off, programming of the organ is locked out by the Lock Organ
function (chapt. 10), so it will not be possible to save combinations and/or view internal programming
functions.

8
Viscount UNICO 700 User Guide
20. Organ general controls.
These controls do not refer to individual sections but to the entire instrument.
- [MEM. BANK +] and [MEM BANK -]: they select the memory bank displayed by the additional
[MEM. BANK] display (point 12).
- [ENC]: enables the Enclosed function, which allows the organ’s general volume to be controlled
using the swell pedal [MAN.III].
- [A.P.]: enables the Automatic Pedal which allows the pedal voices to be played on Man.II. In this case,
the organ’s pedal board is deactivated and the voices become monophonic, with priority to the lowest
note.
- [T]: piston and foot piston for recalling the Tutti. The Tutti can be modified; the procedure for saving
it is described in point 19.
- [C]: Cancel piston
NOTE
Memory bank n. 1 is always selected when the instrument is switched on.
21. Front connections panel.
This panel, on the left underneath the manuals, contains the connectors and settings most often used, for
convenient access.
- [MASTER VOLUME]: regulates the organ’s general volume.
- [REVERB VOLUME]: regulates the level of the reverb effect.
- MIDI [IN]: the MIDI input connector for allowing the organ to receive the data transmitted by a
remote MIDI unit.
- MIDI [OUT]: the MIDI connector that transmits the MIDI data generated by the organ.
- MIDI [THRU]: retransmits the data received by the [IN] port for connection of several MIDI devices
in series.
- [USB]: two USB connectors. The one on the left is used for connecting to a computer to allow the
instrument’s setup programme to be used. The one on the right is for use of an USB stick (not
supplied with the instrument) for use as a mass memory for the organ instead of the internal memory.
For further information refer to chap. 11.
- [PHONES]: the socket for connecting a headphone set.
22. Cover lock.
23. Coupler toe-studs.
These pistons duplicate the functions of the piston and draw-stop couplers.
24. [32’ FLUTE REVERS.] toe-stud.
When activated, this piston can be used to turn off the 32’ flutes.
25. [CRESCENDO] sweller.
You can use this sweller to select the Crescendo steps which activate a preset series of stops. The step
currently selected is displayed by the additional [CRESCENDO] display (see point 12).
Each Crescendo step is programmable. The procedure for saving them is described in point 19.
26. Swell expression pedals.
The organ has three swell pedals for continuous control the expression of Manual I, Manual III and
Manual IV.
The [MAN.IV] swell pedal also incorporates a special lever system for control of the Sustain effect for
the Orchestra voices.

9
Viscount UNICO 700User Guide
27. Rear connections.
On the back of the organ, there are various connections for making the audio connection to external
speaker systems, and the line and microphone input for use of the organ’s internal amplifier.
- [EXT. +12V DC] connectors: power at +12 Volt can be obtained from these connectors to switch-
on any VISCOUNT speakers connected to the PROG. OUT. outputs.
- OUT [GEN. SUB] (General Sub-Woofer): dedicated output for the connection of low-frequency
speakers (sub-woofer).
- PROG. OUT (Programmable Outputs): the instrument’s general line outputs, allowing simulation of
the wind-chests of pipe organs. The signals are distributed over the outputs on the basis of the
display function settings, which allow setting of the type of wind-chest, its size and the position in
space of the speakers used, for each stop. Each output also has dedicated level and equalisation
controls.
- INPUT [L(+R)] / [R]: line inputs which allow other instruments to be played using the organ’s
internal amplification. If the source is monophonic use the [L+(R)] connector only.
- INPUT [MIC]: microphone input allowing amplification of the signal from a microphone.
- [GAIN]: trimmer for regulating the gain of the input signal received at the [MIC] connector.
WARNING!
This group of connections on the rear is not visible from the outside and the organ’s wooden rear
panel has to be removed to access it. Contact qualified staff for this procedure.

10
Viscount UNICO 700 User Guide
4. SWITCHING ON and MAIN VIDEO PAGE
After the instrument is switched on with the [POWER] switch, the system takes a few seconds to become
operational. During this stage, the LEDs on the separate panels of the manuals come on in sequence, and
the display shows the introductory screen.
When the main video page appears, the instrument is ready for use:
The top of this screen contains the fields for selecting the organ’s various setup menus:
o TUNING: instrument tuning parameters.
o VOICES: functions relating to all the organ’s voices.
o STYLE: style selection.
o SET-UP: organ general set-up functions
o UTIL. & MIDI (Utility & MIDI): utility and MIDI functions
o FILE MANAG. (File Manager): management of the files saved in the internal memory or the USB
device.
To display the contents of a menu, simply locate the cursor (the field on which it is located appears in reverse
mode) on the field required using the [FIELD S] and [FIELD T] buttons and press [ENTER]. [EXIT] quits
the menu and returns to the main video page.
The bottom of this screen displays the instrument parameters the status of which it is always useful to know:
o [box in top left-hand corner]: (Equal in the screen shown) displays the temperament currently in use,
selected in the TUNING menu.
o ENSEMBLE: the ENSEMBLE value set in the TUNING menu.
o AIR PRESS: the AIR PRESSURE parameter value set in the TUNING menu.
o A: the instrument’s tuning, expressed as the frequency of A4, set in the TUNING menu.
o [box in top right-hand corner]: (User2 in the screen shown) contains the style selected in the STYLE
menu.
o P. COMB: the status of the PISTON COMBINE function as set in the UTILITY & MIDI menu.
o K. INV: the status of the KEYBOARD INVERSION function as set in the UTILITY & MIDI menu.
o TRANSP: the transposition set in TUNING.
These fields are for information only and cannot be selected. The menus referred to above have to be
accessed to modify the setting of the relative function.
The buttons used to view and navigate through all the display screens are arranged around the display.
- [SEQUENC]: screens for use of the instrument’s internal sequencer.
- [VOLUMES]: screen containing all the instrument’s volumes.

11
Viscount UNICO 700User Guide
- [FIELD S] and [FIELD T]: buttons used to move the cursor, identified by the field in reverse.
[FIELD S] positions it in the field above or the previous field, [FIELD T] in the field below or the next
field.
- [VALUE +] and [VALUE -]: buttons which regulate the values of the parameters, whether they are
numerical or alphanumerical. [VALUE +] increases, [VALUE -] decreases.
- [EXIT] and [ENTER]: buttons for accessing and quitting the display screens and menus, or for
confirming or cancelling prompts made by the system. [ENTER] accesses menus/screens and confirms,
[EXIT] quits menus/screens and cancels.
5. SETTING THE VOLUMES
(VOLUMES function)
Pressing the [VOLUMES] button displays the screen relating to all the organ’s volume controls:
o MST (Master): the organ’s overall volume, which can also be adjusted with the [MASTER VOLUME]
trimmer underneath the manuals.
o REV (Reverb): reverb effect, which can also be adjusted with the [REVERB VOLUME] trimmer
underneath the manuals.
o PHO (Phones): level of the output signal at the headphone [PHONES] connector underneath the manuals.
o EXT (External outputs): general volume of the PROG. OUT connectors on the rear panel.
o PED (Pedal): pedal board divisional volume.
o II (Manual II): second manual divisional volume.
o III (Manual III): third manual divisional volume.
o I (Manual I): first manual divisional volume.
o IV (Manual IV): fourth manual divisional volume.
o ORC (Orchestra): volume of the orchestra section.
Press [EXIT] or wait about 4 seconds to quit the screen and return to display of the previous video page.

12
Viscount UNICO 700 User Guide
6. TUNING THE INSTRUMENT
(TUNING menu)
Selecting the TUNING field on the main video page gives access to all the instrument’s tuning parameters.
o TRANSPOSER: transposer with a range from -6 to +5 semitones. When switched on, the organ always
has transposition equal to zero.
o [second field on the display]: (Equal in the screen shown) selector for setting historic temperaments
of various periods and countries of origin.
o BASE KEY: the note on which the chain of the 12 fifths that make up the temperament starts.
o ENSEMBLE: level of natural tiny differences in pitch between one organ pipe and another, simulating
the tuning error that occurs in the organ’s pipes due to wear over time and variations in temperature.
The values range from – (pipes perfectly tuned) to 8 (maximum pitch instability).
o AIR PRESSURE: simulates the drop in air pressure when a large quantity of air is requested in a short
time (e.g. when large chords are played with the Tutti). This is reflected in a temporary, gradual drop in
pitch, more obvious in the longest, widest pipes (flutes, bourdons, principals).
o PITCH (A): fine tuning of the pitch, indicated as the frequency of A4 (an 8’ pipe).
To quit the video page press [EXIT].
NOTE
Transposition does not have any effect on playback of pieces with the internal sequencer (unlike
recording, where the notes are acquired transposed). A specific transposer is provided for this
purpose (see point 12.3).

13
Viscount UNICO 700User Guide
7. THE ORGAN STYLES
(STYLES menu)
The Style identifies the setup of the organ stops, meaning the voice and the relative parameters of each stop,
allowing the use of sounds appropriate to the repertoire to be performed.
The organ has eight Styles, meaning eight sound setups, in the same console. The first four of them, which
from now on we will also call the Presets or preset styles, are programmed by our laboratories on the basis of
the appropriate organ schools, and cannot be modified by the user. The other four Styles, called User styles,
can be freely modified and customised to personal taste, making the organ extremely flexible.
Select the STYLE field on the main page for the Style selection:
As we have already stated, the first four Styles cannot be modified, so accessing to the VOICES function the
display shows the following warning message:
However it is possible to display and check the settings of these Styles, to continue press any display button
or wait about three seconds.

14
Viscount UNICO 700 User Guide
8. SELECTING AND REGULATING THE VOICES
(VOICES menu)
One of the main features of the new Physis synthesis technology used by the Unico organs for sound
generation is that it offers the user a wide array of options for personalising the instrument with a very large
number of organ timbres, and also makes available several parameters which can be adjusted to further
increase the setup potential.
The VOICES menu contains all the functions for selecting and regulating the voices’ audio parameters.
NOTES:
- The functions described below cannot be edited when a Preset style is selected. Select a User
style to regulate these parameters.
- The voices selected for each rocker switch or draw-stop, and the sound generation parameters
and volume, are automatically saved in the current Style. This means that when another style is
recalled, the voices will be reset with new parameters taken from the last style recalled. The
changes made earlier are not lost, and will be made available when the style in which they were
made is selected again.
The first video page displayed allows selection of the function to be accessed:
o VOLUME LEVEL: regulation of the volume of each individual voice.
o EDIT PARAMETERS: regulation of the sound generation parameters for each individual voice.
o ALTERNATIVE VOICES: selection of alterative voices.
8.1 REGULATING THE VOLUME (VOLUME LEVEL function)
After the VOLUME LEVEL field has been selected in the VOICES menu, the display shows the organ
sections. Select the section which contains the voice the volume of which you wish to adjust:

15
Viscount UNICO 700User Guide
As usual, use the [FIELD S] and [FIELD T] and [ENTER] buttons to select the field on the display.
Another way of displaying and adjusting the volume immediately is to hold out the draw-stop or hold down
the rocker tab for a few moments in the voice on position with the cursor on the VOLUME LEVEL field in
the VOICES menu, or in the function itself.
The LED of the stop the volume of which is being adjusted will flash to prevent modification errors; the
stop will be on and can be played for better, quicker adjustment. Other stops can also be switched on to
assess the overall effect of the changes.
To quit the function and save the values press [EXIT].
8.2 REGULATING THE AUDIO PARAMETERS (EDIT PARAMETERS function)
To view the screens containing the sound generation parameters of each individual voice, select the EDIT
PARAMETERS field in the VOICES menu:
For this function the display again shows the organ’s sections, allowing selection of the one containing the
voice to be modified.
after which the voice the parameters of which are to be viewed can be displayed.
Another way of viewing the setting screen directly is to hold out the draw-stop or hold down the rocker tab
for a few moments in the voice on position with the cursor on the EDIT PARAMETERS field in the
VOICES menu, or in the function itself.

16
Viscount UNICO 700 User Guide
The LED of the stop being modified will flash to prevent modification errors; the stop will be on and can be
played for better, quicker adjustment. Other stops can also be switched on to assess the overall effect of the
changes.
The parameters displayed are not the same for every voice, since some families have specific setting parameters
not required for other types of voice.
The settings which can be made are:
o CHARACTER: harmonic richness.
o AIR NOISE: noise of the air blowing through the pipe.
o REED NOISE: imperfect synchronisation of the reed throb period.
o ATTACK: attack time the sound takes to reach the maximum volume.
o REL. DETUNE: (Release Detune) detuning in the release phase.
o FREQ. SKEW: gradual change in the air’s pitch during the attack and release phases.
o DETUNE: detuning to produce the throb effect in the voices concerned.
o KEYB. LO LEV.: (Keyboard Low Level) gain (positive values) or attenuation (negative values)of the
volume in the low part of the manual.
o KEYB. LO LEV.: (Keyboard High Level) gain (positive values) or attenuation (negative values)of the
volume in the high part of the manual.
o TREMULANT: select the first (1st) or second (2nd) tremulant. The selected tremulant will be applied
to the register when activated through the dedicated draw-stop.
To quit the function and save the values press [EXIT].
8.3 SELECTING THE ALTERNATIVE VOICES (ALTERNATIVE VOICE
function)
Each stop on the panel has a set of voices, the default voice set by the current Style and the alternative voices,
which are variants on the original. To select an alternative voice, the ALTERNATIVE VOICES function has
to be recalled:
As for the other VOICES menu functions, the next step is to select the section of the organ containing the
voice to be modified: this displays the list of the voices present in the chosen section.

17
Viscount UNICO 700User Guide
Here again, there is the option of displaying the alternative voices screen directly by holding out the draw-
stop or holding down the rocker rab for a few moments in the voice on position with the cursor on the
ALTERNATIVE VOICES field in the VOICES menu, or in the function itself.
The LED of the stop being replaced will flash to prevent modification errors; the stop will be on and can be
played for better, quicker adjustment.
The display now shows the list of the alternative voices:
identified as “CURRENT VOICE” in the bottom of the screen.
It should also be remembered that the top of the screen always contains the name screen-printed on the
draw-stop or tab, so that the stop the voice of which is being changed can be identified at all times.
When the [FIELD S] and [FIELD T] buttons are used to move the cursor to other voices, the prompt
changes to “ENTER TO REPLACE”.
instructing you to press [ENTER] to confirm the new voice and render it usable. The voice on which the
cursor is located is available and can be played even before [ENTER] is pressed, allowing the modification
required to be evaluated immediately. Other stops can also be switched on to assess the overall effect of the
changes.
Press [EXIT] to replace other voices or exit the function.
NOTE:
When an alternative voice is selected, the sound generation parameters in the EDIT PARAMETERS
function are automatically reset to the default values of the new voice. The volume setting (in the
VOLUME LEVEL function) remains unchanged.

18
Viscount UNICO 700 User Guide
9. INSTRUMENT GENERAL SETTINGS
(SET-UP menu)
The SET-UP menu contains all the instrument’s general settings except for the settings relating to the MIDI
interface and the accessory and utility functions. To recall this menu, select the SET-UP field from the main
video page:
The functions available are as follows:
o 1st TREMULANT: setting of the first tremulant speed and depth for each individual manual.
o 2nd TREMULANT: setting of the second tremulant speed and depth for each individual manual.
o REVERBERATION: selection of the type of room for the reverb effect.
o INT. AMPL. EQUALIZER (Internal amplification equalizer): setting of the 5-band equalizer of the
internal amplifier.
o INT. AMPL. PANNING (Internal amplification panning): setting of the stereophonic distribution of
the stops of the internal amplification system, to simulate different types of wind- chests for the various
stops.
o INT. AMPL. TUNE-UP (Internal amplification tune-up): function not available in these models.
o PROG. FUNCTIONS (Programmable functions): settings relating to operation of the combinations,
the pistons, the Crescendo and the trimmers underneath the manuals.
o ENC. CONFIGURATION (Enclosed configuration): program the [ENC] piston function .
o EXT. OUT EQUALIZER (External outputs equalizer): setting of the equalizers of the PROG. OUT
outputs on the rear.
o EXT. SUB EQUALIZER (External sub equalizer): equalizer adjustment for the external output on the
back [GEN. SUB.].
o EXT. OUT ROUTER (External outputs router): setting of the routing of the stops on the PROG.
OUT outputs on the rear to simulate the position of the wind-chests and the arrangement of the pipes
inside them.
o EXT. OUT VOLUME (External outputs volume): setting of the volumes of the PROG. OUT outputs
on the rear.
o EXT. OUT CONFIG (External outputs config): setting of the PROG. OUT rear outputs.
o EXT. OUT RESIZE (External out resize): Adapts automatically the link between stops and rear
outputs, according to the amount of outputs actually used.

19
Viscount UNICO 700User Guide
9.1 SETTING THE ROUTING OF THE VOICES ON THE REAR AUDIO
OUTPUTS (EXT. OUT ROUTER function)
One of the Unico series organs’ key features is the capability for simulating the position of the wind-chests
and the arrangement of the pipes inside them, for every stop. This is achieved by setting the routing of the
audio signals, i.e. the way in which they are distributed, on the rear outputs. For each stop, the system is able
to set an output configuration which reflects the layout of the pipes in real wind-chests, as follows:
- single or double cusp
- double wing
- left or right wing
- mono
- alternate keys
Moreover, each of these layouts can be further specified with regard to the width of the wind-chest and its
location in space, defined by the number of outputs used. To access the rear audio output setting video page,
select the EXT. OUT ROUTER field in the SET-UP menu:
this displays the screen for selection of the section which contains the stop to be set up, which has to be
chosen from the list of the stops in the section:
Here again, there is the option of displaying the set-up screen directly by holding out the draw-stop or
holding down the rocker tab for a few moments in the voice on position with the cursor on the EXT. OUT
ROUTER field in the SET-UP menu, or in the function itself.
The LED of the stop being set up will flash to prevent modification errors; the stop will be on and can be
played for better, quicker adjustment. Other stops can also be switched on to assess the overall effect of the
changes.

20
Viscount UNICO 700 User Guide
the screen comprises four sections:
o MODE: selects the type of wind-chest from:
- C – C# (alternate keys)
- MONO
- DOUBLE CUSP
- CUSP
- DOUBLE WING
- WING
o FROM and TO: they select the limits of the area, set in outputs, within which the wind-chest is to be
located. The value is set as [output number-position between two outputs], bearing in mind that there are
four positions between one output and the next (2-4-6-8 on the display).
A value of 40 means that the end of the range (FROM or TO) is on output [4]; a value of 82 means that
the FROM or TO point is between output [8] and [9], close to [8] since it is in the first fifth of the area
between output [8] and output [9]. The screen previosly shown refers to a peaked wind-chest placed
between output [1] and a position between outputs [4] and [5].
o [position indicator]: it consists of small rectangles located above the drawing of the wind-chest and
indicates that the zone is displaying the part below the total number of outputs.
o [wind-chest on outputs]: in the bottom of the screen, it provides a graphic illustration of the wind-
chest with the references to the outputs being used, to give an immediate picture of its position and the
outputs which will carry the notes, in accordance with the wind-chest configuration.
To view the setup of another stop, simply activate the draw-stop / tab or press [EXIT] to quit the function.
In both cases the set-up just created is saved automatically.

21
Viscount UNICO 700User Guide
which means that the external panning (see par- 9.1) of certain stops might be modified automatically.
Stops placed between outputs [16] and [17], and/or outputs set as GENERAL or REVERB, will be
automatically set as Mono on the first output of the previously configured panning.
Press [EXIT] to abort the automatic panning adjustment and return to the SET-UP menu.
Press [ENTER] to confirm - the display will show:
Functioning of different modes is described in the tables below.
MODE OUTPUTS 1-16 OUTPUTS 17-18 OUTPUTS 19-20
TAB AMPLIFICAT.
[CONSOLE ON]
TAB AMPLIFICAT.
[EXT. SPEAKER ON]
STANDARD
As set in Ext. Router
Conf. function.
As set in Ext. Router
Conf. function.
As set in Ext. Router
Conf. function.
Internal amplification Outputs 1-20
GENERAL-REVERB
As set in Ext. Router
Conf. function.
General signal Reverberated signal only Outputs 1-16 Outputs 17-20
ANTIPHONAL
As set in Ext. Router
Conf. function.
As set in Ext. Router
Conf. function.
As set in Ext. Router
Conf. function.
Outputs 1-16 Outputs 17-20
GENERAL-ANTIPH.
As set in Ext. Router
Conf. function.
General signal
As set in Ext. Router
Conf. function.
Outputs 1-16 Outputs 17-20
ANTIPH.-REVERB
As set in Ext. Router
Conf. function.
As set in Ext. Router
Conf. function.
Reverberated signal only Outputs 1-16 Outputs 17-20
9.2 CONFIGURING THE AUDIO OUTPUTS ON THE REAR
(EXT. OUT CONFIG function)
Thanks to this function, the PROGRAMMABLE OUTPUTS can be configured, so as to manage the
Antiphonal signal (controlled through the AMPLIFICATION tabs), the general signal or just the reverberated
signal of the instrument.
Select the EXT. OUT CONFIG. field under the SET-UP menu; this pop-up message will appear:

22
Viscount UNICO 700 User Guide
10. UTILITY AND MIDI FUNCTIONS
(UTIL. & MIDI menu)
The UTILITY & MIDI menu, which can be recalled by selecting the field of the same name in the main
video page, contains all the accessory functions and the settings relating to the organ’s MIDI interface.
The menu is displayed on three screens:
The first part contains the accessory and utility functions:
o PIST. COMBINE (Piston Combine): synchronisation of the dedicated combinations of Manual II
with those of the pedal board.
o KEYBOARDS INV. (Keyboards Inversion): inversion of the manuals, so that the Man.I stops are
played with the second manual and vice-versa.
o TRACKER TOUCH: simulates the typical tracker touch of mechanical organs that affects the attack
times. Attack time is delayed on flue pipes only, release is delayed on all stops.
o 1st SHORT OCT. (First short octave): activation of the short octave on the first octave of the manuals
and pedal board.
o AUTO MAINPAGE: automatic return to the main video page if no display functions are used for 10
seconds.
o LCD CONTRAST: regulates the display contrast.
o SET DATE & TIME: date and time setting.
o LOCK ORGAN: setting of the code used to lock out the organ to prevent access to the instrument’s
set-up screens and the saving of combinations, the Tutti and the Crescendo.
o RESTORE FACT. SET (Restore factory settings): restores the factory settings.
o OP.SYS. UPGRADE (Operating System upgrade): operating system upgrade.
The second part of the menu relates to the MIDI interface settings:
o Tx AND Rx CHANNEL: MIDI transmission and reception channel set-up.
o Tx AND Rx FILTER: MIDI transmission and reception filter set-up.
o PROG. CHANGE SEND (Program Change send): saving of the combinations and transmission of
MIDI Program Change and Bank Select messages.
o PEDAL / KEYB TOUCH (Pedal / Keyboard touch): selection of the dynamic curves of the manuals
for use of the Orchestra voices and the transmission of MIDI notes.
o COUPLED NOTES: this control allows to select the notes to send through MIDI. Select YES to send
both the notes actually played on the manuals and the ones resulting from the coupling controls.
For example, by playing on the pedalboard while the coupling II/P is active, notes from the pedalboard
will be transmitted both on the pedalboard MIDI Channel AND on the Manb.II MIDI Channel.
Select NO to send only the notes physically played (in this example, notes will be transmitted only on the
pedalboard channel).

23
Viscount UNICO 700User Guide
11. FILE MANAGEMENT FUNCTIONS
(FILE MANAG. menu)
The Unico series of organs is able to use two different types of mass memory: the internal memory, and a
data storage device for connection to the [USB] slot underneath the manuals (USB pen).
These data storage units are used to save the organ’s set-up or parts of it, pieces of music and lists of pieces.
If the USB stick is connected, the system will use it as the mass memory. However, the internal memory can
still be used for copying files (from and to the USB pen), but it is not possible to load, delete and rename files
saved on the internal memory: the USB stick has to be removed before this can be done.
Selecting the FILE MANAGEMENT field in the main screen accesses the relative menu containing all the
file management functions. There is also a screen which provides information about the firmware versions
installed on the organ.
As the video page shows, the bottom of the screen identifies the memory unit currently in use:
- INTERNAL MEMORY
- USB STICK DRIVE
The functions available are as follows:
o DIR: displays the contents of the mass memory
o LOAD: file loading
o SAVE: saving of the set-up of the organ or parts of it in the mass memory.
o COPY: for copying files from one memory unit (e.g. internal) to another.
o RENAME: file rename.
o DELETE: file deletion.
o SONGLIST: programming of a list of pieces.
o O.S. INFO: display of the firmware versions installed in the system.
NOTES
- Once the USB pen is inserted please wait some seconds before displaying the FILE
MANAGEMENT menu.
- When using a computer to rename files stored on the USB pen, remember that names can only
contain numbers and letters, which must all be lowercase.
- Always use USB pens formatted with FAT or FAT32 file system (no NTFS).

24
Viscount UNICO 700 User Guide
12.1 PLAYING BACK A PIECE (PLAY mode)
In the sequencer mode selection screen described above, select the PLAY field. The display shows the MIDI
files stored in the memory unit currently in use:
12. PLAYING and RECORDING OF MUSICAL SEQUENCES
(SEQUENCER)
The Unico organ is equipped with an internal sequencer (digital recorder) capable of recording performances
on the instrument, and the commands and controls used. Recordings can then be saved on the USB stick or
in the internal memory as MIDI files and played back at any time.
To recall the sequencer press the [SEQUENC.] button beside the display. The screen for selection of the
system’s three operating modes is displayed:
o PLAY: playback of the performances saved in the internal memory or the USB pen.
o PLAY OPTIONS: options for playing back pieces
o RECORD: recording of pieces of music
The memory unit currently used appears in the bottom of the screen. Remember that the USB stick has
priority over the internal memory; to use the latter, first remove the USB device.
NOTE:
- Once the USB pen is inserted please wait some seconds before recalling the sequencer.
- Transposition set in the TUNING menu does not have any effect on playback of pieces (unlike
recording, where the notes are acquired transposed). To do this you have to set the transposer
described on par. 12.3.

25
Viscount UNICO 700User Guide
The new screen provides information about all the controls necessary for use of the sequencer:
- [ENTER]: starts playback of the piece.
- [EXIT]: quits the sequencer function.
- [FIELD S]: selects the previous piece saved in the memory or transferred to a Songlist (see point 12.4).
- [FIELD T]: selects the next piece saved in the memory or transferred to a Songlist (see point 12.4).
- [VALUE - ] (press once): decrease play speed (displayed on top left as percentage of the original value,
100 in the screen picture above).
- [VALUE + ] (press once): increase play speed (displayed on top left as percentage of the original value,
100 in the screen picture above).
- [VALUE - ] (press and hold): rewind.
- [VALUE +] (press and hold): fast forward.
Once playback of a song has been started, the display changes to:
as the screen shows, the functions of the [ENTER] and [EXIT] buttons have changed to:
- [ENTER]: pause /restart playback of the piece.
- [EXIT]: stop playback of the piece.
[FIELD S], [FIELD T], [VALUE -], [VALUE +] keep the functions already described.
Now select the MIDI file you wish to play back:

26
Viscount UNICO 700 User Guide
As in Play mode, the screen again carries information about the functions of the buttons:
- [ENTER]: starts the recording.
- [EXIT]: quits the sequencer function.
Once recording has started, the functions change to:
- [ENTER]: pause /restart recording.
- [EXIT]: stop recording.
Press [EXIT] to end the session. The display will show the screen allowing the recording just made to be
saved:
select [NEW SONG] to start a new recording. Otherwise, a MIDI file can be loaded to overdub it, or in other
words make a new recording which will be added to the performance already recorded.
12.2 RECORDING A PIECE (RECORD mode)
In the sequencer mode video page, select the RECORD field. The display will show:

27
Viscount UNICO 700User Guide
When composing the name, use the [FIELD S] and [FIELD T] buttons to move the cursor and [VALUE +]
and [VALUE -] to select the character. The first three characters can only be numbers, since they are required
for future expansions of the instrument. To confirm the name and proceed to save the data, press the
[ENTER] button; use [EXIT] to return to the previous screen, aborting the saving operation.
The following message confirms that the file has been saved:
If [EXIT] is pressed from the save screen (i.e. when the recording has been acquired but not saved), the
system warns that the recording is about to be lost:
The functions displayed allow:
o SAVE: saving of the recording as a MIDI file.
o PLAY: playback of the recoding before saving it.
o OVERDUB: creation of a new recording to be added to the sequence just acquired.
o DISCARD AND EXIT: delete the recording and quit sequencer Record mode.
If the SAVE field is selected, the system prompts the user to assign a name to the MIDI sequence about to
be saved:
and that [ENTER] must be pressed to confirm that you wish to quit and delete the data acquired, or [EXIT]
to return to the save screen.
NOTE
When using a computer to rename files stored on the USB pen, remember that names can only
contain numbers and letters, which must all be lowercase.

28
Viscount UNICO 700 User Guide
12.3 SEQUENCER PLAYBACK OPTIONS (PLAY OPTIONS menu)
Selecting the PLAY OPTIONS field in the sequence mode selection screen gives access to a number of
options relating to the playback of the pieces:
these refer to:
o TRANSPOSER: sets transposition in semitones of the pieces played by the sequencer.
o SONG LOOP: if this function is set as “YES”, at the end of a piece it is played back again.
o LIST AUTOPLAY: if this function is set as “YES”, during the use of the Songlist function, at the end
of one piece the next one is automatically played with no need to press the [FIELD T] button.
o LIST LOOP: if this function is set as “YES”, at the end of the last piece in a Songlist, the first piece is
automatically played again.
12.4 SONGLISTS (SONGLIST function)
Songlist is the organ function used to create and save lists of pieces of music (MIDI files).
To programme a list of pieces, recall the FILE MANAGEMENT menu and select the SONGLIST function;
the system asks if you wish to create a new one or modify an existing one:
Select the [NEW LIST] field to create a new list, or select an LST file to modify the list it contains.
In both cases, the first operation is to select the pieces you wish to include in the list:
Use the [FIELD S] and [FIELD T] buttons to select the MIDI file, [VALUE +] to add it to the list and
[VALUE -] to delete it. Its position within the list appears beside the name of the file.

29
Viscount UNICO 700User Guide
Now press [ENTER] to continue the programming or [EXIT] to abort, in this case the system requests a
confirm to proceed with the quit:
The second operation is to arrange the pieces within the list (or confirm the previous programming):
To move a piece into a different position, locate the cursor on the relative field of the file with the [FIELD
S] and [FIELD T] buttons and use [VALUE +] to move the position forward or [VALUE -] to set an earlier
position.
Finally, press [ENTER] to save the list or [EXIT] to return to the previous video page.
As for MIDI files, the first three characters can only be numbers.
To enter the name, use the [[FIELD S] and [FIELD T] buttons to move the cursor and [VALUE +] and
[VALUE -] to select the character.
Press [ENTER] to confirm the name and go ahead with the saving operation, or [EXIT] to return to the
previous video page.
NOTE
When using a computer to rename files stored on the USB pen, remember that names can only
contain numbers and letters, which must all be lowercase.

30
Viscount UNICO 700 User Guide
13. APPENDIX
13.1 STOP LOCAL OFF
Setting a stop in Local Off mode means that it will not be played by the organ’s internal sound generation
system, but the relative MIDI (System Exclusive code) message will be transmitted, so that it can be turned
on and played on a connected instrument.
To set a stop in Local Off mode, while the main screen is on the display, press the [S] (Set) piston, keep it
pressed and also press the [C] (Cancel) button. The LEDs of all the stops will light up and the display will
show the video page:
To set a voice in Local Off mode, operate its draw-stop or rocker switch so that its light goes out.
After setting the setup required, press [S] and [C] together to save it.
Accessing the Local Off setting function after this will trigger display of the status of the stops as follows:
- Light on: stop in Local On mode (plays with internal generation)
- Light off: stop in Local Off status
13.2 FACTORY SETTINGS
The Factory Setting procedure allows restoration of the factory settings of all the instrument’s internal
functions, deleting all the changes made by the user.
The Unico organ also allows the user to choose which settings are to be returned to the default values.
To recall this function, select the RESTORE FACT. SET display field in the second page of the
UTILITY&MIDI menu:
The following can be initialised:
o ENTIRE ORGAN: all the organ’s settings and functions (TUNING, SET-UP and UTILITY & MIDI
menus, the four User Styles, all the general and divisional combinations, Tutti and Crescendo and stop
Local Off status).

31
Viscount UNICO 700User Guide
o SETTING PARAMETERS: TUNING, SET-UP and UTILITY & MIDI menu settings.
o USER STYLE: the 4 User Styles
o COMB. MEMORIES: all the general and divisional combinations, Tutti and Crescendo.
After the required Factory Setting is selected by pressing [ENTER], the display shows a warning screen
indicating what is being restored to the default values:
Press [ENTER] again to start the procedure, during which the “PERFORMING” message is displayed after
which will display “ACCOMPLISHED”. Press [EXIT] to quit the operation.
13.3 UPGRADING THE OPERATING SYSTEM
The operating systm of the Unico organs can be easily and quickly updated. You just need to copy the install
file(s) on an USB drive and plug it in the appropriate connector, under the keyboards, then recall the OP.SYS
UPGRADE function of the UTIL. & MIDI menu.
ùIn order to get the necessary files and all the information about the operating system upgrade, please visit
the “Download” section of our official Physis website, at the address: http://www.physisorgans.com/
download.asp

Disposal of old Electrical & Electronic Equipment (Applìcable throughout the European Union
and other European countries with separate collection programs)
Dir. 2002/95/CE, 2002/96/CE e 2003/108/CE
This syrnbol, found on your product or on its packaging, indicates that this product should not be
treated as household waste when you wish to dispose of it. Instead, it should be handed overt to an
applicable collection point for the recycling of electrical and electronic equipment. By ensuring this
product is disposed of correctly, you will help prevent potential negative consequences to the
environment
and human health, which could otherwise be caused by inappropriate disposal of this product. The
recycling of materials will help to conserve natural resources. For more detailed information about the
recycling of this product, please contact your local city offi ce, waste disposal service or the retail store
where you purchased this product.
This product complies with the requirements of EMCD 2004/108/EC and LVD 2006/95/EC.
CAUTION
This product contains a lithium battery.
Danger of explosion if battery is incorrectly replaced.
Replace only with the same or equivalent type.
The batteries shall not be exposed to excessive heat such as sunshine, fire or the like.
The battery must be replaced by qualified personnel only.


35
Viscount UNICO 700
Gebruikersgids
INHOUDSOPGAVE
1. Belangrijke opmerkingen vooraf ..................................................................................................36
1.1 Zorg voor het product .................................................................................................................................. 36
1.2 Opmerkingen over de handleiding .............................................................................................................. 36
2. Einleitung ......................................................................................................................................38
3. Algemene beschrijving .................................................................................................................. 39
4. Inschakeling en hoofdpagina ........................................................................................................44
5. Regeling van de volumes (functie Volumes) ................................................................................45
6. Intonatie van het instrument (menu Tuning) .............................................................................. 46
7. De organstijlen (menu Styles) .......................................................................................................47
8. Selectie en regeling van de stemmen (menu Voices) ...................................................................48
8.1 Regegling van het volume (functie Volume Level) ................................................................................... 48
8.2 Editen van de geluidsparameters (functie Edit Parameters) .................................................................... 49
8.3 Selectie van de alternatieve stemmen (Alternative Voice function) ........................................................ 50
9. Algemene instellingen van het instrument (menu Set-Up)..........................................................52
9.1 Kanalisatie van de stemmen over de achterste geluidsuitgangen (functie Ext. Out Router function) ....... 53
9.2 Configuratie van de externe audio-uitgangen (functie Ext. Out. Config) ............................................. 54
10. Utiliteits-en Midi-functies (menu Util. & MIDI) .......................................................................56
11. Functies voor het beheer van de bestanden (menu File Manag.) ...............................................57
12. Registratie en weergave van muzieknummers (Sequencer) .......................................................58
12.1 Weergave van een nummer (werkwijze Play) ........................................................................................... 58
12.2 Registratie van een nummer (werkwijze Record) .................................................................................... 60
12.3 Weergaveopties van de sequencer (menu Play Options).......................................................................62
12.4 Songlists (functie Songlist function) ......................................................................................................... 62
13. Bijlage ..........................................................................................................................................64
13.1 Local Off van de registers .......................................................................................................................... 64
13.2 Factory Settings............................................................................................................................................ 64
13.3 Updaten van het besturingssysteem .......................................................................................................... 65

36
Viscount UNICO 700
Gebruikersgids
1. BELANGRIJKE OPMERKINGEN VOORAF
1.1 ZORG VOOR HET PRODUCT
• Zorg ervoor dat het instrument niet te lijden heeft van overmatige trillingen of harde stoten (knoppen,
druktoetsen, registers, enz.).
• Plaats het instrument niet in de buurt van apparaten, waarvan mag worden verwacht dat ze storende
elektrische en magnetische velden opwekken, zoals radio’s, TV’s, monitoren, enz
• Vermijd het blootstellen van het orgel aan hittebronnen. Laat het instrument niet staan in een erg vochtige
of stoffige omgeving of in de buurt van sterke magnetische velden.
• Vermijd het blootstellen van het orgel aan direct zonlicht.
• Plaats nooit voorwerpen in het instrument en giet er nooit vloeistoffen, van welke aard ook, in.
• Gebruik voor het regelmatig reinigen alleen maar een zachte borstel/doek of perslucht. Gebruik voor
het reinigen nooit chemicaliën zoals benzine, verdunners, alcohol, enz.
• Gebruik altijd afgeschermde kabels van goede kwaliteit voor de verbindingen met versterkers en andere
apparaten voor geluidsdistributie.
Trek bij het losnemen van de verbinding nooit aan de kabel zelf maar altijd aan de aansluitsteker. Vlecht
kabels niet in elkaar bij het oprollen.
• Verzeker u ervan alvorens een verbinding te maken, dat de aan te sluiten systemen (in het bijzonder de
versterkers) zijn uitgeschakeld. Hierdoor wordt ongewenst geruis en mogelijk zelfs het optreden van
gevaarlijke signaalpieken voorkomen.
• Vergeet niet om de stekker van het orgel los te nemen als het instrument langere tijd niet wordt gebruikt.
1.2 OPMERKINGEN OVER DE HANDLEIDING
• Ga zorgvuldig met de handleiding om.
• De handleiding vormt met het instrument één geheel. De beschrijvingen en illustraties hierin zijn niet
bindend.
• Hoewel de essentiële kenmerken van het instrument niet zullen veranderen, houdt de fabrikant zich te
allen tijde het recht voor om wijzigingen aan te brengen in onderdelen, details, of accessoires die nodig
worden geacht om het product te verbeteren dan wel vanwege constructieve eisen of om commerciële
redenen, zonder de verplichting om deze publicatie direct aan te passen.
• “All rights reserved”: de reproductie van enig deel van deze handleiding, in welke vorm dan ook, is
zonder schriftelijke toestemming van de fabrikant is verboden.
• Alle handelsmerken die in deze handleiding worden genoemd, zijn eigendom van de betreffende
fabrikanten.

37
Viscount UNICO 700
Gebruikersgids
• Aangeraden wordt om deze handleiding zorgvuldig door te nemen. Dan gaat niet onnodig tijd verloren
om met het instrument te kunnen omgaan en verkrijgt u betere resultaten met het instrument.
• Met tekens of cijfers tussen vierkante haken ( [ . . ] ) worden de namen van de druktoetsen, regelschuiven,
instelknoppen en aansluitingen aangeduid. Bij voorbeeld : [ENTER] verwijst naar de ENTER druktoets.
• De illustraties en afbeeldingen van de display zijn alleen als richtlijn bedoeld en kunnen verschillen van
war werkelijk op de display wordt getoond.
• De instructies die in deze handleiding zijn opgenomen, hebben uitsluitend betrekking op de versie van
het besturingssysteem die actueel was tijdens de publicatie van dit document. Deze instructies zouden
daarom eventueel afwijkingen kunnen vertonen met betrekking tot de huidige versie van uw
besturingssysteem. Raadpleeg daarom de website http://www.physisorgans.com/.com voor de nieuwste
versie van besturingssysteem en bijbehorende handleiding.
• Raadpleeg de referentie handleiding voor een meer gedetailleerde beschrijvingen van de functies van het
orgel. Deze handleiding kan worden gedownload vanaf de download pagina van deze website:
http://www.physisorgans.com.

38
Viscount UNICO 700
Gebruikersgids
2. EINLEITUNG
Geachte gebruiker,
Hartelijk dank voor het kiezen van de Viscount
Unico orgel.
U schafte van ons bedrijf, mondiaal marktleider
op het gebied van prestigieuze klassieke orgels een
uitbreiding van uw bestaande orgel aan. De
nieuwste en meest geavanceerde technologie is
toegepast, die het mogelijk maakt om met een
grote natuurgetrouwheid de klank van een
pijporgel te reproduceren, in het gebruik een
indrukwekkende flexibiliteit garandeert en een
geheel nieuwe klasse van klankkwaliteit markeert.
Na jaren van onderzoek om nieuwe methoden van
klankopwekking te ontdekken en te ontwikkelen
is het Viscount Research & Development centrum
erin geslaagd om wereldwijd als eerste de klank
van de originele orgelpijp te reproduceren met
behulp van ‘Physical Modelling Techniek’ als basis
voor de innovatieve Physis technologie.
Deze revolutionaire wijze van klankopwekking
maakt niet, zoals tot nu toe algemeen toegepast,
gebruik van ‘samples’ van pijporgels, maar berekent ‘real-time’ de gevraagde golfvorm, die het klankkarakter
bepaalt, uit een nauwkeurig fysisch rekenmodel, dat gebaseerd is op de studie naar de fysische werking van
geluidsopwekking in de orgelpijp en waarin rekening wordt gehouden met de belangrijkste fysische parameters
zoals de vorm (mensuur), de materiaalkeuze, de winddruk, enz.
Nu eenmaal het niveau van het louter reproduceren van de opgenomen pijpklank is gepasseerd, wordt het
mogelijk om een tot dusverre ondenkbare mate van realisme vorm te geven, die ook de fijnste details van het
oorspronkelijke muziekinstrument vertolkt.
Om een voorbeeld te geven: het toegepaste mathematische model maakt het mogelijk dat een register voor
iedere toets een eigen klankkleur krijgt. Net als bij het originele pijporgel hoort bij iedere toets een aantal
eigen pijpen, die ieder een unieke klank voortbrengen. Daarboven is de klank ook afhankelijk van verandering
in de winddruk, die bepalend is voor de trillingscondities van de lucht in het pijpcorpus, net als bij het
originele muziekinstrument
Bovendien is een “fysische” bewerking van de klanken mogelijk, bijna op dezelfde manier als de orgelbouwer
zijn pijpen maakt, door de belangrijkste elementen die we hebben genoemd te bewerken. Maar als u dit liever
niet zelf doet, kunt u desgewenst een keuze maken uit een uitgebreid assortiment voorgeprogrammeerde
orgelpijpklanken die al in het interne geheugen van instrument zijn opgeslagen.
Tot slot nodigen wij uit om de websites www.viscount-organs.com en www.physisorgans.com te bezoeken
waar u aanvullende informatie, updates, informatie en actueel nieuws over dit instrument en alle overige
instrumenten uit onze productie kunt vinden.

39
Viscount UNICO 700
Gebruikersgids
3. ALGEMENE BESCHRIJVING

40
Viscount UNICO 700
Gebruikersgids
1. Sectie PEDAL.
Hier zijn de registers van het pedaal en de koppelingen van de manualen met het pedaal ondergebracht.
2. Sectie MAN.II.
Hier zijn de registers, de koppelingen van de manualen en tremulanten van Manuaal II ondergebracht.
3. Sectie MAN.IV.
Registers en tremulanten van Manuaal IV.
4. Sectie MAN.III.
Registers, koppeling van de manualen en tremulanten van Manuaal III.
5. Sectie MAN.I.
Registers, koppeling van de manualen en tremulanten van Manuaal I.
6. Schakelaar [POWER].
Schakelaar voor in- en uitschakelen van het instrument.
7. Sectie AMPLIFICATION.
Regelingen van de versterkingen van het orgel.
- [CONSOLE ON] activeert de interne versterking van het instrument.
- [EXT. SPEAKER ON] activeert de externe uitgangen PROG. OUT op het achterpaneel (punt 27).
8. Sectie CANCEL.
Deze wisknoppen zorgen voor uitsluiting van de uitvoering van alle stemmen die deel uitmaken van de
Tongwerken (wipregister [REED]) en de Mixturen (wipregister [MIXTUR]).
9. Sectie MIDI.
Deze besturingen voor elk manuaal en het pedaal zorgen voor het wel of niet activeren van de verzending
naar de MIDI [OUT] poort van de MIDI nootcodes. Alle overige MIDI meldingen die door het instrument
worden voorzien, worden ook bij uitgeschakelde MIDI besturing verzonden.
10. Sectie voor regeling en programmering.
Hier zijn de toetsen en het display voor de weergave en programmering van alle configuratiefuncties en
de sequencer van het instrument aanwezig.
11. Sectie ORCHESTRA.
Hier zijn de Orchestra-registers van het orgel ondergebracht.
12. Aanvullende displays.
- [CRESCENDO]: geeft de momenteel door het pedaal bereikte stap aan (punt 25)
- [M. BANK]: geeft de geheugenbank weer van de (algemene en speciale) combinaties geselecteerd
met behulp van de duimpistons [MEM. BANK +] en [MEM. BANK -] (punt 20).
13. Algemene combinaties.
Deze duim- en voetpistons zorgen voor het oproepen van de algemene combinaties van de geheugenbank
geselecteerd via [MEM. BANK +] en [MEM. BANK -] (punt 20). Deze combinaties kunnen aangepast
worden, de opslagprocedure is beschreven onder punt 19.
[HR] Hand registratie.
Bovendien zijn de sequencers van algemene combinaties aanwezig, [PREV.] is in aflopende volgorde,
[NEXT] in oplopende volgorde.

41
Viscount UNICO 700
Gebruikersgids
N.B.
Wanneer de Led van de duimpiston [S} uit blijkt te zijn, betekent dit dat de programmering van het
orgel geblokkeerd is, en derhalve zal het niet mogelijk zijn om combinaties op te slaan en/of de
interne programmeerfuncties weer te geven (Lock Organ functie, hoofdstuk 10).
14. Pedaalcombinaties en commando’s .
Hier treft u de zes speciale pedaalcombinaties aan en de [HR] Hand registratie.
Deze combinaties kunnen aangepast worden, de opslagprocedure is beschreven onder punt 19.
15. Combinaties en commando’s van Manuaal IV.
Duimpistons van de speciale combinaties van Man.IV, [HR] Hand registratie. Koppelingen [III/P].
Deze combinaties kunnen aangepast worden, de opslagprocedure is beschreven onder punt 19.
[M.SOLO] (MIDI Solo) aanwezig die voor monofonische overdracht naar MIDI [OUT] van de op dit
manuaal gespeelde noten zorgt, met prioriteit op de hoogste toon.
16. Combinaties en commando’s van Manuaal III.
Duimpistons van de speciale combinaties van Man.III, [HR] Hand registratie.
Koppelingen [III/P], [IV/III]
Deze combinaties kunnen aangepast worden, de opslagprocedure is beschreven onder punt 19.
[M.SOLO] (MIDI Solo) aanwezig die voor monofonische overdracht naar MIDI [OUT] van de op dit
manuaal gespeelde noten zorgt, met prioriteit op de hoogste toon.
17. Combinaties en commando’s van Manuaal II.
Duimpistons van de speciale combinaties van Man.II. [HR] Hand registratie. Koppelingen [II/P], [III/
II], [I/II] en [IV/II]. De combinaties kunnen aangepast worden, de opslagprocedure is beschreven onder
punt 19.
[O.SOLO] (Organ Solo) aanwezig, waarmee de stemmen van Man.III monofonisch gespeeld kan worden,
met prioriteit op de hoogste noot, wanneer de koppeling [III/II] geactiveerd blijkt, [M.SOLO] (MIDI
Solo) die voor monofonische overdracht van de op dit manuaal gespeelde noten naar MIDI [OUT] zorgt,
met prioriteit op de hoogste noot.
18. Combinatie en commando’s van Manuaal I.
Duimpistons van de speciale combinaties van Man.I. [HR] Hand registratie. Koppelingen [I/P] en [III/I] en
[IV/I]. De combinaties kunnen aangepast worden, de opslagprocedure is beschreven onder punt 19.
[M.SOLO] (MIDI Solo) aanwezig die voor monofonische overdracht naar MIDI [OUT] van de op dit
manuaal gespeelde noten zorgt, met prioriteit op de hoogste toon.
19. Duimpiston [S].
Piston voor de opslag van de algemene en speciale combinaties, het Tutti en de stappen van het Crescendo.
Druk, om een combinatie of het Tutti op te slaan, na de gewenste toestand van de stemmen te hebben
ingesteld, op [S] en druk, terwijl [S] ingedrukt wordt gehouden, op de duimpiston of de voetpiston van
de combinatie die men wil opslaan.
Selecteer, om een stap van het Crescendo op slaan, deze met het gelijknamige pedaal, druk op [S] en druk,
terwijl [S] ingedrukt wordt gehouden, op [HR] van de algemene geheugens. Om de inhoud van een stap
in een andere te kopiëren: selecteer de stap die men wenst te kopiëren, druk op de duimpiston [S] en houd
deze ingedrukt, selecteer de stap waarin men de inhoud wil kopiëren, en druk vervolgens op [HR] van de
algemene geheugens.

42
Viscount UNICO 700
Gebruikersgids
20. Algemene commando’s van het orgel.
Het gaat om commando’s die niet voor de afzonderlijke secties zijn bestemd, maar waarvan de activering
het gehele instrument beïnvloedt.
- [MEM. BANK +] en [MEM BANK -]: selecteren de geheugenbank weergegeven op het aanvullende
display [MEM. BANK] (punt 12).
- [ENC]: activeert de functie Enclosed waarmee het algemene volume van het orgel geregeld kan
worden door bediening van het zwelpedaal [MAN.III].
- [A.P.]: activeert Automatic Pedal waarmee de stemmen van het pedaal op Man.II. In dit geval wordt
het pedaal van het orgel uitgeschakeld en worden de stemmen monofonisch, met prioriteit op de
laagste noot
- [T]: duimpiston en voetpiston voor het oproepen van het Tutti. Het Tutti kan aangepast worden, de
opslagprocedure is beschreven onder punt 19.
- [C]: duimpiston voor het annuleren
N.B.
Bij inschakeling wordt altijd de geheugenbank nr. 1 geselecteerd.
21. Paneel van de voorste aansluitingen.
Op dit paneel links onder de manualen bevinden zich de connectors en de regelingen die het meest
gebruikt worden en dus makkelijk toegankelijk moeten zijn.
- [MASTER VOLUME]: regelt het algemene volume van het orgel.
- [REVERB VOLUME]: regelt het niveau van het nagalmeffect.
- MIDI [IN]: dit is de MIDI ingangsconnector waarover het orgel de gegevens ontvangt die door een
externe MIDI-unit worden verzonden.
- MIDI [OUT]: dit is de MIDI-connector die de door het orgel gegenereerde MIDI-gegevens verzendt.
- MIDI [THRU]: herzendt de gegevens ontvangen van de poort [IN] voor de seriële verbinding van
meerdere MIDI-apparaten.
- [USB]: dit zijn twee USB-connectors. De linkse wordt gebruikt voor de verbinding met de computer
om het configuratieprogramma van het instrument te kunnen gebruiken. De rechtse is bestemd voor
toepassing van een usb-stick (niet bij het instrument geleverd) die als massageheugen van het orgel
ter vervanging van het interne geheugen gebruikt kan worden. Zie voor meer informatie hoofdstuk
11.
- [PHONES]: dit is de aansluiting voor een koptelefoon.
22. Dekselslot.
23. Voetpistons van de koppelingen.
Deze pistons repliceren de functie van de koppelingen met duimpiston of trekregister.
24. [32 FLUTE REVERS.] voetpiston.
Wanneer geactiveerd, kan deze zuiger worden gebruikt om uitschakelen van de 32 'fluiten.
25. Pedaal [CRESCENDO].
Met dit pedaal kunt u de stappen van het Crescendo selecteren waarmee een vooraf vastgestelde serie
registers geactiveerd wordt. De momenteel geselecteerde stap wordt op het aanvullende display getoond
[CRESCENDO] (zie punt 12).
Elke stap van het Crescendo is programmeerbaar. De opslagprocedure is beschreven onder punt 19.

43
Viscount UNICO 700
Gebruikersgids
26. Zwelpedalen.
De orgel zijn voorzien van drie zwelpedalen voor de continuregeling van het volume van Manuaal I,
Manuaal III en Manuaal IV.
In het pedaal [MAN.IV] is bovendien een speciaal hendelsysteem ingebouwd waarmee het Sustain-effect
voor de Orchestra-stemmen gecontroleerd kan worden.
27. Achterste aansluitingen
Binnen het orgel zijn diverse aansluitingen voor de audioverbinding met externe weergavesystemen, de
lijn- en microfooningangen voor het gebruik van de interne versterker van het orgel.
- Aansluitingen [EXT. +12V DC]: vanaf deze connectors kan de +12 Volt spanning worden opgenomen
voor de ontsteking van de VISCOUNT luidsprekers die eventueel zijn aangesloten op de PROG.
OUT uitgangen.
- OUT [GEN. SUB] (General Sub-Woofer): uitgang bestemd voor aansluiting van luidsprekers voor
lage frequenties (sub-woofer).
- PROG. OUT (Programmable Outputs): algemene lijnuitgangen van het instrument waarmee de
windladen van pijporgels gesimuleerd kunnen worden. De signalen zijn namelijk over de uitgangen
verdeeld op basis van de instellingen van de displayfuncties die voor elk register de instelling van het
type windlade, zijn grootte en positie in de ruimte van de gebruikte luidsprekers toestaan. Elke uitgang
beschikt bovendien over speciale niveau- en equalizerregelingen.
- INPUT [L(+R)] / [R]: lijningangen waarmee andere instrumenten bespeeld kunnen worden met de
interne versterking van het orgel. Gebruik in geval van een monofonische bron uitsluitend de aansluiting
[L(+R)].
- INPUT [MIC]: ingang voor microfoon waarmee het signaal afkomstig van een microfoon versterkt
wordt.
- [GAIN]: potentiometer voor de versterkingsregeling van het ingangssignaal op de aansluiting [MIC].
ATTENTIE!
Deze groep achterste aansluitingen is niet van buitenaf zichtbaar en voor de toegang tot deze groep
moet het houten achterschot van het orgel verwijderd worden. Wendt u zich tot vakkundig personeel
om deze handeling te verrichten.

44
Viscount UNICO 700
Gebruikersgids
4. INSCHAKELING en HOOFDPAGINA
Na het instrument te hebben ingeschakeld met de schakelaar [POWER], doet het systeem er enkele seconden
over om werkzaam te worden. In deze fase gaan de leds op de afzonderlijke panelen van de manualen achter
elkaar branden en geeft het display de presentatiepagina weer. Bij de weergave van de hoofdpagina, is het
instrument klaar om gebruikt te worden:
Deze pagina bevat in het bovenste gedeelte de selectievelden van de verschillende configuratiemenu’s van het
orgel:
o TUNING: parameters voor de intonatie van het instrument.
o VOICES: functies met betrekking tot alle stemmen van het orgel.
o STYLE: selectie van de stijl.
o SET-UP: algemene configuratiefuncties van het orgel.
o UTIL. & MIDI (Utility & MIDI): utiliteits- en MIDI-functies.
o FILE MANAG. (File Manager): beheer van de bestanden opgeslagen in het interne geheugen of in een
USB-apparaat.
Plaats, om de inhoud van een menu weer te geven, de cursor (aangegeven door het veld in negatief) op het
gewenste veld m.b.v. de knoppen [FIELD S] en[FIELD T] en druk op [ENTER].
[EXIT] sluit het menu af en keert terug naar de hoofdpagina.
In het onderste gedeelte van deze pagina worden de parameters van het instrument weergegeven waarvan het
nuttig is om altijd de betreffende toestand te kennen:
o [eerste hokje linksboven]: (Equal op de afgebeelde pagina) informeert welk temperament momenteel
gebruikt en geselecteerd is in het menu TUNING.
o ENSEMBLE: de waarde van ENSEMBLE (zweving) ingesteld in het menu TUNING.
o AIR PRESS: de waarde van de parameter AIR PRESSURE in het menu TUNING.
o A: de fijnregelaar (toonhoogte), ingesteld in het menu TUNING.
o [eerste hokje rechtsboven]: (User2 op de afgebeelde pagina) geeft de stijl aan die geselecteerd is in het
menu STYLE.
o P. COMB: de status van de functie PISTON COMBINE zoals ingesteld in het menu UTILITY & MIDI.
o K. INV: de status van de functie KEYBOARD INVERSION zoals ingesteld in het menu UTILITY & MIDI.
o TRANSP: de transpositie ingesteld in TUNING.
Deze velden zijn uitsluitend voor informatie bestemd en zijn niet selecteerbaar. Om de geassocieerde functie
te regelen, moeten de hierboven beschreven menu’s geopend worden.
Rondom het display zijn toetsen aanwezig voor de weergave van en de navigatie door alle displaypagina’s:
- [SEQUENC]: schermpagina’s voor het gebruik van de interne sequencer van het instrument.
- [VOLUMES]: schermpagina waarop alle volumes van het instrument zijn vermeld.

45
Viscount UNICO 700
Gebruikersgids
- [FIELD S] en [FIELD T]: met deze drukknoppen is het mogelijk de cursor te bewegen die door het
veld met negatieve weergave is aangegeven. [FIELD S] plaats de cursor in het hogere of vorige veld,
[FIELD T] in het lagere of volgende veld.
- [VALUE +] en [VALUE -]: deze toetsen regelen de waarden van de parameters, of het nu om numerieke
of alfanumerieke waarden gaat. [VALUE +] verhoogt, [VALUE -] verlaagt.
- [EXIT] en [ENTER]: zijn toetsen voor het openen of afsluiten van de menu’s en de displaypagina’s of
om de door het systeem verrichte verzoeken te bevestigen of te annuleren. [ENTER] opent de menu’s /
schermpagina’s en bevestigt, [EXIT] sluit de menu’s / schermpagina’s af en annuleert.
5. REGELING VAN DE VOLUMES
(functie VOLUMES)
Bij bediening van de toets [VOLUMES] wordt de schermpagina met alle volumeregelingen van het orgel
weergegeven:
o MST (Master): algemeen volume van het orgel, ook regelbaar met de potentiometer [MASTER VOLUME]
onder de manualen.
o REV (Reverb): nagalmeffect, ook regelbaar met de potentiometer [REVERB VOLUME] onder de
manualen.
o PHO (Phones): niveau van het signaal dat uit de aansluiting van de koptelefoon [PHONES] onder de
manualen komt.
o EXT (External outputs): algemeen volume van de PROG. OUT aansluitingen op het achterpaneel.
o PED (Pedal): divisioneel pedaalvolume.
o II (Manual II): divisioneel volume van het tweede manuaal.
o III (Manual III): divisioneel volume van het derde manueel.
o I (Manual I): divisioneel volume van het eerste manueel.
o IV (Manual IV): divisioneel volume van het vierde manueel.
o ORC (Orchestra): volume van de Orchestra-sectie.
Om de schermpagina af te sluiten en terug te keren naar de vorige pagina, drukt u op [EXIT] of wacht u circa
4 seconden. (gaat dan vanzelf uit)

46
Viscount UNICO 700
Gebruikersgids
6. INTONATIE VAN HET INSTRUMENT
(menu TUNING)
Selecteer het veld TUNING op de hoofdpagina voor toegang tot alle intonatieparameters van het instrument.
o TRANSPOSER: De transposer met een bereik van –6a +5 halve tonen.
Bij inschakeling heeft het orgel geen transpositie.
o [tweede veld op display]: (Equal op de afgebeelde pagina) Kiezer van historische stemmingen of
“temperaturen” uit verschillende landen en cultuurperioden.
o BASE KEY: de noot waarmee de keten van de 12 kwinten waaruit de temperatuur bestaat begint.
o ENSEMBLE: niveau van natuurlijke micro-ontstemming tussen de verschillende pijpen, zodat de
onnauwkeurigheden van de stemming die met de tijd en de temperatuursveranderingen optreden worden
gesimuleerd.
De waarden kunnen variëren van – (pijpen perfect gestemd) tot 8 (maximale stemmingsinstabiliteit).
o AIR PRESSURE: simuleert de drukval van de lucht wanneer er herhaaldelijk een grote hoeveelheid
lucht is vereist (bijvoorbeeld in het geval van uitvoering van krachtige akkoorden met het Tutti). Dit laat
zich vertalen in een tijdelijke en progressieve verlaging van de intonatie, die duidelijker is voor pijpen met
grotere voetmaat en breedte (Fluiten, Bourdons, Principalen).
o PITCH (A): fijnregelaar van de aangegeven intonatie als frequentie van LA4 (van een 8’ pijp).
Druk op [EXIT] om de schermpagina af te sluiten.
N.B.:
De transpositie heeft geen effect voor de weergave (in tegenstelling tot de registratie waar de noten
wél getransponeerd worden ontvangen) van de nummers met de interne sequencer. Met het oog
hierop is een speciale transposer aanwezig (zie par. 12.3).

47
Viscount UNICO 700
Gebruikersgids
7. DE ORGELSTIJLEN
(menu STYLES)
De Style identificeert de configuratie van de orgelregisters in de zin van de stem en de betreffende parameters
van elk afzonderlijk register, zodat op deze manier de geschikte foniek voor de literatuur die men wenst uit te
voeren gebruikt kan worden.
Het orgel beschikt over acht Styles, en dit betekent dat men op dezelfde console over acht geluidsconfiguraties
beschikt. De eerste vier Styles, die we in het vervolg Preset Styles zullen noemen, zijn door onze laboratoria
geprogrammeerd door de opportune orgelscholen te volgen en kunnen niet door de gebruiker gewijzigd
worden. De resterende vier Styles, die we User Styles noemen, kunnen gewijzigd en naar believen aangepast
worden, en op die manier blijkt het orgel een uitzonderlijke flexibiliteit te bezitten.
Kies voor de keuze van de stijl het veld STYLE op de hoofdpagina:
Zoals al eerder verklaard, kunnen de eerste 4 “stijlen” niet gewijzigd worden, dus wanneer men toegang tot
de stemmen-funktie zoekt, laat de display de volgende waarschuwing zien:
Het is echter mogelijk om de “settings” van deze stijlen te laten zien en kontroleren; Om door te gaan: druk
op een willekeurige knop of wacht ongeveer 3 seconden.

48
Viscount UNICO 700
Gebruikersgids
8. SELECTIE EN REGELING VAN DE STEMMEN
(menu VOICES)
Een van de belangrijkste kenmerken van de nieuwe synthesetechnologie Physis die de Unico orgels voor de
geluidsopwekking gebruiken is, dat aan de gebruiker talrijke aanpassingsmogelijkheden worden geboden
doordat een zeer groot aantal orgelklankkleuren beschikbaar is en diverse parameters ter beschikking staan
waarmee de configuratiemogelijkheden extra worden uitgebreid. Het menu VOICES verzamelt al deze functies
voor selectie en afstelling van de geluidsparameters van de stemmen.
N.B.
- De hierna beschreven functies niet worden gewijzigd wanneer een Preset Style is gekozen.
Selecteer een User Style om deze parameters af te stellen.
- De geselecteerde stemmen voor elk wip- of trekregister worden, evenals het volume en de
parameters voor geluidsopwekking, automatisch in de huidige Style opgeslagen. Dit betekent
dat als een andere stijl wordt opgeroepen, de stemmen opnieuw worden ingesteld met nieuwe
parameters die door de laatst opgeroepen stijl worden beschreven. De eerder aangebrachte
wijzigingen gaan echter niet verloren en worden weer beschikbaar gesteld wanneer de stijl
waarin ze werden uitgevoerd opnieuw wordt geselecteerd.
De eerste weergegeven schermpagina staat selectie van de gewenste functie toe:
o VOLUME LEVEL: regeling van het volume van elke afzonderlijke stem.
o EDIT PARAMETERS: bewerking van de parameters voor geluidsopwekking van elke afzonderlijke stem.
o ALTERNATIVE VOICES: selectie van de alternatieve stemmen.
8.1 REGELING VAN HET VOLUME (functie VOLUME LEVEL)
Na selectie van het veld VOLUME LEVEL in het menu VOICES, geeft het display de secties van het orgel
weer; selecteer de sectie waarin zich de stem bevindt waarvan men het volume wil regelen:

49
Viscount UNICO 700
Gebruikersgids
Gebruik zoals gewoonlijk de toetsen [FIELD S] en[FIELD T] en [ENTER] om het veld op het display te
kiezen. Een alternatieve methode, om onmiddellijk het volume weer te geven en te regelen, is om het trekregister
even uitgetrokken of het wipregister even ingedrukt in de positie van ingeschakelde stem te houden wanneer
de cursor geplaatst is op het veld VOLUME LEVEL in het menu VOICES of binnen de functie zelf.
De led van het register waarvan men het volume regelt, knippert om verkeerde wijzigingen te voorkomen;
het register zal ingeschakeld en bespeelbaar zijn om een betere en snellere regeling toe te staan. Het is ook
mogelijk andere registers in te schakelen om de wijzigingen in hun totaal te beoordelen.
Druk op [EXIT] om de functie af te sluiten en de waarden op te slaan.
8.2 EDITEN VAN DE GELUIDSPARAMETERS (functie EDIT PARAMETERS)
Selecteer, om de schermpagina’s met de parameters voor geluidsopwekking van de afzonderlijke stemmen
weer te geven, het veld EDIT PARAMETERS in het menu VOICES:
Ook voor deze functie zal het display aanvankelijk de secties van het orgel weergeven, zodat de sectie gekozen
kan worden waarin de stem aanwezig is die men wenst te editen:
selecteer vervolgens de stem waarvan men de parameters wil weergeven.
Het is ook mogelijk om rechtstreeks de edit-pagina weer te geven door het trekregister even uitgetrokken of
het wipregister even ingedrukt in de positie van ingeschakelde stem te houden wanneer de cursor geplaatst is
op het veld EDIT PARAMETERS in het menu VOICES of binnen de functie zelf.

50
Viscount UNICO 700
Gebruikersgids
De led van het register dat men edit, knippert om verkeerde wijzigingen te voorkomen; het register zal
ingeschakeld en bespeelbaar zijn om een betere en snellere afstelling toe te staan. Het is ook mogelijk andere
registers in te schakelen om de wijzigingen in hun totaal te beoordelen.
De weergegeven parameters zijn niet gelijk voor alle stemmen, omdat voor sommige families speciale
wijzigingsparameters beschikbaar worden gesteld die voor andere soorten stemmen niet noodzakelijk zijn.
De bewerkingen die men kan maken zijn:
o CHARACTER: harmonische rijkdom.
o AIR NOISE: geluid van de lucht die door de pijp wordt geblazen.
o REED NOISE: imperfectie van de periode van de trilling van het tongwerk.
o ATTACK: aanspraaktijd waarbinnen het geluid het maximum volume bereikt.
o REL. DETUNE: (Release Detune) mate van ontstemming in de loslaatfase.
o FREQ. SKEW: progressieve toonhoogteverandering van de lucht tijdens de aanspraak- en de loslaatfase.
o DETUNE: ontstemming om het zwevingseffect van ontstemde stemmen te produceren.
o KEYB. LO LEV.: (Keyboard Low Level) versterking (positieve waarden) of verzwakking (negatieve
waarden) van het volume van de stem in het onderste gedeelte van het manuaal.
o KEYB. HI LEV.: (Keyboard High Level) versterking (positieve waarden) of verzwakking (negatieve
waarden) van het volume van de stem in het bovenste gedeelte van het manuaal.
o TREMULANT: kies de eerste (1st) of de tweede (2nd) tremulant. De gekozen tremulant zal de klank
van registers moduleren wanneer deze wordt geactiveerd door het betreffende (trek)register.
Druk op [EXIT] om de functie af te sluiten en de waarden op te slaan.
8.3 SELECTIE VAN DE ALTERNATIEVE STEMMEN (functie ALTERNATIVE
VOICE)
Elk register op het paneel beschikt over een serie stemmen: de standaardstem ingesteld door de huidige stijl
en de alternatieve stemmen, ofwel de varianten van het origineel. Om een alternatieve stem te selecteren,
moet de functie ALTERNATIVE VOICES opgeroepen worden:
Zoals bij de andere functies van het menu VOICES, moet nu de sectie van het orgel geselecteerd worden
waarin de te vervangen stem aanwezig is; vervolgens wordt de lijst van de in de geselecteerde sectie aanwezige
stemmen weergegeven.

51
Viscount UNICO 700
Gebruikersgids
Ook voor deze functie kunt u rechtstreeks de pagina van de alternatieve stemmen weergeven door het
trekregister even uitgetrokken of het wipregister even ingedrukt in de positie van ingeschakelde stem te
houden wanneer de cursor geplaatst is op het veld ALTERNATIVE VOICES in het menu VOICES of
binnen de functie zelf.
De led van het register dat men vervangt, knippert om verkeerde wijzigingen te voorkomen; het register zal
ingeschakeld en bespeelbaar zijn om een betere en snellere afstelling toe te staan.
Nu geeft het display de lijst van alternatieve stemmen weer:
de momenteel gebruikte stem wordt aangegeven als “CURRENT VOICE” in het onderste gedeelte van de
schermpagina. Het is verder nuttig om erop te wijzen dat de bovenste sectie van de schermpagina altijd de
naam die gezeefdrukt is op het trek- of het wipregister vermeldt, zodat op elk moment duidelijk is van welk
register men de stem verandert.
Als andere stemmen met de toetsen [FIELD S] en[FIELD T] worden gekozen, verandert het opschrift in
“ENTER TO REPLACE”:
wat aangeeft dat om de nieuwe stem te bevestigen en bruikbaar te maken, op de toets [ENTER] moet
worden gedrukt. De door de cursor aangewezen stem wordt ook voordat op [ENTER] wordt gedrukt,
beschikbaar en bespeelbaar gemaakt, om zo onmiddellijk de benodigde wijziging te kunnen beoordelen. Het
is ook mogelijk andere registers in te schakelen om de wijzigingen in hun totaal te beoordelen.
Druk op [EXIT] om andere stemmen te vervangen of de functie af te sluiten.
N.B.
Wanneer een alternatieve stem wordt geselecteerd, worden de parameters voor geluidsopwekking
in de functie EDIT PARAMETERS automatisch opnieuw ingesteld met de standaardwaarden van de
nieuwe stem. De waarde van het volume (in de functie VOLUME LEVEL) blijft echter ongewijzigd.

52
Viscount UNICO 700
Gebruikersgids
9. ALGEMENE INSTELLINGEN VAN HET INSTRUMENT
(menu SET-UP)
Het menu SET-UP bevat alle algemene instellingen van het instrument, met uitzondering van de configuratie
van de MIDI-interface en de bijkomende en utiliteitsfuncties. Selecteer, om het menu in kwestie op te roepen,
het veld SET-UP op de hoofdpagina:
De oproepbare functies zijn:
o 1st TREMULANT: regeling per afzonderlijk manuaal van de snelheid en diepte van het eerste tremulant-
effect.
o 2nd TREMULANT: regeling per afzonderlijk manuaal van de snelheid en diepte van het tweede
tremulant-effect.
o REVERBERATION: selectie van het type omgeving voor het nagalmeffect.
o INT. AMPL. EQUALIZER (Internal amplification equalizer): regeling van de 5-bands equalizer van
de interne versterker.
o INT. AMPL. PANNING (Internal amplification panning): regeling van de stereofonische verdeling
van de registers over de interne geluidsweergavesystemen om verschillende soorten windladen voor de
diverse registers te simuleren.
o INT. AMPL. TUNE-UP (Internal amplification tune-up): functie is niet beschikbaar in deze modellen.
o PROG. FUNCTION (Programmable functions): instellingen met betrekking tot de werking van de
combinaties, de duimpistons, het Crescendo en de potentiometers onder de manualen.
o ENC. CONFIGURATION (Enclosed configuration): programmeer de [ENC] piston functie.
o EXT. OUT EQUALIZER (External outputs equalizer): regeling van de equalizers van de achterste
PROG. OUT uitgangen.
o EXT. SUB EQUALIZER (External Sub equalizer): regeling van de equalizer voor de externe uitgang
aan de achterzijde [GEN. SUB.].
o EXT. OUT ROUTER (External outputs router): configuratie van de kanalisatie van de registers over
de achterste PROG. OUT uitgangen om de positie van de windladen en de plaatsing van de pijpen hierin
te simuleren.
o EXT. OUT VOLUME (External outputs volume): regeling van de volumes van de achterste PROG.
OUT uitgangen.
o EXT. OUT CONFIG (External outputs config): configuratie van de achterste PROG. OUT uitgangen
o EXT. OUT RESIZE (External Out Resize): Past automatisch het verband tussen de registers en de
uitgangen aan de achterzijde aan, afhankelijk van het aantal uitgangen dat dan werkelijk wordt gebruikt.

53
Viscount UNICO 700
Gebruikersgids
9.1 KANALISATIE VAN DE STEMMEN OVER DE ACHTERSTE
GELUIDSUITGANGEN (functie EXT. OUT ROUTER)
Een belangrijk kenmerk van de orgels van de serie Unico is de mogelijkheid om voor elk register de windladen
en de plaatsing van de pijpen hierin te simuleren. Dit is mogelijk dankzij de kanalisatie van de geluidssignalen,
ofwel hoe deze over de achterste uitgangen verdeeld worden. Het systeem is in staat om voor elk register een
uitgangsconfiguratie te gebruiken die de plaatsing van de pijpen in de echte windladen weerspiegelt, oftewel:
- met enkele of dubbele wig
- met dubbele vleugel
- met enkele vleugel links of rechts
- mono
- alternerend
Bovendien kan elk van deze indelingen verder worden gespecificeerd voor wat betreft de breedte van de
windlade en zijn plaats in de ruimte in relatie tot het aantal gebruikte uitgangen. Selecteer, voor toegang tot de
configuratiepagina’s van de achterste geluidsuitgangen, het veld EXT. OUT ROUTER in het SET-UP menu:
de selectiepagina wordt weergegeven van de sectie waarin het te configureren register aanwezig is, dat gekozen
is uit de lijst van de registers in die sectie:
Ook voor deze functie kunt u rechtstreeks de configuratiepagina weergeven door het trekregister even
uitgetrokken of het wipregister even ingedrukt in de positie van ingeschakelde stem te houden wanneer de
cursor geplaatst is op het veld EXT. OUT ROUTER in het SET-UP menu of binnen de functie zelf. De led
van het register dat men configureert, knippert om verkeerde wijzigingen te voorkomen; het register zal
ingeschakeld en bespeelbaar zijn om een betere en snellere afstelling toe te staan. Het is ook mogelijk andere
registers in te schakelen om de wijzigingen in hun totaal te beoordelen.

54
Viscount UNICO 700
Gebruikersgids
De pagina bestaat uit vier delen:
o MODE: selecteert het type windlade uit:
- C – C#: alternerend
- MONO: mono
- DOUBLE CUSP: dubbele wig
- CUSP: wig
- DOUBLE WING: dubbele vleugel
- WING: enkele vleugel
o FROM en TO: selecteren de uiterste posities van de uitgangen waarbinnen de winladen gepositioneerd
moeten worden. De waarde wordt aangegeven als [uitgangsnummer–tussenpositie tussen twee uitgangen],
rekening houdend met het feit dat er vier (2-4-6-8 op display) tussenposities tussen de ene en de andere
uitgang zijn. Een waarde van 40 betekent dat het uiteinde (FROM of TO) geplaatst is op de uitgang [4];
een waarde van 82 geeft aan dat het punt FROM of TO zich tussen de uitgang [8] en [9] bevindt, in de
buurt van [8] aangezien het zich op de eerste vijfde ruimte tussen [8] en [9] bevindt. De configuratie van
de hierboven afgebeelde pagina geeft een windlade met wig aan die geplaatst is tussen de uitgang [1] en
een tussenpositie tussen [4] en [5].
o [positie-indicator]: wordt voorgesteld door kleine rechthoekjes boven de tekening van de windlade en
geeft aan welke zone het onderliggende gedeelte t.o.v. het totale aantal uitgangen weergeeft.
o [windlade op de uitgangen]: in het onderste gedeelte van de pagina, toont op grafische wijze de windlade
met de referenties van de uitgangen die gebruikt worden, zodat een momentopname wordt geboden van
zijn positie en de uitgangen waarop de noten aanwezig zullen zijn op basis van de configuratie van de
windlade.
Om de configuratie van een ander register weer te geven, volstaat het om het trek- of wipregister te bedienen
of op [EXIT] te drukken om de functie af te sluiten. In beide gevallen wordt de zojuist ingestelde configuratie
automatisch opgeslagen.
9.2 CONFIGUREREN VAN DE AUDIO-UITGANGEN AAN DE ACHTERZIJDE
(functie EXT. OUT CONFIG)
Dank zij deze functie kan ‘PROGRAMMABLE OUTPUTS’ (programmeerbare uitgangen) worden
geconfigureerd voor de instelling van het Antiphonale signaal (regelbaar via de ‘AMPLIFICATION’ labels),
voor het totale signaal, maar ook apart voor het nagalmsignaal van het instrument. Kies het ‘EXT. OUT
CONFIG.’ veld in het ‘SET-UP’-menu, dan verschijnt de volgende boodschap in het pop-up scherm:
Dit betekent dat de externe ‘panning’ (ruimtelijke positie, zie paragraaf 9.1) van bepaalde registers automatisch
kan worden gewijzigd. Registers, geplaatst tussen de uitgangen [16] en [17] en/of uitgangen geconfigureerd
als ‘GENERAL’ of ‘REVERB’ zullen automatisch worden ingesteld als Mono op de eerste uitgang van de
eerder geconfigureerde panning (ruimtelijke verdeling van de registeruitgangen).
Druk op [EXIT] om de automatische bijstelling van de panning de voorkomen en terug te keren naar het

55
Viscount UNICO 700
Gebruikersgids
Het functioneren van de verschillende modi wordt beschreven in onderstaande tabel:
MODE OUTPUTS 1-16 OUTPUTS 17-18 OUTPUTS 19-20
Wipregister AMPLIFICAT.
[CONSOLE ON]
Wipregister AMPLIFICAT.
[EXT. SPEAKER ON]
STANDARD
Zoal ingesteld in de 'Ext.
Router Conf.'-functie.
Zoal ingesteld in de 'Ext.
Router Conf.'-functie.
Zoal ingesteld in de 'Ext.
Router Conf.'-functie.
Interne versterking Outputs 1-20
GENERAL-REVERB
Zoal ingesteld in de 'Ext.
Router Conf.'-functie.
Algemeen geluidssignaal Reverberated signal only Outputs 1-16 Outputs 17-20
ANTIPHONAL
Zoal ingesteld in de 'Ext.
Router Conf.'-functie.
Zoal ingesteld in de 'Ext.
Router Conf.'-functie.
Zoal ingesteld in de 'Ext.
Router Conf.'-functie.
Outputs 1-16 Outputs 17-20
GENERAL-ANTIPH.
Zoal ingesteld in de 'Ext.
Router Conf.'-functie.
Algemeen geluidssignaal
Zoal ingesteld in de 'Ext.
Router Conf.'-functie.
Outputs 1-16 Outputs 17-20
ANTIPH.-REVERB
Zoal ingesteld in de 'Ext.
Router Conf.'-functie.
Zoal ingesteld in de 'Ext.
Router Conf.'-functie.
Alleen het geluid van de
nagalm
Outputs 1-16 Outputs 17-20
‘SET-UP’-menu. Druk dan op [ENTER] ter bevestiging. De display laat dan het volgende beeld zien:

56
Viscount UNICO 700
Gebruikersgids
10. UTILITEITS- EN MIDI-FUNCTIES
(menu UTIL. & MIDI)
Het menu UTILITY & MIDI, oproepbaar door het gelijknamige veld op het display van de hoofdpagina te
selecteren, verzamelt alle bijkomende functies en de instellingen met betrekking tot de MIDI-interface van
het orgel.
Het menu wordt op drie pagina’s weergegeven:
Het eerste gedeelte bevat de bijkomende en utiliteitsfuncties:
o PIST. COMBINE (Piston Combine): synchronisatie van de speciale combinatie van manuaal II met die
van het pedalenbord.
o KEYBOARDS INV. (Keyboards Inversion): omkering van de manualen zodat de registers van Man.I
met het tweede manuaal en omgekeerd spelen.
o TRACKER TOUCH: zorgt voor gebruik van de karakteristieke mechanische aanslag van pijporgels die
van invloed is op de aanspraaktijden van de labiale registers en op het loslaten van alle stemtypes.
o 1st SHORT OCT. (First short octave): activering van het korte octaaf op het eerste octaaf van de
manualen en het pedalenbord.
o AUTO MAINPAGE: automatisch terugkeren naar de hoofdpagina na 10 seconden inactiviteit op het
display.
o LCD CONTRAST: regeling van het contrast van het display.
o SET DATE & TIME: de datum en tijd instellen.
o LOCK ORGAN: instelling van de blokkeringscode van het orgel om toegang tot de configuratiepagina’s
van het instrument en de opslag van de combinaties, het Tutti en het Crescendo te ontzeggen.
o RESTORE FACT. SET (Restore factory settings): herstelt de fabrieksinstellingen.
o OP.SYS. UPGRADE (Operating system upgrade): Upgrade van het besturingssysteem.
Het tweede gedeelte van het menu betreft de configuraties van de MIDI-interface:
o Tx AND Rx CHANNEL: configuratie van de MIDI zend- en ontvangstkanalen.
o Tx AND Rx FILTER: configuratie van de MIDI zend- en ontvangstfilters.
o PROG. CHANGE SEND (Program Change send): opslag van de combinaties en verzending van de
MIDI-meldingen Program Change en Bank Select.
o PEDAL/KEYB TOUCH (Pedal / Keyboard touch): selectie van de dynamiekcurven van de manualen
voor het gebruik van de Orchestra-stemmen en de verzending van de MIDI-noten.
o COUPLED NOTES: met de COUPLED NOTES functie kunnen noten via het MIDI-kanaal worden
verstuurd. Selecteer YES om zowel de noten die daadwerkelijk op het klavier zijn gespeeld als de noten
die voortgekomen zijn door de koppels te versturen. Bijvoorbeeld, bij het bespelen van het voetklavier
terwijl de koppeling II/P aanstaat, worden noten van het voetklavier overgebracht naar zowel het voetklavier
MIDI-kanaal als naar het Man.II MIDI-kanaal.
Selecteer NO om uitsluitend de noten te versturen die daadwerkelijk op het klavier zijn gespeeld (in dit
voorbeeld worden noten alleen verzonden via het voetklavierkanaal).

57
Viscount UNICO 700
Gebruikersgids
11. FUNCTIES VOOR HET BEHEER VAN DE BESTANDEN
(menu FILE MANAG.)
De orgelserie Unico kan gebruik maken van twee verschillende soorten massageheugen: het interne geheugen
en een opslagapparaat dat in de [USB} connector onder de manualen gestoken kan worden (USB-stick).
Deze geheugeneenheden worden gebruikt voor de opslag van de configuratie van het orgel, delen ervan,
muzieknummers en lijsten van nummers.
Als de USB-stick is ingebracht, gebruikt het systeem deze als massageheugen. Het blijft mogelijk om het
interne geheugen voor het kopiëren van de bestanden (vanaf en naar de USB-stick) te gebruiken, maar het is
niet mogelijk om de intern opgeslagen bestanden te laden, te wissen of te hernoemen: daarvoor moet eerst
de USB-stick verwijderd worden.
Bij selectie van het veld FILE MANAGEMENT op de hoofdpagina, wordt het betreffende menu met alle
beheersfuncties van de bestanden getoond. Er is tevens een informatiepagina aanwezig over de in het orgel
geïnstalleerde firmwareversies.
Zoals opgemerkt kan worden, geeft het onderste gedeelte van de pagina de momenteel gebruikte
geheugeneenheid aan:
- INTERAL MEMORY: intern geheugen
- USB PEN DRIVE: USB-stick
De oproepbare functies zijn:
o DIR: weergave van de inhoud van het massageheugen
o LOAD: laden van de bestanden.
o SAVE: opslag in het massageheugen van de configuratie van het orgel of delen ervan.
o COPY: kopiëren van de bestanden van de ene (bijv. interne) naar de andere geheugeneenheid.
o RENAME: herbenoemen van de bestanden.
o DELETE: wissen van de bestanden.
o SONGLIST: programmering van lijsten van nummers.
o O.S. INFO: weergave van de in het systeem geïnstalleerde firmwareversies.
N.B.:
- Wanner u de USB stick hebt ingestoken, moet u een paar seconden wachten voordat u de FILE
MANAGMENT selecteert.
- Als men de op de USB-stick opgeslagen bestanden via een computer wil hernoemen, houd er
dan rekening mee dat de namen alleen nummers en kleine letters mogen bevatten.
- Gebruik altijd USB-sticks geformatteerd met FAT of FAT32 file system (geen NTFS).

58
Viscount UNICO 700
Gebruikersgids
12.1 WEERGAVE VAN EEN NUMMER (werkwijze PLAY)
Selecteer op de eerder beschreven pagina voor selectie van de werkwijze van de sequencer, het veld PLAY;
het display geeft de MID-bestanden weer die opgeslagen zijn in de momenteel gebruikte geheugeneenheid:
12. REGISTRATIE EN WEERGAVE VAN MUZIEKNUMMERS
(SEQUENCER)
Het orgel Unico is uitgerust met een interne sequencer (digitaal registratieapparaat) dat in staat is om de
uitvoeringen, de commando’s en de regelingen die op het instrument zijn uitgevoerd te registreren. De
registraties kunnen vervolgens als MIDI-bestand op de USB-stick of in het interne geheugen opgeslagen
worden en op elk moment beluisterd worden.
Druk, om de sequencer op te roepen, op de drukknop [SEQUENC.] naast het display; de selectiepagina van
de drie werkwijzen van het systeem wordt weergegeven:
o PLAY: weergave van de muzieknummers opgeslagen in het interne geheugen of op de USB-stick.
o PLAY OPTIONS: weergaveopties
o RECORD: registratie van muzieknummers
In de onderste zone van de pagina wordt de momenteel gebruikte geheugeneenheid vermeldt. Denk eraan
dat de USB-stick voorrang heeft t.o.v. het interne geheugen. Als men dus het interne geheugen wil gebruiken,
moet de USB-stick verwijderd worden.
N.B.:
- Wanner u de USB stick hebt ingestoken, moet u een paar seconden wachten voordat u om de
sequencer op te roepen
- De transpositie die regelbaar is in het menu TUNING, heeft geen effect voor de weergave (in
tegenstelling tot de registratie waar de noten wél getransponeerd worden ontvangen) van de
nummers. Gebruik hiervoor de transpositiefunctie beschreven in par. 12.3.

59
Viscount UNICO 700
Gebruikersgids
De nieuwe pagina geeft informatie over alle commando’s die noodzakelijk zijn voor het gebruik van de
sequencer:
- [ENTER]: start de weergave van het nummer.
- [EXIT]: sluit de sequencer af.
- [FIELD S]: selectie van het vorige nummer opgeslagen in het geheugen of ingesteld in een Songlist (zie
par. 12.4).
- [FIELD T]: selectie van het volgende nummer opgeslagen in het geheugen of ingesteld in een Songlist
(zie par. 12.4).
- [VALUE -] (druk éénmaal): Verminder de afspeelsnelheid (de display links boven vermeldt de origenele
waarde 100)
- [VALUE +] (druk éénmaal): Vermeerder de afspeelsnelheid(de display links boven vermeld de origenele
waarde 100)
- [VALUE -] (druk en vasthouden): terugspoelen.
- [VALUE +] (druk en vasthouden): snel voorwaardspoelen.
Zodra de weergave van een nummer start, verandert het display in:
en zoals men kan zien, zijn ook de functies van de toetsen [ENTER] en [EXIT] veranderd in:
- [ENTER]: pauze / opnieuw starten van de weergave van het nummer.
- [EXIT]: stoppen van de weergave van het nummer.
[FIELD S], [FIELD T], [VALUE -], [VALUE +] behouden de eerder beschreven functies.
Selecteer nu het MIDI-bestand dat weergegeven moet worden:

60
Viscount UNICO 700
Gebruikersgids
Zoals bij de werkwijze Play, geeft de pagina ook bij Record informatie over de functies van de toetsen:
- [ENTER]: start de registratie.
- [EXIT]: sluit de sequencer af.
Zodra de registratie is gestart, veranderen de functies in:
- [ENTER]: pauze / opnieuw starten van de registratie.
- [EXIT]: stoppen van de registratie.
Door op [EXIT] te drukken om de sessie te beëindigen, geeft het display de pagina voor de opslag van de
zojuist uitgevoerde registratie weer:
bij selectie van [NEW SONG] start een nieuwe registratie, terwijl als een MIDI-bestand wordt geladen, het
mogelijk is om het overdubben uit te voeren, ofwel een nieuwe registratie die aan de eerder geregistreerde
uitvoering wordt toegevoegd.
12.2 REGISTRATIE VAN EEN NUMMER (werkwijze RECORD)
Selecteer het veld RECORD op de pagina met de werkwijzen van de sequencer: het display geeft weer:

61
Viscount UNICO 700
Gebruikersgids
Gebruik voor de samenstelling van de naam, de toetsen [FIELD S] en[FIELD T] om de cursor te bewegen
en [VALUE +] en [VALUE -] om het teken te selecteren. De eerste drie tekens kunnen alleen nummers zijn,
aangezien deze nodig zijn voor toekomstige uitbreidingen van het instrument. Druk op de drukknop [ENTER]
om de naam te bevestigen en op te slaan; als echter [EXIT] wordt bediend, keert men terug naar de vorige
pagina en wordt de opslag geannuleerd. De opslag van het bestand wordt bevestigd door de melding:
Door echter op [EXIT] vanuit de opslagpagina te drukken (dus bij opgenomen maar nog niet opgeslagen
registratie), waarschuwt het systeem dat de registratie op deze wijze verloren kan gaan:
De weergegeven functies zijn:
o SAVE: opslag van de registratie als MIDI-bestand.
o PLAY: opnieuw de registratie beluisteren alvorens deze op te slaan.
o OVERDUB: een nieuwe registratie in aanvulling op de zojuist geregistreerde sequentie uitvoeren.
o DISCARD AND EXIT: de registratie wissen en de werkwijze Record van de sequencer afsluiten.
Bij selectie van het veld SAVE, vraagt het systeem om een naam toe te wijzen aan de MIDI-sequentie die men
wil opslaan:
en dat op [ENTER] moet worden gedrukt om de afsluiting te bevestigen en de geregistreerde gegevens te
wissen of op [EXIT] om naar de opslagpagina terug te keren.
N.B.:
Als men de op de USB-stick opgeslagen bestanden via een computer wil herbenoemen, houd er dan
rekening mee dat de namen alleen nummers en kleine letters mogen bevatten.

62
Viscount UNICO 700
Gebruikersgids
12.3 WEERGAVEOPTIES VAN DE SEQUENCER (menu PLAY OPTIONS)
Bij selectie van het veld PLAY OPTIONS op de selectiepagina van de werkwijze van de sequencer, heeft men
toegang tot enkele opties met betrekking tot de weergave van de nummers:
deze betreffen:
o TRANSPOSER: stelt een transpositie in halve tonen van de door de sequencer weergegeven nummers in.
o SONG LOOP: indien ingesteld op “YES”, wordt het nummer aan het einde ervan opnieuw weergegeven.
o LIST AUTOPLAY: indien ingesteld op “YES”, wordt na afloop van een nummer, tijdens het gebruik
van de Songlist, automatisch het volgende nummer weergegeven, zonder op de toets [FIELD T] te
hoeven drukken.
o LIST LOOP: indien ingesteld op “YES”, wordt na afloop van het laatste nummer van een Songlist
automatisch het eerste nummer weergegeven.
12.4 SONGLISTS (functie SONGLIST)
Met de term Songlist wordt de functie van het orgel bedoeld waarmee lijsten van muzieknummers (MIDI-
bestanden) gecreëerd en weergegeven kunnen worden.
Roep, om een lijst van nummers te programmeren, het menu FILE MANAGEMENT op en selecteer de
functie SONGLIST; het systeem vraagt of men een nieuwe lijst wil aanmaken of een reeds bestaande lijst wil
wijzigen:
Door het veld [NEW LIST] te selecteren, wordt een nieuwe lijst gecreëerd, door een LST bestand te selecteren,
wordt de lijst in dat bestand gewijzigd.
In beide gevallen moeten eerst de nummers geselecteerd worden die in de lijst opgenomen moeten worden:

63
Viscount UNICO 700
Gebruikersgids
Gebruik de toetsen [FIELD S] en[FIELD T] om het MIDI-bestand te selecteren, [VALUE +] om het in de
lijst op te nemen en [VALUE -] om het uit de lijst te verwijderen. Naast de naam van het bestand wordt zijn
positie in de lijst weergegeven.
Druk nu op [ENTER] om de programmering voort te zetten of op [EXIT] om deze te verlaten.
De tweede handeling is de plaatsing van de nummers binnen de lijst (of de bevestiging van de eerder gemaakte
programmering):
Wanneer een nummer in een ander positie moet worden verplaatst, plaats dan de cursor op het betreffende
veld van het bestand met de toetsen [FIELD S] en[FIELD T], [VALUE +] om een positie vooruit te gaan
of [VALUE -] om een eerdere positie in te stellen.
Druk tenslotte op [ENTER] om de lijst op te slaan of op [EXIT] om naar de vorige pagina terug te keren.
Zoals bij de MIDI-bestanden, mogen de eerste drie tekens uitsluitend nummers zijn.
Gebruik voor de samenstelling van de naam, de toetsen [FIELD S] en[FIELD T] om de cursor te bewegen
en [VALUE +] en [VALUE -] om het teken te selecteren.
Druk op de drukknop [ENTER] om de naam te bevestigen en op te slaan; als echter [EXIT] wordt bediend,
keert men terug naar de vorige pagina.
N.B.:
Als men de op de USB-stick opgeslagen bestanden via een computer wil herbenoemen, houd er dan
rekening mee dat de namen alleen nummers en kleine letters mogen bevatten.

64
Viscount UNICO 700
Gebruikersgids
13. BIJLAGE
13.1 LOCAL OFF VAN DE REGISTERS
Een register in Local Off instellen betekent, ervoor zorgen dat dit niet via de interne opwekking van het
orgel speelt, maar dat sowieso de betreffende MIDI-melding (Exclusief Systeem code) wordt verzonden
zodat het op een aangesloten instrument ingeschakeld en bespeeld kan worden.
Druk, om de Local Off van de stemmen in te stellen, op de duimpiston [S] (Set) en, terwijl deze ingedrukt
wordt gehouden, op [C] (Cancel) wanneer het hoofdmenu in het scherm zichtbaar is. De leds van alle registers
gaan branden en het display geeft de volgende pagina weer:
Bedien, om een stem in Local Off te plaatsen, het trek- of het wipregister zodat het betreffende lichtje dooft.
Druk na instelling van de gewenste configuratie gelijktijdig op [S] en [C] om deze op te slaan.
Een volgende toegang tot de instelling van Local Off zal de status van de registers weergeven volgens de
regel:
- Licht aan: register in Local On (speelt met de interne geluidsopwekking)
- Licht uit: register in Local Off
13.2 FACTORY SETTINGS
Met de procedure Factory Setting kunnen de fabrieksinstellingen van alle interne functies van het instrument
worden hersteld, zodat de door de gebruiker aangebrachte wijzigingen geannuleerd worden.
Het orgel Unico biedt bovendien de mogelijkheid om te kiezen wat men in de standaardwaarden opnieuw
wil instellen.
Selecteer, om de betreffende functie op te roepen, het displayveld RESTORE FACT. SET op de tweede
pagina van het menu UTILITY & MIDI:
Het volgende kan geïnitialiseerd worden:
o ENTIRE ORGAN: alle instellingen en functies van het orgel (menu TUNING, SET-UP en UILITY &

65
Viscount UNICO 700
Gebruikersgids
MIDI, de vier User Styles, alle algemene en divisionele combinaties, Tutti en Crescendo en de Local Off
status van de registers).
o SETTING PARAMETERS: instellingen van de menu’s TUNING, SET-UP en UTILITY & MIDI.
o USER STYLE: de 4 User Styles
o COMB. MEMORIES: alle algemene en divisionele combinaties, Tutti en Crescendo.
Selecteer de gewenste Factory Setting en druk op [ENTER]: het display zal een waarschuwingspagina weergeven
die aangeeft wat men opnieuw met de standaardwaarden instelt:
Druk opnieuw op [ENTER]: de procedure wordt gestart, gedurende welke de volgende melding wordt
getoond: “PERFORMING”, waarna de melding “ACCOMPLISHED” verschijnt. Druk op [EXIT] om de
actie te annuleren.
13.3 UPDATEN VAN HET BESTURINGSSYSTEEM
Het besturingssysteem van de Unico-orgels kan snel en eenvoudig worden geüpdatet. U hoeft slechts de te
installeren bestanden op een USB-stick te kopiëren en deze in de juiste connector onder de manualen te
plaatsen, en vervolgens moet u de betreffende functie activeren OP. SYS UPGRADE (menu UTIL. & MIDI).
Ga naar het “Download”-gedeelte van onze officiële Physis-website op http://www.physisorgans.com/
download.asp voor alle benodigde bestanden en informatie over de upgrade van het besturingssysteem.

Afvalverwerking van elektrische en elektronische apparatuur (voor landen in de Europese Unie
en andere Europese landen met systemen voor de gescheiden inzameling van afval)
Dir. 2002/95/CE, 2002/96/CE e 2003/108/CE
Dit symbool op een product of de verpakking van een product geeft aan dat het product niet als gewoon
huishoudelijk afval mag worden aangeboden. In plaats daarvan moet het product worden aangeboden
bij een speciaal daarvoor ingericht verzamelstation, zodat het product geheel of gedeeltelijk kann
worden hergebruikt. Als u het product op deze manier voor afvalverwerking aanbiedt, voorkomt u
mogelijke schadelijke gevolgen voor het milieu en de volksgezondheid. Het recyclen van materialen
draagt bij aan het behoud van natuurlijke bronnen. Neem voor meer informatie over het hergebruik van
dit product contact op met de gemeente, de dienst afvalstoffenverwerking in uw woonplaats of de winkel
waar u het product hebt gekocht.
Dit product voldoet aan de eisen van EMCD 2004/108/EC en LVD 2006/95/EC.
WAARSCHUWING
Het op onjuiste wijze vervangen van de batterij kan leiden tot explosiegevaar.
Vervang de batterij uitsluitend door hetzelfde of een gelijkwaardig type.
Stel batterijen niet bloot aan hoge temperaturen, zoals zon, vuur en dergelijke.


69
Viscount UNICO 700Guida Utente
INDICE
1. Note importanti .............................................................................................................................70
1.1 Cura del prodotto .......................................................................................................................................... 70
1.2 Note riguardanti il manuale .......................................................................................................................... 70
2. Premessa ........................................................................................................................................72
3. Descrizione generale .....................................................................................................................73
4. Accensione e videata principale ....................................................................................................78
5. Regolazione volumi (funzione Volumes) ......................................................................................79
6. Intonazione dello strumento (menu Tuning) ............................................................................... 80
7. Gli stili d’organo (menu Styles)..................................................................................................... 81
8. Selezione e regolazione delle voci (menu Voices) ........................................................................82
8.1 Regolazione del volume (funzione Volume Level) ................................................................................... 82
8.2 Regolazione dei parametri audio (funzione Edit Parameters) ................................................................. 83
8.3 Selezione delle voci alternative (funzione Alternative Voices) ................................................................ 84
9. Impostazioni generali dello strumento (menu Set-Up) ...............................................................86
9.1 Canalizzazione delle uscite audio posteriori (funzione Ext. Out Router) .............................................. 87
9.2 Configurazione delle uscite audio posteriori (funzione Ext. Out Config)............................................. 88
10. Funzioni di Utilità e MIDI (menu Util. & MIDI) ...................................................................... 90
11. Funzioni per la gestione dei file (menu File Manag.) ................................................................. 91
12. Riproduzione e registrazioni di brani musicali (Sequencer) ......................................................92
12.1 Riproduzione di un brano (modalità Play) ............................................................................................... 92
12.2 Registrazione di un brano (modalità Record) .......................................................................................... 94
12.3 Opzioni di riproduzione (menu Play Options)........................................................................................ 96
12.4 Le Songlist (funzione Songlist) .................................................................................................................. 96
13. Appendice ....................................................................................................................................98
13.1 Local Off dei registri .................................................................................................................................. 98
13.2 Factory Settings............................................................................................................................................ 98
13.3 Aggiornamento del sistema operativo ...................................................................................................... 99

70
Viscount UNICO 700 Guida Utente
1. NOTE IMPORTANTI
1.1 CURA DEL PRODOTTO
• Non applicate eccessiva forza alle strutture ed ai comandi dell’organo (manopole, registri, pulsanti, ecc…).
• Non collocare, quando possibile, lo strumento in prossimità di unità che producano forti interferenze
come apparecchi radio – TV, monitor, ecc...
• Evitate di posizionare l’organo in prossimità di fonti di calore, in luoghi umidi o polverosi o nelle vicinan-
ze di forti campi magnetici.
• Evitate di esporre lo strumento all’irradiazione solare diretta.
• Non introdurre per nessuna ragione oggetti estranei o liquidi di qualsiasi genere all’interno dello stru-
mento.
• Per la pulizia usate solo un pennello morbido od aria compressa, non usate mai detergenti, solventi od
alcool.
• Per il collegamento con impianti di amplificazione e diffusione utilizzate sempre cavi schermati di buona
qualità. Quando scollegate i cavi dalle prese abbiate cura di afferrarli per il connettore e non per il cavo
stesso; avvolgendoli, inoltre, evitate nodi e torsioni.
• Prima di effettuare i collegamenti accertatevi che le altre unità (in particolar modo sistemi di amplificazio-
ne e di diffusione) che state per collegare siano spente. Eviterete rumorosi se non pericolosi picchi di
segnale.
• Collegate il cavo di alimentazione ad una presa di corrente provvista di contatto di terra.
• Accertatevi che la tensione di rete corrisponda a quella indicata sulla targhetta matricola dell’apparato.
• In caso di lunghi periodi di inutilizzo dell’organo scollegate la spina della presa di corrente.
1.2 NOTE RIGUARDANTI IL MANUALE
• Conservate con cura questo manuale.
• Il presente manuale costituisce parte integrante dello strumento. Le descrizioni e le illustrazioni contenu-
te nella presente pubblicazione si intendono non impegnative.
• Ferme restando le caratteristiche essenziali dello strumento, il costruttore si riserva il diritto di apportare
eventuali modifiche di parti, dettagli ed accessori che riterrà opportune per il miglioramento del prodotto
o per esigenze di carattere costruttivo o commerciale, in qualunque momento e senza impegnarsi ad
aggiornare tempestivamente questa pubblicazione.
• Tutti i diritti sono riservati, è vietata la riproduzione di qualsiasi parte di questo manuale, in qualsiasi
forma, senza l’esplicito permesso scritto del costruttore.

71
Viscount UNICO 700Guida Utente
• Tutti i marchi citati all’interno del manuale sono di proprietà delle rispettive case produttrici.
• Leggete attentamente tutte le informazioni descritte. Eviterete inutili perdite di tempo ed otterrete le
migliori prestazioni dallo strumento.
• Le sigle od i numeri riportati tra parentesi quadre ([ ]) stanno ad indicare i nomi dei pulsanti, sliders,
potenziometri e connettori presenti sullo strumento.
Per esempio la scritta [ENTER] indica il pulsante ENTER.
• Le illustrazioni e le videate del display sono puramente a scopo informativo e possono differire da quelle
che vengono realmente visualizzate sul display.
• Le informazioni descritte nel presente manuale fanno riferimento alla versione del sistema operativo
dello strumento presente quando il documento è stato redatto e potrebbero non rispecchiare le funziona-
lità della versione che state utilizzando. Pertanto consultate periodicamente la pagina Download del sito
internet http://www.physisorgans.com per conoscere l’ultima versione del sistema operativo e la dispo-
nibilità di un manuale più aggiornato.
• Per le descrizioni dettagliate di tutte le funzioni dell’organo consultate il Manuale di Riferimento scaricabile
dalla pagina Download del sito internet http://www.physisorgans.com.

72
Viscount UNICO 700 Guida Utente
2. PREMESSA
Gentile cliente,
Grazie per aver scelto l’organo Viscount Unico.
La nostra azienda, leader mondiale nella realizza-
zione di organi classici di prestigio, ha racchiuso
nello strumento in suo possesso la più recente e
sofisticata tecnologia dedicata alla fedele riprodu-
zione delle timbriche dell’organo a canne, capace
di garantire una notevole flessibilità d’uso ed una
qualità timbrica mai riscontrate prima.
Dopo anni di ricerca nell’esplorazione di nuove
tecniche per la sintesi musicale, il centro di “Ricer-
ca e sviluppo” Viscount ha creato, primo al mon-
do, il suono di organo a canne riprodotto con tec-
nologia a “Modelli fisici” su cui, a sua volta, si basa
la tecnologia Physis.
Questa rivoluzionaria tecnica di generazione non
prevede alcun campionamento di organi reali
(come consuetudine fino ad oggi), ma “calcola” in
tempo reale la forma d’onda generata da un accu-
rato modello matematico, basato sullo studio della
fisica di emissione della canna reale e tenendo conto dei più importanti parametri fisici della canna stessa,
quali ad esempio la geometria costruttiva, il materiale utilizzato, la pressione dell’aria applicata, ecc.
Il fatto di essersi svincolati da una mera riproduzione di materiale registrato e memorizzato, consente di
raggiungere livelli di realismo fino ad ora impensabili e un livello di dettaglio ottenibile solo dallo strumento
reale.
Il modello matematico, tanto per fare qualche breve esempio, permette di ottenere un suono diverso per ogni
tasto, poiché esso riproducendo virtualmente lo strumento originale, assegna una canna diversa ad ogni tasto
così come succede nella realtà; inoltre esso è in grado di riprodurre un suono diverso per ogni pressione
successiva dello stesso tasto, tenendo conto delle condizioni precedenti della colonna d’aria all’interno della
canna che si avrebbero nello strumento reale.
E’ inoltre possibile un editing “fisico” dei suoni, quasi come se Lei fosse “l’organaro” che costruisce le canne,
agendo sui principali elementi di cui abbiamo accennato e, qualora l’editing non sia il suo forte, potrà attinge-
re ad una vastissima libreria di voci di canne d’organo già programmate e già residenti nella memoria interna
del suo strumento.
Per concludere la invitiamo a visitare i siti internet www.viscount-organs.com e www.physisorgans.com dove
potrà trovare informazioni, aggiornamenti, documentazione e novità su questo e su tutta la linea degli stru-
menti di nostra produzione.

73
Viscount UNICO 700Guida Utente
3. DESCRIZIONE GENERALE
1
2 3
6
3 4 5
7
8
9
10 11 12
14
22
1913
15
16 17 18 1520 20
24
13
20
13
25 26 24 21
27
23
GR. ORGANO II
GR. ORGANO II
SOLO IV
SOLO IV
SOLO IV
SOLO IV
RECITATIVOIII
RECITATIVOIII
POSITIVO I
POSITIVO I
Tremolo
Unione
IV/II
Unione
IV/II
Unione
III/P
Unione
III/P
PEDALE
Unione
IV/P
Unione
IV/P
Unione
II/P
Unione
II/P
Unione
I/P
Unione
I/P
Unione
I/II
Unione
I/II
Unione
III/II
Unione
III/II
Unione
IV/III
Unione
IV/III
Unione
IV/I
Unione
IV/I
Unione
III/I
Unione
III/I
Tremolo Tremolo
Ance Ripieni
Interna
DIFFUSIONE
DIFFUSIONE
ANNULLATORI
ANNULLATORI
Esterna
Pedale
Grande
Organo
Grande
Organo
Positivo
Recitativo
Solo
Ped. G.O.
G.O.
G.O. Rec. Rec. Pos. Pos. Solo Solo
-
+
III/P
IV/P
II/P
I/P 0
0
0
0
0
0
F
III/I IV/I R.I
I/II III/II R.IIIV/II
O.SOLO
IV/III R.III
MEM- R.IVMEM+
P.A .
A
POSITIVO
RECITATIVO
SOLO
Tremolo

74
Viscount UNICO 700 Guida Utente
1. Sezione PEDALE.
Qui sono raccolti i registri della pedaliera e le unioni dei manuali con la pedaliera.
2. Sezione GR. ORGANO II.
Qui sono raccolti i registri, le unioni dei manuali ed i tremoli del Grande Organo.
3. Sezione SOLO IV.
Registri e tremoli del Solo.
4. Sezione RECITATIVO III.
Registri, unioni e tremoli del Recitativo.
5. Sezione POSITIVO I.
Registri, unione dei manuali e tremoli del Positivo.
6. Interruttore [POWER].
Interruttore di accensione e spegnimento dello strumento.
7. Sezione DIFFUSIONE.
Controlli delle amplificazioni dell’organo.
- [INTERNA] attiva l’amplificazione interna dello strumento.
- [ESTERNA] abilita le uscite esterne PROG. OUT presenti nel pannello posteriore (punto 27).
8. Sezione ANNULLATORI.
Questi annullatori permettono di escludere dall’esecuzione tutte le voci facenti parte delle Ance (bascula
[ANCE]) e dei Ripieni (bascula [RIPIENI]).
9. Sezione MIDI.
Questi controlli per ogni manuale e per la pedaliera permettono di abilitare o meno la trasmissione sulla
porta MIDI [OUT] dei codici MIDI di nota. Tutti gli altri messaggi MIDI previsti dallo strumento
continuano ad essere trasmessi anche a controllo MIDI spento.
10. Sezione di controllo e programmazione.
Qui sono presenti i pulsanti ed il display atti alla visualizzazione e programmazione di tutte le funzioni di
configurazione e del sequencer dello strumento.
11. Sezione ORCHESTRA.
Qui sono raccolti i registri Orchestra dell’organo.
12. Display aggiuntivi.
- [CRESCENDO]: indica lo step attualmente raggiunto dal pedale [CRESCENDO] (punto 25)
- [M. BANK]: visualizza il banco di memoria delle combinazioni (generali e dedicate) selezionato tra-
mite i pistoncini [MEM. +] e [MEM. -] (punto 20).
13. Combinazioni generali.
Questi pistoncini e pistoni a piede permettono il richiamo delle combinazioni generali del banco di
memoria, selezionabile tramite [MEM. +] e [MEM. -] (punto 20). Queste combinazioni sono aggiustabili,
la procedura di memorizzazione è descritta al punto 19.
[0] ripristina lo stato delle voci preparate a mano prima del richiamo di una memoria.
Sono inoltre presenti i sequenziatori di combinazioni generali, [-] è in ordine decrescente, [+] in ordine
crescente.

75
Viscount UNICO 700Guida Utente
14. Pistoncini del Pedale.
Qui trovate le sei combinazioni dedicate di pedaliera e lo [0] per il richiamo dello stato delle voci di
pedaliera preparato a mano prima del richiamo di una combinazione di pedaliera. Queste combinazioni
sono aggiustabili, la procedura di memorizzazione è descritta al punto 19.
15. Pistoncini del Solo.
Pistoncini delle combinazioni dedicate del Solo. [0] per il richiamo dello stato delle voci di questa sezione
preparate a mano, prima del richiamo di una combinazione del Solo. Unione [IV/P]. Le combinazioni ed
i ripieni sono aggiustabili, la procedura di memorizzazione è descritta al punto 19.
E’ inoltre presente il pistoncino [M.SOLO] (MIDI Solo) tramite il quale, sull’uscita [MIDI OUT], tra-
smettere monofonicamente con priorità sulla nota più acuta le note suonate su questo manuale.
16. Pistoncini del Recitativo.
Pistoncini delle combinazioni dedicate del Recitativo. [0] per il richiamo dello stato delle voci di questa
sezione preparate a mano, prima del richiamo di una combinazione del Recitativo.
Unioni [III/P] e [IV/III]. [R.III] ripieno del Recitativo. Le combinazioni ed i ripieni sono aggiustabili, la
procedura di memorizzazione è descritta al punto 19.
17. Pistoncini del Grande Organo.
Pistoncini delle combinazioni dedicate del Grande Organo. [0] per il richiamo dello stato delle voci di
questa sezione preparate a mano, prima del richiamo di una combinazione del Grande Organo.
Unioni [II/P], [IV/II], [III/II]. [R.II] ripieno del Grande Organo.
Le combinazioni ed i ripieni sono aggiustabili, la procedura di memorizzazione è descritta al punto 19.
E’ inoltre presente il pistoncino [O.SOLO] (Organ Solo) tramite il quale suonare monofonicamente con
priorità sulla nota più acuta le voci del Solo quando l’unione [IV/II] risulta attivata.
18. Pistoncini del Positivo.
Pistoncini delle combinazioni dedicate del Positivo. [0] per il richiamo dello stato delle voci di questa
sezione preparate a mano, prima del richiamo di una combinazione del Positivo.
Unioni [I/P], [III/I] e [IV/I] . [R.I] ripieno del Positivo.
Le combinazioni ed i ripieni sono aggiustabili, la procedura di memorizzazione è descritta al punto 19.
19. Pistoncino [F].
Pistoncino fissatore per la memorizzazione delle combinazioni generali e dedicate, del Tutti e degli step
del Crescendo.
Per memorizzare una combinazione od il Tutti, dopo aver impostato lo stato delle voci desiderato preme-
re [F] e mantenendolo premuto premere il pistoncino od il pistone a piede della combinazione che si
desidera memorizzare.
Per memorizzare uno step del Crescendo, selezionarlo tramite l’omonimo pedale, premere [F] e tenendo-
lo premuto premere [0] delle memorie generali. Per copiare il contenuto di uno step in un altro, dopo aver
selezionato lo step che si desidera copiare premere e tenere premuto il pistoncino [F], selezionare lo step
in cui si desidera riversare il contenuto quindi premere [0] delle memorie generali.
NOTA
Qualora il Led del pistoncino [F] risulti spento ciò sta a significare che la programmazione dell’or-
gano è bloccata tramite la funzione Lock Organ (vedi cap. 10), pertanto non sarà possibile memo-
rizzare combinazioni e/o visualizzare le funzioni interne di programmazione.

76
Viscount UNICO 700 Guida Utente
NOTA
All’accensione viene sempre selezionato il banco di memoria n.° 1.
21. Ripieno del Pedale.
I Ripieni sono programmabili, la procedura di memorizzazione è descritto al punto 19.
22. Pannello delle connessioni anteriori.
In questo pannello posto sulla sinistra sotto i manuali si trovano i connettori e regolazioni di più frequen-
te utilizzo per cui di pratica accessibilità.
- [MASTER VOLUME]: regola il volume generale dell’organo.
- [REVERB VOLUME]: regola il livello dell’effetto di riverbero.
- MIDI [IN]: è il connettore MIDI di ingresso per far ricevere all’organo i dati trasmessi da un’unità
MIDI esterna.
- MIDI [OUT]: è il connettore MIDI che trasmette i dati MIDI generati dall’organo.
- MIDI [THRU]: ritrasmette i dati ricevuti dalla porta [IN] per il collegamento in serie di più dispositivi
MIDI.
- [USB]: sono due connettori USB. Quello di sinistra è utilizzato per il collegamento con computer per
poter utilizzare il programma di configurazione dello strumento. Quello di destra è dedicato all’utiliz-
zo di una penna USB (non fornito con lo strumento) da utilizzarsi come memoria di massa dell’orga-
no in sostituzione della memoria interna. Per maggiori informazioni consultare il cap. 11.
- [PHONES]: è la presa per collegare un set di cuffie.
23. Serratura della serranda di protezione.
24. Pistoni a piede delle unioni.
Questi pistoni replicano la funzione delle unioni a pistoncino o tirante.
25. Pedale [CRESCENDO].
Tramite questo pedale potrete selezionare gli step del Crescendo con il quale attivare una serie prefissata
di registri. Lo step attualmente selezionato viene visualizzato dal display aggiuntivo [CRESCENDO]
(vedi punto 12).
Ogni step del Crescendo è programmabile. La procedura di memorizzazione è descritta al punto 19.
26. Staffe espressive.
L’organo è dotato di tre staffe espressive per il controllo continuo del volume del Positivo, del Recitativo
e del Solo.
La staffa [SOLO] ha inoltre incorporato uno speciale sistema a leva con il quale controllare l’effetto di
Sustain per le voci Orchestra.
20. Comandi generali dell’organo.
Si tratta di comandi non dedicati alle singole sezioni ma la cui abilitazione influenza l’intero strumento.
- [MEM. +] e [MEM -]: selezionano il banco di memoria visualizzato dal display aggiuntivo [MEM.
BANK] (punto 12).
- [ENC]: abilita la funzione Enclosed la quale permette di controllare il volume generale
dell’organoagendo sulla staffa espressiva [RECITATIVO] .
- [P.A.]: abilita la funzione Piano Automatico al Pedale che permette di adattare automaticamente la
composizione fonica di Pedaliera in funzione di quale manuale si sta suonando.
- [T]: pistoncino e pistone a piede per il richiamo del Tutti. Il Tutti è aggiustabile, la procedura di
memorizzazione è descritto al punto 19.
- [A]: pistoncino annullatore

77
Viscount UNICO 700Guida Utente
27. Connessioni posteriori.
Dentro l’organo sono presenti diverse connessioni per il collegamento audio con impianti di diffusione
esterni, ingresso di linea e microfonico per l’utilizzo dell’amplificatore interno dell’organo.
- Prese [EXT. +12V DC]: da questi connettori è possibile prelevare la tensione di +12 Volt per l’accen-
sione remota dei diffusori VISCOUNT eventualmente collegati alle uscite PROG. OUT.
- OUT [GEN. SUB] (General Sub-Woofer): uscita dedicata a cui collegare diffusori per basse frequen-
ze (sub-woofer).
- PROG. OUT (Programmable Outputs): uscite di linea generali dello strumento con le quali simulare
i somieri degli organi a canne. I segnali infatti sono distribuiti sulle uscite in base alle impostazioni
delle funzioni a display che permettono, per ogni registro, di impostare il tipo di somiere, la sua
dimensione e posizione nello spazio dei diffusori utilizzati. Ogni uscita dispone inoltre di controlli di
livello ed equalizzazione dedicati.
- INPUT [L(+R)] / [R]: ingressi di linea tramite le quali suonare altri strumenti con l’amplificazione
interna dell’organo. In caso di sorgente monofonica utilizzare esclusivamente la presa [L(+R)].
- INPUT [MIC]: ingresso microfonico tramite il quale amplificare il segnale proveniente da un micro-
fono.
- [GAIN]: potenziometro di regolazione del guadagno del segnale di ingresso alla presa [MIC].
ATTENZIONE!
Questo gruppo di connessioni posteriori non è visibile dall’esterno ed è necessario rimuovere il
pannello posteriore in legno dell’organo per accedervi. Per effettuare l’operazione rivolgersi a
personale qualificato.

78
Viscount UNICO 700 Guida Utente
4. ACCENSIONE e VIDEATA PRINCIPALE
Dopo aver acceso lo strumento tramite l’interruttore [POWER] il sistema impiega alcuni secondi per diven-
tare operativo, in questa fase i Led sui pannelli divisionali dei manuali si accendono in sequenza ed il display
visualizza la videata di presentazione.
Alla visualizzazione della videata principale lo strumento è pronto per essere utilizzato:
Questa videata raccoglie, nella parte superiore, i campi di selezione dei vari menu di configurazione dell’orga-
no:
o TUNING: parametri di intonazione dello strumento.
o VOICES: funzioni inerenti le voci dell’organo.
o STYLE: selezione dello stile.
o SET-UP: impostazioni generali dell’organo
o UTIL. & MIDI (Utility & MIDI): funzioni di utilità e MIDI.
o FILE MANAG. (File Manager): gestione dei file memorizzati nella memoria interna o nel dispositivo
USB.
Per visualizzare il contenuto di un menu è sufficiente posizionare il cursore (indicato dal campo in negativo)
sul campo desiderato tramite i pulsanti [FIELD S] e [FIELD T] e premere [ENTER]. [EXIT] abbandona il
menu e torna alla videata principale.
Nella parte inferiore di questa videata vengono invece visualizzati quei parametri dello strumento di cui è
utile conoscerne sempre lo stato:
o [prima casella in alto a sinistra]: (Equal nella videata raffigurata) informa circa il temperamento al
momento utilizzato e selezionato nel menu TUNING.
o ENSEMBLE: il valore di ENSEMBLE impostato nel menu TUNING.
o AIR PRESS: il valore del parametro AIR PRESSURE nel menu TUNING.
o A: l’intonazione dello strumento inteso come frequenza del LA4 impostata nel menu TUNING.
o [prima casella in alto a destra]: (User2 nella videata raffigurata) indica lo stile selezionato nel menu
STYLE.
o P. COMB: lo stato della funzione PISTON COMBINE come impostato nel menu UTILITY & MIDI.
o K. INV: lo stato della funzione KEYBOARD INVERSION come impostato nel menu UTILITY & MIDI.
o TRANSP: la trasposizione impostata in TUNING.
Questi campi sono solo di informazione e non selezionabili. Per regolare la funzione associata è necessario
entrare nei menu sopra descritti.
Attorno al display sono presenti i pulsanti atti alla visualizzazione e navigazione di tutte le videate a display:
- [SEQUENC]: videate per l’utilizzo del sequencer interno dello strumento.

79
Viscount UNICO 700Guida Utente
- [VOLUMES]: videata che raccoglie tutti i volumi dello strumento.
- [FIELD S] e [FIELD T]: tramite questi pulsanti è possibile muovere il cursore indicato dal campo in
reverse. [FIELD S] lo posiziona nel campo più in alto o precedente, [FIELD T] in quello più in basso o
successivo.
- [VALUE +] e [VALUE -]: questi pulsanti regolano i valori dei parametri, siano essi valori numerici o
alfanumerici. [VALUE +] incrementa, [VALUE -] decrementa.
- [EXIT] e [ENTER]: sono pulsanti per l’accesso e l’abbandono ai menu ed alle videate a display, o per
confermare o annullare le richieste avanzate dal sistema. [ENTER] accede ai menu / videate e conferma,
[EXIT] abbandona i menu / videate e annulla.
5. REGOLAZIONE VOLUMI
(funzione VOLUMES)
Premendo il pulsante [VOLUMES] è possibile visualizzare la videata inerente tutti i controlli di volume
presenti nell’organo:
o MST (Master): volume generale dell’organo, regolabile anche con il potenziometro [MASTER VOLU-
ME] presente sotto i manuali.
o REV (Reverb): effetto di riverbero, regolabile anche con il potenziometro [REVERB VOLUME] pre-
sente sotto i manuali.
o PHO (Phones): livello del segnale in uscita alla presa delle cuffie [PHONES] presente sotto i manuali.
o EXT (External outputs): volume generale delle prese PROG. OUT presenti nel pannello posteriore.
o PED (Pedal): volume divisionale del Pedale.
o GRT (Grande Organo): volume divisionale del Grande Organo.
o SWL (Recitativo): volume divisionale del Recitativo.
o CHR (Positivo): volume divisionale del Positivo.
o SLO (Solo): volume divisionale del Solo.
o ORC (Orchestra): volume della sezione orchestra.
Per abbandonare la videata e tornare a visualizzare quella precedente premere [VOLUMES] o [EXIT] od
attendere circa 4 secondi.

80
Viscount UNICO 700 Guida Utente
6. INTONAZIONE DELLO STRUMENTO
(menu TUNING)
Selezionando il campo TUNING della videata principale è possibile accedere a tutti i parametri di intonazio-
ne dello strumento.
o TRANSPOSER: traspositore con un range da -6 a +5 semitoni. All’accensione l’organo ha sempre
trasposizione nulla.
o [secondo campo a display]: (Equal nella videata raffigurata) selettore di temperamenti storici di varie
epoche ed origini nazionale.
o BASE KEY: la nota con la quale inizia la catena delle 12 quinte costituenti il temperamento.
o ENSEMBLE: livello di naturale microstonatura tra una canna ed un’altra così da simulare le non perfet-
te intonazioni delle canne dell’organo a causa dell’usura con il tempo e la temperatura.
I valori vanno da – (canne perfettamente intonate) a 8 (massima instabilità di intonazione).
o AIR PRESSURE: simula il calo di pressione dell’aria quando ne è richiesta repentinamente una grande
quantità (ad esempio nel caso dell’esecuzione di accordi poderosi con il Tutti). Ciò si traduce in un
temporaneo e progressivo abbassamento dell’intonazione, più evidente per le canne di più alto piedaggio
e larghezza (flauti, bordoni, principali).
o PITCH (A): regolatore fine dell’intonazione indicata come frequenza del LA4 (di una canna 8’).
Per uscire dalla videata premere [EXIT].
NOTA
La trasposizione non ha effetto sulla riproduzione dei brani con il sequencer interno (al contrario
della registrazione dove invece le note vengono acquisite trasposte). A tal scopo è presente un
traspositore dedicato (vedi par. 12.3).

81
Viscount UNICO 700Guida Utente
7. GLI STILI D’ORGANO
(menu STYLES)
Lo Style identifica la configurazione dei registri dell’organo intesa come la voce ed i relativi parametri di ogni
singolo registro, potendo così utilizzare la fonica adeguata alla letteratura che si intende eseguire.
L’organo dispone di otto Style, ciò sta a significare che si dispone di otto configurazioni sonore nella stessa
consolle. Le prime quattro di queste, che d’ora in poi chiameremo anche Preset o stili presettati, sono pro-
grammate dai nostri laboratori seguendo le opportune scuole organare e non sono modificabili da parte
dell’utente. I rimanenti quattro Style invece, chiamati User, sono liberamente modificabili e personalizzabili a
piacere e l’organo risulta così di una flessibilità estrema.
Per la scelta dello stile selezionare il campo STYLE nella videata principale:
Come detto in precedenza i primi quattro Style non sono modificabili. Accedendo alle funzioni VOICES
pertanto, il sistema informa di quanto ciò tramite il messaggio:
Il contenuto di questi stili è comunque accessibile al fine di conoscerne le impostazioni, per continuare
premere un qualsiasi pulsante display od attendere qualche secondo.

82
Viscount UNICO 700 Guida Utente
8. SELEZIONE e REGOLAZIONE DELLE VOCI
(menu VOICES)
Una delle principali caratteristiche della nuova tecnologia di sintesi Physis che gli organi Unico utilizzano
per la generazione sonora è quella di offrire all’utente un’ampia personalizzazione dello strumento disponen-
do di un numero elevatissimo di timbriche organare e mettendo a disposizione diversi parametri la cui
regolazione incrementa ulteriormente le possibilità di configurazione.
Il menu VOICES raccoglie tutte queste funzioni di selezione e regolazione dei parametri audio delle voci.
NOTE
- Le funzioni di seguito descritte non sono modificabili quando è selezionato uno stile Preset.
Selezionare uno stile User per regolare questi parametri.
- Le voci selezionate per ogni bascula o tirante, così come il volume e i parametri di generazione
sonora vengono automaticamente memorizzati nello Style corrente. Ciò sta a significare che
richiamando un altro stile le voci verranno reimpostate con nuovi parametri descritti dallo stile
ultimo richiamato. Le modifiche apportate in precedenza non vengono comunque perse e ver-
ranno rese disponibili riselezionando lo stile in cui le si erano eseguite.
La prima videata visualizzata permette di selezionare la funzione alla quale si desidera accedere:
o VOLUME LEVEL: regolazione del volume di ogni singola voce.
o EDIT PARAMETERS: regolazione dei parametri di generazione sonora di ogni singola voce.
o ALTERNATIVE VOICES: selezione delle voci alternative.
8.1 REGOLAZIONE DEL VOLUME (funzione VOLUME LEVEL)
Dopo aver selezionato il campo VOLUME LEVEL nel menu VOICES il display visualizza le sezioni dell’or-
gano, selezionare quella nella quale si trova la voce di cui si desidera regolare il volume:

83
Viscount UNICO 700Guida Utente
Come al solito utilizzare i pulsanti [FIELD S] e [FIELD T] ed [ENTER] per selezionare il campo a display.
Un metodo alternativo per visualizzare e regolare immediatamente il volume è quello di tenere tirato per
qualche istante il tirante o premuta la bascula in posizione di voce accesa quando il cursore è posizionato sul
campo VOLUME LEVEL nel menu VOICES o all’interno della funzione stessa.
Il Led del registro di cui si sta regolando il volume lampeggia onde evitare modifiche errate, lo stesso risulta
acceso e suonabile per una migliore e più veloce regolazione. E’ anche possibile accendere altri registri al fine
di valutare complessivamente le modifiche.
Per uscire dalla funzione e memorizzare i valori premere [EXIT].
8.2 REGOLAZIONE DEI PARAMETRI AUDIO (funzione EDIT PARAMETERS)
Per visualizzare le videate contenenti i parametri di generazione sonora delle singole voci selezionare il cam-
po EDIT PARAMETERS nel menu VOICES:
Anche per questa funzione il display inizialmente visualizza le sezioni dell’organo in modo da selezionare
quella in cui è presente la voce che si desidera regolare:
dopodichè selezionare la voce di cui si desidera visualizzare i parametri.
E’ altresì possibile visualizzare direttamente la videata di regolazione tenendo tirato per qualche istante il
tirante o premuta la bascula in posizione di voce accesa quando il cursore è posizionato sul campo EDIT
PARAMETERS nel menu VOICES o all’interno della funzione stessa.

84
Viscount UNICO 700 Guida Utente
Il Led del registro che si sta regolando lampeggia onde evitare modifiche errate, lo stesso risulta acceso e
suonabile per una migliore e più veloce regolazione. E’ anche possibile accendere altri registri al fine di
valutare complessivamente le modifiche.
I parametri visualizzati non sono gli stessi per tutte le voci in quanto per alcune famiglie vengono resi dispo-
nibili parametri di modifica dedicati e non necessari per altre tipologie di voce.
Le regolazioni che si possono effettuare sono:
o CHARACTER: ricchezza di armonici.
o AIR NOISE: rumore dell’aria soffiata nella canna.
o REED NOISE: imperfezione del periodo del battito dell’ancia.
o ATTACK: tempo di attacco entro il quale il suono raggiunge il massimo volume.
o REL. DETUNE: (Release Detune) livello di stonatura in fase di rilascio.
o FREQ. SKEW: cambio di intonazione progressivo dell’aria durante le fasi di attacco e rilascio.
o DETUNE: stonatura per produrre l’effetto battente delle voci detunate.
o KEYB. LO LEV.: (Keyboard Low Level) guadagno (valori positivi) o attenuazione (valori negativi) del
volume della voce nella parte bassa del manuale.
o KEYB. HI LEV.: (Keyboard High Level) guadagno (valori positivi) o attenuazione (valori negativi) del
volume della voce nella parte alta del manuale.
o TREMULANT: selezione del primo (1st) o secondo (2nd) tremolo con cui modulare la voce quando
l’effetto viene attivato tramite gli appositi tiranti.
Per uscire dalla funzione e memorizzare i valori premere [EXIT].
8.3 SELEZIONE DELLE VOCI ALTERNATIVE (funzione ALTERNATIVE
VOICES)
Ogni registro a pannello dispone di un set di voci, quella di default impostata dallo Style corrente e quelle
alternative, ovvero varianti dell’originale. Per selezionare una voce alternativa richiamare la funzione ALTER-
NATIVE VOICES:
Come per le altre funzioni del menu VOICES occorre ora selezionare la sezione dell’organo in cui è presente
la voce che si desidera sostituire, viene quindi visualizzato l’elenco delle voci presenti nella sezione seleziona-
ta.

85
Viscount UNICO 700Guida Utente
Anche per questa funzione potete visualizzare direttamente la videata delle voci alternative tenendo tirato per
qualche istante il tirante o premuta la bascula in posizione di voce accesa quando il cursore è posizionato sul
campo ALTERNATIVE VOICES nel menu VOICES o all’interno della funzione stessa.
Il Led del registro che si sta sostituendo lampeggia onde evitare modifiche errate, lo stesso risulta acceso e
suonabile per una migliore e più veloce regolazione.
Ora il display visualizza l’elenco delle voci alternative:
quella al momento in uso viene indicata come “CURRENT VOICE” nella parte bassa della videata.
E’ utile inoltre fare presente che la sezione superiore della videata riporta sempre il nome in serigrafia posto
sul tirante o sulla bascula, in modo da evidenziare in ogni istante quale è il registro di cui si sta cambiando la
voce.
Puntando altre voci con i pulsanti [FIELD S] e [FIELD T] la dicitura cambia in “ENTER TO REPLACE”:
indicando appunto che per confermare la nuova voce e renderla utilizzabile è necessario premere il pulsante
[ENTER]. La voce puntata dal cursore è resa disponibile e suonabile anche prima di premere [ENTER] così
da valutare immediatamente la modifica necessaria. E’ anche possibile accendere altri registri al fine di valu-
tare complessivamente le modifiche.
Premere [EXIT] per sostituire altre voci o abbandonare la funzione.
NOTA
Quando viene selezionata una voce alternativa i parametri di generazione sonora contenuti nella
funzione EDIT PARAMETERS vengono automaticamente reimpostati con i valori di default della
nuova voce. Il valore del volume (nella funzione VOLUME LEVEL) rimane invece invariato.

86
Viscount UNICO 700 Guida Utente
9. IMPOSTAZIONI GENERALI DELLO STRUMENTO
(menu SET-UP)
Il menu SET-UP raccoglie tutte le impostazioni generali dello strumento ad eccezione delle configurazioni
relative l’interfaccia MIDI e le funzioni accessorie e di utilità. Per richiamare il menu in oggetto selezionare il
campo SET-UP nella videata principale:
Le funzioni richiamabili sono le seguenti:
o 1st TREMULANT: regolazione, per singolo manuale, del primo tremolo.
o 2nd TREMULANT: regolazione, per singolo manuale del secondo tremolo.
o REVERBERATION: selezione del tipo di ambiente per l’effetto di riverbero.
o INT. AMPL. EQUALIZER (Internal amplification equalizer): regolazione dell’equalizzatore a 5 bande
dell’amplificatore interno.
o INT. AMPL. PANNING (Internal amplification panning): regolazione della distribuzione stereofonica
dei registri nei sistemi interni di diffusione audio al fine di simulare diverse tipologie di somiere.
o INT. AMPL. TUNE-UP (Internal amplification tune-up): funzione non disponibile in questi modelli.
o PROG. FUNCTIONS (Programmable functions): impostazioni relative al funzionamento delle
combinazioni, dei pistoncini, del Crescendo e dei potenziometri sotto i manuali.
o ENC. CONFIGURATION (Enclosed configuration): programmazione del funzionamento del
pistoncino [ENC].
o EXT. OUT EQUALIZER (External outputs equalizer): regolazione degli equalizzatori delle uscite
posteriori PROG. OUT.
o EXT. SUB EQUALIZER (External sub equalizer): regolazione dell’equalizzatore dell’uscita posteriore
[GEN. SUB.].
o EXT. OUT ROUTER (External outputs router): configurazione della canalizzazione dei registri sulle
uscite posteriori PROG. OUT al fine di simulare la posizione dei somieri e la disposizione delle canne
all’interno di essi.
o EXT. OUT VOLUME (External outputs volume): regolazione dei volumi delle uscite posteriori PROG.
OUT.
o EXT. OUT CONFIG (External outputs config): configurazione delle uscite posteriori PROG. OUT.
o EXT. OUT RESIZE (External out resize): adattamento automatico della canalizzazione dei registri
sulle uscite posteriori PROG. OUT in base al numero delle uscite utilizzate.

87
Viscount UNICO 700Guida Utente
viene visualizzata la videata di selezione della sezione in cui è presente il registro che si desidera configurare,
scelta la quale l’elenco dei registri contenuti in quella sezione:
Anche per questa funzione potete visualizzare direttamente la videata di configurazione tenendo tirato per
qualche istante il tirante o premuta la bascula in posizione di voce accesa quando il cursore è posizionato sul
campo EXT. OUT ROUTER nel menu SET-UP o all’interno della funzione stessa.
Il Led del registro che si sta configurando lampeggia onde evitare modifiche errate, lo stesso risulta attivo e
suonabile per una migliore e più veloce regolazione.
E’ anche possibile accendere altri registri al fine di valutare complessivamente le modifiche.
9.1 CANALIZZAZIONE DELLE VOCI SULLE USCITE AUDIO POSTERIORI
(funzione EXT. OUT ROUTER)
Importante caratteristica degli organi della serie Unico è data dalla possibilità di simulare, per ogni registro, la
posizione dei somieri e la disposizione delle canne all’interno di essi. Questo è possibile grazie alla canalizzazione
dei segnali audio, ovvero come questi vengono distribuiti, sulle uscite posteriori.
Il sistema è in grado di utilizzare per ogni registro una configurazione di uscita che rispecchi la disposizione
delle canne nei veri somieri, ovvero:
- a singola o doppia cuspide
- a doppia ala
- ad ala singola a sinistra o a destra
- mono
- alternato
Ognuna di queste configurazioni è inoltre configurabile per quanto concerne la larghezza del somiere e la sua
posizione nello spazio dimensionato dal numero di uscite utilizzate. Per accedere alle videate di programma-
zione selezionare il campo EXT. OUT ROUTER presente nel menu SET-UP:

88
Viscount UNICO 700 Guida Utente
che informa che il panning esterno (vedi par. 9.1) di alcuni registri potrebbe venir modificato automaticamen-
te dal sistema in base alla configurazione delle uscite adottata.
I registri posizionati infatti tra le uscite [16] e [17] e/o nelle uscite che verranno qui impostate come GENERAL
o REVERB, saranno automaticamente configurati in modalità Mono sulla prima uscita del panning prece-
dentemente configurato.
Premere [EXIT] per annullare la modifica automatica del panning esterno e tornare al menu SET-UP o
[ENTER] per confermare.
La videata si compone di quattro sezioni:
o MODE: seleziona il tipo di somiere tra:
- C – C#: alternato
- MONO: mono
- DOUBLE CUSP: doppia cuspide
- CUSP: cuspide
- DOUBLE WING: doppia ala
- WING: ala singola
o FROM e TO: selezionano le posizioni estreme, riferite alle uscite, entro le quali posizionare il somiere.
Il valore viene indicato come [numero di uscita – posizione intermedia tra due uscite], tenendo presente
che ci sono quattro (2-4-6-8 a display) posizioni intermedie tra un’uscita ed un’altra.
Un valore pari a 40 sta a significare che l’estremo (FROM o TO) è posizionato sull’uscita [4]; un valore
pari a 82 indica che il punto FROM o TO è tra l’uscita [8] e la [9], vicino alla [8] dato che si trova sul primo
quinto di spazio tra la [8] e la [9]. La configurazione della videata raffigurata in precendeza indica un
somiere a cuspide posizionato tra l’uscita [1] e una posizione intermedia fra la [4] e la [5].
o [indicatore di posizione]: rappresentato da piccoli rettangoli posti sopra il disegno del somiere indica
che zona sta visualizzando la parte sottostante rispetto alla totalità delle uscite.
o [somiere sulle uscite]: posto nella zona inferiore della videata, illustra graficamente il somiere con i
riferimenti delle uscite che si stanno utilizzando, offrendo così un’immagine immediata della sua posizio-
ne e su quali uscite saranno presenti le note in base alla configurazione del somiere.
Per visualizzare la configurazione di un altro registro è sufficiente agire sul tirante / bascula oppure premere
[EXIT] per abbandonare la funzione. In entrambi i casi la configurazione appena impostata viene automati-
camente memorizzata.
9.2 CONFIGURAZIONE DELLE USCITE AUDIO POSTERIORI (funzione EXT.
OUT CONFIG)
Questa funzione permette di configurare le uscite PROGRAMMABLE OUTPUTS al fine di disporre del
segnale Antiphonal (e quindi controllato separatamente, tramite le bascule AMPLIFICATION), del segnale
generale dello strumento, del solo segnale riverberato.
Selezionando il campo EXT. OUT CONFIG. del menu SET-UP il display visualizza inizialmente il pop-up di
avviso:

89
Viscount UNICO 700Guida Utente
Il funzionamento delle modalità operative è descritto nelle seguenti tabelle.
MODALITA' USCITE 1-16 USCITE 17-18 USCITE 19-20
CONTROLLO
DIFFUSIONE [INTERNA]
CONTROLLO
DIFFUSIONE [ESTERNA]
STANDARD
Come impostato nella
funzione Ext. Out Router
Come impostato nella
funzione Ext. Out Router
Come impostato nella
funzione Ext. Out Router
Amplificazione interna Uscite 1-20
GENERAL-REVERB
Come impostato nella
funzione Ext. Out Router
Segnale generale Solo segnale riverberato Uscite 1-16 Uscite 17-20
ANTIPHONAL
Come impostato nella
funzione Ext. Out Router
Come impostato nella
funzione Ext. Out Router
Come impostato nella
funzione Ext. Out Router
Uscite 1-16 Uscite 17-20
GENERAL-ANTIPH.
Come impostato nella
funzione Ext. Out Router
Segnale generale
Come impostato nella
funzione Ext. Out Router
Uscite 1-16 Uscite 17-20
ANTIPH.-REVERB
Come impostato nella
funzione Ext. Out Router
Come impostato nella
funzione Ext. Out Router
Solo segnale riverberato Uscite 1-16 Uscite 17-20
In questo caso viene visualizzata la videata di configurazione:

90
Viscount UNICO 700 Guida Utente
10. FUNZIONI DI UTILITA’ e MIDI
(menu UTIL. & MIDI)
Il menu UTILITY & MIDI, richiamabile selezionando l’omonimo campo a display della videata principale
raccoglie tutte le funzioni accessorie e le impostazioni relative l’interfaccia MIDI dell’organo.
Il menu è visualizzato su tre videate:
La prima parte contiene le funzioni accessorie e di utilità:
o PIST. COMBINE (Piston Combine): sincronizzazione delle combinazioni dedicate della pedaliera con
quelle di un’altra sezione (per. es. richiamandone una del Grande Organo ne viene attivata la stessa della
pedaliera).
o KEYBOARDS INV. (Keyboards Inversion): inversione dei manuali in modo che i registri del Positivo
suonino con il secondo manuale e viceversa.
o TRACKER TOUCH: permette di utilizzare il caratteristico tocco meccanico degli organi a canne che
influisce sui tempi e sonorità di attacco dei registri labiali.
o 1st SHORT OCT. (First short octave): attivazione dell’ottava corta sulla prima ottava dei manuali e della
pedaliera.
o AUTO MAINPAGE: ritorno automatico alla videata principale dopo 10 secondi di inattività sul display.
o LCD CONTRAST: regolazione del contrasto del display.
o SET DATE & TIME: regolazione della data e dell’ora.
o LOCK ORGAN: impostazione del codice di blocco dell’organo al fine di evitare l’accesso alle videate di
configurazione dello strumento e della memorizzazione delle combinazioni, del Tutti e del Crescendo.
o RESTORE FACT. SET (Restore factory settings): ripristino delle impostazioni di fabbrica.
o OP.SYS. UPGRADE (Operating System upgrade): aggiornamento del sistema operativo.
La seconda parte del menu riguarda invece le configurazioni riguardanti l’interfaccia MIDI:
o Tx AND Rx CHANNEL: configurazione dei canali MIDI di trasmissione e ricezione.
o Tx AND Rx FILTER: configurazione dei filtri MIDI di trasmissione e ricezione.
o PROG. CHANGE SEND (Program Change send): salvataggio nelle combinazioni e trasmissione dei
messaggi MIDI di Program Change e Bank Select.
o PEDAL/KEYB TOUCH (Pedal / Keyboard touch): selezione delle curve di dinamica dei manuali per
l’utilizzo delle voci Orchestra e la trasmissione delle note MIDI.
o COUPLED NOTES: La funzione COUPLED NOTES permette di scegliere se trasmettere via MIDI
solo le note fisicamente suonate sui manuali (a funzione disattivata), oppure anche quelle generate dai vari
controlli di unione (a funzione attivata). Selezionando YES e suonando per esempio sulla pedaliera con
l’unione G.O./P attiva, vengono trasmesse le note sui canali della pedaliera e del Grande Organo.
Selezionando NO le note vengono trasmesse solo sul canale della pedaliera.

91
Viscount UNICO 700Guida Utente
11. FUNZIONI PER LA GESTIONE DEI FILE
(menu FILE MANAG.)
La serie di organi Unico può utilizzare due diverse tipologie di memoria di massa: la memoria interna e un
dispositivo di memorizzazione da inserire nel connettore [USB] posto sotto i manuali (penna USB).
Tali unità di memoria vengono utilizzate per la memorizzazione della configurazione dell’organo, parti di
essa, brani musicali e liste di brani.
In caso di penna USB inserita il sistema prevede l’utilizzo di quest’ultima come memoria di massa. E’ comun-
que possibile utilizzare la memoria interna per la copia dei file (da e per la penna USB), non è invece possibile
caricare, cancellare e rinominare file memorizzati internamente: per fare ciò è necessario disinserire la penna
USB.
Selezionando il campo FILE MANAGEMENT della videata principale viene visualizzato il relativo menu
contenente tutte le funzioni di gestione dei file. E’ altresì presente una videata di informazione sulle versioni
di firmware installati nell’organo.
Come è possibile notare la parte inferiore della videata indica l’unità di memoria attualmente utilizzata:
- INTERAL MEMORY: memoria interna
- USB PEN DRIVE: penna USB
Le funzioni richiamabili sono le seguenti:
o DIR: visualizzazione del contenuto della memoria di massa.
o LOAD: caricamento dei file.
o SAVE: salvataggio nella memoria di massa della configurazione dell’organo o parti di essa.
o COPY: copia dei file da un’unità di memoria (es. interna) in un’altra.
o RENAME: rinomina dei file.
o DELETE: cancellazione dei file.
o SONGLIST: programmazione di liste di brani.
o O.S. INFO: visualizzazione delle versioni dei firmware installati nel sistema.
NOTE
- Una volta inserita la penna USB attendere qualche secondo prima di visualizzare il menu FILE
MANAGEMENT.
- Qualora si desideri rinominare tramite un computer i file memorizzati nella penna USB porre
particolare attenzione al fatto che i nomi possono contenere solo numeri e lettere le quali devo-
no essere tutte minuscole.
- Utilizzate sempre penne USB formattate con file system FAT o FAT32 (no NTFS).

92
Viscount UNICO 700 Guida Utente
12.1 RIPRODUZIONE DI UN BRANO (modalità PLAY)
Nella videata precedentemente descritta di selezione della modalità del sequencer selezionare il campo PLAY,
il display visualizza i file MIDI memorizzati nell’unità di memoria attualmente utilizzata:
12. RIPRODUZIONE e REGISTRAZIONE DI BRANI MUSICALI
(SEQUENCER)
L’organo Unico è equipaggiato con un sequencer (registratore digitale) interno in grado di acquisire le esecu-
zioni, i comandi e i controlli effettuati sullo strumento. Le registrazioni poi possono essere salvate nella penna
USB o nella memoria interna come file MIDI e riascoltate in qualsiasi momento.
Per richiamare il sequencer premere il pulsante [SEQUENC] posto a fianco del display, viene visualizzata la
videata di selezione delle tre modalità operative del sistema:
o PLAY: riproduzione dei brani musicali presenti nella memoria interna o nella penna USB.
o PLAY OPTIONS: opzioni di riproduzione.
o RECORD: registrazione di brani musicali.
Nella zona inferiore della videata viene riportata l’unità di memoria al momento utilizzata. Si ricorda che la
penna USB ha priorità sulla memoria interna, qualora si desideri utilizzare quest’ultima è necessario disinserire
il dispositivo USB.
NOTE
- Una volta inserita la penna USB attendere qualche secondo prima di richiamare il sequencer.
- La trasposizione regolabile nel menu TUNING non ha effetto sulla riproduzione (al contrario
della registrazione dove invece le note vengono acquisite trasposte) dei brani. A tal fine utiliz-
zare la funzione di trasposizione descritta nel par. 12.3.

93
Viscount UNICO 700Guida Utente
Selezionare ora il file MIDI che si desidera riprodurre.
La nuova videata informa circa tutti i comandi necessari per l’utilizzo del sequencer:
- [ENTER]: avvia la riproduzione del brano.
- [EXIT]: abbandono del sequencer.
- [FIELD
SS
SS
S]: selezione del brano precedente memorizzato in memoria o impostato in una Songlist (vedi
par. 12.4).
- [FIELD
TT
TT
T]: selezione del brano successivo memorizzato in memoria o impostato in una Songlist (vedi
par. 12.4).
- [VALUE -] (pressione singola): riduzione della velocità di riproduzione (visualizzata in alto a sinistra
come percentuale del valore originale, 100 nella videata sopra illustrata).
- [VALUE +] (pressione singola): aumento della velocità di riproduzione (visualizzata in alto a sinistra
come percentuale del valore originale, 100 nella videata sopra illustrata).
- [VALUE -] (pressione prolungata): riavvolgimento veloce (Rewind).
- [VALUE +] (pressione prolungata): avanzamento veloce (Fast Forward).
Avviata la riproduzione di un brano il display cambia in:
e come è possibile notare anche le funzioni dei pulsanti [ENTER] e [EXIT] sono cambiate in:
- [ENTER]: pausa / riavvio della riproduzione del brano.
- [EXIT]: arresto della riproduzione del brano.
[FIELD S], [FIELD T], [VALUE -], [VALUE +] mantengono le funzioni descritte in precedenza.

94
Viscount UNICO 700 Guida Utente
12.2 REGISTRAZIONE DI UN BRANO (modalità RECORD)
Nella videata delle modalità del sequencer selezionare il campo RECORD, il display visualizza:
Come per la modalità Play, anche in Record la videata informa circa le funzioni dei pulsanti:
- [ENTER]: avvia la registrazione.
- [EXIT]: abbandono del sequencer.
Una volta avviata la registrazione le funzioni cambiano in:
- [ENTER]: pausa / riavvio della registrazione.
- [EXIT]: arresto della registrazione.
Premendo [EXIT] per terminare la sessione il display visualizza la videata relativa al salvataggio della registra-
zione appena effettuata.
selezionando [NEW SONG] si avvia una nuova registrazione, mentre caricando un file MIDI è possibile eseguirne
l’overdub ovvero una nuova registrazione che si andrà ad aggiungere all’esecuzione registrata in precedenza.

95
Viscount UNICO 700Guida Utente
Nella composizione del nome utilizzare i pulsanti [FIELD S] e [FIELD T] per muovere il cursore e [VALUE
+] e [VALUE -] per selezionare il carattere. I primi tre caratteri possono essere solo numeri in quanto neces-
sari per future espansioni dello strumento. Per confermare il nome e procedere con il salvataggio premere il
pulsante [ENTER], [EXIT] invece permette di tornare alla videata precedente ed annullare il salvataggio.
L’avvenuta memorizzazione del file viene confermata dal messaggio:
Premendo invece [EXIT] dalla videata di salvataggio (quindi a registrazione acquisita ma non memorizzata)
il sistema avverte che si sta per perdere la registrazione:
e di premere [ENTER] per confermare l’abbandono e l’eliminazione dei dati acquisiti o [EXIT] per tornare
alla videata di salvataggio.
NOTA
Qualora si desideri rinominare tramite un computer i file memorizzati nella penna USB porre par-
ticolare attenzione al fatto che i nomi possono contenere solo numeri e lettere le quali devono
essere tutte minuscole.
Le funzioni visualizzate permettono di:
o SAVE: salvare la registrazione come file MIDI.
o PLAY: riascoltare la registrazione prima di procedere con il salvataggio.
o OVERDUB: eseguire una nuova registrazione in aggiunta alla sequenza appena acquisita.
o DISCARD AND EXIT: cancellare la registrazione ed abbandonare la modalità Record del sequencer.
Selezionando il campo SAVE il sistema chiede di assegnare un nome alla sequenza MIDI che si sta per
salvare:

96
Viscount UNICO 700 Guida Utente
12.3 OPZIONI DI RIPRODUZIONE (menu PLAY OPTIONS)
Selezionando il campo PLAY OPTIONS nella videata di selezione della modalità del sequencer si ha accesso
ad alcune opzioni inerenti la riproduzione dei brani:
queste riguardano:
o TRANSPOSER: imposta una trasposizione in semitoni dei brani riprodotti dal sequencer.
o SONG LOOP: se impostato in “YES” al termine di un brano questo viene riprodotto nuovamente.
o LIST AUTOPLAY: se impostato in “YES”, durante l’uso di Songlist al termine di un brano viene
automaticamente riprodotto il successivo senza la necessità di premere il tasto [FIELD T].
o LIST LOOP: se impostato in “YES”, al termine dell’ultimo brano previsto da una Songlist viene auto-
maticamente riprodotto il primo.
12.4 LE SONGLIST (funzione SONGLIST)
Con il termine Songlist si intende la funzionalità dell’organo di creare e riprodurre liste di brani musicali (file
MIDI).
Per programmare una lista di brani richiamare il menu FILE MANAGEMENT e selezionare la funzione
SONGLIST, il sistema chiede se si desidera crearne una nuova o modificarne una già esistente:
Selezionando il campo [NEW LIST] si crea una lista nuova, selezionando un file LST si modifica la lista
contenuta in quel file.
In entrambi i casi la prima operazione da eseguire è quella di selezionare i brani che si desidera siano presenti
in lista:

97
Viscount UNICO 700Guida Utente
Utilizzare i tasti [FIELD S] e [FIELD T] per selezionare il file MIDI, [VALUE +] per inserirlo in lista e
[VALUE -] per disinserirlo. A fianco del nome del file viene visualizzata l’attuale posizione all’interno della
lista. Premere ora [ENTER] per continuare con la programmazione o [EXIT] per annullarla, in questo caso
il sistema richiede una conferma a procedere con l’abbandono:
La seconda operazione da eseguire è il posizionamento dei brani all’interno della lista (o la conferma della
programmazione fatta in precedenza):
Qualora si desideri muovere un brano in un’altra posizione posizionare il cursore sul relativo campo del file
con i tasti [FIELD S] e [FIELD T], [VALUE +] per avanzare la posizione o [VALUE -] per impostare una
posizione precedente.
Premere infine [ENTER] per salvare la lista o [EXIT] per tornare alla videata precedente.
Come per i file MIDI i primi tre caratteri possono essere solo numeri.
Per la composizione del nome utilizzare i pulsanti [FIELD S] e [FIELD T] per muovere il cursore e [VALUE
+] e [VALUE -] per selezionare il carattere.
Per confermare il nome e procedere con il salvataggio premere il pulsante [ENTER], [EXIT] invece permet-
te di tornare alla videata precedente.
NOTA
Qualora si desideri rinominare tramite un computer i file memorizzati nella penna USB porre par-
ticolare attenzione al fatto che i nomi possono contenere solo numeri e lettere le quali devono
essere tutte minuscole.

98
Viscount UNICO 700 Guida Utente
13. APPENDICE
13.1 LOCAL OFF DEI REGISTRI
Impostare un registro in Local Off significa fare in modo che questo non suoni tramite la generazione
interna dell’organo ma che ne venga comunque trasmesso il relativo messaggio MIDI (codice di Sistema
Esclusivo) così da poter essere attivato e suonato su uno strumento collegato.
Per impostare il Local Off delle voci è necessario, quando il display visualizza la videata principale, premere
il pistoncino [S] (Set) e, mantenendolo premuto, [C] (Cancel). I Led di tutti i registri verranno accesi ed il
display visualizzerà la videata:
Per posizionare una voce in Local Off agire sul tirante o bascula in modo da spegnerne la luce.
Dopo aver impostato la configurazione desiderata premere di nuovo [S] e [C] per memorizzarla.
Successivi accessi al settaggio del Local Off visualizzeranno lo stato dei registri secondo la regola:
- Luce accesa: registro in Local On (suona con la generazione interna)
- Luce spenta: registro in Local Off
13.2 FACTORY SETTINGS
La procedura di Factory Setting permette di ripristinare le impostazioni di fabbrica di tutte le funzioni interne
dello strumento, annullando così le modifiche apportate dall’utente.
L’organo Unico permette inoltre di scegliere cosa si desidera reimpostare ai valori di default.
Per richiamare la funzione in oggetto selezionare il campo a display RESTORE FACT. SET nella seconda
pagina del menu UTILITY & MIDI:
E’ possibile inizializzare:
o ENTIRE ORGAN: tutte le impostazioni e funzioni dell’organo (menu TUNING, SET-UP e UTILITY
& MIDI, i quattro Style User, tutte le combinazioni generali, divisionali, Tutti e Crescendo e stato di
Local Off dei registri).

99
Viscount UNICO 700Guida Utente
o SETTING PARAMETERS: impostazioni dei menu TUNING, SET-UP e UTILITY & MIDI.
o USER STYLE: i 4 Style User
o COMB. MEMORIES: tutte le combinazioni generali e divisionali, il Tutti e il Crescendo.
Dopo aver selezionato il Factory Setting desiderato premendo [ENTER] il display visualizza una videata di
avviso indicando ciò che si sta reimpostando con i valori di default:
Premendo ancora [ENTER] si avvia la procedura durante la quale viene visualizzato il messaggio
“PERFORMING”, terminata la quale il messaggio “ACCOMPLISHED”. Premere invece [EXIT] per an-
nullare l’operazione.
13.3 AGGIORNAMENTO DEL SISTEMA OPERATIVO
Il sistema operativo degli organi Unico è aggiornabile in maniera semplice e veloce, copiando i file di instal-
lazione in una penna USB da inserire nell’apposito connettore posto sotto i manuali e richiamando la funzio-
ne OP. SYS. UPGRADE (vedi cap. 10).
Per ottenere i file di installazione e tutte le informazioni necessarie per completare con successo l’operazione
consultare la sezione “Download” del sito ufficiale degli organi con tecnologia Physis all’indirizzo:
http://www.physisorgans.com/download.asp

Smaltimento dei rifiuti elettrici ed elettronici (applicabile nell’Unione Europea e negli altri paesi
europei con servizio di raccolta differenziata)
Ai sensi dell’art. 13 del Decreto legislativo 25 luglio 2005, n. 151 “Attuazione delle Direttive
2002/95/CE, 2002/96/CE e 2003/108/CE”
II simbolo presente sul prodotto o sulla sua confezione indica che il prodotto non verrà trattato come
rifiuto domestico. Sarà invece consegnato al centro di raccolta autorizzato per il riciclo dei rifi uti
elettrici ed elettronici. Assicurandovi che il prodotto venga smaltito in modo adeguato, eviterete un
potenziale impatto negativo sull’ambiente e la salute umana, che potrebbe essere causato da una
gestione non conforme dello smaltimento del prodotto. Il riciclaggio dei materiali contribuirà alla
conservazione delle risorse naturali. Per ricevere ulteriori informazioni più dettagliate Vi invitiamo a
contattare l’uffi cio preposto nella Vostra città, il servizio per lo smaltimento dei rifi uti o il negozio in
cui avete acquistato il prodotto.
Lo smaltimento del prodotto da parte dell’utente comporta l’applicazione delle sanzioni amministrative
previste dalla normativa di legge.
Questo prodotto è conforme ai requisiti delle direttive EMCD 2004/108/EC e LVD 2006/95/EC.
ATTENZIONE
Questo prodotto contiene una batteria al litio.
Esiste pericolo di esplosione se non viene sostituita correttamente.
La batteria deve essere sostituita con una dello stesso tipo o equivalente.
La batteria non dovrebbe essere esposta a fonti di calore come luce solare, fuoco o simili.
La batteria deve essere sostituita solo da personale qualificato.


viscount
Viscount International S.p.A.
Via Borgo, 68 / 70 – 47836 Mondaino (RN), ITALY
Tel: +39-0541-981700 Fax: +39-0541-981052
Website: www.viscount.it - www.physisorgans.com
Documenttranscriptie
viscount UNICO 700 User Guide - EN Gebruikersgids - NL Guida Utente - IT Ver. EU - 1.4 IMPORTANT SAFETY INSTRUCTIONS WARNING: READ THIS FIRST! WARNING RISK OF ELECTRIC SHOCK DO NOT OPEN AVIS RISQUE DE CHOC ÉLECTRIQUE NE PAS OUVRIR This symbol is intended to alert the user to the presence of uninsulated “dangerous voltage” within the product’s enclosure that may be of sufficient magnitude to constitute a risk of electric shock to persons. This symbol is intended to alert the user to the presence of important operating and maintenance (servicing) instructions in the literature accompanying the appliance. WARNING: TO REDUCE THE RISK OF FIRE OR ELECTRIC SHOCK: DO NOT EXPOSE THIS APPARATUS TO RAIN OR MOISTURE AND OBJECTS FILLED WITH LIQUIDS, SUCH AS VASES, SHOULD NOT BE PLACED ON THIS APPARATUS. DO NOT REMOVE COVER (OR BACK) NO USER-SERVICEABLE PARTS INSIDE REFER SERVICING TO QUALIFIED SERVICE PERSONNEL "INSTRUCTIONS PERTAINING TO A RISK OF FIRE, ELECTRIC SHOCK OR INJURY TO PERSONS" WARNING: 1) 2) 3) 4) 5) 6) 7) 8) Read these instructions. Keep these instructions. Heed all warnings. Follow all instructions. Do not use this apparatus near water. Clean only with dry cloth. Do not block any ventilation openings. Install in accordance with the manufacturer’s instructions. Do not install near any heat sources such as radiators, heat registers, stoves or other apparatus (including amplifiers) that produces heat. 9) Do not defeat the safety purpose of the polarized or grounding-type plug. A polarized plug has two blades with one wider than the other. A grounding type plug has two blades and a third grounding prong. The wider blade or the third prong are provided for your safety. If the provided plug does not fit in to your outlet, consult an electrician for replacement of the obsolete outlet. 10)Protect the power cord from being walked on or pinched, particularly at plugs, convenience receptacles, and the point where they exit from the apparatus. 11) Only use attachments/accessories specified by the manufacturer. 12)Use only with the cart, stand, tripod, bracket, or table specified by the manufacturer, or sold, with the apparatus. When a cart is used, use caution when moving the cart/apparatus combination to avoid injury from tip-over. 13)Unplug this apparatus during lightning storms or when unused for long periods of time. 14)Refer all servicing to qualified service personnel. Servicing is required when the apparatus has been damaged in any way, such as power-supply cord or plug is damaged, liquid has been spilled or objects have fallen into the apparatus, the apparatus has been exposed to rain or moisture, does not operate normally, or has been dropped. NOTE: The socket-outlet shall be installed near the equipment and shall be easily accessible. SAVE THESE INSTRUCTIONS Viscount UNICO 700 User Guide INDEX 1. Important notes .............................................................................................................................. 2 1.1 Looking after the product .............................................................................................................................. 2 1.2 Notes about the manual .................................................................................................................................. 2 2. Introduction.................................................................................................................................... 4 3. General description ........................................................................................................................ 5 4. Switching on and main video page ............................................................................................... 10 5. Setting the volumes (Volumes function) ....................................................................................... 11 6. Tuning the instrument (Tuning menu) ........................................................................................ 12 7. The organ styles (Styles menu) ..................................................................................................... 13 8. Selecting and regulating the voices (Voices menu) ...................................................................... 14 8.1 Regulating the volume (Volume Level function) ....................................................................................... 14 8.2 Regulating the audio parameters (Edit Parameters function) .................................................................. 15 8.3 Selecting the alternative voices (Alternative Voice function)................................................................... 16 9. Instrument general settings (Set-Up menu) ................................................................................. 18 9.1 Setting the routing of the voices on the rear audio outputs (Ext. Out Router function) ................... 18 9.2 Configuring the audio outputs on the rear (Ext. Out Config function) ................................................ 21 10. Utility and MIDI functions (Util. & MIDI menu) ...................................................................... 22 11. File management functions (File Manag. menu)........................................................................23 12. Playing and recording of musical sequences (Sequencer).........................................................24 12.1 Playing back a piece (Play mode) ............................................................................................................... 24 12.2 Recording a piece (Record mode) ............................................................................................................. 26 12.3 Sequencer playback options (Play Options menu) .................................................................................. 28 12.4 Songlists (Songlist function) ....................................................................................................................... 28 13. Appendix ......................................................................................................................................30 13.1 Stop Local Off ............................................................................................................................................. 30 13.2 Factory Settings............................................................................................................................................ 30 13.3 Upgrading the operating system ................................................................................................................ 31 1 Viscount UNICO 700 User Guide 1. IMPORTANT NOTES 1.1 LOOKING AFTER THE PRODUCT • Do not apply excessive force to the organ’s structures or the controls (knobs, stops, push-buttons, etc.). • When possible, do not place the instrument close to units which generate strong interference, such as radios, TVs, computer videos, etc. • Do not place the organ close to heat sources, in damp or dusty places or in the vicinity of strong magnetic fields. • Do not expose the instrument to direct sunlight. • Never insert foreign bodies inside the instrument or pour liquids of any kind into it. • For cleaning, use only a soft brush or compressed air; never use detergents, solvents or alcohol. • Always use good quality screened cables for connection to amplification or diffusion systems. When disconnecting cables from sockets, always take hold of the connector and not the cable itself; when winding cables, do not knot or twist them. • Before making the connections ensure that the other units (especially amplification and diffusion systems) you are about to connect are switched off. This will prevent noisy or even dangerous signal peaks. • Connect the net cable to an earthed socket. • Check that the voltage corresponds to the voltage shown on the serial number plate of the organ. • If the organ is to be out of use for lengthy periods, disconnect the plug from the power socket. 1.2 NOTES ABOUT THE MANUAL • Take good care of this manual. • This manual is an integral part of the instrument. The descriptions and illustrations in this publication are not binding. • While the instrument’s essential characteristics remain the same, the manufacturer reserves the right to make any modifications to parts, details or accessories considered appropriate to improve the product or for requirements of a constructional or commercial nature, at any time and without undertaking to update this publication immediately. • All rights reserved; the reproduction of any part of this manual, in any form, without the manufacturer’s specific written permission is forbidden. • All the trademarks referred to in this manual are the property of the respective manufacturers. 2 Viscount UNICO 700 User Guide • Read all the information carefully in order to obtain the best performances from your product and waste no time. • The codes or numbers in square brackets ([ ]) indicate the names of the buttons, sliders, trimmers and connectors on the instrument. For example, [ENTER] refers to the ENTER button. • The illustrations and display pages are purely guideline and may differ from those actually shown on the display. • The instructions provided in this manual only concern the instrument's operating system version that was up to date when the document was released. Therefore, such instructions might not describe faithfully your current operating system release. Please, visit the website http://www.physisorgans.com/ download.asp to check for the newest operating system release and manual. • Check the Reference Manual for detailed descriptions on the organ's functions. The manual can be downloaded from the Download page of the website http://www.physisorgans.com. 3 Viscount UNICO 700 User Guide 2. INTRODUCTION Dear Customer, Thank you for choosing the organ Viscount Unico. The Company, a world leader in the construction of fine classical organs, has installed in this instrument the latest and most sophisticated technolog y dedicated to the high fidelity reproduction of pipe organ sounds, with impressive flexibility and remakable quality of timbre. After years of research exploring musical synthesis techniques, our Research and Development unit, is the FIRST in the world to create the sounds of a pipe organ by using the “physical modeling technology” upon which the Physis is based. Instead of using “sound samples” from pipe organs (previously the standard method) this revolutionary sound generation system involves the real-time calculation of the waveform generated by a precise mathematical model based on the sound emission physics of a pipe organ, incorporating the principal physical parameters ie. construction geometry, materials used, and pertaining air pressure, etc. The fact that the simple reproduction of memorized “sound” has been disregarded, permits the achievement of unimaginable realism, with the level of detail previously only created by a traditional pipe organ. For example, the mathematical model allows the production of a different sound for each key since it provides the virtual reproduction of the original instrument by assigning a different pipe to each note, similar to a pipe organ. Furthermore, it will generate a different sound for each consecutive pressure of the same note, thus simulating the precise condition of the air volume inside the pipe as it is pressed. The Unico also permits the “physical” editing of the sounds produced, by adjusting the parameters - just as the organ builder constructs the pipes. If however, “editing” is not your forte, you may choose your sound from a big library of pre-programmed pipe organ voices already in the instrument’s memory. To conclude we suggest that you visit our web-sites www.viscount-organs.com and www.physisorgans.com where you will find information, updates, documents and news about our unique range of instruments. 4 Viscount UNICO 700 User Guide 3. GENERAL DESCRIPTION 5 Viscount UNICO 700 User Guide 1. PEDAL Section. Contains the pedal’s stops and couplers for linking the manuals to the pedal board. 2. MAN. II Section. Contains the stops, manual couplers and tremulants of Manual II. 3. MAN. IV Section. Contains the stops and tremulants of Manual IV. 4. MAN.III Section. Contains the stops, manual couplers and tremulants of Manual III. 5. MAN.I Section. Stops, manual couplers and tremulants for Manual I. 6. [POWER] Switch. Instrument on/off switch. 7. AMPLIFICATION Section. Organ amplification controls. - [CONSOLE ON] switches on the instrument’s internal amplification system. - [EXT. SPEAKER ON] enables the PROG. OUT external outputs in the rear panel (point 27). 8. CANCEL Section. Cancel buttons which allow disabling of all the Reed voices ([REED] tab) and the Plenum voices ([MIXTUR] tab). 9. MIDI Section These controls, provided for each manual and the pedal board, allow transmission of the note MIDI codes on the MIDI [OUT] port to be enabled and disabled. All the instrument’s other MIDI messages will continue to be transmitted, even with the MIDI control off. 10. Control and programming section. Contains the buttons and display for viewing and programming all the instrument’s setup and sequencer functions. 11. ORCHESTRA Section. This section contains the organ’s Orchestra stops. 12. Additional displays. - [CRESCENDO] shows the step currently reached by the [CRESCENDO] pedal (point 25) - [M. BANK] displays the memory bank of the combinations (general and customised) selected using the [MEM. BANK +] and [MEM. BANK -] pistons (point 20). 13. General pistons. These pistons and foot pistons recall the general combinations of the memory bank selected using [MEM. BANK +] and [MEM. BANK -] (point 20). These combinations can be modified; the procedure for saving them is described in point 19. [HR] restores the voice setup prepared in manual mode before a memory was recalled. General combination sequencer controls are also provided, [PREV] in descending order, [NEXT.] in ascending order. 6 Viscount UNICO 700 User Guide 14. Pedal Board pistons. This section contains the six pedal board combinations and the [HR] control for restoring the pedal board voice setup prepared in manual mode before one of these combinations is recalled. These combinations can be modified; the procedure for saving them is described in point 19. 15. Manual IV pistons. Pistons of the dedicated combinations of Man.IV. [HR] for restoring the Man.IV voices setup prepared in manual mode before one of these combinations is recalled. The combinations can be modified; the procedure for saving them is described in point 19. [P] of the IV/P coupling. [M.SOLO] (MIDI Solo) piston, which allows mono transmission of the notes played on this manual on the MIDI [OUT] output, with priority to the highest note. 16. Manual III pistons. Pistons of the dedicated combinations of Man.III. [HR] for restoring the Man.III voices setup prepared in manual mode before one of these combinations is recalled. The combinations can be modified; the procedure for saving them is described in point 19. [P] of the III/P coupling. [IV] of the keyboards coupling. [M.SOLO] (MIDI Solo) piston, which allows mono transmission of the notes played on this manual on the MIDI [OUT] output, with priority to the highest note. 17. Manual II pistons. Pistons of the dedicated combinations of Man.II. [HR] for restoring the Man.II voices setup prepared in manual mode before one of these combinations is recalled. The combinations can be modified; the procedure for saving them is described in point 19. [P] of the II/P coupling. [III], [I] and [IV] of the keyboards couplings. [O.SOLO] (Organ Solo) pistons, which allow the Man.III voices to be played in mono mode with priority to the highest note when the [III/II] coupling is active, and [M.SOLO] (Midi Solo) piston, which allows mono transmission of the notes played on this manual on the MIDI [OUT] output, with priority to the highest note. 18. Manual I pistons. Pistons of the dedicated combinations of Man.I. [HR] for restoring the Man.I voices setup prepared in manual mode before one of these combinations is recalled. These combinations can be modified; the procedure for saving them is described in point 19. [P] of the I/P coupling. [III] and [IV] of the keyboards coupling. [M.SOLO] (MIDI Solo) piston, which allows mono transmission of the notes played on this manual on the MIDI [OUT] output, with priority to the highest note. 19. [S] Piston. Fixing piston for saving the general and dedicated combinations, the Tutti and the Crescendo steps. To set a combination or the Tutti, after setting the voices as required, press [S], hold it down and then press the piston or foot piston of the combinations you wish to save. To save a Crescendo step, select it using the pedal of the same name, press [S], hold it down and press the [HR] of the general memories. To copy the contents of one step into another, select the step you wish to copy, hold down the [S] piston, select the step into which you wish to copy the contents, then press the [HR] of the general memories. NOTE If the LED of the [S] piston is off, programming of the organ is locked out by the Lock Organ function (chapt. 10), so it will not be possible to save combinations and/or view internal programming functions. 7 Viscount UNICO 700 User Guide 20. Organ general controls. These controls do not refer to individual sections but to the entire instrument. - [MEM. BANK +] and [MEM BANK -]: they select the memory bank displayed by the additional [MEM. BANK] display (point 12). - [ENC]: enables the Enclosed function, which allows the organ’s general volume to be controlled using the swell pedal [MAN.III]. - [A.P.]: enables the Automatic Pedal which allows the pedal voices to be played on Man.II. In this case, the organ’s pedal board is deactivated and the voices become monophonic, with priority to the lowest note. - [T]: piston and foot piston for recalling the Tutti. The Tutti can be modified; the procedure for saving it is described in point 19. - [C]: Cancel piston NOTE Memory bank n. 1 is always selected when the instrument is switched on. 21. Front connections panel. This panel, on the left underneath the manuals, contains the connectors and settings most often used, for convenient access. - [MASTER VOLUME]: regulates the organ’s general volume. - [REVERB VOLUME]: regulates the level of the reverb effect. - MIDI [IN]: the MIDI input connector for allowing the organ to receive the data transmitted by a remote MIDI unit. - MIDI [OUT]: the MIDI connector that transmits the MIDI data generated by the organ. - MIDI [THRU]: retransmits the data received by the [IN] port for connection of several MIDI devices in series. - [USB]: two USB connectors. The one on the left is used for connecting to a computer to allow the instrument’s setup programme to be used. The one on the right is for use of an USB stick (not supplied with the instrument) for use as a mass memory for the organ instead of the internal memory. For further information refer to chap. 11. - [PHONES]: the socket for connecting a headphone set. 22. Cover lock. 23. Coupler toe-studs. These pistons duplicate the functions of the piston and draw-stop couplers. 24. [32’ FLUTE REVERS.] toe-stud. When activated, this piston can be used to turn off the 32’ flutes. 25. [CRESCENDO] sweller. You can use this sweller to select the Crescendo steps which activate a preset series of stops. The step currently selected is displayed by the additional [CRESCENDO] display (see point 12). Each Crescendo step is programmable. The procedure for saving them is described in point 19. 26. Swell expression pedals. The organ has three swell pedals for continuous control the expression of Manual I, Manual III and Manual IV. The [MAN.IV] swell pedal also incorporates a special lever system for control of the Sustain effect for the Orchestra voices. 8 Viscount UNICO 700 User Guide 27. Rear connections. On the back of the organ, there are various connections for making the audio connection to external speaker systems, and the line and microphone input for use of the organ’s internal amplifier. - [EXT. +12V DC] connectors: power at +12 Volt can be obtained from these connectors to switchon any VISCOUNT speakers connected to the PROG. OUT. outputs. - OUT [GEN. SUB] (General Sub-Woofer): dedicated output for the connection of low-frequency speakers (sub-woofer). - PROG. OUT (Programmable Outputs): the instrument’s general line outputs, allowing simulation of the wind-chests of pipe organs. The signals are distributed over the outputs on the basis of the display function settings, which allow setting of the type of wind-chest, its size and the position in space of the speakers used, for each stop. Each output also has dedicated level and equalisation controls. - INPUT [L(+R)] / [R]: line inputs which allow other instruments to be played using the organ’s internal amplification. If the source is monophonic use the [L+(R)] connector only. - INPUT [MIC]: microphone input allowing amplification of the signal from a microphone. - [GAIN]: trimmer for regulating the gain of the input signal received at the [MIC] connector. WARNING! This group of connections on the rear is not visible from the outside and the organ’s wooden rear panel has to be removed to access it. Contact qualified staff for this procedure. 9 Viscount UNICO 700 User Guide 4. SWITCHING ON and MAIN VIDEO PAGE After the instrument is switched on with the [POWER] switch, the system takes a few seconds to become operational. During this stage, the LEDs on the separate panels of the manuals come on in sequence, and the display shows the introductory screen. When the main video page appears, the instrument is ready for use: The top of this screen contains the fields for selecting the organ’s various setup menus: o o o o o o TUNING: instrument tuning parameters. VOICES: functions relating to all the organ’s voices. STYLE: style selection. SET-UP: organ general set-up functions UTIL. & MIDI (Utility & MIDI): utility and MIDI functions FILE MANAG. (File Manager): management of the files saved in the internal memory or the USB device. To display the contents of a menu, simply locate the cursor (the field on which it is located appears in reverse mode) on the field required using the [FIELD S] and [FIELD T] buttons and press [ENTER]. [EXIT] quits the menu and returns to the main video page. The bottom of this screen displays the instrument parameters the status of which it is always useful to know: o [box in top left-hand corner]: (Equal in the screen shown) displays the temperament currently in use, selected in the TUNING menu. o ENSEMBLE: the ENSEMBLE value set in the TUNING menu. o AIR PRESS: the AIR PRESSURE parameter value set in the TUNING menu. o A: the instrument’s tuning, expressed as the frequency of A4, set in the TUNING menu. o [box in top right-hand corner]: (User2 in the screen shown) contains the style selected in the STYLE menu. o P. COMB: the status of the PISTON COMBINE function as set in the UTILITY & MIDI menu. o K. INV: the status of the KEYBOARD INVERSION function as set in the UTILITY & MIDI menu. o TRANSP: the transposition set in TUNING. These fields are for information only and cannot be selected. The menus referred to above have to be accessed to modify the setting of the relative function. The buttons used to view and navigate through all the display screens are arranged around the display. - [SEQUENC]: screens for use of the instrument’s internal sequencer. [VOLUMES]: screen containing all the instrument’s volumes. 10 Viscount UNICO 700 User Guide - [FIELD S] and [FIELD T]: buttons used to move the cursor, identified by the field in reverse. [FIELD S] positions it in the field above or the previous field, [FIELD T] in the field below or the next field. [VALUE +] and [VALUE -]: buttons which regulate the values of the parameters, whether they are numerical or alphanumerical. [VALUE +] increases, [VALUE -] decreases. [EXIT] and [ENTER]: buttons for accessing and quitting the display screens and menus, or for confirming or cancelling prompts made by the system. [ENTER] accesses menus/screens and confirms, [EXIT] quits menus/screens and cancels. 5. SETTING THE VOLUMES (VOLUMES function) Pressing the [VOLUMES] button displays the screen relating to all the organ’s volume controls: o MST (Master): the organ’s overall volume, which can also be adjusted with the [MASTER VOLUME] trimmer underneath the manuals. o REV (Reverb): reverb effect, which can also be adjusted with the [REVERB VOLUME] trimmer underneath the manuals. o PHO (Phones): level of the output signal at the headphone [PHONES] connector underneath the manuals. o EXT (External outputs): general volume of the PROG. OUT connectors on the rear panel. o PED (Pedal): pedal board divisional volume. o II (Manual II): second manual divisional volume. o III (Manual III): third manual divisional volume. o I (Manual I): first manual divisional volume. o IV (Manual IV): fourth manual divisional volume. o ORC (Orchestra): volume of the orchestra section. Press [EXIT] or wait about 4 seconds to quit the screen and return to display of the previous video page. 11 Viscount UNICO 700 User Guide 6. TUNING THE INSTRUMENT (TUNING menu) Selecting the TUNING field on the main video page gives access to all the instrument’s tuning parameters. o TRANSPOSER: transposer with a range from -6 to +5 semitones. When switched on, the organ always has transposition equal to zero. o [second field on the display]: (Equal in the screen shown) selector for setting historic temperaments of various periods and countries of origin. o BASE KEY: the note on which the chain of the 12 fifths that make up the temperament starts. o ENSEMBLE: level of natural tiny differences in pitch between one organ pipe and another, simulating the tuning error that occurs in the organ’s pipes due to wear over time and variations in temperature. The values range from – (pipes perfectly tuned) to 8 (maximum pitch instability). o AIR PRESSURE: simulates the drop in air pressure when a large quantity of air is requested in a short time (e.g. when large chords are played with the Tutti). This is reflected in a temporary, gradual drop in pitch, more obvious in the longest, widest pipes (flutes, bourdons, principals). o PITCH (A): fine tuning of the pitch, indicated as the frequency of A4 (an 8’ pipe). To quit the video page press [EXIT]. NOTE Transposition does not have any effect on playback of pieces with the internal sequencer (unlike recording, where the notes are acquired transposed). A specific transposer is provided for this purpose (see point 12.3). 12 Viscount UNICO 700 User Guide 7. THE ORGAN STYLES (STYLES menu) The Style identifies the setup of the organ stops, meaning the voice and the relative parameters of each stop, allowing the use of sounds appropriate to the repertoire to be performed. The organ has eight Styles, meaning eight sound setups, in the same console. The first four of them, which from now on we will also call the Presets or preset styles, are programmed by our laboratories on the basis of the appropriate organ schools, and cannot be modified by the user. The other four Styles, called User styles, can be freely modified and customised to personal taste, making the organ extremely flexible. Select the STYLE field on the main page for the Style selection: As we have already stated, the first four Styles cannot be modified, so accessing to the VOICES function the display shows the following warning message: However it is possible to display and check the settings of these Styles, to continue press any display button or wait about three seconds. 13 Viscount UNICO 700 User Guide 8. SELECTING AND REGULATING THE VOICES (VOICES menu) One of the main features of the new Physis synthesis technology used by the Unico organs for sound generation is that it offers the user a wide array of options for personalising the instrument with a very large number of organ timbres, and also makes available several parameters which can be adjusted to further increase the setup potential. The VOICES menu contains all the functions for selecting and regulating the voices’ audio parameters. NOTES: - The functions described below cannot be edited when a Preset style is selected. Select a User style to regulate these parameters. - The voices selected for each rocker switch or draw-stop, and the sound generation parameters and volume, are automatically saved in the current Style. This means that when another style is recalled, the voices will be reset with new parameters taken from the last style recalled. The changes made earlier are not lost, and will be made available when the style in which they were made is selected again. The first video page displayed allows selection of the function to be accessed: o VOLUME LEVEL: regulation of the volume of each individual voice. o EDIT PARAMETERS: regulation of the sound generation parameters for each individual voice. o ALTERNATIVE VOICES: selection of alterative voices. 8.1 REGULATING THE VOLUME (VOLUME LEVEL function) After the VOLUME LEVEL field has been selected in the VOICES menu, the display shows the organ sections. Select the section which contains the voice the volume of which you wish to adjust: 14 Viscount UNICO 700 User Guide As usual, use the [FIELD S] and [FIELD T] and [ENTER] buttons to select the field on the display. Another way of displaying and adjusting the volume immediately is to hold out the draw-stop or hold down the rocker tab for a few moments in the voice on position with the cursor on the VOLUME LEVEL field in the VOICES menu, or in the function itself. The LED of the stop the volume of which is being adjusted will flash to prevent modification errors; the stop will be on and can be played for better, quicker adjustment. Other stops can also be switched on to assess the overall effect of the changes. To quit the function and save the values press [EXIT]. 8.2 REGULATING THE AUDIO PARAMETERS (EDIT PARAMETERS function) To view the screens containing the sound generation parameters of each individual voice, select the EDIT PARAMETERS field in the VOICES menu: For this function the display again shows the organ’s sections, allowing selection of the one containing the voice to be modified. after which the voice the parameters of which are to be viewed can be displayed. Another way of viewing the setting screen directly is to hold out the draw-stop or hold down the rocker tab for a few moments in the voice on position with the cursor on the EDIT PARAMETERS field in the VOICES menu, or in the function itself. 15 Viscount UNICO 700 User Guide The LED of the stop being modified will flash to prevent modification errors; the stop will be on and can be played for better, quicker adjustment. Other stops can also be switched on to assess the overall effect of the changes. The parameters displayed are not the same for every voice, since some families have specific setting parameters not required for other types of voice. The settings which can be made are: CHARACTER: harmonic richness. AIR NOISE: noise of the air blowing through the pipe. REED NOISE: imperfect synchronisation of the reed throb period. ATTACK: attack time the sound takes to reach the maximum volume. REL. DETUNE: (Release Detune) detuning in the release phase. FREQ. SKEW: gradual change in the air’s pitch during the attack and release phases. DETUNE: detuning to produce the throb effect in the voices concerned. KEYB. LO LEV.: (Keyboard Low Level) gain (positive values) or attenuation (negative values)of the volume in the low part of the manual. o KEYB. LO LEV.: (Keyboard High Level) gain (positive values) or attenuation (negative values)of the volume in the high part of the manual. o TREMULANT: select the first (1st) or second (2nd) tremulant. The selected tremulant will be applied to the register when activated through the dedicated draw-stop. o o o o o o o o To quit the function and save the values press [EXIT]. 8.3 SELECTING THE ALTERNATIVE VOICES (ALTERNATIVE VOICE function) Each stop on the panel has a set of voices, the default voice set by the current Style and the alternative voices, which are variants on the original. To select an alternative voice, the ALTERNATIVE VOICES function has to be recalled: As for the other VOICES menu functions, the next step is to select the section of the organ containing the voice to be modified: this displays the list of the voices present in the chosen section. 16 Viscount UNICO 700 User Guide Here again, there is the option of displaying the alternative voices screen directly by holding out the drawstop or holding down the rocker rab for a few moments in the voice on position with the cursor on the ALTERNATIVE VOICES field in the VOICES menu, or in the function itself. The LED of the stop being replaced will flash to prevent modification errors; the stop will be on and can be played for better, quicker adjustment. The display now shows the list of the alternative voices: identified as “CURRENT VOICE” in the bottom of the screen. It should also be remembered that the top of the screen always contains the name screen-printed on the draw-stop or tab, so that the stop the voice of which is being changed can be identified at all times. When the [FIELD S] and [FIELD T] buttons are used to move the cursor to other voices, the prompt changes to “ENTER TO REPLACE”. instructing you to press [ENTER] to confirm the new voice and render it usable. The voice on which the cursor is located is available and can be played even before [ENTER] is pressed, allowing the modification required to be evaluated immediately. Other stops can also be switched on to assess the overall effect of the changes. Press [EXIT] to replace other voices or exit the function. NOTE: When an alternative voice is selected, the sound generation parameters in the EDIT PARAMETERS function are automatically reset to the default values of the new voice. The volume setting (in the VOLUME LEVEL function) remains unchanged. 17 Viscount UNICO 700 User Guide 9. INSTRUMENT GENERAL SETTINGS (SET-UP menu) The SET-UP menu contains all the instrument’s general settings except for the settings relating to the MIDI interface and the accessory and utility functions. To recall this menu, select the SET-UP field from the main video page: The functions available are as follows: o o o o o o o o o o o o o o 1st TREMULANT: setting of the first tremulant speed and depth for each individual manual. 2nd TREMULANT: setting of the second tremulant speed and depth for each individual manual. REVERBERATION: selection of the type of room for the reverb effect. INT. AMPL. EQUALIZER (Internal amplification equalizer): setting of the 5-band equalizer of the internal amplifier. INT. AMPL. PANNING (Internal amplification panning): setting of the stereophonic distribution of the stops of the internal amplification system, to simulate different types of wind- chests for the various stops. INT. AMPL. TUNE-UP (Internal amplification tune-up): function not available in these models. PROG. FUNCTIONS (Programmable functions): settings relating to operation of the combinations, the pistons, the Crescendo and the trimmers underneath the manuals. ENC. CONFIGURATION (Enclosed configuration): program the [ENC] piston function . EXT. OUT EQUALIZER (External outputs equalizer): setting of the equalizers of the PROG. OUT outputs on the rear. EXT. SUB EQUALIZER (External sub equalizer): equalizer adjustment for the external output on the back [GEN. SUB.]. EXT. OUT ROUTER (External outputs router): setting of the routing of the stops on the PROG. OUT outputs on the rear to simulate the position of the wind-chests and the arrangement of the pipes inside them. EXT. OUT VOLUME (External outputs volume): setting of the volumes of the PROG. OUT outputs on the rear. EXT. OUT CONFIG (External outputs config): setting of the PROG. OUT rear outputs. EXT. OUT RESIZE (External out resize): Adapts automatically the link between stops and rear outputs, according to the amount of outputs actually used. 18 Viscount UNICO 700 User Guide 9.1 SETTING THE ROUTING OF THE VOICES ON THE REAR AUDIO OUTPUTS (EXT. OUT ROUTER function) One of the Unico series organs’ key features is the capability for simulating the position of the wind-chests and the arrangement of the pipes inside them, for every stop. This is achieved by setting the routing of the audio signals, i.e. the way in which they are distributed, on the rear outputs. For each stop, the system is able to set an output configuration which reflects the layout of the pipes in real wind-chests, as follows: - single or double cusp - double wing - left or right wing - mono - alternate keys Moreover, each of these layouts can be further specified with regard to the width of the wind-chest and its location in space, defined by the number of outputs used. To access the rear audio output setting video page, select the EXT. OUT ROUTER field in the SET-UP menu: this displays the screen for selection of the section which contains the stop to be set up, which has to be chosen from the list of the stops in the section: Here again, there is the option of displaying the set-up screen directly by holding out the draw-stop or holding down the rocker tab for a few moments in the voice on position with the cursor on the EXT. OUT ROUTER field in the SET-UP menu, or in the function itself. The LED of the stop being set up will flash to prevent modification errors; the stop will be on and can be played for better, quicker adjustment. Other stops can also be switched on to assess the overall effect of the changes. 19 Viscount UNICO 700 User Guide the screen comprises four sections: o MODE: selects the type of wind-chest from: - C – C# (alternate keys) - MONO - DOUBLE CUSP - CUSP - DOUBLE WING - WING o FROM and TO: they select the limits of the area, set in outputs, within which the wind-chest is to be located. The value is set as [output number-position between two outputs], bearing in mind that there are four positions between one output and the next (2-4-6-8 on the display). A value of 40 means that the end of the range (FROM or TO) is on output [4]; a value of 82 means that the FROM or TO point is between output [8] and [9], close to [8] since it is in the first fifth of the area between output [8] and output [9]. The screen previosly shown refers to a peaked wind-chest placed between output [1] and a position between outputs [4] and [5]. o [position indicator]: it consists of small rectangles located above the drawing of the wind-chest and indicates that the zone is displaying the part below the total number of outputs. o [wind-chest on outputs]: in the bottom of the screen, it provides a graphic illustration of the windchest with the references to the outputs being used, to give an immediate picture of its position and the outputs which will carry the notes, in accordance with the wind-chest configuration. To view the setup of another stop, simply activate the draw-stop / tab or press [EXIT] to quit the function. In both cases the set-up just created is saved automatically. 20 Viscount UNICO 700 User Guide 9.2 CONFIGURING THE AUDIO OUTPUTS ON THE REAR (EXT. OUT CONFIG function) Thanks to this function, the PROGRAMMABLE OUTPUTS can be configured, so as to manage the Antiphonal signal (controlled through the AMPLIFICATION tabs), the general signal or just the reverberated signal of the instrument. Select the EXT. OUT CONFIG. field under the SET-UP menu; this pop-up message will appear: which means that the external panning (see par- 9.1) of certain stops might be modified automatically. Stops placed between outputs [16] and [17], and/or outputs set as GENERAL or REVERB, will be automatically set as Mono on the first output of the previously configured panning. Press [EXIT] to abort the automatic panning adjustment and return to the SET-UP menu. Press [ENTER] to confirm - the display will show: Functioning of different modes is described in the tables below. MODE STANDARD GENERAL-REVERB ANTIPHONAL GENERAL-ANTIPH. ANTIPH.-REVERB OUTPUTS 1-16 OUTPUTS 17-18 OUTPUTS 19-20 TAB AMPLIFICAT. [CONSOLE ON] TAB AMPLIFICAT. [EXT. SPEAKER ON] As set in Ext. Router Conf. function. As set in Ext. Router Conf. function. As set in Ext. Router Conf. function. As set in Ext. Router Conf. function. As set in Ext. Router Conf. function. As set in Ext. Router Conf. function. As set in Ext. Router Conf. function. Internal amplification Outputs 1-20 General signal Reverberated signal only Outputs 1-16 Outputs 17-20 As set in Ext. Router Conf. function. As set in Ext. Router Conf. function. As set in Ext. Router Conf. function. Outputs 1-16 Outputs 17-20 Outputs 1-16 Outputs 17-20 Outputs 1-16 Outputs 17-20 General signal As set in Ext. Router Conf. function. Reverberated signal only 21 Viscount UNICO 700 User Guide 10. UTILITY AND MIDI FUNCTIONS (UTIL. & MIDI menu) The UTILITY & MIDI menu, which can be recalled by selecting the field of the same name in the main video page, contains all the accessory functions and the settings relating to the organ’s MIDI interface. The menu is displayed on three screens: The first part contains the accessory and utility functions: o PIST. COMBINE (Piston Combine): synchronisation of the dedicated combinations of Manual II with those of the pedal board. o KEYBOARDS INV. (Keyboards Inversion): inversion of the manuals, so that the Man.I stops are played with the second manual and vice-versa. o TRACKER TOUCH: simulates the typical tracker touch of mechanical organs that affects the attack times. Attack time is delayed on flue pipes only, release is delayed on all stops. o 1st SHORT OCT. (First short octave): activation of the short octave on the first octave of the manuals and pedal board. o AUTO MAINPAGE: automatic return to the main video page if no display functions are used for 10 seconds. o LCD CONTRAST: regulates the display contrast. o SET DATE & TIME: date and time setting. o LOCK ORGAN: setting of the code used to lock out the organ to prevent access to the instrument’s set-up screens and the saving of combinations, the Tutti and the Crescendo. o RESTORE FACT. SET (Restore factory settings): restores the factory settings. o OP.SYS. UPGRADE (Operating System upgrade): operating system upgrade. The second part of the menu relates to the MIDI interface settings: o Tx AND Rx CHANNEL: MIDI transmission and reception channel set-up. o Tx AND Rx FILTER: MIDI transmission and reception filter set-up. o PROG. CHANGE SEND (Program Change send): saving of the combinations and transmission of MIDI Program Change and Bank Select messages. o PEDAL / KEYB TOUCH (Pedal / Keyboard touch): selection of the dynamic curves of the manuals for use of the Orchestra voices and the transmission of MIDI notes. o COUPLED NOTES: this control allows to select the notes to send through MIDI. Select YES to send both the notes actually played on the manuals and the ones resulting from the coupling controls. For example, by playing on the pedalboard while the coupling II/P is active, notes from the pedalboard will be transmitted both on the pedalboard MIDI Channel AND on the Manb.II MIDI Channel. Select NO to send only the notes physically played (in this example, notes will be transmitted only on the pedalboard channel). 22 Viscount UNICO 700 User Guide 11. FILE MANAGEMENT FUNCTIONS (FILE MANAG. menu) The Unico series of organs is able to use two different types of mass memory: the internal memory, and a data storage device for connection to the [USB] slot underneath the manuals (USB pen). These data storage units are used to save the organ’s set-up or parts of it, pieces of music and lists of pieces. If the USB stick is connected, the system will use it as the mass memory. However, the internal memory can still be used for copying files (from and to the USB pen), but it is not possible to load, delete and rename files saved on the internal memory: the USB stick has to be removed before this can be done. Selecting the FILE MANAGEMENT field in the main screen accesses the relative menu containing all the file management functions. There is also a screen which provides information about the firmware versions installed on the organ. As the video page shows, the bottom of the screen identifies the memory unit currently in use: - INTERNAL MEMORY USB STICK DRIVE The functions available are as follows: o o o o o o o o DIR: displays the contents of the mass memory LOAD: file loading SAVE: saving of the set-up of the organ or parts of it in the mass memory. COPY: for copying files from one memory unit (e.g. internal) to another. RENAME: file rename. DELETE: file deletion. SONGLIST: programming of a list of pieces. O.S. INFO: display of the firmware versions installed in the system. NOTES - Once the USB pen is inserted please wait some seconds before displaying the FILE MANAGEMENT menu. - When using a computer to rename files stored on the USB pen, remember that names can only contain numbers and letters, which must all be lowercase. - Always use USB pens formatted with FAT or FAT32 file system (no NTFS). 23 Viscount UNICO 700 User Guide 12. PLAYING and RECORDING OF MUSICAL SEQUENCES (SEQUENCER) The Unico organ is equipped with an internal sequencer (digital recorder) capable of recording performances on the instrument, and the commands and controls used. Recordings can then be saved on the USB stick or in the internal memory as MIDI files and played back at any time. To recall the sequencer press the [SEQUENC.] button beside the display. The screen for selection of the system’s three operating modes is displayed: o PLAY: playback of the performances saved in the internal memory or the USB pen. o PLAY OPTIONS: options for playing back pieces o RECORD: recording of pieces of music The memory unit currently used appears in the bottom of the screen. Remember that the USB stick has priority over the internal memory; to use the latter, first remove the USB device. NOTE: - Once the USB pen is inserted please wait some seconds before recalling the sequencer. - Transposition set in the TUNING menu does not have any effect on playback of pieces (unlike recording, where the notes are acquired transposed). To do this you have to set the transposer described on par. 12.3. 12.1 PLAYING BACK A PIECE (PLAY mode) In the sequencer mode selection screen described above, select the PLAY field. The display shows the MIDI files stored in the memory unit currently in use: 24 Viscount UNICO 700 User Guide Now select the MIDI file you wish to play back: The new screen provides information about all the controls necessary for use of the sequencer: - [ENTER]: starts playback of the piece. [EXIT]: quits the sequencer function. [FIELD S]: selects the previous piece saved in the memory or transferred to a Songlist (see point 12.4). [FIELD T]: selects the next piece saved in the memory or transferred to a Songlist (see point 12.4). [VALUE - ] (press once): decrease play speed (displayed on top left as percentage of the original value, 100 in the screen picture above). [VALUE + ] (press once): increase play speed (displayed on top left as percentage of the original value, 100 in the screen picture above). [VALUE - ] (press and hold): rewind. [VALUE +] (press and hold): fast forward. Once playback of a song has been started, the display changes to: as the screen shows, the functions of the [ENTER] and [EXIT] buttons have changed to: - [ENTER]: pause /restart playback of the piece. [EXIT]: stop playback of the piece. [FIELD S], [FIELD T], [VALUE -], [VALUE +] keep the functions already described. 25 Viscount UNICO 700 User Guide 12.2 RECORDING A PIECE (RECORD mode) In the sequencer mode video page, select the RECORD field. The display will show: select [NEW SONG] to start a new recording. Otherwise, a MIDI file can be loaded to overdub it, or in other words make a new recording which will be added to the performance already recorded. As in Play mode, the screen again carries information about the functions of the buttons: - [ENTER]: starts the recording. [EXIT]: quits the sequencer function. Once recording has started, the functions change to: - [ENTER]: pause /restart recording. [EXIT]: stop recording. Press [EXIT] to end the session. The display will show the screen allowing the recording just made to be saved: 26 Viscount UNICO 700 User Guide The functions displayed allow: o o o o SAVE: saving of the recording as a MIDI file. PLAY: playback of the recoding before saving it. OVERDUB: creation of a new recording to be added to the sequence just acquired. DISCARD AND EXIT: delete the recording and quit sequencer Record mode. If the SAVE field is selected, the system prompts the user to assign a name to the MIDI sequence about to be saved: When composing the name, use the [FIELD S] and [FIELD T] buttons to move the cursor and [VALUE +] and [VALUE -] to select the character. The first three characters can only be numbers, since they are required for future expansions of the instrument. To confirm the name and proceed to save the data, press the [ENTER] button; use [EXIT] to return to the previous screen, aborting the saving operation. The following message confirms that the file has been saved: If [EXIT] is pressed from the save screen (i.e. when the recording has been acquired but not saved), the system warns that the recording is about to be lost: and that [ENTER] must be pressed to confirm that you wish to quit and delete the data acquired, or [EXIT] to return to the save screen. NOTE When using a computer to rename files stored on the USB pen, remember that names can only contain numbers and letters, which must all be lowercase. 27 Viscount UNICO 700 User Guide 12.3 SEQUENCER PLAYBACK OPTIONS (PLAY OPTIONS menu) Selecting the PLAY OPTIONS field in the sequence mode selection screen gives access to a number of options relating to the playback of the pieces: these refer to: o TRANSPOSER: sets transposition in semitones of the pieces played by the sequencer. o SONG LOOP: if this function is set as “YES”, at the end of a piece it is played back again. o LIST AUTOPLAY: if this function is set as “YES”, during the use of the Songlist function, at the end of one piece the next one is automatically played with no need to press the [FIELD T] button. o LIST LOOP: if this function is set as “YES”, at the end of the last piece in a Songlist, the first piece is automatically played again. 12.4 SONGLISTS (SONGLIST function) Songlist is the organ function used to create and save lists of pieces of music (MIDI files). To programme a list of pieces, recall the FILE MANAGEMENT menu and select the SONGLIST function; the system asks if you wish to create a new one or modify an existing one: Select the [NEW LIST] field to create a new list, or select an LST file to modify the list it contains. In both cases, the first operation is to select the pieces you wish to include in the list: Use the [FIELD S] and [FIELD T] buttons to select the MIDI file, [VALUE +] to add it to the list and [VALUE -] to delete it. Its position within the list appears beside the name of the file. 28 Viscount UNICO 700 User Guide Now press [ENTER] to continue the programming or [EXIT] to abort, in this case the system requests a confirm to proceed with the quit: The second operation is to arrange the pieces within the list (or confirm the previous programming): To move a piece into a different position, locate the cursor on the relative field of the file with the [FIELD S] and [FIELD T] buttons and use [VALUE +] to move the position forward or [VALUE -] to set an earlier position. Finally, press [ENTER] to save the list or [EXIT] to return to the previous video page. As for MIDI files, the first three characters can only be numbers. To enter the name, use the [[FIELD S] and [FIELD T] buttons to move the cursor and [VALUE +] and [VALUE -] to select the character. Press [ENTER] to confirm the name and go ahead with the saving operation, or [EXIT] to return to the previous video page. NOTE When using a computer to rename files stored on the USB pen, remember that names can only contain numbers and letters, which must all be lowercase. 29 Viscount UNICO 700 User Guide 13. APPENDIX 13.1 STOP LOCAL OFF Setting a stop in Local Off mode means that it will not be played by the organ’s internal sound generation system, but the relative MIDI (System Exclusive code) message will be transmitted, so that it can be turned on and played on a connected instrument. To set a stop in Local Off mode, while the main screen is on the display, press the [S] (Set) piston, keep it pressed and also press the [C] (Cancel) button. The LEDs of all the stops will light up and the display will show the video page: To set a voice in Local Off mode, operate its draw-stop or rocker switch so that its light goes out. After setting the setup required, press [S] and [C] together to save it. Accessing the Local Off setting function after this will trigger display of the status of the stops as follows: - Light on: stop in Local On mode (plays with internal generation) Light off: stop in Local Off status 13.2 FACTORY SETTINGS The Factory Setting procedure allows restoration of the factory settings of all the instrument’s internal functions, deleting all the changes made by the user. The Unico organ also allows the user to choose which settings are to be returned to the default values. To recall this function, select the RESTORE FACT. SET display field in the second page of the UTILITY&MIDI menu: The following can be initialised: o ENTIRE ORGAN: all the organ’s settings and functions (TUNING, SET-UP and UTILITY & MIDI menus, the four User Styles, all the general and divisional combinations, Tutti and Crescendo and stop Local Off status). 30 Viscount UNICO 700 User Guide o SETTING PARAMETERS: TUNING, SET-UP and UTILITY & MIDI menu settings. o USER STYLE: the 4 User Styles o COMB. MEMORIES: all the general and divisional combinations, Tutti and Crescendo. After the required Factory Setting is selected by pressing [ENTER], the display shows a warning screen indicating what is being restored to the default values: Press [ENTER] again to start the procedure, during which the “PERFORMING” message is displayed after which will display “ACCOMPLISHED”. Press [EXIT] to quit the operation. 13.3 UPGRADING THE OPERATING SYSTEM The operating systm of the Unico organs can be easily and quickly updated. You just need to copy the install file(s) on an USB drive and plug it in the appropriate connector, under the keyboards, then recall the OP.SYS UPGRADE function of the UTIL. & MIDI menu. ùIn order to get the necessary files and all the information about the operating system upgrade, please visit the “Download” section of our official Physis website, at the address: http://www.physisorgans.com/ download.asp 31 Disposal of old Electrical & Electronic Equipment (Applìcable throughout the European Union and other European countries with separate collection programs) Dir. 2002/95/CE, 2002/96/CE e 2003/108/CE This syrnbol, found on your product or on its packaging, indicates that this product should not be treated as household waste when you wish to dispose of it. Instead, it should be handed overt to an applicable collection point for the recycling of electrical and electronic equipment. By ensuring this product is disposed of correctly, you will help prevent potential negative consequences to the environment and human health, which could otherwise be caused by inappropriate disposal of this product. The recycling of materials will help to conserve natural resources. For more detailed information about the recycling of this product, please contact your local city offi ce, waste disposal service or the retail store where you purchased this product. This product complies with the requirements of EMCD 2004/108/EC and LVD 2006/95/EC. CAUTION This product contains a lithium battery. Danger of explosion if battery is incorrectly replaced. Replace only with the same or equivalent type. The batteries shall not be exposed to excessive heat such as sunshine, fire or the like. The battery must be replaced by qualified personnel only. Viscount UNICO 700 Gebruikersgids INHOUDSOPGAVE 1. Belangrijke opmerkingen vooraf ..................................................................................................36 1.1 Zorg voor het product .................................................................................................................................. 36 1.2 Opmerkingen over de handleiding .............................................................................................................. 36 2. Einleitung ......................................................................................................................................38 3. Algemene beschrijving ..................................................................................................................39 4. Inschakeling en hoofdpagina ........................................................................................................44 5. Regeling van de volumes (functie Volumes) ................................................................................ 45 6. Intonatie van het instrument (menu Tuning) .............................................................................. 46 7. De organstijlen (menu Styles) .......................................................................................................47 8. Selectie en regeling van de stemmen (menu Voices) ...................................................................48 8.1 Regegling van het volume (functie Volume Level) ................................................................................... 48 8.2 Editen van de geluidsparameters (functie Edit Parameters) .................................................................... 49 8.3 Selectie van de alternatieve stemmen (Alternative Voice function) ........................................................ 50 9. Algemene instellingen van het instrument (menu Set-Up) ..........................................................52 9.1 Kanalisatie van de stemmen over de achterste geluidsuitgangen (functie Ext. Out Router function) ....... 53 9.2 Configuratie van de externe audio-uitgangen (functie Ext. Out. Config) ............................................. 54 10. Utiliteits-en Midi-functies (menu Util. & MIDI) .......................................................................56 11. Functies voor het beheer van de bestanden (menu File Manag.) ...............................................57 12. Registratie en weergave van muzieknummers (Sequencer) .......................................................58 12.1 Weergave van een nummer (werkwijze Play) ........................................................................................... 58 12.2 Registratie van een nummer (werkwijze Record) .................................................................................... 60 12.3 Weergaveopties van de sequencer (menu Play Options) ....................................................................... 62 12.4 Songlists (functie Songlist function) ......................................................................................................... 62 13. Bijlage ..........................................................................................................................................64 13.1 Local Off van de registers .......................................................................................................................... 64 13.2 Factory Settings............................................................................................................................................ 64 13.3 Updaten van het besturingssysteem .......................................................................................................... 65 35 Viscount UNICO 700 Gebruikersgids 1. BELANGRIJKE OPMERKINGEN VOORAF 1.1 ZORG VOOR HET PRODUCT • Zorg ervoor dat het instrument niet te lijden heeft van overmatige trillingen of harde stoten (knoppen, druktoetsen, registers, enz.). • Plaats het instrument niet in de buurt van apparaten, waarvan mag worden verwacht dat ze storende elektrische en magnetische velden opwekken, zoals radio’s, TV’s, monitoren, enz • Vermijd het blootstellen van het orgel aan hittebronnen. Laat het instrument niet staan in een erg vochtige of stoffige omgeving of in de buurt van sterke magnetische velden. • Vermijd het blootstellen van het orgel aan direct zonlicht. • Plaats nooit voorwerpen in het instrument en giet er nooit vloeistoffen, van welke aard ook, in. • Gebruik voor het regelmatig reinigen alleen maar een zachte borstel/doek of perslucht. Gebruik voor het reinigen nooit chemicaliën zoals benzine, verdunners, alcohol, enz. • Gebruik altijd afgeschermde kabels van goede kwaliteit voor de verbindingen met versterkers en andere apparaten voor geluidsdistributie. Trek bij het losnemen van de verbinding nooit aan de kabel zelf maar altijd aan de aansluitsteker. Vlecht kabels niet in elkaar bij het oprollen. • Verzeker u ervan alvorens een verbinding te maken, dat de aan te sluiten systemen (in het bijzonder de versterkers) zijn uitgeschakeld. Hierdoor wordt ongewenst geruis en mogelijk zelfs het optreden van gevaarlijke signaalpieken voorkomen. • Vergeet niet om de stekker van het orgel los te nemen als het instrument langere tijd niet wordt gebruikt. 1.2 OPMERKINGEN OVER DE HANDLEIDING • Ga zorgvuldig met de handleiding om. • De handleiding vormt met het instrument één geheel. De beschrijvingen en illustraties hierin zijn niet bindend. • Hoewel de essentiële kenmerken van het instrument niet zullen veranderen, houdt de fabrikant zich te allen tijde het recht voor om wijzigingen aan te brengen in onderdelen, details, of accessoires die nodig worden geacht om het product te verbeteren dan wel vanwege constructieve eisen of om commerciële redenen, zonder de verplichting om deze publicatie direct aan te passen. • “All rights reserved”: de reproductie van enig deel van deze handleiding, in welke vorm dan ook, is zonder schriftelijke toestemming van de fabrikant is verboden. • Alle handelsmerken die in deze handleiding worden genoemd, zijn eigendom van de betreffende fabrikanten. 36 Viscount UNICO 700 Gebruikersgids • Aangeraden wordt om deze handleiding zorgvuldig door te nemen. Dan gaat niet onnodig tijd verloren om met het instrument te kunnen omgaan en verkrijgt u betere resultaten met het instrument. • Met tekens of cijfers tussen vierkante haken ( [ . . ] ) worden de namen van de druktoetsen, regelschuiven, instelknoppen en aansluitingen aangeduid. Bij voorbeeld : [ENTER] verwijst naar de ENTER druktoets. • De illustraties en afbeeldingen van de display zijn alleen als richtlijn bedoeld en kunnen verschillen van war werkelijk op de display wordt getoond. • De instructies die in deze handleiding zijn opgenomen, hebben uitsluitend betrekking op de versie van het besturingssysteem die actueel was tijdens de publicatie van dit document. Deze instructies zouden daarom eventueel afwijkingen kunnen vertonen met betrekking tot de huidige versie van uw besturingssysteem. Raadpleeg daarom de website http://www.physisorgans.com/.com voor de nieuwste versie van besturingssysteem en bijbehorende handleiding. • Raadpleeg de referentie handleiding voor een meer gedetailleerde beschrijvingen van de functies van het orgel. Deze handleiding kan worden gedownload vanaf de download pagina van deze website: http://www.physisorgans.com. 37 Viscount UNICO 700 Gebruikersgids 2. EINLEITUNG Geachte gebruiker, Hartelijk dank voor het kiezen van de Viscount Unico orgel. U schafte van ons bedrijf, mondiaal marktleider op het gebied van prestigieuze klassieke orgels een uitbreiding van uw bestaande orgel aan. De nieuwste en meest geavanceerde technologie is toegepast, die het mogelijk maakt om met een grote natuurgetrouwheid de klank van een pijporgel te reproduceren, in het gebruik een indrukwekkende flexibiliteit garandeert en een geheel nieuwe klasse van klankkwaliteit markeert. Na jaren van onderzoek om nieuwe methoden van klankopwekking te ontdekken en te ontwikkelen is het Viscount Research & Development centrum erin geslaagd om wereldwijd als eerste de klank van de originele orgelpijp te reproduceren met behulp van ‘Physical Modelling Techniek’ als basis voor de innovatieve Physis technologie. Deze revolutionaire wijze van klankopwekking maakt niet, zoals tot nu toe algemeen toegepast, gebruik van ‘samples’ van pijporgels, maar berekent ‘real-time’ de gevraagde golfvorm, die het klankkarakter bepaalt, uit een nauwkeurig fysisch rekenmodel, dat gebaseerd is op de studie naar de fysische werking van geluidsopwekking in de orgelpijp en waarin rekening wordt gehouden met de belangrijkste fysische parameters zoals de vorm (mensuur), de materiaalkeuze, de winddruk, enz. Nu eenmaal het niveau van het louter reproduceren van de opgenomen pijpklank is gepasseerd, wordt het mogelijk om een tot dusverre ondenkbare mate van realisme vorm te geven, die ook de fijnste details van het oorspronkelijke muziekinstrument vertolkt. Om een voorbeeld te geven: het toegepaste mathematische model maakt het mogelijk dat een register voor iedere toets een eigen klankkleur krijgt. Net als bij het originele pijporgel hoort bij iedere toets een aantal eigen pijpen, die ieder een unieke klank voortbrengen. Daarboven is de klank ook afhankelijk van verandering in de winddruk, die bepalend is voor de trillingscondities van de lucht in het pijpcorpus, net als bij het originele muziekinstrument Bovendien is een “fysische” bewerking van de klanken mogelijk, bijna op dezelfde manier als de orgelbouwer zijn pijpen maakt, door de belangrijkste elementen die we hebben genoemd te bewerken. Maar als u dit liever niet zelf doet, kunt u desgewenst een keuze maken uit een uitgebreid assortiment voorgeprogrammeerde orgelpijpklanken die al in het interne geheugen van instrument zijn opgeslagen. Tot slot nodigen wij uit om de websites www.viscount-organs.com en www.physisorgans.com te bezoeken waar u aanvullende informatie, updates, informatie en actueel nieuws over dit instrument en alle overige instrumenten uit onze productie kunt vinden. 38 Viscount UNICO 700 Gebruikersgids 3. ALGEMENE BESCHRIJVING 39 Viscount UNICO 700 Gebruikersgids 1. Sectie PEDAL. Hier zijn de registers van het pedaal en de koppelingen van de manualen met het pedaal ondergebracht. 2. Sectie MAN.II. Hier zijn de registers, de koppelingen van de manualen en tremulanten van Manuaal II ondergebracht. 3. Sectie MAN.IV. Registers en tremulanten van Manuaal IV. 4. Sectie MAN.III. Registers, koppeling van de manualen en tremulanten van Manuaal III. 5. Sectie MAN.I. Registers, koppeling van de manualen en tremulanten van Manuaal I. 6. Schakelaar [POWER]. Schakelaar voor in- en uitschakelen van het instrument. 7. Sectie AMPLIFICATION. Regelingen van de versterkingen van het orgel. - [CONSOLE ON] activeert de interne versterking van het instrument. - [EXT. SPEAKER ON] activeert de externe uitgangen PROG. OUT op het achterpaneel (punt 27). 8. Sectie CANCEL. Deze wisknoppen zorgen voor uitsluiting van de uitvoering van alle stemmen die deel uitmaken van de Tongwerken (wipregister [REED]) en de Mixturen (wipregister [MIXTUR]). 9. Sectie MIDI. Deze besturingen voor elk manuaal en het pedaal zorgen voor het wel of niet activeren van de verzending naar de MIDI [OUT] poort van de MIDI nootcodes. Alle overige MIDI meldingen die door het instrument worden voorzien, worden ook bij uitgeschakelde MIDI besturing verzonden. 10. Sectie voor regeling en programmering. Hier zijn de toetsen en het display voor de weergave en programmering van alle configuratiefuncties en de sequencer van het instrument aanwezig. 11. Sectie ORCHESTRA. Hier zijn de Orchestra-registers van het orgel ondergebracht. 12. Aanvullende displays. - [CRESCENDO]: geeft de momenteel door het pedaal bereikte stap aan (punt 25) - [M. BANK]: geeft de geheugenbank weer van de (algemene en speciale) combinaties geselecteerd met behulp van de duimpistons [MEM. BANK +] en [MEM. BANK -] (punt 20). 13. Algemene combinaties. Deze duim- en voetpistons zorgen voor het oproepen van de algemene combinaties van de geheugenbank geselecteerd via [MEM. BANK +] en [MEM. BANK -] (punt 20). Deze combinaties kunnen aangepast worden, de opslagprocedure is beschreven onder punt 19. [HR] Hand registratie. Bovendien zijn de sequencers van algemene combinaties aanwezig, [PREV.] is in aflopende volgorde, [NEXT] in oplopende volgorde. 40 Viscount UNICO 700 Gebruikersgids 14. Pedaalcombinaties en commando’s . Hier treft u de zes speciale pedaalcombinaties aan en de [HR] Hand registratie. Deze combinaties kunnen aangepast worden, de opslagprocedure is beschreven onder punt 19. 15. Combinaties en commando’s van Manuaal IV. Duimpistons van de speciale combinaties van Man.IV, [HR] Hand registratie. Koppelingen [III/P]. Deze combinaties kunnen aangepast worden, de opslagprocedure is beschreven onder punt 19. [M.SOLO] (MIDI Solo) aanwezig die voor monofonische overdracht naar MIDI [OUT] van de op dit manuaal gespeelde noten zorgt, met prioriteit op de hoogste toon. 16. Combinaties en commando’s van Manuaal III. Duimpistons van de speciale combinaties van Man.III, [HR] Hand registratie. Koppelingen [III/P], [IV/III] Deze combinaties kunnen aangepast worden, de opslagprocedure is beschreven onder punt 19. [M.SOLO] (MIDI Solo) aanwezig die voor monofonische overdracht naar MIDI [OUT] van de op dit manuaal gespeelde noten zorgt, met prioriteit op de hoogste toon. 17. Combinaties en commando’s van Manuaal II. Duimpistons van de speciale combinaties van Man.II. [HR] Hand registratie. Koppelingen [II/P], [III/ II], [I/II] en [IV/II]. De combinaties kunnen aangepast worden, de opslagprocedure is beschreven onder punt 19. [O.SOLO] (Organ Solo) aanwezig, waarmee de stemmen van Man.III monofonisch gespeeld kan worden, met prioriteit op de hoogste noot, wanneer de koppeling [III/II] geactiveerd blijkt, [M.SOLO] (MIDI Solo) die voor monofonische overdracht van de op dit manuaal gespeelde noten naar MIDI [OUT] zorgt, met prioriteit op de hoogste noot. 18. Combinatie en commando’s van Manuaal I. Duimpistons van de speciale combinaties van Man.I. [HR] Hand registratie. Koppelingen [I/P] en [III/I] en [IV/I]. De combinaties kunnen aangepast worden, de opslagprocedure is beschreven onder punt 19. [M.SOLO] (MIDI Solo) aanwezig die voor monofonische overdracht naar MIDI [OUT] van de op dit manuaal gespeelde noten zorgt, met prioriteit op de hoogste toon. 19. Duimpiston [S]. Piston voor de opslag van de algemene en speciale combinaties, het Tutti en de stappen van het Crescendo. Druk, om een combinatie of het Tutti op te slaan, na de gewenste toestand van de stemmen te hebben ingesteld, op [S] en druk, terwijl [S] ingedrukt wordt gehouden, op de duimpiston of de voetpiston van de combinatie die men wil opslaan. Selecteer, om een stap van het Crescendo op slaan, deze met het gelijknamige pedaal, druk op [S] en druk, terwijl [S] ingedrukt wordt gehouden, op [HR] van de algemene geheugens. Om de inhoud van een stap in een andere te kopiëren: selecteer de stap die men wenst te kopiëren, druk op de duimpiston [S] en houd deze ingedrukt, selecteer de stap waarin men de inhoud wil kopiëren, en druk vervolgens op [HR] van de algemene geheugens. N.B. Wanneer de Led van de duimpiston [S} uit blijkt te zijn, betekent dit dat de programmering van het orgel geblokkeerd is, en derhalve zal het niet mogelijk zijn om combinaties op te slaan en/of de interne programmeerfuncties weer te geven (Lock Organ functie, hoofdstuk 10). 41 Viscount UNICO 700 Gebruikersgids 20. Algemene commando’s van het orgel. Het gaat om commando’s die niet voor de afzonderlijke secties zijn bestemd, maar waarvan de activering het gehele instrument beïnvloedt. - [MEM. BANK +] en [MEM BANK -]: selecteren de geheugenbank weergegeven op het aanvullende display [MEM. BANK] (punt 12). - [ENC]: activeert de functie Enclosed waarmee het algemene volume van het orgel geregeld kan worden door bediening van het zwelpedaal [MAN.III]. - [A.P.]: activeert Automatic Pedal waarmee de stemmen van het pedaal op Man.II. In dit geval wordt het pedaal van het orgel uitgeschakeld en worden de stemmen monofonisch, met prioriteit op de laagste noot - [T]: duimpiston en voetpiston voor het oproepen van het Tutti. Het Tutti kan aangepast worden, de opslagprocedure is beschreven onder punt 19. - [C]: duimpiston voor het annuleren N.B. Bij inschakeling wordt altijd de geheugenbank nr. 1 geselecteerd. 21. Paneel van de voorste aansluitingen. Op dit paneel links onder de manualen bevinden zich de connectors en de regelingen die het meest gebruikt worden en dus makkelijk toegankelijk moeten zijn. - [MASTER VOLUME]: regelt het algemene volume van het orgel. - [REVERB VOLUME]: regelt het niveau van het nagalmeffect. - MIDI [IN]: dit is de MIDI ingangsconnector waarover het orgel de gegevens ontvangt die door een externe MIDI-unit worden verzonden. - MIDI [OUT]: dit is de MIDI-connector die de door het orgel gegenereerde MIDI-gegevens verzendt. - MIDI [THRU]: herzendt de gegevens ontvangen van de poort [IN] voor de seriële verbinding van meerdere MIDI-apparaten. - [USB]: dit zijn twee USB-connectors. De linkse wordt gebruikt voor de verbinding met de computer om het configuratieprogramma van het instrument te kunnen gebruiken. De rechtse is bestemd voor toepassing van een usb-stick (niet bij het instrument geleverd) die als massageheugen van het orgel ter vervanging van het interne geheugen gebruikt kan worden. Zie voor meer informatie hoofdstuk 11. - [PHONES]: dit is de aansluiting voor een koptelefoon. 22. Dekselslot. 23. Voetpistons van de koppelingen. Deze pistons repliceren de functie van de koppelingen met duimpiston of trekregister. 24. [32 FLUTE REVERS.] voetpiston. Wanneer geactiveerd, kan deze zuiger worden gebruikt om uitschakelen van de 32 'fluiten. 25. Pedaal [CRESCENDO]. Met dit pedaal kunt u de stappen van het Crescendo selecteren waarmee een vooraf vastgestelde serie registers geactiveerd wordt. De momenteel geselecteerde stap wordt op het aanvullende display getoond [CRESCENDO] (zie punt 12). Elke stap van het Crescendo is programmeerbaar. De opslagprocedure is beschreven onder punt 19. 42 Viscount UNICO 700 Gebruikersgids 26. Zwelpedalen. De orgel zijn voorzien van drie zwelpedalen voor de continuregeling van het volume van Manuaal I, Manuaal III en Manuaal IV. In het pedaal [MAN.IV] is bovendien een speciaal hendelsysteem ingebouwd waarmee het Sustain-effect voor de Orchestra-stemmen gecontroleerd kan worden. 27. Achterste aansluitingen Binnen het orgel zijn diverse aansluitingen voor de audioverbinding met externe weergavesystemen, de lijn- en microfooningangen voor het gebruik van de interne versterker van het orgel. - Aansluitingen [EXT. +12V DC]: vanaf deze connectors kan de +12 Volt spanning worden opgenomen voor de ontsteking van de VISCOUNT luidsprekers die eventueel zijn aangesloten op de PROG. OUT uitgangen. - OUT [GEN. SUB] (General Sub-Woofer): uitgang bestemd voor aansluiting van luidsprekers voor lage frequenties (sub-woofer). - PROG. OUT (Programmable Outputs): algemene lijnuitgangen van het instrument waarmee de windladen van pijporgels gesimuleerd kunnen worden. De signalen zijn namelijk over de uitgangen verdeeld op basis van de instellingen van de displayfuncties die voor elk register de instelling van het type windlade, zijn grootte en positie in de ruimte van de gebruikte luidsprekers toestaan. Elke uitgang beschikt bovendien over speciale niveau- en equalizerregelingen. - INPUT [L(+R)] / [R]: lijningangen waarmee andere instrumenten bespeeld kunnen worden met de interne versterking van het orgel. Gebruik in geval van een monofonische bron uitsluitend de aansluiting [L(+R)]. - INPUT [MIC]: ingang voor microfoon waarmee het signaal afkomstig van een microfoon versterkt wordt. - [GAIN]: potentiometer voor de versterkingsregeling van het ingangssignaal op de aansluiting [MIC]. ATTENTIE! Deze groep achterste aansluitingen is niet van buitenaf zichtbaar en voor de toegang tot deze groep moet het houten achterschot van het orgel verwijderd worden. Wendt u zich tot vakkundig personeel om deze handeling te verrichten. 43 Viscount UNICO 700 Gebruikersgids 4. INSCHAKELING en HOOFDPAGINA Na het instrument te hebben ingeschakeld met de schakelaar [POWER], doet het systeem er enkele seconden over om werkzaam te worden. In deze fase gaan de leds op de afzonderlijke panelen van de manualen achter elkaar branden en geeft het display de presentatiepagina weer. Bij de weergave van de hoofdpagina, is het instrument klaar om gebruikt te worden: Deze pagina bevat in het bovenste gedeelte de selectievelden van de verschillende configuratiemenu’s van het orgel: o o o o o o TUNING: parameters voor de intonatie van het instrument. VOICES: functies met betrekking tot alle stemmen van het orgel. STYLE: selectie van de stijl. SET-UP: algemene configuratiefuncties van het orgel. UTIL. & MIDI (Utility & MIDI): utiliteits- en MIDI-functies. FILE MANAG. (File Manager): beheer van de bestanden opgeslagen in het interne geheugen of in een USB-apparaat. Plaats, om de inhoud van een menu weer te geven, de cursor (aangegeven door het veld in negatief) op het gewenste veld m.b.v. de knoppen [FIELD S] en[FIELD T] en druk op [ENTER]. [EXIT] sluit het menu af en keert terug naar de hoofdpagina. In het onderste gedeelte van deze pagina worden de parameters van het instrument weergegeven waarvan het nuttig is om altijd de betreffende toestand te kennen: o [eerste hokje linksboven]: (Equal op de afgebeelde pagina) informeert welk temperament momenteel gebruikt en geselecteerd is in het menu TUNING. o ENSEMBLE: de waarde van ENSEMBLE (zweving) ingesteld in het menu TUNING. o AIR PRESS: de waarde van de parameter AIR PRESSURE in het menu TUNING. o A: de fijnregelaar (toonhoogte), ingesteld in het menu TUNING. o [eerste hokje rechtsboven]: (User2 op de afgebeelde pagina) geeft de stijl aan die geselecteerd is in het menu STYLE. o P. COMB: de status van de functie PISTON COMBINE zoals ingesteld in het menu UTILITY & MIDI. o K. INV: de status van de functie KEYBOARD INVERSION zoals ingesteld in het menu UTILITY & MIDI. o TRANSP: de transpositie ingesteld in TUNING. Deze velden zijn uitsluitend voor informatie bestemd en zijn niet selecteerbaar. Om de geassocieerde functie te regelen, moeten de hierboven beschreven menu’s geopend worden. Rondom het display zijn toetsen aanwezig voor de weergave van en de navigatie door alle displaypagina’s: - [SEQUENC]: schermpagina’s voor het gebruik van de interne sequencer van het instrument. [VOLUMES]: schermpagina waarop alle volumes van het instrument zijn vermeld. 44 Viscount UNICO 700 Gebruikersgids - [FIELD S] en [FIELD T]: met deze drukknoppen is het mogelijk de cursor te bewegen die door het veld met negatieve weergave is aangegeven. [FIELD S] plaats de cursor in het hogere of vorige veld, [FIELD T] in het lagere of volgende veld. [VALUE +] en [VALUE -]: deze toetsen regelen de waarden van de parameters, of het nu om numerieke of alfanumerieke waarden gaat. [VALUE +] verhoogt, [VALUE -] verlaagt. [EXIT] en [ENTER]: zijn toetsen voor het openen of afsluiten van de menu’s en de displaypagina’s of om de door het systeem verrichte verzoeken te bevestigen of te annuleren. [ENTER] opent de menu’s / schermpagina’s en bevestigt, [EXIT] sluit de menu’s / schermpagina’s af en annuleert. 5. REGELING VAN DE VOLUMES (functie VOLUMES) Bij bediening van de toets [VOLUMES] wordt de schermpagina met alle volumeregelingen van het orgel weergegeven: o MST (Master): algemeen volume van het orgel, ook regelbaar met de potentiometer [MASTER VOLUME] onder de manualen. o REV (Reverb): nagalmeffect, ook regelbaar met de potentiometer [REVERB VOLUME] onder de manualen. o PHO (Phones): niveau van het signaal dat uit de aansluiting van de koptelefoon [PHONES] onder de manualen komt. o EXT (External outputs): algemeen volume van de PROG. OUT aansluitingen op het achterpaneel. o PED (Pedal): divisioneel pedaalvolume. o II (Manual II): divisioneel volume van het tweede manuaal. o III (Manual III): divisioneel volume van het derde manueel. o I (Manual I): divisioneel volume van het eerste manueel. o IV (Manual IV): divisioneel volume van het vierde manueel. o ORC (Orchestra): volume van de Orchestra-sectie. Om de schermpagina af te sluiten en terug te keren naar de vorige pagina, drukt u op [EXIT] of wacht u circa 4 seconden. (gaat dan vanzelf uit) 45 Viscount UNICO 700 Gebruikersgids 6. INTONATIE VAN HET INSTRUMENT (menu TUNING) Selecteer het veld TUNING op de hoofdpagina voor toegang tot alle intonatieparameters van het instrument. o TRANSPOSER: De transposer met een bereik van –6a +5 halve tonen. Bij inschakeling heeft het orgel geen transpositie. o [tweede veld op display]: (Equal op de afgebeelde pagina) Kiezer van historische stemmingen of “temperaturen” uit verschillende landen en cultuurperioden. o BASE KEY: de noot waarmee de keten van de 12 kwinten waaruit de temperatuur bestaat begint. o ENSEMBLE: niveau van natuurlijke micro-ontstemming tussen de verschillende pijpen, zodat de onnauwkeurigheden van de stemming die met de tijd en de temperatuursveranderingen optreden worden gesimuleerd. De waarden kunnen variëren van – (pijpen perfect gestemd) tot 8 (maximale stemmingsinstabiliteit). o AIR PRESSURE: simuleert de drukval van de lucht wanneer er herhaaldelijk een grote hoeveelheid lucht is vereist (bijvoorbeeld in het geval van uitvoering van krachtige akkoorden met het Tutti). Dit laat zich vertalen in een tijdelijke en progressieve verlaging van de intonatie, die duidelijker is voor pijpen met grotere voetmaat en breedte (Fluiten, Bourdons, Principalen). o PITCH (A): fijnregelaar van de aangegeven intonatie als frequentie van LA4 (van een 8’ pijp). Druk op [EXIT] om de schermpagina af te sluiten. N.B.: De transpositie heeft geen effect voor de weergave (in tegenstelling tot de registratie waar de noten wél getransponeerd worden ontvangen) van de nummers met de interne sequencer. Met het oog hierop is een speciale transposer aanwezig (zie par. 12.3). 46 Viscount UNICO 700 Gebruikersgids 7. DE ORGELSTIJLEN (menu STYLES) De Style identificeert de configuratie van de orgelregisters in de zin van de stem en de betreffende parameters van elk afzonderlijk register, zodat op deze manier de geschikte foniek voor de literatuur die men wenst uit te voeren gebruikt kan worden. Het orgel beschikt over acht Styles, en dit betekent dat men op dezelfde console over acht geluidsconfiguraties beschikt. De eerste vier Styles, die we in het vervolg Preset Styles zullen noemen, zijn door onze laboratoria geprogrammeerd door de opportune orgelscholen te volgen en kunnen niet door de gebruiker gewijzigd worden. De resterende vier Styles, die we User Styles noemen, kunnen gewijzigd en naar believen aangepast worden, en op die manier blijkt het orgel een uitzonderlijke flexibiliteit te bezitten. Kies voor de keuze van de stijl het veld STYLE op de hoofdpagina: Zoals al eerder verklaard, kunnen de eerste 4 “stijlen” niet gewijzigd worden, dus wanneer men toegang tot de stemmen-funktie zoekt, laat de display de volgende waarschuwing zien: Het is echter mogelijk om de “settings” van deze stijlen te laten zien en kontroleren; Om door te gaan: druk op een willekeurige knop of wacht ongeveer 3 seconden. 47 Viscount UNICO 700 Gebruikersgids 8. SELECTIE EN REGELING VAN DE STEMMEN (menu VOICES) Een van de belangrijkste kenmerken van de nieuwe synthesetechnologie Physis die de Unico orgels voor de geluidsopwekking gebruiken is, dat aan de gebruiker talrijke aanpassingsmogelijkheden worden geboden doordat een zeer groot aantal orgelklankkleuren beschikbaar is en diverse parameters ter beschikking staan waarmee de configuratiemogelijkheden extra worden uitgebreid. Het menu VOICES verzamelt al deze functies voor selectie en afstelling van de geluidsparameters van de stemmen. N.B. - De hierna beschreven functies niet worden gewijzigd wanneer een Preset Style is gekozen. Selecteer een User Style om deze parameters af te stellen. - De geselecteerde stemmen voor elk wip- of trekregister worden, evenals het volume en de parameters voor geluidsopwekking, automatisch in de huidige Style opgeslagen. Dit betekent dat als een andere stijl wordt opgeroepen, de stemmen opnieuw worden ingesteld met nieuwe parameters die door de laatst opgeroepen stijl worden beschreven. De eerder aangebrachte wijzigingen gaan echter niet verloren en worden weer beschikbaar gesteld wanneer de stijl waarin ze werden uitgevoerd opnieuw wordt geselecteerd. De eerste weergegeven schermpagina staat selectie van de gewenste functie toe: o VOLUME LEVEL: regeling van het volume van elke afzonderlijke stem. o EDIT PARAMETERS: bewerking van de parameters voor geluidsopwekking van elke afzonderlijke stem. o ALTERNATIVE VOICES: selectie van de alternatieve stemmen. 8.1 REGELING VAN HET VOLUME (functie VOLUME LEVEL) Na selectie van het veld VOLUME LEVEL in het menu VOICES, geeft het display de secties van het orgel weer; selecteer de sectie waarin zich de stem bevindt waarvan men het volume wil regelen: 48 Viscount UNICO 700 Gebruikersgids Gebruik zoals gewoonlijk de toetsen [FIELD S] en[FIELD T] en [ENTER] om het veld op het display te kiezen. Een alternatieve methode, om onmiddellijk het volume weer te geven en te regelen, is om het trekregister even uitgetrokken of het wipregister even ingedrukt in de positie van ingeschakelde stem te houden wanneer de cursor geplaatst is op het veld VOLUME LEVEL in het menu VOICES of binnen de functie zelf. De led van het register waarvan men het volume regelt, knippert om verkeerde wijzigingen te voorkomen; het register zal ingeschakeld en bespeelbaar zijn om een betere en snellere regeling toe te staan. Het is ook mogelijk andere registers in te schakelen om de wijzigingen in hun totaal te beoordelen. Druk op [EXIT] om de functie af te sluiten en de waarden op te slaan. 8.2 EDITEN VAN DE GELUIDSPARAMETERS (functie EDIT PARAMETERS) Selecteer, om de schermpagina’s met de parameters voor geluidsopwekking van de afzonderlijke stemmen weer te geven, het veld EDIT PARAMETERS in het menu VOICES: Ook voor deze functie zal het display aanvankelijk de secties van het orgel weergeven, zodat de sectie gekozen kan worden waarin de stem aanwezig is die men wenst te editen: selecteer vervolgens de stem waarvan men de parameters wil weergeven. Het is ook mogelijk om rechtstreeks de edit-pagina weer te geven door het trekregister even uitgetrokken of het wipregister even ingedrukt in de positie van ingeschakelde stem te houden wanneer de cursor geplaatst is op het veld EDIT PARAMETERS in het menu VOICES of binnen de functie zelf. 49 Viscount UNICO 700 Gebruikersgids De led van het register dat men edit, knippert om verkeerde wijzigingen te voorkomen; het register zal ingeschakeld en bespeelbaar zijn om een betere en snellere afstelling toe te staan. Het is ook mogelijk andere registers in te schakelen om de wijzigingen in hun totaal te beoordelen. De weergegeven parameters zijn niet gelijk voor alle stemmen, omdat voor sommige families speciale wijzigingsparameters beschikbaar worden gesteld die voor andere soorten stemmen niet noodzakelijk zijn. De bewerkingen die men kan maken zijn: CHARACTER: harmonische rijkdom. AIR NOISE: geluid van de lucht die door de pijp wordt geblazen. REED NOISE: imperfectie van de periode van de trilling van het tongwerk. ATTACK: aanspraaktijd waarbinnen het geluid het maximum volume bereikt. REL. DETUNE: (Release Detune) mate van ontstemming in de loslaatfase. FREQ. SKEW: progressieve toonhoogteverandering van de lucht tijdens de aanspraak- en de loslaatfase. DETUNE: ontstemming om het zwevingseffect van ontstemde stemmen te produceren. KEYB. LO LEV.: (Keyboard Low Level) versterking (positieve waarden) of verzwakking (negatieve waarden) van het volume van de stem in het onderste gedeelte van het manuaal. o KEYB. HI LEV.: (Keyboard High Level) versterking (positieve waarden) of verzwakking (negatieve waarden) van het volume van de stem in het bovenste gedeelte van het manuaal. o TREMULANT: kies de eerste (1st) of de tweede (2nd) tremulant. De gekozen tremulant zal de klank van registers moduleren wanneer deze wordt geactiveerd door het betreffende (trek)register. o o o o o o o o Druk op [EXIT] om de functie af te sluiten en de waarden op te slaan. 8.3 SELECTIE VAN DE ALTERNATIEVE STEMMEN (functie ALTERNATIVE VOICE) Elk register op het paneel beschikt over een serie stemmen: de standaardstem ingesteld door de huidige stijl en de alternatieve stemmen, ofwel de varianten van het origineel. Om een alternatieve stem te selecteren, moet de functie ALTERNATIVE VOICES opgeroepen worden: Zoals bij de andere functies van het menu VOICES, moet nu de sectie van het orgel geselecteerd worden waarin de te vervangen stem aanwezig is; vervolgens wordt de lijst van de in de geselecteerde sectie aanwezige stemmen weergegeven. 50 Viscount UNICO 700 Gebruikersgids Ook voor deze functie kunt u rechtstreeks de pagina van de alternatieve stemmen weergeven door het trekregister even uitgetrokken of het wipregister even ingedrukt in de positie van ingeschakelde stem te houden wanneer de cursor geplaatst is op het veld ALTERNATIVE VOICES in het menu VOICES of binnen de functie zelf. De led van het register dat men vervangt, knippert om verkeerde wijzigingen te voorkomen; het register zal ingeschakeld en bespeelbaar zijn om een betere en snellere afstelling toe te staan. Nu geeft het display de lijst van alternatieve stemmen weer: de momenteel gebruikte stem wordt aangegeven als “CURRENT VOICE” in het onderste gedeelte van de schermpagina. Het is verder nuttig om erop te wijzen dat de bovenste sectie van de schermpagina altijd de naam die gezeefdrukt is op het trek- of het wipregister vermeldt, zodat op elk moment duidelijk is van welk register men de stem verandert. Als andere stemmen met de toetsen [FIELD S] en[FIELD T] worden gekozen, verandert het opschrift in “ENTER TO REPLACE”: wat aangeeft dat om de nieuwe stem te bevestigen en bruikbaar te maken, op de toets [ENTER] moet worden gedrukt. De door de cursor aangewezen stem wordt ook voordat op [ENTER] wordt gedrukt, beschikbaar en bespeelbaar gemaakt, om zo onmiddellijk de benodigde wijziging te kunnen beoordelen. Het is ook mogelijk andere registers in te schakelen om de wijzigingen in hun totaal te beoordelen. Druk op [EXIT] om andere stemmen te vervangen of de functie af te sluiten. N.B. Wanneer een alternatieve stem wordt geselecteerd, worden de parameters voor geluidsopwekking in de functie EDIT PARAMETERS automatisch opnieuw ingesteld met de standaardwaarden van de nieuwe stem. De waarde van het volume (in de functie VOLUME LEVEL) blijft echter ongewijzigd. 51 Viscount UNICO 700 Gebruikersgids 9. ALGEMENE INSTELLINGEN VAN HET INSTRUMENT (menu SET-UP) Het menu SET-UP bevat alle algemene instellingen van het instrument, met uitzondering van de configuratie van de MIDI-interface en de bijkomende en utiliteitsfuncties. Selecteer, om het menu in kwestie op te roepen, het veld SET-UP op de hoofdpagina: De oproepbare functies zijn: o 1st TREMULANT: regeling per afzonderlijk manuaal van de snelheid en diepte van het eerste tremulanteffect. o 2nd TREMULANT: regeling per afzonderlijk manuaal van de snelheid en diepte van het tweede tremulant-effect. o REVERBERATION: selectie van het type omgeving voor het nagalmeffect. o INT. AMPL. EQUALIZER (Internal amplification equalizer): regeling van de 5-bands equalizer van de interne versterker. o INT. AMPL. PANNING (Internal amplification panning): regeling van de stereofonische verdeling van de registers over de interne geluidsweergavesystemen om verschillende soorten windladen voor de diverse registers te simuleren. o INT. AMPL. TUNE-UP (Internal amplification tune-up): functie is niet beschikbaar in deze modellen. o PROG. FUNCTION (Programmable functions): instellingen met betrekking tot de werking van de combinaties, de duimpistons, het Crescendo en de potentiometers onder de manualen. o ENC. CONFIGURATION (Enclosed configuration): programmeer de [ENC] piston functie. o EXT. OUT EQUALIZER (External outputs equalizer): regeling van de equalizers van de achterste PROG. OUT uitgangen. o EXT. SUB EQUALIZER (External Sub equalizer): regeling van de equalizer voor de externe uitgang aan de achterzijde [GEN. SUB.]. o EXT. OUT ROUTER (External outputs router): configuratie van de kanalisatie van de registers over de achterste PROG. OUT uitgangen om de positie van de windladen en de plaatsing van de pijpen hierin te simuleren. o EXT. OUT VOLUME (External outputs volume): regeling van de volumes van de achterste PROG. OUT uitgangen. o EXT. OUT CONFIG (External outputs config): configuratie van de achterste PROG. OUT uitgangen o EXT. OUT RESIZE (External Out Resize): Past automatisch het verband tussen de registers en de uitgangen aan de achterzijde aan, afhankelijk van het aantal uitgangen dat dan werkelijk wordt gebruikt. 52 Viscount UNICO 700 Gebruikersgids 9.1 KANALISATIE VAN DE STEMMEN OVER DE ACHTERSTE GELUIDSUITGANGEN (functie EXT. OUT ROUTER) Een belangrijk kenmerk van de orgels van de serie Unico is de mogelijkheid om voor elk register de windladen en de plaatsing van de pijpen hierin te simuleren. Dit is mogelijk dankzij de kanalisatie van de geluidssignalen, ofwel hoe deze over de achterste uitgangen verdeeld worden. Het systeem is in staat om voor elk register een uitgangsconfiguratie te gebruiken die de plaatsing van de pijpen in de echte windladen weerspiegelt, oftewel: - met enkele of dubbele wig - met dubbele vleugel - met enkele vleugel links of rechts - mono - alternerend Bovendien kan elk van deze indelingen verder worden gespecificeerd voor wat betreft de breedte van de windlade en zijn plaats in de ruimte in relatie tot het aantal gebruikte uitgangen. Selecteer, voor toegang tot de configuratiepagina’s van de achterste geluidsuitgangen, het veld EXT. OUT ROUTER in het SET-UP menu: de selectiepagina wordt weergegeven van de sectie waarin het te configureren register aanwezig is, dat gekozen is uit de lijst van de registers in die sectie: Ook voor deze functie kunt u rechtstreeks de configuratiepagina weergeven door het trekregister even uitgetrokken of het wipregister even ingedrukt in de positie van ingeschakelde stem te houden wanneer de cursor geplaatst is op het veld EXT. OUT ROUTER in het SET-UP menu of binnen de functie zelf. De led van het register dat men configureert, knippert om verkeerde wijzigingen te voorkomen; het register zal ingeschakeld en bespeelbaar zijn om een betere en snellere afstelling toe te staan. Het is ook mogelijk andere registers in te schakelen om de wijzigingen in hun totaal te beoordelen. 53 Viscount UNICO 700 Gebruikersgids De pagina bestaat uit vier delen: o MODE: selecteert het type windlade uit: - C – C#: alternerend - MONO: mono - DOUBLE CUSP: dubbele wig - CUSP: wig - DOUBLE WING: dubbele vleugel - WING: enkele vleugel o FROM en TO: selecteren de uiterste posities van de uitgangen waarbinnen de winladen gepositioneerd moeten worden. De waarde wordt aangegeven als [uitgangsnummer–tussenpositie tussen twee uitgangen], rekening houdend met het feit dat er vier (2-4-6-8 op display) tussenposities tussen de ene en de andere uitgang zijn. Een waarde van 40 betekent dat het uiteinde (FROM of TO) geplaatst is op de uitgang [4]; een waarde van 82 geeft aan dat het punt FROM of TO zich tussen de uitgang [8] en [9] bevindt, in de buurt van [8] aangezien het zich op de eerste vijfde ruimte tussen [8] en [9] bevindt. De configuratie van de hierboven afgebeelde pagina geeft een windlade met wig aan die geplaatst is tussen de uitgang [1] en een tussenpositie tussen [4] en [5]. o [positie-indicator]: wordt voorgesteld door kleine rechthoekjes boven de tekening van de windlade en geeft aan welke zone het onderliggende gedeelte t.o.v. het totale aantal uitgangen weergeeft. o [windlade op de uitgangen]: in het onderste gedeelte van de pagina, toont op grafische wijze de windlade met de referenties van de uitgangen die gebruikt worden, zodat een momentopname wordt geboden van zijn positie en de uitgangen waarop de noten aanwezig zullen zijn op basis van de configuratie van de windlade. Om de configuratie van een ander register weer te geven, volstaat het om het trek- of wipregister te bedienen of op [EXIT] te drukken om de functie af te sluiten. In beide gevallen wordt de zojuist ingestelde configuratie automatisch opgeslagen. 9.2 CONFIGUREREN VAN DE AUDIO-UITGANGEN AAN DE ACHTERZIJDE (functie EXT. OUT CONFIG) Dank zij deze functie kan ‘PROGRAMMABLE OUTPUTS’ (programmeerbare uitgangen) worden geconfigureerd voor de instelling van het Antiphonale signaal (regelbaar via de ‘AMPLIFICATION’ labels), voor het totale signaal, maar ook apart voor het nagalmsignaal van het instrument. Kies het ‘EXT. OUT CONFIG.’ veld in het ‘SET-UP’-menu, dan verschijnt de volgende boodschap in het pop-up scherm: Dit betekent dat de externe ‘panning’ (ruimtelijke positie, zie paragraaf 9.1) van bepaalde registers automatisch kan worden gewijzigd. Registers, geplaatst tussen de uitgangen [16] en [17] en/of uitgangen geconfigureerd als ‘GENERAL’ of ‘REVERB’ zullen automatisch worden ingesteld als Mono op de eerste uitgang van de eerder geconfigureerde panning (ruimtelijke verdeling van de registeruitgangen). Druk op [EXIT] om de automatische bijstelling van de panning de voorkomen en terug te keren naar het 54 Viscount UNICO 700 Gebruikersgids ‘SET-UP’-menu. Druk dan op [ENTER] ter bevestiging. De display laat dan het volgende beeld zien: Het functioneren van de verschillende modi wordt beschreven in onderstaande tabel: MODE OUTPUTS 1-16 Zoal ingesteld in de 'Ext. Router Conf.'-functie. Zoal ingesteld in de 'Ext. GENERAL-REVERB Router Conf.'-functie. Zoal ingesteld in de 'Ext. ANTIPHONAL Router Conf.'-functie. Zoal ingesteld in de 'Ext. GENERAL-ANTIPH. Router Conf.'-functie. Zoal ingesteld in de 'Ext. ANTIPH.-REVERB Router Conf.'-functie. STANDARD OUTPUTS 17-18 OUTPUTS 19-20 Wipregister AMPLIFICAT. Wipregister AMPLIFICAT. [CONSOLE ON] [EXT. SPEAKER ON] Zoal ingesteld in de 'Ext. Zoal ingesteld in de 'Ext. Router Conf.'-functie. Router Conf.'-functie. Interne versterking Outputs 1-20 Algemeen geluidssignaal Reverberated signal only Outputs 1-16 Outputs 17-20 Outputs 1-16 Outputs 17-20 Outputs 1-16 Outputs 17-20 Outputs 1-16 Outputs 17-20 Zoal ingesteld in de 'Ext. Zoal ingesteld in de 'Ext. Router Conf.'-functie. Router Conf.'-functie. Zoal ingesteld in de 'Ext. Algemeen geluidssignaal Router Conf.'-functie. Zoal ingesteld in de 'Ext. Alleen het geluid van de Router Conf.'-functie. nagalm 55 Viscount UNICO 700 Gebruikersgids 10. UTILITEITS- EN MIDI-FUNCTIES (menu UTIL. & MIDI) Het menu UTILITY & MIDI, oproepbaar door het gelijknamige veld op het display van de hoofdpagina te selecteren, verzamelt alle bijkomende functies en de instellingen met betrekking tot de MIDI-interface van het orgel. Het menu wordt op drie pagina’s weergegeven: Het eerste gedeelte bevat de bijkomende en utiliteitsfuncties: o PIST. COMBINE (Piston Combine): synchronisatie van de speciale combinatie van manuaal II met die van het pedalenbord. o KEYBOARDS INV. (Keyboards Inversion): omkering van de manualen zodat de registers van Man.I met het tweede manuaal en omgekeerd spelen. o TRACKER TOUCH: zorgt voor gebruik van de karakteristieke mechanische aanslag van pijporgels die van invloed is op de aanspraaktijden van de labiale registers en op het loslaten van alle stemtypes. o 1st SHORT OCT. (First short octave): activering van het korte octaaf op het eerste octaaf van de manualen en het pedalenbord. o AUTO MAINPAGE: automatisch terugkeren naar de hoofdpagina na 10 seconden inactiviteit op het display. o LCD CONTRAST: regeling van het contrast van het display. o SET DATE & TIME: de datum en tijd instellen. o LOCK ORGAN: instelling van de blokkeringscode van het orgel om toegang tot de configuratiepagina’s van het instrument en de opslag van de combinaties, het Tutti en het Crescendo te ontzeggen. o RESTORE FACT. SET (Restore factory settings): herstelt de fabrieksinstellingen. o OP.SYS. UPGRADE (Operating system upgrade): Upgrade van het besturingssysteem. Het tweede gedeelte van het menu betreft de configuraties van de MIDI-interface: o Tx AND Rx CHANNEL: configuratie van de MIDI zend- en ontvangstkanalen. o Tx AND Rx FILTER: configuratie van de MIDI zend- en ontvangstfilters. o PROG. CHANGE SEND (Program Change send): opslag van de combinaties en verzending van de MIDI-meldingen Program Change en Bank Select. o PEDAL/KEYB TOUCH (Pedal / Keyboard touch): selectie van de dynamiekcurven van de manualen voor het gebruik van de Orchestra-stemmen en de verzending van de MIDI-noten. o COUPLED NOTES: met de COUPLED NOTES functie kunnen noten via het MIDI-kanaal worden verstuurd. Selecteer YES om zowel de noten die daadwerkelijk op het klavier zijn gespeeld als de noten die voortgekomen zijn door de koppels te versturen. Bijvoorbeeld, bij het bespelen van het voetklavier terwijl de koppeling II/P aanstaat, worden noten van het voetklavier overgebracht naar zowel het voetklavier MIDI-kanaal als naar het Man.II MIDI-kanaal. Selecteer NO om uitsluitend de noten te versturen die daadwerkelijk op het klavier zijn gespeeld (in dit voorbeeld worden noten alleen verzonden via het voetklavierkanaal). 56 Viscount UNICO 700 Gebruikersgids 11. FUNCTIES VOOR HET BEHEER VAN DE BESTANDEN (menu FILE MANAG.) De orgelserie Unico kan gebruik maken van twee verschillende soorten massageheugen: het interne geheugen en een opslagapparaat dat in de [USB} connector onder de manualen gestoken kan worden (USB-stick). Deze geheugeneenheden worden gebruikt voor de opslag van de configuratie van het orgel, delen ervan, muzieknummers en lijsten van nummers. Als de USB-stick is ingebracht, gebruikt het systeem deze als massageheugen. Het blijft mogelijk om het interne geheugen voor het kopiëren van de bestanden (vanaf en naar de USB-stick) te gebruiken, maar het is niet mogelijk om de intern opgeslagen bestanden te laden, te wissen of te hernoemen: daarvoor moet eerst de USB-stick verwijderd worden. Bij selectie van het veld FILE MANAGEMENT op de hoofdpagina, wordt het betreffende menu met alle beheersfuncties van de bestanden getoond. Er is tevens een informatiepagina aanwezig over de in het orgel geïnstalleerde firmwareversies. Zoals opgemerkt kan worden, geeft het onderste gedeelte van de pagina de momenteel gebruikte geheugeneenheid aan: - INTERAL MEMORY: intern geheugen USB PEN DRIVE: USB-stick De oproepbare functies zijn: o o o o o o o o DIR: weergave van de inhoud van het massageheugen LOAD: laden van de bestanden. SAVE: opslag in het massageheugen van de configuratie van het orgel of delen ervan. COPY: kopiëren van de bestanden van de ene (bijv. interne) naar de andere geheugeneenheid. RENAME: herbenoemen van de bestanden. DELETE: wissen van de bestanden. SONGLIST: programmering van lijsten van nummers. O.S. INFO: weergave van de in het systeem geïnstalleerde firmwareversies. N.B.: - Wanner u de USB stick hebt ingestoken, moet u een paar seconden wachten voordat u de FILE MANAGMENT selecteert. - Als men de op de USB-stick opgeslagen bestanden via een computer wil hernoemen, houd er dan rekening mee dat de namen alleen nummers en kleine letters mogen bevatten. - Gebruik altijd USB-sticks geformatteerd met FAT of FAT32 file system (geen NTFS). 57 Viscount UNICO 700 Gebruikersgids 12. REGISTRATIE EN WEERGAVE VAN MUZIEKNUMMERS (SEQUENCER) Het orgel Unico is uitgerust met een interne sequencer (digitaal registratieapparaat) dat in staat is om de uitvoeringen, de commando’s en de regelingen die op het instrument zijn uitgevoerd te registreren. De registraties kunnen vervolgens als MIDI-bestand op de USB-stick of in het interne geheugen opgeslagen worden en op elk moment beluisterd worden. Druk, om de sequencer op te roepen, op de drukknop [SEQUENC.] naast het display; de selectiepagina van de drie werkwijzen van het systeem wordt weergegeven: o PLAY: weergave van de muzieknummers opgeslagen in het interne geheugen of op de USB-stick. o PLAY OPTIONS: weergaveopties o RECORD: registratie van muzieknummers In de onderste zone van de pagina wordt de momenteel gebruikte geheugeneenheid vermeldt. Denk eraan dat de USB-stick voorrang heeft t.o.v. het interne geheugen. Als men dus het interne geheugen wil gebruiken, moet de USB-stick verwijderd worden. N.B.: - Wanner u de USB stick hebt ingestoken, moet u een paar seconden wachten voordat u om de sequencer op te roepen - De transpositie die regelbaar is in het menu TUNING, heeft geen effect voor de weergave (in tegenstelling tot de registratie waar de noten wél getransponeerd worden ontvangen) van de nummers. Gebruik hiervoor de transpositiefunctie beschreven in par. 12.3. 12.1 WEERGAVE VAN EEN NUMMER (werkwijze PLAY) Selecteer op de eerder beschreven pagina voor selectie van de werkwijze van de sequencer, het veld PLAY; het display geeft de MID-bestanden weer die opgeslagen zijn in de momenteel gebruikte geheugeneenheid: 58 Viscount UNICO 700 Gebruikersgids Selecteer nu het MIDI-bestand dat weergegeven moet worden: De nieuwe pagina geeft informatie over alle commando’s die noodzakelijk zijn voor het gebruik van de sequencer: - [ENTER]: start de weergave van het nummer. [EXIT]: sluit de sequencer af. [FIELD S]: selectie van het vorige nummer opgeslagen in het geheugen of ingesteld in een Songlist (zie par. 12.4). [FIELD T]: selectie van het volgende nummer opgeslagen in het geheugen of ingesteld in een Songlist (zie par. 12.4). [VALUE -] (druk éénmaal): Verminder de afspeelsnelheid (de display links boven vermeldt de origenele waarde 100) [VALUE +] (druk éénmaal): Vermeerder de afspeelsnelheid(de display links boven vermeld de origenele waarde 100) [VALUE -] (druk en vasthouden): terugspoelen. [VALUE +] (druk en vasthouden): snel voorwaardspoelen. Zodra de weergave van een nummer start, verandert het display in: en zoals men kan zien, zijn ook de functies van de toetsen [ENTER] en [EXIT] veranderd in: - [ENTER]: pauze / opnieuw starten van de weergave van het nummer. [EXIT]: stoppen van de weergave van het nummer. [FIELD S], [FIELD T], [VALUE -], [VALUE +] behouden de eerder beschreven functies. 59 Viscount UNICO 700 Gebruikersgids 12.2 REGISTRATIE VAN EEN NUMMER (werkwijze RECORD) Selecteer het veld RECORD op de pagina met de werkwijzen van de sequencer: het display geeft weer: bij selectie van [NEW SONG] start een nieuwe registratie, terwijl als een MIDI-bestand wordt geladen, het mogelijk is om het overdubben uit te voeren, ofwel een nieuwe registratie die aan de eerder geregistreerde uitvoering wordt toegevoegd. Zoals bij de werkwijze Play, geeft de pagina ook bij Record informatie over de functies van de toetsen: - [ENTER]: start de registratie. - [EXIT]: sluit de sequencer af. Zodra de registratie is gestart, veranderen de functies in: - [ENTER]: pauze / opnieuw starten van de registratie. [EXIT]: stoppen van de registratie. Door op [EXIT] te drukken om de sessie te beëindigen, geeft het display de pagina voor de opslag van de zojuist uitgevoerde registratie weer: 60 Viscount UNICO 700 Gebruikersgids De weergegeven functies zijn: o SAVE: opslag van de registratie als MIDI-bestand. o PLAY: opnieuw de registratie beluisteren alvorens deze op te slaan. o OVERDUB: een nieuwe registratie in aanvulling op de zojuist geregistreerde sequentie uitvoeren. o DISCARD AND EXIT: de registratie wissen en de werkwijze Record van de sequencer afsluiten. Bij selectie van het veld SAVE, vraagt het systeem om een naam toe te wijzen aan de MIDI-sequentie die men wil opslaan: Gebruik voor de samenstelling van de naam, de toetsen [FIELD S] en[FIELD T] om de cursor te bewegen en [VALUE +] en [VALUE -] om het teken te selecteren. De eerste drie tekens kunnen alleen nummers zijn, aangezien deze nodig zijn voor toekomstige uitbreidingen van het instrument. Druk op de drukknop [ENTER] om de naam te bevestigen en op te slaan; als echter [EXIT] wordt bediend, keert men terug naar de vorige pagina en wordt de opslag geannuleerd. De opslag van het bestand wordt bevestigd door de melding: Door echter op [EXIT] vanuit de opslagpagina te drukken (dus bij opgenomen maar nog niet opgeslagen registratie), waarschuwt het systeem dat de registratie op deze wijze verloren kan gaan: en dat op [ENTER] moet worden gedrukt om de afsluiting te bevestigen en de geregistreerde gegevens te wissen of op [EXIT] om naar de opslagpagina terug te keren. N.B.: Als men de op de USB-stick opgeslagen bestanden via een computer wil herbenoemen, houd er dan rekening mee dat de namen alleen nummers en kleine letters mogen bevatten. 61 Viscount UNICO 700 Gebruikersgids 12.3 WEERGAVEOPTIES VAN DE SEQUENCER (menu PLAY OPTIONS) Bij selectie van het veld PLAY OPTIONS op de selectiepagina van de werkwijze van de sequencer, heeft men toegang tot enkele opties met betrekking tot de weergave van de nummers: deze betreffen: o TRANSPOSER: stelt een transpositie in halve tonen van de door de sequencer weergegeven nummers in. o SONG LOOP: indien ingesteld op “YES”, wordt het nummer aan het einde ervan opnieuw weergegeven. o LIST AUTOPLAY: indien ingesteld op “YES”, wordt na afloop van een nummer, tijdens het gebruik van de Songlist, automatisch het volgende nummer weergegeven, zonder op de toets [FIELD T] te hoeven drukken. o LIST LOOP: indien ingesteld op “YES”, wordt na afloop van het laatste nummer van een Songlist automatisch het eerste nummer weergegeven. 12.4 SONGLISTS (functie SONGLIST) Met de term Songlist wordt de functie van het orgel bedoeld waarmee lijsten van muzieknummers (MIDIbestanden) gecreëerd en weergegeven kunnen worden. Roep, om een lijst van nummers te programmeren, het menu FILE MANAGEMENT op en selecteer de functie SONGLIST; het systeem vraagt of men een nieuwe lijst wil aanmaken of een reeds bestaande lijst wil wijzigen: Door het veld [NEW LIST] te selecteren, wordt een nieuwe lijst gecreëerd, door een LST bestand te selecteren, wordt de lijst in dat bestand gewijzigd. In beide gevallen moeten eerst de nummers geselecteerd worden die in de lijst opgenomen moeten worden: 62 Viscount UNICO 700 Gebruikersgids Gebruik de toetsen [FIELD S] en[FIELD T] om het MIDI-bestand te selecteren, [VALUE +] om het in de lijst op te nemen en [VALUE -] om het uit de lijst te verwijderen. Naast de naam van het bestand wordt zijn positie in de lijst weergegeven. Druk nu op [ENTER] om de programmering voort te zetten of op [EXIT] om deze te verlaten. De tweede handeling is de plaatsing van de nummers binnen de lijst (of de bevestiging van de eerder gemaakte programmering): Wanneer een nummer in een ander positie moet worden verplaatst, plaats dan de cursor op het betreffende veld van het bestand met de toetsen [FIELD S] en[FIELD T], [VALUE +] om een positie vooruit te gaan of [VALUE -] om een eerdere positie in te stellen. Druk tenslotte op [ENTER] om de lijst op te slaan of op [EXIT] om naar de vorige pagina terug te keren. Zoals bij de MIDI-bestanden, mogen de eerste drie tekens uitsluitend nummers zijn. Gebruik voor de samenstelling van de naam, de toetsen [FIELD S] en[FIELD T] om de cursor te bewegen en [VALUE +] en [VALUE -] om het teken te selecteren. Druk op de drukknop [ENTER] om de naam te bevestigen en op te slaan; als echter [EXIT] wordt bediend, keert men terug naar de vorige pagina. N.B.: Als men de op de USB-stick opgeslagen bestanden via een computer wil herbenoemen, houd er dan rekening mee dat de namen alleen nummers en kleine letters mogen bevatten. 63 Viscount UNICO 700 Gebruikersgids 13. BIJLAGE 13.1 LOCAL OFF VAN DE REGISTERS Een register in Local Off instellen betekent, ervoor zorgen dat dit niet via de interne opwekking van het orgel speelt, maar dat sowieso de betreffende MIDI-melding (Exclusief Systeem code) wordt verzonden zodat het op een aangesloten instrument ingeschakeld en bespeeld kan worden. Druk, om de Local Off van de stemmen in te stellen, op de duimpiston [S] (Set) en, terwijl deze ingedrukt wordt gehouden, op [C] (Cancel) wanneer het hoofdmenu in het scherm zichtbaar is. De leds van alle registers gaan branden en het display geeft de volgende pagina weer: Bedien, om een stem in Local Off te plaatsen, het trek- of het wipregister zodat het betreffende lichtje dooft. Druk na instelling van de gewenste configuratie gelijktijdig op [S] en [C] om deze op te slaan. Een volgende toegang tot de instelling van Local Off zal de status van de registers weergeven volgens de regel: - Licht aan: register in Local On (speelt met de interne geluidsopwekking) Licht uit: register in Local Off 13.2 FACTORY SETTINGS Met de procedure Factory Setting kunnen de fabrieksinstellingen van alle interne functies van het instrument worden hersteld, zodat de door de gebruiker aangebrachte wijzigingen geannuleerd worden. Het orgel Unico biedt bovendien de mogelijkheid om te kiezen wat men in de standaardwaarden opnieuw wil instellen. Selecteer, om de betreffende functie op te roepen, het displayveld RESTORE FACT. SET op de tweede pagina van het menu UTILITY & MIDI: Het volgende kan geïnitialiseerd worden: o ENTIRE ORGAN: alle instellingen en functies van het orgel (menu TUNING, SET-UP en UILITY & 64 Viscount UNICO 700 Gebruikersgids MIDI, de vier User Styles, alle algemene en divisionele combinaties, Tutti en Crescendo en de Local Off status van de registers). o SETTING PARAMETERS: instellingen van de menu’s TUNING, SET-UP en UTILITY & MIDI. o USER STYLE: de 4 User Styles o COMB. MEMORIES: alle algemene en divisionele combinaties, Tutti en Crescendo. Selecteer de gewenste Factory Setting en druk op [ENTER]: het display zal een waarschuwingspagina weergeven die aangeeft wat men opnieuw met de standaardwaarden instelt: Druk opnieuw op [ENTER]: de procedure wordt gestart, gedurende welke de volgende melding wordt getoond: “PERFORMING”, waarna de melding “ACCOMPLISHED” verschijnt. Druk op [EXIT] om de actie te annuleren. 13.3 UPDATEN VAN HET BESTURINGSSYSTEEM Het besturingssysteem van de Unico-orgels kan snel en eenvoudig worden geüpdatet. U hoeft slechts de te installeren bestanden op een USB-stick te kopiëren en deze in de juiste connector onder de manualen te plaatsen, en vervolgens moet u de betreffende functie activeren OP. SYS UPGRADE (menu UTIL. & MIDI). Ga naar het “Download”-gedeelte van onze officiële Physis-website op http://www.physisorgans.com/ download.asp voor alle benodigde bestanden en informatie over de upgrade van het besturingssysteem. 65 Afvalverwerking van elektrische en elektronische apparatuur (voor landen in de Europese Unie en andere Europese landen met systemen voor de gescheiden inzameling van afval) Dir. 2002/95/CE, 2002/96/CE e 2003/108/CE Dit symbool op een product of de verpakking van een product geeft aan dat het product niet als gewoon huishoudelijk afval mag worden aangeboden. In plaats daarvan moet het product worden aangeboden bij een speciaal daarvoor ingericht verzamelstation, zodat het product geheel of gedeeltelijk kann worden hergebruikt. Als u het product op deze manier voor afvalverwerking aanbiedt, voorkomt u mogelijke schadelijke gevolgen voor het milieu en de volksgezondheid. Het recyclen van materialen draagt bij aan het behoud van natuurlijke bronnen. Neem voor meer informatie over het hergebruik van dit product contact op met de gemeente, de dienst afvalstoffenverwerking in uw woonplaats of de winkel waar u het product hebt gekocht. Dit product voldoet aan de eisen van EMCD 2004/108/EC en LVD 2006/95/EC. WAARSCHUWING Het op onjuiste wijze vervangen van de batterij kan leiden tot explosiegevaar. Vervang de batterij uitsluitend door hetzelfde of een gelijkwaardig type. Stel batterijen niet bloot aan hoge temperaturen, zoals zon, vuur en dergelijke. Viscount UNICO 700 Guida Utente INDICE 1. Note importanti ............................................................................................................................. 70 1.1 Cura del prodotto .......................................................................................................................................... 70 1.2 Note riguardanti il manuale .......................................................................................................................... 70 2. Premessa ........................................................................................................................................72 3. Descrizione generale .....................................................................................................................73 4. Accensione e videata principale ....................................................................................................78 5. Regolazione volumi (funzione Volumes) ......................................................................................79 6. Intonazione dello strumento (menu Tuning) ............................................................................... 80 7. Gli stili d’organo (menu Styles)..................................................................................................... 81 8. Selezione e regolazione delle voci (menu Voices) ........................................................................ 82 8.1 Regolazione del volume (funzione Volume Level) ................................................................................... 82 8.2 Regolazione dei parametri audio (funzione Edit Parameters) ................................................................. 83 8.3 Selezione delle voci alternative (funzione Alternative Voices) ................................................................ 84 9. Impostazioni generali dello strumento (menu Set-Up) ...............................................................86 9.1 Canalizzazione delle uscite audio posteriori (funzione Ext. Out Router) .............................................. 87 9.2 Configurazione delle uscite audio posteriori (funzione Ext. Out Config) ............................................. 88 10. Funzioni di Utilità e MIDI (menu Util. & MIDI) ...................................................................... 90 11. Funzioni per la gestione dei file (menu File Manag.) ................................................................. 91 12. Riproduzione e registrazioni di brani musicali (Sequencer) ......................................................92 12.1 Riproduzione di un brano (modalità Play) ............................................................................................... 92 12.2 Registrazione di un brano (modalità Record) .......................................................................................... 94 12.3 Opzioni di riproduzione (menu Play Options)........................................................................................ 96 12.4 Le Songlist (funzione Songlist) .................................................................................................................. 96 13. Appendice ....................................................................................................................................98 13.1 Local Off dei registri .................................................................................................................................. 98 13.2 Factory Settings............................................................................................................................................ 98 13.3 Aggiornamento del sistema operativo ...................................................................................................... 99 69 Viscount UNICO 700 Guida Utente 1. NOTE IMPORTANTI 1.1 CURA DEL PRODOTTO • Non applicate eccessiva forza alle strutture ed ai comandi dell’organo (manopole, registri, pulsanti, ecc…). • Non collocare, quando possibile, lo strumento in prossimità di unità che producano forti interferenze come apparecchi radio – TV, monitor, ecc... • Evitate di posizionare l’organo in prossimità di fonti di calore, in luoghi umidi o polverosi o nelle vicinanze di forti campi magnetici. • Evitate di esporre lo strumento all’irradiazione solare diretta. • Non introdurre per nessuna ragione oggetti estranei o liquidi di qualsiasi genere all’interno dello strumento. • Per la pulizia usate solo un pennello morbido od aria compressa, non usate mai detergenti, solventi od alcool. • Per il collegamento con impianti di amplificazione e diffusione utilizzate sempre cavi schermati di buona qualità. Quando scollegate i cavi dalle prese abbiate cura di afferrarli per il connettore e non per il cavo stesso; avvolgendoli, inoltre, evitate nodi e torsioni. • Prima di effettuare i collegamenti accertatevi che le altre unità (in particolar modo sistemi di amplificazione e di diffusione) che state per collegare siano spente. Eviterete rumorosi se non pericolosi picchi di segnale. • Collegate il cavo di alimentazione ad una presa di corrente provvista di contatto di terra. • Accertatevi che la tensione di rete corrisponda a quella indicata sulla targhetta matricola dell’apparato. • In caso di lunghi periodi di inutilizzo dell’organo scollegate la spina della presa di corrente. 1.2 NOTE RIGUARDANTI IL MANUALE • Conservate con cura questo manuale. • Il presente manuale costituisce parte integrante dello strumento. Le descrizioni e le illustrazioni contenute nella presente pubblicazione si intendono non impegnative. • Ferme restando le caratteristiche essenziali dello strumento, il costruttore si riserva il diritto di apportare eventuali modifiche di parti, dettagli ed accessori che riterrà opportune per il miglioramento del prodotto o per esigenze di carattere costruttivo o commerciale, in qualunque momento e senza impegnarsi ad aggiornare tempestivamente questa pubblicazione. • Tutti i diritti sono riservati, è vietata la riproduzione di qualsiasi parte di questo manuale, in qualsiasi forma, senza l’esplicito permesso scritto del costruttore. 70 Viscount UNICO 700 Guida Utente • Tutti i marchi citati all’interno del manuale sono di proprietà delle rispettive case produttrici. • Leggete attentamente tutte le informazioni descritte. Eviterete inutili perdite di tempo ed otterrete le migliori prestazioni dallo strumento. • Le sigle od i numeri riportati tra parentesi quadre ([ ]) stanno ad indicare i nomi dei pulsanti, sliders, potenziometri e connettori presenti sullo strumento. Per esempio la scritta [ENTER] indica il pulsante ENTER. • Le illustrazioni e le videate del display sono puramente a scopo informativo e possono differire da quelle che vengono realmente visualizzate sul display. • Le informazioni descritte nel presente manuale fanno riferimento alla versione del sistema operativo dello strumento presente quando il documento è stato redatto e potrebbero non rispecchiare le funzionalità della versione che state utilizzando. Pertanto consultate periodicamente la pagina Download del sito internet http://www.physisorgans.com per conoscere l’ultima versione del sistema operativo e la disponibilità di un manuale più aggiornato. • Per le descrizioni dettagliate di tutte le funzioni dell’organo consultate il Manuale di Riferimento scaricabile dalla pagina Download del sito internet http://www.physisorgans.com. 71 Viscount UNICO 700 Guida Utente 2. PREMESSA Gentile cliente, Grazie per aver scelto l’organo Viscount Unico. La nostra azienda, leader mondiale nella realizzazione di organi classici di prestigio, ha racchiuso nello strumento in suo possesso la più recente e sofisticata tecnologia dedicata alla fedele riproduzione delle timbriche dell’organo a canne, capace di garantire una notevole flessibilità d’uso ed una qualità timbrica mai riscontrate prima. Dopo anni di ricerca nell’esplorazione di nuove tecniche per la sintesi musicale, il centro di “Ricerca e sviluppo” Viscount ha creato, primo al mondo, il suono di organo a canne riprodotto con tecnologia a “Modelli fisici” su cui, a sua volta, si basa la tecnologia Physis. Questa rivoluzionaria tecnica di generazione non prevede alcun campionamento di organi reali (come consuetudine fino ad oggi), ma “calcola” in tempo reale la forma d’onda generata da un accurato modello matematico, basato sullo studio della fisica di emissione della canna reale e tenendo conto dei più importanti parametri fisici della canna stessa, quali ad esempio la geometria costruttiva, il materiale utilizzato, la pressione dell’aria applicata, ecc. Il fatto di essersi svincolati da una mera riproduzione di materiale registrato e memorizzato, consente di raggiungere livelli di realismo fino ad ora impensabili e un livello di dettaglio ottenibile solo dallo strumento reale. Il modello matematico, tanto per fare qualche breve esempio, permette di ottenere un suono diverso per ogni tasto, poiché esso riproducendo virtualmente lo strumento originale, assegna una canna diversa ad ogni tasto così come succede nella realtà; inoltre esso è in grado di riprodurre un suono diverso per ogni pressione successiva dello stesso tasto, tenendo conto delle condizioni precedenti della colonna d’aria all’interno della canna che si avrebbero nello strumento reale. E’ inoltre possibile un editing “fisico” dei suoni, quasi come se Lei fosse “l’organaro” che costruisce le canne, agendo sui principali elementi di cui abbiamo accennato e, qualora l’editing non sia il suo forte, potrà attingere ad una vastissima libreria di voci di canne d’organo già programmate e già residenti nella memoria interna del suo strumento. Per concludere la invitiamo a visitare i siti internet www.viscount-organs.com e www.physisorgans.com dove potrà trovare informazioni, aggiornamenti, documentazione e novità su questo e su tutta la linea degli strumenti di nostra produzione. 72 73 SOLO IV Unione III/II 13 19 F 0 0 Interna Esterna DIFFUSIONE Ance 14 Ripieni ANNULLATORI 8 Pedale + Positivo Recitativo 25 Grande Organo 9 Solo 0 0 0 0 15 I/P II/P III/P IV/P POSITIVO 16 RECITATIVO 26 17 10 18 Ped. IV/I III/II MEM+ G.O. SOLO 20 III/I I/II IV/III MEM- G.O. IV/II Rec. O.SOLO Pos. 15 R.I R.II R.III R.IV Rec. 11 Pos. Solo P.A. Solo 20 A 24 12 Tremolo SOLO IV 3 Unione IV/III RECITATIVO III 21 Tremolo 4 Unione IV/I Unione III/I Tremolo POSITIVO I 5 23 13 Tremolo 7 13 Unione I/II Unione IV/II GR. ORGANO II 3 20 Unione I/P Unione III/P 2 24 22 6 Unione II/P Unione IV/P PEDALE 1 27 Guida Utente Viscount UNICO 700 3. DESCRIZIONE GENERALE Viscount UNICO 700 Guida Utente 1. Sezione PEDALE. Qui sono raccolti i registri della pedaliera e le unioni dei manuali con la pedaliera. 2. Sezione GR. ORGANO II. Qui sono raccolti i registri, le unioni dei manuali ed i tremoli del Grande Organo. 3. Sezione SOLO IV. Registri e tremoli del Solo. 4. Sezione RECITATIVO III. Registri, unioni e tremoli del Recitativo. 5. Sezione POSITIVO I. Registri, unione dei manuali e tremoli del Positivo. 6. Interruttore [POWER]. Interruttore di accensione e spegnimento dello strumento. 7. Sezione DIFFUSIONE. Controlli delle amplificazioni dell’organo. - [INTERNA] attiva l’amplificazione interna dello strumento. - [ESTERNA] abilita le uscite esterne PROG. OUT presenti nel pannello posteriore (punto 27). 8. Sezione ANNULLATORI. Questi annullatori permettono di escludere dall’esecuzione tutte le voci facenti parte delle Ance (bascula [ANCE]) e dei Ripieni (bascula [RIPIENI]). 9. Sezione MIDI. Questi controlli per ogni manuale e per la pedaliera permettono di abilitare o meno la trasmissione sulla porta MIDI [OUT] dei codici MIDI di nota. Tutti gli altri messaggi MIDI previsti dallo strumento continuano ad essere trasmessi anche a controllo MIDI spento. 10. Sezione di controllo e programmazione. Qui sono presenti i pulsanti ed il display atti alla visualizzazione e programmazione di tutte le funzioni di configurazione e del sequencer dello strumento. 11. Sezione ORCHESTRA. Qui sono raccolti i registri Orchestra dell’organo. 12. Display aggiuntivi. - [CRESCENDO]: indica lo step attualmente raggiunto dal pedale [CRESCENDO] (punto 25) - [M. BANK]: visualizza il banco di memoria delle combinazioni (generali e dedicate) selezionato tramite i pistoncini [MEM. +] e [MEM. -] (punto 20). 13. Combinazioni generali. Questi pistoncini e pistoni a piede permettono il richiamo delle combinazioni generali del banco di memoria, selezionabile tramite [MEM. +] e [MEM. -] (punto 20). Queste combinazioni sono aggiustabili, la procedura di memorizzazione è descritta al punto 19. [0] ripristina lo stato delle voci preparate a mano prima del richiamo di una memoria. Sono inoltre presenti i sequenziatori di combinazioni generali, [-] è in ordine decrescente, [+] in ordine crescente. 74 Viscount UNICO 700 Guida Utente 14. Pistoncini del Pedale. Qui trovate le sei combinazioni dedicate di pedaliera e lo [0] per il richiamo dello stato delle voci di pedaliera preparato a mano prima del richiamo di una combinazione di pedaliera. Queste combinazioni sono aggiustabili, la procedura di memorizzazione è descritta al punto 19. 15. Pistoncini del Solo. Pistoncini delle combinazioni dedicate del Solo. [0] per il richiamo dello stato delle voci di questa sezione preparate a mano, prima del richiamo di una combinazione del Solo. Unione [IV/P]. Le combinazioni ed i ripieni sono aggiustabili, la procedura di memorizzazione è descritta al punto 19. E’ inoltre presente il pistoncino [M.SOLO] (MIDI Solo) tramite il quale, sull’uscita [MIDI OUT], trasmettere monofonicamente con priorità sulla nota più acuta le note suonate su questo manuale. 16. Pistoncini del Recitativo. Pistoncini delle combinazioni dedicate del Recitativo. [0] per il richiamo dello stato delle voci di questa sezione preparate a mano, prima del richiamo di una combinazione del Recitativo. Unioni [III/P] e [IV/III]. [R.III] ripieno del Recitativo. Le combinazioni ed i ripieni sono aggiustabili, la procedura di memorizzazione è descritta al punto 19. 17. Pistoncini del Grande Organo. Pistoncini delle combinazioni dedicate del Grande Organo. [0] per il richiamo dello stato delle voci di questa sezione preparate a mano, prima del richiamo di una combinazione del Grande Organo. Unioni [II/P], [IV/II], [III/II]. [R.II] ripieno del Grande Organo. Le combinazioni ed i ripieni sono aggiustabili, la procedura di memorizzazione è descritta al punto 19. E’ inoltre presente il pistoncino [O.SOLO] (Organ Solo) tramite il quale suonare monofonicamente con priorità sulla nota più acuta le voci del Solo quando l’unione [IV/II] risulta attivata. 18. Pistoncini del Positivo. Pistoncini delle combinazioni dedicate del Positivo. [0] per il richiamo dello stato delle voci di questa sezione preparate a mano, prima del richiamo di una combinazione del Positivo. Unioni [I/P], [III/I] e [IV/I] . [R.I] ripieno del Positivo. Le combinazioni ed i ripieni sono aggiustabili, la procedura di memorizzazione è descritta al punto 19. 19. Pistoncino [F]. Pistoncino fissatore per la memorizzazione delle combinazioni generali e dedicate, del Tutti e degli step del Crescendo. Per memorizzare una combinazione od il Tutti, dopo aver impostato lo stato delle voci desiderato premere [F] e mantenendolo premuto premere il pistoncino od il pistone a piede della combinazione che si desidera memorizzare. Per memorizzare uno step del Crescendo, selezionarlo tramite l’omonimo pedale, premere [F] e tenendolo premuto premere [0] delle memorie generali. Per copiare il contenuto di uno step in un altro, dopo aver selezionato lo step che si desidera copiare premere e tenere premuto il pistoncino [F], selezionare lo step in cui si desidera riversare il contenuto quindi premere [0] delle memorie generali. NOTA Qualora il Led del pistoncino [F] risulti spento ciò sta a significare che la programmazione dell’organo è bloccata tramite la funzione Lock Organ (vedi cap. 10), pertanto non sarà possibile memorizzare combinazioni e/o visualizzare le funzioni interne di programmazione. 75 Viscount UNICO 700 Guida Utente 20. Comandi generali dell’organo. Si tratta di comandi non dedicati alle singole sezioni ma la cui abilitazione influenza l’intero strumento. - [MEM. +] e [MEM -]: selezionano il banco di memoria visualizzato dal display aggiuntivo [MEM. BANK] (punto 12). - [ENC]: abilita la funzione Enclosed la quale permette di controllare il volume generale dell’organoagendo sulla staffa espressiva [RECITATIVO] . - [P.A.]: abilita la funzione Piano Automatico al Pedale che permette di adattare automaticamente la composizione fonica di Pedaliera in funzione di quale manuale si sta suonando. - [T]: pistoncino e pistone a piede per il richiamo del Tutti. Il Tutti è aggiustabile, la procedura di memorizzazione è descritto al punto 19. - [A]: pistoncino annullatore NOTA All’accensione viene sempre selezionato il banco di memoria n.° 1. 21. Ripieno del Pedale. I Ripieni sono programmabili, la procedura di memorizzazione è descritto al punto 19. 22. Pannello delle connessioni anteriori. In questo pannello posto sulla sinistra sotto i manuali si trovano i connettori e regolazioni di più frequente utilizzo per cui di pratica accessibilità. - [MASTER VOLUME]: regola il volume generale dell’organo. - [REVERB VOLUME]: regola il livello dell’effetto di riverbero. - MIDI [IN]: è il connettore MIDI di ingresso per far ricevere all’organo i dati trasmessi da un’unità MIDI esterna. - MIDI [OUT]: è il connettore MIDI che trasmette i dati MIDI generati dall’organo. - MIDI [THRU]: ritrasmette i dati ricevuti dalla porta [IN] per il collegamento in serie di più dispositivi MIDI. - [USB]: sono due connettori USB. Quello di sinistra è utilizzato per il collegamento con computer per poter utilizzare il programma di configurazione dello strumento. Quello di destra è dedicato all’utilizzo di una penna USB (non fornito con lo strumento) da utilizzarsi come memoria di massa dell’organo in sostituzione della memoria interna. Per maggiori informazioni consultare il cap. 11. - [PHONES]: è la presa per collegare un set di cuffie. 23. Serratura della serranda di protezione. 24. Pistoni a piede delle unioni. Questi pistoni replicano la funzione delle unioni a pistoncino o tirante. 25. Pedale [CRESCENDO]. Tramite questo pedale potrete selezionare gli step del Crescendo con il quale attivare una serie prefissata di registri. Lo step attualmente selezionato viene visualizzato dal display aggiuntivo [CRESCENDO] (vedi punto 12). Ogni step del Crescendo è programmabile. La procedura di memorizzazione è descritta al punto 19. 26. Staffe espressive. L’organo è dotato di tre staffe espressive per il controllo continuo del volume del Positivo, del Recitativo e del Solo. La staffa [SOLO] ha inoltre incorporato uno speciale sistema a leva con il quale controllare l’effetto di Sustain per le voci Orchestra. 76 Viscount UNICO 700 Guida Utente 27. Connessioni posteriori. Dentro l’organo sono presenti diverse connessioni per il collegamento audio con impianti di diffusione esterni, ingresso di linea e microfonico per l’utilizzo dell’amplificatore interno dell’organo. - Prese [EXT. +12V DC]: da questi connettori è possibile prelevare la tensione di +12 Volt per l’accensione remota dei diffusori VISCOUNT eventualmente collegati alle uscite PROG. OUT. - OUT [GEN. SUB] (General Sub-Woofer): uscita dedicata a cui collegare diffusori per basse frequenze (sub-woofer). - PROG. OUT (Programmable Outputs): uscite di linea generali dello strumento con le quali simulare i somieri degli organi a canne. I segnali infatti sono distribuiti sulle uscite in base alle impostazioni delle funzioni a display che permettono, per ogni registro, di impostare il tipo di somiere, la sua dimensione e posizione nello spazio dei diffusori utilizzati. Ogni uscita dispone inoltre di controlli di livello ed equalizzazione dedicati. - INPUT [L(+R)] / [R]: ingressi di linea tramite le quali suonare altri strumenti con l’amplificazione interna dell’organo. In caso di sorgente monofonica utilizzare esclusivamente la presa [L(+R)]. - INPUT [MIC]: ingresso microfonico tramite il quale amplificare il segnale proveniente da un microfono. - [GAIN]: potenziometro di regolazione del guadagno del segnale di ingresso alla presa [MIC]. ATTENZIONE! Questo gruppo di connessioni posteriori non è visibile dall’esterno ed è necessario rimuovere il pannello posteriore in legno dell’organo per accedervi. Per effettuare l’operazione rivolgersi a personale qualificato. 77 Viscount UNICO 700 Guida Utente 4. ACCENSIONE e VIDEATA PRINCIPALE Dopo aver acceso lo strumento tramite l’interruttore [POWER] il sistema impiega alcuni secondi per diventare operativo, in questa fase i Led sui pannelli divisionali dei manuali si accendono in sequenza ed il display visualizza la videata di presentazione. Alla visualizzazione della videata principale lo strumento è pronto per essere utilizzato: Questa videata raccoglie, nella parte superiore, i campi di selezione dei vari menu di configurazione dell’organo: o o o o o o TUNING: parametri di intonazione dello strumento. VOICES: funzioni inerenti le voci dell’organo. STYLE: selezione dello stile. SET-UP: impostazioni generali dell’organo UTIL. & MIDI (Utility & MIDI): funzioni di utilità e MIDI. FILE MANAG. (File Manager): gestione dei file memorizzati nella memoria interna o nel dispositivo USB. Per visualizzare il contenuto di un menu è sufficiente posizionare il cursore (indicato dal campo in negativo) sul campo desiderato tramite i pulsanti [FIELD S] e [FIELD T] e premere [ENTER]. [EXIT] abbandona il menu e torna alla videata principale. Nella parte inferiore di questa videata vengono invece visualizzati quei parametri dello strumento di cui è utile conoscerne sempre lo stato: o [prima casella in alto a sinistra]: (Equal nella videata raffigurata) informa circa il temperamento al momento utilizzato e selezionato nel menu TUNING. o ENSEMBLE: il valore di ENSEMBLE impostato nel menu TUNING. o AIR PRESS: il valore del parametro AIR PRESSURE nel menu TUNING. o A: l’intonazione dello strumento inteso come frequenza del LA4 impostata nel menu TUNING. o [prima casella in alto a destra]: (User2 nella videata raffigurata) indica lo stile selezionato nel menu STYLE. o P. COMB: lo stato della funzione PISTON COMBINE come impostato nel menu UTILITY & MIDI. o K. INV: lo stato della funzione KEYBOARD INVERSION come impostato nel menu UTILITY & MIDI. o TRANSP: la trasposizione impostata in TUNING. Questi campi sono solo di informazione e non selezionabili. Per regolare la funzione associata è necessario entrare nei menu sopra descritti. Attorno al display sono presenti i pulsanti atti alla visualizzazione e navigazione di tutte le videate a display: - [SEQUENC]: videate per l’utilizzo del sequencer interno dello strumento. 78 Viscount UNICO 700 Guida Utente - [VOLUMES]: videata che raccoglie tutti i volumi dello strumento. [FIELD S] e [FIELD T]: tramite questi pulsanti è possibile muovere il cursore indicato dal campo in reverse. [FIELD S] lo posiziona nel campo più in alto o precedente, [FIELD T] in quello più in basso o successivo. [VALUE +] e [VALUE -]: questi pulsanti regolano i valori dei parametri, siano essi valori numerici o alfanumerici. [VALUE +] incrementa, [VALUE -] decrementa. [EXIT] e [ENTER]: sono pulsanti per l’accesso e l’abbandono ai menu ed alle videate a display, o per confermare o annullare le richieste avanzate dal sistema. [ENTER] accede ai menu / videate e conferma, [EXIT] abbandona i menu / videate e annulla. 5. REGOLAZIONE VOLUMI (funzione VOLUMES) Premendo il pulsante [VOLUMES] è possibile visualizzare la videata inerente tutti i controlli di volume presenti nell’organo: o MST (Master): volume generale dell’organo, regolabile anche con il potenziometro [MASTER VOLUME] presente sotto i manuali. o REV (Reverb): effetto di riverbero, regolabile anche con il potenziometro [REVERB VOLUME] presente sotto i manuali. o PHO (Phones): livello del segnale in uscita alla presa delle cuffie [PHONES] presente sotto i manuali. o EXT (External outputs): volume generale delle prese PROG. OUT presenti nel pannello posteriore. o PED (Pedal): volume divisionale del Pedale. o GRT (Grande Organo): volume divisionale del Grande Organo. o SWL (Recitativo): volume divisionale del Recitativo. o CHR (Positivo): volume divisionale del Positivo. o SLO (Solo): volume divisionale del Solo. o ORC (Orchestra): volume della sezione orchestra. Per abbandonare la videata e tornare a visualizzare quella precedente premere [VOLUMES] o [EXIT] od attendere circa 4 secondi. 79 Viscount UNICO 700 Guida Utente 6. INTONAZIONE DELLO STRUMENTO (menu TUNING) Selezionando il campo TUNING della videata principale è possibile accedere a tutti i parametri di intonazione dello strumento. o TRANSPOSER: traspositore con un range da -6 a +5 semitoni. All’accensione l’organo ha sempre trasposizione nulla. o [secondo campo a display]: (Equal nella videata raffigurata) selettore di temperamenti storici di varie epoche ed origini nazionale. o BASE KEY: la nota con la quale inizia la catena delle 12 quinte costituenti il temperamento. o ENSEMBLE: livello di naturale microstonatura tra una canna ed un’altra così da simulare le non perfette intonazioni delle canne dell’organo a causa dell’usura con il tempo e la temperatura. I valori vanno da – (canne perfettamente intonate) a 8 (massima instabilità di intonazione). o AIR PRESSURE: simula il calo di pressione dell’aria quando ne è richiesta repentinamente una grande quantità (ad esempio nel caso dell’esecuzione di accordi poderosi con il Tutti). Ciò si traduce in un temporaneo e progressivo abbassamento dell’intonazione, più evidente per le canne di più alto piedaggio e larghezza (flauti, bordoni, principali). o PITCH (A): regolatore fine dell’intonazione indicata come frequenza del LA4 (di una canna 8’). Per uscire dalla videata premere [EXIT]. NOTA La trasposizione non ha effetto sulla riproduzione dei brani con il sequencer interno (al contrario della registrazione dove invece le note vengono acquisite trasposte). A tal scopo è presente un traspositore dedicato (vedi par. 12.3). 80 Viscount UNICO 700 Guida Utente 7. GLI STILI D’ORGANO (menu STYLES) Lo Style identifica la configurazione dei registri dell’organo intesa come la voce ed i relativi parametri di ogni singolo registro, potendo così utilizzare la fonica adeguata alla letteratura che si intende eseguire. L’organo dispone di otto Style, ciò sta a significare che si dispone di otto configurazioni sonore nella stessa consolle. Le prime quattro di queste, che d’ora in poi chiameremo anche Preset o stili presettati, sono programmate dai nostri laboratori seguendo le opportune scuole organare e non sono modificabili da parte dell’utente. I rimanenti quattro Style invece, chiamati User, sono liberamente modificabili e personalizzabili a piacere e l’organo risulta così di una flessibilità estrema. Per la scelta dello stile selezionare il campo STYLE nella videata principale: Come detto in precedenza i primi quattro Style non sono modificabili. Accedendo alle funzioni VOICES pertanto, il sistema informa di quanto ciò tramite il messaggio: Il contenuto di questi stili è comunque accessibile al fine di conoscerne le impostazioni, per continuare premere un qualsiasi pulsante display od attendere qualche secondo. 81 Viscount UNICO 700 Guida Utente 8. SELEZIONE e REGOLAZIONE DELLE VOCI (menu VOICES) Una delle principali caratteristiche della nuova tecnologia di sintesi Physis che gli organi Unico utilizzano per la generazione sonora è quella di offrire all’utente un’ampia personalizzazione dello strumento disponendo di un numero elevatissimo di timbriche organare e mettendo a disposizione diversi parametri la cui regolazione incrementa ulteriormente le possibilità di configurazione. Il menu VOICES raccoglie tutte queste funzioni di selezione e regolazione dei parametri audio delle voci. NOTE - Le funzioni di seguito descritte non sono modificabili quando è selezionato uno stile Preset. Selezionare uno stile User per regolare questi parametri. - Le voci selezionate per ogni bascula o tirante, così come il volume e i parametri di generazione sonora vengono automaticamente memorizzati nello Style corrente. Ciò sta a significare che richiamando un altro stile le voci verranno reimpostate con nuovi parametri descritti dallo stile ultimo richiamato. Le modifiche apportate in precedenza non vengono comunque perse e verranno rese disponibili riselezionando lo stile in cui le si erano eseguite. La prima videata visualizzata permette di selezionare la funzione alla quale si desidera accedere: o VOLUME LEVEL: regolazione del volume di ogni singola voce. o EDIT PARAMETERS: regolazione dei parametri di generazione sonora di ogni singola voce. o ALTERNATIVE VOICES: selezione delle voci alternative. 8.1 REGOLAZIONE DEL VOLUME (funzione VOLUME LEVEL) Dopo aver selezionato il campo VOLUME LEVEL nel menu VOICES il display visualizza le sezioni dell’organo, selezionare quella nella quale si trova la voce di cui si desidera regolare il volume: 82 Viscount UNICO 700 Guida Utente Come al solito utilizzare i pulsanti [FIELD S] e [FIELD T] ed [ENTER] per selezionare il campo a display. Un metodo alternativo per visualizzare e regolare immediatamente il volume è quello di tenere tirato per qualche istante il tirante o premuta la bascula in posizione di voce accesa quando il cursore è posizionato sul campo VOLUME LEVEL nel menu VOICES o all’interno della funzione stessa. Il Led del registro di cui si sta regolando il volume lampeggia onde evitare modifiche errate, lo stesso risulta acceso e suonabile per una migliore e più veloce regolazione. E’ anche possibile accendere altri registri al fine di valutare complessivamente le modifiche. Per uscire dalla funzione e memorizzare i valori premere [EXIT]. 8.2 REGOLAZIONE DEI PARAMETRI AUDIO (funzione EDIT PARAMETERS) Per visualizzare le videate contenenti i parametri di generazione sonora delle singole voci selezionare il campo EDIT PARAMETERS nel menu VOICES: Anche per questa funzione il display inizialmente visualizza le sezioni dell’organo in modo da selezionare quella in cui è presente la voce che si desidera regolare: dopodichè selezionare la voce di cui si desidera visualizzare i parametri. E’ altresì possibile visualizzare direttamente la videata di regolazione tenendo tirato per qualche istante il tirante o premuta la bascula in posizione di voce accesa quando il cursore è posizionato sul campo EDIT PARAMETERS nel menu VOICES o all’interno della funzione stessa. 83 Viscount UNICO 700 Guida Utente Il Led del registro che si sta regolando lampeggia onde evitare modifiche errate, lo stesso risulta acceso e suonabile per una migliore e più veloce regolazione. E’ anche possibile accendere altri registri al fine di valutare complessivamente le modifiche. I parametri visualizzati non sono gli stessi per tutte le voci in quanto per alcune famiglie vengono resi disponibili parametri di modifica dedicati e non necessari per altre tipologie di voce. Le regolazioni che si possono effettuare sono: CHARACTER: ricchezza di armonici. AIR NOISE: rumore dell’aria soffiata nella canna. REED NOISE: imperfezione del periodo del battito dell’ancia. ATTACK: tempo di attacco entro il quale il suono raggiunge il massimo volume. REL. DETUNE: (Release Detune) livello di stonatura in fase di rilascio. FREQ. SKEW: cambio di intonazione progressivo dell’aria durante le fasi di attacco e rilascio. DETUNE: stonatura per produrre l’effetto battente delle voci detunate. KEYB. LO LEV.: (Keyboard Low Level) guadagno (valori positivi) o attenuazione (valori negativi) del volume della voce nella parte bassa del manuale. o KEYB. HI LEV.: (Keyboard High Level) guadagno (valori positivi) o attenuazione (valori negativi) del volume della voce nella parte alta del manuale. o TREMULANT: selezione del primo (1st) o secondo (2nd) tremolo con cui modulare la voce quando l’effetto viene attivato tramite gli appositi tiranti. o o o o o o o o Per uscire dalla funzione e memorizzare i valori premere [EXIT]. 8.3 SELEZIONE DELLE VOCI ALTERNATIVE (funzione ALTERNATIVE VOICES) Ogni registro a pannello dispone di un set di voci, quella di default impostata dallo Style corrente e quelle alternative, ovvero varianti dell’originale. Per selezionare una voce alternativa richiamare la funzione ALTERNATIVE VOICES: Come per le altre funzioni del menu VOICES occorre ora selezionare la sezione dell’organo in cui è presente la voce che si desidera sostituire, viene quindi visualizzato l’elenco delle voci presenti nella sezione selezionata. 84 Viscount UNICO 700 Guida Utente Anche per questa funzione potete visualizzare direttamente la videata delle voci alternative tenendo tirato per qualche istante il tirante o premuta la bascula in posizione di voce accesa quando il cursore è posizionato sul campo ALTERNATIVE VOICES nel menu VOICES o all’interno della funzione stessa. Il Led del registro che si sta sostituendo lampeggia onde evitare modifiche errate, lo stesso risulta acceso e suonabile per una migliore e più veloce regolazione. Ora il display visualizza l’elenco delle voci alternative: quella al momento in uso viene indicata come “CURRENT VOICE” nella parte bassa della videata. E’ utile inoltre fare presente che la sezione superiore della videata riporta sempre il nome in serigrafia posto sul tirante o sulla bascula, in modo da evidenziare in ogni istante quale è il registro di cui si sta cambiando la voce. Puntando altre voci con i pulsanti [FIELD S] e [FIELD T] la dicitura cambia in “ENTER TO REPLACE”: indicando appunto che per confermare la nuova voce e renderla utilizzabile è necessario premere il pulsante [ENTER]. La voce puntata dal cursore è resa disponibile e suonabile anche prima di premere [ENTER] così da valutare immediatamente la modifica necessaria. E’ anche possibile accendere altri registri al fine di valutare complessivamente le modifiche. Premere [EXIT] per sostituire altre voci o abbandonare la funzione. NOTA Quando viene selezionata una voce alternativa i parametri di generazione sonora contenuti nella funzione EDIT PARAMETERS vengono automaticamente reimpostati con i valori di default della nuova voce. Il valore del volume (nella funzione VOLUME LEVEL) rimane invece invariato. 85 Viscount UNICO 700 Guida Utente 9. IMPOSTAZIONI GENERALI DELLO STRUMENTO (menu SET-UP) Il menu SET-UP raccoglie tutte le impostazioni generali dello strumento ad eccezione delle configurazioni relative l’interfaccia MIDI e le funzioni accessorie e di utilità. Per richiamare il menu in oggetto selezionare il campo SET-UP nella videata principale: Le funzioni richiamabili sono le seguenti: o o o o o o o o o o o o o o 1st TREMULANT: regolazione, per singolo manuale, del primo tremolo. 2nd TREMULANT: regolazione, per singolo manuale del secondo tremolo. REVERBERATION: selezione del tipo di ambiente per l’effetto di riverbero. INT. AMPL. EQUALIZER (Internal amplification equalizer): regolazione dell’equalizzatore a 5 bande dell’amplificatore interno. INT. AMPL. PANNING (Internal amplification panning): regolazione della distribuzione stereofonica dei registri nei sistemi interni di diffusione audio al fine di simulare diverse tipologie di somiere. INT. AMPL. TUNE-UP (Internal amplification tune-up): funzione non disponibile in questi modelli. PROG. FUNCTIONS (Programmable functions): impostazioni relative al funzionamento delle combinazioni, dei pistoncini, del Crescendo e dei potenziometri sotto i manuali. ENC. CONFIGURATION (Enclosed configuration): programmazione del funzionamento del pistoncino [ENC]. EXT. OUT EQUALIZER (External outputs equalizer): regolazione degli equalizzatori delle uscite posteriori PROG. OUT. EXT. SUB EQUALIZER (External sub equalizer): regolazione dell’equalizzatore dell’uscita posteriore [GEN. SUB.]. EXT. OUT ROUTER (External outputs router): configurazione della canalizzazione dei registri sulle uscite posteriori PROG. OUT al fine di simulare la posizione dei somieri e la disposizione delle canne all’interno di essi. EXT. OUT VOLUME (External outputs volume): regolazione dei volumi delle uscite posteriori PROG. OUT. EXT. OUT CONFIG (External outputs config): configurazione delle uscite posteriori PROG. OUT. EXT. OUT RESIZE (External out resize): adattamento automatico della canalizzazione dei registri sulle uscite posteriori PROG. OUT in base al numero delle uscite utilizzate. 86 Viscount UNICO 700 Guida Utente 9.1 CANALIZZAZIONE DELLE VOCI SULLE USCITE AUDIO POSTERIORI (funzione EXT. OUT ROUTER) Importante caratteristica degli organi della serie Unico è data dalla possibilità di simulare, per ogni registro, la posizione dei somieri e la disposizione delle canne all’interno di essi. Questo è possibile grazie alla canalizzazione dei segnali audio, ovvero come questi vengono distribuiti, sulle uscite posteriori. Il sistema è in grado di utilizzare per ogni registro una configurazione di uscita che rispecchi la disposizione delle canne nei veri somieri, ovvero: - a singola o doppia cuspide - a doppia ala - ad ala singola a sinistra o a destra - mono - alternato Ognuna di queste configurazioni è inoltre configurabile per quanto concerne la larghezza del somiere e la sua posizione nello spazio dimensionato dal numero di uscite utilizzate. Per accedere alle videate di programmazione selezionare il campo EXT. OUT ROUTER presente nel menu SET-UP: viene visualizzata la videata di selezione della sezione in cui è presente il registro che si desidera configurare, scelta la quale l’elenco dei registri contenuti in quella sezione: Anche per questa funzione potete visualizzare direttamente la videata di configurazione tenendo tirato per qualche istante il tirante o premuta la bascula in posizione di voce accesa quando il cursore è posizionato sul campo EXT. OUT ROUTER nel menu SET-UP o all’interno della funzione stessa. Il Led del registro che si sta configurando lampeggia onde evitare modifiche errate, lo stesso risulta attivo e suonabile per una migliore e più veloce regolazione. E’ anche possibile accendere altri registri al fine di valutare complessivamente le modifiche. 87 Viscount UNICO 700 Guida Utente La videata si compone di quattro sezioni: o MODE: seleziona il tipo di somiere tra: - C – C#: alternato - MONO: mono - DOUBLE CUSP: doppia cuspide - CUSP: cuspide - DOUBLE WING: doppia ala - WING: ala singola o FROM e TO: selezionano le posizioni estreme, riferite alle uscite, entro le quali posizionare il somiere. Il valore viene indicato come [numero di uscita – posizione intermedia tra due uscite], tenendo presente che ci sono quattro (2-4-6-8 a display) posizioni intermedie tra un’uscita ed un’altra. Un valore pari a 40 sta a significare che l’estremo (FROM o TO) è posizionato sull’uscita [4]; un valore pari a 82 indica che il punto FROM o TO è tra l’uscita [8] e la [9], vicino alla [8] dato che si trova sul primo quinto di spazio tra la [8] e la [9]. La configurazione della videata raffigurata in precendeza indica un somiere a cuspide posizionato tra l’uscita [1] e una posizione intermedia fra la [4] e la [5]. o [indicatore di posizione]: rappresentato da piccoli rettangoli posti sopra il disegno del somiere indica che zona sta visualizzando la parte sottostante rispetto alla totalità delle uscite. o [somiere sulle uscite]: posto nella zona inferiore della videata, illustra graficamente il somiere con i riferimenti delle uscite che si stanno utilizzando, offrendo così un’immagine immediata della sua posizione e su quali uscite saranno presenti le note in base alla configurazione del somiere. Per visualizzare la configurazione di un altro registro è sufficiente agire sul tirante / bascula oppure premere [EXIT] per abbandonare la funzione. In entrambi i casi la configurazione appena impostata viene automaticamente memorizzata. 9.2 CONFIGURAZIONE DELLE USCITE AUDIO POSTERIORI (funzione EXT. OUT CONFIG) Questa funzione permette di configurare le uscite PROGRAMMABLE OUTPUTS al fine di disporre del segnale Antiphonal (e quindi controllato separatamente, tramite le bascule AMPLIFICATION), del segnale generale dello strumento, del solo segnale riverberato. Selezionando il campo EXT. OUT CONFIG. del menu SET-UP il display visualizza inizialmente il pop-up di avviso: che informa che il panning esterno (vedi par. 9.1) di alcuni registri potrebbe venir modificato automaticamente dal sistema in base alla configurazione delle uscite adottata. I registri posizionati infatti tra le uscite [16] e [17] e/o nelle uscite che verranno qui impostate come GENERAL o REVERB, saranno automaticamente configurati in modalità Mono sulla prima uscita del panning precedentemente configurato. Premere [EXIT] per annullare la modifica automatica del panning esterno e tornare al menu SET-UP o [ENTER] per confermare. 88 Viscount UNICO 700 Guida Utente In questo caso viene visualizzata la videata di configurazione: Il funzionamento delle modalità operative è descritto nelle seguenti tabelle. MODALITA' USCITE 1-16 USCITE 17-18 Come impostato nella Come impostato nella funzione Ext. Out Router funzione Ext. Out Router Come impostato nella Segnale generale GENERAL-REVERB funzione Ext. Out Router Come impostato nella Come impostato nella ANTIPHONAL funzione Ext. Out Router funzione Ext. Out Router Come impostato nella Segnale generale GENERAL-ANTIPH. funzione Ext. Out Router Come impostato nella Come impostato nella ANTIPH.-REVERB funzione Ext. Out Router funzione Ext. Out Router STANDARD USCITE 19-20 CONTROLLO DIFFUSIONE [INTERNA] CONTROLLO DIFFUSIONE [ESTERNA] Come impostato nella funzione Ext. Out Router Amplificazione interna Uscite 1-20 Solo segnale riverberato Uscite 1-16 Uscite 17-20 Uscite 1-16 Uscite 17-20 Uscite 1-16 Uscite 17-20 Uscite 1-16 Uscite 17-20 Come impostato nella funzione Ext. Out Router Come impostato nella funzione Ext. Out Router Solo segnale riverberato 89 Viscount UNICO 700 Guida Utente 10. FUNZIONI DI UTILITA’ e MIDI (menu UTIL. & MIDI) Il menu UTILITY & MIDI, richiamabile selezionando l’omonimo campo a display della videata principale raccoglie tutte le funzioni accessorie e le impostazioni relative l’interfaccia MIDI dell’organo. Il menu è visualizzato su tre videate: La prima parte contiene le funzioni accessorie e di utilità: o PIST. COMBINE (Piston Combine): sincronizzazione delle combinazioni dedicate della pedaliera con quelle di un’altra sezione (per. es. richiamandone una del Grande Organo ne viene attivata la stessa della pedaliera). o KEYBOARDS INV. (Keyboards Inversion): inversione dei manuali in modo che i registri del Positivo suonino con il secondo manuale e viceversa. o TRACKER TOUCH: permette di utilizzare il caratteristico tocco meccanico degli organi a canne che influisce sui tempi e sonorità di attacco dei registri labiali. o 1st SHORT OCT. (First short octave): attivazione dell’ottava corta sulla prima ottava dei manuali e della pedaliera. o AUTO MAINPAGE: ritorno automatico alla videata principale dopo 10 secondi di inattività sul display. o LCD CONTRAST: regolazione del contrasto del display. o SET DATE & TIME: regolazione della data e dell’ora. o LOCK ORGAN: impostazione del codice di blocco dell’organo al fine di evitare l’accesso alle videate di configurazione dello strumento e della memorizzazione delle combinazioni, del Tutti e del Crescendo. o RESTORE FACT. SET (Restore factory settings): ripristino delle impostazioni di fabbrica. o OP.SYS. UPGRADE (Operating System upgrade): aggiornamento del sistema operativo. La seconda parte del menu riguarda invece le configurazioni riguardanti l’interfaccia MIDI: o Tx AND Rx CHANNEL: configurazione dei canali MIDI di trasmissione e ricezione. o Tx AND Rx FILTER: configurazione dei filtri MIDI di trasmissione e ricezione. o PROG. CHANGE SEND (Program Change send): salvataggio nelle combinazioni e trasmissione dei messaggi MIDI di Program Change e Bank Select. o PEDAL/KEYB TOUCH (Pedal / Keyboard touch): selezione delle curve di dinamica dei manuali per l’utilizzo delle voci Orchestra e la trasmissione delle note MIDI. o COUPLED NOTES: La funzione COUPLED NOTES permette di scegliere se trasmettere via MIDI solo le note fisicamente suonate sui manuali (a funzione disattivata), oppure anche quelle generate dai vari controlli di unione (a funzione attivata). Selezionando YES e suonando per esempio sulla pedaliera con l’unione G.O./P attiva, vengono trasmesse le note sui canali della pedaliera e del Grande Organo. Selezionando NO le note vengono trasmesse solo sul canale della pedaliera. 90 Viscount UNICO 700 Guida Utente 11. FUNZIONI PER LA GESTIONE DEI FILE (menu FILE MANAG.) La serie di organi Unico può utilizzare due diverse tipologie di memoria di massa: la memoria interna e un dispositivo di memorizzazione da inserire nel connettore [USB] posto sotto i manuali (penna USB). Tali unità di memoria vengono utilizzate per la memorizzazione della configurazione dell’organo, parti di essa, brani musicali e liste di brani. In caso di penna USB inserita il sistema prevede l’utilizzo di quest’ultima come memoria di massa. E’ comunque possibile utilizzare la memoria interna per la copia dei file (da e per la penna USB), non è invece possibile caricare, cancellare e rinominare file memorizzati internamente: per fare ciò è necessario disinserire la penna USB. Selezionando il campo FILE MANAGEMENT della videata principale viene visualizzato il relativo menu contenente tutte le funzioni di gestione dei file. E’ altresì presente una videata di informazione sulle versioni di firmware installati nell’organo. Come è possibile notare la parte inferiore della videata indica l’unità di memoria attualmente utilizzata: - INTERAL MEMORY: memoria interna USB PEN DRIVE: penna USB Le funzioni richiamabili sono le seguenti: o o o o o o o o DIR: visualizzazione del contenuto della memoria di massa. LOAD: caricamento dei file. SAVE: salvataggio nella memoria di massa della configurazione dell’organo o parti di essa. COPY: copia dei file da un’unità di memoria (es. interna) in un’altra. RENAME: rinomina dei file. DELETE: cancellazione dei file. SONGLIST: programmazione di liste di brani. O.S. INFO: visualizzazione delle versioni dei firmware installati nel sistema. NOTE - Una volta inserita la penna USB attendere qualche secondo prima di visualizzare il menu FILE MANAGEMENT. - Qualora si desideri rinominare tramite un computer i file memorizzati nella penna USB porre particolare attenzione al fatto che i nomi possono contenere solo numeri e lettere le quali devono essere tutte minuscole. - Utilizzate sempre penne USB formattate con file system FAT o FAT32 (no NTFS). 91 Viscount UNICO 700 Guida Utente 12. RIPRODUZIONE e REGISTRAZIONE DI BRANI MUSICALI (SEQUENCER) L’organo Unico è equipaggiato con un sequencer (registratore digitale) interno in grado di acquisire le esecuzioni, i comandi e i controlli effettuati sullo strumento. Le registrazioni poi possono essere salvate nella penna USB o nella memoria interna come file MIDI e riascoltate in qualsiasi momento. Per richiamare il sequencer premere il pulsante [SEQUENC] posto a fianco del display, viene visualizzata la videata di selezione delle tre modalità operative del sistema: o PLAY: riproduzione dei brani musicali presenti nella memoria interna o nella penna USB. o PLAY OPTIONS: opzioni di riproduzione. o RECORD: registrazione di brani musicali. Nella zona inferiore della videata viene riportata l’unità di memoria al momento utilizzata. Si ricorda che la penna USB ha priorità sulla memoria interna, qualora si desideri utilizzare quest’ultima è necessario disinserire il dispositivo USB. NOTE - Una volta inserita la penna USB attendere qualche secondo prima di richiamare il sequencer. - La trasposizione regolabile nel menu TUNING non ha effetto sulla riproduzione (al contrario della registrazione dove invece le note vengono acquisite trasposte) dei brani. A tal fine utilizzare la funzione di trasposizione descritta nel par. 12.3. 12.1 RIPRODUZIONE DI UN BRANO (modalità PLAY) Nella videata precedentemente descritta di selezione della modalità del sequencer selezionare il campo PLAY, il display visualizza i file MIDI memorizzati nell’unità di memoria attualmente utilizzata: 92 Viscount UNICO 700 Guida Utente Selezionare ora il file MIDI che si desidera riprodurre. La nuova videata informa circa tutti i comandi necessari per l’utilizzo del sequencer: - [ENTER]: avvia la riproduzione del brano. [EXIT]: abbandono del sequencer. [FIELD S]: selezione del brano precedente memorizzato in memoria o impostato in una Songlist (vedi par. 12.4). [FIELD T]: selezione del brano successivo memorizzato in memoria o impostato in una Songlist (vedi par. 12.4). [VALUE -] (pressione singola): riduzione della velocità di riproduzione (visualizzata in alto a sinistra come percentuale del valore originale, 100 nella videata sopra illustrata). [VALUE +] (pressione singola): aumento della velocità di riproduzione (visualizzata in alto a sinistra come percentuale del valore originale, 100 nella videata sopra illustrata). [VALUE -] (pressione prolungata): riavvolgimento veloce (Rewind). [VALUE +] (pressione prolungata): avanzamento veloce (Fast Forward). Avviata la riproduzione di un brano il display cambia in: e come è possibile notare anche le funzioni dei pulsanti [ENTER] e [EXIT] sono cambiate in: - [ENTER]: pausa / riavvio della riproduzione del brano. [EXIT]: arresto della riproduzione del brano. [FIELD S], [FIELD T], [VALUE -], [VALUE +] mantengono le funzioni descritte in precedenza. 93 Viscount UNICO 700 Guida Utente 12.2 REGISTRAZIONE DI UN BRANO (modalità RECORD) Nella videata delle modalità del sequencer selezionare il campo RECORD, il display visualizza: selezionando [NEW SONG] si avvia una nuova registrazione, mentre caricando un file MIDI è possibile eseguirne l’overdub ovvero una nuova registrazione che si andrà ad aggiungere all’esecuzione registrata in precedenza. Come per la modalità Play, anche in Record la videata informa circa le funzioni dei pulsanti: - [ENTER]: avvia la registrazione. [EXIT]: abbandono del sequencer. Una volta avviata la registrazione le funzioni cambiano in: - [ENTER]: pausa / riavvio della registrazione. [EXIT]: arresto della registrazione. Premendo [EXIT] per terminare la sessione il display visualizza la videata relativa al salvataggio della registrazione appena effettuata. 94 Viscount UNICO 700 Guida Utente Le funzioni visualizzate permettono di: o o o o SAVE: salvare la registrazione come file MIDI. PLAY: riascoltare la registrazione prima di procedere con il salvataggio. OVERDUB: eseguire una nuova registrazione in aggiunta alla sequenza appena acquisita. DISCARD AND EXIT: cancellare la registrazione ed abbandonare la modalità Record del sequencer. Selezionando il campo SAVE il sistema chiede di assegnare un nome alla sequenza MIDI che si sta per salvare: Nella composizione del nome utilizzare i pulsanti [FIELD S] e [FIELD T] per muovere il cursore e [VALUE +] e [VALUE -] per selezionare il carattere. I primi tre caratteri possono essere solo numeri in quanto necessari per future espansioni dello strumento. Per confermare il nome e procedere con il salvataggio premere il pulsante [ENTER], [EXIT] invece permette di tornare alla videata precedente ed annullare il salvataggio. L’avvenuta memorizzazione del file viene confermata dal messaggio: Premendo invece [EXIT] dalla videata di salvataggio (quindi a registrazione acquisita ma non memorizzata) il sistema avverte che si sta per perdere la registrazione: e di premere [ENTER] per confermare l’abbandono e l’eliminazione dei dati acquisiti o [EXIT] per tornare alla videata di salvataggio. NOTA Qualora si desideri rinominare tramite un computer i file memorizzati nella penna USB porre particolare attenzione al fatto che i nomi possono contenere solo numeri e lettere le quali devono essere tutte minuscole. 95 Viscount UNICO 700 Guida Utente 12.3 OPZIONI DI RIPRODUZIONE (menu PLAY OPTIONS) Selezionando il campo PLAY OPTIONS nella videata di selezione della modalità del sequencer si ha accesso ad alcune opzioni inerenti la riproduzione dei brani: queste riguardano: o TRANSPOSER: imposta una trasposizione in semitoni dei brani riprodotti dal sequencer. o SONG LOOP: se impostato in “YES” al termine di un brano questo viene riprodotto nuovamente. o LIST AUTOPLAY: se impostato in “YES”, durante l’uso di Songlist al termine di un brano viene automaticamente riprodotto il successivo senza la necessità di premere il tasto [FIELD T]. o LIST LOOP: se impostato in “YES”, al termine dell’ultimo brano previsto da una Songlist viene automaticamente riprodotto il primo. 12.4 LE SONGLIST (funzione SONGLIST) Con il termine Songlist si intende la funzionalità dell’organo di creare e riprodurre liste di brani musicali (file MIDI). Per programmare una lista di brani richiamare il menu FILE MANAGEMENT e selezionare la funzione SONGLIST, il sistema chiede se si desidera crearne una nuova o modificarne una già esistente: Selezionando il campo [NEW LIST] si crea una lista nuova, selezionando un file LST si modifica la lista contenuta in quel file. In entrambi i casi la prima operazione da eseguire è quella di selezionare i brani che si desidera siano presenti in lista: 96 Viscount UNICO 700 Guida Utente Utilizzare i tasti [FIELD S] e [FIELD T] per selezionare il file MIDI, [VALUE +] per inserirlo in lista e [VALUE -] per disinserirlo. A fianco del nome del file viene visualizzata l’attuale posizione all’interno della lista. Premere ora [ENTER] per continuare con la programmazione o [EXIT] per annullarla, in questo caso il sistema richiede una conferma a procedere con l’abbandono: La seconda operazione da eseguire è il posizionamento dei brani all’interno della lista (o la conferma della programmazione fatta in precedenza): Qualora si desideri muovere un brano in un’altra posizione posizionare il cursore sul relativo campo del file con i tasti [FIELD S] e [FIELD T], [VALUE +] per avanzare la posizione o [VALUE -] per impostare una posizione precedente. Premere infine [ENTER] per salvare la lista o [EXIT] per tornare alla videata precedente. Come per i file MIDI i primi tre caratteri possono essere solo numeri. Per la composizione del nome utilizzare i pulsanti [FIELD S] e [FIELD T] per muovere il cursore e [VALUE +] e [VALUE -] per selezionare il carattere. Per confermare il nome e procedere con il salvataggio premere il pulsante [ENTER], [EXIT] invece permette di tornare alla videata precedente. NOTA Qualora si desideri rinominare tramite un computer i file memorizzati nella penna USB porre particolare attenzione al fatto che i nomi possono contenere solo numeri e lettere le quali devono essere tutte minuscole. 97 Viscount UNICO 700 Guida Utente 13. APPENDICE 13.1 LOCAL OFF DEI REGISTRI Impostare un registro in Local Off significa fare in modo che questo non suoni tramite la generazione interna dell’organo ma che ne venga comunque trasmesso il relativo messaggio MIDI (codice di Sistema Esclusivo) così da poter essere attivato e suonato su uno strumento collegato. Per impostare il Local Off delle voci è necessario, quando il display visualizza la videata principale, premere il pistoncino [S] (Set) e, mantenendolo premuto, [C] (Cancel). I Led di tutti i registri verranno accesi ed il display visualizzerà la videata: Per posizionare una voce in Local Off agire sul tirante o bascula in modo da spegnerne la luce. Dopo aver impostato la configurazione desiderata premere di nuovo [S] e [C] per memorizzarla. Successivi accessi al settaggio del Local Off visualizzeranno lo stato dei registri secondo la regola: - Luce accesa: registro in Local On (suona con la generazione interna) Luce spenta: registro in Local Off 13.2 FACTORY SETTINGS La procedura di Factory Setting permette di ripristinare le impostazioni di fabbrica di tutte le funzioni interne dello strumento, annullando così le modifiche apportate dall’utente. L’organo Unico permette inoltre di scegliere cosa si desidera reimpostare ai valori di default. Per richiamare la funzione in oggetto selezionare il campo a display RESTORE FACT. SET nella seconda pagina del menu UTILITY & MIDI: E’ possibile inizializzare: o ENTIRE ORGAN: tutte le impostazioni e funzioni dell’organo (menu TUNING, SET-UP e UTILITY & MIDI, i quattro Style User, tutte le combinazioni generali, divisionali, Tutti e Crescendo e stato di Local Off dei registri). 98 Viscount UNICO 700 Guida Utente o SETTING PARAMETERS: impostazioni dei menu TUNING, SET-UP e UTILITY & MIDI. o USER STYLE: i 4 Style User o COMB. MEMORIES: tutte le combinazioni generali e divisionali, il Tutti e il Crescendo. Dopo aver selezionato il Factory Setting desiderato premendo [ENTER] il display visualizza una videata di avviso indicando ciò che si sta reimpostando con i valori di default: Premendo ancora [ENTER] si avvia la procedura durante la quale viene visualizzato il messaggio “PERFORMING”, terminata la quale il messaggio “ACCOMPLISHED”. Premere invece [EXIT] per annullare l’operazione. 13.3 AGGIORNAMENTO DEL SISTEMA OPERATIVO Il sistema operativo degli organi Unico è aggiornabile in maniera semplice e veloce, copiando i file di installazione in una penna USB da inserire nell’apposito connettore posto sotto i manuali e richiamando la funzione OP. SYS. UPGRADE (vedi cap. 10). Per ottenere i file di installazione e tutte le informazioni necessarie per completare con successo l’operazione consultare la sezione “Download” del sito ufficiale degli organi con tecnologia Physis all’indirizzo: http://www.physisorgans.com/download.asp 99 Smaltimento dei rifiuti elettrici ed elettronici (applicabile nell’Unione Europea e negli altri paesi europei con servizio di raccolta differenziata) Ai sensi dell’art. 13 del Decreto legislativo 25 luglio 2005, n. 151 “Attuazione delle Direttive 2002/95/CE, 2002/96/CE e 2003/108/CE” II simbolo presente sul prodotto o sulla sua confezione indica che il prodotto non verrà trattato come rifiuto domestico. Sarà invece consegnato al centro di raccolta autorizzato per il riciclo dei rifi uti elettrici ed elettronici. Assicurandovi che il prodotto venga smaltito in modo adeguato, eviterete un potenziale impatto negativo sull’ambiente e la salute umana, che potrebbe essere causato da una gestione non conforme dello smaltimento del prodotto. Il riciclaggio dei materiali contribuirà alla conservazione delle risorse naturali. Per ricevere ulteriori informazioni più dettagliate Vi invitiamo a contattare l’uffi cio preposto nella Vostra città, il servizio per lo smaltimento dei rifi uti o il negozio in cui avete acquistato il prodotto. Lo smaltimento del prodotto da parte dell’utente comporta l’applicazione delle sanzioni amministrative previste dalla normativa di legge. Questo prodotto è conforme ai requisiti delle direttive EMCD 2004/108/EC e LVD 2006/95/EC. ATTENZIONE Questo prodotto contiene una batteria al litio. Esiste pericolo di esplosione se non viene sostituita correttamente. La batteria deve essere sostituita con una dello stesso tipo o equivalente. La batteria non dovrebbe essere esposta a fonti di calore come luce solare, fuoco o simili. La batteria deve essere sostituita solo da personale qualificato. viscount Viscount International S.p.A. Via Borgo, 68 / 70 – 47836 Mondaino (RN), ITALY Tel: +39-0541-981700 Fax: +39-0541-981052 Website: www.viscount.it - www.physisorgans.com-
 1
1
-
 2
2
-
 3
3
-
 4
4
-
 5
5
-
 6
6
-
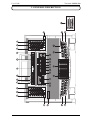 7
7
-
 8
8
-
 9
9
-
 10
10
-
 11
11
-
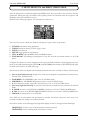 12
12
-
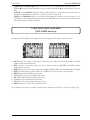 13
13
-
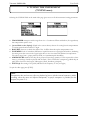 14
14
-
 15
15
-
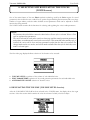 16
16
-
 17
17
-
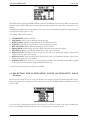 18
18
-
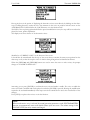 19
19
-
 20
20
-
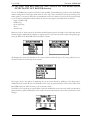 21
21
-
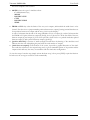 22
22
-
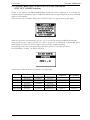 23
23
-
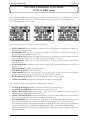 24
24
-
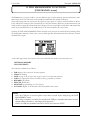 25
25
-
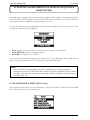 26
26
-
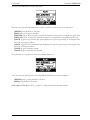 27
27
-
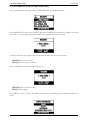 28
28
-
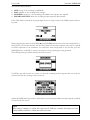 29
29
-
 30
30
-
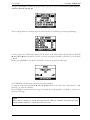 31
31
-
 32
32
-
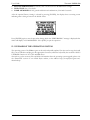 33
33
-
 34
34
-
 35
35
-
 36
36
-
 37
37
-
 38
38
-
 39
39
-
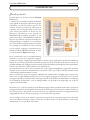 40
40
-
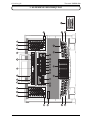 41
41
-
 42
42
-
 43
43
-
 44
44
-
 45
45
-
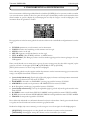 46
46
-
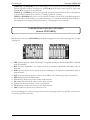 47
47
-
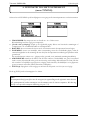 48
48
-
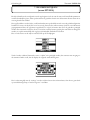 49
49
-
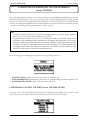 50
50
-
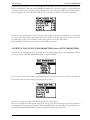 51
51
-
 52
52
-
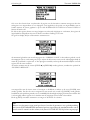 53
53
-
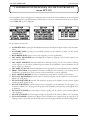 54
54
-
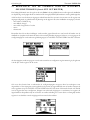 55
55
-
 56
56
-
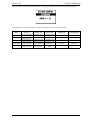 57
57
-
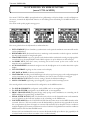 58
58
-
 59
59
-
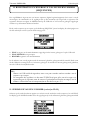 60
60
-
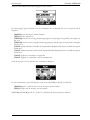 61
61
-
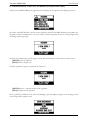 62
62
-
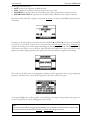 63
63
-
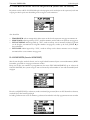 64
64
-
 65
65
-
 66
66
-
 67
67
-
 68
68
-
 69
69
-
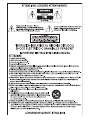 70
70
-
 71
71
-
 72
72
-
 73
73
-
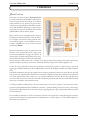 74
74
-
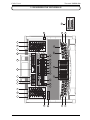 75
75
-
 76
76
-
 77
77
-
 78
78
-
 79
79
-
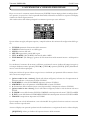 80
80
-
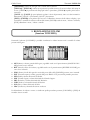 81
81
-
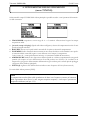 82
82
-
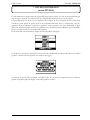 83
83
-
 84
84
-
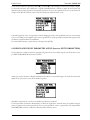 85
85
-
 86
86
-
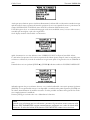 87
87
-
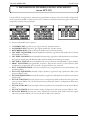 88
88
-
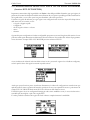 89
89
-
 90
90
-
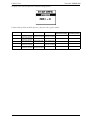 91
91
-
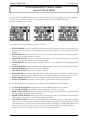 92
92
-
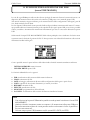 93
93
-
 94
94
-
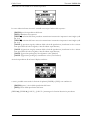 95
95
-
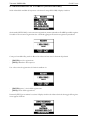 96
96
-
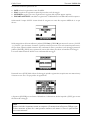 97
97
-
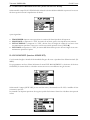 98
98
-
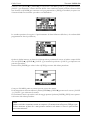 99
99
-
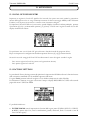 100
100
-
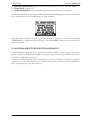 101
101
-
 102
102
-
 103
103
-
 104
104


Viscount Unico 700 Handleiding
- Categorie
- Aanvullende muziekapparatuur
- Type
- Handleiding
in andere talen
- English: Viscount Unico 700 User manual
- italiano: Viscount Unico 700 Manuale utente
Gerelateerde papieren
-
Viscount Unico CLV6 de handleiding
-
Viscount Prestige 80 Quick Manual
-
Viscount Chorum 40, Chorum S40 de handleiding
-
Viscount Cantorum Duo de handleiding
-
-
Viscount Cantorum V de handleiding
-
-
-
-
Andere documenten
-
Medeli FAQ keyboards (NL) de handleiding
-
Yamaha F-400 de handleiding
-
Johannus Positief 35 Handleiding
-
-
-
-
-
-
Johannus Rembrandt 375(PE) Handleiding