
CP-SS30
User manual
Active bookshelf speakers
EN PLESDE RUFR IT NL

Trademarks:
The Bluetooth® word mark and logos are registered trademarks owned
by Bluetooth SIG, Inc.
All product and company names are trademarks™ or registered®
trademarks of their respective holders. Use of them does not imply any
a liation with or endorsement by them.

Trademarks:
The Bluetooth® word mark and logos are registered trademarks owned
by Bluetooth SIG, Inc.
All product and company names are trademarks™ or registered®
trademarks of their respective holders. Use of them does not imply any
a liation with or endorsement by them.
1
23
1
LINE
1
2
5
3
4
6
6
1
2

2
1
2
3
5
6
8
9
7
10
13
12
14
15
11
4
3

EN
Important safety instructions
Please follow all safety instructions and heed all warnings.
Keep this manual for future reference.
This symbol instructs the user to consult the user manual
for further safety, operation, and maintenance related
information.
This symbol indicates presence of uninsulated “dangerous
voltage” within the product and may be of sucient
magnitude as to constitute a risk of electric shock to persons.
Refers to alternating current (AC)
This symbol indicates that the rated voltage marked with the
symbol is AC voltage.
Refers to class II equipment.
This symbol indicates that this product has a double
insulation system and does not require a safety connection to
electrical earth (ground).
Precautions
Damage
• Please inspect the unit for damage after unpacking. If it is damaged in
any way do not operate the unit and consult your dealer.
CAUTION
RISK OF ELECTRIC SHOCK
DO NOT OPEN
To prevent the risk of electric shock, do not remove back cover. No
user serviceable parts inside; please refer servicing to qualied service
personnel.
Power connection and accessibility
• Do not handle the power cord with wet hands as it may cause an
electric shock. If the power plug does not t into your outlet, do not
force the plug into an electrical socket. Switch o the unit completely
before unplugging. Disconnect the power cord if it is not used for a
long time. Ensure that the power plug is always easily accessible. Do not
attach extension cables.
Power source
• Ensure that the unit is plugged into an AC 100-240V 50/60Hz power
outlet. Using higher voltage may cause the unit to malfunction or even
catch re.
Fused moulded power plug (non rewireable) - UK, Malta, Cyprus and
Ireland only.
• The power lead on this equipment is supplied with a moulded plug
incorporating a 3 Amp fuse. The value of the fuse is indicated on the pin
face of the plug and if it requires replacing, a fuse approved to BS1362
of the same rating must be used.
Power cord protection
• Do not damage the power cord, do not place any heavy objects on it, do
not stretch it or bend it. Damage to the power cord can result in re or
electric shock. If the power cord is damaged, it must be replaced by the
manufacturer, a service agent or similarly qualied persons.
Child safety
• Always follow basic safety precautions when using this product,
especially when children are present. Children should be supervised to
ensure that they do not play with the product.
Location
• When in use this product should be placed on a at, stable surface with
no part of the main unit overhanging an edge.
Ventilation
• Slots and openings in the cabinet are provided for ventilation and to
ensure reliable operation of the product protecting it from overheating.
These openings must not be blocked or covered. Ensure a minimum
distance of 5 cm around the product for sucient ventilation. Never
let anyone push anything into holes, slots or any other openings in the
product’s casing as this could result in an electric shock.
Heat and operating temperature
• Do not install near any heat sources such as radiators, heat registers,
stoves, or other apparatus (including ampliers) that produce heat.
Avoid exposure to direct sunlight.
Naked ames
• To prevent the risk of re, keep candles or open ames away from this
product.
Water, moisture, and liquid entry
• To prevent the risk of re or electric shock, do not expose this product
to rain, water or moisture. Do not place objects lled with liquids on or
near this product.
Storms and lightning
• Storms are dangerous for all electric products. If the power is struck by
lightning, the product might get damaged, even if it is turned o. You
should disconnect all the cables and connectors of the product before
a storm.
Maintenance
• Unplug the power cable from the power source before cleaning the
product. Use a soft and clean cloth to clean the outside of the unit.
Never clean it with chemicals or detergent.
Service and repair
• This product does not contain any parts that are serviceable by the
user. Exposing the internal parts inside the device may endanger your
life. In case of a fault, contact the manufacturer or authorised service
department. The manufacturers guarantee does not extend to faults
caused by repairs carried out by unauthorised third parties.
Batteries
Installation
• Do not use any batteries other than those specied. Observe the correct
polarity when inserting the batteries.
Use and maintenance
• Do not expose batteries to high temperatures, e.g. near re or in direct
sunshine. When the product is not to be used for a long time (more than
a month), remove the batteries from the product to prevent them from
leaking. If the batteries leak, wipe away the leakage inside the battery
compartment and replace the batteries with new ones.
Child safety
• Always ensure the battery compartment is closed and secured.
• Batteries are easily swallowed by young children and can cause severe
internal burns and lead to death. Keep batteries away from children.
Seek immediate medical advice if you believe a battery has been
swallowed.
Environmental conditions
• Keep batteries away from low air pressure or high temperatures as this
may result in an explosion or the leakage of a ammable liquid or gas.
Disposal
• Please dispose of batteries correctly by following the guidance in this
manual (see section “Disposal of this equipment and batteries”). Do
CAUTION
RISK OF ELECTRIC SHOCK
DO NOT OPEN
CAUTION
RISK OF ELECTRIC SHOCK
DO NOT OPEN

4
not throw them into re, do not disassemble them and do not try to
recharge non-rechargeable batteries; they could leak or explode.
Disposal of this equipment and batteries
Information for users on collection and disposal of old equipment and
used batteries.
This symbol means that the product contains batteries
covered by European Directive 2013/56/EU which cannot
be disposed of with normal household waste. Cd, Hg and
Pb underneath the wheelie bin symbol shows whether the
battery contains, cadmium (Cd), mercury (Hg) or lead (Pb).
This symbol on a product means that the product is
covered by European Directive 2012/19/EU and must not
be disposed of or dumped with your other household
waste.
This symbol means that the product is designed and
manufactured so that it can be recycled and reused.
These symbols on the products, packaging, and/or accompanying
documents mean that used electrical and electronic products and
batteries should not be mixed with general household waste. Household
users should contact either the retailer where they purchased this product,
or their local government oce, for details of where and how they can
take these items for environmentally safe recycling.
CE and UKCA statement:
• Hereby, Sharp Consumer Electronics Poland sp. z o.o. declares that
this audio device is in compliance with the essential requirements and
other relevant provisions of RED Directive 2014/53/EU and UK Radio
Equipment Regulations 2017.
• The full CE text and UKCA declaration of conformity are available at
sharpconsumer.eu and then entering download section of your model
and choosing “Declaration of Conformity“.

EN
What is included in the box:
• CP-SS30 bookshelf speakers
• Remote control (incl. batteries)
• Speaker connection cable (3m)
• RCA audio cable
• AUX audio cable
• Power cable
• User documentation
Controls
(Refer to 1 on page 1).
1. Removeable speaker grilles
2. LED indicator
• Standby - Red
• Bluetooth - Blue
• Aux in - Green
• RCA - Cyan
• Optical Mode - Yellow
• USB - Purple
3. / Volume/ source/ power control
• Long press to turn on or enter standby mode.
• Short press to change the mode (Bluetooth, Aux-in, RCA, Optical,
USB).
• Rotate to adjust the volume level.
Inputs/outputs
(Refer to 2 on page 1).
1. USB input
2. Optical input
3. RCA line inputs
4. Aux in
5. ~AC power input
6. Audio output for connecting passive left speaker
Remote control
(Refer to 3 on page 2).
1. Press to power on or enter standby.
2. LOUD Loudness compensation increases the low and high frequen-
cies when listening at low volume.
3. Press to mute the sound. Press again to resume sound, or press
+/- to resume sound.
4. In Bluetooth and USB mode, short press for previous track, long
press to rewind.
5. In Bluetooth and USB mode, short press to play/pause.
6. In Bluetooth and USB mode, short press for next track, long press
to fast forward.
7. Short press to enter Bluetooth mode.
Long press to disconnect from paired device.
8. AUX Short press to change audio source to Aux.
9. RCA Short press to change audio source to RCA.
10. OPT Short press to change audio source to Optical.
11. USB Short press to enter USB mode.
12. EQ Short press to conrm current EQ mode.
Continue pressing to cycle through the EQ presets.
13. +/– Press to adjust the volume.
14. BASS +/– Press to adjust the custom EQ bass level.
15. TRE +/– Press to adjust the custom EQ treble level.
Remote control operation
FIRST-TIME USE: The unit has a pre-installed lithium CR2025 battery.
Remove the clear isolating tab to activate the remote control battery.
The supplied remote control allows the unit to be operated from a
distance.
• Even if the remote control is operated within the eective range of
6m, remote control operation may be impossible if there are obstacles
between the unit and the remote control.
• If the remote control is operated near other products which generate
infrared rays, or if other remote control devices using infra-red rays are
used near the unit, it may operate incorrectly. Conversely, the other
products may operate incorrectly.
Remote control battery replacement
12
4
3
12
4
3
The remote control requires a CR2025, 3V Lithium battery.
1. Push the tab on the side of the battery tray towards the centre.
2. Slide the battery tray out of the remote control.
3. Remove the old battery. Place a new CR2025 battery into the tray with
the correct polarity (+/-) as indicated.
4. Slide the tray back into the slot in the remote control until it clicks in
to place.
Initial set-up
Placement of speakers
To enjoy stereo sound, place the "active" speaker unit (the unit with
controls on the front and inputs on the back) on the right hand side. The
other "passive" speaker should be on the left. We recommend the speakers
should be positioned at least 50cm apart. Ensure the speakers are not
obstructed.
Speaker connection
Before powering the unit, connect the left and right speakers using the
speaker connection cable provided. Please observe the polarity when
connecting the speakers: Connect the red cable to the red output, and the
clear cable to the black output on both speakers.
Connect to power
Risk of product damage! Ensure that the power supply voltage
corresponds to the voltage printed on the back or the underside of the
unit.
Connect the power cable to the ~AC power input of the unit and then
insert the plug in to a power socket.

6
Using your bookshelf speakers
Standby/ON
• When you rst connect the unit to the power socket, the unit will be in
STANDBY mode. The indicator will light up red.
• Press on the remote control to switch the speakers between ON and
standby.
• Disconnect the plug from the power wall socket if you want to switch
the unit o completely.
NOTE: The speakers will go into standby mode after 15 minutes of inactivity.
Select modes
Press the volume control on the unit to cycle through the source options,
or use the remote control to select the desired mode.
Red: Standby
Blue: Bluetooth
Green: Aux
Cyan: RCA
Yellow: Optical
Purple: USB
Adjust the volume
ū Use the volume knob on the unit or +/– on the remote control to
adjust the volume.
ū To mute the sound, press on the remote control. To resume the sound,
press or +/– on the remote control, or rotate the volume control
on the unit.
ū While adjusting the volume, the status indicator ashes quickly.
ū When the volume level reaches its maximum level, if you press + again,
the indicator ashes once. When the volume level reaches its minimum
level, if you press – again, the LED indicator ashes once.
Equaliser (EQ) settings
You can adjust the sound of the bookshelf speakers using the equaliser
presets. Press on the remote control once to conrm current EQ mode.
Continue pressing to cycle through the EQ presets.
• Classic - Green LED indicator ashes for 2 seconds
• POP -Yellow LED indicator ashes for 2 seconds
• Rock - Blue LED indicator ashes for 2 seconds
• Movie - Purple LED indicator ashes for 2 seconds
• Voice - Cyan LED indicator ashes for 2 seconds
• Custom - White LED indicator ashes for 2 seconds
Custom settings
• Press the button to enter Custom settings or press either the BASS
or TREB button +/- buttons once, a white light will ash for 2 seconds.
• Use the BASS/TREB buttons on the remote control to increase (+) or
decrease (-) the EQ level. The selected EQ level is indicated by the speed
at which the LED indicator on the speaker ashes. A ashing red LED
indicates an increased level, a white LED (not ashing) indicates the
level is at/0, a ashing green LED indicates a decreased level.
LED colour EQ level Speed LED ashing
RED
+3 Fast
+2 Medium
+1 Slow
White 0 On
Green
-1 Slow
-2 Medium
-3 Fast
NOTE: New EQ changes are saved as default. You have 3 seconds between
each key press to make any changes before the EQ mode exits.
AUX/OPTICAL/RCA
1. Ensure that the unit is connected to the TV or audio device.
2. While the unit is powered on, ensure the correct source is selected
either using the remote control or by pressing the volume control
on the unit.
3. Operate your audio device directly for playback features.
4. Use the volume control on the unit or +/– on the remote control
to adjust the volume level.
NOTE: Please ensure RCA and AUX input are set to mininum
50% volume on the source device. Volume can be adjusted via
the speaker, the remote control or the source device.
Bluetooth mode
Pair Bluetooth-enabled devices
The rst time you connect your Bluetooth device to these speakers, you
need to pair your device to these speakers.
NOTE:
ū The operational range between these speakers and a Bluetooth device
is approximately 8 meters (without any object between the Bluetooth
device and the unit).
ū Before you connect a Bluetooth device to these speakers, ensure you
know the device’s capabilities.
ū Compatibility with all Bluetooth devices is not guaranteed.
ū Any obstacle between these speakers and a Bluetooth device can
reduce the operational range.
ū If the signal strength is weak, your Bluetooth receiver may disconnect,
but it will re-enter pairing mode automatically.
1. With the unit powered on, press on the remote control or press the
volume control on the unit to select Bluetooth mode. The indicator
light will ash blue.
2. Activate your Bluetooth device and select the search mode.
“SHARP CP-SS30” will appear on your Bluetooth device list.
ū If you cannot nd the unit, press and hold on the remote control.
3. Select “SHARP CP-SS30“ from the list of devices. An audio prompt will
sound when it has been successfully connected, and the indicator will
light a solid blue.
4. Begin playing music from the connected Bluetooth device.
To disconnect the Bluetooth function, you can:
ū Switch to another function on the unit.
ū Disable the Bluetooth function on your device. An audio prompt will
sound when it has been successfully disconnected.
ū Press and hold on the remote control.
TIPS:
• Enter “0000“ for the password if necessary.
• If no other Bluetooth device pairs with the speakers in 2 minutes, the
speakers will reconnect to the previous connection.
• The speakers will also be disconnected when your device is moved
beyond the operational range.
• If you want to reconnect your device to this speakers, place it within the
operational range.
• If the device is moved beyond the operational range, when it is brought
back, please check if the device is still connected to the speakers.
• If the connection is lost, follow the instructions above to pair your
device to the speakers again.
Listen to music from Bluetooth device
ū If the connected Bluetooth device supports Advanced Audio
Distribution Prole (A2DP), you can listen to the music stored on the
device through the speakers.

EN
ū If the device also supports Audio Video Remote Control Prole (AVRCP),
you can use the speaker‘s remote control to manage playback of music
stored on the device.
1. Pair your device with the speakers.
2. Play music via your device (if it supports A2DP).
3. Use the supplied remote control to control play (if it supports AVRCP).
ū To pause/resume play, press on the remote control.
ū To skip to a track, press / buttons on the remote control.
ū Long press / to rewind/fast forward within the track.
USB mode
• Press the volume control on the speaker repeatedly or USB on the
remote control to select USB mode. Connect the USB memory device
containing MP3 les (ash drives up to 64GB supported).
• Press to start playback.
• Turn o the unit before removing the USB memory device.
NOTE
SHARP will not be held liable for any loss of data while the USB memory device
is connected to this unit. Always back up your music before playing on this
product.
USB functions (remote control)
ū To play or pause.
ū Skip to next song | Press and hold to fast forward.
ū Skip to beginning of song | Press and hold to quickly rewind.
NOTE:
ūIf the speakers were switched to standby whilst in USB mode, playback will
resume from the same point when the unit is switched back on.
ūUSB playback will be done in order of how audio tracks are saved on the
USB drive.
Troubleshooting
To keep the warranty valid, never try to repair the system yourself. If you
encounter problems when using this unit, review the following before
requesting service.
No power
Ensure that the AC cord is properly connected.
Ensure that there is power at the AC outlet.
Press on the remote control or speaker to turn the unit on.
No sound
Increase the volume. Press + on the remote control or turn the volume
knob on the speaker clockwise.
Press on the remote control to ensure the speakers are not muted.
Short press to select a dierent input source.
When connected to a digital source (Optical), if there is no audio:
ū Try setting the TV output to PCM or
ū Connect directly to your Blu-ray/other source, some TVs do not pass
through digital audio.
Your TV may be set to variable audio output. Conrm that the audio
output setting is set to FIXED or STANDARD, not VARIABLE. Consult your
TV’s user manual for more detailed information.
Ensure that the volume on your source device is turned up and that the
device is not muted.
Remote control does not work
Ensure the battery isolation tab is removed from the back of the remote
control.
Before you press any playback control button, rst select the correct
source.
Reduce the distance between the remote control and the unit.
Insert the battery with its polarities (+/-) aligned as indicated.
Replace the battery.
Aim the remote control directly at the sensor on the front of the right
speaker.
I hear buzzing or humming
Ensure all cables and wires are securely connected.
Connect a dierent source device (TV, record player, etc) to see if the
buzzing persists. If it does not, the problem may be with the original
device.
Connect your device to a dierent input.
If buzzing can be heard whilst using the Aux source, ensure the source
device connected to the Aux input is properly grounded (this can normally
be done by connecting the source device to an earthed mains power
supply).
I can’t nd the Bluetooth name of this unit on my Bluetooth device
Ensure the Bluetooth function is activated on your Bluetooth device.
Re-pair the unit with your Bluetooth device.

8
Wichtige Sicherheitsanweisungen
Bitte befolgen Sie alle Sicherheitshinweise und beachten
Sie alle Warnungen. Bewahren dieses Handbuch zum
Nachschlagen zu einem späteren Zeitpunkt auf.
Dieses Symbol verweist den Benutzer darauf, das
Benutzerhandbuch für zusätzliche Informationen bezüglich
Sicherheit, Betrieb und Wartung zu lesen.
Dieses Symbol kennzeichnet eine nicht isolierte „gefährliche
Spannung“ im Inneren des Produkts. Diese kann so stark sein,
dass für Personen die Gefahr eines Stromschlags besteht.
Bezieht sich auf Wechselstrom (AC)
Dieses Symbol kennzeichnet, dass es sich bei der mit
dem Symbol gekennzeichneten Nennspannung um
Wechselspannung handelt.
Bezieht sich auf ein Gerät der KlasseII.
Dieses Symbol kennzeichnet, dass es sich um ein Produkt mit
doppelter Isolierung handelt, das keine sichere Verbindung
zur elektrischen Masse benötigt (Erdung).
Vorsichtsmaßnahmen
Schäden
• Bitte überprüfen Sie das Gerät nach dem Auspacken auf Schäden. Ist das
Produkt in irgendeiner Weise beschädigt, bedienen Sie das Gerät nicht–
wenden Sie sich an Ihren Händler.
VORSICHT
GEFAHR AUF STROMSCHLAG
NICHT ÖFFNEN
Um das Risiko eines Stromschlags auszuschließen, entfernen Sie nicht
die Abdeckung auf der Rückseite. In diesem Gerät gibt es keine Teile, die
vom Benutzer gewartet werden können. Bitte überlassen Sie die Wartung
qualiziertem Fachpersonal.
Stromanschluss und Zugänglichkeit
• Fassen Sie das Netzkabel nicht mit nassen Händen an. Dies kann
einen elektrischen Schlag verursachen. Wenn der Stecker nicht in die
Steckdose passt, dürfen Sie einen nicht passenden Stecker nicht mit
Gewalt in eine Steckdose zu drücken. Ehe Sie das Gerät ausstecken,
schalten Sie es bitte vollständig aus. Trennen Sie das Stromkabel,
wenn es längere Zeit nicht verwendet wird. Stellen Sie sicher, dass
der Netzstecker immer leicht zugänglich ist. Schließen Sie keine
Verlängerungskabel an.
Spannungsversorgung
• Stellen Sie sicher, dass das Gerät an eine Steckdose mit AC 100-240V
50/60Hz angeschlossen wird. Eine höhere Spannung kann zu
Fehlfunktionen oder sogar zu einem Brand führen.
Spritzgussstecker (nicht neu verdrahtbar)– nur Großbritannien,
Malta, Zypern und Irland.
• Das Stromkabel dieses Geräts ist mit einem Spritzgussstecker mit einer
3-Ampere-Sicherung ausgestattet. Der Sicherungswert wird auf der
Stiftäche des Steckers angegeben. Sollte ein Austausch erforderlich
sein, muss eine nach BS1362 zugelassene Sicherung der gleichen
Nennleistung eingesetzt werden.
Netzkabelschutz
• Das Stromkabel darf nicht beschädigt werden. Stellen Sie keine
schweren Objekte darauf ab und dehnen oder verbiegen sie es nicht.
Schäden am Stromkabel können zu einem Feuer oder Stromschlag
führen. Wenn das Netzkabel beschädigt ist, muss es vom Hersteller,
einem Servicetechniker oder einer ähnlich qualizierten Person
ausgetauscht werden.
Kindersicherheit
• Halten Sie sich während der Nutzung dieses Produkts immer an die
allgemeinen Sicherheitshinweise, insbesondere, wenn Kinder in der
Nähe sind. Kinder sollten beaufsichtigt werden, um sicherzustellen, dass
sie nicht mit dem Produkt spielen.
Ort
• Bei Einsatz sollten Sie dieses Produkt auf eine ebene, stabile Oberäche
stellen und dabei darf kein Teil der Haupteinheit eine Kante überragen.
Belüftung
• Die Schlitze und Önungen im Gehäuse dienen der Belüftung und zur
Gewährleistung eines zuverlässigen Betriebs des Geräts, damit es vor
Überhitzung geschützt wird. Diese Önungen dürfen nicht blockiert
oder abgedeckt werden. Sorgen Sie für einen Mindestabstand von 5cm
rund um das Produkt, um eine ausreichende Belüftung sicherzustellen.
Lassen Sie niemals zu, dass jemand– und dies gilt ganz besonders für
Kinder– etwas in die Löcher, Spalten oder anderen Önungen des
Produktgehäuses stopft, da dies zu einem Stromschlag führen kann.
Wärme und Betriebstemperatur
• Stellen Sie das Produkt nicht in der Nähe von Heizquellen, wie etwa
Heizungen, Heizregister, Öfen oder anderen Apparaten (einschließlich
Verstärker) auf, die Hitze produzieren. Vermeiden Sie direkte
Sonneneinstrahlung.
Oene Flammen
• Halten Sie Kerzen oder oene Flammen von diesem Produkt fern, um
eine Brandgefahr zu vermeiden.
Eindringen von Wasser, Feuchtigkeit und Flüssigkeiten
• Dieses Produkt darf weder Regen, Wasser noch Feuchtigkeit ausgesetzt
werden das Risiko von Feuer oder Stromschlägen zu vermeiden. Stellen
Sie keine mit Flüssigkeit gefüllten Objekte auf oder in die Nähe dieses
Produkts.
Gewitter und Blitze
• Gewitter sind für alle elektrischen Produkte gefährlich. Wenn die
Stromversorgung vom Blitz getroen wird, kann das Gerät, auch wenn
es ausgeschaltet ist, beschädigt werden. Bei einem herannahenden
Gewitter sollten Sie alle Kabel und Stecker des Geräts ausstecken.
Wartung
• Trennen Sie vor dem Reinigen des Produkts das Stromkabel von der
Stromquelle. Verwenden Sie einen weichen und sauberen Lappen, um
die Außenächen des Geräts zu reinigen. Verwenden Sie beim Reinigen
niemals Chemikalien oder Reinigungsmittel.
Service und Reparatur
• Dieses Produkt enthält keine Teile, die vom Benutzer gewartet
werden können. Teile aus dem Inneren des Geräts freizulegen kann
lebensgefährlich sein. Setzen Sie sich im Fall eines Defekts mit dem
Hersteller oder der autorisierten Kundenabteilung in Verbindung.
Die Garantie der Hersteller gilt nicht für Defekte, die durch von nicht
autorisierten Dritten durchgeführte Reparaturen entstehen.
Batterien
Montage
• Verwenden Sie immer nur die angegebenen Batterien. Achten Sie beim
Einlegen der Batterien auf die richtige Polarität.
CAUTION
RISK OF ELECTRIC SHOCK
DO NOT OPEN
CAUTION
RISK OF ELECTRIC SHOCK
DO NOT OPEN

DE
Nutzung und Wartung
• Setzen Sie Batterien keinen hohen Temperaturen aus, z.B. in der Nähe
von Feuer oder direkte Sonneneinstrahlung. Wenn das Produkt für
längere Zeit nicht verwendet wird (länger als einen Monat), sollten
Sie die Batterien aus dem Produkt nehmen, um ein Auslaufen zu
verhindern. Wenn die Batterien auslaufen, wischen Sie die ausgelaufene
Flüssigkeit im Batteriefach weg und ersetzen die Batterien durch neue.
Kindersicherheit
• Vergewissern Sie sich immer, dass das Batteriefach geschlossen und
gesichert ist.
• Batterien können von kleinen Kindern leicht verschluckt werden und
dabei schwere innere Verbrennungen verursachen und sogar zum
Tod führen. Halten Sie Batterien von Kindern fern. Suchen Sie sofort
einen Arzt auf, wenn Sie der Meinung sind, dass jemand eine Batterie
verschluckt hat.
Umweltbedingungen
• Batterien dürfen keinem niedrigen Luftdruck und keinen hohen
Temperaturen ausgesetzt werden. Dies kann zu einer Explosion oder
dem Austreten einer brennbaren Flüssigkeit oder eines entammbaren
Gases führen.
Entsorgung
• Entsorgen Sie die Batterien bitte ordnungsgemäß und befolgen Sie
dabei die Anweisungen in diesem Handbuch (lesen Sie dazu den
Abschnitt „Entsorgung dieses Geräts und von Batterien“). Werfen Sie
Batterien nicht ins Feuer, bauen Sie sie nicht auseinander und versuchen
Sie nicht, nicht wiederauadbare Batterien aufzuladen; sie könnten
undicht werden oder explodieren.
Entsorgung dieses Geräts und von
Batterien
Informationen für Benutzer hinsichtlich der Sammlung und Entsorgung
von Altgeräten und gebrauchten Batterien.
Dieses Symbol bedeutet, dass Batterien in dem
Produkt enthalten sind, die unter die Europäische
Richtlinie2013/56/EU fallen, und diese Batterien können
nicht im normalen Hausmüll entsorgt werden. Cd, Hg und
Pb unter der dem Symbol der Mülltonne auf Rollen zeigt
an, ob die Batterie Cadmium (Cd), Quecksilber (Hg) oder
Blei (Pb) enthält.
Dieses Symbol auf einem Produkt bedeutet, dass das
Produkt unter die Europäische Richtlinie2012/19/EU fällt
und nicht zusammen mit dem übrigen Hausmüll entsorgt
oder deponiert werden darf.
Dieses Symbol bedeutet, dass die Herstellung des
Produkts so konzipiert ist, dass es recycelt und
wiederverwendet werden kann.
Diese Symbole auf den Produkten, Verpackungen und/oder
Begleitdokumenten bedeuten, dass gebrauchte elektrische und
elektronische Produkte und Batterien nicht mit dem allgemeinen
Hausmüll vermischt werden dürfen. Haushaltskunden sollten
sich bezüglich Informationen, wie sie diese Gegenstände einem
umweltverträglichen Recycling zuführen können, entweder an den
Händler wenden, bei dem sie dieses Produkt gekauft haben, oder an ein
lokales Regierungsamt.
Informationen gültig für Deutschland
• Altgeräte sind getrennt zu sammeln und zu entsorgen. Besitzer von
Altgeräten tragen damit zur sicheren Entsorgung bei und helfen,
mögliche umwelt- oder gesundheitsschädlichen Folgen zu vermeiden.
• Entnehmbare Altbatterien und Altakkumulatoren, die zerstörungsfrei
zu entnehmen sind, sind vor der Entsorgung zu entfernen und getrennt
zu behandeln.
• Informationen über geschaene Sammel- bzw. Rückgabemöglichkeiten
sowie die Verpichtungen des Handels/der Vertreiber gegenüber
Endnutzern zur kostenfreien Rücknahme von Altgeräten nden
Sie auf der lokalen Website des Herstellers des Produktes (www.
sharpconsumer.eu), oder wenden Sie sich an den Händler, von dem das
Produkt bezogen wurde.
• Achtung: Die Verantwortung für das Löschen von personenbezogenen
Daten, die sich auf dem zu entsorgenden Gerät benden, liegt beim
Endnutzer!
• Das Symbol mit der durchgestrichenen Mülltonne weist darauf hin, dass
Produkte, deren Batterien/Akkumulatoren und/oder Verpackungen
getrennt vom Hausmüll gesammelt und entsorgt werden müssen. Der
schwarze Balken zeigt an, dass das Produkt nach dem 13. August 2005
auf den Markt gebracht wurde.
CE- und UKCA-Erklärung:
• Sharp Consumer Electronics Poland Sp. z o.o. erklärt hiermit, dass
dieses Audiogerät den wesentlichen Anforderungen und weiteren
entsprechenden Vorschriften der RED-Verordnung 2014/53/EU und der
britischen Funkgeräteverordnung von 2017 entspricht.
• Der vollständige Text der UKCA-Konformitätserklärung ist unter
folgendem Link verfügbar: www.sharpconsumer.com, und anschließend
önen Sie den Download-Abschnitt Ihres Modells und wählen
„Konformitätserklärung“.

10
Was bendet sich im Karton:
• CP-SS30-Regalboxen
• Fernbedienung (inkl. Batterien)
• Lautsprecher-Anschlusskabel (3m)
• RCA-Audiokabel
• AUX-Audiokabel
• Stromkabel
• Benutzerdokumentation
Steuerelemente
(Beziehen Sie sich auf 1 auf Seite1).
1. Abnehmbare Lautsprechergitter
2. LED-Anzeige
• Stand-by– Rot
• Bluetooth– Blau
• Aux in– Grün
• Cinch– Cyan
• Optischer Modus– Gelb
• USB– Lila
3. / Lautstärke / Quelle / Leistungssteuerung
• Lange drücken zum Einschalten oder zum Schalten in den Stand-by-
Modus.
• Kurz drücken zum Ändern des Modus (Bluetooth, Aux-in, Cinch,
Optisch, USB).
• Lautstärke durch Drehen regeln.
Eingänge / Ausgänge
(Beziehen Sie sich auf 2 auf Seite1).
1. USB-Eingang
2. Optischer Eingang
3. Cinch-Line-Eingänge
4. Aux in
5. ~AC Eingangsleistung
6. Audioausgang zum Anschluss des passiven linken Lautsprechers
Fernbedienung
(Beziehen Sie sich auf 3 auf Seite2).
1. Drücken zum Einschalten oder zum Schalten in den Stand-by-
Modus.
2. LAUT Der Lautstärkeausgleich hebt beim Hören mit geringer Laut-
stärke die tiefen und hohen Frequenzen an.
3. Drücken, um den Ton stumm zu schalten. Erneut drücken, um den
Ton erneut einzuschalten, oder drücken Sie dazu +/-.
4. Im Bluetooth- und USB-Modus kann der vorherige Titel durch
kurzes Drücken aufgerufen werden, durch langes Drücken können
Sie zurückspulen.
5. Im Bluetooth- und USB-Modus drücken Sie kurz, um die Wiederga-
be/Pause zu starten.
6. Im Bluetooth- und USB-Modus kann der nächste Titel durch
kurzes Drücken aufgerufen werden, durch langes Drücken können
Sie vorspulen.
7. Kurz drücken, um den Bluetooth-Modus aufzurufen.
Lange drücken, um die Verbindung zum gekoppelten Gerät zu
trennen.
8. AUX Kurz drücken, um die Audioquelle auf Aux umzuschalten.
9. RCA Drücken, um die Audioquelle auf Cinch (RCA) umzuschalten.
10. OPT Kurz drücken, um die Audioquelle auf Optisch umzuschalten.
11. USB Kurz drücken, um den USB-Modus aufzurufen.
12. EQ Kurz drücken, um den aktuellen EQ-Modus zu bestätigen.
Drücken Sie weiter, um durch die EQ-Voreinstellungen zu schalten.
13. +/– Drücken, um Lautstärke einstellen.
14. BASS +/– Drücken, um den benutzerdenierten EQ-Basspegel
einzustellen.
15. TRE +/– Drücken, um den benutzerdenierten EQ-Höhenpegel
einzustellen.
Fernsteuerungsbetrieb
ERSTMALIGE VERWENDUNG: Die Einheit verfügt über eine vor-
installierte CR2025 Lithiumbatterie. Entfernen Sie die durchsichtige
Isolierabdeckung, um die Batterie der Fernbedienung zu aktivieren.
Dank der mitgelieferten Fernbedienung kann das Gerät aus der Ferne
bedient werden.
• Selbst wenn die Fernbedienung innerhalb des eektiven Bereichs von
6 m bedient wird, kann ihr Betrieb unmöglich sein, wenn sich zwischen
der Einheit und der Fernbedienung Hindernisse benden.
• Wenn die Fernbedienung in der Nähe von anderen Produkten, die
Infrarotstrahlen generieren, betrieben wird, oder wenn andere Fernsteu-
erungsgeräte, die Infrarotstrahlen verwenden, in der Nähe der Einheit
verwendet werden, arbeitet diese womöglich nicht ordnungsgemäß.
Umgekehrt arbeiten auch die anderen Geräte womöglich fehlerhaft.
Batterie der Fernbedienung austauschen
12
4
3
12
4
3
Die Fernbedienung benötigt eine CR2025, 3V Lithiumbatterie.
1. Drücken Sie den Verschluss an der Seite des Batteriefachs in Richtung
Mitte.
2. Schieben Sie das Batteriefach aus der Fernbedienung.
3. Entfernen Sie die alte Batterie. Setzen Sie eine neue CR2025 Batterie
mit der entsprechend den Angaben korrekten Polarität (+/-) in das
Fach.
4. Schieben Sie das Fach wieder in die Fernbedienung, bis sie mit einem
Klickgeräusch einrastet.
Ersteinrichtung
Aufstellung der Lautsprecher
Um Stereoton zu genießen, stellen Sie die „aktive“ Lautsprechereinheit
(das ist die Einheit, bei der sich die Bedienelemente auf der Vorderseite
und die Eingänge auf der Rückseite benden) auf die rechte Seite. Der
andere „passive“ Lautsprecher sollte auf der linken Seite stehen. Wir emp-
fehlen, dass die Lautsprecher mit einem Abstand von mindestens 50cm
voneinander aufgestellt werden. Stellen Sie sicher, dass die Lautsprecher
nicht blockiert werden.

DE
Lautsprecheranschluss
Vor dem Einschalten des Geräts schließen Sie den linken und den rechten
Lautsprecher mit dem mitgelieferten Lautsprecheranschlusskabel an. Bitte
achten Sie beim Anschluss der Lautsprecher auf die Polarität: Schließen Sie
das rote Kabel an den roten Ausgang und das durchsichtige Kabel an den
schwarzen Ausgang der beiden Lautsprecher an.
An eine Stromquelle anschließen
Risiko von Geräteschäden! Stellen Sie sicher, dass die Stromversorgungs-
spannung der auf der Rückseite oder Unterseite der Einheit angegebenen
Spannung entspricht.
Schließen Sie das Stromkabel an den Netzeingang ~AC der Einheit und
anschließend an eine Netzsteckdose an.
Verwendung Ihrer Regalboxen
Stand-by/EIN
• Wenn Sie das Gerät das erste Mal an eine Netzsteckdose anschließen,
bendet es sich im STAND-BY-Modus. Die Anzeige leuchtet rot auf.
• Drücken Sie auf der Fernbedienung, um die Lautsprecher ein- oder in
den Stand-by zu schalten.
• Ziehen Sie den Stecker aus der Wandsteckdose, wenn Sie die Einheit
vollständig abschalten möchten.
HINWEIS: Die Lautsprecher schalten nach 15Minu-
ten Inaktivität in den Stand-by-Modus.
Modi wählen
Drücken Sie die Lautstärkeregelung am Gerät, um durch die Quellenop-
tionen zu schalten, oder wählen Sie den gewünschten Modus mit der
Fernbedienung.
Rot: Stand-by
Blau: Bluetooth
Grün: Aux
Cyan: RCA
Gelb: Optisch
Violett: USB
Lautstärkeregelung
ū Verwenden Sie den Lautstärkeregler am Gerät oder +/– auf der
Fernbedienung, um die Lautstärke einzustellen.
ū Um den Ton stumm zu schalten, drücken Sie auf der Fernbedienung.
Um den Ton wieder einzuschalten, drücken Sie oder +/– auf der
Fernbedienung oder drehen Sie den Lautstärkeregler am Gerät.
ū Während des Einstellens der Lautstärke blinkt die Statusanzeige.
ū Wenn die Lautstärke beim erneuten Drücken von + ihre maximale
Stufe erreicht, blinkt die Anzeige einmal auf. Wenn die Lautstärke beim
erneuten Drücken von – ihre minimale Stufe erreicht, blinkt die LED-
Anzeige einmal auf.
Equalizer-Einstellungen (EQ)
Sie können den Ton der Regalboxen mit den Equalizer-Voreinstellungen
anpassen. Drücken Sie auf der Fernbedienung einmal, um den
aktuellen EQ-Modus zu bestätigen. Drücken Sie weiter, um durch die EQ-
Voreinstellungen zu schalten.
• Classic– Grüne LED-Anzeige blinkt 2Sekunden lang
• POP– Gelbe LED-Anzeige blinkt 2Sekunden lang
• Rock– Blaue LED-Anzeige blinkt 2Sekunden lang
• Film– Lila LED-Anzeige blinkt 2Sekunden lang
• Sprache– Cyanfarbene LED-Anzeige blinkt 2Sekunden lang
• Benutzerdeniert– Weiße LED-Anzeige blinkt 2Sekunden lang
Benutzerdenierte Einstellungen
• Drücken Sie die Taste , um die benutzerdenierten Einstellungen
aufzurufen, oder drücken Sie die Tasten BASS oder TREB +/- einmal, ein
weißes Licht blinkt 2 Sekunden lang.
• Verwenden Sie die Tasten BASS/TREB auf der Fernbedienung, um den
EQ-Pegel zu erhöhen (+) oder zu verringern (-). Der gewählte EQ-Pegel
wird durch die Geschwindigkeit angezeigt, mit der die LED-Anzeige am
Lautsprecher blinkt. Eine blinkende rote LED zeigt einen erhöhten Pegel
an, eine weiße LED (nicht blinkend) zeigt an, dass der Pegel gleich/0 ist,
eine blinkende grüne LED zeigt einen verringerten Pegel an.
LED-Farbe EQ-Pegel Geschwindigkeits-LED
blinkt
ROT
+3 Schnell
+2 Mittel
+1 Langsam
Weiß 0 An
Grün
-1 Langsam
-2 Mittel
-3 Schnell
HINWEIS: Neue EQ-Änderungen werden als Standard gespeichert.
Sie haben zwischen jedem Tastendruck 3 Sekunden Zeit, um Än-
derungen vorzunehmen, bevor der EQ-Modus beendet wird.
AUX/OPTISCH/CINCH
1. Stellen Sie sicher, dass die Einheit an den Fernseher oder das Audio-
gerät angeschlossen ist.
2. Achten Sie bei eingeschaltetem Gerät darauf, dass die richtige Quelle
ausgewählt ist. Dies ist entweder über die Fernbedienung oder durch
Drücken des Lautstärkereglers am Gerät möglich.
3. Sie können Ihr Audiogerät direkt für Wiedergabefunktionen nutzen.
4. Verwenden Sie den Lautstärkeregler am Gerät oder +/– auf der
Fernbedienung, um die Lautstärke anzupassen.
HINWEIS: Vergewissern Sie sich bitte, dass die Cinch- und AUX-
Eingänge am Quellgerät auf eine Mindestlautstärke von 50% einge-
stellt sind. Die Lautstärke kann sowohl über den Lautsprecher als auch
über die Fernbedienung oder das Quellgerät eingestellt werden.
Bluetooth-Modus
Bluetooth-fähige Geräte koppeln
Wenn Sie Ihr Bluetooth-Gerät das erste Mal mit diesen Lautsprechern
verbinden, müssen Sie Ihr Gerät mit diesen Lautsprechern koppeln.
HINWEIS:
ū Der Betriebsbereich zwischen diesen Lautsprechern und einem
Bluetooth-Gerät beträgt ungefähr 8 Meter (ohne ein Objekt zwischen
dem Bluetooth-Gerät und der Einheit).
ū Bevor Sie ein Bluetooth-Gerät mit diesen Lautsprechern verbinden,
müssen Sie die Eigenschaften des Geräts kennen.
ū Eine Kompatibilität mit allen Bluetooth-Geräten kann nicht garantiert
werden.
ū Jedes Hindernis zwischen diesen Lautsprechern und einem Bluetooth-
Gerät kann den Betriebsbereich reduzieren.
ū Wenn die Signalstärke schwach ist, könnte Ihr Bluetooth-Empfänger
möglicherweise nicht verbunden sein, dieser geht jedoch automatisch
wieder in den Kopplungsmodus.
1. Während das Gerät eingeschaltet ist, drücken Sie auf der Fernbe-
dienung oder drücken Sie den Lautstärkeregler am Gerät, um den
Bluetooth-Modus auszuwählen. Die Anzeigeleuchte blinkt blau.
2. Aktivieren Sie Ihr Bluetooth-Gerät und wählen Sie den Suchmodus.
„SHARP CP-SS30“ erscheint in der Bluetooth-Geräteliste.

12
ū Wenn Sie das Gerät nicht nden können, halten Sie zum Suchen
auf der Fernbedienung gedrückt.
3. Wählen Sie aus der Geräteliste „SHARP CP-SS30“ aus. Wenn die Ver-
bindung erfolgreich hergestellt wurde, ertönt ein Tonsignal und die
Anzeige leuchtet dauerhaft blau.
4. Beginnen Sie mit dem Abspielen von Musik vom verbundenen
Bluetooth-Gerät.
Um die Bluetooth-Funktion zu deaktivieren, können
Sie Folgendes tun:
ū Wechseln Sie zu einer anderen Funktion auf der Einheit.
ū Deaktivieren Sie die Bluetooth-Funktion auf Ihrem Gerät. Es ertönt ein
Audiosignal, wenn die Verbindung erfolgreich getrennt wurde.
ū Halten Sie auf der Fernbedienung gedrückt.
TIPPS:
• Geben Sie, wenn nötig „0000“ als Passwort ein.
• Wenn innerhalb von zwei Minuten kein anderes Bluetooth-Gerät mit
den Lautsprechern gekoppelt wird, kehren die Lautsprecher zur vorheri-
gen Verbindung zurück.
• Die Lautsprecher werden auch getrennt, wenn Ihr Gerät den Betriebs-
bereich verlässt.
• Wenn Sie Ihr Gerät wieder mit diesen Lautsprechern verbinden möch-
ten, platzieren Sie es innerhalb des Betriebsbereichs.
• Wenn das Gerät den Betriebsbereich verlässt und dann zurückge-
bracht wird, prüfen Sie bitte, ob das Gerät noch mit den Lautsprechern
verbunden ist.
• Wenn die Verbindung verloren ist, folgen Sie bitte den oben angege-
benen Instruktionen, um Ihr Gerät wieder mit den Lautsprechern zu
koppeln.
Musik vom Bluetooth-Gerät hören
ū Wenn das verbundene Bluetooth-Gerät Advanced Audio Distribution
Prole (A2DP) unterstützt, können Sie über die Lautsprecher die auf
dem Gerät gespeicherte Musik hören.
ū Wenn das Gerät auch Audio Video Remote Control Prole (AVRCP)
unterstützt, können Sie die Fernbedienung der Lautsprecher nutzen, um
die auf dem Gerät gespeicherte Musik zu verwalten.
1. Koppeln Sie Ihr Gerät mit den Lautsprechern.
2. Spielen Sie über Ihr Gerät Musik ab (wenn es A2DP unterstützt).
3. Verwenden Sie zum Abspielen die mitgelieferte Fernbedienung
(wenn diese AVRCP unterstützt).
ū Drücken Sie zum Pausieren/weiter Abspielen auf der Fernbe-
dienung.
ū Um einen Track zu überspringen, drücken Sie die Tasten / auf
der Fernbedienung.
ū Drücken Sie lange auf / , um im Lied zurückzuspulen/vorzu-
spulen.
USB-Modus
• Drücken Sie wiederholt den Lautstärkeregler am Lautsprecher oder USB
auf der Fernbedienung, um den USB+-Modus auszuwählen. Schließen
Sie den USB-Stick mit den MP3-Dateien an (unterstützt werden Laufwer-
ke mit bis zu 64 GB).
• Drücken Sie , um die Wiedergabe zu starten.
• Schalten Sie den Lautsprecher aus, bevor Sie den USB-Stick entfernen.
HINWEIS
SHARP haftet nicht für Datenverlust, wenn das USB-Speichergerät an dieses
Gerät angeschlossen ist. Sie sollten Ihre Musikdateien immer erst sichern,
bevor Sie sie auf diesem Gerät abspielen.
ū Zum Abspielen oder Pausieren.
ū Zum nächsten Lied springen | Zum Vorspulen drücken und halten.
ū Zum Anfang des Lieds springen | Zum schnellen Zurückspulen
drücken und halten.
HINWEIS:
ūWenn Sie die Lautsprecher im USB-Modus in den Stand-by-Modus geschal-
tet haben, wird die Wiedergabe beim erneuten Einschalten des Geräts an
der gleichen Stelle fortgesetzt.
ūDie USB-Wiedergabe erfolgt in der Reihenfolge, in welcher die Audiotitel auf
dem USB-Laufwerk gespeichert sind.
Problembehandlung
Damit die Garantie ihre Gültigkeit behält, dürfen Sie nie versuchen, das
System selbst zu reparieren. Wenn Sie Probleme bei der Verwendung der
Einheit haben, beschäftigen Sie sich zuerst mit Folgendem, bevor Sie Hilfe
anfordern.
Kein Strom
Stellen Sie sicher, dass das Wechselstromkabel ordnungsgemäß ange-
schlossen ist.
Stellen Sie sicher, dass die Steckdose ordnungsgemäß funktioniert.
Drücken Sie auf der Fernbedienung oder dem Lautsprecher, um das
Gerät einzuschalten.
Kein Ton
Erhöhen Sie die Lautstärke. Drücken Sie + auf der Fernbedienung oder
drehen Sie den Lautstärkeregler am Lautsprecher im Uhrzeigersinn.
Drücken Sie auf der Fernsteuerung, um sicherzustellen, dass die Laut-
sprecher nicht auf stumm geschaltet sind.
Drücken Sie kurz auf , um eine andere Eingangsquelle auszuwählen.
Bei der Verbindung mit einer digitalen Quelle (Optisch) gibt es keinen Ton:
ū Versuchen Sie, den Ausgang des Fernsehers auf PCM zu setzen, oder
ū Verbinden Sie ihn direkt mit Ihrem Blu-Ray-Player/einer anderen Quelle.
Einige Fernseher geben digitales Audio nicht weiter.
Ihr Fernseher ist womöglich für einen variablen Audio-Ausgang einge-
stellt. Bestätigen Sie, dass die Einstellung des Audio-Ausgangs auf FIXED
oder STANDARD gesetzt ist, nicht auf VARIABLE. Ziehen Sie für weitere
Informationen das Handbuch Ihres Fernsehers zu Rate.
Vergewissern Sie sich, dass die Lautstärke Ihres Quellengeräts aufgedreht
und das Gerät nicht stummgeschaltet ist.
Fernbedienung funktioniert nicht
Vergewissern Sie sich, dass die Isolierlasche der Batterie auf der Rückseite
der Fernbedienung entfernt wurde.
Bevor Sie eine Wiedergabetaste drücken, müssen Sie zuerst die richtige
Quelle auswählen.
Reduzieren Sie den Abstand zwischen der Fernbedienung und der Einheit.
Setzen Sie die Batterie entsprechend der angezeigten Polarität (+/-) ein.
Ersetzen Sie die Batterie.
Zielen Sie mit der Fernbedienung direkt auf den Sensor vorne am rechten
Lautsprecher.
Ich höre ein Summen oder Brummen
Stellen Sie sicher, dass alle Kabel und Drähte fest angeschlossen sind.
Schließen Sie ein anderes Quellengerät an (Fernseher, Schallplattenspie-
lerusw.), um zu prüfen, ob das Summen auch in diesem Fall auftritt. Wenn
dies nicht der Fall ist, liegt das Problem womöglich am ursprünglichen
Gerät.
Schließen Sie Ihr Gerät an einen anderen Eingang an.
Wenn der Brummton während der Nutzung der Aux-Quelle zu hören ist,
sollten Sie sicherstellen, dass das Quellgerät, das an den Aux-Eingang an-
geschlossen ist, ordnungsgemäß geerdet ist (normalerweise erfolgt dies,
indem das Quellgerät an ein geerdetes Stromnetz angeschlossen wird).
Ich kann den Bluetooth-Namen dieser Einheit nicht auf meinem
Bluetooth-Gerät nden
Vergewissern Sie sich, dass die Bluetooth-Funktion auf Ihrem Bluetooth-
Gerät aktiviert ist.
Koppeln Sie die Einheit wieder an Ihr Bluetooth-Gerät.

ES
Instrucciones de seguridad importantes
Siga todas las instrucciones de seguridad y preste atención
a todas las advertencias. Conserve el manual para futuras
consultas.
Este símbolo indica al usuario que consulte el manual de
instrucciones para cuestiones relacionadas con la seguridad,
el uso y la información de mantenimiento.
Este símbolo indica la presencia de "tensión peligrosa" no
aislada dentro del producto, que puede constituir un riesgo
de descarga eléctrica para las personas.
Hace referencia a corriente alterna (CA)
El símbolo indica que la tensión nominal marcada con el
símbolo es tensión de CA.
Se reere a equipos de claseII.
Este símbolo indica que el producto incorpora un sistema
de aislamiento doble y no requiere una conexión segura a
masa (tierra).
Precauciones
Daños
• Inspeccione la unidad tras desembalarla para buscar posibles daños.
Si el producto presenta algún daño, no lo utilice y consulte a su
distribuidor.
ADVERTENCIA
RIESGO DE DESCARGA ELÉCTRICA
NO ABRIR
Para evitar el riesgo de descarga eléctrica, no retire la tapa posterior. El
producto no incluye piezas reparables por el usuario. Diríjase a personal
cualicado para realizar reparaciones.
Conexión eléctrica y accesibilidad
• No toque el cable de alimentación con las manos mojadas, ya que
podrían producirse descargas eléctricas. Si el enchufe no encaja en
la toma, no lo fuerce. Apague completamente la unidad antes de
desenchufarla. Desconecte el cable de alimentación si la unidad no se
va a utilizar durante un periodo prolongado de tiempo. Asegúrese de
que el enchufe de alimentación resulta fácilmente accesible. No utilice
alargadores.
Fuente de alimentación
• Asegúrese de que la unidad está conectada a una toma de corriente
de CA de 100-240V y 50/60Hz. El uso de una tensión superior puede
causar el mal funcionamiento de la unidad o incluso presentar un riesgo
de incendio.
Enchufe moldeado con fusible (no reemplazable) - Solo Reino Unido,
Malta, Chipre e Irlanda.
• El cable de alimentación de este equipo se suministra con un enchufe
moldeado que incorpora un fusible de 3amp. El valor de este fusible
se indica en la parte de las clavijas del enchufe y, si fuera necesario
sustituirlo, se debe utilizar un fusible del mismo valor nominal
homologado conforme al estándar BS1362.
Protección del cable de alimentación
• No dañe el cable de alimentación, no coloque objetos pesados encima,
no lo estire ni lo doble. Los daños en el cable de alimentación pueden
ocasionar incendios o descargas eléctricas. Si el cable de alimentación
presenta algún daño, deberá ser sustituido por el fabricante, un servicio
técnico o personas con una cualicación similar.
Seguridad infantil
• Respete siempre las precauciones básicas de seguridad cuando utilice
este producto, especialmente si hay niños presentes. Los niños deben
ser supervisados para asegurarse de que no juegan con el producto.
Ubicación
• Cuando se use, este producto debe disponerse sobre una supercie
plana y estable sin que ninguna de sus partes sobresalga de los bordes.
Ventilación
• Los oricios y las aperturas de la carcasa del producto se proporcionan
para nes de ventilación con la intención de garantizar un uso able
y protegerlo contra el sobrecalentamiento. Estas aberturas no deben
bloquearse ni cubrirse. Asegúrese de dejar una distancia mínima de
5cm en torno al producto para garantizar una ventilación adecuada. No
permita que se introduzcan elementos en los oricios o ranuras, ni en
ninguna abertura de la carcasa del producto, ya que podrían dar lugar
adescargas eléctricas.
Calor y temperatura de funcionamiento
• No instale el aparato cerca de una fuente de calor, como radiadores,
salidas de aire caliente, estufas u otros aparatos (incluidos
amplicadores) que produzcan calor. Evite la exposición directa al sol.
Llamas descubiertas
• Para evitar el riesgo de incendio, mantenga las velas y llamas
descubiertas lejos del producto.
Entrada de agua, humedad y líquidos
• Para evitar el riesgo de incendio o descarga eléctrica, no exponga este
producto a lluvia, agua ni humedad. No coloque objetos que contengan
líquidos sobre el producto o en sus proximidades.
Tormentas y rayos
• Las tormentas son peligrosas para todos los productos eléctricos. Si los
cables de alimentación son alcanzados por un rayo, el producto puede
resultar dañado, incluso si no está encendido. Deben desconectarse
todos los cables y conectores del aparato antes de una tormenta.
Mantenimiento
• Desenchufe el cable de alimentación de la toma de corriente antes
de limpiar el producto. Utilice un paño suave y limpio para limpiar la
parte exterior de la unidad. No utilice nunca productos químicos ni
detergentes.
Servicio y reparación
• Este producto no contiene ninguna pieza que pueda ser reparada por el
usuario. La exposición de ciertas partes internas del dispositivo puede
poner en peligro su vida. En caso de avería, póngase en contacto con
el fabricante o el servicio técnico autorizado. La garantía del fabricante
no cubre las averías resultantes de reparaciones llevadas a cabo por
terceros.
Pilas
Instalación
• No utilice pilas diferentes a las especicadas. Tenga en cuenta la
polaridad correcta al insertar las pilas.
Uso y mantenimiento
• No exponga las pilas a altas temperaturas, por ejemplo, no las sitúe
cerca de una fuente de fuego o directamente bajo la luz del sol Si el
producto no se va a utilizar durante un largo periodo de tiempo (más
de un mes), retire las pilas para evitar fugas. Si las pilas presentan fugas,
limpie la parte interior del compartimento de las pilas y sustitúyalas por
pilas nuevas.
CAUTION
RISK OF ELECTRIC SHOCK
DO NOT OPEN
CAUTION
RISK OF ELECTRIC SHOCK
DO NOT OPEN

14
Seguridad infantil
• Asegúrese siempre de que el compartimento de las pilas está bien
cerrado.
• Los niños pueden tragarse con facilidad las pilas, que pueden causar
graves quemaduras internas y ocasionar la muerte. Mantenga las pilas
lejos del alcance de los niños. Consulte inmediatamente a un médico si
sospecha de ingestión de una pila.
Condiciones ambientales
• Mantenga alejadas las pilas de condiciones de baja presión de aire
oaltas temperaturas, ya que pueden provocar una explosión o a una
fuga de gas o líquido inamable.
Eliminación
• Elimine de forma correcta las pilas siguiendo la guía incluida en este
manual (consulte la sección "Eliminación de este equipo y de las pilas").
No las arroje al fuego, no las desmonte y no intente recargar pilas no
recargables; podrían producirse ltraciones o explotar.
Eliminación de este equipo y de las pilas
Información dirigida a los usuarios relativa a la recogida y eliminación de
equipos antiguos y pilas usadas.
Este símbolo indica que el producto contiene pilas
previstas en la Directiva Europea 2013/56/UE que no
deben eliminarse con la basura doméstica normal. Los
signos Cd, Hg y Pb que aparecen debajo del símbolo de la
papelera con ruedas indican que la pila contiene cadmio
(Cd), mercurio (Hg) o plomo (Pb).
Este símbolo indica que el producto está previsto en la
Directiva Europea 2012/19/UE y que no debe eliminarse
con la basura doméstica normal.
Este símbolo indica que el producto se ha diseñado
yfabricado para poder reciclarse y reutilizarse.
Estos símbolos incluidos en los productos, los embalajes o los documentos
acompañantes indican que los productos eléctricos y electrónicos, y las
pilas no deben mezclarse con la basura doméstica general. Los usuarios
deben ponerse en contacto con el establecimiento comercial en el que
compraron el producto o en las ocinas públicas locales para obtener
detalles sobre dónde y cómo puede reciclar estos artículos de forma
respetuosa con el medio ambiente.
Declaración de CE y de CA del Reino
Unido:
• Por la presente, Sharp Consumer Electronics Polandsp.zo.o. declara
que este equipo cumple los requisitos esenciales y otras disposiciones
pertinentes de la Directiva RED 2014/53/UE y los reglamentos sobre
equipos de radio del Reino Unido de 2017.
• El texto completo de la CE y la declaración de conformidad de la UKCA
están disponible en sharpconsumer.eu. Una vez en la página, entre
en la sección de descarga de su modelo y seleccione "Declaración de
conformidad".

ES
Contenido de la caja
• Altavoces de estantería CP-SS30
• Mando a distancia (incluye pilas)
• Cable de conexión para el altavoz (3m)
• Cable de audio RCA
• Cable de audio AUX
• Cable de alimentación
• Documentación de usuario
Controles
(Consulte 1 en la página1).
1. Extraiga las rejillas de los altavoces
2. Indicador LED
• En espera - Color rojo
• Bluetooth - Color azul
• Entrada auxiliar - Color verde
• RCA - Color cian
• Modo óptico - Color amarillo
• USB - Color morado
3. / Control de volumen/fuente/potencia
• Mantenga pulsado para encender o activar el modo en espera.
• Pulse para cambiar el modo (Bluetooth, entrada auxiliar, RCA, modo
óptico y USB).
• Gírelo para ajustar el nivel de volumen.
Entradas/salidas
(Consulte 2 en la página1).
1. Entrada de USB
2. Entrada óptica
3. Entradas de línea RCA
4. Entrada AUX
5. Entrada de alimentación de ~CA
6. Salida de audio para conectar un altavoz izquierdo pasivo
Mando a distancia
(Consulte 3 en la página2).
1. Pulse para encender o activar el modo en espera.
2. LOUD La compensación de intensidad aumenta las frecuencias bajas
y altas cuando se escucha a bajo volumen.
3. Pulse para silenciar el sonido. Pulse para reanudar el sonido o
pulse +/- para reanudar el sonido.
4. En el modo Bluetooth y USB, pulse para la siguiente pista y man-
tenga pulsado para rebobinar.
5. En el modo Bluetooth y USB, pulse para reproducir/poner en
pausa.
6. En el modo Bluetooth y USB, pulse para la siguiente pista y man-
tenga pulsado para avanzar.
7. Pulse para entrar en el modo de Bluetooth.
Mantenga pulsado para desconectar del dispositivo emparejado.
8. AUX Pulse para cambiar la fuente de audio a Aux.
9. RCA Pulse para cambiar la fuente de audio a RCA.
10. OPT Pulse para cambiar la fuente de audio a modo óptico.
11. USB Pulse para entrar en el modo USB.
12. EQ Pulse para conrmar el modo de ecualizador actual.
Continúe pulsando para recorrer los preajustes del ecualizador.
13. +/– Pulse para ajustar el volumen.
14. BASS +/– Pulse para ajustar el nivel de graves personalizado del
ecualizador.
15. TRE +/– Pulse para ajustar el nivel de agudos personalizado del
ecualizador.
Funcionamiento del mando a distancia
PRIMER USO: La unidad lleva preinstalada una batería de litio CR2025. Retire
la pestaña aislante transparente para activar la pila del mando a distancia.
El mando a distancia suministrado permite utilizar la unidad a distancia.
• Incluso si se utiliza dentro de un rango de distancia de 6m, el mando
a distancia puede no responder adecuadamente si existen obstáculos
entre este y la unidad.
• Si el mando a distancia se utiliza cerca de otros productos que generan
rayos infrarrojos o si otros dispositivos de control remoto utilizan rayos
infrarrojos cerca de la unidad, el mando a distancia podría no funcionar
correctamente. También podría ocurrir que otros productos no funcio-
nen correctamente.
Colocación de la pila del mando a distancia
12
4
3
12
4
3
El mando a distancia requiere una pila de litio CR2025 de 3V.
1. Presione la pestaña situada al lado de la tapa de la pila en dirección
al centro.
2. Retire la tapa de la pila fuera del mando a distancia deslizándola.
3. Retire la pila antigua. Coloque una nueva pila CR2025 en la tapa de la
pila con la polaridad correcta (+/-) como se indica.
4. Deslice la tapa en la ranura del mando a distancia hasta oír un
chasquido.
Conguración inicial
Ubicación de los altavoces
Para disfrutar de sonido estéreo, coloque la unidad de altavoz "activa"
(la unidad con controles en la parte frontal y las entradas en la parte
posterior) en el lado derecho. El otro altavoz "pasivo" debe situarse a la
izquierda. Recomendamos disponer los altavoces a una distancia de al
menos 50cm. Asegúrese de que los altavoces no está obstruidos.
Conexión de los altavoces
Antes de encender la unidad, conecte los altavoces izquierdo y derecho,
con ayuda del cale de conexión de altavoces suministrado. Observe la
polaridad al conectar los altavoces: conecte el cable rojo a la salida de
color rojo y el cable claro a la salida de color negro de ambos altavoces.
Conexión a la corriente
Riesgo de daños en el producto. Asegúrese de que la tensión de
alimentación se corresponde con la tensión indicada en la parte posterior
o inferior de la unidad.

16
Conecte el cable de corriente a la entrada de la toma de ~CA de la unidad
y, a continuación, introduzca el enchufe en una toma de corriente.
Uso de los altavoces de estante
Modo en espera/encendido
• La unidad se encenderá en modo en espera cuando se conecte por
primera vez a una toma de corriente. El indicador se iluminará en color
rojo.
• Pulse el botón del mando a distancia para alternar entre el modo
encendido y en espera de los altavoces.
• Desconecte el enchufe de la toma de alimentación si desea apagar la
unidad completamente.
NOTA: Los altavoces enterarán en el modo en
espera tras 15minutos de inactividad.
Selección de modos
Pulse el control del volumen de la unidad para recorrer las opciones de la
fuente o utilizar el mando a distancia para seleccionar el modo deseado.
Rojo: en espera
Azul: Bluetooth
Verde: Aux
Cian: RCA
Amarillo: modo óptico
Morado: USB
Ajuste del volumen
ū Use el control de volumen de la unidad o el botón +/– del mando a
distancia para ajustar el volumen.
ū Para silenciar el sonido, pulse el botón del mando a distancia. Para
reanudar el sonido, pulse o +/– en el mando a distancia o gire el
control del volumen de la unidad.
ū Al ajustar el volumen, el indicador de estado parpadea rápidamente.
ū Si pulsa el botón + cuando el volumen ha alcanzado su nivel máximo, el
indicador parpadeará una vez. Si pulsa el botón – cuando el volumen ha
alcanzado su nivel mínimo, el indicador parpadeará una vez.
Ajustes del ecualizador (EQ)
Puede ajustar el sonido de los altavoces de estante utilizando los
preajustes del ecualizador. Pulse en el mando a distancia una vez para
conrmar el modo de ecualizador actual. Continúe pulsando para recorrer
los preajustes del ecualizador.
• Clásico: en indicador LED de color verde parpadeará durante dos
segundos
• POP: en indicador LED de color amarillo parpadeará durante dos
segundos
• Rock: en indicador LED de color azul parpadeará durante dos segundos
• Película: en indicador LED de color morado parpadeará durante dos
segundos
• Voz: en indicador LED de color cian parpadeará durante dos segundos
• Personalizado: en indicador LED de color blanco parpadeará durante
dos segundos
Ajustes personalizados
• Pulse el botón para acceder a los ajustes personalizados o pulse los
botones BASS o TREB +/- una vez. Una luz blanca parpadeará durante
dos segundos.
• Utilice los botones BASS/TREB del mando a distancia para aumentar (+)
o reducir (-) el nivel del ecualizador. El nivel del ecualizador seleccionado
se indica mediante la velocidad a la que el indicador LED parpadea en el
altavoz. Un LED de color rojo parpadeante indica un nivel aumentado,
un LED blanco (no parpadeante) indica que el nivel es plano/cero y un
nivel LED verde parpadeante indica un nivel reducido
Color del LED Nivel del
ecualizador
Velocidad de parpadeo
del LED
Rojo
+3 Rápido
+2 Medio
+1 Lento
Blanco 0 Activado
Verde
-1 Lento
-2 Medio
-3 Rápido
NOTA: Los nuevos cambios del ecualizador se guardan como
predeterminados. Dispone de tres segundos entre cada pulsación de tecla
para realizar los cambios antes de que el modo de ecualizador se aplique.
AUX/OPTICO/RCA
1. Asegúrese de que la unidad está conectada al televisor o el
dispositivo de audio.
2. Con la unidad encendida, asegúrese de seleccionar la fuente correcta
ya sea usando el mando a distancia o pulsando el control de volumen
de la unidad.
3. Utilice el dispositivo de audio directamente para aplicar funciones de
reproducción.
4. Use el control de volumen de la unidad o el botón +/– de la
unidad o del mando a distancia para ajustar el volumen.
NOTA: Asegúrese de que las entradas RCA y AUX están establecidas en
el volumen mínimo del 50% en el dispositivo fuente. El volumen puede
ajustarse a través del altavoz, el mando a distancia y el dispositivo fuente.
Modo Bluetooth
Emparejamiento de dispositivos Bluetooth
La primera vez que conecte su dispositivo Bluetooth a los altavoces,
necesitará emparejarlo con estos.
NOTA:
ū El rango operativo entre los altavoces y un dispositivo Bluetooth es
de aproximadamente 8metros (sin ningún objeto entre el dispositivo
Bluetooth y la unidad).
ū Antes de conectar un dispositivo Bluetooth a los altavoces, asegúrese de
conocer las funciones del dispositivo.
ū No se garantiza la compatibilidad con todos los dispositivos Bluetooth.
ū Cualquier obstáculo entre los altavoces y un dispositivo Bluetooth
puede reducir el rango operativo.
ū Si la señal es débil, su receptor Bluetooth puede desconectarse, pero
volverá a entrar en modo de emparejamiento automáticamente.
1. Con la unidad encendida, pulse el botón del mando a distancia o el
control de volumen de la unidad para seleccionar el modo Bluetooth.
El indicador luminoso parpadeará en color azul.
2. Active el dispositivo Bluetooth y seleccione el modo de búsqueda.
Aparecerá "SHARP CP-SS30" en la lista del dispositivo Bluetooth.
ū Si no puede encontrar la unidad, mantenga pulsado el botón del
mando a distancia.
3. Seleccione "Sharp CP-SS30" en la lista. Un oirá un mensaje sonoro
cuando la conexión se haya completado correctamente y el indicador
brillará en color azul.
4. Empiece a reproducir música desde el dispositivo Bluetooth
conectado.

ES
Para desconectar la función Bluetooth, puede:
ū Cambiar a otra función de la unidad.
ū Desactivar la función Bluetooth del dispositivo. Se oirá un mensaje
sonoro cuando la desconexión se haya completado correctamente.
ū Mantener pulsado el botón del mando a distancia.
CONSEJO:
• Introduzca "0000" como contraseña si fuera necesario.
• Si no se empareja otro dispositivo Bluetooth con los altavoces en los
siguientes dos minutos, los altavoces se reconectarán a la conexión
previa.
• Los altavoces también se desconectarán cuando el dispositivo deje de
estar en el rango operativo.
• Si desea conectar su dispositivo a los altavoces, sitúelo dentro del rango
operativo.
• Si el dispositivo vuelve a situarse dentro del rango operativo después de
dejar de estarlo, compruebe si sigue conectado a los altavoces.
• Si se pierde la conexión, siga las instrucciones anteriores para volver a
emparejar el dispositivo a los altavoces.
Escuchar música desde un dispositivo Bluetooth
ū Si el dispositivo Bluetooth conectado admite Advanced Audio
Distribution Prole (A2DP), puede escuchar la música almacenada en
dicho dispositivo a través de los altavoces.
ū Si el dispositivo también admite Audio Video Remote Control Prole
(AVRCP), puede utilizar el mando a distancia del altavoz para reproducir
música almacenada en el dispositivo.
1. Empareje el dispositivo con los altavoces.
2. Reproduzca música a través del dispositivo (si admite A2DP).
3. Use el mando a distancia suministrado para controlar la reproducción
(si admite AVRCP).
ū Para pausar la reproducción y reanudarla, pulse el botón del
mando a distancia.
ū Para saltar una pista, pulse los botones / del mando a
distancia.
ū Mantenga pulsado / para retroceder o avanzar en modo
rápido dentro de una pista.
Modo USB
• Pulse el control del volumen del altavoz varias veces o el botón USB del
mando a distancia para seleccionar el modo USB. Conecte el dispositivo
de memoria USB con los archivos MP3 (se admiten unidades de hasta
64GB).
• Pulse para iniciar la reproducción.
• Apague la unidad antes de retirar el dispositivo de memoria USB.
NOTA
SHARP no se hace responsable de la pérdida de datos durante la conexión de
la memoria USB a este producto. Realice siempre una copia de seguridad de
su música antes de reproducirla en este producto.
Funciones USB (mando a distancia)
ū : permite reproducir/poner en pausa
ū: permite saltar a la siguiente canción | Mantenga pulsado para
avanzar rápidamente.
ū: permite saltar a la siguiente canción | Mantenga pulsado para
rebobinar rápidamente.
NOTA:
ūSi se ponen los altavoces en espera con el modo USB activado, la
reproducción se reanudará desde el mismo punto cuando la unidad vuelva
a encenderse.
ūSe realizará la reproducción USB en el orden en el que se guardaron las
pistas de audio en la unidad USB.
Resolución de problemas
Para conservar la validez de la garantía, no intente reparar el sistema por
sí mismo. Si observa problemas al usar esta unidad, revise los siguientes
elementos antes de dirigirse al servicio técnico.
Falta de alimentación
Asegúrese de que el cable de CA está adecuadamente conectado.
Asegúrese de que la toma de CA tiene corriente.
Pulse el botón del mando a distancia o del altavoz para encender la
unidad.
No se oye sonido
Aumente el volumen. Pulse el botón + del mando a distancia o gire el
control de volumen del altavoz hacia la derecha.
Pulse el botón del mando a distancia para asegurarse de que los
altavoces no se han silenciado.
Pulse para seleccionar una señal de entrada diferente.
Si no hay audio al conectar a una fuente digital (modo óptico):
ū Pruebe a ajustar la salida del televisor a PCM o
ū Conecte directamente a su dispositivo Blu-ray u otra fuente; algunos
televisores no transmiten audio digital.
Su televisor puede estar establecido en salida de audio variable. Conrme
que el ajuste de salida de audio está congurado en FIXED o STANDARD,
no en VARIABLE. Consulte el manual de usuario del televisor para obtener
más información.
Asegúrese de que el volumen de su dispositivo fuente está activado y de
que el dispositivo no está en silencio.
El mando a distancia no funciona
Asegúrese de retirar la pestaña de aislamiento de la pila de la parte
posterior del mando a distancia.
Antes de pulsar cualquier botón de control de reproducción, seleccione la
fuente correcta.
Reduzca la distancia entre el mando a distancia y la unidad.
Inserte la pila con las polaridades (+/-) alineadas como se indica.
Sustituya la pila.
Dirija el mando distancia directamente hacia el sensor en la parte frontal
del altavoz derecho.
Oigo como zumbidos y silbidos
Asegúrese de que todos los cables están correctamente conectados.
Conecte un dispositivo fuente diferente (televisor, reproductor, etc.) para
comprobar si el zumbido continúa. Si se deja de oír, el problema puede
estar en el dispositivo original.
Conecte el dispositivo a una entrada diferente.
Si se oye un zumbido mientras se utiliza la fuente auxiliar, asegúrese
de que el dispositivo fuente conectado a la entrada auxiliar está
correctamente conectado a tierra (esta operación se puede realizar
normalmente conectando el dispositivo fuente a una toma de
alimentación con toma de tierra).
No puedo encontrar el nombre Bluetooth de esta unidad en mi
dispositivo Bluetooth
Asegúrese de que la función Bluetooth está activada en su dispositivo
Bluetooth.
Vuelva a emparejar la unidad con su dispositivo Bluetooth.

18
Consignes de sécurité importantes
Veuillez suivre toutes les consignes de sécurité et tenir
compte de tous les avertissements. Gardez ce manuel à titre
de référence.
Ce symbole indique à l'utilisateur de consulter le manuel
d'utilisation pour plus d'informations sur la sécurité, le
fonctionnement et la maintenance.
Ce symbole indique la présence d'une tension dangereuse
non isolée à l'intérieur du produit, et pouvant être d'une
magnitude susante pour constituer un risque de choc
électrique pour les personnes.
Se rapporte au courant alternatif (CA)
Ce symbole indique que la tension nominale indiquée par le
symbole est une tension alternative.
Se rapporte aux équipements de classe II.
Ce symbole indique que ce produit est doté d'un système de
double isolation et ne nécessite pas de connexion de sécurité
à la terre (masse).
Précautions
Dégâts
• Veuillez inspecter l'appareil après le déballage. S'il est endommagé de
quelque manière que ce soit, n'utilisez pas l'appareil et consultez votre
revendeur.
ATTENTION
RISQUE D’ÉLECTROCUTION
NE PAS OUVRIR
Pour éviter tout risque de choc électrique, ne pas retirer le couvercle
arrière. Aucune pièce interne ne peut être réparée par l'utilisateur ; veuillez
coner la réparation à un personnel qualié.
Connexion électrique et accessibilité
• Ne maniez pas le cordon d'alimentation avec des mains mouillées. Cela
pourrait provoquer un choc électrique. Si la che électrique ne rentre
pas dans votre prise murale, ne forcez pas pour la faire rentrer. Éteignez
complètement l'appareil avant de le débrancher. Déconnectez le
cordon d'alimentation si l'appareil n'est pas utilisé pendant une période
prolongée. Assurez-vous que la che d'alimentation est toujours
facilement accessible. N'utilisez pas de rallonge électrique.
Alimentation électrique
• Assurez-vous que l'appareil est bien branché dans une prise électrique
100-240VCA 50-60Hz. L'utilisation d'une tension plus élevée peut
entraîner un dysfonctionnement de l'appareil voire un incendie.
Fiche d'alimentation moulée à fusible (non recâblable) - Royaume-
Uni, Malte, Chypre et Irlande uniquement.
• Le câble d'alimentation de cet équipement est fourni avec une che
moulée comprenant un fusible de 3ampères. La valeur du fusible est
indiquée sur la face de la che et, s'il doit être remplacé, un fusible
approuvé selon la normeBS1362 de même valeur doit être utilisé.
Protection du cordon d'alimentation
• N'endommagez pas le cordon d'alimentation, ne placez pas
d'objets lourds sur celui-ci, ne l'étirez pas et ne le tordez pas. Un
cordon d'alimentation endommagé peut être source d'incendie ou
d'électrocution. Si le cordon d'alimentation est endommagé, il doit
être remplacé par le fabricant, un agent du service après-vente ou des
personnes autrement qualiées.
Sécurité enfant
• Suivez toujours les précautions basiques de sécurité durant l'utilisation
de ce produit, particulièrement lorsque des enfants sont présents.
Surveillez les enfants an de vous assurer qu'ils ne jouent pas avec le
produit.
Emplacement
• Lors de son utilisation, ce produit doit être placé sur une surface plane
et stable, sans qu'aucune partie de l'unité principale ne dépasse d'un
bord.
Ventilation
• Le boîtier dispose de fentes et d'ouvertures pour la ventilation, pour
garantir un fonctionnement able du produit et protéger celui-ci contre
la surchaue. Ces ouvertures ne doivent pas être obstruées ou bloquées.
Assurez une distance minimum de 5cm autour du produit an de
garantir une ventilation susante. Ne laissez jamais une personne
faire rentrer un objet dans les trous, fentes ou toute autre ouverture du
boîtier du produit, cela pouvant causer une électrocution fatale.
Chaleur et température de fonctionnement
• N'installez pas l'appareil à proximité de sources de chaleur telles que
des radiateurs, des chauages, des cuisinières ou d'autres appareils (y
compris des amplicateurs) produisant de la chaleur. Évitez l'exposition
directe au soleil.
Flammes nues
• Pour éviter tout risque d'incendie, éloignez les bougies ou les ammes
nues de ce produit.
Entrée d'eau, d'humidité et de liquide
• Pour éviter les risques d'incendie ou de choc électrique, n'exposez
pas ce produit à la pluie, à l'eau ou à l'humidité. Ne placez pas d'objets
remplis de liquide sur ou à proximité de ce produit.
Orages et éclairs
• Les orages sont dangereux pour tous les appareils électriques.
Si l'alimentation est frappée par la foudre, le produit peut être
endommagé, même s'il était éteint. Vous devez débrancher tous les
câbles et connecteurs du produit avant un orage.
Entretien
• Débranchez le câble d'alimentation de la source de courant avant de
nettoyer le produit. Utilisez un chion doux et propre pour nettoyer
l'extérieur de l'appareil. Ne nettoyez jamais l'appareil avec des produits
chimiques ou détergents.
Entretien et réparations
• Ce produit ne contient aucune pièce réparable par l'utilisateur.
L'exposition aux pièces internes situées à l'intérieur de l'appareil peut
mettre votre vie en danger. En cas de défaut, contactez le fabricant ou
le département de service après-vente autorisé. La garantie du fabricant
ne couvre pas les défauts provoqués par des réparations eectuées par
des tiers non autorisés.
Piles
Installation
• N'utilisez pas de piles autres que celles spéciées. Observez la polarité
correcte en insérant les piles.
Utilisation et maintenance
• N'exposez pas les piles à des températures élevées, par exemple près
d'un feu ou en plein soleil. Lorsque vous ne prévoyez pas d'utiliser le
produit pendant une longue période (plus d'un mois), retirez les piles
du produit pour éviter les fuites. Si les piles fuient, nettoyez les fuites à
l'intérieur du compartiment à piles et remplacez les piles par des piles
neuves.
CAUTION
RISK OF ELECTRIC SHOCK
DO NOT OPEN
CAUTION
RISK OF ELECTRIC SHOCK
DO NOT OPEN

FR
Sécurité enfant
• Assurez-vous toujours que le compartiment des piles est fermé et
sécurisé.
• Les piles sont facilement avalées par les jeunes enfants et peuvent
provoquer de graves brûlures internes et entraîner la mort. Gardez les
piles hors de portée des enfants. Consultez immédiatement un médecin
si vous pensez qu'une pile a été avalée.
Conditions environnementales
• Gardez les piles à l'écart des basses pressions d'air ou des températures
élevées, car cela peut entraîner une explosion ou la fuite d'un liquide ou
d'un gaz inammable.
Mise au rebut
• Veuillez jeter les piles correctement en suivant les instructions de ce
manuel (voir la section « Mise au rebut de cet équipement et des piles
»). Ne les jetez pas au feu, ne les démontez pas et n'essayez pas de
recharger des piles non rechargeables; elles pourraient fuir ou exploser.
Mise au rebut de cet équipement et des
piles
Informations pour les utilisateurs sur la collecte et l'élimination des
anciens équipements et des piles usagées.
Ce symbole signie que le produit contient des piles
couvertes par la directive européenne 2013/56/UE, qui
ne peuvent pas être jetées avec les ordures ménagères
normales. Les indications Cd, Hg et Pb sous le symbole de
poubelle signient que la pile contient du cadmium (Cd),
du mercure (Hg) ou du plomb (Pb).
Ce symbole sur un produit signie que le produit est
couvert par la directive européenne 2012/19/UE et ne doit
pas être jeté avec vos autres déchets ménagers.
Ce symbole signie que le produit est conçu et fabriqué
de manière à pouvoir être recyclé et réutilisé.
Ces symboles sur les produits, l'emballage et/ou les documents
d'accompagnement signient que les produits électriques et
électroniques usagés ne doivent pas être mélangés avec les ordures
ménagères. Les ménages sont invités à contacter le magasin où le
produit a été acheté, ou les autorités locales, pour connaître où et
comment procéder au recyclage des composants de façon à respecter
l'environnement.
Déclaration CE et UKCA:
• Par la présente, Sharp Consumer Electronics Poland sp. z o.o. déclare
que cet équipement est conforme aux exigences essentielles et aux
autres dispositions pertinentes de la directive RED 2014/53/UE et de la
réglementation sur l'équipement radio du Royaume-Uni.
• Le texte complet des déclarations de conformité CE et UKCA est
disponible sur sharpconsumer.eu et en entrant ensuite dans la section
de téléchargement de votre modèle et en choisissant «Declaration of
Conformity».

20
Ce qui est inclus dans la boîte:
• Haut-parleurs d'étagèreCP-SS30
• Télécommande (piles incluses)
• Câble de connexion des haut-parleurs (3m)
• Câble audio RCA
• Câble audio AUX
• Câble électrique
• Documentation utilisateur
Commandes
(Voir 1 en page 1).
1. Grilles de haut-parleur amovibles
2. Voyant DEL
• Veille - Rouge
• Bluetooth - Bleu
• Entrée auxiliaire - Vert
• RCA - Cyan
• Mode Optique - Jaune
• USB - Violet
3. / Contrôle du volume, de la source et de la puissance
• Appuyez longuement pour allumer ou passer en mode veille.
• Appuyez brièvement pour changer le mode (Bluetooth, Aux-in, RCA,
Optique, USB).
• Tournez pour régler le volume.
Entrées/Sorties
(Voir 2 en page 1).
1. Entrée USB
2. Entrée optique
3. Entrées line RCA
4. Aux in
5. Entrée d'alimentation secteur
6. Sortie audio pour la connexion d'un haut-parleur passif gauche
Télécommande
(Voir 3 en page 2).
1. Appuyez sur cette touche pour mettre l'appareil en marche ou
en veille
2. LOUD La compensation de l'intensité sonore augmente les fré-
quences basses et hautes lors d'une écoute à faible volume.
3. Appuyez pour couper le son. Appuyez à nouveau pour réactiver le
son, ou appuyez sur +/- pour réactiver le son.
4. En mode Bluetooth et USB, une pression courte permet d'accéder
à la piste précédente, une pression longue permet de revenir en
arrière.
5. En mode Bluetooth et USB, appuyez brièvement pour lire/mettre
en pause.
6. En mode Bluetooth et USB, appuyez brièvement pour passer à
la piste suivante, appuyez longuement pour eectuer une avance
rapide.
7. Appuyez brièvement pour passer en mode Bluetooth.
Appuyez longuement pour vous déconnecter de l'appareil apparié.
8. AUX Appuyez brièvement pour changer la source audio en Aux.
9. RCA Appuyez pour changer la source audio en RCA.
10. OPT Appuyez brièvement pour changer la source audio en Optique.
11. USB Appuyez brièvement pour entrer en mode USB.
12. EQ Appuyez brièvement pour conrmer le mode EQ actuel.
Continuez à appuyer pour faire déler les préréglages de l'égaliseur.
13. +/– Appuyez pour ajuster le volume.
14. BASS +/- Appuyez pour régler le niveau des basses de l'égaliseur
personnalisé.
15. TRE +/- Appuyez pour régler le niveau des aigus de l'égaliseur
personnalisé.
Utilisation de la télécommande
PREMIÈRE UTILISATION: L'unité est équipée d'une
pileCR2025 au lithium préinstallée. Retirez la languette
isolante transparente pour activer la télécommande.
La télécommande fournie permet à l'appareil de fonctionner à distance.
• Même si la télécommande est utilisée dans la gamme eective de 6m,
l'utilisation de la télécommande peut être impossible si des obstacles
sont présents entre l'appareil et la télécommande.
• Si la télécommande est utilisée près d'autres produits générant des
rayons infrarouges, ou si une autre télécommande utilisant des rayons
infrarouges est utilisée près de l'appareil, celle-ci peut ne pas fonction-
ner correctement. Les autres produits peuvent aussi ne pas fonctionner
correctement.
Remplacement de la pile de la télécommande
12
4
3
12
4
3
La télécommande nécessite une pileCR2025 3V au lithium.
1. Poussez la languette située sur le côté du support de pile vers le
centre.
2. Faites glisser le support de pile hors de la télécommande.
3. Retirez la pile usagée. Placez une nouvelle pileCR2025 dans le
support en respectant la polarité (+/-) indiquée.
4. Faites glisser le support dans la fente de la télécommande jusqu'à ce
qu'il s'enclenche en place.
Conguration initiale
Placement des haut-parleurs
Pour proter d'un son stéréo, placez le haut-parleur «actif» (celui avec
les commandes à l'avant et les entrées à l'arrière) du côté droit. L'autre
haut-parleur («passif») doit se trouver à gauche. Nous recommandons de
placer les haut-parleurs à au moins 50cm l'un de l'autre. Assurez-vous que
les haut-parleurs ne sont pas obstrués.
Connexion des haut-parleurs
Avant de mettre l'appareil sous tension, connectez les haut-parleurs
gauche et droit à l'aide du câble de connexion fourni. Veuillez respecter
la polarité lors de la connexion des haut-parleurs: Connectez le câble
rouge à la sortie rouge, et le câble transparent à la sortie noire des deux
haut-parleurs.

FR
Raccordement à l'alimentation électrique
Risque d'endommagement du produit! Assurez-vous que la tension
d'alimentation électrique corresponde à la tension imprimée à l'arrière ou
en dessous de l'appareil
Connectez le câble d'alimentation à l'entrée d'alimentation secteur de
l'appareil, puis insérez la che dans une prise de courant.
Utilisation de vos haut-parleurs d'étagère
Veille/Marche
• Lorsque vous connectez l'appareil pour la première fois, celui-ci reste en
mode VEILLE. Le voyant s'allume en rouge.
• Appuyez sur sur la télécommande pour basculer les haut-parleurs
entre l'état de marche et l'état de veille.
• Déconnectez la prise principale de la prise murale si vous souhaitez
désactiver complètement l'appareil.
REMARQUE: Les haut-parleurs se mettent en mode
veille après 15minutes d'inactivité.
Sélection de modes
Appuyez sur la commande de volume de l'appareil pour faire déler les
options de source, ou utilisez la télécommande pour sélectionner le mode
souhaité.
Rouge: Veille
Bleu: Bluetooth
Vert: Aux
Cyan: RCA
Jaune: Optique
Violet: USB
Réglage du volume
ū Utilisez le bouton de volume de l'appareil ou +/- de la
télécommande pour régler le volume.
ū Pour couper le son, appuyez sur sur la télécommande. Pour reprendre
le son, appuyez sur ou +/- sur la télécommande, ou tournez le
bouton de volume de l'appareil.
ū Lorsque vous ajustez le volume, le voyant indicateur de statut clignote
rapidement.
ū Lorsque le niveau de son atteint son niveau maximum, si vous appuyez
sur + à nouveau, le voyant clignote une fois. Lorsque le niveau de son
atteint son niveau minimum, si vous appuyez sur – à nouveau, le voyant
DEL clignote une fois.
Paramètres de l'égaliseur (EQ)
Vous pouvez régler le son des haut-parleurs d'étagère à l'aide des
préréglages d'égaliseur. Appuyez sur sur la télécommande pour
conrmer le mode EQ actuel. Continuez à appuyer pour faire déler les
préréglages de l'égaliseur.
• Classique - Le voyant DEL vert clignote pendant 2secondes
• POP - Le voyant DEL jaune clignote pendant 2secondes
• Rock - Le voyant LED bleu clignote pendant 2secondes
• Film - Le voyant DEL violet clignote pendant 2secondes
• Voix - Le voyant DEL cyan clignote pendant 2secondes
• Personnalisé - Le voyant DEL blanc clignote pendant 2secondes
Réglages personnalisés
• Appuyez sur le bouton pour accéder aux réglages personnalisés ou
appuyez une fois sur les boutons BASS ou TREB +/-, une lumière blanche
clignote pendant 2secondes.
• Utilisez les touches BASS/TREB de la télécommande pour augmenter (+)
ou diminuer (-) le niveau EQ. Le niveau EQ sélectionné est indiqué par
la vitesse à laquelle la DEL de la barre de son clignote. Une DEL rouge
clignotante indique une augmentation du niveau, une DEL blanche
(xe) indique que le niveau est plat/0, une DEL verte clignotante indique
une diminution du niveau.
Couleur de la DEL Niveau EQ Vitesse de clignotement
de la DEL
Rouge
+3 Rapide
+2 Moyenne
+1 Lente
Blanc 0 En marche
Vert
-1 Lente
-2 Moyenne
-3 Rapide
REMARQUE: Les nouvelles modications de l'EQ sont enregistrées par
défaut. Vous disposez de 3secondes entre chaque pression de touche
pour eectuer des modications avant la désactivation du mode EQ.
AUX/OPTIQUE/RCA
1. Assurez-vous que l'appareil est connecté à la TV ou à un appareil
audio.
2. Lorsque l'appareil est sous tension, assurez-vous que la bonne source
est sélectionnée, soit à l'aide de la télécommande soit en appuyant
sur la commande de volume de l'appareil.
3. Utilisez directement les fonctions de lecture de votre appareil audio.
4. Utilisez le contrôle du volume sur l'appareil ou +/- sur la
télécommande pour régler le niveau du volume.
REMARQUE: Veuillez vous assurer que les entrées RCA et AUX sont réglées
sur un volume minimum de 50% sur l'appareil source. Le volume peut être
réglé via le haut-parleur actif, la télécommande ou l'appareil source.
Mode Bluetooth
Appariement d'appareils Bluetooth
La première fois que vous connectez votre appareil Bluetooth à ces haut-
parleurs, vous devez apparier votre appareil à ces haut-parleurs.
REMARQUE:
ū La portée de fonctionnement entre ces haut-parleurs et un appareil
Bluetooth est environ 8mètres (sans objet entre l'appareil Bluetooth
et l'unité).
ū Avant de connecter un appareil Bluetooth à ces haut-parleurs, assurez-
vous de connaître les spécications de l'appareil.
ū La compatibilité avec tous les appareils Bluetooth n'est pas garantie.
ū Tout obstacle entre ces haut-parleurs et un appareil Bluetooth peut
réduire la portée de fonctionnement.
ū Si la puissance du signal est faible, votre récepteur Bluetooth
peut se déconnecter, mais il réentrera en mode d'appariement
automatiquement.
1. Lorsque l'appareil est sous tension, appuyez sur sur la
télécommande ou sur le bouton de volume de l'appareil pour
sélectionner le mode Bluetooth. Le voyant clignote en bleu.
2. Activez votre appareil Bluetooth et sélectionnez le mode de
recherche. «SHARP CP-SS30» apparaîtra sur votre liste d'appareils
Bluetooth.
ū Si vous ne pouvez pas trouver l'appareil, appuyez sur et maintenez
sur la télécommande.
3. Sélectionnez SHARPCP-SS30 dans la liste d'appareils. Une indication
sonore retentit lorsque la connexion est réussie, et le voyant s'allume
en bleu xe.
4. La musique issue de l'appareil Bluetooth est alors audible.

22
Pour déconnecter la fonction Bluetooth, vous
pouvez:
ū Passer à une autre fonction sur l'appareil.
ū Désactivez la fonction Bluetooth de votre appareil. Un message sonore
retentit lorsque la déconnexion a été eectuée avec succès.
ū Appuyez sur et maintenez sur la télécommande.
CONSEILS:
• Entrez «0000» comme mot de passe si nécessaire.
• Si aucun autre appareil Bluetooth ne se connecte aux haut-parleurs
avant 2minutes, les haut-parleurs se reconnecteront à la précédente
connexion.
• Les haut-parleurs seront aussi déconnectés si votre appareil est en
dehors de la portée de fonctionnement.
• Si vous souhaitez reconnecter ces haut-parleurs, placez-les dans la
portée de fonctionnement.
• Si l'appareil est déplacé hors de la portée de fonctionnement puis est
ramené à proximité du lecteur, vériez si l'appareil est toujours connecté
aux haut-parleurs.
• Si la connexion est perdue, suivez les instructions ci-dessus pour
apparier à nouveau votre appareil aux haut-parleurs.
Écouter de la musique depuis un appareil Bluetooth
ū Si l'appareil Bluetooth connecté est compatible avec Advanced Audio
Distribution Prole (A2DP), vous pouvez écouter la musique stockée sur
l'appareil sur les haut-parleurs.
ū Si l'appareil est aussi compatible avec Audio Video Remote Control
Prole (AVRCP), vous pouvez utiliser la télécommande des haut-parleurs
pour gérer la lecture de la musique stockée sur l'appareil.
1. Appariez votre appareil aux haut-parleurs.
2. Lisez de la musique sur votre appareil (si compatible A2DP).
3. Utilisez la télécommande fournie pour contrôler la lecture (si
compatible AVRCP).
ū Pour mettre en pause ou reprendre la lecture, appuyez sur sur la
télécommande.
ū Pour sauter une piste, appuyez sur les touches / sur la
télécommande.
ū Appuyez longuement sur / pour rembobiner ou avancer
rapidement dans la piste.
Mode USB
• Appuyez plusieurs fois sur la commande de volume des haut-parleurs
ou sur USB sur la télécommande pour sélectionner le mode USB.
Connectez un périphérique USB contenant des chiers MP3 (lecteurs
jusqu'à 64Go pris en charge).
• Appuyez sur pour lancer la lecture.
• Éteignez l'appareil avant de retirer le dispositif de mémoire USB.
REMARQUE
SHARP ne saurait être tenu responsable des pertes de données occasionnées
lorsque le dispositif de mémoire USB est branché à cet appareil. Sauvegardez
toujours votre musique avant de la lire sur ce produit.
Fonctions USB (télécommande)
ū Pour lire ou mettre en pause.
ū Passer à la chanson suivante | Appuyez longuement pour avancer
rapidement.
ū Passer au début de la chanson | Appuyez longuement pour reculer
rapidement.
REMARQUE:
ūSi les haut-parleurs ont été mis en veille alors qu'ils étaient en mode USB, la
lecture reprendra au même endroit lorsque l'appareil est rallumé.
ūLa lecture USB s'eectue dans l'ordre d'enregistrement des pistes audio sur
le lecteur USB.
Dépannage
Pour conserver la validité de la garantie, n'essayez jamais de réparer le
système par vous-même. En cas de problèmes durant l'utilisation de cette
unité, reportez-vous aux conseils ci-dessous avant de contacter le service
après-vente.
Le système ne s'allume pas.
Assurez-vous que le cordon d'alimentation est correctement connecté.
Assurez-vous que la prise murale est bien alimentée.
Appuyez sur sur la télécommande ou les haut-parleurs pour mettre
l'appareil en marche.
Pas de son
Augmentez le volume. Appuyez sur + de la télécommande ou tournez le
bouton de volume du haut-parleur actif dans le sens des aiguilles d'une
montre.
Appuyez sur sur la télécommande pour vous assurer que les haut-
parleurs ne sont pas en sourdine.
Appuyez brièvement sur pour sélectionner une autre source en
entrée.
Lors de la connexion à une source numérique (optique), s'il n'y a pas
d'audio:
ū Essayez de régler la sortie de votre TV en mode PCM ou
ū Connectez directement votre source Blu-ray ou autre, certaines
télévisions ne laissant pas passer les signaux audio numériques.
Vous TV peut être réglée en sortie audio variable. Conrmez que la sortie
audio est réglée sur xe ou standard et non variable. Consultez le manuel
d'utilisation de votre TV pour plus d'informations.
Assurez-vous que le volume de votre appareil source est susamment
élevé et que l'appareil n'est pas en sourdine.
La télécommande ne fonctionne pas.
Assurez-vous que la languette d'isolation de la pile est retirée à l'arrière de
la télécommande.
Avant de presser toute touche de lecture, sélectionnez d'abord la source
adéquate.
Réduisez la distance entre la télécommande et l'unité.
Insérez la pile en respectant les polarités (+/-) indiquées.
Remplacez la pile.
Pointez la télécommande directement sur le détecteur sur la partie avant
du haut-parleur droit.
Un bourdonnement est audible
Assurez-vous que tous les câbles sont correctement connectés.
Connectez un autre appareil source (TV, lecteur Blu-ray, etc.) pour vérier
sur le bourdonnement persiste. Si ce n'est pas le cas, le problème peut être
issu de l'appareil initial.
Connectez votre appareil à une entrée diérente.
Si un bourdonnement se fait entendre lors de l'utilisation de la source
auxiliaire, assurez-vous que l'appareil source connecté à l'entrée auxiliaire
est correctement mis à la terre (cela peut normalement être fait en
connectant l'appareil source à une alimentation secteur mise à la terre).
Je ne peux pas trouver le nom Bluetooth de cette unité sur mon
appareil Bluetooth
Assurez-vous que la fonction Bluetooth est activée sur votre appareil
Bluetooth.
Appariez votre appareil Bluetooth à nouveau.

IT
Importanti istruzioni di sicurezza
Seguire tutte le istruzioni di sicurezza e fare attenzione
a tutte le avvertenze. Conservare il manuale per
consultazioni future.
Questo simbolo indica all'utente di consultare il manuale
utente per ulteriori informazioni relative a sicurezza, utilizzo
e manutenzione.
Questo simbolo indica la presenza di "voltaggio pericoloso"
non isolato all'interno del prodotto che potrebbe essere di
una magnitudine suciente a costituire un rischio di scossa
elettrica per le persone.
Si riferisce alla corrente alternata (CA)
Questo simbolo indica che il voltaggio nominale
contrassegnato con il simbolo è voltaggio CA.
Si riferisce all'apparecchiatura di Classe II.
Questo simbolo indica che questo prodotto ha un doppio
sistema di isolamento e non richiede una connessione di
sicurezza alla terra elettrica (terra).
Precauzioni
Danni
• Controlla che l'unità non abbia riportato danni dopo aver aperto la
confezione. Se è danneggiato in qualsiasi modo, non utilizzare l'unità
econsultare il rivenditore.
ATTENZIONE
RISCHIO DI SCOSSA ELETTRICA
NON APRIRE
Per prevenire il rischio di scosse elettriche, non rimuovere il coperchio
posteriore. All'interno non sono presenti pari utilizzabili dagli utenti;
consultare un personale di supporto qualicato per avere assistenza.
Connessione dell'alimentazione e accessibilità
• Non maneggiare il cavo di alimentazione con le mani bagnate. Ciò
potrebbe causare scosse elettriche. Non forzare la spina se non si
inserisce correttamente nella presa. Spegnere completamente l'unità
prima di staccare la spina. Scollegare il cavo di alimentazione se non
viene usato per molto tempo. Assicurarsi che la presa di corrente sia
sempre facilmente accessibile. Inoltre, non utilizzare prolunghe.
Sorgente di alimentazione
• Assicurarsi che l’unità sia connessa a una presa di corrente CA
100-240V 60Hz. Usare un voltaggio superiore può provocare un
malfunzionamento dell’unità e persino la formazione di amme.
Spina con fusibile (non smontabile) - solo Regno Unito, Malta, Cipro
e Irlanda.
• Il cavo di alimentazione di questo apparecchio è dotato di spina
pressofusa che incorpora un fusibile da 3 Amp. Il valore del fusibile è
indicato sul lato della spina con gli spinotti e richiede di essere sostituito
con un fusibile approvato per BS1362 con lo stesso valore nominale.
Protezione del cavo di alimentazione
• Non danneggiare il cavo di alimentazione, né riporvi sopra oggetti
pesanti, tirarlo o piegarlo. Danni al cavo di alimentazione potrebbero
causare incendi o shock elettrici. Se il cavo di alimentazione è
danneggiato, deve essere sostituito dal produttore, da un agente di
servizio o da persone altrettanto qualicate.
Sicurezza per i bambini
• Seguire sempre le precauzioni di sicurezza basilari quando si utilizza
questo prodotto, specialmente in presenza di bambini. I bambini
dovrebbero essere supervisionati per assicurarsi che non giochino con
il prodotto.
Posizione
• Quando si utilizza questo prodotto, esso dovrebbe essere posto su una
supercie piatta e stabile, senza che alcuna parte dell'unità principale
sporga da un bordo.
Areazione
• Le fessure e le aperture nell'involucro sono state creare per la corretta
areazione, in modo da assicurare un funzionamento adabile del
prodotto e proteggerlo dal surriscaldamento. Queste aperture non
devono essere ostruite o coperte Assicurare una distanza minima di
5 cm attorno al prodotto per una ventilazione suciente. Mai lasciare
che qualcuno inserisca qualcosa nei fori e nelle aperture dell’involucro
dell’unità, in quanto ciò potrebbe risultare in una scossa elettrica.
Calore e temperatura di funzionamento
• Non installarlo vicino a fonti di calore come termosifoni, griglie di
ventilazione, stufe o altri apparecchi (inclusi amplicatori) che generano
calore. Evitare l'esposizione alla luce diretta del sole.
Fiamme scoperte
• Per prevenire il rischio di incendio, tenere candele o amme scoperte
lontane da questo prodotto.
Acqua, umidità e inltrazioni di liquidi
• Per prevenire il rischio di incendio o scossa elettrica, non esporre questo
prodotto a pioggia, acqua o umidità. Non collocare oggetti pieni di
liquidi sopra o vicino a questo prodotto.
Temporali e fulmini
• I temporali sono pericolosi per i prodotti elettronici. Se l'alimentazione
viene colpita da un fulmine, il prodotto potrebbe risultarne
danneggiato, anche se spento. È opportuno scollegare tutti i cavi e i
connettori del prodotto prima di un temporale.
Manutenzione
• Disconnettere il cavo di alimentazione dalla presa elettrica prima di
pulire il prodotto. Usare un panno morbido e pulito per pulire l’esterno
dell’unità. Non pulire con agenti chimici e detergenti.
Assistenza e riparazione
• Questo prodotto non ha componenti che possano essere riparate
dall'utente. Esporre le parti interne al dispositivo può comportare un
pericolo di vita. In caso di guasto, contattate il produttore o l'agente di
servizio autorizzato. La garanzia non copre danni causati da riparazioni
eettuate da terze parti non autorizzate.
Batterie
Installazione
• Non utilizzare batterie diverse da quelle specicate. Rispettare la
corretta polarità quando inserite le batterie.
Utilizzo e manutenzione
• Non esporre le batterie ad alte temperature, ad es. vicino a fuoco o luce
diretta del sole. Quando il prodotto non viene usato per lungo tempo
(più di un mese), rimuovere la batteria per prevenire perdite. In caso di
perdite di batterie, ripulire la perdita all’interno dello scompartimento
erimpiazzare le batterie vecchie con quelle nuove.
Sicurezza per i bambini
• Assicurarsi sempre che lo scompartimento delle batterie sia chiuso
eben sso.
• Le batterie possono essere facilmente ingerite da bambini piccoli
epossono provocare gravi ustioni interne e portare alla morte.
CAUTION
RISK OF ELECTRIC SHOCK
DO NOT OPEN
CAUTION
RISK OF ELECTRIC SHOCK
DO NOT OPEN

24
Tenere lontano le batterie dai bambini. Cercare immediatamente una
consulenza medica se si pensa che una batteria sia stata ingerita.
Condizioni ambientali
• Tenere le batterie lontano da pressione bassa dell'aria o alte
temperature in quanto possono provocare un'esplosione o la perdita di
un liquido o un gas inammabile.
Smaltimento
• Smaltire correttamente le batterie seguendo le istruzioni in questo
manuale (consultare la sezione "Smaltimento dell’apparecchio e delle
batterie"). Non gettarle nel fuoco, non smontarle e non cercare di
ricaricarle se non sono ricaricabili; potrebbero perdere o esplodere.
Smaltimento dell’apparecchio e delle
batterie
Informazioni per gli utenti su raccolta e smaltimento di vecchi apparecchi
e batterie usate.
Questo simbolo indica che il prodotto contiene batterie
coperte dalla Direttiva europea 2013/56/EU che decreta
che non può essere smaltito con i normali riuti domestici.
Cd, Hg e Pb sotto il simbolo del cestino della spazzatura
mostra se la batterie contiene cadmio (Cd), mercurio (Hg)
o piombo (Pb).
Questo simbolo indica che il prodotto è coperto dalla
Direttiva europea 2012/19/EU che decreta che non può
essere smaltito o gettato con i normali riuti domestici.
Questo simbolo indica che il prodotto è progettato
efabbricato in modo da essere riciclato e riutilizzato.
Questi simboli sul prodotto, sulla confezione e/o sui documenti che lo
accompagnano indicano che i prodotti elettrici ed elettronici usati e le
batterie usate non vanno mischiate con i riuti domestici generici. Gli
utenti in contesti domestici dovrebbero contattare il rivenditore presso
cui hanno acquistato il prodotto oppure un ucio governativo locale per
ricevere dettagli su dove e come portare questi oggetti per un riciclaggio
che rispetti l'ambiente.
Dichiarazione CE e UKCA:
• Con il presente, Sharp Consumer Electronics Poland sp. z o.o. dichiara
che il televisore LED soddisfa i requisiti essenziali e le altre disposizioni
rilevanti della direttiva RED 2014/53/EU e delle Normative sulle
apparecchiature radio del Regno Unito del 2017.
• Il testo completo CE e la dichiarazione di conformità UKCA sono
disponibili su sharpconsumer.eu e successivamente accedendo alla
sezione di download del modello, quindi selezionando “Dichiarazioni
di conformità”.

IT
Cosa è compreso nella confezione
• CP-SS30 Altoparlanti da scaale
• Telecomando (batterie incluse)
• Cavo di connessione per altoparlante (3m)
• Cavo audio RCA
• Cavo audio AUX
• Cavo di alimentazione
• Documentazione utente
Controlli
(Consultare 1 a pagina 1).
1. Griglie rimovibili da altoparlante
2. Indicatore LED
• Standby - rosso
• Bluetooth - blu
• Aux in - verde
• RCA - azzurro
• Modalità ottica - giallo
• USB - viola
3. / Volume/ sorgente/ controllo potenza
• premere per qualche istante per attivare o disattivare la modalità
stand-by.
• premere brevemente per modicare la modalità (Bluetooth, Aux-in,
RCA, ottica, USB).
• Ruotare per regolare il livello del volume.
Ingressi / Uscite
(Consultare 1 a pagina 2).
1. Ingresso USB
2. Ingresso ottico
3. Ingressi audio RCA
4. Aux in
5. Ingresso corrente ~AC
6. Uscita audio per connettere altoparlante sinistro passivo
Telecomando
(Consultare 2 a pagina 3).
1. Premere per attivare o passare alla modalità stand-by.
2. LOUD La compensazione del rumore aumenta le alte e basse
frequenze quando si ascolta a basso volume.
3. Premere per disattivare l’audio. Premere nuovamente per riattivare
l’audio, o premere +/- per riattivare l’audio.
4. In modalità Bluetooth e USB, premere brevemente per la traccia
precedente, premere per qualche istante per riavvolgere.
5. In modalità Bluetooth e USB, premere brevemente per riprodurre/
pausa.
6. In modalità Bluetooth e USB, premere brevemente per la traccia
successiva, premere per qualche istante per avanzare velocemente.
7. Pressione breve per entrare in modalità Bluetooth.
Pressione lunga per disconnettersi da un dispositivo accoppiato.
8. AUX pressione breve per cambiare la sorgente audio in Aux.
9. RCA pressione breve per cambiare la sorgente audio in RCA.
10. OPT pressione breve per cambiare la sorgente audio in Ottica.
11. USB Pressione breve per entrare in modalità USB..
12. EQ Pressione breve per confermare la modalità EQ attuale.
Continuare a premere per scorrere attraverso le preimpostazioni
dell’EQ.
13. +/– Premere per regolare il volume.
14. BASS +/– Premere per regolare il livello dei bassi dell’EQ.
15. TRE +/– Premere per regolare il livello degli lati dell’EQ.
Funzionamento del telecomando
PRIMO UTILIZZO: L’unità contiene una batteria al litio CR2025 preinstallata.
Rimuovere la linguetta isolante per attivare la batteria del telecomando.
Il telecomando fornito permette di usare il dispositivo dalla distanza.
• Anche se il telecomando viene utilizzato a una distanza funzionale di
6m, il suo corretto funzionamento potrebbe essere impedito da ostacoli
posti tra l’unità e il telecomando stesso.
• Se il telecomando viene utilizzato vicino ad altri prodotto che generano
raggi infrarossi, oppure se altri telecomandi a infrarossi sono utilizzati
vicino all’unità, potrebbe non funzionare correttamente. O, viceversa,
altri prodotti potrebbero non funzionare correttamente.
Sostituzione delle batterie del telecomando
12
4
3
12
4
3
Il telecomando richiede una batteria al litio da 3v CR2025.
1. Spingere la linguetta sul lato dello scompartimento della batteria
verso il centro.
2. Ora estrarre lo scompartimento delle batterie dal telecomando
facendolo scorrere.
3. Rimuovere la vecchia batteria. Inserire una nuova batteria CR2025
nello scompartimento nella corretta polarità (+/-) come indicato.
4. Fare scorrere lo scompartimento nell’alloggiamento nel telecomando
no a quando non scatta.
Congurazione iniziale
Collocazione degli altoparlanti
Per godersi un suono stereo, collocare l’unità di altoparlanti “attivi” (l’unità
con i comandi su parte anteriore e input sul retro) sul lato destro. Quando
l’altro altoparlante “passivo” dovrebbe essere a sinistra. Raccomandiamo
che gli altoparlanti siano posizionati ad almeno 50 cm di distanza.
Assicurarsi che gli altoparlanti non siano ostruiti.
Connessione altoparlante
Prima di collegare elettricamente l’unità, connettere gli altoparlanti
sinistro e destro usando il cavo di connessione dell’altoparlante. Osservare
la polarità quando si connettono gli altoparlanti: Connettere il cavo rosso
all’uscita rossa, e il cavo chiaro all’uscita nera su entrambi gli altoparlanti.

26
Connessione all’alimentazione
C’è il rischio di danneggiare il prodotto! Assicurarsi che il voltaggio
della rete elettrica corrisponda al voltaggio stampato sul retro o sul fondo
dell’unità.
Connettere l'adattatore di corrente alla presa ~CA dell'unità e poi alla
presa di corrente.
Uso degli altoparlanti da scaale
Standby/Accensione
• Dopo la prima connessione all’alimentazione, l’unità sarà in modalità
STAND-BY. La spia sarà illuminata di rosso.
• Premere sul telecomando per accendere o mettere in standby gli
altoparlanti.
• Disconnettere il cavo di alimentazione dalla presa della corrente se si
desidera spegnere completamente l’unità.
NOTA: Gli altoparlanti andranno in modalità
standby dopo 15 minuti di inattività.
Selezionare le modalità
Premere il controllo del volume sull’unità per scorrere attraverso le
opzioni della sorgente, o usare il telecomando per selezionare la modalità
desiderata.
Rosso: Standby
Blu: Bluetooth
Verde: Aux
Ciano: RCA
Giallo: Ottico
Viola: USB
Regolare il volume
ū Usare la manopola del volume sull’unità o +/– sul telecomando per
regolare il volume.
ū Per silenziare il suono, premere sul telecomando. Pre riprendere il
suono, premere o +/– sul telecomando, o ruotare il controllo del
volume sull’unità.
ū Mentre si regola il volume, la spia di stato lampeggia velocemente.
ū Quando viene raggiunto il volume massimo e si preme ancora +, la
spia di stato lampeggia una volta. Quando viene raggiunto il volume
massimo e si preme ancora –, la spia di stato lampeggia una volta.
Impostazioni equalizzatore (EQ)
Puoi regolare il suono degli altoparlanti da scaale usando le
preimpostazioni dell’equalizzatore. Premere sul telecomando una
volta per confermare la modalità EQ corrente. Continuare a premere per
scorrere attraverso le preimpostazioni dell’EQ.
• Classic - l’indicatore LED verde lampeggia per 2 secondi
• POP - l’indicatore LED giallo lampeggia per 2 secondi
• Rock - l’indicatore LED blu lampeggia per 2 secondi
• Film - l’indicatore LED viola lampeggia per 2 secondi
• Voce - l’indicatore LED azzurro lampeggia per 2 secondi
• Personalizzato - l’indicatore LED bianco lampeggia per 2 secondi
Impostazioni personalizzate
• Premere il pulsante per passare alle impostazioni Personalizzate
opremere i pulsanti BASS o TREB +/- una volta, una luce bianca lampeg-
gia per 2 secondi.
• Usare i pulsanti BASS/TREB sul telecomando per incrementare (+) o ri-
durre (-) il livello di EQ. Il livello EQ selezionato è indicato dalla velocità a
cui l’indicatore LED sull’altoparlante lampeggia. Un LED rosso lampeggia
indica un livello aumentato, un LED bianco (non lampeggiante) indica
che il livello è piatto/0, un LED verde lampeggiante indica un livello
ridotto.
Colore LED Livello EQ Velocità LED
lampeggiante
Rosso
+3 Veloce
+2 Medio
+1 Lento
Bianco 0 Acceso
Verde
-1 Lento
-2 Medio
-3 Veloce
NOTA: Le nuove modiche EQ sono salvate di default. Hai
3 secondi tra ciascuna pressione dei tasti per eettuare
modiche prima che la modalità EQ sia chiusa.
AUX/OTTICO/RCA
1. Assicurarsi che l’unità sia connessa al televisore o al dispositivo audio.
2. Quando l’unità è accesa, assicurarsi che la sorgente corretta sia
selezionata usando il telecomando o premendo il controllo del
volume sull’unità.
3. Usare direttamente le funzionalità di riproduzione del dispositivo
audio.
4. Usare la manopola del volume sull’unità o +/– sul telecomando
per regolare il volume.
NOTA: Assicurarsi che l’ingresso RCA e AUX siano impostati minimo al
50% del volume sul dispositivo sorgente. Il volume può essere regolato
tramite l’altoparlante, il telecomando o il dispositivo sorgente.
Modalità Bluetooth
Accoppiare dispositivi dotati di Bluetooth
La prima volta che connetti il tuo dispositivo Bluetooth a questi
altoparlanti, è necessario accoppiarlo.
NOTA:
ū La portata massima tra questi altoparlanti e il dispositivo Bluetooth è di
circa 8 metri (senza la presenza di oggetti che si frappongano).
ū Prima di collegare il dispositivo Bluetooth a questi altoparlanti,
assicurarsi di conoscere le funzionalità del dispositivo.
ū Non è garantita la compatibilità con tutti i dispositivi Bluetooth.
ū Qualsiasi ostacolo tra l’unità e il dispositivo Bluetooth può ridurre la
portata operativa.
ū Se il segnale è debole, il ricevitore Bluetooth potrebbe disconnettersi,
ma ritornerà in modalità accoppiamento automaticamente.
1. Con l’unità accesa, premere sul telecomando o premere il controllo
del volume sull’unità per selezionare la modalità Bluetooth.
L'indicatore luminoso lampeggerà di un colore blu.
2. Attivare il dispositivo Bluetooth e selezionare la modalità di ricerca.
“SHARP CP-SS30” apparirà sull’elenco dei dispositivi Bluetooth.
ū Se non è possibile trovare l’unità, premere e tenere premuto il
pulsante sul telecomando.
3. Selezionare “Sharp CP-SS30“ dalla lista dei dispositivi. Un messaggio
audio verrà emesso quando la connessione è riuscita con successo,
el'indicatore si illuminerà di un blu sso.
4. Ora è possibile cominciare a riprodurre musica dal dispositivo
Bluetooth connesso.

IT
Modalità per disconnettere la funzione Bluetooth:
ū Passare a un’altra funzione sull’unità.
ū Disattivare la funzione Bluetooth sul tuo dispositivo. Un messaggio
audio verrà emesso quando la disconnessione è avvenuta con successo.
ū Tenere premuto il pulsante sul telecomando.
SUGGERIMENTI:
• Digitare “0000” come password, se necessario.
• Se nell’arco di 2 minuti nessun dispositivo Bluetooth viene accoppiato
agli altoparlanti, questi si collegheranno nuovamente alla connessione
precedente.
• Gli altoparlanti si disconnettono anche quando il dispositivo viene
allontanato a una distanza maggiore della portata di funzionamento.
• Se si vuole riconnettere il dispositivo agli altoparlanti, collocarlo
all’interno della portata di collegamento.
• Quando il dispositivo viene allontanato e poi riportato alla portata
di funzionamento, controllare che esso risulti ancora connesso agli
altoparlanti.
• Se la connessione viene persa, seguire le istruzioni riportate
precedentemente per accoppiare nuovamente il dispositivo agli
altoparlanti.
Ascoltare musica da un dispositivo Bluetooth
ū Se il dispositivo Bluetooth connesso supporta il Prolo Avanzato
Distribuzione Audio (A2DP), è possibile ascoltare musica memorizzata
sul dispositivo usando gli altoparlanti.
ū Se il dispositivo supporta anche il Prolo Controllo Remoto Audio/
Video (AVRCP), è possibile usare il telecomando dell’altoparlante per
riprodurre musica memorizzata sul dispositivo.
1. Accoppiare il dispositivo agli altoparlanti.
2. Riprodurre la musica usando il dispositivo (se supporta A2DP).
3. Usare il telecomando fornito per controllare la riproduzione (se AVRCP
è supportato).
ū Per mettere in pausa o riprendere la riproduzione, premere sul
telecomando.
ū Per saltare una traccia, premere i pulsanti / sul telecomando.
ū Premere pre qualche istante / per riavvolgere/fare avanzare
la traccia.
Modalità USB
• Premere ripetutamente il controllo del volume sull’altoparlante o
USB sul telecomando per selezionare la modalità USB. Connettere il
dispositivo di memorizzazione USB contenente i le MP3 (supporto per
memorie no a 64GB).
• Premere per avviare la riproduzione.
• Spegnere l’unità prima di rimuovere il dispositivo di memorizzazione
UBS.
NOTA
SHARP non sarà ritenuta responsabile per perdite di dati quando il dispositivo
di memorizzazione USB è connesso a questa unità. Salva sempre la tua
musica prima di riprodurla su questo dispositivo.
Funzioni USB (telecomando)
ū Per riprodurre/mettere in pausa.
ū Salta alla canzone successiva | Premere e tenere premuto per andare
avanti rapidamente.
ū Salta all'inizio della canzone | Premere e tenere premuto per andare
indietro rapidamente.
NOTA:
ūSe gli altoparlanti sono messi in standby mentre erano in modalità USB, la
riproduzione riprende dal punto in cui l’unità è stata riavviata.
ūLa riproduzione USB verrà eettuata nell’ordine in cui le tracce audio sono
state salvate sul disco USB.
Risoluzione dei problemi
Per far sì che la garanzia resti valida, non tentare mai di riparare il sistema
da soli. In caso di problemi con l’unità, consultare quanto segue prima di
richiedere assistenza.
Nessuna alimentazione
Assicurarsi che il cavo CA sia connesso correttamente.
Assicurarsi che la presa CA eroghi corrente.
Premere sul telecomando o l’altoparlante sull’unità per accenderla.
Nessun suono
Aumentare il volume. Premere + sul telecomando o girare in senso orario
la manopola del volume sull’altoparlante.
Premere sul telecomando per assicurarsi che gli altoparlanti non siano
silenziati.
Premere brevemente per selezionare una sorgente di ingresso
diversa.
Quando viene connessa a una sorgente digitale (ottico), se non c’è audio:
ū Provare a impostare l’uscita del televisore su PCM oppure
ū Connettere direttamente la sorgente, che sia Blu-ray o altro. Alcuni
televisori non trasmettono il segnale audio digitale.
Il televisore potrebbe essere impostati su uscite audio variabili.
Confermare che l’uscita audio sia impostata su FISSA o STANDARD, e
non VARIABILE. Consultare il manuale del televisore per informazioni più
dettagliate.
Assicurarsi che il volume sul dispositivo sorgente sia alzato e che il
dispositivo non sia in muto.
Il telecomando non funziona
Assicurarsi che la linguetta isolante della batteria sia stata rimossa dal retro
del telecomando.
Prima di premere qualsiasi pulsante di controllo della riproduzione,
bisogna innanzitutto selezionare la corretta sorgente.
Ridurre la distanza tra il telecomando e l’unità.
Inserire la batteria nella giusta polarità (+/-) come indicato.
Sostituire la batteria.
Puntare il telecomando direttamente verso il sensore sul lato anteriore
dell’altoparlante destro.
Sento ronzii o fruscii
Assicurarsi che tutti i cavi e i li siano connessi saldamente.
Connettere diverse sorgenti di segnale (TV, lettore, etc) per controllare se il
ronzio persiste. Se non è così, il problema potrebbe essere nel dispositivo
originale.
Connettere il dispositivo a un ingresso diverso.
Se si sente un ronzio durante l’uso della fonte Aux, assicurarsi che il
dispositivo sorgente collegato all’ingresso Aux sia correttamente messo
a terra (questo può essere fatto normalmente collegando il dispositivo
sorgente a una sorgente di alimentazione messa a terra).
Non riesco a trovare il nome Bluetooth di questa unità sul dispositivo
Bluetooth
Assicurarsi che la funzione Bluetooth sia attiva sul dispositivo Bluetooth.
Ripetere la procedura di accoppiamento sul dispositivo Bluetooth.

28
Belangrijke veiligheidsinstructies
Volg alle veiligheidsinstructies op en neem alle
waarschuwingen in acht. Bewaar deze handleiding voor
toekomstig gebruik.
Dit symbool wijst de gebruiker erop de
gebruikershandleiding te raadplegen voor verdere informatie
over veiligheid, bediening en onderhoud.
Dit symbool duidt op de aanwezigheid van niet-geïsoleerde
"gevaarlijke spanning" in het product. Deze spanning kan
hoog genoeg zijn om een risico van elektrische schokken
voor personen in te houden.
Verwijst naar wisselstroom (AC)
Dit symbool geeft aan dat de met het symbool gemarkeerde
nominale spanning wisselstroom is.
Verwijst naar apparatuur van klasse II.
Dit symbool geeft aan dat dit product een dubbel
isolatiesysteem heeft en geen veiligheidsverbinding met de
elektrische aarde (aarding) nodig heeft.
Voorzorgsmaatregelen
Schade
• Controleer het product na het uitpakken direct op beschadigingen.
Als het product op enigerlei wijze beschadigd is, dan mag u dit niet
gebruiken. Neemt contact op met uw dealer.
GEVAAR
KANS OP ELECTRISCHE SCHOKKEN
NIET OPENEN
Om het risico van elektrische schokken te voorkomen, mag u de
achterkant niet verwijderen. Er zijn geen door de gebruiker te repareren
onderdelen in het apparaat. Laat onderhoud over aan gekwaliceerd
onderhoudspersoneel.
Stroomaansluiting en toegankelijkheid
• Pak het netsnoer niet met natte handen vast, want dat kan een
elektrische schok veroorzaken. Als de stekker niet in uw stopcontact
past, moet u de stekker niet met geweld in een stopcontact duwen.
Schakel het apparaat volledig uit alvorens u de stekker uit het
stopcontact haalt. Koppel het netsnoer los als het lange tijd niet wordt
gebruikt. Zorg ervoor dat de netstekker altijd goed bereikbaar is. Sluit
geen verlengkabels aan.
Voeding
• Zorg ervoor dat het apparaat op een stopcontact van AC 100-240 V,
50/60 Hz is aangesloten. Het gebruik van een hogere spanning kan
storingen of zelfs brandgevaar veroorzaken.
Gegoten stekker met zekering (niet-herdraadbaar) - alleen in het VK,
Malta, Cyprus en Ierland.
• Het netsnoer van deze apparatuur is voorzien van een gegoten stekker
met een 3A-zekering. De waarde van de zekering is aangegeven aan
pinzijde van de stekker. Als deze vervangen moet worden, gebruik
dan een zekering die is goedgekeurd volgens BS1362 van dezelfde
classicering.
Bescherming van het netsnoer
• Beschadig het netsnoer niet, plaats er geen zware voorwerpen op
en trek het niet uit en buig het niet. Schade aan het netsnoer kan
brand of elektrische schokken veroorzaken. Indien het voedingssnoer
beschadigd is, moet deze worden vervangen door de fabrikant, een
onderhoudsdealer of een gelijkwaardig gekwaliceerd persoon.
Veiligheid voor kinderen
• Neem bij het gebruik van dit product altijd de
basisvoorzorgsmaatregelen in acht, vooral als er kinderen aanwezig zijn.
Kinderen dienen onder toezicht te staan om er zeker van te zijn dat ze
niet met het product spelen.
Locatie
• Wanneer dit product in gebruik is, dan moet het op een vlakke, stabiele
ondergrond worden geplaatst. Geen enkel deel van het hoofdapparaat
over een rand uitsteken.
Ventilatie
• De sleuven en openingen in de behuizing zijn bedoeld voor ventilatie
om een betrouwbare werking van het product te waarborgen en om
het product te beschermen tegen oververhitting. Deze openingen
mogen niet geblokkeerd of afgedekt worden. Zorg voor een minimale
afstand van 5 cm rondom het product voor voldoende ventilatie.
Laat nooit iemand iets in gaten, sleuven of andere openingen in de
behuizing van het apparaat duwen, omdat dit een dodelijke elektrische
schok kan veroorzaken.
Warmte en bedrijfstemperatuur
• Installeer het apparaat niet in de buurt van warmtebronnen zoals
radiatoren, verwarmingsroosters, fornuizen of andere apparaten
(inclusief versterkers) die warmte produceren. Vermijd blootstelling aan
direct zonlicht.
Open vlammen
• Om brandgevaar te voorkomen, dient u kaarsen of open vlammen uit
de buurt van dit product te houden.
Water, vocht en vloeistoen
• Om brandgevaar of het risico op elektrische schokken te voorkomen,
mag dit product niet aan regen, water of vocht blootgesteld worden.
Plaats geen met vloeistof gevulde objecten op of in de buurt van dit
product.
Storm en bliksem
• Storm is gevaarlijk voor alle elektrische producten. Indien de voeding
door bliksem wordt geraakt kan het product beschadigd raken, zelfs
wanneer dit is uitgeschakeld. U moet alle kabels en aansluitingen
verwijderen van het apparaat voor een storm.
Onderhoud
• Trek de stekker uit het stopcontact voordat u het product schoonmaakt.
Gebruik een zachte en schone doek om de buitenkant van het apparaat
schoon te maken. Reinig het apparaat nooit met chemicaliën of
reinigingsmiddel.
Service en reparaties
• Dit product bevat geen onderdelen die door de gebruiker kunnen
worden gerepareerd. Het blootleggen van de interne onderdelen
in het apparaat kan uw leven in gevaar brengen. Neem in het geval
van een defect contact op met de fabrikant of een geautoriseerde
onderhoudsafdeling. Onder de fabrieksgarantie vallen geen fouten door
reparaties uitgevoerd door ongeautoriseerde derden.
Batterijen
Installatie
• Gebruik geen andere batterijen dan de gespeciceerde batterijen.
Gebruik de juiste polariteit tijdens het plaatsen van de batterijen.
Gebruik en onderhoud
• Stel batterijen niet bloot aan hoge temperaturen, bijv. in de buurt
van vuur of in direct zonlicht. Verwijder de batterijen uit het product
om lekkage te voorkomen, als u het product gedurende langere tijd
CAUTION
RISK OF ELECTRIC SHOCK
DO NOT OPEN
CAUTION
RISK OF ELECTRIC SHOCK
DO NOT OPEN

NL
(langer dan een maand) niet gebruikt, Als de batterijen lekken, veegt u
de gelekte vloeistof in het batterijvak weg en vervangt u de batterijen
door nieuwe.
Veiligheid voor kinderen
• Zorg er altijd voor dat het batterijvak gesloten en beveiligd is.
• Jonge kinderen kunnen batterijen gemakkelijk inslikken. Deze kunnen
ernstige inwendige brandwonden veroorzaken en zelfs de dood tot
gevolg hebben. Houd batterijen uit de buurt van kinderen. Raadpleeg
onmiddellijk een arts als u denkt dat een kind een batterij heeft
ingeslikt.
Omgevingsfactoren
• Houd batterijen uit de buurt van een lage luchtdruk of hoge
temperaturen, aangezien dit kan leiden tot een explosie of het lekken
van een ontvlambare vloeistof of gas.
Verwijdering
• Verwijder de batterijen op de juiste wijze conform de aanwijzingen in
deze handleiding (zie hoofdstuk "Verwijdering van deze apparatuur en
batterijen"). Gooi de batterijen niet in het vuur, haal deze niet uit elkaar
en probeer niet om niet-oplaadbare batterijen op te laden. De batterijen
kunnen gaan lekken of exploderen.
Verwijdering van deze apparatuur en
batterijen
Informatie voor gebruikers over de inzameling en verwijdering van oude
apparatuur en gebruikte batterijen.
Dit symbool betekent dat het product batterijen bevat
die onder de Europese Richtlijn 2013/56/EU vallen. Deze
batterijen mogen niet met het normale huishoudelijke
afval weggegooid worden. De aanduidingen Cd, Hg en
Pb onder het symbool van de vuilnisbak geven aan of de
batterij cadmium (Cd), kwik (Hg) of lood (Pb) bevat.
Dit symbool betekent dat dit product onder de Europese
Richtlijn 2012/19/EU valt en niet weggegooid of gedumpt
mag worden met ander huishoudelijk afval.
Dit symbool betekent dat het product zodanig ontworpen
en vervaardigd is dat dit gerecycled en hergebruikt kan
worden.
Deze symbolen op de producten, verpakkingen en/of begeleidende
documenten betekenen dat u gebruikte elektrische en elektronische
producten en batterijen niet met het gewone huishoudelijke afval mag
weggooien. Voor bijzonderheden over waar en hoe zij deze artikelen
kunnen inleveren voor een milieuveilige recycling kunnen huishoudelijke
gebruikers contact opnemen met de detailhandelaar waar zij dit product
hebben gekocht of met hun plaatselijke overheidskantoor.
CE- en UKCA-verklaring:
• Hierbij verklaart Sharp Consumer Electronics Poland sp. Z o.o. dat dit
audioapparaat voldoet aan de essentiële vereisten en andere relevante
bepalingen van de RED richtlijn 2014/53/EU en de Britse voorschriften
voor radioapparatuur uit 2017.
• De volledige tekst van de CE- en UKCA-conformiteitsverklaring
is beschikbaar op sharpconsumer.eu. Ga vervolgens naar de
downloadsectie van uw model en selecteer “Declaration of Conformity"
(conformiteitsverklaring).

30
Inhoud van de doos:
• CP-SS30 boekenplankluidsprekers
• Afstandsbediening (incl. batterijen)
• Luidsprekerkabel (3 m)
• RCA-audiokabel
• AUX-audiokabel
• Voedingskabel
• Gebruikersdocumentatie
Bediening
(Zie 1 op blz. 1).
1. Verwijderbare luidsprekerroosters
2. Ledindicatielampjes
• Stand-by - Rood
• Bluetooth - Blauw
• Aux in - Groen
• RCA - Cyaan
• Optical Mode - Geel
• USB - Paars
3. / Volume/bron/vermogensregeling
• Druk hier lang om het apparaat in te schakelen of om in de stand-
bymodus te gaan.
• Druk hier kort op om de modus te wijzigen (Bluetooth, Aux-in, RCA,
Optical, USB).
• Draai aan deze knop om het geluidsniveau aan te passen.
Ingangen/uitgangen
(Zie 2 op pag. 1).
1. USB-ingang
2. Optical-ingang
3. RCA line-ingangen
4. Aux in
5. ~AC stroomingang
6. Audio-uitgang voor aansluiting van passieve linkerluidspreker
Afstandsbediening
(Zie 3 op pag. 2).
1. Druk hierop om het apparaat in te schakelen of om in de stand-by-
modus te gaan.
2. LOUD Loudness-compensatie verhoogt de lage en hoge frequenties
bij luisteren op laag volume.
3. Druk hierop om het geluid te dempen. Druk nogmaals om het
geluid te hervatten of druk op +/- om het geluid te hervatten.
4. In Bluetooth- en USB-modus: druk hier kort op voor het vorige
nummer, druk hier lang op om terug te spoelen.
5. In Bluetooth- en USB-modus: druk hier kort op om af te spelen/
te pauzeren.
6. In Bluetooth- en USB-modus: druk hier kort op voor het volgende
nummer, druk hier lang op om vooruit te spoelen.
7. Druk hier kort op om de Bluetooth-modus te openen.Druk hier lang
op om de verbinding met het gekoppelde apparaat te verbreken.
8. AUX Druk hier kort op om de audiobron te wijzigen in Aux.
9. RCA Druk hier kort op om de audiobron te wijzigen in RCA.
10. OPT Druk hier kort op om de audiobron te wijzigen in Optical.
11. USB Druk hier kort op om de USB-modus te openen.
12. EQ Druk hier kort op om de huidige EQ-modus te bevestigenBlijf
hierop drukken om door de EQ-voorinstellingen te bladeren.
13. +/– Druk hierop om het volume aan te passen.
14. BASS +/– Druk hierop om het basniveau van de EQ aan te passen.
15. TRE +/– Druk hierop om het trebleniveau van de EQ aan te passen.
Bediening met de afstandsbediening
EERSTE GEBRUIK: Het apparaat heeft een voorgeïnstalleerde
CR2025 lithiumbatterij. Verwijder het doorzichtige beschermende
lipje om de batterij van de afstandsbediening te activeren.
Met de meegeleverde afstandsbediening kan het apparaat vanaf een
afstand worden bediend.
• Zelfs als de afstandsbediening binnen het eectieve bereik van 6 m
wordt bediend, is het mogelijk dat de afstandsbediening niet goed
functioneert als er zich obstakels tussen het apparaat en de afstandsbe-
diening bevinden.
• Als de afstandsbediening wordt gebruikt in de buurt van andere
producten die infraroodstralen genereren, of als er andere afstandsbe-
dieningsapparaten met infraroodstralen in de buurt van het apparaat
worden gebruikt, dan kan het zijn dat de afstandsbediening niet goed
werkt. Omgekeerd kunnen ook de andere producten onjuist werken.
De batterij van de afstandsbediening vervangen
12
4
3
12
4
3
Voor de afstandsbediening is een CR2025, 3 V lithiumbatterij nodig.
1. Druk het lipje aan de zijkant van de batterijlade naar het midden toe.
2. Schuif de batterijlade uit de afstandsbediening.
3. Verwijder de oude batterij. Plaats een nieuwe CR2025-batterij in de
batterijlade met de juiste polariteit (+/-) zoals aangegeven.
4. Schuif de batterijlade terug in de sleuf van de afstandsbediening
totdat de lade op zijn plaats vastklikt.
Eerste instellingen
De luidsprekers plaatsen
Om van stereogeluid te genieten, plaatst u de "actieve" luidspreker (het
apparaat met de bedieningsknoppen aan de voorzijde en de ingangen
aan de achterzijde) aan de rechterzijde. De andere "passieve" luidspreker
moet links staan. Wij raden aan de luidsprekers minimaal 50 cm uit elkaar
te plaatsen. Zorg ervoor dat de luidsprekers niet geblokkeerd worden.
De luidsprekers aansluiten
Sluit de linker- en rechterluidspreker aan met de meegeleverde
luidsprekeraansluitkabel alvorens u het apparaat inschakelt. Let bij het
aansluiten van de luidsprekers op de polariteit: sluit op beide luidsprekers
de rode kabel aan op de rode uitgang en de doorzichtige kabel op de
zwarte uitgang.
Aansluiten op stroomvoorziening
Risico op schade aan het product! Zorg ervoor dat de voedingsspanning
overeenkomt met de spanning die op de achterkant of de onderkant van

NL
het apparaat staat.
Sluit het netsnoer aan op de aansluiting ~AC ingang van het apparaat en
steek vervolgens de stekker in het stopcontact.
De boekenplankluidsprekers gebruiken
Stand-by/AAN
• Als u het apparaat voor het eerst aansluit op het stopcontact, staat het
toestel in de STAND-BY-modus. Het indicatielampje licht rood op.
• Druk op van de afstandsbediening om de luidsprekers vanuit de
stand-bymodus IN te schakelen en vice versa.
• Trek de stekker uit het stopcontact als u het apparaat volledig wilt
uitschakelen.
OPMERKING: De luidsprekers schakelen na 15 minuten
inactiviteit automatisch over in de stand-bymodus.
Modi selecteren
Druk herhaaldelijk op de volumeknop op het apparaat om door de
bronopties te bladeren of gebruik de afstandsbediening om de gewenste
modus te selecteren.
Rood: Stand-by
Blauw: Bluetooth
Groen: Aux
Cyaan: RCA
Geel: Optical
Paars: USB
Het volume aanpassen
ū Gebruik de volumknop op het apparaat of de knoppen +/– op de
afstandsbediening om het volume aan te passen.
ū Om het geluid te dempen, drukt u op op de afstandsbediening.
Om het geluid te hervatten, drukt op op of op +/– op de
afstandsbediening. U kunt ook aan de volumeknop op het apparaat
draaien.
ū Tijdens het aanpassen van het volume knippert het
statusindicatielampje snel.
ū Als het volumeniveau het maximumniveau bereikt en u nogmaals op +
drukt, dan knippert het indicatielampje eenmaal. Als het volumeniveau
het minimumniveau bereikt en u nogmaals op - drukt, dan knippert het
ledindicatielampje eenmaal.
Equalizer-instellingen (EQ)
U kunt het geluid van de boekenplankluidsprekers aanpassen met
de voorinstellingen van de equalizer. Druk eenmaal op op de
afstandsbediening om de huidige EQ-modus te bevestigen. Blijf hierop
drukken om door de EQ-voorinstellingen te bladeren.
• Klassiek - Het groene ledindicatielampje knippert gedurende 2secon-
den
• POP - Het gele ledindicatielampje knippert gedurende 2 seconden
• Rock - Het blauwe ledindicatielampje knippert gedurende 2 seconden
• Film - Het paarse ledindicatielampje knippert gedurende 2 seconden
• Stem - Het cyaankleurige ledindicatielampje knippert gedurende
2seconden
• Aangepast - Het witte ledindicatielampje knippert gedurende 2se-
conden
Aangepaste instellingen
• Druk op de knop om de persoonlijke instellingen te openen of
druk eenmaal op een BASS of TREB +/- knop. Een wit lampje zal daarna
gedurende 2 seconden knipperen.
• Gebruik de BASS/TREB-knoppen op de afstandsbediening om het EQ-ni-
veau te verhogen (+) of te verlagen (-). Het geselecteerde EQ-niveau
wordt aangegeven door de snelheid waarmee het ledindicatielampje
op de luidspreker knippert. Een knipperende rode led geeft een verho-
ging aan, een witte led (niet knipperend) geeft een onveranderd niveau
aan, en een knipperende groene led geeft een verlaging aan.
Ledkleur EQ-niveau Snelheid knipperend
led
Rood
+3 Snel
+2 Medium
+1 Langzaam
Wit 0 Aan
Groen
-1 Langzaam
-2 Medium
-3 Snel
OPMERKING: Nieuwe EQ-wijzigingen worden als standaard
opgeslagen. U heeft 3 seconden tussen elke druk op de knop om
wijzigingen aan te brengen voordat de EQ-modus wordt verlaten.
AUX/OPTICAL/RCA
1. Zorg ervoor dat de soundbar is verbonden met de tv of het
audioapparaat.
2. Terwijl het apparaat is ingeschakeld, moet u ervoor zorgen dat de
juiste bron is geselecteerd met de afstandsbediening of door op de
volumeregelaar op het apparaat te drukken.
3. Bedien uw audioapparaat direct voor afspeelfuncties.
4. Gebruik de volumeknop op het apparaat of de knoppen +/– op
de afstandsbediening om het volume aan te passen.
OPMERKING: Zorg ervoor dat de RCA- en AUX-ingang zijn ingesteld
op minimaal 50% volume op het bronapparaat. U kunt het volume
regelen via de luidspreker, de afstandsbediening of het bronapparaat.
Bluetooth-modus
Bluetooth-geschikte apparaten koppelen
De eerste keer dat u uw Bluetooth-apparaat met deze luidsprekers
verbindt, dient u het apparaat te koppelen aan deze luidsprekers.
OPMERKING:
ū Het operationele bereik tussen deze luidsprekers en een Bluetooth-
apparaat is ongeveer 8 meter (zonder objecten tussen het Bluetooth-
apparaat en het apparaat).
ū Voordat u een Bluetooth-apparaat met de luidsprekers verbindt, dient u
zich ervan te verzekeren dat u de mogelijkheden van het apparaat kent.
ū Compatibiliteit met alle Bluetooth-apparaten is niet gegarandeerd.
ū Elk obstakel tussen deze luidsprekers en een Bluetooth-apparaat kan
het operationele bereik verkleinen.
ū Als de signaalsterkte zwak is, kan uw Bluetooth-ontvanger de
verbinding verbreken, maar deze gaat automatisch opnieuw in de
koppelingsmodus over.
1. Als het apparaat ingeschakeld is, drukt op op de afstandsbediening
of u drukt op de volumeknop op het apparaat om de Bluetooth-
modus te selecteren. Het indicatielampje knippert blauw.
2. Activeer uw Bluetooth-apparaat en selecteer de zoekmodus.
“SHARP CP-SS30” verschijnt in de lijst met Bluetooth-apparaten.
ū Als u het apparaat niet kunt vinden, houd dan op de
afstandsbediening ingedrukt.

32
3. Selecteer "Sharp CP-SS30" uit de apparatenlijst. U hoort een
geluidssignaal als de verbinding tot stand is gebracht. Het
indicatielampje brandt continu blauw.
4. Start het afspelen van muziek vanaf het aangesloten Bluetooth-
apparaat.
Om de Bluetooth-functie uit te schakelen, kunt u:
ū Overschakelen naar een andere functie op het apparaat.
ū De Bluetooth-functie op uw apparaat uitschakelen. Er klinkt een
geluidssignaal wanneer de verbinding succesvol is verbroken.
ū Houd de knop op de afstandsbediening ingedrukt.
TIPS:
• Voer het wachtwoord "0000" indien nodig in.
• Als er binnen 2 minuten geen ander Bluetooth-apparaat met deze
luidsprekers gekoppeld wordt, dan brengen de luidsprekers de vorige
verbinding opnieuw tot stand.
• De luidsprekers worden ook losgekoppeld wanneer uw apparaat buiten
het werkbereik wordt gezet.
• Als u uw apparaat opnieuw wilt verbinden met de luidsprekers, dan
plaatst u deze binnen het operationele bereik.
• Als de luidsprekers buiten het werkingsbereik worden verplaatst,
controleer dan bij het terugzetten of het apparaat nog verbonden is
met de luidsprekers.
• Als de verbinding verbroken is, volgt u de bovenstaande instructies om
uw apparaat opnieuw te koppelen aan de luidsprekers.
Naar muziek op uw Bluetooth-apparaat luisteren
ū Als het aangesloten Bluetooth-apparaat Advanced Audio Distribution
Prole (A2DP) ondersteunt, kunt u via de luidsprekers luisteren naar de
muziek die op het apparaat is opgeslagen.
ū Als het apparaat ook Audio Video Remote Control Prole (AVRCP)
ondersteunt, kunt u de afstandsbediening van de luidsprekers
gebruiken om muziek af te spelen die op het apparaat is opgeslagen.
1. Koppel uw apparaat met de luidsprekers.
2. Speel muziek af via uw apparaat (als dit A2DP ondersteunt).
3. Gebruik de meegeleverde afstandsbediening om de muziek af te
spelen (als deze AVRCP ondersteunt).
ū Om de weergave te pauzeren/hervatten, drukt u op op de
afstandsbediening.
ū Druk op / op de afstandsbediening om een nummer over
te slaan.
ū Druk lang op / om terug/vooruit te spoelen binnen een
nummer.
USB-modus:
• Druk herhaaldelijk op de volumeknop op de luidspreker of op USB op
de afstandsbediening om de USB-modus te selecteren. Sluit het USB-
geheugenapparaat aan dat MP3/WAV-bestanden bevat (USB-sticks tot
64 GB worden ondersteund).
• Druk op om het afspelen te starten.
• Schakel het apparaat uit voordat u het USB-geheugenapparaat
verwijdert.
OPMERKING
SHARP kan niet aansprakelijk worden gesteld voor verlies van gegevens terwijl
het USB-geheugenapparaat op dit apparaat is aangesloten. Maak altijd een
back-up van uw muziek voordat u dit product gebruikt.
USB-functies (afstandsbediening)
ū Om af te spelen of te pauzeren.
ū Naar het volgende nummer | Ingedrukt houden om vooruit te
spoelen.
ū Naar het begin van het nummer | Ingedrukt houden om terug te
spoelen.
OPMERKING:
ūAls u de luidsprekers in de USB-modus in de stand-bymodus zet, dan wordt
de weergave vanaf hetzelfde punt wanneer u het apparaat opnieuw
inschakelt.
ūHet afspelen via USB gebeurt in volgorde van hoe de audiotracks op de
USB-drive zijn opgeslagen.
Probleemoplossing
Om de garantie te behouden, mag u nooit proberen om het systeem zelf
te repareren. Als u problemen ondervindt bij het gebruik van dit toestel,
bekijkt u het volgende alvorens u om service vraagt.
Geen stroomtoevoer
Zorg ervoor dat het netsnoer correct is aangesloten.
Zorg ervoor dat er stroom op het stopcontact staat.
Druk op van de afstandsbediening of luidspreker om het apparaat aan
te zetten.
Geen geluid
Verhoog het volume. Druk op + op de afstandsbediening of draai
rechtsom aan de volumeknop.
Druk op op de afstandsbediening om te zorgen dat de luidsprekers niet
gedempt zijn.
Druk kort op om een andere ingangsbron te selecteren.
Bij verbinding met een digitale bron (Optical), als er geen geluid is:
ū Probeer de tv-uitgang in te stellen op PCM of
ū sluit de soundbar rechtstreeks aan op uw Blu-ray/andere bron, sommige
tv's geven geen digitale audio door.
Uw tv kan ingesteld zijn op een andere audio-uitgang. Controleer of
de audio-uitvoerinstelling is ingesteld op FIXED of STANDARD, niet op
VARIABLE. Raadpleeg de gebruikershandleiding van uw tv voor meer
gedetailleerde informatie.
Zorg dat het volume op uw bronapparaat omhoog staat en dat het
apparaat niet gedempt is.
De afstandsbediening werkt niet
Controleer of het beschermende lipje van de batterij aan de achterkant
van de afstandsbediening is verwijderd.
Selecteer eerst de juiste bron, voordat u op een afspeelknop drukt.
Verklein de afstand tussen de afstandsbediening en het apparaat.
Plaats de batterij met de polariteit (+/-) zoals aangegeven.
Vervang de batterij.
Richt de afstandsbediening direct op de sensor aan de voorkant van de
rechterluidspreker.
Ik hoor gonzen of zoemen
Zorg ervoor dat alle kabels en draden goed zijn aangesloten.
Sluit een ander bronapparaat aan (tv, platenspeler, etc.) om te kijken of het
zoemen aanhoudt. Als dit niet het geval is, kan het probleem zich bij het
originele apparaat voordoen.
Sluit uw apparaat aan op een andere ingang.
Als er zoemend geluid te horen is tijdens het gebruik van de Aux-
bron, zorg er dan voor dat het bronapparaat dat op de Aux-ingang
is aangesloten goed geaard is (dit kunt u gewoonlijk doen door het
bronapparaat op een geaarde netvoeding aan te sluiten).
Ik kan de Bluetooth-naam van dit apparaat niet vinden op mijn
Bluetooth-apparaat
Zorg ervoor dat de Bluetooth-functie op uw Bluetooth-apparaat is
geactiveerd.
Koppel de soundbar opnieuw met uw Bluetooth-apparaat.

PL
Ważne środki ostrożności
Należy przestrzegać wszystkich podanych środków
ostrożności i ostrzeżeń. Instrukcję należy zachować na
przyszłość.
Ten symbol informuje użytkownika, aby zapoznał się
z instrukcją obsługi w celu uzyskania dodatkowych informacji
dotyczących bezpieczeństwa, obsługi i konserwacji.
Ten symbol wskazuje na obecność w produkcie
nieizolowanego „niebezpiecznego napięcia”, które może
być na tyle duże, aby stwarzać ryzyko porażenia prądem
elektrycznym.
Dotyczy prądu przemiennego (AC)
Ten symbol informuje, że oznaczone nim napięcie
znamionowe to napięcie prądu przemiennego.
Dotyczy sprzętu klasy II.
Ten symbol wskazuje, że opisywany produkt posiada system
podwójnej izolacji i nie wymaga bezpiecznego połączenia
zuziemieniem.
Ostrzeżenia
Uszkodzenia
• Po usunięciu opakowania należy sprawdzić, czy urządzenie nie jest
uszkodzone. W przypadku jakiegokolwiek uszkodzenia nie korzystaj z
urządzenia i skontaktuj się ze sprzedawcą.
UWAGA
RYZYKO PORAŻENIA PRĄDEM
ELEKTRYCZNYM NIE OTWIERAĆ
Aby zapobiec ryzyku porażenia prądem,, nie wolno demontować tylnej
osłony. Wewnątrz urządzenia nie znajdują się żadne elementy wymagające
obsługi przez użytkownika; naprawy należy zlecać autoryzowanym
punktom serwisowym.
Podłączenie zasilania i dostępność
• Nie wolno dotykać przewodu zasilającego mokrymi rękoma, ponieważ
mogłoby to spowodować porażenie prądem. Jeśli wtyczka przewodu
zasilającego nie pasuje do twojego gniazdka elektrycznego, nie wciskaj
jej na siłę. Przed odłączeniem przewodu zasilającego od gniazdka
elektrycznego należy całkowicie wyłączyć zasilanie urządzenia. Jeśli
nie używasz urządzenia przez dłuższy czas, odłącz przewód zasilający
od gniazdka elektrycznego. Dopilnuj, by wtyczka była zawsze łatwo
dostępna. Nie podłączać urządzenia do przedłużaczy.
Źródło zasilania
• Upewnij się, że urządzenie zostało podłączone do gniazdka
elektrycznego 100–240 V~, 50/60 Hz. Używanie wyższego napięcia
może powodować awarie, a nawet zapalenie się urządzenia.
Nierozbieralna wtyczka przewodu zasilającego z bezpiecznikiem (bez
możliwości wymiany) – dotyczy wyłącznie Wielkiej Brytanii Malty,
Cypru i Irlandii.
• Przewód zasilający w opisywanym urządzeniu wyposażony jest w
nierozbieralną wtyczkę z bezpiecznikiem 3 A. Wartość bezpiecznika
jest podana na obudowie wtyczki; jeśli wymaga wymiany, należy
zastosować bezpiecznik zgodny z BS1362 o tych samych parametrach
znamionowych.
Zabezpieczenie przewodu zasilającego
• Uważaj, by nie uszkodzić przewodu zasilającego: nie stawiaj na nim
ciężkich przedmiotów, nie rozciągaj go ani nie wyginaj. Uszkodzenie
przewodu zasilającego może spowodować pożar lub porażenie
prądem. Jeśli przewód zasilający zostanie uszkodzony, wymianę
należy powierzyć producentowi, personelowi serwisu lub innej
wykwalikowanej osobie
Bezpieczeństwo dzieci
• Zawsze zachowuj podstawowe środki ostrożności podczas korzystania
zurządzenia, zwłaszcza w obecności dzieci. Nadzoruj dzieci, by nie
bawiły się urządzeniem.
Lokalizacja
• Podczas użytkowania opisywane urządzenie należy ustawić na płaskiej,
stabilnej powierzchni; żadna część urządzenia głównego nie powinna
być wysunięta poza krawędź powierzchni, na której urządzenie zostało
ustawione.
Wentylacja
• Szczeliny i otwory w obudowie służą do wentylacji urządzenia, w celu
zapewnienia niezawodnego działania i ochrony przed przegrzaniem;
tych otworów nie wolno blokować ani zakrywać. Należy pozostawić
5cm wolnego miejsca wokół urządzenia dla zapewnienia odpowiedniej
wentylacji. Nigdy nie pozwalaj nikomu wsuwać czegokolwiek w otwory,
gniazda i inne szczeliny w obudowie urządzenia, ponieważ może to
spowodować porażenie prądem.
Ciepło i temperatura podczas pracy
• Nie umieszczaj urządzenia w pobliżu źródeł ciepła, takich jak grzejniki,
nawiewy, piece czy inne urządzenia (w tym wzmacniacze) emitujące
ciepło. Należy unikać bezpośredniego działania promieni słonecznych.
Źródła otwartego ognia
• Aby zapobiec powstaniu pożaru, należy trzymać świece i inne źródła
otwartego ognia z dla od urządzenia.
Wniknięcie wody, wilgoci lub cieczy
• Aby zapobiec wystąpieniu pożaru lub porażenia prądem, nie wolno
narażać opisywanego urządzenia na działanie deszczu, wody ani
wilgoci. Nie wolno umieszczać przedmiotów napełnionych wodą na
urządzeniu lub w jego pobliżu.
Burze i wyładowania atmosferyczne
• Burze stanowią niebezpieczeństwo dla wszystkich urządzeń
elektrycznych. W przypadku uderzenia pioruna urządzenie może zostać
uszkodzone, nawet jeśli jest wyłączone. Przed nadejściem burzy należy
odłączyć od urządzenia wszystkie przewody i złącza.
Konserwacja
• Przed czyszczeniem urządzenia odłącz przewód zasilający od sieci
elektrycznej. Do czyszczenia zewnętrznej części obudowy użyj
miękkiej, czystej ściereczki. Nigdy nie czyść obudowy chemikaliami ani
detergentami.
Serwis i naprawy
• Niniejszy produkt nie posiada żadnych części, które może naprawiać
użytkownik. Odsłanianie wewnętrznych części urządzenia może
stanowić zagrożenie dla życia. W przypadku wystąpienia usterki
skontaktuj się z producentem lub autoryzowanym serwisem. Gwarancja
nie obejmuje usterek wywołanych naprawami wykonywanymi przez
nieupoważnione strony trzecie.
Baterie
Instalacja
• Nie używaj innych baterii niż wskazane w instrukcji. Zachowaj
prawidłową polaryzację, gdy montujesz baterie.
CAUTION
RISK OF ELECTRIC SHOCK
DO NOT OPEN
CAUTION
RISK OF ELECTRIC SHOCK
DO NOT OPEN

34
Użytkowanie i konserwacja
• Nie wystawiaj baterii na działanie wysokich temperatur, np. w pobliżu
ognia lub w bezpośrednim świetle słonecznym. Jeśli urządzenie nie
będzie używane przez dłuższy czas (ponad miesiąc), wyjmij z niego
baterie, by nie wyciekły. Jeśli baterie wyciekną, wytrzyj pojemnik na
baterie i zastąp baterie nowymi.
Bezpieczeństwo dzieci
• Upewnij się, że pojemnik na baterie jest zawsze zamknięty i
zabezpieczony.
• Baterie mogą zostać łatwo połknięte przez małe dzieci, powodując
poważne poparzenia wewnętrzne i doprowadzić do śmierci. Baterie
należy przechowywać w miejscu niedostępnym dla dzieci. Jeśli
przypuszczasz, że bateria została połknięta, natychmiast zasięgnij
porady lekarza.
Warunki otoczenia
• Baterie należy chronić przed niskim ciśnieniem lub wysokimi
temperaturami. W przeciwnym razie mogłoby to spowodować wybuch
albo wyciek łatwopalnej cieczy lub gazu.
Utylizacja
• Utylizuj baterie w prawidłowy sposób, postępując zgodnie ze
wskazówkami podanymi w niniejszej instrukcji (zapoznaj się z opisem
w sekcji „Usuwanie urządzenia i baterii”). Nie wolno ich wrzucać do
ognia, demontować ani ładować jednorazowych baterii; mogłoby to
spowodować wyciek lub wybuch.
Usuwanie urządzenia i baterii
Informacje dla użytkowników dotyczące zbiórki usuwania zużytych
urządzeń i baterii.
Ten symbol oznacza, że produkt zawiera baterie objęte
Dyrektywą Europejską 2013/56/UE, których nie wolno
usuwać razem ze zwykłymi odpadkami z gospodarstwa
domowego. Symbole chemiczne Cd, Hg i Pb umieszczone
pod symbolem kosza na kółkach informują, że bateria
zawiera kadm (Cd), rtęć (Hg) lub ołów (Pb).
Ten symbol umieszczony na urządzeniu oznacza, że
produkt jest objęty Dyrektywą Europejską 2012/19/
UE i nie wolno go usuwać razem z innymi odpadkami
zgospodarstwa domowego.
Ten symbol oznacza, że produkt został zaprojektowany
iwyprodukowany w sposób umożliwiający poddanie go
recyklingowi i ponowne wykorzystanie.
Te symbole umieszczone na produktach, opakowaniach i/lub załączonych
dokumentach oznaczają, że zużytych urządzeń elektrycznych i
elektronicznych oraz baterii nie wolno usuwać razem z innymi odpadkami
z gospodarstwa domowego. Użytkownicy z prywatnych gospodarstw
domowych powinni skontaktować się ze sprzedawcą, u którego
zakupili opisywane urządzenie, lub z władzami lokalnymi, aby uzyskać
szczegółowe informacje dotyczące miejsca i sposobu przekazania
urządzenia do bezpiecznego dla otoczenia recyklingu.
Deklaracja zgodności CE i UKCA:
• Sharp Consumer Electronics Poland sp. z o.o. niniejszym oświadcza, że
opisywane urządzenia audio jest zgodne z zasadniczymi wymaganiami
oraz innymi stosownymi postanowieniami dyrektywy RED 2014/53/UE
ibrytyjskich przepisów dotyczących urządzeń radiowych z 2017 roku.
• Pełne teksty deklaracji zgodności CE i UKCA są dostępne pod linkiem
sharpconsumer.eu, a następnie należy przejść do sekcji pobierania
posiadanego modelu i wybrać „Declaration of Conformity” (deklaracja
zgodności).

PL
Zawartość opakowania:
• Głośniki regałowe CP-SS30
• Pilot zdalnego sterowania (baterie w zestawie)
• Przewód połączeniowy głośników (3 m)
• Przewód audio RCA
• Przewód audio AUX
• Przewód zasilający
• Dokumentacja użytkownika
Elementy sterujące
(Patrz 1 na stronie 1.)
1. Zdejmowane panele przednie
2. Wskaźniki LED
• Tryb czuwania – czerwony
• Tryb Bluetooth – niebieski
• Tryb AUX-IN – zielony
• Tryb RCA – cyjan
• Tryb OPTICAL – żółty
• Tryb USB – oletowy
3. / – regulacja poziomu głośności / wybór źródła sygnału /
wł./wył. zasilania
• Długo naciśnij przycisk, aby włączyć zestaw lub przełączyć go do
trybu czuwania.
• Krótko naciśnij przycisk, aby zmienić tryb (Bluetooth, AUX-IN, RCA,
OPTICAL, USB).
• Obróć, aby dostosować poziom głośności.
Gniazda wejściowe/wyjściowe
(Patrz 2 na stronie 1.)
1. Wejście USB
2. Wejście OPT (optyczne)
3. Wejścia RCA LINE
4. Wejście AUX IN
5. Gniazdo do podłączenia przewodu zasilającego
6. Wyjście audio do podłączenia pasywnego lewego głośnika
Pilot zdalnego sterowania
(Patrz 3 na stronie 2.)
1. – naciśnij przycisk, aby włączyć zestaw lub przełączyć go do trybu
czuwania.
2. LOUD – kompensacja głośności wzmacnia niskie i wysokie częstotli-
wości podczas słuchania przy obniżonym poziomie głośności.
3. – naciśnij przycisk, aby wyciszyć dźwięk. Naciśnij ponownie
przycisk, aby włączyć dźwięk; albo naciśnij przycisk +/-, aby
włączyć dźwięk.
4. – w trybach Bluetooth i USB krótkie naciśnięcie przycisku powo-
duje przejście do następnego utworu; długie naciśnięcie powoduje
przewijanie do tyłu.
5. – w trybach Bluetooth i USB krótkie naciśnięcie przycisku powodu-
je odtwarzanie/pauzę.
6. – w trybach Bluetooth i USB krótkie naciśnięcie przycisku powo-
duje przejście do poprzedniego utworu; długie naciśnięcie powoduje
szybkie przewijanie do przodu.
7. – krótko naciśnij przycisk, aby przejść do trybu Bluetooth.
Długo naciśnij przycisk, aby rozłączyć się ze sparowanym urządze-
niem.
8. AUX – krótko naciśnij przycisk, aby zmienić źródło sygnału audio na
AUX.
9. RCA – krótko naciśnij przycisk, aby zmienić źródło sygnału audio na
RCA.
10. OPT – krótko naciśnij przycisk, aby zmienić źródło sygnału audio na
OPTICAL.
11. USB – krótko naciśnij przycisk, aby przejść do trybu USB.
12. EQ – krótko naciśnij przycisk, aby zatwierdzić aktualny tryb EQ.
Kontynuuj naciskanie przycisku, aby przełączać się między zaprogra-
mowanymi efektami odtwarzania.
13. +/- – naciśnij przycisk, aby ustawić poziom głośności.
14. BASS +/- – naciśnij przycisk, aby wyregulować niestandardowy
poziom tonów niskich korektora.
15. TRE +/- – naciśnij przycisk, aby wyregulować niestandardowy poziom
tonów wysokich korektora.
Obsługa za pomocą pilota
PIERWSZE UŻYCIE: pilot jest wyposażony w baterie litową CR2025.
Zdejmij przezroczystą zakładkę ochronną, by aktywować baterię pilota.
Dostarczony w zestawie pilot umożliwia zdalną obsługę zestawu.
• Nawet jeśli używasz pilota w obrębie jego zasięgu (6 m), jego prawidło-
we działanie może być niemożliwe, jeśli między zestawem a pilotem
znajdują się jakieś przeszkody.
• Jeśli używasz pilota w pobliżu innych urządzeń emitujących fale
podczerwone lub innych pilotów wykorzystujących podczerwień, pilot
może nie działać prawidłowo. Podobnie inne urządzenia mogą działać
nieprawidłowo.
Wymiana baterii pilota
12
4
3
12
4
3
Pilot wymaga litowej baterii CR2025 3V.
1. Naciśnij zatrzask z boku komory baterii w kierunku środka.
2. Wysuń komorę baterii z pilota.
3. Wyjmij starą baterię. Umieść nową baterię CR2025 w komorze baterii,
zachowując polaryzację zgodną z oznaczeniami (+/-).
4. Wsuń komorę z powrotem do pilota, aż zatrzaśnie się na swoim
miejscu.
Ustawienia początkowe
Ustawienie głośników
Aby korzystać z dźwięku stereo, umieść „aktywny” głośnik (urządzenie
z elementami sterującymi z przodu i gniazdami wejściowymi z tyłu) po
prawej stronie. Drugi, „pasywny” głośnik powinien znajdować się po lewej
stronie. Zalecamy ustawienie głośników w odległości co najmniej 50 cm
od siebie. Upewnij się, że głośniki nie są zasłonięte.

36
Podłączenie głośników
Przed włączeniem zasilania należy połączyć lewy i prawy głośnik za
pomocą dostarczonego w zestawie przewodu połączeniowego głośników.
Należy zwrócić uwagę na polaryzację podczas podłączania głośników:
Podłącz czerwony przewód do czerwonego wyjścia, a przezroczysty
przewód do czarnego wyjścia w obu głośnikach.
Podłączenie do zasilania
Ryzyko uszkodzenia produktu! Upewnij się, że napięcie źródła zasilania
odpowiada napięciu wskazanemu z tyłu lub z boku urządzenia.
Podłącz przewód zasilający do gniazda ~AC w urządzeniu, a następnie do
gniazdka elektrycznego w ścianie.
Korzystanie z głośników regałowych
Tryb czuwania (Standby)/włączenie (ON)
• Po pierwszym podłączeniu urządzenia do prądu zostanie uruchomiony
tryb czuwania (STANDBY). Wskaźnik zasilania zacznie świecić na
czerwono.
• Naciśnij przycisk na pilocie, by włączyć (ON) lub przełączyć głośniki
do trybu czuwania.
• Odłącz wtyczkę przewodu zasilającego od gniazdka elektrycznego, jeśli
chcesz całkowicie wyłączyć zestaw.
UWAGA: Głośniki przełączają się do trybu czuwania
po 15 minutach braku aktywności.
Wybór trybu
Naciśnij pokrętło regulacji głośności na urządzeniu, aby przełączać się
między źródłami sygnału; albo wybierz żądany tryb za pomocą przycisków
na pilocie.
Czerwony: tryb czuwania
Niebieski: tryb Bluetooth
Zielony: tryb AUX-IN
Cyjan: tryb RCA
Żółty: tryb OPTICAL
Fioletowy: tryb USB
Regulacja poziomu głośności
ū Wykorzystaj pokrętło głośności lub przycisk +/– na pilocie do
ustawienia żądanego poziomu głośności.
ū Aby wyciszyć dźwięk, naciśnij przycisk na pilocie. Aby włączyć dźwięk,
naciśnij przycisk lub +/– na pilocie, albo obróć pokrętło regulacji
głośności na urządzeniu.
ū Podczas regulacji głośności wskaźnik stanu szybko pulsuje.
ū Jeśli ustawisz maksymalny poziom głośności, po ponownym naciśnięciu
przycisku + wskaźnik pulsuje raz. Jeśli ustawisz minimalny poziom
głośności, po ponownym naciśnięciu przycisku – wskaźnik pulsuje raz.
Ustawienia korektora
Można ustawić dźwięk głośników regałowych za pomocą
zaprogramowanych efektów korektora. Naciśnij jeden raz przycisk na
pilocie, aby zatwierdzić aktualny tryb EQ. Kontynuuj naciskanie przycisku,
aby przełączać się między zaprogramowanymi efektami odtwarzania.
• Classic – zielony wskaźnik LED pulsuje przez dwie sekundy
• POP – żółty wskaźnik LED pulsuje przez dwie sekundy
• Rock – niebieski wskaźnik LED pulsuje przez dwie sekundy
• Movie – oletowy wskaźnik LED pulsuje przez dwie sekundy
• Voice – cyjanowy wskaźnik LED pulsuje przez dwie sekundy
• Custom – biały wskaźnik LED pulsuje przez dwie sekundy
Ustawienia własne
• Naciśnij przycisk , aby przejść do Custom settings (ustawienia
własne), albo naciśnij jeden raz przycisk BASS +/- lub TREB +/-; biały
wskaźnik pulsuje przez dwie sekundy.
• Użyj przycisków BASS/TREB na pilocie, aby zwiększyć (+) lub zmniejszyć
(-) poziom EQ. Wybrany poziom EQ jest wskazywany przez prędkość
pulsowania wskaźnika LED na głośniku. Pulsujący czerwony wskaźnik
LED oznacza podwyższony poziom, biały wskaźnik LED (nie pulsuje)
oznacza niski poziom/0, pulsujący zielony wskaźnik LED oznacza
obniżony poziom.
Kolorowy
wskaźnik LED Poziom EQ Prędkość pulsowania
wskaźnika LED
Czerwony
+3 Szybko
+2 Średnio
+1 Wolno
Biały 0 Wł.
Zielony:
-1 Wolno
-2 Średnio
-3 Szybko
UWAGA: Nowe zmiany EQ są zapisywane domyślnie. Masz
trzy sekundy między każdym naciśnięciem przycisku, aby
wprowadzić dowolne zmiany przed wyjściem z trybu EQ.
Tryb AUX-IN/OPTICAL/RCA
1. Upewnij się, że zestaw jest podłączony do telewizora lub odtwarzacza
audio.
2. Po włączeniu zasilania zestawu należy upewnić się, że zostało
wybrane prawidłowe źródło sygnału za pomocą pilota lub naciskając
pokrętło regulacji głośności na urządzeniu.
3. Funkcje odtwarzania dostosuj za pomocą przycisków odtwarzacza
audio.
4. Wykorzystaj pokrętło głośności na urządzeniu lub przycisk +/– na
pilocie do ustawienia żądanego poziomu głośności.
UWAGA: Upewnij się, że sygnały doprowadzone do wejść RCA
i AUX są ustawione na minimum 50% poziomu głośności w
urządzeniu zewnętrznym. Poziom głośności można regulować
na głośniku, urządzeniu źródłowym lub za pomocą pilota.
Tryb Bluetooth
Parowanie urządzeń z funkcją Bluetooth
Przy pierwszym łączeniu urządzenia Bluetooth z opisywanymi głośnikami
należy sparować oba urządzenia.
UWAGA:
ū Zasięg sygnału między głośnikami a urządzeniem Bluetooth wynosi
około ośmiu metrów (jeśli między urządzeniami nie znajduje się żaden
przedmiot).
ū Zanim podłączysz urządzenie Bluetooth do opisywanych głośników
upewnij się, że znasz jego dane techniczne.
ū Nie wszystkie urządzenia z łącznością Bluetooth są kompatybilne
zzestawem.
ū Każdy przedmiot ustawiony między głośnikami a urządzeniem
Bluetooth może zmniejszać zasięg sygnału.
ū Jeśli sygnał jest za słaby, urządzenie Bluetooth może się rozłączyć, ale
wróci automatycznie do trybu parowania.
1. Po włączeniu zasilania zestawu naciśnij przycisk na pilocie lub
naciśnij pokrętło regulacji głośności na urządzeniu, aby wybrać tryb
Bluetooth. Wskaźnik zacznie pulsować na niebiesko.

PL
2. Aktywuj urządzenie z łącznością Bluetooth i rozpocznij wyszukiwanie
urządzeń. Na liście dostępnych urządzeń Bluetooth pojawi się zestaw
„SHARP CP-SS30”.
ū Jeśli nie możesz wykryć zestawu, naciśnij i przytrzymaj przycisk
na pilocie.
3. Z listy urządzeń wybierz „Sharp CP-SS30”. Po pomyślnym podłączeniu
zostanie wyemitowany sygnał dźwiękowy, a wskaźnik zaświeci się na
niebiesko.
4. Możesz rozpocząć odtwarzanie muzyki z podłączonego urządzenia
zewnętrznego.
By przerwać połączenie Bluetooth, możesz:
ū Przełączyć soundbar na inny tryb.
ū Wyłączyć funkcję Bluetooth w urządzeniu. Po pomyślnym odłączeniu
zostanie wyemitowany sygnał dźwiękowy.
ū Nacisnąć i przytrzymać przycisk na pilocie.
WSKAZÓWKI:
• W razie potrzeby wprowadź hasło „0000”.
• Jeśli przez dwie minuty nie sparujesz z głośnikami żadnego innego
urządzenia Bluetooth, zestaw reaktywuje poprzednie połączenie.
• Głośniki rozłączą się, jeśli urządzenie zewnętrzne znajdzie się poza
zasięgiem sygnału.
• W celu ich ponownego połączenia umieść urządzenie zewnętrzne
wzasięgu sygnału.
• Po oddaleniu urządzenia zewnętrznego i ponownym umieszczeniu go
w zasięgu sygnału sprawdź, czy jest nadal podłączone do głośników.
• Jeśli połączenie zostało przerwane, postępuj zgodnie z powyższymi
wskazówkami, aby ponownie sparować urządzenia.
Odtwarzanie muzyki z urządzenia Bluetooth
ū Jeśli podłączone urządzenie Bluetooth obsługuje funkcję Advanced
Audio Distribution Prole (A2DP), możesz odtwarzać muzykę na
głośnikach.
ū Jeśli urządzenie zewnętrzne obsługuje również funkcję Audio
Video Remote Control Prole (AVRCP), możesz użyć pilota zestawu
do sterowania odtwarzaniem utworów zapisanych w urządzeniu
zewnętrznym.
1. Sparuj urządzenie zewnętrzne z głośnikami.
2. Zacznij odtwarzać muzykę z urządzenia zewnętrznego (jeśli
obsługuje funkcję A2DP).
3. Użyj pilota, aby przełączać utwory (jeśli urządzenie obsługuje funkcję
AVRCP).
ū Aby zatrzymać lub wznowić odtwarzanie, naciśnij przycisk na
pilocie.
ū Aby pominąć utwór, naciśnij przycisk / na pilocie.
ū Długo naciśnij przycisk / , aby przewinąć do tyłu/szybko
przewinąć do przodu w obrębie utworu.
Tryb USB
• Naciśnij kilka razy pokrętło regulacji głośności na głośniku lub przycisk
USB na pilocie, aby wybrać tryb USB. Podłącz pamięć USB zawierającą
pliki MP3 (obsługiwane są pamięci do 64 GB).
• Naciśnij przycisk , aby rozpocząć odtwarzanie.
• Wyłącz zasilanie zestawu przed odłączeniem pamięci USB.
UWAGA
Firma SHARP nie ponosi żadnej odpowiedzialności za ewentualną utratę
danych zapisanych w pamięci USB podłączanej do opisywanego urządzenia.
Należy zawsze utworzyć kopie zapasową utworów muzycznych przed
odtworzeniem w opisywanym urządzeniu.
Funkcje USB (pilot)
ū Przycisk – uruchomienie lub wstrzymanie odtwarzania.
ū Przycisk – przejście do następnego utworu | Naciśnij i przytrzymaj
przycisk, aby szybko przewijać do przodu.
ū Przycisk – przejście do początku utworu | Naciśnij i przytrzymaj
przycisk, aby szybko przewijać do przodu.
UWAGA:
ūJeśli w trybie USB głośniki zostaną przełączone do trybu czuwania, po
włączeniu zasilania odtwarzanie zostanie wznowione się od tego samego
punktu.
ūOdtwarzanie z pamięci USB będzie odbywać się w kolejności, w jakiej
utwory zostały zapisane w pamięci USB.
Rozwiązywanie problemów
Aby zachować gwarancję, nigdy nie próbuj naprawiać urządzenia
samodzielnie. Jeśli podczas użytkowania zestawu wystąpią problemy,
przejrzyj poniższą listę przed wezwaniem serwisanta.
Brak zasilania
Upewnij się, że przewód zasilający jest prawidłowo podłączony.
Upewnij się, że w gniazdku elektrycznym jest napięcie.
Naciśnij przycisk na pilocie lub głośniku, aby włączyć zestaw.
Nie słychać dźwięku
Zwiększ głośność. Naciśnij przycisk + na pilocie lub obróć w prawo
pokrętło regulacji głośności na głośniku.
Naciśnij przycisk na pilocie, aby sprawdzić, czy dźwięk nie jest wyciszony.
Naciśnij przycisk , aby wybrać inne źródło sygnału.
Jeśli po podłączeniu do źródła sygnału cyfrowego (OPTICAL), brak
dźwięku:
ū Spróbuj przełączyć sygnał wyjściowy na PCM lub
ū połącz się bezpośrednio z odtwarzaczem Blue-ray/innym źródłem -
niektóre telewizory nie przesyłają sygnału audio.
Telewizor może być ustawiony na zmienny sygnał wyjściowy. Upewnij
się, że sygnał wyjściowy ustawiony jest na poziom stały (FIXED) lub
standardowy (STANDARD), a nie zmienny (VARIABLE). Więcej informacji
znajdziesz w instrukcji obsługi telewizora.
Upewnij się, że głośność urządzenia źródłowego jest włączona i że
urządzenie nie jest wyciszone.
Pilot nie działa
Upewnij się, że zakładka ochronna baterii została usunięta z tyłu pilota.
Zanim naciśniesz jakikolwiek przycisk sterowania odtwarzaniem, wybierz
właściwe źródło.
Zmniejsz dystans między pilotem a zestawem.
Włóż baterie, zachowując właściwą polaryzację (+/-).
Wymień baterię.
Skieruj pilota bezpośrednio na czujnik znajdujący się z przodu prawego
głośnika.
Dźwięk jest brzęczący lub szumiący
Upewnij się, że wszystkie przewody są prawidłowo podłączone.
Podłącz inne urządzenie źródłowe (telewizor, odtwarzacz itp.), aby
sprawdzić, czy jakość dźwięku się poprawi. Jeśli nie, może to oznaczać
usterkę oryginalnego urządzenia.
Podłącz urządzenie zewnętrzne do innego wejścia.
Jeśli podczas korzystania ze źródła Aux słyszalne jest buczenie, należy
się upewnić, że urządzenie źródłowe podłączone do wejścia Aux jest
prawidłowo uziemione (zazwyczaj powinno być to zapewnione przez
podłączenie urządzenia do właściwie uziemionego zasilacza sieciowego).
Moje urządzenie z łącznością Bluetooth nie wyszukuje zestawu.
Upewnij się, że urządzenie zewnętrzne ma aktywną funkcję Bluetooth.
Ponownie sparuj soundbar z urządzeniem.

38
Важные инструкции по технике
безопасности
Соблюдайте все инструкции по технике безопасности
и примите во внимание все предупреждающие
сообщения. Сохраните данное руководство для
использования в будущем.
Данный символ указывает пользователю на
необходимость ознакомления с указаниями по
технике безопасности, эксплуатации и техническому
обслуживанию, которые содержатся далее в настоящем
руководстве по эксплуатации.
Данный символ указывает на наличие в изделии
неизолированного «опасного напряжения», величина
которого может быть достаточной для повышения риска
поражения электрическим током.
Относится к переменному току (AC)
Данный символ указывает, что отмеченное символом
номинальное напряжение является напряжением
переменного тока.
Относится к оборудованию класса II.
Данный символ указывает, что изделие оснащено
двойной системой изоляции и не требует безопасного
подключения к электрическому заземлению (земле).
Предостережения
Повреждение
• Распаковав устройство, осмотрите его, чтобы убедиться в
отсутствии повреждений. Если оно имеет какие-либо повреждения,
не приступайте к эксплуатации изделия, а обратитесь к продавцу.
ВНИМАНИЕ
РИСК УДАРА ЭЛЕКТРИЧЕСКИМ
ТОКОМ. НЕ ОТКРЫВАТЬ
Во избежание поражения электрическим током не снимайте
заднюю крышку. Изделие не содержит компонентов, пригодных для
самостоятельного ремонта пользователем. В случае необходимости
обратитесь в сервисную службу или к квалифицированному
специалисту по сервисному обслуживанию.
Подключение питания и доступ
• Во избежание поражения электрическим током не прикасайтесь
к шнуру питания мокрыми руками. Если вилка устройства не
подходит к розетке, не применяйте силу, чтобы вставить ее. Перед
отключением полностью выключите устройство. Отключите шнур
питания, если устройство не используется в течение длительного
времени. Вы всегда должны иметь свободный доступ к сетевой
вилке. Не подсоединяйте к нему удлинительные кабели.
Источник питания
• Устройство нужно подключить к розетке 100–240В перем. тока,
50/60Гц. Использование более высокого напряжения может
привести к нарушению функционирования устройства или
возгоранию.
Формованная вилка питания с плавким предохранителем (не
разборная)— только Великобритания, Мальта, Кипр и Ирландия.
• Кабель питания данного оборудования оснащен формованной
вилкой с плавким предохранителем 3А. Номинал предохранителя
указан на лицевой стороне штифта вилки, и в случае необходимости
замены следует использовать предохранитель того же номинала,
одобренный согласно BS1362.
Защита шнура питания
• Не допускайте повреждения шнура питания, не ставьте на
него тяжелые предметы, не растягивайте и не скручивайте его.
Повреждение шнура питания может привести к возгоранию или
поражению электрическим током. Если шнур питания поврежден,
его должен заменить производитель, сервисный агент или другие
лица аналогичной квалификации.
Безопасность детей
• В процессе использования изделия всегда соблюдайте основные
правила техники безопасности, особенно в присутствии детей. Дети
должны находиться под надзором, чтобы они не могли играть с
изделием.
Расположение
• При использовании данное изделие должно быть установлено
на плоскую, устойчивую поверхность так, чтобы никакая часть
основного блока не выступала над полом.
Вентиляция
• Для надежного функционирования изделия необходима
вентиляция, предотвращающая его перегрев. Она обеспечивается
щелями и отверстиями в корпусе изделия. Эти отверстия нельзя
блокировать или перекрывать. Оставьте вокруг изделия зазор
шириной не менее 5см для обеспечения надлежащей вентиляции.
Не позволяйте никому, особенно детям, вставлять посторонние
предметы в порты, слоты и прочие отверстия в корпусе устройства,
поскольку это может привести к поражению электрическим током.
Источники тепла и рабочая температура
• Ну устанавливайте изделие рядом с источниками тепла, например
радиаторами, обогревателями, печами или другими устройствами
(включая усилители), вырабатывающими тепло. Не допускайте
попадания на изделие прямых солнечных лучей.
Открытый огонь
• Во избежание риска возгорания, не ставьте рядом с изделием свечи
или иные источники открытого огня.
Вода, влага и попадание жидкости
• Во избежание риска возгорания или поражения электрическим
током, не допускайте попадания на изделие капель осадков, воды
или влаги. На ставьте на изделие или рядом с ним предметы,
наполненные жидкостями.
Грозы и молнии
• Грозы представляют опасность для всех электроприборов. Удар
молнии может привести к повреждению изделия, даже если оно
выключено. Перед грозой необходимо отключить все кабели и
провода изделия.
Техническое обслуживание
• Прежде чем приступать к очистке изделия, отключите шнур
питания от источника энергии. Для очистки внешней поверхности
устройства используйте мягкую и чистую салфетку. Никогда не
очищайте еще с помощью химических или моющих средств.
Обслуживание и ремонт
• Данное изделие не содержит компонентов, техническое
обслуживание которых пользователь может осуществлять
самостоятельно. Контакт с некоторыми частями внутри устройства
может представлять опасность для жизни. В случае возникновения
неисправностей следует связаться с производителем или
представителем авторизованного сервисного центра. Гарантия
CAUTION
RISK OF ELECTRIC SHOCK
DO NOT OPEN
CAUTION
RISK OF ELECTRIC SHOCK
DO NOT OPEN

RU
производителя не распространяется на неисправности, возникшие
вследствие проведения ремонта не уполномоченными третьими
лицами.
Батарейки
Установка
• Используйте только указанные батарейки. Вставляя батарейки,
обращайте внимание на полярность.
Эксплуатация и техническое обслуживание
• Не подвергайте батарейки воздействию высоких температур,
например в области воздействия прямых солнечных лучей. Если
изделие не будет использоваться в течение длительного периода
(свыше одного месяца), во избежание протекания батареек выньте
их из изделия. Если батарейки протекли, вытрите внутреннюю часть
батарейного отсека и замените батарейки новыми.
Безопасность детей
• Батарейный отсек должен быть всегда закрыт, а его крышка должна
быть зафиксирована.
• Батарейки может легко проглотить ребенок; это может привести
к возникновению тяжелых внутренних ожогов и смерти. Держите
батарейки в недоступном для детей месте. Если имеются основания
предполагать, что проглочена батарейка, немедленно обратитесь за
медицинской помощью.
Условия окружающей среды
• Не допускайте попадания батареек в места с низким давлением
воздуха или высокой температурой: это может привести к взрыву
или утечке воспламеняемой жидкости или газа.
Утилизация
• При утилизации батареек следует соблюдать указания, изложенные
в настоящем руководстве (см. раздел “Утилизация оборудования
и батареек”). Не бросайте в огонь, не разбирайте и не пытайтесь
повторно зарядить обычные батарейки: они могут потечь или
разорваться.
Утилизация оборудования и батареек
Информация для пользователей, относящаяся к утилизации старого
оборудования и использованных батареек.
Данный символ обозначает, что на входящие в состав
изделия батарейки распространяется действие
Директивы ЕС 2013/56/EU, которая запрещает их
утилизацию вместе с обычными бытовыми отходами.
Буквы Cd, Hg и Pb под символом мусорного контейнера
указывают на содержание в батарейках кадмия (Cd),
ртути (Hg) и свинца (Pb).
Данный символ обозначает, что на изделие
распространяется действие Директивы ЕС 2012/19/EU,
которая запрещает его утилизацию и вывоз на свалку
вместе с обычными бытовыми отходами.
Данный символ обозначает, что при проектировании
и изготовлении изделия предусмотрена возможность
его повторного использования и переработки.
Данные символы, нанесенные на изделия, упаковку и (или)
сопроводительную документацию, обозначают, что использованные
электрические и электронные изделия и батарейки нельзя
выбрасывать вместе с обычными бытовыми отходами. Для получения
подробной информации о порядке и возможных местах экологически
безопасной утилизации этих изделий бытовым потребителям следует
обращаться либо в торговую точку, в которой они были приобретены,
либо в местные органы власти.
Заявление о соответствии требованиям
для получения маркировки CE и UKCA:
• Настоящим компания Sharp Consumer Electronics Poland sp. z o.o.
заявляет, что данное аудиоустройство соответствует обязательным
требованиям и прочим важным положениям Директивы ЕС по
радиооборудованию 2014/53/EU и Директивы Великобритании в
отношении радиооборудования от 2017года.
• Для ознакомления с полным текстом Декларации о соответствии
требованиям для получения маркировки CE и UKCA перейдите на
сайт sharpconsumer.eu, откройте раздел загрузки для вашей модели
и выберите документ «Declaration of Conformity».

40
Содержимое коробки:
• Стационарная акустическая система CP-SS30
• Пульт ДУ (с батарейками)
• Кабель для соединения динамиков (3м)
• Аудиокабель RCA
• Аудиокабель AUX
• Кабель питания
• Документация пользователя
Элементы управления
(. 1 1).
1. Съемные решетки динамиков
2. Светодиодный индикатор
• Режим ожидания — красный
• Bluetooth — синий
• Aux in — зеленый
• RCA — голубой
• Оптический режим — желтый
• USB — фиолетовый
3. / регулятор громкости/ переключатель источника/
выключатель питания
• Продолжительное нажатие — переход в режим ожидания.
• Кратковременное нажатие — изменение режима (Bluetooth, Aux-
in, RCA, оптический, USB).
• Поворот — регулирование громкости.
Входы/выходы
(. 2 1).
1. USB вход
2. Оптический вход
3. Аудиовход RCA (линия)
4. Вход Aux in
5. Вход питания от сети
6. Аудиовход для подключения левого пассивного динамика
Пульт дистанционного управления
(. 3 2).
1. служит для включения или перехода в режим ожидания.
2. LOUD Компенсация громкости усиливает звук на низких и высо-
ких частотах во время прослушивания на малой громкости.
3. служит для выключения звука. Чтобы восстановить звук, мож-
но повторно нажать эту кнопку либо нажать +/-.
4. В режиме Bluetooth и USB кратковременное нажатие
позволяет перейти к предыдущей записи, а продолжительное —
перемотать запись назад.
5. В режиме Bluetooth и USB кратковременное нажатие служит
для воспроизведения/паузы.
6. В режиме Bluetooth и USB кратковременное нажатие позволя-
ет перейти к следующей записи, а продолжительное нажатие — к
быстрой перемотке записи вперед.
7. Кратковременное нажатие служит для перехода в режим
Bluetooth.
Продолжительное нажатие служит для отключения от подключен-
ного устройства.
8. AUX Кратковременное нажатие служит для смены источника
аудиосигнала на Aux.
9. RCA Кратковременное нажатие служит для смены источника
аудиосигнала на RCA.
10. OPT Кратковременное нажатие служит для смены источника
аудиосигнала на оптический вход.
11. USB Кратковременное нажатие служит для перехода в режим
USB.
12. EQ Кратковременное нажатие служит для подтверждения теку-
щего режима эквалайзера.
Повторное нажатие этой кнопки позволяет выбрать различные
шаблоны эквалайзера.
13. +/– Регулирование громкости.
14. BASS +/– Настройка уровня низких частот в пользовательском
шаблоне эквалайзера.
15. TRE +/– Настройка уровня высоких частот в пользовательском
шаблоне эквалайзера.
Использование пульта дистанционного управ-
ления
ПЕРВОЕ ИСПОЛЬЗОВАНИЕ: -
CR2025. -
, .
Входящий в комплект пульт ДУ позволяет управлять устройством на
расстоянии.
• Даже при использовании пульта ДУ на эффективном расстоянии в
6м он может не работать, если между ним и устройством имеются
какие-либо препятствия.
• Пульт ДУ может работать неправильно, если он применяется
рядом с другими изделиями, которые генерируют инфракрасные
лучи, или если рядом с устройством работают другие устройства с
пультом дистанционного управления, использующим инфракрас-
ные лучи. В свою очередь, другие устройства также могут работать
неправильно.
Замена батарейки пульта ДУ
12
4
3
12
4
3
Для работы пульта ДУ требуется литиевая батарейка CR2025 на 3В.
1. Прижмите язычок на краю держателя батарейки по направлению
к середине пульта.
2. Вытащите из пульта держатель батарейки.
3. Выньте старую батарейку. Установите в держатель новую батарей-
ку CR2025, соблюдая полярность (+/-).
4. Вставьте держатель в гнездо пульта ДУ до характерного щелчка.

RU
Первоначальная настройка
Размещение динамиков
Чтобы обеспечить стереозвучание, поставьте справа «ведущий»
динамик (на передней панели которого размещены регуляторы, а на
задней — гнезда подключения входов). «Ведомый» динамик следует
поставить слева. Рекомендуемое расстояние между динамиками — не
менее 50см. Убедитесь в том, что перед динамиками нет препятствий.
Подключение динамиков
Прежде чем включать питание, соедините левый и правый динамики
соединительным кабелем, который входит в комплект. При соеди-
нении динамиков следует соблюдать полярность: красным кабелем
должны быть соединены красные гнезда обоих динамиков, а черным
— черные.
Подключение питания
Риск повреждения изделия! Убедитесь в том, что напряжение источ-
ника питания соответствует напряжению, указанному на этикетке на
обратной или нижней стороне устройства.
Подсоедините кабель питания к гнезду ~AC устройства, а затем вставь-
те вилку в розетку.
Пользование стационарной
акустической системой
Режим ожидания / работы
• После первого подключения к сетевой розетке устройство находит-
ся в режиме ожидания. Индикатор загорится красным цветом.
• Чтобы включить динамики или перевести их в режим ожидания,
нажмите кнопку на пульте ДУ.
• Чтобы выключить устройство полностью, выньте сетевую вилку из
розетки.
ПРИМЕЧАНИЕ. -
15 .
Выбор режимов
Выбор источника сигнала осуществляется последовательным нажати-
ем регулятора громкости, а выбор нужного режима осуществляется
с пульта ДУ.
Красный: режим ожидания
Синий: Bluetooth
Зеленый: Aux
Голубой: RCA
Желтый: Оптический канал
Фиолетовый: USB
Регулировка громкости
ū Регулировка громкости осуществляется путем поворота регулятора
громкости на устройстве или нажатия кнопок +/– на пульте ДУ.
ū Чтобы выключить звук, нажмите кнопку на пульте ДУ. Чтобы вклю-
чить звук снова, нажмите на пульте ДУ кнопку или +/– или
поверните ручку регулятора громкости на устройстве.
ū В процессе регулировки громкости индикатор состояния быстро
мигает.
ū При повторном нажатии кнопки + после достижения максималь-
ного уровня громкости индикатор состояния мигает один раз. При
повторном нажатии кнопки – после достижения минимального
уровня громкости индикатор мигает один раз.
Настройки эквалайзера (EQ)
Предварительно заданные настройки эквалайзера позволяют на-
строить звучание акустической системы. Чтобы подтвердить текущий
режим эквалайзера, следует однократно нажать на пульте ДУ кнопку
. Повторное нажатие этой кнопки позволяет выбрать различные
шаблоны эквалайзера.
• Classic(Классика) — зеленый индикатор мигает в течение 2секунд
• POP (Поп) — желтый индикатор мигает в течение 2секунд
• Rock (Рок) — синий индикатор мигает в течение 2секунд
• Movie (Кино) — фиолетовый индикатор мигает в течение 2секунд
• Voice (Голос) — голубой индикатор мигает в течение 2секунд
• Custom (Пользовательский) — белый индикатор мигает в течение
2секунд
Пользовательские настройки
• Нажмите кнопку , чтобы перейти к пользовательским на-
стройкам, или нажмите кнопку BASS или TREB +/- один раз. Белый
индикатор мигает в течение 2секунд.
• Используйте кнопки BASS/TREB на пульте ДУ, чтобы повысить (+) или
понизить (-) уровень эквалайзера. Выбранный уровень эквалайзера
отображает скорость мигания светодиодного индикатора акусти-
ческой системы. Мигающий красный индикатор показывает повы-
шенный уровень, белый светодиодный индикатор (без мигания)
показывает уровень 0, а зеленый мигающий индикатор показывает
сниженный уровень.
Цвет индикатора Уровень
эквалайзера
Скорость мигания
индикатора
КРАСНЫЙ
+3 Быстро
+2 Средне
+1 Медленно
Белый 0 Включен
Зеленый
-1 Медленно
-2 Средне
-3 Быстро
ПРИМЕЧАНИЕ. -
. -
3 -
.
AUX/OPTICAL/RCA
1. Убедитесь в том, что устройство подключено к телевизору или
аудиоустройству.
2. Когда устройство включено, его следует подключить к нужному
источнику сигнала либо с помощью пульта ДУ, либо нажатием на
ручку регулятора громкости устройства.
3. Управляйте функциями воспроизведения непосредственно на
аудиоустройстве.
4. Для настройки громкости следует повернуть ручку регулятора
громкости устройства или нажать кнопки +/– на пульте ДУ.
ПРИМЕЧАНИЕ. , RCA AUX
50% .
,
.
Режим Bluetooth
Сопряжение устройств Bluetooth
При первом подключении устройства Bluetooth к акустической систе-
ме необходимо выполнить его сопряжение с проигрывателем.

42
ПРИМЕЧАНИЕ.
ū Рабочее расстояние между динамиками и устройством Bluetooth
составляет приблизительно 8метров (если между устройством
Bluetooth и устройством отсутствуют посторонние предметы).
ū Прежде чем подключать устройство Bluetooth к динамикам, изучите
его технические характеристики.
ū Совместимость со всеми устройствами Bluetooth не гарантируется.
ū Любые препятствия между динамиками и устройством Bluetooth
сокращают рабочее расстояние.
ū Если сигнал слишком слаб, принимающее устройство Bluetooth
может отсоединиться, но затем оно снова автоматически войдет в
режим сопряжения.
1. Когда устройство включено, нажмите кнопку на пульте ДУ или
ручку регулятора громкости на устройстве, чтобы выбрать режим
Bluetooth. Индикатор мигает синим светом.
2. Включите устройство Bluetooth и выберите режим поиска. В спи-
ске устройств Bluetooth появится пункт «SHARP CP-SS30».
ū Если у вас не получается найти устройство, нажмите и удержи-
вайте на пульте ДУ кнопку .
3. В списке устройств выберите пункт «SHARP CP-SS30». После
успешного подключения звучит звуковой сигнал, а индикатор
загорается постоянным синим светом.
4. Начните воспроизведение музыки с подключенного устройства
Bluetooth.
Отключить функцию Bluetooth можно следующи-
ми способами:
ū Переключитесь на другую функцию устройства.
ū Выключите функцию Bluetooth на внешнем устройстве. После
успешного разъединения звучит звуковой сигнал.
ū Нажмите и удерживайте на пульте ДУ кнопку .
СОВЕТ.
• При необходимости введите пароль «0000».
• При отсутствии сопряжения с другим устройством Bluetooth в
течение 2минут акустическая система возобновит предыдущее
соединение.
• Отключение акустической системы происходит также при переме-
щении устройства за пределы рабочего диапазона.
• Чтобы возобновить соединение устройства с акустической систе-
мой, разместите его в пределах рабочей дальности.
• В случае возврата устройства после выхода устройства за пределы
рабочей дальности проверьте наличие соединения с акустической
системой.
• В случае разрыва соединения выполните повторное сопряжение
устройства с акустической системой в соответствии с приведенны-
ми выше инструкциями.
Прослушивание музыки с устройства Bluetooth
ū Если подключенное устройство Bluetooth поддерживает расширен-
ный профиль распределения аудио (A2DP), акустической системой
можно пользоваться для прослушивания записанной на устройстве
музыки.
ū Если устройство также поддерживает профиль дистанционного
управления аудио- и видеоустройствами (AVRCP), можно управлять
воспроизведением сохраненной на устройстве музыки с помощью
пульта ДУ акустической системы.
1. Выполните сопряжение устройства с акустической системой.
2. Начните на внешнем устройстве (если оно поддерживает A2DP)
воспроизведение музыки.
3. Управляйте воспроизведением при помощи входящего в
комплект пульта дистанционного управления (если устройство
поддерживает AVRCP).
ū Чтобы остановить/возобновить воспроизведение, нажмите
кнопку на пульте ДУ.
ū Чтобы пропустить дорожку, нажмите кнопку / на пульте
ДУ.
ū Чтобы перемотать запись вперед или назад, следует нажать и
удерживать кнопку / .
Режим USB
• Несколько раз нажмите кнопку ИСТОЧНИК на динамике или кнопку
USB на пульте дистанционного управления для выбора режима
Bluetooth. Подключите USB-накопитель с файлами MP3 (система
поддерживает приводы до 64ГБ).
• Нажмите , чтобы начать воспроизведение.
• Прежде чем отключать USB-накопитель, акустическую систему
следует выключить.
ПРИМЕЧАНИЕ
SHARP
USB- -
. ,
.
Функции USB (пульт дистанционного управле-
ния)
ū — воспроизведение/пауза
ū— переход к следующей песне | Нажмите и удерживайте для
быстрой перемотки вперед.
ū— пропуск начала песни | Нажмите и удерживайте для быстрой
перемотки вперед.
ПРИМЕЧАНИЕ.
ū
USB, -
, .
ū USB
.

RU
Поиск и устранение неисправностей
Для сохранения гарантии не пытайтесь самостоятельно ремонтиро-
вать систему. В случае возникновения проблем в процессе эксплуа-
тации устройства ознакомьтесь с приведенной ниже информацией,
прежде чем обращаться в сервисную службу.
Отсутствует питание
Проверьте, правильно ли подключен шнур переменного тока.
Убедитесь в том, что розетка переменного тока подает электроэнер-
гию.
Для включения устройства следует нажать кнопку на пульте ДУ или
динамике.
Отсутствует звук
Повысьте уровень громкости. Нажмите на пульте ДУ кнопку + или
поверните ручку регулятора громкости по часовой стрелке.
Нажмите кнопку на пульте ДУ, чтобы убедиться в том, что в акустиче-
ской системе не отключен звук.
Нажмите кнопку , чтобы выбрать другой источник входного
сигнала.
Если при подключении цифрового источника (оптический разъем)
отсутствует звук:
ū Попробуйте настроить выход телевизора на сигнал ИКМ или
ū Подключитесь напрямую к Blu-ray/другому источнику, некоторые
телевизоры не работают через цифровой аудиовход.
Ваш телевизор может быть настроен на переменные аудиовыходы.
Убедитесь в том, что в настройках аудиовыхода выбрана опция FIXED
(ФИКСИРОВАННЫЙ) или STANDARD (СТАНДАРТНЫЙ), а не VARIABLE
(ПЕРЕМЕННЫЙ). Более подробная информация приведена в руковод-
стве по эксплуатации телевизора.
Убедитесь в том, что на устройстве-источнике включен звук и установ-
лен приемлемый уровень громкости.
Не работает пульт дистанционного управления
Проверьте, удален ли защитный язычок батарейки из держателя в
задней части пульта ДУ.
Прежде чем нажимать любую кнопку управления воспроизведением,
выберите надлежащий источник.
Сократите расстояние между пультом ДУ и устройством.
Вставьте батарейку, соблюдая указанную полярность (+/-).
Замените батарейку.
Направляйте пульт ДУ прямо на датчик, расположенный на передней
панели правого динамика.
Я слышу жужжание или гудение
Убедитесь в том, чтобы все кабели и провода надежно подсоединены.
Подключите другой источник (телевизор, проигрыватель и т.д.), чтобы
проверить, сохраняется ли жужжание. Если нет, возможно, причиной
проблемы является исходное устройство.
Подключите устройство к другому входу.
Если при использовании источника Aux слышен шум, убедитесь, что
источник, подключенный к входу Aux, имеет правильное заземление
(это обычно можно сделать, подключив источник к заземленной сети
переменного тока).
Bluetooth-название данного устройства отсутствует в списке на
моем устройстве Bluetooth
Убедитесь в том, что на устройстве Bluetooth активирована функция
Bluetooth.
Выполните сопряжение проигрывателя с устройством Bluetooth еще
раз.

44
Technical specication | Technische Angaben | Especicación técnica | Spécica-
tion technique | Speciche tecniche | Technische specicaties | Dane techniczne |
Технические спецификации
EN DE ES FR IT NL PL RU
Model Modell Modelo Modèle Modello Model Model Модель CP-SS30
Power supply Stromversorgung Fuente de eliminación Alimentation Alimentazione: Stroomvoorziening Zasilanie Источник питания AC 100-240 V ~ 50/60 Hz
Power consumption Stromverbrauch Consumo de energía Consommation énergétique Consumo energetico Energieverbruik Pobór mocy Энергопотребление 65 W
Standby consumption Stand-by-Verbrauch Consumo en modo de
espera
Consommation en mode
veille Consumo in standby Verbruik in stand-bymodus Pobór mocy w trybie
czuwania:
Мощность в режиме
ожидания <0.5 W
Output power Ausgangsleistung Potencia de salida Puissance de sortie Potenza in uscita Uitgangsvermogen Moc wyjściowa Выходная мощность 60 W (2 x 30W) RMS
Bluetooth Bluetooth Bluetooth Bluetooth Bluetooth Bluetooth Bluetooth Bluetooth
Version Version Versión Version Versione Versie Wersja Версия V 5.0
Maximum power
transmitted
Maximaler übertragener
Strom
Potencia máxima
transmitida
Puissance maximale
transmise Potenza massima trasmessa Maximaal overgedragen
vermogen
Maksymalny poziom prze-
kazywanej mocy
Максимальная мощность
передачи <13 dbm
Frequency bands Frequenzbänder Bandas de frecuencia Bande de fréquences Bande di frequenza Frequentiebanden Pasma częstotliwości Частотные диапазоны 2402 MHz ~ 2480 MHz
Remote control Fernbedienung Mando a distancia Télécommande Telecomando Afstandsbediening Pilot zdalnego sterowania Пульт дистанционного
управления
Battery type Batterietyp Tipo de pilas Type de pile Tipo di batteria Batterijtype Typ baterii Тип батарейки CR2025-3V
158 mm 190 mm
248 mm
4,3 kg
KG

Technical specication | Technische Angaben | Especicación técnica | Spécica-
tion technique | Speciche tecniche | Technische specicaties | Dane techniczne |
Технические спецификации
EN DE ES FR IT NL PL RU
Model Modell Modelo Modèle Modello Model Model Модель CP-SS30
Power supply Stromversorgung Fuente de eliminación Alimentation Alimentazione: Stroomvoorziening Zasilanie Источник питания AC 100-240 V ~ 50/60 Hz
Power consumption Stromverbrauch Consumo de energía Consommation énergétique Consumo energetico Energieverbruik Pobór mocy Энергопотребление 65 W
Standby consumption Stand-by-Verbrauch Consumo en modo de
espera
Consommation en mode
veille Consumo in standby Verbruik in stand-bymodus Pobór mocy w trybie
czuwania:
Мощность в режиме
ожидания <0.5 W
Output power Ausgangsleistung Potencia de salida Puissance de sortie Potenza in uscita Uitgangsvermogen Moc wyjściowa Выходная мощность 60 W (2 x 30W) RMS
Bluetooth Bluetooth Bluetooth Bluetooth Bluetooth Bluetooth Bluetooth Bluetooth
Version Version Versión Version Versione Versie Wersja Версия V 5.0
Maximum power
transmitted
Maximaler übertragener
Strom
Potencia máxima
transmitida
Puissance maximale
transmise Potenza massima trasmessa Maximaal overgedragen
vermogen
Maksymalny poziom prze-
kazywanej mocy
Максимальная мощность
передачи <13 dbm
Frequency bands Frequenzbänder Bandas de frecuencia Bande de fréquences Bande di frequenza Frequentiebanden Pasma częstotliwości Частотные диапазоны 2402 MHz ~ 2480 MHz
Remote control Fernbedienung Mando a distancia Télécommande Telecomando Afstandsbediening Pilot zdalnego sterowania Пульт дистанционного
управления
Battery type Batterietyp Tipo de pilas Type de pile Tipo di batteria Batterijtype Typ baterii Тип батарейки CR2025-3V

www.sharpconsumer.eu
SAU/MAN/0177
Sharp Consumer Electronics Poland sp. z o.o.
Ostaszewo 57B, 87-148 Łysomice, Poland
Made in China
-
 1
1
-
 2
2
-
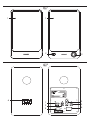 3
3
-
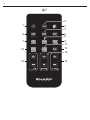 4
4
-
 5
5
-
 6
6
-
 7
7
-
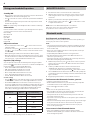 8
8
-
 9
9
-
 10
10
-
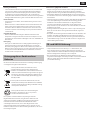 11
11
-
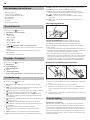 12
12
-
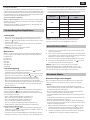 13
13
-
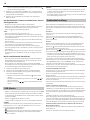 14
14
-
 15
15
-
 16
16
-
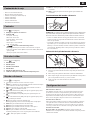 17
17
-
 18
18
-
 19
19
-
 20
20
-
 21
21
-
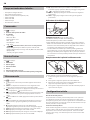 22
22
-
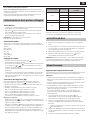 23
23
-
 24
24
-
 25
25
-
 26
26
-
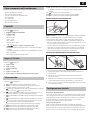 27
27
-
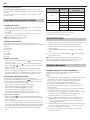 28
28
-
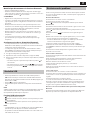 29
29
-
 30
30
-
 31
31
-
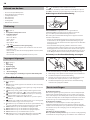 32
32
-
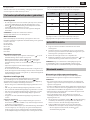 33
33
-
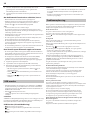 34
34
-
 35
35
-
 36
36
-
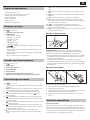 37
37
-
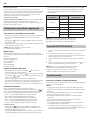 38
38
-
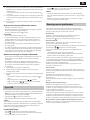 39
39
-
 40
40
-
 41
41
-
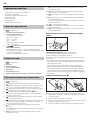 42
42
-
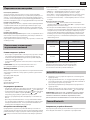 43
43
-
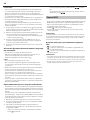 44
44
-
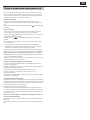 45
45
-
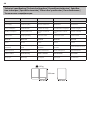 46
46
-
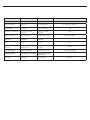 47
47
-
 48
48


in andere talen
Andere documenten
-
Yamaha WXC-50 Handleiding
-
Yamaha RX-V463 de handleiding
-
Samsung HW-K470 Snelstartgids
-
Yamaha RX-V563 de handleiding
-
-
-
Yamaha DSP-Z7 de handleiding
-
Yamaha RX V3900 - AV Network Receiver Handleiding
-
-
Samsung HW-K360 Handleiding