M5

Medeli M5 de handleiding

  • Hallo! Ik ben een AI-chatbot die speciaal is getraind om je te helpen met de Medeli M5 de handleiding. Ik heb het document al doorgenomen en kan je duidelijke en eenvoudige antwoorden geven.
2
Sterke magnetische velden kunnen het
normaal functioneren van het apparaat
verhinderen. Volg dan de resetprocedure
zoals beschreven in de handleiding. Als
dat niet helpt, gebruik het apparaat dan op
een andere locatie.
Voorzichtig!
VEILIGHEIDSINFORMATIE
WAARSCHUWING FCC-VOORSCHRIFTEN (VOOR DE VS)
Deze apparatuur is getest en bevonden te voldoen aan de
beperkingen van een Class B digitaal apparaat, volgens Part
15 van de FCC-reglementen.
De beperkingen zijn ontwikkeld om een redelijke bescherming
te bieden tegen schadelijke storingen bij huishoudelijk
gebruik. Deze apparatuur genereert en gebruikt
radiofrequenties en kan, indien niet geïnstalleerd en gebruikt
volgens de aanwijzingen, schadelijk interfereren met
radiocommunicatie. Er is echter geen garantie dat er zich in
bepaalde situaties geen interferenties voordoen.
Wanneer deze apparatuur schadelijke storingen bij tv- en
radio-ontvangst veroorzaakt, wat kan worden vastgesteld door
het apparaat uit en aan te schakelen, is het raadzaam om de
storing op te heffen door de volgende maatregelen te nemen:
VOORZORGSMAATREGELEN
LEES AANDACHTIG ALVORENS VERDER TE GAAN
Bewaar deze handleiding op een veilige plaats als naslag bij
toekomstig gebruik.
Voeding
Sluit de bijbehorende lichtnetadapter aan op een stopcontact
met het juiste voltage.
Sluit het niet aan op een stopcontact met een ander voltage
dan waarvoor het apparaat bedoeld is.
Ontkoppel de lichtnetadapter wanneer het apparaat niet in
gebruik is of in het geval zich onweer voordoet.
Aansluitingen
Alvorens het instrument op andere apparatuur aan te sluiten,
schakel alle betreffende apparaten eerst uit.
Plaatsing
Stel het apparaat niet bloot aan omstandigheden die
vervorming, verkleuring of nog ernstiger schade veroorzaken:
• Direct zonlicht
• Extreme temperaturen of vochtigheid
• Overmatig stof en vuil
• Sterke trillingen of schokken
• In de nabijheid van magnetische velden
Storingen op andere elektrische apparaten
Radioʼs en tvʼs die dicht bij het apparaat staan kunnen
storende signalen ontvangen. Gebruik het apparaat op een
geschikte afstand van radioʼs en tvʼs.
Reiniging
Reinig uitsluitend met een zachte, droge doek.
Gebruik geen verfverdunner, oplosmiddelen,
schoonmaakmiddelen of met chemische middelen
geïmpregneerde schoonmaakdoekjes.
Behandeling
Gebruik geen overmatige kracht bij de bediening van
schakelaars en knoppen.
Zorg dat er geen papieren, metalen of andersoortige
voorwerpen in het apparaat terechtkomen. Ontkoppel de
lichtnetadapter als dit toch gebeurt. Laat vervolgens het
apparaat inspecteren door geschoold servicepersoneel.
Ontkoppel alle kabels alvorens het apparaat te verplaatsen.
Basic Operation
Voices and Effects
Style Control
Connections
Headphones Jack.........................................................
Sustain Jack.................................................................
USB Jack.....................................................................
Master Volume.............................................................
Power Switch...............................................................
Select a Voice..............................................................
Dual Voice....................................................................
Lower Voice/Split Point..............................................
DSP Effect..................................................................
Sustain.........................................................................
Stop a Style................................................................
Metronome..................................................................
Select a Style..............................................................
The Accompaniment Section.......................................
Start a Style................................................................
Tempo.........................................................................
6
6
7
7
8
9
9
9
10
10
11
12
12
12
15
6
Main/Fill......................................................................
One Touch Setting......................................................
15
Accomp Volume..........................................................
15
Chord Recongnize.....................................................
13
16
16
Record
Start Recording...........................................................
Stop Recording...........................................................
16
Play Back the Recording.............................................
8
3
25
25
MIDI Function
Pedal Assign...............................................................
Octave........................................................................
MIDI IN.......................................................................
Transpose..................................................................
Split Point...................................................................
Beat............................................................................
MIDI OUT...................................................................
Function Menu
21
21
21
22
21
22
Touch.........................................................................
Tune...........................................................................
22
22
Chorus Level..............................................................
23
23
Song
Lesson Mode..............................................................
Lesson 2.....................................................................
Lesson 1.....................................................................
Lesson 3.....................................................................
Grade Function..........................................................
17
18
19
19
Demo
Enter Demo................................................................
20
Exit Demo...................................................................
20
Chord Dictionary........................................
Appendices
USB Connection.........................................................
What is MIDI..............................................................
25
MIDI Application.........................................................
18
Specifications.............................................................
26
Appendix 5 - Chord List.............................................
Appendix 6 - MIDI List................................................
Appendix 2 - Style List................................................
Appendix 1- Voice List................................................
Appendix 3 - Demo List..............................................
Appendix 4 - Song List...............................................
27
29
29
30
30
31
24
Reverb Level................................................................
22
Inhoudsopgave
Beschrijving bedieningspaneel en -venster
Frontpaneel 4
Achterpaneel 4
LCD-venster 4
Voorbereiding
Voeding` 5
Muziekstandaard plaatsen 5
Aansluitingen
Hoofdtelefoonaansluiting 6
Sustainpedaalaansluiting 6
USB-aansluiting 6
Basisbediening
Aan/uitschakelaar 7
Mastervolume 7
Geluiden en effecten
Kies een geluid 8
Twee geluiden gelijktijdig 8
Lower Voice / splitpunt 9
Sustain 9
DSP-effect 9
Style-bediening
Kies een style 10
De begeleidingssectie 10
Een style starten 11
Een style beëindigen 12
Main / fill 12
Tempo 12
Akkoordherkenning 13
Akkoordbeginselen 14
Eenknops-instelling 15
Metronoom 15
Begeleidingsvolume 15
Opname
Start de opname 16
Stop de opname 16
De opname afspelen 16
Song
Les-modus 17
Les 1 18
Les 2 18
Les 3 19
Beoordeling 19
Demo
Start demo 20
Demo beëindigen 20
Functiemenu
Transponeren 21
Octaaf 21
Maatindeling 21
Splitpunt 21
MIDI-in 22
MIDI-out 22
Aanslaggevoeligheid 22
Stemming 22
Galmniveau 22
Chorusniveau 23
Pedaaltoewijzing 23
Akkoordenboek 24
MIDI-functies
Wat is MIDI 25
USB-aansluiting 25
MIDI-toepassing 25
Appendix
Specificaties 26
Appendix 1 - Voice-lijst 27
Appendix 2 - Style-lijst 29
Appendix 3 - Demo-lljst 29
Appendix 4 - Song-lijst 30
Appendix 5 - Akkoordenlijst 30
Appendix 6 - MIDI-implementatie 31
A.B.C.
TOUCH
DUAL
LOWER
DSP
SUSTAIN
5
Using the AC Adaptor
1.
Using Batteries
Always make sure to turn the keyboard off before
inserting new batteries or replacing old ones.
2.
A dim and difficult-to-read LCD display.
Abnormally low speaker/headphone volume.
Distortion of the sound output.
Sudden power failure when playing at high volume.
Abnormal rhythms or demo songs are played.
Dimming of the display when playing at high volume.
Low battery indications
Any of the following symptoms indicate low battery power.
Replace the batteries as soon as possible if any of the
following occurs.
AC Adaptor
AC Outlet
Setting Music Stand
or safety sake, be sure to unplug the AC adaptor
from
the
wall outlet whenever leaving
the
SUM-3, LR6,"AA"SIZE OR EQUIV
SUSTAIN
9V
Make sure that only the AC adaptor specified for this
electronic keyboard is used. The adaptor shall be 9V
DC output, center positive type. Be sure to turn off the
electronic keyboard before you connect the adaptor into
the AC wall outlet and the cord into the unit.
CAUTIONS!
OFF-ON
electronic Keyboard unattended for a long time.
USB
Voeding
Voorbereiding
Muziekstandaard plaatsen
Monteer de muziekstandaard als aangegeven in onderstaande instructie.
• Batterijen plaatsen
Open het batterijencompartiment aan de onderzijde van het
keyboard. Plaats 6 AA-batterijen (SUM-3, Lr6) in het
compartiment en volg de aangegeven polariteit. Plaats de
deksel terug en zorg ervoor dat hij het compartiment goed
afsluit.
• Indicatie lage batterijlading
Elk van de volgende symptomen duidt op lage batterijlading.
Vervang de batterijen zo snel mogelijk als zich het volgende
voordoet:
Een vaag en slecht leesbaar LCD-venster.
Een ongebruikelijk laag volume van hetzij de luidsprekers hetzij
de hoofdtelefoon.
Vervormde geluidsweergave.
Plotseling uitvallen wanneer op hoog volume wordt gespeeld.
Er worden ongebruikelijke ritmes of demosongs afgespeeld.
Wegvallen van het LCD-venster bij het spelen op hoog volume.
Dit elektronische keyboard kan worden gevoed door de
stroom uit een standaard, huisxhoudelijke
wandcontactdoos (met gebruikmaking van de
netvoedingsadapter) of door middel van batterijen.
1. Het gebruik van de netvoedingsadapter
Gebruik uitsluitend een netvoedingsadapter die bedoeld is
voor dit elektronische keyboard. Deze adapter zou 9V-
gelijkspanning moeten afleveren met de pluspool in het
midden van de connector. Zorg ervoor dat het elektronische
keyboard is uitgeschakeld alvorens de netvoedingsadapter
op een wandcontactdoos aan te sluiten.
2. Het gebruik van batterijen
Zorg er altijd voor dat het keyboard is uitgeschakeld alvorens
nieuwe batterijen te plaatsen of de oude te vervangen
Gebruik alleen de aangegeven netvoedingsadapter.
Het gebruik van andere veroorzaakt het risico van
schade of elektrische schokken.
Zorg in verband met de veiligheid dat de
netvoedingsadapter is verwijderd uit de
wandcontactdoos wanneer het elektronische keyboard
gedurende langere tijd onbeheerd wordt achtergelaten.
Volg bij het plaatsen van de batterijen de markering
van de polariteit.
Gebruik nooit batterijen van verschillende types.
Combineer nooit oude en nieuwe batterijen.
Vervang batterijen zo spoedig mogelijk
na tekenen van ontlading.
Verwijder de batterijen uit het compartiment wanneer
het ernaar uitziet dat het keyboard voor gedurende een
langere periode niet zal worden gebruikt.
ATTENTIE!
ATTENTIE!
OFF-ON
OFF-ON
SUSTAIN
9V
6
Connections
If you prefer to play with headphones for high quality
personal monitoring, plug a set of stereo headphones
into the rear panel PHONES jack.
Plug a set of headphones into the PHONES jack and
the speakers will be disabled automatically.
1.
2.
NOTE:
Never use headphones in high volume, as it may hurt
your ears.
An optional footswitch can be plugged into the SUSTAIN
jack for sustain control.
The footswitch functions like the damper pedal of a piano.
Step on the footswitch, all notes played on the keyboard
have a longer sustain effect, release for normal sound.
1.
2.
USB Jack
Connect PC or other USB host devices that support
USB Audio.
For devices with USB cable, after the driver is installed
and initialization is finished, you can choose USB Audio
Device in the device menu of the software to transfer
midi data.
1.
2.
To avoid damages, turn the power switches of
this
keyboard and all related devices OFF if you
want
to
plug in or unplug between this instrument with
all
related devices.
WARNING
SUSTAIN
9V
USB
USB
1. Als u gebruik wilt maken van hoge kwaliteitsweergave alleen
voor u persoonlijk, kunt een hoofdtelefoon op het
achterpaneel aansluiten op de PHONE-uitgang.
2. Wanneer er een hoofdtelefoon is aangesloten is de
weergave via de interne luidsprekers automatisch
uitgeschakeld.
OPMERKING:
Gebruik hoofdtelefoons nooit op een hoog volume. Dit kan
gehoorbeschadiging veroorzaken.
1. Een optioneel verkrijgbare voetschakelaar kan worden
aangesloten op de SUSTAIN-ingang om tonen te laten
doorklinken.
2. De voetschakelaar fungeert dan als het demperpedaal van
een piano. Met het pedaal ingeschakeld krijgen alle
gespeelde noten een lange uitklank. Als het pedaal wordt
losgelaten is de uitklank weer normaal.
1. Sluit een pc of een ander USB-hostapparaat aan dat USB-
audio ondersteunt.
2. Op de via USB aangesloten apparaten kan, nadat daarop de
noodzakelijke drivers zijn geïnstalleerd, USB Audio Device in
de software worden gekozen om MIDI-data te ontvangen.
WAARSCHUWING
Zet alle betreffende apparaten eerst uit voordat ze
worden aangesloten of ontkoppeld. Dit voorkomt
schade.
USB-aansluiting
Sustainpedaalaansluiting
Aansluitingen
Hoofdtelefoonaansluiting
7
Basic Operation
Power Switch
1.
1.
2.
2.
NOTE:
If the keyboard is in silent, that means the volume may
has been adjusted to its minimum level or the headphones
jack has been connected.
First, please ensure the correct connection has been
made based on the previous instruction.
Turn the [POWER] switch on. The LCD display lights
up.
The keyboard volume could be adjusted from 0 to 31
by pressing [MASTER VOLUME + ] and [MASTER
VOLUME -] button LCD will display MVL XX.
Press [MASTER VOLUME +] and [MASTER VOLUME -]
buttons simultaneously to set to the default value MVL
23.
MASTER VOLUME
MASTER VOLUME
NOTE:
If the LCD display does not light up after you turned
on the keyboard, please check the
power supply.
POWER
OFF - ON
Master Volume
1. Zorg ervoor dat alles correct is aangesloten zoals beschreven
in de voorgaande instructies.
2. Zet de POWER-schakelaar aan. Het LCD-venster licht dan op.
OPMERKING:
Als het LCD-venster niet oplicht na het inschakelen,
controleer dan de voeding.
1. Het mastervolume van het keyboard kan worden ingesteld van
0 tot 31 door de toetsen MASTER VOLUME + en MASTER
VOLUME – in te drukken. Het LCD-venster vermeldt dan MVL
xx.
2. Druk tegelijkertijd op MASTER VOLUME + en MASTER
VOLUME – om de waarde terug te zetten op de
standaardwaarde MVL 23.
OPMERKING:
Als het keyboaard geen geluid weergeeft, kan het zijn dat
het volume op de minimumwaarde staat of dat de
hoofdtelefoon is aangesloten.
Basisbediening
Aan/uitschakelaar
Mastervolume
A.B.C.
TOUCH
DUAL
LOWER
DSP
SUSTAIN
8
Voices and Effects
There are 300 voices in total (See appendix).
Select a Voice
Dual Voice
1.
1.
2.
3.
The [+/YES] and [-/NO] buttons:
Press [+/YES] or [-/NO] button to select the voice you want.
The selected voice number will be shown on the display.
The number buttons:
The number buttons can be pressed directly to select
your desired voice.
After selecting a voice, you can now play the keyboard.
Eg. Piano
Eg. Cello
NOTE:
While playing song, you can not switch mode.
You can play two soun ds at the sam e time o n the
keyboard. It is called “Dual Voice mode”. When the dual
function is off, the voice indicator is VOICE 1. When the
dual function is on, the voice indicator is VOICE 2.
The dual voice function is set to OFF when keyboard
power on.
During the VOICE 1 status, you could press and
hold down [FUN CTION] bu tton at fir st, and the n
press [1] button to enter the dual voice mode.
VO ICE 2 and DUAL ico n wou ld be light ene d
simultaneously. The number of the dual voice will
b e di s p la y e d on t h e L CD . N o w, y o u c an g e t t wo
different sounds at the same time when pressing
one key.
2.
3.
Press [+/YES] / [-/NO] button or number buttons to
select you desired voice.
The default DUAL VOICE number is NO.154 Synth
Strings 3.
Press and hold down [FUNCTION] button at first,
The note you play sounds a single voice of Voice 1.
2
4
5
7 8
0
NO
1
FUNCTION
3
6
9
YES
2
4
5
7 8
0
NO
1
FUNCTION
3
6
9
YES
NOTE:
While the keyboard is splitted, only the right hand can
respond the dual voice, the left hand area can’t.
STYLEVOICE
SONG
When repeatedly press [STYLE/SONG/VOICE] button,
Voice Modeswitch to Style Mode.
Use [STYLE/SONG/VOICE] button to switch mode
(Voice Mode, Style Mode and Song Mode).
The default VOICE is “NO.01 Acoustic Grand piano.
LCD displays “VOICE 1” and the voice number.
and then press [1] button to turn off the DUAL VOICE.
will quit “Song Mode” and enter “Voice Mode” or from
Er zijn in het totaal 300 geluiden (zie appendix)
1. Het geluid waarmee vanaf de fabriek wordt opgestart is “NO.01
Acoustic Grand piano”. Net LCD-venster vermeldt “VOICE 1” en
het geluidsnummer.
2. De knoppen +/YES en -/NO:
Druk op de knoppen +/YES en -/NO om door de geluiden te
stappen. Het gekozen geluid wordt weergegeven in de venster.
De numerieke toetsen:
Met de numerieke toetsen kun je het gewenste geluid direct
kiezen.
3. Na het kiezen van het geluid kun je het meteen bespelen via het
klavier.
OPMERKING:
• Gebruik de STYLE/SONG/VOICE-toets om tussen de
verschillende modi te schakelen.
• Bij het herhaaldelijk indrukken van de STYLE/SONG/
VOICE-toets verandert de modus van “Song Modus” in
“Voice Modus” en de “Voice Modus” in “Style Modus”.
• Wanneer er een song wordt afgespeeld kan de modus niet
worden veranderd.
Je kunt tegelijkertijd twee geluiden gebruiken. Dit heet “Dual Voice
mode”. Als de Dual-modus is uitgeschakeld, is de voice-indicator
VOICE 1. Als de Dual-modus is ingeschakeld is de voice-indicator
VOICE 2.
Als het keyboard wordt ingeschakeld staat de Dual Voice-
modus uit.
1. Met VOICE 1 geactiveerd, houd de FUNCTION-toets ingedrukt
en druk tegelijkertijd op de 1-toets op de Dual Voice-modus te
activeren.
“VOICE 2” en het “DUAL”-pictogram zijn nu tegelijkertijd verlicht.
Het geluidsnummer van de Dual Voice wordt in het LCD-venster
weergegeven. Nu krijg je met het bespelen van één toets
tegelijkertijd twee verschillende geluiden.
2. Gebruik de toetsen +/YES en -/NO of de numerieke toetsen om
geluiden te kiezen. Het Dual Voice-geluidsnummer waarmee
wordt opgestart is NO.154 Synth Strings 3.
3. Houd de FUNCTION-toets ingedrukt en druk tegelijkertijd op de
1-toets om de Dual Voice-modus uit te schakelen. De
eerstvolgende toets de je bespeelt klinkt als een enkel geluid:
VOICE 1.
OPMERKING:
Als het klavier is gesplit, kan alleen de rechterhand van de Dual
Voice-modus gebruikmaken. De linkerhand kan dit niet.
Twee geluiden
klinken tegelijkertijd.
Geluiden en effecten
Kies een geluid
Twee geluiden gelijktijdig
The DSP flag lightens on the display.
9
2.
1.
NOTE:
When you step on the sustain pedal, the sustain effect
will be stronger than the effect by pressing [SUSTAIN]
This function allows you to perform the overall
sound in a realistic style.
The DSP Effect is set to ON when keyboard power
on.
1.
2.
2
3
4
5
6
7 8 9
0
NO
YES
1
FUNCTION
NOTE:
The default split key is F#3(19), Turn to Function Menu”
page for more detail.
Press and hold down [FUNCTION] button at first,
effect. The SUSTAIN” flag will disappear.
2
3
4
5
6
7 8 9
0
NO
YES
1
FUNCTION
1.
2.
Press and hold down [FUNCTION] button at first,
then press [6] button to turn off the DSP effect.
The “DSP flag will disappear.
2
3
4
5
6
7 8 9
0
NO
YES
1
FUNCTION
Press [+\YES] / [-\NO] button or number button to
select the voice you want. The default lower voice
number is “No.154 Synth Strings 3.
3.
Press and hold down [FUNCTION] button at first,
LCD darkens its flag.
A.B.C.
TOUCH
DUAL
LOWER
DSP
SUSTAIN
A.B.C.
TOUCH
DUAL
LOWER
DSP
SUSTAIN
A.B.C.
TOUCH
DUAL
LOWER
DSP
SUSTAIN
Press and hold down [FUNCTION] button at first,
and its number.
P ress and hold down [FUNCTION] button at first,
then press [7] button to activate the sustain effect.
The “SUSTAIN” flag lightens on the display.
T he lowe r v oi ce f un ct ion is s et to OFF wh en
keyb oar d po wer on.
You can play two sounds on different parts of the
keyboard. It is called Split Mode.
This function helps you to get a voice with a
sustained effect, while playing the keyboard.
The sustain effect is set to OFF when keyboard
power on.
then press [6] button to turn on DSP effect.
then press [4] button to turn on the LOWER VOICE,
then press [4] button to turn the LOWER VOICE.
off
LCD lights the “LOWER” flag and displays “VOICE L
t h en press [7] button to eliminate the sustain effect.
Sustain
button.
Dsp Effect
Je kunt twee geluiden op verschillende gedeeltes van het
klavier bespelen. Dit heet de “Split Modus”.
Als het keyboard wordt aangezet, staat deze functie
uitgeschakeld.
1. Houd de FUNCTION-toets ingedrukt en druk tegelijkertijd de 4-
toets om de LOWER VOICE te activeren. In het LCD-venster
wordt LOWER gemarkeerd en wordt “VOICE L” en het
bijbehorende nummer zichtbaar.
2. Druk op de toetsen +/YES of -/NO of de numerieke toetsen om
een geluid. Vanuit de fabriek is het Lower Voice-nummer “NO.
154 Synth Strings 3”.
3. Houd de FUNCTION-toets ingedrukt en druk tegelijkertijd op
de 4-toets om de LOWER VOICE uit te schakelen. De
markering in het LCD-venster verdwijnt.
OPMERKING:
Vanuit de fabriek is het klavier gesplit bij F#3 (19). Zie voor
meer informatie het hoofdstuk “Function-menu”.
Deze functie zorgt voor een geluid met een langere uitklank
wanneer het klavier wordt bespeeld. Het sustain-effect is
uitgeschakeld wanneer het keyboard wordt aangezet.
1. Houd de FUNCTION-toets ingedrukt en druk tegelijkertijd op de
7-toets om het sustain-effect te activeren. In het LCD-venster
wordt SUSTAIN gemarkeerd.
2. Houd de FUNCTION-toets nogmaals ingedrukt en druk
tegelijkertijd op de 7-toets om het sustain-effect uit te schakelen.
In het LCD-venster wordt de SUSTAIN-markering opgeheven.
OPMERKING:
Wanneer het sustainpedaal wordt gebruikt, is het
sustaineffect sterker dan bij het gebruik van allen de
SUSTAIN-toets.
Met deze functie beïnvloed je het totaalgeluid op een
natuurgetrouwe manier.
Het DSP-effect is ingeschakeld als het keyboard wordt
aangezet.
1. Houd de FUNCTION-totes ingedrukt en druk tegelijkertijd op de
6-toets om het DSP-effect aan te zetten. In het LCD-venster licht
de DSP-markering op.
2. Houd de FUNCTION-toets ingedrukt en druk tegelijkertijd op de
6-toets om het DSP-effect uit te schakelen. De DSP-markering
verdwijnt.
Lower Voice / splitpunt
DSP-effect
10
The keyboard has a total of 100 styles, from 01 to
100, including 10 piano styles.
1.
2.
3.
4.
Press the [STYLE/SONG/VOICE] button to set the
keyboard to the “Style Mode”. The default STYLE 1 is
NO:01; LCD will display the STYLE flag and its number.
[+/YES] and [-/NO] buttons:
Press [+/YES] or [-/NO] to choose your desired style.
The selected style number will be shown on the display.
The number buttons:
The number buttons can be pressed directly for selecting
the number of your desired style.
After selecting a style, you can start playing the keyboard.
When a style is playing, you can select a new style at
any time. The number of the new style will be displayed
on the LCD immediately. If the style changes at beat
one, the new style will be played at once; if the style
changes at other beats, the new style will start in the
next measure. The new style will be playing with the
old tempo.
Accompaniment consists of Intro, Main, Fill and Ending.
Using different sections based on the different structures
of styles enable you to enhance the overall musical
performance.
INTRO
Press the [INTRO/ENDING] button to insert an intro sec-
tion before you start to play . The rhythm will begin with
a 2-4 measure introduction which will be followed by a
menu section.
FILL and MAIN
ENDING
When you press the [INTRO/ENDING] button, it brings
ending section appropriate for the accompaniment, and
then stop the performance.
N O T E :
The style, song and voice use composite button [STYLE
/SONG/VOICE]. You could press the button continuously
to quit “Voice Mode” and enter “Style Mode”, or switch
“Style Mode” to “Song Mode”.
While the accompaniment is playing, you can fill in
the rhythm/accompaniment by pressing the [FILL]
button.This will automatically insert a fill section.
After fill section over, Accompaniment will auto-
ma ti ca ll y r et ur n to the MA IN style.
Each main section consists of 1 to 4 measures.
STYLE
SONG
START /
STOP
SYNC
INTRO /
ENDING
FILL
SUSTAIN
DUAL
LOWER
DSP
A.B.C.
TOUCH
STYLEVOICE
SONG
2
3
4
5
6
7 8 9
0
NO
YES
1
FUNCTION
The Accompaniment Section
Select a Style
1. Druk op de toets STYLE/SONG/VOICE om het keyboard en de
“Style Modus” te zetten. De standaardinstelling STYLE 1 is NO.
01. Het LCD-venster toont de STYLE-markering en het
bijbehorende nummer.
2. Toetsen +/YES en -/NO:
Druk op de toetsen +/YES en -/NO om de gewenste style te
kiezen. Het gekozen style-nummer wordt in het LCD-venster
getoond.
Numerieke toetsen:
Met de numerieke toetsen kun je het nummer van de gewenste
style direct ingeven.
3. Na het kiezen van de style, kan het klavier meteen worden
bespeeld.
4. Wanneer er een style aan het afspelen is, kan er op elk moment
aan andere worden gekozen. Het nummer van de nieuwe style
wordt onmiddellijk in het LCD-venster weergegeven. Wanneer
een nieuwe style wordt gekozen op de eerste tel van een maat,
wordt de verandering onmiddellijk doorgevoerd. Wordt de
nieuwe style op een andere tel gekozen, dan gaat de
verandering pas in op de volgende maat.
Het keyboard is voorzien van 100 styles, van 01 tot en met 100, inclusief 10 piano styles
OPMERKING:
De style, song of voice gebruiken de gecombineerde STYLE/
SONG/VOICE-toets. Druk herhaaldelijk op deze toets op de
“Voice Modus” te verlaten en de “Style Modus” te activeren,
of om om te schakelen van de “Style Modus” naar de “Song
Modus”.
Een begeleiding bestaat uit Intro, Main, Fill en Ending. Het
gebruik van deze onderdelen gebaseerd op de verschillende
structuren van de styles verrijkt een uitvoering aanzienlijk.
INTRO
Druk op de toets INTRO/ENDING om een inleidend gedeelte in
te voegen voordat je begint te spelen. Het ritme start met 2 – 4
maten inleiding, die wordt gevolgd door een hoofdgedeelte.
FILL en MAIN
Terwijl de begeleiding speelt kun je een fill laten afspelen door
de FILL-toets in te drukken. Dit voegt automatisch een fill-
gedeelte in. Als deze is beëindigd wordt automatisch het
hoofdgedeelte (MAIN) hervat. Elk hoofdgedeelte bestaat uit 1 –
4 maten.
ENDING
Wanneer je op de INTRO/ENDING-toets drukt, volgt er een
eindgedeelte dat past bij de gekozen begeleiding alvorens te
stoppen.
Style-bediening
Kies een style
De begeleidingssectie
11
3.
Sync Start
Press [SYNC] button to enter the sync start waiting
mode. The 4 beats on the LCD flash together.
If the A.B.C. mode is on, play any key in chord area,
the style start playing with bass and chord.
If the A.B.C. mode is off, play any key on keyboard, the
style plays only the drum voice.
Press [SYNC] button again to stop the style.
2.
“A.B.C.” mode
The default setting of A.B.C. is off.
Press [A.B.C./LESSON] button to turn on the auto bass
chord. The area to the left of split point is known as the
chord area.
When playing the chord, both the bass and the chord
voice sound.
1.
Start immediately:
Press [START/STOP] button to start the style, the drum
beats of the style will be played at once. The beats will
be shown on the LCD alternately.
STYLE
SONG
START /
STOP SYNC
INTRO /
ENDING
FILL
STYLE
SONG
START /
STOP
SYNC
INTRO /
ENDING
FILL
Flash simultaneously
STYLE
SONG
START /
STOP SYNC
INTRO /
ENDING
FILL
STYLE
SONG
START /
STOP
SYNC
INTRO /
ENDING
FILL
Intro Start:
4.
Press [INTRO/ENDING] button when the style is not
playing, NOR flag will flash on the LCD, indicating the
indicates the intro section is ready to play.
Press [START/STOP] button, then the style starts with
an intro section, followed by the main section.
SUSTAIN
DUAL
LOWER
DSP
A.B.C.
TOUCH
SUSTAIN
DUAL
LOWER
DSP
A.B.C.
TOUCH
Flashing
L & R
CHORD
DICT.
LESSON
SUSTAIN
DUAL
LOWER
DSP
A.B.C.
TOUCH
SUSTAIN
DUAL
LOWER
DSP
A.B.C.
TOUCH
Start a Style
1. Onmiddellijk starten
Druk op de toets START/STOP om de style en het
bijbehorende ritme onmiddellijk te laten starten. De individuele
tellen in de maat zullen afwisselend in het LCD te zien zijn.
2. “A.B.C.”-modus
Standaard staat A.B.C. uit.
Druk op de A.B.C./LESSON-toets om de automatische bass/
akkoord-begeleiding aan te zetten. Het gedeelte van het
klavier links van het splitpunt staat bekend als het
akkoordgebied.
Als er een akkoord wordt gespeeld klinken zowel de bas- als
de akkoordgeluiden.
3. Sync-start
Druk op de SYNC-toets om de wacht-modus te activeren. De 4
tellen in de maat lichten tegelijkertijd op in het LCD-venster.
Als de A.B.C.-modus is ingeschakeld, kun je een willekeurige
toets in het akkoordgebied spelen om de bas- en
akkoordpartijen te starten. Als A.B.C. is uitgeschakeld start
alleen de drumpartij.
Druk nogmaals op SYNC om de style te beëindigen.
4. Intro-start
Druk op de INTRO/ENDING-toets wanneer de style niet
afspeelt. NOR in het knippert in het LCD-venster, daarmee
aangevend dat het introgedeelte klaarstaat om te beginnen.
Druk op de START/STOP-toets, waarna de style begint met
het introgedeelte gevolgde door het hoofdgedeelte.
Style-bediening
Een style starten
12
Stop a Style
Stop immediately
1.
The accompaniment can be stopped at any time by
pressing [START/STOP] button.
Ending stop
2.
Press [INTRO/ENDING] button to complete style with an
ending section.
Sync stop
3.
Press [SYNC] button to stop playing style, the syn-
chronized start mode will be activated.
STYLE
SONG
START /
STOP SYNC
INTRO /
ENDING
FILL
STYLE
SONG
START /
STOP SYNC
INTRO /
ENDING
FILL
STYLE
SONG
START /
STOP SYNC
INTRO /
ENDING
FILL
Press [TEMPO +] or [TEMPO - ] button to change
the
tempo: 30 - 280
Press [TEMPO +] and [TEMPO - ] button
2.
1.
Note:
When the style stops while selecting style, the
tempo will change with the style automatically to
the default tempo. When style is playing, the tempo
will not change with the style.
2.
In MAIN mode, press [FILL] button to insert 1 measure
fill section and LCD flashes “NOR”; after one measure
is over, MAIN style will be returned.
Press and hold down [FILL] button when style is playing,
the selected FILL pattern repeats continuously until the
button is released.
STYLE
SONG
START /
STOP SYNC
INTRO /
ENDING
FILL
STYLE
SONG
START /
STOP
SYNC
INTRO /
ENDING
FILL
Press and
hold down
SUSTAIN
DUAL
LOWER
DSP
A.B.C.
TOUCH
Flashing
Flashing until button
is released
SUSTAIN
DUAL
LOWER
DSP
A.B.C.
TOUCH
simultan-
eously
to set the tempo value back to its
default.
SUSTAIN
DUAL
LOWER
DSP
A.B.C.
TOUCH
SUSTAIN
DUAL
LOWER
DSP
A.B.C.
TOUCH
- TEMPO +
- TEMPO +
Main/Fill
1.
Tempo
1. Onmiddellijk stoppen
De begeleiding kan op ieder moment worden beëindigd door op
de START/STOP-toets te drukken.
2. Ending om te stoppen
Druk op de INTRO/ENDING-toets om de style te beëindigen met
een bijpassend eindgedeelte.
3. Sync-stop
Druk op de SYNC-toets om de style te beëindigen en Sync-start
alvast te activeren.
1. Tijdens het afspelen van het hoofdgedeelte (MAIN), druk op
de FILL-toets om een fillgedeelte van 1 maat in te voegen. In
het LCD-venster knippert vervolgens “NOR”. Na 1 maat keert
de style terug naar het hoofdgedeelte.
2. Hou de FILL-toets ingedrukt terwijl de style wordt afgespeeld.
Het gekozen fill-patroon zal worden herhaald totdat de toets
wordt losgelaten.
1. Druk op de toetsen TEMPO + en TEMPO – om het tempo te
veranderen binnen een bereik van 30 – 280.
2. Druk gelijktijdig op de toetsen TEMPO + en TEMPO – om het
tempo terug te zetten naar de standaardinstelling.
Opmerking:
Als de style wordt beëindigd alvorens een nieuwe style te
kiezen, verandert het tempo overeenkomstig de nieuwe
style. Als er een nieuwe style wordt gekozen terwijl er al
een wordt afgespeeld, blijft het aanvankelijke tempo
gehandhaafd.
Style-bediening
Een style beëindigen
Main/fill
13
“A.B.C.” is disabled during the default setting.
Press [A.B.C.] button to turn on this “auto bass chord”
function; the A.B.C. flag on the LCD is lightened. The
left section of the keyboard is known as the “chord area”,
while playing the chord, both the bass and the chord
voices phonate.
There are 2 ways to detect a chord: single finger
detect” and “multi fingers detect”.
Single Finger Chords
If the chord played is based on "multi fingers detect", it
is recognized as the “multi fingers chord”.
If not, “single finger chord” will be recognized.
This method allows you to play chords easily within the
accompaniment range of the keyboard using only one,
two, or three fingers.
Examples of Single Finger Chord are “C, Cm, C7 and
Cm7”, shown as below:
To play a major chord
Press the root note of the chord
To play a minor chord
Press the root note together with the
nearest black key to the left of it .
To play a seventh chord
Press the root note together with the
nearest white key to the left of it .
To play a minor seventh chord
Press the root notes together with
the nearest white and black keys to
the left of it (three keys altogether) .
Multi Finger Chords
This method allows you to produce an accompaniment
by playing chords with normal fingerings within the
accompaniment range of the keyboard.
To play Multi Chords ( Example for C chords)
A total of 32 chords are provided as below:
Press [ A.B.C. ] button again to turn off auto bass
chord function. The A.B.C. flag will disappear
16
CM (9)
Notes enclosed in parentheses are optional;
the chords could be recognized without them.
CM (#11)
Caug
5
( )
11
18
Cdim
19 20 21
5
( )
22
17
Cdim
23
(#11)
27
(#9)
28 29
24
13
( )
25
9
( )
26
13
( )
CM
aug
aug
30 31
aug
SUSTAIN
DUAL
LOWER
DSP
A.B.C.
TOUCH
L & R
CHORD
DICT.
LESSON
Chord Recognize
Noten aangegeven tussen ronde haken
(•) zijn optioneel; zonder deze wordt het
akkoord herkend.
Om een majeur-akkoord te spelen
Speel de grondtoon van het
akkoord.
Om een mineur-akkoord te spelen
Speel de grondtoon samen met de
dichtstbijzijnde zwarte toets links.
Om een septiem-akkoord
Speel de grondtoon samen met de
dichtstbijzijnde witte toets links.
Om een mineur-septiem-akkoord
Speel de grondtoon samen met de
dichtstbijzijne witte én zwarte toets
links (drie toetsen totaal).
Style-bediening
Akkoordherkenning
“A.B.C.” is standaard uitgeschakeld wanneer het apparaat
wordt aangezet.
Druk p de A.B.C.-toets om de Auto Bass Chord-functie te
activeren; de A.B.C.-indicator in het LCD-venster is verlicht.
Het linkergedeelte van het klavier staat ook bekend als het
“akkoordgebied”, als daar een akkoord wordt gespeeld
klinken zowel de basnoot als het betreffende akkoord.
Druk nogmaals op de A.B.C.-toets op de A.B.C.-functie uit te
schakelen. De A.B.C.-markering verdwijnt dan.
Er zijn twee manieren waarop een akkoord kan worden
geïdentificeerd: “enkele-vinger-detectie” en “meerdere-
vingers-detectie”.
Als een akkoord wordt gespeeld gebaseerd op “meerdere-
vingers-detectie”, zal het worden herkend als “meerdere-
vingers-akkoord”. Zo niet, dan wordt een “enkele-vinger-
akkoord” herkend.
Enkele-vinger-akkoorden
Deze methode maakt het op simpele manier mogelijk om
akkoorden binnen het begeleidingsgedeelte van het toetsenbord
te spelen met gebruikmaking van een, twee of drie vingers.
Voorbeelden van de enkele-finger-akkoorden C, Cm, C7 en
Cm7 zijn hiernaast getoond:
Meerdere-vingers-akkoorden
Deze methode maakt het mogelijk een begeleidingspartij te
produceren door akkoorden door middel van de normale
vingerzetting binnen het begeleidingsgedeelte van het klavier.
Meerdere-vingers-akkoorden (getoond zijn de C-akkoorden)
In het totaal zijn er 32 akkoorden mogelijk, zoals hiernaast
getoond:
14
Chord Basics
Reading Chord Names
Some Chord Types
“chord”.
The most basic chord type is the "triad" consisting three
notes:
the root, third, and fifth degrees of the corresponding
scale.
A “C major triad”, for example, is made up of the notes
C (the root),
E(the third note of the C major scale),and
G (the fifth note of the
C major scale).
In the C major triad shown as above, the lowest note is
the “root” of the chord(this is the chord’s “root position”
...using other chord notes for the lowest note results in
“inversion”). The root is the central sound of the chord,
which supports and anchors other chord notes.
The distance(interval) between adjacent notes of triad
in root position is either a major or minor third.
The lowest interval in our root-position triad (between
the root and the third) determines whether the triad is a
major or minor chord, and we can shift the highest note
up or down by a semitone to produce two additional
chords, as shown below.
The basic characteristics of the chord sound remain
intact even if we change the order of the notes to create
different inversions. Successive chords in a chord
progression can be smoothly connected, for example,
by choosing the appropriate inversions (or chord
“voicings”).
Chord names tell you just about everything you need to
know about a chord (other than the inversion/voicing).
The chord name tells you what the root of a chord is,
whether it is a major, minor, or diminished, whether it
requires a major or flatted seventh and what alterations
or tension does it use...all at a glance.
Style-bediening
Een paar akkoordtypes
Akkoordnamen lezen
Akkoordnamen vertellen je vrijwel alles wat je moet weten
over een akkoord (afgezien van omkering en voicing). De
akkoordnaam vertelt je wat de grondtoon is, of hij majeur,
mineur of verminderd is, of er een kleine of een grote septiem
vereist is en wat voor gealtreerde tonen en voorhouding er
worden gebruikt.
Akkoordbeginselen
Drie of meer tegelijkertijd gespeelde noten vormen een
“akkoord”.
De basisvorm van een akkoord is de drieklank, bestaande uit
drie noten: de grondtoon (1), de terts (3) en kwint (5) binnen
een toonladder. Een C-majeur drieklank, bijvoorbeeld,
bestaat uit de noten C (grondtoon), E (de derde noot in de
toonladder C-majeur en de G (de vijfde noot binnen de C-
majeur toonladder).
In de C-drieklank hierboven is de grondtoon de laagste noot in
het akkoord. Dit is de “grondligging”. Het gebruik van andere
dan de grondtoon als laagste noot resulteert in “omkeringen”.
De grondtoon is de centrale noot van een akkoord en
ondersteunt de andere noten in het akkoord.
De afstand (het interval) tussen naast elkaar liggende noten
binnen een drieklank in de grondligging is hetzij een grote
hetzij een kleine terts.
Het onderste interval van een akkoord in de grondligging
(tussen de grondtoon en de terts) bepaald of de drieklank
majeur of mineur is, en de hoogste noot kan een halve noot
worden verplaatst om additionele akkoorden te vormen, zoals
hiernaast getoond.
De basiskarakteristiek van een akkoord blijft behouden ook als
we de volgorde van de noten onderling veranderen om andere
omkeringen te vormen. Opeenvolgende akkoorden en een
akkoordenprogressie kunnen vloeiend worden verbonden,
bijvoorbeeld, met goedgekozen omkeringen (ook wel “voicing”).
Kleine terts - drie halve noten
Grote terts - vier halve noten
Majeur-akkoord
Mineur-akkoord
Verminderd akkoord
Overmatig akkoord
Kleine terts
Grote terts
Kleine terts
Kleine terts
Grote terts
Grote terts
Grote terts
Kleine terts
Grondtoon
Akkoordtype
7
Mineur 7
Majeur 7
Mineur-majeur 7
7b5
Mineur 7b5
7 sus 4
Reine kwint
Reine kwart
Kleine septiem
Kleine septiem
Grote septiem
Grote septiem
Mineur-akkoord
Mineur-akkoord
Majeur-akkoord
Majeur-akkoord
Verminderde kwint
Verminderde kwint
Kleine septiem
7-akkoord
Minuer-7-akkoord
Sus-4-akkoord
Terts
Terts
Grondtoon
Accomp Volume
Press [ACCOMP +] or [ACCOMP -] button to adjust
volume of ac compani ment in s tyle pla ying. The
LC D di sp la ys the ac co mp vol um e w hic h r an ge
between 0 and 31. Default Accomp Volume is 28.
Press [ACCOMP +] and [ACCOMP -] button together to
mute the ACCOMP track.
1.
2.
Press [ACCOMP +] and [ACCOMP -] button together
again to turn on the ACCOMP volume.
3.
NOTE:
When in “Song Mode” or recording playback status, the
Accomp Volume function will be invalid.
Press and hold down [FUNCTION] button at first, and
then press [3] button to turn on the “O.T.S. function.
The O.T.S. flag on the LCD will be lightened.
While O.T.S. is on, the relative type of the parameter
will be loaded according to the current style, and the
keyboard will turn the A.B.C. mode on automatically.
Press and hold down [FUNCTION] button at first, and
then press [3] button to turn off the O.T.S. function. LCD
darkens its flag.
One Touch Setting is a powerful and convenient
function that allows you to reconfigure all set-
tings instantly with the touch of a single button.
In this function, 1 types of parameters will be
loaded for operating the current style.
1.
2.
2
3
4
5
6
7 8 9
0
NO
YES
1
FUNCTION
SUSTAIN
DUAL
LOWER
DSP
A.B.C.
TOUCH
SUSTAIN
DUAL
LOWER
DSP
A.B.C.
TOUCH
SUSTAIN
DUAL
LOWER
DSP
A.B.C.
TOUCH
15
L & R
CHORD
DICT.
LESSON
Metronome
Press [METRO] button to turn on the metronome.
Press [METRO] button again to turn off the metronome.
Metronome could not be played in SONG mode.
1.
2.
3.
METRO
SUSTAIN
DUAL
LOWER
DSP
A.B.C.
TOUCH
NOTE:
Metronome can be played along with the tempo as
accompaniment whenever you turn on a style.
Metronome could be played in Recording Mode, but
L & R
CHORD
DICT.
LESSON
it would not be recorded.
Eenknops-instellingen
Eenknops-bediening is een karchtige en handige functie
die het mogelijk maakt alle instellingen op te roepen met
druk op één knop. Met deze functie wordt een complete
set parameters geladen die nodig is om de gekozen style
te kunnen gebruiken.
1. Houd de FUNCTION-toets ingedrukt en druk vervolgens op
de 3-toets om de “O.T.S.”-functie te actieveren.
De O.T.S.-markering in het LCD-venster is dan verlicht. Als de
O.T.S.-functie is geactiveerd, worden alle benodigde
parameters met betrekking tot de huidige song geladen en
wordt automatisch de A.B.C-modus ingeschakeld.
2. Houd de FUNCTION-toets nogmaals ingedrukt en druk
gelijktijdig op de 3-toets om de O.T.S.-functie uit te schakelen.
De markering in het LCD-venster verdwijnt.
Metronoom
Begeleidingsvolume
1. Druk op de METRONOOM-toets om te metronoom aan te
zetten.
2. Druk nogmaals op de METRONOOM-toets om deze uit te
schakelen.
3. De metronoom kan niet worden gebruikt in de SONG-modus.
OPMERKING:
De metronoom kan worden gebruikt voor het tempo samen
met de begeleiding wanneer er een style wordt ingeschakeld.
De metronoom kan ook worden gebruikt in de Recording-
modus, maar wordt niet mee opgenomen.
1. Druk op de toets ACCOMP + of ACCOMP - om het volume
van de begeleidingspartij in een style aan te passen. Het LCD-
venster toont het ingestelde volume, dat een bereik heeft van
0 tot 31. Standaard staat op begeleidingsvolume op 28.
2. Druk gelijktijdig op beide toetsen ACCOMP + en ACCOMP -
om het volume van de begeleidingspartij volledig uit te zetten.
3. Druk nogmaal gelijktijdig op beide toetsen ACCOMP + en
ACCOMP - om het volume van de begeleidingspartij weer aan
te zetten.
OPMERKING:
In de Song-modus of tijdens het afspelen van een opname is
de functie begeleidingsvolume niet van toepassing.
Record
Start Recording
Play back the Recording
Press the [RECORD] button, the four-beat on
the LCD
indicator
will flash simultaneity, indicating the record
waiting
status”.
A voice and style can be selected in this status.
The ACCOMP track and MELODY track can be recorded
together.
Status, play the keyboard (the chord area when
recording ACCOMP) or press [START/STOP] button;
it will start recording and the beat will be displayed
according to the current tempo.
STOP AUTOMATICALLY
While recording, once the capability is full, the recording
will be stopped automatically. “FULL” will be displayed
on the LCD.
1.
1.
2.
2.
Press and hold down [REC] button 2 seconds to play back
the recorded data.
Press [REC] button again (or press [START/STOP]
button)
could quit playback.
STOP MANUALLY
Press [RECORD] button again to stop the recording
immediately.
When a style is playing, press the [INTRO/ENDING]
button, it will stop recording automatically after “ending”.
NOTE:
Once the recording of one track is started, the original
data in the track will be overwritten.
In “Record Status”, song mode will be invalid.
It means, you could not switch to the Song Mode by
pressing [STYLE/ SONG/VOICE] button.
NOTE:
If you power off the keyboard, the recorded data would
be erased.
When the capability is empty, “NULL will be displayed
on the LCD, and then quit playback state automatically.
Flash simultaneously
PLAY
STYLE
SONG
START /
STOP SYNC
INTRO /
ENDING
FILL
A.B.C.
TOUCH
DUAL
LOWER
DSP
SUSTAIN
STYLE
SONG
START /
STOP SYNC
INTRO /
ENDING
FILL
PLAY
16
When all the settings have been done in “Record Waiting
Stop Recording
Opname
Start de opname
Stop de opname
De opname afspelen
1. Druk op de RECORD-toets, de vier-tellen-indictator in het
LCD-venster licht op in het ingestelde tempo, aangevend dat
de stand “wacht op opname” is geactiveerd.
In deze stand kunnen een VOICE en een STYLE worden
geselcteerd. De Begeleidings- (ACCOMP) en melodiesporen
(MELODY) kunnen tegelijkertijd worden opgenomen.
2. Wanneer tijdens de stand “wacht op opname” alle instellingen
zijn gemaakt, bespeel het klavier (het akkoordgebied,
wanneer er een begeleidingspartij (ACCOMP) mee wordt
opgenoemen of druk op de START/STOP-toets. De opname
sart en de tellen worden weergegeven volgens het ingestelde
tempo.
OPMERKING:
Op het moment dat de opname op een spoor is gestart
worden de oorspronkelijke data op dat spoor gewist.
In de “Record-modus” is de Song-modus niet van toepassing.
Dit betekent dat er niet kan worden omgeschakeld naar de
Song-modus door de STYLE/SONG/VOICE-toets in te
drukken.
1. STOP AUTOMATISCH
Op het moment dat de opnamecapaciteit is verbruikt, stopt de
opname automatisch. Het LCD-venster toont “FULL”.
2. STOP HANDMATIG
Druk nogmaals op de RECORD-toets om de opname
onmiddellijk te beëindigen.
Wanneer er tegelijkertijd een style wordt afgespeeld, kan de
opname met de toets INTRO/ENDING worden beëindigd. De
opname stopt dan na het “ending”-gedeelte.
Druk op de REC-toets en hou deze 2 seconde ingedrukt om de
opgenomen data af te spelen.
Druk nogmaals op de REC-toets (of op de START/STOP-toets)
om het afspelen te beëindigen.
OPMERKING:
Als het keyboard wordt uitgezet, wordt de opgenomen data
gewist.
Wanneer de opnamecapaciteit is opgebruikt, wordt er
“NULL” in het LCD-venster getoond en wordt de weergave
automatisch beëindigd.
STYLE
SONG
START /
STOP SYNC
INTRO /
ENDING
FILL
Song
T h e r e a r e t o t a l 1 0 0 s o n g s i n t h is keyboard
(se e A ppen dix) . Eac h son g can be pr acti sed
in the MELODY OFF mode.
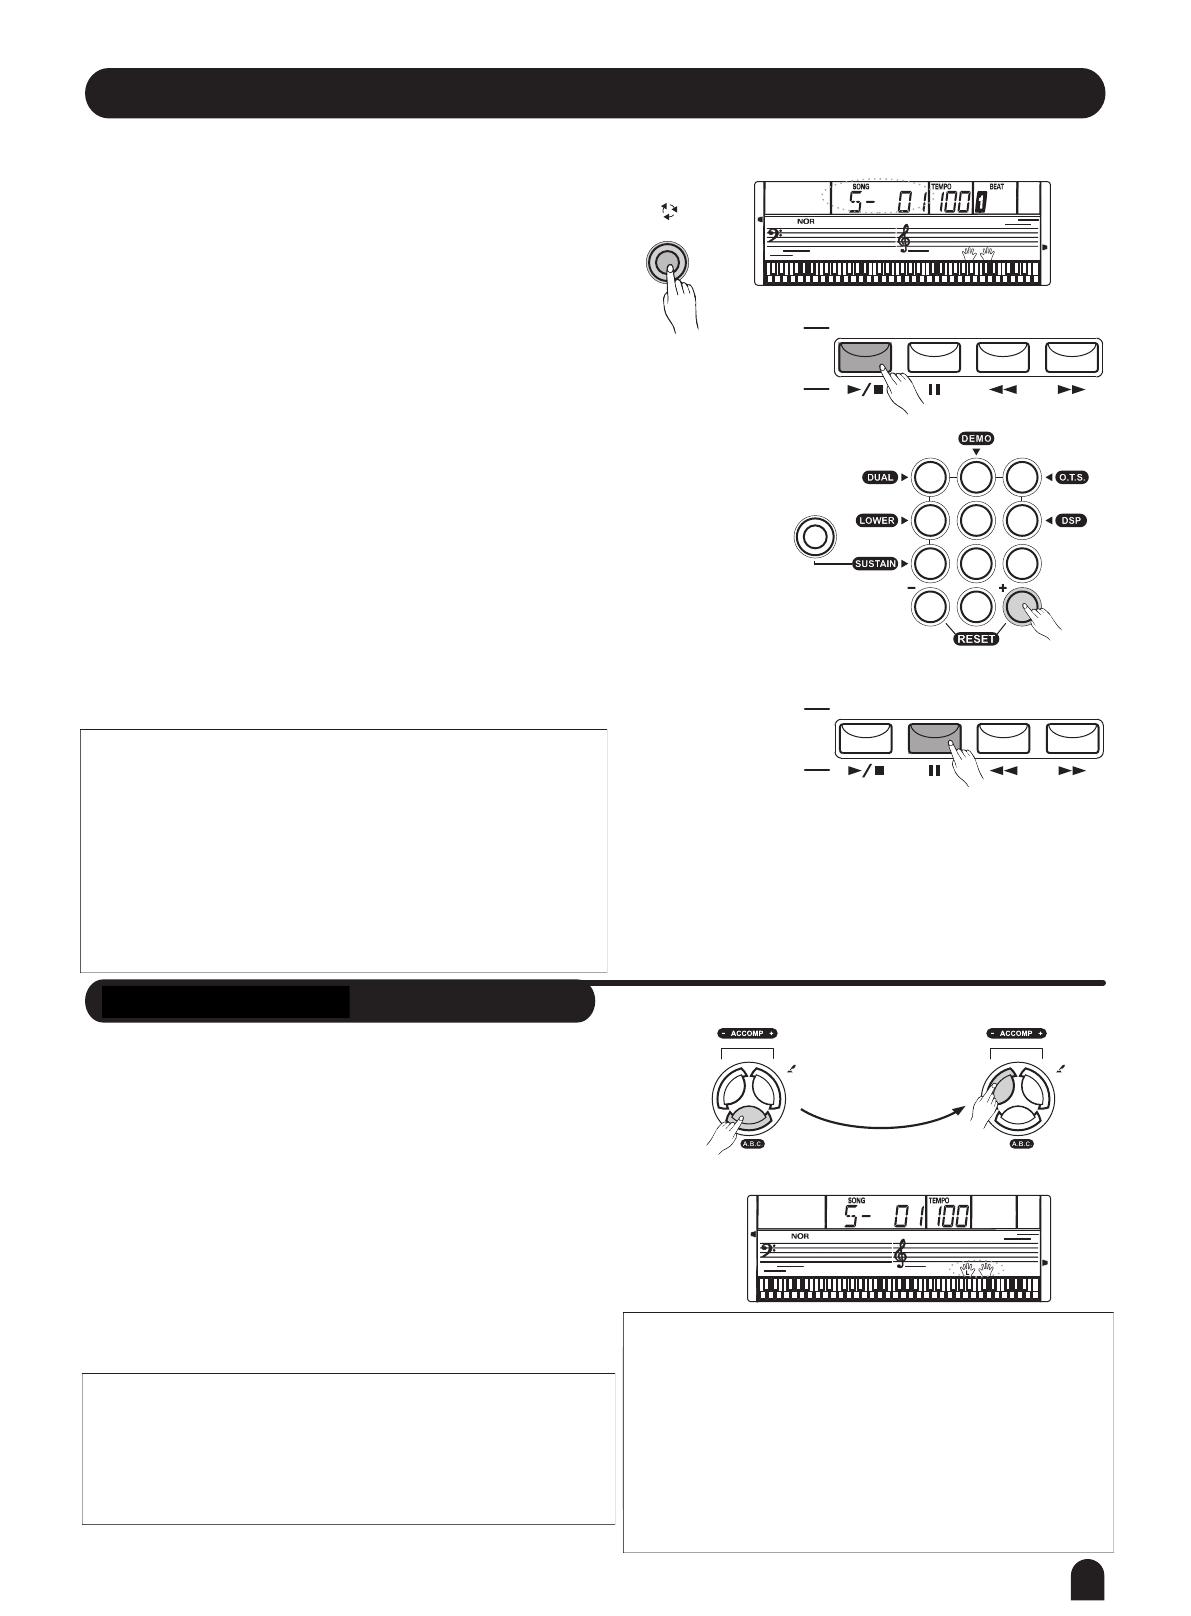
START/STOP song
Press [SONG/STYLE/VOICE] button to enter the “song
mode”, LCD will display “SONG” flag and its number.
All songs will be played in a loop.
LOOP:
The second time you start playing the song by pressing
[START/STOP] button, it will play the current song
repeatedly.
If you want to play all songs in a loop, you should quit
song mode at first, and then enter song mode again.
SELECT song:
Use [+/YES] / [-/NO] button or numeric keypad to select
your desired song.
REW, FF and PAUSE
When a song is playing, press [ ] button to speed forward
the song.
Press [ ] to rewind the song (base on measure);
Press [ ] to pause the song.
NOTE:
When playing song, [STYLE/ SONG/VOICE] button is invalid.
If the song is in pause, the [ ] and [ ] function will be invalid.
When switch from Style Mode to Song Mode, the keyboard
will 3 seconds, and then all songs will be waiting for be
playing in a loop.
In waiting status, you could press [STYLE/ SONG/
VOICE] button again to switch to “Voice Mode.
1.
2.
3.
4.
1.
2.
Lesson Mode
Learning a new song primarily involves with the timing
of the piece and the accuracy of a note. Thus the song
learning function focuses on these two elements to
help you better play a song.
In song mode (when a song is not playing), press
[A.B.C./LESSON] button to enter the Lesson mode.
There are 3 levels to score the performance of your
playing. You can use [R] or [L] button to select which
hand to practice. If neither hand is selected, the
keyboard will choose the right hand automatically.
If [L] and [R] are both selected, you can use two hands
to do the lesson togther.
NOTE:
The contents for practising with left hand varied according
to different types of songs. If you choose a chord
song, the left hand practices the chord, otherwise, the left
hand will be used to practise the melody.
When a song is playing, the notes and keyboard
displayed on the LCD indicate the melody and
chord position, the numbered musical notation
displayed on the LCD shows the last note played by
the RIGHT track, and it will be convenient for you to
practice .
The [R] and [L] function is invalidation in “Style Mode
and “Voice Mode.
SUSTAIN
DUAL
LOWER
DSP
A.B.C.
TOUCH
STYLE
SONG
START /
STOP SYNC
INTRO /
ENDING
FILL
L & R
CHORD
DICT.
LESSON
SUSTAIN
DUAL
LOWER
DSP
A.B.C.
TOUCH
17
2
3
4
5
6
7 8 9
0
NO
YES
1
FUNCTION
STYLEVOICE
SONG
L & R
CHORD
DICT.
LESSON
NOTE:
Dit keyboard is voorzien van in het totaal 100 songs (zie
appendix). Elk van de song kan worden geoefend met de
MELODY OFF-modus.
1. START/STOP song
Druk op de SONG/STYLE/VOICE-toets om de “song-modus” te
activeren. In het LCD-venster wordt “SONG” gemarkeerd en
het songnummer wordt getoond. De songs worden achter
elkaar in een lus weegegeven.
2. LUS:
Wanneer een song voor de tweede keer wordt gestart met de
START/STOP-toets, dan wordt de betreffende song herhaald.
Wanneer alle songs in een lus moeten worden weergegeven
moet eerst de song-modus worden veraleten en opnieuw
geactiveerd.
3. SELECTEER song:
Gebruik de toetsen +/YES en -/NO of het numerieke
toestenbord om de gewenste song te kiezen/
4. REW, FF en PAUSE
Terwijl er een song wordt weergegeven, druk op de toets >>
om snel door te spoelen. Druk op de toets << om per maat
terug te spoelen.
Druk op || om de song te pauzeren.
OPMERKING:
Wanneer een song wordt afgespeeld, is de STYLE/SONG/
VOICE-toets niet van toepassing. Gedurende de pauzestand
zijn de functies << en >> niet van toepassing.Wanneer er
wordt omgeschakeld van de Style-modus naar de Song-
modus, wacht het keyboard 3 seconde alvorens alle songs in
een lus af te spelen.
In de “wachtstand” kun je de STYLE/SONG/VOICE-toets
nogmaals indrukken om over te schakelen naar de Voice-
modus.
Les-modus
Het instuderen van een nieuwe song behelst voornamelijk de
timing van het stuk en de nauwkeurigheid van een noot.
Zodoende focust de song-leer-functie op deze twee
elemeneten.
1. In de Song-modu (wanneer er geen song wordt afgespeeld),
druk op de toets A.B.C./LESSON om de Les-modus te
activeren.
2. Er zijn drie niveaus om de score van je speelvaardigheid bij te
houden. Je kunt de toetsen R en L gebruiken om de kiezen
met welke hand je wilt oefenen. Als er geen hand wordt
gekozen, kiest het keyboard automatisch voor de rechterhand.
Als L en R beide zijn gekozen, kun je een les doen voor beide
handen samen.
OPMERKING:
De inhoud van de oefeningen varieert afhankelijk van het
songtype. Als je een “akkoorden-song” kiest, oefent de
linkerhand in het spelen van akkoorden, anders wordt de
linkerhand gebruikt om een melodie te oefenen.
OPMERKING:
Wanneer er een song wordt afgespeeld, geven de noten
en het klavier in het LCD-venster de positie van de
medoldie en het akkoord aan. De genummerde
muzieknotatie in het LCD-venster toont de laatste door
de RECHTER-partij gespeelde noot.
De R- en L-functies zijn niet van toepassing en de Syle-
modus en de Voice-modus.
Song
Lesson 1
Lesson 2
Press [A.B.C./LESSON] button to enter LESSON 1, the
lesson 1 flag will be lightened on the LCD.
Evaluation is based on the accuracy of the time value,
and the accuracy of note playing will not be graded.
Press [START/STOP] to begin.
If [R] is selected; it will mute the melody of the right
hand position and you will have to follow the timing of
the right hand. As long as the timing is correct, the
melody will be sounded.
If [L] is selected ; it will mute the changing chord / melody
by the left hand. You will have to follow the timing of the
left hand. As long as the timing is correct,
the chord
/
melody will be sounded.
If [L] and [R] are both selected, the chord / melody on both
hands will be muted. You will have to follow the timing
of both the left and right hands, and the song will then
play accordingly.
Once the lesson is completed, the result of evaluation
will be announced.
Press [LESSON] button again to enter LESSON 2, the
lesson 2 flag will be lightened on the LCD.
Evaluation is based on the accuracy of notes playing.
Accuracy of time value will not be considered as the
song could keep going only if the correct note is played.
Press [START/STOP ] button to begin.
If [R] is selected, only the left hand will be played
automatically until the first note on the right hand is
played. The song will not proceed until the correct
note is played.
If [L] is selected, only the right hand will be played.
The song will not proceed until the notes of the left
hand are played correctly.
If [L] and [R] are both selected, the song will proceed
only when the notes of both hands are played correctly.
Once the lesson is completed, the result of evaluation
will be announced.
2.
2.
3.
3.
4.
4.
5.
5.
6.
6.
1.
1.
SUSTAIN
DUAL
LOWER
DSP
A.B.C.
TOUCH
SUSTAIN
DUAL
LOWER
DSP
A.B.C.
TOUCH
SUSTAIN
DUAL
LOWER
DSP
A.B.C.
TOUCH
18
L & R
CHORD
DICT.
LESSON
STYLE
SONG
START /
STOP SYNC
INTRO /
ENDING
FILL
L & R
CHORD
DICT.
LESSON
L & R
CHORD
DICT.
LESSON
STYLE
SONG
START /
STOP SYNC
INTRO /
ENDING
FILL
Les 1
Les 2
1. Druk op de A.B.C./LESSON-toets om LES 1 te starten. De
Les 1-indicatie zal zijn gemarkeerd in het LCD-venster.
De beoordelig is gebaseerd op de timing waarmee de noot is
gespeeld, niet of het de juiste noot is.
2. Druk op START/STOP om te beginnen.
3. Als R is gekozen zal de melodie voor de rechterhand niet
klinken en moet de timing van de rechterhandpartij worden
gespeeld. Zolang deze timing correct is, klink de melodiepartij.
4. Als L is gekozen, zal de wisselingen van de akkoorden / in de
melodie niet worden weergegeven. Speel de linkerhand met
de juiste timing. Zodra de akkoorden / melodie met de juiste
timing worden gespeeld zullen de akkoorden / de melodie
klinken.
5. Als L en R beide zijn gekozen, zullen de akkoorden / de
melodie van beide handen niet klinken. Zodra de akkoorden /
melodie met de juiste timing worden gespeeld zal de volledige
song worden weergegeven.
6. Aan het einde van de les zullen de resultaten van de
beoordeling worden weergegeven.
Text
1. Druk nogmaals op de LESSON-toets om LES 2 te starten. De
Les 2-indicatie zal zijn gemarkeerd in het LCD-venster.
De beoordeling is gebaseerd op het spelen van de juiste
noten. De nauwkeurigheid van de timing telt niet mee,
aangezien het afspelen van de song wordt gecontinueerd
zolang de juiste noten worden gespeeld.
2. Druk op de START/PLAY-toets om te beginnen.
3. Als R is gekozen, zal de linkerhandpartij worden weergegeven
zodra rechts de juiste noot wordt gespeeld. De song zal niet
doorgaan tenzij de juiste noot rechts is gespeeld.
4. Als L is gekozen, wordt alleen de rechterhandpartij
weergegeven. De song zal niet doorgaan tenzij de juiste noot
links is gespeeld.
5. Als L en R beide zijn gekozen, zal de song alleen worden
weergegeven als zowel links als rechts de juiste noten worden
gespeeld.
6. Aan het einde van de les zullen de resultaten van de
beoordeling worden weergegeven.
19
Song
Lesson 3
Grade Function
Press [LESSON] button in LESSON 2 to enter
LESSON 3 .
In this mode, you can hear what you play whether the
notes are right or wrong, evaluation is based on the
correctiveness of both the time value and notes.
Press [START/STOP ] button to begin.
If [R] is selected, the melody on right hand will be
muted.
If [L] is selected, the chord / melody on left hand
will be muted.
If [L] and [R] are both selected, both the left and right
hands will be muted, only the accompaniment will be
sounded.
Once the lesson is completed, the result of evaluation
will be announced.
Lesson 1 / Lesson 2 / Lesson 3 all have the grading
function. There are five levels, including: TRY AGAIN,
OK , GOOD, VERY GOOD, EXCELLENT.
After a grade is given, the song will be played again
and retain lesson mode.
2.
3.
4.
5.
6.
1.
SUSTAIN
DUAL
LOWER
DSP
A.B.C.
TOUCH
L & R
CHORD
DICT.
LESSON
STYLE
SONG
START /
STOP SYNC
INTRO /
ENDING
FILL
Les 3
Beoordeling
1. Druk gedurende LES 2 op de LESSON-toets op LES 3 te
starten.
In deze modus kun je horen wat je speelt onafhankelijk van of
de timing dan wel de noten correct zijn. De beoordeling is
gebaseerd op de correctheid van zowel de timing als de
noten.
2. Druk op de START/STOP-toets om te starten.
3. Als R is gekozen, zal de melody in de rechterhand niet
klinken.
4. Als L is gekozen, zullen de akkoorden / melodie in de
lnikerhand niet klinken.
5. Als zowel R als L zijn gekozen, klinken nog de partijen van de
linker- noch die van de rechterhand. alleen de
begeleidingspartij wordt weergegeven.
6. Aan het einde van de les zullen de resultaten van de
beoordeling worden getoond.
Les 1, 2 en 3 kennen alle drie beoordelingsniveaus. Er zijn 5
niveaus: probeer nog !s (TRY AGAIN), voldoende (OK), goed
(GOOD), zeer goed (VERY GOOD) en uitmuntend
(EXCELLENT).
Nadat het beoordelingsniveau is uitgereikt, wordt de song
opnieuw afgespeeld en de les hervat.
Demo
Enter Demo Mode
Press and hold down [FUNCTION] button at first,
then press [2] button to enter the Demo Mode,
LCD will display "DEMO" flag and its number.
The keyboard will be playing songs 082, 001, 063, 073,
012, 046, 004, 031, 025, 060 in a loop.
NOTE:
You can enter “Demo Mode” anytime by press the right
buttons.
Exit Demo Mode
In “Demo Mode,Press and hold down [FUNCTION]
button at first, then press [2] button to stop playing
and exit demo mode.
In Demo Mode,press [START/ STO P] bu tton to
stop playing and exit demo mode
NOTE:
In “Demo Mode, keyboard was invalid.
2
3
4
5
6
7 8 9
0
NO
YES
1
FUNCTION
SUSTAIN
DUAL
LOWER
DSP
A.B.C.
TOUCH
2.
1.
20
Demo
Activeer de Demo-modus:
Houd de FUNCTION-toets ingedrukt en gelijktijdig op de 2-
toets om de “Demo-modus” in te schakelen. In het LCD-
venster zal “DEMO” zijn gemarkeerd en bijbehorende
nummer. Achtereenvolgens speelt het keyboard de songs
082, 001, 063, 073, 012, 046, 004, 031, 025, 060,
weergegeven in een lus.
Verlaat de Demo-modus:
1. In de Demo-modus, houd de FUNCTION-toets ingedrukt en
druk tegelijkertijd op de 2-toets. Het afspelen wordt gestopt en
de Demo-modus verlaten.
2. In de Demo-modus, druk op de START/STOP-toets om het
afspelen te beëindigen en de Demo-modus te verlaten.
OPMERKING:
Je kunt de “Demo-modus” op elk gewenst moment
inschakelen door de betreffende toetsen in te drukken.
OPMERKING:
In de Demo-modus is het klavier uitgeschakeld.
Octave
Function Menu
Press [FUNCTION] key to enter the menu of function.
The default option of menu is “TRANSPOSE”. function
Everytime you enter the menu, it will return to the option
that you selected last time.
Repeatedly press [FUNCTION] key to select the option
you would like to set.
Use the [+/YES] / [-/NO] button to set the parameter.
The option and the parameters are indicated on the
right:
NOTE:
If there is no action 5 seconds after pressing the
[FUNCTION] key ,it will quit the function menu
automatically.
Press [YES] and [-NO] button together to set the
option value back to its default.
The reverb and chorus level will change with the
automatically to the default level.
Option LCD Display Range Default
TRANSPOSE xPS 00 -12 ~ 0 ~ 12 0
OCTAVE OCt 00 -1 ~ 0 ~ 1 0
BEAT bEt 04 0, 2 ~ 9 4
SPLIT POINT SPt 19 1 ~ 61 19
MIDI RECEIVE CHI ALL 01 ~ 16, ALL ALL
MIDI TRANSMIT CHo 01 01 ~ 16 01
TOUCH TCH 02 1,2,3,OFF 2
TUNE TUE 00 -50 ~ 50 0
Press [FUNCTION] button to enter the TRANSPOSE
sub-menu. The LCD displays the current transpose
value.
Use [+/YES] / [-/NO] to adjust the transpose value
from -12 to 12 semitones.
The default setting is 000.
Press the [FUNCTION] button to enter the OCTAVE
sub-menu. The LCD displays the current octave value.
Use [+ /YES] / [- /NO] to adjust the octav e value
from -1 to 1 octaves.
The default setting is 000.
Press the [FUNCTION] button to enter the BEAT
sub-menu.
The LCD displays the current beat value.
Use [+/YES] / [-/NO] to select the beat value.
The beat value includes: 0, 2-9, 9 types of value.
REVERB LEVEL
CHORUS LEVEL
PEDAL ASSIGN
REL XXX
CHL XXX
SUStAn,SOFT,ST-SP
0 ~ 127
0 ~ 127
SUSTAIN,SOFT,START/STOP
045
0
SUSTAIN
FUNCTION
0
NO
YES
A.B.C.
TOUCH
SUSTAIN
DUAL
LOWER
DSP
0
NO
YES
A.B.C.
TOUCH
SUSTAIN
DUAL
LOWER
DSP
FUNCTION
A.B.C.
TOUCH
SUSTAIN
DUAL
LOWER
DSP
0
NO
YES
FUNCTION
Press the [FUNCTION] button to enter SPLIT POINT
sub-menu. The LCD displays the current split point
value.
Use [+/YES] / [-/NO] button to adjust the split point
value from 1 to 61. The keyboard can be also used to
change the split point.
The key of the split point is the part of the left area.
The default setting is 019.
FUNCTION
A.B.C.
TOUCH
SUSTAIN
DUAL
LOWER
DSP
0
NO
YES
21
Beat
Transpose
Split Point
Druk op de FUNCTION-toets om het functiemenu te openen.
Standaard de eerste optie van het functiemenu
“TRANSPOSE”. Telkens als het functiemenu wordt geopend
verschijnt de laatst gebruikte optie.
Druk herhaaldelijk op de FUNCTION-toets om de andere opties
te kiezen.
Gebruik de toetsen +/YES en -/NO om de parameterwaardes te
veranderen. De opties en de mogelijke waardes zijn hiernaast
weergegeven.
OPMERKING:
Als er 5 seconde na het indrukken van de FUNCTION-toets
geen handelingen zijn verricht, wordt het functiemenu
automatisch verlaten.
Druk tegelijkertijd op de toetsen +/YES en -/NO om de
waardes terug te zetten op de standaardwaarde. Het niveau
van het chorus- en het galmeffect worden automatisch
teruggezet.
Druk op de FUNCTION-toets voor het TRANSPOSE-submenu.
Het LCD-venster toont de huidige waarde.
Gebruik +/YES en -/NO om de waarde te veranderen van -12
tot +12 halve tonen. De standaardwaarde is 000.
Druk op de FUNCTION-toets voor het OCTAVE-submenu. Het
LCD-venster toont de huidige waarde.
Gebruik +/YES en -/NO om de waarde te veranderen van -1 tot
+1 octaaf. De standaardwaarde is 000
Druk op de FUNCTION-toets voor het BEAT submenu voor het
instellen van de maatindeling. Het LCD-venster toont de huidige
instelling. Gebruik de toetsen +/YES en -/NO om de
maatindeling te kiezen. De mogelijkheden zijn: 0 en 2-9 tellen; 9
opties totaal.
Druk op de FUNCTION-toets voor voor het SPLIT POINT-
submenu. Het LCD-venster toont het huidige splitpunt.
Gebruik de toetsen +/YES en -/NO om de waarde te
veranderen in een bereik van 1 tot 61. Ook kan het klavier zelf
worden gebruikt om het splitpunt te bepalen.
De toets die het splitpunt bepaalt maakt onderdeel uit van de
linker zone. De standaardinstelling is 019.
Functiemenu
Transponeren
Octaaf
Maatindeling
Splitpunt
Touch
MIDI IN
MIDI OUT
RECEIVE can be used to set the channel of MIDI IN.
Channel 1-16 can be selected by pressing [+/YES] /
[-/NO] button.
The default setting is ALL.
TRANSMIT can be used to set the channel of MIDI OUT.
Channel 1-16 can be selected by pressing [+/YES] /
[-/NO] button.
The default setting is 001.
FUNCTION
A.B.C.
TOUCH
SUSTAIN
DUAL
LOWER
DSP
0
NO
YES
FUNCTION
A.B.C.
TOUCH
SUSTAIN
DUAL
LOWER
DSP
0
NO
YES
Press [FUNCTION] button to enter the REVERB LEVEL
sub-menu.The LCD displays the current reverb level.
Use [+/YES] / [-/NO] button to adjust the level from 0 to
127, the default level is 045.
Tune
Press [FUNCTION] button to enter the TUNE sub-menu.
The LCD displays the current tune value.
Use [+/YES] / [-/NO] button to adjust the tune value from
-50 to 50 (stand for -100 to 100 cents)
The default setting is 000.
NOTE:
This setting will be effective to both voice and style.
A.B.C.
TOUCH
SUSTAIN
DUAL
LOWER
DSP
0
NO
YES
Press [FUNCTION] button to enter the TOUCH sub-menu.
The LCD displays the current touch level.
Use [+/YES] / [-/NO] button to select touch level from off
to level 3. if the value is set as OFF, that means no touch
response to keyboard, and LCD darkens”TOUCH”flag.
Default level of touch response is 002.
A.B.C.
TOUCH
SUSTAIN
DUAL
LOWER
DSP
0
NO
YES
0
NO
YES
FUNCTION
FUNCTION
FUNCTION
A.B.C.
TOUCH
SUSTAIN
DUAL
LOWER
DSP
22
Reverb Level
Functie-menu
MIDI-in
MIDI-out
Aanslaggevoeligheid
Stemming
Galmniveau
De functie RECIEVE kan worden gebruikt om het MIDI-kanaal
van inkomende MIDI-signalen in te stellen. Gebruik de toetsen
+/YES en -/NO om een kanaal te kiezen van 1 - 16. Standaard
is de instelling ALL.
De functie TRANSMIT kan worden gebruikt om het MIDI-kanaal
van uitgaande MIDI-signalen in te stellen. Gebruik de toetsen +/
YES en -/NO om een kanaal te kiezen van 1 - 16. Standaard is
de instelling 001.
Druk op de FUNCTION-toets om het TOUCH-submenu te
activeren. Het LCD-venster toon de huidige waarde van de
aanslaggevoeligheid. Gebruik de toetsen +/YES en -/NO om
een waarde in te stellen van OFF tot en met 3. Als de waarde is
ingesteld op OFF is het klavier niet aanslaggevoelig en is de
parameter TOUCH in het LCD-venster niet gemarkeerd.
Standaard staat de waarde op 002.
Druk op de FUNCTION-toets om het TUNE-submenu te
activeren. Het LCD-venster toont de huidige instelling van de
stemming. Gebruik de toetsen +/YES en -/NO om de stemming
van het keyboard te veranderen binnen een bereik van -50 tot
+50 (het equivalent van -100 tot +100 procent). Standaard staat
de waarde op 000.
OPMERKING:
Deze parameter beïnvloedt zowel VOICE als STYLE.
Druk op de FUNCTION-toets om het REVERB LEVEL-submenu
te activeren. Get LCD-venster toont het huidige galmniveau.
Gebruik de toetsen +/YES en -/NO om het galmniveau in te
stellen binnen een bereik van 0 tot 127. Standaard staat de
waarde op 045.
Ch
ess [FUNCTION] button to enter the CHORUS LEVEL
sub-menu.The LCD displays the current chorus level.
Use [+/YES] / [-/NO] button to adjust the chorus level
from 0 to 127.
The default level is 000.
A.B.C.
TOUCH
SUSTAIN
DUAL
LOWER
DSP
0
NO
YES
Press [FUNCTION] button to enter the PEDAL
ASSIGN sub-menu. The LCD displays the type of pedal.
Use [+/YES] /[-/NO] button to select the pedal type.
The pedal type includes: pedal sustain, pedal soft and
pedal start/stop.
The default type is pedal sustain.
Pedal Sustain
If pedal assign is set as pedal sustain, step on the
sustain pedal, all notes on the played on the keyboard
have a longer sustain.
Pedal Soft
If pedal assign is set as pedal soft, step on the soft
pedal, all notes on the played on the keyboard have a
soft effect.
Pedal Start/Stop
If pedal assign is set as pedal start/stop,the pedal
will have the same function as [START/STOP] button.
FUNCTION
A.B.C.
TOUCH
SUSTAIN
DUAL
LOWER
DSP
0
NO
YES
FUNCTION
23
Pedal Assign
Functiemenu
Chorusniveau
Pedaaltoewijzing
Druk op de FUNCTION-toets om het CHORUS LEVEL-
submenu te activeren. Het LCD-venster toont het huidige
chorusniveau. Gebruik de toetsen +/YES en -/NO om het
galmniveau in te stellen binnen een bereik van 0 tot 127.
Standaard staat de waarde op 000.
Druk op de FUNCTION-toets om het PEDAL ASSIGN-submenu
te activeren. Het LCD-venster toont de huidige functie van het
pedaal. Gebruik de toetsen +/YES en -/NO om de functie van
het pedaal te wijzigen. Er zijn de volgende functies:
sustainpedaal, una corda-pedaal (gedempt volume) en start/
stop-pedaal. Standaard is het sustainpedaal ingeschakeld.
Sustainpedaal
Het pedaal is ingesteld op “pedal sustain”: als het pedaal wordt
ingetrapt, klinken alle gespeelde noten langer door.
Una corda-pedaal
Het pedaal is ingesteld op “pedal soft”: als het pedaal wordt
ingetrapt, klinken alle gespeelde noten zachter.
Start/stop-pedaal
Het pedaal is ingesteld op “pedal start/stop”: het pedaal heeft
dezelfde functie als de START/STOP-toets.
L & R
CHORD
DICT.
LESSON
Chord Dictionary is essentially a built-in “chord book”
showing you the individual notes of the chords.
It is ideal for you to learn the name of certain chords
and to learn how to play them instantly.
In song mode (when song is not playing),Press and
hold [CHORD DICT./R] button 2 seconds to enter the
DICT mode.
The LCD shows diCt. In this mode, the keyboard
notes in the right area can be played to assign the
Chord Type and the Chord Root.
For example, if we want to play a Cm7 Chord. Press
the C key in the section of the keyboard labeled Chord
Root. (The note does not sound).
The root note you set will be shown on the display.
Press the m7 key in the section of the keyboard
which has labeled Chord Type (The note does not
sound).The notes you should play for the specified
chord (root note and chord type) are shown on the
display as the notation and also in the keyboard
diagram.
When the Chord Type and Chord Root are confirmed,
the LCD will display the Chord and its keyboard
position. A bell sound will be heard if you play it
correctly.
Press [CHORD DICT./R] button again to exit the Chord
Dictionary mode.
1.
2.
3.
4.
SUSTAIN
DUAL
LOWER
DSP
A.B.C.
TOUCH
SUSTAIN
DUAL
LOWER
DSP
A.B.C.
TOUCH
Notation of chord
SUSTAIN
DUAL
LOWER
DSP
A.B.C.
TOUCH
Chord name
(root and type)
Individual notes
of chord(keyboard)
The Chord Type and Chord Root are indicated as the
follows:
Chord Root
NOTE
C6
Chord root
C#6
D6
Eb6
E6
F6
C
C#/Db
D
Eb/D#
C6
F
NOTE
F#6
G6
Ab6
A6
Bb6
B6
Chord root
F#Gb
G
Ab/G#
A
Bb/A#
B
NOTE
C4
Chord type
C#4
D4
Eb4
E4
F4
M
m(9)
mM7
M7
m
NOTE
C5
C#5
D5
Eb5
E5
F5
Chord type
7(b9)
7(9)
7(#9)
7(b13)
7(13)
7(#11)
F#4
m(9)
F#5
dim7
G4
m6 G5
dim
Ab4
m7(9)
Ab5
7aug
A4
m7
A5
aug
Bb4
m7b5
Bb5
7sus4
B4
7
B5
sus4
6
Chord type:
NOTE:
Type / Chord Root could not be heard.
sound.
If the chords are not be played correctly, a bass sound
would be heard.
The chord should be played below the split point(chord
area).
24
If you play the chord correctly, you could hear the clap
The notes you played in order to assign as the Chord
Akkoordenboek
Chord Dictionary is in feite een ingebouwd
“akkoordenboek” dat de individuele noten van akkoorden
toont. Het is uitstekend geschikt om de namen van
specifieke akkoorden te leren en om ze vlot te leren
spelen.
1. In de SONG-modus (wanneer de song niet wordt afgespeeld),
houd de toets CHORD DICT./R 2 seconde ingedrukt om de
DICT-modus te starten.
Het LCD-venster toont “diCt”. In deze modus kunnen in het
rechtergedeelte noten worden gespeeld om het akkoordtype
en de grondtoon van het akkoord te bepalen.
2. Als je bijvoorbeeld een Cm7 wilt spelen: Druk op de C-toets in
het gedeelte van het klavier dat is aangeduid als Chord Root.
De noot zal niet te horen zijn. De grondtoon die je hebt
gekozen wordt in het venster getoond.
Druk op de m7-toets in het gedeelte van het klavier dat is
aangeduid als Chord Type. De noot zal niet te horen zijn. De
noten die je moet spelen voor dit specifieke akkoord
(grondtoon+akkoordtype) worden in het LCD-venster op de
notenbalk weergeven en in de afbeelding van klavier.
3. Wanneer het akkoordtype en de grondtoon zijn bevestigd,
toont het venster het akkoord en de positie op het klavier. Er
klinkt een belgeluid als het correct wordt gespeeld.
4. Druk nogmaals op de toets CHORD DICT./R om het
akkoordenboek te sluiten.
OPMERKING:
Noten die je speelt voor het toewijzen van het akkoordtype
en de grondtoon zijn niet te horen.
Als je het akkoord correct speelt, wordt er een klapgeluid
weergegeven.
Als het akkoord niet correct wordt gespeeld, wordt er een
basgeluid weergegeven.
Het akkoord moet beneden het splitpunt, in het
akkoordgebied, worden gespeeld.
Het akkoordtype en de grondtoon zijn als volgt aangegeven:
Grondtoon
Akkoordtype
Noot
Noot
Noot
Noot
Grondtoon
Type
Type
Grondtoon
MIDI Application
Wh
B Connection
MIDI stands for Musical Instrument Digital Interface " ",
that is the standard interface between a PC and other
electronic instrument(s).
USB connection can be used for midi data transference
with a computer or other USB host devices that support
USB audio devices.
The keyboard can only be connected to the PC.
Use the keyboard as a tone generator, the data (MIDI)
recorded on the PC can be played on the keyboard.
1.
System Requirements
CPU: 300 MHz or higher, Pentium 2
Memory: 64MB or more
Driver: CDROM 24X
OS: WINDOWS 2000/XP
1.
The Method of Connection
Connect a standard USB cable between the rear-panel
of the USB jack of this instrument and the USB jack
of your computer (USB cable will be sold separately).
2.
USB Precautions
Please observe the following precautions while conne-
cting the instrument with the a computer via a USB
cable.Failure to do, so can cause the instrument and/or
the computer to hang up(freeze), possibly causing
corruption or losing the data.
If the instrument or computer hangs up, turn the power
of both devices off and then turn it on again
after
a
few
3.
2.
3.
4.
NOTE:
While a recorded data and a style are being played,
you can not use the MIDI IN function, or the song you
are playing will have an error occurs for the same
channel.
PC recorded data (MIDI) can be played on the keyboard.
You need not to install the USB Driver for WINDOWS
2000/XP.
1.
2.
25
MIDI-functie
Wat is MIDI
USB-aansluiting
MIDI-toepassing
1. MIDI is een afkorting van “Musical Instrument Digital Interface”,
hetgeen een gestandaardiseerde interface is tussen een
computer en andere elektronische instrumenten.
2. De USB-aansluiting kan worden gebruikt om MIDI-data uit te
wisselen tussen een computer en andere USB-hostapparaten die
USB-audioapparaten ondersteunen.
3. Dit keyboard kan alleen worden aangesloten op een computer.
4. Gebruik het keyboard als geluidsmodule door in de computer
opgenomen MIDI-data te laten weergegeven door het keyboard.
OPMERKING:
Wanneer opgenomen data en/of een style worden
weergegeven, is de MIDI-in-functie niet te gebruiken, anders
doen zich fouten voor bij het afspelen van de song op
hetzelfde kanaal.
1. Systeemeisen
• CPU: 300MHz of sneller, minimaal Pentuim 2
• Geheugen 64MB of meer
• Drive: CDROM 24x
• Besturingssysteem Windows 2000/XP
2. Manier van aansluiten
Sluit een standaard USB-kabel aan tussen de USB-connector
op het achterpaneel en de USB-connector van de computer
(USB-kabel apart verkrijgbaar).
3. USB-voorzorgsmaatregelen
Neem de volgende voorzorgsmaatregelen in acht bij het
aansluiten van het instrument op een computer via USB. Dit
achterwege laten veroorzaakt het vastlopen van het
instrument of de computer, met beschadiging of verlies van
data als gevolg.
Als het instrument of de computer zijn vastgelopen moeten
beide apparaten worden uitgeschakeld en na een paar
seconde opnieuw worden opgestart.
1. Met de computer opgenomen data (MIDI) kan door middel
van het keyboard worden afgespeeld.
2. Voor het gebruik in combinatie met Windows 2000/XP
behoeven geen USB-drivers te worden geïnstalleerd.
1/32