Mc crypt MC-120 de handleiding
- Categorie
- Muziekinstrumenten
- Type
- de handleiding

Impressum
Diese Bedienungsanleitung ist eine Publikation der Conrad Electronic SE,
Klaus-Conrad-Straße 1, 92240 Hirschau.
Alle Rechte einschließlich Übersetzung vorbehalten. Reproduktionen jeder Art, z. B. Fotokopie, Mikroverlmung, oder die
Erfassung in elektronischen Datenverarbeitungsanlagen, bedürfen der schriftlichen Genehmigung des Herausgebers.
Nachdruck, auch auszugsweise, verboten.
Diese Bedienungsanleitung entspricht dem technischen Stand bei Drucklegung. Änderung in Technik und Ausstattung
vorbehalten.
© Copyright 2009 by Conrad Electronic SE.
Imprint
These operating instructions are published by Conrad Electronic SE,
Klaus-Conrad-Straße 1, 92240 Hirschau/ Germany.
No reproduction (including translation) is permitted in whole or part e.g. photocopy, microlming or storage in electronic
data processing equipment, without the express written consent of the publisher.
The operating instructions reect the current technical specications at time of print. We reserve the right to change the
technical or physical specications.
© Copyright 2009 by Conrad Electronic SE.
Note de l´éditeur
Cette notice est une publication de la société Conrad Electronic SE,
Klaus-Conrad-Straße 1, 92240 Hirschau/ Allemagne.
Tous droits réservés, y compris traduction. Toute reproduction, quel que soit le type, par exemple photocopies, microlms
ou saisie dans des traitements de texte électronique est soumise à une autorisation préalable écrite de l`éditeur.
Impression, même partielle, interdite.
Cette notice est conforme à la réglementation en vigueur lors de l´impression. Données techniques et conditionnement
soumis à modications sans aucun préalable.
© Copyright 2009 par Conrad Electronic SE.
Impressum
Deze gebruiksaanwijzing is een publicatie van Conrad Electronic SE,
Klaus-Conrad-Straße 1, D-92240 Hirschau/Duitsland.
Alle rechten, inclusief de vertaling, voorbehouden. Reprodukties van welke aard dan ook, fotokopie, microlm of
opgeslagen in een geautomatiseerd gegevensbestand, alleen met schriftelijke toestemming van de uitgever.
Nadruk, ook in uittreksel, verboden.
Deze gebruiksaanwijzing voldoet aan de technische eisen bij het ter perse gaan. Wijzigingen in techniek en uitrusting
voorbehouden.
© Copyright 2009 by Conrad Electronic Benelux B.V.
*02_02/09_03-HW
Diese Bedienungsanleitung gehört zu diesem Produkt. Sie enthält wichtige Hinweise zur Inbetriebnahme und
Handhabung. Achten Sie hierauf, auch wenn Sie dieses Produkt an Dritte weitergeben.
Heben Sie deshalb diese Bedienungsanleitung zum Nachlesen auf! Eine Auistung der Inhalte nden Sie in dem
Inhaltsverzeichnis mit Angabe der entsprechenden Seitenzahlen auf Seite 4.
These Operating Instructions accompany this product. They contain important information on setting up and using
the device. You should refer to these instructions, even if you are buying this product for someone else.
Please retain these Operating Instructions for future use! A list of the contents can be found in the Table of
contents, with the corresponding page number, on page 25.
Le présent mode d’emploi fait partie intégrante du produit. Il comporte des directives importantes pour la
mise en service et la manipulation de l’appareil. Tenir compte de ces remarques, même en cas de transfert
du produit à un tiers.
Conserver ce mode d’emploi an de pouvoir le consulter à tout moment. La table des matières avec indication des
pages correspondantes se trouve à la page 45.
Deze gebruiksaanwijzing hoort bij dit product. Zij bevat belangrijke informatie over de inbedrijfstelling en het
gebruik. Let hierop, ook wanneer u dit product aan derden overhandigt.
Bewaar daarom deze gebruiksaanwijzing om in voorkomende gevallen te kunnen raadplegen. In de inhoudsopgave
op pagina 66 vindt u een lijst met inhoudspunten met vermelding van het bijbehorende.
Keyboard
Keyboard
Clavier
Keyboard
MC-120
Best.-Nr./ Item-No. / Nº de commande / Bestnr.: 30 43 06
Bedienungsanleitung Version 02/09 Seite 4 – 24
Operating instructions Version 02/09 Page 25 – 44
Mode d’emploi Version 02/09 Page 45 – 65
Gebruiksaanwijzing Versie 02/09 Pagina 66 – 86

3
4
Einleitung 5
1. Bestimmungsgemäße Verwendung 6
2. Lieferumfang 6
3. Sicherheitshinweise 6
4. Bedienungselemente 7
A) Vorderseite 7
B) Rückseite 7
C) LC-Anzeige 7
5. Einrichtung 8
A) Stromversorgung 8
B) Notenblatthalter 9
6. Anschlüsse 9
A) Kopfhöreranschluss 9
B) AUX. Auschluss 9
C) Sustain-Anschluss 9
D) Lautstärke-Pedal 9
E) USB-Anschluss 9
7. Betrieb 10
A) Netzschalter & Lautstärke 10
B) Demo 10
C) Voices (Klangarten) und Effekte 10
D) Style-Regler (Musikstil) 11
E) Funktionsmenü 13
F) Mixer 14
G) DSP (Digital Signal Processing) 14
H) Metronom 14
I) Piano 14
J) Speicher 14
K) Schnelleinstellung (One Touch Setting) 14
L) Aufnahme 14
M) Songs 14
N) Lektion 15
O) Akkordverzeichnis 15
8. Wartung und Reinigung 16
9. Entsorgung 17
10. Technische Daten 17
Anhänge 18
Anhang I: Voice-Liste 18
Anhang II: Styles-Liste 20
Anhang III: Songliste 21
Anhang IV: Demo-Liste 22
Anhang V: Akkordverzeichnis 22
Anhang VI: Akkordtabelle 22
Anhang VII: Akkordliste 23
Anhang VIII: MIDI-Liste 24
Diese Bedienungsanleitung gehört zu diesem Produkt, Sie enthält wichtige Hinweise zur Inbetriebnahme und
Handhabung. Achten Sie hierauf, auch wenn Sie dieses Produkt an Dritte weitergaben.
Haben Sie deshalb diese Bedienungsanleitung zum Nachlesen auf!
Inhalt
Bedienungselemente Operating Elements
Eléments de commande Bedieningsorganen
MC-120
VOICE
SONG
DUAL LOWER TOUCH SUSTAIN DSP
OCTAVE TRANSPOSE
METRO
PIANO
STORE
MEMORY
BANK
MIXER
5
4
2
1
3
6
8
7
0
9
Y E SNO
STYLE
Y
DANCE
001-008 PIANO
009-016 MALLET
017-024 ORGAN
025-032 GUITAR
033-040 BASS
041-048 STRINGS
049-056 STRING ENSEMBLE
057-064 BRASS
065-072 REED
073-080 PIPE
081-088 LEAD
089-096 PAD
097-104 EFFECTS
105-112 ETHNIC
113-120 PERCUSSIVE
121-128 SOUND EFFECTS
129-300 OTHER VOICES
301-310 DRUM SET
RE C O R D
RE C O R D PL AY / S T O P
Y
LE S S O N LE F T RIG H T
BE AT F O L L O W P E R F O R M LEF T RIG H T
CH OR D
DIC T I O N A R Y
5
678

5
Sehr geehrter Kunde,
wir bedanken uns für den Kauf dieses Produkts.
Das Produkt ist EMV-geprüft und erfüllt die Anforderungen der geltenden europäischen und nationalen Richtlinien.
Die CE-Konformität wurde nachgewiesen, die entsprechenden Erklärungen sind beim Hersteller hinterlegt.
Um diesen Zustand der Konformität zu erhalten und einen gefahrlosen Betrieb sicherzustellen, müssen Sie als Anwender
diese Bedienungsanleitung beachten!
Lesen Sie sich vor Inbetriebnahme das Produkts die komplette Bedienungsanleitung durch, beachten Sie alle Bedienungs-
und Sicherheitshinweise!
Sämtliche hierin enthaltenen Firmennamen und Produktbezeichnungen sind Markenzeichen ihrer jeweiligen
Eigentümer. Alle Rechte vorbehalten.
Bei Fragen wenden Sie sich bitte an unseren Technischen Beratungsdienst:
Deutschland: Tel. +49 01805 31 21 11
Fax +49 01805 31 21 10
E-Mail: Bitte verwenden Sie für Ihre Anfrage unser Formular im Internet. www.conrad.de unter der
Rubrik: Kontakt
Mo. - Fr. 8.00 bis 18.00 Uhr
Österreich: www.conrad.at
Schweiz: Tel.-Nr.: +49 0848 80 12 88
Fax-Nr.: +49 0848 80 12 89
e-mail: [email protected]
Mo. - Fr. 8.00 bis 12.00 Uhr, 13.00 bis 17.00 Uhr
Einleitung

6
Das Produkt ist dafür vorgesehen, durch Betätigung der Tasten Klänge zu erzeugen. Die Klänge werden durch die eingebauten
Lautsprecher verstärkt. Das Keyboard kann an Kopfhörer oder einen externen Verstärker angeschlossen werden. Das
Keyboard ist einfach zu bedienen und verfügt über Erweiterungsfunktionen, die speziell für allein lernende Spieler und
Anfänger konzipiert wurden. Der Benutzer hat die Möglichkeit, einen Song auf 3 verschiedene Arten spielen zu lernen. Die
LC-Anzeige vereinfacht den Lernvorgang für Spieler. Der Betrieb ist nur in trockenen Innenräumen gestattet.
Das Keyboard kann entweder mit 6 Batterien der Größe D betrieben werden, oder mit einem geeigneten, stabilisierten und
einsteckbaren Netzteil (DC12V/2A, Typ zentral-positiv).
Aus Sicherheits- und Zulassungsgründen (CE) ist das eigenmächtige Umbauen und/oder Verändern des Produktes nicht
gestattet. Eine andere Verwendung als oben beschrieben ist nicht erlaubt und kann zur Beschädigung des Produkts
führen. Darüber hinaus ist dies mit Gefahren, wie z. B. Kurzschluss, Brand, Stromschlag usw. verbunden. Lesen Sie die
Bedienungsanleitung genau durch und bewahren Sie diese für späteres Nachschlagen auf.
2. Lieferumfang
Keyboard•
Notenblatthalter•
Bedienungsanleitung des Herstellers•
Bedienungsanleitung•
3. Sicherheitshinweise
Bei Schäden, die durch Nichtbeachtung dieser Bedienungsanleitung verursacht werden, erlischt der
Garantieanspruch! Für Folgeschäden und bei Sach- und Personenschäden, die durch unsachgemäße
Handhabung oder Nichtbeachten der Sicherheitshinweise verursacht werden, übernehmen wir keine
Haftung!
Wichtige Hinweise, die unbedingt zu beachten sind, werden in dieser Bedienungsanleitung durch das
Ausrufezeichen gekennzeichnet.
Beachten Sie beim Anschluss des Keyboards an andere Geräte auch die Sicherheitshinweise dieser anderen Geräte.•
Das Keyboard darf keinen extremen Temperaturen, direkter Sonneneinstrahlung, starken Vibrationen oder Feuchtigkeit •
ausgesetzt werden.
Bei Verwendung des Geräts innerhalb eines kommerziellen Betriebs müssen die Bestimmungen der betrieblichen •
Haftpfl ichtversicherung zur Sicherheit von elektrischen Geräten und zum Schutz der bedienenden Mitarbeiter beachtet
werden.
In Schulen, Lehrstätten, Hobby- und Selbsthilfegruppen ist der Betrieb elektrischer Geräte durch sachkundiges Personal •
verantwortungsvoll zu beaufsichtigen.
Um eine ausreichende Belüftung zu gewährleisten, muss der Abstand zwischen dem Gerät und anderen Objekten •
mindestens 5 cm betragen.
Kerzen und andere Objekte mit offener Flamme sowie Flüssigkeitsbehälter dürfen nicht auf das Gerät oder in die Nähe •
des Geräts gestellt werden.
Verpackungsmaterialien wie Kunststofffolien bzw. -tüten, Polystyrolteile usw. könnten für Kinder zu einem gefährlichen •
Spielzeug werden. Lassen Sie diese Materialien niemals unbeaufsichtigt herumliegen.
Das Keyboard muss auf einer ebenen und festen Unterlage stehen.•
Die Isolierung des gesamten Produkts darf nicht beschädigt oder zerstört werden. Öffnen Sie niemals das Keyboard-•
Gehäuse.
In die Belüftungsöffnungen dürfen keine Objekte eingeführt werden. Es besteht die Gefahr eines elektrischen Schlages •
und das Gerät könnte zerstört werden.
Wartung, Anpassungs- und Reparaturarbeiten dürfen nur von einem Fachmann bzw. einer Fachwerkstatt durchgeführt •
werden.
Sollten Sie noch Fragen haben, die in dieser Bedienungsanleitung nicht beantwortet werden, so wenden Sie sich bitte an •
unseren technischen Kundendienst oder andere Fachleute.
1. Bestimmungsgemäße Verwendung
87

86
Appendix
Appendix VIII: MIDI Lijst
Functie Verzonden Herkend Opmerkingen
Basis
Kanaal
Standaard
Veranderd
1ch
1ch
1-16ch
1-16ch
Modus
Standaard
Boodschappen
Gewijzigd
X
X
***********
3
X
X
Noot
Nummer Echte Voice
0-127
***********
0...127
0...127
Snelheid: Noot aan
Noot uit
O 9nH,V=1-127
X (9nH,V=0)
O 9nH,V=1-127
X (9nH,V=0; 8nH,V=0-127
Na
Toets
Keys
Toetsen
X
X
X
X
Pitch Bend O O
Controle
Verandering
0
1
5
6
7
1 0
11
64
65
66
67
80
81
91
93
120
121
123
O
O
X
O
O
X
X
O
X
X
X
X
X
X
X
X
X
X
O
O
O
O
O
O
O
O
O
O
O
O
O
O
O
O
O
O
Bank keuze
Modulatie
Portamento tijd
Data invoering
Volume
Pan
Expressie
Voetschakelaar
Portamento AAN/UIT
Sostenuto pedaal
Zacht pedaal
Reverb programma
Chorus programma
Reverbniveau
Chorusniveau
Alle geluid uit
Herstel alle Bedieningen
Alle noten uit
Programma
Verandering
Echt # O
***********
O
0...12 7
Systeem exclusief X O
Systeem :
gemeenschappelijk:
Song positie
Song keuze
Tune
X
X
X
X
X
X
Systeem :
Real Time :
Klok
Commandos
X
X *1
X
X *1
Aux :
:
Boodschappen :
:
Locaal Aan/Uit
Alle noten uit
Active sense
Herstel
X
X
X
X
X
O
O
O
Note: *1
Wanneer de begeleiding is begonnen, wordt een FAH boodschap verzonden.
Wanneer de begeleiding is beëindigd, wordt een FCH boodschap verzonden.
Wanneer een FAH boodschap is ontvangen, is de begeleiding begonnen.
Wanneer een FCH boodschap is ontvangen, is de begeleiding beëindigd.
Mode 1: OMNI AAN, POLY
Mode 3: OMNI UIT, POLY
Mode 2 : OMNI AAN, MONO
Mode 4 : OMNI UIT, MONO
O: Ja
X: Nee
7
A) Vorderseite B) Rückseite
1. POWER EIN/AUS (POWER ON/OFF) 35. USB
2. LAUTSTÄRKE (VOLUME) 36. SUSTAIN-PEDAL (SUSTAIN PEDAL)
3. MIXER 37. LAUTSTÄRKE-PEDAL (VOLUME PEDAL)
RHYTHMUS (RHYTHM) - 38. AUX-AUSGANG (AUX OUT)
BASS - 39. KOPFHÖRER (HEADPHONES)
ACCOMP - 40. DC 12 V
TIEFER (LOWER) -
HÖHER (UPPER) - C) LCD Display
4. TEMPO 41. EIN-/AUSKLINGEN (FADE)
5. EIN-/AUSKLINGEN (FADE) 42. DUAL
6. ABC 43. POWER
7. FUNKTION (FUNCTION) 44. ABC
8. DEMO 45. AKKORD (CHORD)
9. LEKTION (LESSON) 46. VOICES/STYLE/SONG/ALBUM
10. LINKS (LEFT) 47. TEMPO
11. RECHTS/AKKORDVERZEICHNIS
(RIGHT/CHORD DICTIONARY) 48. TAKTMASS (MEASURE)
12. AUFNAHME (RECORD) 49. TAKT (BEAT)
13. WIEDERGABE/STOP (PLAY/STOP) 50. SPEICHER (MEMORY)
14. LC-ANZEIGE (LCD DISPLAY) 51. DSP
15. KLANGART (VOICE) 52. TOUCH
16. MUSIKSTIL (STYLE) 53. SUSTAIN
17. SONG 54. AKKORDVERZEICHNIS (CHORD DICTIONARY)
18. METRONOM (METRONOME) 55. AUFNAHME (RECORD)
19. PIANO 56. RECHTS (RIGHT)
20. NUMERISCHE TASTATUR (NUMERIC KEYPAD) 57. VIOLINSCHLÜSSEL (TREBLE CLEF)
21. DSP 58. LINKS (LEFT)
22. OKTAVE (OCTAVE) 59. SPIELEN (PERFORM)
23. AUSKLANG (SUSTAIN) 60. FOLGEN (FOLLOW)
24. TOUCH 61. BASS-SCHLÜSSEL (BASS CLEF)
25. TRANSPONIEREN (TRANSPOSE) 62. TAKT (BEAT)
26. TIEFER (LOWER)
27. SPEICHERBANK (MEMORY BANK)
28. DUAL
29. SPEICHERN (STORE)
30. PANEL-SPEICHER (PANEL MEMORY)
M1-M6 -
31. O.T.S.
32. STEUERUNG FÜR BEGLEITUNG
(ACCOMPANIMENT CONTROL)
START/STOP - SYNC - INTRO/ENDING - EINLAGE A (FILL-IN A) - EINLAGE B ((FILL-IN B) -
33. MODULATION
34. GLEITENDE TONHÖHENVERSCHIEBUNG
(PITCH BEND)
4. Bedienungselemente

8
A) Stromversorgung
Dieses elektronische Keyboard kann mit Batterien oder einer Netzsteckdose mit Standardspannung betrieben werden.
Verwendung von Batterien
Achten Sie beim Einlegen der Batterien auf die richtige Polung. Entfernen Sie die Batterien, wenn • Sie das Gerät längere Zeit nicht verwenden, um Beschädigungen durch Auslaufen zu vermeiden. Der
Kontakt mit schadhaften Batterien kann zu Säureverätzungen der Haut führen. Verwenden Sie im
Umgang mit schadhaften Batterien daher entsprechende Schutzhandschuhe.
Bewahren Sie Batterien außerhalb der Reichweite von Kindern auf. Lassen Sie Batterien nicht frei • herumliegen, da diese von Kindern oder Haustieren verschluckt werden könnten.
Wechseln Sie alle Batterien gleichzeitig aus. Das Mischen von alten und neuen Batterien im Gerät kann • zum Auslaufen der Batterien und zur Beschädigung des Geräts führen.
Nehmen Sie Batterien nicht auseinander, und vermeiden Sie Kurzschlüsse und Kontakt mit Feuer. • Versuchen Sie niemals, nicht aufl adbare Batterien aufzuladen. Es besteht Explosionsgefahr!
Stellen Sie in jedem Fall sicher, dass Sie das Keyboard vor dem Einlegen neuer Batterien oder beim Auswechseln
gebrauchter Batterien ausschalten.
1. Öffnen Sie die Batteriefachabdeckung an der Unterseite des Keyboards.
2. Legen sie Batterien der Größe 6 (SUM-1, R-20) in das Batteriefach. Beachten Sie dabei die korrekte
Polarität (positiv „+“ und negativ „-“), die neben dem Batteriefach in das Gehäuse geprägt ist.
3. Schließen Sie die Batteriefachabdeckung. Achten Sie darauf, dass die Abdeckung einrastet.
Symptome für niedrigen Batteriestand
Die folgenden Symptome weisen auf einen niedrigen Batteriestand hin. Wechseln Sie die Batterien bei Auftreten der
folgenden Symptome so bald wie möglich aus:
Schwache und schlecht ablesbare LC-Anzeige •
Außergewöhnlich geringe Lautsprecher-/Kopfhörerlautstärke •
Verzerrter Klang •
Plötzliches Abschalten des Keyboards beim Spielen mit hohem Lautstärkepegel •
Demo-Songs werden mit unregelmäßigem Rhythmus abgespielt •
Display wird beim Spielen mit hohem Lautstärkepegel dunkler •
Verwendung eines AC-Adapters (nicht im Lieferumfang enthalten)
Schließen Sie das Keyboard niemals an ein Netzteil an, wenn es gerade von einem kalten an einen warmen
Ort gebracht wurde. Die kondensierte Flüssigkeit kann zu einer Fehlfunktion oder einer Beschädigung des
Keyboards führen, und es besteht die Gefahr eines elektrischen Schlages. Verwenden Sie ausschließlich den
spezifi zierten AC-Adapter. Die Verwendung anderer Adapter-Typen kann zu Brandgefahr und elektrischem
Schock führen. Achten Sie aus Sicherheitsgründen darauf, den AC-Adapter aus der Netzsteckdose zu ziehen,
wenn Sie das Keyboard längere Zeit nicht benutzen.
Stellen Sie sicher, dass nur der für dieses elektronische Keyboard spezifi zierte AC-Adapter verwendet wird. Bei dem
Adapter handelt es sich um einen zentral-positiven Typ mit einer Ausgangsspannung von 12V DC. Achten Sie darauf, das
elektronische Keyboard auszuschalten, bevor Sie den Adapter mit der AC-Netzsteckdose verbinden, und das Kabel an
das Gerät anschließen. Bei angeschlossenem Netzteil erfolgt die Stromversorgung über das Netzteil und nicht über die
Batterien.
Das Netzteil muss den folgenden technischen Spezifi kationen entsprechen:
Eingang: 230V/AC, 50 Hz
Ausgang: 12V/DC, 2.0A
Polung:
Außendurchmesser des Steckers: Ø 5,5 mm
Innendurchmesser des Steckers: Ø 2,1 mm
5. Einrichtung
85
Appendix
Appendix VII: Akkoordenlijst
Akkoordnaam / [Afkorting] Normale Ligging Akkoord (C) Weergave
Majeur [M] 1-3-5 C C
Sext [6] 1-(3)-5-6 C6 C6
Majeurseptiem [M7] 1-3-(5)-7 CM7 CM7
Majeurseptiem met overmatige undecime [M7(#11) 1-(2)-3-#4-5-7
or 1-2-3-#4-(5)-7
CM7(#11) CM7(#11)
Majeur toegevoegde none [M(9)] 1-2-3-5 C M(9) C M(9)
Majeurseptiem met toegevoegde none [M7(9)] 1-2-3-(5)-7 C M7(9) C M7(9)
Sext met toegevoegde none [6 (9)] 1-2-3-(5)-6 C 6(9) C 6(9)
Vermeerderd [aug] 1-3-#5 C aug C aug
Mineur [m] 1-b3-5 Cm Cm
Mineursext [m6] 1-b3-5-6 Cm6 Cm6
Mineurseptiem [m7] 1-b3-(5)-b7 Cm7 Cm7
Mineurseptiem met verminderde kwint [m7b5] 1-b3-b5-b7 Cm7b5 Cm7b5
Mineur met toegevoegde none [m(9)] 1-2-b3-5 Cm(9) Cm(9)
Mineurseptiem met toegevoegde none [m7(9)] 1-2-b3-(5)-b7 Cm7(9) Cm7(9)
Mineurseptiem met toegevoegde undecime [m7(11)] 1-2-b3-4-5-(b7) Cm7(11) Cm7(11)
Mineurmajeurseptiem [mM7] 1-b3-(5)-7 CmM7 CmM7
Mineurmajeurseptiem met toegevoegde none [mM7(9)] 1-2-b3-(5)-7 CmM7(9) CmM7(9)
Verminderd [dim] 1-b3-b5 Cdim Cdim
Verminderde septiem [dim7] 1-b3-b5-6 Cdim7 Cdim7
Septiem [7] 1-3-(5)-b7 C7 C7
Septiem met voorhoudingskwart [7sus4] 1-4-5-b7 C7sus4 C7sus4
Septiem met verminderde kwint) [7b5] 1-3-b5-b7 C7b5 C7b5
Septiem met toegevoegde none [7(9)] 1-2-3-(5)-b7 C 7(9) C 7(9)
Septiem met overmatige undecime [7(#11)] 1-(2)-3-#4-5-b7 or
1-2-3-#4-(5)-b7
C 7(#11) C 7(#11)
Septiem met toegevoegde tredecime [7 (13)] 1-3-(5)-6-b7 C7(13) C7(13)
Septiem met verminderde none [7(b9)] 1-b2-3-(5)-b7 C7(b9) C7(b9)
Septiem met verminderde tredecime [7(b13 )] 1-3-5-b6-b7 C7(b13) C7(b13)
Septiem met overmatige none [7(#9)] (1)-#2-3-(5)-b7 C7(#9) C7(#9)
Vermeerderde majeurseptiem [M7aug] 1-3-#5-7 CM7aug CM7aug
Vermeerderde septiem [7aug] (1)-3-#5-b7 C7aug C7aug
Voorhoudingskwart [sus4] 1-4-5 Csus4 Csus4
Eén plus twee plus vijf [1+2+5] 1-2-5 C 1+2+5 C

84
Appendix
Appendix IV: Demonstratiemelodieën Lijst
Naam
01 Funk
02 American Patrol
03 Guitar&Saxphone
04 I Can......
05 Alise
Appendix V: Akkoordenwoordenboek
Grondtoon: Akkoordtype:
Noot Grondtoon Noot Akkoordtype
C6 C F6# F#/Gb
C6# C#/Db G6 G
D6 D A6b Ab/G#
E6b Eb/D# A6 A
E6 E B6b Bb/A#
F6 F B6 B
Noot Grondtoon Noot Akkoordtype
C4 M C5 7(b9)
C4# M(9) C5# 7(9)
D4 6 D5 7(#9)
E4b mM7 E5b 7(b13)
E4 M7 E5 7(13)
F4 m F5 7(#11)
F4# m(9) F5# dim7
G4 m6 G5 dim
Ab4 m7(9) A5b 7aug
A4 m7 A5 aug
B4b m7b5 B5b 7sus4
B4 7 B5 sus4
Appendix VI: Akkoordentabel
Gemakkelijke Akkoorden Standaardakkoorden
Een majeurakkoord spelen
Speel de grondtoon van het akkoord.
Een mineurakkoord spelen
Speel de grondtoon van het akkoord met de dichtstbijzijnde zwarte
toets links ervan.
Een septiem akkoord spelen
Speel de grondtoon van het akkoord met de dichtstbijzijnde witte
toets links ervan.
Een mineurseptiemakkoord spelen
Speel de grondtoon van het betreffende akkoord met de
dichtstbijzijnde witte en zwarte toetsen links ervan (drie in totaal).
Noten tussen haakjes zijn optioneel;
akkoorden worden ook zonder deze noten herkend.
9
B) Notenblatthalter
Bitte stellen Sie den Notenblatthalter wie unten dargestellt auf.
6. Anschlüsse
A) Kopfhöreranschluss
Stecken Sie die Kopfhörer (6,3 mm Stereo) in die PHONES-Buchse. Die Lautsprecher werden so automatisch
ausgeschaltet.
Vermeiden Sie es, den Kopfhörer lange Zeit mit hoher Lautstärke zu verwenden. Dies könnte Ihrem • Gehör Schaden zufügen und zu Schwerhörigkeit führen.
Um Schäden an den Lautsprechern zu vermeiden, sollten Sie die Lautstärke von externen Geräten vor • dem Anschließen ganz leise stellen. Eine Missachtung dieser Warnhinweise kann zu einem elektrischen
Schlag oder einer Beschädigung der Geräte führen.
Stellen Sie die Lautstärke aller Geräte auf die niedrigste Stufe, und regeln Sie die Lautstärke während • des Spielens langsam hoch, um die gewünschte Lautstärke zu fi nden.
B) AUX-Anschluss
Der AUX-Ausgang sendet das Ausgangssignal des Keyboards an einen externen Verstärker.
Verbinden Sie einen 6,3 mm Stereo-Audiostecker mit dem AUX-Ausgang auf der Rückseite. Schließen Sie dann das andere
Ende des Kabels an die Buchse LINE IN oder AUX. IN des Verstärkers.
C) Sustain-Pedal
In den Sustain-Anschluss kann ein optionaler Fußschalter zur Sustain-Steuerung eingesteckt werden.
Der Fußschalter funktioniert wie die Dämpferpedale eines Klaviers. Betätigen Sie den Schalter für Sustain, lassen Sie ihn los
für normalen Klang.
D) Lautstärke-Pedal
Zur Regelung der Lautstärke kann ein optionaler Lautstärkeregeler in die LAUTSTÄRKE-Buchse eingesteckt werden.
E) USB-Anschluss
Um Schäden zu vermeiden, schalten Sie das Keyboard und alle angeschlossenen Geräte aus, bevor • Sie es mit anderen Zusatzgeräten verbinden. Aktivieren Sie den Computer, falls er sich im Ruhe-/
Pause-/Standby-Modus befi ndet, bevor Sie das USB-Kabel anschließen.
Bitte beachten Sie die Sicherheitsmaßnahmen, wenn Sie das Keyboard per USB-Kabel mit einem • Computer verbinden. Bei Nichtbeachtung dieser Maßnahmen blockiert das Keyboard und/oder der
Computer ggf., was zu Beschädigungen oder Datenverlust führen kann. Falls das Keyboard oder der
Computer blockieren, unterbrechen Sie die Stromzufuhr beider Geräte, und schalten Sie sie nach ein
paar Sekunden wieder ein.
Der USB-Anschluss verbindet das Keyboard mit einem PC oder anderen USB-Hostgeräten, die USB-Audio unterstützen.
Verbinden Sie ein Standard-USB-Kabel mit der USB-Buchse auf der Rückseite des Instruments mit der USB-Buchse Ihres 1.
Computers (USB-Kabel wird separat angeboten).
5. Einrichtung

10
Für Geräte, die mittels USB-Kabel angeschlossen werden, können Sie, nachdem der Treiber installiert und die Initialisierung 2.
abgeschlossen ist, im Gerätemenü der Software „USB-Audiogerät“ auswählen, um MIDI-Daten zu übertragen.
MIDI-Funktion
Dieses Keyboard verfügt über eine MIDI-Funktion (Musical Instrument Digital Interface). MIDI ist der universelle Standard für
das Senden und Empfangen von Musikdaten zwischen elektronischen Musikinstrumenten oder Computern. (Siehe MIDI-Liste
unter Anhang VII)
Mit einem USB-Kabel können MIDI-Daten auf einen Computer oder andere USB-Hostgeräte übertragen werden, die USB-
Audiogeräte unterstützen.
7. Betrieb
A) Netzschalter & Lautstärke
Stellen Sie den [POWER]-Schalter auf ein. Die LC-Anzeige leuchtet auf. 1.
Betätigen Sie den Lautstärkeregler [VOLUME], um die Lautstärke entsprechend einzustellen. 2.
B) Demo
Drücken Sie die [DEMO]-Taste, um Demo-Songs abzuspielen. Es stehen insgesamt 5 Demo-Songs zur Verfügung. (Siehe 1.
Songliste unter Anhang IV)
Sie können einen Demo-Song mittels [+/YES] / [-/NO] oder über die numerischen Tasten auswählen. Der Name des 2.
Demo-Songs erscheint auf der LC-Anzeige.
Drücken Sie die [DEMO]- oder [START/STOP]-Taste, um den Demo-Modus zu verlassen. 3.
C) Voices und Effekte
Das Keyboard bietet insgesamt 310 verschiedene Instrumente (siehe Anhang I).
a. Instrumentenklänge
Drücken Sie die [VOICE]-Taste, um den Voice-Modus aufzurufen. 1.
Um das gewünschte Instrument auszuwählen, drücken Sie [+/YES] / [-/NO] oder verwenden Sie die numerische Tastatur. 2.
b. Dual-Klänge
Diese Dual-Instrumentfunktion ermöglicht Ihnen das simultane Spielen zweier musikalischer Instrumentenklänge. Ist die
Dual-Funktion nicht aktiv, dann ist der angezeigte Klang „KLANG 1“. Ist die Dual-Funktion aktiv, ist der angezeigte Klang
„VOICE 2“.
Drücken Sie im „VOICE 1”-Modus die [DUAL]-Taste, um die duale Klangfunktion zu aktivieren. Die Signale „VOICE 2” 1.
und „DUAL” werden auf der LC-Anzeige angezeigt. Die Nummer des Dual-Klanges wird ebenso angezeigt. Die zwei
ausgewählten Klänge überschneiden sich.
Um das gewünschte Instrument 2 auszuwählen, drücken Sie [+/YES] / [-/NO] oder verwenden Sie die numerische 2.
Tastatur.
Drücken Sie die [DUAL]-Taste erneut, um die duale Klangfunktion auszuschalten. 3.
c. Sustain
Diese Funktion erzeugt Töne mit Ausklang-Effekt.
Drücken Sie die Taste [SUSTAIN], um die Ausklang-Funktion zu aktivieren. Das „SUSTAIN“-Symbol wird angezeigt. 1.
Drücken Sie die Taste [SUSTAIN] erneut, um die Ausklang-Funktion zu deaktivieren. Das „SUSTAIN“-Symbol wird nicht 2.
mehr angezeigt.
d. Teilen / Tiefer Instrumentenklang
Durch diese Funktion wird das Keyboard in einen linken (tieferen) und rechten Abschnitt geteilt.
In diesem Modus werden die Tasten auf der linken Seite des Teilungspunktes dafür benutzt, die auf der rechten Seite
gespielten Melodien zu begleiten.
Der Teilungspunkt zwischen den beiden Abschnitten liegt auf der #F3-Note.
6. Anschlüsse
83
Appendix
Appendix III: Liedjeslijst
KLASSIEK (CLASSICAL) GOUD & POP (GOLDEN & POP) 82 Wine
01 Aida 42 On London Bridge 83 Jazz Old Man
02 Annen Polka 43 Are You Lonesome Tonight 84 Dark Eyes
03 Auf Flugeln Dec Gesanges 44 Only You 85 Carlos
04 Brahms Waltz 45 End Of The World 86 Sad
05 Carmen-Entracte II 46 House Of Rising Sun 87 The Jazz
06 Carmen-Prelude 47 Solveig's Song OOSTERS (ORIENTAL)
07 L'Arlesienne 48 The Blue-Bells Of Scotland 88 South Mud Bay
08 La Traviata 49 Over The Rainbow 89 Give You A Rose
09 Mazurka 50 Beautiful Dreamer 90 Flowing Rill
10 Menuett 51 It`S Been A Long Long Time PIANO
11 Musical Moments 52 Edelweiss 91 Alise
12 Pizzicato Polka 53 O Sole Mio 92 Military March
13 Rigoletto 54 Der Deitcher`S Dog 93 Habanera
14 Serenade 55 You Are My Sunshine 94 Minuet
15 Song Without Words 56 Silent Night 95 Bagatelle No.3
16 Swan 57 Ave Maria 96 Old Macdonald Had A Farm
17 Prelude To Act 2 (Swan Lake) 58 Five Hundred Miles 97 Wedding March
18 Le Lac des Cygnes Acte I 59 Happy New Year 98 2-Part Invention #13 In A Minor.B.W.
19 The Happy Farmer 60 It`S Beginning To Look A Lot Like
Christmas 99 Minuet In G
20 The Sleeping Beauty 61 Jeanie With The Light Brown Hair 100 Turkish March
21 Uungarische Tanz 62 My Bonnie 101 Hey Diddle Diddle
22 Wiegenlied 63 Song Of The Pearlfi sher 102 March
23 Mov.2 Adagio Non Troppo
Piano Sonata No.9 In D 64 Summer Palace 103 Moseta Dance
24 Mov.1 Andante Grazioso Piano
Sonata No.11 In A 65 The Stage Coach 104 Bulie Dance
25 Prelude In C 66 Entertainer 105 Aria
26 Chinese Dance 67 Annie Laurie 106 Germanic Dance
27 Emperors Waltz 68 Killing Me Softly With His Song 107 Away In A Manger
28 March Militaire 69 Love Is Blue 108 Jack & Jill
29 Symphony No.40 70 Last Rose Of Summer 109 Angles We Have Heard On High
30 Pianosonatan 08 IN Cm IN
Pathetique 71 The Old King Cole 110 Humpty Dumpty
31 Arpeggione Sonata in Am JAZZ & FUSION 111 Did You Ever See A Lassie
FOLK & COUNTRY 72 Chrysanf 112 Chopsticks
32 Santa Lucia 73 Maple Leaf Rag 113 Four Little Swans
33 Country 74 June Samba 114 Old France
34 Jambalaya 75 Funk 115 "Jesus, Saviour Pilot Me"
35 Susanna 76 I Can...... 116 Eclogue
36 Bridge 77 Sea Shore 117 Santa Claus Is Coming To Town
37 Battle Hymne Of The Republic 78 Guitar&Saxphone 118 Brave Cavalier
38 The Old Gray Mare 79 The Hip Hop`S Night 119 America The Beautiful
39 American Patrol 80 Blue Lunch 120 Music Box Dancer
40 In The Rain 81 Cobweb
41 Sippin Cider Through A Straw

82
Appendix II: Stijlen lijst
8 BEAT ROCK
01 Sweet Beat 41 Soft Rock 81 Jazz Funk 121 Disco Samba
02 Miami Beat 42 Hard Rock 82 Groove 122 Mambo
03 Rhythm & Beat 43 Heavy Rock 83 Soul 123 Meneito
04 Guitar Pop 1 44 Easy Rock 84 Hip Hop Soul 124 Rumba 2
05 8 Beat Dance 45 New Shuffl e 85 Hip Hop Beat 125 Tikitikita'
06 8 Beat Disco 46 Rock Hip Hop 86 R & B 126 Dancing Tribe
07 Pop Funk 47 Rock & Roll 87 Soul Beat 127 Lambada
08 8 Beat 1 48 Rock Shuffl e 88 R & B Ballad 128 Pop Cha Cha
09 60's 8 Beat 49 70's Rock & Roll 89 British Soul Pop 129 Cha Cha Cha
10 8 Beat 2 50 Folk Rock 90 Samba Funk 130 Salsa
16 BEAT BALLROOM JAZZ WORLD
11 16 Beat Ballad 51 Rhumba 1 91 Jazz Fusion 131 Scottish
12 Pop 16 Beat 1 52 Slow Waltz 1 92 Fusion 132 Laendler
13 Pop 16 Beat 2 53 Fox Trot 93 Jazz Brush 133 Hawaiian
14 Modern 16 Beat 54 Samba 94 Latin Jazz 134 Sirtake
15 16 Beat Hot 55 Cha Cha 95 Acid Jazz 1 135 Venezia
16 16 Beat Modern 56 Quick Step 96 Acid Jazz 2 136 6/8 Flipper
17 16 Beat Bossa Nova 57 Twist 97 Cool Jazz Ballad 137 New Age
18 16 Beat Funk 58 Swing Fox 98 Swing Shuffl e 138 Tarantella
19 16 Beat 59 Jive 99 Big Band 40's 139 Enka
20 Cool Beat 60 Beguine 100 Big Band Medium 140 Norteno
POP DANCE COUNTRY TRADITIONEEL
(TRADITIONAL)
21 Analog Night 61 Garage 101 Country 8 Beat 141 Polka
22 Guitar Pop 2 62 Techno 102 Modern Country 142 German Polka
23 Pop beat 63 Progressive 103 Country Ballad 2 143 Party Polka
24 Soft Beat 64 Rap 1 104 Country Pop 144 March
25 60's Pop 65 Rap 2 105 2/4 Country 145 6/8 March
26 Sting Latin 66 Disco 106 Country 146 US March
27 Brit Pop 1 67 Soft Disco 107 Country Quick Steps 147 Musette
28 Brit Pop 2 68 Disco Party 108 Bluegrass 148 French Musette
29 Pop Hit 69 70's Disco 109 Country Flok 149 Mazurke
30 Fusion Shuffl e 70 70's Disco Funk 110 Country Rock 150 Waltz
BALLADE (BALAD) 71 Club Dance LATIJNS/LATIJNSE DANS
(LATIN/LATIN DANCE) INDONESIE (INDONESIA)
31 Rock Ballad 1 72 Euro Dance 111 Bossa Nova 151 Dandut1
32 Folk Ballad 73 80's Dance 112 Habanera 152 Dandut2
33 Pop Ballad 1 74 Hip Hop 113 Latin 153 Dangdu
34 Pop Ballad 2 75 Down Beat 114 New Reggae 154 Dangdut1
35 EP Ballad SOUL & FUNK 115 Dance Reggae 155 Dangdut2
36 Piano Ballad 76 Funk 116 Pasodoble 156 Dangdut3
37 New R&B Ballad 77 Electric Funk 117 Lite Bossa 157 Keroncong1
38 Natural Ballad 78 Groove Funk 118 Latin Rock 158 Keroncong2
39 Love Ballad 79 Rubber Funk 119 Beguine 159 PopKeroncong
40 Easy Ballad 80 Cool Funky 120 Slow Bolero 160 Slow Dangdut
Appendix
11
Voice L Voice R1/R2
Split Point (#F3)
e. Gleitende Tonhöhenverschiebung
Das Rad für die gleitende Tonhöhenverschiebung kann dazu verwendet werden, um die Noten um bis zu +/- 2 Grade höher
oder tiefer klingen zu lassen.
Drehen Sie das Rad nach oben oder unten, während Sie auf dem Keyboard spielen, um die Tonhöhe zu beugen. 1.
Wird das Rad losgelassen, kehrt der Ton zu seinem normalen Klang zurück. 2.
f. Modulation
Drücken und halten Sie die [MODULATION]-Taste, während Sie auf dem Keyboard spielen. 1.
Lassen Sie die Taste los, um den Modulationseffekt zu stoppen. 2.
g. Touch
Diese Funktion erlaubt Ihnen die Kontrolle der Dynamik Ihrer Noten durch Variation des auf die Tasten ausgeübten Drucks.
Ist die Touch-Funktion deaktiviert, erfolgt bei Kontakt keine Reaktion.
Um zwischen Level 0 und Level 3 des Toucheffektes zu wechseln, drücken Sie die Taste [TOUCH].
h. Transponieren
Sie können die Tonart Ihrer Musik mittels der Funktion TRANSPONIEREN durch Anpassung der Tonlage in Halbtonschritten
ändern.
Drücken Sie die Taste [TRANSPOSE +] oder [TRANSPOSE -], um den Transponierungswert um -12 bis +12 Halbtöne zu 1.
ändern. Das LCD-Display zeigt den aktuellen Transponierungswert an.
Drücken Sie die Tasten [TRANSPOSE +] und [TRANSPOSE -] gleichzeitig, um zur Standardeinstellung 00 2.
zurückzukehren.
i. Oktave
Durch diese Funktion kann die Tonlage um 1 Oktave erhöht bzw. gesenkt werden.
Drücken Sie die Taste [OCTAVE +] oder [OCTAVE -], um den Oktavenwert um -1 bis 1 Oktave zu verschieben. Das LCD-1.
Display zeigt den aktuellen Oktavenwert an.
Drücken Sie die Tasten [OCTAVE +] und [OCTAVE -] gleichzeitig, um zur Standardeinstellung 00 zurückzukehren. 2.
D) Style-Regler
Das Keyboard bietet insgesamt 160 voreingestellte Styles. (siehe Anhang II)
a. Style (Automatische Begleitung)
Style auswählen
Drücken Sie die Taste [STYLE], um in den „Stylemodus“ zu gelangen. Das „STYLE“-Symbol wird angezeigt. 1.
Um das gewünschte Style auszuwählen, drücken Sie [+/YES] / [-/NO] oder verwenden Sie die numerische Tastatur. 2.
Starten eines Styles
Sie können einen Style auf verschiedene Arten starten.
1. Ohne Effekte
Benutzen Sie die Taste [START/STOP], um einen Style zu starten. -
2. Im Einklang mit Ihrer Melodie
Drücken Sie die [SYNC]-Taste. Damit stellen Sie sicher, dass die Tonart passend zum Style startet. -
Der Style wird automatisch gestartet, wenn Sie beginnen, die Melodie zu spielen (durch Drücken einer Taste). -
7. Betrieb

12
3. Im Einklang mit Auto-Bassakkord
Drücken Sie die Taste [A.B.C], um den „Auto-Bassakkord“-Modus einzuschalten. -
Drücken Sie die [SYNC]-Taste. Damit stellen Sie sicher, dass der Auto-Bassakkord passend zum Style startet. -
Der Style startet, wenn Sie beginnen, eine Note oder einen Akkord im AKKORD-Bereich zu spielen. (siehe Abschnitt -
Auto-Bassakkord)
4. Mit Intro
Drücken Sie die Taste [INTRO/ENDING], um einen Intro-Abschnitt einzufügen, bevor Sie die [START/STOP]-Taste -
drücken, um den Style zu spielen. (siehe Abschnitt Intro/Ending)
Beenden eines Styles
Sofortiges Beenden 1.
Benutzen Sie die Taste [START/STOP], um einen Style zu beenden. -
Beenden mit einem Abschluss 2.
Drücken Sie die Taste [INTRO/ENDING], um das Spiel mit einem Abschluss zu beenden. Der Abschluss wird bei Beginn -
des nächsten Abschnittes erklärt.
Sync-Stop 3.
- Drücken Sie die [SYNC]-Taste, um das Spiel sofort zu beenden. Der Synchronisationsmodus wird aktiviert.
b. Synchronisation
Drücken Sie die Taste [SYNC], um Ihre Melodie oder Akkorde mit dem ausgewählten Style zu synchronisieren. Die 1.
Rhythmusindikatoren blinken und zeigen den „Wartemodus” an.
Der Style beginnt, wenn Sie anfangen, die Melodie oder Akkorde zu spielen. 2.
c. Intro / Ending
Diese Funktion erlaubt Ihnen, einem Style ein Intro oder einen Abschluss hinzuzufügen. Seine jeweilige Länge variiert
abhängig vom Style.
Um einen Style mit einer Einleitung zu beginnen, drücken Sie die Taste [INTRO/ENDING], bevor Sie anfangen, den Style 1.
zu spielen.
Um einen Style mit einem Abschluss zu beenden, drücken Sie die Taste [INTRO/ENDING], während der Style gespielt 2.
wird.
Wenn dieser Modus aktiviert wurde, blinkt die Anzeige über „Einlage A“ oder „Einlage B“, bis der Vorgang abgeschlossen 3.
ist.
d. Einlage A/B
Über diese Funktion können Sie einem Style eine Einlage hinzufügen.
Wählen Sie den gewünschten Style und spielen Sie ihn ab. 1.
Um eine Einlage einzufügen, drücken Sie die Taste [FILL-IN A] oder [FILL-IN B]. Wenn die Einlage abgespielt wurde, hört 2.
die Anzeige über der Taste auf zu blinken.
Für eine Wiederholung dieses Vorgangs drücken und halten Sie die Taste [FILL-IN A] oder [FILL-IN B] gedrückt. 3.
e. Tempo
Drücken Sie die Taste [TEMPO+] oder [TEMPO-], um das Tempo zu ändern. Das Tempo liegt zwischen 30 und 280.1.
Drücken Sie die Tasten [TEMPO+] und [TEMPO-] gleichzeitig, um den Tempowert auf Standardtempo zurückzusetzen. 2.
f. Ein-/Ausklingen
Die Funktion „Ein-/Ausklingen“ sorgt für einen weicheren Klang beim Starten bzw. Beenden eines Styles.
Einklingen1.
Um die Einklangsfunktion zu aktivieren, drücken Sie [FADE], bevor Sie einen Style abspielen. Wenn der Style startet, -
blinkt die Anzeige Ein-/Ausklingen auf der LC-Anzeige, und die Lautstärke steigt innerhalb von 10 Sekunden stufenweise
bis auf die maximale Lautstärke an. Die Anzeige Ein-/Ausklingen schaltet sich ab, und der Style wird im Normalmodus
abgespielt.
7. Betrieb
81
Andere stemmen (Other Voices) Drum set
164 Ufoorg 211 Fretlekb 258 Bassokb 301 Standard Drum 1
165 Q-Org 212 Slapbs 259 swetbras 302 Standard Drum 2
166 elorg 213 SlpbsKb 260 softsax 303 Room Drum
167 elorg 214 Synthbs 261 Whistle 304 Rock Drum
168 elorg 215 Synbass 262 Panfl ut 305 Electric Drum
169 sloorg 216 Synbass 263 Lead 306 Analog Drumset
170 ringo 217 Synthb 264 Lead 307 Dance Drumset
171 autolux 218 SynbsKb 265 Lead 308 Jazz Drum
172 elecorg 219 Acidbass 266 Lead 309 Brush Drumset
173 Accodin 220 acostbs 267 Warplead 310 Standard Drumset
174 Softacc 221 picked 268 Warp-
175 Accowaa 222 slapbs 269 Pianstld
176 Softacc 223 synthbs 270 childtoy
177 Harmonic 224 fgepbas 271 ahold
178 Harmharp 225 Vln-Hard 272 fmlead
179 slowacc 226 Viola-Kb 273 tunnel
180 accodin 227 Violastr 274 tunnel
181 softacc 228 Cello 275 fmlead
182 mutharmp 229 Slocello 276 fmlead
183 bigharm 230 Cello 277 fmlead
184 accomut 231 Contrakb 278 roomlead
185 harm 232 Contrakq 279 Sinepad
186 N-Gthamm 233 Stringf 280 Softpad
187 Pickgt 234 Strgszz 281 Bellpad
188 Strgt 235 Stringf 282 Synpad
189 Stel-gt 236 Strings 283 Hornpad
190 Cleagtkb 237 Slwstrzz 284 Newagpad
191 Pickcgt 238 Synthst 285 Bagpipe
192 Bcln-Gt 239 SystrZz 286 Distorld
193 Cln-Gt 240 vlnhard 287 Systrel
194 Solid-Gt 241 violakb 288 Dist-
195 Solidwa 242 cello 289 Chorusld
196 Chorusgt 243 contra 290 Halon
197 Q-Gt 244 strrue 291 Dream
198 Mut-Gt 245 dreamstr 292 Dream
199 Overgtkb 246 pizstr 293 Waspysyn
200 Tremolgt 247 strpiz 294 Orgpd
201 Funk-Gt 248 Swet_Trp 295 Trompad
202 cleagt 249 Trombone 296 Softacpd
203 cleagt 250 Trombon 297 theology
204 rvcleagt 251 Tuba 298 calm
205 overgt 252 Tubabl 299 padorg
206 Acostbs 253 Fmhorn 300 palbel
207 Abascym 254 Bbbrass
208 Fg-Bs-Kb 255 Hibrass
209 Fusionbs 256 Tenosax
210 Pickedkb 257 Bari-Kb
Appendix

80
Appendix I: Voice lijst
Piano (Piano) Snaren (Strings) Leiding (Lead) Geluidseffecten (Sound effects)
01 Acoustic Grand Piano 41 Violin 81 Square 121 Guitar Fret Noise
02 Bright Acoustic Piano 42 Viola 82 Sawtooth 122 Breath Noise
03 Electric Grand Piano 43 Cello 83 Calliope 123 Seashore
04 Honky-tonk Piano 44 Contrabass 84 Chiff 124 Bird Tweet
05 Electric Piano 1 45 Tremolo Strings 85 Charang 125 Telephone Ring
06 Electric Piano 2 46 Pizzicato Strings 86 Voice 126 Helicopter
07 Harpsichord 47 Orchestral Harp 87 Fifths 127 Applause
08 Clavi 48 Timpani 88 Bass & Lead 128 Gunshot
Houten hamer (Mallet) Snarenensemble (String ensemble) Pad (Pad) Andere stemmen (Other Voices)
09 Celesta 49 Strings Ensemble 1 89 Fantasia 129 Pianostr
10 Glockenspiel 50 Strings Ensemble 2 90 Warm 130 Modernep
11 Music box 51 Synth Strings 1 91 Polysynth 131 Galaxy
12 Vibraphone 52 Synth Strings 2 92 Choir 132 Galaxy2
13 Marimba 53 Choirs Aahs 93 Bowed 133 Funk_Ep
14 Xylophone 54 Voice Ooh 94 Metallic 134 Funk_Ep2
15 Tubular Bells 55 Synth Voice 95 Halo 135 Polar
16 Dulcimer 56 Orchestra Hit 96 Sweep 136 Polarz
Orgel (Organ) Koper (Brass) Effecten (Effects) 137 Gdharpsi
17 Drawbar Organ 57 Trumpet 97 Rain 138 Clavr-Kb
18 Jazz Organ 58 Trombone 98 Soundtrack 139 Clavr-Kb2
19 Rock Organ 59 Tuba 99 Crystal 140 Elclav
20 Church Organ 60 Muted Trumpet 100 Atmosphere 141 Wclzavrz
21 Reed Organ 61 French Horn 101 Brightness 142 Wclzael
22 Accordion 62 Brass Ensemble 102 Goblins 143 Bell
23 Harmonica 63 Synth Brass 1 103 Echoes 144 Bell2
24 Tango Accordion 64 Synth Brass 2 104 Sci-Fi 145 Vibes2
Guitaar (Guitar) Riet (Reed) Ethnisch (Ethnic) 146 Vibesma
25 Classic Guitar 65 Soprano Sax 105 Sitar 147 Marin-Kb
26 Steel Guitar 66 Alto Sax 106 Banjo 148 Marinkb2
27 Jazz Guitar 67 Tenor Sax 107 Shamisen 149 Marinbel
28 Clean Guitar 68 Baritone Sax 108 Koto 150 Slopiano
29 Muted Guitar 69 Oboe 109 Kalimba 151 Qpiano
30 Overdriven Guitar 70 English Horn 110 Bagpipe 152 Jz-Org2
31 Distortion Guitar 71 Bassoon 111 Fiddle 153 Jz-Org1
32 Guitar Harmonics 72 Clarinet 112 Shanai 154 Jazzorg3
Bas (Bass) Pijp (Pipe) Percussie (Percussive) 155 Clik-Org
33 Acoustic Bass 73 Piccolo 113 Tinkle Bell 156 Ele-Org
34 Finger Bass 74 Flute 114 Agogo 157 Ele-Org2
35 Picked Bass 75 Recorder 115 Steel Drums 158 Danc-Org
36 Fretless Bass 76 Pan Flute 116 Wood Block 159 New-Org
37 Slap Bass 1 77 Blown Bottle 117 Taiko Drum 160 Organ3Zz
38 Slap Bass 2 78 Shakuhachi 118 Melodic Tom 161 Piporgkb
39 Synth Bass 1 79 Whistle 119 Synth Drum 162 Bgchurch
40 Syth Bass 2 80 Ocarina 120 Reverse Cymbal 163 Elec-Org
Appendix
13
Ausklingen2.
Um die Ausklangsfunktion zu aktivieren, drücken Sie [FADE], wenn ein Style abgespielt wird. Die Anzeige Ein-/Ausklingen -
blinkt auf der LC-Anzeige, und die Lautstärke des Styles sinkt innerhalb von 10 Sekunden stufenweise bis auf die minimale
Lautstärke ab. Die Anzeige Ein-/Ausklingen schaltet sich ab. Der Style wird stummgeschaltet, bis er gestoppt wird.
Um zum normalen Spielmodus zurückzukehren, drücken Sie erneut [Ein-/Ausklingen]. -
g. Automatische Bass-Akkorde (A. B. C.)
A.B.C ist standardmäßig ausgeschaltet. Drücken Sie die Taste [A.B.C], um die „Auto-Bassakkord“-Funktion einzuschalten.
Die Tasten unterhalb der Splittstellen (Split point ) sind in diesem Modus der AKKORD-Bereich (Chord area) .
Chord area
Einfache Akkorde
Sie können einfache Akkorde im Akkord-Bereich mit vereinfachten Fingersätzen spielen. (siehe einfache Akkordtabelle unter
Anhang VI)
Standard-Akkorde
Sie können Standard-Akkorde im Akkord-Bereich mit normalen Fingersätzen spielen. (siehe Standard-Akkordtabelle unter
Anhang VI)
E) Funktionsmenü
Das Funktionsmenü erlaubt Ihnen die Einstellung der Parameter für 11 verschiedene Funktionen.
Um in das Funktionsmenü zu gelangen, drücken Sie die Taste [FUNCTION / BACK] oder [FUNCTION / NEXT]. 1.
Um verschiedene Funktionen auszuwählen, drücken Sie wiederholt die Taste [FUNCTION / BACK] oder [FUNCTION / 2.
NEXT].
Um die Parameter für jede Funktion einzustellen, drücken Sie [+/YES] / [-/NO]. 3.
Einen Überblick über die 11 Funktionen bietet ihnen die unten stehende Tabelle.
Inhalt LC-Anzeige Bereich Standardwert
Melodie Melodie -50...50 0
Rhythmusart Rhythmus 0 2...9 4
Teilungspunkt Teilungspkt. 1...61 19 (F3#)
MDI Eingangskanal Midi Ein 01...16, ALL ALL
MDI Ausgangskanal Midi Aus 01...16 01
Portamento und Modulation MODU MODULATION(MODU)
/PORTAMENTO(PORT) MODULATION (MODU)
Portamento-Typ Port-Typ 1-3 2
D5P Hall-Typ Hall-Typ 1--8 Hall 5
D5P Hallniveau Hallniveau 0--7 2
D5P Refrain-Typ Refr-Typ 1--8 Refrain 1
D5P Refrain-Niveau Refr-Niveau 0--7 0
7. Betrieb

14
F) Mixer
Über den Mixerregler können Sie die Lautstärke von Schlagzeug, Bass, Begleitakkord und linkem und rechten Abschnitt des
Keyboards einstellen.
Um die Track-Lautstärke des Schlagszeugs einzustellen, drücken Sie [RHYTHM +] oder [RHYTHM -]. 1.
Um die Track-Lautstärke des Basses einzustellen, drücken Sie [BASS +] / [BASS -]. 2.
Um die Track-Lautstärke des Begleitakkords einzustellen, drücken Sie [ACCOMP +] / [ACCOMP -]. 3.
Um die Lautstärke des linken Keyboard-Abschnittes einzustellen, drücken Sie [LOWER +] / [LOWER -]. 4.
Um die Lautstärke des rechten Keyboard-Abschnittes einzustellen, drücken Sie [UPPER +] / [UPPER -]. 5.
G) DSP (Digital Signal Processing)
Über diese Funktion wird ein authentischerer Klang aktiviert. Sie können den DSP-Wert über das Menü „Funktion“
einstellen.
H) Metronom
Um das Metronom ein- oder auszuschalten, drücken Sie [Metro].
I) Piano
Um in den Piano-Modus zu gelangen oder ihn zu verlassen, drücken Sie [PIANO]. 1.
Sie können den Piano-Modus auch über die Tasten [DEMO], [SONG] oder [MEMORY] verlassen. 2.
Sie können Styles auch ohne Begleitung abspielen. 3.
Im Piano-Modus haben Sie keinen Zugriff auf die „Aufnahme“-Funktion. 4.
J) Speicher
Dieses Keyboard verfügt über 4 Speicherbänke. Jede Bank kann 6 Datengruppen speichern ([M1] - [M6]). Sie werden für die
Speicherung von 24 kompletten Bedienelement-Konfi gurationen verwendet, auf die nach Bedarf zugegriffen werden kann.
Um eine Speicherbank auszuwählen, drücken Sie wiederholt [Speicherbank], um eine Speicherbank zwischen 01 und 04 1.
auszuwählen.
Nachdem Sie die Speicherbank ausgewählt haben, können Sie Ihre Daten in einer der sechs Gruppen [M1] ~ [M6] 2.
speichern oder wiederfi nden.
Um Ihre Daten zu speichern, drücken und halten Sie die Taste [STORE] gedrückt. Drücken Sie dann simultan [M1] 3.
(oder [M2] bis [M6]), um die Daten in M1 zu speichern. Auf der LC-Anzeige wird beim Speichern der Daten „Speichern“
angezeigt.
Um Daten aus dem Speicher abzurufen, drücken und halten Sie eine der [M1] ~ [M6]-Tasten gedrückt. 4.
Um zur Werkseinstellung der Speicherbänke zurückzukehren, drücken und halten Sie [+/YES] und [-/NO] gleichzeitig 5.
gedrückt, während Sie das Keyboard einschalten. Sämtliche Daten und Konfi gurationen sind nach dem Zurücksetzen
gelöscht.
K) Schnelleinstellung (One Touch Setting)
Diese Funktion lädt entsprechend den aktuellen Style 4 Einstellungen in die Speicherplätze [M1] bis [M4].
Drücken Sie die Taste [O.T.S.] (Schnelleinstellung). Die Einstellungen werden sofort in die Speicherplätze [M1] bis [M4] 1.
geladen. Der „A.B.C.“-Modus wird automatisch eingeschaltet.
Drücken Sie eine der Tasten [M1] bis [M4]. [M1] und [M2] speichern die „normalen“ Styles. [M3] und [M4] speichern die 2.
„variierten“ Styles. Drücken Sie die Taste [M1] oder [M2] während ein Style gespielt wird, um die „Einlage A“ einzufügen.
Drücken Sie die Taste [M3] oder [M4], um „Einlage A“ einzufügen.
Drücken Sie die Taste [O.T.S.] erneut, um den Schnelleinstellungsmodus zu beenden. 3.
L) Aufnahme
Aufnahme starten
Drücken Sie die [RECORD]-Taste. Der Vierteltakt auf der LC-Anzeige blinkt und zeigt den Status „auf Aufnahme warten“ 1.
an. In diesem Status kann eine Klangart (Voice), ein Style und der Speicher ausgewählt werden. Die Tracks ACCOMP und
MELODY können gleichzeitig aufgenommen werden.
7. Betrieb
79
Systeemvereisten: (voor USB aansluiting)
CPU: 300 MHz of hoger, Pentium 2
Geheugen: 64MB of meer
Harde schijf: een vrije basis van tenminste 2 MB
OS: WINDOWS® XP/Vista™, MacOS X® 10.4 en hoger
Aansluitingen: DC voeding
Hoofdtelefoon (6,3 mm stereo)
Aux. Uit (6,3 mm stereo)
Volume
Voetschakelaar
USB Poort (USB B-type pennen)
Voedingsadapter (Optioneel): Ingang: 230V~, 50 Hz
Uitgang: 12V/DC, 2.0A
Buitendiameter van de connector: Ø 5.5 mm
Binnendiameter van de connector: Ø 2.1 mm
Aantal toetsen: 61
Polyfonie: Max. 64 noten
Aantal stemmen: 310
Aantal stijlen: 160
Aantal liedjes: 120
Ingebouwde luidsprekers: 4Ω, 2 x 10W
Voeding: 9V/DC (6 x 1,5V batterijen, type D)
Afmetingen (LxBxH): 970 x 350 x 135 mm
Gewicht: 6 kg
10. Technische gegevens

78
Controleer regelmatig de technische veiligheid van het product, bv. beschadiging aan de behuizing (of aan de externe
adaptor).
Als vastgesteld wordt dat het product niet langer veilig gebruikt kan worden, moet het product uitgeschakeld worden en moet
men vermijden dat het product oneigenlijk gebruikt wordt. Schakel het keyboard uit, doorbreek de verbinding met de externe
stroomeenheid, en haal de externe stroomadaptor uit de stekker. Verwijder de batterijen.
Het product kan niet langer veilig gebruikt worden indien:
het apparaat zichtbare sporen van beschadiging vertoont -
het apparaat niet meer functioneert -
het apparaat lange periode onder slechte omstandigheden werd bewaard -
het apparaat schade heeft opgelopen tijdens het transport. -
De onderstaande veiligheidsinstructies moeten in acht genomen worden, vooraleer het keyboard gereinigd word:
Vóór het reinigen of het herstellen van het apparaat moet u de stekker uittrekken. Schakel het keyboard uit en haal de -
externe stroomeenheid uit de stekker.
Verwijder batterijen/accumulatoren. -
Geen enkel onderdeel binnenin het product mag door de gebruiker onderhouden worden. -
Live-onderdelen kunnen mogelijk blootgesteld worden aan schade of verloren gaan als de behuizing geopend wordt. -
Capacitoren in het apparaat zijn mogelijk nog opgeladen ook al zijn ze niet verbonden met een stroomvoorziening. -
Enkel bevoegde personen die de gevaren en de voorschriften kennen mogen het apparaat herstellen. -
Stof in de openingen van de toetsen kan verwijderd worden met behulp van een propere zachte borstel of een stofzuiger.
Een droge effen doek is voldoende om de buitenkant van het product te reinigen. Voor hardnekkigere vuilresten kunt u de
doek lichtjes vochtig maken met lauw water.
Gebruik geen schoonmaakproducten om de verkleuring van het plastiek te voorkomen. Ook de belettering
zou beschadigd kunnen worden.
Vooraleer de keyboard opnieuw aan te zetten (batterijen insteken/verbinden met een externe
stroomvoorziening) moet het apparaat volledig droog zijn!
9. Verwijdering
Verwijder gebruikte elektrische en elektronische apparatuur
In het belang van het behoud, de bescherming en de verbetering van de kwaliteit van het milieu, de bescherming
van de gezondheid van de mens en een behoedzaam en rationeel gebruik van natuurlijke hulpbronnen dient
de gebruiker een niet te repareren of afgedankt product in te leveren bij de desbetreffende inzamelpunten
overeenkomstig de wettelijke voorschriften.
Het symbool met de doorgekruiste afvalbak geeft aan dat dit product gescheiden van het gewone huishoudelijke
afval moet worden ingeleverd.
Verwijdering van gebruikte batterijen/ accu’s!
De gebruiker is wettelijk verplicht om afgedankte batterijen en accu’s in te leveren. Het is verboden om gebruikte
batterijen bij het huishoudelijke afval te deponeren! Batterijen/accu’s die gevaarlijke stoffen bevatten, zijn
voorzien van het symbool met de doorgekruiste afvalbak. Het symbool geeft aan dat het verboden is om dit product
via het huishoudelijke afval af te voeren. De chemische symbolen voor de betreffende gevaarlijke stoffen zijn
Cd = cadmium, Hg = kwik, Pb = lood.
Afgedankte batterijen en accu’s kunnen gratis worden ingeleverd bij de plaatselijke inzamelpunten (gemeentewerf,
afvalverwerking), bij onze winkels of bij een winkel waar batterijen/accu’s worden verkocht.
Zo vervult u uw wettelijke verplichtingen en draagt u bij tot de bescherming van het milieu!
8. Onderhoud en reiniging
15
Sobald Sie alle Einstellungen vorgenommen haben, können Sie mit der Aufnahme beginnen. Beginnen Sie mit der 2.
Aufnahme durch Spielen der Tasten oder Drücken der [START/STOP]-Taste. Jegliche vorherige Aufnahmen werden
überschrieben.
Der Aufnahmespeicher wird beim Ausschalten des Keyboards gelöscht.
Aufnahme beenden
Automatisches Beenden 1.
Sobald der Speicher voll ist, stoppt die Aufnahme automatisch, und das LCD-Display zeigt „FULL“ an. -
Drücken Sie beim Abspielen eines Styles die [INTRO/ENDING]-Taste, um die Aufnahme nach dem Schluss automatisch -
zu stoppen.
Manuelles Beenden 2.
Um sofort zu stoppen, drücken Sie beim Aufzeichnen die Taste [RECORD] erneut. -
Playback-Aufnahme
Um das Abspielen der aufgezeichneten Daten zu starten oder zu beenden, drücken Sie die Taste [PLAY/STOP].
M) Songs
Insgesamt bietet das Keyboard 120 Songs (siehe Anhang III). Jeder Song kann im Modus LESSON (Lektion) geübt werden.
Drücken Sie die Taste [SONG], um den „Song-Modus“ aufzurufen. Das „Song”-Symbol wird auf dem LCD-Display 1.
angezeigt. Um den aktuellen Song wiederholt zu spielen, drücken Sie die Taste [START/STOP] oder [SONG]. Um das
Abspielen des Songs zu beenden, drücken Sie die Taste [START/STOP] oder [SONG] erneut.
Um den gewünschten Song auszuwählen, verwenden Sie die Taste [+/YES] / [-NO] oder die numerische Tastatur. 2.
Um den „Lektionsmodus“ aufzurufen, drücken Sie die Taste [LESSON]. Jeder Song kann auf 3 verschiedene Arten geübt 3.
werden.
Um den Song-Modus zu verlassen, drücken Sie [STYLE], [VOICE] oder [DUAL]. 4.
N) Lektion
Das Keyboard bietet drei Lektionsstufen.
Drücken Sie im “Song-Modus” die Taste [LESSON], um in den Lektionsmodus zu gelangen.
Der Lektionsmodus wird in folgender Reihenfolge ausgewählt: Lektion 1(Rhythmus) > Lektion 2(Folgen) > Lektion 3(Spielen)
> Aus.
Drücken Sie die Taste [START/STOP], um eine Lektion zu starten oder zu beenden.
Lektion 1:
Wählen Sie Lektion 1, um das Tempo des ausgewählten Stückes zu üben. Der korrekte Ton wird unabhängig von der Note,
die Sie angeschlagen haben, gespielt, solange der Rhythmus korrekt ist.
Lektion 2:
Spielen Sie die im Display angezeigte Note. Wenn die richtige Note gespielt wurde, wird die nächste Note angezeigt.
Lektion 3:
Spielen Sie die im Display angezeigte Note im richtigen Tempo. Die Begleitung wird automatisch hinzugefügt.
O) Akkordverzeichnis
Das Akkordverzeichnis hilft Ihnen, die Akkordnoten nachzuschlagen. (siehe Anhang V)
Um in den Verzeichnis-Modus zu gelangen, drücken und halten Sie die Taste [RIGHT/CHORD DICTIONARY] für zwei 1.
Sekunden gedrückt. Auf dem LCD-Display wird „Verz“ angezeigt. In diesem Modus sind die Tasten über „C4“ der
Akkordtyp, die Tasten über „C6“ sind der Grundton des Akkords.
7. Betrieb

16
Beispiel: Wir möchten einen Cm7-AKKORD spielen. Drücken Sie die „C”-Taste im Abschnitt des Keyboards mit der 2.
Bezeichnung „AKKORD-GRUNDTON“. (Der Ton erklingt nicht.) Die Grundton-Note, die Sie einstellen, wird auf dem
Display angezeigt.
Drücken Sie die Taste „m7” im Abschnitt des Keyboards mit der Bezeichnung „AKKORDTYP“ (Der Ton erklingt nicht.). Die 3.
Noten für den spezifi zierten Akkord (Grundton und Akkordtyp) werden auf dem Display in Notenschrift angezeigt, ebenso
im Keyboard-Diagramm.
Wenn Sie den Akkord korrekt spielen (was auf dem Keyboard-Diagramm angezeigt wird), erklingt ein Glockenton 4.
8. Wartung und Reinigung
Prüfen Sie regelmäßig die technische Sicherheit des Produkts. Stellen Sie z. B. sicher, dass das Gehäuse oder das externe
Netzteil nicht beschädigt sind.
Wenn Sie erkennen, dass ein sicherer Betrieb nicht länger gewährleistet ist, müssen Sie die Verwendung des Produkts sofort
stoppen und sicherstellen, dass es auch in Zukunft nicht mehr verwendet wird. Schalten Sie das Keyboard aus, trennen Sie
es ggf. vom externen Netzteil, und nehmen Sie das externe Netzteil aus der Steckdose. Entfernen Sie ggf. die eingelegten
Batterien.
Daran können Sie erkennen, dass ein sicherer Betrieb nicht länger gewährleistet ist:
Das Gehäuse ist sichtbar beschädigt. -
Das Gerät funktioniert nicht mehr. UND: -
Das Gerät wurde für längere Zeit unter ungünstigen Bedingungen gelagert. ODER: -
Das Gerät war bei einem Transport größeren Belastungen ausgesetzt. -
Bei der Wartung und Reinigung des Keyboards sind folgende Sicherheitshinweise zu beachten:
Vor jeder Reinigung, Wartung oder Reparatur muss das Gerät vollständig von der Stromversorgung getrennt werden. -
Schalten Sie das Keyboard aus, und trennen Sie es vom externen Netzteil.
Entfernen Sie ggf. die eingelegten Batterien / Akkus. -
Die Komponenten des Produkts können nicht vom Benutzer gewartet werden. -
Beim Öffnen des Gehäuses oder beim Entfernen von Komponenten können unter Spannung stehende Komponenten -
freigelegt werden.
Möglicherweise sind die Kondensatoren im Gerät noch geladen, obwohl das Gerät von allen Stromquellen getrennt -
wurde.
Nur Fachpersonal, das die Gefahren sowie die entsprechenden Vorschriften kennt, kann Reparaturen ausführen. -
Staub in den Tastenzwischenräumen kann mit Hilfe eines sauberen, weichen Tuchs oder eines Staubsaugers entfernt
werden.
Zur äußeren Reinigung des Produktes genügt eine trockenes, fusselfreies Tuch. Stärkeren Schmutz können Sie entfernen,
indem Sie das Tuch mit lauwarmen Wasser leicht anfeuchten.
Verwenden Sie keine Reinigungsmittel, da das Plastik entfärbt oder beschädigt werden könnte. Auch die
Beschriftung könnte beschädigt werden.
Bevor Sie das Keyboard erneut an Strom anschließen (durch Einlegen der Batterien oder Anschließen
eines Netzteils) müssen Sie warten, bis es ganz trocken ist!
7. Betrieb
77
Afspelen van opgenomen data
Om te beginnen of te stoppen met het afspelen van de opgenomen data, druk op de [PLAY/STOP] toets.
M) Liedjes
Er zijn in totaal 120 liedjes (zie Appendix III). Elk lied kan worden geoefend in de lesmodus.
Druk op de [SONG] toets om over te schakelen naar de “songmodus”. . Druk op de [START/STOP] of [SONG] toets 1.
om het huidige lied herhalend af te spelen. Druk opnieuw op de [START/STOP] of [SONG] toets om het afspelen van
het lied te stoppen.
Gebruik de [+/YES] / [-NO] toets of het numerieke toetsenbord om het gewenste lied te selecteren 2.
Druk op de [LESSON] toets om “lesmodus” te beginnen. Er zijn drie manieren om elk lied te oefenen. 3.
Om de songmodus (liedmodus) te verlaten, druk op [STYLE] , [VOICE] of [DUAL]. 4.
N) Les
Het keyboard heeft drie lesniveaus.
In „song mode“, druk op de [LESSON] toets wanneer u zich in de „song modus“ bevindt, om de Lesmodus te beginnen.
De lesmodus kan in de volgende volgorde worden geselecteerd: Les 1(Ritme) > Les 2(Volgen) > Les 3(Uitvoeren) > Uit.
Om met de les te beginnen of te stoppen, dient u op de [START/STOP] toets te drukken.
Les 1:
Kies Les 1 om het ritme van het liedje te leren. Het juiste geluid wordt gespeeld ongeacht de door u gespeelde noot, zoland
het ritme correct is.
Les2:
Speel de noot die op het scherm getoond wordt. Wanneer de juiste noot gespeeld wordt, zal de volgende noot getoond
worden.
Les 3:
Speel de noot die op het scherm getoond wordt in de juist maat. Het keyboard zal verderspelen als begeleiding.
O) Akkoordenwoordenboek
Het Akkoordenwoordenboek helpt u om akkoordnoten op te zoeken. (Zie Appendix V)
Druk op de [RIGHT/CHORD DICTIONARY] toets en houd deze gedurende twee seconden ingedrukt om over te schakelen 1.
naar de woordenboekmodus. “Dict” zal worden getoond op het LCD paneel. In deze modus worden de toetsen boven
“C4” gezien als het akkoordtype en de toetsen boven “C6” als de grondtoon.
Bijvoorbeeld, als we een Cm7 AKKOORD willen spelen, drukken we op de „C“ toets in het gedeelte van het keyboard met 2.
het opschrift „CHORD ROOT“. (De noot geeft geen geluid) De grondtoon die u instelt wordt getoond op het scherm.
Druk op de „m7“ toets in het gedeelte van het keyboard met het opschrift „CHORD TYPE“ (De noot geeft geen geluid). De 3.
noten die u zou moeten spelen voor het aangegeven akkoord (grondtoon en akkoordtype) worden op het scherm getoond
in muzikale notatie en in het toetsendiagram.
Als u het akkoord (dat wordt weergegeven op het keyboarddiagram) juist speelt, klinkt er een belgeluid.4.
7. Bediening

76
H) Metronoom
Druk op [Metro] om de metronoom in of uit te schakelen.
I) Piano
Druk op [PIANO] om de pianomodus in of uit te schakelen. 1.
U kan de pianomodus verlaten met de [DEMO], [SONG] of [MEMORY] ([GEHEUGEN]) toets. 2.
U kan stijlen zonder begeleiding spelen. 3.
In de pianomodus kunt u de “Opnemen” functie niet inschakelen. 4.
J) Geheugen
Dit keyboard heeft 4 geheugenbanken en elke bank kan 6 gegevensgroepen opslaan ([M1] - [M6]). Deze worden gebruikt
om 24 volledige controlepaneelinstellingen op te slaan, die, wanneer nodig, opnieuw kunnen worden opgehaald.
Om een geheugenbank te kiezen, druk achtereenvolgens op [Memory Bank] ([Geheugenbank]) om geheugenbank 01-04 1.
te selecteren.
Nadat u een geheugenbank heeft gekozen, kan u ervoor kiezen om uw gegevens op te slaan of weer op te halen in/uit 2.
een van de zes groepen [M1] ~ [M6].
Om uw gegevens op te slaan, druk op de [STORE] ([OPSLAAN]) toets en houd deze ingedrukt, en druk tegelijkertijd 3.
op [M1] (of [M2] tot [M6]) om gegevens op te slaan in M1. Het LCD paneel zal “Memwrite” (“geheugen beschrijven”)
weergeven tijdens het opslaan van de gegevens.
Om de gegevens opnieuw op te halen uit het geheugen, dient u op de [M1] ~ [M6] toets te drukken en deze ingedrukt te 4.
houden.
Druk tegelijkertijd op [+/YES] en [-/NO] en houd deze ingedrukt terwijl u de voeding inschakelt om de fabrieksinstellingen 5.
van de geheugenbanken te herstellen. Na het herinstellen (reset) zullen alle gegevens en confi guraties verloren gaan
K) One Touch Setting/Eén Toets Instelling (O.T.S.)
Deze functie laadt 4 instellingen in [M1] tot [M4] volgens de huidige stijl.
Druk op de [O.T.S.] toets. De instellingen zullen onmiddellijk in de geheugenbanken [M1] tot [M4] worden geladen. 1.
De“A.B.C.“ modus zal automatisch ingeschakeld worden.
Druk op eender welke toets van [M1] tot [M4]. [M1] en [M2] bevatten de „normale“ stijlen. [M3] en [M4] bevatten de 2.
„variatie“ stijlen. Wanneer een stijl aan het spelen is, druk op de [M1] of [M2] toets om „Fill-in A“ in te voegen. Druk op de
[M3] of [M4] toets om „Fill-in A“ in te voegen.
Druk opnieuw op de [O.T.S.] toets om de Eén Toets Instelling te verlaten. 3.
L) Opnemen
Opnemen beginnen
Druk op de [RECORD] toets, en de four-beat op het LCD scherm zal knipperen om aan de “record waiting status” (wachten 1.
om op te nemen status) weer te geven. Een voice, stijl en geheugen kunnen in deze status geselecteerd worden. De
ACCOMP (begeleiding) track en de MELODY (melodie) track kunnen samen opgenomen worden.
U kunt beginnen opnemen wanneer u alles hebt ingesteld. Start de opname door het keyboard te bespelen of door op de 2.
[START/STOP] toets te drukken. Eerder opgenomen bestanden zullen overschreven worden.
De opname zal gewist worden wanneer het keyboard uitgeschakeld wordt.
Stoppen met opnemen
1. Automatisch stoppen
Wanneer het geheugen vol is, zal het opnemen automatisch stoppen. Het LCD scherm zal dan “FULL” (vol) vertonen. -
Wanneer een stijl aan het spelen is, druk dan op de [INTRO/ENDING] toets om het opnemen automatisch te stoppen -
na het einde van de stijl.
2. Handmatig stoppen
Om onmiddellijk te stoppen, druk opnieuw op de [RECORD] toets tijdens het opnemen. -
7. Bediening
17
Entsorgung von Elektro- und Elektronikgeräten
Im Interesse unserer Umwelt und um die verwendeten Rohstoffe möglichst vollständig zu recyclen, ist der
Verbraucher aufgefordert, gebrauchte und defekte Geräte zu den öffentlichen Sammelstellen für Elektroschrott
zu bringen.
Das Zeichen der durchgestrichenen Mülltonne mit Rädern bedeutet, dass dieses Produkt an einer
Sammelstelle für Elektronikschrott abgegeben werden muss, um es durch Recycling einer bestmöglichen
Rohstoffwiederverwertung zuzuführen.
Entsorgung verbrauchter Batterien / Akku
Sie als Endverbraucher sind gesetzlich (Batterieverordnung) zur Rückgabe aller gebrauchten Batterien und
Akkus verpfl ichtet; eine Entsorgung über den Hausmüll ist untersagt!
Schadstoffärmste Batterien/Akkus sind mit nebenstehenden Symbolen gekennzeichnet, die auf das Verbot der
Entsorgung über den Hausmüll hinweisen. Die Bezeichnungen für das ausschlaggebende Schwermetall sind:
Cd = Cadmium, Hg = Quecksilber, Pb = Blei (Bezeichnung steht auf der Batterie/Akku z.B. unter den links
abgebildeten Mülltonnen-Symbolen).
Ihre verbrauchten Batterien/Akkus können Sie unentgeltlich bei den Sammelstellen Ihrer Gemeinde, unseren
Filialen oder überall dort abgeben, wo Batterien/Akkus verkauft werden!
Somit werden Sie Ihren gesetzlichen Pfl ichten gerecht und tragen zum Umweltschutz bei!
10. Technische Daten
Systemanforderungen: (für USB-Anschluss)
Zentraleinheit: 300 MHz oder höher, Pentium 2
Speicher : 64MB oder mehr
Festplatte: Mindestens 2 MB freier
Betriebssystem: Microsoft Windows® XP/Vista™, MacOS X® 10.4 und höher
Anschlüsse: Gleichstrom
Kopfhörer (6,3 mm Stereo)
Aux-Ausgang (6,3 mm Stereo)
Lautstärke
Sustain
USB-Anschluss (USB B-Typ Stecker)
Netzteil (optional): Eingang: 230V~, 50 Hz
Ausgang: 12V/DC, 2.0A
Außendurchmesser des Steckers: Ø 5,5 mm
Innendurchmesser des Steckers: Ø 2,1 mm
Anzahl der Tasten: 61
Polyphoner Klang: Max. 64 Töne
Anzahl der Instrumente: 310
Anzahl der Styles: 160
Anzahl der Songs: 120
Integrierte Lautsprecher: 4Ω, 2 x 10W
Stromversorgung: 9V/DC (6 x 1,5V Batterien, Typ D)
Abmessungen (L × B × T): 970 × 350 × 135 mm
Gewicht: 6 kg
9. Entsorgung

18
Anhang I : Voice-Liste
Klavier (Piano) Streichinstrumente (Strings) Hauptstimme (Lead) Soundeffekte (Sound effects)
01 Acoustic Grand Piano 41 Violin 81 Square 121 Guitar Fret Noise
02 Bright Acoustic Piano 42 Viola 82 Sawtooth 122 Breath Noise
03 Electric Grand Piano 43 Cello 83 Calliope 123 Seashore
04 Honky-tonk Piano 44 Contrabass 84 Chiff 124 Bird Tweet
05 Electric Piano 1 45 Tremolo Strings 85 Charang 125 Telephone Ring
06 Electric Piano 2 46 Pizzicato Strings 86 Voice 126 Helicopter
07 Harpsichord 47 Orchestral Harp 87 Fifths 127 Applause
08 Clavi 48 Timpani 88 Bass & Lead 128 Gunshot
Schlägel (Mallet) Streicherensemble (String ensemble) Dämpfung (Pad) Andere Instrumente
09 Celesta 49 Strings Ensemble 1 89 Fantasia 129 Pianostr
10 Glockenspiel 50 Strings Ensemble 2 90 Warm 130 Modernep
11 Music box 51 Synth Strings 1 91 Polysynth 131 Galaxy
12 Vibraphone 52 Synth Strings 2 92 Choir 132 Galaxy2
13 Marimba 53 Choirs Aahs 93 Bowed 133 Funk_Ep
14 Xylophone 54 Voice Ooh 94 Metallic 134 Funk_Ep2
15 Tubular Bells 55 Synth Voice 95 Halo 135 Polar
16 Dulcimer 56 Orchestra Hit 96 Sweep 136 Polarz
Orgel (Organ) Blechblasinstrument (Brass) Effekte (Effects) 137 Gdharpsi
17 Drawbar Organ 57 Trumpet 97 Rain 138 Clavr-Kb
18 Jazz Organ 58 Trombone 98 Soundtrack 139 Clavr-Kb2
19 Rock Organ 59 Tuba 99 Crystal 140 Elclav
20 Church Organ 60 Muted Trumpet 100 Atmosphere 141 Wclzavrz
21 Reed Organ 61 French Horn 101 Brightness 142 Wclzael
22 Accordion 62 Brass Ensemble 102 Goblins 143 Bell
23 Harmonica 63 Synth Brass 1 103 Echoes 144 Bell2
24 Tango Accordion 64 Synth Brass 2 104 Sci-Fi 145 Vibes2
Gitarre (Guitar) Blasinstrument (Reed) Folklore (Ethnic) 146 Vibesma
25 Classic Guitar 65 Soprano Sax 105 Sitar 147 Marin-Kb
26 Steel Guitar 66 Alto Sax 106 Banjo 148 Marinkb2
27 Jazz Guitar 67 Tenor Sax 107 Shamisen 149 Marinbel
28 Clean Guitar 68 Baritone Sax 108 Koto 150 Slopiano
29 Muted Guitar 69 Oboe 109 Kalimba 151 Qpiano
30 Overdriven Guitar 70 English Horn 110 Bagpipe 152 Jz-Org2
31 Distortion Guitar 71 Bassoon 111 Fiddle 153 Jz-Org1
32 Guitar Harmonics 72 Clarinet 112 Shanai 154 Jazzorg3
Bass Flöteninstrument (Pipe) Schlaginstrument (Percussive) 155 Clik-Org
33 Acoustic Bass 73 Piccolo 113 Tinkle Bell 156 Ele-Org
34 Finger Bass 74 Flute 114 Agogo 157 Ele-Org2
35 Picked Bass 75 Recorder 115 Steel Drums 158 Danc-Org
36 Fretless Bass 76 Pan Flute 116 Wood Block 159 New-Org
37 Slap Bass 1 77 Blown Bottle 117 Taiko Drum 160 Organ3Zz
38 Slap Bass 2 78 Shakuhachi 118 Melodic Tom 161 Piporgkb
39 Synth Bass 1 79 Whistle 119 Synth Drum 162 Bgchurch
40 Syth Bass 2 80 Ocarina 120 Reverse Cymbal 163 Elec-Org
Anhänge
75
Chord area
Gemakkelijke akkoorden
U kunt gemakkelijke akkoorden in het akkoord gebied spelen met vereenvoudigde vingerzettingen. (Zie Appendix VI voor
eenvoudige akkoorden)
Standaardakkoorden
U kunt standaardakkoorden in het akkoordgebied spelen met een normale vingerzetting. (Zie Appendix VI voor
standaardakkoorden)
E) Functiemenu
Het functiemenu laat u toe om de parameters van 11 eenheden aan te passen.
Druk op de [FUNCTION / BACK] ([FUNCTIE/TERUG]) of [FUNCTION / NEXT] ([FUNCTIE/VOLGENDE]) toets om dit 1.
functiemenu in te schakelen.
Druk herhaaldelijk op de [FUNCTION / BACK] ([FUNCTIE/TERUG]) of [FUNCTION / NEXT] ([FUNCTIE/VOLGENDE]) 2.
toets om andere eenheden te selecteren.
Druk op [+/YES] / [-/NO] ([+/JA] / [-/NEE]) om de parameters voor elke eenheid aan te passen. 3.
We verwijzen u naar de onderstaande tabel voor een overzicht van de 11 eenheden.
Inhoud LCD paneel Bereik Standaardwaarde
Tune Tune -50...50 0
Ritme Type Ritme 0 2...9 4
Splitpunt Split pt 1...61 19 (F3#)
MDI in kanaal Midi in 01...16, ALL ALL
MDI UIT kanaal Midi uit 01...16 01
Portamento en modulatie MODU MODULATIE(MODU)
/ PORTAMENTO(PORT) MODULATIE (MODU)
Portamento Type Poorttype 1-3 2
D5P Reverb type Rvb type 1--8 Hall 5
D5P reverbniveau Rvb niveau 0--7 2
D5P chorustype Crs type 1--8 Refrain 1
D5P chorusniveau Crs niveau 0--7 0
F) Mixer
De mixerregelaar laat u toe om het geluidsniveau van de drum, bas, begeleidingsakkoord en het linker- en rechtergebied van
het keyboard aan te passen.
Druk op [RHYTHM +] ([RITME +]) of [RHYTHM -] ([RITME -]) om het track geluidsniveau van de drums aan te passen. 1.
Druk op [BASS +] / [BASS -] ([BAS +] / [BAS -]) om het track geluidsniveau van de bas aan te passen. 2.
Druk op [ACCOMP +] / [ACCOMP -] ([BEGELEIDING +] / [BEGELEIDING -] om het track geluidsniveau van het 3.
begeleidingsakkoord aan te passen.
Druk op [LOWER +] / [LOWER -] ([LAGER +] / [LAGER -] om het geluidsniveau van het linkergebied van het keyboard 4.
aan te passen.
Druk op [UPPER +] / [UPPER -] ([HOGER +] / [HOGER -] om het geluidsniveau van het rechtergebied van het keyboard 5.
aan te passen.
G) DSP (Digitale signaalverwerking)
Met deze functie klinken geluiden realistischer. U kan de waarde van de DSP aanpassen vanuit het “Functie” menu.
7. Bediening

74
Om een stijl te stoppen
1. Onmiddellijk stoppen
Gebruik de [START/STOP] toets om een stijl te stoppen. -
2. Stoppen met een slotpatroon
Druk op de [INTRO/ENDING] toets om te stoppen met een slotpatroon. Het slotpatroon wordt geïntroduceerd in het -
begin van de volgende sectie.
3. Sync stop
Druk op de [SYNC] toets om het afspelen onmiddellijk te beëindigen. De synchronisatiemodus wordt geactiveerd. -
b. Sychronizatie
Druk op de [SYNC] toets om uw melodie of akkoorden te synchronizeren met de geselecteerde stijl. De ritme-indicatoren 1.
knipperen om aan te geven dat het apparaat zich in “wachtmodus” bevindt.
De stijl zal beginnen wanneer u een melodie of akkoorden begint te spelen. 2.
c. Intro / slotpatroon
Via deze functie kunt u een intro of een slotpatroon toevoegen aan een stijl. De lengte hiervan is verschillend naargelang de
stijl.
1. Om een stijl te beginnen met een intro, druk op de [INTRO/ENDING] toets voor u de stijl start.
2. Om de stijl een slotpatroon te geven, druk op de [INTRO/ENDING] toets tijdens het afspelen van de stijl.
Wanneer het apparaat zich in deze modus bevindt, zal de indicator boven “Fill-in A” (“Vul-in A”) of “Fill-in B” (“Vul-in B”) 3.
knipperen totdat de modus is beëindigd.
d. Fill A/B (Vul A/B)
Deze functie laat u toe om een stijlinvulling aan een stijl toe te voegen.
Kies en speel uw gewenste stijl af. 1.
Druk op de [FILL-IN A] ([VUL-IN A]) of [FILL-IN B] ([VUL-IN B]) toets om een stijlinvulling in te voegen. De indicator boven 2.
de toets zal stoppen met knipperen wanneer de stijlinvulling stopt met spelen.
Om het patroon te blijven herhalen, druk op de [FILL-IN A] ([VUL-IN A]) of [FILL-IN B] ([VUL-IN B]) toets en houd deze 3.
ingedrukt.
e. Tempo
Druk op de [TEMPO+] of de [TEMPO-] toets om het tempo te veranderen. Het tempobereik ligt tussen 30 en 280.1.
Druk tegelijk op de [TEMPO+] en [TEMPO-] toetsen om de tempowaarde direct terug te zetten naar de standaardwaarde.2.
f. Fade
Deze Fade functie creëert een zachter geluid om een stijl te beginnen of te beëindigen.
1. Fade-in
Om de fade-in functie in te schakelen, dient u op [FADE] te drukken voor u een stijl begint af te spelen. Wanneer de stijl -
begint, zal de fade indicator op het LCD paneel knipperen en zal het volume binnen 10 seconden langzaamaan verhogen
tot het maximum niveau. Daarna zal de fade indicator uitgaan en zal de stijl normaal afspelen.
2. Fade-out
Om de fade-out functie in te schakelen, dient u op [FADE] te drukken terwijl een stijl aan het afspelen is. De fade indicator -
op het LCD paneel zal knipperen en het volume zal binnen 10 seconden langzaamaan verlagen tot het minimum niveau.
Dan zal de fade indicator uitgaan. De stijl zal gedempt worden afgespeeld totdat deze wordt gestopt.
- Druk opnieuw op [FADE] om het normaal afspelen te hervatten.
g. Auto Bass Akkoord (A. B. C.)
A.B.C staat normaal UIT. Druk op de [A.B.C.] toets om deze „auto bass chord“ (auto bass akkoord) functie in te schakelen. In
deze modus zijn de toetsen onder het splitpunt (Split point) bekend als het Akkoord gebied (Chord area).
7. Bediening
19
Andere Instrumente (Other voices) Schlagzeug (Drum Set)
164 Ufoorg 211 Fretlekb 258 Bassokb 301 Standard Drum 1
165 Q-Org 212 Slapbs 259 swetbras 302 Standard Drum 2
166 elorg 213 SlpbsKb 260 softsax 303 Room Drum
167 elorg 214 Synthbs 261 Whistle 304 Rock Drum
168 elorg 215 Synbass 262 Panfl ut 305 Electric Drum
169 sloorg 216 Synbass 263 Lead 306 Analog Drumset
170 ringo 217 Synthb 264 Lead 307 Dance Drumset
171 autolux 218 SynbsKb 265 Lead 308 Jazz Drum
172 elecorg 219 Acidbass 266 Lead 309 Brush Drumset
173 Accodin 220 acostbs 267 Warplead 310 Standard Drumset
174 Softacc 221 picked 268 Warp-
175 Accowaa 222 slapbs 269 Pianstld
176 Softacc 223 synthbs 270 childtoy
177 Harmonic 224 fgepbas 271 ahold
178 Harmharp 225 Vln-Hard 272 fmlead
179 slowacc 226 Viola-Kb 273 tunnel
180 accodin 227 Violastr 274 tunnel
181 softacc 228 Cello 275 fmlead
182 mutharmp 229 Slocello 276 fmlead
183 bigharm 230 Cello 277 fmlead
184 accomut 231 Contrakb 278 roomlead
185 harm 232 Contrakq 279 Sinepad
186 N-Gthamm 233 Stringf 280 Softpad
187 Pickgt 234 Strgszz 281 Bellpad
188 Strgt 235 Stringf 282 Synpad
189 Stel-gt 236 Strings 283 Hornpad
190 Cleagtkb 237 Slwstrzz 284 Newagpad
191 Pickcgt 238 Synthst 285 Bagpipe
192 Bcln-Gt 239 SystrZz 286 Distorld
193 Cln-Gt 240 vlnhard 287 Systrel
194 Solid-Gt 241 violakb 288 Dist-
195 Solidwa 242 cello 289 Chorusld
196 Chorusgt 243 contra 290 Halon
197 Q-Gt 244 strrue 291 Dream
198 Mut-Gt 245 dreamstr 292 Dream
199 Overgtkb 246 pizstr 293 Waspysyn
200 Tremolgt 247 strpiz 294 Orgpd
201 Funk-Gt 248 Swet_Trp 295 Trompad
202 cleagt 249 Trombone 296 Softacpd
203 cleagt 250 Trombon 297 theology
204 rvcleagt 251 Tuba 298 calm
205 overgt 252 Tubabl 299 padorg
206 Acostbs 253 Fmhorn 300 palbel
207 Abascym 254 Bbbrass
208 Fg-Bs-Kb 255 Hibrass
209 Fusionbs 256 Tenosax
210 Pickedkb 257 Bari-Kb
Anhänge

20
Anhang II: Styles-Liste
8 BEAT ROCK
01 Sweet Beat 41 Soft Rock 81 Jazz Funk 121 Disco Samba
02 Miami Beat 42 Hard Rock 82 Groove 122 Mambo
03 Rhythm & Beat 43 Heavy Rock 83 Soul 123 Meneito
04 Guitar Pop 1 44 Easy Rock 84 Hip Hop Soul 124 Rumba 2
05 8 Beat Dance 45 New Shuffl e 85 Hip Hop Beat 125 Tikitikita'
06 8 Beat Disco 46 Rock Hip Hop 86 R & B 126 Dancing Tribe
07 Pop Funk 47 Rock & Roll 87 Soul Beat 127 Lambada
08 8 Beat 1 48 Rock Shuffl e 88 R & B Ballad 128 Pop Cha Cha
09 60's 8 Beat 49 70's Rock & Roll 89 British Soul Pop 129 Cha Cha Cha
10 8 Beat 2 50 Folk Rock 90 Samba Funk 130 Salsa
16 BEAT BALLROOM JAZZ WORLD
11 16 Beat Ballad 51 Rhumba 1 91 Jazz Fusion 131 Scottish
12 Pop 16 Beat 1 52 Slow Waltz 1 92 Fusion 132 Laendler
13 Pop 16 Beat 2 53 Fox Trot 93 Jazz Brush 133 Hawaiian
14 Modern 16 Beat 54 Samba 94 Latin Jazz 134 Sirtake
15 16 Beat Hot 55 Cha Cha 95 Acid Jazz 1 135 Venezia
16 16 Beat Modern 56 Quick Step 96 Acid Jazz 2 136 6/8 Flipper
17 16 Beat Bossa Nova 57 Twist 97 Cool Jazz Ballad 137 New Age
18 16 Beat Funk 58 Swing Fox 98 Swing Shuffl e 138 Tarantella
19 16 Beat 59 Jive 99 Big Band 40's 139 Enka
20 Cool Beat 60 Beguine 100 Big Band Medium 140 Norteno
POP DANCE COUNTRY TRADITIONAL
21 Analog Night 61 Garage 101 Country 8 Beat 141 Polka
22 Guitar Pop 2 62 Techno 102 Modern Country 142 German Polka
23 Pop beat 63 Progressive 103 Country Ballad 2 143 Party Polka
24 Soft Beat 64 Rap 1 104 Country Pop 144 March
25 60's Pop 65 Rap 2 105 2/4 Country 145 6/8 March
26 Sting Latin 66 Disco 106 Country 146 US March
27 Brit Pop 1 67 Soft Disco 107 Country Quick Steps 147 Musette
28 Brit Pop 2 68 Disco Party 108 Bluegrass 148 French Musette
29 Pop Hit 69 70's Disco 109 Country Flok 149 Mazurke
30 Fusion Shuffl e 70 70's Disco Funk 110 Country Rock 150 Waltz
BALLAD 71 Club Dance LATIN/LATIN DANCE INDONESIA
31 Rock Ballad 1 72 Euro Dance 111 Bossa Nova 151 Dandut1
32 Folk Ballad 73 80's Dance 112 Habanera 152 Dandut2
33 Pop Ballad 1 74 Hip Hop 113 Latin 153 Dangdu
34 Pop Ballad 2 75 Down Beat 114 New Reggae 154 Dangdut1
35 EP Ballad SOUL & FUNK 115 Dance Reggae 155 Dangdut2
36 Piano Ballad 76 Funk 116 Pasodoble 156 Dangdut3
37 New R&B Ballad 77 Electric Funk 117 Lite Bossa 157 Keroncong1
38 Natural Ballad 78 Groove Funk 118 Latin Rock 158 Keroncong2
39 Love Ballad 79 Rubber Funk 119 Beguine 159 PopKeroncong
40 Easy Ballad 80 Cool Funky 120 Slow Bolero 160 Slow Dangdut
Anhänge
73
e. Pitch Bend/Verbuiging van de toonhoogte
Het pitch bend wieltje kan gebruikt worden om de toonhoogte tussen +/- 2 cent te verhogen of te verlagen.
Draai het wieltje omhoog of omlaag om de toonhoogte te verbuigen terwijl u het keyboard bespeelt.1.
Wanneer het wieltje losgelaten wordt, zal de noot weer normaal klinken.2.
f. Modulatie
Druk op de [MODULATION] toets en houd deze ingedrukt terwijl u het keyboard bespeelt.1.
Laat de toets los om het modulatie effect uit te schakelen.2.
g. Touch/Toetsgevoeligheid
Deze functie laat u toe om de dynamiek van uw noten te regelen via de veranderingen in druk die uitgeoefend wordt op de
klaviertoetsen. Als de Touch functie uitgeschakeld is, zal er geen toetsrespons zijn.
Druk op de [TOUCH] ([TOETS]) toets om heen en weer te schakelen tussen level 0 en level 3 van het toetseffect.
h. Transponeren
U kunt de sleutel van uw muziek veranderen via de TRANSPOSE functie, door de toon te verhogen of te verlagen in semitoon
(halve toon) eenheden.
Druk op de [TRANSPOSE +] of [TRANSPOSE -] toets om de transponeerwaarde te veranderen tussen -12 tot +12 1.
semitonen. Het LCD paneel zal de huidige transponeerwaarde weergeven.
Druk tegelijk op de [TRANSPOSE +] en [TRANSPOSE -] toetsen om de waarde direct terug te zetten naar de 2.
standaardwaarde van 00.
i. Octaafverschuiving
Deze functie kan de sleutel 1 octaaf omhoog of omlaag verschuiven.
Druk op de [OCTAVE +] of [OCTAVE -] toets om de octaafwaarde tussen -1 en 1 te veranderen. Het LCD paneel zal de 1.
huidige octaafwaarde weergeven.
Druk tegelijk op de [OCTAVE +] en [OCTAVE -] toetsen om de waarde direct terug te zetten naar de standaardwaarde 2.
van 00.
D) Stijlregeling
Het keyboard heeft in totaal 310 vooraf ingestelde stijlen. (Zie Appendix II)
a. Stijl (Automatische begeleiding)
Om een stijl te selecteren
Druk op de [STYLE] toets om het keyboard in “stijl modus” te zetten. Het “STYLE” icoon wordt weergegeven. 1.
Druk op [+/YES] / [-/NO] ([+/JA] / [-/NEE]) van het numerieke toetsenbord om de gewenste stijl te selecteren die u wenst.2.
Om een stijl af te spelen
U kunt een stijl op verschillende manieren laten afspelen.
Zonder effecten 1.
Gebruik de [START/STOP] toets om de stijl te beginnen spelen. -
Synchroon met uw melodie 2.
Druk op de [SYNC] toets. Dit zorgt ervoor dat de klaviertoets synchroon met de stijl begint. -
De stijl zal beginnen wanneer u de melodie begint te spelen (door op een klaviertoets te drukken). -
Synchroon met het Auto Bass Akkoord 3.
Druk op de [A.B.C] toets om de “auto bass akkoord” modus in te schakelen. -
Druk op de [SYNC] toets. Dit zorgt ervoor dat de auto bass akkoorden tegelijkertijd beginnen met de stijl. -
De stijl zal beginnen wanneer u een noot of een akkoord begint te spelen in het akkoordgebied (zie de Auto Bass -
Akkoord sectie)
Met een intro 4.
Druk op de [INTRO/ENDING] toets om een intropatroon toe te voegen voordat u op de [START/STOP] toets drukt om -
de stijl af te spelen. (Zie de Intro/Slotpatroon paragraaf)
7. Bediening

72
Nadat het stuurprogramma is geïnstalleerd en opgestart, kunt u bij toestellen met een USB kabel de USB Audio Apparaat 2.
optie kiezen in het menu van de software om zo MIDI gegevens te verzenden.)
MIDI Functie
Dit keyboard ondersteunt MIDI) (Musical Instrument Digital Interface) MIDI is de wereldstandaard voor het verzenden en
ontvangen van muziekdata tussen elektronische muziekinstrumenten of computers (Zie Appendix VII voor de MIDI lijst).
Met een USB kabel kan MIDI-data verzonden worden naar een computer of andere USB gastapparaten die USB audio
apparaten ondersteunen.
7. Bediening
A) Spanningstoets & Volume
Schakel de [POWER] toets aan. Het LCD panel licht op.1.
Draai de [VOLUME] schakelaar om het volume aan te passen2.
B) Demonstratietoets
Druk op de [DEMO] toets om de demonstratiemelodieën te spelen. Er zijn in totaal 5 demonstratiemelodieën. (Zie Appendix 1.
IV voor een liedjeslijst)
U kunt een demonstratiemelodie kiezen via de [+/YES] / [-/NO] ([+/JA] / [-/NEE]) of de numerieke toetsen.2.
Druk op de [DEMO] of [START/STOP] toets om de demonstratiemodus te verlaten.3.
C) Voices en Effecten
Er zijn in totaal 310 voices (Zie Appendix I).
a. Instrumentvoice
Druk op de [VOICE] toets om de voice modus in te schakelen.1.
Druk op [+/YES] / [-/NO] ([+/JA] / [-/NEE]) van het numerieke toetsenbord om de stem te selecteren die u wenst. 2.
b. Dual voice
Met de dual voice functie kunt u de voices van twee muziekinstrumenten tegelijk spelen. Wanneer de dual functie uitgeschakeld
is, is de getoonde voice “VOICE 1”, en wanneer de dual functie ingeschakeld is, is de getoonde voice “VOICE 2”.
Wanneer het toestel zich in de “VOICE 1” stand bevindt, dient u op de [DUAL] toets te drukken om de dual voice functie 1.
te activeren. Het “VOICE 2” and “DUAL” signaal zal worden getoond op het LCD paneel. Het dual voice nummer zal ook
getoond worden. De twee geselecteerde voices zullen overlappen.
Om uw gewenste tweede stem te selecteren, druk op [+/YES] / [-/NO] ([+/JA] / [-/NEE]) van het numerieke toetsenbord 2.
om de stem te selecteren die u wenst.
Druk opnieuw op de [DUAL] toets om de dual voice functie uit te schakelen.3.
c. Aanhouden (Sustain)
Deze functie zorgt ervoor dat de geluiden langer doorklinken.
1. Druk op de [SUSTAIN] toets om het aangehouden effect te activeren. Het “SUSTAIN” icoon zal worden getoond.
2. Druk op de [SUSTAIN] toets om het aangehouden effect uit te schakelen. Het “SUSTAIN” icoon zal verdwijnen.
d. Split / Lagere stem
Deze functie verdeelt het keyboard in een links (lager) en rechts gebied.
In deze modus worden de toetsen links van het splitpunt gebruikt om de melodieën gespeeld door het rechtse gebied te
begeleiden. Het splitpunt tussen de twee gebieden is de #F3 noot.
Voice L Voice R1/R2
Split Point (#F3)
6. Aansluitingen
21
Anghang III: Songliste
CLASSICAL GOLDEN & POP 82 Wine
01 Aida 42 On London Bridge 83 Jazz Old Man
02 Annen Polka 43 Are You Lonesome Tonight 84 Dark Eyes
03 Auf Flugeln Dec Gesanges 44 Only You 85 Carlos
04 Brahms Waltz 45 End Of The World 86 Sad
05 Carmen-Entracte II 46 House Of Rising Sun 87 The Jazz
06 Carmen-Prelude 47 Solveig's Song ORIENTAL
07 L'Arlesienne 48 The Blue-Bells Of Scotland 88 South Mud Bay
08 La Traviata 49 Over The Rainbow 89 Give You A Rose
09 Mazurka 50 Beautiful Dreamer 90 Flowing Rill
10 Menuett 51 It`S Been A Long Long Time PIANO
11 Musical Moments 52 Edelweiss 91 Alise
12 Pizzicato Polka 53 O Sole Mio 92 Military March
13 Rigoletto 54 Der Deitcher`S Dog 93 Habanera
14 Serenade 55 You Are My Sunshine 94 Minuet
15 Song Without Words 56 Silent Night 95 Bagatelle No.3
16 Swan 57 Ave Maria 96 Old Macdonald Had A Farm
17 Prelude To Act 2 (Swan Lake) 58 Five Hundred Miles 97 Wedding March
18 Le Lac des Cygnes Acte I 59 Happy New Year 98 2-Part Invention #13 In A Minor.B.W.
19 The Happy Farmer 60 It`S Beginning To Look A Lot Like
Christmas 99 Minuet In G
20 The Sleeping Beauty 61 Jeanie With The Light Brown Hair 100 Turkish March
21 Uungarische Tanz 62 My Bonnie 101 Hey Diddle Diddle
22 Wiegenlied 63 Song Of The Pearlfi sher 102 March
23 Mov.2 Adagio Non Troppo
Piano Sonata No.9 In D 64 Summer Palace 103 Moseta Dance
24 Mov.1 Andante Grazioso Piano
Sonata No.11 In A 65 The Stage Coach 104 Bulie Dance
25 Prelude In C 66 Entertainer 105 Aria
26 Chinese Dance 67 Annie Laurie 106 Germanic Dance
27 Emperors Waltz 68 Killing Me Softly With His Song 107 Away In A Manger
28 March Militaire 69 Love Is Blue 108 Jack & Jill
29 Symphony No.40 70 Last Rose Of Summer 109 Angles We Have Heard On High
30 Pianosonatan 08 IN Cm IN
Pathetique 71 The Old King Cole 110 Humpty Dumpty
31 Arpeggione Sonata in Am JAZZ & FUSION 111 Did You Ever See A Lassie
FOLK & COUNTRY 72 Chrysanf 112 Chopsticks
32 Santa Lucia 73 Maple Leaf Rag 113 Four Little Swans
33 Country 74 June Samba 114 Old France
34 Jambalaya 75 Funk 115 "Jesus, Saviour Pilot Me"
35 Susanna 76 I Can...... 116 Eclogue
36 Bridge 77 Sea Shore 117 Santa Claus Is Coming To Town
37 Battle Hymne Of The Republic 78 Guitar&Saxphone 118 Brave Cavalier
38 The Old Gray Mare 79 The Hip Hop`S Night 119 America The Beautiful
39 American Patrol 80 Blue Lunch 120 Music Box Dancer
40 In The Rain 81 Cobweb
41 Sippin Cider Through A Straw
Anhänge

22
Anhänge
Anghang IV: Demo-Liste
Name
01 Funk
02 American Patrol
03 Guitar&Saxphone
04 I Can......
05 Alise
Anghang V: Akkordverzeichnis
Akkord-Grundton: Akkordtyp:
Hinweis Akkord-
Grundton
Hinweis Akkordtyp
C6 C F6# F#/Gb
C6# C#/Db G6 G
D6 D A6b Ab/G#
E6b Eb/D# A6 A
E6 E B6b Bb/A#
F6 F B6 B
Hinweis Akkord-
Grundton
Hinweis Akkordtyp
C4 M C5 7(b9)
C4# M(9) C5# 7(9)
D4 6 D5 7(#9)
E4b mM7 E5b 7(b13)
E4 M7 E5 7(13)
F4 m F5 7(#11)
F4# m(9) F5# dim7
G4 m6 G5 dim
Ab4 m7(9) A5b 7aug
A4 m7 A5 aug
B4b m7b5 B5b 7sus4
B4 7 B5 sus4
Anghang VI: Akkordtabelle
Tabelle der einfachen Akkorde Tabelle der Standardakkorde
Spielen eines Dur-Akkords
Drücken Sie den Grundton des Akkords.
Spielen eines Moll-Akkords
Drücken Sie den Grundton gemeinsam mit der nächsten
schwarzen Taste links von vom Grundton.
Spielen eines siebten Akkords
Drücken Sie den Grundton gemeinsam mit der nächsten weißen
Taste links vom Grundton.
Spielen eines siebten Moll-Akkords
Drücken Sie den Grundton gemeinsam mit den nächsten
weißen und schwarzen Tasten links vom Grundton (drei Tasten
gleichzeitig).
Noten in Klammern sind optional;
die Akkorde werden auch ohne diese erkannt.
71
B) Muziekbladstandaard
Plaats de muziekbladstandaard zoals hieronder getoond.
6. Aansluitingen
A) Hoofdtelefoonaansluiting
Wanneer u een hoofdtelefoon (6.3mm stereo) aansluit op de PHONES aansluiting, zullen de luidsprekers automatisch
uitgeschakeld worden.
Vermijd het luisteren met de koptelefoons op hoog volume gedurende lange periodes; dit doen kan niet • enkel leiden tot oorvermoeidheid, het kan ook uw gehoor beschadigen.
Om schade te vermijden aan de luidsprekers stelt u het volume van de externe toestellen in op de • minimuminstelling alvorens ze aan te sluiten. Het niet naleven van deze waarschuwingen kan leiden
tot elektrische schokken of schade aan de apparatuur.
Stel de volumes van alle toestellen in op hun minimumpeil en verhoog geleidelijk bij het spelen met het • instrument om het gewenste luisterpeil in te stellen.
B) AUX. OUT uitgangsaansluiting
De AUX. OUT uitgangsaansluiting verzendt het uitgangssignaal van het keyboard naar een externe versterker.
Gebruik een 6.3mm stereo stekker om aan te sluiten op de AUX. OUT uitgangsaansluiting die zich op het achterpaneel
bevindt, en verbindt het andere eind van het snoer met de LINE IN of AUX. IN van de versterker.
C) Voetschakelaar
Een optionele voetschakelaar of aanhoudpedaal kan worden aangesloten op de voetschakelaaraansluiting om het aanhouden
te controleren.
De voetschakelaar voert dezelfde functie uit als het demppedaal van een piano. Druk hem in om het geluid aan te houden en
laat hem los voor normaal geluid.
D) Volumepedaal
Een optionele volumeregelaar kan op de VOLUME aansluiting worden aangesloten om het volume van het geluid aan te
passen.
E) USB aansluiting
Om schade te voorkomen, dient u het keyboard en andere verbonden apparaten uit te schakelen voordat • u het instrument aansluit op of loskoppelt van andere verbonden apparaten. Schakel de computer aan
vanuit de slaap/sluimer/standby-stand voordat u de USB kabel erop aansluit.
Wees voorzichtig wanneer u het instrument aansluit op een computer met een USB kabel. Indien u dat • niet doet, kan het instrument en/of de computer vastlopen, wat corruptie of dataverlies kan veroorzaken.
Als het instrument of de computer vastloopt, dient u de stroom van beide apparaten uit te schakelen en
na een paar seconden terug aan te schakelen.
De USB aansluiting verbindt het keyboard met een PC of andere USB gastapparaten die USB audio ondersteunen.
Sluit een standaard USB kabel aan vanuit het achterpaneel van de USB aansluiting van het instrument op de USB 1.
aansluiting op uw computer (USB kabel niet inbegrepen).
5. Installatie

70
A) Stroomvoorziening
Dit elektronisch keyboard mag enkel gevoed worden door batterijen of het standaard lichtnet.
Bij gebruik van batterijen
Respecteer de correcte polariteit terwijl u de batterijen invoert. Verwijder de batterijen indien het toestel
niet gebruikt wordt gedurende een lange periode om schade te vermijden door het lekken. Lekkende of
beschadigde batterijen kunnen brandwonden door zuur veroorzaken bij contact met de huid, gebruik
daarom passende beschermende handschoenen om de slechte batterijen te behandelen.
Houd batterijen buiten het bereik van kinderen. Laat de batterij niet rondslingeren, omdat er een risico
bestaat dat kinderen of huisdieren ze kunnen inslikken.
Vervang alle batterijen tegelijkertijd. Oude en nieuwe batterijen mengen in het toestel kan leiden tot
lekkende batterijen en schade aan het toestel.
Zorg ervoor dat batterijen niet ontmanteld worden, een kortsluiting veroorzaken of in het vuur gegooid
worden. Nooit niet-herlaadbare batterijen herladen. Er bestaat een risico op explosie!
Let er altijd op het keyboard uit te schakelen voordat u er nieuwe batterijen in plaatst of oude batterijen vervangt.
1. Verwijder het deksel van het batterijvak aan de onderkant van het keyboard.
2. Leg 6 batterijen maat D (SUM-1, R-20) in het batterijvak. Let op de juiste polariteit (positief,
“+” en negatief “-”); u vindt deze gedrukt naast het batterijvak.
3. Sluit het deksel en zorg ervoor dat het goed vastklikt.
Indicatie lage batterijspanning
Eén van de volgende syptomen kan op een lage batterijspanning duiden. Vervang de batterijen zo spoedig mogelijk wanneer
één van deze symptomen optreedt.
Het LCD scherm is donker en moeilijk af te lezen•
Abnormaal laag luidspreker-/hoofdtelefoonvolume•
Vervorming van het geluid•
Plotseling uitvallen van de stroom tijdens weergave bij een hoog volume•
Demonstratiemelodieën worden afgespeeld met een abnormaal ritmepatroon•
Het scherm wordt donker tijdens weergave bij een hoog volume•
Gebruik van een optionele stroomadapter
Sluit het keyboard nooit aan op een stroomadapter onmiddellijk nadat het van een koude omgeving
naar een warme omgeving is gebracht. Condensatiewater kan storing of schade aan het keyboard
veroorzaken, alsook het risico op elektrische schokken. Gebruik enkel de voorgeschreven AC adapter.
Bij gebruik van andere soorten adapters bestaat er gevaar op brand en elektrische schokken. Zorg er uit
veiligheidsoverwegingen voor dat u de AC adapter uit het stopcontact haalt wanneer u het elektronisch
keyboard gedurende lange tijd niet gebruikt.
Zorg ervoor dat enkel de voorgeschreven AC adapter voor dit elektronisch keyboard wordt gebruikt. De adapter is een
center positief type dat voor een 12V DC output zorgt. Let erop dat het keyboard uitgeschakeld is alvorens de adapter in het
stopcontact te steken en het snoer aan te sluiten op het instrument. Eens het keyboard aangesloten is op het lichtnet, zal deze
gevoed worden door de adapter en zal de batterijspanning onderbroken worden.
De netspanningsadapter moet voldoen aan de volgende technische voorschriften:
Ingang: 230V/AC, 50 Hz
Uitgang: 12V/DC, 2.0A
Polariteit:
Buitendiameter van de connector: Ø 5.5 mm
Binnendiameter van de connector: Ø 2.1 mm
5. Installatie
23
Anhänge
Anghang VII: Chord List
Akkordbezeichnung / [Abkürzung] Normales Voicing Chord (C) Display
Dur [M] 1-3-5 C C
Sechster [6] 1-(3)-5-6 C6 C6
Dur siebter [M7] 1-3-(5)-7 CM7 CM7
Siebter Dur-Akkord plus elftes
Erhöhungszeichen [M7(#11)]
1-(2)-3-#4-5-7
or 1-2-3-#4-(5)-7
CM7(#11) CM7(#11)
Dur plus neunter [M] 1-2-3-5 C M(9) C M(9)
Haupt siebter neunter [M7(9)] 1-2-3-(5)-7 C M7(9) C M7(9)
Haupt siebter neunter [M7(9)] 1-2-3-(5)-6 C 6(9) C 6(9)
Vergrößert [aug] 1-3-#5 C aug C aug
Moll [m] 1-b3-5 Cm Cm
Dur sechster [m6] 1-b3-5-6 Cm6 Cm6
Moll siebter [m7] 1-b3-(5)-b7 Cm7 Cm7
Moll siebter fl acher fünfter [m7b5] 1-b3-b5-b7 Cm7b5 Cm7b5
Moll plus neunter [m(9)] 1-2-b3-5 Cm(9) Cm(9)
Moll siebter neunter [m7(9)] 1-2-b3-(5)-b7 Cm7(9) Cm7(9)
Moll siebter und elfter [m7(11)] 1-2-b3-4-5-(b7) Cm7(11) Cm7(11)
Moll Dur siebter [mM7] 1-b3-(5)-7 CmM7 CmM7
Moll Dur siebster neunter [mM7(9)] 1-2-b3-(5)-7 CmM7(9) CmM7(9)
Diminuiert [dim] 1-b3-b5 Cdim Cdim
Diminuierter siebter [dim7] 1-b3-b5-6 Cdim7 Cdim7
Siebter [7] 1-3-(5)-b7 C7 C7
Siebter, pausierender vierter [7sus4] 1-4-5-b7 C7sus4 C7sus4
Siebter fl acher fünfter [7b5] 1-3-b5-b7 C7b5 C7b5
Siebter neunter [7(9)] 1-2-3-(5)-b7 C 7(9) C 7(9)
Siebter plus elftes Erhöhungszeichen
[7(#11)]
1-(2)-3-#4-5-b7 or
1-2-3-#4-(5)-b7
C 7(#11) C 7(#11)
Siebter plus dreizehnter [7 (13)] 1-3-(5)-6-b7 C7(13) C7(13)
Siebter fl acher Neunter [7(b9)] 1-b2-3-(5)-b7 C7(b9) C7(b9)
Siebter plus dreizehntes Erhöhungszeichen
[7(b13 )]
1-3-5-b6-b7 C7(b13) C7(b13)
Siebter neuntes Erhöhungszeichen [7(#9)] (1)-#2-3-(5)-b7 C7(#9) C7(#9)
Dur siebter vergrößert [M7aug] 1-3-#5-7 CM7aug CM7aug
Siebter vergrößert [7aug] (1)-3-#5-b7 C7aug C7aug
Pausierender vierter [sus4] 1-4-5 Csus4 Csus4
Eins + zwei + fünf [1+2+5] 1-2-5 C 1+2+5 C

24
Anhänge
Anhang VIII: MIDI-Liste
Funktion Übertragen Erkannt Bemerkungen
Einfach
Kanal
Voreingestellt
Geändert
1ch
1ch
1-16ch
1-16ch
Modus
Voreingestellt
Nachrichten
Geändert
X
X
***********
3
X
X
Note
Nummer Echtes Voice
0-127
***********
0...127
0...127
Tempo: Note ein
Note aus
O 9nH,V=1-127
X (9nH,V=0)
O 9nH,V=1-127
X (9nH,V=0; 8nH,V=0-127
Nach
Kontakt
Tasten
Chs
X
X
X
X
Gleitende Tonhöhenverschiebung O O
Kontrolle
Change
0
1
5
6
7
1 0
11
64
65
66
67
80
81
91
93
120
121
123
O
O
X
O
O
X
X
O
X
X
X
X
X
X
X
X
X
X
O
O
O
O
O
O
O
O
O
O
O
O
O
O
O
O
O
O
Bemerkungen
Modulation
Portamento Zeit
Dateneingabe
Lautstärke
Schwenk
Ausdruck
Sustain-Pedale
Portamento ON/OFF
Sostenuto-Pedale
Soft-Pedale
Hall-Programm
Refrain-Programm
Hallniveau
Refrain-Niveau
Alle Töne aus
Alle Steuerungen zurücksetzen
Alle Noten aus
Programm-
änderung :
true # O
***********
O
0...12 7
Exklusives System X O
System:
Normal:
Song-Position
Song auswählen
Melodie
X
X
X
X
X
X
System :
Echtzeit :
Uhr
Kommandos
X
X *1
X
X *1
Aux :
:
Nachrichten :
:
Lokal Ein/Aus
Alle Noten Aus
Aktive Wahrnehmung
Zurücksetzen
X
X
X
X
X
O
O
O
Note: *1
Wenn die Begleitung gestartet wird, wird eine FAH-Nachricht übertragen.
Wenn die Begleitung gestoppt wird, wird eine FCH-Nachricht übertragen.
Wird eine FAH-Nachricht empfangen, wird die Begleitung gestartet.
Wird eine FCH-Nachricht empfangen, wird die Begleitung gestoppt.
Modus 1: OMNI ON , POLY
Modus 3: OMNI OFF , POLY
Modus 2 : OMNI ON , MONO
Modus 4 : OMNI OFF , MONO
O: Ja
X: Nein
69
A) Frontpaneel B) Achterpaneel
1. SCHAKEL AAN/UIT (POWER ON/OFF) 35. USB (USB)
2. VOLUME (VOLUME) 36. VOETSCHAKELAAR (SUSTAIN PEDAL)
3. MIXER (MIXER) 37. VOLUMEPEDAAL (VOLUME PEDAL)
RITME (RHYTHM) - 38. AUX UITGANG (AUX OUT)
BAS (BASS) - 39. HOOFDTELEFOON (PHONES)
BEGELEIDING (ACCOMP) - 40. DC 12 V
LAGER (LOWER) -
HOGER (UPPER) - C) LCD PANEEL
4. TEMPO (TEMPO) 41. FADE (FADE)
5. FADE (FADE) 42. DUAL (DUAL)
6. ABC (ABC) 43. VOEDING (POWER)
7. FUNCTIE (FUNCTION) 44. ABC (ABC)
8. DEMONSTRATIE (DEMO) 45. AKKOORD (CHORD)
9. LES (LESSON) 46. STEMMENS/STIJL/LIED/ALBUM
(VOICES/STYLE/SONG/ALBUM)
10. LINKS (LEFT) 47. TEMPO (TEMPO)
11. RECHTS/AKKOORDENWOORDENBOEK
(RIGHT/CHORD DICTIONARY) 48. MAAT (MEASURE)
12. OPNEMEN (RECORD) 49. RITME (BEAT)
13. SPELEN / STOP (PLAY/STOP) 50. GEHEUGEN (MEMORY)
14. LCD PANEEL (LCD DISPLAY) 51. DSP (DSP)
15. STEM (VOICE) 52. TOETS (TOUCH)
16. STIJL (STYLE) 53. AANHOUDEN (SUSTAIN)
17. LIED (SONG) 54. AKKOORDENWOORDENBOEK
(CHORD DICTIONARY)
18. METRONOOM (METRONOME) 55. OPNEMEN (RECORD)
19. PIANO (PIANO) 56. RECHTS (RIGHT)
20. NUMERIEK TOETSENBORD (NUMERIC KEYPAD) 57. SOLSLEUTEL (TREBLE CLEF)
21. DSP (DSP) 58. LINKS (LEFT)
22. OCTAAF (OCTAVE) 59. UITVOEREN (PERFORM)
23. AANHOUDEN (SUSTAIN) 60. VOLGEN (FOLLOW)
24. TOETS (TOUCH) 61. BASSLEUTEL (BASS CLEF)
25. TRANSPONEREN (TRANSPOSE) 62. RITME (BEAT)
26. LAGER (LOWER)
27. GEHEUGENBANK (MEMORY BANK)
28. DUAL (DUAL)
29. OPSLAAN (STORE)
30. PANEELGEHEUGEN (PANEL MEMORY)
M1-M6 -
31. EEN TOETS INSTELLING (OTS)
32. BEGELEIDINGSCONTROLE
(ACCOMPANIMENT CONTROL)
START/STOP (START/STOP) - SYNC (SYNC) - INTRO/SLOT (INTROD/ENDING) - VUL-IN A (FILL-IN A) - VUL-IN B (FILL-IN B) -
33. MODULATIE (MODULATION)
34. TOONHOOGTEVERBUIGING (PITCH BEND)
4. Bedieningselementen

68
Door het bespelen van de toetsen van dit product kunt u geluiden genereren. De geluiden worden versterkt door ingebouwde
luidsprekers. Het keyboard kan aangesloten worden op een hoofdtelefoon of een externe versterker. Het keyboard is
gemakkelijk te gebruiken en heeft geavanceerde functies ter beschikking die speciaal ontworpen zijn voor autodidacten en
beginners. Gebruikers kunnen liedjes op 3 verschillende manieren leren spelen. Het LCD paneel maakt het gemakkelijker
voor gebruikers om te leren spelen.
Bediening van het instrument is enkel toegelaten in droge ruimtes binnenshuis.
U kunt het keyboard gebruiken met 6 batterijen maat D of een geschikte, gestabiliseerde adapter die u op het keyboard kan
aansluiten (DC12V/2A, center-positief type).
Het eigenhandig ombouwen en/of veranderen van het product is niet toegestaan om veiligheids- en keuringsredenen (CE).
Een andere toepassing dan hierboven beschreven, is niet toegestaan en kan leiden tot beschadiging van het product.
Daarnaast bestaat het risico van bijv. kortsluiting, brand, elektrische schokken, enz. Lees de gebruiksaanwijzing grondig door
en bewaar deze voor raadpleging in de toekomst.
2. Leveringsomvang
Keyboard•
Muziekbladstandaard•
Handleiding van de fabrikant•
Gebruiksaanwijzingen•
3. Veiligheidsinstructies
Schade die voortvloeit uit het niet naleven van dit handbook leidt tot het vervallen van de garantie! We
nemen geen verantwoordelijkheid op ons voor daaruit voortvloeiende schade of eigendomsschade of
lichamelijke letsels bij ongepast gebruik of het negeren van de veiligheidsinstructies!
Belangrijke opmerkingen, die strikt gevolgd moeten worden, zijn gekenmerkt door een uitroepteken.
Bij het aansluiten van het keyboard op andere toestellen, volgt u de veiligheidsinstructies van deze toestellen.•
Het keyboard mag niet blootgesteld worden aan extreme temperaturen, rechtstreeks zonlicht, intense trillingen of vocht.•
Indien het apparaat gebruikt wordt in een commerciële context moeten de veiligheidsregels van toepassing op elektrische •
apparatuur en de betreffende bedieningsbronnen zoals bepaald door de aansprakelijkheidsverzekering van de werkgevers,
nageleefd worden.
In scholen, opleidingscentra, in workshops voor hobby en doe het zelf moet de werking van elektrische toestellen goed •
nagezien worden door opgeleid personeel.
Voor voldoende ventilatie moet een afstand van ongeveer 5cm behouden worden tussen het toestel en andere •
voorwerpen.
Onbedekte vlambronnen of containers met vloeistoffen mogen niet op of in de buurt van het toestel geplaatst worden.•
Verpakkingsmateriaal, zoals plasticfolie of zakken, polystyreen schuimonderdelen enz.kunnen gevaarlijk speelgoed •
worden voor kinderen. Laat het nooit zorgeloos rondslingeren.
Het keyboard moet geplaatst worden op een effen en stevig oppervlak.•
De isolatie van het volledige product mag niet beschadigd of vernietigd zijn. Open nooit de behuizing van het keyboard.•
Er mag geen voorwerp in de luchtventilatie geplaatst worden. Er is risico op een dodelijke elektrische schok of vernietiging •
van het toestel.
Onderhoud, aanpassing en herstelling kan enkel gebeuren door een bekwaam persoon of een atelier.•
Indien u verdere vragen hebt die niet beantwoord werden in dit handboek, raadpleeg dan uw technische klantendienst of •
andere bekwame personen.
1. Voorgeschreven gebruik
25
Table of contents
Introduction 26
1. Intended Use 27
2. Delivery Content 27
3. Safety Instructions 27
4. Operating Elements 28
A) Front Panel 28
B) Rear Panel 28
C) LCD display 28
5. Setup 29
A) Power supply 29
B) Music Stand 30
6. Connections 30
A) Headphone Jack 30
B) AUX. OUT Jack 30
C) Sustain Pedal 30
D) Volume Pedal 30
E) USB Jack 30
7. Operation 31
A) Power Switch & Volume 31
B) Demo 31
C) Voices and Effects 31
D) Style Control 32
E) Function Menu 33
F) Mixer 34
G) DSP (Digital Signal Processing) 34
H) Metronome 34
I) Piano 34
J) Memory 34
K) One Touch Setting (O.T.S) 34
L) Recording 35
M) Songs 35
N) Lesson 35
O) Chord Dictionary 36
8. Maintenance and cleaning 36
9. Disposal 37
10. Technical Data 37
Appendix 38
Appendix I: Voice list 38
Appendix II: Style list 40
Appendix III: Songs list 41
Appendix IV: Demo List 42
Appendix V: Chord Dictionary 42
Appendix VI: Chord Table 42
Appendix VII: Chord list 43
Appendix VIII: MIDI list 44
These operating instructions pertain with this product. It contains important information on the operating and
handling of the product. Please bear this in mind, even if you pass it on to third party.
Please keep these operating instructions for future reference!

26
Introduction
Dear Customer,
Thank you for purchasing this product.
This product fulfi ls European and national requirements related to electromagnetic compatibility (EMC). CE
conformity has been verifi ed and the relevant statements and documents have been deposited at the manufacturer.
We kindly request the user to adhere to the operating instructions to preserve the aforementioned condition and to ensure
safe operation!
Please read the operating instructions thoroughly before using the product!
All company and product names mentioned in this document are trademarks of their respective owners. All rights reserved.
For a fast response of you technical enquiries please use the email address listed below:
Germany: Tel. +49 1805 31 21 11
Fax +49 9604 40 88 48
E-mail: Please use our contact form in the Internet: www.conrad.de in the category “Contact”
Mon to Thurs 8.00am to 4.30pm Fri 8.00am to 2.00pm
67
Geachte Klant,
Dank u voor de aankoop van dit product.
Dit product voldoet aan de Europese en nationale eisen betreffende elektromagnetische compatibiliteit (EMC). De CE-
conformiteit werd gecontroleerd en de betreffende verklaringen en documenten werden neergelegd bij de fabrikant.
Wij verzoeken de gebruiker vriendelijk om zich te houden aan de bedieningsinstructies om de bovenvermelde toestand in
stand te houden en te zorgen voor een veilige werking!
Gelieve de bedieningsinstructies aandachtig te lezen alvorens het product te gebruiken!
Alle hierin genoemde fi rmanamen en productverwijzingen zijn handelsmerken van de betreffende eigenaars. Alle
rechten voorbehouden.
Bij technische vragen kunt u zich wenden tot:
Voor meer informatie kunt u kijken op www.conrad.nl of www.conrad.be
Inleiding

66
Inleiding 67
1. Voorgeschreven gebruik 68
2. Leveringsomvang 68
3. Veiligheidsinstructies 68
4. Bedieningselementen 69
A) Frontpaneel 69
B) Achterpaneel 69
C) LCD Paneel 69
5. Installatie 70
A) Stroomvoorziening 70
B) Muziekbladstandaard 71
6. Aansluitingen 71
A) Hoofdtelefoonaansluiting 71
B) AUX. OUT uitgangsaansluiting 71
C) Voetschakelaaraansluiting 71
D) Volumepedaal 71
E) USB aansluiting 71
7. Bediening 72
A) Spanningstoets & Volume 72
B) Demonstratietoets 72
C) Voices en Effecten 72
D) Stijlregeling 73
E) Functiemenu 75
F) Mixer 75
G) DSP (Digitale signaalverwerking) 75
H) Metronoom 76
I) Piano 76
J) Geheugen 76
K) One Touch Setting/Eén Toets Instelling 76
L) Opnemen 76
M) Liedjes 77
N) Les 77
O) Akkoordenwoordenboek 77
8. Onderhoud en reiniging 78
9. Verwijdering 78
10. Technische gegevens 79
Appendix 80
Appendix I: Voice lijst 80
Appendix II: Stijlen lijst 82
Appendix III: Liedjeslijst 89
Appendix IV: Demonstratiemelodieën Lijst 84
Appendix V: Akkoordenwoordenboek 84
Appendix VI: Akkoordentabel 84
Appendix VII: Akkoordenlijst 85
Appendix VIII: MIDI lijst 86
Deze werkende instruties hoort bij dit product. Zij bevat belangrijke informatie over de inbedrijfstelling en het
gebruik. Let hierop, ook wanneer u dit product aan derden overhandigt.
Bewaar daarom deze werkende instruties om in voorkomende gevallen te kunnen raadplegen!
Inhoudsopgave
27
1. Intended use
The product is used to generate sounds by playing on the keys. The sounds are amplifi ed by the built-in loudspeakers. The
keyboard could be connected to headphones or an external amplifi er. The keyboard is easy-to-use with advanced functions
especially designed for self-learners and beginners. Users can learn to play songs in 3 different ways. The LCD display makes
it simpler for users to learn playing.
Operation is only permissible in dry, indoor areas.
You can either operate the keyboard with 6 D-size batteries or a suitable, stabilised plug-in power unit (DC12V/2A , center-
positive type).
Unauthorised conversion and/or modifi cation of the device are inadmissible because of safety and approval reasons (CE).
Any usage other than described above is not permitted and can damage the product and lead to associated risks such as
short-circuit, fi re, electric shock, etc. Please read the operating instructions thoroughly and keep them for further reference.
2. Delivery Content
Keyboard•
Music Stand•
Manufacturer‘s manual•
Operating instructions•
3. Safety instructions
We do not assume liability for resulting damages to property or personal injury if the product has been
abused in any way or damaged by improper use or failure to observe these operating instructions. The
guarantee will then expire!
The exclamation mark points out important information in these operating instructions that must be
strictly adhered to.
When connecting the keyboard to other devices, observe the safety instructions of those devices.•
The keyboard must not be exposed to extreme temperatures, direct sunlight, intense vibration or dampness.•
If the device is used in a commercial context, the safety regulations applicable to electrical equipment and relevant •
operating resources as laid down by the employers’ liability insurance association must be observed.
In schools, training facilities, hobby and self help workshops the operation of electric devices has to be responsibly •
supervised by trained personnel.
For suffi cient ventilation, a distance of about 5cm must be kept between the device and other objects.•
Naked fl ame source or any containers with liquids must not be placed on or near the device.•
Packaging material, such as plastic foil or bags, polystyrene parts etc., could become dangerous toy for children. Never •
leave it lying around carelessly.
The keyboard must be placed on a level and sturdy surface.•
The insulation of the entire product must not be damaged or destroyed. Never open the keyboard casing.•
No object should be inserted into the air ventilation. There is risk of a fatal electric shock or destruction of the device.•
Servicing, adjustment or repair works must only be carried out by a specialist/ specialist workshop.•
If any questions arise that are not answered in this operating instruction, contact our Technical Advisory Service or other •
experts.

28
4. Operating elements
A) Front panel B) Rear panel
1. POWER ON/OFF 35. USB
2. VOLUME 36. SUSTAIN PEDAL
3. MIXER 37. VOLUME PEDAL
RHYTHM - 38. AUX OUT
BASS - 39. PHONES
ACCOMP - 40. DC 12 V
LOWER -
UPPER - C) LCD Display
4. TEMPO 41. FADE
5. FADE 42. DUAL
6. A.B.C. 43. LOWER
7. FUNCTION 44. A.B.C.
8. DEMO 45. CHORD
9. LESSON 46. VOICE/STYLE/SONG/ALBUM
10. LEFT 47. TEMPO
11. RIGHT/CHORD DICTIONARY 48. MEASURE
12. RECORD 49. BEAT
13. PLAY/STOP 50. MEMORY
14. LCD DISPLAY 51. DSP
15. VOICE 52. TOUCH
16. STYLE 53. SUSTAIN
17. SONG 54. CHORD DICTIONARY
18. METRONOME 55. RECORD
19. PIANO 56. RIGHT
20. NUMERIC KEYPAD 57. TREBLE CLEF
21. DSP 58. LEFT
22. OCTAVE 59. PERFORM
23. SUSTAIN 60. FOLLOW
24. TOUCH 61. BASS CLEF
25. TRANSPOSE 62. BEAT
26. LOWER
27. MEMORY BANK
28. DUAL
29. STORE
30. PANEL MEMORY
M1-M6 -
31. O.T.S.
32. ACCOMPANIMENT CONTROL
START/STOP - SYNC - INTRO/ENDING - FILL-IN A - FILL-IN B -
33. MODULATION
34. PITCH BEND
65
Annexes
Annexe VIII: Liste MIDI
Fonction Transmise Reconnue Remarques
De base
Canal
Implicite
Changé
1ch
1ch
1-16ch
1-16ch
Mode
Implicite
Messages
Altérée
X
X
***********
3
X
X
Note
Numéro Voix réelle
0-127
***********
0...127
0...127
Vélocité : Note activée
Note désactivée
O 9nH,V=1-127
X (9nH,V=0)
O 9nH,V=1-127
X (9nH,V=0; 8nH,V=0-127
Après
Touche
Clés
Chs
X
X
X
X
Changement de ton O O
Commande
Changement
0
1
5
6
7
1 0
11
64
65
66
67
80
81
91
93
120
121
123
O
O
X
O
O
X
X
O
X
X
X
X
X
X
X
X
X
X
O
O
O
O
O
O
O
O
O
O
O
O
O
O
O
O
O
O
Sélection de la banque
Modulation
Durée de portamento
Saisie de données
Volume
Pan
Expression
Pédale de prolongation
Portamento ACTIVE/DESACTIVE
Pédale Sostenuto
Pédale gauche
Programme Reverb
Programme Chorus
Niveau de reverb
Niveau de chorus
Tous les sons désactivés
Réinitialiser tous les contrôleurs
Toutes les notes désactivées
Programme
Change :
true # O
***********
O
0...12 7
Systèmmente exclusif X O
Système :
Commun :
:
Position piste
Sélection titre
Accorder
X
X
X
X
X
X
Système :
Temps réel :
Mélodie
Commandes
X
X *1
X
X *1
Aux :
:
Messages :
:
Local Activé/ Désactivé
Toutes les notes désactivées
Activer détection
Réinitialiser
X
X
X
X
X
O
O
O
Note: *1
Quand l’accompagnement démarre, un message FAH est transmis.
Quand l’accompagnement est arrêté, un message FCH est transmis.
Quand un message FAH est reçu, l’accompagnement est démarré.
Quand un message FCH est reçu, l’accompagnement est arrêté.
Mode 1: OMNI ACTIVÉ , POLY
Mode 3: OMNI DÉSACTIVÉ , POLY
Mode 2 : OMNI ACTIVÉ , MONO
Mode 4 : OMNI DÉSACTIVÉ , MONO
O: Oui
X: Non

64
Annexes
Annexe VII: Liste des accords
Nom de l’accord / [Abréviation] Harmonisation normale Accord (C) Ecran
Majeur [M] 1-3-5 C C
Sixième [6] 1-(3)-5-6 C6 C6
Septième majeure [M7] 1-3-(5)-7 CM7 CM7
Major seventh add sharp Eleventh [M7(#11)] 1-(2)-3-#4-5-7
or 1-2-3-#4-(5)-7
CM7(#11) CM7(#11)
Major add ninth [M(9)] 1-2-3-5 C M(9) C M(9)
Major seventh ninth [M7(9)] 1-2-3-(5)-7 C M7(9) C M7(9)
Sixth ninth [6 (9)] 1-2-3-(5)-6 C 6(9) C 6(9)
Augmented [aug] 1-3-#5 C aug C aug
Minor [m] 1-b3-5 Cm Cm
Minor sixth [m6] 1-b3-5-6 Cm6 Cm6
Minor seventh [m7] 1-b3-(5)-b7 Cm7 Cm7
Minor seventh fl atted fi fth [m7b5] 1-b3-b5-b7 Cm7b5 Cm7b5
Minor add ninth [m(9)] 1-2-b3-5 Cm(9) Cm(9)
Minor seventh ninth [m7(9)] 1-2-b3-(5)-b7 Cm7(9) Cm7(9)
Minor seventh add eleventh [m7(11)] 1-2-b3-4-5-(b7) Cm7(11) Cm7(11)
Minor major seventh [mM7] 1-b3-(5)-7 CmM7 CmM7
Minor major seventh ninth [mM7(9)] 1-2-b3-(5)-7 CmM7(9) CmM7(9)
Diminished [dim] 1-b3-b5 Cdim Cdim
Diminished seventh [dim7] 1-b3-b5-6 Cdim7 Cdim7
Seventh [7] 1-3-(5)-b7 C7 C7
Seventh suspended fourth [7sus4] 1-4-5-b7 C7sus4 C7sus4
Seventh fl atted fi fth [7b5] 1-3-b5-b7 C7b5 C7b5
Seventh ninth [7(9)] 1-2-3-(5)-b7 C 7(9) C 7(9)
Seventh add sharp eleventh [7(#11)] 1-(2)-3-#4-5-b7 or
1-2-3-#4-(5)-b7
C 7(#11) C 7(#11)
Seventh add thirteenth [7 (13)] 1-3-(5)-6-b7 C7(13) C7(13)
Seventh fl atted Ninth [7(b9)] 1-b2-3-(5)-b7 C7(b9) C7(b9)
Seventh add fl atted thirteen [7(b13 )] 1-3-5-b6-b7 C7(b13) C7(b13)
Seventh sharp ninth [7(#9)] (1)-#2-3-(5)-b7 C7(#9) C7(#9)
Major seventh augmented [M7aug] 1-3-#5-7 CM7aug CM7aug
Seventh augmented [7aug] (1)-3-#5-b7 C7aug C7aug
Suspended Fourth [sus4] 1-4-5 Csus4 Csus4
One plus two plus fi ve [1+2+5] 1-2-5 C 1+2+5 C
29
5. Setup
A) Power supply
This electronic keyboard can be powered by batteries or a standard household wall outlet
Using batteries
Observe correct polarity while inserting the batteries. Remove the batteries if the device is not used for • a long period of time to avoid damage through leakage. Leaking or damaged batteries might cause acid
burns when contact with skin, therefore use suitable protective gloves to handle leaking batteries.
Keep batteries out of reach of children. Do not leave batteries lying around, as there is a risk that • children or domestic pets could swallow them.
Replace all the batteries at the same time. Mixing old and new batteries in the device can lead to battery • leakage and device damage.
Make sure that batteries are not dismantled, short-circuited or thrown into fi re. Never recharge non-• rechargeable batteries. There is a risk of explosion!
Always make sure to turn the keyboard off before inserting new batteries or replacing old ones.
1. Open the battery compartment cover at the bottom of the keyboard.
2. Insert 6 D-size (SUM-1, R-20) batteries into the battery compartment while observing the
correct polarity (positive, “+” and negative, “-”) embossed next to the battery compartment.
3. Close the compartment cover, making sure it locks fi rmly in place.
Low battery indications
Any of the following symptoms indicate low battery power. Replace the batteries as soon as possible
whenever any of the following occurs.
A dim and diffi cult-to-read LCD display•
Abnormally low speaker/headphone volume•
Distortion of the sound output•
Sudden power failure when playing at high volume•
Demo songs are played at irregular rhythms•
Dimming of the display when playing at high volume•
Using the AC Adaptor (Not included)
Never connect the keyboard to a power adapter immediately after it has been taken from a cold place
to a warm one. The condensed moisture can lead to malfunction or damage to the keyboard or risk of
electric shock. Use only the specifi ed AC adaptor. Using other types of adaptor creates the risk of fi re and
electrical shock. For safety sake, be sure to unplug the AC adaptor from the wall outlet whenever leaving
the electronic keyboard unattended for a long time.
Make sure that only the AC adaptor specifi ed for this electronic keyboard is used. The adaptor is a center positive type which
provides 12V DC output. Be sure to turn off the electronic keyboard before you connect the adaptor into the AC wall outlet
and the cord into the unit. Once connected, the keyboard will be powered by the power adapter and the battery power supply
will be cut off.
The power adapter must match the following technical specifi cation:
Input: 230V/AC, 50 Hz
Output: 12V/DC, 2.0A
Polarity:
Outer diameter of plug: Ø 5.5 mm
Inner diameter of plug: Ø 2.1 mm

30
B) Music Stand
Please setup the music stand as illustrated below.
6. Connections
A) Headphone Jack
Plug a set of headphones (6.3mm stereo) into the PHONES jack and the speakers will be turned off automatically.
Avoid listening with the headphones at high volume for long periods of time; doing so may not only • result in ear fatigue, it may be damaging to your hearing.
To prevent damage to the speakers, set the volume of the external devices at the minimum setting before • connecting them. Failure to observe these cautions may result in electric shock or equipment damage.
Set the volumes of all devices to their minimum levels and gradually increase the volume to the desired • listening level.
B) AUX.OUT Jack
The AUX. OUT jack delivers the output signal of the keyboard to an external amplifi er.
Use a 6.3mm stereo audio plug to connect into the AUX. OUT jack located on the rear panel; then plug the other end of the
cord into LINE IN or AUX. IN of the amplifi er.
C) Sustain Pedal
An optional footswitch can be plugged into the SUSTAIN jack for sustain control.
The footswitch functions like the damper pedal of a piano. Press for sustain, release for normal sound.
D) Volume Pedal
An optional volume control can be plugged into the VOLUME jack for adjusting the volume of sound.
E) USB Jack
To avoid damages, turn off this keyboard and all related devices before you plug or unplug this • instrument with other related devices. Activate the computer from a sleep/ suspended/ standby mode
before connecting the USB cable.
Please observe the precautions when connecting the instrument to a computer via a USB cable. Failure • to do so can cause the instrument and/or the computer to freeze, possibly causing corruption or losing
the data. If the instrument or computer does freeze, turn the power of both devices off and then turn it
on again after a few seconds.
The USB jack connects the keyboard to a PC or other USB host devices that support USB Audio.
Connect a standard USB cable from the rear-panel of the USB jack of the instrument to the USB jack on your computer 1.
(USB cable sold separately).
For devices with USB cable, after the driver is installed and initialization is fi nished, you can choose USB Audio Device in 2.
the device menu of the software to transfer midi data.
MIDI Function
This keyboard includes the MIDI feature. (Musical Instrument Digital Interface) MIDI is the universal standard for sending and
receiving performance data between electronic musical instruments or computer. (See Appendix VII for MIDI list)
With a USB cable, midi data can be transferred to a computer or other USB host devices that support USB audio devices
5. Setup
63
Annexes
Annexe IV: Liste démo
Nom
01 Funk
02 American Patrol
03 Guitar&Saxphone
04 I Can......
05 Alise
Annexe V: Dictionnaire des accords
Racine de l’accord : Type d’accord :
Note Racine accord Note Type d’accord
C6 C F6# F#/Gb
C6# C#/Db G6 G
D6 D A6b Ab/G#
E6b Eb/D# A6 A
E6 E B6b Bb/A#
F6 F B6 B
Note Racine accord Note Type d’accord
C4 M C5 7(b9)
C4# M(9) C5# 7(9)
D4 6 D5 7(#9)
E4b mM7 E5b 7(b13)
E4 M7 E5 7(13)
F4 m F5 7(#11)
F4# m(9) F5# dim7
G4 m6 G5 dim
Ab4 m7(9) A5b 7aug
A4 m7 A5 aug
B4b m7b5 B5b 7sus4
B4 7 B5 sus4
Annexe VI: Tableau des accords
Tableau des accords simples Tableau des accords standards
Pour jouer un accord majeur
Appuyer sur la note racine de l’accord
Pour jouer un accord mineur
Appuyer sur la note racine en même temps que sur la touche noire
à gauche la plus proche.
Pour jouer un accord septième
Appuyer sur la note en même temps que sur la touche blanche la
plus proche à gauche.
Pour jouer un accord septième mineur
Jouer les notes racines en même temps que les touches blanches
et noires les plus proches à gauche (total de trois touches).
Les notes entre parenthèses sont optionnelles;
les accords peuvent être reconnus sans elles.

62
Annexes
Annexe III: Liste des chansons
CLASSIQUE [CLASSICAL] GOLDEN & POP [GOLDEN & POP] 82 Wine
01 Aida 42 On London Bridge 83 Jazz Old Man
02 Annen Polka 43 Are You Lonesome Tonight 84 Dark Eyes
03 Auf Flugeln Dec Gesanges 44 Only You 85 Carlos
04 Brahms Waltz 45 End Of The World 86 Sad
05 Carmen-Entracte II 46 House Of Rising Sun 87 The Jazz
06 Carmen-Prelude 47 Solveig's Song ORIENTALE [ORIENTAL]
07 L'Arlesienne 48 The Blue-Bells Of Scotland 88 South Mud Bay
08 La Traviata 49 Over The Rainbow 89 Give You A Rose
09 Mazurka 50 Beautiful Dreamer 90 Flowing Rill
10 Menuett 51 It`S Been A Long Long Time PIANO [PIANO
11 Musical Moments 52 Edelweiss 91 Alise
12 Pizzicato Polka 53 O Sole Mio 92 Military March
13 Rigoletto 54 Der Deitcher`S Dog 93 Habanera
14 Serenade 55 You Are My Sunshine 94 Minuet
15 Song Without Words 56 Silent Night 95 Bagatelle No.3
16 Swan 57 Ave Maria 96 Old Macdonald Had A Farm
17 Prelude To Act 2 (Swan Lake) 58 Five Hundred Miles 97 Wedding March
18 Le Lac des Cygnes Acte I 59 Happy New Year 98 2-Part Invention #13 In A Minor.B.W.
19 The Happy Farmer 60 It`S Beginning To Look A Lot Like
Christmas 99 Minuet In G
20 The Sleeping Beauty 61 Jeanie With The Light Brown Hair 100 Turkish March
21 Uungarische Tanz 62 My Bonnie 101 Hey Diddle Diddle
22 Wiegenlied 63 Song Of The Pearlfi sher 102 March
23 Mov.2 Adagio Non Troppo
Piano Sonata No.9 In D 64 Summer Palace 103 Moseta Dance
24 Mov.1 Andante Grazioso Piano
Sonata No.11 In A 65 The Stage Coach 104 Bulie Dance
25 Prelude In C 66 Entertainer 105 Aria
26 Chinese Dance 67 Annie Laurie 106 Germanic Dance
27 Emperors Waltz 68 Killing Me Softly With His Song 107 Away In A Manger
28 March Militaire 69 Love Is Blue 108 Jack & Jill
29 Symphony No.40 70 Last Rose Of Summer 109 Angles We Have Heard On High
30 Pianosonatan 08 IN Cm IN
Pathetique 71 The Old King Cole 110 Humpty Dumpty
31 Arpeggione Sonata in Am JAZZ & FUSION 111 Did You Ever See A Lassie
FOLK & COUNTRY 72 Chrysanf 112 Chopsticks
32 Santa Lucia 73 Maple Leaf Rag 113 Four Little Swans
33 Country 74 June Samba 114 Old France
34 Jambalaya 75 Funk 115 "Jesus, Saviour Pilot Me"
35 Susanna 76 I Can...... 116 Eclogue
36 Bridge 77 Sea Shore 117 Santa Claus Is Coming To Town
37 Battle Hymne Of The Republic 78 Guitar&Saxphone 118 Brave Cavalier
38 The Old Gray Mare 79 The Hip Hop`S Night 119 America The Beautiful
39 American Patrol 80 Blue Lunch 120 Music Box Dancer
40 In The Rain 81 Cobweb
41 Sippin Cider Through A Straw
31
7. Operation
A) Power Switch & Volume
1. Turn [POWER] switch on. The LCD display illuminates.
2. Turn [VOLUME] control switch to adjust the volume to the desired level.
B) Demo
Press [DEMO] button to play demo songs. There are a total of 5 demo songs. (See Appendix IV for song list.)1.
You can select a demo song with [+/YES] / [-/NO] or the numeric buttons. The name of demo song will appear on the 2.
LCD.
Press [DEMO] or [START/STOP] button to exit from the demo mode.3.
C) Voices and Effects
There are 310 voices in total (See Appendix I).
a. Instrument Voice
Press [VOICE] button to enter voice mode.1.
Press [+/YES] / [-/NO] or the numeric kepad to select the voice you want.2.
b. Dual voice
This dual voice function allows you to play two musical instruments voices simultaneously. When the dual function is off, the
voice indicated is “VOICE 1”, when the dual function is on, the voice indicated is “VOICE 2”.
During the “VOICE 1” status, press [DUAL] button to activate the dual voice function. “VOICE R2” and “DUAL” signal will be 1.
displayed on the LCD. The dual voice number will also be displayed. The two selected voices will be overlapped.
To select your desired voice 2, press [+/YES] / [-/NO] or the numeric kepad to select the voice you want.2.
Press [DUAL] button again to turn off the dual voice function.3.
c. Sustain
This function generates sounds with a sustained effect.
Press [SUSTAIN] button to activate the sustain effect. The “SUSTAIN” icon will be displayed.1.
Press [SUSTAIN] button again to disable the sustain effect. The “SUSTAIN” icon will disppear.2.
d. Split / Lower Voice
This function will split the keyboard into left (lower) and right sections.
Under this mode, the keys to the left of the split point will be used to accompany the melodies played at the right.
The split point for the two sections is the #F3 note.
Voice L Voice R1/R2
Split Point (#F3)
e. Pitch Bend
The pitch bend wheel can be used to bend the note upwards or downwards, ranging between +/- 2 cent.
While playing on the keyboard, slide the wheel up or down to bend the pitch.1.
When the wheel is released, the note will return to its normal sound.2.
f. Modulation
While playing on the keyboard, press and hold [MODULATION] button. 1.
Release the button to exit the modulation effect.2.

32
7. Operation
g. Touch
This function allows you to control the dynamics of your notes by varying the pressure applied on the keys.
If the touch function is disabled, there will be no touch response.
Press [TOUCH] button to switch between the level 0 to level 3 of the touch effect.
h. Transpose
You can change the key of your music with the TRANSPOSE function by adjusting the pitch in semitone steps.
Press [TRANSPOSE +] or [TRANSPOSE -] button to change the Transpose value from -12 to +12 semitones.1.
The LCD will display the current transpose value.
Press [TRANSPOSE +] and [TRANSPOSE -] buttons simultaneously to reset to its default value of 00.2.
i. Octave
This function can shift the key 1 octave up or down.
Press [OCTAVE +] or [OCTAVE -] button to change the Octave value from -1 to 1.1.
The LCD will display the current octave value.
Press [OCTAVE +] and [OCTAVE -] buttons simultaneously to reset to its default value of 00.2.
D) Style Control
The keyboard has a total of 160 preset styles. (See Appendix II)
a. Style (Auto accompaniment)
To select a style
Press the [STYLE] button to set the keyboard to the “style mode”. The “STYLE” icon will be displayed.1.
Press [+/YES] / [-/NO] or the numeric kepad to select the style you want.2.
To start a Style
You can start a style with various ways.
1. Without any effects
Use [START/STOP] button to start the style. -
2. In sync with your melody
Press [SYNC] button. This ensures that the key starts in sync with the style. -
The style will initiate when you start playing melody (by pressing any key). -
In sync with Auto Bass Chord3.
Press [A.B.C] button to turn on the “auto bass chord” mode. -
Press [SYNC] button. This ensures that the auto bass chords starts in sync with the style. -
The style will initiate when you start playing a note or a chord on the CHORD area. (See section on Auto Bass Chord) -
4. With an Introduction
Press [INTRO/ENDING] button to insert an intro section before you press [START/STOP] button to play the style. (See -
section on Intro/Ending)
To stop a Style
1. Stop immediately
Use [START/STOP] button to stop a style. -
2. Stop with an ending
Press [INTRO/ENDING] button to stop with an ending section. The ending section will be introduced at the beginning -
of the next section.
3. Sync stop
Press [SYNC] button to stop playing immediately. The synchronized mode will be activated. -
b. Sychronization
Press [SYNC] button to synchronise your melody or chords with the selected style. The beat indicators fl ash indicating that 1.
it is in a “waiting mode”.
The style will start when you begin playing melody or chords.2.
61
Annexes
Annexe II: Liste des Styles
RYTHME 8 [8 BEAT] ROCK [ROCK]
01 Sweet Beat 41 Soft Rock 81 Jazz Funk 121 Disco Samba
02 Miami Beat 42 Hard Rock 82 Groove 122 Mambo
03 Rhythm & Beat 43 Heavy Rock 83 Soul 123 Meneito
04 Guitar Pop 1 44 Easy Rock 84 Hip Hop Soul 124 Rumba 2
05 8 Beat Dance 45 New Shuffl e 85 Hip Hop Beat 125 Tikitikita'
06 8 Beat Disco 46 Rock Hip Hop 86 R & B 126 Dancing Tribe
07 Pop Funk 47 Rock & Roll 87 Soul Beat 127 Lambada
08 8 Beat 1 48 Rock Shuffl e 88 R & B Ballad 128 Pop Cha Cha
09 60's 8 Beat 49 70's Rock & Roll 89 British Soul Pop 129 Cha Cha Cha
10 8 Beat 2 50 Folk Rock 90 Samba Funk 130 Salsa
RYTHME 16 [16 BEAT] DANSE DE SALON
[BALLROOM] JAZZ [JAZZ] MUSIQUE DU MONDE [WORLD]
11 16 Beat Ballad 51 Rhumba 1 91 Jazz Fusion 131 Scottish
12 Pop 16 Beat 1 52 Slow Waltz 1 92 Fusion 132 Laendler
13 Pop 16 Beat 2 53 Fox Trot 93 Jazz Brush 133 Hawaiian
14 Modern 16 Beat 54 Samba 94 Latin Jazz 134 Sirtake
15 16 Beat Hot 55 Cha Cha 95 Acid Jazz 1 135 Venezia
16 16 Beat Modern 56 Quick Step 96 Acid Jazz 2 136 6/8 Flipper
17 16 Beat Bossa Nova 57 Twist 97 Cool Jazz Ballad 137 New Age
18 16 Beat Funk 58 Swing Fox 98 Swing Shuffl e 138 Tarantella
19 16 Beat 59 Jive 99 Big Band 40's 139 Enka
20 Cool Beat 60 Beguine 100 Big Band Medium 140 Norteno
POP [POP] DANSE [DANCE] COUNTRY [COUNTRY] TRADITIONNEL [TRADITIONAL]
21 Analog Night 61 Garage 101 Country 8 Beat 141 Polka
22 Guitar Pop 2 62 Techno 102 Modern Country 142 German Polka
23 Pop beat 63 Progressive 103 Country Ballad 2 143 Party Polka
24 Soft Beat 64 Rap 1 104 Country Pop 144 March
25 60's Pop 65 Rap 2 105 2/4 Country 145 6/8 March
26 Sting Latin 66 Disco 106 Country 146 US March
27 Brit Pop 1 67 Soft Disco 107 Country Quick Steps 147 Musette
28 Brit Pop 2 68 Disco Party 108 Bluegrass 148 French Musette
29 Pop Hit 69 70's Disco 109 Country Flok 149 Mazurke
30 Fusion Shuffl e 70 70's Disco Funk 110 Country Rock 150 Waltz
BALLADE [BALAD] 71 Club Dance LATINO/DANSE LATINO
[LATIN/LATIN DANCE] INDONÉSIE [INDONESIA]
31 Rock Ballad 1 72 Euro Dance 111 Bossa Nova 151 Dandut1
32 Folk Ballad 73 80's Dance 112 Habanera 152 Dandut2
33 Pop Ballad 1 74 Hip Hop 113 Latin 153 Dangdu
34 Pop Ballad 2 75 Down Beat 114 New Reggae 154 Dangdut1
35 EP Ballad SOUL & FUNK
[SOUL & FUNK] 115 Dance Reggae 155 Dangdut2
36 Piano Ballad 76 Funk 116 Pasodoble 156 Dangdut3
37 New R&B Ballad 77 Electric Funk 117 Lite Bossa 157 Keroncong1
38 Natural Ballad 78 Groove Funk 118 Latin Rock 158 Keroncong2
39 Love Ballad 79 Rubber Funk 119 Beguine 159 PopKeroncong
40 Easy Ballad 80 Cool Funky 120 Slow Bolero 160 Slow Dangdut

60
Annexes
Autres voix [Other Voices] Percutant [Drum Set]
164 Ufoorg 211 Fretlekb 258 Bassokb 301 Standard Drum 1
165 Q-Org 212 Slapbs 259 swetbras 302 Standard Drum 2
166 elorg 213 SlpbsKb 260 softsax 303 Room Drum
167 elorg 214 Synthbs 261 Whistle 304 Rock Drum
168 elorg 215 Synbass 262 Panfl ut 305 Electric Drum
169 sloorg 216 Synbass 263 Lead 306 Analog Drumset
170 ringo 217 Synthb 264 Lead 307 Dance Drumset
171 autolux 218 SynbsKb 265 Lead 308 Jazz Drum
172 elecorg 219 Acidbass 266 Lead 309 Brush Drumset
173 Accodin 220 acostbs 267 Warplead 310 Standard Drumset
174 Softacc 221 picked 268 Warp-
175 Accowaa 222 slapbs 269 Pianstld
176 Softacc 223 synthbs 270 childtoy
177 Harmonic 224 fgepbas 271 ahold
178 Harmharp 225 Vln-Hard 272 fmlead
179 slowacc 226 Viola-Kb 273 tunnel
180 accodin 227 Violastr 274 tunnel
181 softacc 228 Cello 275 fmlead
182 mutharmp 229 Slocello 276 fmlead
183 bigharm 230 Cello 277 fmlead
184 accomut 231 Contrakb 278 roomlead
185 harm 232 Contrakq 279 Sinepad
186 N-Gthamm 233 Stringf 280 Softpad
187 Pickgt 234 Strgszz 281 Bellpad
188 Strgt 235 Stringf 282 Synpad
189 Stel-gt 236 Strings 283 Hornpad
190 Cleagtkb 237 Slwstrzz 284 Newagpad
191 Pickcgt 238 Synthst 285 Bagpipe
192 Bcln-Gt 239 SystrZz 286 Distorld
193 Cln-Gt 240 vlnhard 287 Systrel
194 Solid-Gt 241 violakb 288 Dist-
195 Solidwa 242 cello 289 Chorusld
196 Chorusgt 243 contra 290 Halon
197 Q-Gt 244 strrue 291 Dream
198 Mut-Gt 245 dreamstr 292 Dream
199 Overgtkb 246 pizstr 293 Waspysyn
200 Tremolgt 247 strpiz 294 Orgpd
201 Funk-Gt 248 Swet_Trp 295 Trompad
202 cleagt 249 Trombone 296 Softacpd
203 cleagt 250 Trombon 297 theology
204 rvcleagt 251 Tuba 298 calm
205 overgt 252 Tubabl 299 padorg
206 Acostbs 253 Fmhorn 300 palbel
207 Abascym 254 Bbbrass
208 Fg-Bs-Kb 255 Hibrass
209 Fusionbs 256 Tenosax
210 Pickedkb 257 Bari-Kb
33
7. Operation
c. Intro / Ending
This function allows you to add an introduction or ending to a style. Its length varies with different styles.
To begin a style with an introduction, press [INTRO/ENDING] button before starting the style.1.
To give a style an ending, press [INTRO/ENDING] button while the style is playing. 2.
When this mode is in process. the indicator above “Fill-in A” or “Fill-in B” will fl ash until the mode completes.3.
d. Fill A/B
This function allows you to add a fi ll-in into a style.
Choose and play your desired style.1.
To insert a fi ll-in, press [FILL-IN A] or [FILL-IN B] button. The indicator above the button will stop fl ashing when the fi ll-in 2.
fi nishes playing.
To keep repeating the pattern, press and hold [FILL-IN A] or [FILL-IN B] button.3.
e. Tempo
Press [TEMPO+] or [TEMPO-] button to change the tempo. The tempo ranges from 30 to 280. 1.
Press [TEMPO+] and [TEMPO-] buttons together to reset the tempo value to its default.2.
f. Fade
This Fade function creates a softer sound to begin or end a style.
Fade-in1.
To enable the fade-in function, press [FADE] before starting a style. When the style starts, the fade indicator on the LCD -
will fl ash and the volume will gradually increase to the maximum level within 10 seconds. Then fade indicator will shut
off and the style will play normally.
Fade-out2.
To enable the fade-out function, press [FADE] when a style is being played. The fade indicator on the LCD will fl ash and -
the volume of the style will gradually decrease to the minimum level within 10 seconds. The fade indicator will shut off.
The style will be muted until it is stopped.
To resume to normal playing, press [FADE] again. -
g. Auto Bass Chord (A. B. C.)
A.B.C is OFF by default. Press the [A.B.C.] button to turn on this “auto bass chord” function. Under this mode, the keys below
the split point are known as the CHORD area.
Chord area
Simple chords
You can play simple chords in the chord area with simplifi ed fi ngerings. (See Appendix VI for simple chord table)
Standard chords
You can play standard chords in the chord area with normal fi ngerings. (See Appendix VI for standard chord table)
E) Function Menu
The function menu allows you to adjust the parameters of 11 items.
Press [FUNCTION / BACK] or [FUNCTION / NEXT] button to enter this function menu. 1.
Press [FUNCTION / BACK] or [FUNCTION / NEXT] button repeatedly to select other items.2.
Press [+/YES] / [-/NO] to adjust the parameters for each item. 3.

34
7. Operation
Please refer to the table below for an overview of the 11 items.
Content LCD Display Range Default Value
Tune Tune -50...50 0
Beat Type Beat 0 2...9 4
Split Point Split pt 1...61 19 (F3#)
MIDI IN Channel Midi In 01...16, ALL ALL
MIDI OUT Channel Midi Out 01...16 01
Portamento
and Modulation MODU MODULATION(MODU)
/PORTAMENTO(PORT) MODULATION (MODU)
Portamento Type Port Type 1-3 2
DSP Reverb Type Rvb Type 1--8 Reverb 5
DSP Reverb Level Rvb Level 0--7 2
DSP Chorus Type Crs Type 1--8 Chorus 1
DSP Chorus Level Crs Level 0--7 0
F) Mixer
The mixer control allows you to adjust the volume of the drum, bass, accompany chord, left and right section of the keyboard.
Press [RHYTHM +] or [RHYTHM -] to adjust the track volume of the drums.1.
Press [BASS +] / [BASS -] to adjust the track volume of bass. 2.
Press [ACCOMP +] / [ACCOMP -] to adjust the track volume of accompany chord.3.
Press [LOWER +] / [LOWER -] to adjust the volume of the left keyboard section.4.
Press [UPPER +] / [UPPER -] to adjust the volume of the right keyboard section.5.
G) DSP (Digital Signal Processing)
This function enables realistic sounding. You can adjust the value of DSP from the “Function” menu.
H) Metronome
Press [Metro] to turn the metronome on or off.
I) Piano
Press [PIANO] to enter or exit the piano mode. 1.
You can also exit the piano mode with the [DEMO], [SONG] or [MEMORY] button.2.
You can play styles without accompaniment. 3.
In the piano mode, you will not be able to enter the “Record” function. 4.
J) Memory
This keyboard has 4 memory banks and each bank can store 6 groups of data ([M1] - [M6]). They are used to store 24
complete control-panel setups, which can be retrieved as needed.
To choose a memory bank, press [Memory Bank] sequentially to select memory bank 01-04.1.
After you have chosen the memory bank, you can choose to store or retrieve your data in one of the six groups [M1] ~ 2.
[M6].
To store your data, press and hold [STORE] button, then simultaneously press [M1] (or [M2] to [M6]) to store data to M1. 3.
The LCD will display “Memwrite” when storing the data.
To retrieve data from the memory, press and hold any of the [M1] ~ [M6] button.4.
To restore the memory banks to their default values, press and hold [+/YES] and [-/NO] simultaneously while turning the 5.
power on. All data and configuration will be lost after the reset.
K) One Touch Setting (O.T.S)
This function loads 4 sets of data into [M1] ~ [M4] according to current style.
After you have chosen your style, press [O.T.S.]. The settings will be loaded immediateely into the memory banks [M1] ~ 1.
[M4]. The A.B.C. mode will be turned on automatically.
To play the keyboard with one of the four styles, retrieve the settings by pressing [M1] ~ [M4].2.
Press [O.T.S.] button to quit the one-touch-setting.3.
59
Annexes
Annexe I: Liste des voix
Piano [Piano] Cordes [Strings] Tête [Lead] Effets sonores [Sound effects]
01 Acoustic Grand Piano 41 Violin 81 Square 121 Guitar Fret Noise
02 Bright Acoustic Piano 42 Viola 82 Sawtooth 122 Breath Noise
03 Electric Grand Piano 43 Cello 83 Calliope 123 Seashore
04 Honky-tonk Piano 44 Contrabass 84 Chiff 124 Bird Tweet
05 Electric Piano 1 45 Tremolo Strings 85 Charang 125 Telephone Ring
06 Electric Piano 2 46 Pizzicato Strings 86 Voice 126 Helicopter
07 Harpsichord 47 Orchestral Harp 87 Fifths 127 Applause
08 Clavi 48 Timpani 88 Bass & Lead 128 Gunshot
Mailloche [Mallet] Ensemble de cordes [String ensemble] Pad [Pad Autres voix [Other Voices]
09 Celesta 49 Strings Ensemble 1 89 Fantasia 129 Pianostr
10 Glockenspiel 50 Strings Ensemble 2 90 Warm 130 Modernep
11 Music box 51 Synth Strings 1 91 Polysynth 131 Galaxy
12 Vibraphone 52 Synth Strings 2 92 Choir 132 Galaxy2
13 Marimba 53 Choirs Aahs 93 Bowed 133 Funk_Ep
14 Xylophone 54 Voice Ooh 94 Metallic 134 Funk_Ep2
15 Tubular Bells 55 Synth Voice 95 Halo 135 Polar
16 Dulcimer 56 Orchestra Hit 96 Sweep 136 Polarz
Orgue [Organ] Cuivres [Brass] Effets [Effects] 137 Gdharpsi
17 Drawbar Organ 57 Trumpet 97 Rain 138 Clavr-Kb
18 Jazz Organ 58 Trombone 98 Soundtrack 139 Clavr-Kb2
19 Rock Organ 59 Tuba 99 Crystal 140 Elclav
20 Church Organ 60 Muted Trumpet 100 Atmosphere 141 Wclzavrz
21 Reed Organ 61 French Horn 101 Brightness 142 Wclzael
22 Accordion 62 Brass Ensemble 102 Goblins 143 Bell
23 Harmonica 63 Synth Brass 1 103 Echoes 144 Bell2
24 Tango Accordion 64 Synth Brass 2 104 Sci-Fi 145 Vibes2
Guitare [Guitar] Anche [Reed] Ethnique [Ethnic] 146 Vibesma
25 Classic Guitar 65 Soprano Sax 105 Sitar 147 Marin-Kb
26 Steel Guitar 66 Alto Sax 106 Banjo 148 Marinkb2
27 Jazz Guitar 67 Tenor Sax 107 Shamisen 149 Marinbel
28 Clean Guitar 68 Baritone Sax 108 Koto 150 Slopiano
29 Muted Guitar 69 Oboe 109 Kalimba 151 Qpiano
30 Overdriven Guitar 70 English Horn 110 Bagpipe 152 Jz-Org2
31 Distortion Guitar 71 Bassoon 111 Fiddle 153 Jz-Org1
32 Guitar Harmonics 72 Clarinet 112 Shanai 154 Jazzorg3
Basse [Bass] Pipeau [Pipe] Percussions [Percussive] 155 Clik-Org
33 Acoustic Bass 73 Piccolo 113 Tinkle Bell 156 Ele-Org
34 Finger Bass 74 Flute 114 Agogo 157 Ele-Org2
35 Picked Bass 75 Recorder 115 Steel Drums 158 Danc-Org
36 Fretless Bass 76 Pan Flute 116 Wood Block 159 New-Org
37 Slap Bass 1 77 Blown Bottle 117 Taiko Drum 160 Organ3Zz
38 Slap Bass 2 78 Shakuhachi 118 Melodic Tom 161 Piporgkb
39 Synth Bass 1 79 Whistle 119 Synth Drum 162 Bgchurch
40 Syth Bass 2 80 Ocarina 120 Reverse Cymbal 163 Elec-Org

58
10. Caractéristiques techniques
Système requis : (Pour les raccordements USB)
UC : 300 MHz ou supérieur, Pentium 2
Mémoire : 64 MB ou plus
Disque dur : au moins 2 MB d’espace libre
SE: WINDOWS® XP/Vista™, MacOS X® 10.4 et plus
Connecteurs : Courant en continu
Écouteurs (stéréo 6,3 mm)
Sortie Aux. (stéréo 6,3 mm)
Volume
Prolongation
Port USB (USB mâle de type B)
Adaptateur de courant (optionnel) : Entrée : 230V~, 50 Hz
Sortie : 12V/CC, 2.0A
Diamètre externe de la prise : 5,5 mm de Ø
Diamètre interne de la prise : 2,1 mm de Ø
Nombre de touches : 61
Son polyphonique : Max. de 64 notes
Nombre de voix : 310
Nombre de styles : 160
Nombre de chansons : 120
Haut parleurs intégrés : 4Ω, 2 x 10 W
Alimentation électrique : 9 V/CC (6 piles 1,5 V, Type D)
Dimensions (L x l x H) : 970 x 350 x 135 mm
Poids : 6 kg
35
L) Recording
Start Recording
Press [RECORD] button, the four counting beats on the LCD will fl ash, indicating a “record waiting status”. The ACCOMP 1.
track and MELODY track can be recorded together.
You can start recording once all your settings have been made. Start recording by playing the keyboard or pressing the 2.
[START/STOP] button. Any previous recording will be overwritten.
The recording will be erased once the keyboard is turned off.
Stop Recording
1. Automatic Stop
Once the memory is full, the recording will stop automatically, and the LCD will display “FULL”. -
When a style is playing, press [INTRO/ENDING] button to stop recording automatically after the ending. -
2. Manual Stop
To stop immediately, press [RECORD] button again while recording. -
Playback Recording
To start or stop playing the recorded data, press [PLAY/STOP] button.
M) Songs
There are 120 songs in total (see Appendix III). Each song can be practised in the LESSON mode.
Press [SONG] button to enter the “song mode”. The “Song” icon on the LCD will be displayed. Press [START/STOP] or 1.
[SONG] button to play the current song repeatedly. Press [START/STOP] or [SONG] button again to stop playing the
song,
Use [+/YES] / [-NO] button or th numeric keypad to select the song you want.2.
Press [LESSON] button to enter the “lesson mode”. There are 3 different ways to practise each song.3.
To exit the song mode, press [STYLE] , [VOICE] or [DUAL].4.
N) Lesson
The keyboard provides three level of lessons.
In “song mode”, press [LESSON] button to enter the lesson mode.
The lesson mode is selected in following sequence: Lesson 1(Beat) > Lesson 2(Follow) > Lesson 3(Perform) > Off.
To start or stop the lesson, press [START/STOP] button.
Lesson 1:
Choose Lesson 1 to learn the rhythm of the song. The correct sound will be played irrespective of the note you played, as
long as the rhythm is correct.
Lesson 2:
Play the note shown in the display. When the correct note is played, the next note will be shown.
Lesson 3:
Play the note as shown in the display with correct tempo. The keyboard will play the accompaniment.
7. Operation

36
O) Chord Dictionary
Chord dictionary helps you to look up chord notes. (See Appendix V)
Press and hold the [RIGHT/CHORD DICTIONARY] button for two seconds to enter the dictionary mode. “Dict” will be 1.
displayed on the LCD. In this mode, the keys above “C4” are assigned as the Chord Type, the keys above “C6” are
assigned as the Chord Root.
For example , if we want to play a Cm7 CHORD. Press the “C” key in the section of the keyboard labeled “CHORD ROOT”. 2.
(The note will not sound) The root note you set will be shown on the display.
Press the “m7” key in the section of the keyboard which has labeled “CHORD TYPE” (The note will not sound). The notes 3.
for the specifi ed chord (root note and chord type) will be shown on the display in musical notation and also in the keyboard
diagram.
If you play the chord correctly (which is displayed on the keyboard diagram) , a bell tone will sound.4.
8. Maintenance and cleaning
Check the technical safety of the product regularly, e.g. damage to the housing (or the external adapter which you use).
When it can be assumed that safe operation is no longer possible, the product must be put out of service and precautions
taken to ensure that it is not used unintentionally. Switch off the keyboard, disconnect it from any external power unit, and
disconnect the external power adapter from the mains voltage. Remove any possibly inserted batteries.
It must be assumed that safe operation is no longer possible if:
the device shows signs of visible damage -
the device no longer operates and -
has been stored for long periods under unfavourable conditions or -
has been subjected to considerable stress in transit. -
The safety instructions below must be noted before the keyboard is cleaned:
Before cleaning, servicing or repair works, the device must be disconnected from all sources of voltage. Switch off the -
keyboard and disconnect the external power unit.
Remove any possibly inserted batteries/accumulators. -
None of the components inside the product are to be maintained by the user. -
Live components may be exposed if the covering is opened or components are removed. -
Capacitors in the device may still be charged, even if the device has been disconnected from all voltage sources. -
Only qualifi ed experts, who are familiar with the hazards involved and with the relevant regulations, can carry out -
repairing.
Dust in the opening of the keys can be removed with the aid of a clean, soft brush or a vacuum cleaner.
The use of a dry, lint-free cloth is suffi cient to clean the outside of the product. For more resistant dirt, you can moisten the
cloth slightly with lukewarm water.
Do not use any cleaning agents as these may discolour the plastic material. The lettering may also
become damaged.
Before connecting the keyboard again (or insert batteries/connect it with an external power unit), wait
until the device is completely dry!
7. Operation
57
8. Entretien et nettoyage
Vérifi ez régulièrement les conditions de l’appareil relatives à la sécurité, telles que l’intégrité du boîtier (ou celle du boîtier de
l’alimentation éventuellement utilisée).
Si vous pensez que l’appareil ne peut plus être utilisé en toute sécurité, mettez-le hors service et faites en sorte que l’on ne
puisse plus l’utiliser par mégarde. Eteignez le clavier, déconnectez-le de l’alimentation externe, et débranchez l’alimentation
du secteur. Retirez les piles si elles sont présentes.
L’utilisation en toute sécurité n’est plus possible si :
L’appareil est visiblement endommagé -
L’appareil ne fonctionne plus et -
L’appareil a été stocké pendant longtemps dans des conditions défavorables ou -
L’appareil a subi de très fortes contraintes pendant son transport. -
Prenez connaissance des consignes de sécurité suivantes avant le nettoyage du clavier:
Avant nettoyage, entretien ou réparation, déconnectez toute source d’alimentation du clavier et débranchez l’alimentation -
externe.
Retirez toutes les piles/batteries éventuellement présentes. -
L’intérieur de l’appareil ne comporte aucune pièce pouvant être entretenue par l’utilisateur. -
Des composants sous tension peuvent se trouver à nu si vous ouvrez le boîtier de l’appareil ou si vous en retirez des -
éléments.
Il est possible que des condensateurs soient encore chargés, même si l’appareil a été débranché. -
Seuls des experts qualifi és familiarisés avec les dangers et les règles en vigueur sont en mesure de réparer cet appareil. -
Vous pouvez retirer la poussière présente aux ouïes de ventilation à l’aide d’un pinceau propre et doux ou d’un aspirateur.
Un chiffon sec et non pelucheux suffi t pour nettoyer l’extérieur du clavier. En cas de salissures résistantes, vous pouvez
humecter légèrement le chiffon avec de l’eau tiède.
N’utilisez aucun produit nettoyant qui serait susceptible de décolorer le plastique de l’appareil. Vous
risqueriez également d’abîmer les inscriptions.
Avant de rebrancher le clavier (ou d’y insérer des piles/d’y brancher une alimentation externe), attendez
son séchage complet!
9. Elimination des déchets
Mise au rebut d’équipements électriques et électroniques
Afi n de respecter l’environnement et de recycler au maximum les objets usagés, il est demandé à l’utilisateur de
rapporter les appareils à mettre au rebut aux points de collecte et de recyclage appropriés.
Le logo représentant une poubelle à roulettes barrée d’une croix signifi e que ce produit doit être apporté à un
point de collecte et de recyclage des produits électroniques pour que ses matières premières soient recyclées
au mieux.
Mise au rebut de piles/accumulateurs usagés
L’utilisateur est dans l’obligation légale de rendre les piles et accumulateurs usagés. La mise au rebut de
piles usagées dans les ordures ménagères est interdite ! Les piles/accumulateurs contenant des substances
dangereuses sont marqués par la poubelle barrée. Le symbole indique que la mise au rebut du produit est interdite
par l’intermédiaire des ordures ménagères. Les symboles chimiques pour les substances dangereuses respectives
sont Cd = Cadmium, Hg = Mercure, Pb = Plomb.
Vous pouvez rendre les piles/accumulateurs usagés gratuitement à tout point de collecte de votre collectivité, nos
magasins ou tout point de vente de piles/accumulateurs.
Vous respecterez ainsi vos obligations civiles et contribuerez à la protection de l’environnement !

56
7. Fonctionnement
2. Arrêt manuel
- Pour arrêter immédiatement, appuyez de nouveau sur la touche [RECORD] en cours d’enregistrement.
Lecture d’un enregistrement
Pour lancer ou arrêter la lecture des données enregistrées, appuyez sur la touche [PLAY/STOP].
M) Chansons
Il y a un total de 120 chansons (voir Annexe III). Chaque chanson peut être pratiquée en mode LEÇON.
Appuyez sur la touche [CHANSON] pour accéder au « mode chanson ». L’icône « Chanson » sera affi chée à l’écran. 1.
Appuyez plusieurs fois sur la touche [COMMENCER/ARRÊTER] ou [CHANSON] pour jouer immédiatement la chanson
actuelle. Appuyez à nouveau sur la touche [COMMENCER/ARRÊTER] ou [CHANSON] pour arrêter de jouer la chanson,
Utiliser la touche [+/OUI] / [-NON] ou le clavier numérique pour sélectionner la chanson souhaitée. 2.
Appuyez sur la touche[LEÇON] pour accéder au « mode leçon ». Il existe 3 façons différentes de pratiquer chaque 3.
chanson.
Pour quitter le « mode chanson », appuyez sur [STYLE], [VOIX] ou [DOUBLE]. 4.
N) Leçon
Le clavier comprend trois niveaux de leçons.
En « mode chanson », appuyez sur la touche [LESSON] pour passer au « mode leçon ».
Le mode leçon est sélectionné selon la séquence suivante : Leçon 1 (Rythme) > Leçon 2 (Suivre) > Leçon 3 (Jouer) > Arrêt.
Pour démarrer ou arrêter une leçon, appuyez sur la touche [START/STOP].
Leçon 1 :
Choisir Leçon 1 pour apprendre le rythme de la chanson. Le son correct sera joué indépendamment de la note que vous avez
jouée, aussi longtemps que le rythme est correct.
Leçon 2 :
Jouez les notes affi chées à l’écran. Quand la bonne note est jouée, la note suivante est affi chée.
Leçon 3 :
Jouez les notes affi chées à l’écran avec le bon tempo. Le clavier jouera l’accompagnement.
O) Dictionnaire des accords
Le dictionnaire des accords vous aide à chercher des accords. (Voir l’Annexe V).
Appuyez sur la touche [DICTIONNAIRE DROITE/ACCORD] et maintenez-la enfoncée pendant deux secondes pour 1.
accéder au mode dictionnaire. L’écran affi chera « Dict ». Dans ce mode, les touches au-dessus de « C4 » sont allouées
au type de chœur, les touches au-dessus de « C6 » sont allouées à la racine de l’accord.
Par exemple, si vous voulez lire un ACCORD Cm7, appuyez sur la touche « C » sur la partie du clavier appelée « RACINE 2.
D’ACCORD » (la note ne sera pas jouée). La note racine que vous réglez sera affi chée à l’écran.
Appuyez sur la touche « m7 » dans la partie du clavier appelée « TYPE D’ACORD » (la note ne sera pas jouée). Les notes 3.
que vous réglez pour l’accord spécifi é (note racine et type d’accord) apparaîtront à l’écran dans la notation musicale ainsi
que dans le graphique du clavier.
Si vous jouez l’accord correctement, (celui qui est affi ché sur le diagramme du clavier), un carillon retentira. 4.
37
Waste electrical and electronic equipment disposal
In order to preserve, protect and improve the quality of environment, protect human health and utilise natural
resources prudently and rationally, the user should return unserviceable product to relevant facilities in
accordance with statutory regulations.
The crossed-out wheeled bin indicates the product needs to be disposed separately and not as municipal waste.
It is used in conjunction with either solid bar or date of manufacture/ put on the market.
Used batteries/ accumulators disposal
The user is legally obliged to return used batteries and accumulators. Disposing used batteries in the household
waste is prohibited! Batteries/ accumulators containing hazardous substances are marked with the crossed-out
wheeled bin. The symbol indicates that the product is forbidden to be disposed via the domestic refuse. The
chemical symbols for the respective hazardous substances are Cd = Cadmium, Hg = Mercury, Pb = Lead.
You can return used batteries/ accumulators free of charge to any collecting point of your local authority, our stores
or where batteries/ accumulators are sold.
Consequently you comply with your legal obligations and contribute to environmental protection!
10. Technical Data
System Requirements: (For USB connection)
CPU: 300 MHz or higher, Pentium 2
Memory: 64MB or more
Hard Disk: at least 2 MB of free space
OS: WINDOWS® XP/Vista™, MacOS X® 10.4 and higher
Connectors: DC Power
Headphones (6.3mm stereo)
Aux. Out (6.3mm stereo)
Volume
Sustain
USB Port (USB B-type male)
Power Adapter (Optional): Input: 230V~, 50 Hz
Output: 12V/DC, 2000 mA
Outer diameter of plug: Ø 5.5 mm
Inner diameter of plug: Ø 2.1 mm
Number of Keys: 61
Polyphonic Sound: Max. 64 notes
Number of Voices: 310
Number of Styles: 160
Number of Songs: 120
Built-In Speakers: 4Ω, 2 x 10W
Power Supply: 9V/DC (6 x 1.5V Batteries, Type D)
Dimensions (L x W x D): 970 x 350 x 135 mm
Weight: 6 kg
9. Disposal

38
Appendix
Appendix I: Voice list
Piano Strings Lead Sound Effects
01 Acoustic Grand Piano 41 Violin 81 Square 121 Guitar Fret Noise
02 Bright Acoustic Piano 42 Viola 82 Sawtooth 122 Breath Noise
03 Electric Grand Piano 43 Cello 83 Calliope 123 Seashore
04 Honky-tonk Piano 44 Contrabass 84 Chiff 124 Bird Tweet
05 Electric Piano 1 45 Tremolo Strings 85 Charang 125 Telephone Ring
06 Electric Piano 2 46 Pizzicato Strings 86 Voice 126 Helicopter
07 Harpsichord 47 Orchestral Harp 87 Fifths 127 Applause
08 Clavi 48 Timpani 88 Bass & Lead 128 Gunshot
Mallet String Ensemble Pad Other Voices
09 Celesta 49 Strings Ensemble 1 89 Fantasia 129 Pianostr
10 Glockenspiel 50 Strings Ensemble 2 90 Warm 130 Modernep
11 Music box 51 Synth Strings 1 91 Polysynth 131 Galaxy
12 Vibraphone 52 Synth Strings 2 92 Choir 132 Galaxy2
13 Marimba 53 Choirs Aahs 93 Bowed 133 Funk_Ep
14 Xylophone 54 Voice Ooh 94 Metallic 134 Funk_Ep2
15 Tubular Bells 55 Synth Voice 95 Halo 135 Polar
16 Dulcimer 56 Orchestra Hit 96 Sweep 136 Polarz
Organ Brass Effects 137 Gdharpsi
17 Drawbar Organ 57 Trumpet 97 Rain 138 Clavr-Kb
18 Jazz Organ 58 Trombone 98 Soundtrack 139 Clavr-Kb2
19 Rock Organ 59 Tuba 99 Crystal 140 Elclav
20 Church Organ 60 Muted Trumpet 100 Atmosphere 141 Wclzavrz
21 Reed Organ 61 French Horn 101 Brightness 142 Wclzael
22 Accordion 62 Brass Ensemble 102 Goblins 143 Bell
23 Harmonica 63 Synth Brass 1 103 Echoes 144 Bell2
24 Tango Accordion 64 Synth Brass 2 104 Sci-Fi 145 Vibes2
Guitar Reed Ethnic 146 Vibesma
25 Classic Guitar 65 Soprano Sax 105 Sitar 147 Marin-Kb
26 Steel Guitar 66 Alto Sax 106 Banjo 148 Marinkb2
27 Jazz Guitar 67 Tenor Sax 107 Shamisen 149 Marinbel
28 Clean Guitar 68 Baritone Sax 108 Koto 150 Slopiano
29 Muted Guitar 69 Oboe 109 Kalimba 151 Qpiano
30 Overdriven Guitar 70 English Horn 110 Bagpipe 152 Jz-Org2
31 Distortion Guitar 71 Bassoon 111 Fiddle 153 Jz-Org1
32 Guitar Harmonics 72 Clarinet 112 Shanai 154 Jazzorg3
Bass Pipe Percussive 155 Clik-Org
33 Acoustic Bass 73 Piccolo 113 Tinkle Bell 156 Ele-Org
34 Finger Bass 74 Flute 114 Agogo 157 Ele-Org2
35 Picked Bass 75 Recorder 115 Steel Drums 158 Danc-Org
36 Fretless Bass 76 Pan Flute 116 Wood Block 159 New-Org
37 Slap Bass 1 77 Blown Bottle 117 Taiko Drum 160 Organ3Zz
38 Slap Bass 2 78 Shakuhachi 118 Melodic Tom 161 Piporgkb
39 Synth Bass 1 79 Whistle 119 Synth Drum 162 Bgchurch
40 Syth Bass 2 80 Ocarina 120 Reverse Cymbal 163 Elec-Org
55
7. Fonctionnement
G) DSP (Système de traitement numérique du signal)
Cette fonction permet d’obtenir un son réaliste. Vous pouvez ajuster la valeur du DSP à partir du menu « Fonction ».
H) Métronome
Appuyez sur [Métro] pour activer ou désactiver le métronome.
I) Piano
Appuyez sur [PIANO] pour accéder au mode piano ou pour le quitter. 1.
Vous pouvez aussi quitter le mode piano à l’aide du bouton [DÉMO], [CHANSON] ou [MÉMOIRE]. 2.
Vous pouvez jouer des styles sans accompagnement. 3.
En mode piano, vous ne pourrez pas accéder à la fonction « Enregistrement ». 4.
J) Mémoire
Ce clavier dispose de 4 banques de mémoire et chaque banque peut stocker jusqu’à 6 groupes de données ([M1] - [M6]).
Ces banques servent à stocker 24 réglages complets du panneau de commande qui peuvent être récupérés en tant que de
besoin
Pour choisir une banque de mémoire, appuyez sur [Banque de mémoire] en séquence pour sélectionner les banques de 1.
mémoire 01-04.
Après avoir choisi la banque de mémoire, vous pouvez stocker ou récupérer les données contenues dans l’un des six 2.
groupes [M1] ~ [M6].
Pour stocker les données, appuyez et maintenez enfoncée la touche [STORE], puis appuyez simultanément sur [M1] (ou 3.
[M2] à [M6]) pour stocker les données dans M1.
L’écran LCD affi chera « Memwrite » lors du stockage des données. 4.
Pour récupérer les données de la mémoire, appuyez sur l’une des touches [M1] ~ [M6] et maintenez-la enfoncée. 5.
Pour rétablir les valeurs implicites des banques de mémoire, appuyez simultanément sur [+/OUI] et [-/NON] tout en 6.
allumant l’appareil. Après la réinitialisation, toutes les données et la confi guration seront perdues.
K) Réglage à touche unique (O.T.S. One Touch Setting)
Cette fonction charge 4 réglages de [M1] à [M4] selon le style en cours.
Appuyez sur la touche [O.T.S.]. Ces réglages seront immédiatement chargés dans les banques de mémoire de [M1] à 1.
[M4]. Le mode « A.B.A. » sera automatiquement activé.
Appuyez sur l’une des touches de [M1] à [M4]. [M1] et [M2] contiennent les style « normaux », [M3] et [M4] les styles 2.
« variation ».
Quand un style est en cours de lecture, appuyez sur la touche [M1] ou [M2] pour ajouter une « FILL-IN A ». Appuyez sur la 3.
touche [M3] ou [M4] pour ajouter un « Intermède B ».
Appuyez de nouveau sur la touche [O.T.S.] pour quitter le réglage à touche unique. 4.
L) Enregistrement
Démarrage de l’enregistrement
Appuyez sur la touche [RECORD], les quatre temps à l’écran LCD clignoteront, indiquant un statut « en attente 1.
d’enregistrement ». Vous pouvez sélectionner une voix, un style et une mémoire dans ce statut. Les pistes ACCOMP et
MELODIE peuvent être enregistrées ensemble.
Vous pouvez lancer l’enregistrement lorsque tous vos réglages sont terminés. Commencez à enregistrer en jouant sur le 2.
clavier ou en appuyant sur la touche [START/STOP]. Tout enregistrement précédent sera écrasé. L’enregistrement sera
effacé lorsque le clavier est éteint.
Der Aufnahmespeicher wird beim Ausschalten des Keyboards gelöscht.
Arrêt de l’enregistrement
1. Arrêt automatique
Lorsque la mémoire est pleine, l’enregistrement s’arrête automatiquement et l’écran LCD indique « FULL ». -
Quand un style est en cours de lecture, appuyer sur la touche [INTRO/ENDING] pour arrêter l’enregistrement -
automatiquement après la fi n.

54
7. Fonctionnement
g. Accord de basse auto (A. B. C.)
A.B.A. est DÉSACTIVÉ implicitement. Appuyez sur la touche [A.B.C.] pour activer la fonctionnalité « accord de basse auto».
Dans ce mode, les touches en-dessous du point de séparation (Split point) sont appelées « zone d’ACCORD » (Chord
area).
Chord area
Accords simples
Vous pouvez jouer des accords simples dans la zone d’accord avec des doigtés simplifi és. (voir le tableau des accords
simples en Annexe VI)
Accords standards
Vous pouvez jouer des accords standards dans la zone d’accord avec un doigté normal. (voir le tableau des accords standards
en Annexe VI)
E) Menu des fonctions
Le menu des fonctions vous permet d’ajuster les paramètres de 11 éléments.
Appuyez sur la touche [FONCTION / ARRIÈRE] ou [FONCTION / SUIVANTE] pour accéder à cette fonction du menu. 1.
Appuyez plusieurs fois sur la touche [FONCTION / ARRIÈRE] ou [FONCTION / SUIVANTE] pour sélectionner d’autres 2.
éléments.
Appuyez sur [+/OUI] / [-/NON] pour ajuster les paramètres pour chaque élément. 3.
Le tableau ci-dessous présente les 11 éléments.
Contenu Affi chage LCD Gamme Valeur implicite
Air Air -50...50 0
Type de rythme Rythme 0 2...9 4
Point de séparation Pt de séparation 1...61 19 (F3#)
Canal entrée MIDI Entrée MIDI 01...16, ALL ALL
Canal sortie MIDI Sortie MIDI 01...16 01
Portamento et Modulation MODU MODULATION(MODU)
/PORTAMENTO(PORT) MODULATION (MODU)
Type de portamento Type de port. 1-3 2
Type de réverbération D5P Type de rév. 1--8 Réverb 5
Niveau de réverbération D5P Niveau de rév. 0--7 2
Type de choeur D5P Type de choeur 1--8 Choeur 1
Niveau de choeur D5P Niveau de choeur 0--7 0
F) Mélangeur
La commande du mélangeur vous permet d’ajuster le volume de la batterie, de la basse, de l’accord d’accompagnement et
de la section de droite du clavier.
1. Appuyez sur [RYTHME +] ou [RYTHME -] pour ajuster le volume de la piste de la batterie.
2. Appuyez sur [BASSE +] / [BASSE -] pour ajuster le volume de la piste de la basse.
3. Appuyez sur [ACCOMP +] / [ACCOMP -] pour ajuster le volume de la piste de l’accord d’accompagnement.
4. Appuyez sur [INFÉRIEUR +] / [INFÉRIEUR -] pour ajuster le volume de la section gauche du clavier.
5. Appuyez sur [SUPÉRIEUR +] / [SUPÉRIEUR -] pour ajuster le volume de la section droite du clavier.
39
Appendix
Other Voices Drum Set
164 Ufoorg 211 Fretlekb 258 Bassokb 301 Standard Drum 1
165 Q-Org 212 Slapbs 259 swetbras 302 Standard Drum 2
166 elorg 213 SlpbsKb 260 softsax 303 Room Drum
167 elorg 214 Synthbs 261 Whistle 304 Rock Drum
168 elorg 215 Synbass 262 Panfl ut 305 Electric Drum
169 sloorg 216 Synbass 263 Lead 306 Analog Drumset
170 ringo 217 Synthb 264 Lead 307 Dance Drumset
171 autolux 218 SynbsKb 265 Lead 308 Jazz Drum
172 elecorg 219 Acidbass 266 Lead 309 Brush Drumset
173 Accodin 220 acostbs 267 Warplead 310 Standard Drumset
174 Softacc 221 picked 268 Warp-
175 Accowaa 222 slapbs 269 Pianstld
176 Softacc 223 synthbs 270 childtoy
177 Harmonic 224 fgepbas 271 ahold
178 Harmharp 225 Vln-Hard 272 fmlead
179 slowacc 226 Viola-Kb 273 tunnel
180 accodin 227 Violastr 274 tunnel
181 softacc 228 Cello 275 fmlead
182 mutharmp 229 Slocello 276 fmlead
183 bigharm 230 Cello 277 fmlead
184 accomut 231 Contrakb 278 roomlead
185 harm 232 Contrakq 279 Sinepad
186 N-Gthamm 233 Stringf 280 Softpad
187 Pickgt 234 Strgszz 281 Bellpad
188 Strgt 235 Stringf 282 Synpad
189 Stel-gt 236 Strings 283 Hornpad
190 Cleagtkb 237 Slwstrzz 284 Newagpad
191 Pickcgt 238 Synthst 285 Bagpipe
192 Bcln-Gt 239 SystrZz 286 Distorld
193 Cln-Gt 240 vlnhard 287 Systrel
194 Solid-Gt 241 violakb 288 Dist-
195 Solidwa 242 cello 289 Chorusld
196 Chorusgt 243 contra 290 Halon
197 Q-Gt 244 strrue 291 Dream
198 Mut-Gt 245 dreamstr 292 Dream
199 Overgtkb 246 pizstr 293 Waspysyn
200 Tremolgt 247 strpiz 294 Orgpd
201 Funk-Gt 248 Swet_Trp 295 Trompad
202 cleagt 249 Trombone 296 Softacpd
203 cleagt 250 Trombon 297 theology
204 rvcleagt 251 Tuba 298 calm
205 overgt 252 Tubabl 299 padorg
206 Acostbs 253 Fmhorn 300 palbel
207 Abascym 254 Bbbrass
208 Fg-Bs-Kb 255 Hibrass
209 Fusionbs 256 Tenosax
210 Pickedkb 257 Bari-Kb

40
Appendix
Appendix II: Style list
8 BEAT ROCK
01 Sweet Beat 41 Soft Rock 81 Jazz Funk 121 Disco Samba
02 Miami Beat 42 Hard Rock 82 Groove 122 Mambo
03 Rhythm & Beat 43 Heavy Rock 83 Soul 123 Meneito
04 Guitar Pop 1 44 Easy Rock 84 Hip Hop Soul 124 Rumba 2
05 8 Beat Dance 45 New Shuffl e 85 Hip Hop Beat 125 Tikitikita'
06 8 Beat Disco 46 Rock Hip Hop 86 R & B 126 Dancing Tribe
07 Pop Funk 47 Rock & Roll 87 Soul Beat 127 Lambada
08 8 Beat 1 48 Rock Shuffl e 88 R & B Ballad 128 Pop Cha Cha
09 60's 8 Beat 49 70's Rock & Roll 89 British Soul Pop 129 Cha Cha Cha
10 8 Beat 2 50 Folk Rock 90 Samba Funk 130 Salsa
16 BEAT BALLROOM JAZZ WORLD
11 16 Beat Ballad 51 Rhumba 1 91 Jazz Fusion 131 Scottish
12 Pop 16 Beat 1 52 Slow Waltz 1 92 Fusion 132 Laendler
13 Pop 16 Beat 2 53 Fox Trot 93 Jazz Brush 133 Hawaiian
14 Modern 16 Beat 54 Samba 94 Latin Jazz 134 Sirtake
15 16 Beat Hot 55 Cha Cha 95 Acid Jazz 1 135 Venezia
16 16 Beat Modern 56 Quick Step 96 Acid Jazz 2 136 6/8 Flipper
17 16 Beat Bossa Nova 57 Twist 97 Cool Jazz Ballad 137 New Age
18 16 Beat Funk 58 Swing Fox 98 Swing Shuffl e 138 Tarantella
19 16 Beat 59 Jive 99 Big Band 40's 139 Enka
20 Cool Beat 60 Beguine 100 Big Band Medium 140 Norteno
POP DANCE COUNTRY TRADITIONAL
21 Analog Night 61 Garage 101 Country 8 Beat 141 Polka
22 Guitar Pop 2 62 Techno 102 Modern Country 142 German Polka
23 Pop beat 63 Progressive 103 Country Ballad 2 143 Party Polka
24 Soft Beat 64 Rap 1 104 Country Pop 144 March
25 60's Pop 65 Rap 2 105 2/4 Country 145 6/8 March
26 Sting Latin 66 Disco 106 Country 146 US March
27 Brit Pop 1 67 Soft Disco 107 Country Quick Steps 147 Musette
28 Brit Pop 2 68 Disco Party 108 Bluegrass 148 French Musette
29 Pop Hit 69 70's Disco 109 Country Flok 149 Mazurke
30 Fusion Shuffl e 70 70's Disco Funk 110 Country Rock 150 Waltz
BALLAD 71 Club Dance LATIN/LATIN DANCE INDONESIA
31 Rock Ballad 1 72 Euro Dance 111 Bossa Nova 151 Dandut1
32 Folk Ballad 73 80's Dance 112 Habanera 152 Dandut2
33 Pop Ballad 1 74 Hip Hop 113 Latin 153 Dangdu
34 Pop Ballad 2 75 Down Beat 114 New Reggae 154 Dangdut1
35 EP Ballad SOUL & FUNK 115 Dance Reggae 155 Dangdut2
36 Piano Ballad 76 Funk 116 Pasodoble 156 Dangdut3
37 New R&B Ballad 77 Electric Funk 117 Lite Bossa 157 Keroncong1
38 Natural Ballad 78 Groove Funk 118 Latin Rock 158 Keroncong2
39 Love Ballad 79 Rubber Funk 119 Beguine 159 PopKeroncong
40 Easy Ballad 80 Cool Funky 120 Slow Bolero 160 Slow Dangdut
53
7. Fonctionnement
Appuyez sur la touche [SYNC]. Cela garantit que les accords de basse auto démarrent en synchronisation avec le -
style.
Le style démarrera quand vous commencerez à jouer une note ou un accord dans la zone ACCORD (voir la partie -
Accord de basse auto)
4. Avec une introduction
Appuyez sur LA TOUCHE [INTRO/ENDING] pour insérer une section introductive avant d’appuyer sur la touche -
[START/STOP] pour lire le style (voir la partie son Intro/Conclusion)
Arrêt d’un style
1. Arrêt immédiat
Utilisez la touche [START/STOP] pour arrêter le style. -
2. Arrêtez avec une conclusion
Appuyez sur la touche [INTRO/ENDING] pour arrêter avec une conclusion. La conclusion sera introduite au début du -
prochain paragraphe
3. Arrêt Sync
Appuyez sur la touche [SYNC] pour arrêter la lecture immédiatement. Le mode synchronisé sera activé. -
b. Synchronisation
Appuyez sur la touche [SYNC] pour synchroniser votre mélodie ou vos accords avec le style sélectionné. Les indicateurs 1.
de battement clignotent pour indiquer que le rythme est en « mode attente ».
Le style démarrera quand vous commencerez à jouer votre mélodie ou vos accords. 2.
c. Intro / Conclusion
Cette fonction vous permet d’ajouter une introduction ou une conclusion à un style. Sa longueur dépend des différents styles.
Pour faire démarrer un style avec une introduction, appuyez sur la touche [INTRO/ENDING] avant de démarrer le style. 1.
Pour ajouter une conclusion à un style, appuyez sur la touche [INTRO/ENDING] pendant la lecture du style. 2.
Lorsque ce mode est activé, l’indicateur au-dessus de « Intermède A » ou de « Intermède B » clignotera jusqu’à la fi n du 3.
mode.
d. Intermède A/B
Cette fonction vous permet d’ajouter un intermède à un style.
Choisissez et jouez le style souhaité. 1.
Pour insérer un intermède, appuyer sur la touche [INTERMEDE A] ou [INTERMEDE B]. L’indicateur au-dessus de la 2.
touche arrêtera de clignoter lorsque l’intermède arrête de jouer.
Pour continuer à répéter le motif, appuyez et maintenez enfoncée la touche [INTERMEDE A] ou la touche [INTERMEDE B]. 3.
e. Tempo
Appuyez sur la touche [TEMPO+] ou [TEMPO-] pour modifi er le tempo. Le tempo varie de 30 à 280.1.
Appuyez sur la touche [TEMPO+] et [TEMPO-] en même temps pour rétablir la valeur implicite du tempo.2.
f. Fondu
Cette fonction de fondu crée un son plus doux pour commencer ou terminer un style.
1. Ouverture en fondu
Pour activer la fonction d’ouverture en fondu, appuyez sur [FONDU] avant de commencer un style. Lorsque le style -
commence, l’indicateur de fondu de l’écran clignotera et le volume augmentera progressivement jusqu’au niveau maximum
en 10 secondes. Puis l’indicateur s’arrêtera et le style jouera normalement.
2. Fermeture en fondu
Pour activer la fonction de fermeture en fondu, appuyez sur [FONDU] lorsqu’un style est en cours de jeu. L’indicateur -
de fondu de l’écran clignotera et le volume diminuera progressivement jusqu’au niveau minimum en 10 secondes. Puis
l’indicateur de fondu s’arrêtera. Le style sera mis en sourdine jusqu’à ce qu’il soit arrêté.
Pour retourner au jeu normal, appuyez à nouveau sur [FONDU]. -

52
7. Fonctionnement
Le point de séparation entre les deux sections est la note #F3.
Voice L Voice R1/R2
Split Point (#F3)
e. Changement de ton
La boule de changement de tons peut servir à élever ou à baisser la note de +/- 2 cents.
En jouant sur le clavier, faites glisser la boule vers le haut ou vers le bas pour moduler le ton. 1.
Une fois la boule relâchée, le son normal de la note sera rétabli. 2.
f. Modulation
En jouant sur le clavier, appuyez et maintenez enfoncée la touche [MODULATION]. 1.
Relâchez la touche pour désactiver l’effet de modulation. 2.
g. Tactile
Cette fonction vous permet de contrôler la dynamique de vos notes en faisant varier la pression sur les touches.
Si la fonction « toucher » est désactivée, les touches ne répondront pas au toucher.
Appuyer sur la touche [TACTILE] pour alterner entre le niveau 0 et le niveau 3 de l’effet tactile.
h. Transposition
Vous pouvez changer la clé de votre musique avec la fonction TRANSPOSE en modifi ant le ton de demi-ton en demi-ton.
Appuyez sur la touche [TRANSPOSE +] ou [TRANSPOSE -] pour modifi er la valeur de Transposition de -12 à +12 demi-1.
tons. L’écran LCD affi chera la valeur de transposition actuelle.
Appuyez simultanément sur les touches [TRANSPOSE +] et [TRANSPOSE -] pour retourner à la valeur implicite de 00. 2.
i. Octave
Cette fonction peut augmenter ou baisser la touche d’une octave.
Appuyez sur la touche [OCTAVE +] ou [OCTAVE -] pour modifi er la valeur de l’octave de -1 à 1. L’écran LCD affi chera la 1.
valeur actuelle de l’octave.
Appuyez simultanément sur les touches [OCTAVE +] et [OCTAVE -] pour retourner à la valeur implicite de 00. 2.
D) Contrôle du style
Le clavier comprend un total de 160 styles prédéfi nis différents. (voir l’Annexe II)
a. Style (Accompagnement automatique)
Sélection d’un style
Appuyez sur la touche [STYLE] pour mettre le clavier en « mode style ». L’icône « STYLE » sera affi chée. 1.
Pour sélectionner le style, appuyez sur [+/OUI] / [-/NON] ou sur le clavier numérique pour sélectionner la voix souhaitée. 2.
Démarrage d’un style
Vous pouvez faire démarrer un style de différentes manières.
1. Sans aucun effet
Utilisez la touche [START/STOP] pour faire démarrer le style. -
2. En synchronisation avec votre mélodie
Appuyez sur la touche [SYNC]. Cela garantit que la clé démarre en synchronisation avec le style. -
Le style commencera quand vous commencerez à jouer votre mélodie (en appuyant sur l’une des clés). -
3. En synchronisation avec votre accord de basse auto
Appuyez sur la touche [A.B.C] pour activer le mode « accord de basse auto ». -
41
Appendix
Appendix III: Songs list
CLASSICAL GOLDEN & POP 82 Wine
01 Aida 42 On London Bridge 83 Jazz Old Man
02 Annen Polka 43 Are You Lonesome Tonight 84 Dark Eyes
03 Auf Flugeln Dec Gesanges 44 Only You 85 Carlos
04 Brahms Waltz 45 End Of The World 86 Sad
05 Carmen-Entracte II 46 House Of Rising Sun 87 The Jazz
06 Carmen-Prelude 47 Solveig's Song ORIENTAL
07 L'Arlesienne 48 The Blue-Bells Of Scotland 88 South Mud Bay
08 La Traviata 49 Over The Rainbow 89 Give You A Rose
09 Mazurka 50 Beautiful Dreamer 90 Flowing Rill
10 Menuett 51 It`S Been A Long Long Time PIANO
11 Musical Moments 52 Edelweiss 91 Alise
12 Pizzicato Polka 53 O Sole Mio 92 Military March
13 Rigoletto 54 Der Deitcher`S Dog 93 Habanera
14 Serenade 55 You Are My Sunshine 94 Minuet
15 Song Without Words 56 Silent Night 95 Bagatelle No.3
16 Swan 57 Ave Maria 96 Old Macdonald Had A Farm
17 Prelude To Act 2 (Swan Lake) 58 Five Hundred Miles 97 Wedding March
18 Le Lac des Cygnes Acte I 59 Happy New Year 98 2-Part Invention #13 In A Minor.B.W.
19 The Happy Farmer 60 It`S Beginning To Look A Lot Like
Christmas 99 Minuet In G
20 The Sleeping Beauty 61 Jeanie With The Light Brown Hair 100 Turkish March
21 Uungarische Tanz 62 My Bonnie 101 Hey Diddle Diddle
22 Wiegenlied 63 Song Of The Pearlfi sher 102 March
23 Mov.2 Adagio Non Troppo
Piano Sonata No.9 In D 64 Summer Palace 103 Moseta Dance
24 Mov.1 Andante Grazioso Piano
Sonata No.11 In A 65 The Stage Coach 104 Bulie Dance
25 Prelude In C 66 Entertainer 105 Aria
26 Chinese Dance 67 Annie Laurie 106 Germanic Dance
27 Emperors Waltz 68 Killing Me Softly With His Song 107 Away In A Manger
28 March Militaire 69 Love Is Blue 108 Jack & Jill
29 Symphony No.40 70 Last Rose Of Summer 109 Angles We Have Heard On High
30 Pianosonatan 08 IN Cm IN
Pathetique 71 The Old King Cole 110 Humpty Dumpty
31 Arpeggione Sonata in Am JAZZ & FUSION 111 Did You Ever See A Lassie
FOLK & COUNTRY 72 Chrysanf 112 Chopsticks
32 Santa Lucia 73 Maple Leaf Rag 113 Four Little Swans
33 Country 74 June Samba 114 Old France
34 Jambalaya 75 Funk 115 "Jesus, Saviour Pilot Me"
35 Susanna 76 I Can...... 116 Eclogue
36 Bridge 77 Sea Shore 117 Santa Claus Is Coming To Town
37 Battle Hymne Of The Republic 78 Guitar&Saxphone 118 Brave Cavalier
38 The Old Gray Mare 79 The Hip Hop`S Night 119 America The Beautiful
39 American Patrol 80 Blue Lunch 120 Music Box Dancer
40 In The Rain 81 Cobweb
41 Sippin Cider Through A Straw

42
Appendix
Appendix IV: Demo List
Name
01 Funk
02 American Patrol
03 Guitar&Saxphone
04 I Can......
05 Alise
Appendix V: Chord Dictionary
Chord Root : Chord Type:
Note Chord Root Note Chord Type
C6 C F6# F#/Gb
C6# C#/Db G6 G
D6 D A6b Ab/G#
E6b Eb/D# A6 A
E6 E B6b Bb/A#
F6 F B6 B
Note Chord Root Note Chord Type
C4 M C5 7(b9)
C4# M(9) C5# 7(9)
D4 6 D5 7(#9)
E4b mM7 E5b 7(b13)
E4 M7 E5 7(13)
F4 m F5 7(#11)
F4# m(9) F5# dim7
G4 m6 G5 dim
Ab4 m7(9) A5b 7aug
A4 m7 A5 aug
B4b m7b5 B5b 7sus4
B4 7 B5 sus4
Appendix VI: Chord Table
Simple Chord table Standard Chord Table
To play a major chord
Press the root note of the chord.
To play a minor chord
Press the root note together with the nearest black key to the left
of it.
To play a seventh chord
Press the root note together with the nearest white key to the left
of it.
To play a minor seventh chord
Press the root note together with the nearest black and white key
to the left of it (three keys altogether).
Notes enclosed in parentheses are optional;
the chords could be recognized without them.
51
6. Branchements
Fonction MIDI
Ce clavier est doté d’une fonctionnalité MIDI. MIDI (Musical Instrument Digital Interface) est la norme universelle utilisée
pour envoyer et recevoir des données de performance entre des instruments musicaux électroniques ou un ordinateur (voir
l’Annexe VII pour une liste MIDI).
Avec un câble USB, les données MIDI peuvent être transférées à un ordinateur ou un autre périphérique hôte USB compatible
avec les périphériques audio USB
7. Fonctionnement
A) Interrupteur et volume
Allumer l’ [POWER ]. L’écran LCD s’allume. 1.
Appuyez sur le bouton de commande du [VOLUME] pour régler le volume au niveau souhaité. 2.
B) Démo
Appuyez sur le bouton [DEMO] pour affi cher les titres de démo. Il y en a 5 au total (une liste complète se trouve dans 1.
l’Annexe IV)
Vous pouvez sélectionner une chanson de démonstration à l’aide de [+/OUI] / [-/NON] ou des touches numériques. Le 2.
nom de la chanson de démonstration apparaîtra à l’écran.
Appuyez sur [DEMO] ou [START/STOP] pour sortir du mode démo. 3.
C) Voix et effets
Un total de 310 voix est disponible (voir l’Annexe I).
a. Voix instrumentale
Appuyez sur la touche [VOICE] pour passer au mode vocal. 1.
Appuyez sur [+/OUI] / [-/NON] ou sur le clavier numérique pour sélectionner la voix souhaitée. 2.
b. Double voix
La fonction double voix vous permet de jouer simultanément deux instruments musicaux. Lorsque cette fonction duelle est
éteinte, la voix indiquée est « VOICE 1 », quand la fonction duelle est active, la voix indiquée est « VOICE 2 ».
En statut « VOICE 1 », appuyez sur la touche [DOUBLE] pour activer la fonction double voix. « VOICE 2 » et le signal 1.
« DUAL » sera affi ché à l’écran LCD. Le nombre de voix doubles sera également affi ché. Les deux voix sélectionnées
se chevaucheront.
Pour sélectionner la voix souhaitée 2, appuyez sur [+/OUI] / [-/NON] ou sur le clavier numérique pour sélectionner la voix 2.
souhaitée.
Appuyez de nouveau sur la touche [DUAL] pour désactiver la fonction double voix. 3.
c. Prolongation
Cette fonction produit des sons avec un effet de prolongation.
Appuyez sur la touche [SUSTAIN] pour activer l’effet de prolongation. L’icône « SUSTAIN » sera également affi chée. 1.
Appuyez sur la touche [SUSTAIN] pour désactiver l’effet de prolongation. L’icône « SUSTAIN » disparaîtra. 2.
d. Séparer/baisser la voix
Cette fonction séparera le clavier en section gauche (inférieure) et droite.
Dans ce mode, les touches à gauche du point de séparation seront utilisées pour accompagner les mélodies jouées à
droite.

50
5. Réglage
B) Pupitre
Installez le pupitre comme sur l’illustration ci-dessous.
6. Branchements
A) Prise casque
Branchez un jeu d’écouteurs (Stéréo 6,3 mm) dans la prise ÉCOUTEURS et les haut-parleurs seront automatiquement
éteints.
Evitez l’écoute au casque à fort volume pendant de longues périodes de temps; en plus d’une fatigue • auditive, vous pourriez endommager votre audition.
Afi n d’éviter d’endommager les haut-parleurs, réglez le volume des périphériques au minimum avant • de les brancher sur le clavier. Le non respect de ces précautions pourrait entraîner des dommages au
matériel ainsi qu’un risque de décharge électrique.
Réglez le volume de tous les appareils à leur minimum puis augmentez graduellement le volume en • jouant de l’instrument jusqu’à atteindre le niveau sonore désiré.
B) Prise SORTIE AUX
La prise SORTIE AUXILIAIRE génère le signal de sortie du clavier vers un amplifi cateur externe.
Utilisez un câble audio stéréo de 6,3 mm pour relier la prise SORTIE AUX sur le panneau arrière, puis branchez l‘autre
extrémité du câble dans le réceptacle ENTRÉE LIGNE ou ENT. AUX. de l’amplifi cateur.
C) Pédale de prolongation
Une pédale optionnelle peut être branchée à la prise PROLONGATION pour commander la prolongation.
La pédale fonctionne comme la pédale forte d’un piano. Appuyez pour prolonger, relâchez pour un son normal.
D) Pédale du volume
Il est possible de brancher une commande optionnelle de volume dans la prise VOLUME pour ajuster le niveau sonore.
E) Prise USB
Pour éviter tout dégât, éteignez ce clavier et tous les appareils qui y sont reliés avant de brancher ou • de débrancher un instrument avec d’autres appareils qui lui sont reliés. Activez l’ordinateur depuis le
mode Veille/Suspendu/Stanby avant de brancher le câble USB.
Respectez les précautions en reliant l’instrument à un ordinateur par câble USB, faute de quoi • l’instrument et/ou l’ordinateur pourrait se bloquer, ce qui pourrait causer une altération ou une perte
de données. Si l’instrument ou l’ordinateur se bloque, éteignez les deux appareils, puis rallumez-les
après quelques secondes.
La prise USB relie le clavier à l’ordinateur ou à un autre hôte USB compatible avec une interface audio USB.
Reliez un câble USB standard à la prise USB du panneau arrière de l’instrument à la prise USB de votre ordinateur (le 1.
câble USB est vendu séparément).
Pour les appareils avec câble USB, lorsque le pilote est installé et que l’initialisation est terminée, vous pouvez choisir le 2.
périphérique audio USB dans le menu des périphériques du logiciel pour transférer les données MIDI.
43
Appendix VII: Chord List
Chord Name / [Abbreviation] Normal Voicing Chord (C) Display
Major [M] 1-3-5 C C
Sixth [6] 1-(3)-5-6 C6 C6
Major seventh[M7] 1-3-(5)-7 CM7 CM7
Major seventh add sharp Eleventh [M7(#11)] 1-(2)-3-#4-5-7
or 1-2-3-#4-(5)-7
CM7(#11) CM7(#11)
Major add ninth [M(9)] 1-2-3-5 C M(9) C M(9)
Major seventh ninth [M7(9)] 1-2-3-(5)-7 C M7(9) C M7(9)
Sixth ninth [6 (9)] 1-2-3-(5)-6 C 6(9) C 6(9)
Augmented [aug] 1-3-#5 C aug C aug
Minor [m] 1-b3-5 Cm Cm
Minor sixth [m6] 1-b3-5-6 Cm6 Cm6
Minor seventh [m7] 1-b3-(5)-b7 Cm7 Cm7
Minor seventh fl atted fi fth [m7b5] 1-b3-b5-b7 Cm7b5 Cm7b5
Minor add ninth [m(9)] 1-2-b3-5 Cm(9) Cm(9)
Minor seventh ninth [m7(9)] 1-2-b3-(5)-b7 Cm7(9) Cm7(9)
Minor seventh add eleventh [m7(11)] 1-2-b3-4-5-(b7) Cm7(11) Cm7(11)
Minor major seventh [mM7] 1-b3-(5)-7 CmM7 CmM7
Minor major seventh ninth [mM7(9)] 1-2-b3-(5)-7 CmM7(9) CmM7(9)
Diminished [dim] 1-b3-b5 Cdim Cdim
Diminished seventh [dim7] 1-b3-b5-6 Cdim7 Cdim7
Seventh [7] 1-3-(5)-b7 C7 C7
Seventh suspended fourth [7sus4] 1-4-5-b7 C7sus4 C7sus4
Seventh fl atted fi fth [7b5] 1-3-b5-b7 C7b5 C7b5
Seventh ninth [7(9)] 1-2-3-(5)-b7 C 7(9) C 7(9)
Seventh add sharp eleventh [7(#11)] 1-(2)-3-#4-5-b7 or
1-2-3-#4-(5)-b7
C 7(#11) C 7(#11)
Seventh add thirteenth [7 (13)] 1-3-(5)-6-b7 C7(13) C7(13)
Seventh fl atted Ninth [7(b9)] 1-b2-3-(5)-b7 C7(b9) C7(b9)
Seventh add fl atted thirteen [7(b13 )] 1-3-5-b6-b7 C7(b13) C7(b13)
Seventh sharp ninth [7(#9)] (1)-#2-3-(5)-b7 C7(#9) C7(#9)
Major seventh augmented [M7aug] 1-3-#5-7 CM7aug CM7aug
Seventh augmented [7aug] (1)-3-#5-b7 C7aug C7aug
Suspended Fourth [sus4] 1-4-5 Csus4 Csus4
One plus two plus fi ve [1+2+5] 1-2-5 C 1+2+5 C
Appendix

44
Appendix
Appendix VIII: MIDI List
Function Transmitted Recognized Remarks
Basic
Channel
Default
Changed
1ch
1ch
1-16ch
1-16ch
Mode
Default
Messages
Altered
X
X
***********
3
X
X
Note
Number True Voice
0-127
***********
0...127
0...127
Velocity: Note on
Note off
O 9nH,V=1-127
X (9nH,V=0)
O 9nH,V=1-127
X (9nH,V=0; 8nH,V=0-127
After
Touch
Keys
Chs
X
X
X
X
Pitch Bend O O
Control
Change
0
1
5
6
7
1 0
11
64
65
66
67
80
81
91
93
120
121
123
O
O
X
O
O
X
X
O
X
X
X
X
X
X
X
X
X
X
O
O
O
O
O
O
O
O
O
O
O
O
O
O
O
O
O
O
Bank Select
Modulation
Portamento Time
Data Entry
Volume
Pan
Expression
Sustain Pedal
Portamento ON/OFF
Sostenuto Pedal
Soft Pedal
Reverb Program
Chorus Program
Reverb Level
Chorus Level
All Sound Off
Reset All Controllers
All Notes Off
Program
Change :
true # O
***********
O
0...12 7
System Exclusive X O
System :
Common :
:
Song Position
Song Select
Tune
X
X
X
X
X
X
System :
Real Time :
Clock
Commands
X
X *1
X
X *1
Aux :
:
Messages :
:
Local On/Off
All Notes Off
Active sense
Reset
X
X
X
X
X
O
O
O
Note: *1
When the accompaniment is started, an FAH message is transmitted.
When accompaniment is stoped, an FCH message is transmitted.
When an FAH message is received, accompaniment is started.
When an FCH message is received, accompaniment is stopped.
Mode 1: OMNI ON , POLY
Mode 3: OMNI OFF , POLY
Mode 2 : OMNI ON , MONO
Mode 4 : OMNI OFF , MONO
O: Yes
X: No
49
5. Réglage
A) Alimentation électrique
Ce clavier électronique peut être alimenté par piles ou branché dans une prise secteur murale standard
Utilisation de piles
Respectez les polarités lors de la mise en place des piles. Retirez les piles si vous n’utilisez pas le • clavier pendant une longue période de temps afi n d’éviter qu’elles ne coulent. Des piles endommagées
ou qui coulent peuvent provoquer des brûlures acides en cas de contact avec la peau, utilisez alors
des gants de protection pour les manipuler.
Conservez les piles hors de portée des enfants. Ne laissez pas traîner les piles, des enfants ou des • animaux domestiques pourraient les avaler.
Remplacez toutes les piles en même temps. Le mélange de piles neuves et usées est susceptible de • les faire couler, ce qui endommagerait l’appareil.
Assurez-vous que les piles ne soient pas disloquées, court-circuitées ou jetées au feu. Ne rechargez • jamais les piles non rechargeables. Il y aurait risque d’explosion!
Assurez-vous toujours d’éteindre le clavier avant d’introduire de nouvelles piles ou de remplacer des piles usées.
1. Ouvrez le compartiment des piles situé au bas du clavier.
2. Introduisez 6 piles de taille D (SUM-1, R-20) dans le compartiment des piles en suivant
l’indication de polarité (positive « + » et négative « - ») près du compartiment des piles.
3. Refermez le couvercle en vous assurant qu’il est bien enclenché.
Indications de décharge des piles
Tous les symptômes suivants sont des indications de piles faibles. Remplacez les piles dès que l’un d’entre eux se
manifeste.
Un écran LCD sombre et diffi cile à déchiffrer •
Le volume des haut-parleurs et des écouteurs est anormalement faible •
Le son est déformé •
Une coupure de courant soudaine lorsque le volume est élevé •
Le rythme des titres de démo est irrégulier •
L’écran s’assombrit lorsque le volume de jeu est élevé •
Utilisation de la sortie secteur (non comprise)
Ne branchez jamais le clavier à une sortie secteur immédiatement après l’avoir transféré d’un endroit froid
vers un endroit plus chaud. La condensation peut causer un mauvais fonctionnement, endommager le
clavier et pose un risque d’électrocution. N’utilisez que l’adaptateur de courant préconisé. L’utilisation
d’autres types d’adaptateurs pose un risque d’incendie et d’électrocution. Pour des raisons de sécurité,
veillez à débrancher l’adaptateur de courant de la prise murale si vous laissez le clavier électronique sans
surveillance pendant de longues périodes.
Assurez-vous bien que seul l’adaptateur de courant préconisé pour ce clavier électronique est utilisé. Cet adaptateur est de
type centrale-positive et produit 12V de CC de sortie. Prenez soin d’éteindre le clavier avant de brancher la sortie secteur à la
prise CA murale et le câble à l’unité. Une fois branché, le clavier sera mis sous tension par la sortie secteur et l’alimentation
électrique des piles sera coupée.
L’adaptateur de courant doit répondre aux spécifi cations techniques suivantes :
Entrée : 230 V/AC, 50 Hz
Sortie : 12 V/CC, 2.0A
Polarité :
Diamètre externe de la prise : 5,5 mm de Ø
Diamètre interne de la prise : 2,1 mm de Ø

48
4. Eléments constitutifs
A) Panneau frontal B) Panneau arrière
1. MARCHE/ARRÊT [POWER ON/OFF] 35. USB [USB]
2. VOLUME [VOLUME] 36. PÉDALE DE PROLONGATION [SUSTAIN PEDAL]
3. MÉLANGEUR [MIXER] 37. PÉDALE DU VOLUME [VOLUME PEDAL]
RYTHME [RHYTHM] - 38. SORTIE AUX [AUX OUT]
BASSE [BASS] - 39. ÉCOUTEURS [PHONES]
ACCOMP [ACCOMPAGNEMENT] - 40. 12 V CC [12 V DC]
INFÉRIEUR [LOWER] -
SUPÉRIEUR [UPPER] - C) Affi chage LCD
4. TEMPO [TEMPO] 41. FONDU [FADE]
5. FONDU [FADE] 42. DOUBLE [DUAL]
6. ABC [ABC] 43. MARCHE [POWER]
7. FONCTION [FUNCTION] 44. ABC [ABC]
8. DÉMO [DEMO] 45. ACCORD [CHORD]
9. LEÇON [LESSON] 46. VOIX/STYLE/CHANSON/ALBUM
[VOICES/STYLE/SONG/ALBUM]
10. GAUCHE [LEFT] 47. TEMPO [TEMPO]
11. DROITE/DICTIONNAIRE DES ACCORDS
[RIGHT/CHORD DICTIONARY]
48. MESURE [MEASURE]
12. ENREGISTRER [RECORD] 49. RYTHME [BEAT]
13. MARCHE/ARRÊT [PLAY/STOP] 50. MÉMOIRE [MEMORY]
14. AFFICHAGE LCD [LCD DISPLAY] 51. DSP [DSP]
15. VOIX [VOICE] 52. TACTILE [TOUCH]
16. STYLE [STYLE] 53. PROLONGER [SUSTAIN]
17. CHANSON [SONG] 54. DICTIONNAIRE DES ACCORDS
[CHORD DICTIONARY]
18. MÉTRONOME [METRONOME] 55. ENREGISTRER [RECORD]
19. PIANO [PIANO] 56. DROITE [RIGHT]
20. CLAVIER NUMÉRIQUE [NUMERIC KEYPAD] 57. CLÉ [TREBLE CLEF]
21. DSP [DSP] 58. GAUCHE [LEFT]
22. OCTAVE [OCTAVE] 59. JOUER [PERFORM]
23. PROLONGER [SUSTAIN] 60. SUIVRE [FOLLOW]
24. TACTILE [TOUCH] 61. CLÉ BASSE [BASS CLEF]
25. TRANSPOSER [TRANSPOSE] 62. RYTHME [BEAT]
26. INFÉRIEUR [LOWER]
27. BANQUE DE MÉMOIRE [MEMORY BANK]
28. DOUBLE [DUAL]
29. STOCKER [STORE]
30. MÉMOIRE DE PANNEAU [PANEL MEMORY]
M1-M6 -
31. OTS [OTS]
32. CONTRÔLE DE L’ACCOMPAGNEMENT
[ACCOMPANIMENT CONTROL]
MARCHE/ARRÊT [START/STOP] - SYNC [SYNC] - INTRO/FIN [INTROD/ENDING] - INTERMÉDE [FILL-IN A] - INTERMÉDE [FILL-IN B] -
33. MODULATION [MODULATION]
34. MODULATION DU TON [PITCH BEND]
45
Table des matières
Introduction 46
1. Utilisation prévue 47
2. Contenu d’emballage 47
3. Consignes de sécurité 47
4. Eléments constitutifs 48
A) Panneau frontal 48
B) Panneau arrière 48
C) Écran LCD 48
5. Réglage 49
A) Alimentation électrique 49
B) Pupitre 50
6. Branchements 50
A) Prise casque 50
B) Prise SORTIE AUX 50
C) Prise prolongation 50
D) Pédale du volume 50
E) Prise USB 50
7. Fonctionnement 51
A) Interrupteur et volume 51
B) Démo 51
C) Voix et effets 51
D) Contrôle du style 52
E) Menu des fonctions 54
F) Mélangeur 54
G) DSP (Système de traitement numérique du signal) 55
H) Métronome 55
I) Pianoss 55
J) Mémoire 55
K) Réglage à touche unique 55
L) Enregistrement 55
M) Chansons 56
N) Leçon 56
O) Dictionnaire des accords 56
8. Entretien et nettoyage 57
9. Elimination des déchets 57
10. Caractéristiques techniques 58
Annexes 59
Annexe I : Liste des voix 59
Annexe II : Liste des styles 61
Annexe III : Liste des chansons 62
Annexe IV : Liste démo 63
Annexe V : Dictionnaire des accords 63
Annexe VI : Tableau des accords 63
Annexe VII : Liste des accords 64
Annexe VIII : Liste MIDI 65
Le présent instructions d‘emploi fait partie intégrante du produit. Il comporte des directives importantes pour la mise en
service et la manipulation de l’appareil. Tenir compte de ces remarques, même en cas de transfert du produit à un tiers.
Conserver ce instructions d‘emploi afi n de pouvoir le consulter à tout moment!

46
Introduction
Cher client,
Merci d’avoir acheté ce produit.
Ce produit respecte les conditions européennes et nationales relatives à la compatibilité électromagnétique (CEM).
Cette conformité a été vérifi ée, et les déclarations et documents en rapport ont été déposés chez le fabricant.
Nous prions l’utilisateur de se conformer aux instructions d’exploitation en vue de respecter la condition susmentionnée et de
garantir un fonctionnement sûr!
Prière de lire attentivement les instructions avant d’utiliser le produit!
Tous les noms de sociétés et toutes les références à des produits contenus dans ce document sont des marques
déposées de leurs propriétaires respectifs. Tous droits réservés.
Pour plus de renseignements, contactez notre service consultatif technique :
France: Tél. 0 892 897 777
Fax 0 892 896 002
e-mail: [email protected]
du lundi au vendredi de 8h00 à 18h00
le samedi de 8h00 à 12h00
Allemagne: Téléphone: 0180/5 31 21 11, télécopie: 0180/5 31 21 10
Email : Veuillez utiliser notre formulaire pour votre demande dans Internet www.conrad.de sous la
rubrique Contact
Suisse: Tel.-Nr.: +49 0848 80 12 88
Fax-Nr.: +49 0848 80 12 89
e-mail: [email protected]
Mo. - Fr. 8.00 bis 12.00 Uhr, 13.00 bis 17.00 Uhr
47
1. Utilisation prévue
Ce produit est utilisé pour produire des sons en appuyant sur les touches. Les sons sont amplifi és par les haut-parleurs
intégrés. Leclavier peut être branché à des écouteurs ou à un amplifi cateur externe. Le clavier est facile à utiliser et dispose
de fonctions avancées conçues spécifi quement pour apprendre seul et pour les débutants. Les utilisateurs peuvent apprendre
à jouer de trois manières différentes. L’écran LCD facilite l’apprentissage.
Le fonctionnement n’est possible que dans un environnement sec à l’intérieur.
Vous pouvez faire fonctionner le clavier soit avec 6 piles de dimension D soit avec un bloc d’alimentation enfi chable stabilisé
(CC12V/2A, de type centrale positive).
Toute autre utilisation que celle décrite ci-dessus est proscrite et est susceptible d’endommager l’appareil et de faire courir
des risques de courts-circuits, d’incendie, de décharges électriques, etc. Aucune partie de cet appareil ne doit être modifi ée
ou reconstruite. Veuillez lire attentivement le mode d’emploi et conservez-le pour vous-y référer dans le futur.
2. Contenu d’emballage
Clavier 1.
Pupitre 2.
Manuel du fabricant 3.
Mode d’emploi4.
3. Consignes de sécurité
Nous déclinons toute responsabilité en cas de dommages matériels ou de blessures dans le cas où
cet appareil aurait été maltraité de quelque façon que ce soit ou endommagé du fait d’une mauvaise
utilisation ou d’un non respect de ce mode d’emploi. La garantie en serait d’ailleurs annulée!
Le point d’exclamation attire l’attention sur une information importante dont il convient de tenir compte
impérativement.
Les transformations et/ou modifi cations de cet appareil sont inacceptables pour des raisons de sécurité et de respect des •
normes (CE).
Lors du branchement du clavier sur d’autres appareils, observez les consignes de sécurité inhérentes à ces autres •
appareils.
N’exposez pas ce clavier à des températures extrêmes, aux rayons directs du soleil, à de fortes vibrations ou à •
l’humidité.
En cas d’utilisation dans un contexte commercial, les normes électriques en vigueur édictées par les autorités locales et •
les règles d’assurance doivent être respectées.
Dans les écoles, gymnases, ateliers de loisir et en self-service, l’utilisation d’appareils électriques doit être supervisée par •
une personne responsable et qualifi ée.
Afi n d’assurer une bonne ventilation, une distance d’environ 5cm doit être respectée entre l’appareil et tout autre objet.•
Eloignez de l’appareil toute fl amme nue et tout récipient contenant du liquide.•
Les éléments d’emballage, tels que les feuilles ou sacs en plastique, les éléments en polystyrène, etc., peuvent se •
transformer en jouets dangereux pour les enfants. Ne les laissez jamais traîner.
Le clavier doit être placé sur une surface stable et de niveau.•
L’isolation de tout l’appareil ne doit être ni abîmée ni détruite. N’ouvrez jamais le boîtier du clavier.•
N’insérez aucun objet dans les ouïes de ventilation. Vous risqueriez une décharge électrique mortelle ou d’abîmer •
l’appareil.
Les travaux de maintenance ou de réparation ne doivent être effectués que par un spécialiste ou un atelier spécialisé.•
Si vous avez des questions sur un point non abordé dans ce mode d’emploi, contactez notre service technique ou autres •
experts.
-
 1
1
-
 2
2
-
 3
3
-
 4
4
-
 5
5
-
 6
6
-
 7
7
-
 8
8
-
 9
9
-
 10
10
-
 11
11
-
 12
12
-
 13
13
-
 14
14
-
 15
15
-
 16
16
-
 17
17
-
 18
18
-
 19
19
-
 20
20
-
 21
21
-
 22
22
-
 23
23
-
 24
24
-
 25
25
-
 26
26
-
 27
27
-
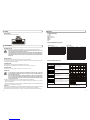 28
28
-
 29
29
-
 30
30
-
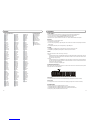 31
31
-
 32
32
-
 33
33
-
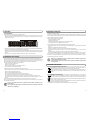 34
34
-
 35
35
-
 36
36
-
 37
37
-
 38
38
-
 39
39
-
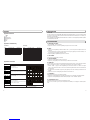 40
40
-
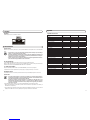 41
41
-
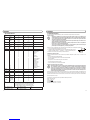 42
42
-
 43
43
-
 44
44


Mc crypt MC-120 de handleiding
- Categorie
- Muziekinstrumenten
- Type
- de handleiding
in andere talen
- français: Mc crypt MC-120 Le manuel du propriétaire
- Deutsch: Mc crypt MC-120 Bedienungsanleitung