LG MA3884VCT de handleiding
- Categorie
- Magnetrons
- Type
- de handleiding
Deze handleiding is ook geschikt voor

MFL33716112_06
Copyright © 2016 - 2018 LG Electronics Inc. Alle rechten voorbehouden.
GEBRUIKSAANWIJZING
Lees deze gebruikershandleiding aandachtig alvorens de oven te gebruiken.
De fabrikanten zijn niet verantwoordelijk voor mogelijke problemen veroorzaakt door het
niet naleven van deze instructies door de gebruiker.
MA3884VC
MA3884VCT
www.lg.com
Speed Oven +
DUTCH
FRANÇAIS
ENGLISH

2
Inhoud
De werking van de microgolffunctie
Microgolven zijn een vorm van energie die vergelijkbaar is met radio- en tv-
golven en gewoon daglicht. Normaal gesproken worden de microgolven op
hun reis door de atmosfeer zodanig verspreid dat ze geen effect hebben op
objecten. Deze oven is echter voorzien van een magnetron die gebruik
maakt van de energie in microgolven. De elektriciteit die aan de
magnetronbuis wordt geleverd, wordt gebruikt om microgolven te maken.
Deze microgolven worden via een opening in de oven naar de kookzone
geleid. In de oven bevindt zich een bakplaat.
De microgolven kunnen niet door de metalen wanden van de oven dringen,
maar dringen wel door materialen als glas, porselein en papier, de
materialen waaruit magnetron-bestendige schalen zijn vervaardigd.
De microgolven verwarmen het kookgerei niet. Het kookgerei wordt echter
wel heet door de hitte die door het voedsel wordt gegenereerd.
Een uiterst veilig apparaat
Uw oven,
de Speed Oven+
, is een van de veiligste
huishoudapparaten die er zijn.
Wanneer de ovendeur wordt geopend, stopt de oven
automatisch met het produceren van microgolven.
Microgolfenergie wordt volledig in warmte omgezet
wanneer ze voedsel binnendringt, en laat geen restenergie
achter die u kan schaden wanneer u het voedsel opeet.
Inhoud __________________________________________________2
BELANGRIJKE VEILIGHEIDSINSTRUCTIES
LEES ZORGVULDIG EN BEWAAR VOOR RAADPLEGING IN DE
TOEKOMST ______________________________________________3 ~ 20
Voorzorgsmaatregelen ____________________________________21
Uitpakken en installeren ____________________________________22 ~ 23
Bedieningspaneel _________________________________________24
Klok instellen _____________________________________________25
Kinderslot _______________________________________________26
Snelstart _________________________________________________27
Bereidingen met de Magnetronfunctie_________________________28
Vermogensstanden van de Magnetronfunctie___________________29
Grillen __________________________________________________30
Convectie voor het koken ___________________________________31
Snel Koken in de Combinatie modus__________________________32 ~ 34
Snelmenu ________________________________________________35 ~ 38
Stomen __________________________________________________39 ~ 42
Automatisch Ontdooien ____________________________________43 ~ 44
Langere/kortere bereidingstijd ______________________________45
EZ-Clean ________________________________________________46
Voor Magnetron geschikt kookgerei __________________________47
Voedseleigenschappen en bereidingen met de combimagnetron __48 ~ 49
Vragen en antwoorden ____________________________________50
Technische gegevens ______________________________________51

3
DUTCH
BELANGRIJKE VEILIGHEIDSINSTRUCTIES
LEES ZORGVULDIG EN BEWAAR VOOR
RAADPLEGING IN DE TOEKOMST
Bewaar voor toekomstig gebruik. Lees alle instructies en volg deze op
voordat u uw stofzuiger gaat gebruiken opdat u het risico op brand,
elektrocutie, persoonlijk letsel, of schade tijdens het gebruik van de oven
voorkomt. Deze handleiding bespreekt niet alle mogelijke omstandigheden
die zich kunnen voordoen. Neem altijd contact op met uw service-agent of
fabrikant indien u problemen tegenkomt die u niet begrijpt.
WAARSCHUWING:
Dit symbool waarschuwt u voor de gevaren van
onveilig gebruik die kunnen leiden tot ernstig letsel of de dood.
Dit is het veiligheid waarschuwingssymbool. Dit symbool
waarschuwt u voor mogelijke gevaren die u of anderen kan doden.
Alle veiligheidsberichten komen na het veiligheid
waarschuwingssymbool en het woord "WAARSCHUWING" of "LET
OP". Deze woorden betekenen:
LET OP: Dit symbool waarschuwt u voor de gevaren van onveilig gebruik
die kunnen leiden tot ernstig letsel of de dood.

4
1. Probeer de deur, deurrubbers,
bedieningspaneel, veiligheidsgrendels
of andere delen van de oven niet te
wijzigen of repareren. Het
verwijderen van een afsluiting kan
leiden tot blootstelling aan de straling
van de magnetron. Gebruik de oven
niet indien de deurrubbers en
aangrenzende delen van de
magnetron defect zijn. Reparaties
mogen alleen uitgevoerd worden
door een erkende servicemonteur.
De magnetron is, in tegenstelling tot
andere apparaten, een hoog voltage
en hoogspanning apparaat. Onjuist
gebruik of reparaties kunnen leiden
tot schadelijke blootstelling aan
excessieve magnetron energie of een
elektrische schok.
2. Gebruik de oven niet om te
ontvochtigen. (bijv. De magnetron
gebruiken met natte kranten,
kleding, speelgoed, elektrische
apparaten, huisdieren of kinderen
etc.) De magnetron is bedoeld voor
het opwarmen van voedsel en
dranken. Drogen van voedsel of
kleding en opwarmen van
warmtekussens, slippers, sponzen,
vochtige doeken en dergelijke kan
leiden tot een risico op letsel,
ontvlamming of brand.
WAARSCHUWING
BELANGRIJKE VEILIGHEIDSINSTRUCTIES
LEES ZORGVULDIG EN BEWAAR VOOR
RAADPLEGING IN DE TOEKOMST
Bewaar voor toekomstig gebruik. Lees alle instructies en volg deze op
voordat u uw stofzuiger gaat gebruiken opdat u het risico op brand,
elektrocutie, persoonlijk letsel, of schade tijdens het gebruik van de oven
voorkomt. Deze handleiding bespreekt niet alle mogelijke omstandigheden
die zich kunnen voordoen. Neem altijd contact op met uw service-agent of
fabrikant indien u problemen tegenkomt die u niet begrijpt.

5
DUTCH
Dit brengt de veiligheid ernstig in
gevaar, en kan leiden tot brand,
brandwonden, overlijden door
elektrocutie.
3. Het apparaat en de toegankelijke
delen worden heet tijdens gebruik.
Men moet voorzichtig zijn om het
aanraken van
verwarmingselementen te vermijden.
Kinderen van jonger dan 8 jaar
moeten uit de buurt van het product
gehouden worden, tenzij zij onder
constant toezicht staan.
4. Vloeibare consumptiegoederen en
soortgelijk voedsel dienen niet te
lang gekookt te worden in
afgesloten bakken, omdat deze
kunnen ontploffen. Verwijder de
plastic verpakking van het voedsel
voordat u gaat koken of ontdooien.
Let op dat in sommige gevallen het
voedsel afgedekt moet worden met
plastic folie, bij verwarmen of
koken.
Deze producten kunnen uiteenspatten
WAARSCHUWING
BELANGRIJKE VEILIGHEIDSINSTRUCTIES
LEES ZORGVULDIG EN BEWAAR VOOR
RAADPLEGING IN DE TOEKOMST
Bewaar voor toekomstig gebruik. Lees alle instructies en volg deze op
voordat u uw stofzuiger gaat gebruiken opdat u het risico op brand,
elektrocutie, persoonlijk letsel, of schade tijdens het gebruik van de oven
voorkomt. Deze handleiding bespreekt niet alle mogelijke omstandigheden
die zich kunnen voordoen. Neem altijd contact op met uw service-agent of
fabrikant indien u problemen tegenkomt die u niet begrijpt.

6
5. Dit apparaat is niet bedoeld om
gebruikt te worden door personen
(inclusief kinderen) met verminderde
fysieke, gevoelsmatige of mentale
mogelijkheden, of gebrek aan
ervaring en kennis, tenzij er toezicht
is of instructies betreffende het
gebruik van het apparaat zijn
verstrekt door een persoon die
verantwoordelijk is voor hun
veiligheid.
6. Wanneer het apparaat wordt
bediend in de combinatiemodus,
mogen kinderen de oven alleen
gebruiken onder toezicht van een
volwassene, vanwege de
gegenereerde temperaturen.
WAARSCHUWING
BELANGRIJKE VEILIGHEIDSINSTRUCTIES
LEES ZORGVULDIG EN BEWAAR VOOR
RAADPLEGING IN DE TOEKOMST
Bewaar voor toekomstig gebruik. Lees alle instructies en volg deze op
voordat u uw stofzuiger gaat gebruiken opdat u het risico op brand,
elektrocutie, persoonlijk letsel, of schade tijdens het gebruik van de oven
voorkomt. Deze handleiding bespreekt niet alle mogelijke omstandigheden
die zich kunnen voordoen. Neem altijd contact op met uw service-agent of
fabrikant indien u problemen tegenkomt die u niet begrijpt.

7
DUTCH
7. Dit apparaat is bedoeld voor
gebruik in huishoudelijke en
vergelijkbare toepassingen, zoals:
* Personeelskeukens in winkels,
kantoren en andere werkomgevingen;
* Boerderijen;
* Door klanten in hotels, motels en
andere woonomgevingen;
* Omgevingen als bed and
breakfasts.
8. WAARSCHUWING: toegankelijke
onderdelen kunnen heet worden
tijdens gebruik. Jonge kinderen
moeten uit de buurt worden
gehouden.
WAARSCHUWING
BELANGRIJKE VEILIGHEIDSINSTRUCTIES
LEES ZORGVULDIG EN BEWAAR VOOR
RAADPLEGING IN DE TOEKOMST
Bewaar voor toekomstig gebruik. Lees alle instructies en volg deze op
voordat u uw stofzuiger gaat gebruiken opdat u het risico op brand,
elektrocutie, persoonlijk letsel, of schade tijdens het gebruik van de oven
voorkomt. Deze handleiding bespreekt niet alle mogelijke omstandigheden
die zich kunnen voordoen. Neem altijd contact op met uw service-agent of
fabrikant indien u problemen tegenkomt die u niet begrijpt.

8
1. U kunt de oven niet gebruiken met
een open deur vanwege de
ingebouwde veiligheidsvergrendeling
in het deurmechanisme. Het is
belangrijk dat u niet knoeit met de
veiligheidsvergrendeling.
Dit kan leiden tot schadelijke
blootstelling aan excessieve straling
van de magnetron. (Kookfuncties
worden automatisch door de
veiligheidsvergrendeling onderbroken
zodra de deur geopend wordt.)
2. Plaats geen voorwerpen (zoals
theedoeken, servetten, etc) tussen de
voorkant van de oven en de deur en let
op dat er geen voedselresten
achterblijven op de afsluitoppervlakten.
Dit kan leiden tot schadelijke
blootstelling aan excessieve straling
van de magnetron.
3. Gebruik de oven niet als hij
beschadigd is. Het is van groot
belang dat de ovendeur volledig
sluit en dat er geen schade is aan
de: (1) deur (verbogen), (2)
scharnieren en vergrendelingen (stuk
of los), (3) deurdichtingen en
afdichtingsoppervlakken.
Dit kan leiden tot schadelijke
blootstelling aan excessieve straling
van de magnetron.
LET OP
BELANGRIJKE VEILIGHEIDSINSTRUCTIES
LEES ZORGVULDIG EN BEWAAR VOOR
RAADPLEGING IN DE TOEKOMST
Bewaar voor toekomstig gebruik. Lees alle instructies en volg deze op
voordat u uw stofzuiger gaat gebruiken opdat u het risico op brand,
elektrocutie, persoonlijk letsel, of schade tijdens het gebruik van de oven
voorkomt. Deze handleiding bespreekt niet alle mogelijke omstandigheden
die zich kunnen voordoen. Neem altijd contact op met uw service-agent of
fabrikant indien u problemen tegenkomt die u niet begrijpt.

9
DUTCH
4. Controleer of de kooktijden correct
ingesteld zijn, kleine hoeveelheden
voedsel hebben een kortere
kooktijd, of opwarmtijd nodig.
Te lang koken kan er toe leiden dat
het voedsel vlam vat en vervolgens
schade veroorzaakt.
5. Bij het verwarmen van vloeistoffen,
bijv. soepen, sauzen en dranken in
uw magnetron.
* Vermijd het gebruik van rechte
dubbelzijdige containers met smalle
hals.
* Oververhit de vloeistof niet.
* Roer de vloeistof alvorens de
container in de oven te plaatsen en
nogmaals halverwege de
verwarmingstijd.
* Laat de vloeistof na het verwarmen
nog even in de oven staan. Roer of
schud de vloeistof vervolgens
nogmaals voorzichtig en controleer
de temperatuur ervan alvorens deze
te nuttigen, om brandwonden te
vermijden (in het bijzonder de
inhoud van zuigflessen en potjes
babyvoeding).
LET OP
BELANGRIJKE VEILIGHEIDSINSTRUCTIES
LEES ZORGVULDIG EN BEWAAR VOOR
RAADPLEGING IN DE TOEKOMST
Bewaar voor toekomstig gebruik. Lees alle instructies en volg deze op
voordat u uw stofzuiger gaat gebruiken opdat u het risico op brand,
elektrocutie, persoonlijk letsel, of schade tijdens het gebruik van de oven
voorkomt. Deze handleiding bespreekt niet alle mogelijke omstandigheden
die zich kunnen voordoen. Neem altijd contact op met uw service-agent of
fabrikant indien u problemen tegenkomt die u niet begrijpt.

10
Wees voorzichting bij het hanteren
van de container. Het in de
magnetron verhitten van dranken kan
onverwachts leiden tot vertraagd
overkoken met verwondingen als
gevolg.
6. Er bevindt zich een uitgang boven,
onder of aan de zijkant van de
oven. Blokkeer de uitgang niet.
Dit kan leiden tot beschadigingen
aan de oven en slechte
kookresultaten.
7. Bedien de oven niet terwijl deze leeg
is. U laat het best een glas water in
de oven staan wanneer u deze niet
gebruikt. Het water zal alle
microgolfenergie veilig absorberen
als de oven per ongeluk wordt
gestart.
Onjuist gebruik kan uw oven
beschadigen.
8. Kook voedsel niet verpakt in
keukenpapier tenzij dit in het recept
wordt aangegeven. Gebruik geen
kranten in plaats van keukenpapier.
Onjuist gebruik kan leiden tot
explosies of brand.
LET OP
BELANGRIJKE VEILIGHEIDSINSTRUCTIES
LEES ZORGVULDIG EN BEWAAR VOOR
RAADPLEGING IN DE TOEKOMST
Bewaar voor toekomstig gebruik. Lees alle instructies en volg deze op
voordat u uw stofzuiger gaat gebruiken opdat u het risico op brand,
elektrocutie, persoonlijk letsel, of schade tijdens het gebruik van de oven
voorkomt. Deze handleiding bespreekt niet alle mogelijke omstandigheden
die zich kunnen voordoen. Neem altijd contact op met uw service-agent of
fabrikant indien u problemen tegenkomt die u niet begrijpt.

11
DUTCH
9. Gebruik geen houten of keramische
bakken met metaal (bijv goud of
zilver). Verwijder metalen bandjes
altijd. Controleer voor gebruik of de
hulpmiddelen gebruikt kunnen
worden in een magnetron.
Ze kunnen verhit raken en verkolen.
Vooral metalen voorwerpen in de
oven kunnen vonken veroorzaken die
kunnen leiden tot ernstige schade.
10. Gebruik geen gerecycled papieren
producten.
Deze kunnen onzuiverheden bevatten
die kunnen vonken en brand kunnen
veroorzaken tijdens het koken.
11. Spoel de bak en het rek niet in
water meteen na het koken.
Ze kunnen breken of schade
veroorzaken.
Onjuist gebruik kan uw oven
beschadigen.
12. Plaats de oven zodanig dat de
voorkant van de deur zich op
minimaal 8 cm van de rand van het
oppervlak bevindt waarop de oven
staat, om te voorkomen dat hij per
ongeluk omkantelt.
Onjuist gebruik kan leiden tot letsel
en schade aan de oven.
LET OP
BELANGRIJKE VEILIGHEIDSINSTRUCTIES
LEES ZORGVULDIG EN BEWAAR VOOR
RAADPLEGING IN DE TOEKOMST
Bewaar voor toekomstig gebruik. Lees alle instructies en volg deze op
voordat u uw stofzuiger gaat gebruiken opdat u het risico op brand,
elektrocutie, persoonlijk letsel, of schade tijdens het gebruik van de oven
voorkomt. Deze handleiding bespreekt niet alle mogelijke omstandigheden
die zich kunnen voordoen. Neem altijd contact op met uw service-agent of
fabrikant indien u problemen tegenkomt die u niet begrijpt.

12
13. Doorprik aardappelen, appelen of
ander dergelijk fruit of groenten
vóór u ze kookt.
Ze kunnen uiteenspatten.
14. Kook eieren niet in de schaal.
Eieren in de schaal en hele
hardgekookte eieren mogen niet
verwarmd worden in de
magnetron aangezien ze kunnen
ontploffen, zelfs nadat het
verwarmen in de magnetron
gestopt is.
Er ontstaat druk in het ei waardoor
het ei zal barsten.
15. Probeer niet te frituren in uw oven.
Dit kan leiden tot het plotseling
overkoken van de hete vloeistof.
16. Als er rook wordt waargenomen
(of uitgestoten), schakel dan het
toestel uit of koppel deze los en
houd de deur gesloten om de
vlammen te verstikken.
Dit kan leiden tot zeer gevaarlijke
situaties, zoals brand en elektrische
schokken.
LET OP
BELANGRIJKE VEILIGHEIDSINSTRUCTIES
LEES ZORGVULDIG EN BEWAAR VOOR
RAADPLEGING IN DE TOEKOMST
Bewaar voor toekomstig gebruik. Lees alle instructies en volg deze op
voordat u uw stofzuiger gaat gebruiken opdat u het risico op brand,
elektrocutie, persoonlijk letsel, of schade tijdens het gebruik van de oven
voorkomt. Deze handleiding bespreekt niet alle mogelijke omstandigheden
die zich kunnen voordoen. Neem altijd contact op met uw service-agent of
fabrikant indien u problemen tegenkomt die u niet begrijpt.

13
DUTCH
17. Indien voedsel verhit of gekookt
wordt in wegwerp bakken of
plastic, papier of andere
ontbrandbare materialen, dient u
de oven in de gaten te houden, en
regelmatig te controleren.
Uw voedsel kan overvloeien wegens
verslechtering van de bak, wat
tevens tot brand kan leiden.
18. De temperatuur van de bereikbare
oppervlakken op het apparaat kan
hoog oplopen wanneer het toestel
functioneert. Raak de ovendeur,
externe behuizing, de achterzijde
van de behuizing, het interieur,
toebehoren en gerechten tijdens de
grillmodus, convectiemodus en
auto-bereiding niet aan totdat u er
zeker van bent dat deze niet langer
warm zijn.
Gebruik als ze heet zijn dikke
ovenwanten om brandwonden te
voorkomen.
19. De oven moet regelmatig worden
schoongemaakt en alle
voedselrestjes worden verwijderd.
Indien u de oven niet schoon houd,
kan het oppervlakte van het apparaat
verslechteren, waardoor het toestel
minder lang mee gaat en gevaarlijke
situaties kan veroorzaken.
LET OP
BELANGRIJKE VEILIGHEIDSINSTRUCTIES
LEES ZORGVULDIG EN BEWAAR VOOR
RAADPLEGING IN DE TOEKOMST
Bewaar voor toekomstig gebruik. Lees alle instructies en volg deze op
voordat u uw stofzuiger gaat gebruiken opdat u het risico op brand,
elektrocutie, persoonlijk letsel, of schade tijdens het gebruik van de oven
voorkomt. Deze handleiding bespreekt niet alle mogelijke omstandigheden
die zich kunnen voordoen. Neem altijd contact op met uw service-agent of
fabrikant indien u problemen tegenkomt die u niet begrijpt.

14
20. Gebruik alleen de temperatuursonde
aanbevolen voor deze magnetron.
(voor apparaten die uitgerust zijn
met een temperatuursonde
mogelijkheid).
Met ongeschikte thermometers kunt u
niet controleren of de temperatuur
accuraat is.
21. Indien u de meegeleverde
verwarmingselementen gebruikt,
zal het apparaat heet worden.
Zorg ervoor dat u de
verwarmingselementen binnen de
oven niet aanraakt.
Risico op brandwonden.
22. Volg de exacte aanwijzingen van
de fabrikanten van popcorn-
producten voor het bereiden van
dit product. Laat de magnetron niet
achter zonder toezicht terwijl de
popcorn wordt bereid. Als de
popcorn bereiding mislukt na de
voorgestelde tijden, stop dan met
de bereiding. Maak nooit gebruik
van een bruin papieren zak voor
het bereiden van popcorn. Probeer
nooit overgebleven popcorn
opnieuw te bereiden.
Het overmatig verhitten van de
popcorn kan leiden tot brand.
LET OP
BELANGRIJKE VEILIGHEIDSINSTRUCTIES
LEES ZORGVULDIG EN BEWAAR VOOR
RAADPLEGING IN DE TOEKOMST
Bewaar voor toekomstig gebruik. Lees alle instructies en volg deze op
voordat u uw stofzuiger gaat gebruiken opdat u het risico op brand,
elektrocutie, persoonlijk letsel, of schade tijdens het gebruik van de oven
voorkomt. Deze handleiding bespreekt niet alle mogelijke omstandigheden
die zich kunnen voordoen. Neem altijd contact op met uw service-agent of
fabrikant indien u problemen tegenkomt die u niet begrijpt.


16
24. Gebruik geen agressieve
schoonmaakproducten of scherpe
metalen schrapers om het glas van
de ovendeur te reinigen.
Deze kunnen krassen veroorzaken
die kunnen leiden tot het breken van
het glas.
25. Deze oven mag niet worden
gebruikt voor commerciële catering.
Onjuist gebruik kan uw oven
beschadigen.
26. Deze magnetron is bedoeld als een
zelfondersteunende constructie en
moet nooit worden ingesloten in
een meubelstuk, tenzij u de
inbouwmontageset gebruikt die
hiervoor exclusief wordt geleverd
(optioneel)
27. Het product kan aangesloten worden
door de stekker op een toegankelijke
plek te plaatsen of door gebruik te
maken van een schakelaar in de
vaste bekabeling volgens de
bekabelingsrichtlijnen.
Het gebruik van een onjuiste stekker
of schakelaars kan elektrische
schokken of brand veroorzaken.
LET OP
BELANGRIJKE VEILIGHEIDSINSTRUCTIES
LEES ZORGVULDIG EN BEWAAR VOOR
RAADPLEGING IN DE TOEKOMST
Bewaar voor toekomstig gebruik. Lees alle instructies en volg deze op
voordat u uw stofzuiger gaat gebruiken opdat u het risico op brand,
elektrocutie, persoonlijk letsel, of schade tijdens het gebruik van de oven
voorkomt. Deze handleiding bespreekt niet alle mogelijke omstandigheden
die zich kunnen voordoen. Neem altijd contact op met uw service-agent of
fabrikant indien u problemen tegenkomt die u niet begrijpt.

17
DUTCH
28. Plaats de oven op een locatie naar
uw keuze op een grotere hoogte
dan 85 cm, en verifieer dat er een
tussenruimte van tenminste 20 cm
bovenaan en 10 cm aan de
achterkant aanwezig is om te
zorgen voor een goede ventilatie.
De voorkant van de oven moet
tenminste 8cm van de rand van het
oppervlak staan om kantelen te
vermijden. Een luchtuitlaat bevindt
zich op het onderste gedeelte en/of
de zijkant van de oven.
29. Let erop dat jonge kinderen niet
met het apparaat kunnen spelen.
LET OP
BELANGRIJKE VEILIGHEIDSINSTRUCTIES
LEES ZORGVULDIG EN BEWAAR VOOR
RAADPLEGING IN DE TOEKOMST
Bewaar voor toekomstig gebruik. Lees alle instructies en volg deze op
voordat u uw stofzuiger gaat gebruiken opdat u het risico op brand,
elektrocutie, persoonlijk letsel, of schade tijdens het gebruik van de oven
voorkomt. Deze handleiding bespreekt niet alle mogelijke omstandigheden
die zich kunnen voordoen. Neem altijd contact op met uw service-agent of
fabrikant indien u problemen tegenkomt die u niet begrijpt.

18
30. Dit apparaat kan worden gebruikt
door kinderen van 8 jaar en ouder
en door personen met beperkte
fysieke, zintuiglijke of
verstandelijke vermogens of met
gebrek aan ervaring en kennis als
zij onder toezicht staan en
instructies krijgen betreffende het
veilige gebruik van het apparaat
en als zij de betreffende risico's
begrijpen. Kinderen mogen niet
spelen met het apparaat. Reiniging
en onderhoud mag niet worden
uitgevoerd door kinderen van
jonger dan 8 jaar die niet onder
toezicht staan.
31. Het apparaat is niet bedoeld voor
bediening met een externe timer of
afzonderlijk
afstandsbedieningssysteem.
32. De inhoud van zuigflessen en
potten met babyvoeding moet
worden omgeroerd of geschud en
de temperatuur moet voorafgaand
aan consumptie worden
gecontroleerd om brandwonden te
vermijden.
LET OP
BELANGRIJKE VEILIGHEIDSINSTRUCTIES
LEES ZORGVULDIG EN BEWAAR VOOR
RAADPLEGING IN DE TOEKOMST
Bewaar voor toekomstig gebruik. Lees alle instructies en volg deze op
voordat u uw stofzuiger gaat gebruiken opdat u het risico op brand,
elektrocutie, persoonlijk letsel, of schade tijdens het gebruik van de oven
voorkomt. Deze handleiding bespreekt niet alle mogelijke omstandigheden
die zich kunnen voordoen. Neem altijd contact op met uw service-agent of
fabrikant indien u problemen tegenkomt die u niet begrijpt.

19
DUTCH
33. Een stoomreiniger mag niet worden
gebruikt.
34. Het apparaat mag niet in een kast
worden geplaatst.
35. Dit apparaat mag worden gebruikt
door kinderen van 8 jaar en ouder
en personen met verminderde
lichamelijke, zintuiglijke of
verstandelijke vermogens of gebrek
aan ervaring en kennis, als ze
onder toezicht staan of worden
geïnstrueerd over het veilig gebruik
van het apparaat en bijbehorende
gevaren begrijpen. Kinderen
mogen niet met het apparaat
spelen. Reiniging en onderhoud
door de gebruiker mag niet
worden uitgevoerd door kinderen
zonder toezicht.
LET OP
BELANGRIJKE VEILIGHEIDSINSTRUCTIES
LEES ZORGVULDIG EN BEWAAR VOOR
RAADPLEGING IN DE TOEKOMST
Bewaar voor toekomstig gebruik. Lees alle instructies en volg deze op
voordat u uw stofzuiger gaat gebruiken opdat u het risico op brand,
elektrocutie, persoonlijk letsel, of schade tijdens het gebruik van de oven
voorkomt. Deze handleiding bespreekt niet alle mogelijke omstandigheden
die zich kunnen voordoen. Neem altijd contact op met uw service-agent of
fabrikant indien u problemen tegenkomt die u niet begrijpt.

Metalen verpakkingen voor voedsel en
dranken kunnen niet in de magnetron
geplaatst worden tijdens het koken.
Deze voorwaarde is niet van toepassing
als de fabrikant op voorhand aangeeft
dat metalen verpakkingen met een bep-
aalde grootte en vorm wel geschikt zijn
voor koken met de magnetron.
Om oververhitting te voorkomen mag
het apparaat niet achter een decoratieve
deur worden geïnstalleerd.
38.
39.

21
DUTCH
Voorzorgsmaatregelen
Voorzorgsmaatregelen om mogelijke blootstelling aan
overmatige microgolfenergie te vermijden.
Voorzorgsmaatregelen om mogelijke blootstelling aan overmatige
microgolfenergie te vermijden.
In het mechanisme van de ovendeur zijn veiligheidsvergrendelingen
ingebouwd die het onmogelijk maken om de oven te laten werken met de
ovendeur open. Deze veiligheidsvergrendelingen schakelen automatisch de
oven uit wanneer de deur van de oven wordt geopend, omdat dit bij een
microgolfoven tot schadelijke blootstelling aan microgolfenergie zou leiden.
Het is belangrijk dat u niet aan de veiligheidsvergrendelingen komt.
Plaats geen voorwerpen tussen de voorkant van de oven en de ovendeur en
zorg ervoor dat er zich geen resten van voedsel of reinigingsmiddelen
kunnen ophopen op de afdichtingsoppervlakken.
Gebruik de oven niet als hij beschadigd is. Het is van groot belang dat de
ovendeur behoorlijk sluit en dat er geen schade is aan de: (1) deur
(verbogen), (2) scharnieren en vergrendelingen (stuk of los), (3)
deurdichtingen en afdichtingsoppervlakken.
Uw oven mag enkel worden afgesteld of hersteld door erkend
servicepersoneel.
WAARSCHUWING
Bij het opwarmen van vloeistoffen, bv. soepen, sauzen en dranken, in uw
oven kan het voorkomen dat de vloeistof aanvankelijk niet borrelt en pas
daarna plots begint te borrelen. Hierdoor kan de vloeistof plots overkoken.
Volg de onderstaande stappen om dit te vermijden:
1
Vermijd het gebruik van containers met rechte wanden en een smalle hals.
2 Oververhit de vloeistof niet.
3 Roer de vloeistof alvorens de recipiënt in de oven te plaatsen en nogmaals
in de helft van de verwarmingstijd.
4 Laat de vloeistof na het verwarmen nog even in de oven staan. Roer of
schud de vloeistof (in het bijzonder de inhoud van zuigflessen en potjes
babyvoeding) vervolgens nogmaals voorzichtig en controleer de
temperatuur ervan alvorens ze te nuttigen, om brandwonden te vermijden
(in het bijzonder de inhoud van zuigflessen en potjes babyvoeding).
Wees voorzichtig bij het omgaan met de recipiënt.
WAARSCHUWING
Laat levensmiddelen die bereid zijn in de
microgolfoven altijd eventjes staan en controleer
de temperatuur alvorens ze te nuttigen. Dit geldt
in het bijzonder voor zuigflessen en potjes
babyvoeding.
Vergewis u ervan de bereidingstijden correct in te
stellen, want als u het VOEDSEL te lang bereidt,
kan het vuur vatten en uw oven beschadigen.

22
Uitpakken en
installeren
Aan de hand van de basisstappen op de volgende twee pagina’s kunt u snel controleren of uw oven correct
werkt. Lees aandachtig de aanwijzingen met betrekking tot waar u uw oven mag plaatsen. Let er bij het
uitpakken van uw oven op alle toebehoren en verpakkingen te verwijderen. Controleer of uw oven geen schade
heeft opgelopen bij de levering.
Plaats de oven op het gewenste waterpas oppervlak met
meer dan 85 cm hoogte, maar zorg ervoor dat er
minstens 20 cm vrije ruimte is boven de oven en 10 cm aan de
achterzijde voor afdoende verluchting. De voorzijde van de oven
moet zich min. 8 cm / max. 22 cm van de rand van het oppervlak
bevinden om te vermijden dat de oven kan kantelen.
Aan de onderzijde of de zijkant van de oven bevindt zich een
uitlaat. Het blokkeren van deze uitlaat kan schadelijk zijn voor de
oven.
Pak uw oven uit en plaats hem op een waterpas
oppervlak.
* DEZE OVEN MAG NIET WORDEN GEBRUIKT VOOR COMMERCIËLE
CATERING.
* DEZE OVEN KAN WORDEN GEBRUIKT ALS INGEBOUWD TYPE.
* DE INBOUWSET GEMAAKT DOOR LG ELECTRONICS IS HIERVOOR
VEREIST.
HOOG REK
(Voor grillmodus)
LAAG REK
(Voor magnetron- en
convectiemodus)
METALEN SCHAAL
STOOMDEKSEL
STOOMPLAAT
STOOMSCHAAL
(CRISPPLAAT)
STOOMOVEN

23
DUTCH
U kunt op het Display zien dat er vanaf 30 seconden
wordt afgeteld. Wanneer 0 wordt bereikt, klinkt er een
geluidsignaal. Open de ovendeur en test de temperatuur van het
water. Als de oven naar behoren werkt, moet het water warm zijn.
Wees voorzichtig wanneer u de houder uit de oven haalt,
aangezien deze heet kan zijn.
UW OVEN IS NU GEÏNSTALLEERD
Vul een magnetronbestendige houder met 300 ml
water. Plaats op het METALEN SCHAAL op de
onderkant van de oven en sluit de ovendeur. Zie bladzijde 47
als u niet zeker weet welke schaal u kunt gebruiken.
Open uw ovendeur door aan de DEURGREEP te trekken.
Plaats de METALEN SCHAAL in de oven.
Steek de stekker in een standaard stopcontact.
Controleer of de oven het enige elektrische
huishoudelijke apparaat is dat op deze wandcontactdoos
is aangesloten. Indien de oven niet juist functioneert, trek dan de
stekker uit het stopcontact en steek hem er opnieuw in.
Druk op de STOP/WISSEN-toets.
Druk vervolgens één keer op de
START/Q-START-toets om een bereidingstijd
van 30 seconden in te stellen.

24
Bedieningspaneel
1. Display: U kunt de modusfunctie, de tijd van de dag, de kooktijd, de
vermogensstand. en kookcategorieën tonen.
2. Snelmenu: Met snel automatisch koken kunt u uw favoriete voedsel snel
koken door het selecteren van het type voedsel en het gewicht van het
voedsel.
3. Autom Ontdooien: U kunt het type voedsel en het gewicht van het voedsel
selecteren.
4. Stomen: Met stomen kunt u uw favoriete voedsel snel stomen door het
selecteren van het type voedsel en het gewicht van het voedsel.
5. FUNCTIE: U kunt de bedieningsfunctie selecteren.
6. BEDIENING:
• U kunt de kooktijd, de temperatuur, het gewicht en kookcategorieën
selecteren.
• U kunt de kooktijd op elk gewenst moment verlengen of verkorten door
aan de draaiknop te draaien (behalve de ontdooiingsmodus).
7. Instellen/Klok: U kunt de geselecteerde kookcategorie, het vermogen of de
temperatuur van de magnetron bepalen en u kunt de tijd van de dag
instellen.
8. START/Q-START:
• Om te beginnen met koken, drukt u na uw selectie eenmaal op de knop.
• Met de snelle startfunctie kunt u intervallen van 30 seconde kooktijd op
HOOG vermogen instellen. Gebruik hiervoor de snelstartknop.
9. STOP/WISSEN: U kunt stoppen en alle invoeren wissen, behalve de tijd
van de dag.
561789
2
34

25
DUTCH
U kunt een 12-uurs of 24-uurs klok instellen. In het
volgende voorbeeld ziet u hoe u de tijd op 14:35 instelt voor de 24-uurs klok.
Wanneer uw oven voor het eerst is
aangesloten op het elektriciteitsnet of
wanneer de elektriciteit terugkeert na een
stroomuitval, toont het display ‘12:00’ en
moet u de klok instellen.
Als de klok (of het display) vreemde
symbolen weergeeft, moet u de stekker
van uw oven uit het stopcontact trekken
en deze er vervolgens terug insteken. U
moet vervolgens opnieuw de klok
instellen.
Verzeker uzelf ervan uw oven correct te hebben geïnstalleerd, zoals
eerder beschreven in deze handleiding.
Druk op de toets STOP/WISSEN.
Druk eenmaal op Instellen/Klok.
Draai aan de BEDIENING knop totdat er “14:00” wordt getoond.
Druk op Instellen/Klok voor uur bevestiging
Draai aan de BEDIENING knop totdat er “14:35” wordt getoond.
Druk op de toets Instellen/Klok.
De klok begint nu te lopen.
Klok
instellen

26
Kinderslot
Houd STOP/WISSEN ingedrukt totdat “L” en op het scherm
verschijnt en er een PIEP te horen is.
Het KINDERSLOT is nu ingeschakeld.
De tijdsaanduiding verdwijnt nu eventjes van het display maar komt
enkele seconden later terug.
“L” en zullen op het scherm worden getoond indien er een knop
ingedrukt wordt.
Om het KINDERSLOT te annuleren houd u STOP/WISSEN ingedrukt
totdat “L” en verdwijnt.
Wanneer u de toets loslaat, klinkt er een piepsignaal.
Uw oven is uitgerust met een
veiligheidssysteem dat voorkomt dat uw
oven ongewild in werking wordt
gesteld.
Na het instellen van het kinderslot kunt
u geen enkele functie meer gebruiken
en kan er geen voedsel worden bereid.
Uw kind kan de ovendeur echter nog
altijd openen.
Druk op de toets STOP/WISSEN.

27
DUTCH
Snelstart
In het volgende voorbeeld wordt uitgelegd hoe voedsel in 2 minuten bereid wordt met een hoog
vermogen van 900 W.
Druk op de toets STOP/WISSEN.
Druk viermaal op de toets START/Q-START om 2 minuten bereidingstijd
met een HOOG vermogen (900 W) in te stellen.
De oven start reeds voordat u de toets viermaal heeft ingedrukt.
Dankzij de snelstartfunctie kunt u via een
druk op de toets START/Q-START 30
seconden bereidingstijd op HOOG
vermogen (900 W) instellen.

28
Bereidingen met
de Magnetronfunctie
In het volgende voorbeeld wordt uitgelegd hoe u in 5 minuten en 30 seconden voedsel kunt bereiden
op 600 W.
Verzeker uzelf ervan uw oven correct te hebben geïnstalleerd, zoals
eerder beschreven in deze handleiding.
Druk op de toets STOP/WISSEN.
Draai aan de FUNCTIE knop om Magnetron te selecteren ( ).
Druk op Instellen/Klok voor bevestiging van modus.
Draai aan de BEDIENING knop totdat er “600 W” wordt getoond.
Druk op Instellen/Klok voor bevestiging van vermogen.
Uw oven beschikt over vijf
vermogensinstellingen. De oven werkt
automatisch op de hoogste
vermogensstand. Door aan de Dial knop te
draaien kunt u een ander niveau kiezen.
VERMOGEN
HOOG
MEDIUM-HOOG
MEDIUM
ONTDOOIEN
MEDIUM-LAAG
LAAG
Draai aan de BEDIENING knop totdat er “5:30” wordt getoond.
Druk op de toets START/Q-START.
Tijdens het koken kunt u de kooktijd verlengen of verkorten door aan de
BEDIENING knop te draaien.
900 W
600 W
360 W
180 W
90 W

29
DUTCH
Vermogensstanden van de
Magnetronfunctie
Deze oven is uitgerust met 5 vermogensstanden, die u maximale flexibiliteit en controle
over het bereidingsproces geven. Onderstaande tabel toont voorbeelden van
levensmiddelen en de aanbevolen vermogensstand om hen in deze oven te bereiden.
VERMOGENSSTAND
HOOG 900 W * Water koken
* Bereiden van stukken gevogelte, vis en groenten
* Bereiden van malse stukken vlees
MEDIUM-HOOG 600 W * Opwarmen van voedsel
* Bereiden van gebraad en gevogelte
* Bereiden van paddenstoelen en schaaldieren
* Bereiden van voedsel met kaas en eieren
MEDIUM 360 W * Taarten en gebakjes bakken
* Bereiden van eieren
* Bereiden van custard
* Bereiden van rijst, soep
ONTDOOIEN / 180 W * Ontdooien
MEDIUM-LAAG * Smelten van boter en chocola
* Bereiden van minder malse stukken vlees
LAAG 90 W * Zacht maken van boter en kaas
* Zacht maken van roomijs
* Het laten rijzen van deeg met gist
WATT GEBRUIK TOEBEHOREN
Laag Rek +
Metalen Schaal

30
Grillen
In het volgende voorbeeld wordt er uitgelegd hoe u de grill gebruikt om in 12 minuten en 30 seconden voedsel te
bereiden.
Druk op de toets STOP/WISSEN.
Draai aan de FUNCTIE knop om de Grill modus te selecteren ( ).
Druk op Instellen/Klok voor bevestiging van modus.
Draai aan de BEDIENING knop totdat er “Gr-1” wordt getoond.
Druk op Instellen/Klok voor bevestiging van categorie.
Draai aan de BEDIENING knop totdat het display "12:30" weergeeft.
Druk op START/Q - START.
Tijdens het koken kunt u de kooktijd verlengen of verkorten door aan de
BEDIENING knop te draaien.
U moet na het koken ovenwanten dragen om de metalen plaat
te verwijderen, omdat deze erg heet kan zijn.
Met deze functie kunt u uw voedsel snel
goudbruin en knapperig klaarmaken.
Het grill rek moet gebruikt worden
tijdens het grillen.
Categorie Display Verwarmer in bedrijf
Grill-1 Gr-1 Bovenste verhitter(1650 W)
Grill-2 Gr-2 Bovenste verhitter(1100 W)
Grill-3 Gr-3 Onderste verhitter(700 W)

31
DUTCH
Convectie voor het
koken
In het volgende voorbeeld wordt er uitgelegd hoe de convectiemodus gebruikt voor het bereiden
van voedsel gedurende 50 minuten op een temperatuur van 220 °C.
1. Voor voorverwarmen
Drukt u op STOP/WISSEN.
De convectie-oven heeft een
temperatuurbereik van 40 °C, 100 ~ 230 °C.
De oven heeft een fermentatiefunctie bij een
oventemperatuur van 40 °C. U moet wachten
totdat de oven is afgekoeld omdat u de
fermentatiefunctie niet kunt gebruiken als de
oventemperatuur hoger is dan 40 °C.
Het is mogelijk om de de kooktijd met 9 uur
te verlengen in de convectiemodus, met de
magnetron modus geactiveerd op 40 °C.
Het duurt enkele minuten voordat uw oven de
geselecteerde temperatuur bereikt.
Wanneer de juiste temperatuur bereikt is,
geeft uw oven een PIEPTOON om u te laten
weten dat de juiste temperatuur is bereikt.
Plaats uw voedsel vervolgens in uw oven: stel
uw oven vervolgens in om te beginnen met
koken.
Het onderste rek moet worden gebruikt
tijdens convectiekoken.
Draai aan de FUNCTIEL knop
voor het selecteren van de
convectiemodus ( ).
Druk op Instellen/Klok voor
bevestiging.
Draai aan de BEDIENING knop
totdat het display "220 °C"
weergeeft.
2. Voor koken
Drukt u op STOP/WISSEN.
Draai aan de BEDIENING knop
totdat het display "50:00"
weergeeft.
Druk op START/Q-START.
Na het koken moet u
ovenhandschoenen dragen om
de metalen schaal uit de oven
te halen omdat deze heet is.
Druk op START/Q-START.
Display toont “Pr-H”.
Druk op Instellen/Klok voor
bevestiging.
Draai aan de FUNCTIEL knop voor
het selecteren van de
convectiemodus ( ).
Druk op Instellen/Klok voor
bevestiging van convectie.
Draai aan de BEDIENING knop
totdat het display "220 °C"
weergeeft.

32
Uw oven heeft een hetelucht-combi functie
waarmee u voedsel kunt bereiden met de
hitte element en magnetron tegelijkertijd of
afwisselend. Dit betekent over het algemeen
dat het bereiden van het voedsel korter duurt.
U kunt drie vermogensstanden (180 W,
360 W en 600 W) instellen in de snelle
combinatiemodus.
Speed Combi
(Co-1, 2, 3)
* Snelle combinatiecategorie
* Grillmodus: Raadpleeg pagina 28
Co-1
Co-2
Co-3
Co-4
Co-5
Grill-1 + Magnetronvermogen
Grill-2 + Magnetronvermogen
Grill-3 + Magnetronvermogen
(Bovenste + onderste verhitter)
+ Magnetronvermogen
Convectie + Magnetronvermogen
Draai aan de FUNCTIEL knop en selecteer snelle combinatie ( ) voor
het selecteren van de grillcombinatiemodus (Co-1, 2, 3).
Druk op Instellen/Klok voor bevestiging van snelle combinatie.
Druk op STOP/WISSEN.
Draai aan de BEDIENING knop totdat het display "Co-1" weergeeft.
Druk op Instellen/Klok voor bevestiging van grill-1.
Draai aan de BEDIENING knop totdat het display "360 W" weergeeft.
Druk op Instellen/Klok voor bevestiging van vermogen.
Draai aan de BEDIENING knop totdat het display "25:00" weergeeft.
Druk op START/Q-START.
Tijdens het koken kunt u de kooktijd verlengen of verkorten door aan de
BEDIENING knop te draaien.
Na het koken moet u ovenhandschoenen dragen om de metalen
schaal uit de oven te halen omdat deze heet is.
Snel Koken
in de Combinatie modus
In het volgende voorbeeld wordt uitgelegd hoe u uw oven moet programmeren met een
(magnetron) vermogen van 360 W en de grillfunctie geactiveerd, voor een kooktijd van
25 minuten.

DUTCH
33
Snel Koken
in de Combinatie modus
Na het koken moet u ovenhandschoenen dragen om de metalen schaal / bak uit de
oven te halen omdat deze heet is.
Draai aan de FUNCTIEL knop en selecteer snelle combinatie ( ) voor
het selecteren van de snelle combinatiemodus (Co-4).
Druk op Instellen/Klok voor bevestiging van snelle combinatie.
Druk op STOP/WISSEN.Speed Combi
(Co-4)
Draai aan de BEDIENING knop totdat het display "360 W" weergeeft.
Druk op Instellen/Klok voor bevestiging van vermogen.
Draai aan de BEDIENING knop totdat het display "25:00" weergeeft.
Druk op START/Q-START.
Tijdens het koken kunt u de kooktijd verlengen of verkorten door aan de
BEDIENING knop te draaien.
Na het koken moet u ovenhandschoenen dragen om de metalen schaal
uit de oven te halen omdat deze heet is.
U kunt vier soorten magnetron
vermogensstanden (0 W, 180 W, 360 W
en 600 W) instellen in de snelle
combinatiemodus (Co-4).
[ x2 ]
* Snelle combinatiecategorie
Co-1
Co-2
Co-3
Co-4
Co-5
Grill-1 + Magnetronvermogen
Grill-2 + Magnetronvermogen
Grill-3 + Magnetronvermogen
(Bovenste + onderste verhitter)
+ Magnetronvermogen
Convectie + Magnetronvermogen
Draai aan de BEDIENING knop totdat het display "Co-4" weergeeft.
Druk op Instellen/Klok voor bevestiging van snelle combinatie.
Draai aan de BEDIENING knop totdat het display "200 °C" weergeeft.
Druk op Instellen/Klok voor bevestiging van temperatuur.

34
Snel Koken
in de Combinatie modus
In het volgende voorbeeld wordt er uitgelegd hoe u uw oven programmeert met een
magnetronvermogen van 360 W en een convectietemperatuur van 200 °C gedurende
een kooktijd van 25 minuten.
Uw oven heeft een combinatie modus
waarmee u voedsel kunt bereiden met
verhitting door de Convectie-modus en
Magnetron-modus tegelijkertijd of
afwisselend. Dit betekent over het algemeen
dat het bereiden van uw voedsel korter duurt.
U kunt drie soorten magnetron
vermogensstanden (180 W, 360 W en
600 W) instellen in de snelle
combinatiemodus (Co-5).
Draai aan de FUNCTIEL knop en selecteer snelle combinatie ( ) voor
het selecteren van de convectiecombinatiemodus (Co-5).
Druk op Instellen/Klok voor bevestiging van snelle combinatie.
Druk op STOP/WISSEN.Speed Combi
(Co-5)
Druk op START/Q-START.
Tijdens het koken kunt u de kooktijd verlengen of verkorten door aan de
BEDIENING knop te draaien.
Na het koken moet u handschoenen dragen om de metalen schaal /
bak uit de oven te halen omdat het heet is.
Draai aan de BEDIENING knop totdat het display "360 W" weergeeft.
Druk op Instellen/Klok voor bevestiging van vermogen.
Draai aan de BEDIENING knop voor bevestiging van vermogen.
Draai aan de BEDIENING knop totdat het display "Co-5" weergeeft.
Druk op Instellen/Klok voor bevestiging van convectie.
Draai aan de BEDIENING knop totdat het display "200 °C" weergeeft.
Druk op Instellen/Klok voor bevestiging van temperatuur.
* Snelle combinatiecategorie
Co-1
Co-2
Co-3
Co-4
Co-5
Grill-1 + Magnetronvermogen
Grill-2 + Magnetronvermogen
Grill-3 + Magnetronvermogen
(Bovenste + onderste verhitter)
+ Magnetronvermogen
Convectie + Magnetronvermogen

35
DUTCH
Snelmenu
In het volgende voorbeeld wordt er uitgelegd hoe u 0,6 kg aan gepofte aardappelen bereidt (Ac 8).
Druk op STOP/WISSEN.
Druk op Snelmenu ( ).
Draai aan de BEDIENING knop totdat het display "Ac 8" weergeeft.
Druk op Instellen/Klok voor bevestiging van categorie.
Menu's voor Snelmenu worden
geprogrammeerd en hiermee kunt u
uw meeste favoriete voedsel snel
koken door het selecteren van het type
voedsel en het gewicht van het
voedsel.
Draai aan de BEDIENING knop totdat het display "0,60 kg" weergeeft.
Druk op START/Q-START.
Tijdens het koken kunt u de kooktijd verlengen of verkorten door aan de
BEDIENING knop te draaien.
Na het koken moet u ovenhandschoenen dragen om de metalen
schaal / bak uit de oven te halen omdat het heet is.

36
Aanwijzingen
Ac 1
Ac 2
Ac 3
Ac 4
Ac 5
Ac 6
Bevroren
Pizza
Franse
Frietjes
Hele kip
Kipstukken
Biefstuk
Gebraden
Varkensvlees
0,30 ~ 0,50 kg
0,20 ~ 0,75 kg
0,80 ~ 1,80 kg
0,20 ~ 0,80 kg
0,30 ~ 1,20 kg
0,80 ~ 1,80 kg
Metalen schaal
Hittebestendige
glazen schaal
+ Hoog rek +
Metalen schaal
Laag rek +
Metalen schaal
Hoog rek +
Metalen schaal
Hoog rek +
Metalen schaal
laag rek +
Metalen schaal
Bevroren
Bevroren
Gekoeld
Gekoeld
Gekoeld
Gekoeld
Deze functie is voor het bereiden van bevroren pizza. Verwijder alle
verpakkingen en plaats op het rek op de metalen bak. Laat na het
koken 1-2 minuten afkoelen.
Spreid bevroren aardappel producten uit op het hoge rek. Voor de
beste resultaten in een enkele laag. Draai het voedsel om na de
PIEP. En druk op start om door te gaan koken. Verwijder na het
koken uit de oven en laat 1-2 minuten staan.
Smeer de hele kip in met gesmolten margarine, boter, of marinade,
zoals gewenst. Plaats de hele kip met de borst omlaag op het lage
rek. Na de PIEP verwijdert u de sappen en draait u het voedsel om.
En druk op start om door te gaan koken. Laat met folie 10 minuten
afkoelen na het koken.
Plaats de kipstukken op het hoge rek.
Draai het voedsel om na de PIEP. Druk om het koken te hervatten.
Laat met folie 2-5 minuten afkoelen na het koken.
Plaats op het hoge rek. Draai het voedsel om na de PIEP.
En druk op start om door te gaan koken. Serveer meteen na het
koken.
Snij een overschot aan varkensvlees weg. Smeer het vlees in met
gesmolten margarine of boter. Plaats op het rek op het metalen bak.
Draai het voedsel om na de PIEP. En druk op start om door te gaan
koken. Laat met folie 10 minuten afkoelen na het koken.
Snelmenu
Functie
Categorie
Voedsel-
temperatuur
Kookgerei
Gewichts
limiet

37
DUTCH
Ac
7
Ac
8
Ac
9
Ac
10
Ac
11
Gebraden
Rundvlees
Gepofte
Aardappelen
Bevroren
Maaltijden
Verse
Groenten
Bevroren
Groenten
0,80 ~ 1,80 kg
0,20 ~ 1,00 kg
0,40 ~ 1,00 kg
0,20 ~ 1,00 kg
0,20 ~ 1,00 kg
Laag rek +
Metalen schaal
Hoog rek +
Metalen schaal
Laag rek +
Metalen schaal
Metalen schaal
+
Voor microgolven
geschikte kom met
deksel
Metalen schaal
+
Voor microgolven
geschikte kom met
deksel
Gekoeld
Kamertemperatuur
Bevroren
Kamertemperatuur
Diepgevroren
Smeer het rundvlees in met gesmolten margarine of boter. Plaats op het lage
rek. Draai het voedsel om na de PIEP.
Druk om het koken te hervatten.
Laat met folie 10 minuten afkoelen na het koken.
Kies aardappelen van gemiddelde grootte. (200-220 g elk) Was en droog
de aardappelen. Prik een paar keer in de aardappelen met een vork. Plaats
de aardappelen op het hoog rek. Pas het gewicht aan en druk op start.
Verwijder na het koken de aardappelen uit de oven. Laat met folie 5 minuten
afkoelen na het koken.
Plaats bevroren maaltijden op het lage rek.
Plaats de groenten in een geschikte kom voor in de magnetron. Voeg water
toe. Dek af met inpakken. Bij het biepsignaal roert u eenmaal de groenten
om. Na het koken roert u nogmaals door de groenten en laat u ze 2 tot 3
minuten staan. Voeg een hoeveelheid water bij in verhouding tot de
hoeveelheid groenten.
**
0,20 kg - 0,50 kg
: 2 eetlepels
**
0,55 kg - 1,00 kg
: 4 eetlepels
Plaats de groenten in een geschikte kom voor in de magnetron. Voeg water
toe, Dek af met inpakken. Bij het biepsignaal roert u eenmaal de groenten
om, Na het koken roert u nogmaals door de groenten en laat ze 2 tot 3
minuten staan, Voeg een hoeveelheid water bij in verhouding tot de
hoeveelheid groenten,
**
0,20 kg - 0,50 kg
: 2 eetlepels
**
0,55 kg - 1,00 kg
: 4 eetlepels
Snelmenu
Aanwijzingen
Functie
Categorie
Voedsel-
temperatuur
Kookgerei
Gewichts
limiet

38
Ac
12
Rijst/
Pasta
0,10 ~ 0,30 kg Metalen schaal
+
Voor magnetron
geschikte kom met
deksel
Kamertemperatuur
Plaats de rijst en het kookwater met
1
/4 tot 1 koffielepel zout in een
diepe en grote kom (900 ml). Bij het piepsignaal roert u eenmaal de
rijst om.
** Rijst – Na het koken 5 minuten laten staan of wachten tot het
water is geabsorbeerd.
** Pasta – Tijdens het koken verschillende malen roeren indien
nodig. Na het koken nog 1 tot 2 minuten laten staan.
Spoel de pasta af met koud water.
Snelmenu
Gewicht
Water Rijst
Pasta
100 g
300 ml
400 ml
200 g
600 ml
800 ml
300 g
900 ml
1200 ml
Afdekken
Ja
Neen
Aanwijzingen
Functie
Categorie
Voedsel-
temperatuur
Kookgerei
Gewichts
limiet
< Metalen Schaal > < Laag Rek + Metalen Schaal > < Hoog Rek + Metalen Schaal >

39
DUTCH
Stomen
In onderstaand voorbeeld ziet u hoe u 0,6 kg aan groene bonen bereidt (St 8).
Druk op de toets STOP/WISSEN.
Druk eenmaal op Stomen ( ).
Draai aan de BEDIENING knop totdat er “St 8” wordt getoond.
Druk op Instellen/Klok voor bevestiging van categorie.
Met deze functie kunt u stomen.
Let op:
1. Gebruik altijd ovenhandschoenen
wanneer u een stoomschaal uit de oven
haalt. Deze is erg heet.
2. Plaats een hete stoomschaal na het
bereiden niet op een glazen tafel of een
materiaal dat makkelijk smelt. Gebruik
altijd een onderzetter.
3. Wanneer u deze stoomschaal gebruikt,
vul de schaal dan vóór gebruik met
minimaal 400 ml water. Als de
hoeveelheid water minder dan 400 ml is,
kan het voedsel onvolledig gekookt
worden, kan het apparaat vlam vatten
of onherstelbaar beschadigd raken.
4. Wees voorzichtig wanneer u de
stoomschaal gevuld met water
verplaatst.
5. Wanneer u de stoomschaal gebruikt,
moeten de deksel en de schaal precies
recht staan. Eieren en kastanjes
exploderen wanneer de deksel en de
schaal niet goed zijn afgesteld.
6. Gebruik deze Steamer nooit met een
product van een ander model, dit kan
brand of ernstige schade aan het product
veroorzaken.
Draai aan de BEDIENING knop totdat er “0.6 kg” wordt getoond.
Druk op de toets START/Q-START.
U kunt de kooktijd tijdens het koken verhogen of verlagen door te draaien
aan de BEDIENING knop.

40
Bereidingsmethode
St 1
St 2
St 3
St 4
NB: De kooktijd kan worden aangepast met gebruik van de draaiknop terwijl de maaltijd wordt bereid.
Garnalen
Schelpdieren
Hele vis
Visfilet
0,20 ~ 0,80 kg
0,20 ~ 0,80 kg
0,20 ~ 0,80 kg
0,20 ~ 0,80 kg
Koelkast
Koelkast
Koelkast
Koelkast
Was de garnalen. Giet 400 ml water of witte
wijn in de stoomoven. Plaats de stoomplaat
met de garnalen bovenop de stoomoven.
Dek het af met de stoomdeksel en plaats het in
de oven.
Was de mosselen. Giet 400 ml water of witte
wijn in de stoomoven. Plaats de stoomplaat
met de mosselen bovenop de stoomoven.
Dek het af met de stoomdeksel en plaats het in
de oven.
Was de vis. Giet 400 ml water of witte wijn in
de stoomoven. Plaats de stoomplaat met de vis
bovenop de stoomoven. Dek het af met de
stoomdeksel en plaats het in de oven.
Fileer de vis. Giet 400 ml water of witte wijn in
de stoomoven. Plaats de stoomplaat met de
visfilet bovenop de stoomoven. Dek het af met
de stoomdeksel en plaats het in de oven.
Kleine garnalen (garnalen,
grote garnalen, kleine
krab, enz.)
Kleine mosselen (mosselen,
rode mossel, enz.)
Maximumdikte van 3 cm
Maximumlengte van 25
cm
Maximumdikte van 2,5 cm
Stoomdeksel
Stoomplaat
Stoomwaterbak
Metalen schaal
Stoomdeksel
Stoomplaat
Stoomwaterbak
Metalen schaal
Stoomdeksel
Stoomplaat
Stoomwaterbak
Metalen schaal
Stoomdeksel
Stoomplaat
Stoomwaterbak
Metalen schaal
HANDLEIDING VOOR STOMEN
Stomen
Functie Ingrediënt
Temperatuur
voorafgaand
aan koken
Grootte van
ingrediënt
KooktoestelGewicht

41
DUTCH
Bereidingsmethode
St 5
St 6
St 7
St 8
St 9
St 10
NB: De kooktijd kan worden aangepast met gebruik van de draaiknop terwijl de maaltijd wordt bereid.
Wortel
Broccoli
Courgette
Sperziebonen
Spinazie
Bloemkool
0,20 ~ 0,80 kg
0,20 ~ 0,80 kg
0,20 ~ 0,80 kg
0,20 ~ 0,60 kg
0,20 ~ 0,50 kg
0,20 ~ 0,80 kg
Kamertemperatuur
Koelkast
Koelkast
Koelkast
Koelkast
Kamertemperatuur
Giet 400 ml water in de stoomoven. Plaats de
stoomplaat met de groente bovenop de
stoomoven. Dek het af met de stoomdeksel en
plaats het in de oven.
Als boven bereiden.
Als boven bereiden.
Als boven bereiden.
Als boven bereiden.
Als boven bereiden.
Ronde plakjes of fijngehakt
Klein cluster
Fijngehakt
Klein cluster
Stoomdeksel
Stoomplaat
Stoomwaterbak
Metalen schaal
Stoomdeksel
Stoomplaat
Stoomwaterbak
Metalen schaal
Stoomdeksel
Stoomplaat
Stoomwaterbak
Metalen schaal
Stoomdeksel
Stoomplaat
Stoomwaterbak
Metalen schaal
Stoomdeksel
Stoomplaat
Stoomwaterbak
Metalen schaal
Stoomdeksel
Stoomplaat
Stoomwaterbak
Metalen schaal
Stomen
Functie Ingrediënt
Temperatuur
voorafgaand
aan koken
Grootte van
ingrediënt
KooktoestelGewicht

42
NB: De kooktijd kan worden aangepast met gebruik van de draaiknop terwijl de maaltijd wordt bereid.
< Stoomoven + Metalen Schaal >
ROESTVRIJE DEKSEL
STOOMPLAAT
STOOM SCHAAL
LAAG REK
METALEN SCHAAL
STEAMCHEF
Bereidingsmethode
St 11
St 12
Aardappel
Kipfilet
0,20 ~ 0,80 kg
0,20 ~ 0,80 kg
Kamertemperatuur
Koelkast
Giet 400 ml water in de stoomoven. Plaats de
stoomplaat met de groente bovenop de
stoomoven. Dek het af met de stoomdeksel en
plaats het in de oven.
Maak de kipfilet klaar. Giet 400 ml water of
witte wijn in de stoomoven. Plaats de stoomplaat
met de kipfilet bovenop de stoomoven. Dek het
af met de stoomdeksel en plaats het in de oven.
Hele
Maximumdikte van 2,5 cm
Stoomdeksel
Stoomplaat
Stoomwaterbak
Metalen schaal
Stoomdeksel
Stoomplaat
Stoomwaterbak
Metalen schaal
Stomen
Functie Ingrediënt
Temperatuur
voorafgaand
aan koken
Grootte van
ingrediënt
KooktoestelGewicht

43
DUTCH
Automatisch
Ontdooien
Druk op de toets STOP/WISSEN.
Weeg het voedsel dat u wilt ontdooien. Verwijder alle metalen draden of
folies en plaats het voedsel in een voor microgolven geschikte schotel op
de metalen schaal in uw oven en sluit de ovendeur.
Druk op Instellen/Klok voor bevestiging van categorie.
Voer het gewicht in van het bevroren voedsel dat u wilt ontdooien.
Draai aan de BEDIENING knop totdat het scherm “1.4 kg” toont voor het
gewicht van het ingevroren voedsel.
Druk op Autom Ontdooien ( ).
Draai aan de BEDIENING knop totdat er "dEF2" wordt getoond.
Druk op de toets START/Q-START.
Uw oven heeft vier instellingen om te
ontdooien in de magnetron-modus:
Vlees, Gevogelte, Vis en Brood; elke
ontdooicategorie heeft verschillende
vermogensinstellingen.
De temperatuur en de dichtheid van voedsel varieert. Het wordt daarom aangeraden om het voedsel hierop te controleren
alvorens het te beginnen bereiden. Let in het bijzonder op bij grote stukken vlees en kip. Sommige voedingsmiddelen moeten
niet volledig ontdooid zijn vooraleer ze worden bereid. Vis, bijvoorbeeld, is zo snel gaar dat het soms beter is om dit reeds te
beginnen bereiden wanneer hij nog licht bevroren is. Het BROOD-programma is geschikt om kleine voedingsartikelen zoals
broodjes of een klein brood te ontdooien. U moet deze wel nog een tijdje laten staan zodat ook het middelste gedeelte kan
ontdooien. In het volgende voorbeeld wordt er uitgelegd hoe u 1,4 kg bevroren kip kunt ontdooien.
Wanneer tijdens het ontdooien een "Piep"-signaal weerklinkt, moet u de ovendeur openen, het voedsel omkeren en
scheiden om een gelijkmatige ontdooiing te verkrijgen. Verwijder gedeelten die reeds ontdooid zijn of scherm ze af om
een trage ontdooiing mogelijk te maken. Sluit na het controleren de ovendeur en druk op de toets
START/Q-START
om
het ontdooien voort te zetten.
Uw oven stopt pas met ontdooien wanneer u de ovendeur opent (zelfs wanneer het biepsignaal reeds is afgegaan).

44
Vlees
(dEF1)
Gevogelte
(dEF2)
Vis
(dEF3)
Brood
(dEF4)
Categorie
Gewichtslimiet
Kookgerei Voedsel
0,1 - 4,0 kg
0,1 - 0,5 kg
Magnetron
(Vlakke plaat),
laag rek,
Metalen schaal
Keukenrol
of Vlakke plaat,
laag rek,
Metalen schaal
Vlees
Rundergehakt, tournedos, stoofvleesblokjes, lendenbiefstuk, stoofschotel, gebraden bout,
rundsburger, lamskarbonade, rollade, worsten, koteletjes (2 cm).
Bij het piepsignaal het vlees omdraaien.
Laat het vlees na het ontdooien nog 5 tot 15 minuten staan.
Gevogelte
Hele kip, poten, borsten, kalkoenborsten. (onder 2.0 kg)
Bij het piepsignaal het vlees omdraaien.
Laat het vlees na het ontdooien nog 20 tot 30 minuten staan.
Vis
Filets, steaks, hele vis, zeevruchten.
Bij het piepsignaal de vis omdraaien.
Laat het vlees na het ontdooien nog 10 tot 20 minuten staan.
Brood
Gesneden brood, broodjes, baguette enz.
Laat het vlees na het ontdooien nog 5 minuten staan.
RICHTLIJNEN VOOR HET ONTDOOIEN
* Plaats de te ontdooien levensmiddelen in een voor de magnetron geschikte container onafgedekt op het lage rek op de metalen plaat.
* Scherm indien nodig kleine stukken vlees of gevogelte af met vlakke gedeelten aluminiumfolie. Zo voorkomt u dat dunne gedeelten warm worden tijdens het
ontdooien. Zorg ervoor dat de aluminiumfolie niet in aanraking komt met de wanden van de oven.
* Scheid eetwaren zoals gehakt, karbonades, worsten en spek zo vlug mogelijk. Bij het piepsignaal draait u het voedsel om. Zet het ontdooien van de overige
gedeelten voort. Laat de eetwaren nadien nog een tijdje staan tot ze volledig ontdooid zijn.
* Moet onafgedekt worden geplaatst op het lage rek op de metalen plaat.

45
DUTCH
Langere/Kortere
bereidingstijd
In het volgende voorbeeld wordt er uitgelegd hoe u de tijden van de vooraf ingestelde
programma’s uit het Snelmenu kunt verlengen of verkorten.
Als u van mening bent dat het voedsel te
lang of te kort gekookt heeft bij het
gebruik van het Snelmenu programma,
kunt u de kooktijd verhogen of verlagen
door te draaien aan de BEDIENING
knop.
U kunt de kooktijd op ieder moment
inkorten of verlengen (behalve in de
ontdooimodus) door aan de BEDIENING
knop te draaien.
Draai aan de BEDIENING knop.
De bereidingstijd wordt langer of korter.
Druk op de toets STOP/WISSEN.
Stel het vereiste programma uit het Snelmenu in.
* Zie Snelmenu programma's.
Selecteer het gewicht van het voedsel.
Druk op de toets START/Q-START.
Kooktijd
0~3 min.
3~20 min.
20~30 min.
30~90 min.
10 s.
30 s.
1 Min.
5 Min.
Tijd verhogen of verlagen

46
EZ-Clean
In het volgende voorbeeld, kunt u zien hoe u geurtjes uit de oven verwijdert.
Druk op de toets STOP/WISSEN.
Draai aan de FUNCTIE knop om EZ-Clean te selecteren ( ).
Druk op Instellen/Klok voor EZ-Clean bevestiging.
De oven heeft een speciale functie om de
geur in de oven te verwijderen.
U kunt de EZ-Clean functie gebruiken
zonder dat er zich voedsel in de oven
bevindt.
Druk op de toets START/Q-START.
(De tijd wordt automatisch afgeteld)

47
DUTCH
Voor Magnetron
geschikt kookgerei
Gebruik nooit metalen of met metaal afgeboorde keukengerei wanneer u de
magnetronfunctie gebruikt.
Microgolven kunnen metaal niet binnendringen. Ze worden afgekaatst door
metalen voorwerpen in de oven, waardoor vonken ontstaan die op bliksems lijken
en erg verontrustend zijn. U kunt het meeste warmtebestendige niet-metalen
kookgerei veilig gebruiken in uw microgolfoven. Er is echter ook keukengerei dat
materialen bevat die het ongeschikt maken voor gebruik in de combimagnetron.
Als u twijfelt aan de geschiktheid van bepaald keukengerei, kunt u gemakkelijk te
weten komen of u het mag gebruiken in de combimagnetron.
Plaats het desbetreffende keukengerei naast een kom met water in de oven en
schakel de magnetronfunctie in. Gebruik de magnetronfunctie op de HOGE
vermogensstand gedurende 1 minuut. Als het water warm wordt maar het
keukengerei koel blijft, is het gerei geschikt voor gebruik in de combimagnetron.
Als de temperatuur van het water niet verandert, maar het keukengerei warm
wordt, betekent dit dat het keukengerei de microgolven absorbeert en dat het niet
veilig is voor gebruik met de magnetronfunctie. Waarschijnlijk is een groot deel
van uw keukengerei geschikt om te worden gebruikt met de magnetronfunctie.
Neem ter informatie deze lijst door.
Eetborden
Tal van tafelgerei is geschikt voor gebruik in de combimagnetron. Als u niet zeker bent,
kunt u de informatie van de fabrikant raadplegen ofwel de magnetron test uitvoeren.
Glazen
Warmtebestendig glas is ook geschikt voor microgolven. Dit omvat alle
merken van in de oven gehard glazen kookgerei. Gebruik echter geen fijn
glas zoals tuimelglazen of wijnglazen, want deze kunnen in stukken springen
wanneer de inhoud warm wordt.
Plastic houders
Hierin kunt u voedsel doen dat snel moet worden opgewarmd. U mag plastic
houders echter niet gebruiken voor voedsel dat lange tijd in de oven moet
blijven, want het warme voedsel zal de plastic recipiënten vervormen en doen
smelten.
Papier
Papieren borden en houders zijn geschikt en veilig voor gebruik met de
magnetronfunctie, op voorwaarde dat de bereidingstijd kort is en dat het
voedsel dat ze bevatten een laag vet- en vochtgehalte heeft. Keukenpapier
is ook erg nuttig om voedsel in te wikkelen en om in schalen te leggen
waarin u vettige voedingsmiddelen zoals spek kookt. Over het algemeen
doet u er goed aan geen gekleurd papier te gebruiken want de kleur kan
uitlopen. Sommige producten van kringlooppapier kunnen bepaalde
onzuiverheden bevatten die vonken of brand kunnen veroorzaken
wanneer ze met de microgolffunctie worden gebruikt.
Plastic kookzakken
Kookzakken zijn geschikt voor de combimagnetron op voorwaarde dat ze
speciaal voor het koken gemaakt zijn. Voor alle zekerheid doet u er goed
aan een snee aan te brengen in de zak zodat er stoom kan ontsnappen.
Gebruik nooit gewone plastic zakken om levensmiddelen te koken met de
magnetronfunctie, want zij smelten en scheuren.
Plastic magnetron kookgerei
Er is een ruim aanbod van magnetron kookgerei in alle vormen en maten.
Waarschijnlijk kunt u het merendeel van het kookgerei dat u reeds heeft
gebruiken in plaats van alles nieuw aan te kopen.
Aardewerk, steengoed en keramiek
Houders die van deze materialen zijn vervaardigd lenen zich meestal
goed voor de magnetronfunctie, maar om zeker te zijn doet u toch beter
een test.
LET OP:
Keukengerei met een hoog gewicht of een hoog ijzergehalte is niet
geschikt voor gebruik in de combimagnetron.
U moet controleren of uw keukengerei geschikt is voor gebruik met de
magnetronfunctie.

48
Voedseleigenschappen en bereidingen
met de combimagnetron
De zaken in het oog houden
De recepten in het boek zijn met grote zorgvuldigheid geformuleerd, maar het succes van de
bereiding hangt af van hoeveel aandacht u aan het voedsel besteedt terwijl het bereidt.
Houd het voedsel altijd in het oog terwijl het in de oven staat. Wanneer u de magnetronfunctie
inschakelt, gaat er automatisch een lichtje branden in de oven zodat u binnenin de oven kunt kijken
om de voortgang van de bereiding te controleren. Aanwijzingen in de recepten om het voedsel te
roeren, hoger te plaatsen enz. zijn slechts minimale aanbevelingen. Als u de indruk heeft dat het
voedsel ongelijk gaar wordt, maakt u eenvoudigweg de volgens u gepaste aanpassing om het
probleem te verhelpen.
Factoren van invloed op de bereidingstijden met de combimagnetron
Tal van factoren hebben een invloed op de bereidingstijden. De temperatuur van de gebruikte
ingrediënten maakt een groot verschil uit voor de bereidingstijden. Zo zal bijvoorbeeld gebak dat
met ijskoude boter, melk en eieren wordt gemaakt aanzienlijk meer tijd nodig hebben dan een
gebak met ingrediënten op kamertemperatuur. Alle recepten in dit boek geven een
bereidingstijdbereik aan. Over het algemeen zult u vaststellen dat het voedsel niet genoeg wordt
gekookt als u de kortste kooktijd instelt en soms kan het voorvallen dat u uw voedsel langer wilt
koken dan de opgegeven maximale kooktijd. Dit hangt af van uw persoonlijke voorkeur. Bij het
opgeven van bereidingstijden in dit boek is ervan uitgegaan dat het altijd beter is om voorzichtige
tijdramingen te geven. Voedsel dat overmatig wordt gekookt is compleet onbruikbaar. Voor
sommige recepten -- in het bijzonder voor brood, gebak en vla – is het daarentegen vereist om het
voedsel uit de oven te nemen terwijl het nog niet volledig klaar is. Dit is geen fout.
Als u de eetwaar in kwestie een tijdje laat staan, meestal afgedekt, zet het gaarproces zich voort
buiten de oven, gezien de warmte in de buitenste gedeelten geleidelijk aan naar binnen dringt.
Als u de eetwaar in de oven laat tot het door en gaar is, zullen de buitenste gedeelten te gaar zijn
of zelfs verbrand zijn. Na verloop van zult u steeds meer bedreven worden in het inschatten van de
tijd die verschillende levensmiddelen nodig hebben om gaar te worden in en buiten de oven.
Dichtheid van voedsel
Licht, poreus voedsel zoals gebak en brood zijn sneller klaar dan zwaarder, dichter voedsel zoals
gebraad en stoofschotels. Als u poreus voedsel klaarmaakt met de magnetronfunctie moet u erop
letten dat de buitenste hoeken niet droog en broos worden.
Hoogte van voedsel
Het bovenste deel van grote eetwaren, in het bijzonder gebraad, zal sneller garen dan het onderste
deel. U doet er bijgevolg goed aan zulke hoge eetwaren tijdens het koken om te draaien – soms
verschillende keren.
Vochtigheidsgehalte van het voedsel
Aangezien de warmte die wordt opgewekt door microgolven vocht doet verdampen moet betrekkelijk
droog voedsel zoals gebraad en sommige groenten ofwel worden besprenkeld met water alvorens het
te bereiden ofwel worden afgedekt om het vocht te behouden.
Beender- en vetgehalte van voedsel
Beenderen zijn warmtegeleidend en vet kookt sneller dan vlees. U moet opletten bij het bereiden van
beenderige of vette stukken vlees om te vermijden dat ze ongelijkmatig koken en overgaar worden.
Hoeveelheid voedsel
Het aantal microgolven in uw oven blijft constant ongeacht de hoeveelheid voedsel die wordt bereid.
Des te meer voedsel u in de oven plaatst, des te langer de bereidingstijd.
Vergeet niet de bereidingstijden minstens met een derde te verkorten wanneer u een recept halveert.
Vorm van voedsel
Microgolven dringen slechts 2 cm ver in het voedsel. Het binnenste gedeelte van dik voedsel wordt
gaar naarmate de aan de buitenkant opgewekte warmte naar binnen dringt. Enkel de buitenrand van
voedsel wordt gekookt door de microgolfenergie, de rest wordt gaar door warmtegeleiding. De slechtst
mogelijke vorm van voedsel dat u wilt bereiden met de magnetronfunctie is een dik vierkant. De
hoeken zullen reeds lang verbrand zijn wanneer het middengedeelte pas warm begint te worden.
Rond en dun voedsel en ringvormig voedsel worden vlot gaar in de combimagnetron.
Afdekken
Een deksel belet dat warmte en stoom kunnen ontsnappen en zorgt ervoor dat het voedsel sneller gaar
wordt. Gebruik een deksel ofwel magnetronfolie, waarvan u een hoek terugvouwt om te vermijden dat
het scheurt.
Bruinen
Vlees en gevogelte dat vijftien minuten of langer wordt bereid zal lichtjes bruinen in zijn eigen vet.
Voedsel dat gedurende kortere tijd wordt bereid kunt u inwrijven met een bruinsaus zoals
worcesterschiresaus, sojasaus of barbecuesaus om het een appetijtelijke kleur te geven. Aangezien
slechts vrij kleine hoeveelheden bruinsaus worden toegevoegd aan het voedsel, verandert de smaak
van het recept zelf niet.
Afdekken met vetvrij papier
Afdekken met vetvrij papier voorkomt het spatten en draagt bij tot het warmtebehoud van het voedsel.
Aangezien het echter minder afdekking biedt dan een deksel of folie, droogt het voedsel een beetje uit.
Schikking en afstand
Afzonderlijke voedselartikelen zoals gebakken aardappelen, klein gebak en nagerechten worden
gelijkmatiger verwarmd als u ze op gelijke afstand van elkaar plaatst, bij voorkeur in een cirkel. Plaats
nooit afzonderlijke voedselartikelen op elkaar.

49
DUTCH
Voedseleigenschappen en bereidingen
met de combimagnetron
Roeren
Roeren is een van de belangrijkste technieken bij het koken met de combimagnetron. Bij conventioneel
koken wordt het voedsel geroerd om het beter te mengen. Bij het koken met microgolven dient het roeren
om de warmte te spreiden en te herverdelen. Roer altijd van de buitenzijde naar het midden, want de
buitenzijde is het warmst.
Omdraaien
Grote en hoge voedselartikelen zoals gebraden en hele kippen moeten worden omgedraaid zodat de
bovenzijde en de onderzijde gelijkmatig worden gekookt. U doet er ook goed aan kippendelen en
vleeslapjes om te draaien.
Dikkere gedeelten aan de buitenkant plaatsen
Aangezien microgolven worden aangetrokken tot het buitenste gedeelte van voedsel, is het verstandig om
dikkere vleesporties, gevogelte en vis aan de buitenste kant van de schaal te leggen. Zo krijgen de dikkere
gedeelte de meeste microgolfenergie en kookt het voedsel gelijkmatig.
Afschermen
U kunt stroken aluminiumfolie (die geen microgolven doorlaten) over de hoeken of randen van vierkante en
rechthoekige etenswaren aanbrengen om te voorkomen dat die gedeelten te veel warmte ontvangen.
Gebruik nooit te veel folie en zorg ervoor dat de folie vastgemaakt is aan de schaal. Anders kunnen er
vonken ontstaan.
Hoger plaatsen
Dikke of dichte voedingsartikelen kunt u hoger plaatsen zodat de microgolven ook door de onderzijde en
het middelste gedeelte van het voedsel kunnen worden opgenomen.
Prikken
Voedsel in een schelp, schil of vlies zal barsten in de oven als u er eerst niet in heeft geprikt. Tot deze
categorie van voedingsartikelen behoren de dooiers en het wit van eieren, mosselen en oesters en
onversneden groente en fruit.
Controleren of het voedsel gaar is
Voedsel wordt zo snel gaar in een oven dat het noodzakelijk is om het vaak te controleren. Sommige
voedingswaren kunnen in de combimagnetron gelaten worden tot ze volledig klaar zijn, maar de meeste,
waaronder vlees en gevogelte, moeten uit de oven worden genomen terwijl ze nog lichtjes ongaar zijn, om
voort te garen buiten de oven. De inwendige temperatuur van voedsel stijgt tussen 3°C en 8°C tijdens het
voortgaren buiten de oven.
Laten garen buiten de oven
Vaak moet voedsel nog 3 tot 10 minuten buiten de oven blijven staan. Doorgaans wordt het voedsel afgedekt
tijdens het garen buiten de oven om zoveel mogelijk warmte te behouden, tenzij het een droge textuur moet
krijgen (zoals bepaald gebak en sommige koekjes bijvoorbeeld). Door het voedsel nog een tijdje buiten de oven
te laten staan wordt het gaar en mengen de smaken zich meer en komen ze beter tot hun recht.
Uw oven reinigen
1 De binnenzijde van de oven zuiver houden
Spatten of gemorste vloeistof kleven aan de wanden van de oven en tussen de afdichting en
het oppervlak van de ovendeur. Het beste is de spatten en gemorste vloeistoffen onmiddellijk
weg te vegen met een vochtige doek. Kruimels en gemorste vloeistof absorberen
microgolfenergie en verlengen de bereidingstijden. Gebruik een vochtige doek om kruimels
weg te vegen die tussen de ovendeur en het frame terechtkomen. Voor een goede afdichting
van de ovendeur is het belangrijk om deze zone zuiver te houden. Verwijder vetspatten met
een doek met reinigingsmiddel. Daarna spoelen en droogwrijven. Gebruik geen harde
detergenten of schurende reinigingsmiddelen. De metalen schaal kunt u met de hand of in de
vaatwasmachine wassen.
2 De buitenzijde van de oven zuiver houden
Maak de buitenzijde van uw oven schoon met zeep en water en dan met zuiver water. Droog
de buitenzijde van uw oven daarna af met een zachte doek of keukenpapier. Om
beschadiging van de werkingsonderdelen in de oven te vermijden, moet u vermijden dat er
water in de oven dringt via de ventilatieopeningen. Om het bedieningspaneel te reinigen
opent u de ovendeur, om te voorkomen dat de oven ongewenst in werking wordt gesteld, en
veegt u het paneel schoon met een vochtige doek en onmiddellijk daarna met een droge doek.
Druk op de toets Stop/Clear na het schoonmaken.
3 Als er zich stoom ophoopt binnenin de oven of aan de buitenzijde van de ovendeur moet u dat
wegvegen met een zachte doek. Dit kan gebeuren wanneer de oven wordt gebruikt in erg
vochtige omstandigheden en duidt absoluut niet op een defect van de oven.
4 De ovendeur en de deurafdichtingen moeten zuiver worden gehouden. Gebruik enkel warm
zeepwater en spoel en droog grondig na.
GEBRUIK GEEN SCHURENDE MATERIALEN, ZOALS REINIGINGSPOEDERS OF STALEN EN
PLASTIC SCHUURSPONSJES.
Metalen onderdelen zijn gemakkelijker te onderhouden als u ze regelmatig schoonmaakt met
een vochtige doek.
5 Gebruik geen stoomreiniger.

50
Vragen en
antwoorden
V Wat scheelt er als het ovenlichtje niet brandt?
A Er zijn tal van mogelijke oorzaken als het ovenlichtje niet brandt.
Bijvoorbeeld:
Het lampje is stuk.
Het relais is defect.
V Dringt microgolfenergie door het kijkvenster in de ovendeur?
A Neen. De gaten of kanalen zijn gemaakt om licht door te laten, ze laten
geen microgolfenergie door.
V Waarom klinkt er een piepsignaal wanneer ik een toets op het
bedieningspaneel aanraak?
A Het piepsignaal weerklinkt om u zekerheid te geven over het goed ingeven
van de instellingen.
V Raakt de magnetronfunctie beschadigd als deze werkt wanneer de oven
leeg is?
A Gebruik nooit de oven leeg of zonder de metalen schaal.
V Waarom spatten eieren soms uit elkaar?
A Tijdens het bakken, frituren of pocheren van eieren kan de dooier soms
uiteenspatten tengevolge van stoomophoping binnen het dooiervlies. U
kunt dit eenvoudig voorkomen door de dooier te doorprikken alvorens het
ei te bereiden. Maak nooit eieren klaar in de schaal.
V Waarom wordt het aangeraden om voedsel nog een tijdje buiten de
oven te laten staan na het koken?
A Na het koken in de microgolfoven blijft het voedsel nog een tijdje
voortgaren buiten de oven. Tijdens deze tijd wordt het bereidingsproces
voltrokken in het volledige stuk voedsel. De lengte van deze tijd is
afhankelijk van de dichtheid van het voedsel.
V Is het mogelijk om popcorn te bereiden in deze oven?
A Ja, bij gebruik van een van de twee hieronder omschreven methoden
1 Keukengerei voor poffen van popcorn dat specifiek is ontworpen voor
de magnetron.
2 Voorverpakte in de handel verkrijgbare magnetronpopcorn die
specifieke tijden en uitgangsvermogen bevat dat nodig is voor een
acceptabel eindproduct.
VOLG DE EXACTE AANWIJZINGEN DIE WORDEN GEGEVEN DOOR ELKE
FABRIKANT VOOR HUN POPCORNPRODUCT. LAAT DE OVEN NIET
ONBEHEERD ACHTER TERWIJL DE MAÏS WORDT GEPOFT. ALS DE MAÏS
NIET POFT NA DE AANBEVOLEN TIJDEN, STOPT U MET DE BEREIDING. TE
LANG BEREIDEN ZOU KUNNEN LEIDEN TOT VLAM VATTEN VAN DE MAÏS.
OPGELET
GEBRUIK NOOIT EEN BRUINE PAPIEREN ZAK VOOR HET POFFEN VAN
MAÏS. PROBEER NOOIT OM RESTERENDE KORRELS TE POFFEN.
V Waarom zijn de werkelijke bereidingstijden van mijn oven niet altijd zo
snel als de tijden die de gids vermeldt?
A Controleer uw kookgids opnieuw om u ervan te vergewissen dat u de
aanwijzingen correct heeft opgevolgd en om uit te vinden wat de oorzaak
kan zijn van de verschillen in bereidingstijd.
De bereidingstijden en vermogensinstellingen in de kookgids zijn
suggesties die zo gekozen zijn om te vermijden dat u voedsel te lang
bereidt, wat het meest voorkomende probleem is bij het gebruik van deze
oven. Afwijkingen in de maat, de vorm, het gewicht en de afmetingen
van het voedsel vergen langere bereidingstijden. Gebruik naast de
aanwijzingen in de kookgids ook uw eigen oordeel om het voedsel te
testen, net zoals u zou doen wanneer u het voedsel op conventionele
wijze klaarmaakt.

51
DUTCH
Technische
gegevens
Technische gegevens
MA3884VC / MA3884VCT
Voltage
Uitgangsvermogen
Microgolffrequentie
Uitwendige afmetingen
Verbruik
Magnetron
Grill
Combinatie
Convectie
230 V~ 50 Hz
900 W (IEC60705-norm)
2450 MHz
527 mm(B) X 395 mm(H) X 469 mm(D)
1650 watt
max. 1700 watt
max. 2800 watt
2400 watt
BELANGRIJKE OPMERKING
In tegenstelling tot de andere kookapparatuur, warmt uw magnetron de
bak niet op, maar alleen de inhoud. Een reëel gevaar van het verbranden
van de keel en het gehemelte is aanwezig als u de temperatuur van het
voedsel niet controleert voorafgaand aan consumptie. Wij raden u in het
bijzonder aan om de temperatuur van de melk (of andere vloeistof) in een
houder (bijvoorbeeld zuigfles) te controleren voordat u het aan
zuigelingen en kinderen geeft. Warm nooit vloeistof in een gesloten
houder op. (risico op barsten van de houder voorafgaand aan, tijdens of
na het openen van de deur) Vervanging van de voedingskabel en/of
enige interventie waarbij het apparaat moet worden geopend, mag alleen
worden uitgevoerd door gekwalificeerd technisch personeel.
Deze magnetron wordt verzonden met een stroomsnoer dat, als het wordt
beschadigd, moet worden vervangen door een snoer van hetzelfde type.
Dit snoer kan alleen worden geleverd door de fabrikant en worden
geïnstalleerd door een deskundige persoon.
Eieren in de schaal en hardgekookte eieren moeten niet worden gekookt
of opgewarmd in een magnetron aangezien ze kunnen exploderen en uw
apparaat onherstelbaar kunnen beschadigen. Na het koken of opwarmen,
moet u het voedsel eventjes in de oven laten zodat de hitte gelijkmatig
wordt verspreid over alle delen van het voedsel. Roer of schud de inhoud
(in het bijzonder zuigflessen en potten met babyvoedsel) en controleer
vooral voorzichtig de temperatuur voorafgaand aan consumptie om
brandwonden te vermijden.
• Magnetronfrequentie: 2450 MHz +/- 50 MHz (Groep 2 / Klasse B)
** Apparatuur van groep 2: groep 2 bevat alle ISM RF-apparatuur
waarin radiofrequentie-energie in het frequentiebereik van 9 kHz
tot 400 GHz opzettelijk wordt gegenereerd en gebruikt of alleen
gebruikt in de vorm van elektromagnetische straling, inductieve
en/of capacitieve koppeling, voor de behandeling van materiaal
of doeleinden van inspectie/analyse. Apparatuur van klasse B is
apparatuur die geschikt is voor gebruik in huishoudelijke
instellingen en in instellingen die direct zijn aangesloten op een
laagspanningsnet dat levert aan gebouwen die worden gebruikt
voor huishoudelijke doeleinden.
• U kunt de gebruikershandleiding downloaden van de site:
http://www.lg.com


MFL33716112_06
Copyright © 2016 - 2018 LG Electronics Inc. Tous droits réservés.

2
Sommaire _______________________________________________2
CONSIGNES DE SÉCURITÉ IMPORTANTES
À LIRE ATTENTIVEMENT ET À CONSERVER SOIGNEUSEMENT __3 ~ 20
Précautions ______________________________________________21
Déballage et installation ___________________________________________22 ~ 23
Bandeau de commande ___________________________________24
Réglage de l’horloge ______________________________________25
Sécurité Enfant ___________________________________________26
Démarrage rapide ________________________________________27
Micro-ondes(Cuisson avec modulation de puissance) ___________28
Niveaux de puissance _____________________________________29
Cuisson Gril______________________________________________30
Cuisson Chaleur Tournante _________________________________31
Cuisson combinée rapide __________________________________32 ~ 34
Cuisson automatique rapide ________________________________35 ~ 38
Cuisson à la Vapeur du Chef _______________________________39 ~ 42
Décongélation automatique _______________________________________
43 ~ 44
Touche Plus ou Moins(Cuisson Plus ou moins longue) ____________45
Désodoriser _____________________________________________46
Ustensiles Spécifiques micro-ondes ___________________________47
Caractéristiques des aliments et Cuisson au micro-ondes ________48 ~ 49
Questions et Réponses _____________________________________50
Caractéristiques techniques _______________________________________51
Sommaire
Comment fonctionne le micro-ondes
Les micro-ondes constituent une forme d’énergie similaire aux ondes de
radio et de télévision et à la lumière du jour. Normalement, les micro-
ondes se dirigent vers l’extérieur lorsqu’elles traversent l’atmosphère et elles
disparaissent sans effet. Toutefois, les fours à micro-ondes ont un
magnétron conçu pour utiliser l’énergie des micro-ondes. L’électricité,
fournie au tube magnétron, est utilisée pour créer les micro-ondes.
Ces ondes pénètrent dans la zone de cuisson par des ouvertures dans le
four.
Un plateau tournant est situé sur la partie inférieure du four. Les ondes ne
peuvent pas passer à travers les parois métalliques du four, mais elles
peuvent passer à travers certains matériaux, tels que le verre, la porcelaine
et le papier : ce sont les matériaux dans lesquels sont fabriqués les
récipients spécial micro-ondes.
Les ondes ne chauffent pas le contenant, bien que les récipients finissent
par se réchauffer en raison de la chaleur générée par les aliments.
Un appareil très sûr
Votre four, le
Speed Oven+
, est l’un des appareils les plus
sûrs de tous les appareils domestiques. Lorsque la porte est
ouverte, le four ne produit plus d’ondes. L’énergie des micro-
ondes est convertie entièrement pour réchauffer les aliments
lorsque les ondes pénètrent les aliments, ne laissant aucune
énergie <restante> qui pourrait être nuisible pour vous
lorsque vous mangez ces aliments.

3
FRANÇAIS
LIRE AVEC ATTENTION ET GARDER POUR FUTURES UTILISATIONS.
Suivez toutes les instructions avant d’utiliser votre four pour éviter les risques d’incendie, de
choc électrique, de blessures ou de dégâts pour le four lors de son utilisation. Ce guide ne
recouvre pas toutes les conditions possibles. Contactez toujours votre centre agréé ou le
fabricant si vous avez des problèmes que vous ne comprenez pas.
CONSIGNES DE SÉCURITÉ IMPORTANTES
À LIRE ATTENTIVEMENT ET À
CONSERVER SOIGNEUSEMENT
AVERTISSEMENT :
Ce symbole vous alerte sur des risques ou des pratiques
incertaines pouvant produire des blessures graves ou mortelles.
Voici le symbole d’alerte à la sécurité. Ce symbole vous alerte sur des risques
potentiels pouvant tuer ou blesser vous-même ou d’autres personnes. Tous les
messages de sécurité suivront le symbole d’alerte à la sécurité et les mots
“AVERTISSEMENT” ou “ATTENTION”. Ces mots signifient :
ATTENTION :
Ce symbole vous alerte sur des risques ou des pratiques incertaines
pouvant produire des blessures ou des dégâts matériels.

4
1. N’essayez pas de modifier ou
d’entreprendre des ajustements ou des
réparations de la porte, des joints des
portes, du panneau de contrôle, des
interrupteurs d’enclenchement de sécurité ni
de toute autre pièce du four, ni le retrait
d'une quelconque plaque qui protège contre
l’exposition à l’énergie des micro-ondes.
N’utilisez pas le four si les joints des portes et
les parties adjacentes du four à micro-ondes
sont endommagés. Les réparations ne
doivent être réalisées que par du personnel
qualifié.
A la différence d’autres appareils, le four à
micro-ondes est du matériel à haut voltage et
haut courant. Une utilisation ou une
réparation inappropriée peut aboutir à une
exposition excessive à l’énergie des micro-
ondes ou à un choc électrique.
2. N’utilisez pas le four pour déshumidifier. (Par
ex., utiliser le four à micro-ondes pour sécher
des journaux, des vêtements, des jouets, des
dispositifs électriques, des animaux ou des
enfants, etc.) Le four à micro-ondes est conçu
pour réchauffer de la nourriture et des
boissons. Le séchage de denrées
alimentaires ou de linge et le chauffage de
coussins chauffants, pantoufles, éponges,
linge humide et autres articles similaires
peuvent entraîner des risques de blessures,
d'inflammation ou de feu.
Cela peut causer de graves périls à la
sécurité, comme un incendie, une brûlure ou
une mort soudaine produite par un choc
électrique.
AVERTISSEMENT
LIRE AVEC ATTENTION ET GARDER POUR FUTURES
UTILISATIONS.
Suivez toutes les instructions avant d’utiliser votre four pour éviter les
risques d’incendie, de choc électrique, de blessures ou de dégâts pour le four lors de son
utilisation. Ce guide ne recouvre pas toutes les conditions possibles. Contactez toujours
votre centre agréé ou le fabricant si vous avez des problèmes que vous ne comprenez pas.
CONSIGNES DE SÉCURITÉ IMPORTANTES
À LIRE ATTENTIVEMENT ET À
CONSERVER SOIGNEUSEMENT

5
FRANÇAIS
3. L'appareil et les pièces accessibles
chauffent pendant l'utilisation. Éviter de
toucher les éléments chauffants. Les
enfants de moins de 8 ans doivent être
tenus à l'écart ou faire l'objet d'une
surveillance constante.
4. Les liquides et les autres aliments ne
doivent pas être chauffés dans des
récipients fermés hermétiquement,
puisque ceux-ci peuvent éclater. Enlevez
l’enveloppe en plastique des aliments
avant de les cuire ou les décongeler.
Cependant, notez que dans certains cas
les aliments doivent être couverts avec du
film en plastique pour les chauffer ou les
cuire.
Ils peuvent éclater.
AVERTISSEMENT
LIRE AVEC ATTENTION ET GARDER POUR FUTURES UTILISATIONS.
Suivez toutes les instructions avant d’utiliser votre four pour éviter les risques d’incendie, de
choc électrique, de blessures ou de dégâts pour le four lors de son utilisation. Ce guide ne
recouvre pas toutes les conditions possibles. Contactez toujours votre centre agréé ou le
fabricant si vous avez des problèmes que vous ne comprenez pas.
CONSIGNES DE SÉCURITÉ IMPORTANTES
À LIRE ATTENTIVEMENT ET À
CONSERVER SOIGNEUSEMENT

6
5. Cet appareil ne doit pas être utilisé par
des personnes (y compris des enfants)
souffrant de capacités physiques,
sensorielles ou mentales réduites, ou
manquant d’expérience et de
connaissances, sauf sous la surveillance
d’une personne responsable de leur
sécurité leur ayant indiqué comment
utiliser l’appareil.
6. Lorsque l'appareil est utilisé en mode
combiné, les enfants ne devraient utiliser
le four que sous la surveillance d'adultes
en raison des températures générées.
AVERTISSEMENT
LIRE AVEC ATTENTION ET GARDER POUR FUTURES
UTILISATIONS.
Suivez toutes les instructions avant d’utiliser votre four pour éviter les
risques d’incendie, de choc électrique, de blessures ou de dégâts pour le four lors de son
utilisation. Ce guide ne recouvre pas toutes les conditions possibles. Contactez toujours
votre centre agréé ou le fabricant si vous avez des problèmes que vous ne comprenez pas.
CONSIGNES DE SÉCURITÉ IMPORTANTES
À LIRE ATTENTIVEMENT ET À
CONSERVER SOIGNEUSEMENT

7
FRANÇAIS
7. Cet appareil est réservé à un usage
domestique courant, ou à d'autres
utilisations comme:
* Par les employés dans les cuisines des
magasins, bureaux et autres
environnements de travail;
* Dans les domaines agricoles;
* Par les clients dans les hôtels, motels et
autres environnements résidentiels;
* Environnements de type gîte touristique
8. AVERTISSEMENT : Des parties accessibles
de l’appareil peuvent devenir brûlantes
pendant son utilisation. Les jeunes enfants
doivent être tenus à l’écart de l’appareil.
AVERTISSEMENT
LIRE AVEC ATTENTION ET GARDER POUR FUTURES UTILISATIONS.
Suivez toutes les instructions avant d’utiliser votre four pour éviter les risques d’incendie, de
choc électrique, de blessures ou de dégâts pour le four lors de son utilisation. Ce guide ne
recouvre pas toutes les conditions possibles. Contactez toujours votre centre agréé ou le
fabricant si vous avez des problèmes que vous ne comprenez pas.
CONSIGNES DE SÉCURITÉ IMPORTANTES
À LIRE ATTENTIVEMENT ET À
CONSERVER SOIGNEUSEMENT

8
1. Vous ne pouvez pas utiliser votre four la
porte ouverte à cause des enclenchements
de sécurité du mécanisme de la porte. Il
est important de ne pas altérer
l’enclenchement de sécurité.
Cela peut aboutir à une exposition nocive
à de l’énergie micro-ondes excessive. (Les
dispositifs de sécurité arrêtent
automatiquement toute activité de cuisson
si la porte du four est ouverte.)
2. Ne placez aucun objet (comme des
serviettes de cuisine ou de table, etc.)
entre le front du four et la porte et ne
permettez aucune accumulation
d’aliments ou de résidus de nettoyage sur
la surface des joints.
Cela peut aboutir à une exposition nocive
à de l’énergie micro-ondes excessive.
3. N’utilisez pas votre four s’il est
endommagé. La porte du four doit
obligatoirement fermer correctement et il
ne doit y avoir aucun dommage au
niveau : (1) de la porte (déformation), (2)
des charnières et des systèmes de
verrouillage (cassés ou desserrés), (3) des
joints de porte et des surfaces
d’étanchéité.
Cela peut aboutir à une exposition nocive
à de l’énergie micro-ondes excessive.
ATTENTION
LIRE AVEC ATTENTION ET GARDER POUR FUTURES
UTILISATIONS.
Suivez toutes les instructions avant d’utiliser votre four pour éviter les
risques d’incendie, de choc électrique, de blessures ou de dégâts pour le four lors de son
utilisation. Ce guide ne recouvre pas toutes les conditions possibles. Contactez toujours
votre centre agréé ou le fabricant si vous avez des problèmes que vous ne comprenez pas.
CONSIGNES DE SÉCURITÉ IMPORTANTES
À LIRE ATTENTIVEMENT ET À
CONSERVER SOIGNEUSEMENT

9
FRANÇAIS
4. Veuillez vérifier que les temps de cuisson
sont correctement réglés, des petites
quantités d’aliments requérant un temps
de cuisson ou de chauffage plus court.
La cuisson excessive peut faire brûler vos
aliments, et de ce fait causer des dégâts
dans votre four.
5. Lorsque vous chauffez des liquides,
comme des soupes, des sauces et des
boissons, dans votre four à micro-ondes,
* Evitez d’utiliser des récipients à goulots
étroits.
* Ne chauffez pas à outrance.
* Remuez le liquide avant de mettre le
récipient dans le four et remuez à
nouveau à la moitié du temps de
chauffe.
* Après avoir réchauffé les liquides,
laissez-les dans le four pendant un petit
instant, remuez-les ou secouez-les
doucement et vérifiez leur température
avant de les consommer pour éviter les
brûlures (en particulier, le contenu des
biberons et des petits pots pour bébés).
Soyez prudent lorsque vous prenez le
récipient. Le réchauffage de boissons par
micro-ondes peut produire une ébullition
retardée sans bouillonnement. Cela peut
aboutir à un bouillonnement soudain sur la
surface du liquide chaud.
ATTENTION
LIRE AVEC ATTENTION ET GARDER POUR FUTURES UTILISATIONS.
Suivez toutes les instructions avant d’utiliser votre four pour éviter les risques d’incendie, de
choc électrique, de blessures ou de dégâts pour le four lors de son utilisation. Ce guide ne
recouvre pas toutes les conditions possibles. Contactez toujours votre centre agréé ou le
fabricant si vous avez des problèmes que vous ne comprenez pas.
CONSIGNES DE SÉCURITÉ IMPORTANTES
À LIRE ATTENTIVEMENT ET À
CONSERVER SOIGNEUSEMENT

10
6. Il y a une évacuation d'air sur le haut, le
bas ou le côté du four. Ne la bloquez pas.
Cela peut aboutir à un endommagement
de votre four et à une cuisson appauvrie.
7. Ne pas faire fonctionner le four vide. Il est
préférable de laisser un verre d’eau dans
le four inutilisé. L’eau absorbera les micro-
ondes en toute sécurité en cas de
démarrage accidentel du four.
Une utilisation incorrecte peut
endommager votre four.
8. Ne cuisez pas les aliments enveloppés dans
des serviettes en papier, à moins que votre
livre de cuisine contienne des instructions
sur ces aliments. Et n’utilisez pas de papier
journal au lieu des serviettes.
Une utilisation incorrecte peut produire une
explosion ou un incendie.
9. N’utilisez pas des récipients en bois ni des
récipients en céramique ayant des
incrustations en métal (par exemple, en or
ou en argent). Enlevez toute attache en
métal. Vérifiez que les ustensiles sont
adaptés à un usage dans des fours à
micro-ondes avant de les utiliser.
Ils peuvent réchauffer et noircir. En
particulier, les objets métalliques peuvent se
courber, ce qui peut produire des dégâts
importants.
ATTENTION
LIRE AVEC ATTENTION ET GARDER POUR FUTURES
UTILISATIONS.
Suivez toutes les instructions avant d’utiliser votre four pour éviter les
risques d’incendie, de choc électrique, de blessures ou de dégâts pour le four lors de son
utilisation. Ce guide ne recouvre pas toutes les conditions possibles. Contactez toujours
votre centre agréé ou le fabricant si vous avez des problèmes que vous ne comprenez pas.
CONSIGNES DE SÉCURITÉ IMPORTANTES
À LIRE ATTENTIVEMENT ET À
CONSERVER SOIGNEUSEMENT

11
FRANÇAIS
10. N’utilisez pas des produits en papier
recyclé.
Ils peuvent contenir des impuretés pouvant
produire des étincelles et/ou un incendie
s’ils sont utilisés pour cuire.
11. Ne rincez pas la lèchefrite et la grille en
les mouillant juste après la cuisson. Ils
pourraient se briser ou se casser.
Une utilisation incorrecte peut
endommager votre four.
12. Veillez à bien placer le four de sorte que
le devant de la porte se situe à au moins
8 cm derrière le bord de la surface sur
laquelle il est posé, afin d’éviter le
renversement accidentel de l’appareil.
Une utilisation incorrecte peut aboutir à
des blessures et à des dégâts pour votre
four.
13. Avant la cuisson, percez la peau des
pommes de terre, des pommes ou de
tout autre fruit ou légume semblable.
Ils peuvent éclater.
ATTENTION
LIRE AVEC ATTENTION ET GARDER POUR FUTURES UTILISATIONS.
Suivez toutes les instructions avant d’utiliser votre four pour éviter les risques d’incendie, de
choc électrique, de blessures ou de dégâts pour le four lors de son utilisation. Ce guide ne
recouvre pas toutes les conditions possibles. Contactez toujours votre centre agréé ou le
fabricant si vous avez des problèmes que vous ne comprenez pas.
CONSIGNES DE SÉCURITÉ IMPORTANTES
À LIRE ATTENTIVEMENT ET À
CONSERVER SOIGNEUSEMENT

12
14. Ne cuisez pas des œufs dans leurs
coques. Il ne faut pas cuire les œufs
dans leurs coques ni chauffer les œufs
durs dans le four à micro-ondes du fait
qu’ils peuvent éclater, même une fois
que le chauffage à micro-ondes est
terminé.
La pression augmentera à l’intérieur de
l’œuf, et il peut éclater.
15. Ne pas utiliser le four pour frire.
Cela peut aboutir à une ébullition
soudaine du liquide chaud.
16. En cas de fumée observée (ou émise),
éteignez ou débranchez le four de
l'alimentation et gardez la porte du four
fermée afin d'étouffer les flammes
éventuelles.
Cela peut nuire gravement à votre
sécurité, en produisant un incendie ou un
choc électrique.
17. Lorsque les aliments sont chauffés ou
cuits dans des récipients jetables en
plastique, en papier ou faits avec un
autre matériel combustible, surveillez le
four et jetez un coup d’œil sur lui de
temps en temps.
Vos aliments peuvent être dénaturés à
cause de la détérioration des récipients, ce
qui peut aussi produire un incendie.
ATTENTION
LIRE AVEC ATTENTION ET GARDER POUR FUTURES
UTILISATIONS.
Suivez toutes les instructions avant d’utiliser votre four pour éviter les
risques d’incendie, de choc électrique, de blessures ou de dégâts pour le four lors de son
utilisation. Ce guide ne recouvre pas toutes les conditions possibles. Contactez toujours
votre centre agréé ou le fabricant si vous avez des problèmes que vous ne comprenez pas.
CONSIGNES DE SÉCURITÉ IMPORTANTES
À LIRE ATTENTIVEMENT ET À
CONSERVER SOIGNEUSEMENT

13
FRANÇAIS
18. La température des surfaces accessibles
peut être élevée lorsque l’appareil est en
marche. Ne touchez ni la porte du four,
ni la cavité externe, ni l'arrière, ni la
cavité interne du four, ni les accessoires,
ni les assiettes en modes gril, chaleur
tournante et cuisson automatique ;
vérifiez qu’ils ne sont pas chauds avant
d’enlever les aliments.
Comme ils chauffent, il y a des risques de
brûlures si vous n’utilisez pas des gants
épais.
19. Le four doit être régulièrement nettoyé et
tout débris alimentaire doit être enlevé.
Ne pas maintenir le four propre peut
conduire à la détérioration de sa surface,
ce qui pourrait nuire à la durée de vie de
l'appareil et provoquer éventuellement une
situation dangereuse.
20. N'utilisez que la sonde thermique
recommandée pour ce four (pour les
appareils ayant une fonction pour
utiliser une sonde thermique).
Vous ne pouvez pas être sûr que la
température est correcte avec une sonde à
température non indiquée.
ATTENTION
LIRE AVEC ATTENTION ET GARDER POUR FUTURES UTILISATIONS.
Suivez toutes les instructions avant d’utiliser votre four pour éviter les risques d’incendie, de
choc électrique, de blessures ou de dégâts pour le four lors de son utilisation. Ce guide ne
recouvre pas toutes les conditions possibles. Contactez toujours votre centre agréé ou le
fabricant si vous avez des problèmes que vous ne comprenez pas.
CONSIGNES DE SÉCURITÉ IMPORTANTES
À LIRE ATTENTIVEMENT ET À
CONSERVER SOIGNEUSEMENT

14
21. Si des éléments chauffants sont
introduits, l'appareil devient chaud lors
de son utilisation. Faites attention à ne
pas toucher les éléments chauffants à
l'intérieur du four.
Il existe un danger de brûlures.
22. Suivre les instructions données par
chaque fabricant de popcorn.
Lors de la préparation du popcorn, ne
pas laisser le four sans surveillance. Si
en suivant les temps de cuisson indiqués,
le maïs n'éclate pas, arrêter la cuisson.
Ne jamais utiliser de sac papier marron
pour préparer du popcorn. Ne jamais
essayer de faire éclater les graines
restantes.
Le fait de trop cuire le popcorn risquerait
de le brûler.
ATTENTION
LIRE AVEC ATTENTION ET GARDER POUR FUTURES
UTILISATIONS.
Suivez toutes les instructions avant d’utiliser votre four pour éviter les
risques d’incendie, de choc électrique, de blessures ou de dégâts pour le four lors de son
utilisation. Ce guide ne recouvre pas toutes les conditions possibles. Contactez toujours
votre centre agréé ou le fabricant si vous avez des problèmes que vous ne comprenez pas.
CONSIGNES DE SÉCURITÉ IMPORTANTES
À LIRE ATTENTIVEMENT ET À
CONSERVER SOIGNEUSEMENT

G

16
24. N’utilisez pas de produits nettoyants
abrasifs ni de raclettes en métal pour
nettoyer le verre de la porte du four.
Ils peuvent érafler la surface, et cela peut
aboutir au brisement du verre.
25. Ce four ne doit pas être utilisé à des fins
professionnelles. (Exemple: Traiteurs)
Une utilisation incorrecte peut aboutir à
des dégâts pour votre four.
26.
Ce four à micro-ondes est à structure
autoporteuse et ne doit jamais être
encastré dans un meuble sauf si vous
utilisez exclusivement le kit d'encastrement
prévu à cet effet (en option)
27. La connexion doit être réalisée de façon
à avoir un accès facile à la prise ou en
incorporant un interrupteur sur le câble
rattaché en accord avec les règles de
câblage.
L’utilisation incorrecte d’une prise ou d’un
interrupteur peut produire un choc
électrique ou un incendie.
ATTENTION
LIRE AVEC ATTENTION ET GARDER POUR FUTURES
UTILISATIONS.
Suivez toutes les instructions avant d’utiliser votre four pour éviter les
risques d’incendie, de choc électrique, de blessures ou de dégâts pour le four lors de son
utilisation. Ce guide ne recouvre pas toutes les conditions possibles. Contactez toujours
votre centre agréé ou le fabricant si vous avez des problèmes que vous ne comprenez pas.
CONSIGNES DE SÉCURITÉ IMPORTANTES
À LIRE ATTENTIVEMENT ET À
CONSERVER SOIGNEUSEMENT

17
FRANÇAIS
28. Placez le four à l’endroit de votre choix
à plus de 85 cm de hauteur, mais
vérifiez qu’il y a au moins 20 cm sur le
dessus et 10 cm à l’arrière pour assurer
une bonne ventilation. La façade du four
doit être au minimum à 8 cm du bord de
la surface pour éviter tout basculement.
Une évacuation d’air est située sur la
partie inférieure et/ou sur le côté du
four.
Le fait d’obstruer l’évacuation d’air peut
endommager le four.
29. Les enfants (jeunes) doivent être
surveillés afin de s'assurer qu'ils ne
jouent pas avec l'appareil.
ATTENTION
LIRE AVEC ATTENTION ET GARDER POUR FUTURES UTILISATIONS.
Suivez toutes les instructions avant d’utiliser votre four pour éviter les risques d’incendie, de
choc électrique, de blessures ou de dégâts pour le four lors de son utilisation. Ce guide ne
recouvre pas toutes les conditions possibles. Contactez toujours votre centre agréé ou le
fabricant si vous avez des problèmes que vous ne comprenez pas.
CONSIGNES DE SÉCURITÉ IMPORTANTES
À LIRE ATTENTIVEMENT ET À
CONSERVER SOIGNEUSEMENT

18
ATTENTION
LIRE AVEC ATTENTION ET GARDER POUR FUTURES
UTILISATIONS.
Suivez toutes les instructions avant d’utiliser votre four pour éviter les
risques d’incendie, de choc électrique, de blessures ou de dégâts pour le four lors de son
utilisation. Ce guide ne recouvre pas toutes les conditions possibles. Contactez toujours
votre centre agréé ou le fabricant si vous avez des problèmes que vous ne comprenez pas.
CONSIGNES DE SÉCURITÉ IMPORTANTES
À LIRE ATTENTIVEMENT ET À
CONSERVER SOIGNEUSEMENT
30. Cet appareil peut être utilisé par des
enfants âgés de 8 ans et plus et les
personnes ayant des capacités
physiques, sensorielles ou mentales, ou
qui manquent d'expérience et de
connaissances si elles ont été formées et
encadrées pour utiliser cet appareil en
toute sécurité et comprennent les
dangers impliqués. Les enfants ne
devront pas jouer avec l'appareil. Le
nettoyage et l'entretien ne doivent pas
être accomplis par des enfants sauf s'ils
ont plus de 8 ans sans surveillance.
31. L'appareil n'est pas destiné à être
actionné au moyen d'une minuterie
externe ou système de commande à
distance séparé.
32. Avant consommation, il est impératif de
vérifier la température des biberons et
autres aliments pour bébé afin d’éviter
tout risque de brûlure.

19
FRANÇAIS
LIRE AVEC ATTENTION ET GARDER POUR FUTURES UTILISATIONS.
Suivez toutes les instructions avant d’utiliser votre four pour éviter les risques d’incendie, de
choc électrique, de blessures ou de dégâts pour le four lors de son utilisation. Ce guide ne
recouvre pas toutes les conditions possibles. Contactez toujours votre centre agréé ou le
fabricant si vous avez des problèmes que vous ne comprenez pas.
CONSIGNES DE SÉCURITÉ IMPORTANTES
À LIRE ATTENTIVEMENT ET À
CONSERVER SOIGNEUSEMENT
ATTENTION
33. Ne pas utiliser de nettoyeur à vapeur.
34. L’appareil ne doit pas être placé dans
une armoire ou un placard.
35. Cet appareil peut être utilisé par des
enfants de 8 ans au moins et par des
personnes aux capacités physiques,
sensorielles ou mentales réduites, ou
dépourvues de l’expérience et des
connaissances nécessaires, qui agissent
sous la supervision ou les directives
d’une personne leur ayant expliqué
comment utiliser l’appareil et quels sont
les risques encourus pour la sécurité. Les
enfants ne doivent pas jouer avec
l’appareil. Les enfants ne doivent pas
procéder sans surveillance au nettoyage
et à la maintenance de l’appareil.

20
ATTENTION
36. Les opérations de dépannage ou de
réparation impliquant le retrait du
couvercle qui protège contre l’exposition
aux micro-ondes, doivent être
exclusivement assurées par une
personne compétente. L’intervention de
toute autre personne présente des
risques. Pour toute question ou
commentaire, n’hésitez pas à me
contacter.
37. Lorsque vous faites chauffer des aliments
renfermés dans du plastique ou du
papier, surveillez le four, un départ de
feu étant toujours possible.
Il n’est pas autorisé d’utiliser des récipients
métalliques pour aliments et boissons dans le
four à micro -ondes.
Cette exigence n’est pas applicable si le fabri-
cant spécifie la taille et la forme des récipients
métalliques appropriés pour la cuisson dans
le four à micro-ondes.
L'appareil ne doit pas être installé derrière
une porte décorative pour éviter sa sur-
chauffe.
38.
39.

21
FRANÇAIS
Précautions
Précautions à prendre pour éviter toute exposition excessive aux ondes.
Il est impossible d’utiliser votre micro-ondes avec la porte ouverte en raison
des dispositifs de sécurité prévus dans le mécanisme de la porte. Ces
dispositifs de sécurité interrompent automatiquement toute cuisson lorsque la
porte est ouverte, pour éviter toute exposition nuisible aux ondes.
Il est important de ne pas manipuler les dispositifs de sécurité.
Ne mettez pas d’objets entre la façade du four et la porte et ne laissez pas
s’accumuler d’aliments ou de résidus de nettoyage sur les surfaces
d’étanchéité.
N’utilisez pas votre four s’il est endommagé. La porte du four doit
obligatoirement fermer correctement et il ne doit y avoir aucun dommage au
niveau : (1) de la porte (déformation), (2) des charnières et des systèmes de
verrouillage (cassés ou desserrés), (3) des joints de porte et des surfaces
d’étanchéité.
Votre four ne doit être réglé ou réparé que par un technicien qualifié.
AVERTISSEMENT
Lorsque vous réchauffez des liquides, par exemple des soupes, des sauces et
des boissons dans votre four à micro-ondes, une ébullition soudaine du
liquide chaud peut se produire avec retard. Pour éviter cela, prenez les
précautions suivantes :
1 Evitez d’utiliser des récipients à goulots étroits.
2 Ne chauffez pas à outrance.
3 Remuez le liquide avant de mettre le récipient dans le four et remuez à
nouveau à la moitié du temps de chauffe.
4 Après avoir réchauffé les liquides, laissez les dans le four pendant un petit
instant, remuez-les ou secouez-les doucement (en particulier le contenu
des biberons et des petits pots pour bébés) et vérifiez leur température
avant de les consommer pour éviter les brûlures (en particulier, le contenu
des biberons et des petits pots pour bébés).
Faites attention lorsque vous manipulez le récipient.
AVERTISSEMENT
Après avoir cuit les aliments au micro-ondes,
laissez toujours reposer les aliments et vérifiez leur
température avant de les consommer, en
particulier le contenu des biberons et des petits
pots de bébés.
Veillez à ce que les temps de cuisson soient réglés
correctement car le fait de trop cuire les aliments
peut les brûler et endommager votre four.

22
Déballage et
installation
En suivant les deux étapes de base mentionnées sur ces deux pages, vous pourrez vous assurer que votre four
fonctionne correctement. Suivez bien les conseils qui vous sont donnés pour l’installation de votre four. Lorsque
vous déballez votre four, veillez à enlever tous les accessoires ainsi que l’emballage. Vérifiez que votre four n’a
pas été endommagé lors du transport.
Placez le four à l’endroit de votre choix à plus de 85 cm
de hauteur, mais vérifiez qu’il y a au moins 20 cm sur le
dessus et 10 cm à l’arrière pour assurer une bonne ventilation. La
façade du four doit être au minimum à 8 cm et au maximum à 22
cm du bord de la surface pour éviter tout basculement.
Une évacuation d’air est située sur la partie inférieure et/ou le côté
du four. Le fait d’obstruer l’évacuation d’air peut endommager le
four.
Déballez votre four et placez-le sur une surface
plate.
* CE FOUR NE DOIT PAS ETRE UTILISE A DES FINS PROFESSIONNELLES
(TRAITEURS).
* CE FOUR PEUT ÊTRE UTILISÉ DANS UN MEUBLE ENCASTRÉ.
* LE KIT D'ENCASTREMENT DE LG ELECTRONICS DOIT ÊTRE UTILISÉ.
GRILLE HAUTE
(Mode gril)
GRILLE BASSE
(Mode micro-ondes et
chaleur tournante)
PLATEAU
METALLIQUE
CLOCHE EN
INOX
ASSIETTE DE
CUISEUR
PLAT VAPEUR
(À REMPLIR
D'EAU)
CLOCHE STEAMCHEF

23
FRANÇAIS
L’AFFICHEUR commencera le compte à rebours de
30 secondes.
Lorsqu’il atteint 0, un BIP est émis. Ouvrez la porte du four et testez
la température de l’eau. Si votre four fonctionne, l’eau doit être
chaude. Lorsque vous déplacez le récipient, faites attention, il peut
être chaud.
VOTRE FOUR EST MAINTENANT INSTALLE
Remplissez un récipient spécial micro-ondes avec 300
ml d’eau. Placez le PLATEAU METALLIQUE et fermez la
porte du four. Si vous avez des doutes sur le type de
récipients à utiliser, reportez-vous à la page 47.
Ouvrez la porte de votre micro-ondes en tirant sur la
POIGNEE DE PORTE. Placez le PLATEAU METALLIQUE
dans le four.
Branchez votre four sur une prise standard. Assurez-
vous que votre four est le seul appareil à être branché
sur cette prise. Si votre four ne fonctionne pas
correctement, débranchez la prise, puis rebranchez-la.
Appuyez sur la touche STOP/WISSEN,
puis appuyez une fois sur la touche
START/Q-START pour régler le temps de cuisson à 30
secondes.

24
Bandeau de
commande
561789
2
34
1. Afficheur: Indique l’heure, le temps de cuisson, le niveau de puissance et
les types de cuisson.
2. Snelmenu: Cette fonction vous permet de cuisiner rapidement la plupart de
vos aliments préférés en sélectionnant le type d’aliments et le poids de
ceux-ci.
3. Autom Ontidooien: Cette fonction vous permet de décongeler vos aliments
en sélectionnant le type d'aliments ainsi que son poids.
4. Stomen: La fonction de cuisson vapeur (« STEAM COOK ») vous permet
de cuire rapidement la plupart des aliments à la vapeur en sélectionnant
le type d'aliment et son poids
5. Molette de Sélection de FUNCTIE: Vous pouvez sélectionner le mode de
cuisson: micro-ondes, gril, convection, cuisson combinée, désodorisation.
6. Molette de BEDIENING:
• Vous pouvez fixer le temps de cuisson, la température ou la puissance,
le poids et les programmes de cuisson.
• Vous pouvez prolonger ou raccourcir le temps de cuisson en tournant le
bouton (à l'exception du mode de décongélation et en mode
désodoriser).
7. Instellen/Klok: Vous pouvez sélectionner la catégorie de cuisson et la
puissance ou la température du four à micro-ondes. Vous pouvez
également définir une heure.
8. START/Q-START:
• Pour commencer la cuisson sélectionnée, appuyez une fois sur cette
touche.
• La fonction Quick Start vous permet de définir des intervalles de 30
secondes de cuisson sur la position de puissance HIGH (ELEVEE),
d’un simple appui sur la touche.
9. STOP/WISSEN: Vous pouvez arrêter et effacer toutes les entrées, sauf
l’heure.

25
FRANÇAIS
L’exemple suivant vous montre comment régler l’heure : par exemple 14:35. Assurez-vous que vous
avez enlevé tous les emballages de votre four.
Lorsque votre four est branché pour la
première fois ou que l’alimentation
revient après une coupure de courant,
tous les segments de l’écran vont
s’allumer pendant 15 secondes, puis
“12:00“ va s’afficher à l’écran ; vous
devrez alors réinitialiser l’horloge.
Si des symboles étranges apparaissent
sur l’horloge (ou l’afficheur), débranchez
votre four, puis rebranchez-le et
réinitialisez l’horloge.
REMARQUE : Les informations
clignotent
Assurez-vous que vous avez bien suivi les conseils donnés dans ce manuel
d’utilisation pour l’installation de votre four.
Appuyez sur STOP/WISSEN.
Appuyez une fois sur Instellen/Klok.
Tournez la molette de BEDIENING jusqu’à ce que “14:00” apparaisse.
Appuyez sur Instellen/Klok pour confirmer l’heure.
Tournez la molette de BEDIENING jusqu’à ce que “14:35” apparaisse.
Appuyez sur Instellen/Klok.
Les chiffres commencent à défiler sur l’horloge.
Pour régler le mode, un
clignotement vous guidera
jusqu’à la prochaine étape.
Réglage de
l’horloge

26
Sécurité
Enfant
Appuyez et maintenez enfoncée la touche STOP/WISSEN jusqu’à voir
affichés “L” et “ “ et entendre un bip.
La SECURITE ENFANT est maintenant activée.
L’heure disparaîtra, mais réapparaîtra quelques secondes plus tard.
Si vous appuyez sur une touche, “L“ et “ “ apparaîtront sur l’écran.
Pour annuler SECURITE ENFANT, appuyez et maintenez enfoncée la
touche STOP/WISSEN jusqu’à la disparition de “L” et de “ “.
Lorsque la touche sera relâchée, vous entendrez un BIP.
Votre four possède une fonction qui
permet d’éviter les accidents.
Une fois la sécurité enfant activée,
aucune fonction ne peut être utilisée et
aucune cuisson ne peut être effectuée.
Toutefois, votre enfant peut quand même
ouvrir la porte du four.
Appuyez sur STOP/WISSEN.

27
FRANÇAIS
Démarrage
rapide
L’exemple suivant vous montre comment régler un temps de cuisson de 2 minutes sur la position de puissance
MAXIMUM (900 W).
Appuyez sur STOP/WISSEN.
Appuyez quatre fois sur START/Q-START pour sélectionner un temps de
cuisson de 2 minutes sur la position de puissance MAXIMUM
(900 W).
Votre four commencera la cuisson avant que vous n’ayez appuyé sur la
touche pour la quatrième fois.
La fonction Quick Start vous permet de
définir des intervalles de 30 secondes sur
la position MAXIMUM (900 W) d’une
seule pression de la touche
START/Q-START

28
Micro-ondes
(Cuisson avec modulation de puissance)
L’exemple suivant vous montre comment cuire des
aliments avec une puissance de 600 W, pendant
5 minutes et 30 secondes.
Assurez-vous que vous avez installé votre four correctement en suivant
les instructions indiquées dans ce manuel d’utilisation.
Appuyez sur STOP/WISSEN.
Tournez la molette de Sélection de FUNCTIE pour sélectionner
Micro-ondes( ).
Appuyez sur Instellen/Klok pour confirmer la sélection “Micro-ondes“.
Tournez la molette de BEDIENING jusqu'à ce que “600 W” apparaisse.
Appuyez sur Instellen/Klok pour confirmer la puissance.
Votre four possède cinq niveaux de
puissance différents. La puissance
maximale est sélectionnée par défaut :
vous pouvez la modifier en tournant la
molette de contrôle.
PUISSANCE
MAXIMUM
FORTE-MOYENNE
MOYENNE
DÉCONGÉLATION/
MOYENNEMENT
FAIBLE
FAIBLE
Tournez la molette de BEDIENING jusqu’à ce que “5:30” apparaisse.
900 W
600 W
360 W
180 W
90 W
Appuyez sur START/Q-START
Pendant la cuisson, vous pouvez augmenter ou diminuer la durée de
cuisson en tournant la molette de BEDIENING.

29
FRANÇAIS
Niveaux
de puissance
Pour vous donner plus de souplesse et vous permettre de mieux contrôler la cuisson, votre four à micro-ondes
possède 5 niveaux de puissance différents. Le tableau ci-dessous montre des exemples d’aliments et fournit des
recommandations sur les niveaux de puissance de votre four à micro-ondes.
NIVEAU DE
PUISSANCE
MAXIMUM 900 W * Faire bouillir de l’eau
* Faire cuire des morceaux de volaille, du poisson, des légumes
* Faire cuire des morceaux tendres de viande
FORTE-MOYENNE 600 W * Tout réchauffage
* Faire rôtir de la viande et de la volaille
* Faire cuire des champignons et des coquillages
* Faire cuire des aliments contenant du fromage et des œufs
MOYENNE 360 W * Faire cuire des gâteaux et des “scones”
* Préparer des œufs
* Préparer de la crème anglaise
* Préparer du riz, de la soupe
DÉCONGÉLATION/ 180 W * Toute décongélation
MOYENNEMENT * Faire fondre du beurre et du chocolat
FAIBLE * Faire cuire des morceaux de viande moins tendres
FAIBLE 90 W * Ramollir le beurre et le fromage
* Ramollir les glaces
* Faire lever la pâte
PUISSANCE UTILISATION ACCESSOIRE
Grille basse +
Plateau
métallique

30
Cuisson
Gril
L’exemple suivant vous montre comment utiliser la fonction Gril-1 pour cuire des aliments pendant 12 minutes
et 30 secondes.
Appuyez sur STOP/WISSEN.
Tournez la molette de Sélection de FUNCTIE pour sélectionner Gril ( ).
Appuyez sur Instellen/Klok pour confirmer la fonction Gril.
Tournez la molette de BEDIENING jusqu'à ce que “Gr-1” apparaisse.
Appuyez sur Instellen/Klok pour confirmer la catégorie.
Cette fonction vous permettra de dorer
et de griller rapidement les aliments.
En mode gril, la grille est placée sur le
plateau métallique, en mode gril.
En mode gril, la grille haute doit être
utilisée pendant la cuisson.
Catégorie Afficheur Fonctionnement de la résistance de chauffe
Gril-1 Gr-1 Résistance de chauffe supérieure (1 650 W)
Gril-2 Gr-2 Résistance de chauffe supérieure (1 100 W)
Gril-3 Gr-3 Résistance de chauffe inférieure (700 W)
Tournez la molette de BEDIENING jusqu'à ce que “12:30” apparaisse.
Appuyez sur START/Q-START.
Pendant la cuisson, vous pouvez augmenter ou diminuer la durée de
cuisson en tournant la molette de BEDIENING.
Après la cuisson, portez des gants pour ne pas vous brûler et utilisez un
récipient pour retirer le plateau métallique du micro-ondes, car celui-ci
est très chaud.

31
FRANÇAIS
Cuisson Chaleur
Tournante
L’exemple suivant vous montre comment utiliser la chaleur tournante pour cuisiner certains aliments
pendant 50 minutes à 220 °C.
1. Pour préchauffer le four.
Appuyez sur STOP/WISSEN.
En mode Chaleur tournante, la température
du four peut varier entre 40 °C et
100 °C ~ 230 °C.
Le four possède une fonction de
fermentation, à une température de 40 °C.
Attendez que le four refroidisse car vous
ne pouvez pas utiliser la fonction de
fermentation si la température est
supérieure à 40 °C.
Il est possible d'allonger le temps de
cuisson jusqu'à 9 heures à une
température maximum de 40 °C dans la
fonction convection du four à micro-ondes.
Il faudra quelques minutes pour que votre
four atteigne la température sélectionnée.
Une fois la température adéquate atteinte,
votre four émet un BIPsonore. Placez alors
les aliments dans le four et commencer la
cuisson.
Rappel :
L’utilisation du trépied
bas est recommandée
pour la cuisson en
chaleur tournante.
Tournez la molette de Sélection de
FUNCTIE pour sélectionner le
mode convection
( ).
Appuyez sur
Instellen/Klok
pour
la confirmation de la convection.
Tournez la molette de BEDIENING
jusqu’à ce que “220 °C”
apparaisse.
2. Pour cuire.
Appuyez sur STOP/WISSEN.
Tournez la molette de BEDIENING
jusqu’à ce que “50:00” apparaisse.
Appuyez sur
START/Q-START
.
Après la cuisson, portez des gants
pour ne pas vous brûler et utilisez un
récipient pour retirer le plateau
métallique du micro-ondes, car celui-
ci est très chaud.
Appuyez sur START/Q-START.
L’écran d’affichage indique
“Pr-H”.
Appuyez sur Instellen/Klok pour
confirmer la température.
Tournez la molette de Sélection de
FUNCTIE pour sélectionner le mode
convection
( ).
Appuyez sur
Instellen/Klok
pour la
confirmation de la convection.
Tournez la molette de BEDIENING
jusqu’à ce que “220 °C” apparaisse.

32
Cuisson combinée
rapide
L’exemple suivant vous montre comment programmer votre four avec une puissance micro de 360 W et gril
pour un temps de cuisson de 25 minutes.
Votre four possède une fonction de
cuisson combinée rapide qui vous
permet de cuire les aliments avec la
résistance de chauffe et le micro-ondes
en même temps ou alternativement. Cela
signifie généralement qu’il faut moins de
temps pour cuire vos aliments.
Vous pouvez choisir entre trois types de
niveaux de puissance (180 W, 360 W et
600 W) en mode Speed combi.
Tournez la molette de Sélection de FUNCTIE ( ) pour sélectionner le
mode de cuisson combinée (Co-1, 2, 3).
Appuyez sur Instellen/Klok pour confirmer le mode cuisson combinée.
Appuyez sur STOP/WISSEN.Speed Combi (Co-1, 2, 3)
Tournez la molette de BEDIENING jusqu’à ce que “Co-1” apparaisse.
Appuyez sur Instellen/Klok pour confirmer le mode gril-1.
Tournez la molette de BEDIENING jusqu’à ce que “360 W” apparaisse.
Appuyez sur Instellen/Klok pour confirmer la puissance.
Tournez la molette de BEDIENING jusqu’à ce que “25:00” apparaisse.
Appuyez sur START/Q-START.
Pendant la cuisson, vous pouvez augmenter ou diminuer la durée de
cuisson en tournant la molette de BEDIENING.
Après la cuisson, portez des gants pour ne pas vous brûler et utilisez
un récipient pour retirer le plateau métallique du micro-ondes, car
celui-ci est très chaud.
* Type de Cuisson combinée rapide
* Mode Gril : voir page 28
Co-1
Co-2
Co-3
Co-4
Co-5
Gril-1 + Puissance micro-ondes
Gril-2 + Puissance micro-ondes
Gril-3 + Puissance micro-ondes
Convection + Puissance
micro-ondes
(Résistance de chauffe
supérieure + inférieure) +
Puissance micro-ondes

FRANÇAIS
33
Cuisson combinée
rapide
L’exemple suivant vous montre comment programmer votre four avec une puissance de 360 W et à une
température de convection de 200 °C, pour un temps de cuisson de 25 minutes.
Votre four possède une fonction qui vous
permet de cuire les aliments avec les
modes convection et micro-ondes en
même temps ou alternativement. Cela
signifie généralement qu’il faut moins de
temps pour cuire vos aliments.
Vous pouvez choisir entre quatre types de
niveaux de puissance
(0 W, 180 W, 360 W, 600 W), en mode
Cuisson combinée rapide (Co-4).
Tournez la molette de Sélection de FUNCTIE ( ) pour sélectionner le
mode de cuisson combinée (Co-4).
Appuyez sur Instellen/Klok pour confirmer le mode cuisson combinée.
Appuyer sur STOP/WISSEN .
Speed Combi
(Co-4)
Appuyez sur START/Q-START.
Pendant la cuisson, vous pouvez augmenter ou diminuer la durée de
cuisson en tournant la molette de BEDIENING.
Après la cuisson, portez des gants pour ne pas vous brûler et utilisez
un récipient pour retirer le plateau métallique du micro-ondes, car
celui-ci est très chaud.
Tournez la molette de BEDIENING jusqu’à ce que “360 W“ apparaisse.
Appuyez sur Instellen/Klok pour confirmer la puissance.
Tournez la molette de BEDIENING jusqu’à ce que “25:00“ apparaisse.
Tournez la molette de BEDIENING jusqu’à ce que “Co-4” apparaisse.
Appuyez sur Instellen/Klok pour confirmer le mode Convection.
Tournez la molette de BEDIENING jusqu’à ce que “200 °C“ apparaisse.
Appuyez sur Instellen/Klok pour confirmer la température.
[ x2 ]
* Type de Cuisson combinée rapide
Co-1
Co-2
Co-3
Co-4
Co-5
Gril-1 + Puissance micro-ondes
Gril-2 + Puissance micro-ondes
Gril-3 + Puissance micro-ondes
Convection + Puissance
micro-ondes
(Résistance de chauffe
supérieure + inférieure) +
Puissance micro-ondes

34
Cuisson combinée
rapide
L’exemple suivant vous montre comment programmer votre four avec une puissance de 360 W et à une
température de 200 °C, pour un temps de cuisson de 25 minutes.
Tournez la molette de Sélection de FUNCTIE ( ) pour sélectionner le
mode de cuisson combinée (Co-5).
Appuyez sur Instellen/Klok pour confirmer le mode cuisson combinée.
Appuyez sur STOP/WISSEN.Speed Combi (Co-5)
Tournez la molette de BEDIENING jusqu’à ce que “Co-5” apparaisse.
Appuyez sur Instellen/Klok pour confirmer le mode cuisson combinée.
Tournez la molette de BEDIENING jusqu’à ce que “200 °C“ apparaisse.
Appuyez sur Instellen/Klok pour confirmer la température.
Tournez la molette de BEDIENING jusqu’à ce que “360 W“ apparaisse.
Appuyez sur Instellen/Klok pour confirmer la puissance.
Tournez la molette de BEDIENING jusqu’à ce que “25:00“ apparaisse.
Appuyez sur START/Q-START.
Pendant la cuisson, vous pouvez augmenter ou diminuer la durée de
cuisson en tournant la molette de BEDIENING.
Après la cuisson, portez des gants pour ne pas vous brûler et utilisez un
récipient pour retirer le plateau métallique du micro-ondes, car celui-ci
est très chaud.
Vous pouvez choisir entre trois niveaux
de puissances
(180 W, 360 W, 600 W) en mode
Cuisson combinée rapide (Co-5).
[ x2 ]
* Type de Cuisson combinée rapide
Co-1
Co-2
Co-3
Co-4
Co-5
Gril-1 + Puissance micro-ondes
Gril-2 + Puissance micro-ondes
Gril-3 + Puissance micro-ondes
Convection + Puissance
micro-ondes
(Résistance de chauffe
supérieure + inférieure) +
Puissance micro-ondes

35
FRANÇAIS
Cuisson automatique
rapide
L’exemple suivant vous montre comment cuire 0,6 kg de pommes de terres (Ac 8).
Appuyez sur STOP/WISSEN.
Appuyez sur Snelmenu ( ).
Tournez la molette de BEDIENING jusqu’à ce que “Ac 8” apparaisse.
Appuyez sur Instellen/Klok pour confirmer la catégorie.
CUISSON AUTOMATIQUE RAPIDE vous
permet de cuire facilement la plupart de
vos aliments favoris en sélectionnant le
type d’aliments et le poids de ceux-ci.
Tournez la molette de BEDIENING jusqu’à ce que “0.60 kg” apparaisse.
Appuyez sur START/Q-START.
Pendant la cuisson, vous pouvez augmenter ou diminuer la durée de
cuisson en tournant la molette de BEDIENING.
Après la cuisson, portez des gants pour ne pas vous brûler et utilisez
un récipient pour retirer le plateau métallique du micro-ondes, car
celui-ci est très chaud.

36
Instructions
Ac 1
Ac 2
Ac 3
Ac 4
Ac 5
Pizza
surgelée
Frites
Poulet
Cuisses
de poulet
Steak
0,30 ~ 0,50 kg
0,20 ~ 0,75 kg
0,80 ~ 1,80 kg
0,20 ~ 0,80 kg
0,30 ~ 1,20 kg
Plateau métallique
Assiette en verre
résistant à la
chaleur +
Grille haute +
Plateau métallique
Grille basse +
Plateau métallique
Grille haute +
Plateau métallique
Grille haute +
Plateau métallique
Congélation
Congélation
Réfrigération
Réfrigération
Réfrigération
Cette fonction permet de cuire des pizzas surgelées. Enlevez tous les
emballages et placez la pizza sur le plateau métallique. Après la cuisson,
laissez reposer la pizza 1 à 2 minutes.
Etalez la pomme de terre congelée sur l'assiette en verre résistant à la
chaleur posée sur la grille haute. Pour de meilleurs résultats, disposez une
couche unique. Lorsque vous entendez un BIP, retournez les aliments. Puis
appuyez sur start pour continuer la cuisson. Après cuisson, retirez du four et
laissez reposer pendant 1 à 2 minutes.
Si vous le souhaitez, enduisez le poulet de margarine fondue, de beurre ou
d’assaisonnement. Placez le poulet sur un côté, sur le plateau métallique.
Dès que vous entendez un BIP, égouttez le jus, puis retournez le poulet
immédiatement. Après la cuisson, recouvrez-le de papier aluminium et
laissez-le reposer pendant 10 minutes.
Placez les cuisses de poulet sur la grille haute.
Dès que vous entendez un BIP, retournez les cuisses de poulet, puis appuyez
sur Start pour continuer la cuisson.
Après la cuisson, recouvrez-les de papier aluminium et laissez-les reposer
pendant 2 à 5 minutes.
Placez les steaks sur la grille haute. Dès que vous entendez un BIP,
retournez-les, puis appuyez sur Start pour continuer la cuisson.
Après la cuisson, recouvrez-les de papier aluminium et laissez-les reposer
pendant 10 minutes.
GUIDE CUISSON AUTOMATIQUE RAPIDE
Cuisson
automatique
Fonction
Catégorie
Température
des aliments
Ustensile
Limite de poids

37
FRANÇAIS
Ac 6
Ac 7
Ac 8
Ac 9
Ac 10
Rôti de
porc
Rôti de
bœuf
Pommes
de terre
Plats
surgelés
Légumes
frais
0,80 ~ 1,80 kg
0,80 ~ 1,80 kg
0,20 ~ 1,00 kg
0,40 ~ 1,00 kg
0,20 ~ 1,00 kg
Grille basse +
Plateau métallique
Grille basse +
Plateau métallique
Grille haute +
Plateau métallique
Grille basse +
Plateau métallique
Grille basse +
Plateau métallique
+ Récipient spécial
micro-ondes avec
couvercle
Réfrigération
Réfrigération
Temp.
ambiante
Congélation
Temp.
ambiante
Dégraissez le rôti de porc. Enduisez-le de margarine fondue ou de beurre. Placez-le
sur la grille basse, sur le plateau métallique. Dès que vous entendez un BIP,
retournez-le rôti de porc. Puis appuyez sur Start pour continuer la cuisson. Après la
cuisson, recouvrez-le de papier aluminium et laissez-le reposer pendant 10 minutes.
Enduisez le rôti de bœuf avec de la margarine fondue ou du beurre. Placez le rôti
de bœuf sur la grille basse, sur le plateau métallique. Dès que vous entendez un BIP,
retournez le rôti de porc.
Puis appuyez sur Start pour continuer la cuisson. Après la cuisson, recouvrez le rôti
de bœuf de papier aluminium et laissez-le reposer pendant 10 minutes.
Choisissez des pommes de terre de taille moyenne (200-220 g chacune)
Lavez-les et séchez-les. Percez-les plusieurs fois avec une fourchette. Posez-les sur le
trépied haut. Choisissez « Ac 8 » puis le poids, puis appuyez sur Start.
Lorsque le bip retentit, retournez les pommes de terre.
A la fin de la cuisson, retirez-les du four, recouvrez-les de papier aluminium et
laissez-les reposer 5 minutes.
Placez le plat surgelé sans le couvrir sur la grille basse.
Coupez les légumes en petits morceaux.
** Brocolis: coupez-les en petites fleurettes.
** Carottes: épluchez et découpez-les en fines rondelles.
Placez les légumes dans un récipient spécial micro-ondes. Ajoutez de l’eau.
Recouvrez-les d’un film plastique. Dès que vous entendez un BIP, remuez-les (une
seule fois). Après la cuisson, remuez-les à nouveau et laissez-les reposer pendant 2
à 3 minutes. Ajoutez de l’eau en fonction de la quantité de légumes.
** 0,20 kg – 0,50 kg: 2 cuillerées à soupe
** 0,55 kg – 1,00 kg: 4 cuillerées à soupe
GUIDE CUISSON AUTOMATIQUE RAPIDE
Cuisson
automatique
Instructions
Fonction
Catégorie
Température
des aliments
Ustensile
Limite de poids

38
< Plateau métallique > < Grille basse + Plateau métallique > < Grille haute + Plateau métallique >
Ac 11
Ac 12
Légumes
surgelés
Riz /
Pâtes
0,20 ~ 1,00 kg
0,10 ~ 0,30 kg
Grille basse +
Plateau métallique
+ Récipient spécial
micro-ondes avec
couvercle
Grille basse +
Plateau métallique
+ Récipient spécial
micro-ondes avec
couvercle
Congélation
Temp.
ambiante
Placez les légumes dans un récipient spécial micro-ondes. Ajoutez de l’eau.
Recouvrez-les d’un film. Dès que vous entendrez un BIP, remuez-les (une seule
fois). Après la cuisson, remuez-les à nouveau et laissez-les reposer pendant 2 à 3
minutes. Ajoutez de l’eau en fonction de la quantité de légumes.
** 0,20 kg – 0,50 kg: 2 cuillerées à soupe
** 0,55 kg – 1,00 kg: 4 cuilllerées à soupe
Placez le riz et l’eau bouillante avec
1
/4 à 1 cuillérée à café de sel dans un
récipient grand et profond (3 L).
Dès que vous entendez un BIP, remuez le riz.
** Riz – Après la cuisson, recouvrez-le et laissez-le reposer pendant
5 minutes ou jusqu’à ce que l’eau soit absorbée.
** Pâtes – Pendant la cuisson, remuez-les plusieurs fois, si nécessaire.
Après la cuisson, laissez-les reposer pendant 1 ou 2 minutes. Rincez les
pâtes à l’eau froide.
GUIDE CUISSON AUTOMATIQUE RAPIDE
Cuisson
automatique
Poids
Eau Riz
Pâtes
100 g
300 ml
400 ml
200 g
600 ml
800 ml
300 g
900 ml
1200 ml
Couvercle
Oui
Non
Instructions
Fonction
Catégorie
Température
des aliments
Ustensile
Limite de poids

39
FRANÇAIS
Cuisson à la
Vapeur du Chef
Dans l’exemple suivant, je vous montrerai comment cuisiner 0,6 kg de Haricots verts (St 8).
Appuyez sur STOP/WISSEN.
Appuyez sur Stomen ( ).
Tournez la molette de BEDIENING jusqu’à ce que “St 8” apparaisse.
Appuyez sur Instellen/Klok pour confirmer la catégorie.
Cette fonction vous permet de cuisiner à
la vapeur.
AVERTISSEMENT:
1. Utilisez toujours des gants de protection
pour retirer un CUITVAPEUR du four. Il
est très chaud.
2. Ne posez un CUIT-VAPEUR bouillant ni
sur une table en verre, ni sur une
surface susceptible de fondre
facilement. Pensez toujours à utiliser
une manique ou un plateau.
3. Lorsque vous utilisez ce cuit-vapeur,
versez au moins 400 ml d’eau avant
l’utilisation. Si la quantité d’eau est
inférieure à 400 ml, la cuisson peut
être incomplète. Cela peut également
provoquer un incendie ou mettre le
produit hors d’usage.
4. Soyez prudent lorsque vous déplacez
le CUIT-VAPEUR rempli d’eau.
5. Lorsque vous utilisez le CUIT-VAPEUR,
le couvercle vapeur et le réservoir d’eau
doivent être parfaitement mis en place.
Sinon, les oeufs ou les châtaignes
explosent.
6. N’utilisez jamais ce Cuit-vapeur avec un
autre produit. Cela pourrait provoquer
un incendie ou mettre le produit hors
d’usage.
Tournez la
molette de
BEDIENING jusqu’à ce que “0.60 kg” apparaisse.
Appuyez sur START/Q-START.
Pendant la cuisson, vous pouvez augmenter ou diminuer la durée de
cuisson en tournant la molette de BEDIENING.

40
Taille de l’ingrédient
Méthode de cuisson
St 1
St 2
St 3
St 4
Gambas
Fruits
de mer
Poisson
entier
Filet de
poisson
0,20 - 0,80 kg
0,20 - 0,80 kg
0,20 - 0,80 kg
0,20 - 0,80 kg
Cloche Steamchef
Grille basse +
Plateau métallique
Cloche Steamchef
Grille basse +
Plateau métallique
Cloche Steamchef
Grille basse +
Plateau métallique
Cloche Steamchef
Grille basse +
Plateau métallique
Réfrigération
Réfrigération
Réfrigération
Réfrigération
Petites gambas gambas
(gambas, grosses crevettes,
petits crabes, etc.)
Petites palourdes
(moules, Fruits de mer, etc.)
Laver les palourdes. Verser 400 ml d’eau
ou de vin blanc dans le cuiseur.
Placer la plaque supportant les palourdes
en haut du cuiseur. Recouvrir la plaque
avec la cloche et la placer dans le four.
Épaisseur maximum de 3 cm
Longueur maximum de 25 cm
Laver le poisson. Verser 400 ml d’eau ou
de vin blanc dans le cuiseur.
Placer la plaque supportant le poisson en
haut du cuiseur.
Recouvrir la plaque avec la cloche et la
placer dans le four.
Épaisseur maximum de 2.5 cm Fileter le poisson. Verser 400 ml d’eau
ou de vin blanc dans le cuiseur.
Placer la plaque supportant le filet de
poisson en haut du cuiseur.
Recouvrir la plaque avec la cloche et la
placer dans le four.
Laver les crevettes. Verser 400 ml d’eau
ou de vin blanc dans le cuiseur.
Placer la plaque supportant les gambas
en haut du cuiseur.
Recouvrir la plaque avec la cloche et la
placer dans le four.
Cuisson
vapeur
Fonction
Aliments
REMARQUE: La durée de cuisson peut être ajustée à l’aide du cadran pendant la cuisson du plat.
Température
initiale
Ustensile
Fourchette de
poids
GUIDE DE LA CUISSON VAPEUR

41
FRANÇAIS
St 5
St 6
St 7
St 8
Carottes
Brocolis
Courgette
Haricots verts
0,20 - 0,80 kg
0,20 - 0,80 kg
0,20 - 0,80 kg
0,20 - 0,60 kg
Temp.
ambiante
Temp.
ambiante
Temp.
ambiante
Temp.
ambiante
Coupés en rondelles ou en dés Verser 400 ml d’eau ou de vin blanc dans
le cuiseur. Placer la plaque supportant les
légumes en haut du cuiseur.
Recouvrir la plaque avec la cloche et la
placer dans le four.
Coupés en rondelles ou en dés
En dés
Cuire comme indiqué ci-dessus.
Cuire comme indiqué ci-dessus.
Cuire comme indiqué ci-dessus.
Cuisson
vapeur
Fonction
Aliments
REMARQUE: La durée de cuisson peut être ajustée à l’aide du cadran pendant la cuisson du plat.
Température
initiale
Ustensile
Fourchette de
poids
GUIDE DE LA CUISSON VAPEUR
Cloche Steamchef
Grille basse +
Plateau métallique
Cloche Steamchef
Grille basse +
Plateau métallique
Cloche Steamchef
Grille basse +
Plateau métallique
Cloche Steamchef
Grille basse +
Plateau métallique
Taille de l’ingrédient
Méthode de cuisson

42
REMARQUE: La durée de cuisson
p
eut être a
j
ustée à l’aide du cadran
p
endant la cuisson du
p
lat.
St 9
St 10
St 11
St 12
Epinards
Choux
eur
Pommes
de terre
Blancs
de poulet
0,20 - 0,50 kg
0,20 - 0,80 kg
0,20 - 0,80 kg
0,20 - 0,80 kg
Petite toue
Temp.
ambiant e
Temp.
ambiant e
Temp.
ambiant e
Réfrigération
Cuire comme indiqué ci-dessus.
Cuire comme indiqué ci-dessus.
Entiers Verser 400ml d’eau ou de vin blanc
dans le cuiseur. Placer la plaque
supportant les légumes en haut du
cuiseur. Recouvrir la plaque avec la
cloche et la placer dans le four
Épaisseur maximum de 2.5 cm Préparer des poitrines de poulet.
Verser 400ml d’eau ou de vin blanc
dans le cuiseur.
Recouvrir la plaque avec la cloche et la
placer dans le four.
Cuisson
vapeur
Fonction
Aliments
Température
initiale
Ustensile
Fourchette
de poids
GUIDE DE LA CUISSON VAPEUR
Taille de l’ingrédient
Méthode de cuisson
Cloche Steamchef
Grille basse +
Plateau métallique
Cloche Steamchef
Grille basse +
Plateau métallique
Cloche Steamchef
Grille basse +
Plateau métallique
Cloche Steamchef
Grille basse +
Plateau métallique
CLOCHE EN INOX
ASSIETTE DE CUISEUR
PLAT VAPEUR (À REMPLIR D'EAU)
GRILLE BASSE
PLATEAU METALLIQUE
CLOCHE STEAMCHEF

43
FRANÇAIS
Décongélation
automatique
Appuyez sur STOP/WISSEN.
Pesez les aliments que vous êtes sur le point de décongeler. Assurez-vous
de bien enlever toutes attaches ou tous emballages métalliques ; puis
placez les aliments dans un récipient spécial micro-ondes, sur le plateau
métallique, et fermez la porte du four.
Appuyez sur Instellen/Klok pour confirmer la catégorie (volaille).
Saisissez le poids des aliments congelés que vous êtes sur le point de
décongeler.
Tournez la molette de BEDIENING jusqu’à ce que “1.4 kg” apparaisse,
pour le poids des aliments congelés.
Appuyez sur Autom Ontdooien ( ).
Tournez la molette de BEDIENING jusqu’à ce que “dEF2” apparaisse.
Appuyez sur START/Q-START.
Votre four possède quatre programmes
de décongélation automatique :-VIANDE
-VOLAILLE -POISSON et PAIN ; chaque
type de décongélation possède différents
niveaux de puissance. Si vous appuyez
plusieurs fois sur la touche
Décongélation, un programme différent
sera sélectionné
La température et la densité des aliments varient. Avant de commencer la cuisson, il est recommandé de vérifier
les aliments avant de commencer la cuisson. Faites particulièrement attention aux gros morceaux de viande et de
poulet, certains aliments peuvent ne pas être complètement décongelés avant de les cuire. Par exemple, le poisson
cuit tellement vite qu’il est souvent conseillé de commencer la cuisson lorsque le poisson est encore légèrement
congelé. Le programme PAIN permet de décongeler des petits pains. Il faut un certain temps pour que le centre
du pain décongèle. L’exemple suivant vous montre comment décongeler 1,4 kg de volaille congelée.
Lors de la décongélation, votre four émettra un “BIP”. Ouvrez la porte du four, retournez les aliments et séparez-les
pour permettre une décongélation homogène sur l’ensemble des aliments. Enlevez les parties qui ont décongelé ou
recouvrez-les pour ralentir la décongélation. Ensuite, fermez la porte du four, puis appuyez sur
START
/Q-START pour
commencer la décongélation.
Votre four continuera la décongélation des aliments (même lorsqu’un bip a été émis) sauf si la porte est ouverte.

44
Viande
(dEF1)
Volaille
(dEF2)
Poisson
(dEF3)
Pain
(dEF4)
Catégorie Limite de poids Ustensile Aliments
GUIDE DE DÉCONGÉLATION
0,1 ~ 4,0 kg
0,1 ~ 0,5 kg
Matériel de
micro-ondes
(Plaque plane)
Grille basse,
Plateau métallique
Essuie-tout ou
plaque plane
Grille basse,
Plateau métallique
Viande
Viande hachée, steaks, petits morceaux de viande pour ragoûts, biftecks d'aloyau,
ragoûts de viande, rôtis de rumsteck, hamburgers, côtelettes de porc, côtelettes d’agneau,
roulade de viande, saucisses, côtelettes (2 cm)
Lors de l’émission du bip, retournez les aliments.
Après décongélation, laissez reposer les aliments pendant 5 à 15 minutes.
Volaille
Poulet entier, cuisses, blancs, blancs de dinde (inférieur à 2,0 kg)
Lors de l’émission du bip, retournez les aliments.
Après la décongélation, laissez reposer les aliments pendant 20 à 30 minutes
Poisson
Filets, steaks, poisson entier, fruits de mer
Lors de l’émission du bip, retournez les aliments.
Après la décongélation, laissez reposer les aliments pendant 10 à 20 minutes
Pain
Tranches de pain, petits pains, baguettes, etc.
* Les aliments à décongeler doivent être placés dans un récipient adapté pour micro-ondes et doivent être non couverts sur le trépied bas sur le plateau
métallique.
* Si nécessaire, couvrez les petites parties de viande ou de volaille avec des bandes de papier aluminium. Cela permettra aux parties fines de ne pas se
refroidir pendant la décongélation. Assurez-vous que le papier aluminium ne touche pas les parois du four.
* Séparez les aliments comme la viande hachée, côtelettes, saucisses et lard le plus possible. Lorsque vous entendez un BIP, retournez les aliments. Continuez
à décongeler les pièces restantes. Laissez reposer jusqu'à une décongélation totale.
* Par exemple, rôti et poulet entier doivent reposer pendant au moins 1 heure avant de les cuire.

45
FRANÇAIS
Touche Plus ou Moins
(Cuisson Plus ou moins longue)
L’exemple suivant vous montre comment modifier les programmes prédéfinis
de CUISSON RAPIDE AUTOMATIQUE pour obtenir un temps de cuisson
plus long ou plus court, selon le cas.
Si vous trouvez que votre aliment est trop
ou pas assez cuit lorsque vous utilisez le
fonction CUISSON AUTOMATIQUE,
vous pouvez diminuer ou augmenter la
durée de cuisson en tournant la molette
de BEDIENING.
Vous pouvez prolonger ou raccourcir le
temps de cuisson en tournant le bouton
de cadran (à l'exception du mode de
décongélation et en mode désodoriser).
Tournez la molette de BEDIENING.
Le temps de cuisson augmentera ou diminuera.
Appuyez sur STOP/WISSEN.
Choisissez le programme Snelmenu.
* Voir Cuisson automatique. (page 33)
Sélectionnez le poids des aliments.
Appuyez sur START/Q-START.
Temps de cuisson
0~3 min.
3~20 min.
20~30 min.
30~90 min.
10 s
30 s
1 min
5 min
Augmenter ou diminuer le
temps de cuisson

46
Désodoriser
L´exemple suivant vous montre comment éliminer les odeurs du four à micro-ondes.
Appuyez sur STOP/WISSEN.
Tournez la molette de Sélection de FUNCTIE pour sélectionner
Désodoriser( ).
Appuyez sur Instellen/Klok pour confirmer.
Le four est doté d'une fonction spéciale
pour y enlever les odeurs.
Vous pouvez utiliser la fonction de
Désodoriser dans le four sans aucun
accessoire dedans.
Appuyez sur START/Q-START.
(Le compte à rebours commence automatiquement)

FRANÇAIS
47
Ustensiles
Spécifiques micro-ondes
Si vous utilisez la fonction micro-ondes, n’utilisez jamais d’ustensiles
métalliques ou d’ustensiles qui ont des garnitures métalliques
Les ondes ne peuvent pas pénétrer le métal. Elles risquent de faire rebondir tout
objet métallique se trouvant dans le four et de provoquer un arc électrique, un
phénomène similaire à celui de l’éclair. La plupart des ustensiles non métalliques et
résistants à la chaleur peuvent être utilisés sans risque pour votre four à micro-
ondes. Toutefois, certains ustensiles peuvent contenir des matériaux qui les rendent
inappropriés pour être utilisés dans un four à micro-ondes. Si vous avez un doute
sur un ustensile, il y a un moyen très simple de savoir si vous pouvez l’utiliser avec
la fonction Micro-ondes.
Placez l’ustensile en question à côté d’un récipient en verre rempli d’eau, en mode
Micro-ondes, sur la position de puissance HIGH (ELEVEE) pendant 1 minute. Si
l’eau se réchauffe, mais que l’ustensile est froid au toucher, cela signifie que
l’ustensile peut être utilisé dans votre four à micro-ondes. Toutefois, si l’eau ne
change pas de température, mais que l’ustensile devient chaud, les micro-ondes
sont absorbées par l’ustensile : cela signifie que cet ustensile ne peut pas être
utilisé dans un four à micro-ondes. Vous avez certainement dans votre cuisine un
grand nombre d’ustensiles que vous pourriez utiliser pour votre four à micro-
ondes. Lisez simplement la liste des ustensiles ci-dessous.
Vaisselle de table
Un grand nombre d’articles de vaisselle de table peuvent être utilisés dans votre four à
micro-ondes. Si toutefois vous avez des doutes, consultez la documentation du fabricant
ou bien réalisez le test dans votre four à micro-ondes.
Récipients en verre
Les récipients en verre, qui résistent à la chaleur, peuvent être utilisés sans
danger dans votre four à micro-ondes. Cela comprend toutes les marques de
récipients en verre trempé. Toutefois, n’utilisez pas de récipients en verre
délicats, tels que les grands verres ou les verres à vin, car ils risquent de se
briser au fur et à mesure que les aliments chauffent.
Récipients en plastique
Ils peuvent être utilisés pour contenir des aliments qui vont être réchauffés
rapidement. Toutefois, ils ne doivent pas être utilisés pour contenir des
aliments dont la cuisson prend un temps assez important, car les aliments
chauds risquent de déformer ou de faire fondre les récipients en plastique.
Récipients en carton et essuie-tout
Les assiettes et récipients en carton peuvent être utilisés sans danger dans
votre four à micro-ondes, à condition que le temps de cuisson soit court et
que les aliments qui doivent être cuits aient une faible teneur en matières
grasses et en humidité. L’essuie-tout est également très utile pour emballer
les aliments et pour placer sur les plaques à pâtisserie sur lesquelles sont
cuits des aliments gras, tels que le bacon. En général, évitez d’utiliser les
essuie-tout colorés car la couleur risque de fondre. Certains essuie-tout
recyclés peuvent contenir des impuretés, ce qui risque de provoquer un
arc électrique ou des étincelles, en mode Micro-ondes.
Sacs plastiques spécial cuisson
A condition qu’ils soient spécialement conçus pour la cuisson, les sacs
plastiques spécial cuisson peuvent être utilisés sans risques dans votre four
à micro-ondes. Toutefois, faites une fente dans le sac pour que la vapeur
puisse s’échapper. En mode Micro-ondes, n’utilisez jamais de sacs
plastiques ordinaires pour cuire des aliments, sinon ils fondraient et se
déchireraient.
Récipients en plastique spécial micro-ondes
Vous trouverez une grande variété de formes et de tailles différentes de
récipients spécial micro-ondes. Pour la plupart, vous pouvez
probablement utiliser des récipients que vous avez déjà chez vous plutôt
que d’investir dans de nouveaux ustensiles de cuisine.
Récipients en poterie, grès et céramique
Les récipients fabriqués avec ces matériaux peuvent généralement être
utilisés en mode Micro-ondes, mais ils doivent être testés avant d’être
utilisés.
ATTENTION
Certains récipients qui contiennent une grande quantité de plomb ou de
fer ne peuvent pas être utilisés comme ustensiles dans votre four à
micro-ondes.
Vérifiez les ustensiles pour vous assurer qu’ils peuvent être utilisés en
mode Micro-ondes.

48
Caractéristiques des aliments et
Cuisson au micro-ondes
Surveiller les aliments pendant la cuisson
Les recettes du livre ont été concoctées avec une grande attention, mais votre réussite dans la
préparation de ces recettes dépend de l’attention que vous apportez aux aliments pendant leur
cuisson.
Surveillez toujours les aliments pendant la cuisson. Votre four à micro-ondes est équipé d’une
lampe-témoin qui s’allume automatiquement lorsque le four fonctionne de sorte que vous puissiez
voir ce qui se passe à l’intérieur et vérifier la progression de la cuisson. Les instructions données
dans les recettes doivent être considérées comme des recommandations minimales. S’il vous semble
que les aliments cuisent de manière non homogène, procédez à des réglages, si nécessaire, pour
résoudre le problème.
Facteurs ayant une influence sur le temps de cuisson
De nombreux facteurs ont une influence sur le temps de cuisson. Selon la température des
ingrédients utilisés dans une recette, les temps de cuisson sont très différents. Par exemple, la
cuisson d’un gâteau préparé avec du beurre, du lait et des œufs très froids prendra beaucoup plus
longtemps qu’un gâteau préparé avec des ingrédients qui sont à température ambiante. Toutes les
recettes du livre indiquent une plage de temps de cuisson. Vous trouverez certainement que les
aliments ne sont pas assez cuits pour les temps de cuisson les plus bas, et vous voudrez peut-être
cuire les aliments un peu plus que le temps maximum indiqué, selon vos goûts. La philosophie
inhérente à ce livre de recettes est la suivante : dans une recette, il vaut mieux être prudent
lorsqu’on indique les temps de cuisson. Les aliments trop cuits sont bons à jeter. Certaines des
recettes, particulièrement les recettes de pains, de gâteaux et de crème anglaise, recommandent
de retirer les aliments du four lorsqu’ils sont légèrement trop cuits. Il ne s’agit pas d’une erreur.
Si on laisse reposer les aliments et qu’on les recouvre, ils continueront à cuire en dehors du four car
la chaleur piégée dans les parties extérieures des aliments se dirige peu à peu vers l’intérieur. Si les
aliments restent dans le four jusqu’à ce qu’ils soient cuits tout au long du temps de cuisson, les
parties extérieures seront trop cuites voire brûlées. Vous serez bientôt expert dans l’estimation des
temps de cuisson et de repos pour un grand nombre d’aliments.
Densité des aliments
Les aliments légers, poreux, tels que gâteaux et pains cuisent plus rapidement que les aliments
lourds et denses, tels que rôtis et ragoûts. Lorsque vous cuisez des aliments poreux, faites attention
à ce que les bords extérieurs ne deviennent pas secs et fragiles.
Hauteur des aliments
La partie supérieure des aliments hauts, en particulier les rôtis, cuira plus rapidement que la partie
inférieure. Par conséquent, il vaut mieux retourner les aliments hauts pendant la cuisson, même
plusieurs fois, si nécessaire.
Teneur en humidité des aliments
Etant donné que la chaleur générée par les micro-ondes a tendance à évaporer l’humidité, il faut
arroser les aliments relativement secs, tels que les rôtis et certains légumes avec un peu d’eau, avant la
cuisson, ou les couvrir pour garder l’humidité.
Os et matières grasses contenus dans les aliments
Les os sont conducteurs de chaleur et les matières grasses cuisent plus rapidement que la viande.
Lorsque vous cuisez des morceaux de viande avec des os ou des morceaux gras de viande, veillez à
ce qu’ils ne cuisent pas de manière inégale et qu’ils ne soient pas trop cuits.
Quantité d’aliments
Le nombre d’ondes dans votre four reste constant indépendamment de la quantité d’aliments à cuire.
Par conséquent, plus vous mettez d’aliments dans le four, plus le temps de cuisson est long.
Lorsque vous préparez une recette et que vous n’utilisez que la moitié des ingrédients, n’oubliez pas de
diminuer le temps de cuisson d’au moins un tiers.
Forme des aliments
Les ondes ne pénètrent les aliments qu’à une profondeur d’environ 2 cm, la partie intérieure des
aliments qui ont une certaine épaisseur sont cuits car la chaleur générée à l’extérieur se dirige vers
l’intérieur. Seul le bord extérieur des aliments est cuit par les ondes ; le reste est cuit par conduction. La
forme la plus inadéquate pour un aliment à cuire dans un four à micro-ondes est un aliment épais et
carré. Les coins brûleront bien avant que le centre soit chaud. Les aliments fins et ronds ainsi que les
aliments qui sont arrondis cuisent très facilement dans le four à micro-ondes.
Couvrir les aliments
Un couvercle piège la chaleur et la vapeur accélère la cuisson des aliments. Utilisez un couvercle ou un
film spécial micro-ondes avec un coin rabattu pour éviter toute rupture.
Dorer les aliments
Les viandes et les volailles qui sont cuites pendant quinze minutes ou plus longtemps doreront
légèrement dans leur propre graisse. Les aliments qui ont un temps de cuisson plus court peuvent être
recouverts d’une sauce brune, comme par exemple la sauce worcestershire, la sauce au soja ou la
sauce barbecue, pour obtenir une couleur très agréable à l’oeil. Dans la mesure où seulement une
petite quantité de sauce brune est ajoutée aux aliments, le goût des aliments est préservé.
Couvrir les aliments avec du papier sulfurisé
Le papier sulfurisé permet aux matières grasses de ne pas éclabousser et aux aliments de conserver
leur chaleur. Mais, le fait que le papier sulfurisé couvre moins les aliments qu’un couvercle ou un film
permet aux aliments de sécher légèrement.
Disposition et espacement
Des aliments tels que les pommes de terre cuites au four, les biscuits et les hors-d’oeuvres cuiront de
manière plus homogène s’ils sont placés dans le four à une distance égale, de préférence en rond.
N’empilez jamais d’aliments les uns sur les autres.

FRANÇAIS
49
Caractéristiques des aliments et
Cuisson au micro-ondes
Remuer les aliments
Le fait de remuer les aliments est une des techniques les plus importantes de la cuisson au micro-ondes. En
cuisine traditionnelle, les aliments sont remués pour bien les mélanger. Toutefois, les aliments cuits au micro-
ondes doivent être remués pour répandre et redistribuer la chaleur. Remuez toujours de l’extérieur vers le
centre car c’est l’extérieur des aliments qui se réchauffe en premier.
Retourner les aliments
Il faut retourner les aliments, volumineux et hauts, tels que les rôtis et les poulets, pour que le haut et le bas
des aliments cuisent de manière homogène. Il est également recommandé de retourner les morceaux de
poulet et les côtelettes.
Placer les morceaux les plus épais, faces vers l’extérieur
Dans la mesure où les ondes sont dirigées vers la partie extérieure des aliments, il est plus judicieux de
placer les morceaux de viande, de volaille, de poisson, les plus épais, sur le bord extérieur du plat à four.
Ainsi, les parties les plus épaisses recevront une plus grande quantité d’ondes et les aliments cuiront de
manière homogène.
Protection avec du papier aluminium
Vous pouvez mettre des bandes de papier aluminium (qui bloquent les ondes) sur les coins ou les bords des
aliments de forme carrée ou rectangulaire pour éviter que ces parties ne cuisent trop. N’utilisez jamais trop
de papier aluminium et veillez à ce que le papier aluminium soit bien fixé au plat, car sinon cela pourrait
provoquer un arc électrique dans le four.
Placer les aliments plus haut
Vous pouvez placer les aliments épais ou denses plus haut dans le four pour que les micro-ondes puissent
être absorbées par le dessous et le centre des aliments.
Piquer les aliments
Les aliments qui sont enfermés dans une coquille ou dans une peau ou une membrane risquent d’éclater
dans le four sauf s’ils sont piqués avant la cuisson. Ces aliments comprennent par exemple les jaunes et les
blancs d’oeufs, les palourdes et les huîtres, et l’ensemble des légumes et des fruits.
Vérifier fréquemment les aliments pour voir s’ils sont cuits
Dans un four à micro-ondes, les aliments cuisent si rapidement qu’il est nécessaire de vérifier fréquemment
si les aliments sont cuits. Certains aliments restent dans le four à micro-ondes jusqu’à ce qu’ils soient
entièrement cuits, mais la plupart des aliments, y compris les viandes et les volailles, sont retirés du four,
bien qu’il ne soient pas tout à fait cuits, et cela permet aux aliments de continuer à cuire pendant le temps
de repos. Pendant le temps de repos, la température intérieure des aliments augmentera de 3°C à 8°C.
Temps de repos
Après avoir retiré les aliments du four, on laisse souvent reposer les aliments pendant 3 à 10 minutes.
Pendant le temps de repos, les aliments sont généralement recouverts pour conserver la chaleur sauf s’ils
sont supposés rester secs en texture (comme certains gâteaux et biscuits, par exemple). Ce temps de repos
permet aux aliments de continuer à cuire, développe la saveur des aliments et favorise le mélange des
saveurs.
Pour nettoyer votre four
1 Garder l’intérieur du four propre
Les éclaboussures d’aliments ou de liquides collent aux parois du four et, entre le
joint et la surface de la porte. Il est recommandé d’essuyer immédiatement tout
débordement avec un chiffon humide. Les miettes et les débordements absorberont
les ondes et allongeront le temps de cuisson. Utilisez un chiffon humide pour
éliminer les miettes qui se glissent entre la porte et la structure. Il est important de
garder cette zone propre pour assurer une bonne étanchéité. Nettoyez les
éclaboussures de graisse avec un chiffon imbibé d’eau et de savon, puis rincez et
séchez. N’utilisez pas de détergent corrosif ou de produit de nettoyage abrasif. Le
plateau métallique peut être lavé à la main ou au lave-vaisselle.
2 Garder l’extérieur du four propre
Nettoyez l’extérieur de votre four avec de l’eau savonneuse, puis avec de l’eau
propre et séchez avec un chiffon ou avec de l’essuie-tout. Pour éviter
d’endommager certaines parties du four, l’eau ne doit pas s’infiltrer dans les
ouvertures de ventilation. Pour nettoyer le bandeau de commande, ouvrez la porte
pour éviter que le four se mette à fonctionner accidentellement, et essuyez avec un
chiffon humide, puis tout de suite après avec un chiffon sec. Après le nettoyage,
appuyez sur Stop/Annulation.
3 Si la vapeur s’accumule à l’intérieur et autour de l’extérieur de la porte du four,
essuyez les bandeaux à l’aide d’un chiffon. Cela peut se produire lorsque le four
fonctionne dans des conditions d’humidité élevée et cela ne signifie en aucune
manière le mauvais fonctionnement de l’appareil.
4 La porte et les joints de porte doivent être gardés propres. Utilisez uniquement de
l’eau chaude et savonneuse, rincez, puis séchez complètement.
NE PAS UTILISER DE MATERIAUX ABRASIFS, TELS QUE LES POUDRES A
RECURER OU LES TAMPONS LAINE D’ACIER ET PLASTIQUE.
Les parties métalliques seront plus faciles à entretenir si vous les essuyez
fréquemment à l’aide d’un chiffon humide.

50
Questions et
Réponses
Q Que se passe-t-il si la lampe-témoin du four ne s’allume pas ?
R Il peut y avoir plusieurs raisons pour lesquelles la lampe du four ne
s’allume pas.
L’ampoule a éclaté
Le transformateur est en panne
Q Les ondes traversent-elles la façade vitrée de la porte ?
R Non. Les trous, ou les orifices sont prévus pour permettre à la lumière de
passer ; ils ne laissent pas passer les ondes.
Q Pourquoi un bip est-il émis lorsqu’on appuie sur une touche sur le
bandeau de commande ?
R Un bip est émis pour s’assurer que le réglage est bien défini.
Q Le four à micro-ondes sera t-il endommagé s’il fonctionne à vide ?
R Oui. N’utilisez jamais votre four à micro-ondes à vide ou sans le plateau
métallique.
Q Pourquoi les œufs éclatent-ils ?
R Lorsque vous cuisez, faites frire ou pochez des oeufs, le jaune peut éclater
en raison de l’accumulation de la vapeur dans la membrane du jaune
d’oeuf. Pour éviter cela, percez simplement le jaune avant la cuisson.
Ne cuisez jamais d’œufs dans leur coquille dans votre four à micro-ondes.
Q Pourquoi un temps de repos est-il recommandé après la cuisson au
micro-ondes ?
R Une fois la cuisson au micro-ondes terminée, les aliments continuent à cuire
pendant le temps de repos. Ce dernier termine la cuisson de manière
homogène sur l’ensemble des aliments. Le temps de repos dépend de la
densité des aliments.
Q Est-il possible de faire du pop corn dans un four à micro-ondes ?
R R Oui, si vous utilisez une des deux méthodes indiquées ci-dessous
1 Les ustensiles pour faire du popcorn conçus spécialement pour le micro-
ondes.
2 Les paquets de popcorn spécial micro-ondes vendus dans le commerce
qui indiquent les temps de cuisson et les puissances nécessaires pour
obtenir un produit final acceptable.
SUIVRE LES INSTRUCTIONS DONNEES PAR CHAQUE FABRICANT DE
POPCORN. LORS DE LA PREPARATION DU POPCORN, NE PAS LAISSER
LE FOUR SANS SURVEILLANCE. SI EN SUIVANT LES TEMPS DE
CUISSON INDIQUES, LE MAÏS N’ECLATE PAS, ARRETER LA CUISSON.
LE FAIT DE TROP CUIRE LE POPCORN RISQUERAIT DE LE BRULER.
ATTENTION
NE JAMAIS UTILISER DE SAC PAPIER MARRON POUR PREPARER DU
POPCORN. NE JAMAIS ESSAYER DE FAIRE ECLATER LES GRAINES
RESTANTES.
Q Pourquoi mon four ne cuit-il pas aussi vite que l’affirme le livre des
recettes ?
R Vérifiez le livre de recettes pour vous assurer que vous avez bien suivi les
instructions, et pour voir ce qui pourrait causer des variations au niveau
du temps de cuisson. Les temps de cuisson et les positions de puissance
indiqués dans le livre de recettes ne sont que des suggestions, qui ont
pour objectif d’éviter une cuisson excessive des aliments, le problème le
plus courant lorsqu’on apprend à utiliser un four à micro-ondes. Selon la
taille, la forme, le poids et les dimensions des aliments, le temps de
cuisson est plus ou moins long. Pour tester l’état de cuisson des aliments,
aidez-vous de nos suggestions et jugez par vous-même, de la même
manière que si vous utilisiez un four classique.

FRANÇAIS
51
Caractéristiques techniques
Spécifications techniques
MA3884VC / MA3884VCT
Alimentation
Puissance restituée
Fréquence des micro-ondes
Dimensions extérieures de l’appareil
Consommation électrique
Micro-ondes
Gril
Combinée
Convection
230 V~ 50 Hz
900 W (Norme IEC60705)
2 450 MHz
527 mm(L) X 395 mm(H) X 469 mm(P)
1 650 watt
max. 1 700 watt
max. 2 800 watt
2 400 watt
NOTE IMPORTANTE
A la différence des autres appareils de cuisson, votre four à micro-ondes ne chauffe
pas le récipient mais uniquement son contenu. Un réel danger de brûlure de la
gorge et du palais existe, si vous ne contrôlez pas la température des aliments avant
de les absorber. Nous vous recommandons plus particulièrement de vérifier la
température du lait (ou autre liquide), contenu dans un récipient (biberon par
exemple) à donner aux nourrissons et enfants. Ne jamais faire chauffer de liquide
dans un récipient fermé. (risque d’éclatement du récipient, avant, pendant ou oprès
l’ouverture de la parte) Le remplacement du cable d’alimentation et/ou toute
intervention nécessitant l’ouverture de l’appareil ne doit s’effectuer que par du
personnel technique qualifié.
Ce four micro-ondes est livré avec un cordon d'alimentation, qui, s'il est
endommagé, doit être remplacé par un cordon de même type. Ce cordon ne
peut être délivré que par le fabriquant et installé par une personne compétente
Les œufs dans leur coquille et les œufs durs ne doivent pas être cuits ou
réchauffés dans un four à micro-ondes, car ils risquent d’exploser et
d’endommager irrémédiablement votre appareil. Après la cuisson ou le
réchauffage, laisser reposer quelques instants, les aliments dans le four, pour
que la température de toutes les parties de l’aliment soit homogène. Remuer ou
agiter le contenu (en particulier le biberons et les pots d’aliments pour bébé) et
surtout, vérifier la température avec soin avant consommation afin d’éviter les
brûlures.
• Fréquence micro-ondes : 2 450 MHz +/- 50 MHz (Groupe 2 / Classe B)
** Équipement de groupe 2 : le groupe 2 comprend tous les
équipements ISM RF pour lesquels l'énergie radiofréquence comprise
entre 9 kHz et 400 GHz est générée intentionnellement et utilisée, ou
seulement utilisée, sous la forme de radiations électromagnétiques,
couplage inductif et/ou capacitif, pour le traitement de matériaux ou
à des fins d'inspection/analyse. Les équipements de classe B sont
adaptés à une utilisation dans les établissements domestiques et les
établissements directement reliés à un réseau d'alimentation basse
tension et comprenant des bâtiments d'alimentation à usage
domestique.
• Vous pouvez télécharger le manuel d'utilisation sur le site :
http://www.lg.com


OWNER’S MANUAL
Please read this owner's manual thoroughly before operating.
The manufacturers are not liable for any problems caused by the user's failure to observe
these instructions.
MA3884VC
MA3884VCT
www.lg.com
Speed Oven +
ENGLISH
MFL33716112_06
Copyright © 2016 - 2018 LG Electronics Inc. All Rights Reserved.

2
Contents
How the Microwave Function Works
Microwaves are a form of energy similar to radio and television waves and
ordinary daylight. Normally, microwaves spread outwards as they travel
through the atmosphere and disappear without effect. This ovens, however,
have a magnetron which is designed to make use of the energy in
microwaves. Electricity, supplied to the magnetron tube, is used to create
microwave energy.
These microwaves enter the cooking area through openings inside the oven.
A tray is located inside the oven. Microwaves cannot pass through metal
walls of the oven, but they can penetrate such materials as glass, porcelain
and paper, the materials out of which microwave-safe cooking dishes are
constructed.
Microwaves do not heat cookware, though cooking vessels will eventually
get hot from the heat generated by the food.
A very safe appliance
Your oven,
Speed Oven+
, is one of the safest of all
home appliances. When the door is opened, the oven
automatically stops producing microwaves. Microwave
energy is converted completely to heat when it enters
food, leaving no “left over” energy to harm you when
you eat your food.
Contents _________________________________________________2
IMPORTANT SAFETY INSTRUCTIONS
READ CAREFULLY AND KEEP FOR FUTURE REFERENCE ________3 ~ 20
Precautions_______________________________________________21
Unpacking & Installing _____________________________________22 ~ 23
Control Panel _____________________________________________24
Setting the Clock __________________________________________25
Child Lock________________________________________________26
Quick Start_______________________________________________27
Micro Power Cooking ______________________________________28
Micro Power Level _________________________________________29
Grill Cooking _____________________________________________30
Convection Cooking _______________________________________31
Speed Combi Cooking _____________________________________32 ~ 34
Speed Auto Cooking_______________________________________35 ~ 38
Steam Cook _____________________________________________39 ~ 42
Auto Defrost ____________________________________________________
43 ~ 44
More or Less Cooking ______________________________________45
Ez Clean_________________________________________________46
Microwave - safe Utensils___________________________________47
Food characteristics & Microwave cooking_____________________48 ~ 49
Questions & Answers ______________________________________50
Technical Specifications ____________________________________51

3
ENGLISH
IMPORTANT SAFETY INSTRUCTIONS
READ CAREFULLY AND KEEP FOR
FUTURE REFERENCE
Please keep for future reference. Read and follow all instructions before
using your oven to prevent the risk of fire, electric shock, personal injury,
or damage when using the oven. This guide do not cover all possible
conditions that may occur. Always contact your service agent or
manufacturer about problems that you do not understand.
WARNING:
This symbol will alert you to hazards or unsafe practices
which could cause serious bodily harm or death.
This is the safety alert symbol. This symbol alerts you to potential
hazards that can kill or hurt you and others.
All safety messages will follow the safety alert symbol and either the
word “WARNING” or “CAUTION”. These word means :
CAUTION: This symbol will alert you to hazards or unsafe practices which
could cause bodily injury or property damage.

4
1. Do not attempt to tamper with, or make
any adjustments or repairs to the door,
door seals, control panel, safety
interlock switches or any other part of
the oven. which involves the removal of
any cover which gives protection
against exposure to microwave energy.
Do not operate the oven, if the door
seals and adjacent parts of the
microwave oven are faulty. Repairs
should only be undertaken by a
qualified service technician.
Unlike other appliances, the microwave
oven is high-voltage and high-current
equipment. Improper use or repair
could result in harmful exposure to
excessive microwave energy or an
electric shock.
WARNING
IMPORTANT SAFETY INSTRUCTIONS
READ CAREFULLY AND KEEP FOR
FUTURE REFERENCE
Please keep for future reference. Read and follow all instructions before
using your oven to prevent the risk of fire, electric shock, personal injury,
or damage when using the oven. This guide do not cover all possible
conditions that may occur. Always contact your service agent or
manufacturer about problems that you do not understand.

5
ENGLISH
2. Do not use the oven for the purpose of
dehumidification. (ex. Operating the
microwave oven with the wet
newspapers, clothes, toys, electric
devices, pet or child etc.) The
microwave oven is intended for heating
food and beverages. Drying of food or
clothing and heating of warming pads.
slippers, sponges, damp cloth and
similar may lead to risk of injury,
ignition or fire.
It can be the cause of serious damage of
safety such as a fire, a burn or a
sudden death due to an electric shock.
3. The appliance and its accessible
parts become hot during use. Care
should be taken to avoid touching
heating elements. Children less than
8 years of age shall be kept away
unless continuously supervised.
4. Liquids or other foods must not be
heated in sealed containers since
they are liable to explode. Remove
the plastic wrapping from food
before cooking or defrosting. Note
though that in some cases food
should be covered with plastic film,
for heating or cooking.
They could burst.
WARNING
IMPORTANT SAFETY INSTRUCTIONS
READ CAREFULLY AND KEEP FOR
FUTURE REFERENCE
Please keep for future reference. Read and follow all instructions before
using your oven to prevent the risk of fire, electric shock, personal injury,
or damage when using the oven. This guide do not cover all possible
conditions that may occur. Always contact your service agent or
manufacturer about problems that you do not understand.

6
5. This appliance is not intended for use
by persons (including children) with
reduced physical, sensory or mental
capabilities, or lack of experience
and knowledge, unless they have
been given supervision or instruction
concerning use of the appliance by a
person responsible for their safety.
6. When the appliance is operated in
the combination mode, children
should only use the oven under adult
supervision due to the temperatures
generated.
WARNING
IMPORTANT SAFETY INSTRUCTIONS
READ CAREFULLY AND KEEP FOR
FUTURE REFERENCE
Please keep for future reference. Read and follow all instructions before
using your oven to prevent the risk of fire, electric shock, personal injury,
or damage when using the oven. This guide do not cover all possible
conditions that may occur. Always contact your service agent or
manufacturer about problems that you do not understand.

7
ENGLISH
7. This appliance is intended to be used
in household and similar
applications such as :
* Staff kitchen areas in shops, offices
and other working environments;
* Farm houses;
* By clients in hotels, motels and
other residential environments;
* Bed and breakfast type
environments.
8. WARNING: Accessible parts may
become hot during use. Young
children should be kept away.
WARNING
IMPORTANT SAFETY INSTRUCTIONS
READ CAREFULLY AND KEEP FOR
FUTURE REFERENCE
Please keep for future reference. Read and follow all instructions before
using your oven to prevent the risk of fire, electric shock, personal injury,
or damage when using the oven. This guide do not cover all possible
conditions that may occur. Always contact your service agent or
manufacturer about problems that you do not understand.

8
1. You cannot operate your oven with
the door open due to the safety
interlocks built into the door
mechanism. It is important not to
tamper with the safety interlock.
It could result in harmful exposure to
excessive microwave energy.
(Safety interlocks automatically switch
off any cooking activity when the
door is opened.)
2. Do not place any object (such as
kitchen towel, napkin, etc.) between
the oven front face and the door or
allow food or cleaner residue to
accumulate on sealing surfaces.
It could result in harmful exposure to
excessive microwave energy.
3. Do not operate your oven if it is damaged.
It is particularly important that the oven
door closes properly and that there is no
damage to the: (1) door(bent), (2) hinges
and latches (broken or loosened), (3) door
seals and sealing surfaces.
It could result in harmful exposure to
excessive microwave energy.
4. Please ensure cooking times are
correctly set small amounts of food
require shorter cooking or heating time.
The over cooking may result in the
food catching a fire and subsequent
damage to your oven.
CAUTION
IMPORTANT SAFETY INSTRUCTIONS
READ CAREFULLY AND KEEP FOR
FUTURE REFERENCE
Please keep for future reference. Read and follow all instructions before
using your oven to prevent the risk of fire, electric shock, personal injury,
or damage when using the oven. This guide do not cover all possible
conditions that may occur. Always contact your service agent or
manufacturer about problems that you do not understand.

9
ENGLISH
5. When heating liquids, e.g. soups,
sauces and beverages in your
microwave oven,
* Avoid using straight sided
containers with narrow necks.
* Do not overheat.
* Stir the liquid before placing the
container in the oven and again
halfway through the heating time.
* After heating, allow to stand in the
oven for a short time, stir or shake
them again carefully and check the
temperature of them before
consumption to avoid burns
(especially, contents of feeding
bottles and baby food jars).
Be careful when handling the
container. Microwave heating of
beverages can result in delayed
eruptive boiling without evidence of
bubbling. This could result in a
sudden boil over of the hot liquid.
6. An exhaust outlet is located on top
or bottom or side of the oven. Don’t
block the outlet.
It could result in damage to your
oven and poor cooking results.
CAUTION
IMPORTANT SAFETY INSTRUCTIONS
READ CAREFULLY AND KEEP FOR
FUTURE REFERENCE
Please keep for future reference. Read and follow all instructions before
using your oven to prevent the risk of fire, electric shock, personal injury,
or damage when using the oven. This guide do not cover all possible
conditions that may occur. Always contact your service agent or
manufacturer about problems that you do not understand.

10
7. Do not operate the oven when
empty. It is best to leave a glass of
water in the oven when not in use.
The water will safely absorb all
microwave energy, if the oven is
accidentally started.
Improper use could result in damage
to your oven.
8. Do not cook food wrapped in paper
towels, unless your cook book
contains instructions for the food you
are cooking. And do not use
newspaper in place of paper towels
for cooking.
Improper use can be the cause of an
explosion or a fire.
9. Do not use wooden containers and
ceramic containers which have
metallic (e.g. gold or silver) inlays.
Always remove metal twist ties.
Check the utensils are suitable for
use in microwave ovens before use.
They may heat-up and char.
Especially metal objects in the oven
may arc, which can cause serious
damage.
CAUTION
IMPORTANT SAFETY INSTRUCTIONS
READ CAREFULLY AND KEEP FOR
FUTURE REFERENCE
Please keep for future reference. Read and follow all instructions before
using your oven to prevent the risk of fire, electric shock, personal injury,
or damage when using the oven. This guide do not cover all possible
conditions that may occur. Always contact your service agent or
manufacturer about problems that you do not understand.

11
ENGLISH
10. Do not use recycled paper
products.
They may contain impurities which
may cause sparks and/or fires when
used in cooking.
11. Do not rinse the tray and rack by
placing it in water just after
cooking. This may cause breakage
or damage.
Improper use could result in damage
to your oven.
12. Be certain to place the oven so the
front of the door is 8 cm or more
behind the edge of the surface on
which it is placed, to avoid
accidental tipping of the appliance.
Improper use could result in bodily
injury and oven damage.
13. Before cooking, pierce the skin of
potatoes, apples or any such fruit
or vegetable.
They could burst.
CAUTION
IMPORTANT SAFETY INSTRUCTIONS
READ CAREFULLY AND KEEP FOR
FUTURE REFERENCE
Please keep for future reference. Read and follow all instructions before
using your oven to prevent the risk of fire, electric shock, personal injury,
or damage when using the oven. This guide do not cover all possible
conditions that may occur. Always contact your service agent or
manufacturer about problems that you do not understand.

12
14. Do not cook eggs in their shell.
Eggs in their shell and whole hard-
boiled eggs should not be heated in
microwave ovens since they may
explode, even after microwave
heating has ended.
Pressure will build up inside the egg
which will burst.
15. Do not attempt deep fat frying in
your oven.
This could result in a sudden boil
over of the hot liquid.
16. If smoke is observed (or emitted),
switch off or disconnect the oven
from the power supply and keep
the oven door closed in order to
stifle any flames.
It can be the cause of serious
damage of safety such as a fire, an
electric shock.
17. When food is heated or cooked in
disposable containers of plastic,
paper or other combustible
materials, keep an eye on the oven
and check it frequently.
Your food may be poured due to the
possibility of container deterioration,
which also can cause a fire.
CAUTION
IMPORTANT SAFETY INSTRUCTIONS
READ CAREFULLY AND KEEP FOR
FUTURE REFERENCE
Please keep for future reference. Read and follow all instructions before
using your oven to prevent the risk of fire, electric shock, personal injury,
or damage when using the oven. This guide do not cover all possible
conditions that may occur. Always contact your service agent or
manufacturer about problems that you do not understand.

13
ENGLISH
18. The temperature of accessible
surfaces may be high when the
appliance is operating. Do not
touch the oven door, outer cabinet,
rear cabinet, oven cavity,
accessories and dishes during grill
mode, convection mode and auto
cook operations, before clearing
make sure they are not hot.
As they will become hot, unless
wearing thick oven gloves there is
the danger of a burn.
19. The oven should be cleaned
regularly and any food deposits
removed.
Failure to maintain the oven in a
clean condition could lead to
deterioration of the surface that
could adversely affect the life of the
appliance and possibly result in a
hazardous situation.
20. Only use the temperature probe
recommended for this oven (for
appliances having a facility to use
a temperature-sensing probe).
You can not ascertain that the
temperature is accurate with
unsuitable temperature probe.
CAUTION
IMPORTANT SAFETY INSTRUCTIONS
READ CAREFULLY AND KEEP FOR
FUTURE REFERENCE
Please keep for future reference. Read and follow all instructions before
using your oven to prevent the risk of fire, electric shock, personal injury,
or damage when using the oven. This guide do not cover all possible
conditions that may occur. Always contact your service agent or
manufacturer about problems that you do not understand.

14
21. If heating elements are provided,
during use the appliance becomes
hot. Care should be taken to avoid
touching heating elements inside
the oven.
There is the danger of a burn.
22. Follow exact directions given by
each manufacturer for their
popcorn product. Do not leave the
oven unattended while the corn is
being popped. If corn fails to pop
after the suggested times,
discontinue cooking. Never use a
brown paper bag for popping
corn. Never attempt to pop leftover
kernels.
Overcooking could result in the corn
catching a fire.
CAUTION
IMPORTANT SAFETY INSTRUCTIONS
READ CAREFULLY AND KEEP FOR
FUTURE REFERENCE
Please keep for future reference. Read and follow all instructions before
using your oven to prevent the risk of fire, electric shock, personal injury,
or damage when using the oven. This guide do not cover all possible
conditions that may occur. Always contact your service agent or
manufacturer about problems that you do not understand.

ENGLISH
G

16
24. Do not use harsh abrasive cleaners
or sharp metal scrapers to clean
the oven door glass.
They can scratch the surface, which
may result in shattering of the glass.
25. This oven should not be used for
commercial catering purposes.
Improper use could result in damage
to your oven.
26. This microwave oven is meant to be
a self-supporting structure and
must never be enclosed in a piece
of furniture unless you use the flush
mount kit exclusively provided for
this (optional)
27. The connection may be achieved by
having the plug accessible or by
incorporation a switch in the fixed
wiring in accordance with the
wiring rules.
Using improper plug or switch can
cause an electric shock or a fire.
CAUTION
IMPORTANT SAFETY INSTRUCTIONS
READ CAREFULLY AND KEEP FOR
FUTURE REFERENCE
Please keep for future reference. Read and follow all instructions before
using your oven to prevent the risk of fire, electric shock, personal injury,
or damage when using the oven. This guide do not cover all possible
conditions that may occur. Always contact your service agent or
manufacturer about problems that you do not understand.

17
ENGLISH
28. Place the oven in a location of your
choice at a height greater than 85
cm, and verify that there is at least
20 cm clearance on the top and 10
cm clearance to the rear to ensure
good ventilation. The front of the
oven must be at least 8 cm from the
edge of the surface to avoid
tipping. An air exhaust is located
on the lower part and/or on the
side of the oven.
29. (Young)Children should be
supervised to ensure that they do
not play with the appliance.
CAUTION
IMPORTANT SAFETY INSTRUCTIONS
READ CAREFULLY AND KEEP FOR
FUTURE REFERENCE
Please keep for future reference. Read and follow all instructions before
using your oven to prevent the risk of fire, electric shock, personal injury,
or damage when using the oven. This guide do not cover all possible
conditions that may occur. Always contact your service agent or
manufacturer about problems that you do not understand.

18
30. This appliance can be used by
children 8 years and older and
persons with reduced physical,
sensory or mental capabilities or
lack of experience and knowledge
if they have been given supervision
and instruction concerning use of
the appliance in a safe way and
understand the hazards involved.
Children must not play with the
appliance. Cleaning and
maintenance must not be
undertaken by children under the
age of 8 without supervision.
31. The appliance is not intended to be
operated by means of an external
timer or separate remote-control
system.
32. The contents of feeding bottles and
baby food jars shall be stirred or
shaken and the temperature
checked before consumption, in
order to avoid burns.
CAUTION
IMPORTANT SAFETY INSTRUCTIONS
READ CAREFULLY AND KEEP FOR
FUTURE REFERENCE
Please keep for future reference. Read and follow all instructions before
using your oven to prevent the risk of fire, electric shock, personal injury,
or damage when using the oven. This guide do not cover all possible
conditions that may occur. Always contact your service agent or
manufacturer about problems that you do not understand.

19
ENGLISH
IMPORTANT SAFETY INSTRUCTIONS
READ CAREFULLY AND KEEP FOR
FUTURE REFERENCE
Please keep for future reference. Read and follow all instructions before
using your oven to prevent the risk of fire, electric shock, personal injury,
or damage when using the oven. This guide do not cover all possible
conditions that may occur. Always contact your service agent or
manufacturer about problems that you do not understand.
33. Steam cleaner is not to be used.
34. The appliance must not be placed
in a cabinet.
35. This appliance can be used by
children aged from 8 years and
above and persons with reduced
physical, sensory or mental
capabilities or lack of experience
and knowledge if they have been
given supervision or instruction
concerning use of the appliance in
a safe way and understand the
hazards involved.
Children shall not play with the
appliance. Cleaning and user
maintenance shall not be made by
children without supervision.
CAUTION

36. It is hazardous for anyone other
than a competent person to carry
out any service or repair operation
that involves the removal of a cover
which gives protection against
exposure to microwave energy If
you have some questions or
comments, please feel free to
contact me.
37. When heating food in plastic or
paper containers, keep an eye on
the oven due to the possibility of
ignition.
Metallic containers for food and bever-
ages are not allowed during microwave
cooking.
This requirement is not applicable if the
manufacturer specifies size and shape
of metallic containers suitable for micro-
wave cooking.
The appliance must not be installed
behind a decorative door in order to
avoid overheating.
38.
39.

21
ENGLISH
Precautions
Precautions to avoid possible exposure to excessive microwave energy.
You cannot operate your oven with the door open due to the safety interlocks
built into the door mechanism. These safety interlocks automatically switch off
any cooking activity when the door is opened; which in the operation of
microwave function could result in harmful exposure to microwave energy.
It is important not to tamper with the safety interlocks.
Do not place any object between the oven front face and the door or allow
food or cleaner residue to accumulate on sealing surfaces.
Do not operate your oven if it is damaged. It is particularly important that the
oven door closes properly and that there is no damage to the: (1) door(bent),
(2) hinges and latches (broken or loosened), (3) door seals and sealing
surfaces.
Your oven should not be adjusted or repaired by anyone except qualified
service personnel.
WARNING
When heating liquids, e.g. soups, sauces and beverages in your oven with
microwave function, delayed eruptive boiling can occur without evidence of
bubbling. This could result in a sudden boil over of the hot liquid. To prevent
this possibility the following steps should be taken:
1 Avoid using straight sided containers with narrow necks.
2 Do not overheat.
3 Stir the liquid before placing the container in the oven and again halfway
through the heating time.
4 After heating, allow to stand in the oven for a short time, stir or shake
them(especially the contents of feeding bottles and baby food jars) again
carefully and check the temperature of them before consumption to avoid
burns (especially, contents of feeding bottles and baby food jars).
Be careful when handling the container.
WARNING
Always allow food to stand after being cooked by
microwaves and check the temperature of them
before consumption. Especially contents of feeding
bottles and baby food jars.
Please ensure cooking times are correctly set as
over cooking may result in the FOOD catching fire
and subsequent damage to your oven.

22
Unpacking &
Installing
By following the basic steps on these two pages you will be able to quickly check that your oven is operating
correctly. Please pay particular attention to the guidance on where to install your oven. When unpacking your
oven make sure you remove all accessories and packing. Check to make sure that your oven has not been
damaged during delivery.
Place the oven in the level location of your choice with
more than 85 cm height but make sure there is at least
20 cm of space on the top and 10 cm at the rear for proper
ventilation. The front of the oven should be at least min. 8 cm/max.
22 cm from the edge of the surface to prevent tipping.
An exhaust outlet is located on bottom or side of the oven. Blocking
the outlet can damage the oven.
Unpack your oven and place it on a flat level surface.
* THIS OVEN SHOULD NOT BE USED FOR COMMERCIAL CATERING
PURPOSES.
* THIS OVEN CAN BE USED AS BUILT-IN TYPE.
* MUST USE THE BUILT-IN KIT THAT IS MADE BY LG ELECTRONICS.
HIGH RACK
(For grill mode)
LOW RACK
(For microwave and
convection mode)
METAL TRAY
STEAM COVER
STEAM PLATE
STEAM WATER
BOWL
(CRISP TRAY)
STEAMER

23
ENGLISH
The DISPLAY will count down from 30 seconds. When it
reaches 0 it will sound BEEPS. Open the oven door and
test the temperature of the water. If your oven is operating the water
should be warm. Be careful when removing the container it may
be hot.
YOUR OVEN IS NOW INSTALLED
Fill a microwave safe container with 300 ml (1/2 pint)
of water. Place on the METAL TRAY on the oven bottom
surface and close the oven door. If you have any doubts
about what type of container to use please refer to page 47.
Open your oven door by pulling the DOOR HANDLE.
Place the METAL TRAY inside the oven.
Plug your oven into a standard household socket. Make
sure your oven is the only appliance connected to the
socket. If your oven does not operate properly, unplug it
from the electrical socket and then plug it back in.
Press the STOP/WISSEN button, and
press the START/Q-START button one
time to set 30 seconds of cooking time.

24
Control Panel
561789
2
34
1. DISPLAY WINDOW: You can show mode function, time of day, cooking
time, power level and cooking categories.
2. Snelmenu: Speed auto cook allows you to cook most of your favorite food
quickly by selecting the food type and the weight of the food.
3. Autom Ontdooien: You can select the food type and the weight of the
food.
4. Stomen: Steam cook allows you to cook most of your favorite food quickly
by selecting the food type and the weight of the food.
5. FUNCTIE DIAL: You can select the operating function.
6. BEDIENING DIAL:
• You can set cooking time, temperature, weight and cooking categories.
• You can lengthen or shorten the cooking time at any point by turning the
dial knob(except defrost mode).
7. Instellen/Klok: You can determine the selected cooking category,
microwave power level or temperature and you can set the time of day.
8. START/Q-START:
• In order to start cooking which is selected, press button one time.
• The quick start feature allows you to set 30 seconds intervals of HIGH
power cooking with a touch of the quick start button.
9. STOP/WISSEN: You can stop over and clear all entries except time of day.

25
ENGLISH
In the following example I will show you how to set the time for 14:35 when using the 24 clock.
Make sure that you have removed all packaging from your oven.
When your oven is plugged in for the
first time or when power resumes after a
power cut. All segments of the screen will
turn on for 15 seconds, then a ‘12:00’
will be shown in the display; you will
have to reset the clock.
If the clock (or display) shows any
strange looking symbols, unplug your
oven from the electrical socket and plug
it back in and reset the clock.
Make sure that you have correctly installed your oven as described
earlier in this book.
Press STOP/WISSEN.
Press Instellen/Klok once.
Turn BEDIENING dial until display shows “14:00”.
Press Instellen/Klok for hour confirmation
Turn BEDIENING dial until display shows “14:35”.
Press Instellen/Klok.
The clock starts counting.
Setting the
Clock

26
Child
Lock
Press and hold STOP/WISSEN until “L” and appears on the display
and BEEP sounds.
The CHILD LOCK is now set.
The time will disappear on the display but will reappear on the display
a few seconds later.
If any button is pressed, “L” and will appear on the display
To cancel CHILD LOCK press and hold STOP/WISSEN until “L” and
disappears.
You will hear BEEP when it’s released.
Your oven has a safety feature that
prevents accidental running of the oven.
Once the child lock is set, you will be
unable to use any functions and no
cooking can take place.
However your child can still open the
oven door.
Press STOP/WISSEN.

27
ENGLISH
Quick
Start
In the following example I will show you how to set 2 minutes of cooking on high power (900 W).
Press STOP/WISSEN.
Press START/Q-START four times to select 2 minutes on HIGH power
(900 W).
Your oven will start before you have finished the fourth press.
The Quick Start feature allows you to set
30 seconds intervals of HIGH power
(900 W) cooking with pressing of the
START/Q-START button.

28
Micro Power
Cooking
In the following example I will show you how to cook some food on 600 W power for 5 minutes and 30 seconds.
Make sure that you have correctly installed your oven as described
earlier in this book.
Press STOP/WISSEN.
Turn FUNCTIEL dial to select mirco ( ).
Press Instellen/Klok for mode confirmation.
Turn BEDIENING dial until display shows “600 W”.
Press Instellen/Klok for power confirmation.
Your oven has five microwave Power
settings. High power is automatically
selected and pressing on control will
select a different power level.
POWER
HIGH
MEDIUM HIGH
MEDIUM
DEFROST
M
EDIUM LOW
LOW
Turn BEDIENING dial until display shows “5:30”.
Press START/Q-START.
When cooking you can increase or decrease cooking time by turning
BEDIENING dial.
900 W
600 W
360 W
180 W
90 W

29
ENGLISH
Micro Power
Level
This oven is equipped with 5 power levels to give you maximum flexibility and control over cooking.
The table below shows the examples of food and their recommended cooking power levels for use with this oven.
POWER LEVEL
HIGH 900 W * Boil Water
* Cook poultry pieces, fish, vegetables
* Cook tender cuts of meat
MEDIUM HIGH 600 W * All reheating
* Roast meat and poultry
* Cook mushrooms and shellfish
* Cook foods containing cheese and eggs
MEDIUM 360 W * Bake cakes and scones
* Prepare eggs
* Cook custard
* Prepare rice, soup
DEFROST/ 180 W * All thawing
MEDIUM LOW * Melt butter and chocolate
* Cook less tender cuts of meat
LOW 90 W * Soften butter & cheese
* Soften ice cream
* Raise yeast dough
OUTPUT USE ACCESSORY
Low Rack +
Metal Tray

30
Grill
Cooking
In the following example I will show you how to use the Grill-1 to cook some foods for 12 minutes and
30 seconds.
Press STOP/WISSEN.
Turn FUNCTIEL dial to select Grill.
The following indication is displayed: “ “
Press Instellen/Klok for mode confirmation.
Turn BEDIENING dial until display shows “Gr-1”.
Press Instellen/Klok for category confrimation.
This feature will allow you to brown and
crisp food quickly.
The grill rack must be used during grill
cooking.
Turn BEDIENING dial knob until display shows “12:30”.
Press START/Q-START.
When cooking you can increase or decrease cooking time by turning
BEDIENING dial.
After cooking you must wear gloves and container to take
metal tray out oven, because metal tray is very hot.
Category Display Heater Operating
Grill-1 Gr-1 Upper Heater(1650 W)
Grill-2 Gr-2 Upper Heater(1100 W)
Grill-3 Gr-3 Lower Heater(700 W)

31
ENGLISH
Convection
Cooking
In the following example I will show you how to use the convection mode to cook some foods for 50 minutes at
220 °C temperature.
1. To Preheat
Press STOP/WISSEN.
The convection oven has a temperature
range.(40 °C, 100 ~ 230 °C)
The oven has a ferment function at the
oven temperature of 40 °C. You should
wait until the oven is cool because you
cannot use a ferment function if the
oven temperature is over 40 °C.
It is available to extend the cooking time
up to 9 hours in the condition of 40 °C
at convection function for the operating
microwave oven.
Your oven will take a few minutes to
reach the selected temperature.
Once it has reached the correct
temperature, your oven will BEEP to let
you know that it has reached the correct
temperature.
Then place your food in your oven: then
set your oven to start cooking.
The low rack must be used during
convection cooking.
Turn FUNCTIEL dial to select
convection mode ( ).
Press Instellen/Klok for
convection confirmation.
Turn BEDIENING dial knob until
display shows “220 °C”.
2. To Cook
Press STOP/WISSEN.
Turn BEDIENING dial knob until
display shows “50:00”.
Press START/Q-START.
After cooking you must wear
gloves to take metal tray /
container out of oven since its
hot.
Press START/Q-START.
Display shows “Pr-H”.
Press Instellen/Klok for temp.
confirmation.
Turn FUNCTIEL dial to select
convection mode ( ).
Press Instellen/Klok for convection
confirmation.
Turn BEDIENING dial knob until
display shows “220 °C”.

32
Speed combi
Cooking
In the following example I will show you how to programme your oven at micro power 360 W and grill for a
cooking time of 25 minutes.
Your oven has a combination cooking
feature which allows you to cook food
with heater and microwave at the same
time or alternately. This generally means
it takes less time to cook the food.
You can set three kinds of micro power
level(180 W, 360 W and 600 W) in
speed combi mode.
Speed
Combi
(Co-1, 2, 3)
* Speed combi Category
* Grill mode: Refer to page 28
Co-1
Co-2
Co-3
Co-4
Co-5
Grill-1 + Microwave power
Grill-2 + Microwave power
Grill-3 + Microwave power
(Upper + Lower heater)
+ Microwave power
Convection + Microwave power
Turn FUNCTIEL dial speed combi ( ) to select grill combination
mode(Co-1, 2, 3).
Press Instellen/Klok for speed combi confirmation.
Press STOP/WISSEN.
Turn BEDIENING dial knob until display shows “Co-1”.
Press Instellen/Klok for grill-1 confirmation.
Turn BEDIENING dial knob until display shows “360 W”.
Press Instellen/Klok for power confirmation.
Turn BEDIENING dial knob until display shows “25:00”.
Press START/Q-START.
When cooking you can increase or decrease cooking time by turning
BEDIENING dial.
After cooking you must wear gloves to take metal tray / container out
of oven since its hot.

33
ENGLISH
Speed combi
Cooking
In the following example I will show you how to programme your oven with micro power 360 W
and at a temperature 200 °C for a cooking time of 25 minutes.
Turn FUNCTIEL dial speed combi ( ) to select speed combination
mode(Co-4).
Press Instellen/Klok for speed combi confirmation.
Press STOP/WISSEN.Speed Combi
(Co-4)
Turn BEDIENING dial knob until display shows “Co-4”.
Press Instellen/Klok for speed combi confirmation.
Turn BEDIENING dial knob until display shows “200 °C”.
Press Instellen/Klok for temp. confirmation.
Turn BEDIENING dial knob until display shows “360 W”.
Press Instellen/Klok for power confirmation.
Turn BEDIENING dial knob until display shows “25:00”.
Press START/Q-START.
When cooking you can increase or decrease cooking time by turning
BEDIENING dial.
After cooking you must wear gloves to take metal tray / container out
of oven since its hot.
You can set four kinds of micro power
level(0 W, 180 W, 360 W, 600 W) in
speed combi mode(Co-4).
[ x2 ]
* Speed combi Category
Co-1
Co-2
Co-3
Co-4
Co-5
Grill-1 + Microwave power
Grill-2 + Microwave power
Grill-3 + Microwave power
(Upper + Lower heater)
+ Microwave power
Convection + Microwave power

34
Speed combi
Cooking
In the following example I will show you how to programme your oven with:- micro power 360 W and at a
convection temperature 200 °C for a cooking time of 25 minutes.
Your oven has a combination cooking
feature which allows you to cook food
with convection temp. and microwave
at the same time or alternately. This
generally means it takes less time to
cook your food.
You can set three kinds of micro power
level(180 W, 360 W, 600 W) in speed
combi mode(Co-5).
Turn FUNCTIEL dial speed combi ( ) to select convection combination
mode(Co-5).
Press Instellen/Klok for speed combi confirmation.
Press STOP/WISSEN.
Speed Combi
(Co-5)
Press START/Q-START.
When cooking you can increase or decrease cooking time by turning
BEDIENING dial.
After cooking you must wear gloves to take metal tray / container out
of oven since its hot.
Turn BEDIENING dial knob until display shows “360 W”.
Press Instellen/Klok for power confirmation.
Turn BEDIENING dial knob until display shows “25:00”.
Turn BEDIENING dial knob until display shows “Co-5”.
Press Instellen/Klok for convection confirmation.
Turn BEDIENING dial knob until display shows “200 °C”.
Press Instellen/Klok for temp. confirmation.
[ x2 ]
* Speed combi Category
Co-1
Co-2
Co-3
Co-4
Co-5
Grill-1 + Microwave power
Grill-2 + Microwave power
Grill-3 + Microwave power
(Upper + Lower heater)
+ Microwave power
Convection + Microwave power

35
ENGLISH
Speed Auto
Cooking
In the following example I will show you how to cook 0.6 kg of jacket potatoes(Ac 8).
Press STOP/WISSEN.
Press Snelmenu ( ).
Turn BEDIENING dial knob until display shows “Ac 8”.
Press Instellen/Klok for category confirmation.
Speed Auto Cook menus are
programmed and allows you to cook
most of your favorite food quickly by
selecting the food type and the weight of
the food.
Turn BEDIENING dial knob until display shows “0.60 kg”.
Press START/Q-START.
When cooking you can increase or decrease cooking time by turning
BEDIENING dial.
After cooking you must wear gloves to take metal tray / container out
of oven since its hot.

36
Instructions
Ac 1
Ac 2
Ac 3
Ac 4
Ac 5
Ac 6
Frozen
Pizza
French
Fries
Whole
Chicken
Chicken
Pieces
Beef Steaks
Roast
Pork
0.30 ~ 0.50 kg
0.20 ~ 0.75 kg
0.80 ~ 1.80 kg
0.20 ~ 0.80 kg
0.30 ~ 1.20 kg
0.80 ~ 1.80 kg
Metal tray
Heatproof
glass dish
+ High rack
+ Metal tray
Low rack
+ Metal tray
High rack
+ Metal tray
High rack
+ Metal tray
Low rack
+ Metal tray
Frozen
Frozen
Refrigerated
Refrigerated
Refrigerated
Refrigerated
This function is for cooking frozen pizza. Remove all package and
place on the metal tray. After cooking, stand for 1~2 minutes.
Spread frozen potato products out on a heatproof glass dish on the
high rack. For the best results, cook in a single layer. When BEEP,
turn food over. And then press start to continue cooking. After
cooking, remove from the oven and stand for 1~2 minutes.
Brush whole chicken with melted margarine, butter or seasonings, if
desired. Place the whole chicken breast-side down on the low rack.
When BEEP, drain the juices and turn food over immediately. And
then press start to continue cooking. After cooking, let stand covered
with foil for 10 minutes.
Place the chicken pieces on the high rack.
When BEEP, turn food over. And then press start to continue cooking.
After cooking, stand covered with foil for 2-5 minutes.
Place on the high rack. When BEEP, turn food over.
And then press start to continue cooking. After cooking, serve
immediately.
Trim excess fat from pork. Brush the pork with melted margarine or
butter. Place on the rack on the metal tray. When BEEP, turn food
over. And then press start to continue cooking.
After cooking, stand covered with foil for 10 minutes.
Auto
cooking
Function
Category
Food Temp.Utensil
Weight
Limit

37
ENGLISH
Ac
7
Ac
8
Ac
9
Ac
10
Ac
11
Roast Beef
Jacket
Potatoes
Frozen
Dinners
Fresh
Vegetables
Frozen
Vegetables
0.80 ~ 1.80 kg
0.20 ~ 1.00 kg
0.40 ~ 1.00 kg
0.20 ~ 1.00 kg
0.20 ~ 1.00 kg
Low rack
+ Metal tray
High rack
+ Metal tray
Low rack
+ Metal tray
Metal tray +
Microwavesafe
bowl with
cover
Metal tray +
Microwavesafe
bowl with
cover
Refrigerated
Room
Frozen
Room
Frozen
Brush the beef with melted margarine or butter. Place on the low rack.
When BEEP, turn food over.
And then press start to continue cooking.
After cooking, stand covered with foil for 10 minutes.
Choose medium sized potatoes. (200-220 g per each)
Wash and dry potatoes. Pierce the potatoes several times with a fork.
Place the potatoes on the high rack. Adjust weight and press start.
When BEEP, after cooking, remove the potatoes from the oven. Let
stand covered with foil for 5 minutes.
Place frozen dinner uncovered on the low rack.
Cut vegetables into small pieces.
** Broccoli : Cut into floweret-size.
** Carrot : Peel and slice 5 mm thick.
Place vegetables in a microwave-safe bowl. Add water. Cover with
wrap. When BEEP, stir once. After cooking, stir and allow to stand for
2-3 minutes. Add amount of water according to the quantity.
** 0.20 kg - 0.50 kg : 2 Tablespoons
** 0.55 kg - 1.00 kg : 4 Tablespoons
Place vegetables in a microwave-safe bowl. Add water. Cover with
wrap. When BEEP, stir once. After cooking, stir and allow to stand for
2-3 minutes. Add amount of water according to the quantity.
** 0.20 kg - 0.50 kg : 2 Tablespoons
** 0.55 kg - 1.00 kg : 4 Tablespoons
Auto
cooking
Instructions
Function
Category
Food Temp.Utensil
Weight
Limit

38
Ac
12
Rice /
Pasta
0.10 ~ 0.30 kg Metal tray
+ Microwave-
safe bowl with
cover
Room Place rice/pasta and boiling water with
1
/
4 to 1 teaspoon salt in a
deep and large bowl(3 L). When BEEP, stir once.
** Rice - After cooking, stand covered for 5 minutes or until water is
absorbed.
** Pasta - During the cooking, stir several times if required. After
cooking, stand 1-2 minutes. Rinse pasta with cold water.
Auto
cooking
Weight
Water Rice
Pasta
100 g
300 ml
400 ml
200 g
600 ml
800 ml
300 g
900 ml
1200 ml
Cover
Cover and vent with wrap
Uncover
Instructions
Function
Category
Food Temp.Utensil
Weight
Limit
< Metal Tray > < Low Rack + Metal Tray > < High Rack + Metal Tray >

39
ENGLISH
Steam
Cook
In the following example I will show you how to cook 0.6 kg of green beans(St 8).
Press STOP/WISSEN.
Press Stomen ( ).
Turn BEDIENING dial until display shows “St 8”.
Press Instellen/Klok for category confirmation.
This feature allows you steamed cook.
CAUTION:
1. Always use oven gloves when
removing a STEAMER from the oven.
It’s very hot.
2. Do not put a hot STEAMER on a glass
table or a place easy to be melted
after cooking. Always make sure to
use a pad or tray.
3. When you use this Steamer, pour at
least 400 ml water before use. If the
amount of water is less than 400 ml,
it may cause incomplete cooking, or
may cause a fire or fatal damage to
the product.
4. Be careful when you move the
STEAMER with water.
5. When you use the STEAMER, the
steam cover and steam water bowl
should be set perfectly right. The eggs
or the chestnut would be exploding
without setting the steam cover and
steam water bowl.
6. Never use this Steamer with a
product of different model. it may
cause a fire or fatal damage to the
product.
Turn BEDIENING dial until display shows “0.6 kg”.
Press START/Q-START.
When cooking you can increase or decrease cooking time by turning
BEDIENING.

40
Cooking method
St 1
Note: The cooking time may be adjusted by using the dial while the meal is cooking.
Shrimp
0.20 ~ 0.80 kg
Refrigerator Wash the shrimps. Pour 400 ml of water or
white wine in the steamer. Put the steam plate
with the shrimps on top of the steamer.
Cover it with the steam bell and put it in the
oven.
Small shrimps (shrimps,
large shrimps, small crab
etc.)
St 2 Shellfish
0.20 ~ 0.80 kg
Steam cover
Steam plate
Steam water bowl
Metal tray
Steam cover
Steam plate
Steam water bowl
Metal tray
Refrigerator Wash the clams. Pour 400 ml of water or
white wine in the steamer. Put the steam plate
with the clams on top of the steamer.
Cover it with the steam bell and put it in the
oven.
Small clams (mussels, ark
shell etc.)
St 3 Whole Fish
0.20 ~ 0.80 kg
Steam cover
Steam plate
Steam water bowl
Metal tray
Refrigerator Wash the fish. Pour 400 ml of water or white
wine in the steamer. Put the steam plate with
the fish on top of the steamer. Cover it with
the steam bell and put it in the oven.
Maximum thickness of 3 cm
Maximum length of 25 cm
St 4 Fish Fillet
0.20 ~ 0.80 kg
Steam cover
Steam plate
Steam water bowl
Metal tray
Refrigerator Fillet the fish. Pour 400 ml of water or white
wine in the steamer. Put the steam plate with
the fish fillet on top of the steamer. Cover it
with the steam bell and put it in the oven.
Maximum thickness of
2.5 cm
STEAM COOK GUIDE
Steam
Cook
Function
Ingredient
Temp. prior
to cooking
Size of ingredientCooking device
Weight

41
ENGLISH
Cooking method
St 5
Note: The cooking time may be adjusted by using the dial while the meal is cooking.
Carrot
0.20 ~ 0.80 kg
Room temperature Pour 400 ml of water in the steamer. Put the
steam plate with the vegetables on top of the
steamer. Cover it with the steam bell and put
it in the oven.
Sliced round or diced
Steam cover
Steam plate
Steam water bowl
Metal tray
St 6 Broccoli
0.20 ~ 0.80 kg
Refrigerator Cook as above.Small cluster
Small cluster
Steam cover
Steam plate
Steam water bowl
Metal tray
St 7 Courgette
0.20 ~ 0.80 kg
Refrigerator Cook as above.Diced
Steam cover
Steam plate
Steam water bowl
Metal tray
St 8 Green
Beans
0.20 ~ 0.60 kg
Refrigerator Cook as above.
Steam cover
Steam plate
Steam water bowl
Metal tray
St 9 Spinach
0.20 ~ 0.50 kg
Refrigerator Cook as above.
Steam cover
Steam plate
Steam water bowl
Metal tray
Steam
Cook
Function
Ingredient
Temp. prior
to cooking
Size of ingredientCooking device
Weight
St 10 Cauliflower
0.20 ~ 0.80 kg
Room temperature Cook as above.
Steam cover
Steam plate
Steam water bowl
Metal tray

42
Cooking method
St 11
Note: The cooking time may be adjusted by using the dial while the meal is cooking.
< Steamer + Metal Tray >
Potato
0.20 ~ 0.80 kg
Room temperature Pour 400 ml of water in the steamer. Put the
steam plate with the vegetables on top of the
steamer. Cover it with the steam bell and put
it in the oven.
Whole
Steam cover
Steam plate
Steam water bowl
Metal tray
St 12 Chicken
Breasts
0.20 ~ 0.80 kg
Refrigerator Prepare chicken breasts. Pour 400 ml of
water or white wine in the steamer. Put the
steam plate with the chicken breasts on top
of the steamer. Cover it with the steam bell
and put it in the oven.
Maximum thickness
of 2.5 cm
Steam cover
Steam plate
Steam water bowl
Metal tray
Steam
Cook
Function
Ingredient
Temp. prior
to cooking
Size of ingredientCooking device
Weight
STAINLESS STEEL COVER
STEAM PLATE
STEAM PAN (TO FILL WITH WATER)
LOW RACK
METAL TRAY
STEAMCHEF COVER

43
ENGLISH
Auto
Defrost
Press STOP/WISSEN.
Weigh the food that you are about to defrost. Be certain to remove any
metallic ties or wraps; then place the food on microwave safe dish on
Metal tray in your oven and close the oven door.
Press Instellen/Klok for category confirmation.
Enter the weight of the frozen food that you are about to defrost.
Turn BEDIENING dial knob until display shows "1.4 kg" for the weight of
frozen food.
Press Autom Ontdooien ( ).
Turn BEDIENING dial knob until display shows "dEF2".
Press START/Q-START.
Your oven has four microwave defrost
settings:- Meat, Poultry, Fish and Bread;
each defrost category has different
power settings.
The temperature and density of food varies, I would recommend that the food be checked before cooking
commences. Pay particular attention to large joints of meat and chicken, some foods should not be
completely thawed before cooking. For example fish cooks so quickly that it is sometimes better to begin
cooking while still slightly frozen. The bread programme is suitable for defrosting small items such as rolls
or a small loaf. These will require a standing time to allow the centre to thaw. In the following example I
will show you how to defrost 1.4 kg of frozen poultry.
During defrosting your oven will “BEEP”, at which point open the oven door, turn food over and separate to
ensure even thawing. Remove any portions that have thawed or shield them to help slow down thawing. After
checking, close the oven door and press START/Q-START to resume defrosting.
Your oven will not stop defrosting (even when the beep sounded) unless the door is opened.

44
Meat
(dEF1)
Poultry
(dEF2)
Fish
(dEF3)
Bread
(dEF4)
Category Weight Limit Utensil Food
Defrosting Guide
0.1 ~ 4.0 kg
0.1 ~ 0.5 kg
Microwave ware
(Flat plate),
Low rack,
Metal tray
Paper towel or flat plate,
Low rack,
Metal tray
Meat
Minced beef, Fillet steak, Cubes for stew, Sirloin steak, Pot roast, Rump roast, Beef burger
Lamb chops, Rolled roast, Sausage, Cutlets(2 cm)
When beep, turn food over.
After defrosting, let stand for 5-15 minutes.
Poultry
Whole chicken, Legs, Breasts, Turkey breasts(under 2.0 kg).
When beep, turn food over.
After defrosting, let stand for 20-30 minutes.
Fish
Fillets, Steaks, Whole fish, Sea foods
When beep, turn food over.
After defrosting, let stand for 10-20 minutes.
Bread
Sliced bread, Buns, Baguette, etc.
* Food to be defrosted should be in a suitable microwave proof container and should be placed uncovered on the low rack on the metal tray.
* If necessary, shield small areas of meat or poultry with flat pieces of aluminum foil. This will prevent thin areas becoming warm during defrosting. Ensure the
foil does not touch the oven walls.
* Separate items like minced meat, chops, sausages and bacon as soon as possible.
When BEEP, turn food over. Continue to defrost remaining pieces.
Allow to stand until completely thawed.
* For example, joints of meat and whole chickens should be standed for a minimum 1 hour before cooking.

45
ENGLISH
More or Less
Cooking
In the following example I will show you how to change the preset SPEED AUTO COOK programmes for a longer
or shorter cooking time.
If you find that your food is over or
undercooked when using the Auto Cook
programme, you can increase or
decrease cooking time by turning the
BEDIENING dial knob.
You can lengthen or shorten the cooking
time(except defrost mode) at any point
by turning the BEDIENING dial knob.
Turn BEDIENING dial knob.
The cooking time will increase or decrease.
Press STOP/WISSEN.
Set the required AUTO COOK programme.
*See AUTO COOK guide.
Select weight of food.
Press START/Q-START.
Cooking time
0~3 min.
3~20 min.
20~30 min.
30~90 min.
10 s.
30 s.
1 Min.
5 Min.
Increas or Decrease time

46
EZ
Clean
In the following example I will show you how to remove smell in the oven.
Press STOP/WISSEN.
Turn FUNCTIEL dial to select EZ Clean ( ).
Press Instellen/Klok for ez clean confirmation.
The oven has a special function to
remove the smell in the oven.
You can use the EZ Clean function
without food in the oven.
Press START/Q-START.
(Time counts down automatically)

47
ENGLISH
Microwave-safe
Utensils
Never use metal or metal trimmed utensils in using microwave function
Microwaves cannot penetrate metal. They will bounce off any metal object in
the oven and cause arcing, an alarming phenomenon that resembles
lightning. Most heat resistant non metallic cooking utensils are safe for use in
your oven. However, some may contain materials that render them unsuitable
as microwave cookware. If you have any doubts about a particular utensil,
there’s a simple way to find out if it can be used in using microwave function.
Place the utensil in question next to a glass bowl filled with water in using
microwave function. Microwave at power HIGH for 1 minute. If the water
heats up but the utensil remains cool to the touch, the utensil is
microwave~safe. However, if the water does not change temperature but the
utensil becomes warm, microwaves are being absorbed by the utensil and it is
not safe for use in using microwave function. You probably have many items
on hand in your kitchen right now that can be used as cooking equipment in
using microwave function. Just read through the following checklist.
Dinner plates
Many kinds of dinner-ware are microwave-safe. If in doubt consult the
manufacturer’s literature or perform the microwave test.
Glassware
Glassware that is heat-resistant is microwave-safe. This would include all
brands of oven tempered glass cookware. However, do not use delicate
glassware, such as tumblers or wine glasses, as these might shatter as the food
warms.
Plastic storage containers
These can be used to hold foods that are to be quickly reheated. However,
they should not be used to hold foods that will need considerable time in the
oven as hot foods will eventually warp or melt plastic containers.
Paper
Paper plates and containers are convenient and safe to use
in using
microwave function
, provided that the cooking time is short and foods to be
cooked are low in fat and moisture. Paper towels are also very useful for
wrapping foods and for lining baking trays in which greasy foods such as
bacon are cooked. In general, avoid coloured paper products as the
colour may run. Some recycled paper products may contain impurities
which could cause arcing or fires when used
in using microwave function
.
Plastic cooking bags
Provided they are made specially for cooking, cooking bags are
microwave safe. However, be sure to make a slit in the bag so that steam
can escape. Never use ordinary plastic bags for cooking
in using
microwave function
, as they will melt and rupture.
Plastic microwave cookware
A variety of shapes and sizes of microwave cookware are available. For
the most part, you can probably use items you already have on hand
rather than investing in new kitchen equipment.
Pottery, stoneware and ceramic
Containers made of these materials are usually fine for use
in using
microwave function
, but they should be tested to be sure.
CAUTION
Some items with high lead or iron content are not suitable for cooking
utensils.
Utensils should be checked to ensure that they are suitable for use in
using microwave function.

48
Food characteristics &
Microwave cooking
Keeping an eye on things
The recipes in the book have been formulated with great care, but your success in
preparing them depends on how much attention you pay to the food as it cooks.
Always watch your food while it cooks. Your microwave function is equipped with a
light that turns on automatically when the oven is in operation so that you can see
inside and check the progress of your food. Directions given in recipes to elevate,
stir, and the like should be thought of as the minimum steps recommended. If the
food seems to be cooking unevenly, simply make the necessary adjustments you
think appropriate to correct the problem.
Factors affecting microwave cooking times
Many factors affect cooking times. The temperature of ingredients used in a recipe
makes a big difference in cooking times. For example, a cake made with ice-cold
butter, milk, and eggs will take considerably longer to bake than one made with
ingredients that are at room temperature. All of the recipes in this book give a
range of cooking times. In general, you will find that the food remains under-
cooked at the lower end of the time range, and you may sometimes want to cook
your food beyond the maximum time given, according to personal preference. The
governing philosophy of this book is that it is best for a recipe to be conservative in
giving cooking times. While overcooked food is ruined for good. Some of the
recipes, particularly those for bread, cake, and custards, recommend that food be
removed from the oven when they are slightly undercooked. This is not a mistake.
When allowed to stand, usually covered, these foods will continue to cook outside
of the oven as the heat trapped within the outer portions of the food gradually
travels inward. If the food is left in the oven until it is cooked all the way through,
the outer portions will become overcooked or even burnt. You will become
increasingly skilful in estimating both cooking and standing times for various foods.
Density of food
Light, porous food such as cakes and breads cook more quickly than heavy, dense
foods such as roasts and casseroles. You must take care when microwaving porous
food that the outer edges do not become dry and brittle.
Height of food
The upper portion of tall food, particularly roasts, will cook more quickly than the
lower portion. Therefore, it is wise to turn tall food during cooking, sometimes
several times.
Moisture content of food
Since the heat generated from microwaves tends to evaporate moisture, relatively dry food
such as roasts and some vegetables should either be sprinkled with water prior to cooking
or covered to retain moisture.
Bone and fat content of food
Bones conduct heat and fat cooks more quickly than meat. Care must be taken when
cooking bony or fatty cuts of meat that they do not cook unevenly and do not become
overcooked.
Quantity of food
The number of microwaves in your oven remains constant regardless of how much food is
being cooked. Therefore, the more food you place in the oven, the longer the cooking time.
Remember to decrease cooking times by at least one third when halving a recipe.
Shape of food
Microwaves penetrate only about 2 cm into food, the interior portion of thick foods are
cooked as the heat generated on the outside travels inward. Only the outer edge of food in
cooked by microwave energy; the rest is cooked by conduction. The worst possible shape
for a food that is to be microwaved is a thick square. The corners will burn long before the
centre is even warm . Round thin foods and ring shaped foods cook successfully in the
microwave.
Covering
A cover traps heat and steam which causes food to cook more quickly. Use a lid or
microwave cling film with a corner folded back to prevent splitting.
Browning
Meats and poultry that are cooked fifteen minutes or longer will brown lightly in their own
fat. Food that are cooked for a shorter period of time may be brushed with a browning
sauce such as worcestershire sauce, soy sauce or barbecue sauce to achieve an appetizing
colour. Since relatively small amounts of browning sauces are added to food the original
flavour of the recipe is not altered.
Covering with greaseproof paper
Greaseproofing effectively prevents spattering and helps food retain some heat. But because
it makes a looser cover than a lid or clingfilm, it allows the food to dry out slightly.
Arranging and spacing
Individual foods such as baked potatoes, small cakes and hors d’oeuvres will heat more
evenly if placed in the oven an equal distance apart, preferably in a circular pattern. Never
stack foods on top of one another.

49
ENGLISH
Food characteristics &
Microwave cooking
Stirring
Stirring is one of the most important of all microwaving techniques. In conventional
cooking, food is stirred for the purpose of blending. Microwaved food, however, is stirred
in order to spread and redistribute heat. Always stir from the outside towards the centre
as the outside of the food heats first.
Turning over
Large, tall foods such as roasts and whole chickens should be turned so that the top and
bottom will cook evenly. It is also a good idea to turn cut up chicken and chops.
Placing thicker portions facing outwards
Since microwaves are attracted to the outside portion of food, it makes sense to place
thicker portions of meat, poultry and fish to the outer edge of the baking dish. This way,
thicker portions will receive the most microwave energy and the food will cook evenly.
Shielding
Strips of aluminium foil (which block microwaves) can be placed over the corners or
edges of square and rectangular foods to prevent those portions from overcooking. Never
use too much foil and make sure the foil is secured to the dish or it may cause ‘arcing’ in
the oven.
Elevating
Thick or dense foods can be elevated so that microwaves can be absorbed by the
underside and centre of the foods.
Piercing
Foods enclosed in a shell, skin or membrane are likely to burst in the oven unless they are
pierced prior to cooking. Such foods include yolks and whites of eggs, clams and oysters
and whole vegetables and fruits.
Testing if cooked
Food cooks so quickly in a oven, it is necessary to test it frequently. Some foods are left in
the microwave until completely cooked, but most foods, including meats and poultry, are
removed from the oven while still slightly undercooked and allowed to finish cooking
during standing time. The internal temperature of foods will rise between 5˚F (3˚C) and
15˚F (8˚C) during standing time.
Standing time
Foods are often allowed to stand for 3 to 10 minutes after being removed from the oven.
Usually the foods are covered during standing time to retain heat unless they are
supposed to be dry in texture (some cakes and biscuits, for example). Standing allows
foods to finish cooking and also helps flavour blend and develop.
To Clean Your Oven
1. Keep the inside of the oven clean
Food spatters or spilled liquids stick to oven walls and between seal and door
surface. It is best to wipe up spillovers with a damp cloth right away. Crumbs
and spillovers will absorb microwave energy and lengthen cooking times. Use
a damp cloth to wipe out crumbs that fall between the door and the frame. It
is important to keep this area clean to assure a tight seal. Remove greasy
spatters with a soapy cloth then rinse and dry. Do not use harsh detergent or
abrasive cleaners. The Metal tray can be washed by hand or in the
dishwasher.
2. Keep the outside of the oven clean
Clean the outside of your oven with soap and water then with clean water and
dry with a soft cloth or paper towel. To prevent damage to the operating parts
inside the oven, the water should not be allowed to seep into the ventilation
openings. To clean control panel, open the door to prevent oven from
accidentally starting, and wipe a damp cloth followed immediately by a dry
cloth. Press Stop/Clear after cleaning.
3. If steam accumulates inside or around the outside of the oven door, wipe the
panels with a soft cloth. This may occur when the oven is operated under high
humidity conditions and in no way indicates a malfunction of the unit.
4. The door and door seals should be kept clean. Use only warm, soapy water,
rinse then dry thoroughly.
DO NOT USE ABRASIVE MATERIALS, SUCH AS CLEANING POWDERS OR
STEEL AND PLASTIC PADS.
Metal parts will be easier to maintain if wiped frequently with a damp cloth.
5. Do not use any steam cleaner.

50
Questions &
Answers
Q What’s wrong when the oven light will not glow?
A There may be several reasons why the oven light will not glow.
Light bulb has blown
Relay is failed
Q Does microwave energy pass through the viewing screen in the door?
A No. The holes, or ports, are made to allow light to pass; they do not let
microwave energy through.
Q Why does the beep tone sound when a button on the Control Panel is
touched?
A The beep tone sounds to assure that the setting is being properly entered.
Q Will the microwave function be damaged if it operates empty?
A Yes Never run it empty or without the metal tray.
Q Why do eggs sometimes pop?
A When baking, frying, or poaching eggs, the yolk may pop due to steam
build up inside the yolk membrane. To prevent this, simply pierce the yolk
before cooking. Never microwave eggs in the shell.
Q Why is standing time recommended after microwave cooking is over?
A After microwave cooking is finished, food keeps on cooking during
standing time. This standing time finishes cooking evenly throughout the
food. The amount of standing time depends on the density of the food.
Q Is it possible to cook popcorn in this oven?
A Yes, if using one of the two methods described below
1 Popcorn-popping utensils designed specifically for microwave cooking.
2 Prepackaged commercial microwave popcorn that contains specific
times and power outputs needed for an acceptable final product.
FOLLOW EXACT DIRECTIONS GIVEN BY EACH MANUFACTURER FOR
THEIR POPCORN PRODUCT. DO NOT LEAVE THE OVEN UNATTENDED
WHIE THE CORN IS BEING POPPED. IF CORN FAILS TO POP AFTER THE
SUGGESTED TIMES, DISCONTINUE COOKING. OVERCOOKING COULD
RESULT IN THE CORN CATCHING FIRE.
CAUTION
NEVER USE A BROWN PAPER BAG FOR POPPING CORN. NEVER
ATTEMP TO POP LEFTOVER KERNELS.
Q Why doesn’t my oven always cook as fast as the cooking guide says?
A Check your cooking guide again to make sure you’ve followed directions
correctly, and to see what might cause variations in cooking time.
Cooking guide times and heat settings are suggestions, chosen to help
prevent overcooking, the most common problem in getting used to a this
oven. Variations in the size, shape, weight and dimensions of the food
require longer cooking time. Use your own judgement along with the
cooking guide suggestions to test food condition, just as you would do
with a conventional cooker.

51
ENGLISH
Technical
Specifications
Technical Specification
MA3884VC / MA3884VCT
Power Input
Output
Microwave Frequency
Outside Dimension
Power
Consumption
Microwave
Grill
Combination
Convection
230 V~ 50 Hz
900 W (IEC60705 rating standard)
2450 MHz
527 mm(W) X 395 mm(H) X 469 mm(D)
1650 watt
max. 1700 watt
max. 2800 watt
2400 watt
IMPORTANT NOTE
Unlike the other cooking equipment, your microwave oven does not heat
the container but only its content. A real danger of burning the throat and
palate exists, if you do not check the temperature of the food before
consuming it. In particular we recommend you check the temperature of
the milk (or other liquid), in a container (baby bottle for example) before
giving it to infants and children. Never heat liquid in a closed container.
(risk of the container bursting, prior to, during, or after opening the door)
Replacement of the power supply cable and/or any intervention requiring
the opening of the device must only be carried out by qualified technical
personnel.
This microwave oven is shipped with a power cord, which, if it is
damaged, must be replaced by a cord of the same type. This cord can only
be supplied by the manufacturer and installed by a competent person.
Eggs in the shell and hard-boiled eggs should not be cooked or heated in
a microwave oven as they can explode and irreparably damage your
device. After cooking or reheating, leave the food in the oven for a few
moments, so that the heat is evenly distributed throughout all parts of the
food. Stir or shake the contents (in particular baby bottles and jars of baby
food) and especially check the temperature with care before consumption
in order to avoid burns.
• Microwave Frequency: 2,450 MHz +/- 50 MHz (Group 2 / Class B)
** Group 2 equipment: group 2 contains all ISM RF equipment in
which radio-frequency energy in the frequency range 9 kHz to
400 GHz is intentionally generated and used or only used, in the
form of electromagnetic radiation, inductive and /or capacitive
coupling, for the treatment of material or inspection/analysis
purposes. Class B equipment is equipment suitable for use in
domestic establishments and in establishments directly connected
to a low voltage power supply network which supplies buildings
used for domestic purposes.
• You can download the user manual on the site:
http://www.lg.com

Verwijdering van uw oude apparaat
1. Dit symbool van de doorgekruiste vuilnisbak geeft aan dat afgedankte elektrische en elektronische producten (WEEE) afzonderlijk van het huishoudelijke afval moeten worden verwijderd.
2. Oude elektrische producten kunnen gevaarlijke stoffen bevatten, dus een juiste verwijdering van uw oude apparaat helpt bij het voorkomen van mogelijke negatieve gevolgen voor het milieu
en de volksgezondheid. Uw oude apparaat kan herbruikbare onderdelen bevatten die gebruikt zouden kunnen worden voor het repareren van andere producten, en andere waardevolle
materialen die kunnen worden gerecycleerd voor het behoud van beperkte grondstoffen.
3. U kunt uw apparaat meenemen naar de winkel waar u het product hebt gekocht, of u kunt contact opnemen met uw plaatselijke afvalinstantie voor de gegevens van uw dichtstbijzijnde
geautoriseerde WEEE-verzamelpunt. Voor de meest geactualiseerde informatie voor uw land wordt verwezen naar www.lg.com/global/recycling
Recyclage de votre ancien appareil
1. Ce symbole de poubelle barrée d’une croix indique que votre équipement électrique et électronique (EEE) ne doit pas être jeté avec les ordures ménagères. Il doit faire l’objet d’un tri et
d’une collecte sélective séparée.
2. Les équipements électriques que vous jetez peuvent contenir des substances dangereuses. Il est donc important de les jeter de façon appropriée afin d’éviter des impacts négatifs sur
l’environnement et la santé humaine. L’équipement que vous jetez peut également contenir des pièces réutilisables pour la réparation d’autres produits ainsi que des matériaux précieux
pouvant être recyclés pour préserver les ressources de la planète.
3. Vous pouvez rapporter votre appareil au commerçant qui vous l’a vendu ou contacter votre collectivité locale pour connaitre les points de collecte de votre EEE. Vous trouverez également
des informations à jour concernant votre pays en allant sur www.quefairedemesdechets.fr
Disposal of your old appliance
1. This crossed-out wheeled bin symbol indicates that waste electrical and electronic products (WEEE) should be disposed of separately from the municipal waste stream.
2. Old electrical products can contain hazardous substances so correct disposal of your old appliance will help prevent potential negative consequences for the environment and human
health. Your old appliance may contain reusable parts that could be used to repair other products, and other valuable materials that can be recycled to conserve limited resources.
3. You can take your appliance either to the shop where you purchased the product, or contact your local government waste office for details of your nearest authorised WEEE collection point.
For the most up to date information for your country please see www.lg.com/global/recycling
-
 1
1
-
 2
2
-
 3
3
-
 4
4
-
 5
5
-
 6
6
-
 7
7
-
 8
8
-
 9
9
-
 10
10
-
 11
11
-
 12
12
-
 13
13
-
 14
14
-
 15
15
-
 16
16
-
 17
17
-
 18
18
-
 19
19
-
 20
20
-
 21
21
-
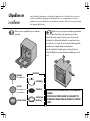 22
22
-
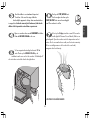 23
23
-
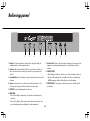 24
24
-
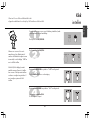 25
25
-
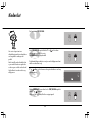 26
26
-
 27
27
-
 28
28
-
 29
29
-
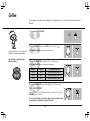 30
30
-
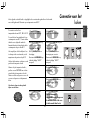 31
31
-
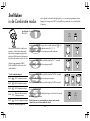 32
32
-
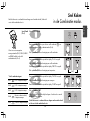 33
33
-
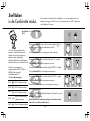 34
34
-
 35
35
-
 36
36
-
 37
37
-
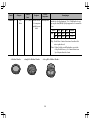 38
38
-
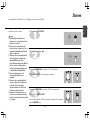 39
39
-
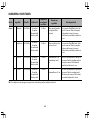 40
40
-
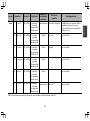 41
41
-
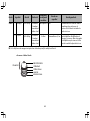 42
42
-
 43
43
-
 44
44
-
 45
45
-
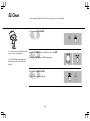 46
46
-
 47
47
-
 48
48
-
 49
49
-
 50
50
-
 51
51
-
 52
52
-
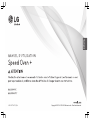 53
53
-
 54
54
-
 55
55
-
 56
56
-
 57
57
-
 58
58
-
 59
59
-
 60
60
-
 61
61
-
 62
62
-
 63
63
-
 64
64
-
 65
65
-
 66
66
-
 67
67
-
 68
68
-
 69
69
-
 70
70
-
 71
71
-
 72
72
-
 73
73
-
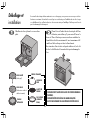 74
74
-
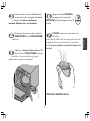 75
75
-
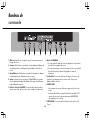 76
76
-
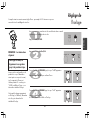 77
77
-
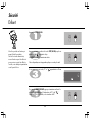 78
78
-
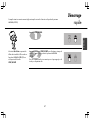 79
79
-
 80
80
-
 81
81
-
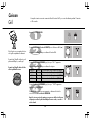 82
82
-
 83
83
-
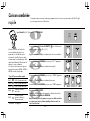 84
84
-
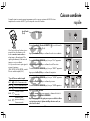 85
85
-
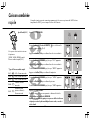 86
86
-
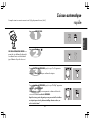 87
87
-
 88
88
-
 89
89
-
 90
90
-
 91
91
-
 92
92
-
 93
93
-
 94
94
-
 95
95
-
 96
96
-
 97
97
-
 98
98
-
 99
99
-
 100
100
-
 101
101
-
 102
102
-
 103
103
-
 104
104
-
 105
105
-
 106
106
-
 107
107
-
 108
108
-
 109
109
-
 110
110
-
 111
111
-
 112
112
-
 113
113
-
 114
114
-
 115
115
-
 116
116
-
 117
117
-
 118
118
-
 119
119
-
 120
120
-
 121
121
-
 122
122
-
 123
123
-
 124
124
-
 125
125
-
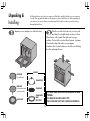 126
126
-
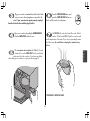 127
127
-
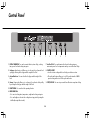 128
128
-
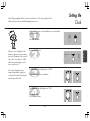 129
129
-
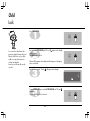 130
130
-
 131
131
-
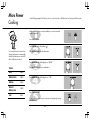 132
132
-
 133
133
-
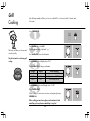 134
134
-
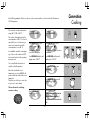 135
135
-
 136
136
-
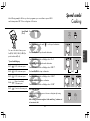 137
137
-
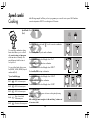 138
138
-
 139
139
-
 140
140
-
 141
141
-
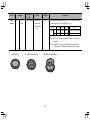 142
142
-
 143
143
-
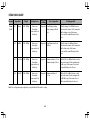 144
144
-
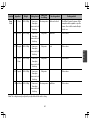 145
145
-
 146
146
-
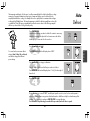 147
147
-
 148
148
-
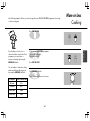 149
149
-
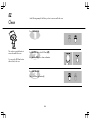 150
150
-
 151
151
-
 152
152
-
 153
153
-
 154
154
-
 155
155
-
 156
156


LG MA3884VCT de handleiding
- Categorie
- Magnetrons
- Type
- de handleiding
- Deze handleiding is ook geschikt voor
in andere talen
- English: LG MA3884VCT Owner's manual
- français: LG MA3884VCT Le manuel du propriétaire
Gerelateerde artikelen
Andere documenten
-
Panasonic NN-K12JM de handleiding
-
Valberg VG-MWC23S de handleiding
-
-
Panasonic NNGD38HS Handleiding
-
Panasonic NN-K12JM de handleiding
-
-
Whirlpool MAG638RVS/P02 Safety guide
-
Panasonic NN-S932 de handleiding
-
Asko OCS8464A1 Handleiding
-
Silvercrest SMW 900 EDS B4 Operating Instructions Manual