
packaging. Consequently, add the dough to a piping bag and fill each mold with
a tuft of dough. Not too full, the dough will rise during the baking process! A
general guideline that could be followed is 3 to 5 minutes preparation time per
batch of cake pops. As mentioned before, you can use a toothpick or skewer to
check the progress of the cakes pops.
Self-made cake mix
There are several options when it comes to preparing your own basic cake pops.
Neutral cake pops (about 48 pieces)
Ingredients
• 190 grams flour
• 1 teaspoon baking powder
• ¼ teaspoon salt
• 120 grams butter
• 225 grams sugar
• 1 small bag of vanilla sugar
• 2 eggs
• 225 ml. milk
Put the butter and sugar in a bowl and beat it with a mixer until it is light and
creamy. Add the eggs and the vanilla sugar and blend it well. Consequently add
the flour, the baking powder, the salt and the milk. Blend well with the mixer.
Fill each mold with about 1 tablespoon of batter. Bake the cake pops for 4 to 5
minutes. Use a toothpick or skewer to check the progress of the cakes pops.
Chocolate cake pops (about 48 pieces)
Ingredients
• 95 grams flour
• 110 grams sugar
• 3 tablespoons cocoa
• ½ teaspoon baking soda
• ¼ teaspoon baking powder
• ¼ teaspoon salt
• 60 ml buttermilk
• 3 tablespoons vegetable oil
• 1 egg
• ½ teaspoon vanilla extract
• 60 ml freshly brewed hot coffee
Add the flour, sugar, cocoa, baking soda, baking powder and salt to a mixing
bowl. Add the buttermilk, vegetable oil, egg and vanilla extract. Use a mixer to
blend it until the mixture is smooth. Add the coffee and continue mixing until
the coffee is evenly divided among the mixture. Fill each mold with about 1
tablespoon of batter. Bake the cake pops for 4 to 5 minutes. Use a toothpick or
skewer to check the progress of the cakes pops.
Lemon cake pops (about 30 pieces)
Ingredients
• 60 grams butter, softened
• 110 grams sugar
• 1 teaspoon lemon peel
• 1 egg
• ½ teaspoon lemon extract
• 95 grams flour
• ½ teaspoon baking powder
• ¼ teaspoon baking soda
• dash of salt
• 3 tablespoons milk
• 1 tablespoon lemon juice
Put the butter and sugar in a bowl and beat it with a mixer until it is light and
creamy. Add the lemon peel, eggs and the vanilla sugar and blend it well.
Consequently add the flour, the baking powder, baking soda, the salt, the milk
and the lemon juice. Blend well with the mixer until it is smooth. Fill each mold
with about 1 tablespoon of batter. Bake the cake pops for 4 to 5 minutes. Use a
toothpick or skewer to check the progress of the cakes pops.
RECIPES FOR DECORATING THE CAKE POPS
There are different ways in which the cake pops can be decorated.
Coating
The cake pops can be coated with a (colored) layer, such as melting chocolate
(available in supermarkets) or Candy Melts. Candy Melts are colored pastilles in
different flavors. After dripping the cake pop, you should tap the stick with the
cake pop on the edge of the pan or bowl a couple of times, in order to drip off
the remaining coating.
Coating and dipping
When the coating is still sticky, you could dip the cake pop it into different
decorations, for example:
• Different kind of sprinkles
• Smarties
• Colored sugars
Candy
Candy could be used to make different kind of forms:
• Round shaped candy (like Smarties) can be used for making eyes.
• Cone shaped candy and pretzels are fun to use for ears, horns and stalks.
• Chocolate drips can be used for making eyes, buttons, hair etc.
Make your own drawings
It is also possible to decorate the cake pops with your own drawings. Tubes
with eatible gel or special writing pens for food are perfect for this. These are
available in different colors and flavors.
CLEANING AND MAINTENANCE
• Remove the plug from the wall outlet and allow the device to cool down for
about 3 minutes with both halves opened.
• First remove the cake rests with the supplied fork, not by scratching on the
plate but by insert the fork in the pieces of dough and remove them.
• Clean the baking plates with a damp cloth or soft brush with a mild detergent.
• Rinse the cloth well so there is no soap residue in it, then clean the plates
about to times with the damp cloth so there will not remaining any soap
residue on the plates.
• Clean the exterior with a damp cloth. Never use harsh and abrasive cleaners,
scouring pad or steel wool, which damages the device.
• Never immerse the device in water or any other liquid. The device in not
dishwasher proof.
GUARANTEE
• This product is guaranteed for 24 months granted. Your warranty is valid if
the product is used in accordance to the instructions and for the purpose
for which it was created. In addition, the original purchase (invoice, sales
slip or receipt) is to be submitted with the date of purchase, the name of the
retailer and the item number of the product.
• For the detailed warranty conditions, please refer to our service website:
www.service.tristar.eu
GUIDELINES FOR PROTECTION OF THE ENVIRONMENT
This appliance should not be put into the domestic garbage at the end of its
durability, but must be offered at a central point for the recycling of electric
and electronic domestic appliances. This symbol on the appliance, instruction
manual and packaging puts your attention to this important issue. The materials
used in this appliance can be recycled. By recycling used domestic appliances you
contribute an important push to the protection of our environment. Ask your local
authorities for information regarding the point of recollection.
Packaging
The packaging is 100% recyclable, return the packaging separated.
Product
This device is equipped with a mark according to the European Directive
2002/96/EC on Waste Electrical and Electronic Equipment (WEEE). By ensuring
that this product will be correctly processed into waste, it will help prevent
possible negative consequences for the environment and human health.
EC declaration of conformity
This appliance is designed to come into contact with food and is designed
in accordance with EC Directive89/109/EEC. This device is designed,
manufactured and marketed in accordance with the safety objectives of
the Low Voltage Directive "No 2006/95/EC", the protection requirements
of the EMC Directive 2004/108/EC "Electromagnetic Compatibility" and the
requirement of Directive 93/68/EEC.
Geachte klant,
Gefeliciteerd met de aankoop van dit kwaliteitsproduct. Lees de
gebruiksaanwijzing zorgvuldig door zodat u optimaal gebruik kunt maken van dit
apparaat. In deze handleiding vindt u alle benodigde aanwijzingen en adviezen
voor het gebruik, schoonmaak en onderhoud van het apparaat. Als u deze
aanwijzingen volgt, heeft u altijd een uitstekend resultaat, bespaart u tijd en kunt u
problemen voorkomen. Wij hopen dat u dit apparaat met plezier zult gebruiken.
VEILIGHEIDSVOORSCHRIFTEN
• Lees de gebruiksaanwijzing aandachtig door voordat u het apparaat voor
het eerst gebruikt. Bewaar de gebruiksaanwijzing, het garantiecertificaat,
de verkoopbon en indien mogelijk de kartonnen doos met de binnenste
verpakking om deze indien nodig later te kunnen raadplegen.
• Dit apparaat is niet bedoeld voor gebruik door personen (waaronder
kinderen) met verminderde lichamelijke, zintuiglijke of geestelijke
vermogens, of die gebrek aan ervaring of kennis hebben, tenzij iemand
die verantwoordelijk is voor hun veiligheid toezicht op hen houdt of
hun heeft uitgelegd hoe het apparaat dient te worden gebruikt.
• Als de veiligheidsinstructies niet worden opgevolgd, kan de fabrikant
niet verantwoordelijk worden gesteld voor schade die daar eventueel
het gevolg van is.
• Om kinderen te beschermen tegen de gevaren van elektrische
apparatuur mag u ze nooit zonder toezicht bij het apparaat laten.
Selecteer daarom een plek voor uw apparaat op dusdanige wijze
dat kinderen er niet bij kunnen. Zorg ervoor dat het snoer niet naar
beneden hangt.
• Dit apparaat is alleen voor huishoudelijk gebruik en voor het doel waar
het voor bestemd is.
• Het apparaat moet worden geplaatst op een stabiele, vlakke
ondergrond.
• Raak hete oppervlakken niet aan. Gebruik hendels of draaiknoppen.
• Laat het apparaat nooit onbeheerd achter wanneer het in werking is.
• Reparaties dienen te geschieden door een bekwame gekwalificeerde
dienst(*).
• Zorg dat het apparaat opgeborgen wordt op een droge plaats.
• Het is noodzakelijk om dit toestel zuiver te houden, aangezien het in
direct contact komt met eetwaren.
• Controleer of het voltage dat wordt aangegeven op het apparaat,
overeenkomt met de plaatselijke netspanning voordat u het apparaat
aansluit. Voltage 220V-240V 50Hz. De contactdoos moet met ten
minste 16 A of 10 A traag beveiligd zijn.
• Dit apparaat voldoet aan alle richtlijnen met betrekking tot
elektromagnetische velden (EMV). Mits het apparaat op de juiste wijze en
volgens de instructies in deze gebruiksaanwijzing wordt gebruikt, is het
veilig te gebruiken volgens het nu beschikbare wetenschappelijke bewijs.
• Verplaats het apparaat nooit door aan het snoer te trekken en zorg
ervoor dat het snoer nergens in verstrikt kan raken.
• Gebruik het apparaat nooit buitenshuis.
• Wind het snoer niet om het apparaat heen en buig het niet.
• Zorg ervoor dat het apparaat afgekoeld is voordat u het schoonmaakt
en opbergt.
• Dompel het snoer, de stekker en/of het apparaat nooit in het water of een
andere vloeistof, dit om u te beschermen tegen een elektrische schok.
• Haal de stekker uit het stopcontact als u toebehoren wisselt en voor
onderhoudswerkzaamheden.
• Gebruik het apparaat niet indien de stekker, het netsnoer of het
apparaat zelf beschadigd is. Indien het netsnoer beschadigd is, moet u
het laten vervangen door een bekwame gekwalificeerde dienst(*) om
gevaar te voorkomen.
• Gebruik het apparaat nooit in de buurt van directe hittebronnen.
• Haal de stekker uit het stopcontact wanneer het apparaat niet gebruikt
wordt.
• Let op: om gevaar te voorkomen door het onbedoeld terugstellen van
de thermische beveiliging mag dit apparaat niet gevoed worden via
een extern schakelapparaat, zoals een timer, of aangesloten zijn op een
circuit dat regelmatig uit en aangezet wordt door het voorwerp.
• Laat het snoer niet over de rand van de tafel hangen of tegen hete
oppervlakken. Plaats het product niet onder of dicht de gordijnen,
raambekleding enz.
• Zorg dat het snoer niet in aanraking komt met de warme onderdelen
van het apparaat.
• Het is aangeraden een warmtewerende bedekking tussen de tafel en
het toestel te leggen (eveneens om geen sporen tengevolge van de
warmte op uw tafellaken of tafel na te laten).
• Gebruik het apparaat nooit in de buurt van een met water gevulde
gootsteen of iets dergelijks. Pak een apparaat dat in het water is gevallen
nooit zomaar vast, maar trek eerst de stekker uit het stopcontact.
* Bekwame gekwalificeerde dienst: after-sales dienst van de fabrikant of de
importeur, die erkend en bevoegd is om dergelijke reparaties te doen zodat elk
gevaar vermeden wordt. Gelieve het toestel bij problemen naar deze dienst
terug te brengen.
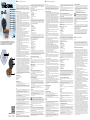
ONDERDELENBESCHRIJVING
1. Rood indicatielampje
2. Groen indicatielampje
3. Veiligheidssluiting
4. Bakplaten
5. Behuizing
VOOR HET EERSTE GEBRUIK
• Verwijder alle verpakkingen van het apparaat.
• Controleer of de spanning van het apparaat overeenkomt met de
netspanning van uw huis. Voltage 220V-240V 50Hz.
• Plaats het apparaat altijd op een vlakke stabiele ondergrond en zorg voor
minimaal 10 cm. vrije ruimte rondom het apparaat. Dit apparaat is niet
geschikt voor inbouw of buitengebruik.
• Het apparaat kan bij het eerste gebruik wat geur en rook verspreiden, dit is
normaal.
GEBRUIK
• Vet de antiaanbaklaag van de grillplaten lichtelijk in met olie of boter.
• Steek de stekker in het stopcontact, beide indicatielampjes lichten op. Laat
het apparaat zonder inhoud gesloten opwarmen.
• Het apparaat zal ongeveer 3 minuten moeten opwarmen om de gewenste
baktemperatuur te bereiken, als het apparaat is opgewarmd zal het groene
indicatielampje uit gaan.
• Open het apparaat, gebruik hiervoor een ovenwant om contact met de hete
oppervlakken van het apparaat te vermijden.
• Vul ieder bakvormpje met deeg. Het is aangeraden hiervoor een kan, lepel
of spuitzak te gebruiken. Met name een spuitzak is zeer handig voor het
vullen van de bakvormpjes.
• Let op: Gebruik hiervoor geen plastic wegwerp spuitzakken, deze kunnen
smelten wanneer ze in aanraking komen met de hete bakplaten. Zorg er ook
voor dat u de bakvormpjes niet te vol doet (1 cm onder de rand); het deeg
zal namelijk nog gaan rijzen tijdens het bakproces.
• Sluit het apparaat en vergrendel het met de veiligheidssluiting. Sluit het
apparaat met beleid, zodat het deeg niet uit de vormpjes loopt.
• De benodigde baktijd zal afhangen van de ingrediënten en het soort cake
pops dat u bakt. Voor een serie van 12 cake pops geldt een gemiddelde
bereidingstijd van 3 tot 5 minuten.
• Tip: gebruik een tandenstoker/prikker om te checken of de cake pops goed
zijn. Steek de tandenstoker/prikker in een popcake. Wanneer er geen deeg
aan de tandenstoker/prikker blijft kleven wanneer u deze eruit haalt, zijn de
cake pops klaar.
• Gebruik altijd een houten of plastic vork of prikker om de cake pops uit het
apparaat te halen. Gebruik hiervoor nooit stalen of scherpe voorwerpen.
Deze kunnen de bakplaat beschadigen.
• Als u de cake pops op de stokjes wilt aanbrengen, dient u deze voor 2/3
deel in de cake pop te steken om te voorkomen dat de cake pop eraf rolt of
breekt.
RECEPTEN VOOR HET MAKEN VAN BASIS CAKE POPS
Er zijn twee manieren om de basis cake pops te bereiden; de gemakkelijke, snelle
manier en de uitgebreidere manier. Beiden worden hieronder beschreven.
Kant-en-klare cakemix
U kunt voor het deeg een kant-en-klare deegmix uit de supermarkt gebruiken,
zoals mix voor boerencake, chocolade cake, fijne cake, muffins en boerencake
met chocolate chips. Het deeg dient vervolgens gemaakt te worden volgens de
beschrijving zoals vermeld op het pak. Vul een spuitzak met het deeg en vul ieder
bakvormpje in de bakplaat met een toef deeg. Niet te vol; het deeg zal nog rijzen.
Laat de cake pops ongeveer 3 tot 5 minuten bakken in de cake pop maker. Zoals
bij ‘Gebruik’ vermeld, kunt u met behulp van een prikker controleren of de cake
pops goed zijn.
Zelfgemaakte cake pops
Er zijn meerdere opties als het aankomt op het zelf maken van basis cake pops.
Neutrale cake pops (voor ca. 48 stuks)
Ingrediënten
• 190 gram patentbloem
• 1 theelepel bakpoeder
• ¼ theelepel zout
• 120 gram boter
• 225 gram suiker
• 1 zakje vanillesuiker
• 2 eieren
• 225 ml melk
Klop met een mixer de boter en het suiker tot een romig mengsel. Voeg de
eieren en het zakje vanillesuiker toe en mix alles door elkaar. Voeg daarna
de bloem, het bakpoeder, het zout en de melk toe. Klop het geheel met de
mixer tot een glad beslag. Vul de openingen in de onderste bakplaat met ca.
1 eetlepel beslag (of een toef wanneer u een spuitzak gebruikt). Bak de cake
pops in ca. 3 tot 5 minuten gaar. Om te controleren of de cake pops klaar zijn,
kunt u een prikker in het midden van de cake pop steken. Als deze er droog
uitkomt, zijn de cake pops gaar.
Chocolade cake pops (voor ca. 42 stuks)
Ingrediënten
• 95 gram patentbloem
• 110 gram suiker
• 3 eetlepels cacaopoeder
• ½ theelepel zuiveringszout
• ¼ theelepel bakpoeder
• ¼ theelepel zout
• 60 ml karnemelk
• 3 eetlepels zonnebloemolie
• 1 ei
• ½ theelepel vanille-extract
• 60 ml hete koffie
Doe de bloem, het suiker, het cacaopoeder, het zuiveringszout, het bakpoeder
en het zout in een mengkom. Voeg de karnemelk, de zonnebloemolie, het
ei en het vanille-extract toe. Mix alles goed door elkaar. Voeg de koffie toe
en blijf mixen tot de koffie goed door het beslag zit. Vul elke opening in de
onderste bakplaat met ongveer 1 eetlepel beslag. Bak de cake pops in ca. 3
tot 5 minuten gaar. Om te controleren of de cake pops klaar zijn, kunt u een
prikker in het midden van de cake pop steken. Als deze er droog uitkomt, zijn
de cake pops gaar.
Cake pops met citroensmaak (voor ca. 30 stuks)
Ingrediënten
• 60 gram zachte boter
• 110 gram suiker
• 1 theelepel citroenrasp
• 1 ei
• ½ theelepel citroenextract
• 95 gram patentbloem
• ½ theelepel bakpoeder
• ¼ theelepel zuiveringszout
• Mespuntje zout
• 3 eetlepels melk
• 1 eetlepel citroensap
Klop in een grote mengkom de boter en de suiker tot een romig mengsel. Voeg
de citroenrasp, het ei en het citroenextract toe en mix alles goed door elkaar. Voeg
vervolgens de bloem, het bakpoeder, het zuiveringszout, de melk en het citroensap
toe en mix het tot een glad geheel. Vul elke opening in de onderste bakplaat met
ongeveer 1 eetlepel beslag. Bak de cake pops in ca. 3 tot 5 minuten gaar. Om te
controleren of de cake pops klaar zijn, kunt u een prikker in het midden van de cake
pop steken. Als deze er droog uitkomt, zijn de cake pops gaar.
Let op: laat de cake pops altijd afkoelen voordat u deze decoreert!
TIPS VOOR HET DECOREREN VAN DE CAKE POPS
Er zijn verschillende manieren waarop u de cake pops kunt decoreren.
Coating
De cake pops kunnen bedekt worden met een (gekleurd) laagje, bijvoorbeeld
met smeltchocolade (te koop in de supermarkt) of Candy Melts. Candy Melts
zijn gekleurde pastilles in verschillende smaken.
Na het onderdompelen van de cake pop wordt geadviseerd het lolliestokje
een aantal keer op de rand van een schaal af te tikken, zodat het teveel aan
coating eraf kan druipen.
Coating + dip
Als de coating nog niet opgedroogd is, kunt u de cake pops dippen. Mogelijke
dips:
• Eetbare (disco)balletjes
• Smarties
• Muisjes
• Hagelslag
Snoepgoed
Snoepgoed kan gebruikt worden om verschillende vormen te maken:
• Snoep in een ronde vorm (bijvoorbeeld Smarties) is geschikt om oogjes te
maken.
• Zure matten kunnen dienen als tong of sjaaltjes.
• Kegelvormig snoepgoed en zoutjes zijn leuk te gebruiken als oren, hoorns
en steeltjes.
• Chocolade druppels kunnen gebruikt worden als ogen, knopen, haren enz.
Zelf tekenen
Het is ook mogelijk zelf dingen te tekenen op de cake pops. Hiervoor kunnen
tubes gebruikt worden waar een eetbare gel in zit. Ook zijn er speciale
schrijfpennen die u op voedsel kunt gebruiken. Deze zijn beschikbaar in
verschillende kleuren en smaken.
SCHOONMAKEN VAN HET APPARAAT
• Haal de stekker uit het stopcontact en laat het apparaat geopend ongeveer
3 minuten goed afkoelen.
• Verwijder eerst de cakerestjes met de bijgeleverde vork. Schraap hierbij niet
over de bakplaat, maar prik de vork in de stukjes deeg en verwijder deze.
• Reinig de bakplaten met een vochtige doek of een zacht borsteltje.
• Spoel de doek goed, zodat er geen zeepresten meer aanwezig zijn. Reinig
de bakplaten meerdere malen met de vochtige doek, om er zeker van te zijn
dat er geen zeepresten op de platen zijn achtergebleven.
• Reinig de buitenkant met een vochtige doek. Gebruik nooit agressieve
en schurende schoonmaakmiddelen, een schuurspons of staalwol; dit
beschadigt het apparaat.
• Dompel het apparaat niet onder in water of in een andere vloeistof en
plaats het apparaat niet in de vaatwasmachine om te reinigen.
Dear customer,
Congratulations and thank you for purchasing this high quality product. Please read
the instruction manual carefully so that you will be able to make the best possible
use of the appliance. This manual includes all the necessary instructions and advice
for using, cleaning and maintaining the appliance. If you follow these instructions
you will be guaranteed of an excellent result, it saves you time and will avoid
problems. We hope you will have a great deal of pleasure from using this appliance.
SAFETY INSTRUCTIONS
• Please read the instruction manual carefully before using the device.
Please keep these instructions, the guarantee certificate, the sales
receipt and, if possible, the carton with the inner packaging.
• This appliance is not intended to be used by persons (including
children) with reduced physical, sensory or mental capabilities, or lack
of experience and knowledge, unless they have been given supervision
or instructions concerning the use of the appliance by a person that is
responsible for their safety.
• By ignoring the safety instructions the manufacturer can not be hold
responsible for the damage.
• To protect children against the dangers of electrical appliances, please
make sure that you never leave the appliance unattended. Therefore you
have to select a storage place for the appliance where children are not able
to grab it. Make sure that the cable is not hanging in a downward position.
• This appliance is only to be used for household purposes and only for
the purpose it is made for.
• The appliance must be placed on a stable, level surface.
• Do not touch hot surfaces. Use handles or knobs.
• Never use the device unsupervised.
• All repairs should be made by a competent qualified repair service(*).
• Make sure that the appliance is stored in a dry environment.
• It is absolutely necessary to keep this appliance clean at all times,
because it comes into direct contact with food.
• Check if the voltage of the appliance corresponds to the main voltage
of your home. Rated voltage: AC220-240V 50Hz. The socket must be at
least 16A or 10 A slow-protected.
• This appliance complies with all standards regarding electromagnetic
fields (EMF). If handled properly and according to the instructions
in this user manual, the appliance is safe to use based on scientific
evidence available today.
• Never move the appliance by pulling the cord and make sure the cord
can not become entangled.
• Do not use this appliance outdoors.
• Do not wind the cord around the appliance and do not bend it.
• Allow the appliance to cool down before you clean or store it.
• To protect yourself against an electric shock, do not immerse the cord,
plug or appliance in the water or any other liquid.
• Unplug the appliance from the socket when changing the spare parts
or for maintenance.
• Do not use this appliance with a damaged cord or plug or when the
appliance has malfunctions, or has been damaged in any manner. To
avoid a hazard make sure that a damaged cord or plug will be replaced
by an authorized technician(*). Do not repair this appliance yourself.
• Do not use this appliance near direct heat sources.
• Unplug the appliance from the socket when you are not using it.
• Note: To avoid danger by accidental resetting the thermal protection, this
appliance may not be powered through an external switching device, such
as a timer, or connected to a circuit that regularly will be switched on or off.
• Make sure that the cord is not hanging over the edge of the table or
counter, does not touch any hot surfaces or is coming directly into
contact with the hot parts of the appliance. Do not place the appliance
underneath or close to curtains, window coverings etc.
• Make sure the cord does not touch the hot parts of the appliance.
• We advise to place a heat resistant coating between your table and the
appliance (this way you don't get burns on your table or table cloth).
• Do not use this appliance in the bathroom or near a sink filled with water.
If this appliance has fallen into the water do not under no circumstances
directly grab this appliance, but first pull the plug from the socket.
* Competent qualified repair service: after sales department of the producer or
importer or any person who is qualified, approved and competent to perform
this kind of repairs in order to avoid all danger. In any case you should return the
appliance to this repair service.
PARTS DESCRIPTION
1. Red power indication light
2. Green power indication light
3. Safety lock
4. Baking plates
5. Housing
BEFORE THE FIRST USE
• Remove all packaging of the device.
• Check if the voltage of the appliance corresponds to the main voltage of
your home. Rated voltage: AC220-240V 50Hz.
• Always place the device on a flat stable surface and allow at least 10 cm. free
space around the unit. This device is not suitable for integration or outdoor use.
• The device may spread some smell and smoke at first use, this is normal.
USE
• Slightly grease the non-stick coating of the baking plates with oil or butter.
• Close the device and plug it into the wall outlet. Both indication lights will
illuminate, indicating that the device is now preheating.
• It will take approximately 3 minutes to reach the recommended baking
temperature. The green power indication light will go off once the device is
ready to use.
• Open the lid using an oven glove in order to prevent making contact with
the hot surfaces of the device.
• Fill each mold with batter by using a jug, spoon or piping bag. Especially a
piping bag seems very practical for filling the molds.
• Note: Do not use disposable plastic piping bags, as these may melt when
coming into contact with the hot baking plates. Be careful not to overfill the
molds, as the batter will rise during the baking process.
• Gently close the lid, ensuring it is locked well. Do not slam the lid down, as it
may cause the mixture to run off the molds.
• The actual preparation time will vary depending on the ingredients used
and the type of cake pops being prepared. A general guide line is 3 to 5
minutes preparation time per batch of cake pops.
• Hint: use a toothpick or skewer to check the progress of the cakes pops.
Insert the skewer into the cake pops. When the toothpick/skewer is coming
out clean, the cake pops are ready.
• To remove the cake pops, always use a plastic or wooden spatula. Never
use a sharp or metal object, as this will damage the non-stick coating of the
baking plates.
• When you use the lolly sticks, insert the stick for 2/3th into the cake pop
otherwise the cakepop will roll off or break.
RECIPES FOR PREPARING BASIC CAKE POPS
There are two ways to prepare basic cake pops; an easy and quick way and a
more extensive way. Both are described below.
Ready-made cake mix
You can use a ready-made cake mix from the supermarket for preparing the
cake pops, such as neutral cake mix, chocolate cake mix, vanilla cake mix, muffin
mix etc. The dough should be prepared according to the description on the
EN Instruction manual NL Gebruiksaanwijzing
FR Mode d'emploi
GARANTIEVOORWAARDEN
• Op dit product wordt een garantie van 24 maanden verleend. Uw garantie
is geldig wanneer het product is gebruikt in overeenstemming met de
gebruiksaanwijzing en voor het doel waarvoor het gemaakt is. Tevens
dient de originele aankoopbon (factuur, kassabon of kwitantie) overlegd
te worden met daarop de aankoopdatum, de naam van de retailer en het
artikelnummer van het product.
• Voor uitgebreide garantievoorwaarden verwijzen wij u naar onze
servicewebsite: www.service.tristar.eu
AANWIJZINGEN TER BESCHERMING VAN HET MILIEU
Dit product mag aan het einde van zijn levensduur niet bij het
normale huisafval worden gedeponeerd, maar dient bij een speciaal
inzamelpunt voor het hergebruik van elektrische en elektronische apparaten
te worden aangeboden. Het symbool op artikel, gebruiksaanwijzing en
verpakking attendeert u hierop. De gebruikte grondstoffen zijn geschikt voor
hergebruik. Met het hergebruik van gebruikte apparaten of grondstoffen
levert u een belangrijke bijdrage aan de bescherming van ons milieu.
Informeer bij uw lokale overheid naar het bedoelde inzamelpunt.
Verpakking
Het verpakkingsmateriaal is 100% recyclebaar, lever het verpakkingsmateriaal
gescheiden in.
Product
Dit apparaat is voorzien van het merkteken volgens de Europese richtlijn
2002/96/EG inzake afgedankte elektrische en elektronische apparaten(AEEA).
Door ervoor te zorgen dat dit product op de juiste manier als afval wordt
verwerkt, helpt u mogelijk negatieve consequenties voor het milieu en de
menselijke gezondheid te voorkomen.
EG-conformiteitsverklaring
Dit apparaat is ontworpen om in contact te komen met levensmiddelen en is
ontworpen in overeenstemming met de EG-richtlijn 89/109/EEC. Dit apparaat
is ontworpen, vervaardigd en in de handel gebracht in overeenstemming
met de veiligheidsdoeleinden van de “laagspanningsrichtlijn”nr. 2006/95/
EC, de beschermingsvoorschriften van de EMC-richtlijn 2004/108/EC
“Elektromagnetische compatibiliteit” en de vereiste van richtlijn 93/68/EG.
Cher client,
Félicitations et merci d'avoir acheté ce produit de haute qualité. Veuillez lire ce
manuel d'instructions avec attention pour pouvoir profiter du meilleur de cet
appareil. Ce manuel contient toutes les instructions et avis nécessaires pour
l'utilisation, le nettoyage et l'entretien de l'appareil. Si vous suivez ces instructions,
vous avez la garantie d'un excellent résultat, ceci vous économisera du temps et
des soucis. Nous espérons que vous éprouverez beaucoup de plaisir en utilisant cet
appareil.
INSTRUCTIONS DE SÉCURITÉ IMPORTANTES
• Veuillez lire attentivement la notice d’emploi avant l’utilisation de
l’appareil. Veuillez conserver cette notice, le certificat de garantie, le
ticket de caisse et si possible, le carton avec l’emballage intérieur.
• Cet appareil n’est pas destiné à être utilisé par ces personnes (y compris
les enfants) ayant des difficultés physiques, sensorielles ou mentales,
ou sans expérience et connaissance, à moins de leur en donner la
responsabilité ou d'être informés sur l'utilisation de l'appareil par une
personne responsable de leur sécurité.
• Le fabricant ne sera pas tenu responsable de tous dommages si les
consignes de sécurité ne sont pas respectées.
• Pour protéger les enfants des dangers des appareils électriques, veillez
à ne jamais laisser les appareils sans surveillance. Par conséquent, il
faudra choisir un lieu de rangement pour l’appareil inaccessible aux
enfants. Veillez à ce que le cordon ne pende pas.
• Cet appareil est uniquement destiné à des utilisations domestiques et
seulement dans le but pour lequel il est fabriqué.
• L’appareil doit être posé sur une surface stable et nivelée.
• Ne touchez pas les surfaces brûlantes. Utilisez les poignées ou les
boutons.
• Ne jamais utiliser l’appareil sans supervision.
• Toutes les réparations doivent être effectuées par un Centre de
réparation qualifié agréé (*).
• Veillez à ce que l’appareil soit rangé dans un lieu sec.
• Il est impératif de conserver cet appareil propre en permanence car il
est en contact direct avec des aliments.
• Vérifiez si la tension de l'appareil correspond à la tension du secteur de
votre domicile. Tension nominale : 220-240V CA 50Hz. La prise doit être
d’au moins 16A ou 10A et à fusible lent.
• Cet appareil est conforme à toutes les normes des champs
électromagnétiques (EMF). L’appareil est sans danger à l’utilisation selon
les preuves scientifiques disponibles à ce jour, à condition de manipulation
correcte et en respectant les consignes de cette notice d’emploi.
• Ne jamais déplacer l’appareil en tirant sur le cordon et veillez à ce que
ce dernier ne devienne pas entortillé.
• Ne pas utiliser cet appareil à l’extérieur.
• N’enroulez pas le cordon autour de l’appareil et ne le pliez pas.
• Laissez refroidir l’appareil avant de le nettoyer ou de le ranger.
• Ne pas immerger le cordon, la prise ou l'appareil dans de l'eau ou autre
liquide afin de vous éviter un choc électrique.
• Débranchez l’appareil de la prise lors du changement de pièces ou pour
l’entretien.
• Ne pas utiliser cet appareil avec un cordon ou une prise endommagés
ou s’il ne fonctionne pas correctement, ou a subi des dégâts
quelconques. Afin d’éviter tous dangers, veillez à ce qu’un cordon ou
prise endommagés soient remplacés par un technicien agréé (*). Ne
réparez pas vous-même cet appareil.
• Ne pas utiliser cet appareil à proximité de sources directes de chaleur.
• Débranchez l’appareil de la prise lorsqu’il n’est pas utilisé.
• NB : Afin d’éviter tout danger en cas de la réinitialisation accidentelle de
la protection thermique, cet appareil ne peut pas être alimenté par un
dispositif externe de commande, tel une minuterie, ou branché sur un
circuit qui sera régulièrement allumé ou éteint.
• Veillez à ce que le cordon ne soit pas suspendu au bord d'une table
ou d’un comptoir, qu’il ne touche aucune surface chaude ou n'entre
pas en contact direct avec des parties brulantes de l'appareil. Ne pas
positionner l’appareil sous ou à proximité de rideaux, de tentures, etc.
• Veillez à ce que le cordon ne touche pas les parties brulantes de l’appareil.
• Il est recommandé de mettre un dessous résistant à la chaleur entre votre
table et l'appareil (ce procédé évitera de bruler votre table ou votre nappe).
• Ne pas utiliser cet appareil dans la salle de bain ou à proximité d’un
évier rempli d’eau. Si cet appareil est tombé dans l’eau il ne faut en
aucun cas le saisir directement. Débranchez d’abord la fiche de la prise.
* Centre de réparation qualifié agréé : Service après vente du fabricant ou de
l’importateur ou tout autre personne qualifiée, agréé et apte à effectuer ce type
de réparation afin d’éviter tous dangers. L'appareil doit, dans tous les cas, être
renvoyé à cet Centre de réparation.
1
3
4
5
2
www.tristar.eu
Tristar Europe B.V. | Jules Verneweg 87
5015 BH Tilburg | The Netherlands
EN
NL
FR
DE
ES
PT
PL
IT
CS
SV
SK
Instruction manual
Gebruiksaanwijzing
Mode d'emploi
Bedienungsanleitung
Manual de usuario
Manual de utilizador
Instrukcja obsługi
Manuale utente
Návod na použití
Bruksanvisning
Návod na použitie
SA-1123
PARTS DESCRIPTION / ONDERDELENBESCHRIJVING / DESCRIPTION DES
PIÈCES / TEILEBESCHREIBUNG / DESCRIPCIÓN DE LAS PIEZAS / DESCRIÇÃO
DOS COMPONENTES / OPIS CZĘŚCI / DESCRIZIONE DELLE PARTI /
BESKRIVNING AV DELAR / POPIS SOUČÁSTÍ / POPIS SÚČASTÍ
Pagina laadt ...
Pagina laadt ...
Pagina laadt ...
Documenttranscriptie
EN Instruction manual eN Instruction manual Nl Dear customer, Congratulations and thank you for purchasing this high quality product. Please read the instruction manual carefully so that you will be able to make the best possible use of the appliance. This manual includes all the necessary instructions and advice for using, cleaning and maintaining the appliance. If you follow these instructions you will be guaranteed of an excellent result, it saves you time and will avoid problems. We hope you will have a great deal of pleasure from using this appliance. Gebruiksaanwijzing Safety instructions FR Mode d'emploi DE Bedienungsanleitung ES Manual de usuario PT Manual de utilizador PL Instrukcja obsługi IT Manuale utente SV Bruksanvisning CS Návod na použití SK Návod na použitie • Please read the instruction manual carefully before using the device. Please keep these instructions, the guarantee certificate, the sales receipt and, if possible, the carton with the inner packaging. • This appliance is not intended to be used by persons (including children) with reduced physical, sensory or mental capabilities, or lack of experience and knowledge, unless they have been given supervision or instructions concerning the use of the appliance by a person that is responsible for their safety. • By ignoring the safety instructions the manufacturer can not be hold responsible for the damage. • To protect children against the dangers of electrical appliances, please make sure that you never leave the appliance unattended. Therefore you have to select a storage place for the appliance where children are not able to grab it. Make sure that the cable is not hanging in a downward position. • This appliance is only to be used for household purposes and only for the purpose it is made for. • The appliance must be placed on a stable, level surface. • Do not touch hot surfaces. Use handles or knobs. • Never use the device unsupervised. • All repairs should be made by a competent qualified repair service(*). • Make sure that the appliance is stored in a dry environment. • It is absolutely necessary to keep this appliance clean at all times, because it comes into direct contact with food. • Check if the voltage of the appliance corresponds to the main voltage of your home. Rated voltage: AC220-240V 50Hz. The socket must be at least 16A or 10 A slow-protected. • This appliance complies with all standards regarding electromagnetic fields (EMF). If handled properly and according to the instructions in this user manual, the appliance is safe to use based on scientific evidence available today. • Never move the appliance by pulling the cord and make sure the cord can not become entangled. • Do not use this appliance outdoors. • Do not wind the cord around the appliance and do not bend it. • Allow the appliance to cool down before you clean or store it. • To protect yourself against an electric shock, do not immerse the cord, plug or appliance in the water or any other liquid. • Unplug the appliance from the socket when changing the spare parts or for maintenance. • Do not use this appliance with a damaged cord or plug or when the appliance has malfunctions, or has been damaged in any manner. To avoid a hazard make sure that a damaged cord or plug will be replaced by an authorized technician(*). Do not repair this appliance yourself. • Do not use this appliance near direct heat sources. • Unplug the appliance from the socket when you are not using it. • Note: To avoid danger by accidental resetting the thermal protection, this appliance may not be powered through an external switching device, such as a timer, or connected to a circuit that regularly will be switched on or off. • Make sure that the cord is not hanging over the edge of the table or counter, does not touch any hot surfaces or is coming directly into contact with the hot parts of the appliance. Do not place the appliance underneath or close to curtains, window coverings etc. • Make sure the cord does not touch the hot parts of the appliance. • We advise to place a heat resistant coating between your table and the appliance (this way you don't get burns on your table or table cloth). • Do not use this appliance in the bathroom or near a sink filled with water. If this appliance has fallen into the water do not under no circumstances directly grab this appliance, but first pull the plug from the socket. SA-1123 Parts Description / Onderdelenbeschrijving / Description des pièces / Teilebeschreibung / Descripción de las piezas / Descrição dos componentes / Opis części / Descrizione delle parti / Beskrivning av delar / Popis součástí / Popis súčastí 2 1 3 4 5 * Competent qualified repair service: after sales department of the producer or importer or any person who is qualified, approved and competent to perform this kind of repairs in order to avoid all danger. In any case you should return the appliance to this repair service. Parts description 1. Red power indication light 2. Green power indication light 3. Safety lock 4. Baking plates 5. Housing Before the first use • Remove all packaging of the device. • Check if the voltage of the appliance corresponds to the main voltage of your home. Rated voltage: AC220-240V 50Hz. • Always place the device on a flat stable surface and allow at least 10 cm. free space around the unit. This device is not suitable for integration or outdoor use. • The device may spread some smell and smoke at first use, this is normal. Use • Slightly grease the non-stick coating of the baking plates with oil or butter. • Close the device and plug it into the wall outlet. Both indication lights will illuminate, indicating that the device is now preheating. • It will take approximately 3 minutes to reach the recommended baking temperature. The green power indication light will go off once the device is ready to use. • Open the lid using an oven glove in order to prevent making contact with the hot surfaces of the device. • Fill each mold with batter by using a jug, spoon or piping bag. Especially a piping bag seems very practical for filling the molds. • Note: Do not use disposable plastic piping bags, as these may melt when coming into contact with the hot baking plates. Be careful not to overfill the molds, as the batter will rise during the baking process. • Gently close the lid, ensuring it is locked well. Do not slam the lid down, as it may cause the mixture to run off the molds. • The actual preparation time will vary depending on the ingredients used and the type of cake pops being prepared. A general guide line is 3 to 5 minutes preparation time per batch of cake pops. • Hint: use a toothpick or skewer to check the progress of the cakes pops. Insert the skewer into the cake pops. When the toothpick/skewer is coming out clean, the cake pops are ready. • To remove the cake pops, always use a plastic or wooden spatula. Never use a sharp or metal object, as this will damage the non-stick coating of the baking plates. • When you use the lolly sticks, insert the stick for 2/3th into the cake pop otherwise the cakepop will roll off or break. www.tristar.eu Tristar Europe B.V. | Jules Verneweg 87 5015 BH Tilburg | The Netherlands Recipes for preparing basic cake pops There are two ways to prepare basic cake pops; an easy and quick way and a more extensive way. Both are described below. Ready-made cake mix You can use a ready-made cake mix from the supermarket for preparing the cake pops, such as neutral cake mix, chocolate cake mix, vanilla cake mix, muffin mix etc. The dough should be prepared according to the description on the NL Gebruiksaanwijzing packaging. Consequently, add the dough to a piping bag and fill each mold with a tuft of dough. Not too full, the dough will rise during the baking process! A general guideline that could be followed is 3 to 5 minutes preparation time per batch of cake pops. As mentioned before, you can use a toothpick or skewer to check the progress of the cakes pops. Self-made cake mix There are several options when it comes to preparing your own basic cake pops. Neutral cake pops (about 48 pieces) Ingredients • 190 grams flour • 1 teaspoon baking powder • ¼ teaspoon salt • 120 grams butter • 225 grams sugar • 1 small bag of vanilla sugar • 2 eggs • 225 ml. milk Put the butter and sugar in a bowl and beat it with a mixer until it is light and creamy. Add the eggs and the vanilla sugar and blend it well. Consequently add the flour, the baking powder, the salt and the milk. Blend well with the mixer. Fill each mold with about 1 tablespoon of batter. Bake the cake pops for 4 to 5 minutes. Use a toothpick or skewer to check the progress of the cakes pops. Chocolate cake pops (about 48 pieces) Ingredients • 95 grams flour • 110 grams sugar • 3 tablespoons cocoa • ½ teaspoon baking soda • ¼ teaspoon baking powder • ¼ teaspoon salt • 60 ml buttermilk • 3 tablespoons vegetable oil • 1 egg • ½ teaspoon vanilla extract • 60 ml freshly brewed hot coffee Add the flour, sugar, cocoa, baking soda, baking powder and salt to a mixing bowl. Add the buttermilk, vegetable oil, egg and vanilla extract. Use a mixer to blend it until the mixture is smooth. Add the coffee and continue mixing until the coffee is evenly divided among the mixture. Fill each mold with about 1 tablespoon of batter. Bake the cake pops for 4 to 5 minutes. Use a toothpick or skewer to check the progress of the cakes pops. Lemon cake pops (about 30 pieces) Ingredients • 60 grams butter, softened • 110 grams sugar • 1 teaspoon lemon peel • 1 egg • ½ teaspoon lemon extract • 95 grams flour • ½ teaspoon baking powder • ¼ teaspoon baking soda • dash of salt • 3 tablespoons milk • 1 tablespoon lemon juice Put the butter and sugar in a bowl and beat it with a mixer until it is light and creamy. Add the lemon peel, eggs and the vanilla sugar and blend it well. Consequently add the flour, the baking powder, baking soda, the salt, the milk and the lemon juice. Blend well with the mixer until it is smooth. Fill each mold with about 1 tablespoon of batter. Bake the cake pops for 4 to 5 minutes. Use a toothpick or skewer to check the progress of the cakes pops. Recipes for decorating the cake pops There are different ways in which the cake pops can be decorated. Coating The cake pops can be coated with a (colored) layer, such as melting chocolate (available in supermarkets) or Candy Melts. Candy Melts are colored pastilles in different flavors. After dripping the cake pop, you should tap the stick with the cake pop on the edge of the pan or bowl a couple of times, in order to drip off the remaining coating. Coating and dipping When the coating is still sticky, you could dip the cake pop it into different decorations, for example: • Different kind of sprinkles • Smarties • Colored sugars Candy Candy could be used to make different kind of forms: • Round shaped candy (like Smarties) can be used for making eyes. • Cone shaped candy and pretzels are fun to use for ears, horns and stalks. • Chocolate drips can be used for making eyes, buttons, hair etc. Make your own drawings It is also possible to decorate the cake pops with your own drawings. Tubes with eatible gel or special writing pens for food are perfect for this. These are available in different colors and flavors. Cleaning and maintenance • Remove the plug from the wall outlet and allow the device to cool down for about 3 minutes with both halves opened. • First remove the cake rests with the supplied fork, not by scratching on the plate but by insert the fork in the pieces of dough and remove them. • Clean the baking plates with a damp cloth or soft brush with a mild detergent. • Rinse the cloth well so there is no soap residue in it, then clean the plates about to times with the damp cloth so there will not remaining any soap residue on the plates. • Clean the exterior with a damp cloth. Never use harsh and abrasive cleaners, scouring pad or steel wool, which damages the device. • Never immerse the device in water or any other liquid. The device in not dishwasher proof. Guarantee • This product is guaranteed for 24 months granted. Your warranty is valid if the product is used in accordance to the instructions and for the purpose for which it was created. In addition, the original purchase (invoice, sales slip or receipt) is to be submitted with the date of purchase, the name of the retailer and the item number of the product. • For the detailed warranty conditions, please refer to our service website: www.service.tristar.eu Guidelines for protection of the environment This appliance should not be put into the domestic garbage at the end of its durability, but must be offered at a central point for the recycling of electric and electronic domestic appliances. This symbol on the appliance, instruction manual and packaging puts your attention to this important issue. The materials used in this appliance can be recycled. By recycling used domestic appliances you contribute an important push to the protection of our environment. Ask your local authorities for information regarding the point of recollection. Packaging The packaging is 100% recyclable, return the packaging separated. Product This device is equipped with a mark according to the European Directive 2002/96/EC on Waste Electrical and Electronic Equipment (WEEE). By ensuring that this product will be correctly processed into waste, it will help prevent possible negative consequences for the environment and human health. EC declaration of conformity This appliance is designed to come into contact with food and is designed in accordance with EC Directive89/109/EEC. This device is designed, manufactured and marketed in accordance with the safety objectives of the Low Voltage Directive "No 2006/95/EC", the protection requirements of the EMC Directive 2004/108/EC "Electromagnetic Compatibility" and the requirement of Directive 93/68/EEC. Geachte klant, Gefeliciteerd met de aankoop van dit kwaliteitsproduct. Lees de gebruiksaanwijzing zorgvuldig door zodat u optimaal gebruik kunt maken van dit apparaat. In deze handleiding vindt u alle benodigde aanwijzingen en adviezen voor het gebruik, schoonmaak en onderhoud van het apparaat. Als u deze aanwijzingen volgt, heeft u altijd een uitstekend resultaat, bespaart u tijd en kunt u problemen voorkomen. Wij hopen dat u dit apparaat met plezier zult gebruiken. Veiligheidsvoorschriften • Lees de gebruiksaanwijzing aandachtig door voordat u het apparaat voor het eerst gebruikt. Bewaar de gebruiksaanwijzing, het garantiecertificaat, de verkoopbon en indien mogelijk de kartonnen doos met de binnenste verpakking om deze indien nodig later te kunnen raadplegen. • Dit apparaat is niet bedoeld voor gebruik door personen (waaronder kinderen) met verminderde lichamelijke, zintuiglijke of geestelijke vermogens, of die gebrek aan ervaring of kennis hebben, tenzij iemand die verantwoordelijk is voor hun veiligheid toezicht op hen houdt of hun heeft uitgelegd hoe het apparaat dient te worden gebruikt. • Als de veiligheidsinstructies niet worden opgevolgd, kan de fabrikant niet verantwoordelijk worden gesteld voor schade die daar eventueel het gevolg van is. • Om kinderen te beschermen tegen de gevaren van elektrische apparatuur mag u ze nooit zonder toezicht bij het apparaat laten. Selecteer daarom een plek voor uw apparaat op dusdanige wijze dat kinderen er niet bij kunnen. Zorg ervoor dat het snoer niet naar beneden hangt. • Dit apparaat is alleen voor huishoudelijk gebruik en voor het doel waar het voor bestemd is. • Het apparaat moet worden geplaatst op een stabiele, vlakke ondergrond. • Raak hete oppervlakken niet aan. Gebruik hendels of draaiknoppen. • Laat het apparaat nooit onbeheerd achter wanneer het in werking is. • Reparaties dienen te geschieden door een bekwame gekwalificeerde dienst(*). • Zorg dat het apparaat opgeborgen wordt op een droge plaats. • Het is noodzakelijk om dit toestel zuiver te houden, aangezien het in direct contact komt met eetwaren. • Controleer of het voltage dat wordt aangegeven op het apparaat, overeenkomt met de plaatselijke netspanning voordat u het apparaat aansluit. Voltage 220V-240V 50Hz. De contactdoos moet met ten minste 16 A of 10 A traag beveiligd zijn. • Dit apparaat voldoet aan alle richtlijnen met betrekking tot elektromagnetische velden (EMV). Mits het apparaat op de juiste wijze en volgens de instructies in deze gebruiksaanwijzing wordt gebruikt, is het veilig te gebruiken volgens het nu beschikbare wetenschappelijke bewijs. • Verplaats het apparaat nooit door aan het snoer te trekken en zorg ervoor dat het snoer nergens in verstrikt kan raken. • Gebruik het apparaat nooit buitenshuis. • Wind het snoer niet om het apparaat heen en buig het niet. • Zorg ervoor dat het apparaat afgekoeld is voordat u het schoonmaakt en opbergt. • Dompel het snoer, de stekker en/of het apparaat nooit in het water of een andere vloeistof, dit om u te beschermen tegen een elektrische schok. • Haal de stekker uit het stopcontact als u toebehoren wisselt en voor onderhoudswerkzaamheden. • Gebruik het apparaat niet indien de stekker, het netsnoer of het apparaat zelf beschadigd is. Indien het netsnoer beschadigd is, moet u het laten vervangen door een bekwame gekwalificeerde dienst(*) om gevaar te voorkomen. • Gebruik het apparaat nooit in de buurt van directe hittebronnen. • Haal de stekker uit het stopcontact wanneer het apparaat niet gebruikt wordt. • Let op: om gevaar te voorkomen door het onbedoeld terugstellen van de thermische beveiliging mag dit apparaat niet gevoed worden via een extern schakelapparaat, zoals een timer, of aangesloten zijn op een circuit dat regelmatig uit en aangezet wordt door het voorwerp. • Laat het snoer niet over de rand van de tafel hangen of tegen hete oppervlakken. Plaats het product niet onder of dicht de gordijnen, raambekleding enz. • Zorg dat het snoer niet in aanraking komt met de warme onderdelen van het apparaat. • Het is aangeraden een warmtewerende bedekking tussen de tafel en het toestel te leggen (eveneens om geen sporen tengevolge van de warmte op uw tafellaken of tafel na te laten). • Gebruik het apparaat nooit in de buurt van een met water gevulde gootsteen of iets dergelijks. Pak een apparaat dat in het water is gevallen nooit zomaar vast, maar trek eerst de stekker uit het stopcontact. * Bekwame gekwalificeerde dienst: after-sales dienst van de fabrikant of de importeur, die erkend en bevoegd is om dergelijke reparaties te doen zodat elk gevaar vermeden wordt. Gelieve het toestel bij problemen naar deze dienst terug te brengen. Onderdelenbeschrijving 1. Rood indicatielampje 2. Groen indicatielampje 3. Veiligheidssluiting 4. Bakplaten 5. Behuizing Voor het eerste gebruik • Verwijder alle verpakkingen van het apparaat. • Controleer of de spanning van het apparaat overeenkomt met de netspanning van uw huis. Voltage 220V-240V 50Hz. • Plaats het apparaat altijd op een vlakke stabiele ondergrond en zorg voor minimaal 10 cm. vrije ruimte rondom het apparaat. Dit apparaat is niet geschikt voor inbouw of buitengebruik. • Het apparaat kan bij het eerste gebruik wat geur en rook verspreiden, dit is normaal. Gebruik • Vet de antiaanbaklaag van de grillplaten lichtelijk in met olie of boter. • Steek de stekker in het stopcontact, beide indicatielampjes lichten op. Laat het apparaat zonder inhoud gesloten opwarmen. • Het apparaat zal ongeveer 3 minuten moeten opwarmen om de gewenste baktemperatuur te bereiken, als het apparaat is opgewarmd zal het groene indicatielampje uit gaan. • Open het apparaat, gebruik hiervoor een ovenwant om contact met de hete oppervlakken van het apparaat te vermijden. • Vul ieder bakvormpje met deeg. Het is aangeraden hiervoor een kan, lepel of spuitzak te gebruiken. Met name een spuitzak is zeer handig voor het vullen van de bakvormpjes. • Let op: Gebruik hiervoor geen plastic wegwerp spuitzakken, deze kunnen smelten wanneer ze in aanraking komen met de hete bakplaten. Zorg er ook voor dat u de bakvormpjes niet te vol doet (1 cm onder de rand); het deeg zal namelijk nog gaan rijzen tijdens het bakproces. • Sluit het apparaat en vergrendel het met de veiligheidssluiting. Sluit het apparaat met beleid, zodat het deeg niet uit de vormpjes loopt. • De benodigde baktijd zal afhangen van de ingrediënten en het soort cake pops dat u bakt. Voor een serie van 12 cake pops geldt een gemiddelde bereidingstijd van 3 tot 5 minuten. • Tip: gebruik een tandenstoker/prikker om te checken of de cake pops goed zijn. Steek de tandenstoker/prikker in een popcake. Wanneer er geen deeg aan de tandenstoker/prikker blijft kleven wanneer u deze eruit haalt, zijn de cake pops klaar. • Gebruik altijd een houten of plastic vork of prikker om de cake pops uit het apparaat te halen. Gebruik hiervoor nooit stalen of scherpe voorwerpen. Deze kunnen de bakplaat beschadigen. • Als u de cake pops op de stokjes wilt aanbrengen, dient u deze voor 2/3 deel in de cake pop te steken om te voorkomen dat de cake pop eraf rolt of breekt. Garantievoorwaarden • Op dit product wordt een garantie van 24 maanden verleend. Uw garantie is geldig wanneer het product is gebruikt in overeenstemming met de gebruiksaanwijzing en voor het doel waarvoor het gemaakt is. Tevens dient de originele aankoopbon (factuur, kassabon of kwitantie) overlegd te worden met daarop de aankoopdatum, de naam van de retailer en het artikelnummer van het product. • Voor uitgebreide garantievoorwaarden verwijzen wij u naar onze servicewebsite: www.service.tristar.eu Recepten voor het maken van basis cake pops Er zijn twee manieren om de basis cake pops te bereiden; de gemakkelijke, snelle manier en de uitgebreidere manier. Beiden worden hieronder beschreven. Kant-en-klare cakemix U kunt voor het deeg een kant-en-klare deegmix uit de supermarkt gebruiken, zoals mix voor boerencake, chocolade cake, fijne cake, muffins en boerencake met chocolate chips. Het deeg dient vervolgens gemaakt te worden volgens de beschrijving zoals vermeld op het pak. Vul een spuitzak met het deeg en vul ieder bakvormpje in de bakplaat met een toef deeg. Niet te vol; het deeg zal nog rijzen. Laat de cake pops ongeveer 3 tot 5 minuten bakken in de cake pop maker. Zoals bij ‘Gebruik’ vermeld, kunt u met behulp van een prikker controleren of de cake pops goed zijn. Zelfgemaakte cake pops Er zijn meerdere opties als het aankomt op het zelf maken van basis cake pops. Neutrale cake pops (voor ca. 48 stuks) Ingrediënten • 190 gram patentbloem • 1 theelepel bakpoeder • ¼ theelepel zout • 120 gram boter • 225 gram suiker • 1 zakje vanillesuiker • 2 eieren • 225 ml melk Klop met een mixer de boter en het suiker tot een romig mengsel. Voeg de eieren en het zakje vanillesuiker toe en mix alles door elkaar. Voeg daarna de bloem, het bakpoeder, het zout en de melk toe. Klop het geheel met de mixer tot een glad beslag. Vul de openingen in de onderste bakplaat met ca. 1 eetlepel beslag (of een toef wanneer u een spuitzak gebruikt). Bak de cake pops in ca. 3 tot 5 minuten gaar. Om te controleren of de cake pops klaar zijn, kunt u een prikker in het midden van de cake pop steken. Als deze er droog uitkomt, zijn de cake pops gaar. Chocolade cake pops (voor ca. 42 stuks) Ingrediënten • 95 gram patentbloem • 110 gram suiker • 3 eetlepels cacaopoeder • ½ theelepel zuiveringszout • ¼ theelepel bakpoeder • ¼ theelepel zout • 60 ml karnemelk • 3 eetlepels zonnebloemolie • 1 ei • ½ theelepel vanille-extract • 60 ml hete koffie Doe de bloem, het suiker, het cacaopoeder, het zuiveringszout, het bakpoeder en het zout in een mengkom. Voeg de karnemelk, de zonnebloemolie, het ei en het vanille-extract toe. Mix alles goed door elkaar. Voeg de koffie toe en blijf mixen tot de koffie goed door het beslag zit. Vul elke opening in de onderste bakplaat met ongveer 1 eetlepel beslag. Bak de cake pops in ca. 3 tot 5 minuten gaar. Om te controleren of de cake pops klaar zijn, kunt u een prikker in het midden van de cake pop steken. Als deze er droog uitkomt, zijn de cake pops gaar. Cake pops met citroensmaak (voor ca. 30 stuks) Ingrediënten • 60 gram zachte boter • 110 gram suiker • 1 theelepel citroenrasp • 1 ei • ½ theelepel citroenextract • 95 gram patentbloem • ½ theelepel bakpoeder • ¼ theelepel zuiveringszout • Mespuntje zout • 3 eetlepels melk • 1 eetlepel citroensap Klop in een grote mengkom de boter en de suiker tot een romig mengsel. Voeg de citroenrasp, het ei en het citroenextract toe en mix alles goed door elkaar. Voeg vervolgens de bloem, het bakpoeder, het zuiveringszout, de melk en het citroensap toe en mix het tot een glad geheel. Vul elke opening in de onderste bakplaat met ongeveer 1 eetlepel beslag. Bak de cake pops in ca. 3 tot 5 minuten gaar. Om te controleren of de cake pops klaar zijn, kunt u een prikker in het midden van de cake pop steken. Als deze er droog uitkomt, zijn de cake pops gaar. Let op: laat de cake pops altijd afkoelen voordat u deze decoreert! Aanwijzingen ter bescherming van het milieu Dit product mag aan het einde van zijn levensduur niet bij het normale huisafval worden gedeponeerd, maar dient bij een speciaal inzamelpunt voor het hergebruik van elektrische en elektronische apparaten te worden aangeboden. Het symbool op artikel, gebruiksaanwijzing en verpakking attendeert u hierop. De gebruikte grondstoffen zijn geschikt voor hergebruik. Met het hergebruik van gebruikte apparaten of grondstoffen levert u een belangrijke bijdrage aan de bescherming van ons milieu. Informeer bij uw lokale overheid naar het bedoelde inzamelpunt. Verpakking Het verpakkingsmateriaal is 100% recyclebaar, lever het verpakkingsmateriaal gescheiden in. Product Dit apparaat is voorzien van het merkteken volgens de Europese richtlijn 2002/96/EG inzake afgedankte elektrische en elektronische apparaten(AEEA). Door ervoor te zorgen dat dit product op de juiste manier als afval wordt verwerkt, helpt u mogelijk negatieve consequenties voor het milieu en de menselijke gezondheid te voorkomen. EG-conformiteitsverklaring Dit apparaat is ontworpen om in contact te komen met levensmiddelen en is ontworpen in overeenstemming met de EG-richtlijn 89/109/EEC. Dit apparaat is ontworpen, vervaardigd en in de handel gebracht in overeenstemming met de veiligheidsdoeleinden van de “laagspanningsrichtlijn”nr. 2006/95/ EC, de beschermingsvoorschriften van de EMC-richtlijn 2004/108/EC “Elektromagnetische compatibiliteit” en de vereiste van richtlijn 93/68/EG. Tips voor het decoreren van de cake pops Er zijn verschillende manieren waarop u de cake pops kunt decoreren. Coating De cake pops kunnen bedekt worden met een (gekleurd) laagje, bijvoorbeeld met smeltchocolade (te koop in de supermarkt) of Candy Melts. Candy Melts zijn gekleurde pastilles in verschillende smaken. Na het onderdompelen van de cake pop wordt geadviseerd het lolliestokje een aantal keer op de rand van een schaal af te tikken, zodat het teveel aan coating eraf kan druipen. Coating + dip Als de coating nog niet opgedroogd is, kunt u de cake pops dippen. Mogelijke dips: • Eetbare (disco)balletjes • Smarties • Muisjes • Hagelslag Snoepgoed Snoepgoed kan gebruikt worden om verschillende vormen te maken: • Snoep in een ronde vorm (bijvoorbeeld Smarties) is geschikt om oogjes te maken. • Zure matten kunnen dienen als tong of sjaaltjes. • Kegelvormig snoepgoed en zoutjes zijn leuk te gebruiken als oren, hoorns en steeltjes. • Chocolade druppels kunnen gebruikt worden als ogen, knopen, haren enz. Zelf tekenen Het is ook mogelijk zelf dingen te tekenen op de cake pops. Hiervoor kunnen tubes gebruikt worden waar een eetbare gel in zit. Ook zijn er speciale schrijfpennen die u op voedsel kunt gebruiken. Deze zijn beschikbaar in verschillende kleuren en smaken. Schoonmaken van het apparaat • Haal de stekker uit het stopcontact en laat het apparaat geopend ongeveer 3 minuten goed afkoelen. • Verwijder eerst de cakerestjes met de bijgeleverde vork. Schraap hierbij niet over de bakplaat, maar prik de vork in de stukjes deeg en verwijder deze. • Reinig de bakplaten met een vochtige doek of een zacht borsteltje. • Spoel de doek goed, zodat er geen zeepresten meer aanwezig zijn. Reinig de bakplaten meerdere malen met de vochtige doek, om er zeker van te zijn dat er geen zeepresten op de platen zijn achtergebleven. • Reinig de buitenkant met een vochtige doek. Gebruik nooit agressieve en schurende schoonmaakmiddelen, een schuurspons of staalwol; dit beschadigt het apparaat. • Dompel het apparaat niet onder in water of in een andere vloeistof en plaats het apparaat niet in de vaatwasmachine om te reinigen. FR Mode d'emploi Cher client, Félicitations et merci d'avoir acheté ce produit de haute qualité. Veuillez lire ce manuel d'instructions avec attention pour pouvoir profiter du meilleur de cet appareil. Ce manuel contient toutes les instructions et avis nécessaires pour l'utilisation, le nettoyage et l'entretien de l'appareil. Si vous suivez ces instructions, vous avez la garantie d'un excellent résultat, ceci vous économisera du temps et des soucis. Nous espérons que vous éprouverez beaucoup de plaisir en utilisant cet appareil. Instructions de sécurité importantes • Veuillez lire attentivement la notice d’emploi avant l’utilisation de l’appareil. Veuillez conserver cette notice, le certificat de garantie, le ticket de caisse et si possible, le carton avec l’emballage intérieur. • Cet appareil n’est pas destiné à être utilisé par ces personnes (y compris les enfants) ayant des difficultés physiques, sensorielles ou mentales, ou sans expérience et connaissance, à moins de leur en donner la responsabilité ou d'être informés sur l'utilisation de l'appareil par une personne responsable de leur sécurité. • Le fabricant ne sera pas tenu responsable de tous dommages si les consignes de sécurité ne sont pas respectées. • Pour protéger les enfants des dangers des appareils électriques, veillez à ne jamais laisser les appareils sans surveillance. Par conséquent, il faudra choisir un lieu de rangement pour l’appareil inaccessible aux enfants. Veillez à ce que le cordon ne pende pas. • Cet appareil est uniquement destiné à des utilisations domestiques et seulement dans le but pour lequel il est fabriqué. • L’appareil doit être posé sur une surface stable et nivelée. • Ne touchez pas les surfaces brûlantes. Utilisez les poignées ou les boutons. • Ne jamais utiliser l’appareil sans supervision. • Toutes les réparations doivent être effectuées par un Centre de réparation qualifié agréé (*). • Veillez à ce que l’appareil soit rangé dans un lieu sec. • Il est impératif de conserver cet appareil propre en permanence car il est en contact direct avec des aliments. • Vérifiez si la tension de l'appareil correspond à la tension du secteur de votre domicile. Tension nominale : 220-240V CA 50Hz. La prise doit être d’au moins 16A ou 10A et à fusible lent. • Cet appareil est conforme à toutes les normes des champs électromagnétiques (EMF). L’appareil est sans danger à l’utilisation selon les preuves scientifiques disponibles à ce jour, à condition de manipulation correcte et en respectant les consignes de cette notice d’emploi. • Ne jamais déplacer l’appareil en tirant sur le cordon et veillez à ce que ce dernier ne devienne pas entortillé. • Ne pas utiliser cet appareil à l’extérieur. • N’enroulez pas le cordon autour de l’appareil et ne le pliez pas. • Laissez refroidir l’appareil avant de le nettoyer ou de le ranger. • Ne pas immerger le cordon, la prise ou l'appareil dans de l'eau ou autre liquide afin de vous éviter un choc électrique. • Débranchez l’appareil de la prise lors du changement de pièces ou pour l’entretien. • Ne pas utiliser cet appareil avec un cordon ou une prise endommagés ou s’il ne fonctionne pas correctement, ou a subi des dégâts quelconques. Afin d’éviter tous dangers, veillez à ce qu’un cordon ou prise endommagés soient remplacés par un technicien agréé (*). Ne réparez pas vous-même cet appareil. • Ne pas utiliser cet appareil à proximité de sources directes de chaleur. • Débranchez l’appareil de la prise lorsqu’il n’est pas utilisé. • NB : Afin d’éviter tout danger en cas de la réinitialisation accidentelle de la protection thermique, cet appareil ne peut pas être alimenté par un dispositif externe de commande, tel une minuterie, ou branché sur un circuit qui sera régulièrement allumé ou éteint. • Veillez à ce que le cordon ne soit pas suspendu au bord d'une table ou d’un comptoir, qu’il ne touche aucune surface chaude ou n'entre pas en contact direct avec des parties brulantes de l'appareil. Ne pas positionner l’appareil sous ou à proximité de rideaux, de tentures, etc. • Veillez à ce que le cordon ne touche pas les parties brulantes de l’appareil. • Il est recommandé de mettre un dessous résistant à la chaleur entre votre table et l'appareil (ce procédé évitera de bruler votre table ou votre nappe). • Ne pas utiliser cet appareil dans la salle de bain ou à proximité d’un évier rempli d’eau. Si cet appareil est tombé dans l’eau il ne faut en aucun cas le saisir directement. Débranchez d’abord la fiche de la prise. * Centre de réparation qualifié agréé : Service après vente du fabricant ou de l’importateur ou tout autre personne qualifiée, agréé et apte à effectuer ce type de réparation afin d’éviter tous dangers. L'appareil doit, dans tous les cas, être renvoyé à cet Centre de réparation.-
 1
1
-
 2
2
-
 3
3
-
 4
4


in andere talen
- English: Tristar SA-1123 User manual
- italiano: Tristar SA-1123 Manuale utente
- français: Tristar SA-1123 Manuel utilisateur
- español: Tristar SA-1123 Manual de usuario
- Deutsch: Tristar SA-1123 Benutzerhandbuch
- português: Tristar SA-1123 Manual do usuário
- svenska: Tristar SA-1123 Användarmanual
- polski: Tristar SA-1123 Instrukcja obsługi