Timex Expedition WS4 Gebruikershandleiding
- Categorie
- Horloges
- Type
- Gebruikershandleiding

W253 810-095009-NA
TMTM
USER MANUAL
TMX_W253_WS4_Cover_NA:Layout 1 8/27/09 12:07 PM Page CVR2

English page 1
Français page 51
Español página 99
TMX_W253_WS4_Cover_NA:Layout 1 8/27/09 12:07 PM Page CVR4

E
TABLE OF CONTENTS
INTRODUCTION . . . . . . . . . . . . . . . . . . . . . . . . . . . . . . . . . . . . . . . . 5
TIMEX
®
EXPEDITION
®
WS4
™
. . . . . . . . . . . . . . . . . . . . . . . . . . . . . . . 7
WATCH FEATURES. . . . . . . . . . . . . . . . . . . . . . . . . . . . . . . . . . . . . . 8
Time . . . . . . . . . . . . . . . . . . . . . . . . . . . . . . . . . . . . . . . . . . . . . . 8
Altimeter . . . . . . . . . . . . . . . . . . . . . . . . . . . . . . . . . . . . . . . . . . . 8
Barometer. . . . . . . . . . . . . . . . . . . . . . . . . . . . . . . . . . . . . . . . . . 9
Temperature . . . . . . . . . . . . . . . . . . . . . . . . . . . . . . . . . . . . . . . . 9
Compass. . . . . . . . . . . . . . . . . . . . . . . . . . . . . . . . . . . . . . . . . . . 9
Chronograph . . . . . . . . . . . . . . . . . . . . . . . . . . . . . . . . . . . . . . . . 9
Timer . . . . . . . . . . . . . . . . . . . . . . . . . . . . . . . . . . . . . . . . . . . . 10
Alarm . . . . . . . . . . . . . . . . . . . . . . . . . . . . . . . . . . . . . . . . . . . . 10
QUICK START. . . . . . . . . . . . . . . . . . . . . . . . . . . . . . . . . . . . . . . . . . . 11
Setting the Time and Date. . . . . . . . . . . . . . . . . . . . . . . . . . . . . 11
Calibrating the Compass . . . . . . . . . . . . . . . . . . . . . . . . . . . . . . 11
Calibrating Altitude or Barometer and Setting the Weather . . . . 12
TMX_W253_WS4_EN:Layout 1 9/3/09 8:38 AM Page ii

INSTRUCTIONS . . . . . . . . . . . . . . . . . . . . . . . . . . . . . . . . . . . . . . . . . 14
TIME MODE . . . . . . . . . . . . . . . . . . . . . . . . . . . . . . . . . . . . . . . . . . 14
Setting the Time and Measurements . . . . . . . . . . . . . . . . . . . . . 14
Changing the Display . . . . . . . . . . . . . . . . . . . . . . . . . . . . . . . . 14
ALTIMETER MODE . . . . . . . . . . . . . . . . . . . . . . . . . . . . . . . . . . . . . 15
Operating the Altimeter . . . . . . . . . . . . . . . . . . . . . . . . . . . . . . . 15
Setting the Target Altitude or Altitude Alarm . . . . . . . . . . . . . . . 16
BAROMETER MODE . . . . . . . . . . . . . . . . . . . . . . . . . . . . . . . . . . . . 19
Operating the Barometer. . . . . . . . . . . . . . . . . . . . . . . . . . . . . . 19
TEMPERATURE AND FORECAST . . . . . . . . . . . . . . . . . . . . . . . . . . . 21
COMPASS MODE . . . . . . . . . . . . . . . . . . . . . . . . . . . . . . . . . . . . . . 23
Calibrating the Compass . . . . . . . . . . . . . . . . . . . . . . . . . . . . . . 23
Using the Compass . . . . . . . . . . . . . . . . . . . . . . . . . . . . . . . . . . 26
CHRONO MODE . . . . . . . . . . . . . . . . . . . . . . . . . . . . . . . . . . . . . . . 27
Laps and Splits . . . . . . . . . . . . . . . . . . . . . . . . . . . . . . . . . . . . . 29
REVIEW MODE. . . . . . . . . . . . . . . . . . . . . . . . . . . . . . . . . . . . . . . . 30
Reviewing Activity Data . . . . . . . . . . . . . . . . . . . . . . . . . . . . . . . 30
E
TIMER MODE. . . . . . . . . . . . . . . . . . . . . . . . . . . . . . . . . . . . . . . . . 32
Setting the Timer . . . . . . . . . . . . . . . . . . . . . . . . . . . . . . . . . . . 32
Operating the Timer . . . . . . . . . . . . . . . . . . . . . . . . . . . . . . . . . 33
ALARM MODE . . . . . . . . . . . . . . . . . . . . . . . . . . . . . . . . . . . . . . . . 34
Setting an Alarm . . . . . . . . . . . . . . . . . . . . . . . . . . . . . . . . . . . . 34
Operating the Alarm . . . . . . . . . . . . . . . . . . . . . . . . . . . . . . . . . 35
CALIBRATION MODE . . . . . . . . . . . . . . . . . . . . . . . . . . . . . . . . . . . 36
Setting and Calibrating Your Reference Points . . . . . . . . . . . . . . 38
INDIGLO
®
NIGHT-LIGHT . . . . . . . . . . . . . . . . . . . . . . . . . . . . . . . . . 39
GLOSSARY. . . . . . . . . . . . . . . . . . . . . . . . . . . . . . . . . . . . . . . . . . . 40
TIMEX INTERNATIONAL WARRANTY . . . . . . . . . . . . . . . . . . . . . . . . 43
TMX_W253_WS4_EN:Layout 1 9/3/09 8:38 AM Page 2

INTRODUCTION
Some of the best places on the planet are the hardest to get to. Your new
Timex
®
Expedition
®
WS4
™
watch will help you get there.
Equipped with essential outdoor features, the WS4
™
watch takes a fresh
approach to wrist-top adventure instruments. The large, wide-screen dash-
board displays key information at a glance, without flipping through modes.
The WS4
™
watch utilizes advanced sensors that have precision accuracy, and
coupled with the intuitive user-interface, you can rely on it to give you all the
right answers in even the most extreme conditions. The first few pages of the
manual will get you started in minutes, and the rest provides an in-depth
understanding of our most advanced outdoor instrument yet.
So whether you’re taking to the trails, hitting the slopes or racing up
twenty-three flights of stairs to see just how sensitive the altimeter is, get ready
to venture out of bounds.
E
5
TMX_W253_WS4_EN:Layout 1 9/3/09 8:38 AM Page 4

TIMEX
®
EXPEDITION
®
WS4
™
“Remember, your WS4 is no substitute for sound judgment. Sound
judgment comes from experience, and the only way to gain experience
is to put in the time. Enjoy your new instrument, yet keep in mind it is
like a pet dog that needs exercise. Take it outdoors and put it and
yourself through the paces.”
-Conrad Anker
World-Renowned Mountaineer
Timex
®
Expedition
®
Brand Ambassador
7
6
E
START/SPLIT
(+)
INDIGLO
®
BUTTON
SET
(DONE)
MODE
(NEXT)
STOP/RESET
(-)
TIME OF DAY>ALTIMETER>BAROMETER>
COMPASS>CHRONO>REVIEW>TIMER>
ALARM>CALIBRATION
ALARM INDICATOR
CHRONOGRAPH INDICATOR
REPEAT COUNTDOWN
TIMER INDICATOR
COUNTDOWN TIMER INDICATOR
TMX_W253_WS4_EN:Layout 1 9/3/09 8:38 AM Page 6

• Altitude alarm.
• Five user-set, customizable altitude reference points.
Barometer
• Tracks high, low and current pressure as well as sea level pressure.
• Displays sea level pressure changes in a graph.
• Operating range from 300 to 1100 mbar (9 to 32.5 inHg)
• Displays a weather forecast graphic.
Temperature
• Shows the temperature in either Celsius or Fahrenheit.
• Operating range from 14° to 122° F (-10° to 50°C)
Compass
• Includes the heading in both number format and a digital compass needle.
• Can be calibrated to a declination angle for maximum accuracy.
Chronograph
• Stopwatch feature that will time up to 100 hours and 99 laps.
WATCH FEATURES
Time
• Hours, minutes, and seconds displayed in 12- or 24-hour format.
• Date displayed in MM-DD or DD.MM formats.
• Second time zone, with independent hours, minutes, date, and format
settings.
• Hourly chime (optional).
• Button beep (optional).
• Both a digital and an analog clock.
Altimeter
• Shows measurements in either feet or meters.
• Operating range from -1312 to 29,520 ft (-400 to 9000m)
• Tracks current, peak and accumulated altitude.
• Displays ascent and descent in a graph.
• Tracks time in and above target altitude (in Review Mode).
9
8
E
TMX_W253_WS4_EN:Layout 1 9/3/09 8:38 AM Page 8

QUICK START
The next three pages will give you the basics you need to get your watch up
and running in under 5 minutes. Continue reading for full instructions.
Setting the Time and Date
1. Press MODE until time of day appears.
2. Press and hold SET to start.
3. Press START/SPLIT (+) or STOP/RESET (-) to increase or decrease setting
values for time zone, time, date, sounds, and measurement units.
4. Press MODE (NEXT) to advance to the next setting option.
5. Press SET (DONE) to finish.
Calibrating the Compass
Prior to calibrating, remove the watch from your wrist, hold it in your hand,
and choose a declination angle from the table on pages 24 and 25.
1. Press MODE until COMPASS appears.
2. Press and hold SET to start.
• Option to display lap or split time in larger digits.
• During chronograph use, the WS4
™
watch records key activity statistics that
can be seen in Review Mode.
Timer
Countdown timer works up to 100 hours, with the option to repeat countdown up
to 99 times.
Alarm
• Choose from daily, weekday, weekend, or weekly alarms.
• One-time backup alert if alarm is ignored.
11
10
ENGLISH QUICK START
TMX_W253_WS4_EN:Layout 1 9/3/09 8:38 AM Page 10

5. Press START/SPLIT (+) or STOP/RESET (-) to increase or decrease
setting values.
6. Press MODE (NEXT) to advance to the next setting option.
7. Press SET (DONE).
8. To complete calibration for the selected reference, hold
STOP/RESET until watch beeps.
Once you have set the altitude or barometer, then you will need to synchronize
the weather icon to current weather conditions.
1. In CAL mode, press SET to begin calibration.
2. Press START/SPLIT (+) or STOP/RESET (-) to scroll to WEATHER.
3. Press MODE (NEXT) to begin the setting process.
4. Press START/SPLIT (+) or STOP/RESET (-) to scroll among weather options.
5. Press SET (DONE).
6. To calibrate the weather to the preselected data, hold
STOP/RESET until the watch beeps.
3. Keeping the watch level and facing up, rotate it twice (taking at least
15 seconds per revolution) and then press MODE.
4. Press START/SPLIT (+) or STOP/RESET (-) to increase or decrease setting
values to match your chosen declination angle.
5. Press MODE to advance to the next setting option.
6. Press SET to finish.
If you see CAL OK at the end of the calibration process you have successfully
calibrated the compass. If you see CAL FAIL, repeat the calibration process.
Calibrating Altitude or Barometer and Setting the Weather
You should calibrate either the Altimeter (HOME) or the Barometer (BARO), and the
Weather Icon (WEATHER) prior to first use. You should calibrate the watch to the
most accurate information you have.
1. Press MODE until CAL appears.
2. Press and hold SET to begin the calibration.
3. Press START/SPLIT (+) or STOP/RESET (-) to scroll among the reference point
settings and choose either HOME or BARO.
4. Press MODE (NEXT) to begin the setting process.
13
12
ENGLISH QUICK START
TMX_W253_WS4_EN:Layout 1 9/3/09 8:38 AM Page 12

• When in Time of Day Mode, press STOP/RESET to choose among the
following display options: Date, Altitude, or Barometric Pressure.
ALTIMETER MODE
Your watch allows you to track current, peak, and accumulated altitude as well
as time spent at or above a target altitude. This mode also includes an alarm if
you want to be alerted when you go above an altitude of your choosing. You
should calibrate the altimeter before first use (see page 38).
Operating the Altimeter
Once in Altimeter Mode, the WS4
™
watch automatically scrolls through:
• PEAK: The highest reached altitude.
• ACC (accumulated): The total altitude change, taking both ascent and
descent into account.
• CURR (current): The current altitude.
Note: If during a hike you climb 400 meters and descend 100
meters, then your accumulated altitude is 300 meters.
INSTRUCTIONS
TIME MODE
Your watch shows the time for two time zones. In this mode, you can also choose
measurement units (i.e., feet or meters; Fahrenheit or Celsius) and pick from three
different display options.
Setting the Time and Measurements
1. Press MODE until time of day is displayed.
2. Press and hold SET to start.
3. Press START/SPLIT (+) or STOP/RESET (-) to increase or decrease setting
values for time zone, time, date, sounds, and measurements.
4. Press MODE (NEXT) to advance to the next setting option.
5. Press SET (DONE) to finish.
Changing the Display
• Times Zones: Look at the other time zone by pressing START/SPLIT or switch
time zones by holding START/SPLIT.
14
E
15
TMX_W253_WS4_EN:Layout 1 9/3/09 8:38 AM Page 14

“When the alarm beeps you know you’ve reached your set
altitude. This quick reminder will allow you to assess your
condition and decide if you are on track for a successful ascent.”
-Conrad Anker
World-Renowned Mountaineer
To set the Target Altitude or Altimeter Alarm:
1. Press MODE until ALTI is shown.
2. Press and hold SET to start.
3. Press START/SPLIT (+) or STOP/RESET (-) to increase or decrease setting
values.
When the watch reaches the current altitude display you can also:
Press START/SPLIT: view numeric
current altitude or graphic display of
altitude over the last 36 hours.
Press and hold STOP/RESET: Reset
accumulated altimeter statistics to
zero to clear the memory.
Setting the Target Altitude or Altitude Alarm
Altimeter settings include:
•
Target Altitude:
If the chrono is running, the watch will track the time spent at
or above this altitude in Review Mode.
•
Altitude Alarm:
Alerts you via an onscreen pop-up and an audible alarm that you
have reached a pre-selected altitude.
17
16
E
Target Altitude
Altitude Alarm
TMX_W253_WS4_EN:Layout 1 9/3/09 8:38 AM Page 16

As it is an inverse relationship between altitude and barometric
pressure, if I wake at the same or lower elevation I can be confident
the atmospheric pressure has remained constant. If I rise to a higher
altitude I need to be aware as there is a chance a low pressure is
moving in.”
-Conrad Anker
World-Renowned Mountaineer
BAROMETER MODE
Your watch includes information about current and sea level pressure, high or
low barometric information, and changes in sea level pressure over the most
recent 36 hours. These features are useful for understanding changes in
weather.
Operating the Barometer
Once in BARO Mode, the watch automatically scrolls through:
• Highest reached barometric pressure.
• Lowest barometric pressure.
4. Press MODE (NEXT) to advance to the next setting option.
5. Press SET (DONE) to finish.
NOTE: The altimeter will display in either FT (feet) or M (meters)
depending on which display unit you chose in Time Mode.
See page 14 for information on setting units of measurement.
ATTENTION: Your altimeter is sensitive to weather changes! Sudden
changes in barometric pressure can change your altimeter reading by
+/- 100 meters even if you have stayed in the same location. If
possible, re-calibrate to a known altitude when drastic pressure
changes occur.
You only need to calibrate barometer OR altimeter, since they rely
on the same pressure. See Calibration Mode on page 36 for more
information.
“Before I curl into my sleeping bag I note the current altitude and baro-
metric pressure. In the few hours I sleep if I see a change in altitude or
barometric pressure I can get an idea of the coming weather patterns.
19
18
E
TMX_W253_WS4_EN:Layout 1 9/3/09 8:38 AM Page 18

You only need to calibrate the barometer OR altimeter, since they
rely on the same pressure. See Calibration Mode on page 36 for
more information.
TEMPERATURE AND FORECAST
In TIME, ALTI, BARO, CHRONO, and TIMER Modes, your WS4
™
watch includes
information about temperature and forecast.
The watch can predict the weather based on historical air pressure trends.
Generally, if the air pressure is rising, the weather situation is considered to be
improving and is indicated by the sun icon. If the air pressure trend is falling,
then the weather situation is worsening and is indicated by showing the clouds
and/or precipitation icons.
When worn on your wrist, the temperature reading is affected by body heat and
may differ from the actual temperature by 10 degrees or more. Long periods of
exposure to direct sunlight may also affect accuracy. The watch can also mea sure
the temperature in water, but make sure you don’t press any watch buttons under
water or this will compromise the watch’s water-resistance.
21
E
• Current barometric pressure and the corrected sea level pressure.
When the watch reaches the current barometric display you can also:
Press START/SPLIT: Displays numeric
current barometer reading or graphic
display of the sea level pressure over
the last 36 hours.
Press and hold STOP/RESET: Reset
accumulated barometer statistics to
zero to clear the memory.
NOTE: The barometer will display in either MB (millibars) or In Hg
(inches of mercury) depending on which display unit you chose in
Time Mode. See page 14 for information on setting units of
measurement.
20
TMX_W253_WS4_EN:Layout 1 9/3/09 8:38 AM Page 20

23
E
COMPASS MODE
The WS4
™
watch includes an accurate digital compass that takes a reading
every second when engaged and shows the compass reading as a number and
a cardinal heading along with a virtual compass needle. You must calibrate the
compass prior to first use and it’s also a good idea to calibrate it periodically to
maintain more accurate readings. For more information, see Calibration Mode
on page 36.
Calibrating the Compass
When using the compass, it’s important to keep your wrist at a level, horizon-
tal position to help make compass readings more accurate.
For the most accurate readings, avoid calibrating the compass near large
metallic objects (such as electronics, cars, filing cabinets, and
anything else metal) since magnetic force in these objects may
interfere with the magnetic field and give you inaccurate
compass readings. Note that the Indiglo
®
night-light feature
does not work while calibrating the compass.
Prior to calibrating the compass, remove the watch from your wrist, hold it in
your hand and choose a declination angle from the table on the next page.
NOTE: At low temperatures, the display could appear sluggish. Refer
to page 9 for operating temperature range. Increase temperature
surrounding watch to resume normal operation.
NOTE: For more accurate temperature readings, try wearing the
watch outside your jacket or clipping it to your belt or pack (ideally
in an area not constantly exposed to the sun). You can also remove
the watch from your wrist and put in shade for 15 to 30 minutes.
For information on calibrating your weather icon see Calibration Mode on
page 36.
22
P
P
TMX_W253_WS4_EN:Layout 1 9/3/09 8:38 AM Page 22

CITY DEC. ANGLE CITY DEC. ANGLE
Oslo 1° E Toronto 10° W
Paris 0° W Vancouver 17° E
Reykjavik 15° W Warsaw 4° E
Rio De Janeiro 22° W Washington DC 10° W
For cities that do not appear on the table above, you can find your declination
angle using the declination angle calculator at the URL listed below. Note that
you will need to know the latitude and longitude of your location before you can
calculate the declination angle at this website. Latitude and longitude informa-
tion can be found on the internet.
http://www.ngdc.noaa.gov/geomagmodels/struts/calcDeclination
Once you know your declination angle:
1. Press MODE until COMPASS is shown.
2. Hold SET to start.
3. Keeping the watch level and facing up, rotate it twice (taking at least
15 seconds per revolution) and then press MODE.
25
E
CITY DEC. ANGLE CITY DEC. ANGLE
Amsterdam 0° W Chicago 3° W
Anchorage 19° E Dallas 3° E
Auckland 18° E Denver 9° E
Beijing 3° W Dubai 1° E
Berne 0° E Hong Kong 2° W
Bogota 5° W Jerusalem 3° E
Bozeman 13° E London 1° W
Buenos Aires 8° W Los Angeles 12° E
Calgary 15° E Madrid 1° W
Capetown 23° W Mexico City 5° W
Moscow 10° W Riyadh 2° E
Mt. Everest 0° W Rome 1° E
Mumbai 0° W Seattle 17° E
Munich 1° E Seoul 7° W
New York 12° W Sydney 12° E
Orlando 5° W Tokyo 6° W
24
TMX_W253_WS4_EN:Layout 1 9/3/09 8:38 AM Page 24

TIP: Your watch would be a great tool for orienteering. You can use
your compass to navigate way points and if you participate in an
orienteering race, you can time yourself using the chronograph
(see next section).
CHRONO MODE
Your watch includes a chronograph, which is a stopwatch function. The chrono
can track up to 100 hours and 99 laps. The data you collect while running the
chronograph can then be used to check your progress in Review Mode.
(See page 30 for more information about Review Mode).
Most watch buttons have multiple functions in Chrono Mode. Use the table
along with your watch to explore the options.
4. Press START/SPLIT or STOP/RESET to increase or decrease setting values to
match your chosen declination angle.
5. Press MODE to advance to the next setting option.
6. Press SET to finish.
If you see CAL OK at the end of the calibration process you have successfully
calibrated the compass. If you see CAL FAIL, repeat the calibration process.
ATTENTION: Calibration may fail if you rotate the watch too quickly or
take longer than one minute to complete. Calibration may also fail if
you are near objects that are magnetic.
Using the Compass
After you have calibrated your compass, you will see the current compass
heading, cardinal points, and the digital compass needle when you enter Compass
Mode. After 30 seconds the compass reading times out and disappears from the
watch display to preserve battery life. Press START/SPLIT to display the current
heading for another 30 seconds.
27
E
26
TMX_W253_WS4_EN:Layout 1 9/3/09 8:38 AM Page 26

29
E
make sure bad weather is not approaching. Once you’ve finished,
you can check out information about your activity in Review Mode.
Laps and Splits
When referring to lap times, this is the time for an individual segment of an
activity. Split time is the entire time up to the current segment.
When the chrono is running, a bar is shown in chrono and time
of day modes above the stopwatch icon.
NOTE: Your chronograph can be a good tool for mountain
biking, skiing, or trail running. You can take splits at specified trail
points along the way, periodically check your altimeter to see how
high you’ve climbed or descended, and even check the barometer to
28
BUTTON FUNCTIONS
MODE
• Enter or exit the mode.
• Quickly display a lap or split after pressing
START/SPLIT when chrono is running.
STOP/RESET
• Stop the chrono.
• Switch between altimeter or barometer display
information (if chrono is at 00:00:00).
START/SPLIT
• Start the chrono.
• Take a lap or split.
SET
• Switch the lap and split display positions.
TMX_W253_WS4_EN:Layout 1 9/3/09 8:38 AM Page 28

31
E
• Time Spent At or Above Target Altitude
• Altitude Graph (most recent 35 minutes)
• Highest Barometric Pressure
• Lowest Barometric Pressure
• Average Barometric Pressure
• Sea Level Pressure Graph (most recent 35 minutes)
• Highest Temperature
• Lowest Temperature
• Average Temperature
• Temperature Graph (most recent 35 minutes)
TIP: You can use Review Mode to relive your hike on the way
home. Scroll through activity stats to let your friends know how
high you climbed, how much time you spent above your target
altitude, and even the temperature changes over the course
of your hike. Even more, you can show them this information
through a series of graphs that show altitude, barometric pressure,
and temperature changes over time.
ATTENTION: To save the life of your watch battery, when the chrono
reaches 100 hours the watch will stop timing and the START/SPLIT
button will not function.
REVIEW MODE
The Activity Review Mode on the watch captures lows, highs and adventure
averages. Activity statistics are recorded while the chronograph is running and are
then visible in Review Mode.
Reviewing Activity Data
1. Press MODE until REVIEW is shown.
2. Press START/SPLIT to scroll through the data.
3. Press and hold STOP/RESET to clear the most recent review information after
you have finished reviewing it.
The following data is tracked in Review Mode:
• Maximum Altitude
• Minimum Altitude
• Total Ascent
• Total Descent
30
TMX_W253_WS4_EN:Layout 1 9/3/09 8:38 AM Page 30

33
E
Operating the Timer
1. Press START/SPLIT to start the timer or restart it after a pause.
2. Press STOP/RESET to stop the countdown.
3. Hold STOP/RESET to reset the timer to the start value.
4. Hold STOP/RESET again to clear the timer to 0.
When the countdown reaches zero the watch will beep. You can press any
button to silence the beep. If you set the timer to repeat at the end of the count-
down, the repeat will continue until you press STOP/RESET. The display will show
R and a number to indicate the timer is repeating and how many times it has
repeated.
TIP: The timer might be useful when you want to be alerted at the
halfway point of an activity. For example, you go out knowing you
only have about two hours to spend on a hike. You set the timer for
60 minutes and when it beeps you know it’s time to turn around
and start heading back to the trail head. Timer information is not
connected to Review Mode.
NOTE: Press and hold START/SPLIT to quickly scroll through
all data.
ATTENTION: You will see the message NO DATA STORED if the
Chrono has never been run.
TIMER MODE
Your WS4
™
watch includes a standard countdown timer that you can use for
both outdoor and indoor activities. It can count down from a fixed time of up to
100 hours and can repeat a countdown up to 99 times.
Setting the Timer
1. Press MODE until TIMER is shown.
2. Press and hold SET to start.
3. Press START/SPLIT (+) or STOP/RESET (-) to increase or decrease setting
values for hours, minutes, seconds, and end action.
4. Press MODE (NEXT) to advance to the next setting option.
5. Press SET (DONE) to finish.
32
TMX_W253_WS4_EN:Layout 1 9/3/09 8:38 AM Page 32

35
E
NOTE: When you set the alarm, you automatically turn it on.
Operating the Alarm
To turn an alarm on or off without initiating the setting process, press START/SPLIT
when you enter ALARM MODE. The alarm will sound for 20 seconds when it
reaches a scheduled alarm. Push any button to turn the alarm off. A one-time
backup alarm will sound after 5 minutes if you don’t turn the alarm off the first
time it rings.
“The alarm clock is perhaps the simplest function on the WS4watch.
Yet in it’s simplicity it plays a very important part in the overall
expedition. There is a comfort in hearing the 2 AM alarm wake me
from my sleep. These predawn hours are the finest of the day. Crisp
firm snow under foot, a few stars fading to dawn and the rhythm
of your partners cadence are the intangible part of the expedition
experience.”
-Conrad Anker
World-Renowned Mountaineer
NOTE: While setting the timer, quickly scroll through the setting values
by holding down START/SPLIT (+) or STOP/RESET (-).
When the timer is running, a bar is shown in timer and time of day
modes above the timer icon.
If the timer is set to repeat, the bar is shown above the timer with
arrow icon.
ALARM MODE
The WS4
™
watch includes an alarm that you can set to ring once, or at the same
time every day, or only on weekends, weekdays, or even just one day a week.
Setting an Alarm
1. Press MODE until ALARM is shown.
2. Press and hold SET to start.
3. Press START/SPLIT (+) or STOP/RESET (-) to increase or decrease setting values
for hours, minutes, AM/PM and alarm type.
4. Press MODE (NEXT) to advance to the next setting option.
5. Press SET (DONE) to finish.
34
TMX_W253_WS4_EN:Layout 1 9/3/09 8:38 AM Page 34

37
E
The watch also has five Altitude Reference Points (REFERENCE HOME,
REFERENCE BASE 1, REFERENCE BASE 2, REFERENCE BASE 3, and REFERENCE
MAN-ALT) which allow you to set the altitude of a known location ahead of time,
and then re-calibrate your watch at that point with one push of a button.
ATTENTION: Sudden changes in barometric pressure can impact
your altimeter reading. If possible, re-calibrate to a known altitude
when drastic pressure changes occur.
NOTE: While setting an alarm, quickly scroll through the setting
values by holding down START/SPLIT (+) or STOP/RESET (-).
— The AM/PM value will (+) only appear if you have set the watch to
display the 12-hour format.
When the alarm is armed, a bar is shown in alarm and time of day
modes above the alarm icon.
CALIBRATION MODE
The WS4
™
watch has the ability to take extremely accurate measurements. You
should calibrate either the Altimeter (HOME) or the Barometer (BARO), and the
Weather Icon (WEATHER) prior to first use. And, as with any precision instrument,
you should calibrate frequently to maintain accuracy.
NOTE: For the best accuracy, choose the calibration method based on
the most accurate reference source available. For example, if you are
standing at a trail head and know the correct altitude, then the most
accurate calibration will be altitude. If you don’t know your altitude,
you can find out the current sea level pressure (published online or in
a newspaper) and calibrate the sensor to barometric pressure.
36
HOME
(HOME 1 ALTI)
(ie. 800 M)
TRAIL HEAD
(BASE 1 ALTI)
(1200 M)
PEAK
(BASE 2 ALTI)
(2000 M)
LODGE
(BASE 3 ALTI)
(1000 M)
EXAMPLE: FAVORITE HIKE
TMX_W253_WS4_EN:Layout 1 9/3/09 8:38 AM Page 36

39
E
Note: If you have already entered a reference point, you can
quickly select that reference point and hold STOP/RESET to
quickly calibrate.
INDIGLO
®
NIGHT-LIGHT
In any mode, when you press the INDIGLO
®
button, the watch face will light up
for easier viewing. You can also activate the Night-Mode
®
feature if you press
and hold the INDIGLO
®
button until you hear a beep. The Night-Mode
®
feature
is a very useful feature in low light conditions because it allows you to press any
button to light the watch for 2 to 3 seconds. Once activated, the Night-Mode
®
feature stays active for 7 to 8 hours. If you want to deactivate the Night-Mode
®
feature before 7 to 8 hours have elapsed, press and hold the INDIGLO
®
button
until you hear a beep.
Setting and Calibrating Your Reference Points
1. Press MODE until CAL is shown.
2. Hold SET to begin the calibration.
3. Press START/SPLIT (+) to scroll among the reference points (HOME ALTI,
BASE 1 ALTI, BASE 2 ALTI, BASE 3 ALTI, MANUAL ALTI, BARO, and WEATHER).
4. Press MODE (NEXT) to begin the setting process.
5. Press START/SPLIT (+) or STOP/RESET (-) to increase or decrease setting
values.
6. Press MODE (NEXT) to advance to the next setting option.
7. Press SET (DONE).
8. To complete calibration for the selected reference, press and hold
STOP/RESET until watch beeps.
9. As your location changes, select a new reference and recalibrate by pressing and
holding STOP/RESET.
Note: Use Manual-Altitude (MAN-ALT) for one-time, manual
re-calibrations. Use Home Altitude and Base Altitude 1,2,3 to store
altitude reference points that will be used multiple times.
38
TMX_W253_WS4_EN:Layout 1 9/3/09 8:38 AM Page 38

41
E
a compass uses a declination angle setting. Westerly declinations are subtract-
ed from the computed compass heading while easterly declinations are added.
See the table on pages 24 and 25 for a list of declinations for major world
cities.
Digital:
As it relates to watches, digital tells time with the use of numbers.
In Hg:
In Hg stands for Inches of mercury, which is a unit for measuring air
pressure. One inch of mercury is equivalent to 33.86 millibars.
Lap:
Lap time records the time or duration of individual segments of your activity.
Magnetic North:
The direction of the earth’s magnetic pole and the direction
towards which a compass needle points, which differs from true north (see
below). The difference between true north and magnetic north is used to
calculate the declination angle used by the watch’s compass.
MB:
MB stands for millibars, which is a metric unit for measuring air pressure.
One millibar is equal to .0295 inches of mercury.
Sea Level Pressure:
Air pressure for a specific location adjusted for difference
in the altitude of a location. Typically, local pressure will be lower than sea level
pressure because air pressure decreases with altitude.
GLOSSARY
This glossary provides definitions for some of the features and functions of the
watch described throughout this manual.
Altimeter:
An instrument used to determine the altitude of an object with respect
to a fixed level. Typically altitude is measured with respect to sea level.
Analog:
As it relates to a watch, analog tells time with the use of hands.
Barometer:
A barometer measures atmospheric pressure and can help predict
changes in weather.
Barometric Pressure:
Air pressure as it relates to weather forecasts. Higher
pressure usually indicates warmer and clearer weather while lower pressure
typically indicates cloudy weather and a greater chance of precipitation.
Calibration:
A technique to improve the accuracy of the compass, altimeter,
barometer, and weather forecast, primarily by compensating for local conditions.
Chronograph:
The chronograph records timed segments for the duration of your
activity.
Declination:
To account for the difference between true north and magnetic north,
40
TMX_W253_WS4_EN:Layout 1 9/3/09 8:38 AM Page 40

43
E
TIMEX INTERNATIONAL WARRANTY
(U.S. – LIMITED WARRANTY)
Your TIMEX
®
watch is warranted against manufacturing defects by Timex
Group USA, Inc. for a period of ONE YEAR from the original purchase date.
Timex and its worldwide affiliates will honor this International Warranty.
Please note that Timex may, at its option, repair your watch by installing new
or thoroughly reconditioned and inspected components or replace it with an
identical or similar model. IMPORTANT — PLEASE NOTE THAT THIS WAR-
RANTY DOES NOT COVER DEFECTS OR DAMAGES TO YOUR WATCH:
1) after the warranty period expires;
2) if the watch was not originally purchased from an authorized Timex
retailer;
3) from repair services not performed by Timex;
4) from accidents, tampering or abuse; and
5) lens or crystal, strap or band, watch case, attachments or battery.
Timex may charge you for replacing any of these parts.
THIS WARRANTY AND THE REMEDIES CONTAINED HEREIN ARE EXCLUSIVE
AND IN LIEU OF ALL OTHER WARRANTIES, EXPRESS OR IMPLIED, INCLUDING
Split:
Split time records the total elapsed time since the beginning of your current
activity.
Taking a lap or split:
When you take a lap or split, the chronograph records the
time for the current segment and automatically begins timing a new one.
True North:
The geographic north pole where all longitude lines meet. Maps are laid
out with true north at the top. The difference between true north and magnetic north
is used to calculate the declination angle used by the watch’s compass.
42
TMX_W253_WS4_EN:Layout 1 9/3/09 8:38 AM Page 42

45
E
For the U.S., please call 1-800-328-2677 for additional warranty information.
For Canada, call 1-800-263-0981. For Brazil, call +55 (11) 5572 9733. For
Mexico, call 01-800-01-060-00. For Central America, the Caribbean,
Bermuda and the Bahamas, call (501) 370-5775 (U.S.). For Asia, call 852-
2815-0091. For the U.K., call 44 020 8687 9620. For Portugal, call 351 212
946 017. For France, call 33 3 81 63 42 00. For Germany/ Austria, call +43
662 88921 30. For the Middle East and Africa, call 971-4-310850. For other
areas, please contact your local Timex retailer or Timex distributor for war-
ranty information. In Canada, the U.S. and in certain other locations, partici-
pating Timex retailers can provide you with a postage-paid, pre-addressed
Watch Repair Mailer for your convenience in obtaining factory service.
©2009 Timex Group USA, Inc. TIMEX, E Logo, EXPEDITION and NIGHT-MODE
are registered trademarks of Timex Group USA, Inc. in the U.S. and other
countries. INDIGLO is a registered trademark of Indiglo Corporation in the
U.S. and other countries. WS4 is a trademark of Timex Group B.V.
ANY IMPLIED WARRANTY OF MERCHANTABILITY OR FITNESS FOR PARTICULAR
PURPOSE. TIMEX IS NOT LIABLE FOR ANY SPECIAL, INCIDENTAL OR CONSE-
QUENTIAL DAMAGES. Some countries and states do not allow limitations on
implied warranties and do not allow exclusions orlimitations on damages, so
these limitations may not apply to you. This warranty gives you specific legal
rights and you may also have other rights which vary from country to country
and state to state.
To obtain warranty service, please return your watch to Timex, one of its affili-
ates or the Timex retailer where the watch was purchased, together with a
completed original Watch Repair Coupon or, in the U.S. and Canada only, the
completed original Watch Repair Coupon or a written statement identifying your
name, address, telephone number, and date and place of purchase. Please
include the following with your watch to cover postage and handling (this is not
a repair charge): a US $8.00 check or money order in the U.S.; a CAN $7.00
cheque or money order in Canada; and a UK £2.50 cheque or money order in
the U.K. In other countries, Timex will charge you for postage and handling.
NEVER INCLUDE A SPECIAL WATCHBAND OR ANY OTHER ARTICLE OF
PERSONAL VALUE IN YOUR SHIPMENT.
44
TMX_W253_WS4_EN:Layout 1 9/3/09 8:38 AM Page 44

W253 810-095011-EU
TMTM
USER MANUAL
TMX_W253_WS4_Cover_EU:Layout 1 8/27/09 12:21 PM Page CVR2

147
INTRODUÇÃO
Alguns dos melhores lugares do planeta são os de mais difícil acesso. O novo
relógio Timex
®
Expedition
®
WS4
™
o ajudará a chegar lá.
Equipado com recursos essenciais para atividades ao ar livre, o relógio WS4
™
segue uma abordagem original em instrumentos de pulso para esportes de
aventura. O painel com amplo visor mostra em relance informações chave sem
ter de passar pelos modos.
Com sensores avançados de alta precisão e uma interface de usuário
intuitiva, o WS4
™
é o relógio em que você pode confiar para obter todas as
respostas corretas, mesmo nas condições mais extremas. Em poucos
minutos você saberá como o relógio funciona ao ler as primeiras páginas do
manual. O restante, oferece uma compreensão mais aprofundada do nosso
mais avançado instrumento de atividades ao ar livre.
Seja pegando trilhas, subindo ladeiras ou correndo vinte-e-três lanços de
escada só para conferir a sensibilidade do altímetro, prepare-se para se
aventurar ultrapassando limites.
P
TMX_W253_WS4_PO:Layout 1 8/27/09 12:24 PM Page 146

TIMEX
®
EXPEDITION
®
WS4
™
“Lembre-se de que o WS4 não substitui o bom senso. O bom senso surge
da experiência, e a única forma de obter experiência é dedicar tempo.
Desfrute este novo instrumento; porém, não esqueça que é como um cão
de estimação que precisa de exercício. Tire-o ao ar livre para
experimentá-lo e ponha-se à prova.”
-Conrad Anker
Alpinista de renome mundial
Embaixador da marca
Timex
®
Expedition
®
149
148
START/SPLIT
(iniciar/tempo fracionado)
(+)
INDIGLO
®
BOTÃO
SET
(configurar)
(DONE)
(concluído)
MODE
(modo)
(NEXT)
(seguinte)
STOP/RESET
(parar/reinicializar)
(-)
HORA DO DIA>ALTÍMETRO>BARÔMETRO>BÚSSOLA>
CRONÓGRAFO>REVER>TEMPORIZADOR>ALARME>CALIBRAÇÃO
INDICADOR DE ALARME
INDICADOR DE CRONÓGRAFO
REPETIR INDICADOR DE
CONTAGEM REGRESSIVA
INDICADOR DE CONTAGEM REGRESSIVA
P
TMX_W253_WS4_PO:Layout 1 8/27/09 12:24 PM Page 148

• Cinco pontos de referência de altitude personalizáveis e estabelecidos
pelo usuário.
Barômetro
• Acompanha a pressão alta, baixa e atual, bem como a pressão ao nível
do mar.
• Mostra as mudanças da pressão ao nível do mar em gráficos.
• Alcance operacional de 9 a 32,5 inHg.
• Mostra um gráfico da previsão climática.
Temperatura
• Mostra a temperatura em graus Celsius ou Fahrenheit.
• Alcance operacional de -10° a 50°C.
Bússola
• Inclui a direção expressa por meio de números e pela agulha de bússola
digital.
• Pode ser calibrada para um ângulo de declinação para maior precisão.
Cronógrafo
• Função de cronógrafo com capacidade de cronometrar até 100 horas
e 99 voltas.
FUNÇÕES DO RELÓGIO
Hora
• Horas, minutos e segundos mostrados no formato de 12 ou 24 horas.
• Data mostrada no formato MM-DD ou DD.MM.
• Segundo fuso horário com horas, minutos e data independentes e configuração
dos formatos.
• Sinal horário (opcional).
• Botão do bipe (opcional).
• Um relógio digital e um analógico.
Altímetro
• Mostra as medidas em pés ou metros.
• Alcance operacional de-400 a 9.000 m.
• Acompanha a altitude atual, máxima e acumulada.
• Mostra subidas e descidas em gráficos.
• Acompanha o tempo decorrido na altitude alvo e acima desta altitude
(no Modo Rever).
• Alarme de altitude.
151
150
P
TMX_W253_WS4_PO:Layout 1 8/27/09 12:24 PM Page 150

INÍCIO RÁPIDO
As três páginas seguintes oferecem as instruções básicas para que você faça
funcionar o relógio em menos de cinco minutos. Continue lendo para obter as
instruções completas.
Configuração da hora e da data
1. Pressione MODE até que apareça a hora do dia.
2. Pressione e mantenha pressionada a tecla SET para iniciar.
3. Pressione START/SPLIT (+) ou STOP/RESET (-) para aumentar ou diminuir
os valores de configuração para fuso horário, hora, data, sons e unidades
de medida.
4. Pressione MODE (NEXT) para avançar para a opção de configuração
seguinte.
5. Pressione SET (DONE) para finalizar.
Calibração da bússola
Antes de calibrar, tire o relógio do pulso, segure-o na mão e escolha um dos
valores de ângulo de declinação mostrados na tabela das páginas 167 e 168.
1. Pressione MODE até aparecer COMPASS.
2. Pressione e mantenha pressionada a tecla SET para iniciar.
• Opção para mostrar a volta ou o tempo fracionado com dígitos maiores.
• Durante o uso do cronógrafo, o relógio WS4
™
registra os dados estatísticos das
principais atividades que podem ser vistos no Modo Rever.
Temporizador
O temporizador de contagem regressiva funciona por até 100 horas, com a opção
de repetir até 99 vezes a contagem regressiva.
Alarme
• Escolha a partir de alarmes diários, de dias de semana, de fins de semana
ou semanais.
• Alerta de backup que toca só uma vez caso o alarme seja ignorado.
153
152
PORTUGUÊS – INÍCIO RÁPIDO
TMX_W253_WS4_PO:Layout 1 8/27/09 12:24 PM Page 152

5. Pressione START/SPLIT (+) ou STOP/RESET (-) para aumentar ou diminuir
os valores de configuração.
6. Pressione MODE (NEXT) para avançar para a opção de configuração
seguinte.
7. Pressione SET (DONE).
8. Para concluir a calibração da referência selecionada, mantenha
pressionada a opção STOP/RESET até o relógio emitir um som.
Após haver configurado a altitude ou o barômetro, você precisará sincronizar
o ícone da condição climática para as condições climáticas atuais.
1. No modo CAL, pressione SET para iniciar a calibração.
2. Pressione START/SPLIT (+) ou STOP/RESET (-) para chegar até WEATHER
(condição climática).
3. Pressione MODE (NEXT) para iniciar o processo de configuração.
4. Pressione START/SPLIT (+) ou STOP/RESET (-) para explorar as opções
de condição climática.
5. Pressione SET (DONE).
6. Para calibrar a condição climática para os dados pré-selecionados,
mantenha pressionada a opção STOP/RESET até o relógio emitir
um som.
3. Mantendo o relógio nivelado e voltado para cima, gire-o duas vezes (levando
pelo menos 15 segundos por revolução) e pressione MODE.
4. Pressione START/SPLIT (+) ou STOP/RESET (-) para aumentar ou diminuir os
valores de configuração para coincidirem com os valores dos ângulos de
declinação escolhidos.
5. Pressione MODE para avançar para a opção de configuração seguinte.
6. Pressione SET para finalizar.
Se aparecer CAL OK no final de um processo de calibração, a bússola foi ca librada
com sucesso. Se aparecer CAL FAIL, repita o processo de calibração.
Calibração da altitude ou do barômetro e configuração da condição
climática
Você deve calibrar o altímetro (HOME) ou o barômetro (BARO) e o ícone da
condição climática (WEATHER) antes de usar o relógio pela primeira vez. O relógio
deve ser calibrado com as informações mais precisas que tiver na ocasião.
1. Pressione MODE até aparecer CAL.
2. Pressione e mantenha pressionada a tecla SET para iniciar a calibração.
3. Pressione START/SPLIT (+) ou STOP/RESET (-) para explorar as configurações
dos pontos de referência e escolher a opção HOME ou BARO.
4. Pressione MODE (NEXT) para iniciar o processo de configuração.
155
154
PORTUGUÊS – INÍCIO RÁPIDO
TMX_W253_WS4_PO:Layout 1 8/27/09 12:24 PM Page 154

MODO ALTÍMETRO
O relógio possibilita acompanhar a altitude atual, máxima e acumulada, bem
como o tempo decorrido na altitude alvo ou acima desta altitude. Este modo
também inclui um alarme se você quiser ser alertado quando ultrapassar a
altitude selecionada. Você deve calibrar o altímetro antes de usá-lo por
primeira vez (consultar página 180).
Operação do altímetro
Uma vez no modo Altímetro, o relógio WS4
™
explora automaticamente:
• PEAK (máxima): a máxima altitude atingida.
• ACC (acumulada): a mudança total na altitude, levando em consideração
subidas e descidas.
• CURR (atual): a altitude atual.
Observação: se durante uma caminhada você subir 400 metros e
descer 100 metros, você acumulou 300 metros de altitude.
INSTRUÇÕES
MODO HORA
O relógio mostra a hora para dois fusos horários. Neste modo você também pode
escolher as unidades de medida (p.ex.: pés ou metros; Fahrenheit ou Celsius)
e selecionar uma das três opções de mostrador.
Configuração da hora e das medidas
1. Pressione MODE até aparecer a hora do dia.
2. Pressione e mantenha pressionada a tecla SET para iniciar.
3. Pressione START/SPLIT (+) ou STOP/RESET (-) para aumentar ou diminuir os
valores de configuração para fuso horário, hora, data, sons e medidas.
4. Pressione MODE (NEXT) para avançar para a opção de configuração seguinte.
5. Pressione SET (DONE) para finalizar.
Troca do mostrador
• Fusos horários: Veja o outro fuso horário pressionando START/SPLIT ou troque
fusos horários mantendo pressionado START/SPLIT.
• No modo Hora do Dia, pressione STOP/RESET para escolher entre as
seguintes opções de mostrador: Data, altitude ou pressão barométrica.
157
156
P
TMX_W253_WS4_PO:Layout 1 8/27/09 12:24 PM Page 156

Configuração da altitude alvo ou do alarme de altitude
As configurações do altímetro incluem:
•
Altitude alvo:
Se o cronógrafo estiver ativado, o relógio acompanhará
o tempo decorrido nessa altitude ou acima dessa altitude no modo Rever.
•
Alarme de altitude:
Alerta-o por meio de uma tela instantânea e um alarme
audível de haver alcançado a altitude pré-selecionada.
“Quando o alarme toca, você sabe que você alcançou a altitude
configurada. Esse rápido lembrete lhe permitirá avaliar a sua
condição e decidir se você está no caminho certo para se sair bem
na subida.”
-Conrad Anker
Alpinista de renome mundial
Quando o relógio alcançar o mostrador da altitude atual você também poderá:
Pressionar START/SPLIT: aparece a
altitude numérica atual ou o mostrador
com gráfico da altitude das últimas
36 horas.
Pressione e mantenha pressionada a
opção STOP/RESET: redefine os dados
estatísticos acumulados do altímetro
para zero para limpar a memória.
159
158
P
TMX_W253_WS4_PO:Layout 1 8/27/09 12:24 PM Page 158

ATENÇÃO: O altímetro é sensível a mudanças climáticas!
Mudanças súbitas na pressão barométrica pode alterar a leitura do
altímetro em +/- 100 metros, mesmo tendo permanecido no
mesmo local. Se possível, volte a calibrá-lo para uma altitude
conhecida quando ocorrerem mudanças drásticas de pressão.
Você só precisa calibrar o barômetro OU o altímetro, pois ambos
dependem da mesma pressão. Consulte a seção “Modo de
Calibração” na página 180 para obter informações adicionais.
“Antes de me enrolar no meu saco de dormir, anoto a altitude
e a pressão barométrica atuais. Se nas poucas horas que durmo
percebo uma mudança na altitude ou na pressão barométrica, tenho
uma idéia dos próximos padrões climáticos. Por haver uma relação
inversa entre altitude e pressão barométrica, se ao acordar a
elevação for a mesma ou mais baixa, posso ter certeza de que a
pressão atmosférica permaneceu constante. Se eu acordar a uma
maior altitude, precisarei prestar atenção, pois há chances da
aproximação de um centro de baixa pressão.”
-Conrad Anker, Alpinista de renome mundial
Para configurar a altitude alvo ou o alarme do altímetro:
1. Pressione MODE até aparecer ALTI.
2. Pressione e mantenha pressionada a tecla SET para iniciar.
3. Pressione START/SPLIT (+) ou STOP/RESET (-) para aumentar ou diminuir os
valores de configuração.
4. Pressione MODE (NEXT) para avançar para a opção de configuração seguinte.
5. Pressione SET (DONE) para finalizar.
OBSERVAÇÃO: o altímetro mostrará os valores em FT (pés) ou M
(metros), dependendo da unidade de mostrador selecionada no modo
Hora. Consulte a página 156 para obter informações de configuração
das unidades de medida.
161
160
P
Altitude alvo Alarme de altitude
TMX_W253_WS4_PO:Layout 1 8/27/09 12:24 PM Page 160

Quando o relógio alcançar o mostrador da pressão barométrica atual você
também poderá:
Pressionar START/SPLIT: mostra a
leitura numérica atual do barômetro
ou o mostrador do gráfico da
pressão ao nível do mar das últimas
36 horas.
Pressione e mantenha pressionada a
opção STOP/RESET: redefine os
dados estatísticos acumulados do
barômetro para zero para limpar a
memória.
OBSERVAÇÃO: o barômetro mostrará os valores em MB (milibares) ou
In Hg (polegadas de mercúrio) dependendo da unidade de mostrador
selecionada no modo Hora. Consulte a página 156 para obter
informações de configuração das unidades de medida.
Você só precisa calibrar o barômetro OU o altímetro, pois ambos
dependem da mesma pressão. Consulte a seção “Modo
Calibração” na página 180 para obter informações adicionais.
MODO BARÔMETRO
Com o relógio incluem-se informações sobre a pressão atual e ao nível do mar,
informações de pressão barométrica alta ou baixa e mudanças na pressão ao
nível do mar durante as últimas 36 horas. Esses recursos são úteis para entender
as mudanças climáticas.
Operação do barômetro
Uma vez no modo BARO, o relógio explora automaticamente:
• A máxima pressão barométrica atingida.
• A pressão barométrica mínima.
• A pressão barométrica atual e a pressão ao nível do mar corrigida.
163
162
P
TMX_W253_WS4_PO:Layout 1 8/27/09 12:24 PM Page 162

OBSERVAÇÃO: Em temperaturas baixas, o visor pode parecer
embaçado. Consulte a página 151 para saber o alcance
operacional da temperatura. Aumente a temperatura
ao redor do relógio para voltar à operação normal.
OBSERVAÇÃO: para obter leituras de temperatura mais precisas,
tente usar o relógio por fora do casaco ou prenda-o no cinto ou na
mochila (idealmente em uma parte que não fique constantemente
exposta ao sol). Você também pode tirar o relógio do pulso e
colocá-lo à sombra por 15 a 30 minutos.
Para obter informações de calibração do ícone da condição climática, consulte
a seção “Modo Calibração” na página 180.
TEMPERATURA E PREVISÃO DO TEMPO
Nos modos TIME, ALTI, BARO, CHRONO e TIMER, o relógio WS4
™
inclui
informações sobre temperatura e previsão do tempo.
O relógio tem capacidade para prever o clima com base em tendências históricas
da pressão atmosférica. Em geral, se a pressão atmosférica sobe, considera-se
que a condição climática está melhorando e é indicada por um ícone de sol. Se a
pressão atmosférica tende a baixar, a condição climática piora e é indicada com
ícones de nuvens e/ou precipitação.
Se usar o relógio no pulso, a leitura da temperatura será afetada pelo calor do
corpo e poderá diferir da temperatura real em 10 graus ou mais. Longos períodos
de exposição direta aos raios solares também podem afetar a precisão. O relógio
também pode medir a temperatura na água, mas certifique-se de não pressionar
nenhum botão do relógio debaixo d’água; do contrário poderia comprometer a
resistência do relógio à água.
165
164
P
P
P
TMX_W253_WS4_PO:Layout 1 8/27/09 12:24 PM Page 164

Antes de calibrar a bússola, tire o relógio do pulso, segure-o na mão e
escolha um dos valores de ângulo de declinação da tabela apresentada na
página seguinte.
CITY DEC. ANGLE CITY DEC. ANGLE
(cidade) (ângulo de declinação) (cidade) (ângulo de declinação)
Amsterdã 0° O Chicago 3° O
Anchorage 19° L Dallas 3° L
Auckland 18° L Denver 9° L
Beijing 3° O Dubai 1° L
Berne 0° L Hong Kong 2° O
Bogotá 5° O Jerusalém 3° L
Bozeman 13° L Londres 1° O
Buenos Aires 8° O Los Angeles 12° L
Calgary 15° L Madri 1° O
Cidade do Cabo 23° O Cidade do México 5° O
Moscou 10° O Riad 2° L
Monte Everest 0° O Roma 1° L
MODO BÚSSOLA
O relógio WS4
™
inclui uma bússola digital precisa que, quando utilizada, faz a
leitura a cada segundo e mostra a leitura da bússola como um número e uma
direção cardeal, juntamente com uma agulha de bússola virtual. Você deve
calibrar a bússola antes de usá-la por primeira vez. Além disso, recomenda-se
calibrá-la periodicamente para manter uma maior precisão das leituras. Consulte
a seção “Modo Calibração” na página 180 para obter informações adicionais.
Calibração da bússola
Quando utilizar a bússola, é importante manter o pulso em uma posição nivelada
e horizontal para que as leituras sejam mais precisas.
Para as leituras mais precisas, evite calibrar a bússola perto de objetos metálicos
grandes (como objetos eletrônicos, carros, arquivos metálicos
e tudo mais que for metálico), pois sua força magnética pode
interferir com o campo magnético, resultando em leituras
imprecisas. Observe que a função luz noturna Indiglo
®
não
funciona durante a calibração da bússola.
167
166
continua na página seguinte
P
TMX_W253_WS4_PO:Layout 1 8/27/09 12:24 PM Page 166

Uma vez conhecido o ângulo de declinação:
1. Pressione MODE até aparecer COMPASS.
2. Mantenha pressionada a tecla SET para iniciar.
3. Mantendo o relógio nivelado e voltado para cima, gire-o duas vezes
(levando pelo menos 15 segundos por revolução) e pressione MODE.
4. Pressione START/SPLIT ou STOP/RESET para aumentar ou diminuir os
valores de configuração para coincidirem com os valores de ângulo de
declinação escolhidos.
5. Pressione MODE para avançar para a opção de configuração seguinte.
6. Pressione SET para finalizar.
Se aparecer CAL OK no final de um processo de calibração, a bússola foi
calibrada com sucesso. Se aparecer CAL FAIL, repita o processo de calibração.
ATENÇÃO: A calibração poderá falhar se você girar o relógio muito
rapidamente ou se tomar mais de um minuto para completar. A
calibração também poderá falhar se você estiver perto de objetos
magnéticos.
CITY DEC. ANGLE CITY DEC. ANGLE
(cidade) (ângulo de declinação) (cidade) (ângulo de declinação)
Mumbai 0° O Seattle 17° L
Munique 1° L Seul 7° O
Nova Iorque 12° O Sidney 12° L
Orlando 5° O Tóquio 6° O
Oslo 1° L Toronto 10° O
Paris 0° O Vancouver 17° L
Reykjavík 15° O Varsóvia 4° L
Rio de Janeiro 22° O Washington DC 10° O
Para as cidades que não aparecem na tabela acima, o ângulo de declinação pode
ser obtido utilizando o calculador de ângulo de declinação no URL indicado a
seguir. Observe que é necessário saber de antemão a latitude e a longitude do
local antes de poder calcular o ângulo de declinação nesse site da Web. As
informações de latitude e longitude podem ser encontradas na Internet.
http://www.ngdc.noaa.gov/geomagmodels/struts/calcDeclination
169
168
P
TMX_W253_WS4_PO:Layout 1 8/27/09 12:24 PM Page 168

A maioria dos botões do relógio tem várias funções no modo Cronógrafo. Utilize
a tabela juntamente com o relógio para explorar as opções.
Uso da bússola
Depois de calibrada, a bússola mostrará a direção e os pontos cardeais atuais
e a agulha da bússola digital quando entrar no modo Bússola. Depois de
30 segundos, a leitura da bússola é interrompida e desaparece do mostrador do
relógio para preservar a carga da pilha. Pressione START/SPLIT para mostrar a
direção atual por outros 30 segundos.
DICA: o relógio seria um excelente instrumento para orientação.
Você pode utilizar a bússola para navegar por pontos do caminho e,
se chegar a participar de uma corrida de orientação, você poderá
cronometrar o seu tempo utilizando o cronógrafo (consultar a
seção seguinte).
MODO CRONÓGRAFO
O relógio inclui um cronógrafo, o qual é tem a função de cronometar. O cronógrafo
pode acompanhar até 100 horas e 99 voltas. Os dados coletados quando o
cronógrafo está em funcionamento poderão ser utilizados para verificar o seu
progresso no modo Rever. (Consulte a página 173 para obter mais informações
sobre o modo Rever).
171
170
BUTTON (botão) FUNCTIONS (funções)
MODE (modo)
• Entrar no modo ou sair do modo.
• Mostra rapidamente uma volta ou um tempo fra-
cionado depois de pressionar START/SPLIT quan-
do o cronógrafo estiver em funcionamento.
STOP/RESET
(parar/reinicializar)
• Parar o cronógrafo.
• Alterne entre as informações do mostrador do
altímetro e do barômetro (se for o cronógrafo
será 00:00:00)
START/SPLIT (iniciar/
tempo fracionado)
• Iniciar o cronógrafo.
• Use uma volta ou um tempo fracionado.
SET (configurar)
• Alterne entre as posições do mostrador
da volta e do tempo fracionado.
P
TMX_W253_WS4_PO:Layout 1 8/27/09 12:24 PM Page 170

Quando o cronógrafo está em funcionamento, aparece uma barra
nos modos cronógrafo e hora do dia acima do ícone de cronógrafo.
ATENÇÃO: Para economizar a carga da pilha do relógio,
quando o cronógrafo alcançar as 100 horas, o relógio parará
a cronometragem e o botão START/SPLIT não funcionará.
MODO REVER
O modo Rever Atividade no relógio captura os valores baixos, altos e as médias
do esporte de aventura. Os valores estatísticos da atividade são registrados
enquanto o cronógrafo está em funcionamento e são visíveis no modo Rever.
Revisão dos dados da atividade
1. Pressione MODE até aparecer REVIEW.
2. Pressione START/SPLIT para explorar os dados.
3. Pressione e mantenha pressionada a tecla STOP/RESET para cancelar as
informações revistas mais recentes após concluir a revisão.
OBSERVAÇÃO: o cronógrafo pode ser um bom instrumento para
andar de bicicleta de montanha, esqui ou corrida em trilhas. Você
pode conferir o tempo fracionado em determinados pontos da trilha
ao longo do caminho, verificar periodicamente o altímetro para ver
quanto você subiu ou desceu e mesmo para conferir o barômetro
para ter certeza de que não vai haver más condições climáticas.
Logo que terminar, você pode verificar as informações sobre a sua
atividade no modo Rever.
Voltas e tempos fracionados
O tempo de uma volta se refere ao tempo de um segmento individual de uma
atividade. O tempo fracionado é todo o tempo do segmento atual.
173
172
P
TMX_W253_WS4_PO:Layout 1 8/27/09 12:25 PM Page 172

DICA: Você pode utilizar o modo Rever para voltar a ver a sua
caminhada quando estiver voltando para casa. Explore os va lores
de atividade para informar seus amigos quanto você subiu, quanto
tempo você passou acima da altitude alvo e mesmo as mudanças
de temperatura durante o curso da sua caminhada. Mais ainda,
você pode mostrar-lhes essas informações por meio de uma série
de gráficos que mostram altitude, pressão barométrica e mudanças
de temperatura ao longo do tempo.
OBSERVAÇÃO: pressione e mantenha pressionado START/SPLIT
para explorar rapidamente todos os dados.
ATENÇÃO: Você verá a mensagem NO DATA STORED (não há dados
armazenados) se o cronógrafo nunca foi posto para funcionar.
MODO TEMPORIZADOR (TIMER)
O relógio WS4
™
inclui um temporizador de contagem regressiva padrão que
pode ser utilizado para atividades ao ar livre e atividades em ambientes
internos. Pode fazer a contagem regressiva de uma hora fixa de até 100 horas
e repetir até 99 vezes essa contagem.
Os seguintes dados são acompanhados no modo Rever:
• Altitude máxima
• Altitude mínima
• Subida total (Total Ascent)
• Descida total (Total Descent)
• Tempo decorrido na altitude alvo ou acima dessa altitude
• Gráfico de altitude (35 minutos mais recentes)
• Pressão barométrica máxima
• Pressão barométrica mínima
• Pressão barométrica média
• Gráfico de pressão ao nível do mar (35 minutos mais recentes)
• Temperatura máxima
• Temperatura mínima
• Temperatura média
• Gráfico de temperatura (35 minutos mais recentes)
175
174
P
TMX_W253_WS4_PO:Layout 1 8/27/09 12:25 PM Page 174

DICA: o temporizador poderá ser útil quando você quer ser
alertado na metade de uma atividade. Por exemplo, você sai para
uma caminhada sabendo que tem cerca de duas horas para
concluí-la. Você configura o temporizador para 60 minutos e,
quando soa o bipe, você sabe que é hora de voltar em direção ao
início da trilha. As informações do temporizador não estão
conectadas ao modo Rever.
OBSERVAÇÃO: enquanto estiver configurando o temporizador,
explore rapidamente os valores de configuração ao manter
pressionado START/SPLIT (+) ou STOP/RESET (-).
Quando o temporizador está em funcionamento, aparece uma
barra nos modos temporizador e hora do dia acima do ícone
de temporizador.
Se o temporizador estiver configurado para repetir, a barra aparece
acima do temporizador com um ícone de seta.
Configuração do temporizador
1. Pressione MODE até aparecer TIMER.
2. Pressione e mantenha pressionada a tecla SET para iniciar.
3. Pressione START/SPLIT (+) ou STOP/RESET (-) para aumentar ou diminuir os
valores de configuração para horas, minutos, segundos e ação final.
4. Pressione MODE (NEXT) para avançar para a opção de configuração seguinte.
5. Pressione SET (DONE) para finalizar.
Operação do temporizador
1. Pressione START/SPLIT para iniciar o temporizador ou reiniciá-lo após uma
pausa.
2. Pressione STOP/RESET para parar a contagem regressiva.
3. Mantenha pressionado STOP/RESET para reinicializar o temporizador para o
valor inicial.
4. Mantenha pressionado STOP/RESET de novo para limpar os valores do
temporizador para 0 (zero).
Quando a contagem regressiva atingir o número zero, o relógio emitirá um bipe.
Você pode pressionar qualquer botão para silenciar o bipe. Se você configurou o
temporizador para repetir no final da contagem regressiva, a repetição continuará
até o STOP/RESET ser pressionado. O mostrador mostrará R e um número para
indicar que o temporizador está repetindo e quantas vezes repetiu.
177
176
P
TMX_W253_WS4_PO:Layout 1 8/27/09 12:25 PM Page 176

Operação do alarme
Para ativar (ON) ou desativar (OFF) o alarme sem iniciar o processo de
configuração, pressione START/SPLIT enquanto estiver no ALARM MODE
(modo Alarme). O alarme tocará por 20 segundos quando atingir um alarme
programado. Pressione qualquer botão para desativar o alarme. Um alarme de
backup que só toca uma vez voltará a alertá-lo depois de 5 minutos decorri-
dos se você não o desativar na primeira vez que tocar.
“O despertador talvez seja a função mais simples do relógio WS4.
Porém, na sua simplicidade, joga um papel muito importante em
toda a expedição. Sinto-me bem ao ouvir o alarme me acordando às
duas horas da manhã. Essas horas da madrugada são as melhores
do dia. A neve firme e revigorante sob os pés, algumas estrelas se
esvaindo com o amanhecer e o ritmo dos seus companheiros são a
parte intangível da experiência de uma expedição.”
-Conrad Anker
Alpinista de renome mundial
MODO ALARME (ALARM)
O relógio WS4
™
inclui um alarme que você pode configurar para tocar uma vez, à
mesma hora todos os dias, somente nos fins de semana, dia de semana ou
mesmo apenas uma vez na semana.
Configuração do alarme
1. Pressione MODE até aparecer ALARM.
2. Pressione e mantenha pressionada a tecla SET para iniciar.
3. Pressione START/SPLIT (+) ou STOP/RESET (-) para aumentar ou diminuir os
valores de configuração para horas, minutos, AM/PM e tipo de alarme.
4. Pressione MODE (NEXT) para avançar para a opção de configuração seguinte.
5. Pressione SET (DONE) para finalizar.
OBSERVAÇÃO: ao configurar o alarme, você o ativa automaticamente.
179
178
P
TMX_W253_WS4_PO:Layout 1 8/27/09 12:25 PM Page 178

sabe a altitude, você pode descobrir a pressão ao nível do mar
(publicado on-line ou nos jornais) e calibrar o sensor em relação à
pressão barométrica.
O relógio também tem cinco pontos de referência de altitude (REFERENCE
HOME, REFERENCE BASE 1, REFERENCE BASE 2, REFERENCE BASE 3
e REFERENCE MAN-ALT) os quais possibilitam configurar de antemão a
altitude de um local conhecido e, depois, voltar a calibrar o relógio nesse ponto
com só pressionar um botão.
OBSERVAÇÃO: enquanto estiver configurando um alarme, explore
rapidamente os valores de configuração ao manter pressionado
START/SPLIT (+) ou STOP/RESET (-).
— O valor AM/PM aparecerá (+) somente se você configurou o
relógio para mostrar o formato de 12 horas.
Quando o alarme está preparado, aparece uma barra nos modos
alarme e hora do dia acima do ícone de alarme.
MODO CALIBRAÇÃO
O relógio WS4
™
tem a capacidade de tomar medidas extremamente precisas.
Você deve calibrar o altímetro (HOME) ou o barômetro (BARO) e o ícone da
condição climática (WEATHER) antes de usar o relógio pela primeira vez. E, como
ocorre com qualquer instrumento de precisão, você pode calibrá-lo frequente-
mente para manter a precisão.
OBSERVAÇÃO: para obter a melhor precisão, escolha o método de
calibração com base na fonte de referência mais precisa possível. Por
exemplo, se você está parado no início de uma trilha e sabe a altitude
correta, então a calibração mais precisa será a altitude. Se você não
181
180
HOME (início)
(HOME 1 ALTI)
(ie. 800 M)
TRAIL HEAD
(início da trilha)
(BASE 1 ALTI)
(1200 M)
PEAK (máxima):
(BASE 2 ALTI)
(2000 M)
LODGE (alojamento)
(BASE 3 ALTI)
(1000 M)
EXEMPLO: CAMINHADA FAVORITA
P
TMX_W253_WS4_PO:Layout 1 8/27/09 12:25 PM Page 180

Observação: utilize a altitude manual (MAN-ALT) para recalibrações
manuais feitas só uma vez. Utilize Altitude de Origem (Home Altitude)
e Altitude Base (Base Altitude) 1,2,3 para salvar os pontos de
referência da altitude que serão utilizados várias vezes.
Observação: após digitado, o ponto de referência poderá ser
rapidamente selecionado e calibrado ao manter pressionado
STOP/RESET.
LUZ NOTURNA INDIGLO
®
Em qualquer modo, quando você pressiona o botão INDIGLO
®
, a face do
relógio ilumina para facilitar a visualização. Você também poderá ativar o
recurso noturno Night-Mode
®
ao pressionar e manter pressionado o botão
INDIGLO
®
até ouvir um som. O recurso Night-Mode
®
é muito útil em condições
de pouca luz porque possibilita que o relógio fique iluminado por 2 a 3
segundos ao pressionar qualquer botão. Após ativado, o recurso Night-Mode
®
permanece ativo por 7 a 8 horas. Se desejar desativar o recurso noturno
Night-Mode
®
antes de haver decorrido as 7 ou 8 horas, pressione e mantenha
pressionado o botão INDIGLO
®
até ouvir um som.
ATENÇÃO: Mudanças súbitas da pressão barométrica podem
impactar a leitura do altímetro. Se possível, volte a calibrá-lo para
uma altitude conhecida quando ocorrerem mudanças drásticas
de pressão.
Configuração e calibração dos pontos de referência
1. Pressione MODE até aparecer CAL.
2. Pressione e mantenha pressionada a tecla SET para iniciar a calibração.
3. Pressione START/SPLIT (+) para explorar os pontos de referência (HOME ALTI,
BASE 1 ALTI, BASE 2 ALTI, BASE 3 ALTI, MANUAL ALTI, BARO e WEATHER).
4. Pressione MODE (NEXT) para iniciar o processo de configuração.
5. Pressione START/SPLIT (+) ou STOP/RESET (-) para aumentar ou diminuir os
valores de configuração.
6. Pressione MODE (NEXT) para avançar para a opção de configuração seguinte.
7. Pressione SET (DONE).
8. Para concluir a calibração da referência selecionada, pressione e man-
tenha pressionada a opção STOP/RESET até o relógio emitir um som.
9. À medida que a localização altera, selecione uma nova referência e faça uma
nova calibração pressionando e mantendo pressionada a opção STOP/RESET.
183
182
P
TMX_W253_WS4_PO:Layout 1 8/27/09 12:25 PM Page 182

Declinação:
para considerar a diferença entre o norte verdadeiro e o norte
magnético, a bússola faz uso da configuração dos ângulos de declinação. As
declinações para o oeste são subtraídas da direção computadorizada da
bússola, enquanto as declinações para o leste, são somadas. Consulte a tabela
nas páginas 167 e 168 para obter uma lista dos valores de declinação das
principais cidades do mundo.
Digital:
quando relacionado com relógios, digital informa a hora com o uso de
números.
In Hg:
significa polegadas de mercúrio, unidade de medida da pressão
atmosférica. Uma polegada (25,40 mm) de mercúrio é equivalente a 33,86
milibares.
Volta:
o tempo da volta (Lap time) registra o tempo ou a duração de cada
segmento da sua atividade.
Norte magnético:
direção do pólo magnético da Terra e direção para a qual a
agulha da bússola aponta, o qual difere do norte verdadeiro (consulte a seguir).
A diferença entre o norte verdadeiro e o norte magnético é utilizada para
calcular o ângulo de declinação utilizado pela bússola do relógio.
MB:
significa milibar, unidade métrica para medir a pressão atmosférica. Um
milibar é igual a 0,0295 polegadas de mercúrio (0,7500 mm Hg a 0 °C).
GLOSSÁRIO
Este glossário oferece definições para alguns dos recursos e algumas das funções
do relógio descritos neste manual.
Altímetro:
instrumento utilizado para determinar a altitude de um objeto em
relação a um nível fixo. Tipicamente, a altitude é medida em relação ao nível do
mar.
Analógico:
quando relacionado com relógios, analógico informa a hora com o uso
dos ponteiros.
Barômetro:
mede a pressão atmosférica e auxilia na previsão de mudanças
climáticas.
Pressão barométrica:
pressão atmosférica quando relacionada com a previsão
climática. Geralmente, uma maior pressão indica condições climáticas mais quentes
e com céu mais claro, enquanto que uma pressão mais baixa, tipicamente indica uma
condição nublada e maior probabilidade de precipitação.
Calibração:
técnica para melhorar a precisão da bússola, do altímetro, do
barômetro e da previsão climática, principalmente pela compensação para as
condições locais.
Cronógrafo:
registra os segmentos cronometrados durante toda a atividade.
185
184
P
TMX_W253_WS4_PO:Layout 1 8/27/09 12:25 PM Page 184

GARANTIA INTERNACIONAL TIMEX
(GARANTIA LIMITADA PARA OS EUA)
A Timex Group USA, Inc. garante o relógio TIMEX
®
contra defeitos de
fabricação por um período de UM ANO a partir da data original da
compra. A Timex e suas filiais em todo o mundo reconhecerão esta Garantia
Internacional.
Observe que a Timex poderá, por sua própria opção, consertar o relógio
colocando componentes novos ou totalmente recondicionados e inspeciona-
dos ou substituí-lo por um modelo idêntico ou similar.
IMPOR TANTE — OBSERVE QUE ESTA GARANTIA NÃO COBRE DEFEITOS
OU DANOS OCASIONADOS AO SEU RELÓGIO:
1) após vencer o período de garantia;
2) se o relógio não foi comprado originalmente de um revendedor Timex
autorizado;
3) se for por consertos não executados pela Timex;
4) se for devido a acidentes, adulteração ou abuso e
5) se o defeito for no cristal, na pulseira, na caixa do relógio, nos
acessórios ou na pilha. A Timex poderá cobrar o custo de substituição
de qualquer uma dessas peças.
Pressão ao nível do mar:
pressão atmosférica para um local específico ajustada
para a diferença na altitude de um local. Tipicamente, a pressão no local será mais
baixa que a pressão ao nível do mar porque a pressão atmosférica diminuiu com
a altitude.
Tempo fracionado:
registra o tempo total transcorrido desde o começo da sua
atividade atual.
Usar uma volta ou um tempo fracionado:
ao usar uma volta ou um tempo
fracionado, o cronógrafo registra o tempo do segmento atual e automaticamente
começa a cronometrar outro seguinte.
Norte verdadeiro:
pólo norte geográfico onde convergem todas as linhas de
longitude. Os mapas são arranjados com o norte verdadeiro na parte superior. A
diferença entre o norte verdadeiro e o norte magnético é utilizada para calcular
o ângulo de declinação utilizado pela bússola do relógio.
187
186
P
TMX_W253_WS4_PO:Layout 1 8/27/09 12:25 PM Page 186

de manuseio e remessa. NUNCA INCLUA NENHUMA PULSEIRA ESPECIAL OU
OUTRO ARTIGO DE VALOR PESSOAL NA SUA REMESSA.
Nos EUA, ligue para 1-800-328-2677 para obter informações adicionais sobre
a garantia. No Canadá, ligue para o 1-800-263-0981. No Brasil, ligue para o
+55 (11) 5572 9733. No México, ligue para o 01-800-01-060-00. Na América
Central, no Caribe, nas Bermudas e nas Bahamas, ligue para o (501) 370-
5775 (EUA). Na Ásia, ligue para o 852-2815-0091. No Reino Unido, ligue para
o 44 020 8687 9620. Em Portugal, ligue para o 351 212 946 017. Na França,
ligue para o 33 3 81 63 42 00. Na Alemanha/Áustria, ligue para o +43 662
88921 30. No Oriente Médio e na África, ligue para o 971-4-310850. Para
outras áreas, entre em contato com o representante autorizado ou distribuidor
Timex para obter informações sobre garantia. Para facilitar a obtenção do
serviço de fábrica, os revendedores participantes autorizados Timex no
Canadá, nos EUA e em outros lugares podem fornecer um envelope
pré-endereçado e pré-pago do local de consertos.
©2009 Timex Group USA, Inc. O logotipo TIMEX E, EXPEDITION e NIGHT-MODE
são marcas comerciais registradas da Timex Group USA, Inc. nos Estados
Unidos e em outros países. INDIGLO é uma marca comercial registrada da
Indiglo Corporation nos EUA e em outros países. WS4 é uma marca comercial
da Timex Group B.V.
ESTA GARANTIA E OS RECURSOS AQUI CONTIDOS SÃO EXCLUSIVOS E
SUBSTITUEM TODAS AS OUTRAS GARANTIAS, EXPRESSAS OU IMPLÍCITAS,
INCLUSIVE QUALQUER GARANTIA IMPLÍCITA DE COMERCIABILIDADE OU
ADEQUAÇÃO A UM FIM PARTICULAR. A TIMEX NÃO ASSUME NENHUMA
RESPONSABILIDADE QUANTO A DANOS ESPECIAIS, INCIDENTAIS OU DE
CONSEQÜÊNCIA. Alguns países e estados não permitem limitações sobre
garantias implícitas nem permitem exclusões ou limitações de danos, por isso,
essas limitações poderão não se aplicar ao seu caso. Esta garantia lhe confere
direitos legais específicos, bem como outros direitos os quais variam de um país
para outro e de um estado para outro.
Para obter o serviço de garantia, devolva o relógio à Timex, a uma das filiais ou ao
revendedor autorizado Timex onde o relógio foi comprado, juntamente com o
Cupom de Conserto do Relógio original devidamente preenchido ou, somente nos
EUA e no Canadá, o Cupom de Conserto do Relógio original devidamente pre -
enchido ou uma declaração por escrito identificando o seu nome, endereço, número
de telefone e data e local da compra. Inclua com o relógio o seguinte pagamento
para cobrir as despesas de manuseio e remessa (não se refere a custos de
consertos): nos EUA, um cheque ou vale-postal no valor de US$8; no Canadá, um
cheque ou vale-postal no valor de CAN$7; no Reino Unido, um cheque ou
vale-postal no valor de £2,50. Nos outros países, você deverá pagar as despesas
189
188
P
TMX_W253_WS4_PO:Layout 1 8/27/09 12:25 PM Page 188

INDICE
INTRODUZIONE . . . . . . . . . . . . . . . . . . . . . . . . . . . . . . . . . . . . . . 195
TIMEX
®
EXPEDITION
®
WS4
™
. . . . . . . . . . . . . . . . . . . . . . . . . . . . . 197
CARATTERISTICHE DELL’OROLOGIO . . . . . . . . . . . . . . . . . . . . . . 198
Ora . . . . . . . . . . . . . . . . . . . . . . . . . . . . . . . . . . . . . . . . . . . . . 198
Altimetro . . . . . . . . . . . . . . . . . . . . . . . . . . . . . . . . . . . . . . . . . 198
Barometro. . . . . . . . . . . . . . . . . . . . . . . . . . . . . . . . . . . . . . . . 199
Temperatura . . . . . . . . . . . . . . . . . . . . . . . . . . . . . . . . . . . . . . 199
Bussola. . . . . . . . . . . . . . . . . . . . . . . . . . . . . . . . . . . . . . . . . . 199
Cronografo . . . . . . . . . . . . . . . . . . . . . . . . . . . . . . . . . . . . . . . 200
Timer . . . . . . . . . . . . . . . . . . . . . . . . . . . . . . . . . . . . . . . . . . . 200
Sveglia . . . . . . . . . . . . . . . . . . . . . . . . . . . . . . . . . . . . . . . . . . 200
AVVIAMENTO RAPIDO . . . . . . . . . . . . . . . . . . . . . . . . . . . . . . . . . . . 201
Impostazione di ora e data . . . . . . . . . . . . . . . . . . . . . . . . . . . 201
Calibrazione della bussola. . . . . . . . . . . . . . . . . . . . . . . . . . . . 201
Calibrazione dell’altitudine o del barometro
e impostazione delle condizioni atmosferiche . . . . . . . . . . . 202
I
TMX_W253_WS4_IT:Layout 1 8/27/09 1:58 PM Page 190

ISTRUZIONI . . . . . . . . . . . . . . . . . . . . . . . . . . . . . . . . . . . . . . . . . . . 204
MODALITÀ ORA . . . . . . . . . . . . . . . . . . . . . . . . . . . . . . . . . . . . . . 204
Impostazione di ora e misure . . . . . . . . . . . . . . . . . . . . . . . . . 205
Modifica del display . . . . . . . . . . . . . . . . . . . . . . . . . . . . . . . . 205
MODALITÀ ALTIMETRO . . . . . . . . . . . . . . . . . . . . . . . . . . . . . . . . 206
Funzionamento dell’altimetro . . . . . . . . . . . . . . . . . . . . . . . . . 206
Impostazione dell’altitudine bersaglio
o dell’allarme di altitudine. . . . . . . . . . . . . . . . . . . . . . . . . . 208
MODALITÀ BAROMETRO . . . . . . . . . . . . . . . . . . . . . . . . . . . . . . . 211
Funzionamento del barometro. . . . . . . . . . . . . . . . . . . . . . . . . 211
TEMPERATURA E PREVISIONI. . . . . . . . . . . . . . . . . . . . . . . . . . . . 213
MODALITÀ BUSSOLA . . . . . . . . . . . . . . . . . . . . . . . . . . . . . . . . . . 216
Calibrazione della bussola. . . . . . . . . . . . . . . . . . . . . . . . . . . . 216
Uso della bussola . . . . . . . . . . . . . . . . . . . . . . . . . . . . . . . . . . 220
MODALITÀ CRONOGRAFO . . . . . . . . . . . . . . . . . . . . . . . . . . . . . . 221
Tempi di giro e intermedi . . . . . . . . . . . . . . . . . . . . . . . . . . . . 224
I
MODALITÀ ESAME. . . . . . . . . . . . . . . . . . . . . . . . . . . . . . . . . . . . 225
Esame dei dati sull’attività . . . . . . . . . . . . . . . . . . . . . . . . . . . 225
MODALITÀ TIMER . . . . . . . . . . . . . . . . . . . . . . . . . . . . . . . . . . . . 228
Impostazione del timer . . . . . . . . . . . . . . . . . . . . . . . . . . . . . . 228
Funzionamento del timer . . . . . . . . . . . . . . . . . . . . . . . . . . . . 229
MODALITÀ SVEGLIA. . . . . . . . . . . . . . . . . . . . . . . . . . . . . . . . . . . 231
Impostazione di una sveglia . . . . . . . . . . . . . . . . . . . . . . . . . . 231
Funzionamento della sveglia . . . . . . . . . . . . . . . . . . . . . . . . . . 232
MODALITÀ CALIBRAZIONE . . . . . . . . . . . . . . . . . . . . . . . . . . . . . . 233
Impostazione e calibrazione dei punti di riferimento . . . . . . . . 236
ILLUMINAZIONE DEL QUADRANTE INDIGLO
®
. . . . . . . . . . . . . . . . 237
GLOSSARIO . . . . . . . . . . . . . . . . . . . . . . . . . . . . . . . . . . . . . . . . . 238
GARANZIA INTERNAZIONALE TIMEX. . . . . . . . . . . . . . . . . . . . . . . 241
TMX_W253_WS4_IT:Layout 1 8/27/09 1:58 PM Page 192

INTRODUZIONE
Alcuni dei luoghi più belli del nostro pianeta sono anche i più difficili da
raggiungere. Il vostro nuovo orologio Timex
®
Expedition
®
WS4
™
vi aiuterà a
scoprirli.
Dotato di funzioni essenziali per l’escursionismo, l’orologio WS4
™
offre un
approccio originale rispetto a quello dei consueti strumenti da polso per le
avventure. Il grande display ad ampio schermo visualizza informazioni chiave a
colpo d’occhio, senza bisogno di passare in rassegna svariate modalità.
L’orologio WS4
™
utilizza sensori avanzati che offrono accuratezza e precisione;
l’interfaccia intuitiva vi darà la risposta giusta anche nelle condizioni più
difficili. Le prime pagine del manuale vi metteranno in grado di usare l’orologio
in pochi minuti, mentre nel resto del manuale troverete una descrizione più
approfondita del più avanzato strumento che sia mai stato creato per le
avventure all’aria aperta.
Quindi, che vogliate incamminarvi per i sentieri, lanciarvi lungo le piste da sci
o correre su per ventitré rampe di scale per vedere quanto è sensibile
l’altimetro, preparatevi ad avventure senza limiti.
195
I
TMX_W253_WS4_IT:Layout 1 8/27/09 1:58 PM Page 194

TIMEX
®
EXPEDITION
®
WS4
™
“Ricordate che il vostro WS4 non vuole essere un sostituto del buon
senso. Il buon senso deriva dall’esperienza, e l’unico modo per
acquisire esperienza è dedicarvi molto tempo. Godetevi il vostro
strumento, ma tenete presente che è come un cane che ha bisogno
di fare esercizio. Portatelo all’aperto e mettete voi stessi, e l’orologio,
alla prova.”
-Conrad Anker
Alpinista di fama mondiale
Ambasciatore del marchio
Timex
®
Expedition
®
197
196
START/SPLIT
(AVVIO/TEMPO
INTERMEDIO)
(+)
PULSANTE INDIGLO
®
SET
(DONE)
(FINITO)
MODE
(MODALITÀ)
(NEXT)
(AVANTI)
STOP/RESET
(-)
ORA DEL GIORNO>ALTIMETRO>BAROMETRO>
BUSSOLA>CRONOGRAFO>ESAME>TIMER>SVEGLIA
>CALIBRAZIONE
INDICATORE DELLA
SVEGLIA
INDICATORE DEL CRONOGRAFO
INDICATORE DI TIMER CON RI -
P ETIZIONE DEL CONTO ALLA ROVESCIA
INDICATORE DI TIMER PER CONTO
ALLA ROVESCIA
III
I
TMX_W253_WS4_IT:Layout 1 8/27/09 1:58 PM Page 196

• Allarme altitudine.
• Cinque punti di riferimento dell’altitudine personalizzati, definiti dall’utente.
Barometro
• Monitora la pressione alta, bassa e attuale, oltre alla pressione sul livello
del mare.
• Visualizza in un grafico le variazioni di pressione sul livello del mare.
• Intervallo operativo da 300 a 1100 mbar (da 9 a 32,5 pollici Hg).
• Visualizza un grafico di previsione delle condizioni atmosferiche.
Temperatura
• Mostra la temperatura in gradi Celsius o Fahrenheit.
• Intervallo operativo da -10 a 50 °C (da 14 a 122 °F).
Bussola
• Include la direzione sia in formato numerico che come ago di bussola digitale.
• Può essere calibrata ad un angolo di declinazione per offrire la massima
precisione.
CARATTERISTICHE DELL’OROLOGIO
Ora
• Ore, minuti e secondi visualizzati nel formato a 12 o a 24 ore.
• Data visualizzata nel formato MM-GG o GG.MM.
• Secondo fuso orario, con impostazioni indipendenti per ora, minuti,
data e formato.
• Segnale acustico orario (opzionale).
• Segnale acustico alla pressione di qualsiasi pulsante (opzionale).
• Un orologio sia digitale che analogico.
Altimetro
• Visualizza i dati in piedi o in metri.
• Intervallo operativo da -400 a 9000 metri (da -1312 a 29.520 piedi).
• Monitora l’altitudine attuale, quella della vetta e quella accumulata.
• Visualizza mediante un grafico l’ascesa e la discesa.
• Monitora il tempo trascorso all’altitudine bersaglio e al di sopra di essa
(in Modalità Esame).
199
198
I
TMX_W253_WS4_IT:Layout 1 8/27/09 1:58 PM Page 198

AVVIAMENTO RAPIDO
Le prossime tre pagine offrono all’utente le nozioni fondamentali che gli
servono per iniziare a usare l’orologio in meno di 5 minuti. Si prega di
continuare la lettura per ottenere le istruzioni complete.
Impostazione di ora e data
1. Premere MODE finché non appare l’ora del giorno.
2. Tenere premuto SET (impostazione) per iniziare.
3. Premere START/SPLIT (+) o STOP/RESET (-) per aumentare o diminuire i
valori di impostazione per il fuso orario, l’ora, la data, i suoni e le unità di
misura.
4. Premere MODE (NEXT) per passare all’opzione di impostazione successiva.
5. Premere SET (DONE) per terminare.
Calibrazione della bussola
Prima di calibrare, togliere l’orologio dal polso, tenerlo in mano e scegliere un
angolo di declinazione dalla tabella riportata alle pagine 217 e 218.
1. Premere MODE finché non appare la parola COMPASS (bussola).
Cronografo
• Registra fino a 100 ore e 99 giri.
• Opzione di visualizzazione del tempo di giro o tempo intermedio in cifre più
grandi.
• Durante l’uso del cronografo, l’orologio WS4
™
registra le statistiche chiave
sull’attività, che possono essere visualizzate nella Modalità Esame.
Timer
Il timer per conto alla rovescia registra fino a un massimo di 100 ore, con l’opzione
di ripetere il conto alla rovescia per un massimo di 99 volte.
Sveglia
• Si può scegliere fra sveglia quotidiana, per giorni feriali, per fine settimana o
settimanale.
• Una sveglia di riserva se la sveglia originaria viene ignorata.
201
200
ITALIANO AVVIO RAPIDO
TMX_W253_WS4_IT:Layout 1 8/27/09 1:58 PM Page 200

1. Premere MODE finché non appare la parola CAL.
2. Tenere premuto SET per iniziare la calibrazione.
3. Premere START/SPLIT (+) o STOP/RESET (-) per passare in rassegna le
impostazioni relative al punto di riferimento e scegliere HOME o BARO.
4. Premere MODE (NEXT) per iniziare il procedimento di impostazione.
5. Premere START/SPLIT (+) o STOP/RESET (-) per aumentare o diminuire i
valori di impostazione.
6. Premere MODE (NEXT) per passare all’opzione di impostazione
successiva.
7. Premere SET (DONE).
8. Per completare la calibrazione per il riferimento selezionato, tenere
premuto STOP/RESET finché l’orologio non emette un segnale
acustico.
Una volta impostati l’altitudine o il barometro, occorre sincronizzare l’icona
delle condizioni atmosferiche con le attuali condizioni del tempo.
1. In modalità CAL, premere SET per iniziare la calibrazione.
2. Tenere premuto SET (impostazione) per iniziare.
3. Tenendo l’orologio orizzontale e rivolto verso l’alto, ruotarlo due volte
(impiegando almeno 15 secondi per ogni rotazione) e poi premere MODE.
4. Premere START/SPLIT (+) o STOP/RESET (-) per aumentare o diminuire i valori
di impostazione in modo da farli corrispondere all’angolo di declinazione
scelto.
5. Premere MODE per passare all’opzione di impostazione successiva.
6. Premere SET per terminare.
Se al termine del procedimento di calibrazione appare la scritta CAL OK, significa
che la bussola è stata calibrata. Se invece appare la scritta CAL FAIL, ripetere il
procedimento di calibrazione.
Calibrazione dell’altitudine o del barometro e impostazione delle
condizioni atmosferiche
Prima dell’uso iniziale, occorre calibrare l’altimetro (HOME) o il barometro (BARO),
e l’icona delle condizioni atmosferiche (WEATHER). Occorre calibrare l’orologio
secondo le informazioni più accurate a disposizione.
203
202
ITALIANO AVVIO RAPIDO
TMX_W253_WS4_IT:Layout 1 8/27/09 1:58 PM Page 202

Impostazione di ora e misure
1. Premere MODE finché non viene visualizzata l’ora del giorno.
2. Tenere premuto SET (impostazione) per iniziare.
3. Premere START/SPLIT (+) o STOP/RESET (-) per aumentare o diminuire i
valori di impostazione per il fuso orario, l’ora, la data, i suoni e le misure.
4. Premere MODE (NEXT) per passare all’opzione di impostazione successiva.
5. Premere SET (DONE) per terminare.
Modifica del display
• Fusi orari: premere START/SPLIT per dare un’occhiata all’ora dell’altro fuso
orario, oppure tenere premuto START/SPLIT per passare da un fuso orario
all’altro.
• Quando ci si trova in modalità Ora del giorno (Time of Day), premere
STOP/RESET per scegliere fra le seguenti opzioni di visualizzazione: data
(Date), altitudine (Altitude) o pressione barometrica (Barometric Pressure).
2. Premere START/SPLIT (+) o STOP/RESET (-) per passare in rassegna le voci ed
arrivare a WEATHER.
3. Premere MODE (NEXT) per iniziare il procedimento di impostazione.
4. Premere START/SPLIT (+) o STOP/RESET (-) per passare in rassegna le opzioni
relative alle condizioni atmosferiche.
5. Premere SET (DONE).
6. Per calibrare le condizioni atmosferiche secondo i dati preselezionati,
tenere premuto STOP/RESET finché l'orologio non emette un segnale
acustico.
ISTRUZIONI
MODALITÀ ORA
L’orologio mostra l’ora relativa a due fusi orari. In questa modalità, si possono
anche scegliere le unità di misura (ovvero piedi o metri; gradi Fahrenheit o Celsius)
e scegliere l’opzione di visualizzazione fra le tre disponibili.
205
204
I
TMX_W253_WS4_IT:Layout 1 8/27/09 1:59 PM Page 204

Quando l’orologio visualizza l’altitudine corrente, si può anche fare
quanto segue.
Premere START/SPLIT: si
visualizzano così l’altitudine
corrente in forma numerica oppure
un display grafico dell’altitudine
che riflette le precedenti 36 ore.
Premere e tenere premuto
STOP/RESET: si azzerano così le
statistiche accumulate
dall’altimetro per liberare la
memoria.
MODALITÀ ALTIMETRO
L’orologio permette di monitorare l’altitudine corrente, quella della vetta e quella
accumulata, oltre che il tempo trascorso all’altitudine bersaglio o al di sopra di
essa. Questa modalità dispone anche di un allarme, da usare se l’utente desidera
essere avvertito quando supera una determinata altitudine da lui scelta. Prima
dell’uso iniziale, occorre calibrare l’altimetro (vedere pagina 233).
Funzionamento dell’altimetro
Quando si trova in Modalità Altimetro (Altimeter Mode), l’orologio WS4
™
passa
automaticamente in rassegna le seguenti voci:
• PEAK (VETTA): la massima altitudine raggiunta.
• ACC (accumulata): la variazione totale di altitudine, prendendo in consider-
azione sia l’ascesa che la discesa.
• CURR (corrente): l’altitudine corrente.
Nota: se durante un’escursione si sale per 400 metri e si scende per
100 metri, l’altitudine accumulata è di 300 metri.
207
206
I
TMX_W253_WS4_IT:Layout 1 8/27/09 1:59 PM Page 206

Come impostare l’altitudine bersaglio o l’allarme dell’altimetro.
1. Premere MODE finché non compare ALTI.
2. Tenere premuto SET (impostazione) per iniziare.
3. Premere START/SPLIT (+) o STOP/RESET (-) per aumentare o diminuire
i valori di impostazione.
4. Premere MODE (NEXT) per passare all’opzione di impostazione successiva.
5. Premere SET (DONE) per terminare.
NOTA: l’altimetro visualizza il valore in FT (piedi) o M (metri),
a seconda dell’unità di misura scelta nella Modalità Ora. Vedere
pagina 205 per informazioni su come impostare le unità di misura.
Impostazione dell’altitudine bersaglio o dell’allarme di altitudine
Le impostazioni dell’altimetro includono le seguenti.
•
Altitudine bersaglio:
se il cronografo sta scorrendo, l’orologio monitora il
tempo trascorso a questa altitudine o al di sopra di essa, nella Modalità
Esame.
•
Allarme altitudine:
avvisa l’utente, mediante un messaggio a comparsa
sullo schermo e un allarme sonoro, che ha raggiunto l’altitudine
preselezionata.
“Quando suona l’allarme, si sa di aver raggiunto l’altitudine impostata.
Questa rapida allerta permette di valutare le proprie condizioni e di
decidere se si hanno le basi per una buona ascesa.”
-Conrad Anker
Alpinista di fama internazionale
209
208
Altitudine
bersaglio
Allarme altitudine
I
TMX_W253_WS4_IT:Layout 1 8/27/09 1:59 PM Page 208

sveglio l’altitudine è più alta, devo stare attento, in quanto c’è la
possibilità che sia in arrivo bassa pressione.”
-Conrad Anker
Alpinista di fama internazionale
MODALITÀ BAROMETRO
L’orologio riporta anche informazioni sulla pressione corrente e quella sul
livello del mare, informazioni sulla pressione barometrica alta o bassa,
e informazioni sulle variazioni della pressione sul livello del mare avvenute nel
corso delle precedenti 36 ore. Queste funzioni sono utili per capire
i cambiamenti delle condizioni atmosferiche.
Funzionamento del barometro
Una volta in Modalità Barometro (BARO Mode), l’orologio passa automatica-
mente in rassegna le seguenti voci:
• la più alta pressione barometrica raggiunta;
• la più bassa pressione barometrica;
• pressione barometrica corrente e pressione corretta sul livello del mare.
ATTENZIONE: l’altimetro è sensibile ai cambiamenti atmosferici!
Variazioni improvvise della pressione barometrica possono causare
variazioni nei dati registrati dall’altimetro di +/- 100 metri anche se si
è rimasti nella stessa località. Se possibile, ricalibrarlo ad un’altitudine
nota quando si verificano drastiche variazioni di pressione.
Basta calibrare soltanto il barometro OPPURE soltanto l’altimetro, in
quanto entrambi questi strumenti si basano sugli stessi valori di
pressione. Per ulteriori informazioni, vedere Modalità Calibrazione a
pagina 233.
“Prima di infilarmi nel sacco a pelo, mi annoto l’altitudine e la pres-
sione barometrica correnti. Se durante le poche ore in cui dormo
riscontro una variazione di altitudine o di pressione barometrica, mi
posso fare un’idea delle condizioni atmosferiche in arrivo. Poiché c’è un
rapporto inverso fra l’altitudine e la pressione barometrica, se quando
mi sveglio il valore dell’altitudine è lo stesso o più basso, so con certez-
za che la pressione atmosferica è rimasta costante. Se quando mi
211
210
I
TMX_W253_WS4_IT:Layout 1 8/27/09 1:59 PM Page 210

NOTA: il barometro visualizza le informazioni in MB (millibar)
o In Hg (pollici di mercurio) a seconda dell’unità di misura scelta
nella Modalità Ora. Vedere pagina 205 per informazioni su come
impostare le unità di misura.
Basta calibrare soltanto il barometro OPPURE soltanto l’altimetro,
in quanto entrambi gli strumenti si basano sugli stessi valori di
pressione. Per ulteriori informazioni, vedere Modalità Calibrazione
a pagina 233.
TEMPERATURA E PREVISIONI
Nelle modalità TIME (ora), ALTI (altimetro), BARO (barometro), CHRONO
(cronografo) e TIMER, l’orologio WS4
™
riporta informazioni sulla temperatura
e sulle previsioni.
L’orologio è in grado di predire le condizioni atmosferiche in base alle preceden-
ti tendenze relative alla pressione atmosferica. In generale, se la pressione
atmosferica sta salendo, la situazione del tempo viene considerata in migliora-
mento e viene indicata dal simbolo del sole. Se la tendenza della pressione
atmosferica è in discesa, la situazione del tempo sta peggiorando e viene
Quando l’orologio visualizza le informazioni barometriche correnti, si può anche
fare quanto segue.
Premere START/SPLIT: si visualizzano
così la lettura numerica del barometro
corrente o una visualizzazione grafica
della pressione sul livello del mare che
riflette le ultime 36 ore.
Premere e tenere premuto
STOP/RESET: si azzerano così le statis-
tiche accumulate per il barometro per
liberare la memoria.
213
212
I
TMX_W253_WS4_IT:Layout 1 8/27/09 1:59 PM Page 212

NOTA: alle basse temperature, il display potrebbe apparire lento.
Consultare pagina 199 per l’intervallo delle temperature operative.
Aumentare la temperatura circostante l’orologio per permettere la
ripresa del normale funzionamento.
NOTA: per ottenere valori di temperatura più accurati, indossare
l’orologio fuori dalla giacca o agganciandolo alla cintura o allo
zaino (preferibilmente in un’area che non sia costantemente
esposta al sole). Si può anche togliere l’orologio dal polso e
metterlo all’ombra per 15-30 minuti.
Per informazioni sulla calibrazione dell’icona delle condizioni atmosferiche,
consultare la sezione Modalità Calibrazione a pagina 233.
indicata dalla visualizzazione delle icone delle nuvole e/o della precipitazione
atmosferica.
Quando l’orologio viene indossato al polso, la lettura della temperatura viene
influenzata dal calore corporeo, e potrebbe scostarsi dalla temperatura effettiva di
10 gradi o più. Lunghi periodi di esposizione alla luce solare diretta possono
anch’essi influire sulla precisione delle temperature. L’orologio è anche in grado di
misurare la temperatura nell’acqua, ma occorre fare attenzione a non premere
nessun pulsante mentre l’orologio è sott’acqua, poiché si rischia di compromet-
terne la resistenza all’acqua.
215
214
P
P
I
TMX_W253_WS4_IT:Layout 1 8/27/09 1:59 PM Page 214

Prima di calibrare la bussola, togliere l’orologio dal polso, tenerlo in mano e
scegliere un angolo di declinazione dalla tabella seguente.
CITTA’ ANGOLO DEC. CITTA’ ANGOLO DEC.
Amsterdam 0° O Chicago 3° O
Anchorage 19° E Dallas 3° E
Auckland 18° E Denver 9° E
Pechino 3° O Dubai 1° E
Berna 0° E Hong Kong 2° O
Bogotà 5° O Gerusalemme 3° E
Bozeman 13° E Londra 1° O
Buenos Aires 8° O Los Angeles 12° E
Calgary 15° E Madrid 1° O
Città del Capo 23° O Città del Messico 5° O
Mosca 10° O Riyadh 2° E
Monte Everest 0° O Roma 1° E
MODALITÀ BUSSOLA
L’orologio WS4
™
include un’accurata bussola digitale che quando è attivata
registra i valori ad ogni secondo, e li visualizza in forma numerica e come segno
di direzione cardinale insieme ad un ago di bussola virtuale. Occorre calibrare la
bussola prima dell’uso iniziale, ed è anche consigliabile calibrarla periodicamente
per mantenere letture più accurate. Per ulteriori informazioni, consultare la
sezione Modalità Calibrazione a pagina 233.
Calibrazione della bussola
Quando si usa la bussola, è importante tenere il polso in una posizione orizzon-
tale, parallela al terreno, per rendere le letture della bussola più accurate.
Per ottenere le letture più accurate, evitare di calibrare la bussola in prossimità
di oggetti metallici di grandi dimensioni (es. strumenti elettronici,
vetture, armadietti di archiviazione o qualsiasi altra cosa
metallica) in quanto la forza magnetica di questi oggetti potrebbe
interferire con il campo magnetico e la bussola potrebbe
registrare valori non accurati. Si noti che la funzione di
illuminazione del quadrante Indiglo
®
non funziona mentre si calibra la bussola.
217
216
continua alla pagina successiva
I
TMX_W253_WS4_IT:Layout 1 8/27/09 1:59 PM Page 216

Una volta individuato il proprio angolo di declinazione, fare quanto segue.
1. Premere MODE finché non viene visualizzato COMPASS.
2. Tenere premuto SET per iniziare.
3. Tenendo l’orologio orizzontale e rivolto verso l’alto, ruotarlo due volte
(impiegando almeno 15 secondi per ogni rotazione) e poi premere MODE.
4. Premere START/SPLIT o STOP/RESET per aumentare o diminuire i valori di
impostazione in modo da farli corrispondere all’angolo di declinazione
scelto.
5. Premere MODE per passare all’opzione di impostazione successiva.
6. Premere SET per terminare.
Se si vede la scritta CAL OK al termine del processo di calibrazione, significa
che la bussola è stata calibrata correttamente. Se invece compare la scritta
CAL FAIL, ripetere il procedimento di calibrazione.
CITTA’ ANGOLO DEC. CITTA’ ANGOLO DEC.
Mumbai 0° O Seattle 17° E
Monaco di Baviera 1° E Seul 7° O
New York 12° O Sydney 12° E
Orlando 5° O Tokyo 6° O
Oslo 1° E Toronto 10° O
Parigi 0° O Vancouver 17° E
Reykjavik 15° O Varsavia 4° E
Rio De Janeiro 22° O Washington DC 10° O
Per le città che non appaiono nella tabella, si possono trovare gli angoli di
declinazione usando il calcolatore apposito reperibile nel sito indicato sotto. Si
tenga presente che occorrerà conoscere la latitudine e la longitudine della propria
ubicazione prima di poter calcolare l’angolo di declinazione. Le informazioni su
latitudine e longitudine sono reperibili su Internet.
http://www.ngdc.noaa.gov/geomagmodels/struts/calcDeclination
219
218
I
TMX_W253_WS4_IT:Layout 1 8/27/09 1:59 PM Page 218

MODALITÀ CRONOGRAFO
L’orologio include un cronografo, che è una funzione di cronometro. Il
cronografo è in grado di registrare fino a 100 ore e 99 giri. I dati raccolti
mentre scorre il cronografo possono poi essere usati per verificare i propri
progressi nella Modalità Esame. (Per ulteriori informazioni sulla Modalità
Esame, vedere a pagina 225.)
La maggior parte dei pulsanti dell’orologio svolge funzioni multiple in Modalità
Cronografo (Chrono Mode). Per esplorare le varie opzioni, insieme all’orologio
usare la tabella riportata sotto.
ATTENZIONE: la calibrazione potrebbe non riuscire se si ruota
l’orologio troppo rapidamente o se il suo completamento richiede più
di un minuto. La calibrazione potrebbe non riuscire anche se si è in
prossimità di oggetti magnetici.
Uso della bussola
Dopo aver calibrato la bussola, si vedranno la direzione corrente della bussola,
i punti cardinali e l’ago di bussola digitale quando si entra nella Modalità Bussola.
Dopo 30 secondi i valori della bussola scompaiono dal display dell’orologio per
conservare l’energia della batteria. Premere START/SPLIT per visualizzare la
direzione corrente per altri 30 secondi.
CONSIGLIO: l’orologio è uno strumento eccezionale per l’orienteering
(corsa di orientamento). Si può usare la bussola per spostarsi fra punti
intermedi del percorso e, se si partecipa ad una gara di orienteering,
si può cronometrare il proprio tempo usando il cronografo (vedere la
sezione successiva).
221
220
I
TMX_W253_WS4_IT:Layout 1 8/27/09 1:59 PM Page 220

NOTA: il cronografo può essere un ottimo strumento per quando si
va in mountain bike, si scia o si corre lungo i sentieri. Si possono
registrare tempi intermedi in corrispondenza di punti particolari
lungo il sentiero, si può controllare periodicamente l’altimetro per
vedere di quanto si è saliti o scesi, e persino controllare il
barometro per assicurarsi che non stia arrivando il brutto tempo. Al
termine, si possono verificare le informazioni sulla propria attività
nella Modalità Esame.
223
222
PULSANTE FUNZIONI
MODE
• Per entrare nella modalità o uscire dalla modalità.
• Visualizza rapidamente un tempo di giro o inter-
medio alla pressione di START/SPLIT mentre sta
scorrendo il cronografo.
STOP/RESET
• Interrompe il cronografo.
• Alterna le informazioni su altimetro e barometro
(se il cronografo si trova a 00:00:00).
START/SPLIT
• Avvia il cronografo.
• Registra un tempo di giro o un tempo intermedio.
SET
• Scambia le posizioni sul display di tempo
di giro e tempo intermedio.
I
TMX_W253_WS4_IT:Layout 1 8/27/09 1:59 PM Page 222

Quando sta scorrendo il cronografo, nelle modalità cronografo e
ora del giorno viene visualizzata una barra sopra l’icona
del cronometro.
ATTENZIONE: per risparmiare l’energia della batteria, quando il
cronografo raggiunge le 100 ore l’orologio interrompe il cronome-
traggio e il pulsante START/SPLIT non funziona più.
MODALITÀ ESAME
La Modalità Esame dell’attività dell’orologio cattura i valori bassi, alti e medi
dell’avventura. Le statistiche sull’attività vengono registrate mentre sta
scorrendo il cronografo e sono poi visualizzabili nella Modalità Esame.
Esame dei dati sull’attività
1. Premere MODE finché non viene visualizzato REVIEW.
2. Premere START/SPLIT per passare in rassegna i dati.
3. Premere e tenere premuto STOP/RESET per azzerare le più recenti
informazioni di esame dopo che si è terminato di esaminarle.
Tempi di giro e intermedi
Quando si parla di tempi di giro, si intende il tempo relativo a un singolo segmen-
to di un’attività. Il tempo intermedio è invece l’intero tempo trascorso fino all’at-
tuale segmento di attività.
225
224
I
TMX_W253_WS4_IT:Layout 1 8/27/09 1:59 PM Page 224

CONSIGLIO: si può usare la Modalità Esame per ripercorrere la
propria escursione ritornando a casa. Si possono passare in
rassegna le statistiche sull’attività per informare i propri amici
sull’altitudine raggiunta, su quanto tempo si è trascorso al di sopra
dell’altitudine bersaglio, e persino sulle variazioni di temperatura
nel corso dell’escursione. Si possono persino comunicare queste
informazioni attraverso una serie di grafici che mostrano le
variazioni di altitudine, pressione barometrica e temperatura
nell’arco del tempo.
NOTA: tenere premuto START/SPLIT per passare rapidamente in
rassegna tutti i dati.
ATTENZIONE: se il cronografo non è stato mai utilizzato, si vedrà il
messaggio NO DATA STORED (nessun dato memorizzato).
Nella Modalità Esame vengono memorizzati i seguenti dati.
• Altitudine massima
• Altitudine minima
• Ascesa totale
• Discesa totale
• Tempo trascorso all’altitudine bersaglio o al di sopra di essa
• Grafico dell’altitudine (per i 35 minuti più recenti)
• La più alta pressione barometrica
• La più bassa pressione barometrica
• La pressione barometrica media
• Grafico della pressione sul livello del mare (per i 35 minuti più recenti)
• La temperatura più alta
• La temperatura più bassa
• La temperatura media
• Grafico della temperatura (per i 35 minuti più recenti)
227
226
I
TMX_W253_WS4_IT:Layout 1 8/27/09 1:59 PM Page 226

Funzionamento del timer
1. Premere START/SPLIT per avviare il timer o per riavviarlo dopo una pausa.
2. Premere STOP/RESET per fermare il conto alla rovescia.
3. Tenere premuto STOP/RESET per ripristinare il timer sul valore iniziale.
4. Tenere premuto di nuovo STOP/RESET per azzerare il timer.
Quando il conto alla rovescia raggiunge lo zero l’orologio emette un segnale
acustico. Per silenziarlo, si può premere un pulsante qualsiasi. Se si imposta il
timer sulla ripetizione al termine del conto alla rovescia, la ripetizione continua
finché non si preme STOP/RESET. Il display mostra una R ed un numero, ad
indicare che il timer sta ripetendo il conto alla rovescia e quante volte lo ha
ripetuto.
MODALITÀ TIMER
L’orologio WS4
™
include un cronometro standard per conto alla rovescia che si può
usare per attività sia all’aperto che al chiuso. Può contare alla rove scia partendo
da un periodo di tempo prefissato di un massimo di 100 ore, e ripetere il conto alla
rovescia per un massimo di 99 volte.
Impostazione del timer
1. Premere MODE finché non viene visualizzato TIMER.
2. Tenere premuto SET (impostazione) per iniziare.
3. Premere START/SPLIT (+) o STOP/RESET (-) per aumentare o diminuire i valori
di impostazione relativi a ore, minuti, secondi e azione finale.
4. Premere MODE (NEXT) per passare all’opzione di impostazione successiva.
5. Premere SET (DONE) per terminare.
229
228
I
TMX_W253_WS4_IT:Layout 1 8/27/09 1:59 PM Page 228

MODALITÀ SVEGLIA
L’orologio WS4
™
offre una sveglia che l’utente può impostare in modo che
suoni una volta sola, alla stessa ora ogni giorno, solo dal lunedì al venerdì, nei
fine settimana, o persino solo un giorno alla settimana.
Impostazione di una sveglia
1. Premere MODE finché non viene visualizzato ALARM.
2. Tenere premuto SET (impostazione) per iniziare.
3. Premere START/SPLIT (+) o STOP/RESET (-) per aumentare o diminuire i
valori di impostazione relativi a ore, minuti, AM/PM (ovvero indicazione di
mattina o pomeriggio) e tipo di sveglia.
4. Premere MODE (NEXT) per passare all’opzione di impostazione successiva.
5. Premere SET (DONE) per terminare.
NOTA: quando si imposta la sveglia, la si abilita automaticamente.
CONSIGLIO: il timer potrebbe essere utile quando si vuole essere
avvertiti del punto intermedio di un’attività. Per esempio, si esce
sapendo di avere solo due ore da dedicare ad un’escursione. Si
imposta il timer su 60 minuti e quando si sente il segnale acustico si
sa che è il momento di tornare indietro. Le informazioni sul timer non
sono collegate alla Modalità Esame.
NOTA: quando si imposta il timer, passare in rassegna rapidamente
i valori di impostazione tenendo premuti START/SPLIT (+) o
STOP/RESET (-).
Quando sta scorrendo il timer, nelle modalità timer e ora del giorno
viene visualizzata una barra sopra l’icona del timer.
Se il timer viene impostato sulla ripetizione, la barra viene mostrata
sopra l’icona del timer con la freccia.
231
230
I
TMX_W253_WS4_IT:Layout 1 8/27/09 2:00 PM Page 230

NOTA: quando si imposta la sveglia, passare rapidamente in
rassegna i valori di impostazione tenendo premuti START/SPLIT (+)
o STOP/RESET (-).
— L’indicazione AM/PM (mattina/pomeriggio) (+) appare solo se si
ha l’orologio impostato sul formato a 12 ore.
Quando la sveglia è abilitata, nelle modalità sveglia e ora del
giorno viene visualizzata una barra sopra l’icona della sveglia.
MODALITÀ CALIBRAZIONE
L'orologio WS4
™
è in grado di fare misurazioni estremamente accurate. Prima
dell'uso iniziale, occorre calibrare l'altimetro (HOME) o il barometro (BARO), e
l'icona delle condizioni atmosferiche (WEATHER). E, come con qualsiasi
strumento di precisione, occorre eseguire con frequenza la calibrazione per
garantirne l'accuratezza.
Funzionamento della sveglia
Per abilitare o disabilitare la sveglia senza avviare il procedimento di impostazione,
premere START/SPLIT quando si entra nella Modalità Sveglia (ALARM MODE). La
sveglia suona per 20 secondi nei tempi programmati. Per spegnere la sveglia,
premere un pulsante qualsiasi. Una sveglia di riserva suona dopo 5 minuti se non
si spegne la sveglia la prima volta che suona.
“La funzione di sveglia è forse la più semplice dell’orologio WS4. Eppure,
in tutta la sua semplicità, gioca un ruolo importante nel successo
dell’intera spedizione. Mi dà conforto sentire la sveglia delle 2 del
mattino. Le ore che precedono l’alba sono le più belle della giornata. La
neve che scricchiola sotto i piedi, le stelle che iniziano a scomparire con
il sorgere del sole e il ritmo del passo dei tuoi compagni sono parte
integrante della spedizione.”
-Conrad Anker
Alpinista di fama internazionale
233
232
I
TMX_W253_WS4_IT:Layout 1 8/27/09 2:00 PM Page 232

ATTENZIONE: cambiamenti improvvisi della pressione barometrica
possono influenzare le letture dell’altimetro. Se possibile,
ricalibrarlo ad un’altitudine nota quando si verificano drastiche
variazioni di pressione.
NOTA: per ottenere la miglior precisione, scegliere il metodo di
calibrazione in base alla fonte di riferimento più precisa disponibile.
Per esempio, se ci si trova all’inizio di un sentiero e se ne conosce
l’altitudine esatta, la calibrazione più precisa sarà quella
dell’altitudine. Se non si conosce l’altitudine, si può scoprire qual è la
pressione atmosferica sul livello del mare (reperibile su Internet o nei
quotidiani) e calibrare il sensore in base alla pressione barometrica.
L’orologio ha anche cinque Punti di riferimento dell’altitudine [REFERENCE HOME
(casa), REFERENCE BASE 1 (base 1), REFERENCE BASE 2 (base 2), REFERENCE
BASE 3 (base 3) e REFERENCE MAN-ALT (altitudine manuale)] che permettono di
impostare in anticipo l’altitudine di una località nota e di ricalibrare poi l’orologio
in corrispondenza di tale località con la semplice pressione di un pulsante.
235
234
CASA
(ALTI CASA 1)
(cioè 800 M)
INIZIO DEL SENTIERO
(ALTI BASE 1)
(1200 M)
VETTA
(ALTI BASE 2)
(2000 M)
RIFUGIO
(ALTI BASE 3)
(1000 M)
ESEMPIO: ESCURSIONE PREFERITA
I
TMX_W253_WS4_IT:Layout 1 8/27/09 2:00 PM Page 234

Nota: usare l’Altitudine manuale (MAN-ALT) per le singole
ricalibrazioni manuali. Usare Home Altitude e Base Altitude 1,2,3
per memorizzare punti di riferimento dell’altitudine che verranno
usati più volte.
Nota: se si è già inserito un punto di riferimento, lo si può
selezionare rapidamente e poi tenere premuto STOP/RESET per
eseguire rapidamente la calibrazione.
ILLUMINAZIONE DEL QUADRANTE INDIGLO
®
In qualsiasi modalità, quando si preme il pulsante INDIGLO
®
il quadrante
dell'orologio si illumina per facilitarne la visualizzazione. Si può anche attivare
la funzione Night-Mode
®
premendo e tenendo premuto il pulsante INDIGLO
®
finché non si sente un segnale acustico. La funzione Night-Mode
®
è molto utile
in condizioni di scarsa luminosità, in quanto permette all'utente di illuminare il
quadrante dell'orologio per 2-3 secondi premendo qualsiasi pulsante. Una
volta attivata, la funzione Night-Mode
®
resta attiva per 7-8 ore. Se si vuole
disattivare la funzione Night-Mode
®
prima dello scadere delle 7-8 ore, premere
e tenere premuto il pulsante INDIGLO
®
finché non si sente un segnale acustico.
Impostazione e calibrazione dei punti di riferimento
1. Premere MODE finché non viene visualizzato CAL.
2. Tenere premuto SET per iniziare la calibrazione.
3. Premere START/SPLIT (+) per passare in rassegna i punti di riferimento [HOME
ALTI (altitudine casa), BASE 1 ALTI (altitudine base 1), BASE 2 ALTI (altitudine base
2), BASE 3 ALTI (altitudine base 3), MANUAL ALTI (altitudine manuale), BARO
(barometro) e WEATHER (condizioni atmosferiche)].
4. Premere MODE (NEXT) per iniziare il procedimento di impostazione.
5. Premere START/SPLIT (+) o STOP/RESET (-) per aumentare o diminuire i valori
di impostazione.
6. Premere MODE (NEXT) per passare all’opzione di impostazione successiva.
7. Premere SET (DONE).
8. Per completare la calibrazione per il riferimento selezionato, premere e
tenere premuto STOP/RESET finché l’orologio non emette un segnale
acustico.
9. Quando la propria ubicazione cambia, selezionare un nuovo riferimento e
rieseguire la calibrazione premendo e tenendo premuto STOP/RESET.
237
236
I
TMX_W253_WS4_IT:Layout 1 8/27/09 2:00 PM Page 236

Cronografo:
registra segmenti cronometrati per la durata dell’attività.
Declinazione:
per compensare la differenza fra nord geografico e nord
magnetico, la bussola usa l’impostazione dell’angolo di declinazione. Le
declinazioni occidentali vengono sottratte dalla direzione calcolata della busso-
la, mentre quelle orientali vengono aggiunte ad essa. Vedere la tabella alle
pagine 217 e 218 per un elenco delle declinazioni per le principali città del
mondo.
Digitale:
quando si riferisce ad un orologio, questo termine significa che
l’orologio indica l’ora facendo uso di cifre.
Pollici hg:
Indica i pollici di mercurio, un’unità di misura della pressione
atmosferica. Un pollice di mercurio equivale a 33,86 millibar.
Tempo di giro:
registra il tempo o la durata dei singoli segmenti di un’attività.
Nord magnetico:
la direzione del polo magnetico terrestre e la direzione verso
la quale punta l’ago di una bussola, e che differisce dal nord geografico (vedere
sotto). La differenza fra il nord geografico e il nord magnetico viene usata per
calcolare l’angolo di declinazione utilizzato dalla bussola dell’orologio.
GLOSSARIO
Questo glossario fornisce le definizioni relative ad alcune caratteristiche e funzioni
dell’orologio descritte in questo manuale.
Altimetro:
strumento usato per determinare l’altitudine di un oggetto in relazione
ad un livello fisso. Di solito l’altitudine viene misurata in relazione al livello del
mare.
Analogico:
quando si riferisce ad un orologio, vuol dire che l’orologio indica l’ora
facendo uso delle lancette.
Barometro:
misura la pressione atmosferica e può aiutare a predire cambiamenti
nelle condizioni atmosferiche.
Pressione barometrica:
la pressione dell’aria in relazione alle previsioni atmos-
feriche. Una pressione più alta di solito indica condizioni atmosferiche più calde e
limpide, mentre una pressione più bassa di solito indica tempo nuvoloso ed una
maggiore probabilità di precipitazioni.
Calibrazione:
tecnica usata per migliorare la precisione di bussola, altimetro,
barometro e previsioni atmosferiche, principalmente mediante compensazione in
base alle condizioni locali.
239
238
I
TMX_W253_WS4_IT:Layout 1 8/27/09 2:00 PM Page 238

GARANZIA INTERNAZIONALE TIMEX
(U.S.A. – GARANZIA LIMITATA)
L’orologio TIMEX
®
è garantito contro difetti di produzione dalla Timex Group
USA, Inc. per un periodo di UN ANNO dalla data di acquisto originaria. Timex
e le sue affiliate di tutto il mondo onoreranno questa Garanzia Internazionale.
Si prega di notare che la Timex potrà, a sua discrezione, riparare l’orologio
installando componenti nuovi o accuratamente ricondizionati e ispezionati,
oppure sostituirlo con un modello identico o simile. IMPORTANTE — SI
PREGA DI NOTARE CHE QUESTA GARANZIA NON COPRE I DIFETTI O I
DANNI ALL’OROLOGIO:
1) dopo la scadenza del periodo di garanzia;
2) se l’orologio non era stato acquistato originariamente presso un
dettagliante autorizzato Timex;
3) causati da servizi di riparazione non eseguiti da Timex;
4) causati da incidenti, manomissione o abuso; e
5) a lenti o cristallo, cinturino in pelle o a catena, cassa dell’orologio,
periferiche o batteria. Timex potrebbe addebitare al cliente la
sostituzione di una qualsiasi di queste parti.
MB:
MB sta per millibar, un’unità metrica di misura della pressione atmo sferica.
Un millibar equivale a 0,0295 pollici di mercurio.
Pressione sul livello del mare:
la pressione atmosferica di una località specifica
modificata in base alla differenza nell’altitudine di una località. Di solito, la
pressione locale sarà inferiore a quella sul livello del mare perché la pressione
atmosferica diminuisce con l’altitudine.
Tempo intermedio:
il tempo intermedio registra il tempo totale trascorso dall’inizio
dell’attività corrente.
Registrazione di un tempo di giro o di un tempo intermedio:
quando si registra un
tempo di giro o un tempo intermedio, il cronografo registra un tempo per il
segmento corrente e inizia automaticamente a registrarne uno nuovo.
Nord geografico:
il polo nord geografico nel quale si incontrano tutte le linee
longitudinali. Le carte geografiche vengono disposte con il nord geografico in alto.
La differenza fra il nord geografico e il nord magnetico viene usata per calcolare
l’angolo di declinazione utilizzato dalla bussola dell’orologio.
241
240
I
TMX_W253_WS4_IT:Layout 1 8/27/09 2:00 PM Page 240

ALLA SPEDIZIONE UN CINTURINO SPECIALE O QUALSIASI ALTRO ARTICOLO
DI VALORE PERSONALE.
Per gli U.S.A., si prega di chiamare il numero 1-800-328-2677 per ulteriori
informazioni sulla garanzia. Per il Canada, chiamare l’1-800-263-0981. Per il
Brasile, chiamare lo +55 (11) 5572 9733. Per il Messico, chiamare lo 01-800-
01-060-00. Per l’America Centrale, i Caraibi, le Isole Bermuda e le Isole
Bahamas, chiamare il (501) 370-5775 (U.S.). Per l’Asia, chiamare l’852-2815-
0091. Per il Regno Unito, chiamare il 44.020 9620. Per il Portogallo, chiamare
il 351 212 946 017. Per la Francia, chiamare il 33 3 81 63 42 00. Per la
Germania, chiamare il +43.662 88921 30. Per il Medio Oriente e l’Africa, chia-
mare il 971-4-310850. Per altre aree, si prega di contattare il rivenditore o
distributore Timex di zona per ottenere informazioni sulla garanzia. In Canada,
negli Stati Uniti e in certe altre località, i dettaglianti Timex partecipanti
possono fornire al cliente una busta di spedizione preindirizzata e preaffran-
cata per la riparazione dell’orologio, per facilitare al cliente l’ottenimento del
servizio in fabbrica.
©2009 Timex Group USA, Inc. TIMEX, il logotipo “E”, EXPEDITION e NIGHT-
MODE sono marchi della Timex Group USA, Inc., depositati negli USA e in altri
Paesi. INDIGLO è un marchio depositato della Indiglo Corporation negli Stati
Uniti e in altri Paesi. WS4 è un marchio commerciale del Timex Group, B.V.
QUESTA GARANZIA E I RIMEDI IN ESSA CONTENUTI SONO ESCLUSIVI E
SOSTITUISCONO TUTTE LE ALTRE GARANZIE, ESPRESSE O IMPLICITE, INCLUSA
QUALSIASI GARANZIA IMPLICITA DI COMMERCIABILITA’ O IDONEITA’ AD UN USO
PARTICOLARE. TIMEX NON E’ RESPONSABILE DI NESSUN DANNO SPECIALE,
INCIDENTALE O CONSEQUENZIALE. Alcuni Paesi e Stati non permettono
limitazioni su garanzie implicite e non permettono esclusioni o limitazioni sui
danni; pertanto queste limitazioni potrebbero non pertenere al cliente. Questa
garanzia dà al cliente diritti legali specifici, e il cliente potrebbe avere anche altri
diritti, che variano da Paese a Paese e da Stato a Stato.
Per ottenere il servizio sotto garanzia, si prega di restituire l’orologio alla Timex,
ad una delle sue affiliate o al rivenditore Timex dove è stato acquistato l’orolo-
gio, insieme al Buono di riparazione originale compilato o, solo negli U.S.A. e nel
Canada, insieme al Buono di riparazione compilato o una dichiarazione scritta
indicante nome, indirizzo, numero di telefono e data e luogo dell’acquisto. Si
prega di includere quanto segue con l’orologio al fine di coprire le spese di
spedizione e gestione (non si tratta di addebiti per la riparazione): un assegno o
un vaglia da US $ 8,00 negli USA; un assegno o vaglia da CAN $ 7,00 in Canada;
e un assegno o vaglia da UK £ 2,50 nel Regno Unito. Negli altri Paesi, la Timex
addebiterà il cliente per le spese di spedizione e la gestione. NON ALLEGARE MAI
243
242
I
TMX_W253_WS4_IT:Layout 1 8/27/09 2:00 PM Page 242

INHALT
EINLEITUNG. . . . . . . . . . . . . . . . . . . . . . . . . . . . . . . . . . . . . . . . . 249
TIMEX
®
EXPEDITION
®
WS4
™
. . . . . . . . . . . . . . . . . . . . . . . . . . . . . 251
UHR-EIGENSCHAFTEN . . . . . . . . . . . . . . . . . . . . . . . . . . . . . . . . . 252
Uhrzeit . . . . . . . . . . . . . . . . . . . . . . . . . . . . . . . . . . . . . . . . . . 252
Höhenmesser . . . . . . . . . . . . . . . . . . . . . . . . . . . . . . . . . . . . . 252
Barometer. . . . . . . . . . . . . . . . . . . . . . . . . . . . . . . . . . . . . . . . 253
Temperatur . . . . . . . . . . . . . . . . . . . . . . . . . . . . . . . . . . . . . . . 253
Kompass. . . . . . . . . . . . . . . . . . . . . . . . . . . . . . . . . . . . . . . . . 253
Chronograph . . . . . . . . . . . . . . . . . . . . . . . . . . . . . . . . . . . . . . 254
Timer . . . . . . . . . . . . . . . . . . . . . . . . . . . . . . . . . . . . . . . . . . . 254
Wecker . . . . . . . . . . . . . . . . . . . . . . . . . . . . . . . . . . . . . . . . . . 254
SCHNELLEINFÜHRUNG. . . . . . . . . . . . . . . . . . . . . . . . . . . . . . . . . . . 255
Zeit und Datum einstellen . . . . . . . . . . . . . . . . . . . . . . . . . . . . 255
Kompass-Kalibrierung. . . . . . . . . . . . . . . . . . . . . . . . . . . . . . . 255
Höhe oder Barometer kalibrieren und Wetter einstellen. . . . . . 256
D
TMX_W253_WS4_GE:Layout 1 8/27/09 12:26 PM Page 244

INSTRUKTIONEN . . . . . . . . . . . . . . . . . . . . . . . . . . . . . . . . . . . . . . . 258
ZEITMODUS . . . . . . . . . . . . . . . . . . . . . . . . . . . . . . . . . . . . . . . . 258
Zeit und Maßeinheiten einstellen. . . . . . . . . . . . . . . . . . . . . . . 258
Anzeige ändern . . . . . . . . . . . . . . . . . . . . . . . . . . . . . . . . . . . . 259
HÖHENMESSER-MODUS . . . . . . . . . . . . . . . . . . . . . . . . . . . . . . . 259
Gebrauch des Höhenmessers . . . . . . . . . . . . . . . . . . . . . . . . . 260
Zielhöhe oder Höhenalarm einstellen. . . . . . . . . . . . . . . . . . . . 261
BAROMETERMODUS . . . . . . . . . . . . . . . . . . . . . . . . . . . . . . . . . . 265
Gebrauch des Barometers. . . . . . . . . . . . . . . . . . . . . . . . . . . . 265
TEMPERATUR UND VORHERSAGE . . . . . . . . . . . . . . . . . . . . . . . . 267
KOMPASSMODUS . . . . . . . . . . . . . . . . . . . . . . . . . . . . . . . . . . . . 269
Kompass-Kalibrierung. . . . . . . . . . . . . . . . . . . . . . . . . . . . . . . 269
Einsatz der Kompassfunktion . . . . . . . . . . . . . . . . . . . . . . . . . 273
CHRONOGRAPH-MODUS . . . . . . . . . . . . . . . . . . . . . . . . . . . . . . . 274
Runden und Zwischenzeiten . . . . . . . . . . . . . . . . . . . . . . . . . . 276
REVIEW-MODUS . . . . . . . . . . . . . . . . . . . . . . . . . . . . . . . . . . . . . 277
Aktivitätsdaten anzeigen . . . . . . . . . . . . . . . . . . . . . . . . . . . . . 277
MODUS TIMER. . . . . . . . . . . . . . . . . . . . . . . . . . . . . . . . . . . . . . . 279
Einstellen des Timers . . . . . . . . . . . . . . . . . . . . . . . . . . . . . . . 280
Benutzung des Timers. . . . . . . . . . . . . . . . . . . . . . . . . . . . . . . 280
WECK-MODUS. . . . . . . . . . . . . . . . . . . . . . . . . . . . . . . . . . . . . . . 282
Einstellen eines Weckers. . . . . . . . . . . . . . . . . . . . . . . . . . . . . 282
Benutzung der Weckfunktion. . . . . . . . . . . . . . . . . . . . . . . . . . 283
KALIBRIERUNGSMDOUS . . . . . . . . . . . . . . . . . . . . . . . . . . . . . . . 284
Einstellen und Kalibrieren der Referenzpunkte . . . . . . . . . . . . 286
INDIGLO
®
-NACHTLICHT . . . . . . . . . . . . . . . . . . . . . . . . . . . . . . . . 288
GLOSSAR . . . . . . . . . . . . . . . . . . . . . . . . . . . . . . . . . . . . . . . . . . 289
TIMEX INTERNATIONALE GARANTIE . . . . . . . . . . . . . . . . . . . . . . . 292
D
TMX_W253_WS4_GE:Layout 1 8/27/09 12:26 PM Page 246

249
EINLEITUNG
Manche der schönsten Gegenden der Welt sind schwer zugänglich. Ihre neue
Timex
®
Expedition
®
WS4
™
-Uhr hilft Ihnen, dorthin zu gelangen.
Die WS4
™
-Uhr ist ein einzigartiges Instrument für Abenteuer-Enthusiasten und
bietet wichtige Funktionen für Aktivitäten im Freien. Das große Breitformat-
Dashboard zeigt wichtige Informationen direkt an, ohne dass man den Modus
umschalten muss.
Die WS4
™
-Uhr verwendet modernste, hochpräzise Sensoren und eine intuitive
Benutzeroberfläche, so dass Sie selbst unter extremsten Umständen immer die
richtige Antwort erhalten. Die ersten Seiten des Handbuchs bieten eine
schnelle Einführung, und der Rest eine detaillierte Darstellung unseres mod-
ernsten Geräts für Aktivitäten im Freien.
Ganz gleich, ob Sie wandern, Skifahren oder 23 Stockwerke nach oben rennen,
um die Genauigkeit des Höhenmessers zu prüfen, ist die WS4 immer für
Sie da.
D
TMX_W253_WS4_GE:Layout 1 8/27/09 12:26 PM Page 248

TIMEX
®
EXPEDITION
®
WS4
™
„Denken Sie daran, dass die WS4 kein Ersatz für richtige
Entscheidungen ist. Richtige Entscheidungen beruhen auf Erfahrung,
und Erfahrungen brauchen Zeit. Bedenken Sie, dass Ihr neues
Instrument trainiert werden muss, wie ein Hund. Nehmen Sie sie nach
draußen und beginnen Sie mit dem Training.“
-Conrad Anker
Weltberühmter Bergsteiger
Timex
®
Expedition
®
Brand Ambassador
251
250
START/SPLIT
(+)
INDIGLO
®
-KNOPF
SET
(FERTIG)
MODE
(NEXT)
(WEITER)
STOP/RESET
(-)
UHRZEIT>HÖHENMESSER>BAROMETER
>KOMPASS>CHRONO>REVIEW>TIMER
>WECKER>KALIBRIERUNG
WECKANZEIGE
CHRONOGRAPH-ANZEIGE
ANZEIGE F. WIEDERHOLTEN
COUNTDOWN-TIMER
COUNTDOWN TIMER-ANZEIGE
D
TMX_W253_WS4_GE:Layout 1 8/27/09 12:26 PM Page 250

• Fünf benutzerdefinierte, programmierbare Höhenreferenzpunkte.
Barometer
• Zeigt hohen, niedrigen und aktuellen Luftdruck, sowie Druck auf
Meeresspiegelniveau.
• Zeigt Änderungen des Druckes auf Meeresspiegelniveau grafisch an.
• Betriebsbereich von 300 bis 1100 mbar (9-32,5 inHg)
• Zeigt Wettervorhersage grafisch an.
Temperatur
• Zeigt Temperaturen in Celsius oder Fahrenheit an.
• Betriebsbereich von -10° bis 50°C
Kompass
• Stellt Richtung sowohl numerisch als auch als digitale Kompassnadel dar.
• Kann auf Deklinationswinkel kalibriert werden, um maximale Präzision
zu bieten.
UHR-EIGENSCHAFTEN
Uhrzeit
• Stunden-, Minuten- und Sekundenanzeige im 12- oder 24-Stunden Format.
• Datumsanzeige im MM-DD- (Monat-Tag-) oder DD-MM- (Tag-Monat-) Format.
• Zweite Zeitzone mit unabhängigen Einstellungen für Stunden, Minuten, Datum
und Format.
• Stundenton (optional).
• Knopfdrucksignal (optional).
• Analoge und digitale Zeitanzeige.
Höhenmesser
• Zeigt Werte in Fuß oder Meter an.
• Betriebsbereich von -400 bis 9000 m.
• Verfolgt aktuelle, Spitzen- und gesammelte Höhe.
• Zeigt Aufstieg und Abstieg grafisch an.
• Verfolgt Zeit auf und über der Zielhöhe (im Review-Modus).
• Höhenalarm.
253
252
D
TMX_W253_WS4_GE:Layout 1 8/27/09 12:26 PM Page 252

SCHNELLEINFÜHRUNG
Die nächsten drei Seiten bieten eine Einführung, mit der Sie die Uhr in 5
Minuten betriebsbereit haben. Danach folgen die ausführlichen Anweisungen.
Zeit und Datum einstellen
1. MODE drücken, bis die Tageszeit erscheint.
2. SET drücken und halten, um zu starten.
3. START/SPLIT (+) oder STOP/RESET (-) drücken, um die eingestellten Werte
für Zeitzone, Uhrzeit, Datum, Signale und Maßeinheiten zu erhöhen oder
zu senken.
4. MODE (NEXT) drücken, um zur nächsten Einstelloption zu gehen.
5. Zum Fertigstellen SET (DONE) drücken.
Kompass-Kalibrierung
Nehmen Sie vor der Kalibrierung die Uhr vom Handgelenk ab und wählen Sie
aus der Tabelle auf Seite 270/271 einen Deklinationswinkel.
1. MODE drücken, bis COMPASS erscheint.
2. SET drücken und halten, um zu starten.
Chronograph
• Stoppuhrfunktion für bis zu 100 Stunden und 99 Runden.
• Vergrößerte Anzeige der Runden- oder Zwischenzeit möglich.
• Im Chronograph-Modus speichert die WS4
™
-Uhr wichtige Statistiken, die im
Review-Modus abrufbar sind.
Timer
Countdown-Timer für bis zu 100 Stunden, wobei der Countdown bis zu 99 Mal
wiederholbar ist.
Wecker
• Täglich-, Wochentag-, Wochenende- oder Wochen-Weckoptionen.
• Einmaliges Backup-Signal, wenn Wecker ignoriert wird.
255
254
DEUTSCH SCHNELLEINFÜHRUNG
TMX_W253_WS4_GE:Layout 1 8/27/09 12:26 PM Page 254

3. START/SPLIT (+) oder STOP/RESET (-) drücken, um die Referenzpunktein -
stellungen durchzugehen und entweder HOME oder BARO wählen.
4. MODE (NEXT) drücken, um mit der Einstellung zu beginnen.
5. START/SPLIT (+) oder STOP/RESET (-) drücken, um die Werte zu erhöhen
oder zu reduzieren.
6. MODE (NEXT) drücken, um zur nächsten Einstelloption zu gehen.
7. SET (DONE) drücken.
8. Zum Abschließen der Kalibrierung für die ausgewählten
Referenzen STOP/RESET gedrückt halten, bis der Signalton der
Uhr ertönt.
Nach Einstellung von Höhe bzw. Barometer müssen Sie das Wettersymbol mit
den aktuellen Wetterbedingungen synchronisieren.
1. Im CAL-Modus SET drücken, um die Kalibrierung zu starten.
2. START/SPLIT oder STOP/RESET drücken, um zu WEATHER zu gehen.
3. MODE (NEXT) drücken, um mit der Einstellung zu beginnen.
4. START/SPLIT oder STOP/RESET drücken, um Wetteroptionen
durchzugehen.
3. Halten Sie die Uhr eben und drehen Sie sie, mit nach oben weisendem
Zifferblatt, zwei Mal (wobei jede Umdrehung mindestens 15 Sekunden
dauern muss), und drücken Sie dann MODE.
4. START/SPLIT (+) oder STOP/RESET (-) drücken, um die Einstellungswerte zu
erhöhen oder zu reduzieren, bis sie dem gewählten Deklinationswinkel
entsprechen.
5. MODE drücken, um zur nächsten Einstelloption zu gehen.
6. Zum Fertigstellen SET drücken.
Wenn Sie nach dem Kalibrierungsverfahren CAL OK sehen, haben Sie den
Kompass erfolgreich kalibriert. Wenn Sie CAL FAIL sehen, wiederholen Sie das
Kalibrierungsverfahren.
Höhe oder Barometer kalibrieren und Wetter einstellen
Sie sollten entweder den Höhenmesser (HOME) oder das Barometer (BARO), sowie
das Wettersymbol (WEATHER) vor der ersten Benutzung kalibrieren. Sie sollten die
Uhr anhand der genauesten Informationen kalibrieren, über die Sie verfügen.
1. MODE drücken, bis CAL erscheint.
2. SET gedrückt halten, um mit der Kalibrierung zu beginnen.
257
256
DEUTSCH SCHNELLEINFÜHRUNG
TMX_W253_WS4_GE:Layout 1 8/27/09 12:26 PM Page 256

4. MODE (NEXT) drücken, um zur nächsten Einstelloption zu gehen.
5. Zum Fertigstellen SET (DONE) drücken.
Anzeige ändern
• Zeitzonen: Rufen Sie die andere Zeitzone auf, indem Sie START/SPLIT
drücken, und wechseln Sie Zeitzonen durch Drücken von START/SPLIT.
• Drücken Sie im Uhrzeit-Modus STOP/RESET, um eine der folgenden
Anzeigeoptionen zu wählen: Datum, Höhe oder atmosphärischer Luftdruck.
HÖHENMESSER-MODUS
Ihre Uhr ermöglicht es Ihnen, aktuelle, Spitzen- und gesammelte Höhe, sowie
Zeit auf/über Zielhöhe zu überwachen. Dieser Modus besitzt auch eine
Alarmfunktion, die Sie benachrichtigen kann, wenn Sie eine von ihnen
gewählte Höhe überschreiten. Sie sollten den Höhenmesser vor dem
Ersteinsatz kalibrieren (siehe Seite 284).
5. SET (DONE) drücken.
6. Um das Wetter auf die vorgewählten Daten zu kalibrieren,
STOP/RESET gedrückt halten, bis der Signalton der Uhr ertönt.
INSTRUKTIONEN
ZEITMODUS
Ihre Uhr zeigt die Zeit für zwei Zeitzonen an. In diesem Modus können Sie auch
Maßeinheiten (wie Fuß oder Meter, Fahrenheit oder Celsius) wählen und eine von
drei Anzeigeoptionen wählen.
Zeit und Maßeinheiten einstellen
1. MODE drücken, bis die Uhrzeit erscheint.
2. SET drücken und halten, um zu starten.
3. START/SPLIT (+) oder STOP/RESET (-) drücken, um die eingestellten Werte
für Zeitzone, Uhrzeit, Datum, Signale und Maßeinheiten zu erhöhen oder
zu senken.
259
258
D
TMX_W253_WS4_GE:Layout 1 8/27/09 12:27 PM Page 258

Wenn die Uhr die Anzeige der aktuellen Höhe erreicht, können Sie
Folgendes tun:
START/SPLIT drücken: numerische
aktuelle Höhe oder Grafik der Höhe
über die letzten 36 Stunden
anzeigen.
STOP/RESET gedrückt halten:
Gesammelte Höhenstatistik
zurücksetzen, um Speicher
zu löschen.
Zielhöhe oder Höhenalarm einstellen
Zu den Höheneinstellungen gehören:
•
Zielhöhe:
Wenn der Chronograph läuft, zeichnet die Uhr im Review-Modus
die Zeit auf, die Sie auf oder über dieser Höhe verbringen.
•
Höhenalarm:
Warnt Sie mittels Popup auf der Anzeige und hörbarem
Alarm, dass Sie eine voreingestellte Höhe erreicht haben.
Gebrauch des Höhenmessers
Wenn Sie sich im Höhenmesser-Modus befinden geht die WS4
™
-Uhr automatisch
folgende Punkte durch:
• PEAK (Spitze): Die höchste erreichte Höhe.
• ACC (gesammelt): Die gesamte Höhenänderung, wobei sowohl Aufstieg als
auch Abstieg berücksichtigt werden.
• CURR (aktuell): Die aktuelle Höhe.
Hinweis: Wenn Sie während einer Wanderung 400 Meter aufsteigen
und 100 Meter absteigen, beträgt Ihre gesammelte Höhe 300 Meter.
261
260
D
TMX_W253_WS4_GE:Layout 1 8/27/09 12:27 PM Page 260

4. MODE (NEXT) drücken, um zur nächsten Einstelloption zu gehen.
5. Zum Fertigstellen SET (DONE) drücken.
HINWEIS: Der Höhenmesser zeigt entweder FT (Fuß) oder
M (Meter) an, je nachdem, welche Anzeigeeinheit Sie im Zeitmodus
wählen. Die Einstellung der Maßeinheiten wird auf Seite 258
beschrieben.
VORSICHT: Ihr Höhenmesser reagiert auf Wetterumschwünge!
Plötzliche Luftdruckänderungen können die Anzeige des
Höhenmessers um +/- 100 m ändern, selbst wenn Sie an der
gleichen Stelle bleiben. Soweit möglich, sollten Sie erneut mit
einem bekannten Höhenwert kalibrieren, wenn drastische
Änderungen eintreten.
„Wenn der Alarm ertönt, wissen Sie, dass Sie die eingestellte Höhe
erreicht haben. Dieser schnelle Hinweis ermöglicht es Ihnen, Ihre Lage
zu bewerten und zu entscheiden, ob der Aufstieg gelingen wird.“
- Conrad Anker
Weltberühmter Bergsteiger
Einstellen der Zielhöhe/des Höhenalarms:
1. MODE drücken, bis ALTI erscheint.
2. SET drücken und halten, um zu starten.
3. START/SPLIT (+) oder STOP/RESET (-) drücken, um die Werte zu erhöhen oder
zu reduzieren.
263
262
Zielhöhe
Höhenalarm
D
TMX_W253_WS4_GE:Layout 1 8/27/09 12:27 PM Page 262

BAROMETERMODUS
Ihre Uhr bietet Informationen über den aktuellen Luftdruck und den Druck auf
Meeresspiegelniveau, hohen und niedrigen Druck, sowie Änderungen des
Druckes auf Meeresspiegelniveau in den letzten 36 Stunden. Diese Funktionen
helfen dabei, die Wetterentwicklung zu verstehen.
Gebrauch des Barometers
Wenn Sie sich im BARO-Modus befinden geht die Uhr automatisch folgende
Punkte durch:
• Höchster Stand des atmosphärischen Luftdrucks
• Niedrigster Stand des atmosphärischen Luftdrucks
• Der aktuelle atmosphärische Luftdruck und der korrigierte Druck
auf Meeresspiegel.
Sie müssen nur das Barometer ODER den Höhenmesser kalibrieren,
da beide den gleichen Druck verwenden. Weitere Informationen finden
Sie unter Kalibrierungsmodus auf Seite 284.
„Bevor ich in den Schlafsack krieche, sehe ich mir die aktuelle Höhe
und den atmosphärischen Luftdruck an. Wenn ich nach ein paar
Stunden Schlaf eine Änderung der Höhe oder des atmosphärischen
Luftdrucks sehe, gibt das Aufschluss über das kommende Wetter. Da es
eine umgekehrte Beziehung zwischen Höhe und atmosphärischem
Luftdruck gibt, weiß ich, dass der Luftdruck gleich geblieben ist, wenn
beim Aufwachen die gleiche oder eine niedrigere Höhe angezeigt wird.
Wenn beim Aufwachen eine größere Höhe angezeigt wird, ist
möglicherweise ein Tiefdruckgebiet im Anzug.“
- Conrad Anker
Weltberühmter Bergsteiger
265
264
D
TMX_W253_WS4_GE:Layout 1 8/27/09 12:27 PM Page 264

TEMPERATUR UND VORHERSAGE
Im Modus TIME, ALTI, BARO, CHRONO und TIMER zeigt Ihre WS4
™
-Uhr
Informationen über Temperatur und Vorhersage.
Die Uhr kann das Wetter aufgrund historischer Luftdrucktendenzen
vorhersagen. Allgemein gilt: Wenn der Luftdruck steigt, tendiert das Wetter zu
einer Verbesserung und wird durch ein Sonnensymbol dargestellt. Wenn der
Luftdruck tendenziell fällt, verschlechtert sich die Wetterlage und wird durch
Wolken- bzw. Niederschlagssymbole dargestellt.
Wenn die Uhr am Arm getragen wird, wird die Temperaturmessung von der
Körperwärme beeinflusst und kann eine Temperatur melden, die sich um 10
oder mehr Grad von der aktuellen Lufttemperatur unterscheiden kann. Wenn
sie lange direktem Sonnenlicht ausgesetzt ist, kann die Genauigkeit auch
beeinflusst werden. Die Uhr kann auch die Temperatur im Wasser messen,
aber Sie sollte darauf achten, unter Wasser keine Knöpfe zu drü cken, da dies
die Wasserbeständigkeit gefährden könnte.
Wenn die Uhr die Anzeige ded aktuellen Barometerstands erreicht, können Sie
Folgendes tun:
START/SPLIT drücken: Zeigt den
aktuellen Barometerstand als
numerischen Wert, oder eine grafische
Anzeige des Drucks auf Meeresspiegel
über die letzten 36 Stunden.
Setzt gesammelte Barometerstatistik
zurück, um Speicher zu löschen.
HINWEIS: Das Barometer zeigt entweder MB (Millibar) oder In Hg (Zoll
Quecksilber) an, je nach der im Zeitmodus gewählten Einheit. Die
Einstellung der Maßeinheiten wird auf Seite 258 beschrieben.
Sie müssen nur das Barometer ODER den Höhenmesser kalibrieren,
da beide den gleichen Druck verwenden. Weitere Informationen finden
Sie unter Kalibrierungsmodus auf Seite 284.
267
266
D
TMX_W253_WS4_GE:Layout 1 8/27/09 12:27 PM Page 266

KOMPASSMODUS
Die WS4
™
-Uhr besitzt einen zuverlässigen digitalen Kompass, der nach
Aktivierung jede Sekunde eine Messung vornimmt und die Kompass mes sung
als Zahl und Himmelsrichtung, sowie als virtuelle Kompassnadel anzeigt. Sie
müssen den Kompass vor dem Ersteinsatz kalibrieren, und es empfiehlt sich
auch, ihn regelmäßig zu kalibrieren, um präzise Messungen sicherzustellen.
Weitere Informationen finden Sie unter Kalibrierungs modus auf Seite 284.
Kompass-Kalibrierung
Beim Kompasseinsatz ist es wichtig, das Handgelenk horizontal zu halten,
damit die Kompassablesungen genauer sind.
Um genaue Werte sicherzustellen, sollten Kalibrierungen nicht in der Nähe
von großen Metallobjekten (wie Elektrogeräten, Fahr zeu gen,
Aktenschränken oder anderen Metallge gen stän den) durchge-
führt werden, da diese das Magnetfeld beeinflus sen und zu
falschen Kompassanzeigen führen können. Die Indiglo
®
-
Nachtlichfunktion funktioniert während der Kom pas s -
kalibrierung nicht.
HINWEIS: Bei niedrigen Temperaturen ist es möglich, dass die Anzeige
langsamer reagiert. Auf Seite 253 finden Sie weitere Informationen
über den Betriebstemperaturbereich. Temperatur um die Uhr herum
erwärmen, damit der Normalbetrieb fortgesetzt werden kann.
HINWEIS: Um genauere Temperaturmessungen zu erzielen, sollten Sie
die Uhr außerhalb Ihrer Jacke tragen, oder sie an an Ihren Gürtel oder
Ihre Gürteltasche hängen (am besten in einen Bereich, der nicht
ständig der Sonne ausgesetzt ist). Sie können auch die Uhr abnehmen
und 15 bis 30 Minuten lang in den Schatten legen.
Informationen zur Kalibrierung des Wettersymbols finden Sie unter
Kalibrierungsmodus auf Seite 284.
269
268
P
P
D
TMX_W253_WS4_GE:Layout 1 8/27/09 12:27 PM Page 268

STADT DEKL.-WINKEL STADT DEKL.-WINKEL
Mumbai 0° W Seattle 17° O
München 1° O Seoul 7° W
New York 12° W Sydney 12° O
Orlando 5° W Tokio 6° W
Oslo 1° O Toronto 10° W
Paris 0° W Vancouver 17° O
Reykjavik 15° W Warschau 4° O
Rio De Janeiro 22° W Washington DC 10° W
Sie können den Deklinationswinkel für nicht in obiger Tabelle aufgelisteten
Städte mit Hilfe des Deklinationswinkelprogramms unter unten stehender URL
berechnen. Sie müssen allerdings Breiten- und Längengrad ihrer Position
kennen, um auf dieser Website den Deklinationswinkel berechnen zu können.
Informationen zu Breiten- und Längengrad finden Sie im Internet.
http://www.ngdc.noaa.gov/geomagmodels/struts/calcDeclination
Nehmen Sie vor der Kalibrierung die Uhr vom Handgelenk ab und wählen Sie
aus der Tabelle auf der nächsten Seite einen Deklinationswinkel.
STADT DEKL.-WINKEL STADT DEKL.-WINKEL
Amsterdam 0° W Chicago 3° W
Anchorage 19° O Dallas 3° O
Auckland 18° O Denver 9° O
Beijing 3° W Dubai 1° O
Bern 0° O Hongkong 2° W
Bogota 5° W Jerusalem 3° O
Bozeman 13° O London 1° W
Buenos Aires 8° W Los Angeles 12° O
Calgary 15° O Madrid 1° W
Kapstadt 23° W Mexiko Stadt 5° W
Moskau 10° W Riad 2° O
Mt. Everest 0° W Rom 1° O
271
270
Fortsetzung auf nächster Seite
D
TMX_W253_WS4_GE:Layout 1 8/27/09 12:27 PM Page 270

VORSICHT: Die Kalibrierung kann fehlschlagen, wenn Sie die Uhr
zu schnell drehen oder länger als eine Minute benötigen. Sie kann
auch fehlschlagen, wenn Sie sich in der Nähe magnetischer
Objekte befinden.
Einsatz der Kompassfunktion
Nachdem Sie Ihren Kompass kalibriert haben, sehen Sie im Kompassmodus
die aktuelle Kompassrichtung, die Himmelsrichtungen und die digitale
Kompassnadel. Nach 30 Sekunden wird die Kompassanzeige ausgeblendet,
um die Lebensdauer der Batterie zu erhöhen. START/SPLIT drücken, um die
aktuelle Richtung weitere 30 Sekunden lang anzuzeigen.
TIPP: Ihre Uhr kann Ihnen bei der Orientierung sehr helfen. Sie
können mit dem Kompass zu Wegpunkten finden, und wenn Sie an
einem Orientierungsrennen teilnehmen, können Sie Ihre Zeit mit
dem Chronographen messen (siehe nächsten Abschnitt).
Sobald Sie Ihren Deklinationswinkel kennen:
1. MODE drücken, bis COMPASS erscheint.
2. Zum Start SET gedrückt halten.
3. Halten Sie die Uhr eben und drehen Sie sie, mit nach oben weisendem
Zifferblatt, zwei Mal (wobei jede Umdrehung mindestens 15 Sekunden
dauern muss), und drücken Sie dann MODE.
4. START/SPLIT oder STOP/RESET drücken, um die Einstellungswerte zu
erhöhen oder zu reduzieren, bis sie dem gewählten Deklinationswinkel
entsprechen.
5. MODE drücken, um zur nächsten Einstelloption zu gehen.
6. Zum Fertigstellen SET drücken.
Wenn Sie nach dem Kalibrierungsverfahren CAL OK sehen, haben Sie den
Kompass erfolgreich kalibriert. Wenn Sie CAL FAIL sehen, wiederholen Sie das
Kalibrierungsverfahren.
273
272
D
TMX_W253_WS4_GE:Layout 1 8/27/09 12:27 PM Page 272

CHRONOGRAPH-MODUS
Ihre Uhr hat einen Chronograph, der als Stoppuhr fungiert. Der Chronograph kann
bis zu 100 Stunden und 99 Runden verfolgen. Mit den Daten, die Sie mit dem
Chronographen sammeln, können Sie im Review-Modus Ihren Fortschritt über-
prüfen. (Siehe Seite 277 für weitere Informationen über den Review-Modus).
Die meisten Knöpfe der Uhr besitzen im Chronograph-Modus mehrere Funktionen.
Sie können Optionen anhand der Tabelle und an der Uhr selbst ausprobieren.
275
274
KNOPF FUNKTIONEN
MODUS
• Modus aufrufen oder verlassen.
• Bei laufendem Chronograph nach Drücken von
START/SPLIT schnell Runde oder Zwischenzeit
anzeigen.
STOP/RESET
• Chronograph anhalten.
• Zwischen Höhenmesser und Barometer
wechseln (wenn Chronograph auf 00:00:00
steht).
START/SPLIT
• Chronograph starten.
• Runden- oder Zwischenzeit nehmen.
SET
• Anzeige von Runde/Zwischenzeit wechseln.
D
TMX_W253_WS4_GE:Layout 1 8/27/09 12:27 PM Page 274

Wenn der Chronograph läuft, erscheint über dem Stoppuhrsymbol
im Chrono- und Uhrzeitmodus eine Leiste.
VORSICHT: Um Batteriestrom zu sparen, schaltet sich der
Chronograph nach 100 Stunden ab, und der Knopf START/SPLIT
funktioniert nicht mehr.
REVIEW-MODUS
Der Aktivitäts-Review-Modus der Uhr erfasst hohe, niedrige und durchschnitt -
liche Werte. Während der Chronograph läuft, werden Aktivitätsstatistiken
aufgezeichnet, die im Review-Modus angezeigt werden können.
Aktivitätsdaten anzeigen
1. MODE drücken, bis REVIEW erscheint.
2. START/SPLIT drücken, um die Daten durchzugehen.
3. STOP/RESET gedrückt halten, um nach der Anzeige die aktuellsten
Informationen zu löschen.
HINWEIS: Ihr Chronograph ist für das Mountainbiking, Skifahren oder
den Waldlauf sehr nützlich. Sie können Zwischenzeiten an bestimmten
Wegpunkten nehmen, regelmäßig den Höhenmesser ablesen, um zu
sehen, wie hoch Sie auf- oder abgestiegen sind, und sogar das
Barometer dazu verwenden, Wetterumschwünge zu entdecken. Wenn
Sie fertig sind, können Sie im Review-Modus Informationen über Ihre
Aktivitäten anzeigen.
Runden und Zwischenzeiten
Rundenzeiten bezeiehen sich auf einen individuellen Aktivitätsabschnitt. Die
Zwischenzeit ist die gesamte Zeit bis zum jetzigen Abschnitt.
277
276
D
TMX_W253_WS4_GE:Layout 1 8/27/09 12:27 PM Page 276

TIPP: Mit dem Review-Modis können Sie Ihre Wanderung auf dem
Heimweg noch ein Mal erleben. Gehen Sie Ihre Aktivitätsstatistik
durch, damit Ihre Freunde sehen können, wie hoch Sie geklettert
sind, wie lange Sie über der Zielhöhe waren, und selbst wie die
Temperaturschwankungen während der Wanderung aussahen. Sie
können sogar diese Informationen über Diagramme anzeigen, die
Höhe, atmosphärischen Luftdruck und Temperaturschwankungen im
Laufe der Zeit darstellen.
HINWEIS: START/SPLIT gedrückt halten, um schnell durch die
Daten zu gehen.
VORSICHT: Die Meldung NO DATA STORED erscheint, wenn der
Chronograph nie gelaufen ist.
MODUS TIMER
Ihre WS4
™
-Uhr besitzt einen standardmäßigen Countdown-Timer, den Sie
sowohl daheim als auch im Freien einsetzen können. Er kann von einer
bestimmten Zeit aus bis zu 100 Stunden abzählen und einen Countdown bis
zu 99 Mal wiederholen.
Folgende Daten werden im Review-Modus aufgezeichnet:
• Maximale Höhe
• Minimale Höhe
• Gesamtaufstieg
• Gesamtabstieg
• Zeit auf oder über der Zielhöhe
• Höhendiagramm (die letzten 35 Minuten)
• Höchster atmosphärischer Luftdruck
• Niedrigster atmosphärischer Luftdruck
• Durchschnittlicher atmosphärischer Luftdruck
• Meeresspiegeldruck-Diagramm (die letzten 35 Minuten)
• Höchste Temperatur
• Niedrigste Temperatur
• Durchschnittstemperatur
• Temperaturdiagramm (die letzten 35 Minuten)
279
278
D
TMX_W253_WS4_GE:Layout 1 8/27/09 12:27 PM Page 278

Wenn der Countdown Null erreicht, ertönt ein Signalton. Drücken Sie einen
beliebigen Knopf, um den Ton zu beenden. Wenn Sie Timer so einstellen, dass
er sich nach Ende des Countdowns wiederholt, wiederholt er sich, bis Sie
STOP/RESET drücken. Auf der Anzeige erscheint R und eine Zahl, um
darzustellen, dass der Timer sich wiederholt, und wie oft dies schon
geschehen ist.
TIPP: Der Timer kann nützlich sein, wenn Sie erfahren wollen,
wenn die Hälfte der Zeit für eine Aktivität vorüber ist. Beispiels -
weise gehen Sie auf eine Wanderung und haben nur zwei Stun den
Zeit. Stellen Sie den Timer auf 60 Minuten, und wenn der Signalton
ertönt, machen Sie sich auf den Rückweg. Die Timer informationen
sind nicht mit dem Review-Modus verbunden.
HINWEIS: Gehen Sie bei der Timereinstellung schnell die Werte
durch, indem Sie START/SPLIT (+) oder STOP/RESET (-) gedrückt
halten.
Einstellen des Timers
1. MODE drücken, bis TIMER erscheint.
2. SET drücken und halten, um zu starten.
3. START/SPLIT (+) oder STOP/RESET (-) drücken, um die eingestellten Werte
für Stunden, Minuten, Sekunden und Vorgang beenden zu erhöhen oder
zu senken.
4. MODE (NEXT) drücken, um zur nächsten Einstelloption zu gehen.
5. Zum Fertigstellen SET (DONE) drücken.
Benutzung des Timers
1. START/SPLIT drücken, um den Timer zu starten oder ihn nach einer Pause
erneut zu starten.
2. STOP/RESET/SET drücken, um den Countdown zu stoppen.
3. STOP/RESET gedrückt halten, um den Timer auf den Startwert
zurückzusetzen.
4. STOP/RESET erneut gedrückt halten, um den Timer auf 0 zu setzen.
281
280
D
TMX_W253_WS4_GE:Layout 1 8/27/09 12:27 PM Page 280

HINWEIS: Wenn Sie den Wecker einstellen, wird dieser automa-
tisch aktiviert.
Benutzung der Weckfunktion
Um den Wecker ohne Verwendung der Einstellung zu aktivieren bzw. deak-
tivieren, drücken Sie START/SPLIT in ALARM MODE. Wenn eine eingestellte
Weckzeit erreicht wird, ertönt 20 Sekunden lang ein akustisches Signal.
Drücken Sie einen beliebigen Knopf, um die Weckfunktion auszuschalten.
Wenn das Signal nicht beim ersten Mal ausgeschaltet wird, ertönt nach
5 Minuten ein zweiter Signalton.
„Der Wecker ist vielleicht die einfachste Funktion der WS4-Uhr. Bei
aller Einfachheit spielt sie aber eine wichtige Rolle bei der
Expedition. Es ist irgendwie angenehm, um 2 Uhr früh geweckt zu
werden. Die Stunden vor Sonnenaufgang sind die schönsten.
Knirschender Schnee, einige verblassende Sterne am Himmel, und
der Rhythmus ihres Partners – das gehört einfach zum Erlebnis
einer Expedition dazu.“
- Conrad Anker, Weltberühmter Bergsteiger
Wenn der Timer läuft, erscheint über dem Timersymbol im Timer- und
Uhrzeitmodus eine Leiste.
Wenn der Timer auf Wiederholung eingestellt ist, erscheint ein Pfeil an
der Leiste über dem Timersymbol.
WECK-MODUS
Die WS4
™
-Uhr verfügt über eine Weckoption, die einmal, jeden Tag zur selben Zeit,
oder nur an Wochentagen, Wochenenden oder auch nur an einem Tag der Woche.
Einstellen eines Weckers
1. MODE drücken, bis ALARM erscheint.
2. SET drücken und halten, um zu starten.
3. START/SPLIT (+) oder STOP/RESET (-) drücken, um die eingestellten Werte
für Stunden, Minuten, AM/PM und Weckertyp zu erhöhen oder zu senken.
4. MODE (NEXT) drücken, um zur nächsten Einstelloption zu gehen.
5. Zum Fertigstellen SET (DONE) drücken.
283
282
D
TMX_W253_WS4_GE:Layout 1 8/27/09 12:27 PM Page 282

HINWEIS: Um die höchste Präzision zu gewährleisten, wählen Sie
die auf der genauesten verfügbaren Referenzquelle basierende
Kalibrierungsmethode. Wenn Sie sich beispielsweise am
Ausgangspunkt eines Pfades befinden und die richtige Höhe
kennen, wäre die genaueste Kalibrierung die Höhe. Wenn die
Höhenlage jedoch nicht bekannt ist, können Sie den aktuellen
Druck über dem Meeresspiegel herausfinden (der online oder in
Zeitungen veröffentlicht wird) und den Sensor auf den
atmosphärischen Luftdruck kalibrieren.
Die Uhr besitzt auch fünf Höhenreferenzpunkte (REFERENCE HOME,
REFERENCE BASE 1, REFERENCE BASE 2, REFERENCE BASE 3 und
REFERENCE MAN-ALT), so dass Sie die Höhe eines bekannten Standorts im
Voraus eingeben und dann die Uhr dort durch Knopfdruck rekalibrieren
können.
HINWEIS: Gehen Sie bei der Weckereinstellung schnell die Werte
durch, indem Sie START/SPLIT (+) oder STOP/RESET (-) gedrückt
halten.
— Der AM-/PM-Wert wird nur erscheinen, wenn Sie die Uhr für das
12-Stunden-Anzeigeformat eingestellt haben.
Wenn der Wecker aktiviert ist, erscheint über dem Weckersymbol im
Wecker- und Uhrzeitmodus eine Leiste.
KALIBRIERUNGSMDOUS
Die WS4-Uhr kann extrem genaue Messungen vornehmen. Sie sollten entweder
den Höhenmesser (HOME) oder das Barometer (BARO), sowie das Wettersymbol
(WEATHER) vor der ersten Benutzung kalibrieren. Wie jedes Präzisionsinstrument
sollte die Uhr häufig kalibriert werden, um diese Präzision sicherzustellen.
285
284
D
TMX_W253_WS4_GE:Layout 1 8/27/09 12:27 PM Page 284

3. START/SPLIT (+) drücken, um die Referenzpunkte (HOME ALTI, BASE 1
ALTI, BASE 2 ALTI, BASE 3 ALTI, MANUAL ALTI, BARO und WEATHER)
durchzugehen.
4. MODE (NEXT) drücken, um mit der Einstellung zu beginnen.
5. START/SPLIT (+) oder STOP/RESET (-) drücken, um die Werte zu erhöhen
oder zu reduzieren.
6. MODE (NEXT) drücken, um zur nächsten Einstelloption zu gehen.
7. SET (DONE) drücken.
8. Zum Abschließen der Kalibrierung für die ausgewählten
Referenzen STOP/RESET gedrückt halten, bis der Signalton der
Uhr ertönt.
9. Bei einem sich ändernden Standort eine neue Referenz finden und durch
Gedrückthalten von STOP/RESET erneut kalibrieren.
Hinweis: Verwenden Sie manuelle Höhe (MAN-ALT) für eine
einmalige, manuelle Neukalibrierung. Verwenden Sie Höhe zu
Hause und Grundhöhe 1, 2, 3, um Höhenreferenzpunkte zu
speichern, die häufig benutzt werden.
VORSICHT: Plötzliche Änderungen im atmosphärischen Luftdruck
können die Höhenmessungen beeinflussen. Soweit möglich, sollten
Sie erneut mit einem bekannten Höhenwert kalibrieren, wenn
drastische Änderungen eintreten.
Einstellen und Kalibrieren der Referenzpunkte
1. MODE drücken, bis CAL erscheint.
2. SET gedrückt halten, um die Kalibrierung zu beginnen.
287
286
ZUHAUSE
(ZUHAUSE1
ALTI)
(d.h. 800 M)
START DES
WANDERWEGS
(BASIS 1 ALTI)
(1200 M)
SPITZE
(BASIS 2 ALTI)
(2000 M)
HÜTTE
(BASIS 3
ALTI)
(1000 M)
BEISPIEL: LIEBLINGSWANDERWEG
D
TMX_W253_WS4_GE:Layout 1 8/27/09 12:27 PM Page 286

GLOSSAR
Dieses Glossar bietet Definitionen für einige der Elemente und Funktionen, die
in diesem Handbuch ebschrieben werden.
Höhenmesser:
Ein Instrument, das die Höhe eines Objekts in Bezug auf ein
vorgegebenes Niveau bestimmt. Üblicherweise ist dies die Meereshöhe.
Analog:
In Bezug auf eine Uhr bedeutet dies, dass sie Zeiger besitzt.
Barometer:
Ein Barometer misst den Luftdruck und hilft, Wetter umschwünge
vorherzusagen.
Atmosphärischer Luftdruck:
Luftdruck bezüglich der Wettervorhersage.
Hochdruck bedeutet üblicherweise warmes und sonniges Wetter, während
Tiefdruck auf Wolken und möglicherweise Niederschläge verweist.
Kalibrierung:
Eine Methode zur Verbesserung der Präzision bei Kompass,
Höhenmesser, Barometer und Wettervorhersage, vor allem durch die
Kompensierung örtlicher Bedingungen.
Chronograph:
Der Chronograph zeichnet gestoppte Abschnitte für die Dauer
Ihrer Aktivität auf.
Hinweis: Wenn Sie bereits einen Referenzpunkt eingegeben haben,
können Sie sofort schnell wählen und zur Schnellkalibrierung
STOP/RESET gedrückt halten.
INDIGLO
®
-NACHTLICHT
Wenn Sie in einem beliebigen Modus den INDIGLO
®
-Knopf drücken, wird das
Zifferblatt beleuchtet, damit Sie es besser sehen können. Sie können auch die
Funktion Night-Mode
®
aktivieren, indem Sie den INDIGLO
®
-Knopf gedrückt halten,
bis ein Signalton ertönt. Die Funktion Night-Mode
®
ist bei Dunkelheit sehr nützlich,
da Sie einen beliebigen Knopf drücken können, um die Uhr 2 bis 3 Sekunden lang
zu beleuchten. Nach Aktivierung bleibt die Funktion Night-Mode
®
7 bis 8 Stunden
aktiv. Wenn Sie die Funktion Night-Mode
®
vor Ablauf der 7 bis 8 Stunden
deaktivieren wollen, halten Sie den INDIGLO
®
-Knopf gedrückt halten, bis ein
Signalton ertönt.
289
288
D
TMX_W253_WS4_GE:Layout 1 8/27/09 12:27 PM Page 288

Druck auf Meeresspiegelniveau:
Der Luftdruck für einen spezifischen Standort,
angepasst an den Höhenunterschied für den Standort. Normalerweise ist der
örtliche Luftdruck niedriger als der Druck auf Meeresspiegelniveau, da der
Luftdruck mit zunehmender Höhe abnimmt.
Zwischenzeit:
Zwischenzeit zeichnet die gesamte abgelaufene Zeit seit dem
Start einer Aktivität auf.
Runden- oder Zwischenzeit nehmen:
Wenn Sie eine Runden- oder
Zwischenzeit nehmen, zeichnet der Chronograph die Zeit des aktuellen
Abschnitts auf und nimmt automatisch eine neue auf.
Geografische Nordrichtung:
Der geografische Nordpol, an dem sich alle
Längengrade treffen. Bei Karten ist die geografische Nordrichtung immer oben.
Mittels des Unterschieds zwischen der geografischen Nordrichtung und dem
magnetischen Norden wird der vom Kompass der Uhr verwendete
Deklinationswinkel berechnet.
Deklination:
Ein Kompass verwendet eine Deklinationswinkeleinstellung, um den
Unterschied zwischen der geografischen Nordrichtung und dem magnetischen
Norden einzubeziehen. Westliche Deklinationen werden von der berechneten
Kompassrichtung abgezogen, östliche zu dieser hinzugezählt. Die Tabelle auf
Seite 270-271 bietet eine Liste der Deklinationen für wichtige Städte der Welt.
Digital:
In Bezug auf eine Uhr bedeutet dies, dass sie Ziffern anzeigt.
In Hg (Zoll Quecksilber):
In Hg steht für Zoll Quecksilber, eine Einheit zur Messung
des Luftdrucks. Ein Zoll Quecksilbersäule entspricht 33,86 Millibar.
Runde:
Die Rundenzeit zeichnet die Zeit oder Zeitdauer individueller Abschnitte
Ihrer Aktivität auf.
Magnetischer Norden:
Die Richtung zum magnetischen Nordpol, in die die
Kompassnadel deutet, die aber von der geografischen Nordrichtung abweicht
(siehe unten). Mittels des Unterschieds zwischen der geografischen Nordrichtung
und dem magnetischen Norden wird der vom Kompass der Uhr verwendete
Deklinationswinkel berechnet.
MB:
MB steht für Millibar, eine Maßeinheit für den Luftdruck. Ein Millibar entspricht
0,0295 Zoll Quecksilbersäule.
291
290
D
TMX_W253_WS4_GE:Layout 1 8/27/09 12:27 PM Page 290

DIESE GARANTIE UND DIE DARIN ENTHALTENEN ABHILFEN GELTEN
EXKLUSIV UND ANSTATT JEGLICHER ANDERER GARANTIEN;
AUSDRÜCKLICHER ODER STILLSCHWEIGENDER ART, EINSCHLIESSLICH DER
STILLSCHWEIGENDEN GARANTIE DER HANDELSÜBLICHEN QUALITÄT ODER
EIGNUNG FÜR EINEN BESTIMMTEN ZWECK. TIMEX HAFTET NICHT FÜR
SONDER-, NEBEN- ODER FOLGESCHÄDEN. Einige Länder und Bundesstaaten
erlauben keine Einschränkungen stillschweigender Garantien und keine
Ausschlüsse oder Einschränkungen von Schadensersatzansprüchen, so dass
diese Einschränkungen nicht unbedingt auf Sie zutreffen. Diese Garantie gibt
Ihnen bestimmte Rechte. Darüber hinaus haben Sie u.U. weitere Rechte, die
je nach Land oder Bundesstaat unterschiedlich sind.
Um den Garantie-Service in Anspruch zu nehmen, senden Sie Ihre Uhr an
Timex, einen Timex-Partner oder den Timex-Einzelhändler, bei dem Sie die
Uhr gekauft haben, mit ausgefülltem Original-Reparaturschein als Anlage.
Ausschließlich für USA und Kanada: legen Sie den ausgefüllten Original-
Reparaturschein oder eine schriftliche Erklärung mit Namen, Adresse,
Telefonnummer, Ort und Kaufdatum bei. Schicken Sie zusammen mit Ihrer
Uhr folgenden Betrag für Porto- und Verpackung ein (hierbei handelt es sich
nicht um Reparaturkosten): in den USA, einen Scheck oder eine
Zahlungsanweisung über US$ 8,00; in Kanada, einen Scheck oder eine
TIMEX INTERNATIONALE GARANTIE
(U.S.A. – BESCHRÄNKTE GARANTIE)
Für Ihre TIMEX
®
-Uhr übernimmt die Timex Group USA, Inc. eine Garantie auf
Herstellungsmängel für die Dauer EINES JAHRES vom Original-Verkaufsdatum.
Timex und ihre Partner weltweit erkennen diese internationale Garantie an.
Bitte beachten Sie, dass Timex nach eigenem Ermessen die Uhr durch
Installieren neuer oder gründlich überholter und überprüfter Komponenten
reparieren bzw. durch ein identisches oder ähnliches Modell ersetzen kann.
WICHTIG — BITTE BEACHTEN SIE, DASS SICH DIESE GARANTIE NICHT AUF
MÄNGEL ODER SCHÄDEN IHRER UHR BEZIEHT:
1) wenn die Garantiezeit abgelaufen ist;
2) wenn das Produkt ursprünglich nicht von einem autorisierten TIMEX-
Händler gekauft wurde;
3) wenn Reparaturen nicht von Timex durchgeführt wurden;
4) wenn diese durch Unfälle, unbefugte Eingriffe oder unsachgemäße
Behandlung entstanden sind; und
5) wenn Glas, Armband, Uhrengehäuse, Zubehör oder Batterie betroffen
sind. Timex kann den Ersatz dieser Teile in Rechnung stellen.
293
292
D
TMX_W253_WS4_GE:Layout 1 8/27/09 12:27 PM Page 292

295
Zahlungsanweisung über CAN$ 7,00; und in GB, einen Scheck oder eine
Zahlungsanweisung über UK£ 2,50. In allen anderen Ländern wird Ihnen Timex
die Port- und Verpackungskosten in Rechnung stellen. KEINE BESONDEREN
ARMBÄNDER ODER ANDERE ARTIKEL MIT PERSÖNLICHEM WERT BEIFÜGEN.
Innerhalb der USA erhalten Sie zusätzliche Garantieinformation unter der
Nummer 1-800-328-2677. Für Kanada wählen Sie 1-800-263-0981, für
Brasilien +55 (11) 5572 9733, für Mexiko 01-800-01-060-00, für
Zentralamerika, die Karibik, Bermuda und die Bahamas (501) 370 5775 (USA).
Für Asien wählen Sie 852-2815-0091, für GB 44 020 8687 9620, für Portugal
351 212 946 017, für Frankreich 33 3 81 63 42 00, für Deutschland/Österreich
+43 662 88921 30, für den mittleren Osten und Afrika 971-4-310850. Für alle
anderen Länder wenden Sie sich für Garantieinformation bitte an Ihren örtlichen
Timex-Einzelhändler oder Timex-Generalvertreter. In Kanada, den USA und
anderen bestimmten Standorten können teilnehmende Timex-Händler Ihnen
einen frankierten und adressierten Versandumschlag für die Rücksendung der
Uhr zur Verfügung stellen.
©2009 Timex Group USA, Inc. TIMEX, E Logo, EXPEDITION und NIGHT-MODE
sind eingetragene Marken der Timex Group USA, Inc. in den USA und anderen
Ländern. INDIGLO ist eine eingetragene Marke der Indiglo Corporation in den
USA und in anderen Ländern. WS4 ist eine Marke der Timex Group, B.V.
294
D
TMX_W253_WS4_GE:Layout 1 8/27/09 12:27 PM Page 294

INHOUDSOPGAVE
INLEIDING . . . . . . . . . . . . . . . . . . . . . . . . . . . . . . . . . . . . . . . . . . 301
TIMEX
®
EXPEDITION
®
WS4
™
. . . . . . . . . . . . . . . . . . . . . . . . . . . . . 303
HORLOGEFUNCTIES. . . . . . . . . . . . . . . . . . . . . . . . . . . . . . . . . . . 304
Tijd . . . . . . . . . . . . . . . . . . . . . . . . . . . . . . . . . . . . . . . . . . . . . 304
Hoogtemeter . . . . . . . . . . . . . . . . . . . . . . . . . . . . . . . . . . . . . . 304
Barometer. . . . . . . . . . . . . . . . . . . . . . . . . . . . . . . . . . . . . . . . 305
Temperatuur . . . . . . . . . . . . . . . . . . . . . . . . . . . . . . . . . . . . . . 305
Kompas . . . . . . . . . . . . . . . . . . . . . . . . . . . . . . . . . . . . . . . . . 305
Chronograaf . . . . . . . . . . . . . . . . . . . . . . . . . . . . . . . . . . . . . . 305
Timer . . . . . . . . . . . . . . . . . . . . . . . . . . . . . . . . . . . . . . . . . . . 306
Alarm . . . . . . . . . . . . . . . . . . . . . . . . . . . . . . . . . . . . . . . . . . . 306
SNELSTART . . . . . . . . . . . . . . . . . . . . . . . . . . . . . . . . . . . . . . . . . . . 307
De tijd en datum instellen . . . . . . . . . . . . . . . . . . . . . . . . . . . . 307
Het kompas kalibreren . . . . . . . . . . . . . . . . . . . . . . . . . . . . . . 307
Hoogte of barometer kalibreren en het weer instellen . . . . . . . 308
N
TMX_W253_WS4_DU:Layout 1 8/27/09 12:28 PM Page 296

INSTRUCTIES. . . . . . . . . . . . . . . . . . . . . . . . . . . . . . . . . . . . . . . . . . 310
TIJDMODUS. . . . . . . . . . . . . . . . . . . . . . . . . . . . . . . . . . . . . . . . . 310
De tijd en maateenheden instellen . . . . . . . . . . . . . . . . . . . . . 310
Het display veranderen . . . . . . . . . . . . . . . . . . . . . . . . . . . . . . 311
HOOGTEMETERMODUS . . . . . . . . . . . . . . . . . . . . . . . . . . . . . . . . 311
De werking van de hoogtemeter . . . . . . . . . . . . . . . . . . . . . . . 311
De streefhoogte of het hoogtealarm instellen . . . . . . . . . . . . . 313
BAROMETERMODUS . . . . . . . . . . . . . . . . . . . . . . . . . . . . . . . . . . 316
De werking van de barometer. . . . . . . . . . . . . . . . . . . . . . . . . 316
TEMPERATUUR EN WEERSVERWACHTINGEN . . . . . . . . . . . . . . . . 318
KOMPASMODUS . . . . . . . . . . . . . . . . . . . . . . . . . . . . . . . . . . . . . 320
Het kompas kalibreren . . . . . . . . . . . . . . . . . . . . . . . . . . . . . . 320
Het kompas gebruiken . . . . . . . . . . . . . . . . . . . . . . . . . . . . . . 324
CHRONOGRAAFMODUS . . . . . . . . . . . . . . . . . . . . . . . . . . . . . . . . 324
Ronde- en tussentijden . . . . . . . . . . . . . . . . . . . . . . . . . . . . . . 326
BEKIJKMODUS. . . . . . . . . . . . . . . . . . . . . . . . . . . . . . . . . . . . . . . 327
Activiteitsgegevens bekijken . . . . . . . . . . . . . . . . . . . . . . . . . . 327
DE TIMERMODUS . . . . . . . . . . . . . . . . . . . . . . . . . . . . . . . . . . . . 329
De timer instellen . . . . . . . . . . . . . . . . . . . . . . . . . . . . . . . . . . 330
De werking van de timer . . . . . . . . . . . . . . . . . . . . . . . . . . . . 330
ALARMMODUS . . . . . . . . . . . . . . . . . . . . . . . . . . . . . . . . . . . . . . 332
Een alarm instellen . . . . . . . . . . . . . . . . . . . . . . . . . . . . . . . . . 332
De werking van het alarm. . . . . . . . . . . . . . . . . . . . . . . . . . . . 333
KALIBRATIEMODUS . . . . . . . . . . . . . . . . . . . . . . . . . . . . . . . . . . . 334
De referentiepunten instellen en kalibreren. . . . . . . . . . . . . . . 336
INDIGLO
®
NACHTLICHT . . . . . . . . . . . . . . . . . . . . . . . . . . . . . . . . 337
VERKLARENDE WOORDENLIJST. . . . . . . . . . . . . . . . . . . . . . . . . . 338
INTERNATIONALE GARANTIE VAN TIMEX . . . . . . . . . . . . . . . . . . . 341
N
TMX_W253_WS4_DU:Layout 1 8/27/09 12:28 PM Page 298

301
INLEIDING
Sommige van de beste plekken op de planeet zijn het moeilijkste te bereiken.
Uw nieuwe Timex
®
Expedition
®
WS4
™
horloge helpt u daar te komen.
Het WS4
™
horloge, uitgerust met essentiële functies voor de vrije natuur, volgt
een originele methode voor polsinstrumenten voor het beleven van avonturen.
Het grote, brede scherm geeft belangrijke informatie in een oogopslag weer
zonder de modi te hoeven doorlopen.
Het WS4
™
horloge maakt gebruik van geavanceerde sensoren met hoge
nauwkeurigheid. Omdat ze ook aan de intuïtieve gebruikersinterface
gekoppeld zijn, kunt u erop vertrouwen dat u alle juiste antwoorden krijgt, zelfs
in de meest extreme omstandigheden. De eerste pagina’s van de handleiding
helpen u om snel van start te gaan en de rest legt ons meest geavanceerde
instrument voor de vrije natuur gedetailleerd uit.
Dus of u nu een wandelpad neemt, de skihellingen afdaalt of 23 trappen oprent
om alleen even te zien hoe gevoelig de hoogtemeter is, bereid u voor om alle
perken te buiten te gaan.
N
TMX_W253_WS4_DU:Layout 1 8/27/09 12:28 PM Page 300

TIMEX
®
EXPEDITION
®
WS4
™
“Vergeet niet dat uw WS4 niet de plaats kan innemen van gezond
verstand. Gezond verstand is gebaseerd op ervaring en ervaring opdoen
kost altijd tijd. Geniet van uw nieuwe instrument, maar bedenk wel dat
het net zoals een hond is die beweging nodig heeft. Neem het mee
naar buiten en test het en uzelf uit.”
-Conrad Anker
Wereldvermaarde bergbeklimmer
Merkambassador voor
Timex
®
Expedition
®
303
302
START/SPLIT
(starten/tussentijd)
(+)
KNOP INDIGLO
®
SET
(instellen)
(DONE)
(voltooid)
MODE
(modus)
(NEXT)
(volgende)
STOP/RESET
(-)
TIME OF DAY (tijd)>ALTIMETER (hoogtemeter)
>BAROMETER>COMPASS (kompas)>CHRONO (chronograaf)
>REVIEW (bekijken)>TIMER>ALARM>CALIBRATION (kalibratie)
INDICATOR ALARM
INDICATOR CHRONOGRAAF
INDICATOR AFTELTIMER HERHALEN
INDICATOR AFTELTIMER
N
TMX_W253_WS4_DU:Layout 1 8/27/09 12:28 PM Page 302

Barometer
• Houdt de hoogste, laagste en huidige druk bij alsook de druk op
zeeniveau.
• Geeft de veranderingen in druk op zeeniveau in een grafiek weer.
• Bedrijfsbereik van 300 tot 1100 mbar (9 tot 32,5 inHg).
• Geeft een grafiek van de weersverwachtingen weer.
Temperatuur
• Toont de temperatuur in Celsius of Fahrenheit.
• Bedrijfsbereik van 14 tot 122 °F (-10 tot 55 °C).
Kompas
• Dit omvat de koers in zowel getallen als een digitale kompasnaald.
• Kan op een miswijzing worden gekalibreerd voor maximale
nauwkeurigheid.
Chronograaf
• Stopwatchfunctie die de tijd kan opnemen tot 100 uur en 99 ronden.
• De mogelijkheid om ronde- of tussentijd in grotere cijfers weer te geven.
HORLOGEFUNCTIES
Tijd
• Uren, minuten en seconden weergegeven in 12- of 24-uurs indeling.
• Datum weergegeven in MM-DD of DD.MM indeling.
• Tweede tijdzone, met zelfstandige uren, minuten, datum en indelings -
instellingen.
• Uursignaal (optioneel).
• Pieptoon van knoppen (optioneel).
• Zowel een digitale als analoge klok.
Hoogtemeter
• Toont metingen in ft of meters.
• Bedrijfsbereik van -1312 tot 29.520 ft (-400 tot 9000 m).
• Houdt de huidige, grootste en totale hoogte bij.
• Geeft het stijgen en dalen in een grafiek weer.
• Houdt de tijd op en boven de streefhoogte bij (in de bekijkmodus).
• Hoogtealarm.
• Vijf door de gebruiker in te stellen, aanpasbare referentiepunten voor
de hoogte.
305
304
N
TMX_W253_WS4_DU:Layout 1 8/27/09 12:28 PM Page 304

SNELSTART
Op de volgende drie pagina’s vindt u de basiskennis die u nodig hebt om uw
horloge in minder dan 5 minuten op gang te krijgen. Lees verder voor
volledige aanwijzingen.
De tijd en datum instellen
1. Druk op MODE (modus) totdat de tijd verschijnt.
2. Houd SET (instellen) ingedrukt om te starten.
3. Druk op START/SPLIT (starten/tussentijd) (+) of STOP/RESET (-) om de
instellingswaarden voor de tijdzone, tijd, datum, geluiden en maateenheden
te verhogen of te verlagen.
4. Druk op MODE (NEXT) (volgende) om naar de volgende instellingsoptie te
gaan.
5. Druk op SET (DONE) (voltooid) om te beëindigen.
Het kompas kalibreren
Voordat u het horloge kalibreert, moet u het van uw pols halen, het in uw hand
houden en een miswijzing kiezen uit de tabel op pagina 321 en 322.
1. Druk op MODE totdat COMPASS (kompas) verschijnt.
2. Houd SET ingedrukt om te starten.
• Tijdens het gebruik van de chronograaf registreert het WS4
™
horloge
belangrijke statistische gegevens van activiteiten die in de bekijkmodus
gezien kunnen worden.
Timer
De afteltimer werkt maximaal 100 uur met de mogelijkheid het aftellen wel
99 keer te herhalen.
Alarm
• Kies uit drie dagelijkse, weekdag-, weekend- of wekelijkse alarmen.
• Eenmalige tweede waarschuwing als het alarm wordt genegeerd.
307
306
NEDERLANDS SNELSTART
TMX_W253_WS4_DU:Layout 1 8/27/09 12:28 PM Page 306

referentiepunten te doorlopen en HOME of BARO te kiezen.
4. Druk op MODE (NEXT) om met het instellingsproces te beginnen.
5. Druk op START/SPLIT (+) of STOP/RESET (-) om de instellingswaarden te
verhogen of verlagen.
6. Druk op MODE (NEXT) om naar de volgende instellingsoptie te gaan.
7. Druk op SET (VOLTOOID).
8. Om de kalibratie voor de geselecteerde referentie te voltooien, houdt
u STOP/RESET ingedrukt totdat het horloge een pieptoon geeft.
Zodra u de hoogte of barometer hebt ingesteld, moet u het weerpictogram met
de huidige weersomstandigheden synchroniseren.
1. Druk in de modus CAL op SET om met het kalibreren te beginnen.
2. Druk op START/SPLIT (+) of STOP/RESET (-) om naar WEATHER (weer) te
schuiven.
3. Druk op MODE (NEXT) om met het instellingsproces te beginnen.
4. Druk op START/SPLIT (+) of STOP/RESET (-) om de weersopties te
doorlopen.
5. Druk op SET (VOLTOOID).
3. Terwijl u het horloge horizontaal en naar boven gericht houdt, draait u het
tweemaal rond (een omwenteling moet minstens 15 seconden duren) en drukt
u op MODE.
4. Druk op START/SPLIT (+) of STOP/RESET (-) om de instellingswaarden te
verhogen of te verlagen om ze aan de door u gekozen miswijzing aan te
passen.
5. Druk op MODE om naar de volgende instellingsoptie te gaan.
6. Druk op SET om te beëindigen.
Als u CAL OK (kalibratie in orde) aan het einde van het kalibratieproces ziet, is het
kompas goed gekalibreerd. Als u CAL FAIL (kalibratie mislukt) ziet, herhaalt u het
kalibratieproces.
Hoogte of barometer kalibreren en het weer instellen
U moet ofwel de hoogtemeter (HOME) ofwel de barometer (BARO) en het
weerpictogram [WEATHER (WEER)] kalibreren voordat u het horloge voor het eerst
gebruikt. U moet het horloge op grond van de meest nauwkeurige informatie die
u hebt kalibreren.
1. Druk op MODE totdat CAL (kalibreren) verschijnt.
2. Houd SET ingedrukt om met het kalibreren te beginnen.
3. Druk op START/SPLIT (+) of STOP/RESET (-) om de instellingen van de
309
308
NEDERLANDS SNELSTART
TMX_W253_WS4_DU:Layout 1 8/27/09 12:28 PM Page 308

Het display veranderen
• Tijdzones: U kunt de andere tijdzone zien door op START/SPLIT te drukken of
van tijdzone veranderen door START/SPLIT ingedrukt te houden.
• In de tijdmodus kunt u op STOP/RESET drukken om uit de volgende
weergaveopties te kiezen: datum, hoogte of barometerstand.
HOOGTEMETERMODUS
Met uw horloge kunt u de huidige, grootste en totale hoogte alsook de tijd die
u op of boven een streefhoogte doorbrengt, volgen. Deze modus omvat ook een
alarm als u gewaarschuwd wilt worden wanneer u boven een gekozen hoogte
komt. U moet de hoogtemeter kalibreren voordat u hem voor het eerst gebruikt
(zie pagina 334).
De werking van de hoogtemeter
In de hoogtemetermodus doorloopt het WS4
™
horloge automatisch het
volgende:
• PEAK (piek): De grootste hoogte die bereikt is.
• ACC [accumulated (totaal)]: De totale hoogteverandering waarbij stijgen en
dalen in aanmerking wordt genomen.
• CURR [current (huidig)]: De huidige hoogte.
6. Om het weer op grond van de vooraf geselecteerde gegevens te
kalibreren, houdt u STOP/RESET ingedrukt totdat het horloge een
pieptoon geeft.
INSTRUCTIES
TIJDMODUS
Uw horloge toont de tijd voor twee tijdzones. In deze modus kunt u ook maateen-
heden (bv. ft of meter; Fahrenheit of Celsius) en uit drie verschillende weergaveop-
ties kiezen.
De tijd en maateenheden instellen
1. Druk op MODE totdat de tijd wordt weergegeven.
2. Houd SET ingedrukt om te starten.
3. Druk op START/SPLIT (+) of STOP/RESET (-) om de instellingswaarden voor de
tijdzone, tijd, datum, geluiden en maateenheden te verhogen of te verlagen.
4. Druk op MODE (NEXT) om naar de volgende instellingsoptie te gaan.
5. Druk op SET (DONE) om te beëindigen.
311
310
N
TMX_W253_WS4_DU:Layout 1 8/27/09 12:28 PM Page 310

De streefhoogte of het hoogtealarm instellen
De hoogtemeterinstellingen bestaan uit:
•
Streefhoogte:
Als de chronograaf loopt, volgt het horloge de tijd die op of
boven deze streefhoogte in de bekijkmodus is doorgebracht.
•
Hoogtealarm:
Waarschuwt u via een pop-up op het scherm en een
hoorbaar alarm dat u een vooraf geselecteerde hoogte hebt bereikt.
“Wanneer het alarm afgaat, weet u dat u de door u ingestelde
hoogte hebt bereikt. Dankzij deze snelle herinnering kunt u de
situatie beoordelen en besluiten of u op de juiste weg bent naar
een succesvolle beklimming.”
-Conrad Anker
Wereldvermaarde bergbeklimmer
Opmerking: Als u tijdens een wandeling 400 meter klimt en 100
meter daalt, dan is de totale hoogte 300 meter.
Wanneer het horloge de weergave van de huidige hoogte bereikt, kunt u ook:
Op START/SPLIT drukken: De
numerieke huidige hoogte of een
grafische weergave van de hoogte over
de afgelopen 36 uur bekijken.
Houd STOP/RESET ingedrukt: stel
de verzamelde statistische hoogte -
metergegevens op nul om het
geheugen te wissen.
313
312
N
TMX_W253_WS4_DU:Layout 1 8/27/09 12:28 PM Page 312

OPGELET: Uw hoogtemeter is gevoelig voor weersveranderingen!
Plotselinge veranderingen in de barometerstand kunnen de
waarden op uw hoogtemeter met +/- 100 meter wijzigen, zelfs
als u op dezelfde plaats bent gebleven. Zo mogelijk opnieuw op een
bekende hoogte kalibreren wanneer drastische veranderingen in
druk zich voordoen.
U hoeft alleen de barometer OF de hoogtemeter te kalibreren
omdat ze dezelfde druk gebruiken. Zie Kalibratiemodus op
pagina 334 voor meer informatie.
“Voordat ik in mijn slaapzak kruip, noteer ik altijd de huidige hoogte en
barometerstand. In de uren dat ik slaap kan ik een idee krijgen van op
komst zijnde weerspatronen als ik een verandering in de hoogte of
barometerstand zie. Omdat hoogte en barometerstand omgekeerd
evenredig zijn, kan ik erop vertrouwen dat de atmosferische druk
constant is gebleven als ik op dezelfde of een kleinere hoogte wakker
word. Als ik op een grotere hoogte opsta, moet ik opletten omdat er
een kans is dat een lage druk op komst is.”
-Conrad Anker, Wereldvermaarde bergbeklimmer
De streefhoogte of het hoogtealarm instellen:
1. Druk op MODE totdat ALTI verschijnt.
2. Houd SET ingedrukt om te starten.
3. Druk op START/SPLIT (+) of STOP/RESET (-) om de instellingswaarden te
verhogen of verlagen.
4. Druk op MODE (NEXT) om naar de volgende instellingsoptie te gaan.
5. Druk op SET (DONE) om te beëindigen.
OPMERKING: De hoogtemeter geeft waarden in FT (ft) of M (meter)
weer afhankelijk van de maateenheid die u in de tijdmodus hebt
gekozen. Zie pagina 310 voor meer informatie over het instellen van
de maateenheden.
315
314
N
Streefhoogte
Hoogtealarm
TMX_W253_WS4_DU:Layout 1 8/27/09 12:28 PM Page 314

Wanneer het horloge de weergave van de huidige barometerstand bereikt, kunt
u ook:
Op START/SPLIT drukken: Geeft de
numerieke huidige barometerstand
of een grafische weergave van de
druk op zeeniveau weer over de
afgelopen 36 uur.
Houd STOP/RESET ingedrukt: stel
de verzamelde statistische
gegevens van de barometerstand
op nul om het geheugen te wissen.
OPMERKING: De barometer geeft waarden in MB (millibar) of In Hg
(inch kwik) weer afhankelijk van de maateenheid die u in de tijd-
modus hebt gekozen. Zie pagina 310 voor meer informatie over
het instellen van de maateenheden.
U hoeft alleen de barometer OF de hoogtemeter te kalibreren
omdat ze dezelfde druk gebruiken. Zie Kalibratiemodus op
pagina 334 voor meer informatie.
BAROMETERMODUS
Uw horloge geeft informatie over de huidige druk, de druk op zeeniveau, hoge of
lage barometerstand en veranderingen in de druk op zeeniveau over de afgelopen
36 uur. Deze functies zijn handig om weersveranderingen te begrijpen.
De werking van de barometer
In de modus BARO doorloopt het horloge automatisch het volgende:
• De hoogste bereikte barometerstand.
• De laagste bereikte barometerstand.
• De huidige barometerdruk en de gecorrigeerde druk op zeeniveau.
317
316
N
TMX_W253_WS4_DU:Layout 1 8/27/09 12:28 PM Page 316

OPMERKING: Bij lage temperaturen kan het display traag zijn.
Raadpleeg pagina 305 voor het bedrijfstemperatuurbereik. Verhoog
de temperatuur rond het horloge om de normale werking te
hervatten.
OPMERKING: Probeer voor nauwkeurigere temperatuurwaarden
het horloge buiten uw jas te dragen of klem het aan uw riem of
rugzak (bij voorkeur op een plek die niet steeds aan de zon wordt
blootgesteld). Ook kunt u het horloge van uw pols afhalen en het
15 tot 30 minuten in de schaduw leggen.
Voor informatie over het kalibreren van het weerpictogram kunt u
Kalibratiemodus op pagina 334 raadplegen.
TEMPERATUUR EN WEERSVERWACHTINGEN
In de modi TIME, ALTI, BARO, CHRONO en TIMER geeft uw WS4
™
horloge
informatie over de temperatuur en weersverwachtingen.
Het horloge kan het weer voorspellen op grond van historische luchtdruktrends.
Over het algemeen wordt verondersteld dat het weer beter wordt als de luchtdruk
stijgt en dit wordt aangegeven door het zonpictogram. Als de luchtdruk aan het
dalen is, wordt het weer slechter en dit wordt aangegeven door de pictogrammen
voor wolken en/of neerslag.
Wanneer u het horloge om uw pols draagt, beïnvloedt de lichaamswarmte de
temperatuurwaarde; deze kan 10 graden of meer van de werkelijke temperatuur
afwijken. Lange perioden van blootstelling aan direct zonlicht kunnen de
nauwkeurigheid ook beïnvloeden. Het horloge kan ook de tempera tuur in water
meten, maar zorg dat u onder water op geen enkele knop van het horloge drukt;
anders is het horloge niet meer waterbestendig.
319
318
P
P
N
TMX_W253_WS4_DU:Layout 1 8/27/09 12:28 PM Page 318

VVoordat u het kompas kalibreert, moet u het horloge van uw pols halen, het
in uw hand houden en een miswijzing kiezen uit de tabel op deze en de
volgende pagina.
PLAATS MISWIJZING PLAATS MISWIJZING
Amsterdam 0° W Chicago 3° W
Anchorage 19° O Dallas 3° O
Auckland 18° O Denver 9° O
Peking 3° W Dubai 1° O
Bern 0° O Hongkong 2° W
Bogota 5° W Jeruzalem 3° O
Bozeman 13° O Londen 1° W
Buenos Aires 8° W Los Angeles 12° O
Calgary 15° O Madrid 1° W
Kaapstad 23° W Mexico-stad 5° W
Moskou 10° W Riyad 2° O
Mount Everest 0° W Rome 1° O
KOMPASMODUS
Het WS4
™
horloge heeft een nauwkeurig digitaal kompas dat om de se conde een
waarde afleest wanneer het ingeschakeld is, en toont de kompaswaarde als een
een getal plus een hoofdkoers met een virtuele kompasnaald. U moet het kompas
kalibreren voordat u het voor het eerst gebruikt. Het is ook een goed idee om het
regelmatig te kalibreren om steeds exacte waarden te krijgen. Voor meer
informatie kunt u Kalibratiemodus op pagina 334 raadplegen.
Het kompas kalibreren
Bij gebruik van het kompas is het belangrijk dat u uw pols horizontaal houdt
zodat de kompaswaarden nauwkeuriger zijn.
Voor de nauwkeurigste waarden mag u het kompas niet nabij grote metalen
voorwerpen (zoals elektronica, auto’s, archiefkasten en andere
metalen voorwerpen) kalibreren omdat de magnetische kracht in
deze voorwerpen het magnetische veld kan verstoren en u
onnauwkeurige kompaswaarden kan geven. De functie Indiglo
®
nachtlicht werkt niet terwijl het kompas wordt gekalibreerd.
321
320
wordt vervolgd op de volgende pagina
N
TMX_W253_WS4_DU:Layout 1 8/27/09 12:28 PM Page 320

Als u de miswijzing eenmaal weet, doet u het volgende:
1. Druk op MODE totdat COMPASS verschijnt.
2. Houd SET ingedrukt om te starten.
3. Terwijl u het horloge horizontaal en naar boven gericht houdt, draait u het
tweemaal rond (een omwenteling moet minstens 15 seconden duren) en
drukt u op MODE.
4. Druk op START/SPLIT of STOP/RESET om de instellingswaarden te
verhogen of te verlagen om ze aan de door u gekozen miswijzing aan te
passen.
5. Druk op MODE om naar de volgende instellingsoptie te gaan.
6. Druk op SET om te beëindigen.
Als u CAL OK aan het einde van het kalibratieproces ziet, is het kompas goed
gekalibreerd. Als u CAL FAIL ziet, herhaalt u het kalibratieproces.
OPGELET: De kalibratie kan mislukken als u het horloge te snel
draait of als u langer dan één minuut over de kalibratie doet.
De kalibratie kan ook mislukken als u nabij magnetische
voorwerpen bent.
PLAATS MISWIJZING PLAATS MISWIJZING
Mumbai 0° W Seattle 17° O
München 1° O Seoul 7° W
New York 12° W Sydney 12° O
Orlando 5° W Tokio 6° W
Oslo 1° O Toronto 10° W
Parijs 0° W Vancouver 17° O
Reykjavik 15° W Warschau 4° O
Rio de Janeiro 22° W Washington DC 10° W
Voor plaatsen die niet in de bovenstaande tabel staan, kunt u de miswijzing vinden
met behulp van de miswijzingsrekenmachine op de onderstaande URL. U moet de
breedte- en lengtegraad van uw locatie weten voordat u de miswijzing op deze
website kunt berekenen. Informatie over breedte- en lengtegraad kunt u op
internet vinden.
http://www.ngdc.noaa.gov/geomagmodels/struts/calcDeclination
323
322
N
TMX_W253_WS4_DU:Layout 1 8/27/09 12:28 PM Page 322

De meeste knoppen op het horloge hebben meerdere functies in de chrono-
graafmodus. Gebruik de tabel samen met uw horloge om de mogelijkheden te
verkennen.
Het kompas gebruiken
Nadat u het kompas gekalibreerd hebt, ziet de de huidige koers van het kompas,
de hoofdwindstreken en de digitale kompasnaald wanneer u naar de kompas-
modus gaat. Na 30 seconden worden geen kompaswaarden meer gelezen en
verdwijnen deze van het horlogedisplay zodat de batterij langer meegaat. Druk op
START/SPLIT om de huidige koers nog 30 seconden weer te geven.
TIP: Uw horloge is een fantastisch instrument voor een oriëntatieloop.
U kunt uw kompas gebruiken om waypoints te navi geren en als u aan
een oriëntatieloop deelneemt, kunt u uw tijd opnemen met de
chronograaf (zie het volgende gedeelte).
CHRONOGRAAFMODUS
Uw horloge heeft een chronograaf; dit is een stopwatchfunctie. De chronograaf
houdt maximaal 100 uur en 99 ronden bij. De gegevens die u verzamelt terwijl de
chronograaf loopt, kunnen dan worden gebruikt om uw voortgang in de
bekijkmodus te volgen. (Zie pagina 327 voor verdere informatie over de
bekijkmodus.)
325
324
KNOP FUNCTIES
MODE
• Naar de modus gaan of de modus verlaten.
• Snel een ronde- of tussentijd weergeven na op
START/SPLIT gedrukt te hebben wanneer de
chronograaf loopt.
STOP/RESET
• De chronograaf stoppen.
• Tussen informatie op het display over de
hoogtemeter en barometer wisselen (als de
chronograaf op 00:00:00 staat).
START/SPLIT
• De chronograaf starten.
• Een ronde- of tussentijd opnemen:
SET
• De plaats op het display van de ronde- en
tussentijd omwisselen.
N
TMX_W253_WS4_DU:Layout 1 8/27/09 12:28 PM Page 324

Als de chronograaf loopt, wordt in de chronograaf- en tijdmodi een
staaf boven het stopwatchpictogram getoond.
OPGELET: Om de batterij van het horloge langer mee te laten
gaan, stopt het horloge met het opnemen van de tijd en werkt de
knop START/SPLIT niet wanneer de chronograaf 100 uur bereikt.
BEKIJKMODUS
De modus voor het bekijken van activiteiten op het horloge legt lage, hoge en
gemiddelde waarden van avonturen vast. Statistische activiteitsgegevens
worden geregistreerd terwijl de chronograaf loopt en zijn dan zichtbaar in de
bekijkmodus.
Activiteitsgegevens bekijken
1. Druk op MODE totdat REVIEW (bekijken) verschijnt.
2. Druk op START/SPLIT om de gegevens te doorlopen.
3. Houd STOP/RESET ingedrukt om de meest recente informatie te wissen
nadat u deze bekeken hebt.
OPMERKING: De chronograaf kan een goed instrument zijn voor
mountainbiken, skiën of joggen. U kunt tussentijden nemen bij
specifieke punten onderweg, de hoogtemeter regelmatig controleren
om te zien hoe hoog u geklommen of afgedaald bent en zelfs de
barometer controleren om er zeker van te zijn dat er geen slecht weer
op komst is. Als u klaar bent, kunt u informatie over uw activiteit in de
bekijkmodus bekijken.
Ronde- en tussentijden
Met rondetijden wordt de tijd voor een individueel segment van een activiteit
bedoeld. De tussentijd is de gehele tijd tot het huidige segment.
327
326
N
TMX_W253_WS4_DU:Layout 1 8/27/09 12:28 PM Page 326

TIP: U kunt de bekijkmodus gebruiken om op weg naar huis uw
wandeling opnieuw te beleven. Schuif door de statistische
activiteitsgegevens om uw vrienden te laten weten hoe hoog u
geklommen hebt, hoeveel tijd u boven uw streefhoogte hebt
doorgebracht en zelfs de temperatuurswisselingen tijdens uw
wandeling. En u kunt hun deze informatie op een serie grafieken
laten zien, die hoogte, barometerstand en temperatuurswisselingen
gedurende de verstreken tijd tonen.
OPMERKING: Houd START/SPLIT ingedrukt om de gegevens snel
te doorlopen.
OPGELET: U ziet het bericht NO DATA STORED (geen gegevens
opgeslagen) als de chronograaf niet gelopen heeft.
DE TIMERMODUS
Het WS4
™
horloge heeft een standaard afteltimer die u voor activiteiten zowel
binnen als buiten kunt gebruiken. Het kan vanaf een vaste tijd aftellen tot 100
uur en kan het aftellen maximaal 99 keer herhalen.
De volgende gegevens worden in de bekijkmodus gevolgd:
• Maximale hoogte
• Minimale hoogte
• Totale stijging
• Totale daling
• Tijd doorgebracht op of boven streefhoogte
• Hoogtegrafiek (meest recente 35 minuten)
• Hoogste barometerstand
• Laagste barometerstand
• Gemiddelde barometerstand
• Grafiek van druk op zeeniveau (meest recente 35 minuten)
• Hoogste temperatuur
• Laagste temperatuur
• Gemiddelde temperatuur
• Temperatuurgrafiek (meest recente 35 minuten)
329
328
N
TMX_W253_WS4_DU:Layout 1 8/27/09 12:28 PM Page 328

TIP: De timer kan handig zijn wanneer u halverwege een activiteit
gewaarschuwd wilt worden. Als u bijvoorbeeld weggaat en weet
dat u maar ongeveer twee uur de tijd hebt voor een wandeling. U
stelt de timer op 60 minuten in en wanneer u de pieptoon hoort,
weet u dat het tijd is om terug te keren. De timerinformatie is niet
verbonden met de bekijkmodus.
OPMERKING: Terwijl u de timer instelt, doorloopt u de
instellingswaarden snel door START/SPLIT (+) of STOP/RESET
(-) ingedrukt te houden.
Als de timer loopt, wordt in de timer- en tijdmodi een staaf boven
het timerpictogram getoond.
Als de timer voor herhalen is ingesteld, wordt de staaf boven het
timerpictogram met pijl getoond.
De timer instellen
1. Druk op MODE totdat TIMER verschijnt.
2. Houd SET ingedrukt om te starten.
3. Druk op START/SPLIT (+) of STOP/RESET (-) om de instellingswaarden voor de
uren, minuten, seconden en einde van actie te verhogen of te verlagen.
4. Druk op MODE (NEXT) om naar de volgende instellingsoptie te gaan.
5. Druk op SET (DONE) om te beëindigen.
De werking van de timer
1. Druk op START/SPLIT om de timer te starten of opnieuw te starten na een
pauze.
2. Druk op STOP/RESET om het aftellen te stoppen.
3. Houd STOP/RESET ingedrukt om de timer op de beginwaarde terug te stellen.
4. Houd STOP/RESET nogmaals ingedrukt om de timer op 0 te stellen.
Het horloge geeft een pieptoon wanneer het aftellen nul bereikt. U kunt op om het
even welke knop drukken om de pieptoon te stoppen. Als u de timer zo instelt dat
het aftellen aan het einde van het aftellen wordt herhaald, wordt er herhaald tot u
op STOP/RESET drukt. Op het display staat R (Repeat, herhalen) en een getal om
aan te geven dat de timer aan het herhalen is en hoeveel keer herhaald is.
331
330
N
TMX_W253_WS4_DU:Layout 1 8/27/09 12:28 PM Page 330

De werking van het alarm
Om een alarm aan of uit te zetten zonder het instellingsproces te starten, drukt
u op START/SPLIT wanneer u naar de modus ALARM gaat. Het alarm
weerklinkt 20 seconden wanneer het een ingesteld alarm bereikt. Druk op om
het even welke knop om het alarm uit te zetten. Een eenmalig tweede alarm
weerklinkt na 5 minuten als u het alarm niet uitzet wanneer het de eerste
keer afgaat.
“De wekker is wellicht de eenvoudigste functie op het WS4 horloge.
Maar toch speelt het een zeer belangrijke rol tijdens de hele
expeditie. Het is behaaglijk als de wekker om 2 uur ‘s nachts afgaat
en me wakker maakt. Deze uren voor het ochtendgloren zijn de
beste van de dag. Knerpende, stevige sneeuw onder uw voeten, een
paar sterren die tegen zonsopgang vervagen en het vloeiende ritme
van uw partners zijn het ongrijpbare deel van de expeditie-ervaring.”
-Conrad Anker
Wereldvermaarde bergbeklimmer
ALARMMODUS
Het WS4
™
horloge heeft een alarm dat u zo kunt instellen dat het eenmaal afgaat,
of elke dag op dezelfde tijd of alleen op weekends, weekdagen of zelfs slechts één
dag per week.
Een alarm instellen
1. Druk op MODE totdat ALARM verschijnt.
2. Houd SET ingedrukt om te starten.
3. Druk op START/SPLIT (+) of STOP/RESET (-) om de instellingswaarden voor
de uren, minuten, AM/PM (ochtend/middag) en alarmtype te verhogen of
te verlagen.
4. Druk op MODE (NEXT) om naar de volgende instellingsoptie te gaan.
5. Druk op SET (DONE) om te beëindigen.
OPMERKING: Wanneer u het alarm instelt, zet u het automatisch aan.
333
332
N
TMX_W253_WS4_DU:Layout 1 8/27/09 12:28 PM Page 332

u de hoogte niet weet, kunt u de huidige druk op zeeniveau te weten
komen (online of in een krant te vinden) en de sensor volgens de
barometerstand kalibreren.
Het horloge heeft ook vijf referentiepunten voor hoogte [REFERENCE HOME
(referentie thuis), REFERENCE BASE 1 (referentie basis 1), REFERENCE BASE 2,
REFERENCE BASE 3 en REFERENCE MAN-ALT (referentie handmatig-hoogte)]
waarmee u de hoogte van een bekende plaats vooraf kunt instellen en dan uw
horloge op dat punt met één druk op de knop opnieuw kunt kalibreren.
OPMERKING: Terwijl u een alarm instelt, doorloopt u de
instellingswaarden snel door START/SPLIT (+) of STOP/RESET (-)
ingedrukt te houden.
— De waarde AM/PM verschijnt (+) alleen als u het horloge op de
12-uurs indeling hebt ingesteld.
Als het alarm geactiveerd is, wordt in de alarm- en tijdmodi een staaf
boven het alarmpictogram getoond.
KALIBRATIEMODUS
Het WS4
™
horloge kan uiterst nauwkeurige metingen uitvoeren. U moet ofwel
de hoogtemeter (HOME) ofwel de barometer (BARO) en het weerpictogram
[WEATHER (WEER)] kalibreren voordat u het horloge voor het eerst gebruikt. En net
zoals bij elk precisie-instrument moet u het regelmatig kalibreren opdat het
nauwkeurig blijft.
OPMERKING: Voor de hoogste nauwkeurigheid kiest u de
kalibratiemethode op grond van de meest nauwkeurige referentiebron
die beschikbaar is. Als u bijvoorbeeld aan het begin van een pad staat en
de juiste hoogte weet, dan is hoogte de meest nauwkeurige kalibratie. Als
THUIS
(THUIS 1
HOOGTE)
(bv. 800 M)
BEGIN VAN PAD
(BASIS 1 HOOGTE)
(1200 M)
PIEK
(BASIS 2 HOOGTE)
(2000 M)
HOTEL
(BASIS 3
HOOGTE)
(1000 M)
VOORBEELD: FAVORIETE WANDELING
N
335
334
TMX_W253_WS4_DU:Layout 1 8/27/09 12:28 PM Page 334

9. Naarmate uw locatie verandert, selecteert u een nieuwe referentie en
kalibreert u opnieuw door STOP/RESET ingedrukt te houden.
Opmerking: Gebruik handmatige hoogte (MAN-ALT) voor
eenmalige, handmatige herkalibraties. Gebruik Hoogte thuis en
Basishoogte 1,2,3 om referentiepunten voor de hoogte op te slaan
die meerdere keren zullen worden gebruikt.
Opmerking: Als u al een referentiepunt hebt ingevoerd, kunt u dat
referentiepunt snel selecteren en STOP/RESET ingedrukt houden
om snel te kalibreren.
INDIGLO
®
NACHTLICHT
In elke modus wordt de wijzerplaat verlicht wanneer u op de knop INDIGLO
®
drukt, zodat u de wijzerplaat beter kunt zien. U kunt de functie Night-Mode
®
ook activeren als u de knop INDIGLO
®
ingedrukt houdt totdat u een pieptoon
hoort. De functie Night-Mode
®
is een zeer nuttige functie wanneer er weinig
licht is omdat u op om het even welke knop kunt drukken om het horloge 2
tot 3 seconden te verlichten. Nadat de functie Night-Mode
®
geactiveerd is,
blijft deze functie 7 tot 8 uur aan. Als u de functie Night-Mode
®
wilt deactiv-
eren voordat 7 tot 8 uur verstreken zijn, houdt u de knop INDIGLO
®
ingedrukt
totdat u een pieptoon hoort.
OPGELET: Plotselinge veranderingen in de barometerstand kunnen
van invloed zijn op de waarde op de hoogtemeter. Zo mogelijk
opnieuw op een bekende hoogte kalibreren wanneer drastische
veranderingen in druk zich voordoen.
De referentiepunten instellen en kalibreren
1. Druk op MODE totdat CAL verschijnt.
2. Houd SET ingedrukt om met het kalibreren te beginnen.
3. Druk op START/SPLIT (+) om de referentiepunten [HOME ALTI (hoogte thuis),
BASE 1 ALTI (hoogte basis 1), BASE 2 ALTI, BASE 3 ALTI, MANUAL ALTI, BARO
en WEATHER] te doorlopen.
4. Druk op MODE (NEXT) om met het instellingsproces te beginnen.
5. Druk op START/SPLIT (+) of STOP/RESET (-) om de instellingswaarden te
verhogen of verlagen.
6. Druk op MODE (NEXT) om naar de volgende instellingsoptie te gaan.
7. Druk op SET (VOLTOOID).
8. Om de kalibratie voor de geselecteerde referentie te voltooien, houdt u
STOP/ RESET ingedrukt totdat het horloge een pieptoon geeft.
337
336
N
TMX_W253_WS4_DU:Layout 1 8/27/09 12:28 PM Page 336

Miswijzing:
Om het verschil tussen het ware noorden en het magnetische
noorden in aanmerking te nemen, maakt een kompas gebruik van de instelling
voor een miswijzing. Westelijke miswijzingen worden van de berekende
kompaskoers afgetrokken en oostelijke miswijzingen worden erbij opgeteld.
Zie de tabel op pagina 321 en 322 voor een lijst met miswijzingen voor grote
wereldsteden.
Digitaal:
Wanneer digitaal betrekking heeft op horloges, geeft digitaal de tijd
met cijfers aan.
In Hg:
In Hg betekent inch kwik wat een maateenheid voor de luchtdruk is. Eén
inch kwik is gelijk aan 33,86 millibar.
Ronde:
De rondetijd registreert de tijd of duur van individuele segmenten van
uw activiteit.
Magnetische noorden:
De richting van de magnetische pool van de aarde en de
richting waarheen een kompasnaald wijst, die verschilt van het ware noorden
(zie hieronder). Het verschil tussen het ware noorden en het magnetische
noorden wordt gebruikt om de miswijzing te berekenen die door het kompas
van het horloge wordt gebruikt.
VERKLARENDE WOORDENLIJST
Deze verklarende woordenlijst geeft definities voor enkele van de functies van het
horloge die in deze handleiding worden beschreven.
Hoogtemeter:
Een instrument dat wordt gebruikt om de hoogte van een voorwerp
ten opzichte van een vast niveau te bepalen. Gewoonlijk wordt hoogte gemeten
ten opzichte van zeeniveau.
Analoog:
Wanneer analoog betrekking heeft op een horloge, geeft analoog de tijd
weer met wijzers.
Barometer:
Een barometer meet atmosferische druk en kan weersveranderingen
helpen voorspellen.
Barometerstand:
Luchtdruk zoals deze betrekking heeft op weersvoorspellingen.
Hogere druk duidt gewoonlijk op warmer en droger weer terwijl lagere druk
meestal op bewolking en grotere kans op neerslag duidt.
Kalibratie:
Een techniek om de nauwkeurigheid van het kompas, de hoogtemeter
en de weersvoorspellingen te verbeteren, voornamelijk door lokale omstandighe-
den te compenseren.
Chronograaf:
De chronograaf registreert opgenomen segmenten tijdens de duur
van uw activiteit.
339
338
N
TMX_W253_WS4_DU:Layout 1 8/27/09 12:28 PM Page 338

INTERNATIONALE GARANTIE VAN TIMEX
(VS - BEPERKTE GARANTIE)
Het TIMEX
®
horloge heeft een garantie van de Timex Group USA, Inc. voor
gebreken in fabricage gedurende een periode van EEN JAAR vanaf de
oorspronkelijke aankoopdatum. Timex en gelieerde ondernemingen over de
hele wereld erkennen deze internationale garantie.
Timex mag, naar eigen keuze, het horloge repareren door nieuwe of grondig
gereviseerde en geïnspecteerde componenten te installeren of het vervangen
door een identiek of gelijksoortig model. BELANGRIJK — DEZE GARANTIE
DEKT GEEN GEBREKEN OF SCHADE AAN HET HORLOGE:
1) nadat de garantietermijn is verlopen,
2) als het horloge oorspronkelijk niet bij een erkende Timex-winkelier is
gekocht;
3) als gevolg van reparaties die niet door Timex zijn uitgevoerd,
4) als gevolg van ongelukken, knoeien of misbruik en
5) het glas, de band, de kast, de accessoires of de batterij. Timex kan het
vervangen van deze onderdelen in rekening brengen.
MB:
MB betekent millibar wat een metrische eenheid voor het meten van de
luchtdruk is. Eén millibar is gelijk aan 0,0295 inch kwik.
Druk op zeeniveau:
Luchtdruk voor een specifieke locatie, aangepast voor het
verschil in de hoogte van een locatie. Gewoonlijk is plaatselijke druk lager dan de
druk op zeeniveau omdat de luchtdruk afneemt op grotere hoogte.
Tussentijd:
De tussentijd registreert de totale verstreken tijd sinds het begin van
uw huidige activiteit.
Ronde- of tussentijd opnemen:
Wanneer u een ronde- of tussentijd opneemt,
registreert de chronograaf de tijd voor het huidige segment en begint automatisch
een nieuw segment op te nemen.
Ware noorden:
De geografische noordpool waar alle lengtegraadlijnen
samenkomen. Kaarten worden met het ware noorden bovenaan getekend. Het
verschil tussen het ware noorden en het magnetische noorden wordt gebruikt om
de miswijzing te berekenen die door het kompas van het horloge wordt gebruikt.
341
340
N
TMX_W253_WS4_DU:Layout 1 8/27/09 12:28 PM Page 340

EEN SPECIAAL HORLOGEBANDJE OF ENIG ANDER ARTIKEL VAN PERSOON-
LIJKE WAARDE MEE.
Voor de VS kunt u 1-800-328-2677 bellen voor meer informatie over de
garantie. Voor Canada belt u 1-800-263-0981. Voor Brazilië +55 (11) 5572
9733. Voor Mexico 01-800-01-060-00. Voor Midden-Amerika, het Caribische
gebied, Bermuda en de Bahamas (501) 370-5775 (VS). Voor Azië 852-2815-
0091. Voor het VK 44 020 8687 9620. Voor Portugal 351 212 946 017. Voor
Frankrijk 33 3 81 63 42 00. Voor Duitsland/Oostenrijk +43 662 88921 30.
Voor het Midden-Oosten en Afrika 971-4-310850. Voor andere gebieden kunt
u contact opnemen met uw plaatselijke Timex-winkelier of -distributeur voor
informatie over de garantie. In Canada, de VS en sommige andere locaties
kunnen deelnemende Timex winkeliers u een voorgeadresseerde, franco
horlogereparatie-enveloppe verschaffen voor het verkrijgen van service van
de fabriek.
©2009 Timex Group USA, Inc. TIMEX, E logo, EXPEDITION en NIGHT-MODE
zijn gedeponeerde handelsmerken van Timex Group USA, Inc. in de VS en
andere landen. INDIGLO is een gedeponeerd handelsmerk van de Indiglo
Corporation in de VS en andere landen. WS4 is een handelsmerk van Timex
Group B.V.
DEZE GARANTIE EN HET HIERIN UITEENGEZETTE VERHAAL ZIJN EXCLUSIEF EN
KOMEN IN DE PLAATS VAN ALLE ANDERE GARANTIES, UITDRUKKELIJK OF
IMPLICIET, MET INBEGRIP VAN IMPLICIETE GARANTIE VAN VERKOOPBAARHEID
OF GESCHIKTHEID VOOR EEN BEPAALD DOEL. TIMEX IS NIET AANSPRAKELIJK
VOOR SPECIALE, INCIDENTELE OF GEVOLGSCHADE. Sommige landen en staten
staan geen beperkingen toe met betrekking tot impliciete garanties en staan
geen uitsluitingen of beperkingen met betrekking tot schade toe, zodat deze
beperkingen wellicht niet voor u van toepassing zijn. Deze garantie geeft u
specifieke wettelijke rechten en u kunt ook andere rechten hebben die van land
tot land en van staat tot staat verschillen.
Voor het verkrijgen van service onder de garantie dient u uw horloge naar Timex,
een van de gelieerde ondernemingen of de Timex-winkelier waar het horloge
gekocht is, te retourneren, samen met een ingevulde, originele reparatiebon van
het horloge of, alleen in de VS en Canada, de ingevulde originele reparatiebon
van het horloge of een schriftelijke verklaring waarin uw naam, adres, telefoon-
nummer en datum en plaats van aankoop worden vermeld. Wilt u het volgende
met uw horloge sturen voor port en behandeling (dit zijn geen reparatiekosten):
een cheque of postwissel voor US$8,00 in de VS; een cheque of postwissel voor
CAN$7,00 in Canada; en een cheque of postwissel voor UK£2,50 in het VK. In
andere landen zal Timex port en behandeling in rekening brengen. STUUR NOOIT
343
342
N
TMX_W253_WS4_DU:Layout 1 8/27/09 12:28 PM Page 342
-
 1
1
-
 2
2
-
 3
3
-
 4
4
-
 5
5
-
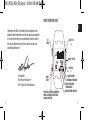 6
6
-
 7
7
-
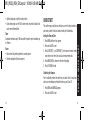 8
8
-
 9
9
-
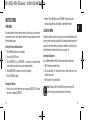 10
10
-
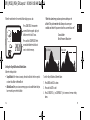 11
11
-
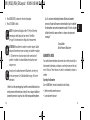 12
12
-
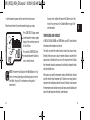 13
13
-
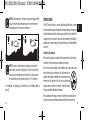 14
14
-
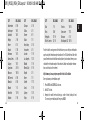 15
15
-
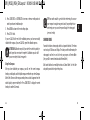 16
16
-
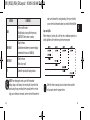 17
17
-
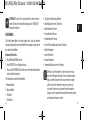 18
18
-
 19
19
-
 20
20
-
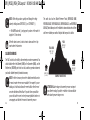 21
21
-
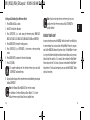 22
22
-
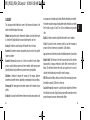 23
23
-
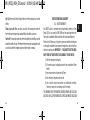 24
24
-
 25
25
-
 26
26
-
 27
27
-
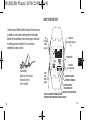 28
28
-
 29
29
-
 30
30
-
 31
31
-
 32
32
-
 33
33
-
 34
34
-
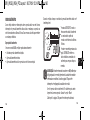 35
35
-
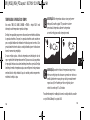 36
36
-
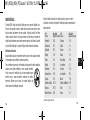 37
37
-
 38
38
-
 39
39
-
 40
40
-
 41
41
-
 42
42
-
 43
43
-
 44
44
-
 45
45
-
 46
46
-
 47
47
-
 48
48
-
 49
49
-
 50
50
-
 51
51
-
 52
52
-
 53
53
-
 54
54
-
 55
55
-
 56
56
-
 57
57
-
 58
58
-
 59
59
-
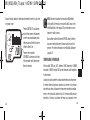 60
60
-
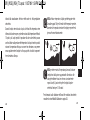 61
61
-
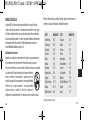 62
62
-
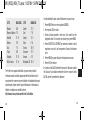 63
63
-
 64
64
-
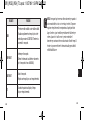 65
65
-
 66
66
-
 67
67
-
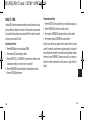 68
68
-
 69
69
-
 70
70
-
 71
71
-
 72
72
-
 73
73
-
 74
74
-
 75
75
-
 76
76
-
 77
77
-
 78
78
-
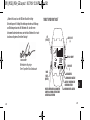 79
79
-
 80
80
-
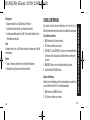 81
81
-
 82
82
-
 83
83
-
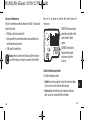 84
84
-
 85
85
-
 86
86
-
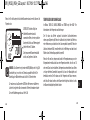 87
87
-
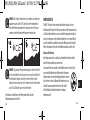 88
88
-
 89
89
-
 90
90
-
 91
91
-
 92
92
-
 93
93
-
 94
94
-
 95
95
-
 96
96
-
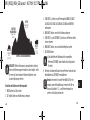 97
97
-
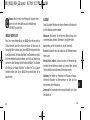 98
98
-
 99
99
-
 100
100
-
 101
101
-
 102
102
-
 103
103
-
 104
104
-
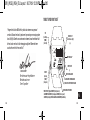 105
105
-
 106
106
-
 107
107
-
 108
108
-
 109
109
-
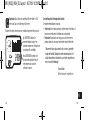 110
110
-
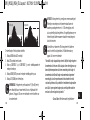 111
111
-
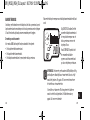 112
112
-
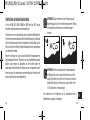 113
113
-
 114
114
-
 115
115
-
 116
116
-
 117
117
-
 118
118
-
 119
119
-
 120
120
-
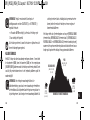 121
121
-
 122
122
-
 123
123
-
 124
124
-
 125
125


Timex Expedition WS4 Gebruikershandleiding
- Categorie
- Horloges
- Type
- Gebruikershandleiding
in andere talen
- English: Timex Expedition WS4 User guide
- italiano: Timex Expedition WS4 Guida utente
- español: Timex Expedition WS4 Guía del usuario
- Deutsch: Timex Expedition WS4 Benutzerhandbuch
- português: Timex Expedition WS4 Guia de usuario
Gerelateerde papieren
Andere documenten
-
 Oregon Scientific EB833 Handleiding
-
Hama 00106919 Kompass de handleiding
-
 Hamilton Watch Khaki Field Multi-Touch Handleiding
-
Oregon Scientific GP123 Handleiding
-
 La Crosse Technology wireless weather station Handleiding
-
Suunto S-Lander Handleiding
-
Suunto S6 Handleiding
-
 Oregon Scientific RA202 Handleiding
-
Suunto Observer Sr de handleiding
-
Hamilton Khaki Field Multi-Touch Handleiding


